
1.0 Introduction
The Prestashop Twitter Post Feed is an addon which provides a feature to advertise your Twitter Page on your store by adding Twitter window (Notification Bar). Users can click on this bar and see the summary of added Twitter Page. Users can also like and comment on the same. This advertisement helps to share information/updates about the store and can increase the conversion.
2.0 Steps for Installation
1. Copy twitter post feed module folder under your root_directory/modules/of your store via FTP or use Prestashop interface to upload the plugin.
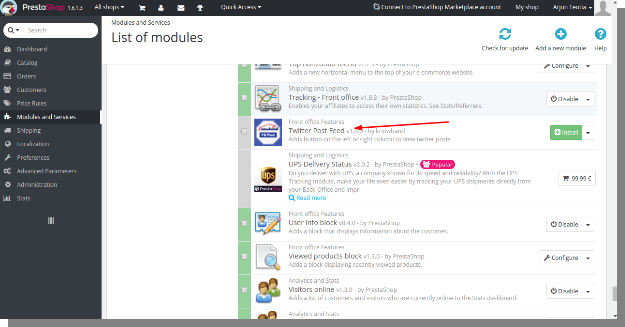
2. After copying, the Prestashop module will be listed on module listing page in the admin panel as given in the below screen.
3. If Prestashop twitter post module is not displaying on your module listing page, search it by filtering module with following details:
Keyword: twitterpostfeed
Author: Knowband
Category: front-office feature
Filter by: Installed & Not Installed/Enabled & Disabled
Note:
1. When you will click on install button, a pop-up box will appear which will display warning messages. You can ignore these messages and move ahead. There will be no negative impact of this warning message on your store.
2. After installing Prestashop feed module, a “configure” button will be in front of this plugin on the module listing page as shown in the screen below:
3.0 Configuration Settings
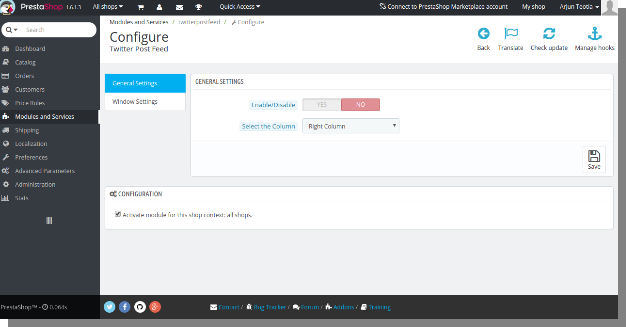
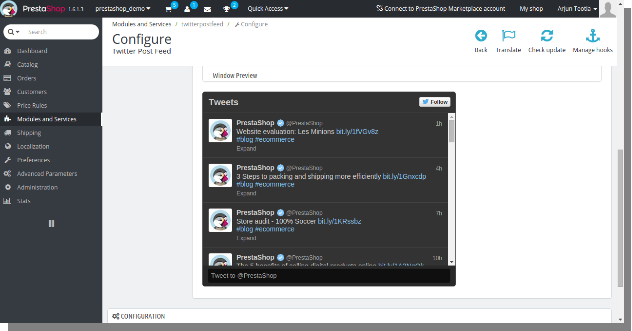
To access this module, Click on configure button of twitter post feed module. On clicking, module interface will be open and following screen will be displayed as given below:
This User Manual provides you the guidelines of this Prestashop addon. This module has 2 interfaces –
- The admin interface
- The front end interface
3.1 Admin Interface
Admin can setup or configure this module through Admin Panel of store by following steps given below –
- Go to Store Admin -> Modules and Services
- Find “Twitter Post Feed” and click “configure” button given corresponding to the module.
- General Settings tab will be displayed.
- Enable the “Enable/Disable” Button.
- Click on Save button.
3.1.1 General Settings
- Enable/Disable: To enable the twitter feed plugin, switch the enable button from OFF to ON. The default value will be “OFF”.
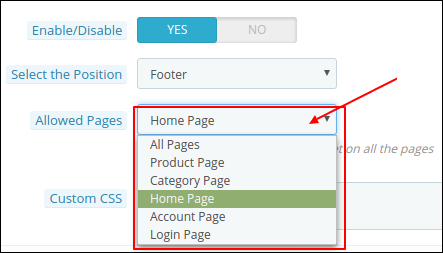
- Select the Position: This is the option to choose which column your twitter post feed will display on your front page. The default value will be “Left Column”.
- Allowed pages: This is a drop-down option. Here, you can choose the pages on which you want to display the Twitter feed.
- Custom CSS: Admin can add custom CSS codes in this section to override the CSS of the Prestashop twitter feed module.
3.1.2 Window Settings
This tab basically contains look and feel of maintenance page. These settings are for our user interface on maintenance page.
- Data Widget ID: This is the widget ID of your twitter page. You need a widget ID to show your tweets from Twitter on your website. To know your twitter widget ID please see here.
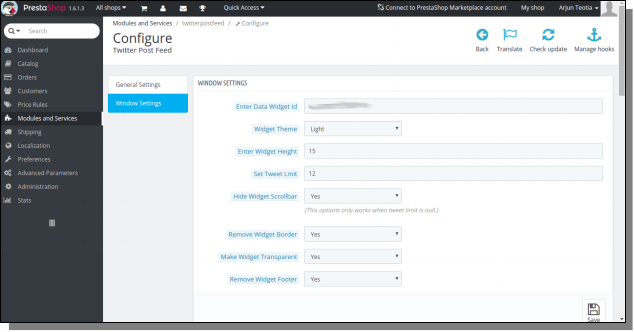
- Widget Theme: You can also have an option to show your tweet window in dark or light theme. The default value of this field will be“light”.
- Widget Height: This is the height of twitter window. Default data will be white “15px”. This only works when tweet limit is null.
- Set Tweet Limit: You can also limit the number of tweets on the window using this options. The default data will be“null”.
- Hide Widget Scrolling: This is the option to turn off scrolling in your tweet widget if it is annoying on your desired page. The default value will be ‘Yes’.
- Remove Widget Border: This is the option to remove the border from your tweet twitter feed addon if it is annoying on your desired page. The default value will be ‘Yes’.
- Make Transparent Widget: You can also make your Prestashop module transparent on your desired page using this option. The default data will be “No”.
- Remove Widget Footer: You can remove the widget footer if it is annoying on your desired page. The default data will be “Yes”.
Recommendation: Do not set tweet limit, some page may be distorted.
3.1.2.1 How to get Widget ID?
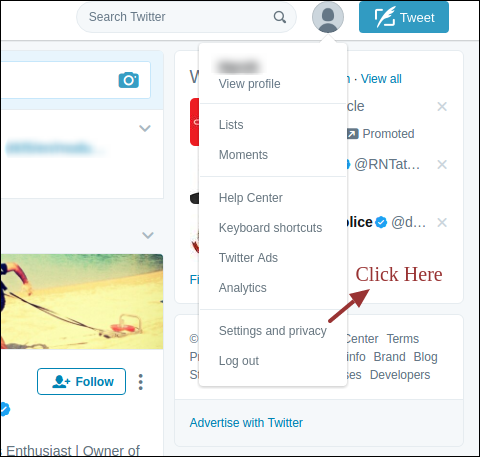
You can get the Widget ID by following steps given below –
- Log in to your twitter account “https://www.twitter.com”.
- Click on “Setting and Privacy”.
- Click on “Widgets” on the left side.

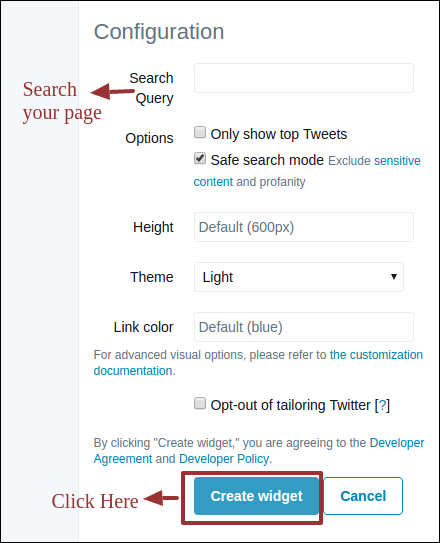
- Search your Twitter page and click on “Create Widget”.
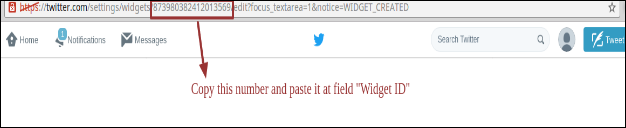
- Copy the Numeric Content from the URL as shown below and paste it at field “Widget ID”.
3.2 Front End Interface
3.2.1 Twitter Icon on right column
![]()
3.2.2 After clicking on icon default Settings Interface
![]()
3.2.3 Dark theme with tweet footer

3.2.5 Without Tweet Footer
3.2.5 Light theme with tweet footer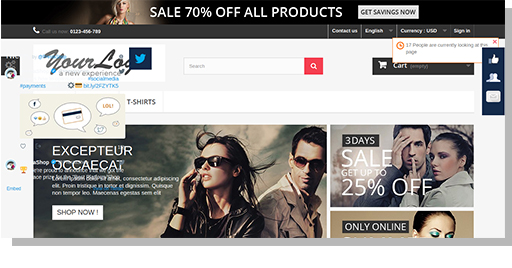
3.2.6 Dark theme with transparent widget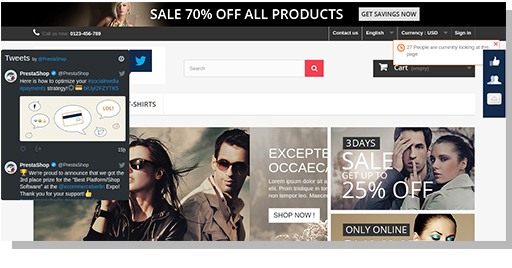 From all of the above images, you can easily make your homepage more social for your customers. They can tweet easily and read all the tweets by you.
