After being listed as the top mobile commerce solution provider, KnowBand plugins once again featured as leading eCommerce plugins and solutions providers in the market. We feel privileged that the company will dominate the online retail industry from 2020-2026.
Various global researchers and analysts have predicted that the eCommerce industry is assured to witness a steep graphical growth from the year 2020 to 2026. The report has been drafted with the data & statistics in the past decade. Among leading key players in the online eCommerce industry, KnowBand has also made a prominent position.
One-Stop Solution To All E-Commerce Needs:
We, at KnowBand, are considering this acknowledgment as a responsibility to stand up-to-the expectations of store owners as well as front end audiences. With such thoughts, our entire pool of team members are highly motivated to make available plugins more promising and featured along with new launches as well.
Hence, for all the eCommerce store owners out there, check out these plugins and add more functionalities to your store:
Along with plugins/extensions for eCommerce, Mobile App Builder allows all retail store owners to launch a native shopping app. Selling products just via the website isn’t enough in 2020. Having a mobile shopping app enhances the reach of your business to a wide range of smartphone-based audiences.
To ease out the app development complexities, an automated framework Mobile App Maker develops Android & iOS apps in 3 simple steps:
1. Purchase & install the extension.
2. Fill the pre-requisites form.
3. Get them published on Google Play & Apple App Store.
That’s easy is it to own a mobile app with us. Along with that, the following features are the prime highlights of the apps:
The beginning of the year 2020 does not seem to go too well, not only just for me or you, but the entire world. And the only reason for that is the Coronavirus which has shaken everyone and created chaos globally.
Originated from the Wuhan City of China, the COVID-19 has spread across countries infecting and killing many. This global pandemic has severely affected businesses, be it offline or eCommerce.
Before I proceed further, let’s understand what this COVID-19 is, what are its symptoms, how it can be prevented and lastly how it is affecting businesses.
What is COVID-19?
Corona Virus Diseases 2019 or COVID-19 is an infectious disease that spreads from person to person through respiratory droplets like when an infected person coughs or sneezes. These droplets can transfer from that infected person to the other person and make them infected too. And that’s how this coronavirus chain is formed.
A person can become the victim of COVID-19 in some other ways as well, like by touching an object or a surface that has the virus attached to it and then touching their face with those hands.
Symptoms of Corona Virus
People infected with Corona Virus might display symptoms like-
Mild to strong fever
Dry Cough
Difficulty in breathing/ Shortness of breath
The symptoms are not reflected immediately but usually after 1-2 weeks. Therefore it is advised not to be careless and take preventive measures.
How can Corona Virus be prevented?
Wash your hands often properly for at least 20 seconds | Use Sanitizer
Maintain Social Distancing
Avoid touching your face with unwashed hands
Stay Home
Cough into your elbow
Impact of COVID-19 in eCommerce
With the everyday increase in the total number of corona positive patients, the situation is only getting from worse to worst. From a local shopkeeper to popular eCommerce brands, the COVID-19 outbreak has left no one. Cities, states, even whole countries are getting locked down to prevent the spread of the disease and break its chain.
– Theatres, bars, restaurants, gyms, everything that involves mass gathering have been shut down.
– Corporates are left with no choice but to provide their employees with the work from home facility.
– Online food delivery businesses are almost shut.
– On-demand booking apps like OLA and Uber have also discontinued their facility in many places.
– Online shopping businesses have also witnessed a significant drop in the number of orders. Brick-and-mortar stores, on the other hand, are facing heavy downfall as people are not coming out of their home.
People have totally isolated themselves and are remaining inside their home. And this is the time when online streaming services like Netflix, Amazon Prime Video, Hotstar are making the most out of it. There is even talk of these streaming services reducing down their streaming quality to avoid the heavy traffic congestion during this pandemic.
Health-related products like Masks, Sanitizers, etc. are being sold in huge numbers and the sales figure is touching sky.
Final word
Let’s just hope this COVID-19 pandemic ends soon and the world takes a sigh of relief. Till then, just stay at your home, enjoy Netflix and chill. That’s the best way to do the best for your people, for your country and for this world.
Hope things get back to normal again and we are living the same life as it was before this Corona pandemic.
We, at Knowband, are trying our best to help eCommerce businesses in this difficult phase. Following the Corona outbreak, we are thinking to make some modules cost-free for our customers.
We have recently launched a Free COVID-19 Information Popup module as well for the PrestaShop and Magento 2 platform.
With the help of this module, you can notify your customers about any shipping and delivery related changes or any updates about your business. You can use this to educate your visitors about the preventive measures to stop the spread of the Coronavirus. And if you have some offers running on your website through which you want to help your customers in this quarantine period, you can do that too.
Running an eCommerce store isn’t a piece of cake, that too with numerous goals & outcomes to achieve. Regardless of the products you sell, there will surely be challenges waiting for you. When it comes to designing PrestaShop store website, it’s all about having a well-functioning interface (UI) to provide a great user experience (UX). It’s a good thing that some of the popular eCommerce platform solutions like PrestaShop come up with such feature-rich backend to achieve that.
The PrestaShop eCommerce platform helps to launch and run an online website in the most seamless and fluid manner. With proper planning in the right direction, an online retail store can be made more promising and enjoyable.
But, the question is, what are those prime features that one must keep in mind while designing an eCommerce PrestaShop website? Well, this article aims to elaborate on a few of them along with their implementation & optimization.
Prime Features To Add In PrestaShop eCommerce Store:
#1. Navigation & Category Placement:
It’s not ideal to have the products listed without setting them under proper categories & subcategories. Apart from just categorizing the products, each category/ sub-category must be arranged on the navigation-bar/ toggle- menu in a way that the customers don’t need to make more than 4 to 5 clicks to reach their choice of page. Also, have all other necessary links in the navigation bar /menu with the motive to make this more seamless on the front-end for your shoppers.
Keep the category URLs SEO friendly & have relevant thumbnail images with relevant alt-tags on images source code. This further enhances your on-site SEO & makes your category image discoverable on Google search results.
#2. Product Page Design:
The PrestaShop store admin must design the product page keeping following things in mind:
Depending on the product you are selling, add necessary fields like SKU, dimensions /weight, expiry date, stock availability, minimum quantity per order, shipping charges & taxes, deliverability in specific areas (Pincode), etc.
Add quick links to suggest the customers to related products /accessories.
Have the option to add a product to wishlist. Some eCommerce websites also allow users to create multiple wishlist folders which they can also share with their respective friends. This is an amazing approach to encourage new visitors to set up an account & contribute to boosting conversions on your eCommerce site.
Add the social sharing quick links for popular platforms like Facebook, WhatsApp, Pinterest, Instagram, Custom URL, etc.
Apart from product images, adding a video with the product details is also in the trend. It helps the customers to get a better view of various details about the product. This further helps to boost sales for that particular product. For instance, the assembly video of a DIY Wardrobe.
#3. Design for Convenient Browsing:
Add relevant filter & sorting options for easy product finding. For eCommerce giants like Amazon, different product categories require different filtering options. For example, the apparel category can have filters like brand, color, size, fit, cloth material, etc. On the other hand, the smartphone category may have filters like brand, color, dimensions, operating system, RAM, etc. If your PrestaShop eCommerce website sells a wide range of different categories of products, have the right set of filtering parameters for each such category.
Some of the very common sorting options are – popularity, price (low to high or high to low), customer ratings/ reviews, etc. Based on the products you are selling, you must design your PrestaShop eCommerce website to have sorting options according to the user needs & choices.
#4. Offering Discount Coupon & Vouchers:
Setting up coupons & vouchers with all sorts of discounts isn’t enough these days. Their availability & benefits must be smartly designed to be introduced to online shoppers. Some eCommerce websites tend to display it on the home page & checkout pages, while some websites have those coupon codes displayed all the time by attaching a sticky tab on the bottom of the screen. Such factors must be considered while displaying coupon codes & other discounts.
#5. Seamless Checkouts & Payments:
Checkout pages can be differentiated as two different designs. One of them involves having more detailed user entries making it a bit lengthier & time taking. While the other one is with one-page checkout with limited yet necessary entries making the checkout procedure really quick. Make your checkout pages encouraging users for more purchases.
Design your checkout pages to have some entries pre-filled during the checkout. For instance, have all the previous delivery addresses saved so that customers don’t have to manually type the entire address again each time they purchase anything.
Add all the relevant payment options according to the audiences you are serving. Set up your payment gateways with reliable robustness and security in consideration. Keep the processes simple so that customers don’t back out from checkout & payment without successful purchases.
#6. User-Friendly Backend:
A good PrestaShop website must not only be designed to keep the customer-centric factors in mind but also aim for the website admin’s convenience. For eCommerce website owners on the PrestaShop platform, it’s kind of a necessity to have the right set of tools in order to manage the website, inventory, user data, payment gateways, & other online retail factors.
For instance, if you want customers visiting websites to purchase a particular product in limited quantities, the admin may set those limits in a matter of minutes via the admin panel without spending hours on coding. That’s just a nominal functionality out of all of them. In simple words, complete website design and working can be controlled over a few mouse clicks.
Most of the elements in a PrestaShop website can be added/ enabled with utter ease because of in-built backend features. And, in addition to that, other ones can be added via 3rd party PrestaShop Modules or custom coding. Hence, the store owners are not bound to the availability of templates & extensions.
Conclusion:
These above-discussed potent features & even others can be designed & implemented in a PrestaShop web-store. If you are, in any form, associated with an eCommerce business or planning to launch one, choose PrestaShop and keep these points in mind.
We, at KnowBand Plugins, offer all sorts of plugins/extensions to enhance and improve the functionality of your PrestaShop store. Our leading eCommerce plugin & development services have assisted a wide range of retail store owners worldwide running their business on any the following eCommerce platforms:
“PrestaShop Product Availability Check by Zip Code, also referred to as PrestaShop Zip Code Validator or PrestaShop Zip Code Verification addon allows your store visitors to check whether the product they are thinking to purchase is available for delivery at their location or not. All they need to do is enter their area Zip Code.”
The module aims to enhance the customer shopping experience. It adds a zip code validator on the product pages and asks visitors to provide their zip code, upon entering which they are informed about the product availability.
Note: Currently, you can get this module for free. Related information and the download link is given at the end of the article.
Overview
1. Product Availability check through zip code
2. Display delivery period and date as per the specified zip code
3. Disable Add to Cart Functionality for non-available products
4. Disable zip code verification on selected products
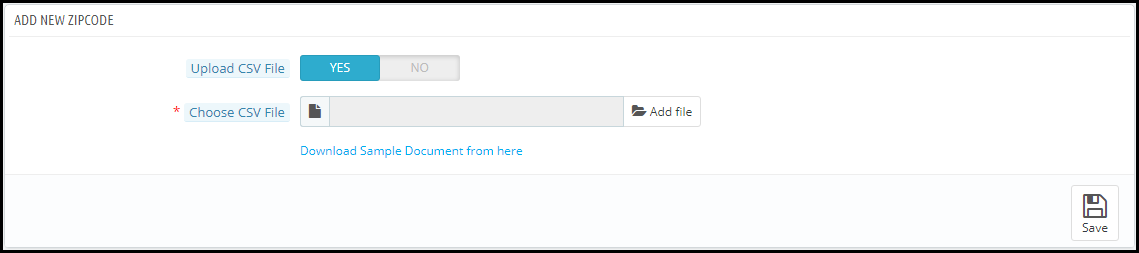
5. Add zip codes manually or through CSV upload
6. Specify the delivery period for a particular zone
7. Map products with zones
Description
1. PrestaShop Zip code Validator addon adds a product availability check tab on your product pages. Customers would be required to enter their area zip code before adding the item to their cart and heading towards the checkout page.
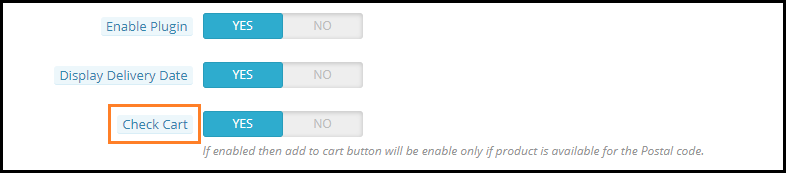
2. The Zip code verification module contains a “Check Cart” option enabling which the “add to cart” button functionality will not work if the product is not available for the specified zip code.
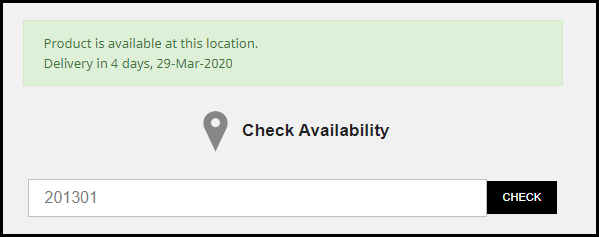
3. If the product is available in the specified area zip code, PrestaShop Product Zip code addon displays the delivery period along with the delivery date.
4. No need to enter zip code every time on a different product page. Once entered, the availability of every product will be shown on that basis.
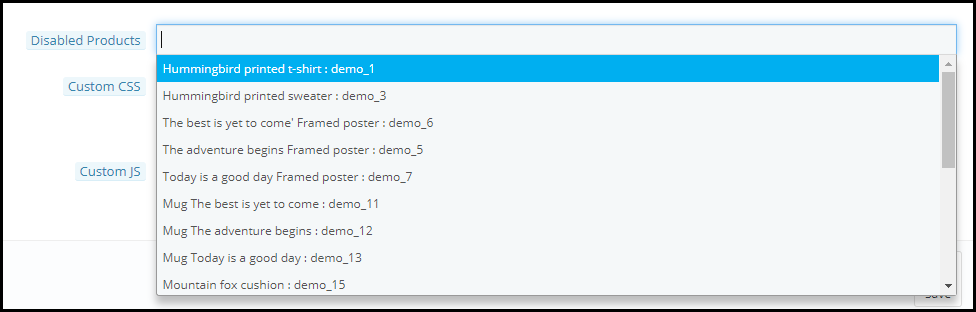
5. PrestaShop Product Availability addon lets you disable the zip code verification functionality for some specific products. You can choose the products for which you do not want the display the zip code check tab on the product pages.
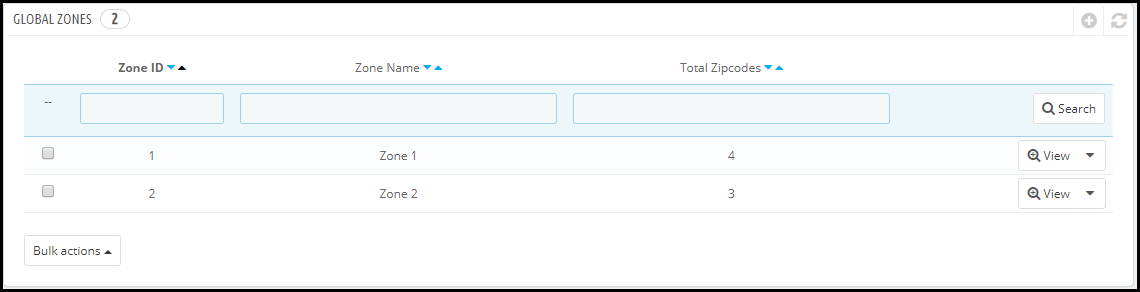
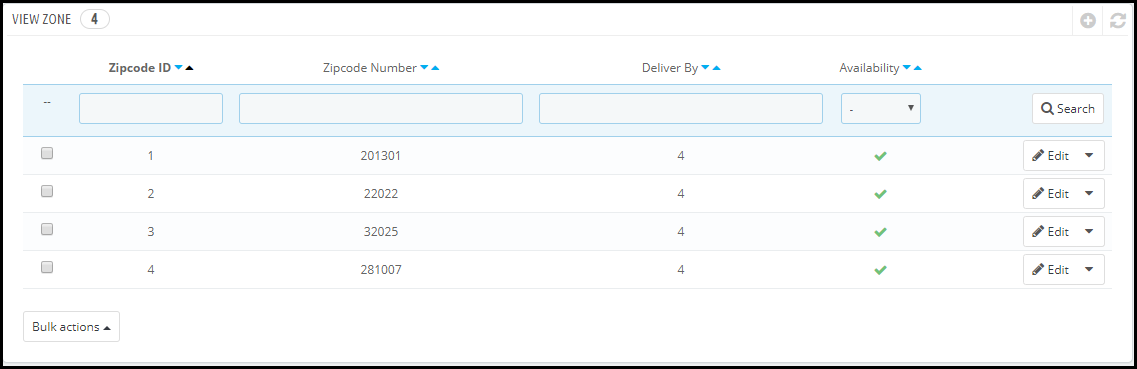
6. With the help of PrestaShop Zipcode Validator addon, you can add multiple zones from the back end. For each zone, you can specify the zip codes and for each zip code, you can define the delivery period. The zip codes can be added either manually or by uploading a CSV file.
7. You can also map products according to zones. Put simply, you can specify which products would be available for delivery in a particular zone.
8. PrestaShop Zip code verification module is easy to install and configure.
9. Multi-store compatible, provides multi-lingual support and is compatible with all PrestaShop themes.
10. You can make additional changes in the PrestaShop Product Availability Check by Zipcode addon through Custom CSS and Custom JS.
Benefits of PrestaShop Zip Code Validator
1. Improve the shopping experience of your customers.
2. Easy managing products delivery.
3. Customers are notified right on the check out about the product availability rather than the checkout, hence making it time-saving.
Special note: The module costs around $30 with free 3 months support but as of now, following the corona outbreak in the entire world, we have currently made it free for our customers. During these hard times, we are making sure that we do best for our customers in whatever way possible.
Due to the Corona Virus pandemic which has created a lot of trouble in the delivery scenario, we decided to make this module free to help online businesses. Letting customers know about the product availability in their location would surely be of some great help not only for you but your customers as well.
You probably think that your job is done on the thank you page when a user has made a purchase.
Well, you are not wrong to think that way. Once a customer has made the payment and placed the order, what remains to be bothered about?
The focus of a brand is to encourage customers to shop and if they have been taken to the thank you page, you have succeeded in your efforts.
But do you know you can leverage a thank you page in many aspects rather than displaying a simple “Thank you for shopping with us” or “Thank you for placing your order” text?
What is a Thank You Page?
A thank you page also referred to as a post-purchase page is the page that is displayed to the users once they have successfully placed their order. It is basically a page where users are informed that their order has been confirmed.
Your thank you page could provide you with ample benefits. Let’s try to understand how you can make the best use of a thank you page on your website.
1. Encourage Cross-selling on the thank you page
Customers’ mind can switch in seconds. If they didn’t show the interest in the related items while purchasing, does not mean they cannot be encouraged later to purchase. With that being said, you should use the cross-selling strategy even when a customer has placed the order.
Display items that match with the customer’s purchase. Who knows they might be interested in buying them too.
2. Ensure Customer Retention by offering a Coupon Code
You want to make sure that your customers return to your website in the future right? Then give them a reason for it. This becomes important especially in the case of new customers.
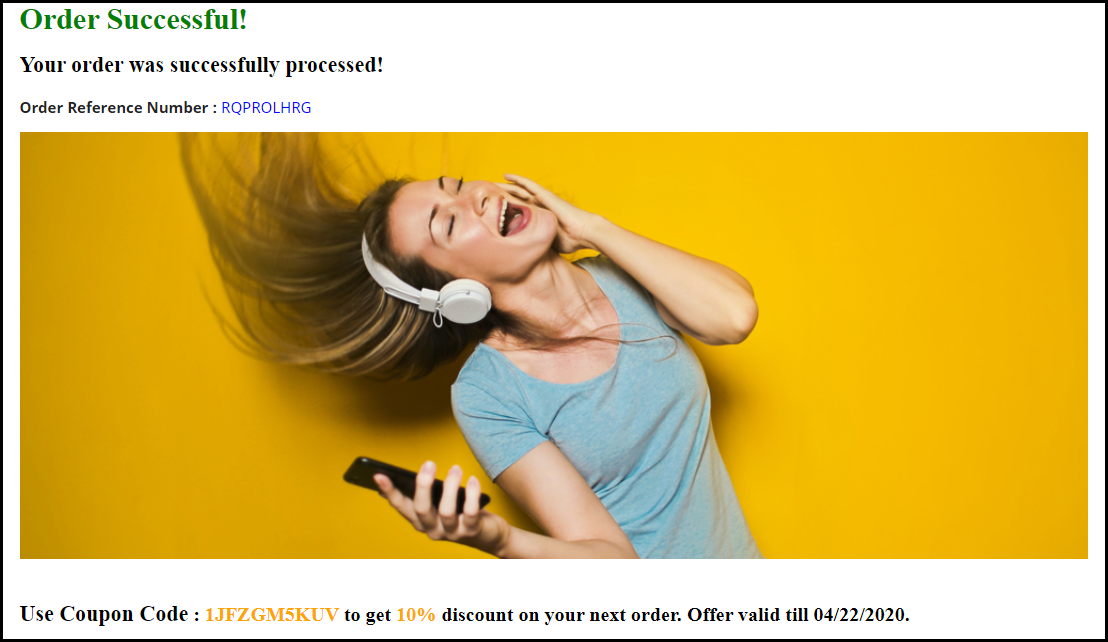
When a new visitor buys an item from your website, reward them with a coupon code alongside a thank you message. By displaying a coupon code on your thank you page, you can develop the curiosity inside the customer to come back to your store and purchase again.
It is good to know what your customers think about your Brand. And there cannot be a better way to ask them that other than on the thank you page.
Ask them about their shopping experience or if they faced any difficulty at any place during their purchase journey.
This gesture tends to increase customer’s attachment towards your brand since they feel that their opinion is being valued. And if they leave any remark, appreciate them for it.
You can get more response if you just add a personal touch and also make them feel how important their opinion is for the success of your Brand.
4. Let Customers share their Order details
Customers might want to share their order details with someone, especially if they have purchased the product, not for themselves but for the other person.
Include an order sharing option on the thank you page. Allow sharing on WhatsApp, Facebook messenger, and Instagram since these three are the major communication channels for netizens.
5. Add a link to your Social Media Pages
You can display social icons of the platforms where you have your brand page or account so that customers get redirected to your social media pages after clicking on it. It is one of the best practices to increase your social followers.
6. Ask Customers to Refer your Brand to their known ones
If you are running a Refer and earn campaign for your website promotion, one of the best strategies to get more referrals would be to put it on the thank you page.
When someone makes a purchase, ask them to share your website with their friends, colleagues, family or relatives and reward them with some exciting incentives in return, for every successful referral.
Thank You Page module by Knowband turns your normal order success page into a marketing page where you could display related products to the customers along with the discount coupon for their next purchase. You can also set an advertisement banner on the thank you page.
This module is available for PrestaShop, OpenCart and Magento. Check out-
Now make the overall process of checkout easy and faster by implementing one-page checkout. Knowband offers Prestashop Smart One Page Checkout Addon which replaces the default checkout process with one-page advance checkout. The online merchant can make the overall process easy and convenient for online users
The online buyers can view a one-page checkout popup at the same time when they click on the “Add to Cart” button. The Prestashop simplified checkout addon makes the checkout process very simple and effective for online users. There is no need to follow the lengthy process of checkout while shopping online. The store admin can enable testing mode before implementing it. Admin can set the look and feel of checkout buttons. By making the process of checkout simpler, the online merchant can increase sales and profit.
1.1 Features offered by PrestaShop Smart One Page Checkout Addon
The online users can view the checkout popup at the same time when they click on the “Add to cart” button on the product page. This module offers AJAX-based popup.
The online merchant can allow guests and registered customers to checkout easily.
Admin can enable test mode and check it before implementing it.
Admin can add specific IP addresses if he doesn’t want to offer smart one-page checkout to all the customers.
Prestashop Smart One Page Checkout Addon allows the online merchant to set the look and feel of the checkout button. Admin can preview the button color easily from the admin interface. The online merchant can enter custom CSS and JS codes also.
Admin can offer Facebook login and Google login option on the checkout page. From the admin interface, admin can get the configuration steps of the Google app and Facebook app.
Admin can setup Klaviyo, MailChimp and Sendinblue email integrator sites and save email id details of subscribers.
This Prestashop Quick checkout addon offers auto address filling functionality.
Admin can select from available payment methods and delivery methods easily from the admin interface of this Prestashop One Page Advanced Checkout.
Admin can also hide payment methods from shipping methods.
Admin can also check the customer’s consent by entering the email ID/order reference number.
The Prestashop Smart One Page Checkout addon offers GDPR compliance.
The Prestashop Smart One Page Checkout addon is multi-lingual compatible, multi-store compatible and offers smooth functioning.
2.0 Installation
First of all, purchase the Prestashop Smart One Page Checkout Addon and download the zip file from the Downloads section of your Knowband account.
You will get smartonepagecheckout.zip (source code of the module) and User Manual after downloading the zip file.
To install the module in the store follow the below-mentioned steps:
1) Unzip the smartonepagecheckout.zip file.
2) Copy the entire content, that is, the files and folders of the unzipped folder. Paste the same into the “Modules” folder of your store’s directory. Follow the below-mentioned address path – Root Directory/modules/.
3) The Prestashop simplified checkout addon is all set to be installed in the store. Go to the Store Admin and then to ‘Modules and Services’.
4) Now click on the “Install” button just next to your module. There will be a pop-up for your confirmation. Click on “Proceed with the installation” option. This step will install the Prestashop simplified checkout addon and show notification – “Module(s) installed successfully”.
5) Once the installation is complete, you will get access to the admin interface of the module by clicking on the “Configure” button.
3.0 Admin Settings
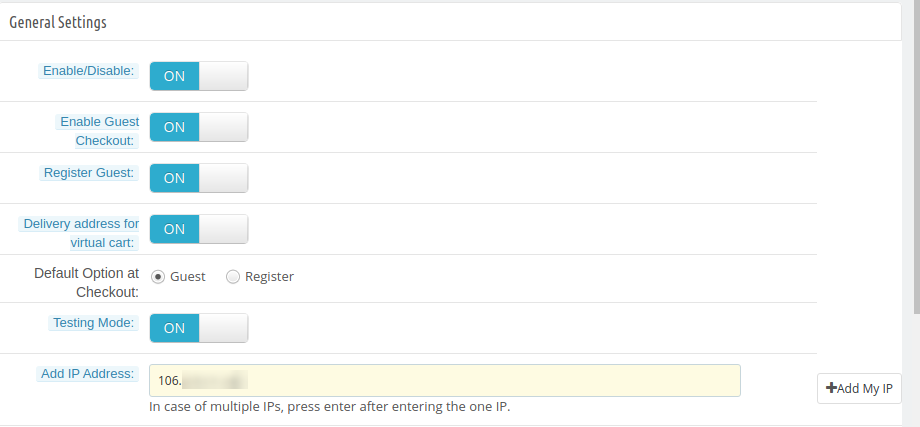
The online store admin can easily apply the settings from the admin interface and implement smart one page checkout functionality. These are the configuration options as shown below:
General Settings
Customizer
Login
Email Marketing
Addresses
Payment method
Delivery Method
Ship2pay
custom Fields
cart
customer consent
GDPR Settings
3.1 General Settings
In General settings, the online merchant can apply these settings as described below:
Enable/disable: Activate or deactivate the module functionality.
Enable Guest Checkout: Activate the Guest checkout option by toggling the button.
Register Guest: Allow guest registration option.
Delivery address for Virtual cart: Enable this option for showing delivery address. While deactivating this option, it will show the invoice address and hide the delivery address for virtual products.
Delivery Option at Checkout: Admin can select guests or register as a default option at the checkout page.
Testing Mode:
Testing Mode: Enable the option if you want to test the module before implementation.
Add IP address: Enter the IP addresses if you want to show smart one-page checkout on specific IP addresses. Separate every IP address with a comma.
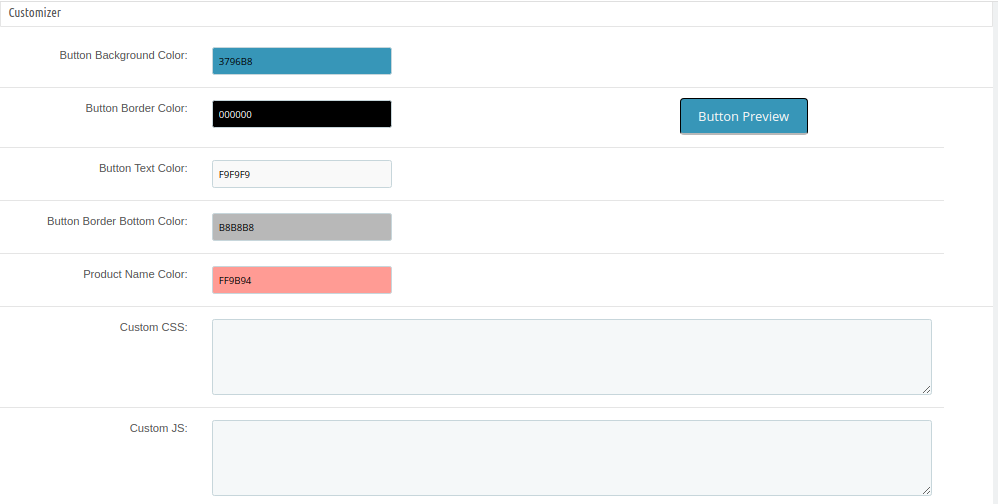
3.2 Customizer
In Customizer settings, admin can set the look and feel of smart one-page checkout button and also apply advance appearance settings as shown below:
Button Background Color: Set the background color for the button.
Button Border Color: Set the button border color from the admin interface.
Button Text Color: Set the button text color from here.
Button Border Bottom Color: Set button border-bottom-color from here.
Product Name Color: Here, set the product name color.
Custom CSS: Enter custom CSS code for the advance look and feel settings.
Custom JS: Enter JS codes for more appearance settings.
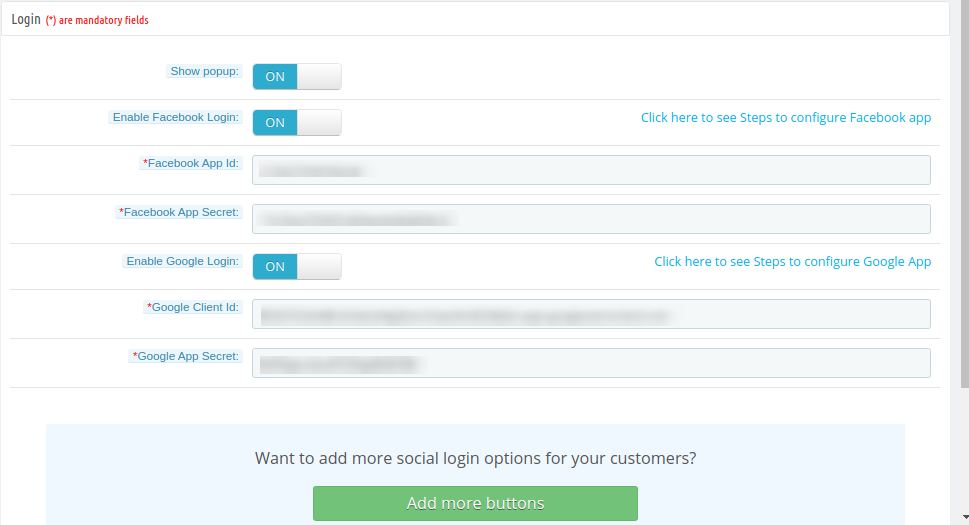
3.3 Login
In login settings, admin can offer social login options to online users like Facebook and Google login options:
Show popup: If this setting is enabled then Facebook or Google Login Page will be open in a pop up after clicking on the login options.
Enable Facebook Login: Enable this option for showing the Facebook login button.
Facebook App Id: Admin can check the configure steps for Facebook app ID generation and enter the Facebook app id here. Visit 3.3.1 Section for getting steps to generate Facebook app id and app secret.
Facebook App Secret: Here, Enter Facebook App Secret.
Enable Google Login: Activate if you want to show Google login option on the checkout page.
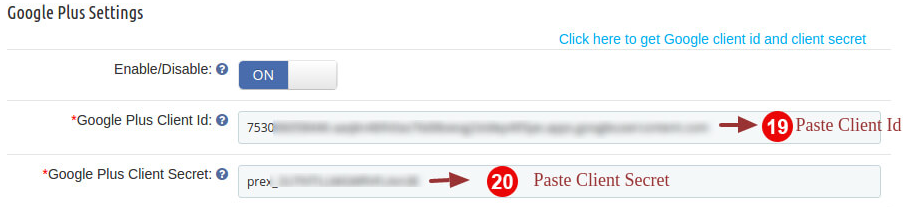
Google Client Id: Admin can check the steps to configure Google App and enter Google client Id here.
Google App Secret: Enter Google app secret here. Visit 3.3.2 Section for getting steps to generate Google app id and client id.
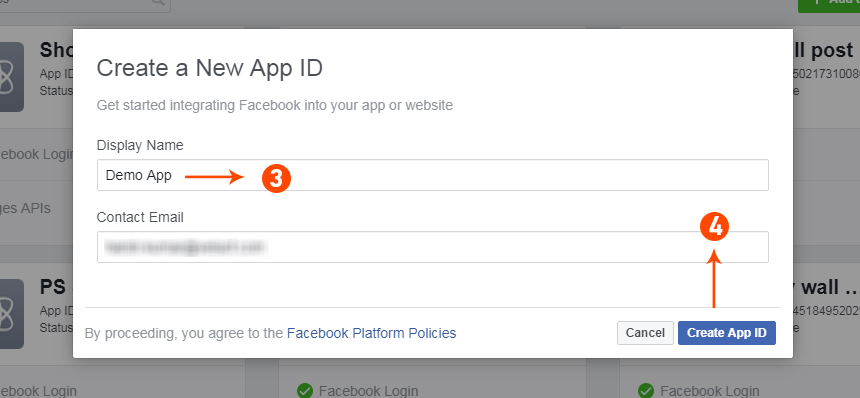
3.3.1 How to setup Facebook Login
For Generating Facebook App id and app secret follow these steps:-
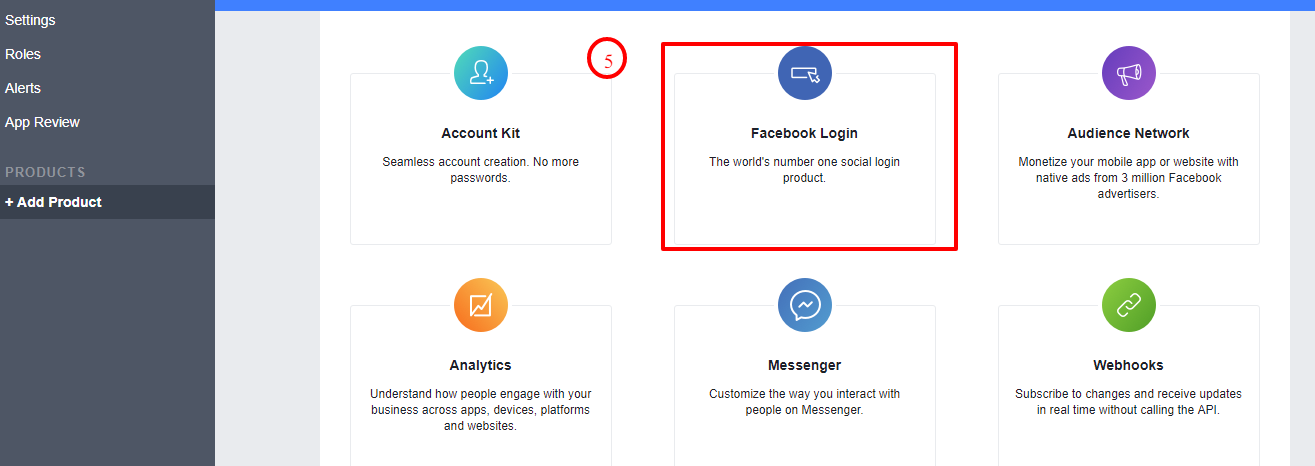
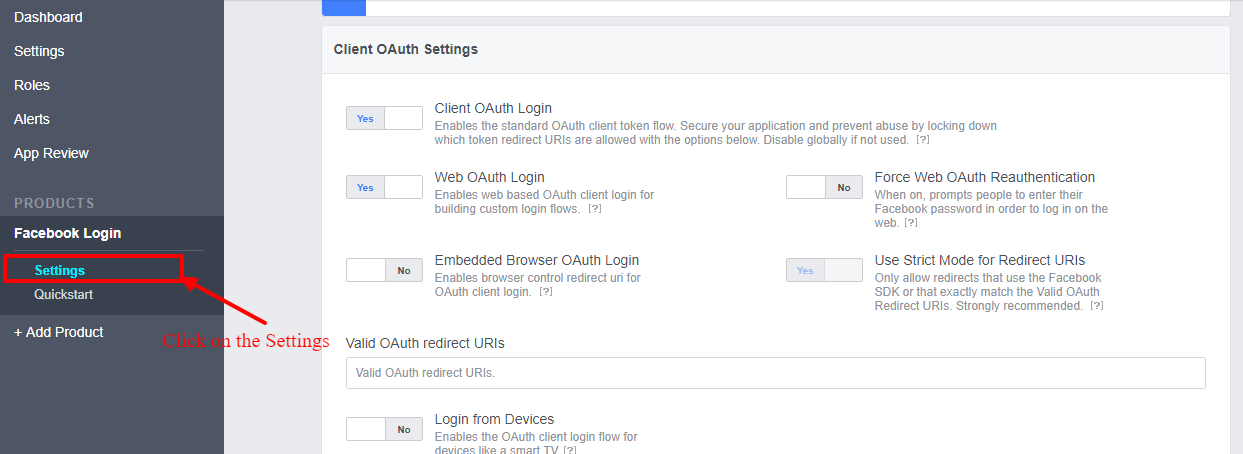
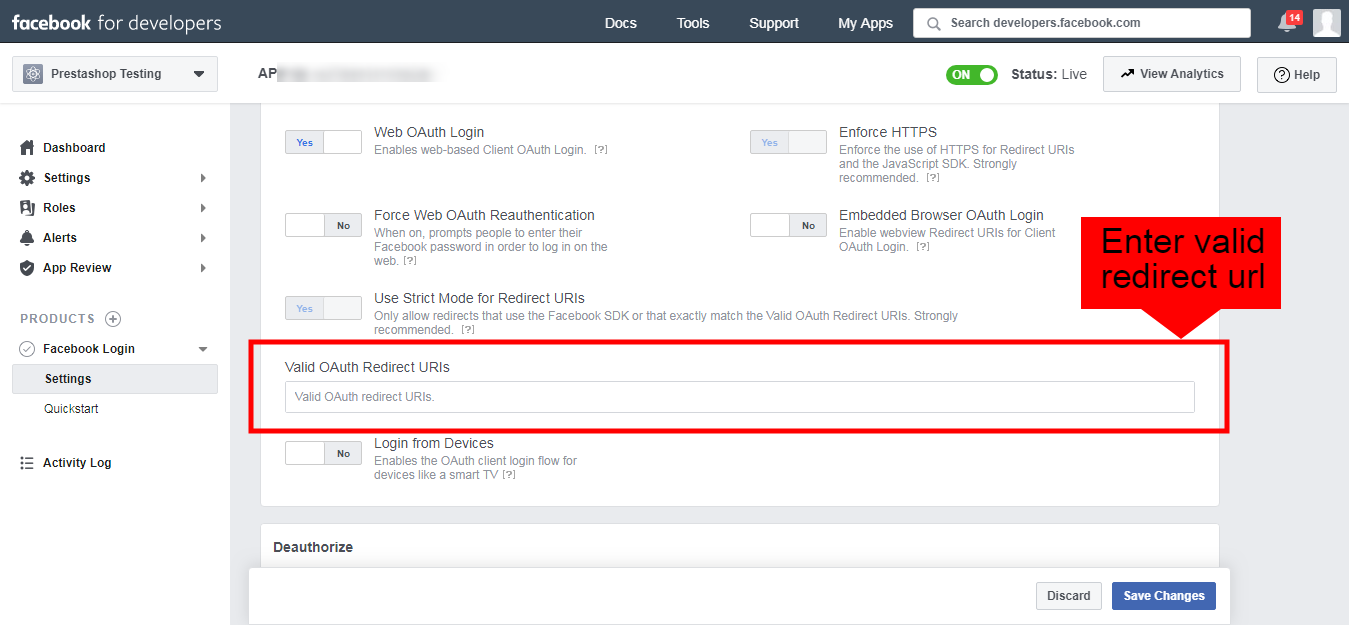
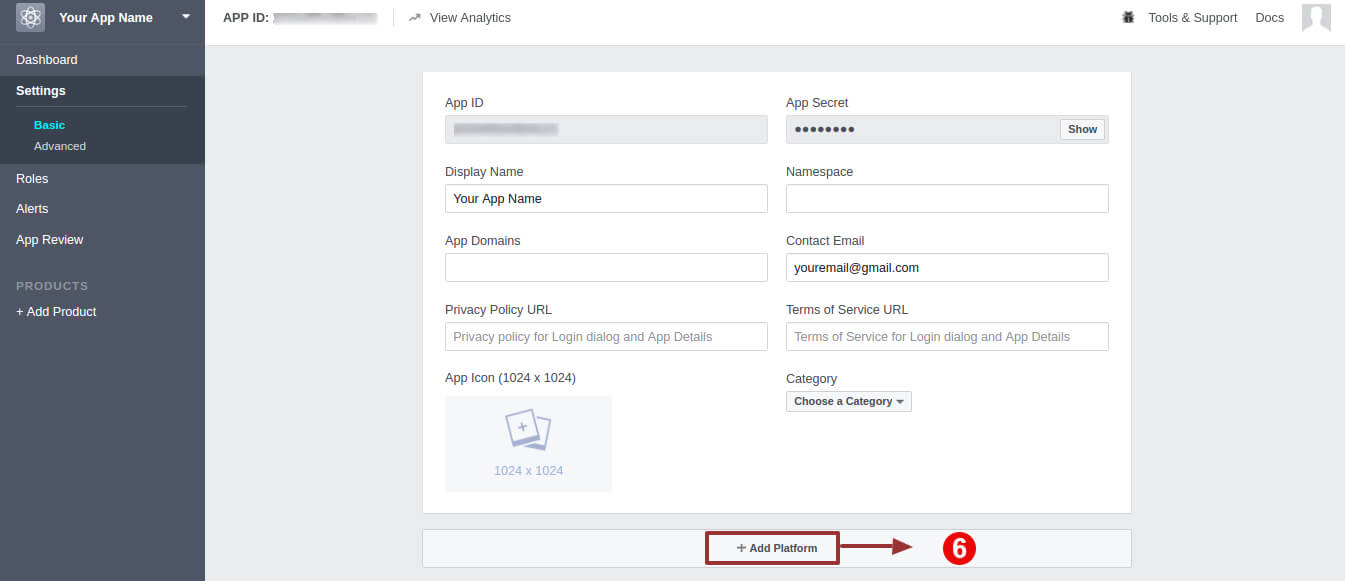
Step 6: Now in the settings section, there will be two options available in the dropdown list, Basic and Advanced. You need to click on “Basic” settings and click on the “+Add Platform” button.
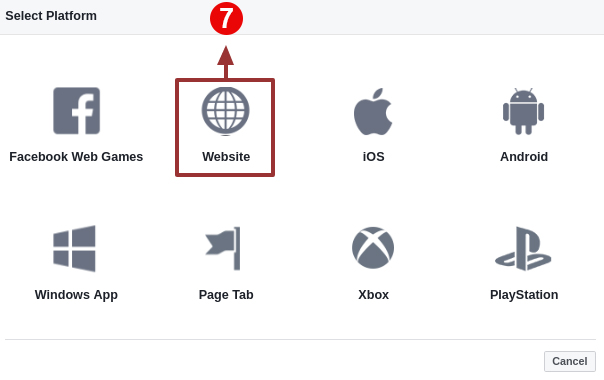
Step 7: Now select the website as your platform.
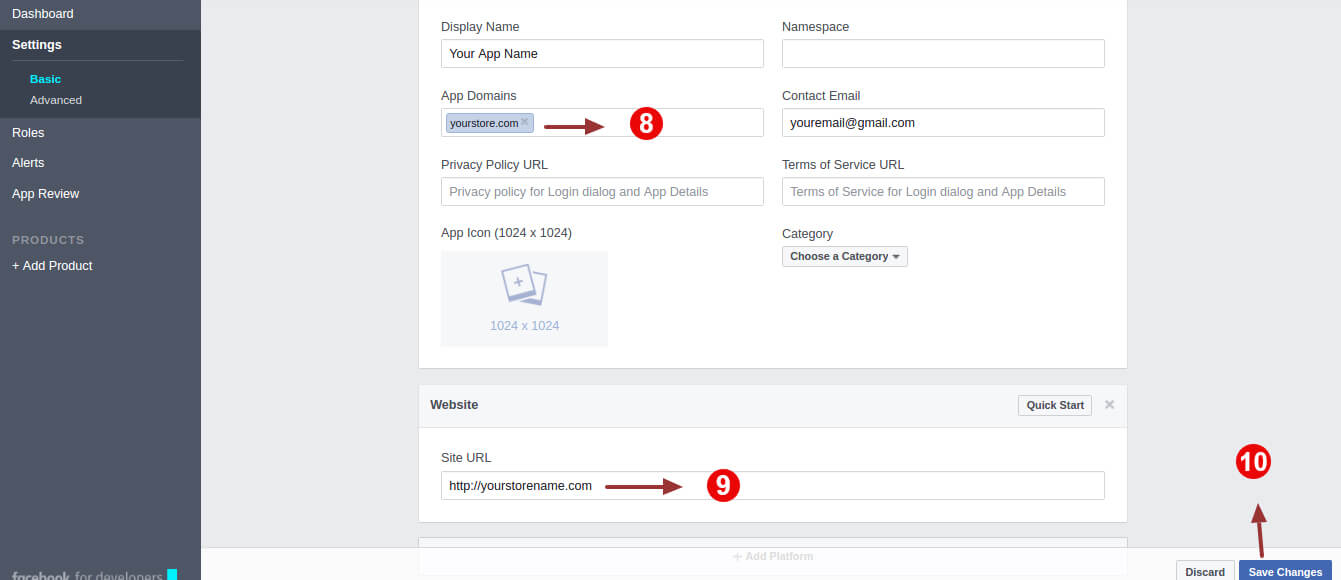
Step 8,9,10: In the basic settings enter these details:
In step 8, enter App Domain:www.example.com
For Step 9 use Site Url: https://www.example.com/
After that save the changes.
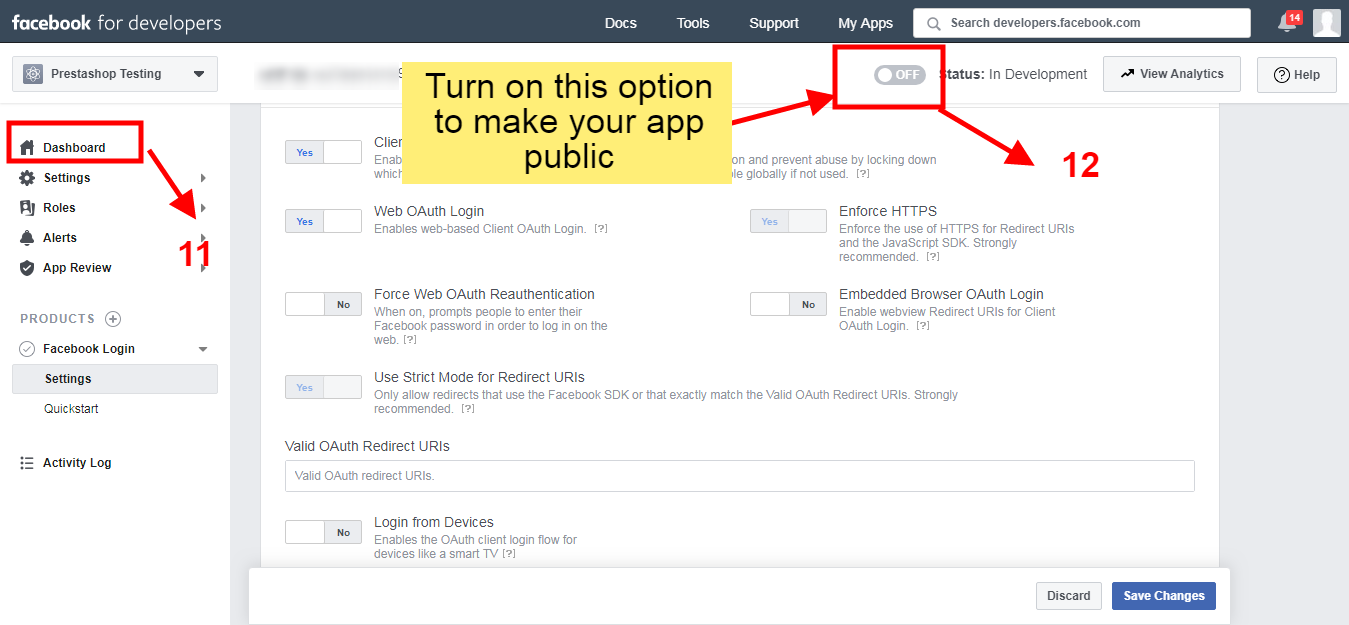
Step 11 and 12: Go to the dashboard and turn on the option for making the app public:
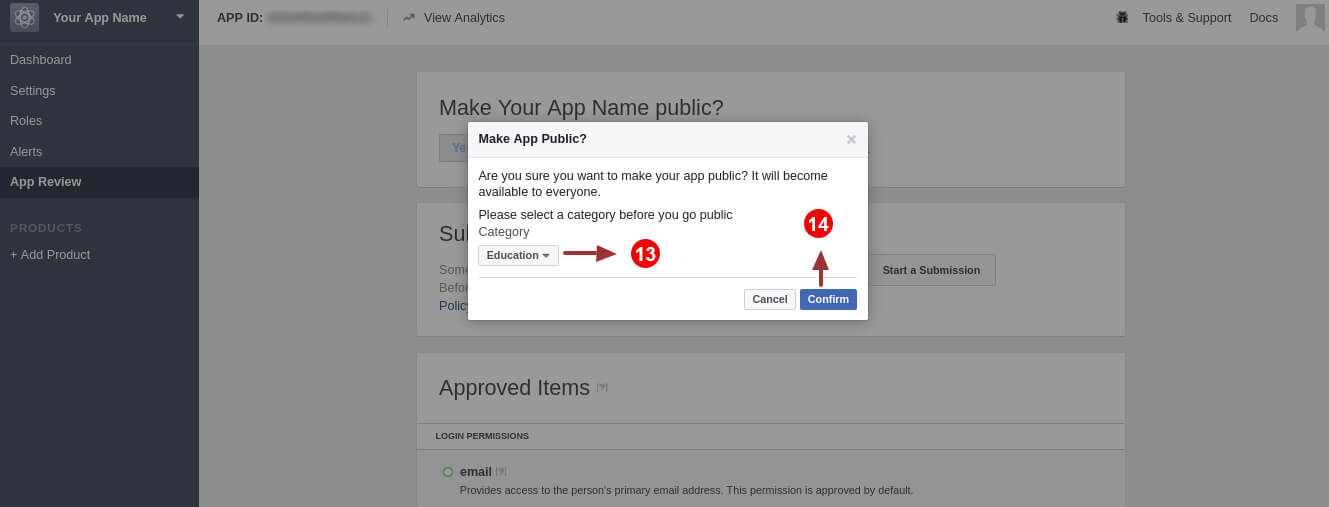
Step 13,14: Select the category and click on the Confirm button.
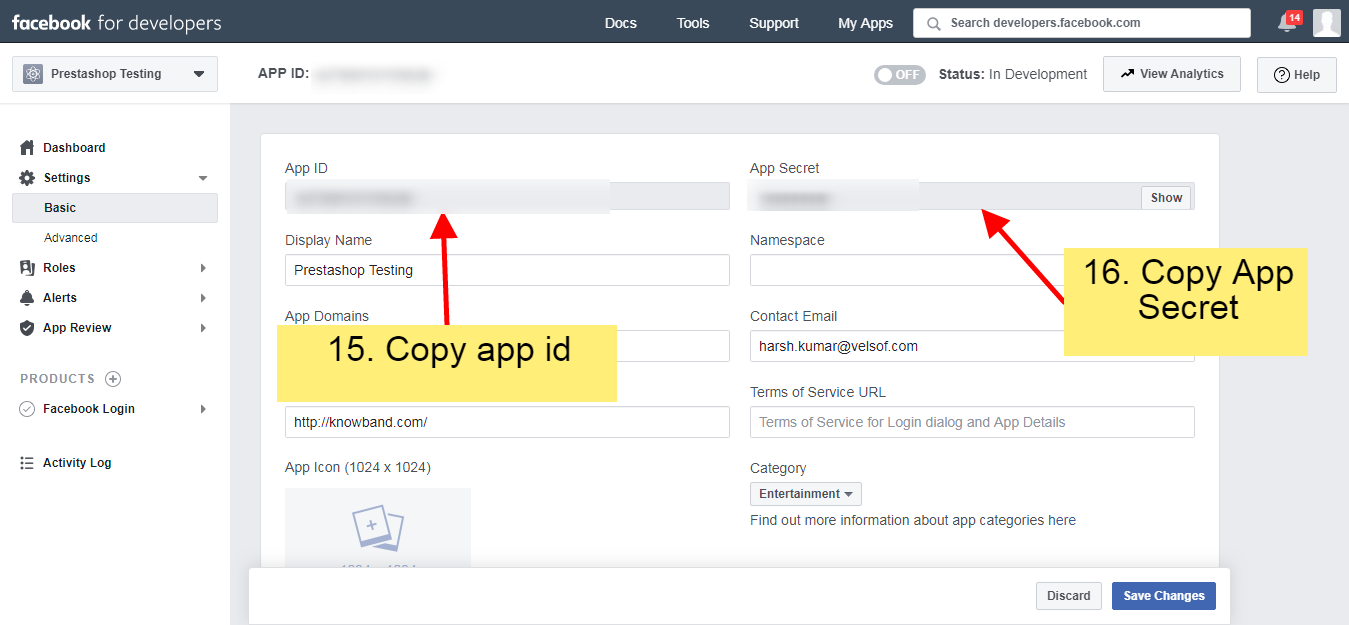
Step 15,16: Copy the App ID and App Secret from here:
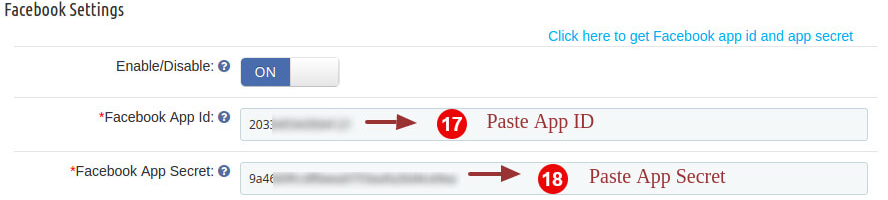
Step 17, 18: Enter app id and app secret into the fields provided in the module.
3.3.2 How to setup Google Login
Follow the below steps to get a client id and client secret.
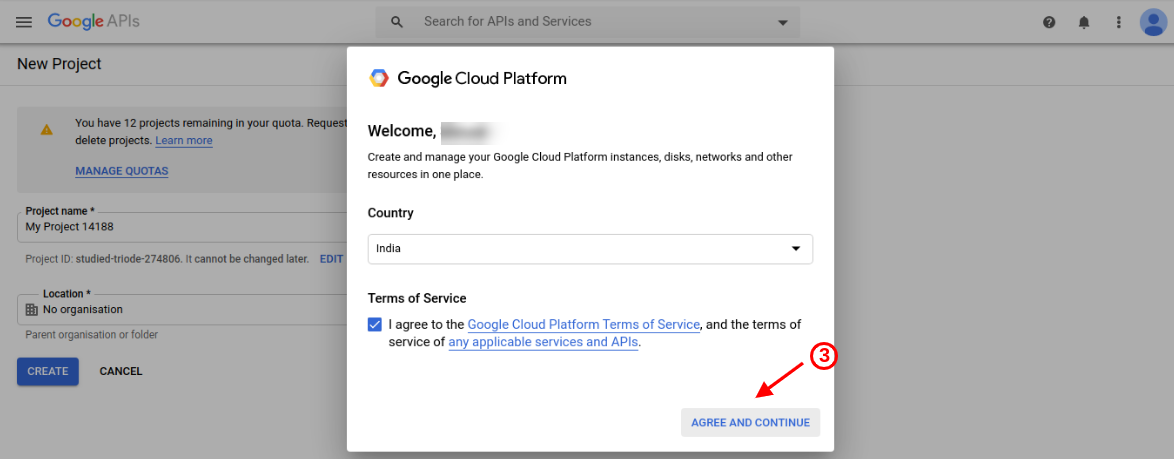
Step 3: Select the country and check on agree with terms and conditions. After that click on the continue button.
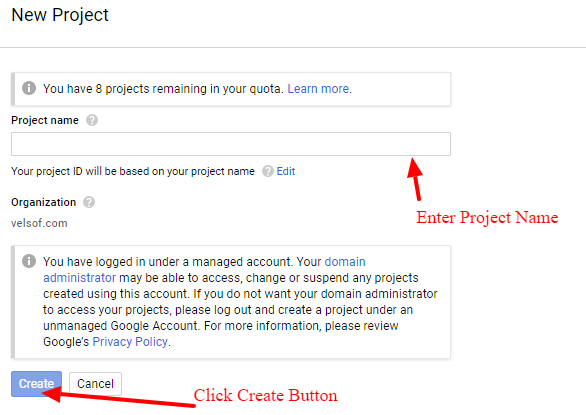
Step 4, 5: Enter your desired Project Name and click on the “Create” option.
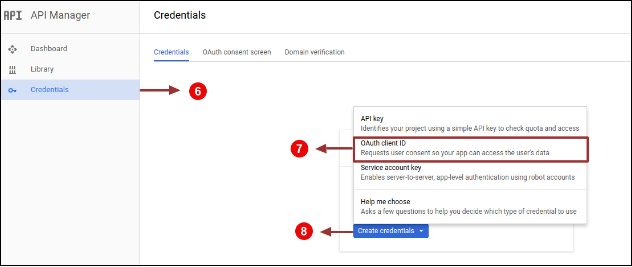
Step 6,7 & 8: Go to API Manager, click on Create Credentials and select the OAuth client ID option.
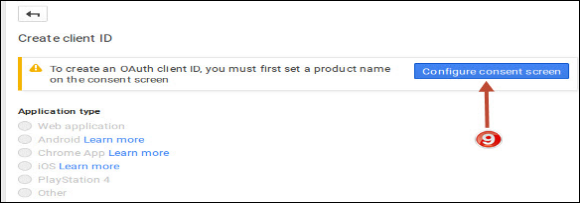
Step 9: Click on the “Configure consent screen” button.
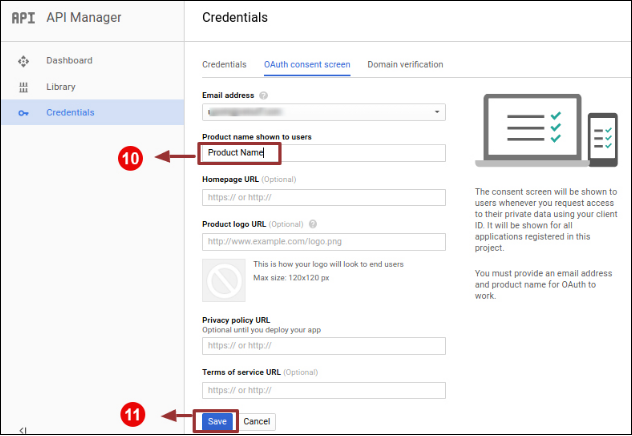
Step 10, 11: Enter “Email Id”,“Product Name” and then click on “Save” button.
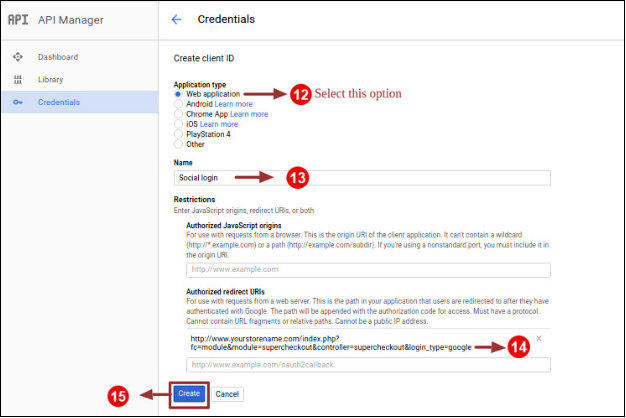
Step 12,13 & 14,15: Select “Web application”, Enter “Name “, “Authorized Redirected URIs“ as mentioned below and click on “Create” Button.
Use Authorized javascript origins: https://www.example.com/
Use Authorized Redirect Url: https://www.example.com/index.php?fc=module&module=kbstepcheckout&controller=kbstepcheckout&login_type=google
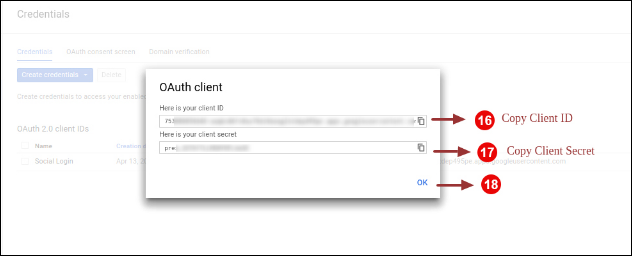
Step 16, 17, 18: Copy Client ID and Client Secret.
Step 18, 19: Paste Client ID and Client Secret in the Text Field shown below:
3.4 Email Marketing
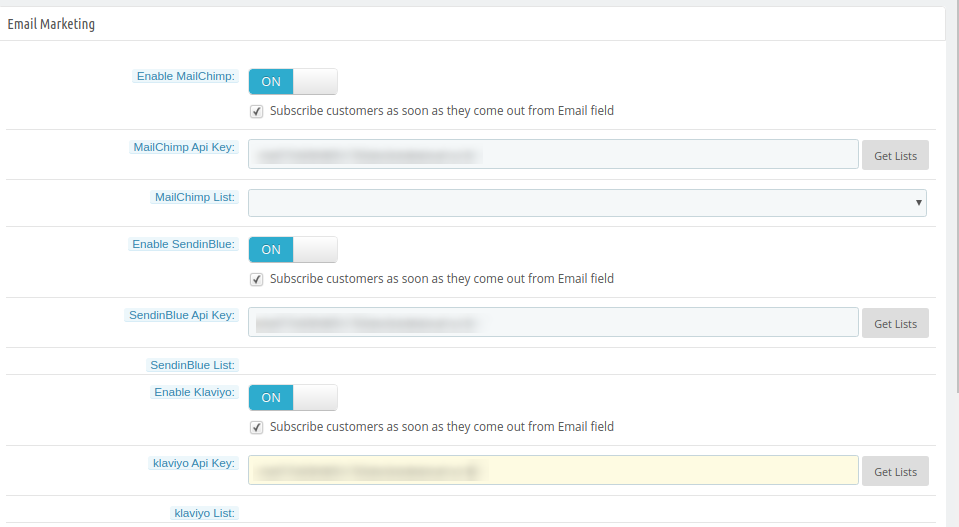
The online merchant can setup Klaviyo, MailChimp and Sendinblue email integrator sites and save email id details of subscribers. The store admin can save the user’s email ID details easily.
Enable MailChimp: Activate this option for saving email id details in MailChimp.
MailChimp API key: Enter API key here.
MailChimp List: Choose the list in which you want to save the email id details.
Enable SendinBlue: The online merchant can also configure Sendinblue.
SendinBlue API key: Enter SendinBlue API key here.
SendinBlue list: Select the list from available options.
Enable Klaviyo: Enable Klaviyo option for saving email id.
Klaviyo API Key: The online merchant can enter Klaviyo API Key here.
Klaviyo list: Select the list from here.
3.5 Addresses
In address settings, admin can configure auto address filling options as shown below:
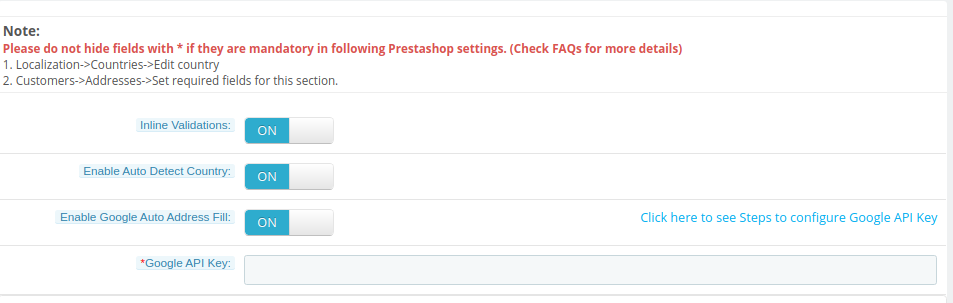
Inline Validations: Admin can activate or deactivate inline validators.
Enable Auto Detect Country: Activate country auto-detect functionality.
Enable Google Auto Address Fill: Activate for automatically address filling functionality.
Google API Key: Admin can check the Steps to configure Google API Key and enter it here.
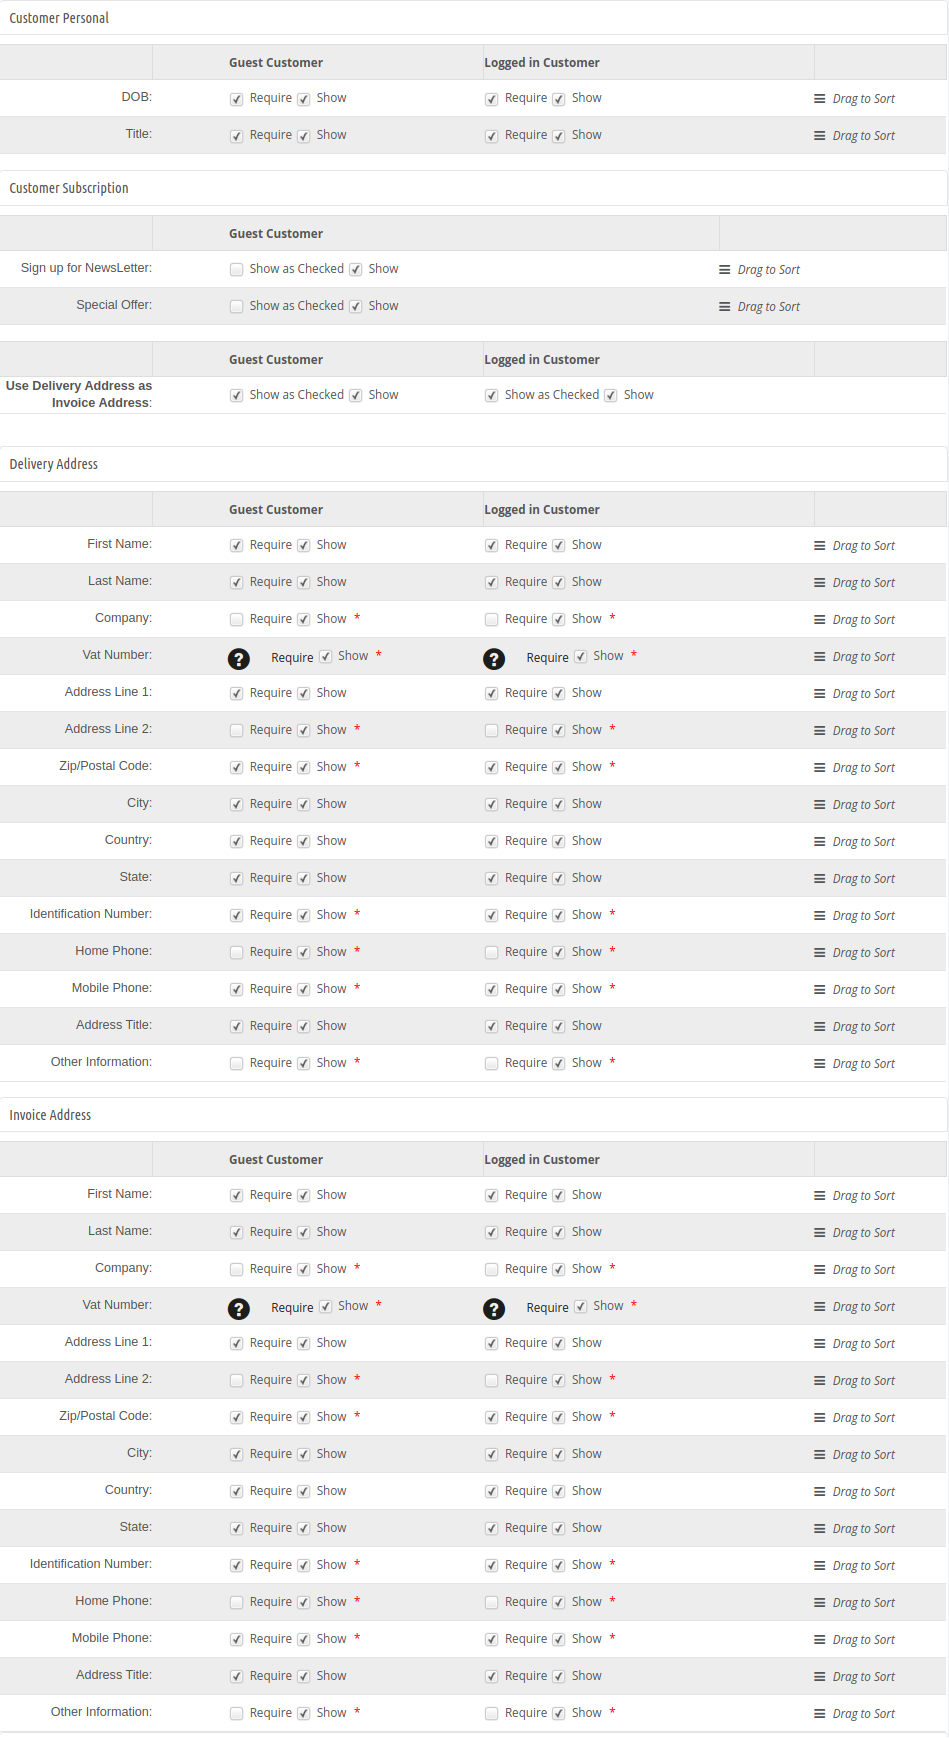
Admin can also view field details of guest and registered customers:
Important points:
To make a field show/hide in the Prestashop Smart one page checkout page, check the checkbox just to the left of Show label.
To make a field of this Smart checkout Prestashop checkout addon as mandatory (required field), check the checkbox just to the left of Require Label.
The fields of the Prestashop Smart One Page Checkout Extension can also be rearranged according to the requirement. To rearrange just hold Drag to sort and drag & drop the field vertically, wherever it is required.
On saving, the fields will be rearranged as per the changes.
3.6 Payment method
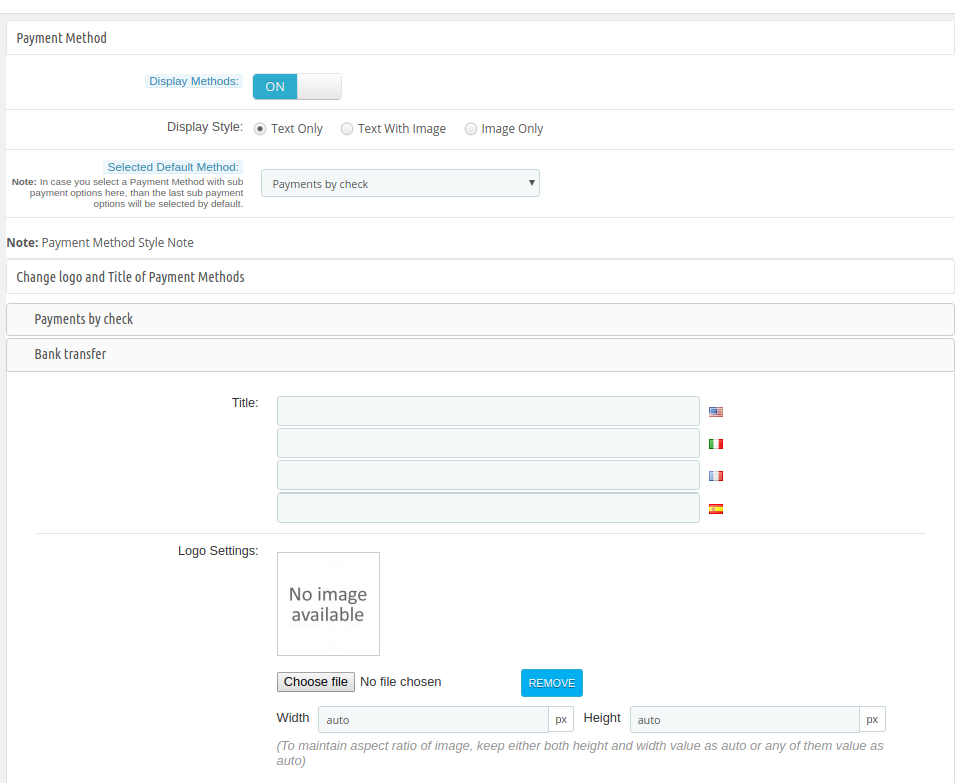
In the payment method section, admin can set payment method related conditions as shown below:
Display Methods: To Enable/Disable the payment methods on the Smart checkout page, switch the button from ON to OFF or vice-versa. This will disable the payment method block from the checkout page. By default, this option of the
Prestashop Smart checkout addon will be enabled.
Display style: There are 3 options in this field of the Prestashop Smart One Step Checkout Addon to display how your payment methods will be displayed on the checkout page.
Selected Default method: Choose the default payment method from the list which will be displayed as selected at the time, when the customer comes on the checkout page.
Admin can change the logo and title of available payment methods.
3.7 Delivery method
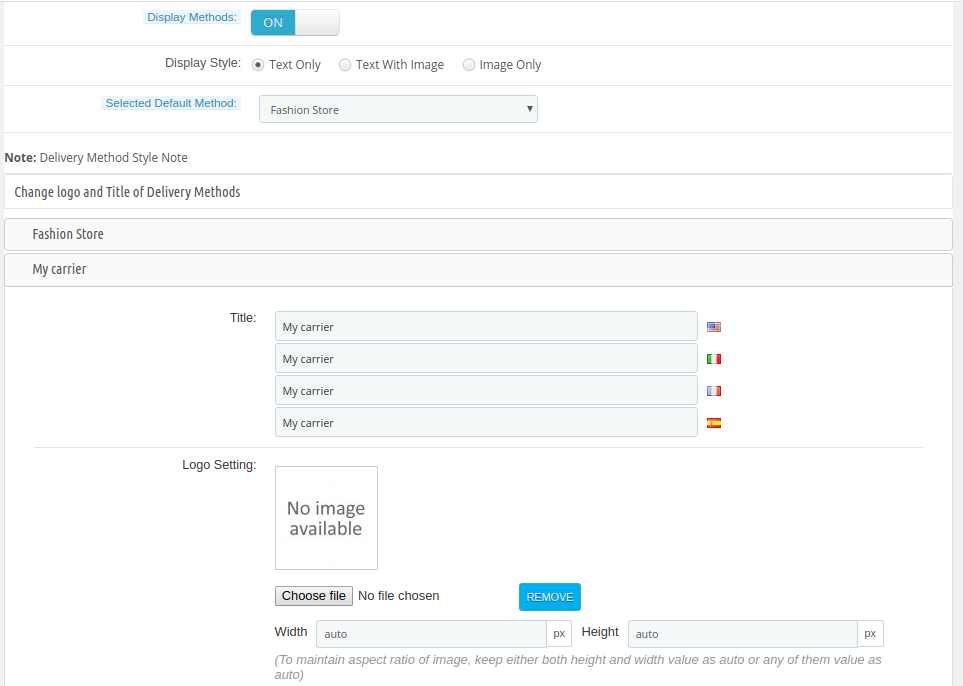
In this section of Prestashop Quick checkout addon, admin can apply delivery methods related settings:
Display Methods: To Enable/Disable the delivery methods on the checkout page switch the button from ON to OFF or vice-versa. This will disable the delivery method block from the checkout page. By default, this will be enabled.
Display style: There are 3 options in this field of the Prestashop fast checkout addon to display how your delivery methods will be displayed on the checkout page.
Selected Default method: Choose the default delivery method from the available list which will be displayed as selected at the time, when the customer comes on the checkout page.
Admin can change the logo and title of available payment methods.
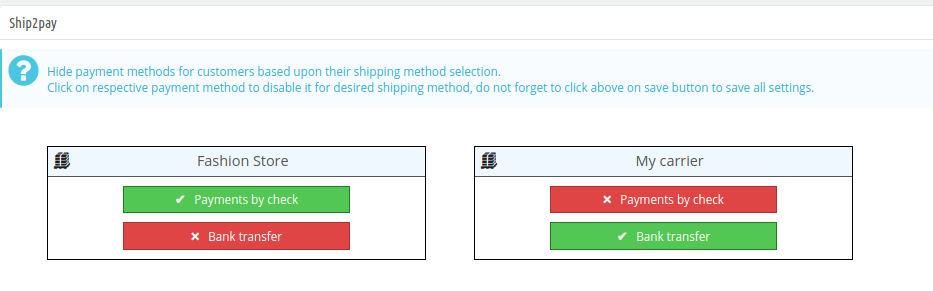
3.8 Ship2pay
From here, admin can hide the payment methods for all the available shipping methods. Admin just needs to click on the payment method for showing or hiding it.
3.9 Custom Fields
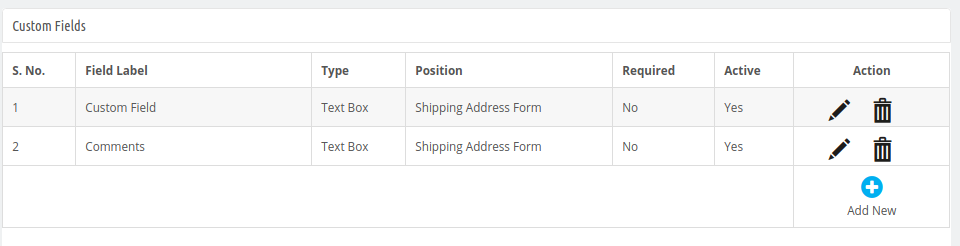
Admin can also create custom fields as per the requirements. In the Custom fields section, admin can view the list of all the created custom fields. Admin can edit, delete and make new custom fields easily.
How to Create new Custom Fields:
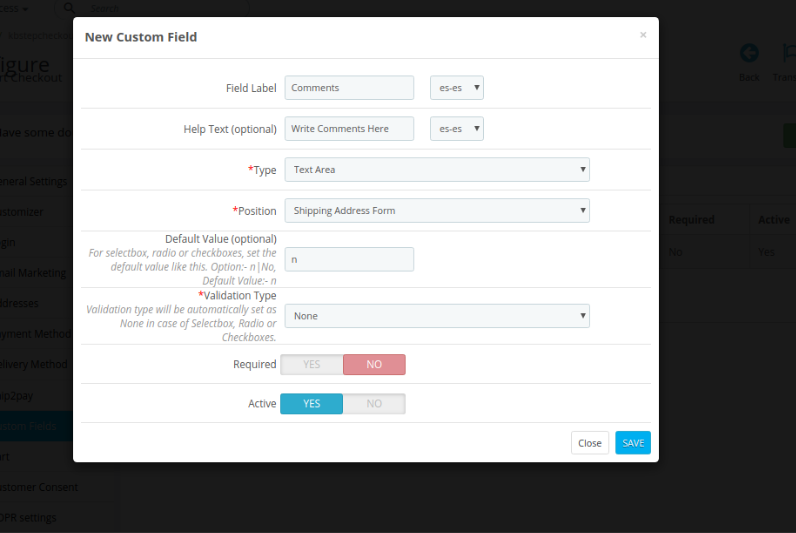
For adding a new custom field, the admin needs to click on the “+” button and enter these details as shown below:
Field Label: Enter the label for the new custom field.
Help Text: Enter help text for this new custom field.
Type: Select type of custom input field like text box, select box, text area, radio button, checkboxes and date.
Position: Select the position where you want to show this custom field.
Default value: For select box, radio or checkboxes admin needs to set value. By default, this value will be n.
Validation Type: Set validation type from the available options like int, URL, name, email and date.
Required: Make this field as a required field.
Active: Activate the field by enabling this option.
Admin can click on the bin button for deleting the custom fields and click on the edit button for changing the custom field settings.
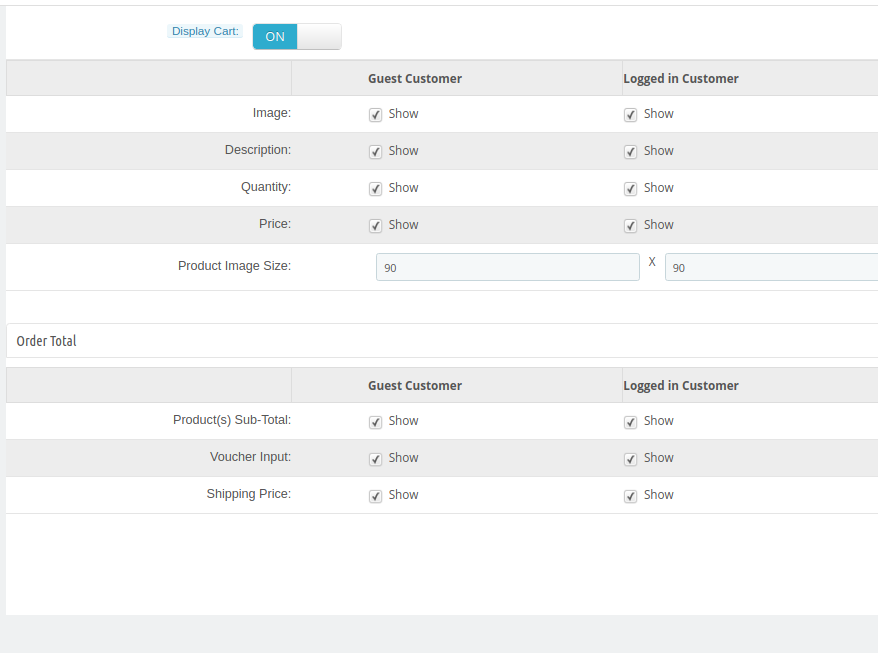
3.10 Cart
Admin can enable the “Display Cart” option for showing cart. Admin can select the fields which he wants to show to the guest and logged in customers.
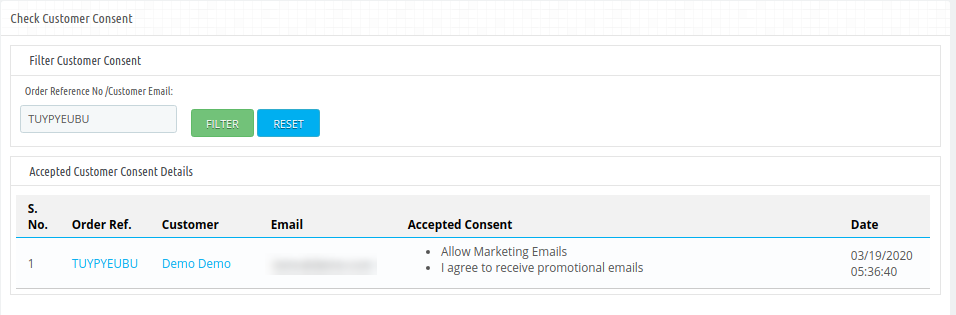
3.11 Customer Consent
Enter the Order Reference number or customer email id from the filter customer consent section.
3.12 GDPR Settings
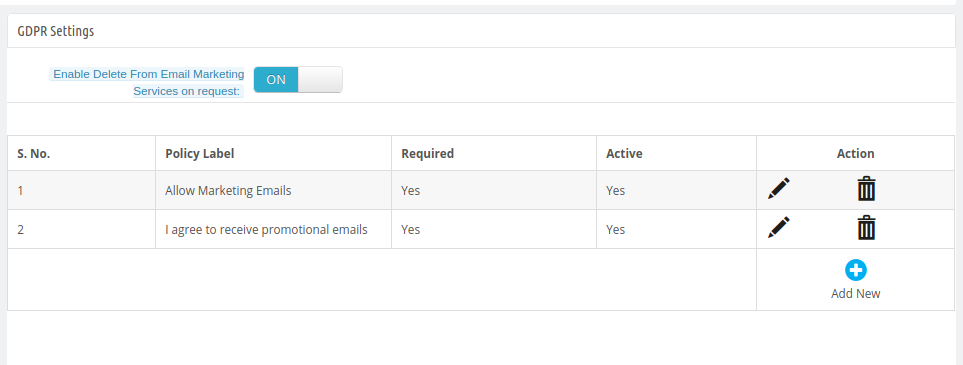
Enabling Delete from Email Marketing Services on Request: Activate or deactivate the settings as per the requirements. By enabling the option, admin can delete customer details from email marketing services on their request.
Admin can view a list of policies and also add new GDPR policies, delete and edit any policy.
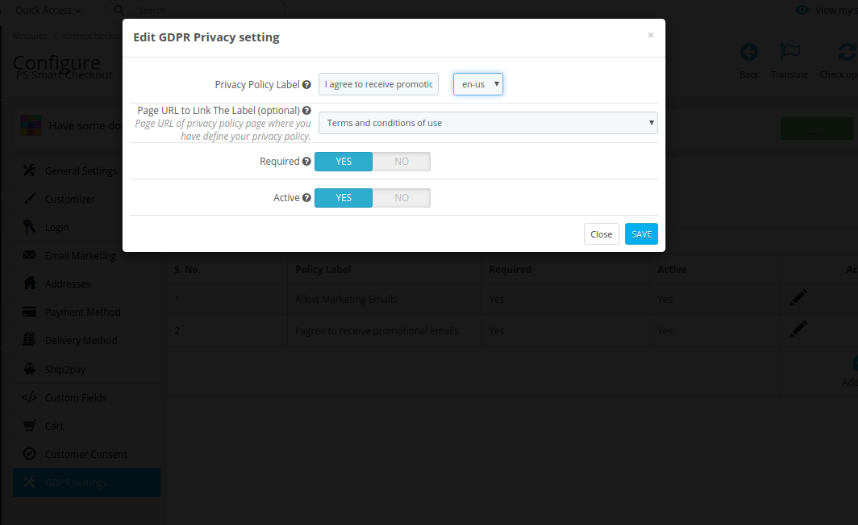
Privacy Policy Label: Admin can set the label for privacy policy in different languages.
Page URL to link the label: Admin can select the page to link the label.
Required: Make this policy mandatory.
Active: Enable the option for activating this privacy policy.
4.0 Front-end Interface
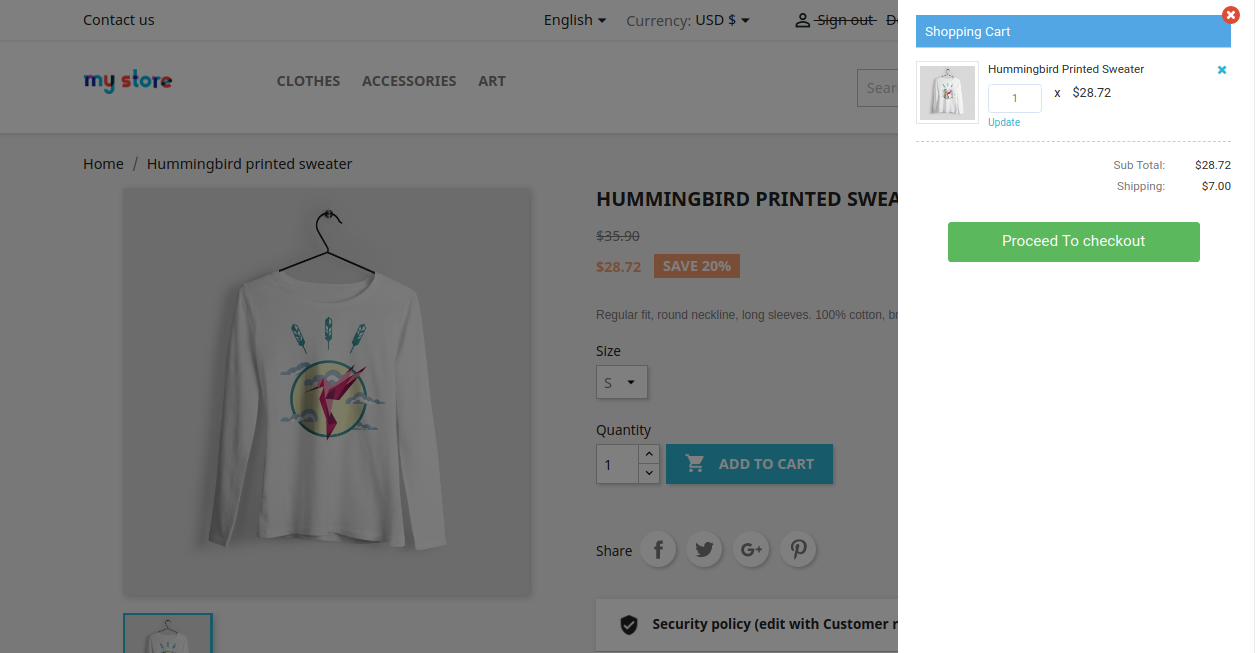
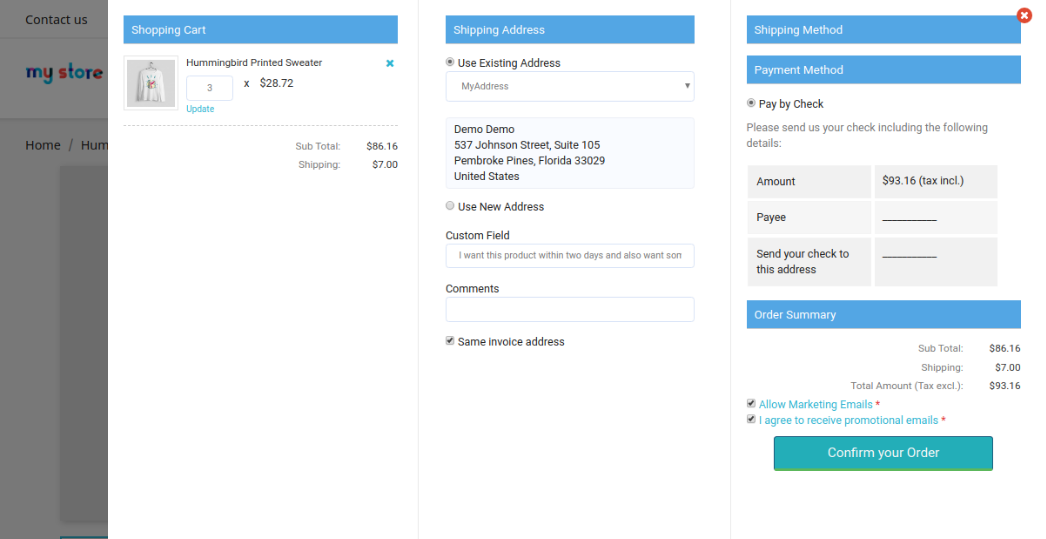
After a successful configuration, the admin can offer a simple and hassle-free checkout option. The online users will get smart one-page checkout popup as soon they click on “add to cart option”. Please check the below Screenshot for better details:
After that, online users need to click on “proceed to checkout” for further process.
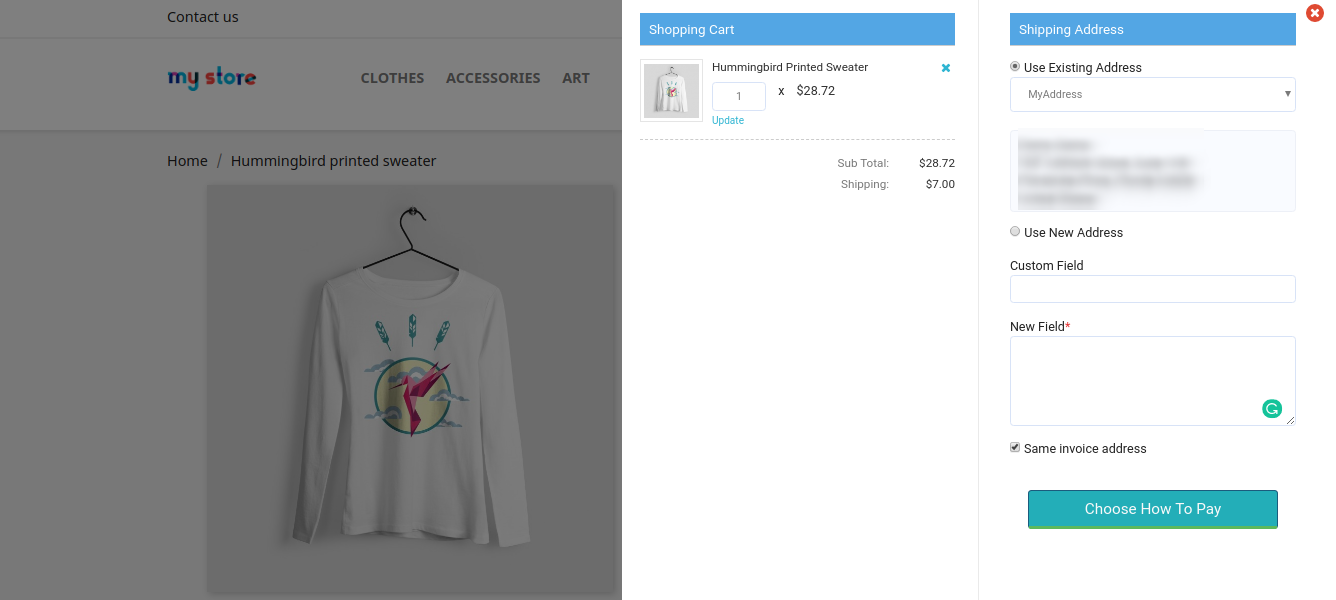
Here, online users need to select a shipping address or add a new address.
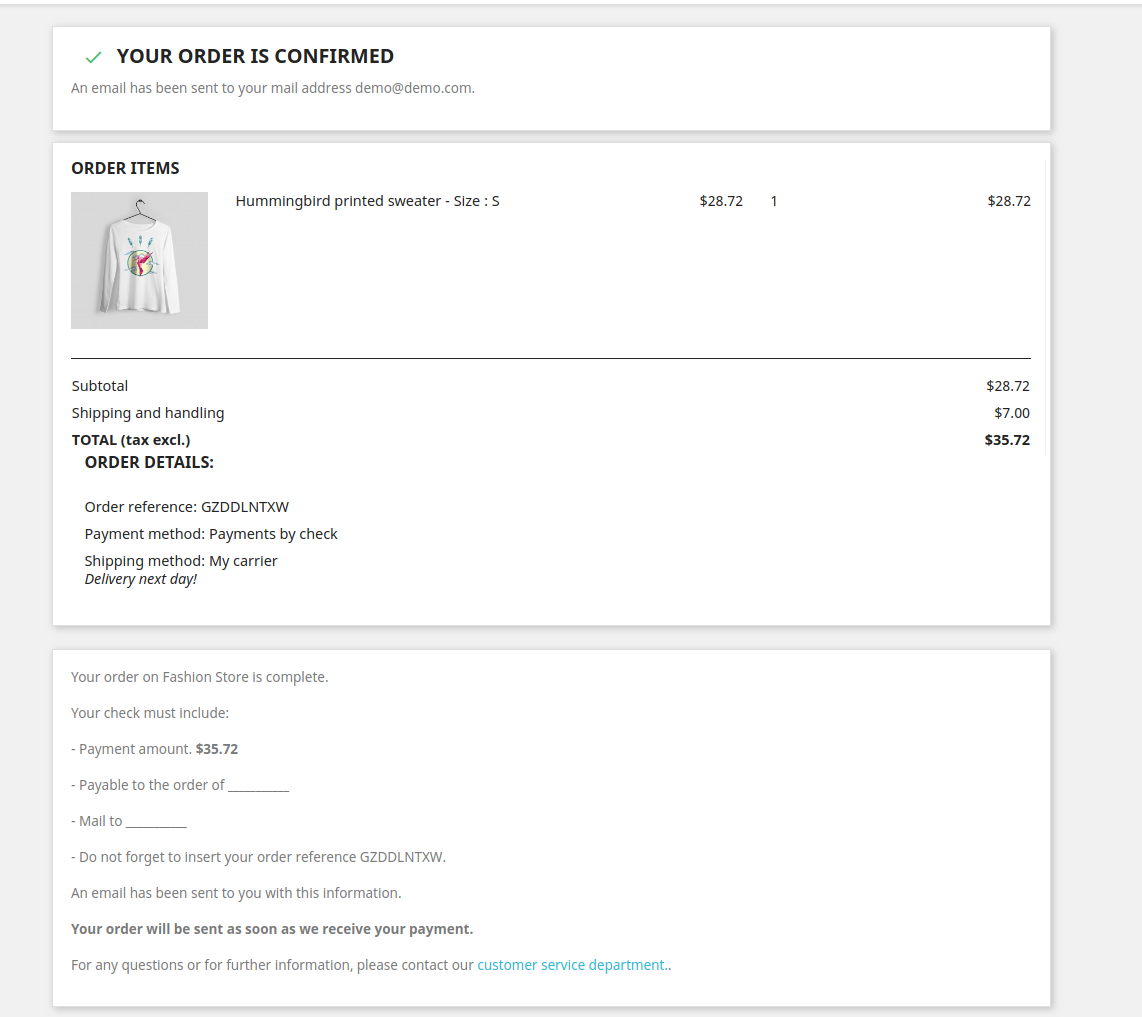
After that, online users can select the shipping method and payment method. After that, they can confirm the order easily.
Online users can check the order summary from this page easily.
“Incorporate a gift card section on your Magento website with Magento Gift Card extension. The module allows your store visitors to shop for e-gift cards/ digital gift cards from your website.”
Digital Gift Cards have been in trend for a long time now, and the trend will continue since people have become fond of purchasing e-gift cards. It saves their time from the tedious gift search. Today, with the facility of online gift cards, a person can purchase and send a gift card to anyone in the world, at any point of time.
It is only because of this that a majority of eCommerce website owners like to provide the gift card facility to their customers.
Wishing for a gift card extension for your site so that you could also start selling gift cards? Knowband’s Magento Gift Card extension will cover all your possible requirements regarding gift cards.
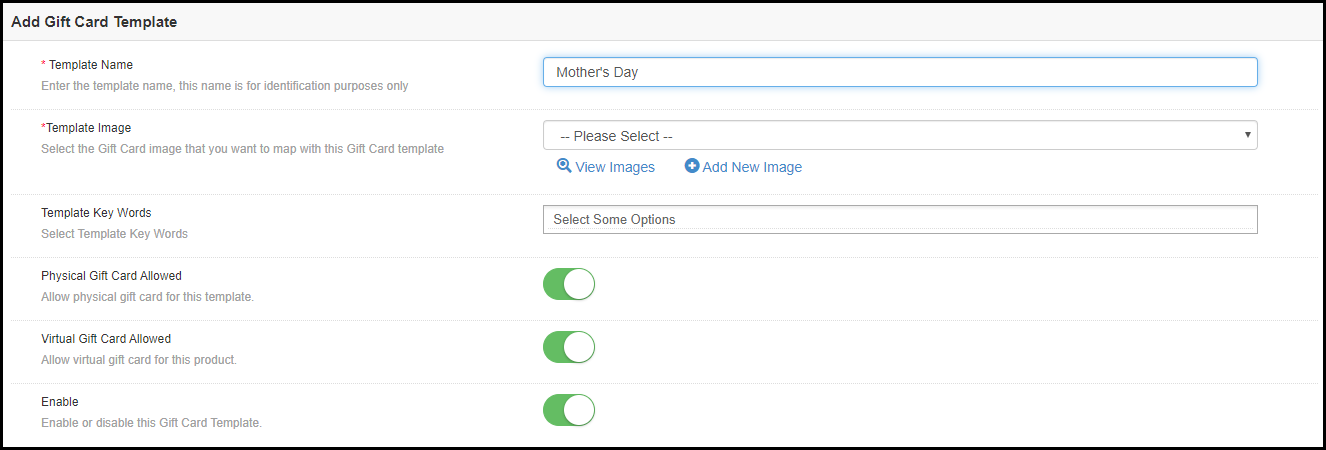
And with Mother’s Day only a few days away, purchasing a Mother’s Day special Gift Card will be one of the best ways to thank your mother and put a smile on her face. The module will let you create a Mother’s Day Gift Card from the back-end after which you can make it available for the customers to purchase it.
Overview of Magento Gift Card
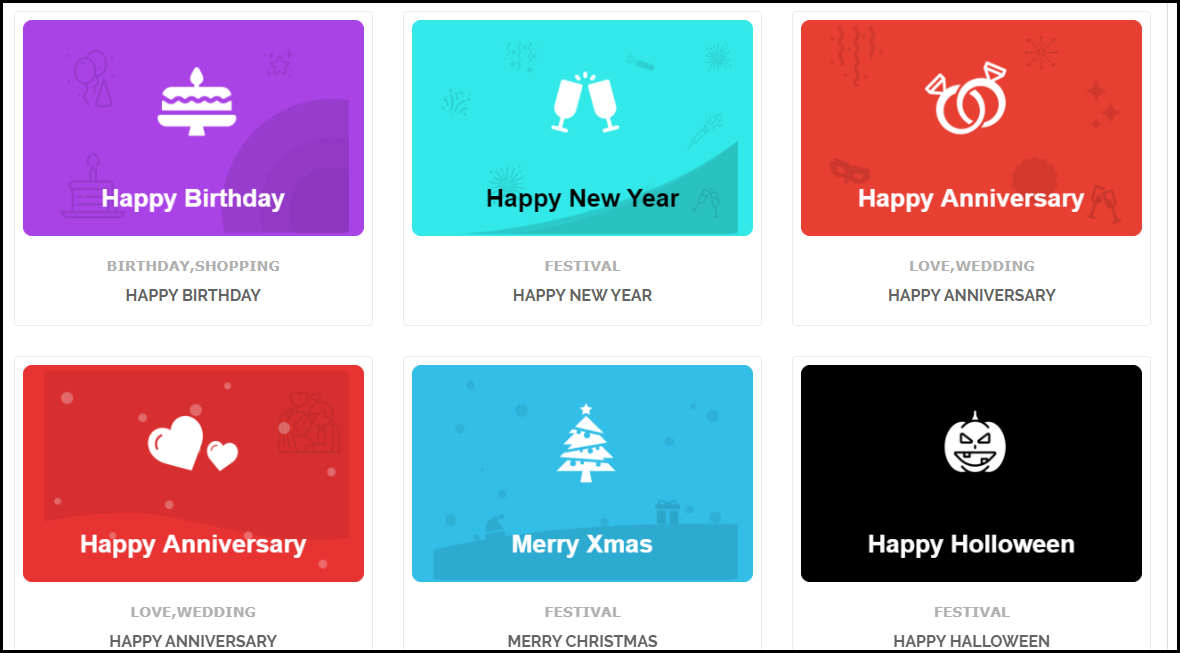
1. Gift Cards for multiple occasions- Mother’s Day, Valentine’s, Halloween, Christmas, Birthday, Anniversary, etc.
2. Customizable Gift Card templates | Add New Gift Card templates
3. Create different price range gift cards
4. Display the gift card option on Header, Footer, etc.
5. Customizable email templates
6. Send gift cards via email or print it yourself
7. Track gift card orders
Magento Gift Card functionality
1. Magento Gift card extension comes with pre-existing templates for occasions like Birthday, New Year, Mother’s Day, Father’s Day, Anniversary, Halloween, Christmas, etc. These gift card templates can be customized and you can also add new ones. You can also disable a particular template anytime.
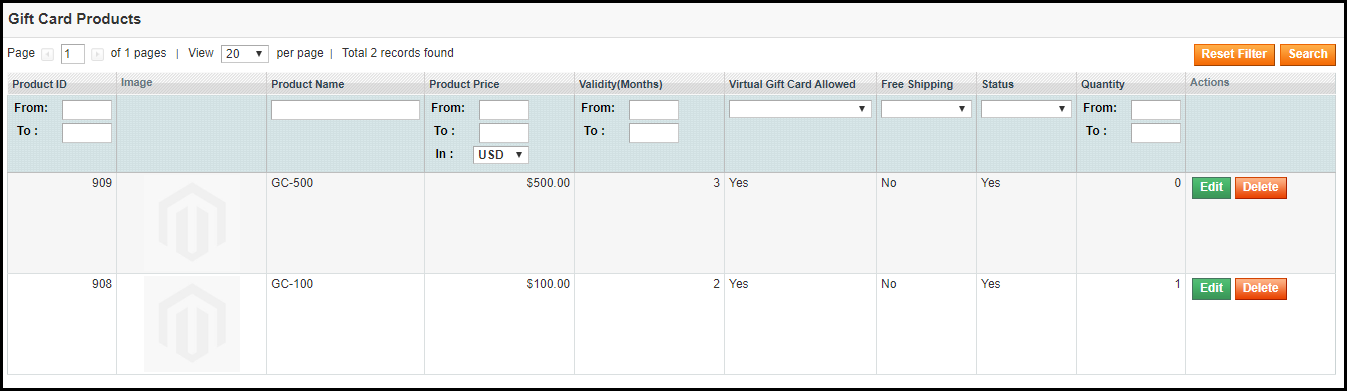
2. Magento Gift Card manager extension lets you set up gift cards of multiple prices so that a customer can choose the gift card as per his/her budget. You can also specify the gift card quantity of different priced gift cards. You can also set their validity. Besides, you can provide free shipping on a specific value gift card.
3. The gift card link can be placed across multiple places on your website such as the Header, Footer, and my account section. You can also highlight it on the left side on the front-end.
4. With the help of Magento Gift voucher extension, you can specify the order status for which the gift card would be marked as delivered and the gift card code would be generated.
5. Magento Gift Card extension provides an email template for the sender as well as the recipient, the subject and content of which can be customized as per the admin’s choice.
6. You can also set the minimum delivery time for the gift cards.
7. Magento gift card module lets you fix a prefix for your gift cards that helps you in your brand promotion.
8. The recipient can also download the gift card in the PDF format.
9. Allow gift cards to be sent physically (by printing it yourself) and virtually (over recipient’s email address).
10. With Magento Gift Card Voucher extension, you can track your gift card orders on your website.
11. The Magento Gift Card extension makes it a one-click task to enable or disable the module functionality.
Benefits of Magento Gift Card Extension
1. Easy to set up module with simple configurations
2. Helps in boosting your brand awareness
3. Increases your store sales and revenue
4. Acquire more customers [new] for your brand
If you need any assistance in this module regarding its configuration or have any sort of query, you can contact us at support@knowband.com.
How did you find this Magento Gift Card extension?
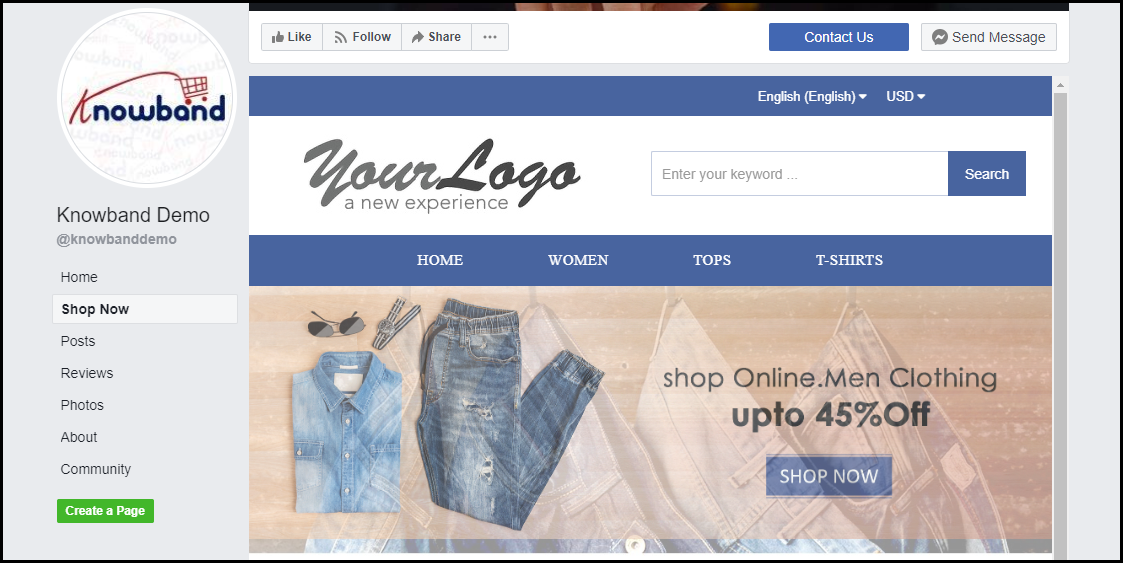
“PrestaShop Facebook store, also known as PrestaShop Facebook shop addon or PrestaShop social shop addon is amongst the best PrestaShop social media modules. It lets you set up a shop on your Facebook business page.”
The Facebook audience is huge. People of every age group are present on the largest social media platform that has over 2.4 billion monthly active users. It is the most targeted social media network by brands as it provides them with the opportunity to reach out to a large target audience.
Moreover, people spend a lot of time on Facebook and this is the reason why Brands have linked their Facebook page to their eCommerce website and opened a Facebook shop, i.e. to allow people to shop from that medium too.
If you are a PrestaShop website owner looking to open a Facebook shop, PrestaShop Facebook store addon will help you do that effortlessly. All you require is the Facebook App ID.
Note: This module requires a minimum of 2K likes on your Facebook page to work. Besides, your website must be SSL-enabled. If your website does not have an SSL certificate, the module would not work because Facebook does not allow linking to a non-SSL website.
Overview
1. Easy to set up your Facebook store without any requirement of technical knowledge.
2. Track performance of your Facebook shop by connecting Google Analytics.
3. Adjust the look and feel of your Facebook shop.
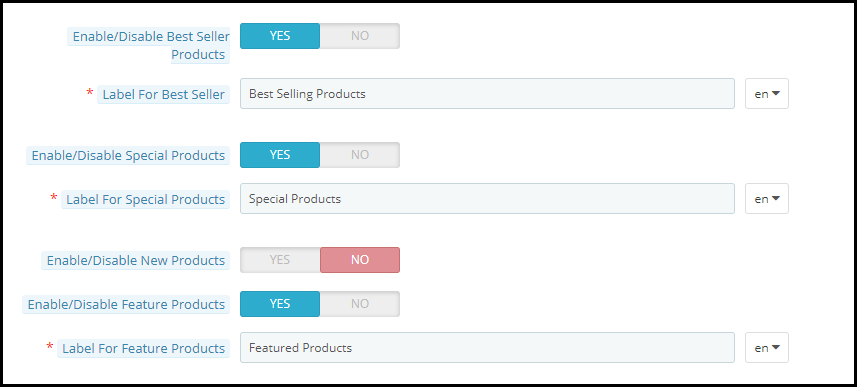
4. Display your bestsellers, featured products, new arrivals, etc.
Features of PrestaShop Facebook store addon [Detailed]-
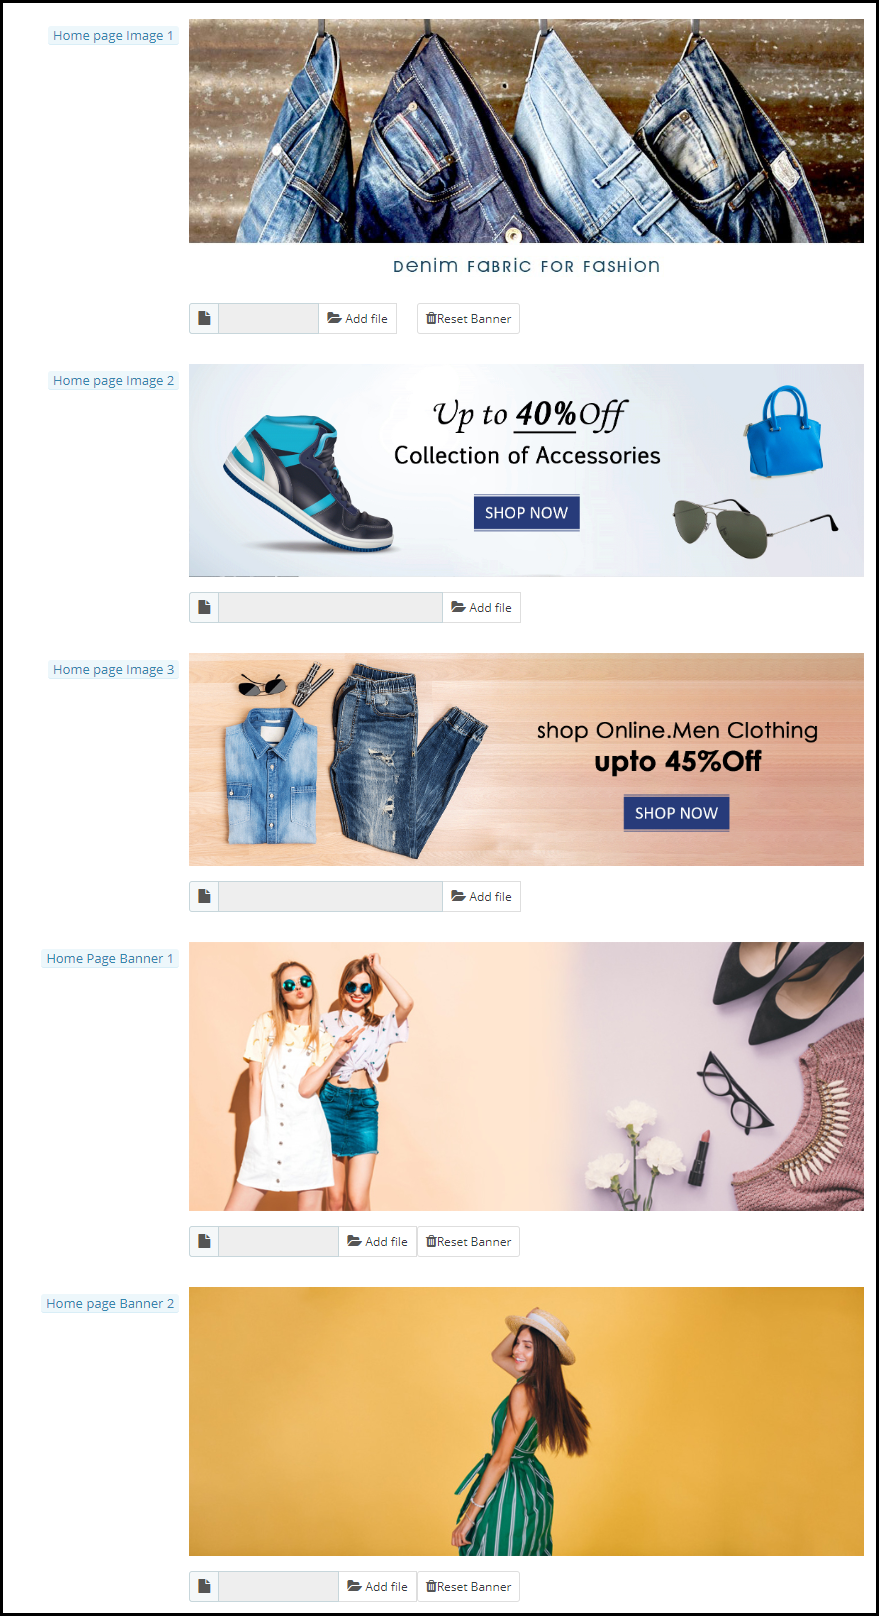
1. You can set up some attractive home page images to draw user attention. The images are displayed automatically. You can upload a maximum of three home page images.
Besides, you can set up home page banners as well to make your Facebook store more attractive. You can upload a maximum of two home page banners.
2. PrestaShop Facebook shop addon lets you customize the menu bar of your Facebook shop. The back-end of the module displays a list of categories that are set up on your website. You can then decide what category you want to put in the menu bar of your Facebook store.
3. With PrestaShop Social shop addon, you can display featured products, bestsellers, new arrivals, special products, etc. You can specify the products that you want to show on your social shop.
You can also specify the maximum number of featured products that you want to display.
4. Connect Google Analytics by entering your analytics ID and track the performance (conversion and sales) of your Facebook shop.
5. PrestaShop Facebook store addon helps you set up your Brand logo on your Facebook shop.
6. You can also adjust the theme colour of your Facebook shop.
7. PrestaShop Facebook store addon lets you set up the footer content for your store.
Benefits of PrestaShop Facebook shop addon
1. Boost your website traffic
2. Increase the conversion rate on your website
3. Promote your Facebook shop in front of a huge Facebook audience
4. Enhance the shopping experience of your Facebook followers
Over to You
PrestaShop Facebook store addon provides multi-lingual support and has multi-store compatibility. If you want to achieve high sales from the Facebook platform, having a Facebook shop is a must.
If you need any assistance with this module, you can contact us for help at support@knowband.com
Mobile Commerce has excelled at a rapid rate in the past few years. Smartphones are dominating the new generation and ease of access to online transactions is the primary reason for the quick evolvement of mobile commerce.
The use of desktops for online purchases has diminished and it is now being replaced by hand-held devices.
In 2018, mobile commerce made a figure of around $207 billion in the US itself, and that was around 40% of the total eCommerce retail sales captured that year. And the numbers are expected to hit the $338 billion mark in 2020, reports Statista.
If you talk about global mCommerce sales, it has already surpassed eCommerce way back in 2016, and it is going to make a powerful impact in the future.
What is Mobile Commerce?
Mobile Commerce also referred to as mobile eCommerce or simply mCommerce/m-commerce is all about online transactions that take place through mobile devices or tablets.
Put simply, whenever you conduct a transaction through your smartphone, it’s mCommerce. From purchasing the smallest of things to expensive ones, today, most of the people prefer to make the payment using their cell phones. This is what has led to mobile commerce expansion.
Mobile Commerce vs eCommerce: What’s the difference?
Though this would have been pretty clear by now, let me make it easier for you to understand. The key difference between m-Commerce and eCommerce is that the latter involves buying and selling of goods through any kind of device, be it a mobile or desktop, whereas m-commerce is used when online transactions are made through mobile devices specifically.
You can also say that eCommerce is the parent category and mCommerce is the child category.
Mobile Commerce Examples
M-commerce can be witnessed in our day to day lives. A few examples are-
Mobile Shopping
When I talk about mobile shopping, Amazon hits my mind straight away. The largest eCommerce company in the world captures a huge number of sales daily through mobile devices. It has its own mobile app as well which makes it even easier to purchase anything from their store. And since it covers a wide variety of items, it is the go-to shopping store for most of the people.
And similar to Amazon, there are multiple other websites that encourage mobile shopping.
Mobile Banking
Another example of mobile commerce is Mobile banking. Until a few years ago, people either used to meet-in-person or go to a money transfer store to send money to someone. Thanks to Mobile banking which has now made it a few clicks task.
If you want to transfer money to a user, all you require is their account details like account number and IFSC code, and a single tap would deposit the money in the recipient’s account. Digital wallets like Google Pay does not even require account details if the recipient is registered on the same platform.
Benefits of Mobile Commerce
There is a reason why m-commerce has achieved a significant rise in the past few years. Some of the major advantages of mobile commerce are-
1. Better Customer Experience
M-commerce makes it convenient for mobile users to make online payments. They do not need a laptop or desktop to conduct a transaction. If you are having a smartphone and a good Internet connection (since payment may fail if there is network issue), you can make a payment anytime, anywhere, without any hassle.
2. More and more people are shifting towards m-commerce
Mobile eCommerce is expected to reach 70% of the total eCommerce retail sales this year. Therefore, it is vital that you allow your mobile visitors with the facility of easy mobile transactions. Failing to do so may result in a huge loss in your mobile conversions.
Work on the mobile version of your website. Optimize it, make it responsive.
3. Faster transactions
Everyone wants comfort. Nothing would make a person happier if he or she could perform any task without getting up from their bed. Not sure about other things but mobile commerce applications have made it possible to make payments faster and you do not need to get up from your bed and search for your laptop.
You cannot carry a laptop with you every time. A cell phone? Definitely.
Final word
The first and the foremost thing to do to improve mobile commerce is making your web pages load quickly. The faster your website loads, the more mobile conversions you will have. The use of AMP in such cases proves to be beneficial.
From the moment a visitor enters your website to the final payment page, each and every step must be optimized, primarily the checkout page, so that the visitors do not find any kind of trouble on your website.
Cart Abandonment is the primary concern for every eCommerce retailer. And in the online world, it is something that you have to deal with. It cannot be eradicated no matter how many efforts or techniques you apply.
However, many modules or plugins help website owners to reduce the cart abandonment rate on their website. One such module is the Abandoned Cart module by Knowband.
If you have a website on the Magento 2 platform and looking for some of the best Magento 2 Abandoned Cart extensions, Knowband’s Abandoned Cart extension for Magento 2 will probably put an end to your search.
1. Option to mark a cart as abandoned after a certain time
2. Auto-email functionality
3. Multiple email templates
4. Send discount and non-discount emails
5. Track Abandoned Carts
6. View Converted Carts
7. Abandoned Cart Analytics
8. Test mode functionality
Features of Magento 2 Abandoned Cart Extension [Detailed]-
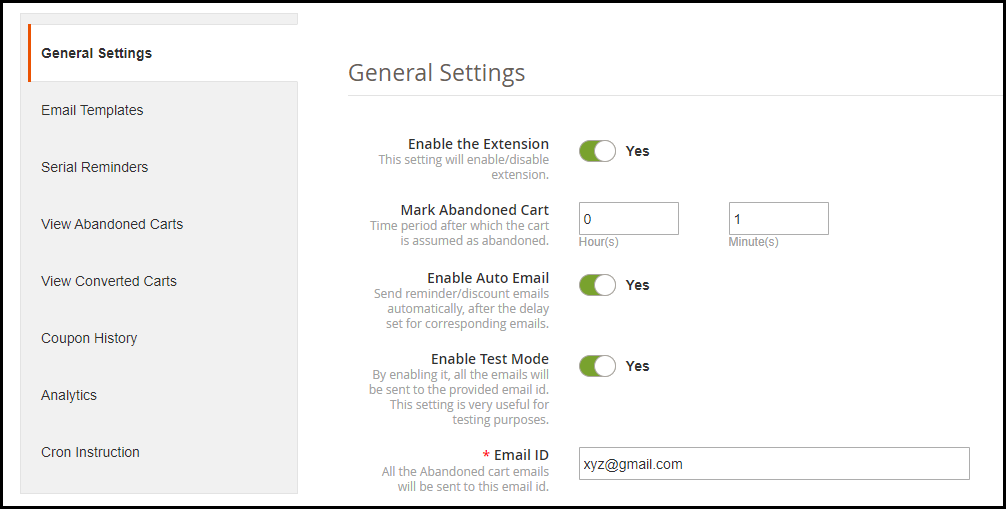
1. Magento 2 Abandoned Cart extension lets you specify a time period after which a customer’s cart is automatically marked as abandoned. For example, if the duration is set to 1 hour, then after 1 hour it will be added to the abandoned cart list.
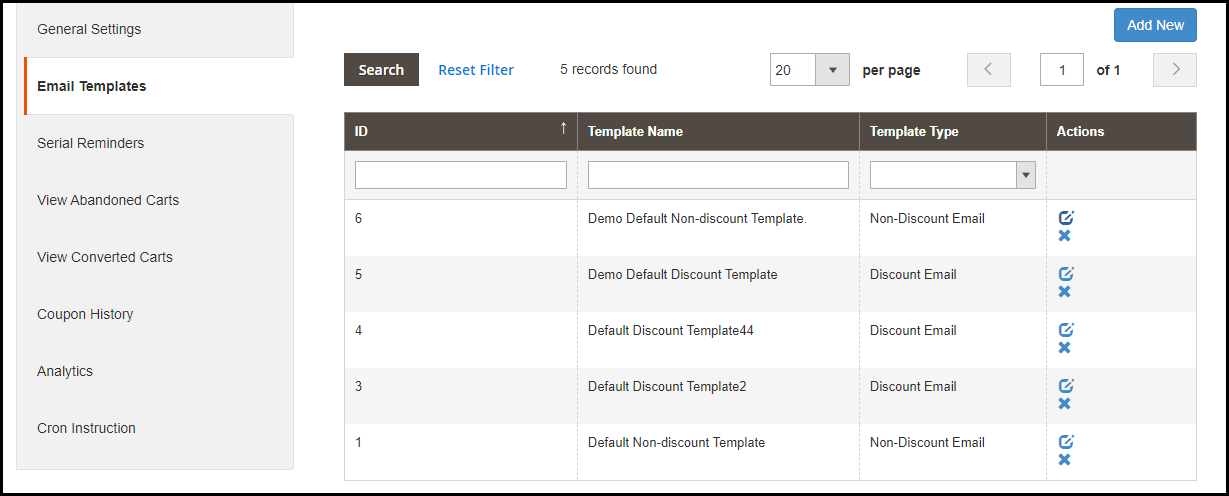
2. The Magento 2 follow up email extension offers multiple pre-existing email templates and you can also create new ones or customize the existing ones. For every email template, you can specify the template type whether it should be a discount email or a non-discount email. The latter is simply a reminder email where a user would be reminded about the pending items in his cart whereas the discount email contains a coupon code inside the email content which a user can claim to get discount on his left purchase.
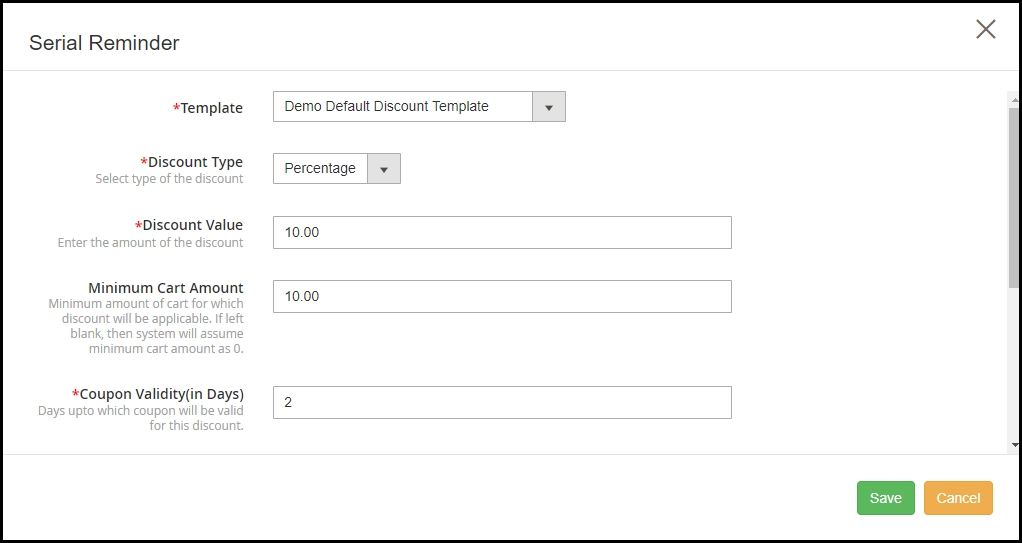
3. The Magento 2 Abandoned Cart extension allows you to schedule your emails. For discount email type, you can specify whether you want to provide a flat discount or percentage discount. You can also set the coupon value, coupon validity and specify the minimum cart amount for which the discount would be applicable. Besides, you can also offer free shipping to customers on their purchase.
4. Magento 2 Shopping cart abandonment extension also provides auto-email functionality enabling which the reminder emails would be automatically sent to the abandoned cart user after the set delay.
5. Track details of the abandoned cart users easily with the Magento 2 Abandoned Cart Reminder module. It displays some very useful information of the users like their name, email address, left cart amount, customer type whether they are registered or non-registered, their last visit or whether they have been sent a reminder email or not.
You can also check the pending items in their cart. Besides, you can view the list of the users who made a purchase after they had been sent the reminder email.
6. Check the complete history of the coupon codes that shows the discount amount, discount type, status of the coupon and whether it has been used or not.
7. Magento 2 Abandoned Cart Email extension provides you with some amazing analytics view in the form of line graphs and pie charts. You can compare abandoned carts and converted carts, abandoned cart amount and converted amount, and cart abandonments stats over a period.
8. There is test mode functionality that allows you to check how the emails are delivered to the user.
9. Enable/disable the extension in a single click.
If you need any assistance with this abandoned cart extension, you can reach out to us at support@knowband.com and we will try to resolve your query to the earliest.