
1.0 Introduction
Now make the overall process of checkout easy and faster by implementing one-page checkout. Knowband offers Prestashop Smart One Page Checkout Addon which replaces the default checkout process with one-page advance checkout. The online merchant can make the overall process easy and convenient for online users
The online buyers can view a one-page checkout popup at the same time when they click on the “Add to Cart” button. The Prestashop simplified checkout addon makes the checkout process very simple and effective for online users. There is no need to follow the lengthy process of checkout while shopping online. The store admin can enable testing mode before implementing it. Admin can set the look and feel of checkout buttons. By making the process of checkout simpler, the online merchant can increase sales and profit.
1.1 Features offered by PrestaShop Smart One Page Checkout Addon
- The online users can view the checkout popup at the same time when they click on the “Add to cart” button on the product page. This module offers AJAX-based popup.
- The online merchant can allow guests and registered customers to checkout easily.
- Admin can enable test mode and check it before implementing it.
- Admin can add specific IP addresses if he doesn’t want to offer smart one-page checkout to all the customers.
- Prestashop Smart One Page Checkout Addon allows the online merchant to set the look and feel of the checkout button. Admin can preview the button color easily from the admin interface. The online merchant can enter custom CSS and JS codes also.
- Admin can offer Facebook login and Google login option on the checkout page. From the admin interface, admin can get the configuration steps of the Google app and Facebook app.
- Admin can setup Klaviyo, MailChimp and Sendinblue email integrator sites and save email id details of subscribers.
- This Prestashop Quick checkout addon offers auto address filling functionality.
- Admin can select from available payment methods and delivery methods easily from the admin interface of this Prestashop One Page Advanced Checkout.
- Admin can also hide payment methods from shipping methods.
- Admin can also check the customer’s consent by entering the email ID/order reference number.
- The Prestashop Smart One Page Checkout addon offers GDPR compliance.
- The Prestashop Smart One Page Checkout addon is multi-lingual compatible, multi-store compatible and offers smooth functioning.
2.0 Installation
First of all, purchase the Prestashop Smart One Page Checkout Addon and download the zip file from the Downloads section of your Knowband account.
You will get smartonepagecheckout.zip (source code of the module) and User Manual after downloading the zip file.
To install the module in the store follow the below-mentioned steps:
1) Unzip the smartonepagecheckout.zip file.
2) Copy the entire content, that is, the files and folders of the unzipped folder. Paste the same into the “Modules” folder of your store’s directory. Follow the below-mentioned address path – Root Directory/modules/.
3) The Prestashop simplified checkout addon is all set to be installed in the store. Go to the Store Admin and then to ‘Modules and Services’.
4) Now click on the “Install” button just next to your module. There will be a pop-up for your confirmation. Click on “Proceed with the installation” option. This step will install the Prestashop simplified checkout addon and show notification – “Module(s) installed successfully”.
5) Once the installation is complete, you will get access to the admin interface of the module by clicking on the “Configure” button.
3.0 Admin Settings
The online store admin can easily apply the settings from the admin interface and implement smart one page checkout functionality. These are the configuration options as shown below:
- General Settings
- Customizer
- Login
- Email Marketing
- Addresses
- Payment method
- Delivery Method
- Ship2pay
- custom Fields
- cart
- customer consent
- GDPR Settings
3.1 General Settings
In General settings, the online merchant can apply these settings as described below:
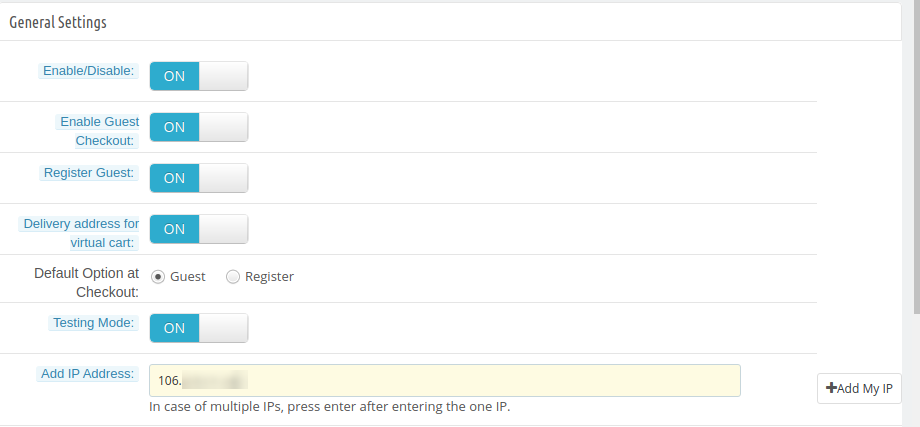
- Enable/disable: Activate or deactivate the module functionality.
- Enable Guest Checkout: Activate the Guest checkout option by toggling the button.
- Register Guest: Allow guest registration option.
- Delivery address for Virtual cart: Enable this option for showing delivery address. While deactivating this option, it will show the invoice address and hide the delivery address for virtual products.
- Delivery Option at Checkout: Admin can select guests or register as a default option at the checkout page.
- Testing Mode:
- Testing Mode: Enable the option if you want to test the module before implementation.
- Add IP address: Enter the IP addresses if you want to show smart one-page checkout on specific IP addresses. Separate every IP address with a comma.
3.2 Customizer
In Customizer settings, admin can set the look and feel of smart one-page checkout button and also apply advance appearance settings as shown below:

- Button Background Color: Set the background color for the button.
- Button Border Color: Set the button border color from the admin interface.
- Button Text Color: Set the button text color from here.
- Button Border Bottom Color: Set button border-bottom-color from here.
- Product Name Color: Here, set the product name color.
- Custom CSS: Enter custom CSS code for the advance look and feel settings.
- Custom JS: Enter JS codes for more appearance settings.
3.3 Login
In login settings, admin can offer social login options to online users like Facebook and Google login options:
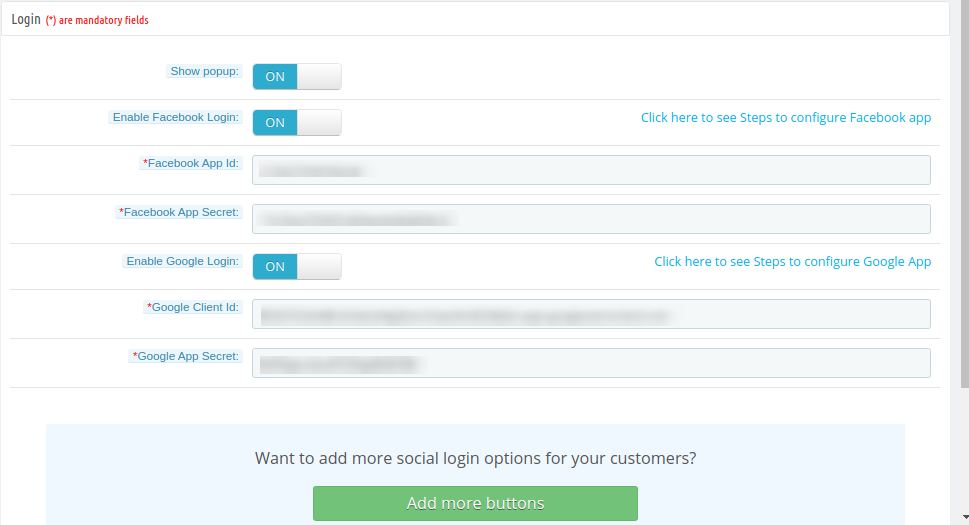
- Show popup: If this setting is enabled then Facebook or Google Login Page will be open in a pop up after clicking on the login options.
- Enable Facebook Login: Enable this option for showing the Facebook login button.
- Facebook App Id: Admin can check the configure steps for Facebook app ID generation and enter the Facebook app id here. Visit 3.3.1 Section for getting steps to generate Facebook app id and app secret.
- Facebook App Secret: Here, Enter Facebook App Secret.
- Enable Google Login: Activate if you want to show Google login option on the checkout page.
- Google Client Id: Admin can check the steps to configure Google App and enter Google client Id here.
- Google App Secret: Enter Google app secret here. Visit 3.3.2 Section for getting steps to generate Google app id and client id.
3.3.1 How to setup Facebook Login
For Generating Facebook App id and app secret follow these steps:-
Step 1: Click on this URL: https://developers.facebook.com/apps/
Step 2: Click on the “Add a New App” button.
Step 3&4: Enter your App name and email id, then click on the “Create App ID” button.
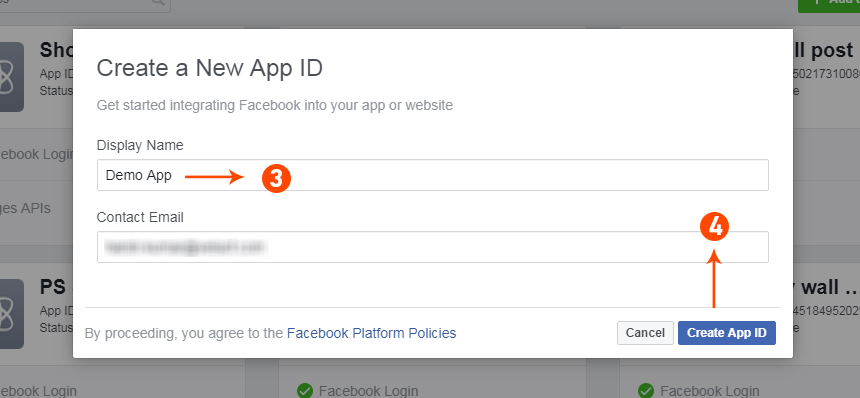
After completing the security check, you can successfully create app id.
Step 5: Now click on the “Setting” tab and select the Facebook login setup option.
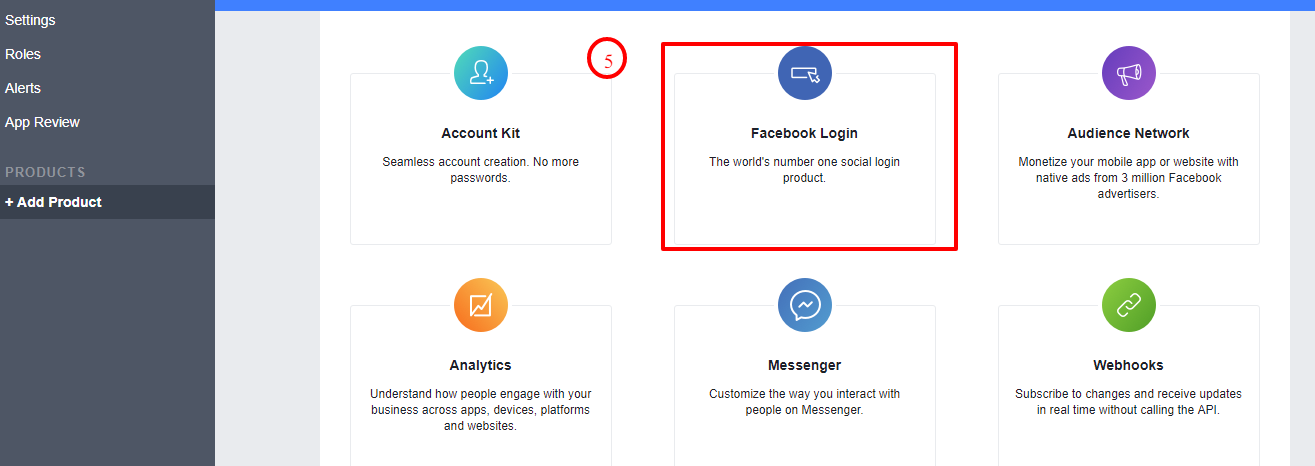
After that click on the settings under the Facebook login option.
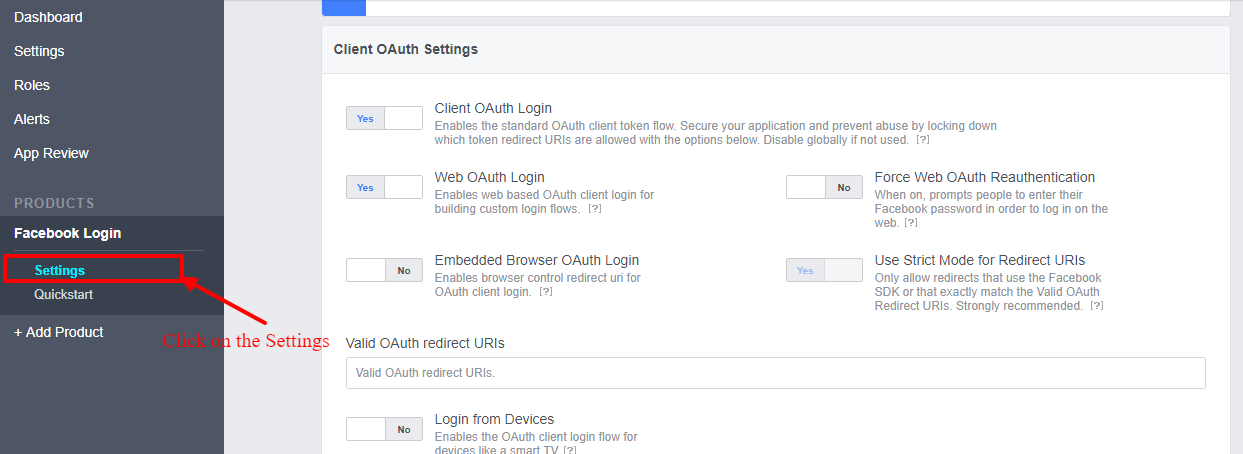
In the “Valid OAuth Redirect URL” option, enter the below-provided URL:

For example if your domain is https://www.example.com/ then enter the url:
https://www.example.com/index.php?fc=module&module=kbstepcheckout&controller=kbstepcheckout&login_type=fb
Save these changes.
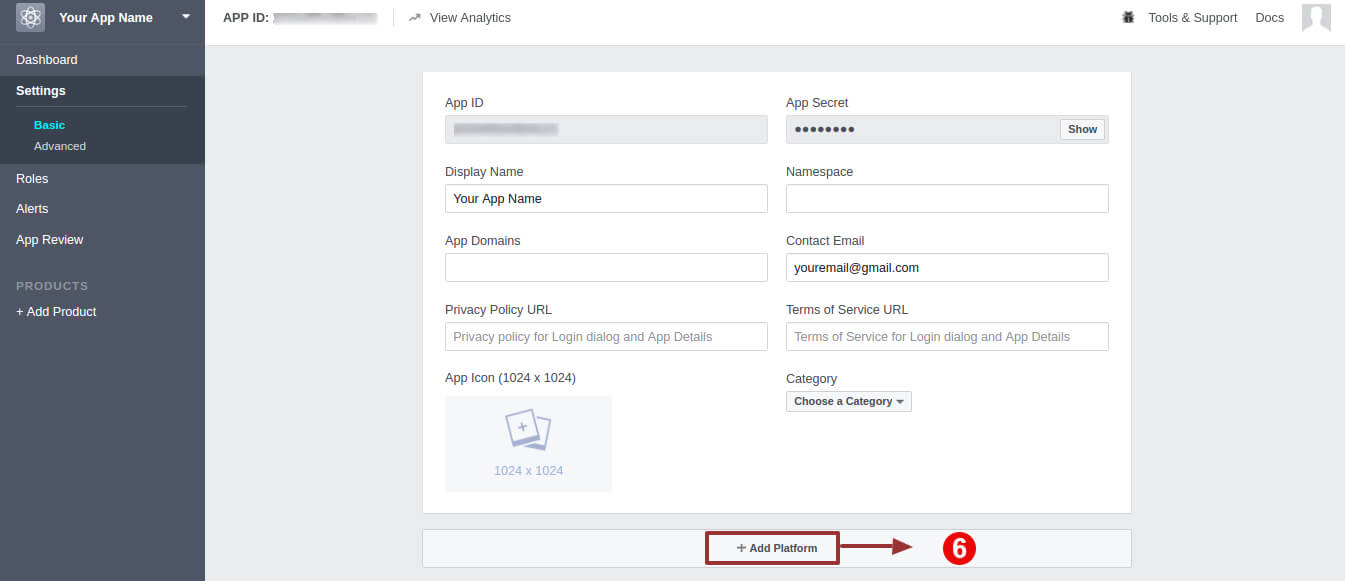
Step 6: Now in the settings section, there will be two options available in the dropdown list, Basic and Advanced. You need to click on “Basic” settings and click on the “+Add Platform” button.
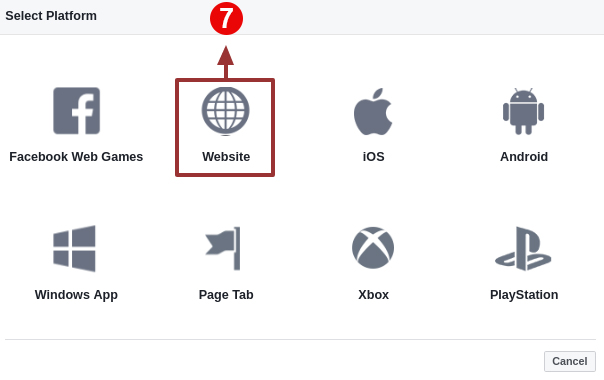
Step 7: Now select the website as your platform.
Step 8,9,10: In the basic settings enter these details:
In step 8, enter App Domain:www.example.com
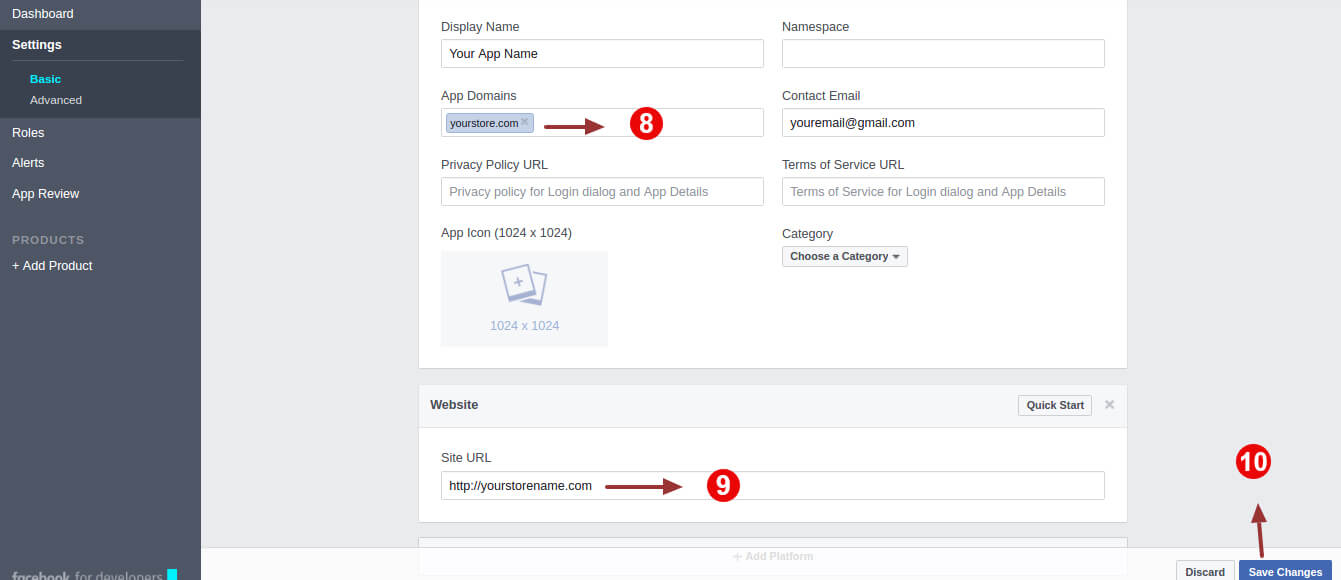
For Step 9 use Site Url: https://www.example.com/
After that save the changes.
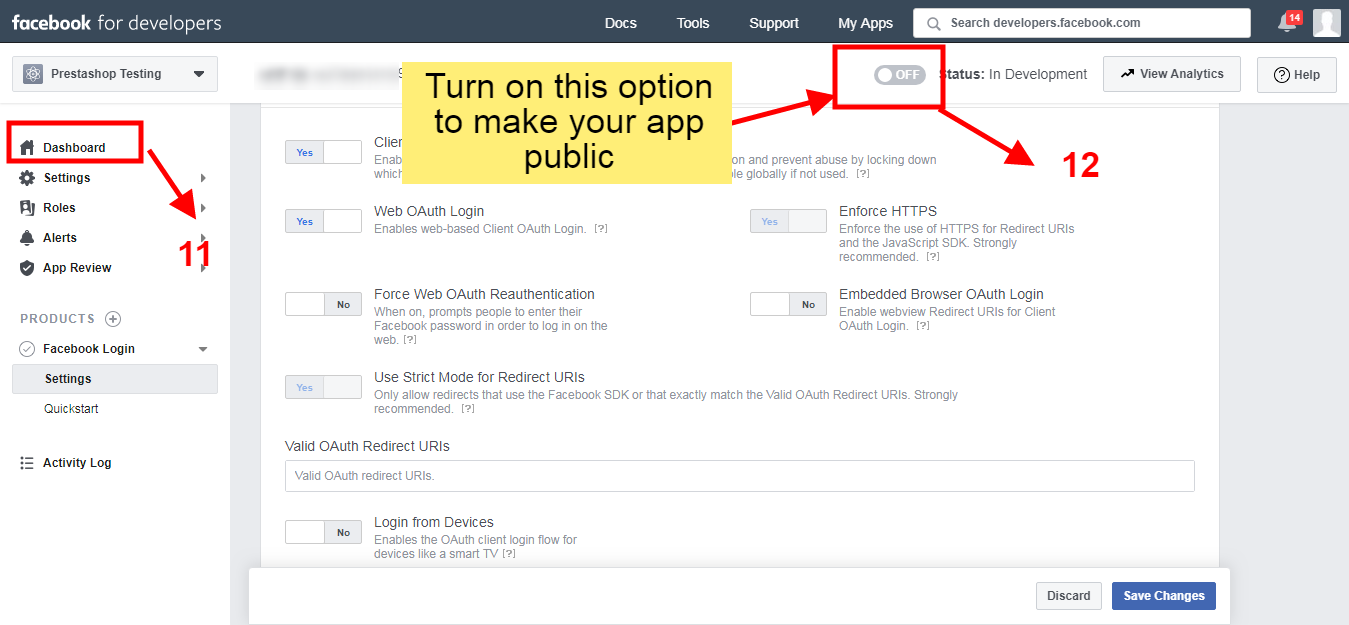
Step 11 and 12: Go to the dashboard and turn on the option for making the app public:
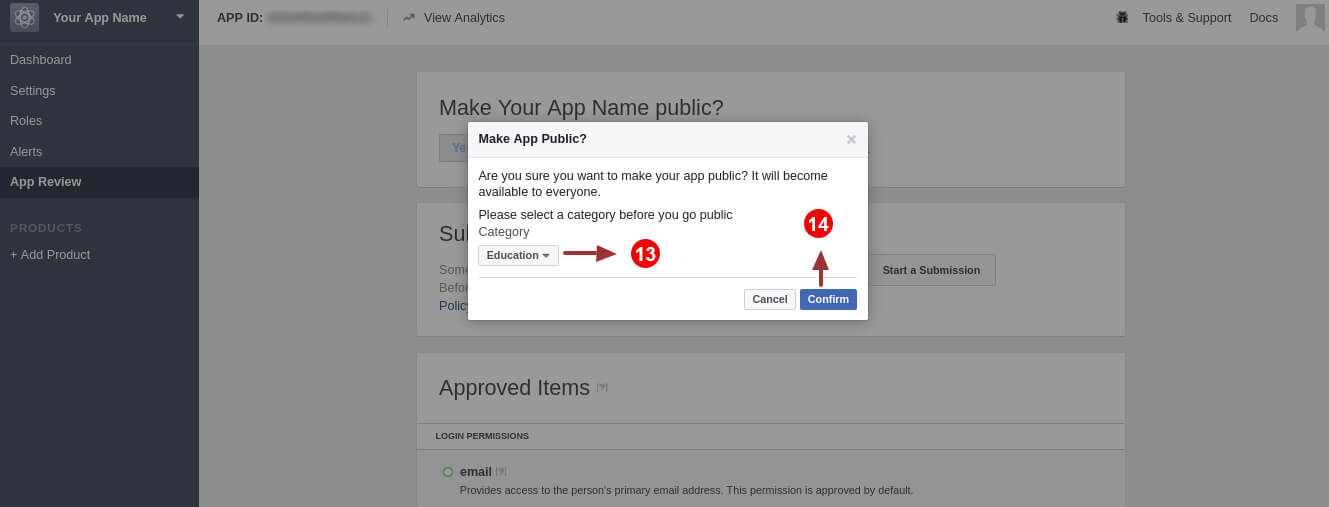
Step 13,14: Select the category and click on the Confirm button.
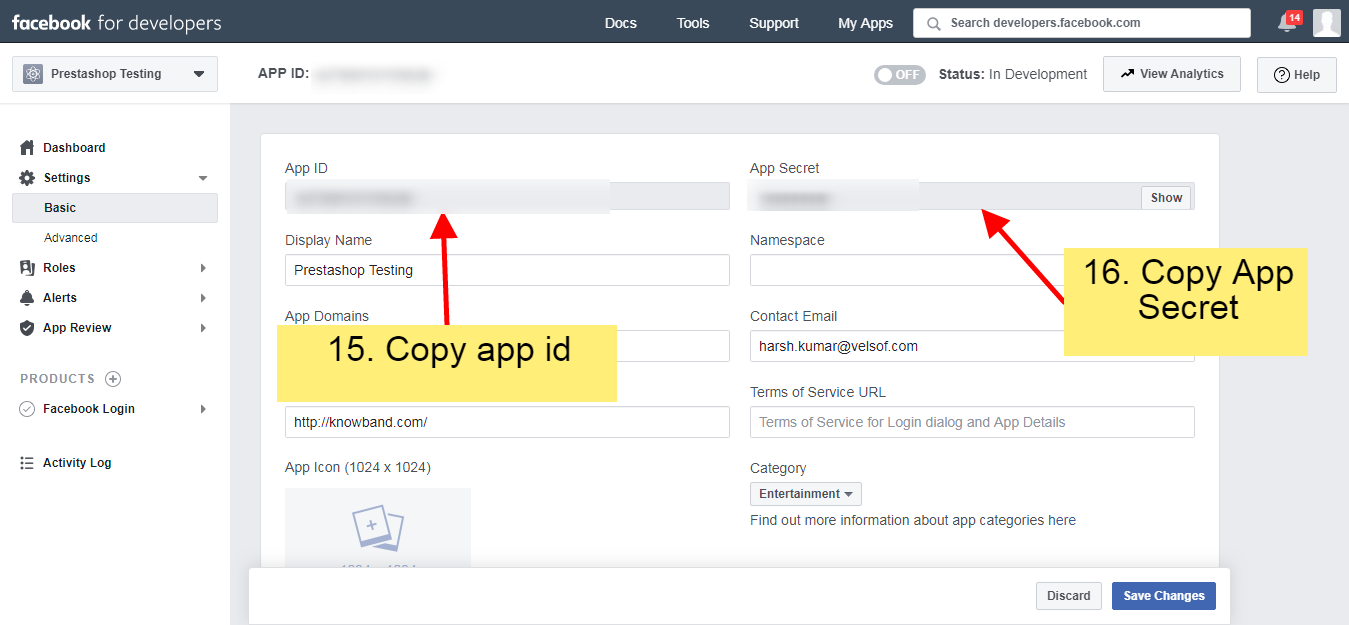
Step 15,16: Copy the App ID and App Secret from here:
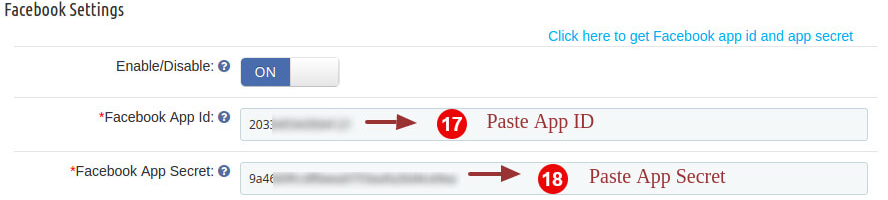
Step 17, 18: Enter app id and app secret into the fields provided in the module.
3.3.2 How to setup Google Login
Follow the below steps to get a client id and client secret.
Step 1: Go to the link “ https://console.developers.google.com/project ”.
Step 2: Click on the “Create a project” option.

Step 3: Select the country and check on agree with terms and conditions. After that click on the continue button.
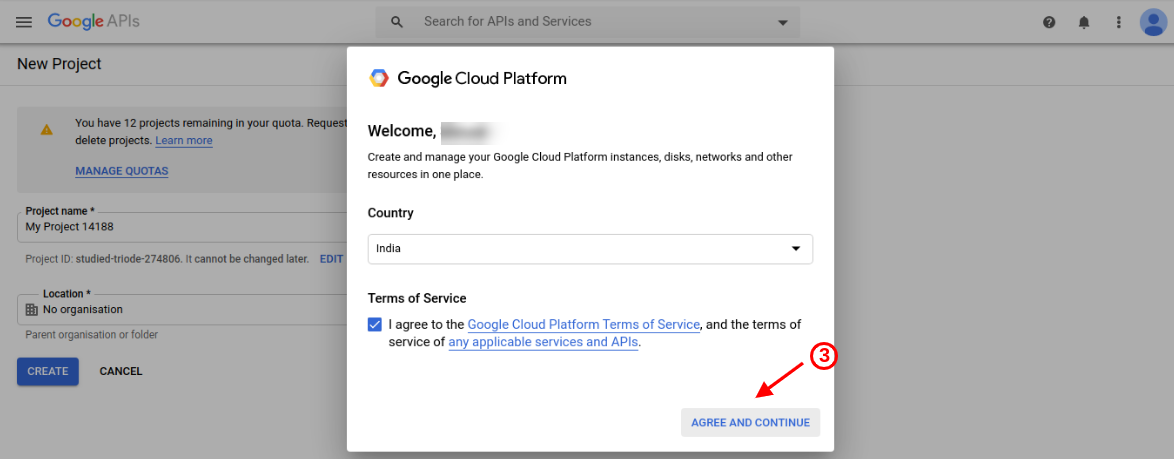
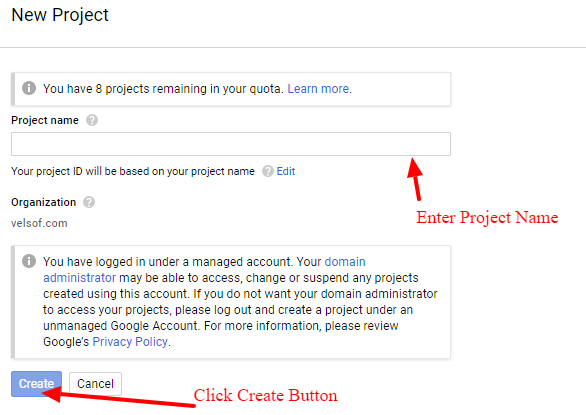
Step 4, 5: Enter your desired Project Name and click on the “Create” option.
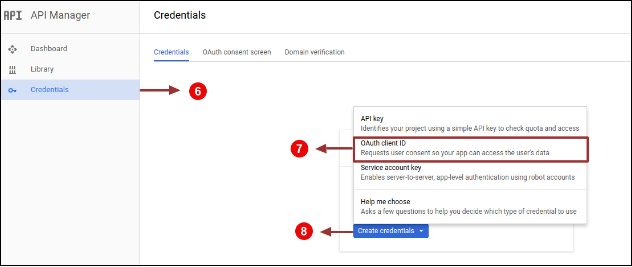
Step 6,7 & 8: Go to API Manager, click on Create Credentials and select the OAuth client ID option.
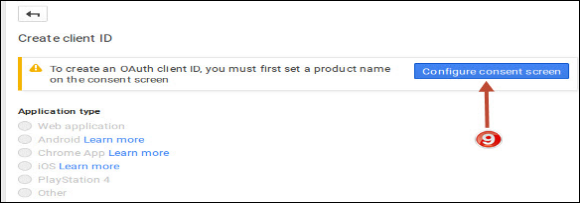
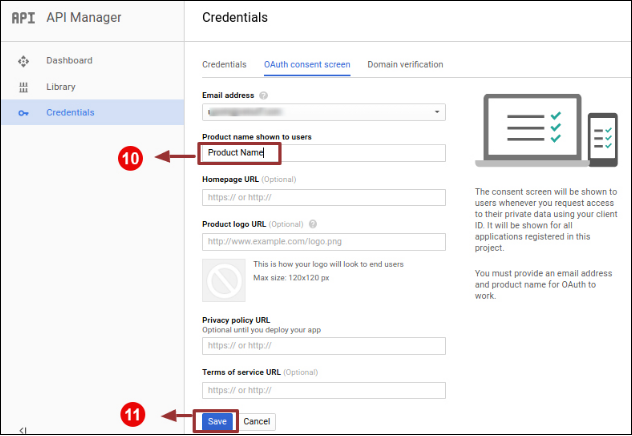
Step 9: Click on the “Configure consent screen” button.
Step 10, 11: Enter “Email Id”,“Product Name” and then click on “Save” button.
Step 12,13 & 14,15: Select “Web application”, Enter “Name “, “Authorized Redirected URIs“ as mentioned below and click on “Create” Button.
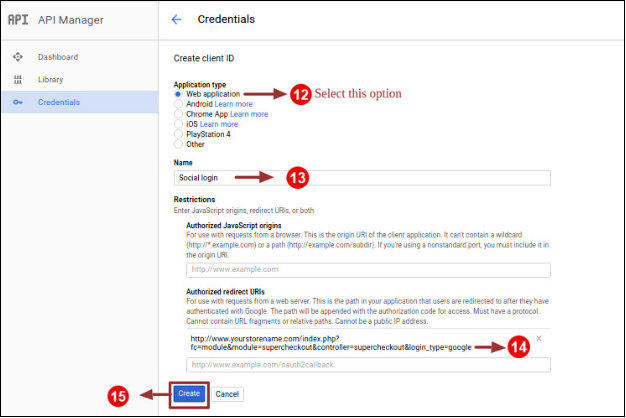
Use Authorized javascript origins: https://www.example.com/
Use Authorized Redirect Url: https://www.example.com/index.php?fc=module&module=kbstepcheckout&controller=kbstepcheckout&login_type=google
Step 16, 17, 18: Copy Client ID and Client Secret.
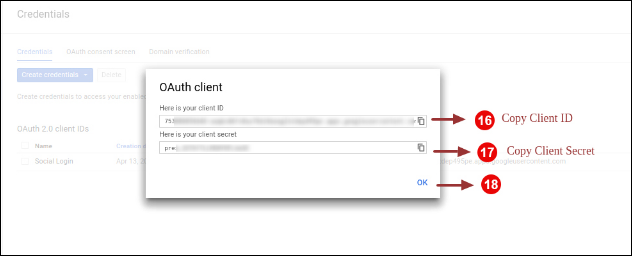
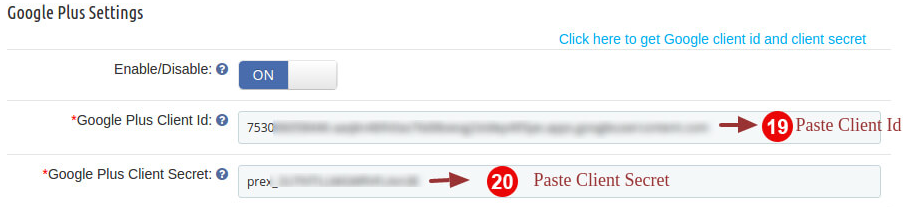
Step 18, 19: Paste Client ID and Client Secret in the Text Field shown below:
3.4 Email Marketing
The online merchant can setup Klaviyo, MailChimp and Sendinblue email integrator sites and save email id details of subscribers. The store admin can save the user’s email ID details easily.
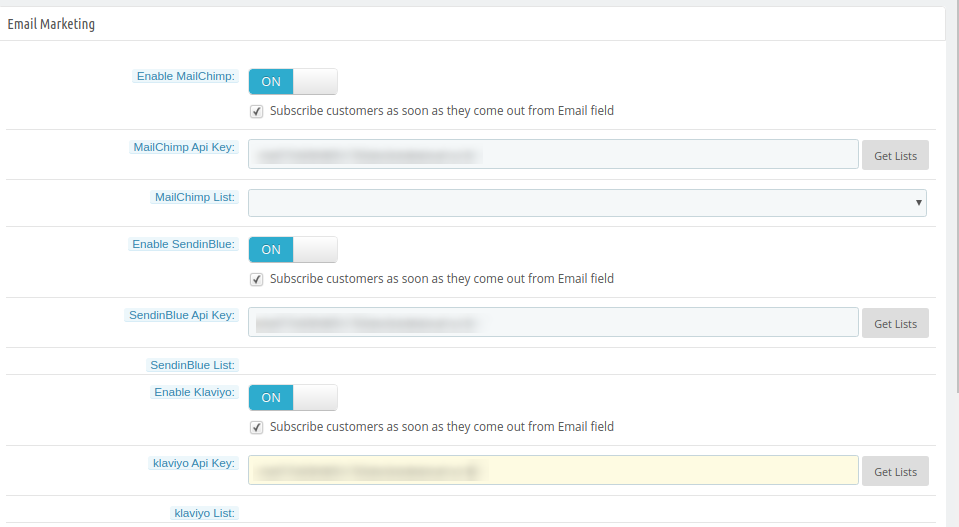
- Enable MailChimp: Activate this option for saving email id details in MailChimp.
- MailChimp API key: Enter API key here.
- MailChimp List: Choose the list in which you want to save the email id details.
- Enable SendinBlue: The online merchant can also configure Sendinblue.
- SendinBlue API key: Enter SendinBlue API key here.
- SendinBlue list: Select the list from available options.
- Enable Klaviyo: Enable Klaviyo option for saving email id.
- Klaviyo API Key: The online merchant can enter Klaviyo API Key here.
- Klaviyo list: Select the list from here.
3.5 Addresses
In address settings, admin can configure auto address filling options as shown below:
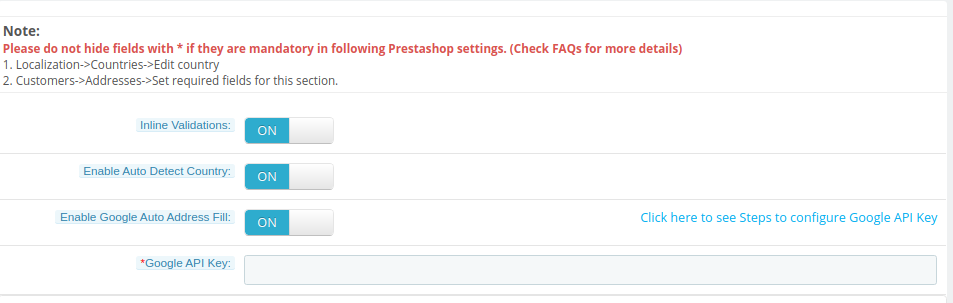
- Inline Validations: Admin can activate or deactivate inline validators.
- Enable Auto Detect Country: Activate country auto-detect functionality.
- Enable Google Auto Address Fill: Activate for automatically address filling functionality.
- Google API Key: Admin can check the Steps to configure Google API Key and enter it here.
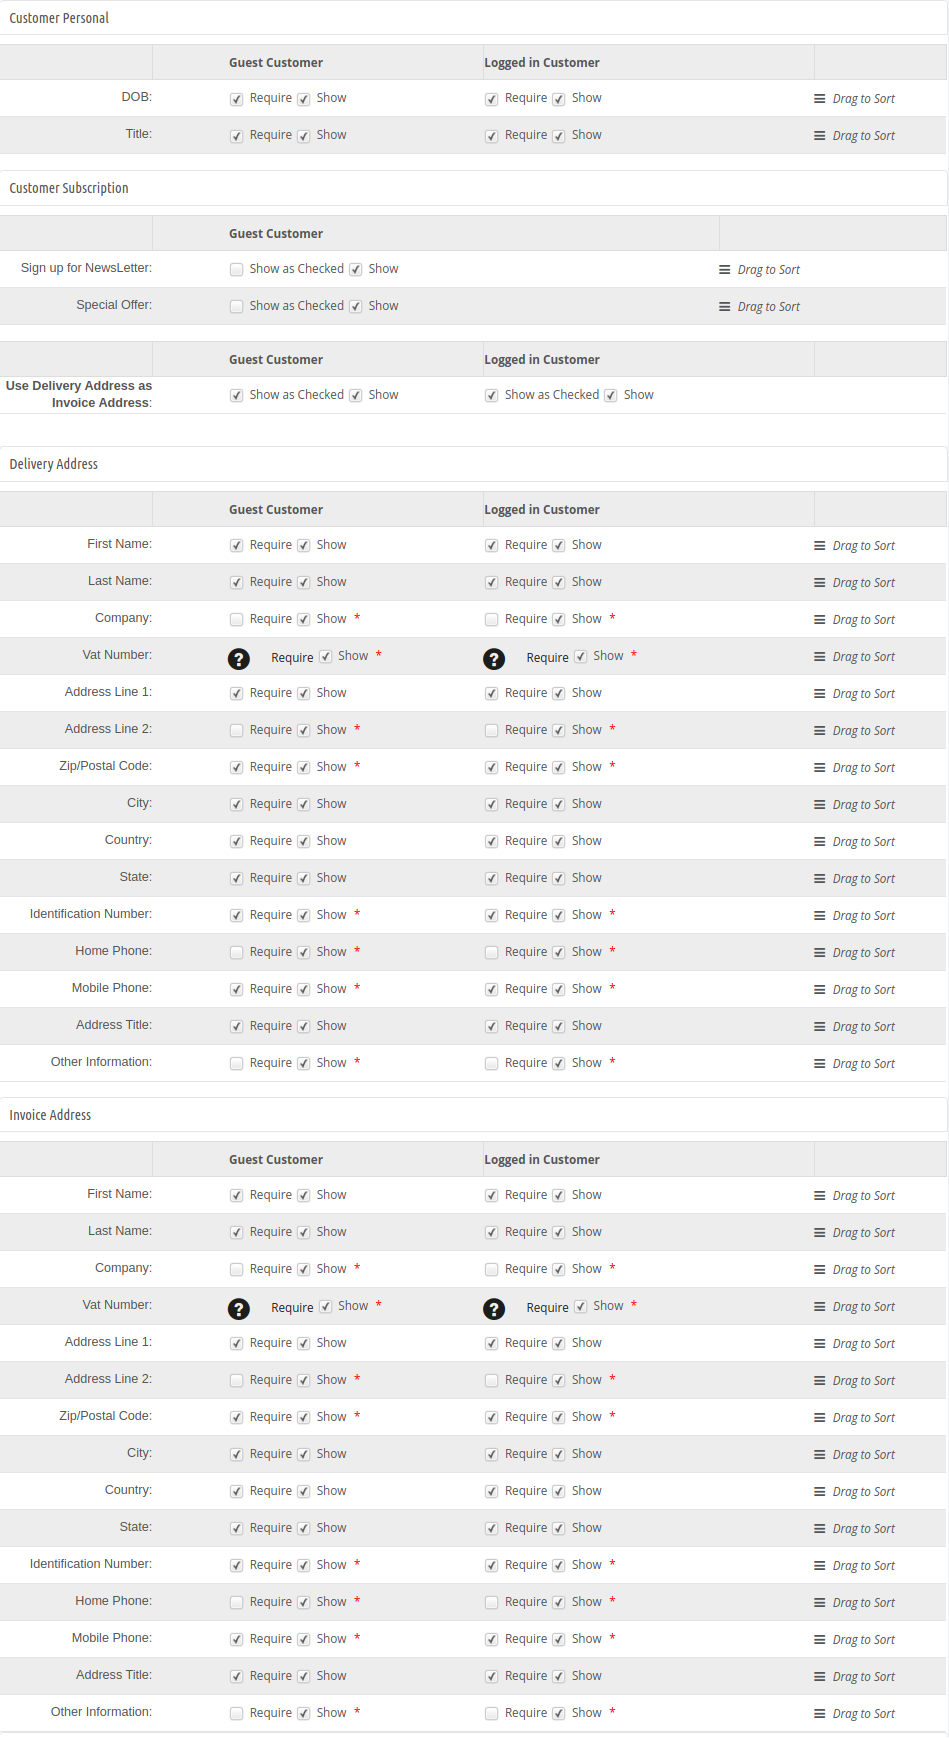
Admin can also view field details of guest and registered customers:
Important points:
- To make a field show/hide in the Prestashop Smart one page checkout page, check the checkbox just to the left of Show label.
- To make a field of this Smart checkout Prestashop checkout addon as mandatory (required field), check the checkbox just to the left of Require Label.
- The fields of the Prestashop Smart One Page Checkout Extension can also be rearranged according to the requirement. To rearrange just hold Drag to sort and drag & drop the field vertically, wherever it is required.
- On saving, the fields will be rearranged as per the changes.
3.6 Payment method
In the payment method section, admin can set payment method related conditions as shown below:
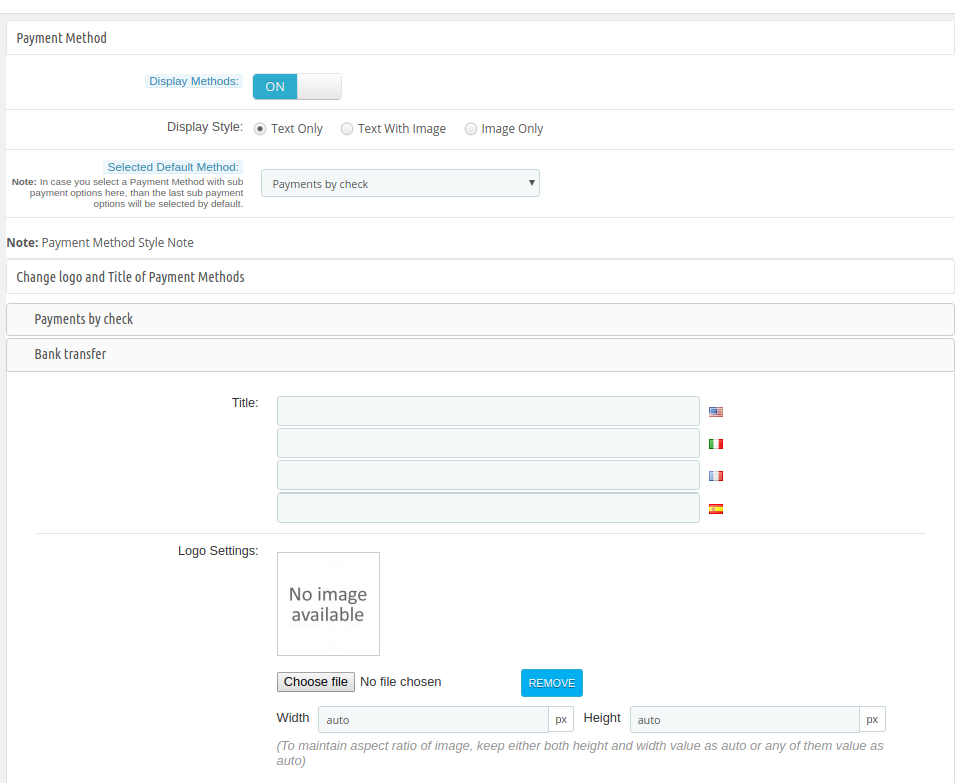
- Display Methods: To Enable/Disable the payment methods on the Smart checkout page, switch the button from ON to OFF or vice-versa. This will disable the payment method block from the checkout page. By default, this option of the
- Prestashop Smart checkout addon will be enabled.
- Display style: There are 3 options in this field of the Prestashop Smart One Step Checkout Addon to display how your payment methods will be displayed on the checkout page.
- Selected Default method: Choose the default payment method from the list which will be displayed as selected at the time, when the customer comes on the checkout page.
Admin can change the logo and title of available payment methods.
3.7 Delivery method
In this section of Prestashop Quick checkout addon, admin can apply delivery methods related settings:
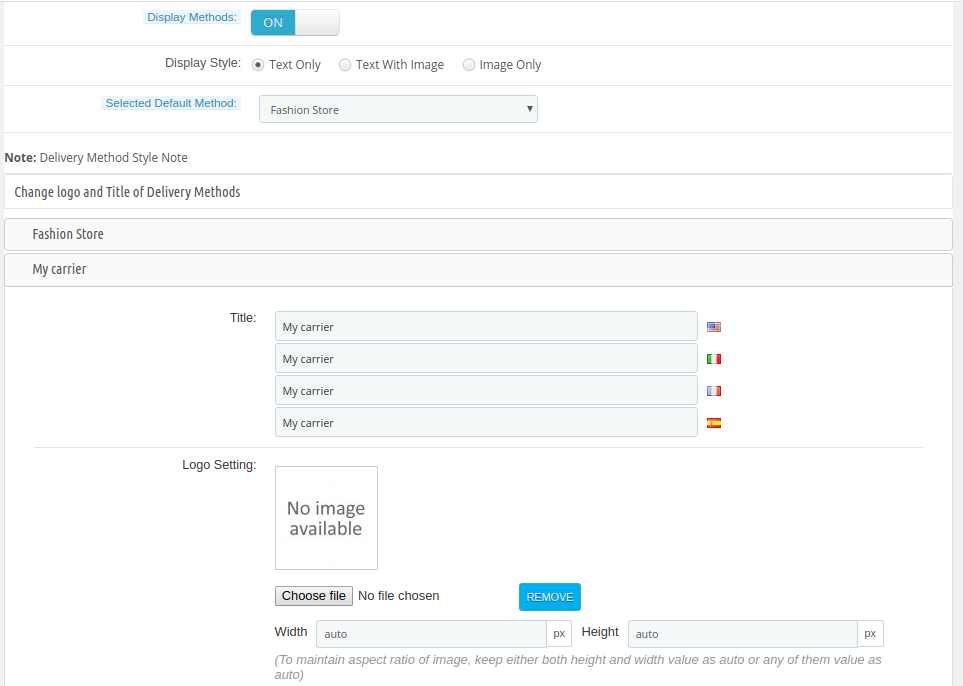
- Display Methods: To Enable/Disable the delivery methods on the checkout page switch the button from ON to OFF or vice-versa. This will disable the delivery method block from the checkout page. By default, this will be enabled.
- Display style: There are 3 options in this field of the Prestashop fast checkout addon to display how your delivery methods will be displayed on the checkout page.
- Selected Default method: Choose the default delivery method from the available list which will be displayed as selected at the time, when the customer comes on the checkout page.
Admin can change the logo and title of available payment methods.
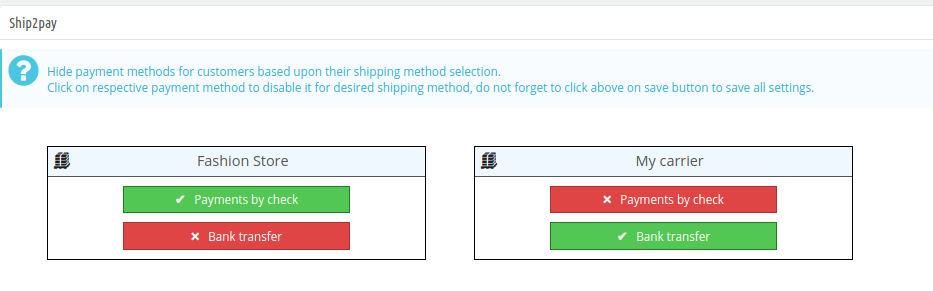
3.8 Ship2pay
From here, admin can hide the payment methods for all the available shipping methods. Admin just needs to click on the payment method for showing or hiding it.
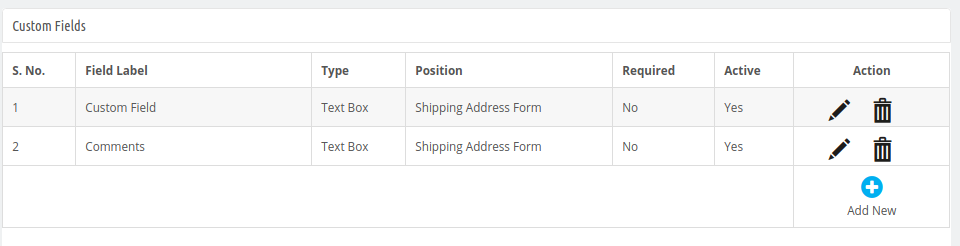
3.9 Custom Fields
Admin can also create custom fields as per the requirements. In the Custom fields section, admin can view the list of all the created custom fields. Admin can edit, delete and make new custom fields easily.
 How to Create new Custom Fields:
For adding a new custom field, the admin needs to click on the “+” button and enter these details as shown below:
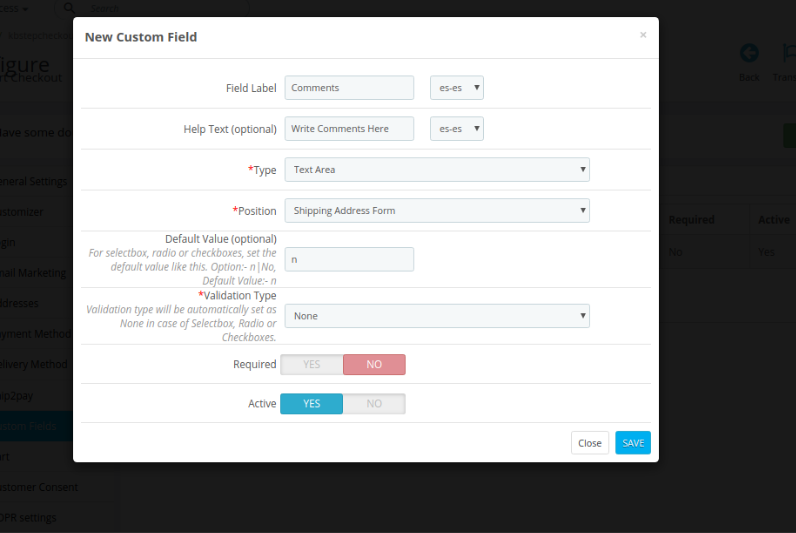
- Field Label: Enter the label for the new custom field.
- Help Text: Enter help text for this new custom field.
- Type: Select type of custom input field like text box, select box, text area, radio button, checkboxes and date.
- Position: Select the position where you want to show this custom field.
- Default value: For select box, radio or checkboxes admin needs to set value. By default, this value will be n.
- Validation Type: Set validation type from the available options like int, URL, name, email and date.
- Required: Make this field as a required field.
- Active: Activate the field by enabling this option.
Admin can click on the bin button for deleting the custom fields and click on the edit button for changing the custom field settings.
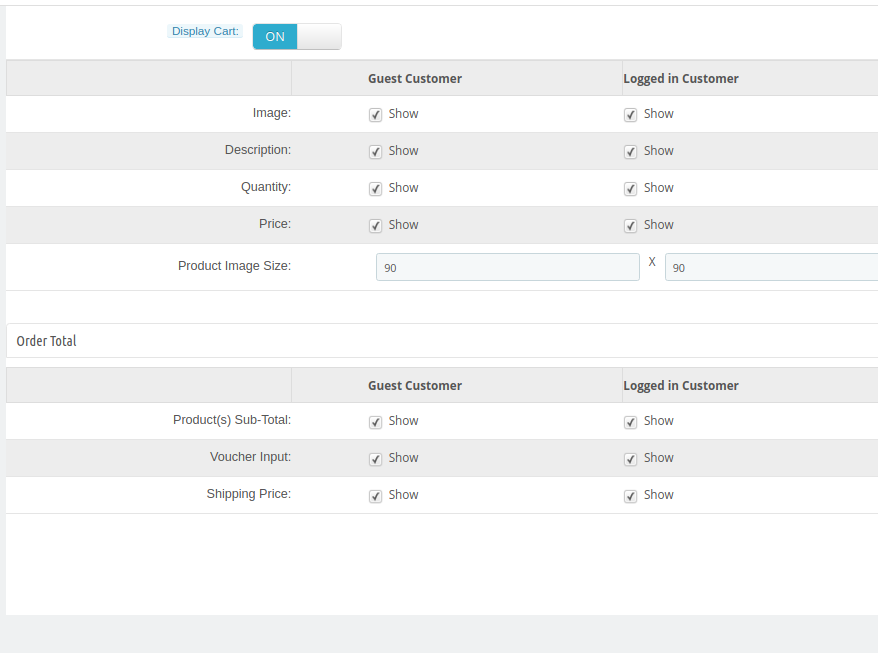
3.10 Cart
Admin can enable the “Display Cart” option for showing cart. Admin can select the fields which he wants to show to the guest and logged in customers.
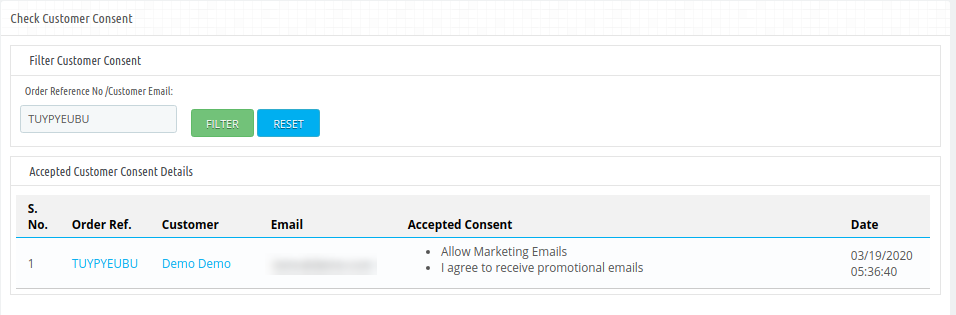
3.11 Customer Consent
Enter the Order Reference number or customer email id from the filter customer consent section.
3.12 GDPR Settings
Enabling Delete from Email Marketing Services on Request: Activate or deactivate the settings as per the requirements. By enabling the option, admin can delete customer details from email marketing services on their request.
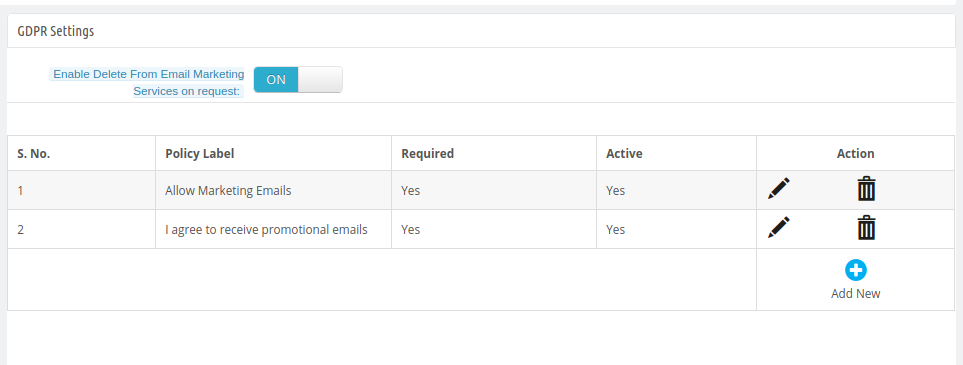 Admin can view a list of policies and also add new GDPR policies, delete and edit any policy.
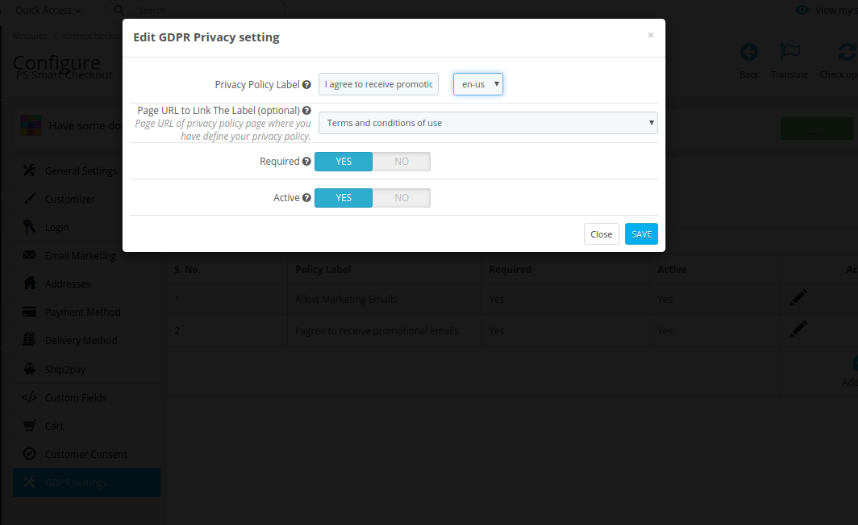
- Privacy Policy Label: Admin can set the label for privacy policy in different languages.
- Page URL to link the label: Admin can select the page to link the label.
- Required: Make this policy mandatory.
- Active: Enable the option for activating this privacy policy.
4.0 Front-end Interface
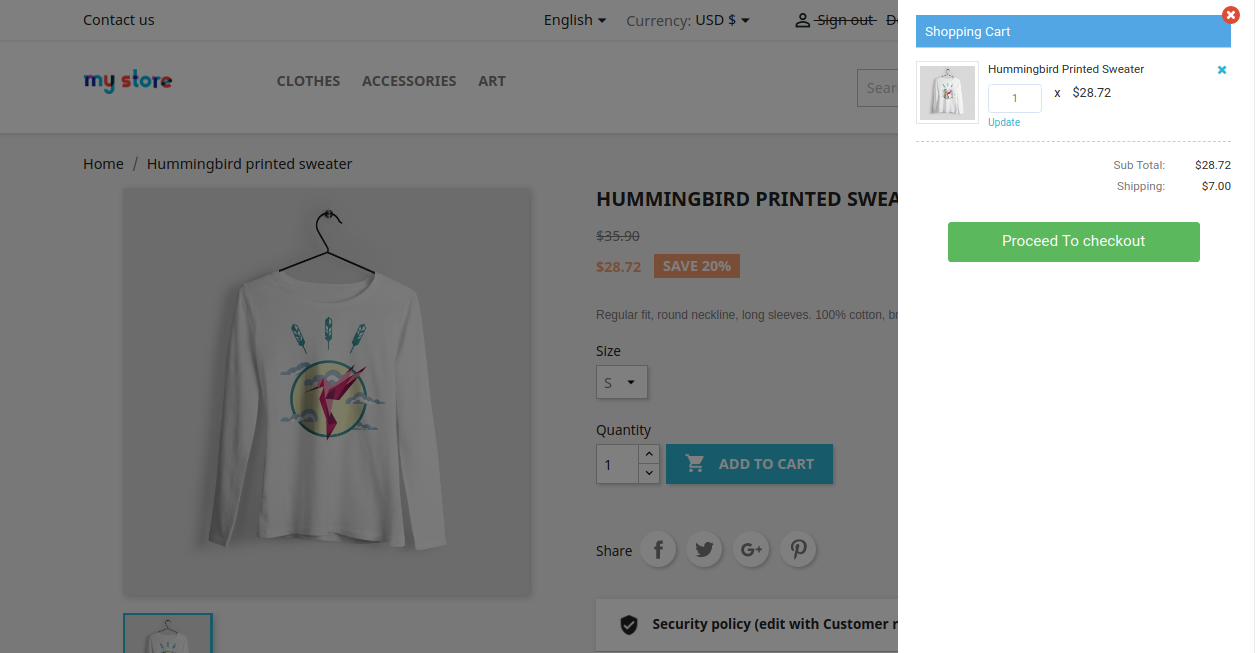
After a successful configuration, the admin can offer a simple and hassle-free checkout option. The online users will get smart one-page checkout popup as soon they click on “add to cart option”. Please check the below Screenshot for better details:
After that, online users need to click on “proceed to checkout” for further process.
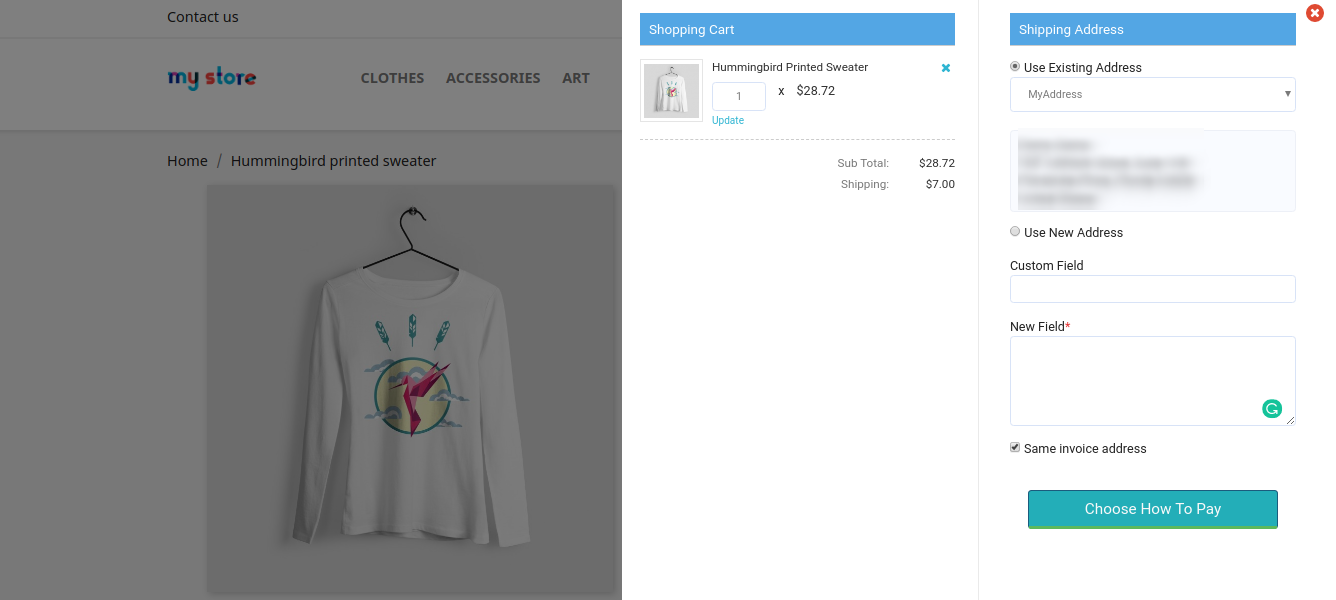
Here, online users need to select a shipping address or add a new address.
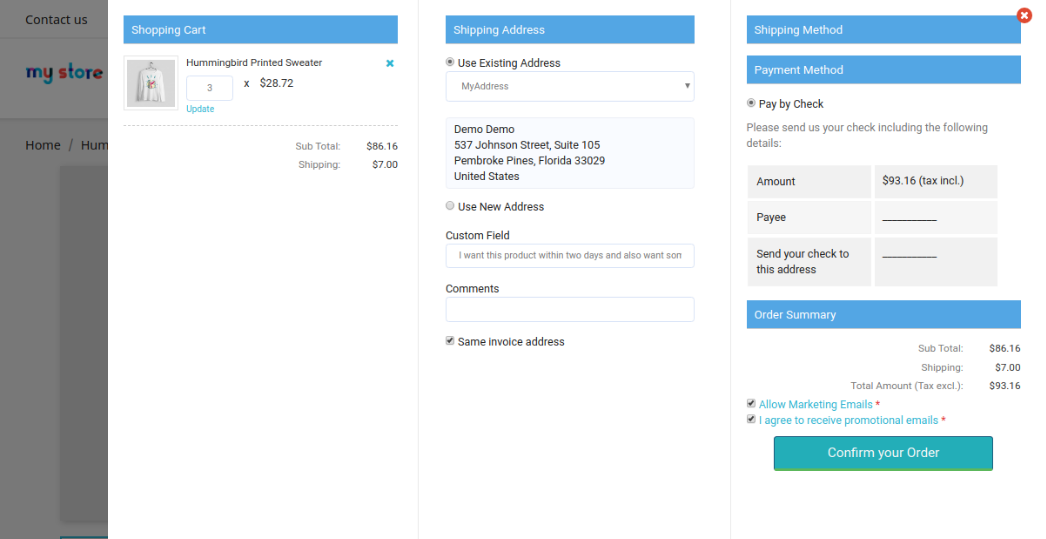
After that, online users can select the shipping method and payment method. After that, they can confirm the order easily.
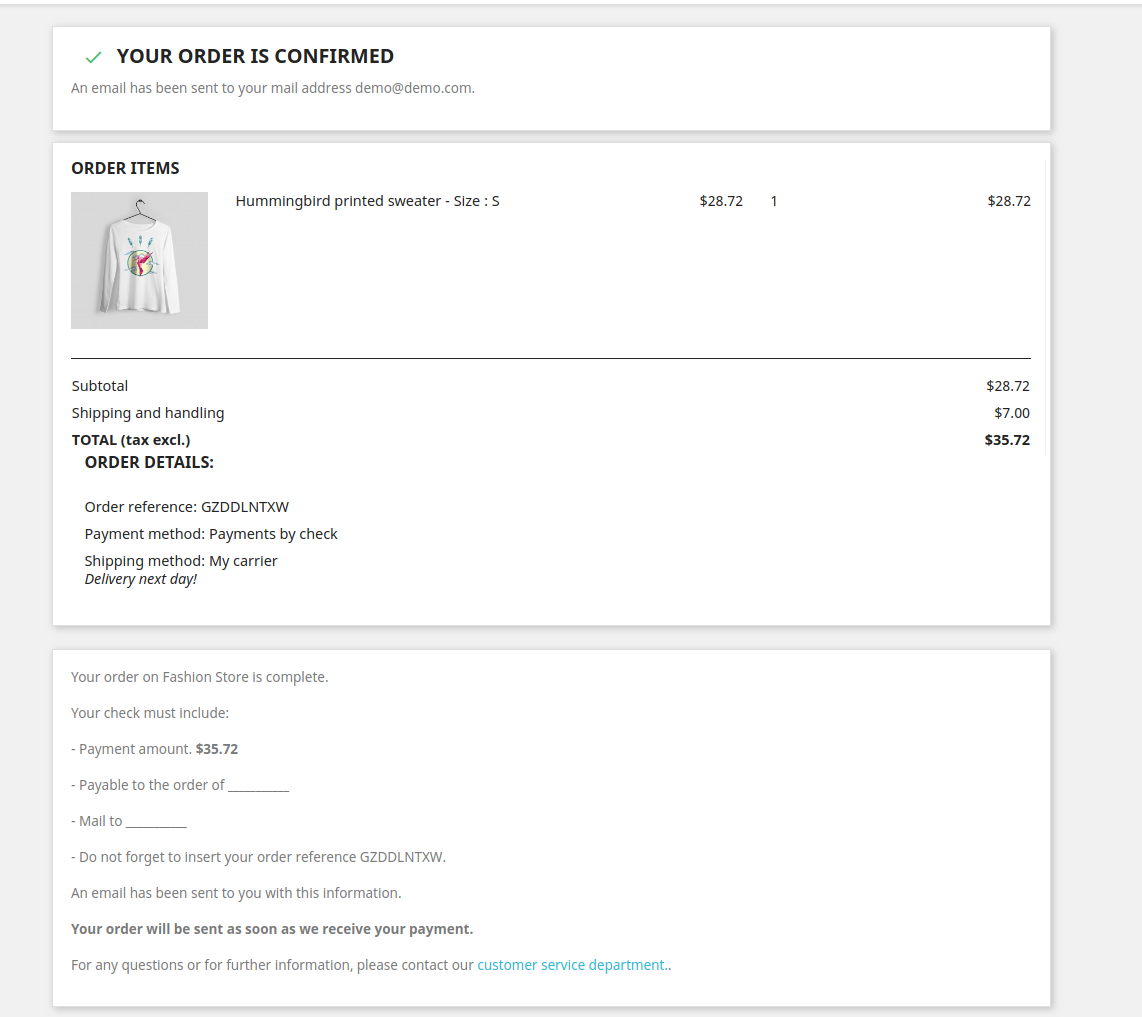
Online users can check the order summary from this page easily.
