If you have a website, you will have to deal with spammers. They leave no opportunity to attack a website and OpenCart is no exception.
Spammers try to degrade your website by posting spam links, comments, fake registrations, etc. Go through the OpenCart forum once and you will see many users complaining about the spam activities on their website.
Scrapping this wanted traffic is important so that your website’s performance on the search engine is not affected. To help you get rid of spammers, we present you with two modules that could prove to be effective in restricting bots and spammers from entering your website and doing malicious activities.
Before we begin, let’s try to understand a few spam activities that you could witness on your OpenCart website.
Few Spam Activities That You Could Witness on Your Opencart Website
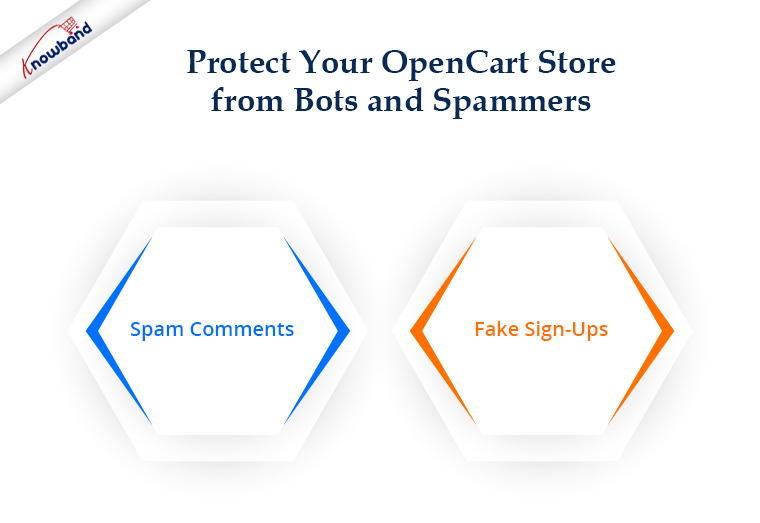
1. Spam Comments
You would often get excited to see too many comments on your blog posts only to realize that they are just spam links and have no relation to the content whatsoever. These irrelevant comments are not only annoying but they also hurt your SEO as they pass on the link juice to the spammers’ websites.
2. Fake Sign-Ups
In this spam activity, bots bombard your website with multiple fake registrations. They take up a lot of storage on your server and intend to slow or harm your website’s performance.
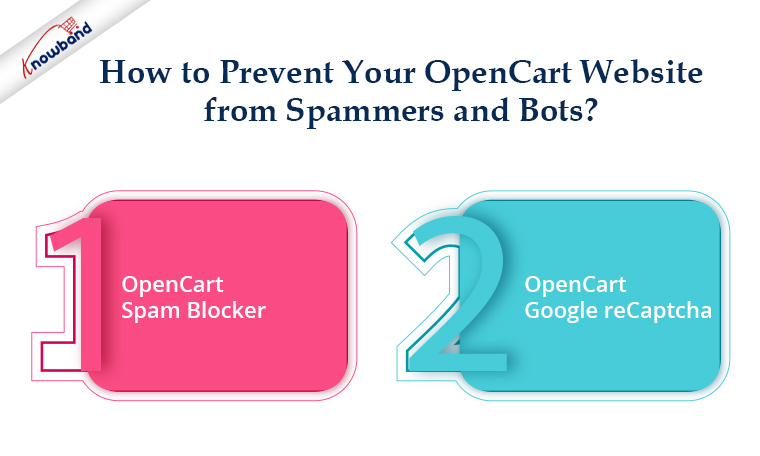
How to Prevent Your Opencart Website from Spammers and Bots?
As I said above, we have two extensions specially designed to deal with this. Let’s take a look.
1. OpenCart Spam Blocker
OpenCart Spam Blocker extension lets you block a store visitor by his/her IP address, country, or user agent.
From the back-end, you can specify the IP addresses from which you don’t receive traffic or which you suspect to be sending spam to your website. You can insert multiple IPs at once. Or instead of blocking, you can allow only certain IPs to access your OpenCart store.
Similar to this, you can add nations to your block list if they consistently send you large amounts of spam.
The next feature it has is blocking spammers/bots that are landing on your website from a specific user agent. (Firebox, Chrome, Mozilla, Android, Windows, etc.)
It may happen sometimes that you block a genuine user. This module enables blocked users to submit a request for unblocking to the website’s owner. The admin can track the requests from the back-end and take decisions accordingly.
Knowband OpenCart Block User Extension provides a spam blocker solution. The OpenCart Block User Extension enables the e-merchant to block particular IP addresses, nations, or user agents. The anti-bot solution offered by OpenCart Spam Blocker Extension is a clever technique to stop malicious users from accessing the website, enhancing the shopping experience of the store’s legitimate customers. You have a lot of options with the OpenCart Spam Blocker module to filter out suspected bot traffic in the store. Consequently, the possibility of unwanted threats and spam in the store is eliminated.
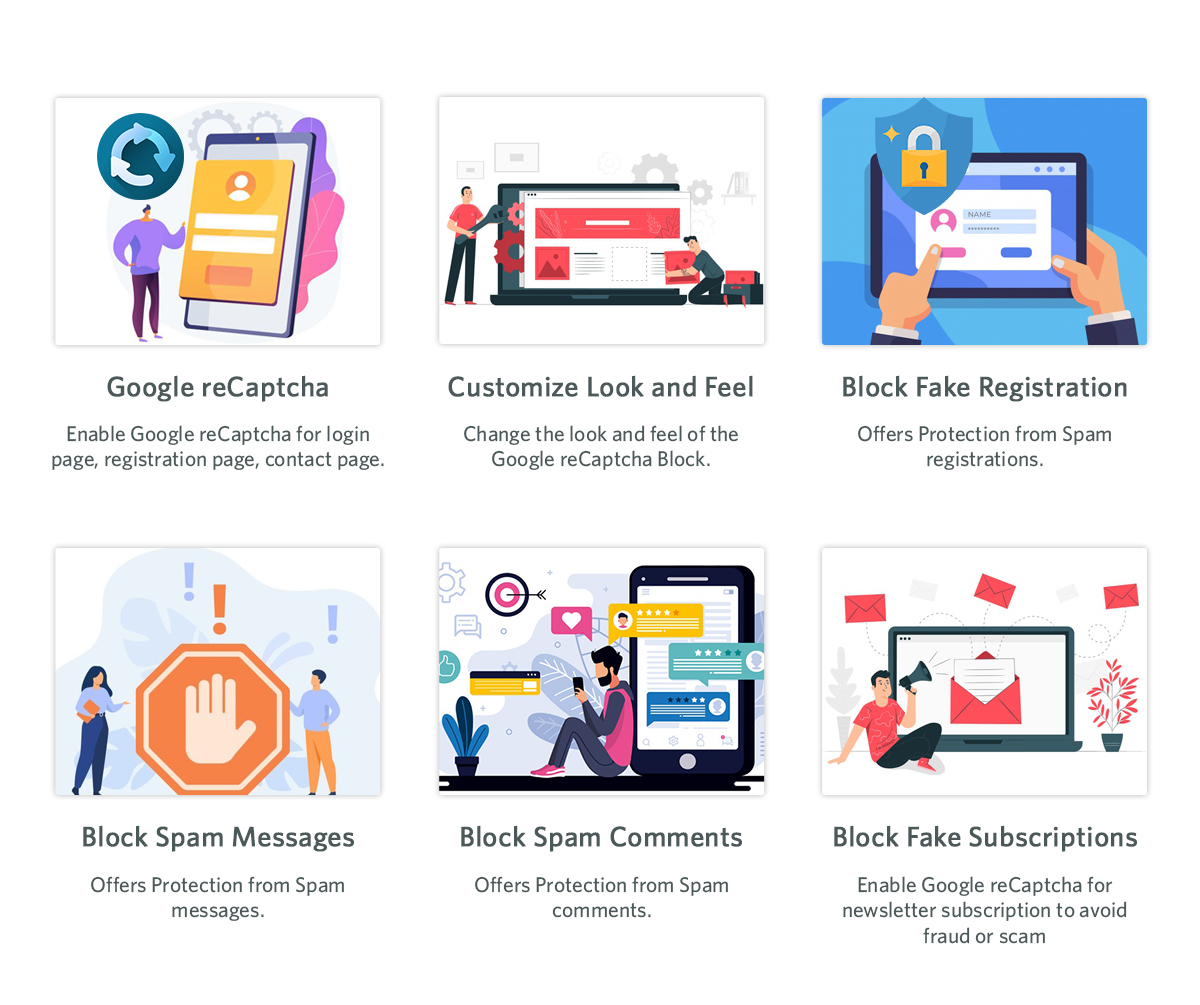
OpenCart Google reCaptcha is the best way to counter fake registrations on your website. It adds a security layer to your website. You can enable reCaptcha on the Login page, Registration Page, Contact Us page and Forgot password page. For each page, you can specify the reCaptcha that you want to set: v2 reCaptcha or v3 reCaptcha.
In contrast to the new reCaptcha (v3), which employs machine learning and extensive risk analysis to distinguish between bots and humans, the old reCaptcha (i.e., v2) is a basic “I am not a robot” checkbox that allows individuals to quickly navigate that particular website. With the OpenCart Google reCaptcha extension from Knowband, your customers may pass the human verification test without providing any additional website inputs. You allow free registration for your users, just like websites like Gmail, Hotmail, Facebook, Twitter, and others. Therefore, it is crucial to safeguard your store’s registration and login process. You may verify that specified actions are actually carried out by real humans and not by automated programmes by using Opencart Google Captcha.
The combat between spammers and websites goes on forever. They will try to spread spam by any means. I am sure these two OpenCart extensions will be extremely beneficial in getting rid of spammers and bots on your website. If you need any kind of assistance with these two modules, feel free to reach out to us at support@knowband.com.
We have a dedicated support team that is always available to aid customers to deliver the best and most effective post-sale support to our customers. Moreover, even on weekends, we continue to fulfil our obligations to customers who need assistance with urgent website problems.
This readymade plugin is designed & developed by KnowBand to convert your running WooCommerce store into a feature-rich Progressive Web Application. Once the eCommerce store is transformed into PWA Application, whenever any user opens the store URL in the mobile browser, the concerned person will be asked to “Add PWA To Home Screen”. Once the WooCommerce PWA Mobile App is added to the home screen of the mobile device, the user can browse the store on the app like any other application.
The WooCommerce PWA Mobile App is a web application that actually doesn’t rely on app publish on Google Play and Apple App Store. The users can simply add the Progressive Web App to the mobile device and use like any other application.
1.1 Compelling Features to Choose WooCommerce PWA:
– Faster loading & quick performance
– Fully customizable home screen with the DIY editor
– All website shipping & payment methods support
– Engaging user-friendly interface
– No dependency on App stores
– Fully branded to your store
– Email & Social Login (Google & Facebook)
– Multi-lingual & RTL support
– Offline mode working
– Live synchronization b/w website & app
– Both android and iOS compatible
– One page checkout
– Lightweight application
– CMS pages management
1.2 View WooCommerce PWA Demo
Explore module and PWA app features from the below demo links:
–> iOS devices do not offer any inbuilt “Add To Home Screen” prompt, so users need to manually add the PWA Mobile App to the home screen of iPhone or iPad.
–> iOS does not support web push notifications. Hence the push notifications won’t be received on the PWA installed on the iPhone or iPad.
[NEW UPDATE] WooCommerce PWA supports RTL Language Scripts:
The WooCommerce Progressive Web App Creator now supports all worldwide languages including RTL (Right To Left) ones like Arabic, Hebrew, Persian, etc. The store admin can now even add RTL languages on WooCommerce PWA Mobile App.
2.0 Admin Panel Screens:
Explore all settings under Admin Panel of WooCommerce PWA Mobile App and check how they work with the help below detailed screenshots:
2.1 General Settings:
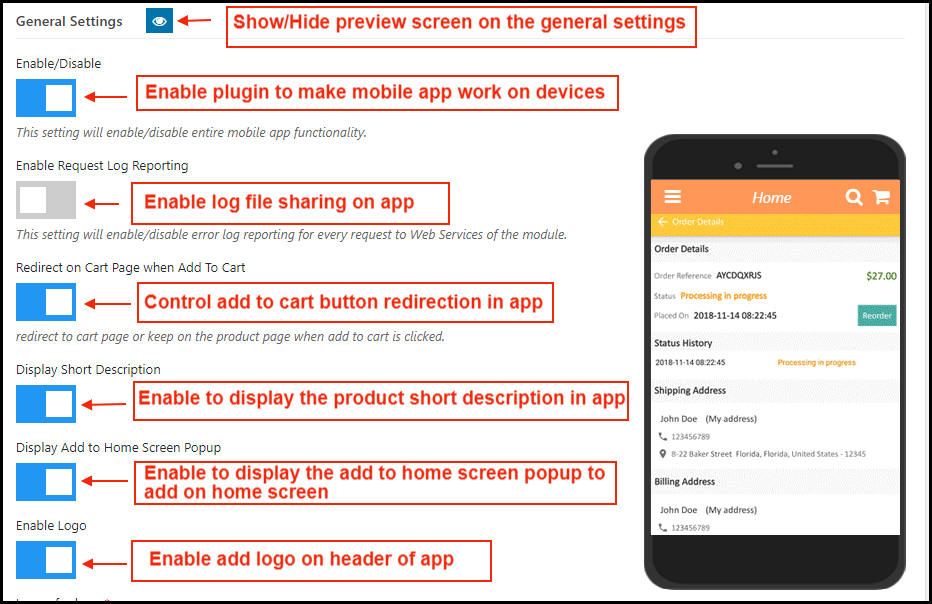
a) Show/hide Preview: Tap on the eye button to display/hide preview phone in the admin panel. b) Enable/Disable: Enable the module to PWA work on mobile devices. c) Enable Request Log Reporting: Enable error log on mobile. d) Redirect on Cart Page when Add To Cart: Control redirection of Add To Cart button whenever any user taps Add To Cart button. e) Display Short Description: Enable and display a short description for the product (if added on the website product page). f) Display Add To Home Screen Pop Up: Offer pop-up message “Add To Home Screen” and allow users to add the PWA app on the mobile devices. g) Enable Logo: Add your brand logo on the header of the WooCommerce PWA Mobile App.
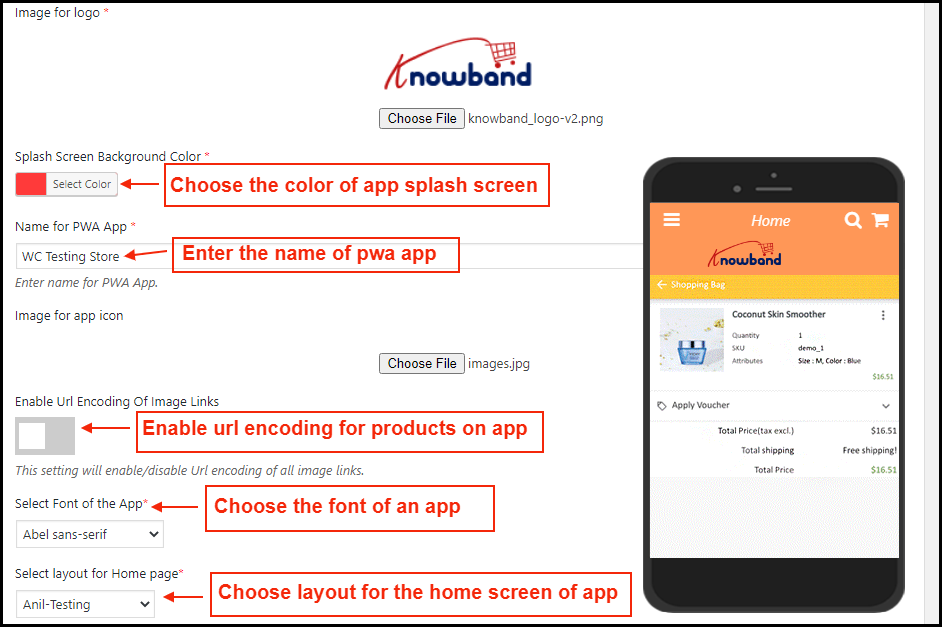
h) Splash Screen Background Color: Choose and set the color for the splash screen of the WooCommerce Progressive Web App. i) Name for PWA App: Enter the desired name for WooCommerce PWA App. It will be displayed once the user add app on the mobile devices. j) Image for App Icon: Add app icon image in the admin panel. k) Select Font of the App: Choose the font for your WooCommerce PWA Mobile App. l) Select Layout for Home Page: Choose from pre-added home screen layout for the WooCommerce PWA App.
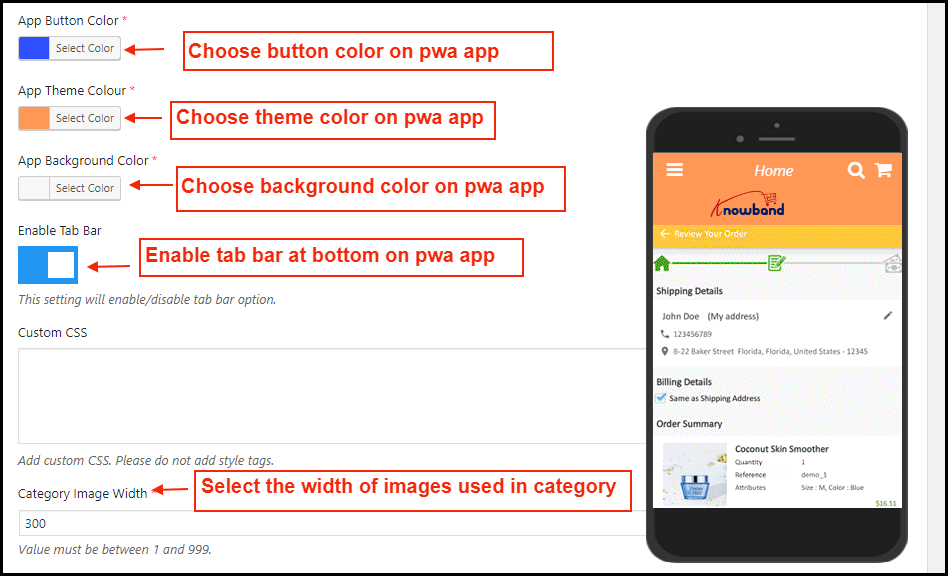
m) App Button Color: Choose button color for PWA Mobile App. n) App Theme Color: Choose theme color for PWA App. o) App Background Color: Choose the background color for the PWA App. p) Enable Tab Bar: Enable tab bar on the bottom of the PWA App for quick and easier navigation. q) Custom CSS: Enter CSS code to improve look and feel of web-view pages of PWA App like web-view payment, CMS pages, etc.
2.2 Push Notifications Settings
Push notifications are the best marketing tool for the PWA app for WooCommerce. The store admin can simply promote the store products and deals to app users and bring more sales and revenue. Enter all details in push notification settings by creating a Firebase project:
How to set up a Firebase Account?
Step 1: Login Google Firebase
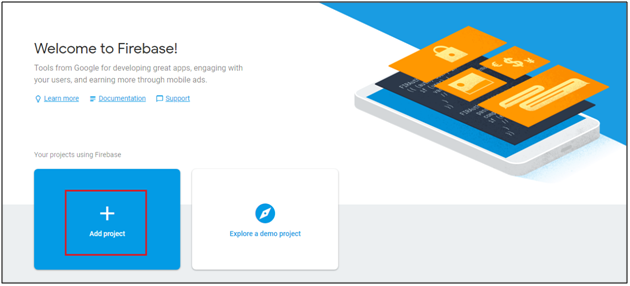
Step 2: Create a New Project
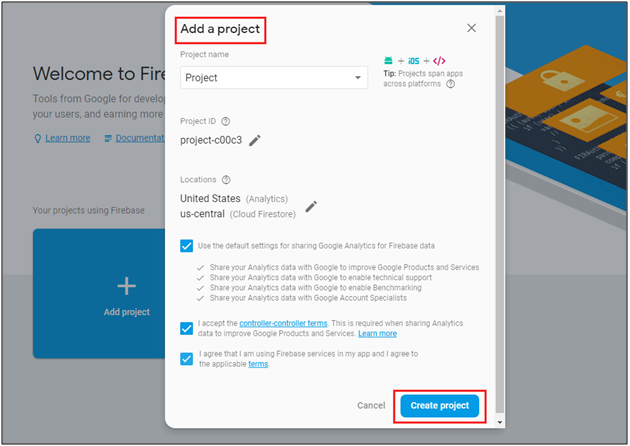
As you click on Add Project, the following dialog box will pop up:
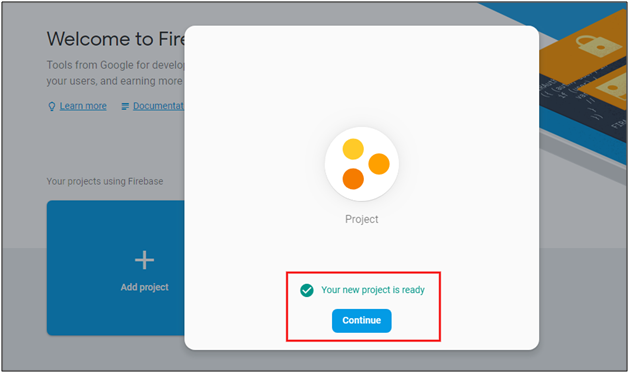
It will take a few seconds to create the project. Once the project is ready, click continue.
Step 3: Manage Project Settings
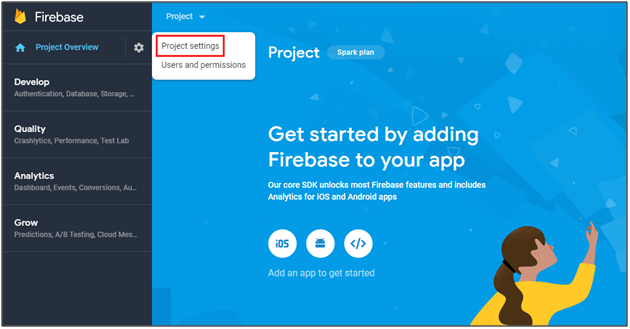
Once the project is created, click on Project Settings.
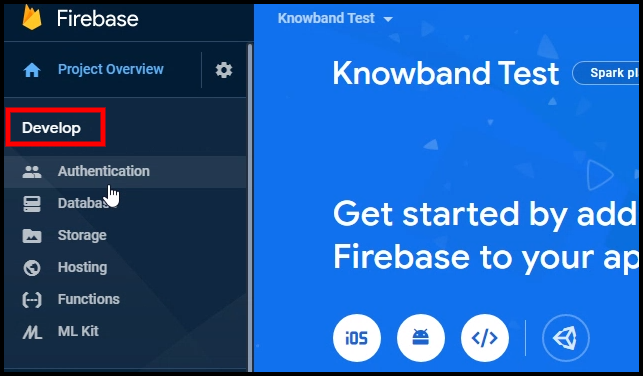
Step 4: Go to Authentication options:
Step 5: Find Firebase Keys
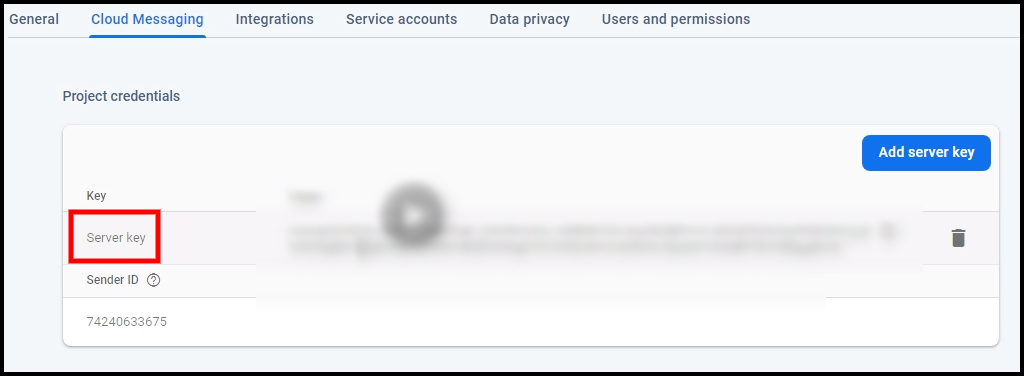
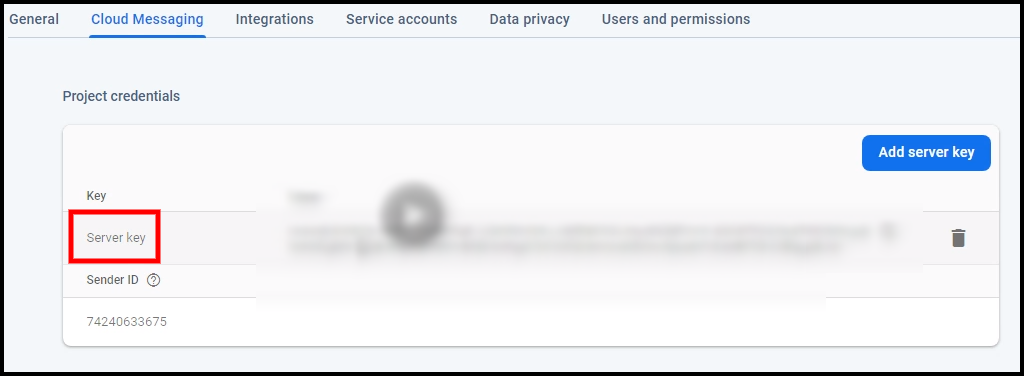
In the project settings, click on Cloud messaging settings. From here, you can directly get the server key.
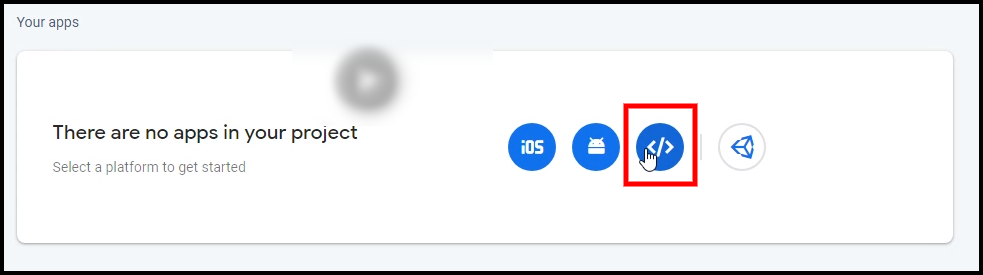
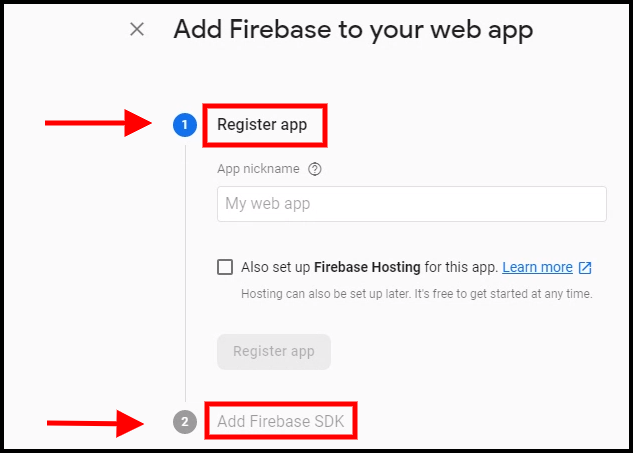
Step 6: Add your Web-App to Firebase
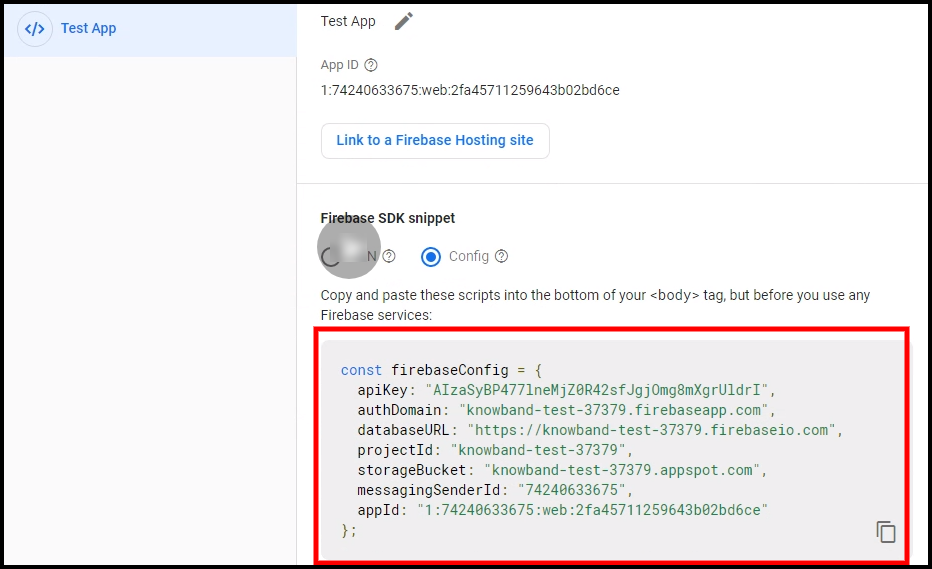
Step 7: Get other firebase related details and paste the same in PWA module admin panel.
Step 8: Get firebase server key from cloud messaging tab in Settings:
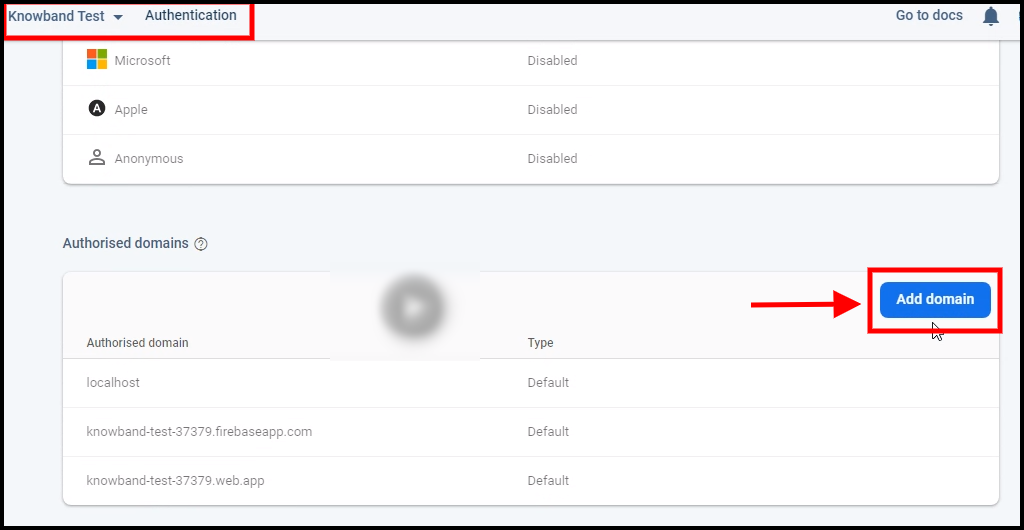
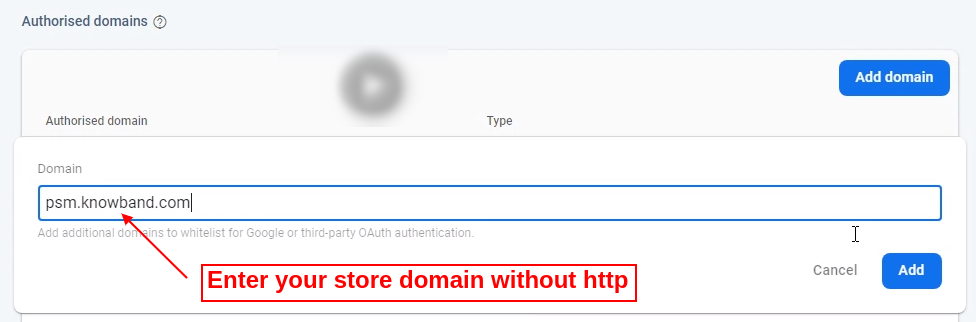
Step 9: Add your domain in authentication>>sign-in.
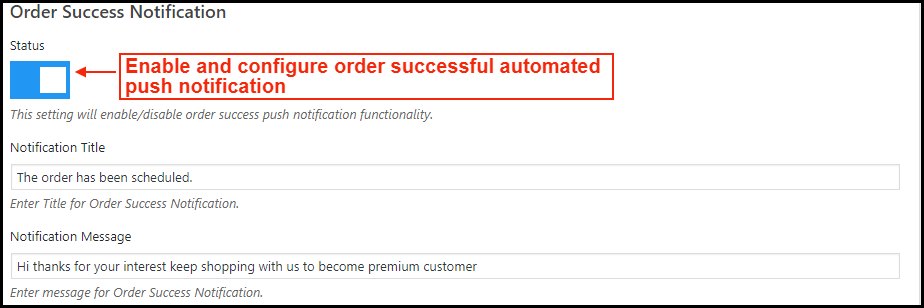
A) Successful Order Push Notification:
Enable/Disable automated Push Notification to be sent to app users whenever they place successful order from the WooCommerce PWA app.
B) Order Status Update Push Notification:
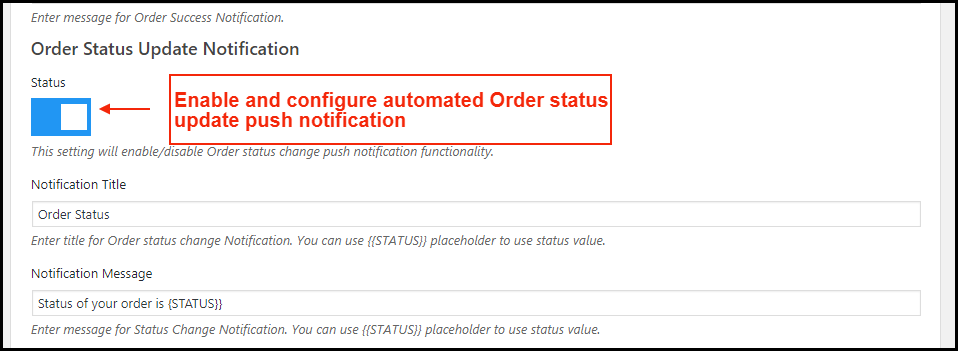
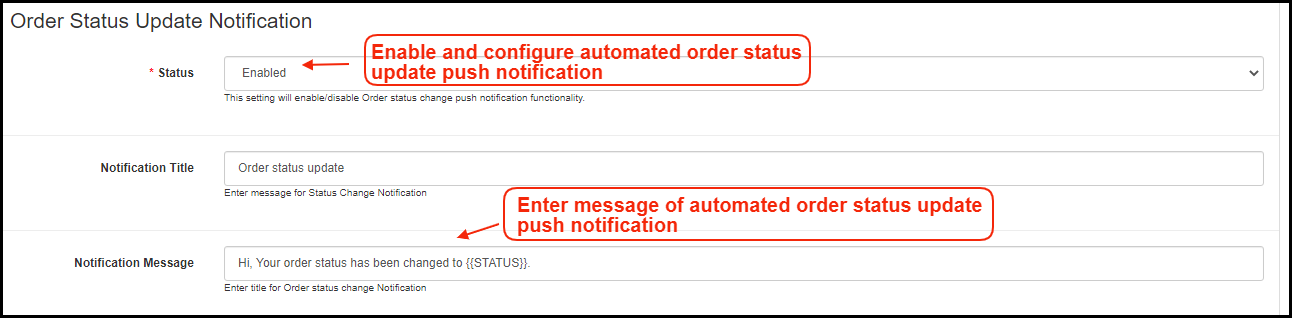
Enable/Disable automated Push Notification sent whenever order status from the app gets updated. The WooCommerce PWA mobile app users can keep an eye on the details of previous orders.
C) Abandoned Cart Push Notification:
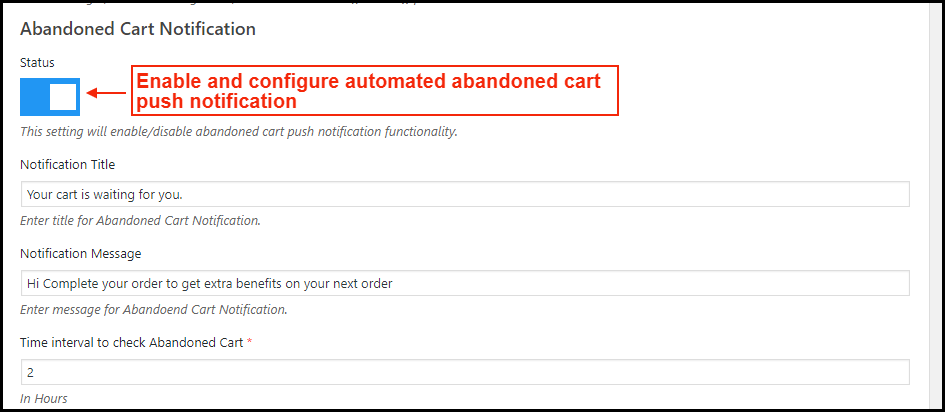
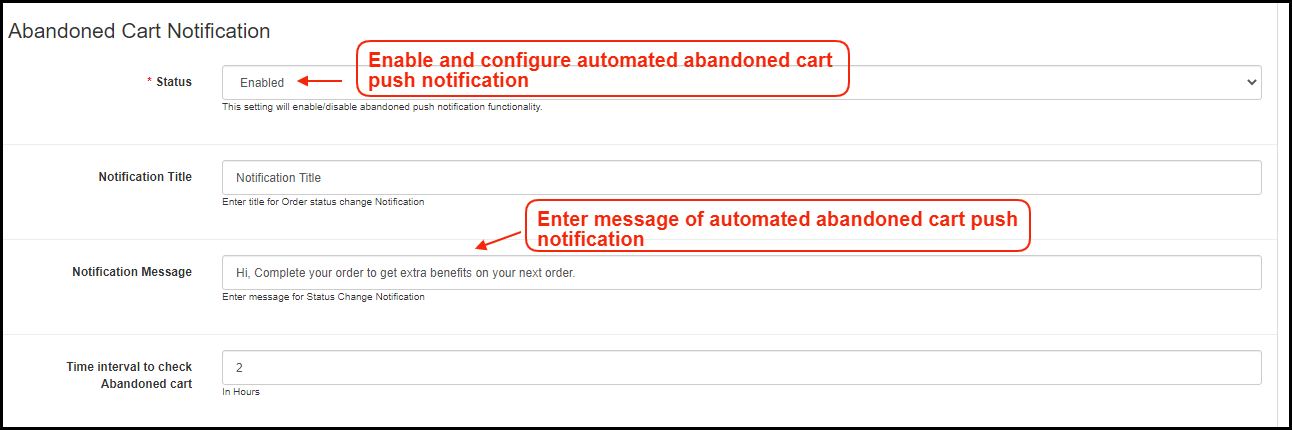
Enable/Disable automated push notification sent to users abandoning products in cart without successful purchase. This push notification will be sent to users automatically after the entered time interval.
2.3 Push Notifications History
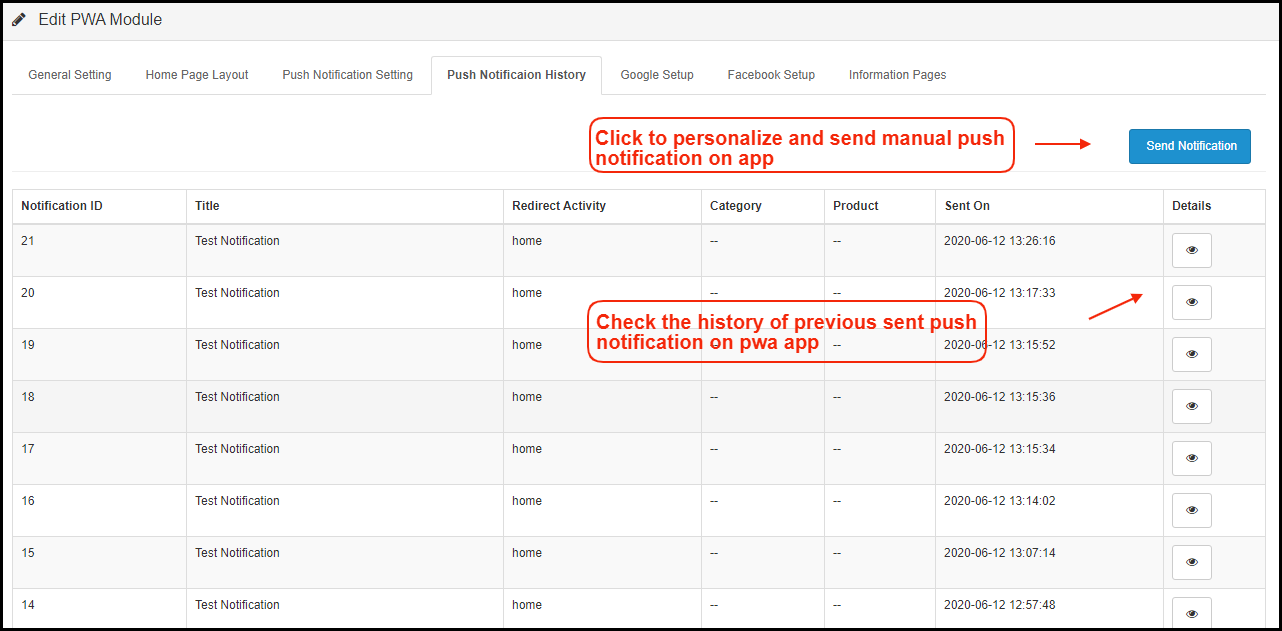
Complete push notification history of successfully sent push notifications will be seen here. The store admin can keep a track of previously sent push notifications from here.
A) Send Notification:
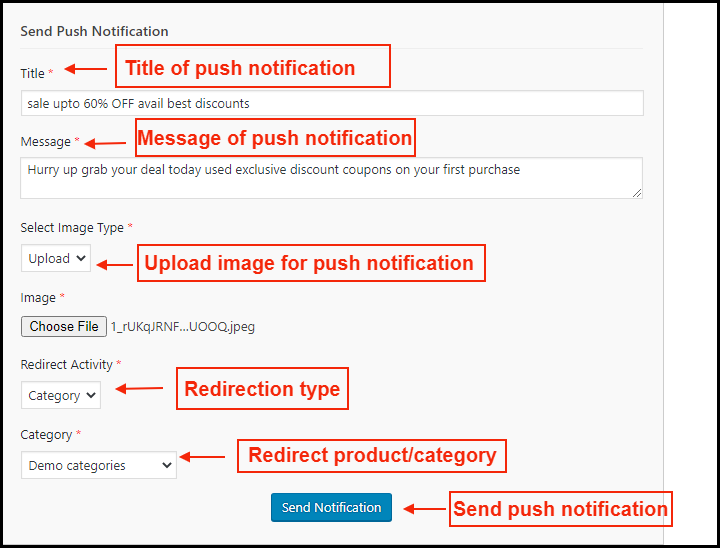
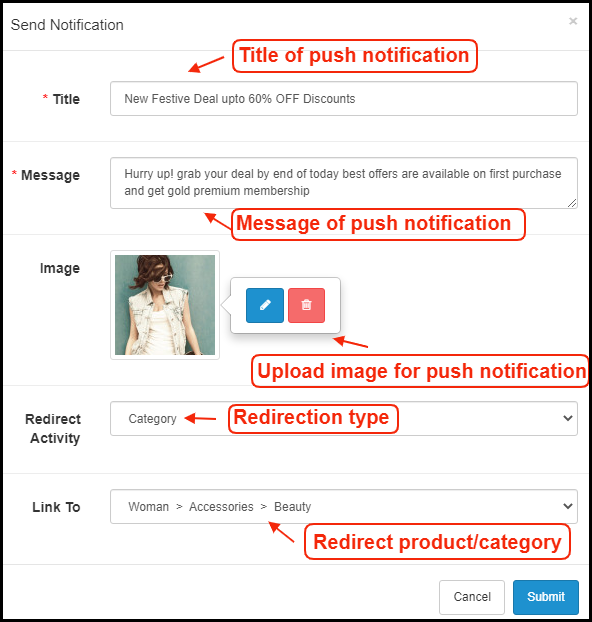
Personalize and send push notification manually to PWA app users as per the need. The store admin can configure these notifications on their own & send them to WooCommerce PWA app users.
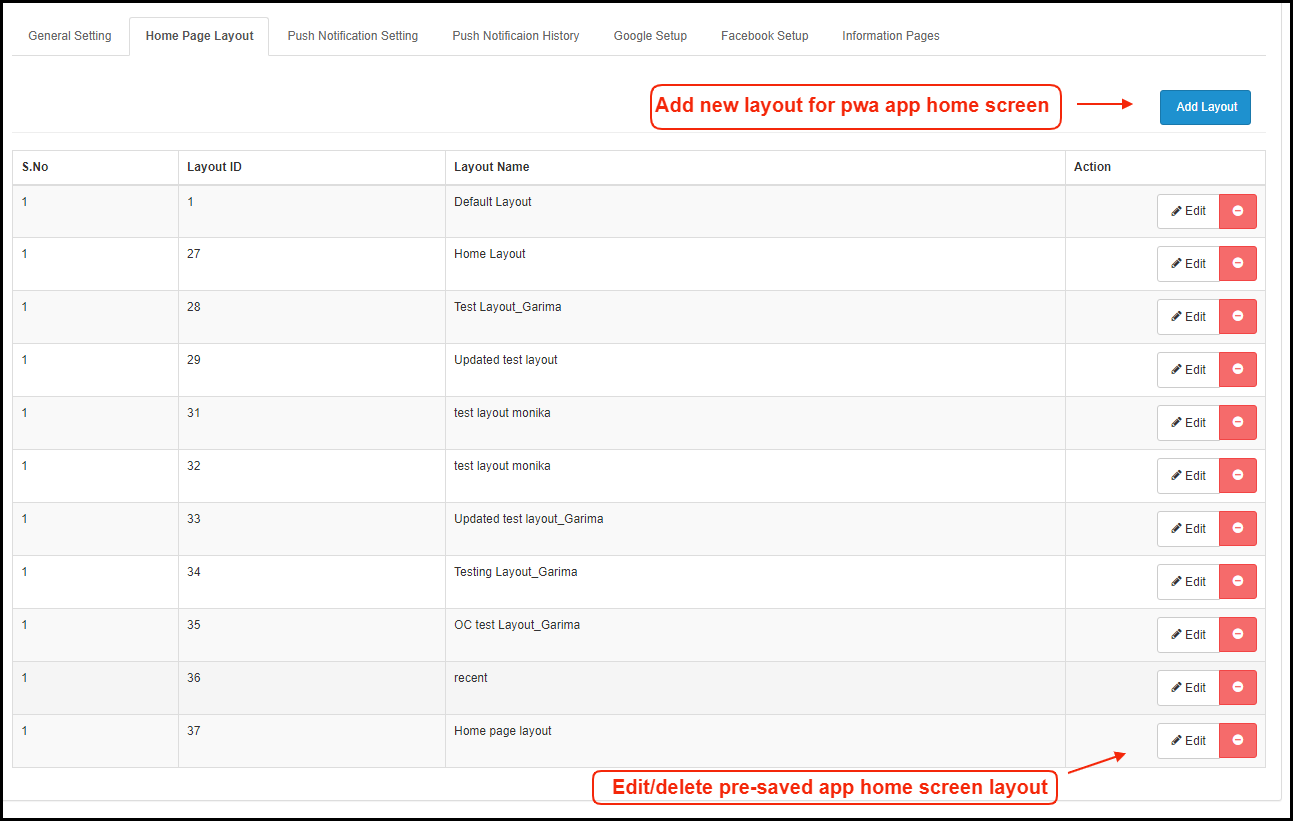
2.4 Home Page Layout:
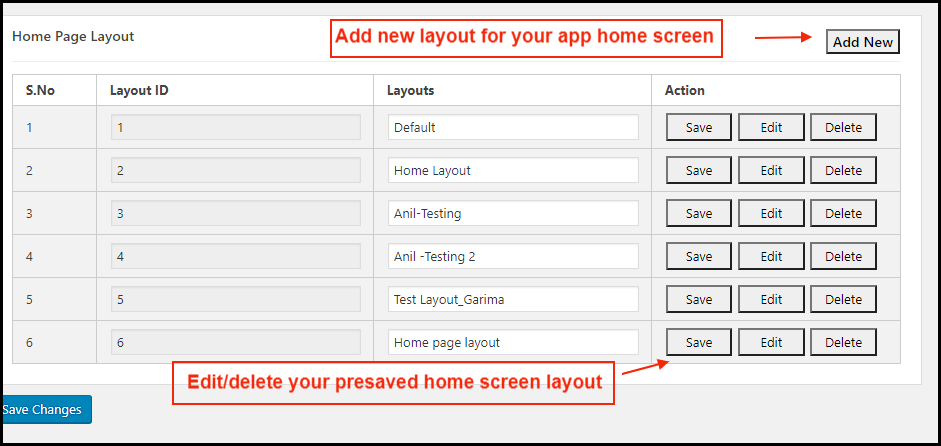
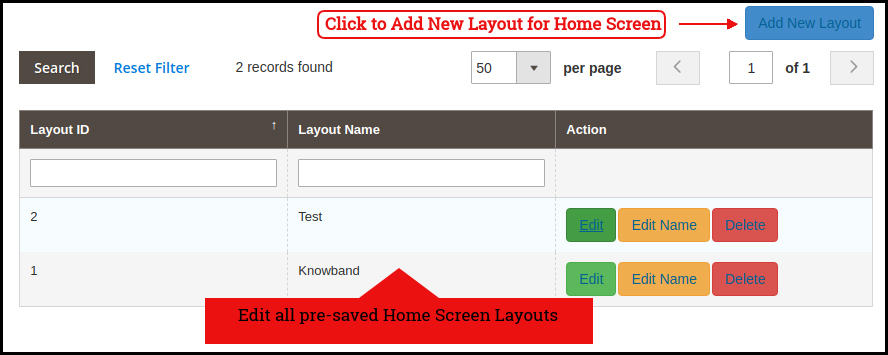
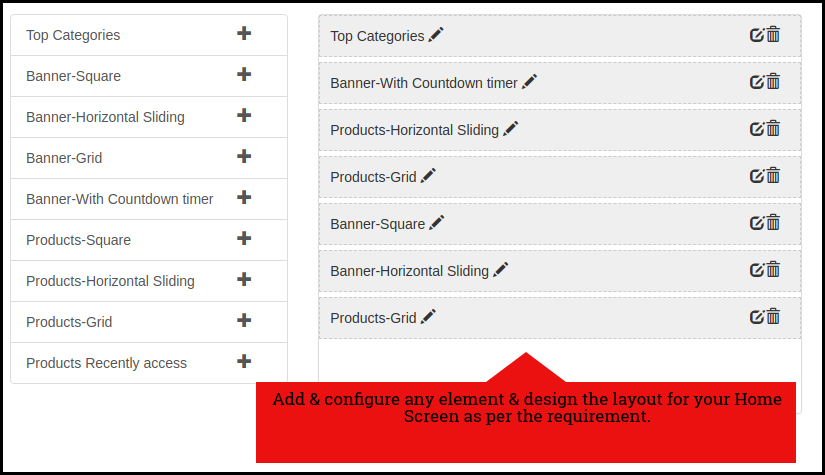
The WooCommerce PWA Mobile App offers a customizable Home Screen whose layout can be designed from the admin panel with a few mouse clicks and drag-drop. The attractive layout as per running festival, sale, occasion etc. can surely help in improving sales through WooCommerce PWA Mobile Apps.
Add a new layout from this tab or edit the previously added ones. The home page configuration settings offers the following elements:
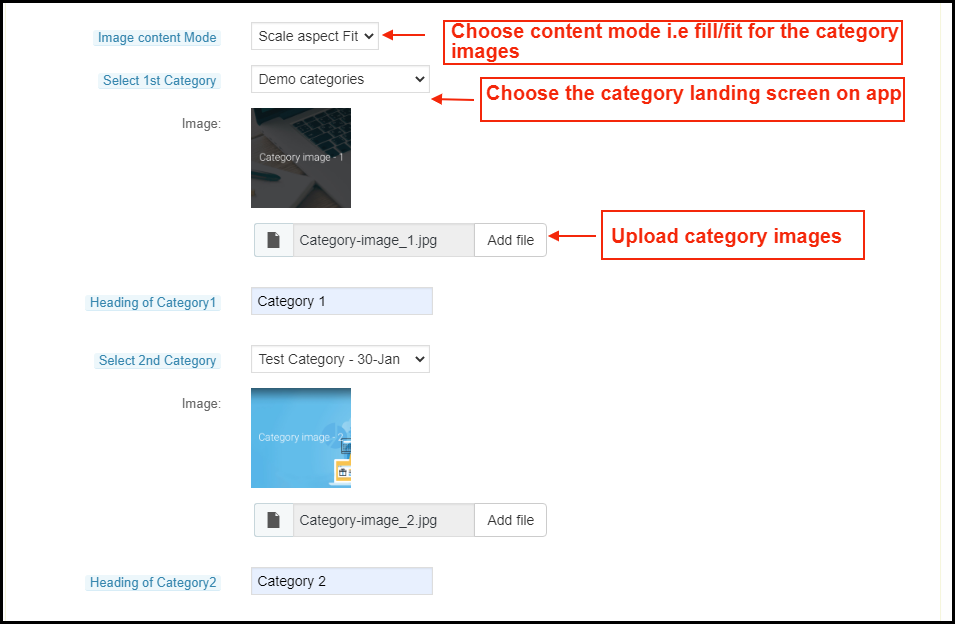
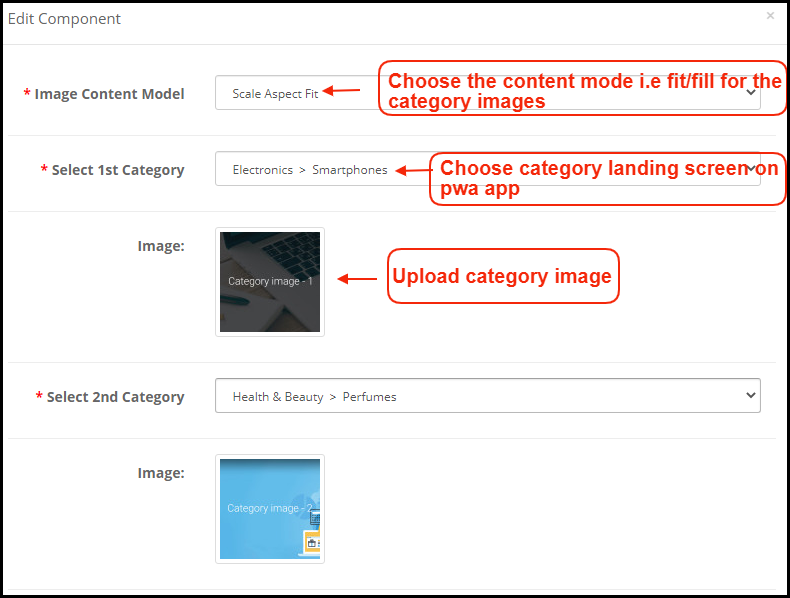
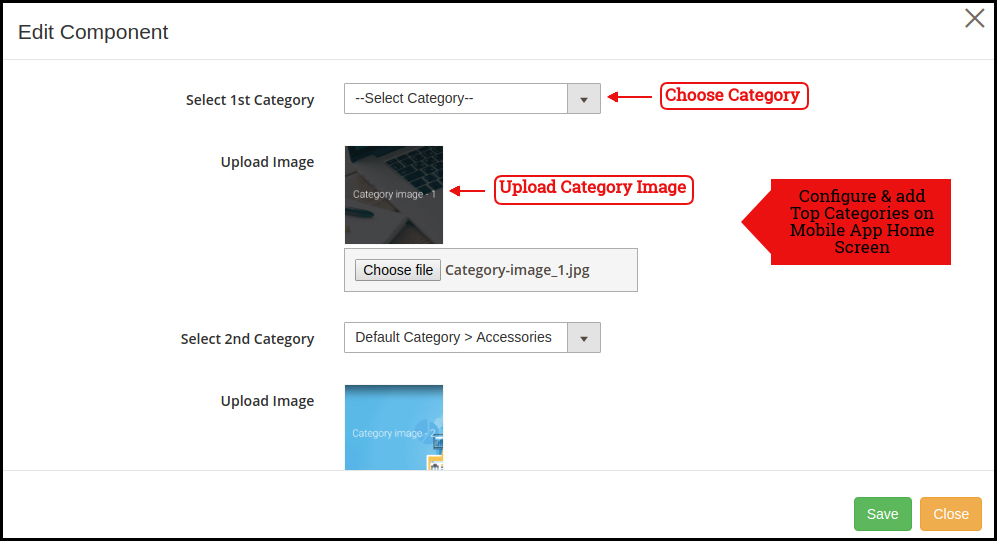
a) Top Categories:
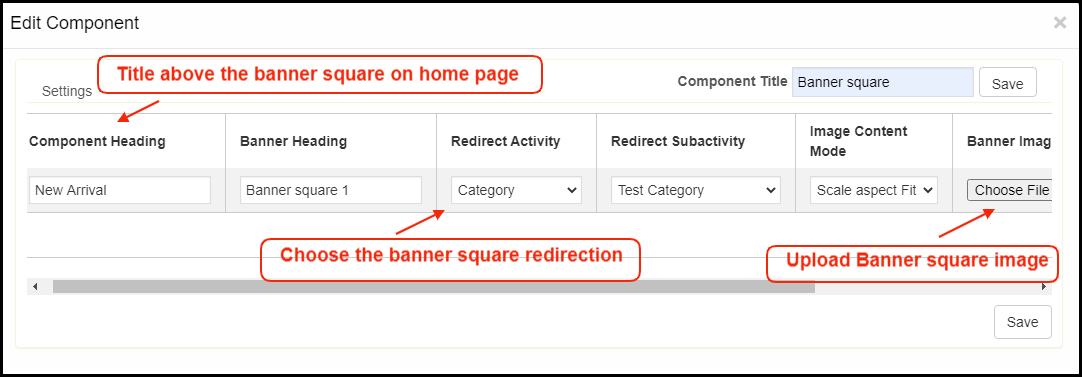
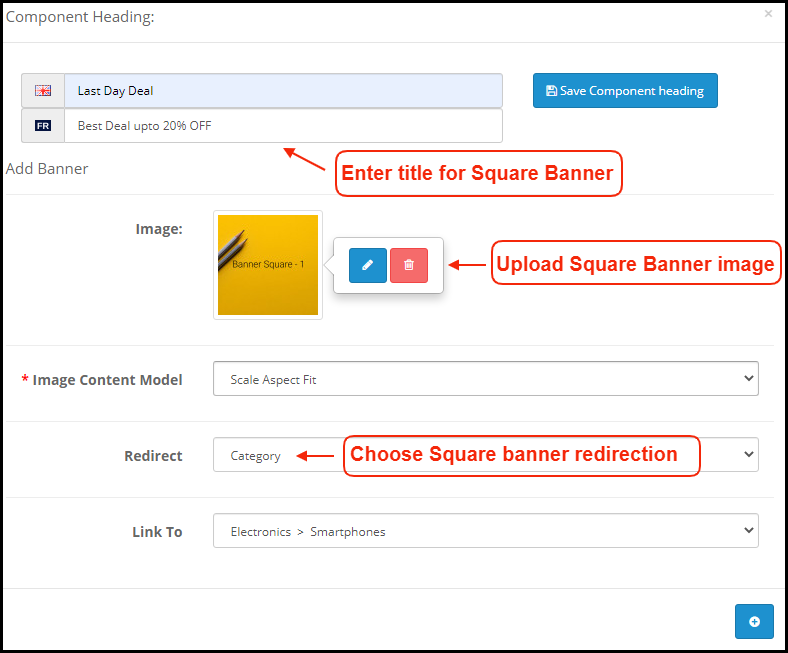
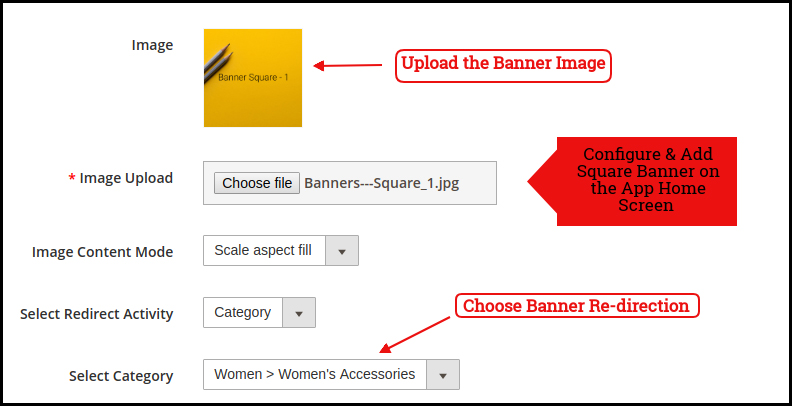
b) Square Banner:
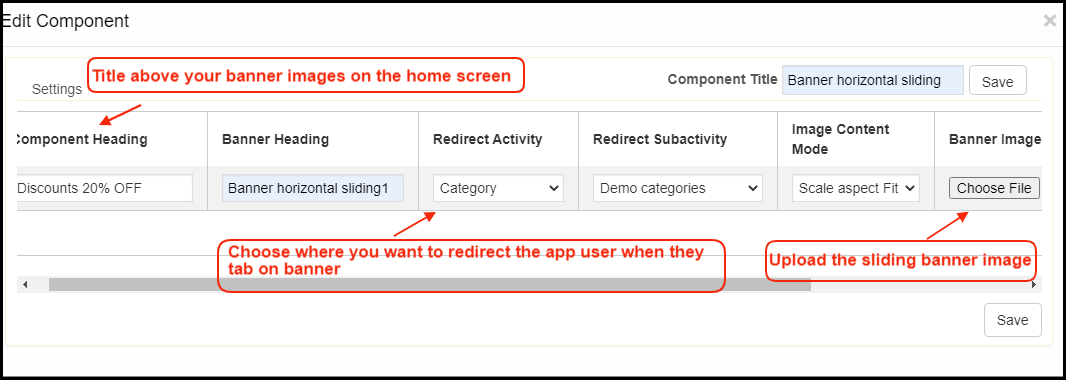
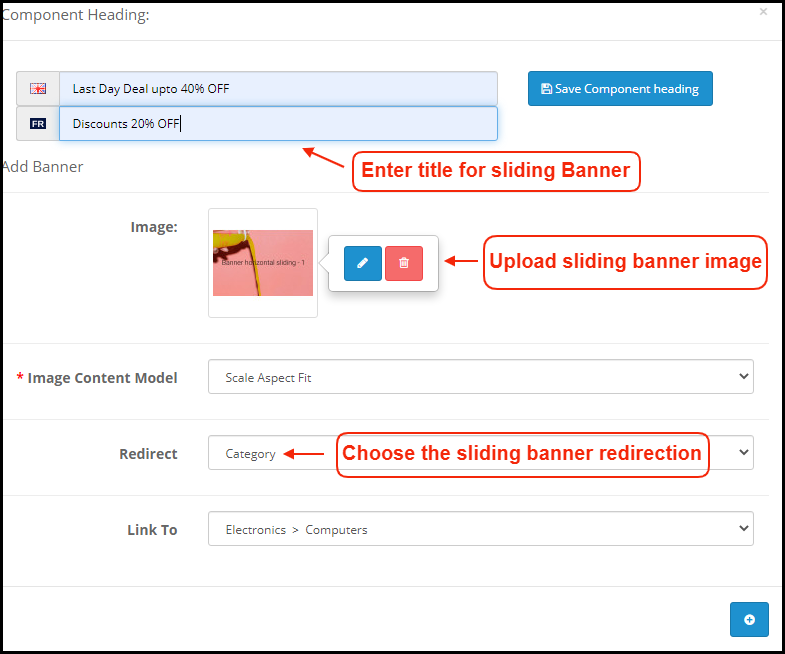
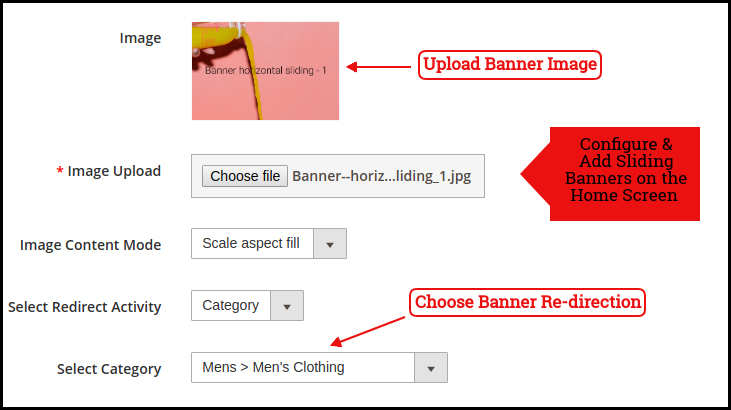
c) Horizontal Sliding Banner:
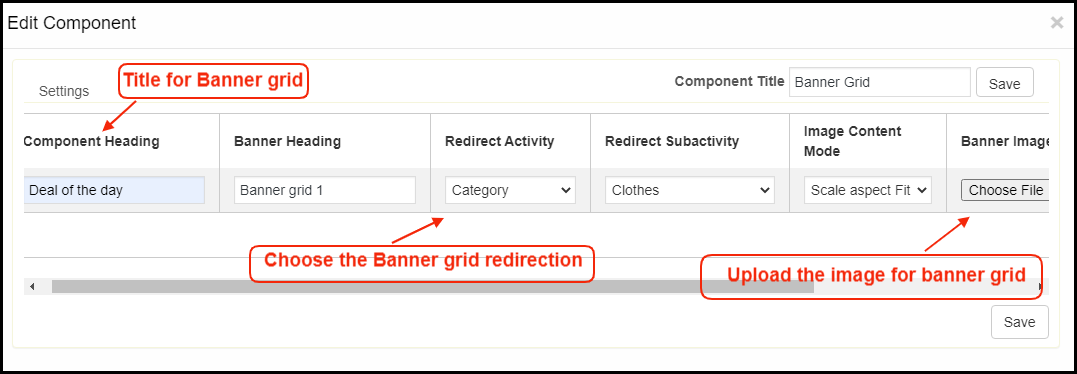
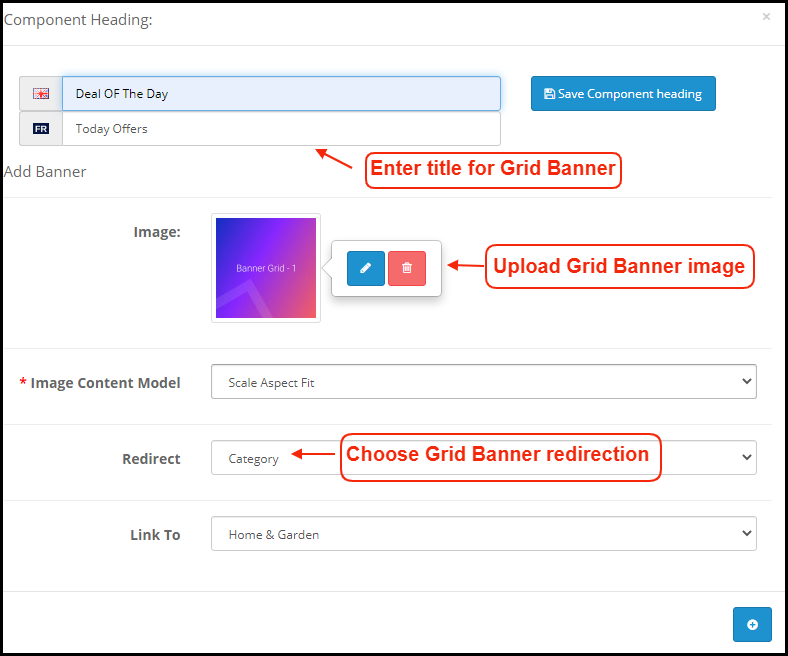
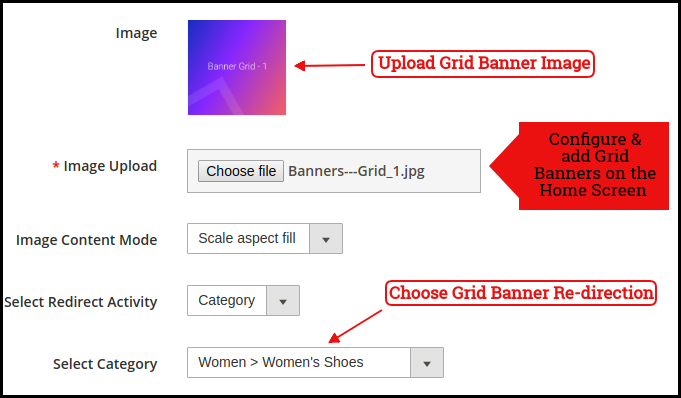
d) Grid Banners:
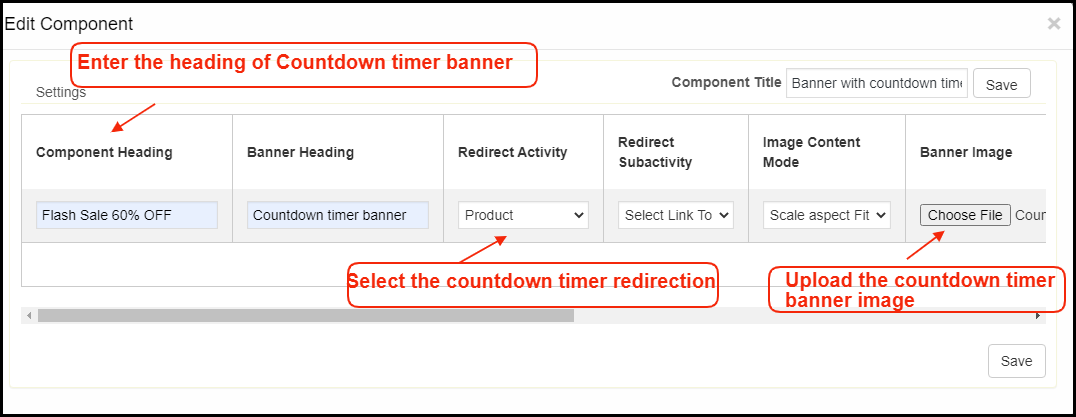
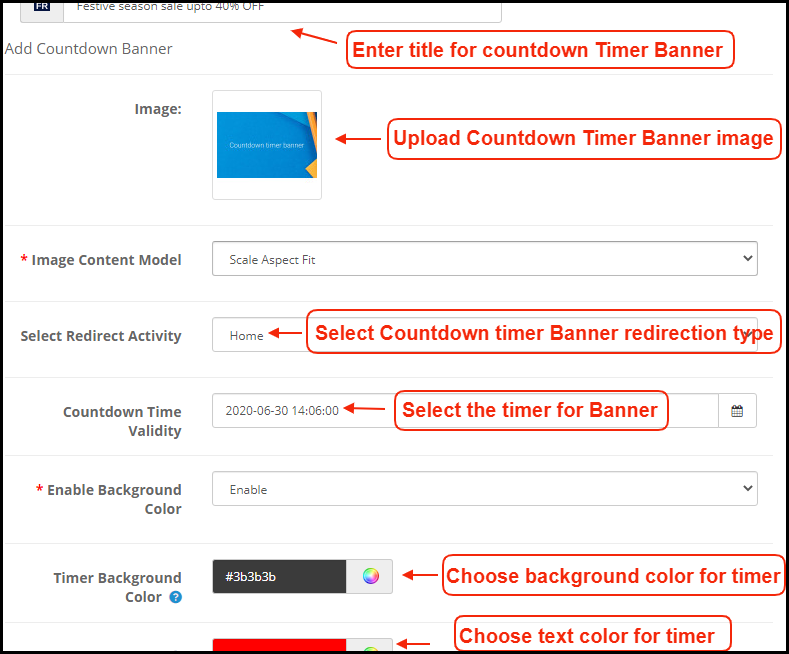
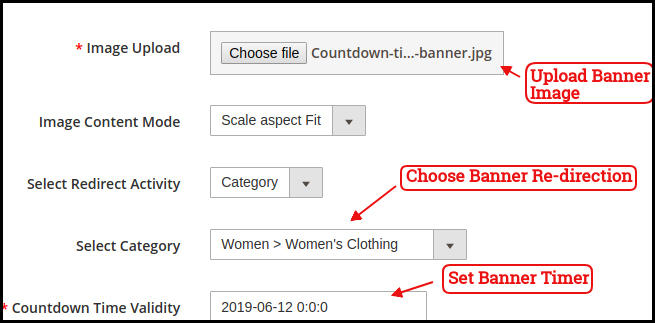
e) Countdown Timer Banner:
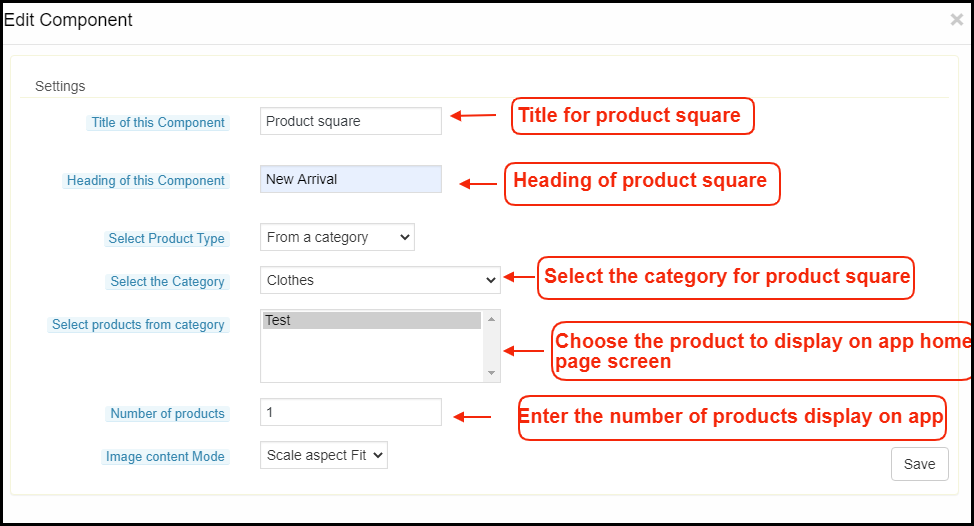
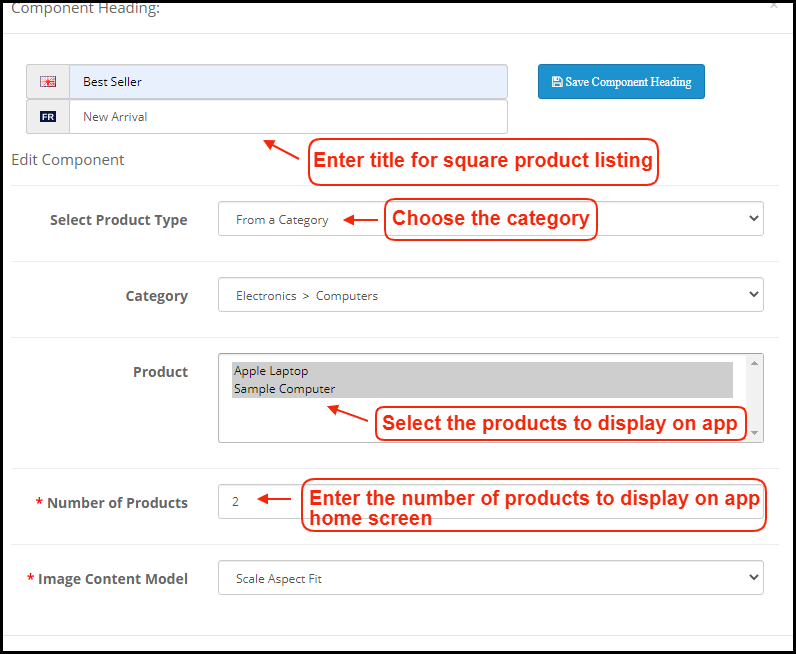
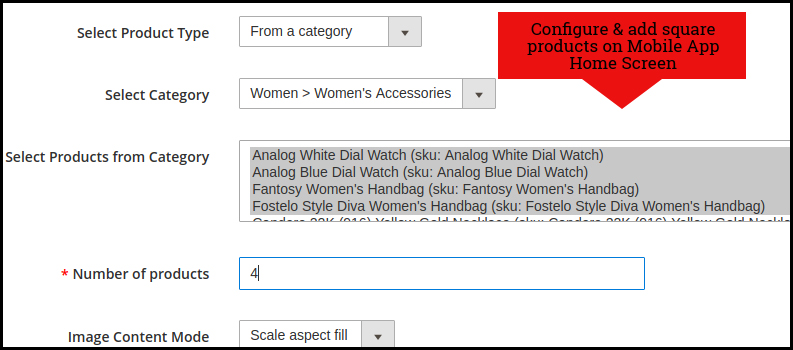
f) Square Products:
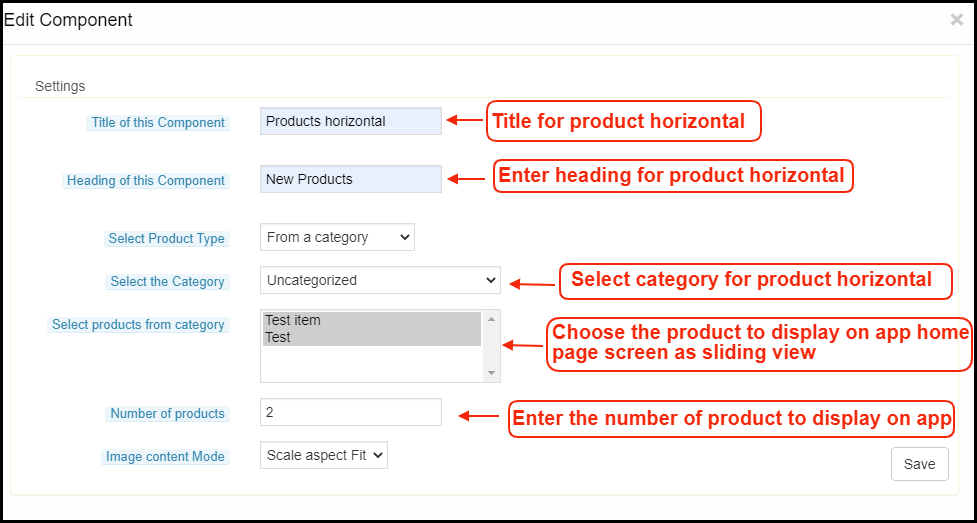
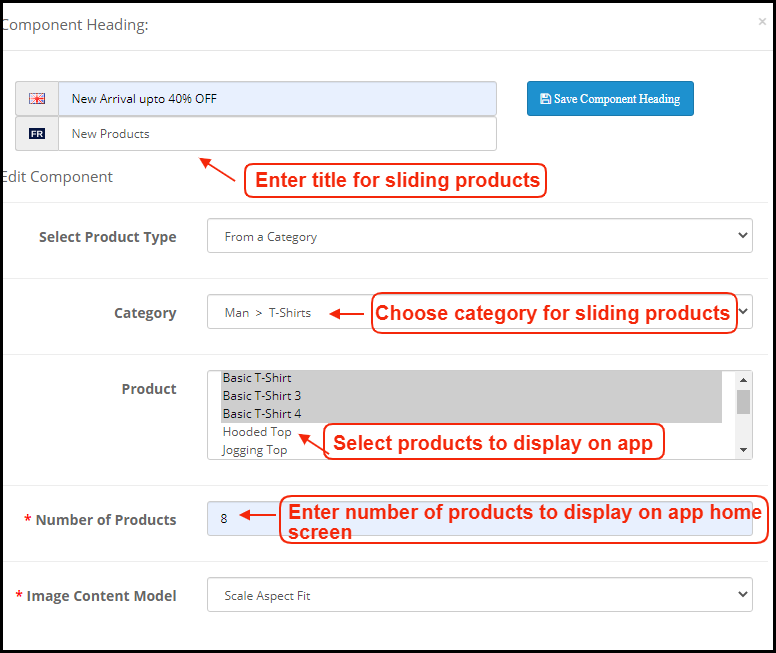
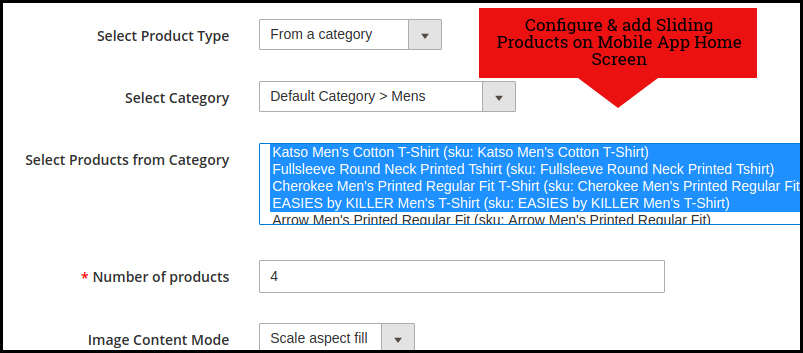
g) Sliding Products:
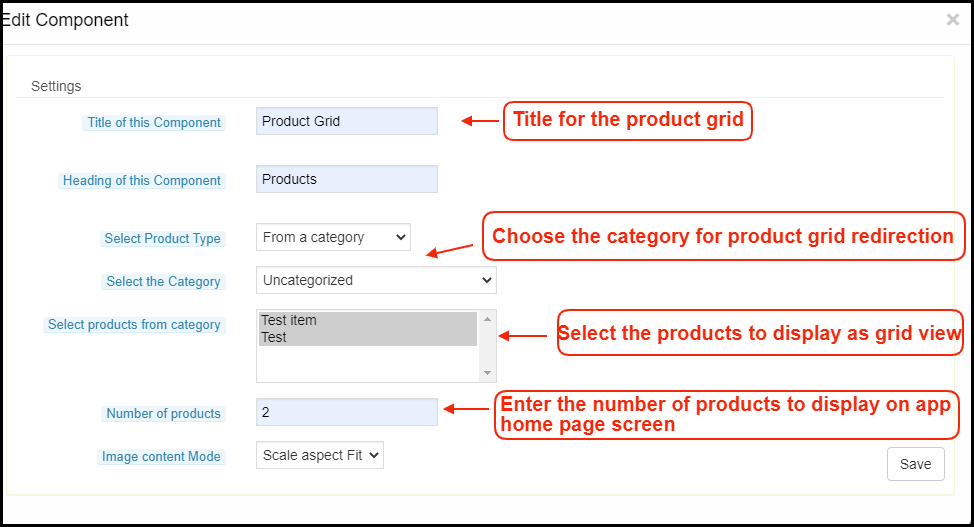
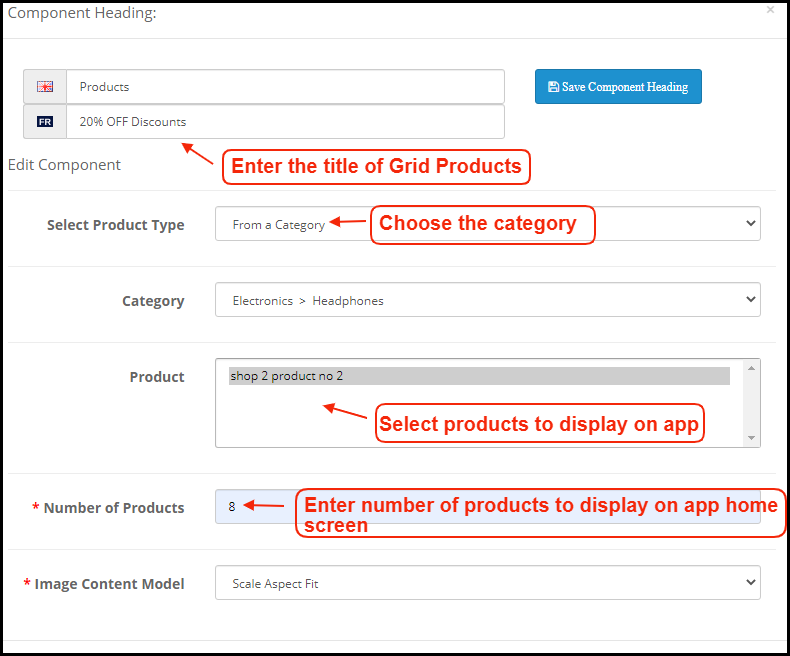
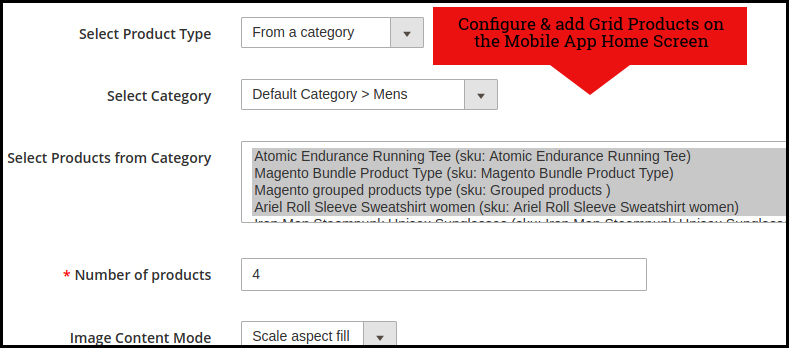
h) Grid Products:
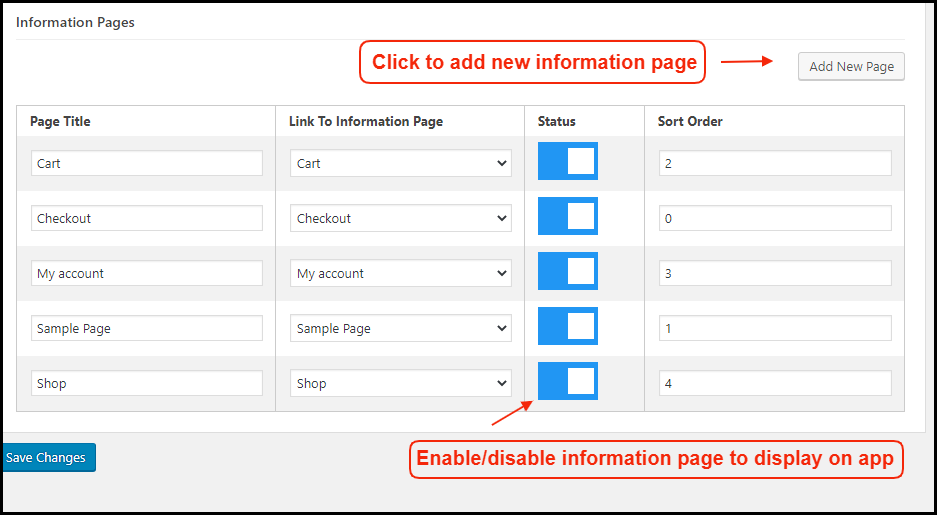
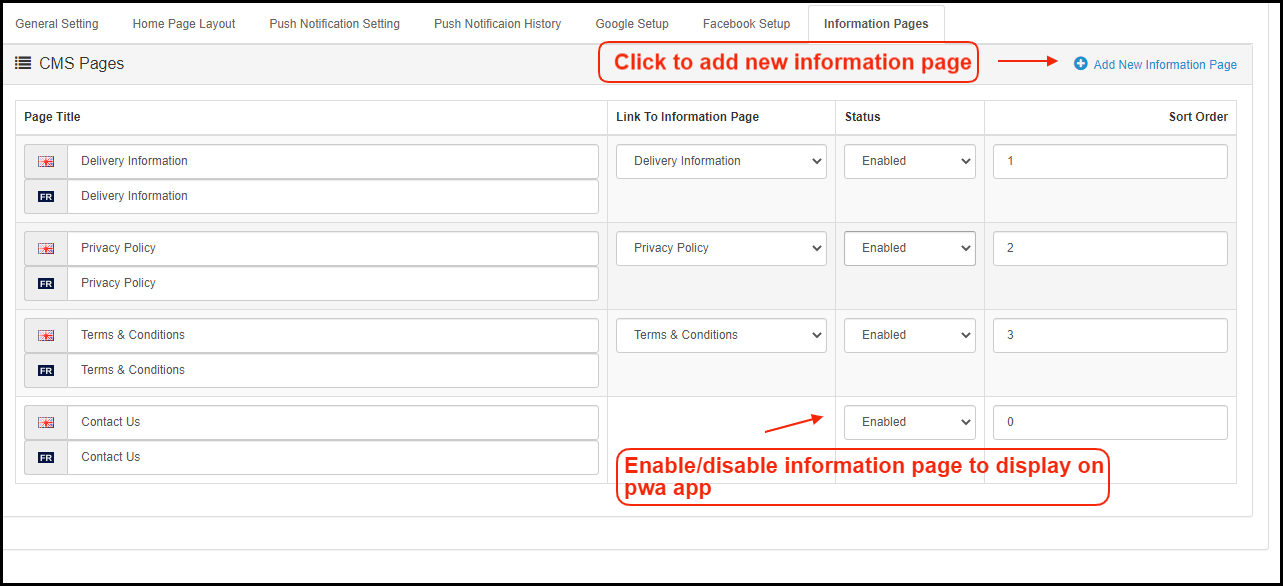
2.5 Information Pages:
Add CMS pages on the app and offer informative content to WooCommerce PWA Mobile App users.
How to get Facebook App details?
Facebook App can be created by following below-mentioned steps:-
Step 1: Go to given URL: https://developers.facebook.com/apps/
Step 2: Click on the “Add a New App” button.
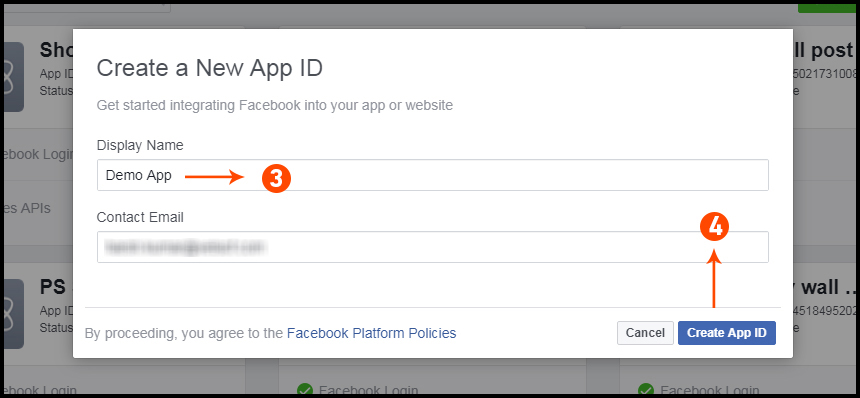
Step 3&4: Enter your App name and email id, then click on “Create App ID” button.
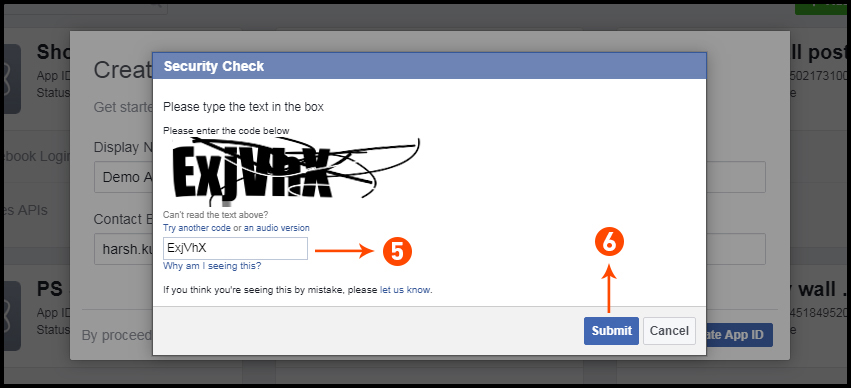
Step 5&6: After clicking on Create App ID you will have to go through a security check as shown:
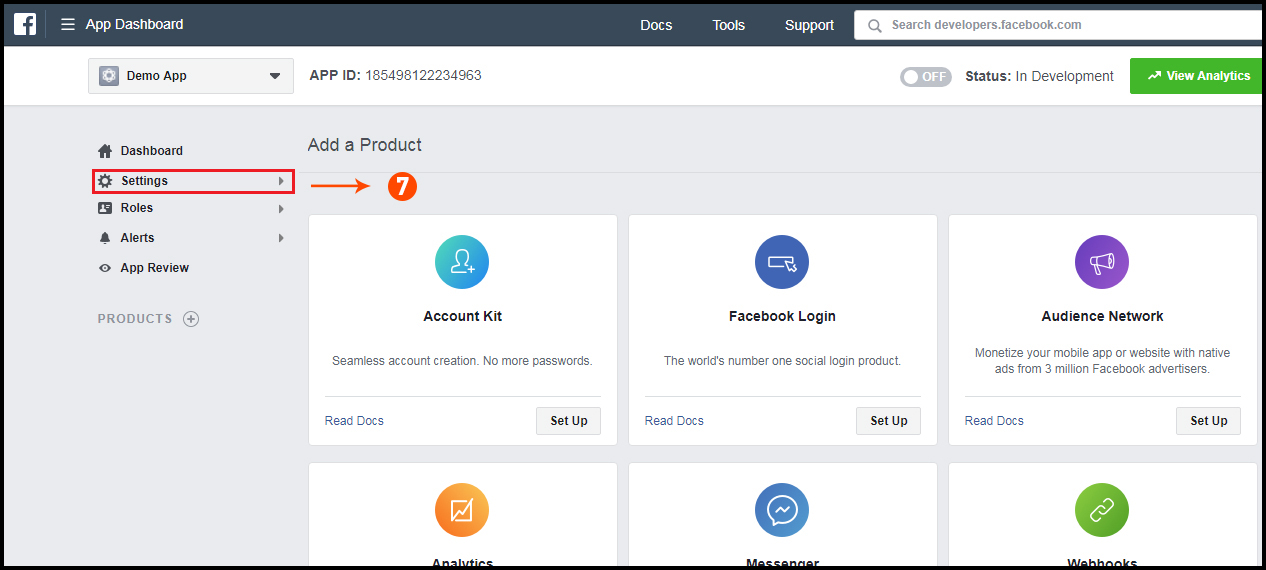
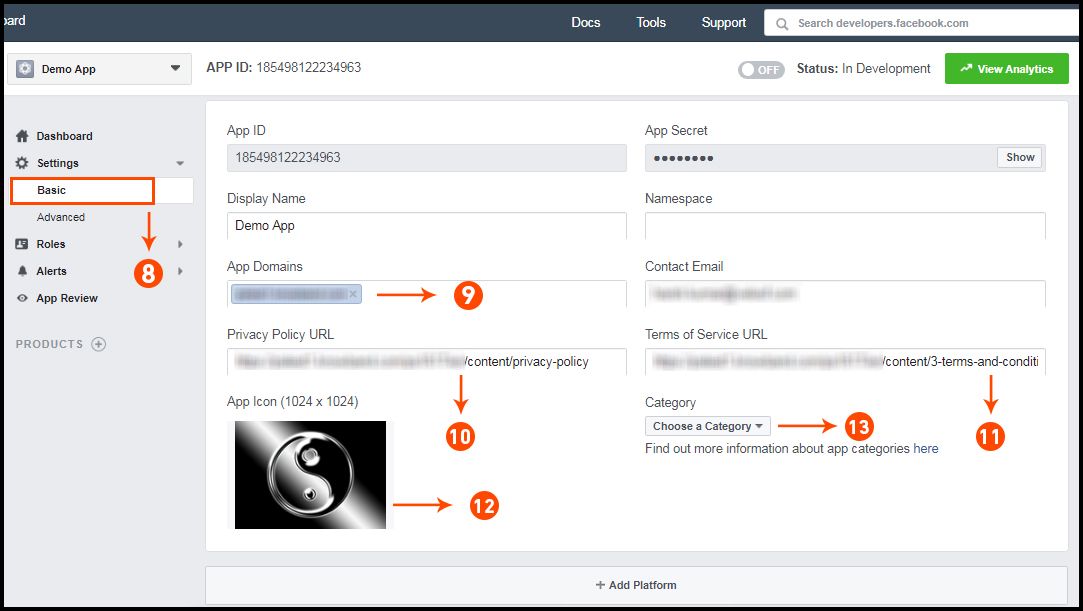
Step 7: Click on “Setting” tab.
Step 8-13: Two option will be available in the dropdown, Basic and Advanced, click on “Basic”. And then enter your “App Domain”, “Contact Email”, ”Privacy URL”, ”Terms and Conditions URL”, ”Add Logo”, ”Select Category” and click on “Save Changes” button.
App Domains:
yourdomain.com is correct
yourdomain.com/store is incorrect
www.domain.com is incorrect
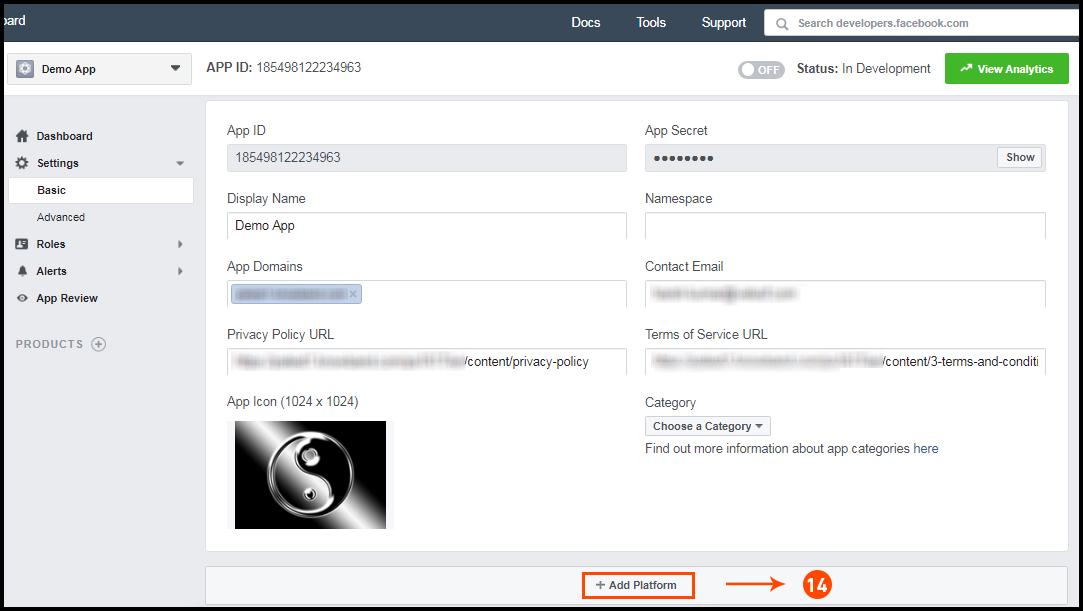
Step 14: Now click on “+Add Platform”.
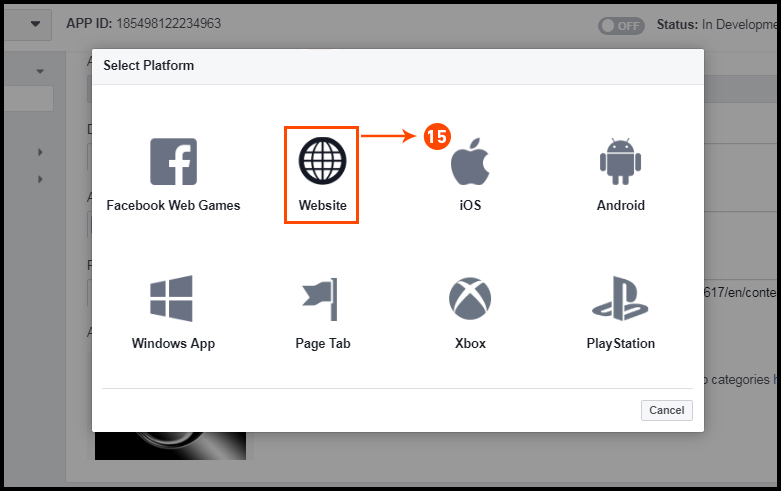
Step 15: And select Website as Platform.
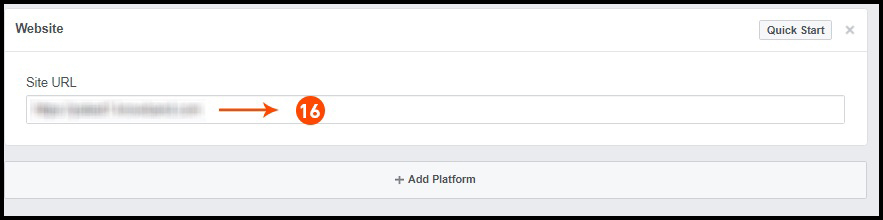
Step 16: Now Enter your site URL.
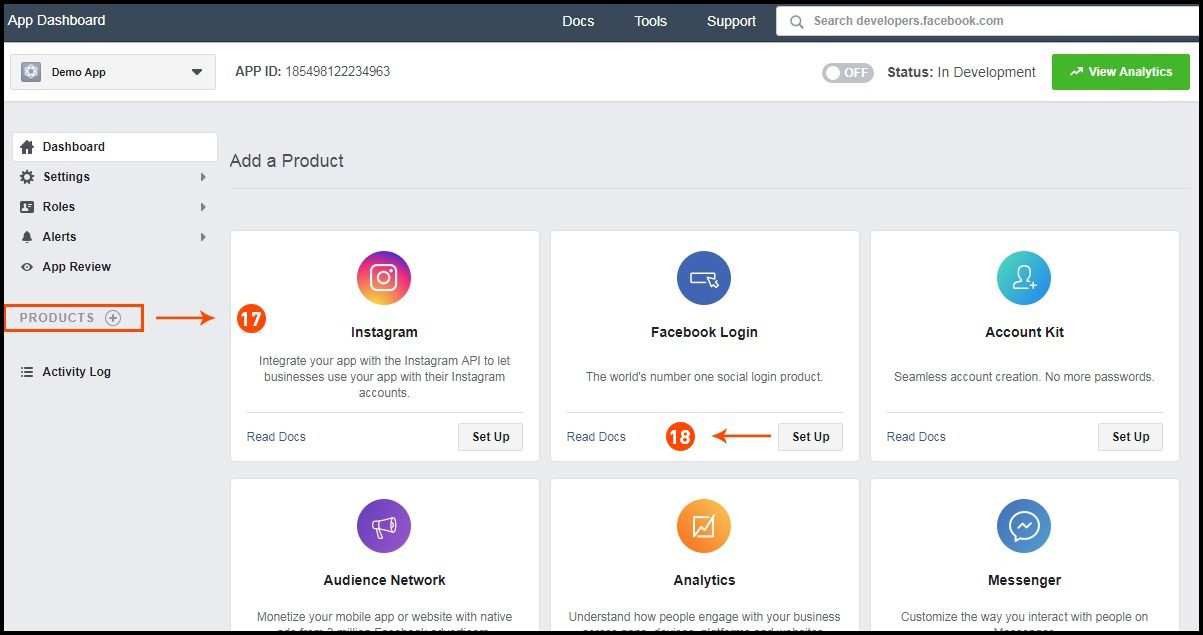
Step 17&18: Click on “Products+” and select Facebook login.
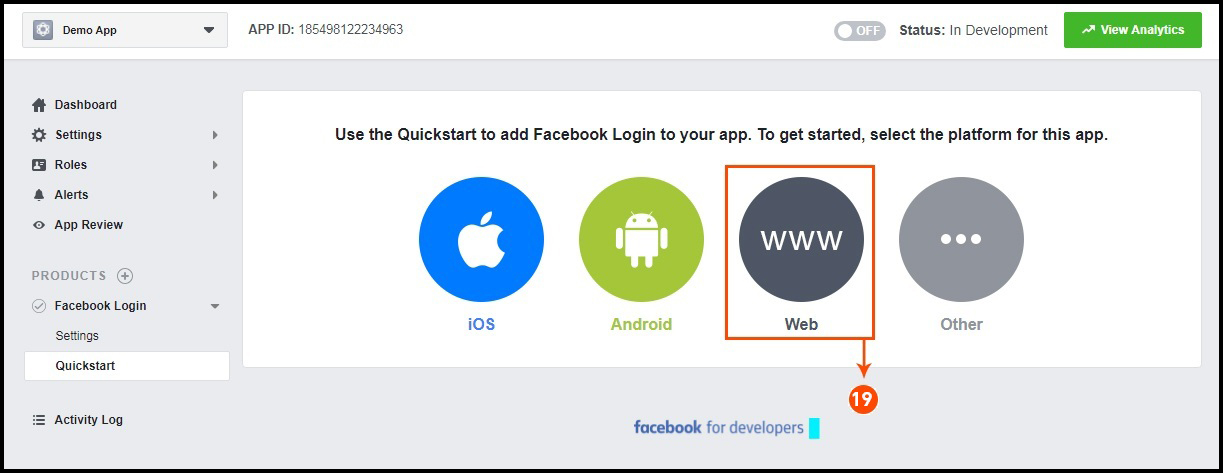
Step 19: Select web as the platform for the app.
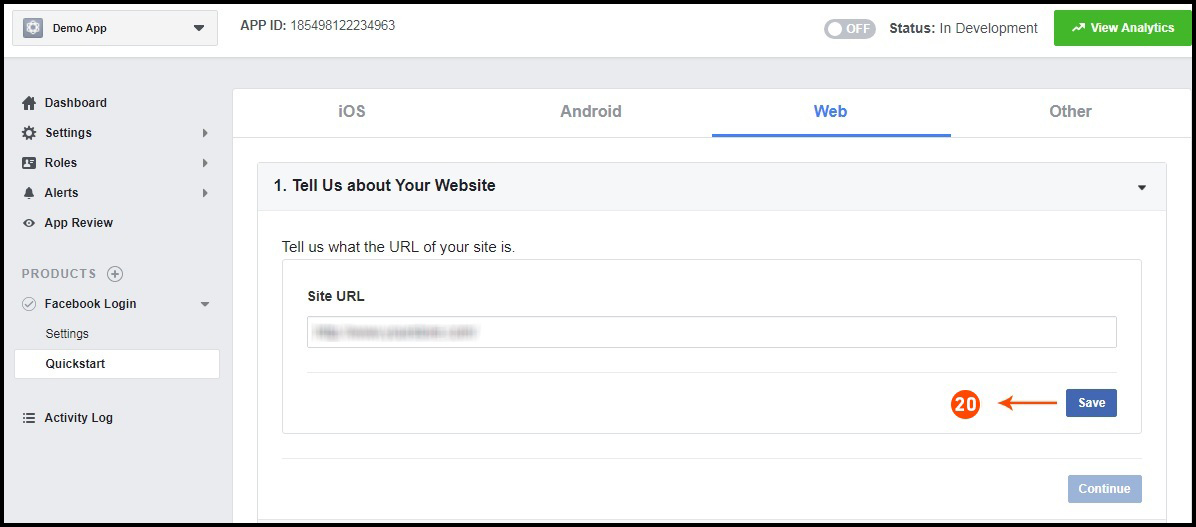
Step 20: Now click on save.
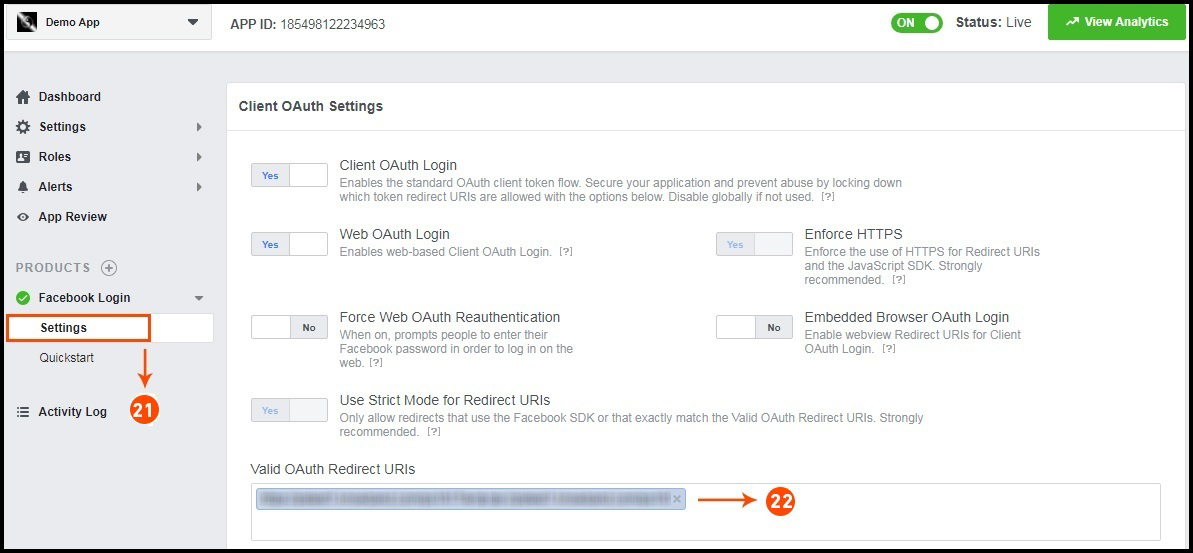
Step 21&22: Click on Settings and add a Valid OAuth Redirect URIs.
Valid OAuth Redirect URIs:
https://example.com/pwa-app/login
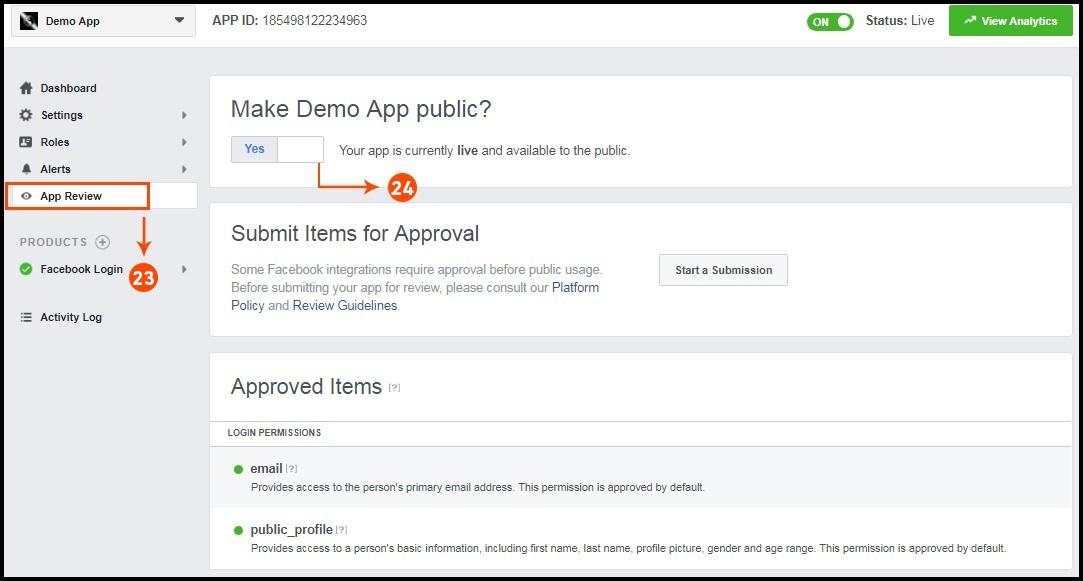
Step 23&24: Click on “App review”. And mark “Make ‘your app name’ Public” to Yes.
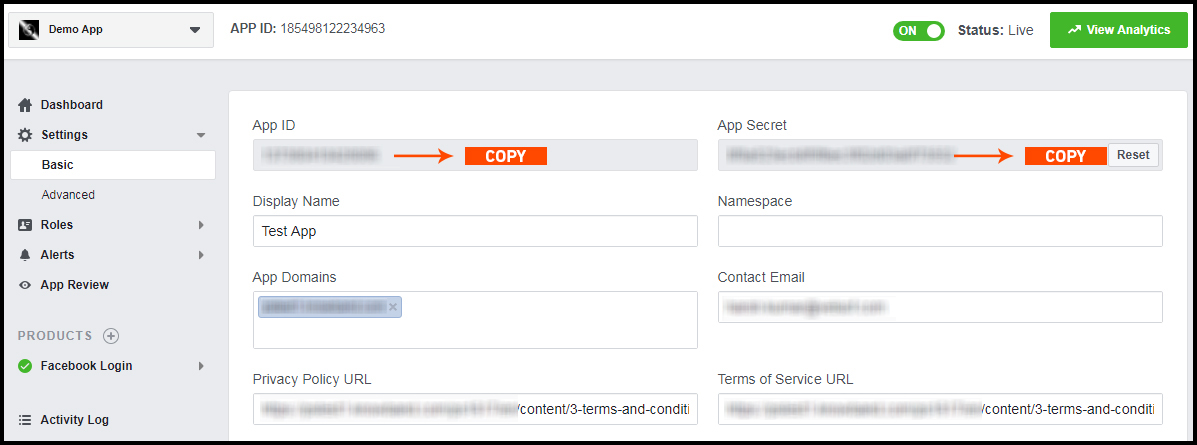
Final Step: Copy the App ID and App Secret and paste it into the fields provided in the module.
How to get Google App details?
Go to Google Developers Console
(https://console.developers.google.com/project) or click on link given top right of the respective tab in module configuration page.
Now click on Create Project on the left of the page.
Enter a name for your project and proceed to the next step.
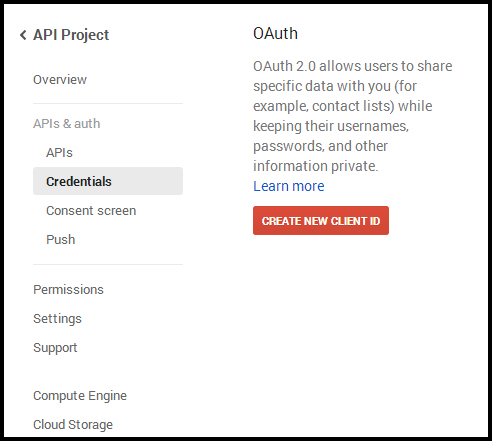
Now click on APIs and auth-> Credentials from the left menu as shown below.
Click Create New Client ID button from the right panel of the screen.
You may have to fill the form for Consent Screen before proceeding. To do so, that you have to click on Consent Screen in the left menu as shown in the image above.
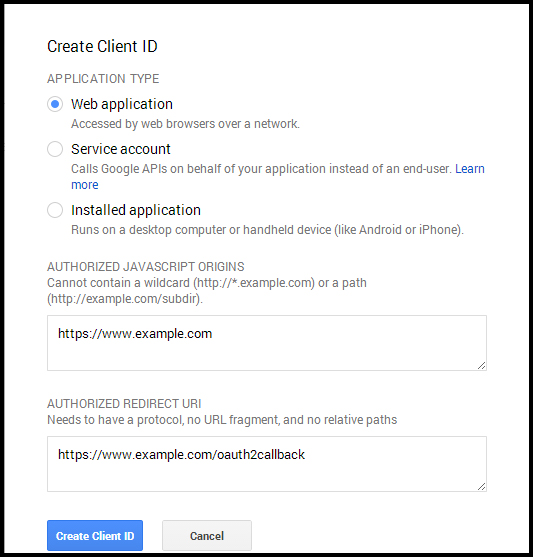
Fill the pop-up form with below details:
Application Type: Web Application. Authorized JavaScript Origins: Your store domain name (https://www.yourstore.com). Authorized redirect URI or URI of Loginizer redirect page:
https://example.com/pwa-app/login
Now click Create Client ID button to get your Client ID and Client Secret Key.
Now you can use the client secret and client ID to let your customers login to your store using their Google account.
3.0 Front End PWA Screens:
3.1 Home Screen:
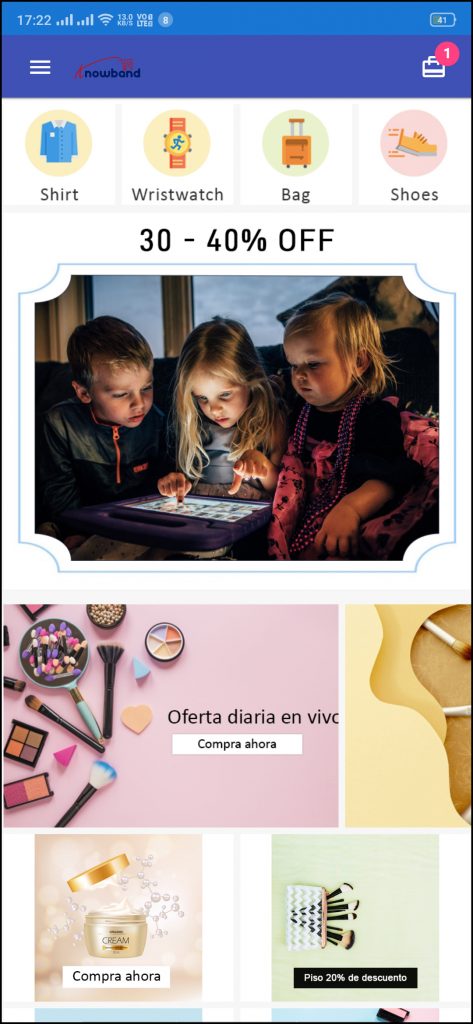
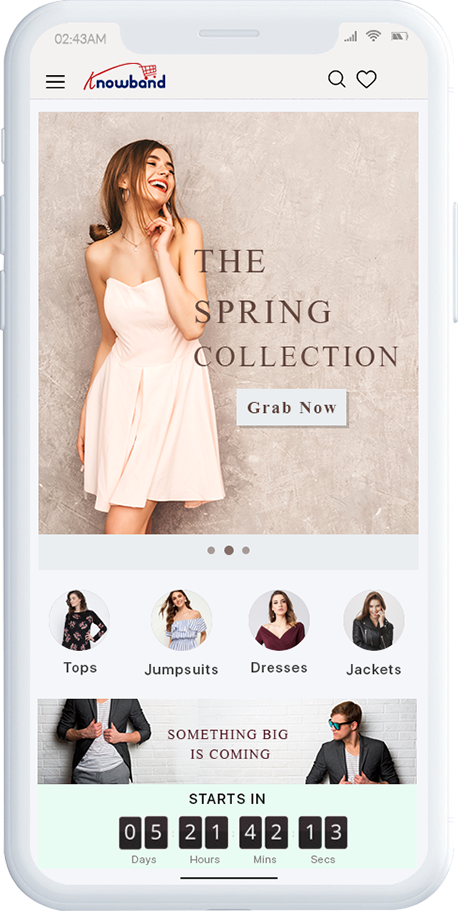
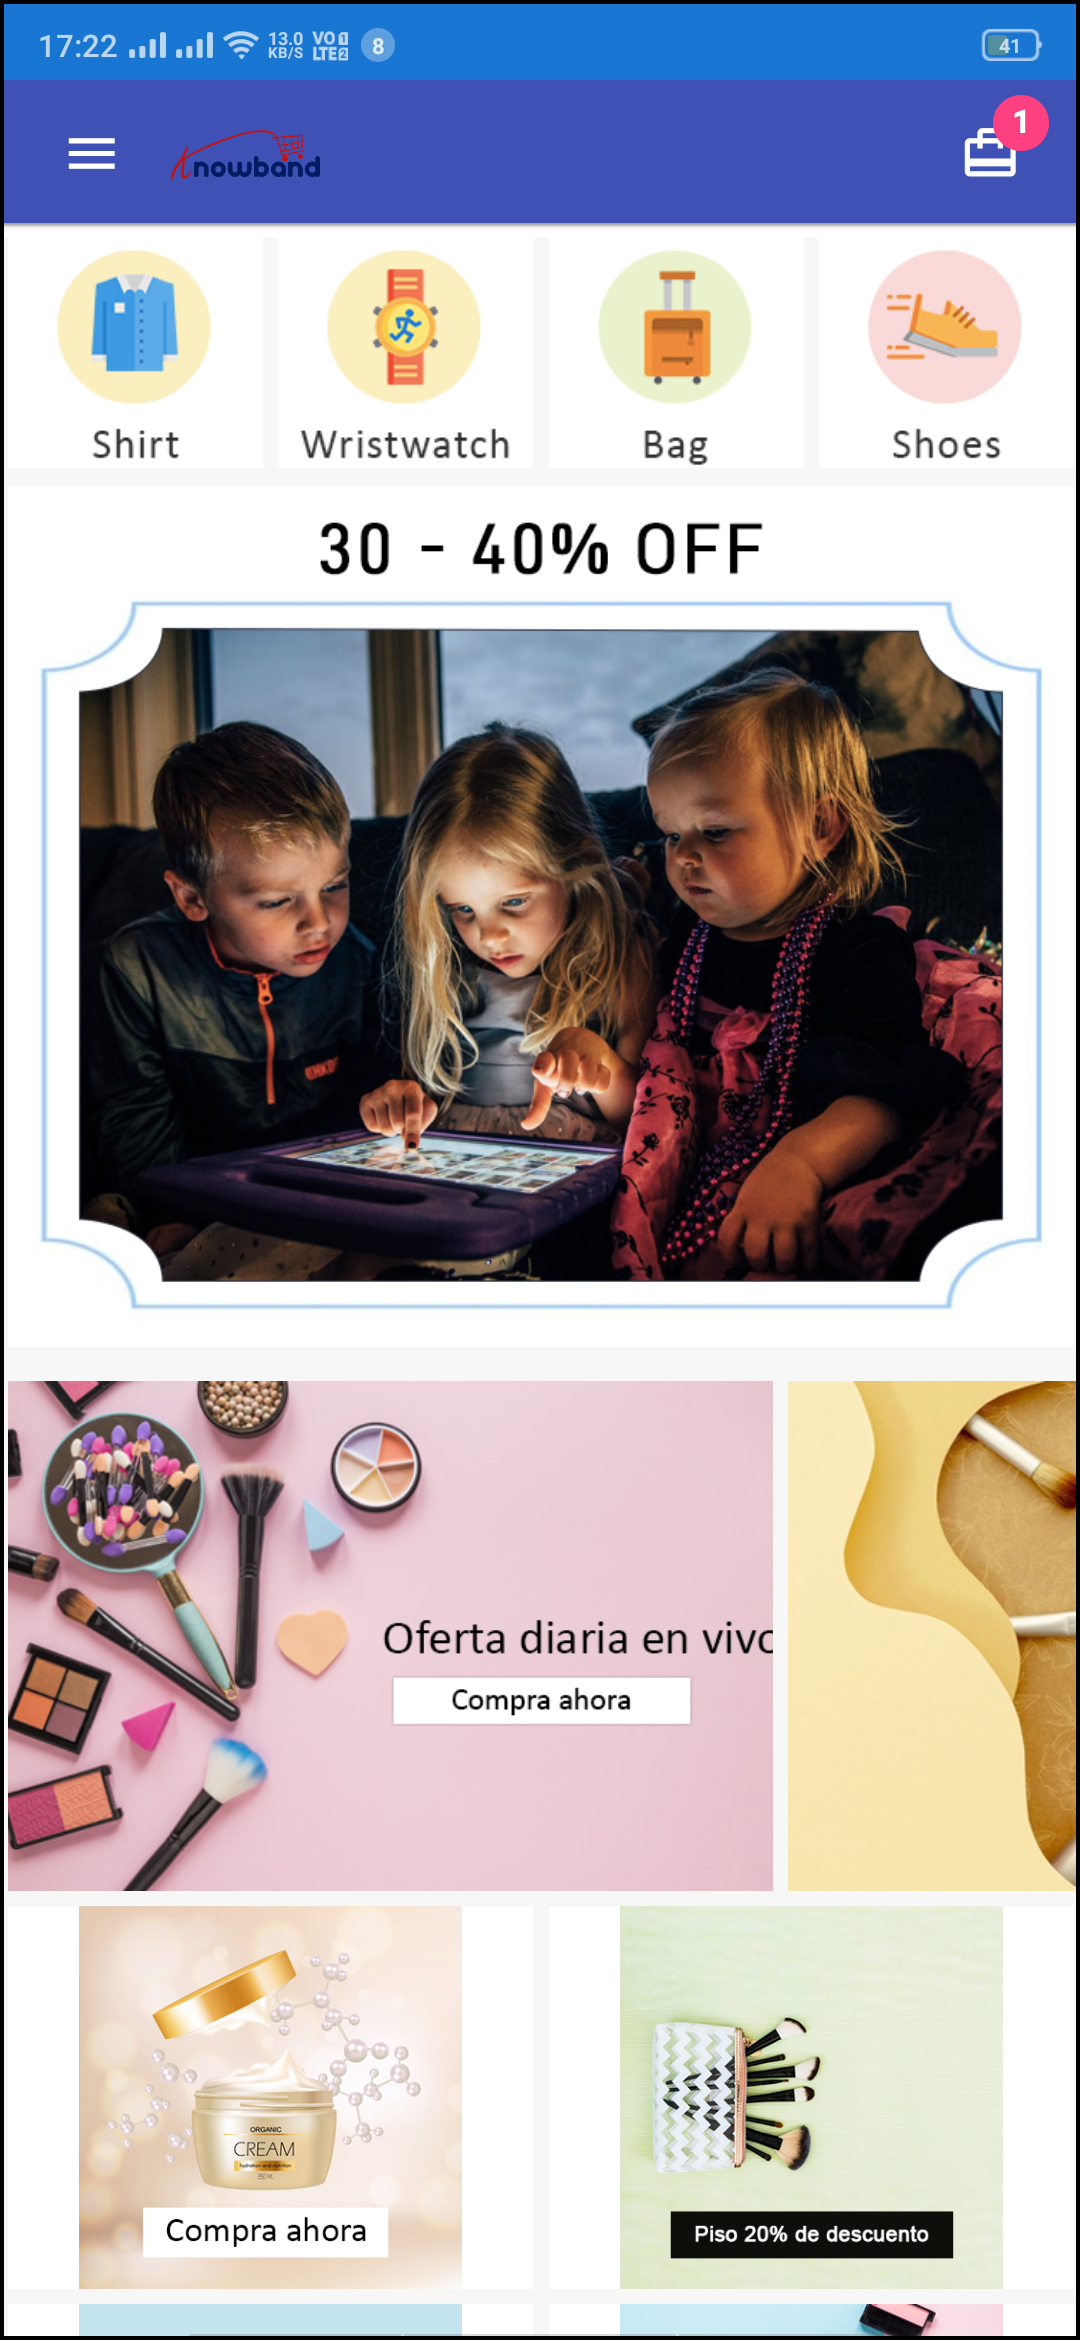
The home screen of the WooCommerce PWA Mobile App is fully customizable with the DIY editor as explained above in Admin Panel screens. Change app home screen look & feel anytime and offer more user-friendly & sale driven appearance.
1. Custom Layout:
Using various banner, slider, product elements, the store admin can create dynamic layout as per the need.
2. Brand Logo:
Use your store logo on the top header of the WooCommerce PWA app.
3. Shopping Cart Bag:
The shopping cart icon on the top-right corner of the home screen allows users to access cart screen and check added products.
4. Left Navigation Menu:
Browse the categories displayed in the PWA app with left navigation menu browsing.
3.2 Accordion Menu (Navigation Bar):
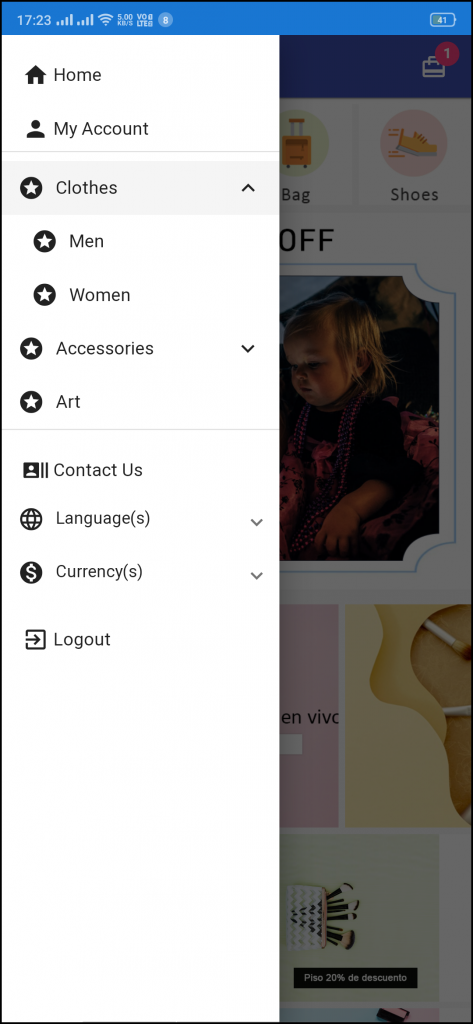
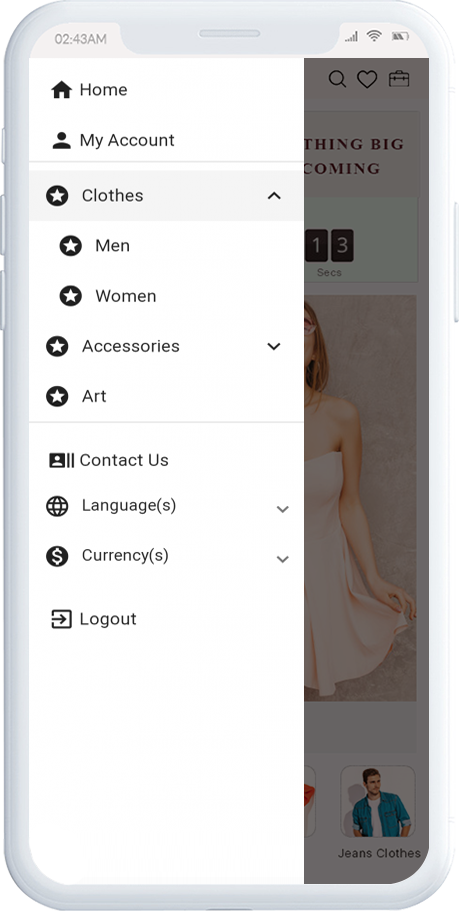
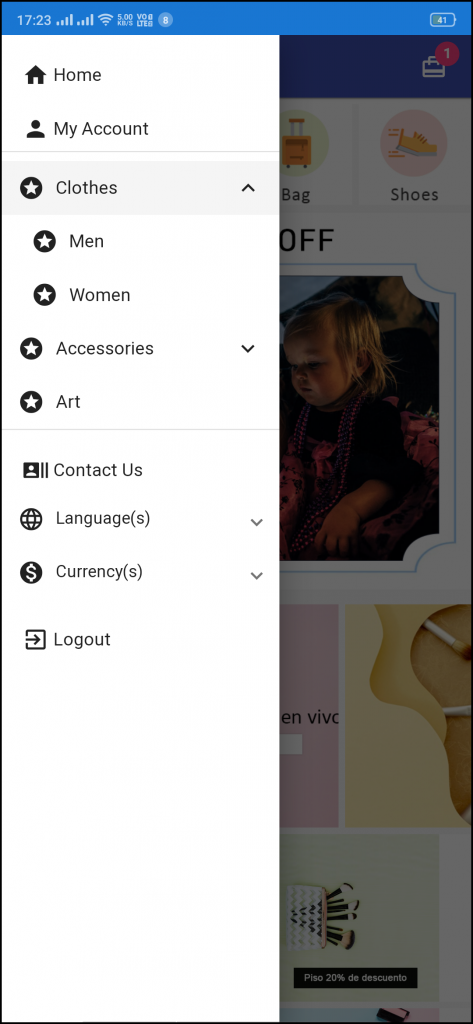
The WooCommerce PWA Mobile Apps comes with seamless and proper categorization available. The users can find relevant categories from the left navigation menu and browse products. Various CMS pages can also be added in the menu offering relevant content on App.
1. My Account
My Account option contains all the users’ personal information including shipping and order. The WooCommerce Progressive Web App shoppers can view and update the saved information.
2. Categories
Categories displayed in the left navigation menu of the WooCommerce Progressive Web App are the same as available on the eCommerce store.
3. CMS Pages
Various CMS pages like About Us, Contact Us, Terms & Conditions, etc. can be accessed from here. These information pages can be added from the admin panel of the extension.
4. Language(s)
The language option allows PWA app users to view the web-app in their desired language.
5. Currency(s)
All available currencies on your website are displayed here on the WooCommerce PWA app.
6. Login/Logout
Users can easily sign-in/sign-out from the WooCommerce PWA app via this option.
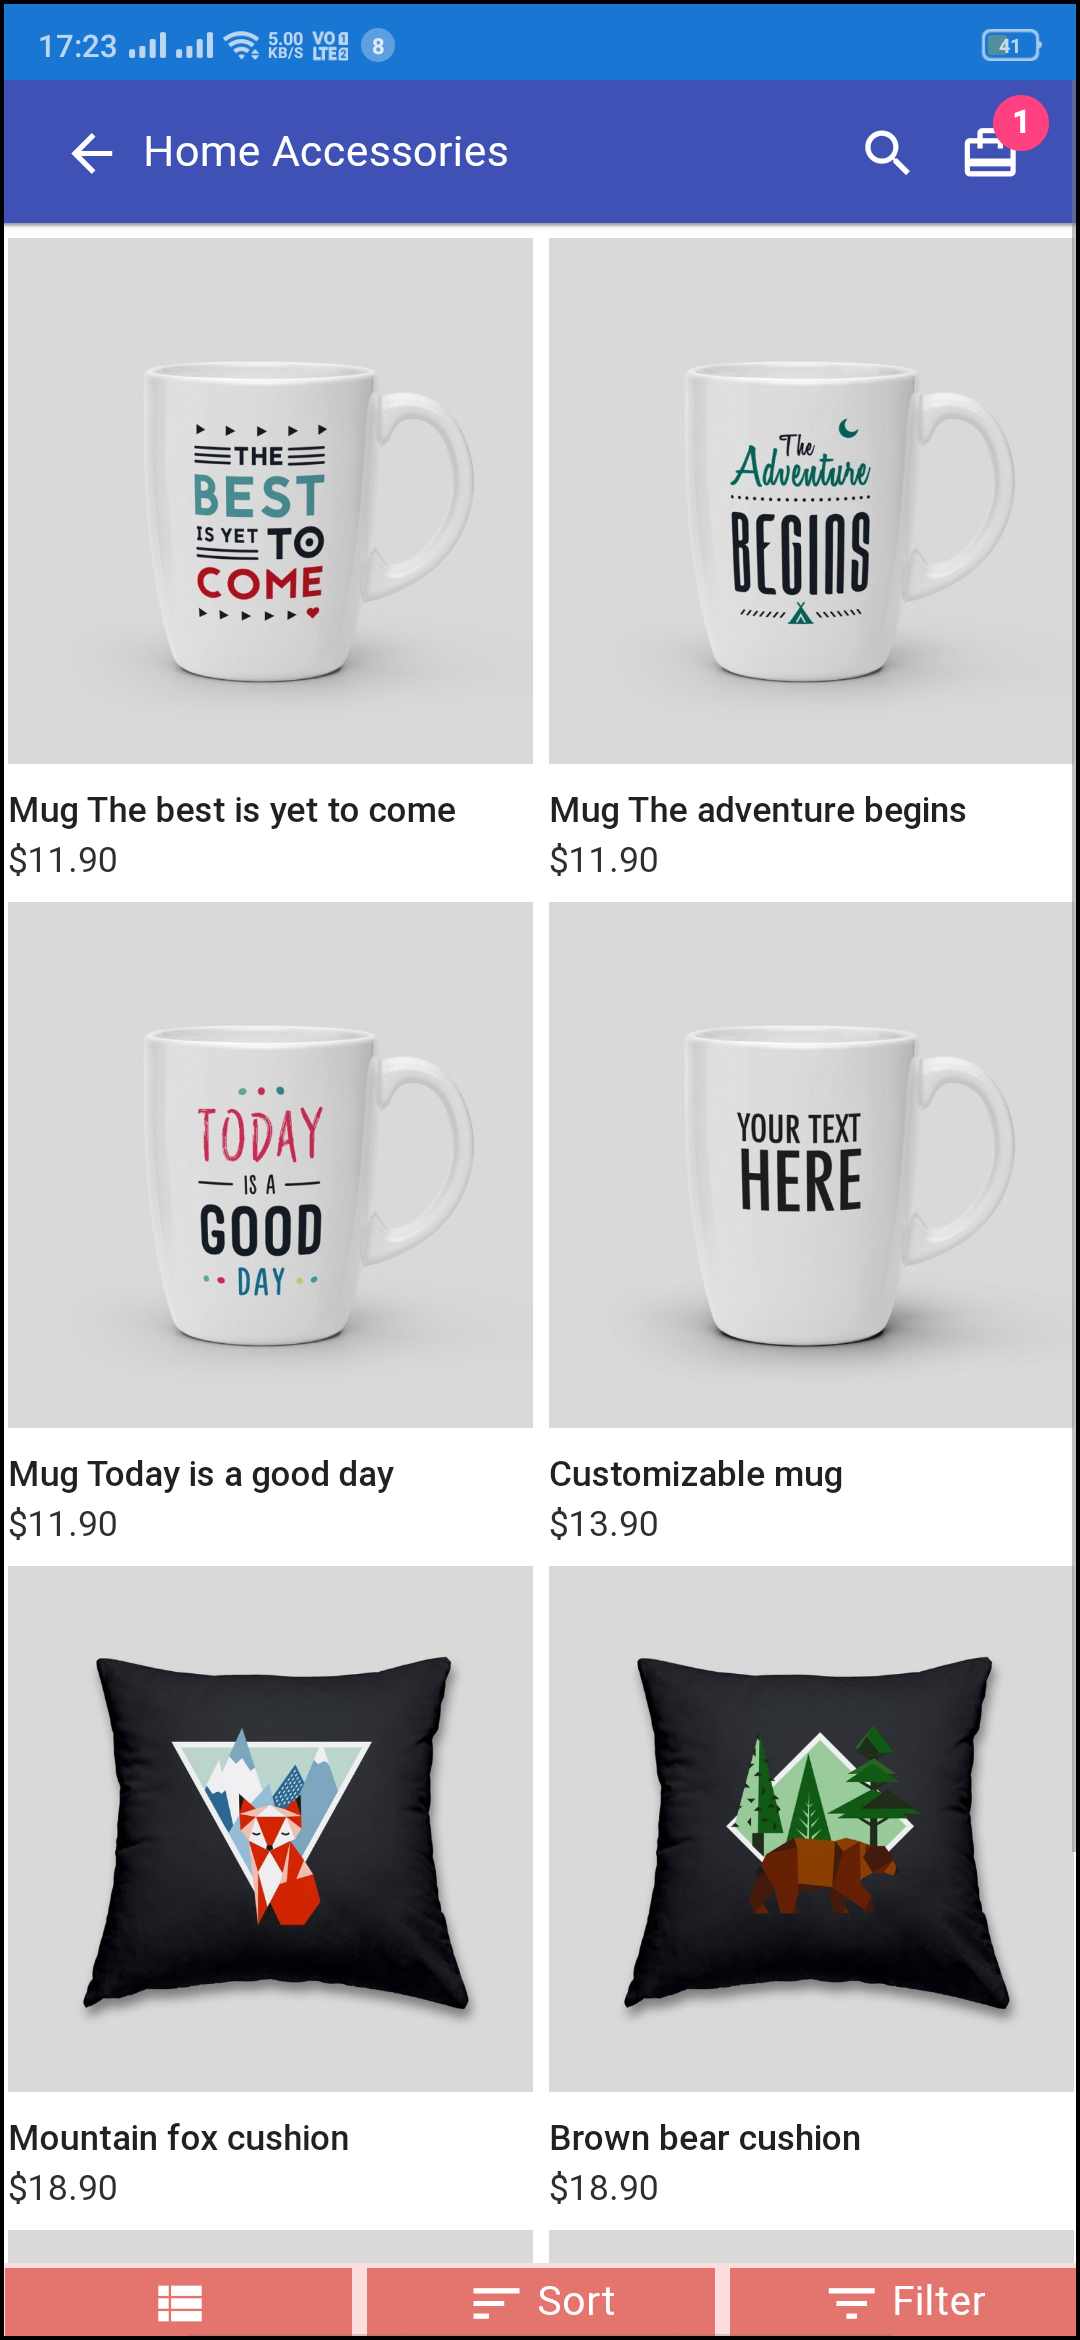
3.3 Category Screen:
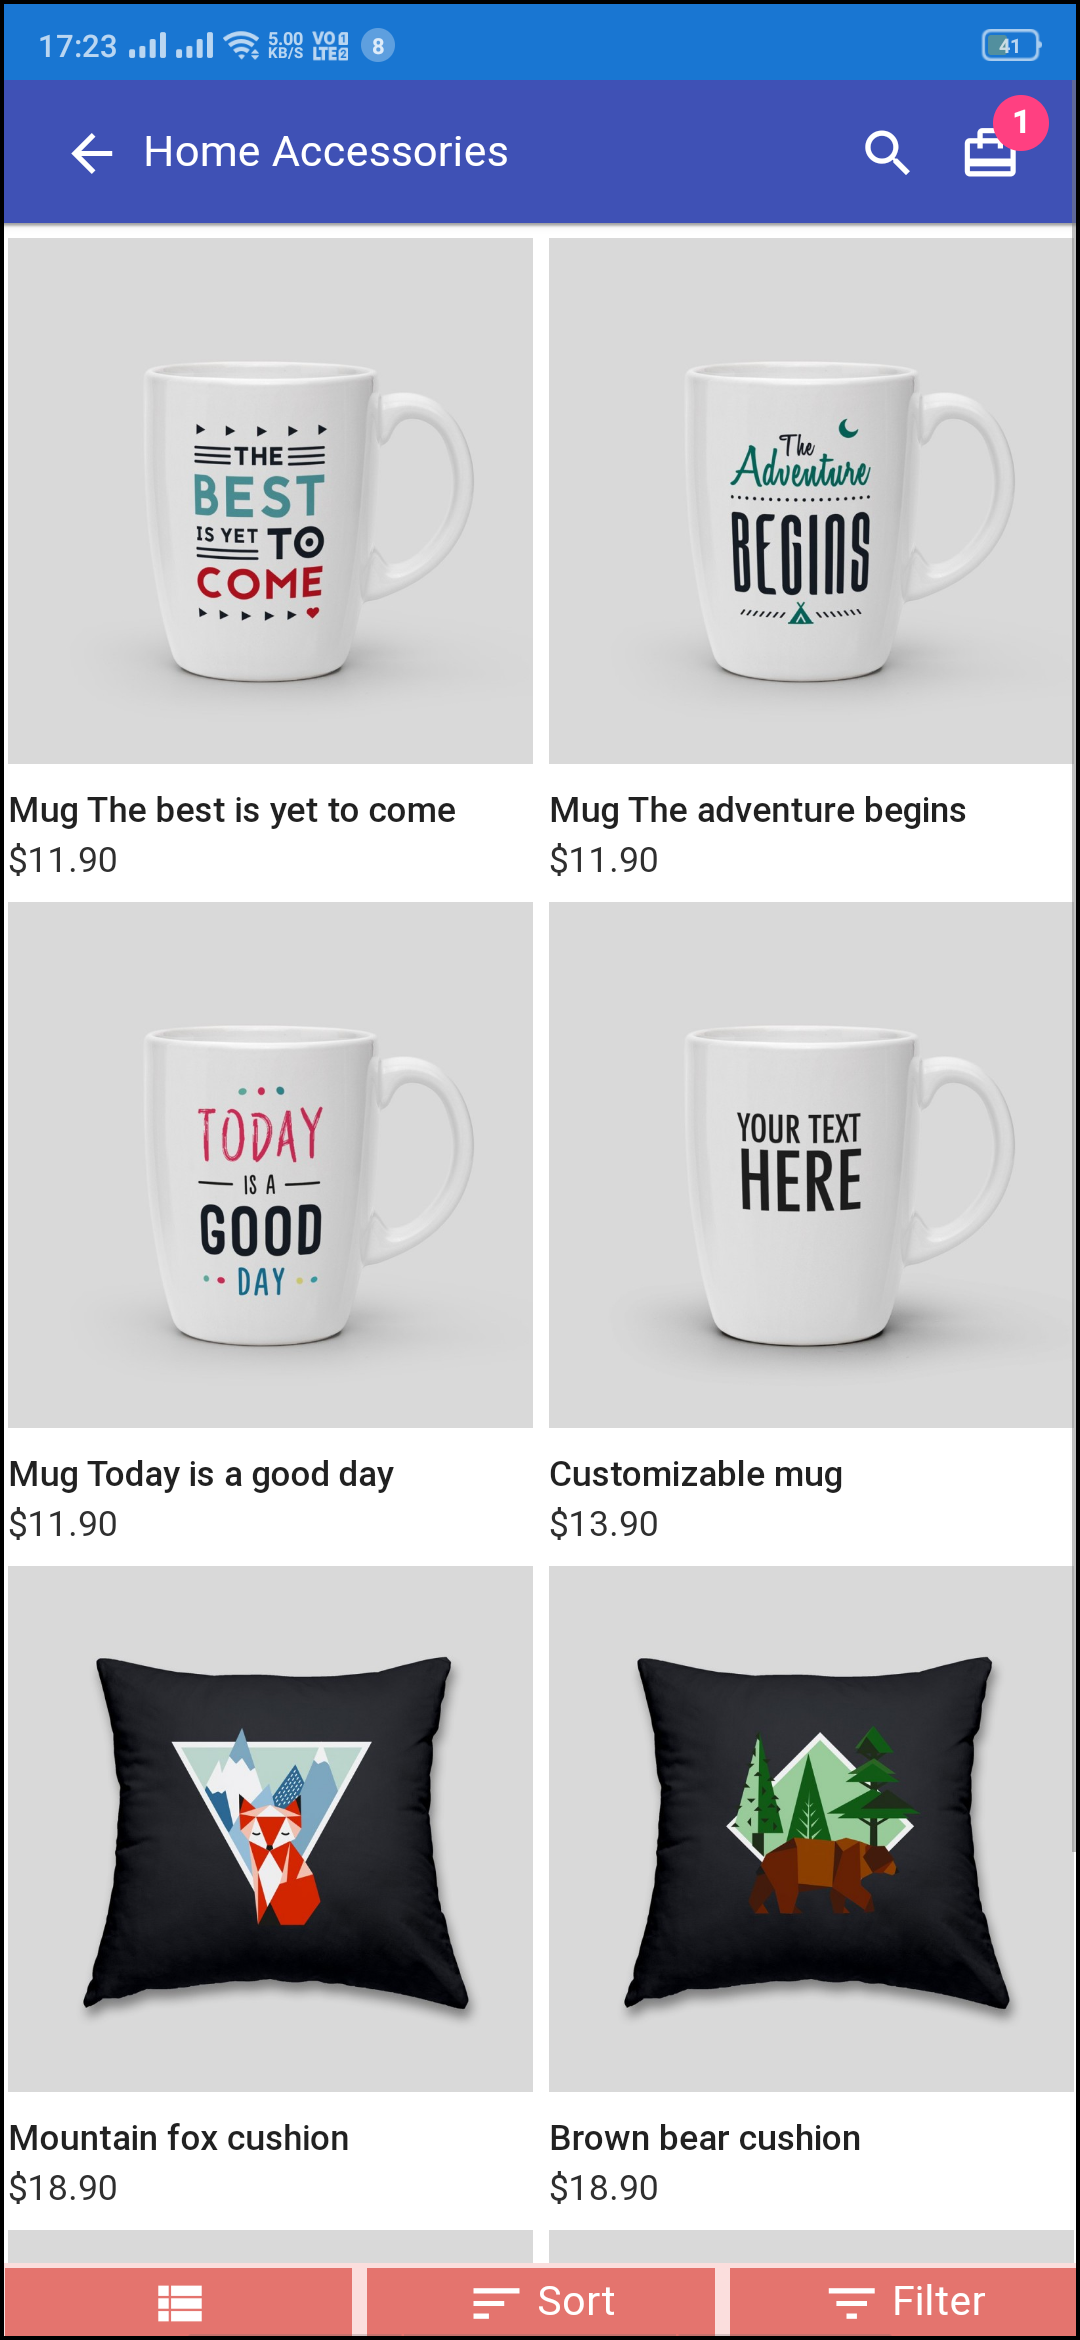
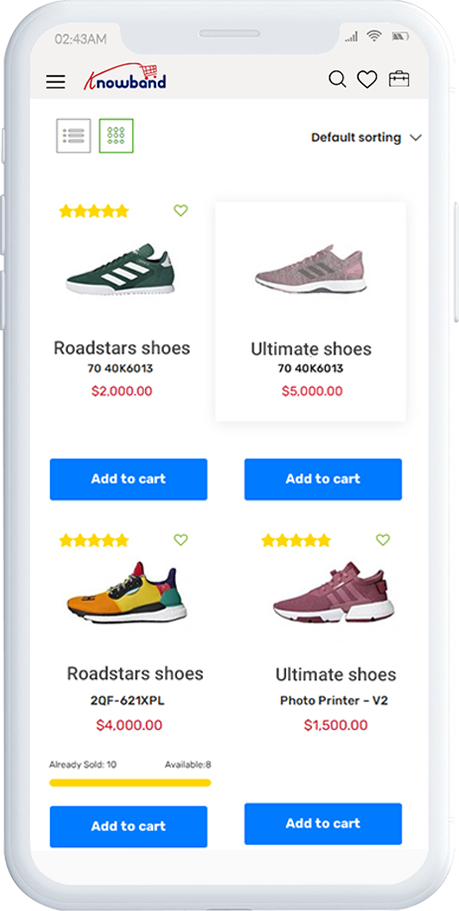
Clutter-free category screens with the list and grid view allow the users to choose what’s best for them from a specific category. The entire store inventory will remain in-sync with WooCommerce PWA Mobile App and new additions and changes even get updated in real-time.
1. List & Grid View:
The categories on the PWA app for WooCommerce can be browsed in both list and grid view.
2. Product Sorting:
The sorting option allows online shoppers to narrow down the products in the desired sort order and find the right one.
3. Product Filter:
The WooCommerce PWA Mobile App offers the option to filter products simplifying the product search. Online shoppers can find the desired products under categories using filters for various attributes like size, color, price, etc.
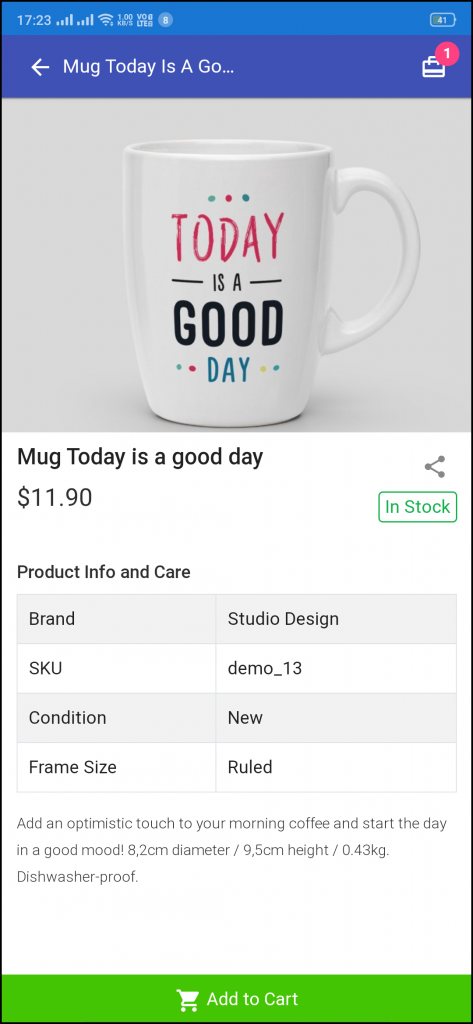
3.4 Product Screen:
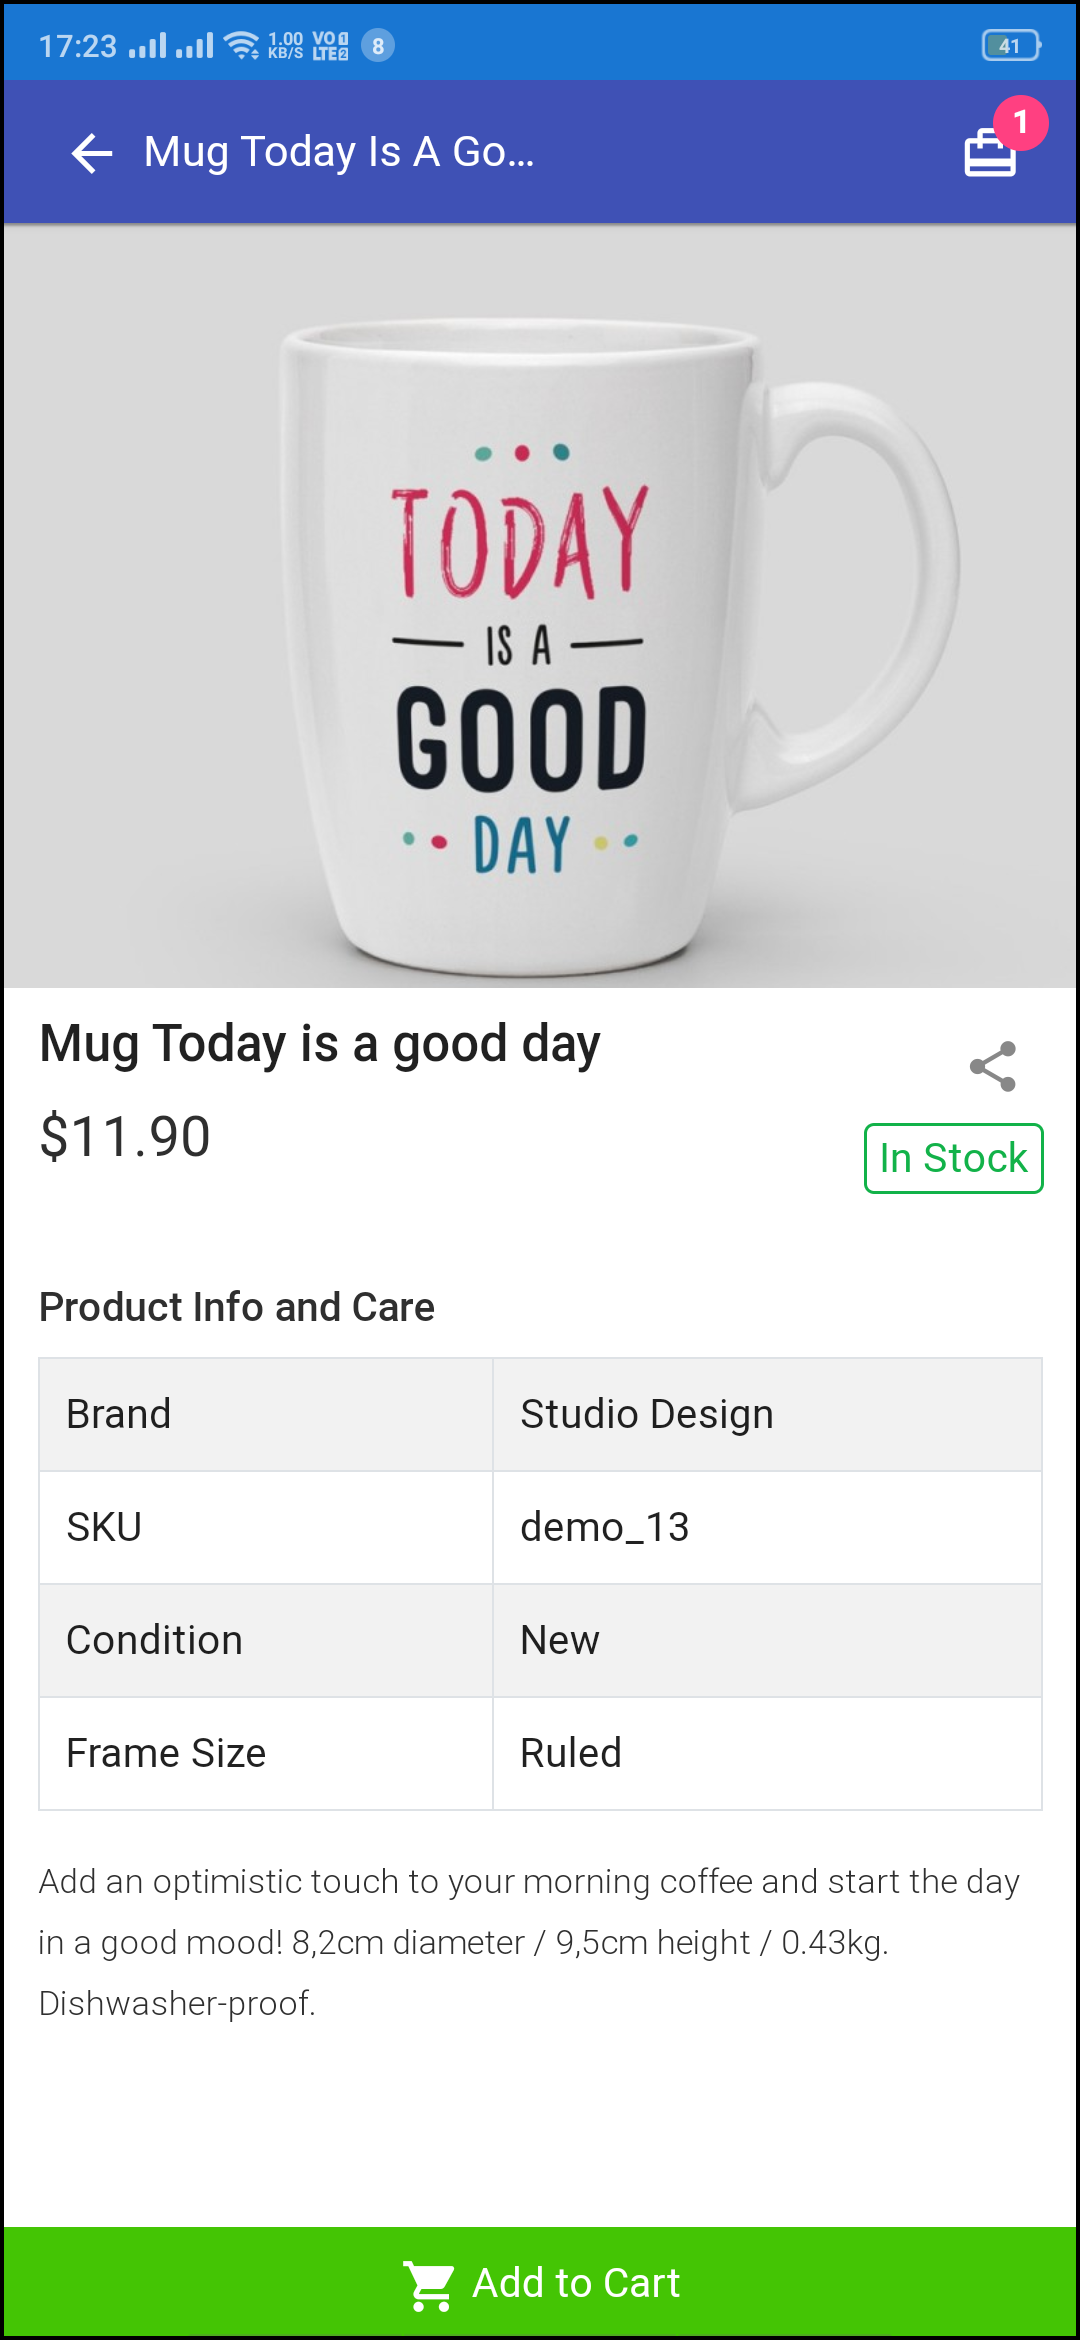
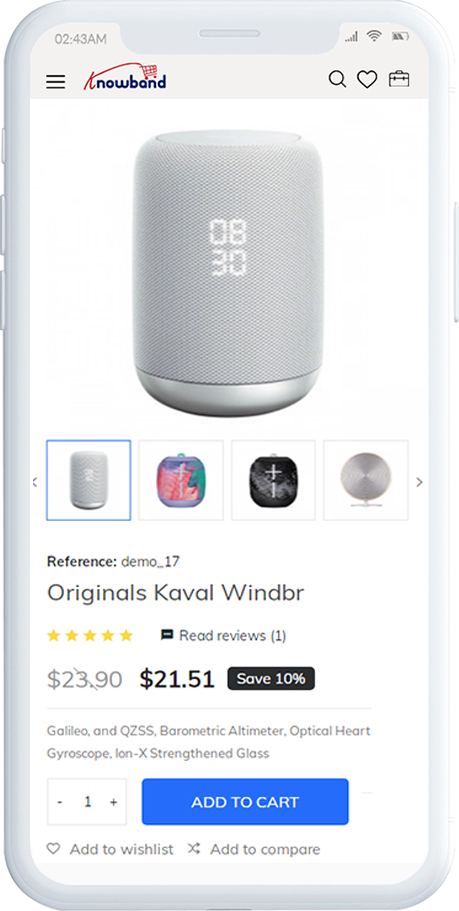
The product screen of the WooCommerce Progressive Web App is as simple & intriguing as it could get. With all the necessary options and information about the product, it becomes a matter of minutes for users to be sure about the product which he/she is about to purchase. Multi-images are available for the product with In stock and Out of stock options.
1. Product Info & Care:
The complete product information as available in the inventory will be displayed here.
2. Short Description:
Users get to read the short description of your product to quickly make up their minds about the purchase.
3. Product Options:
All the options related to the product like size, color, etc. are displayed here.
5. Add To Cart:
This button allows users to add products into the cart. The users can further process the cart for purchase.
6. Product Social Sharing:
The sharing option for the product allows users to share products on multiple social channels.
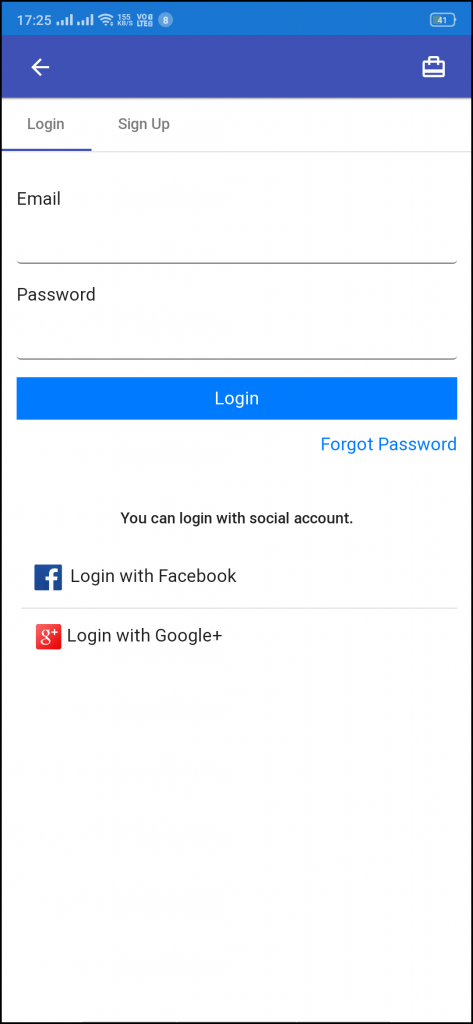
3.5 Login Screen
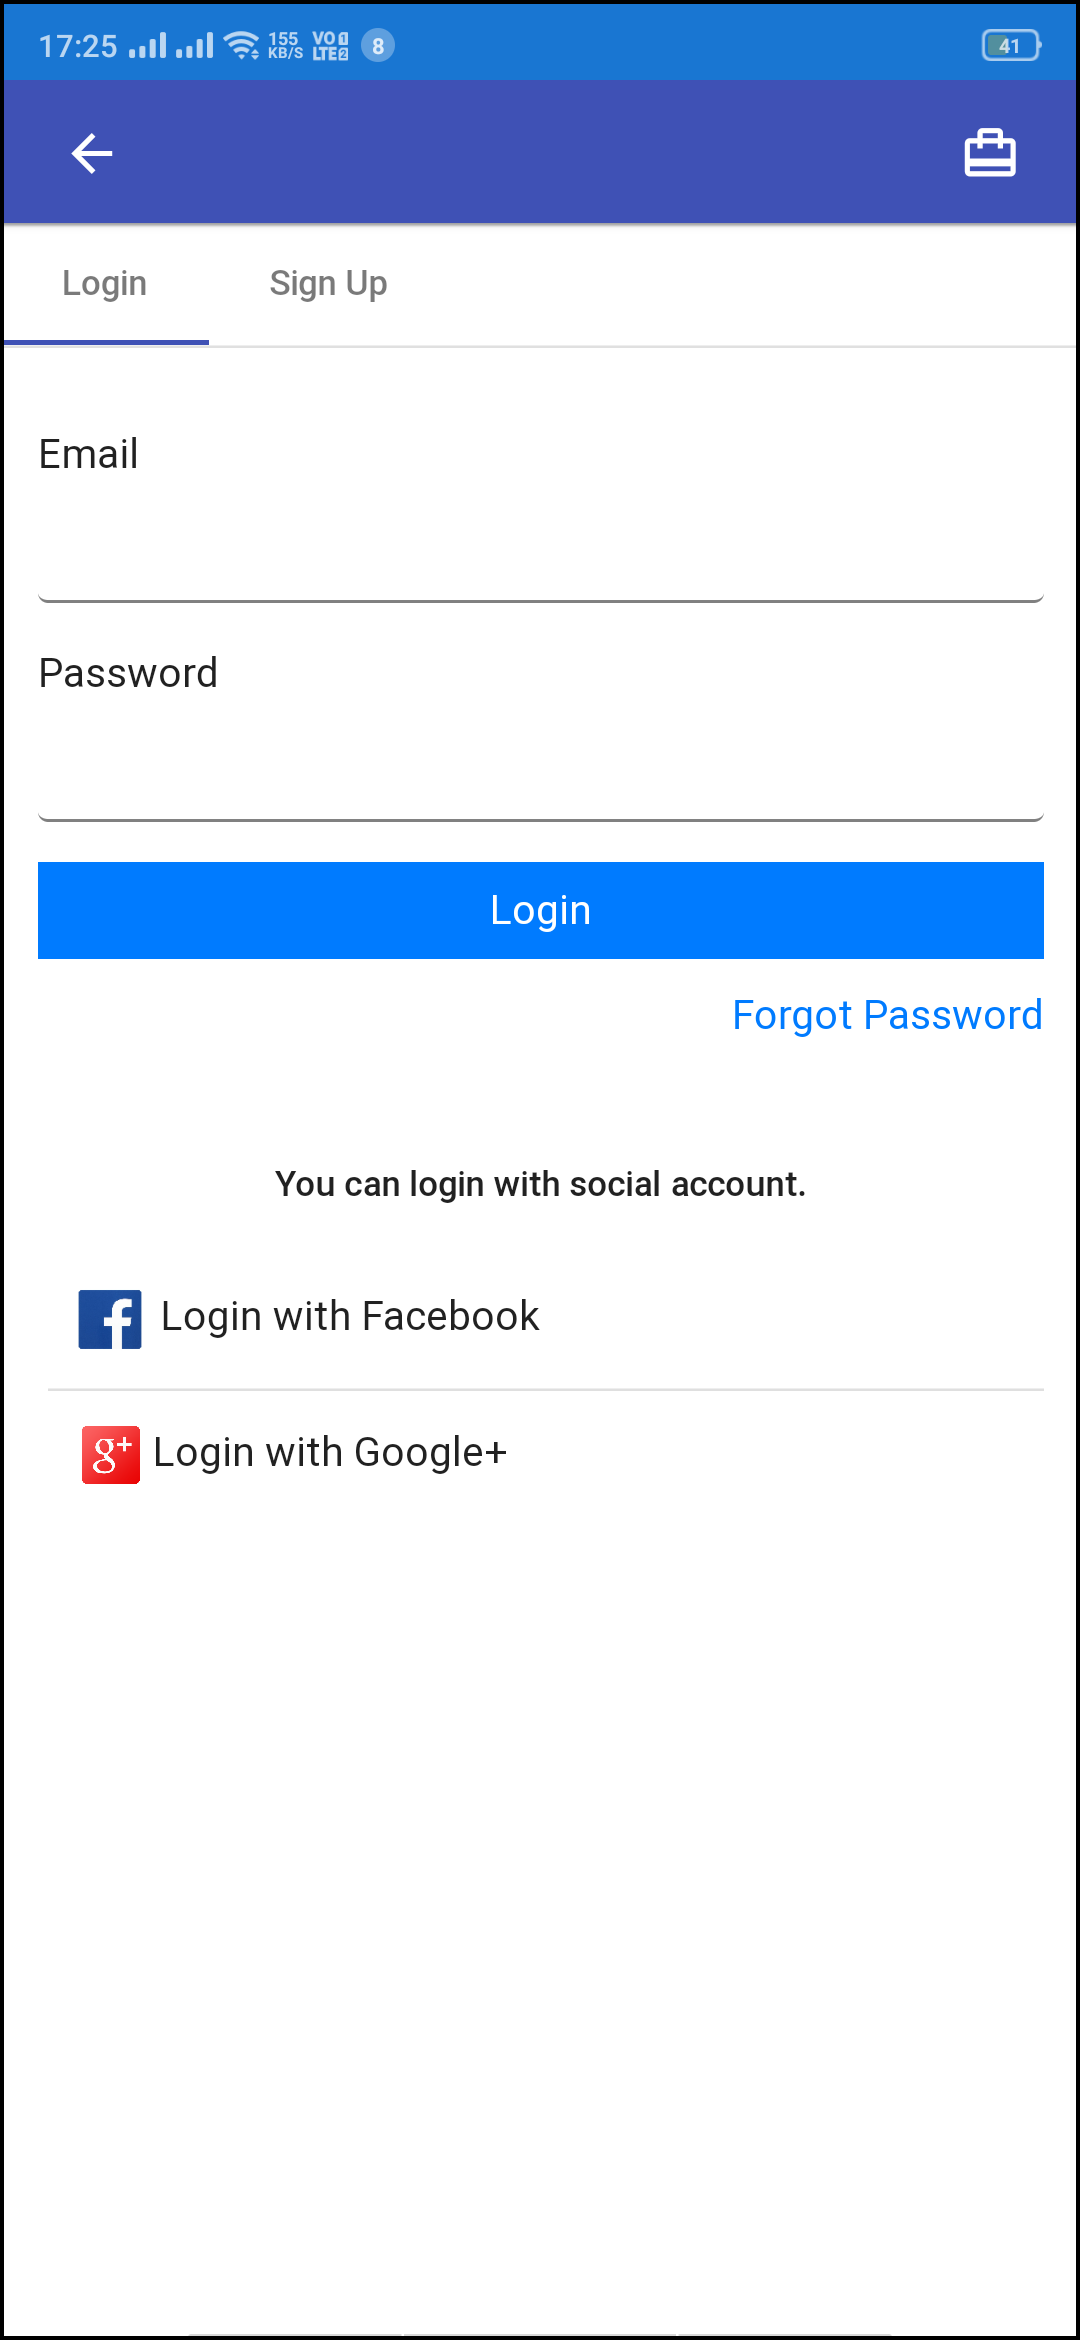
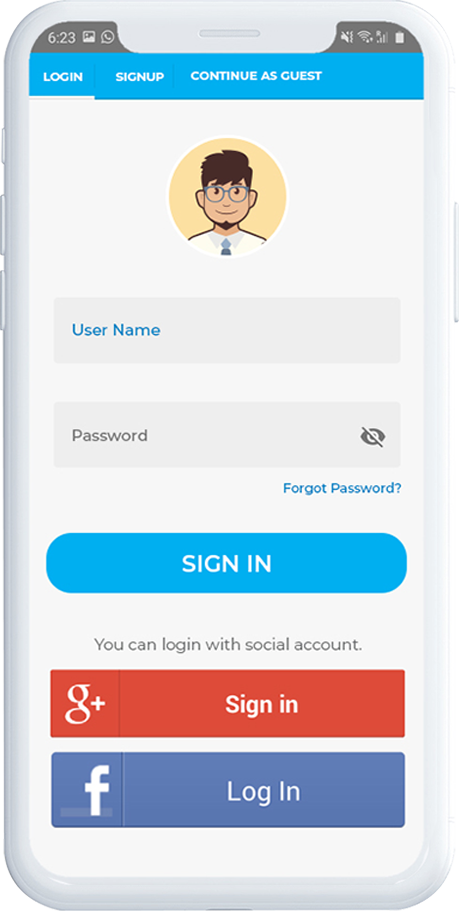
The WooCommerce PWA Mobile App offers one-tap social login options & make the sign-in/registration process more seamless. The WooCommerce Progressive Web App offers Google and Facebook login.
1. Login:
The app users can easily authenticate & login to PWA apps using their previous email login credentials.
2. Sign Up:
All the new app users can sign-up & create their account on the store from the WooCommerce PWA App. The sign-up form asks for only the necessary details to create an account.
3. Login with Facebook:
The users can log in to the PWA app using their Facebook Account Credentials.
4. Login with Google:
The users can log in to the PWA app using their Google Account Credentials.
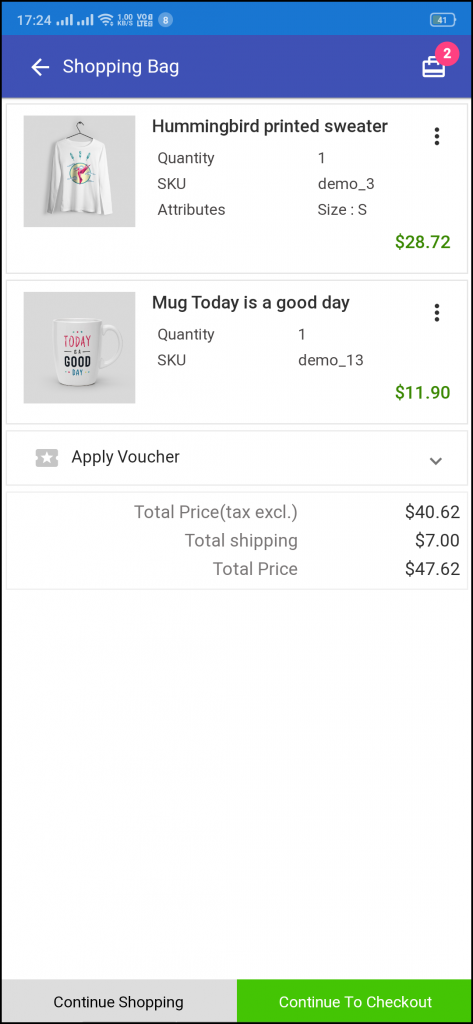
3.6 Shopping Cart Screen:
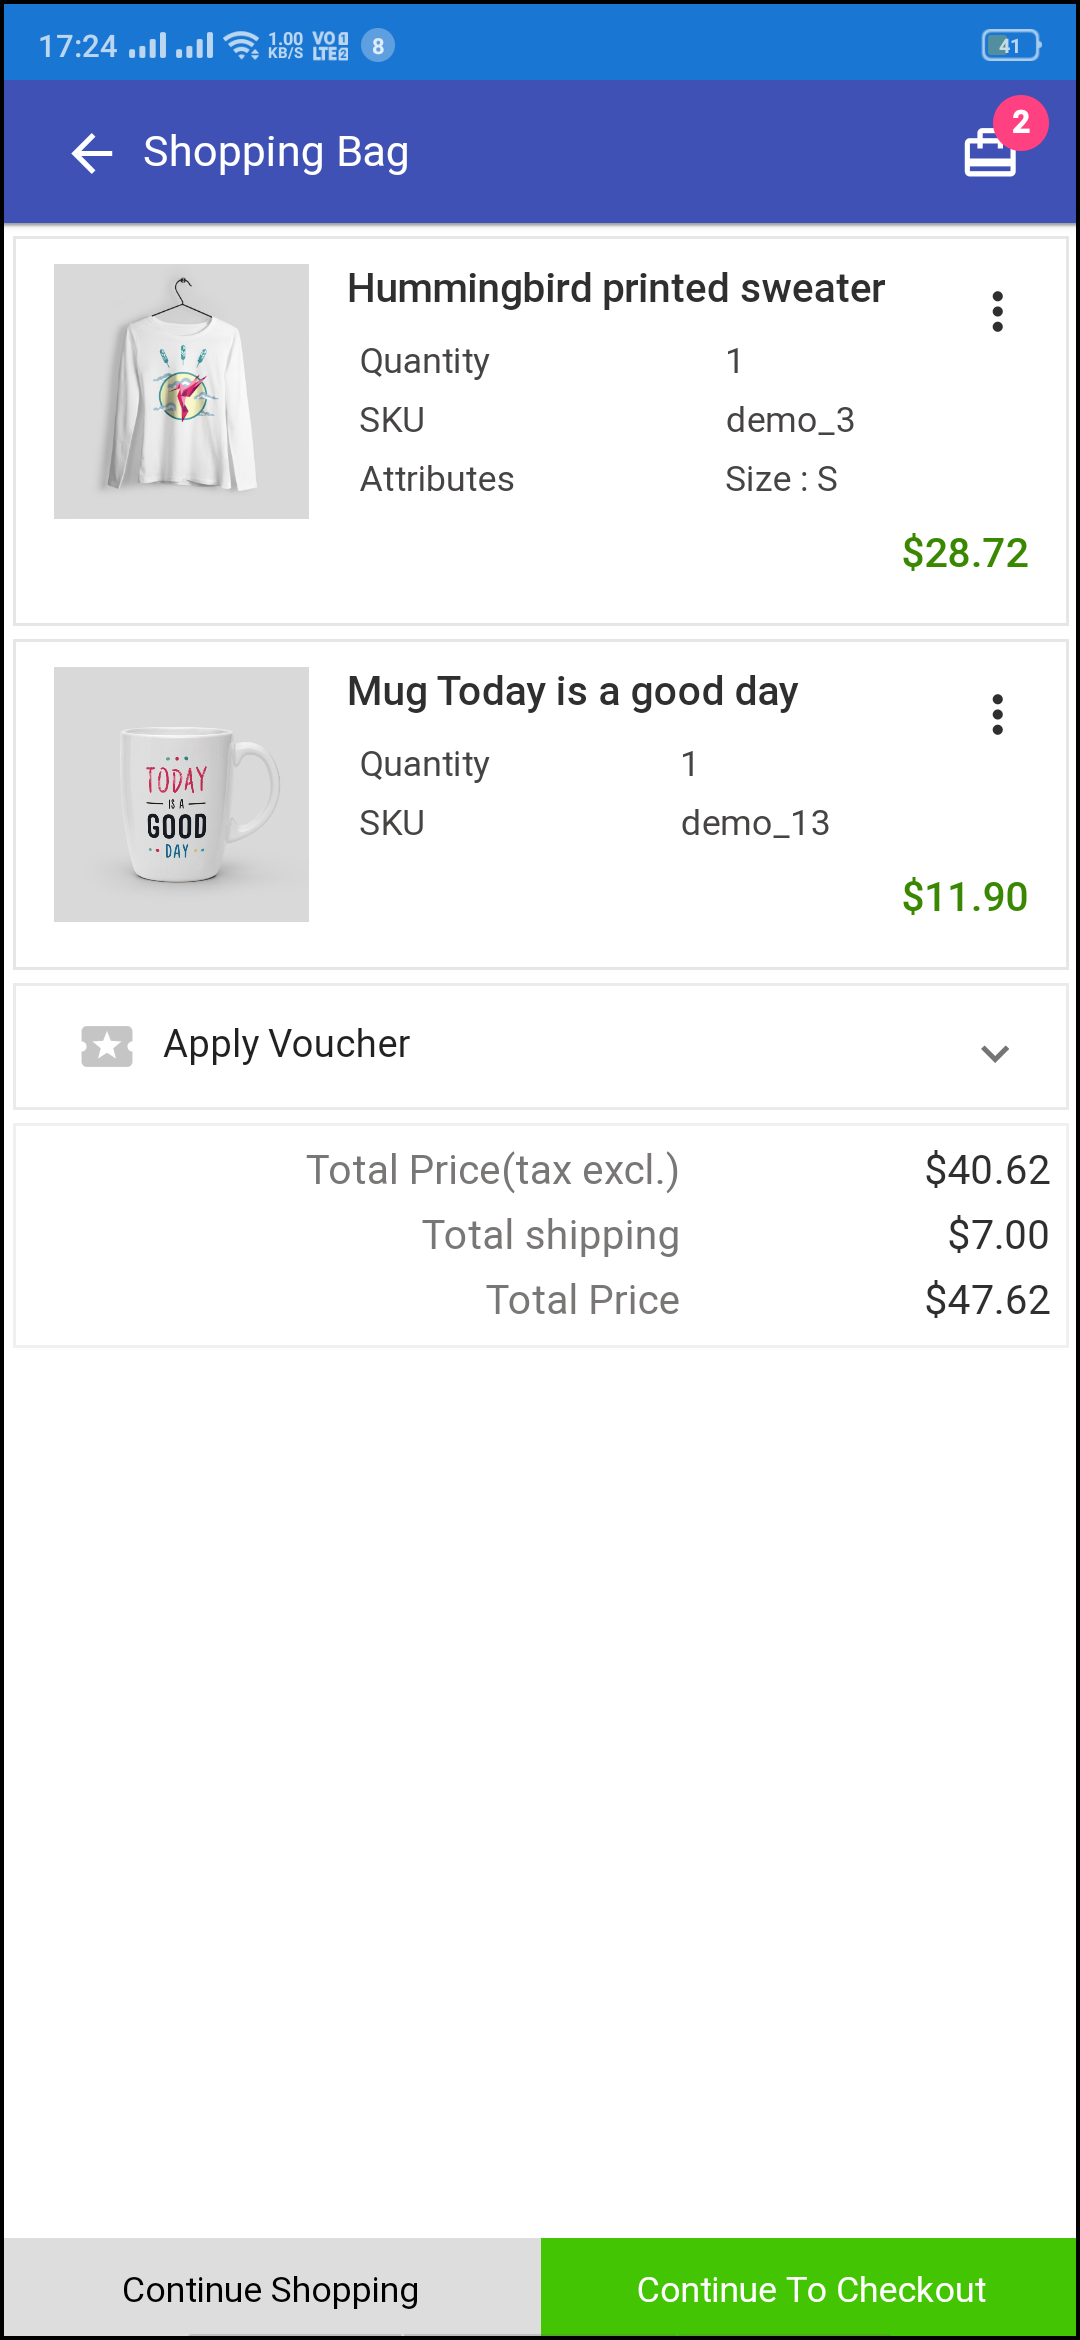
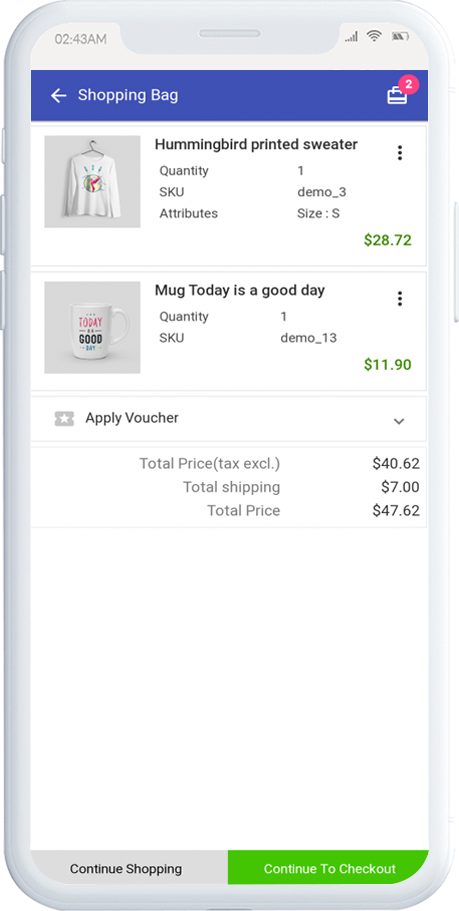
The Shopping Cart screen of the WooCommerce PWA Mobile App will display all products added into the shopping cart. The app users can view Product name, quantity, total price & shipping cost. This screen has the following options:
1. Apply Voucher:
This option allows users to use website coupons and grab discount offers.
2. Total Product Price:
The users get to view the complete cost of their shopping bag before proceeding further. It is automatically updated according to any update with product quantity or new addition.
3. Update Product Quantity:
The PWA app users can even update the product quantity with the “Update Quantity” option.
4. Remove Product:
The app users can simply remove the product from the cart by simply tapping the “Remove” option.
5. Continue Shopping:
The app users can leave the cart to browse more products on your app.
6. Continue To Checkout:
The PWA app users can proceed further to the checkout & payment screens just by tapping the “Continue To Checkout” option.
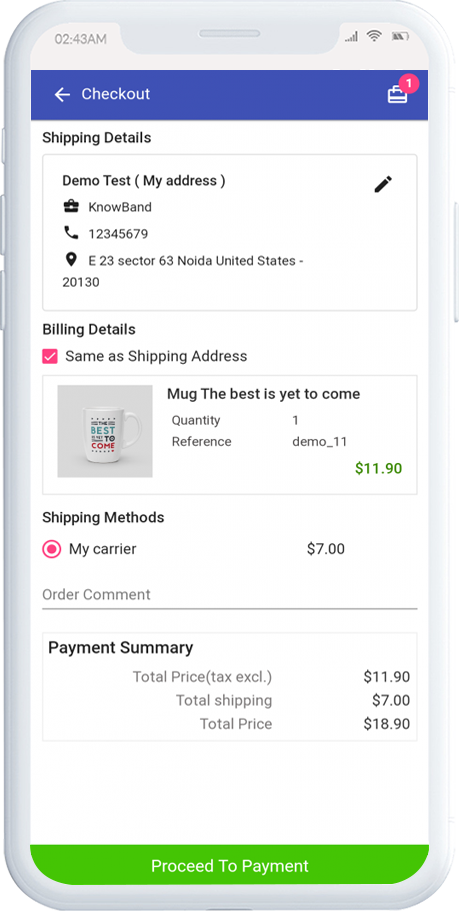
3.7 Checkout Screen
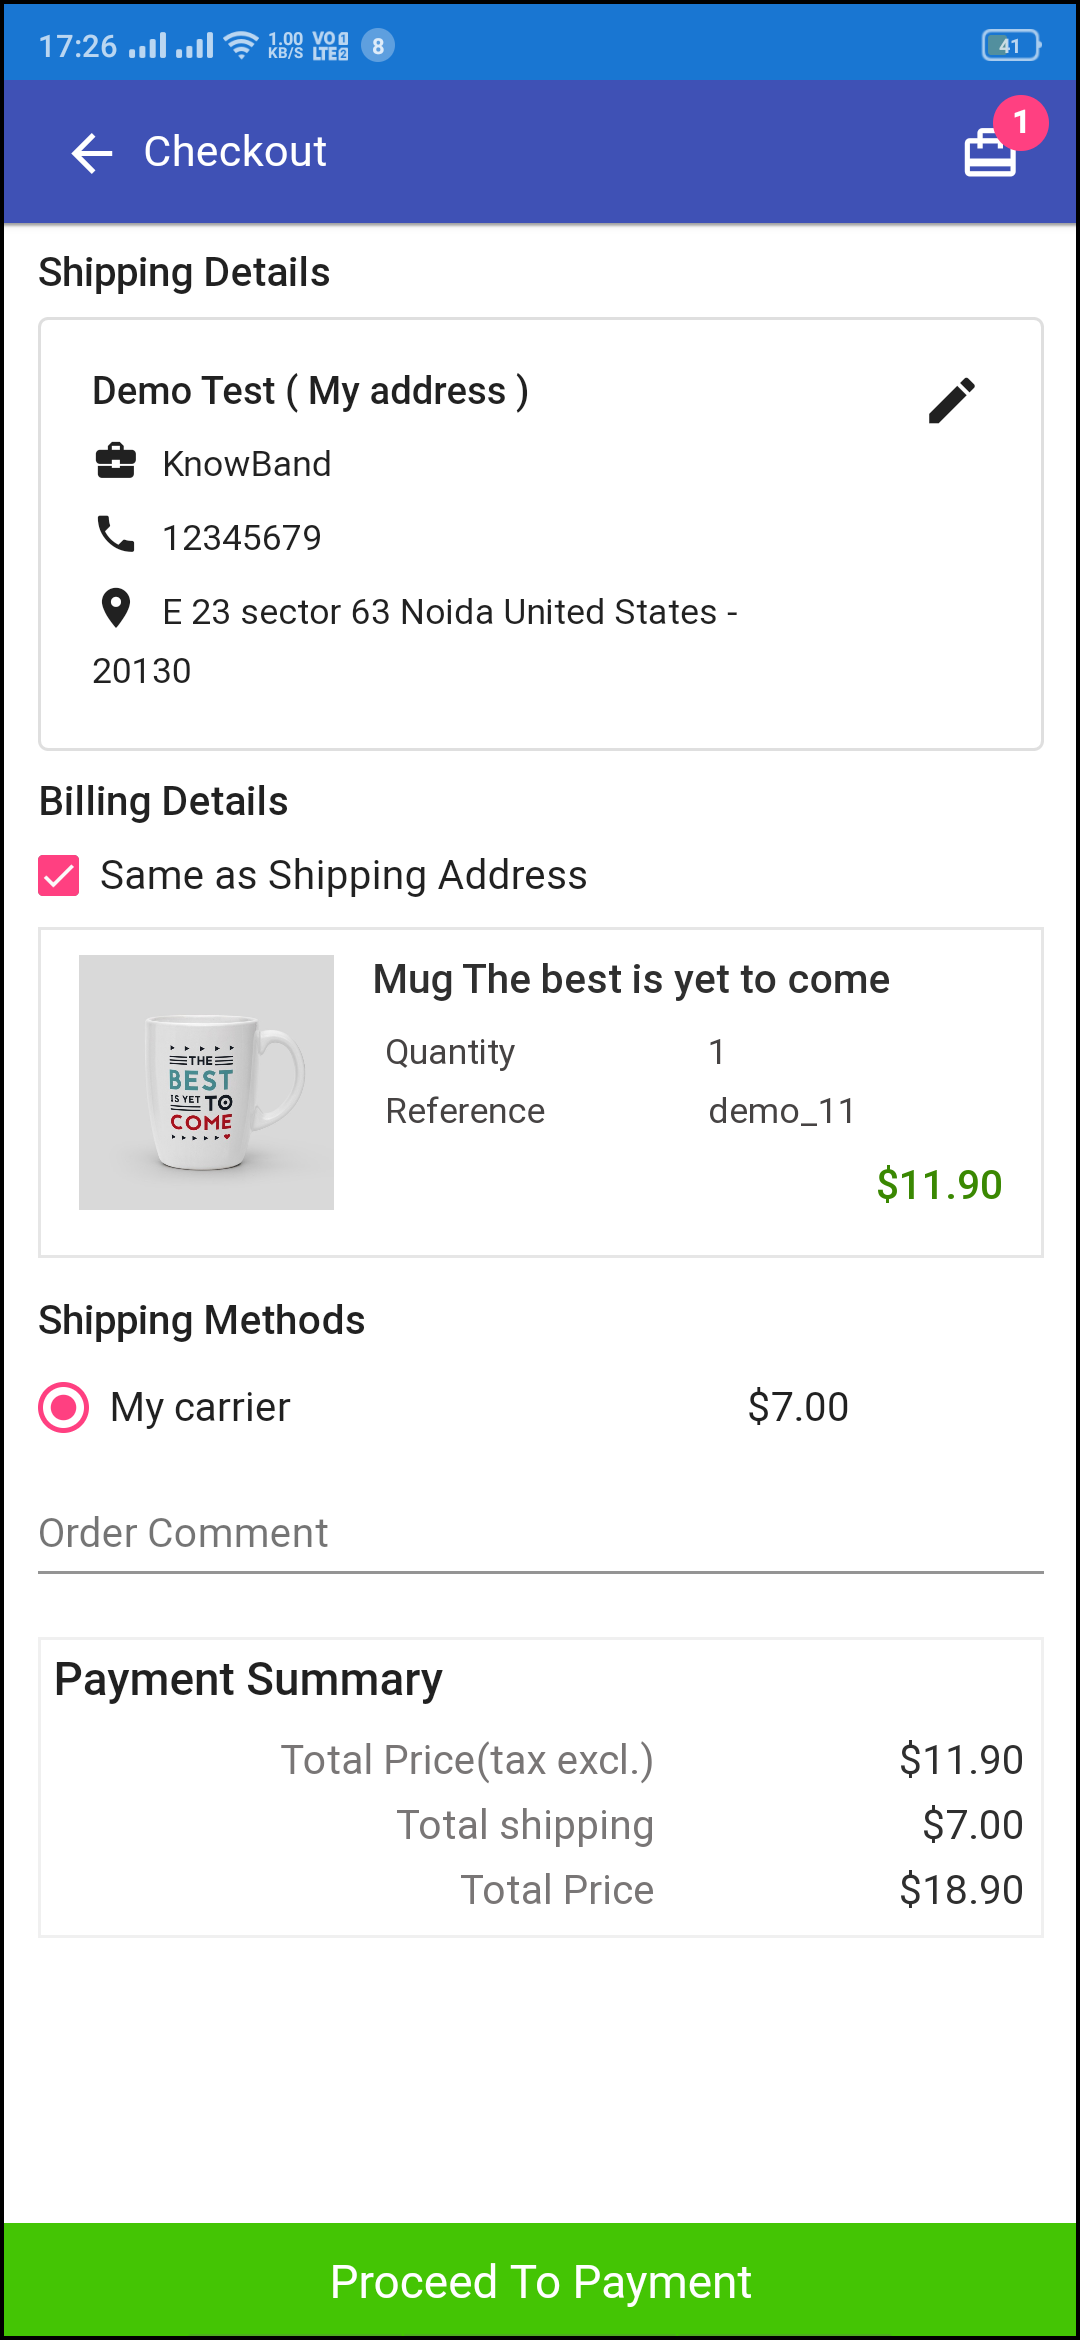
The Progressive Web App for WooCommerce has a simplified single-screen checkout with only relevant information. The app users can view complete checkout details like shipping details, billing details, order summary, order comment, payment summary.
1. Shipping & Billing Details:
This screen provides details of the shipping & billing addresses saved by the user. The user can also edit/save the new shipping address if needed.
2. Order Summary:
The app users get to view product details before making payment.
3. Shipping Methods:
All available shipping methods are displayed here. Users can choose the one suiting their needs.
4. Order Comment:
Users can also add any comment related to their order which will be visible to store admin on the order web-page in the backend.
5. Payment Summary:
This section displays the complete breakdown payment details involved with the purchase.
6. Proceed To Payment:
The PWA app users will be re-directed to the Payment screen after tapping the “Proceed To Payment” button.
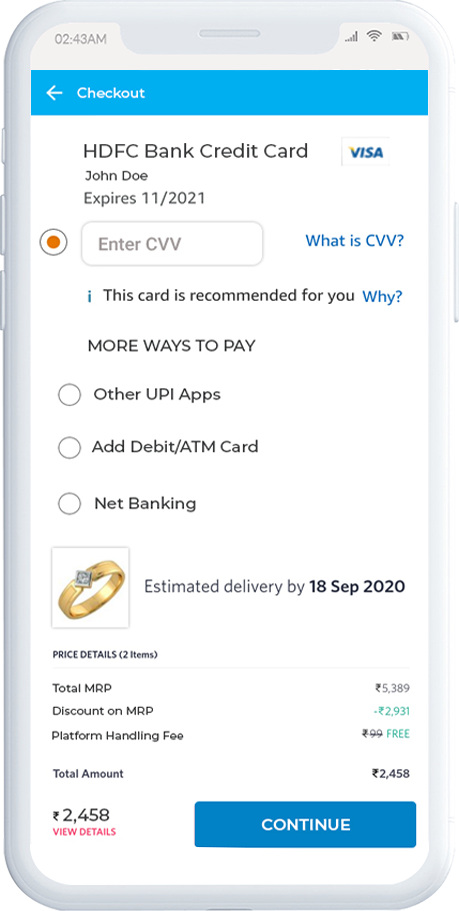
3.8 Payment Screen:
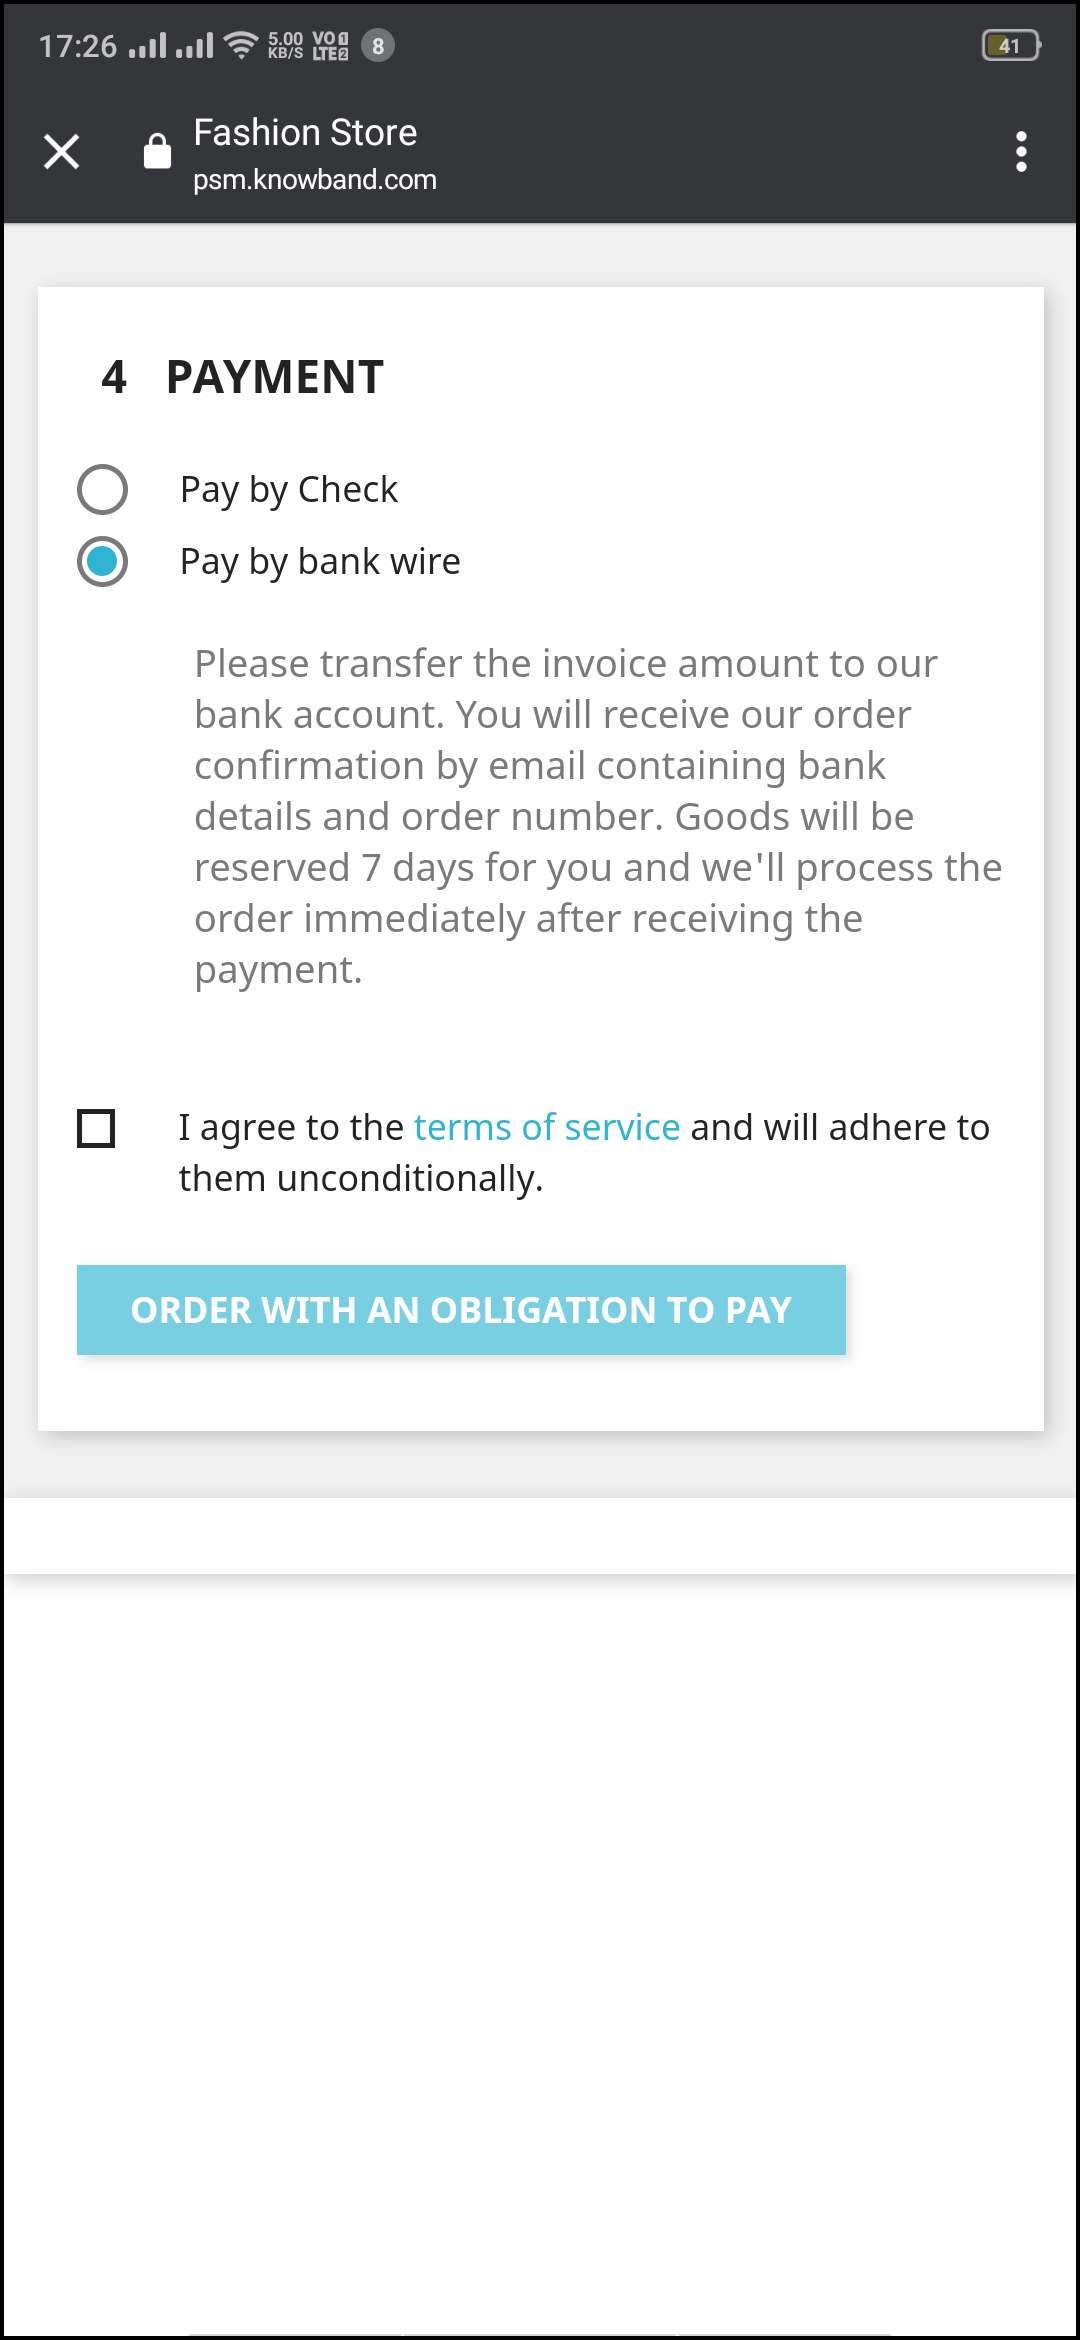
The payment screen of the WooCommerce PWA App has all web-view payments available on the store. Online shoppers can find similar payment experiences on both websites and apps.
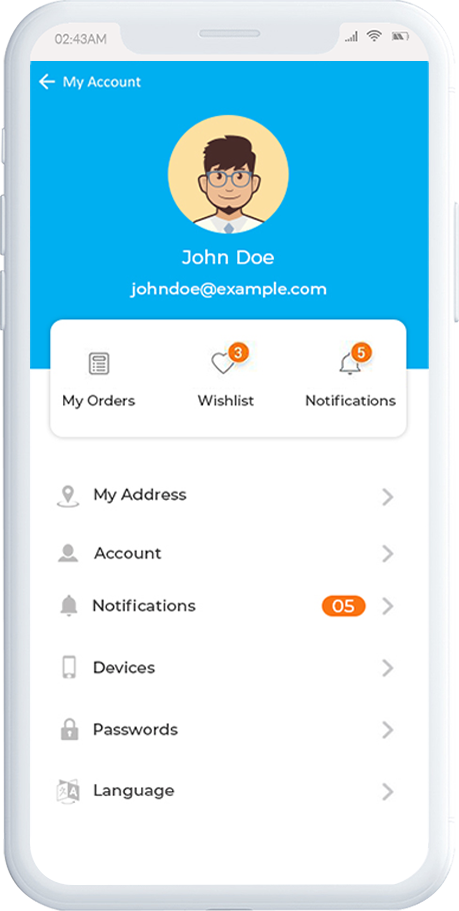
3.9 My Account Screen
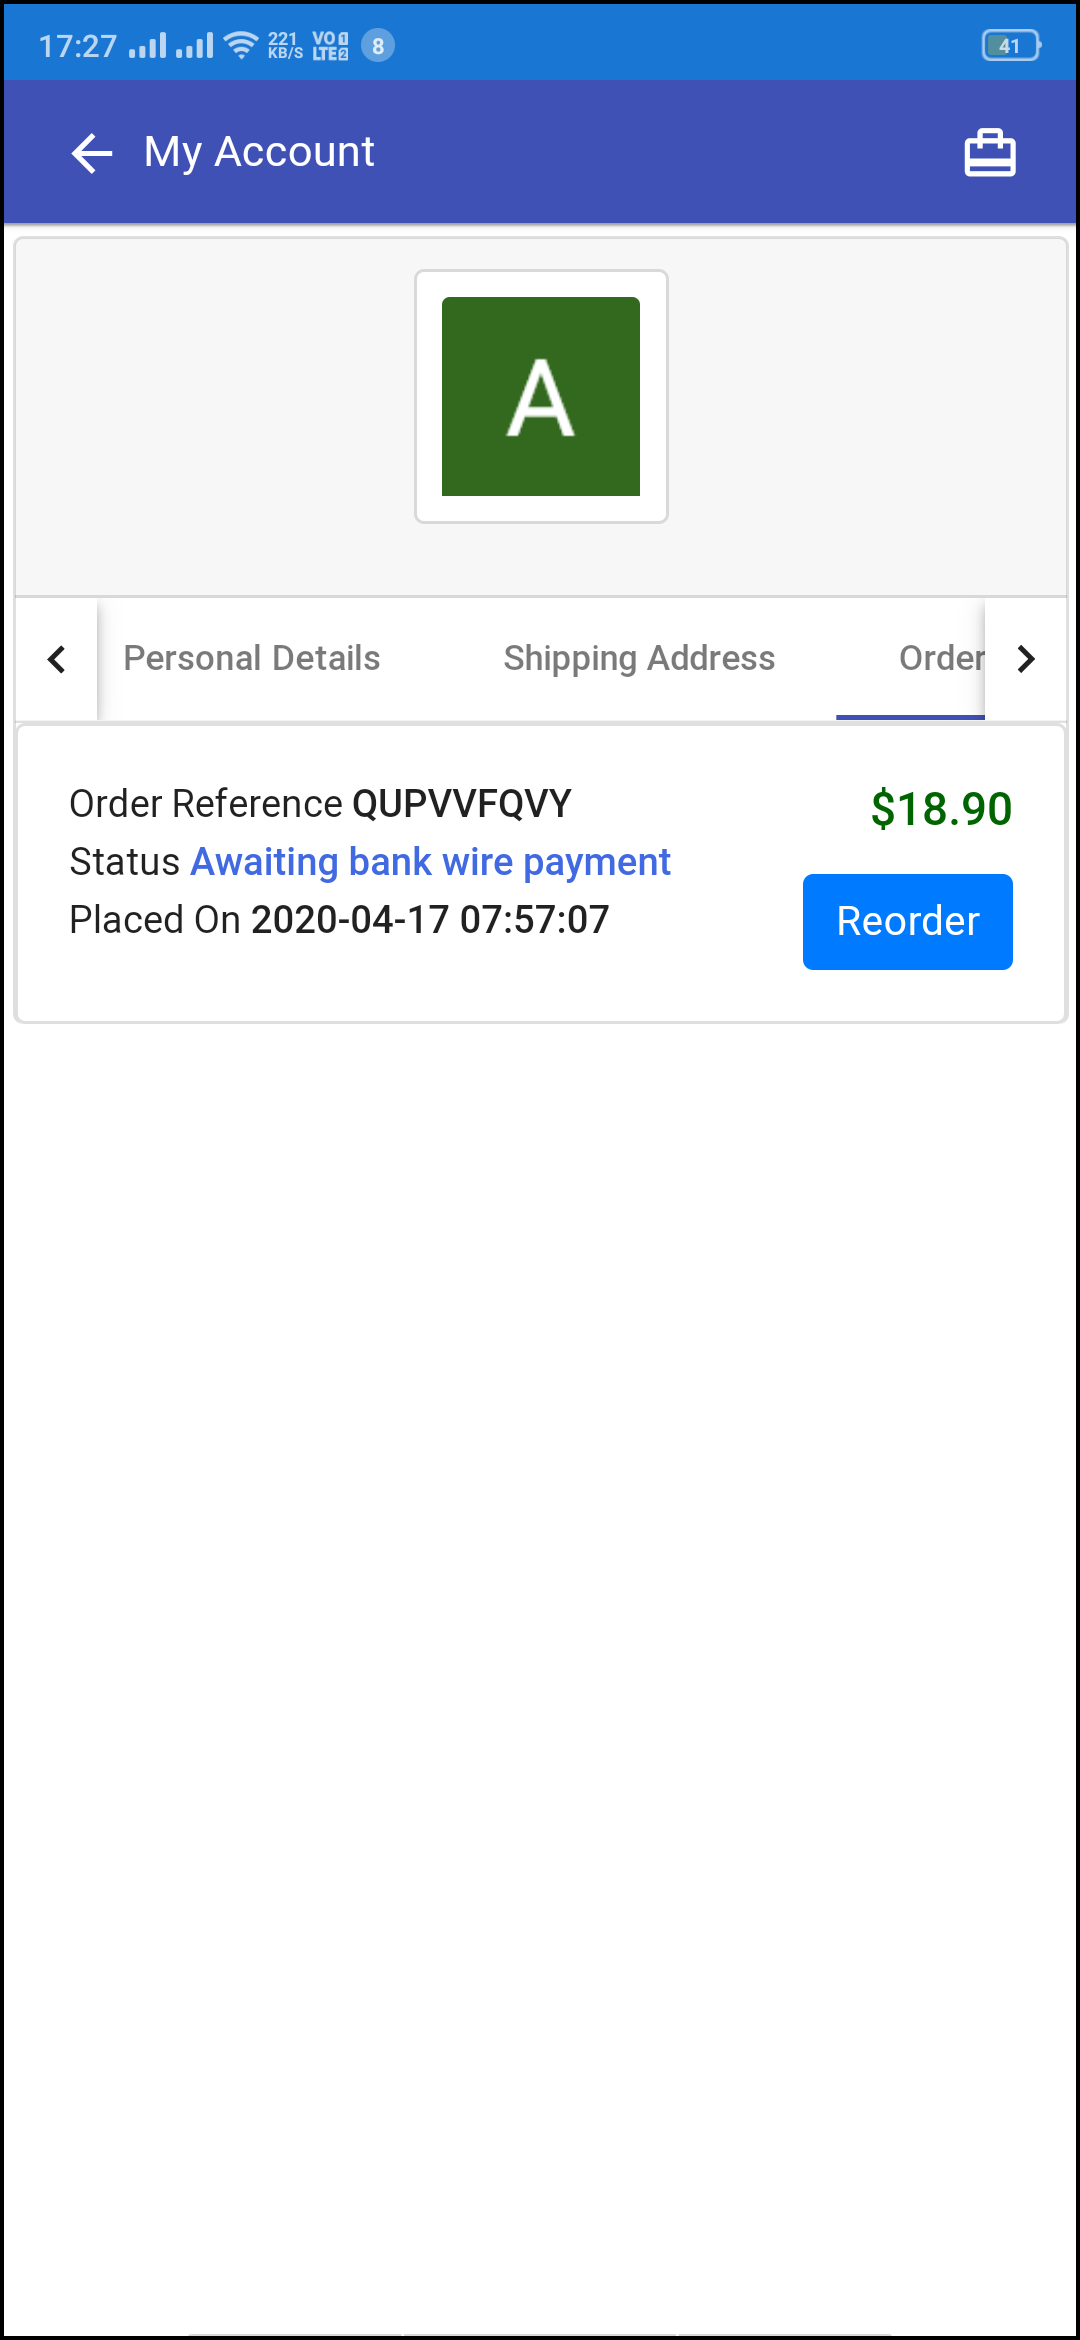
My account screen of the WooCommerce PWA Mobile App allows online shoppers to view their complete details saved on the Progressive Web App. This screen also displays a list of previous app orders as well.
1. Personal Details:
Users get to view & update their pre-saved personal details on PWA Mobile App.
2. Shipping Address(s):
The app users can see the complete list of pre-saved shipping addresses in the PWA app.
3. Order Details:
The app users can get to view the complete list of the previously placed orders from the PWA app and their details.
4. Re-order feature:
There is a direct re-order button on the My Account screen of the PWA app. All the previous products under this order will be added into the cart with just a single button.
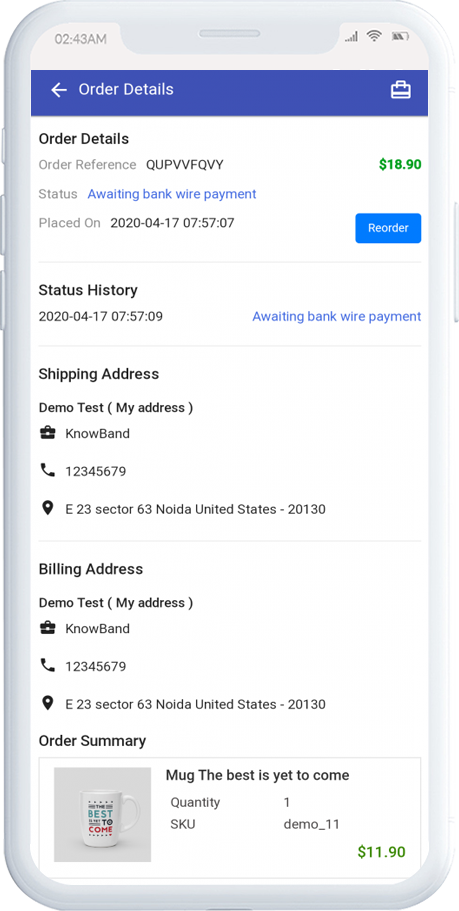
3.91 Order Detail Screen
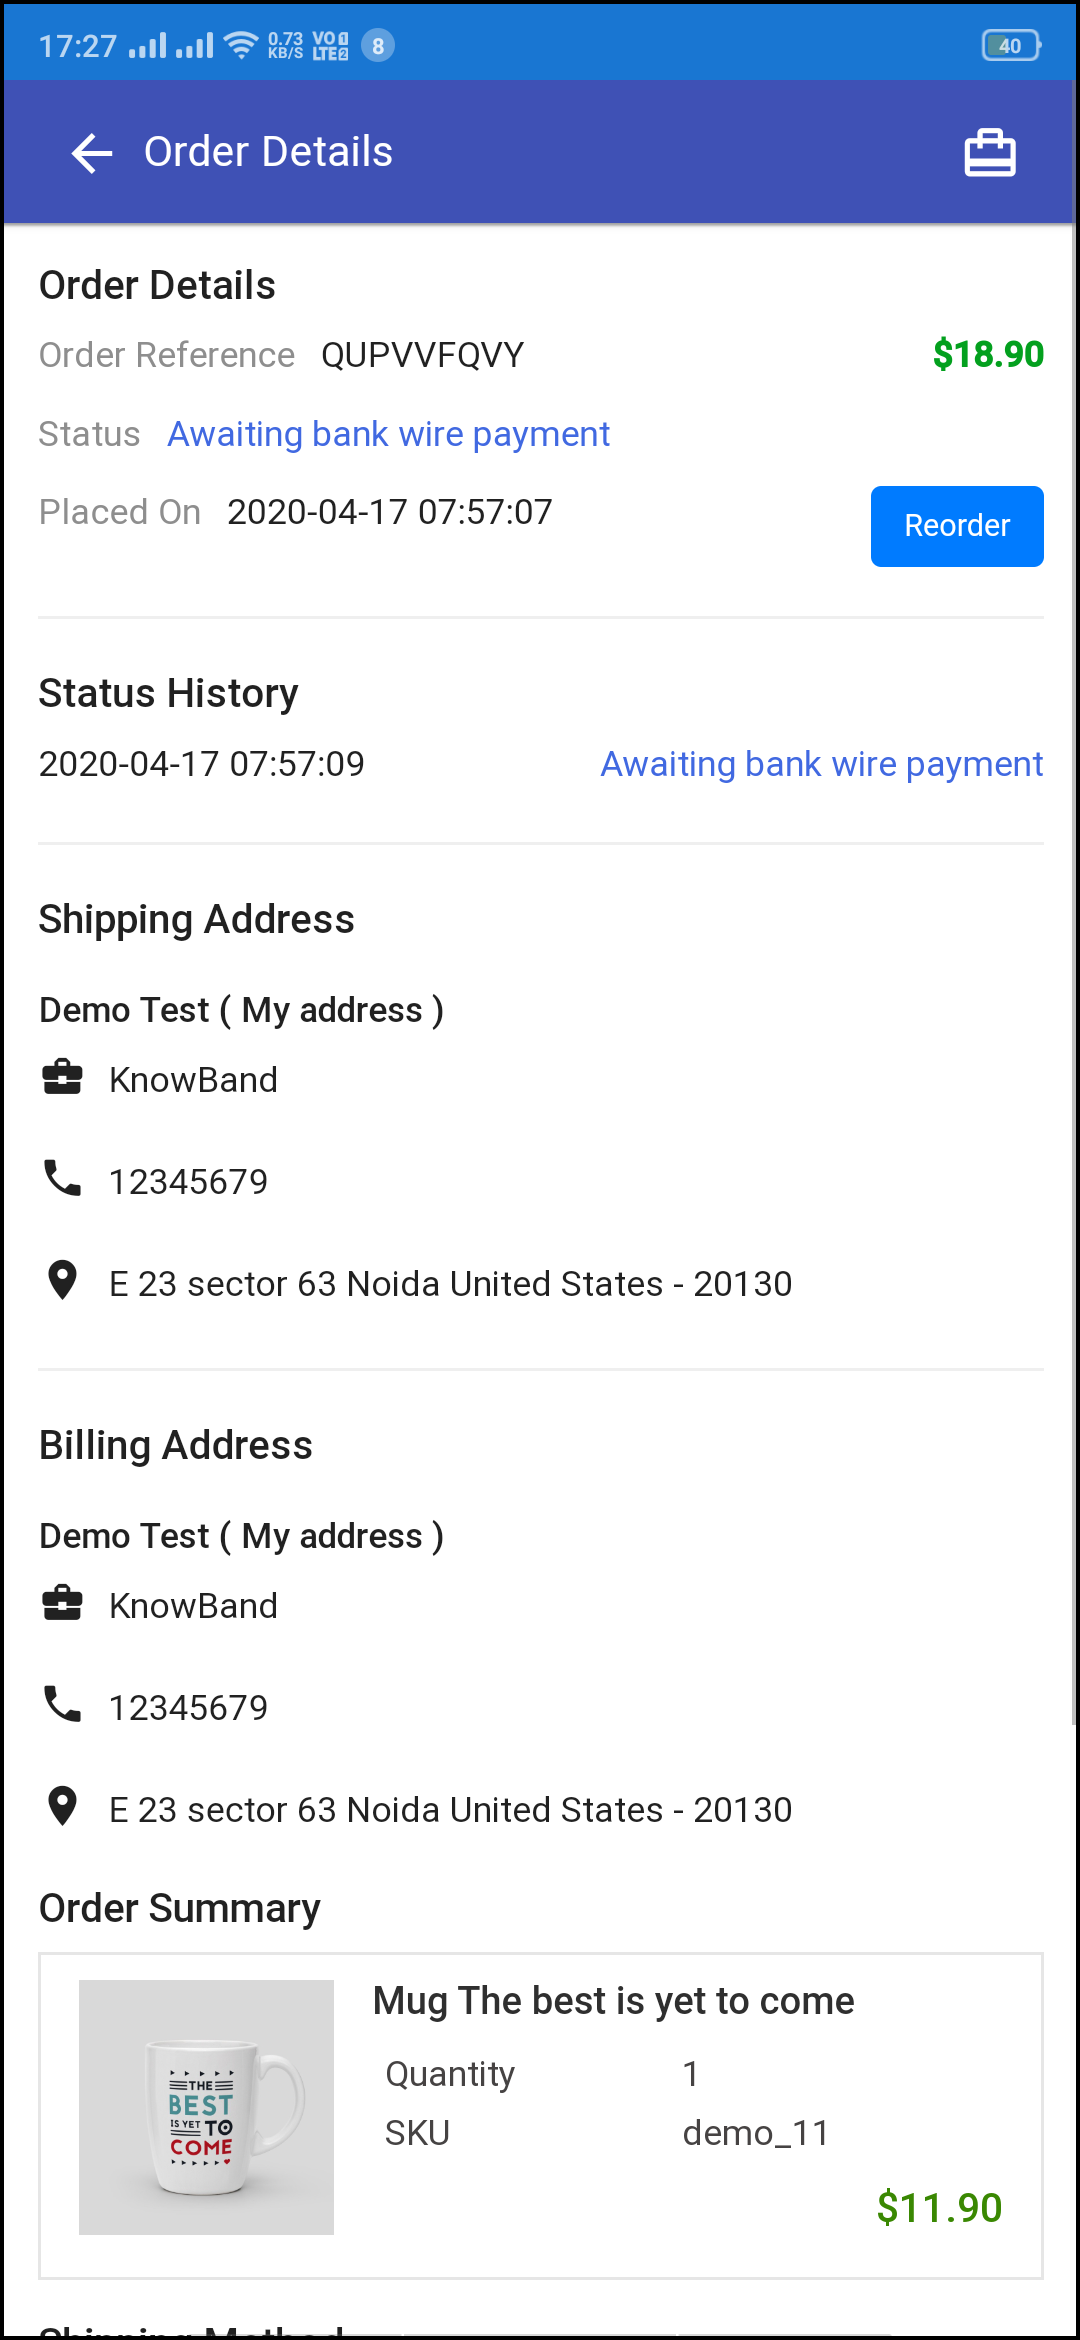
The order details screen of the WooCommerce Progressive Web App provides complete details of specific orders from the PWA app. Users can easily view shipping address, product summary, shipping and payment method, and total cost summary, etc. It even offers the option to keep a track of status of order and delivery.
Earlier, people used to be a bit hesitant when paying online especially when making a big transaction. But as time progressed, people got habitual of online payments. In this digital era, online businesses are trying to enhance the customer shopping experience by providing them with multiple payment options. Therefore, integrating the best payment gateway to an eCommerce platform is becoming significant to boost sales.
What is a Payment Gateway?
A payment gateway is a merchant service that authorizes credit card or other direct payments processing for eCommerce businesses. In other words, you can say a payment gateway acts as a mediator between the payment processor and the eCommerce store.
The payment gateway makes the payment processing secure and hassle-free.
Payment Gateways to choose for your eCommerce Business
There are multiple payment gateways that offer a smooth transaction between the site and the payment processor. While choosing one for your business, make sure it meets your business requirements. Do not forget to read its reviews or feedback.
In this write-up, I have compiled a list of top 5 payment gateways that we feel would match your needs.
Note: The choice is purely the author’s. You may find other payment gateways on other blogs and articles.
1. PayPal
Founded in December 1998 though launched in November 1999, PayPal is one of the most popular and widely used payment gateways accepting both Debit Card and Credit Card payments. As of the first quarter of 2020, there were 325 million active PayPal accounts worldwide, reports Statista.
It is free for consumers while eCommerce merchants have to pay a small transition fee to accept payments through PayPal, nearly 3% per transaction without any monthly charges. Also, PayPal doesn’t require any setup expenses or gateway charges. Some of the top brands using this payment gateway are Disney and Adidas.
2. Authorize.net
Launched in 1996, Authorize.net is also among the extensively used eCommerce payment gateways with a major part of its user base (reportedly 83% of the customers) coming from the United States. Over 40,000 eCommerce merchants use Authorize.net payment gateway that allows them to accept Credit Card and electronic check payments. The company charges a $25 monthly gateway fee and 2.9% plus $0.3 per transaction fee.
3. 2Checkout
2Checkout started officially in 2006. From Startups to popular brands, over 17,000 companies use this payment gateway that offers its services in more than 180 countries. 2Checkout allows merchants to accept online payments via Debit Cards, Credit Cards and PayPal. Its processing fee is similar to that of Autorize.net and does not require you to pay any set-up and monthly charges. It is a multi-lingual online payment processing service supporting multiple currencies.
4. Stripe
Based in San Francisco, California, Stripe is one of the best eCommerce payment gateways, founded in 2010. It provides APIs that web developers can use to integrate payment processing into websites and mobile applications. You need not be a coding expert to use it; you can get going within a few minutes.
Millions of companies in over 120 countries use Stripe to manage payments on their website. The processing fee of Stripe is 2.9% + $0.3 per domestic transaction. Some of the top brands using Stripe are Shopify, Microsoft, and Shopify.
5. SecurePay
Founded in 1999, SecurePay is a mobile payment gateway that accepts multiple forms of payment and is designed to secure processing, transmitting and storing of payment card-related data.
Nearly 23.5 million transactions are conducted using SecurePay yearly and over 8500 eCommerce merchants use this payment gateway on their website. SecurePay charges 0.25-1% + $0.25 per transaction fee.
We receive a significant amount of traffic from European countries like France, Spain, Italy and Poland. So we have also made a list of some of the best payment gateways supported in those countries. Check them out-
Best Payment Gateways for France
Braintree
Authorize.net
2Checkout
Skrill
Stripe
PayPal
Amazon Pay
PAYMILL
Best Payment Gateways for Spain
Stripe
Braintree
Authorize.net
2Checkout
PAYMILL
WorldPay (Direct)
PayLane
BlueSnap
Best Payment Gateways for Italy
GestPay
2Checkout
Authrorize.net
Braintree
PAYMILL
Skrill
WorldPay
AlliedWallet
Best Payment Gateways for Poland
PayLane
DotPay
PaybyNet
PayU
PayPal
Tap2Pay
Przelewy24
Integrate Multiple Payment Gateways on your Mobile App with our Mobile App Builder
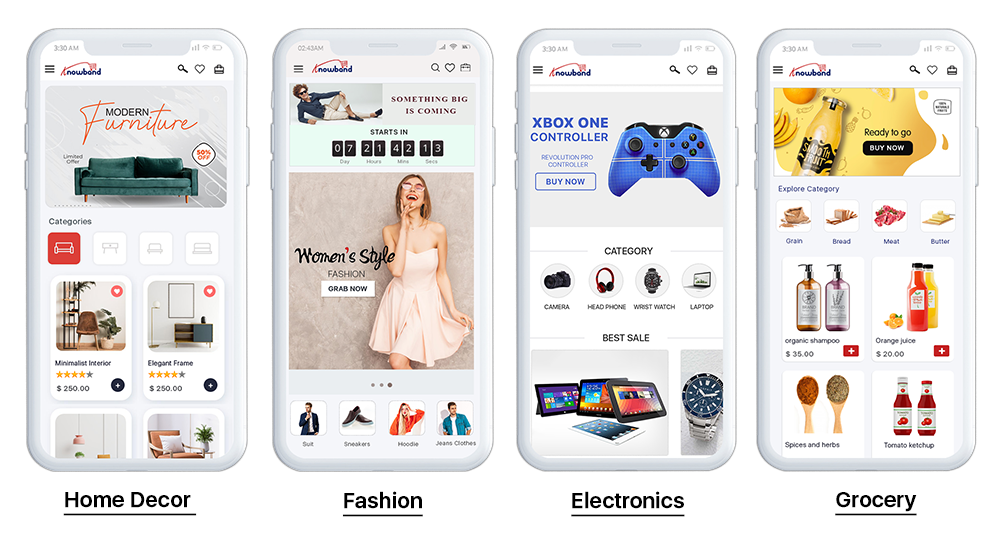
We, at Knowband, provide the mobile app builder module for multiple eCommerce platforms like PrestaShop, OpenCart, Magento, Magento 2, and WooCommerce that supports a wide range of payment gateways. The mobile app builder is a feature-packed module that lets you provide a convenient and rich shopping experience to your mobile users.
You can also take a look at our One Page Checkout module that offers support to nearly all the major payment gateways.
Final Thoughts
Before you choose a payment gateway for your eCommerce website, consider a few factors such as the transition fee (whether it falls within your budget or not), international support (multiple languages and currency), different forms of payment methods they accept, etc. Make your final decision considering every factor that fits your requirements perfectly.
Walmart recently launched a new integration with the e-commerce shopping platform, Shopify. It is used by more than 1 million small and medium businesses. With the help of this partnership, Shopify vendors can use the Walmart marketplace. This deal focuses on the goal of bringing 1,200 Shopify sellers to the marketplace by this year. The idea behind this integration is to increase the reach of more brands by placing them in front of millions of Walmart’s users.
The Walmart-Shopify integration came at a time when most of the users are shop online due to the coronavirus pandemic. Walmart saw around a 74% increment in their sales in the last quarter, due to the increase in pandemic-fueled shopping, which sent users online for necessary items like food, cleaning products, and more.
With the launching of Walmart-Shopify integration, Walmart now focuses on those brands that can fulfill their user’s needs. It looks for those brands that have a great record track and better customer satisfaction.
After this integration, Shopify sellers can check their eligibility by installing Walmart’s app from the Shopify store. If they got approved from the Walmart store then the sellers can upload unlimited products to the Walmart store, and all these updates will immediately be reflected on Walmart’s website.
Easy selling with marketplace integrations
Similarly, just like Walmart-Shopify Integration we at Knowband also offer various extensions to make your selling process easy and smooth as well as to convert your e-commerce store into a marketplace. By using these extensions you will get the following features:
Upload products in bulk: You can easily upload products in bulk using these extensions,
Allow multiple sellers: By using these extensions you can also allow multiple sellers to sell on your marketplace.
Commission Management: You can set different kinds of commissions on sellers to sell their products in your store.
Seller reviews: The review process is very easy, user can review both seller and their product.
Multiple Choices: If more sellers sell their products in your marketplace then your users have a wider variety of choices.
Easy Registration: Sellers can easily register themselves with just a few button clicks. The whole process is very easy.
All product type support: These extensions support various types of products like simple, configurable, and bundled.
So, if you are selling your products online and want to convert your online store into a marketplace to allow multiple sellers to sell their products on your marketplace then you must try these extensions:
This automated OpenCart extension is built with the motive to provide ease for online store owners to transform their store into a Progressive Web Application. The eCommerce store into PWA is one of the major advanced technologies that every eCommerce business should look for. The OpenCart PWA Mobile App is actually a web application that doesn’t rely on the third-party App stores (Google Play and Apple App Store). Online shoppers can easily “Add PWA App To Home Screen” and shop products on the go like any other application.
1.1 How OpenCart Progressive Web App (PWA) Works?
Once the eCommerce store is converted to OpenCart PWA Mobile App, whenever any user opens the store URL in the mobile browser, users will be asked to “Add PWA To Home Screen”. It’s that simple to install and use OpenCart Progressive Web App.
–> iOS devices (iPhone, iPad, etc.) do not offer any inbuilt “Add To Home Screen” prompt. Hence, the PWA Mobile App users need to manually add OpenCart PWA Mobile App to the home screen of iPhone or iPad.
–> iOS does not support web push notifications. Hence, the store admin can only send the push notifications to the Android device, not on iOS.
[NEW UPDATE] OpenCart PWA supports RTL Languages (Arabic, Hebrew, etc.):
The OpenCart PWA Mobile App Creator now supports multiple languages including RTL (Right To Left) scripts like Arabic, Hebrew, Persian, etc. All languages of the OpenCart store will be on the Progressive Web App and other required languages can also be added. The users can choose the language on the Progressive web app and the entire app content will be translated accordingly.
Fully Compatible With KnowBand Multi-vendor Marketplace:
Our OpenCart PWA Mobile App is compatible with OpenCart Multi-vendor Marketplace. Convert your OpenCart eCommerce store into a full-fledged marketplace and launch PWA mobile app for the same. The marketplace sellers will be available on your Progressive Web App and users can simply browse them as well.
Note: OpenCart PWA Mobile Apps are only customer-centric i.e. the users can visit the browse PWA app along with sellers. There won’t be any seller dashboard or management via OpenCart Progressive Web App. The admin can manage the sellers from marketplace web and same will be updated automatically on the PWA Mobile App.
1.3 View OpenCart PWA Demo:
Explore module and PWA app features from the below demo links:
(Copy-paste URL in the mobile browser and “Add To Home Screen”)
2.0 Admin Panel Screens:
Explore all settings of Admin panel of OpenCart PWA Mobile App extension along with functionality and work with the below-shared snapshots :
2.1 General Settings:
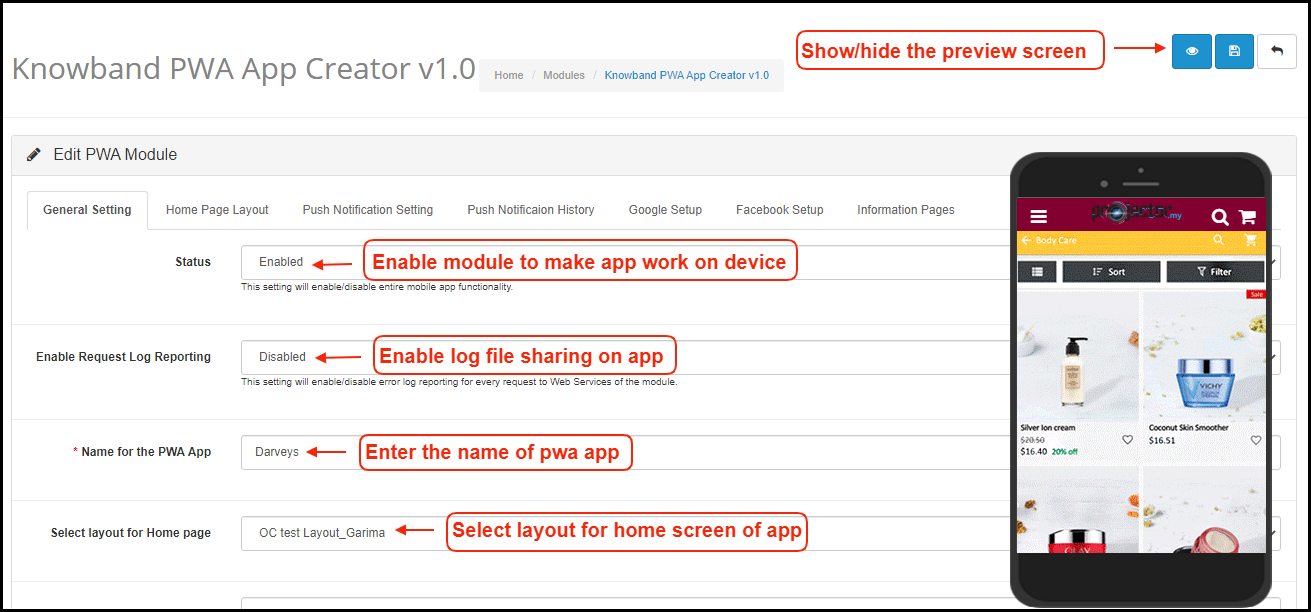
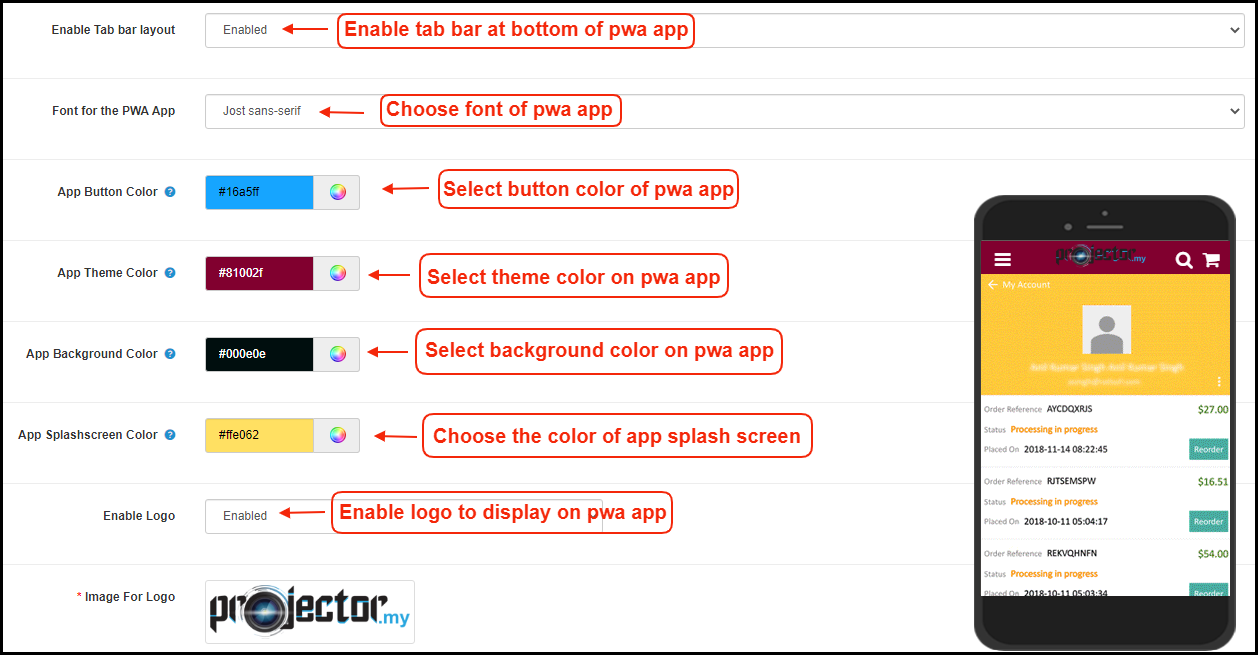
a) Show/hide Preview: Tap on the eye button to display/hide preview phone in the admin panel. b) Status: Enable the module to PWA work on mobile devices. c) Enable Request Log Reporting: Enable error log on mobile. d) Name for PWA App: Enter name for OpenCart PWA App. e) Select Layout for Home Page: Choose from pre-added home screen layout for OpenCart Progressive Web App.
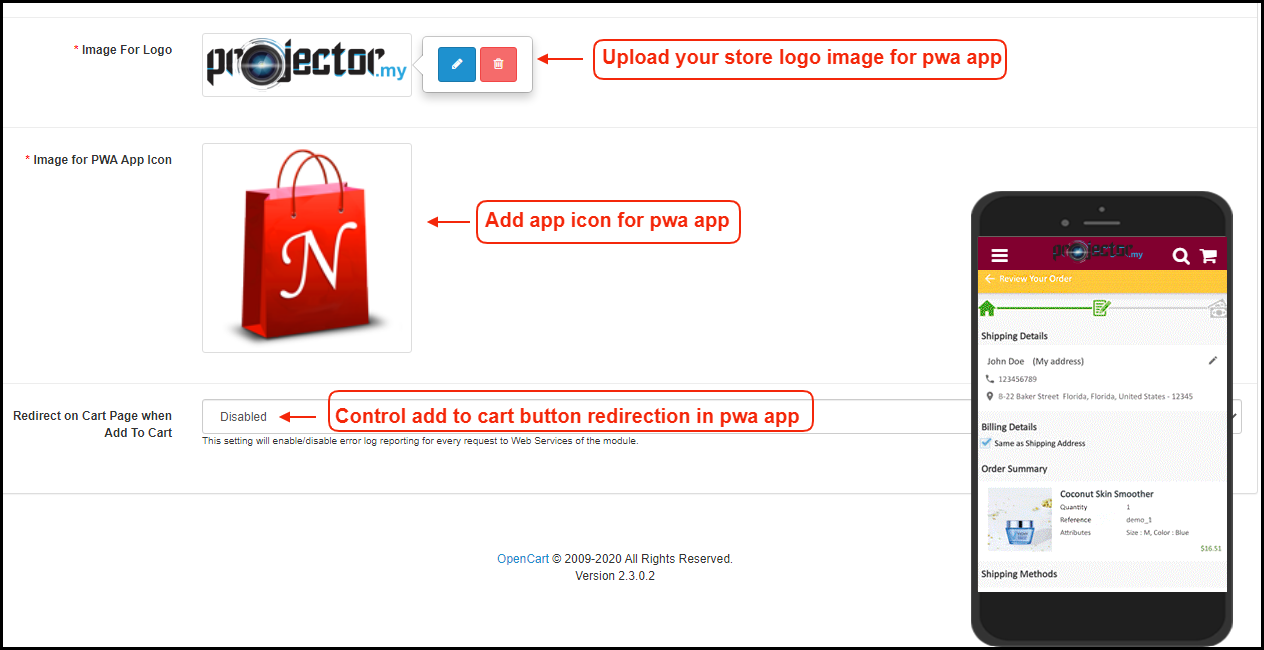
f) Enable Tab Bar: Enable tab bar on the bottom of the OpenCart PWA App for seamless navigation. g) Font for PWA App: Choose a font for OpenCart Progressive Web App(PWA). h) App Button Color: Choose button color for PWA Mobile App. i) App Theme Color: Choose theme color for PWA App. j) App Background Color: Choose the background color for the PWA App. k) App Splash Screen Color: Choose a splash screen for PWA Mobile App. l) Enable Logo: Add your brand logo on the header of the OpenCart PWA Mobile App.
m) Image for App Icon: Add app icon image in the admin panel of OpenCart PWA extension. n) Redirect on Cart Page when Add To Cart: Control redirection of Add To Cart button whenever any user taps Add To Cart button.
2.2 Push Notifications Settings
Push notifications are the best marketing tool for the Progressive Web App(PWA) for OpenCart. The store admin can simply promote the store products and deals to app users and bring more sales and revenue. Enter all details in push notification settings by creating a Firebase project:
How to set up a Firebase Account?
Step 1: Login Google Firebase
Step 2: Create a New Project
As you click on Add Project, the following dialog box will pop up:
It will take a few seconds to create the project. Once the project is ready, click continue.
Step 3: Manage Project Settings
Once the project is created, click on Project Settings.
Step 4: Go to Authentication options:
Step 5: Find Firebase Keys
In the project settings, click on Cloud messaging settings. From here, you can directly get the server key.
Step 6: Add your Web-App to Firebase
Step 7: Get other firebase related details and paste the same in PWA module admin panel.
Step 8: Get firebase server key from cloud messaging tab in Settings:
Step 9: Add your domain in authentication>>sign-in.
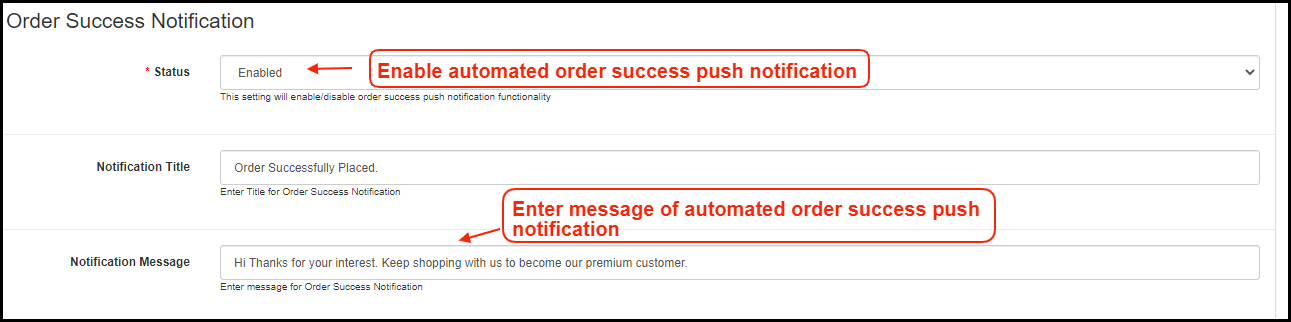
A) Successful Order Push Notification:
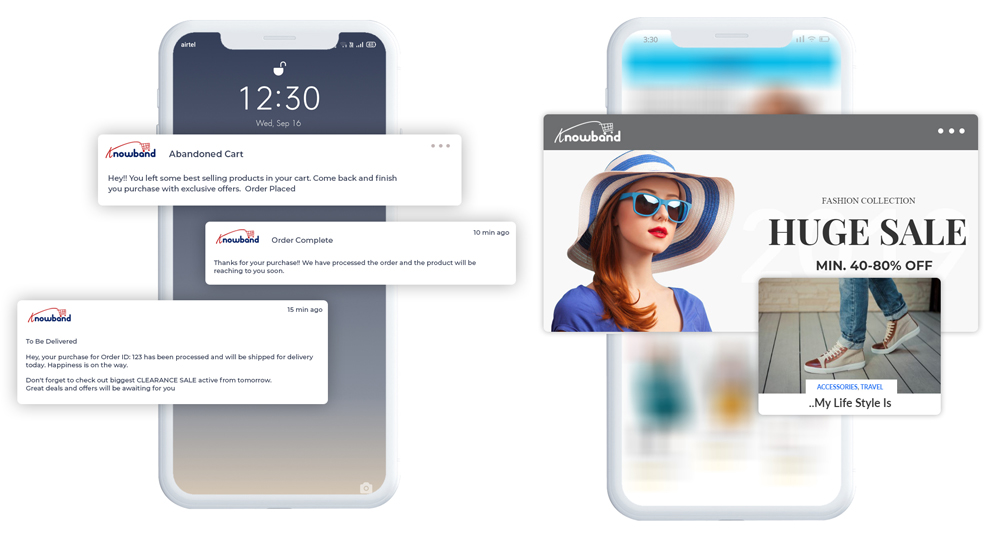
Enable/Disable automated Push Notification to be sent to app users whenever they place successful order from the OpenCart Progressive Web App (PWA).
B) Order Status Update Push Notification:
Enable/Disable automated Push Notification sent whenever order status from the app gets updated. The OpenCart PWA mobile app users can keep an eye on the details of previous orders.
C) Abandoned Cart Push Notification:
Enable/Disable automated push notification sent to users abandoning products in cart without successful purchase. This push notification will be sent to users automatically after the entered time interval.
2.3 Push Notifications History
Complete push notification history of successfully sent push notifications will be seen here. The store admin can keep a track of previously sent push notifications from here.
A) Send Notification:
Personalize and send push notification manually to OpenCart Progressive Web App(PWA) users as per the need. The store admin can configure these notifications on their own & send it to OpenCart Progressive Web App (PWA) users.
2.4 Home Page Layout:
Design and save multiple layouts designs (sale, festivals etc.) and just choose right one from admin panel to update on OpenCart Progressive Web App.
The OpenCart Progressive Web App(PWA) offers a customizable Home Screen whose layout can be designed from the admin panel with a few mouse clicks and drag-drop. The attractive layout as per running festival, sale, occasion, etc. can surely help in improving sales through OpenCart PWA Mobile Apps.
Add a new layout from this tab or edit the previously added ones. The home page configuration settings offer the following elements:
Top Categories:
Square Banner:
Horizontal Sliding Banner:
Grid Banner:
Countdown Timer Banner:
Square Products:
Sliding Products:
Grid Products:
How to get Facebook App details?
Facebook App can be created by following below-mentioned steps:-
Step 1: Go to given URL: https://developers.facebook.com/apps/
Step 2: Click on the “Add a New App” button.
Step 3&4: Enter your App name and email id, then click on “Create App ID” button.
Step 5&6: After clicking on Create App ID you will have to go through a security check as shown:
Step 7: Click on “Setting” tab.
Step 8-13: Two option will be available in the dropdown, Basic and Advanced, click on “Basic”. And then enter your “App Domain”, “Contact Email”, ”Privacy URL”, ”Terms and Conditions URL”, ”Add Logo”, ”Select Category” and click on “Save Changes” button.
App Domains:
yourdomain.com is correct
yourdomain.com/store is incorrect
www.domain.com is incorrect
Step 14: Now click on “+Add Platform”.
Step 15: And select Website as Platform.
Step 16: Now Enter your site URL.
Step 17&18: Click on “Products+” and select Facebook login.
Step 19: Select web as the platform for the app.
Step 20: Now click on save.
Step 21&22: Click on Settings and add a Valid OAuth Redirect URIs.
Valid OAuth Redirect URIs:
https://example.com/pwa-app/login
Step 23&24: Click on “App review”. And mark “Make ‘your app name’ Public” to Yes.
Final Step: Copy the App ID and App Secret and paste it into the fields provided in the module.
How to get Google App details?
Go to Google Developers Console
(https://console.developers.google.com/project) or click on link given top right of the respective tab in module configuration page.
Now click on Create Project on the left of the page.
Enter a name for your project and proceed to the next step.
Now click on APIs and auth-> Credentials from the left menu as shown below.
Click Create New Client ID button from the right panel of the screen.
You may have to fill the form for Consent Screen before proceeding. To do so, that you have to click on Consent Screen in the left menu as shown in the image above.
Fill the pop-up form with below details:
Application Type: Web Application. Authorized JavaScript Origins: Your store domain name (https://www.yourstore.com). Authorized redirect URI or URI of Loginizer redirect page:
https://example.com/pwa-app/login
Now click Create Client ID button to get your Client ID and Client Secret Key.
Now you can use the client secret and client ID to let your customers login to your store using their Google account.
2.7 Information Pages:
Add CMS pages on the app and offer informative content to OpenCart PWA Mobile App users.
3.0 Front End PWA App Screens:
3.1 Home Screen:
The home screen of the OpenCart Progressive Web App (PWA) is fully customizable with a DIY editor as explained above in Admin Panel screens. Change app home screen look & feel anytime and offer more user-friendly & sale driven appearance.
1. Custom Layout:
Using various banner, slider, product elements, the store admin can create a dynamic layout as per the need.
2. Brand Logo:
Use your store logo on the top header of the OpenCart Progressive Web App(PWA).
3. Shopping Cart Bag:
The shopping cart icon on the top-right corner of the home screen allows users to access cart screen and check added products.
4. Left Navigation Menu:
Browse the categories displayed in the PWA app with left navigation menu browsing.
3.2 Accordion Menu (Navigation Bar)
The OpenCart PWA Mobile Apps comes with seamless and proper categorization available. The users can find relevant categories from the left navigation menu and browse products. Various CMS pages can also be added to the menu offering relevant content on the App.
1. My Account:
My Account option contains all the users’ personal information including shipping and order. The OpenCart Progressive Web App shoppers can view and update the saved information.
2. Categories:
Categories displayed in the left navigation menu of the OpenCart Progressive Web App are the same as available on the eCommerce store.
3. CMS Pages:
Various CMS pages like About Us, Contact Us, Terms & Conditions, etc. can be accessed from here. These information pages can be added from the admin panel of the extension.
4. Language(s):
The language option allows PWA app users to view the web-app in their desired language.
5. Currency(s):
All available currencies on your website are displayed here on the OpenCart Progressive Web App (PWA) app.
6. Login/Logout:
Users can easily sign-in/sign-out form the OpenCart PWA app via this option.
3.3 Category Screen:
Clutter-free category screens with the list and grid view allow the users to choose what’s best for them from a specific category. The entire store inventory will remain in-sync with OpenC Progressive Web App(PWA) Mobile App and new additions and changes even get updated in real-time.
1. List & Grid View:
The categories on the PWA app for OpenCart can be browsed in both list and grid view.
2. Product Sorting:
The sorting option allows online shoppers to narrow down the products in the desired sort order and find the right one.
3. Product Filter:
The OpenCart PWA Mobile App offers the option to filter products simplifying the product search. Online shoppers can find the desired products under categories using filters for various attributes like size, color, price, etc.
3.4 Product Screen:
The product screen of the OpenCart Progressive Web App is as simple & intriguing as it could get. With all the necessary options and information about the product, it becomes a matter of minutes for users to be sure about the product which he/she is about to purchase. Multi-images are available for the product with In stock and Out of stock options.
1. Product Info & Care:
The complete product information as available in the inventory will be displayed here.
2. Short Description:
Users get to read the short description of your product to quickly make up their minds about the purchase.
3. Product Options:
All the options related to the product like size, color, etc. are displayed here.
4. Add To Cart:
This button allows users to add products into the cart. The users can further process the cart for purchase.
5. Product Social Sharing:
The sharing option for the product allows users to share products on multiple social channels.
3.5 Login Screen
The OpenCart PWA Mobile App offers one-tap social login options & make the sign-in/registration process more seamless. The OpenCart Progressive Web App offers Google and Facebook login.
1. Login:
The app users can easily authenticate & login to PWA apps using their previous email login credentials.
2. Sign Up:
All the new app users can sign-up & create their account on the store from the OpenCart PWA App. The sign-up form asks for only the necessary details to create an account.
3. Login with Facebook:
The users can log in to the PWA app using their Facebook Account Credentials.
4. Login with Google:
The users can log in to the PWA app using their Google Account Credentials.
3.6 Shopping Cart Screen:
The Shopping Cart screen of the OpenCart PWA Mobile App will display all products added into the shopping cart. The app users can view Product name, quantity, total price & shipping cost. This screen has the following options:
1. Apply Voucher:
This option allows users to use website coupons and grab discount offers.
2. Total Product Price:
The users get to view the complete cost of their shopping bag before proceeding further. It is automatically updated according to any update with product quantity or new addition.
3. Update Product Quantity:
The PWA app users can even update the product quantity with the “Update Quantity” option.
4. Remove Product:
The app users can simply remove the product from the cart by simply tapping the “Remove” option.
5. Continue Shopping:
The app users can leave the cart to browse more products on your app.
6. Continue To Checkout:
The PWA app users can proceed further to the checkout & payment screens just by tapping the “Continue To Checkout” option.
3.7 Checkout Screen
The Progressive Web App for OpenCart has a simplified single-screen checkout with only relevant information. The app users can view complete checkout details like shipping details, billing details, order summary, order comment, payment summary.
1. Shipping & Billing Details:
This screen provides details of the shipping & billing addresses saved by the user. The user can also edit/save the new shipping address if needed.
2. Order Summary:
The app users get to view product details before making payment.
3. Shipping Methods:
All available shipping methods are displayed here. Users can choose the one suiting their needs.
4. Order Comment:
Users can also add any comment related to their order which will be visible to store admin on the order web-page in the backend.
6. Payment Summary:
This section displays the complete breakdown payment details involved with the purchase.
7. Proceed To Payment:
The PWA app users will be re-directed to the Payment screen after tapping the “Proceed To Payment” button.
3.8 Payment Screen:
The payment screen of the OpenCart PWA App has all web-view payments available on the store. Online shoppers can find similar payment experiences on both websites and apps.
3.9 My Account Screen
My account screen of the OpenCart PWA Mobile App allows online shoppers to view their complete details saved on the Progressive Web App. This screen also displays a list of previous app orders as well.
1. Personal Details:
Users get to view & update their pre-saved personal details on PWA Mobile App.
2. Shipping Address(s):
The app users can see the complete list of pre-saved shipping addresses in the PWA app.
3. Order Details:
The app users can get to view the complete list of the previously placed orders from the PWA app and their details.
4. Re-order feature:
There is a direct re-order button on the My Account screen of the OpenCart Progressive Web App (PWA). All the previous products under this order will be added into the cart with just a single button.
3.91 Order Detail Screen
The order details screen of the OpenCart Progressive Web App provides complete details of specific orders from the PWA app. Users can easily view shipping address, product summary, shipping and payment method, and total cost summary, etc. It even offers the option to keep a track of status of order and delivery.
You do not always require cold calling or sending the bulk of emails to close a deal or make higher sales. If you know how to Upsell and Cross-sell, it makes your job easy.
Cross-selling and Upselling are marketing strategies that provide you with an excellent opportunity to earn more revenue or make more money from your existing customers. If implemented well, it can boost your sales by a significant margin.
Research says that it is 5-25x times more challenging to acquire a new customer than retaining an existing one. It is because existing customers are already familiar with your brand. If they are satisfied with your products or services, they will likely visit your website again in the future and spend more.
On the other hand, acquiring a new customer is challenging because they have never interacted with your brand before and will take time to get familiar.
This is why Upselling and Cross-selling are considered the best practices to get sales from your existing customers as they give the best ROI.
Let’s dig further and understand the cross-selling and upselling techniques.
What is Cross-selling?
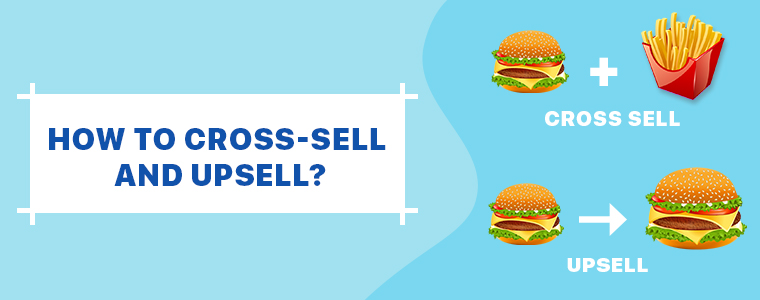
Cross-selling is a tactic to encourage customers to purchase related products along with the primary product. For example, if a customer has purchased or is purchasing an iPhone, he/she can be recommended to purchase Apple Airpods along with it.
This fits well with the product which he/she initially came to buy, right? If they are buying an iPhone, they would love to have Airpods to listen to music which usually costs around 235 USD. This added $235 in the order value reflects cross-selling.
What is Upselling?
Upselling is the marketing tactic to encourage customers to purchase a higher end-product than the one they are primarily purchasing. For example, when you purchase any tool, it usually comes with a basic plan and a premium plan; which obviously has got more features.
The basic plan is set by default during the purchase but you push customers to upgrade to the premium plan to enjoy more benefits; that is Upselling.
Difference between Cross-selling and Upselling
From the above-mentioned definitions, we can conclude that the cross-selling involves pushing customers to purchase products relevant to the primary purchase while upselling involves persuading customers to buy a more expensive or premium version of the product.
This is the difference, but both Upselling and Cross-selling have a similarity, i.e., both tend to increase the average order value.
Studies suggest that Upselling is more effective than Cross-selling as it is easier to convince someone to upgrade to a premium plan than convincing them to purchase a related and new product.
4 Ways to Cross-sell and Upsell
Some of the best practices to cross-sell and up-sell are-
1. Know Your Audience
You may be aware of the buyer persona but it’s important to understand your audience and know them more once they have purchased your product. Analyze their shopping behaviour, use demographic information, and collect their feedback to understand their motives and challenges to present them with the most useful products that you could upsell and cross-sell.
2. Be a Good Listener
When you try to cross-sell or upsell your products or services to your customers over call, make sure that you do not go gaga over it. Customers will find out within seconds that you are just calling to take out money from their pocket if you keep bragging about how good your products are.
Be a good listener. Ask if they had a good experience with their previous purchase. Do not be in a rush to pitch. If they have something to tell, be it a wish, a suggestion or a complaint; listen to it carefully and then mention how your products or services can be helpful for them to get what they want.
3. Provide a Relevant Solution
You need to understand that cross-selling and upselling needs to be done in the right manner, only then it will be useful and bring results. Until and unless what you are offering is helpful to the customers on their current or recent purchase, it would not bring any positive outcome.
Track the customer’s purchase history. Go through their journey. Then review your product offerings and identify how it can provide a solution to the challenges your customers would be facing.
4. Use Remarketing Tactics
Remarketing is the best way to automate cross-selling and upselling and involves minimum efforts. Once you have set up your remarketing campaign, run some ads.
Configure remarketing campaigns across various social networks as that’s where your possible target audience would be.
Through remarketing, customers are shown ads on different platforms about products which they intended to purchase or it can also be used to display some related products which could complement with their recent purchase.
Final Thoughts
Ecommerce websites can use upselling and cross-selling to suggest products based on consumer’s search, clicks and their purchase history.
E-commerce merchants always look to make the online shopping experience of their customers convenient and better than ever. And it’s vital because the eCommerce market is heavily occupied and the competition is fierce. Customers have too many options to choose from which makes it important for you to stay ahead of the game and meet the demands of the customers.
Online shoppers are attracted towards the brand or the website that provides them with a smooth shopping experience, which includes certain factors such as faster loading of web pages, appealing UI, quick and simplified checkout, and mobile-friendliness. Apart from these, what consumers demand is the availability of multiple payment options, in which digital wallets have a huge role to play.
What is a Digital Wallet?
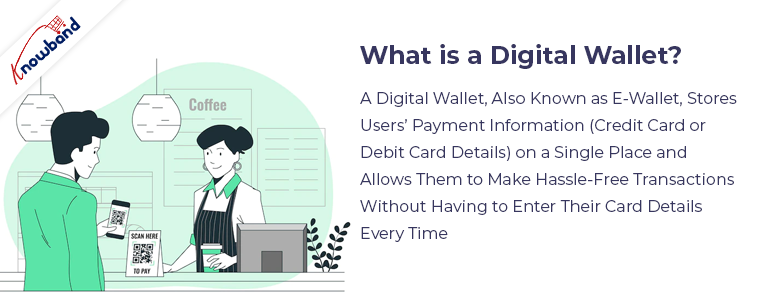
A digital wallet, also known as e-wallet, stores users’ payment information (Credit Card or Debit Card Details) on a single place and allows them to make hassle-free transactions without having to enter their card details every time.
When you make payment at a store through a mobile app, it is also a digital wallet though it is often termed as Mobile Wallet.
You can say that a digital wallet is the parent category while the mobile wallet is the child. The slight difference between both is that mobile wallet is an online payment app on your smartphone whereas digital Wallet can be found across devices including desktop, laptop and mobile.
PayPal is one of the most popular digital wallets accepted by millions of online merchants. Some other popular digital wallets that consumers make use of nowadays are Amazon Pay, Google Pay, Apple Pay, Paytm, etc.
Why Digital Wallets are preferred over Credit Cards?
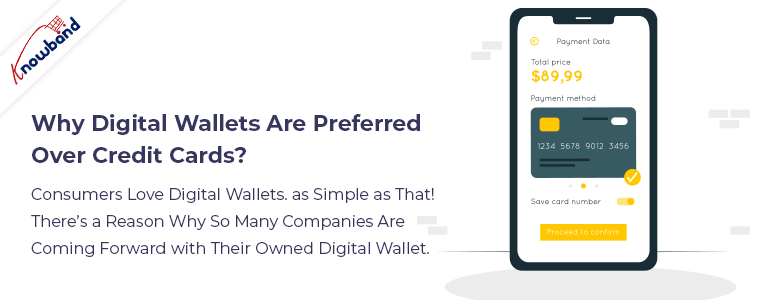
Consumers love digital wallets. As simple as that! There’s a reason why so many companies are coming forward with their owned digital wallet.
Why customers love them and why they are trending among online shoppers is simply because it makes their shopping experience convenient and effortless. They no longer need to take out their credit card or debit card from their wallet and enter their card details like card number, card validity, and security code which we also call CVV.
People do fear taking out their credit card in public which is obvious considering the theft that happens nowadays. A digital wallet eliminates that fear completely. Wherever you are, you can easily do online shopping.
Moreover, the payments made through digital wallets are highly secured. So, one doesn’t need to be concerned about their details being shared online.
Digital wallets are not only restricted to online shopping but they are accepted at maximum brick-and-mortar stores. This also eliminates the need to carry a credit card or cash whenever going outside like shopping malls or restaurants. At the checkout counter, they can simply scan the QR code through the app on their smartphone or ask the concerned person regarding the digital wallets they accept.
For a majority of customers, a digital wallet is a one-stop solution for everything, be it about shopping offline or online.
Benefits of Digital Wallets for Merchants
In the above paragraph, I have already covered the advantages of digital wallets for consumers and why they are a better option than credit cards. Let’s now understand how digital wallets can be beneficial for eCommerce retailers as well.
Gone are those days where you could grow your business by having only Credit Card and Debit Card as your payment modes. Surviving in today’s competitive eCommerce market requires integrating multiple payment options including digital wallets.
A majority of the online shoppers, even the one who shop offline, make use of digital wallets to conduct transactions. Most of the people own a smartphone and have access to the Internet and that’s why most people prefer to pay via their mobile devices.
Mobile Commerce has already gone past eCommerce in terms of conversions and sales, and it is growing every day. As per the stats collected by Statista, Mobile Commerce or m-commerce sales made a figure of 268.78 billion USD in the United States in 2019, and the number is expected to touch the 340 billion USD mark by 2020.
Conclusion
Just because Mobile Wallets/Digital Wallets have an upper hand over Credit Card and Debit Cards does not mean that you should stop accepting the latter at your online store. Some people still prefer paying through their cards than setting up a digital wallet.
Credit Cards are the old-school method and they should never be abandoned.
So the conclusion that we take out from this article is that accept both but keep your major focus on digital wallets.
We, at Knowband also offer different modules to integrate multiple payment options on your website including digital wallets. Some of the best modules that we have for this are One Page Checkout and Mobile App Builder. Do check them out. Know more:
Nothing comes with ease. You have to put continuous efforts and do hard work to achieve something. Similarly, when you start an eCommerce business, it takes time to make your name in the market.
The ultimate goal of any entrepreneur is to get sales and make revenue. But you don’t achieve it overnight. As your business grows, you start getting good results with time.
Many people start their online business but give up very soon. They struggle to get their business off the ground and are not clear on how to take it forward.
So, when trying to grow your business, focus on doing it efficiently as you have a limited budget to spend on its marketing and other things. Initially, your primary focus should be on your website’s growth. Try to attract as many users as you can to your website.
One of the best ways to do it is by starting a blog for your business. It’s simple and affordable yet effective. By having a blog for your business, you will be able to expand the reach of your business on the Internet and eventually it will help you drive traffic to your website.
A blog is the best way to promote your brand, products and services. But again, just having a blog is not going to help. There are hundreds of blogs on the same niche and tons of content is posted daily.
The internet is already occupied with too much content. So make sure that your content is amazing and creative. It should be unique and intriguing as well to make it stand out from the rest of the contents.
If you deliver what the users expect, you will get sales for sure. Let’s understand how you can make the best use of your blog to increase your eCommerce sales.
1. Give a Professional Look to your Blog
Your blog should be designed in such a way that when visitors enter it, they do not feel like taking an exit. Before even reading your content, the first thing that the user will notice is how appealing your blog section looks.
It has happened to me many times. When I open any blog and find everything so cluttered or untidy, I do not even pay attention to the content and bounce off immediately. Do not make this mistake with your blog.
Your blog should reflect professionalism. It should look neat and clean with the use of professional fonts and proper spacing between everything.
2. Write Amazing Content
The key to growing your eCommerce sales through your blog is by writing amazing content. The more quality you put in your content, the more people will like and share it.
Don’t try to use fancy words. Use plain English so that it can be easily understood by everyone. The content should be crisp and engaging, and most importantly the flow of the content should be maintained. Write from the reader’s point of view.
Also, make sure to add visuals to your content to make it more appealing. As they say, “A picture is worth a thousand words,” it applies here as well. Use images of your products or screenshots to grab user attention. There are multiple websites that provide free and premium images for blogs.
3. Boost Brand Awareness
A blog is a great platform to boost brand awareness and make your customers aware of your products and services. If people search a query on Google and land on your blog for that query, you can drive a huge amount of traffic on your website.
Moreover, a blog provides you with the opportunity to explain your products and offerings in great detail. There is no limit as to what you write. Just focus on presenting your thoughts in the best way possible. You can even inspire people by letting them know how you started your journey. This builds a personal connection between the brand and the users.
4. Promote on Social Media
Today, a brand that is not present on social media is seriously missing out on a great opportunity to scale-up their business. If you have a good follower base on social media, promoting your blog posts on different social networks like Facebook, LinkedIn, Twitter, etc. can help you drive a significant amount of traffic on your website.
It is always a good idea to share your blog post content on social media. It gives reach to your content. Just make sure that you use good headlines when talking about a blog post to persuade readers else they will likely skip it on their feed. Never use click-bait titles.
Final Thoughts
To ensure your blog posts stand out, you must have a little knowledge of SEO too. No matter how amazing you write, if it is not reaching the desired audience, efforts seem to go in vain. Focus on the keywords related to your niche and find out how you can those keywords in your blog posts.
I hope the information that I shared above was helpful and helped you understand the importance of a blog to increase eCommerce sales.
Online shoppers get disappointed when the product they are looking to purchase is out-of-stock. This is majorly seen during the launch of a smartphone when it gets out of stock even before the user has added it to his cart.
Then they just wait, wait, and wait unless there is another option. And there is a sense of excitement when that product is back in stock.
I can relate to this very well. I wanted to purchase a smartphone. When I looked for my desired smartphone on Amazon, it was unavailable, went out of stock from the smartphone brand’s website as well and wasn’t available anywhere else. So, I subscribed to get notified about it as soon as it returns to the store.
A few days later, I got the notification that the product is available to buy. Without wasting any further time, I quickly opened the email, clicked on the buy now option and purchased the phone.
This is where the role of back-in-stock alert emails becomes crucial. A single back in stock email can bring you huge revenue. A case study done by Marketing Sherpa revealed that back-in-stock alert emails have around a 22.45% conversion rate.
If you do not take the onus of informing your visitors when the product becomes available again, they will likely search a competitive product on other online shopping websites.
What is Back-in-stock Email?
A back-in-stock email is an email that is sent to those users who have subscribed to receive updates regarding an out-of-stock product. When the product is back-in-stock, the shoppers are informed via email about its availability so that they can purchase it as soon as possible or before it goes out of stock again.
Many of the users can miss out on the purchase if they aren’t notified and this eventually leads to some lost revenue.
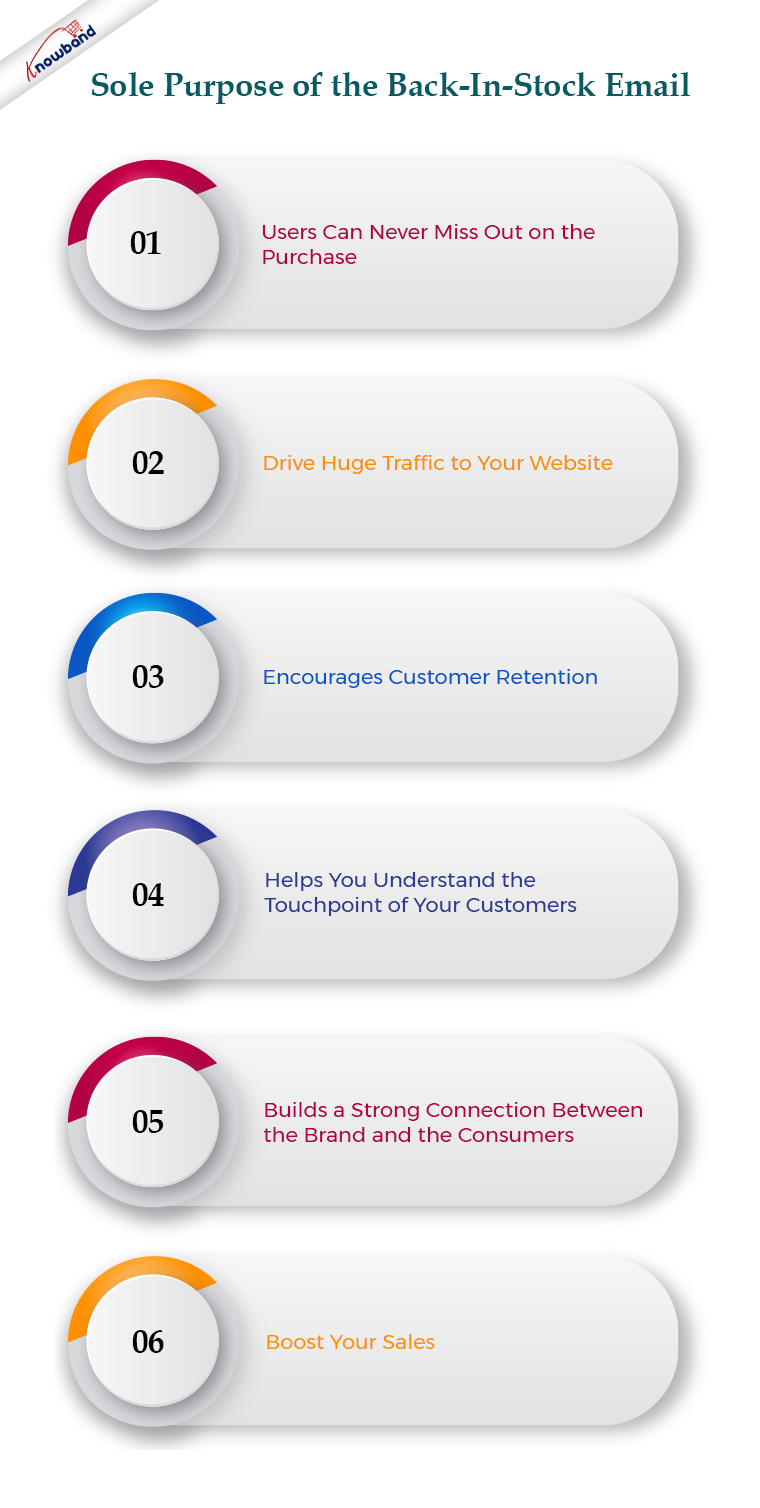
The sole purpose of the back-in-stock email is to boost your sales. Besides, it helps you drive huge traffic to your website, encourages customer retention, helps you understand the touchpoint of your customers, and builds a strong connection between the brand and the consumers.
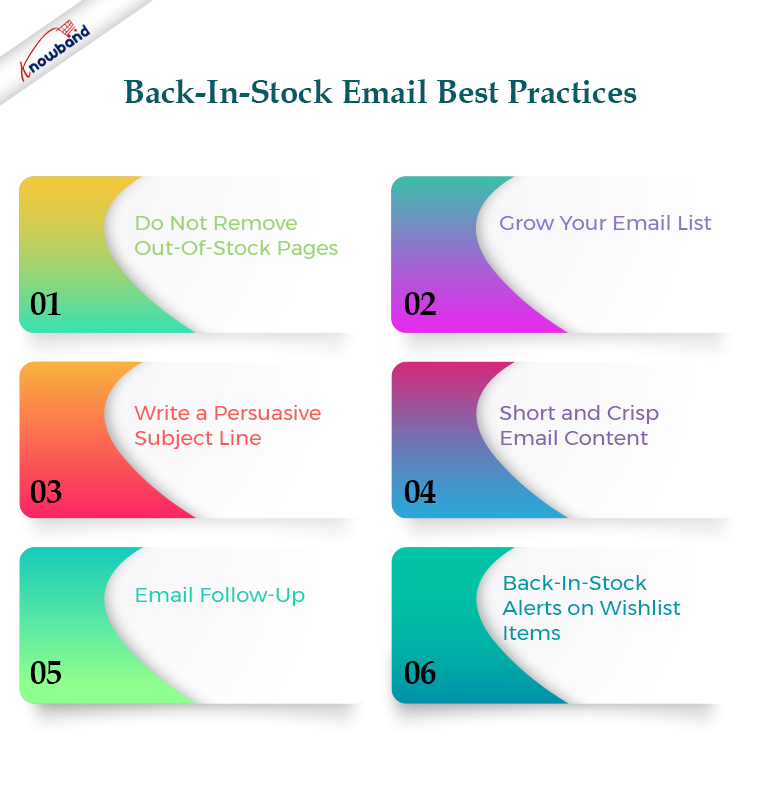
Back-In-Stock Email Best Practices
We will start from scratch. For a back-in-stock alert email, keep the following points in mind.
1. Do Not Remove Out-Of-Stock Pages
It is never a wise idea to hide the out-of-stock product pages from your website. How will consumers even know that the product is just out-of-stock? If they browse your website, search for and product, and find a 404 page, they will simply think that the product was never available in your store. Moreover, it will leave a negative user experience.
The concept of back-in-stock email would not even work if out-of-stock product pages are not visible.
So, simply include an out-of-stock tag on the product and place a “notify me” call to action, clicking on which users will be asked to specify the email address on which they want to get notified about the product availability once it is back in stock.
You can also take the help of Exit Popup, so when a user tries to exit your website after seeing that the product is out of stock, the popup appears asking them to get an alert over their email address once the product is back in stock.
2. Grow Your Email List
Many of your users might not have subscribed to your newsletters or promotional emails. So when someone clicks on the “notify me” option, having a newsletter checkbox along with the email address field can help you grow your email list further.
This will not only be beneficial to sending back-in-stock alerts but you can target those users in other email campaigns as well.
3. Write a Persuasive Subject Line
Users will be excited to know that the product they desired to purchase is back in stock. Increase the excitement by writing a compelling subject line.
Since the subject line has to be in limited words to make it visible, it must start with “Back in Stock,” followed by the product name. This will immediately make it clear to the visitor what the email is about.
After that, you can use the call to action like “Grab it ASAP”, “Limited Stock Available”, and “Hurry, selling fast”. These sorts of tags are highly effective in creating urgency.
4. Short and Crisp Email Content
Shoppers would want to grab the product as soon as it is available. Do not let them waste their time in reading the email content. Keep only the necessary information in the body.
What should you include in the email content?
Use the product image for sure. Visuals tend to make the purchase decision even stronger. Apart from this, write a short and persuasive text. Use large and bold font to highlight the main point. Use an alluring CTA like “Shop Now” or “Buy Now”. Also, it should be clearly visible.
5. Email Follow-Up
It is likely to happen that your subscribers miss out on your back-in-stock email due to some reason. Therefore, it is recommended to take a follow-up after a while if the product hasn’t gone out of stock.
This will push customers to purchase the product once they realize that they missed the opportunity to get the product in the previous email.
You can also inform the back-in-stock alert subscribers even when the product quantity is low or when the consumers have added the product to the cart but forgot to purchase, just to make them purchase the product before it goes out of stock again. This helps to reduce cart abandonment as well.
6. Back-In-Stock Alerts on Wishlist Items
Many online shoppers add the product to their Wishlist so that they do not have to search again for that product when they return to the store next time. Wishlist items also indicate that customers have the intent to purchase it.
So, if a Wishlist item goes out of stock, make sure to remind customers when it is back in stock. Tell them that the product they wished to buy is now available for purchase.
Back-In-Stock Notification Module by Knowband
If you are looking for a module that could help you set the back-in-stock alert for out-of-products, you can try out our Back-in-stock notification module.
This module adds a “notify me” tab on your out-of-stock product pages. Hence, users can enter their email addresses and get notified as soon as the product is back in store.
In fact with this module, you can set a low-stock alert as well which means if the available product quantity reaches the specified number, a low stock notification will be sent to the subscribers, triggering impulse buying. The module is available for the PrestaShop and Magento platforms.
You can also check out the Web Push Notifications module which also provides similar functionality. In fact, the users do not even need to specify their email addresses. If a product is out-of-stock, the user can simply subscribe for web push notifications.
Back-in-stock alert emails are important to drive shoppers back to your store and encourage them to shop. They are far more impactful than any other type of email since customers have opted for it themselves and they have a strong desire to purchase that product.
I hope this article helped you understand the concept of back-in-stock alerts. If the product will take time to come back in stock, then you can recommend some related and similar products to the customers. Who knows if they change their mind from that product to buying the suggested one!
Being in the retail eCommerce industry, you must have come across the word PWA (Progressive Web App). If yes, you must be also aware of the capability they carry as a shopping application. In case not, you’ve landed in the right place. With the constant growth in the usage of shopping apps (both native & PWA), online stores are shifting to PWA Mobile App development for their businesses. Launching a Progressive Web App is quite a simpler and affordable task these days.
KnowBand has launched Magento 2 PWA Mobile App, a complete no-code and automated tool to launch a Progressive Web App. In simple words, whenever any user opens your store URL on the mobile browser, he will get a prompted message of “Add To Home Screen”. The Magento 2 Progressive Web App will be added in the user’s device like any other app and online purchasing can be done on the go.
1.1 View Demo App:
Explore Progressive Web App demo for Magento 2 and take a glance at how your final apps will look and work:
–> iOS devices do not offer any inbuilt “Add To Home Screen” prompt. Users need to manually add the Magento 2 PWA Mobile App to the home screen of iPhone or iPad.
–> iOS does not support web push notifications. The push notifications can only be sent to the Android device from the admin panel of Magento 2 PWA Mobile App Builder.
The Magento 2 PWA Mobile App Creator now supports all worldwide languages including RTL (Right To Left). The PWA Mobile App for Magento 2 can have languages like Arabic, Hebrew, Persian, etc. The store owner can offer all website languages on the Progressive Web App and can even add new ones.
2.0 Admin Panel Screens:
With the friendly admin panel backend, the store admin can configure and customize the look, feel, and working of the PWA Mobile Application. It’s just a matter of a few clicks and mouse toggles to make changes in the Magento 2 Progressive Web Apps. Let’s take a detailed overview of the Admin panel screens:
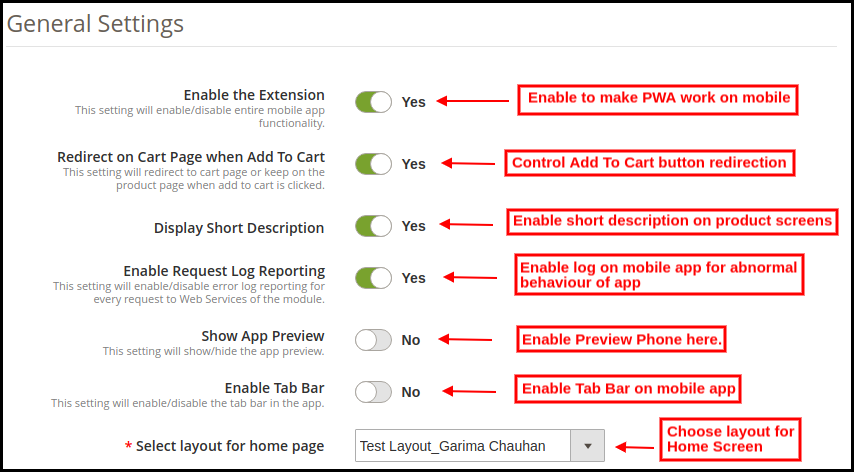
2.1 General Settings:
a) Enable the Extension: Enable Magento 2 PWA module to make web app work on the users’ smartphones.
b) Redirect on Cart Page when Add To Cart: Enable to re-direct users to shopping cart or disable to keep them on the product screen.
c) Display Short Description: Enable to add & display a short description on the product screen of Progressive Web App.
d) Enable Request Log Reporting: Enable this tab to activate the log file on the PWA Mobile App. This log file can be used to rectify any abnormal behavior of Progressive Web Application.
e) Show App Preview: Enable to add a preview phone in the admin panel. All color, font, home screen changes will be displayed in real-time preview phone.
f) Enable Tab Bar: Add a bottom tab bar on the Magento 2 PWA Mobile App.
g) Select Layout for Home Page: Choose desired layouts from the added ones and improve look and feel of app.
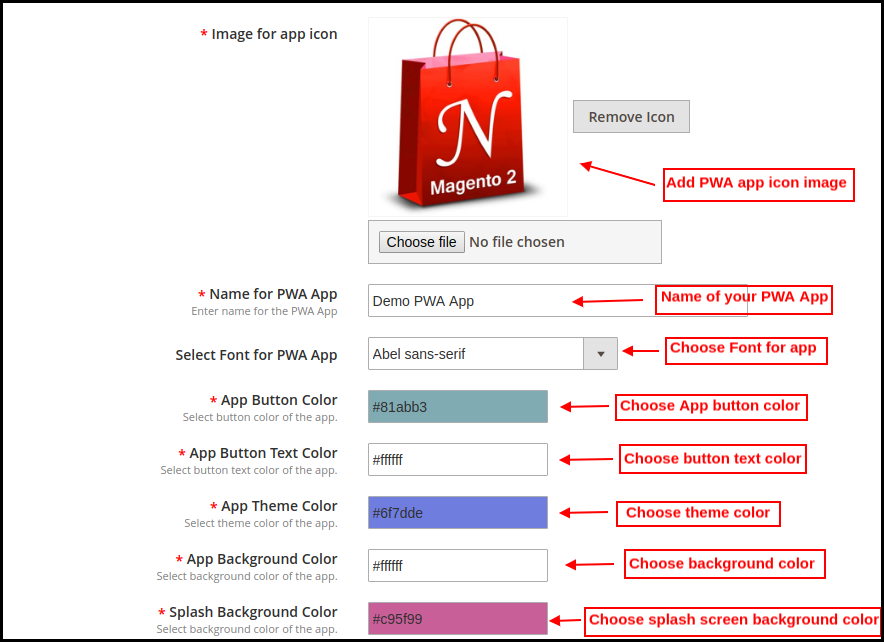
h) Image for App Icon: Upload Magento 2 PWA app icon on your own and change the same as well if required.
i) Name For PWA App: Enter the name of the Magento 2 Progressive Web App.
j) Select Font For PWA App: Choose the font of your PWA app for Magento 2.
k) App Button Color: Choose button color for your PWA Mobile App.
l) App Button Text Color: Choose the button text color for your Magento 2 Progressive Web App.
m) App Theme Color: Choose the theme color (header) of your web application.
n) App Background Color: Choose the background color of the Progressive Web Application.
o) Splash Screen Background Color: Choose the right color option for the background of the PWA app splash screen.
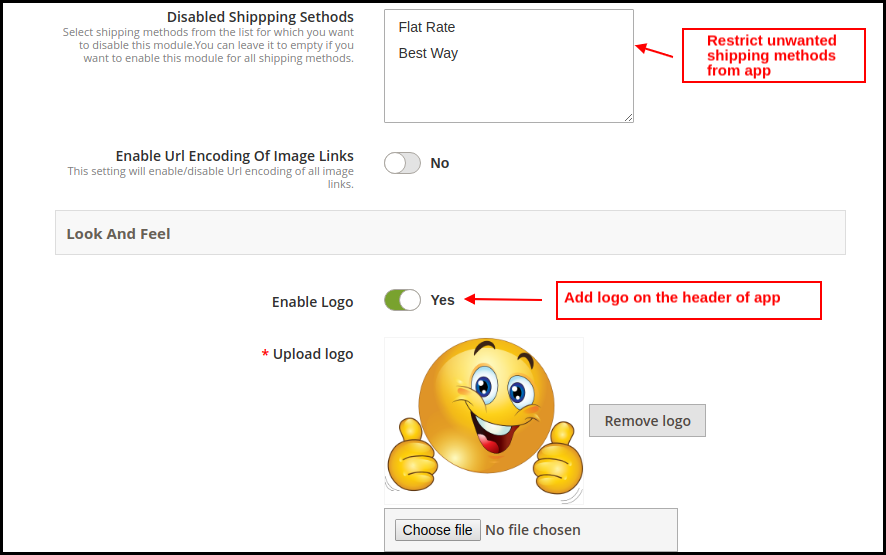
p) Disabled Shipping Methods: Choose shipping methods to be restricted from working in Magento 2 PWA mobile app.
q) Enable & Upload Logo: Add the logo image of your store to be displayed on the header of the PWA Mobile app.
2.2 Push Notifications Settings:
The Magento 2 Progressive Web App offers unlimited push notifications to market and promotes store deals and products. The store admin will get push notifications for a lifetime with no additional charges.
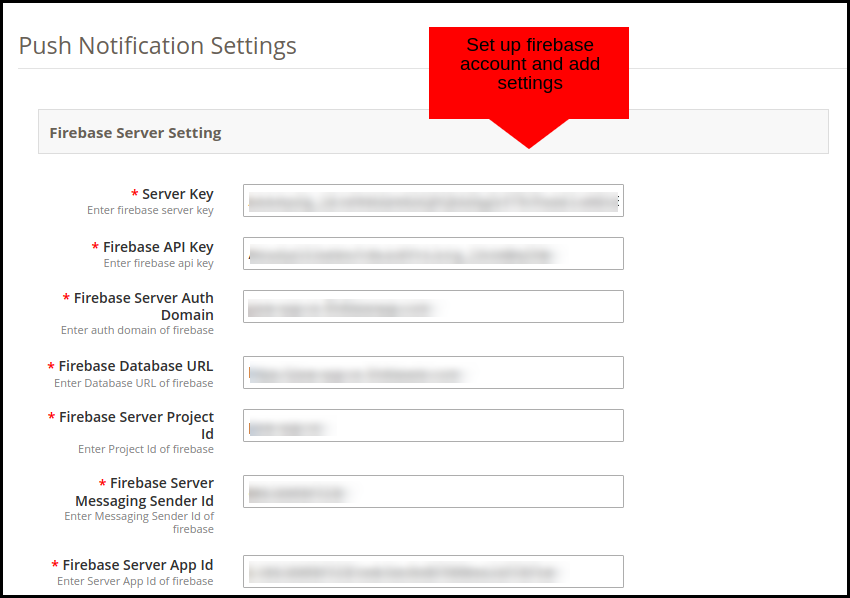
The various fields under this setting tab require a Firebase Account set up. Here’s how you may set one:
How to set up a Firebase Account?
Step 1: Login Google Firebase
Step 2: Create a New Project
As you click on Add Project, the following dialog box will pop up:
It will take a few seconds to create the project. Once the project is ready, click continue.
Step 3: Manage Project Settings
Once the project is created, click on Project Settings.
Step 4: Go to Authentication options:
Step 5: Find Firebase Keys
In the project settings, click on Cloud messaging settings. From here, you can directly get the server key.
Step 6: Add your Web-App to Firebase
Step 7: Get other firebase related details and paste the same in PWA module admin panel.
Step 8: Get firebase server key from cloud messaging tab in Settings:
Step 9: Add your domain in authentication>>sign-in.
2.21 Automated Push Notifications:
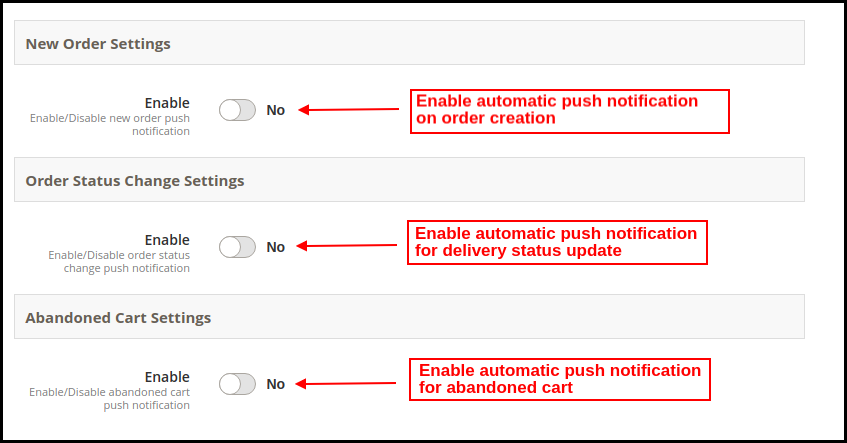
The store admin gets to schedule automated notification sending for the following cases:
a) New Order Settings: Whenever any new order is placed from the Magento 2 PWA Mobile App.
b) Order Status Change Settings: Whenever the delivery status of any order gets changed/updated.
c) Abandoned Cart Settings: Whenever any user leaves product in cart and abandon Progressive Web App.
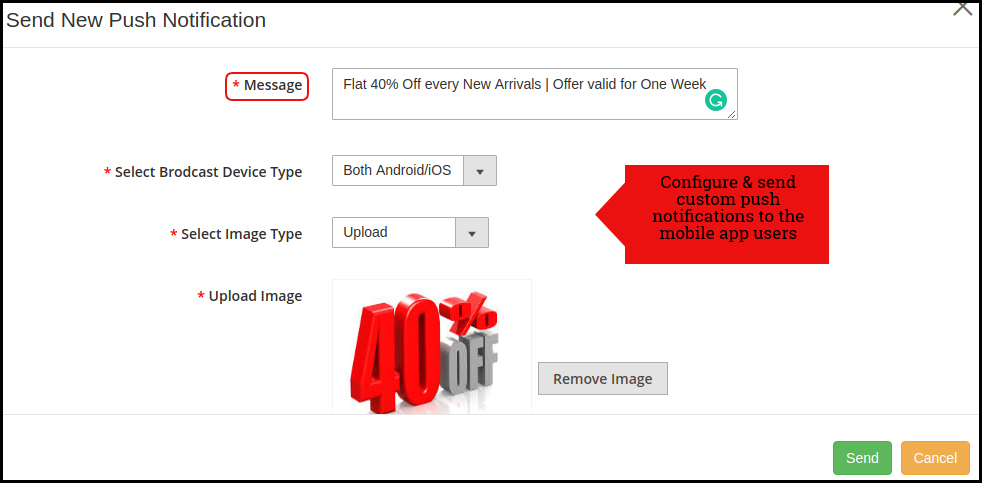
2.22 Manual Push Notification:
As shown in the above snapshot, the store admin can personalize and send manual push notifications to PWA Mobile App users. The message, image, discount offered, redirection link can be added/edited to improve the efficiency of notification and bring more sales.
2.3 Home Page Layout:
The Magento 2 PWA Mobile App Builder offers a fully customizable DIY editor panel to customize and configure the look and feel of Progressive Web Application. Various new layouts can be added to the admin panel based on upcoming festivals and occasions.
2.31 Top Categories:
2.32 Square Banner:
2.33 Sliding Banner:
2.34 Grid Banner:
2.35 Countdown Timer Banner
2.36 Square Products:
2.37 Sliding Products:
2.38 Grid Products:
How to get Facebook App details?
Facebook App can be created by following below-mentioned steps:-
Step 1: Go to given URL: https://developers.facebook.com/apps/
Step 2: Click on the “Add a New App” button.
Step 3&4: Enter your App name and email id, then click on “Create App ID” button.
Step 5&6: After clicking on Create App ID you will have to go through a security check as shown:
Step 7: Click on “Setting” tab.
Step 8-13: Two option will be available in the dropdown, Basic and Advanced, click on “Basic”. And then enter your “App Domain”, “Contact Email”, ”Privacy URL”, ”Terms and Conditions URL”, ”Add Logo”, ”Select Category” and click on “Save Changes” button.
App Domains:
yourdomain.com is correct
yourdomain.com/store is incorrect
www.domain.com is incorrect
Step 14: Now click on “+Add Platform”.
Step 15: And select Website as Platform.
Step 16: Now Enter your site URL.
Step 17&18: Click on “Products+” and select Facebook login.
Step 19: Select web as the platform for the app.
Step 20: Now click on save.
Step 21&22: Click on Settings and add a Valid OAuth Redirect URIs.
Valid OAuth Redirect URIs:
https://example.com/pwa-app/login
Step 23&24: Click on “App review”. And mark “Make ‘your app name’ Public” to Yes.
Final Step: Copy the App ID and App Secret and paste it into the fields provided in the module.
How to get Google App details?
Go to Google Developers Console
(https://console.developers.google.com/project) or click on link given top right of the respective tab in module configuration page.
Now click on Create Project on the left of the page.
Enter a name for your project and proceed to the next step.
Now click on APIs and auth-> Credentials from the left menu as shown below.
Click Create New Client ID button from the right panel of the screen.
You may have to fill the form for Consent Screen before proceeding. To do so, that you have to click on Consent Screen in the left menu as shown in the image above.
Fill the pop-up form with below details:
Application Type: Web Application. Authorized JavaScript Origins: Your store domain name (https://www.yourstore.com). Authorized redirect URI or URI of Loginizer redirect page:
https://example.com/pwa-app/login
Now click Create Client ID button to get your Client ID and Client Secret Key.
Now you can use the client secret and client ID to let your customers login to your store using their Google account.
3.0 Front End PWA App Screens:
Take a quick glance on seamlessly designed screens of Progressive Web App for Magento 2:
3.1 Home Screen:
The home screen of the Magento 2 Progressive Web App is fully customizable from the admin panel of the module. You can design the layout of app screens the way you want. Custom layouts can be designed in the admin panel based on events, festivals, occasions, etc. and used whenever required.
1. Dynamic Layout:
Using various designing elements (banners, sliders, categories, etc), the store admin can create dynamic layout as per the need.
2. Store Logo:
Add store logo on the header of the PWA app.
3. Shopping Cart:
The shopping cart icon on the top-right corner of the home screen allows users to switch on cart screen.
4. Navigation Menu:
Browse the categories in the apps with left navigation menu on the home screen.
3.2 Left Navigation Menu:
The Magento 2 PWA Mobile Apps come up with seamless categorization of products. The categories on the PWA Mobile App will be the same as available on the website. Online shoppers can easily browse products from multiple categories without any hassle. Various CMS pages can also be added to the left navigation menu using the admin panel.
1. My Account:
My Account option contains all the user personal, shipping, order information. The PWA app shoppers get to view all the stored data related to them & can update the same as well.
2. Categories
Categories displayed in left navigation menu of PWA app are the same as of your website.
3. CMS Pages:
Various CMS pages like About Us, Contact Us, Terms & Conditions, etc. Can be accessed from here.
4. Language(s)
The language option allows PWA app users to view the web-app in their desired language. All available languages are displayed under this option only.
5. Currency(s)
All available currencies on your website are displayed here on Magento 2 PWA app.
6. Login/Logout
Users can easily sign-in/sign-out from Magento 2 PWA app via this option.
3.3 Category Screen:
1. Multiple Views:
The categories on PWA app for Magento 2 can be viewed in both list and grid view.
2. Sorting:
This option allows the online shoppers to choose the sort order in order to narrow down the search and get desired product with ease.
3. Filter:
Option to filter products simplifies product search. Users can filter all products under categories using various attributes like size, color, price etc.
3.4 Product Screen:
The product screen of the Magento 2 Progressive Web App contains all necessary product information the same as of your store. From multiple product images to short and long description helps in making user’s mind for purchase. The product availability is signaled as “In Stock” or “Out Of Stock” based on inventory status.
1. Product Info & Care
The complete product information as available in the inventory will be displayed here.
2. Short Description
Users get to read the short description of your product to quickly make up their minds about the purchase.
3. Product Options:
All the options related to the product like size, color, etc. are displayed here.
5. Add To Cart:
This button allows users to add products into the cart. The users can further process the cart for purchase.
6. Product Social Sharing:
The sharing option for the product allows users to share products on multiple social channels.
3.5 Login Screen
The Magento 2 Progressive Web App offers quick one-tap login options & make sign-in/registration process more seamless:
– Email Login
– Google Login
– Facebook Login
1. Login
The app users can easily authenticate & login to PWA apps using their previous email login credentials.
2. Sign Up
All the new app users can sign-up & create their account on the store from the Magento 2 PWA App. The sign-up form asks for only the necessary details to create an account.
3. Login with Facebook
The users can log in into the PWA app using their Facebook Account Credentials.
4. Login with Google+
The users can log in into the PWA app using their Google Account Credentials.
3.6 Shopping Cart Screen:
The shopping bag of Magento 2 PWA apps will display all added products along with their quantity and price to pay. The app users can view product details as well to be sure before purchasing one.
1. Apply Voucher:
This option allows users to use website coupons and grab discount offers.
2. Total Product Price:
The users get to view the complete cost of their shopping bag before proceeding further. It is automatically updated according to any update with product quantity or new addition.
3. Update Product Quantity:
The PWA app users can even update the product quantity with the “Update Quantity” option.
4. Remove Product:
The app users can simply remove the product from the cart by simply tapping the “Remove” option.
5. Continue Shopping:
The app users can leave the cart to browse more products on your app.
6. Continue To Checkout:
The PWA app users can proceed further to the checkout & payment screens just by tapping the “Continue To Checkout” option.
3.7 Checkout Screen:
The PWA Mobile apps for Magento 2 comes with a single screen clutter-free checkout with only relevant & necessary fields required. App users get a complete overview of the order before actually making the payment like shipping details, billing details, order summary, order comment, payment summary.
1. Shipping & Billing Details
This screen provides details of the shipping & billing addresses saved by the user. The user can also edit/save the new shipping address if needed.
2. Order Summary
The app users get to view product details before making payment.
3. Shipping Methods
All available shipping methods are displayed here. Users can choose the one suiting their need.
4. Order Comment
Users can also add any comment related to their order which will be visible to store admin on the order web-page in the backend.
6. Payment Summary
This section displays the complete breakdown payment details involved with the purchase.
7. Proceed To Payment
The PWA app users will be re-directed to the Payment screen after tapping the “Proceed To Payment” button.
3.8 Payment Screen:
Magento 2 PWA App brings all web-view (website) payments on the app. The app users will find same payment options here as available on the applications. The payment screen of Magento 2 Progressive Web App is fully optimized for app view.
3.9 My Account Screen:
My account screen of the Magento 2 PWA app offers all users details available on the Progressive Web App. The online shoppers get to view the personal details, shipping address, order details, etc.
1. Personal Details
Users can also view & update their pre-saved profile details.
2. Shipping Address(s)
The app users can see the complete list of pre-saved shipping addresses in the PWA app.
3. Order Details
The app users can get to view the complete list of the previously placed orders from the PWA app and their details.
4. Re-order feature
There is a direct re-order button on the My Account screen of the PWA app. All the previous products under this order will be added into the cart with just a single button.
3.10 Order Detail Screen
The Magento 2 Progressive Web App displays complete order details of previous app orders. This screen contains Order Details, Status History, Shipping & Billing Addresses, etc. for every order placed through the Magento 2 PWA app. The app users can quickly view the entire order summary and get to keep track of delivery status as well.