Addon de Notificação de Atualização do Produto Prestashop – Manual do Usuário

Introdução:

Há momentos em que os visitantes da loja chegam ao site à procura de um produto, mas deixam o site porque o produto não está em estoque. Eles encontram o mesmo em algumas outras lojas e você perde uma conversão. Você nunca saberá por que os visitantes deixaram seu site sem comprar nada. Para encontrar o problema e corrigir o problema, você deve aprimorar o envolvimento do cliente com seu site, para que você possa recuperá-lo caso esteja deixando sua loja por esse motivo.

este Addon de Notificação de Atualização do Produto Prestashop por Knowband oferece dois tipos de benefícios apenas em assinatura única para os clientes, ou seja,

  1. estoque
  2. Preço

O Módulo de Notificação Atualizado do Produto Prestashop da Knowband é compatível com GDPR.

Etapas para instalação do addon de notificação de atualização de produto Prestashop

1. Estrutura de pastas da pasta do plug-in Product Update.

Instalação 1

2. Copie a pasta inteira nomeada como atualização do produto para a pasta de módulos do diretório raiz da sua loja PrestaShop através do FTP.

3. Você poderá encontrar o plug-in de atualização do produto pronto para ser instalado nos Módulos da sua loja PrestaShop, conforme mostrado abaixo.
4. Clique no link Instalar para instalar o Plugin Prestashop.

Módulo de administração

Aqui o dono da loja pode alterar as várias configurações deste plugin Prestashop de acordo com os requisitos, que serão refletidos no front end, bem como no painel de administração.

Para instalar este plug-in, siga os seguintes passos:

1. Adicione toda a pasta do plugin à pasta modules no diretório raiz da PrestaShop Store.

2. Depois de adicionar arquivos de plug-in, o sistema listará o plug-in na página do módulo.

3. Clique em instalar / desinstalar de acordo com a necessidade.

4. Outra maneira é, você pode zipar toda a pasta e clicar no link Adicionar Novo Módulo exibido no canto superior direito da página de listagem do módulo, conforme mostrado na tela abaixo:

5. Depois de instalar este módulo Prestashop, o link Configurar será exibido em vez do link Instalar, conforme mostrado na tela abaixo:
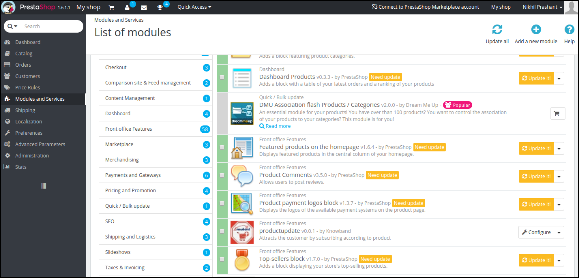
6. Agora, seu módulo de assinatura de Prestashop está disponível para uso e clique em Configurar link para configurar o módulo.

Interface de administração

Depois de instalar este addon de notificação Prestashop, o administrador receberá as seguintes interfaces:

  1. Configurações gerais
  2. Solicitação de configurações de e-mail de notificação
  3. Configuração de e-mail de notificação
  4. Análise

Configurações gerais

Quando você clica no botão configurar, o sistema abre o campo de configuração geral por padrão. Este campo tem as seguintes opções:
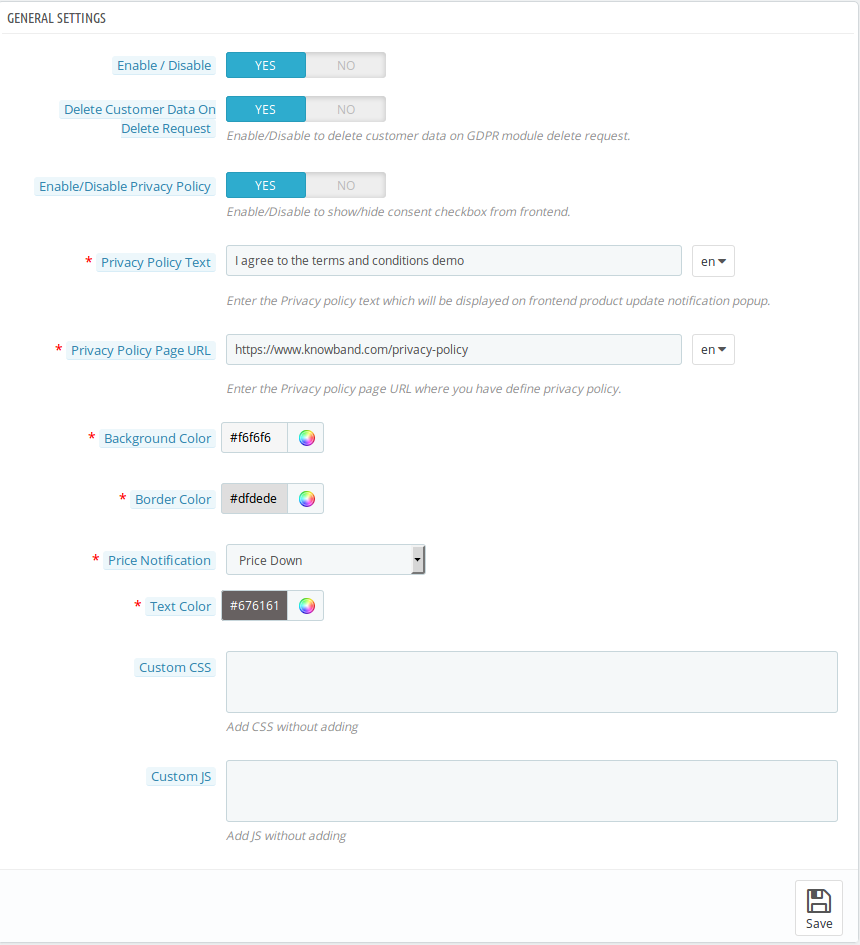
Inicialmente os campos no formulário acima já estarão preenchidos com seus valores padrão.

  • Habilitar desabilitar: Inicialmente, este add-on de notificação Prestashop fora de estoque por Knowband é definido como opção NO. Você precisa definir isso como SIM para obter os benefícios do complemento.
  • Excluir dados do cliente na solicitação de exclusão: A ativação dessa funcionalidade permitirá a opção para os clientes solicitarem a exclusão de dados pessoais.
  • Ativar / desativar a política de privacidade: O módulo de notificação de atualização do produto Prestashop permite ao administrador exibir ou ocultar a política de privacidade no front end.
  • Texto da Política de Privacidade: Este campo do módulo de atualização do produto Prestashop permite ao administrador definir o texto desejado da política de privacidade. O texto da política de privacidade pode ser editado sempre que necessário.
  • URL com Política de Privacidade: O administrador pode vincular a política de privacidade à escolha desejada de URL. O URL também pode ser alterado sempre que necessário.
  • Cor de fundo: Este campo do addon de notificação de atualização do produto Prestashop é preenchido com algum valor padrão no nível inicial. O administrador pode alterar a cor de fundo da caixa de assinatura selecionando uma cor no seletor de cores que será refletida no front end.
  • Cor da margem: Nesse campo, o administrador pode alterar a cor da borda da caixa de assinatura de acordo com sua preferência.
  • Notificação de Preços: Este campo da notifcação de atualização do produto Prestashop fornece ao administrador para selecionar o tipo de nível de preço para notificar os assinantes. O administrador pode selecionar o preço para baixo, o preço para cima ou o tipo de nível de preço.
  • Cor do texto: O respectivo plug-in Prestashop permite até que o administrador personalize a cor do texto da caixa de assinatura conforme sua escolha.
  • CSS personalizado e JS: Ambas as opções permitem que o administrador altere a aparência deste Prestashop no addon de notificação de ações da Knowband.

Pedido

Uma vez
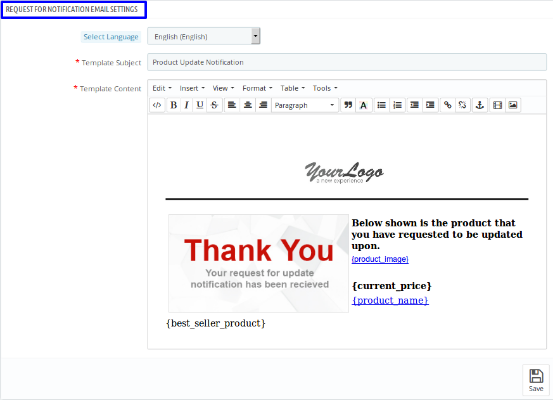
  • Selecione o idioma: Neste campo do addon de atualização do produto Prestashop, o administrador pode selecionar quatro idiomas, por exemplo, inglês, francês, espanhol e italiano.
  • Assunto do Modelo: Aqui, o administrador pode inserir o texto de sua escolha como assunto. Por padrão, o assunto do email é Notificação de atualização do produto.
  • Conteúdo do Modelo: Este é o corpo do email que o usuário recebe após a assinatura. O administrador pode modificar o texto de acordo com suas preferências.

Notificação

o

  • produtos
  • produtos

Uma vez

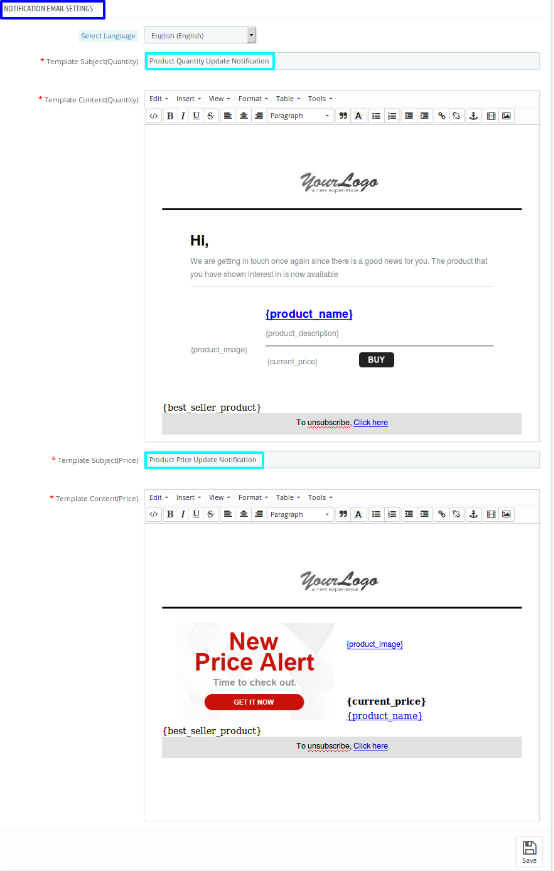
  • Notificação de atualização de quantidade de produto: Notificação de atualização de quantidade de produto é o assunto do modelo do email. Isto é para os produtos fora de estoque. Quando o produto, para o qual o cliente se inscreveu, estará em estoque, então este e-mail será enviado para os assinantes automaticamente. O administrador pode alterar o assunto do modelo e o conteúdo do modelo conforme sua escolha.
  • Notificação de atualização do preço do produto: Esta é a segunda parte da Configuração de e-mail de notificação que contém a notificação de atualização do preço do produto como assunto do modelo. Isso ocorre quando há uma alteração no preço do produto de acordo com a sua configuração que você salvou na Configuração geral, no campo "Notificação de preço". Aqui, também, o administrador pode alterar o assunto do modelo e o conteúdo do modelo conforme sua escolha.

Análise:

Na seção de análise deste addon de notificação de atualização de produto Prestashop, o administrador pode ver o relatório geral do produto e dos clientes inscritos na forma de gráfico e também na forma de lista detalhada. Quando você seleciona um intervalo de datas, o gráfico será exibido nos principais produtos 10.
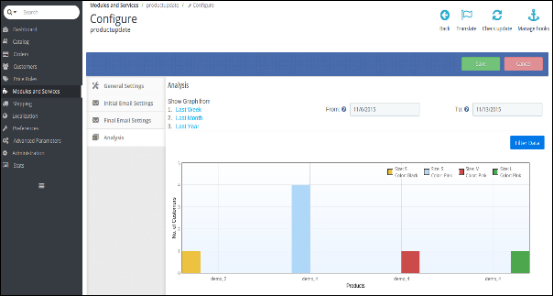
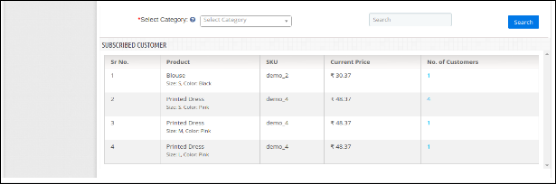
Com a ajuda da categoria selecionada e do elemento de pesquisa, o administrador pode ver todos os detalhes sobre os produtos inscritos junto com o número de clientes inscritos. Para mais detalhes sobre o cliente inscrito, o administrador só precisará clicar no "número de cliente". Ao fazer isso, ele pode ver os detalhes sobre o cliente inscrito no menu pop-up.

Frente

Depois de ativar este addon de notificação do Knowband Prestashop no back-end, o usuário verá a caixa de assinatura na página do produto. A caixa contém um campo de entrada para inserir o ID do email e um botão Notificar-me, através do qual o cliente será inscrito no respectivo produto.
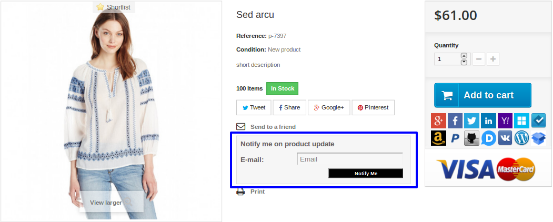
Quando um cliente insere o ID de e-mail e clica no botão, notifique-me que o e-mail inicial será enviado para o endereço de e-mail digitado e a mensagem exibida se inscreveu.

Haverá um caso quando o e-mail digitado para assinatura e o respectivo já existirem, nesse caso o assinante será atualizado e o e-mail atualizado será enviado novamente para o e-mail.

Link do Módulo: https://www.knowband.com/prestashop-product-update-notification

Demonstração de administrador: https://ps.knowband.com/demo1/16/admin1/index.php?controller=AdminLogin&token=aea1bb3fb1bab860c86c4db00ce5949e&redirect=AdminModules&demo_lang=en

Demonstração Frontal: https://ps.knowband.com/demo1/16/en/evening-dresses/38-sed-arcu.html

Assista ao tutorial em vídeo aqui: https://www.youtube.com/watch?v=CwScwWa6kaM

Compre o produto da loja addon

Sinta-se livre para nos contatar em support@knowband.com para qualquer consulta ou solicitação de mudança personalizada de acordo com sua exigência de negócios.

How to show slider on a specific information page in OpenCart?

Sliders play an important role in improving the look and feel of your OpenCart site.

Sliders are an important part of any website as they add an aesthetic look and appeal. They help in displaying the images, scenery, and other promotional items in the best possible manner. It is one of the important element that is increasingly used by websites around the world and the same is actively adopted by platforms such as OpenCart.

E-Commerce stores based on OpenCart platform are utilizing sliders in a big way as it helps in showcasing their latest arrival products, upcoming shopping deals, latest events, detailed product view or any other such purposes. The slider option is available due to the presence of built-in OpenCart extensions that improve the look and feel of a website. These sliders can be prominently seen on the home page of numerous eCommerce stores around the world as they help in better customer targeting and attention. However, it needs to be understood that home page is not the only place of utilizing sliders as they can be used effortlessly on any part of your website.

If you are keen to add a slider on the specific information page of your OpenCart site, you need not be worried about how to perform the same. Here are the simple steps that can guide you in the right direction.

1. You need to first navigate towards System >> Design >> Banners.

2. For adding a banner, site owners need to create a new banner by including a unique name along with the images that you want to display on the information page.

3. Site owners can further edit the slideshow module by following the path Extensions >> Modules >> Slideshow.

4. You need to click on the Add module.

5. It is then required to select the desired banner from the given list and set the layout to the Information page.

6. Finally, you need to save the settings now.

The above steps will help in displaying the slider on all information pages. In case, you want to show the slider only on one information page, it is advised to include the below mentioned code at the starting of the /catalog/view/theme/default/template/information/information.tpl file.

<?php if($heading_title != ‘About Us’) echo ‘<style>.slideshow{display:none;}</style>’; ?>

Point to remember

In the PHP statement mentioned above, you need to replace the “About Us” with the required page where you want to display the slider.

Apart from displaying the slider option, OpenCart site owners can also add the desired functionality by installing the required OpenCart extensions from Knowband store. In addition to this, you can also avail the customized plugin development services for your Magento, OpenCart or PrestaShop site. In case, you have any other query related to your OpenCart site or the above mentioned platforms, do share with us. We will help you with the solution that can improve the sales and conversions of your online business.

Prestashop Marketplace Admin to Seller Paypal Payment Addon – User Manual

Introduction

Earlier in Marketplace if the admin has to transfer sellers cut which the seller has earned from selling his products then he has to do that manually using his account, but using this module the admin can transfer money to the seller or can also take the refund from the seller when needed, but for this both the admin and the seller must use their PayPal account.

Steps for Installation

To install this ad-don, please follow the following steps:

1. Add ad-don folder under modules folder of your system.

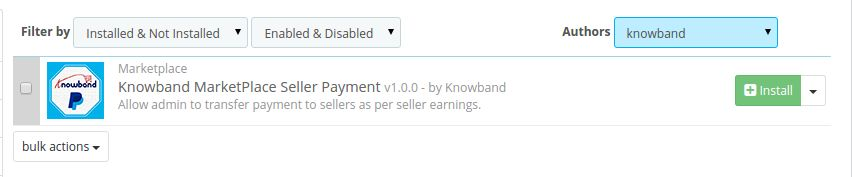
2. After adding this ad-don folder, system will list the ad-don on module page under front office feature category as given below:

3. Click install to install this Prestashop Admin Tool Addon.

Menu Location

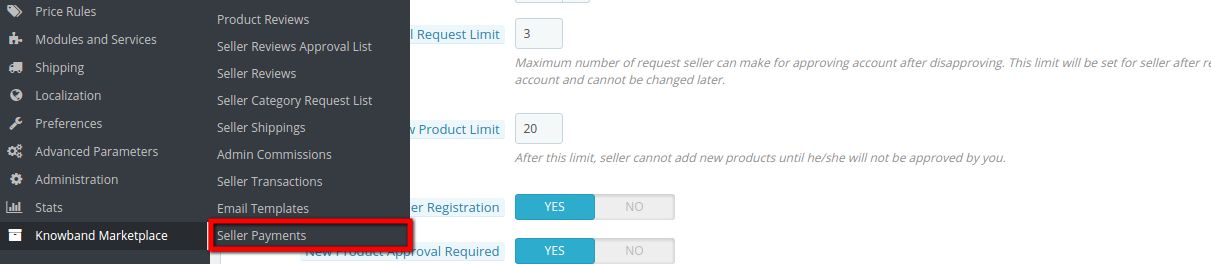
After installation, a sub menu will be added in the Knowband Marketplace menu and will be named as SELLER PAYMENT.

On clicking the highlighted link, system will be redirected to the Seller Balance Payment Page where all the listing of the seller with PayPal accounts will be listed and the admin can make the payment to the seller and also take the refund from the seller.

Seller Payment Configuration

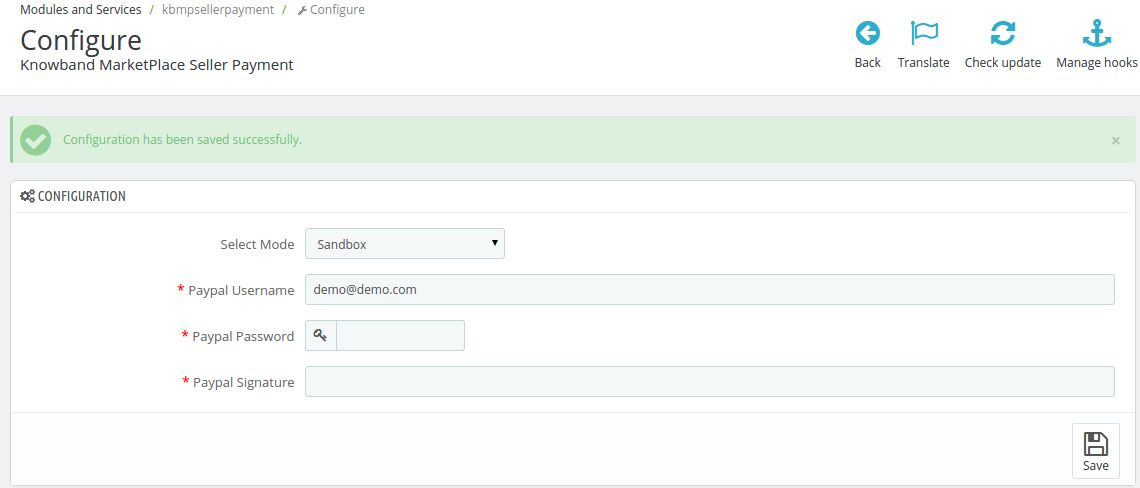
Here is the configuration Page for the admin in the admin account.

Settings Description

1. Select Mode: This field has two options 1. Sandbox 2. Live. When the module is on sandbox mode then the module is on the testing mode and can be tested by the admin till he gets sure and if the module is set for the live mode then it is live working on the store.

2. PayPal User name: In this field the admin has to enter his user name of the PayPal account to which the admin will make the payment or request for the refund.

3. PayPal Password : Here the admin has to enter the PayPal account password.

4. PayPal Signature: Enter the PayPal signature associated with your account.

Seller Balance Payment

Here the seller can make payment or request for the refund from the seller.

Settings Description For Transfer Payment to Seller

1. Seller: This field will contain the seller shop title.

2. Email: This contains the seller email id.

3. PayPal Email: Here the PayPal Email of the seller is provided.

4. Total Earning: Displays the total earning done by the seller from t

5. Your Commission: This field shows the admin what commission does he deserves from the seller total earning.

6. Seller Earning: Here the seller earning is shown after the admin commission is removed from it.

7. Amount Transferred: This shows the admin that how much amount the admin has transferred to the seller.

8. Balance: This is the balance between the seller and the admin that the admin should transfer to the seller.

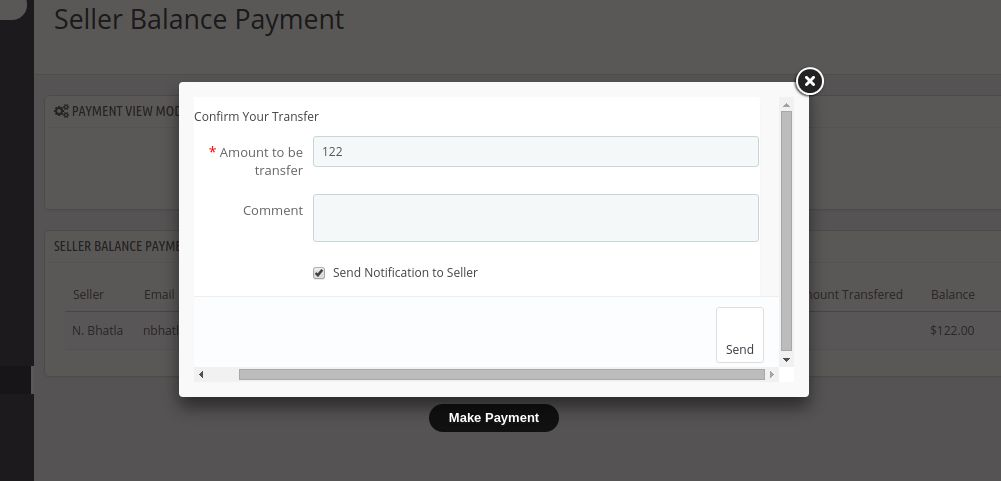
9. Make Payment: When the admin clicks on Make Payment then a pop up appears as shown in the below screen shot from where the admin can transfer the amount to the particular seller.

A. Amount to be transferred: Here the admin has to enter the amount which he wants to transfer to the seller PayPal account.

B. Comment: The admin can also enter any comment which he wants to add to the transfer of payment which he is doing.

C. Send notification to seller: If this filed is checked by the admin the an email is send to the seller whenever the admin transfers any payment to the seller.

Settings Description For Refund Payment from Seller

1. Seller: This field will contain the seller shop title.

2. Email: This contains the seller email id.

3. PayPal Email: Here the PayPal Email of the seller is provided.

4. Amount: This is the amount which the admin has transferred to the seller earlier and can be refunded by using this transaction.

5. Transaction Id: This is the transaction id which was generated to the transaction which the admin has done to the seller earlier.

6. Account ID: This is the account ID of the seller to which he account has been transferred.

7. Transaction Pay Key: This is the key which is generated for the transaction which is done.

8. Refund Back: When the admin will click on this button then the account which has been transferred by the admin using this transaction will be refunded back to the admin account.

Module Location

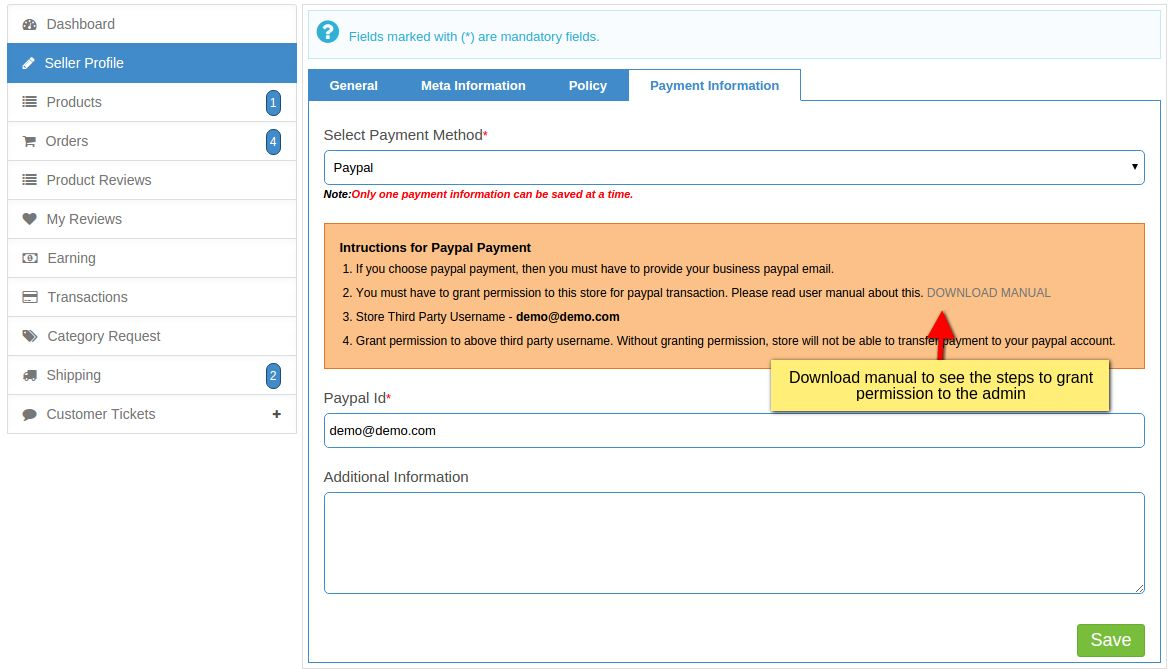
The module will appear when the seller will select PayPal as their payment option. Here the seller will see all the instruction which he/she has to follow to make the PayPal payment.

The instruction are given in the screen shot below.

Seller can also download a manual to see the steps of STEPS TO GRANT PERMISSION TO THE ADMIN for refund request.

NOTE: Please test the module in the sandbox test mode and check the permissions which the admin has to be granted to complete the refund transaction.

How can you add the product name on the OpenCart Download Page?

If you are into the eCommerce business, it is sure that you must be familiar with the name of OpenCart as an eCommerce platform. It is one of the fastest growing eCommerce platforms that is a perfect choice for multiple small, medium and large eCommerce stores due to the availability of more than 14,000 OpenCart extensions, themes, integrations, and APIs.

These extensions and other features have made it a delectable platform for various eCommerce stores around the world. However, the platform does not just mean features and functionalities alone without any customer support services. To resolve the issues of its ever growing OpenCart customers, the platform offers the dedicated customer support and technical assistance through community forums.

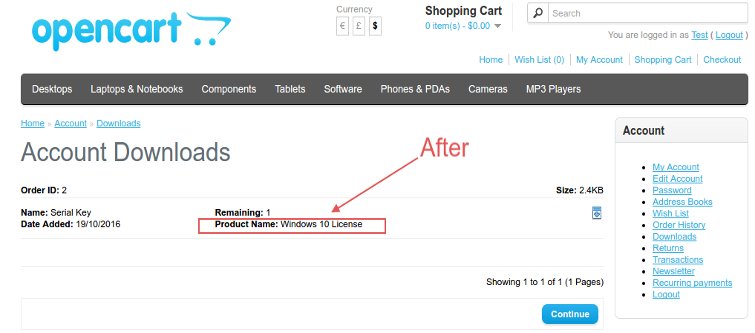
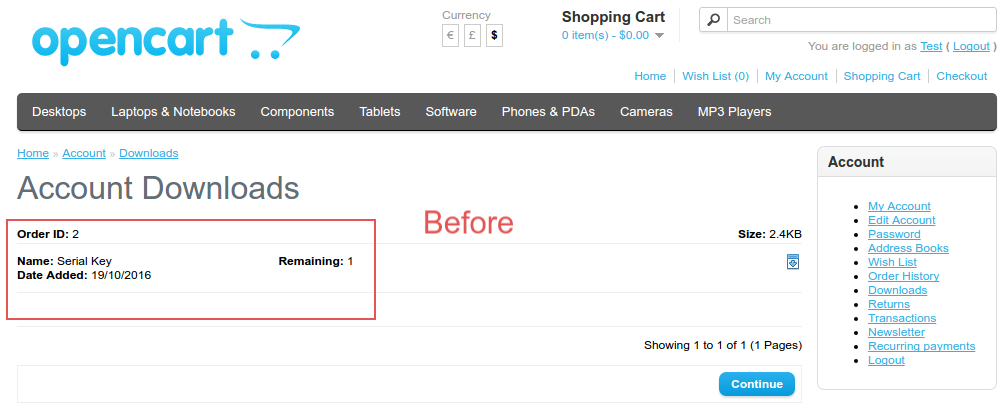
I have observed a common problem that many site owners have also mentioned on community forum discussions. The issue is that site owners while downloading any virtual products on their OpenCart site are unable to get product name information. The list of all the downloadable virtual products are available on the “Account downloads” page but the names of the downloadable products are not shown to site owners. Due to this scenario, it becomes extremely difficult for OpenCart site owners to know which product has been downloaded or not. To have a better idea about this problem, you need to check out the image shown below:

In the default case, the name of the downloadable product is not shown.

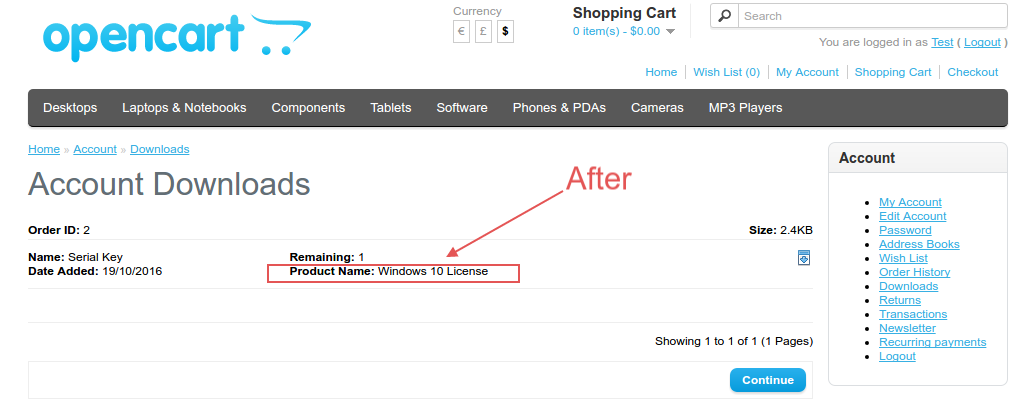
Here, under the “Account Downloads page, the product name is not mentioned which makes it difficult for owners to get proper information about the product which is downloaded. If you want to resolve this problem, here are the few changes that are required in the coding files of your OpenCart site.

1. Site owners need to make required changes in mainly three OpenCart files to display the name of their downloadable products. They need to first search this required file /catalog/view/theme/default/template/account/download.tpl and find out this code as shown below:

<div><b><?php echo $text_remaining; ?></b> <?php echo $download[‘remaining’]; ?></div>

After locating the above statement, it needs to be replaced with the given code:

<div><b><?php echo $text_remaining; ?></b> <?php echo $download[‘remaining’]; ?><br> <b> Product Name:</b> <?php echo $download[‘product_name’]; ?> </div>

2. Once, you are done with making changes in the /catalog/controller/account/download.php file, it is necessary to search this coding,

foreach ($results as $result) {

and then replace it with the PHP coding as shown below.

foreach ($results as $result) {$q_result=$this->db->query(‘SELECT name from ‘.DB_PREFIX.’order_product where order_product_id=’.$result[‘order_product_id’].”);

In the same file, you need to search for this given code,

‘name’ => $result[‘name’],

and then change it with the programming code as shown below,

‘name’ => $result[‘name’],’product_name’=>$q_result->row[‘name’],

3. Finally, you need to make changes in this catalog/model/account/download.php file and then search for the below coding part,

$query = $this->db->query(“SELECT o.order_id, o.date_added, od.order_download_id, od.name, od.filename, od.remaining FROM ” . DB_PREFIX . “order_download od LEFT JOIN `” . DB_PREFIX . “order` o ON (od.order_id = o.order_id) WHERE o.customer_id = ‘” . (int)$this->customer->getId() . “‘ AND o.order_status_id > ‘0’ AND o.order_status_id = ‘” . (int)$this->config->get(‘config_complete_status_id’) . “‘ AND od.remaining > 0 ORDER BY o.date_added DESC LIMIT ” . (int)$start . “,” . (int)$limit);

After locating the above code, you need to replace it with the programming statements as shown below:

$query = $this->db->query(“SELECT od.order_product_id, o.order_id, o.date_added, od.order_download_id, od.name, od.filename, od.remaining FROM ” . DB_PREFIX . “order_download od LEFT JOIN `” . DB_PREFIX . “order` o ON (od.order_id = o.order_id) WHERE o.customer_id = ‘” . (int)$this->customer->getId() . “‘ AND o.order_status_id > ‘0’ AND o.order_status_id = ‘” . (int)$this->config->get(‘config_complete_status_id’) . “‘ AND od.remaining > 0 ORDER BY o.date_added DESC LIMIT ” . (int)$start . “,” . (int)$limit);

By making small changes in the above files, site owners can add the product name on the download page of OpenCart site without any trouble. In case, you want to add any other desired functionality in the OpenCart site, you can add desired OpenCart extensions from Knowband store.

This Would Also Interest You:

How to drive eCommerce Conversions through email marketing?

Emails are omnipresent and their impact has been mammoth in the business world due to their high utility. It is still one of the most reliable medium of formal or business communication at the most competitive price. In the course of extending its scope, email marketing is now actively used in the fields like business promotion, product sales, customer targeting and retargeting, customer retention, finding out new prospects and other such critical tasks.

The field of email marketing needs to be utilized in the best manner for grabbing higher conversion rates and sales among your competitors. Let us explore this email marketing in detail with this interactive infographic shown below:

By understanding the role of email marketing in a business environment, it will not be difficult for any business to grab its share of conversion rates and sales. These promotional and marketing emails have the potential to improve your business fortunes without burning a major hole in the pocket of various businesses. Do follow the tips mentioned in the infographic above and reinvent your email marketing strategy for a quick turnaround.

Liked This? You’ll Like These Too

Prestashop Size Chart Module – User Manual

Introduction

The Prestashop Product Size chart addon is a Size Chart creating module for Prestashop. Using this extension, the merchant can show the different types of size charts for each category, product, and manufacturers available on his/her store.

The eCommerce store admin can assign a single chart in ‘n’ number of the category in a single configuration. Products under the default category will show the size chart on the product landing page. The eCommerce store admin can assign the created size chart on any product or any category or any manufacturer. And, a product can have a unique size chart which means, any merchant can assign a pre-configured chart to any product.

The eCommerce store admin can assign the chart to a particular product or products of a particular category or products of a particular manufacturer. Thus with the help of this Prestashop Product Size chart module the eCommerce store owner can easily resolve the size-related issues of the store customers. The user-friendly interface of this Prestashop size catalog extension makes it more useful.

Features –

  • The Prestashop Product Size chart module allows the eCommerce admin to display the size chart on the product pages of the eCommerce store.
  • It’s very easy to install and configure this Prestashop size guide addon.
  • The store admin can enable/disable this Prestashop size catalog extension without any hassle.
  • The Prestashop Size Chart Popup addon is fully customizable.
  • The Prestashop Size Chart link module offers a simple and hassle-free implementation.
  • No technical knowledge is required for the configuration of this size chart popup addon.
  • The Prestashop size catalog extension provides an option to add images, guidelines or any HTML content to the size chart.
  • The Prestashop size guide for a category of products, a single product, or a manufacturer.
  • An unlimited number of rows and columns on the size charts can be added as per requirement.
  • The Prestashop Product Size chart extension provides the preview option.
  • Helps in making the purchase decision.
  • The Prestashop Size Catalog plugin is multi-lingual Compatible.

What’s New in 1.0.7 Update:

Customizable Size Chart:

You can now customize the size chart according to your needs and preferences, providing a more personalized experience for your customers.

UNIT Feature Update:

With this feature, Admin has the ability to specify the unit of measurement for the size charts

Custom CSS and JS:

You can now load your own custom CSS and JS files, allowing you to further customize and enhance the look and feel.

Improved Popup:

The all-updated 1.0.7 Size Chart Module allows for popups to be displayed over the other popups or directly on the product page under the “Add to Cart” button, providing a more seamless and user-friendly experience to both users and Presta admins.

New Rule Options:

Now, the Prestashop store admins can find two new rule options based on product reference and attribute, giving administrators more flexibility and control over how they map charts with products.

Multistore Compatibility:

The all-new Prestashop Size Chart module is now compatible with multistore. The PrestaShop store admins can now manage and customize their e-commerce platform with greater ease and efficiency.

Benefits offered by Prestashop Product Size Chart:

  • With the help of this Prestashop size guide addon the store admin can create appropriate size charts just by entering values.
  • The Prestashop size catalog extension allows e-merchant to set the size chart on a particular category, product or manufacturer.
  • This size chart will be available on every product page for a better store experience.
  • The admin can add n number of rows and columns in the size chart.
  • A preview option is available on the back-end.
  • This size related information reduces product return based on size issues.
  • With the help of Prestashop size catalog extension, the customers can view the size chart before purchasing the product.
  • The Prestashop product size table allows adding text and images in the size chart for better understanding.
  • The customers can easily understand the guidelines given with the size chart.
  • The Size Chart module offers admins to use the module for their Multi-Store Prestashop stores.
  • Along with all the pre-tailored options, the admins can now also add custom CSS and JS to improve the look and feel of their Product Size chart.
  • Multiple Rules based on the attribute conditions.

Steps For Installation of Prestashop Size Chart Module

To install the Prestashop product size table addon, please follow the following steps:

1. Add the addon folder to the modules folder of your system.
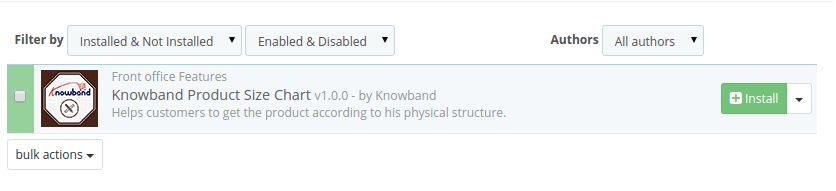
2. After adding this addon folder, system will list the addon on module page under front office feature category as given below:

3. Click install to install this Prestashop Addon.

Administration Module

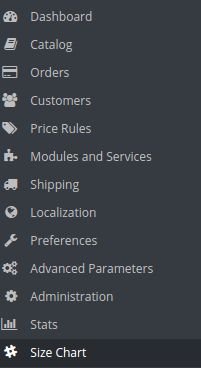
After the module is installed a new entry in the menu bar of the shop starts appearing in the back end with the name ‘Size Chart’. This menu will contain a sub-menu which further will be containing the following options.

1. Attributes Set

2. Chart

3. Category/Manufacturer Chart

4. Category Chart

5. Product Chart

Each section is described in detail below.

Configuration Setting:

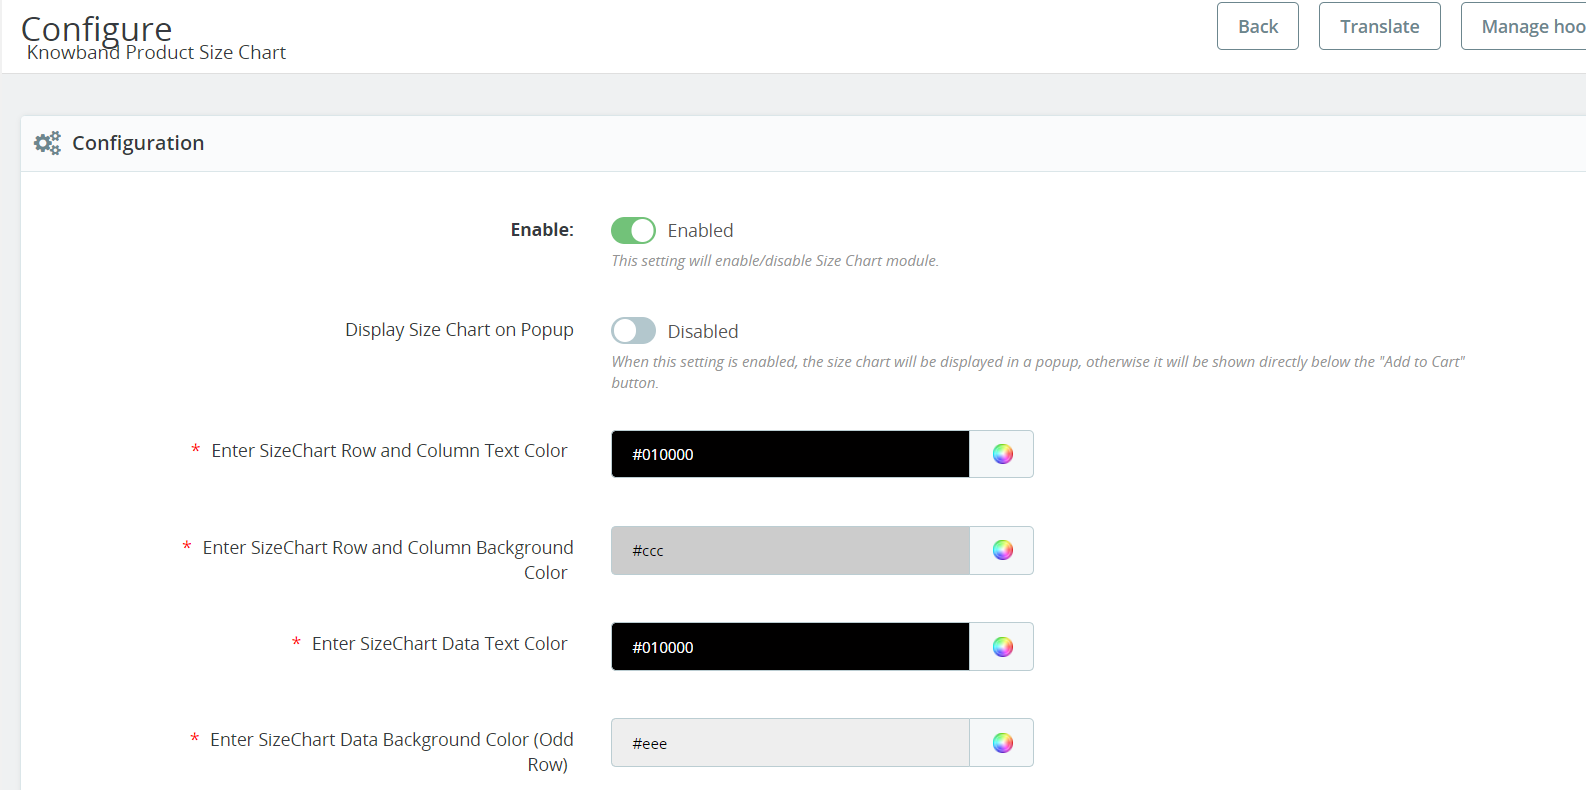
In the following tab, the store admins can configure their Prestashop Size chart module and choose all the major size chart attributes such as component colours, CSS, JS, etc.

Enable/Disable:

The store admins can enable/disable the module with the help of this particular button.

Display Size Chart on Popup:

When this setting is enabled, the size chart will be displayed in a popup, otherwise, it will be shown directly below the “Add to Cart” button.

Enter SizeChart Row and Column Text Color:

This particular option will manage the row and column text color of the size chart.

Enter SizeChart Row and Column Background Color:

Like text color, the Prestashop store admins can manage the background color of size chart rows and columns.

Enter Size Chart Data Text Color:

With the help of this button, the store admins can manage the text color of size chart data.

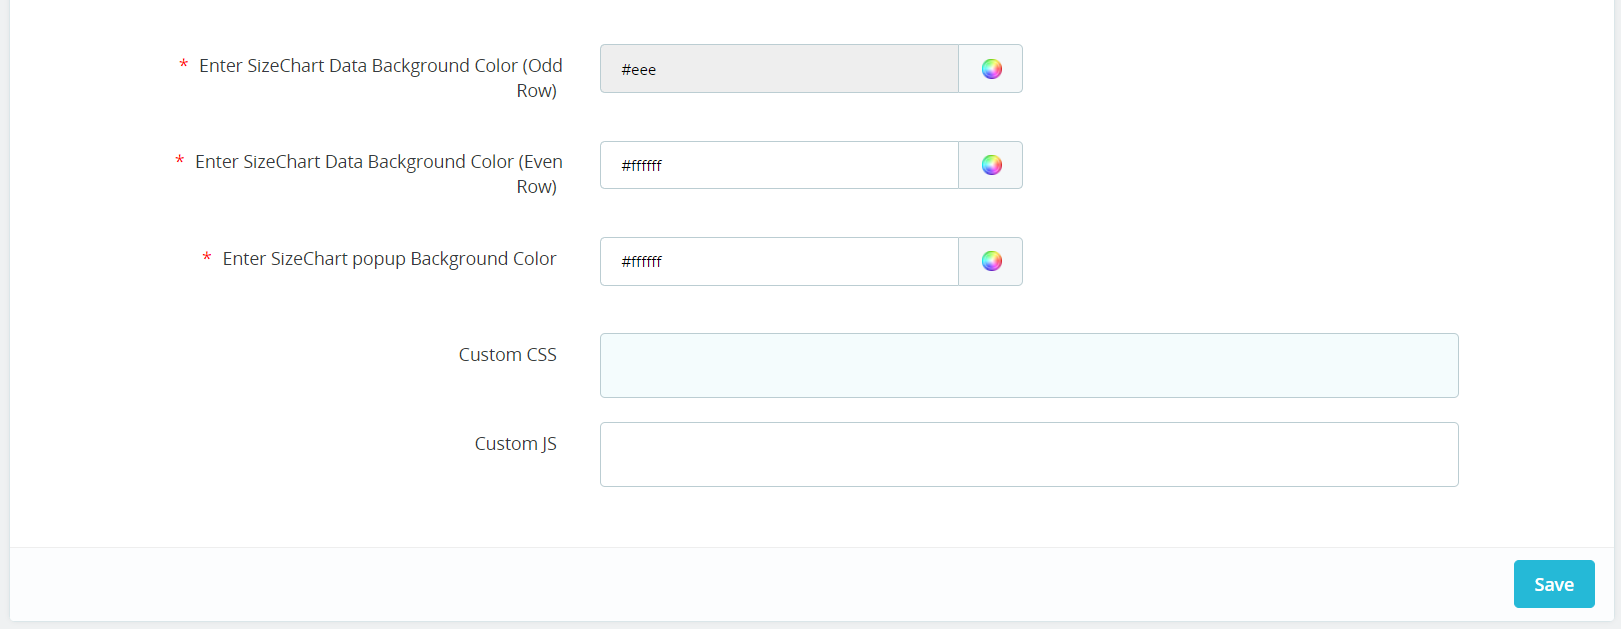
Enter SizeChart Data Background Color (Odd Row):

You can choose the color of the background of the size chart data from here. This option will manage the background color for the odd row only.

Enter SizeChart Data Background Color (Even row):

Like odd rows background color, the Prestashop store retailers can manage the the data background color for the even rows from this option.

Enter SizeChart Popup Background Color:

This option will allow the store admins to manage the SizeChart popup background color.

Custom CSS:

In the following text field, the admins can enter customized CSS to make their size chart sounding.

Custom JS:

Likewise, this particular field can be used for adding customized JS for the size chart.

Attributes Set

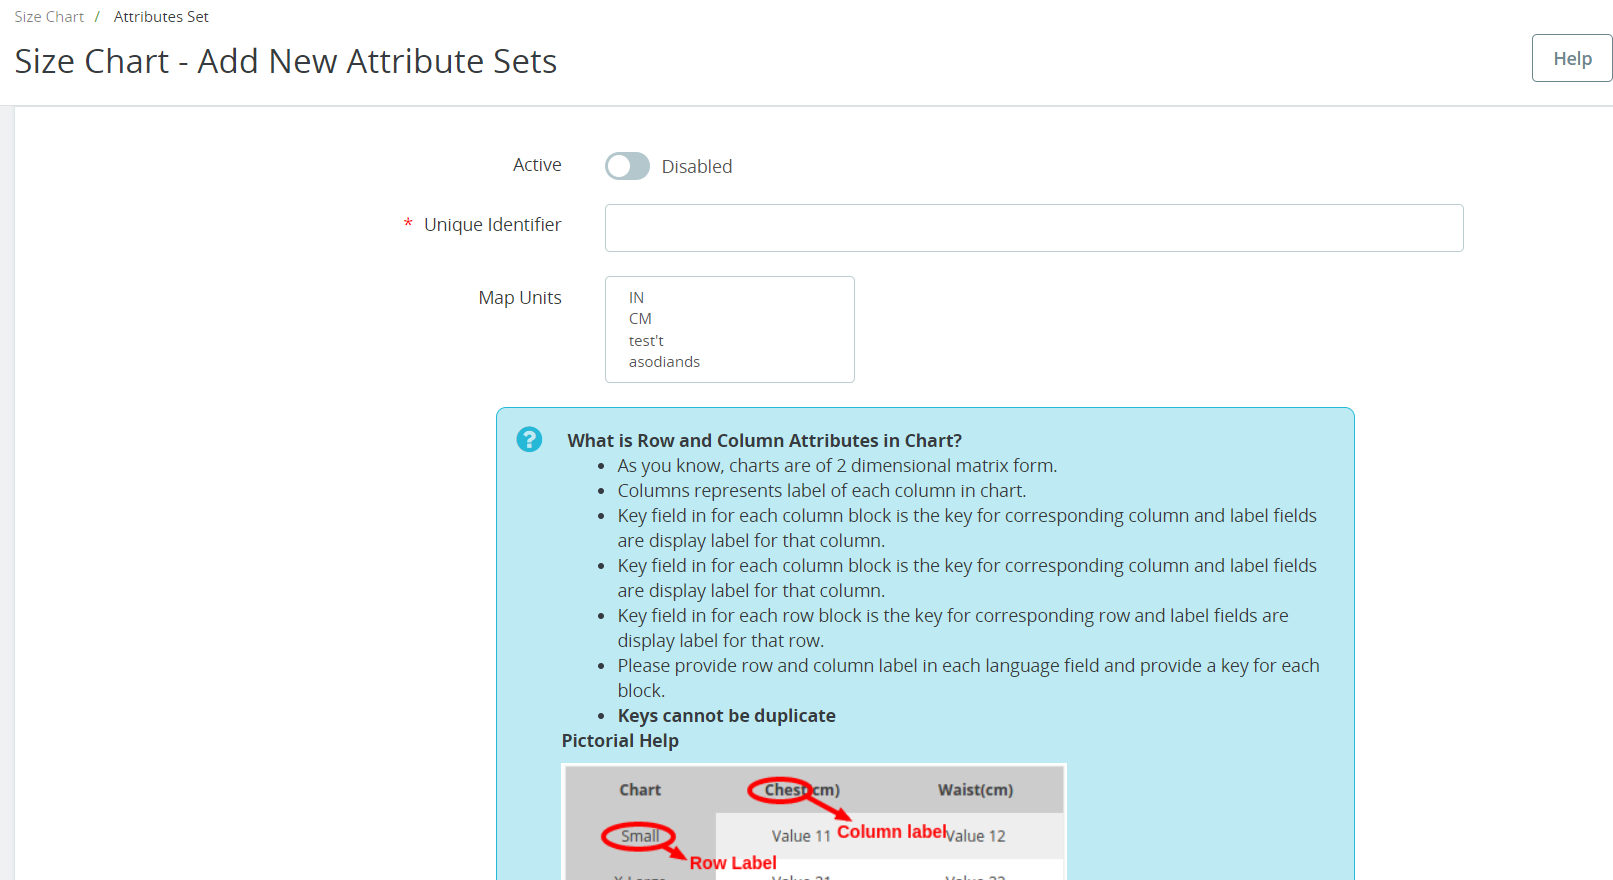
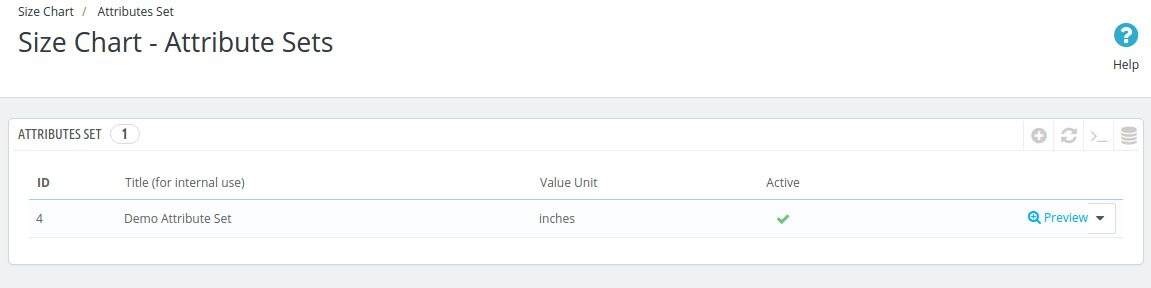
Once the admin will click on this option, a table appears which will contain the details of all the attributes of the chart which has been created to date. The admin can also create new attributes set by clicking on the add icon above the table. After the admin will click on the add icon, a new form appears containing the following fields.

1. Active: This field indicates whether the particular attribute set is enabled or not. The attribute set will only work if it is enabled.

2. Unique Identifier: In this field, the admin has to enter the unique name of the attribute set from which the attribute is going to be identified in the back end of the shop to create full-size chart.

3. Map Units: This feature allows you to choose the units that you wish to associate with the size charts. By visiting the size chart unit page, you can create Units for the size chart of your choice and then map them to your preferred charts using this option.

4. Value Unit: This is the field where the admin will choose the unit of the attributes set may be in inches, cms, kms, grams.

5. Chart Column Labels: In this field, the Prestashop eCommerce store admin has to choose the chart column labels and their name in the different store languages. The admin can add ‘n’ number of column labels.

6. Chart Row Labels: In this field, the eCommerce store admin has to choose the chart row labels and their names in different store languages. The admin can add ‘n’ number of column labels.

7. Preview: By clicking on this link the Prestashop store admin can view the preview of the attributes set which will be created by the values that are filled above.

8. Actions: Actions like edit and delete are also available to edit the entries which are already done by the admin.

Charts

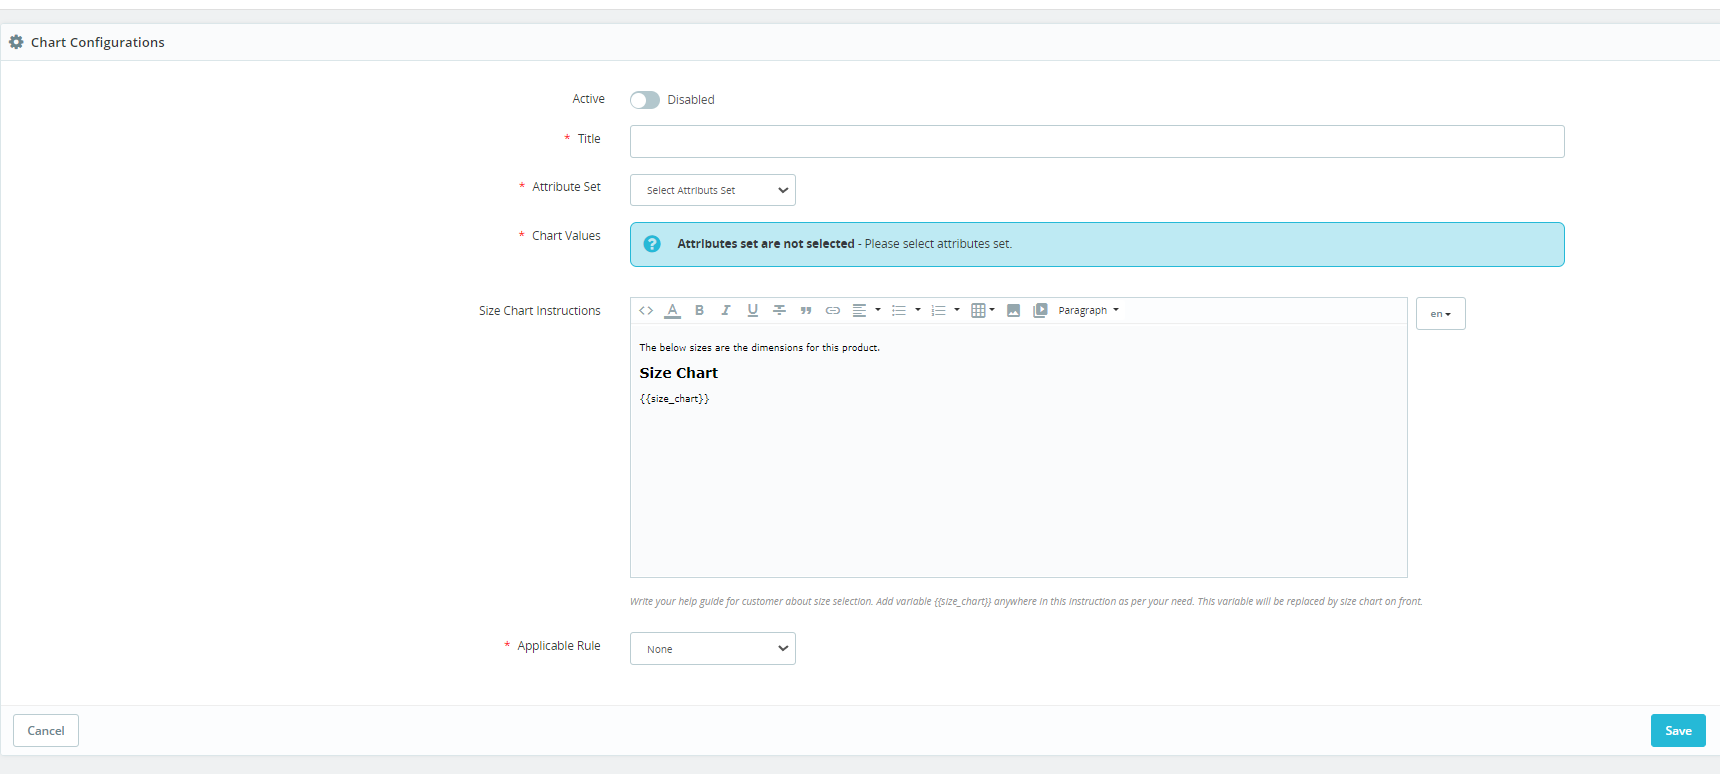
Here, the admin will create the full chart using the attribute sets which were created in the previous tab. To create a chart, the eCommerce store admin has to click on the add button on the right side of the chart. As soon as the eCommerce store admin clicks on that add button, a new form appears with the following options.

1. Active: From here, the Prestashop store admin can set the chart enabled or disabled. The chart will be displayed only if it is enabled.

2. Title: This is the title of the chart which is for internal use only to uniquely identify the chart when assigning them to the product, category or manufacturer.

3. Attributes Set: This field will contain all the data attribute sets which were created earlier and are enabled. The admin can choose any of the attributes set in this field.

4. Chart Values: After the admin selects the attributes set, then he/she has to fill in the values which will be reflected where this chart will be used.

5. Size Chart Instructions: Here, the admin can add up the instructions which he/she feels are important for the customers to understand the above attribute set chart.

6. Actions: Actions like edit and delete are also available to edit the entries which are already done by the admin.

7. Applicable Rule: From here, the admins can select the rule for which the product chart is going the display on the product page. Instance, we have provided 2 options here. Using the first one, the store admins can add the conditions for a chart based on product features such as color, conditions, and more. Apart from it using the other option (reference), the admins can add the product reference in the text field and the chart will be automatically applicable for all the products that are having mentioned references.

Manufacturer Chart

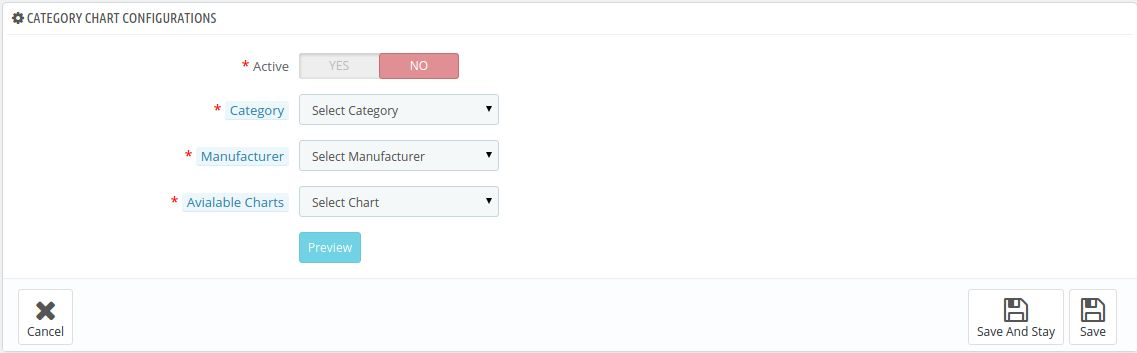
A table appears in this tab. This table shows which charts are mapped to which manufacturer. To add a new entry, the admin can click on the add icon appearing on the right side of the table. The following form appears after clicking on the add icon button –

1. Active: This is the field that decides whether the chart should be enabled or disabled. The chart only works if it is enabled from this end.

2. Category: Here the admin may select the category of the products where this chart should appear.

3. Manufacturer: In this field, the admin has to select the manufacturer to which this particular chart is to be mapped.

4. Available Chart: In this field, all the charts which are created till now are listed. The admin can select any of the charts from this field and then save the settings.

5. Preview: Admin can also view the preview of the chart by clicking on the preview button below.

6. Actions: Actions like edit and delete are also available to edit the entries which are already done by the admin.

Category Chart

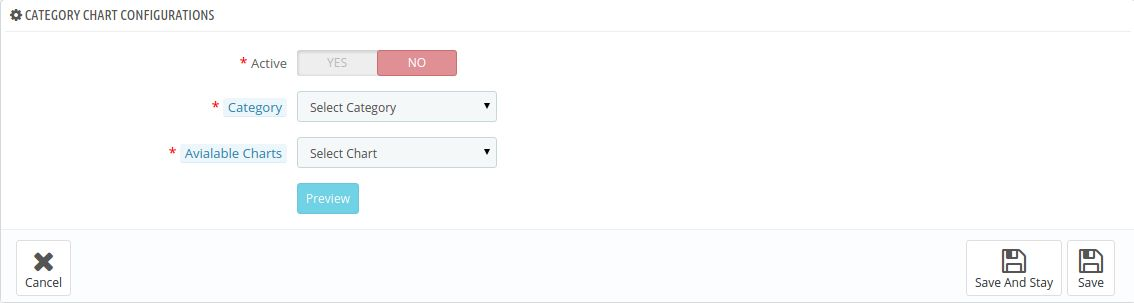
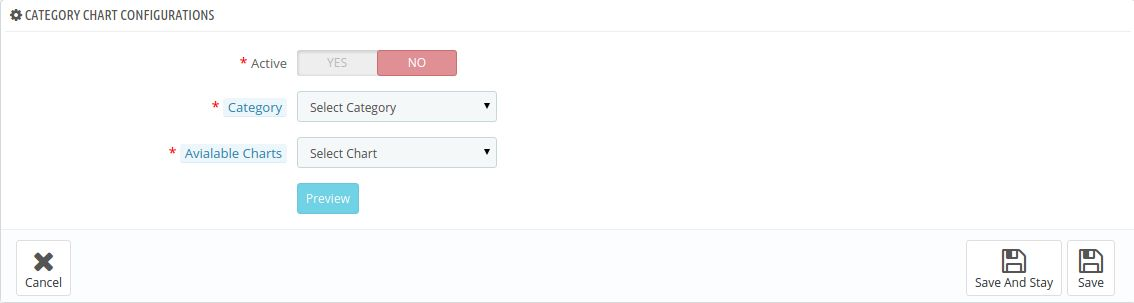
In this tab, a table appears. This table shows that which charts are mapped to which category. The following form appears after clicking on the add icon button –

1. Active: This is the field that decides whether the chart should be enabled or disabled. The chart only works if it is enabled from this end.

2. Category: Here, the Prestashop store admin may select the category of the products where this chart should appear.

3. Available Chart: In this field, all the charts which are created till now are listed. The admin can select any of the charts from this field and then save the settings.

4. Preview:  The eCommerce store admin can also view the preview of the chart by clicking on the preview button below.

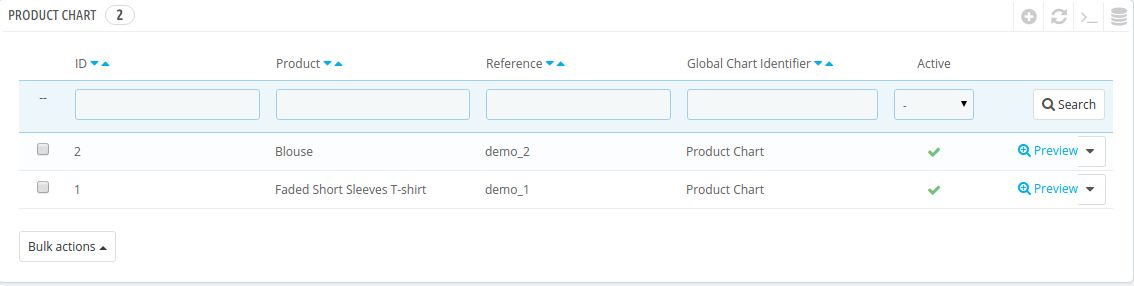
Product Chart

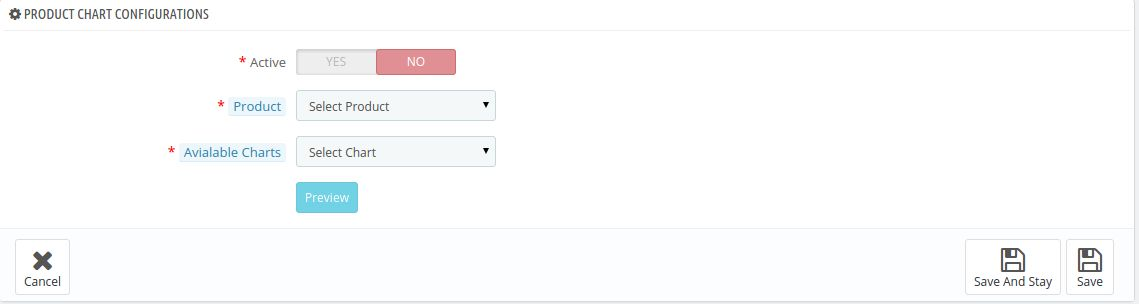
A table appears in this tab. This table shows that which charts are mapped to which product. The following form appears after clicking on the add icon button –

1. Active: This is the field that decides whether the chart is enabled or disabled. The chart only works if it is enabled from this end.

2. Select Product: In this field, all the products which are available in this particular store appear and the admin can choose any one of those products and get that product mapped with that particular chart.

3. Available Chart: In this field, all the charts which are created till now are listed. The admin can select any of the charts from this field and then save the setting.

4. Preview: Admin can also view the preview of the chart by clicking on the preview button below.

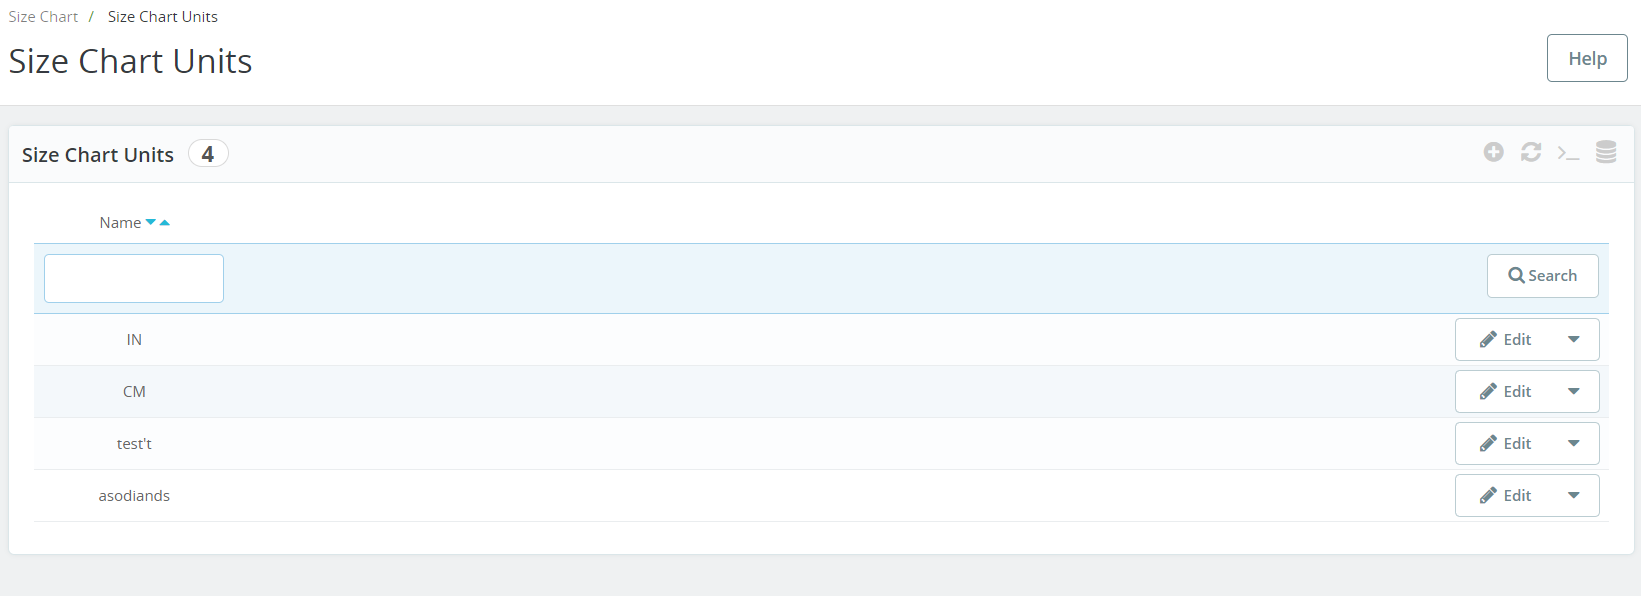
Size Chart Units:

In the following tab offered by the Prestashop size chart addon, the admin can manage all the size chart units. Not only the admin can modify the added units but also can add as many units as he wants for the size charts.

Front End Module

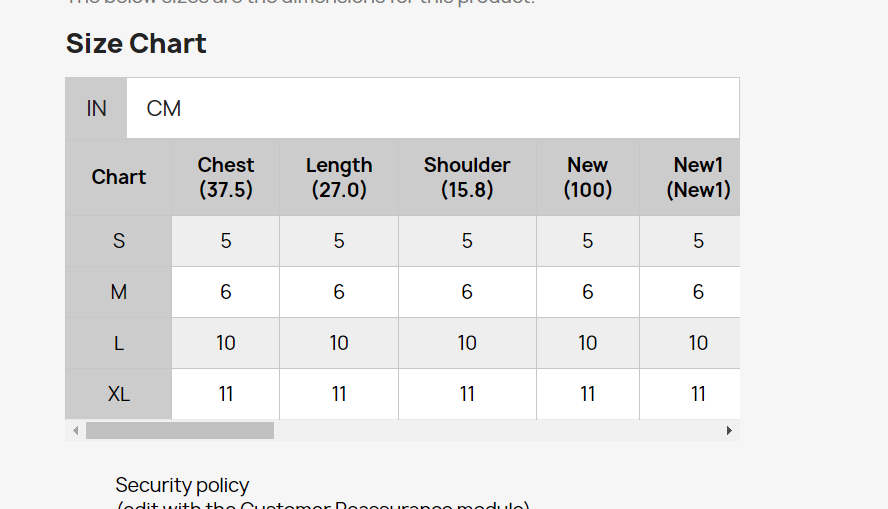
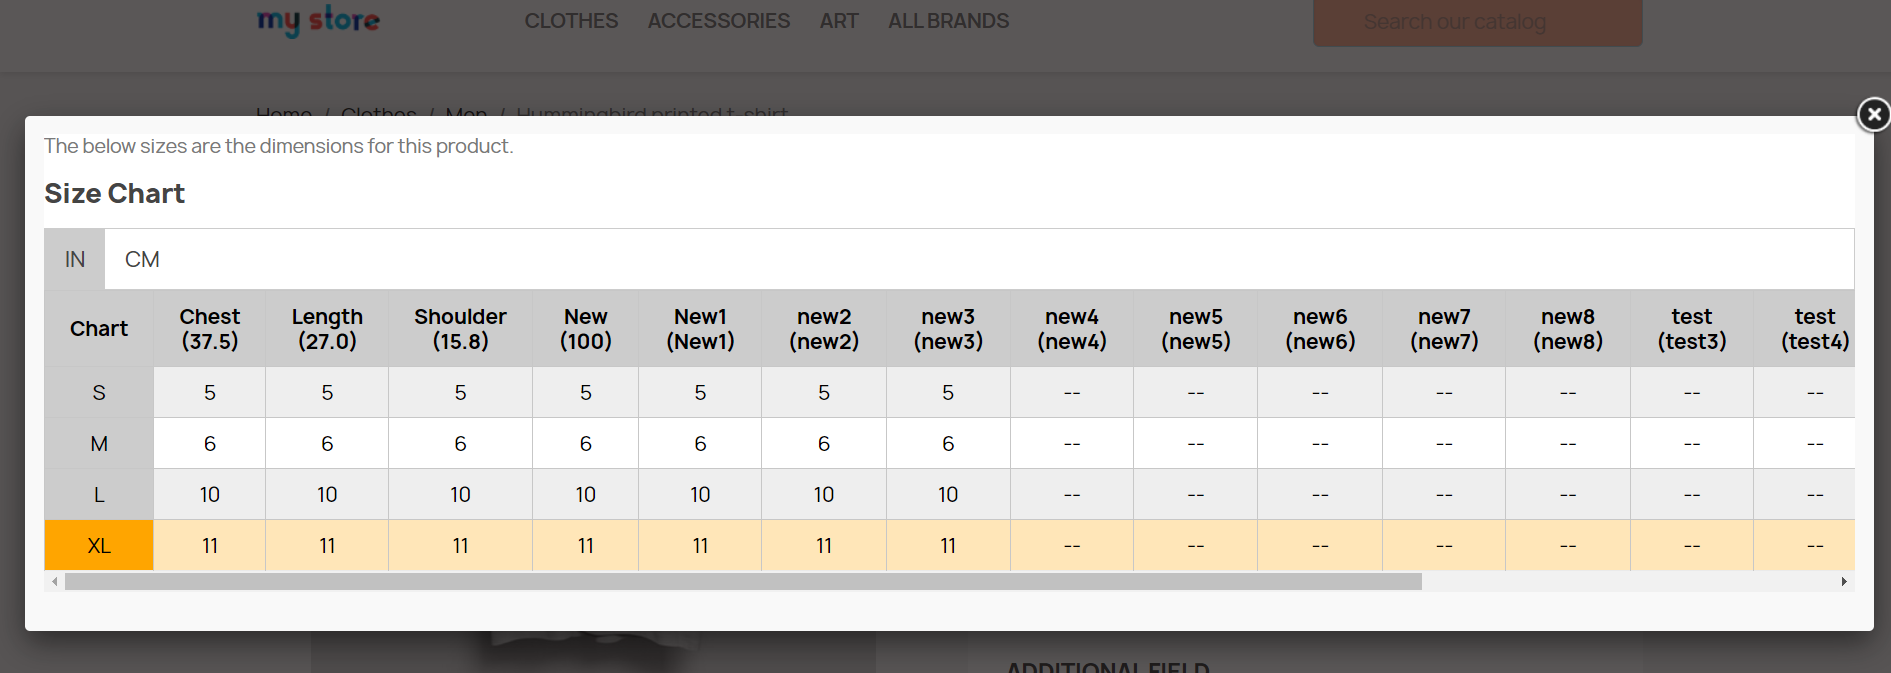
When this extension is enabled from the back end with all the entries done, then a link named ‘VIEW SIZE CHART’ appears on the right side of the page just like the screenshot below.

Also, if “Display size chart on popup” is enabled then the “View Size Chart” button is available otherwise, the chart is displayed directly under the Add to Cart button.

It may be a case when a product has a chart mapped to itself and it also has a chart mapped to its category and it also has a chart mapped to its manufacturer. In this case, the priority of the chart has been decided. So, the priority of a product chart is higher than the priority of the category chart and the priority of the category chart is higher than the priority of the manufacturer chart.

So, the chart on the product page is shown according to the priority basis which has been explained above.

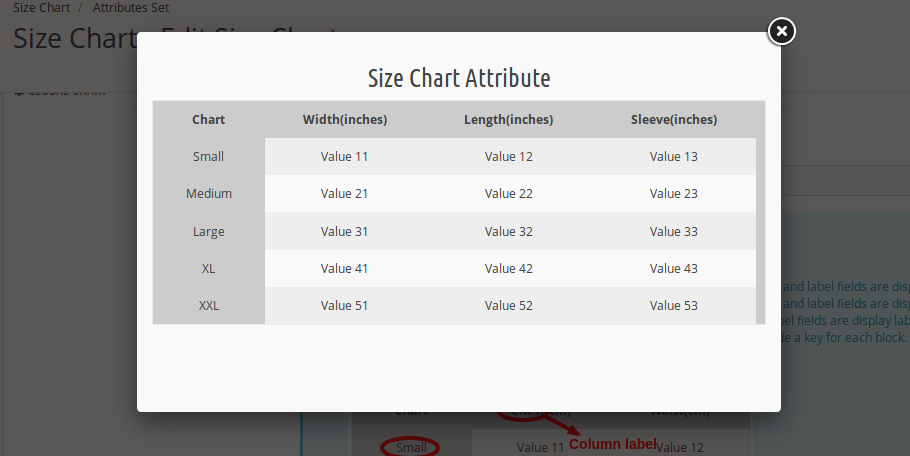
When the customer will click on the link, a pop-up will appear with all the data of size for that product.

We hope that we have covered all the concerns regarding the installation and the product guide of this PrestaShop Extension. You should also check our blog on How you can eliminate the distraction by One Page Checkout.

Thus this Prestashop product size chart addon makes shopping easy for the online customers. The admin can reduce the complexity of choosing the perfect size. By using this Prestashop product size table plugin the admin can display size charts on the product page. The customers can buy the products easily after viewing the size chart.

Prestashop Size Chart Addon: Video Tutorial

For a more visual and hands-on understanding of how to install, configure, and use the Knowband Prestashop Size Chart Addon, we have created a step-by-step video tutorial.

This video covers:

  • Module installation

  • Creating and customising size charts

  • Assigning size charts to products

  • Front-end display and functionality

Watch the full tutorial below to get started quickly and make the most out of this addon.

For more information about this Prestashop Size Chart Popup Addon please visit Knowband.

Knowband Prestashop product size chart Module Link:  https://www.knowband.com/prestashop-product-size-chart

Knowband Prestashop size chart popup addon Watch video: https://www.youtube.com/watch?v=DVq2y9pWGGM&feature=youtu.be

Knowband Prestashop product size chart Admin Demo Link: 

https://ps.knowband.com/demo3/16/admin1/index.php?controller=AdminLogin&token=ffa17b0c72ff8c0ab7cf3e344c5ae4fc&redirect=AdminChartAttributesSet&demo_lang=en

Knowband Prestashop product size chart extension Front Demo Link:   https://ps.knowband.com/demo3/16/en/evening-dresses/30-morbi-in-sem-quis-dui.html

Knowband Prestashop size chart link module Addon Store Link: https://addons.prestashop.com/en/additional-information-product-tab/23493-knowband-product-size-chart.html

Please contact us at support@knowband.com for any query or custom change request as per your business requirement.

How to Hide Input Fields for Disabled Languages in OpenCart while Adding New Category?

OpenCart is hailed as an amazing eCommerce platform due to its multiple functionalities and features that have made it a popular choice among site owners. One of the wonderful features that have earned it followers across geographical boundaries is its multi-language support due to the presence of OpenCart extensions. Due to this feature, numerous eCommerce site owners can run their online store in an efficient manner by targeting their customers in their native language.

However, sometimes this advantage becomes an issue for certain site owners while adding a new product category for their OpenCart store. Let me explain you the situation which is observed by several OpenCart users during the addition of new product category.

Assume that you have an OpenCart website that is particularly targeting the Dutch customers. Now, if you want to add a new product category in that OpenCart site, a small issue arises. Several OpenCart site owners have observed that even if they have disabled a particular language on their site, they are still asked to fill out the product details in that inactive language during the addition of a new product category.

Before providing the solution of the above problem, let me clarify your doubt. The OpenCart platform always shows all the inactive language during the task like the addition of a new product category. This occurs due to the fact that this OpenCart platform believes that those inactive languages could be used by the site owner in the future business dealings.

Let us talk about the resolution of this problem. It is really irritating to fill out those lengthy product details for each and every disabled language in the OpenCart site during the addition of product category. Check out these helpful tips that can help you in avoiding this boring task of filling out product details for each inactive language. Here are the steps you need to follow as an OpenCart store owner.

1. First, create the backup of the required file /admin/view/template/catalog/category_form.tpl.

2. You need to edit the above file and search the below mentioned code:

<?php foreach ($languages as $language) { ?>

3. This PHP statement will be visible to you in two places. The site owner needs to replace the coding in both these places with the one as shown below:

<?php foreach ($languages as $language) { ?><?php if($language[‘status’] == 0) continue; ?>

By performing these simple steps, it is now easier for any OpenCart site owner to resolve the problem of adding product details in inactive languages. For adding any other desired functionalities and new features in your OpenCart site, you can install any of the feature loaded OpenCart extensions from Knowband store.

Stay involved with us and avail the solution to your eCommerce platform related issues for mainly three platforms- OpenCart, Magento, and PrestaShop. We do offer customized plugin development services for these platforms.

PrestaShop Product Quantity Update – User Manual

Introduction of PrestaShop Product Quantity Update Addon:

This PrestaShop Product Quantity Update by Scanner module is basically developed for the Prestashop eCommerce site owners to let them update their product quantity on the site without any hassle. It provides an option to update the product quantities without going to the product listings on the back end. A separate interface is provided at the back end which allows the product quantity update based on the:

  1. UPC Number
  2. Reference Number
  3. EAN Number

Steps for Installation:

To install this Prestashop product quantity addon by Knowband, please follow the following steps:

1. Add add-on folder to the modules folder on your system.

2. After adding this Prestashop addon folder, the system will list the add-on on module page under front office feature category as given below:

3. Click ‘Install’ to install this Prestashop Admin Tool Addon.

Admin Account Interfaces

These interfaces will be accessible only by the admin in his modules section.

Menu Location:

An Admin can access the interface of this Prestashop module by navigating to the following address:

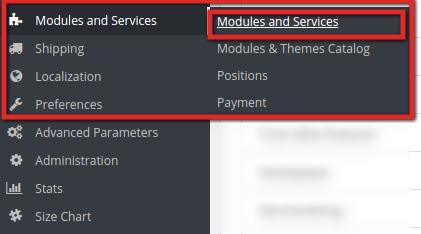
1. Navigate to Modules and Services >> Modules and Services

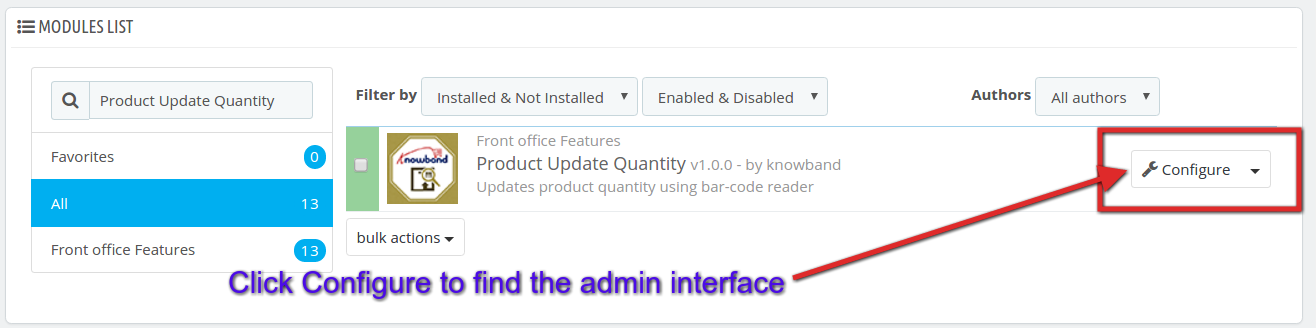
2. The list of Prestashop modules installed on your site will open. Now search for Product Update Quantity in the search box, you will find the following interface. In the following interface click on the Configure button:

Admin Configuration Panel:

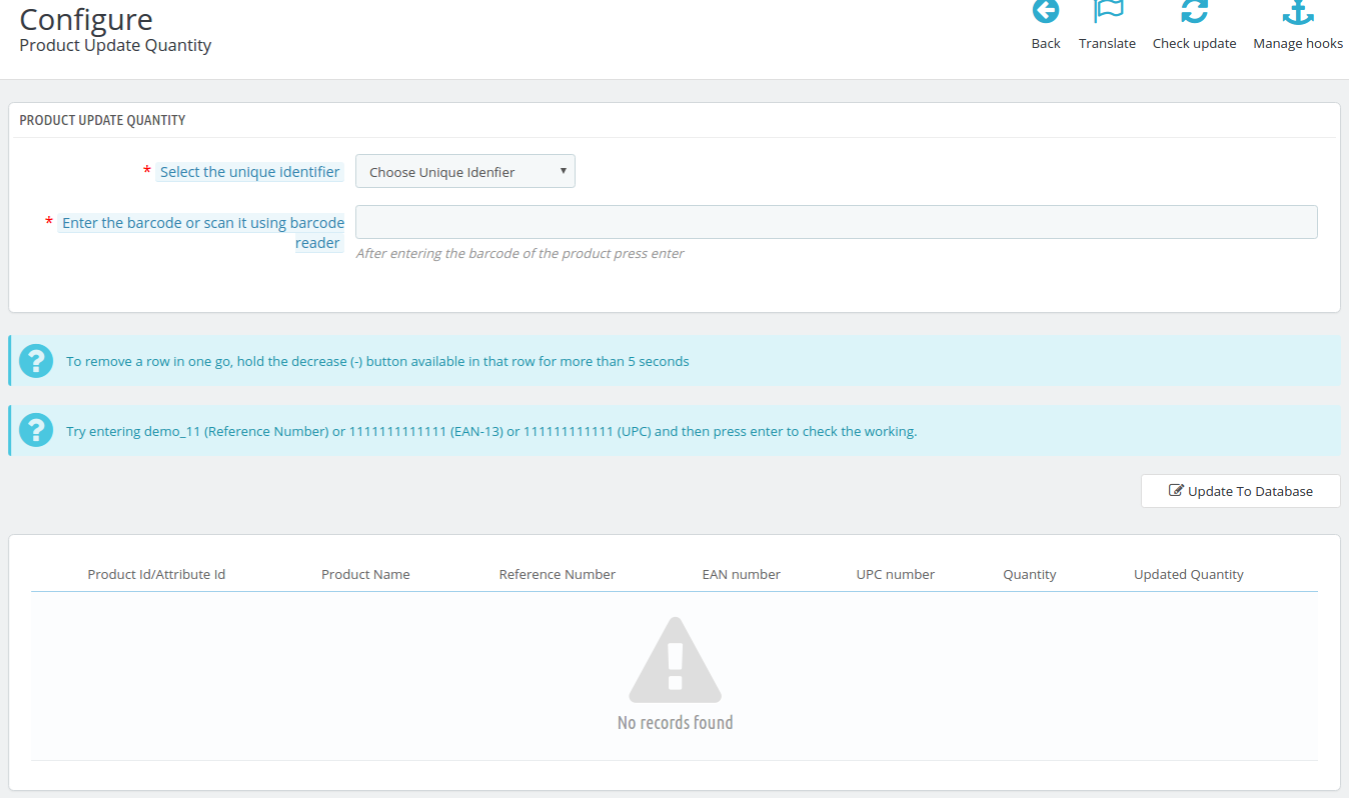
The Admin configuration interface of this Prestashop Quantity update addon by Knowband looks like this:

Update the Product Quantity based on UPC Number:

To update the product quantity based on UPC Number, follow the following steps:

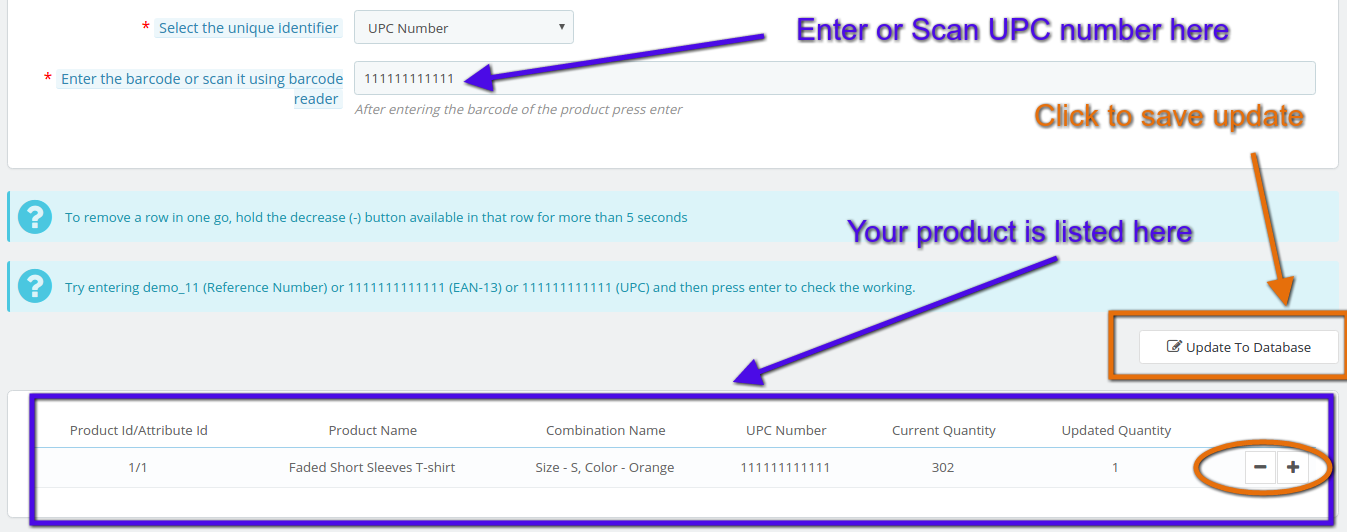
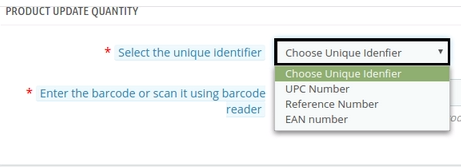
1. Select UPC Number from the drop-down list in ‘Select Unique Identifier’ menu option.

2. Scan the UPC number of the product ( you can even enter the UPC number manually in the text filed to entering the bar-code or scan it using the bar-code reader).

3. Your product will be listed below in the interface as shown in this screen shot:

4. You can re-scan the UPC number of the other products in the list to add a quantity or you can also increase or decrease the quantity by clicking + or – as shown in the screen shot above.

5. After you update the desired quantity of the products it will shown in Updated Quantity that how many new products you have added in the list for this particular UPC number. Click on ‘Update To Database’ to save your product quantity update for the particular UPC number.

6. Similarly, you can perform the Product Quantity update based on EAN number or Reference Number too. Just don’t forget to select the items from the drop-down list according to your need.

Module Link: https://www.knowband.com/prestashop-product-quantity-update

Admin Demo: https://ps.knowband.com/demo1/16/admin1/index.php?controller=AdminLogin&token=aea1bb3fb1bab860c86c4db00ce5949e&redirect=AdminModules&demo_lang=en

Watch Video tutorial here: https://www.youtube.com/watch?v=GSdsowwt1JU

Feel free to contact us at support@knowband.com for any query or custom change request as per your business requirement.

Why are Marketplace sites more successful than the Inventory Model?

Marketplace like Amazon, eBay, Alibaba are known to everyone today. It was a time when these sites had their dominance in their home country only. But looking at the stats for the reach of these sites in the global context shows us the figures that shout their presence in almost every country on the globe.

The globalization of eCommerce sites has only been seen in the past decade when a new model of eCommerce was introduced. It’s the marketplace model of eCommerce. eBay was the first entrant here. A series of development has been noticed in the past few years with the growth of the marketplace model. But what is a marketplace model of eCommerce? Before discussing that, I would like to illuminate a few points on the eCommerce scenario before the introduction of the marketplace model.

What is/was the case before the marketplace hit the floor?

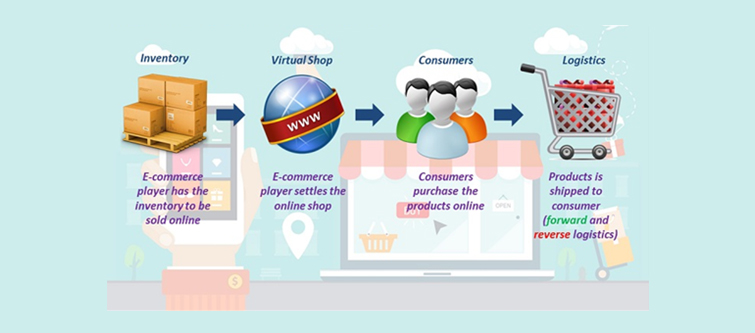
The inventory model of eCommerce has been on the market for long enough. We can say the actual eCommerce started with the inventory model. According to the FDI policy “Inventory model of eCommerce means an eCommerce activity where the inventory of goods and services is owned by the eCommerce entity and is sold to the consumers directly”.

It clarifies the inventory model that all the products are brought directly from the eCommerce firm itself and it is the firm itself who manages the shipping of the items to the consumers. Taking the case of Flipkart which has evolved from an inventory model to multi-vendor model of eCommerce. An Indian eCommerce firm based in Singapore, which was started as an inventory model, later in 2013 it also took the path of the marketplace model.

Inventory model of eCommerce indicates a direct B2C relation between the firm and the consumers.

Earlier before the marketplace joined the game, firms were in direct relation to the consumers. The orders were received by the eCommerce firm through its site interface and then fulfilled only by the firm itself. The firms had a direct partnerships with the delivery services who were responsible for delivering the dispatched item to the consumers. One of the major characteristics of the inventory model was that firms have to manage their own inventory of products in their warehouses and this was also one of the major drawbacks of the inventory model of eCommerce. Managing such a large inventory of products was a risky task and even a complicated one.

What happened when the marketplace finally arrived?

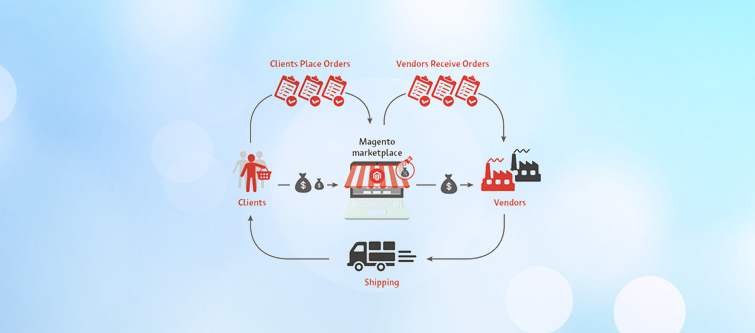
It was the arrival of the multi-vendor model, which completely revolutionized the way eCommerce firms worked by then. In order to extend their reach to the corners of the world, eCommerce firms adopted a new B2B layer between the firms and the consumers where the consumers directly contact the firm but the fulfillment is done by the new layer which is also called as vendors or sellers. The eCommerce sites started accepting the seller/vendor registration and allowed them to sell on the firm’s site.

The official definition laid by FDI for marketplace site says”Marketplace model of eCommerce means providing an information technology platform by an eCommerce entity on a digital and electronic network to act as a facilitator between buyer and seller”

Multi-vendor sites are the firms that allow a huge, distributed population of buyers and vendors to find prices, products and transact with each other on a third-party platform that is trusted, safe, reliable, and transparent. In return, these marketplace sites charge some commission from the sellers on each sale. Some of the multi-vendor platforms like Amazon, Flipkart, and others provide the services and products as fulfilled by the firm itself. If you have noticed, you might see certain lines in the description of certain products like “Fulfilled by Amazon”. These lines mean that the particular product will be delivered to the consumers by the inventory of the firm itself and the delivery will be too handled by the firm itself. If we consider the marketplace model in technical terms then these kinds of products are also called “Admin’s product”.

Marketplace model of eCommerce provides a platform to different vendors and sellers to sell from a third party website.

Marketplace sites provide more options to choose from- It is not only the availability products that matter but the prices of those products also matter. On this site, when vendors see a large number of other sellers also selling the same product at a different price, then it generates a competitive environment that encourages the improvement in product quality, service quality, reduction in price, etc. Therefore marketplace sites are often preferred by the buyers.

Perfect UX for users- The competition does not only exist between the sellers, but also the marketplace sites compete with each other too. This competition encourages the marketplace sites to offer tempting deals and additional offers. In addition to this, marketplace sites keep experimenting with their UI and UX optimization in order to provide the convenient user experience to the buyer so that they remain stacked to their site only.

It takes away the burden of pure inventory- Now the firms do not have to necessarily manage their own inventory. The inventory is maintained by the sellers and also the delivery in most of the cases. There are certain sites that operate as hybrid ones and manage their own inventories too. However, the pure form of the marketplace does not include inventory management by marketplace firms.

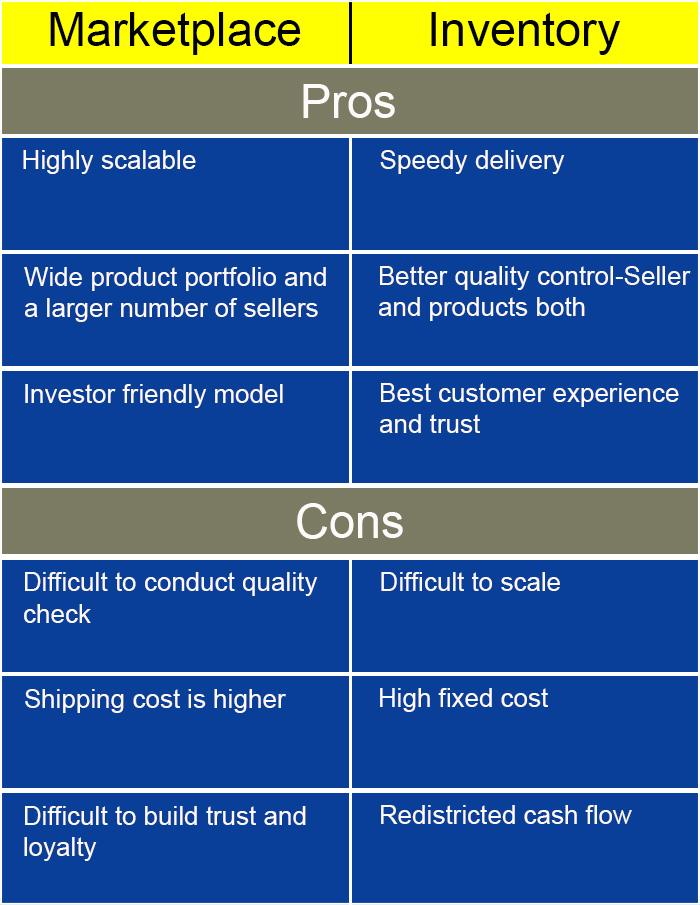
A small comparison with both pros and cons.

This model is overall a new trend which was introduced a long ago but has gained popularity in the past few years. With some of the pros, it also has its cons, but overall it is still in a developing phase where new ideas and innovation are introduced each day. PrestaShop Marketplace module is a similar innovation by knowband that can easily convert an inventory model PrestaShop site to a marketplace site. You can find more about how to convert an eCommerce store into a marketplace site in “How to get a marketplace site in 8 easiest steps?“.

Liked This? You’ll Like These Too

How can OpenCart website owners recover the sales lost due to Shopping Cart Abandonment?

Online Sellers are losing money every day. I can say this very confidently because a survey laid by Baymard Institute says that in the UK, 76.45% of the total online sales are lost because of the shopping cart abandonment. Truth to be told, for every 100 potential customers, 67 of them just leave the site without completing the checkout. This scenario is not true just for the UK but every corner of the world. I wonder, how much would be the conversion rates if anyone could save those customers from abandoning your online shopping cart.

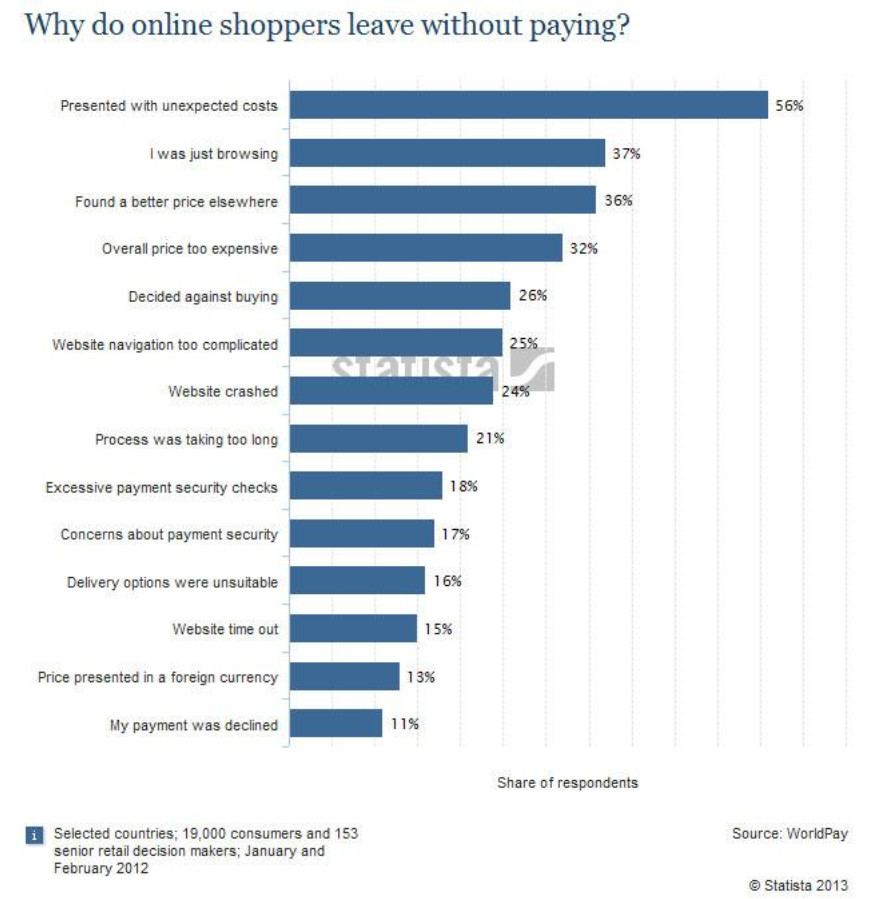
A research by Statistia suggests 14 main reasons for why shopping cart abandonments occur on an eCommerce site.

The reasons for shopping cart abandonment on an eCommerce site are even more than that. We can fight with them, but truth to be told, we cannot just eradicate them all even through the most advanced conversion optimization tools. There are some scenarios that can be minimized to show the least effect on the sales but we cannot avoid them at once. The reasons for shopping cart abandonment are numerous and they require some vigorous efforts and a considerable amount of time to be minimized. My concern here is not to go for the ways to avoid or eradicate the shopping cart abandonment, but to find a way to face and deal with them.

There are two ways to deal with the shopping cart abandonment on your site. 

1. Ways to prevent- before cart abandonment.

2. Ways to recover- After cart abandonment.

There are numerous article and research reports on the web stating the ways to prevent shopping cart abandonments, and these articles are effective too. But, going with my concern here, I would like put some points that can be utilized to face the worst case scenario of shopping cart abandonments on an OpenCart site. OpenCart is an open-source eCommerce website solution that represents a quiet competitive control panel and a flexibility to manage some light weight eCommerce sites. Being a light weight and an open source solution, OpenCart lags in some areas when it actually resembles to prevent shopping cart abandonments. Well, it’s not a problem in only OpenCart sites, but many of the major open source and even some premium solutions cannot prevent the causes of shopping cart abandonment.

So, let’s get to the point where we would try to know some ways to deal with the inevitable. Shopping cart abandonments occur for multiple reasons and we cannot eradicate all of them at once. But, instead, we can be ready to face the OpenCart abandoned carts on the site. We can plan a strategy to deal with them instead of avoiding or ignoring them. If avoiding or preventing a shopping cart abandonment is not completely in our hands, then we can go for the recovery options to minimize the losses.

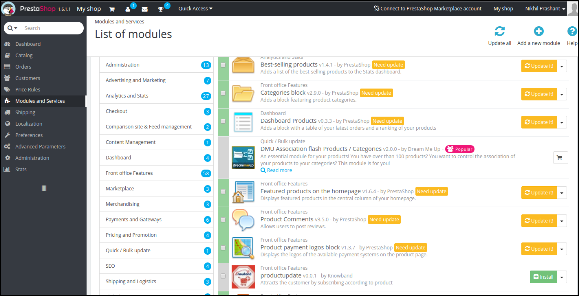
One of the best recovery options in this case is an OpenCart abandoned cart module or extension. We have to prepare our site to deal with the already occurred OpenCart abandoned cart instances, and for this to happen, the site must be ready to manage them in such a way that they generate the possibility to lure the customers back to the site. An OpenCart abandoned cart extension works smartly b sending messages and notifications to the customers reminding them about the abandoned cart they have left on your site. Well, the reminders are not at all enough to lure them back. So these extensions also possess the features to send some encouragements with the notifications.

OpenCart abandoned cart extensions

How an OpenCart abandoned cart extension would help you recover your lost sales?

1. An OpenCart abandon cart extension works as a cron level real time system

An OpenCart abandoned cart extension works as a real-time system that operates according to the cron level settings. The cron level setting is required to setup the serial reminders with different email templates that are set to send different messages at different interval of time.

2. Can be set to discover the new abandoned carts

The extensions automatically add the orphan carts in the abandoned cart list and notify to the admin as soon as a cart crosses the time limit set to decide if a cart would be considered as abandoned or not. So, whenever the cron finds a new orphan cart, it updates them in the list.

3. It becomes very easy to send automatic emails

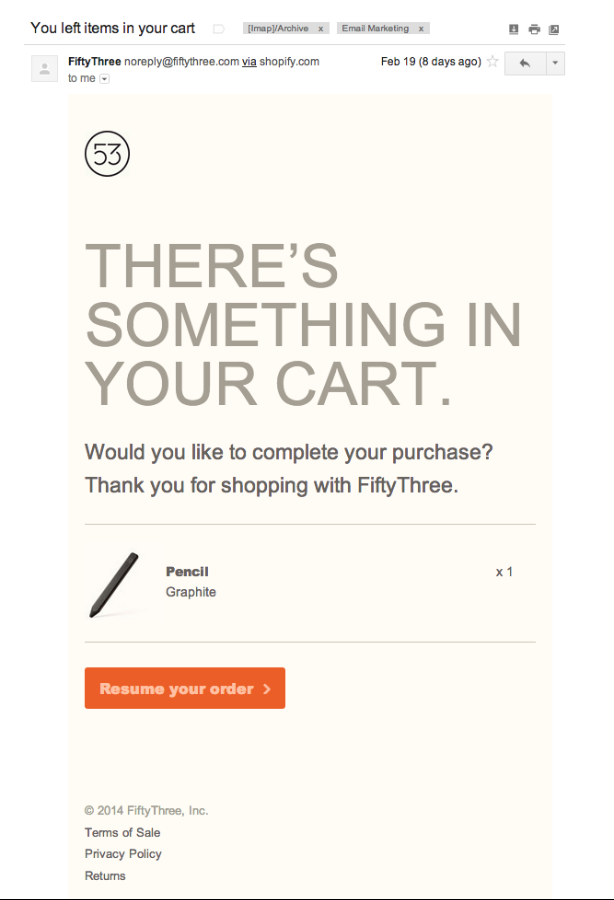
Through an abandoned cart extension, it becomes very easy to send serial reminders automatically without any manual intervention. The cron can be set to decide which email template would be sent to the customers at what time. So, the admin can set different email templates to be sent at different time slots. Say, the first email would be sent after 7 hours and without any offer, and the second email will be sent after 24 hours and with an offer. You can look at this example for a similar scenario:

The emails would include:

Pictures of the products they left in the cart

Reviews or ratings from other customers

Guarantee and easy refund policy information

A strong call to action to get them back again

Timing the emails:

1st email – should go out within 24 hrs

2nd email – send within 2 days

3rd email – send within 1 week

Example of an abandoned cart email from a site to one of its customers.

4. Know your abandoned customers

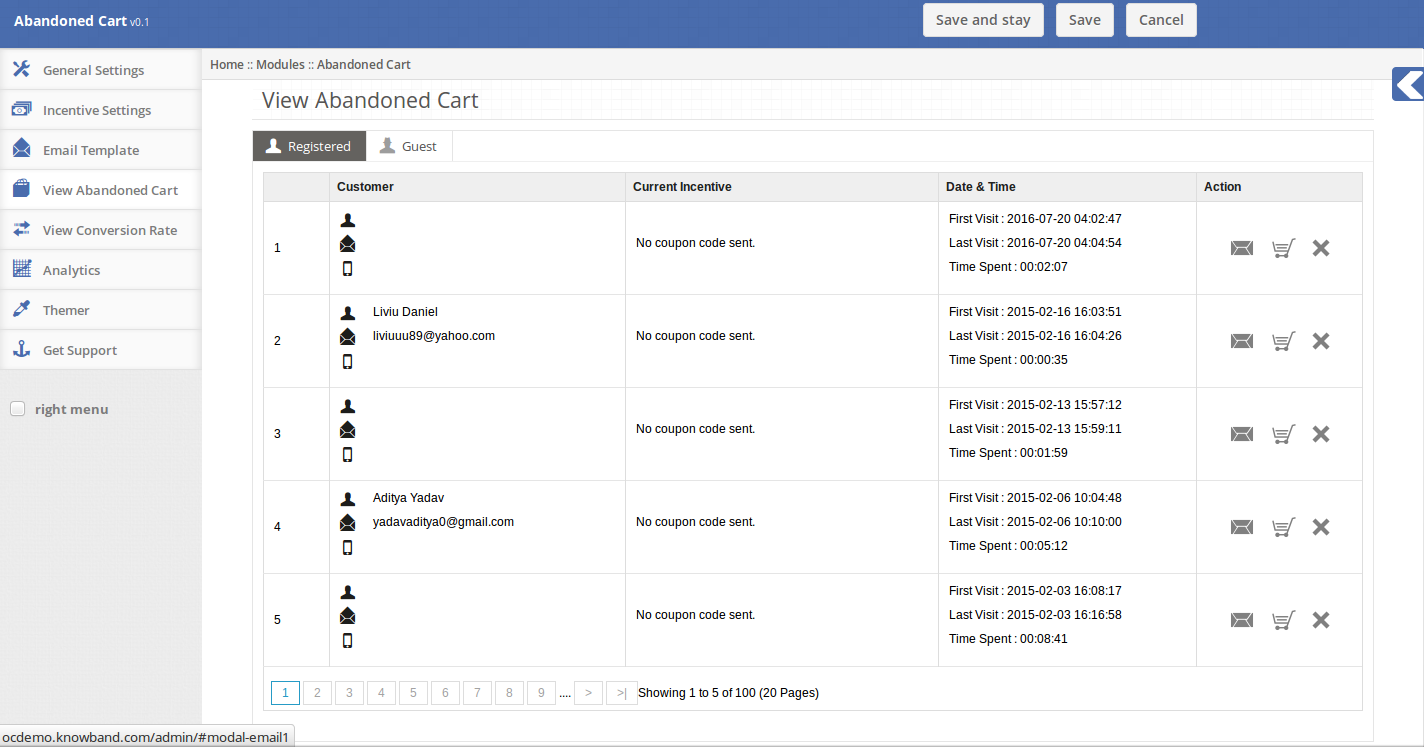
A central control panel to browse and manage the abandoned carts

The reporting system of an OpenCart abandoned cart extension provides the information about the customers who have abandoned your shopping cart. These information contain the details like name of the customer, email Id, Products in the cart. With these information you can also analyse why the particular customers would have left the cart and exit your site.

5. Know your site’s cart statistics

An OpenCart abandoned cart extension not only provide the interface to manage the emails to be sent but also it can be used as a research tool to find out how many carts are being abandoned at the moment and you can also compare your current cart performance with the earlier ones. With these information, you can plan your conversion optimization strategy based on the analytic.

Ad Re-targeting

Ad re-targeting in association with an effective OpenCart extension can recover the other 98 % sales.

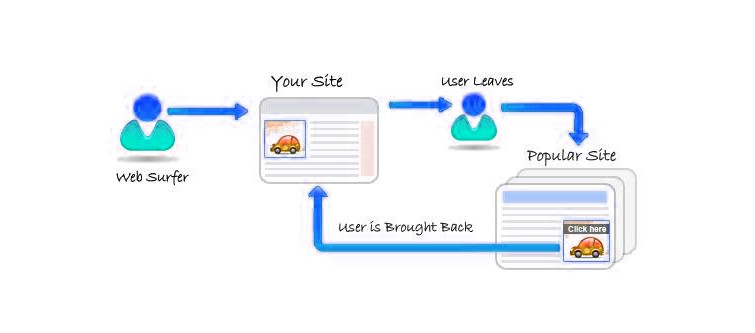
The another after cart abandonment method is by conducting an Ad Re-targeting campaign. A research by AdRoll, says that “2%” of buyers convert on the first visit itself. But your re-targeting strategy can bring the other 98% buyers back to the site. The ad re-targeting works by fetching the cookies from your site and utilizing them to advertise your site on the other site where the customer visits after abandoning your site. The condition for ad re-targeting is that your site needs to have an ad re-targeting partnership with the other site. For this, you can select any Ad re-targeting partner.

Solution by Knowband

The OpenCart abandon cart extension can be used by the website owners to get strengthen their after cart abandonment strategy. It’s a heavy duty OpenCart extension that gets installed like any other OpenCart extension and performs all the task needed to be performed by a competitive OpenCart abandoned cart extension . So, now it’s a time to stop leaving money on the table and get back to where it was left by the customers.

This Would Also Interest You: