Opencart Advanced Wishlist Extension – User Manual

1.0 Introduction

Imagine you are browsing through your mobile phone and saw that pretty dress but couldnt buy it right now because its month’s end and let’s face it you are broke! You added it to your wishlist so that if its price comes down or when you get your salary credited, you will buy it. Suddenly a support Team member of that eCommerce site calls/e-mails you and offers you a coupon on that Dress. You feel happy and buy that Dress because now it’s affordable. Offering wish lists is an effective way to reduce Shopping Cart Abandonment and fulfill sales from customers who showed intent but didn’t end up purchasing. Wish lists are mutually beneficial: they give customers an easy way to remind themselves of a product and help merchants measure product interest beyond a clear-cut sale. OpenCart Advanced Wishlist Extension by Knowband helps customer to shortlist their favorite products so that they can be aware of the products they want to purchase or view later.

This OpenCart save for later extension is like a basket in hand where you add whatever you like and proceed with the checkout when you are ready to buy it. As a Store Admin you can keep a track on the requirements of your customers and proceed accordingly with your sales plan.

picture1
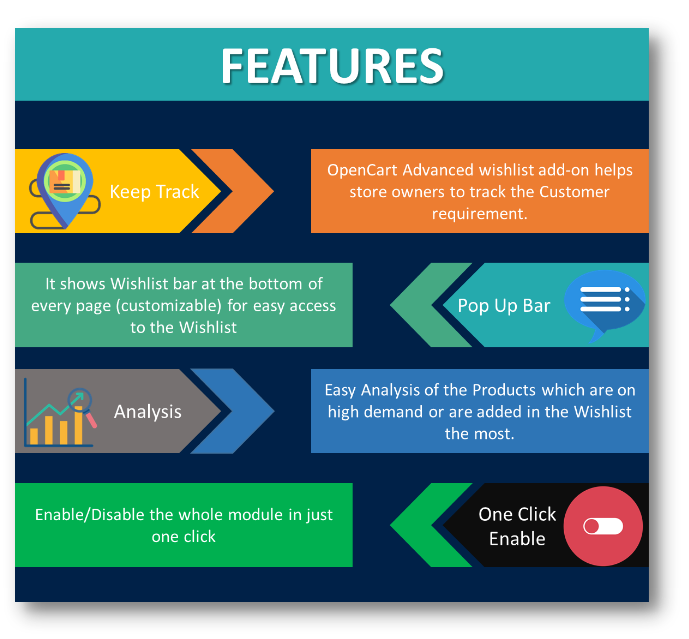
1.0.1 Features of OpenCart Advanced Wishlist Extension
2.0 Installation Guide

Before starting the installation process, you have to buy the Opencart Advanced order list extension by the Knowband store. Once purchased, you will receive the following files on your registered email.

  • Source code of Opencart Advanced order list extension in zipped file format.
  • User Manual of Opencart save for later plugin.

Now in order to install this on your online shop, follow the given steps:

Step 1: Unzip the zip file. You will get the folders as shown in the image below
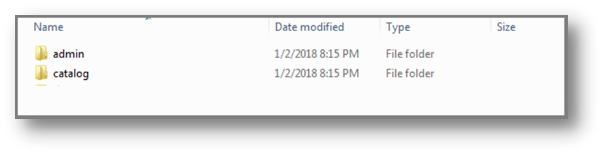

Step 2: Copy all the folders of the zip file in the Root Directory of OpenCart setup via FTP manager.

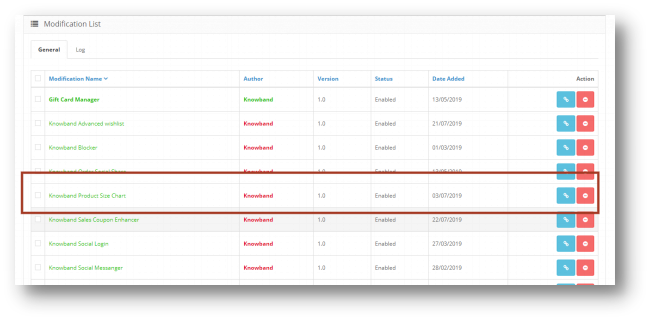
Step 3: There is a file name kbadvancedwishlist.ocmod.xml (for oc<3.0)
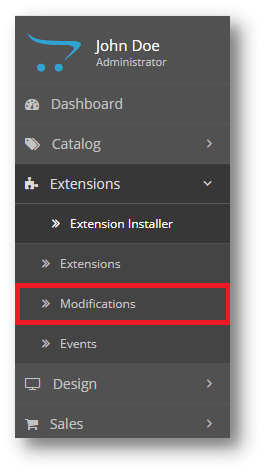
kbadvancedwishlist.ocmod.zip (for oc>3.0). You need to install this file in the following Location:
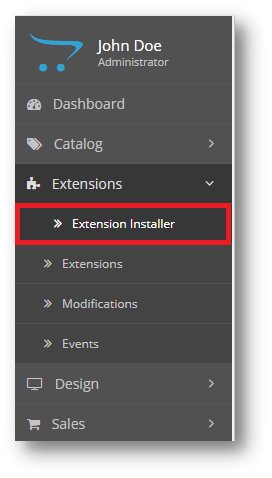
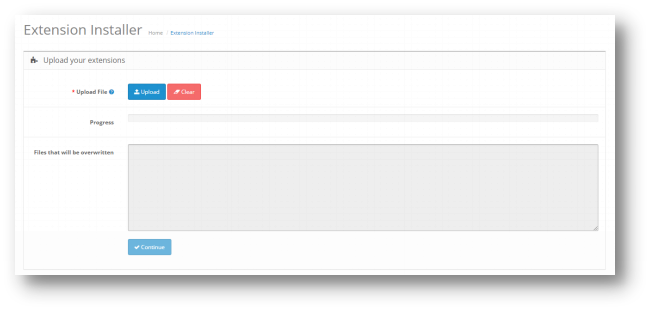
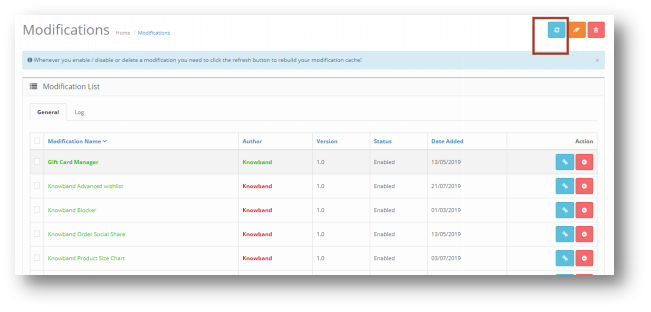
Step 4: After Installation you need to select this file and refresh Modifications:
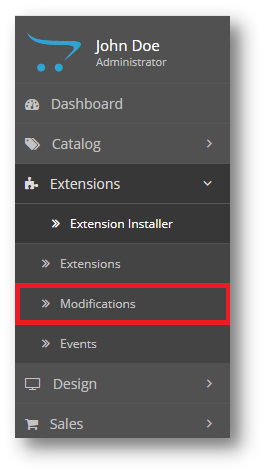
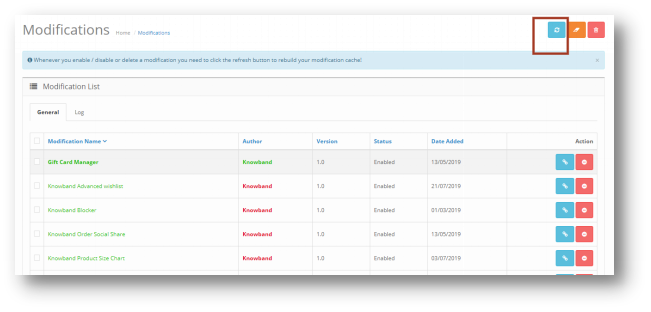
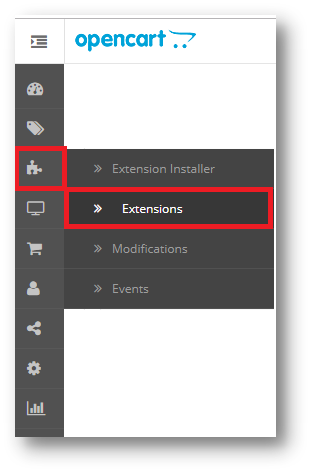
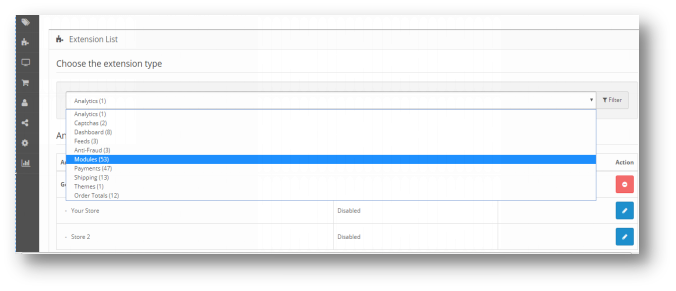
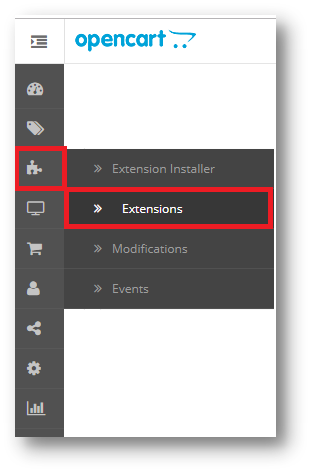
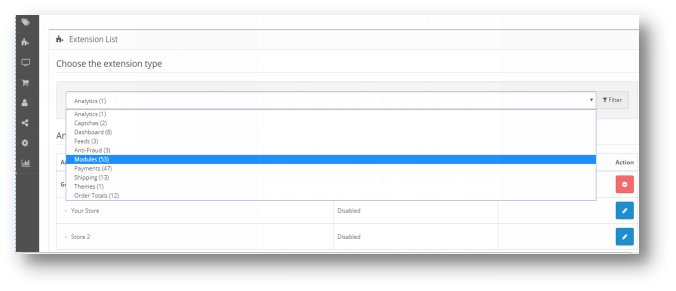
So, Opencart save for later plugin is now successfully installed and is ready to use at your store. Go to the admin menu and click on the extensions. Choose the Extension Type as Modules. You will find a list of modules. Select the Knowband Advanced Wishlist.

3.0 Admin Interface of OpenCart Advanced Wishlist Extenstion

To configure the Size guide module for OpenCart, Navigate the settings in the following order:
Admin Panel > Extensions >Modules>Knowband Advanced Wishlist
The Admin Interface of OpenCart Advanced Wishlist Extension is divided into 6 Tabs:

  • General Settings
  • Product Analysis Report
  • Customer Analysis Report
  • Order Analysis Report
  • Support

3.0.1 General Settings

This setting will have the Option to enable/disable the plugin. The page will look like as shown below:
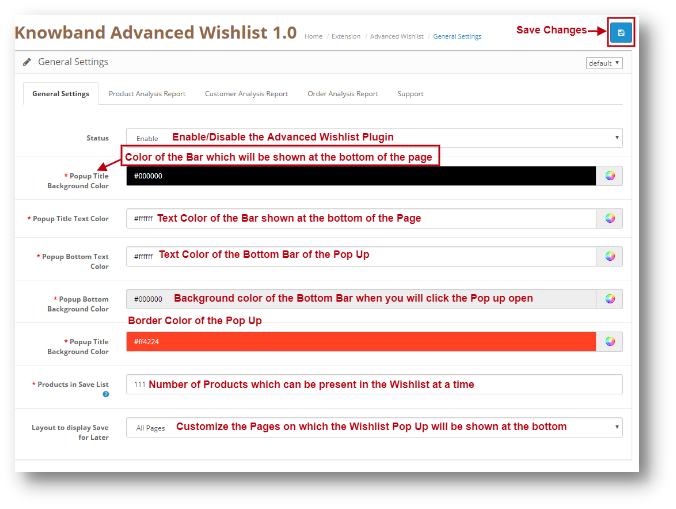

3.0.2 Product Analysis Report

Through this setting of OpenCart save for later module, you can view the reports of a Particular Category. You can analyze the most popular category or the Category which was added in the Wishlist of the Users the most. The Screen will look like as shown below:
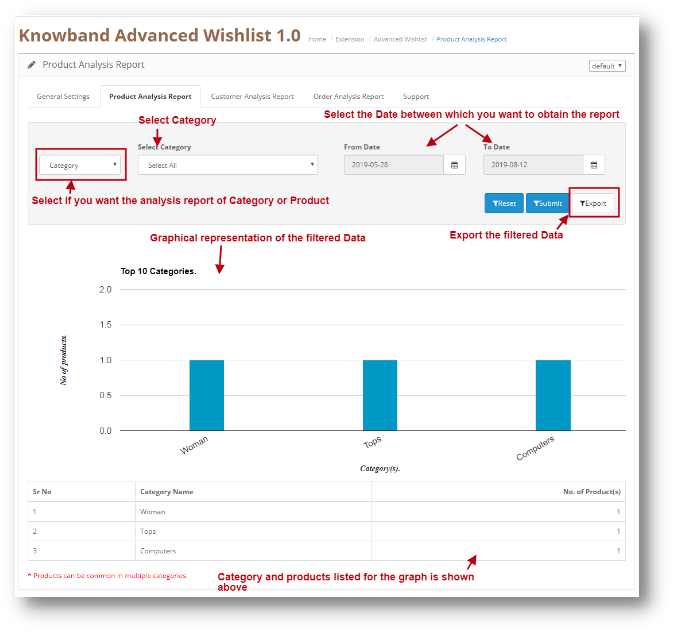

Filter your Report:
You can filter your Report on the basis of the categories added in your web Store and also on the basis of Date. You can just Enter the ‘To’ and ‘From’ Date and the reports will be shown to you.

3.0.3 Customer Analysis Report

Through this setting of OpenCart Advanced Wishlist module, you can view the reports of a Particular Customer. You can analyze the most loyal customers of yours in your Store. The customer information will be shown here. The Screen will look like as shown below:
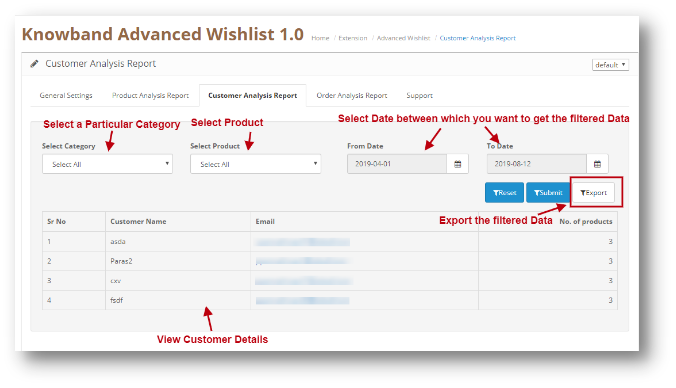

Filter your Report:
You can filter your Report on the basis of the categories and Products added in your web Store and also on the basis of Date. You can just Enter the ‘To’ and ‘From’ Date and the reports will be shown to you.

3.0.4 Order Analysis Report

Through this setting of OpenCart Advanced Wishlist module, you can view the reports of a Particular Product on the basis of how much it was ordered by customers. You can also view the report of the products which was in the Customer’s Wishlist and were later added in the Cart and were ordered. You can analyze the most popular Product in your Store or the Product which was added to the Cart of the Users the most. The Screen will look like as shown below:
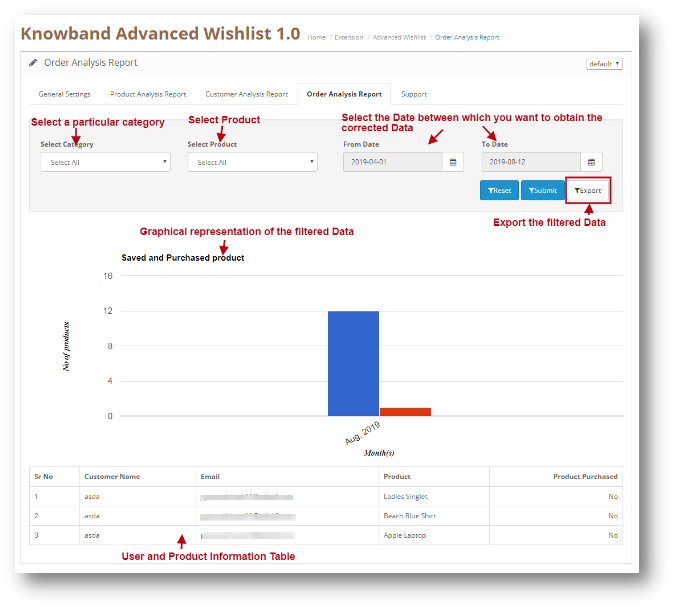
Filter your Report:
You can filter your Report on the basis of the categories and Products added in your web Store and also on the basis of Date. You can just Enter the ‘To’ and ‘From’ Date and the reports will be shown to you.

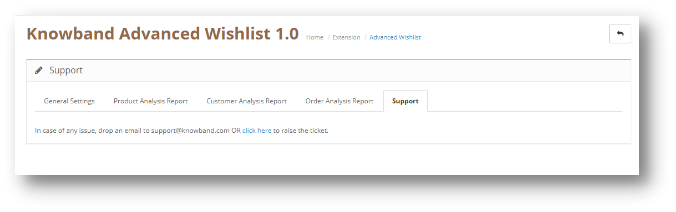
3.0.5 Support

In case of any issue, drop an email to support@knowband.com OR click here to raise the ticket.
4.0 User Interface of OpenCart Advanced Wishlist Extention

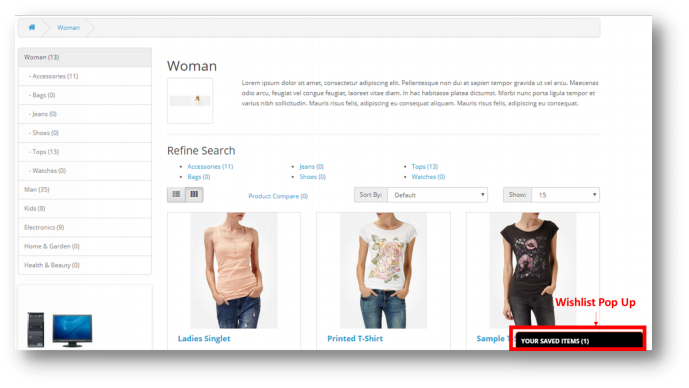
The Wishlist pop up will be shown to the user at the bottom of the page as shown below:
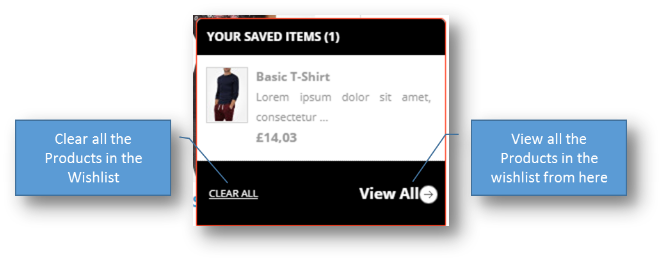
When User will click on the Pop-Up Bar, the following pop-up will show:
5.0 Opencart Advanced Wishlist Tutorial

In this comprehensive tutorial, we walk you through everything you need to know about the OpenCart Advanced Wishlist. From installation to complete configuration, we cover all the settings step by step.

You’ll also learn how to set up and customise the wishlist for the frontend, ensuring a seamless experience for your customers.

This video provides complete guidance from start to finish, making it easy for you to implement and manage the Advanced Wishlist on your OpenCart store.

6.0 Knowband Support

If you face any issues or need assistance with the OpenCart Advanced Wishlist, Knowband provides dedicated support to help you resolve your queries quickly. Our support team can assist with installation, configuration, customisation, and troubleshooting.

You can reach Knowband support via email at support@knowband.com or by raising a support ticket through our official website. We will guide you step by step to ensure the extension works perfectly for your store.

Explore more plugins

Opencart Video Manager extension:  https://www.knowband.com/opencart-videomate-extension

Opencart AI Content Generator Plugin: https://www.knowband.com/opencart-ai-content-generator

OpenCart Sales Coupon Enhancer – User Manual

1.0 Introduction

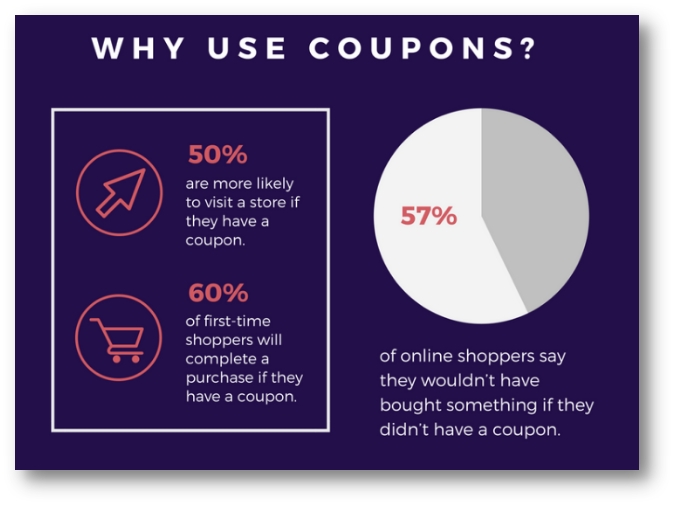
Coupons are the best way to get your Customer’s Attention. The goal of any offer or coupon is to encourage the consumer to try the product or service. Offering Coupons introduce new customers to your store, introducing new product lines, providing a way to get rid of unwanted inventory to make room in your warehouse or store for a newer product, encouraging customers to try a new brand that is more profitable to you or getting customers to come back to your Web store. Opencart Sales Coupon Enhancer by Knowband makes the job of generating these coupons easy for you. You are just one click away of generating your Discount coupons as per your needs by OpenCart Coupon Code generator Extension.
The key to maximizing the advantage of coupons in today’s digital world is using coupons as a way to build your customer base. Coupons can become a crucial part of your social media marketing provided you use them strategically.

Using discounts coupons can be a powerful tool to get you the spike in sales that you are looking for. And once you’ve achieved that, you can then use it as a springboard to skyrocket your sales to even greater heights. You can easily generate your coupons using Opencart coupon code generator extension and thus increasing your sales.

1.1 Features

2.0 Installation Guide

Before starting the installation process, you have to buy the Opencart sales coupon enhancer by the Knowband store. Once purchased, you will receive the following files on your registered email.

  • Source code of Opencart sales coupon enhancer in zipped file format.
  • User Manual of Opencart sales coupon enhancer.

Now in order to install this on your online shop, follow the given steps:

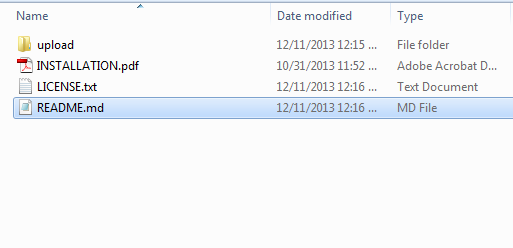
Step 1: Unzip the zip file. You will get the folders as shown in the image below:


Step 2: Copy all the folders of the zip file in the Root Directory of OpenCart setup via FTP manager.

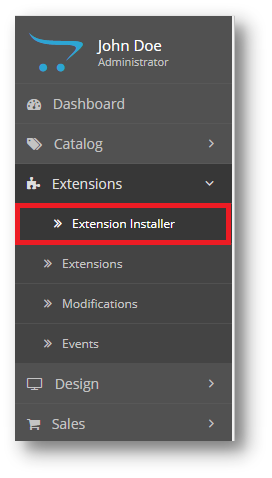
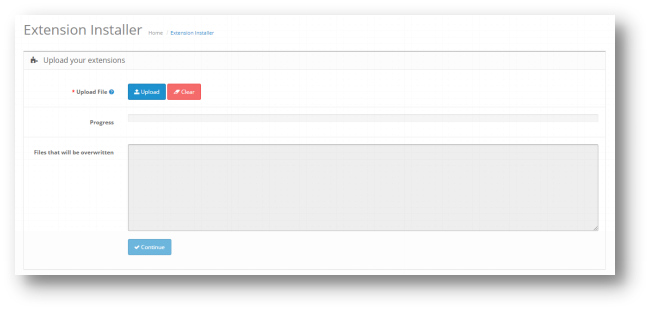
Step 3: There is a file name kbsales_coupon_enhancer.ocmod,xml (for OC<3.0) or  kbsales_coupon_enhancer.ocmod,zip (for OC>3.0). You need to install this file in the following Location:

Step 4: After Installation you need to select this file and refresh Modifications:

So, Opencart sales coupon enhancer is now successfully installed and is ready to use at your store. Go to the admin menu and click on the extensions. Choose the Extension Type as Modules. You will find a list of modules. Select the Knowband Sales coupon Enhancer.

3.0 Admin Interface of OpenCart Sales Coupon Enhancer

To configure the Sales Coupon Enhancer module for OpenCart, Navigate the settings in the following order:

Admin Panel >> Extensions >> Modules >> Knowband Sales Coupon Enhancer

The Admin Interface of OpenCart Sales Coupon Extension includes four main settings:

  • General Settings
  • Configure Coupons
  • Statistics
  • Coupons

3.0.1 General Settings

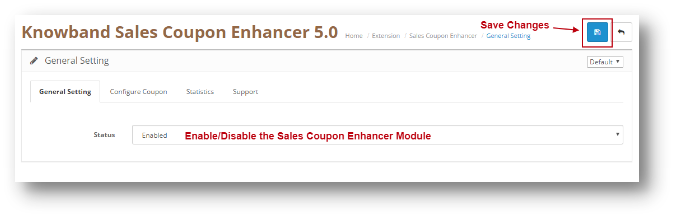
This setting will have the Option to enable/disable the plugin. The page will look like as shown below:

3.0.2 Configure Coupon

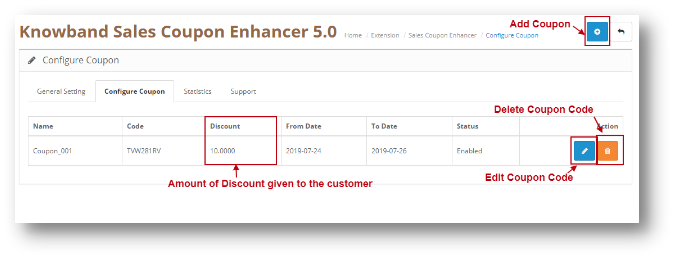
Through this setting of OpenCart Sales Coupon Extension, you can add a New Coupon Code or make changes in the Existing Coupon Codes. The screen will look like as shown below:

  • Edit a Coupon: You can Edit an existing Coupon using the Edit option. The screens for Editing Coupon will be same as Adding a Coupon. The only difference will be that Edit will have the fields already filled.
  • Delete a Coupon: You can delete a Coupon by clicking on the ‘Trash’ Icon.

3.0.2.1 Add a Coupon

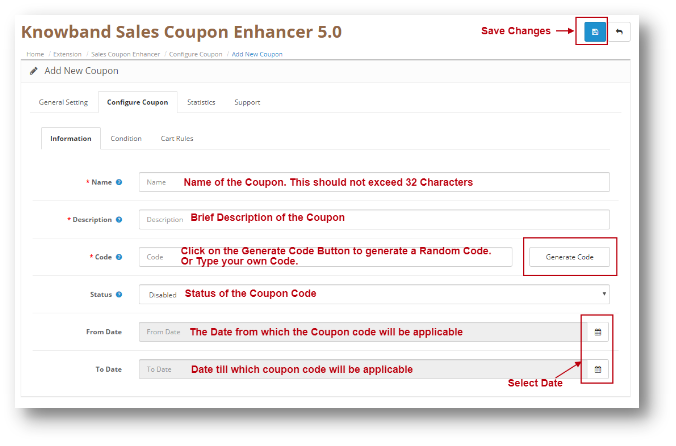
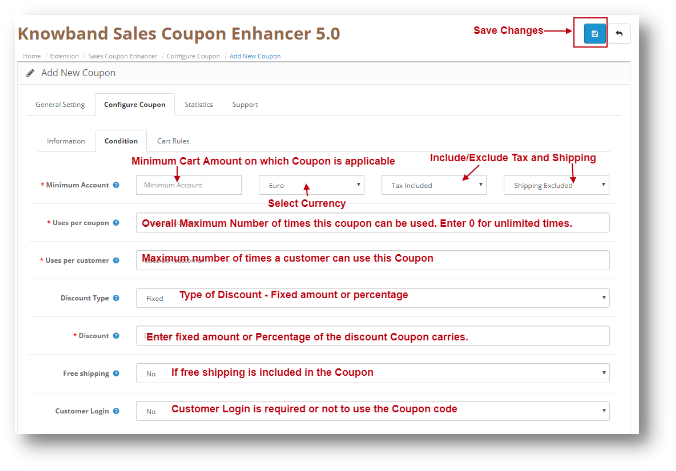
You can add a Coupon Code by Clicking on the ‘+’ Icon provided on the Top of the Page. The following screen will show up. Add Coupon will have three Tabs as explained below:

Information


Condition Tab


Cart Rules

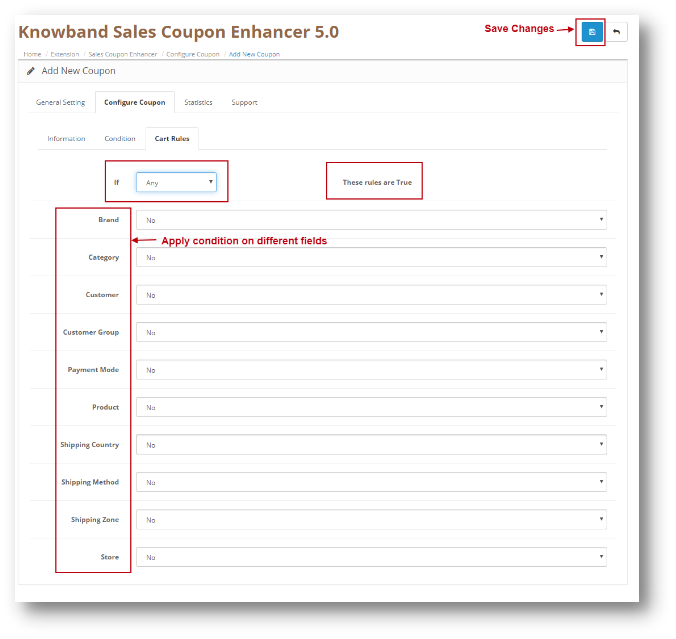
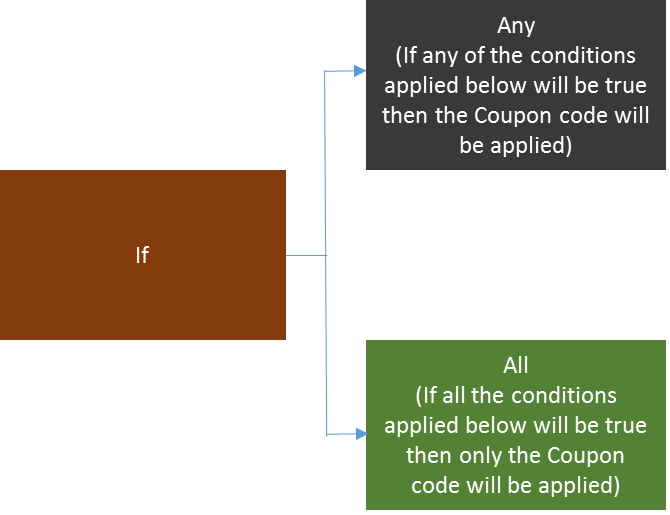
You can apply different conditions on a coupon using Cart Rule Tab in OpenCart promotional vouchers Generator. Conditions are explained in detail below. Let’s have a look at the screenshot:

Conditions on Different fields:

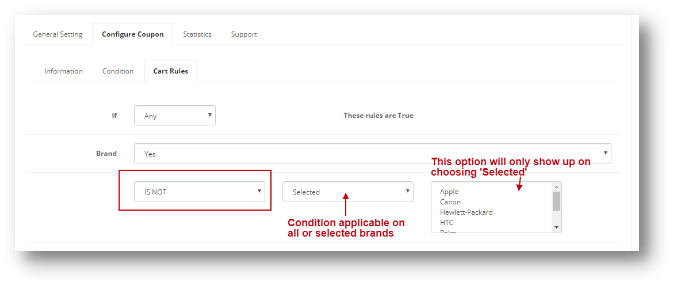
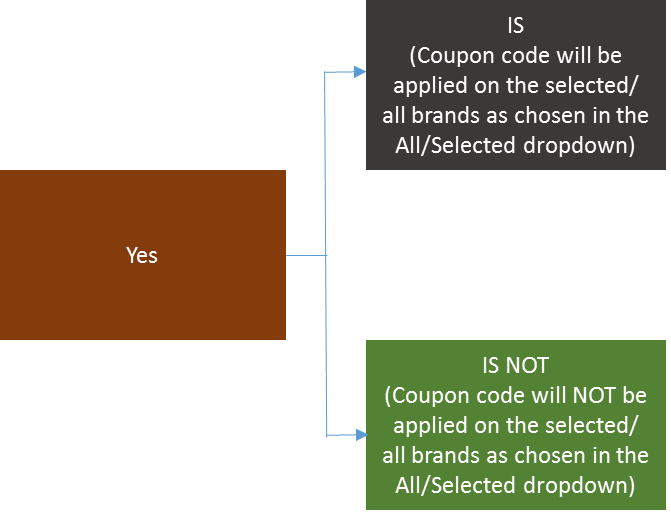
Various fields are shown in the Opencart Promotional Vouchers Creator. Let’s take one example of Brand and apply a condition on it. To apply a condition, select Yes in the dropdown of the Brand. The screen will look like as shown below:


This is how you can select the condition for different fields in the Cart Rules Tab.

3.0.3 Statistics

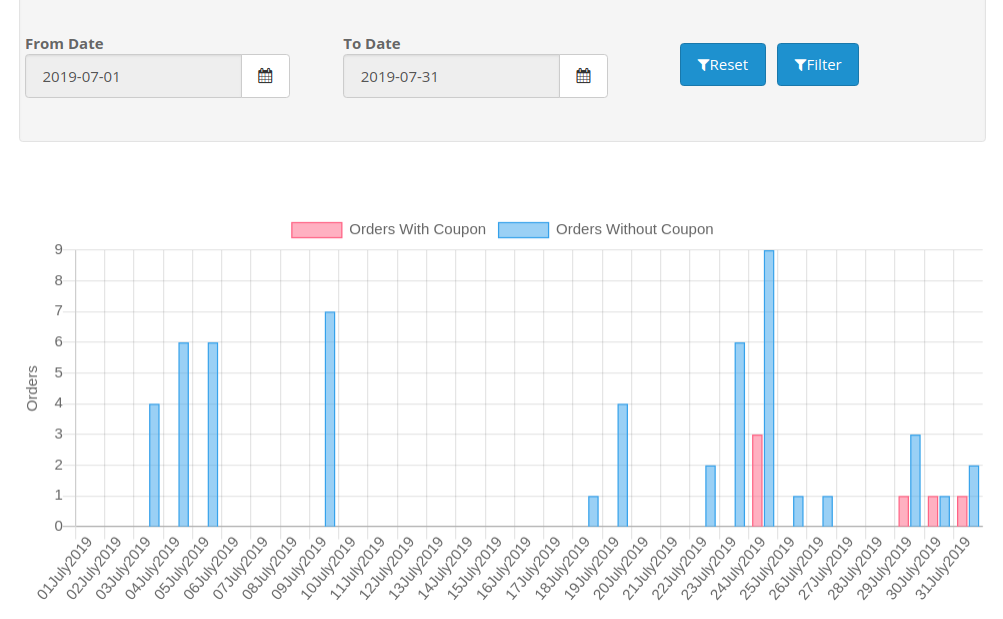
Through this setting of OpenCart Sales Coupon Extension, you can view the statistics of your Coupons. It will show you the graphical representation of Order placed which used coupons and which did not. The screen will look like as shown below:

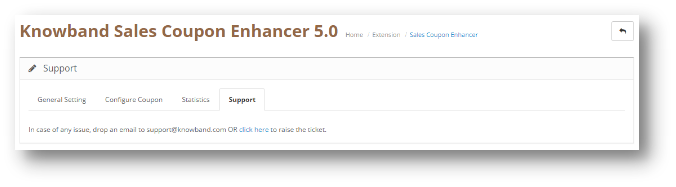
3.0.4 Support

If you need any Support, then drop an email to support@knowband.com OR click here to raise the ticket.


4.0 User Interface of OpenCart Sales Coupon Enhancer

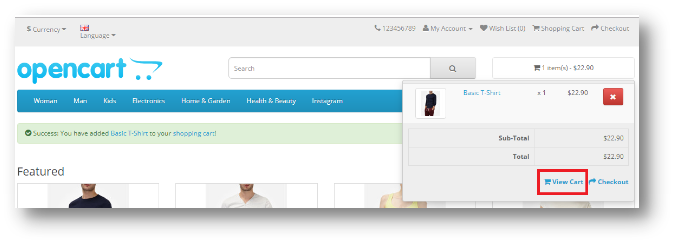
Once you add a Product from cart, Click on View cart as shown in the screenshot below:

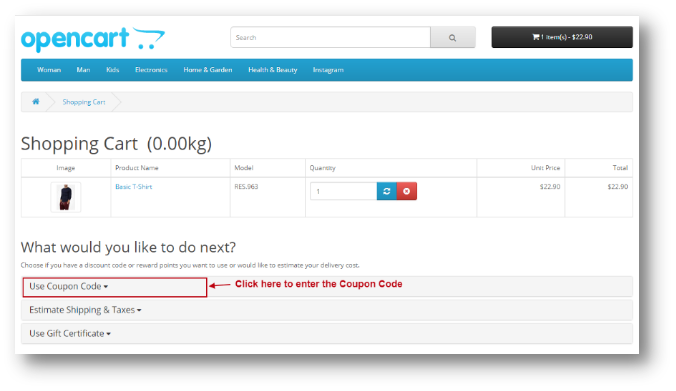
The following page will open up:

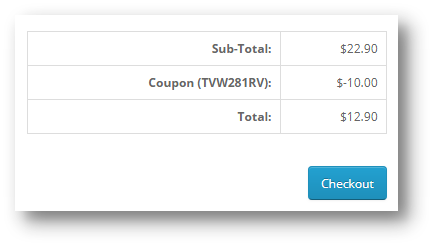
Once the Coupon Code is applied, Amount will be discounted in the Total Section and User can proceed with the Checkout.

OpenCart Deal Timer – User Manual

1.0 Installation

You can follow the steps mentioned below to install the OpenCart Deal Timer extension by Knowband on your server.

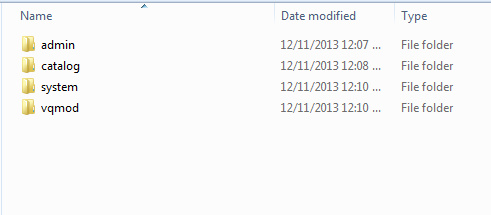
  • The folder structure of the Opencart master deal timer folder.

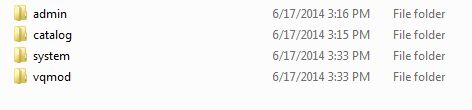
  • Open the uploaded folder and you will find the following folder structure:

https://code.google.com/p/vqmod/

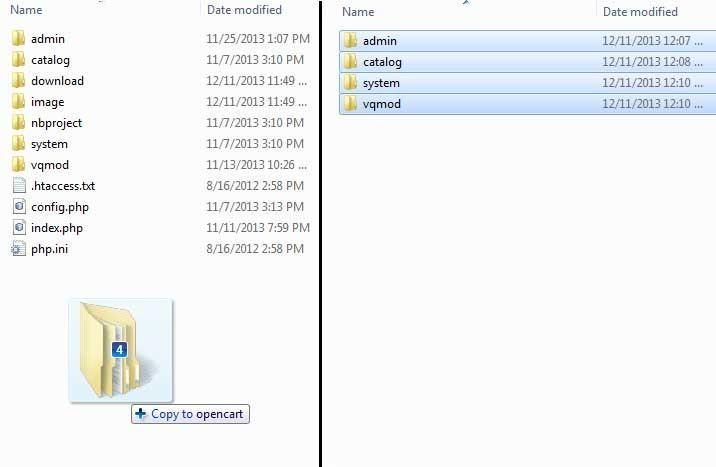
  • Select all the folders, drag and drop them to the root directory of your OpenCart store through FTP.
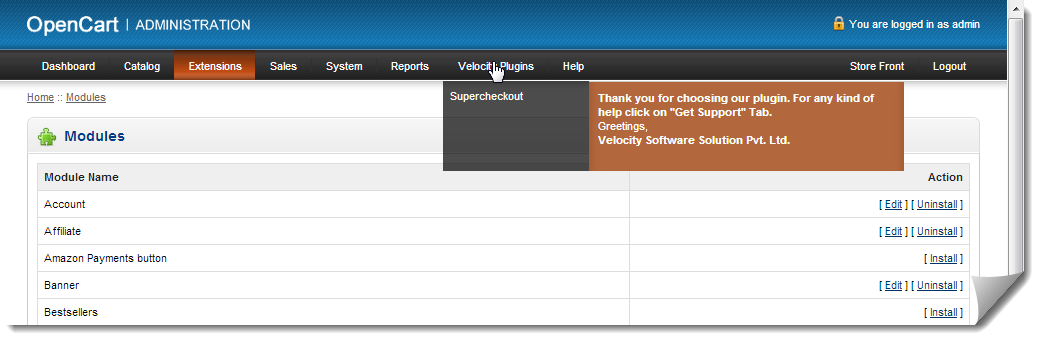
  • You will be able to find the Opencart product countdown plugin ready to be installed in the OpenCart modules on your OpenCart store as shown below.

  • Click on the Install link to install the Special offer timer Opencart extension. This will also add a drop-down option in your menu bar which will list all plugins by Velocity installed on your store for fast navigation. This drop-down also has a message box, using which we can inform you about newly launched plugins or new updates.

  • Delete the Vqcache files from the vqmod/vqcache folder.
  • To access Opencart countdown timer module, click on the edit button in the module section as shown below:

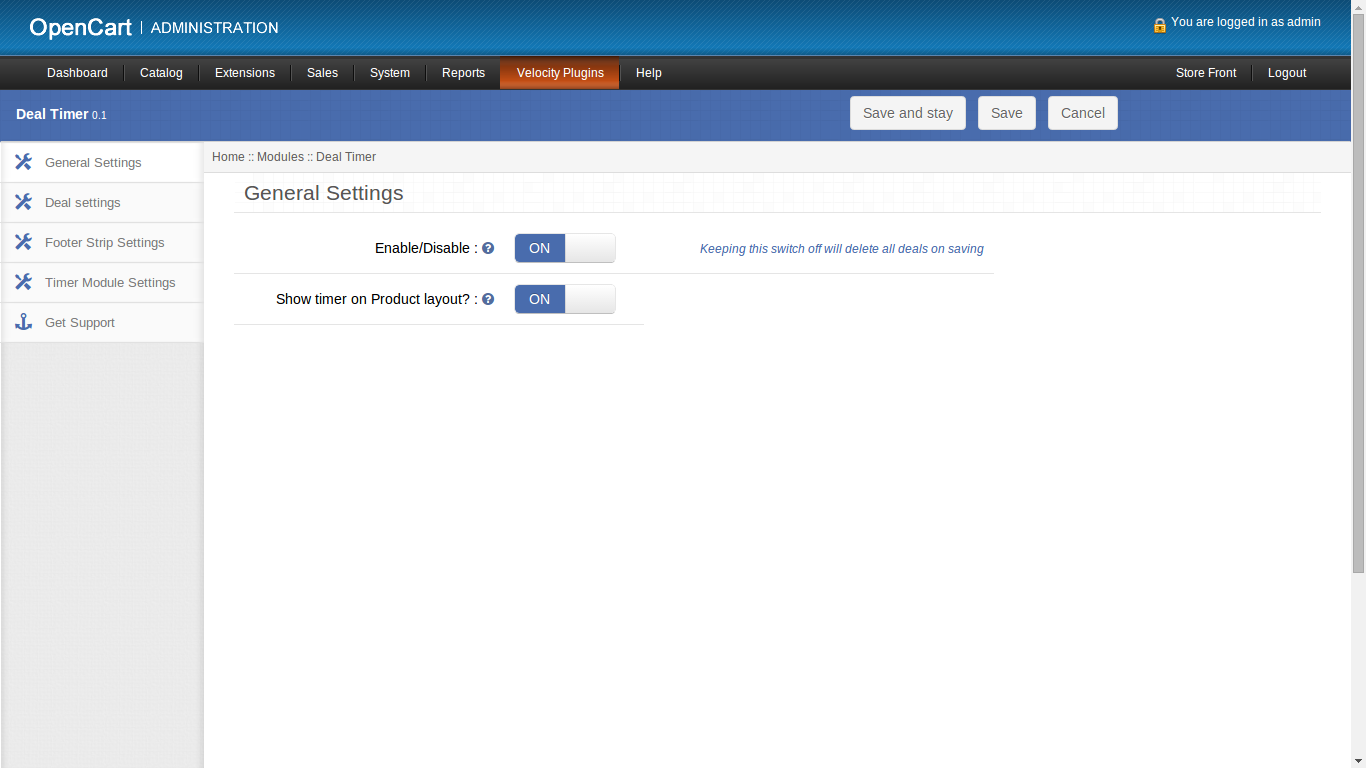
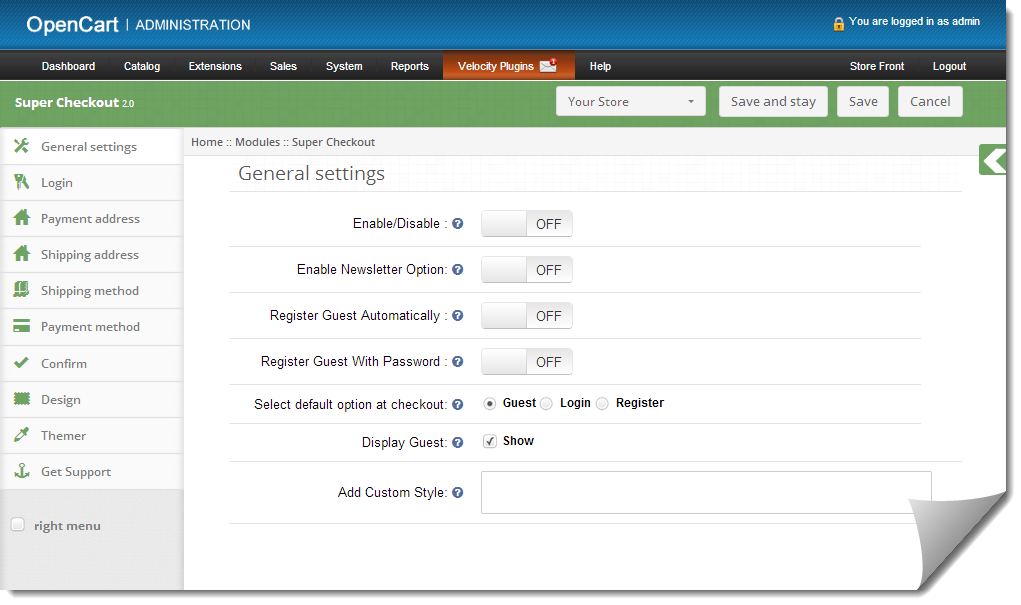
On clicking the edit button, the module for the plugin will open. It contains navigational bar at the top, the menu on the left and main content at the center as shown below.

2.0 User Manual

2.0.1 General Settings

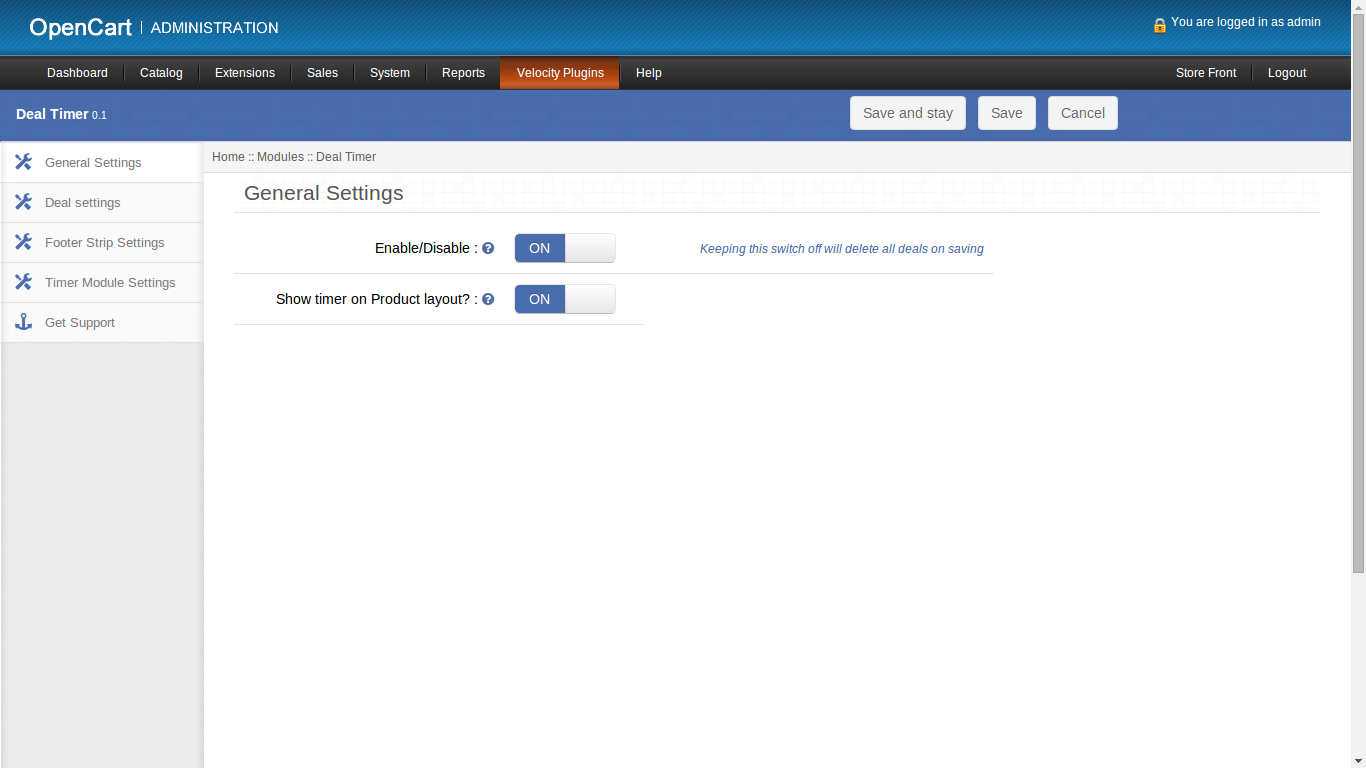
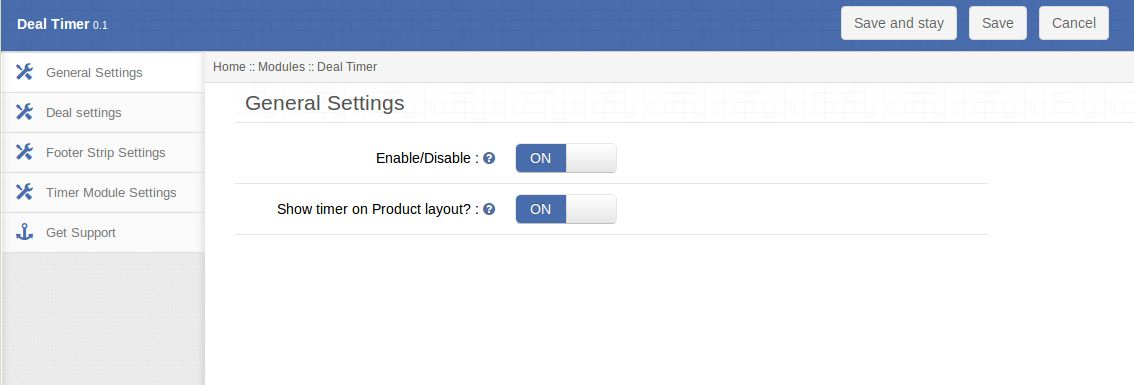
General Settings of the Special offer timer Opencart extension tab by Knowband has following options as shown below:

  1. Enable/Disable: This is the global enable switch. On switching this ON, the entire Opencart countdown timer module is switched on and similarly switched off on turning it OFF. If the switch is off, no footer strip, module or product timer will be visible, also the deals added in deals settings tab will also be deleted.
  2. Show timer on product layout: Enabling this will start showing a small timer beside the discounted price for each special product (On which discount can be availed).

2.0.2 Deal Settings tab

This tab lets the admin create deals and group products in these deals. He can provide a discount ‘%’ for a group of products for a period of chosen duration. It has a table like structure with each having the following fields:

  • Deal Name: This textbox is a required field which describes the name of your deal. This name won’t be displayed on front end though.
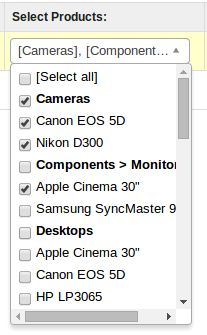
  • Select Products: This field in the Special offer timer Opencart extension is also required. Its a multiple selection drop-down with check-boxes. Main categories are the group heading and products under it are option values. You can select any number of products to include in this deal.

  • Discount %: You can specify the discount % which will be applied to each product in this group. In this required field, you can only type in numbers. Also, it shouldn’t be greater than 100.
  • Priority: You can choose the priority of a deal over another if they are falling in the same duration on a product. (This is optional)
  • Title: This field is a required textbox with a restriction of characters to be entered as this will be displayed on the footer strip and the front-end of the Opencart extension.
  • URL: This field is a textbox where you can enter the URL on which the user will be redirected by clicking the title of footer strip or Opencart special price timer module.
  • Start Date: This required field is a date picker. This will mark from which date shall discount be provided for the group of products chosen.
  • End date: This required field is a date picker. This will mark until which date shall the discount be provided for the group of products.

Other than these fields, there’s an option to add more deals or remove the existing deals from the system.
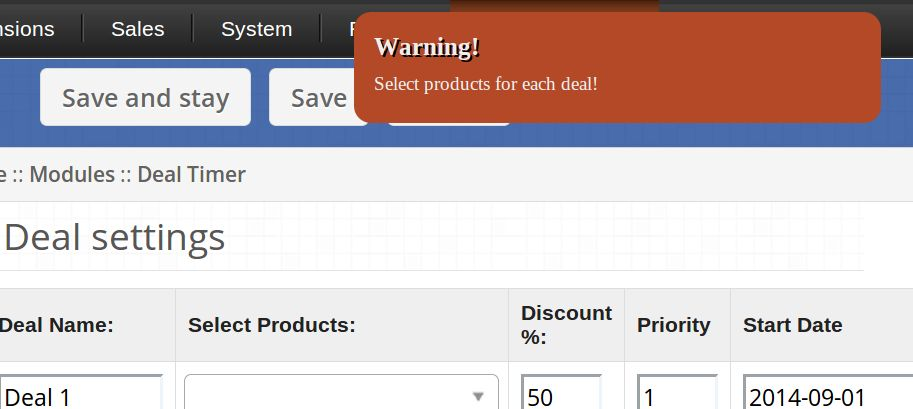
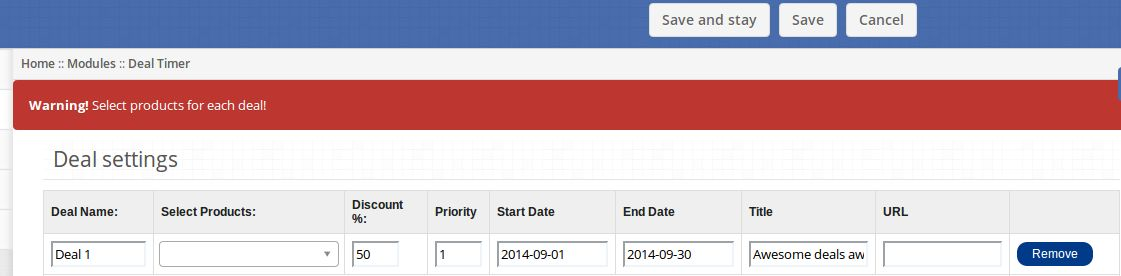
If one tries to save and stay on the page without filling up the required fields, appropriate warning messages will be displayed telling the problem with data entered.

On clicking the save button, the user is restricted as follows:

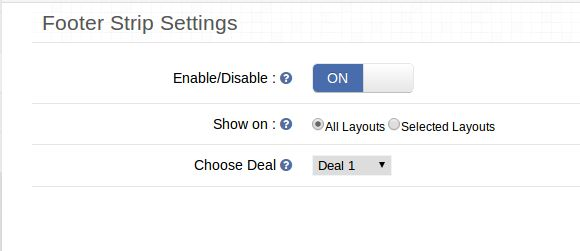
2.0.3 Footer Strip Settings tab

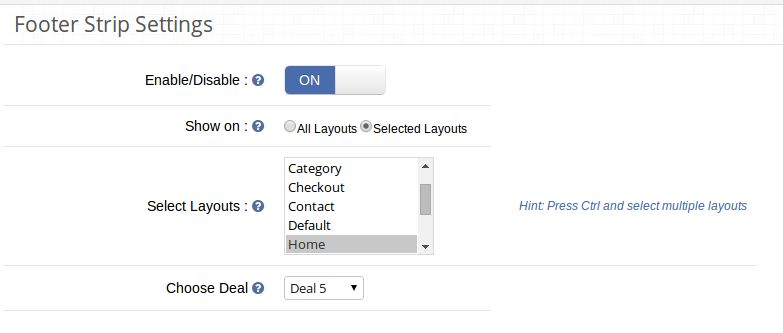
This tab lets you enable/disable the footer strip that displays the text and timer for the deal. It has following fields:

  • Enable/Disable: Enabling this setting will show the footer strip when a deal is active.
  • Show on: You can choose to show the footer strip on layouts of your choice, you have two options to choose from: a) All Layouts b) Selected Layouts. In case option ‘b)’ is selected, another field will start appearing with a multiple-selection box with the list of all layouts. The user may select any number of layouts here.

Choose Deal: A drop-down lists down all Deals added to the system. The selected deal will be the one, whose text and URL will be displayed on footer strip.

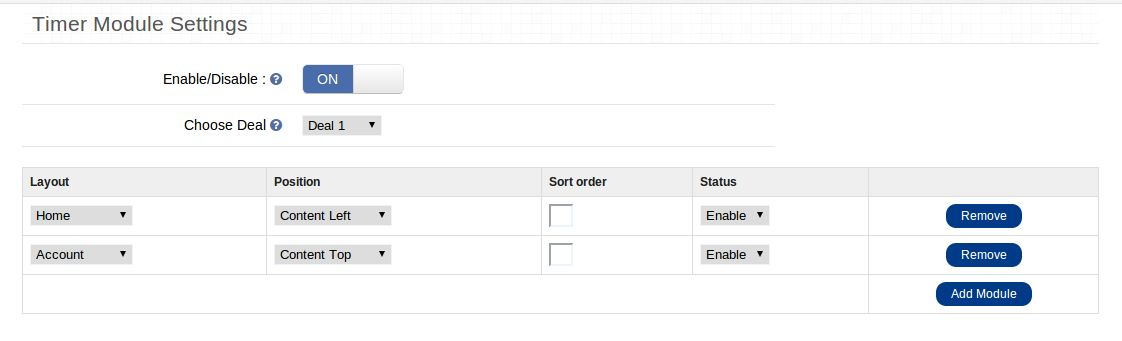
2.0.4 Timer Module Settings tab

With this Opencart master deal timer plugin, you can also have a separate module in addition to footer strip that can be applied to any layout and position. This OpenCart module by Knowband essentially contains a timer whose countdown is based on the deal chosen for this module. It has following fields:

  • Enable/Disable: Enabling this setting will show all active timer modules on respective layouts.
  • Choose Deal/group: A dropdown will list all deals added with this plugin. The selected deal will be the one, whose start Date and end date will determine countdown of the timer of the module. If you choose to show a deal whose start date is in future, the countdown for the deal to start will be displayed otherwise countdown for a deal to end will be shown.

A table like structure follows with each row having following fields:

  1. Layout: Choose layout on which you want to add the module.
  2. Position: Choose a position on which you want to add a module.
  3. Sort Order: Choose sort order.
  4. Status: Enable/disable each module individually.

Note: In order to view a module you must ensure that it has enabled status, Timer module setting also is enabled, and the global enable is enabled as well. If anyone of the three fields is disabled, the OpenCart module will be disabled and thus, not displayed.

Other than these fields, there are buttons to remove each row and to add another row (Module).

2.0.5 Get Support tab

By clicking on ‘Get Support tab’, you will be redirected to our support website, where you can contact our support for help. Use this tab in case you some query/issue or found some bug.

Store Front

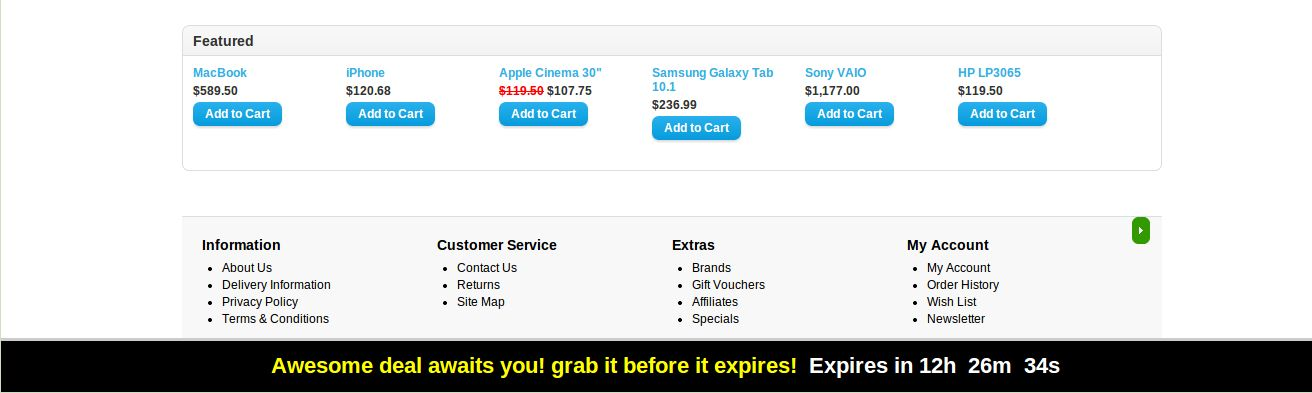
Footer Strip

On the front end, visitors will see the footer strip for the selected deal on either each page or selected ones.

You may click on the title being displayed in the footer and you’ll be redirected to the URL associated with the deal.

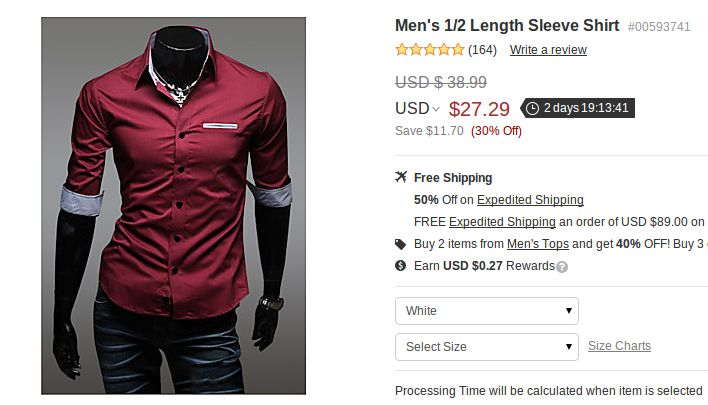
A timer on Special Products

A timer will be displayed beside the discounted price on viewing a special product if you have enabled showing products timer in the admin panel.

Knowband OpenCart Search More Module – User Manual

Introduction:

Knowband offers OpenCart more search module which helps you to make product searching easy for your website store customers. This OpenCart plugin implements a special functionality which auto-completes search. Thus the store visitors can get search suggestions without any hassle. When customer type anything, at the same time-related search suggestions, appears as a suggestion.

Features:

  • Check out the salient features of this OpenCart search mechanism:
  • The OpenCart search products module is absolutely easy to install and configure.
  • It is very simple to enable/disable this OpenCart plugin.
  • It offers you to display product price and caption in search results.
  • The OpenCart search mechanism is highly customizable.
  • You can implement this functionality without any codes changes.
  • OpenCart refined search offers hassle-free implementation.
  • You can choose the layouts on which you want to display search suggestions.
  • You can manage the look and feel.
  • Allows editing the color of highlight text in the search results.
  • You can show/hide out of stock products in search suggestions.
  • You can decide the number of search suggestions at a time.
  • You can view the total number of top ten searched keywords.
  • It provides search results at the same time of searching.
  • It offers fast AJAX product search for better user experience.
  • The OpenCart improve filter is fully mobile responsive.
  • This plugin allows searching products in the product description, tags, SKU, UPC etc.

How to install OpenCart Search More plugin on your server

1. Folder structure of the Slideup Promotion plug-in folder.

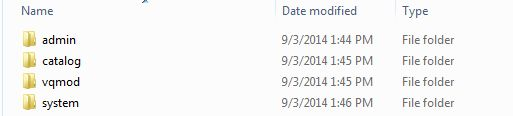
2. Open the upload folder and you will find the following folder structure:

You must have VQMOD installed for this plug-in to work. If VQMOD is not installed please download and install from the URL below:
https://code.google.com/p/vqmod/

3. Select all the folder and drag and drop them to the root directory of your OpenCart store through FTP.

4. You will be able find the plug-in ready to be installed in the Modules in your OpenCart store as shown below.

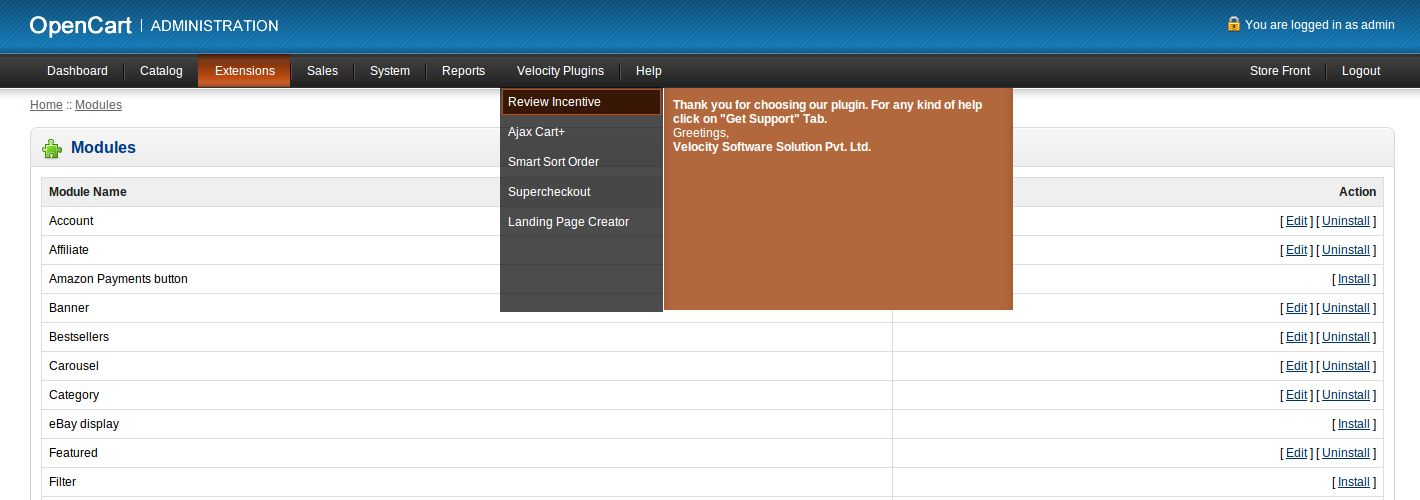
5. Click on the Install link to install the plug-in. This will also add a dropdown option in your menu bar which will list all plug-ins by Velocity installed on your store for fast navigation. This dropdown also has a message box, using which we can inform you about new launched plug-in or new update.

6. Delete the Vqcache files from the vqmod/vqcache folder.

7. To access Slideup Promotion plug-in click on edit button in module section as shown below:

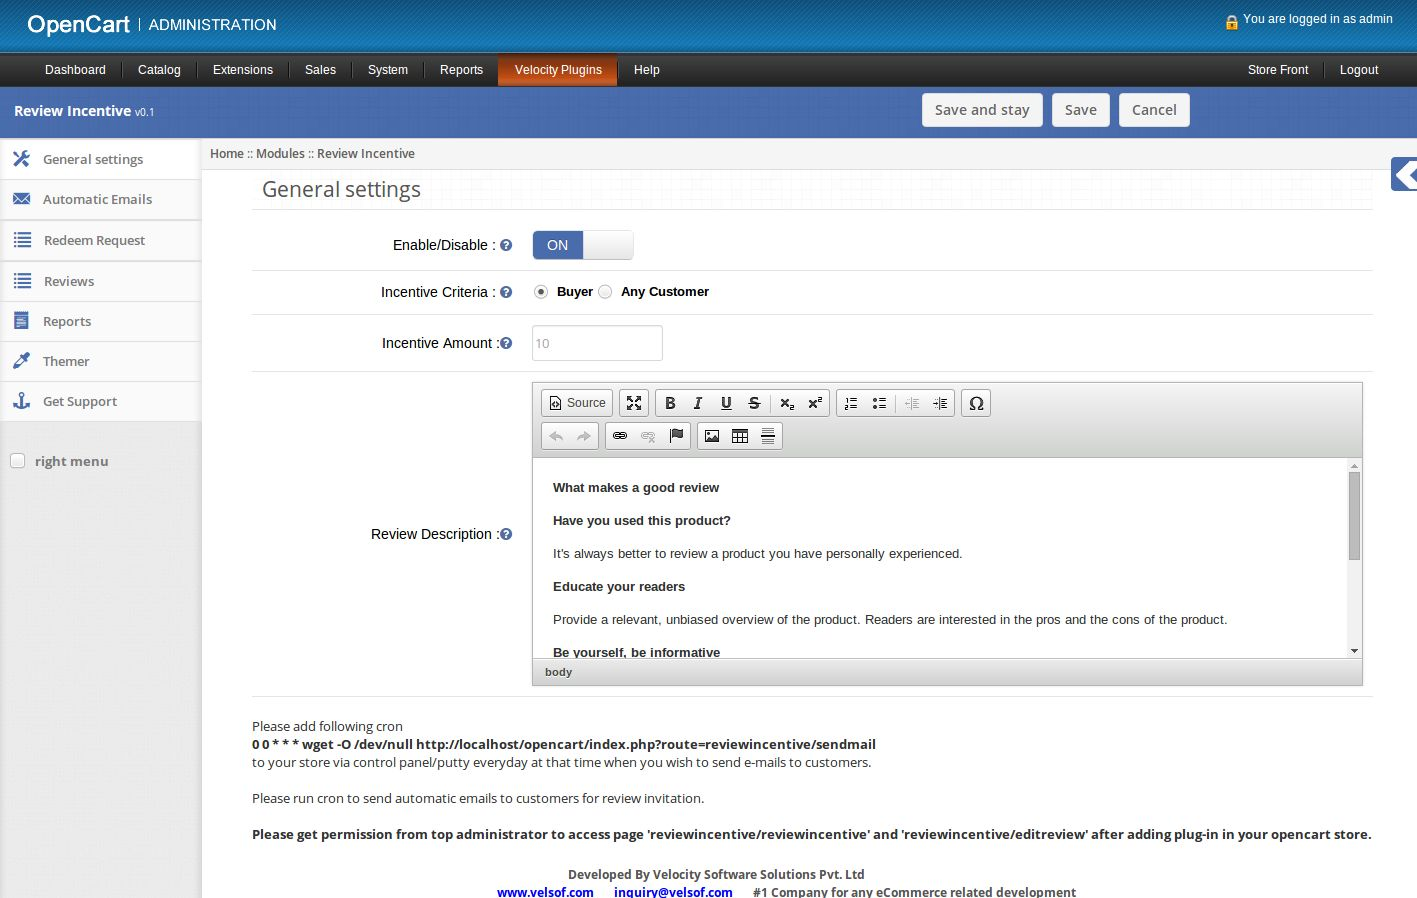
8. On clicking edit button the module for plug-in will open. It contains navigational bar at top, menu at left and main content at center as shown below.

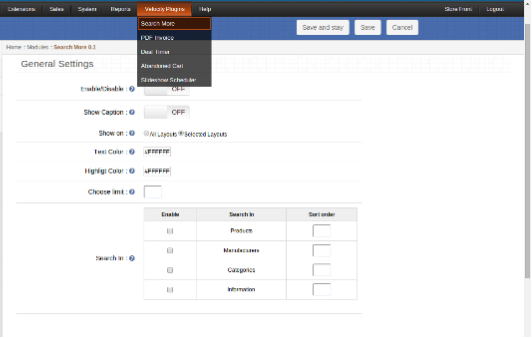
1. General Settings tab

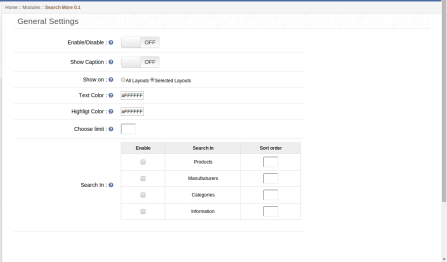
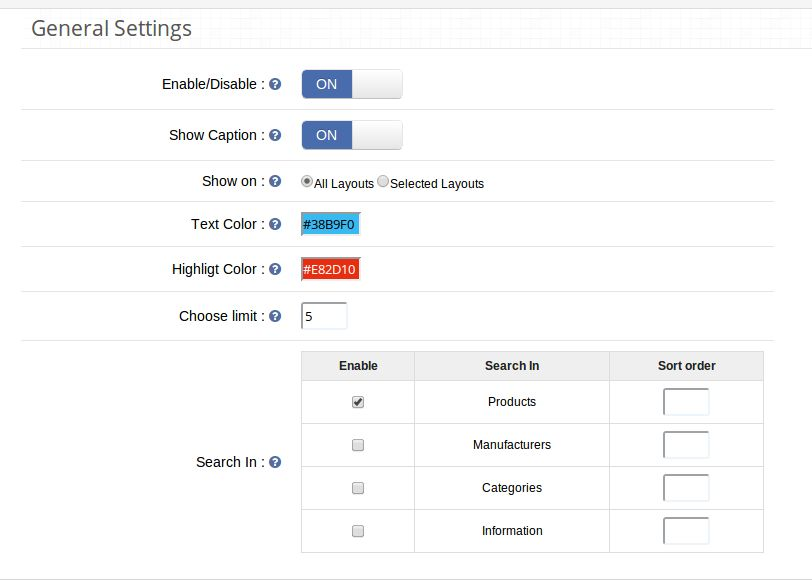
General Settings tab will have following options:

1. Enable/Disable :

This is the main switch to enable/disable the entire Module

2. Show Caption:

You can show captions below each search result. You can also show the price of the products.Admin can choose the show or hide price along with the name of the product in the search result. In case of manufacturers, category, and information, a caption can be shown or hidden instead of price.

3. Choose layouts to be shown on :

You can choose to show the show more search box on layouts of your choice, you have two options to choose from :

a) All Layouts

b) Selected Layouts.

In case option b) is selected, another field will start appearing with a multiple selection box with list of all layouts. User may select any number of layouts here.

4. Choose Text color for search results:

Admin can choose text color for the search result to come up with when used on the front end.

5. Choose highlight color for search results:

Admin can choose highlight color for the search result to come up with when used on the front end.

6. Choose search results limit:

Admin can choose max limit for the search results.

7. Show caption:

Admin can choose show or hide price along with the name of the product in search result. In case of manufacturers, category and information, a caption can be shown or hidden instead of price.

8. Search In:

Here you can choose to search not only products but also categories , manufacturers and Information. That is, if someone for example types a character in search box, search result will come up showing not only products but also name of manufacture

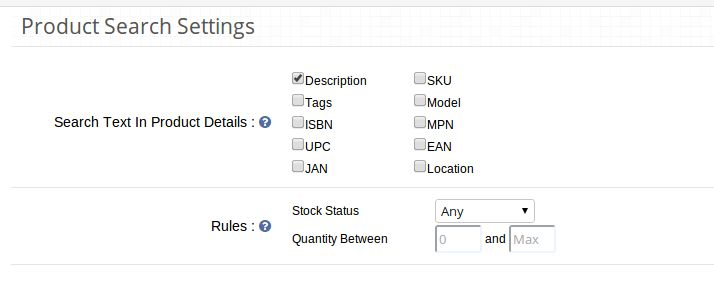
2. Product Search Settings tab

This tab will help admin decide on what basis should products be searched.

1. Search Products in:
Here you will get number of options, out of which you can select as many as you want to. These options will be in form of check boxes. Some of the options being Description, Tags, Model, SKU, UPC, EAN, JAN, ISBN, MPN etc.

Note that, in case product search has been selected, search term will be searched in a products name.

2. Rules:

In order to improve search results, admin can use these filters/rules :

A. Stock Status: This will be a dropdown field with all possible stock statuses as options to choose from.

B. Quantity between: This field essentially has two text boxes that only allow numeric values. You can type in the min and max values or leave them blank if you don’t want to filter on basis of quantity.

3. Search Statistics tab

Using this module, you can not only search fast and better, but also view the most searched keywords. A detailed list of keywords will be listed in this tab of admin panel where admin can view the most searched keywords , count, date when it was last searched, date when it was first searched.

Also, you can view upto 10 most searched keywords in form of a pie chart for better visualization.

Store Front

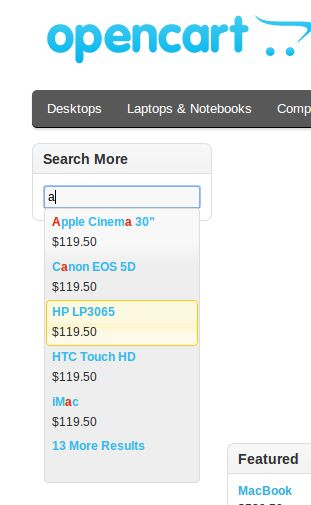
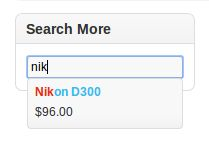
On the front end, the default search box will be replaced by the new search box which will display products along with there price via auto-suggest functionality on basis of the options selected in admin panel.

Also, in a module too search results can be seen via auto-suggest.

Search word highlight:

When the user will type in any characters and search results are displayed on basis of the search characters, the search characters will be highlighted in all the search results. The characters will be highlighted in the configured color.

Clicking on any of the search results will redirect user on the appropriate page. Clicking a products name will land you on that products page, clicking on a manufacturers page will land you on that manufacturers page and similarly for category and information.

For more details please visit:

Module Link: https://www.knowband.com/opencart-search-more

Admin Demo Link:

https://ocdemo.knowband.com/?url=admin/index.php?route=module/searchMore&token=a261b78f42e6ddd5a8dbd9a17bd60825

Front Demo: https://ocdemo.knowband.com/1.5/index.php?route=common/home

Please contact us at support@knowband.com for any query or custom change request as per your business requirement.

OpenCart Review Incentive – User Manual

How to install OpenCart Review Incentive plugin on your server

1. Folder structure of the Review Incentive plug-in folder.

2. Open the upload folder and you will find the following folder structure:


You must have VQMOD installed for this plug-in to work. If VQMOD is not installed please download and install from the URL below:
https://code.google.com/p/vqmod/

3. Select all the folder and drag and drop them to the root directory of your OpenCart store through FTP.

4. You will be able find the plug-in ready to be installed in the Modules in your OpenCart store as shown below.

5. Click on the Install link to install the plug-in. This will also add a drop down option in your menu bar which will list all plug-ins by Velocity installed on your store for fast navigation. This drop down also has a message box, using which we can inform you about new launched plug-in or new update.

6. Delete the Vqcache files from the vqmod/vqcache folder.

7. To access Review Incentive plug-in click on edit button in module section as shown below:

8.On clicking edit button the module for plug-in will open. It contains navigational bar at top, menu at left

and main content at center as shown below.

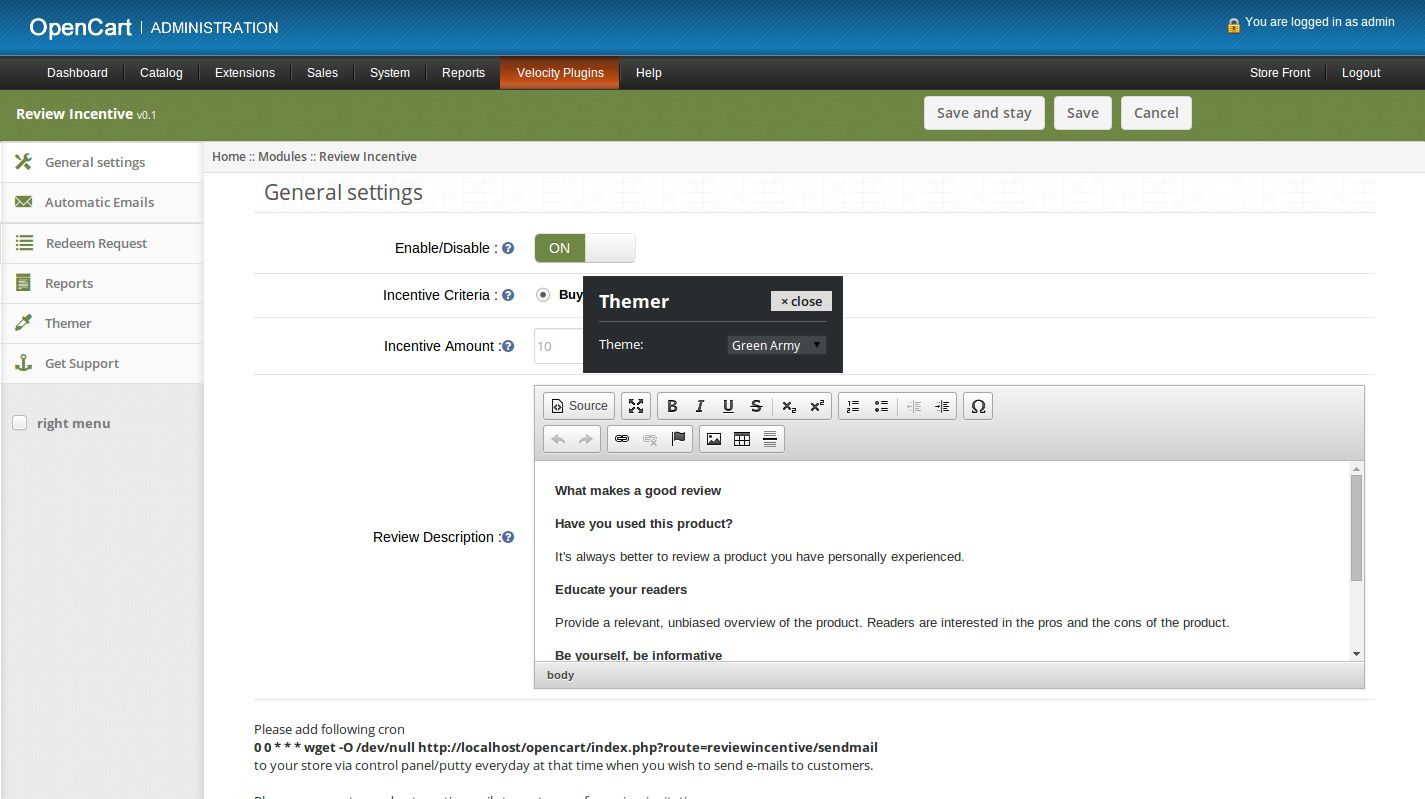
1. General Settings

1. To enable/disable plug-in, Switch the enable button OFF to ON / ON to OFF this is just to the right of
Enable/Disable label.

2. Incentive Criteria – Select Buyer if you wish to give incentive to only those customers who purchased the product he/she reviewed. If you wish to give incentives to all customers who reviewed the product then select Any Customer.

3. Incentive Amount – Set the amount to give as incentive to customers on writing a review.

4. Review Description – Set content to show on left column in Write Review page.

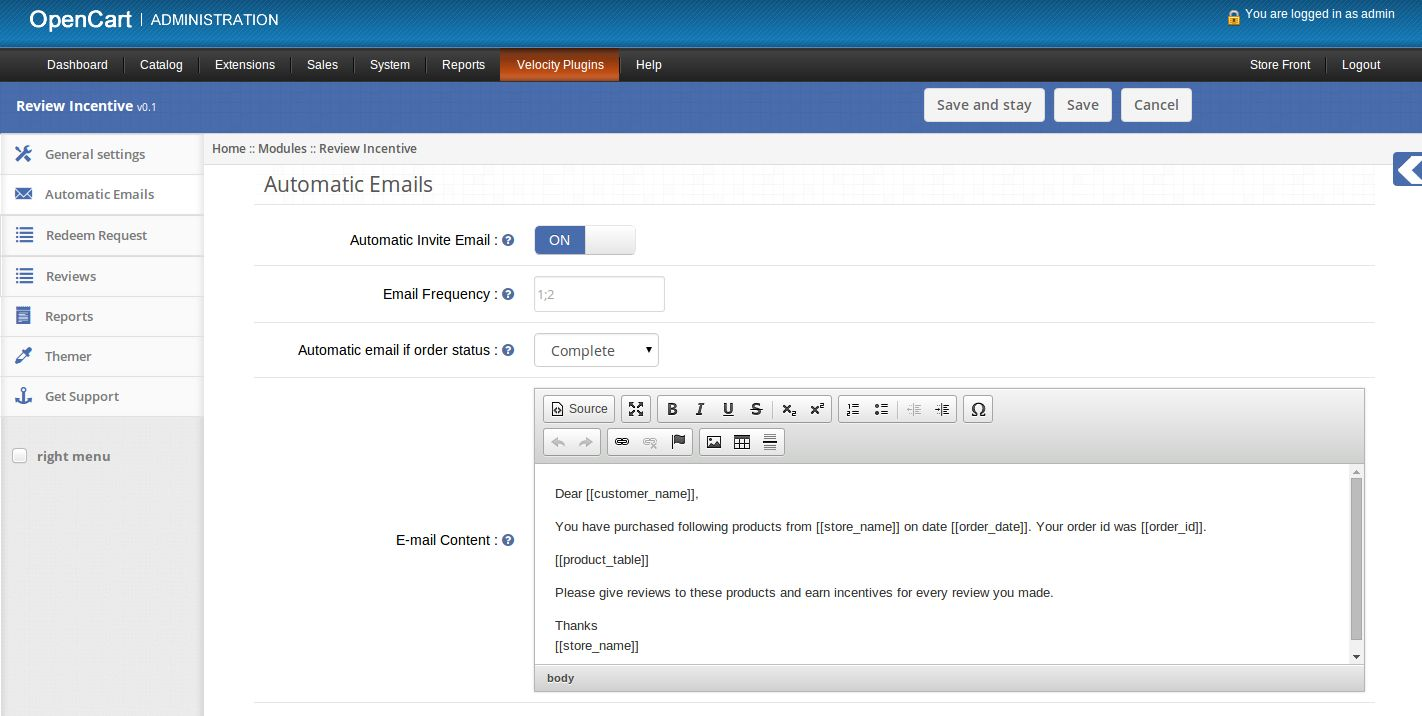
2. Automatic Emails tab

1. Here admin can set values for sending automatic emails to customer for inviting them to write review.

2. Automatic Invite Email – Enable or Disable sending of automatic emails to customers.

3. Email frequency – Set the number of days after which the automatic email will be sent to customers.
Admin can set multiple reminders (in days) using semicolon(;) as separator. If admin wish to send reminder after 2 and 3 days then he should set email frequency as 2;3.

4. Automatic email if order status – Set order status after which automatic email will be sent to customer.

5. Email Content – Set the content of email to be sent to customer .

6. Admin can use following variables in email content.
[[store_name]] — To write name of store.
[[customer_name]] –To write name of customer.
[[order_date]] — To write date on which order was made.
[[order_id]] — To write order id of order.
[[product_table]] — To show all products of order in tabular form.

7. If admin sets Email frequency as 2 and Order Status as Complete then automatic email.
will be sent to customer 2 days after his/ her order status is Complete.

8. If admin sets Email frequency as 2;3 and Order Status as Complete then automatic email will be sent to customer 2 days and 3 days after his/ her order status is Complete.

3. Redeem Requests tab

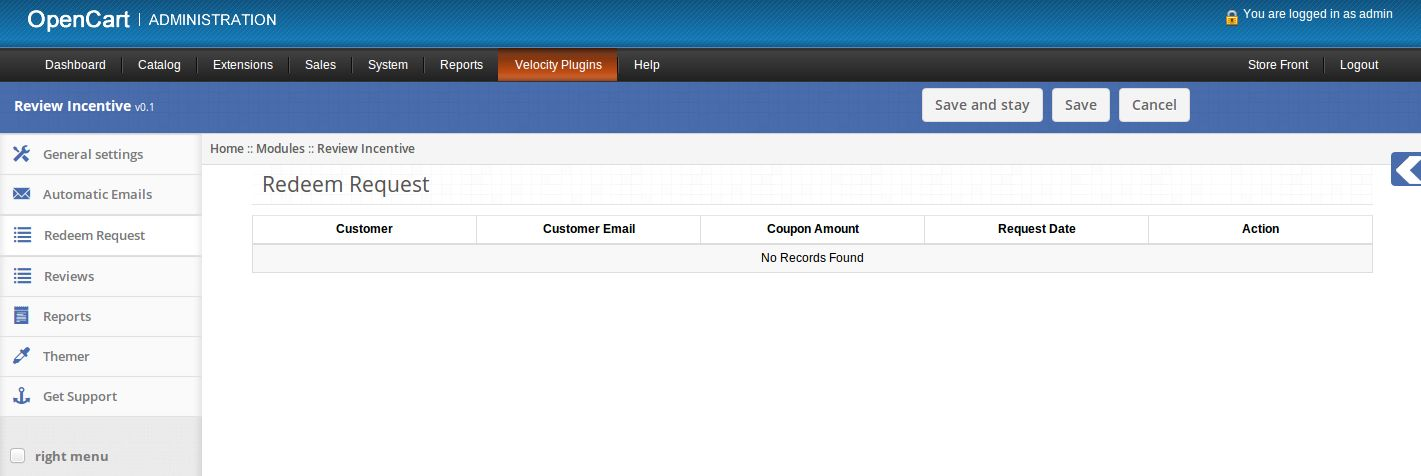
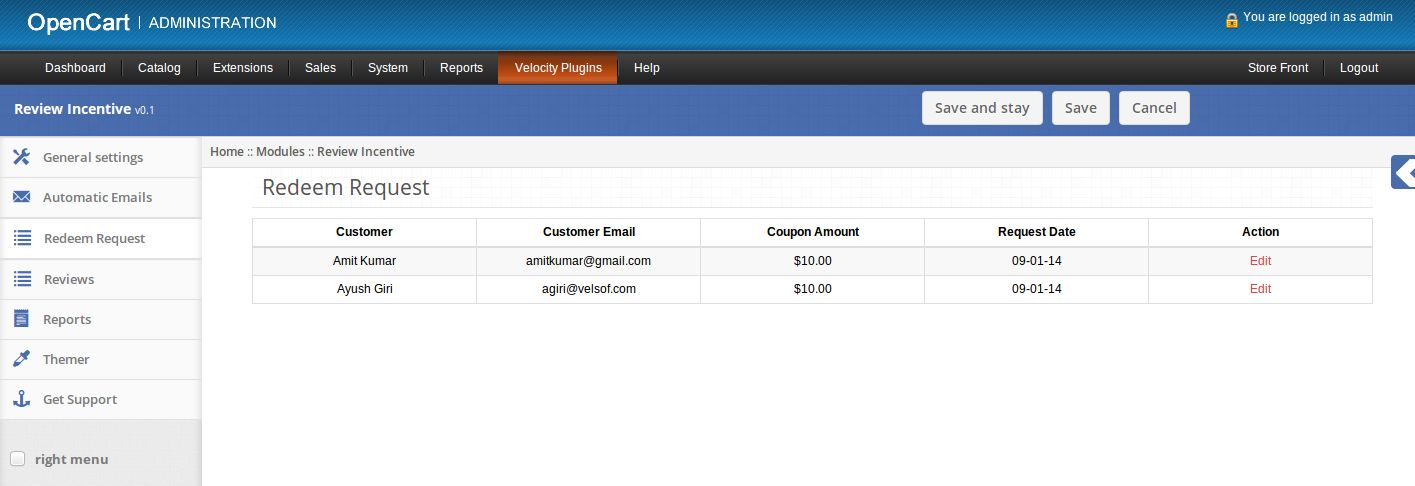
1. Here admin can see list of requests made by customers to get coupon as exchange of their incentives.

2. If their are no pending requests then this tab will look as follows:

3. If their are some requests then this tab will look as follows:

4. Click on edit link provided in front of each request to generate a coupon for the customer.

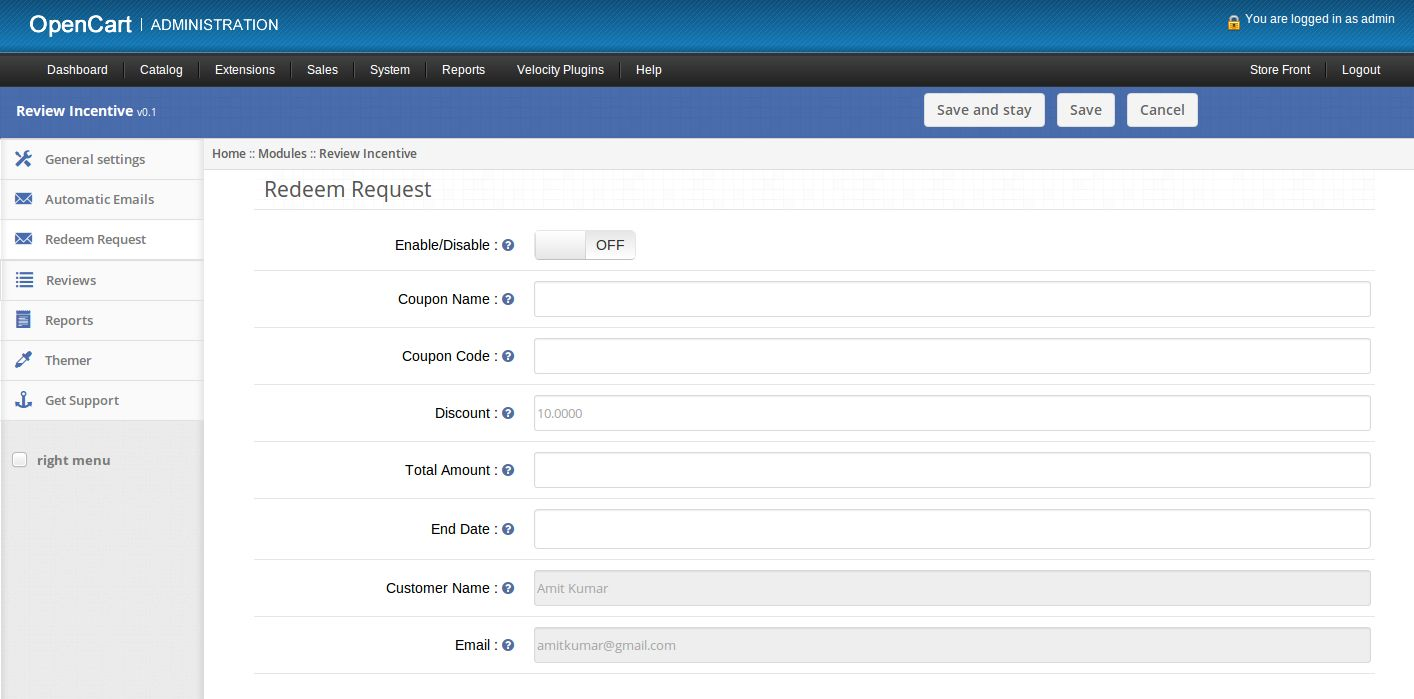
5. On clicking the edit link a new page will open to add coupon for the customer.

6. Enable/Disable: Enable or disable new coupon.

7. Coupon Name: Set name of new coupon.

8. Coupon Code: Set unique coupon code.

9. Discount: Fixed discount to give on coupon. This value should be same as requested by customer,but admin can change this value.

10. Total amount: The total amount that should reach before the coupon is valid.

11. End Date: Expiry date for coupon. Start date will be the date of enabling the coupon.

12. An email will be sent to give coupon code when new coupon is set enabled and saved.

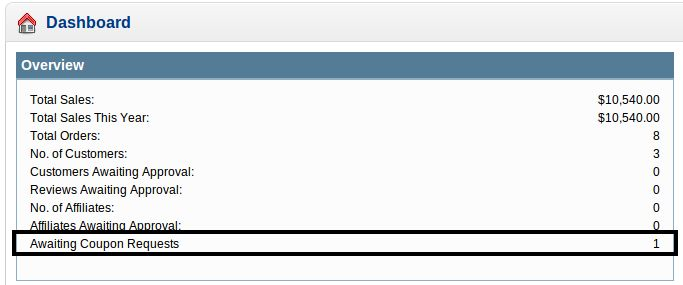
13. Total number of awaiting coupon requests is also displayed in dashboard of admin.

4. Reviews tab

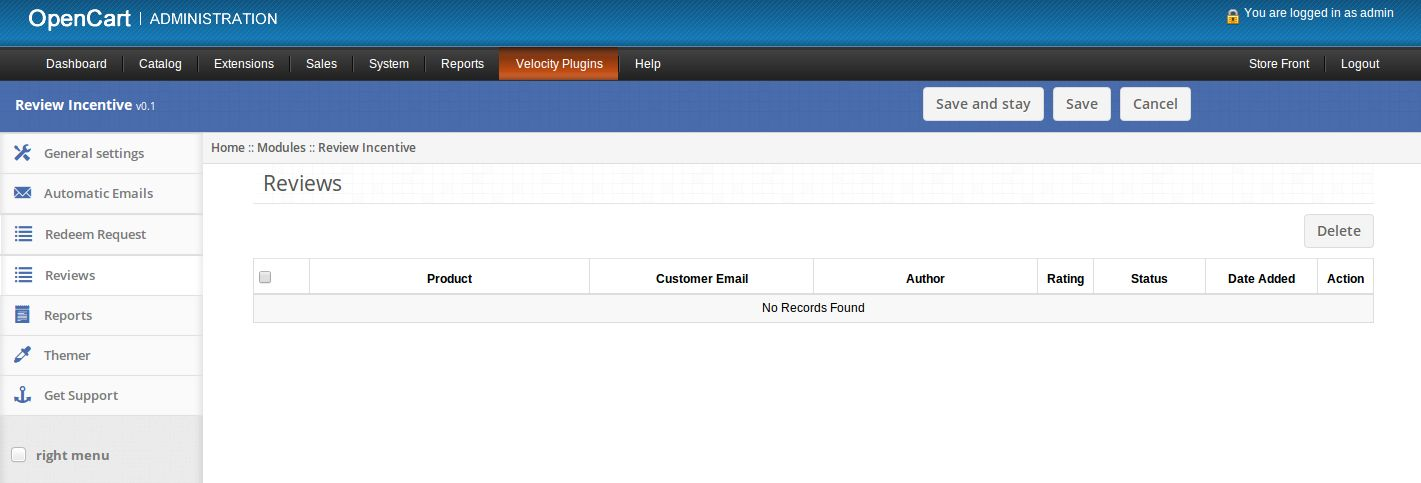
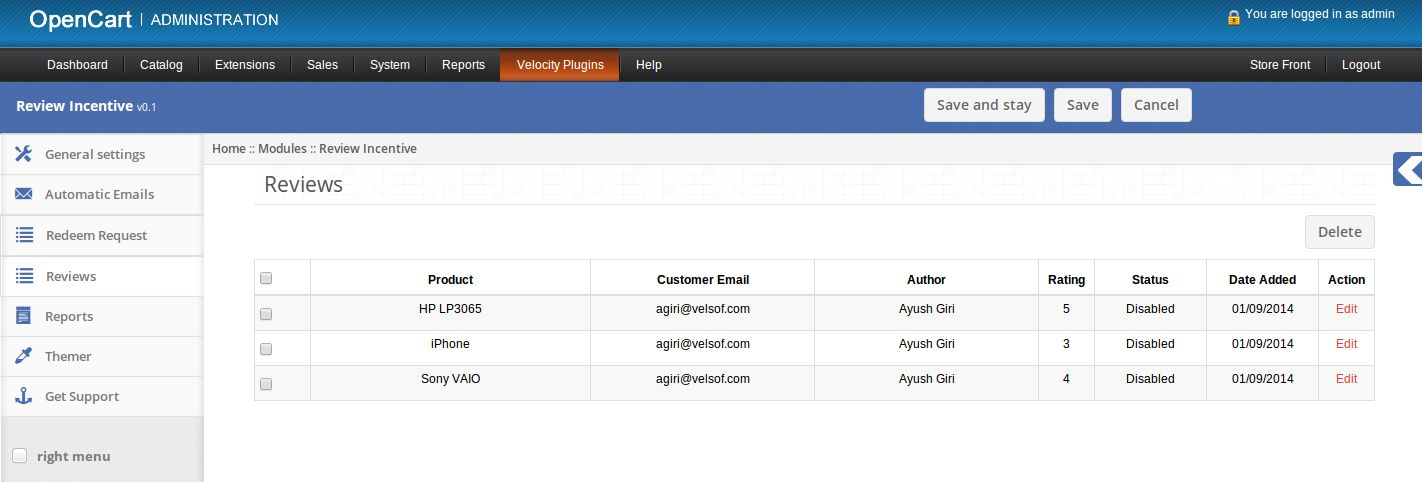
1. Here admin can see list of reviews made by customers and can edit those reviews.

2. If their are no reviews then this tab will look as follows:

3. If there are some reviews then this tab will look as follows:

4. Click on edit link provided in front of each review to edit/approve that review.

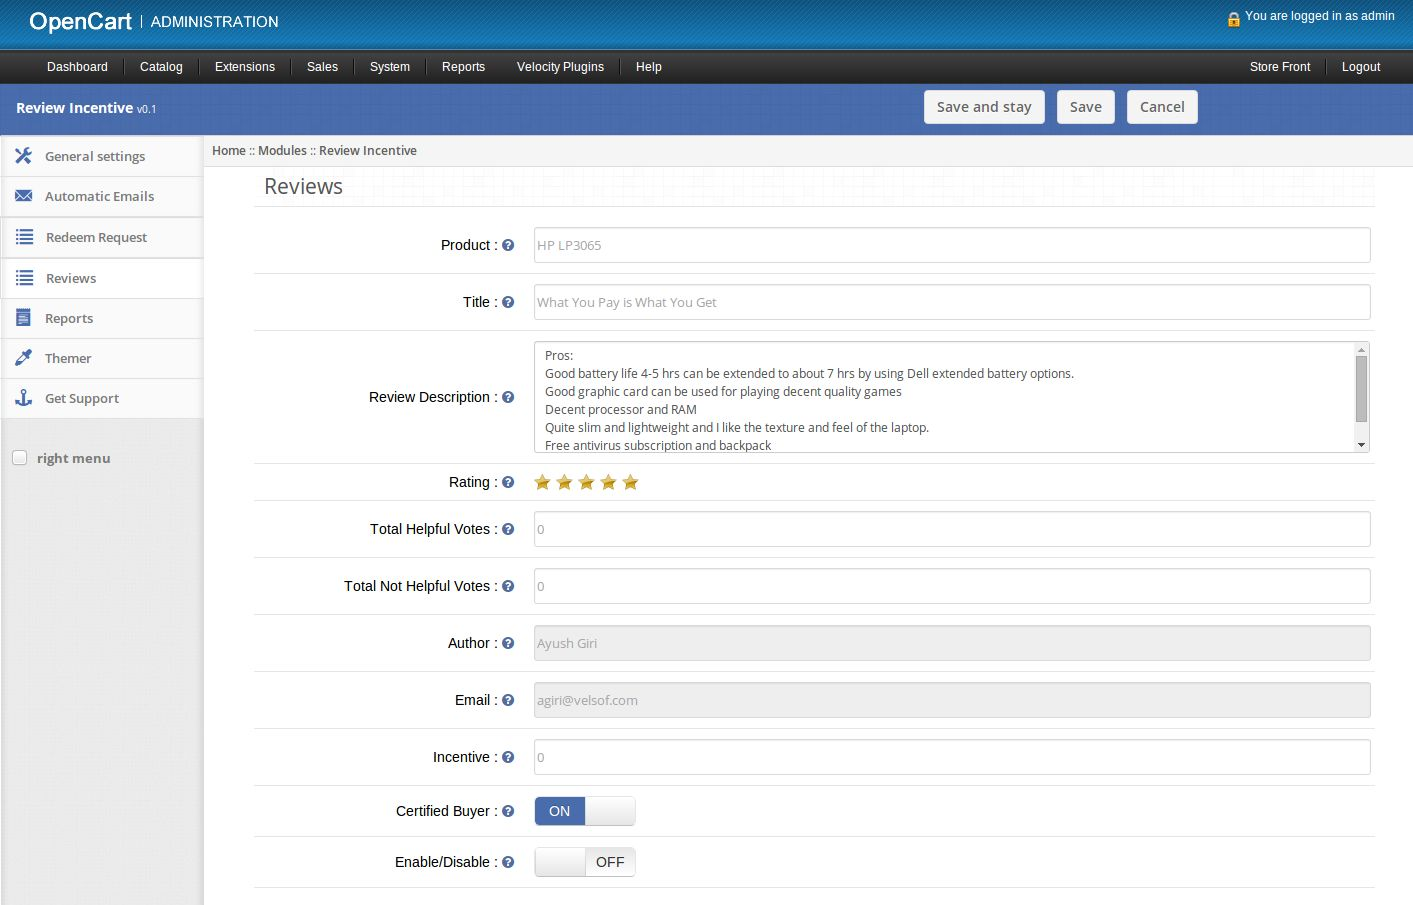
5. On clicking the edit link a new page will open to edit review.

6. Product: Set name of product.

7. Title: Set title of review.

8. Review Description: Set main text of review.

9. Rating: Set rating points for the product.

10. Total Helpful votes: Set the total number of users who found this review helpful.

11. Total Not Helpful votes: Set the total number of users who found this review not helpful.

12. Author: See the name of Author who wrote the review.

13. Email: Email of customer/author who wrote the review.

14. Incentive: Set incentive given to customer for writing the review.

15. Certified Buyer: Add or remove badge of certified buyer from the review for the customer.

16. Enable/Disable: Enable or Disable the review.

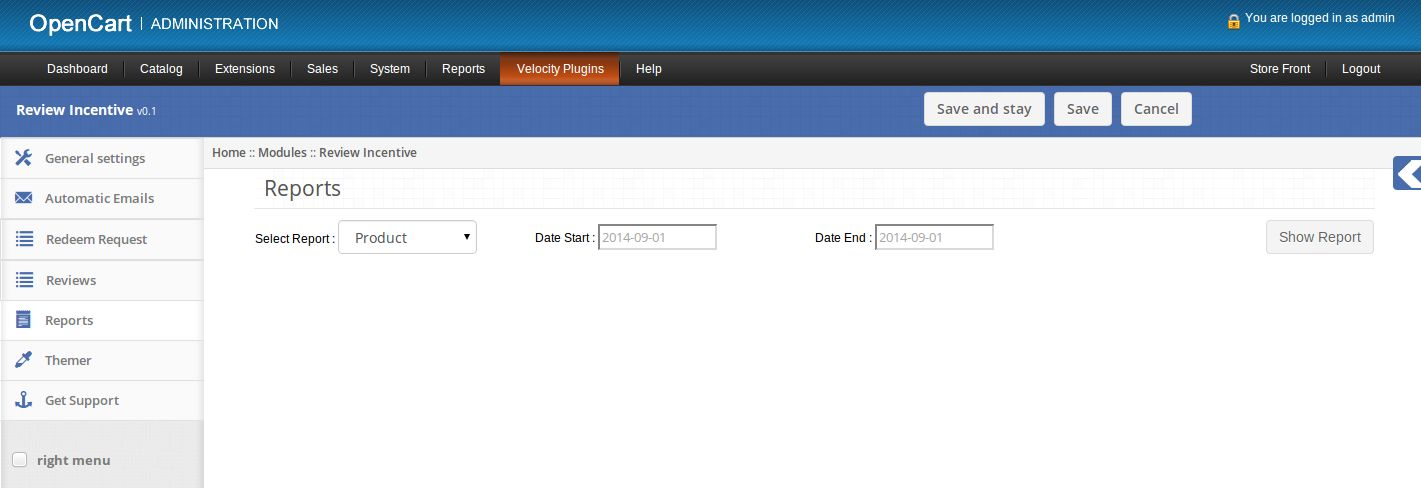
5. Reports tab

1. Here admin can see different reports related to review incentives.

2. Admin can select the type of report, start date and end date.

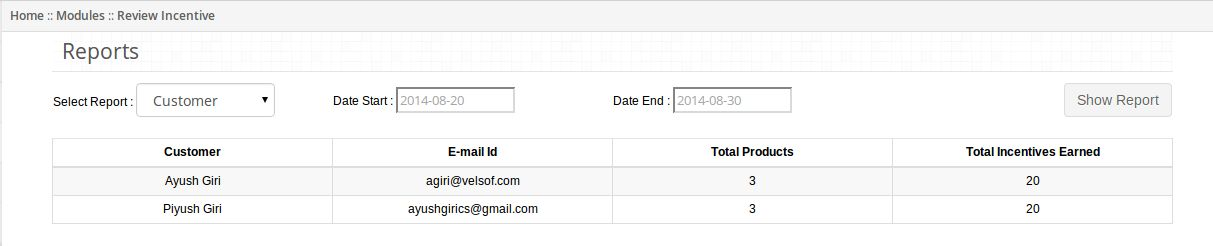
3. On clicking Show Report button, selected report will appear on screen.


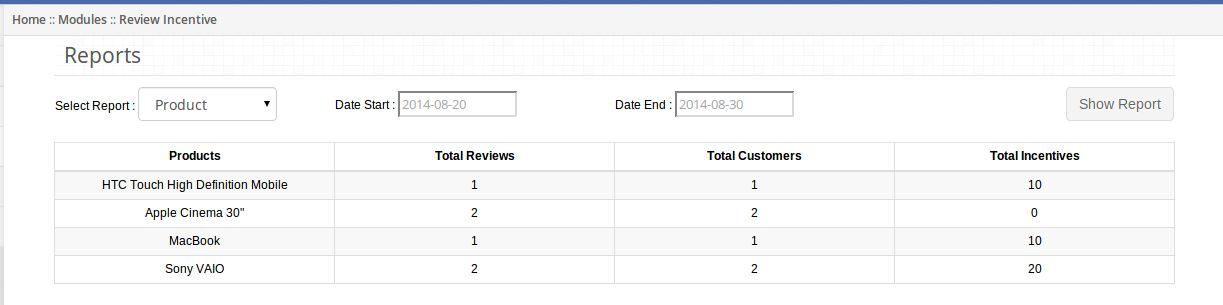
4. If admin selects Product report then product wise report will appear.


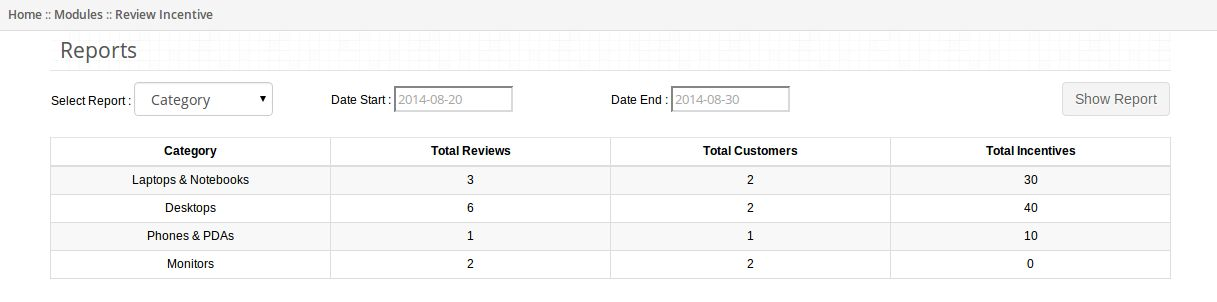
5. If admin selects Category report then category wise report will appear.


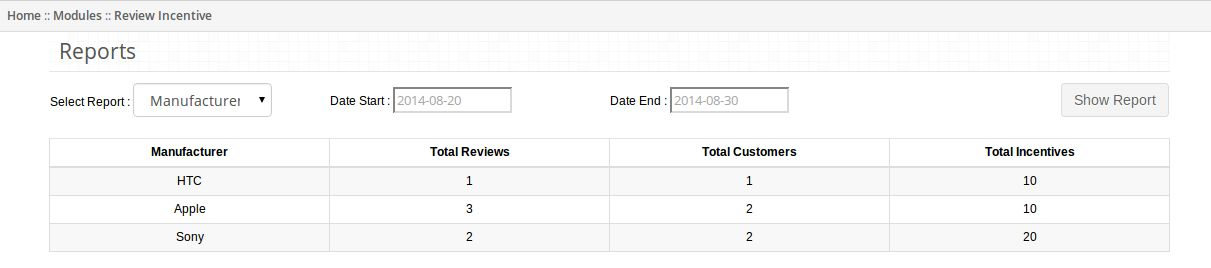
6. If admin selects Manufacturer report then manufacturer wise report will appear.


7. If admin selects Customer report then customer wise report will appear.

6. Themer tab

1. By clicking on themer tab, you will have an option to change the theme of Review Incentive admin panel .

7. Get Support

1. By clicking on Get Support tab, you will be redirected to our support website, where you can contact our support for help. Use this tab in case you some query/issue or found some bug.

8. Short hand Code

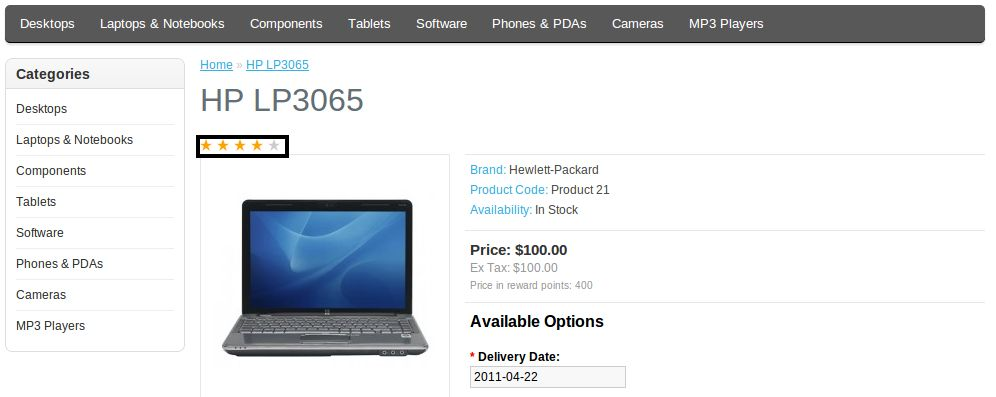
1. Admin can show average rating of product at any position on web page by calling a function in tpl file.

2. Admin should call function show Rating(product_id, store_id) as

3. Here first argument is the id of product whose rating is to be displayed and second argument is id of the store.

4. This function will show average product rating at the place where it is called.

5. Average rating is displayed in black box in following image:

Screenshots

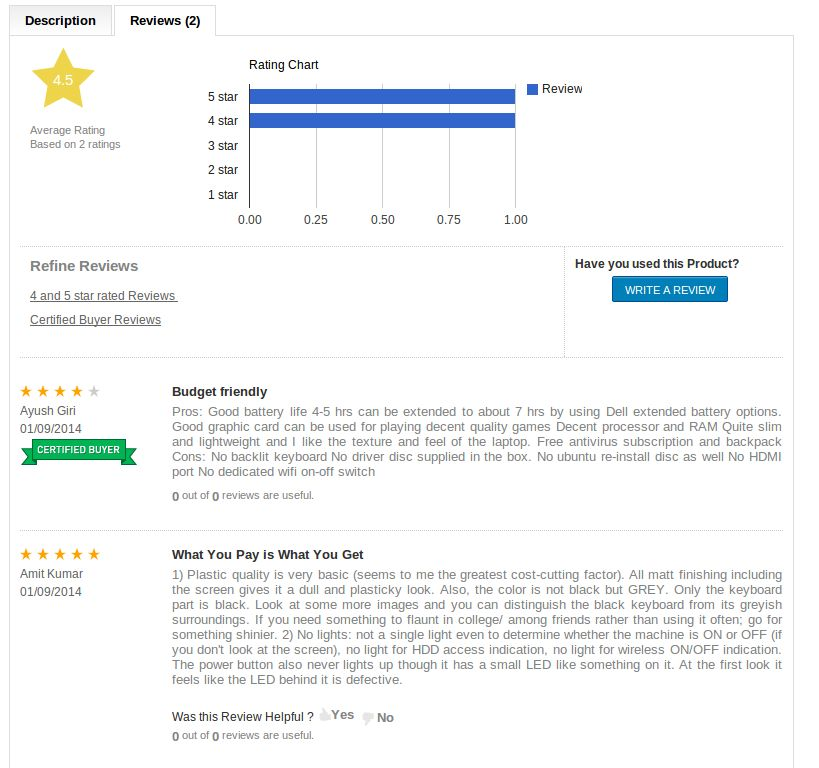
Review tab in product page showing reviews of product.

Certified Buyer badge is added to those customers who purchased the product from your store.

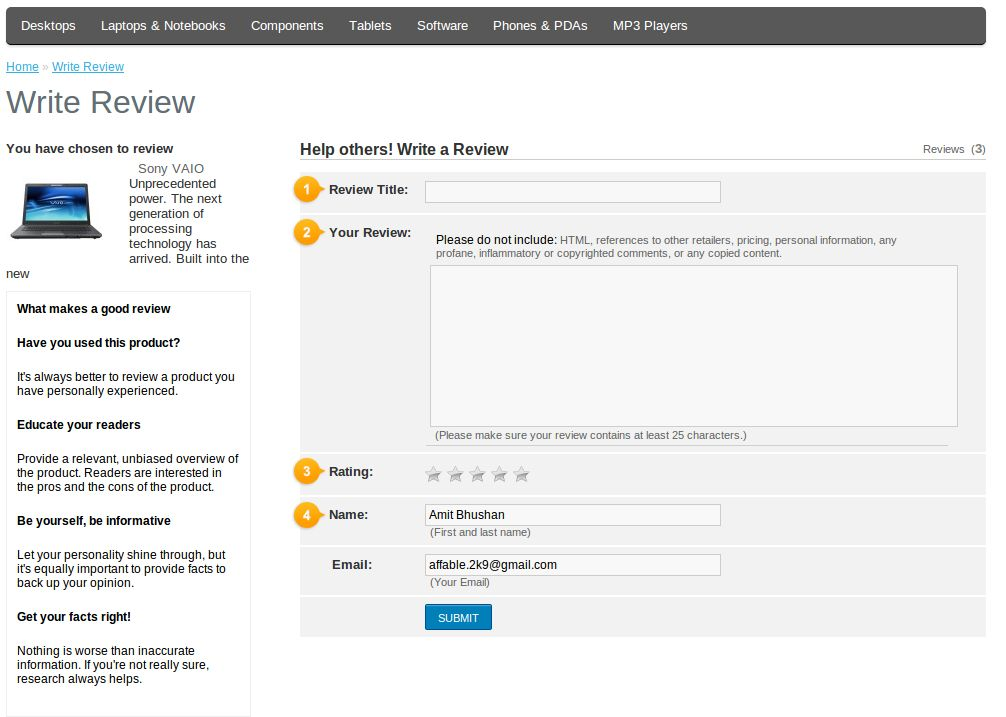
Screenshot of Write Review page.

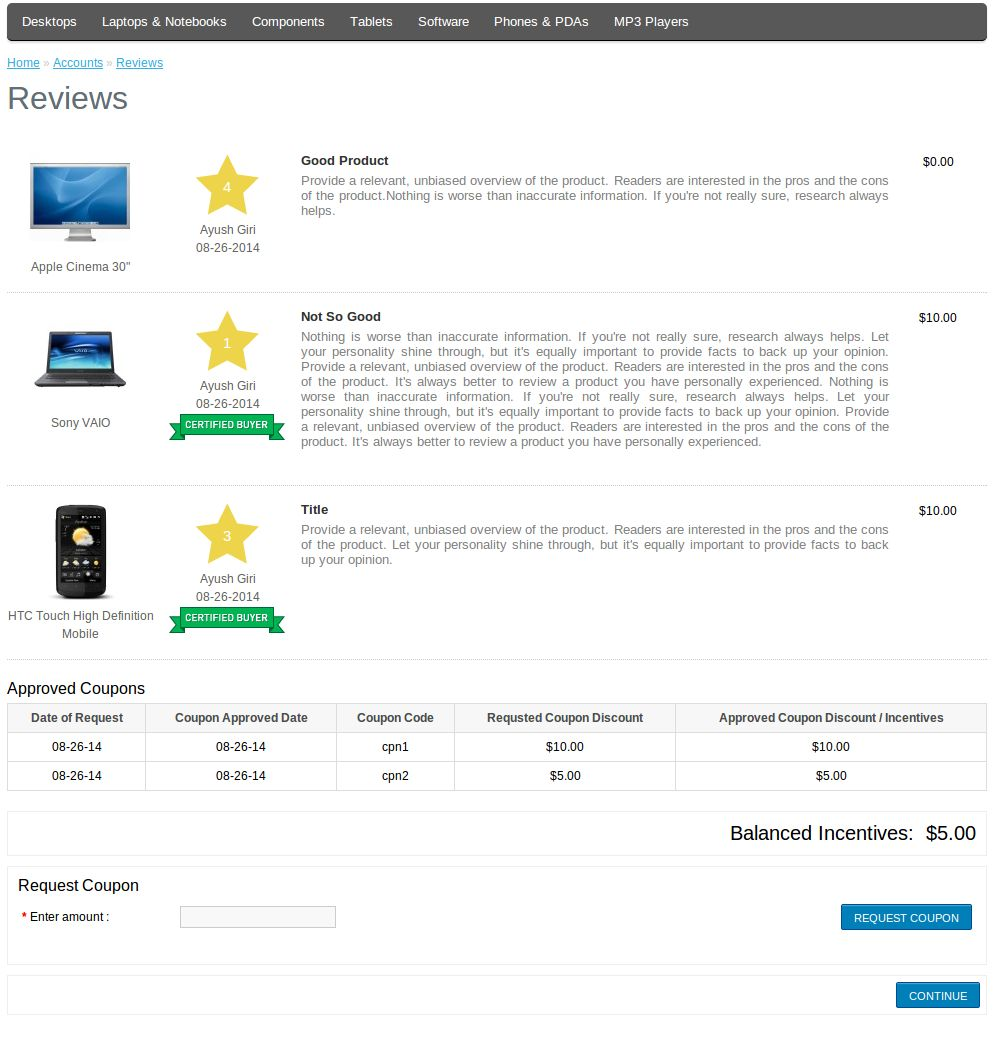
Screenshot of Reviews page

Recommendations

1. Top administrator should give permissions to access page reviewincentive/reviewincentive after moving the plug-in to root folder of your store.
2. Set cron file to run everyday.

Related Stories:

Opencart Abandoned Cart – User Manual

How to install OpenCart Abandoned Cart plugin on your server

Follow the following steps for installing Abandoned Cart Module:
1. Install VQmod (if not yet installed, visit
https://code.google.com/p/vqmod/wiki/Install_OpenCart).

2. Unzip the archive and find Upload folder.

3. via FTP manager (like Filezilla or WinSCP – download here: https://filezilla-project.org/)
upload to you main directory the files and folders in the Upload folder.

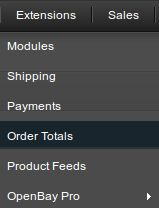
4. In Admin Panel go to Menu > Extensions > Modules > Abandoned Cart.

5.Install Abandoned Cart.

6.That is all – Your system is ready. Click on Edit and configure it.

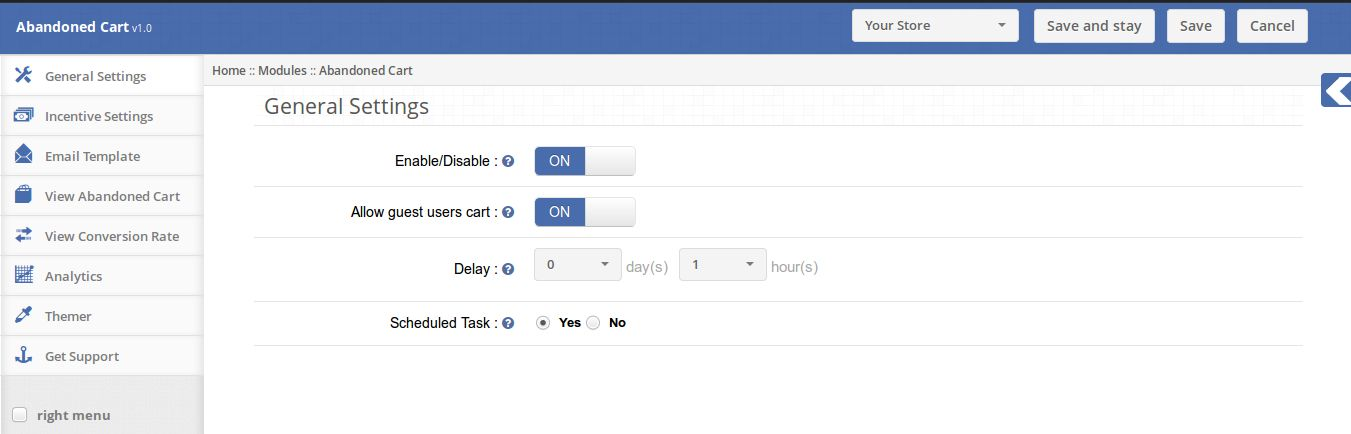
1. General Settings tab

The General Settings tab has following options:

1. Enable/Disable: Enables or Disables the plugin on the store front. If disabled, the abandoned will not be saved to the database and no coupon codes will be send to the customers.

2. Allow guest users cart: This feature will allow admin to decide whether guest customers will be saved or not.

3. Delay: The Delay time is the time period after which the cart will be assumed to abandon.

4. Scheduled Task: This feature will allow admin to schedule coupon email sending task or not.

2. Incentive Settings tab

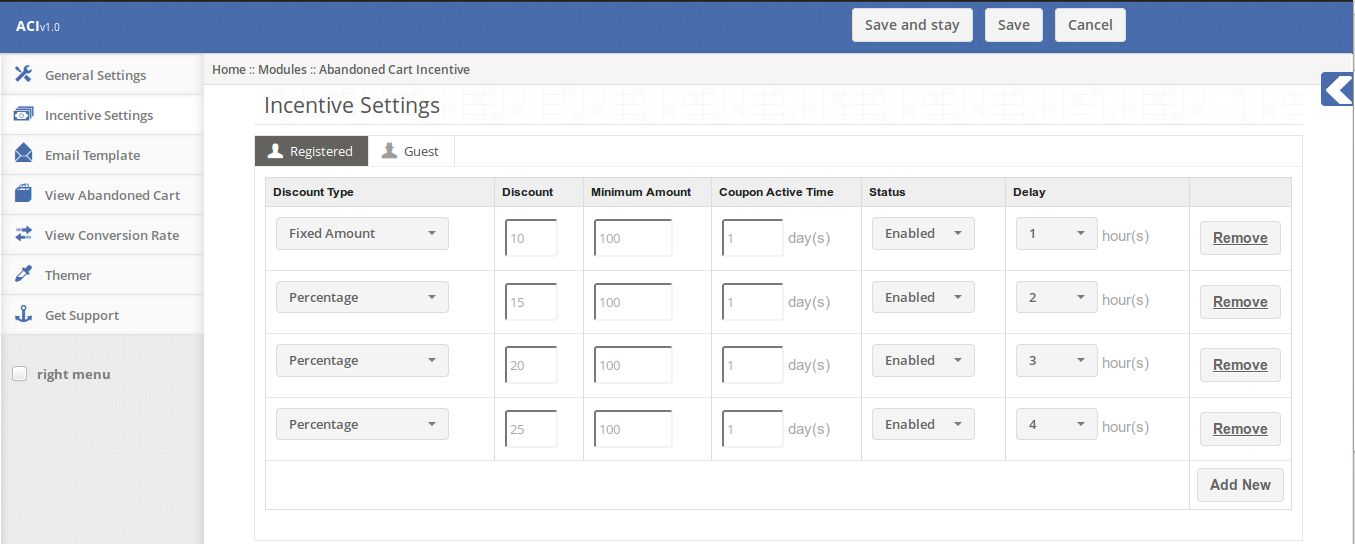
The Incentive table will manage the incentive details for each coupon mail either for Registered Customers or Guest Customers. The total number of rows in this table will indicate the number of emails scheduled for each abandoned cart.

1. Discount Type: The discount might be fixed amount discount or some percentage of the cart total.

2. Discount: This field holds the value of the discount, either fixed or percentage, given to the customer.

3. Minimum Amount: The minimum cart total against which the coupon is valid.

4. Coupon Active Time: The time period (in days) for which the coupon will be active, after that the coupon will be expired.

5. Status: Status, as the name defines, manages whether the particular incentive is enable or disable. The disabled incentives will not be sent to the customers.

6. Delay: This is the time period in hours after which the particular mail will be send. This time will be calculated once the cart is assumed as abandoned.
(These fields are same for the guest customers also.)

3. Email Template tab

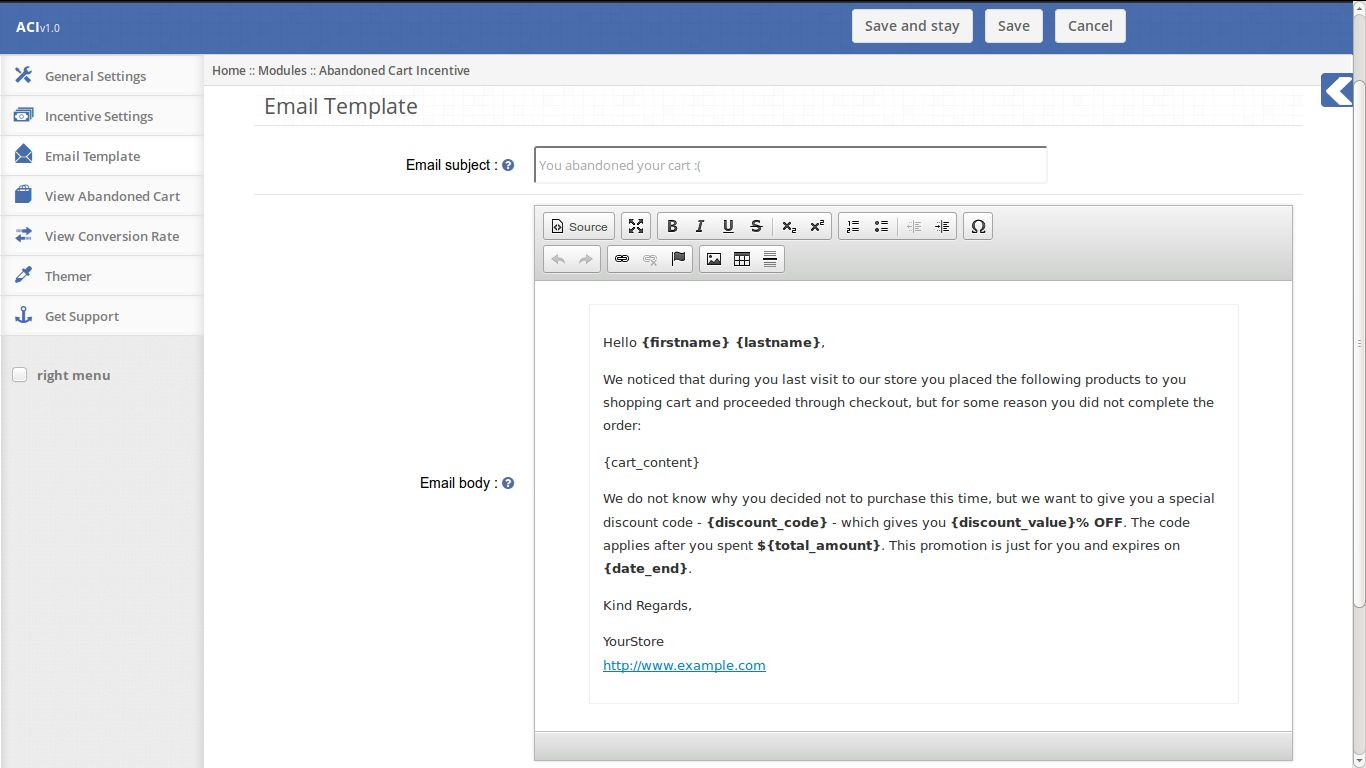
The Email Template is the format of the email that will be send to the customers. It contains some place holders whose values will be replaced when the email will be sent.
The place holders are:
{firstname}
{lastname}
{cart_content}
{discount_code}
{discount_value}
{total_amount}
{date_end}
Keep these place holders as it is.

4. View Abandoned Cart tab

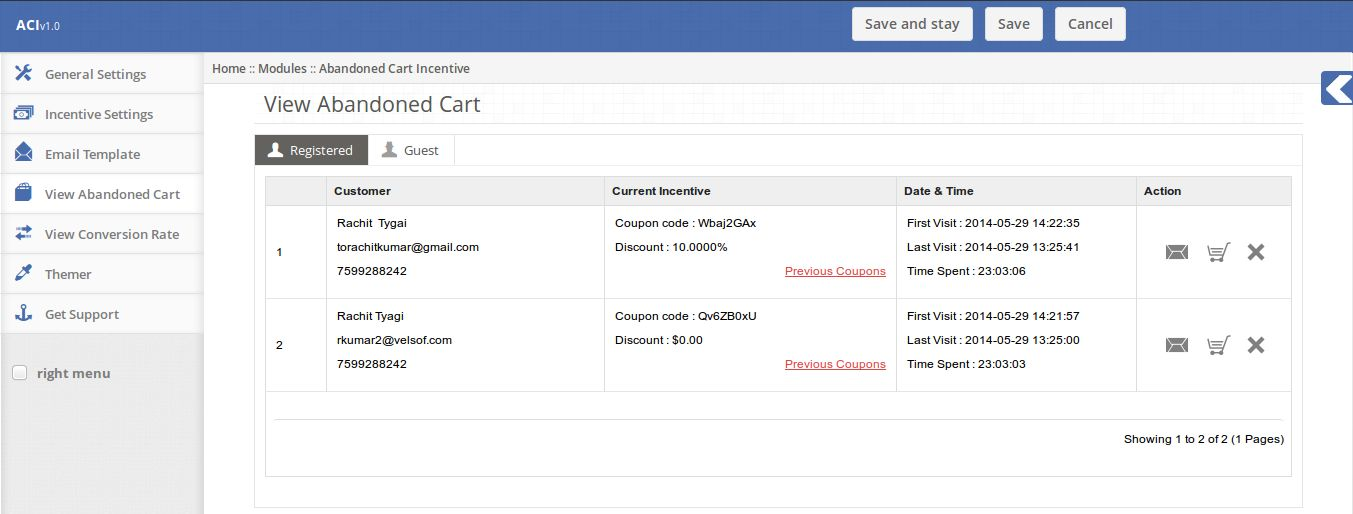
This tab enlists all carts which will be assumed to abandoned. It contains two sub-tabs,

1. Registered:
The Registered Sub-tab enlists all the carts of the registered users which are assumed as abandoned.

2. Guest: (Unregistered customers of the Store)
The Guest Sub-tab enlists all the carts of the guest customers which are assumed as abandoned.

The table consists of the following columns:

1. Customer: The basic information of the customer i.e. Name, Email, Contact Number.

2. Current Incentive: The Current Incentive shows the details of the latest coupon code which was sent to the customer either manually or automatically. This field contains a link for all previous coupons sent to the user.

3. Date & Time: This field shows the First Visit, Last Visit & Time Spent by the customer on the store for that particular abandoned cart.

4. Action: The Action column contains a set of actions which can be performed on that abandoned cart. These action are (from left to right):

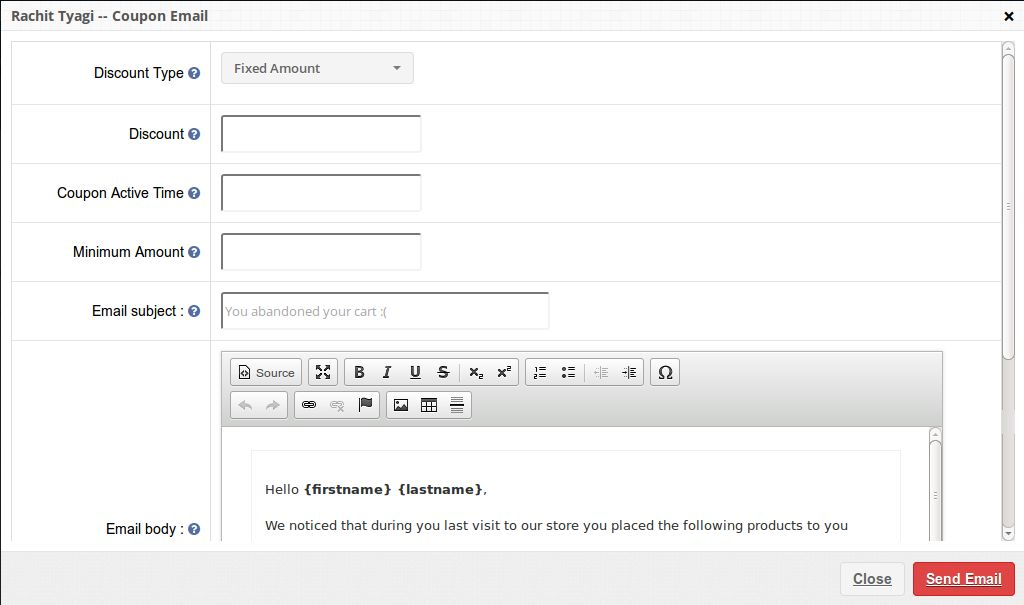
1. Email: Shows a form for sending a coupon code for the selected abandoned cart. This coupon will be listed in the current incentive section of the table.

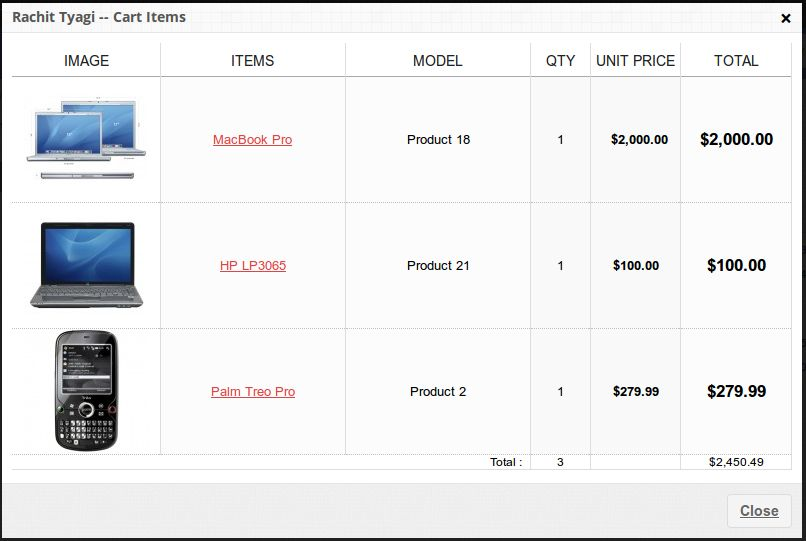
2. Shopping Cart: Shows the items in the abandoned cart of the customer.

5. View Conversion Rate tab

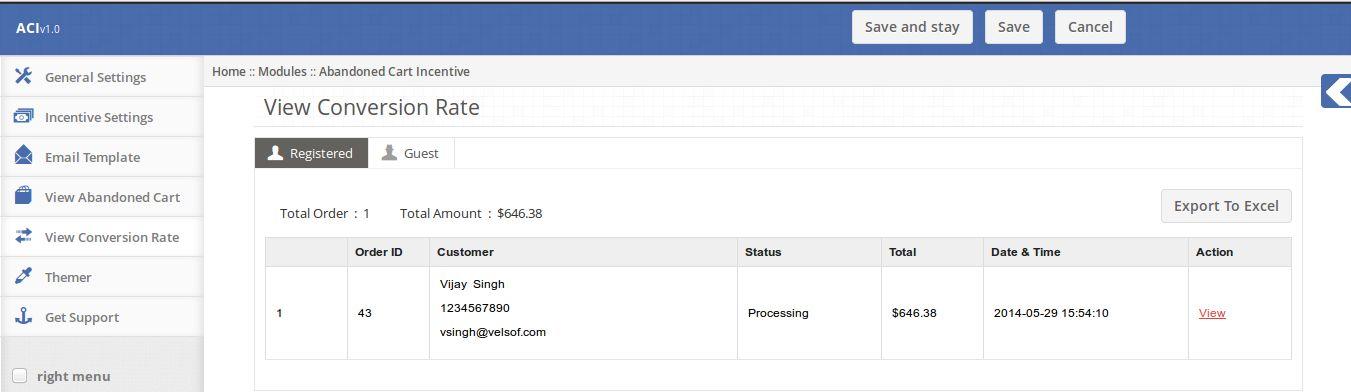
The Conversion Rate tab, enlists all converted orders for registered and guest customers both.
The converted orders list consists of following columns:

1. Order ID: The Order Id column displays the Order Id generated by the system for that order

2. Customer: Displays the customer information.

3. Status: Shows the status of the order.

4. Total: The total amount paid by the customer.

5. Date & Time: Time at which the order was placed.

6. Actions: Set of actions performed on selected order.

7. View: View the complete details of the order in new tab.

6. Analytics tab

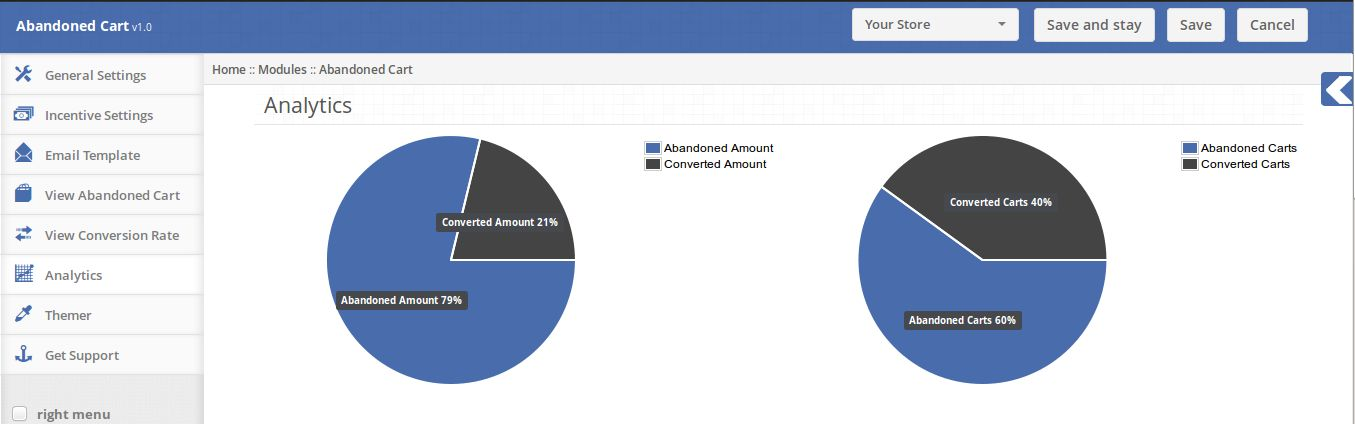
The Analytics tab shows the overall insights of the store in graphical interface.

This tab contains following graphs,

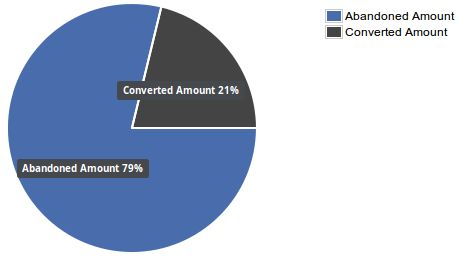
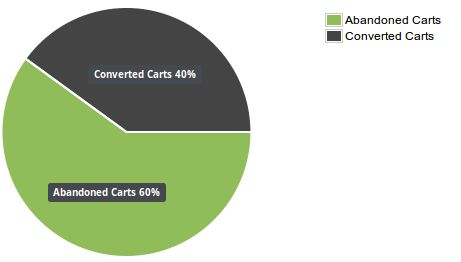
1. Abandoned Amount vs Converted Amount:

This chart gives the overview of the total abandoned amount and the amount converted by the coupons provided by the abandoned cart module.


2. Abandoned Cart vs Converted Cart:

This chart gives the overview of the total abandoned carts and the carts converted by the coupons provided by the abandoned cart module.

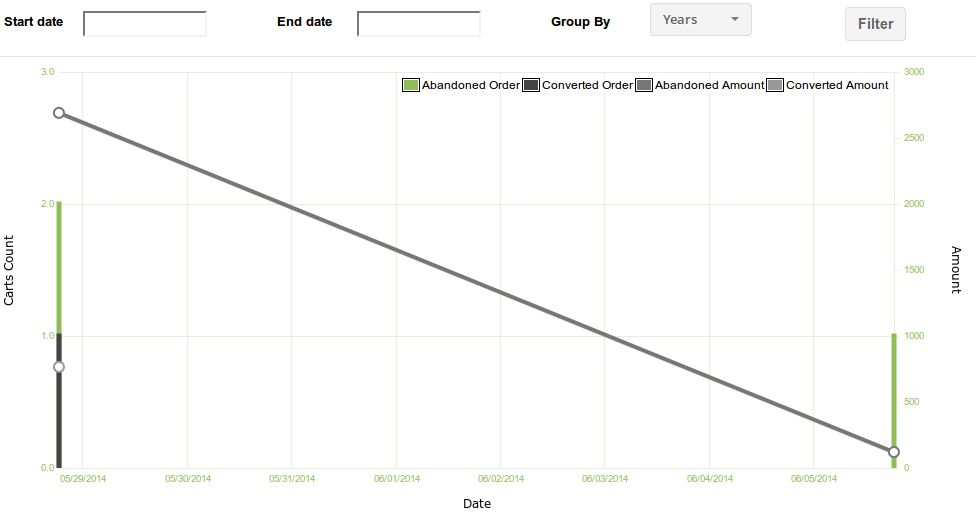
3. Carts Count Vs Days Vs Amount:

This chart gives the overview of the total abandoned carts vs the carts converted and theamount abandoned vs the amount convertes in given time span.

This chart also contains filters on the basis of date to filter out and group the data for aconcise view of store sales.

Description

Store Front

In store front section of the Abandoned Cart Module, nothing is visible to the customers visiting
the stores but their abandoned carts will be captured and saved to the system for sending the
coupon codes and reminder e-mails. This all will be done by the Cron Job which is scheduled
to run on server after every half hour.

This Would Also Interest You:

OpenCart Make An Offer – User Manual

Admin Panel of OpenCart Make An Offer Extension

The admin panel has 6 tabs for configuring this plug-in, as listed below:

  • General Settings
  • Products Settings
  • Email Settings
  • Pending Requests
  • Processed Requests
  • Statistics

General Settings

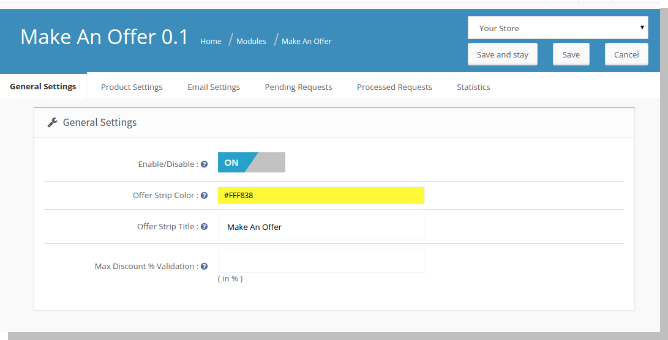
General Settings tab has following options:

Enable/Disable (On/Off switch) :

This is the main switch to enable/disable the entire Module.

Offer Strip Colour :

You can change the colour of the strip that appears on the front end by clicking on this field and choosing the desired colour to suit your theme.

Offer Strip Title :

You can change the text on the strip that appears on the front end.

Maximum discount % validation :

The discount % you enter here decides the validating amount a customer can enter on front end and make request for a negotiable amount. This option minimizes the admins effort to review requests with absurdly low prices for each product.

Product Settings

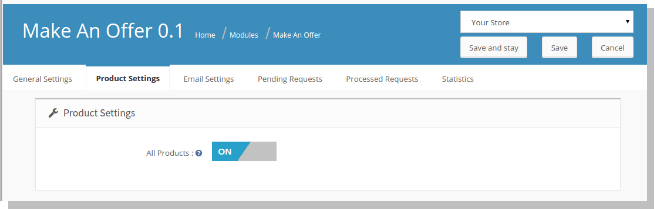
This tab has following options:

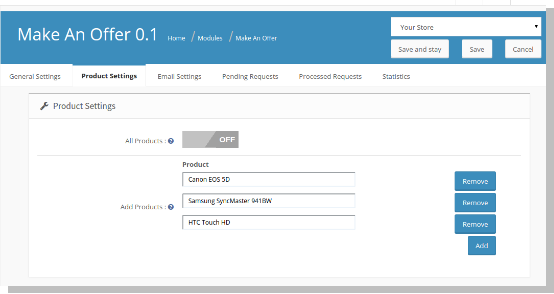
All Products:

Admin can add the products that shall come under this scheme. Admin can either select all product to come under this scheme or only selected products.

Disabling this switch adds a row below this option where you can add the products that shall come under this scheme.

Add Products:

If admin chooses to enable on only selected products, following fields will show up on page.

  • Name : This will be an auto-suggest box
  • Add: Button to add more similar rows for more products.
  • Remove: Button to remove row.

Email Settings

This tab will help admin create mail bodies for different actions he/she might take for each request.

Rejecting Offer :

If all the products within a customer request are rejected, an email informing the same will be sent in response to the customers automatically, provided mail settings in admin have been configured properly. The subject and Email body for this email can be configured here.

Common Response :

If one or more product offers are accepted or negotiated, this email will be sent to the customers automatically which can be configured.

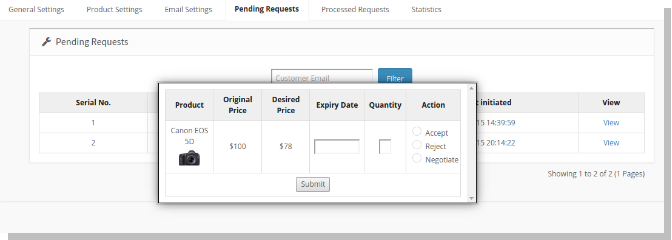
Pending Requests

This is the place where admin can view all requests that have been made by each customer. Also he/she can take actions as to whether accept/reject an offer, or to negotiate price with customer.

Admin can filter these requests based on the customers email ID.

After, you have decided to take actions on each product offer, you can submit the response. As soon as you submit the response, an email will be sent informing the status of all the product requests made.

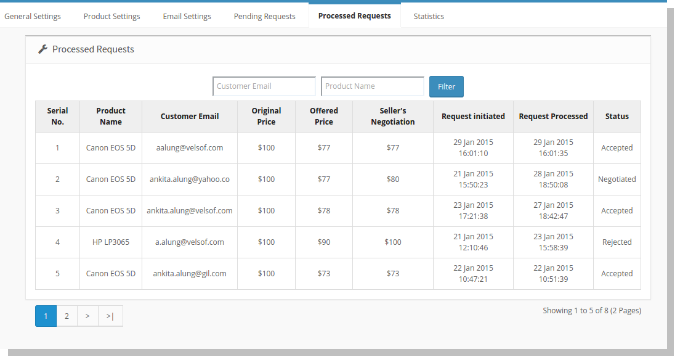
Processed Requests

This is the place where admin can view all requests that he/she has taken action on. Admin can view all these requests with filter options for customer email and product name.

Statistics

This is the place where admin can view the counts of requests made by each customer and corresponding responses to their requests made by the admin. There is also option to filter these statistics based on customer email. Here admin can also view the total sum of all the requests sent and responses taken by the admin as highlighted on the top.

Front End

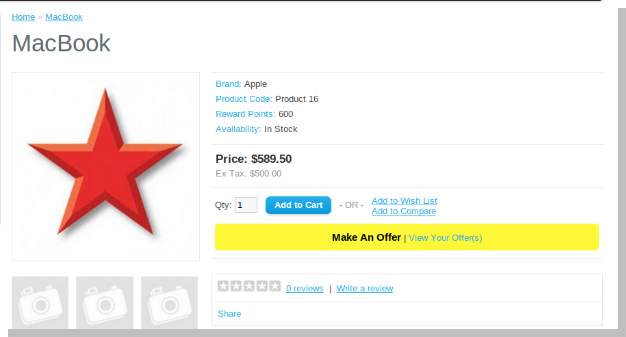
On the front end, the product layout will have a button to make an offer besides the add to cart button, if the product is added on admin panel to come under this scheme.

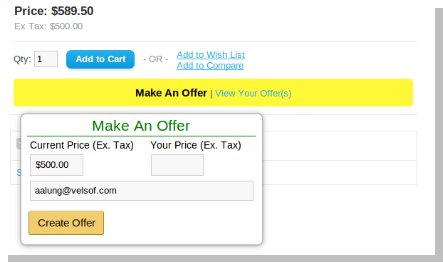
Clicking on make an offer opens up a pop up asking for an offer price you want to make. Once after entering that price and email ID, you may submit the request.

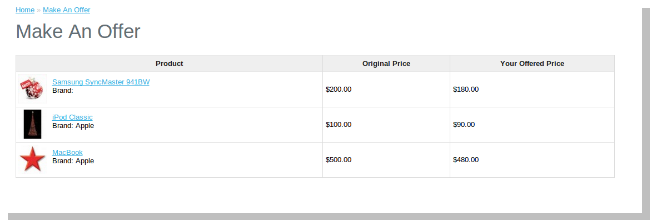
After submitting request, you can view page which shows all the products for which you have made offer. The link for the page is provided next to the option where one can create offers.

After submitting the request for all products, you will have to wait for response from admin via email on your submitted email ID.

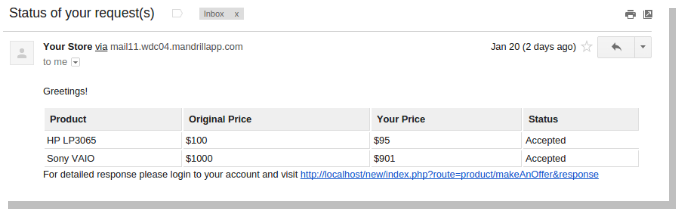
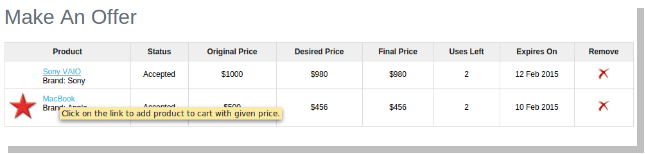
After the customer receives the response via email, clicking on the link provided in email will land user to the page where all requested products can be seen with status.

You can avail the discounted prices by visiting the product page via link with each product. On the product layout page, you can add a product to cart just the same way as before, that is, by clicking on add to cart button after selecting desired options.

This page gives the detailed response to all your requests which can be used by you to avail discounted price.

After you use up this offered price, respective quantity of uses left will be subtracted. You can purchase product at the offered price until uses are exhausted or offer surpasses the expiry date.

We hope that we have covered all the concerns regarding the installation and product guide of this OpenCart Extension. If you are new to OpenCart you should check the Merits and Demerits of OpenCart.

Knowband Magento filter pro extension- User manual

Introduction:

Knowband offers Magento Filter Pro Extension which allows the store admin to display advance filtering options on the eCommerce store. It helps the customers to add filter narrow down search result so that they can find their desired price with fewer efforts. Now the Magento store owner can decrease bounce rates and increase sales by making the navigation to the products quite easily. The Magento product filter extension is highly customizable. The store admin can show multiple filtering options. Look and feel of the product pages can be managed easily from the admin panel.

Features:

  • Magento filter pro extension module is very easy to install and configure.
  • Product filter extension can be enabled/disabled easily.
  • Offers simple and hassle-free implementation.
  • Magento custom filter module allows managing the look and feel of filters.
  • Magento advance filter module is highly customizable.
  • No technical skills are required to implement this functionality.
  • No need to change the codes in back-end for implementation.
  • The checkbox layered navigation extension is multi-store compatible.
  • AJAX-based navigation makes product search faster.
  • Customers can specify their own custom ranges for weight, price, size and other search attributes.
  • Admin can hide or display attributes for product categories.
  • Admin can choose the type of filter options and it’s positioning also.
  • Admin can disable JQuery.

Steps For Installation of Magento Filter Pro Extension

Follow the following steps for installing Filter Pro extension:

  • Download the extension package.
  • Unzip the package on your root folder of Magento setup via FTP manager (like Filezilla or WinSCP – download here: https://filezilla-project.org/).
  • In Admin Panel go to System > FilterPro. In case you are not able to see the link under System, please clear Magento Cache first then check again.

  • That is all – Extension is installed on your system.

Admin Module

The Admin Module contains 3 tabs as mentioned below:

  • General Settings
  • Attributes Settings
  • Color Scheme

General Settings

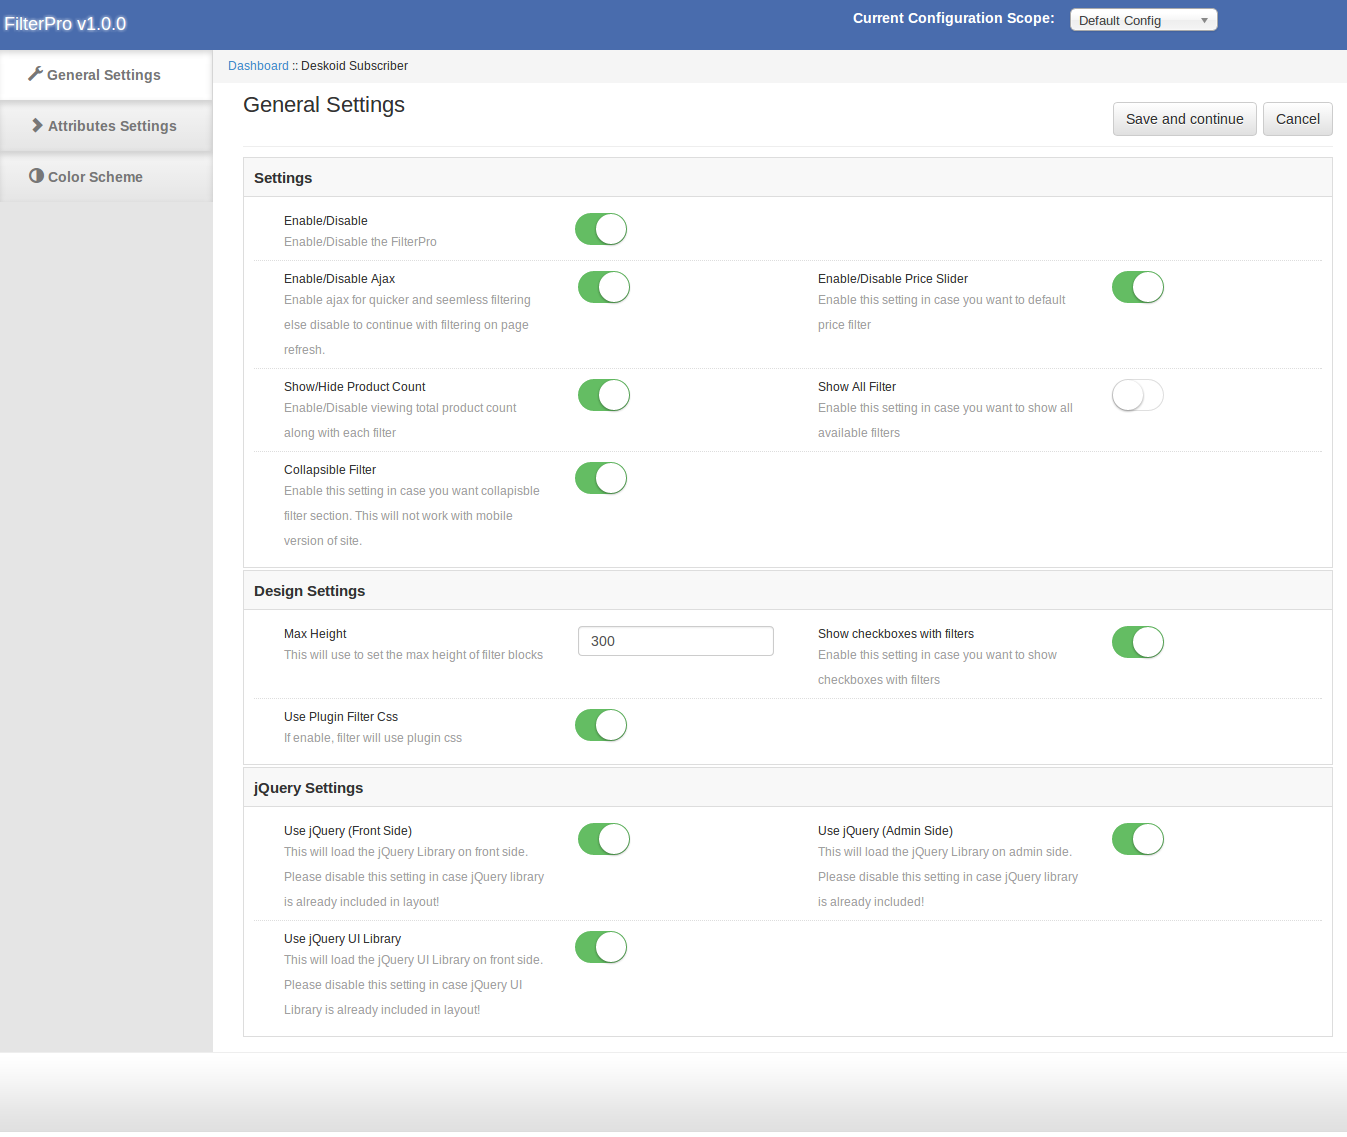
The General Settings tab has following options:

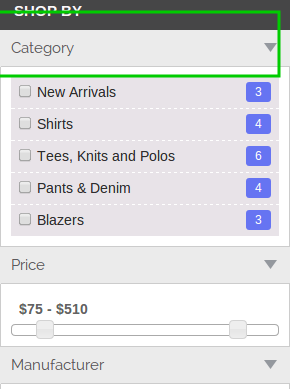
Enable/Disable: Enables or Disables the extension on the storefront. If disabled, default layered navigation will show.

Enable/Disable Ajax: This will enable the product filtering without page refresh. This setting will be applicable to left-hand filters, sorting, paging, product view type etc.

Enable/Disable Price Slider: This will replace the default price filter with price slider.

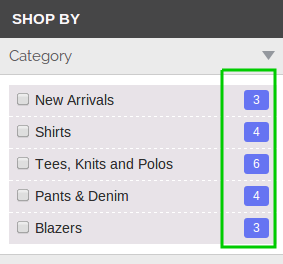
Show/Hide Product Count: In case you want to hide/show the product count.

Show All Filter: On the front side by default filters will hide/show as per the first selected filter section e.g. If we choose color first then all colors will available for selection but other filters will hide/show as per product available.

If this setting is enabled, the extension will show all the filters permanently.

Collapsible Filter: This will enable the collapsible filter.

Max Height: In case we need to increase the height filter section, we can do that by this setting. This field supports numbers only.

Show Checkbox with Filters: Show/hide checkboxes with filter, price and categories.

Use jQuery (Front Side): Disable jQuery in case it is already included on front by another plugin or theme.

Use jQuery (Admin Side): Disable jQuery from admin side in case it is already included in admin by another plugin.

Use jQuery Ui Library: Disable jQuery UI from admin side in case it is already included on front by another plugin.

Attributes Settings

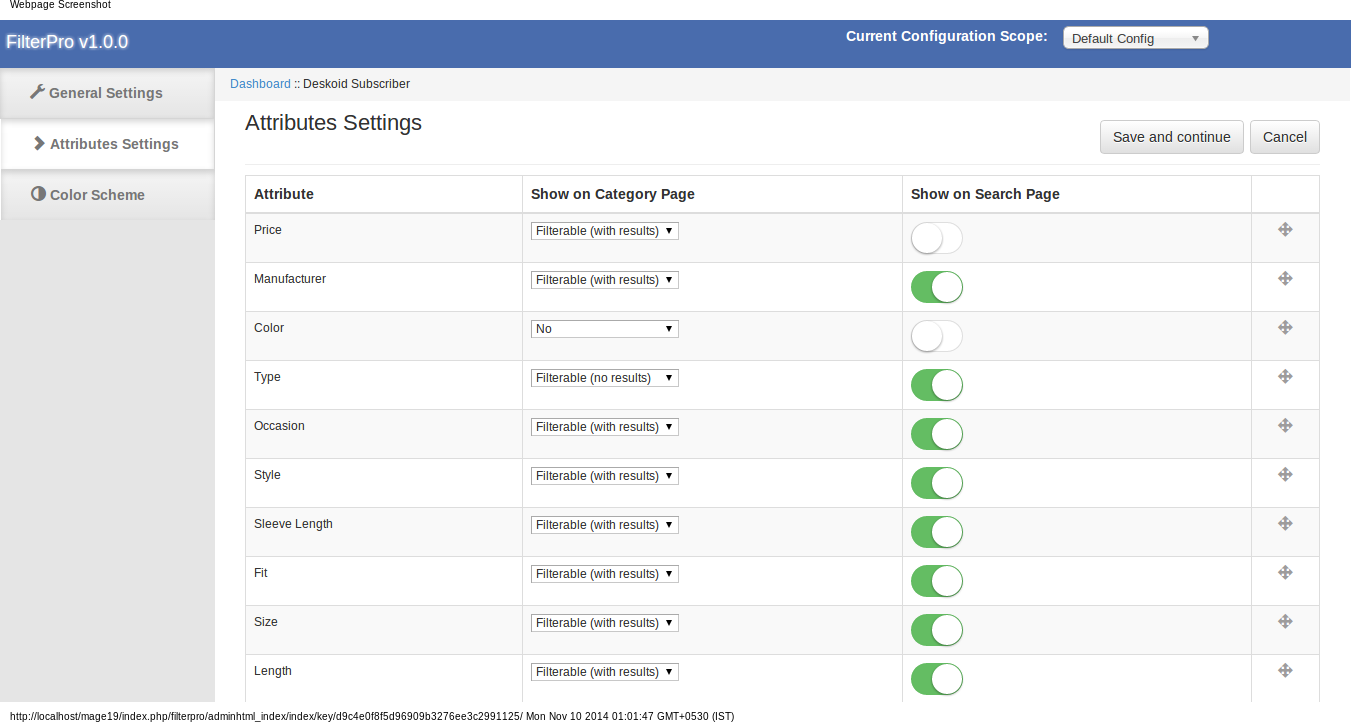
This tab shows the list of all attributes of drop-down/Multiple Select/Price along with disable/enable option from category & search page and sorting option.

To change filter position, we need to drag the filter to the new position.

Color Scheme

In this module, we have also provide the option to change the color of filter. These settings will apply if Use Plugin Filter CSS setting is enabled.

Plugin has the color picker to choose the appropriate color for filter.

Filter Header:

Selected Filter Header:

Filter Heading Box:

Product Count Box:

Filter List Box:

Store Front

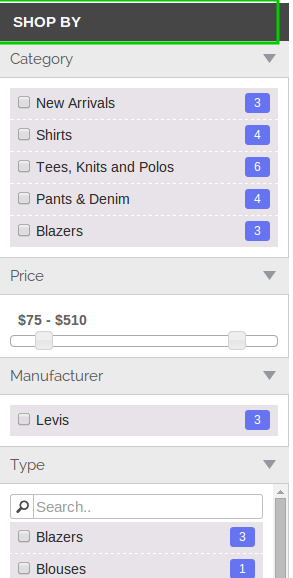
If extension is enabled, layered navigation will apply on category page. In case, extension layered navigation is not working, there can be 2 possible reasons as mentioned below –

  • Another extension overriding Magento Layered Navigation – If this is the possibility then we need to disable that extension.
  • Category is not set as anchor – Layered navigation work with categories of anchor type. To mark a category as anchor please edit that category.

To edit a category go to Catalog -> Manage Category page.

  • Category layout should not be 1 column

For more details:

Module Link: https://www.knowband.com/magento-filterpro

Admin Demo Link: https://mademo3.knowband.com/admin

Front Demo Link: https://mademo3.knowband.com/

YouTube Video Link:  https://www.youtube.com/watch?v=tPrL2EEWcLA&feature=youtu.be

Please contact us at support@knowband.com for any query or custom change request as per your business requirement.

Magento One Page Checkout – User Manual

Introduction

How to optimize the checkout process for your Magento store to make it responsive yet simple for the online users? By reducing the multiple checkout steps involved in a checkout process of a website, customers are more likely to purchase and thereby increase the conversion rate for your store. To simplify the checkout process of your Magento store, Knowband offers Magento One Page Checkout extension which incorporates a single step checkout page on your website, referred to as Magento Supercheckout. This supercheckout page gathers and displays all the checkout fields on a single page easing customers to fill information and complete checkout for their product.

The checkout page and layout has been optimized to show all necessary steps needed to complete the order on a single page to the customer.  Magento one step checkout is fully responsive for desktop, tablet, and mobile views and is perfectly compatible with all native Magento payment and shipping methods which are configurable from the backend interface.

Features of Responsive checkout for Magento

1. Magento one page checkout extension simplifies the multi-step checkout process by incorporating a single step checkout on the store.
2. Ajax based loading of Magento one step checkout eliminates the delayed loading time consumed by multiple checkout pages.
3. Magento quick checkout extension gathers and merges all the checkout field information into a single page checkout form which is convenient to fill for the customers while performing order checkout.
4. The mobile responsive feature of Magento one page supercheckout makes it compatible with all kinds of devices(mobiles or tablets), screen sizes and designs.
5. Store merchant can also enable the guest registration option for their customers which automatically generates and sends a random password to the user for further account use.
6. If guest registration with password is enabled, admin can allow their customers to fill the desired password for their account while performing guest checkout.
7. Magento one page checkout extension offers an option to enable or disable newsletters for the eCommerce store.
8. Magento fast checkout extension offers two easy social login options like Google and Facebook so that the customers can conveniently login and perform checkout on the store.
9. This one step checkout Magento extension offers customizable address fields for payment address and shipping address. Admin can show or hide the fields differently to guest and logged in customers of the store.
10. With Magento one step checkout module, admin can configure and display multiple payment and shipping methods for their shop on the frontend.
11. This Responsive checkout for Magento offers a configurable cart to the store merchants. Admin can show/hide any cart description field as per their site needs.
12. Magento one page checkout extension offers two intuitive and appealing layouts including 2-column and 3-column which are fully customizable from backend panel of the module.

Installation Steps of Magento One Page Checkout Extension

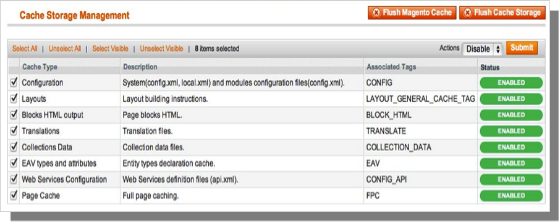
1. Disable the Cache

The Magento front end relies heavily on caching to provide a faster experience to customer. This is a wonderful tool, but can wreak havoc during the installation process. To ensure that the cache is not the cause of any problems, we should turn it off. This can be done from the admin console by navigating to the cache management page (System->Cache Management), selecting all caches, clicking disable from the drop-down menu, and submitting the change.

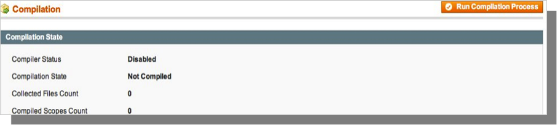
2. Disable Compilation Mode

This may not be an issue for many readers, but if you are using Magentos compilation mode on your store, it is important that you remove it. Without going into to many details, compilation mode takes many files spread out over the system and condensing them into a single file that can be run very quickly. If an extensions files are not in the system when this single file is compiled, they will not be included. To check that this is disabled, go to System->Tools->Compilation. If the compiler status is Disabled, you are ready to go. If not, simply click the Disable button on the right hand side of the screen.

Choose An Installation Method

There are two different methods used to install extensions.The first involves taking advantage of the Magento Connect Manager, while the second involves manually installing the files via ftp or command line. The first option is generally used by store owners and is a relatively automated process, the problem is that if there is a problem with this process, you are at the mercy of the connect manager to tell you where the problem is coming from. Option two involves getting your hands on the files yourself and manually dropping them into the Magento installation.

Option 1: Using Magento Connect

Required Materials:

  • User account for Magento Connect
  • Magento Admin account with access to Magento Connect Manager

As stated before, this option is relatively easy to implement. The first step is finding the link on Magento Connect for the extension you wish to install. Once there click install now. If you are not currently logged into the site you will be prompted to do so. Next, select the version of Magento connect you are using (if in doubt, select 2.0), accept the extensions license agreement, and copy the extension key.

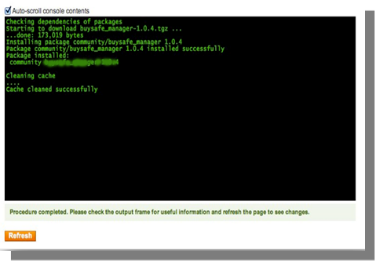
Log into your stores admin console and navigate to System->Magento Connect->Magento Connect Manager. At this point you will be prompted to re-enter your administrator credentials. In order to install an extension from the connect manager; you must have an account with full access to the administration console. If you were given limited access, Magento will not allow you to proceed. Once you are logged into the manager, simply paste the extension key into the text box and click install. A system window will appear towards the bottom of the page that will display the progress of your installation.
Congratulations, you have successfully installed the extension on your store. Be sure to test thoroughly before re-enabling the cache/compilation. If you found no problems both before and after these features have been re-enabled, you should be ready to repeat the installation process on your live site. DONT FORGET TO BACKUP ALL FILES AND DATABASES BEFORE INSTALLATION!

Option 2: Manual Installation

Required Materials:

  • All files used by the extension.
  • FTP access to your website.

The connect manager is a useful tool for installing extensions, but prefer hands-on method when it comes to installations. It feels more comfortable when you are personally in control of the process.
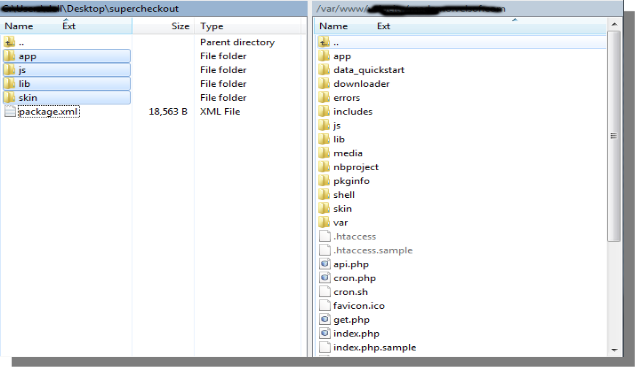
Do you see an app-code directory there, what about app-etc-modules? If you dont see these directory paths and files contained within them chances are that the extension download was faulty. Take a look at the package.xml file, this is the blueprint used by Magento Connect to arrange the files in the proper places. You may need to use this to ensure that everything is as it should be. Once you have reviewed the extension files you are ready to perform the last step. Using your ftp client, drag all of the files onto the store root of the Magento instance. Depending on the number of files in the extension, this may take a few moments.

Now go to the admin console and click Flush Cache Storage. This is the requirement for any extension that adds pages to the admin console. Logging out and back in is also required to ensure that everything loads properly. If you cannot clear the cache via the admin console for any reason, you will need to clear the cache manually via your FTP client (see the first FAQ question for assistance). That is the final step. Congratulations on a successful installation.
Troubleshooting & FAQs

I loaded all files onto my Magento store, and now get a white screen for some or all of the admin console.

This is a fairly common problem, and 99% of the time it is cache related. If you can get to it, go to System->Cache Management and click Flush Cache Storage. This will ensure that everything cached by Magento is deleted and will to be regenerated. Log out and back in to complete the process.

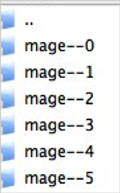
If you are completely cut off from the admin console, navigate to the var-cache directory of your website. You should see a series of directories named mage*. Delete all of these directories (DO NOT DELETE var-cache). This is the equivalent of flushing the cache storage from the admin console.

I am receiving a Magento error when accessing certain pages. How can I debug this?

This question really deserves a blog post all to itself, but a good start would be to go into the errors directory of your store. Locate the local.xml.sample file and rename it local.xml. The next time you see the error detailed information will be provided explaining where the error took place. Dont forget to change this back when you are finished troubleshooting!

I have a critical error with my webstore and need to turn off an extension I cannot access the admin console. What do I do?

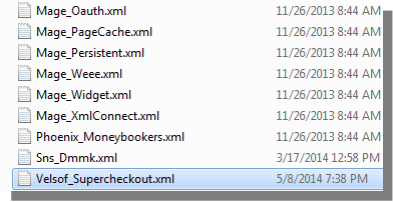
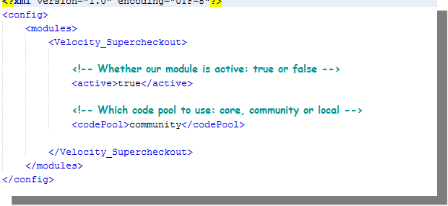
Go to the app-etc-modules directory and open the file that goes with your extension. The naming convention is generally DeveloperName_ExtensionName.xml. In this case it would be Velsof_Supercheckout.xml.

Look for the active tags in the file, change the value from true to false and save your changes. This tells Magento that the extension is disabled and not to run any code associated to it. Deleting the Magento cache is recommended (and most likely required) for this change to take effect.

General Settings

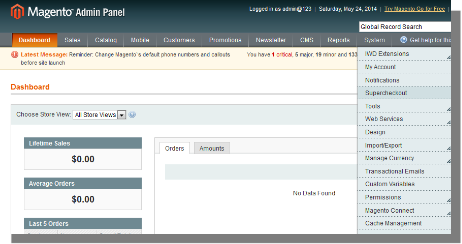
  • To excess Super Checkout plugin, Click on supercheckout option appearing as a sub menu in navigation menu under System main menu as shown below.

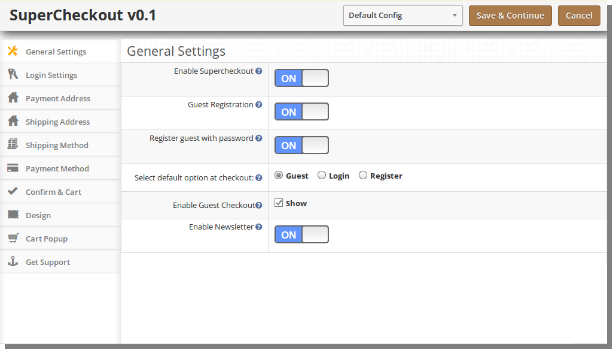
  • On clicking sub menu Supercheckout the module for plugin will open. It contains navigational bar at the top, menu at the left and main content in the center as shown below. To enable the plugin, switch the enable button from OFF to ON which is just to the right of Enable/Disable label.
  • To enable guest registration, switch the button from OFF to ON which is just to the right of Register Guest Automatically label. Enabling this would result in registering the guest to your store and an automatically generated password would be mailed to that user.
  • To enable registration, switch the button from OFF to ON which is just to the right of Register Guest With Password label. On enabling this password and confirm password fields will appear so that customer can register from the checkout page itself.
  • To change the default option from Guest, Login or Register in Login section of checkout page, select an option from given radio button. The selected option will be set as chosen option by default.
  • To enable or disable guest checkout by the user check/uncheck the checkbox which is just to the right of Display Guest label.

Login Tab

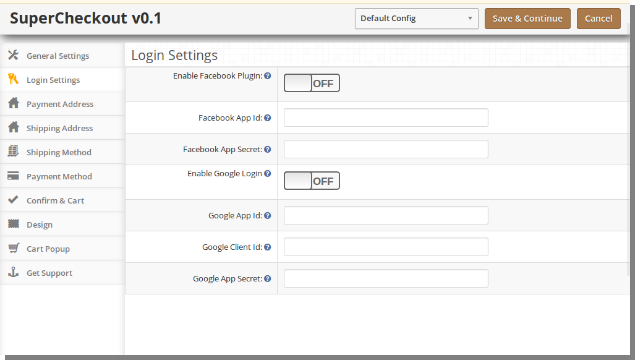
  • This tab of Magento One Page Checkout basically contains setting to enable /disable Facebook and Google registration & login as shown below.

  • To enable Facebook Registration & Login switch the button from OFF to ON which is just to the right of Enable Facebook Login label. But before you do that do get facebook APP ID and APP SECRET from https://developers.facebook.com.
  • Enter the APP ID and APP SECRET in their respective fields and save. You will find Facebook login button on your checkout page.
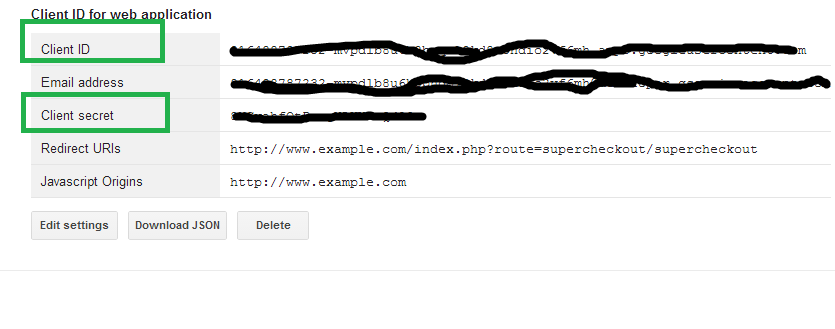
  • To enable Google Registration & Login switch the button from OFF to ON which is just to the right of Enable Google Login label. But before you do that do get Google APP ID, CLIENT ID and APP SECRET from https://code.google.com/apis/console. For detailed instructions to get the APP ID, download the Facebook & Google Setup guide from oepncart accout.
  • Enter the APP ID, CLIENT ID and APP SECRET in their respective fields and save. You will find Google login button on your checkout page.

Payment Address Tab

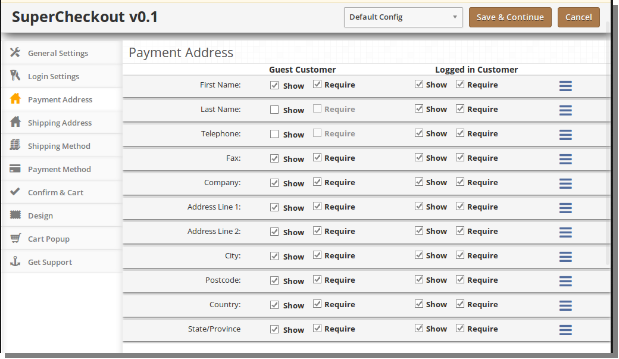
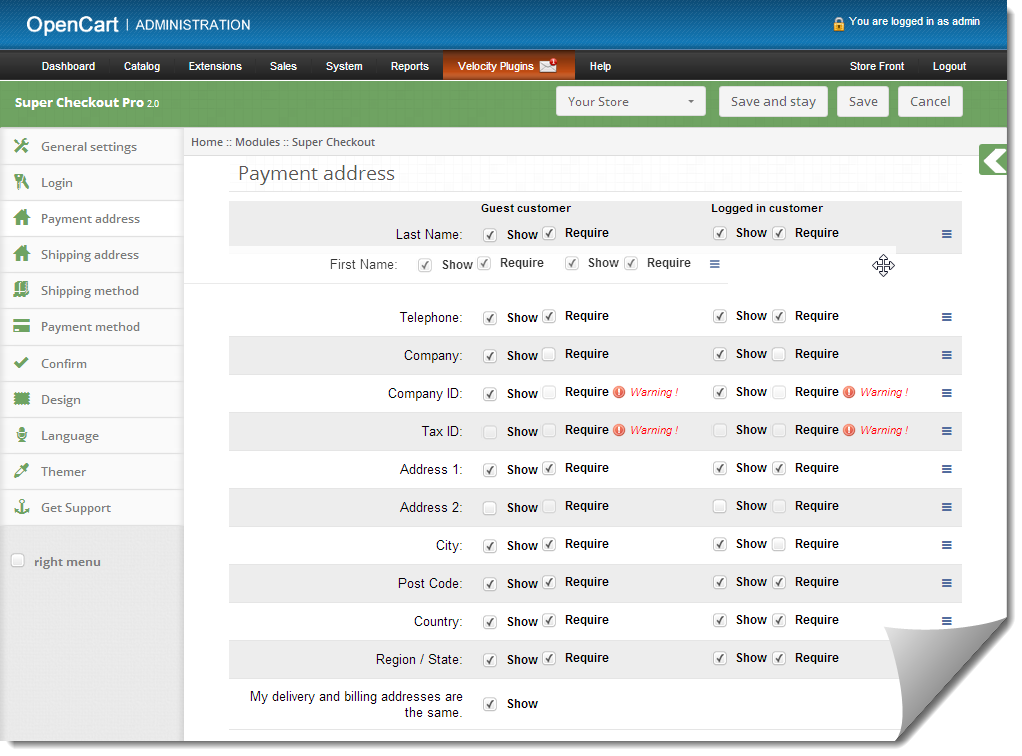
  • This tab of Magento One Page Checkout contains setting for the fields which is to be shown in Payment or Billing Address section in checkout page as shown below.

  • It consists of two sections. The one in the left is for Guest Customers and the right one for registered customers.
  • To make a field display/hide in the checkout page check the checkbox just to the left of Show label.
  • To make a field as mandatory (required field) check the checkbox just to the left of Require Label.
  • The fields can also be rearranged according to the requirement. To rearrange just move the cursor to the drag icon and drag & drop the field wherever it is required as shown below.
  • On saving, the fields will be rearranged as per the changes.

Shipping Address Tab

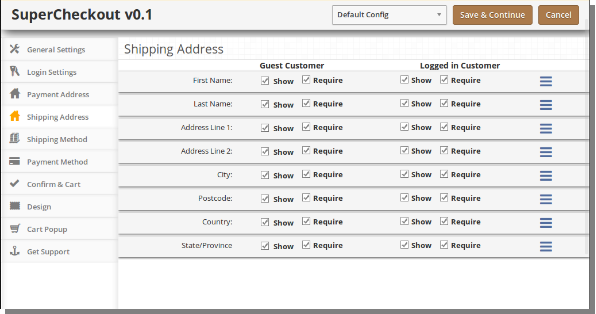
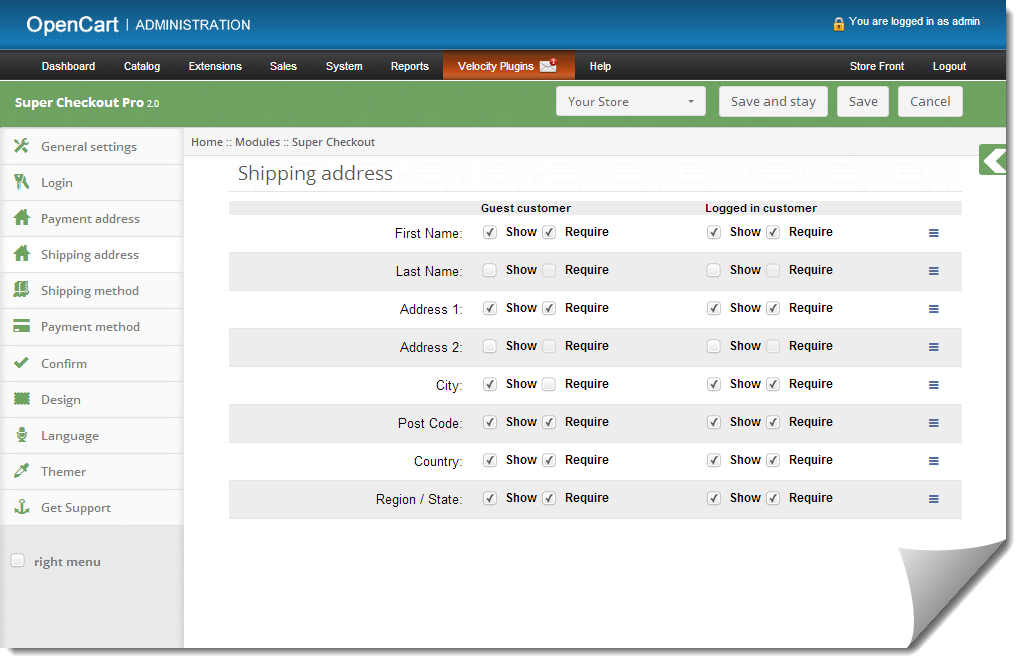
  • This tab of Magento One Page Checkout contains setting for the fields which is to be shown in Shipping Address section in checkout page as shown below.

  • It consists of two sections. The one in the left if for Guest Customers and the right one for registered customers.
  • To make a field display/hide in the checkout page check the checkbox just to the left of Show label.
  • To make a field as mandatory (required field) check the checkbox just to the left of Require Label.
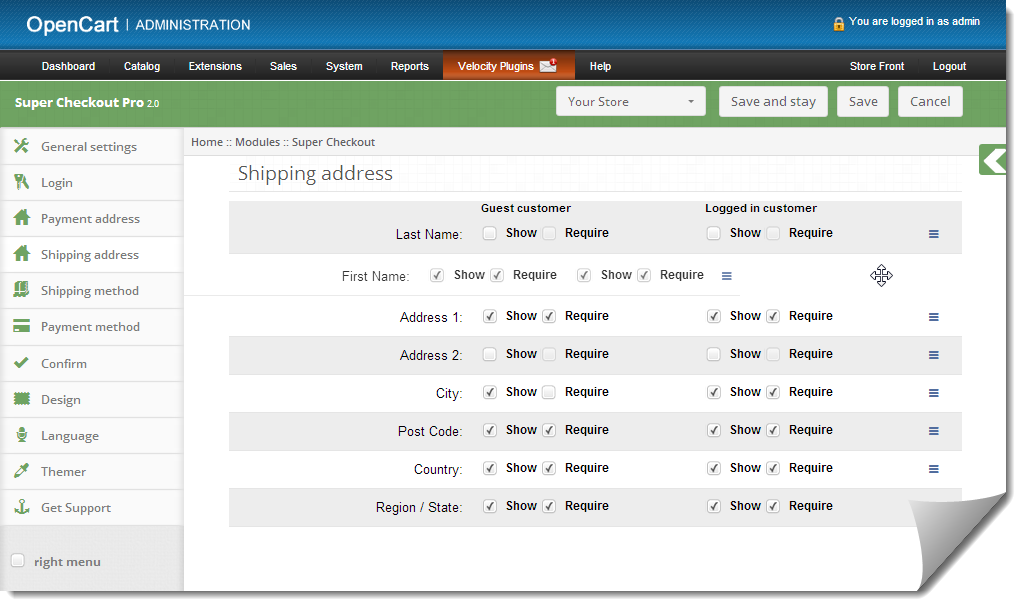
  • The fields can also be rearranged according to the requirement. To rearrange just move the cursor to the drag icon and drag & drop the field wherever it is required which is same as payment address.

Shipping Method Tab

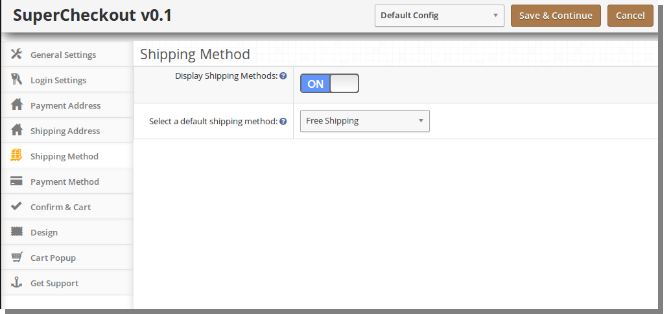
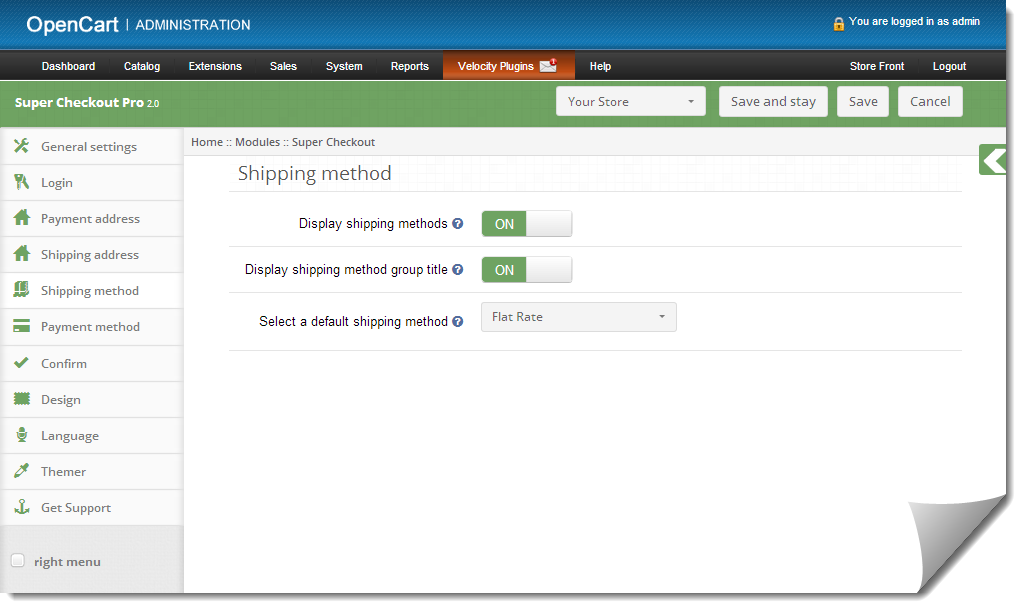
  • This tab of Magento One Page Checkout contains settings for shipping method which is shown in checkout page. It basically contains settings for enabling/disabling and setting the default shipping method as shown below:

  • To Enable/Disable the shipping methods from the checkout page switch the button from ON to OFF or vice-versa. This will disable the shipping method block from checkout page. But you should select a default shipping method (if any installed) to apply shipping charges to the order.
  • To get a default shipping method selected in the checkout page select the default shipping method from the dropdown. If the selected shipping method is not installed it will automatically select from installed shipping method.

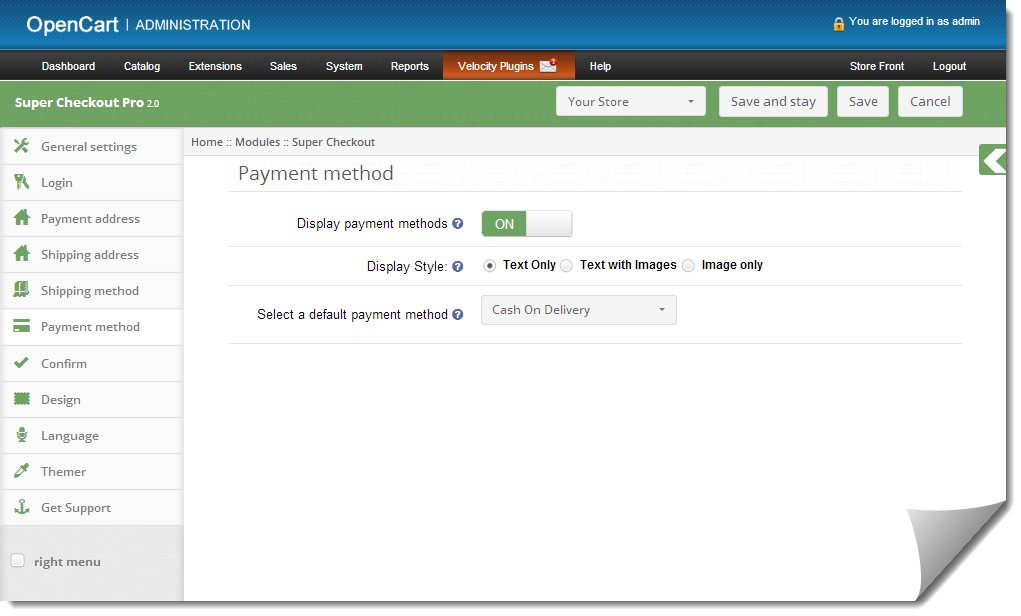
Payment Method Tab

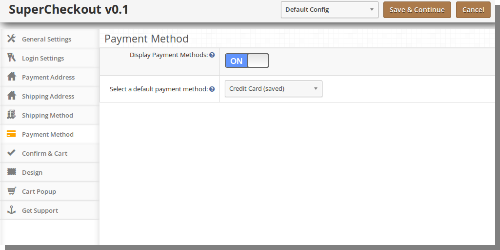
  • This tab of Magento One Page Checkout contains settings for payment methods shown in checkout page like enabling/disabling or selecting a default method.

  • To Enable/Disable the payment methods from the checkout page switch the button from ON to OFF or vice-versa. This will disable the payment method block from checkout page. But you should select a default payment method (if any installed) to get a payment method in the checkout page.

Confirm Tab

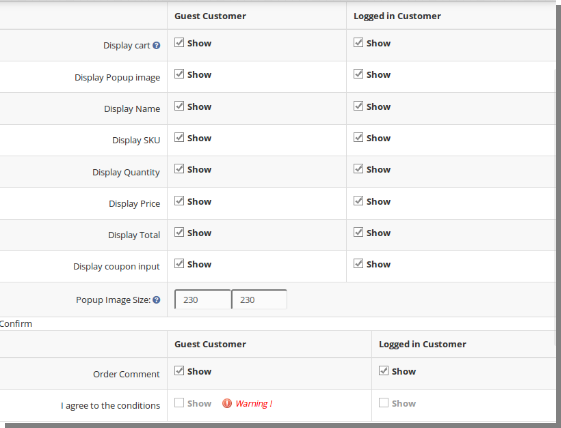
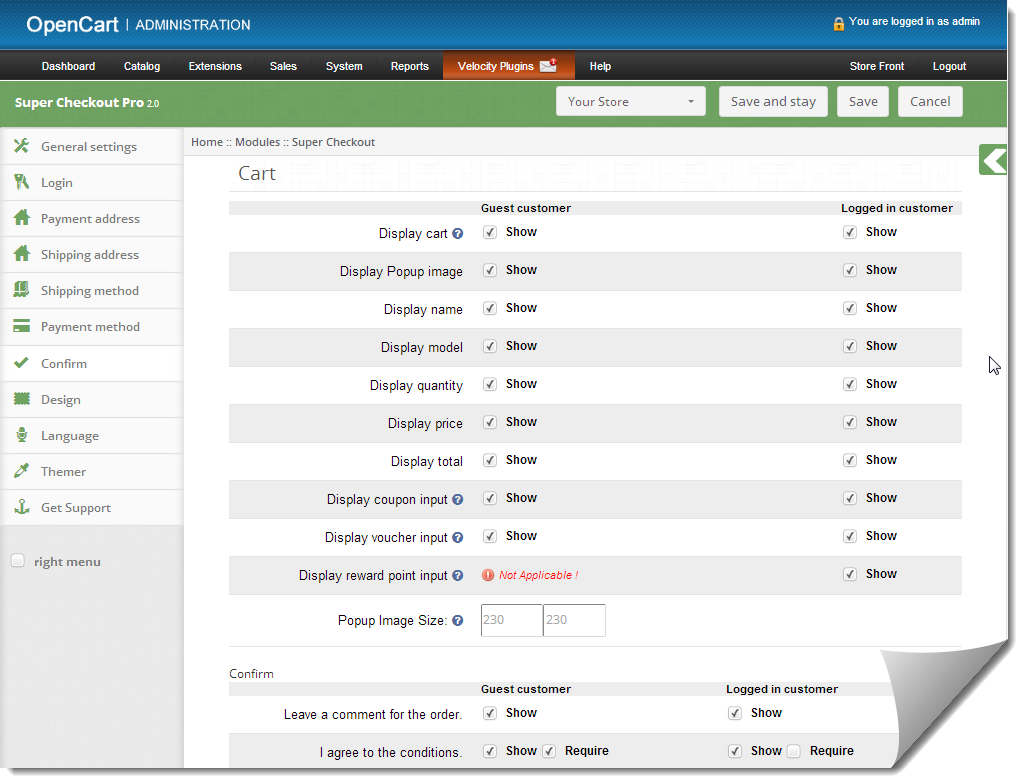
This tab contains setting of Magento One Page Checkout is for the cart and confirming the order as shown below:

  • Its divide in two section

a. Cart

b. Confirm

Cart

1. This tab is again divided into two sections, the left one is for Guest Customers and Right one for Registered or Logged in customers.

2. To Display/Hide cart from the checkout page check uncheck the checkbox present in front of Display Cart label.

3. To enable/ disable any column in the cart check/uncheck the checkbox in front of that respective column.

4. To enable/disable the popup images for the product check/uncheck the checkbox in front of that respective column.

5. To change the size of popup for images Enter the width and height of the popup in textbox in front of Pop Image Size label.

6. Coupon and Voucher options can also be disabled or enable by checking/unchecking the checkbox in front of that respective field.

Confirm

1. This tab is again divided into two sections, the left one is for Guest Customers and Right one for Registered or Logged in customers.

2. To enable the comment box for the order by customer check the checkbox in front of that Leave a comment for the order label & to disable uncheck the same checkbox.

3. To enable agree to the term or any other information saved in the admin for the store check/uncheck the checkbox in front of I agree to the conditions label.

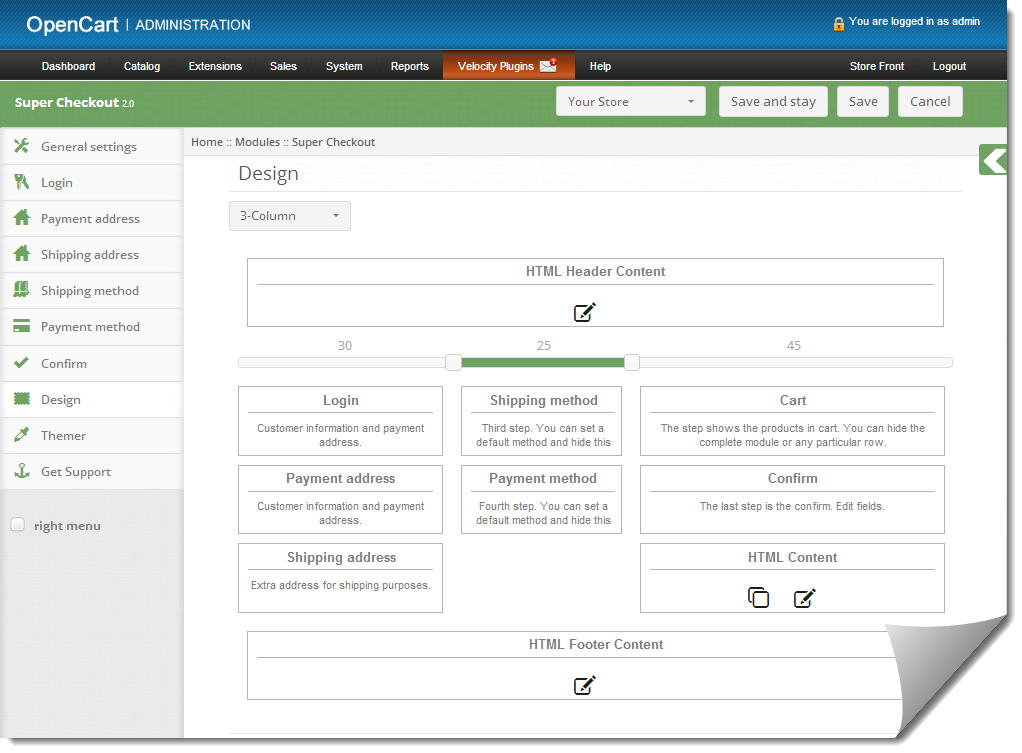
Design Tab

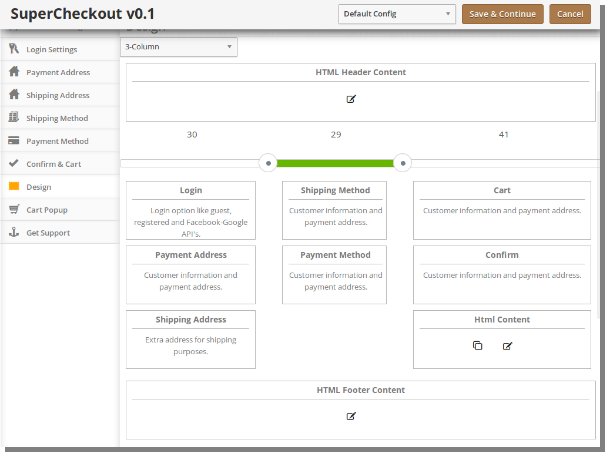
  • This tab contains the settings for the design of checkout page in the catalog as shown below
  • To change the width of any column adjust the slider present at the top as shown below :

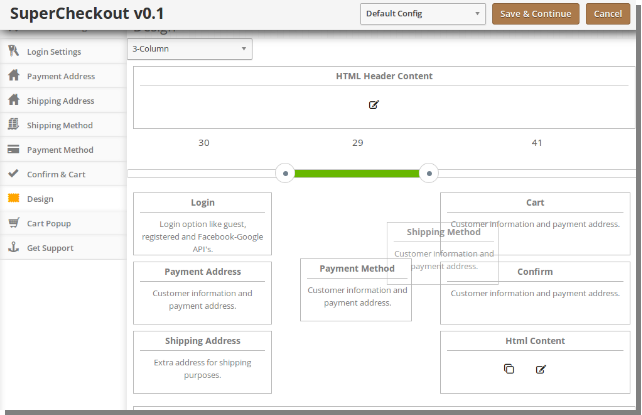
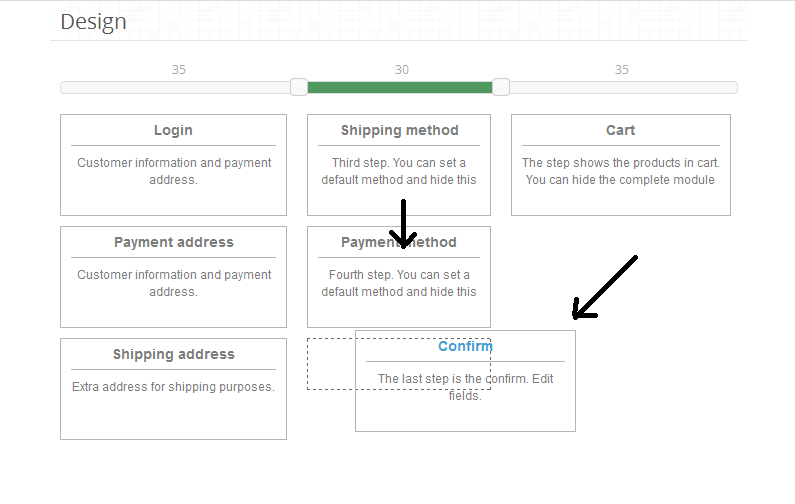
  • Block of different steps can also be rearranged from one column to the other or in the same column as shown below:

  • On saving, the block will be rearranged in the checkout page as per the changes
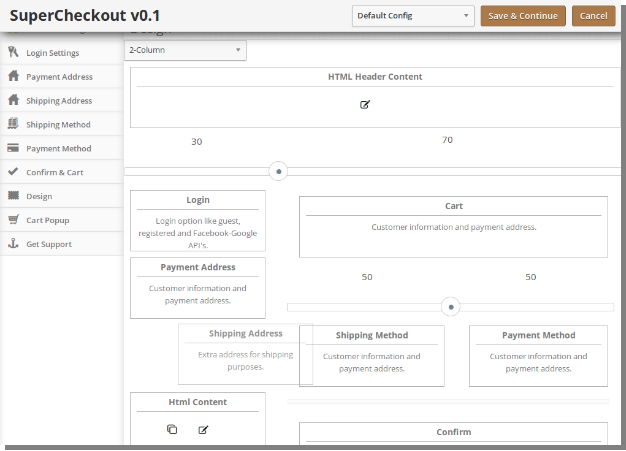
  • The same goes for layout with two columns as shown below:

Confirm and Cart Tab

  • This tab contains the settings for pop up cart that appear on adding any product to the cart.
  • To enable the popup cart on frontend, you can show/hide the complete cart or you can show/hide the selected cart fields only.
  • Admin can select and unselect the different cart fields for logged in and guest users of the store.
  • Admin can also set the Popup Image Size which is shown over the product shown in the cart section of the checkout.
  • Store merchants can also grab cutomer’s comment regarding the product by enabling and disabling the order comment field on supercheckout page.

Visit Magento One Page Supercheckout extension product page

You Might Also Like:

OpenCart One Page Checkout Pro – User Manual

How to install OpenCart One Page Checkout Pro plugin on your server

1. Download the zip from OpenCart & unzip into a folder. After unzip folder structure of Supercheckout Pro plugin will be similar as shown in below screen

2. Open the upload directory & you will see following folder structure.

3. Login via FTP & Drag drop all the folders into your server root directory. You dont have the change the default theme folder name to your theme folder name.

You must have VQMOD installed for this plug-in to work. If VQMOD is not installed please download and install fromthe URL below:
https://code.google.com/p/vqmod/

4. You will find the plugin ready to be installed in the Modules of your opencart.


5. Click on Install link to install the plugin. This will also add a dropdown option in your menu bar which will list all plugins by Velocity installed on your store for fast navigation. This dropdown also has a message box, using which we can inform you about new launched plugin or new update.

6. Delete the Vqcache files from the vqmod/vqcache folder.

7. To access Super Checkout plugin, Click on edit button which is just to the right of Supercheckout Pro module as shown below.

8. On clicking edit button the module for plugin will open. It contains navigational bar at the top, menu at the left and main content in the center as shown below.

1. General Settings tab

1. To enable/disable plug-in, Switch the enable button OFF to ON / ON to OFF this is just to the right of Enable/Disable label. Refresh home page of your store every time you change enable/disable setting.

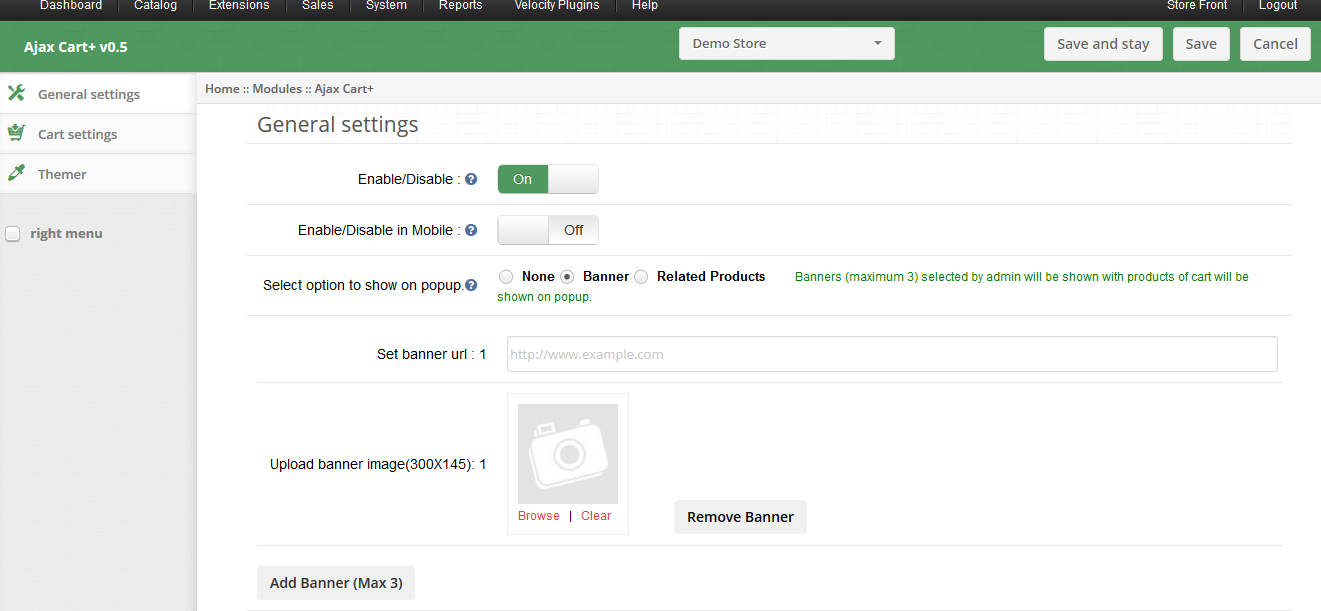
2. To change the default view from None to Banner or Related Product or vice-versa in pop-up dialog select an option from given radio button.

3. When you select banner radio button, a button Add Banner (Max 3) will appear on screen.

4. Click Add Banner button to add a banner, on clicking this button you will be asked to enter banner URL and select banner image.


5. Write the complete URL of your web page where you wish to redirect user on clicking the banner.

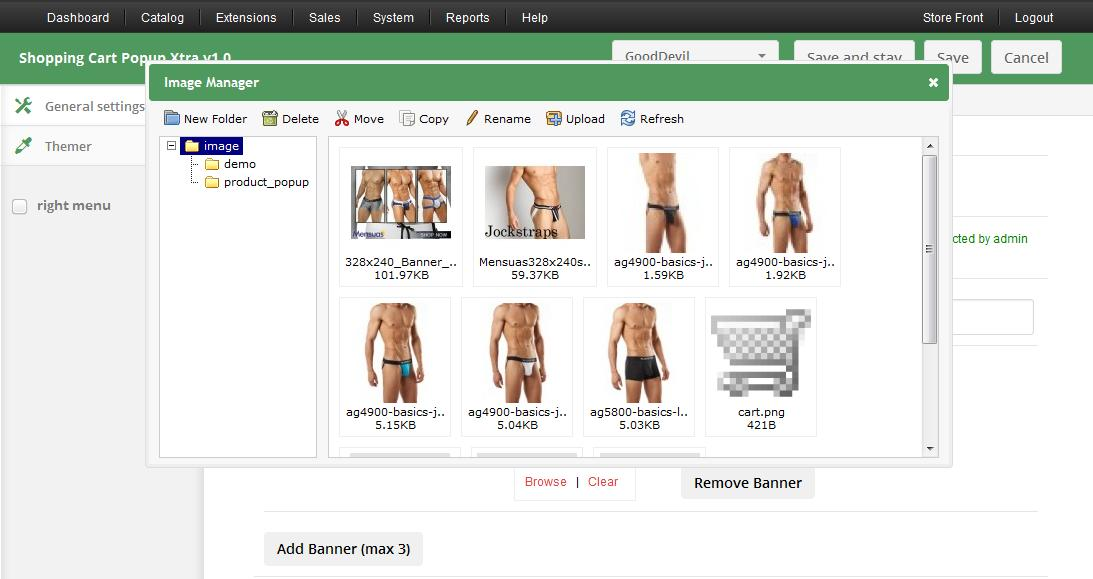
6. Select an image for banner to be shown on pop-up dialog from Image Manager as shown below. Click Browse to open Image Manager.

7. You can remove a banner by clicking Remove Banner button.

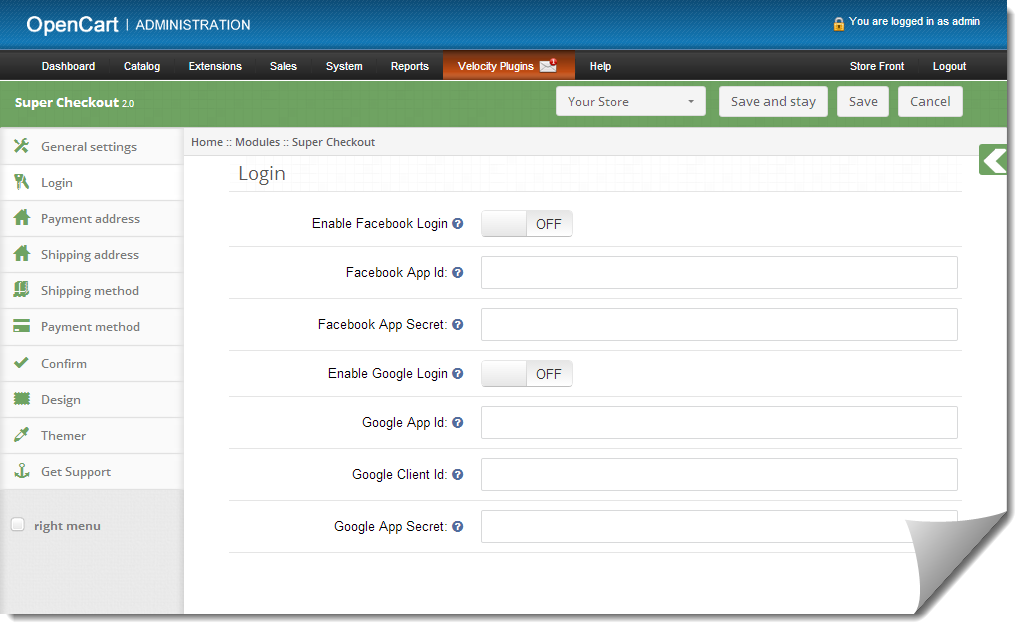
2. Login Tab

  1. This tab basically contains setting to enable /disable Facebook and Google registration & login as shown below.
  2. To enable Facebook Registration & Login switch the button from OFF to ON which is just to the right of Enable Facebook Login label. But before you do that do get Facebook APP ID and APP SECRET from www.developers.facebook.com.
  3. Enter the APP ID and APP SECRET in their respective fields and save. You will find Facebook login button on your checkout page.
  4. To enable Google Registration & Login switch the button from OFF to ON which is just to the right of Enable Google Login label. But before you do that do get Google APP ID, CLIENT ID and APP SECRET from https://code.google.com/apis/console. For detailed instructions to get the APP ID, download the Facebook & Google Setup guide from OpenCart account.
  5. Enter the APP ID, CLIENT ID and APP SECRET in their respective fields and save. You will find Google login button on your checkout page.

3. Payment Address Tab

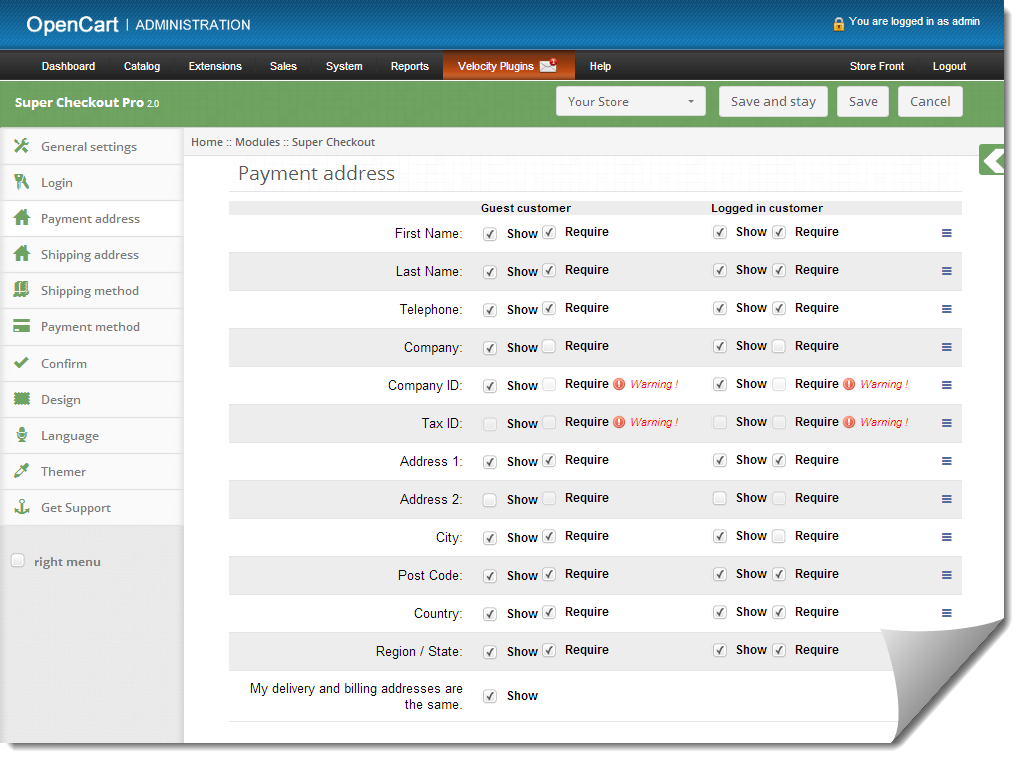
  1. This tab contains setting for the fields which is to be shown in Payment or Billing Address section in checkout page as shown below.
  2. It consists of two sections. The one in the left if for Guest Customers and the right one for registered customers.
  3. To make a field display/hide in the checkout page check the checkbox just to the left of Show label.
  4. To make a field as mandatory (required field) check the checkbox just to the left of Require Label.
  5. The fields can also be rearranged according to the requirement. To rearrange just move the cursor to the drag icon and drag & drop the field wherever it is required as shown below.
  6. On saving, the fields will be rearranged as per the changes.

4. Shipping Address Tab

  1. This tab contains setting for the fields which is to be shown in Shipping Address section in checkout page as shown below.
  2. It consists of two sections. The one in the left if for Guest Customers and the right one for registered customers.
  3. To make a field display/hide in the checkout page check the checkbox just to the left of Show label.
  4. To make a field as mandatory (required field) check the checkbox just to the left of Require Label.
  5. The fields can also be rearranged according to the requirement. To rearrange just move the cursor to the drag icon and drag & drop the field wherever it is required as shown below.
  6. On saving, the fields will be rearranged as per the changes.

5. Shipping Method Tab

  1. This tab contains settings for shipping method which is shown in checkout page. It basically contains settings for enabling/disabling and setting the default shipping method as shown below:
  2. To Enable/Disable the shipping methods from the checkout page switch the button from ON to OFF or vice-versa. This will disable the shipping method block from checkout page. But you should select a default shipping method (if any installed) to apply shipping charges to the order.
  3. To Enable/Disable Shipping Method title switch the button from ON to OFF or vice-versa. This will cause the title to of shipping to enable or disable from checkout page.
  4. To get a default shipping method selected in the checkout page select the default shipping method from the dropdown. If the selected shipping method is not installed it will automatically select from installed shipping method.

6. Payment Method tab

  1. This tab contains settings for payment methods shown in checkout page like enabling/disabling or selecting a default method.
  2. To Enable/Disable the payment methods on the checkout page switch the button from ON to OFF or vice-versa. This will disable the payment method block from checkout page. But you should select a default payment method (if any installed) to get a payment method in the checkout
    page.
  3. Supercheckout also enables you to display payment method name with or without their logo. You can also set it to display Payment method image only. Select desired radio button which is just right of Display style label.

7. Confirm Tab

  1. This tab contains setting for the cart and confirming the order as shown below:
  2. Its divide in two section
    a. Cart
    b. Confirm

Cart:

  1. This tab is again divided into two sections, the left one is for Guest Customers and Right one for Registered or Logged in customers.
  2. To Display/Hide cart from the checkout page check uncheck the checkbox present in front of Display Cart label.
  3. To enable/ disable any column in the cart check/uncheck the checkbox in front of that respective column.
  4. To enable/disable the popup images for the product check/uncheck the checkbox in front of that respective column.
  5. To change the size of popup for images Enter the width and height of the popup in textbox in front of Pop Image Size label.
  6. Coupon , Reward Points and Voucher options can also be disabled or enable by checking/unchecking the checkbox in front of that respective field. Kindly note that rewards point text box will only be visible on Supercheckout page once following three conditions are fulfilled.
    a.) Customer must be logged in.
    b.) He must have at-least 1 reward point in his account.
    c.) He must have a product in the cart which can be purchased with reward points.

Confirm:

  1. This tab is again divided into two sections, the left one is for Guest Customers and Right one for Registered or Logged in customers.
  2. To enable the comment box for the order by customer check the checkbox in front of that Leave a comment for the order label & to disable uncheck the same checkbox.
  3. To enable agree to the term or any other information saved in the admin for the store check/uncheck the checkbox in front of I agree to the conditions label.

8.  Design Tab

  1. This tab contains the settings for the design of checkout page in the catalog as shown below:
  2. To change the width of any column adjust the slider present at the top as shown below
  3. Block of different steps can also be rearranged from one column to the other or in the same column as shown below:
  4. On saving, the block will be rearranged in the checkout page as per the changes

9. Language tab

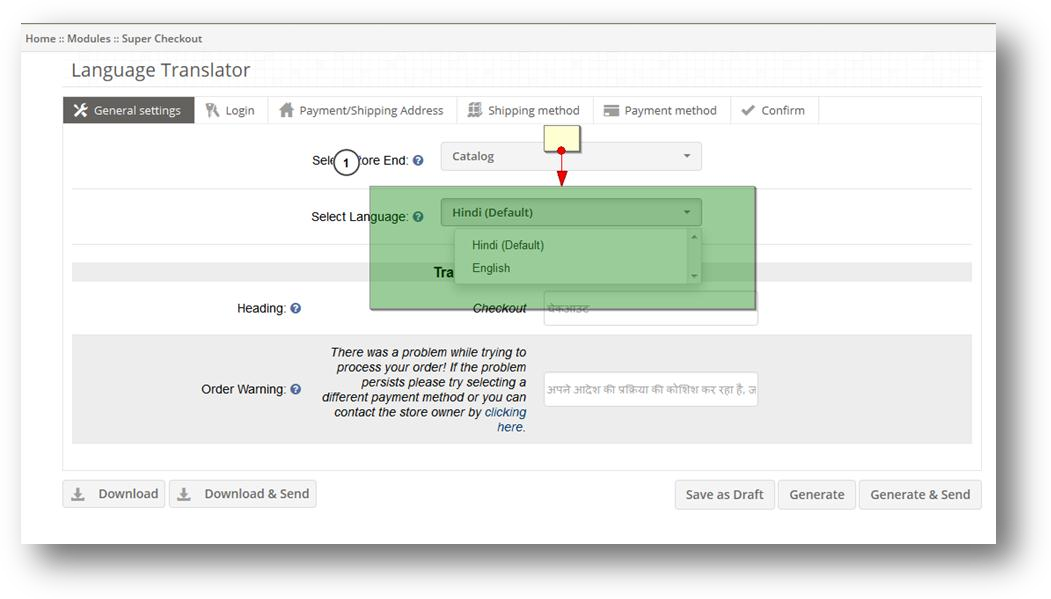
Using language tab, you can generate language translation of the supcheckout language file.

1. First you need to add a language in your OpenCart store. To add the new language to go System -> Localization -> Language & add now language.

2. Added language will be displayed in supercheckout module as displayed below.

3. Choose the language in which you need to translate & choose the website i.e. Front End/Admin End which you need to translate.

4. Based on the selection, Various fields in Various tabs will be populated like in General Settings,Login, Payment/Shipping Address Setting etc.

5. By default it will display the English translation. Add translation of various texts.

6. After adding translation of text, you can perform following action using the buttons below.

a. Download: Download button will download the translated language file. You need to upload the file into your supercheckout language directory.

1.1: If case of front end, you need to upload the language file in catalog/language/[[YOUR_LANG]] /supercheckoutPro folder

2.1: In case of admin, you need to upload the downloaded language file in
admin/language//[[YOUR_LANG]] /module folder

b. Download & Share: Download & Share button will download the language file & a copy
of the language file will be shared with Velocity.

c. Save as Draft: Save as Draft button will save the translation for future use.

d. Generate: Generate button will try to upload the language file in desired directory if server permissions allow saving of the files.

e. Generate & Send: Generate button will try to upload the language file in desired directory if server permissions allow saving of the files & a copy of the files will be shared with Velocity

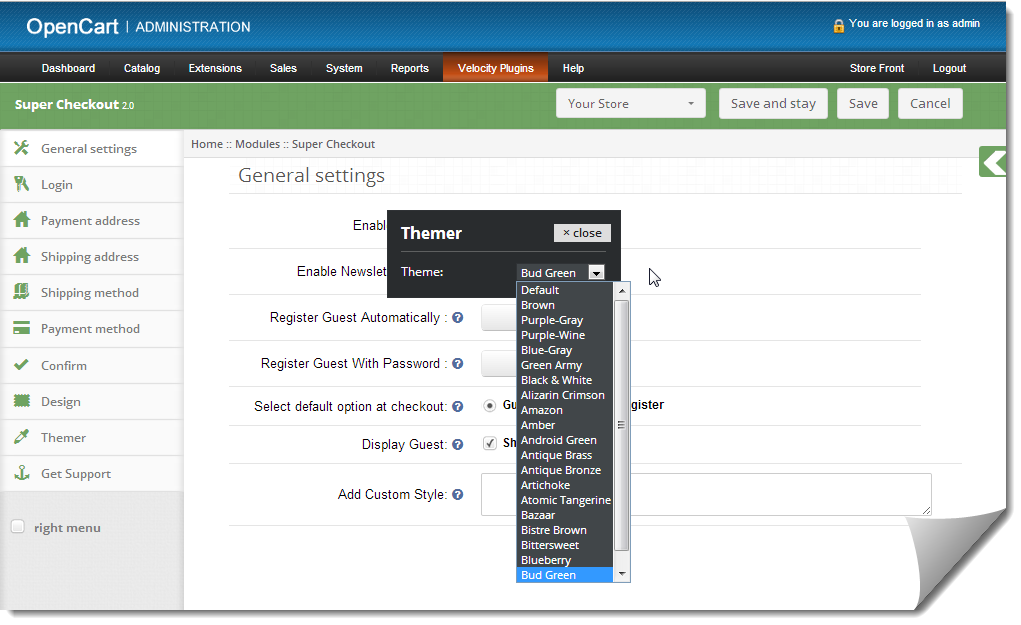
10. Themer tab

By clicking on themer tab, you will have an option to change the theme of Supercheckout admin panel.

11. Get Support tab

By clicking on Get Support tab, you will be redirected to our support website, where you can contact our support for help. Use this tab in case you have any query/issue or found some bug.

How to get Facebook API details?

Steps:

    • Go to https://developers.facebook.com/
    • Click on Apps -> Create a new app.
    • Follow the instructions on the screen.
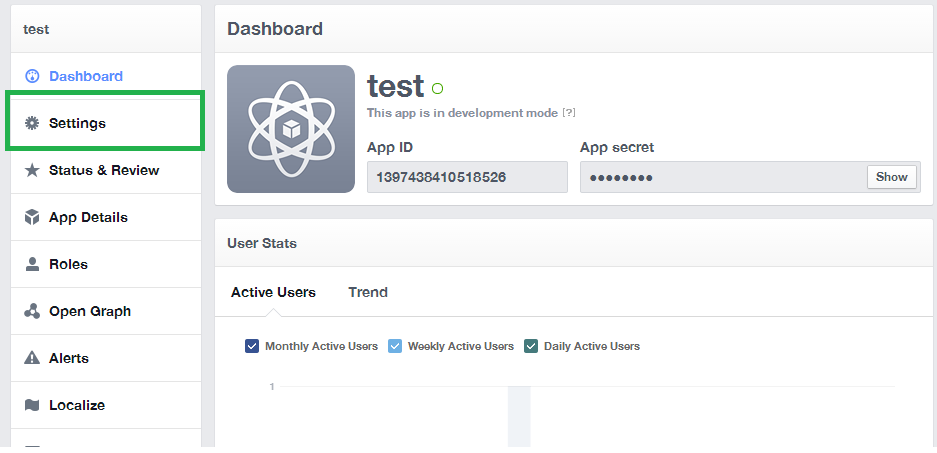
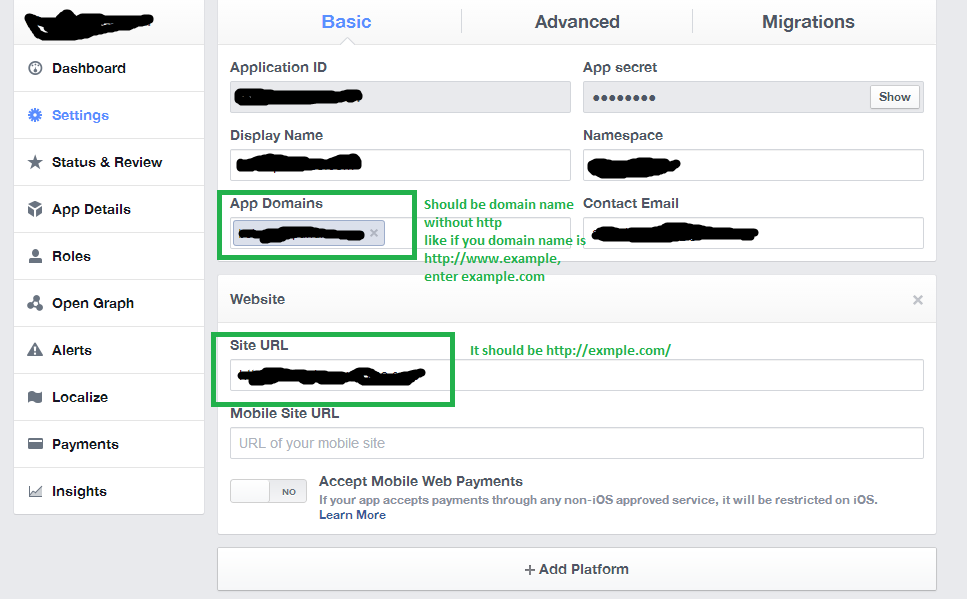
    • You will get the API ID & App secret (Click show button)
    • Now Go to Settings from the Left Menu

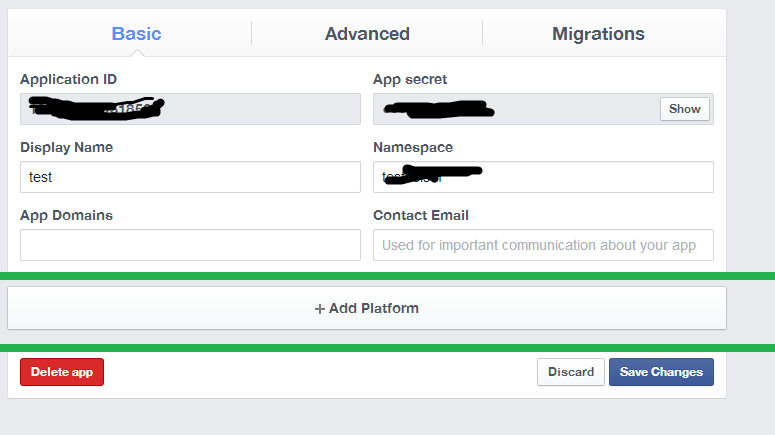
    • Click on Add Plateform link as shown below

    • Select Website.
    • Enter App Domain & Site URL as shown in below screen.

  • Click Save Changes button.
  • After that Go to Status & Review tab & make the application Live.

How to get Google API details?


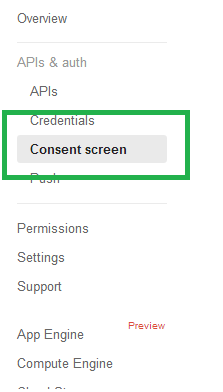
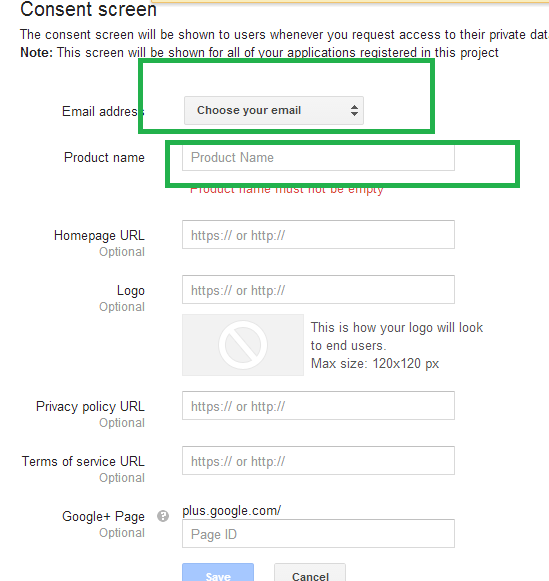
  • On the Consent screen, Select Email Address, Enter Any Project Name & Press Save Button.

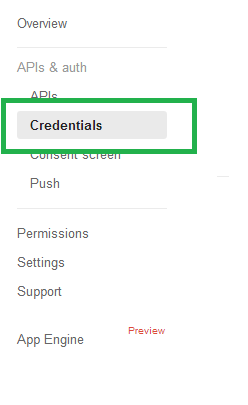
  • Then click App & Auth -> Credentials from left column.

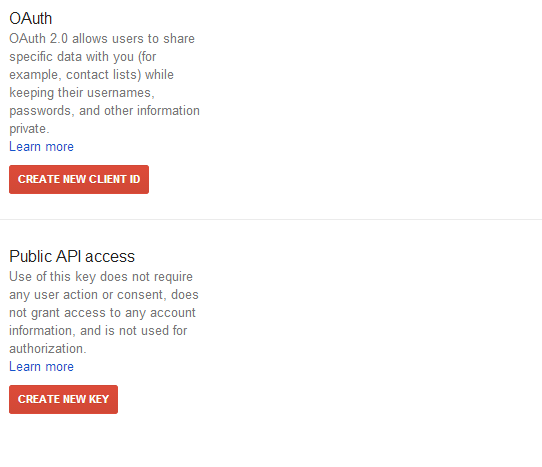
  • A screen as below will appear.

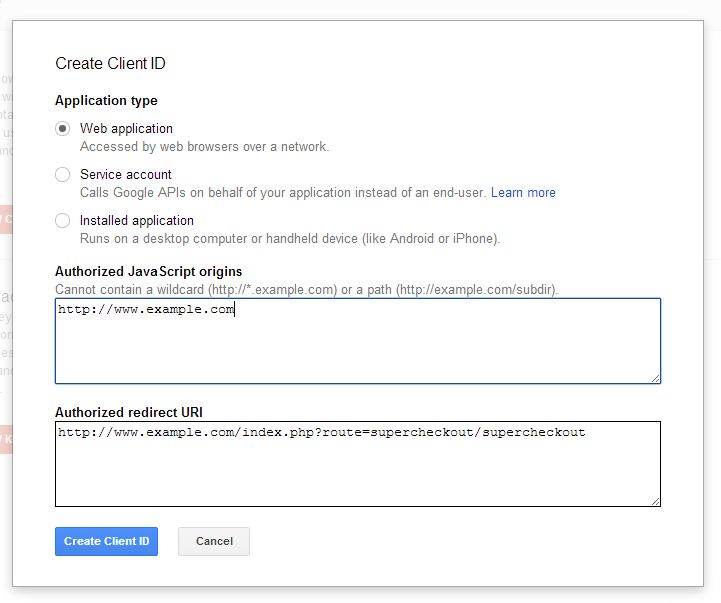
  • Click on CREATE NEW CLIENT ID. A popup as below will appear.

  • Enter the details as shown in above screen.
    1. Application Type: Web Application
    2. Authorized JavaScript origins: Your domain name i.e. https://www.example.com
    3. Authorized redirect URI: Path of super checkout page

https://www.example.com/index.php?route=supercheckout/supercheckout

  • Click Create Client ID. As screen as below will appear. Copy the Client ID, Client secret from the below screen.

  • Click CREATE NEW KEY from public API access section. A popup will appear. Click on server key button then click on Create button without adding anything in input box.
  • Above step will generate the API key.

This Would Also Interest You: