Prestashop Preferred Delivery Time module – User Manual

1.0 Introduction

The Prestashop Preferred Delivery Time Addon module is developed for the Prestashop eCommerce website to provide preferred delivery time at checkout. Customers can add preferred delivery time at checkout so that products will be delivered at the preferred time. This Prestashop prefer delivery time module helps the owner to know the availability of the customer on the provided delivery address to deliver the product. During checkout, the customer has to select the preferred date & time for preferred delivery of the product.

1.1 Salient Features Offered by Prestashop prefer delivery time addon

  • With the help of this Prestashop prefer delivery module, admin can offer the online users to choose the preferred date and time for product delivery.
  • The online users can also get a chance to update the preferences even after placing their order.
  • The Prestashop prefer delivery date display a calendar format for the date and a drop-down menu for choosing the delivery time slot. In the updated version, the Prestashop prefer delivery module shows calendar for every language.
  • The e-merchant can configure the ‘time slot range’ according to the requirement. In the updated version of this Prestashop prefer delivery date extension, the online merchant can also set 30 minutes time slot range.
  • The start time of the delivery and the end time of the day can also be configured in the Prefer delivery time Prestashop addon by Knowband.
  • The online store merchant can activate or deactivate the delivery time slot feature from the admin panel.
  • This Prestashop prefer delivery date extension allows the store merchant to set ‘Delivery Days Gap’ between the order date and preferred delivery date.
  • There is an option to set specific days on which delivery will not be available.
  • The online merchant can select 12-hour or 24-hour format from the admin interface of this Prestashop prefer delivery date and time addon.
  • The online merchant can set the first day of week. The admin can select 1-6 number for weekdays. 0 will be selected for Sunday.
  • The online store merchant can customize and send email notification to the online users along with the preferred delivery date and time-related details.
  • The Prestashop prefer delivery date and time addon is multi-lingual compatible and offers theme compatibility too.
  • The Prestashop Prefer delivery date and time module is SSL compatible and offers multi-lingual support.

2.0 Technology for Development

Language: PHP

FrameWork: PrestaShop

3.0 Installation Steps for Prestashop prefer time addon

Follow the following steps for installing Preferred Delivery Date Prestashop Addon:

  • Download the module package offered by Knowband.
  • Open the “Installed Modules” page in your store and click on the “Upload a Modules” link which provides a dialog box to upload package as shown below:
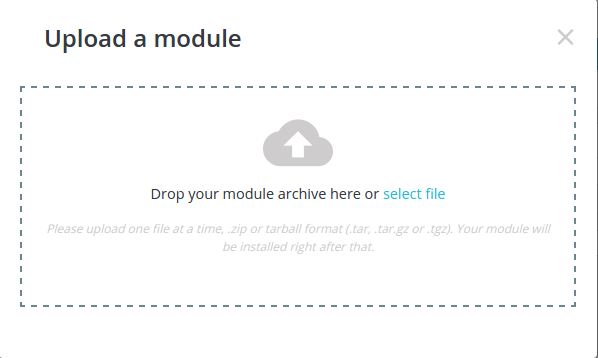
Prestashop prefer delivery time module: installation

  • After successful uploading of the module package, the Prestashop prefer delivery module is installed in your store.

4.0 Admin Module

Here, the Prestashop store owner can change the various settings of this plugin according to requirements, which will be reflected on the front end as well as in the admin panel.

To install this plug-in, please follow the following steps:

  • Add all the whole plugin folder to the modules folder into the root directory of the PrestaShop Store.
  • After adding plug-in files, the system will list the plug-in on the module page.
  • Click on install/uninstall according to the need.
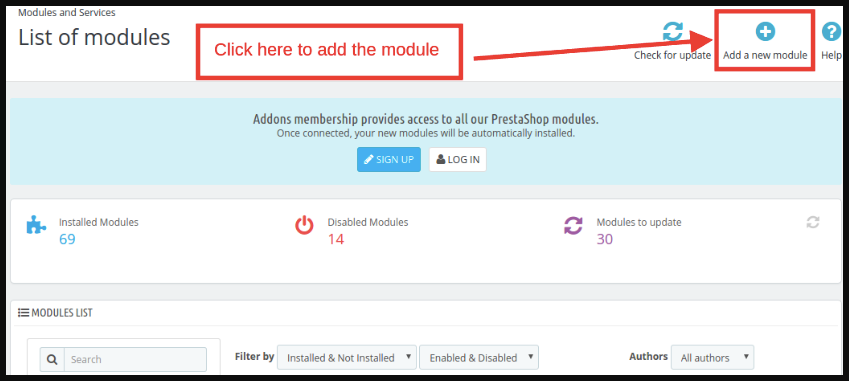
  • Another way is, you can zip the whole folder and then click on the “Add New Module” link displaying on the top right corner of the module listing page.
  • After installing the Prefer delivery time Prestashop addon, the “Configure” link will be displayed instead of the “Install” link.
  • Now, your Prestashop module is ready to use and click on the “Configure” link to configure the module.

4.1 Configuration

On clicking on configure link on the module listing page, the system will open configuration settings as shown in the screen below:

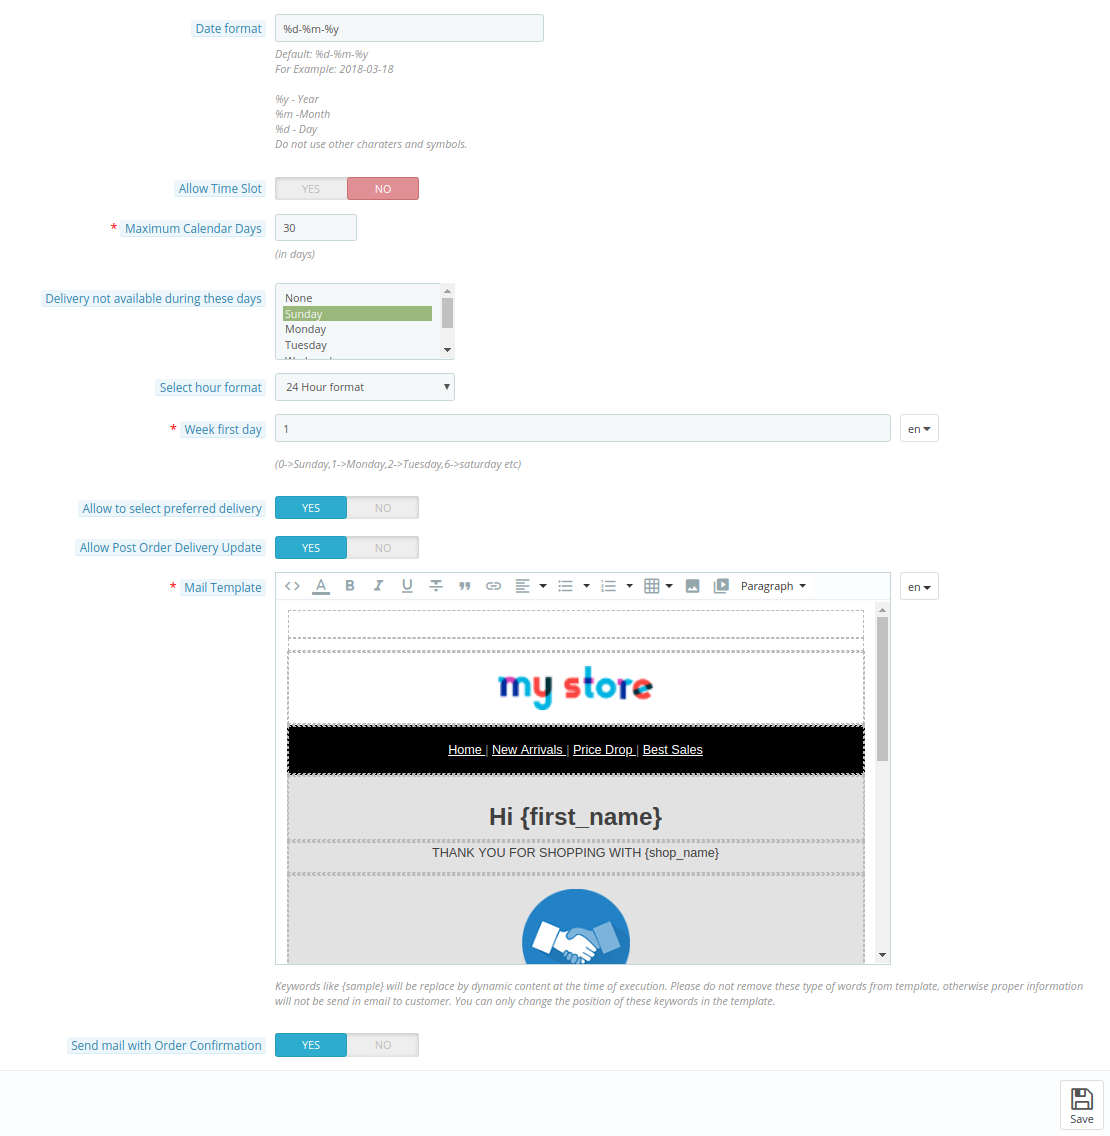
Initially, fields in the above form will be already filled with their default values.

  • Enable/Disable: Initially, this will be “OFF”. Admin can enable/disable Prestashop prefer delivery date plug-in by turning ON/OFF this setting.
  • Delivery Days Gap: Initially, this will be 4 days. This is the gap in the number of days from the date on which order has been placed. Customers will be able to select the preferred date after the “Delivery Days Gap” days.
  • Delivery Hours Gap– After placing an order this is the minimum time gap in hours after which the preferred delivery time slots can be selected.
  • Delivery Minutes Gap- After placing an order this is the minimum time gap in minutes after which the preferred delivery time slots can be selected.
  • Date Format: The Prestashop Prefer delivery date and time module allows the online store merchant to set the format of dates.

  • Allow Time Slot: Initially, this will be ON. Admin can enable/disable the display of Time Slot on the front end for the preferred delivery time.
  • Added Custom Slots– Using this option the time slot under which the delivery has to be completed can be set.
  • Time Slot Range: Initially, this will be 2 hrs. Admin can set the range in hours to display the time range in the Time Slot in the front end. The maximum Value allowed is 6 hrs. For Example, if the range is 2 hrs then it will show the time range as 12AM-2AM, 2AM-4AM. In the updated version of this Prestashop prefer delivery date extension, the online merchant can also set the time slot of 30 minutes by setting it as 0.5.
  • Start Delivery Time: Initially, this will be 08:00 AM. Admin can set the start time for the starting of delivery time which will be provided to display the time range from “Start Delivery Time”. The only defined format of time is allowed.
  • End Delivery Time: Initially, this will be 09:00 PM. The Prestashop store admin can set the “End time” for the closing of delivery time which will be provided to display the time range until “End Delivery Time”. The only defined format of the time is allowed.
  • Allow Incomplete Time Range: Initially, it will be ON. Admin can enable/disable the setting to display the time range which is not in a regular fashion. For Example, If it is enabled then Range can be 08:00 AM-10:00 AM, 10:00 AM-12:00 PM, 12:00 PM-1:00 PM as difference of range in each time range is 2hr except the last one which is 1 hr. If it is disabled, then Time Range can be 08:00 AM-10:00 AM, 10:00 AM-12:00 PM only.
  • Maximum Calendar Days: Initially, this will be 15 days. Admin can set the maximum enabled days to select the preferred delivery date in the front end.
  • Delivery not available during these days: Initially, “Sunday” will be selected. Admin can disable the multiple days so that the customer will not be able to select the delivery date on that day.
  • Select Hour Format: The online store merchant can also set hour format as 12 hours or 24 hours.
  • Week First Day: Admin can now set the first day of the week by setting numbers from 0 to 6. 0 will be used for Sunday and 6 for Saturday.
  • Allow Select Preferred Delivery: Initially, it will be “OFF”. Admin can enable/disable to provide the option for the customers to add preferred delivery time when placing an order.
  • Allow Post Order Delivery Update: Initially, it will be “OFF”. Admin can enable/disable the setting to provide the option to update the preferred delivery time even after the order is placed.
  • Mail Template: The admin can edit the mail template which will be sent to the customer to provide information regarding the preferred delivery time after the order is placed. This mail will be sent if “Send Mail with Order Confirmation” is enabled.
  • Send Mail with order Confirmation: By default, the setting will be ON which allows sending the preferred delivery mail after placing the order to the customer.

4.2 Order Detail Page

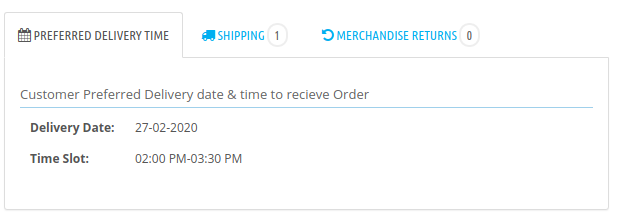
To view the details of the preferred delivery time of an order placed by the customer. Click on the “Orders” in the Admin Menu followed by a click on particular order. The full detailed page will open. In the “Order” block, click on the “Preferred Delivery Time” tab to view details regarding preferred delivery time as shown below:
5.0 Front-end Interface

After enabling the Prestashop prefer delivery module, the front-end user will see the preferred delivery time block on the Checkout page and Order Details page.

On Checkout Page

If “Allow to select Preferred Delivery” option is disabled then it will be mandatory for customers to select preferred delivery time otherwise, a checkbox will be shown to provide an option to customers to select preferred delivery time or not at the time of placing an order. By default, it will be checked so the “Your Preferred Delivery Time” will be displayed in the shipping methods on the checkout page and if it will be unchecked then “Your preferred Delivery Time” will not be displayed as shown below:
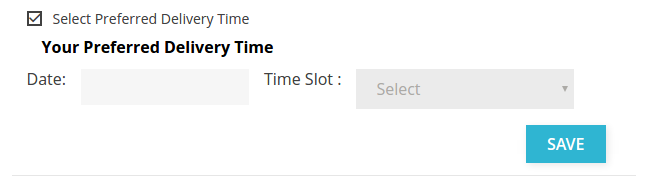
If “Select Preferred Delivery Time” is unchecked then it will be displayed as shown below:

If the admin disables the “Allow Time Slot” as displayed above, the “Time Slot” will not be displayed.

If “Date” field is empty or “Time Slot” is not selected and clicked on “Save” button then it will display error message as shown below:

If Preferred Delivery Time is not saved and clicked on “Proceed to Checkout” then it will display an error message as shown below:

The online users can select the preferred date from the available calendar.
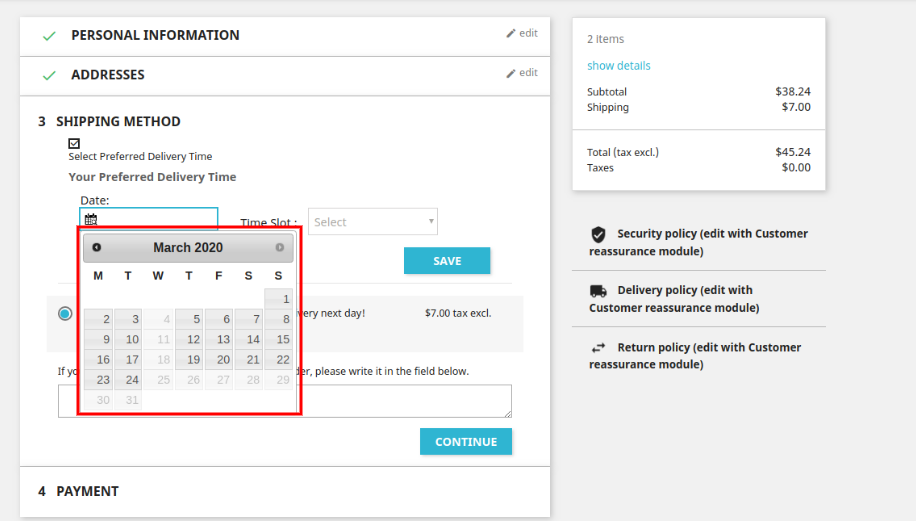
After selecting the date, online users needs to select the time slot as shown below:
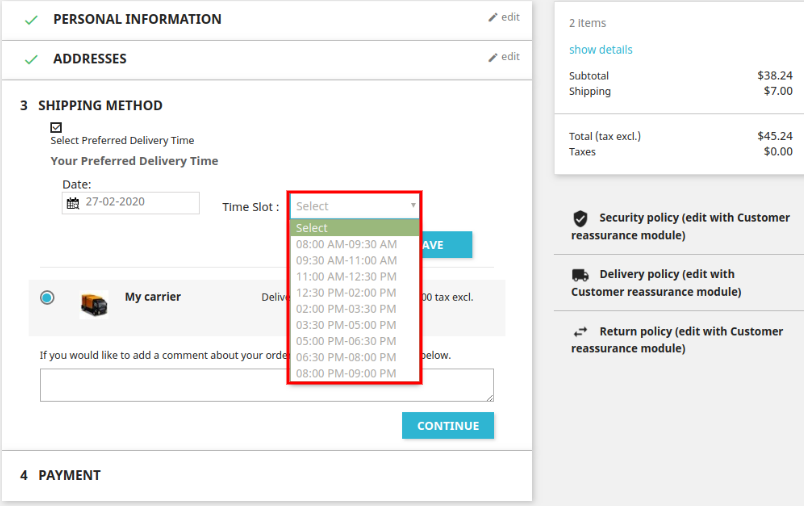
When customer adds the “Date” & select the “Time Slot” and click on “Save” button, then it will be saved in the database after validating with displaying of success message as shown below:
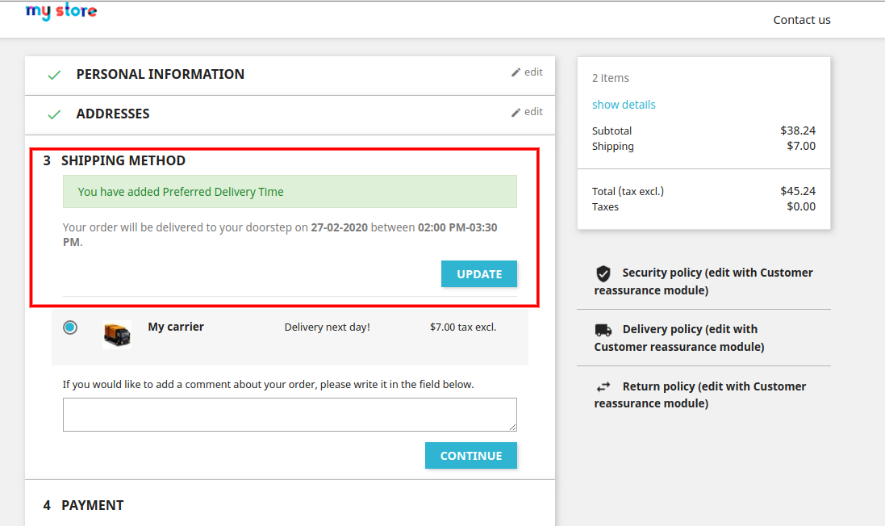
On Order Detail Page

If the customer added the “Preferred Delivery Time” while placing an order the customer will be able to see the details of Preferred Delivery Time in “Order Detail Page” by clicking on the “My Account” link followed by “Order History and Details” page. A list of all orders will be displayed.

NOTE: To Display the preferred delivery block in Prestashop 1.7.x.x, you have to add “no filter” with $HOOK_DISPLAYORDERDETAIL in root_directory/themes/classic/templates/customer/order-detail.tpl as there is a bug in Prestashop 1.7.x.x. It should be resolved in the higher version.

To view the preferred delivery time, click on the “Details” button of the particular order. All details regarding the order will be displayed below in the list.

Preferred Delivery Time block will be displayed as shown below:
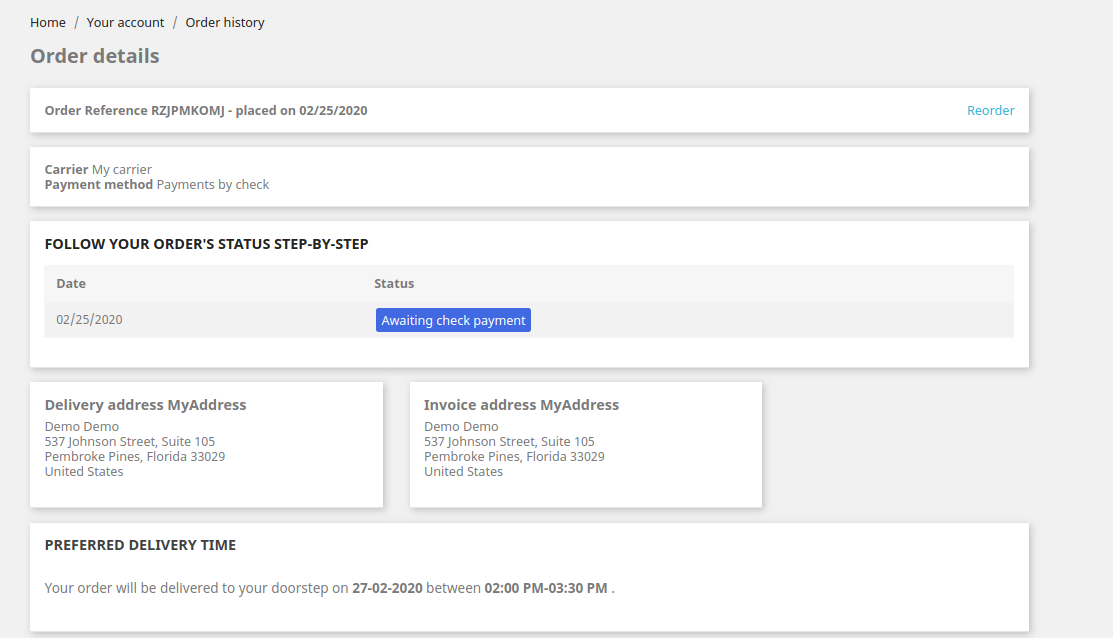
If “Allow Post Order Delivery Update” is enabled, then the customer will be able to update the preferred delivery time by clicking on the “Update” button as shown below:
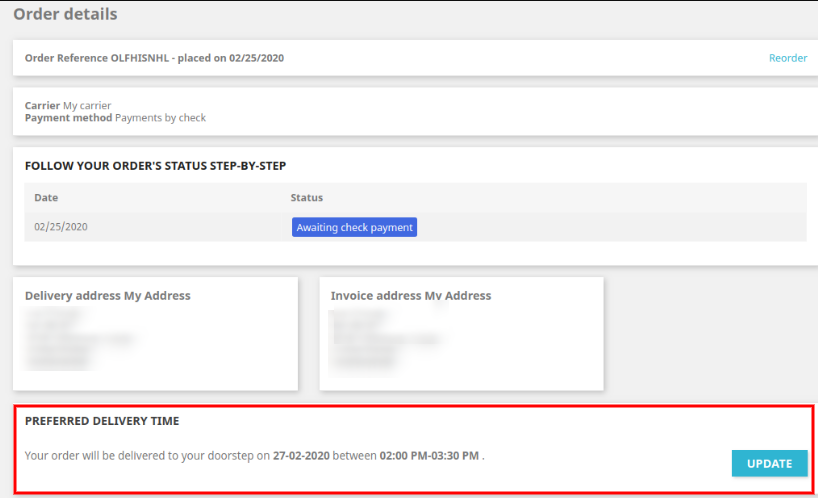
On clicking the “Update” button, Date & Time field will be displayed to update the preferred delivery time as shown below:

After changing the date & time, click on the “Update” button to update the delivery time. After successful updating, the success message will be displayed as shown below:

For more details about this Prestashop prefer delivery time addon please visit here:

Prestashop prefer delivery date module link.

Prestashop prefer delivery time addon Admin Demo link.

Knowband Prestashop prefer time module Front Demo link.

Knowband Prestashop prefer delivery date module Addon store link.

Knowband Prestashop prefer delivery extension YouTube video link.

Please contact us at support@knowband.com for any query or custom change request as per your business requirement.

PrestaShop Auto Switch Language and Currency Module – User Manual

1.0 Introduction

As you know Prestashop supports multiple languages and multiple currencies for customers. If there are multiple language and currency on the store, then customers need to change language and currency according to their region.

Knowband offers Prestashop auto switch language and currency module which will change the language and currency automatically according to the customer’s region whenever customer will visit the website. This Auto change language and currency addon implements a functionality through which the Prestashop website will automatically change the language according to the customer’s region. The Auto change language and currency addon fetches the customers actual location and country details using their system’s IP address. After having the location information, the Auto change language addon switches the language and currency of the website easily within a second.

The Auto change language and currency addon is highly customizable and offers hassle-free implementation. The store admin can increase his business and offer the store products, services globally. The online users can view the products and order easily without having any confusion. The online users can view store details and currency information in their preferred language.

1.1 Features of Prestashop Auto change language addon

  • The online store admin can Enable/Disable the Language Setting Option in Prestashop auto switch language and currency module for all active countries.
  • Admin can Enable/Disable the Currency Setting Option for all active countries from the admin interface of this Auto change language and currency addon.
  • In this Prestashop auto switch language module the admin can set one common language for all the countries.
  • The Auto change language and currency addon allows the store owner to set one common currency for all the countries.
  • Admin can search for any country by its name.
  • The auto change language and currency addon allow the admin to configure any language for a particular country.
  • The Auto change currency module allows the admin to configure any currency for a particular country.
  • The auto change currency extension is multi-lingual compatible.
  • The auto change language extension is multi-store compatible.
  • The auto change language and currency module offer SSL Compatibility.
  • The auto change language addon is compatible with all PrestaShop themes.
  • Whenever Customer will visit the website language will automatically change according to the region.
  • Whenever Customer will visit the website currency will automatically change according to the region.
  • The auto change language and currency extension use IP address of the user to track Country or Region of the user.
  • The Auto change language addon offers a user-friendly interface.
  • Auto change language addon offers a smooth and hassle-free implementation.

2.0 Installation Manual

Once the store admin purchases the Prestashop Auto change language and currency addon from the Knowband store, he will get below-mentioned files:

1. The zipped file consists of the source code of the Prestashop Auto change language and currency addon.

2. User Manual

The online store owner can follow the provided steps to install the Prestashop Auto change language and currency addon.

  • First of all the admin needs to unzip the zipped file. This file includes a few files and folders.
  • Copy the all the folder and paste them into the “Modules” folder of the store’s directory. The admin can follow the path – Root Directory/modules/.

3. Now the store owner can install the Prestashop Auto change language and currency addon. As an eCommerce store owner, the admin can find that in Store Admin -> Modules and Services. It would be shown as below –

The admin can click on the “Install” button to install this Prestashop Auto change language addon easily. A confirmation pop-up will be shown. Click on “Proceed with the installation” option. This step will install the Prestashop Auto change language module and show notification – “Module(s) installed successfully”.

3.0 User Manual

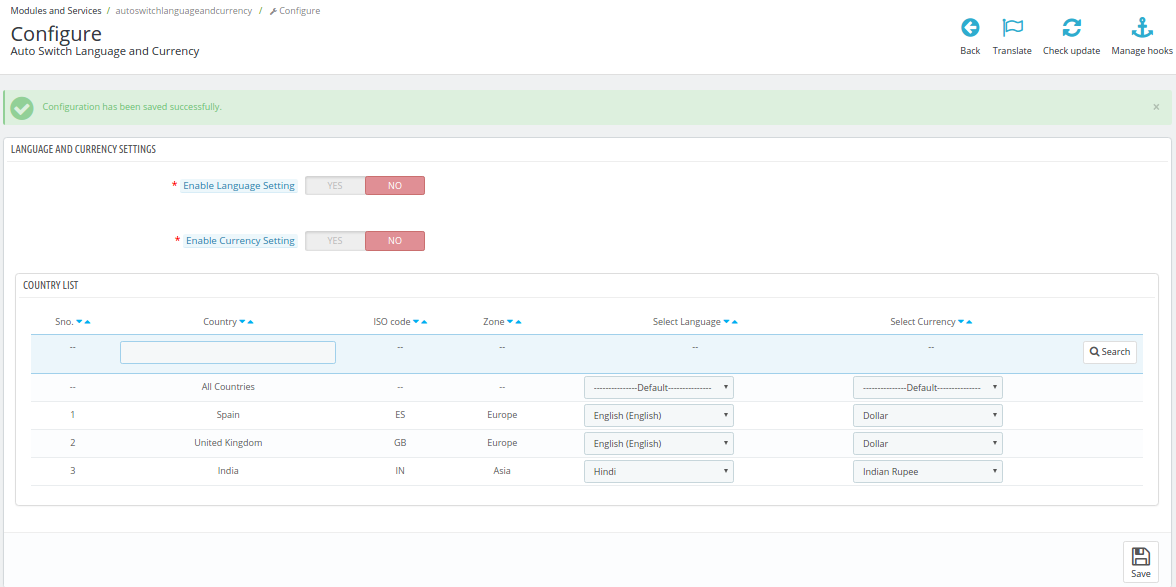
This User Manual will guide you through the Admin Module/Store Front settings and various features of this Auto Switch Language and Currency Addon. This will contain one screen where admin can configure language and currency after successful installation.

3.1 Language and Currency Setting

Following are the steps to configure the General Setting tab from the admin interface of this Prestashop Auto Switch Language and Currency module-

  1. Go to modules and Setting.
  2. Search Module ‘Auto Switch Language and Currency.
  3. Click on the Configure button.

Fields

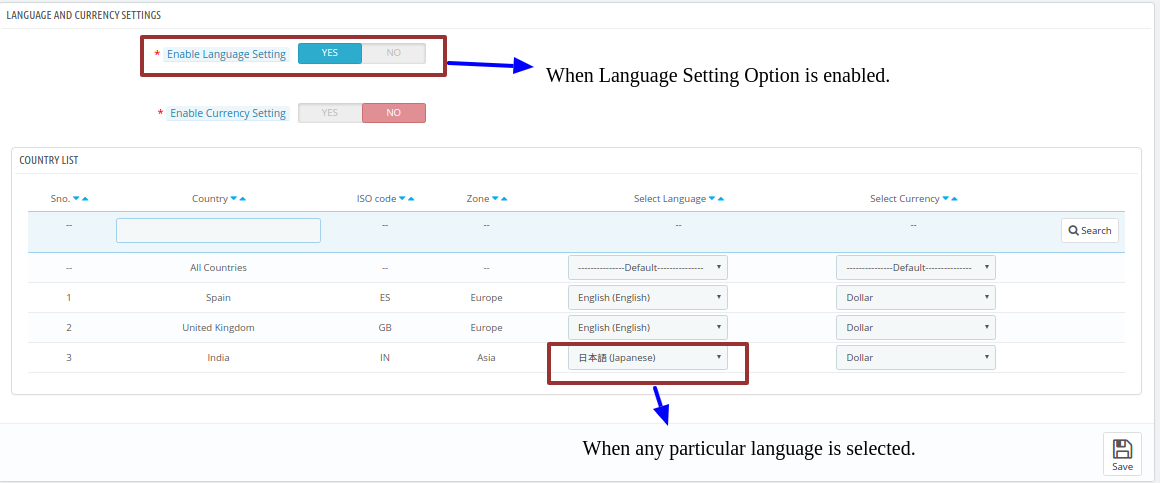
  • Enable Language Setting: By default, it will be OFF. Language auto switch will only work if this setting is ON.

Following are the steps to Enable plugin-

  1. Go to modules and Setting.
  2. Search Module ‘Auto Switch Language and Currency.
  3. Click on the Configure button.
  4. Enable the Language Setting Option.
  5. Click on Save.
  6. Enable Currency Setting: By default, it will be OFF. Currency auto switch will only work if this setting is ON.

Following are the steps to Enable Prestashop Auto Switch Language and Currency plugin-

  1. Go to modules and Setting.
  2. Search Module ‘Auto Switch Language and Currency.
  3. Click on Configure button.
  4. Enable Currency Setting Option.
  5. Click on Save.
  6. Country Configuration: This contains the list of active countries with Country name, ISO-Code, Zone, active Languages and active Currencies. First row is having “All Countries” which allow admin to mark all countries with one common language or currency.

Following are the steps to configure common Language or Currency (Mapping Common to All)-

  1. Go to modules and Setting.
  2. Search Module ‘Auto Switch Language and Currency.
  3. Click on Configure button.
  4. Select any language or currency for “All Countries”.
  5. Click on Save.

Following are the steps to configure countries with any particular language or currency (One to One Mapping)-

  1. Go to modules and Setting.
  2. Search Module ‘Auto Switch Language and Currency.
  3. Click on Configure button.
  4. Select any language or currency for any particular country.
  5. Click on Save.
  6. Save: By clicking this button, the Auto change language addon will save setting into the database and return back with success message.

4.0 Front End Interface

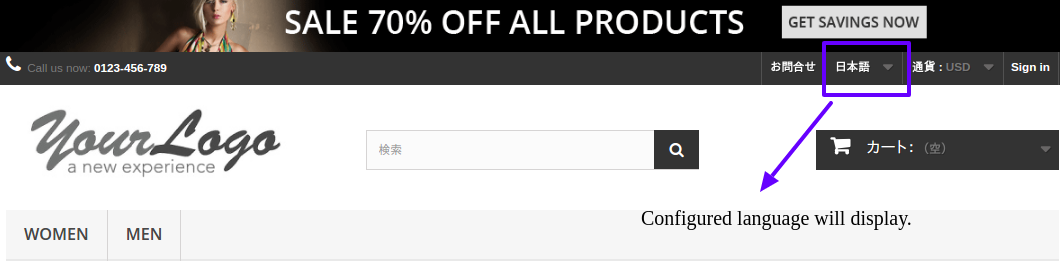
In the Front End, the Language and Currency will automatically switch according to admin configuration in Back-Office.

Enable Language Setting

When Admin enables “Language Setting” Option and select some language like “Japanese” from the admin interface of this Auto change language extension.

Enable Currency Setting

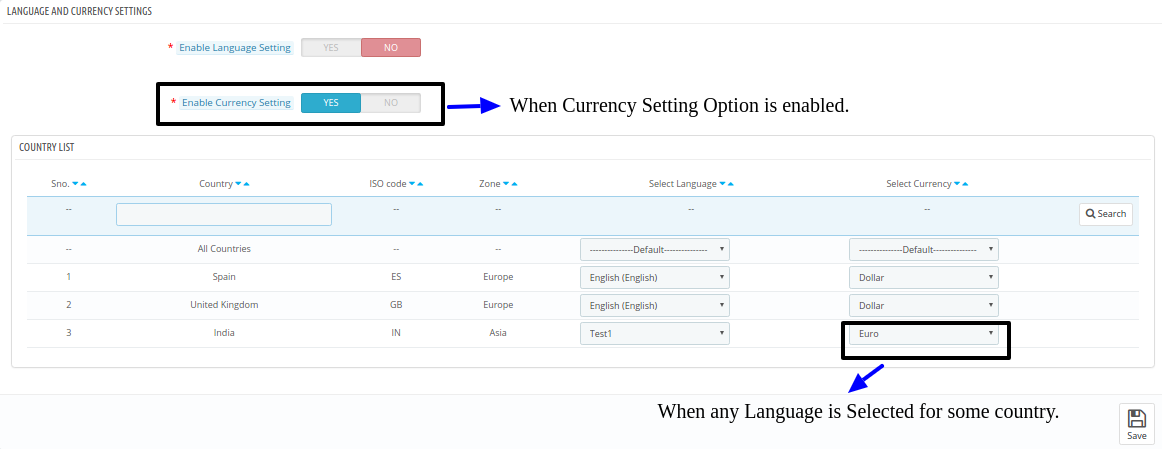
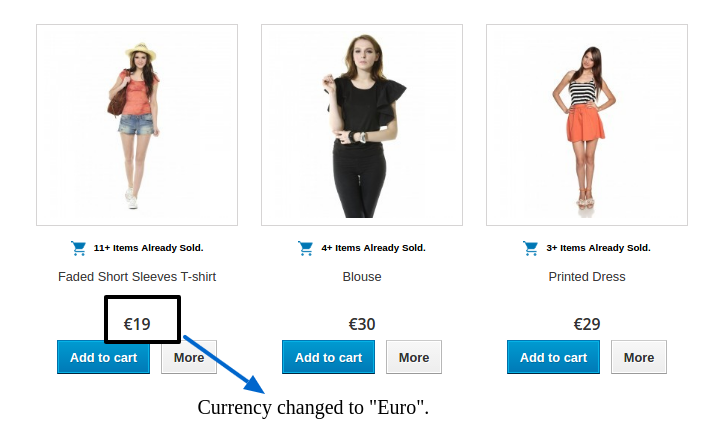
When Admin enables “Currency Setting” Option and select some Currency like “EURO” from the admin interface of this Prestashop Auto change currency plugin.

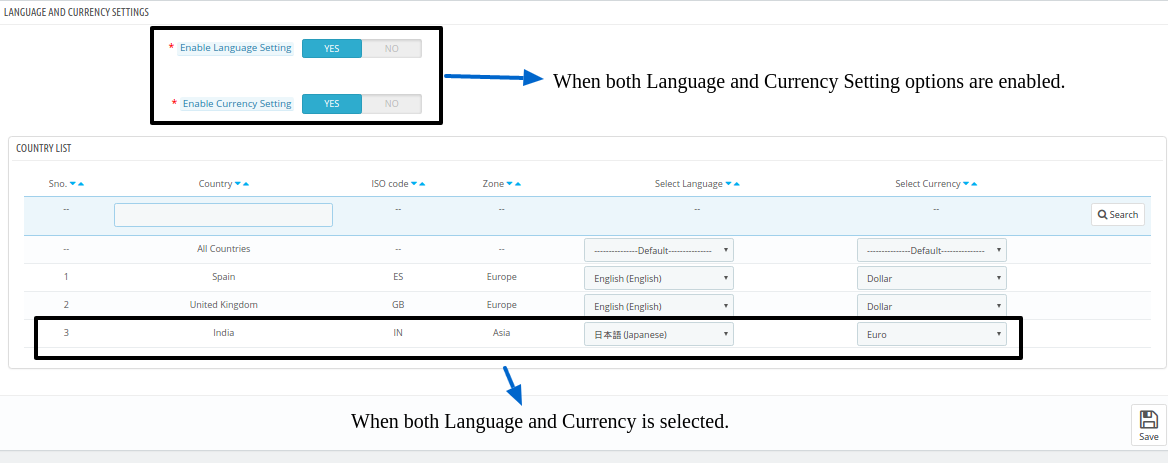
Enable Both Language and Currency Setting

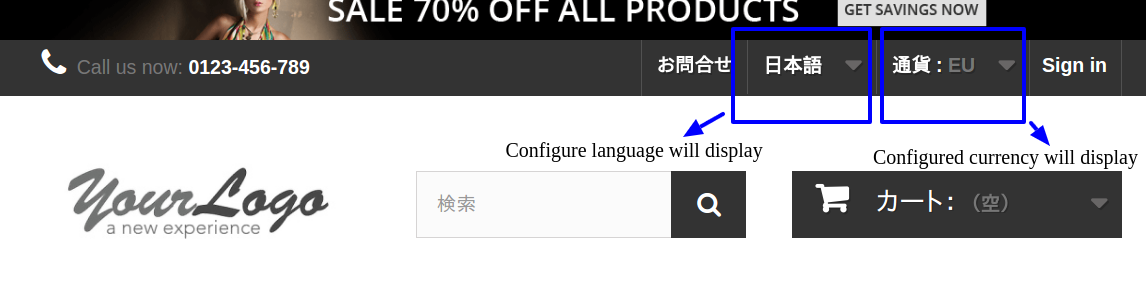
When Admin enables “Language Setting” Option and select some language like “Japanese”.

When Admin enables “Currency Setting” Option and select some Currency like “EURO”.

Thus by implementing this Auto change language and currency addon, the store admin can reduce all the language and currency-related hurdles and issues. The language and currency are the basic factors in order to grow business globally. The store owner can set the language and currency according to requirement. The customers can view the store details as per the settings of the admin interface. This is one of the easiest ways to offer a better store experience to the customers.

It is very easy to implement automatic language switching functionality on the eCommerce store with the help of this Prestashop auto switch language and currency Module. The Prestashop auto switch language module fetches the customers geological location and changes the language and currency at the same time. The customers can view the store details and price-related information easily in their familiar language and currency type.  Prestashop auto switch currency module is very simple to implement and it offers smooth functioning. You can also implement Auto change language and currency addon for offering a better store experience to the global customers.

For more Prestashop addons please visit Knowband.

For more details about this Prestashop auto switch language and currency addon:

Knowband Auto change language addon Module Link.

Knowband Auto change currency module Admin Demo Link.

Knowband Prestashop Auto change language and currency addon Front Demo.

Knowband Prestashop auto switch language and currency Watch Video.

Knowband Prestashop auto switch language Addon Store link.

Please contact us at support@knowband.com for any query or custom change request as per your business requirement.

Prestashop Mailigen and MailChimp Integrator Addon- User Manual

Prestashop Mailigen & MailChimp Integrator Addon

1.0 Introduction

Prestashop Mailigen & MailChimp Integrator Addon by Knowband is a Prestashop module that allows the system to automatically sync customers email addresses of your store on Mailigen Account or MailChimp Account or both accounts. Mailigen and Mailchimp both are email service providers through which you can send newsletters or emails related to your services and offers to your customers. Also, Both provides number of email templates which you can select as per your need.

1.1 Benefits of the Admin:

1. This Prestashop Mailigen and MailChimp Integrator addon allows the store admin to enable/disable the module as per need.
2. Smart sync feature allows admin to subscribe users to his/her Mailigen and MailChimp account.
3. The Prestashop Mailigen and MailChimp Integrator extension offers the smart sync feature. However, the module synchronizes of email as soon as focus is blurred from email field.
4. The Prestashop Mailigen extension allows the store admin to sync the Mailigen account by entering the Mailigen API Key.
5. The Prestashop MailChimp integrator module allows the store admin to sync the MailChimp account by entering the MailChimp API Key.
6. The Store admin can easily synchronize the Mailigen & MailChimp account with your store without any hassle.
7. With the help of this Magento Addon, The Online retailers can send email campaigns to all the customers either they have registered to the site or not.
8. The advanced feature of this Prestashop extension, the admin can also include Field Id and Class Id to sync emails from the non-default email fields.
9. The Prestashop addon helps the Prestashop merchant in email marketing.
10. The Admin can boost the website revenue.

2.0 Installation

After purchasing the Prestashop Mailigen and MailChimp Integrator extension, you will get following files as listed below:

1. Compressed File in ZIP format (contains source code of the module)
2. User Manual

Follow the following steps to install the extension:

1. Unzip the compressed file. It would contain files and folders as shown below –

2. Copy all the files and folders of unzipped folder into your store “modules” directory on the path – Root Directory/modules/.

3. Now Prestahsop extension is ready to be installed on your store and you can find that in Store Admin -> Modules and Services. It would shown as below –

For Prestashop 1.6.x.x


For Prestashop 1.7.x.x


4. Click on “Install” button to install the Prestahsop MailChimp integartor addon. It would show a pop-up for your confirmation. Click on “Proceed with the installation” option. This step will install the Prestashop addon and show notification – “Module(s) installed successfully”.

3.0 How to configure module ?

This Prestashop Mailigen and MailChimp integrator extension is configurable and the Store Owner can setup or configure this Prestashop module through Admin Panel of store by following steps given below –

1. Go to Store Admin -> Modules and Services
2. Find “Mailigen and MailChimp” and click “configure” button given corresponding to the module.
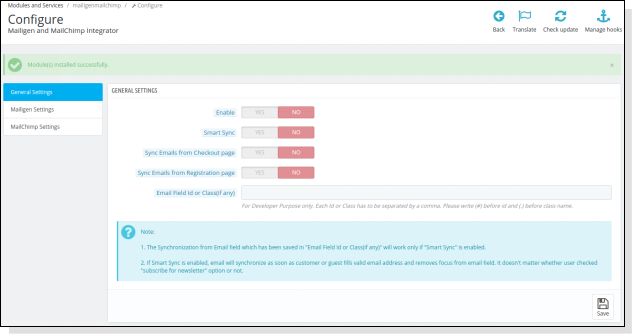
3. It would open a new page as shown below –

4.0 Admin Panel

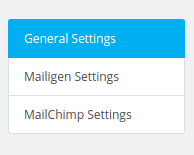
The admin panel will have 3 tabs for configuring this plugin, as listed below:

  1. General Settings
  2. Mailigen Settings
  3. MailChimp Settings

4.1 General Settings

This section the Prestashop Mailigen and MailChimp integrator extension allows the online retailers to enable/disable the Prestashop addon with some more configurations.

You have to follow steps given below to configure General Settings –

1.Goto the Prestashop Module and Services -> Module and Services
2.It would list all the modules of store. Find ‘Mailigen and MailChimp’ in modules list.
3.Now click on ‘Configure’ button given corresponding to the ‘Mailigen and MailChimp’ module.
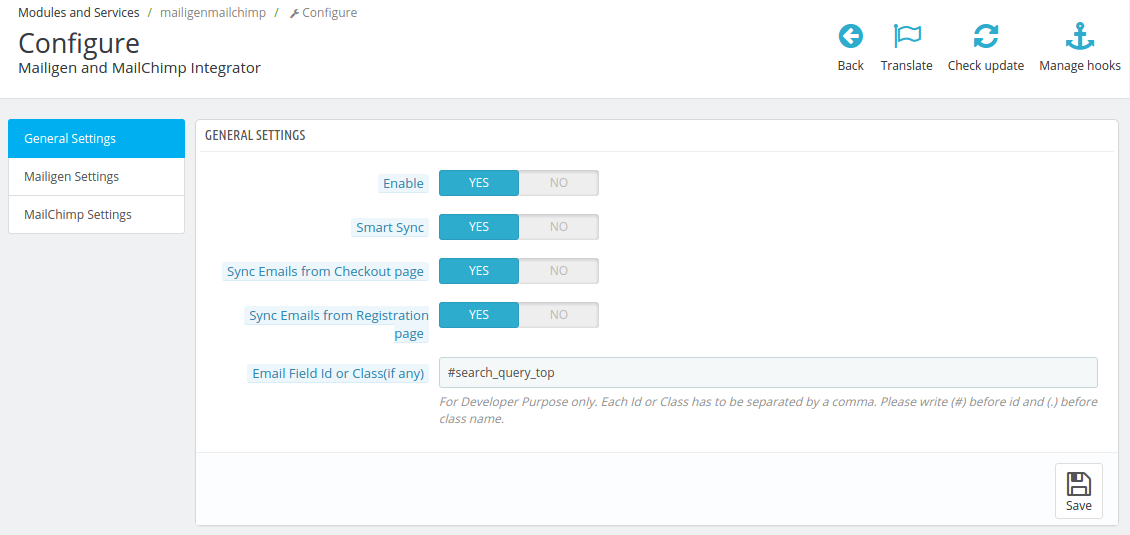
4.It would redirect eCommerce merchant to a new page as shown below –


5.Update the values of given fields corresponding to ‘General Settings’ as per need.
6. Now click on ‘Save’ and it would validate and save the provided values.

That’s it.

From here admin can enable/disable Prestahsop extension Also he/she can set the page ( registration and checkout ) from where to sync e-mail id.

General Settings tab will have following options:

1.  Enable: From this button admin can enable/ disable the Knowband’s Prestahsop Mailigen and MailChimp module. By default, it will be off.

2. Smart Sync: This option when enabled, email id after validation will be synchronized if visitor/guest/customer remove focus after filling email field irrespective of the fact if the user have submitted the form or not or user have opted for newsletter subscription or not. If it is disabled the email will be synced only when form is submitted and if customer has opted for newsletter subscription.

3. Sync Email from Checkout page: From this button admin can set whether to sync email from checkout page or not. If enabled, email will be synced from the checkout page to accounts configured in admin panel. If customer chooses guest checkout then only email address filled at the time of checkout will sync.

4. Sync Email from Registration page: From this option the Prestashop store Admin can set whether to sync email from registration page or not. If enabled, email will be synced from the registration page to accounts configured in admin panel. If guest chooses to create account on checkout page or guest sign up in both cases, email will be synced if he/she chooses “subscribe for newsletter”.

5. Email Field Id or class (if any): This text field is for developer purpose only. From this option the Online retailers  or his/her developer can set the fields of email or newsletter from which he/she wants email to sync. The field id name or class name should be followed by (#) or (.) respectively. The purpose of this field is to make module compatible with other newsletter forms which comes with theme or some third party module.

4.2 Mailigen Settings

This section allows the store admin to enable/disable Mailigen functionality which allow system to sync emails on Mailigen system.

You have to follow steps given below to configure Mailigen Settings –

1. Goto the Module and Services -> Module and Services
2. It would list all the modules of store. Find ‘Mailigen and MailChimp’ in modules list.
3. Now click on ‘Configure’ button given corresponding to the ‘Mailigen and MailChimp’ module.
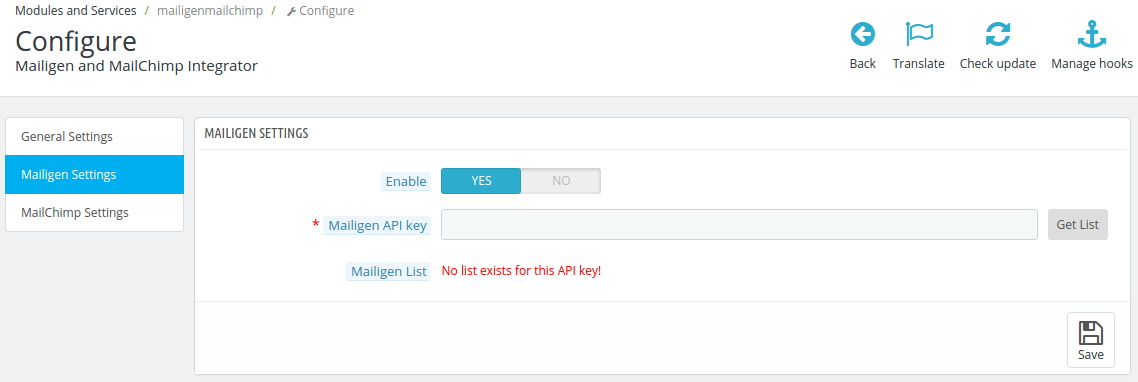
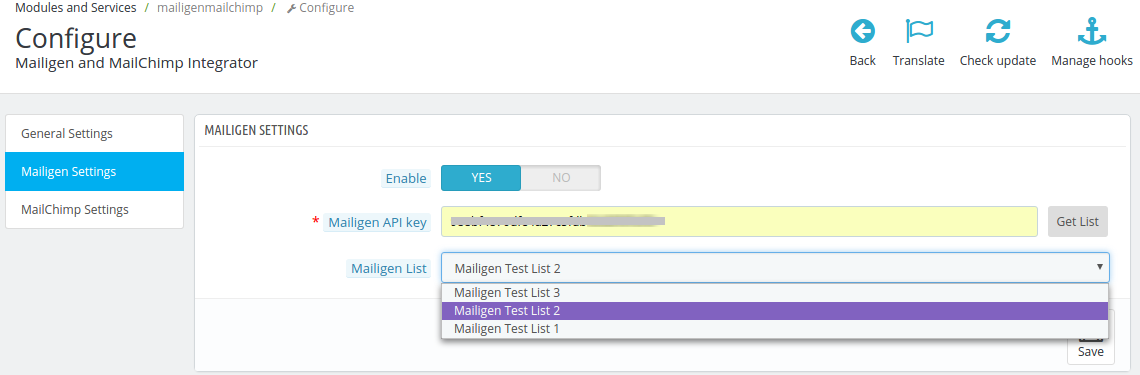
4. It would redirect Store Owner to a new page. Click on “Mailigen Settings” tab and it would open a new section as shown below -\


5. Update the values of given fields as per need.
6. Now click on ‘Save’ and it would validate and save the provided values.
7. That’s it.

Mailigen Settings tab will have following options.

Enable: From this option admin can enable/disable the Mailigen settings. Initially it will be off.

Mailigen API Key: Mailigen API key is the key that the user created on his/her Mailigen account at www.mailigen.com. This API key will be used to connect to the Mailigen API. Fill API field with correct API and click Get List button. Lists drop down will be visible containing all the lists related to that Mailigen API key.

Mailigen Lists:  Mailigen Lists will be available when the Mailigen API key is provided.

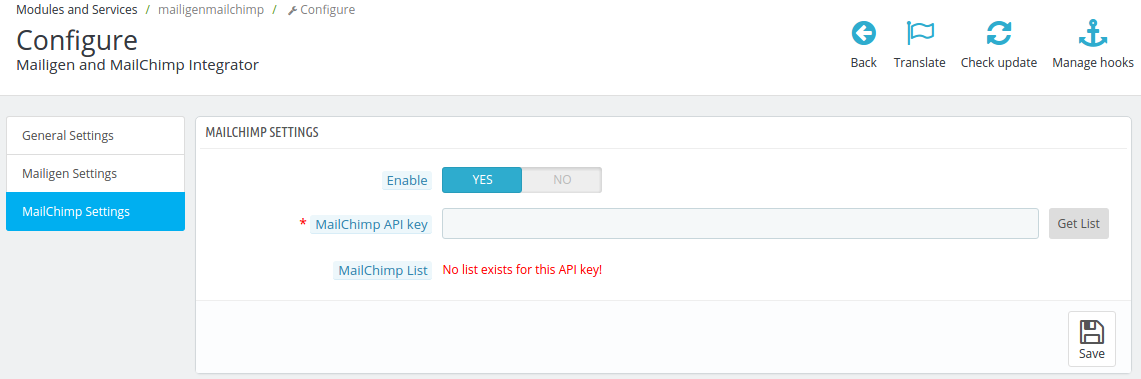
NOTE : If the Mailigen Settings > Mailigen API key field is empty then no lists will be shown , but an error message will be shown instead saying ‘No lists exist for this API key !’ as shown in screen above.

To Set up Mailigen Account

  • Visit mailigen and create account. After account creation, login to your account.
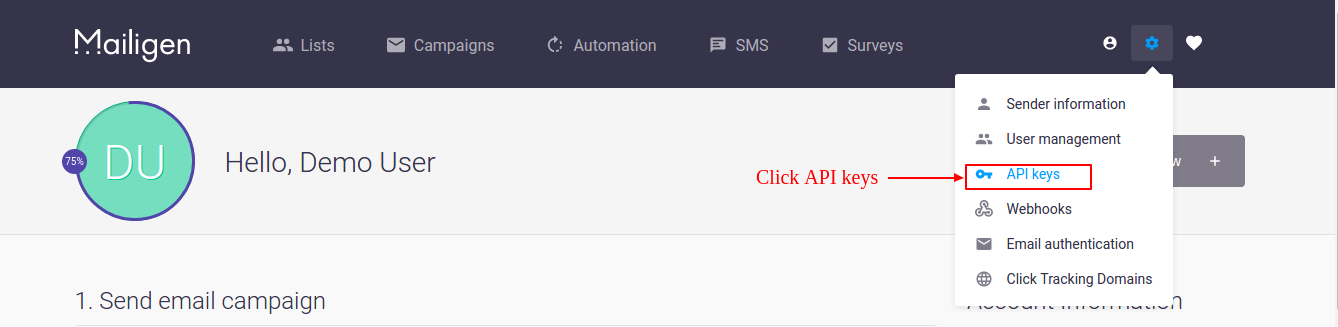
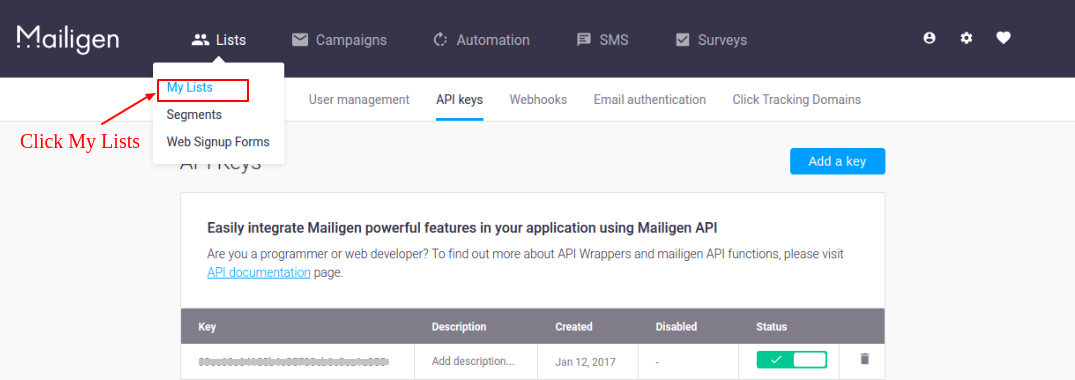
  • On Dashboard, click settings icon on upper right corner of dashboard as seen in screen below.

  • After clicking settings icon drop down will open, click API keys in that menu. Screen is given below:

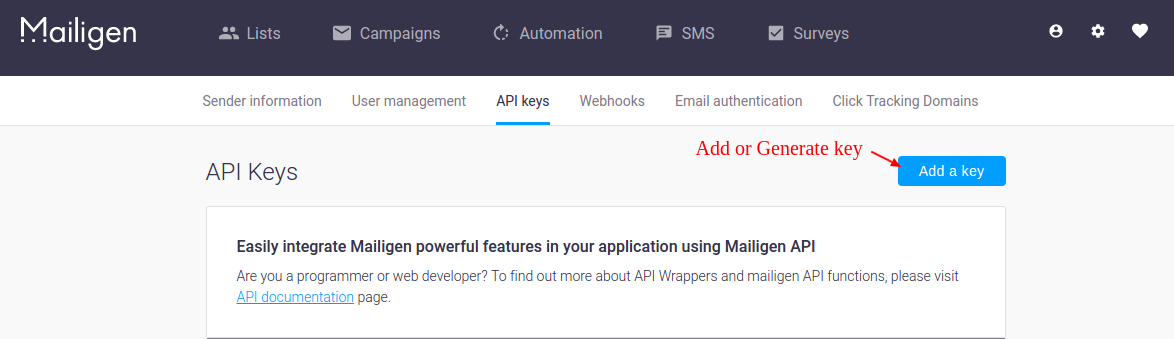
  • After clicking “API keys” link, admin will be redirected to new page where he/she can add API key. Click Add a key link to create API.

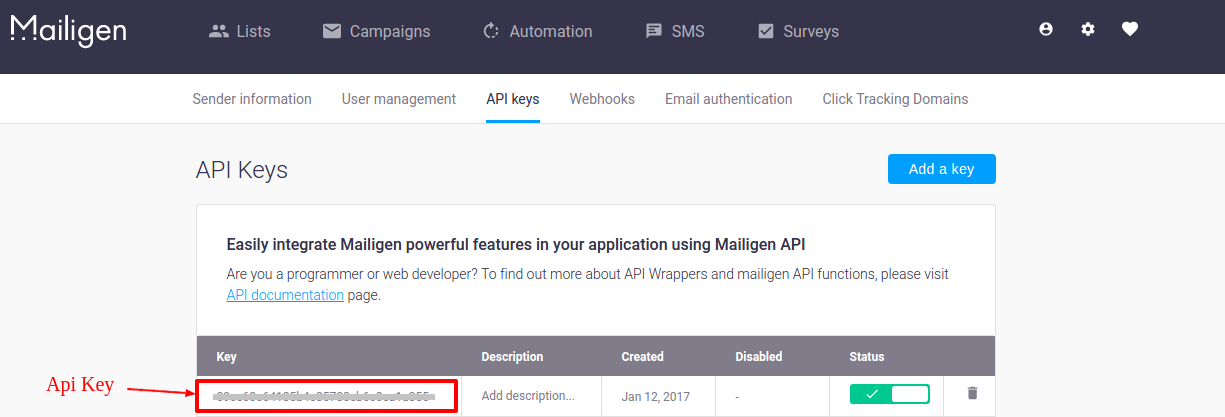
  • After generation of key, your API key will be visible in list as shown below. Use this key load your lists in plugin.

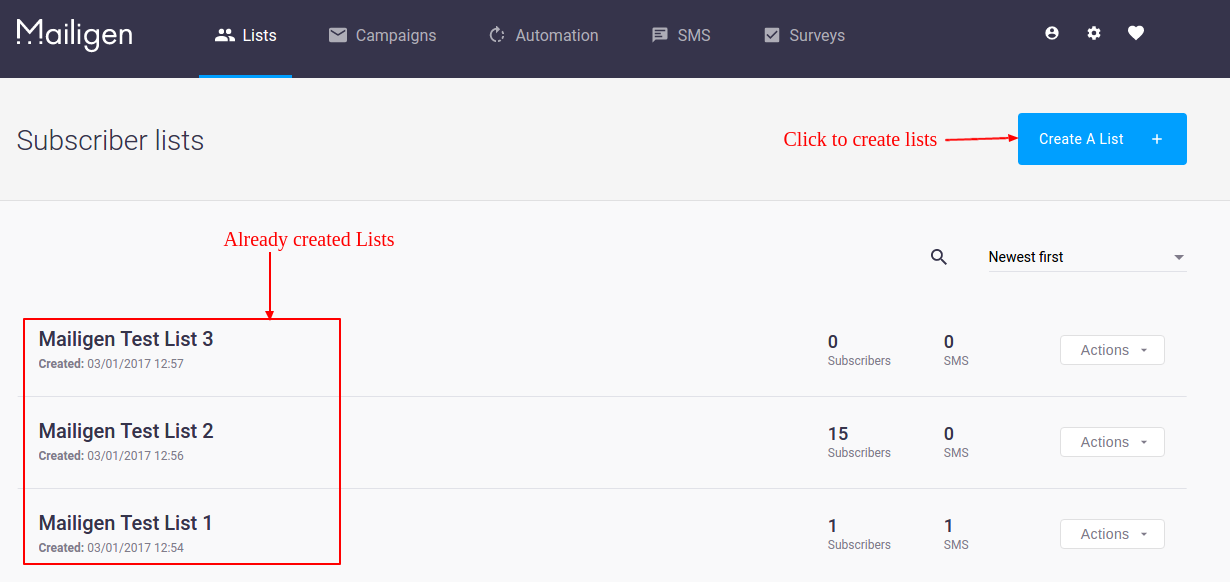
  • Now to create list, Go to Lists tab in upper menu. Drop down will open. Click “My Lists”link to view you lists or to create lists.

  • On My Lists page, Click “Create a list” to create new list. After creation lists will be visible on My Lists page as shown in screen below.

4.3 MailChimp Settings

This section allows admin to enable/disable MailChimp functionality which allow system to sync emails on MailChimp system.

You have to follow steps given below to configure MailChimp Settings –

1. Goto the Module and Services -> Module and Services
2. It would list all the modules of store. Find ‘Mailigen and MailChimp’ in modules list.
3. Now click on ‘Configure’ button given corresponding to the ‘Mailigen and MailChimp’ module.
4. It would redirect Store Owner or Admin to a new page. Click on “MailChimp Settings” tab and it would open a new section as shown below –


5.Update the values of given fields as per need.
6.Now click on ‘Save’ and it would validate and save the provided values.
7.That’s it.

MailChimp Settings tab will have following options.

Enable/Disable: From this option admin can enable/disable the MailChimp settings. Initially it will be off.

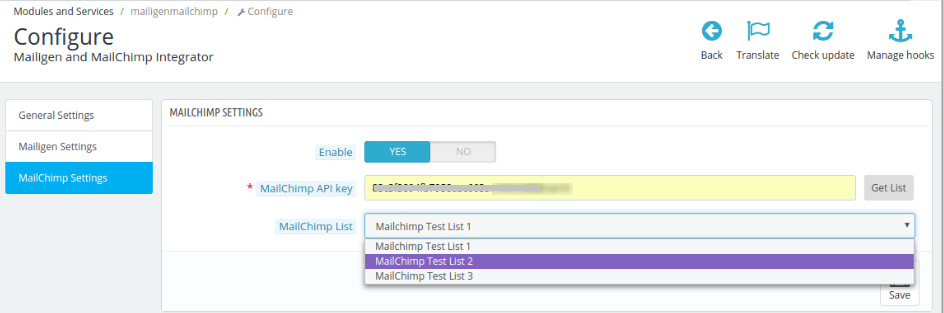
MailChimp API Key: MailChimp API key is the key that the user created on his/her MailChimp account at www.mailchimp.com. This API key will be used to connect to the MailChimp API. Fill API field with correct API and click Get List button. Lists drop down will be visible containing all the lists related to that MailChimp API key.

MailChimp Lists: MailChimp Lists will be available when the MailChimp API key is provided.

NOTE : If the MailChimp Settings >MailChimp API key field is empty then no lists will be shown , but an error message will be shown instead saying ‘No lists exist for this API key !’ as shown in screen above.

To Set up MailChimp Account

  • Visit mailchimp and create account. After account creation, login to your account.
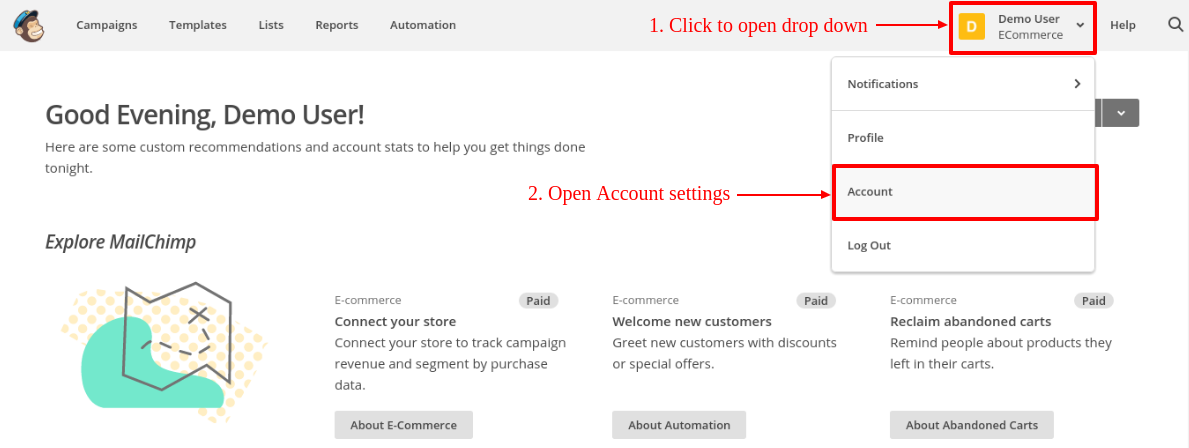
  • On Dashboard, click button on upper right corner of dashboard. Drop down menu will open, click Account link in that menu as seen in screen below.

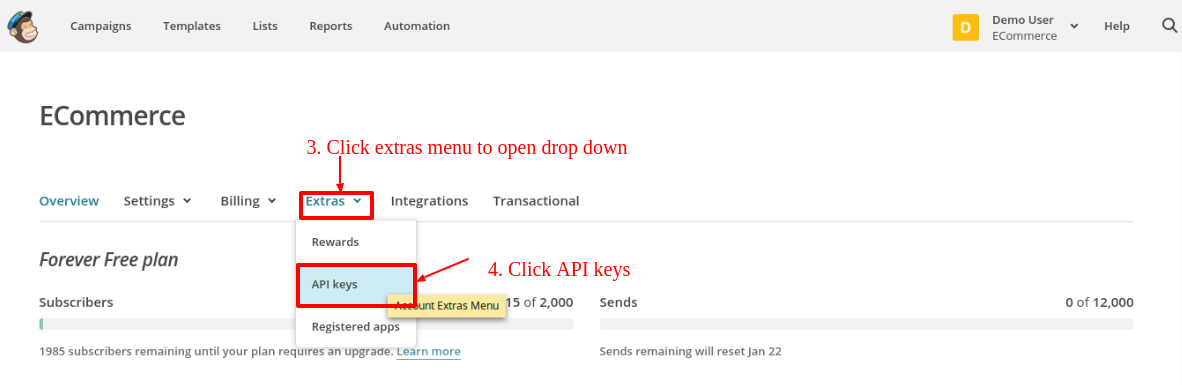
  • On Account settings page, some sub menus will be visible. Click “Extras” sub-menu to open drop down menu. Click “API keys”as shown in screen below:

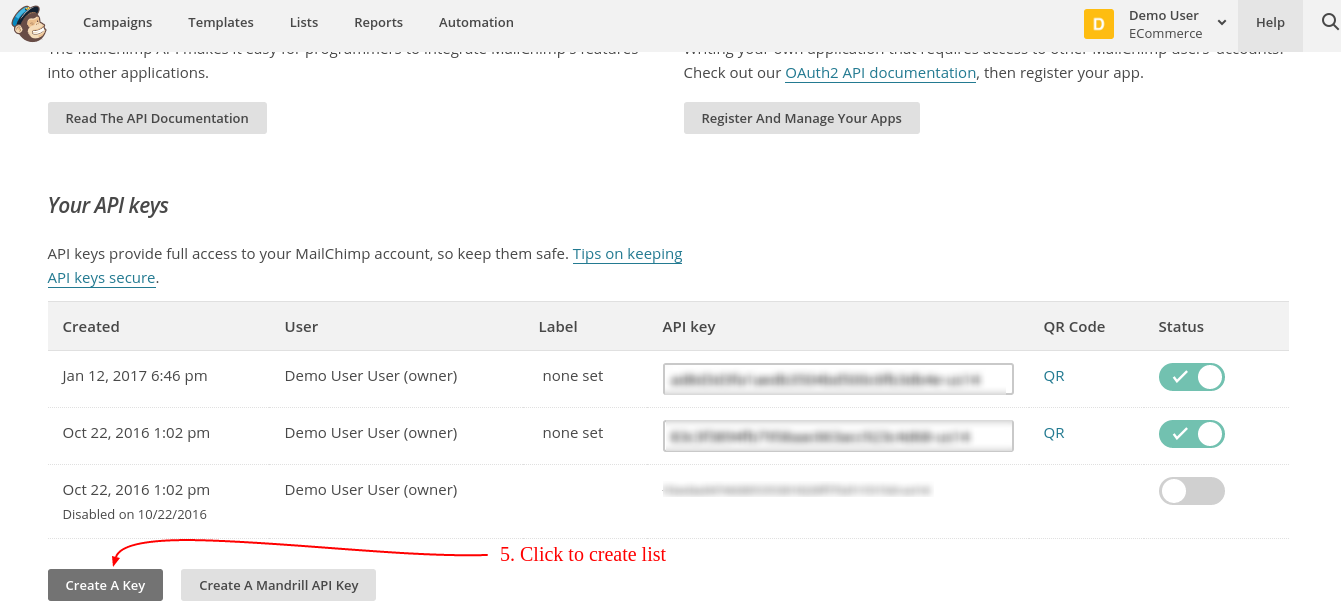
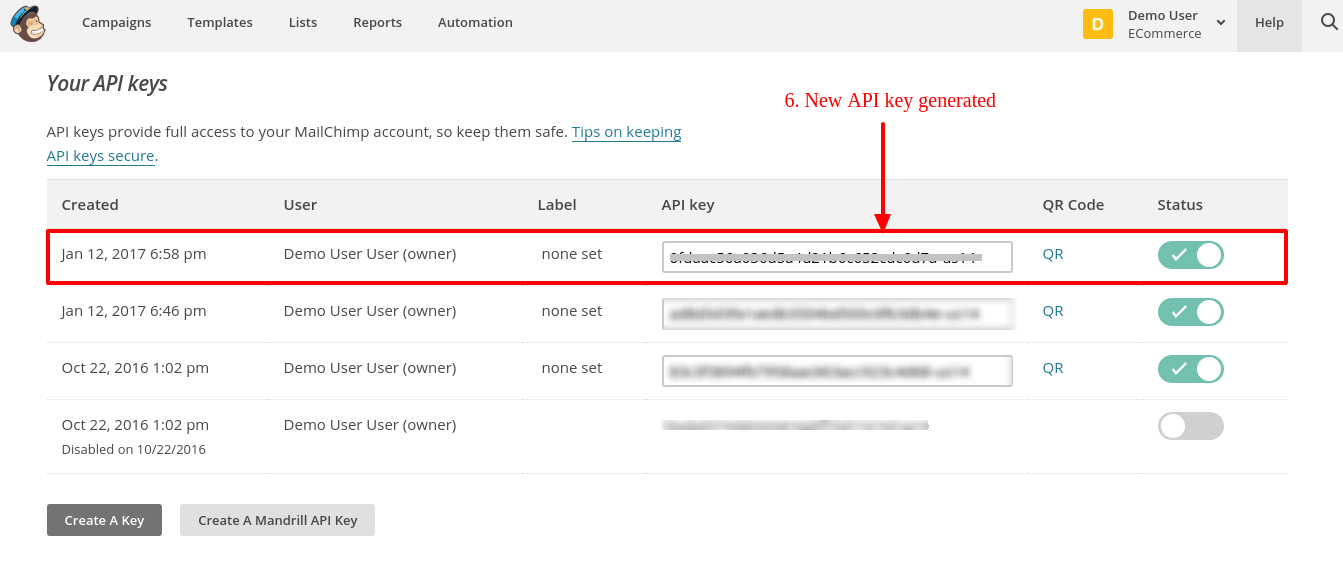
  • On API keys page, click “Create a key”to generate API key. After creation, a new API key will be added to your API keys list. Screen is given below:

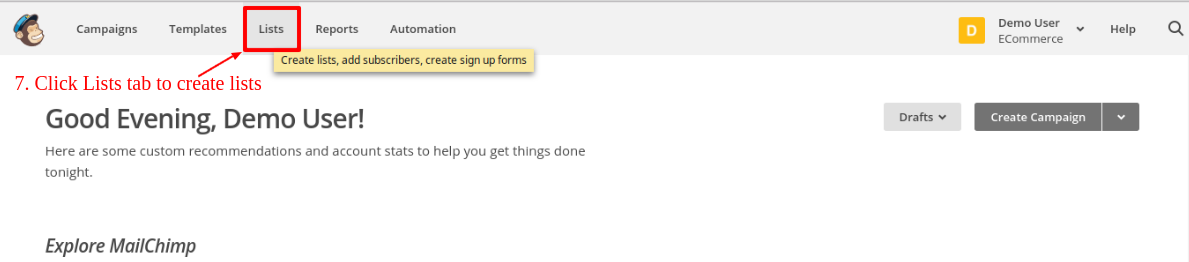
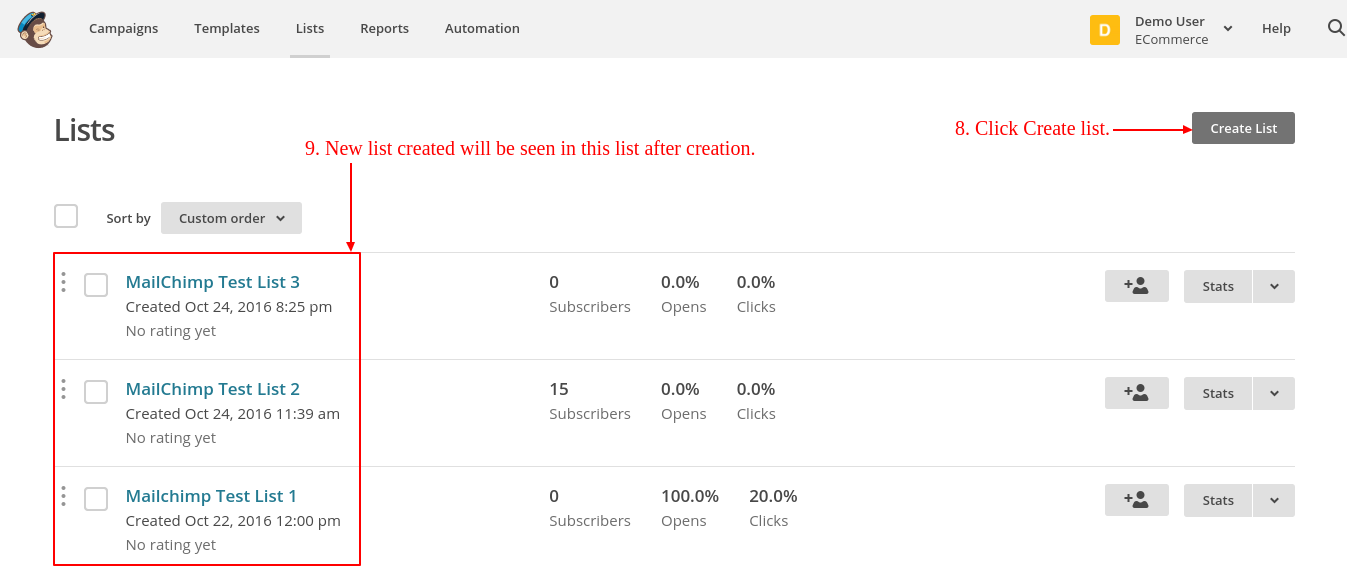
  • Now to create list, click Lists tab in upper menu. Admin will be redirected to new page where he/she can view lists and create lists also. Screen is given below:

  • On Lists page, Click “Create list” to create new list. After creation lists will be visible on Lists page as shown in screen below.

5.0 Front End

Newsletter Subscription

If Smart sync is disabled and customer or guest enters email in newsletter field and click submit, email will be added to the lists configured in admin panel. If smart sync is enabled, email( if valid) will be added to lists on removing focus from email field. It doesn’t matter whether user clicked submit button or not.

Registration Page

If the ‘Sync Email from Registration Page’ setting is enabled in Admin panel, then after registration customer’s email address will be synchronized to the configuration lists if he/she chooses the option to subscribe to newsletter. If “Smart Sync” is also enabled then email will be synchronized with lists on removing focus from email field. It doesn’t matter whether user registered or not.

Checkout Page

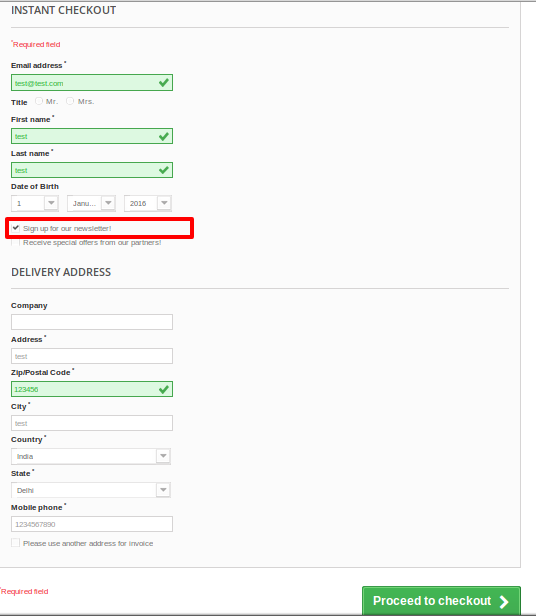
If the ‘Sync Email from checkout page’ is enabled in admin panel, then on the guest checkout page after checkout, guest’s email address will be synchronized to the configuration lists if he/she chooses the option to subscribe to newsletter. If “Smart Sync” is also enabled then email will be synchronized with lists on removing focus from email field. It doesn’t matter whether user checkout successfully or not.

Note: If “Smart Sync” is enabled then it doesn’t matter whether customer or guest checked “Sign up for newsletter” or not, synchronization will take place on blur event from email input field.

You can try Prestashop Mailigen and MailChimp Integrator addon for on your Prestashop website. KnowBand’s Prestashop Mailigen and MailChimp Integrator extension helps you in email marketing to your eCommerce store & boost th website traffic.

Module Link: https://www.knowband.com/prestashop-mailigen-mailchimp-integrator
Admin Demo Link: https://ps.knowband.com/demo3/16/admin1/index.php?controller=AdminLogin&token=ffa17b0c72ff8c0ab7cf3e344c5ae4fc&redirect=AdminModules&demo_lang=en
Front Demo Link: https://ps.knowband.com/demo3/16/en/login

Please contact us at support@knowband.com for any query or custom change request as per your business requirement.
Prestashop Google reCaptcha module – User Manual

1.0 What is Google ReCaptcha?

Prestashop Google ReCaptcha Addon is an effective security solution that protects your website from spam entries while letting real people pass through with ease. The Prestashop addon can be used for login, registration, password recovery, popular contact forms, and other. Google ReCaptcha addon displays images to identify humans as part of their normal validation procedures. This Prestashop Google reCaptcha addon is highly customizable and offers flawless functioning. The e-merchant can easily customize this Prestashop Google reCaptcha addon from the back-end.

2.0 Introduction

The Prestashop Google reCaptcha addon has a functionality through which Prestashop website will be able to confirm that the user is not a robot. It’s easy for people and hard for bots.

The Prestashop addon provides a lot of features which are as follows:

  • Admin can Enable/Disable the Prestashop Google reCaptcha addon without any hassle.
  • Admin can display Prestashop human verification on the Customer Login Page.
  • Prestashop Google reCaptcha addon allows the admin to display Google ReCaptcha on the Customer Registration Page.
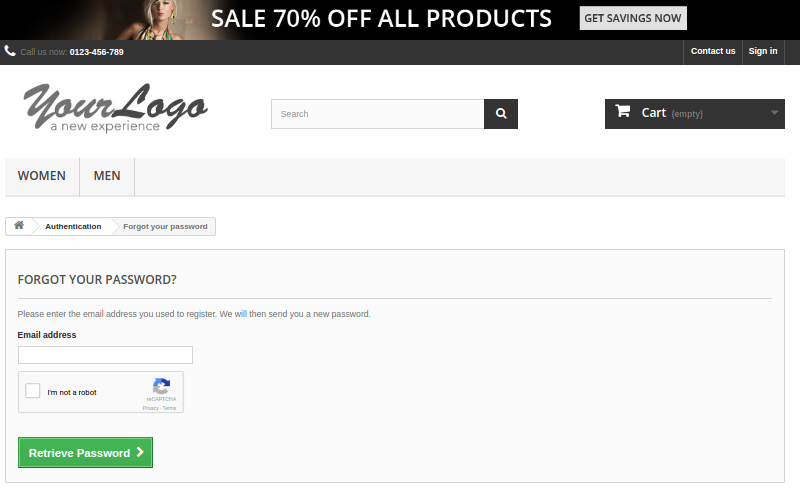
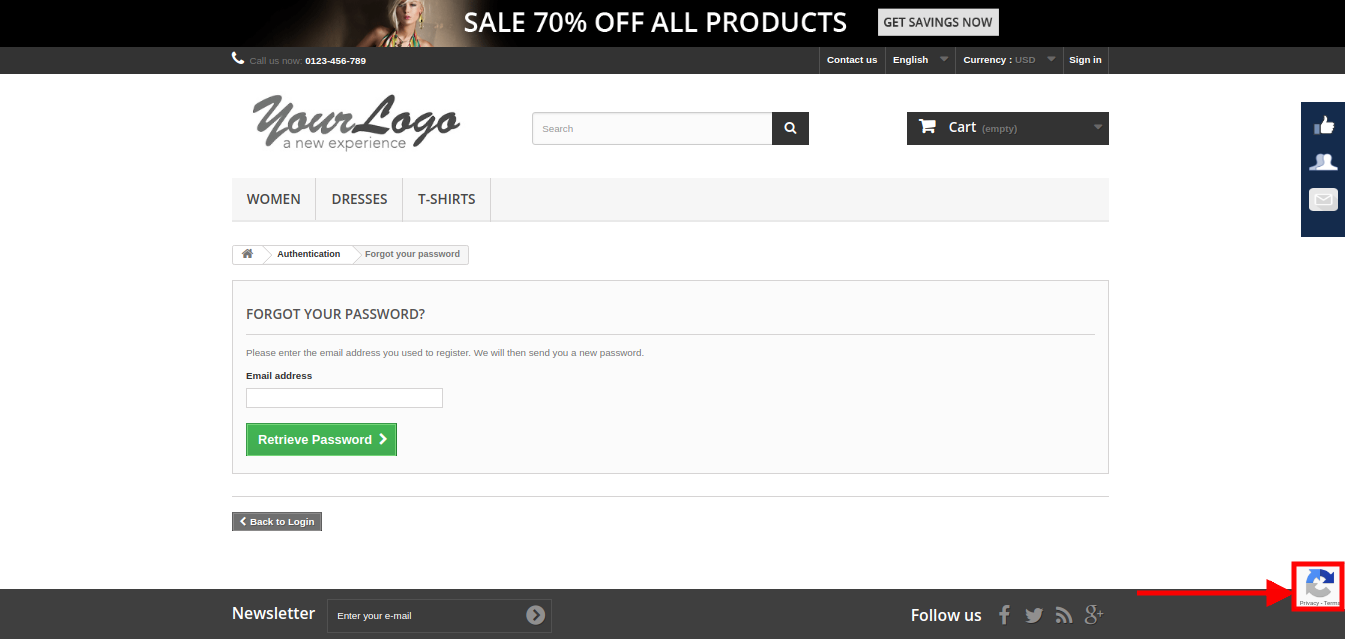
  • Admin can display Google ReCaptcha on the Customer Forget Password Page.
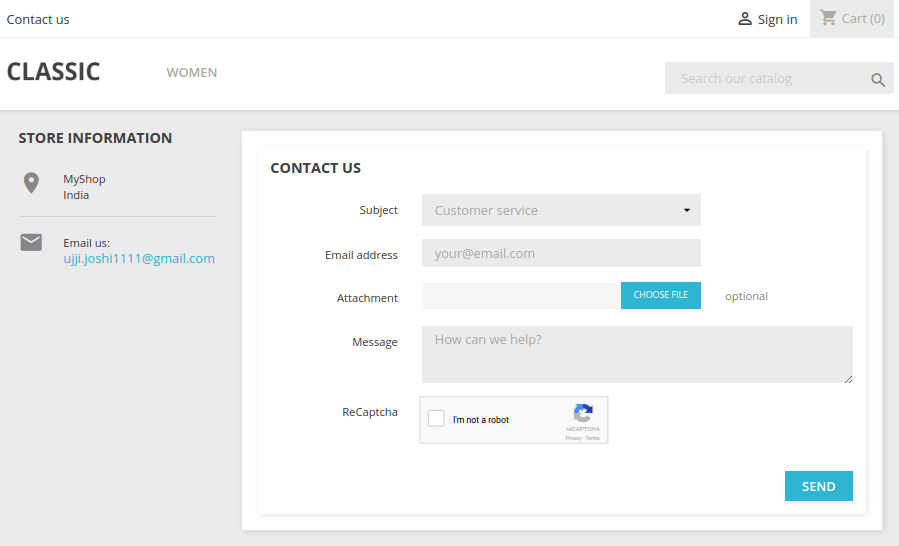
  • Admin can display Google ReCaptcha on the Customer Contact Page.
  • Admin can configure the number of attempts after which Google ReCaptcha will display.
  • Admin can display Google ReCapcha on the Super Checkout Page.
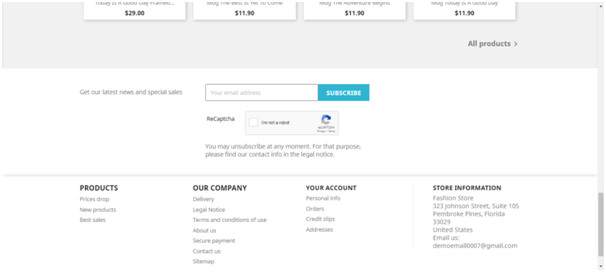
  • If a visitor opts for newsletter then admin can allow Google ReCaptcha verification for the confirmation of newsletter subscription.
  • Prestashop Human Verification addon works for both v2 and v3 recaptcha systems.
  • Admin gets an option to select the type of recaptcha for the different pages from the backend of Prestashop Google reCaptcha
  • Advanced users can add Custom CSS (Cascading Style Sheet) and Custom JS (JavaScript) in the block for customization.
  • Admin can configure the different Site Key and Secret Key for his/her different Prestashop domains.
  • Admin can easily set the Site Key and the Secret Key on the official site of Google ReCaptcha for his domain by following the Steps to Configure.
  • This Prestashop Google reCaptcha addon is compatible with SSL enabled stores.

3.0 Installation Manual

Follow the below-mentioned steps to install the Prestashop Google ReCaptcha addon by Knowband:

  • Download the Prestashop addon package.
  • Unzip the package in /modules directory of your Prestashop store via FTP manager (like Filezilla or WinSCP – download here: https://filezilla-project.org/). Folder structure for Google ReCaptcha addon inside /modules/googlerecaptcha directory is shown in the image below:

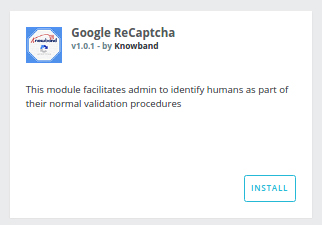
  • You will be able to find the Prestashop Google ReCaptcha addon that is ready to be installed in the “Modules List” in your Prestashop store as shown below.

  • Click on the “Install” link to install. Once the module is installed properly, the “Install” link will be converted to “Configure”.

4.0 Admin Interface of Prestashop Google reCaptcha addon

This User Manual will guide you through the Admin Module/Store Front settings and various features of this Prestashop Google ReCaptcha Addon.

The admin interface of Prestashop Google reCaptcha system consists of 4 tabs listed below:

  • General Settings
  • v2 ReCaptcha Settings
  • v3 ReCaptcha Settings
  • Look and Feel Settings

4.1 General Settings Tab

Following are the steps to configure the General Setting tab –

  1. Go to modules and services.
  2. Search Module ‘Google ReCaptcha.
  3. Click on the Configure button.
  4. Select ReCaptcha Setting Tab.

  • Enable Plugin: By default, it will be OFF. This Prestashop human verification module will only work if this setting is ON.
  • Enable GoogleReCaptcha for: By default, all the checkboxes would be selected. It is used to set the position of the Google ReCaptcha on a particular
  • Recaptcha for Customer Login Page: When enabled, this setting will either show v2 or v3 ReCaptcha on customer login pages set by the admin.
  • Recaptcha for Customer Registration Page: When enabled, this setting will either show v2 or v3 ReCaptcha on the customer registration page as set by the admin.
  • Recaptcha for Supercheckout Page: When enabled, this setting will either show v2 or v3 ReCaptcha on the checkout page as set by the admin.
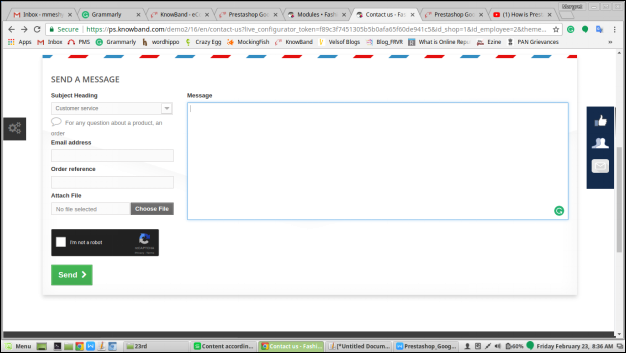
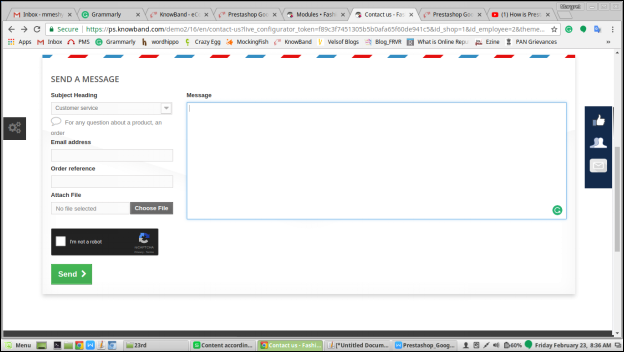
  • Recaptcha for Contact us Page: When enabled, this setting will either show v2 or v3 ReCaptcha on the contact us page as set by the admin.
  • Recaptcha for forgot password Page: When enabled, this setting will either show v2 or v3 ReCaptcha on the forgot password page as set by the admin.
  • ReCaptcha for Newsletter: If enabled, this functionality will display the v2 or v3 ReCaptcha for newsletter subscription.

After you have set all the configuration options, click on Save button. By clicking this button, the Prestashop module will save setting into the database and return back with a success message.

4.1.1 How to activate module?

Follow these steps to activate the module –

  1. After installation of the module, go to the “Module and Services”.
  2. It would list all the modules of the store. Find “Google ReCaptcha” in modules list.
  3. Now, click on the “Configure” button given corresponding to the “Google ReCaptcha” module.
  4. It would redirect the admin to a “General Settings” tab.
  5. Go to “ReCaptcha Settings” tab and configure the “Site Key” and the “Secret Key” which you will get by following “Steps to Configure” below the text fields.
  6. After configuration “Site Key” and “Secret Key”, go to the General Settings tab and switch the “Enable/Disable” button to “Yes” and configure all other details as per your desire.
  7. Click the “Save” button.

4.2 v2 ReCaptcha Settings

This tab will contain all the necessary steps to setup Google ReCaptcha in the module.

Following are the steps to configure v2 ReCaptcha Setting tab –

  • Go to modules and services.
  • Search Module ‘Google ReCaptcha.
  • Click on Configure button.
  • Selectv2 ReCaptcha Setting Tab.

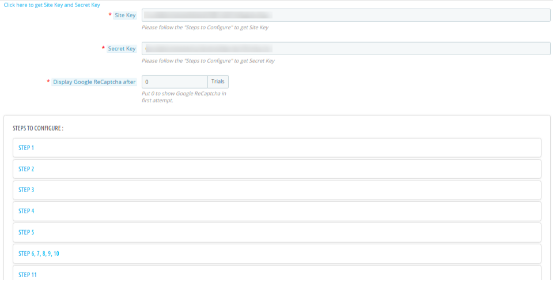
This Tab contains 3 fields, the first has link to set Google ReCaptcha and the next are steps to configure Site Key and Secret Key.

  • Site Key: Admin will enter the Site Key to display the widget on the site. This field is mandatory to enable plugin.
  • Secret Key: Admin will enter the Secret Key to authorize communication between the application and the reCAPTCHA server to verify the user’s response. This field is mandatory to enable the Prestashop Google reCaptcha plugin.
  • DisplayGoogle ReCaptcha After: By default, it would contain 0. It would be used to display Google ReCaptcha after a certain number of attempts.
  • Steps To Configure: This will contain all the steps to get Site Key and Secret Key for a particular domain name.

Click here to get Site Key and Secret Key: This link will redirect admin to the official website of Google ReCaptcha to get Site Key and Secret Key.

Following are the steps to visit Google ReCaptcha official site –

  1. Go to modules and services.
  2. Search Module ‘Google ReCaptcha.
  3. Click on Configure button.
  4. Select ReCaptcha Setting Tab.
  5. Click here to get Site Key and Secret Key.

4.2.1 How to get Site Key and Secret Key?

Follow these steps to get Site and Secret Key –

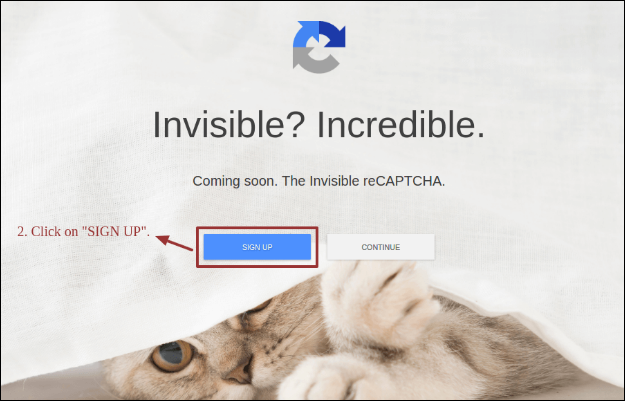
  • Create/Login to your Gmail account.

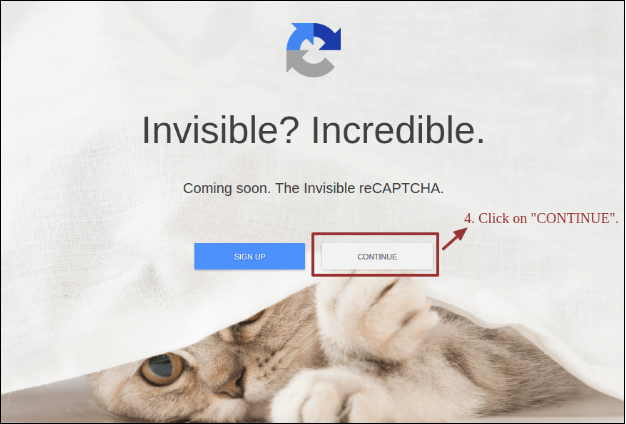
  • Click on “CONTINUE”.

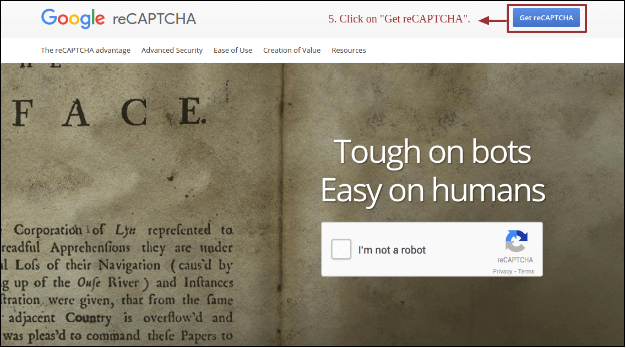
  • Click on “Get ReCaptcha”.

  • Enter “Label” of your Domain.
  • Enter “Domains” of your store.
  • Click on “Register”.

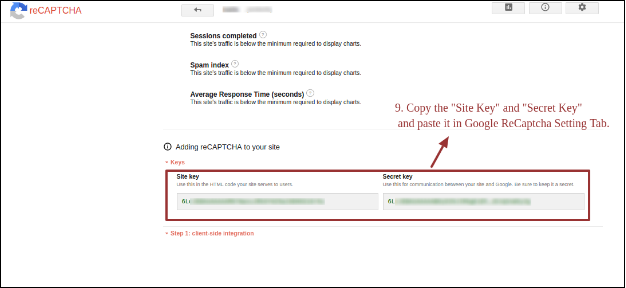
  • Copy the “Site Key” and “Secret Key” and paste it into Google ReCaptcha Setting Tab.

4.3 v3 ReCaptcha Settings

This tab will contain all the necessary steps to setup Google ReCaptcha in the module.

Following are the steps to configure v3 ReCaptcha Setting tab –

  • Go to modules and services.
  • Search Module ‘Google ReCaptcha.
  • Click on Configure button.
  • Select v3ReCaptcha Setting Tab.

This tab contains 2 fields, the first has link to set Google ReCaptcha and the next are steps to configure Site Key and Secret Key.

  • Site Key: Admin will enter the Site Key to display the widget on the site. This field is mandatory to enable plugin.
  • Secret Key: Admin will enter the Secret Key to authorize communication between the application and the reCAPTCHA server to verify the user’s response. This field is mandatory to enable the Prestashop Google reCaptcha plugin.
  • Steps To Configure: This will contain all the steps to get Site Key and Secret Key for a particular domain name. Follow the same procedure as for v2 Google reCaptcha.

4.4 Look & Feel Setting Tab

This tab will contain all the look and feel features of the Prestashop module.

Following are the steps to configure Look and Feel Setting tab-

  1. Go to modules and services.
  2. Search Module ‘Google ReCaptcha.
  3. Click on Configure button.
  4. Select Look and Feel Setting Tab.

Fields

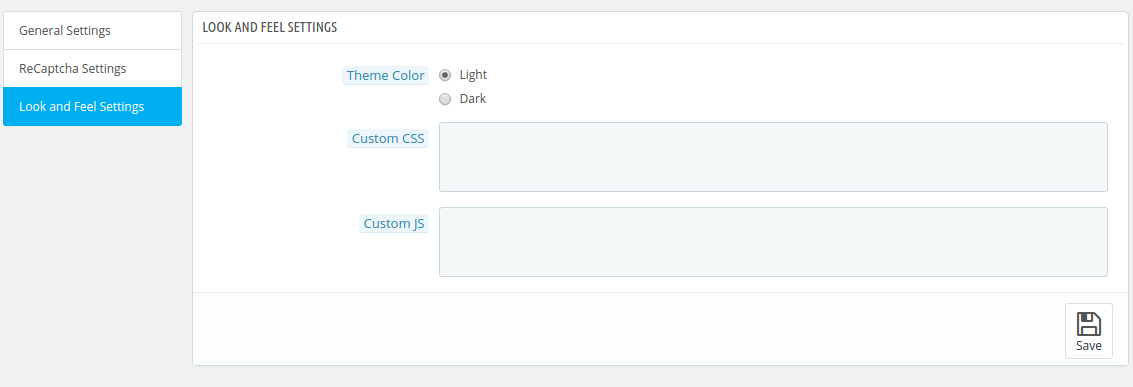
  • Theme: Admin will select the theme – Light or Dark for the Google ReCaptcha.
    Following are the steps to configure Google ReCaptcha theme –
  1. Go to modules and Services.
  2. Search Module ‘Google ReCaptcha.
  3. Click on Configure button.
  4. Select Look and Feel Setting Tab.
  5. Select Theme.
  • Custom CSS: Admin can use this option to add custom CSS if required.
    Following are the steps to configure Custom CSS –
  1. Go to modules and Services.
  2. Search Module ‘Google ReCaptcha.
  3. Click on Configure button.
  4. Select Look and Feel Setting Tab.
  5. Enter Custom CSS.

Note: Enter CSS content excluding <style> — inner content– </style> Tags (only write inner content).

  • Custom JS: Admin can use this option to add custom js if required (Only in version 1.6.x.x).
    Following are the steps to configure Custom JS-
  1. Go to modules and Services.
  2. Search Module ‘Google ReCaptcha.
  3. Click on Configure button.
  4. Select Look and Feel Setting Tab.
  5. Enter Custom JS.

Note: Enter JS content excluding <script> –inner content– </script> Tags (only write inner content).

5.0 Front End Interface

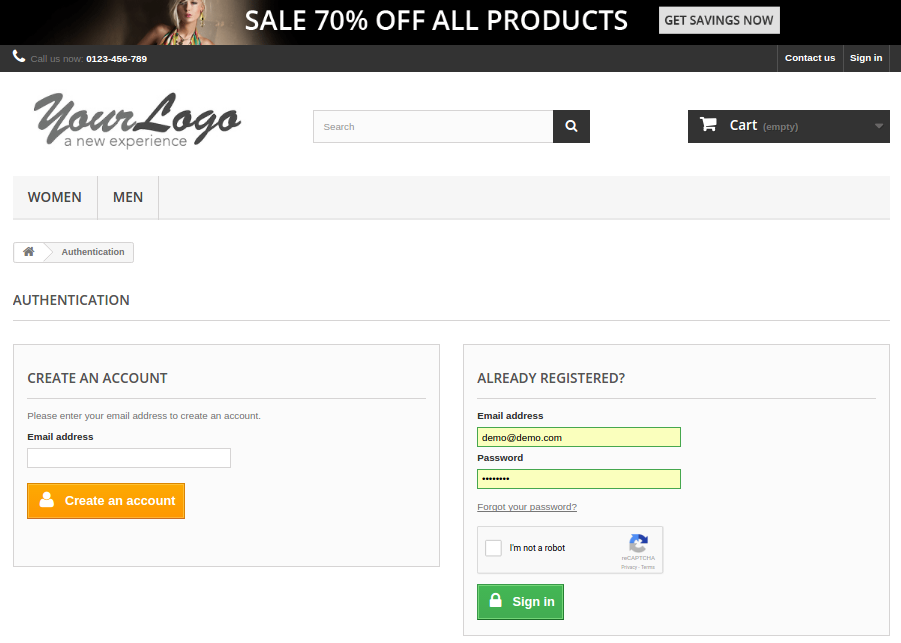
If admin enables the plugin then Google ReCaptcha will be displayed for selected forms in the Front End as shown below.

5.1 Customer Login Page

Following are the steps to visit Customer Login Page –

  • Go to Front End Home Page.
  • Click on the “Sign In” option.

5.2 Customer Registration Page

Version 1.6.x.x –

Following are the steps to visit Customer Registration Page in version 1.6.x.x –

  • Go to Front End Home Page.
  • Sign In.
  • Click on the button “Create an Account”.

Version 1.7.0.x –

Following are the steps to visit Customer Registration Page in version 1.7.0.x –

  • Go to Front End Home Page.
  • Sign In Option.
  • Click on the link “No Account? Create one here“.

5.3 Customer Contact Page

Version 1.6.x.x –

Following are the steps to visit Customer Contact Page in version 1.6.x.x –

  • Go to Front End Home Page.
  • Click on “Contact Us” option.

Version 1.7.0.x –

Following are the steps to visit Customer Contact Page in version 1.7.0.x-

  • Go to Front End Home Page.
  • Click on “Contact Us” option.

5.4 Customer Password Forgotten Page

Version 1.6.x.x –

Following are the steps to visit Customer Password Forgotten Page in version 1.6.x.x-

  • Go to Front End Home Page.
  • Sign In option.
  • Click on “Forget Password?”.

Version 1.7.0.x –

The following are the steps to visit Customer Password Forgotten Page in version 1.7.0.x-

  • Go to Front End Home Page.
  • Sign In option.
  • Click on “Forget Password?”.

5.5 Newsletter

Version 1.6.x.x –
Following are the steps to visit Customer Password Forgotten Page in version 1.6.x.x-

  • Go to Front End Home Page.
  • Go to the newsletter subscription tab on the footer section
  • Enter the email address and click on subscribe.

Version 1.7.0.x –
The following are the steps to visit Customer Password Forgotten Page in version 1.7.0.x-

  • Go to Front End Home Page.
  • Go to the newsletter subscription tab on the footer section
  • Enter the email ID and click on the subscribe button.

Note: This Prestashop Google reCaptcha module by Knowband will work on the default form of the Prestashop store for the above-mentioned pages i.e. Customer Login Page, Customer Registration Page, Customer Contact Page, super checkout page, and Customer Password Forgotten Page and for Newsletter subscription. This module will not be applicable for the Guest Checkout Page.

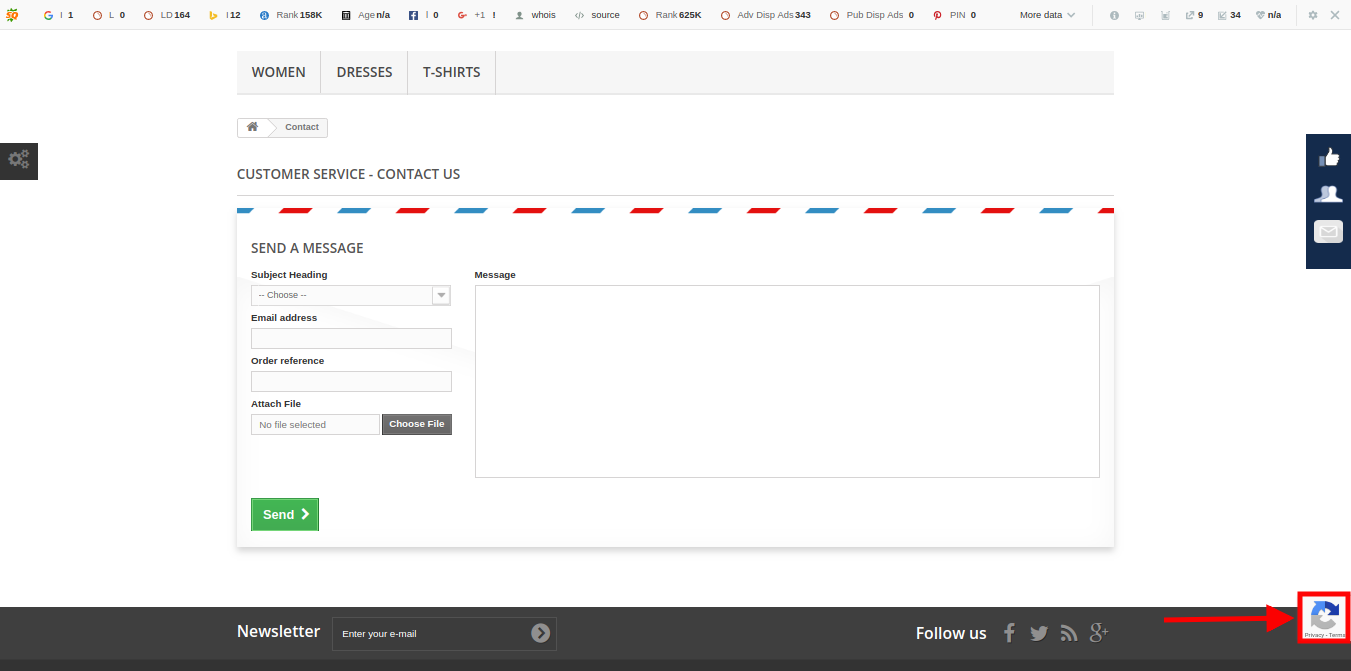
5.6 v3 Google ReCaptcha

  1. On Contact Us Page

2. On Forgot Password Page

Check out the Prestashop Google reCAPTCHA Tutorial

Liked This? You’ll Like These Too

How to integrate Google reCaptcha protection on your PrestaShop store?

For more Prestashop addons please visit Knowband.

Prestashop Google reCaptcha addon Module Link.

Knowband human verification plugin Admin Demo Link.

Prestashop Google reCaptcha module Front Demo.

Prestashop human verification addon Youtube video link.

Prestashop Google reCaptcha module Addon Store Link.

Please contact us at support@knowband.com for any query or custom change request as per your business requirement.
Magento Product Update Extension by Knowband – User Manual

Introduction of Magento Product Update Extension

The Magento product update notification extension by Knwoband adds an attractive functionality to your Magento website, which is beneficial for both the store owner and the customers. This Magento extension helps the customers to subscribe for product updates i.e. if product price or stock availability changes customer will be notified by an email. Magento back in stock module adds a simple block to the product page of Magento store through which the user can subscribe by entering the email id for the respective product.

The subscribed customers for product will be visible to store owner and helps in updating the product according to requirement so that customer can buy those products.

The Magento stock alert provides simple input field to enter email Id and a notify button that will be displayed on the product page itself. Customers can easily get subscribed to the product by entering email id and start getting email corresponding to that.

Installation

After purchasing this Magento extension, you will get following files as shown below:

  1. magentoproductupdatenotification.zip(contains source code of the extension)
  2. User Manual

Follow the following steps to install the Magento extension by Knowband:

  1. Unzip the magentoproductupdatenotification.zip file.
  2. Copy all the files and folders of unzipped folder into your store root directory.
  3. After copying all the files and folders, clear the cache.
  4. Open any page of your store. Magento will install the Magento module at the time of loading any page.
  5. After installing, please login into your admin panel and go to the below menu:

System > Configuration > Advanced

Here you will see that “Vss_Productupdate” module is listed.

Extension Interfaces

There are two interfaces in this Magento price alert notification extension. Each interface have different functionality according to its use. These interfaces are:

  1. Admin Panel Interface(Only be accessible by admin/store owner)
  2. Front End Interface(accessible to front end user)

Each interface of this Magento product update extension has been described in separate section.

Admin Panel Interface

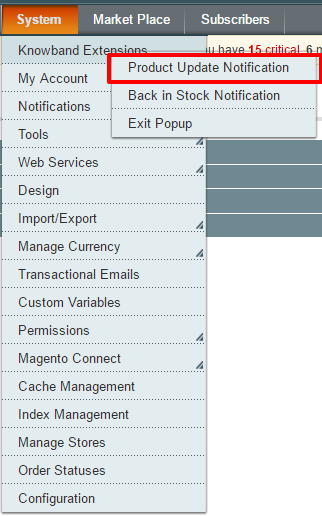
This part of the plug in will be for admin user, through which the admin can configure the settings. After installing Magento extension, Product Update Notification menu will be visible under System > Knowband Extensions menu in the menu bar as shown in below screen:

On clicking above mentioned menu, admin panel interface of the Magento stock alert extension will open.

There are four tabs in the admin panel of this Magento price alert through which the admin will be able to manage the functionality of the Magento plugin. These are listed below:

  1. General Settings
  2. Request for Notification Email Settings
  3. Notification Email Settings
  4. Analysis

General Settings

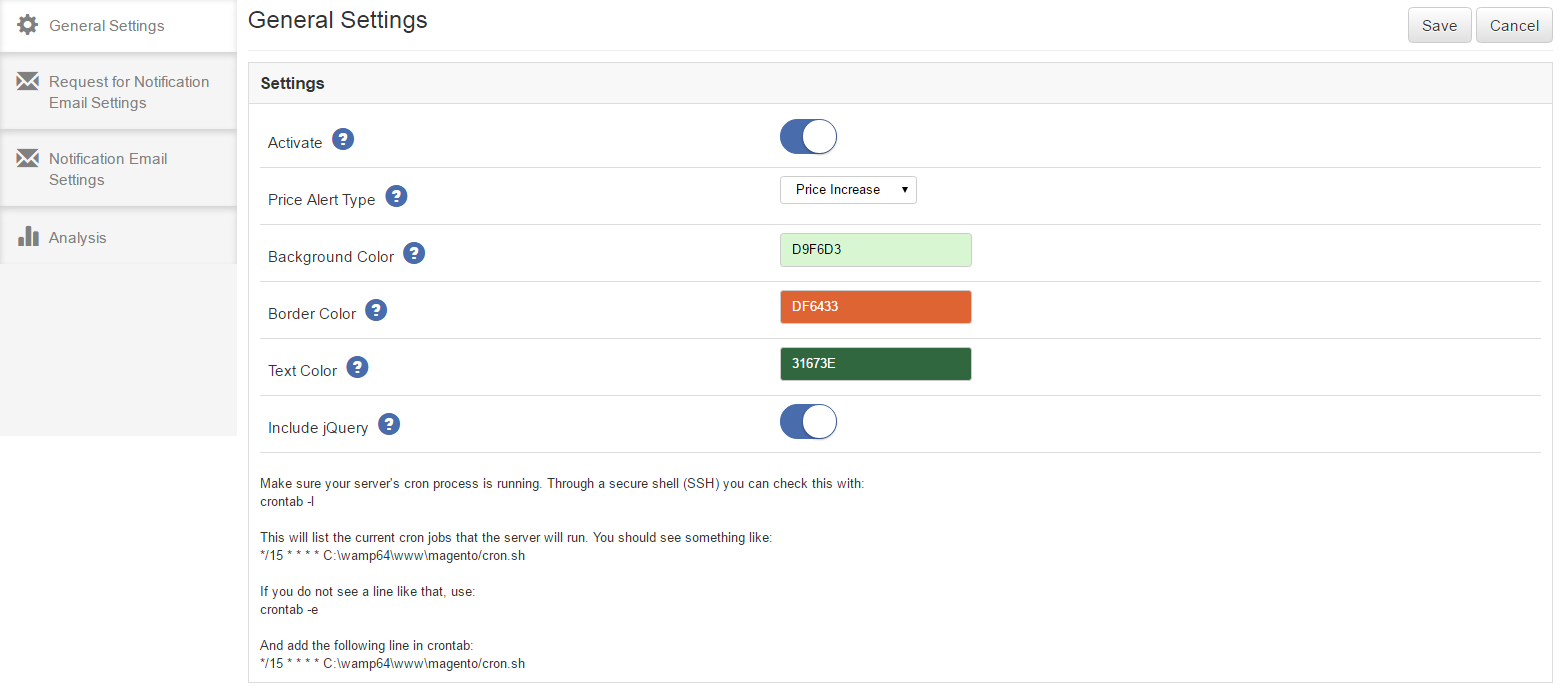
This tab will be opened by default when you click on the menu. General Settings tab will have following options:

  • Activate – This will be an on/off switch. Admin will have the option to Enable/ Disable the Magento back in stock extension. If enabled Magento stock alert will be enabled on front end product page otherwise not.
  • Price Alert Type – This will be a drop down list having options “Price Decrease”, “Price Increase” and “both”. It means if “Price Decrease” is set then mail will be triggered to customer only when price of subscribed product decreases. If “Price Increase” is set then mail will be triggered when price of subscribed product increases. And if “both” is set then mail will be triggered in both cases. Default value of this Magento price alert notification extension will be set to “Price Decrease”.
  • Background Color – This will be a color picker palette. It will set the background color of Magento product update extension block on the product page.
  • Border Color – It will also be a color picker palette. It will set the border color of Product update extension block on the product page.
  • Text Color – This will also be a color picker palette. It will set the text color in the Magento stock alert extension block on the product page.
  • Include j-Query – This field of Magento price alert will also be an on/off switch. By default it will set to off but if you are using Magento version lower than 1.9 then turn it on. It will include required j-Query files.

*Note 1: Stock notification mail will be sent to the customers at every time when product goes in stock from out of stock.

*Note 2: You have to make sure that Magento CRON process is running on your server to get notified your customers when any subscribed product comes in stock. Through a secure shell(SSH), you can check this with:

crontab -l

This will list the current CRON jobs that the server will run. You should see something like:

*/15 * * * * /home/user/public_html/magento/cron.sh

If you do not see a line that, use:

crontab -e

And add the following line in crontab:

*/15 * * * * /home/user/public_html/magento/cron.sh

Below is the screen shot of the this tab :

Request for Notification Email Settings

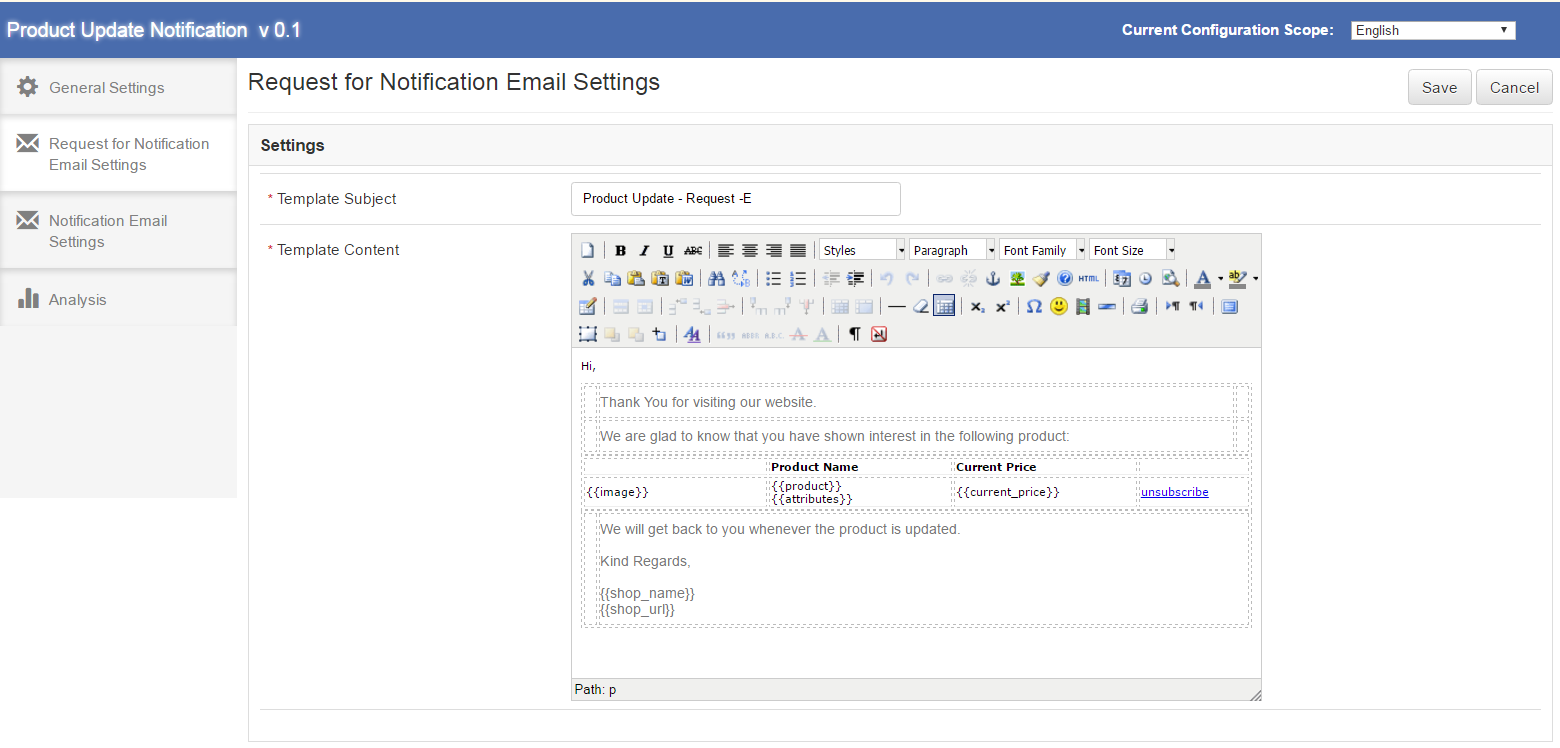
This tab of product update notification Magento will have the Email settings which will be sent when customer subscribes himself for notifications for a particular product. This tab will have the following options:

  • Template Subject – It will be the subject of the mail which will be sent. This field of the Magento product update will be mandatory and default value will be ‘Product Update – Request’.

  • Template Content – This will be the content of the mail which will be sent initially to the customer. This field will also be mandatory. The default content of the Magento back in stock plugin will be as shown in the proposed screen below. The content enclosed in {{}}, will be the variables which will be used when sending actual mail. Other than these all content would be static. There will also be “Unsubscribe” link against the product clicking on which customer will be redirected to a page on store showing “You have been unsubscribed successfully”.

Below is the screen shot of the this tab :

Notification Email Settings

This tab of Magento stock alert extension will have the Email settings which will be sent to the subscribed customers for a particular product and that product gets updated i.e. either price updated or comes in stock from out of stock. This tab of Magento price alert extension will have the following options:

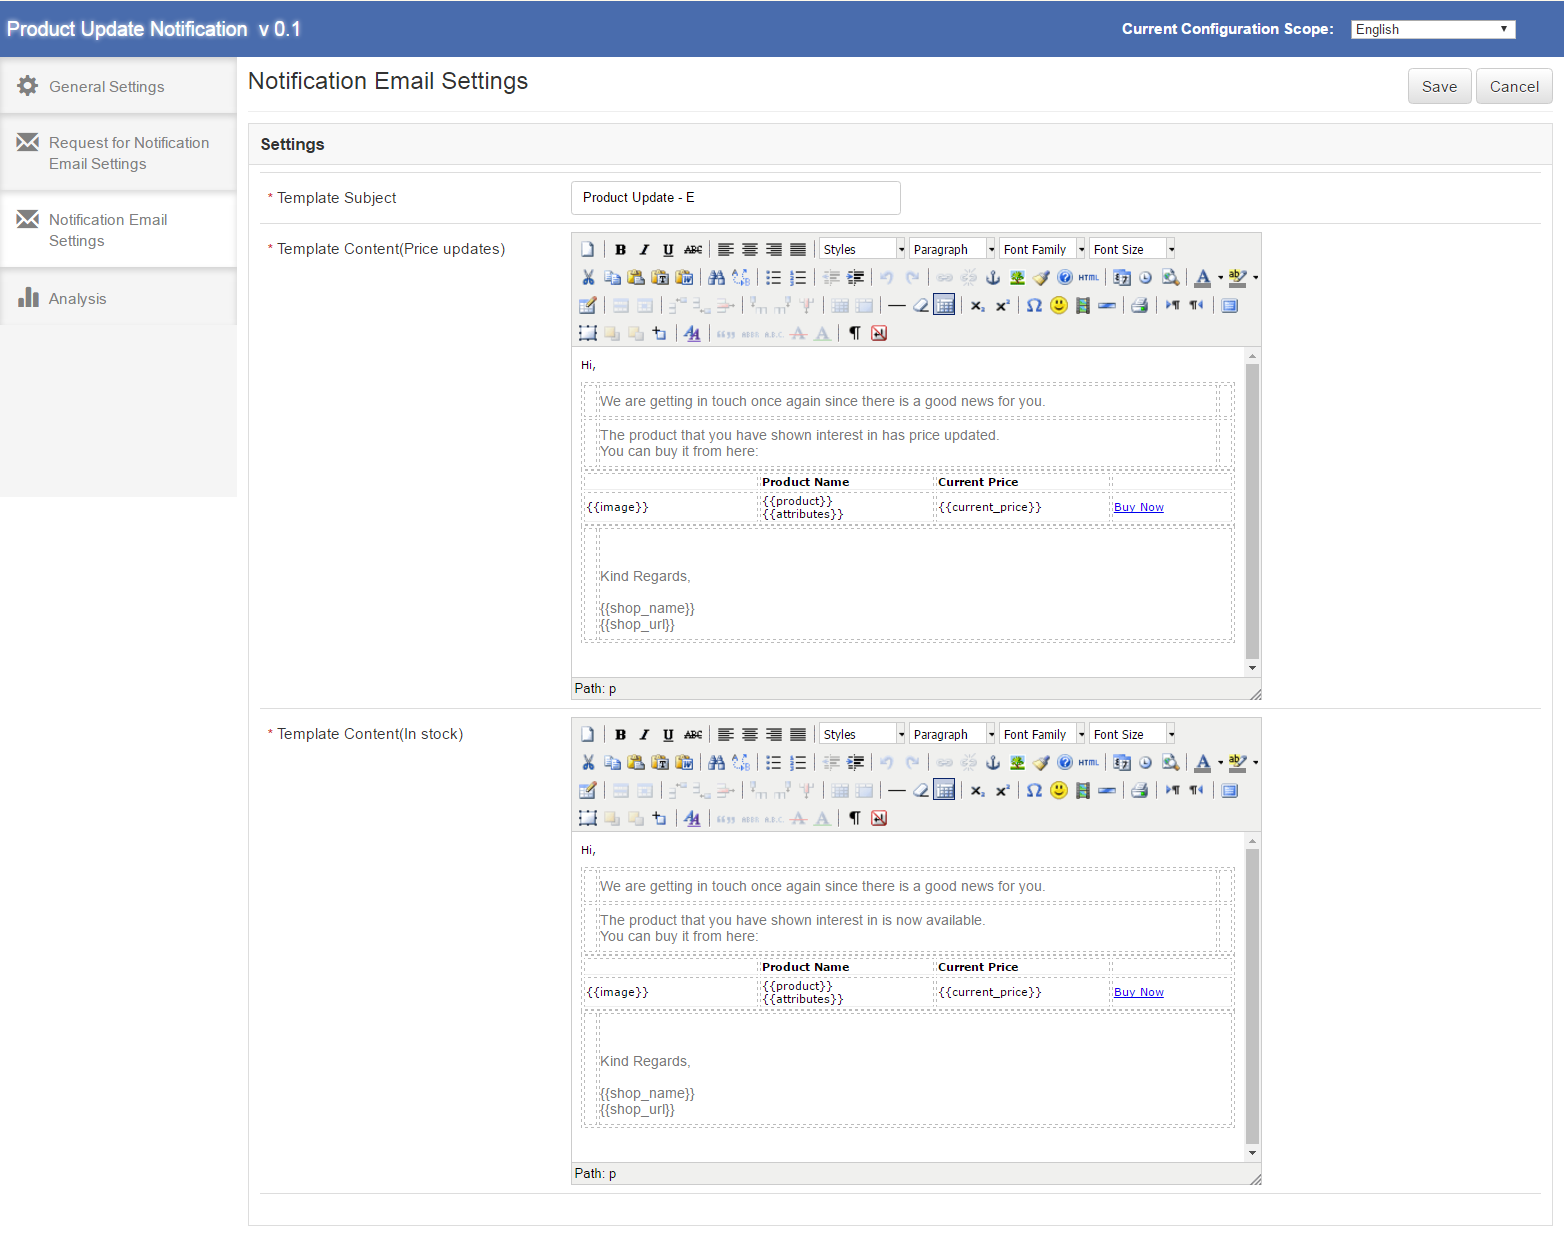
  • Template Subject – It will be the subject of the mail of the Magento product update extension which will be sent to the customer when product gets updated. This field will be mandatory and default value will be ‘Product Update’.
  • Template Content(Price Updates) – This will be the content of the mail of product update notification extension which will be sent finally to the customer when a particular subscribed product gets price update. This field of Magento price alert notification extension will also be mandatory. The default content will be as shown in the proposed screen below. The content enclosed in {{}} will be the variables which will be used when sending actual mail. Other than these all content would be static.
  • Template Content(In Stock) – This will be the content of the mail which will be sent finally to the customer when a particular subscribed product comes in stock. This field will also be mandatory. The default content of the Magento stock alert will be as shown in the proposed screen below. The content enclosed in {{}} will be the variables which will be used when sending actual mail. Other than these all content would be static.

Below is the screen shot of the this tab :

Analysis

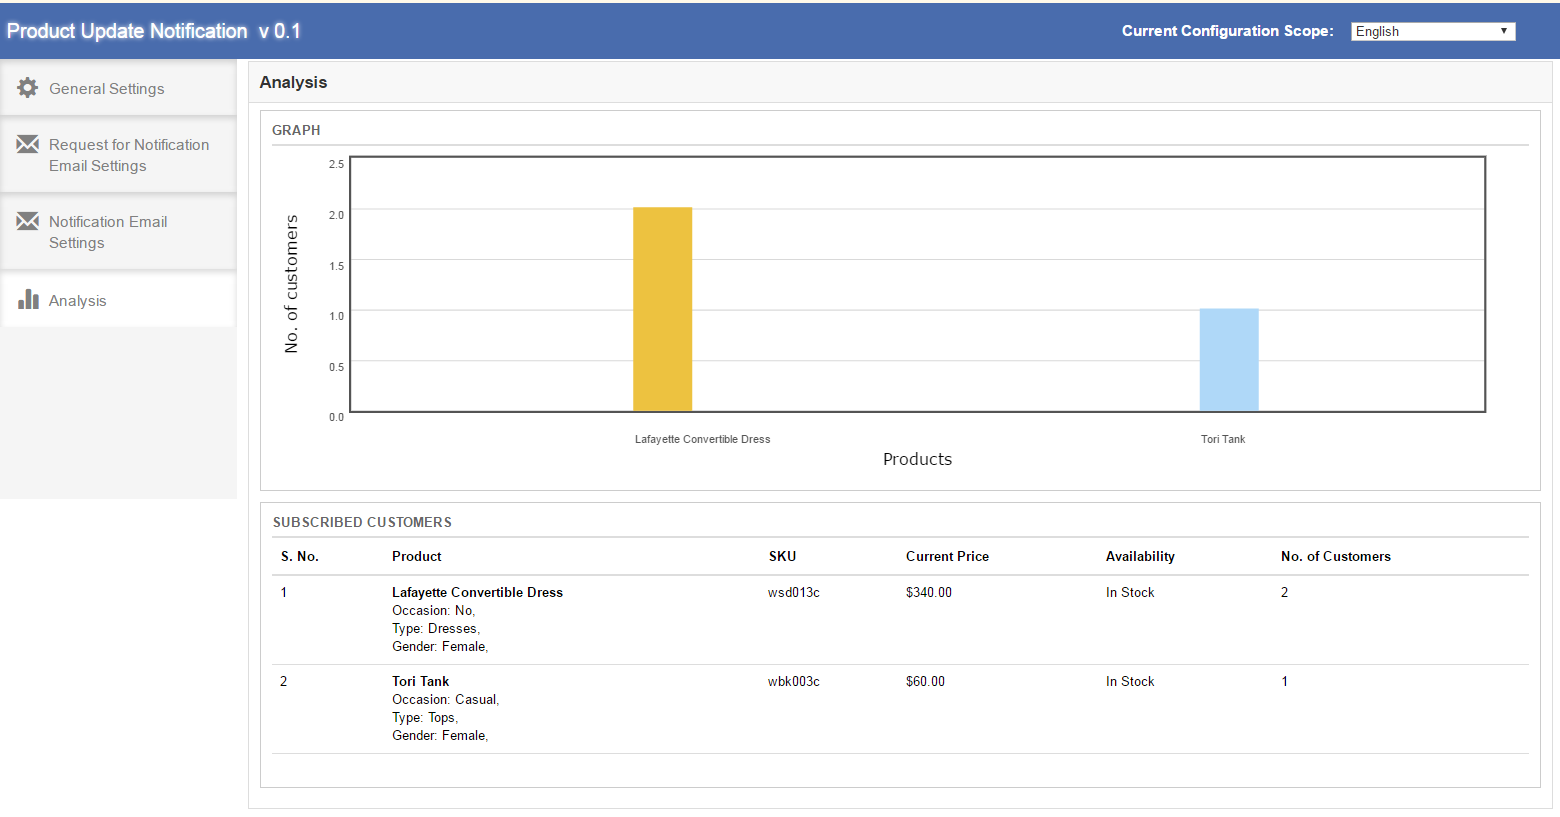
In this tab of product update notification extension, complete analysis of the subscribed customers can be found. This analysis would be in form of graph and in form of detailed list. It will be the analysis of top 10 products. Also, this list would only include the customers who are waiting for the notification email(either price update mail or stock availability mail). This tab of Magento product update extension will have two sections, which are described below:

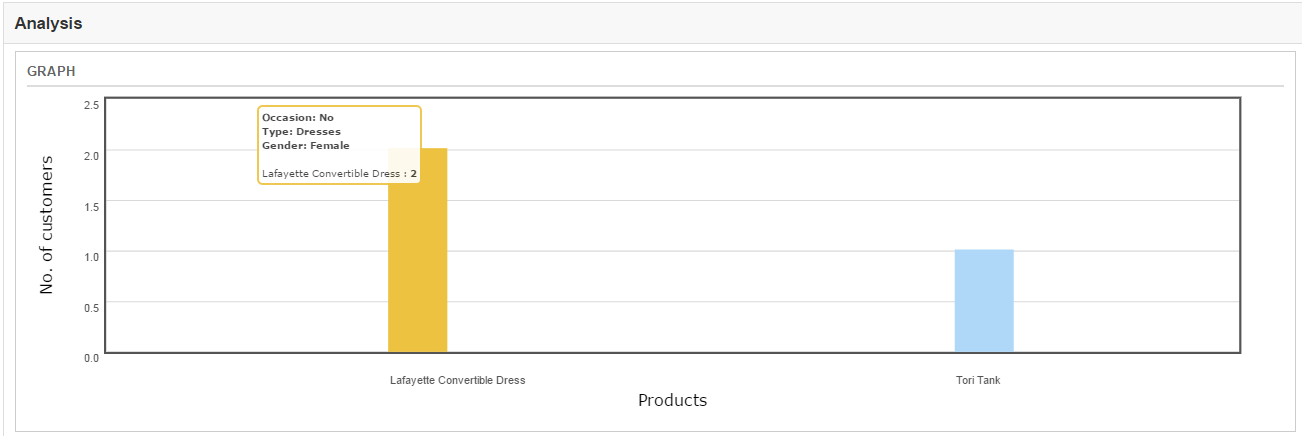
  • GRAPH – The graph of the Magento stock alert will show the analysis of top 10 products. Horizontally products would be shown and vertically number of customers would be shown. On hovering a bar in the graph name of the product, product attributes and number of customers which have subscribed for this product will be shown in a pop up.
  • SUBSCRIBED CUSTOMER – Subscribed customer would be a product wise detailed list. In first column of the list S. No., in second column product name and product attributes, in third column SKU of the product, in fourth column current price and in fifth column availability of the product(In stock or out of stock) and in sixth column number of customers that have subscribed for this product would be shown. This list of Magento price alert notification extension would also show top 10 products.

Below is the screen shot of the this tab :

On hovering a bar in the graph a small pop up will come as below:

Front End Interface

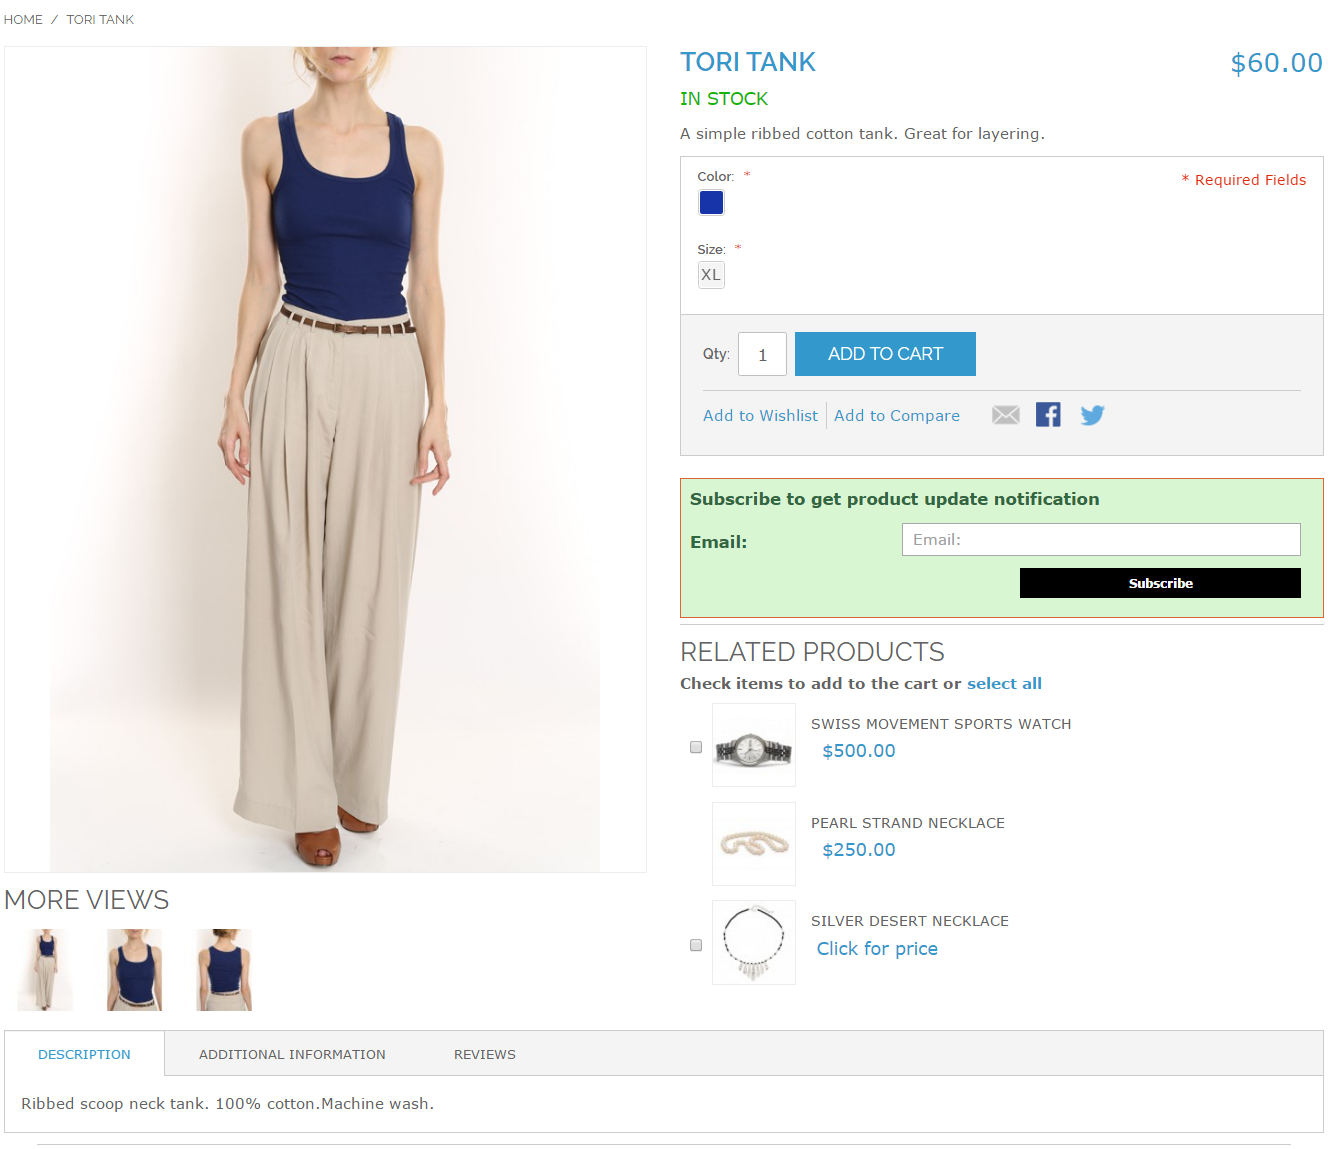
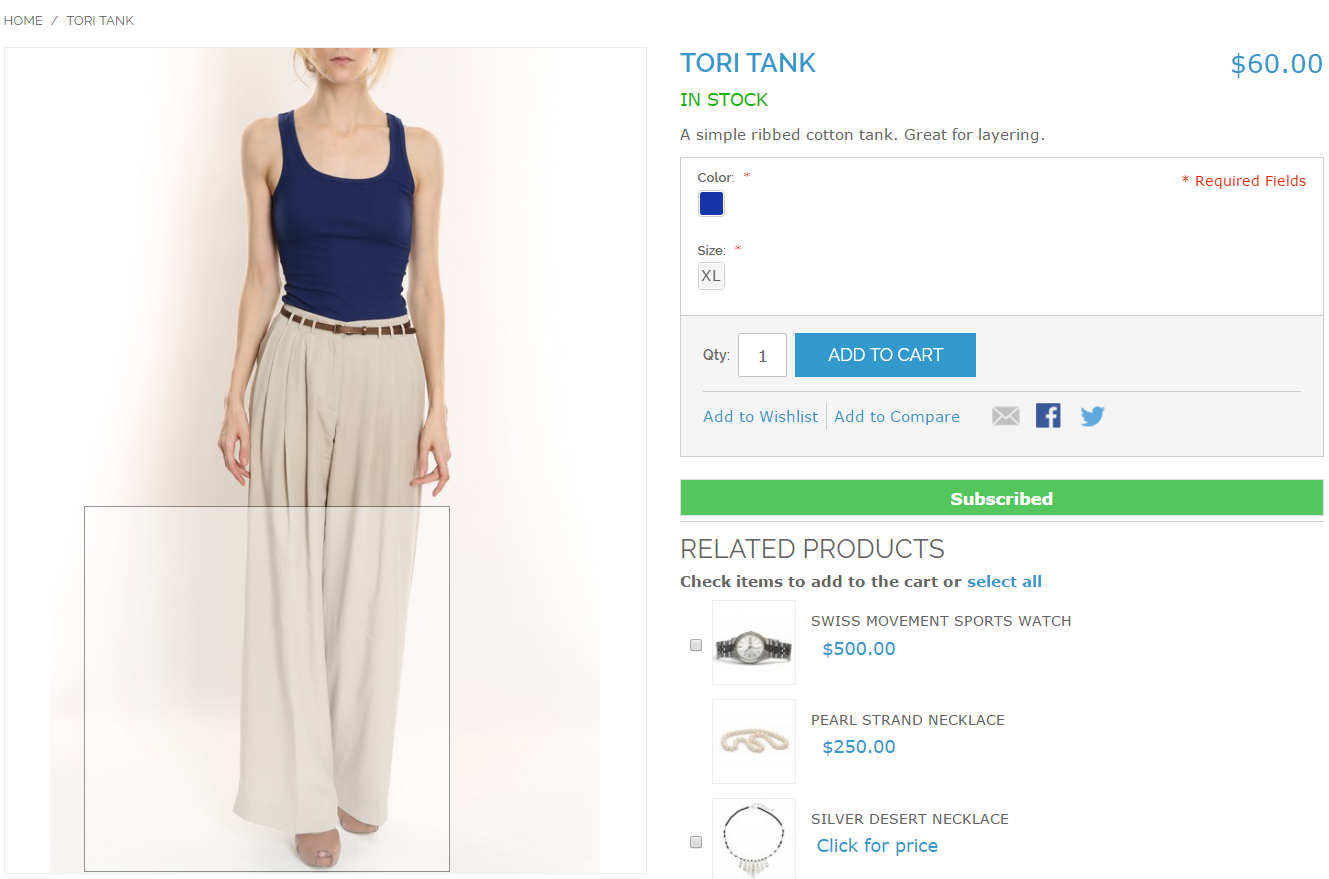
After enabling the Magento product update extension, the front end user will see a subscribe box at the product page. This block will contain an input field as to enter email id and a notify button through which the user will get subscribed for the respective product.

The front end of product update extension would appear as follows:

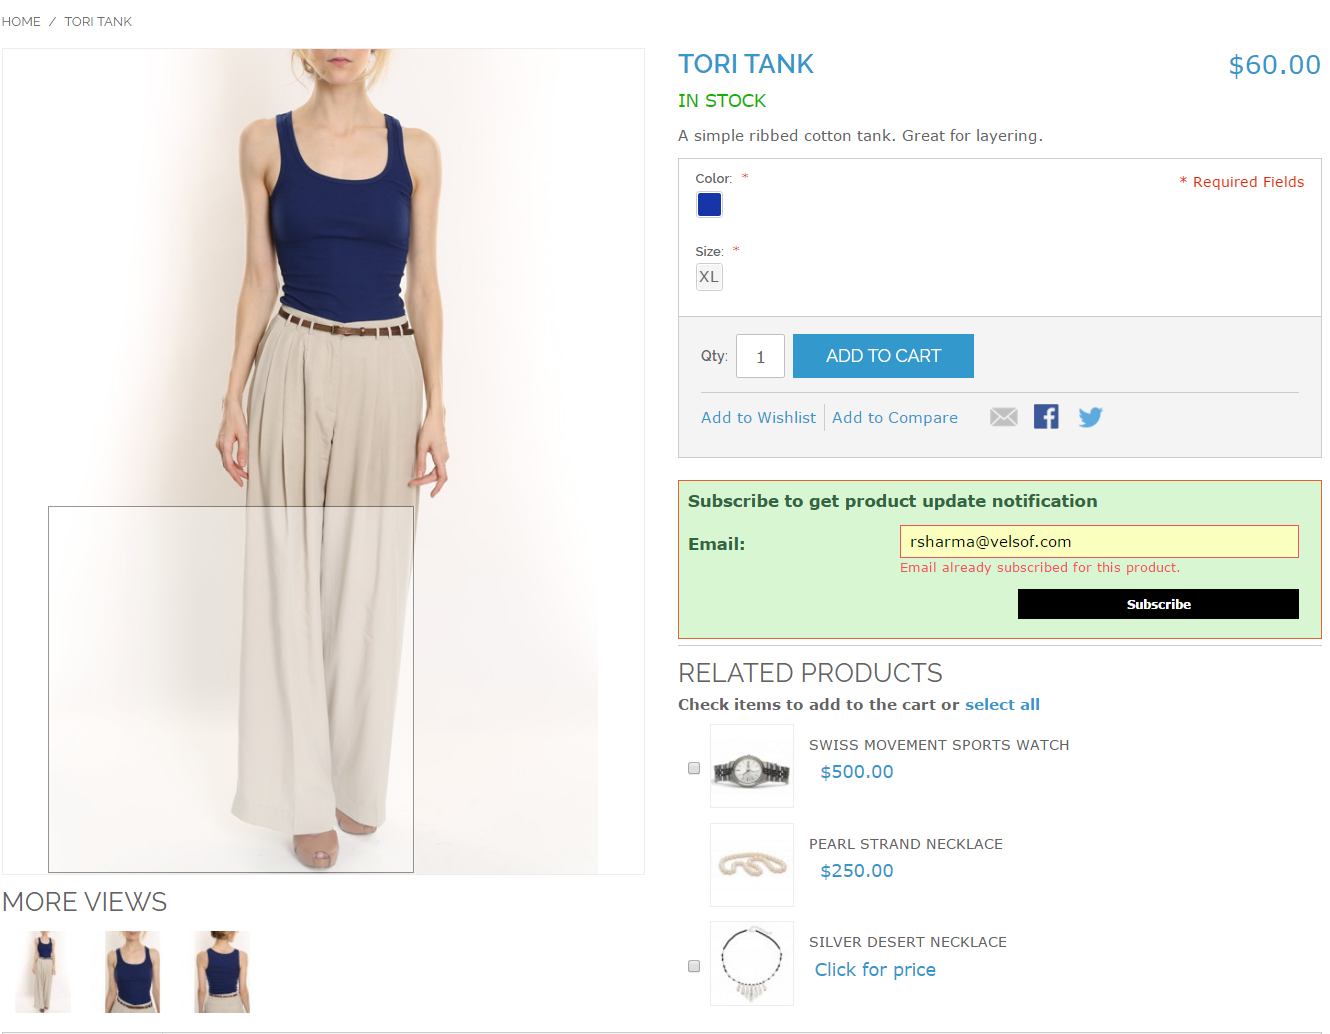
When customer enters the email id and click to the button “Subscribe” the initial mail will be sent to the entered email address and the message showing subscribed as below.

Note*

If a customer who has already subscribed for a particular product for Product Update tries to subscribe again with same email id for the same product then a message will appear showing “You have already subscribed for this product.”.

The screen shot is as following:

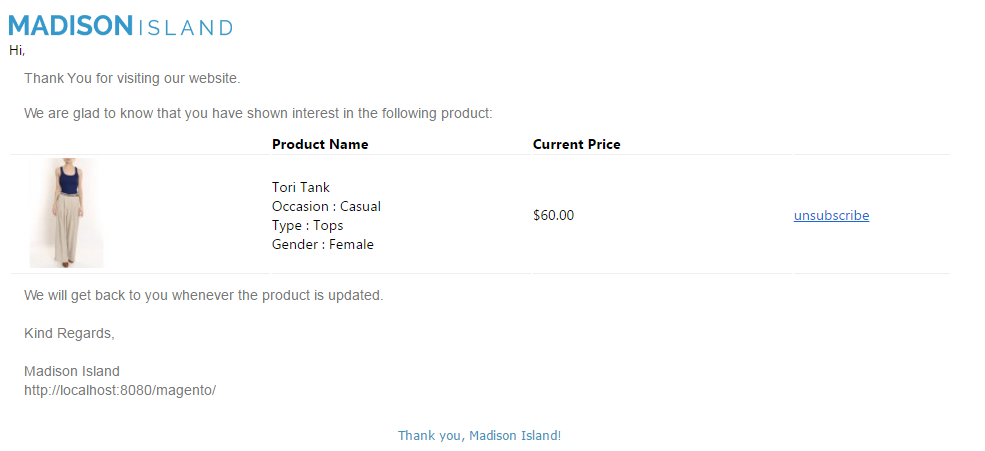
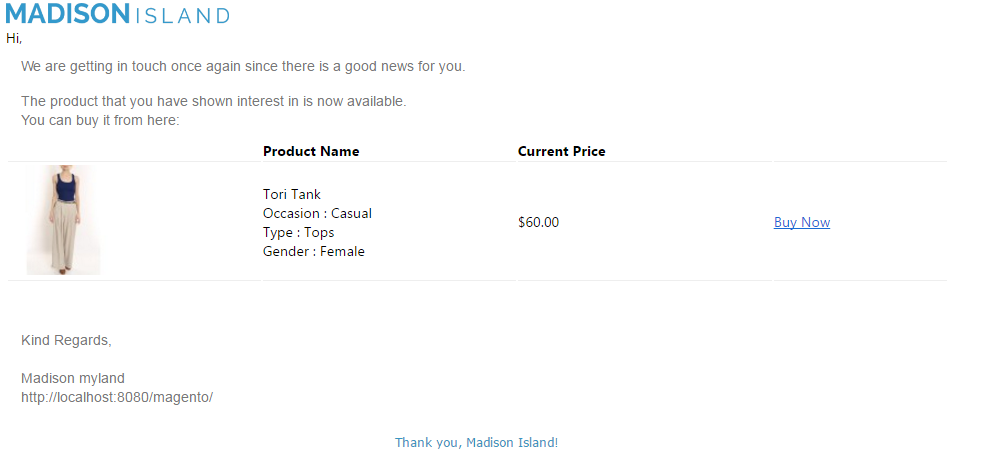
The initial email of the Magento stock alert extension by Knowband that will be triggered to the entered email id is as following:

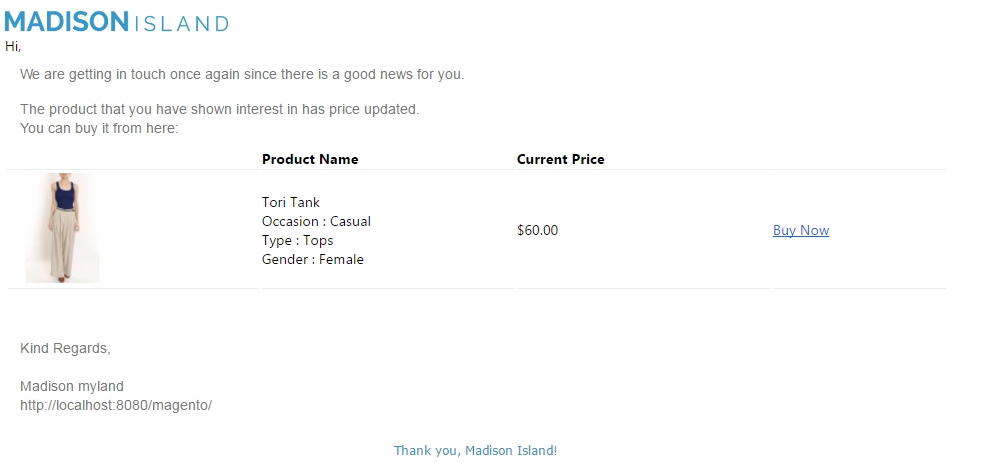
* Whenever the price of the product changes from admin panel and CRON for the module runs, the product update mail that will be triggered will be as following –

* Whenever product goes In stock from Out of stock and CRON for the module runs, the product update mail that will be triggered will be as following –

Module Link: https://www.knowband.com/magento-product-update-notification

Admin Demo: https://marketplace.knowband.com/index.php/productupdate/adminhtml_index/index/key/fd6d3b2be24a5975616043cdc671eca5/

Front Demo: https://marketplace.knowband.com/

Prestashop Back in Stock Notification – User Manual

1.0 Introduction

The online merchant can now use Knowband’s Prestashop back in stock notification module which allows the online users to subscribe for the favourite out of stock products. This Prestashop Out of Stock Subscription addon sends a notification to the subscribed customers when the products come in stock again. The Prestashop store merchant can show a notify block on the out of stock product pages. Store owners can also customize the looks and feel of the notification box. The online users can share the email id where they want to receive the Instock email alerts and click on the “Notify me” button.

The online users can view the list of subscribed products and also remove any product from the subscribed product’s list. This Prestashop product stock notification extension also provides an option to send low stock alert notification to the subscribers. The online merchant can send the low stock alert email notification after the specific quantity which can be set from the admin interface.

The Knowband’s Prestashop Back in Stock Module is GDPR compliant. The Prestashop product stock notification addon is integrated with Mailchimp, Klaviyo, SendInBlue email integrator. The store merchant can also view the list of subscribed customers along with the product name. The subscribers can be removed from the subscriber list. Admin can also download the subscriber’s list in CSV format.

1.1 Salient Features offered by Prestashop back in stock notification Addon

  • The online merchant can use this Prestashop product stock notification addon for sending email notifications of product back in stock to those users who subscribed for the same.
  • The Prestashop product stock notification addon offers GDPR compliance.
  • Admin can enable privacy policy settings and apply the related configurations from the admin interface of this Prestashop back in the stock addon.
  • In the updated version of this Prestashop back in stock notification Module, the online users have an option to view the subscribed products list. They can also remove any product from this list if they wish to do so.
  • The online merchant can also send low stock alert notifications to the subscribers for the subscribed products.
  • Prestashop product stock notification addon allows adjusting the color of the notification box using the color picker tool.
  • Admin can also enter the custom CSS and JS code for the advanced look and feel management.
  • The online merchant can integrate Mailchimp, Klaviyo, SendInBlue email integrator for creating a list of customers for email marketing activities in the future.
  • The store admin can view a list of highly demanded products from the analysis section.
  • The Prestashop back in stock notification Addon shows a list of all the subscribers and the e-merchant can also remove any subscriber from the list
  • Provides an option to add custom fields on the back in the stock window/notification box.
  • Collect information like name, region, address, etc from the subscribers. It has a text field, radio button, select option, etc for adding the custom fields.
  • You can also set priority for the fields to organize them in proper order.
  • Admin can set the order for the added custom fields.
  • PrestaShop Back in stock is provided with V3 ReCaptcha settings for bot and spam protection
  • The prestaShop owner can download the subscriber list in CSV format from the backend of Back In Stock Alerts Module.
  • The Prestashop back in the stock plugin is mobile responsive, compatible with all the Prestashop themes and is also SSL compatible.
  • The Prestashop back in stock notification Module offers multi-store and multi-lingual support.
  • Prestashop Instock Notifierallows store owners to share subscribed products, in stock, and low stock updates via em Store owners can easily customize the subject and body of the emails.

1.2 Technology for Development

Language: PHP
FrameWork: PrestaShop

2.0 Installation Guide

First of all, purchase the Prestashop back in stock notification

Addon and follow the below steps:

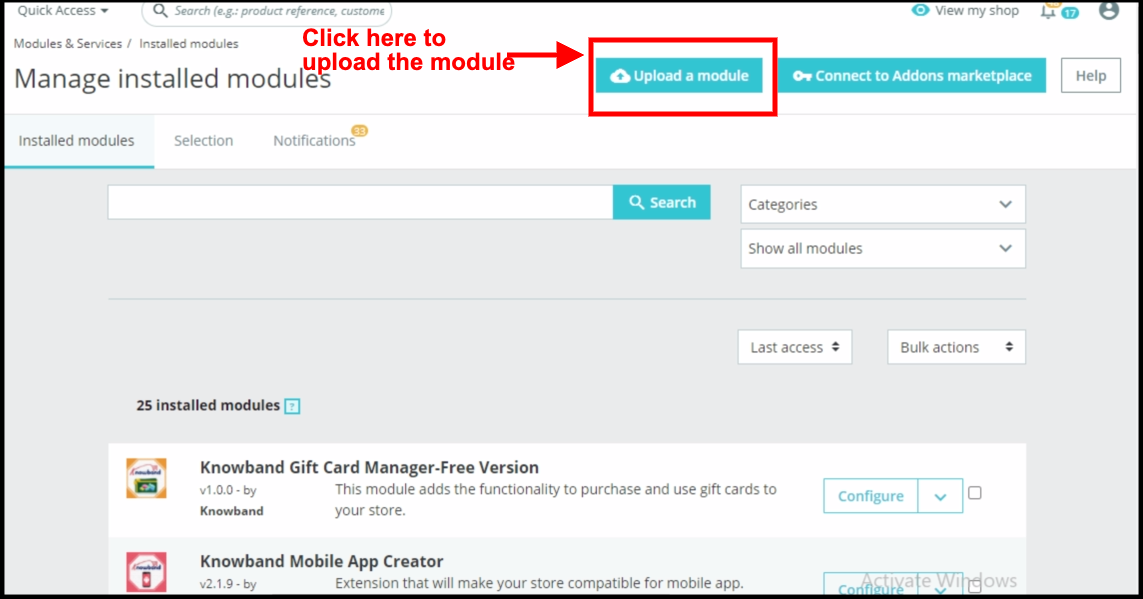
  • From the backend of the store, go to the Module Manager and click on “Upload a module”.

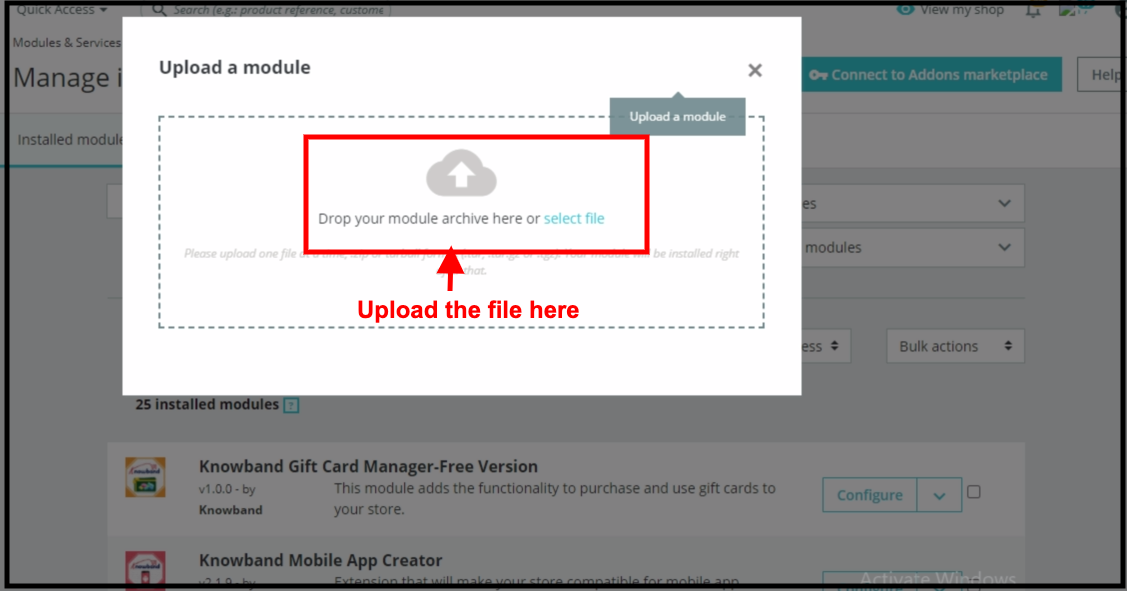
  • Upload the file from the system or drag and drop your module file here in the next tab.

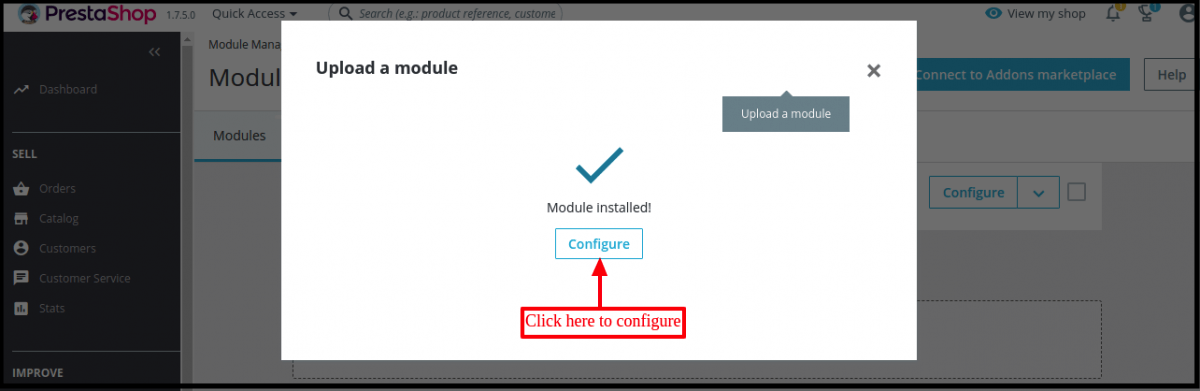
  • Once the installation process is completed, “Module installed” notifications will get displayed.

After the installation process, you will get access to the admin interface of the module by clicking on the “Configure” button. Click on the configure button and your module is ready to use.

3.0 Admin Interface

After installing Prestashop back in stock notification plugin into the store, the Prestashop plugin will provide Module Configuration and Subscribers list.

Admin will get these configuration options:

  • General Settings
  • Initial Email Settings
  • Final Email Settings
  • Low Stock Email Settings
  • Email Marketing Settings
  • Analysis
  • V3 Recaptcha Settings
  • Add Custom Fields
  • Subscription List

Each interface of this Prestashop back in stock is explained below.

3.1 General Settings

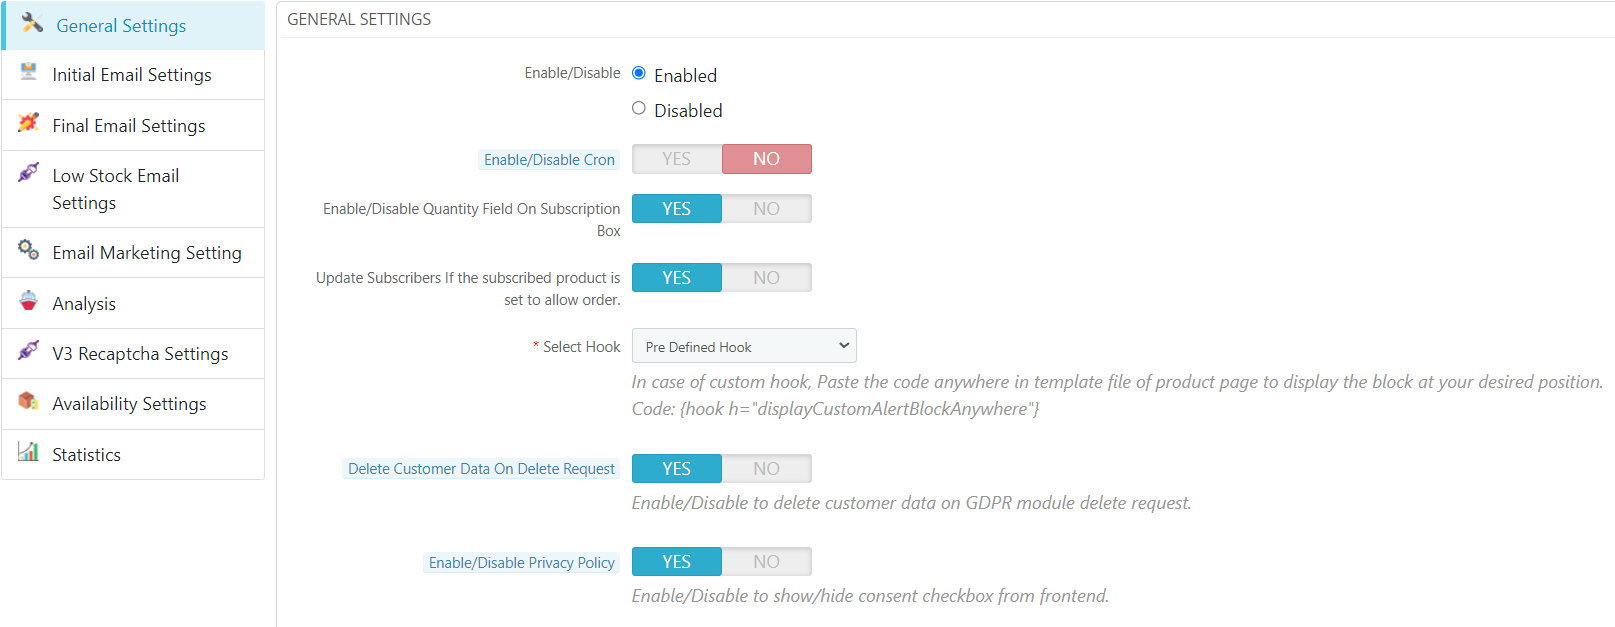
On clicking on configure link on Prestashop stock alert module listing page, the system will open general settings tabs of this Prestashop plugin by default. Initially, fields of this Prestashop product stock notification addon in the above form will be already filled with their default values.

  • Enable/Disable: Initially, this field of Prestashop back in the stock module by Knowband will be “OFF”. Admin can enable/disable the PrestaShop plugin by turning ON/OFF in this setting.
  • Enable/Disable Cron: When this field is enabled the admin needs to hit the settled cron and the mail will be sent to respective subscribers.
  • Enable/Disable Quantity Field On Subscription Box: When this field is enabled the users are allowed to enter the quantity of their respective product from the field that will be displayed in the subscriber form.
  • Update Subscribers If the subscribed product is set to allow order: When this functionality is enabled then the customers who have subscribed to the product will receive the back-in-stock mail when the product is set to allow order.
  • Delete Customer Data on Delete Request: Enabling this functionality will delete the customer data on GDPR module delete request.
  • Privacy Policy: Enable this toggle button to display the privacy policy option at the front end. The Privacy Policy will be shown at Notify Me block.
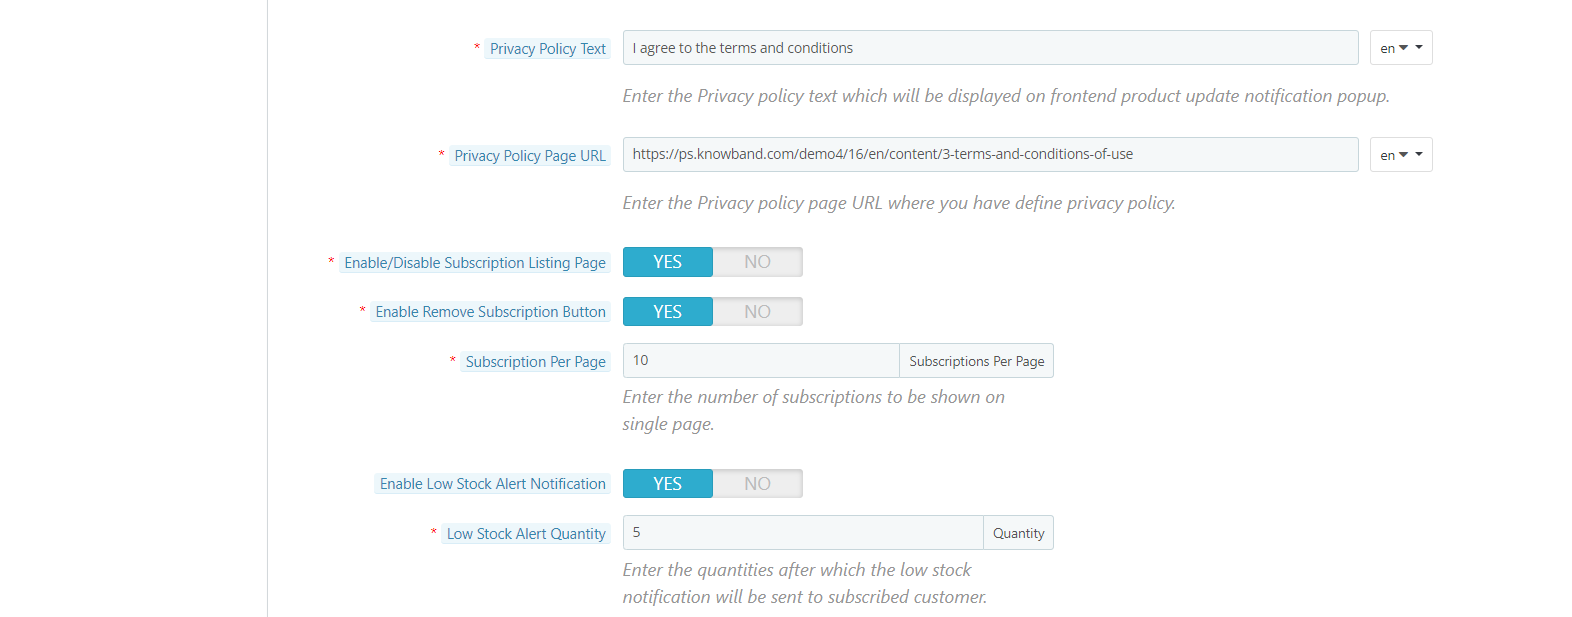
  • Privacy Policy Text: The admin can enter the desired text for a privacy policy. The text can be changed whenever needed.
  • Privacy Policy Page URL: The admin can easily set his choice of URL to the privacy policy.
  • Enable/disable Subscription listing page: The online merchant can enable this option for showing a list of subscribed products on the website front-end interface.

  • Enable Remove Subscription button: By enabling this option, the online merchant can show a remove button that can be used for removing any product from the subscription list.
  • Subscription per page: Select the number of products that you want to show per page.
    Enable Low Stock Alert Notification: Enable this option for sending a low stock alert notification for the users.
  • Low Stock Alert Quantity: Enter the quantity after which you want to alert the subscribers.

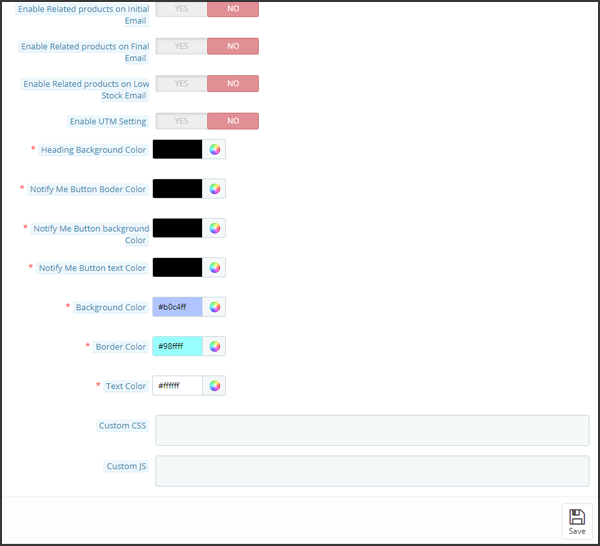
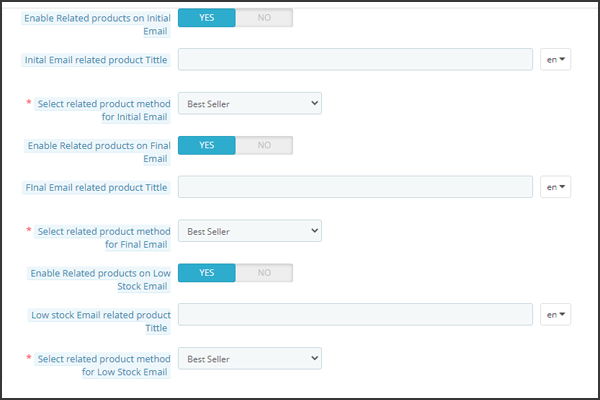
Show Related Products in initial, final and low stock email

  • Enable Related Products in Initial email: It allows admin to add related products in the initial email. You can add a title to the related products and choose what kind of products you want to show.
  • Enable Related Products in Final email: It allows admin to add related products in the final email alert of Back in Stock. You can add a title to the related products in the final email and choose what kind of products you want to show.
  • Enable Related products in Low stock email: Users can add related products in the low stock email alert. You can add a title to the related products in the final email and choose what kind of products you want to show.
  • Enable UTM Setting: By enabling UTM settings, you can add UTM source, UTM medium, and UTM campaign links
  • Heading Background color: Change the background color of the heading for the notification box
  • Notify me button border-color: Edit the button border color here
  • Notify me button background color: The button background color can be selected here
  • Notify me button text color: Change the text color of the button from here.
  • Background Color: Initially, this field of Prestashop stock alert module will be filled with some default value. Admin can change the background color of the subscription box by picking the color from the color picker that will be reflected on the front end of the Prestashop product stock notification addon.
  • Border Color: Using this option of the Prestashop back in stock notification plugin, the admin can set the border color of the subscribed box using the color picker.
  • Text Color: This field of Prestashop back in stock module allows the admin to change the text color of the notify box.
  • Custom CSS: This option of the Prestashop stock alert module allows the admin to write there own CSS as per requirement and will be reflected in the front end of this Prestashop plugin.
  • Custom JS: This field of Prestashop product stock notification addon allows the admin to write there own JavaScript as required.

3.2 Initial Email Settings

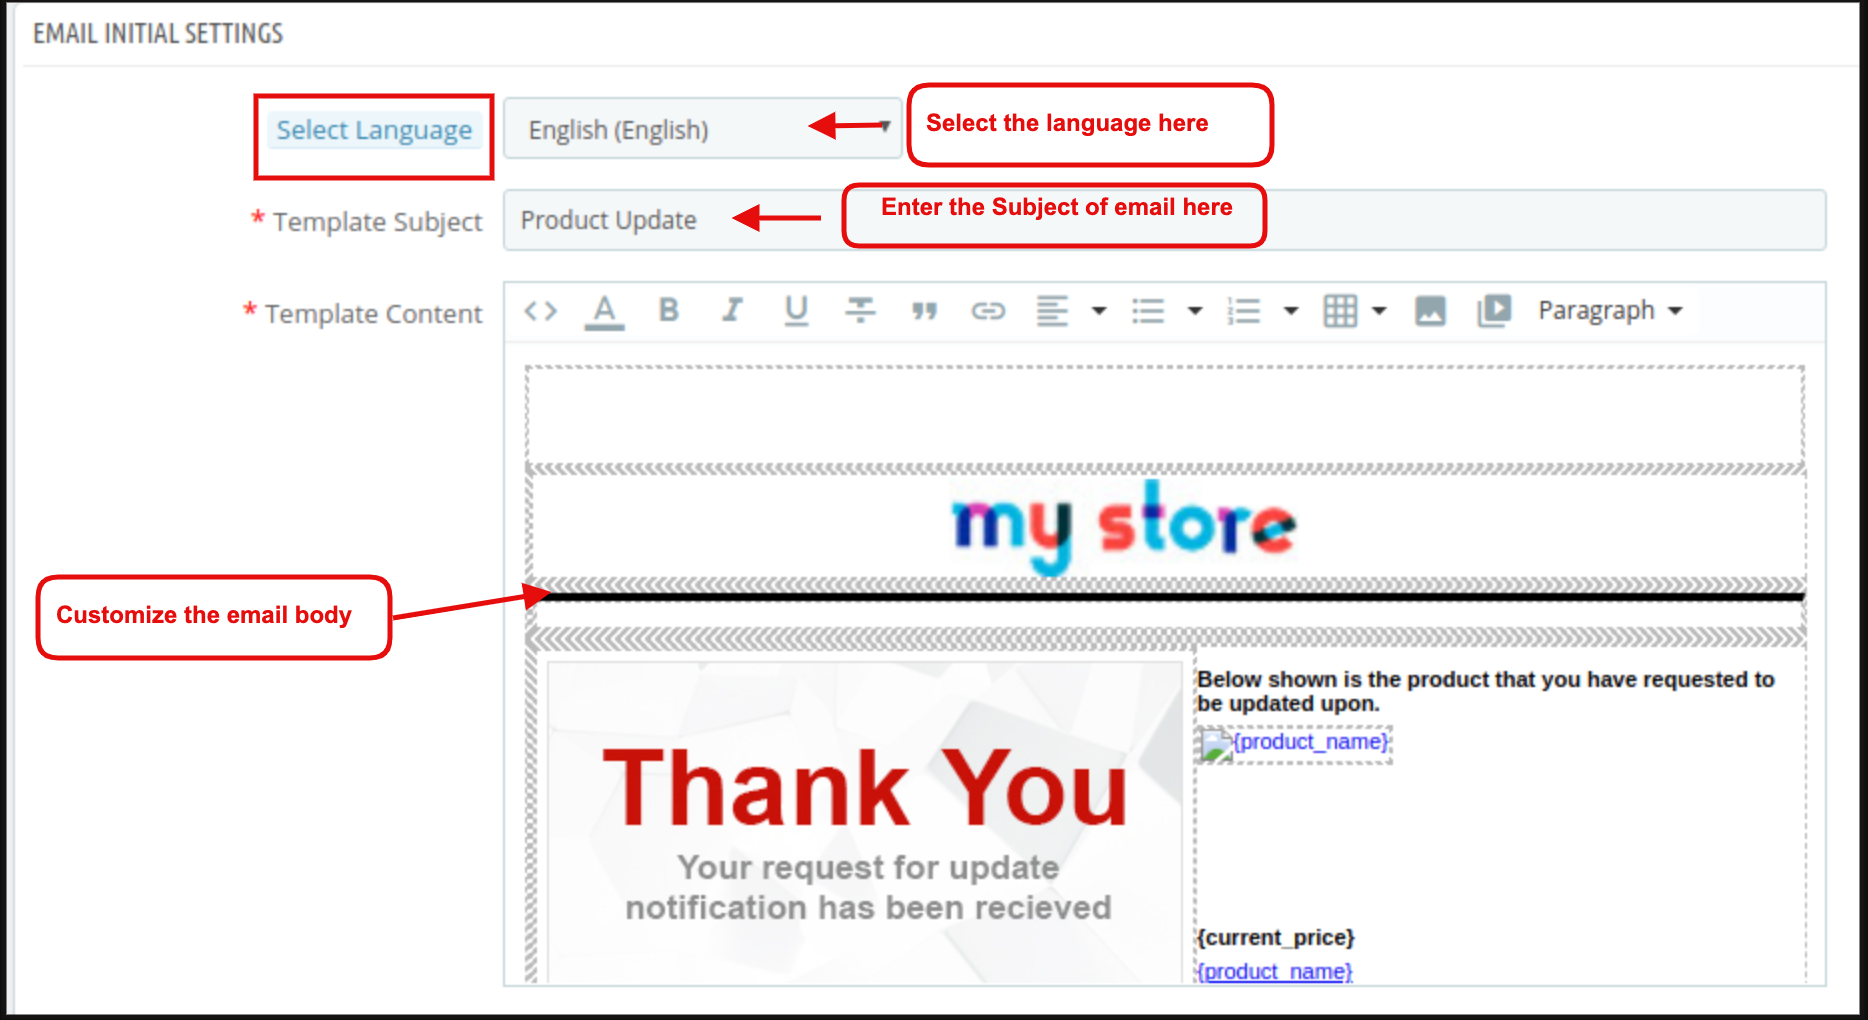
In this tab of the Prestashop product stock notification addon by Knowband, the admin can edit the email template of this Prestashop Out of Stock Subscription module. Admin can change the subject and main body of the mail corresponding to the particular language enabled or selected. The initial mail will be sent to the customer when the customer subscribes to a particular product.

3.3 Final Email Settings

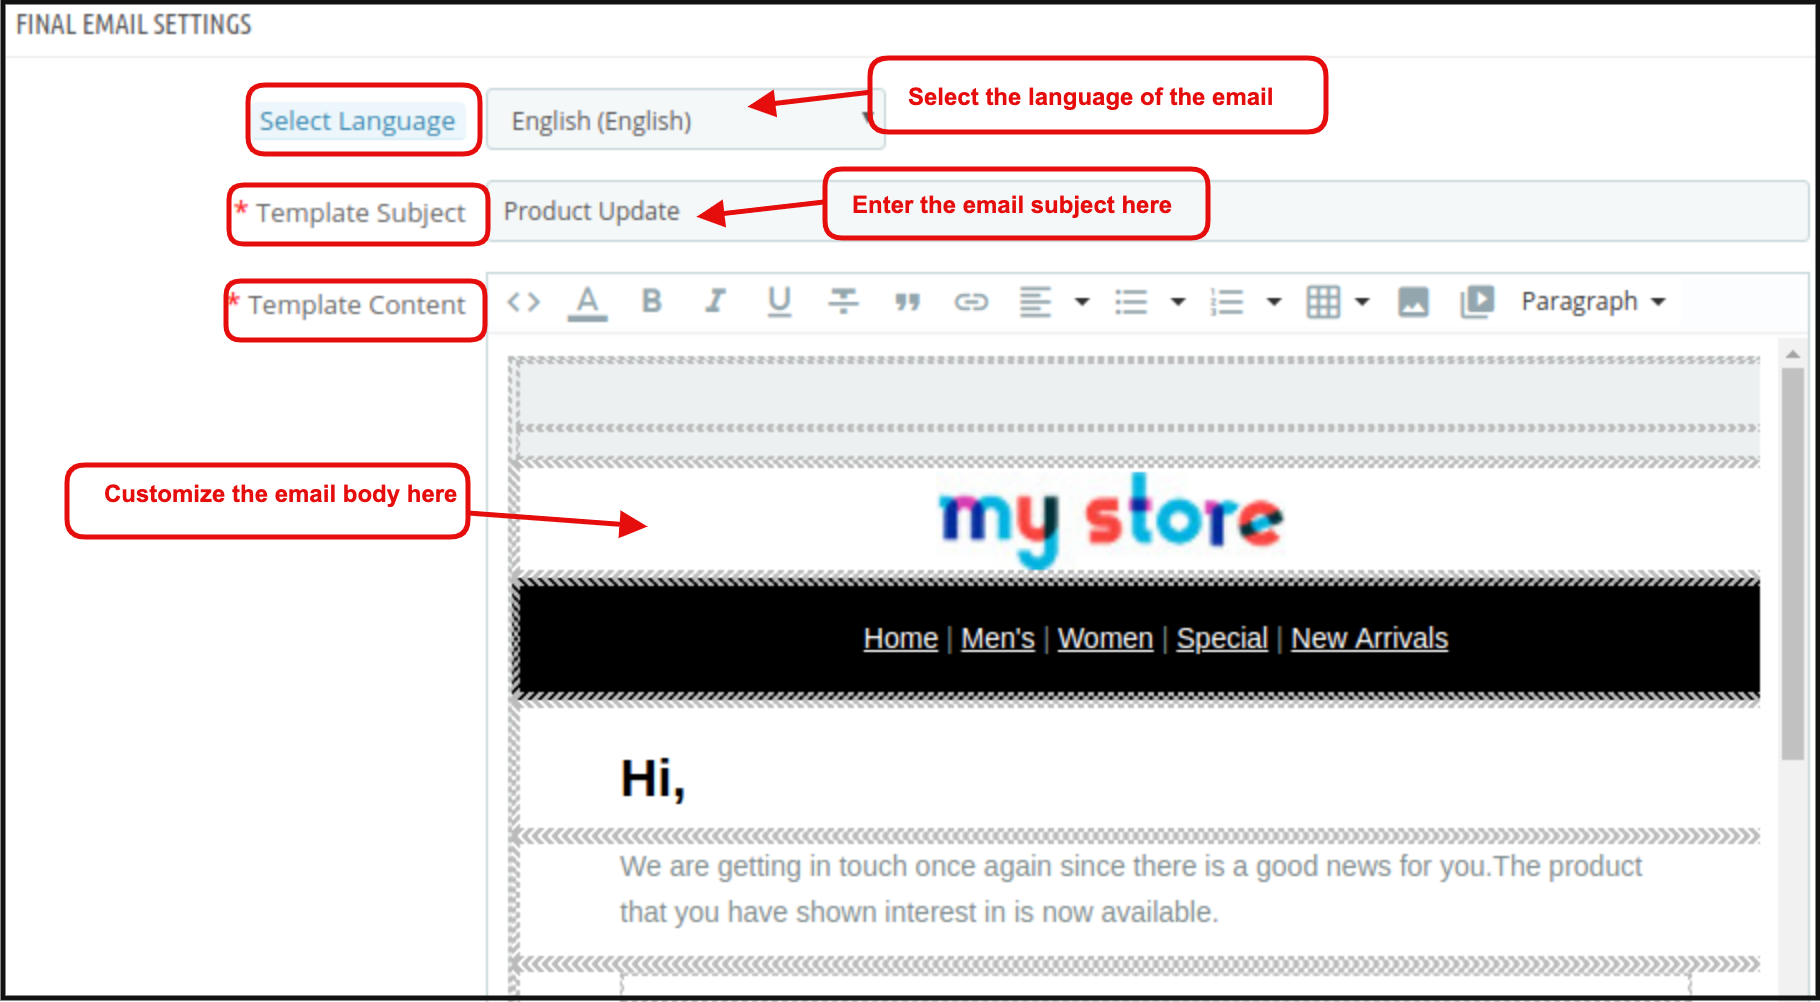
In this tab of the Prestashop reminder email module, the admin can edit the final email template to send to the customer when the product quantity of the product will be updated/ Instock. Admin can start customizing the email template after selecting the language corresponding to which admin wants to edit the template.

 3.4 Low Stock Email Settings

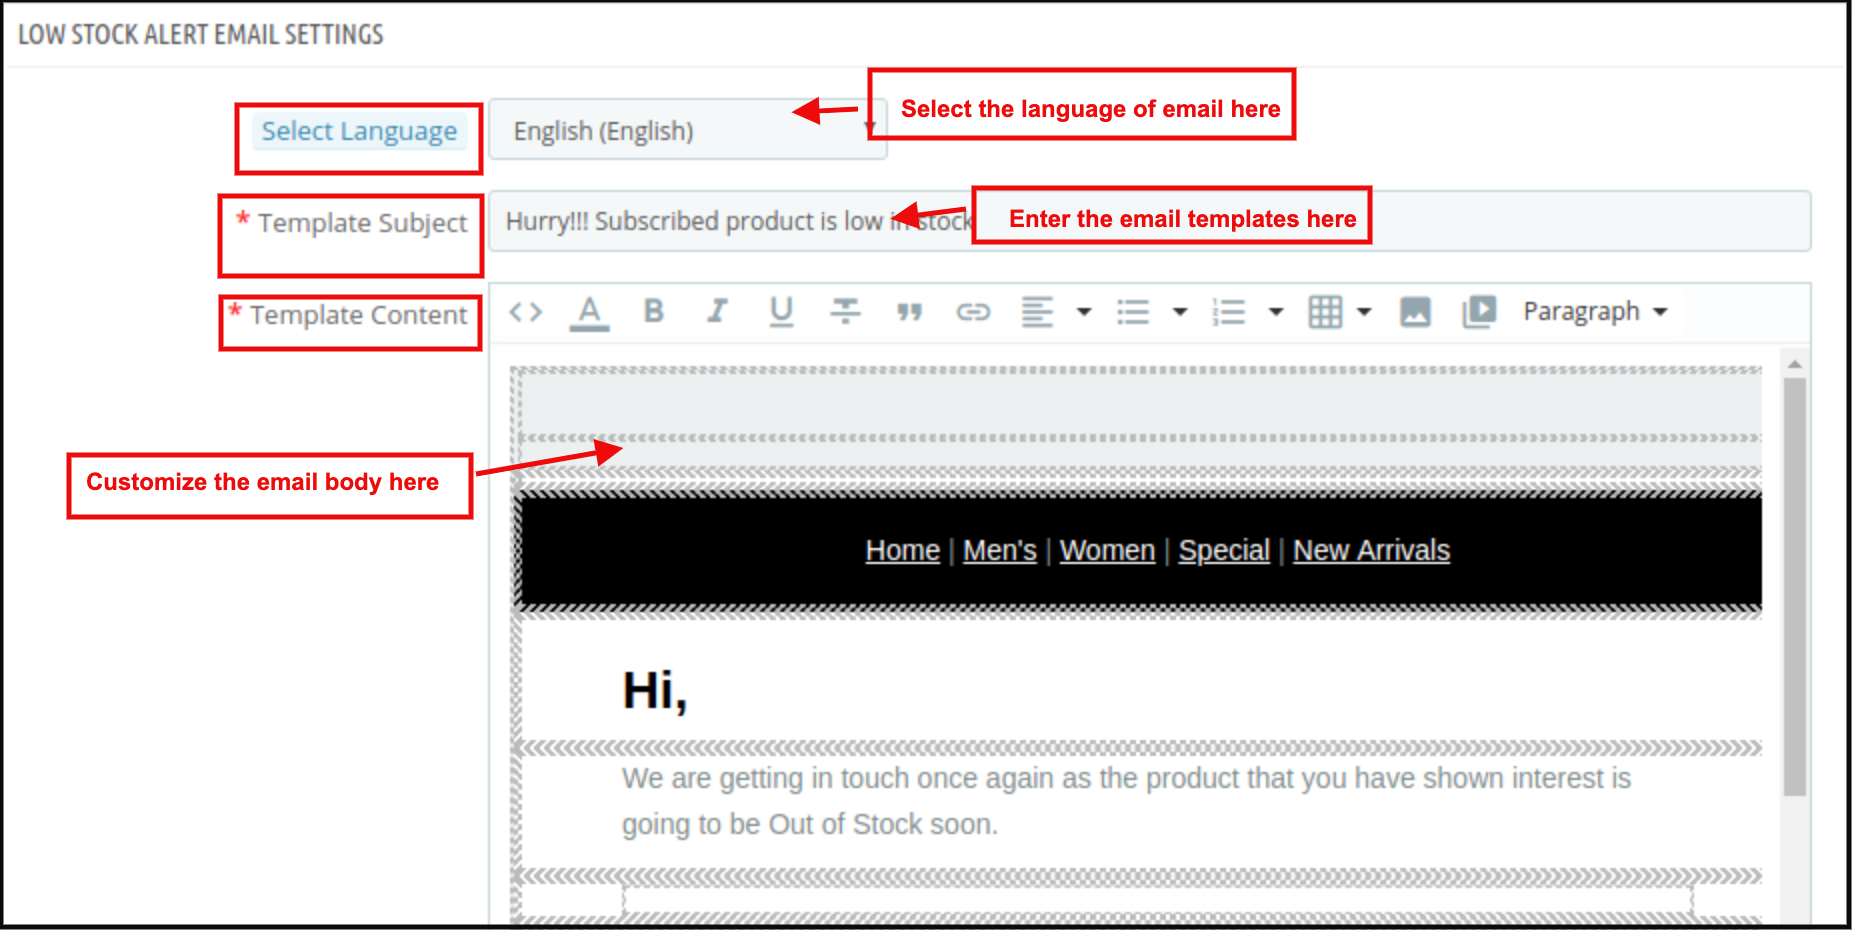
In this tab, an email template is available which can be further edited for sending a low stock email notification to the subscribers. The online merchant can select the language, enter the email subject line and edit the main content. Store admin can make changes in the subject and body of the mail anytime from the backend.

3.5 Email Marketing Settings

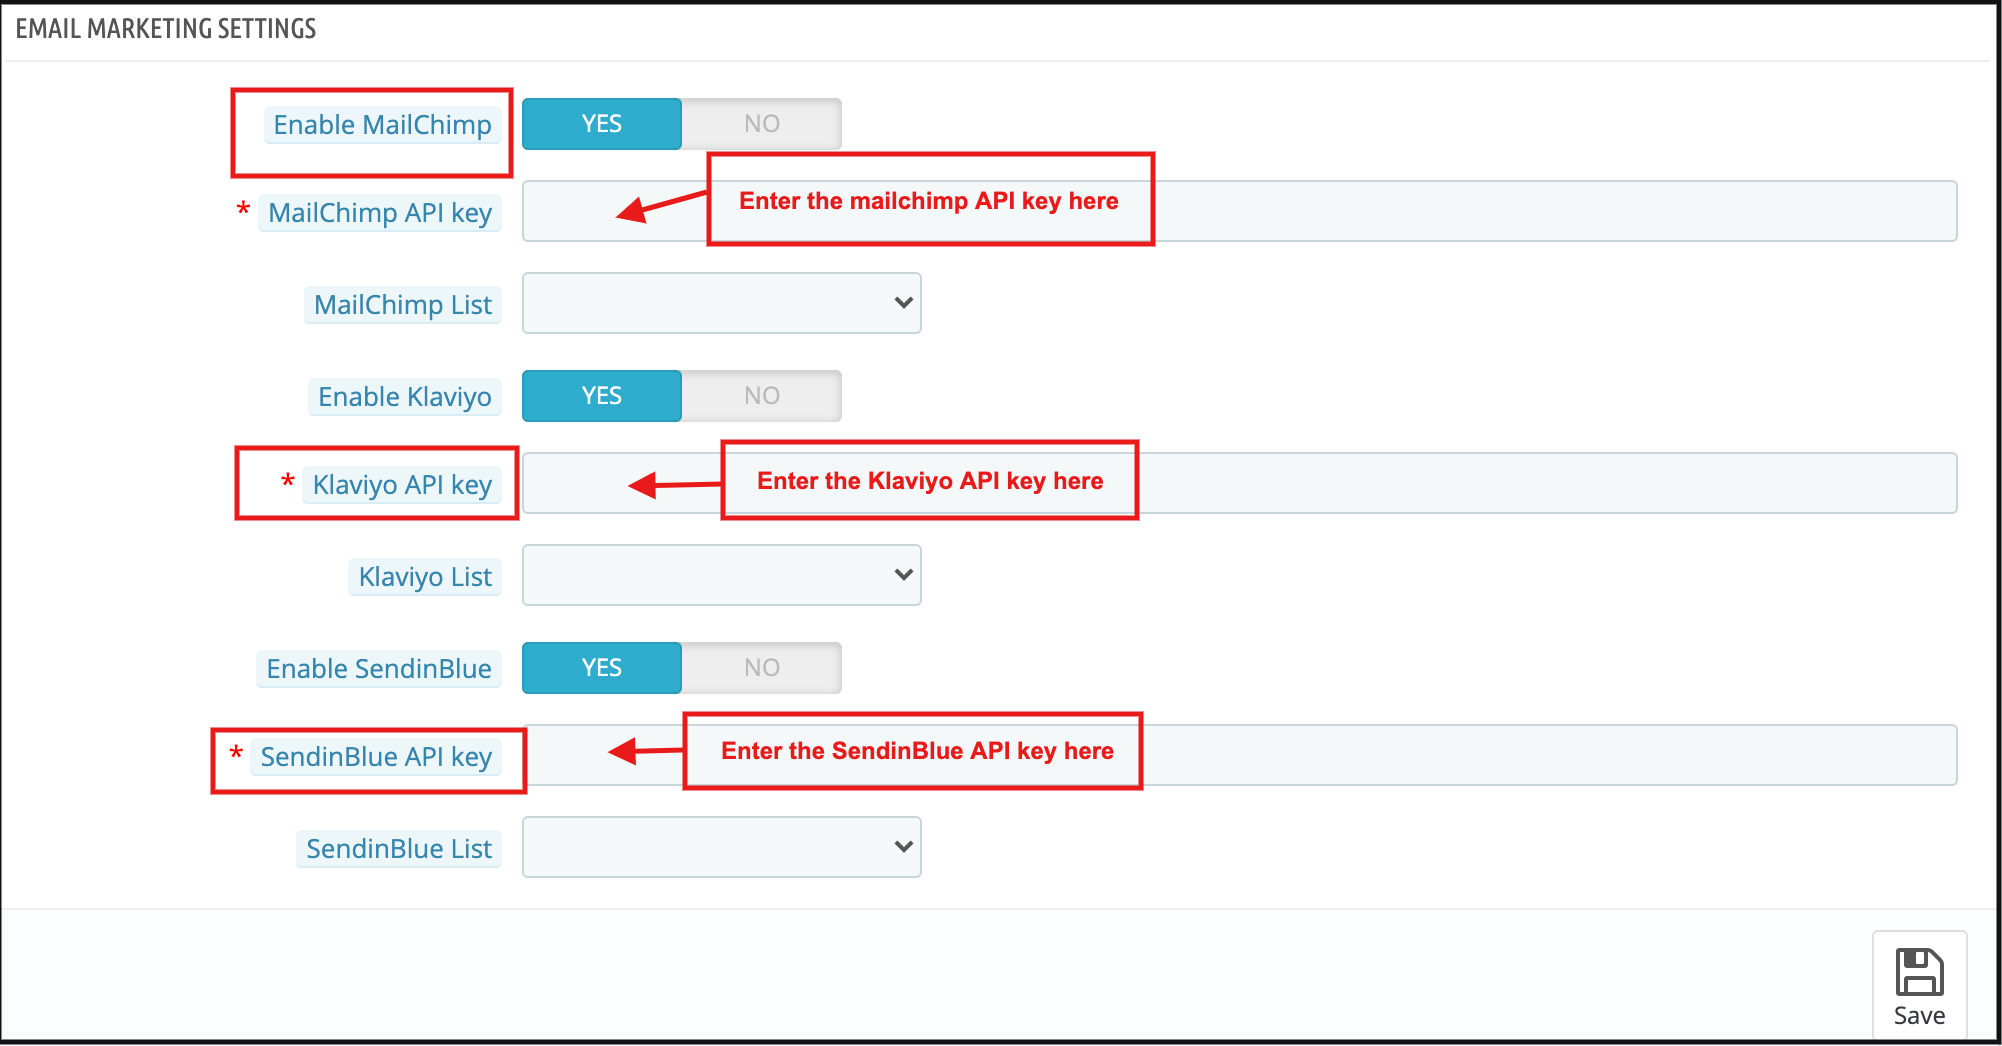
Admin can integrate various email integrators like MailChimp, Klaviyo and SendinBlue. Admin just needs to enter the API key for these email integrator sites and select the list in which they want to save the email id details.

3.6 Analysis

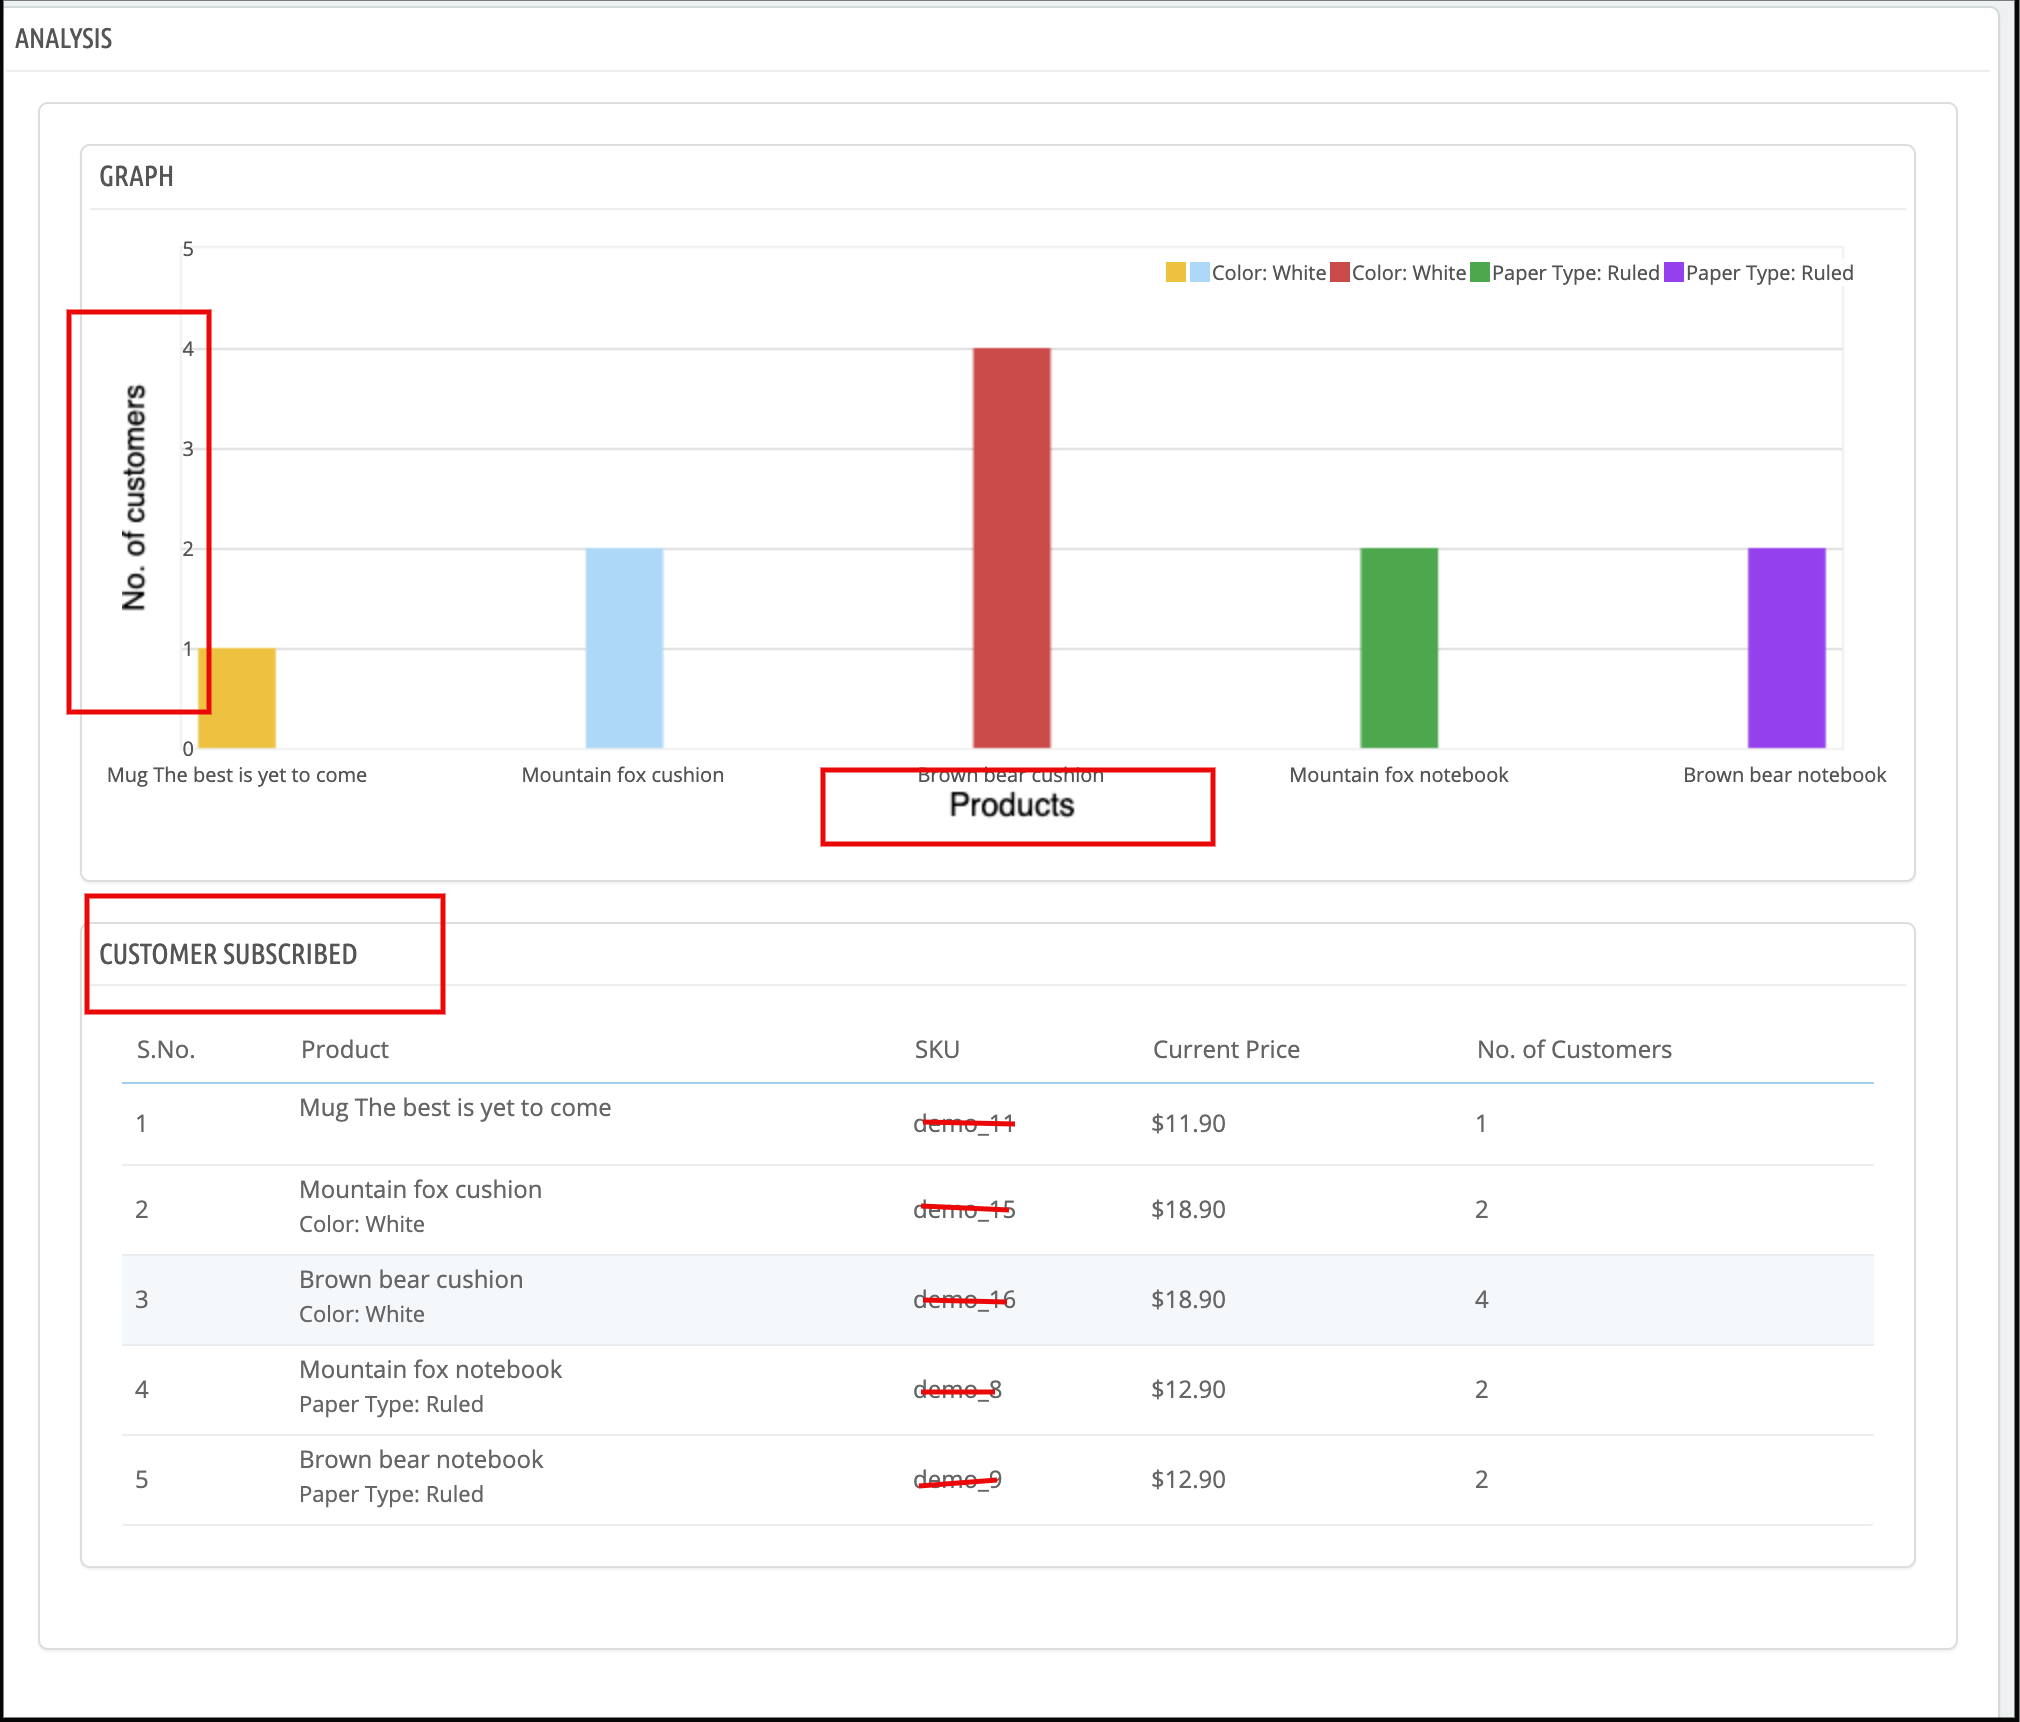
The complete analysis of the subscribed customers can be done in the form of a graph and the form of the detailed list. The graph will be displayed for the top 10 products at the back end of the Prestashop reminder email module.

According to the search elements and categories selected the list of the subscribed product will be displayed with some customers subscribed.

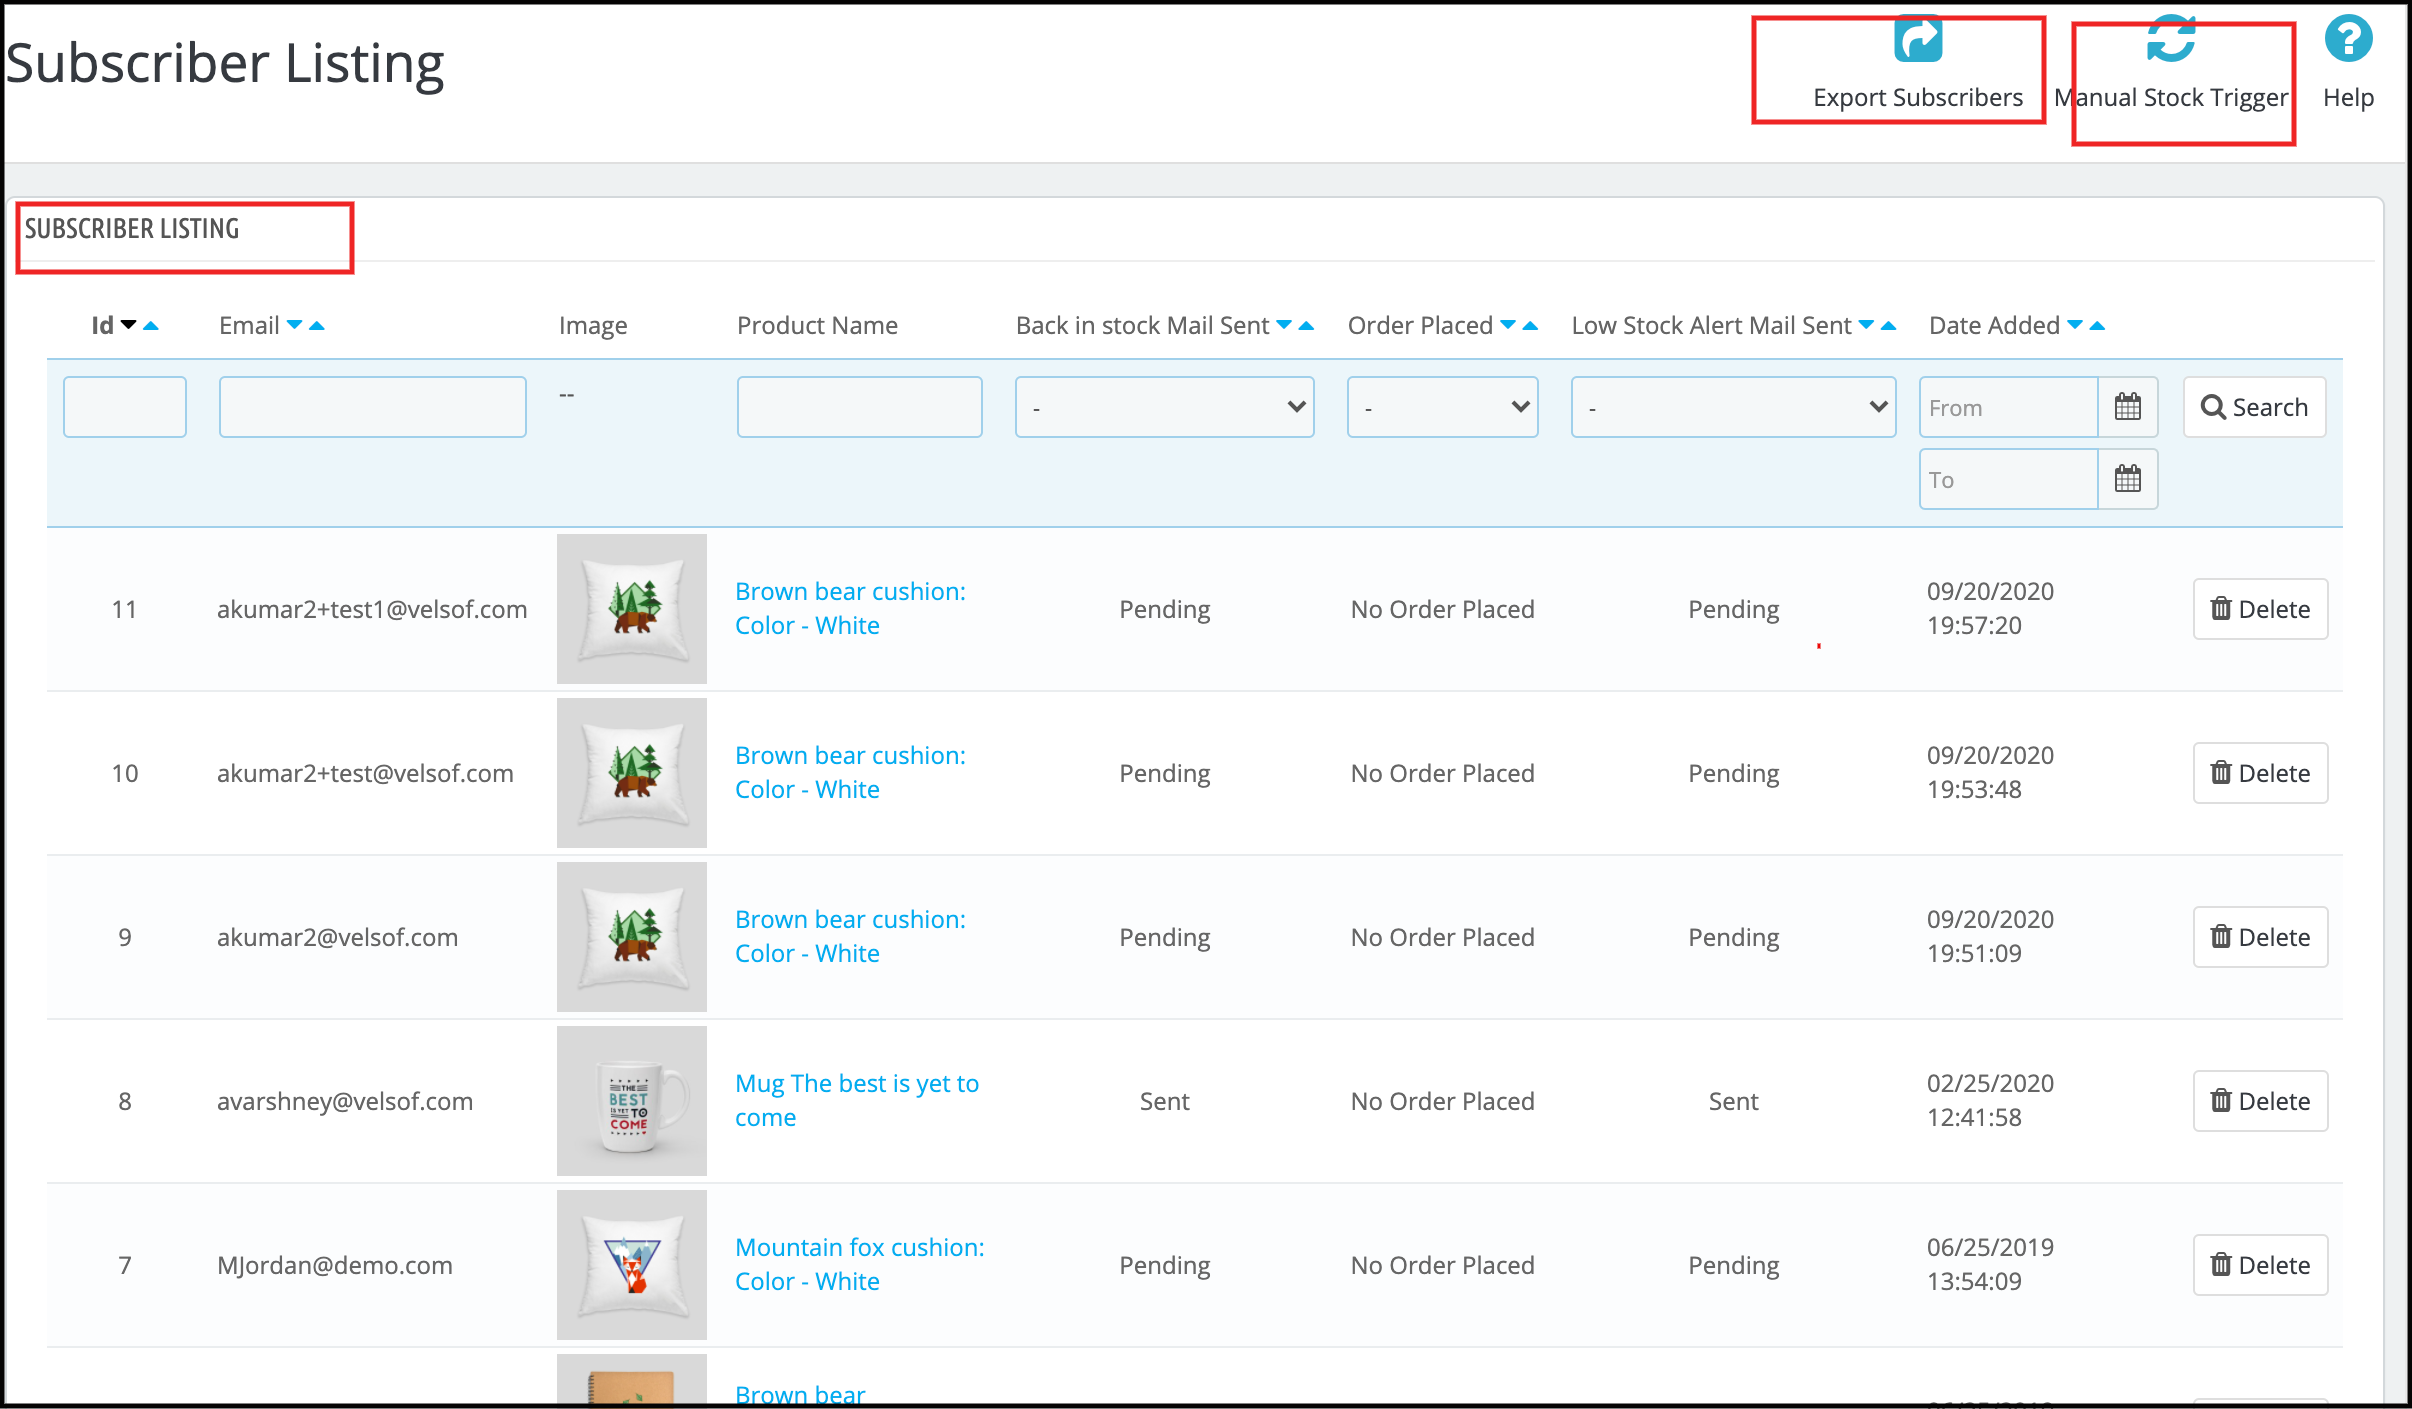
3.7 Subscriber List

The online merchant can view a list of all the subscribers. The online merchant can view the email id of the subscribers, product details, and email status. Admin can also view if the customer placed an order for that product or not. An online merchant can also download the overall list of subscribers in CSV file format.

You can also check the subscriber list from the left menu of the dashboard.

3.7 V3 Recaptcha Settings

Admin can add the V3 Google reCaptcha from this setting.

  • Enable: Toggle to enable or disable the Google reCaptcha on your PrestaShop store with Back in stock notification box
  • V3 Site Key: Admin can enter V3 site key
  • V3 Secret Key: Enter V3 secret key

3.8 Add Custom Field

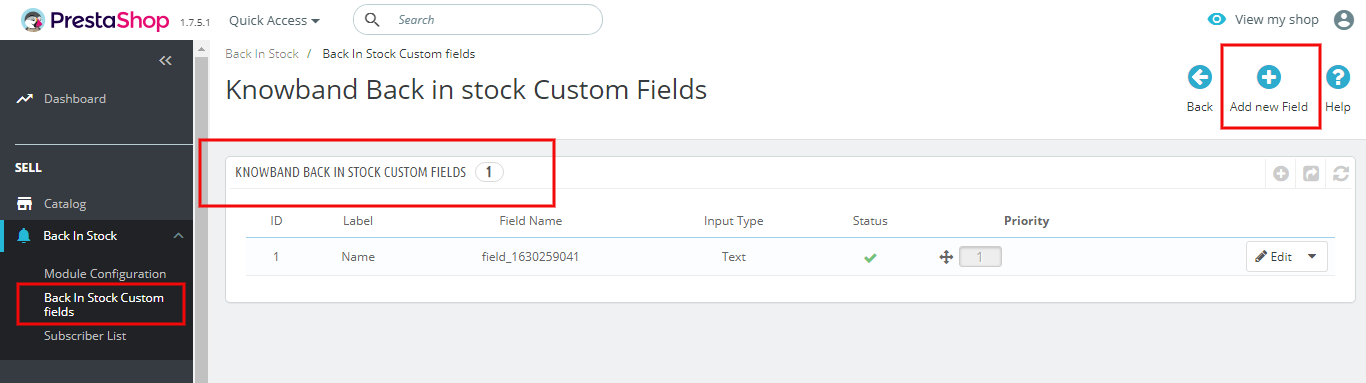
You can add new custom fields and set their priorities from this setting. It allows you to add fields like text, radio, select, etc. Every type of field requires some additional configuration and after making the changes, save the settings and enable it if you want to activate it on your Back-in-Stock subscription box.

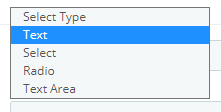
You can click on the Add New button to create new custom fields. Once you click on the Add New button, you will be redirected to a new window where you have to select the field type.

For text:

Add text, message, or other custom fields from this menu.

4.0 Front-end Interface

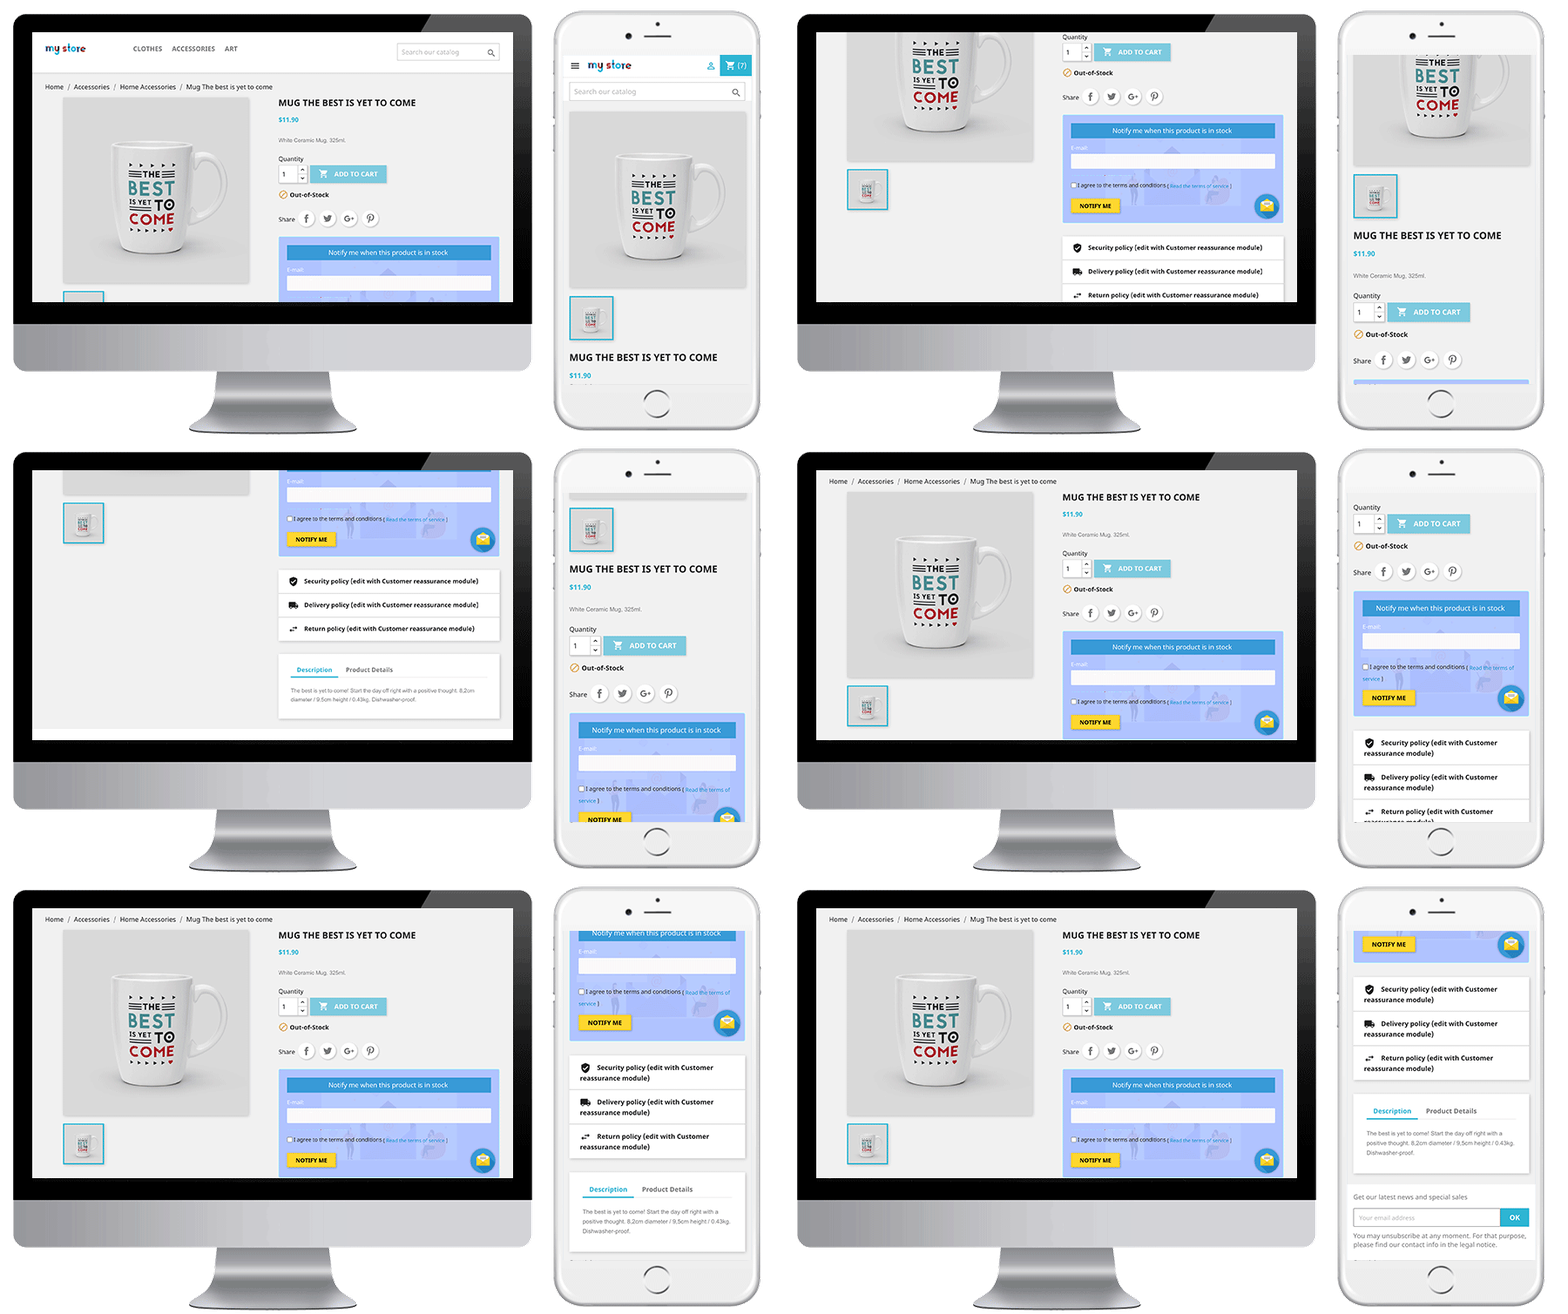
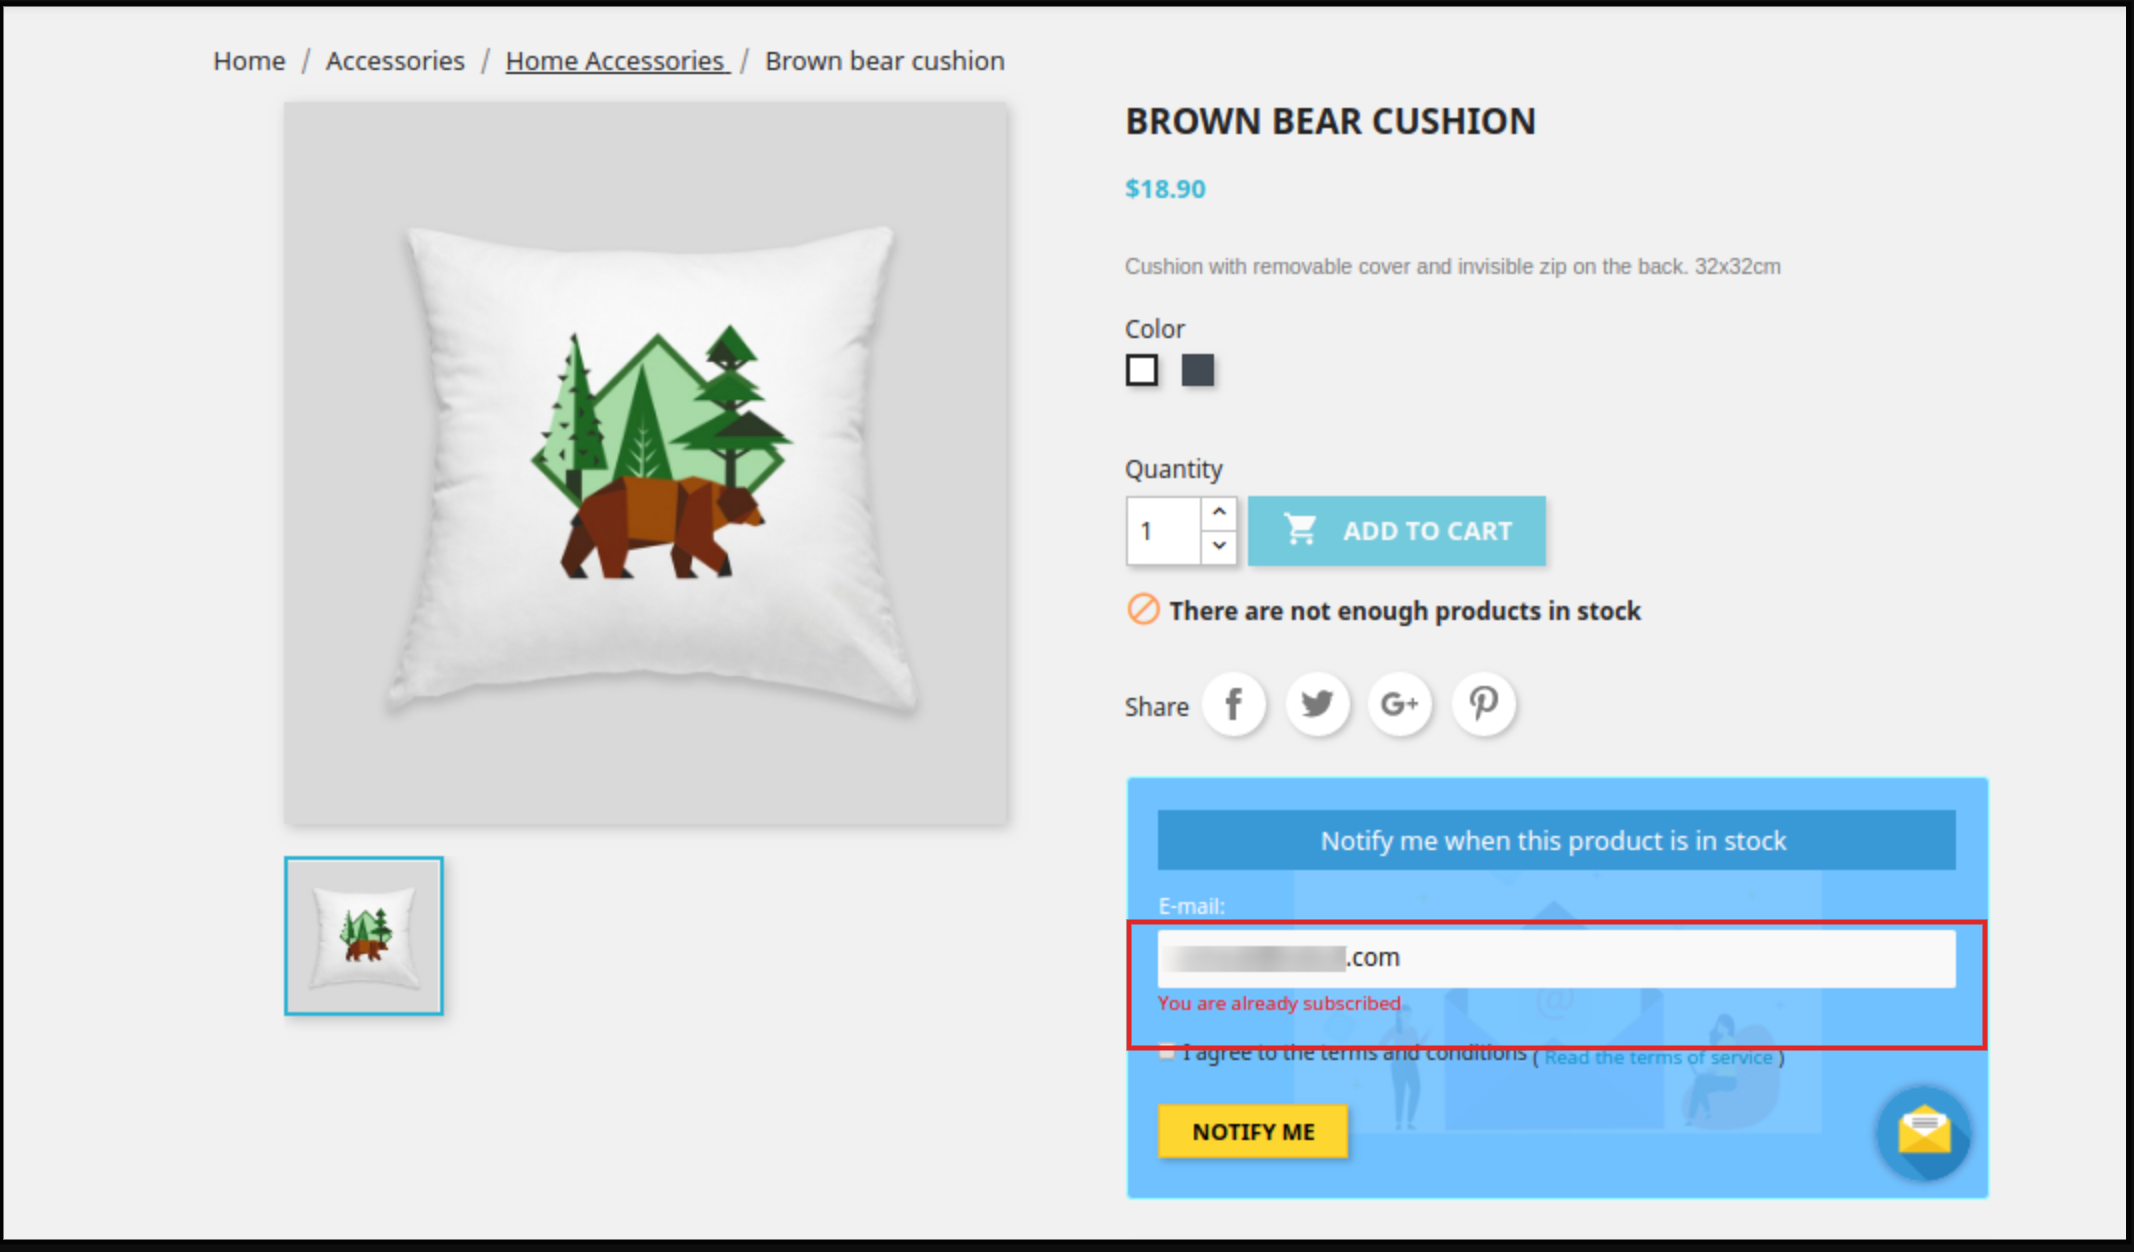
The online users can view an out-of-stock product notification box on the product pages and they can share email id for notification. The subscription block of the Prestashop reminder email module would appear as follows:

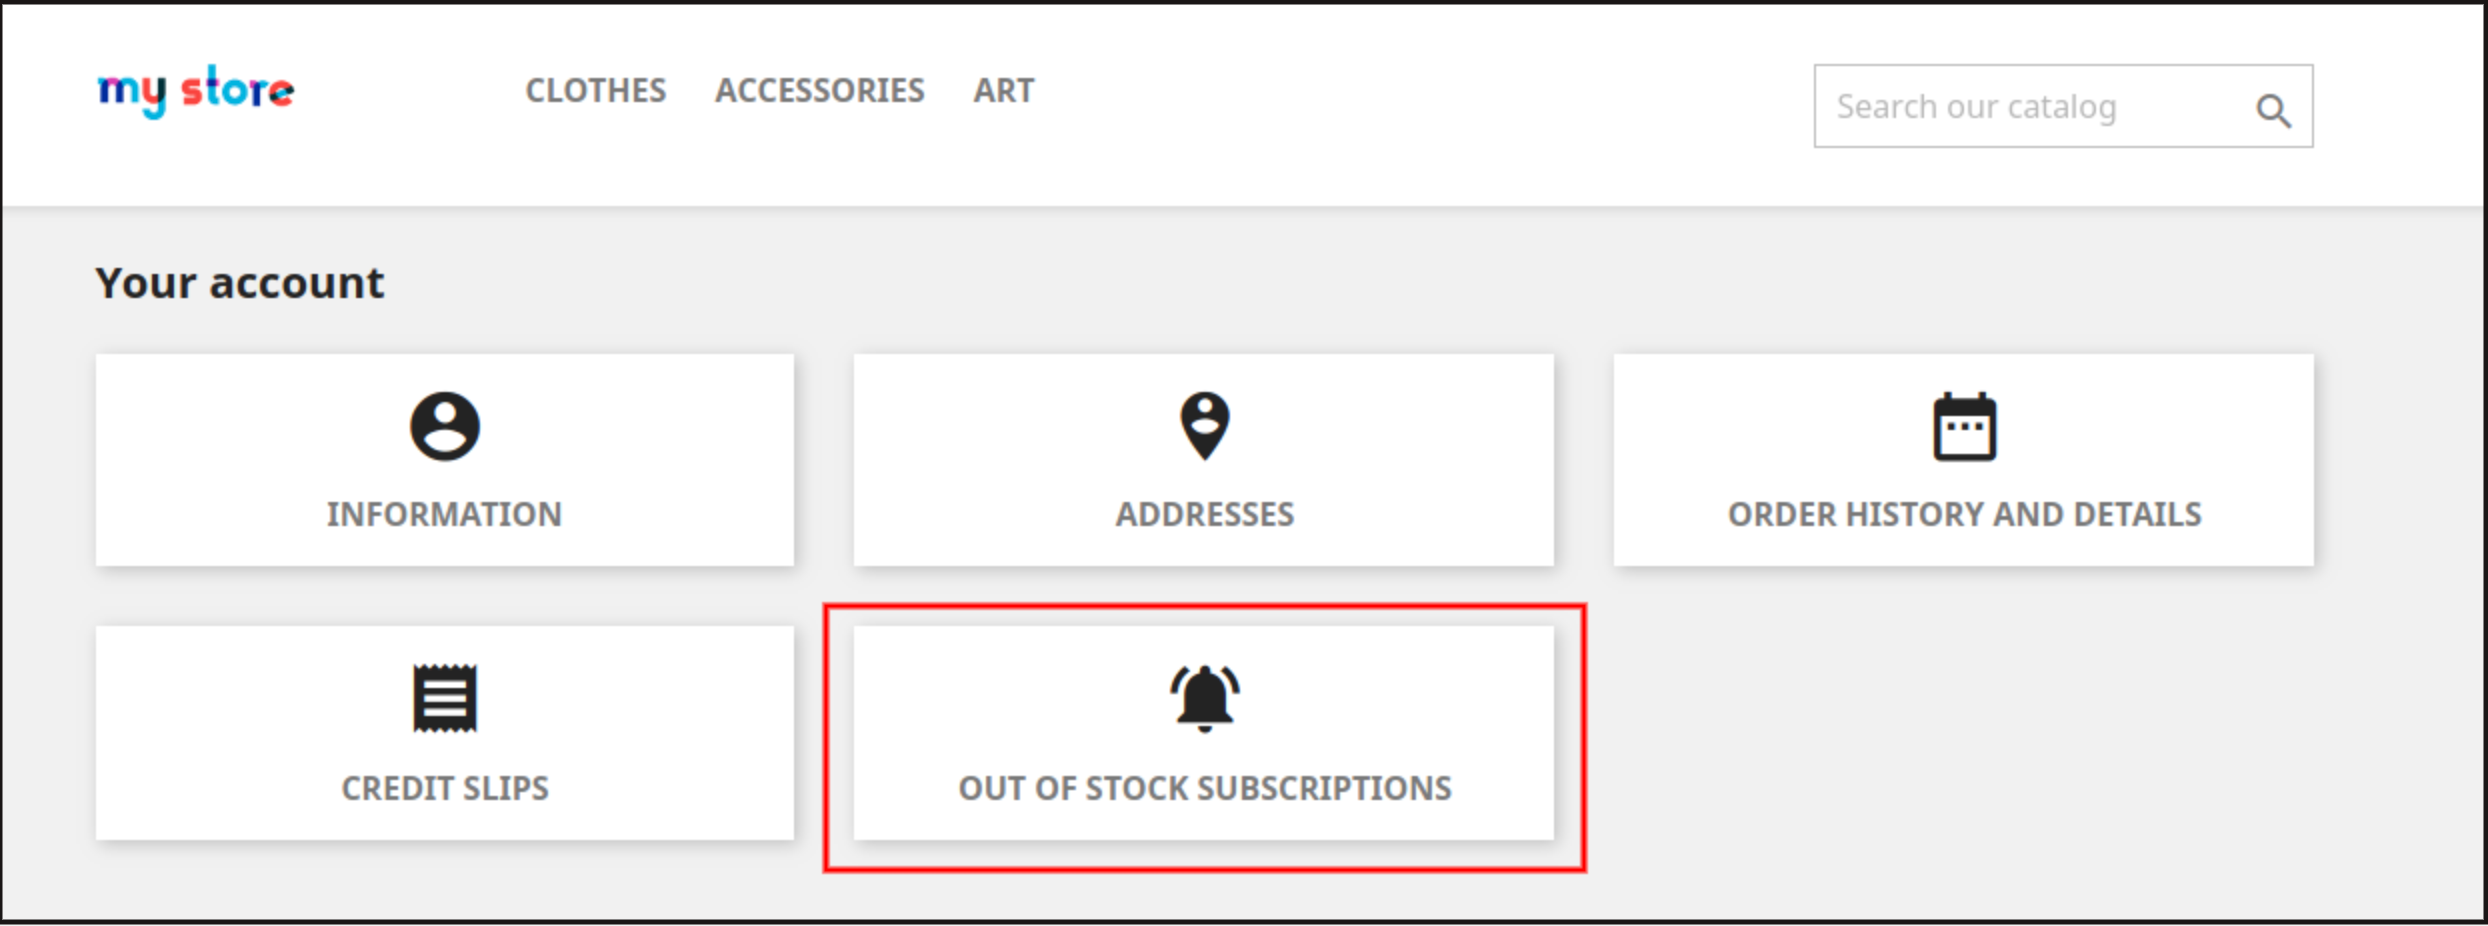
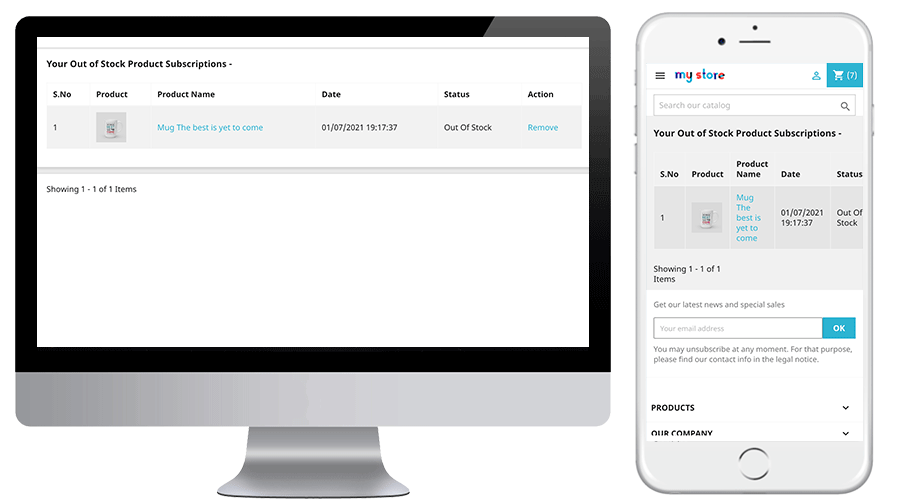
The online users can also view the subscription list from the account menu. They need to click on “Out of stock Subscription” as shown below:

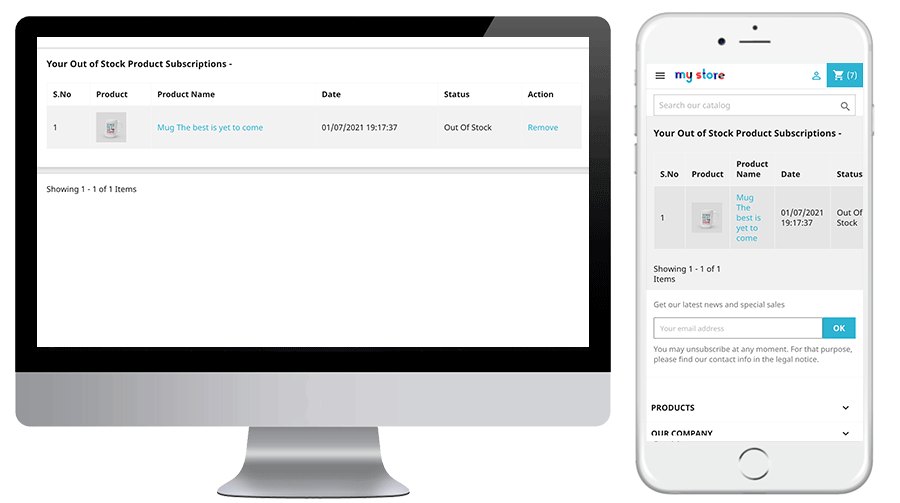
After clicking on the “Out of stock Subscription” option, they can view the list of all subscribed products and they can also remove any product from the list by clicking on the “Remove” button.

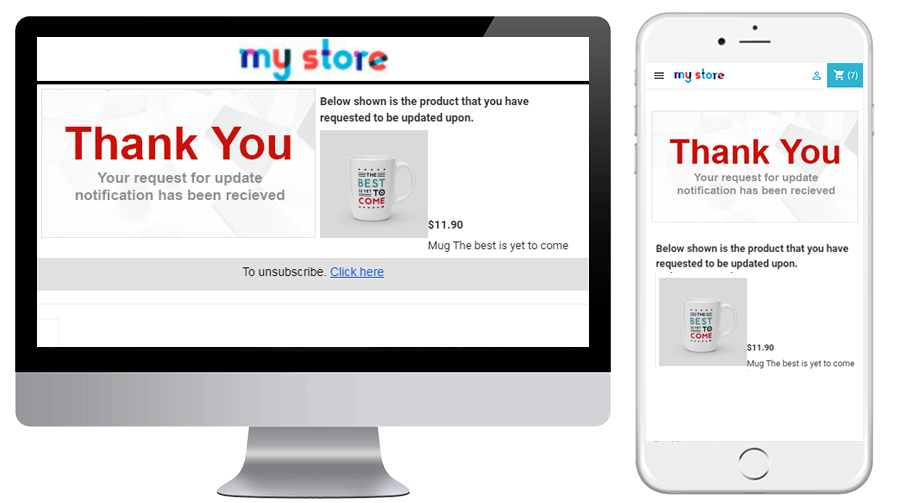
When the customer enters the email id and clicks to the button notify me the initial mail is sent to the entered email address and the message showing subscribed.

Prestashop Back in stock module will prevent the customer from subscribing the same product twice. It will display “already subscribed” message on the front end of the store.

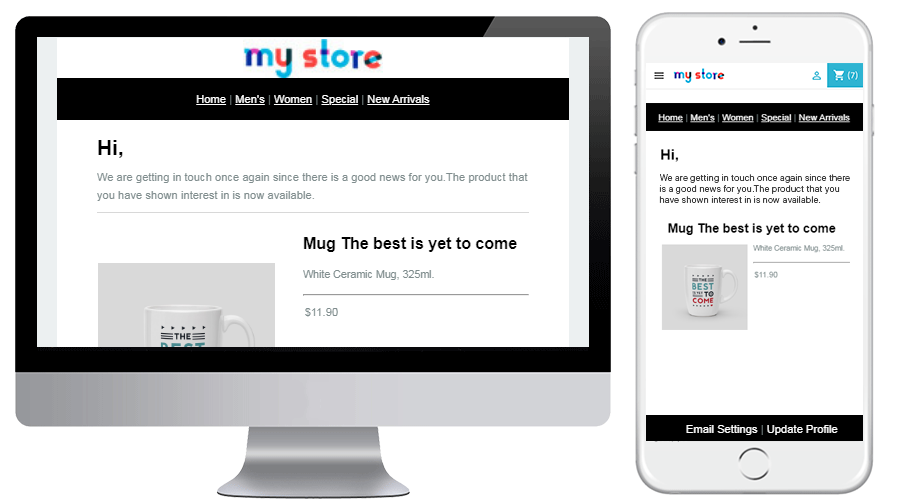
The online users can get an email notification when the product is available in stock.

They can also view a low stock alert email for the subscribed product in case of running stocks. The subscribed product status can also be checked from the Out of stock notification tab.

This Would Also Interest You:

Watch the video tutorial here:

Find more about this Prestashop plugin by Knowband below:

Engage your customers even when their product is out of stock. Quickly allow your customers to subscribe for back in stock alerts right from the product page. Don’t let them miss their favourite product deals on your store. This automatic notification is easy to install and configure on your Prestashop store. Purchase this module from addon store

Prestashop Website Testimonial Addon – User Manual

1.0 Introduction

Testimonials are a very powerful yet underutilized internet marketing tool that helps businesses build credibility, alleviate concerns, and convert prospects into clients. Adding customer testimonials to your website can be an extremely effective way to establish trust and strengthen your company’s reputation. The Prestashop Website Testimonial Plugin is developed for providing the valuable customer the opportunity to give there positive and useful feedback as a written testimonial. Testimonial will helps the seller and customer to build a strong relationship with each other. Prestashop Website Testimonial addon also proves to be a good marketing tool for the website.

With this Prestashop review addon, the store owner has the right to allow customers to write their testimonials. The store owner can take back the permission from the allowed customer any time. The testimonials which are approved by the store owner are displayed on the website.

 1.1 Features offered by Prestashop comment plugin

  • The store admin can manage the testimonials to display on the website with the help of the Prestashop rating addon by Knowband.
  • The Prestashop store admin can control all the things starting from allowing the customers to write the testimonials to displaying the same on the page and position where it will be displayed on the website.
  • The Prestashop rating addon allows the admin to approve or decline the testimonials posted by the customers.
  • The customers can add images to their testimonials if they wist to.
  • The Prestashop Website Testimonial addon has a mobile responsive interface.
  • It’s very easy to install and configure this Prestashop review addon.
  • The e-merchant can display the testimonials at Homepage, Left Column, and Right Column as per the requirement.
  • The Prestashop rating addon shows random testimonial from the approved list.
  • The Prestashop rating addon has a write testimonial permission feature also.
  • This Prestashop comment addon offers SSL compatibility.
  • The rating addon is multi-store compatible also.
  • The Prestashop addon offers multi-lingual compatibility.

2.0 Installation Guide

After purchasing the Prestashop Website Testimonial addon from the store and you’ll get these files:

1. The zipped file that consists of the source code of this Prestashop addon.

2. User Manual

Follow the following steps to install the Prestashop gift card manager extension:

  • First of all, unzip the zipped file. It includes some files and folders.
  • After that copy the overall content of the folder and paste them into “Modules” folder of the store’s directory. Follow the path – Root Directory/modules/.

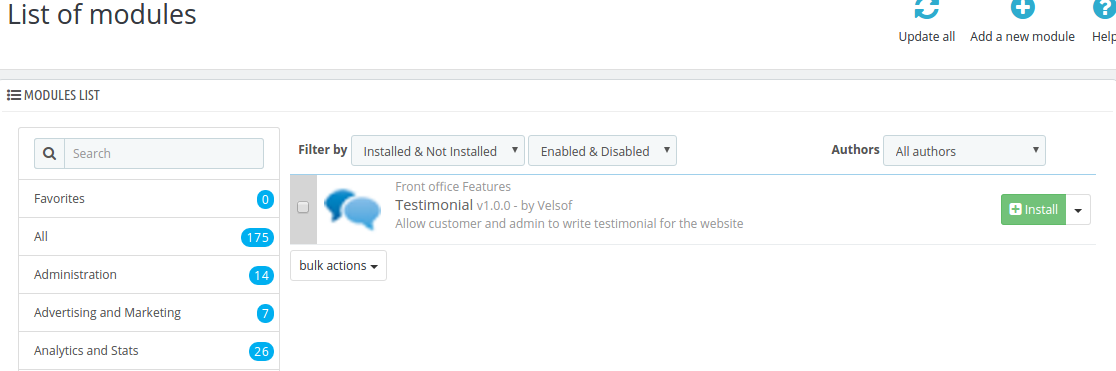
3. Now you can install the Prestashop rating addon. You can find that in Store Admin -> Modules and Services. It would be shown as below –

You just need to click on “Install” button to install this Prestashop module. A confirmation pop-up will be shown. Click on “Proceed with the installation” option. This step will install the module and show notification – “Module(s) installed successfully”.

3.0 Admin Interface

This User Manual will guide you through the Admin Module/Store Front settings and various features of this Prestashop Website Testimonial Module by Knowband.

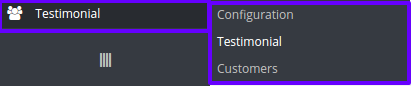
In the main menu of the admin panel of Prestashop, you will get the following configuration options as shown below:

  • Configuration
  • Testimonial
  • Customers

3.1 Testimonial Configuration

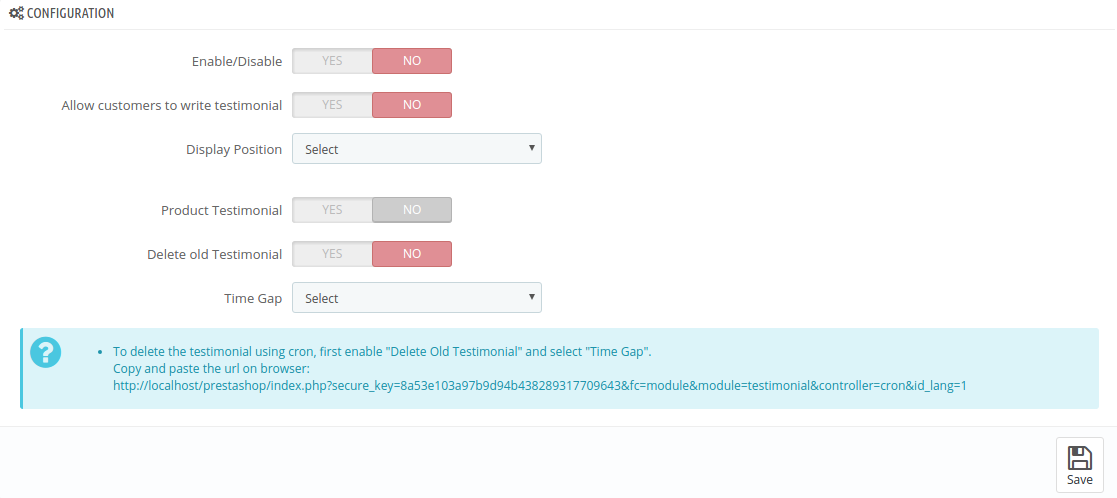
On the Configuration Page, there are various settings which are shown as below:

The configuration page consists of the following fields:

  • Enable/Disable: By Default, the Prestashop Website Testimonial addon is disabled. This setting will enable/disable all the functionality of this Prestashop review addon on the front end.
  • Allow customers to write testimonial: By default, this is disabled. In order to allow your customers to write testimonials for you, you have to enable it. This can allow the customers who are under as “Testimonial Customer” to write the testimonial for the store.
  • Display Position: To display the testimonials on the store, there are various positions such as “Left Column”, “Right Column” and “Home Page”.
  • If “Left/Right” column is selected then, a select box to choose page type appears which have page type such as “Category”, “Product”, “CMS” and “All” to display the testimonials.
  • Delete Old Testimonial: By default, this is disabled. If this is enabled then the Prestashop addon will delete all those testimonials which have been set by time gap field.
  • Time Gap: This can provide the time gap used for deleting the old testimonials. There are following time gap options: a) 1 Month Ago, b) 2 Months Ago, c) 1 Week Ago, d) 2 Weeks Ago.

After modifying the configuration, click on the “Save” button to save the configuration.

There is an “Information” which is displayed below the “Time Gap”.

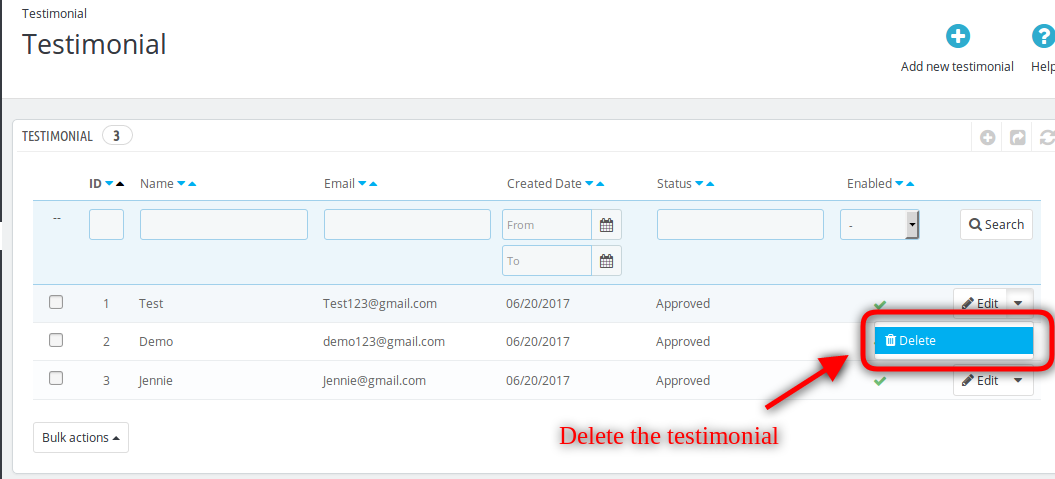
There is a link provided to delete the testimonial. To delete the testimonial(s), copy and paste the link into the browser and press enter.

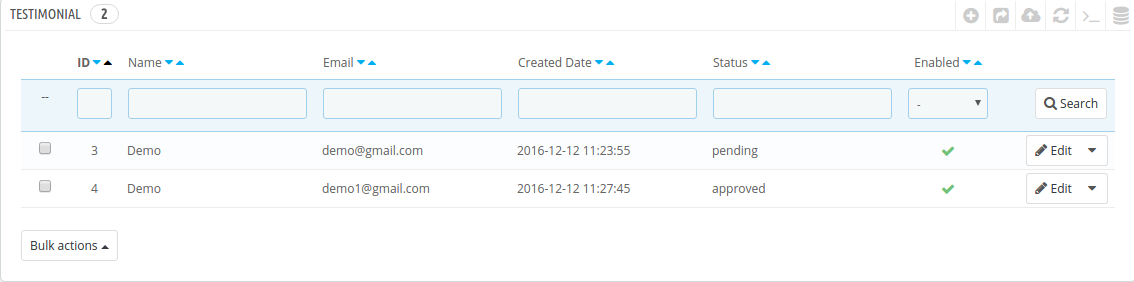
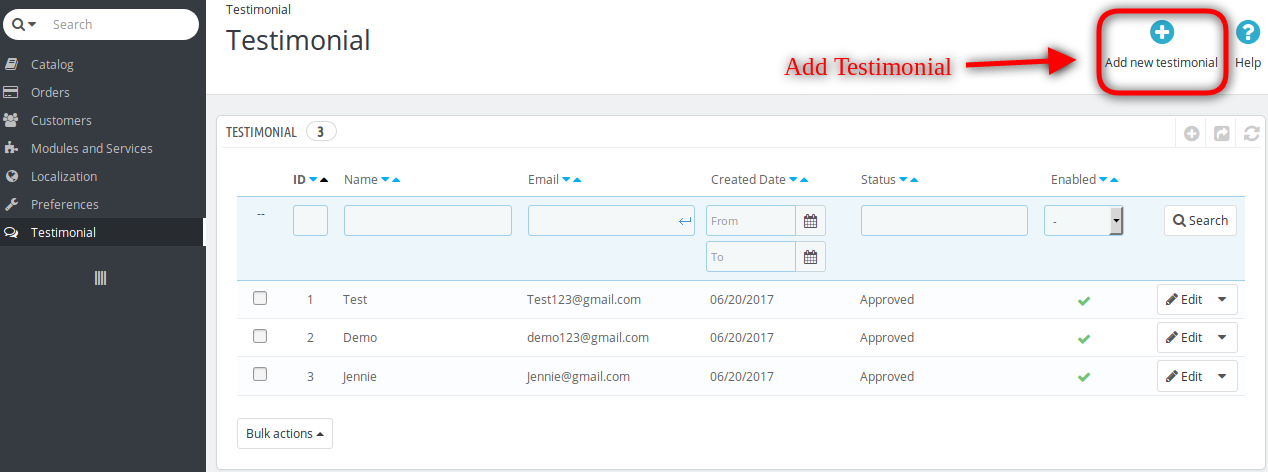
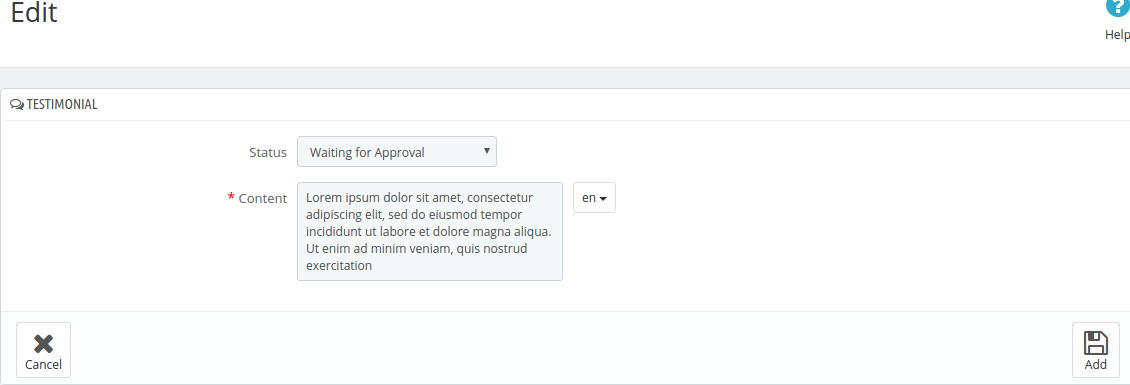
3.2 Testimonial

This page has the listing of all testimonials added by “Admin” or “Customer” as shown below:

There are also several other filters as well to filter the list of sellers as shown in the above screen shot.

The Prestashop store admin can also enable or disable a testimonial in this list using the bulk actions of the grid. If a testimonial is disabled then that testimonial will not be visible on the storefront. Admin can enable/disable testimonial by clicking on “Tick” or “Cross” in the Enabled field of the list for the particular testimonial.

3.2.1 How to add Testimonial from the admin panel

To add testimonial on the front-end, click on the “Add new testimonial” button shown above the list of testimonial in the Prestashop comment.

A blank form will open to add testimonial for the particular “Allowed Customer” as shown below:

  • Search Customer: First, search the customer from the “Testimonial Customers” to add the testimonial. By typing the name of the customer, the list of customers will appear in the select box. Then, choose the customer.
  • Status: By default, the status is “Waiting for Approval”. Set the permission for the testimonial.
  • Content: In this field of the Prestashop rating addon, add the content to display on the testimonial. The admin can select the language from the drop-down list. Content can be added for the multiple allowed languages. The length of content should be greater than 100 characters.

Click on the “Add” button to add the testimonial or “Cancel” button to go the previous page.

After adding the testimonial, the admin can see the testimonial in the Testimonial list.

3.2.2 How to Edit Testimonial from the admin panel

To edit the particular testimonial, click on the “Edit” button of that testimonial displayed on the list. A form appears as shown below:

The testimonials which are added by the customers and are waiting for approval can be allowed to appear on the designated page or declined by changing the status of the testimonial.

Content can be modified for the multiple languages.

Then, Click on the “Add” button to update the testimonial or “Cancel” button to go to the previous page.

3.2.3 How to Delete Testimonial from the admin panel

Tha admin can easily delete the testimonial just by cicking “delete” option. After confirmation the store owner can delete any testimonial.

3.3 Customers

To view “All Customer” and “Testimonial Customer”, click on the Customers tab of the testimonial menu. This page will provide the display of all existing customer and allowed testimonial customer as shown below:

Choose the page view as “All Customer” or “Testimonial Customer”.

3.3.1 All Customer

On choosing the “All Customer” from the list, a list will appear which have the details of all existing customers as shown below:

To add the existing customers, click on the checkbox of the customer and click “Save” button to add the customer in the “Testimonial Customer”.

3.3.2 Testimonial Customer

On choosing the “Testimonial Customer” from the page view list, the list of all the allowed customers will be displayed as shown below:

Only the allowed customers can write a testimonial for the store.

The admin can delete the customer by clicking on corresponding “Delete” button or delete the customers from the “Bulk Action” tab.

4.0 Store Front

If the customer is allowed, then user can see the“My Testimonial”link in “My Account” page as shown below:

On Clicking the “My Testimonial” link of the Prestashop comment addon, a page is open as shown below if no testimonial is added:

  • Add Testimonial: To add testimonial, click on the “Add Testimonial” link and a new blank form will open as shown below:

  • Upload Image: Add the testimonial image in jpg, jpeg, png format. On adding the image, the image preview can be seen in the box provided above.
  • Content: Add the testimonial description to display on the testimonial.

On clicking the “Save” button, the form will validate and if no error occurs form data is added. On adding the testimonial, notification is sent to the admin for the permission change.
With this, the page is redirected to “My testimonial” page and the added testimonial is displayed as shown below:

  • Edit: On clicking the edit button, a form is opened as shown below:

Add image before clicking the “Save” button to update the testimonial.

  • Delete: To delete the testimonial, click on the delete button and it will prompt you before deleting the testimonial to verify whether to delete or not. If the store admin clicks “Yes” then testimonial is deleted and notification is sent to the admin.

Do you know your users want to hear from other customers before making a purchase from your store? Quickly help them to clear all their doubts with this testimonial addon and guide them towards finalizing a purchase from your Prestashop store. Displaying a positive review or feedback from your customer powerfully impacts the minds of the potential customers. So let’s see who all are thinking to buy from your store? Buy the product now from addon store

Prestashop Google Shopping Module – User Manual

1.0 Introduction

Prestashop Google Shopping Integration addon offers a way to upload the products of the store on Google Shopping. Further, displaying the product ads on the search result is one of the ways to get thousands of visitors to your site.

In fact, Google Shopping allows e-merchants to display its product on Google’s search result page. Further, it is powered by AdWords and Google Merchant Center. In fact, this is one of the ways to allow users to search for the products. Further, on online shopping websites. Moreover, compare prices between different vendors. Therefore, the Prestashop Google Shopping Integration makes it easier for store owners to display their products on Google’s SERP.

The Prestashop Google Shopping Integration module automatically syncs feed from the Prestashop store to the Google Merchant Center Account. Additionally, the store admin can sync the product status back to the store’s database. How? By executing cron in the back-end of the Google Shopping Prestashop Feed Synchronization plugin.

Features that Knowband’s Prestashop Google Shopping integrator offers are:

  • The Prestashop Google Shopping Integration addon automates the entire process of listing the products. Further, on Google Shopping from the eCommerce site.
  • The store admin can automatically update the product inventory between the two stores. In fact, this happens from the back-end of the Google Shopping Prestashop Integration extension.
  • The store admin gets an option to create an N number of profiles. Further, this happens in the back-end of the Prestashop module.
  • The profile-based upload allows the admin to list the products in bulk. Moreover, any changes in the product details happen by making changes in the profile. Further, this happens in the back-end of the Google Shopping Prestashop API integration addon.
  • The store admin gets an easy option to keep a track of the products listed in the Google merchant center. Further, in the ‘Product Listing’ tab of the Prestashop Google Shopping connector.
  • The expired products are renewable just by executing cron in the back-end of the Prestashop Shopping Integration plugin.
  • Prestashop Google Shopping Feed synchronization plugin even allows the admin to delete the products. In addition, view the errors that occurred while product listing.
  • Every time a cron executes, it creates a feed. Additionally, the status of the feed is visible from the backend of the Google Shopping Prestashop Integration plugin.
  • The real-time synchronization offered by the Prestashop Google Shopping Integration module makes tracking easier. Moreover, it also makes feed management easier for the store admin.
  • The status of the actions that the admin performs is visible in the audit log section. In fact, they’re available in the backend of the Google Shopping Prestashop Integrator.

What’s New in the Recent Updates!

[Important]Google Merchant API Update (July 1, 2026)

What Changed in PrestaShop Google Shopping Integration
The PrestaShop Google Shopping module has been updated to use the Google Merchant API for product synchronisation and your store authentication on Google Merchant, replacing the previous API integration of the Content API.

Why This Update Matters for Users Who Are Using Knowband’s Prestashop Google Shopping Integration 

Improved reliability – Product sync with Google Merchant Centre is faster and more stable
Modern authentication – Uses Google’s current API standards for connecting your store to Google Merchant Centre
Continued compatibility – keeps the module aligned with Google’s supported integration methods, avoiding disruptions from older/deprecated APIs

Automatic Feed Upload on Google: The new “automatic feed upload” button lets the store admin choose between automatic and manual feed submission. If disabled, feeds won’t sync automatically with Google Merchant. Instead, the admin can copy the feed URL or download the feed and manually submit it to Google Shopping.

Copy Feed URL/Download Feed: The updated Prestashop Google Shopping Integration addon includes features to copy the feed URL or download it in JSON, XML, or CSV formats. This gives admins flexibility in managing their merchant console feed.

Product Type Selection: Store admins can now specify product types within Feed Profiles, making feed management more flexible.

Promotion ID: To track the performance of listings in the Google Merchant console, we’ve added a Promotion ID section in the profile management tab of the Prestashop addon.

Custom Product-Level Specifications: Admins can list products using universal feed specifications or configure them at the product level, found under the product listing tab. This gives more control over how products are presented.

1.1. Project Objectives

Listed below are the project objectives:

1. The Prestashop Google Shopping Integration module installation and configuration.

2. The method of the Prestashop Google Shopping Integration extension connection with the Google Merchant Center.

3. The profile management, category mapping, and feed management.
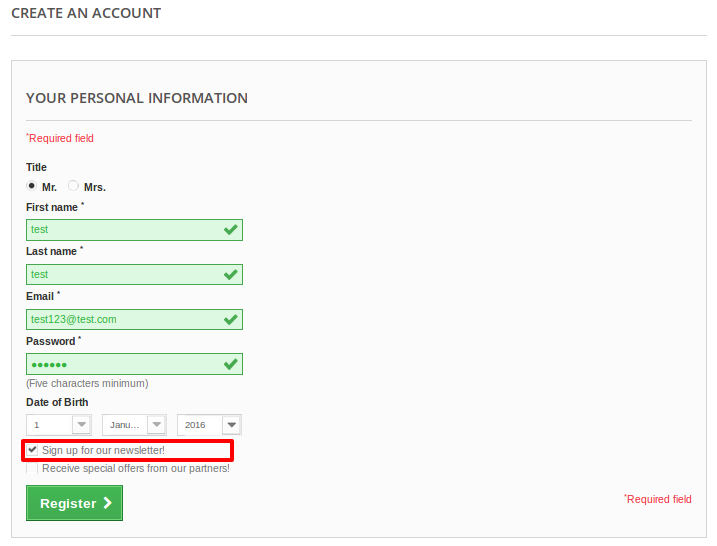
4. Product listing and synchronization.

2.0 Installation

Purchase the Prestashop Google shopping integration plugin from the Knowband store. Further, you will get the zipped file along with the user manual. Moreover, please follow the below steps to install it:

1: Go to the Module listing page and the “Add New Module” button.

2: Upload the downloaded zipped file of the module.

3: After uploading, the system will list the module on the module listing page as shown below screen:

4: Click on the install button. Further, the Google Shopping Prestashop Integration module will install in your Prestashop store.

Note: Please set the read/write permission on the module folder before installing the addon into the system.

3.0 Admin Interface

After installing the Prestashop Google Shopping Integration extension, it will list on the module listing page. Further, kindly see the screen below:

Now, the Prestashop Google Shopping Integration extension add-on is installed. Further, it will display 7 tabs in the main menu of the admin interface. In fact, each tab explains one by one in the next section.

3.1. Connection Setting

This section of the Prestashop plugin allows the store admin to connect their store with the Google Merchant. Here are the information fields that you need to mention for setting up the connection.


Automatic Upload Feed on Google: If you want to upload the feeds manually on the Google merchant console, keep this option disabled. Or, if you want to get the feeds managed automatically with APIs, enable this option and enter the other connection details.

Google Application Name: Enter the name of the project/application that you created for Google Shopping.

Google Client ID: Enter the Client ID that will authenticate the connection between the store and Google Merchant. By default empty but required field. (See Appendix A)

Google Client Secret: Enter the client’s secret to set up the connection. By default empty but required field. (See Appendix A)

Google Merchant ID: By default empty but required field. Here, you will provide the merchant ID of your Google merchant center account.

3.2. General Settings

This section of the Prestashop Google Shopping API integration allows the store admin to set up the basic features.

Enable the plugin: By default, this setting will be OFF. In fact, the Prestashop Google Shopping Integration module will sync the products to Google Shopping if this setting will be ON.

Image Size of Product: Select the size of the product from the drop-down list. Further, the admin can enter the image size option in the Main Menu -> Preference -> Images.

Exclude Out of Stock Products: If disabled, only the in-stock product will be displayed in Google search results. Additionally, enable the display of out-of-stock products.

Exclude Products with Price less than Enter a fixed amount. Further, the products below this amount will not display in the search results only.

Exclude Products that do not have EAN13/JAN or UPC: If the admin disables this, the products that don’t have the EAN13/JAN or UPC will not display.

utm_campaign Parameter, utm_source Parameter, utm_medium Parameter: Enter the UTM for tracking the traffic received via Google Shopping.

Select your default language: The module offers multi-lingual support. Further, select the default language from this section.

3.3. Profile Management

The admin can create, edit or delete profiles from this tab of the Prestashop Google Shopping Integration extension

3.3.1 How to Create a New Profile?

Click on the ‘Add New Profile’ or ‘+’ sign to create a new profile.

You’ll be redirected to the profile creation page of the Google Shopping Prestashop Integrator.

Select the Country from the drop-down list.

Language: Select the language for profile creation.

Currency: Select the desired currency for the selected location.

Project Title: Enter the name of the project.

Google Category: Select the Google category where you want to map the category of the store.

Store Category: Expand the category and check the categories that you want to map in Google Shopping.

GTIN: Here, you will map the product’s unique field. Further, the Prestashop Google Shopping Connector module can identify products according to the mapped attribute. In fact, you must also have to provide unique field mapping for product attributes as well. Furthermore, the various options to choose from include: Reference No., UPC, EAN13. Thus, the mapping can then be done based on the selected attribute.

Product Listing Method: The store admin can select the product listing method by Feed or by API under this section. If the feed is selected, the products will be updated at the time of the feed schedule. However, if the API is selected, all the products can be updated once the admin hit the synchronization cron.

Customize Product Title: Customize the product title by using the following place-holders.

  • {id_product} for Product ID
  • {product_title} for Product title
  • {manufacturer_name} for Manufacturer name
  • {supplier_name} for Supplier name
  • {reference} for Product Reference
  • {ean13} for Product EAN13
  • {short_description} for Product Short Description
  • {price} for Product Price

Place-holders like {sample} will be replaced by the dynamic content at the time of execution.


Product Type: Enter the product type in this text field.

Product Condition: Select the product condition.

Promotion ID: The Prestashop Google Shopping Connector provides the admin with the option to enter the Promotion ID in this text field. This can be used for tracking the performance of various Google events.

Material: Select the material of the product.

Pattern: Choose the pattern from the drop-down menu.

Gender: Select the Gender for which the product is intended. Further, the options are Male, Female, or Unisex.

Age Group: Select the age group that is expected to use the product.

Adult Content: Specify if the product has any adult content or not.

Color: Use the color attribute to describe your product’s color. Further, this information helps create accurate filters, which users can use to narrow search results.

Size: The size attribute describes the standardized size of your product. Your product ad will appear in the results that are filtered by size.

Size Type: The attribute describes the cut of your product. Further, the supported value for this field includes a variety. For instance, regular, petite, plus, big, tall, and others. Therefore, this helps create accurate filters.

Size System: With this attribute, you can explain which country’s sizing system your product uses.

Product Shipping: Select the shipping method for the particular product.

Google Adsense

Google Adsense refers to the campaign that you’ll run on Google Adwords. Further, Custom Labels, Custom Label 0 through Custom Label 4, allows you to create specific filters to use in your Shopping campaigns. In fact, use these filters for reporting and bidding on groups of products. Furthermore, the information you include in these attributes won’t be shown to users.

3.3.2 How to Edit the Existing Profile?

The created profile in the Prestashop Google Shopping Synchronization addon can be viewed in the admin interface. Further, click on ‘Edit’ to edit the profile. In fact, you can even enable/disable by changing the status as shown below.

The category mapped can even be viewed by clicking the ‘View Mapped Category’ button shown in the above image.

3.3.3 How to Edit the Mapped Category?

To map a new category, click on ‘Add New Category’.

Fill in the information as shown below:

Google Shopping Category: Select the category that you want to map.

Store Category: Select the category of your store that you want to map with the Google Shopping Category.

Material: Select the material of the products in the selected category.

Pattern: Choose the pattern from the drop-down menu.

Gender: Select the Gender for which the category is intended. Furthermore, the options are Male, Female, or Unisex.

Age Group: Select the age group that is expected to use the products of the category.

Adult Content: Specify if the category has any adult content or not.

Color: Use the color attribute to describe your product’s color. Further, this information helps create accurate filters, which users can use to narrow search results.

Size: The size attribute describes the standardized size of your products being mapped along with the category. In fact, your category ad will appear in the results that are filtered by size.

Size Type: The attribute describes the cut of your product of the category.

Size System: With this attribute, you can explain which country’s sizing system the product of the category uses.

The mapped category will be shown as below:

To edit the mapped category, click the ‘Edit’ button.

To delete the mapped category, click the ‘Delete’ button.

3.3.4 How to Download the Feed to Submit Manually on the Merchant Console?

The Prestashop Google Shopping provides the admin with the option to download and submit the feeds manually on the merchant console.
The store admin can export the feed in JSON, XML, and CSV format, providing enhanced control over feed submission.

3.4. Product Listing

The listed products can be viewed in this section. Further, the Google Shopping Prestashop Connector is shown in the image below.

The admin can remove the product by clicking on ‘Delete’.

The admin can view the Error that occurred while uploading the product.

The Renew button can relist the products whose listing has expired.

3.5. Feed Management

In this tab of the Google Shopping Prestashop Integrator, the admin will get the feature to configure a schedule on which the module can upload products on Google without any manual interference.

Click on the ‘Add New Feed’ or ‘+’ sign to create a new profile.

The configurations options in this tab of the Prestashop Google Shopping Integration addon are shown below:

Select Profile: The list will show the created profiles. Furthermore, select the one whose product you want to sync with Google shopping.

Feed Label: Enter the name of the Feed.

Feed Upload Schedule: Select the frequency when you want to upload the feed.

Set Hour: Select the number of hours in which you want to schedule the feed.

To download the created Feeds, go to Profile Management and click on ‘Download Feed’ as shown in the image below.

3.6. Synchronization

The Synchronization tab of the Prestashop Google Shopping Integration extension offers easy integration with the help of cron jobs. Additionally, the Prestashop Google Shopping Feed synchronization allows the admin to sync the feeds to Google Merchant. Moreover, syncs the product status back to the store.

Local Sync: This cron loads the products in the module’s local listing tab.

Sync Feed on Google Shopping: ‘Sync Feed’ cron will synchronize the feed on Google Shopping.

Sync Products Status from Google Shopping: This button can sync the product status from Google shopping to the web store.

3.7. Audit Log

The admin can view all the jobs running and the errors that occurred in the same. Furthermore, the status of the jobs is visible in this tab of the Prestashop Google Shopping Integration plugin.

4.0. Appendix

How to Create Google Shopping Account?

Before uploading your products on Google shopping, you must have your Google merchant account. In fact, if you don’t have then please follow the below URL:

https://merchants.Google.com

Follow the instructions given on the above URL and create your account.

After creating your account, you will be redirected to your merchant center homepage as shown in below screen:

Copy your merchant id highlighted in the above screen and save it in module configurations.

After this, click on the Connect button so that your module gets integrated with your PrestaShop store, In addition, you will be able to fetch the report details.

Verify your Website for Google Merchant Account

This verification process is a compulsory process to upload your products to Google Shopping. In fact, if you do not verify your site then the module will not be able to upload products and may result in an error.

To verify your website, please follow the below instructions:

Step 1: Go to the “Business Information” tab in your Google Merchant Account.

Step 2: Under the “About Your Business” tab, provide the URL of your store. For instance, https://www.example.com. Save URL.

Step 3: After saving a website URL, Under the “Website” tab, click on the “Claim Your Website” link. In fact, this will show you the link to an HTML file. Hence, download this file. In addition, upload it to your root directory of the store.

Step 4: After uploading the HTML file, execute the URL given by Google in step 3.

Step 5: Click on the “Verify & Claim” link.

After this, you can fetch your products report under the product tab of your Merchant store.

How to get Client ID and Secret

To get a Google client id and secret you need to create a project in a Google developer account. In fact, please go to the below URL to sign in to the Google developer account.

https://console.developers.Google.com

On the above URL, create a project by clicking the link shown in below screen:

1: Name your Project Name. Moreover, click on the “Create” link. In fact, after creating a project, Google will redirect to the same page and your new project will be selected.

2: Go to the library tab, search for “Content API for Shopping ”. Further, enable this API for this project.

3: Click on the “Credentials” tab. This tab will show 3 tabs.

4: Set your application name in “OAuth Consent Screen” and save it.

5: Click on the “Credentials” tab and click on the “Create Credentials” button.

6: After clicking the “Create Credentials” button, Google will be shown credentials type options. Therefore, choose “OAuth client ID”.

Step 7: Set application type as “Web Application”.

Step 8: Set the “Authorized Redirect URIs” field. Additionally, your redirect URI is given on the module configuration page. Further, please copy from there and paste it into this field.

Step 9: Click on the “Create” button. Further, after saving credentials, Google will generate the client id and secret for you. In fact, copy and paste them into the corresponding field in module configuration.

Note: For more detailed instructions, follow URL https://developers.Google.com/identity/sign-in/web/devconsole-project

Note: If you are getting an error while getting your refresh token. Further, please also try after “Allowing Less Secure App” in your Google account.

In fact, for more values, please follow the below URL and read the documentation:

https://support.google.com/merchants/answer/7052112?hl=en

Prestashop Google Shopping Integration Module Link: https://www.knowband.com/prestashop-google-shopping

Prestashop Google Shopping Integrator Admin Demo Link: https://psm.knowband.com/googleshopping/16/admin1/index.php?controller=AdminLogin&token=ffa17b0c72ff8c0ab7cf3e344c5ae4fc&redirect=AdminModules

You can even get Google Shopping Prestashop Integrator on the Addon Store: https://addons.prestashop.com/en/price-comparison/25953-knowband-google-shopping-google-merchant-centre.html?pab=1&

Magento 2 Social Loginizer Extension – User Manual

1.0 Introduction

Magento 2 Social Login extension allows the customers to login/signup using their social media accounts like Facebook, Google, Yahoo and 9 other options. This Magento 2 Social Login module will add a new link ‘Quick Log In’ next to the default login link. This text can be customized. On the click of this link, a login popup will be opened.

The Magento 2 Social Login plugin gives the freedom to the eCommerce store admin to enable or disable login through several platforms, the admin can also change the behavior of the Magento 2 Social Media Login extension at the front-end and also enables or disable login through any available social platform.

1.1 Features offered by Magento 2 Social Login Extension

  1. With this Magento 2 Social Login extension, admin can offer a simple and hassle-free login/signup option to the customers.
  2. Using this Magento 2 Social Login module, the store merchant can set up 12 different social media buttons for offering simple login/registration to the customers.
  3. The store admin can select small/large and circular/rectangular icons for showing social login options.
  4. The Magento 2 Social Login module allows setting different animation in social login buttons like zoom/highlight/rotate.
  5. The store merchant can set a header link on the website for providing a popup login/signup option.
  6. Facebook login, Google login, Yahoo login, Paypal log in, Instagram login, Twitter login, Amazon login, Linkedin login, Live login, Dropbox login, Foursquare and WordPress login options are available for login/signup.
  7. By offering a simple and hassle-free way, the store merchant can increase customer registration on the website.
  8. The store merchant can also change the position of social login buttons by the following drag and drop function.
  9. Admin can set up API for various social login options from the admin interface of this Magento 2 Social Login extension.
  10. The Magento 2 Social Login module is mobile responsive and offers smooth functioning.
  11. Magento 2 Social Media Login extension is multi-lingual compatible and offers hassle-free implementation.

2.0 Installation

After purchasing Magento 2 Social Login extension, the store admin will get the following files:

1. zip which has the source code of this Magento 2 Socialloginizer program plugin.

2. User Manual, with all the basic details and information.

The steps to install the Magento 2 Social Loginizer Program Extension are mentioned below:

  • Buy the Magento 2 Social Loginizer Program module from Knowband. You can download the extension package.
  • The package has a zipped file that contains the user manual and the source code of the Magento 2 Social Loginizer Program module. Now, Unzip this package.
  • Create a folder {Magentoroot}/app/code/Knowband/Socialloginizer
  • Upload the extracted content in the above folder via FTP manager (like Filezilla or WinSCP – download here: https://filezilla-project.org/).
  • Now run below commands to install the plugin:1. php bin/magento module:enable Knowband_Socialloginizer2. php bin/magento setup:upgrade3. php bin/magento setup:di:compile
  • The extension is now installed and ready for use. In Admin Panel go to “Knowband Extensions -> Social Loginizer ”.
    You can now configure and use the Knowband Magento 2 Social Login extension.

3.0 Admin Settings

Log into your Magento Admin, then goto Stores -> Configuration -> Knowband -> Social Loginizer and configure the plugin.

To access Knowband plug-in, go to Stores -> Configuration -> Knowband -> Social Loginizer. Store admin will have various settings options categorized as follows:

Admin can easily configure the Magento 2 Social Login module and show social login options on the website easily.

3.1 Configuration

In configuration section, the store admin can configure the module and apply basic settings. Admin can also apply website settings from this section.

3.1.1 General Settings

Admin can customize the general settings by using the following settings options:


  • Enable: Activate or deactivate the Social Login Magento 2 module functionality from here.
  • Show Login Popup: Enabling it will create a link saved in “Text for popup link”. On clicking this link, a popup will appear with a login option and a social loginizer section.
  • Text for Pop Up Link: This text will appear as a link for login popup at the header in the front end.
  • Select Layout: Admin can select a layout for showing login buttons in the popup.
  • Show At Login Page: By enabling this configuration option, admin can show social login buttons on the login page.
  • Select Layout: Admin can select the layout for showing social login options on the login page.
  • Show At Registration Page: By activating this option, admin can show social login buttons on the customer registration page.
  • Select Layout: The store merchant can choose from available layouts for showing social login buttons at the registration page.
  • Show At Checkout Page: Admin can also show social login options at the checkout page.
  • Select Layout: Admin can choose from available layouts for showing social login options on the checkout page.
  • Text For Heading: This text will appear before the social organizer block.
  • Default Visible Option: It will be the no of icons that will be shown by default at the social loginizer block.

3.1.2 Websites Settings

Admin can add websites setting here.For each website, there will be similar settings like as below:-

  • Active: To enable the website for login and signup, select Yes.
  • App ID (eg. for Facebook: Facebook App Id) : Enter your Application ID/Client. ID/Consumer ID is provided by corresponding website.

  • App Secret (eg. for Facebook: Facebook App Secret) : Enter your Application Secret/Client .Secret /Consumer Secret is provided by the corresponding website.

3.2 Custom Icon Settings

In the custom icon set, the admin can add, edit and delete the social login button layout. The Magento 2 Social Login extension allows the store admin to apply layout settings and show social login options in an attractive manner.

3.2.1 How to Add New Layout?

Admin can click on add new button and apply these settings for adding new layout:

  • Layout Name: Admin can set layout names from here.
  • Enable Social Login Options: Select the social login options from the available list which you want to show in this layout.
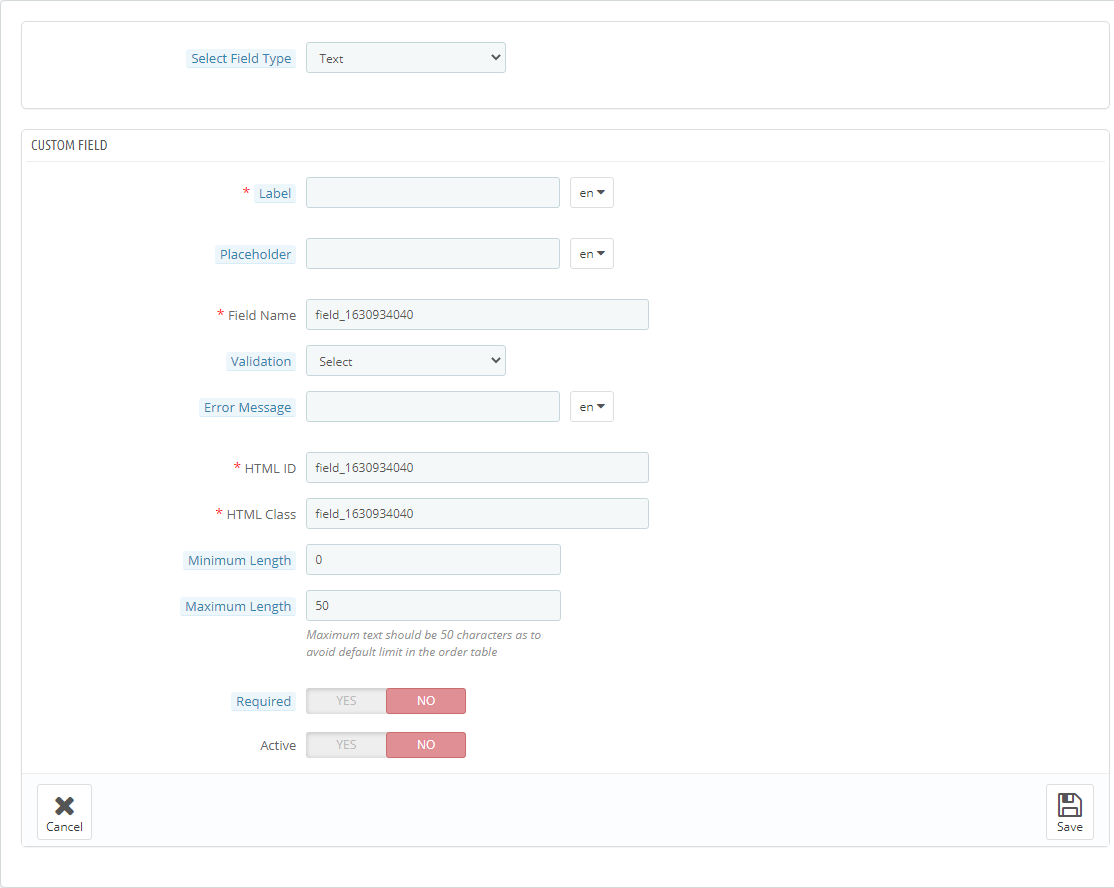
  • Hover Effects: Admin can select from different hover effects like highlight, zoom and rotate.
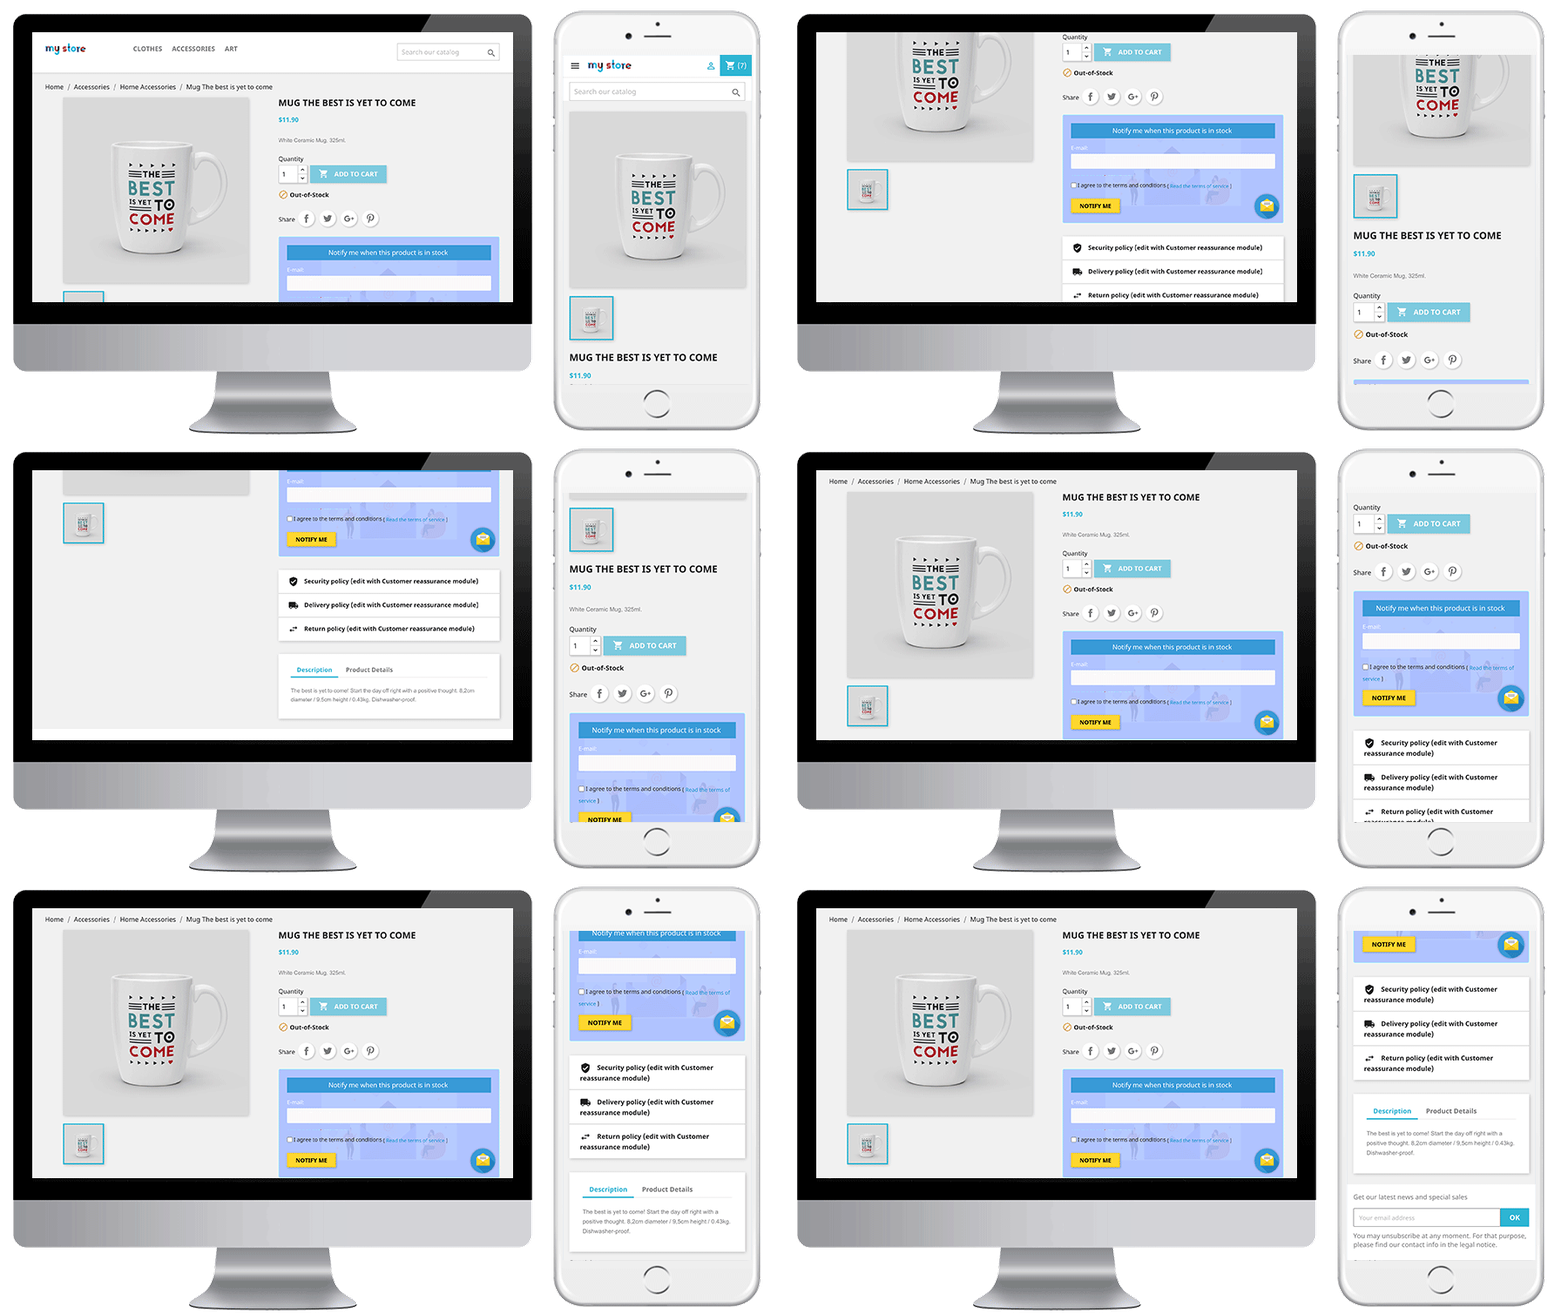
  • Alignment Option: The online merchant can set login option alignment as vertical or horizontal.
  • Icon Types: Admin can select icon type as small circular, small rectangular, small rounded, large rounded and large rectangular.
  • Button Type: Admin can select button type as default or customized.

In Customizable option, admin can apply these settings:

3.2.2 How to Edit Layout?

Admin can click on the edit button for editing the layout settings.

3.2.3 How to Delete Layout?

For deleting any layout admin just need to click on the delete button.

3.3 Statistics

There is a “Statistics” tab in the menu from where admin can view the report.

3.3.1 Website Graphical Report

It shows social login and registration data in graphical form.

3.3.2 Social Login report

It shows a table containing data related to each social login website like login count, registration count etc.

3.3.3 Social Login User Report

It shows a table containing data related to customer and social login sites like customer email, login count etc.

Reset Database:- There is a “Reset Database” Button. On clicking this button all the social login plugin related data will be deleted.

4.0 Front-end Interface

Login Popup: On enabling login Pop Up a link will appear with text as fixed in the admin interface.

On clicking this link a popup appears with a social login option.

Login Page: If enabled Social Login Block will appear at Customer Login Page.

Registration Page: If enabled Social Login Block will appear at Customer Account creation Page.

  1. Checkout Page:- If enabled Social Login Block will appear at checkout Sign In Popup.

Appendix

How to set Redirect Url?

Let your website URL be ‘www.example.com’. and social login site is “Facebook”.

If Url Rewrite is enabled in your website then redirect URL will be

Unsecured Url: https://www.example.com/socialloginizer/index/vssSoloApi Facebook /

  1. Secured Url: https://www.example.com/socialloginizer/index/vssSoloApi Facebook /

If Url Rewrite is disabled in your website then redirect URL will be

  1. Unsecured Url: https://www.example.com/index.php/socialloginizer/index/vssSoloApi Facebook /
  2. Secured Url: https://www.example.com/index.php/socialloginizer/index/vssSoloApi Facebook /

Note: For Yahoo, URLS will be

Unsecured Url: https://www.example.com/socialloginizer/index/vssSoloApi /

  1. Secured Url: https://www.example.com/socialloginizer/index/vssSoloApi /

1. How to get Facebook App details?

Steps:

  1. Go to Facebook Developers Website (https://developers.facebook.com) or click on the link given top right of respective tab in the module configuration page.
  2. Click on Apps -> Create a new App.
  3. Follow the instructions on the screen.
  4. You will get the App ID and App Secret (Click “Show” button).

  1. Now, go to Settings from left menu.

  1. Click on “Add Platform” button.
  2. Select Website.
  3. Enter your App Domain and Site URL.

Application Type: Web Application.

Authorized JavaScriptorigins: Your store domain name. (https://www.example.com)

  1. Click the “Save Changes” button.
  2. Now, go to the “Status & Review” tab from the left menu and make the Application Live.

2. How to get Google App details?

Steps:

  1. Go to Google Developers Console (https://console.developers.google.com/projectselector/apis/library)or click on create project link given top left dropdown of the page or at the center of the page.

  1. Provide name of the project.

  1. Create credentials by clicking on “Create Credentials” Button and selection oAuth client id.

  1. Credentials can be created only after providing details in oAuth form. Click same and now credentials can be found.

  1. Redirection URL can be set at credentials screen

3. How to get LinkedIn App details?

Steps:

Go to LinkedIn Developers (https://www.linkedin.com/developer/apps) or click “Create Application” and follow the steps.

Authentication details can be added in authentication tab.

4. How to get Live App details?

Steps:

  1. Go to Microsoft Development Center (https://apps.dev.microsoft.com/#/appList) or click on Add an App.

  1. Fill details in form and click on save.

5. How to get Twitter App details?

Steps:

  1. Go to Twitter App Management (https://apps.twitter.com/) or click on the link given top right of respective tab in the module configuration page.

  1. Click the “Create New App ”button.
  2. Enter the Application Details as follows:
  • Application Name: Name of your Application.
  • Description: 10 to 200 characters description of your application.
  • Website: Your store URL.
  • Callback URL: Loginizer redirects the page URL of your store.
  1. Now, Click “Yes, I agree” and then click “Create your Twitter application”.
  2. Now, select the “API Keys” from the menu below your Application Name and copy your API Key and API Secret.

6. How to get Yahoo App details?

Steps:

  1. Go to Yahoo Developer Network (https://developer.yahoo.com/apps/) and click on the “My Apps” link given top right and header menu of the configuration page.

  1. Click “Create An App”.

  1. Fill the required details as per instructions

  1. Copy your “Client Id” and “Client Secret”.

7. How to get Amazon App details?

Steps:

  1. Go to Amazon Developer Network (https://login.amazon.com/manageApps) or click on link given top right of respective tab in module configuration page.

  1. Click on Sign in to App Console button.
  2. After successful login to App Console click on Register’s new application button in the top right of the page and you will be redirected to the following page.

  1. Enter the Application Details as follows:
  • Name: Name of your Application.
  • Description: Description of your application.
  • Privacy Notice URL: Url of privacy policy page of your store.
  • Logo Image: Select the optional logo image of your store.
  1. Click the Save button.
  2. Now click on Web Settings to get your client id and secret.

  1. Allowed Return URL: Loginizer redirects the page URL of your store.

Note: To enable Amazon to login into your website, your website “must be secure with HTTPS” otherwise Amazon login will not work.

8. How to get Instagram App details?

Steps:

  1. Go to Instagram Developer Network (https://instagram.com/developer/clients/manage/#) or click on the link given top right of respective tab in the module configuration page.
  2. Click on Register a New Client button on the top right of the page.

  1. Fill the following form

  1. Set OAuth redirect_uri as Loginizer redirect page URL of your store. (https://www.example.com/module/socialoginizer/index/vssSoloApiInstagram).
  2. Click Create button then copy and paste Client Id and Secret in the admin panel of the plug-in.

9. How to get Paypal App details?

Steps:

  1. Go to Paypal Developer Network (https://developer.paypal.com/developer/applications/) and log in.
  2. Click My Apps and Credentials.

  1. Now enter name of your Application and click Create App Button.

  1. By default sandbox details is selected, switch it to live and input other app details.

  1. Now set the redirection URL in live App Settings.

  1. Check Login with PayPal and save details.

10. How to get Dropbox App details?

Go to Steps:

Note: To enable Dropbox login into your website, your website “must be secure with HTTPS” otherwise Dropbox login will not work.

Go to Dropbox Developer Website (https://www.dropbox.com/developers/apps) or click on link given bottom of the respective tab in the module configuration page.

  1. Click On the Create App button and provide a name for Application.

  1. Fill up the details , set redirect url and save the settings.

  1. Copy and paste the key and secret in plugin admin panel.

11. How to get WordPress App details?

Steps:

1. Go to WordPress Developer Website (https://developer.wordpress.com/apps/) or click on link given bottom of respective tab in module configuration page.

2. Click On the “Create New Application” button and provide a name for Application.

  1. Fill up the details and save the application.

  1. Copy and Paste the credentials in plugin admin console.

12. How to get FourSquare App details?

Steps:

  1. Go to the foursquare developer website(https://foursquare.com/developers/apps) or click on the bottom link in the Plugin admin console.
  2. Click on the ‘Create a new app’ button.

  1. Fill the details , set the redirect URL and save the application.

  1. Copy the credentials.

For more details about this Magento 2 Facebook Login plugin, visit here:

Magento 2 Social Login Module link

Magento 2 Social Login module Admin Demo Link

Magento 2 Social Login plugin Front Demo Link

For more support and information, feel free to contact us via email at support@knowband.com anytime.

Magento Marketplace Sellers Shipping Charge and Invoice Extension – User Manual

1. Introduction of Magento Marketplace Sellers Shipping Charge and Invoice Extension

This extension is the sub extension of Magento Marketplace. In Marketplace, there is no option for sellers to add shipping charges on his products. All time seller has to depends on shipping applied by store owner.

With this extension, seller will have functionality to apply his own shipping charges on product as well as create invoices for his orders.

Note: This module require Magento Marketplace extension developed by Knowband. Before isntalling it, your store must have Marketplace module.

2. Installation

After purchasing extension, you will get following files as shown in below screen:

  1. marketplaceproductshipping.zip (contain source code of the extension)
  2. User Manual

Follow the following steps to install extension:

  1. Unzip the marketplaceproductshipping.zip folder
  2. Copy all the files and folder of unzipped folder into your store root directory
  3. After coping all the files and folders, clear the cache.
  4. Open any page of your store. Magento will install the module at the time of loading of any page.
  5. After installing, please login into your admin panel. And go to the below menu:

System > Configuration > Advanced

Here you will see that, the “Vss_Marketplaceproductshipping” module is listed.

3. Extension Interfaces

There are two ends from where user will interact with extension functionality. They are following:

  1. Admin Interface (Only be accessible by admin/store owner)
  2. Seller Interface (Onl Seller can access this interface)

Each interface has been explained in next section.

4. Admin Interface

This interface will only be accessible in admin panel. After installing extension, system will add one more shipping methods into your system configuration panel as shown in below screen:

You can access the above page by going: System >> Configuration >> Shipping Methods

4.1 Global Level Shipping Setting

In the above screen, you can configure this shipping method for all your products as well as seller’s products. This method will work like regular flat rate shipping methods.

Fields

  1. Enable: By default method will be disabled. This method will only work if the shipping method is enabled.
  2. Title : Title of the method. Default name will be “Knowband Flat Shipping”
  3. Method Name: Name of the method. Default name will be “Shipping Per Product”.
  4. Type: Type of the shipping method. There will be two types:
    1. Per Item: With this setting, system will apply defined shipping charges on whole ordered quantity at once. For example, if customer ordered 3 qty of same product and shipping charge is $5 per item then system will apply only $5 shipping sharge instead of $15.
    2. Per Quantity: With this setting, system will apply shipping charge by per quantity. Shipping charges will be applicable as per quantity ordered.
  5. Price: Cost of shipping in price format.
  6. Display Error Message: System will show this error message to customer, if something gone wrong on front with this method.
  7. Sort Order: Order in which this shipping will be displayed.

4.2 Product Level Settings

Apart from global level shipping charges, you can also apply different shipping charges on different product as per your need. After installing this method, system will show shipping charge fields on product edit page under “General”tab as shown in below screen:

5. Seller Account Interface

5.1 Product Level Shipping Settings

With this extension, seller will also enable to apply shipping charge on his own products. Seller will only have option to set shipping charge on product level. They will not have option for global level shipping charges.

Shipping fields will be shown to seller on product edit or product new page as shown in below screen:


5.2 Create Invoices for Orders

As seller will have option to set his own shipping charges for his products. With this feature, extension will also enable seller to create invoices for his orders. If any order placed at website and order has seller products with this shipping method then extension will shown “Invoice”option to seller on corresponding order on order view page as shown in below screen:

On clicking “Invoice”button, system will redirect seller to create invoice page from where seller can create invoice for corresponding order as per his need.

You Might Also Like: