In Opencart there is functionality to automate sending order email to admin which we send to the customer after placing an order.
For Opencart 2.2
Follow the following steps to automate sending order emails to the admin:
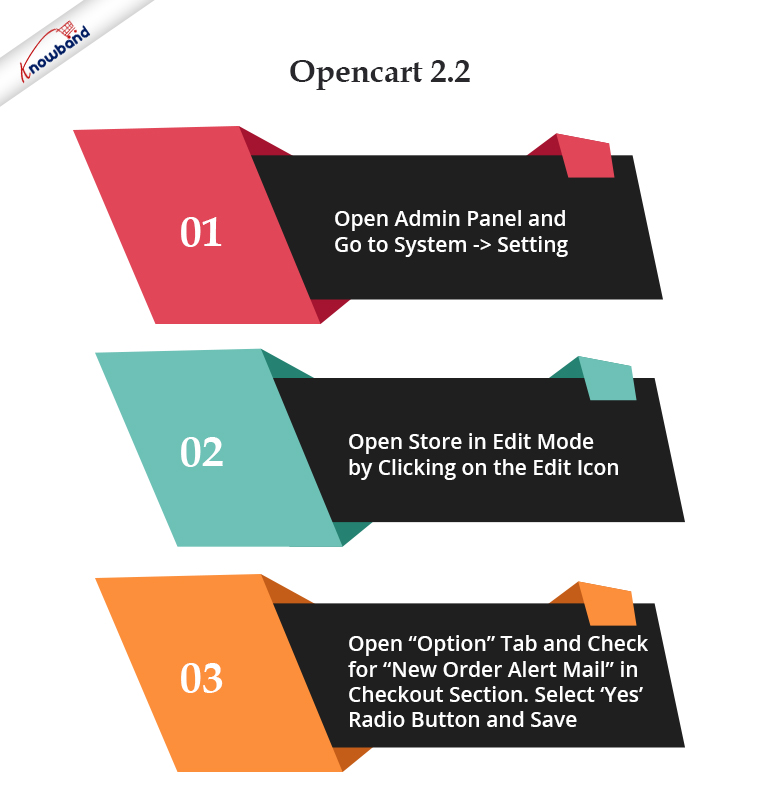
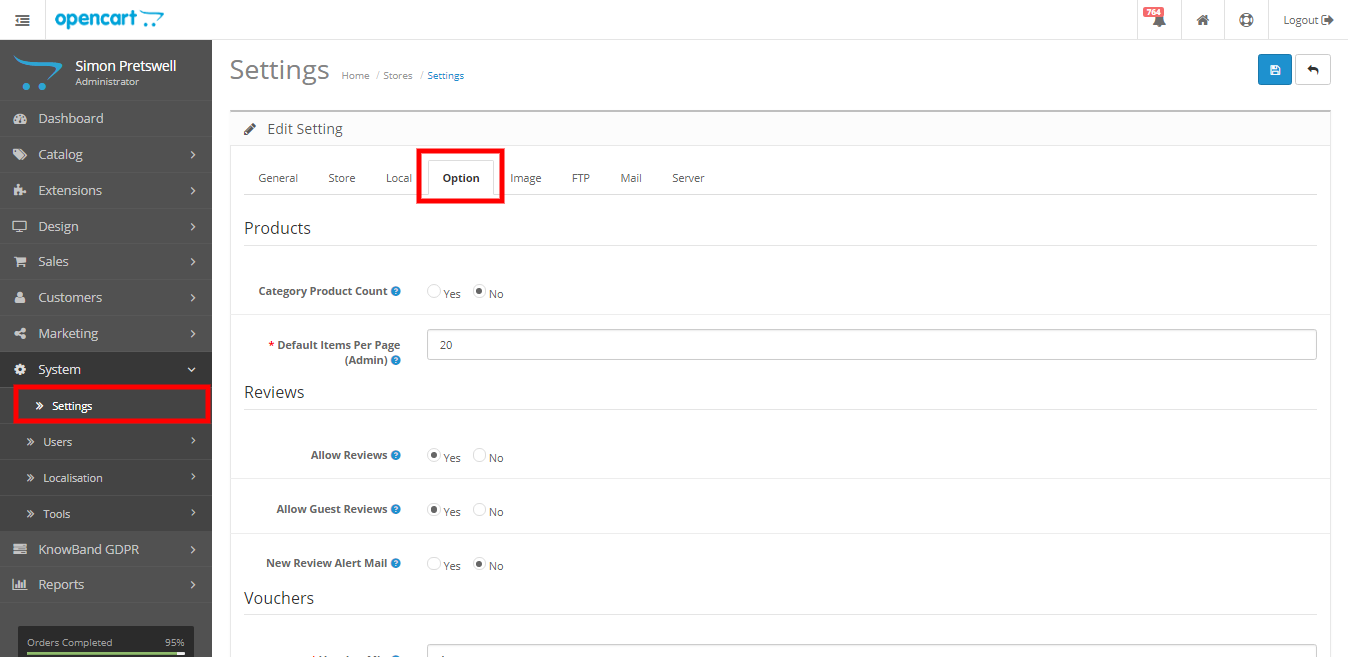
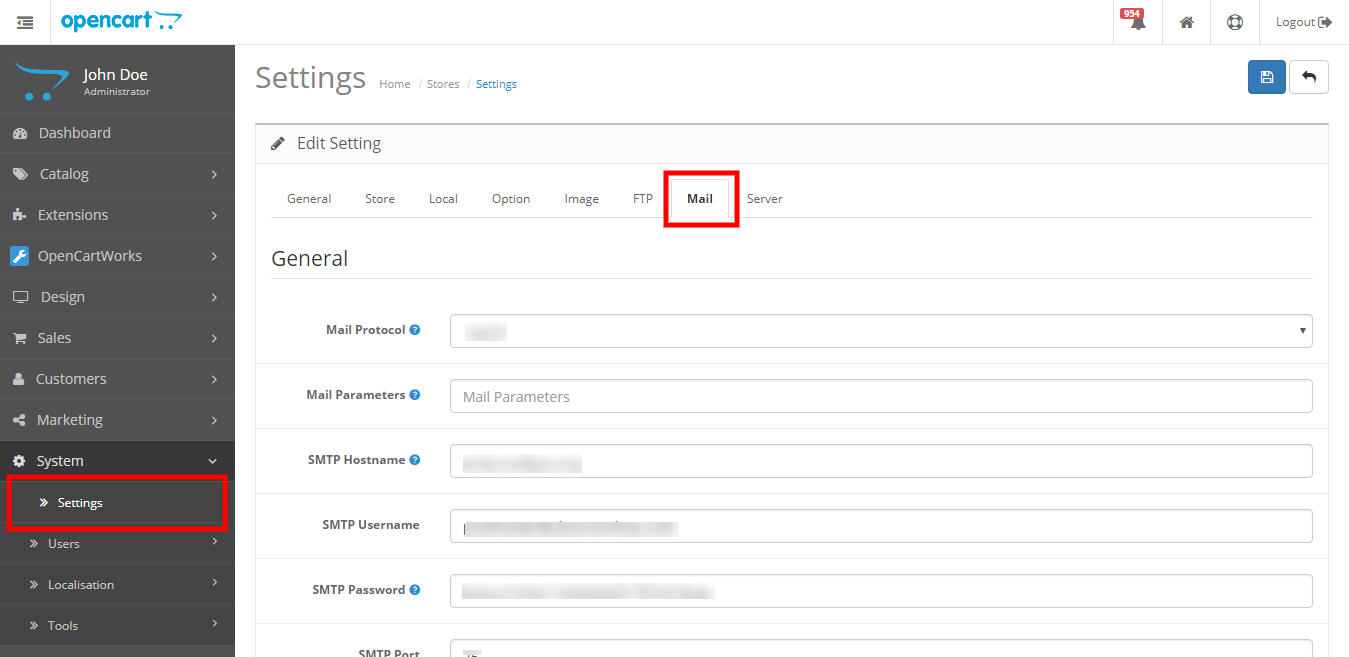
Open the admin panel and go to System -> Setting. On this page, you will see a store listing.
Open a store in edit mode by clicking on the edit icon.
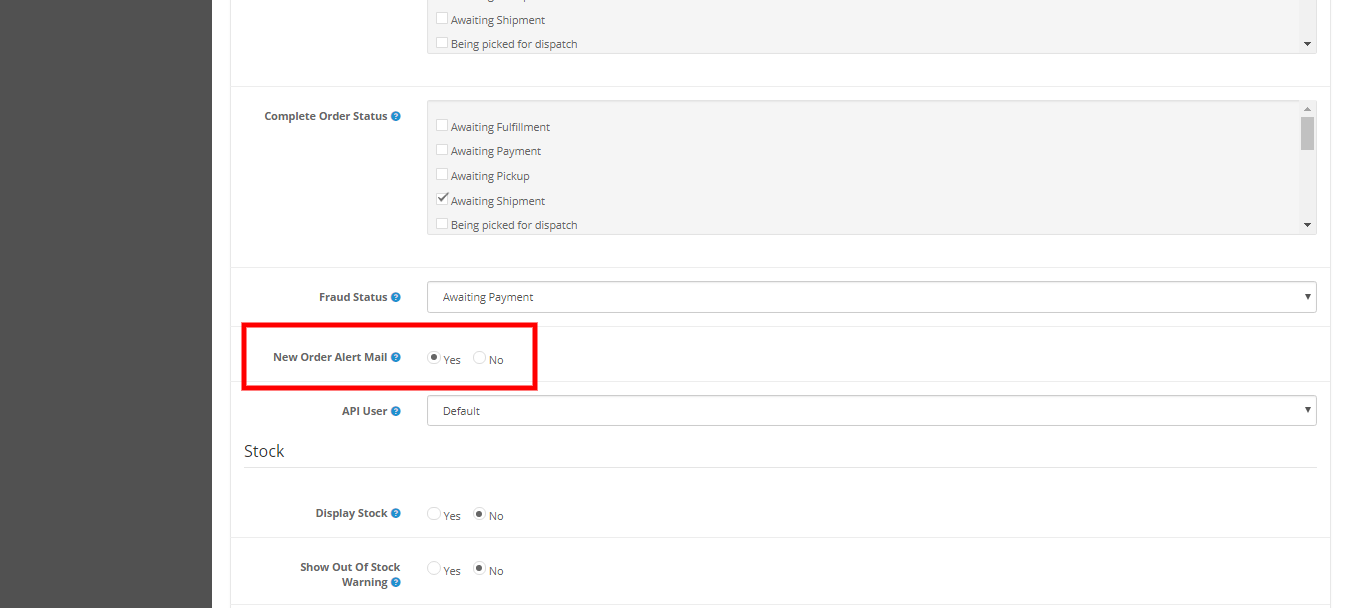
Open the “Option” tab and check for “New Order Alert Mail” in the checkout section. Select the ‘Yes’ radio button and save.
Refer below screenshots
Note: Function add order history() in catalog/model/checkout/order.php file is used to send mail to mail to admin in. If you want to make any changes to the email then can make this function.
Search for ‘if ($this->config->get(‘config_order_mail’)) {‘ to find code to send mail to admin.
For Opencart 2.3
Follow the following steps to automate sending order emails to the admin:
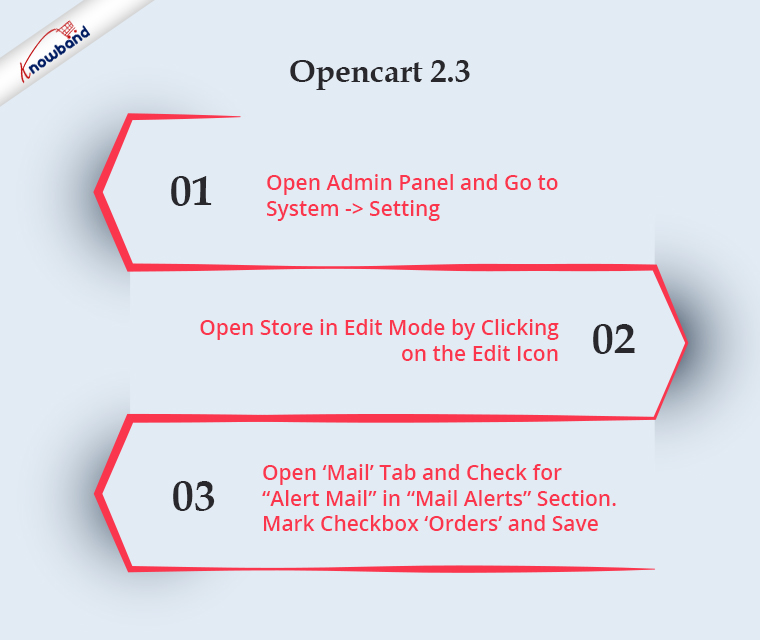
Open the admin panel and go to System -> Setting. On this page, you will see a store listing.
Open a store in edit mode by clicking on the edit icon.
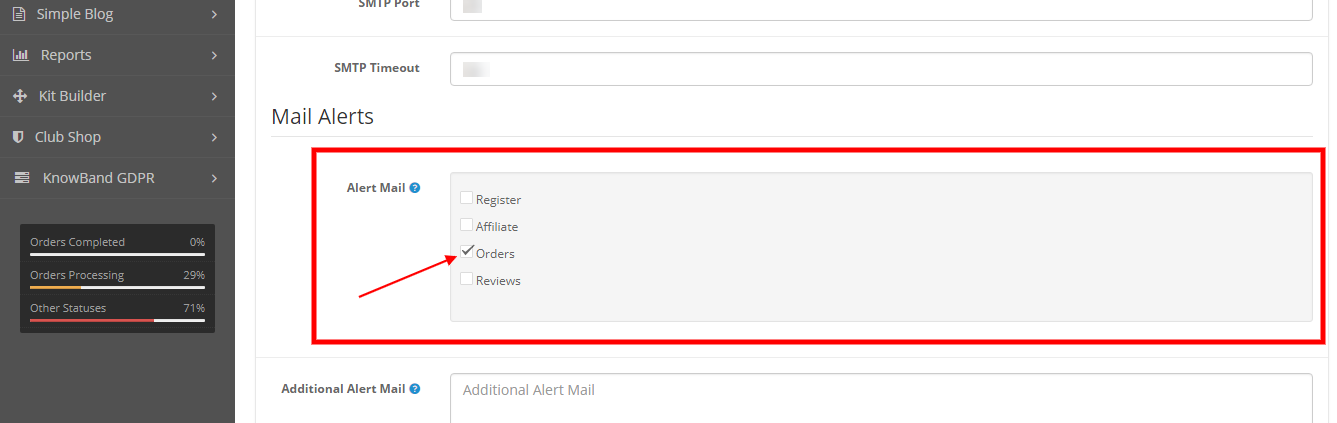
Open the ‘mail’ tab and check for “Alert Mail” in the “Mail Alerts” section. Mark checkbox ‘orders’ and save.
Refer below screenshots
Note: Function addOrderHistory() in catalog/model/checkout/order.php file is used to send mail to mail to admin in. If you want to make any changes to the email then can make this function.
Search for ‘if (in_array(‘order’, (array)$this->config->get(‘config_mail_alert’))) {‘ to find code to send mail to admin.
In the End:
In order to enhance the functionality of your OpenCart store, Knowband offers a large selection of both free and paid OpenCart extensions. With a large variety of features available in these modules, the store admin can easily launch, develop, and grow their business. To know further about OpenCart Modules’ functionality and features, feel free to reach us at support@Knowband.com.
After reading this blog, you will be able to understand how a seller can delete products from the catch marketplace.
Methods to delete Products from the catch marketplace
You can delete products from the catch marketplace by two methods:
By deleting manually from merchant account
By Using Offer Feed
1.0 Delete manually from merchant account
Login to the Catch merchant account (URL: https://marketplace.catch.com.au/login).
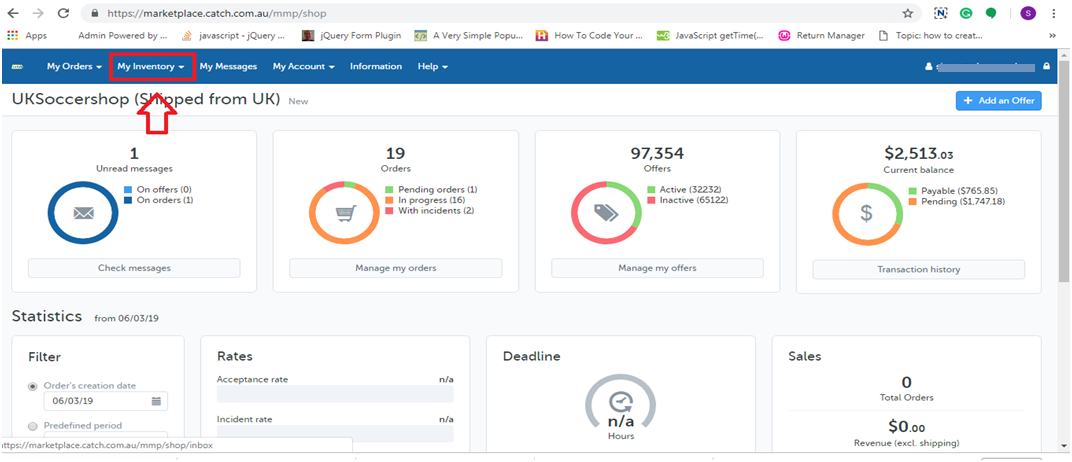
After logged in, you will be redirected to the home page where you need to select the offer list from the “My Inventory” tab as shown in the image given below:
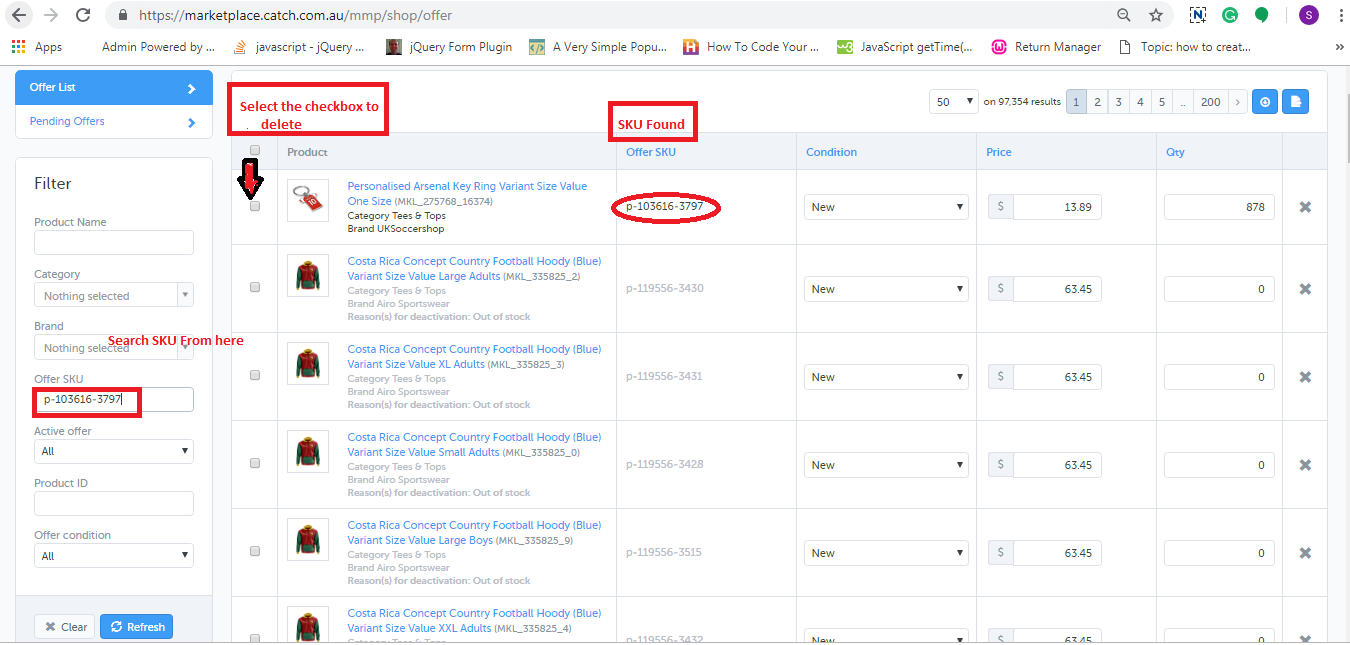
In the offer list page you need to search the SKU by using “Offer SKU” field and check the checkboxes corresponding to those SKU which you want to delete as shown in the image below.
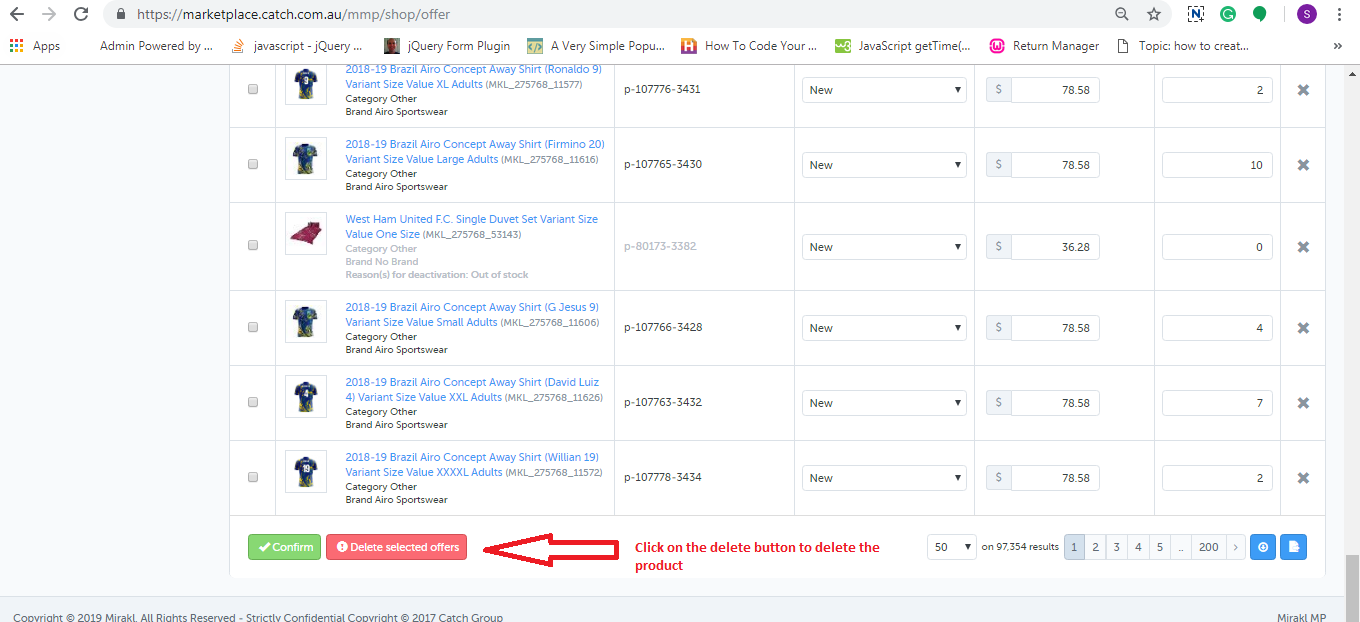
At the bottom of the page, you will find a button to delete the product as shown in the image below.
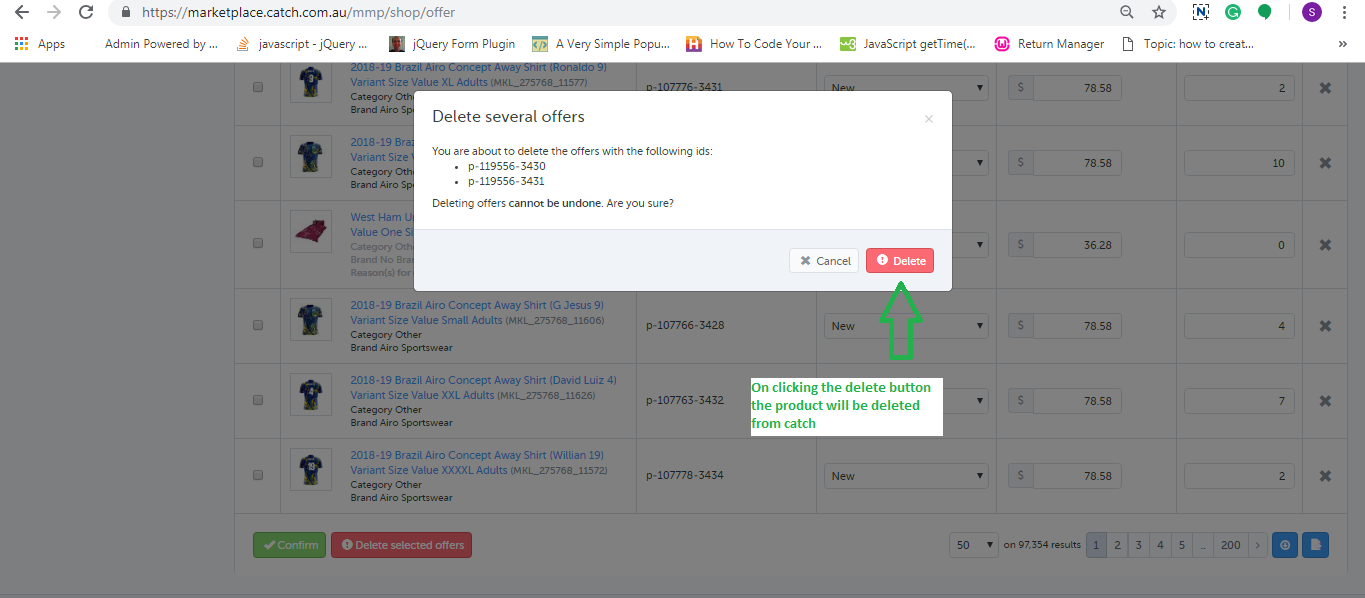
On clicking that button, a popup will be appeared on the screen which will show the list of SKUs that you have selected to delete and the button to delete those products. This is shown in the image below:
2.0 Using Offer Feed
You can delete the products in bulk from the Catch marketplace using offer feed. You can download the sample offer feed from the link given below:
In this feed, you need to fill the data in the following fields:
SKUs: Enter the SKU which you want to delete
update-delete: Enter “DELETE” in this column.
club-catch-eligible: Enter FALSE
tax-au: 0
After creating the feed, you need to upload the feed on the catch merchant account. The steps are given below:
Login to the Catch merchant account (URL: https://marketplace.catch.com.au/login).
After logged in, you will be redirected to the home page in which you need to select the “Import From File” option from the “My Inventory” tab.
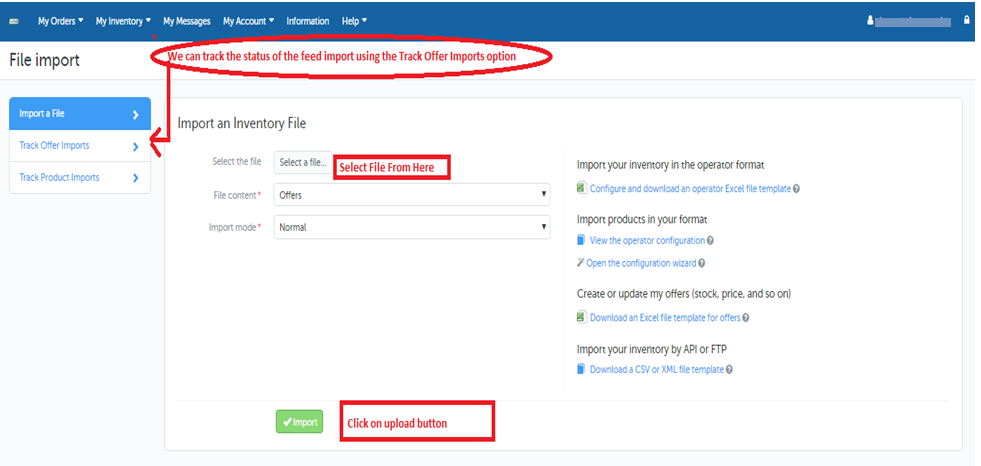
On the Import file page you need to upload the feed as shown in the image:
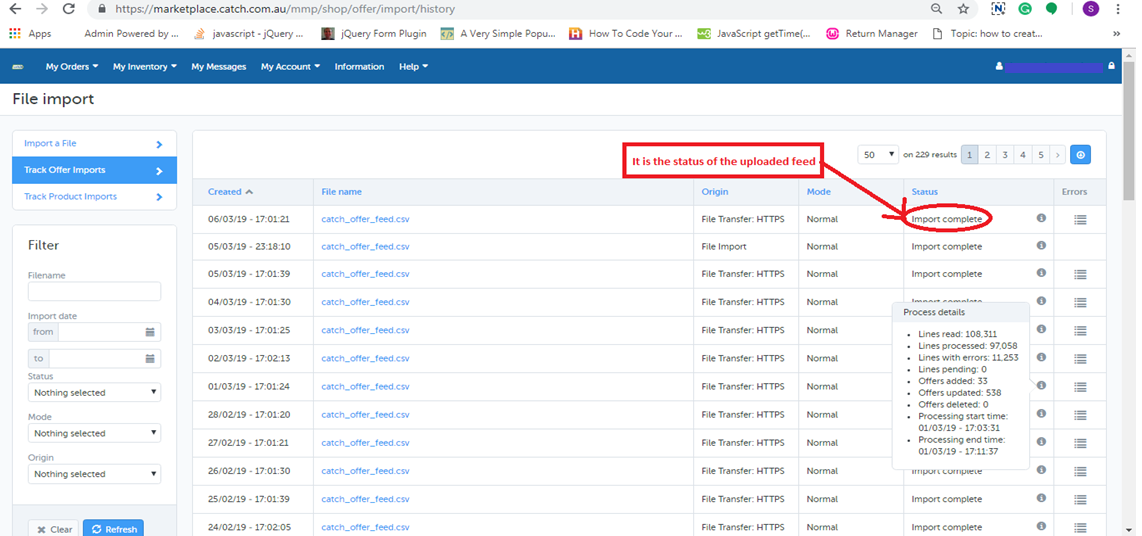
You can track the status of the uploaded feed using Track Offer Import Option as shown in the image given above. On clicking on the Track Offer Import option, a new page will be opened where you can check the status of the uploaded feed. If the feed is imported successfully then you can also check the processing status of the feed as shown in the image below:
Summary
After reading this document you (seller) can easily delete your products from the Catch marketplace.
After reading this blog we will be able to understand the process to fetch data from Firebase. This process includes installation of Firebase SDK and implementation of code to fetch data from Firebase.
Pre-requisites
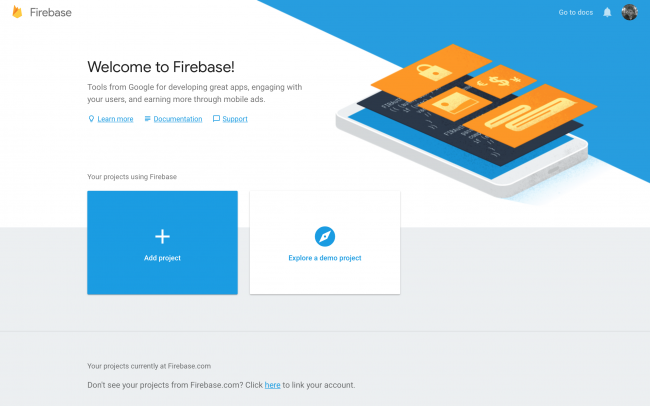
We need to write swift code to fetch the data from Firebase. For this first we will have to create the Firebase project. Follow the steps given below to create the Firebase project –
2. Then you will have to create Firebase project by clicking on “Add Project” button
3. You need GoogleService-Info.plist file for iOS SDK as this file contains the details of the Firebase project which are used by Firebase SDK
4. Then add the plist file in the project
5. Add the following code before the return statement within application(_:didFinishLaunchingWithOptions:) in AppDelegate.swift file
FirebaseApp.configure()
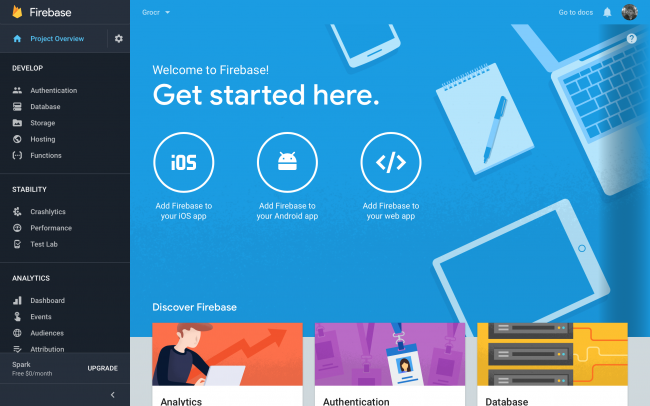
6. Then go to “Database” option from the left menu.
7. Select “Realtime Database” and that is the database for the Firebase project. All the data that is stored in or fetched from is from this location.
8. Firebase setup is completed
Now you will have to download Firebase SDK in the swift. For this you will have to install the following pods.
pod ‘Firebase/Core’
pod ‘Firebase/Database’
Let suppose you have the following data in the given structure in the Firebase database –
// The root of the tree
{
  // grocery-items
  "grocery-items": {

    // grocery-items/milk
    "milk": {

      // grocery-items/milk/name
      "name": "Milk",

      // grocery-items/milk/addedByUser
      "addedByUser": "David"
    },

    "pizza": {
      "name": "Pizza",
      "addedByUser": "Alice"
    },
  }
}
After successful installation of the pods, we can move on to the coding part.
Code Implementation
All the data points/nodes are used to access data from Firebase database. We create references to the nodes and then fetch data from that node.
In other words a Firebase reference points to a location in Firebase where data is stored.
First we will have to create reference to the root node of the database structure –
let ref = Database.database().reference(withPath: "grocery-items")
or the following way can be used –
let rootRef = Database.database().reference()
let ref = rootRef.child("grocery-items")
Reference to the child node which is “milk” can be created using the following code –
let milkRef = ref.child("milk")
Asynchronous listener can be attached to a reference in order to retrieve data from Firebase using observe(_:with:) method.
The following code will fetch the data and keep listening to the data changes on the database. As soon as any change is made in the database, the new snapshot of the node/reference is fetched and we get the updated data as soon as any change is made in the database.
ref.observe(.value, with: { snapshot in
  // This is the snapshot of the data at the moment in the Firebase database
  // To get value from the snapshot, we user snapshot.value
  print(snapshot.value as Any)
})
Then the snapshot values can be parsed and used in the app.
One big advantage of using observe method over observeSingleEvent method is that you don’t have to call the function again and again as the updated data is fetched from the database as soon as any value is changed in the database.
Summary
Now you should be able to fetch the data from the Firebase database in swift using Firebase SDK.
Please feel free to get in touch with us at support@knowband.com for any issues.
We also provide No Code Mobile App solutions for Prestashop, Opencart, Magento 2 and Woocommerce. Know more here:
Implement Facebook login using Facebook SDK in iOS app. OR you can download the sample project from this link.
Procedure to implement
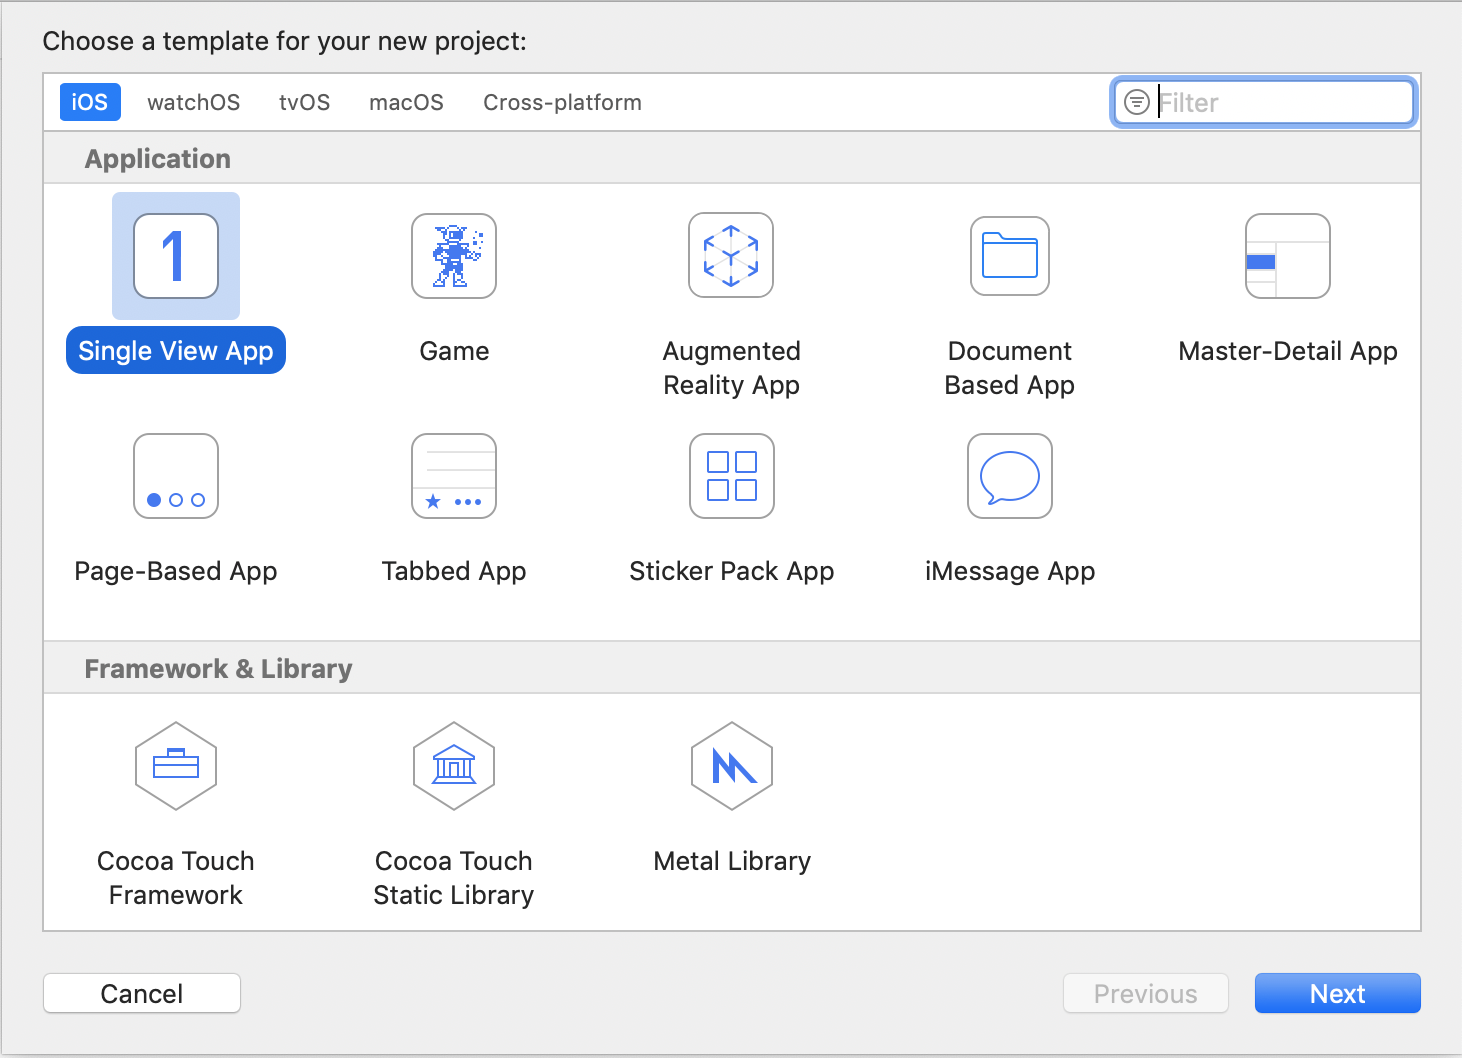
1. Create a new Xcode project. And open the project.
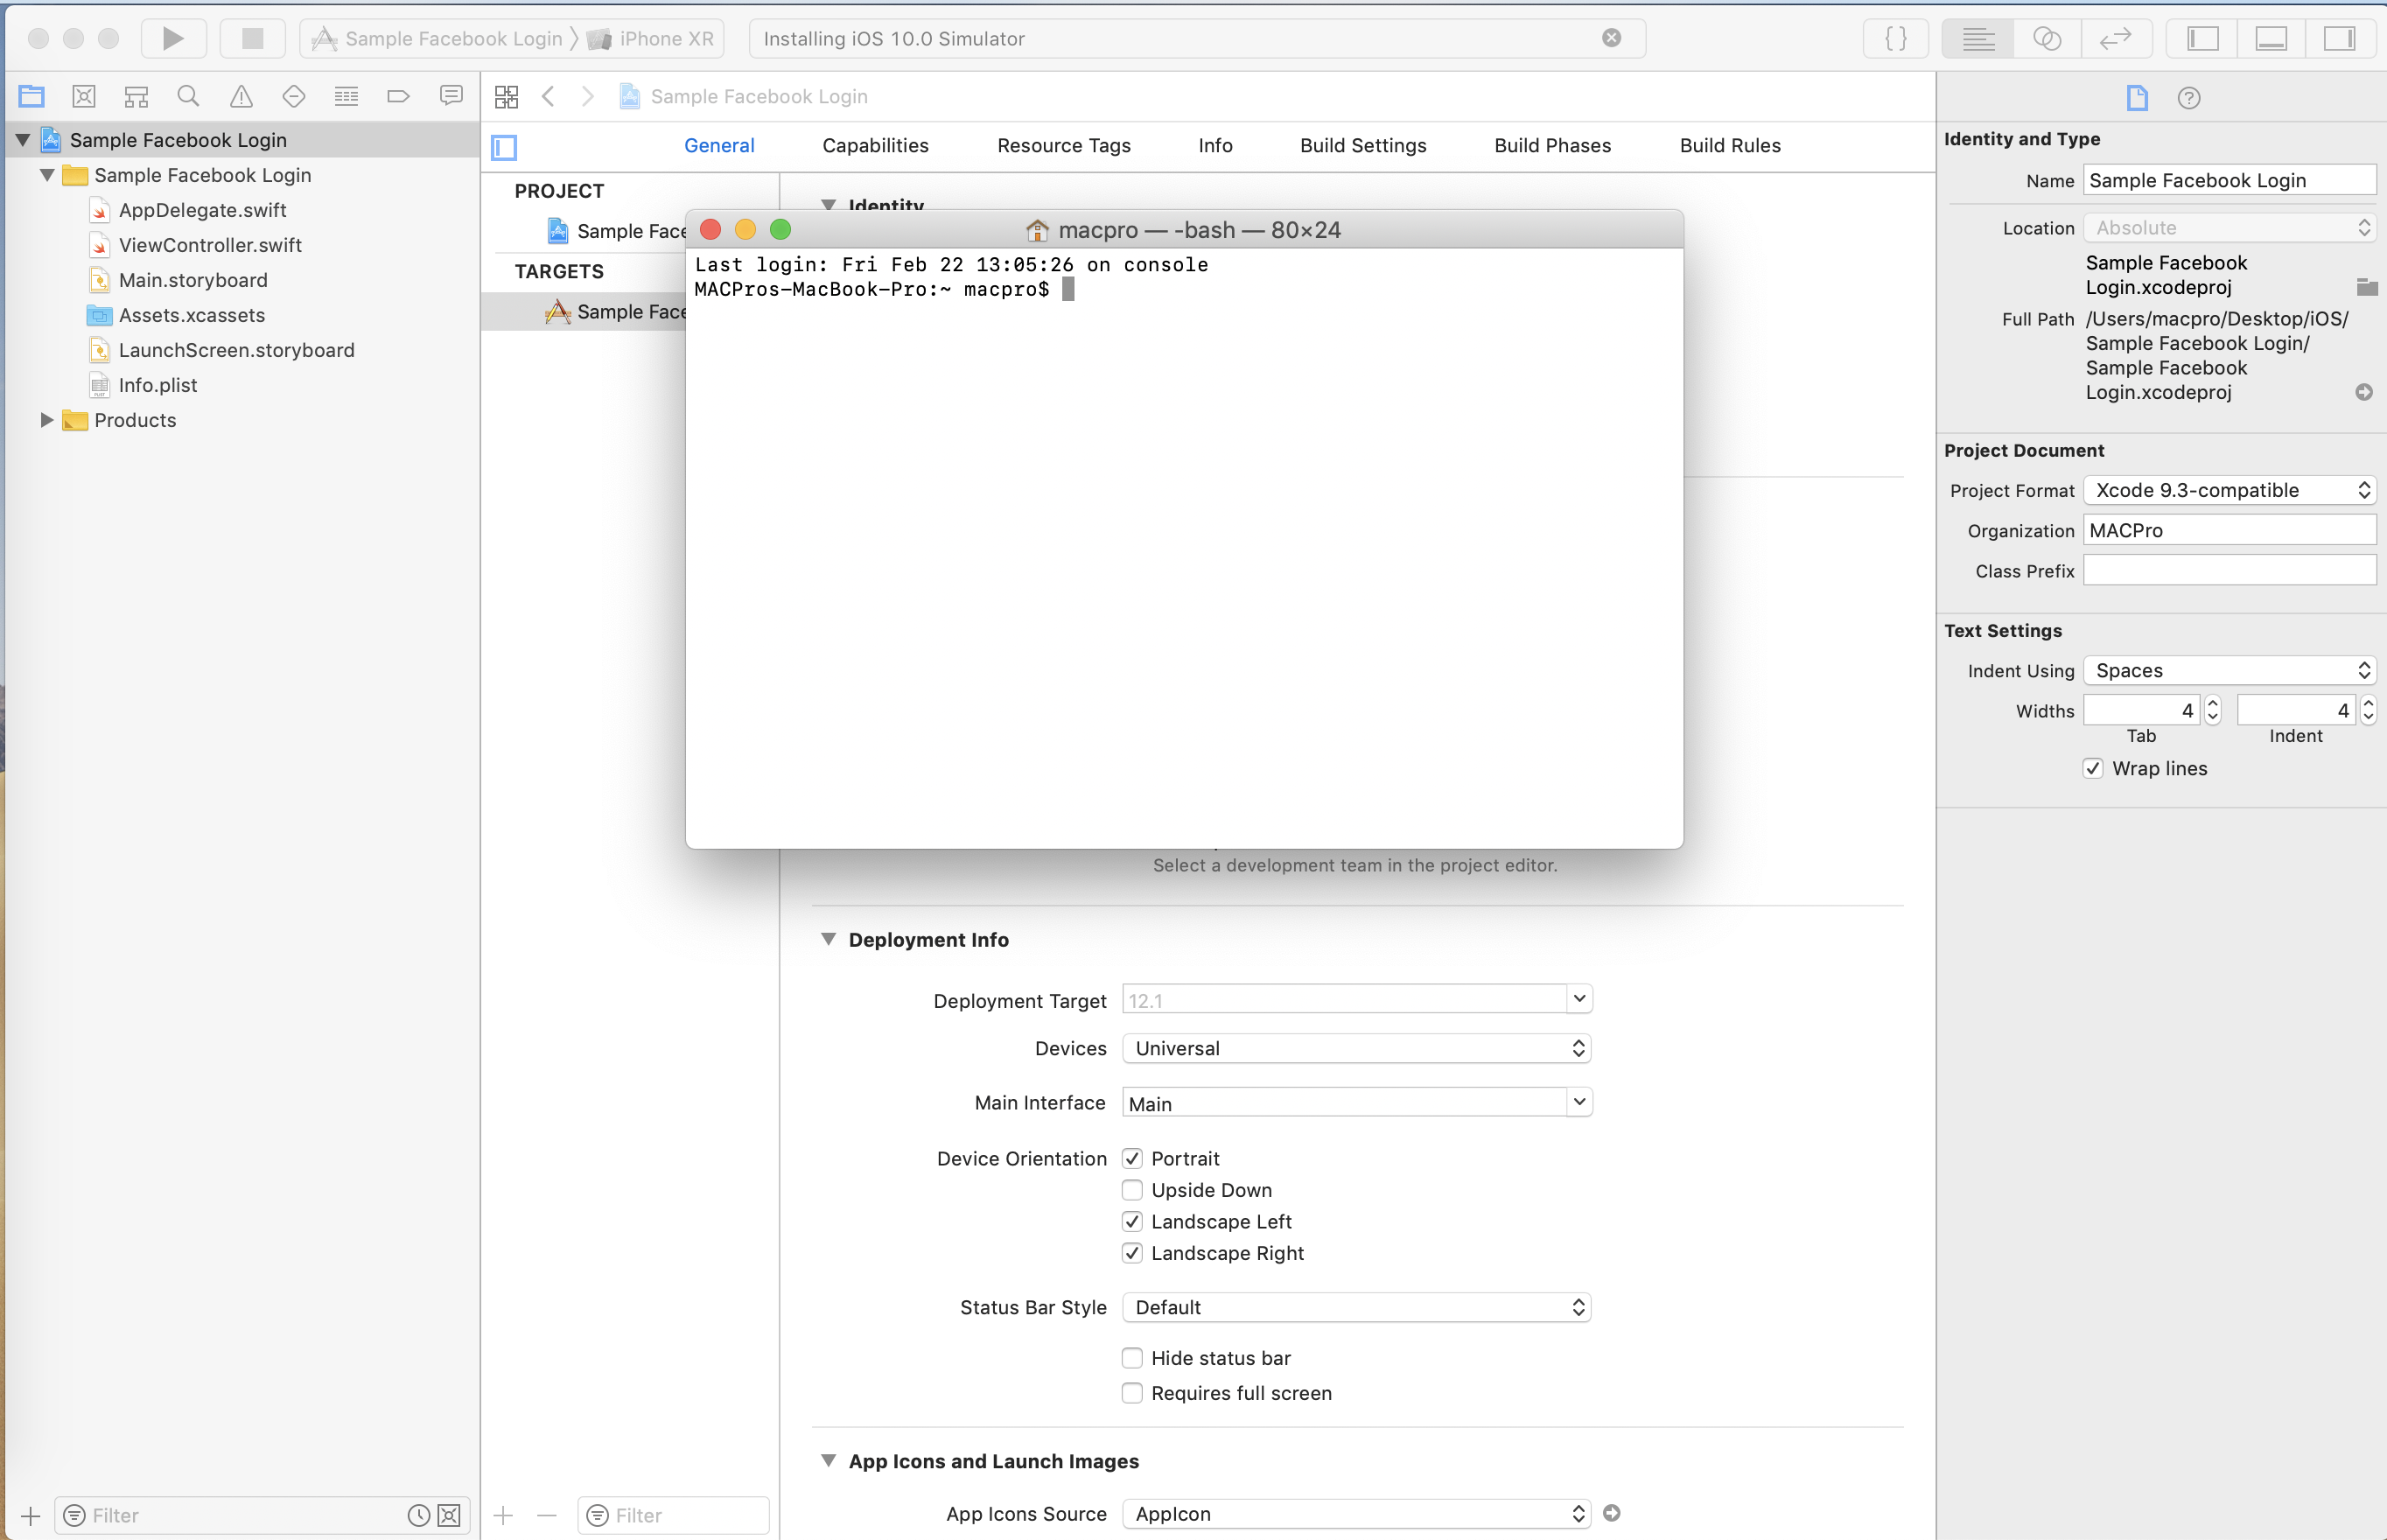
2. Open the Terminal and type “cd “. Then drag the project file from Xcode to the terminal. This will add the path of the project folder into the Terminal. Then delete the project name “Sample Facebook Login.xcodeproj” from the command. Final command in Xcode will be like “cd /Users/macpro/Desktop/iOS/Sample Facebook Login/“, this is the path of the project.
3. In terminal, use command “pod init“, this will create a podfile for the project.
4. Use command “nano podfile“, this will open the podfile in editing mode. The add below pods in the file.
pod ‘FBSDKCoreKit’
pod ‘FBSDKShareKit’
pod ‘FBSDKLoginKit’
5. The podfile will look like below screenshot.
6. Use command “control + X“, to exit the file and save the podfile.
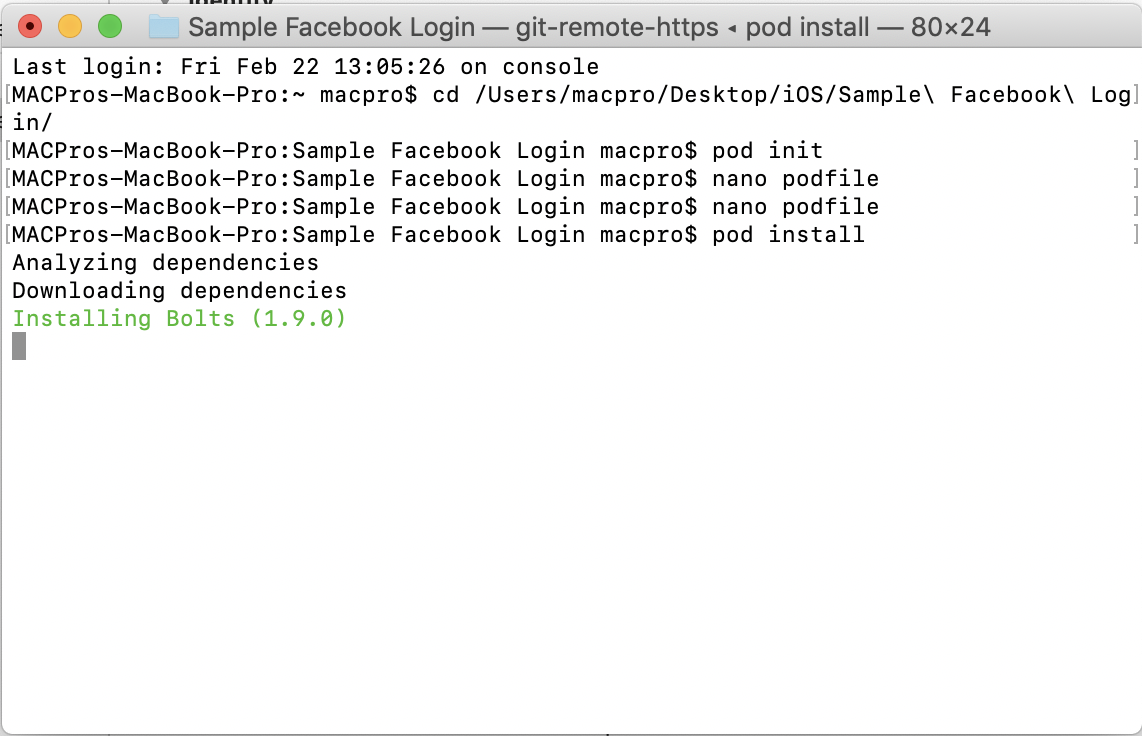
7. Run command “pod install” to install the podfile in the project. You will see the process terminal like below:
8. After the installation is complete, close the xcode project. Go to the project folder, you will see new project named “[your project name].wcWorkspace“. Open this project.
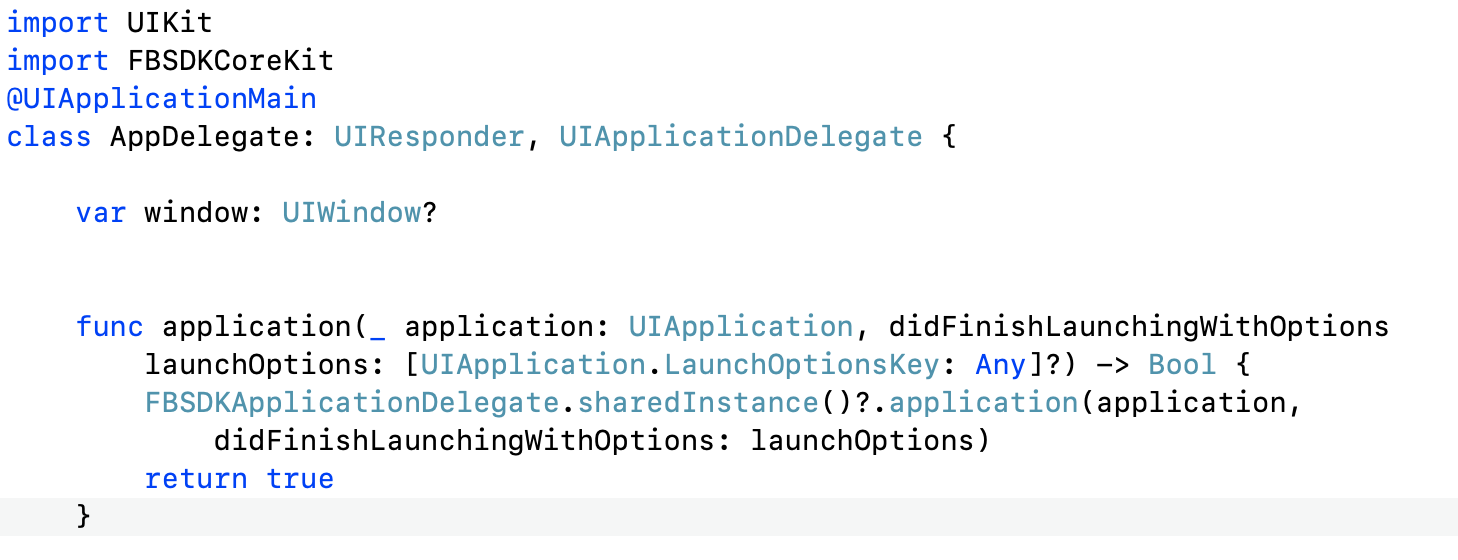
9. Open file named “AppDelegate.swift” in your project. Import “FBSDKCoreKit” and add below code in func application(_ application: UIApplication, didFinishLaunchingWithOptions launchOptions: [UIApplication.LaunchOptionsKey: Any]?)
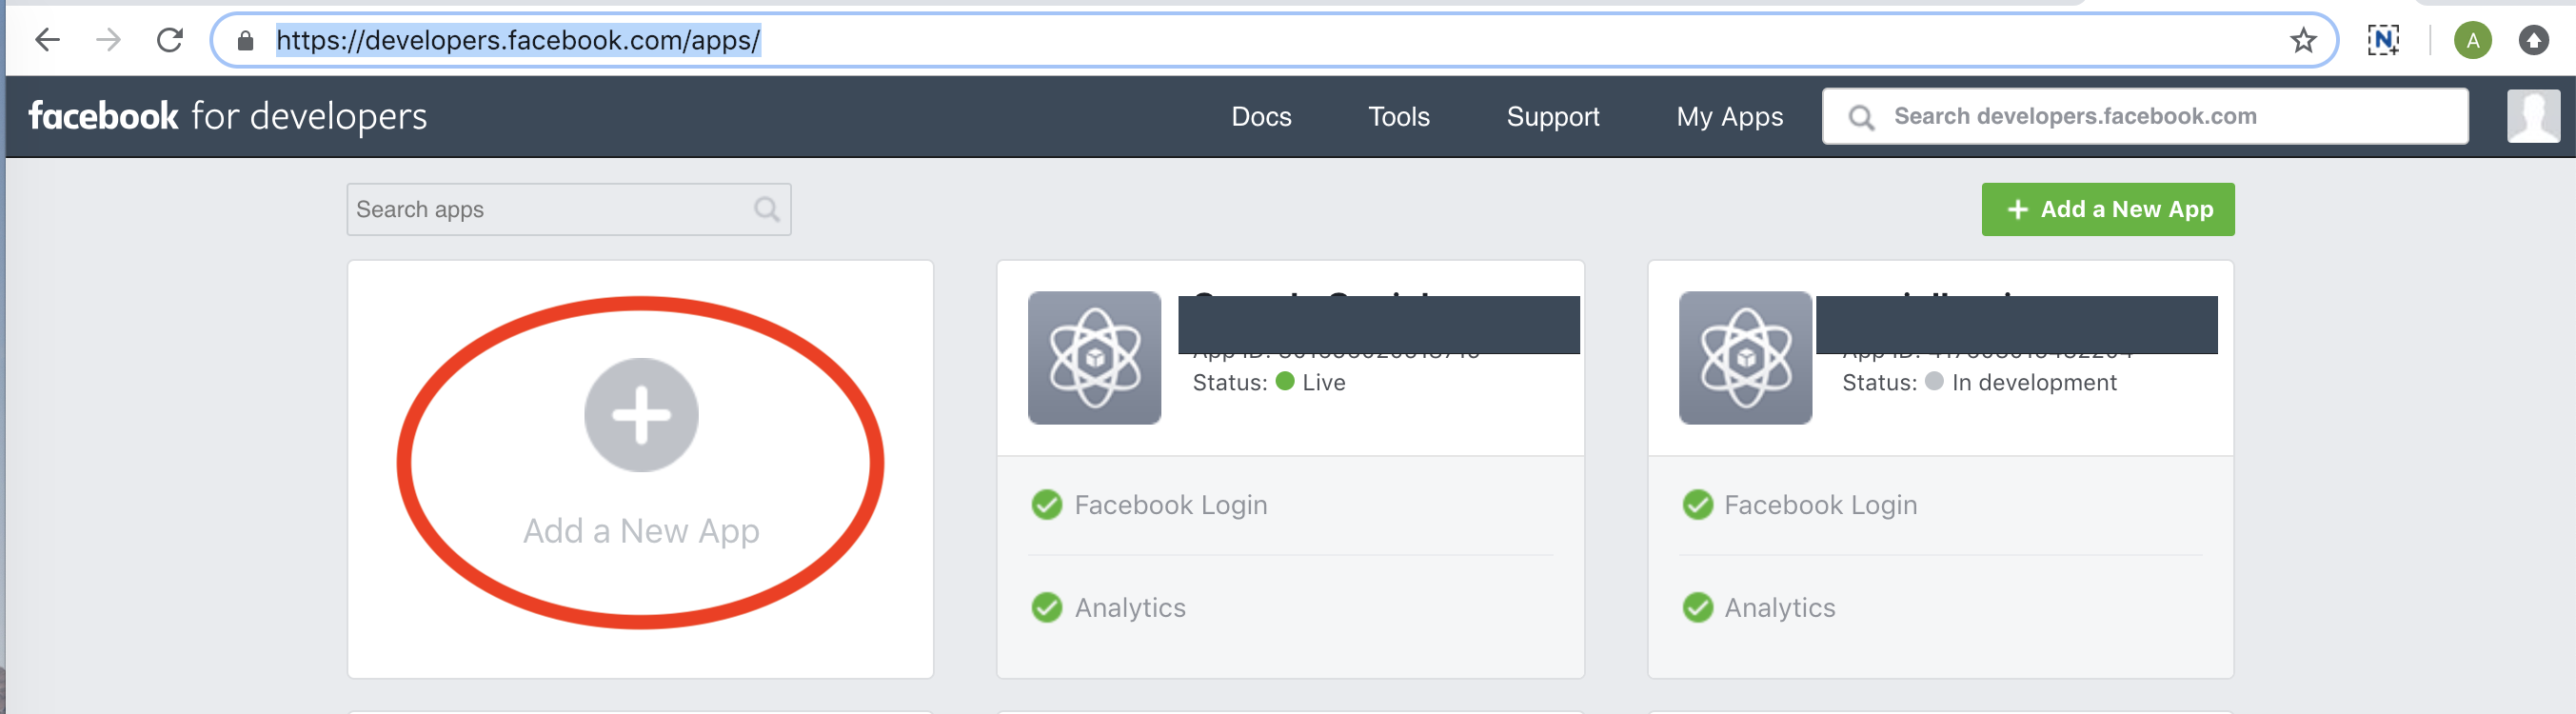
11. Click on “Add a new App“. Enter your projects name and proceed.
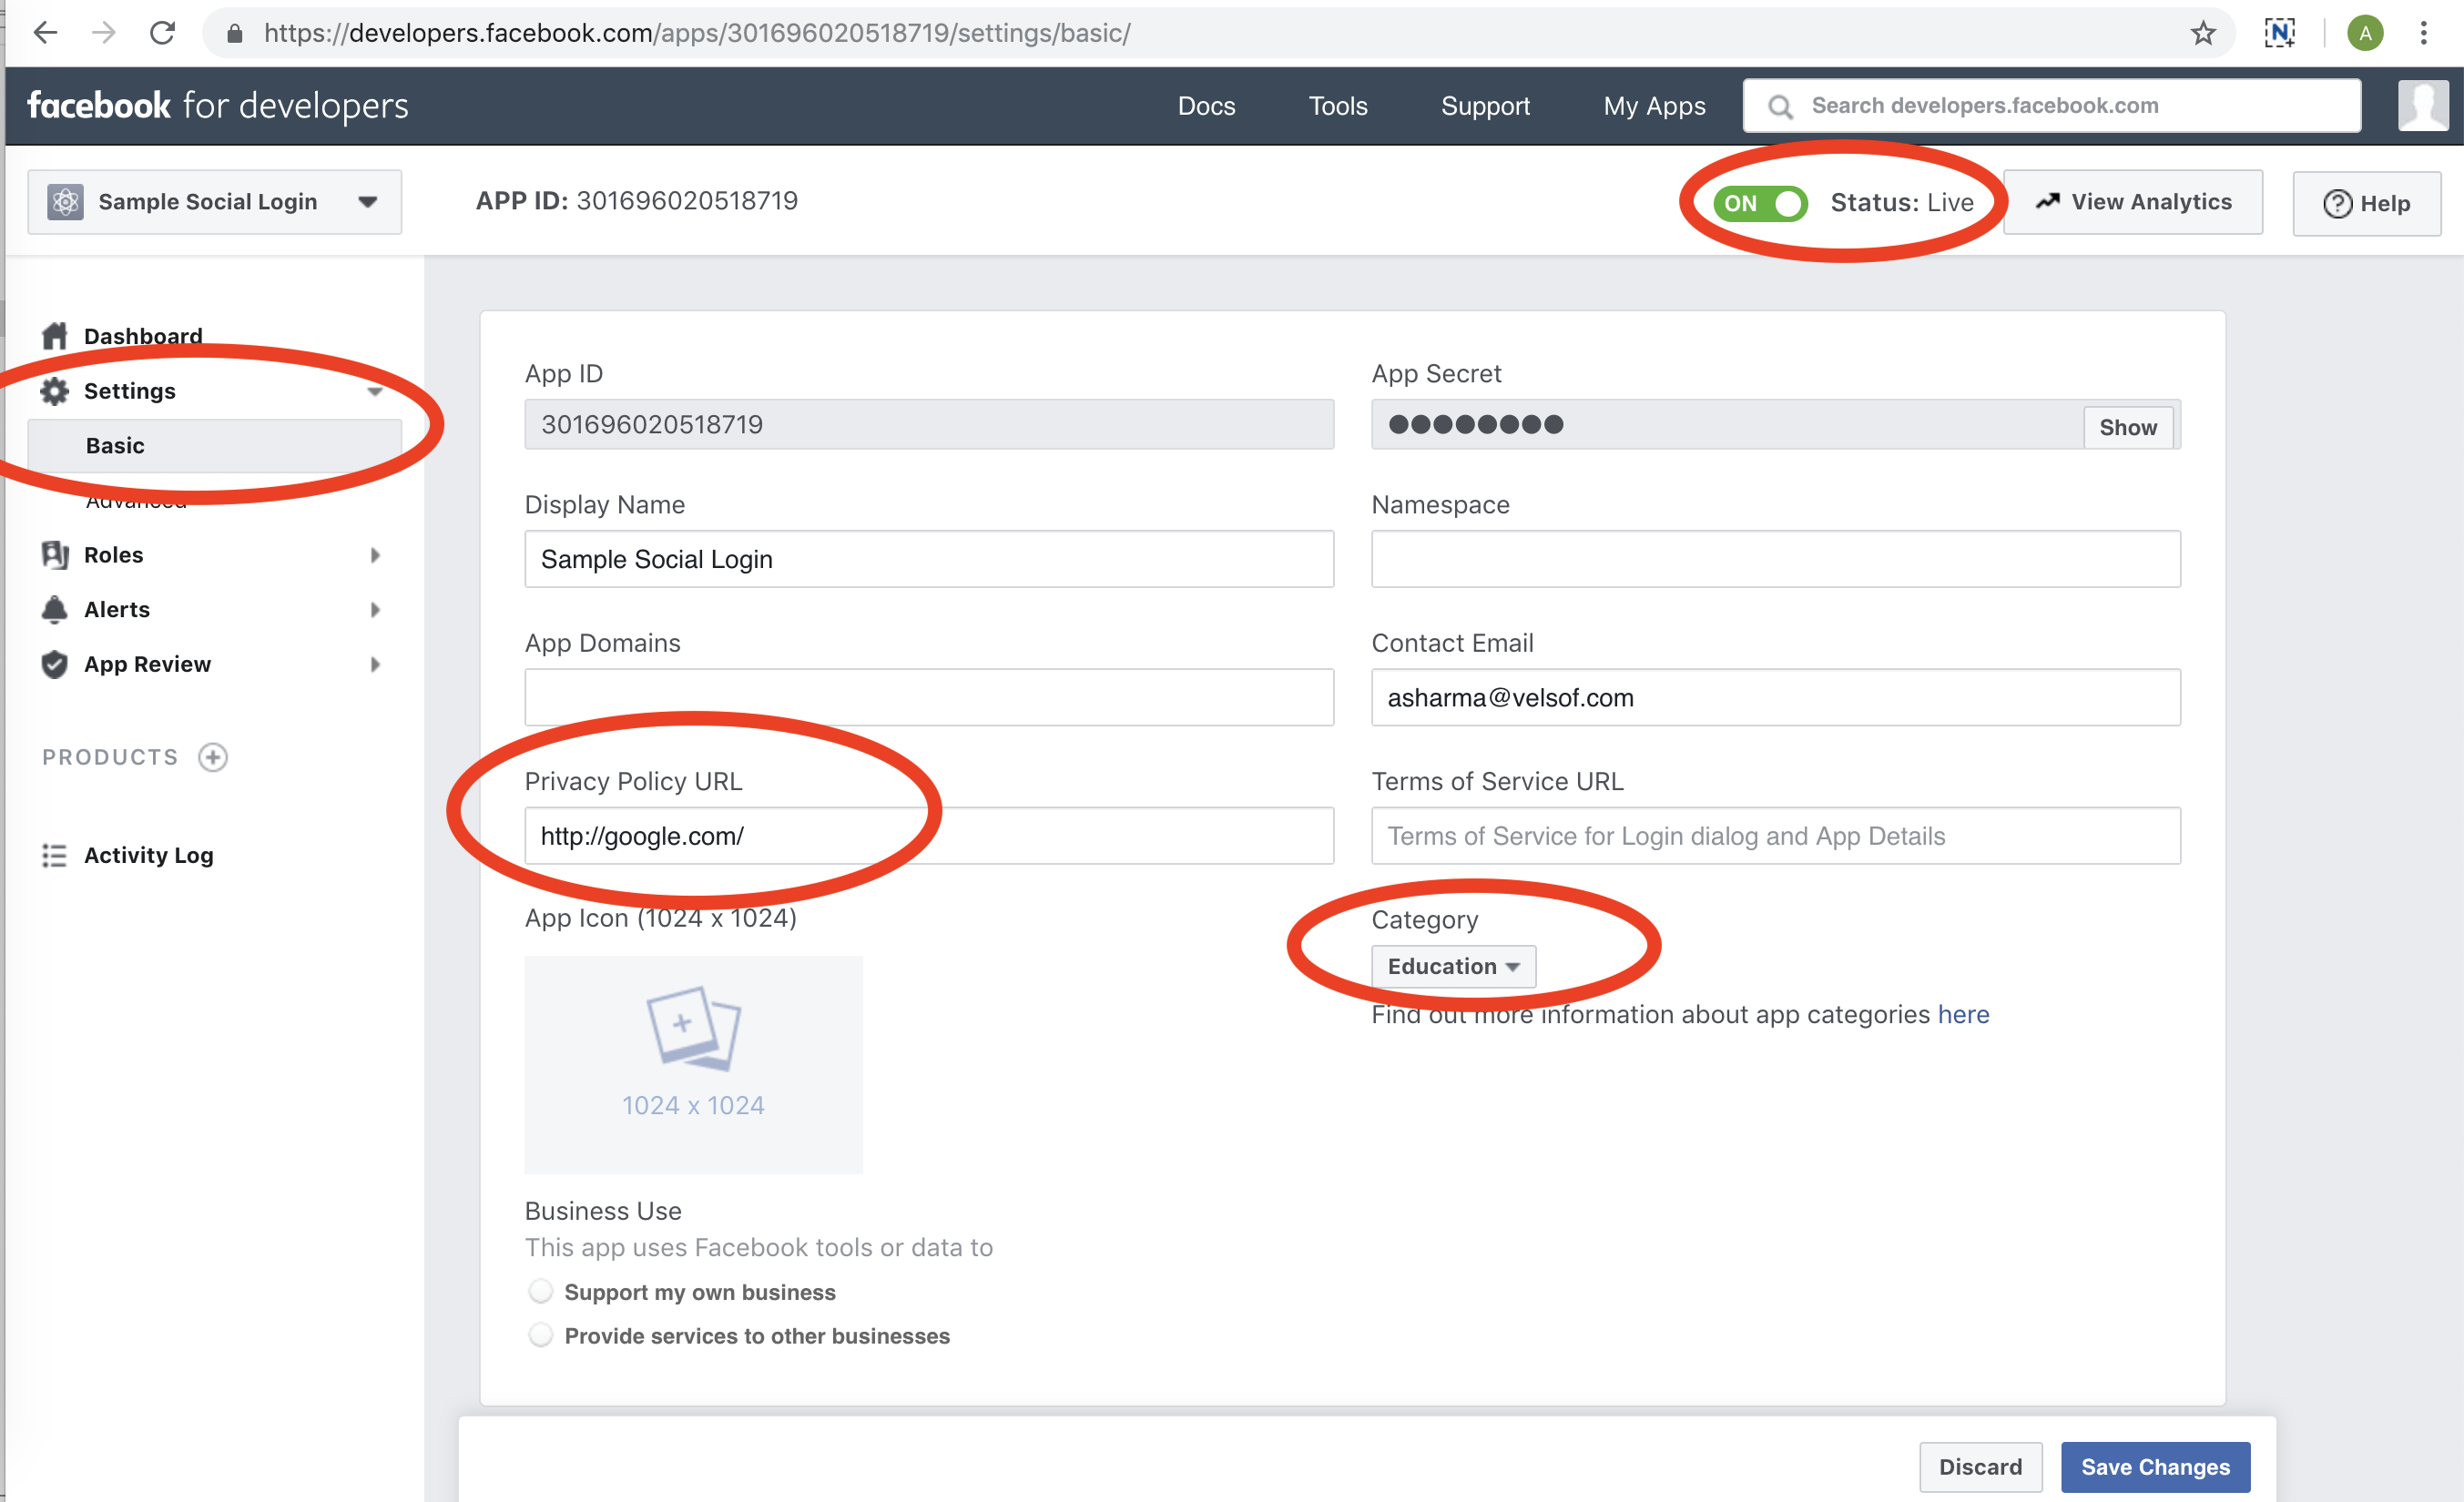
12. Fill the details on the next page. Go to “Settings” in left menu, then go to “Basic” and fill the details.
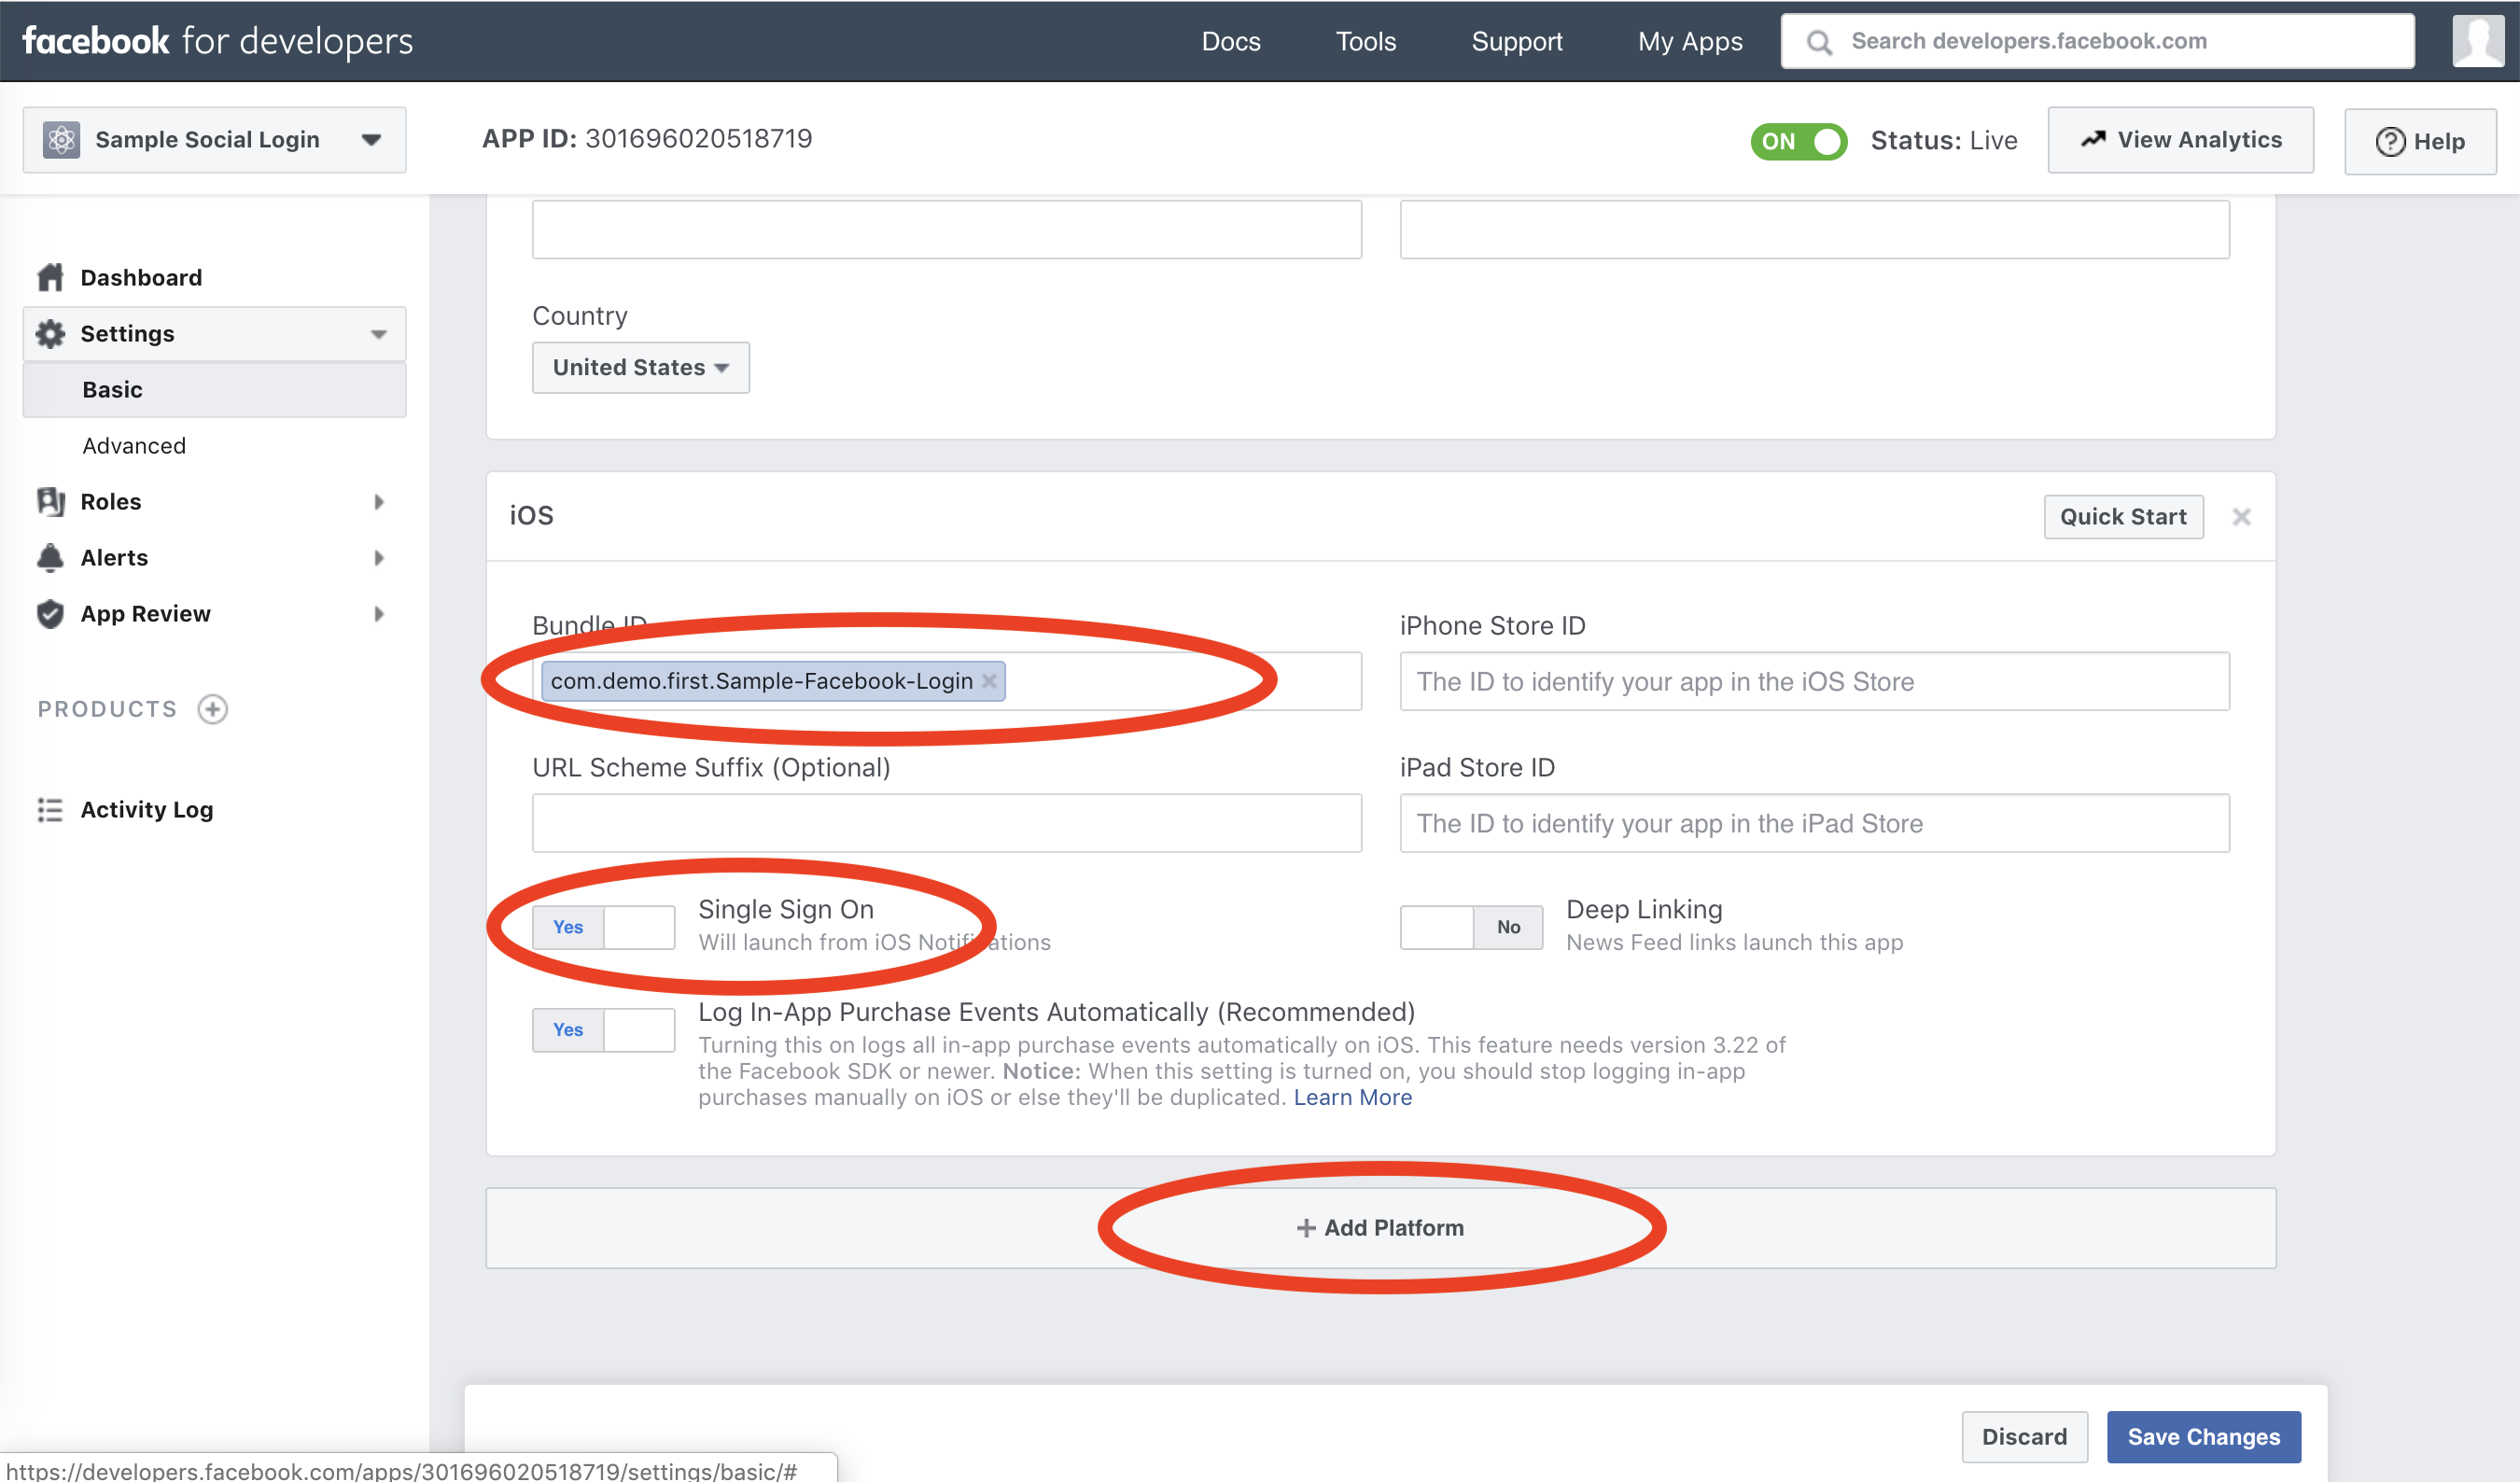
13. Go to bottom of the page. Click on “Add Platform“. Then fill you apps bundle ID and you will see a screen as below:
14. Then go to your Xcode project. Open info.plist file (right click -> Open As -> Source Code), then add below code in your info.plist file.
<key>CFBundleURLTypes</key>
<array>
<dict>
<key>CFBundleURLSchemes</key>
<array
<string>fb[your Facebook App Id that you will get in step 11]</string>
</array>
</dict>
</array>
<key>FacebookAppID</key>
<string>[your facebook App Id that you will get in step 11]</string>
<key>FacebookDisplayName</key>
<string>[your facebook App Name]</string>
15. Open your ViewController where you want to add Facebook button for login. Import “FBSDKLoginKit” and add below code in viewDidLoad() function.
// Creating an instance of facebook login button.
let loginButton = FBSDKLoginButton()
// Setting permission to facebook button.
loginButton.readPermissions = ["email", "public_profile"]
// Setting delegate of facebook button so that we can access the response we get from facebook after login.
loginButton.delegate = self
// Centering the facboiok login button and adding the button in main view
loginButton.center = self.view.center
self.view.addSubview(loginButton)
16. Add Facebook button delegate and the delegate methods.
17. To get the user details you need to add below code in func loginButton(_ loginButton: FBSDKLoginButton!, didCompleteWith result:
FBSDKLoginManagerLoginResult!, error: Error!) delegate method of Facebook button.
// If we get token in response, that means Facebook login is successfull. Below code is used to get user details after facebook login is successfull.
if((FBSDKAccessToken.current()) != nil){
FBSDKGraphRequest(graphPath: "me", parameters: ["fields": "id, name, first_name, last_name, email"]).start(completionHandler: { (connection, result, error) -> Void in
if (error == nil){
// Result will contain the user details that can be fetched.
print(result ?? "")
}
})
}
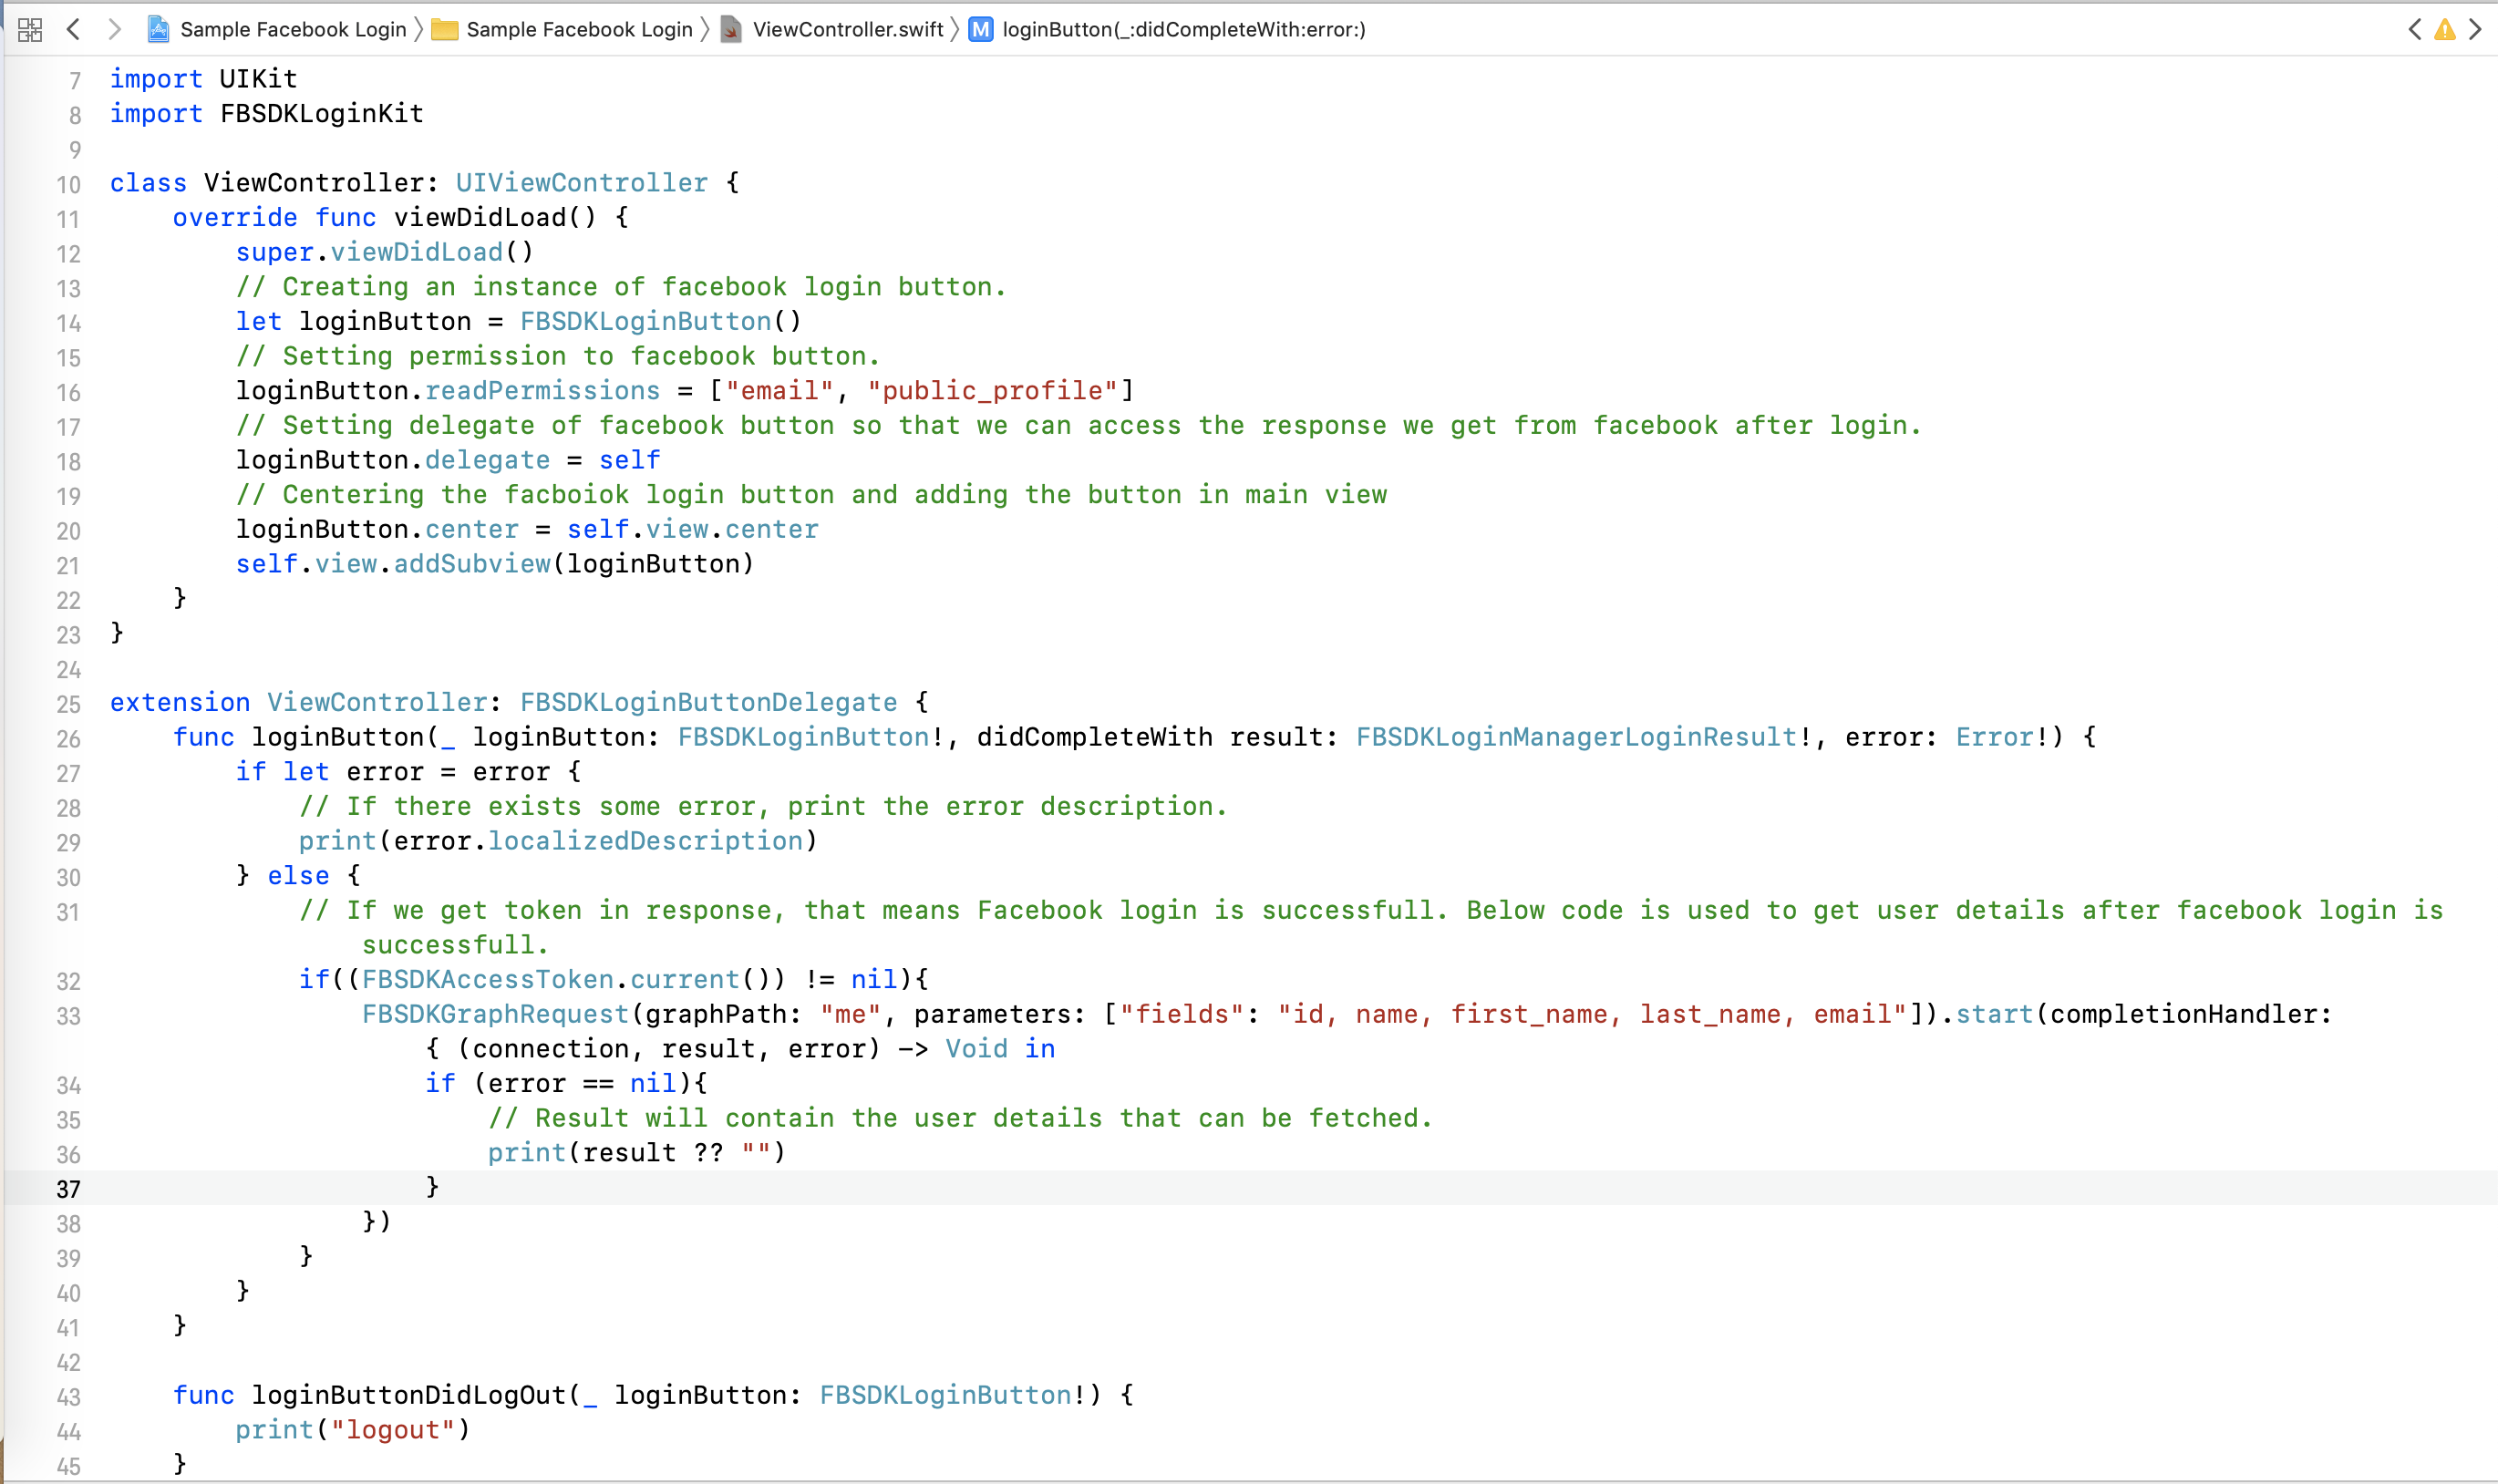
18. The Final code will look like below:
19. Run the project and use the button “Log in”. You will be logged into the Facebook. You will get the user details in “result” variable, from which you can parse the details into your project.
Summary
After following the above procedure, you will be able to implement Facebook authentication in iOS Apps.
One of the most popular Marketplaces in the world i.e Walmart Marketplace has gained sustainability in its eCommerce business all over the world. Walmart Marketplace provides a platform for many third-party sellers to sell their products and earn a huge chunk of profits. Many third-party sellers have already leveraged the benefits of Marketplace by expanding their reach to millions of customers worldwide. However, this led to an increase in the number of third-party sellers and competition continues to heat up. So, it’s high time for sellers to come up with some new strategies to acquire an extra edge over others.
So, here are some tips which can help you make more sale and help you earn good profits:
1. Create your own Brand:
Getting a shelf on Walmart Marketplace is not an easy goal to achieve. To become a third party seller on Walmart Marketplace, vendors have to go through the strict policies laid by Walmart for third-party sellers. Walmart Marketplace mainly entertains brand owners rather than re-sellers. This means if you are a brand owner, then there are high chances of your acceptance as a third party seller on Walmart Marketplace.
2. Performance Record:
It’s very important to maintain a good record as a seller before applying to Walmart. Walmart considers those eSellers first who manifest a good track record on other Marketplaces. They verify your review and ratings on your current sales channels. In fact, Walmart itself keeps a seller’s scorecard to rate sellers on Marketplace. So, do keep an eye on your performance and try to improvise it on regular basis.
3. Build a brand image:
Once you are approved as a seller, It’s necessary to maintain a good image in front of Walmart Marketplace. Streamline your operations to avoid out of stock or any other issues related to inventory. These issues downgrade your performance in front of Walmart which could lead to many serious consequences. However, keeping a check manually on these issues is a hassle. Sellers need a trustworthy integration software that provides you seamless integration of your website with Walmart Marketplace. This integration will make your job easier by maintaining your inventories from the back-end itself. It will also help the seller to optimize their presence on Walmart Marketplace.
4. Detailed and Accurate product Description:
Although every customer knows what they are buying but Walmart needs sellers to write product descriptions more accurate and in detail when compared to other Marketplaces. The data provided by sellers should be accurate and should not divert customers from the features of the product. This will compel customers to go for instant purchase and in return, you will get loyal and satisfied customers for your eCommerce business.
Avoid using irrelevant data and keywords as it will frustrate customers resulting in loss of sales. Make sure the information provided by you should be to the point and up to date. Product description should not long so keep a check on the standardized length of the same.
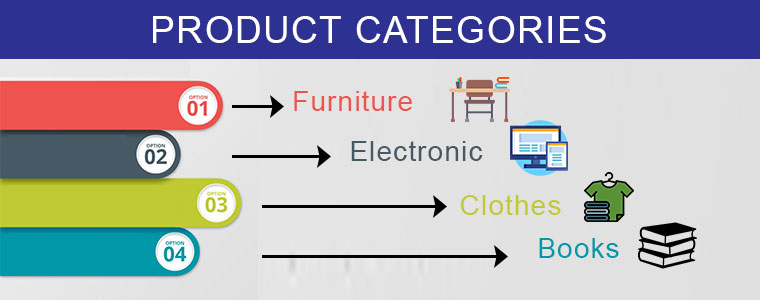
5. Relevant product categories:
Imagine that customers are unable to find your products and finally settling with the same product sold by your competitor. To ensure the higher sales of your items, make sure that the items listed by you are placed in the right product category with relevant attributes. Choosing the correct product category on a digital shelf directly influences the visibility of your product in between customers and help you gain good profits. Make sure that the ranking of your products on Walmart is high so that they are visible on the top of search results.
6. SKU Caps by Walmart:
Walmart’s SKU (Stock Keeping Unit) for product listing is been set to a favorable limit for third-party sellers. Once you start selling your products on Walmart Marketplace, you will be able to increase the SKU caps according to your sales performance and customer reviews on them. As soon as your sale increases, Walmart will provide you the opportunity to increase your SKU’s and more products from your eCommerce website. So, make sure to list your best selling items and gradually work on building a good reputation as a seller on Walmart Marketplace.
7. List down the products at the lowest price:
Today, consumers can easily access the Internet which let the continuous increase in the number of customers and eCommerce stores, multiple vendors are offering the same quality products at different prices on the same Marketplace. The seller that offers the products at the best or the lowest price attracts customers and compels them to go for instant purchase. Walmart Marketplace mainly focuses to provide the lowest price to its customers and also provides instant visibility to sellers which can help them to win BuyBox too. So, if you want to be a successful seller on the Walmart platform, the low pricing of products should be a priority.
8. Don’t Forget to Apply for Promotions:
Walmart always features promotions that provide “everyday low prices” guarantee. Sellers can take advantage of applying for these promotions and enhance their visibility in front of customers. Walmart takes time to consider your request so keep yourself motivated and wait for their response. The lower the price, the better your chances of having your promotion accepted. So, try to provide the lowest yet best price of your product.
9. Importance of Marketing:
As an eCommerce seller, It’s important to promote your products on the Walmart Marketplace. You can try various marketing strategies like social media strategy, Facebook’s advertising program and many more. These strategies are a great way to popularise your products in between the audience and can turn them into potential customers. You can also try email and content marketing to increase your product’s visibility too. Sellers can personalize their brand by these marketing strategies which can help you sell more on Walmart’s Marketplace.
Over To You:
Getting a shelf on Walmart Marketplace is not a cake walk. Although Walmart invites third-party sellers to its marketplace, there are many vendors who are still dreaming to be one of the sellers on Walmart. However, if your application is accepted you should take advantage of this opportunity. It’s a platform with millions of loyal customers. Building your eCommerce business reputation and presence on such a renowned Marketplace will definitely help you increase your audience base which can turn into loyal customers in the future. So, What are you waiting for, If you haven’t applied to sell on Walmart till now, you should do it as soon as possible.
Sell your products on Walmart Marketplace without any inconvenience. Now, you can easily list your products by integrating with the Walmart marketplace in just a few simple steps. KnowBand offers Walmart integrators to help retailers sell their goods on Walmart Marketplace in a hassle free way. Sellers can easily download and install it on their website without knowing any technical knowledge. Knowband provides integrators for all the major CMS platforms like Prestashop Walmart Integration Addon, Magento Walmart Integrator, Walmart Magento 2 connector, as well as OpenCart Walmart Integration plugin.
In order to integrate Express Checkout with the REST API, a PayPal client ID that authenticates a merchant’s account with PayPal is necessary. A client ID can only be created by the account holder.
Ask the merchant to share their client ID with you if you’re a developer integrating Express Checkout on the client’s behalf. If the merchant hasn’t already done so, they must create a client ID.
Steps to find the PayPal ID and PayPal Client Secret Key:
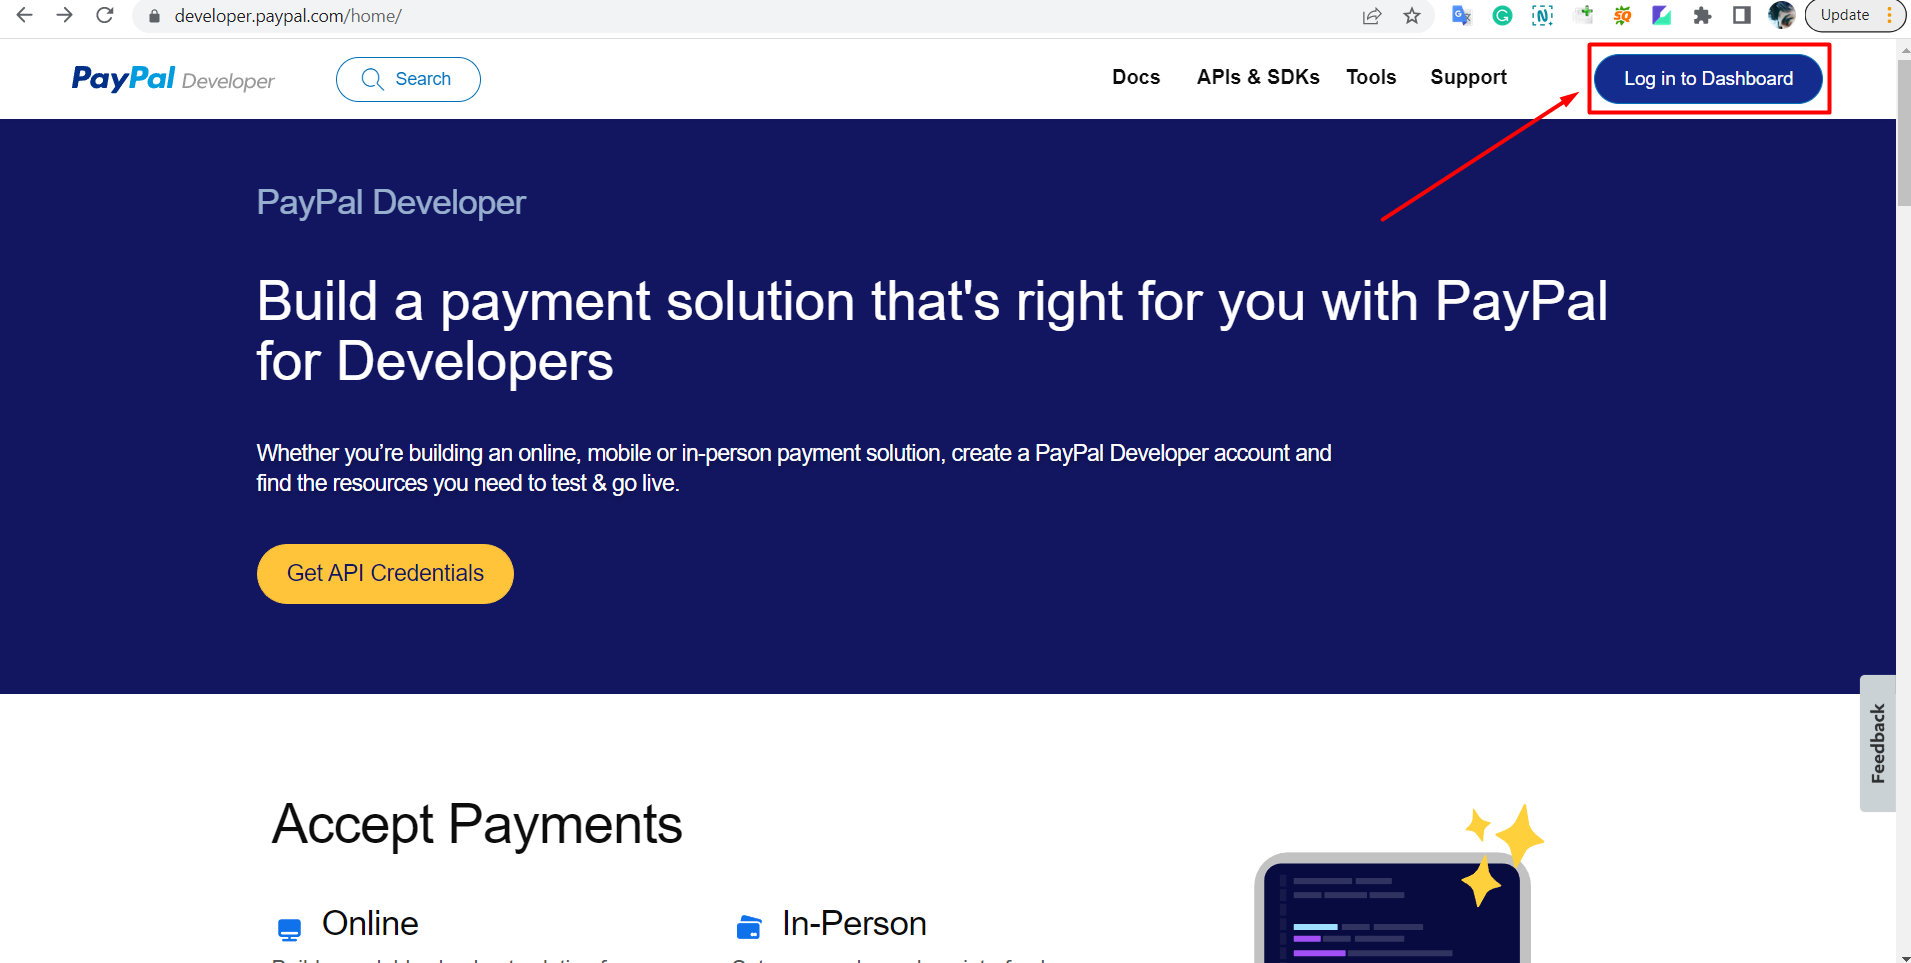
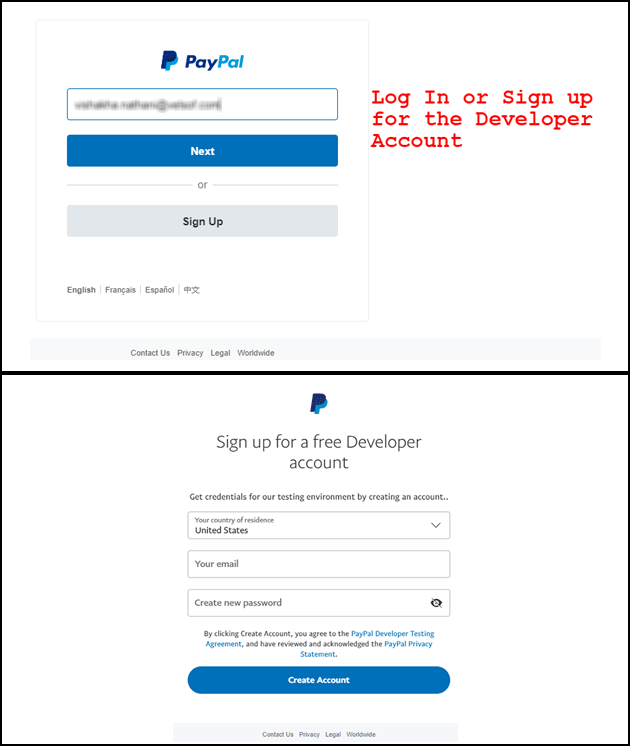
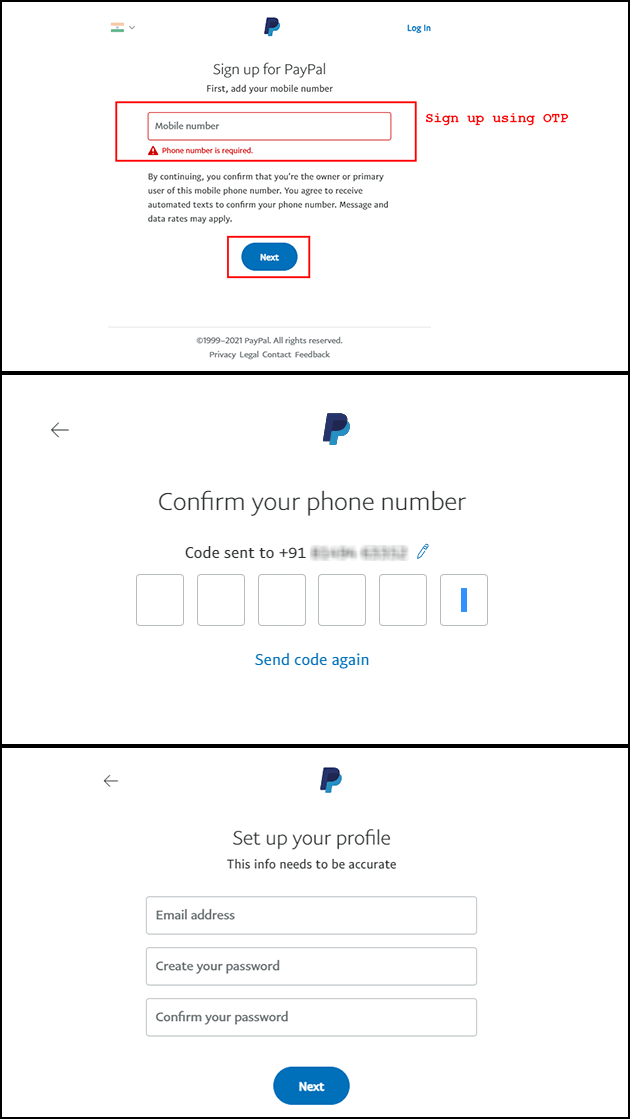
You can log in with your mobile number using OTP and set up your profile by adding basic details.
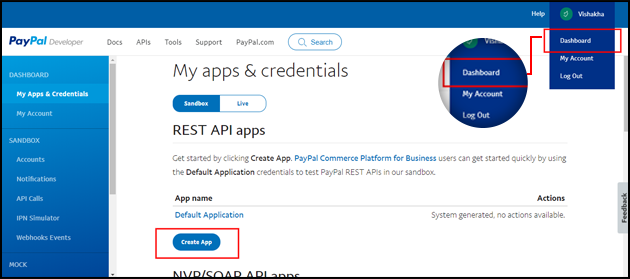
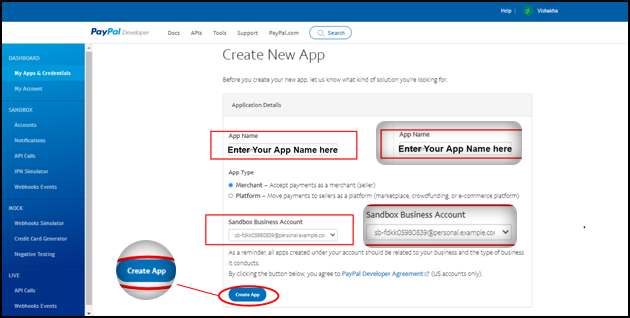
3. Go to “[Your Name]“, then go to “Dashboard” in the top right corner. You will get an option to “Create App“. Create your new app.
4. Fill in the details for the new app and create a new app. A new screen will open.
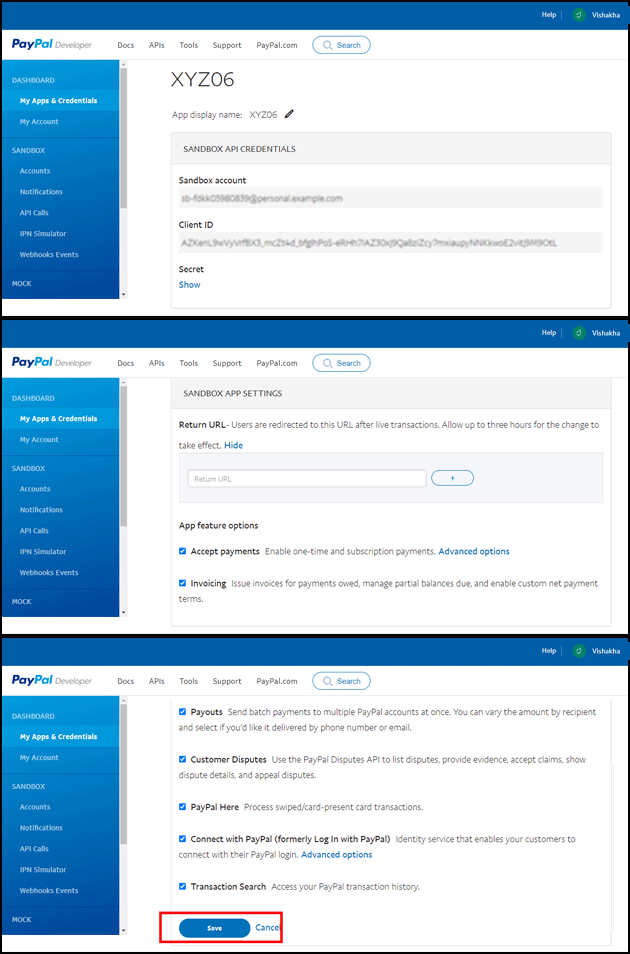
5. On the next page, you will be able to see your PayPal Client ID and PayPal Client secret.
Note: You will find Sandbox App settings and credentials on the same page.
6. You have the PayPal Client ID and secret.
You need a developer, personal, or business account to access the Developer Dashboard, get credentials, and create sandbox accounts. Different levels of access to PayPal functionality are available with each account. On the My Account page in the Developer Dashboard, you can upgrade your account if you need access to a feature you don’t currently have.
Capabilities
Developer Account
Personal Account
Business Account
Access sandbox
x
x
x
Send and receive money
x
x
Go live
x
You can use the Paypal Client ID with our One Page supercheckout Prestashop module and integrate the Paypal payment gateway and transform the standard checkout into an optimized, seamless, and feature-rich One page express checkout.
Prestashop One Page Supercheckout Addon
The Prestashop One Page Supercheckout addon by Knowband makes checkout faster and easier by putting everything on one page, helping to reduce cart abandonment.
Apart from it, along with Prestashop we offer One Page checkout modules for Opencart and Magento 2 eCommerce platforms. The One Page SuperCheckout Addon has over 15,000 downloads on the official addon store and is one of the top-selling extensions. On top of that, the module supports all the popular payment gateways and shipping methods, opening the door for endless customizations for eCommerce store admin.
Having queries about PayPal payment gateway integration, get in touch with our support team at our email address support@knowband.com.
This document will give an idea about how to create SEO Friendly URLs in Opencart (version 2.x). Also will explain how to customize the Opencart function to create SEO URLs other than default pages (product page, category page etc.).
This document will also explain how to 301 redirect URLs from old URL to new URL and URLs deleted.
The main purpose of this document is to learn about creating SEO Friendly URLs in Opencart (version 2.x) and URL redirections to maintain our SEO ranking on Google.
SEO Friendly URLs are well-crafted URLs which provide both humans and search engines with an easy-to-understand indication of what the destination page will be about.
Default Step in Opencart to Enable SEO URL
In Opencart there are setting which we have to manage from the admin panel to activate SEO Friendly URLs.
Following are the steps to enable:
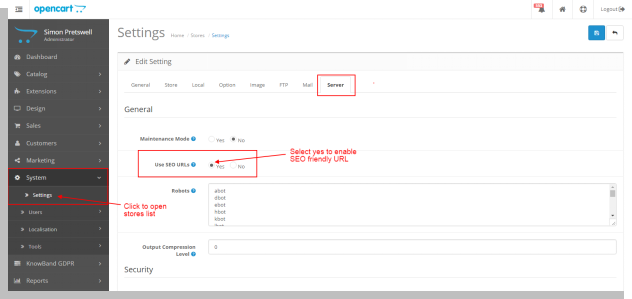
Open admin panel. Go to System > Setting. Then click on the edit button corresponding to the store from the store listing page.
In the edit system setting page open the ‘Server’ tab.
In the server, the tab selects the ‘Yes’ radio button corresponding to ‘Use SEO URL’ and then clicks on the save button.
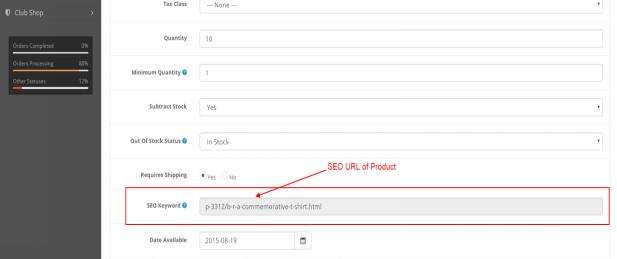
To save the SEO URL of any product page go to Catalog > Products in the admin panel. Click on the edit button corresponding to the product name.
In the edit product page click on the ‘Data’ tab. In the Data tab, there is an option for ‘SEO Keyword’. Enter the SEO URL of the product and then save. Refer below screen:
Category Page
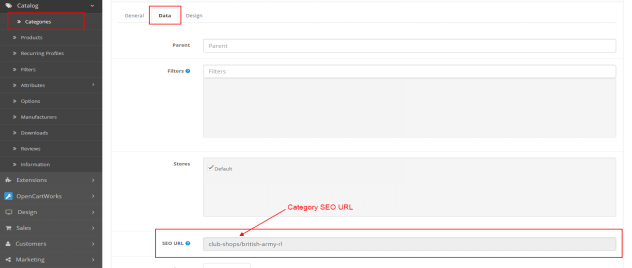
To save the SEO URL of any category page go to Catalog > Categories in the admin panel. Click on the edit button corresponding to the category.
In the edit category page click on the ‘Data’ tab. In the Data tab, there is an option for ‘SEO URL”. Enter SEO URL of category and then save. Refer below screen:
Manufacturer Page
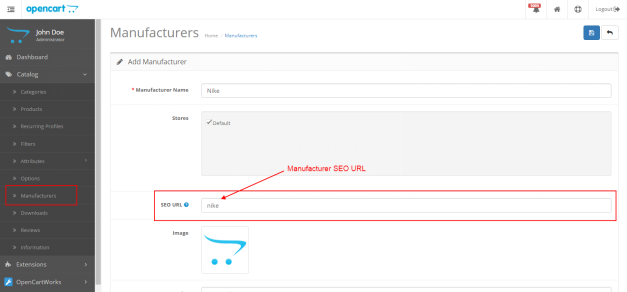
To save the SEO URL of any manufacturer page go to Catalog > Manufacturers in the admin panel. Click on the edit button corresponding to the manufacturer.
On the edit manufacturer page, there is an option for ‘SEO URL”. Enter the SEO URL of the manufacturer and then save.
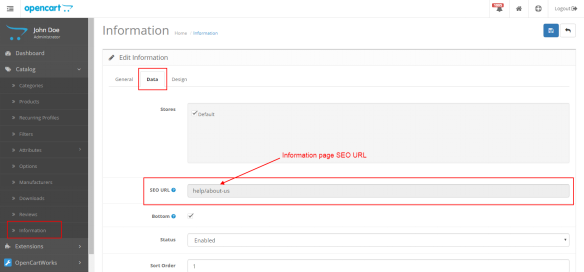
To save the SEO URL of any information page go to Catalog > Information in the admin panel. Click on the edit button corresponding to the information page.
On the edit, the information page clicks on the ‘Data’ tab. In the Data tab, there is an option for ‘SEO URL”. Enter the SEO URL of the information page and then save.
Refer below screen:
Note: Admin can also save SEO URL while adding a new product, category, manufacturer and information page.
If the admin wants to create an SEO URL for any custom pages then he/she has to make changes accordingly (explained below in the same document).
Technical Flow for URLs
In Opencart (version 2.x) when the user hit any URL (SEO or non-SEO) it calls the controller file seo_url.php located at catalogue/controller/startup. This file is called to find the SEO URL.
Note: The SEO URL of each page is stored in the ‘url_alias’ table in the database.
If the customer hit any non-SEO URL then it calls the seo_url.php file. In this file, there is code which searches the SEO URL of the Non-SEO URL in the ‘keyword’ column of the url_alias table corresponding to the ‘query’ column
url_alias Table in the Database
url_alias table is used to save SEO URLs of all pages. There are the following 3 columns in the table by default:
url_alias_id: Primary key of the table.
Query: contains the id of different pages like product_id, category_id, and other pages.
Keyword: contains SEO URL keyword of the corresponding page
SEO URL creation for other than default pages
If the admin has created landing pages and wants to serve an SEO URL for the page. For this first have to make an entry of the page in the url_alias table.
Example 1:
If the admin has created the ‘Sports’ landing page then he has to make an entry in the url_alias table as:
In query column: sport_id=1
In keyword column: sports
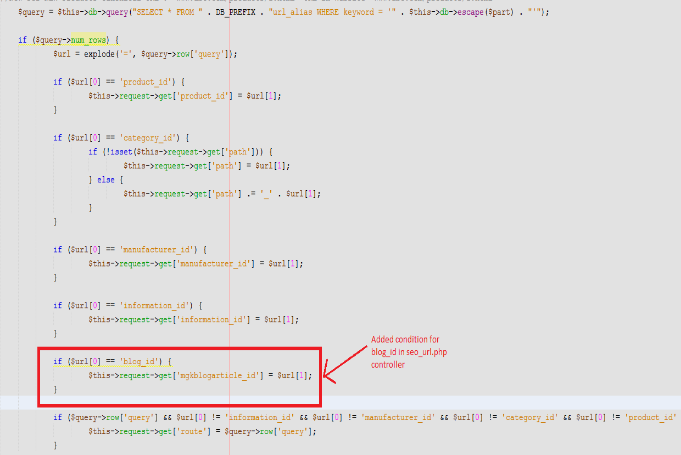
Admin also has to make changes in controller file seo_url.php for sport_id. Admin has to add a condition for sport_id same as product_id and category_id.
Now if admin enter URL “host/index.php?route=product/landing_page&sport_id=1” then code will search seo keyword in url_alias table corresponding to sport_id=1 and then serve URL ‘host/sports’.
Example 2:
In this example, we will create an SEO URL for the blog page.
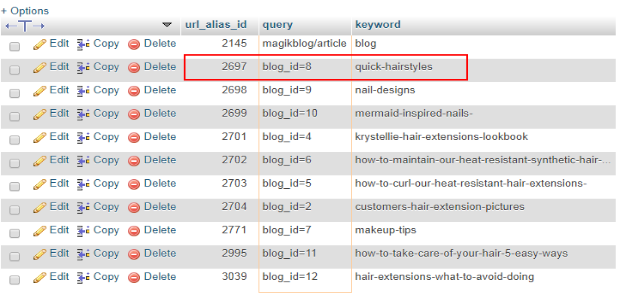
For this we have to add a condition in the controller file and make an entry in the url_alias table corresponding to blog_id:
In Opencart if the admin wants to create new SEO URLs and wants 301 (permanent redirection) or 302 (temporary redirection) redirect on a new URL then the admin has to make the following changes in the controller file and url_alias table.
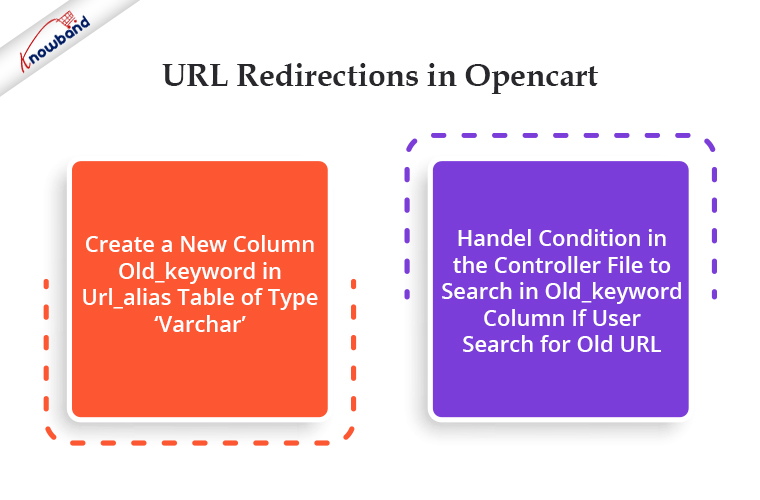
Create a new column old_keyword in url_alias table of type ‘varchar’.
Handel condition in the controller file to search in old_keyword column if user search for old URL.
Example: To redirect from the old URL of the ‘termes and conditions’ page to the new URL.
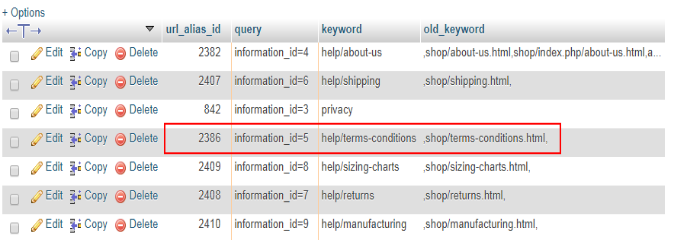
If the admin wants to redirect any information page from the old URL to the new then he has to make an entry in the url_alias table. Refer to the below screenshot:
Here
the old keyword is: shop/terms-conditions.html
new keyword: help/terms-conditions
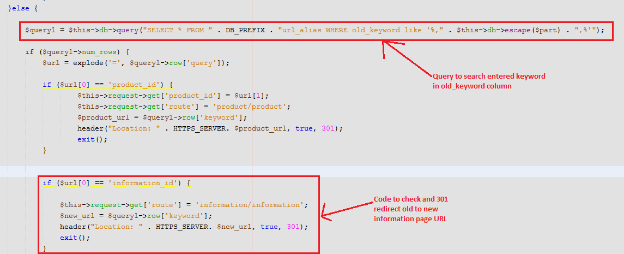
Controller file changes: In seo_url.php controller admin has to handle conditions if enter URL did not found in the keyword column.
The first system will search entered URL in the keyword column. If not found then will search in the old_keyword column. If found then will redirect to the corresponding new URL.
Please refer to the below screenshot:
URL Redirections in Opencart for Deleted Pages
If the admin wants to redirect the URL of deleted categories, products or any other pages on the home page then he can make changes in the controller file accordingly.
Example: Here we will 301 redirect URLs of deleted categories
Steps to redirect URL of deleted categories:
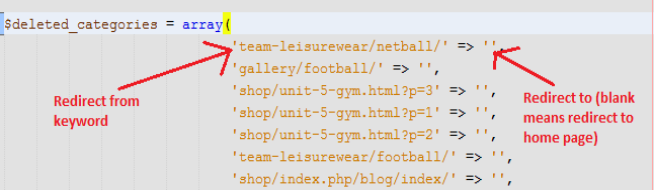
Create a file and define an array with the key as deleted category URL and value as URL to which admin wants to redirect. Refer to the below screenshot for creating an array of deleted categories.
Note: Here we have defined blank value because we want to redirect deleted categories URLs to the home page
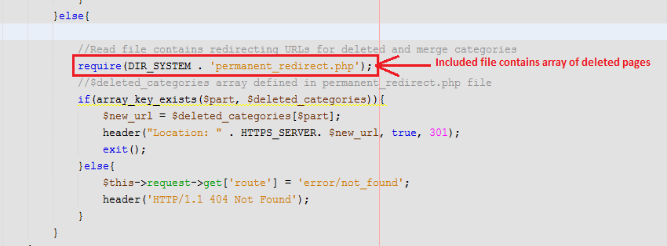
Add a condition in the seo_url.php controller to redirect from deleted category URL to the new URL.
In this code first, we have included a file containing URLs of deleted categories and then checked if the entered URL is in the defined array or not. If yes then redirected to a new URL else redirected to the not found page.
In the End:
A variety of OpenCart modules and extensions, both free and paid, are available from Knowband to boost your store’s operation. To know in detail about the OpenCart platforms, modules available or any functionality related to the platform feel free to drop us an email at support@Knowband.com.
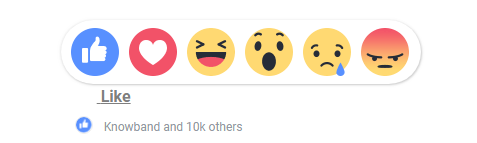
Reactions are more expressive as compared to the simple like and dislike buttons. Using reactions the user can easily express their thought because emoticons are basically a way to show the emotions. On the other hand if we use like and dislike button then the user can not show the exact emotion. Using emoticons we can make our site more expressive for the user.
Objectives of the blog
In this blog, you will find an easy and quick way to implement the Reactions functionality. After going through the blog, you will be able to create a reaction system for your website same as Facebook’s Like button.
Working
There will be one Like button and rest of the Reaction buttons. On focus the Like button, the Reaction buttons will be displayed. JQuery will be used to handle the taps on the reaction buttons. On tapping reaction button, an Ajax request is sent on like.php page. The logic to save/update data on database can be written on the handler page.
On tapping the reaction text again, the reaction is undone and this time we are sending Ajax on undo_like.php page.
All the functionality to show/hide the reaction buttons and animation is added through JavaScript and CSS.
Creating the HTML Structure
Before working on the logic, we will have to create the layout. HTML for the layout is following –
<!DOCTYPE html>
<html>
<head>
<title>Facebook Reactions</title>
<meta name="description" content="Facebook Like Reaction System" />
<!-- bootstrap css -->
<link rel="stylesheet" href="https://maxcdn.bootstrapcdn.com/font-awesome/4.3.0/css/font-awesome.min.css">
<link rel="stylesheet" type="text/css" href="css/style.css" />
<!-- Css for reaction system -->
<link rel="stylesheet" type="text/css" href="css/reaction.css" />

<script type="text/javascript" src="js/jquery.min.js"></script>
<!-- jQuery for Reaction system -->
<script type="text/javascript" src="js/reaction.js"></script>
</head>
<body>
<div class="container">
<div class="header">
<h1>Facebook Reactions</h1>
</div>
<div class="main">
<!-- Reaction system start -->
<div class="reaction-container"><!-- container div for reaction system -->
<span class="reaction-btn"> <!-- Default like button -->
<span class="reaction-btn-emo like-btn-default"></span> <!-- Default like button emotion-->
<span class="reaction-btn-text">Like</span> <!-- Default like button text,(Like, wow, sad..) default:Like  -->
<ul class="emojies-box"> <!-- Reaction buttons container-->
<li class="emoji emo-like" data-reaction="Like"></li>
<li class="emoji emo-love" data-reaction="Love"></li>
<li class="emoji emo-haha" data-reaction="HaHa"></li>
<li class="emoji emo-wow" data-reaction="Wow"></li>
<li class="emoji emo-sad" data-reaction="Sad"></li>
<li class="emoji emo-angry" data-reaction="Angry"></li>
</ul>
</span>
<div class="like-stat"> <!-- Like statistic container-->
<span class="like-emo"> <!-- like emotions container -->
<span class="like-btn-like"></span> <!-- given emotions like, wow, sad (default:Like) -->
</span>
<span class="like-details">Knowband and 10k others</span>
</div>
</div>
<!-- Reaction system end -->
</div>
</div>
</body>
</html>
Adding Style
We are using two CSS files (style.css and reaction.css) to add styling in the page.
Note: You can find the CSS files in the complete project build.
Adding Functionality
Once our layout is ready, we can work on the functionalities.
First we will be handling the taps on the Like and Reaction buttons. For that, we will be using jQuery and we will be adding the click events. The code to add the click events is given below –
// Adding the click event as soon as the document is ready
$(document).ready(function () {
// Adding the click event on reaction button by using the class name
$(".emoji").on("click", function () {   // like click
// Here we will be writing the code, which will run on tapping the reaction button
});
});
On focus of the reaction button, we will be sending the Ajax request on php page. The Ajax request is given below –
// Sending Ajax request in handler page (like.php) to perform the database operations
$.ajax({
type: "POST",
url: "php/like.php",
data: "",
success: function (response) {
// This code runs after the Ajax is successful
}
})
Then we will have to create a handler page. This can be a simple php file.
Note: User can perform database changes in the handler file according to the requirement.
Whatever is returned/printed in that file is returned to the Ajax request and we can update layout accordingly. Here we have added the code to update the layout to show the currently saved reaction. The full code of the reaction.js file is following –
$(document).ready(function () {
$(".emoji").on("click", function () {
// Here we are getting the reaction which is tapped by using the data-reaction attribute defined in main page
var data_reaction = $(this).attr("data-reaction");
// Sending Ajax request in handler page to perform the database operations
$.ajax({
type: "POST",
url: "php/like.php",
data: "data_reaction=" + data_reaction,
success: function (response) {
// This code will run after the Ajax is successful
$(".like-details").html("You, Knowband and 10k others");
$(".reaction-btn-emo").removeClass().addClass('reaction-btn-emo').addClass('like-btn-' + data_reaction.toLowerCase());
$(".reaction-btn-text").text(data_reaction).removeClass().addClass('reaction-btn-text').addClass('reaction-btn-text-' + data_reaction.toLowerCase()).addClass("active");

if (data_reaction == "Like")
$(".like-emo").html('<span class="like-btn-like"></span>');
else
$(".like-emo").html('<span class="like-btn-like"></span><span class="like-btn-' + data_reaction.toLowerCase() + '"></span>');
}
})
});

$(".reaction-btn-text").on("click", function () { // undo like click
if ($(this).hasClass("active")) {
// Sending Ajax request in handler page to perform the database operations
$.ajax({
type: "POST",
url: "php/undo_like.php",
data: "",
success: function (response) {
// Handle when the Ajax is successful
$(".reaction-btn-text").text("Like").removeClass().addClass('reaction-btn-text');
$(".reaction-btn-emo").removeClass().addClass('reaction-btn-emo').addClass("like-btn-default");
$(".like-emo").html('<span class="like-btn-like"></span>');
$(".like-details").html("Knowband and 1k others");
}
})
}
})
});
Summary
You can download the full project from the following location –
In this tutorial we have not covered the database connection and operations as the database logic can be different as per your needs. With the help of this project, you can easily implement the reactions functionality same as Facebook in your webpage.
If you face any issues, drop us an email at support@knowband.com. We also provide plugins for Prestashop, Opencart, Magento and Magento 2. All sorts of customization is also done by us on your store.
Take a look at one of our top selling modules:
Prestashop One page Supercheckout by Knowband is a must have tool for any eCommerce store as it helps you streamline the checkout process, increase your conversion rate and reduce the abandoned carts. Know more here:
After reading this blog we will be able to create multiple thumbnails while uploading an image. In this blog we can learn how to resize the image size using code.
Let’s know about the thumbnails
Thumbnails are the reduced-size versions of pictures or videos. Thumbnails are created from the original image by reducing their dimension and size. By creating thumbnails we can represent a large sized image by a small size image. The website such as online ecommerce stores use thumbnail images instead of large images to reduce the loading time of their web page which also make the site faster.
To understand the working of the thumbnails technically we will make a simple program. The requirement has been shared below:
Requirement
Let’s understand the requirement first.
Let’s say we have a website named as Knowband which sells the modules for the e-commerce platform like Magento, Prestashop, Opencart etc. It shows so many images on the listing page of Knowband modules. The original images are of large size so it directly increases the loading time of the listing page so to reduce the loading time of the page Knowband site uses thumbnail images on the listing page.
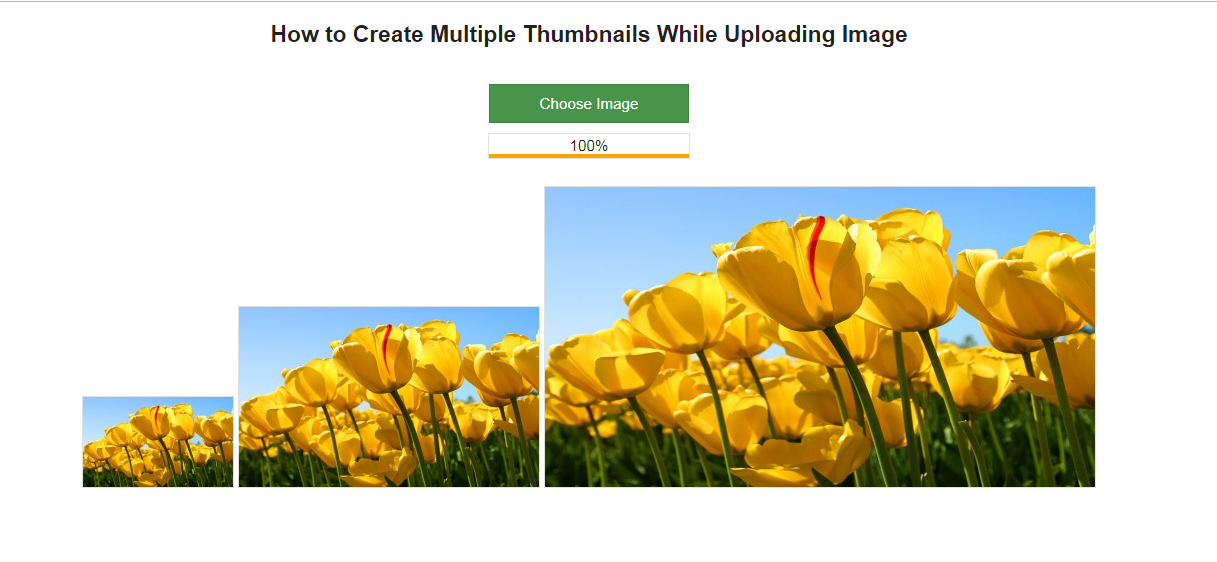
In this blog, we can learn how to create multiple thumbnails of an image. Let’s consider an example, where we will create three thumbnails as shown in the image given below:
Function to create the Thumbnail
Let’s understand the main functionality or code which is actually responsible for creating the thumbnails.
A function is given below which is responsible for creating the thumbnail. Let understand the function how it actually worked.
Below function have 4 parameters
The code of creating multiple thumbnails while uploading an image is given below:
$source_path: This contains the path of the original image.
$target_path: This contains the path of the thumbnail which will be created.
$file_type: This contains the image extension e.g. jpg, png etc.
$thumb_width: It is the width of the required thumbnail image.
$thumb_height: It is the height of the required thumbnail image.
This function simply fetches the image from the source file and after validating the image it creates the thumbnail of given width and height. So to create the ‘n’ number thumbnails we have to call this function ‘n’ number of times with the required width and height of the thumbnail. This function will return TRUE if thumbnail created successfully else it will return FALSE.
function create_thumbnail($source_path, $target_path, $file_type, $thumb_width, $thumb_height) {
//Checking the file type.
    if ($file_type == 'jpeg' || $file_type == 'jpg') {
        $source = imagecreatefromjpeg($source_path);
    } else if ($file_type == 'png') {
        $source = imagecreatefrompng($source_path);
    } else if ($file_type == 'gif') {
        $source = imagecreatefromgif($source_path);
    }

    // get the width of the original image
    $width = imagesx($source);

    // get the height of the original image
    $height = imagesy($source);

    // Create a black image of thumb image size
    $thumb_image = imagecreatetruecolor($thumb_width, $thumb_height);

    // It copy and resize part of an original image and resampled in thumb image to create a reduced size image of the original image
    imagecopyresampled($thumb_image, $source, 0, 0, 0, 0, $thumb_width, $thumb_height, $width, $height);

    // creates a JPEG file from the given image and save it in the targeted folder.
    if (imagejpeg($thumb_image, $target_path, 90)) {
        // destroy the images to free the memory associate with them
        imagedestroy($thumb_image);
        imagedestroy($source);
        return TRUE;
    } else {
        return FALSE;
    }
}
It is always a good idea to add password protection to any of the folders/webpages of your website if you want to restrict access on them. The method for applying the same is more important. We can use PHP for authorizing the information on each page, but that doesn’t protect your images or any other media, does it? So we can use another method known as htaccess password protection or htaccess authentication. It is reliable and much easier.
Objective
This blog help you know about how to restrict the access to the website from unauthorized users.
Please follow the steps mentioned below:
Step 1. To use htaccess password protection we need to create two files in the directory in which you want to restrict access:-
1) .htaccess file 2) .htpasswd file
Step 2. Add the following code in .htaccess file that you have created in step 1.
Note: You can replace “C:/wamp64/www/test_project/” with your own directory structure.
The above code (directives) is described below:
i.) AuthType
From AuthType directive you can select the method that is used to authenticate the user.
ii.) AuthName
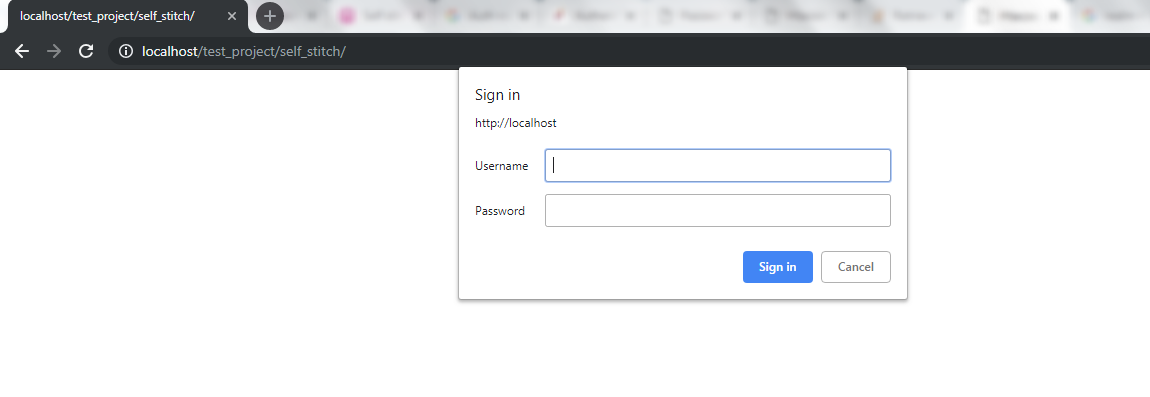
Replace “No Access” to any name as per your requirement. This name will be displayed in the alert box, when the user attempts to open a htaccess protected page.
The AuthName directive sets the domain to be used in the authentication.
Once a client has passed the authentication in the “No Access” zone, then there is no need to enter the password to access any other file in the same zone on the same server. Therefore, to prevent a user from entering the password again and again by letting multiple restricted areas to share the same domain.
iii.) AuthUserFile
You need to add your .htpasswd path in place of “C:/wamp64/www/test_project/self_stitch/.htpasswd”.
The “AuthUserFile” value is always specific to your host configuration.
If you don’t know what the value should be, do a phpinfo() and check the DOCUMENT_ROOT value.
For this you just need to add the line “<?php phpinfo(); ?>” in phpinfo.php file. You can find phpinfo.php file at your root folder (www for localhost) and then run the phpinfo.php file on the browser. For Example, on localhost, run localhost/phpinfo.php
NOTE:
1. To password protect more than one file in the same folder, just create more <Files></Files> blocks within the same .htaccess file – for example:
2. To Allow only the specific types of files to be accessed by the users, you need to add the following code:
AuthUserFile /full/path/to/.htpasswd
AuthType Basic
AuthName "My Secret Page"

# deny *everything*
<FilesMatch ".*">
Order Allow,Deny
Deny from all
</FilesMatch>

# Allowing just *certain* necessary files:
<FilesMatch ".*\.(php|html|css|js|JS|CSS)$">
Order Allow,Deny
Allow from all
</FilesMatch>
Here, first we are restricting access to everything using <FilesMatch “.*”> and after that we are allowing only certain files (php, html,css,js) to be accessed using <FilesMatch “.*\.(php|html|css|js|JS|CSS)$”>
Our example does not allow access to other files for eg. .jpg, .png, etc.
You can also allow access from a specific IP address using “allow from 12.34.56.78” instead of using “allow from all“.
3. To add htaccess password for only the specific types of files you need to add the following code:
AuthType Basic
AuthName "restricted area"
AuthUserFile C:/wamp64/www/test_project/self_stitch/.htpasswd

# but now allow just *certain* necessary files:
<FilesMatch ".*\.(txt)$">
require valid-user
</FilesMatch>
Using the above code all the files will be accessed without a password but the files with extension .txt will need username and password to be accessed.
4. If you need to apply htaccess password for all the files except one than add the folllowing code:
AuthType Basic
AuthName "restricted area"
AuthUserFile C:/wamp64/www/test_project/self_stitch/.htpasswd

<FilesMatch ".*">
Require valid-user
</FilesMatch>

# but now allow just *certain* necessary files:
<FilesMatch ".*\.(txt)$">
Require all granted
</FilesMatch>
In the above example, except .txt files all the other files will need the username and password to be accessed.
iv.)require
The line “require valid-user” means that any user specified in your .htpasswd (ie, password) file will be able to access your website.
If your password file contains many users, but you only want specific users (Like John and Pamela) to be able to access the website then, change the “require valid-user” to:
“require user John Pamela” Step 3. Add the username and password in .htpasswd file as described below:
The .htpasswd Code
john:$apr1$DObQIej5$0ZmEaLN42GEz/XJEiJXh9.
i.) The .htpasswd file contains the usernames and passwords of allowed users.
ii.) The passwords are encrypted using MD5 for security purposes.
iii.) As you can see above, only 1 user is allowed i.e. john with the password:
Actual password: egypt4721
Encrypted password: $apr1$DObQIej5$0ZmEaLN42GEz/XJEiJXh9.(encrypted using MD5).
iv.) To generate .htpasswd file use the link given below:
After creating .htaccess and .htpasswd file in the directory you want to protect, an alert will be displayed when you open your website. Please refer to the screenshot below:
Click Here to download a sample project with .htaccess password protected.