In the ever-evolving landscape of eCommerce, selling good products is just not enough. Modern customers expect a lot more than just good services. For the same reason, your eCommerce stores demand innovative tools that enhance your store’s functionality, improve customer experience, and drive sales.
On the other hand, Knowband offers a suite of essential extensions for Prestashop that can help you achieve these goals. In this article, we’ll explore five must-have Prestashop extensions from Knowband that will elevate your eCommerce game.
The Importance of Choosing the Right eCommerce Extensions:
eCommerce platforms like Prestashop provide a solid foundation for creating and managing online stores. However, to truly maximize the potential of your store, you need to leverage the power of extensions. Furthermore, the perfect tools for your Prestashop eCommerce store can introduce new features, improve efficiency, and enhance the shopping experience for your customers.
Thus, whether you’re looking to streamline your operations, increase sales, or engage better with your audience, the right extensions can make a significant difference.
Knowband’s Top Prestashop Addons for eCommerce Retailors!
Prestashop Product Sticker Module:
Starting with enhancing your product image presence, the Prestashop Product Sticker Module is a fantastic way to make your products stand out. This extension allows you to add custom stickers and labels to your products, making it easier to highlight special offers, new arrivals, bestsellers, and more. Furthermore, with an easy-to-use interface, you can create and manage stickers that match your store’s branding. Therefore, applying these stickers to individual products or entire categories can significantly increase visibility and attract customer attention, promoting special deals and enhancing the overall shopping experience.
👉Explore the Module with Our Video Guide
Prestashop Mobile App Builder:
As mobile shopping continues to rise, having a mobile app for your eCommerce store is crucial. The Prestashop Mobile App Builder for Android and iOS from Knowband enables you to convert your Prestashop store into a fully functional mobile app without any coding skills. This extension offers seamless integration with your store, real-time synchronization of products and inventory, and customizable design options. Additionally, it supports push notifications, keeping your customers engaged with the latest updates and offers. Thus, by providing a convenient and user-friendly shopping experience on mobile devices, this app builder helps expand your reach and boost customer retention.
Prestashop eBay Integration Addon:
Expanding your sales channels can significantly increase your revenue, and the Prestashop eBay Integration Addon makes this process effortless. This extension allows you to list your products on eBay directly from your Prestashop store, ensuring real-time synchronization of inventory, prices, and product details. Furthermore, the orders from eBay are automatically imported into your Prestashop store, simplifying order management. Therefore, by accessing eBay’s vast customer base, you can boost your sales while managing everything efficiently from a single dashboard.
Prestashop Back in Stock Notification Addon:
Out-of-stock products can lead to lost sales and disappointed customers and it is one of the biggest reasons for web abandonment. Thus, it becomes crucial to provide customers with back-in-stock subscription options. The Prestashop Back in Stock Notification Addon helps you capture these lost opportunities by allowing customers to subscribe for notifications on out-of-stock products. When the product is back in stock, the module automatically sends an email notification to interested customers. Moreover, this feature not only helps retain potential customers but also provides valuable insights into product demand, enabling better inventory management.
Prestashop Abandoned Cart Addon:
Cart abandonment is a common issue that can significantly impact your sales. On the other hand, the Prestashop Abandoned Cart Addon from Knowband is designed to tackle this problem effectively. This extension tracks abandoned carts and sends automated email reminders to customers, encouraging them to complete their purchases. Furthermore, with customizable email templates and detailed analytics, you can personalize your messages and monitor the success of your recovery campaigns. By reducing cart abandonment rates, this addon helps increase your conversion rates and boost your overall sales.
Knowband’s Prestashop Extensions
Enhance your PrestaShop store with Knowband’s powerful plugins, offering features like eCommerce marketplace integrations, mobile app builder, and more for seamless e-commerce management.
Enhancing your eCommerce store with the right extensions is crucial for staying competitive and meeting the evolving needs of your customers. Knowband’s Prestashop extensions offer powerful solutions that can help you achieve these goals. From drawing attention to specific products with the Product Sticker Module to expanding your sales channels with the eBay Integration Addon, these tools are designed to boost your store’s functionality and drive sales. Additionally, the Mobile App Builder, Back in Stock Notification Addon, and Abandoned Cart Addon provide essential features that enhance customer engagement and retention. By incorporating these extensions into your Prestashop store, you can step up your eCommerce game and achieve greater success. You can also check our free PrestaShop modules:
The digital gift card is a pleasant commodity to buy, sell, and receive! Whoever bought the digital gift card, saves time, fuel, and efforts to find the right thing to gift. Whoever receives it, find lucky enough to save from getting the wrong thing. Finally, whoever sells it, find cash upfront for an unsold thing! If you are looking for a perfect e-gift card addon, then, KnowBand PrestaShop gift card manager module helps you send the gift card to anyone without any hassle. With easy customer acquisition, the e-merchants can now double their revenue
The PrestaShop gift card manager Addon by Knowband allows the PrestaShop store owners to manage the gift cards according to the need. This PrestaShop gift card voucher addon is an effortless way to engage more customers with the website. The pre-paid vouchers can help the e-merchants aid the purchase intention of the store visitors and easily convert them into paying leads.
This PrestaShop gift card addon gives the flexibility to a customer to buy the gift card online and send Gift vouchers to friends via email on a specific date and time. The sender can print a gift card for giving it in person. It provides the functionality to create a personalized image gift card. Online shoppers can order gift cards for special occasions for their near and dear ones.
How Gift Card can help you to boost sales in your store?
81% of online buyers prefer to buy a gift card for a birthday, anniversary, holiday season, or festival.
38% of adults buy a gift voucher for a friend’s birthday.
One of the biggest selling days of the gift card is Father’s Day. In contrast, only 24,7% of moms wish to get a gift card for Mother’s Day, putting above homemade stuff, greeting cards, and dinner.
12% of buyers will buy gift cards for Wedding wishes and presents.
These are major facts that can prove the importance of the Gift card.
Prestashop gift card addon by Knowband has rich functionality that can help the admin to increase the revenue by selling gift cards.
1.1 Benefits for merchant
The store owner can increase customer engagement and the number of potential buyers on his/her PrestaShop store as well as boost their revenue. The following are the benefits for the merchant:
The store admin can add multiple gift cards in a matter of moments from the backend of the PrestaShop gift card addon.
PrestaShop gift manager addon by Knowband allows the store admin to set the card amount, validity period and other conditions that can be set from the backend of the PrestaShop send gift card module.
The PrestaShop store admin even gets easy options to change and edit the look and feel of the cards that will be shown in the front-end.
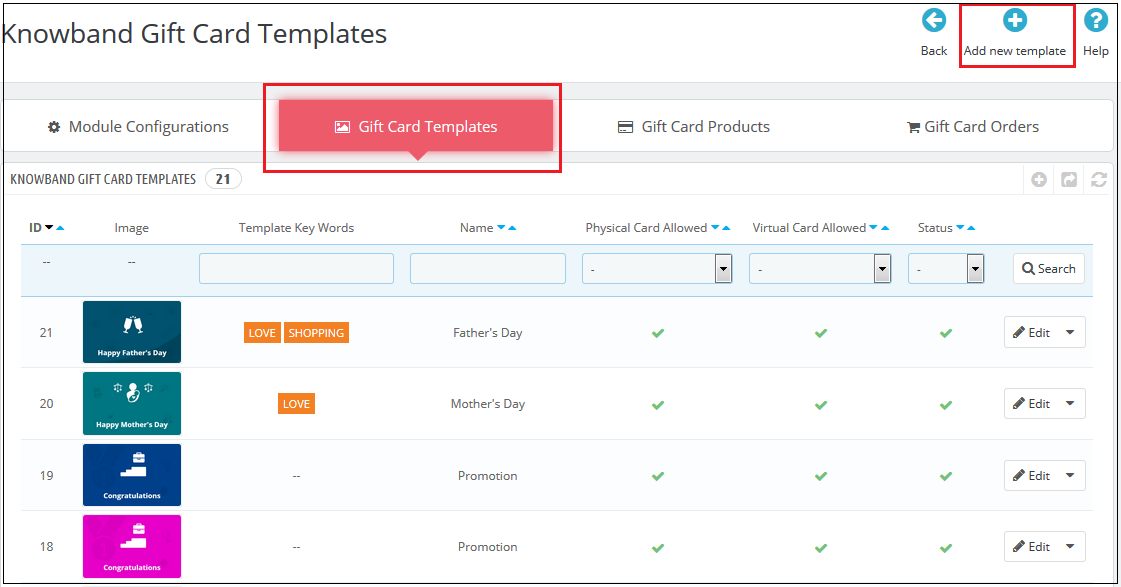
With the help of the PrestaShop gift voucher addon, the store admin can easily add the gift card templates according to the need.
The orders for the gift cards is trackable at a button click from the admin interface of the PrestaShop gift card manager module.
Knowband PrestaShop gift card addon enables the store merchant to show the gift card buttons on which page they want to show.
Even the email template for sending the gift cards and its PDF format to the recipient is customizable in a few easy steps from the backend of the PrestaShop gift card addon.
This PrestaShop send gift card module increases conversions especially for occasions like holidays.
PrestaShop Gift Card Manager addon by Knowband allows you to earn more revenue, get new customers by sending online gift cards, and offer discounts on the vouchers.
1.2 Benefits of customer
Customers can easily buy a gift card for their loved ones.
This PrestaShop gift card module by Knowband is best for those customers who are helpless for selecting a gift.
Customers can send a gift card with a custom image that the sender can upload while making the gift card purchase.
PrestaShop gift card add-ons allow online buyers to send the gift cards to their loved ones on the desired date and time.
The receiver of the Gift Card can redeem the amount partially while purchasing in the store.
2.0 Installation
After purchasing the PrestaShop gift card module from the store and you’ll get the following files.
1. The zipped file that consists of the source code of the module
2. User Manual
Follow the following steps to install the PrestaShop gift card manager extension:
Extract the “kbgiftcard.zip” zip file.
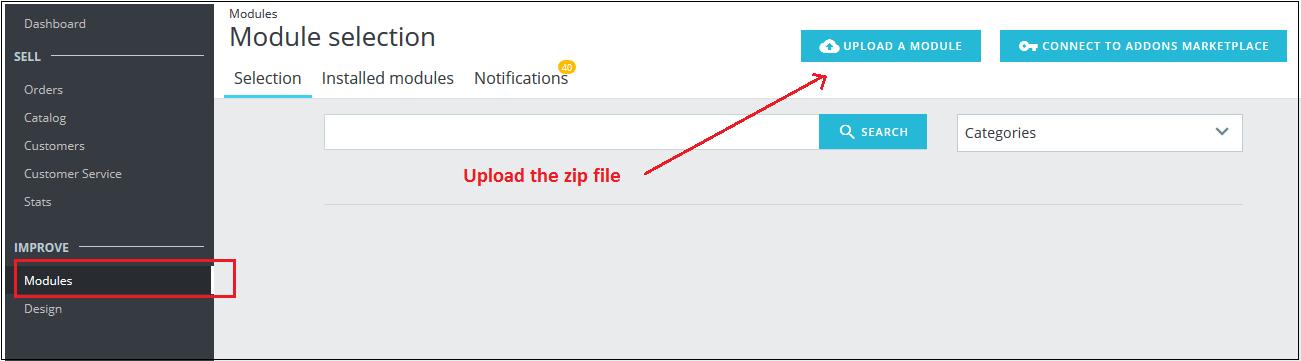
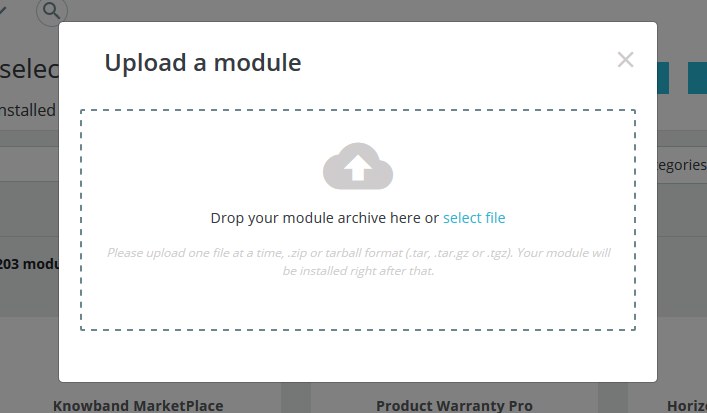
Go to the “Modules” section and click on the “Upload a Module” button. Select the “kbgiftcard.zip” file.
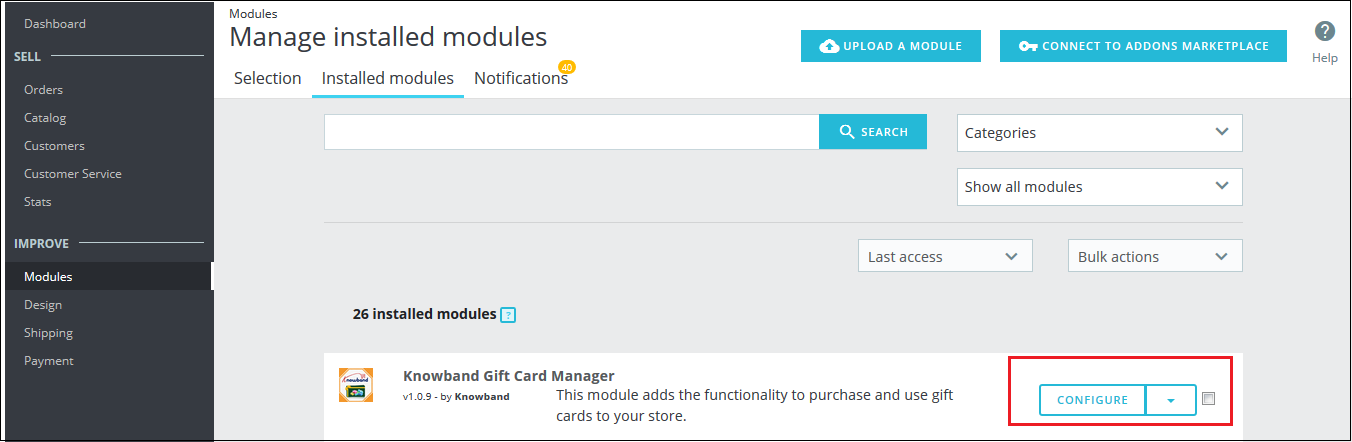
The PrestaShop gift card module is now ready for configuration. You can find that in Store Admin -> Modules. It would be shown as below –
You may even search for the module in the admin modules list by using the following details –
Keyword – Gift Card Manager
Category – Pricing and Promotion
Filter By – Installed & Not Installed / Enabled & Disabled
3.0 Admin Interface
The admin can enable and configure the PrestaShop Gift Card module by Knowband easily in a few simple steps. The admin interface of the addon has four customization options. They are below:
Module Configuration
Gift Card Templates
The Gift Card Products
Gift Card Orders
The various options are below in detail:
3.1 Module Configuration
The ‘Module configuration’ tab of the PrestaShop gift voucher addon offers the four features to admin that are below:
Configuration
Email Settings
PDF Settings
Cron Settings
The following features are available in detail below:
3.1.1 Configuration Tab
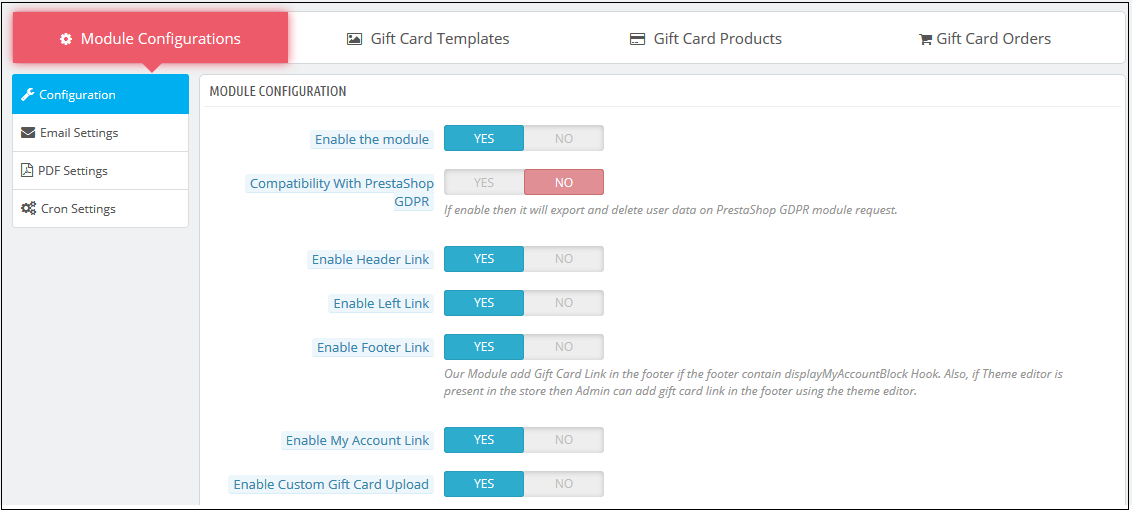
When the admin comes to the configuration tab of the PrestaShop gift card extension. The configuration tab shows the multiple features that are shown below:
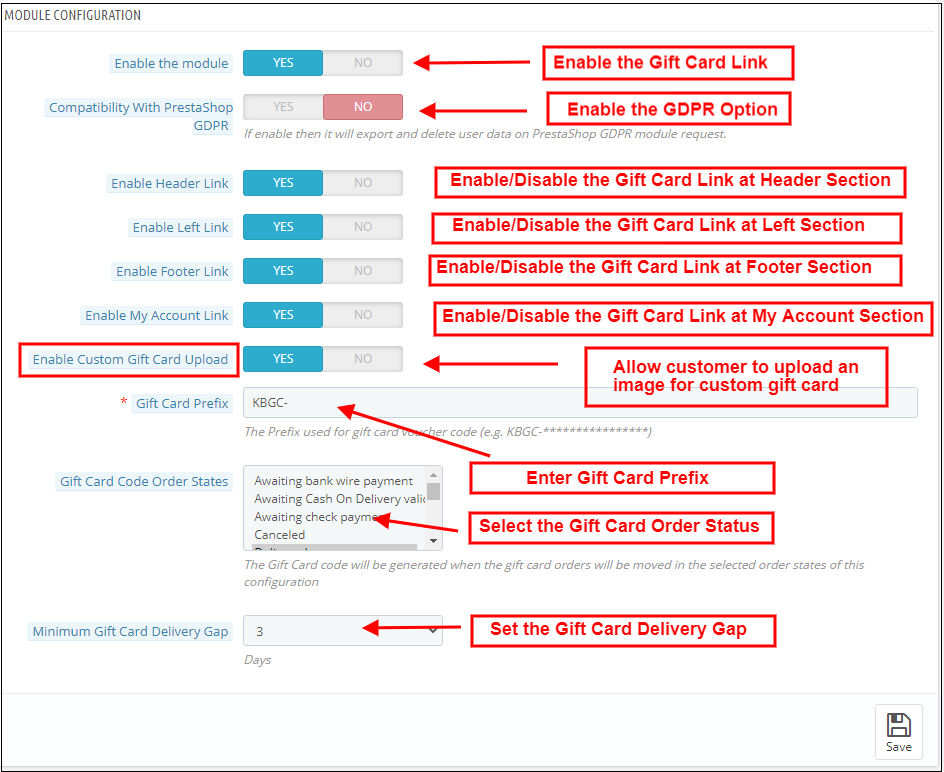
1. Enable the module: When the admin comes to the configuration tab of the PrestaShop gift voucher addon, he/she needs to enable the same from the backend. This happens with a button toggle as shown below.
2. Compatibility with PrestaShop GDPR: If the admin enables the settings, then the customers can access their GDPR rights to delete or export the customer data from their store
Note: If you are using the official GDPR module then you must need to enable this setting. The main purpose of this feature is to export and delete user data on the PrestaShop GDPR module request. It is also compatible with PrestaShop GDPR Module developed by Knowband.
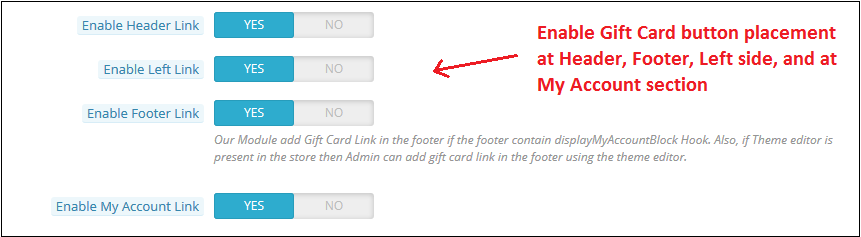
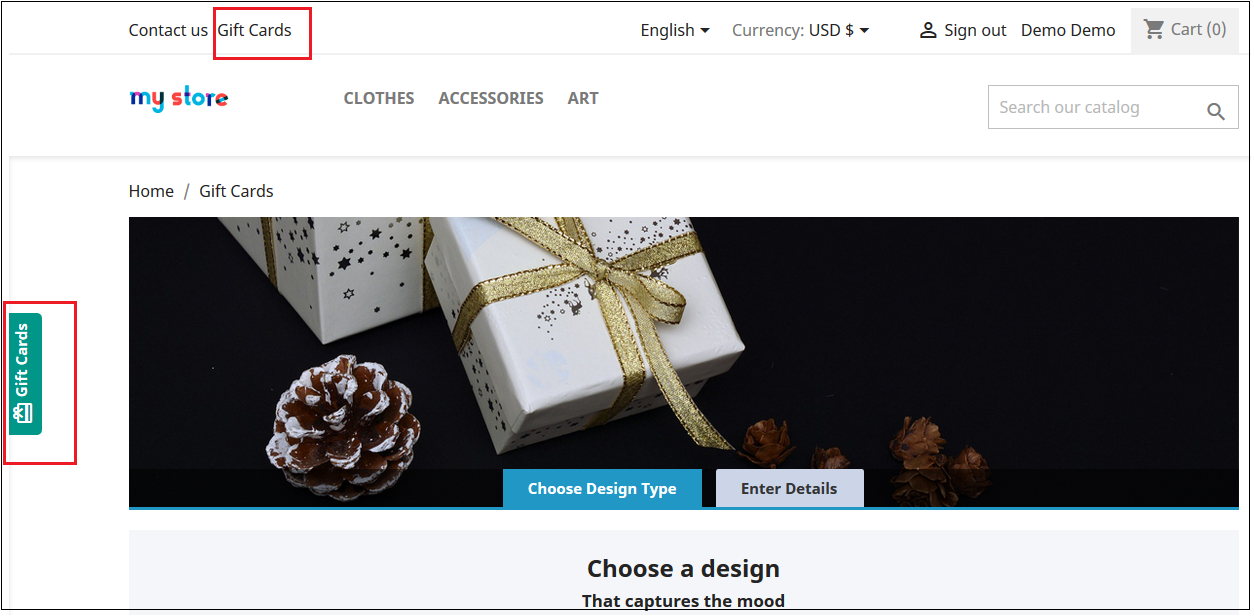
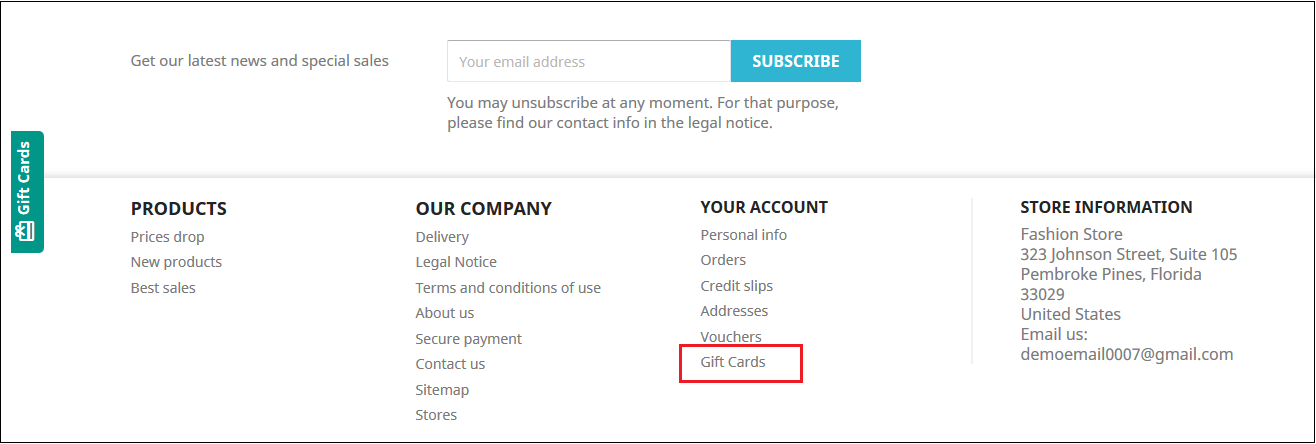
The link to the eCommerce gift cards can place on the web pages as per the requirement. The admin can enable or disable the link at the header or footer. It is placeable at the left side of the website where the visitors pay maximum attention. In addition, the option to redirect the customers to the ‘Gift card page’ can be provided in the ‘My Account’ page of the registered customers.
The links will be shown in the front-end of the website as shown below:
In the header & At the left side of the web page
In the footer
My Account Page
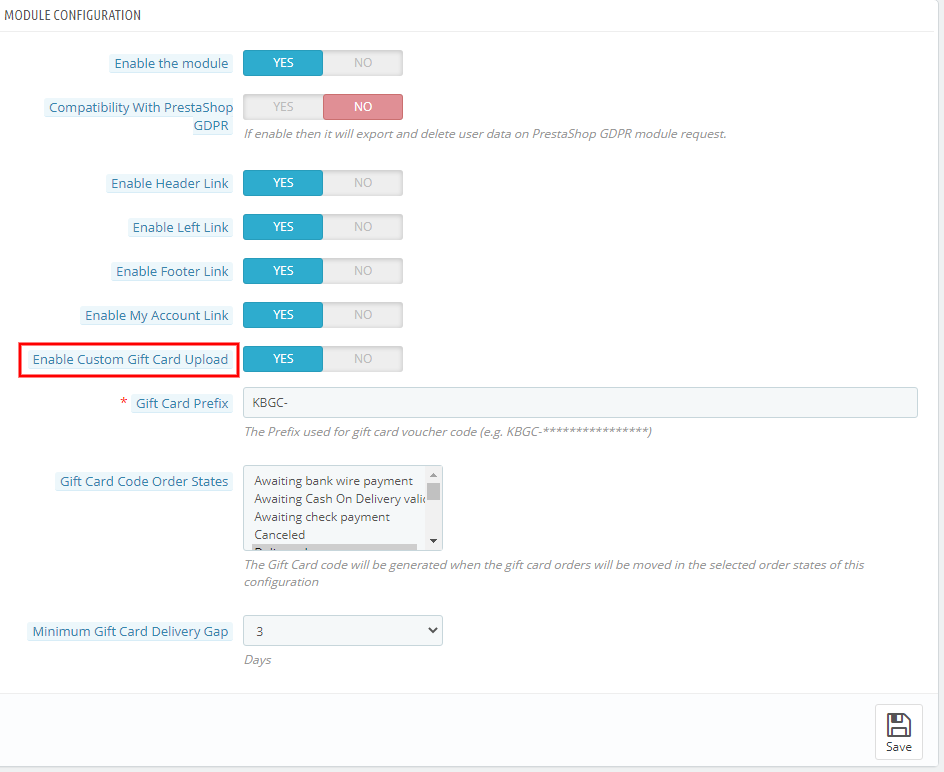
3. Enable Custom Gift Card Upload: If the admin enables this, the Gift Card Module allows users to upload an image to personalize a custom Gift cards.
4. Gift Card Prefix: In this option PrestaShop gift card addon the admin can set the prefix for the voucher code of the pre-paid gift card from here. The code enters in the format KBGC – ******
5. Gift Card order Status: The admin gets an option to select the status of the orders. The gift card code will be generated when the order is moved in any of the selected order states.
6. Minimum Gift Card Delivery Gap: The PrestaShop gift voucher allows the store admin to specify the minimum duration of the day. Further, when the order places and the day of the gift card delivery.
3.1.2 Email Setting
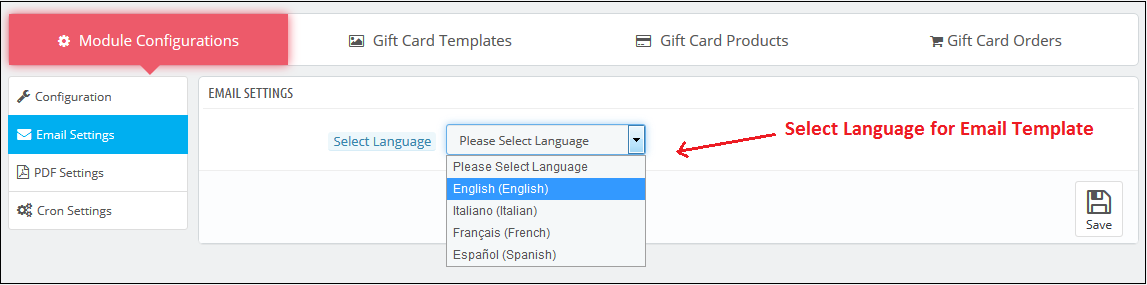
The customer gets an option to print the gift cards or else they can be sent to the receiver via email. The PrestaShop gift card module by Knowband offers default email templates that can be personalized as per the requirement of the store admin.
In addition, the PrestaShop gift voucher module offers multi-lingual support. The emails can be sent in various languages. The admin can select the desired language from the drop-down list.
Once the language is selected, the entire email right from the subject line to the content can be edited and personalized as per the requirement.
3.1.3 PDF Setting
The buyer can print the PrestaShop gift voucher module in PDF format. The PDF file of the Gift voucher can be printed in different languages. The admin can edit the content of the file. The changes made in the backend will be reflected in the PDF.
The admin needs to select the language as done in the email settings.
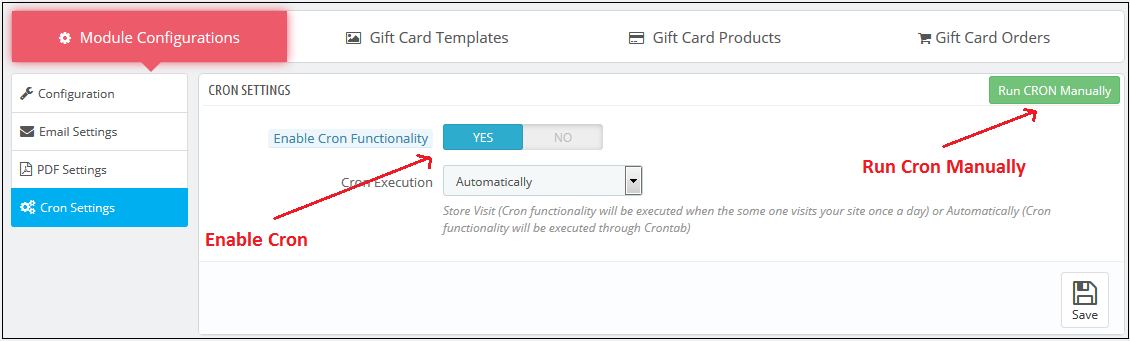
3.1.4 Cron Setting
You can add the Cron to your store via the control panel to send gift card vouchers automatically.
3.2 How to customize the template of the gift card?
3.2.1 Add New Gift Card Template
To create the new templates for the PrestaShop gift card manager addon, go to the Gift Card template tab and then click the ‘Add New Template’ option or ‘+’ sign at the top right side of the module.
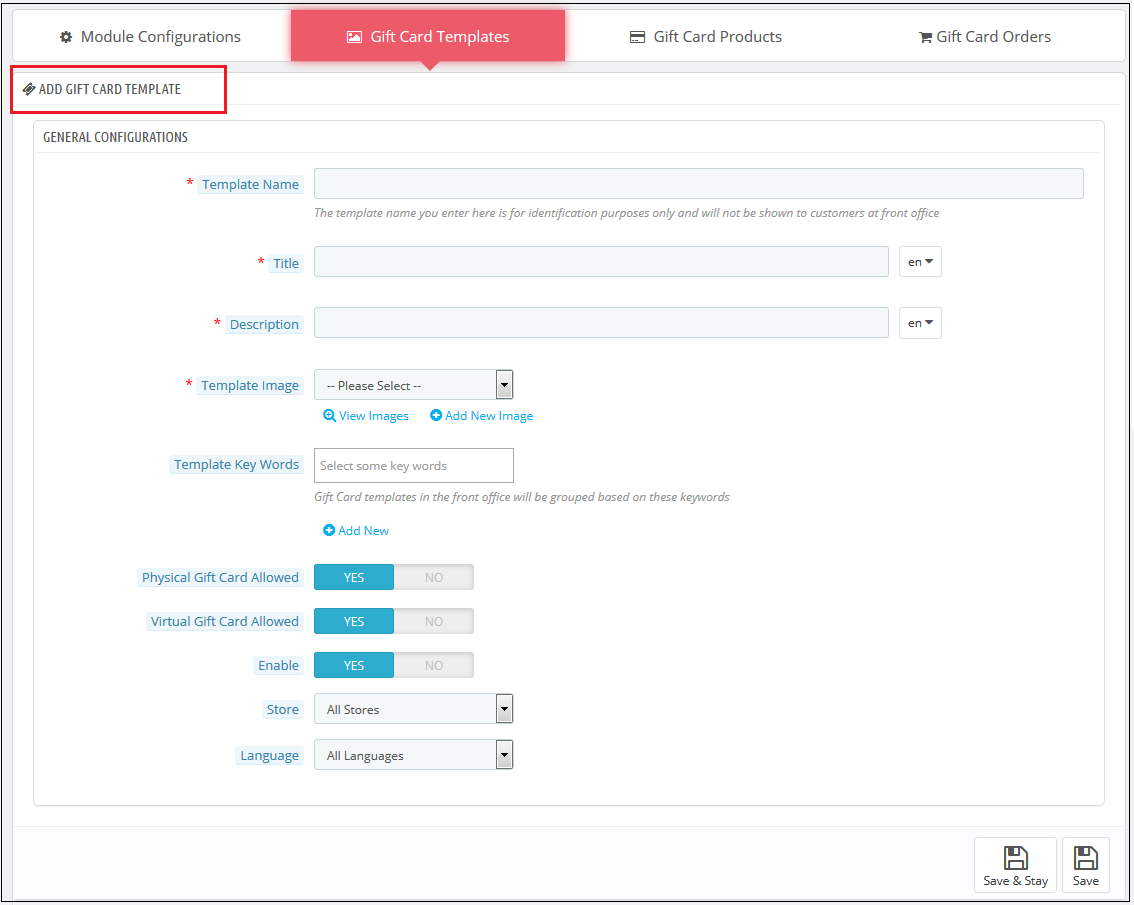
Fill up the information to create the template as shown in the image:
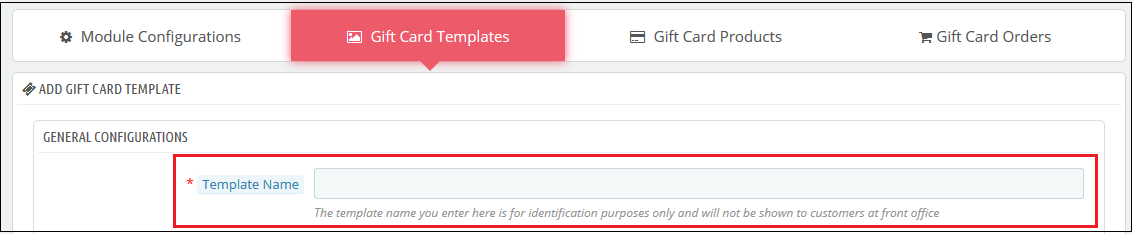
1. Template Name: The PrestaShop send gift card addon allows the store admin to name the template in this section.
2. Title and Description: With PrestaShop Gift Card Module, the admin can add a title and description for the Gift Card template.
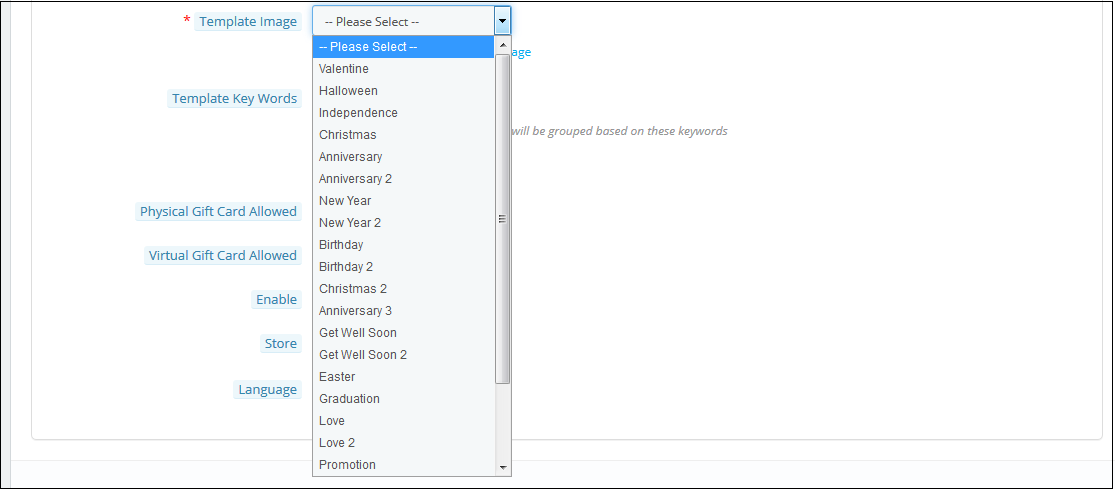
3. Template Image: The admin can select the image or the layout of the gift cards that will be shown in the front-end of the eCommerce site.
The images for the various occasions can be saved in the back-end of the PrestaShop gift card addon. The admin selects the occasion to find the image as shown below:
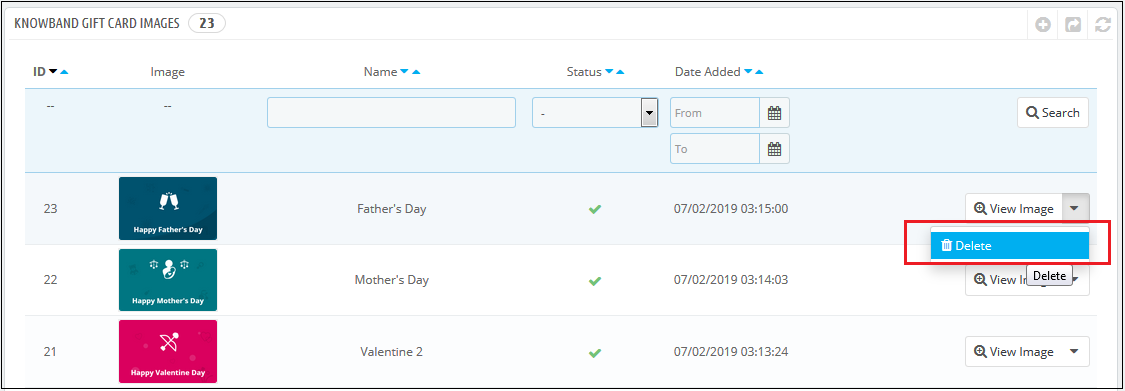
The store admin can even view the images for the various events that have been saved or can create a new image for the same.
As you click on the ‘View Image’, you’ll head to the page below.
The list showcases the entire images that were created and saved. You can view the complete image or even delete it if is necessary.
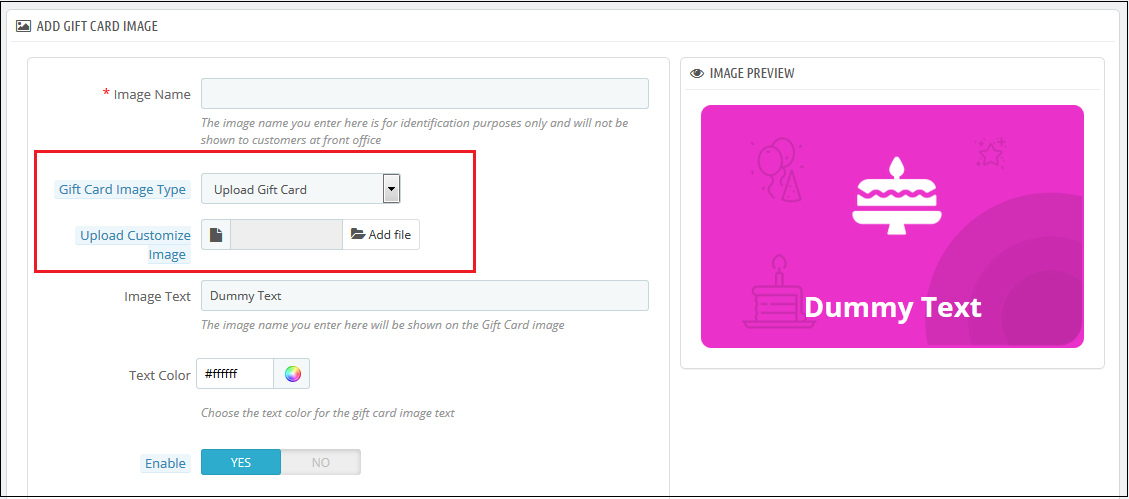
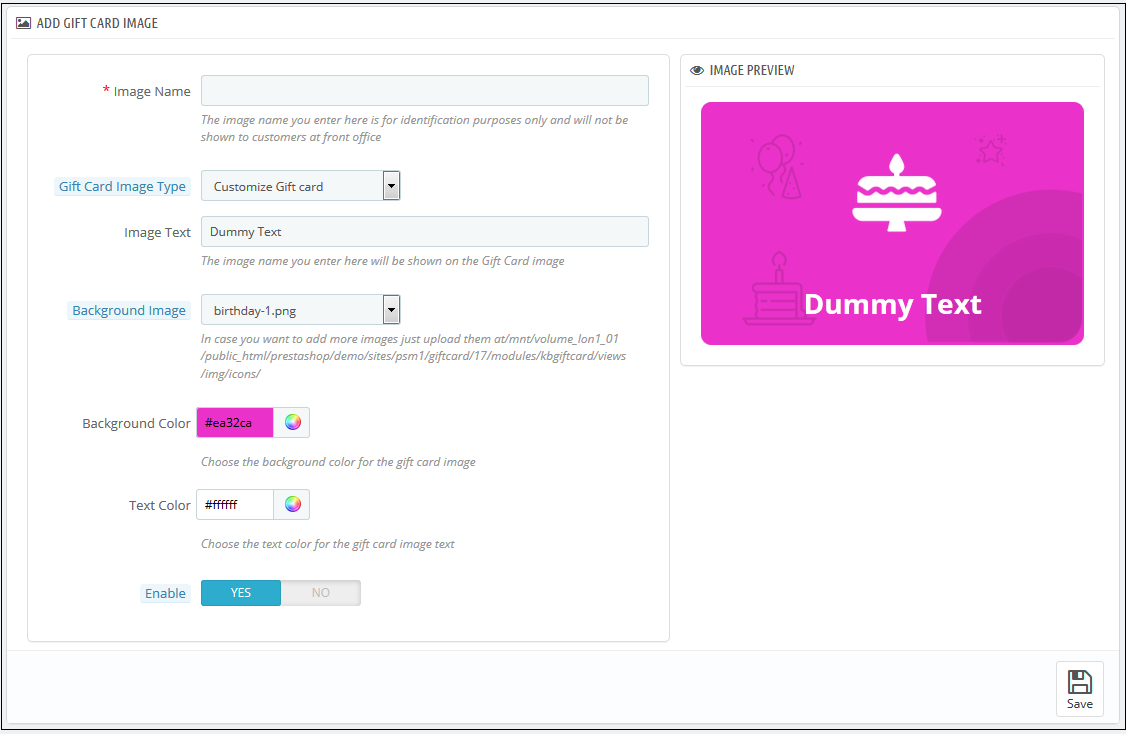
To create new images, click ‘Add New Image’ as shown below. The admin can choose a Gift Card Image Type. The store admin can customize the gift card or upload custom images also.
You can enter the image name and the text of the image to be shown on the gift card. Even the background image and color, as well as font color, can be changed at a button click. Preview the final image before making it live on the website.
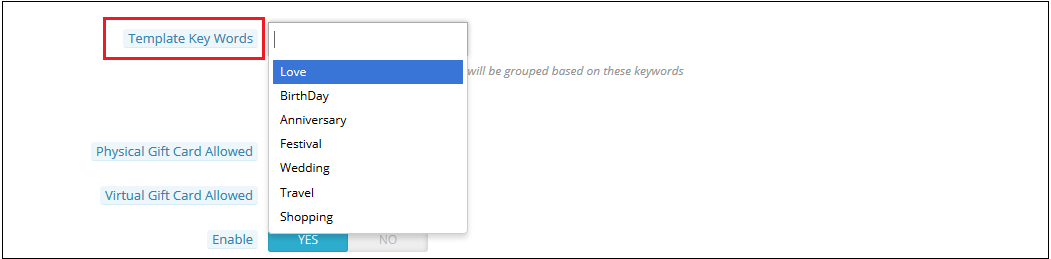
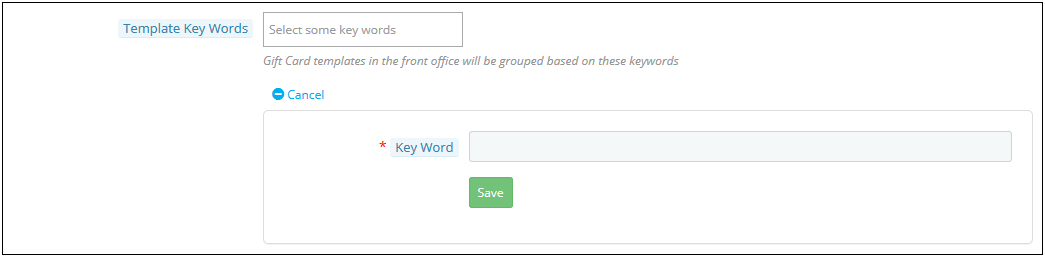
4. Template Keywords: The keywords of the gift cards can be selected from the list as shown below.
To create new keywords, click on ‘Add New’.
The admin can enter the keywords and save them here.
5. Physical Gift Card Allowed: The PrestaShop gift card manager addon by Knowband allows the store admin to enable the physical gift card for this template.
6. Virtual Gift Card Allowed: The functionality will allow the e-cards.
7. Enable: The functionality can enable or disable the template.
8. Stores: The PrestaShop gift voucher module is multi-store compatible. The admin can either enable the functionality in all the stores or can select anyone from the drop-down list.
9. Languages: The admin can select the desired language for the template from the drop-down list.
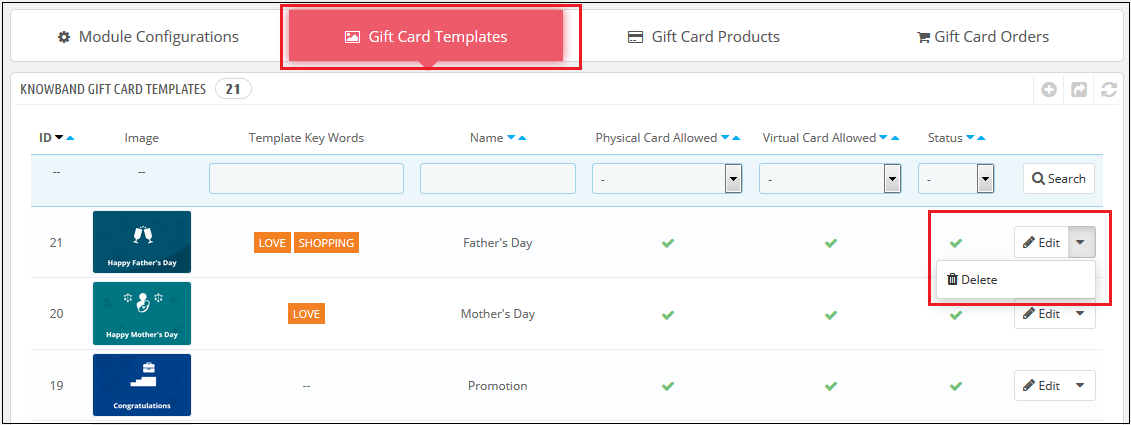
3.2.2 Edit Gift Card Template
The admin even gets an option to edit the template or delete from the section shown below:
3.3 How to customize the gift cards product?
3.3.1 Create New Conditions for the gift vouchers
The e-merchants can customize the pre-paid gift card products in a few simple steps.
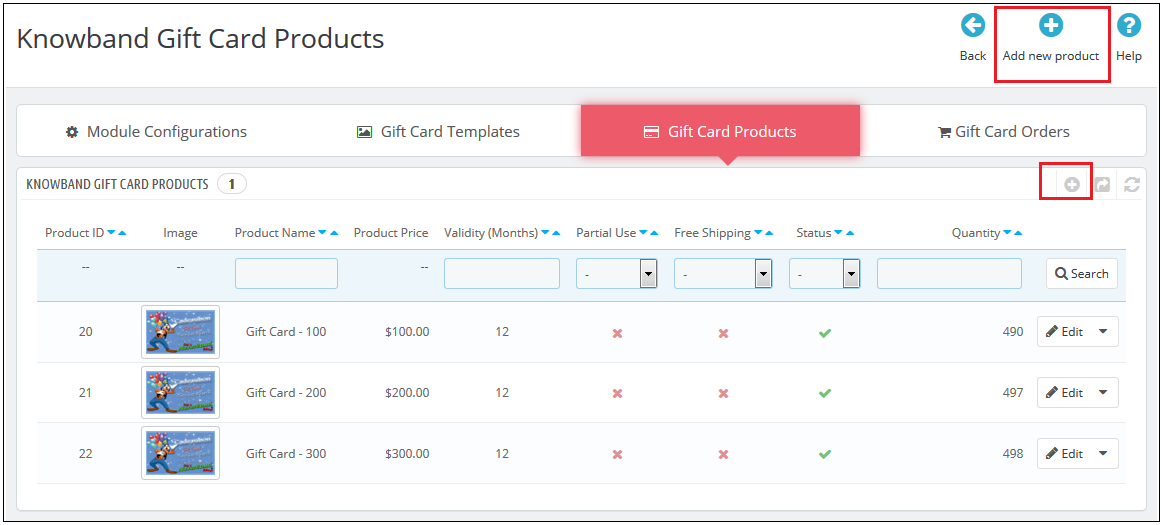
In the ‘Gift Card Product’ tab go to the ‘Add New Product’ or click on the ‘+’ sign in the top right section.
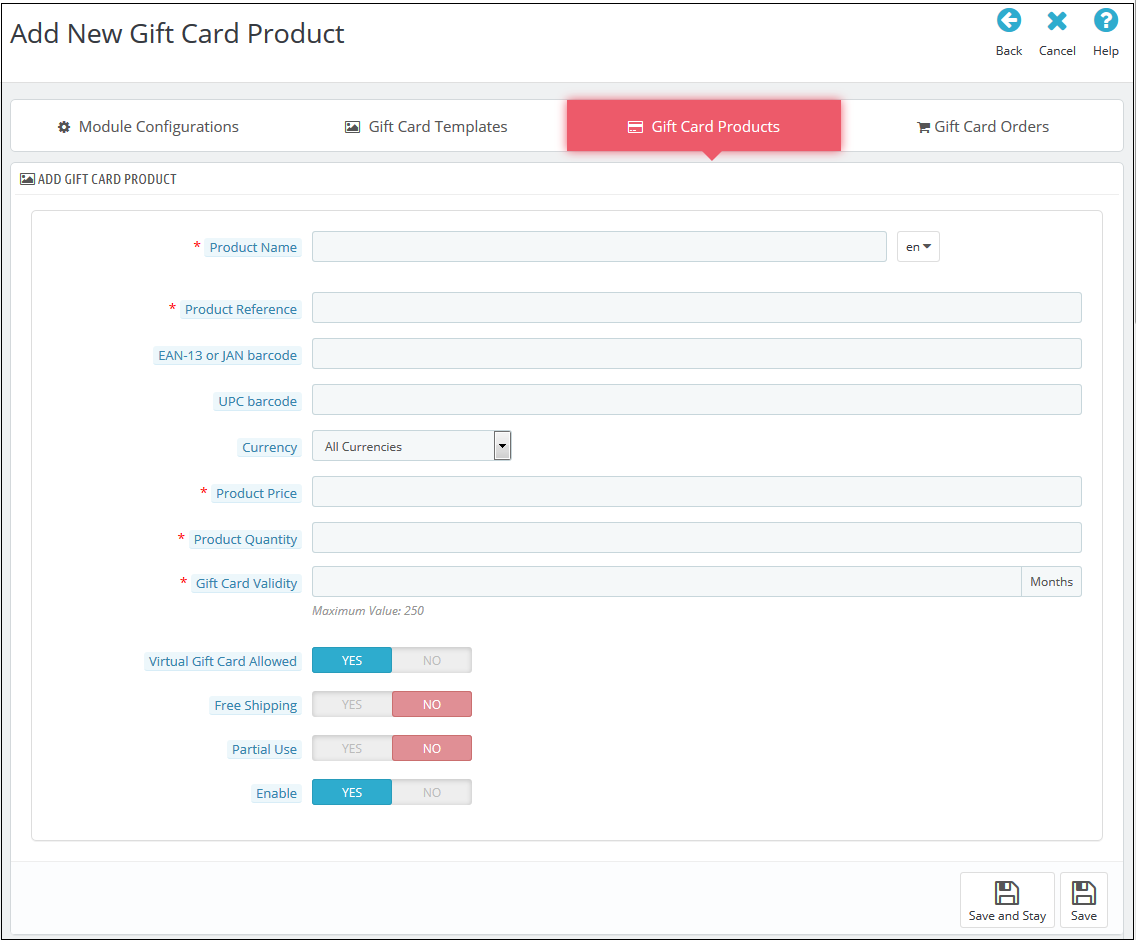
Below is the information that you need to provide for creating the product.
Product Name: Enter the name of the product here. It can be Happy Anniversary, Happy Birthday, Merry Christmas, or any other.
Product Reference: This includes the unique reference id. The admin can enter the internal reference code as per the requirement.
EAN-13 or JAN barcode: This product code is widely used internationally, but is specifically included for Europe and Japan. It is a super-set of UPC code and will be acceptable in North America.
UPC barcode: This product code is acceptable in almost all countries.
Currency: The admin can select the currency for the card from the drop-down list.
Product Price: The gift card amount enters here.
Gift Card Validity: The validity period in months of the gift card enters here.
Virtual Gift Card Allowed: Enable e-card by switching on the button.
Partial Use: The eCommerce seller can even allow partial use of the voucher amount.
Enable: The admin can enable or disable the PrestaShop gift voucher module from here.
3.3 Track the order for the gift cards of the site
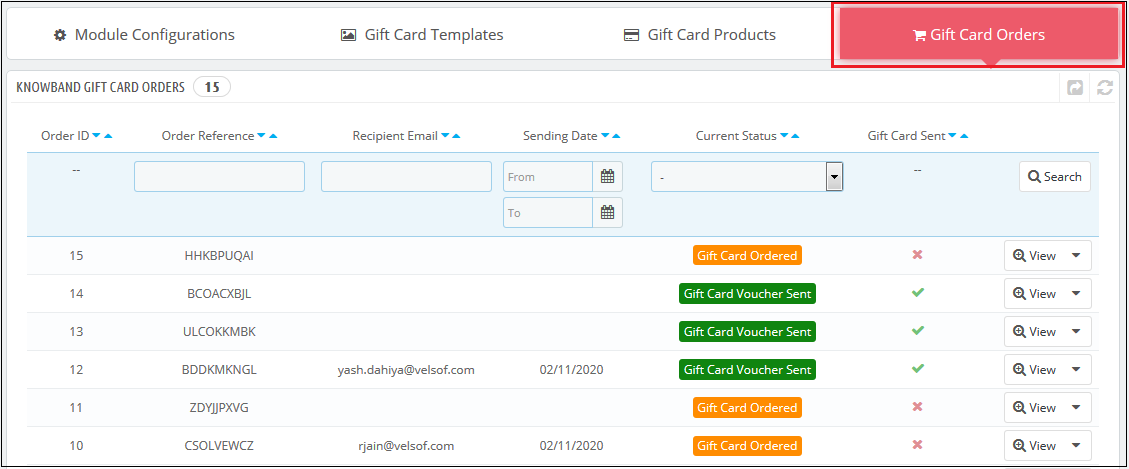
The Gift Card Order tab provides the entire list of the orders received for the gift cards. It involves the recipient email, date of sending as well as the status of the gift cards.
In the ‘Gift Card Order’ tab go to the ‘View’ button in the right section. This section shows the entire information about the order.
4.0 Website UI
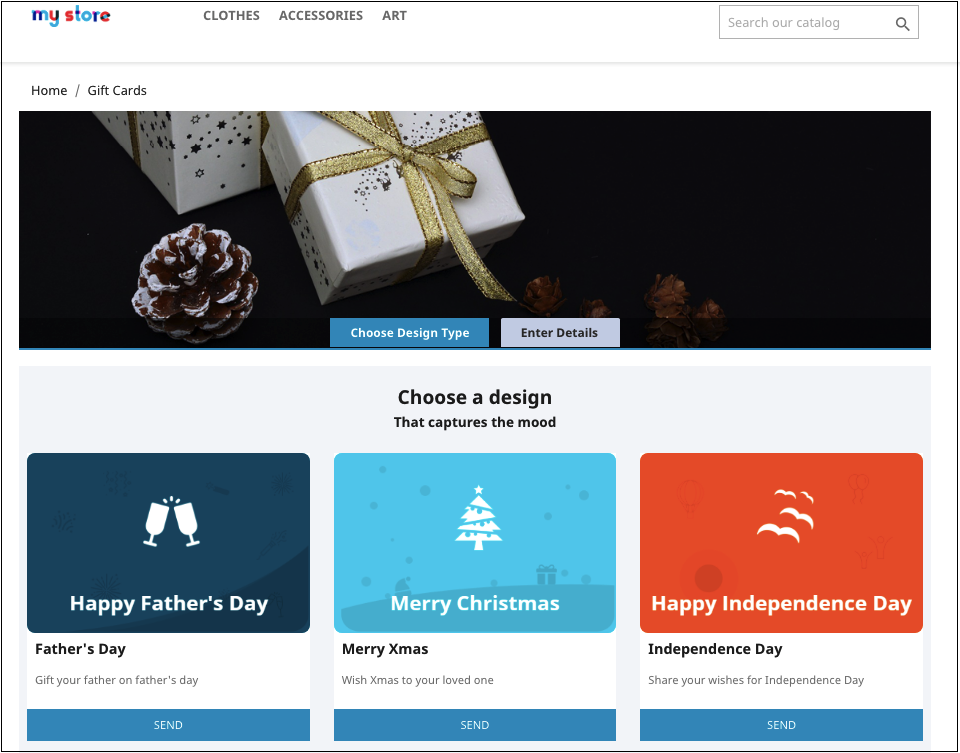
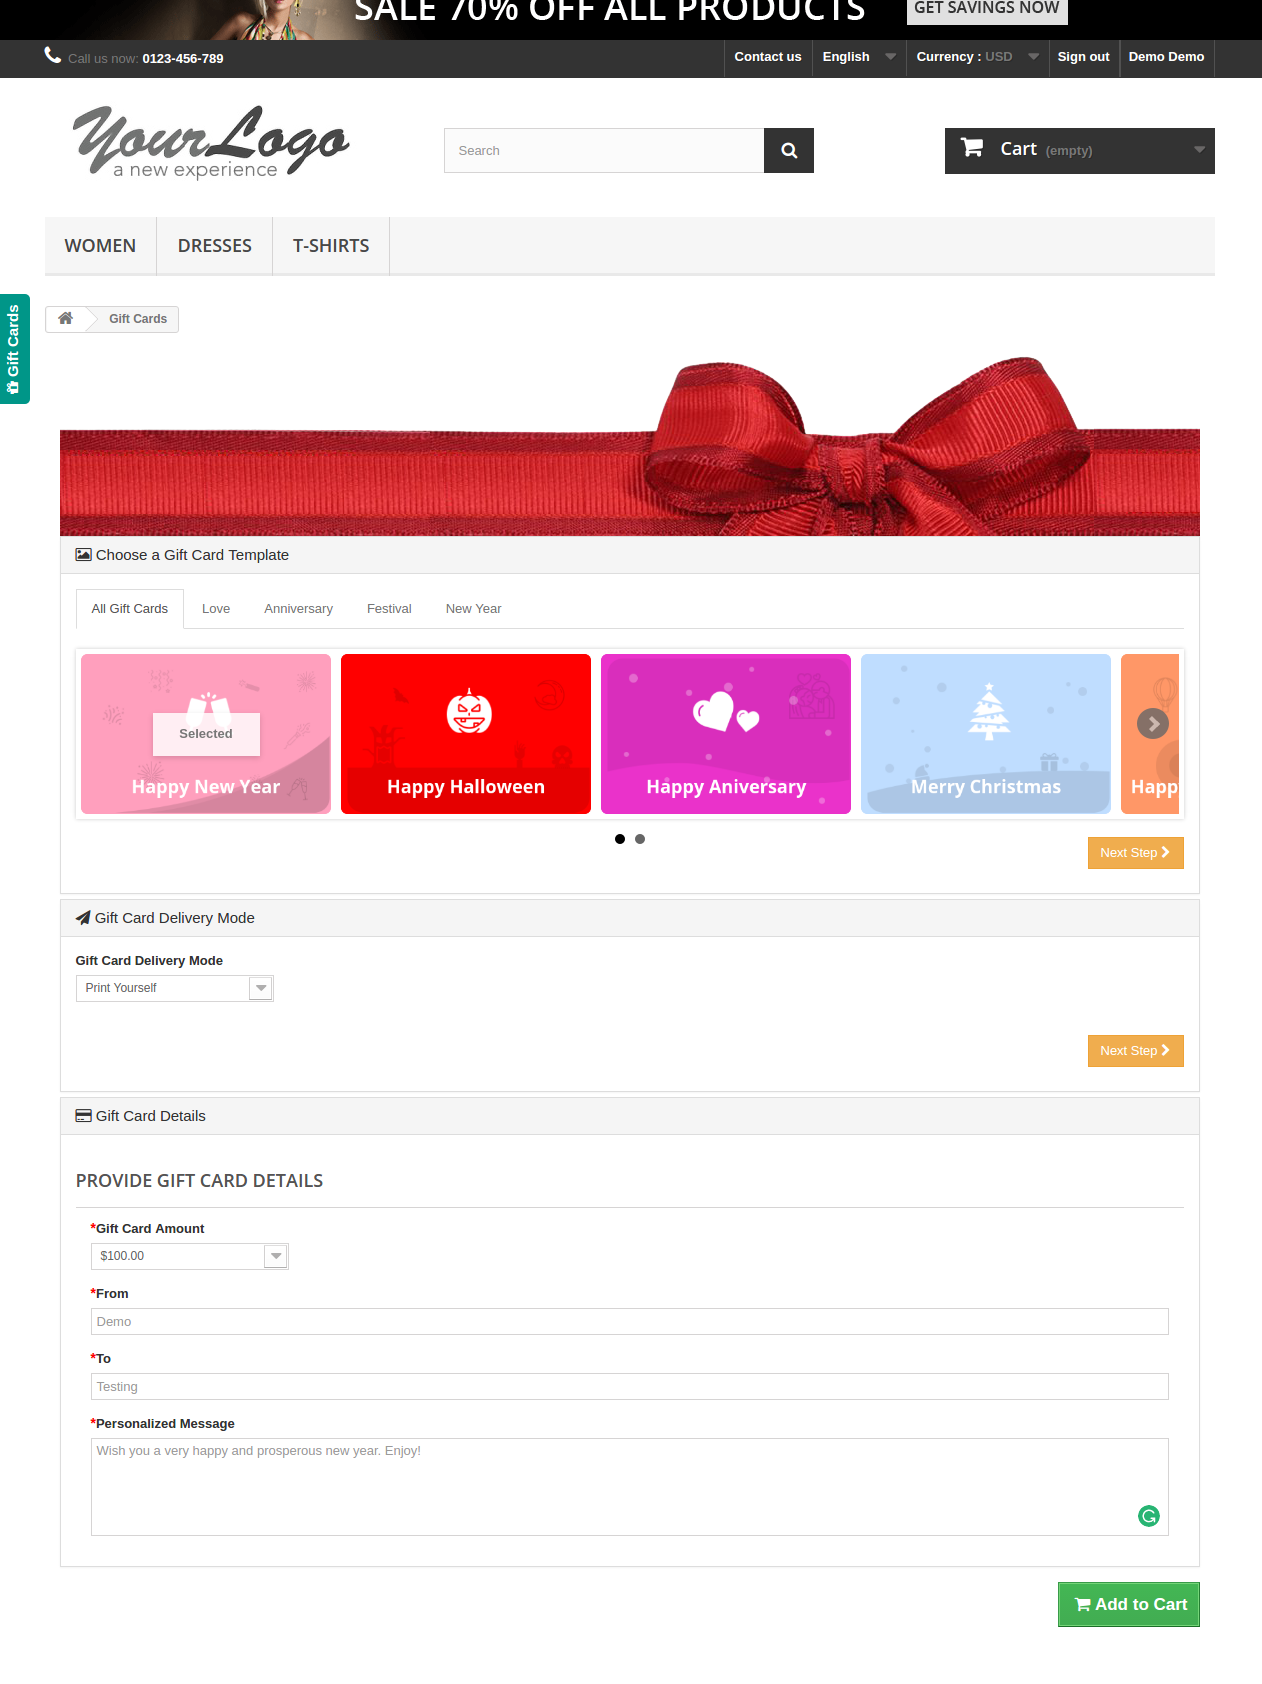
The links to the gift cards page can be viewed in the front end as opted by the store admin. Once the store visitors click on the link, they will head to the gift card page of the site.
The PrestaShop gift card manager addon by Knowband is the front-end of the website will be shown very similarly to the image below:
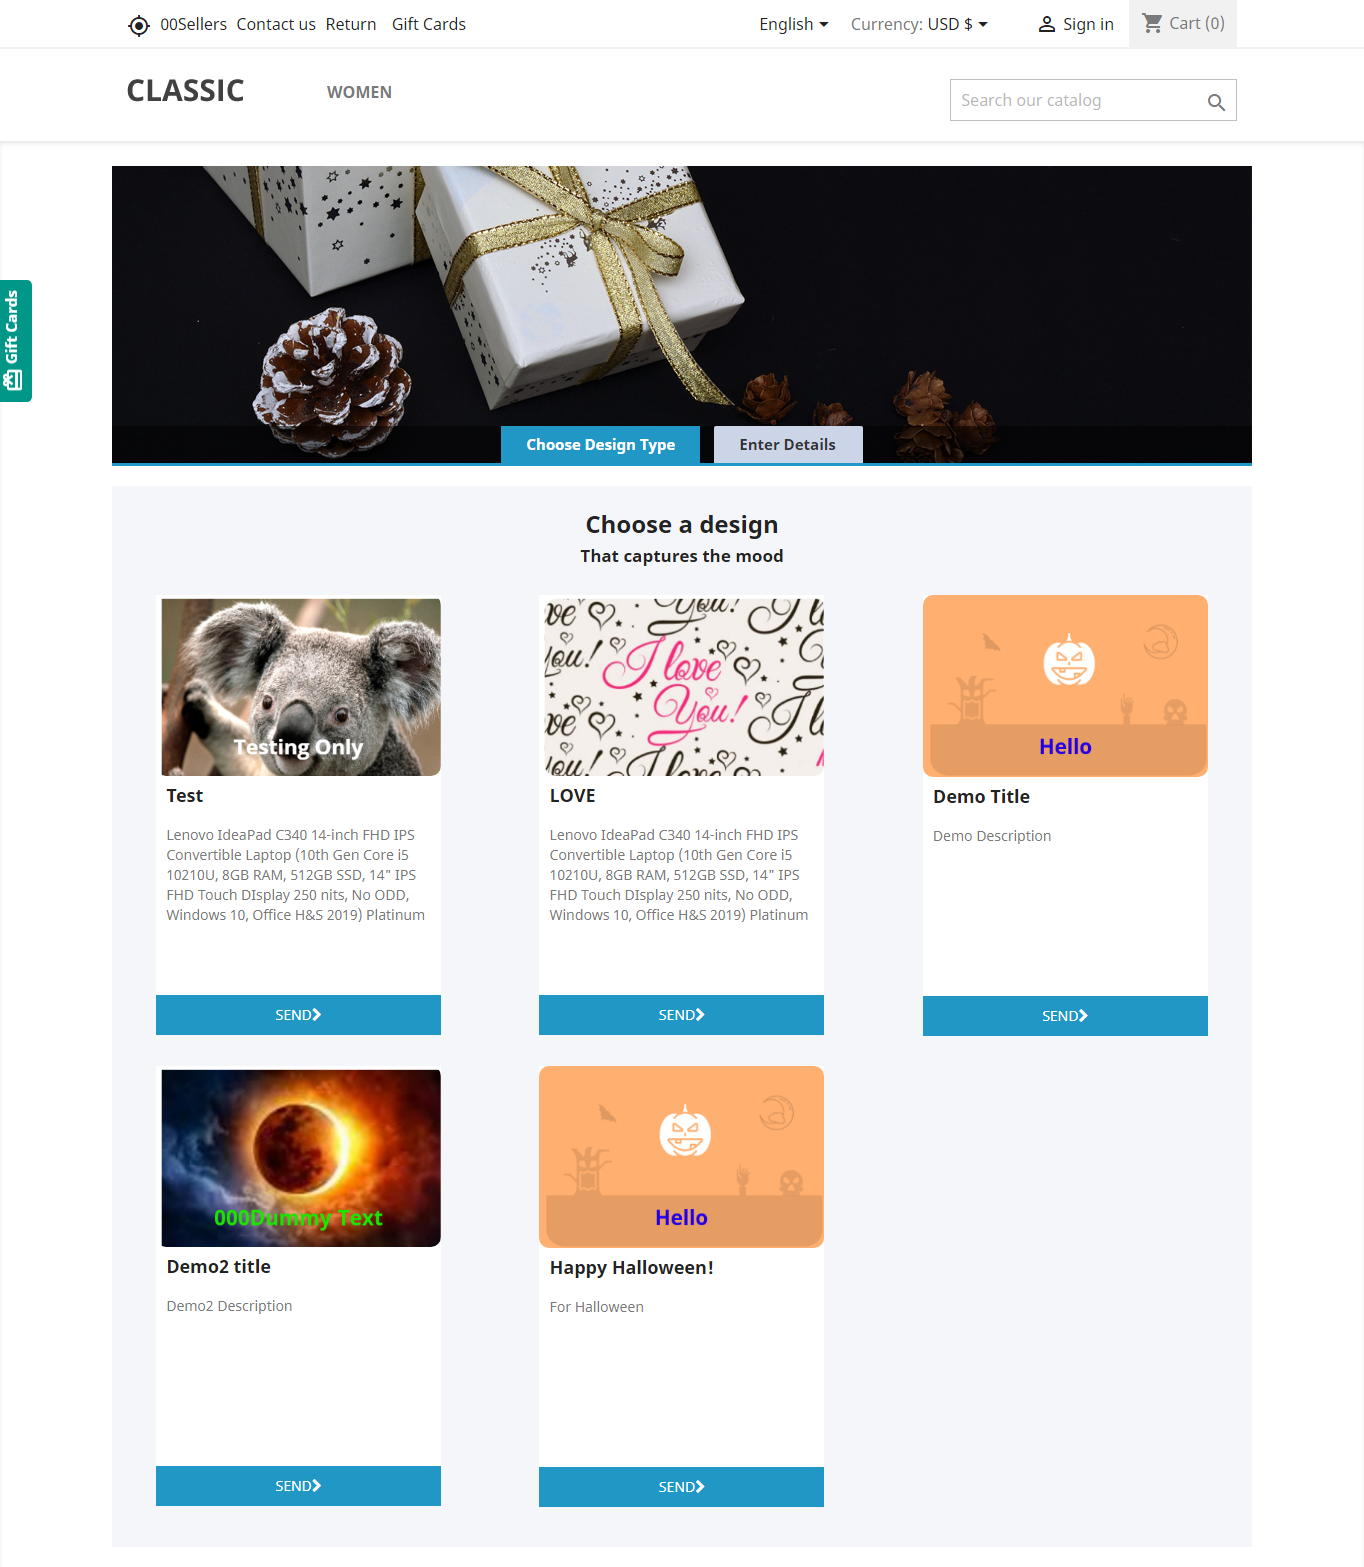
Shopping for the same is easy. The customers can select the card for different occasions. For instance, he chooses the Happy Halloween card. All he needs to do is to click on the Send button of the card.
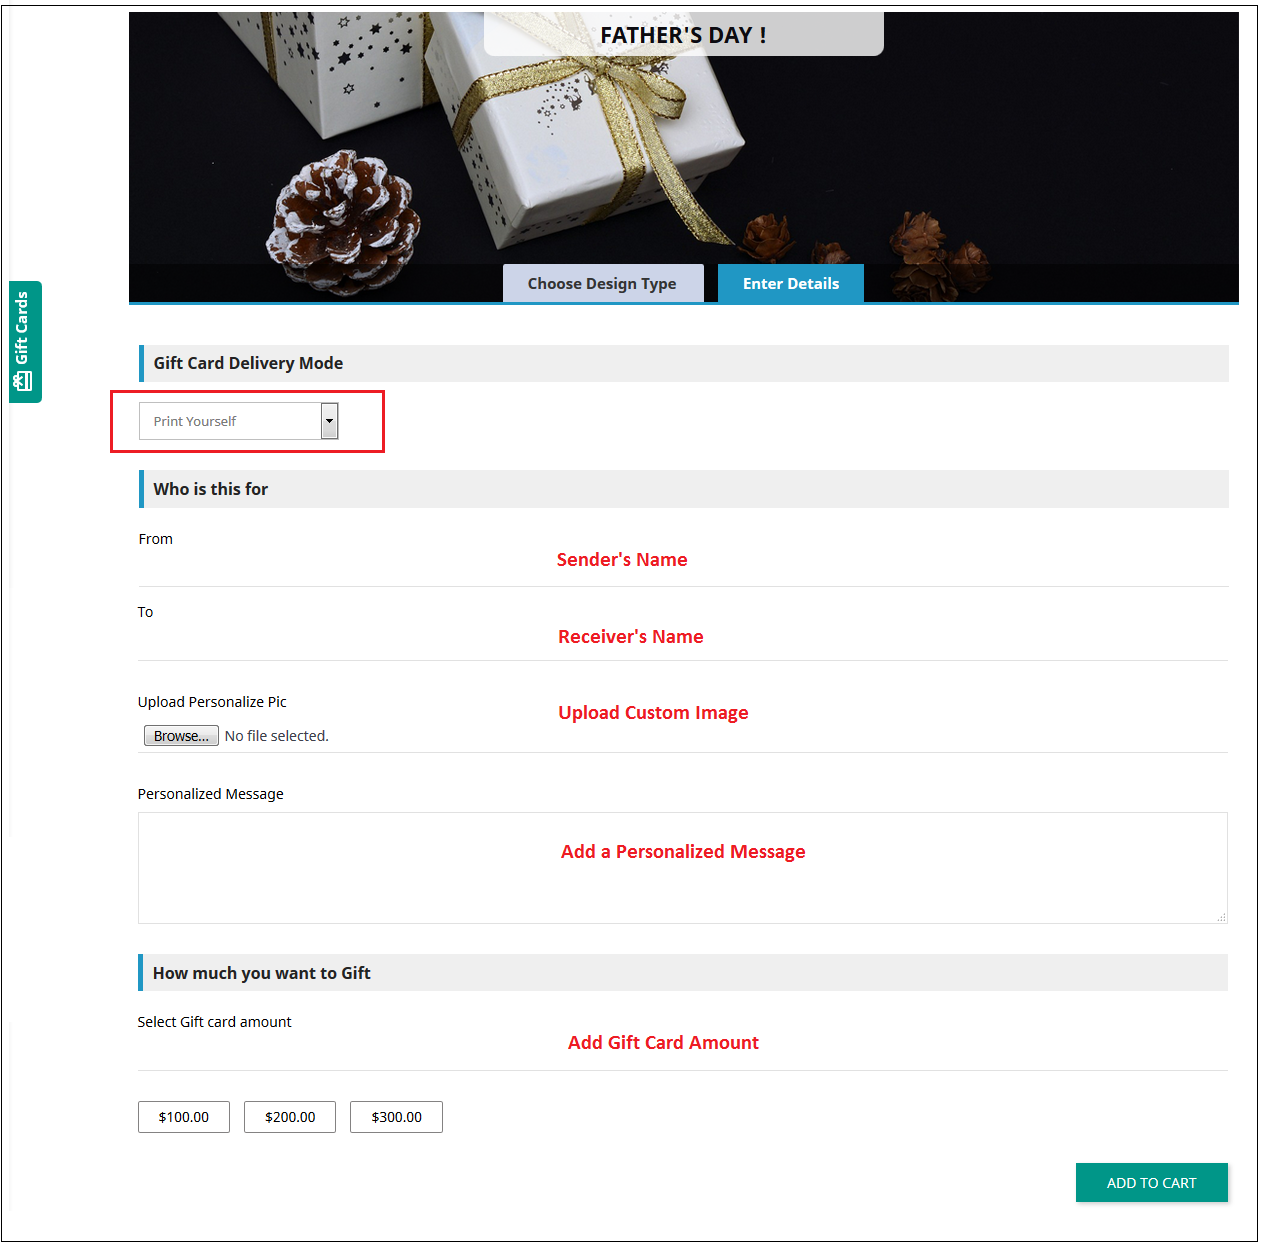
The customer will head to the ‘Enter Details’ page where he can add all the needful details.
He can print the card or send it via email. The sender and receiver names along with the message can be mentioned in the section as shown below.
Upload Image: The sender can upload a custom image for a Personalised Gift Card.
Print By Yourself: Insert the details to print the gift card.
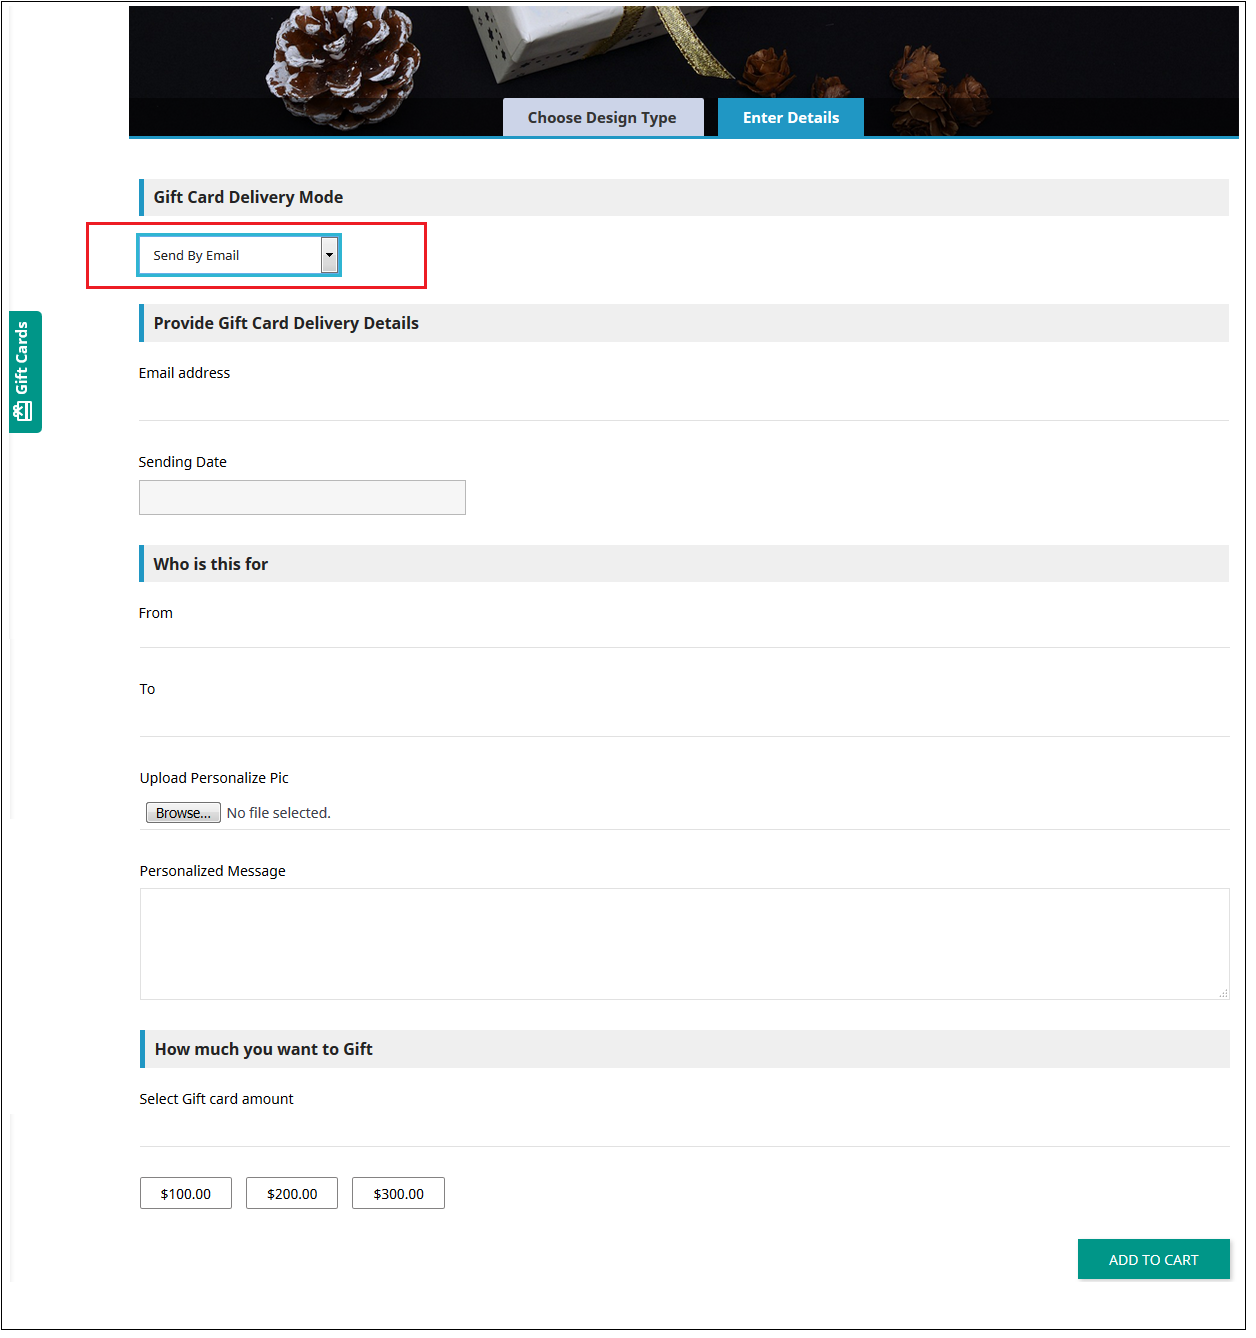
Send via email: Add the email address of the receiver, upload a custom image, and a note for your loved one.
Add the product to the shopping cart and proceed to the checkout page. The gift card will then be sent to the receiver.
Now you want to buy gift cards for your near and dear ones this PrestaShop addon is a way to connect with you with just one click. KnowBand PrestaShop Gift Card Module helps you engage more customers to your store.
Tutorial: Watch the Video Guide
To help you set up and use the PrestaShop Gift Card Manager Module, we have created a detailed YouTube tutorial. The video explains the installation process, configuration options, and how to manage gift cards step by step.
Managing the shipping costs for different countries and regions is the biggest issue while catering to online customers globally. Knowband offers Prestashop Shipping Cost by Zipcode module allows the Prestashop eCommerce store admin to fix different shipping charges for different regions. This Prestashop Shipping Cost by Zipcode addon is one of the best Prestashop extensions. The Prestashop Shipping Cost by Post Code module helps you segregate the countries into the zone. The Prestashop store admin can enter multiple postal codes for the different regions. At the same time, he/she can even set the minimum and maximum range of the postal codes for a particular region from the admin interface of this Prestashop Shipping Cost by the country addon. The shipping cost for each zone can be set easily without any hassle. The charges will be calculated automatically at the checkout page in accordance to the zip code entered by the customer.
This Prestashop Shipping Cost by Zipcode addon is highly customizable and the store admin just needs to configure it as per the requirements. The admin needs to apply shipping cost settings a single time. There is no need to change any setting again and again. The online customers can view the shipping charges at the same time when they enter their area pin code. The transparency of the shipping cost calculation process increases customers trust on the website. The Prestashop zipcode wise shipping cost module makes shipping cost calculation very easy for the online store admin.
1.1. Project Objectives
Listed below are some of the objectives that the store owner can achieve with Prestashop Shipping cost by postal address.
The Prestashop eCommerce store admin can fix different shipping charges for the different regions in which the eCommerce site is operating.
The shipping charges of the customers are calculated automatically based on the zip code entered by them.
The amount charged will including or excluding the tax and handling charges as set by the store admin.
Store admin can fix the carrier charges according to the total price or total weight.
CSV File upload tab will allow the admin to add the shipping conditions for multiple locations in bulk.
1.2. Features
It is very easy to install and configure this Prestashop Shipping Cost by Zipcode addon.
The Prestashop Shipping Cost by Post Code module offers a simple and hassle-free implementation.
The e-merchant can enable or disable the shipping cost by postal code module just by toggling the button.
The admin can select zones from the dropdown list and also can add new zones whenever required.
The Prestashop Shipping Cost by Postal Code module admin interface offers a list of the countries to select from.
Admin can set shipping cost according to zip codes of the particular region.
The Prestashop shipping cost by location module allows admin to set the shipping cost according to the range of the postal codes that exist in that particular region.
The Prestashop shipping cost by country allows editing various shipping cost provided by the admin.
The shipping cost by zone module allows admin to fix the shipping charge based on zone, country, state/region, city, postcode range.
The Prestashop Shipping Cost by location plugin allows the store admin to disable the product delivery for a particular zone or region.
The Prestashop Shipping Cost by Postal Code addon is multi-lingual compatible.
The Prestashop delivery cost by postcode plugin is compatible with the latest versions of Prestashop.
The Prestashop eCommerce store admin can create the term and conditions of the carrier options.
ImportCSV file feature in the backend allows the admin to add shipping conditions for various countries, zones, zipcodes in bulk
2.0 Installation
Purchase the Prestashop shipping cost by postcode module from the store. On completing the transaction, follow the below steps:
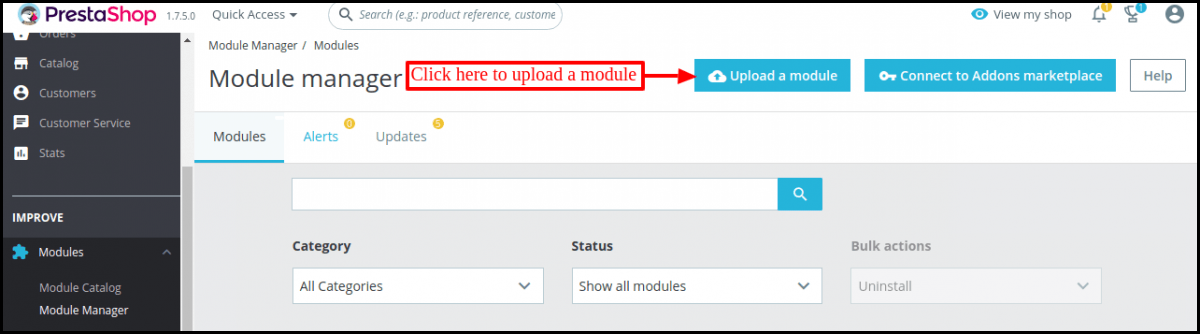
From the backend of the store, go to the Module Manager and click on “Upload a module”.
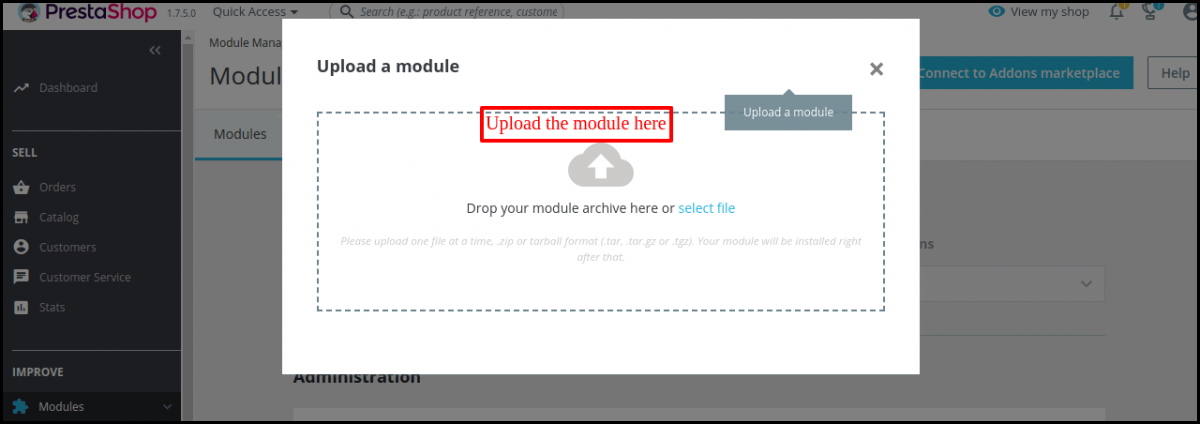
Upload the file from the system or drag and drop your module file here in the next tab. This step will install the module and show notification – “Module(s) installed successfully”.
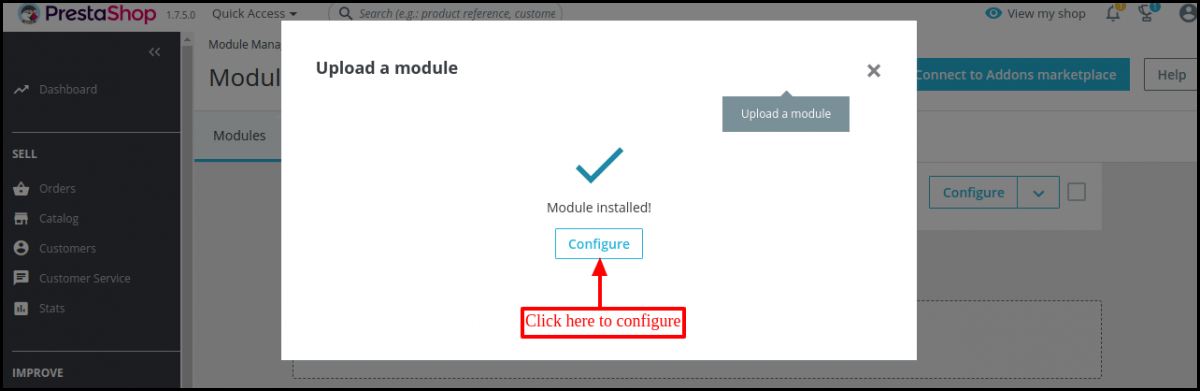
Once the installation process is completed, “Module installed” notifications will get displayed.
Click on the configure button and your module is ready to use.
In case, you are not able to find the module in the admin modules list, please try searching module by entering the Keyword, Shipping Cost by Zipcode.
3.0 Admin Interface
This Prestashop Shipping Cost by Zipcode module is completely configurable. The settings can be updated via the admin interface.
3.1 How to start using the module?
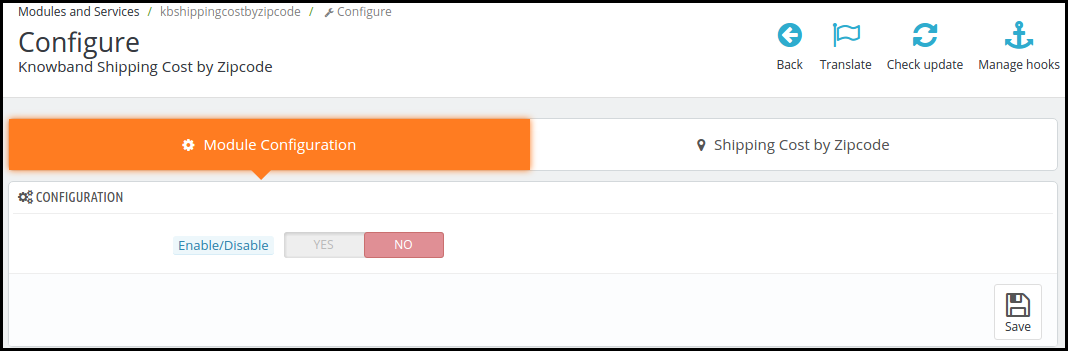
Once the installation is complete, all you need to do is to enable the Prestashop shipment charge by zipcode module on your Prestashop store by toggling the button as shown in the image below.
3.2 How to add new shipping conditions?
The very first step for adding new shipping cost by zipcode is to divide the location where you cater your products into different zones. The Prestashop Shipping Cost by Post Code module allows easy creation of zone and separation of the various regions. Follow the below-mentioned steps in order to create new conditions.
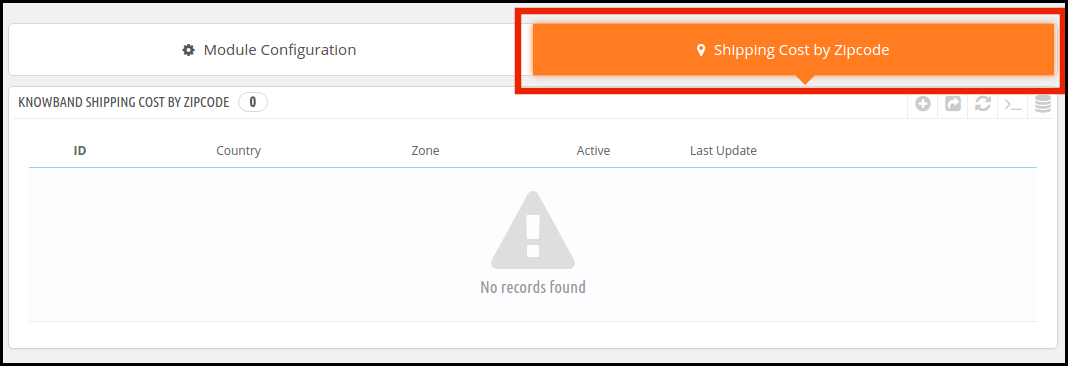
1. Go to the ‘Shipping Cost by Zipcode’ tab.
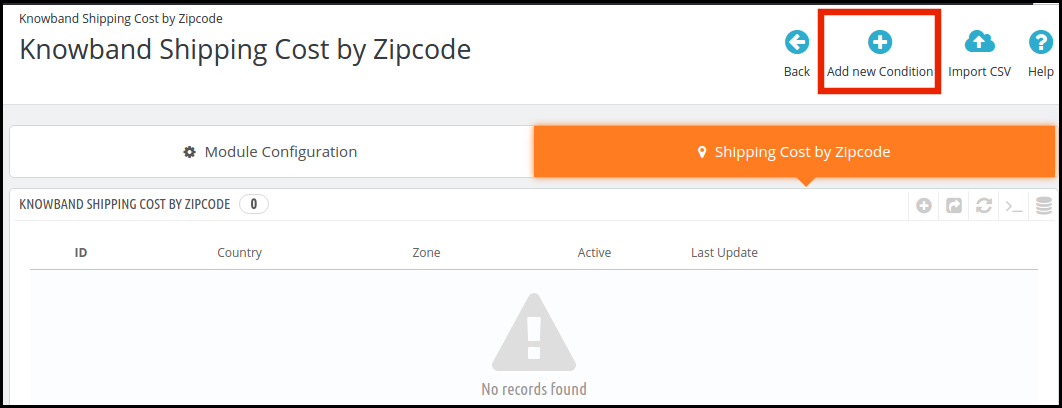
2. In order to create new zones, you need to click on the ‘Add New Condition’ on the top of the admin interface.
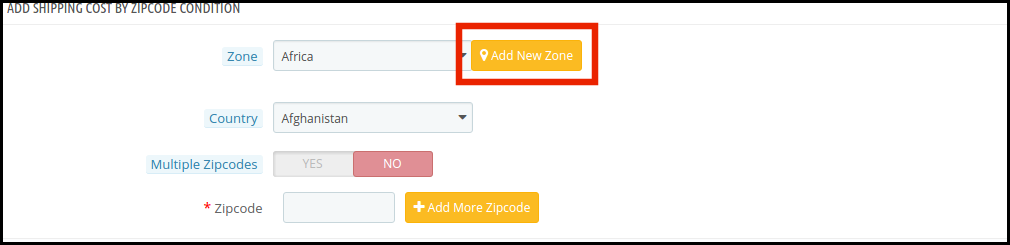
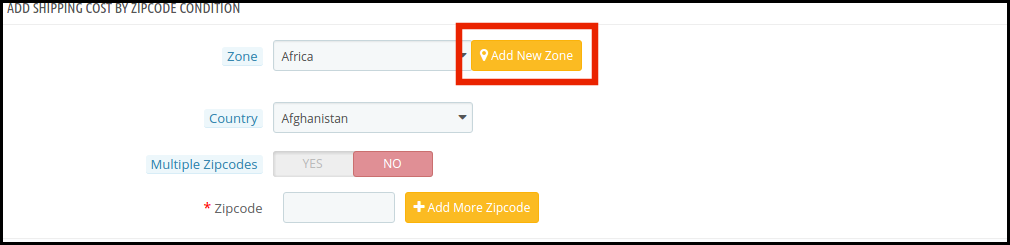
3. Once this is done, you’ll be redirected to the customization page. The Prestashop store admin is required to enter the following information as shown in the image below.
Let us discuss the options one-by-one.
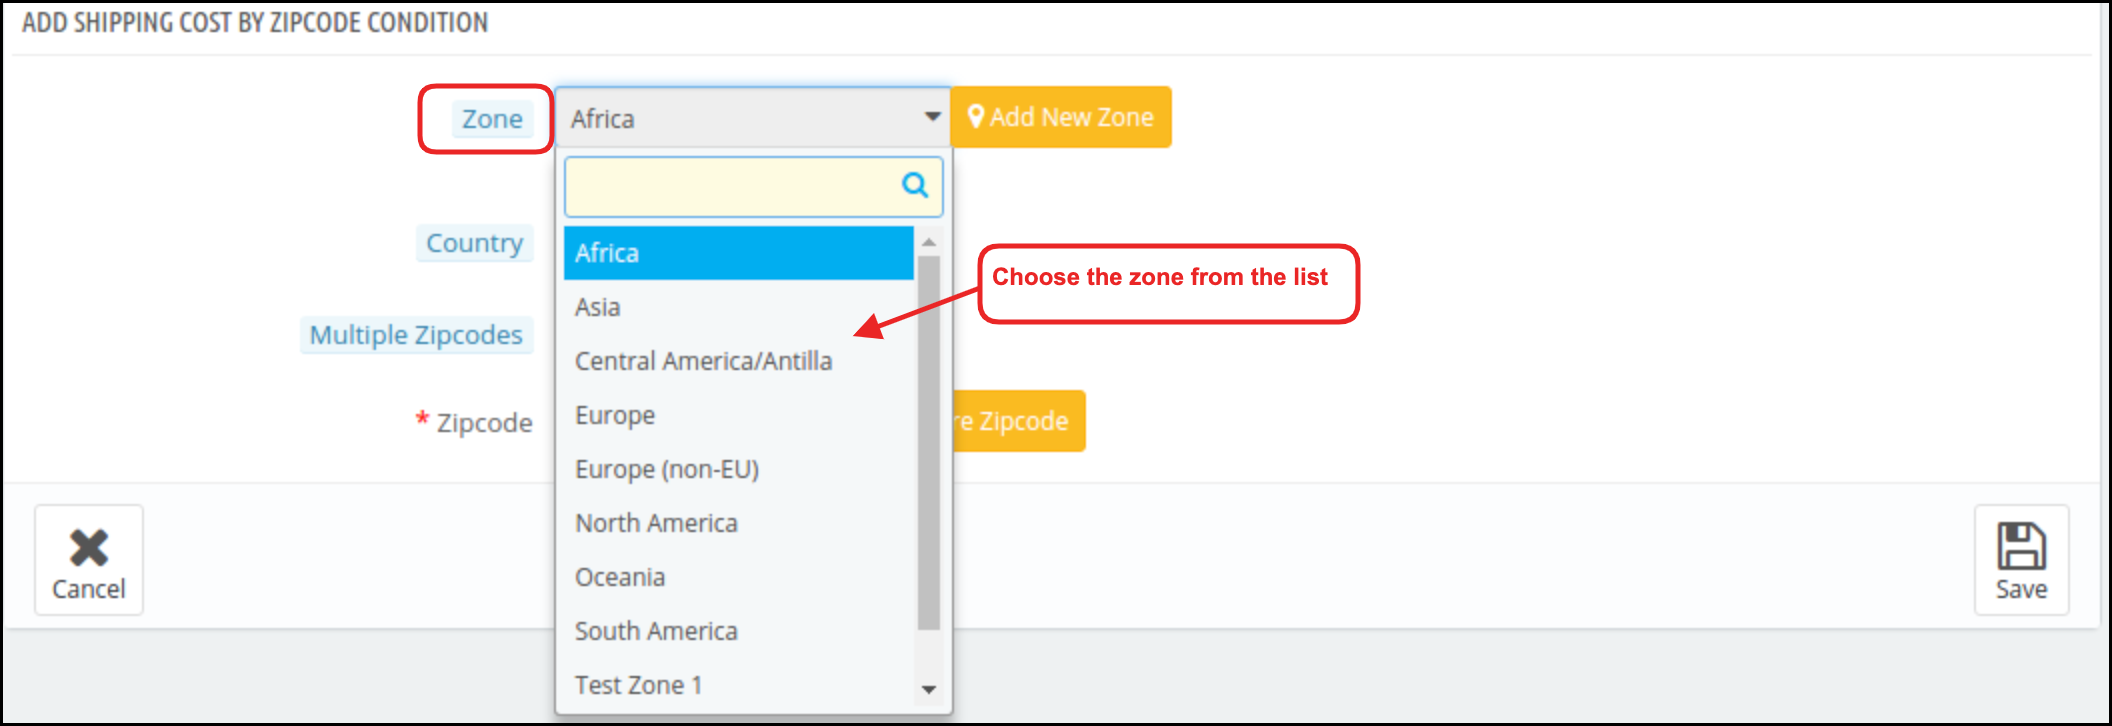
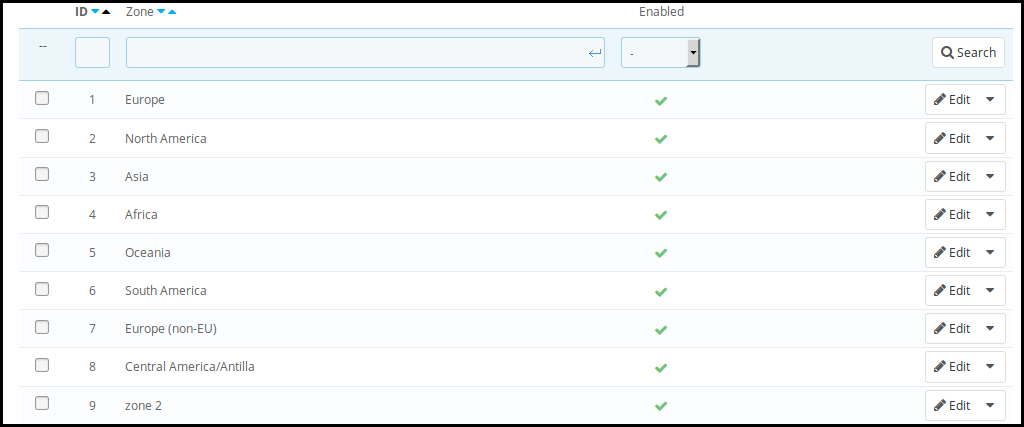
Zone: The various zones already created on the store will be shown in the drop-down list. The Prestashop store admin can select anyone and make the necessary changes.
In case, the admin wants to create a new zone, he can do so by clicking on the ‘Add New Zone’ option.
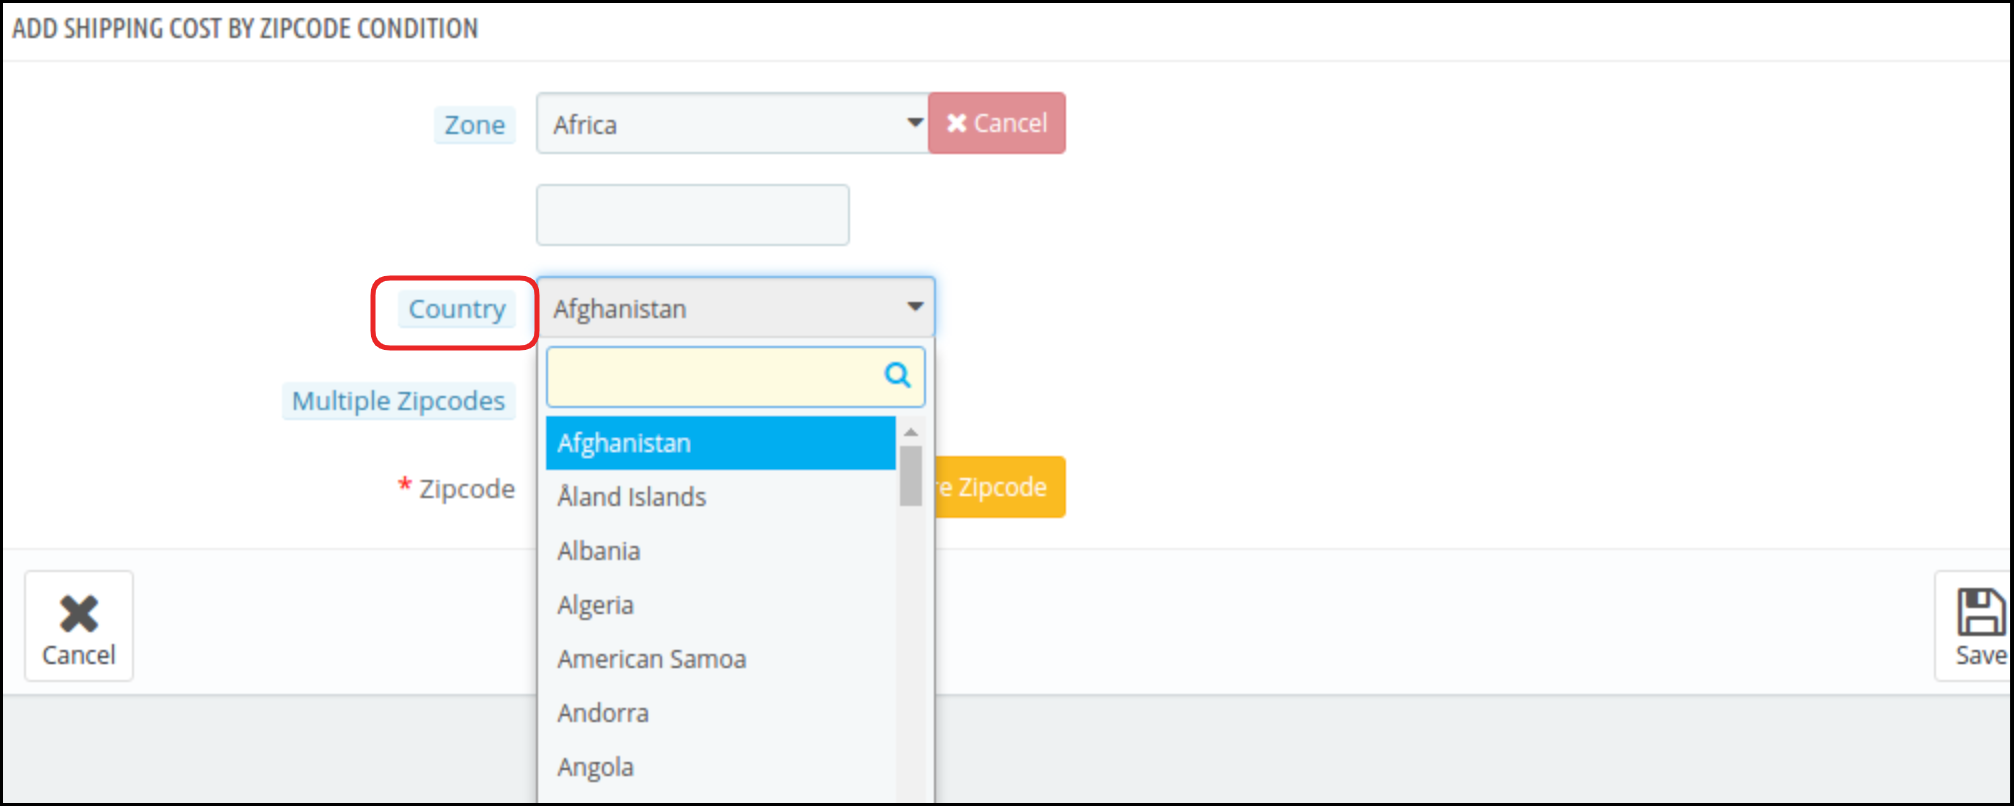
Country: The country for that particular zone can be selected from the list available.
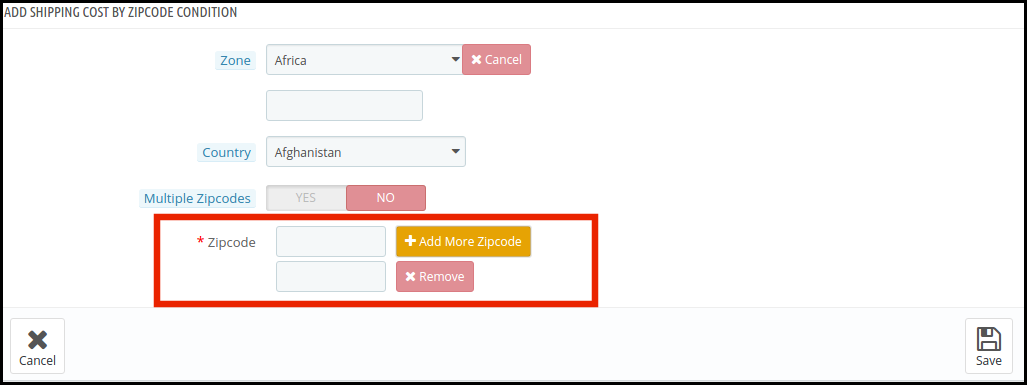
Zipcodes: A particular zone can have either have multiple zip codes. The Prestashop store admin can add the postal codes by clicking on the ‘Add More Zipcodes’.
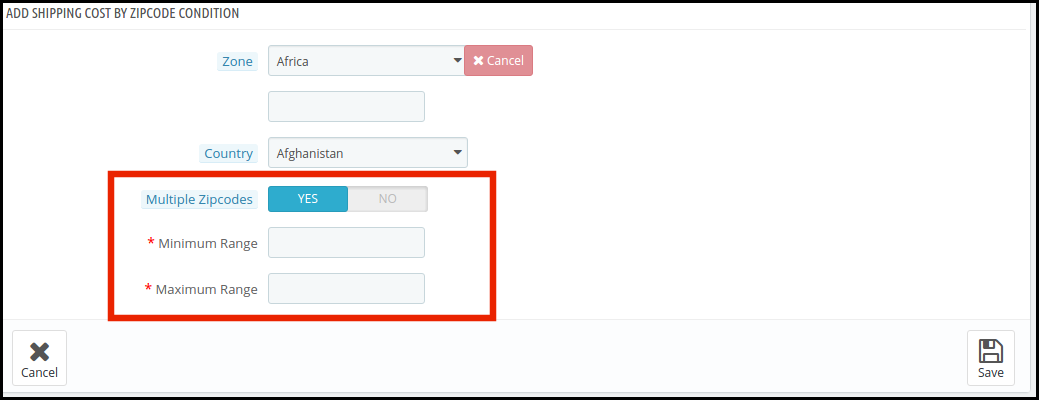
Multiple Zipcode: In case the eCommerce store admin is looking to add the range of the postal codes, he can do so switching this button on.
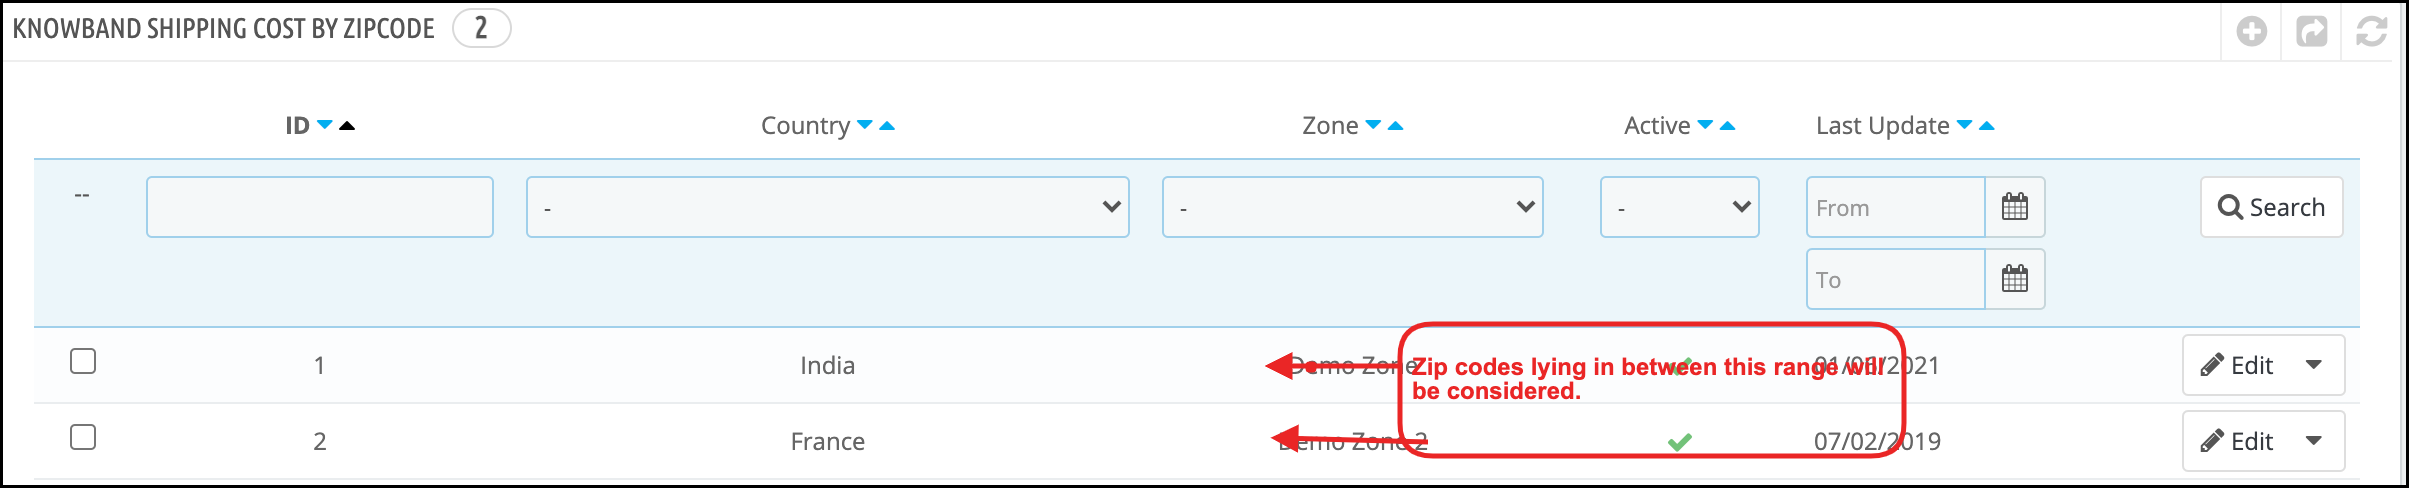
The Prestashop eCommerce store admin can then enter the minimum and maximum range of the postcodes. Any zip codes lying in between this range will be considered in that particular zone and the shipping charges will be calculated accordingly.
The list of the zones created can be viewed in the ‘Shipping Cost by Zipcode’ tab.
The exiting zones can be edited or deleted by clicking on the respective buttons.
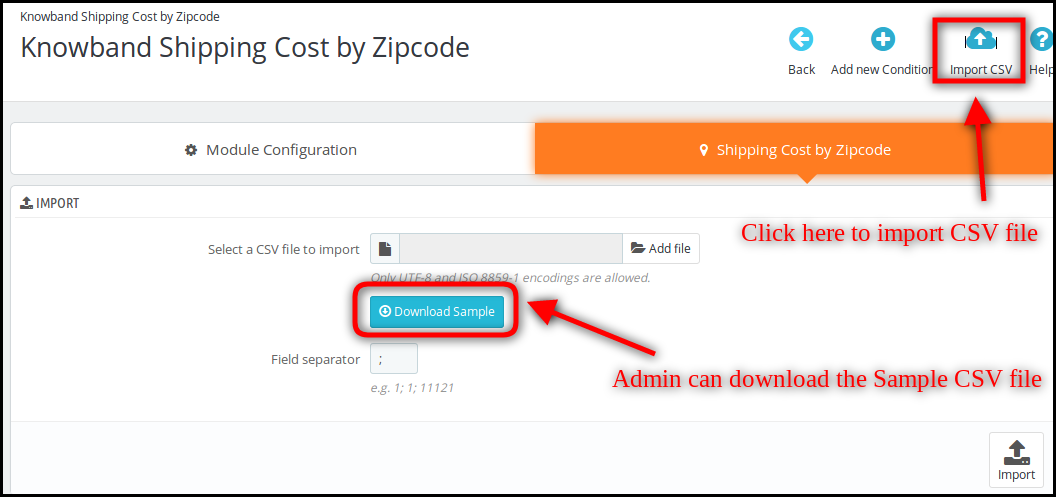
Import CSV:
The store admin can download a sample CSV file for adding multiple zip-codes. The admin just needs to click on the “Import CSV” option. The admin can download the sample CSV file.
Sample CSV File: There are three fields in sample CSV file ie.Country id, Zone and Zip Code.
The admin can enable or disable the zone from the admin panel.
After activating a particular zone the admin can insert the particular country ID and zip code easily. Thus the admin can easily enter multiple zipcodes at a time without any hassle.
3.3 How to enter shipping costs?
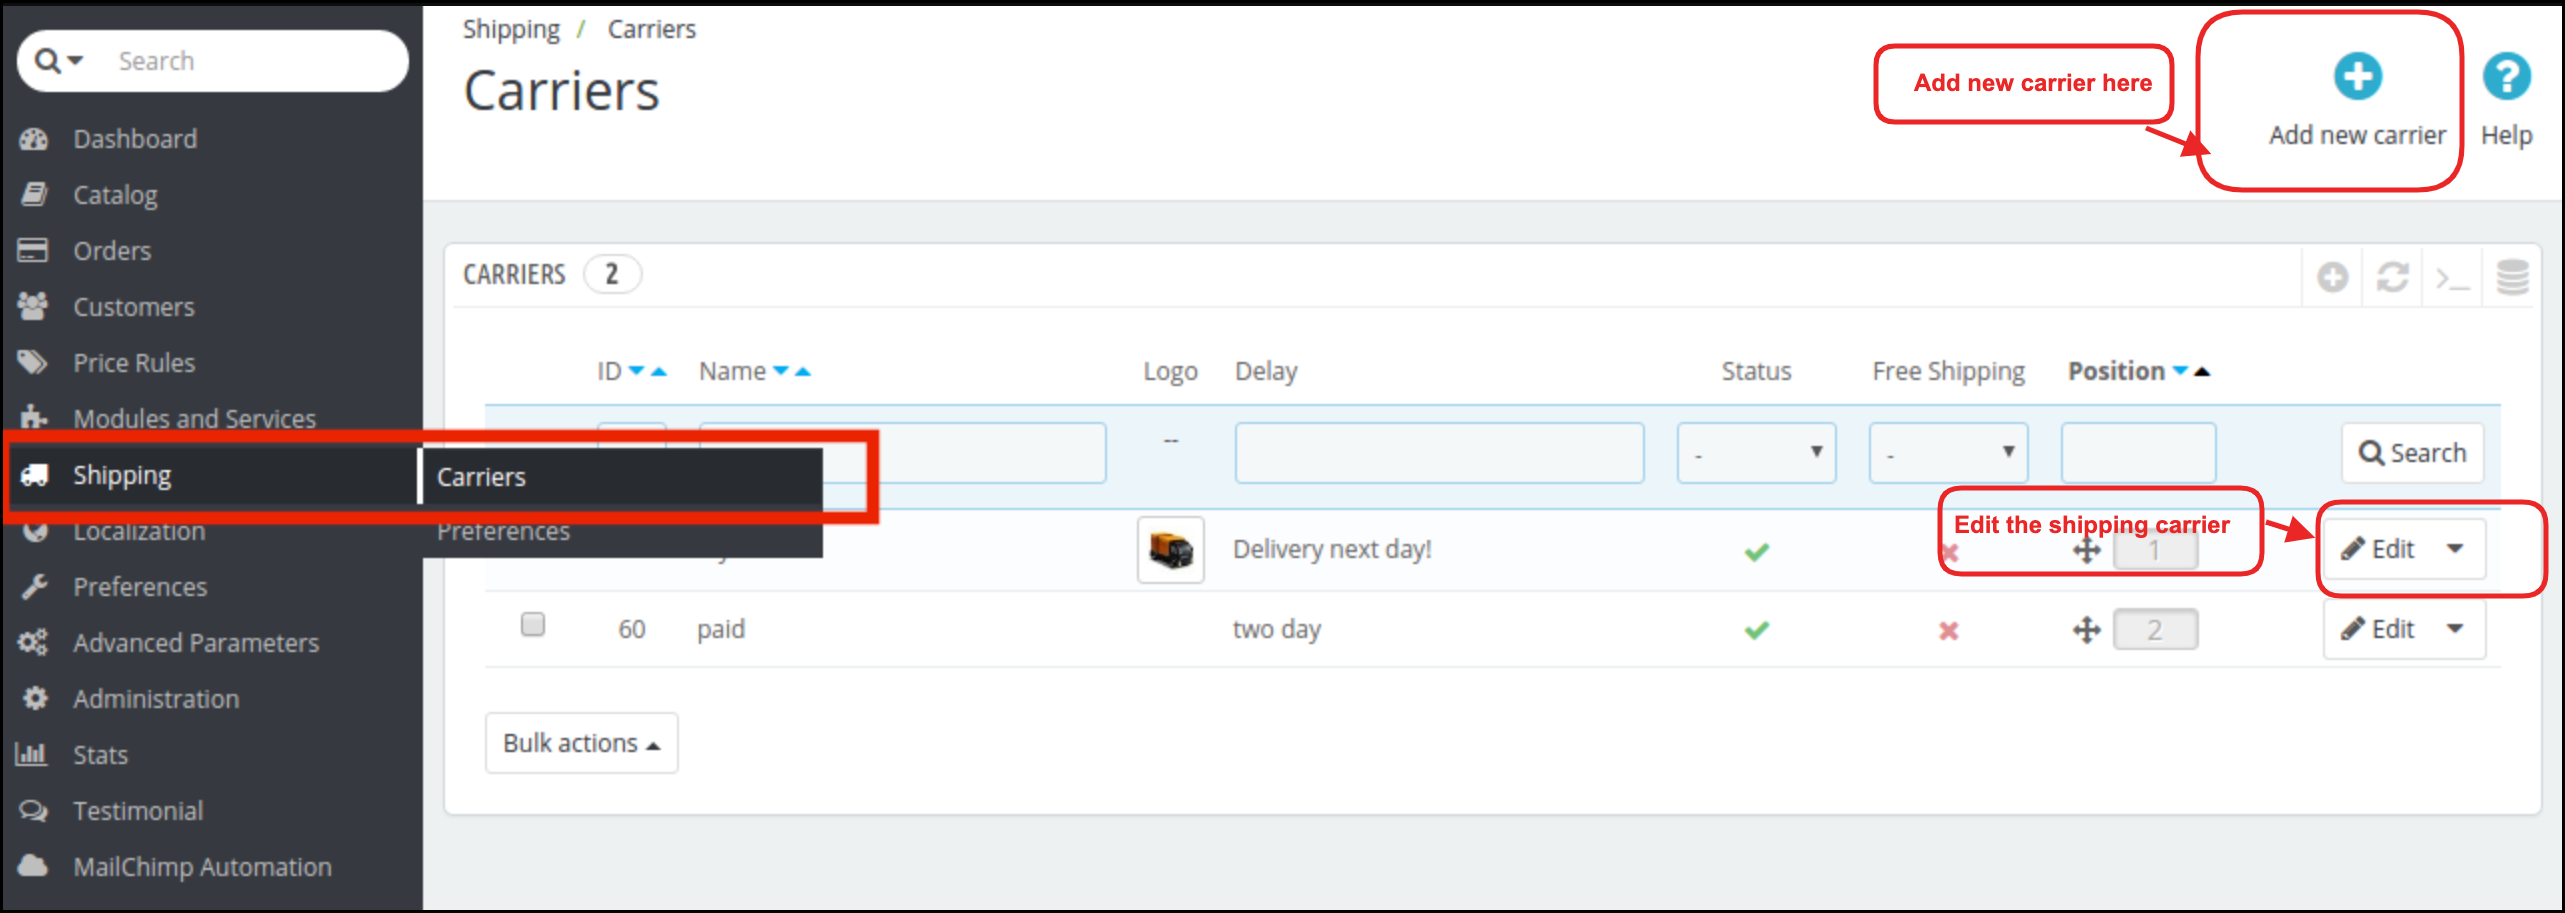
The shipping conditions can be fixed in the Shipping option of the main menu of the admin interface. Follow the below-mentioned root for the same.
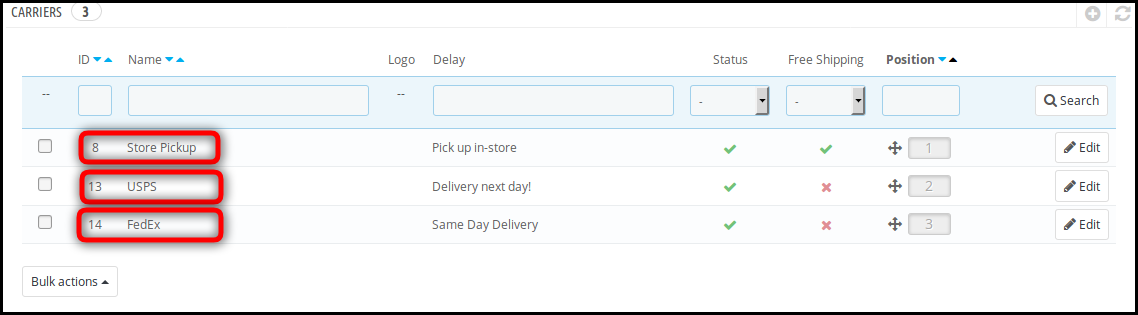
Go to the Main Menu -> Shipping -> Carrier -> Select the carrier option that you want to edit.
The admin can browse the ‘Edit’ option in order to make the necessary changes.
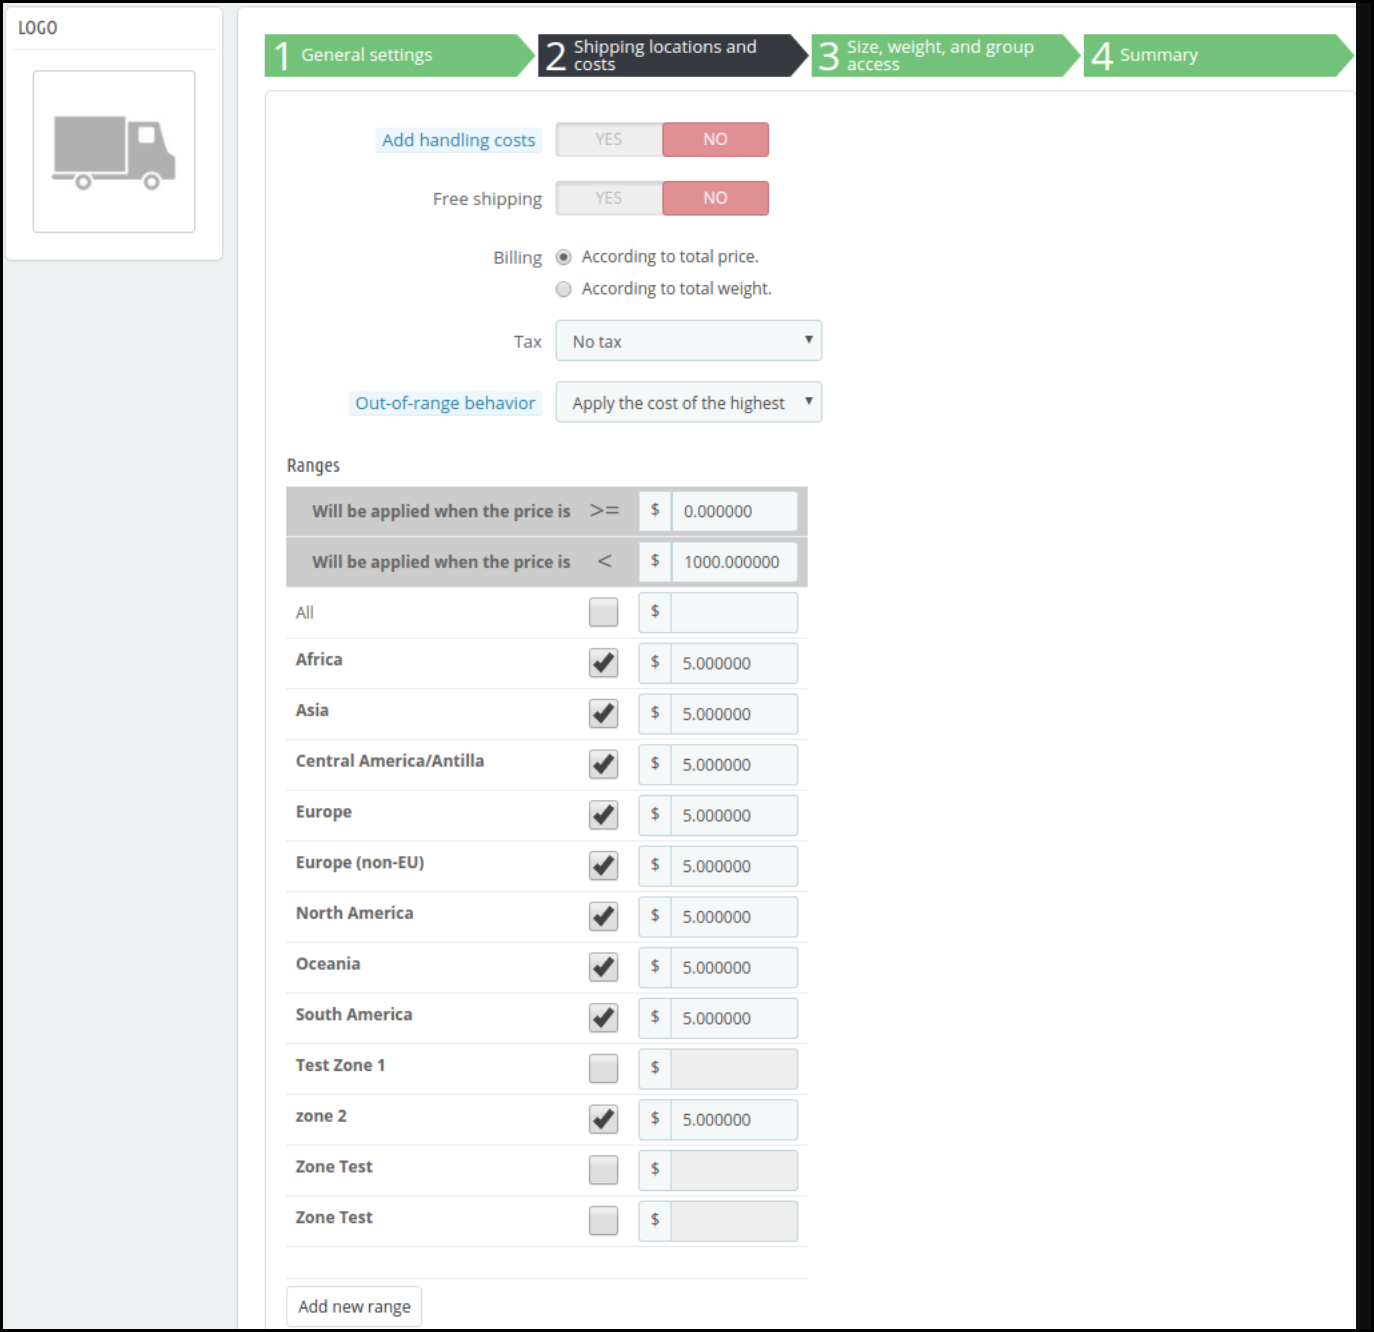
While the ‘General Setting’ and other options remain the same as per the store admin’s requirement, he can change the shipping cost based on the zipcodes. For this, he needs to go to the ‘Shipping Locations and Costs.
The Prestashop eCommerce store admin gets to optimize the shipping management by adding delivery cost for different regions. The shipping cost for the customers will then be calculated by taking all the aspects into account.
4.0 Website UI
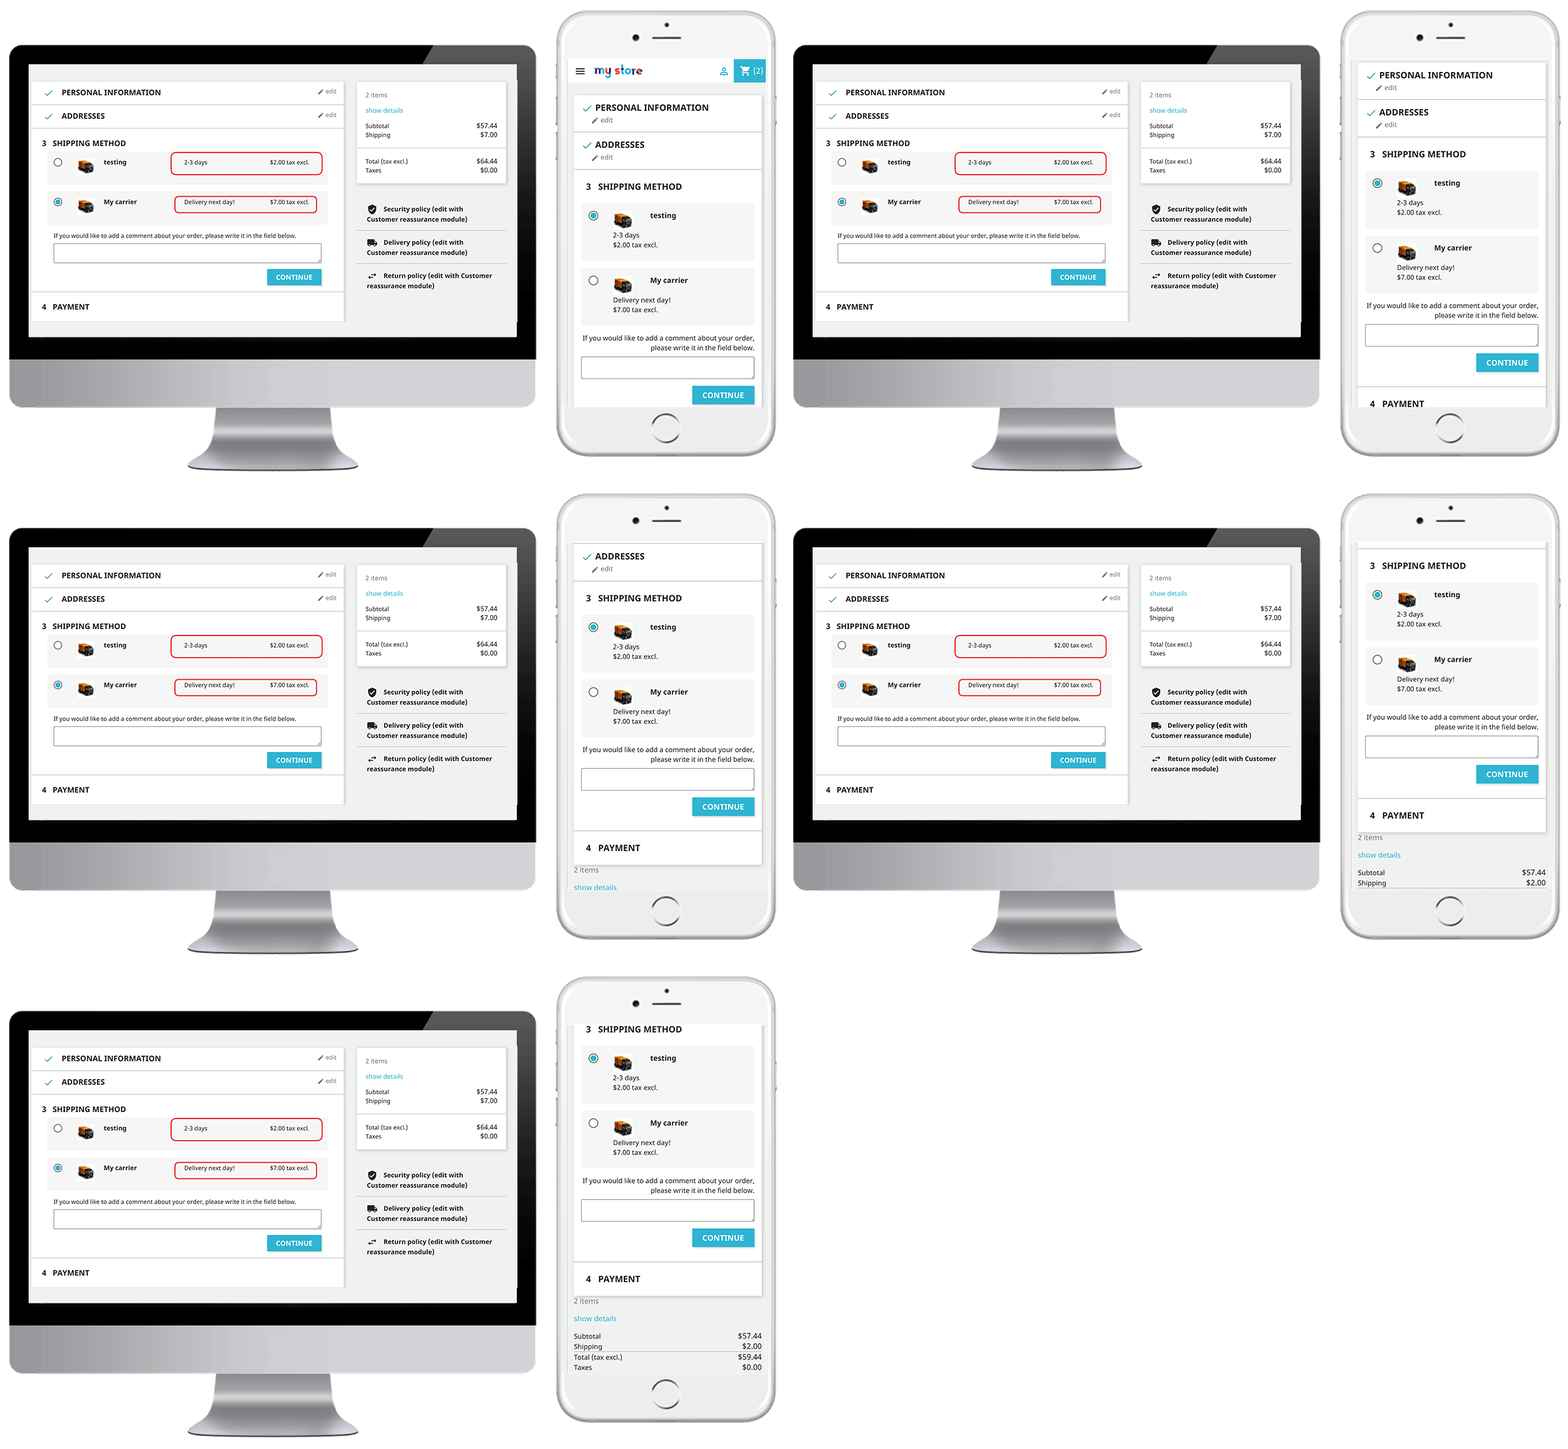
In the front-end of the eCommerce website, the customer can enter their postal code and the carrier option available in that location and the total shipping cost will be calculated and shown in the checkout page as shown in the image below:
This way, the online store merchant can implement Prestashop Shipping Cost by Zipcode addon for automatic cost calculation. The eCommerce store admin can manage the delivery cost as per the customer’s area Pincode. The Prestashop Shipping Cost by Zipcode module allows the online store admin to segregate customers location into regions, countries, zones and area pin codes. The online store merchant can also include tax and handling fee in the shipping charges if he wishes to add it. The Prestashop Shipping Cost by Postal Code module allows the store admin to offer services and products all over the world by simplifying the shipping cost calculation process. After a successful setup, the Prestashop delivery cost by postcode addon automatically calculates the shipping cost on the checkout page.
For additional guidance, please refer to the tutorial video available below, which provides a step-by-step walkthrough of this module.
There are many aspects to manage the online business like: marketing strategy, social media optimization, email marketing- the list goes on and on. Present time most of the online merchants offering free shipping to their customer & they see the result free shipping generates more sale. Knowband offers you a Prestashop Free Shipping Manager Addon.
The Knowband Prestashop Free Shipping manager addon allows the admin to offer free shipping to the customers. Not just this, the admin can even apply shipping charges when the cart value is below a certain limit. All this can be done following few simple customization option at the back end of the admin interface of the module.
The shipping charges are determined by two factors. They are listed below:
The cart value or the total price of the order: The store admin can determine the shipping charges as needed when the cart value of the shopper is below a certain limit. This limit can be set by the store owner himself.
The total weight of the order: The store admin can even charge shipping amount when the weight of the parcel exceeds beyond a certain permissible limit.
1.1 Benefits of Merchant
The Prestashop free shipping manager addon is aimed at making it easier for the store owner to manage the shipping cost of their website. Listed below are some of the objectives that can be achieved by the Prestashop extension:
Terms & Conditions: It allows the store owner to set the terms and conditions for the shipping of the eCommerce store. The admin can offer free shipping or charge an amount as per his wish.
Free Shipping by Price: It allows the store owner to set the price of cart value below this price admin won’t be allowed the Free shipping by price.
Free Shipping by Weight: It allows the store merchant to set the minimum and maximum limit of the weight of the package below this weight they can charge the shipping cost.
Free Shipping by Zone: It allows the PrestaShop admin to select the country where they want to offer free shipping by zone.
Free Shipping by Carrier: It allows the owners to select the carrier option which his/her want to provide the free shipping option.
Look and Feel Settings: In this option admin can change the background color, button color and border color of the free shipping block.
Customer Selection: In this option, Prestashop store merchant can select the customer according to the need.
The Free shipping comples customer to add more product to the shopping cart.
These Prestashop addons motivate customers to spend more time on your website and your customers will feel in control of what they’re spending on.
1.2 Benefits of Customer
This Prestashop Free Shipping manager module shows a block on cart summary which gives the exact information about the condition.
This Prestashop Free Shipping manager extension gives them access to a customer to buy the product with free shipping.
2.0 Installation
After purchasing the Prestashop Free Shipping manager addon, you will get following files as listed below in the apk folder:
freeshipping.zip (contains source code of the module)
User Manual
In order to install the extension in your Prestashop store follow the below mentioned steps:
Unzip the freeshipping.zip file. It would contain a number of files and folders as shown below
Copy the entire content, that is, the files and folders of the unzipped folder. Paste the same into the “Modules” folder of your store’s directory. Follow the below-mentioned address path – Root Directory/modules/.
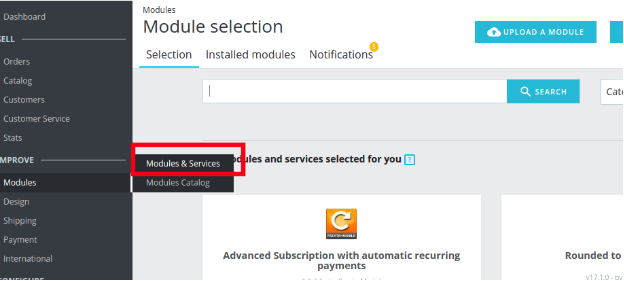
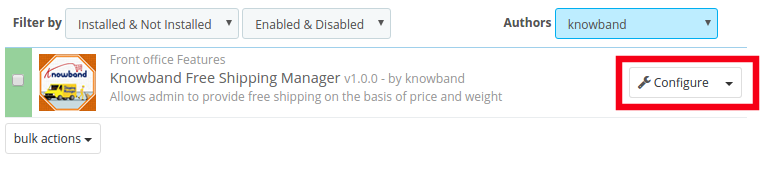
The plugin is all set to be installed in the store. Go to the Store Admin and then to‘Modules and Services’. Your module will be shown as below –
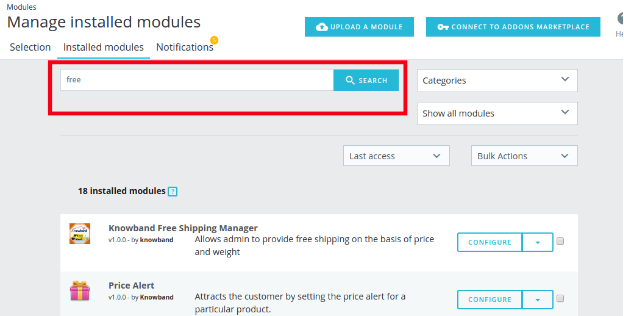
In case, you are not able to find module in admin modules list, you can do so by searching for it with the details mentioned below-
Keyword – Free Shipping
Category – Front office
Filter By – Installed & Not Installed / Enabled & Disabled
Click on the “Install” button just next to your module. It would show a pop-up for your confirmation. Click on “Proceed with the installation” option. This step will install the module and show notification – “Module(s) installed successfully”.
Once the installation is complete, you can get an access to the admin interface of the module by clicking on the “Configure” button.
3.0 Admin Interface
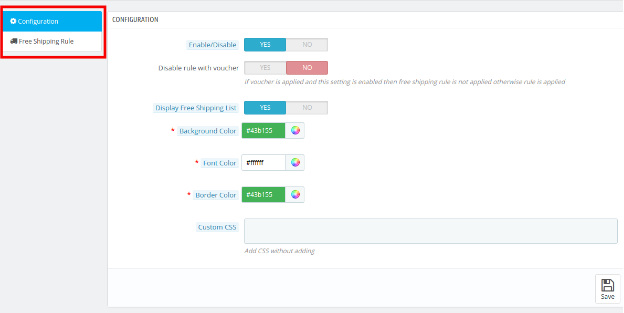
The Prestashop Free Shipping Manager addon is fully configurable. The best thing is the configuration settings can be updated via the admin interface by just clicking the buttons. No code changes are required for the same. The admin interface of the extension has two customization options. They are listed below:
1- Configuration
2- Free Shipping Rule
These options are discussed in detail below:
3.1 Configuration Settings
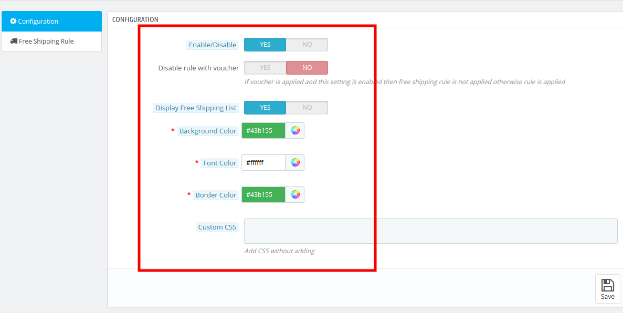
The ‘configuration’ tab of the Prestashop Free Shipping Manager extension offers the seven options to admin that are shown on image below:
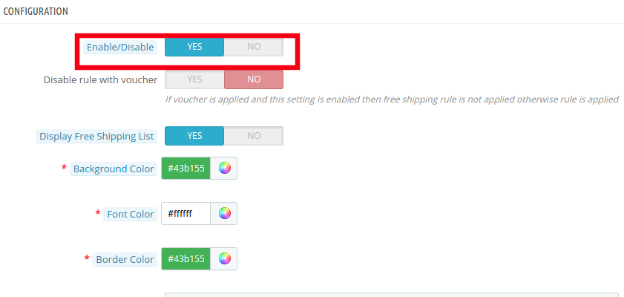
3.1.1 Enable the module: In this section admin can enable/disable the module. This can be done with a button toggle as shown below.
Listed below are some of the options that are offered to the store owner by Prestashop Free Shipping Manager Module.
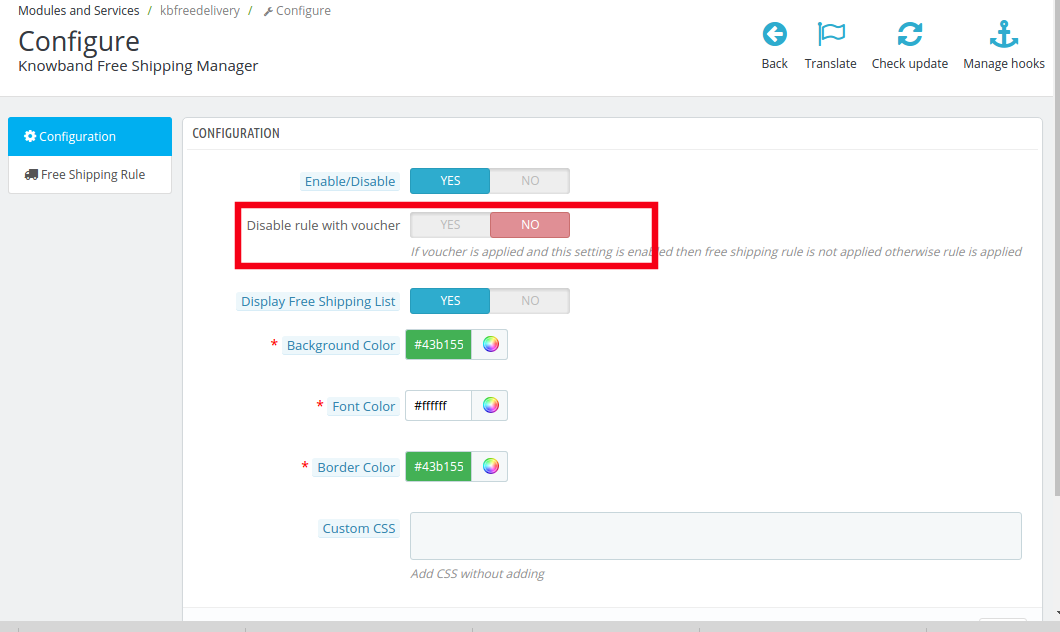
3.1.2 Disable Rule With Voucher
Once this setting is disabled, the free shipping offer will not be applicable even when the voucher is applied.
As it is disabled, the free shipping rule will not be applicable if the voucher is applied on any purchase.
In case, you want to offer free shipping even if any voucher code is applied, then, you can do so by enabling the button.
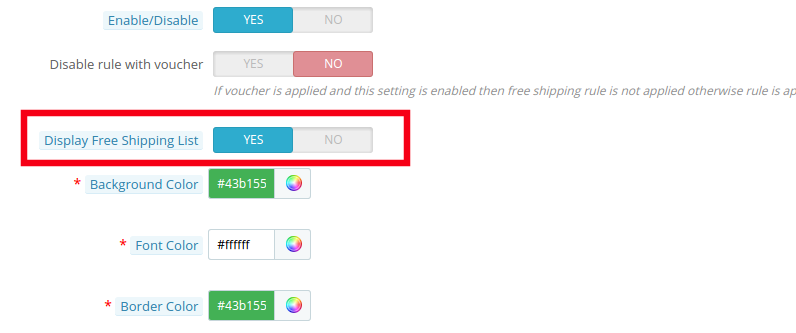
3.1.3 Display Free Shipping List
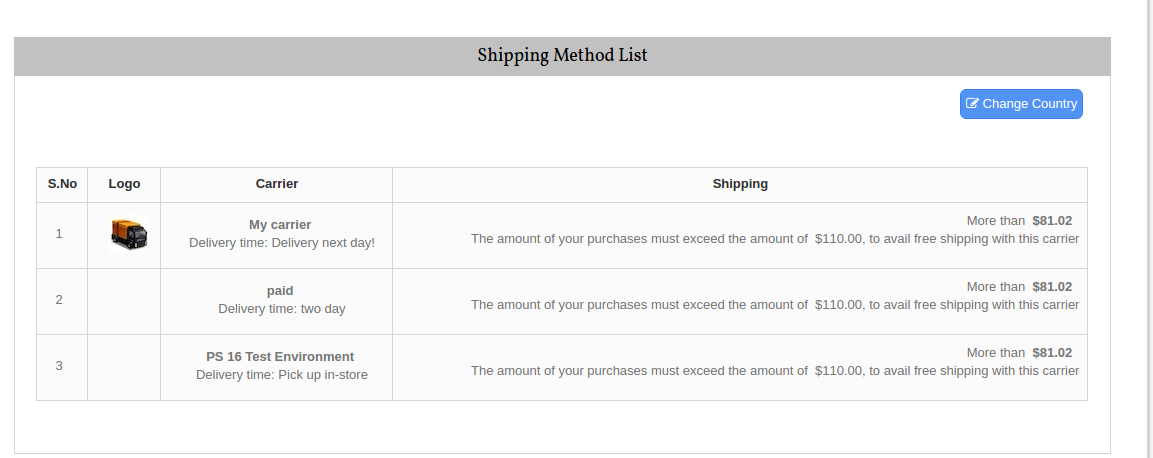
The various free shipping methods can be displayed to the visitors on the website. The list will be shown as mentioned in the image below.
However, if the Prestashop store admin wants to remove the feature, he can do so by disabling the button mentioned below.
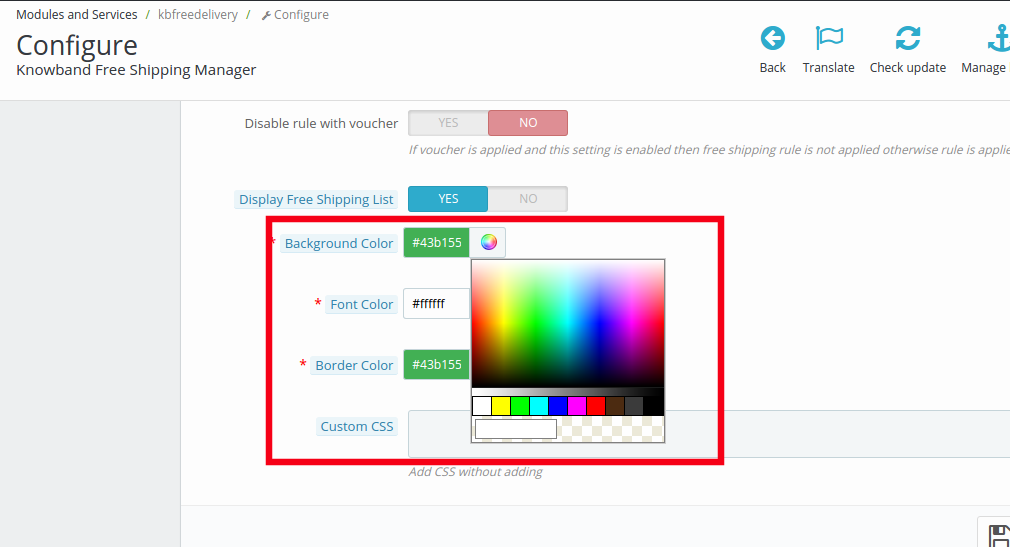
3.1.4 Background Color
The color picker can help you change the background color of the free shipping display.
You may the color that suits the theme of your Prestashop store.
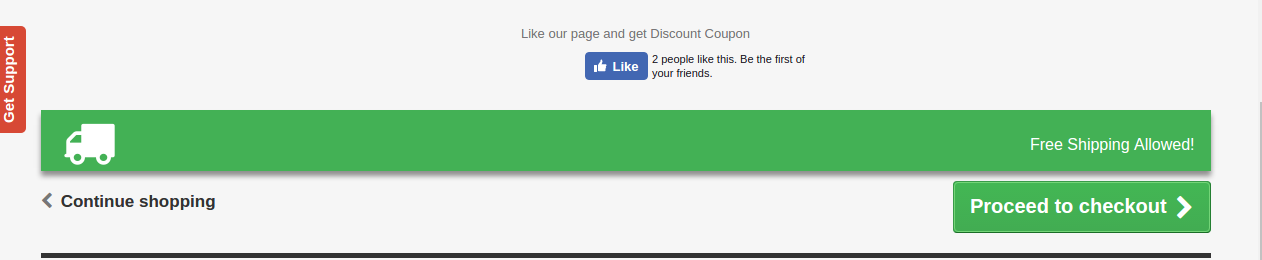
The message will be displayed in the front end of the website as shown in the image below.
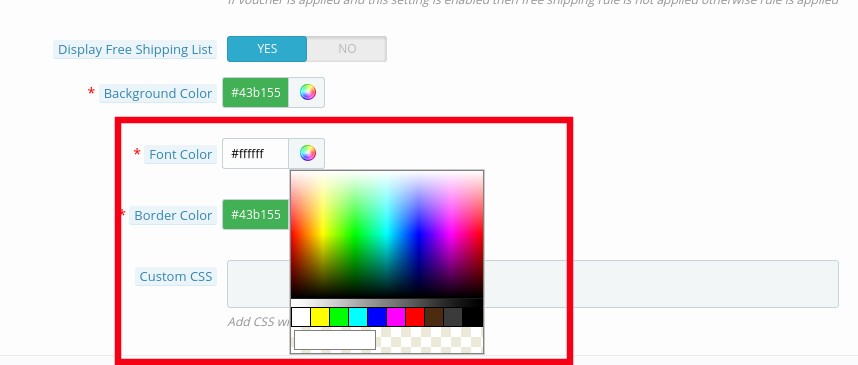
3.1.5 Font Color
The font color of the message that is to be flashed on the website can be picked and set from here.
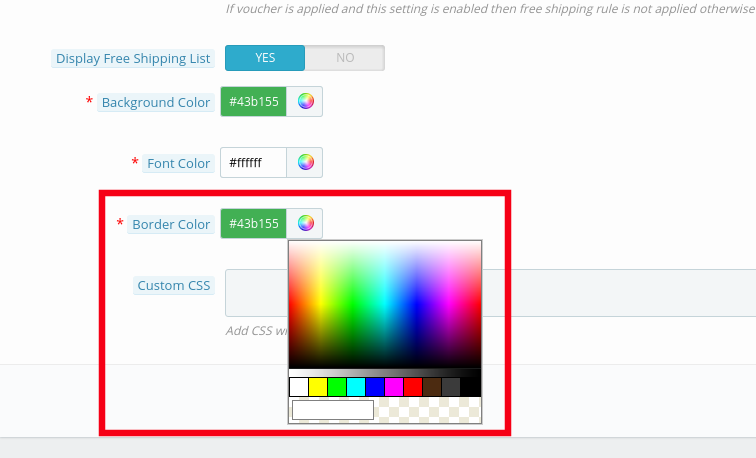
3.1.5 Border Color
The entire block can be customized as per the requirement of the website. The border color of the box can be selected and changed from color picker as shown in the image below.
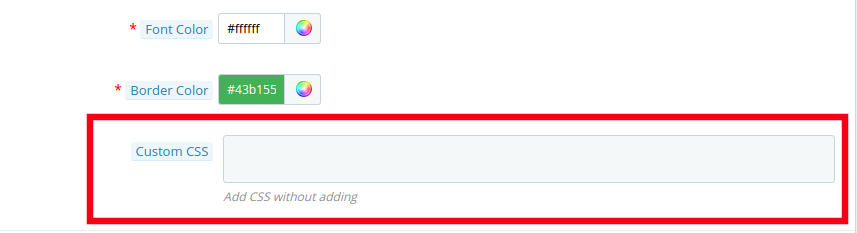
3.1.6 Custom CSS
Any custom change in the look and feel of the module can be done from here. The store admin can customize it by entering custom CSS code in the block shown below.
3.2 Free Shipping Rule
The online merchants get full access to change and modify the terms and conditions of shipping method on their website. All this can be done by just filling up few information.
Follow the steps mentioned below in order to make the changes:
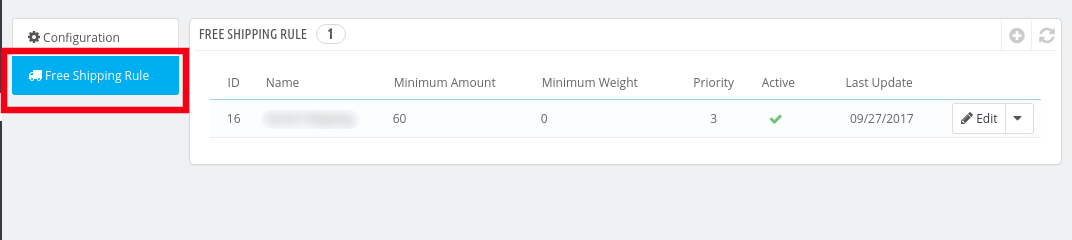
Go to “Free Shipping Rule”. You’ll be redirected to the interface where you will get the list of the rules already fixed by you.
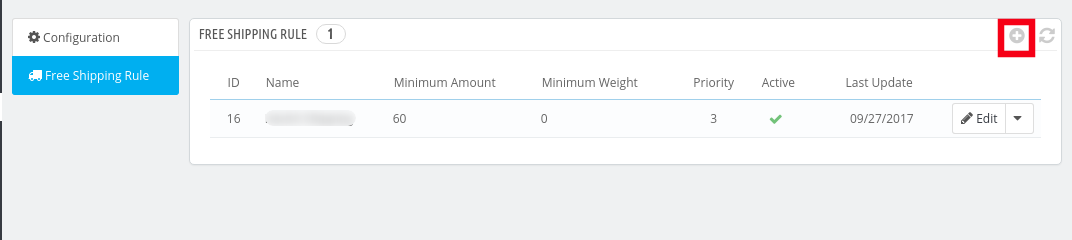
In order to add new rules click on the ‘+’ sign on the right end of the page as shown in the image below:
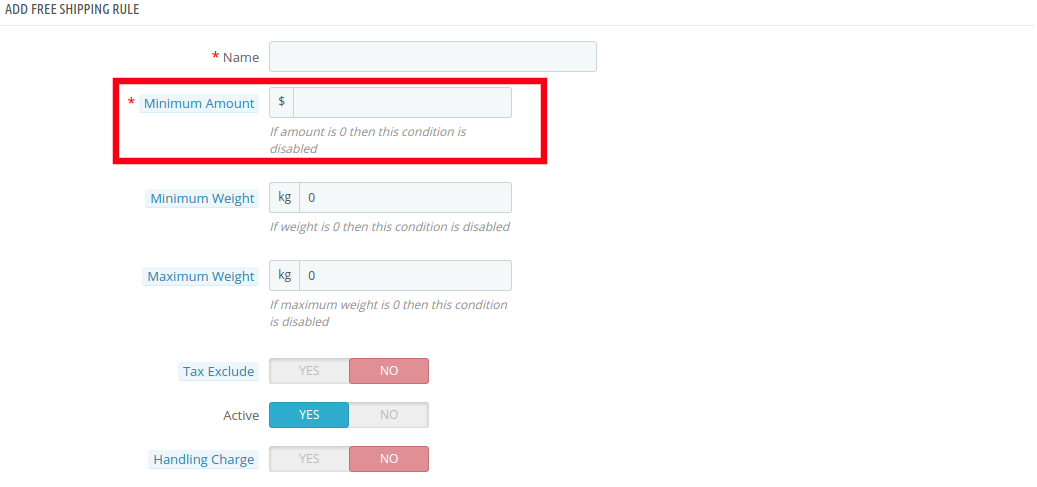
You’ll be redirected to “Add Free Shipping Rule” page.
Listed below are some of the information that you need to enter in order to set the free shipping rules.
Enter the Name: Enter the name of the shipping rule. It can be anything as per your convenience.
Minimum Amount: Enter the minimum cart value at which you want to offer the free shipping by price options. This facility will be disabled at the store if the minimum amount is ‘0’.
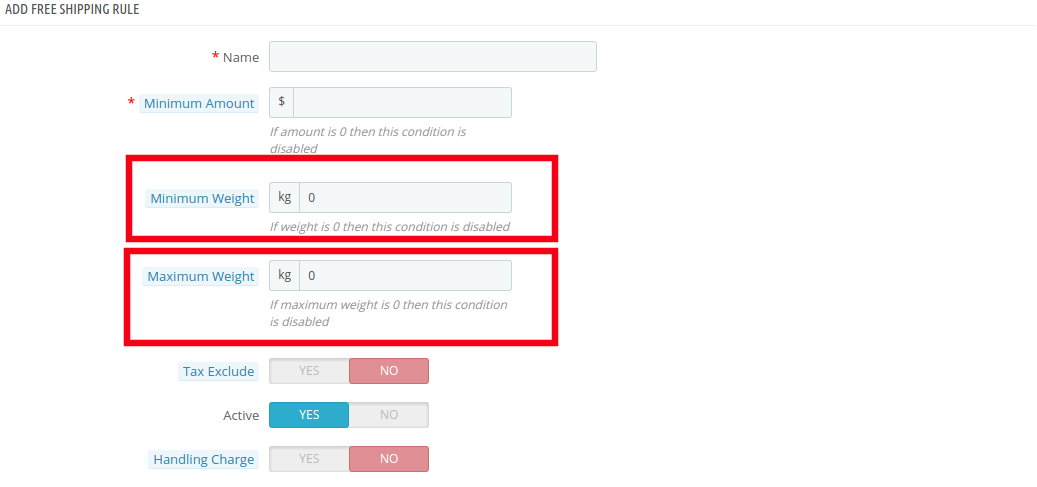
Minimum Weight and Maximum Weight: Set the minimum and maximum weight of the parcel beyond which you are looking to charge the shipping cost. Below this limit, the site will by default offer free shipping facility. The weight is to be entered in Kilogram.
Tax Exclude: You can include the tax or exclude it from the shipping charges by enabling or disabling the button mentioned below.
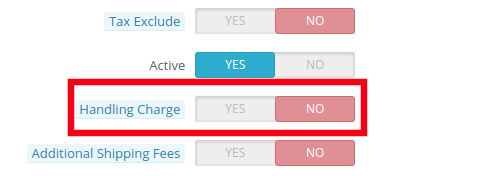
Handling Charge: The merchant can even include the handling charge in the shipping cost by enabling this button. Otherwise, he can leave it disabled.
Additional Shipping Charge: In case of any additional shipping charge, the store owner can enable the button shown in the image below.
Zone: The Prestashop Free Shipping Manager Addon even allows the store admin to set free shipping facility as per the geographical location of the customer. The admin can choose the zones where he wants to offer this facility and give the facility to customer to buy the products free shipping by zone.
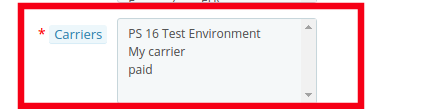
Carrier: In this section prestashop store admin can selectall the carrier options in which you would like to include this facility.
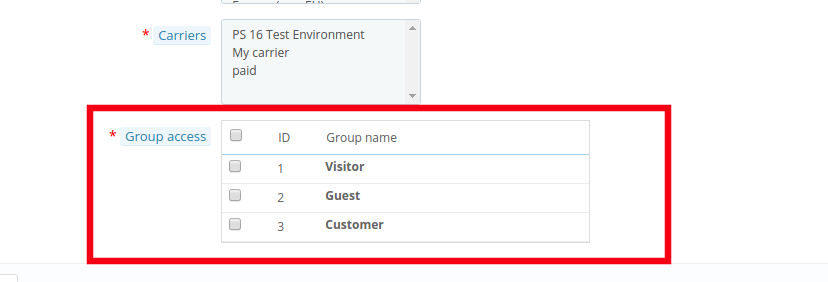
Group Access: The store admin can offer the free shipping facility to the Registered Customer, the Visitors or the New Customers as per his wish. Just check the options that you want to include in the feature.
4.0 Website UI
The changes done in the prestashop store back-end will be reflected in the front-end of the website.
4.1 Free Shipping Block
The free shipping block will be shown as mentioned below.
4.2 Free Shipping Limit
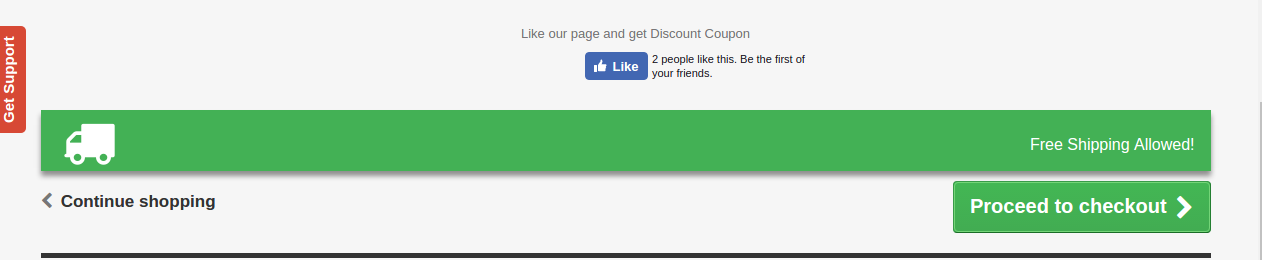
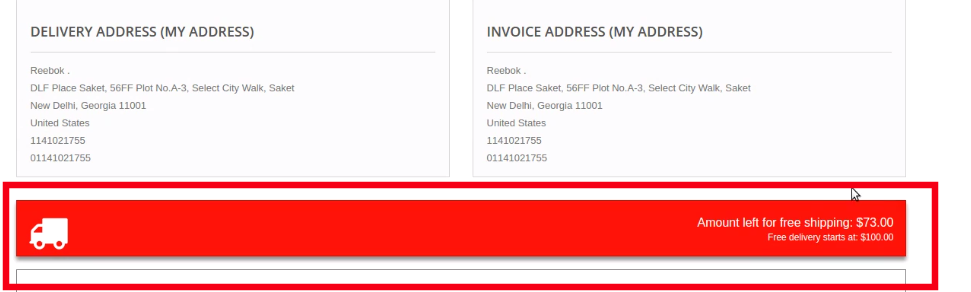
In case you have fixed any limit for the offering free shipping than the same will be shown on the cart of the shopper. If the customer select the product below the cart limit this block shows a block on cart summary which gives them the exact information on the condition to fulfill.
4.2 Free Shipping List Display
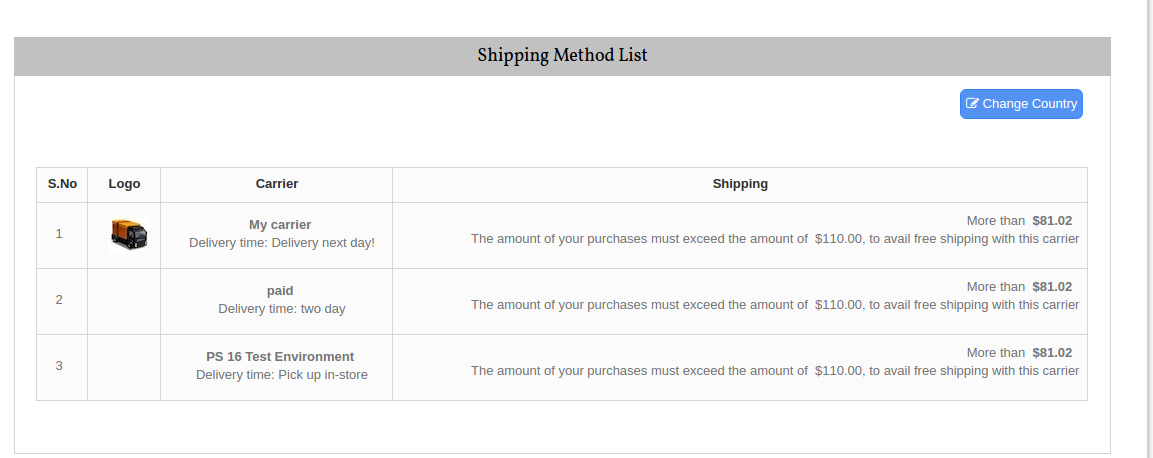
The entire list of the free shipping methods will be displayed on the website if the functionality is enabled by the store admin. This can provide a better user experience and ensure more transparency during the transaction.
Now you can try Prestashop free shipping manager module for on your Prestashop website. KnowBand Prestashop Free Shipping Manager Addon helps you enagege more customer to your store & increase the customer base.
1.0 What is Product Availability Check By Zipcode?
As you know that after finding a suitable product, the customer wants to know the availability of the same in a particular region.
By this Prestashop Availability Check by Zipcode Addon, the customer can check the availability of the product in a particular location using its Zipcode. This Prestashop zipcode validator will ease the work of the customers to check the availability of the product in any particular area before placing an order.
2.0 Product Availability Check By Zipcode
2.1 Introduction
This Prestashop Zipcode addon has a functionality through which the customers can check the availability of the products in a particular region.
The Prestashop Zipcode validator addon provides lots of enticing features which are as follows:
Prestashop zipcode addon allows the customer can check the availability of a product at any location using Zip-code.
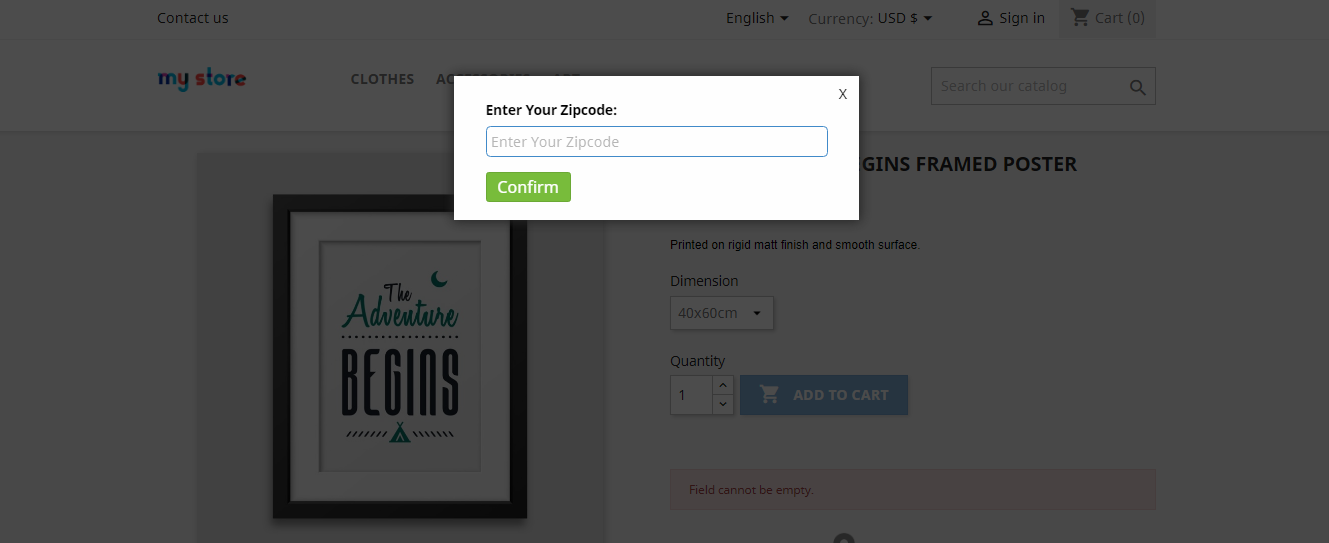
A popup will be displayed on the frontend of the PrestaShop store when the user visits the website.
With the help of this Prestashop zip code validator module, the admin can easily map Zones with Zip-codes by uploading a CSV file.
This zip code validator module offers the admin to easily map Zones with the Product by uploading the CSV file.
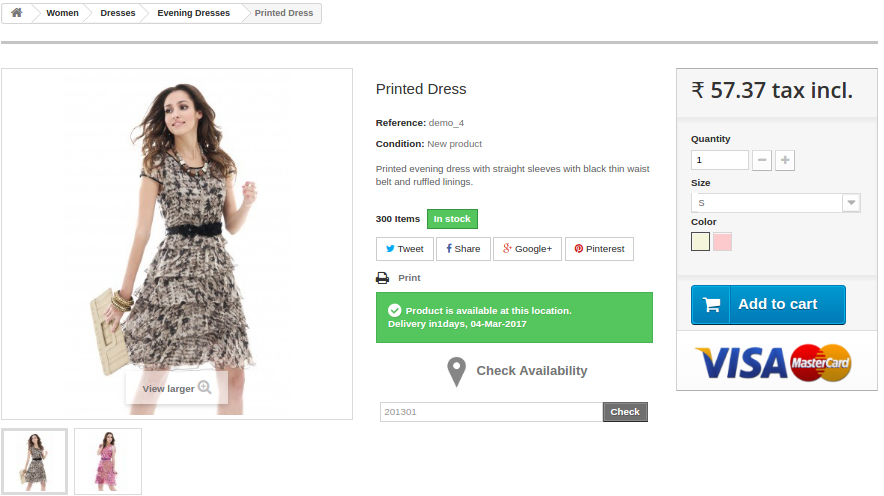
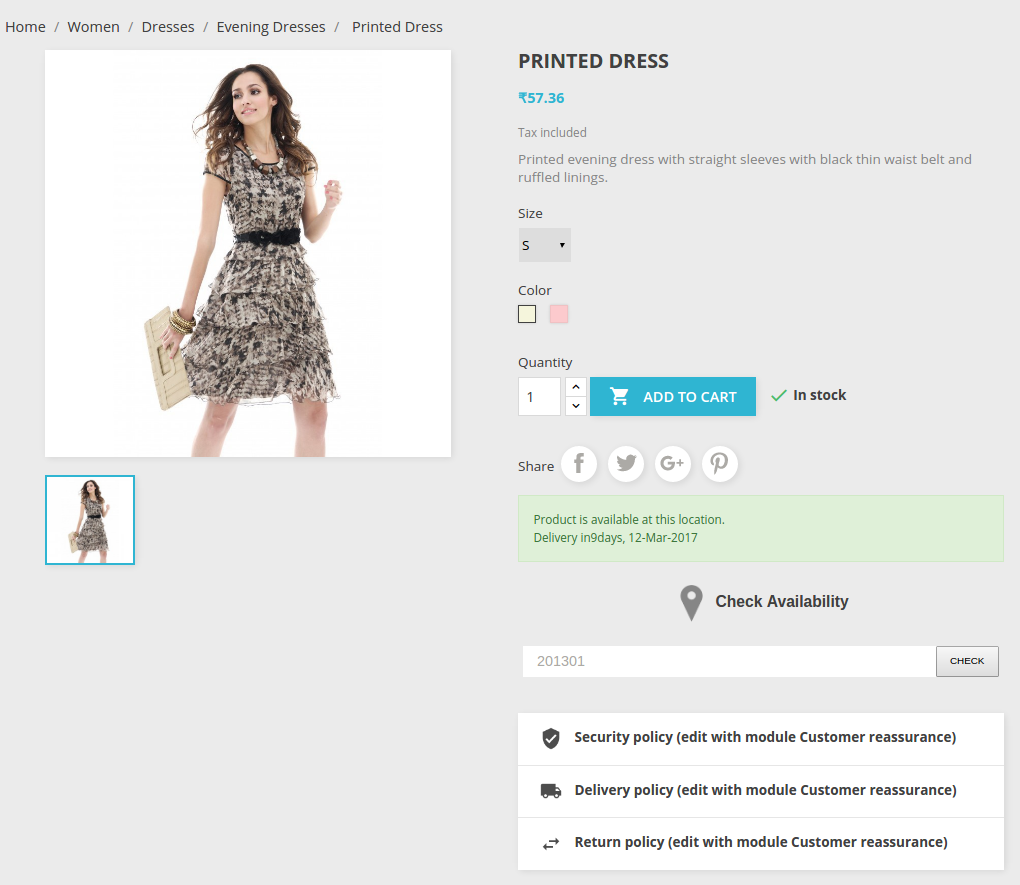
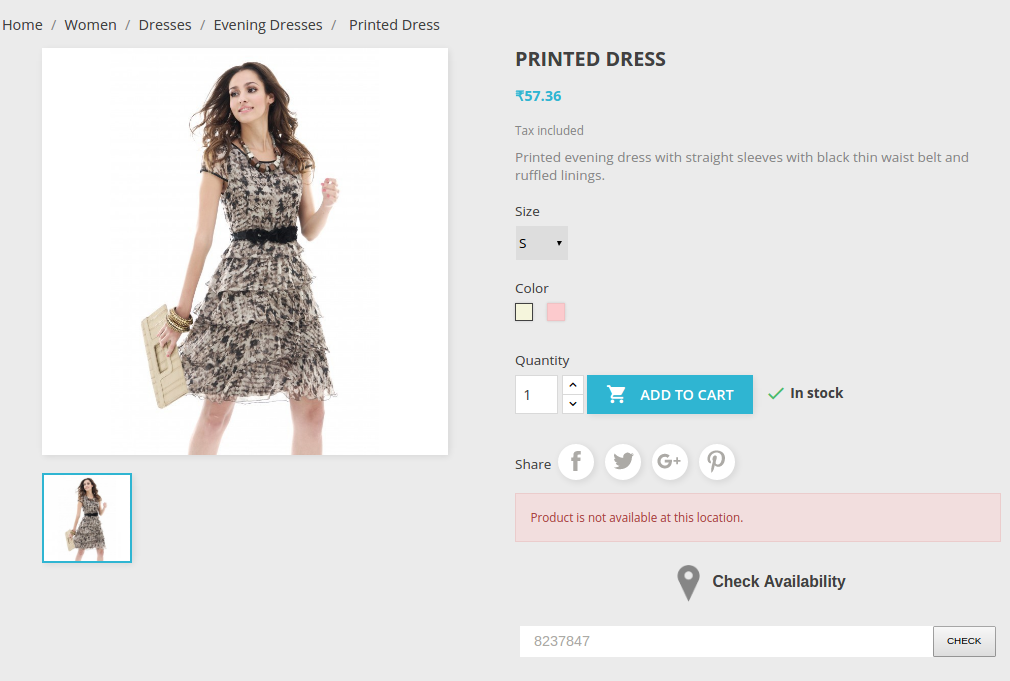
The Prestashop Product Availability module helps in displaying the Delivery date, Success message, and Failure message on the front end.
The product availability check PrestaShop module lets the admin Enable/Disable the availability of the product for a specific Zip-code at any time.
The product availability check by zipcode Prestashop module allows the admin to map multiple Products with multiple Zones.
This Prestashop Postal Code Validator module offers to add the multiple Zip-codes with Zones by comma separated values.
The Prestashop Postal Code Validator Addon provides the admin to search, delete, or even modify Zones.
The product zipcode validator module allows the admin to search, delete, modify Zip-codes.
The Prestashop product zipcode validator plugin offers the admin can search, delete Product-Zone Mapping.
This Prestashop Availability check by zipcode module allows the admin to add Custom CSS and Custom JS at Product Page of the front end to change the look and feel of the box.
Prestashop Product Postal Code Validator allows the admin to disable product availability check for specific products.
With autofill feature of Prestashop product zipcode validator, the user need not fill zipcode field for every product on the store. Once the zipcode is entered for a product, it will automatically show availability for every product they visit.
2.2 Installation Manual:
Follow the following steps for installing the Product Availability Check By Zipcode addon:
Download the Prestashop zipcode validator package.
Unzip the package in your modules folder of Prestashop setup via FTP manager (like Filezilla or WinSCP – download here).
In the admin Panel go to “Modules and Services> Product Availability Check By Zipcode >Install”.
Click ‘Configure’ to edit settings of this Prestashop zipcode module.
3.0 User Manual:
This User Manual will guide the the admin through the Module/Store Front settings of the Prestashop zipcode validator module and the various features of the Prestashop Product Availability Check By Zipcode Addon.
4.0 The Admin Interface:
After installation, when the the admin clicks on Configure, a screen will be displayed where he/she can configure general settings of this product zipcode validator module.
4.1 Configure Product Availability Check By Zipcode Setting:
Following are the steps to configure this Prestashop Zipcode module –
Go to Modules and Services.
Search module ‘Product Availability Check By Zipcode ’ .
Click on ‘Configure’ button.
Fields:
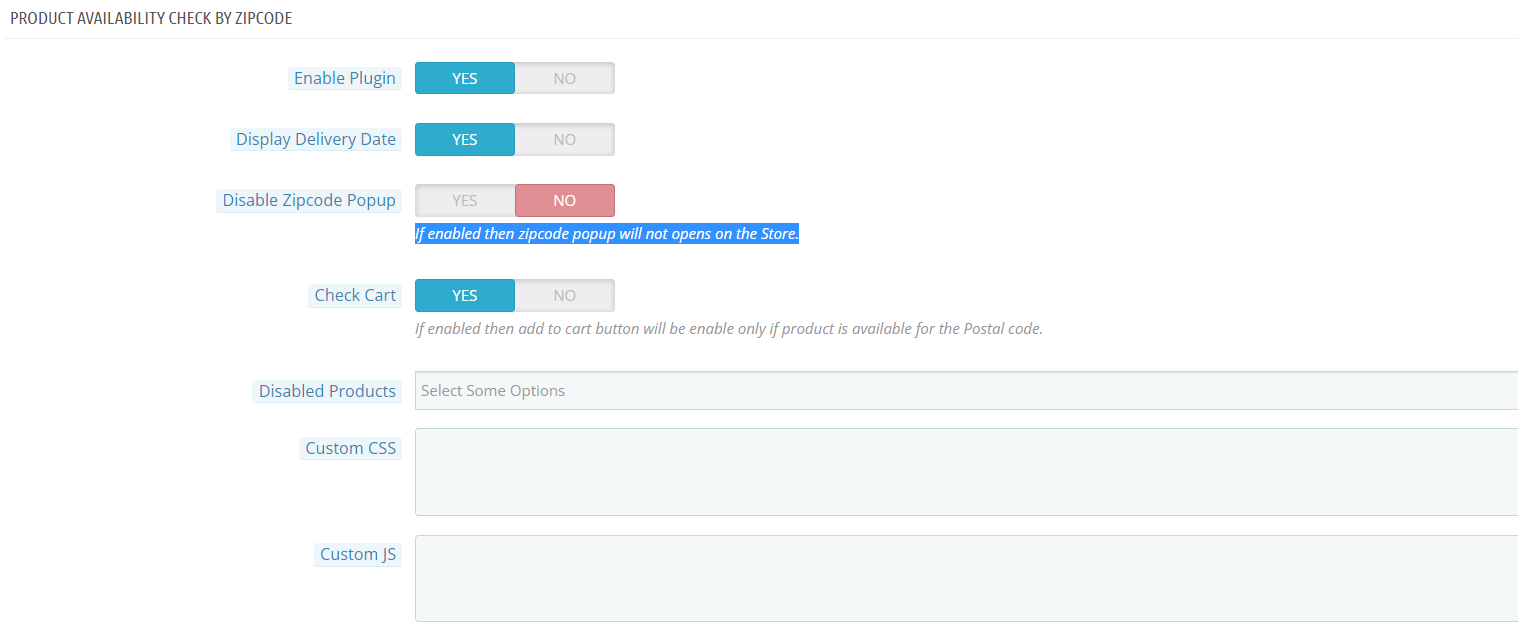
Enable: By default, this setting of the product availability check Prestashop module will be OFF. Whole Prestashop zipcode validator module functionality depends on this toggle button. When it is enabled, a text field to check product availability will be displayed on the product page on the front end of the product zipcode validator module.
Display Delivery Date: This field of the Prestashop Postal Code Validator Module is offered to the admin to display the delivery date of the products. The admin just needs to turn on the setting to display the delivery date. But, if he doesn’t want to show the delivery date, then he can set the toggle button on OFF mode.
Display Zipcode Popup – If this option is enabled then the module popup doesn’t appear on the front.
Check cart: Check cart feature restricts the visitor to go to the checkout page if any of the product is not available in the zip code entered by the customer in the address field.
Disabled Product: The store admin can restrict zipcode check functionality for particular products using this option.
Custom CSS: This field of Prestashop Prestashop product zipcode validator is offered to the admin to add custom CSS to the product page if required.
Save: By clicking this button, this Prestashop Zipcode module will save setting into the database and return back with success message.
4.2. Zipcode Availability Check:
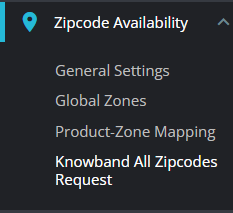
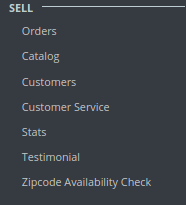
After installing the product zipcode validator module, a separate menu (named “Zipcode Availability Check”) will be added at the end of menu listing as shown below.
.
Figure 3.1 – Product Availability Check by Zipcode – Menu Tabs(1.6.x.x)
Figure 3.2 – Product Availability Check by Zipcode – Menu Tabs(1.7.x.x)
In this tab of the Prestashop zipcode validator module, there will be 3 sub-tabs described below.
4.3. Global Zones:
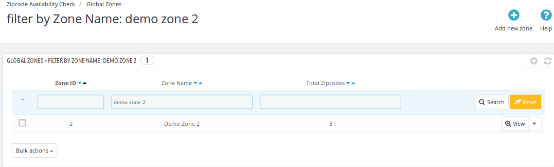
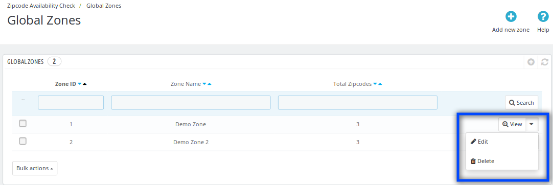
This tab of the Prestashop Postal Code Validator Addon contains the list of zones that are created by the the admin by adding new zones from ‘Add new Zone’ button appears at the top right of the page. The admin can perform operations like searching the zone, view a zone, delete zones, edit zones and add a new zone in the image mentioned below.
Following are the steps-
Hover on ‘Zipcode Availability Check ’ menu.
Go to ‘Global Zones ’.
Figure 4 – Product Availability Check by Zipcode – Global Zone
The image below would be displayed when the admin searches any zone.
Figure 5 – Product Availability Check by Zipcode – Search Global Zone
4.3.1 Add New Global Zone:
In this field of the Prestashop zipcode addon admin can add a new Global Zone and the image mentioned below will display when the admin clicks on the ‘Add New‘ button.
Following are the steps –
Hover on ‘Zipcode Availability Check’ menu.
Go to ‘Global Zones’.
Click on ‘Add new zone’.
Figure 6.- Product Availability Check by Zipcode – Add New Zone
Fields:
Availability: By default, this setting of the zipcode validator module will be ON/enabled. When the admin disables this button then the product will not be available at added zipcode location.
Zone Name: In this field of Prestashop Availability check by zipcode, the admin can define zone names according to his/her understanding.
NOTE: Zone name must be unique.
Zip-code: This is text-area Field. In this field of Prestashop product zipcode validator module, the admin can enter multiple Zip-codes here separated by the comma (,). Ex- 201301, 983923, 345453
Deliver By: This is the estimated day of product delivery. The Prestashop zipcode addon offers the the admin to configure the number of days of delivery. When the customer will enter the zip code, a message will be showen with the estimated delivery date.
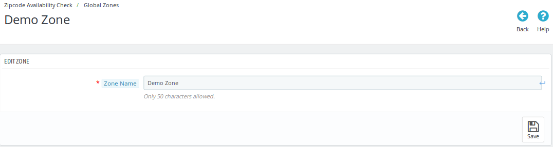
The image mentioned below will be displayed when the admin clicks on the ‘Edit‘ button.
Figure 7.2 – Product Availability Check by Zipcode – Edit Zone
Fields:
Zone Name: The Prestashop Postal Code Validator Addon offers the admin to define the zone names according to his/her understanding.
4.3.3. Delete Global Zone:
The admin can delete a particular Global Zone.
Following are the steps to Delete Zone –
Hover on ‘Zipcode Availability Check ’ menu.
Go to ‘Global Zones ’.
Click on ‘Delete ’.
Click on ‘OK ’.
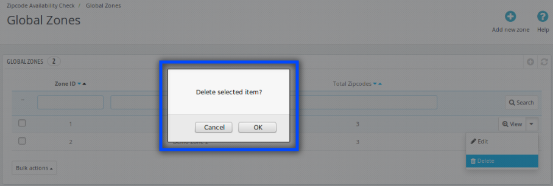
Note: If Admin delete a zone then all the zip-codes in that zone will also be deleted.
The image mentioned below will display when the admin clicks on the ‘Delete’ button.
Figure 8.1- Product Availability Check by Zipcode – Delete Zone
4.3.4. View Global Zone
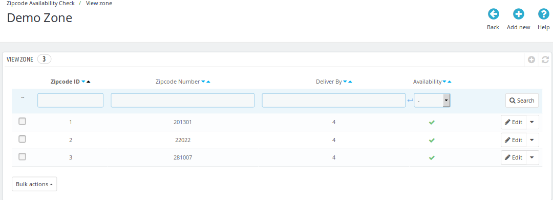
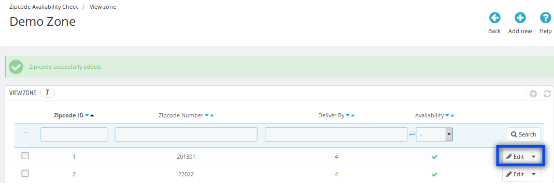
This field of Prestashop Product Availability module lets the the admin view a particular Zone by clicking on ‘View ’. Each zone contains a list of zip-codes with their number of days of delivery and availability status. The admin can perform the search, edit and delete operations in this list of the product availability check Prestashop module.
Following are the steps to View Zone –
Hover on ‘Zipcode Availability Check’ menu.
Go to ‘Global Zones’.
Click on ‘View’.
Figure 9 – Product Availability Check by Zipcode – Delete Zone
4.3.4.1. Add new Zipcodes:
In this field of Prestashop Postal Code Validator Addon, the admin can add more zipcodes in a particular Zone by clicking on ‘Add new’ button to a particular zone.
Following are the steps to add new Zone –
Hover on ‘Zipcode Availability Check’ menu.
Go to ‘Global Zones’.
Click on ‘View’ for a particular Zone.
Click on ‘Add new’.
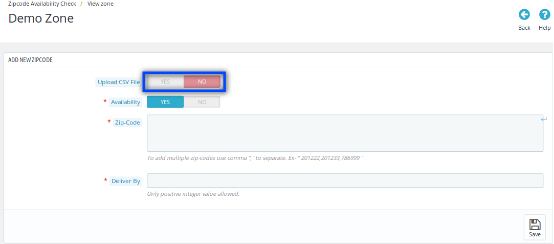
When ‘Upload CSV File’ option is Disabled:
Figure 10.1- Product Availability Check by Zipcode – Add new Zipcodes
Fields:
Availability: By default, this setting of the product availability check by zipcode Prestashop addon will be ON. When the admin disables this button, then the product will not be available at added zipcode location.
Zone Name: This Product Availability Check by Zipcode module lets the the admin define zone names according to his/her understanding.
NOTE: Zone names must be unique.
Zip-code: This is text-area Field. In this field of Prestashop Postal Code Validator plugin, the admin can enter multiple Zip-codes here by the comma (,) separated. Ex- 201301, 983923, 345453.
Deliver By: In this field of Prestashop product zipcode validator module, the admin can configure the number of days of the delivery.
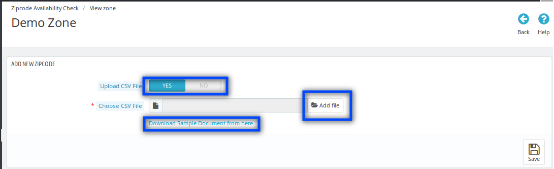
When Upload CSV File option is enabled:
Figure 10.2 – Product Availability Check by Zipcode – Add New Zone
Field:
Upload CSV File: By enabling this option of the Prestashop zipcode validator module, Choose CSV file Option with a link to download the sample ‘.csv ‘ file will be displayed.
Add File: In this field of Prestashop product zipcode validator module, the admin can choose the CSV file by clicking on Add file option.
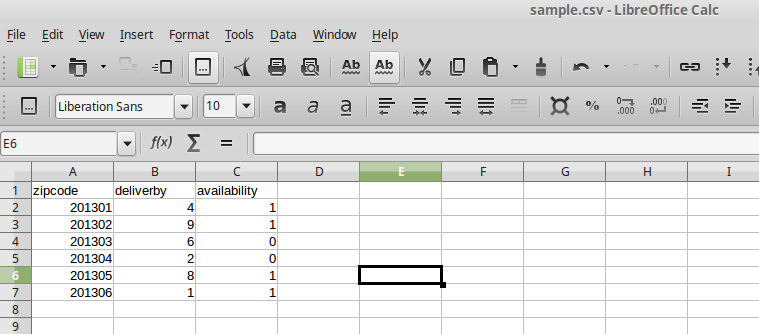
Download Sample Document from here: When the admin clicks on this link, this file will be downloaded.
Figure 11 – Product Availability Check by Zipcode – Download Sample (Add New Zone)
4.3.4.2. Edit Zip-codes:
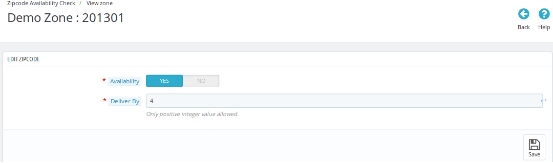
This Prestashop Product Availability addon offers the admin to edit the particular zip code. This can be done just by clicking on ‘Edit’ option of that particular zip code. The image mentioned below will be displayed when the admin clicks on ‘Edit’ button of a particular zip-code from ‘View Global Zones’ page.
Figure 12- Product Availability Check by Zipcode – Edit Zipcodes
Field:
Availability: By default, this setting of the product availability check by zipcode Prestashop addon will be OFF. When the admin enables this toggle button, then the products added to the ‘Product Details Tab’ will be available at this location. But if the admin sets the option to NO, then the product mapped to that particular zip code will not be available.
Delivery By: In this field of product availability check Prestashop addon, the admin can edit the day of delivery to that particular zipcode just by entering any positive integer value.
4.3.4.3. Delete Zipcode
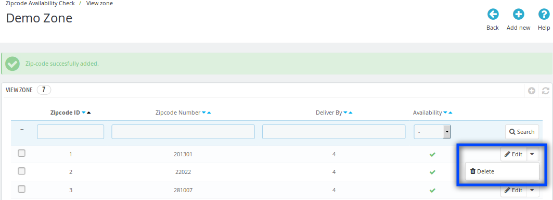
This Prestashop Availability check by zipcode allows the admin to delete a particular Zipcode.
Figure 13- Product Availability Check by Zipcode – Delete Button
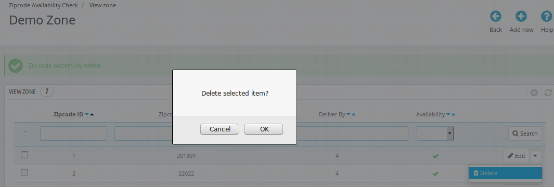
The image mentioned below will be displayed when the admin clicks on the ‘Delete‘ button of the zipcode validator module.
Figure 13.2- Product Availability Check by Zipcode – Delete Zipcodes
4.4. Product-Zone Mapping:
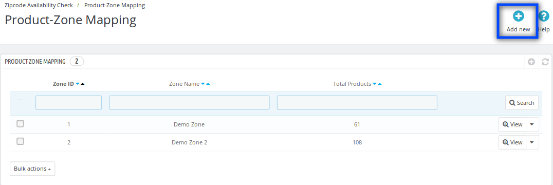
This tab of Prestashop Product Availability Check by Zipcode module contains the list of the zones which are mapped with some products. The admin can search, view, delete and can map (add) new Products with Zones.
The admin can view the products which are mapped to a particular zone by clicking on ‘View‘ button of the Prestashop Availability check by zipcode module.
Figure 14- Product Availability Check by Zipcode – Product Zone Mapping
4.4.1 Add new Product-Zone Mapping
When the admin clicks on ‘Add New’ button of the ‘Product-Zone Mapping Tab‘ then the image mentioned below will be displayed.
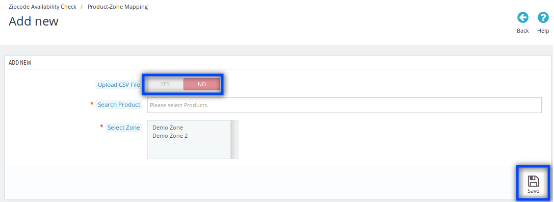
When ‘Upload CSV File’ option is disabled:
Figure 15.1- Product Availability Check by Zipcode – Add New Product Zone Mapping
Fields:
Upload CSV File: In this field of Prestashop zipcode addon, the admin can upload a CSV file to add the large number of Zip-codes.
Search Product: In this field of Prestashop Zip code addon, the admin can select and enter any searched product/multiple products.
Select Zone: This is a multiple-select drop-down. In this field of zipcode validator module, the admin can select zones from this drop-down.
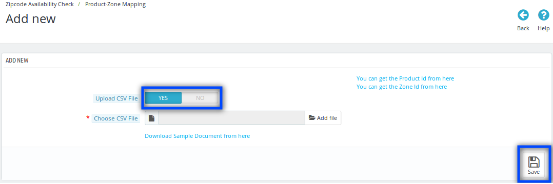
When Upload CSV File option is enabled
Figure 15.2- Product Availability Check by Zipcode – Add New Product Zone Mapping
Fields:
Upload CSV File: By enabling this field of the Prestashop Postal Code Validator Module, Choose CSV File option will be displayed with a link to Download Sample Document from here.
Choose File: In this field of product availability check by zipcode Prestashop addon, the admin can choose a file by clicking on Add File option.
Download CSV file format from here: In this field of Prestashop Product Availability addon, when the admin clicks on this link, file inside the image mentioned below will be downloaded.
Figure 16- Product Availability Check by Zipcode – Document Sample (Add New Product-Zone Mapping)
You can get the Product ID from here: In this field of Prestashop Zipcode plugin, when the admin clicks on this link the admin will be redirected to Products Listing Page of the admin panel.
You can get the Zone ID from here: After clicking on this link of the Prestashop zipcode addon, the admin will be redirected to Global Zones Page of the admin panel.
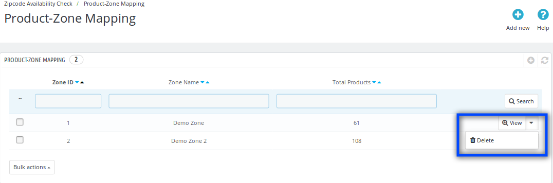
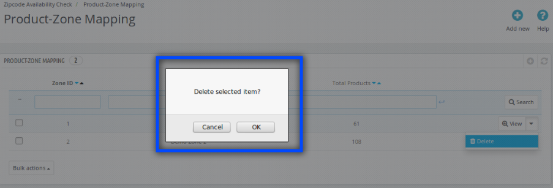
4.4.2 Delete Product-Zone Mapping
This field of zipcode validator module allows the admin to delete zone which is mapped with the products.
Figure 17.1- Product Availability Check by Zipcode – Delete Button
Following are the steps to Delete Zipcode-
Hover on ‘Zipcode Availability Check’ menu.
Go to ‘Product-Zone Mapping’.
Click on ‘Delete’.
Click on ‘OK’.
The image mentioned below will be displayed when the admin clicks on the ‘Delete’ button.
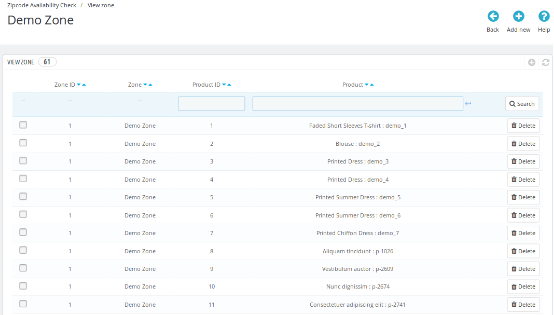
When the admin clicks on the View Button of the Prestashop Availability check by zipcode plugin, then the list of products mapped with that selected zone will be displayed. The admin can search and delete any product.
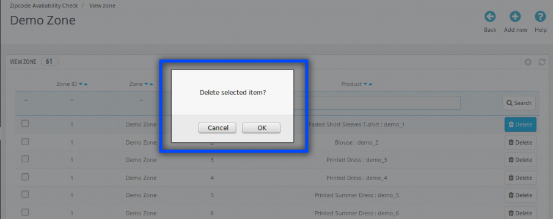
The admin can delete a particular product which is mapped to a zone.
Following are the steps to Delete Zipcode –
Hover on ‘Zipcode Availability Check’ menu.
Go to ‘Product-Zone Mapping’.
Click on ‘View’ for a particular zone.
Click on ‘Delete’ for a particular product.
Click on ‘OK’.
The image mentioned below will be displayed when the admin clicks on the ‘Delete‘ button.
Figure 19- Product Availability Check by Zipcode – Delete Product
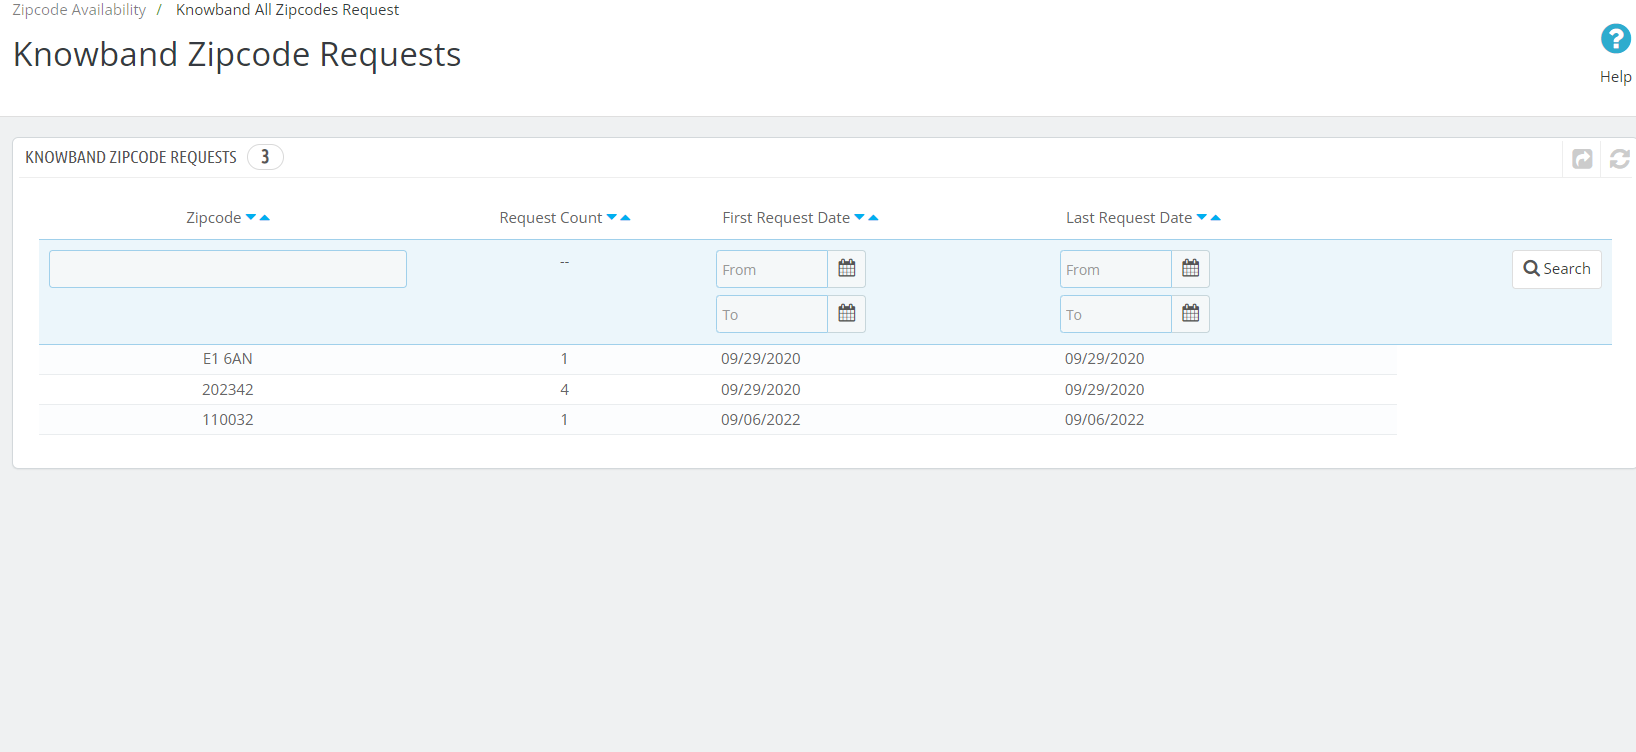
4.5. Knowband All Zipcode Request:
Using this option the Admin can see the product availability requested under the specific Zipcode area.
5.0 Front End Interfaces:
If the Prestashop zipcode validator module is enabled, then the customer can check the availability of a product in a particular location by entering the Zip-code of the region. The customer will see a popup on the screen when he/she visits the website as displayed in the picture below:
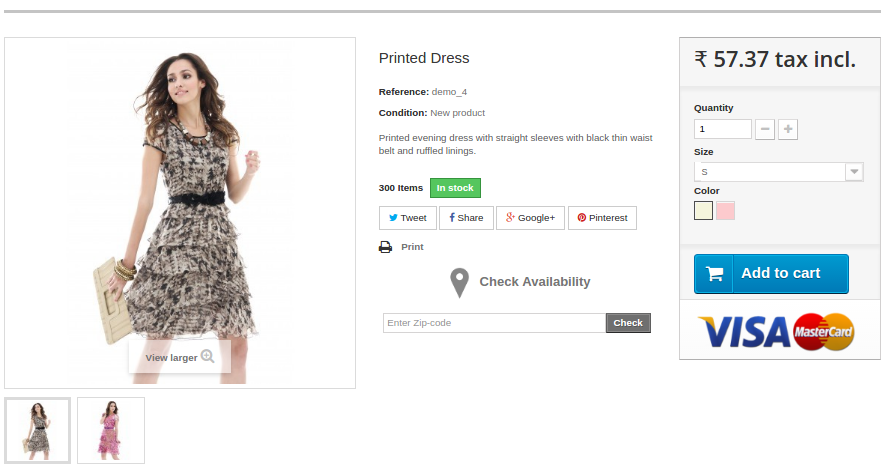
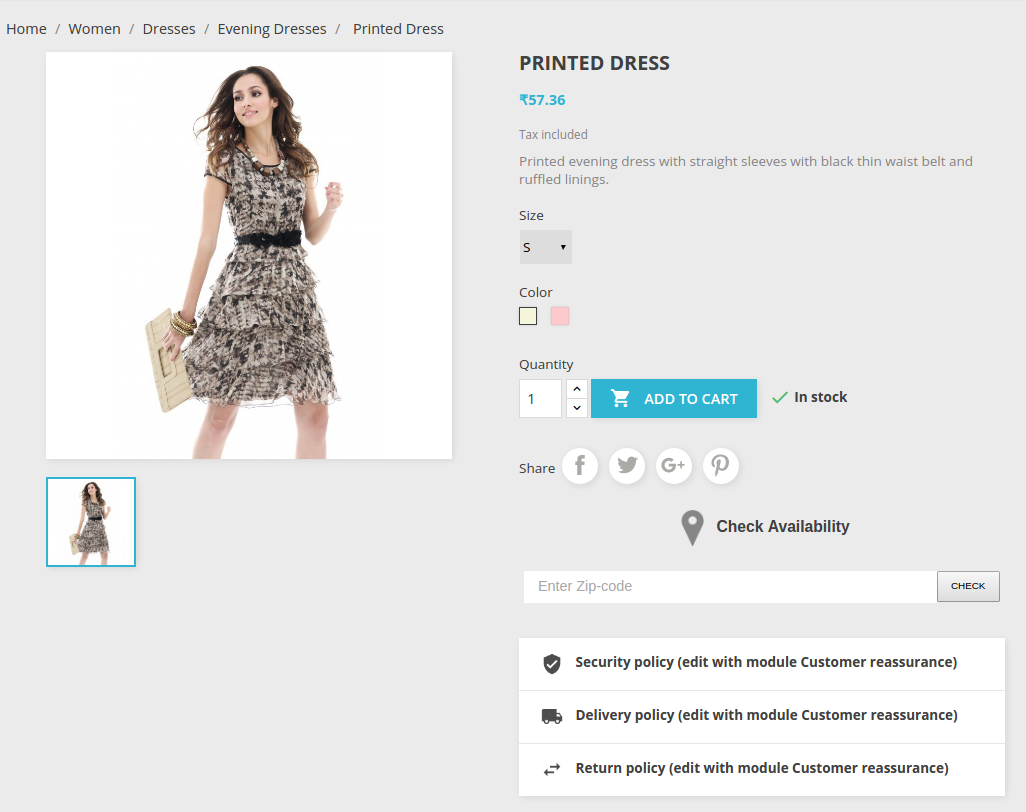
On the frontend, the image mentioned below will be displayed.
The Prestashop Product Size chart addon is a Size Chart creating module for Prestashop. Using this extension, the merchant can show the different types of size charts for each category, product, and manufacturers available on his/her store.
The eCommerce store admin can assign a single chart in ‘n’ number of the category in a single configuration. Products under the default category will show the size chart on the product landing page. The eCommerce store admin can assign the created size chart on any product or any category or any manufacturer. And, a product can have a unique size chart which means, any merchant can assign a pre-configured chart to any product.
The eCommerce store admin can assign the chart to a particular product or products of a particular category or products of a particular manufacturer. Thus with the help of this Prestashop Product Size chart module the eCommerce store owner can easily resolve the size-related issues of the store customers. The user-friendly interface of this Prestashop size catalog extension makes it more useful.
Features –
The Prestashop Product Size chart module allows the eCommerce admin to display the size chart on the product pages of the eCommerce store.
It’s very easy to install and configure this Prestashop size guide addon.
The store admin can enable/disable this Prestashop size catalog extension without any hassle.
The Prestashop Size Chart Popup addon is fully customizable.
The Prestashop Size Chart link module offers a simple and hassle-free implementation.
No technical knowledge is required for the configuration of this size chart popup addon.
The Prestashop size catalog extension provides an option to add images, guidelines or any HTML content to the size chart.
The Prestashop size guide for a category of products, a single product, or a manufacturer.
An unlimited number of rows and columns on the size charts can be added as per requirement.
The Prestashop Product Size chart extension provides the preview option.
Helps in making the purchase decision.
The Prestashop Size Catalog plugin is multi-lingual Compatible.
What’s New in 1.0.7 Update:
Customizable Size Chart:
You can now customize the size chart according to your needs and preferences, providing a more personalized experience for your customers.
UNIT Feature Update:
With this feature, Admin has the ability to specify the unit of measurement for the size charts
Custom CSS and JS:
You can now load your own custom CSS and JS files, allowing you to further customize and enhance the look and feel.
Improved Popup:
The all-updated 1.0.7 Size Chart Module allows for popups to be displayed over the other popups or directly on the product page under the “Add to Cart” button, providing a more seamless and user-friendly experience to both users and Presta admins.
New Rule Options:
Now, the Prestashop store admins can find two new rule options based on product reference and attribute, giving administrators more flexibility and control over how they map charts with products.
Multistore Compatibility:
The all-new Prestashop Size Chart module is now compatible with multistore. The PrestaShop store admins can now manage and customize their e-commerce platform with greater ease and efficiency.
Benefits offered by Prestashop Product Size Chart:
With the help of this Prestashop size guide addon the store admin can create appropriate size charts just by entering values.
The Prestashop size catalog extension allows e-merchant to set the size chart on a particular category, product or manufacturer.
This size chart will be available on every product page for a better store experience.
The admin can add n number of rows and columns in the size chart.
A preview option is available on the back-end.
This size related information reduces product return based on size issues.
With the help of Prestashop size catalog extension, the customers can view the size chart before purchasing the product.
The Prestashop product size table allows adding text and images in the size chart for better understanding.
The customers can easily understand the guidelines given with the size chart.
The Size Chart module offers admins to use the module for their Multi-Store Prestashop stores.
Along with all the pre-tailored options, the admins can now also add custom CSS and JS to improve the look and feel of their Product Size chart.
To install the Prestashop product size table addon, please follow the following steps:
1. Add the addon folder to the modules folder of your system.
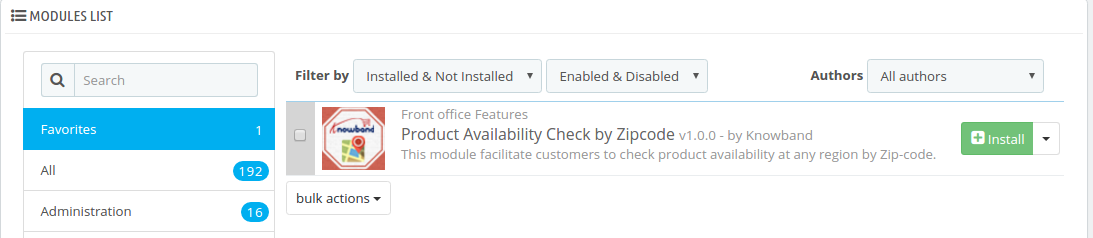
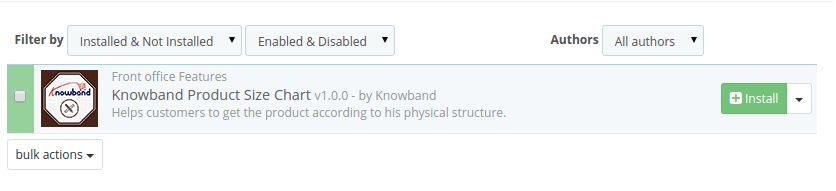
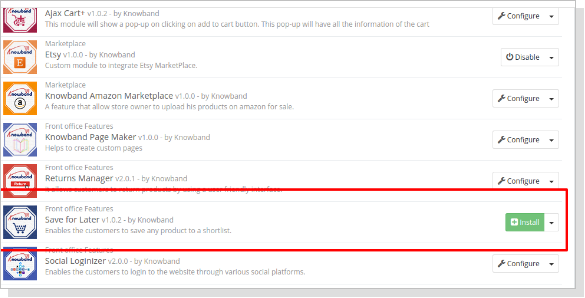
2. After adding this addon folder, system will list the addon on module page under front office feature category as given below:
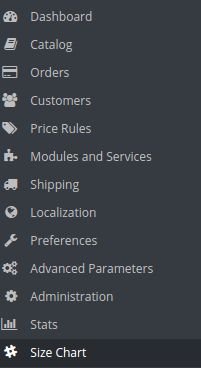
After the module is installed a new entry in the menu bar of the shop starts appearing in the back end with the name ‘Size Chart’. This menu will contain a sub-menu which further will be containing the following options.
1. Attributes Set
2. Chart
3. Category/Manufacturer Chart
4. Category Chart
5. Product Chart
Each section is described in detail below.
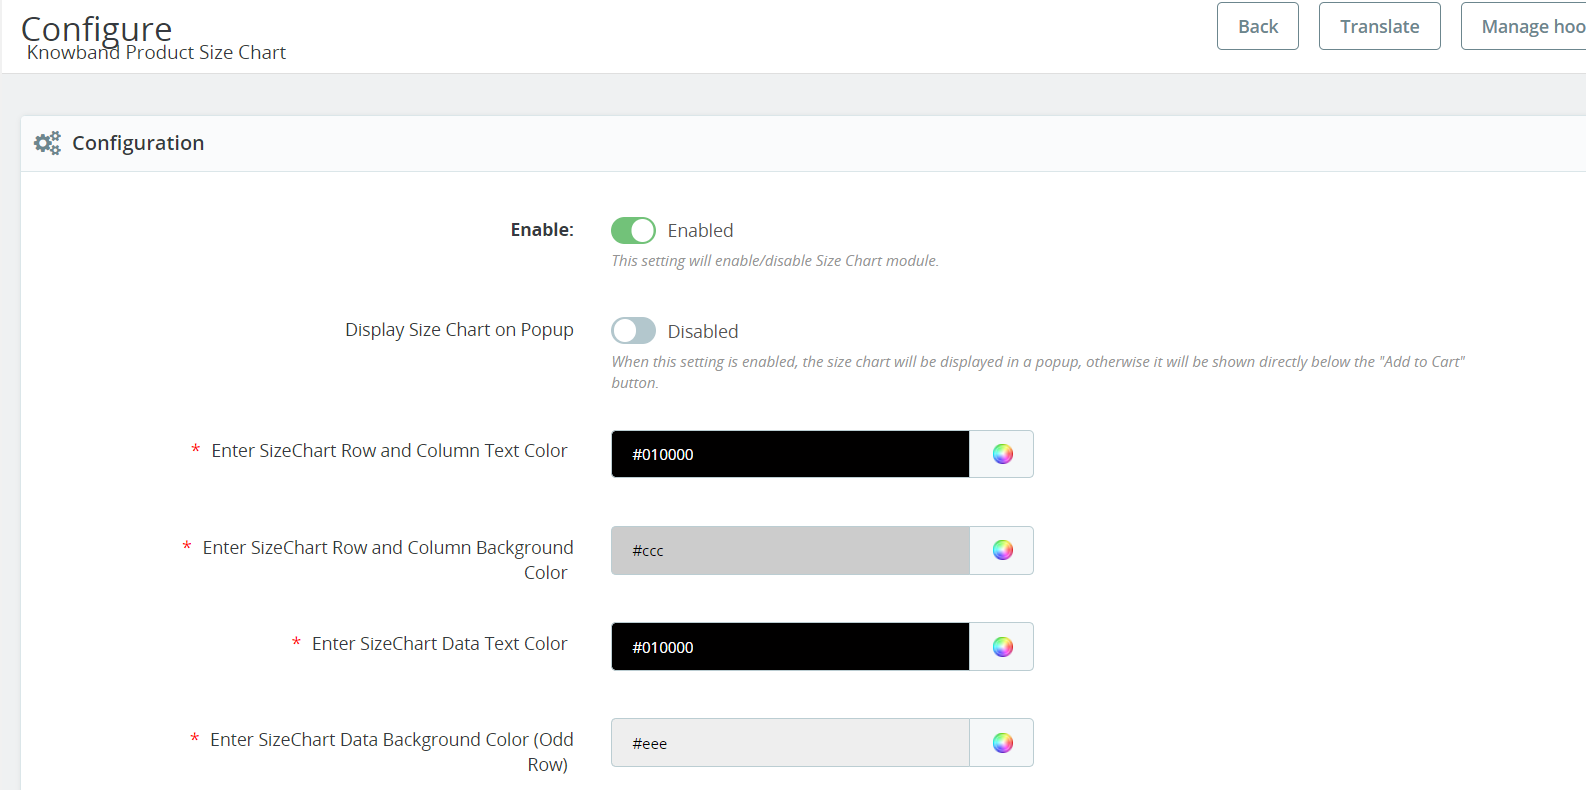
Configuration Setting:
In the following tab, the store admins can configure their Prestashop Size chart module and choose all the major size chart attributes such as component colours, CSS, JS, etc.
Enable/Disable:
The store admins can enable/disable the module with the help of this particular button.
Display Size Chart on Popup:
When this setting is enabled, the size chart will be displayed in a popup, otherwise, it will be shown directly below the “Add to Cart” button.
Enter SizeChart Row and Column Text Color:
This particular option will manage the row and column text color of the size chart.
Enter SizeChart Row and Column Background Color:
Like text color, the Prestashop store admins can manage the background color of size chart rows and columns.
Enter Size Chart Data Text Color:
With the help of this button, the store admins can manage the text color of size chart data.
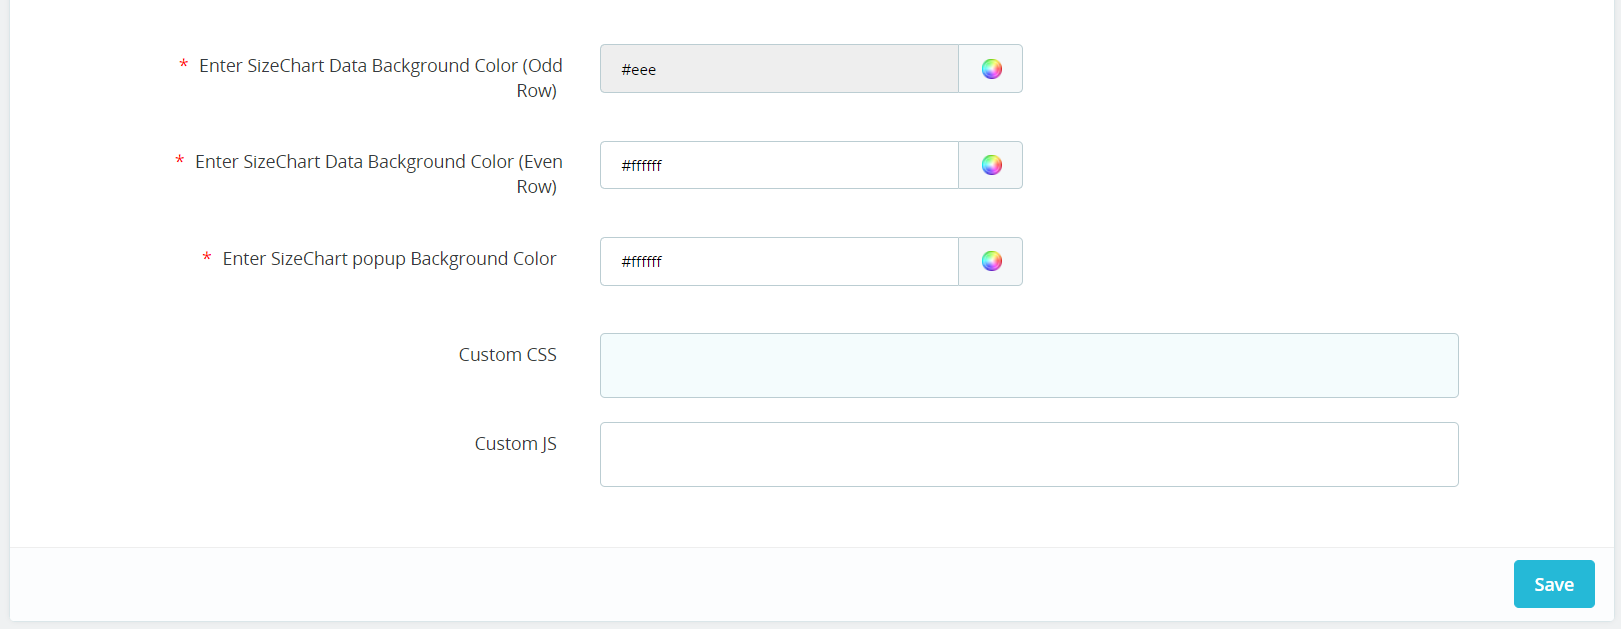
Enter SizeChart Data Background Color (Odd Row):
You can choose the color of the background of the size chart data from here. This option will manage the background color for the odd row only.
Enter SizeChart Data Background Color (Even row):
Like odd rows background color, the Prestashop store retailers can manage the the data background color for the even rows from this option.
Enter SizeChart Popup Background Color:
This option will allow the store admins to manage the SizeChart popup background color.
Custom CSS:
In the following text field, the admins can enter customized CSS to make their size chart sounding.
Custom JS:
Likewise, this particular field can be used for adding customized JS for the size chart.
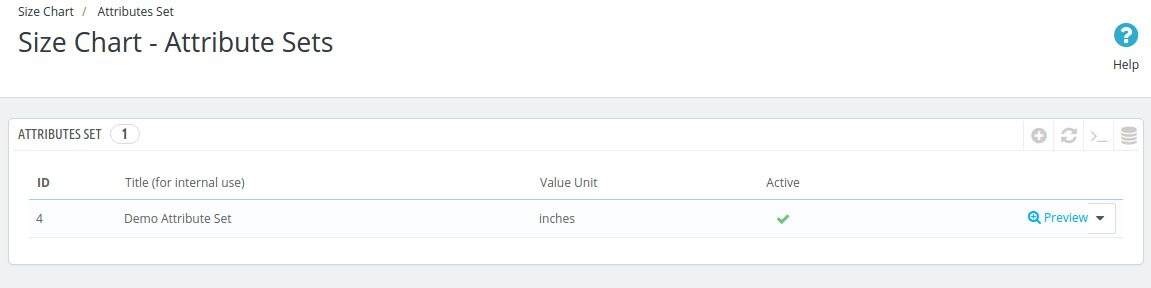
Attributes Set
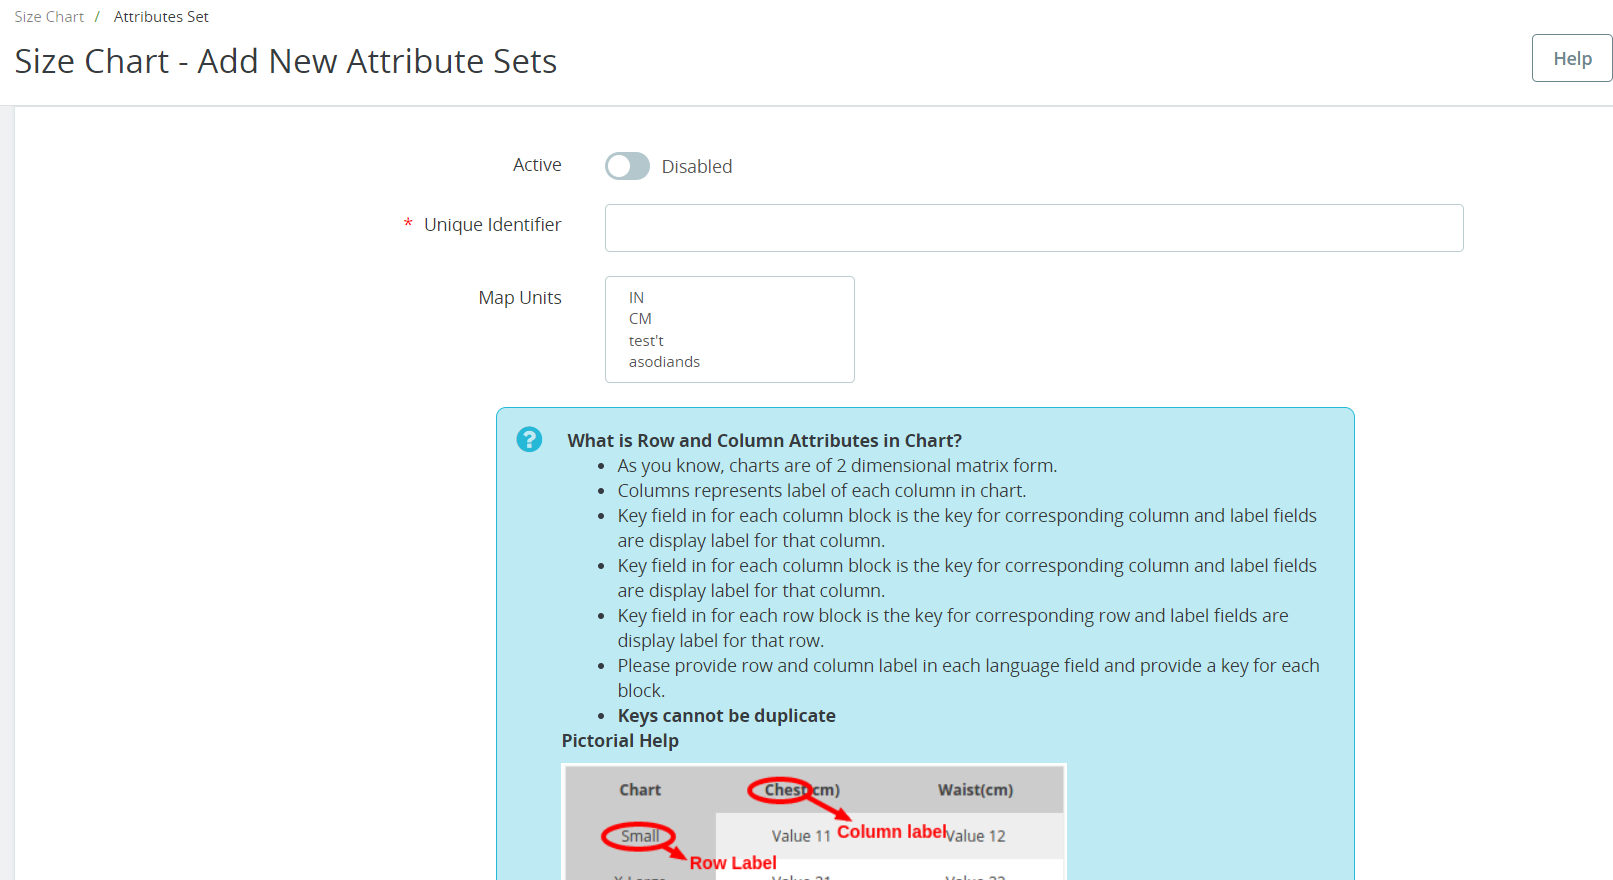
Once the admin will click on this option, a table appears which will contain the details of all the attributes of the chart which has been created to date. The admin can also create new attributes set by clicking on the add icon above the table. After the admin will click on the add icon, a new form appears containing the following fields.
1. Active: This field indicates whether the particular attribute set is enabled or not. The attribute set will only work if it is enabled.
2. Unique Identifier: In this field, the admin has to enter the unique name of the attribute set from which the attribute is going to be identified in the back end of the shop to create full-size chart.
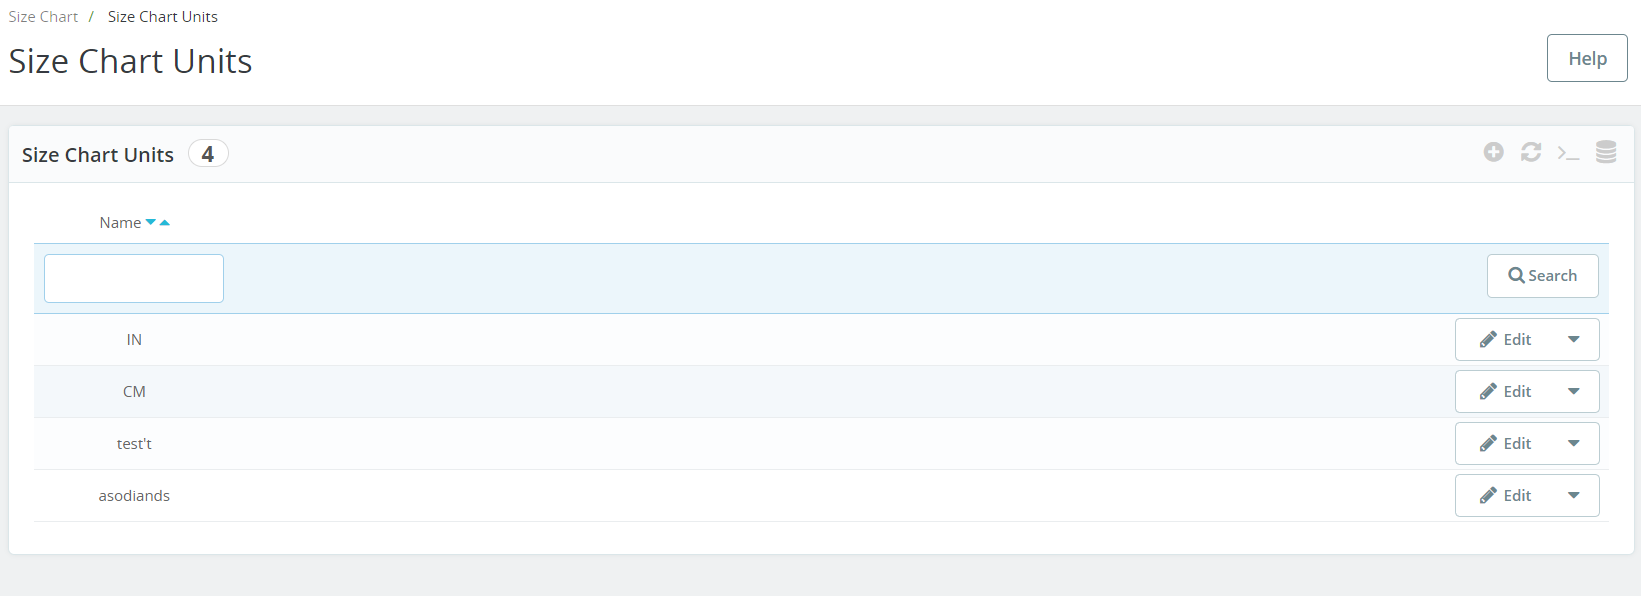
3. Map Units: This feature allows you to choose the units that you wish to associate with the size charts. By visiting the size chart unit page, you can create Units for the size chart of your choice and then map them to your preferred charts using this option.
4. Value Unit: This is the field where the admin will choose the unit of the attributes set may be in inches, cms, kms, grams.
5. Chart Column Labels: In this field, the Prestashop eCommerce store admin has to choose the chart column labels and their name in the different store languages. The admin can add ‘n’ number of column labels.
6. Chart Row Labels: In this field, the eCommerce store admin has to choose the chart row labels and their names in different store languages. The admin can add ‘n’ number of column labels.
7. Preview: By clicking on this link the Prestashop store admin can view the preview of the attributes set which will be created by the values that are filled above.
8. Actions: Actions like edit and delete are also available to edit the entries which are already done by the admin.
Charts
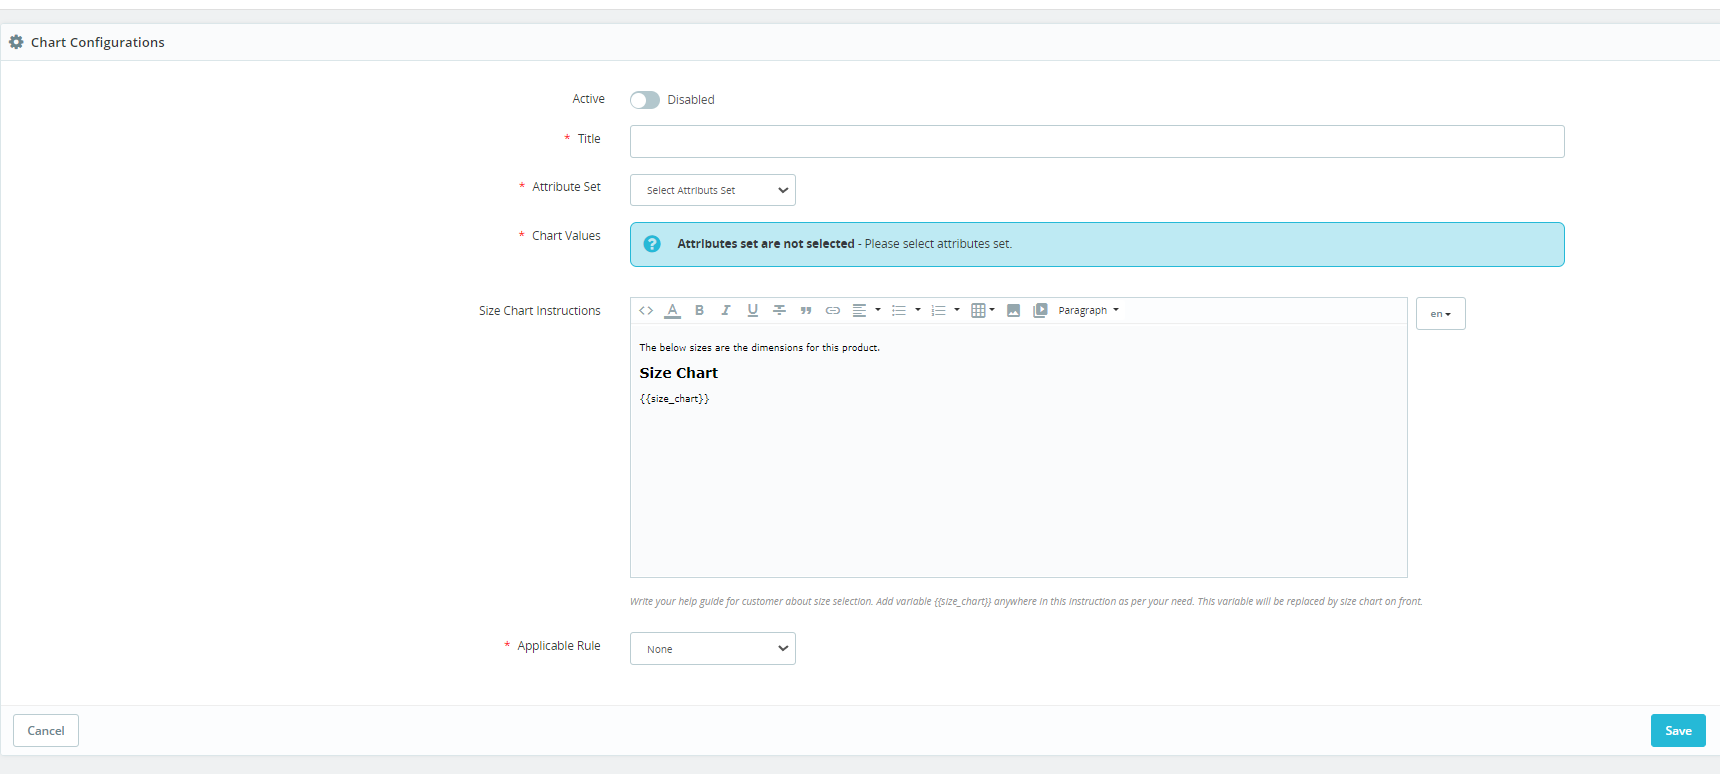
Here, the admin will create the full chart using the attribute sets which were created in the previous tab. To create a chart, the eCommerce store admin has to click on the add button on the right side of the chart. As soon as the eCommerce store admin clicks on that add button, a new form appears with the following options.
1. Active: From here, the Prestashop store admin can set the chart enabled or disabled. The chart will be displayed only if it is enabled.
2. Title: This is the title of the chart which is for internal use only to uniquely identify the chart when assigning them to the product, category or manufacturer.
3. Attributes Set: This field will contain all the data attribute sets which were created earlier and are enabled. The admin can choose any of the attributes set in this field.
4. Chart Values: After the admin selects the attributes set, then he/she has to fill in the values which will be reflected where this chart will be used.
5. Size Chart Instructions: Here, the admin can add up the instructions which he/she feels are important for the customers to understand the above attribute set chart.
6. Actions: Actions like edit and delete are also available to edit the entries which are already done by the admin.
7. Applicable Rule: From here, the admins can select the rule for which the product chart is going the display on the product page. Instance, we have provided 2 options here. Using the first one, the store admins can add the conditions for a chart based on product features such as color, conditions, and more. Apart from it using the other option (reference), the admins can add the product reference in the text field and the chart will be automatically applicable for all the products that are having mentioned references.
Manufacturer Chart
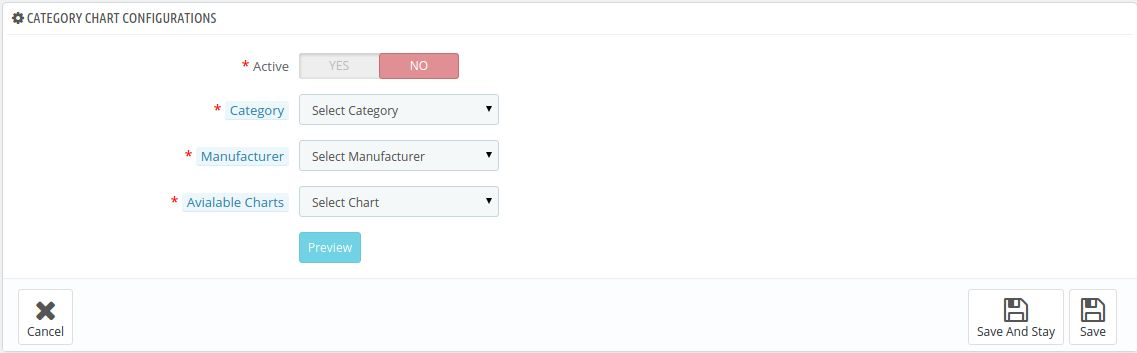
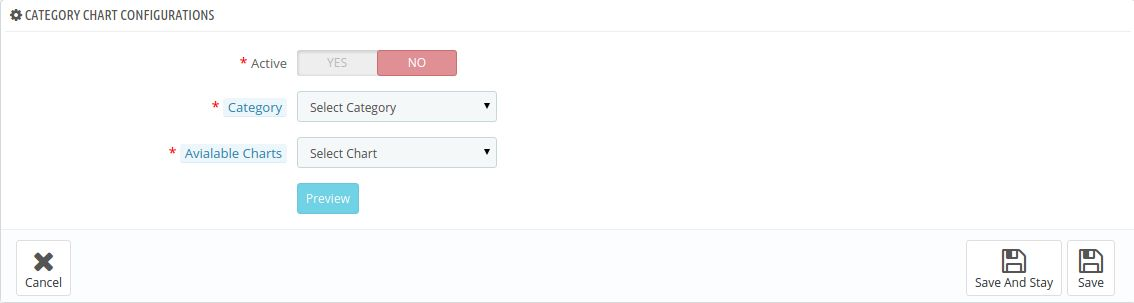
A table appears in this tab. This table shows which charts are mapped to which manufacturer. To add a new entry, the admin can click on the add icon appearing on the right side of the table. The following form appears after clicking on the add icon button –
1. Active: This is the field that decides whether the chart should be enabled or disabled. The chart only works if it is enabled from this end.
2. Category: Here the admin may select the category of the products where this chart should appear.
3. Manufacturer: In this field, the admin has to select the manufacturer to which this particular chart is to be mapped.
4. Available Chart: In this field, all the charts which are created till now are listed. The admin can select any of the charts from this field and then save the settings.
5. Preview: Admin can also view the preview of the chart by clicking on the preview button below.
6. Actions: Actions like edit and delete are also available to edit the entries which are already done by the admin.
Category Chart
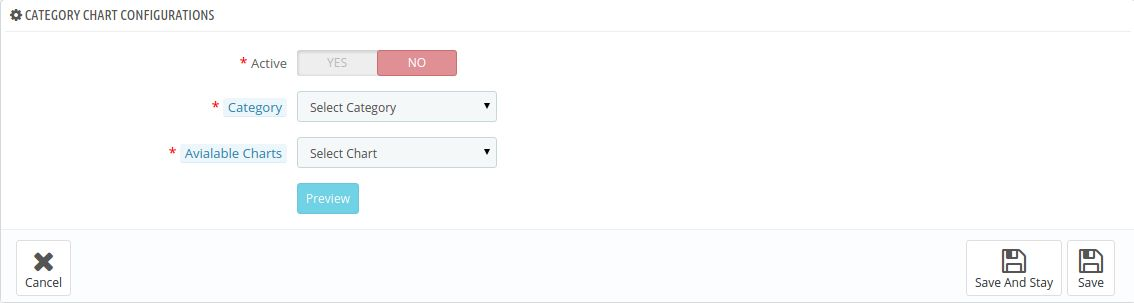
In this tab, a table appears. This table shows that which charts are mapped to which category. The following form appears after clicking on the add icon button –
1. Active: This is the field that decides whether the chart should be enabled or disabled. The chart only works if it is enabled from this end.
2. Category: Here, the Prestashop store admin may select the category of the products where this chart should appear.
3. Available Chart: In this field, all the charts which are created till now are listed. The admin can select any of the charts from this field and then save the settings.
4. Preview: The eCommerce store admin can also view the preview of the chart by clicking on the preview button below.
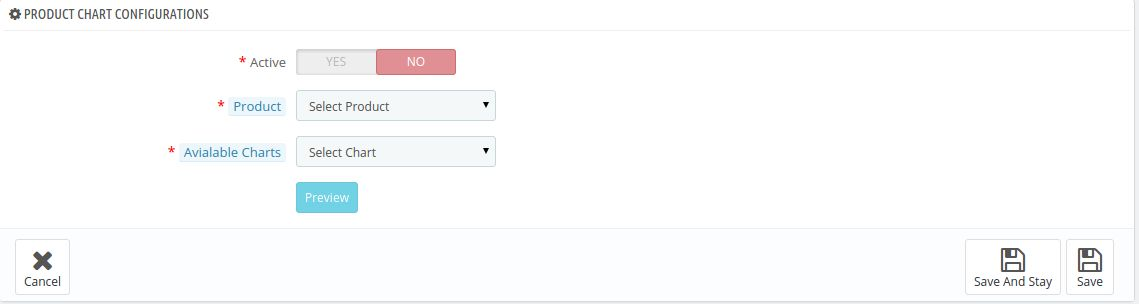
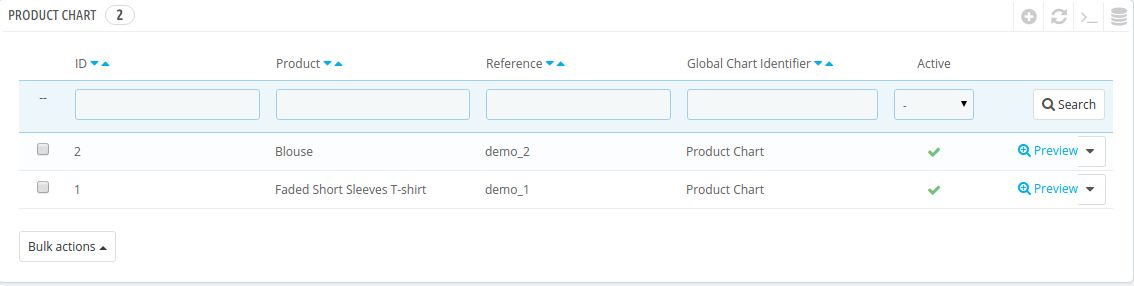
Product Chart
A table appears in this tab. This table shows that which charts are mapped to which product. The following form appears after clicking on the add icon button –
1. Active: This is the field that decides whether the chart is enabled or disabled. The chart only works if it is enabled from this end.
2. Select Product: In this field, all the products which are available in this particular store appear and the admin can choose any one of those products and get that product mapped with that particular chart.
3. Available Chart: In this field, all the charts which are created till now are listed. The admin can select any of the charts from this field and then save the setting.
4. Preview: Admin can also view the preview of the chart by clicking on the preview button below.
Size Chart Units:
In the following tab offered by the Prestashop size chart addon, the admin can manage all the size chart units. Not only the admin can modify the added units but also can add as many units as he wants for the size charts.
Front End Module
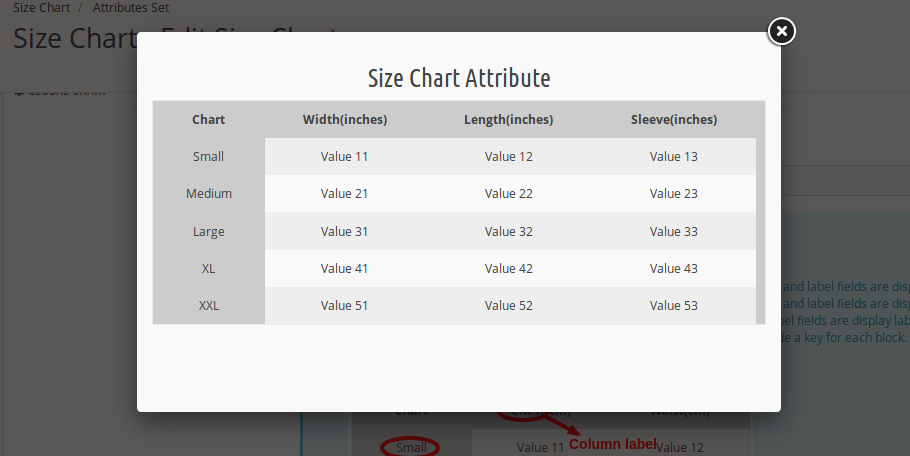
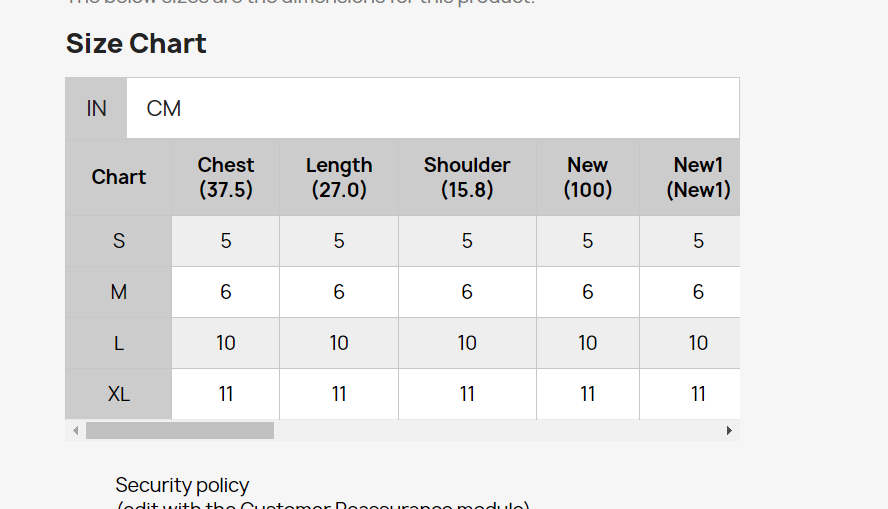
When this extension is enabled from the back end with all the entries done, then a link named ‘VIEW SIZE CHART’ appears on the right side of the page just like the screenshot below.
Also, if “Display size chart on popup” is enabled then the “View Size Chart” button is available otherwise, the chart is displayed directly under the Add to Cart button.
It may be a case when a product has a chart mapped to itself and it also has a chart mapped to its category and it also has a chart mapped to its manufacturer. In this case, the priority of the chart has been decided. So, the priority of a product chart is higher than the priority of the category chart and the priority of the category chart is higher than the priority of the manufacturer chart.
So, the chart on the product page is shown according to the priority basis which has been explained above.
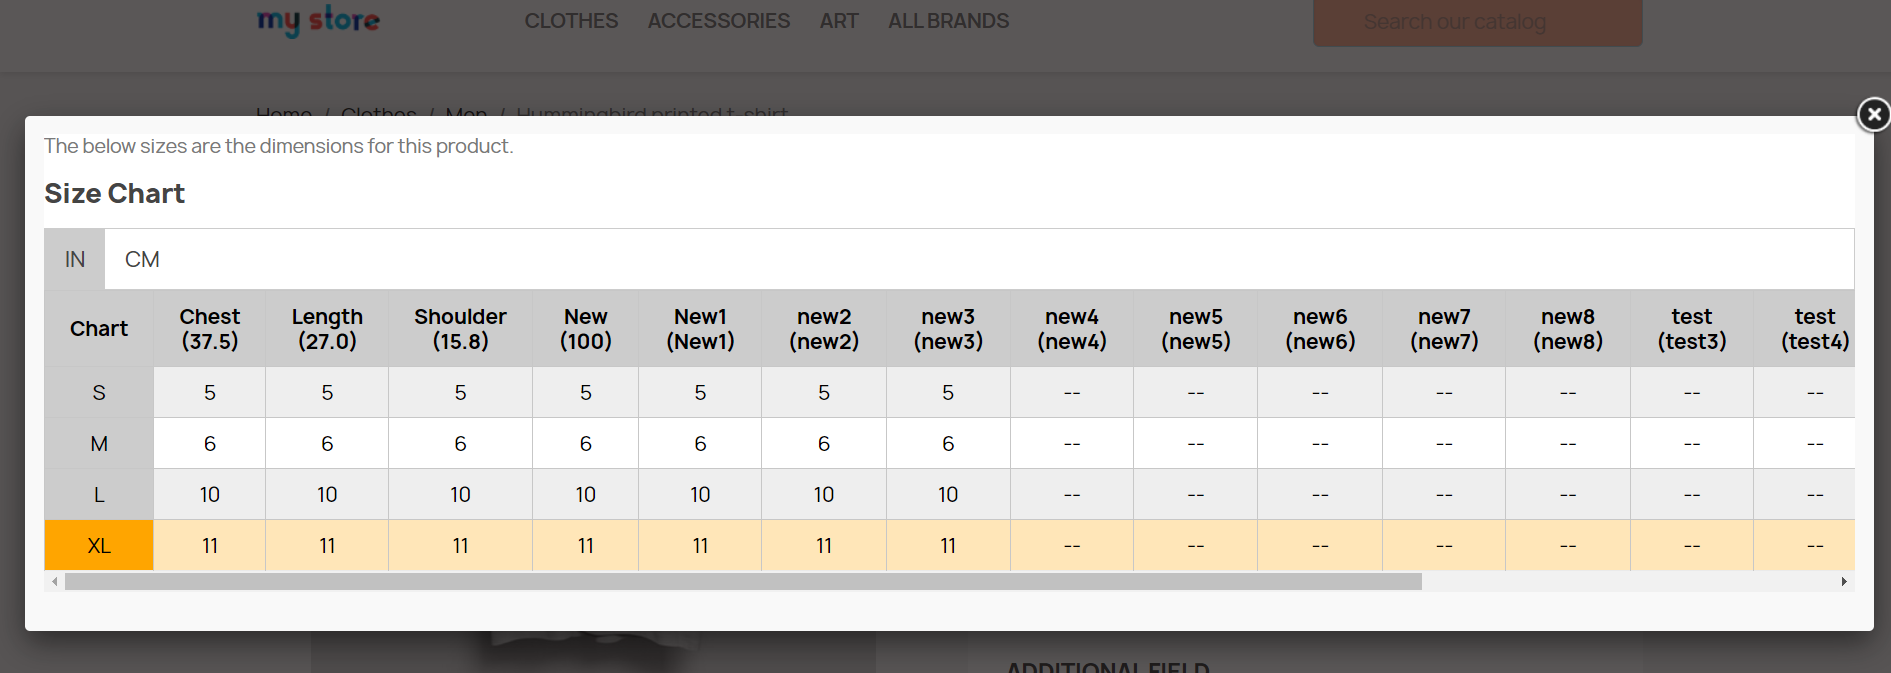
When the customer will click on the link, a pop-up will appear with all the data of size for that product.
Thus this Prestashop product size chart addon makes shopping easy for the online customers. The admin can reduce the complexity of choosing the perfect size. By using this Prestashop product size table plugin the admin can display size charts on the product page. The customers can buy the products easily after viewing the size chart.
Prestashop Size Chart Addon: Video Tutorial
For a more visual and hands-on understanding of how to install, configure, and use the Knowband Prestashop Size Chart Addon, we have created a step-by-step video tutorial.
This video covers:
Module installation
Creating and customising size charts
Assigning size charts to products
Front-end display and functionality
Watch the full tutorial below to get started quickly and make the most out of this addon.
For more information about this Prestashop Size Chart Popup Addon please visit Knowband.
Today, Online Customers on eCommerce sites browse through multiple products but only make a purchase of a selected product at a particular instance of time because the goal of the shoppers is not to make an immediate purchase always. Sometimes, the customers just visit to have a look at the product and add it to their cart, so that later when they would need the product they can buy it. Moreover, they check the other store prices and checkout. The Prestashop Advanced Wishlist addon by Knowband provides a special feature to display the shortlisted, recently viewed and recommended products/banners into the website. This Prestashop wishlist module allows the customer to shortlist their favorite products so that they can be aware of the products they want to purchase or view later. This Prestashop save for later extension is like a basket in hand where you add whatever you like and can change the quantity at last when making the purchase.
Knowband Prestashop Advanced Wishlist addon is integrated with GDPR hooks. GDPR settings are added in the module using which the Prestashop admin can comply with the rules of the GDPR. Please refer to the General Settings to know more about the GDPR.
The Prestashop advanced wishlist module by Knowband is beneficial for both merchant and the customer. Let us discuss how Prestashop wishlist addon is working.
1.1 Benefits for the Merchant
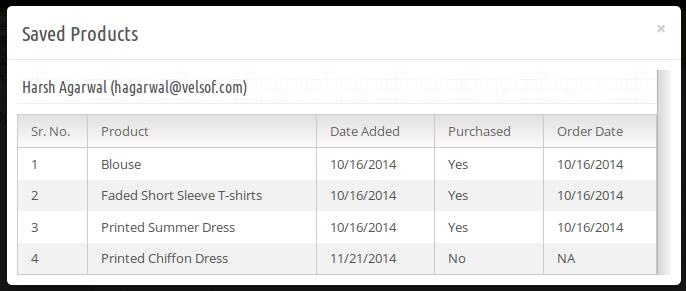
This Prestashop advanced wishlist addon is a help to the store owners for tracking the Customer requirement.
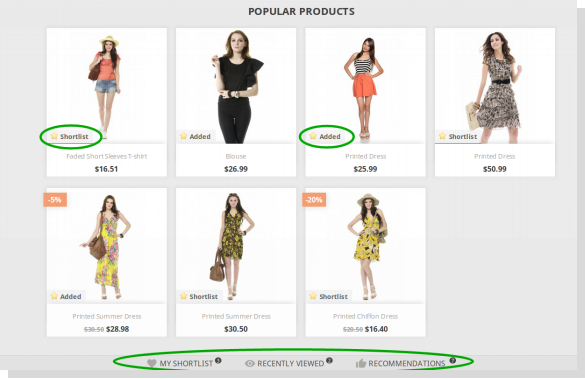
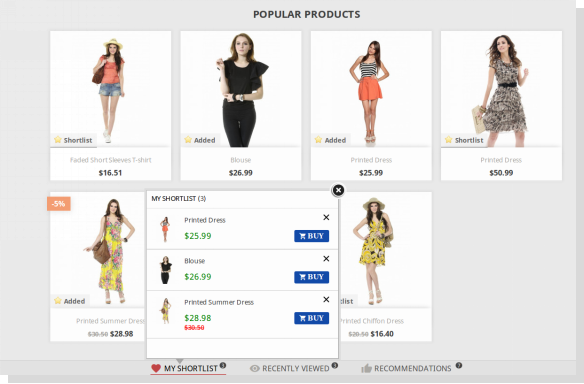
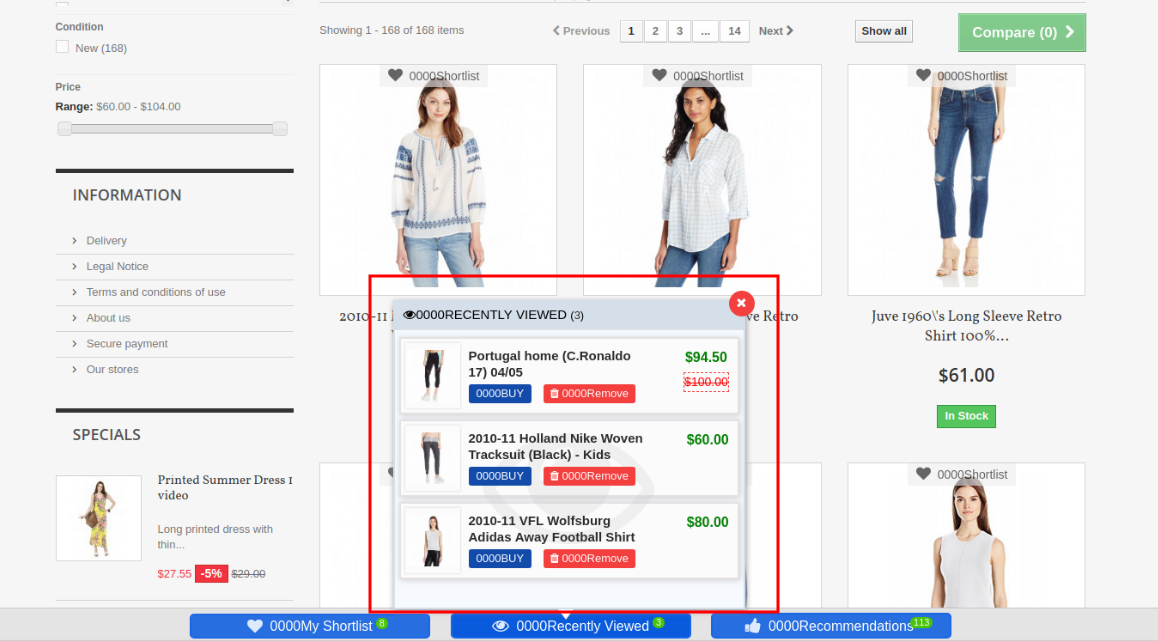
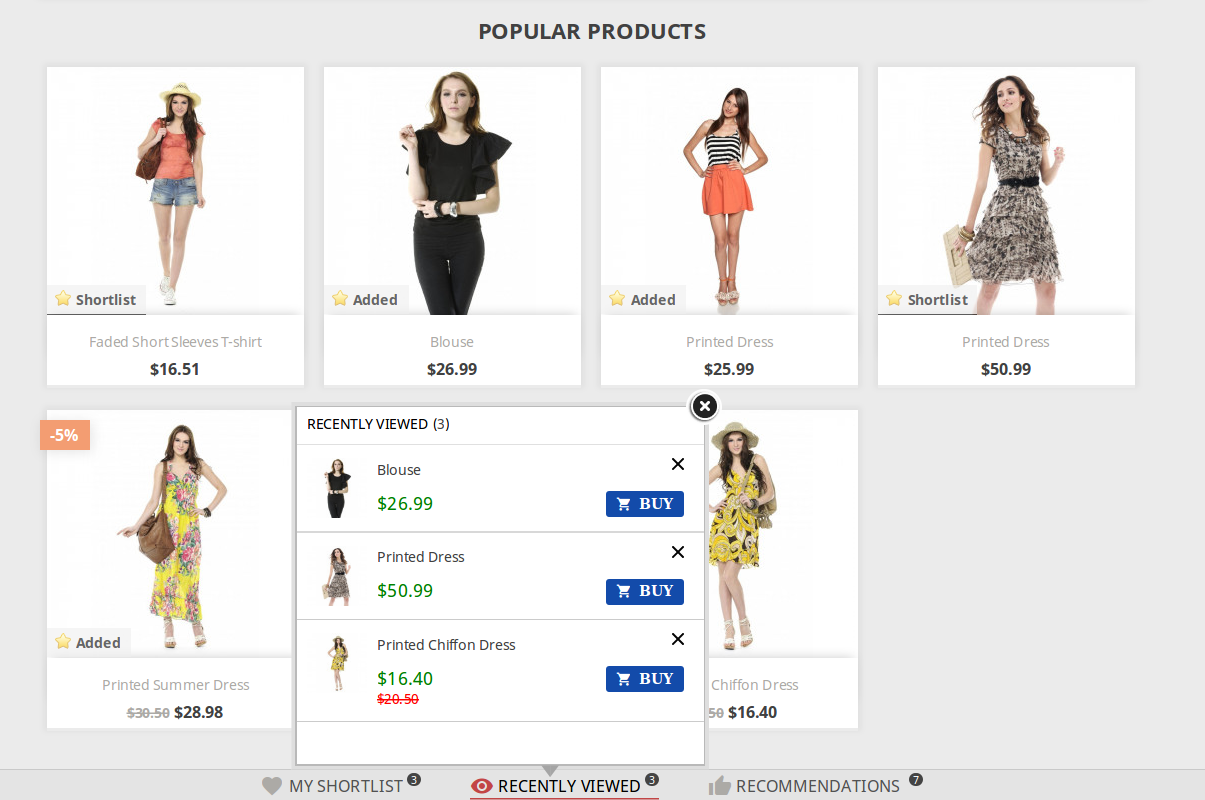
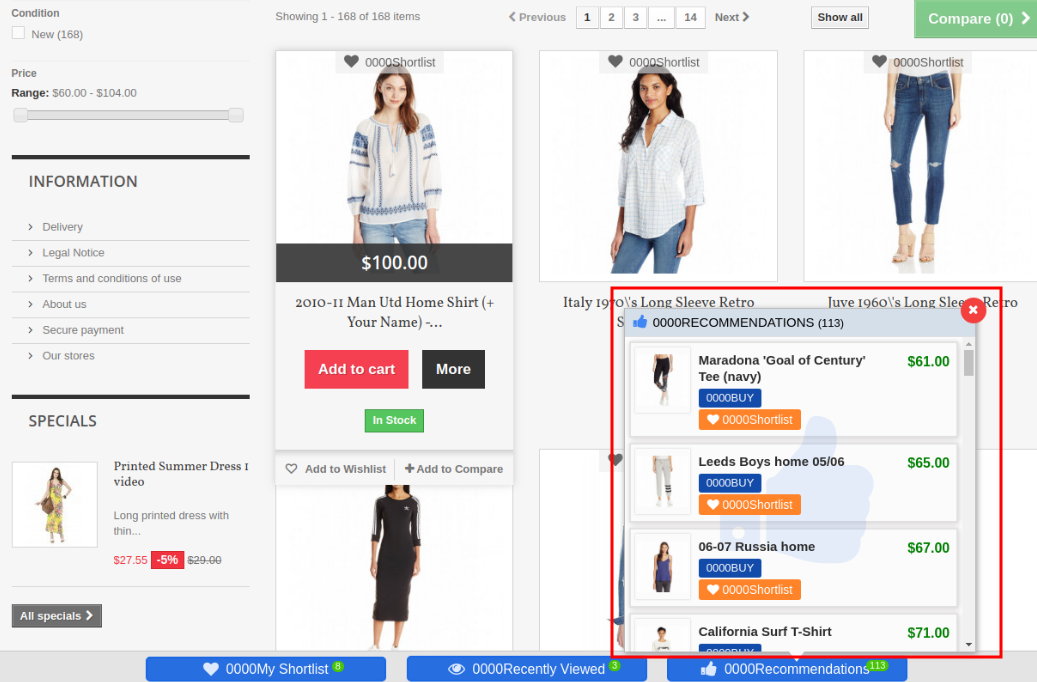
This Prestashop wishlist module shows the bar at the bottom of every page containing three different blocks as ‘My Shortlist’, ‘Recently Viewed’ and ‘Recommendations’. Each block has a pop-up containing respective data. This bar is managed by the admin according to the need.
This Knowband Prestashop advanced wishlist addon shows my wishlist block which is controlled by the online merchant. My Shortlist pop-up shows the products shortlisted by the customer.
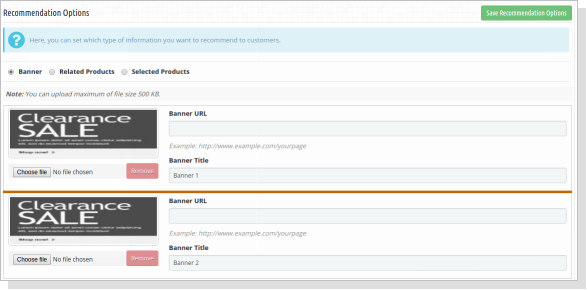
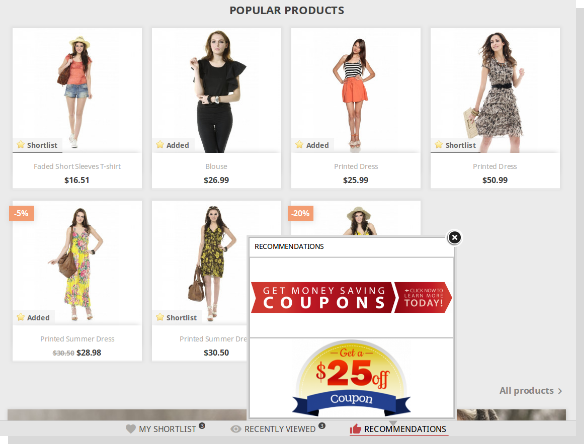
This Prestashop advanced wishlist extension shows the recommendations block which is totally controlled by the Store Owner. Store the admin can choose products or banners as per choice.
This Prestashop save for later extension gives the access to the admin to enable/disable the recently viewed block that shows the products which are recently viewed by the customer.
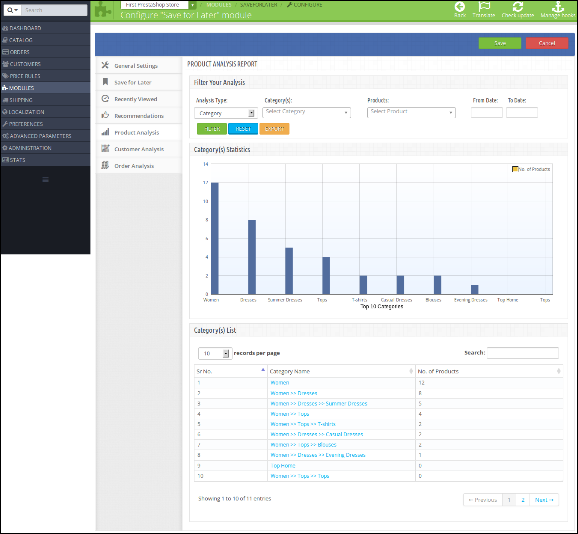
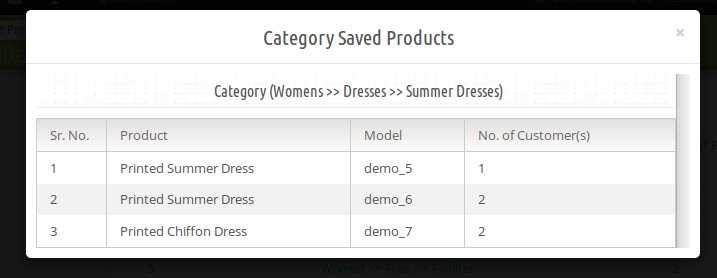
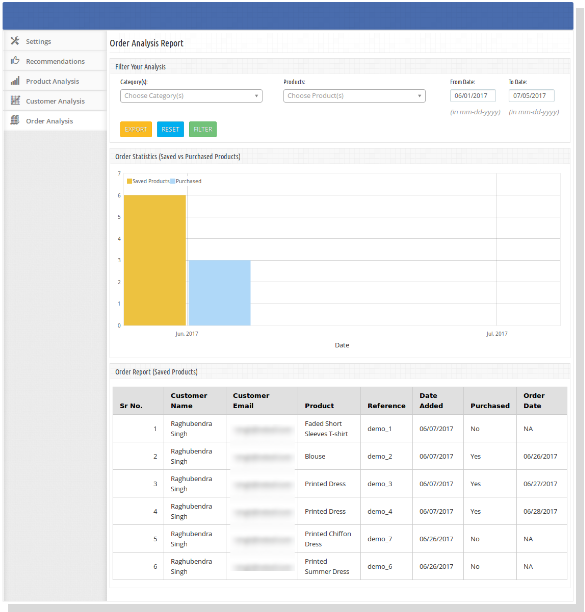
This Prestashop wishlist addon helps the admin to view the product details which product is high on demand or which product is added in the wishlist the most. The Graph shows the whole information about the wishlist product.
This Prestashop advanced wishlist extension allows the admin to know what customers wish to purchase.
The Prestashop save for later extension helps for re-marketing.
This Prestashop wishlist addon reduces the abandoned cart of the website.
This module helps the admin in boosting sales and conversion rates for your online store.
The admin can easily customize the save for later addon.
The online store admin can set the number of products which he wants to show on the customer’s wishlist page.
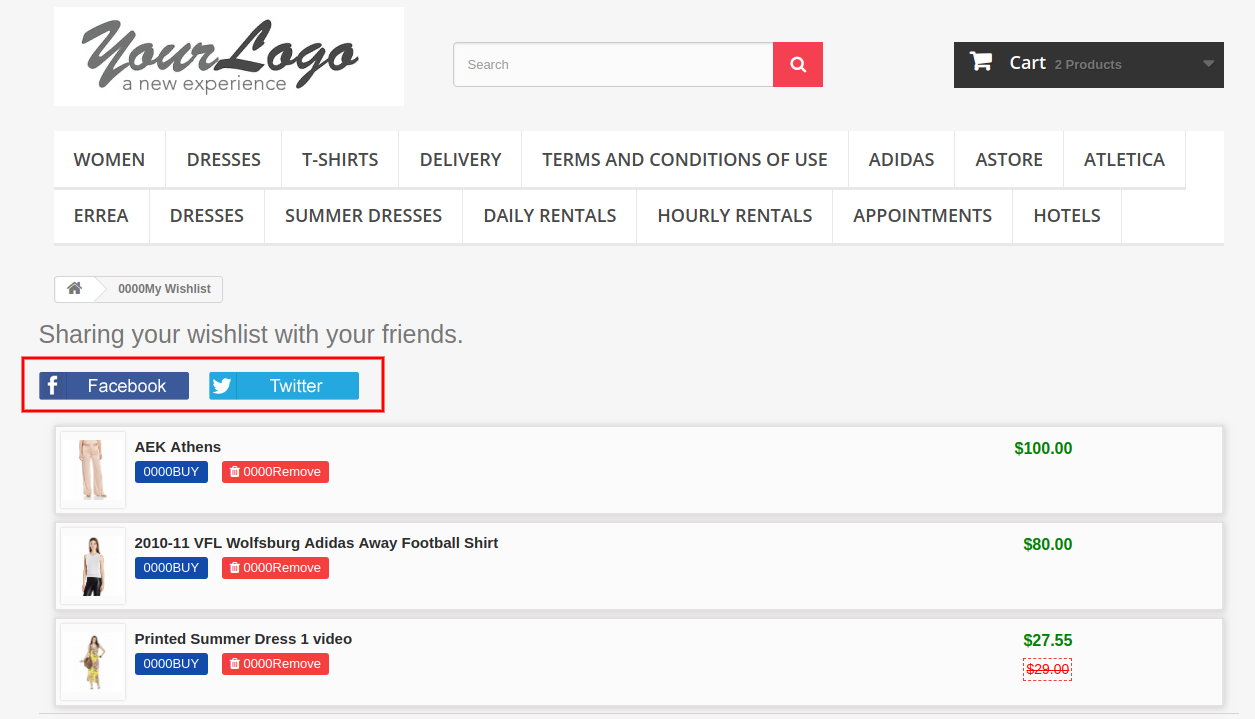
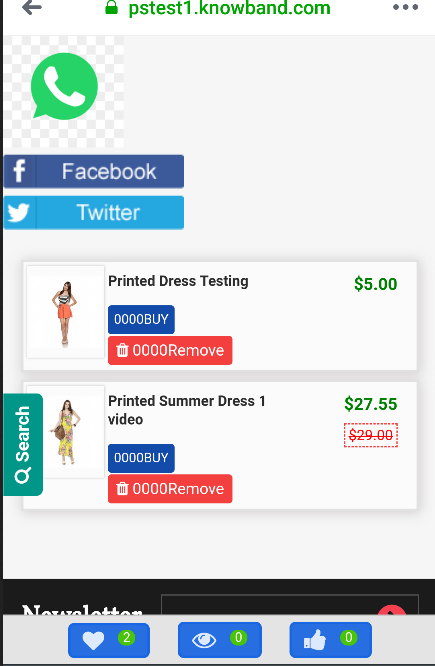
The online store merchant can also provide an option to share wish-listed products on Social media platforms like Facebook, Twitter and WhatsApp.
Customers can view wishlist products, recently viewed products and recommendations.
The Prestashop wishlist module offers a userfriendly and eye-catchy interface.
The Prestashop wishlist addon is mobile responsive, multi-lingual compatible and offers multi-store support.
Admin can show specific Wishlist tab on the website.
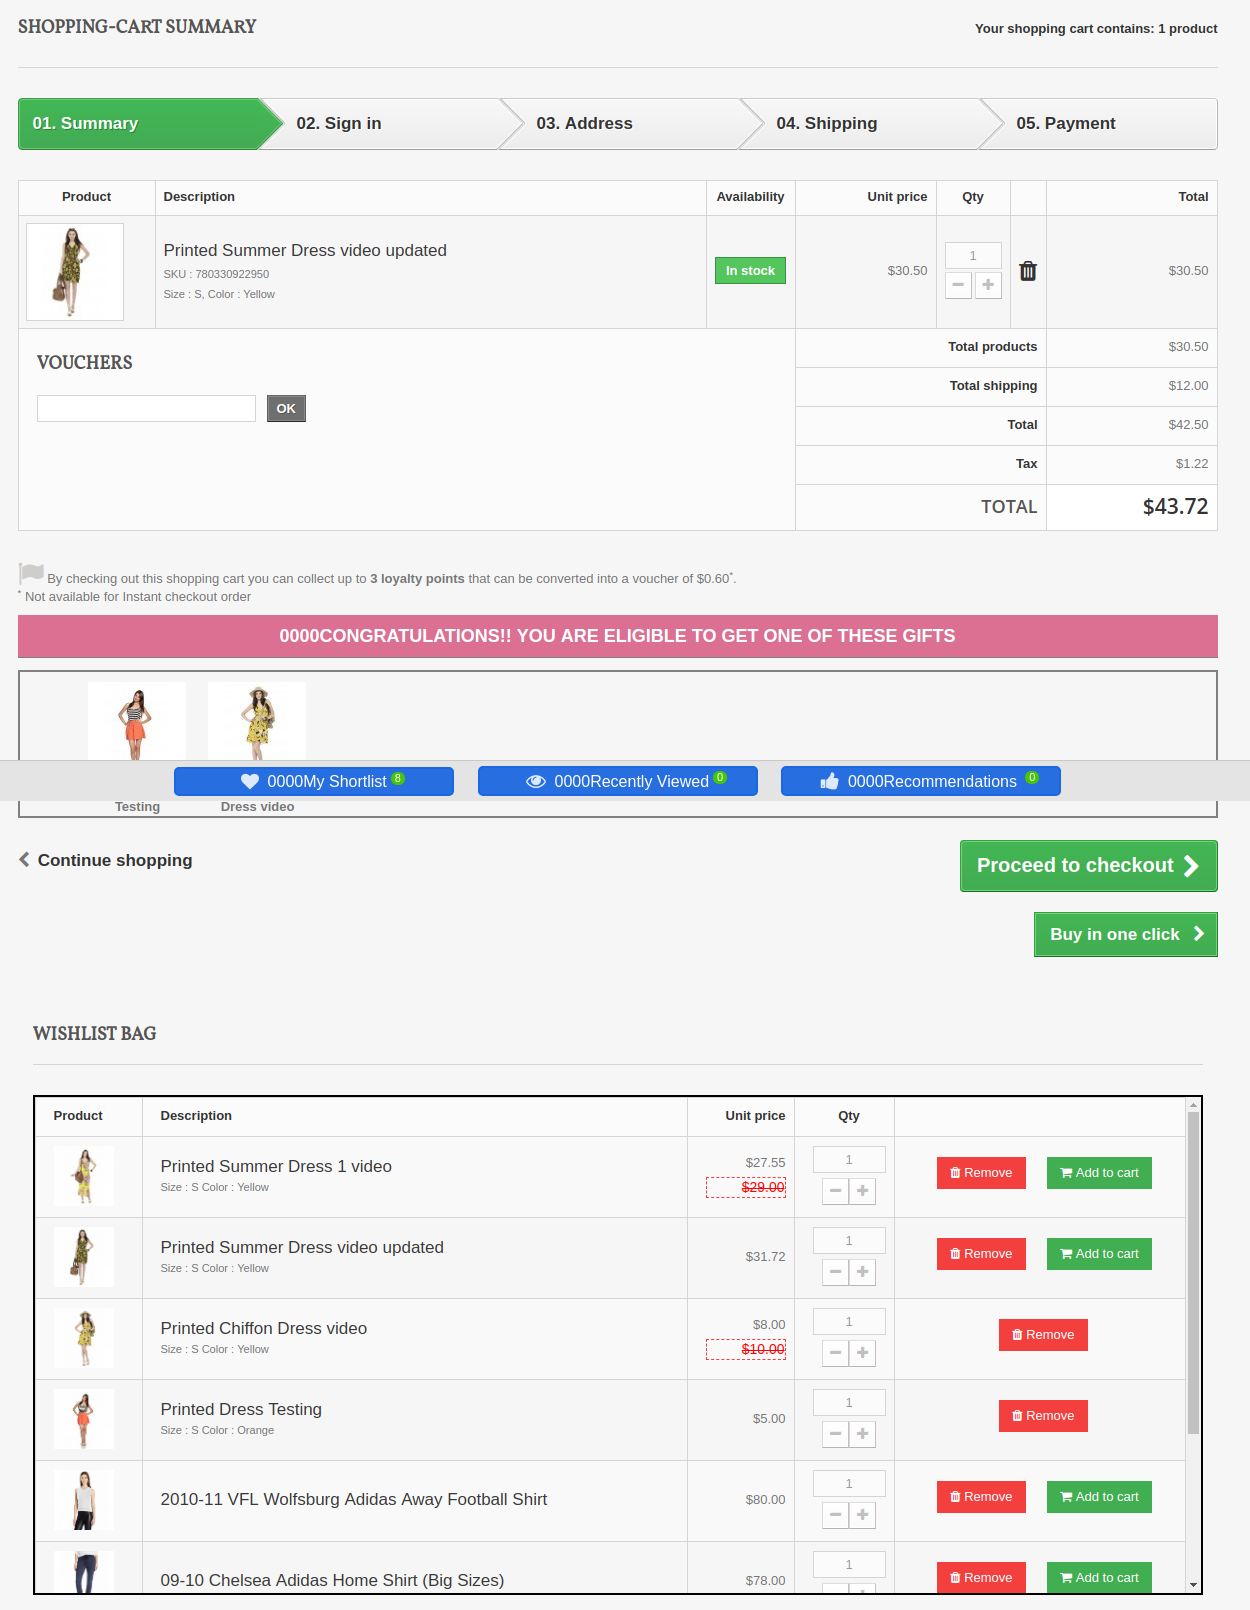
The Prestashop plugin shows wishlist on the checkout page.
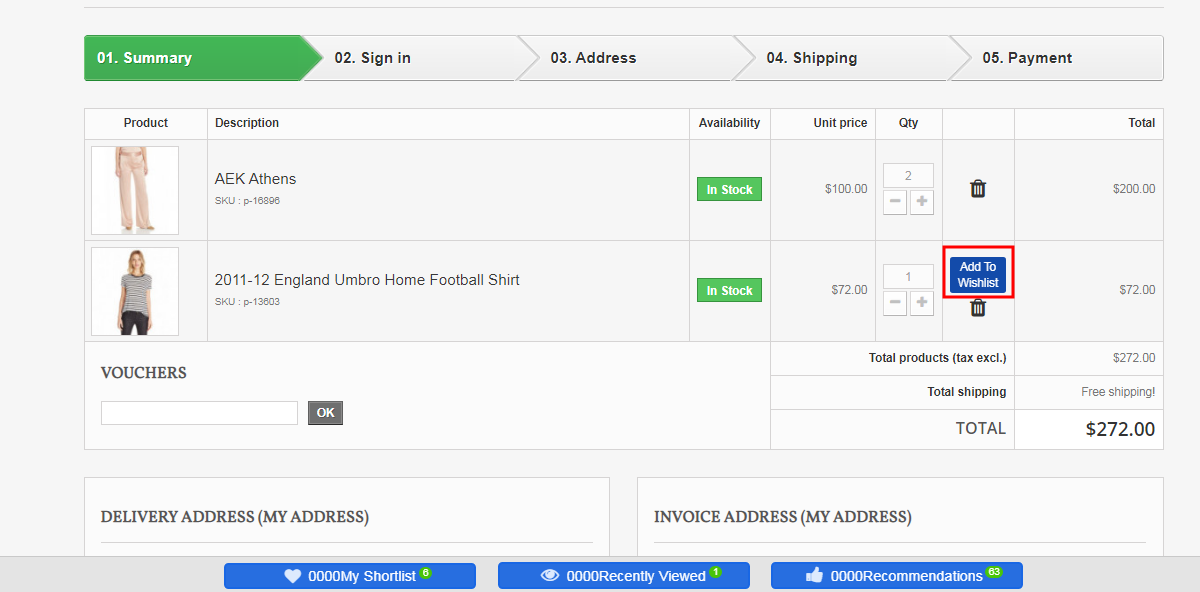
The customers can add available products from wishlist and move any product from cart to wishlist.
1.2 Benefits for the Customer
This Prestashop favorite product list addon helps online shoppers to add products to their wishlist and feel free to buy it later.
This Prestashop save for later module by Knowband is mobile responsive and allows the customers to use the Wishlist feature both on their mobile phones and desktop.
Customers can add product from the wishlist while checkout.
The online users can move any product to wishlist by clicking on “Add to Wishlist” button.
The online users can also share their wishlist on Facebook, Twitter and Whatsapp.
2.0 Installation
After purchasing the Prestashop advanced wishlist addon, you will get the following files as listed below:
1. Compressed File in ZIP format (contains source code of the module)
2. User Manual
Follow the following steps to install the Prestashop save for later extension:
1. Unzip the compressed file. It would contain files and folders as shown below –
2.Copy all the files and folders of the unzipped folder into your store “modules” directory on the path – Root Directory/modules/.
3. Now, the module is ready to be installed on your store and you can find that in Store the admin -> Modules and Services. It would shown as below –
PrestaShop 1.6
PrestaShop 1.7
4. Before installing the module, please make sure that ‘Customer.php’ does not exist in ‘Root Directory/override/classes/ folder. If it exists, then please remove it. Also, clear cache before installing the module.
5. Click on “Install” button to install the module. It would show a pop-up for your confirmation. Click on “Proceed with the installation” option. This step will install the module and show notification – “Module(s) installed successfully”.
3.0 How to configure module?
Once the Prestashop wishlist addon is configurable, the Store Owner can setup or configure this Prestashop save for later module through the Admin Panel of the store. There are following sections available to configure this module –
Go to Store the admin -> Modules and Services
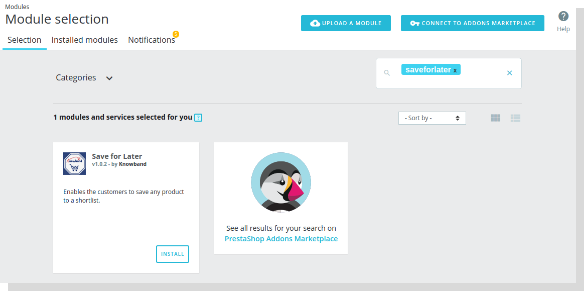
Find “Advanced WishList Addon” and click “configure” button given corresponding to the module i.e. shown below-
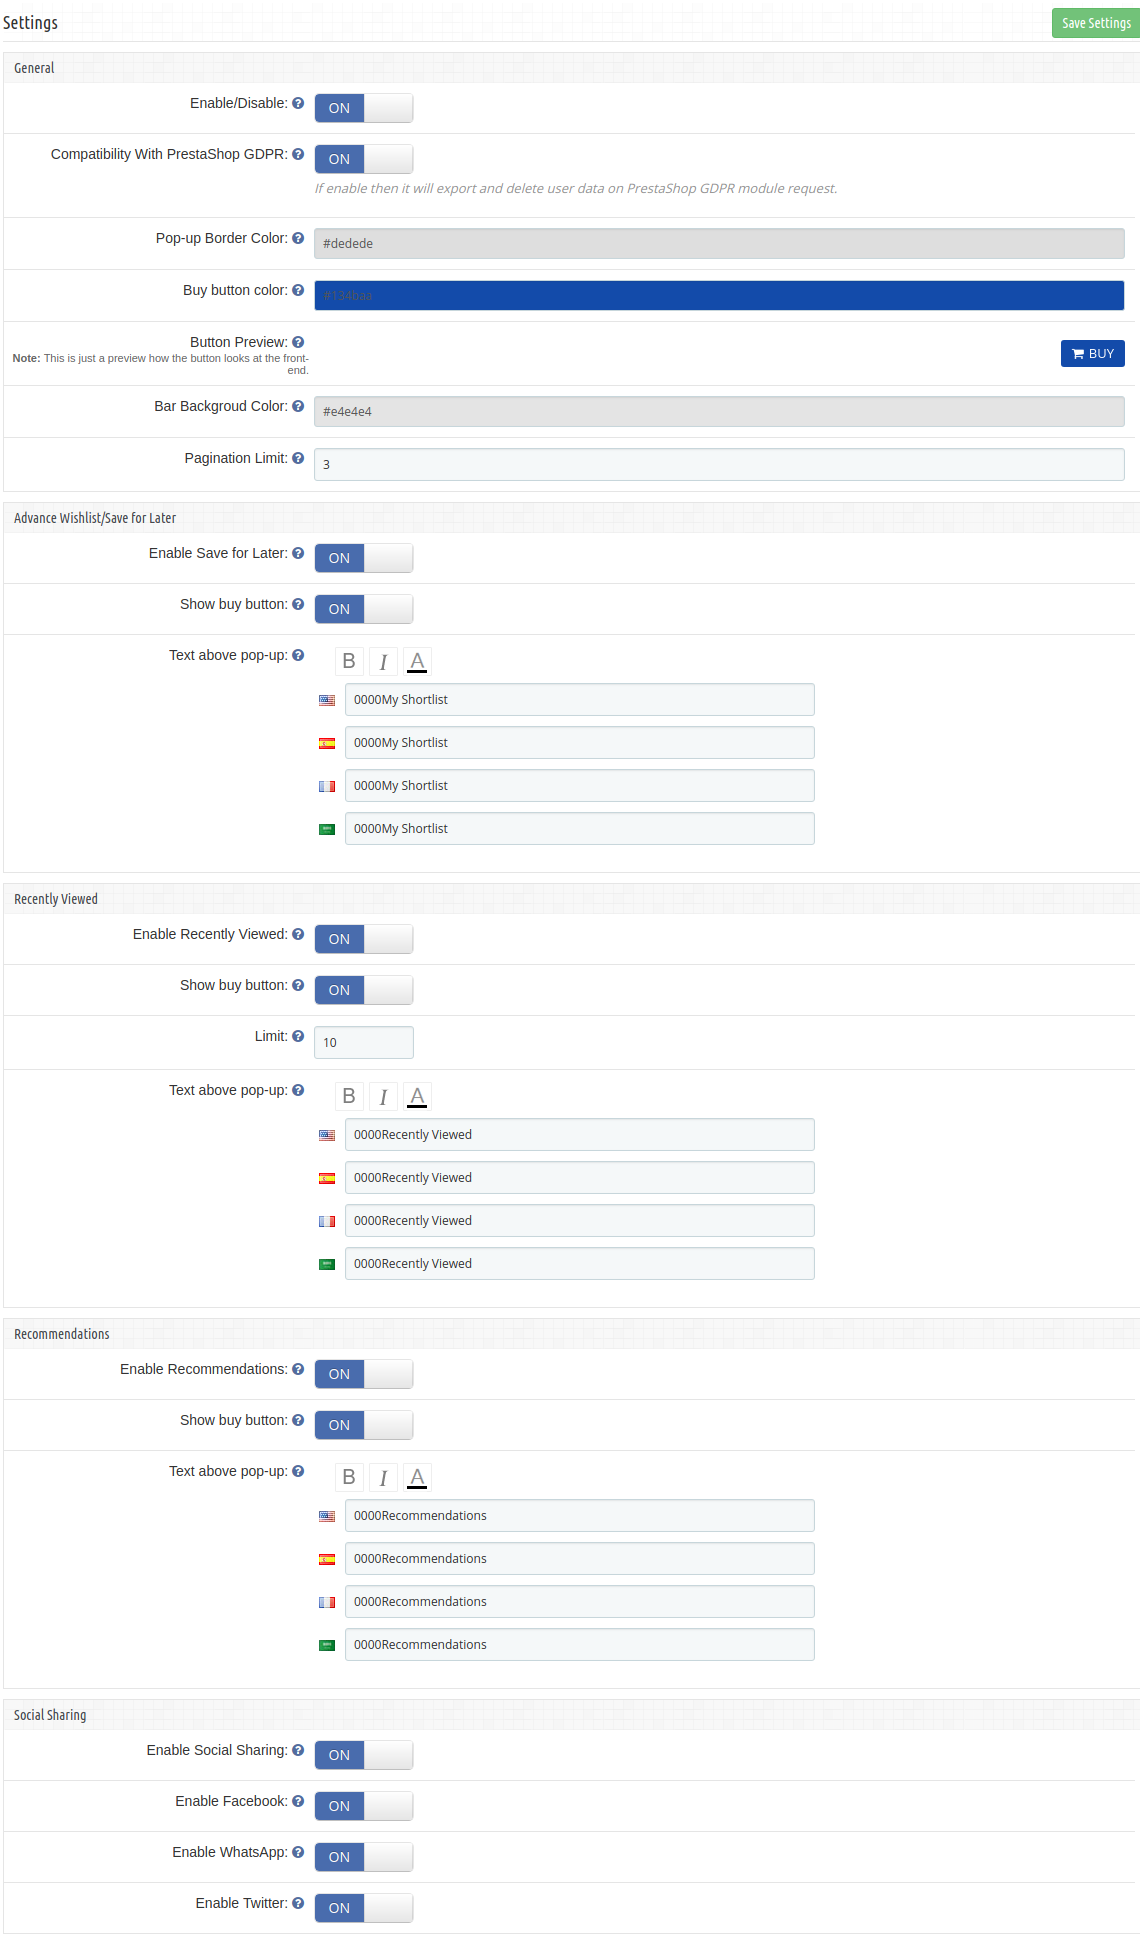
After clicking on the “configure” button, you will see a window like the one mentioned below-
4.0 Admin Interface
After installing the Prestashop wishlist addon into the Prestashop store, the admin interface is designed in such a way that a Prestashop store owner can make the changes without any hassles. There are the following sections available on the admin interface: –
General Settings
Save for Later
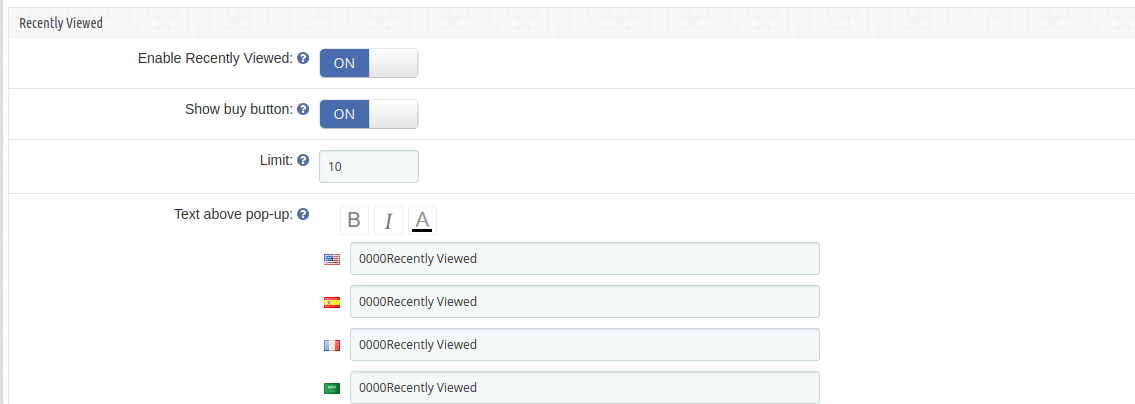
Recently Viewed
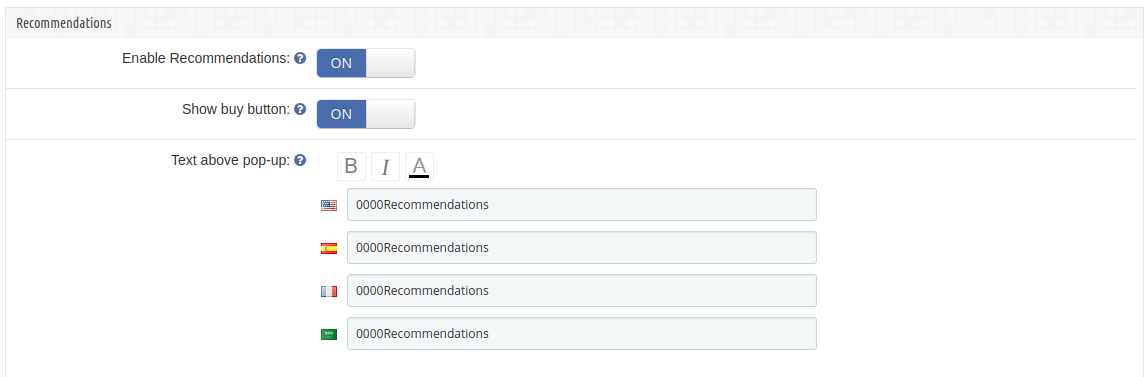
Recommendations
Social Sharing
Recommendations
Product Analysis
Customer Analysis
Order Analysis
Above 5 points are actually one section which comes under “Settings” but as described here as a separate entity for more clarity.
Each section of this Prestashop save for later module is explained below.
4.1 Settings Tab
4.1.1 General Settings
In the General settings tab, we have five options which the admin can use to manage the store;
Below mentioned is the general setting tab image-
This tab contains the following input fields which the Store Owner or the admin can update –
Enable/Disable: Initially, this will be notified as “OFF” And the admin can enable/disable the module by turning ON/OFF this option.
Compatibility with Prestashop GDPR Module: The Admin can enable the GDPR option. The Customer has an access to request the admin to delete and export the personal data from the back-office. The Admin can also export the customer data from the back-end.
Note: If you are using the official GDPR module then you must need to enable this setting. The main purpose of this feature is export and deletes user data on PrestaShop GDPR module request. It is also compatible with Prestashop GDPR Module developed by Knowband.
Pop-up Border Color: This setting enables the admin to change the border color of the pop-ups appearing at the front-end. Initially, it has a default color that best suits the pop-ups.
Buy Button Color: This setting enables the admin to change the buy button color appearing at the front-end, in front of every product in the pop-ups. Initially, it has a default color that best suits the button.
Button Preview: This option is not a setting, it is just a preview window of the buy-button appearing on the front-end. When the color of the buy button is changed using the above setting, then the color of the button preview will change dynamically displaying the current appearance of the buy button.
Bar Background Color: This Prestashop Advanced Wishlist addon enables the admin to change the background color for the bottom bar that appears at every page on the front-end. Initially, it has a default color that best suits the background of the bar.
Pagination Limit: The online merchant can set the number of products which he wants to show in a single page.
4.1.2 Save For later
In this section, the Prestashop Save for later addon allows Store Owner or the admin to update the settings of “My Shortlist” section of the Front-end. Through this section, the Store Owner or the admin can do the following things –
1.Enable/Disable “My Shortlist” section in the Store Front.
2.Show/Hide the Buy button
3. Add some text to “My Shortlist” popup which will be shown at the top of popup.
This Prestashop Advanced Wishlist extension form contains the following input fields which the Store Owner can update:
Enable Save for Later: Initially, this will be displayed as “OFF”. the admin can enable/disable the shortlist option by toggling the button.
Show buy Button : This Prestashop save for later addon allows the admin to choose whether to display the buy button in front of the products in the Shortlist pop-up or not.
Text above pop up: This Prestashop advanced wishlist addon allows the admin to enter the text that should be displayed at the front-end as a heading for the shortlist pop-up. the admin can enter the different text for different languages available in the system and can also customize the appearance (i.e. bold, italic and color of text) of the text using the font-style options.
4.1.3 Recently Viewed
Through this section, the Store Owner or the admin can do following things –
1.Enable/Disable “Recently Viewed” section in Store Front.
2.Show/Hide the Buy button
3.Limit the number of products to display
Add some text to the “Recently Viewed” popup which will be shown at the top of pop-up.
This Section contains the following input fields which the Store Owner or the admin can update –
1. Enable Recently Viewed: Initially, this will be OFF. Admin can enable/disable Recently viewed option by turning ON/OFF this setting.
2. Show buy Button : This setting enables the admin to choose whether to display the buy button in front of the products in the Recently viewed pop-up.
3. Limit: Admin can limit the products to display in recently viewed product section.
4. Text above pop up: This setting enables the admin to enter text that should be displayed at the front-end as a heading for the recently viewed pop-up. The admin can enter different text for different languages available in the system and can also customize the appearance (i.e. bold, italic and color of text) of the text using the font-style options.
4.1.4 Recommendations
In this tab, change the settings for the Recommendations block of the plugin. Here, the admin can recommend various things to the customer as per the need. the admin can enable/disable it and can also customize the text above the recommendations popup.
1.Enable/Disable “Recommendations” section in the Store Front.
2.Show/Hide Buy Button
3.Add some text to the “Recommendations” popup which will be shown at the top of pop-up.
This form contains the following input fields which Store Owner or the admin can update –
1. Enable Recommendations : Initially, this will be OFF. Admin can enable/disable Recommendations option by turning ON/OFF this setting.
2. Show buy Button : This setting enables the admin to choose whether to display the buy button in front of the products(if admin wants to recommends products to customers) in the Recommendations pop-up.
3. Text above pop up : This setting enables the admin to enter text that should be displayed at the front-end as a heading for the Recommendations pop-up. The admin can enter different text for different languages available in the system and can also customize the appearance (i.e. bold, italic and color of text) of the text using the font-style options.
4.1.5 Social Sharing
The online store merchant can allow the online buyers to share wish list products in various Social Media Platform.
Enable Social Sharing: Enable or Disable social sharing option
Enable Facebook: Activate or deactivate to allow users to share wish-listed products on Facebook.
Enable Whatapp: Allow/disallow customers to share products on Whatsapp.
Enable Twitter: Enable the functionality to allow customers to share wish-listed products on Twitter.
5.0 Recommendations
This Prestashop advanced wishlist addon by Knowband allows the Store Owner or the admin to setup the content of Recommendation pop-up to display at Store Front.
There are 3 options available for Store Owner:
1.Banner
2.Related Products
3.Selected Products.
The admin can only choose one of them to display at Store Front as the content of Recommendations Pop-up.
5.1 Banners
Using this option, the admin can upload a maximum of two banners for the recommendations popup, there is also an option to enter the URls for the banners uploaded.
You have to follow steps given below to show banners in Recommendations Pop-up –
Go to the Module and Services -> Module and Services
It would list out all the modules of store. Find ‘Save for Later’ in modules list.
Now click on the ‘Configure’ button given corresponding to the ‘Save for Later’ module.
It would redirect the Store Owner or the admin to a module settings page. Now click on “Recommendations” option listed at left side column.
It would open a new section. Choose “Banner” option. It would display the section where you can upload/change banners (Max. 2) with their Title and Link. You can find the screenshot below –
Click on “Save Recommendation Options” button. It would validate the data and submit the form.
5.2 Related Products
You have to follow the steps given below to show the related products in the Recommendations Pop-up –
Go to the Module and Services -> Module and Services
It would list all the modules of the store. Find ‘Save for Later’ in modules list.
Now click on ‘Configure’
button given corresponding to the ‘Save for Later’ module.It would redirect the Store Owner or the admin to a module settings page. Now click on “Recommendations” option listed at left side column.
It would open a new section. Choose “Related Products” option. You can find the screenshot below –
Click on “Save Recommendation Options” button. It would validate the data and submit the form.
That’s It.
5.3 Selected Products
You have to follow the steps given below to show selected products in Recommendations Pop-up –
Go to the Module and Services -> Module and Services
It would list all the modules of the store. Find ‘Save for Later’ in modules list.
Now click on ‘Configure’ button given corresponding to the ‘Save for Later’ module.
It would redirect the Store Owner or the admin to a module settings page. Now click on “Recommendations” option listed at left side column.
It would open a new section. Choose “Selected Products” option. You can find the screenshot below –
After choosing “Selected Products” option, the module will ask to choose Category and then the Products to display at Store Front. Choose Products and module will list them one by one in a list. The admin can remove selected one from this list if needed.
Click on “Save Recommendation Options” button. It would validate the data and submit the form.
That’s It.
6.0 Product Analysis
This Prestashop save for later addon tab will display the category/product reports in the form of graphs and list. The graph will display top ten categories/products shortlisted by customers in descending order. You can find the screenshot below –
Below is the screen of this Product wishlist module product analysis tab:
1. Filter your analysis: The filter will be used for filtering data. There are folowing parameters on the basis of you can filter report:
Analysis Type: This will be the dropdown list. With this filter, you can change the behavior of report such displaying report for top 10 categories or top 10 products.
Category(s): Here you can select multiple categories to filter the report. This option will be hidden if you select analysis type as Products.
Products: The products will be in this drop-down will be displayed on the basis of categories you have selected. If analysis typeset as Product, it will display all the products.
Start and Date: To Specify start and end date.
Filter: To display filtered data, the user must have to click on this button.
Reset: On clicking this button, the module will reset all parameter and display default report i.e displaying report according to categories.
Export: To export the current report in excel.
2. Category(s)/Product(s) Statistics: This Prestashop wishlist addon by Knowband shows a bar graph which will display top 10 categories or top 10 products on the basis of analysis type.
3. Category(s)/Product(s) List: In this, Prestashop advanced wishlist addon will list all the categories/products in descending order. If the analysis type is “Category” the module will display the category name in this list as clickable. On clicking the category, the module will display how many and which products of this category shortlisted by customers in the pop up box as shown in the below screen:
7.0 Customer Analysis
This Knowband Prestashop advanced wishlist addon shows the tab to display the list of customers with their number of shortlisted products. Here, the admin can also view the products list shortlisted by the particular customer.
1. Filter your analysis: The filter will be used for filtering data. There are folowing parameters on the basis of you can filter report:
Category(s): Here you can select multiple categories to filter the report.
Products: The products will be in this drop down will be displayed on the basis of categories you have selected.
Start and Date: To Specify start and end date.
Filter: To display filtered data, the user must have to click on this button.
Reset: On clicking this button, the Prestashop save for later module will reset all parameter and display default report i.e displaying report according to categories.
Export: To export the current report in excel.
2. Customer Analysis Report: In this, the Prestashop wishlist module will list all the registered customers and guest customers (who have placed an order as the guest) with how many products he/she has shortlisted. The customer email in this link will be clickable. On clicking email, a popup will display to showcase which product he/she has shortlisted and among these, which products are bought by corresponding customers as shown below:
8.0 Order Analysis
This tab is for doing analysis on the basis of how many products are ordered after shortlisted by the customer as shown in below screen:
1. Filter your analysis: The filter will be used for filtering data. There are folowing parameters on the basis of you can filter report:
Category(s): Here you can select multiple categories to filter the report.
Products: The products will be in this drop-down will be displayed on the basis of categories you have selected.
Start and Date: To Specify start and end date.
Filter: To display filtered data, the user must have to click on this button.
Reset: On clicking this button, Prestashop save for later addon will reset all parameter and display default report i.e displaying report according to categories.
Export: To export the current report in excel.
2. Order Report: In this, Prestashop advance wishlist addon by Knowband will list all the products which are shortlisted by customers with Purchased status. This Purchased status will tell you that this product is bought after shortlisted by the same customer.
9.0 Front End
After enabling the Prestashop wishlist addon the front-end user will see a bottom bar at every page of the front-end containing the blocks as they are enabled using the admin panel of the plugin.
The bottom bar at the front-end appears as follows:
PrestaShop Advanced Wishlist Addon 1.6
PrestaShop Advanced Wishlist Addon 1.7
The highlighted Shortlist button will allow customers to shortlist corresponding products into the separate bucket. This bucket displays at the bottom of the page as highlighted in above screen.
When the customer clicks on Shortlist button, the product will be added into bucket and button text will be changed from Shortlist to Added.
My Shortlist Pop-up
This Prestashop advanced wishlist addon by Knowband shows pop-up contains the products that are shortlisted by the customer. The customer can also remove the products from the shortlist by using the cross sign in front of products from the pop-up.
PrestaShop Wishlist Addon 1.6
PrestaShop Wishlist Addon 1.7
Recently Viewed Pop-up
This pop-up contains the products that are recently viewed by the customer. They can directly go to the product detail page of any product listed in this pop-up by clicking on the product name or by clicking on the ‘Buy’ button in front of the respective product.
PrestaShop Advanced Wishlist Addon 1.6
PrestaShop Advanced Wishlist Addon 1.7
Recommendations
Content of this pop-up depends upon the choice of the admin. This Prestashop wishlist addon may have a list of selected products, it may have related products based on the browsing history of the customer or it can also have a maximum of two banners with an option of the link over them.
The recommendation pop-up with banners looks as follows:
PrestaShop Advanced Wishlist Addon 1.6
PrestaShop Advance Wishlist Addon 1.7
The online store admin can provide an option to share wish listed products on social media platforms like Facebook, Twitter and Whatsapp:
Online users can view whatsapp sharing option on their mobile devices:
The online users can view a specific tab for viewing wish list.
The online users can view wishlist on checkout page.
The online users get an option to move any cart product in wishlist:
Important Things
Refresh home page of your store every time you enable/disable plugin. If Prestashop favorite product list module is not working after installation then please check permissions on modules folder. The folder should be writable. Please make the folder permission to 755.
Before Installing Prestashop wishlist module, please check that Customer.php file already exists in root/override/classes/ folder. if yes, then Please remove it and clear the cache. We prefere that if exist, then please contact to our support to doing the same.
Now you can try Prestashop advanced wishlist addon by Knowband for on your Prestashop website. KnowBand Prestashop save for later addon helps you engage more customer to your store & increase the customer base.
There is a constant complaint among numerous online shoppers that they are not informed actively about other similar products or recommendations while making a purchase through an eCommerce store. This not only affects their shopping behavior but also has an adverse impact on the conversion rates, customer engagement and product sales of your eCommerce site. But, this would not be case with the PrestaShop store owners anymore as Knowband, a leading name in the field of eCommerce modules development has come up with this amazing PrestaShop Automatic Related Products Module that can provide instant product recommendations to customers while doing online shopping. It is really a massive game changer in the eCommerce world and can change the business fortunes of numerous PrestaShop sites around the world. Let us explore this PrestaShop extension in detail for redefining the online shopping experience for your targeted customers.
USP features of this PrestaShop extension :
This wonderful module from Knowband is simply amazing in more than one way. It is equipped with numerous features and functionalities that makes its unique among other available eCommerce modules. Those features are explained below:
1. Provides related product information about the current product-
For boosting your product sales and conversion rates, this PrestaShop extension has the functionality that allow online shoppers to get the various related products or product recommendations while purchasing a particular product. With this feature, customers can be easily persuaded to shop more and PrestaShop store owners can effortlessly improve your product sales and conversion rates.
2. Supports various mobile based devices-
This PrestaShop Automatic Related Products module is built on a responsive mobile design that makes it easier to be used on multiple devices like desktops, laptops, smart phones or tablets. This development ensures that the customers get the same functionality and user experience irrespective of the device used by them.
3. Works independently with other themes and browsers-
Now, PrestaShop store owners can use this PrestaShop extension without any trouble as it can work independently irrespective of the themes and browsers used by the site owners. With this addon, you don’t need any other update or extension to work seamlessly on any browser and theme.
4. Provides freedom to display the product on desired location-
With the various features of this amazing addon, you can now decide about where to display your related products on your PrestaShop site for grabbing the instant attention of the targeted customers. These related products can be shown on the left or right column of your PrestaShop site in order to persuade people to shop more through your online store.
5. Flexibility to show the related products according to the choice-
One of the specialty of this PrestaShop extension is that it allows site owners to display the related products according to their choice and preference. Apart from this, site admin can effortlessly configure the each product individually for boosting their product sales, site traffic and customer engagement.
6. It can be easily installed and configured-
This PrestaShop Automatic related product addon can be easily installed and configured by any individual having the basic knowledge about computers. But, if you still encounter any issue related to this addon, you can easily contact us any time for getting effective resolution of your problem.
7. It is faster in loading along with compatibility for SSL and multiple stores-
Compared to the other eCommerce modules that aim to improve the online shopping experience, this module load pages quickly and is compatible with the SSL for providing the enhanced shopping experience. Further, this PrestaShop extension can be effectively used for any eCommerce store regardless of the nature and size of its business.
For grabbing the immediate attention and for enhanced online shopping experience, this PrestaShop Automatic Related Products module is definitely the right choice to make. For more information about our other amazing modules for PrestaShop, Magento and OpenCart customers, you need to visit our eCommerce site at knowband.