Launched in April 2019, Eddie Sale is a growing UK-based electronics store that offers affordable, reliable gadgets and tech products. Founded by Amanda White, the store was built on the OpenCart platform to avoid the high monthly fees of SaaS-based eCommerce solutions.
As the online marketplace grew more competitive and customer expectations changed, Amanda realized the store needed smarter solutions to stay ahead. That’s when she discovered Knowband’s Opencart plugins, which ended up revolutionizing how the business operates.
“I spent hours writing product descriptions, but I was still not happy when I read the content of the products.” Amanda White said.
Mobile App Revolution
Amanda used the OpenCart Mobile Builder App which helps her to launch her own app for the store without any coding expertise. Additionally, Amanda revealed that more than 65% of her traffic now comes from mobile devices. “We were totally missing the mobile traffic before” she admitted.
The team took a chance on Knowband’s Mobile App Builder without huge expectations. The results surprised everyone with how quickly things changed.
Results were amazing:
Mobile orders jumped 40% in just two months
Average session time went from a measly 2 minutes to over 6
The Knowband’s OpenCart ChatGPT AI Content Generator Module helps the store to generate the product description as well as meta details and obviously category details. Moreover, this module became a game-changer for Eddie Sale, especially when it came to handling product and category content.
Before using the AI content generator, Amanda had to manually write every single product description, category text, and SEO meta detail.
Implementing Knowband’s AI Content Generator:
Generated and translated the content for products
They expanded into 3 new language markets almost accidentally
The team reclaimed 40+ hours monthly for customer service
Organic traffic climbed 28% from the SEO benefits
Moreover, Amanda’s take was refreshingly honest: “The content was very informative and good. When I first read the description of my own products, it really looked motivating”
Smart Cross-Selling That Actually Works
Cross-selling pr showing related products was once a tough task by manual process that required constant updating and monitoring. Also, since downloading Knowband’s Automatic Related Product module, customers now seamlessly see relevant suggestions based on their browsing history and cart items or the product that they want.
Results:
Average cart value increased by $23.40 (28%)
Customers spent longer exploring the site
Their electronic sections, like audio gadgets, previously underperforming, started connecting with their customers
Opencart Visual Appealing Stickers Plugins
Meanwhile, by using Knowband’s Opencart Product Sticker Module, Eddie Sale strategically added visual labels like “Hot,” “New,” “Limited Stock,” and “Sale” to highlight top products and create a sense of urgency. This visual enhancement strategy led to:
Get 25% more clicks on products with stickers
Help customers decide faster
Reduce the time it takes to make a purchase
Make the store look more attractive and professional
Eddie Sale is an online electronics store started by Amanda White in April 2019. Amanda wanted to run her store without paying monthly fees, so she chose OpenCart, a platform that gave her full control.
The store offers a variety of affordable gadgets, tech accessories, and smart devices. Amanda’s goal was to make good tech products easy to find and easy to buy. Furthermore, instead of hiring expensive teams, she used smart tools from Knowband to automate tasks like writing product descriptions, translating content, and improving SEO. Significantly, the Opencart ChatGPT Module helped her grow the store faster and save time
With Knowband’s OpenCart extensions, Amanda transformed her store’s operations:
Delivered a smooth, app-like mobile shopping experience that increased mobile conversions.
Eliminated the guesswork and repetitive tasks of manually adding the content and around translating product content and SEO.
Entered new markets effortlessly by auto-translating content into different languages.
Boosted average cart values with smart cross-selling, showing customers what they didn’t know they needed.
Captured attention and drove urgency with clean, strategic product stickers that increased click-through Rate
She improved organic discoverability through AI-enhanced metadata and keyword-rich content
Final Thoughts:
Running an online store isn’t easy — it takes time, effort, and the right tools to stand out in a competitive market. However, as Amanda’s story shows, with the help of smart solutions like Knowband’s OpenCart plugins, even a small team can achieve big results.
Whether you’re just starting your eCommerce journey or you’re ready to take your store to the next level, these extensions can help you work smarter, not harder. Moreover, these tasks take care of repetitive tasks, improve user experience, and give you more time to focus on what matters — growing your business.
In today’s highly competitive eCommerce landscape, having a well-designed and feature-rich website is essential for success. Whether you’re using OpenCart, PrestaShop, WooCommerce, Magento 2, or any other eCommerce platform. Certain features are crucial to provide a seamless shopping experience for your customers.
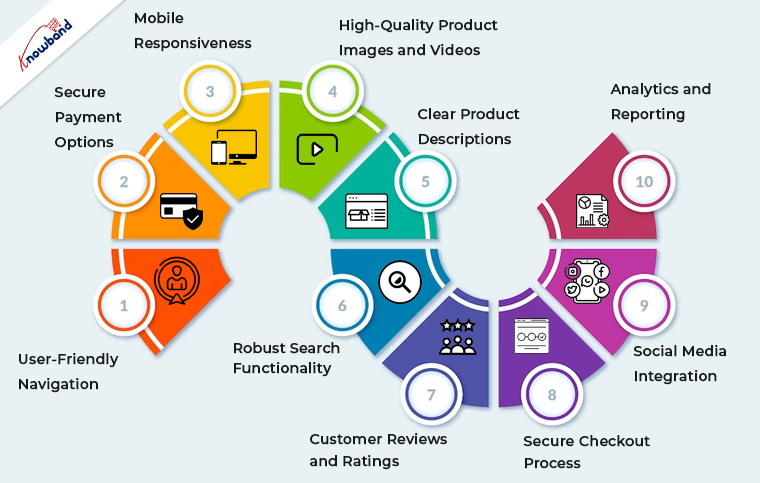
Following the same, in this article, we’ll explore the ten essential features your eCommerce website should have to drive sales, enhance user satisfaction, and stay ahead in the game.
1. User-Friendly Navigation of Mobile App Builder:
Smooth and intuitive navigation is the foundation of any successful eCommerce website and Mobile App for Opencart, Woocommerce, Magento, and Prestashop. Thus, you can implement clear and logical menus, filters, and search functionality to help users find products effortlessly. Furthermore, you should always ensure that your website is responsive, catering to both desktop and mobile users.
2. Secure Payment Options:
Online shoppers demand secure payment options. The reason behind the same is that modern customers prefer security and safety while completing payments. Thus, you can integrate reputable payment gateways, such as PayPal, Stripe, or Square, to instill trust and offer various payment methods, including credit cards, digital wallets, and bank transfers.
3. Mobile Responsiveness:
The number of mobile users is way more than the number of desktop ones. Therefore, mobile commerce is on the rise, and your website must be optimized for mobile devices. Furthermore, a responsive design ensures that your site looks and functions seamlessly on smartphones and tablets.
4. High-Quality Product Images and Videos:
Visual appeal is paramount in eCommerce. Use high-resolution images and, when possible, product videos to showcase your offerings from multiple angles.
5. Clear Product Descriptions:
Accurate and detailed product descriptions are crucial for transparency and SEO. Include essential information, such as product specifications, sizes, colors, and any relevant details that aid customers in making purchase decisions.
6. Robust Search Functionality:
Search is one of the most important features of an eCommerce website. Thus, you can implement a powerful search feature with filters to help users narrow down their product choices quickly. This feature is particularly important for stores with extensive inventories.
7. Customer Reviews and Ratings:
Customer feedback builds trust. Furthermore, positive reviews can sway potential buyers, while constructive criticism helps you improve your offerings.
8. Secure Checkout Process:
Streamline the checkout process to minimize cart abandonment. Ensure a secure and hassle-free experience by integrating SSL certificates and providing multiple shipping and payment options.
9. Social Media Integration:
Leverage the power of social media by integrating sharing buttons and showcasing your social profiles. This facilitates user engagement and allows customers to share their favorite products with their networks.
10. Analytics and Reporting:
Collect and analyze data about your website’s performance and customer behavior. Moreover, tools like Google Analytics provide insights into traffic, conversion rates, and user demographics. Thus, you can use these insights to refine your marketing strategies and improve your site continually.
Why OpenCart, PrestaShop, WooCommerce, and Magento 2?
These essential features apply to eCommerce websites built on various platforms, including OpenCart, PrestaShop, WooCommerce, and Magento 2. Here’s how they relate to each platform:
OpenCart:
OpenCart is known for its user-friendly interface, making it easy to implement essential features like navigation, product descriptions, and secure payment options.
PrestaShop:
PrestaShop offers robust out-of-the-box features, making it an excellent choice for responsive design, powerful search functionality, and analytics integration.
WooCommerce:
As a WordPress plugin, WooCommerce combines seamlessly with WordPress themes, making it ideal for integrating high-quality images, videos, and social media elements.
Magento 2:
Magento 2 is a versatile platform that excels in secure payment options, customer reviews, and ratings. Its advanced analytics and reporting capabilities are also top-notch.
Wrapping Up!
In conclusion, having these ten essential features on your eCommerce website, regardless of the platform you choose, is critical for attracting and retaining customers. Your website’s design, functionality, and security are all key factors in building trust and driving sales. Evaluate your current website against these criteria and consider implementing any missing features to create a compelling shopping experience for your customers. Remember, a well-optimized eCommerce website is a valuable asset in today’s digital marketplace.
Ensure that you regularly update and maintain your site to meet evolving customer expectations and industry trends. By doing so, you’ll be well on your way to eCommerce success, regardless of the platform you use.
OpenCart is a popular PHP-based CMS platform that allows eCommerce merchants to start their online shop without specific coding skills.
Today, we’re diving into the world of OpenCart and exploring the latest release – OpenCart 4.0. As an e-commerce entrepreneur, you know the importance of staying up-to-date with the latest technologies and trends. To ensure your online store remains competitive. With the release of OpenCart 4.0, you might be wondering whether it’s time to upgrade your shop. Well, the answer depends on various factors and your business needs. Let’s take a closer look at the features and improvements this new version offers and help you make an informed decision.
About OpenCart 4.0:
OpenCart is a popular open-source e-commerce platform thousands of online merchants use worldwide. Known for its user-friendly interface and extensive range of extensions. It has been a reliable choice for setting up and managing online stores. Therefore, OpenCart 4.0 is the latest major release, promising significant advancements over its predecessors.
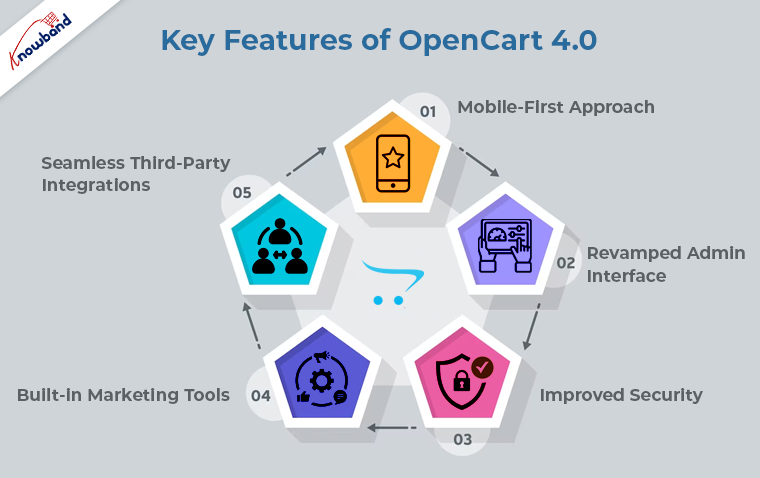
Key Features of OpenCart 4.0:
Enhanced Performance: With the ever-increasing demand for faster and more responsive online shopping experiences. OpenCart 4.0 boasts substantial performance improvements. Further, with the major upgrade, the page load times are reduced, leading to better SEO rankings and, ultimately, higher customer satisfaction.
Mobile-First Approach:
Mobile shopping continues to dominate the e-commerce landscape. Following the same, OpenCart 4.0 is built with a mobile-first approach. Ensuring your store looks and performs flawlessly on all devices, from smartphones to tablets. Furthermore, if you are willing to launch the Android and iOS Apps for your Opencart store, you can also check out Knowband’s OpenCart Android and iOS Mobile App Builder Plugin.
Revamped Admin Interface:
The administration dashboard receives a complete overhaul, making it more intuitive and easier to navigate. Store owners can now manage products, orders, and customer data more efficiently, saving time and effort. Therefore, it is considered one of the major improvements from the store admin perspective.
Improved Security:
Cybersecurity is a top priority for any online business. OpenCart 4.0 addresses this concern with strengthened security measures, providing a safer environment for both merchants and customers.
Built-in Marketing Tools:
OpenCart 4.0 introduces new marketing tools, such as advanced analytics, personalized recommendations, and targeted promotions. Furthermore, these tools are designed to help you reach your target audience more effectively and increase conversions.
Seamless Third-Party Integrations:
The latest version offers enhanced compatibility with various third-party integrations. Enabling you to easily connect your store with popular payment gateways, shipping providers, and other essential services.
Should You Upgrade to OpenCart 4.0?
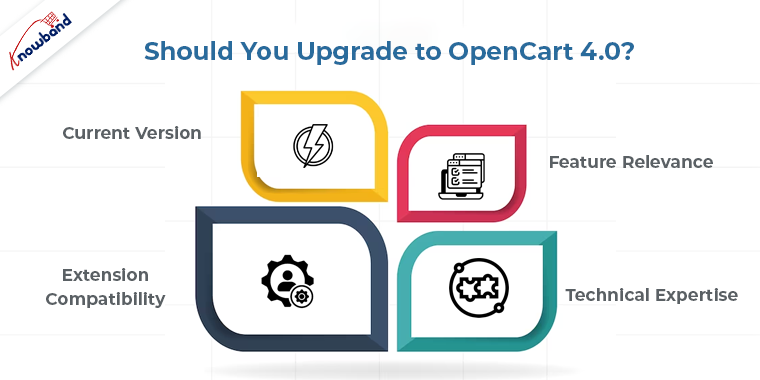
Now that we’ve explored some of the exciting features of OpenCart 4.0, the big question is whether you should upgrade your shop. Here are a few factors to consider before making the decision:
Current Version:
If you are still running an older version of OpenCart, upgrading to the latest release is highly recommended. Newer versions often come with bug fixes, performance enhancements, and security updates that will benefit your store.
Feature Relevance:
Evaluate the new features of OpenCart 4.0 and determine if they align with your business needs. If the enhancements directly address your current pain points, upgrading could significantly improve your store’s performance and customer experience.
Extension Compatibility:
If your store relies heavily on third-party extensions, check their compatibility with OpenCart 4.0. Some extensions may not be immediately compatible, so it’s crucial to ensure that your essential plugins are ready for the upgrade. Furthermore, you can also check out a wide range of OpenCart Plugins offered by Knowband for more information.
Technical Expertise:
Upgrading an e-commerce platform requires technical knowledge. If you lack experience in handling such updates, consider seeking assistance from a developer or a reliable e-commerce agency. Moreover, you can also reach out to us at support@knowband.com to safely move your data from the older version to the latest OpenCart 4.0.
Conclusion!!
OpenCart 4.0 presents an exciting array of features and improvements that can potentially elevate your online store to new heights. However, the decision to upgrade should be taken thoughtfully. Considering factors like your store’s current version, feature relevance, extension compatibility, and technical capabilities.
By making an informed decision, you can leverage the power of OpenCart 4.0 to provide your customers with an exceptional shopping experience, improve your store’s performance, and stay competitive in the ever-evolving world of e-commerce. Remember to back up your data before attempting any major upgrades and, if possible, test the new version in a staging environment to ensure a smooth transition.
So, is it time to upgrade your shop to OpenCart 4.0? The answer lies in your unique business requirements and growth aspirations. Happy selling!
OpenCart is an open-source e-commerce platform that allows businesses to create an online store and sell products or services. Not only Opencart is one of the most popular eCommerce platforms but also it provides a quite simple interface to eCommerce merchants. Furthermore, the sellers can add as many features as they want to the Opencart online shop by using OpenCart Extensions. Moreover, it is possible without having literally zero coding knowledge.
Not only the Opencart plugins are easily available but they also save a lot of money to the sellers. For the same reason, more and more eCommerce sellers are migrating their online shops to the OpenCart platform.
Thus, if you’re currently using a different e-commerce platform and want to switch to OpenCart, or if you want to upgrade your current version of OpenCart. Then, you need to perform a migration. It can be a challenging process, but with careful planning and execution, you can migrate your store successfully. Or, you can also feel free to reach out to us for OpenCart migration.
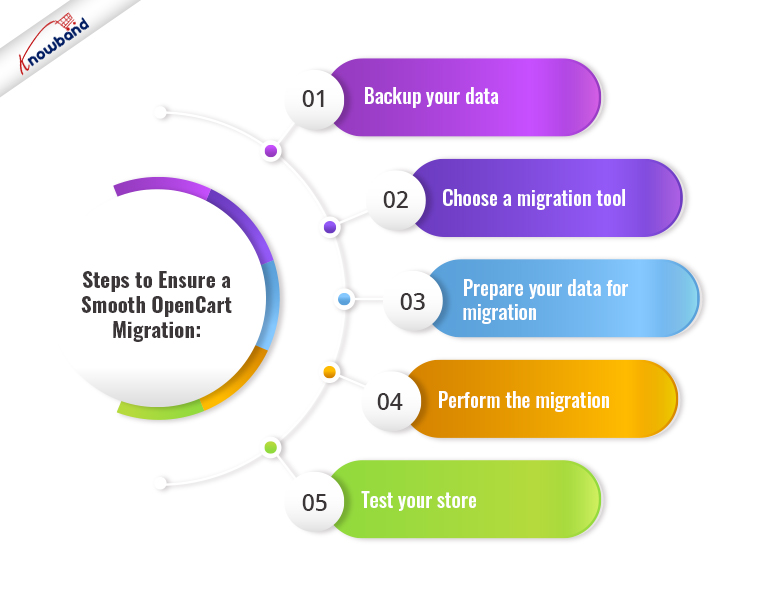
Steps to Ensure a Smooth OpenCart Migration:
Backup your Data
Before you begin the migration process, make sure you back up all your store data, including products, orders, customers, and configurations. This is essential because if anything goes wrong during the migration, you’ll have a backup of your data to restore from. There are several backup plugins available in OpenCart that can help you automate the backup process.
Choose a Migration Tool
To perform a migration, you’ll need to use a migration tool. There are several migration tools available, both free and paid, that can help you migrate your data from your current e-commerce platform to OpenCart. Make sure you choose a tool that supports your current platform and has a good track record of successful migrations.
Prepare your Data for Migration
Before you begin the migration process, you’ll need to prepare your data for migration. This includes cleaning up your data, removing any unnecessary data, and ensuring that your data is compatible with OpenCart. For example, you can remove spam customers from your customer list. This step is crucial because if your data isn’t properly prepared, it could cause errors during the migration process.
Perform the Migration
Once you’ve backed up your data, chosen a migration tool, and prepared your data for migration, you’re ready to perform the migration. The migration process will vary depending on the tool you’re using. In general, you’ll need to follow the instructions provided by the tool to transfer your data from your current platform to OpenCart.
Test your Store
After the migration is complete, you need to test your store thoroughly to ensure everything is working correctly. This includes testing your store’s functionality, design, and performance. You may also need to make some tweaks to your store to ensure it’s optimized for OpenCart.
Upgrading OpenCart: For the Existing Users!
Opencart has recently launched the latest version 4.0.0. According to the platform, the new version comes with a lot of performance enhancements along with new features. Thus, if you’re already using OpenCart and want to upgrade to a newer version, the process is relatively straightforward.
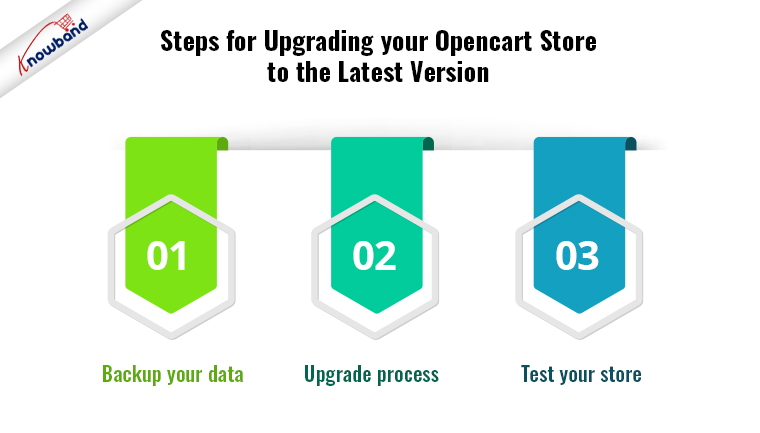
Steps for Upgrading your Opencart Store to the Latest Version
Backup your Data
Backing up the old data is the most important part of doing any changes on your website. The same applies to the OpenCart upgrade. It ensures that you have a backup of your data in case anything goes wrong during the upgrade process.
After having the back-up ready the next step is checking the compatibility. Before you upgrade, you need to check that your current store is compatible with the new version of OpenCart. Check the system requirements and ensure that any third-party extensions or plugins you’re using are compatible with the new version. However, you can also check out Knowband’s Opencart Extensions which are perfectly tailored for the latest OpenCart versions and are compatible with all the Opencart themes.
Upgrade Process
Once you’ve backed up your data and ensured compatibility, you’re ready to upgrade. The upgrade process will vary depending on the version you’re upgrading from and to, but in general, you’ll need to follow the instructions provided by OpenCart to upgrade your store.
Test your Store
For the final touch, after the upgrade is complete, you need to test your store thoroughly to ensure everything is working correctly. This includes testing your store’s functionality, design, and performance. You may also need to make some tweaks to your store to ensure it’s optimized for the new version of OpenCart.
Conclusion!!
Migrating or upgrading your store to OpenCart can be a challenging process, but it’s essential to ensure that your store remains up-to-date and optimized for your customers. However, it is required to have a good knowledge of PHP coding concepts before proceeding to upgrade or migrate to OpenCart. Whether you’re migrating from a different e-commerce platform or upgrading your current version, you can feel free to find us at our email address support@knowband.com for any sort of assistance.
Looking for a viable point of interaction to deal with the product listing, inventory, and orders? OpenCart Etsy Integration Extension presented by Knowband is the right tool. The OpenCart Etsy Integration deals with the exercises on the stage. For example, product listing, inventory, and orders. As a matter of fact, the administrator can do this from the administrator board of the OpenCart Etsy Marketplace Integration.
Why use OpenCart Etsy Integration Plugin to sell on the Etsy marketplace?
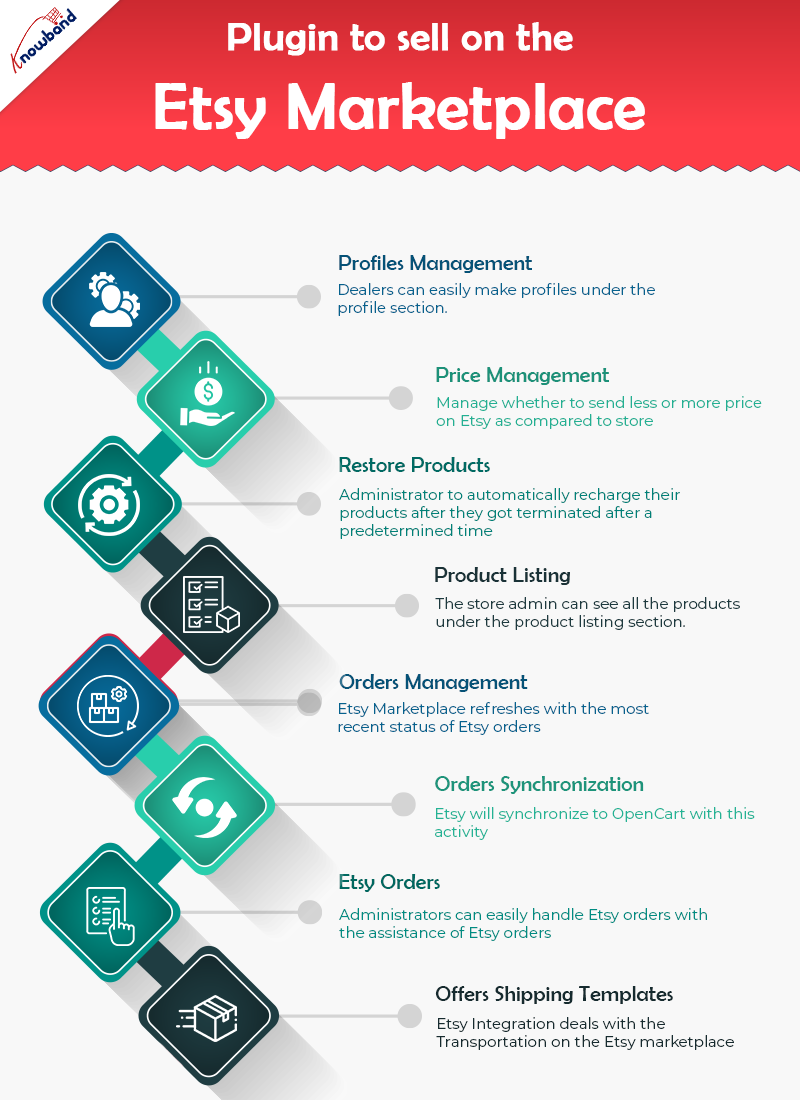
OpenCart Etsy Connector oversees profiles easily
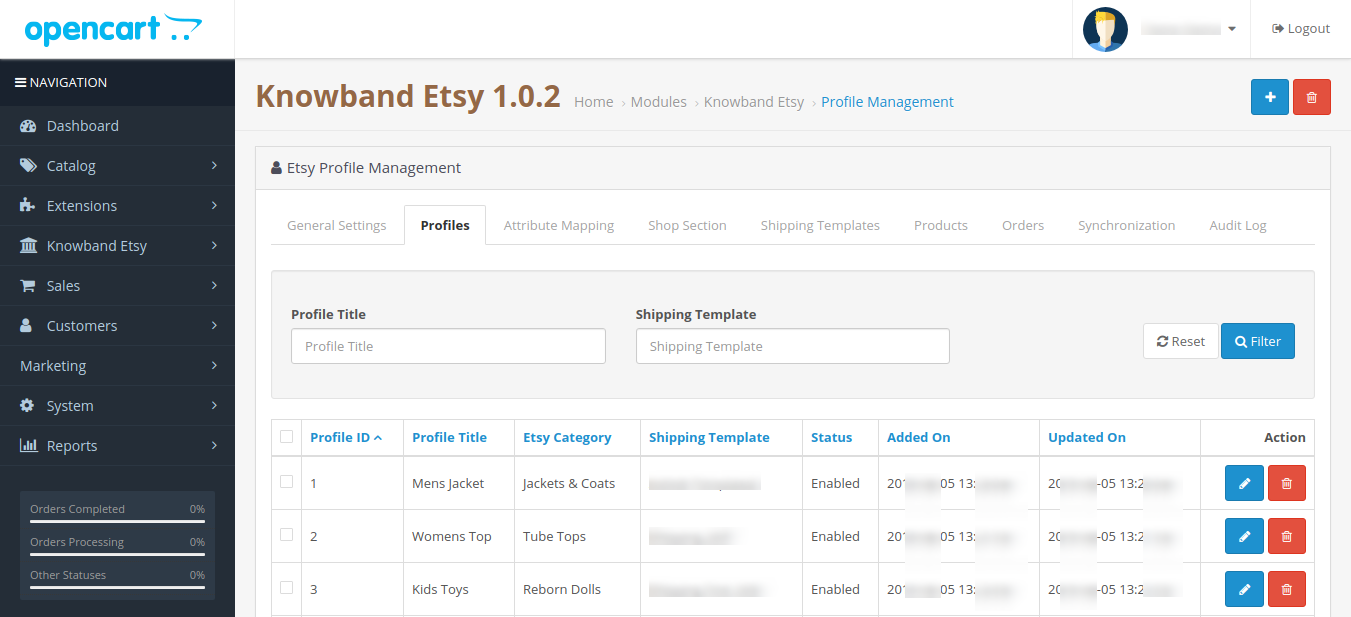
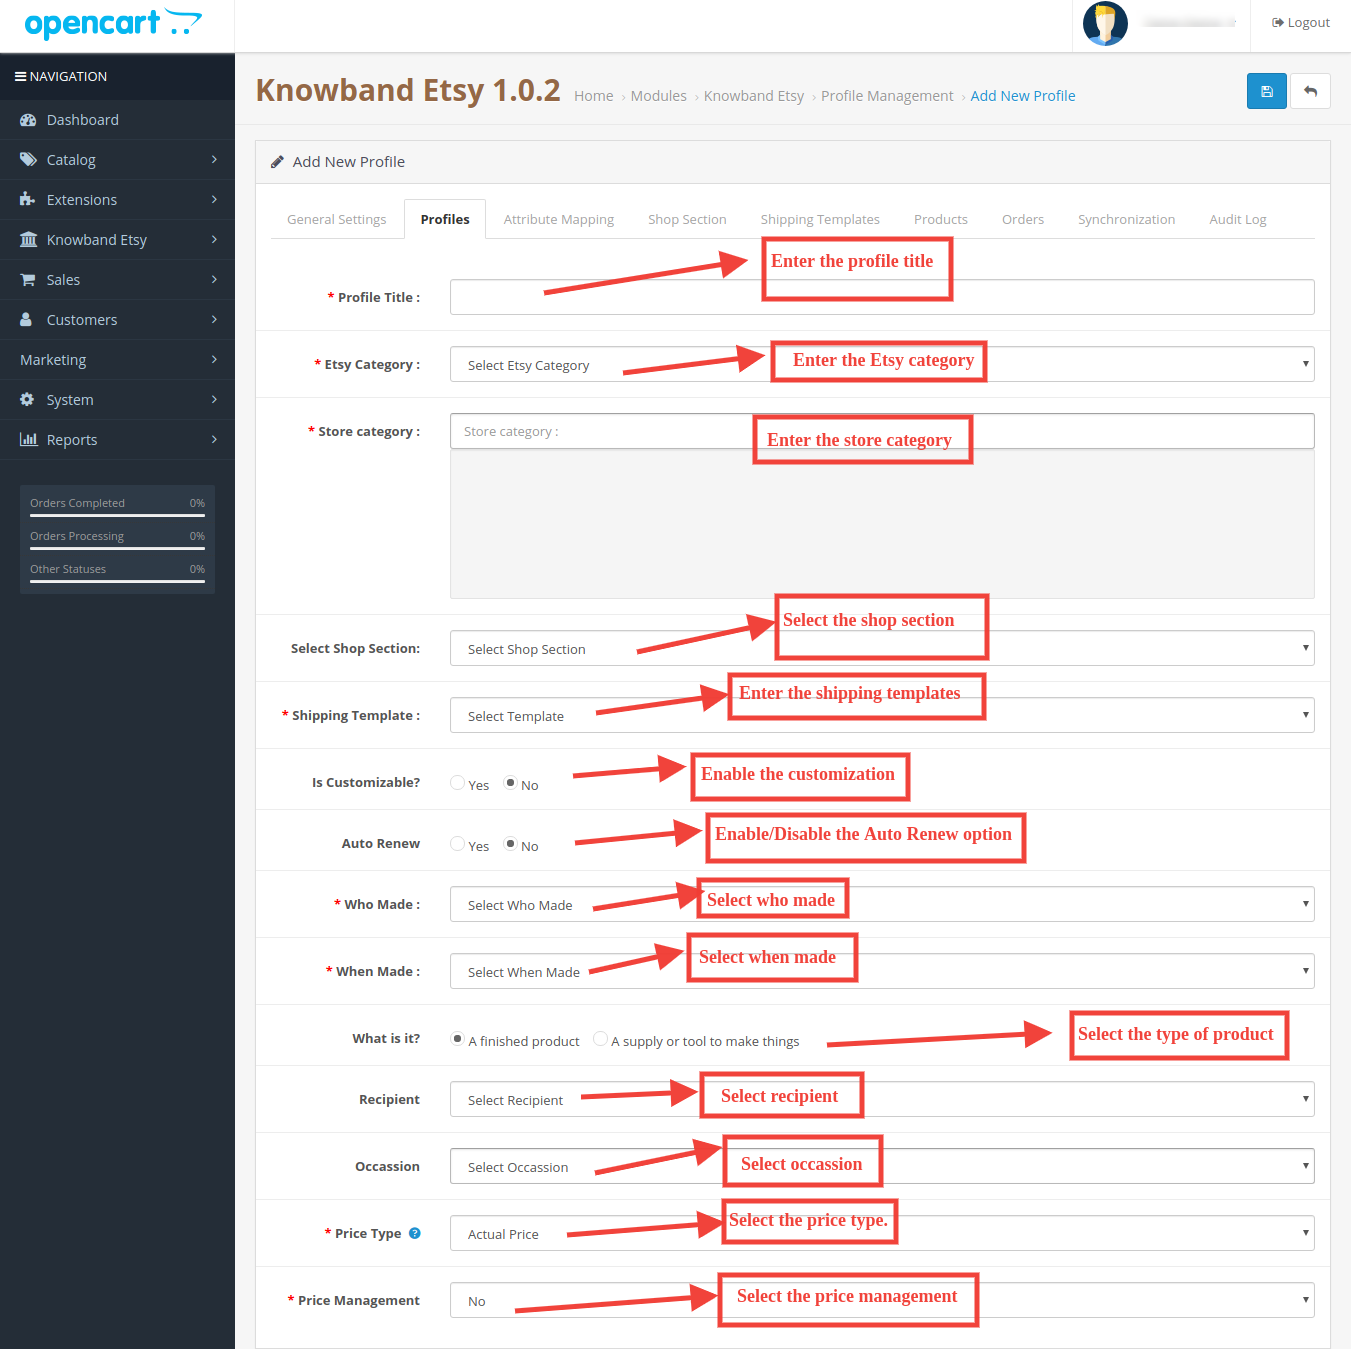
The profile component of the module helps dealers in making profiles. In addition, select the essential settings to list the product. Moreover, the necessary strides to make a profile are – the Select Shop Section, Auto-Renew Option, and a couple of different fields. Further, to plan the OpenCart store class to the Etsy Marketplace classification.
Price Management is a highlight in the Etsy OpenCart Connector
The OpenCart Etsy Integrator permits administrators to put their products on the Etsy marketplace. Further, at an unexpected cost in comparison to the one in their OpenCart store. The Etsy OpenCart Integration incorporates the capacity to list products in light of a fixed or rate-based sequential cost.
Automatically restore products
The OpenCart Etsy API integration gives an auto-recharge highlight. Further, that allows the administrator to automatically recharge their products after they got terminated after a predetermined time. Also, you will track down this element under the Profiles tab of Etsy OpenCart API integration.
Product Listing
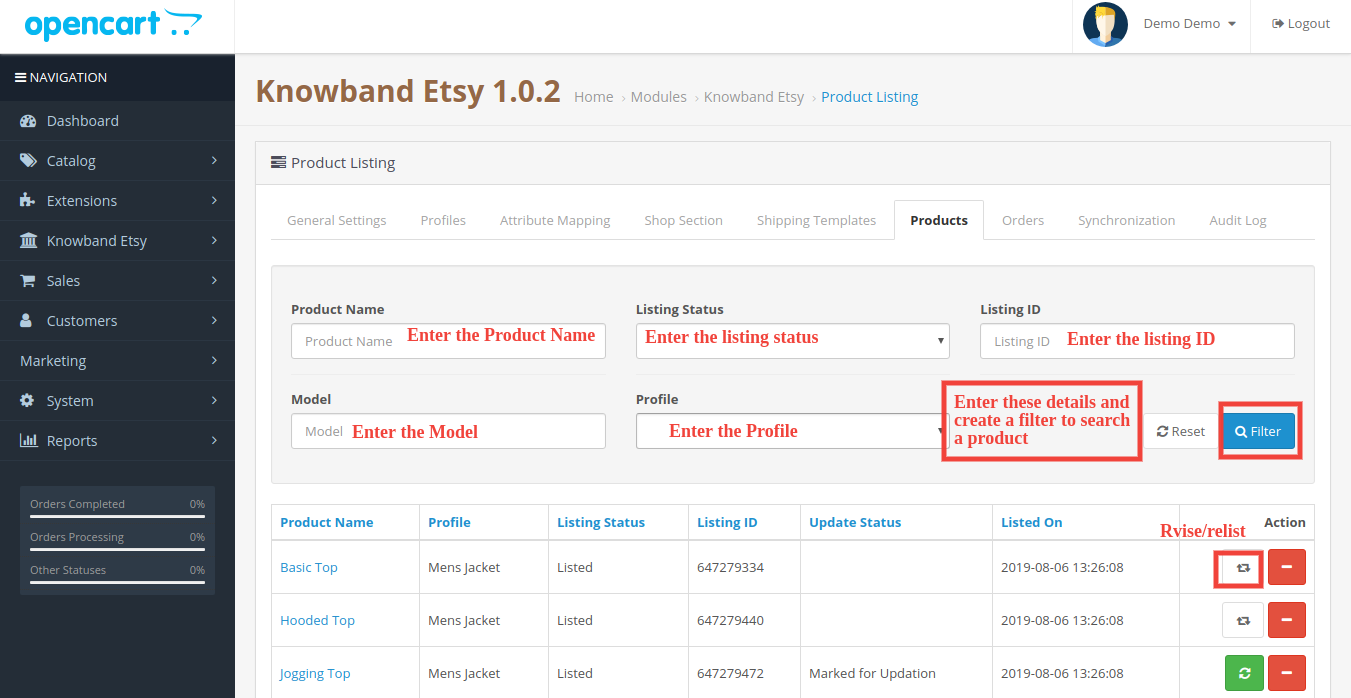
Administrators can see every one of the products including those which should be listed on the Etsy marketplace. Further, it is under the product listing tab of the OpenCart to Etsy Synchronization. Besides, products that are right now distributed on Etsy can likewise be seen under the product listing tab. The administrator can see the product picture and that’s just the beginning, in fact. For instance, Etsy Listing Id, Name, Profile to which the product coordinates, Listing Status, and Date Added. By tapping on the product name on the Etsy store page, administrators can see their listed product.
Orders Management
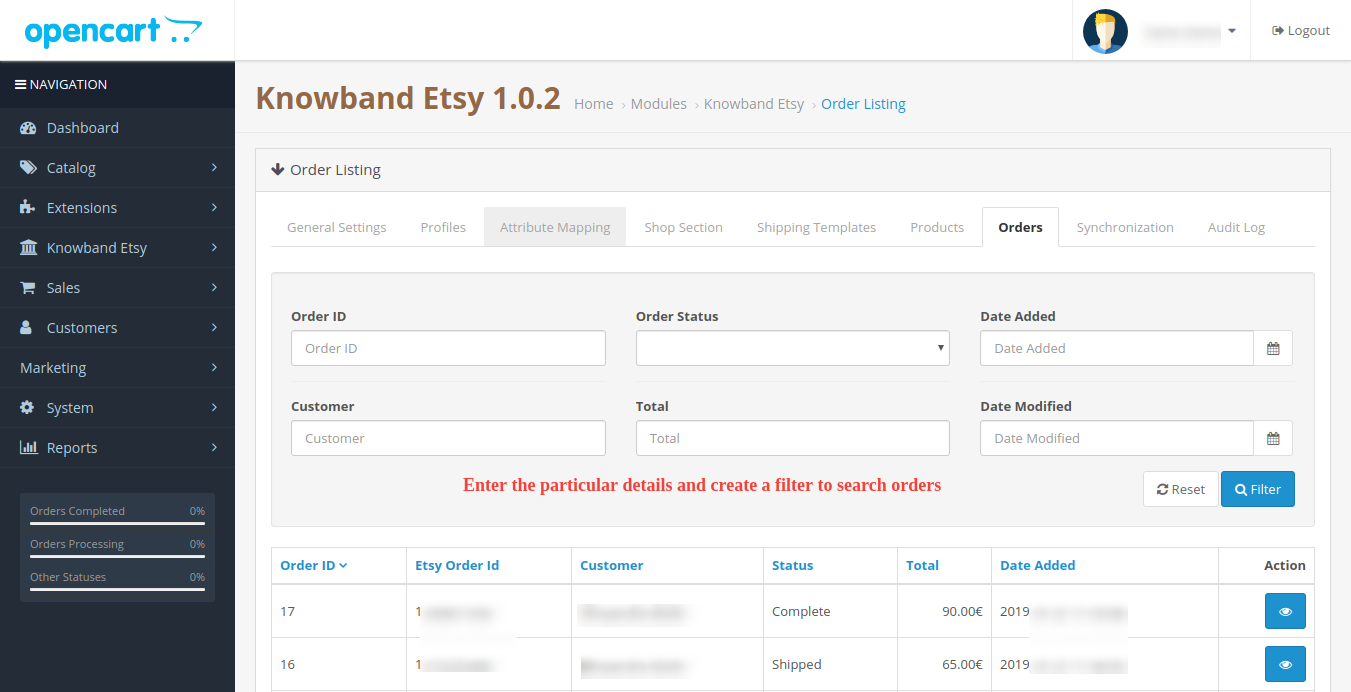
The order executives component of OpenCart Etsy Integration Extension assists vendors with synchronizing the Etsy store orders to the Opencart store. The element even cycles the orders from the Opencart store itself. Further, the Etsy Marketplace refreshes with the most recent status of Etsy orders.
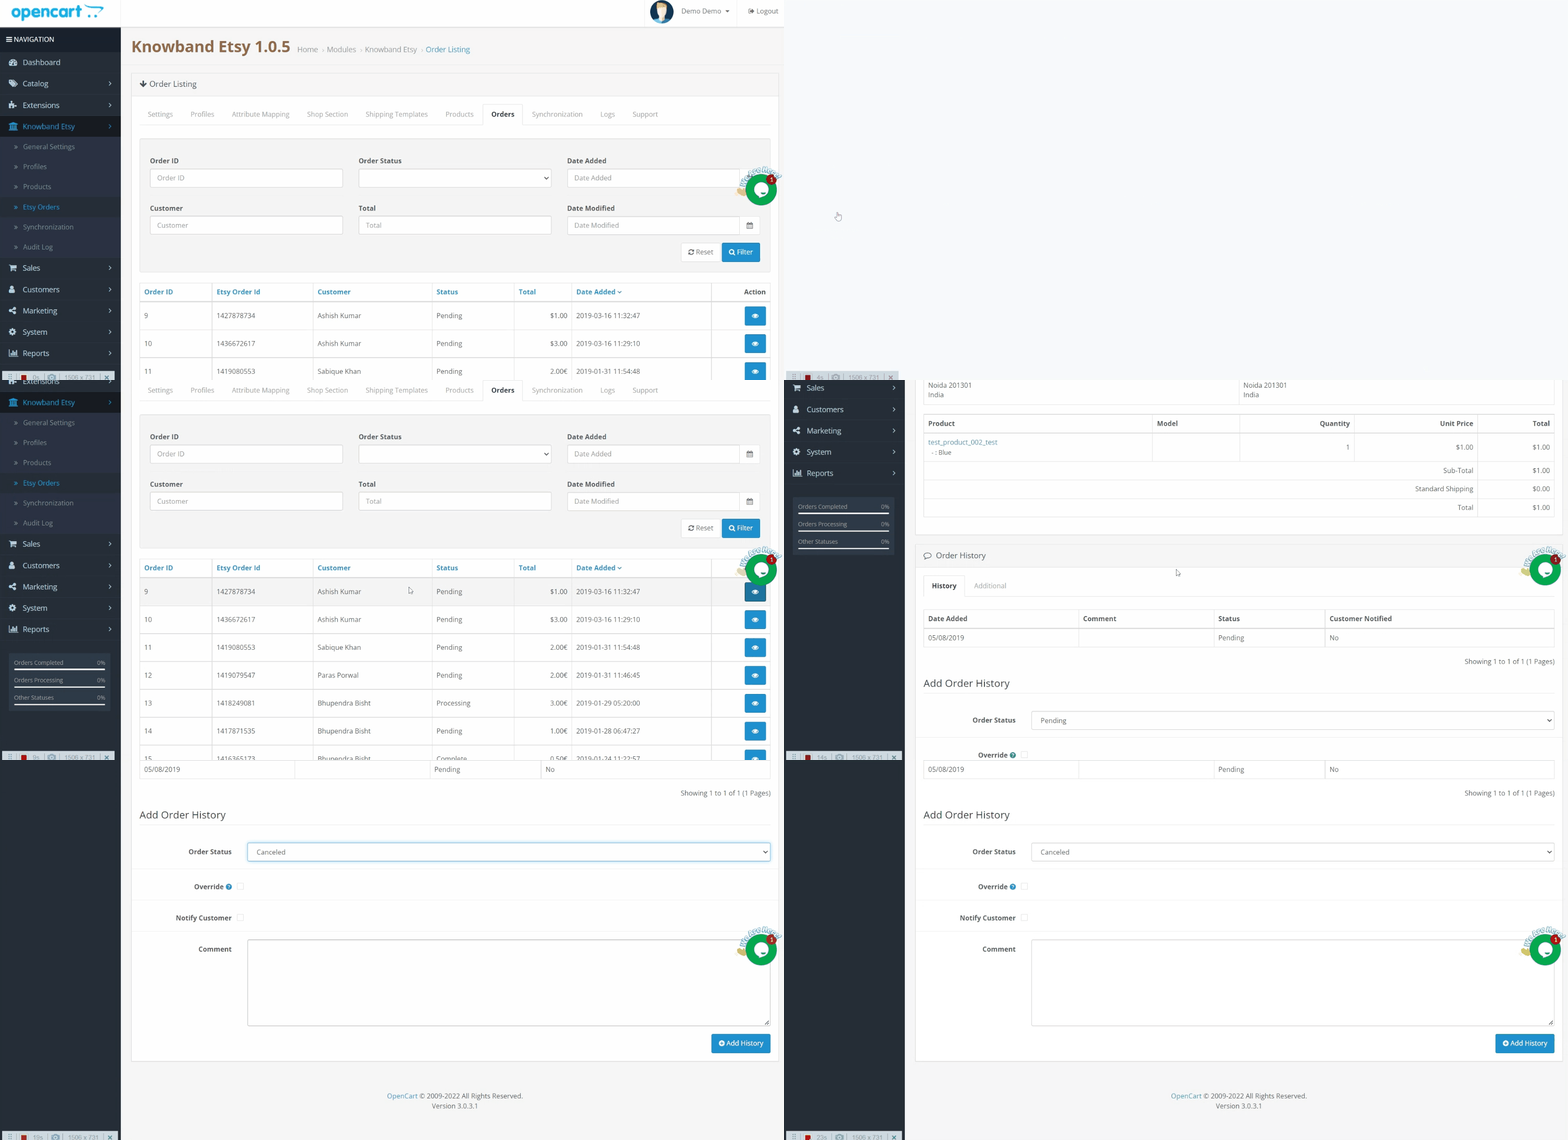
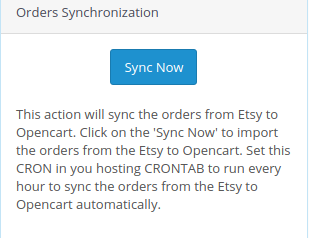
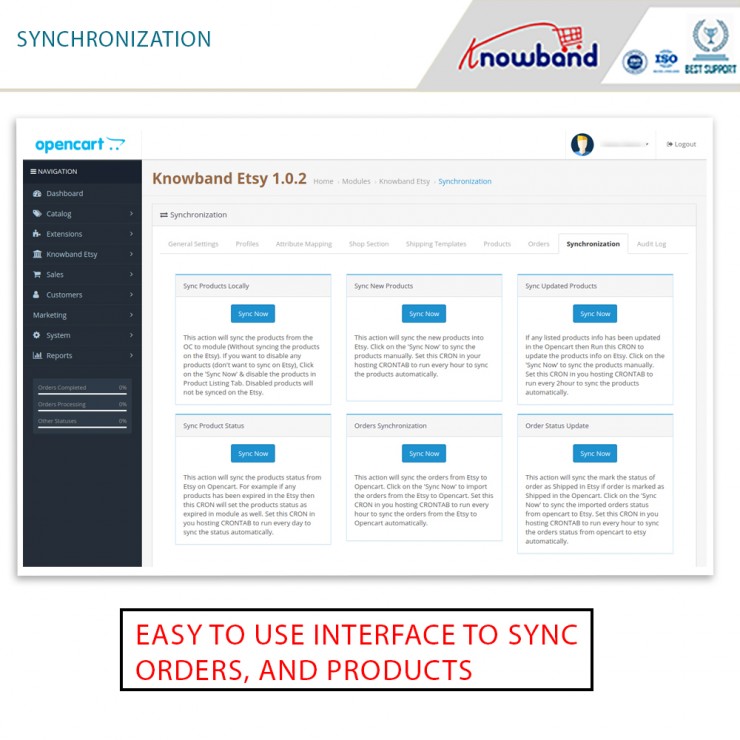
The orders from Etsy will synchronize to OpenCart with this activity. To import orders from Etsy to Opencart, click the ‘Orders Synchronization’ button. This element is available under the OpenCart Etsy Marketplace Integration’s Synchronization tab.
Etsy Orders
Etsy orders make it more straightforward for the store administrator to oversee orders from inside the OpenCart stage. This capacity is advantageous in saving time and exertion. Store administrators can easily handle Etsy orders with the assistance of Etsy orders.
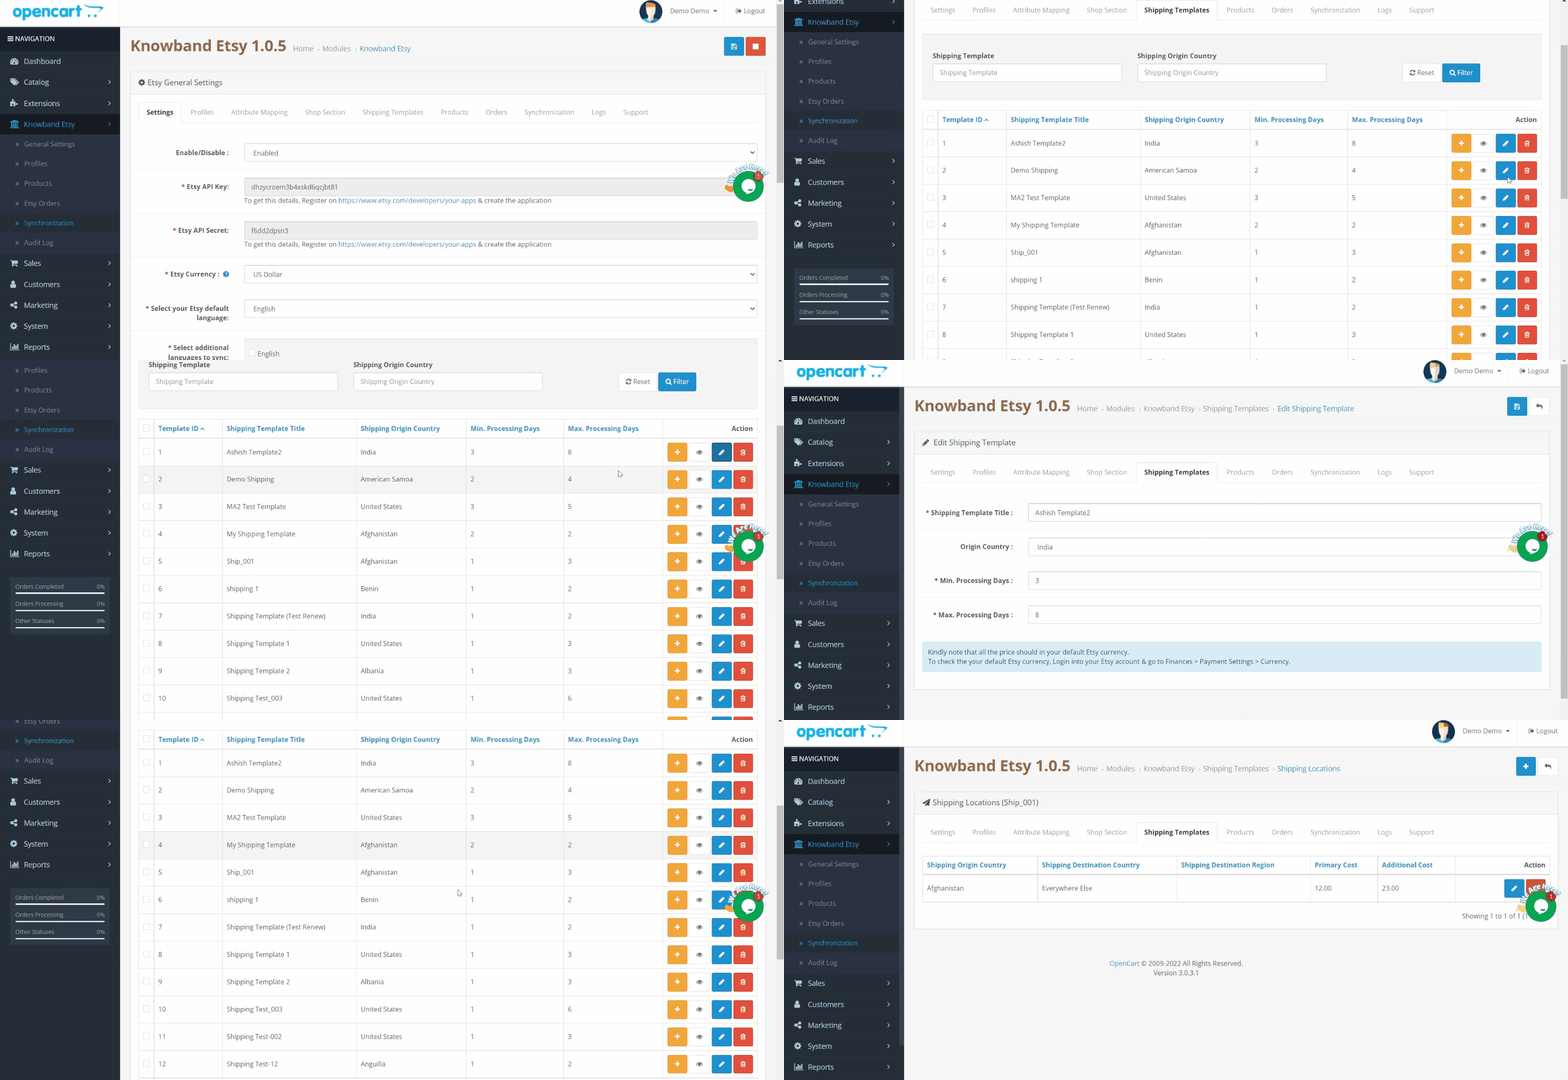
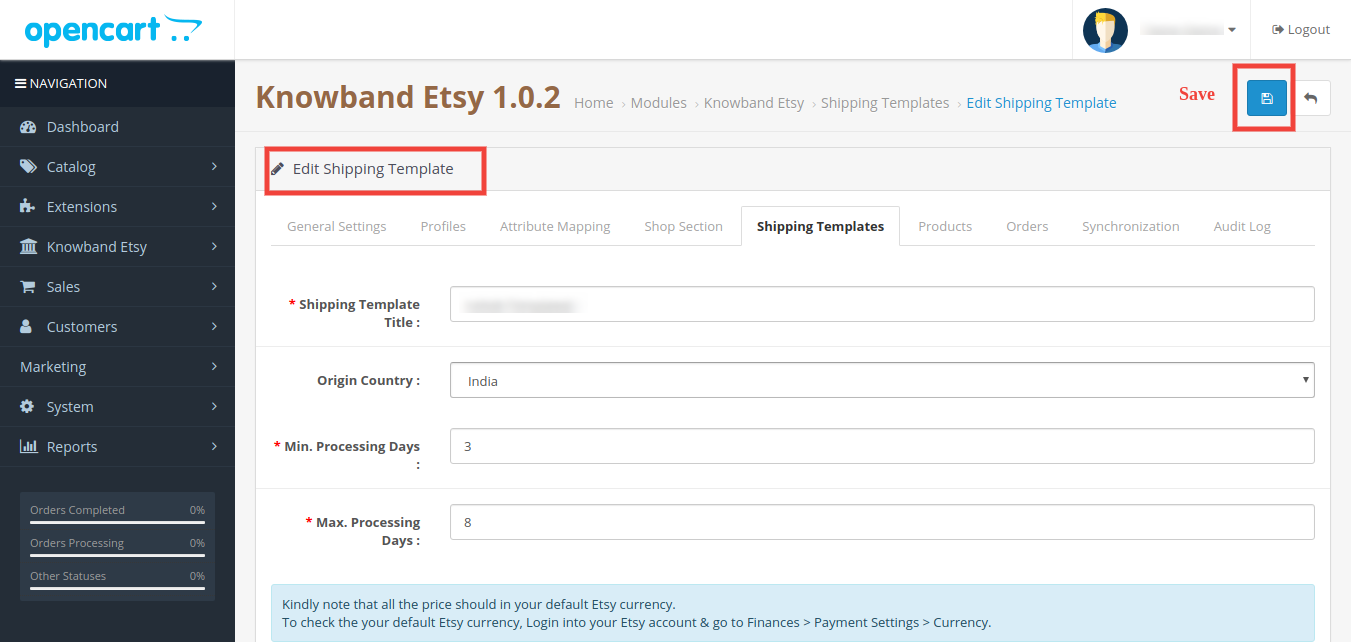
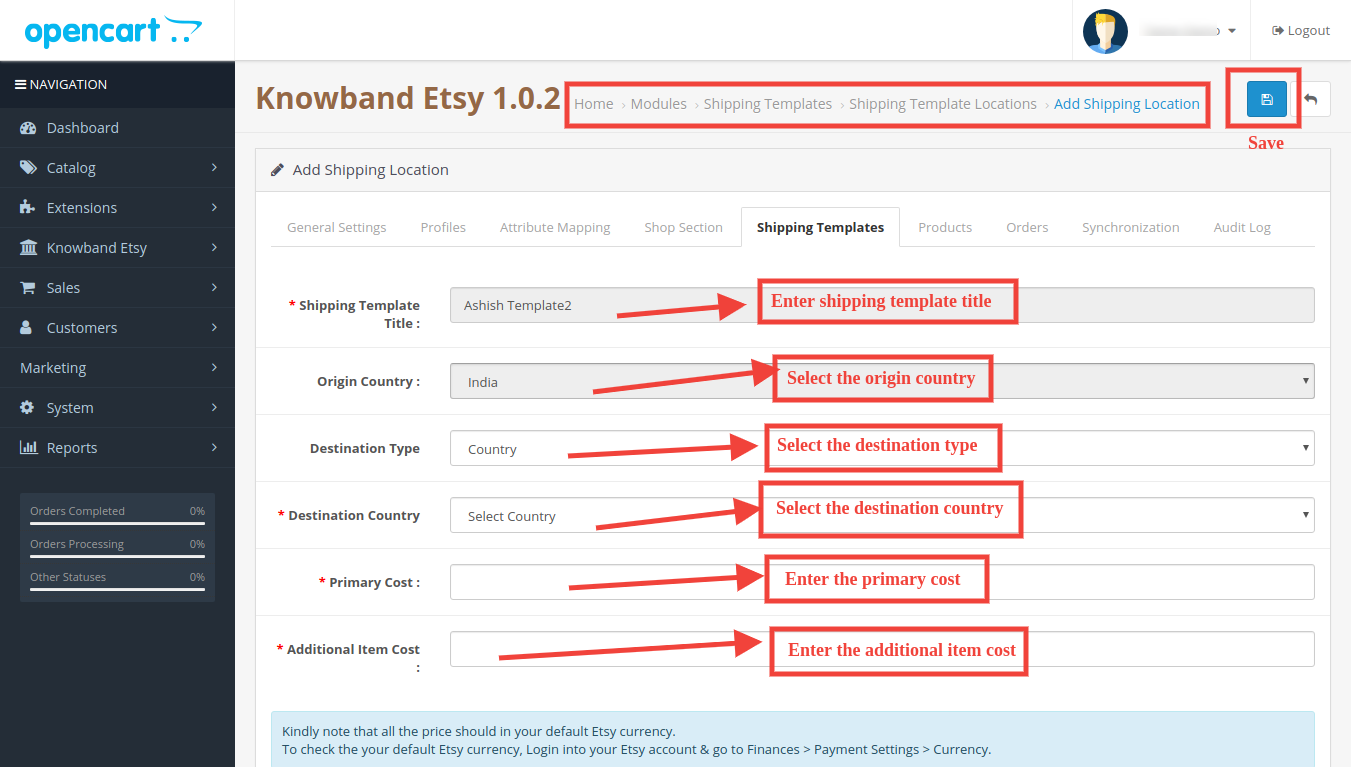
The delivery formats element of Opencart Etsy Integration deals with the transportation on the Etsy marketplace. The Etsy OpenCart Connector permits the OpenCart shop administrator to configure delivering formats. Further, that will synchronize to Etsy, very much like the Etsy Marketplace.
Finally!!
Therefore, now you know why the OpenCart Etsy Integration Extension by Knowband is a must. If you have any kind of queries related to the OpenCart extension, let us know at support@knowband.com.
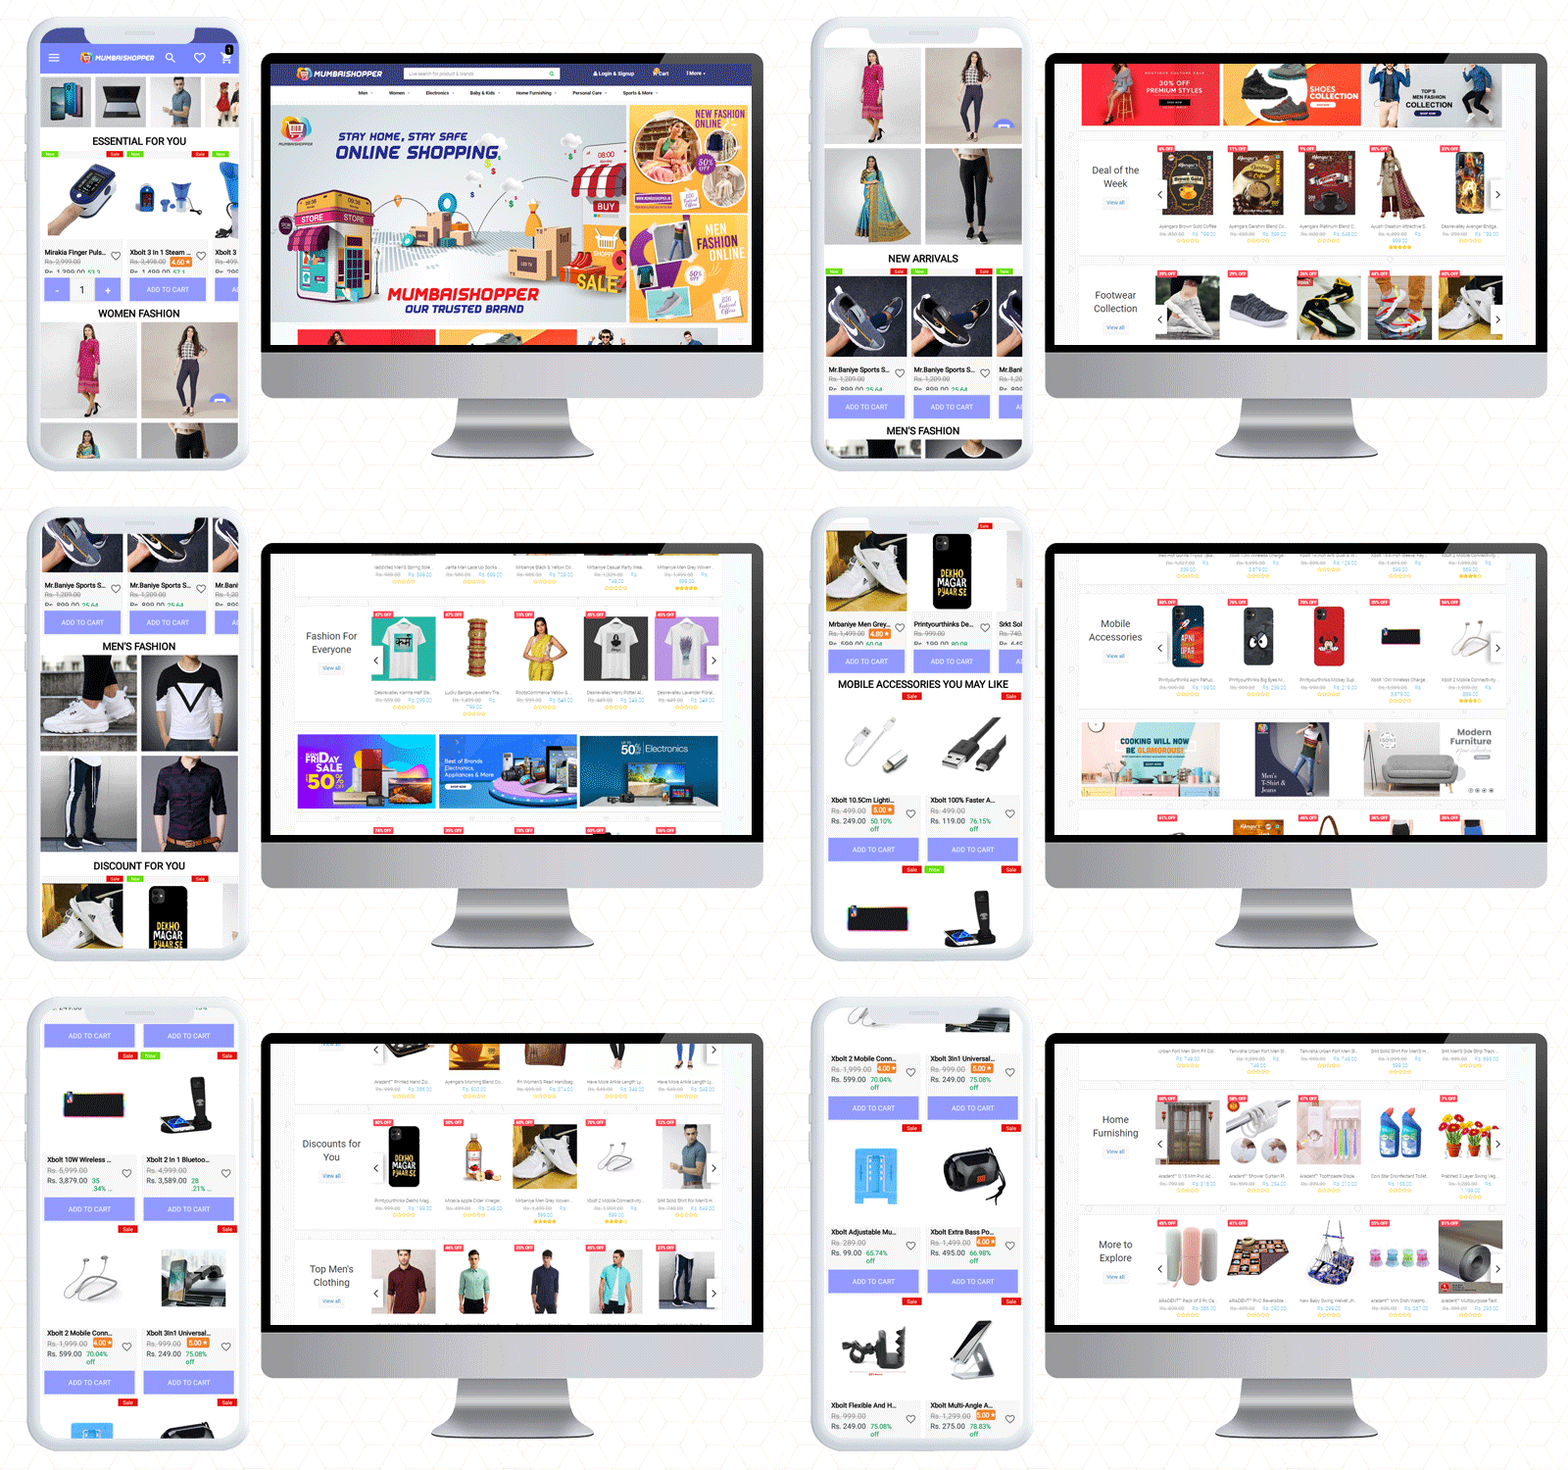
Do you have a count on the mobile apps you are using right now? Two, three, or maybe 10 at a time! The increase in the usage of mobile applications cannot be ignored. As mobile users are increasing rapidly, so is the demand for mobile apps. MumbaiShopper is a Marketplace for Mumbaikars. They have built their website on the OpenCart platform. To design their OpenCart Android App, they have used KnowBand’s OpenCart Mobile App Builder plugin.
From a fashionable home page design to a checkout page, it is personalized for sophisticated UI/UX. The CTAs, cart design, customer support, and many other features are a part of this mobile app builder plugin. This mobile app offers more exclusive facilities to customers and the admin. Let’s dive in to explore!
MumbaiShopper OpenCart Android Mobile App
As said before, the MumbaiShopper is a marketplace where you will find everything from fashion to furniture. If you want to shop baby products, fashion, electronics, or sports ranges, you will find everything at Mumbaishopper.
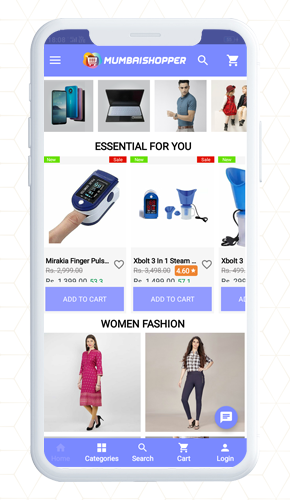
MumbaiShopper OpenCart Mobile App supports multiple currencies. You can see the prices in USD and INR. The categories, product listings, home page design, cart design; everything is up to the mark.
Have a look at the attractive home page!
The theme of the MumbaiShopper OpenCart Android app is similar to the website which is exceptional.
In midst of tough competition, the application needs to be user-friendly and appealing. It is quite certain to add color pallets, graphic images, banners, and logos that match your website theme.
For instance, the banner display is completely customizable. On the home page, show top categories, square banners, sliding banners, or products in the grid pattern. It is all up to you.
Have a look at the app design and its theme colors.
Isn’t it engaging!
About the Shopping Cart
Customers can add products to the cart quickly. The shopping cart of the app has two options:
Shop more
Proceed to checkout
It has clear navigation because the CTAs in the app are bold and aloud
Every change on the website is in Real-Time synch
The changes and updates that are made on MumbaiShopper Website are reflected directly on the Mobile App. It has real-time synchronization.
Finding the right product is easy
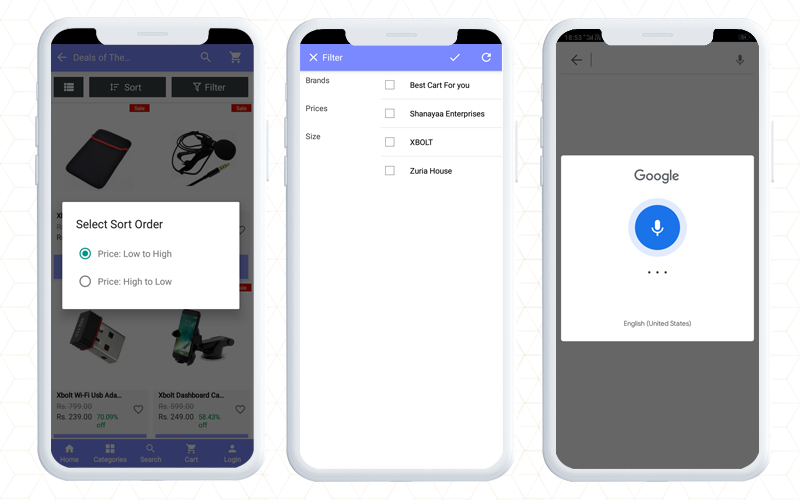
Find out the product you want by sorting and using the filter. Decide first and then apply filters. Sort it as relevancy, price, or bestseller.
It gives a satisfactory customer experience to OpenCart Android App users. It helps them in finding a product of their choice.
Voice search makes it easier.
Whatsapp and Zopim for live chat support
The customers can get quick support from the MumbaiShopper team using WhatsApp chat and Zopim chat support options. WhatsApp live Chat is available because Customer service is the topmost priority of every brand.
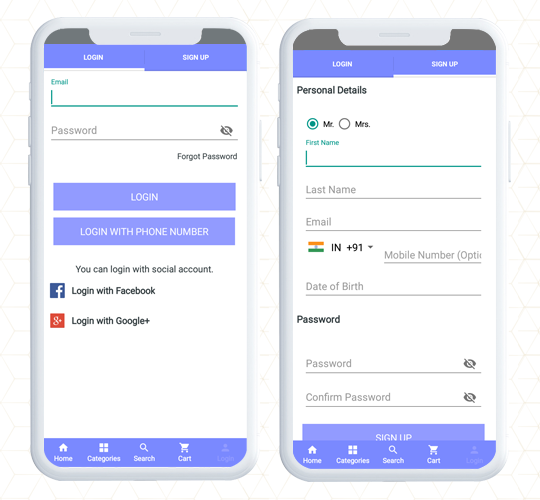
Quick Login and Sign up saves time and efforts
While most of the world population is connected via social media, why shouldn’t we take advantage? The OpenCart Mobile app has Google login and Facebook sign-up options for netizens.
Along with this, customers can register using their mobile number. This allows them to log in using OTP.
Additionally, a fingerprint login option is also available for the customers.
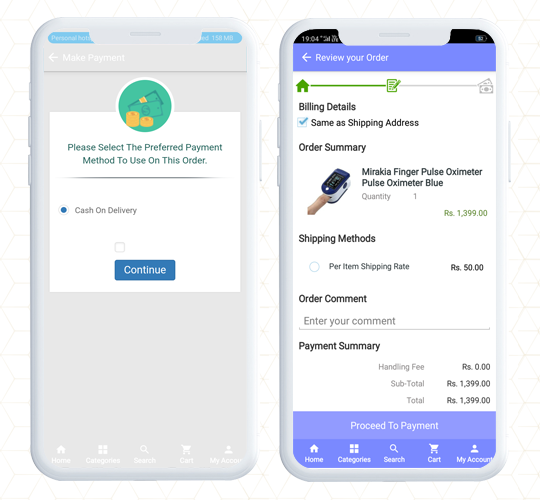
Multiple Payment and Shipping Support for every customer
As the user completes the registration process, they will have to make the payments first, then choose the shipping method for their product delivery on MumbaiShopper Store.
More conversion with One Page Checkout
The MumbaiShopper OpenCart Android App has a single-page checkout screen, as a result, it makes product purchase easier for front-end users. One Page Checkout provides quick checkout that refects in the reduction of abandoned carts. This also improves the app’s usability for order placement.
It is possible to run promotions on the OpenCart mobile App
Yes, you can run promotions on your OpenCart store if you have KnowBand’s OpenCart mobile app builder. The MumbaiShopper product range is wide and to entice customers, they run deals and discounts.
Deals of the Day, Deal of the Week, and Discounts for you are some listed categories in the MumbaiShopper OpenCart Mobile App.
The app allows the store owner to run promotions and coupons that are applicable on the website.
You can add Spin to Win promotional gamified element to your mobile app only if the same is available on your website.
Bring new customers to store
Wondering how? The MumbaiShopper store has a social sharing option for products.
The OpenCart Mobile App allows customers to share products on their social media profiles. This also attracts more attention from their friends and family. Hence brings you, new potential visitors.
Feature to track the traffic
With Google Analytics integration, OpenCart Android App allows tracking app performance standards, in short, you can set new goals. On the mobile app, the store administrator can monitor traffic and plan marketing campaigns accordingly.
To sum up, like the MumbaiShopper store, you can also make your mobile app using the Opencart Mobile App builder plugin. The application has almost everything that you need for a mobile app. Check out the live demo or get the free OpenCart mobile app to have a preview of your store.
We believe in customer satisfaction. If you want any custom feature that is not included in the Mobile App Builder, let us know in the comment below.
The OpenCart-based eCommerce store owners can now create an online marketplace like Etsy and eBay with Knowband’s OpenCart Marketplace plugin. Further, just install the OpenCart Multi vendor Marketplace plugin in your store. Moreover, this will enable multi-seller functionality at your site. Third-party sellers can easily register and list their products on the site. The various aspects of the store management rest in the hands of the site admin. Thus, the seller’s profile, category request, products, and review approval happen from the back-end of the OpenCart Multi seller marketplace extension.
1.1 Admin Benefits of OpenCart Marketplace Extension
The various admin benefits of Knowband’s OpenCart Multi-vendor marketplace plugin are mentioned below:
The store admin can easily convert their single-vendor eCommerce site into a whole new and fully-functional marketplace with the help of Etsy clone for OpenCart.
The OpenCart Multi vendor Marketplace plugin supports all types of products including simple, configurable, and bundled.
The OpenCart multi-seller marketplace plugin enables the admin to set the global as well as the category-based commission to be charged to the sellers.
The store owner can easily monitor the seller’s profile and products being posted at the site. They can easily approve/disapprove the seller’s profile from the admin interface of the OpenCart Multi-vendor Marketplace plugin.
The admin can even assign the categories to the sellers. Additionally, the vendors can send a category request to the admin. These requests are processed by the store admin from the back-end of the OpenCart Multi seller Marketplace extension.
The OpenCart Marketplace Module allows the store admin to enable/disable the review/rating option from the site. If enabled, the customers can give reviews for the products as well as the sellers.
OpenCart Multi-vendor Marketplace plugin offers custom shipping options. If this feature is enabled, the sellers can add their own shipping methods.
The OpenCart Marketplace Plugin offers easy tracking of sales report and overall transaction of the site.
The store admin gets 24 default email templates to keep the sellers notified about the various aspects.
1.2 Seller Benefits of OpenCart Multi-Vendor Marketplace Extension
The third-party vendors can easily register as a seller at the site just by filling out a form.
Once the account approves, the sellers can list their products at the site from their dashboard.
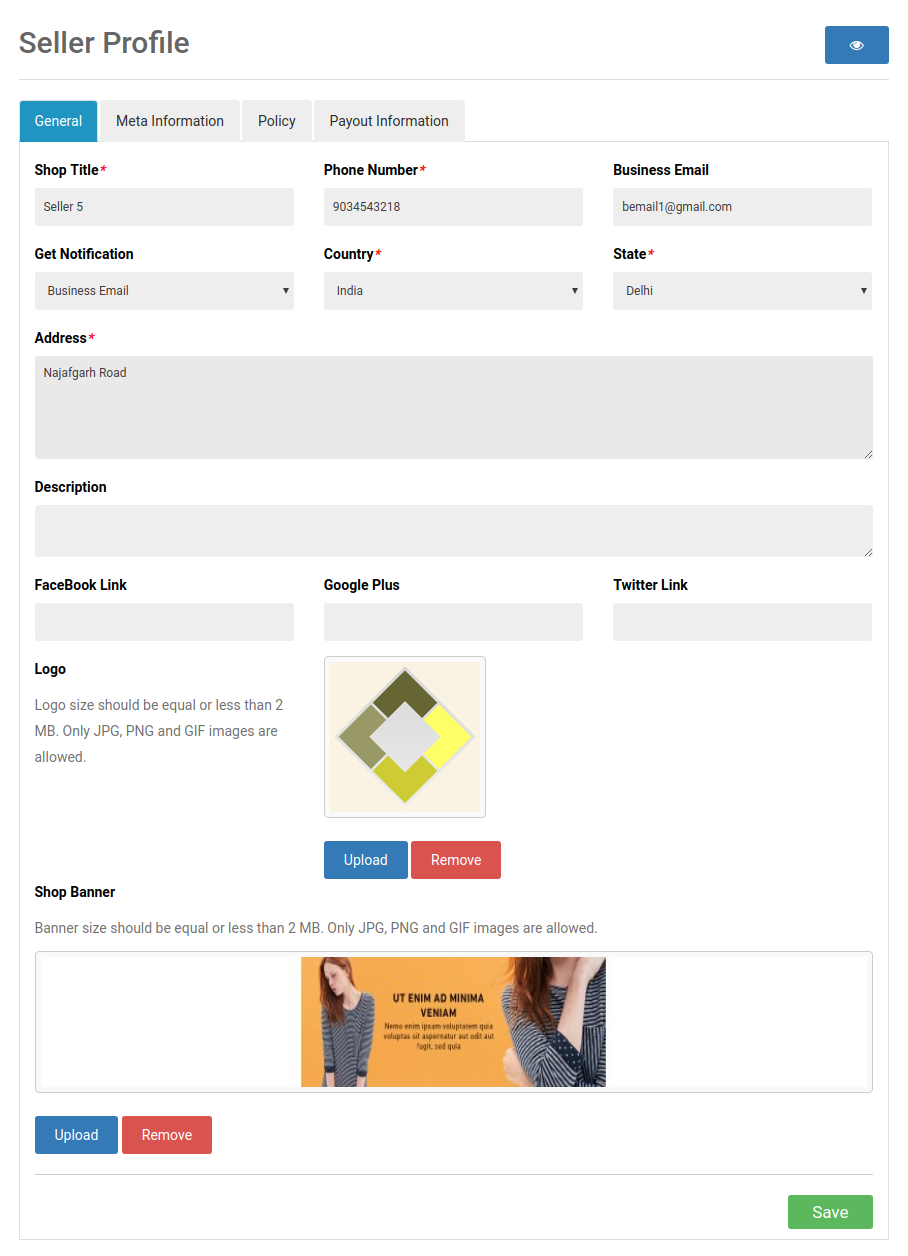
The sellers can add banners, shop logos, and metadata from their dashboards. The vendors can easily make an SEO-friendly URL for their shop.
The sellers even get an option to track the overall transaction and sales report from the dashboard with ease.
The sellers get an option to add category requests. The admin can approve/disapprove their request from the back-end of the OpenCart Marketplace Extension.
If enabled from the admin panel of the OpenCart Multi seller Marketplace module, the sellers can even add their own shipping methods.
1.3 Customer Benefits of OpenCart Multi-seller Marketplace Extension
The store visitors can now choose the ideal products from a wider range of product options.
The online shoppers can view the seller’s profile on the products page. Further, only if the admin allows it.
The customers even get an option to give their reviews for the products as well as the seller.
Customers can easily contact the sellers of the product from the seller account page and raise a ticket for their queries and issues.
1.4 New Features in OpenCart Multi vendor Marketplace plugin:
Improved Admin UI: It has a dynamic and functional new admin UI for effortless management.
A new Seller Custom Form: A new custom field is available to the backend of the Multi vendor marketplace. It allows the admin to create a separate registration form for the sellers.
Now admin can allow sellers to display the seller and admin details on the invoice.
To choose the order status for which commission/earning will be calculated a field in the admin panel is now available. Previous earning was being calculated on all the order status i.e. Cancelled, Returned, etc.
Admin can decide order status options for sellers which they can use for the customer orders.
An option is now available in the admin panel to enable/ disable the sellers. All the products will be removed automatically from OpenCart Marketplace if a seller is disabled by the admin.
Admin assigns the products to the individual seller.
OpenCart Marketplace extension allows the admin to register any customer as a seller.
OpenCart Marketplace Product page and admin UI
2. Installation of OpenCart Marketplace Plugin
Purchase the OpenCart Multi-vendor Marketplace Module from the Knowband store. You’ll get the following files:
Zipped File containing the source code of the module
User Manual
Follow the steps mentioned below in order to install the open cart Multi vendor Marketplace plugin in your store:
Unzip the zipped file. The vqmod must be installed, otherwise, the plugin will not work. You’ll get the folders as shown in the image below:
Copy all the files and folders of the zip file in the Root Directory of the site.
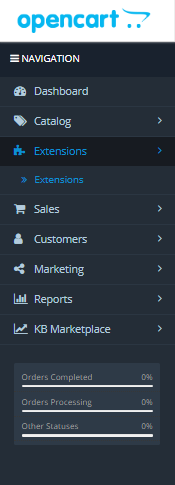
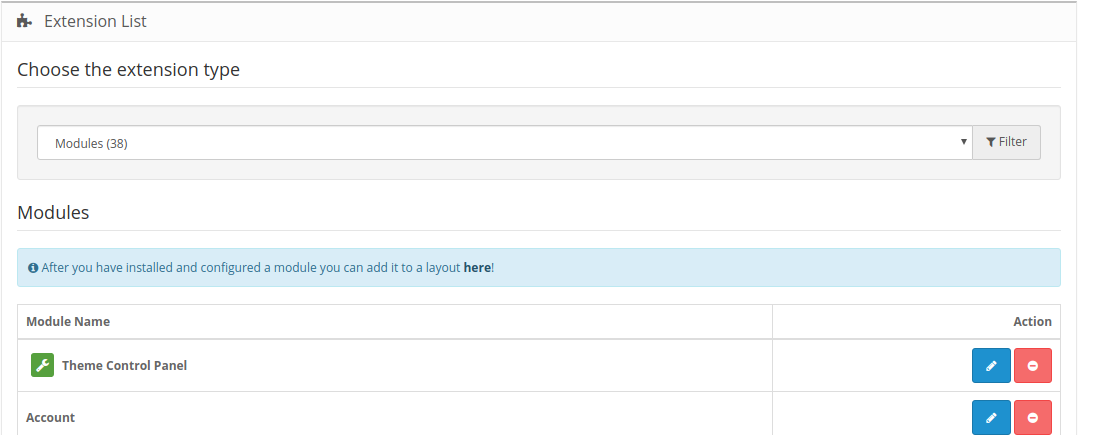
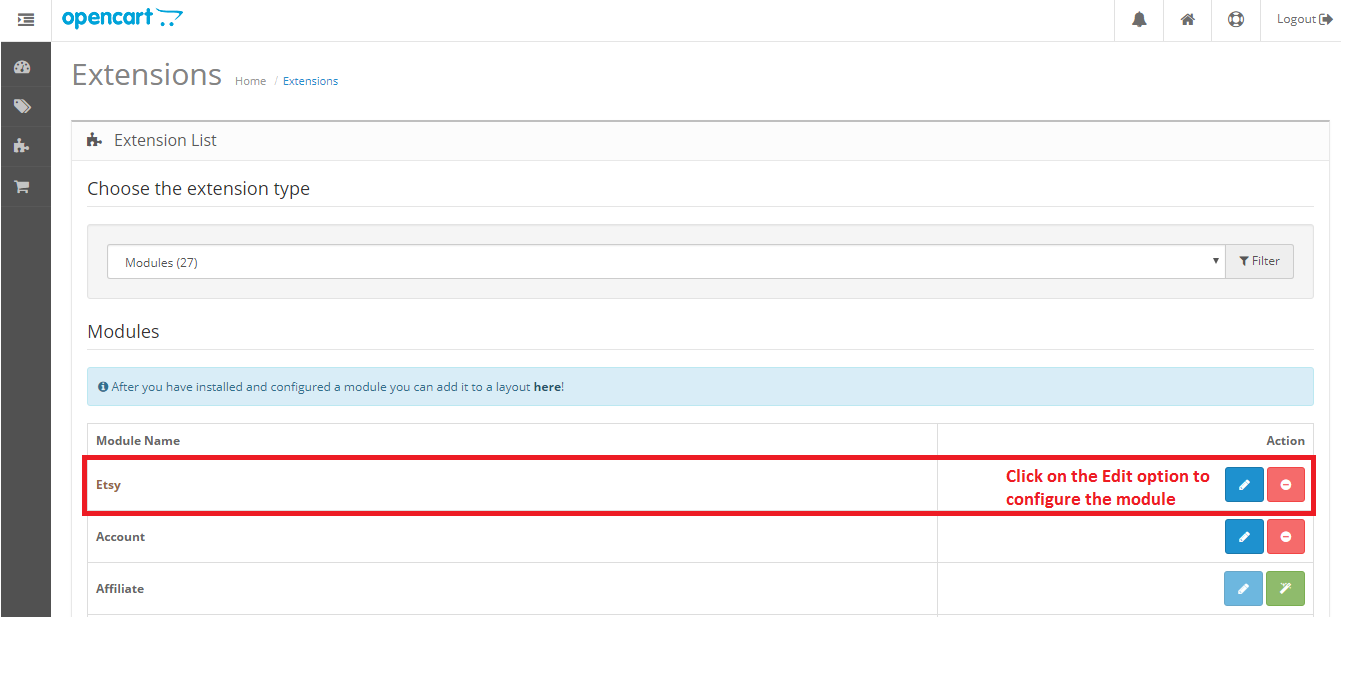
The admin can find the OpenCart Multi-Seller Marketplace extension at the path Admin Panel -> Extensions. Install the module by clicking on the ‘Install’ button corresponding to the module.
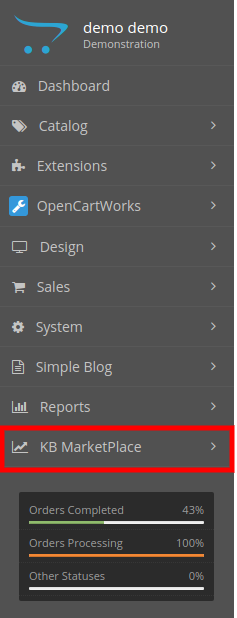
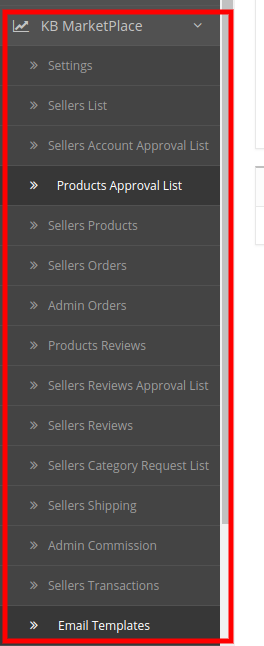
The OpenCart Marketplace plugin is now installed and is ready to use. Go to Admin -> Main Menu -> KB MarketPlace as shown in the image below:
3. Admin Panel
The OpenCart Multi-vendor Marketplace plugin offers multiple options for the configuration and management of the online marketplace.
After that, click on the edit option of the KnowBand Marketplace.
There are 6 main menus in the configuration settings:
3.1 Setting
3.2 Sellers
3.3 Products
3.4 Orders
3.5 Commissions
3.6 Support
All the six main menus are discussed below in detail:
3.1 Settings
The various fields of this menu of the OpenCart Multi-vendor Marketplace plugin are discussed below:
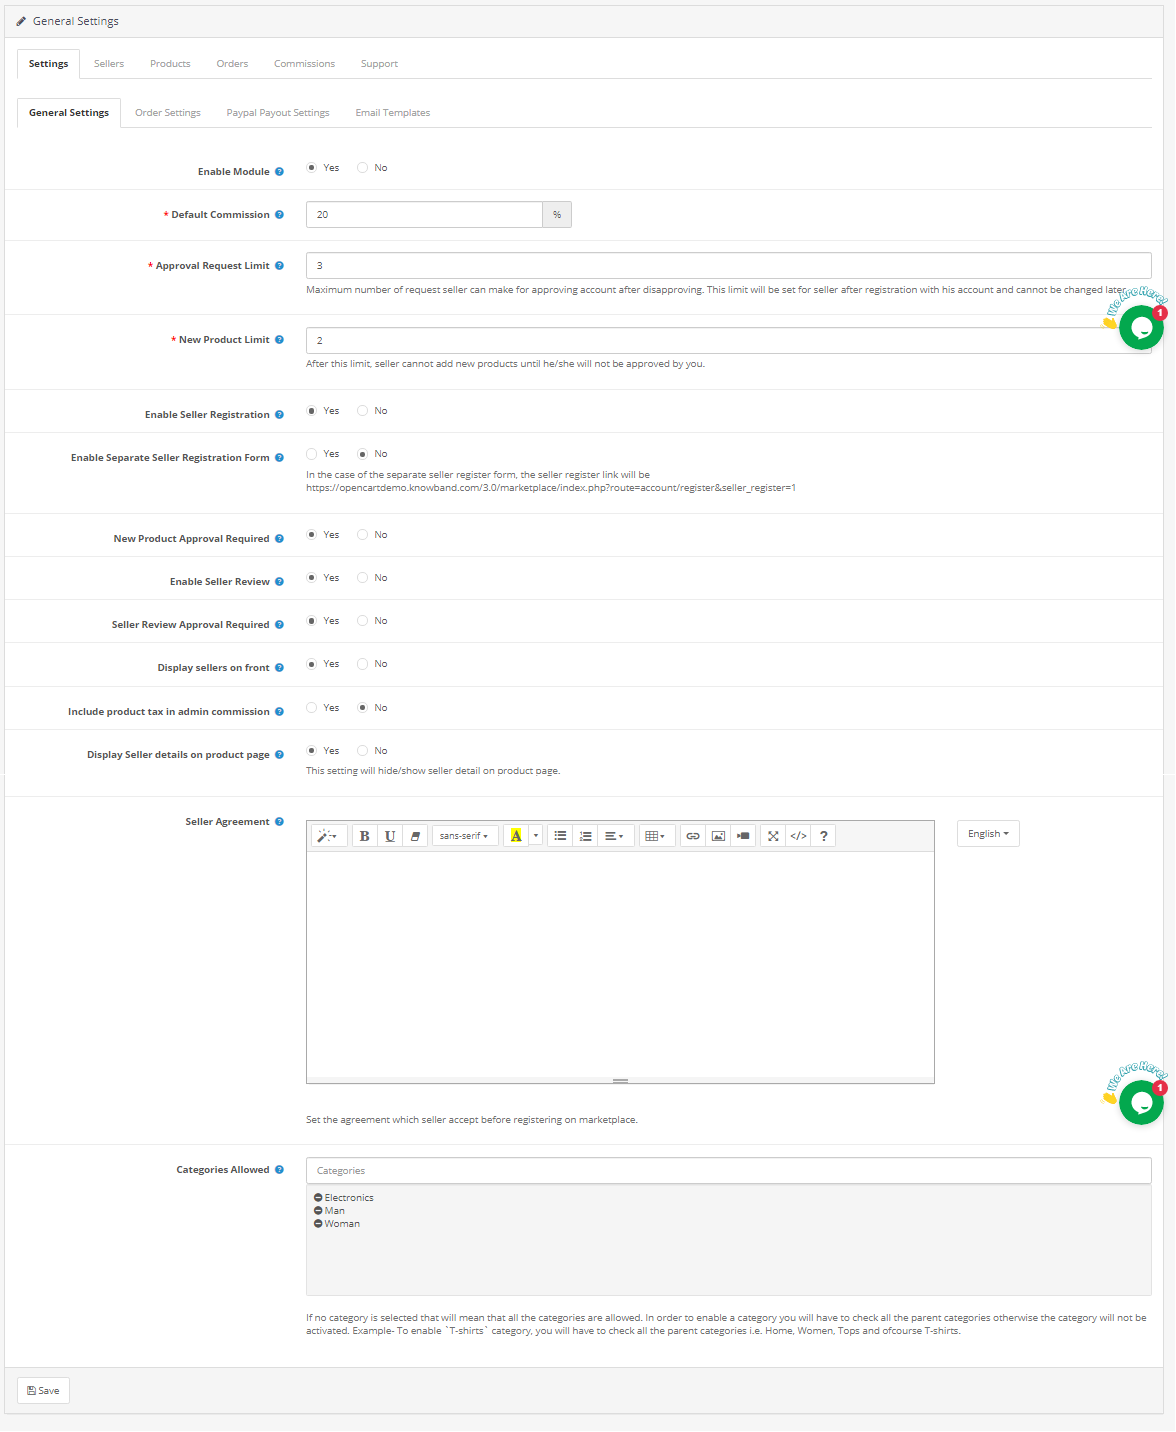
3.1.1 General settings
Enable Module: Toggle the button to “enable” the module on the website.
Default Commission: Set the commission to be charged to the sellers here. The percentage amount as specified by the admin here will be applicable to all the marketplace sellers by default.
Approval Request Limit: The store admin can approve/disapprove the seller’s account from the back-end of the OpenCart Multi vendor Marketplace plugin. The sellers can send a request for account approval. The admin can set the maximum number of requests that the seller can send in this section.
New Product Limit: Fix the maximum number of new products that a seller can list in the marketplace.
Enable Seller Registration: Select ‘yes’ in order to enable the third-party seller registration.
Enable Separate seller registration form: Select ‘yes’ in order to enable the separate seller registration form.
New Product Approval Required: If he selects ‘Yes’, then, the approval of the admin will be required to list the product at the site.
Enable Seller Review: Select ‘Yes’ if you want to enable the seller review option in the front-end.
Seller Review Approval Required: If this feature is enabled, then, the review will be posted in the front-end only after the approval of the store admin.
Display Sellers on the front: Enable to display the list of the sellers in the front-end of the website.
Include Product Tax in Admin Commission: If he selects ‘Yes ’, then, product tax will be included in the admin commission.
Display Seller Details on Product Page: Enable this option to display the seller’s details on the product page of the website.
Seller Agreement: Specify the terms and conditions for the sellers in this section. The agreement details as mentioned here display in the front-end of OpenCart Multi-seller Marketplace.
Categories that the admin allows: The admin can select the category that they want to assign to the sellers in this section.
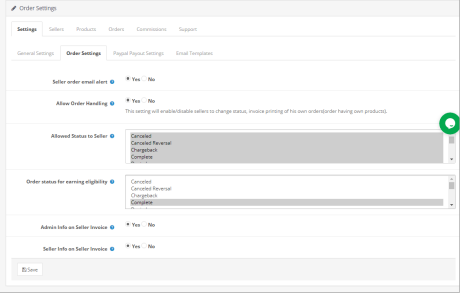
3.1.2 Order Settings:
Seller order email alert: If he selects ‘Yes’, then, an automated email will be sent to the vendors every time the order of their product is received.
Allow Order Handling: If he selects ‘Yes’, then, the sellers can handle the orders received on their products. They can process the orders and change the order status.
Allowed Status to Seller: Order statuses that are okay for sellers to update the order. It includes Cancelled, Cancelled Reversal, Chargeback, Complete, denied, processing, failed, expired, etc.
Order Status for Earning Eligibility: Order status assigned to the sellers only for which they will receive the Payouts or they will get the earnings only for the assigned order status such as complete, shipped, voided, etc. Admin can choose from the options mentioned in dropbox.
Admin Info on seller invoice: Select yes or no for sending a system-generated email to the seller on the new order.
Seller Info on seller invoice: Select yes or no for sending a system-generated email to the seller on the new order.
3.1.3 PayPal Payout Settings
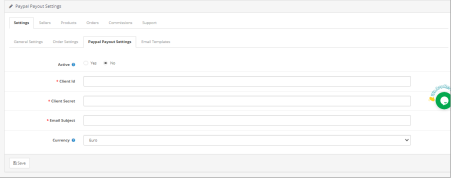
Opencart Multi-Vendor Marketplace plugin offers admin access to set the PayPal Payout Settings from the backend of the store. Admin needs to activate the setting and fill the Client ID, Client Secret key, Paypal Email Subject, and Paypal Currency in the backend of the store.
3.1.4 Email Templates
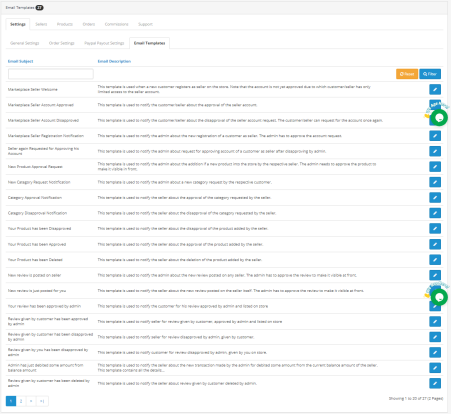
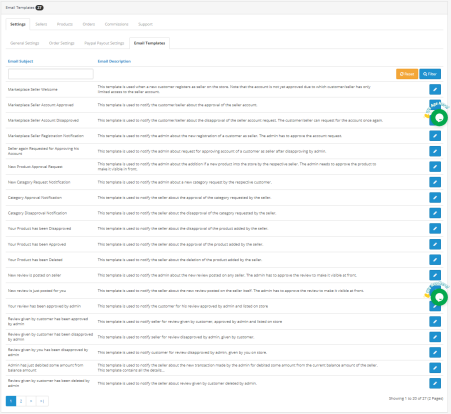
The OpenCart Multi seller marketplace plugin offers 24 pre-designed email templates for various scenarios. The store admin can even edit the templates if required by clicking on the Edit button.
3.2 Sellers
3.2.1 Sellers Setting
This page of the OpenCart Multi-vendor Marketplace extension has a list of all the sellers that the store owner approves. The admin can view the list of the sellers whose accounts he approves from the Seller Account Approval List tab of the OpenCart Multi seller Marketplace extension.
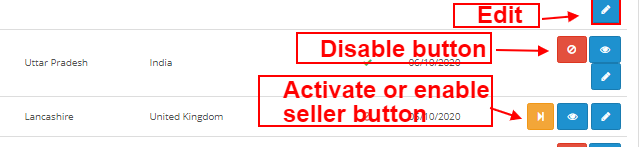
Admin can enable/disable the seller from the buttons shown below.
How to Edit Seller’s Account?
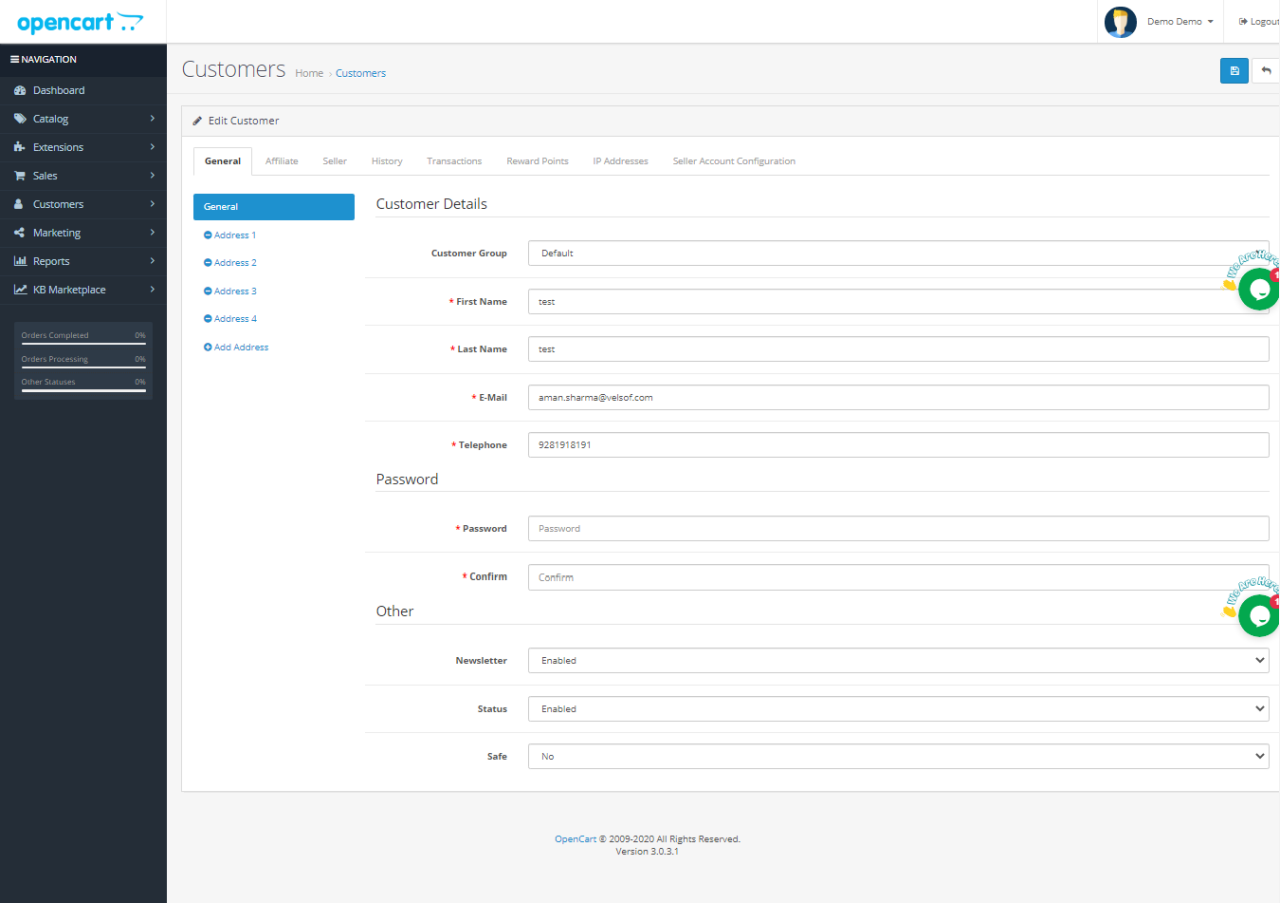
The admin can even edit the profile of the vendors from the back-end of the OpenCart Multi vendor Marketplace plugin. In order to edit the same, click on the Edit button. This will redirect you to an interface of the OpenCart multi-seller marketplace extension where you can make the required changes.
3.2.1.1 General
Customer Detail: Admin can edit all the basic details of sellers on the Customers Setting Page. This includes Customer group, Name, email address, contact information, etc.
Password: Admin can set the password for the seller.
Other: It includes more settings for Newsletter subscription, Enable/Disable the seller, and categorizing the seller as safe.
Multiple Addresses: the OpenCart Multi-Vendor Marketplace allows the admin to add one or more addresses to the seller’s account.
3.2.1.2 Affiliate
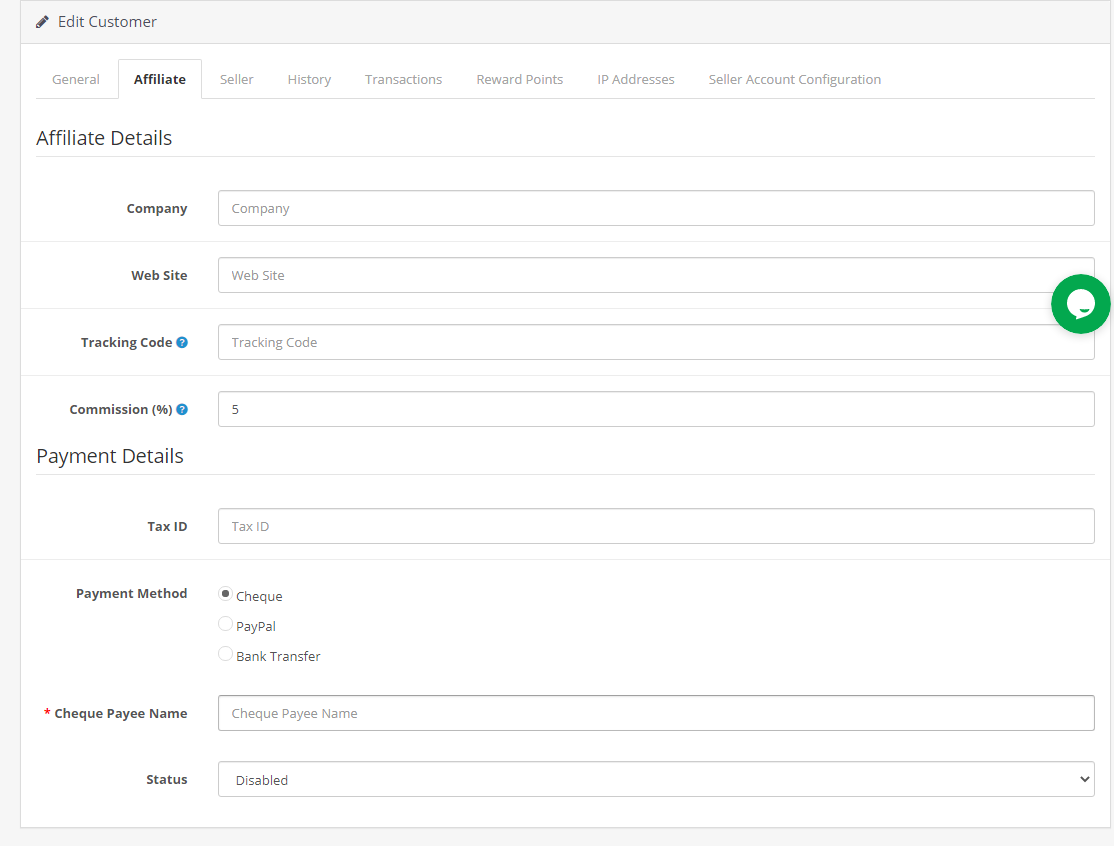
Admin can add affiliate Details in the Affiliate setting.
Affiliate Details: All the information such as Company Name, Website, Tracking code, Commission Percentage.
Payment Details: The admin can add or select the tax ID and Payment Methods. In fact, the payment methods that are indexed in the extension are Cheque, PayPal, and bank transfer.
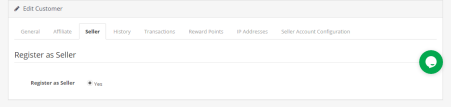
3.2.1.3 Seller
Admin can register the company as a seller by selecting the Yes button.
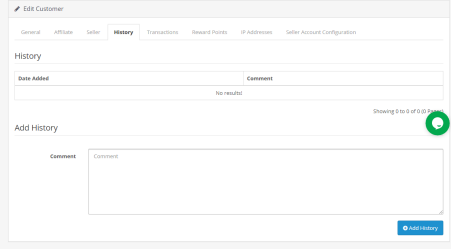
3.2.1.4 History
History: Seller history and comments will display here.
Add History: Admin can add comments for the seller in the History section which will display on History Table.
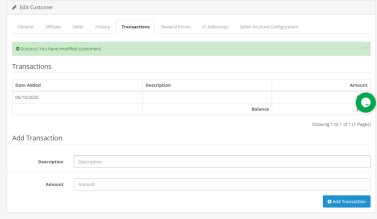
3.2.1.5 Transaction
Transactions: All the transactions will be shown here for the particular seller.
Add Transaction: The store owner even gets an option to add a transaction by clicking on the ‘Add New Transaction’.
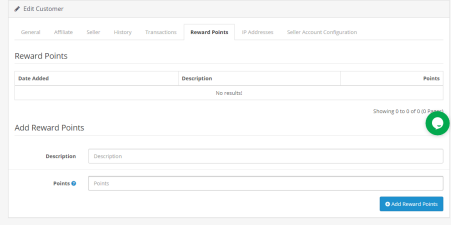
3.2.1.6 Reward Points
If the admin wants to reward the seller then he/she can add the reward description and points in this section of the Sellers setting.
Reward Points: A table showing all the reward points given to the seller by the admin will display here.
Add Reward Points: Admin can add new reward points by clicking on the ‘Add Reward Points’ button.
The window will display as shown below:
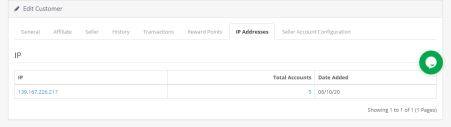
3.2.1.7 IP Address
The IP address of the seller and the number of accounts registered will display here.
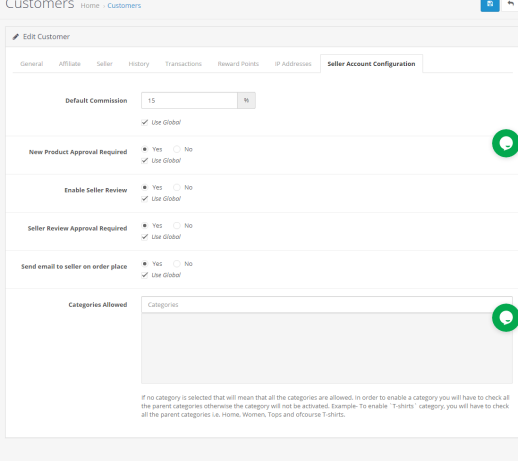
3.2.1.8 Seller Account configuration
OpenCart Multi-vendor Marketplace extension allows admin to set the commission amount for individual sellers.
Default commission: Admin can add the commission details in the Seller Account Configuration setting.
New Product Approval required: Select Yes if the admin wants to approve the new product and select no otherwise.
Enable Seller Review: Yes/No buttons are given to enable/disable seller reviews.
Seller Review Approval Required: If this feature is enabled, then, the review will be posted in the front-end only after the approval of the store admin.
Send email to seller on order place: If enabled then an auto-trigger mail will be sent to admin with the default email template.
Categories that the admin allows: Admin can assign categories to the seller. Sellers can only sell products from the allotted categories.
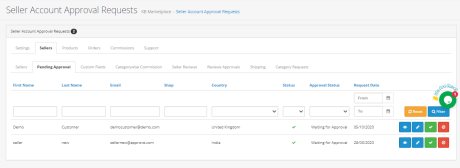
3.2.2 Pending Approval
The third-party vendors can fill up the form in order to create a seller account at the site. The seller’s profile will list in this tab of the OpenCart Multi-vendor Marketplace Plugin for approval as shown in the image below:
How to Approve/Disapprove the Seller’s Account?
The admin can approve the seller’s account at a button click from the back-end of the OpenCart Marketplace module.
Just click on the approve or disapprove button corresponding to each seller account. On clicking on the Approve button, a pop-up will display asking for permission to approve or disapprove the seller account.
Once the seller’s profile approves, the same will list in the ‘Seller List’ tab of the OpenCart Multi-vendor Marketplace module.
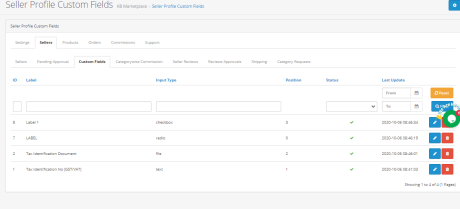
3.2.3 Custom Fields
(New)Admin can add a custom field for seller profile. This setting allows the admin to add one or more fields on the seller page to collect extra information from the seller.
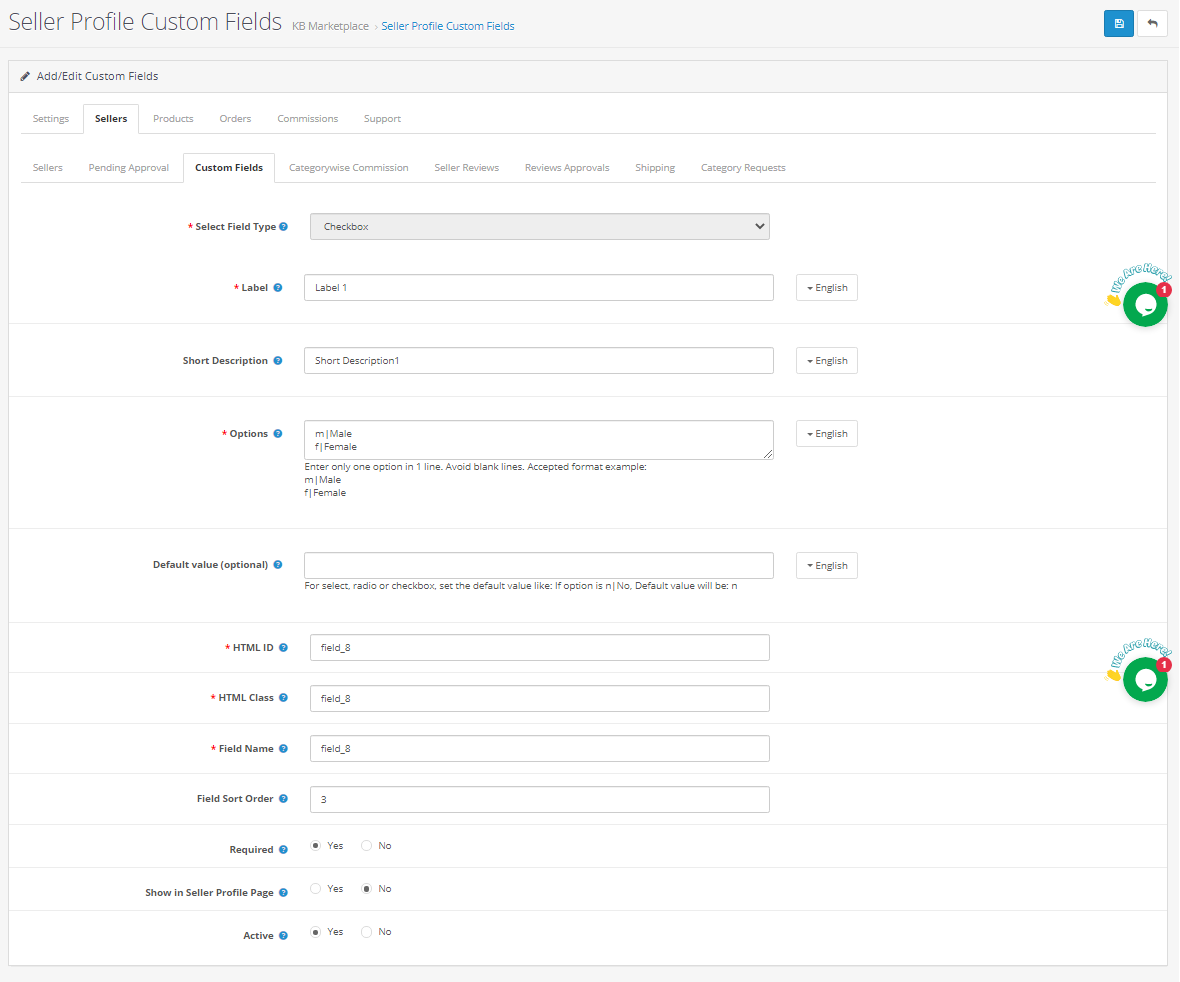
Click on the edit button for adding or updating the custom fields. On clicking the ‘edit button’, the following window will appear:
Select Field Type: Select the field type as a checkbox
Label: Add the field name which will display on the front end of the seller dashboard.
Short Description: Add the short description for the field
Options: Add the options for the field like Male, female, or Yes, No as the accepted format mentioned in the field.
HTML Details: Add HTML ID and HTML class here.
Add New Field Details: like field name, field sort order etc.
Required: Set the field as optional or mandatory
Show in seller profile page: Select Yes if the field is to display on Seller Profile Page otherwise select no.
Active: Activate or deactivate the field by selecting yes or no options.
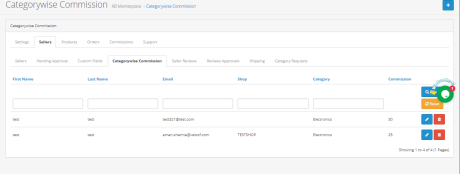
3.2.4 Category wise commission
With the Opencart Multi-Seller Marketplace plugin, the store admin gets access to set the commission category-wise. Admin can easily view the total earning, total commission for a particular category in Category Wise Commission. Category wise commission for the particular seller will display here as shown below:
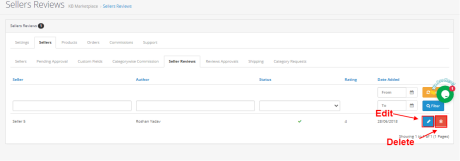
3.2.5 Seller Review
Admin can see the seller reviews and edit them from the backend if required.
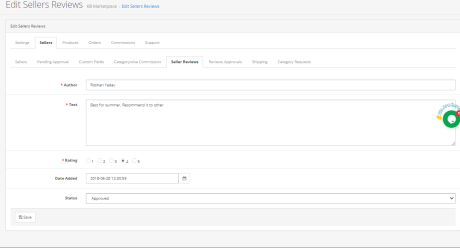
The admin can add the author details, Text, update ratings, change the date of the review.
Admin can approve or disapprove the review from the status field.
3.2.6 Reviews Approval
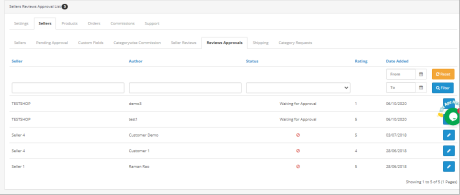
The list of approved and disapproved seller reviews will display here. If the admin click on the edit button then he will be directed to a new page.
Store Admin can add the author details, Text, update ratings, change the date of the review.
Status: Admin can approve or disapprove the review.
The various fields of this interface are discussed below:
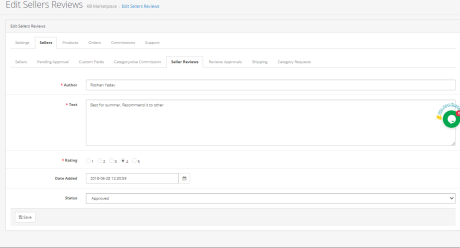
Author: The name of the reviewer will be shown here. The admin can change the name if required.
Text: The review entered by the customer will be shown here. The store owner can edit the review if required.
Rating: This section will by default show the rating given by the customer. The admin can even change the rating.
Review Date is available: The date when the review is available will display here.
Status: Enable or disable the review from here. If the admin enables it, the review will display on the product page.
3.2.7 Shipping
Seller’s shipping information can be reviewed by the admin from the backend of the OpenCart Multi-vendor Marketplace. The OpenCart Multi-seller Marketplace extension comes with custom shipping options wherein the sellers can add their own shipping methods. If this feature is enabled by the store admin from the Settings Tab of the OpenCart Multi-vendor Marketplace module, then, the sellers can add their shipping methods.
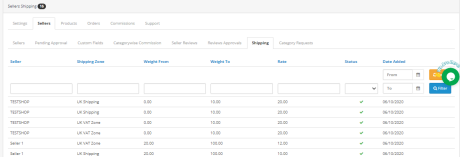
The shipping templates available by the sellers will list in the Sellers Shipping tab of the OpenCart Multi vendor Marketplace plugin. All the orders shipping details like shipping zone, weight, Rate, and status will display on this page as shown below:
3.2.8 Category Requests
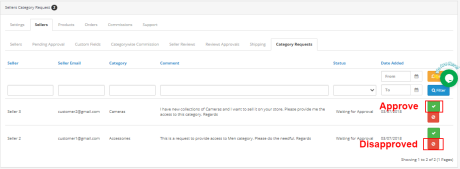
The admin assigns the category to the third-party seller for listing the products. The sellers can even request the admin to add a new category from their Dashboard. The category requests sent by the sellers will list in the Seller Category Request tab of the OpenCart Multi-Vendor Marketplace extension as shown in the image below:
3.3 Products
3.3.1 Seller Products
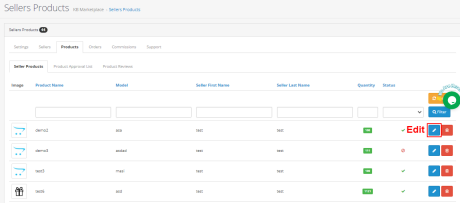
The admin approves the products from the back-end of the OpenCart Multi-vendor Marketplace extension. Further, they will list in the Sellers Products tab.
OpenCart Multi vendor Marketplace plugin- Sellers products
3.5.1 How to edit/remove the details of the products?
The store owner can edit or delete the product details of the sellers if required. Click on the ‘Edit’ or ‘Delete’ button respectively.
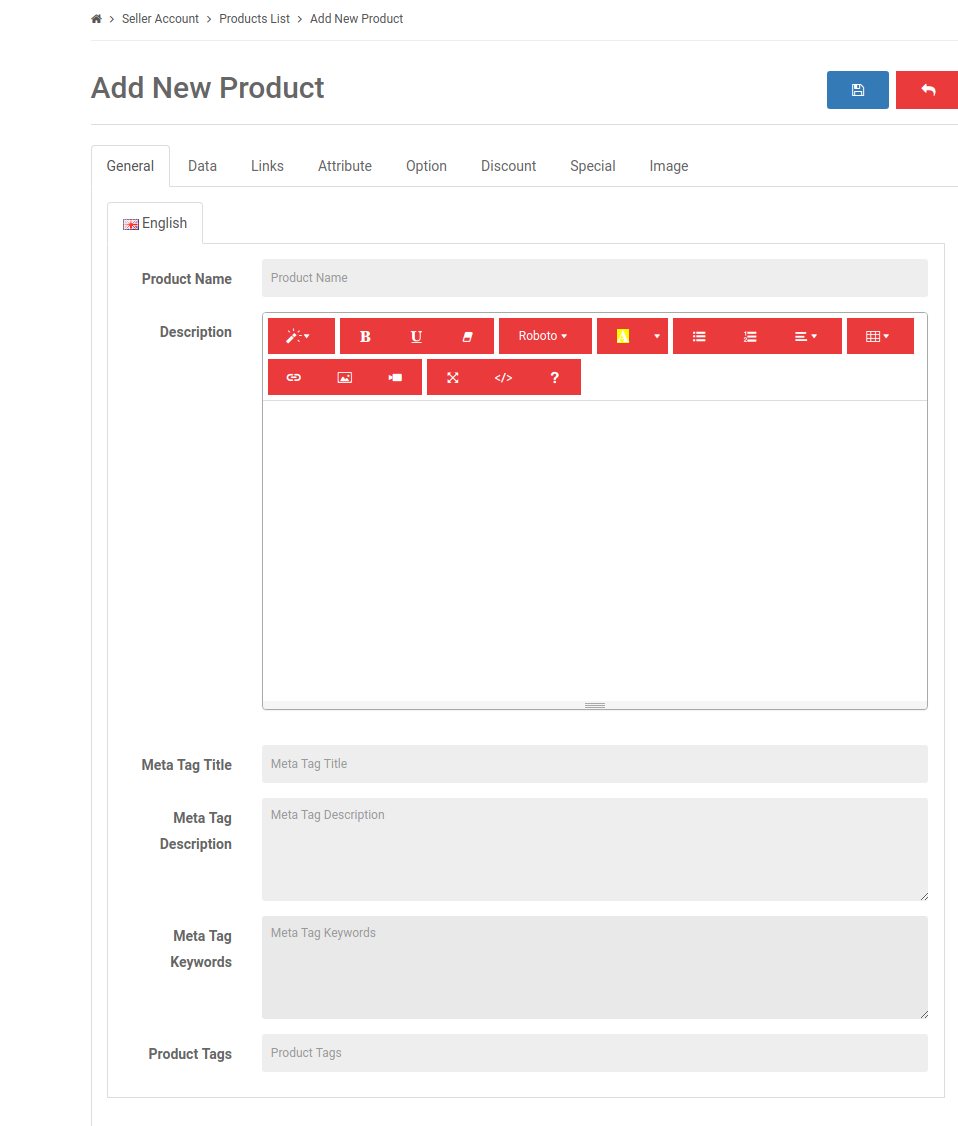
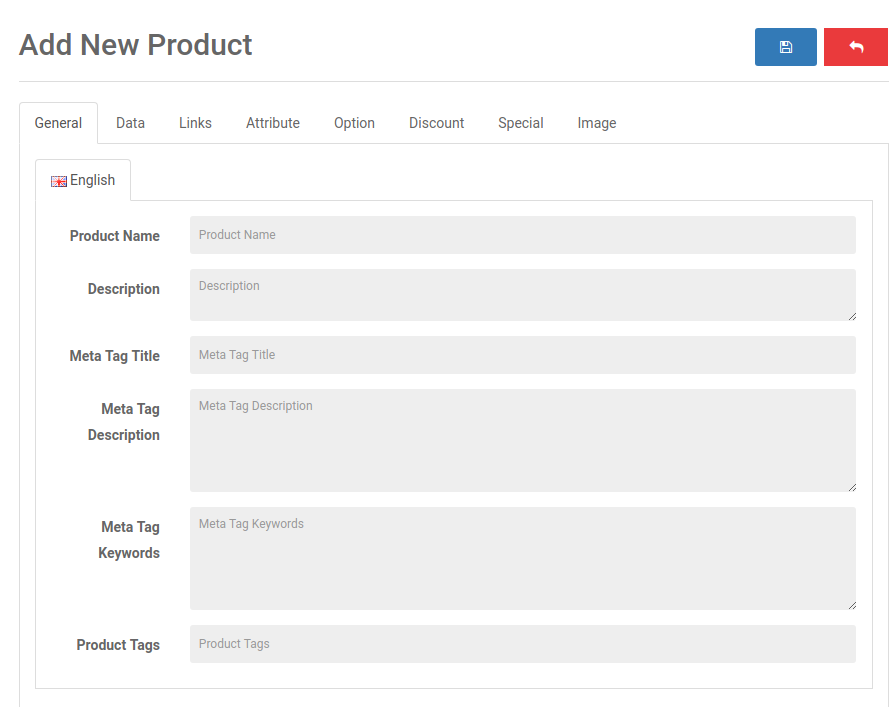
3.3.1.1 General
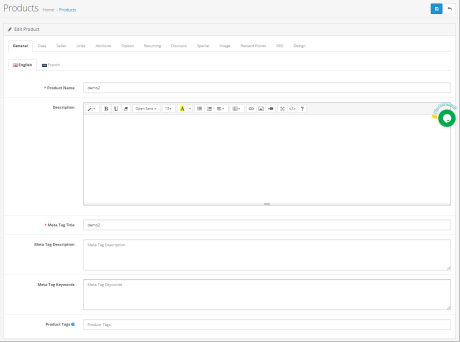
Add a general product description in the General setting tab of the product.
Product Name: Add product Name in this field.
Product Description: Add the product description in the description field.
Meta Tag Title: Enter the Meta tag here.
Listing Meta Description: Enter the Meta description of the website here.
Meta tag Keywords: Enter the meta keywords in this section. Enter the tags and separate them with comma.
Product Tags: Add all the product tags here.
3.3.1.2 Data
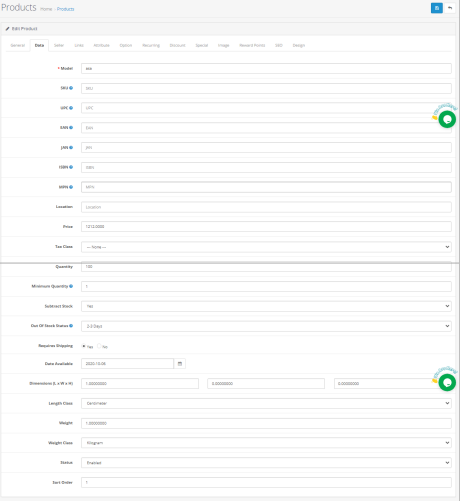
In the data section of Product description, the admin have to fill the details like Model, Product codes like SKU, UPC, EAN number, JAN, ISBN and MPN, Location details, Product price, Tax class, Quantity, Minimum quantity, Stock status, Shopping charges requirements, dimensions, weight etc.
3.3.1.3 Seller
Select the seller from the given seller’s list.
3.3.1.4 Links
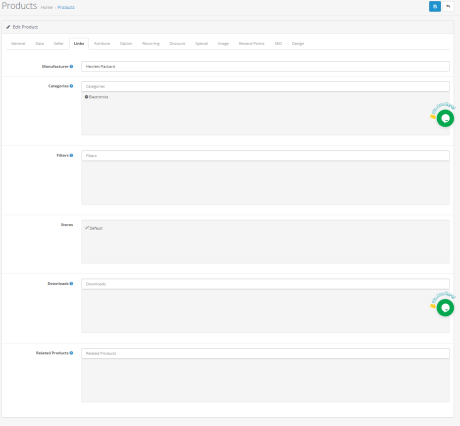
Add details like manufacturers, categories, filters, stores, related product, etc.
3.3.1.5 Attributes
Admin can add product attributes in English and French.
3.3.1.6 Option
If required then a product option will be available from this section.
3.3.1.7 Recurring
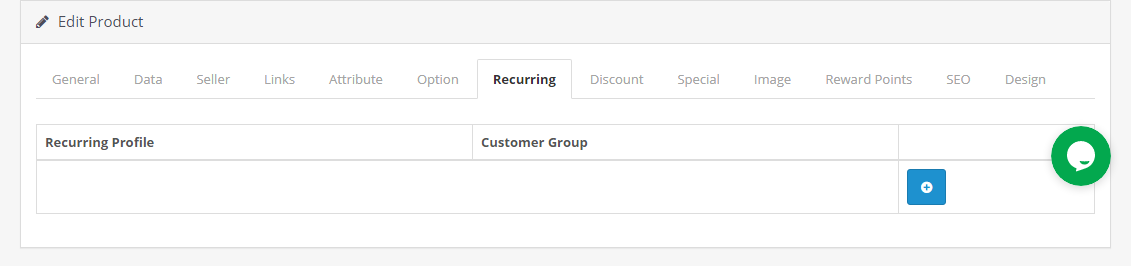
From this section, addition of recurring profiles will happen.
3.3.1.8 Discount
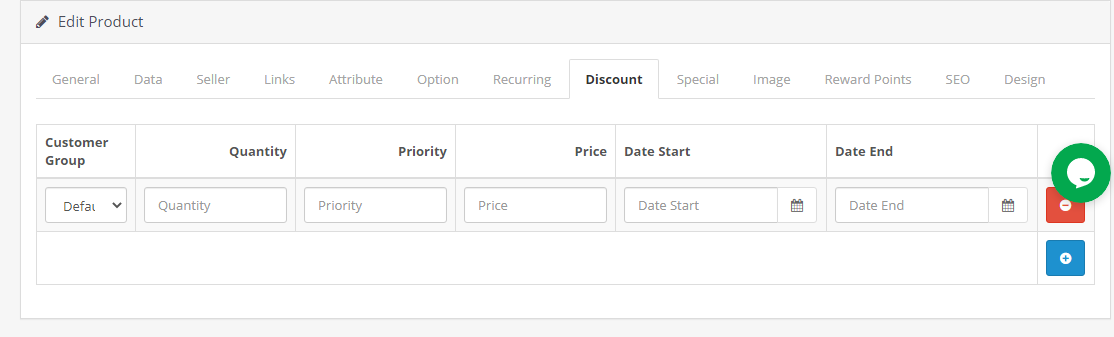
The discount details on the particular product will display here.
3.3.1.9 Special
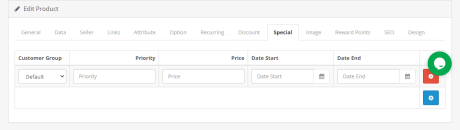
Admin can set the product on priority for a period by adding start date and end date.
3.3.1.10 Image
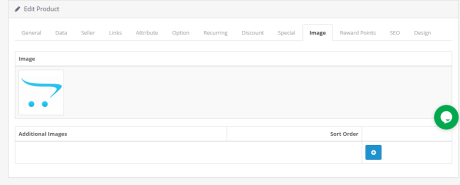
Upload the Image of the product here. Addition of one or more images can happen with order to display.
3.3.1.11 Reward Points
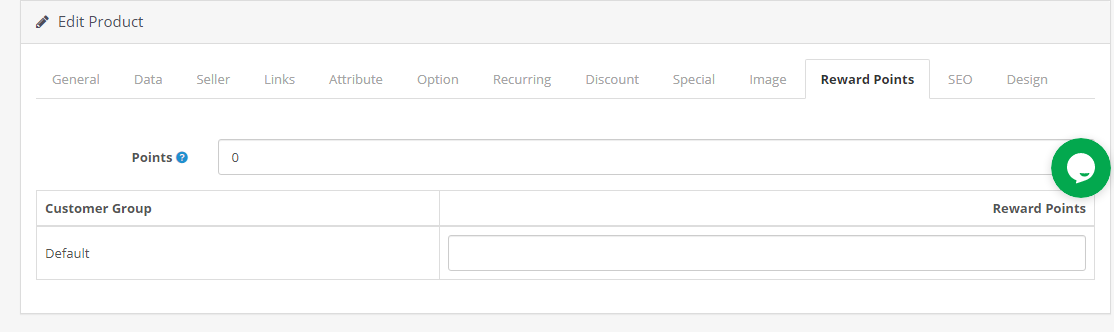
Admin can add a minimum number of points needed to buy this product.
3.3.1.12 SEO
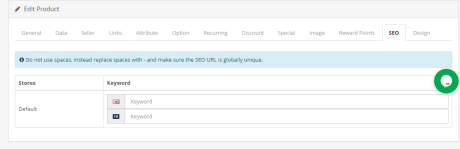
Add SEO for the product here.
3.3.1.13 Design
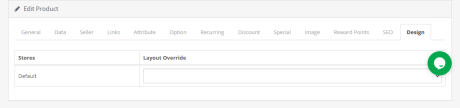
From this design section, sellers can choose the layout design.
3.3.2 Product Approval List
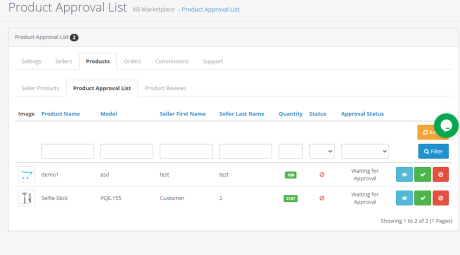
The third-party vendors can list their product from the dashboard of their profile. The products put in from the dashboard list in this tab of the OpenCart Multi-vendor marketplace module for approval. Admin approval is required only if this feature is enabled. The store admin can, then, approve or disapprove the product at a button click.
The products put in by the sellers will list in the Product Approval List tab of the OpenCart Multi seller Marketplace module as shown in the image below:
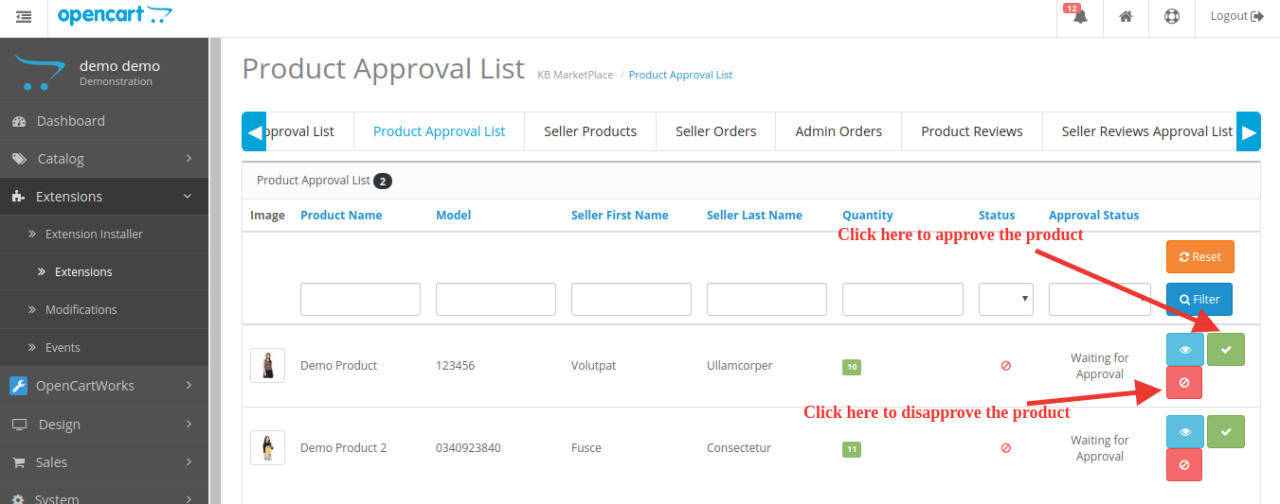
The admin can approve or disapprove of the products by clicking on the respective button corresponding to each product. Refer to the image below:
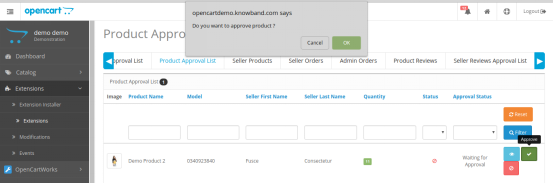
Once the Approve or Disapprove button is clicked, a pop-up will display with the message “Do you want to approve product?”
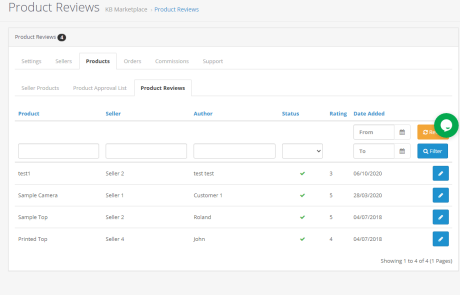
3.3.3 Product Reviews
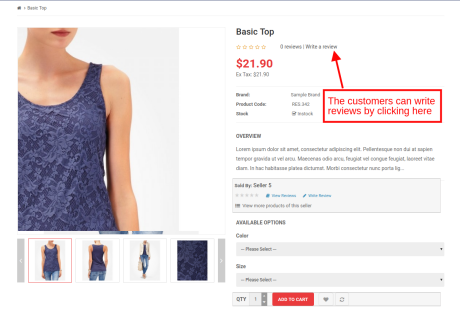
The customers can give ratings and write reviews for the products if this feature is enabled from the back-end of the OpenCart marketplace plugin. If enabled, the customers can leave their reviews by clicking on ‘Write a Review’.
The reviews written in the front-end will list in the back-end of the OpenCart Multi-vendor Marketplace plugin as shown in the image below:
Click on the ‘Edit’ button to edit or approve the product reviews. This will redirect you to the review edition page of the OpenCart Multi-vendor Marketplace module.
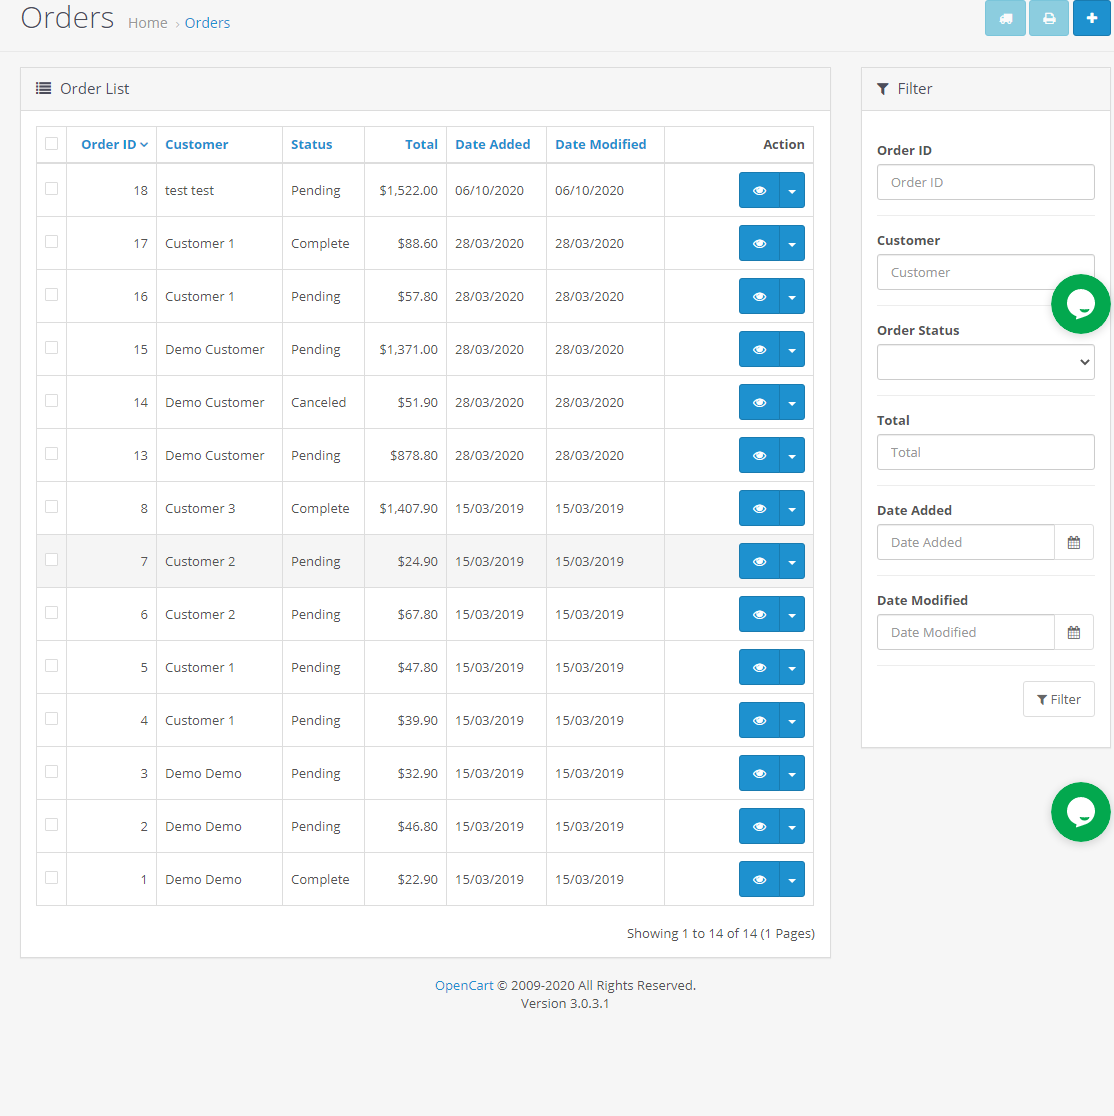
3.4 Orders
OpenCart store admin can view the list of all the orders here.
3.4.1 Seller Orders
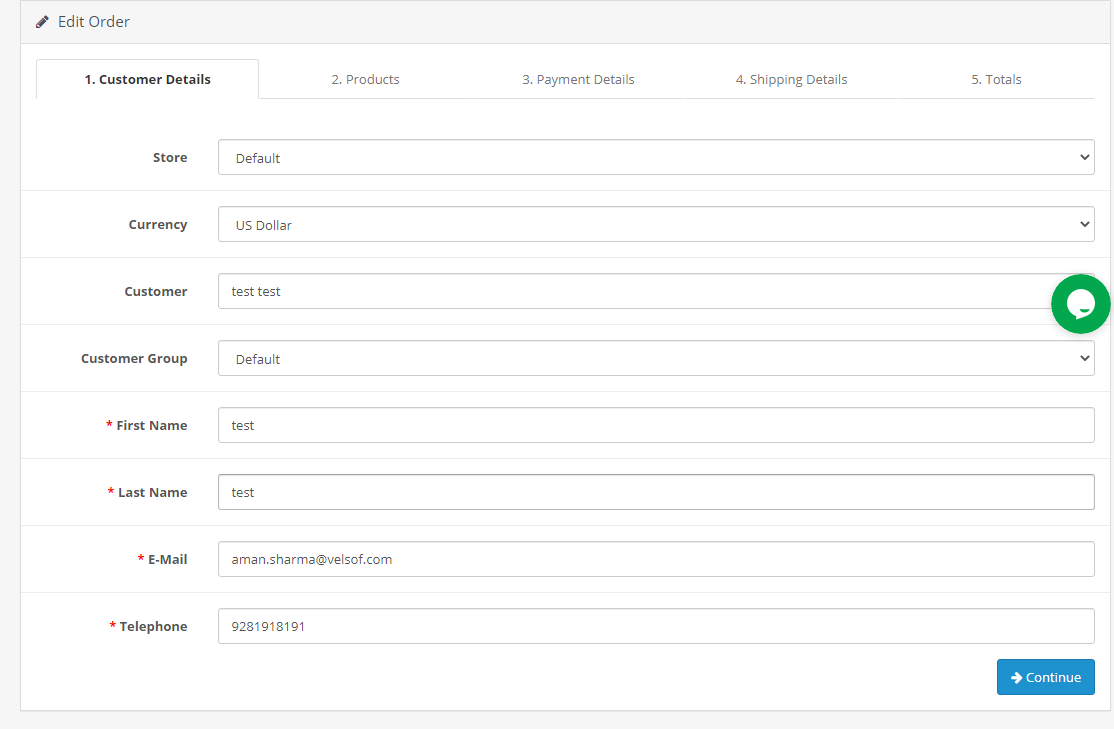
The orders received on the seller’s product will list in the tab of the OpenCart Multi seller marketplace plugin. The store admin can view or edit the orders by clicking on the View and Edit buttons respectively.
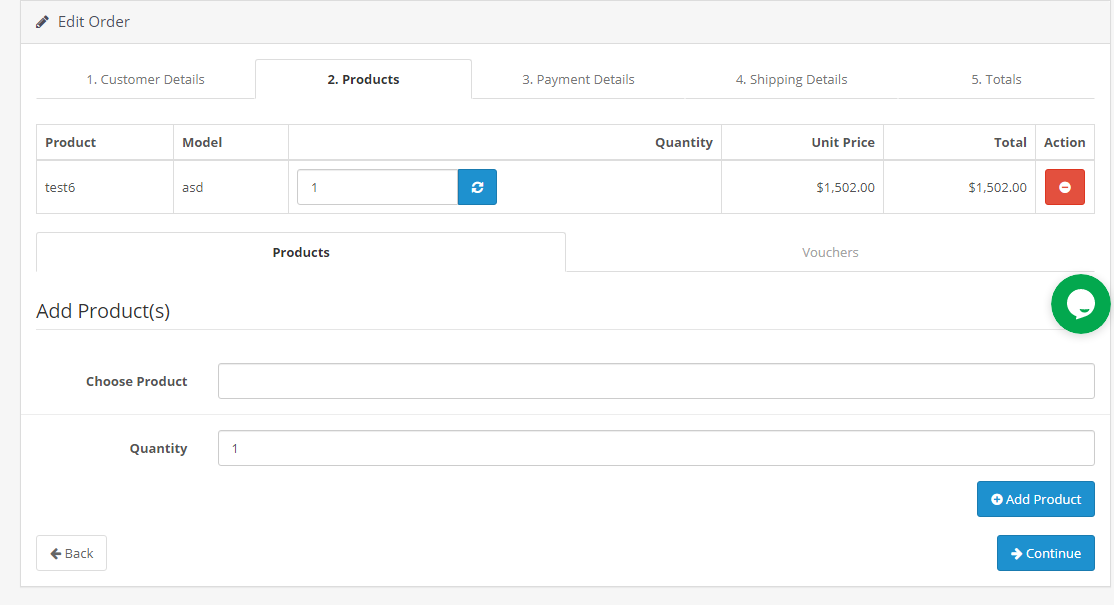
The following window will display if admin clicks the edit button. Admin can make the changes in all the fields as required.
3.6.1 Customer Details
From this section, admin can add their customer’s details.
3.6.2 Products
From this section, admin can add their products details.
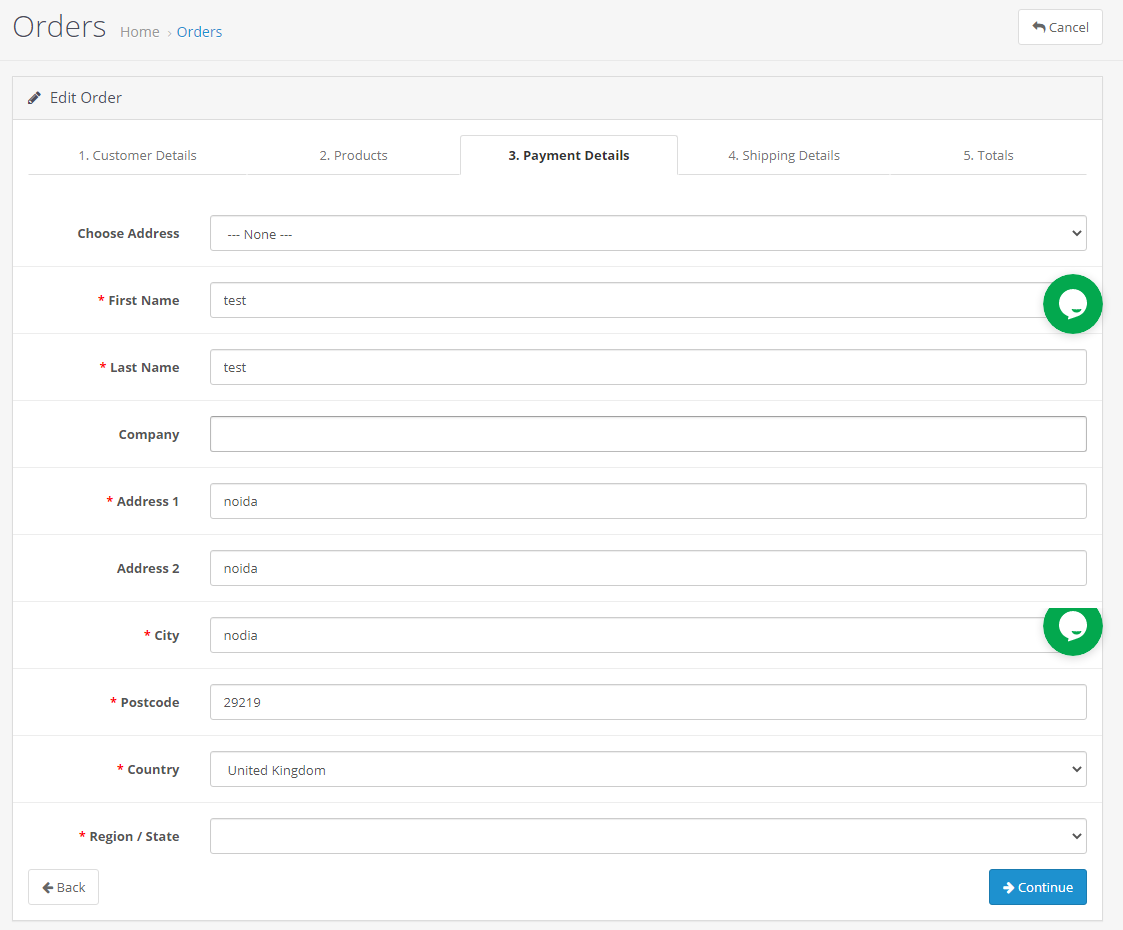
3.6.3 Payment Details
From this section, admin can add their payment details.
3.6.4 Shipping Details
From this section, the admin can add their shipping details.
3.6.5 Totals
From this section, the admin can add the details of their total.
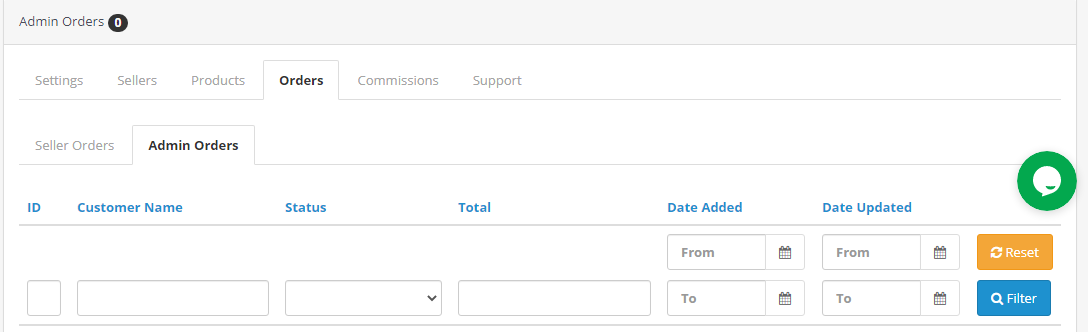
3.4.2 Admin Orders
The admin can track the order details of their products in the Admin Order tab of the OpenCart Multi seller marketplace extension.
3.5 Commissions
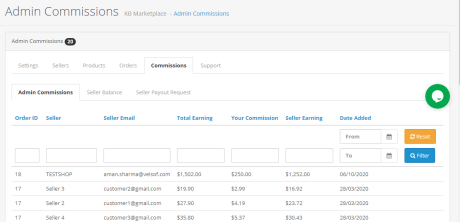
3.5.1 Admin commission
The admin can view the commission earned from the marketplace in this tab of the OpenCart Multi-vendor Marketplace Plugin. The store owner gets an option to view the earnings of the seller and total earnings.
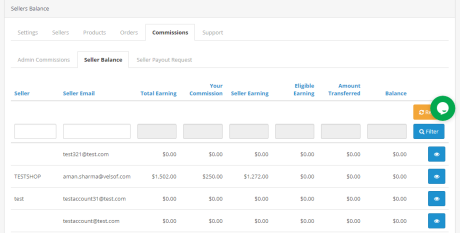
3.5.2 Seller Balance
The store admin even gets an option to view the transaction of the sellers. The admin can see the Seller Balance History as well as Transaction History in this tab of the OpenCart Multi seller Marketplace plugin.
3.5.3 Seller Payout Request
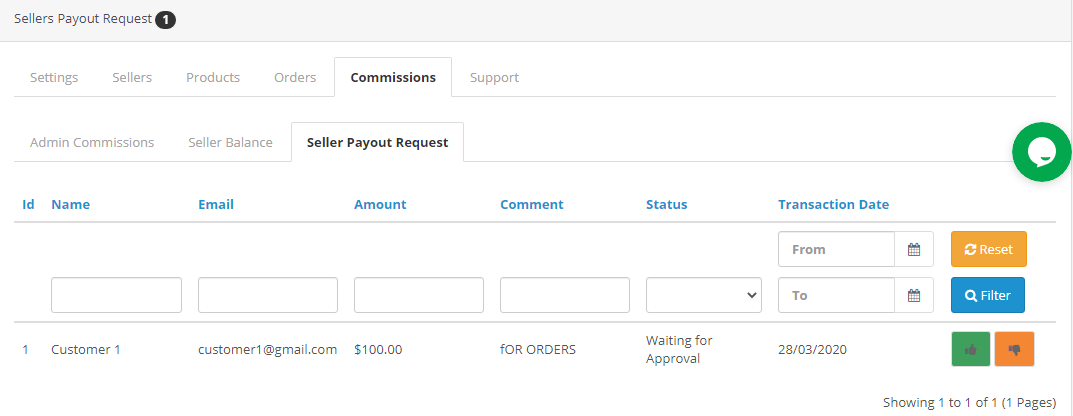
Payout Request sent by the sellers can be viewed by the admin from the backend of the Sellers Payout Request. Admin can approve/ disapprove the payout request with a few clicks. Once the admin clicks on the “Approve” button a pop window as shown in the figure will appear.
When the admin will click on the “Disapprove” button, a dialog box with a comment field will appear. Once the admin clicks the submit button after filling the comment fields, the request will disapprove.
3.6 Support
This tab is used to find the user manual of the Opencart multi-seller Marketplace Module and also to raise a support ticket for any kind of queries and issues.
4.0 Front-end UI
Once the OpenCart Multi vendor Marketplace plugin is successfully installed at the OpenCart store, third-party vendors can fill a simple form and open-up their online shop. For easy management of the shop, the seller gets access to their dashboard.
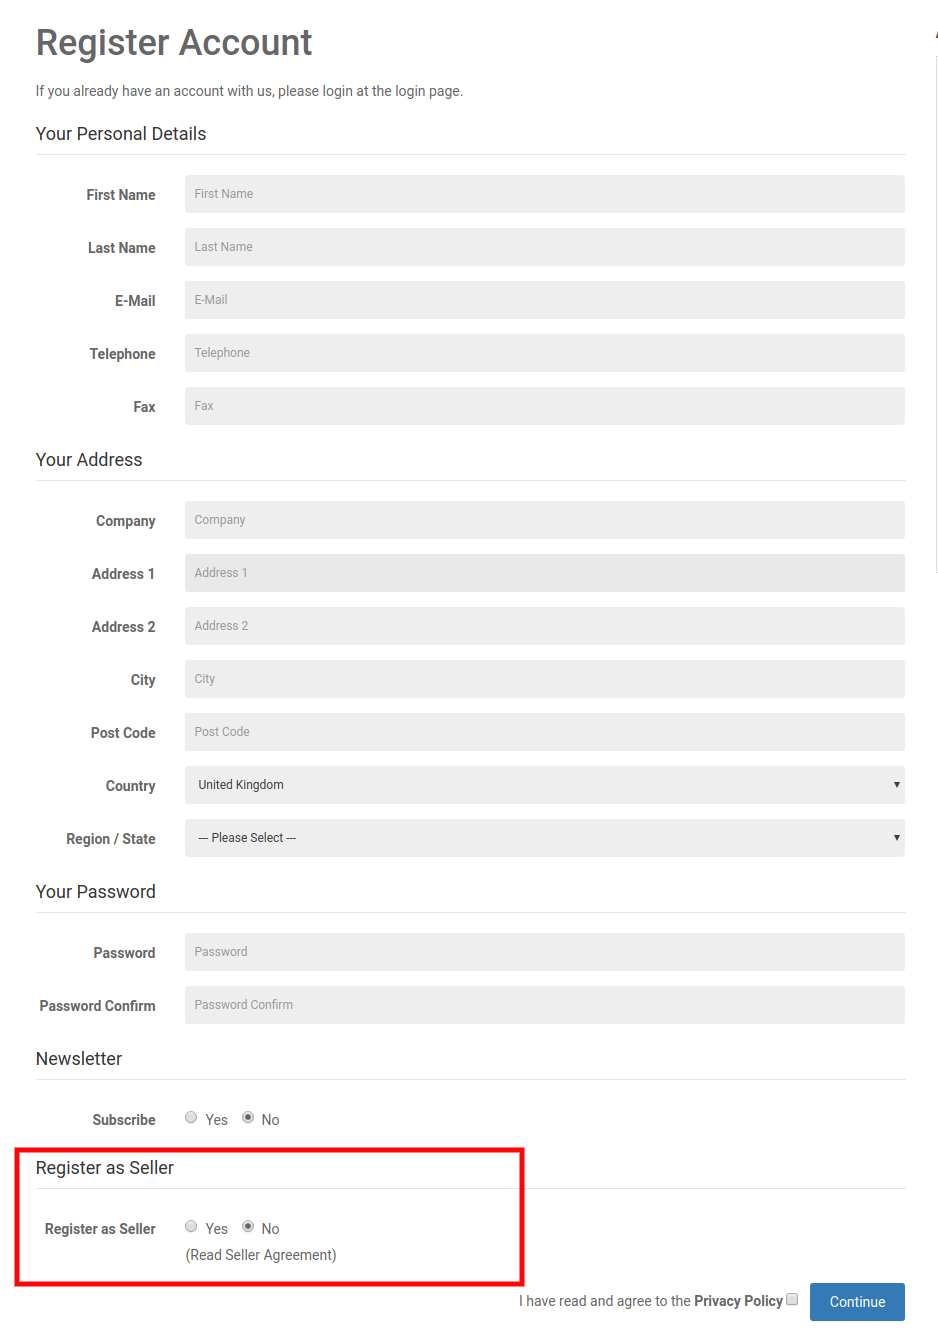
4.1 Seller Registration
The third-party vendors can easily register as a seller of the site by filling a simple registration form. In order to register as a seller, select ‘Yes’ in the Register as Seller section of the form.
4.2 Seller Dashboard
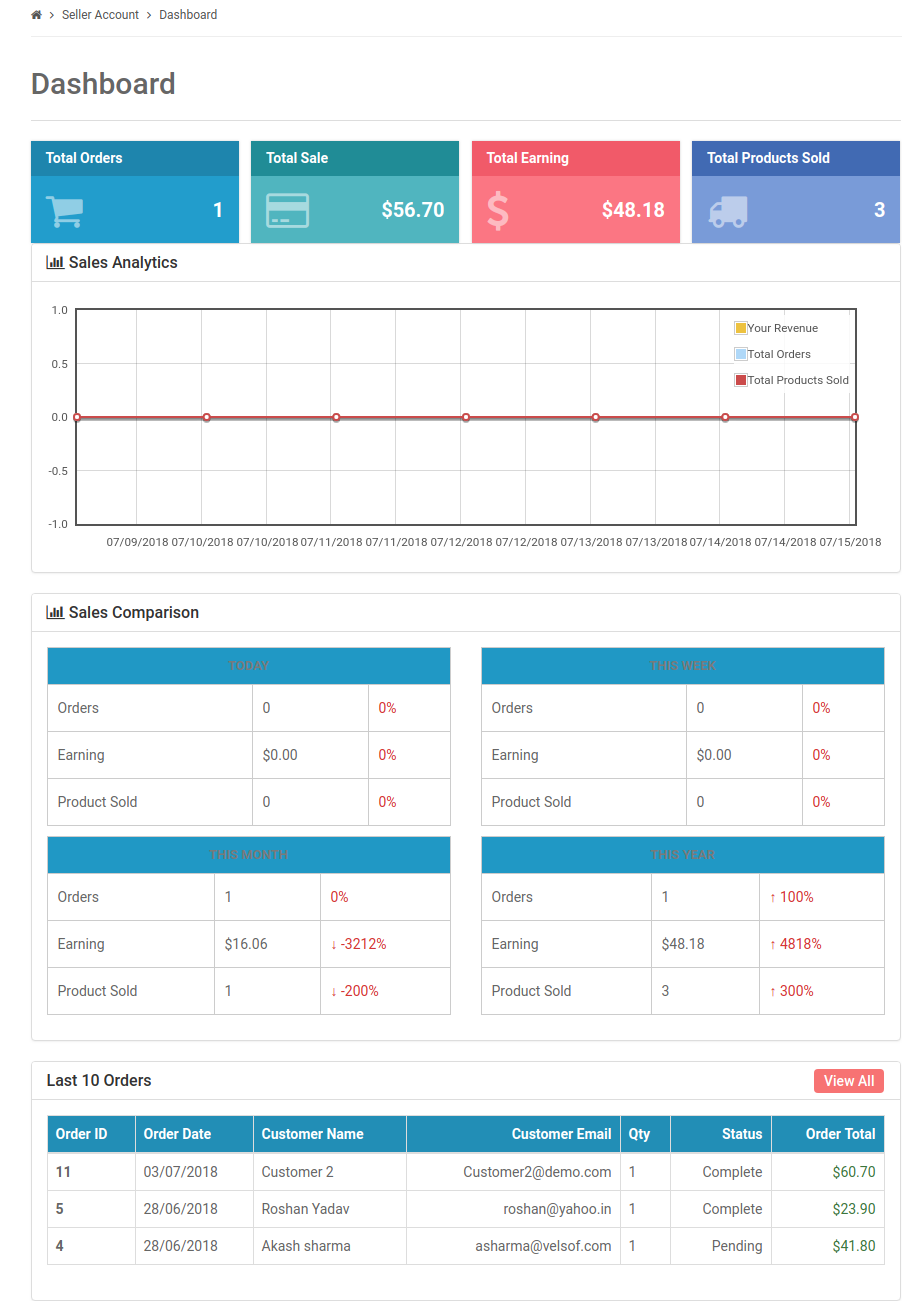
Once the registration is complete and the seller’s account approves from the back-end of the OpenCart multi-seller Marketplace plugin, the seller gets access to the Dashboard.
They can view the entire sales report and order details.
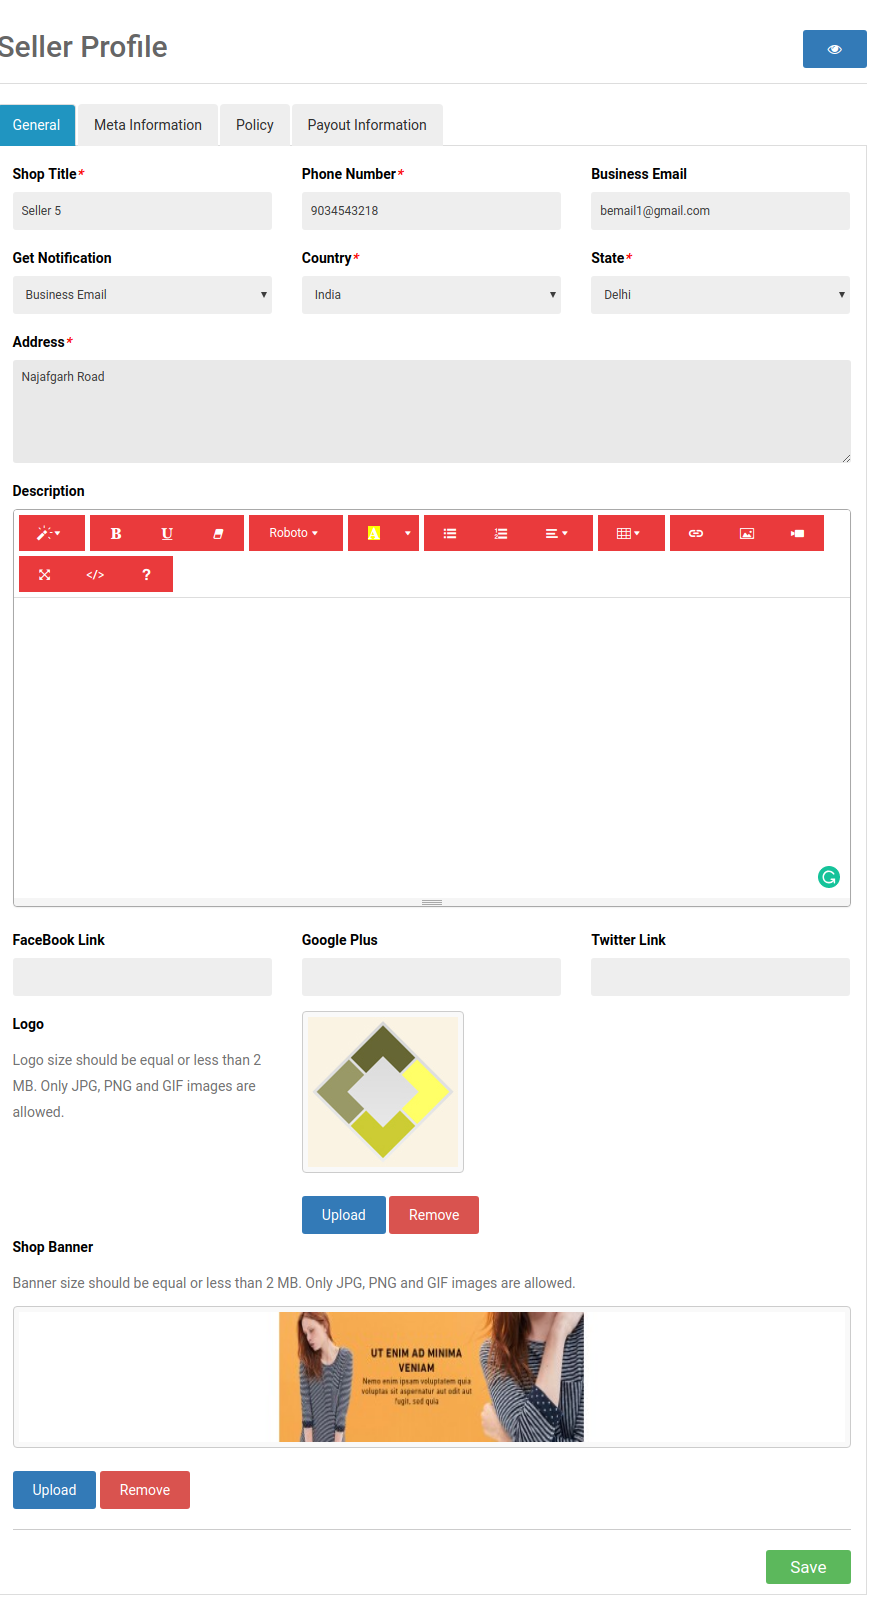
4.2.1 Seller’s Profile
The sellers can edit their profile and personalize their shop from this tab of the dashboard.
4.2.2 Seller’s Product
The sellers can follow the path mentioned below in order to add a new product.
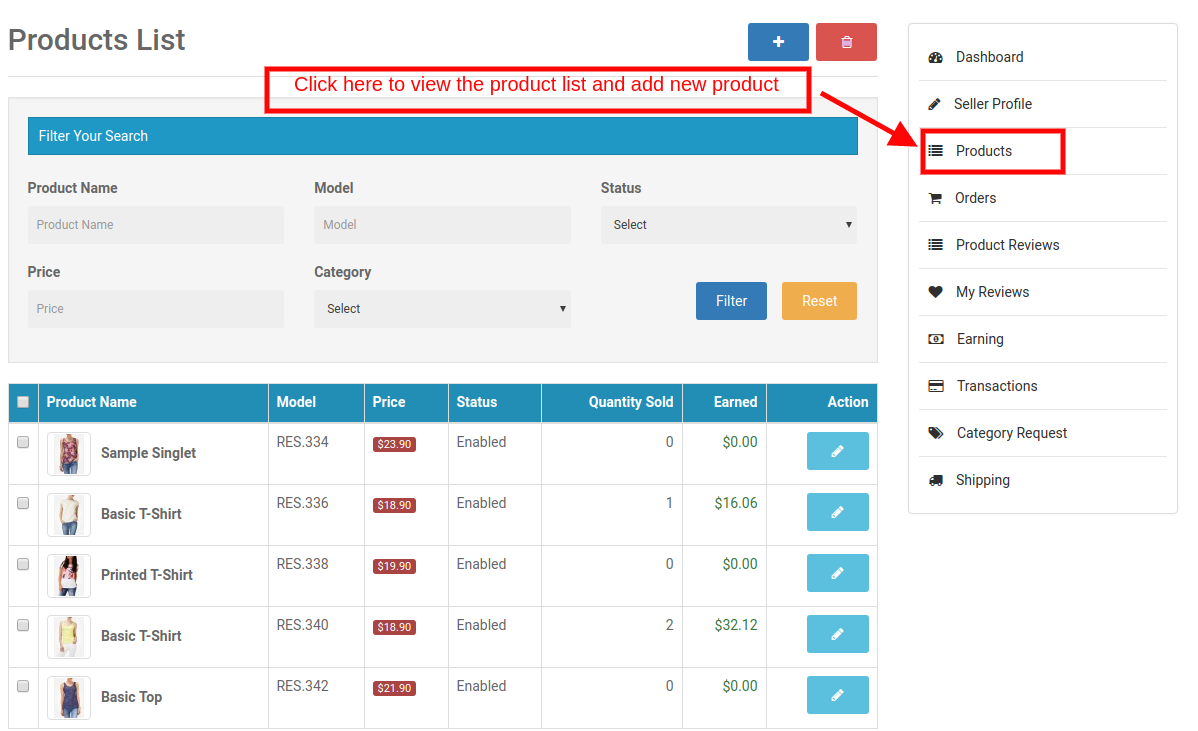
Go to My Account -> Dashboard -> Products
The list products display in this tab of the seller’s Dashboard.
In order to add a new product click on the ‘+’ sign at the top right portion.
This will redirect you to the ‘Add New Product’ page. Fill up the required detail in order to add the product.
4.2.3 Order
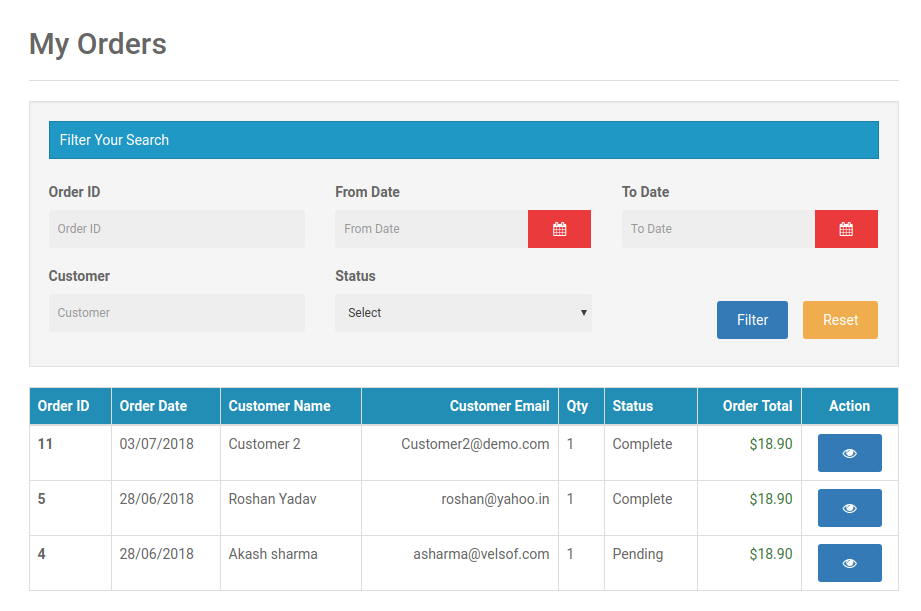
The sellers can view their orders and related details in this tab of the Dashboard.
4.2.4 Product Reviews
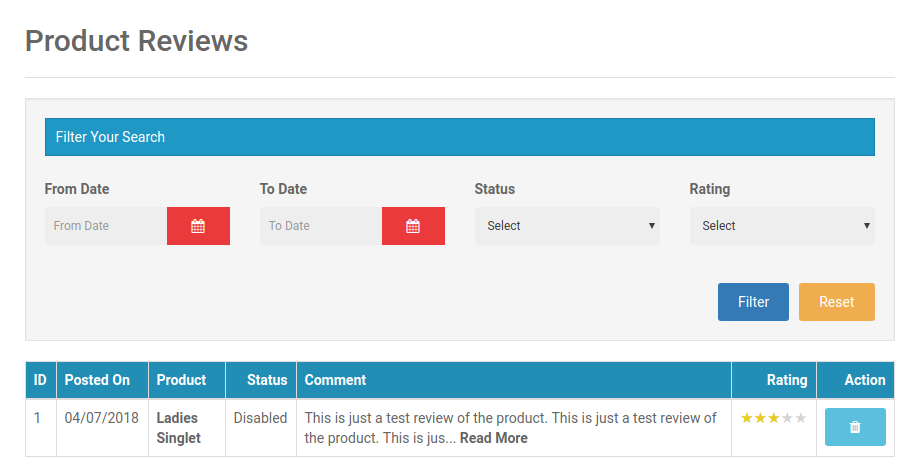
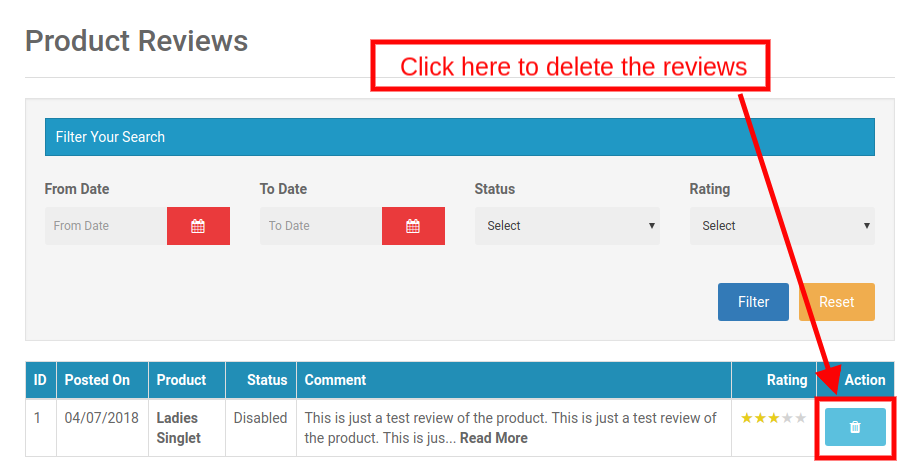
The sellers can view the review received on their product in the Product Review Tab of their Dashboard. All the reviews received will list as shown in the image below:
4.2.4.1 How can the sellers delete the Product Reviews?
Even the sellers get an option to delete the reviews. This happens by clicking on the ‘Delete’ button corresponding to each review.
4.2.5 My Reviews
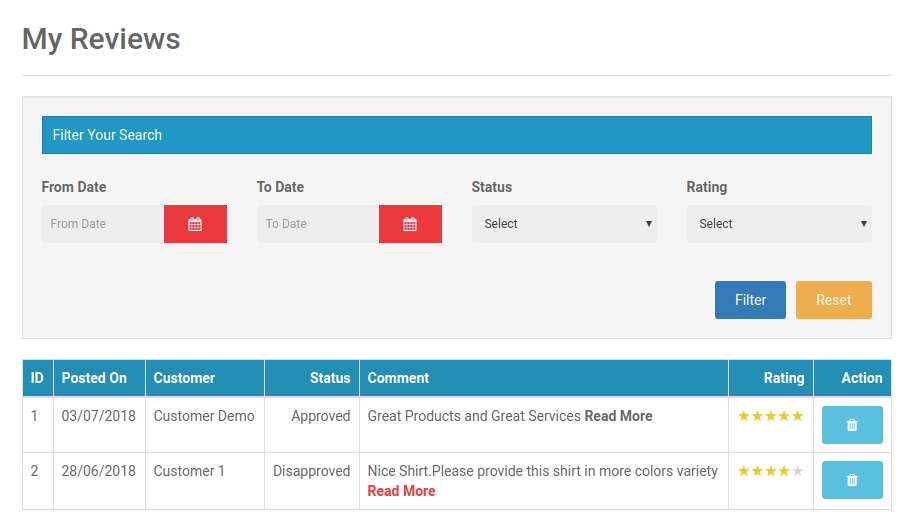
The tab of the seller’s dashboard lists out the reviews received on their profile.
OpenCart Multi vendor Marketplace plugin- My reviews
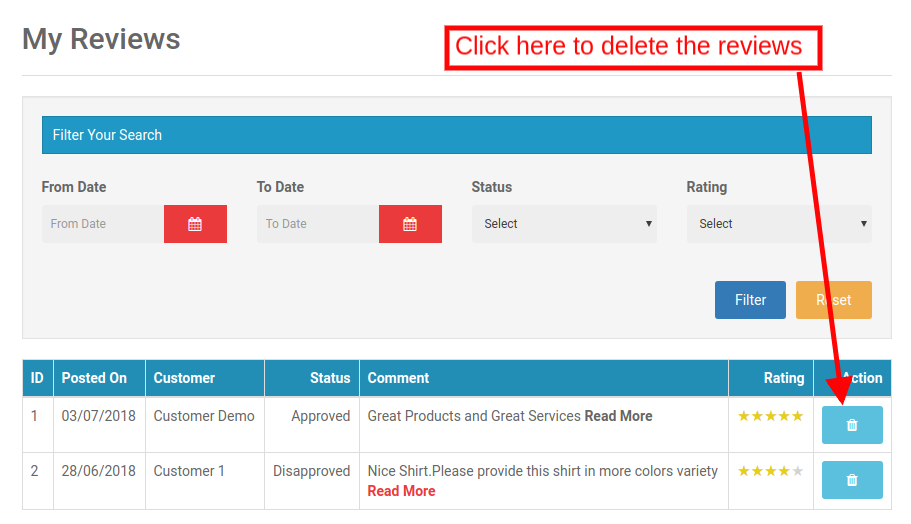
4.2.5.1 How can the Sellers Delete the Reviews on their Profile?
The sellers can even delete their profile reviews if required. This happens by clicking on the ‘Delete’ button corresponding to each review.
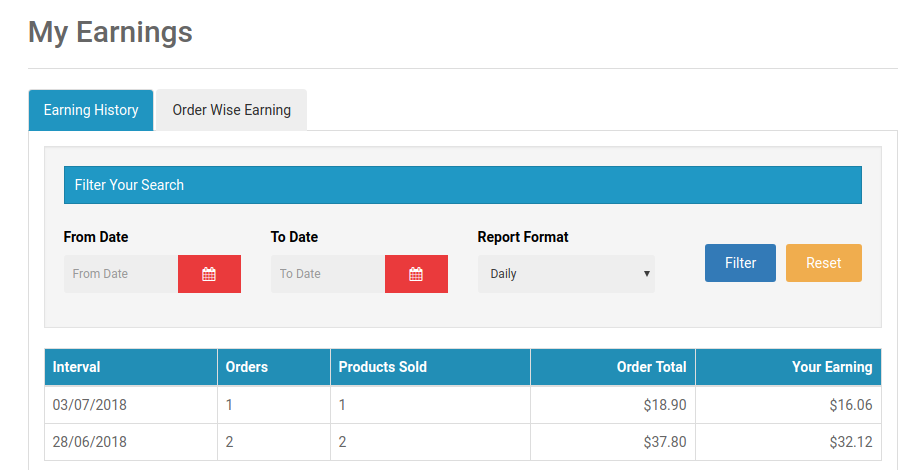
4.2.6 Earnings
The total earnings of the seller can be viewed in this tab. The vendors can filter the results as per requirement.
The total earning history will display as shown below:
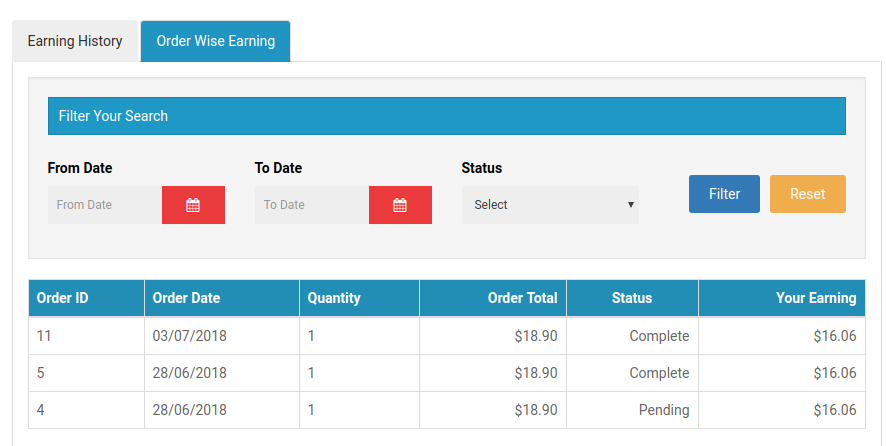
The sellers can even view the order-wise earning as shown below:
4.2.6 Transactions
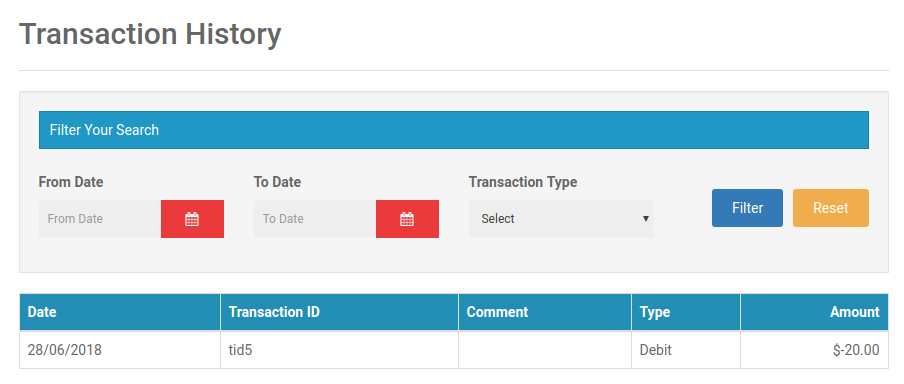
The seller can view their entire transaction history in this tab. The amount debited or credited in their account can be viewed here.
4.2.7 Payout Request
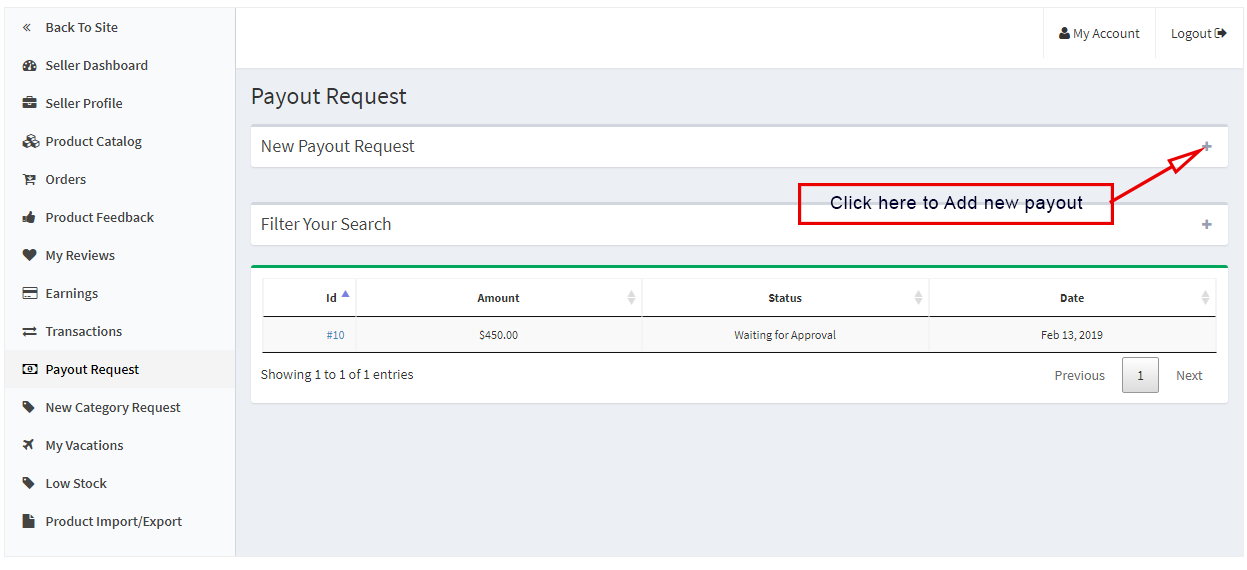
Sellers can view the list of payout request sent to the admin from the Payout Request tab. For a new payout request sellers need to fill the payout amount and reason and send it to the admin for approval.
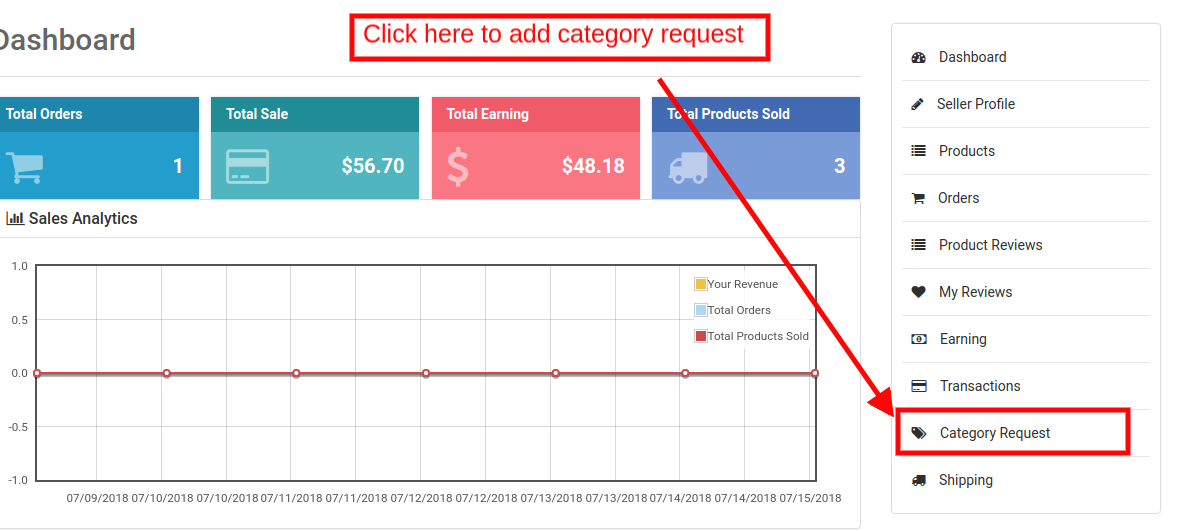
4.2.8 Category Request
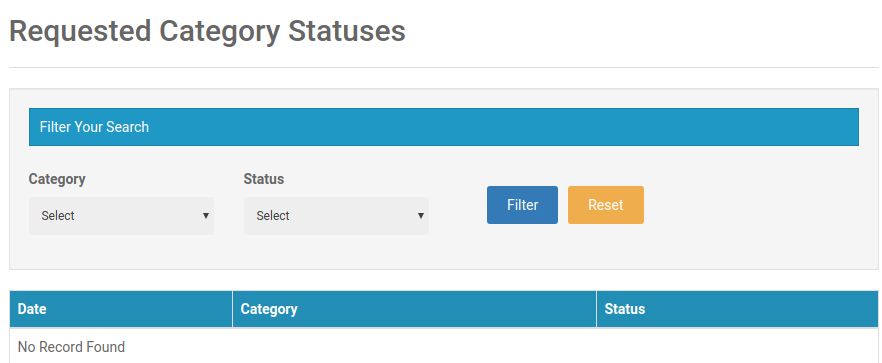
The sellers can view the categories assigned to them. Additionally, they can even send a category request to the store admin. In order to send category request, go to the Dashboard -> Category Request
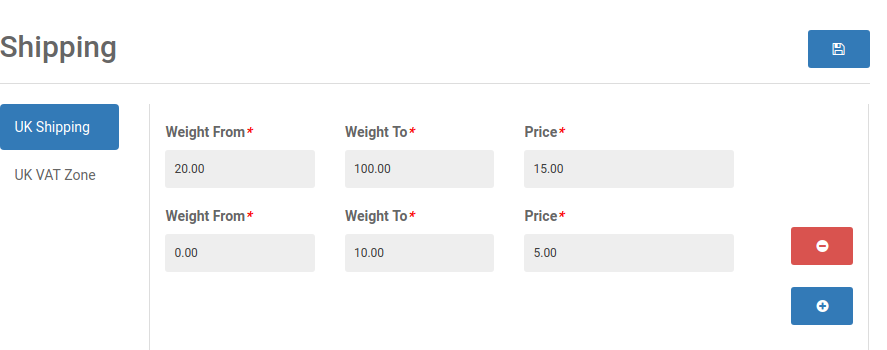
4.2.9 Shipping
The sellers can view the shipping process as in the screenshot below:
4.2.10 Product Import
With the help of the product import feature, sellers can add products in bulk. They have to download the template for products upload and just fill in the information of their products and upload again to list the products in bulk.
Product Return:
The seller can see the product return list here. The seller can add a filter to search for the product returned or requested for the product return.
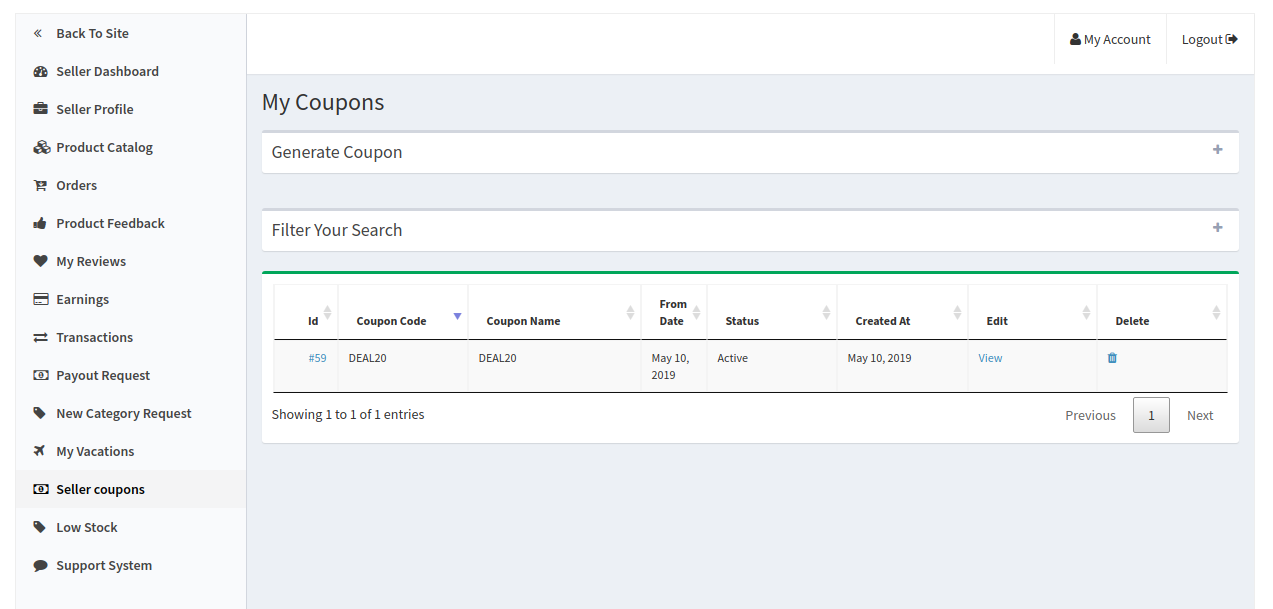
4.2.11 Seller Coupons
Using this feature seller’s can generate coupons for their customers. Sellers can use different variations for creating their coupons like users per coupon, coupon type etc.
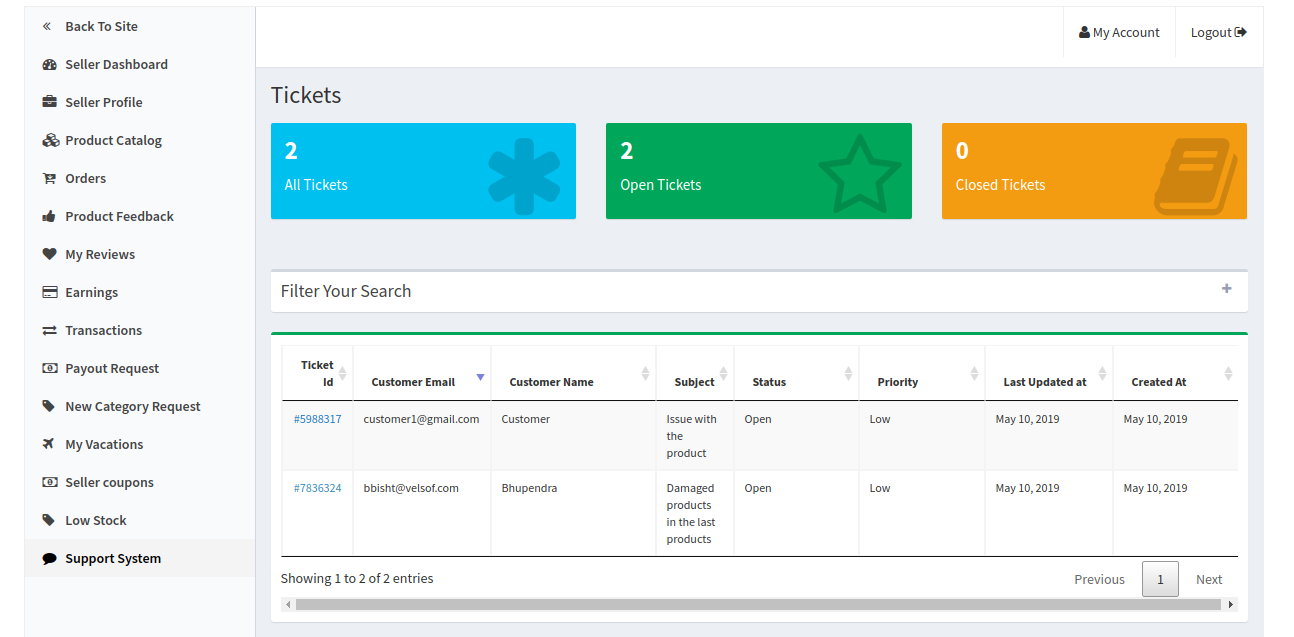
4.2.12 Support System
This feature allows the sellers to view the queries of their customers in the form of tickets. When the seller clicks on the Ticket ID they are able to see the full detail about the query and even reply and change the status of the query.
The OpenCart GDPR module by Knowband provides a tool to the OpenCart store owners to meet the GDPR requirements imposed by the European Parliament. GDPR directives provide more rights to the EU citizens to protect their personal data.
New Data Protection Rights under GDPR:
1) Right of access by the data subject
2) Right to rectification
3) Right to erasure (‘right to be forgotten’)
4) Right to restriction of processing
5) Notification obligation regarding rectification or erasure of personal data or restriction of processing
6) Right to data portability
7) Right to object
8) Automated individual decision-making, including profiling
The GDPR Extension for the OpenCart platform helps the store owner to provide an interface to the customers so that they can meet the GDPR requirements.
How can OpenCart GDPR module help you?
The OpenCart GDPR module by Knowband helps the sellers to comply with the GDPR directives without putting any extra efforts. By installing the OpenCart GDPR compliance module admin can display the GDPR Tools option on the account details page at the front-end of the customer or admin has the option to enable the GDPR rights for the guest users. The OpenCart GDPR Extension handles the following requests:
1) Cookies Consent Bar
2) Right of access to the personal data
3) Right to data portability
4) Right to be anonymous
5) Right to be forgotten
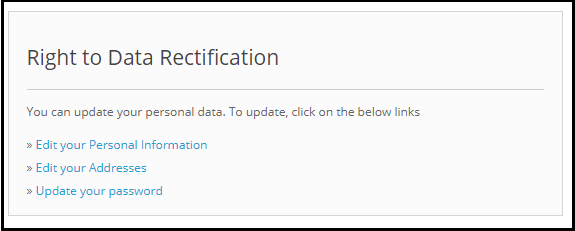
6) Right to data rectification
7) Right to restriction of processing
8) Rights related to the automated decision making
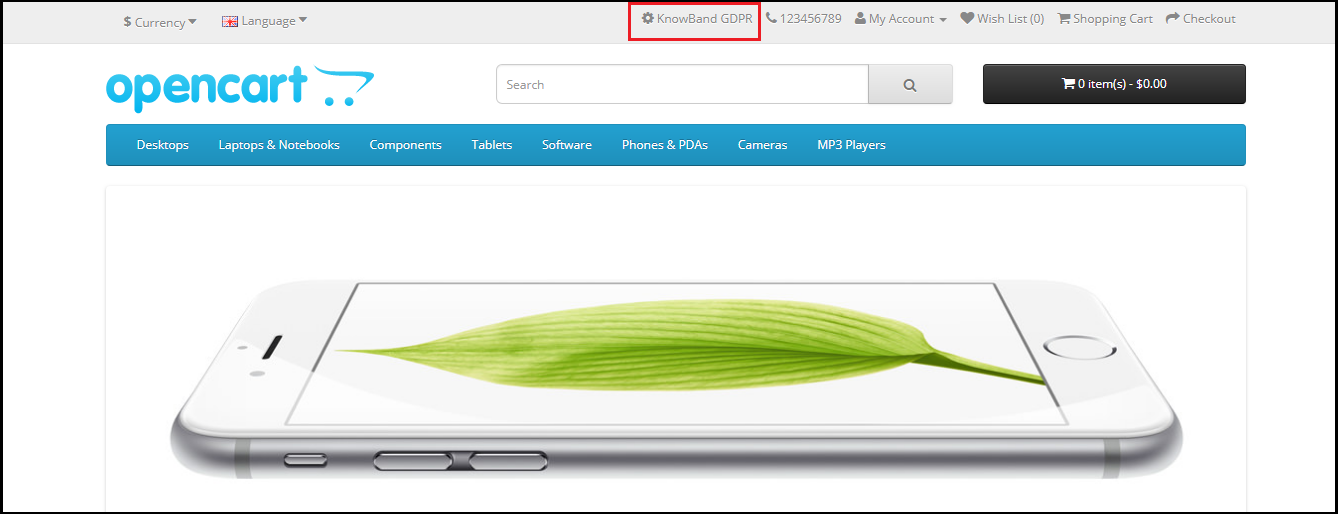
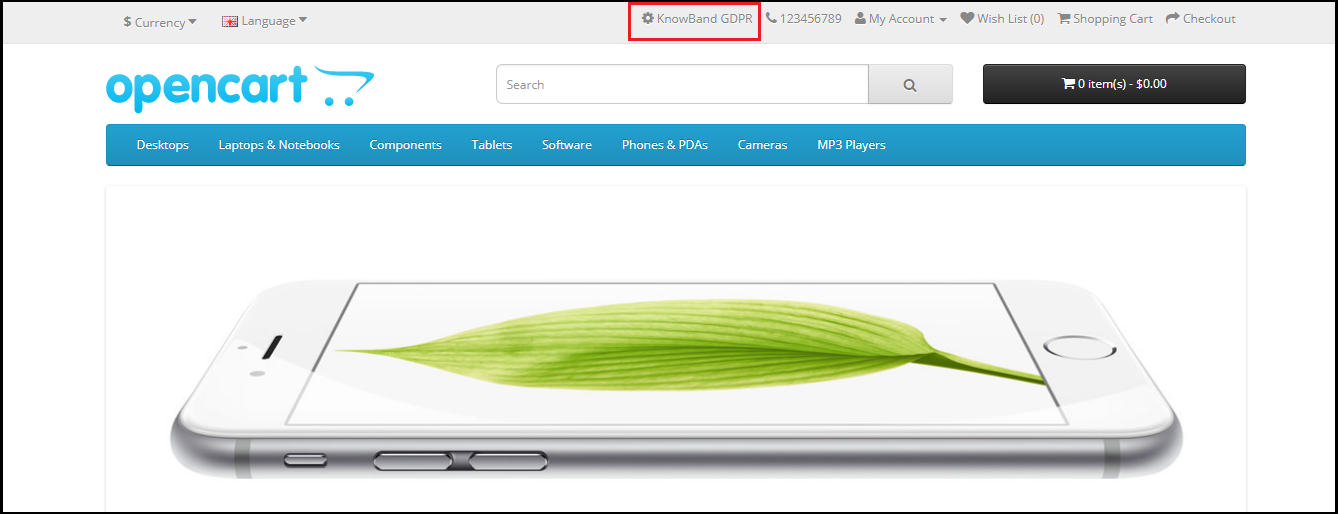
If the GDPR rights are enabled for the guest user then the GDPR Rights text will appear on the top of the home page. As per the need admin can modify the text.
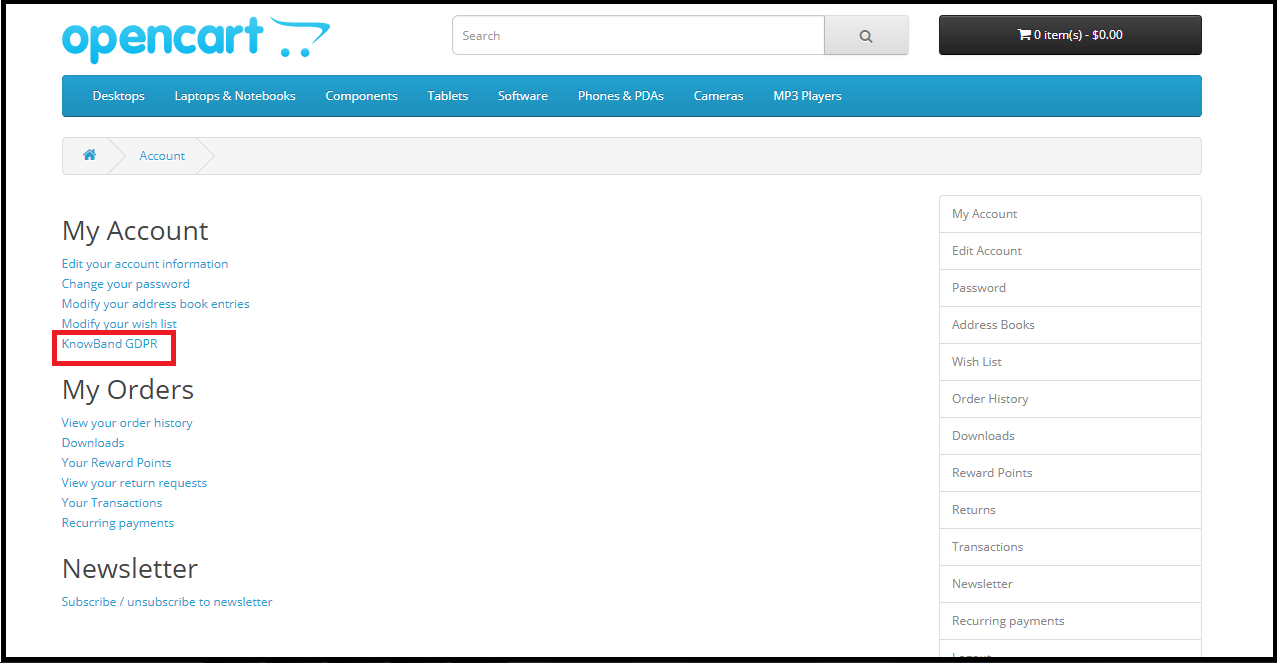
If the GDPR rights are enabled for the registered users only then the customers will be able to access the GDPR rights after logging into their account. Under My Account section there will be an option to access the GDR rights. Please refer to the attaced screenshot:
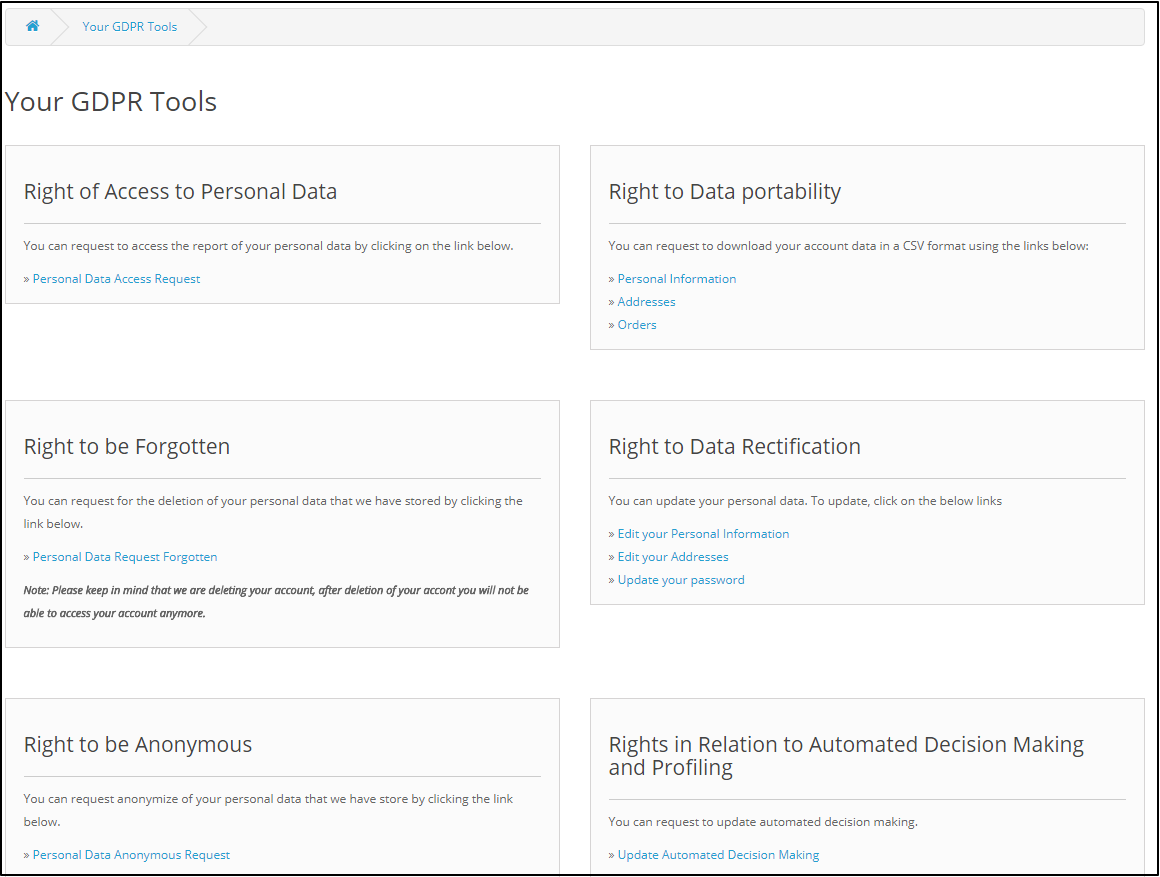
On clicking the GDPR settings tab the customer will be directed to a new page.
As per the requirement admin has the choice to enable/disable any of these rights.
2.0 Installation of OpenCart GDPR Module:
After placing your order for the OpenCart GDPR plugin you can download the zip file of the module. This zip file contains:
1) OC_GDPR_v1.0.0.zip (source code of the module)
2) User Manual
In order to install the extension in your OpenCart store follow the below-mentioned steps:
1) Unzip the zip file.
2. Copy all the files and folders of the zip file in the Root Directory of OpenCart setup via FTP manager.
3. The OpenCart GDPR module is now installed and is ready to use. Go to Admin -> Main Menu -> Extensions
3.0 Admin Interface of OpenCart GDPR Plugin:
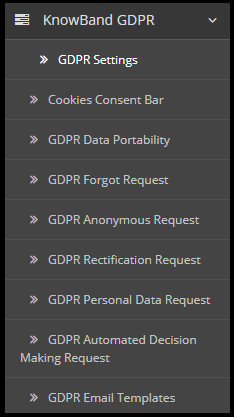
In the admin section of the OpenCart GDPR Customer rights module following options are available:
GDPR Settings
Cookies Consent Bar
GDPR Data Portability
GDPR Forgot Request
GDPR Anonymous Request
GDPR Rectification Request
GDPR Personal Data Request
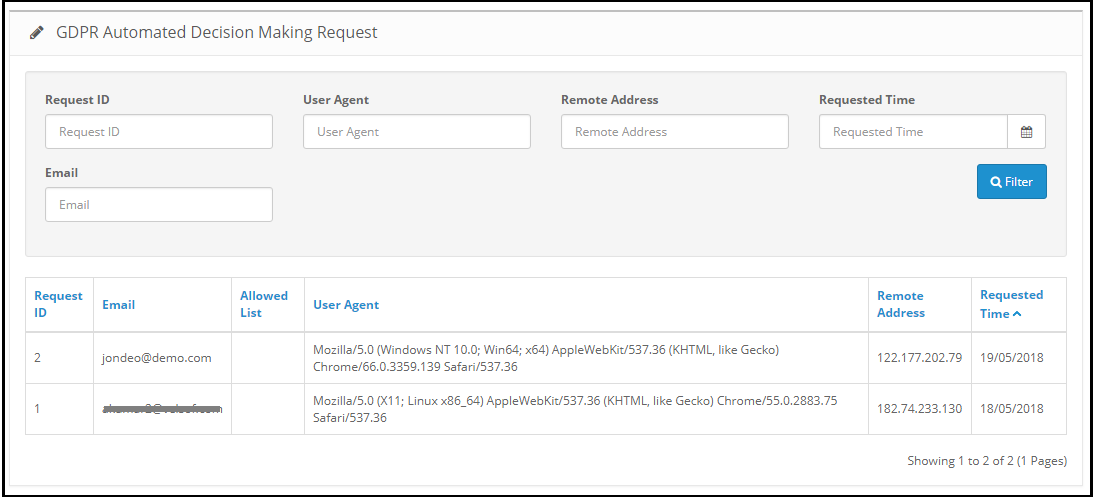
GDPR Automated Decision Making Request
GDPR Email Templates
3.1 GDPR Settings:
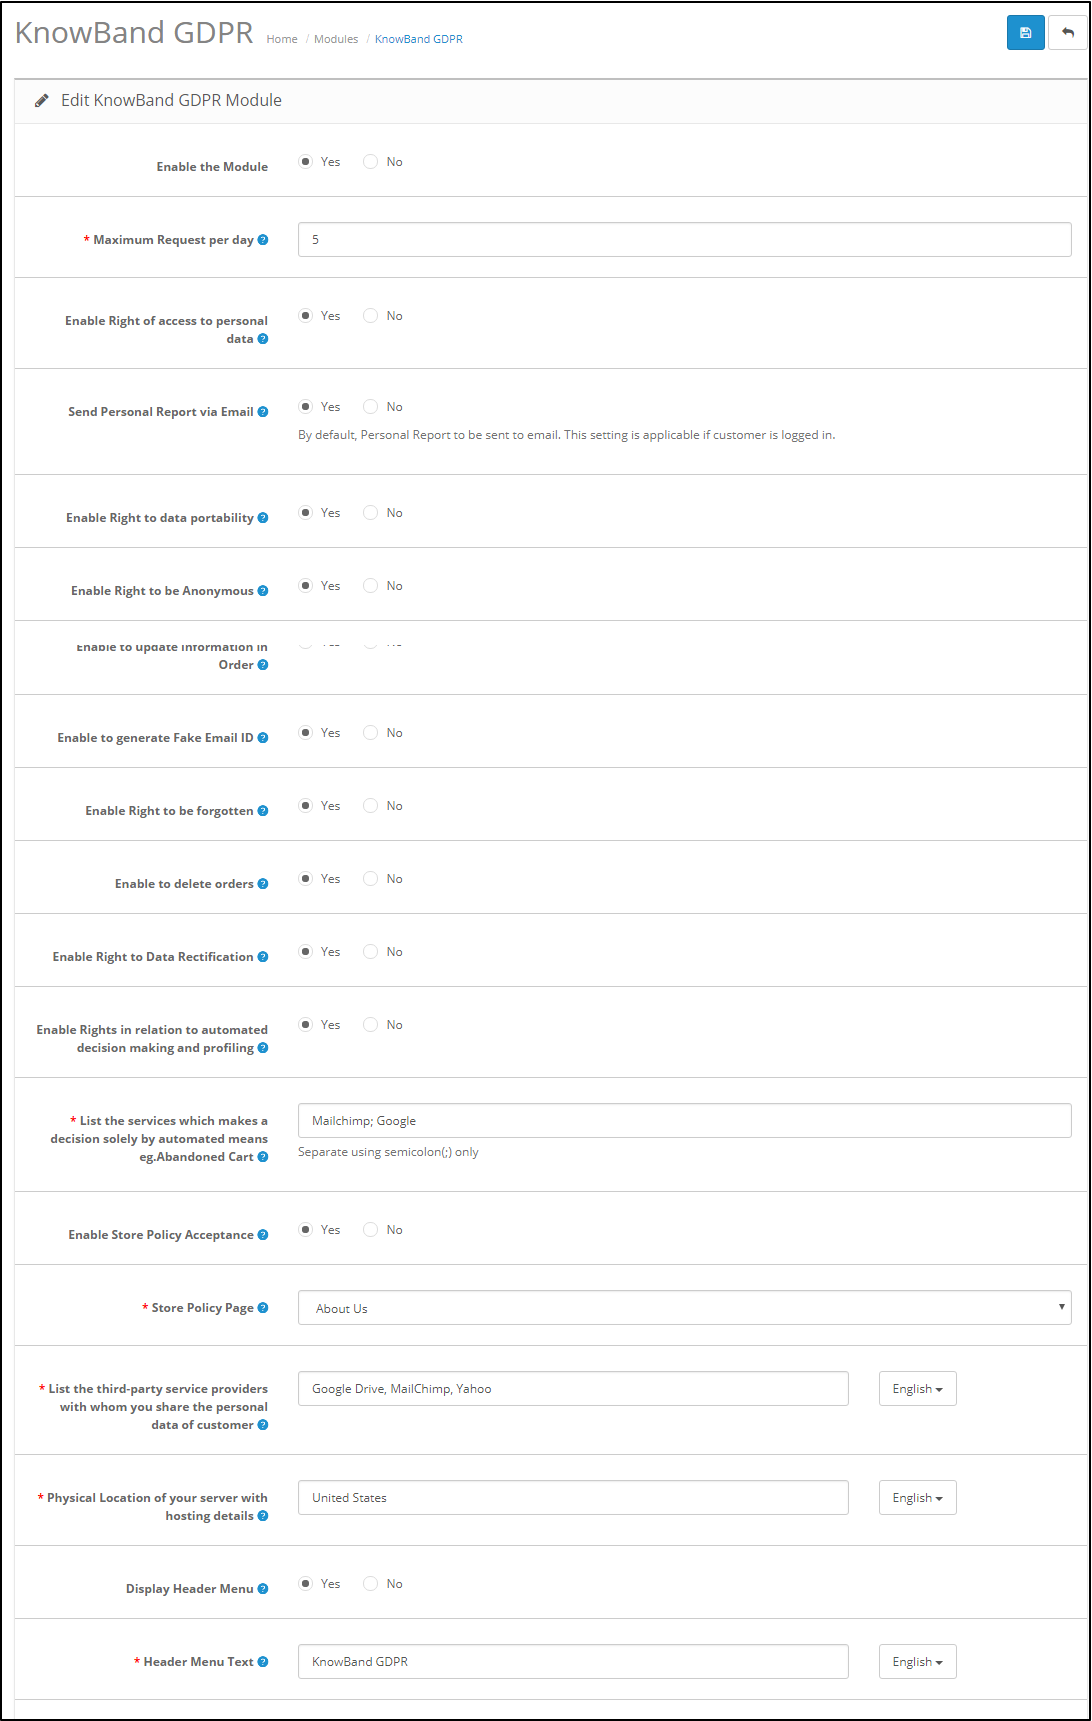
The GDPR Settings tab of the OpenCart GDPR Rights of the Individuals module allows the store admin to enable/disable the customer’s rights as per need. As per the settings enabled by the admin, the customer will be able to access the rights from his/her account. Please refer to the attached screenshot below:
Enable the Module: As per the requirement, admin can Enable/Disable the OpenCart GDPR Compliance Module.
Maximum request per day: Customers have the right to make request for the GDPR rights. Admin can set the limit for the requests on daily basis. It will be recommended to set the maximum requests per day to a minimum number to avoid the spam requests.
Enable Right of access to personal data: The right of access to personal data allows the customers to request for their personal details which they have shared with the data controller.
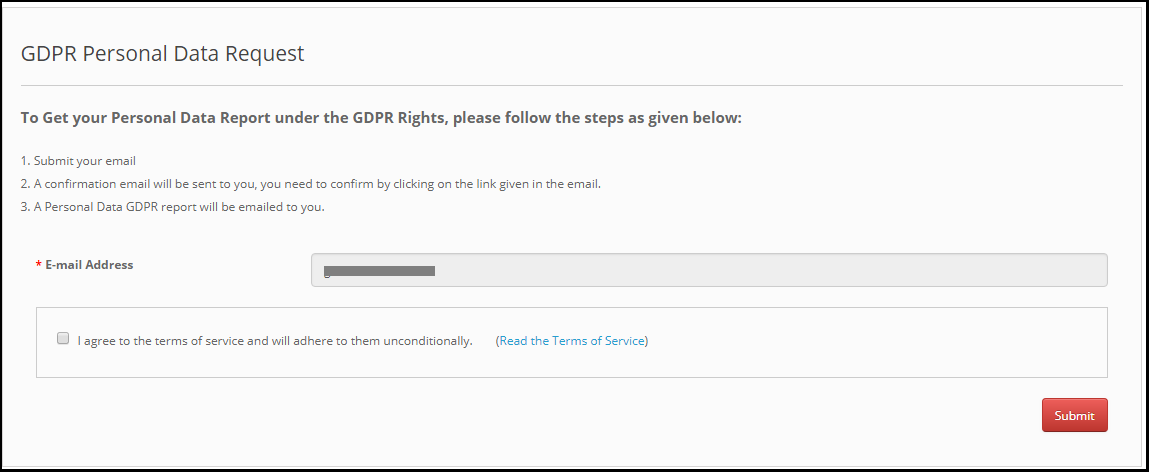
If this setting is enabled from the admin interface of the OpenCart GDPR plugin only then customers will be able to check their personal details by logging into their account. The screenshot of customer end has been attached below:
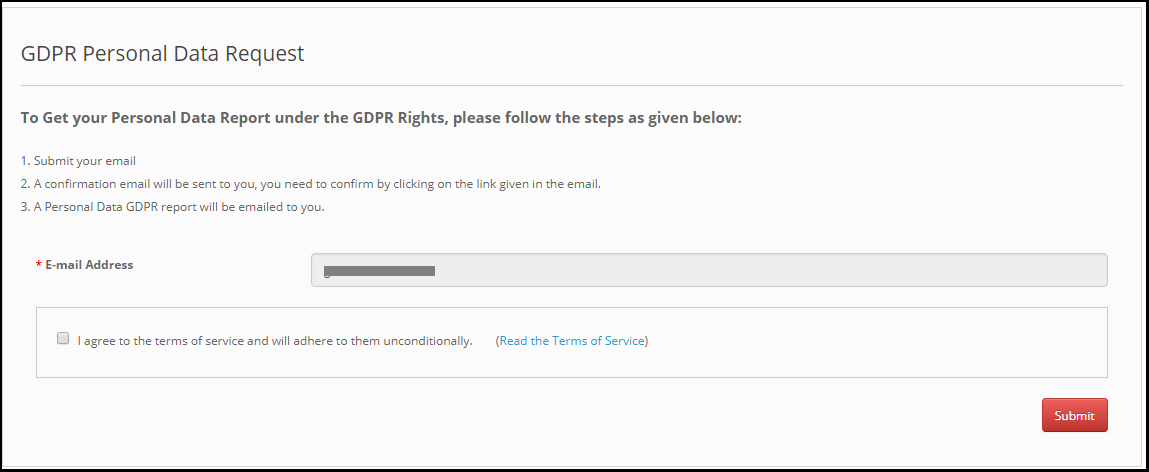
Step-1 – Request for the GDPR Personal Data report – OpenCart GDPR Extension
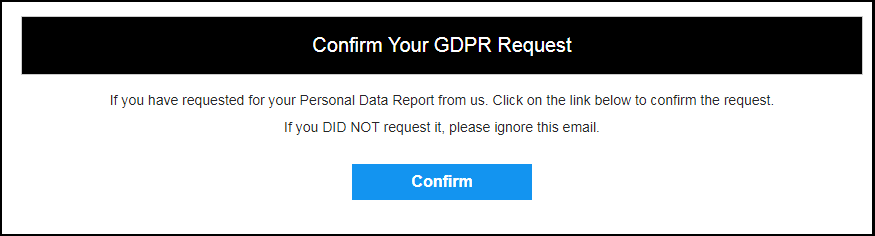
Step: 2 – Confirm the GDPR Request
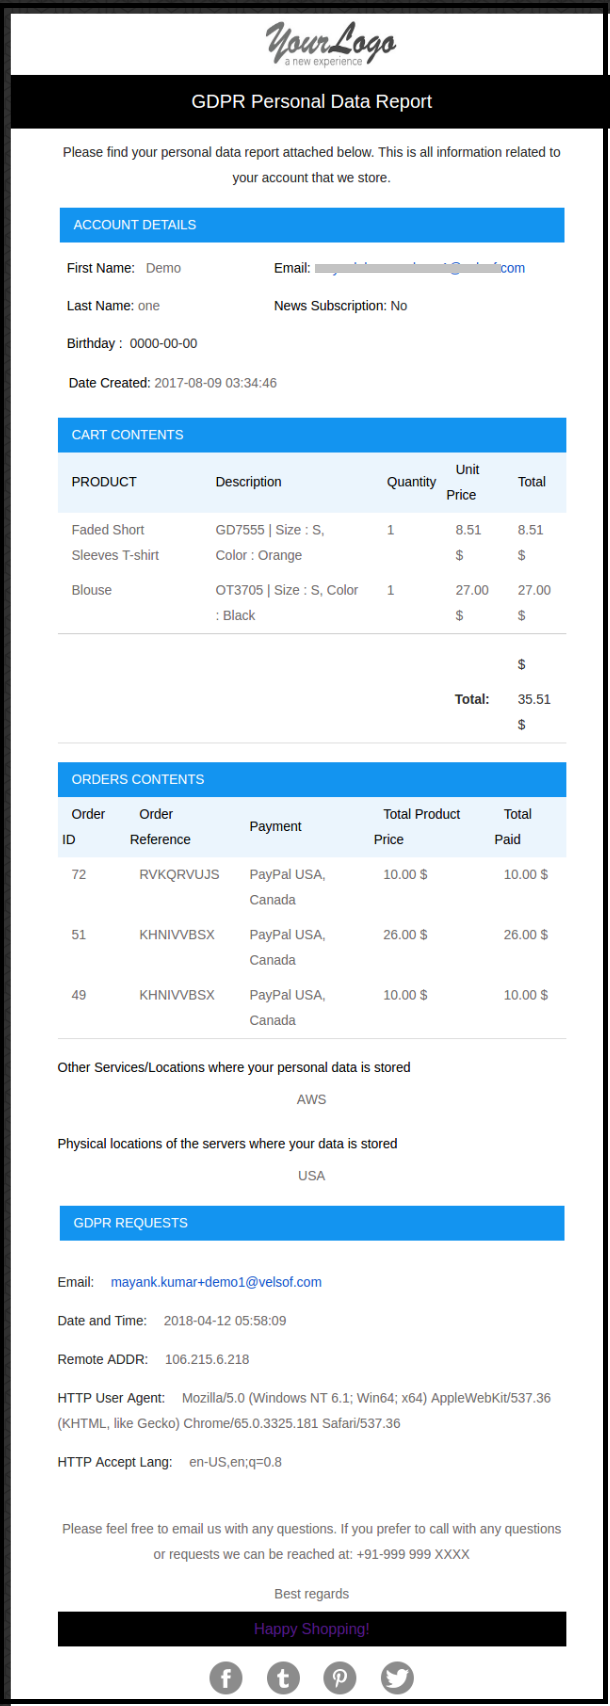
Step: 3 – As soon as customer will confirm the GDPR Personal Data Request, an email with the customer details will be sent to the customer.
Step: 4 – Send personal report via email:
Admin has the choice to display the customer data on the front-end or send the report to the entered email address. This setting will work for the logged-in customers only.
Step: 5 – Enable Right to Data Portability:
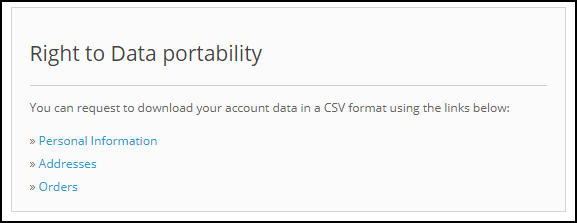
Right to data portability allows the customer to download his/her personal data so that he/she can access and reuse this data.
If this setting is enabled from the admin interface of the OpenCart GDPR Module only then the customer will be able to download their personal data in CSV format. As of now, the OpenCart GDPR Module allows the customers to download their personal data like –
Account information
Address details
Order details
The screenshot of the interface at the customer end has been attached below:
On requesting for the data portability customer will be able to download the CSV file with the required details.
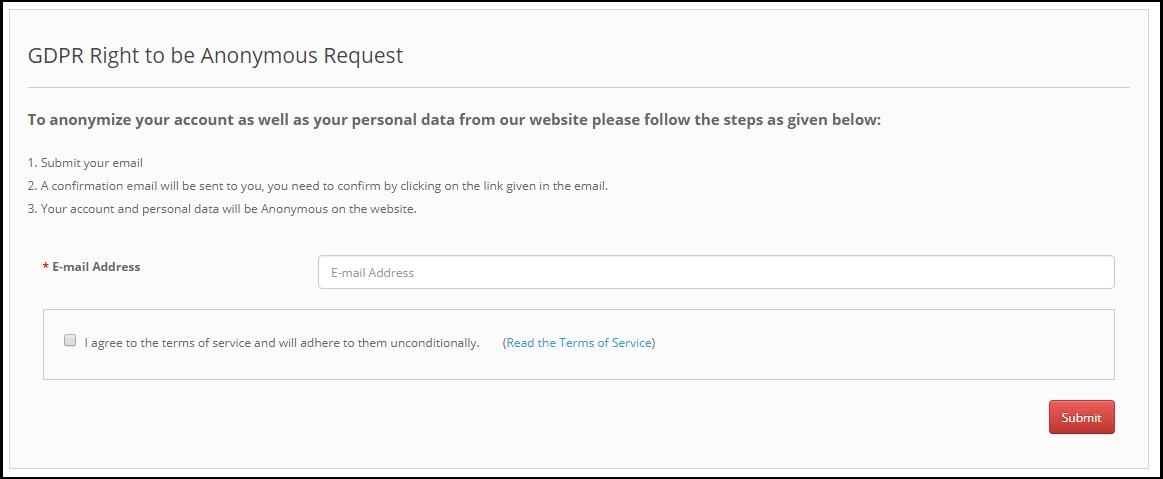
Step: 6 – Data anonymization request:
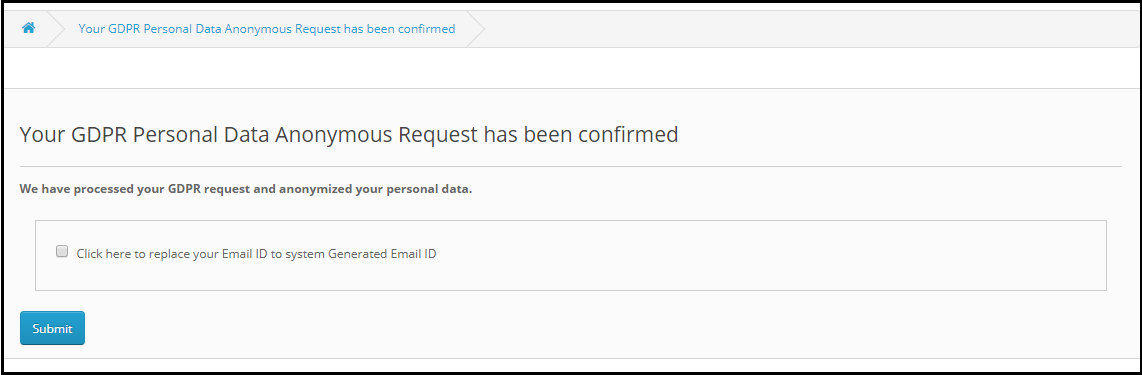
Data anonymization option allows the customer to replace the personal details with the random data. The name, email-id and order details can be anonymized. As soon as customer will request for the data anonymization a confirmation email will be sent to the customer. If customer confirms the data anonymization request, as per the settings enable by the admin personal details like Name, Email Id will be replaced by random details. To process the data anonymization request the admin has the following option:
Enable the Data anonymization settings:
If the data anonymization settings are enabled from the admin interface of the OpenCart GDPR compliance module then customer will be able to request for the data anonymization and in this case, only customer name will be replaced by the random name.
If a customer request for the Data anonymization, then a confirmation email will be sent to the entered email address and customer will be requested to confirm the request.
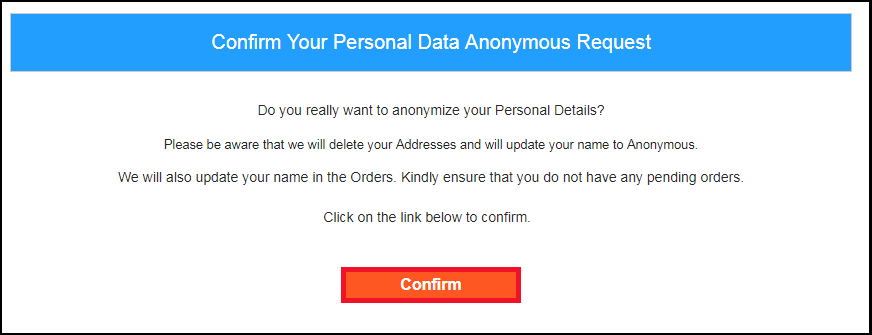
Email confirmation:
On requesting for the data anonymization customer will receive the email with request to confirm the data anonymization request.
Note: In case you are using the third-party services and sharing the customer data with third-party, then you need to make the required changes as per the procedure followed by the service provider. This GDPR module will anonymize the data which you have stored in your database only.
Step: 7 – Enable to update information in Order:
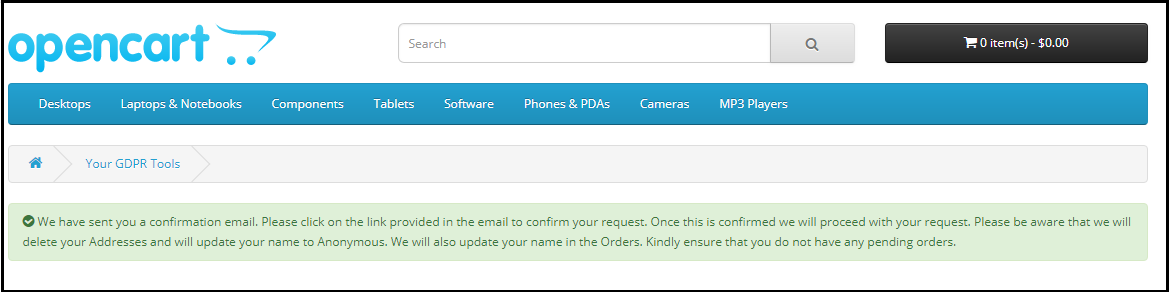
If customer requests to make his/her information anonymous then admin can select the option to enable/disable the changes to the previous orders. If this setting is enabled from the admin interface of the OpenCart GDPR module then the previous order details will also get modified and shipping and billing details will be deleted.
Step: 8 – Enable to generate Fake Email ID:
Admin can select the option to replace the email id of the customer by fake email id. If the setting is enabled from the admin then after requesting for the Data anonymization customer will be requested to confirm the email-id anonymization. Please refer to the attached screenshot:
If customer submits the request for email-id anonymization then the email id of the customer will be replaced by the system generated email address. Please refer to the attached screenshot.
Step: 9 – Enable right to be Forgotten:
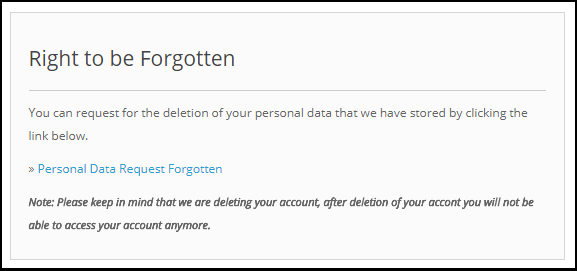
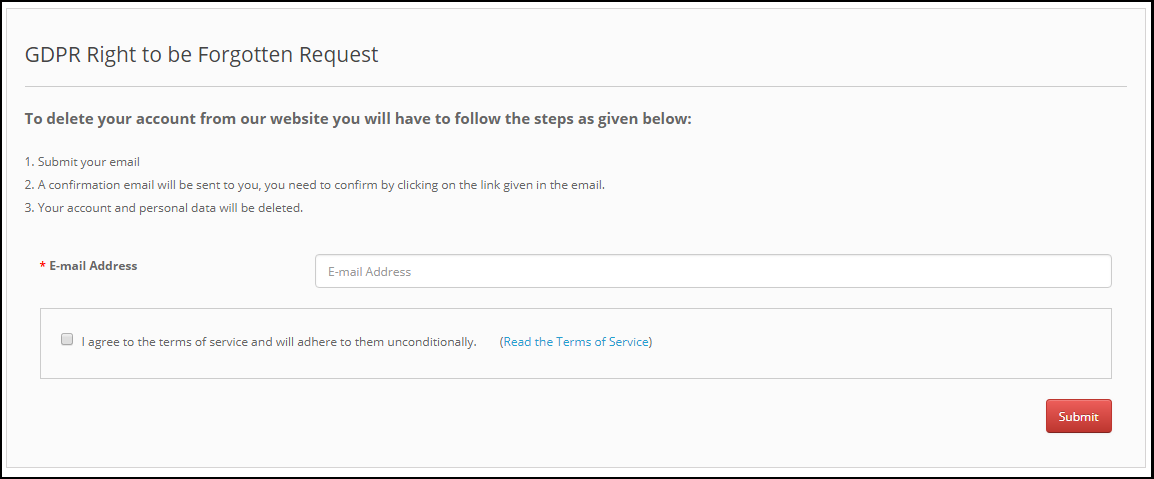
As per the new GDPR Directives customer has the right to request for the deletion of the personal data. OpenCart GDPR Compliance Module allows the customer to request for the deletion of his/her data by accessing his/her account. After receiving the request of the customer a confirmation email will be sent to the customer and as per customer’s approval, entire details of the customer will be deleted from the database.
The report request interface for the customer will be as below:
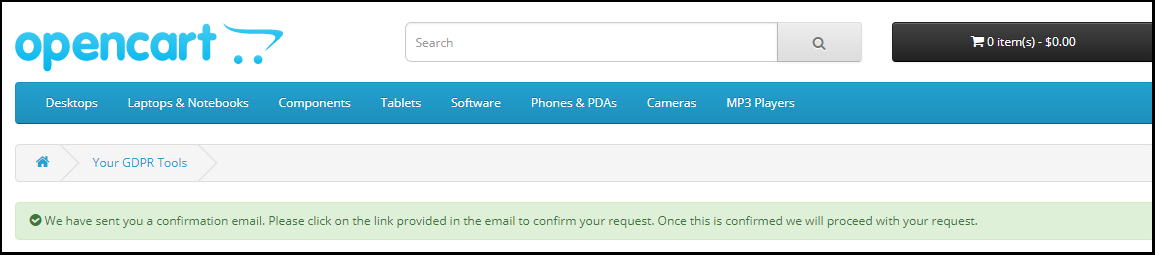
On requesting for the Account deletion request the customer will be notified that an email with the confirmation request has been sent to the registered email id.
Note: 1) It is recommended to consult with your legal team before enabling this setting. After deleting the customer’s personal data it cannot be retrieved. Admin has the option to enable the delete order setting which has been explained in the next topic. 2) In case you are sharing the customer data with third-party service providers then you need to delete the customer data manually. As of now, this module does not support the feature to delete the data shared with the third-party service providers. Example: If you are using MailChimp for sending promotional emails then you have to delete the customer details from MailChimp list manually.
Step: 10 – Enable to Delete Orders:
If a customer has requested for the data deletion request under the GDPR, then the admin has the choice to delete the personal data of the customer along with the previous order details. If this setting is not enabled from the admin interface of the GDPR module then only personal data will be deleted and order information will remain as it is.
Note: It is recommended to consult with your legal team before enabling the order deletion settings. The order details deleted from the system cannot be retrieved.
Step: 10 – Enable the right to data rectification:
A customer has the right to update the incorrect personal data. The OpenCart GDPR Customer Rights Module allows the store admin to let the customer modify the personal data like personal details, address etc.
Step: 11 – Enable the right to data rectification:
A customer has the right to update the incorrect personal data. The OpenCart GDPR Customer Rights Module allows the store admin to let the customer modify the personal data like personal details, address etc.
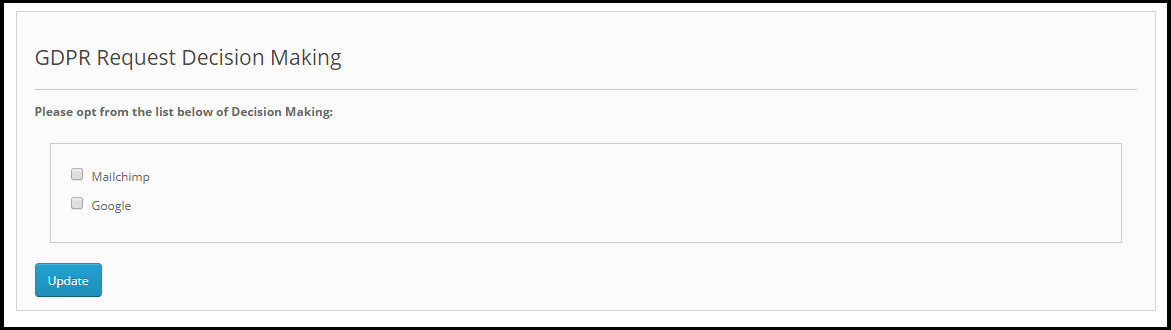
Step: 12 – Enable Rights in relation to automated decision making and profiling:
If this setting is enabled from the admin panel of the OpenCart GDPR compliance module then store admin will be able to list the services which make a decision by automated means. If a customer requests for the services which makes decision by automated means then customer will get email to confirm the request. As soon as the user will confirm the request, user will be redirected to a new link. Here all the services with the automated decision making will be listed and user can select the one which he/she would like to continue.
Admin can list all the such services to the under the List the services which makes a decision solely by automated means.
Step: 13 – Enable Store Policy Acceptance:
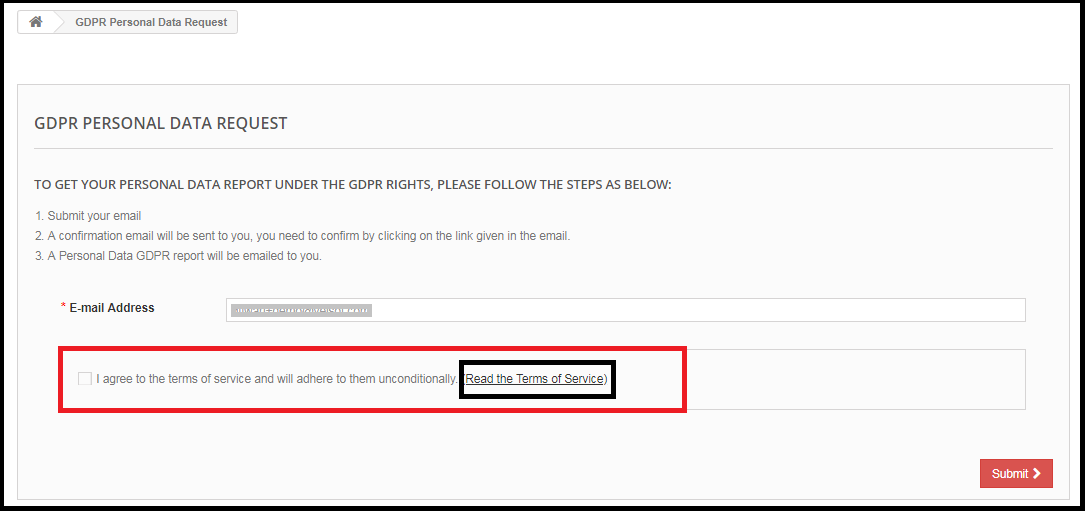
The admin interface of the OpenCart General data Protection Regulation Plugin allows the store admin to enable the setting so that a checkbox with the option to accept the Terms and Conditions will be displayed to the customer before requesting for the GDPR reports.
Step: 14 – Store Policy Page:
Admin can add the URL of the page on which all the Terms and Conditions are listed. The customer can check the Terms and Conditions by clicking the link available with the message at the time of raising the request.
Step: 15 – Services/ Other locations where you store customer data:
The third party services which process the customer data like MailChimp or you have stored the customer data on different places like Google Drive then you can list the details of the third party services which uses the customer data.
Step: 16 – Physical locations of servers where you host your website and other data:
You can mention the server location here, where you store the customer data.
Step: 17 – Display Header Menu
Display Header Menu option of the OpenCart GDPR compliance Plugin allows the store admin to display the GDPR option in the header section of the website. By enabling “Display Header Menu” setting of the OpenCart GDPR Plugin, store admin can allow the guest users to access the GDPR rights.
Step: 18 – Header Menu Text
Admin can define the text for the Header Menu.
3.2 Cookie Consent Bar:
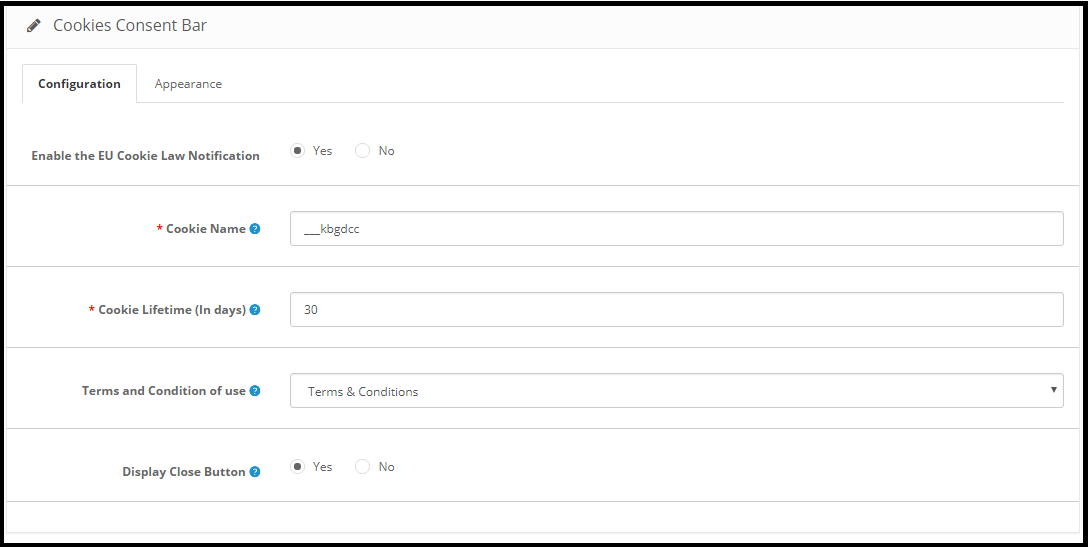
The OpenCart GDPR Module allows the store admin to display the Cookie Consent Bar at the front end with the option to accept the cookie or discard the message. Admin can easily customize the appearance settings as well as the message on the cookie bar.
The Cookie Consent Bar tab has following settings:
1) Configuration: Admin has following options to set-up the Cookie Consent Bar.
Enable the EU Cookie Law Notification: The Admin can enable or disable the cookie message on the website.
Cookie Name: In this section define the name of the cookie to get the user consent. Please do not use the space to the cookie name.
Cookie Lifetime: Cookie Lifetime allows the store admin to set up the cookie duration that how long the cookie will be stored on the user’s device.
Terms and Condition of use: The admin can list the cookies details on a Cookie Policy page and add the link to the page on the message displayed to the user.
Display Close Button: Admin has the option to remove the Close button from the Cookie Consent Bar.
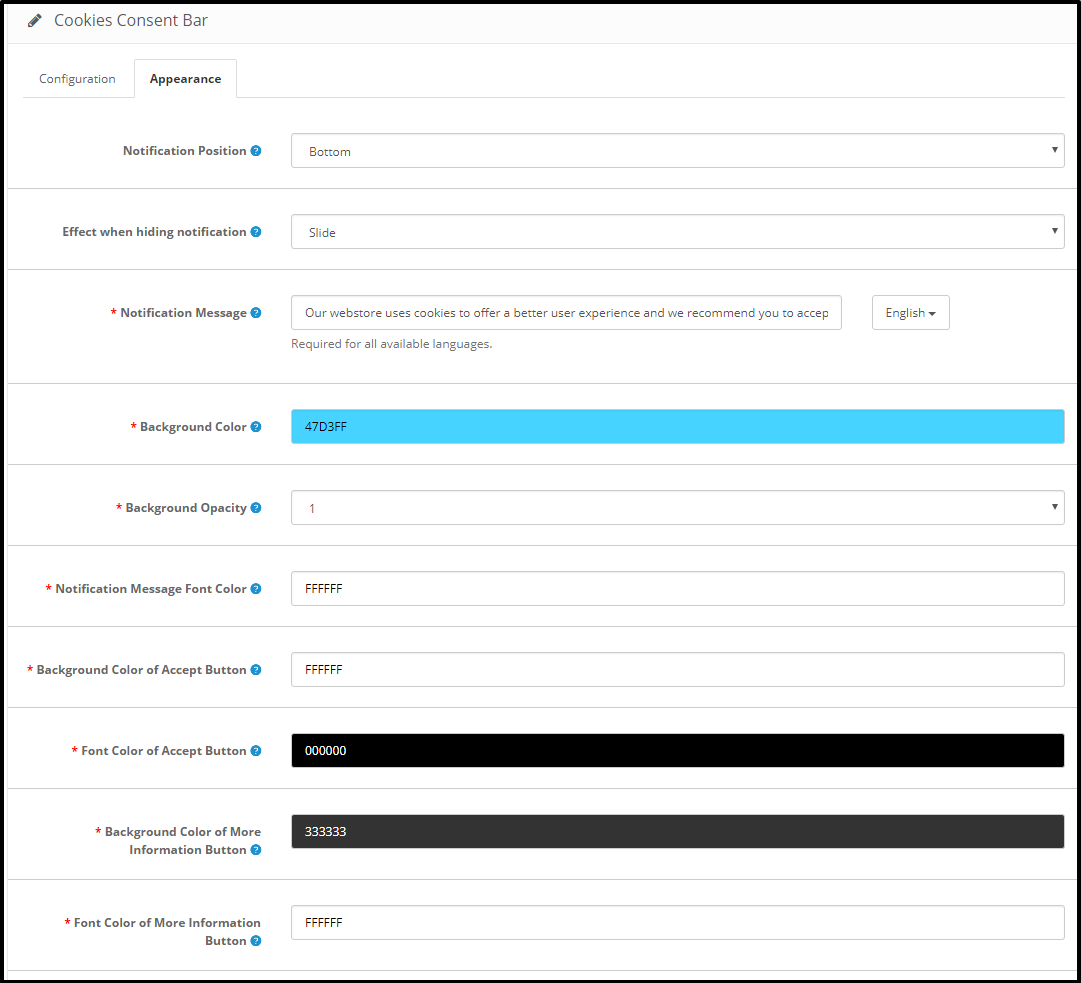
2) Appearance Settings:
Admin can easily control the following options for the Cookie Consent Bar.
Notification Position: Admin can select the position of the Cookie Notice on the Bottom of the page or Top.
Effect when hiding the notification: Admin can select the options like Fade, Hide or Slide from the drop-down list.
Notification Message: Admin can easily update the notification message as per the requirement.
Background Color
Background Opacity
Notification Message Font Color
Notification Message Font Color
Background Color of Accept Button
Font Color of Accept Button
Background Color of More Information Button
Font Color of More Information Button
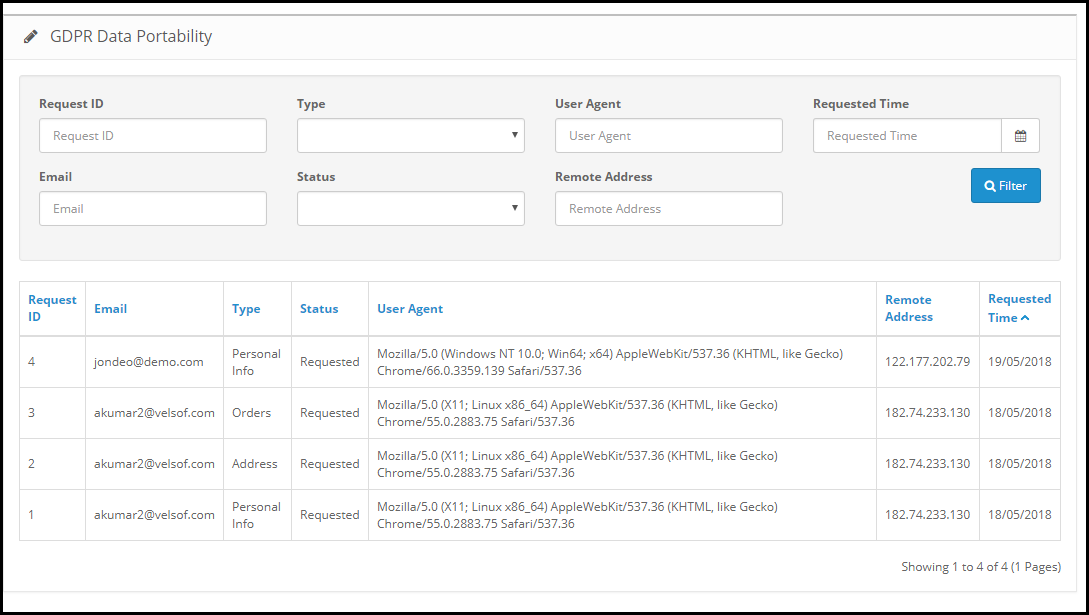
3.3 GDPR Data Portability:
In the GDPR data portability section of OpenCart GDPR Module, admin can check the log of the data portability requests from the back-end.
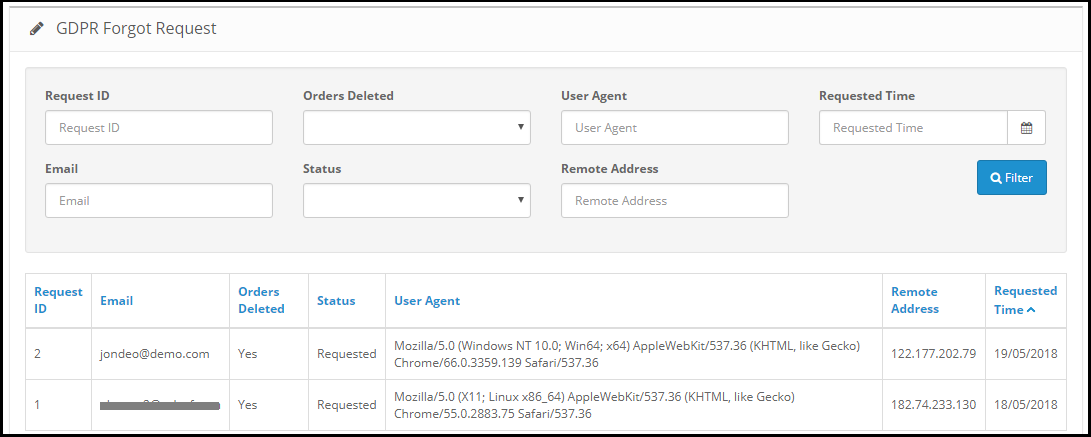
3.4 GDPR Forgot Request:
OpenCart GDPR extension keeps the log of the data deletion requests. Admin can use this information to remove the customer data from the third party services.
Note:
1. As soon as customer request for the deletion of his/her details a confirmation email will be sent to the customer. As per the customer’s confirmation the details of the customer will be deleted from the system.
2. The OpenCart GDPR Module allows the admin to exclude the previous orders so that only the personal details of the customer will be deleted but order details will be saved for the future reference. Please use this setting carefully because the data deleted once cannot be retrieved. It is strongly recommended to consult with your legal team to make sure how to use this setting.
3. The OpenCart GDPR Module only deletes the customer data from the store database. If you share the customer data with the third-party service providers (eg. MailChimp) or store it on third-party platform (eg. Google Drive) then you need to delete the customer data from these platforms manually.
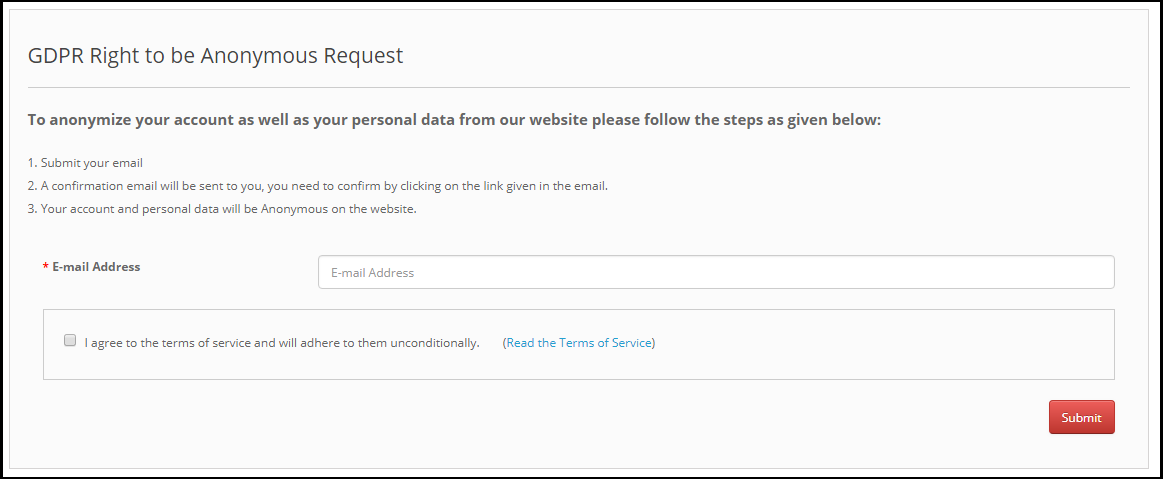
3.5 GDPR Anonymous Request
OpenCart GDPR extension keeps the log of the data anonymization requests. Admin can use this information to remove the customer data from the third party services.
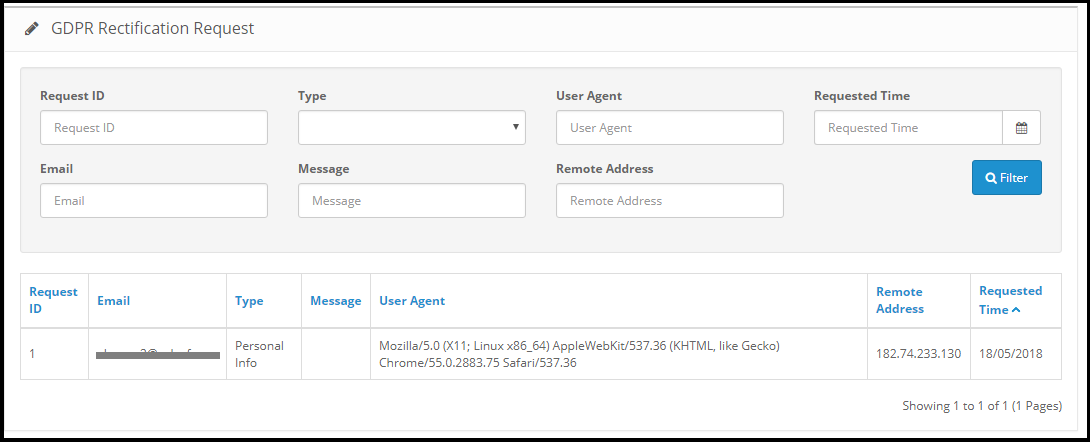
3.6 GDPR Rectification Request
OpenCart GDPR extension keeps the log of the data rectification requests. Admin can use this information to modify the customer data on the third party services.
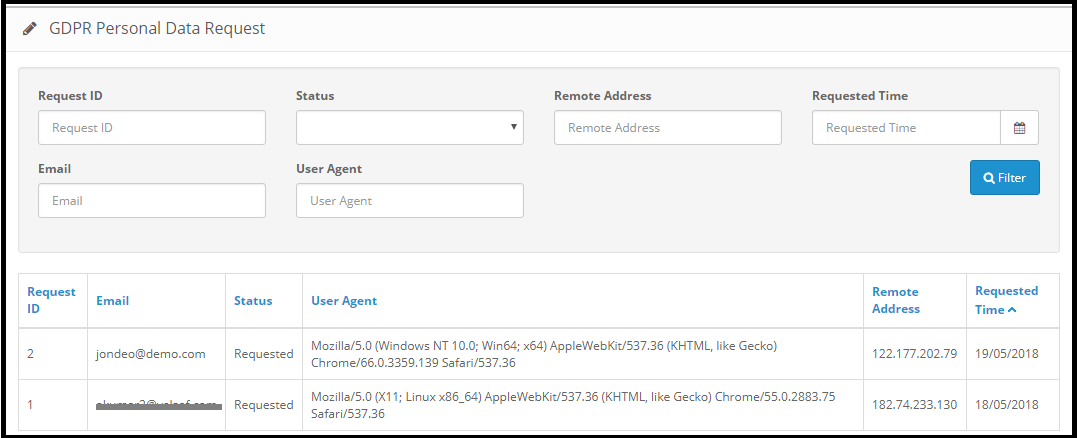
3.7 GDPR Personal Data Report Request
OpenCart GDPR Plugin keeps the log of all the personal data requests.
Note: As of now the OpenCart GDPR Module by Knowband allows the store admin to share the details like Personal Information, Address Details, Newsletter Subscription, Shopping Cart Contents, Order Details, Admin can also list all the third-party service providers details and the physical location of the server along with the details of the hosting company.
3.9 GDPR Automated Decision Making Request
3.10 GDPR Email Templates:
The OpenCart GDPR Plugin by Knowband allows the admin to sending following emails to the customer:
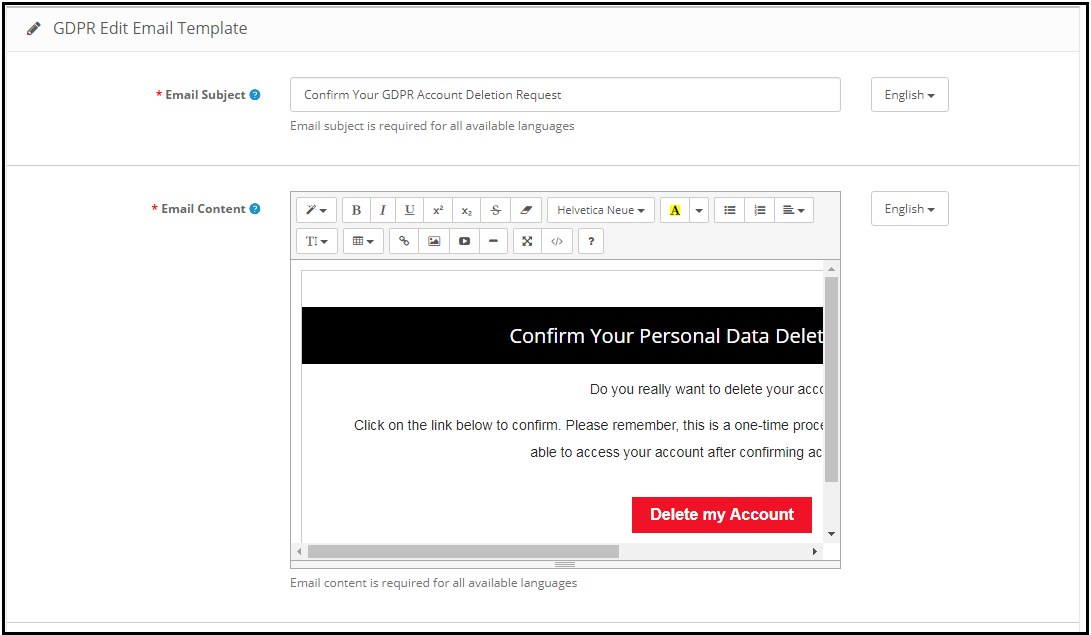
Confirm Your GDPR Account Deletion Request
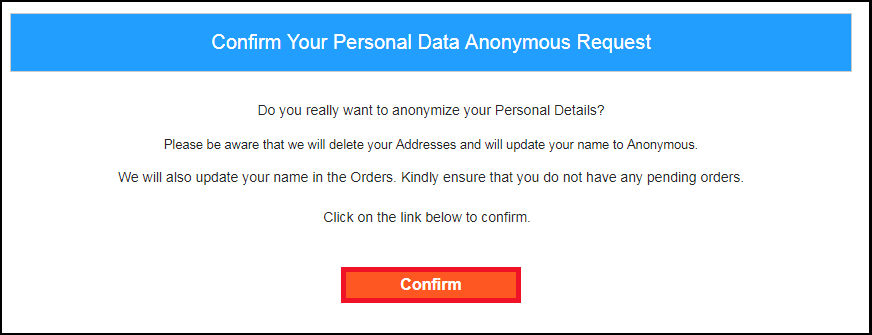
Confirm Your GDPR Personal Data Anonymous Request
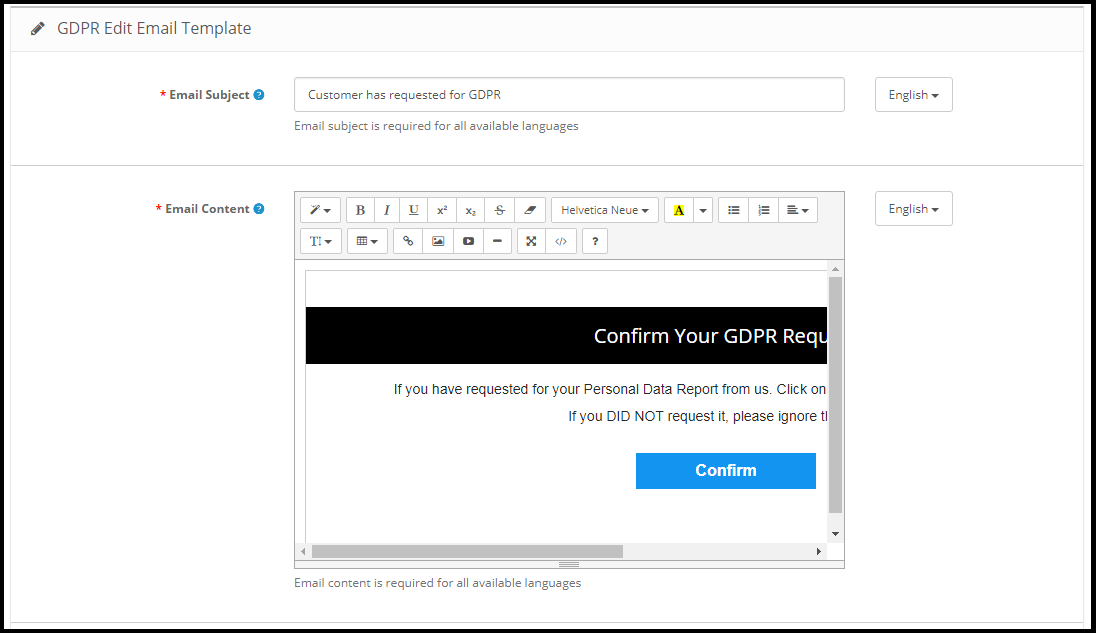
Customer has requested for GDPR
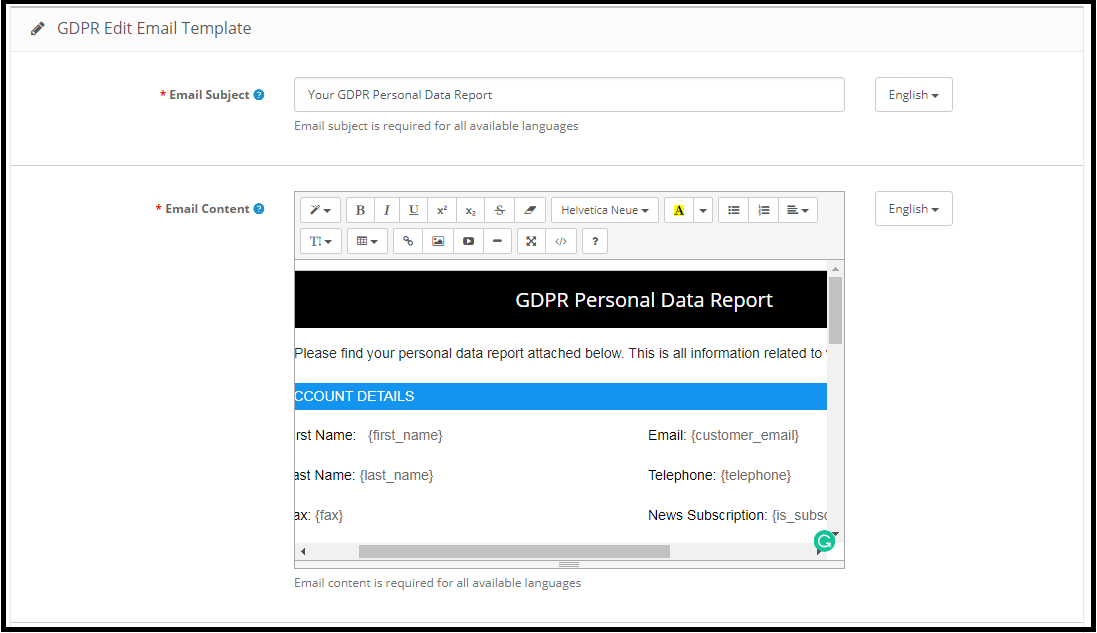
Your GDPR Personal Data Report
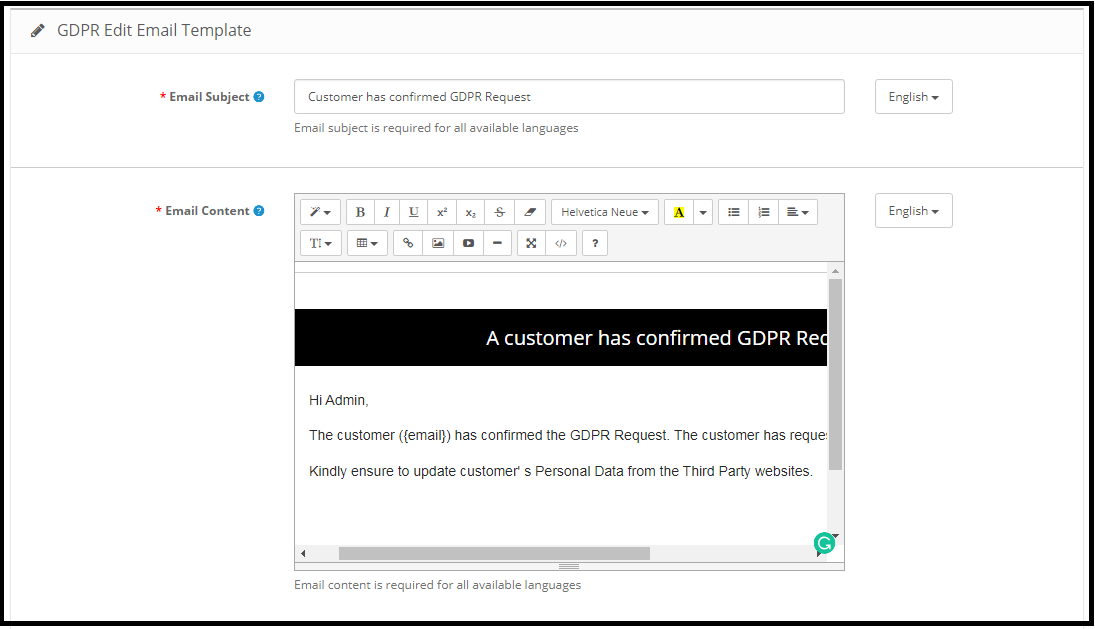
Customer has confirmed GDPR Request
Confirm Your GDPR Decision Making Request
Confirm Your GDPR Personal Data Portability Request
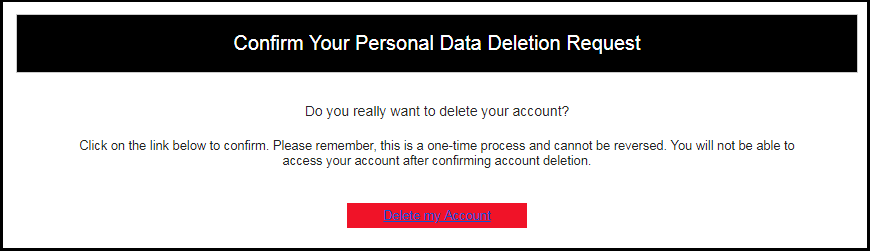
Confirm Your GDPR Account Deletion Request:
Admin can update the Subject line and the email text by using the GDPR Email Template Settings.
Default format of the email template is as below:
Confirm Your GDPR Personal Data Anonymous Request:
Admin can update the Subject line and the email text by using the GDPR Email Template Settings.
Default format of the email template is as below:
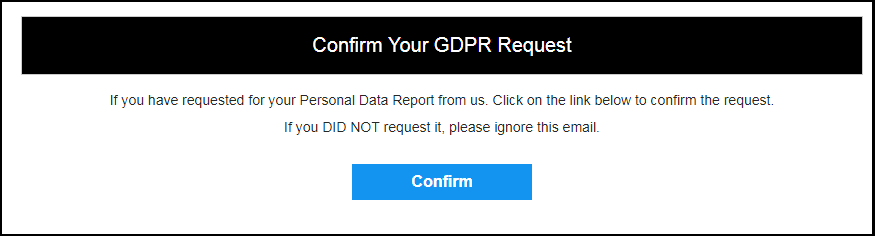
Customer has requested for GDPR
This Email template is used to send confirmation mail to the customer when customer requested for Personal Data Report.
The email at the customer end will be like below:
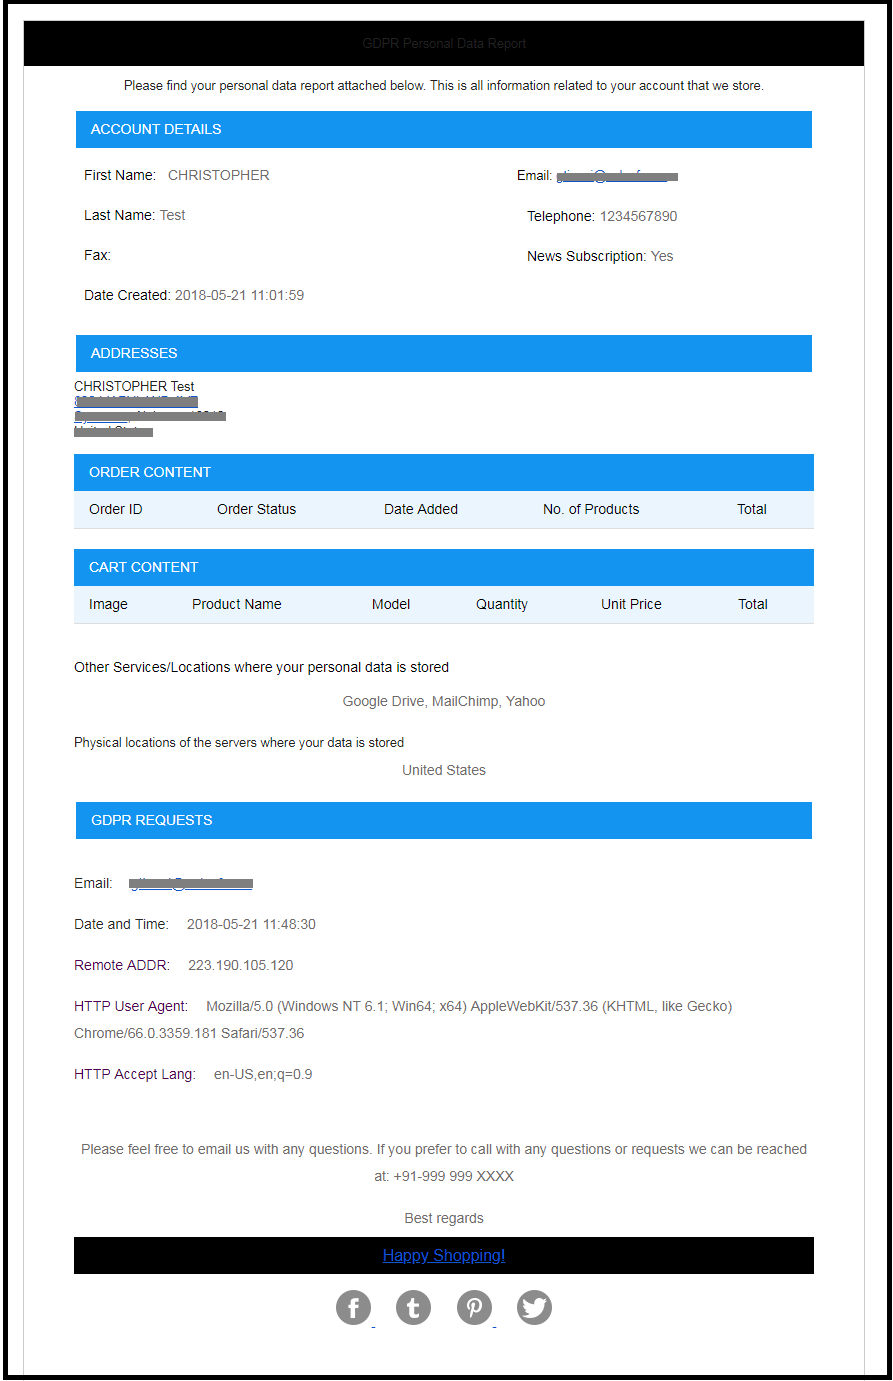
Your GDPR Personal Data Report
This email template will be used to send the Personal Data of the customer requested under the GDPR Right to the access to the Personal Data.
At the customer end the email design will be as below:
Customer has confirmed GDPR Request
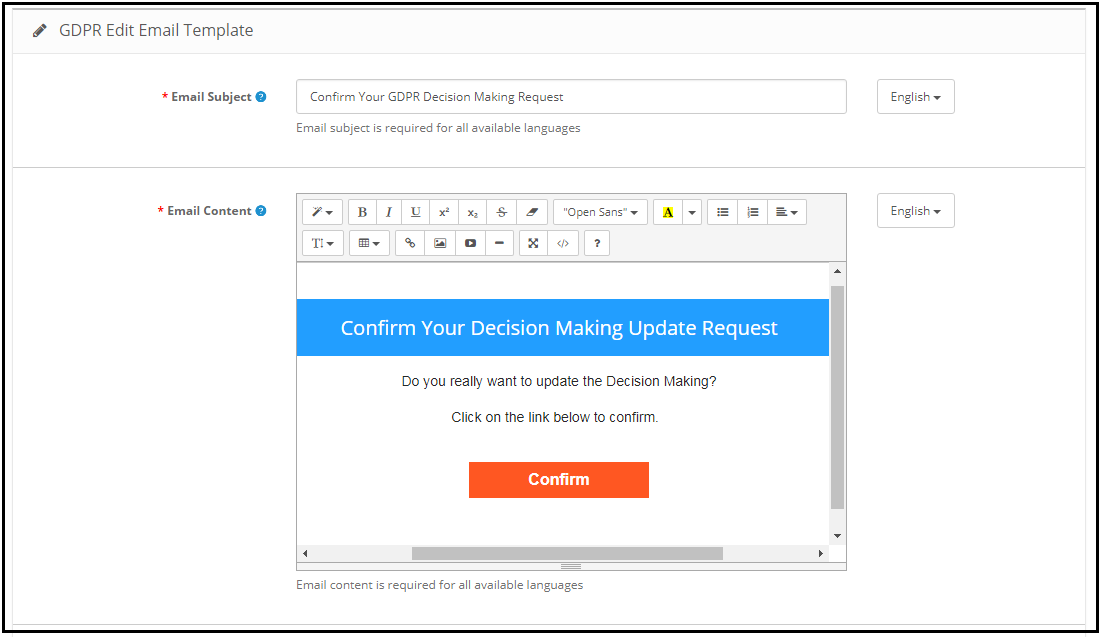
Confirm Your GDPR Decision Making Request
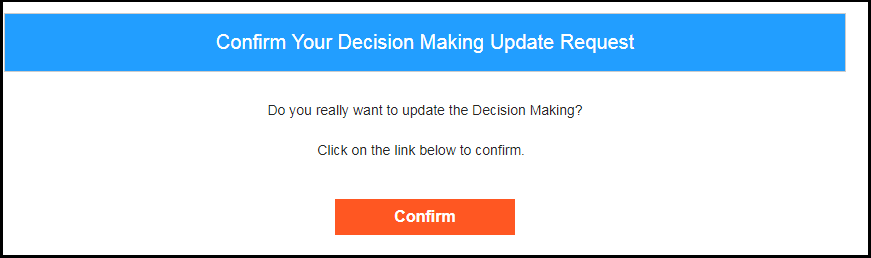
This email template will be used to request the customer for the confirmation of the automated decision-making requests.
Email at the Customer end:
Note: The purpose of these features is to help you to meet with the GDPR requirements. Installing this module only does not guarantee merchant sites’ compliance with the new obligations imposed by the GDPR. It is your responsibility to put in place all the necessary measures to ensure you comply.
Marketplaces have played a vital role in the growth of e-commerce. Amazon and eBay are some of the well-known platforms, but in recent years a number of new marketplaces have marked their presence in the eCommerce ecosystem. Etsy is one of the most popular marketplaces for handmade goods and vintage items. Etsy allows people from around the globe to buy and sell unique goods. This platform invites the sellers to showcase their creativity to the new audience, thus, helping them to reach out to potential customers globally. Etsy is a great place to extend the reach of your business. The process of starting a business in the Etsy marketplace is quite easy. Please click on the link below to know more about the rules and regulations of trading: https://www.etsy.com/in-en/sell. Opencart Etsy Marketplace Integration can help you reach your business goals effectively.
KnowBand, an eCommerce plugin, and marketplace integration development company offers the OpenCart Etsy integration module. The Opencart Etsy Marketplace Integrator allows the seller to synchronize their OpenCart store with the Etsy marketplace in a few simple steps. We do understand that being ready to start selling on the Etsy marketplace, it is also important for the store owner to analyze their business method and process so that they can be able to keep up with the new challenges. After starting to sell on multi-channel sellers have to keep proper track of their inventory status, product listings, shipping methods, delivery time, and customer support. To overcome all the major challenges of selling on a marketplace, KnowBand has developed the Opencart Etsy Marketplace Connector.
With the help of the Etsy OpenCart Integration extension, OpenCart store owners can effectively manage the inventory, orders, and shipping for the Etsy shop orders from the OpenCart store admin. OpenCart Etsy marketplace integration module offers the following advantages to the sellers:
Easy installation and user-friendly interface: The user-friendly interface of the OpenCart Etsy Marketplace Integration offers an effortless interface to list the products to the Etsy marketplace.
Bulk uploading of the products: OpenCart Etsy Marketplace Integrator Module allows the sellers to upload products in bulk. Sellers can create a profile to upload the entire category of the OpenCartstore to the Etsy marketplace.
Category and product attribute mapping: Sellers can easily map the product attributes and category of the OpenCartstore products with the Etsy store attributes and category via the OpenCart Etsy Marketplace Connector Extension.
Shipping templates: Create shipping templates from the OpenCartstore admin panel and sync these templates to the Etsy shop via OpenCart Etsy Marketplace Integration Plugin.
Order Management: Manage and keep track of Etsy shop orders from the OpenCartstore admin panel.
Order status: Admin can update the order status of the Etsy marketplace orders from the OpenCart store admin panel through a cron job.
Inventory management: Manage inventory for the Etsy store products from the OpenCart admin panel. After making any changes in the product inventory or attributes in the OpenCart store, the admin can easily synchronize the changes to the Etsy marketplace.
Secondary language: Admin can select a secondary language for the store and easily synchronize it with the Etsy marketplace shop through a cron job.
What’s New in the Recent Enhancements of Opencart Etsy Extension v2.0.4?
[New]Aligned with Etsy OpenAPI Standard
The OpenCart Etsy Extension has been enhanced to support OpenAPI authorisation headers, ensuring secure authentication and full compliance with Etsy’s current API standards. Furthermore, this update helps maintain uninterrupted connectivity between OpenCart and Etsy while aligning the extension with Etsy’s evolving security and policy requirements.
[New]Return Policy Synchronisation
In addition to the authentication header format update, Knowband’s Etsy Marketplace extension now includes Return Policy Synchronization, allowing merchants to seamlessly sync their return policies between their opencart store and Etsy. This ensures consistency across both platforms, reduces manual effort, and helps provide a clear and unified return experience for customers.
Profile Level Product Synchronization:
The enhanced Knowband’s Opencart Etsy marketplace connector extension now features profile-level product synchronization. This allows admins to list products from specific categories, offering a more targeted and efficient listing process compared to bulk product listing. This feature enhances inventory management and improves the accuracy of product listings on Etsy.
Product Listing with Custom Details:
The updated extension also includes a feature for product listing with custom details. Admins can now list products with unique titles and descriptions, differentiating their products and enhancing visibility on Etsy. This flexibility allows for better product presentation and marketing, tailored to attract specific customer segments.
You can watch our video on “New Features in Knowband’s Opencart Etsy Connector v1.0.9”:
2.0 Installation
After purchasing the module, you will get the following files as below:
1. zip (contains the source code of the module)
2. User Manual
Follow the following steps to install the extension:
Unzip the zip file. It would contain files and folders as shown below –
2. Copy all the files and folders of the unzipped folder into the root folder of the website.
3. Now module is ready to be installed on your store and you can find that in Store Admin -> Modules and Services. It would be shown as below –
Etsy OpenCart Integration Extension
Knowband’s OpenCart Etsy Marketplace Integration plugin facilitates seamless integration between your OpenCart store and Etsy marketplace, streamlining product listings and order management.
Before proceeding ahead, it is important to know the correct flow of actions to set up this system as several things are dependent on other things. If we do not take care of them then it would become difficult to process smoothly or it may be error-prone.
Seller account setup: This section will help you to set up the shop on the Etsy marketplace and in the next steps you will learn about the Etsy API key. Etsy API key and API Secret are required to integrate the Opencart and Etsy marketplace.
Admin Interface: This section will help you to understand the complete working of the Etsy Opencart Integration plugin.
4.0 Etsy Marketplace – Seller Account Setup
To start selling on Etsy Marketplace you need to have a seller account on Etsy. In this section, we are listing all the steps to create a seller account on Etsy. Please find them below –
Click on the “Sell on Etsy” button present at the top right corner.
Click on the “Register” button on the page you are visiting now. Refer to the screenshot given below.
Fill up the registration form and click on the “Register” button. It would create your seller account and send a verification email to the provided email address.
Now, it would also redirect you to another page as shown below.
5. Now, it is asking to set up your shop preferences. Complete all the highlighted sections – Shop Preferences and Name your shop, Stock your shop, how you will get paid, and Set up Billing.
5.0 Etsy Marketplace – Setup an App
To start communication between OpenCartStore and Etsy Seller Account, you need to create an App on Etsy Marketplace. Following are the steps to create an App on Etsy –
It would open a page where a form will be shown with a few input fields as shown below.
Fill up the form and click on “Read Terms and Create App”. Please make sure that you left the “Inventory Management Compatibility” checkbox is checked.
It would ask to accept “terms and conditions”. Accept and click on the “Create App” button.
It would register your App on Etsy Marketplace and provide API details as shown below.
Note: “The term ‘Etsy’ is a trademark of Etsy, Inc. This application uses the Etsy API but is not endorsed or certified by Etsy, Inc.”
6.0 Admin Interface
Opencart Etsy Marketplace connector is easy to configure. The configuration settings can be managed via the admin interface. After installation, the store admin can find the “Etsy” module in the Extension List under the “Extensions” tab.
The Etsy integration extension will display as shown below:
On clicking the Edit button next to the Etsy module, it will redirect to the admin interface. Here admin can see all the options to configure the Etsy module:
Etsy Marketplace extension offers the following options –
General Settings
Profiles
Attribute Mapping
Shop Section
Shipping Templates
Products
Orders
Synchronization
Audit Log
Each tab is explained below.
6.1 General Settings
You can find the screenshot of the “General Settings” page below –
General Settings tab is there for capturing details of Etsy Marketplace API like API Key, Host, etc. This helps the admin to connect the OpenCart store with the Etsy marketplace. Please find the description of each input field below –
1. Enable/Disable
Admin can Enable/Disable Opencart Etsy Marketplace Integration by using this option. If enabled, then only this module and all its settings will be working otherwise there will be no impact of this module on the store.
2. Etsy API Key
Enter Etsy API Key which will authenticate the connection being established between OpenCartstore and Etsy Marketplace.
3. Etsy API Secret
Admin needs to enter Etsy API Secret mandatory for authentication between OpenCartstore and Etsy Marketplace.
4. Etsy Currency
Admin can select the Etsy currency from the menu.
5. Select your Etsy default language:
Admin can select the Etsy default language from the menu.
6. Select additional languages to sync:
Admin can select additional languages to sync with the Marketplace.
6.1.1 Etsy Order Settings:
After providing these details, click on the “Save” button in the top right corner. It would redirect the admin to the Etsy Marketplace to allow the App Access for the store. Click on the “Allow Access” button as shown below and it will establish the connection between the store and Etsy Marketplace.
It would also redirect the admin back to the same page of “General Settings” and show the “Disconnect” button as the connection has now been set up with Etsy Marketplace.
6.2 Profiles
The profile Management tab provides options to create the profile for product listing. In this section, the admin will be able to map OpenCart store product attributes and categories to Etsy Marketplace. Opencart Etsy Marketplace Connector allows the seller to select multiple store categories to sync with the one Etsy category.
Admin needs to enter all the mandatory details as per the instructions are given in the below screenshot. After entering all the details click on the Save button at the top of the form.
6.2.1 How to Add New Profiles?
Following are the steps to add new profiles-
Go to the Etsy Marketplace module-> Profiles(Menu Option)
It would redirect the admin to a page where already added profiles will be listed (If any). Click on the “+” (plus icon as shown in the screenshot below) and it will redirect the admin to a new page where a form with some input fields will be shown.
Fill up the following input fields –
Profile Title: Enter the Profile Title as per your choice.
Etsy Category (List of Etsy Marketplace categories): Select the correct category from the drop-down list.
Store Category (Lists of Store Categories): Select the OpenCart store category for the products. The selected category will be mapped with the Etsy category (as selected in the Etsy Category) field.
Select Shop Section: Select the shop section from the drop-down list.
Shipping Template (List of Shipping Templates): Select the shipping template from the drop-down list.
Is Customizable?: Select from the drop-down list.
Who Made: Select from the drop-down list.
When Made: Select from the drop-down list.
What is it?: Select from the drop-down list.
Recipient: Select from the drop-down list.
Occasion: Select from the drop-down list.
Price Type: Select from the drop-down list.
Price Management: Select from the drop-down list.
6.2.2 How to Edit/Delete Profile?
Admin can easily update the profile entries; the Opencart Etsy Marketplace Connector allows the admin to sync the changes to the Etsy shop in simple steps. Following are the steps to edit/delete a profile from the system –
1. Go to the Etsy Module -> Profiles (Menu Option)
2. Click on the “Edit/Delete” button corresponding to each profile as shown in the above screenshot.
3. If an admin has clicked on the “Edit” option, then, it will redirect the admin to a new page where a form with some already filled input fields will be shown. Admin can simply update values and save the details by clicking on the “Save” button.
4. The admin can click on the “Delete” option to delete the selected Profile from the system.
6.3 Attribute Mapping
This option helps to upload the Variation products. Select the correct attribute and save it.
6.4 Shop Section
Under this tab, the admin can view the shop sections and their titles. You can edit, and delete the existing profile while you can add the new shop section too from the top right corner. You will be directed to the window below. The same window will open for editing the shop section with filled details.
6.5 Shipping Templates
The shipping Templates tab is there to manage shipping options. In this section, the admin can create Shipping Templates along with other options for the existing shipping template like Add Shipping entry, View shipping entry, Edit Shipping Template, and Delete. Admin can create multiple shipping templates by using the EtsyOpenCart Integration module. Please refer to the next screenshot:
Admin can easily modify the existing shipping template or add new shipping templates. After creating new shipping templates, the store admin must sync the shipping templates to the Etsy shop by clicking the “Shipping Template Synchronization” option under the “Synchronization” tab.
6.5.1 How to add Shipping Templates?
Following are the steps to add a Shipping Template into the system –
Go to the Etsy Marketplace -> Shipping Templates (Menu Option)
It would display the page where already added Shipping Templates will list (If any). Click on the “+” (Plus Icon – as shown in the above screenshot).
It would redirect the admin to the new page where a form with some input field will be shown (Screenshot is shown below).
Fill up the following input fields of form –
Shipping Template Title: Enter the shipping template title as per your choice.
Origin Country: Select the origin country from the drop-down list.
Primary Cost: Enter the primary shipping cost for the shipment.
Additional Item Cost: Enter the additional item cost for shipment. It is the additional cost if the customer adds a second product to the package.
Min. Processing Days: Enter the minimum processing days. This field accepts only numeric values.
Max. Processing Days: Enter the minimum processing days. This field accepts only numeric values.
Click on the “Save” button to add the new shipping template.
You can find the screenshot of the “Add New Shipping Template” form below –
6.5.2 How to Edit/Delete Shipping Template?
Following are the steps to edit/delete Shipping Template from the system –
1. Go to the Etsy Marketplace -> Shipping Templates (Menu Option)
2. It would display the page where already added Shipping Templates will list (If any). Click on the “Edit/Delete” buttons corresponding to each Shipping Template.
3. Admin can update the values as per the requirement and save the details by clicking on the “Save” button.
4. If an admin has chosen the “Delete” option then it would delete the Shipping Template and all its Shipping Template Entries from the system.
Admin can modify the shipping template details by using the Edit option. After making the changes in the shipping template details, the admin needs to save the changes and synchronize the shipping templates with the Etsy marketplace.
6.5.3 How to Edit/Delete Shipping Location of a Shipping Template?
The shipping Entry tab of the Etsy OpenCart module allows the admin to define the destination country and the standard shipping cost for the selected destination. Admin can create only one shipping entry for a particular destination (country/region). Following are the steps to view the Shipping Template location into the system –
1. Go to the Etsy Marketplace Connector module -> Shipping Templates (Menu Option)
2. It would display the page where already added Shipping Templates will list (If any). Click on the “+” button given corresponding to each Shipping Template listed.
3. It would display the page as the screenshot given below:
Shipping Template Title: Enter the shipping template title.
Origin Country: Select the country of origin.
Destination Type: Select the country of destination for the shipping template.
Destination Country: Select the destination country.
Primary Cost: Enter the Primary Cost.
Additional Item Cost: Enter the additional item cost.
6.6 Products
In the Etsy OpenCart integration extension after creating the profile, the admin needs to sync the products which are selected in the profile to the Etsy marketplace. Admin can also check the status of the listed products from the OpenCart store admin panel. The product listing tab of the Etsy Marketplace Integration shows a list of all the products that are to list on Etsy Marketplace with their status and values as shown in the screenshot below –
Please note that after creating a profile the admin must click on the “Product Synchronization” option under the “Synchronization” tab of the Etsy module to list the selected products to the Etsy marketplace. Admin can click on the Revise/Relist button to activate it on the Etsy Marketplace. Admin can also delete the product listing by clicking on the “-” button.
6.7 Order Settings
The order Settings tab is there for mapping store order status with Etsy Marketplace order status which will be used during capturing orders from Etsy Marketplace. The screenshot below will show you the order listings and the admin can also create a filter to search for a particular order.
6.5.1 How to view Order Details and Status?
Following are the steps to map order status –
Go to the Etsy Marketplace Integration module -> Orders (Menu Option)
It would display a page the same as shown in the above screenshot.
Click on the View Button given below the “Action” tab.
It would display the page with all the Order details as shown below.
6.8 Synchronization
All tabs defined above are basically for saving the settings and options into the system which are used during synchronization between OpenCart Store and Etsy Marketplace. There are the following jobs to synchronize content between OpenCart Store and Etsy Marketplace which you can find below –
6.8.1 How to sync products locally?
Following are the steps to synchronize sync products locally on Etsy Marketplace –
1. Go to the Etsy Marketplace ->Synchronization (Menu Option)
2. It would redirect admin to a new page where all synchronization actions list as shown in the above screenshot.
3. Click on the “Sync Now” button shown below.
This action will sync the products from the OC to the module (Without syncing the products on Etsy). If you want to disable any products (don’t want to sync on Etsy), click on the ‘Sync Now’ & disable the products in the Product Listing Tab. Disabled products will not be synced on Etsy.
6.8.2 How to Sync New Products on Etsy Marketplace?
Following are the steps to get Countries and Regions from Etsy Marketplace –
1. Go to the Etsy Marketplace Integration module->Synchronization (Menu Option)
2. It would redirect admin to a new page where all synchronization actions list as shown in the above screenshot.
3. Click on the “Sync Now” button shown below.
This action will sync the new products into Etsy. Click on the ‘Sync Now’ to sync the products manually. Set this CRON in your hosting CRONTAB to run every hour to sync the products automatically
6.8.3 How to sync Updated Products on Etsy Marketplace?
Following are the steps to synchronize Products Listing on Etsy Marketplace –
2. It would redirect admin to a new page where all synchronization actions list as shown in the above screenshot.
3. Click on the “Sync Now” button shown below.
If any listed product info has been updated in the Opencart then Run this CRON to update the product info on Etsy. Click on the ‘Sync Now’ to sync the products manually. Set this CRON in your hosting CRONTAB to run every 2hour to sync the products automatically.
6.8.4 How to sync Products Status on Etsy Marketplace?
Following are the steps to synchronize Products Variations Listing on Etsy Marketplace –
2. It would redirect admin to a new page where all synchronization actions list as shown in the above screenshot.
3. Click on the “Sync Now” button shown below.
This action will sync the status of the products from Etsy on Opencart. For example, if any products have been expired in Etsy then this CRON will set the status of the products as expired in the module as well. Set this CRON in your hosting CRONTAB to run every day to sync the status automatically.
6.8.5 How to Synchronize orders from Etsy Marketplace?
Following are the steps to synchronize Products Variations Listing on Etsy Marketplace –
Goto the Etsy Marketplace Integration module -> Synchronization (Menu Option)
It would redirect the admin to a new page where all synchronization actions are listed as shown in the above screenshot.
Click on the “Sync Now” button shown below.
This action will sync the orders from Etsy to Opencart. Click on the ‘Sync Now’ to import the orders from Etsy to Opencart. Set this CRON in your hosting CRONTAB to run every hour to sync the orders from Etsy to Opencart automatically.
6.8.6 How to update Orders Status on Etsy Marketplace?
Following are the steps to update the status of orders on Etsy Marketplace –
2. It would redirect admin to a new page where all synchronization actions are listed as shown in the above screenshot.
3. Click on the “Sync Now” button shown below.
This action will sync the mark the status of order as Shipped in Etsy if the order is marked as Shipped in the Opencart. Click on the ‘Sync Now’ to sync the status of the imported order from OpenCart to Etsy. Set this CRON in your hosting CRONTAB to run every hour to sync the status of the order from OpenCart to Etsy automatically.
6.8.7. How to Synchronize a Particular Profile on the Etsy Marketplace?
All the crons available in the “Synchronization” tab of the Opencart Etsy Connector plugin provide support for all the categories in bulk. However, if you want to list/update a particular profile only, you can handle this task from the “Profile Management” tab itself.
In this section, we have provided the “Local Sync”, “Sync Products”, and “Sync Product Status” crons to provide the Opencart admin with the flexibility of managing the category-level synchronization between Opencart and Etsy.
6.8.8 How to List the Products with Custom Details on Etsy Marketplace.
Knowband’s Opencart Etsy Marketplace Integration Extension comes with a custom product details listing option. This feature allows the Opencart store admin to list the products on the Etsy marketplace with different names and product descriptions.
If you want to list the product as it is, you can keep the custom status disabled. However, if you want to list the products with different details as in the screenshot above, save the same.
These details will be updated in the next product synchronization.
6.9 Audit Log
The audit log helps the admin to keep track of all the tasks performed. Please refer to the attached screenshot below.
6.10 [New] Return Policy Synchronisation
The OpenCart Etsy Module allows the admin to efficiently manage and synchronize return policies between their Opencart store and Etsy. Admins can create, edit, or delete multiple return policies within the module and assign them to specific profiles. Once a return policy is mapped to a profile, all categories associated with that profile are automatically updated on Etsy with the selected return policy, ensuring uniform policy application across listings.
Add New Return Policy
Admins can create new return policies or modify existing ones directly from the OpenCart Etsy Marketplace Module. Moreover, this provides flexibility to manage different return rules based on business requirements without needing to log in to Etsy separately.
Sync Return Policies
Using the Return Policy Sync cron, admins can fetch all available return policies from Etsy into the OpenCart store. Moreover, the synchronization process includes important details such as return and exchange acceptance, the number of allowed returns or exchanges, and return deadline dates, ensuring accurate and up-to-date policy data.
Profile Mapping
Within the profile mapping section, admins can select and assign a return policy to products under a specific category. This makes it easy to manage return rules in bulk rather than applying them individually to each product.
Automatic Updates
When a category is added or updated within a mapped profile, the assigned return policy is automatically applied to the product of the categories mapped on Etsy. This ensures consistency between the OpenCart store and Etsy listings, reduces manual work, and helps maintain compliance with Etsy’s policies.
Watch the Tutorial of the Etsy Marketplace Integration Extension
This OpenCart Etsy Marketplace Integration tutorial provides a complete step-by-step guide on installing and configuring the Etsy integration module, connecting your OpenCart store with your Etsy seller account, synchronizing products, categories, prices, and inventory in real time, managing Etsy orders directly from the OpenCart admin panel, enabling automated product listing with customizable template controls, mapping store attributes with Etsy product requirements for accurate listings, organizing products into Etsy Shop Sections for better storefront management, and handling active, drafted, or expired Etsy listings seamlessly from your OpenCart store.
If the sales have been low at your OpenCart store for an alarming reason, it is time to analyze the performance of checkout process on your site. You can’t expect to have bumper sales on your eCommerce store if your site visitors are still struggling while making the online purchase. It is a common phenomenon that not all site visitors are converted into actual visitors and the foremost reason for this issue can be the complicated checkout process. You could lose a substantial amount of traffic and sales if the checkout process on your site is not engaging at all.
Checkout process is the gateway for achieving higher sales and conversions which explains its huge importance in the online business environment. In case your checkout process is not adequate, it is time to avail the wonderful services of One Page Checkout for OpenCart to grab desired conversions. Here is why this OpenCart checkout plugins for conversions is the best choice for every eCommerce store.
Caters to a wide range of global customers
Every site owner wants to expand its business among targeted customers but the language often becomes a great barrier in the smooth business transaction. Understanding this grave situation, Knowband has come up with this OpenCart One Page Checkout module that contains various advanced features and functionalities. It has an amazing language translation feature that can help spread your business to various countries without any coding related issues.
Provides great freedom to site admin
If you are eager to improve the functionality of your OpenCart site, this feature loaded admin panel can be a great help. It has various amazing features and functionalities that can customize your website as per your business requirements. Through the back end of this user friendly admin panel, you can make required changes in the design, layout and content of your website in a smooth manner. This One Page Checkout for OpenCart also offers facility to show/hide various checkout fields for a simple online shopping experience.
Eliminates customer login related hurdles
Online shoppers are often having problems while logging onto a site which indirectly affects their customer engagement, sales and conversions. If people are not logging onto your site, you need to use this OpenCart plugin that ensures quick customer login for better conversions and product sales. In order to enhance the performance of your customer login process, the module integrates various social media sites like Facebook, Google+, Twitter, LinkedIn and others for encouraging more customer logins.
Offers detailed information about shopping cart
For simplifying the checkout process and to make it more engaging, you need to provide detailed information about shopping cart to your customers. This OpenCart checkout extensions has crucial information like product image, product number, product name, coupon/voucher code and other data for making online business much simplified than before. Along with this data, the module also provides information about crucial factors like shipping cost, applied taxes, total amount and other such parameters that play a critical role in the growth of an online store.
Increases the number of payment and shipping methods
Multiple payment and shipping methods can make customers more confident while making an online purchase. Don’t force your customers to go with dedicated payment and shipping methods on your site for grabbing more conversions and sales. This One Page Checkout for OpenCart is a feature packed module that contains shipping methods like Citilink, Smart Send, United Parcel Service (UPS), FedEx and consists of payment methods like Sage pay, Mollie, Boleto, Paypal, PayU and others for obtaining desired conversions.
This checkout plugin for OpenCart stores is a revolutionary plugin that is packed with various features and functionalities for taking your online business to new heights. There should not be any dilemma regarding the use of this One Page Checkout for OpenCart as it is the best buy option with its most affordable price. Reach out to our Knowband store and grab the required conversions for your OpenCart store.