After a busy 5-day holiday period comprising of Thanksgiving, Black Friday and Cyber Monday, follows Christmas, which is also one of the most popular occasions rejoiced by shopaholics as well as the e-retailers.
The last week of the year holds immense potential to add huge revenue to your online business. Adding a fact to this statement, the previous year Christmas retail sales captured approximately $719.17 billion in the United States, as per Statista.
In this article, I have put forward 8 Best Christmas Marketing Ideas that you can look to adapt to your online business for a successful Christmas campaign.
1. Add a Christmas Touch to Your Brand
Your Brand appearance should go hand-in-hand with the holiday mood. When one holiday approaches a close, you need to develop the curiosity for the next one. Let the customers’ mood be on the same track. Do not let the holiday feel fade away.
Start by customizing the colour of your website to something red and white. Go for Christmas hats, bells, lights, Christmas trees next. Every time a visitor lands on your website, it should give them a joyous Christmas feel and add a spark to the shopping mood.
Get your website cover banner ready to catch the Christmas holiday spirit. It should immediately grab visitors’ attention. Display your Christmas deals on the banner to make your visitors aware about the Christmas sales.
Christmas Marketing would be tasteless if you do not restyle your social media accounts. Set a Christmas theme for your social media pages by having a Christmas-personalized profile picture and cover picture.
These are some of the basic Christmas marketing ideas.
2. Introduce Christmas Gift Cards If You Do Not Have It Yet
Digital Gift Cards or e-gift cards are the shoppers’ primary gift choice during the holiday season and add a huge sum to your revenue, simply because they are convenient, easy to purchase and time-saving.
People are found scratching their heads when it comes to choosing gifts as they are surrounded by multiple gift ideas. And there is always the uncertainty about the receiver liking the gift.
Gifting one or two persons can still be managed but when the numbers are high, digital gift cards tend to be the best option, and this is why Christmas themed Gift cards would be one of the best Christmas marketing ideas.
No more wastage of time in searching for tons of gifts. Get a gift card for your loved ones and deliver it to their email address within no time. Recipients are also delighted to receive gift cards as they can buy whatever they want of their own choice. This is the reason why most of the e-retailers have added a Gift Card section on their store/website.
Believe me, Gift cards prove to be extremely beneficial in boosting your sales. If you do not have a Gift Card section yet, add it today.
Well and good, if you are having a mobile app for your business and using app push notifications to reach out to your customers. In case you don’t, Web Push Notifications would make up for an ideal Christmas marketing idea.
Web Push Notifications allow you to interact with your subscribers in real-time even if they are not present at your website. They help you keep your customers updated about the trends and promotions on your website.
Ask your users to subscribe to your Christmas updates to receive enticing offers regarding the Christmas sale.
Web Push Notifications module, by Knowband, lets you use the communication power to announce a flash sale, product price alert, product availability alert, etc. The module is available for PrestaShop, Magento and Magento 2.
Adding to the list of Christmas marketing ideas would be creating a Christmas-themed video.
If it fits your budget, prepare a video to boost your brand awareness. Make sure it is not overly promotional else people would likely skip it. Keep it short, creative, engaging and a bit entertaining.
Post the video on social media platforms and promote it using social media ads. If users like your content, your video could go viral overnight and you cannot even imagine the limelight it will create about your business.
Your followers count would catch up the speed of a bullet train. You would start getting higher engagement. To put it simply, it will heavily endorse your brand without even a brand ambassador.
But it is not that easy. Creating such a video requires time, efforts and out-of-the-box thinking. If you want to capture people’s attention, you need to do something worth it.
5. Start Sending Christmas Specific Emails
Your subscribers may not pay much attention to your emails rest of the year but they will surely try not to miss any of the mail notifications during the holiday season because they know it is that time where they can expect some exciting offers from Brands.
Use this to your advantage. Start sending out emails to your customers at regular intervals but do not be too frequent. Develop the interest slowly inside the customer and avoid being promotional every time. You need to make your customers feel how they can get benefited from your Christmas offerings.
Find the perfect time when most of your subscribers are active to open the emails. Create a catchy subject line that triggers the user to browse the inside content. Do not shout just Sales, Sales and Sales!
6. Offer Gift Packages
People would spend huge bucks during the Christmas sale and offering gift packages would be an effective Christmas marketing idea.
Encourage people to spend more by offering them product bundles. Not only it increases your average order value but also helps in selling out those items which are otherwise purchased rarely by the customers.
For example- You can offer 3 pair of shoes with different colours at a slightly lesser combo price than their individual cost. Now even if the prospect is not much impressed with 1 colour, he would probably show the desire to purchase as he would be getting it in a bundle with 3 different colours. The prospect would have not purchased it, in particular.
7. Run a Christmas Themed User-Generated Content Campaign
How about asking people to share their Santa stories? Or asking them to share a picture wearing a Santa Claus dress or clicking a picture with the Christmas tree? And then gifting them something special for this effort. Sounds a great Christmas marketing idea?
Well, it is. User-generated content campaigns make a great way to spread the word about your brand. In fact, it is one of the best forms of word-of-mouth marketing.
Apart from this, you can also start a campaign where you ask your customers to post a picture of what they shopped from your store on the Christmas sale. Tell them to use a specific hashtag and tag your brand. In return, you could provide them with an exclusive offer or some gift vouchers to the winners.
8. Be Active on Your Social Media Pages
There is no marketing strategy today that does not involve social media, same goes for the Christmas marketing.
Social media has become a vital platform for Brands to boost their brand visibility, acquire new customers and drive more conversions. But it doesn’t occur by just uploading posts. You need to develop a friendliness with your audience and it would develop only by regularly interacting and engaging with them.
Try to create a fun-filled Christmas atmosphere around your audience. Persuade them to like, react or comment to your posts. Again, avoid posting promotional stuff every time. Reply to your followers’ comments, solve their queries. The more the engagement, the higher the reach.
Also, do not post the same set of posts on every platform. A few can be okay but copy-pasting every post would probably bore your customers. Have different posts for different platforms like Facebook, Instagram, and Twitter.
The Bottom Line
That’s it! I found these 8 Christmas marketing ideas to be most fruitful for online businesses, though not every point mentioned above would be suitable for all business types.
Christmas is going to arrive soon. Make the festival count and while you prepare for the Christmas marketing, do not forget to keep these ideas for New Year as well, which would take place right after a week.
If you have some other Christmas marketing ideas or strategies, feel free to add in the comment below.
It is always desired to keep better quality content and human-readable keywords in order to target high traffic to your website. So, the very first thing you need to make sure that your website shop is more SEO Friendly by rewriting the incorrect website URLs and making your website pages more searchable, using Knowband’s OpenCart SEO Redirect module. This module also provides redirect URL features for your website shop and you can implement any redirection like 301, 302 and 303 type. Redirect feature informs the customer’s browser that the page is moved and it will automatically switch to a new page of your choice.
1.1 Striking Features of OpenCart SEO Friendly URL Extension
OpenCart SEO Friendly URL extension helps to convert default URLs into SEO friendly URL.
OpenCart URL Redirect module automatically fetches all the duplicate URLs at your store which can modified or removed as per business needs.
With the OpenCart Rewrite URL module, you can redirect the old URLs into new URLs using 3 redirection choices as 301, 302 and 303 redirect type.
OpenCart SEO Redirect module helps to restructure your store by reforming incorrect store links of product pages and categories.
OpenCart URL Redirect module helps in improving website SEO in Google search results.
OpenCart Friendly URL Module is multi-store and multi-lingual compatible.
OpenCart SEO Optimizer offers an easy to use backend which requires no coding skills for configuring module settings.
OpenCart URL Redirect module allows changing all the known SEO URLs into SEO URLs.
OpenCart 301/302/303 Redirect Module allows you to redirect the non HTTPS URL to the HTTPS URL.
You can enable or disable the complete functionality of the OpenCart URL Redirect module on a single button click at the backend.
OpenCart 301/302/303 Redirect Module allows you to create N number of redirects for your store corresponding to different redirection type.
2.0 Installation Guide of OpenCart SEO Redirect Module
Before starting the installation process, you have to buy the OpenCart SEO Redirect module from the Knowband store. Once purchased, you will receive the following files on your registered email.
Source code of OpenCart SEO Redirect in zipped file format
User Manual of OpenCart SEO Redirects extension.
Now in order to install this SEO Redirect on your website, follow the given steps:
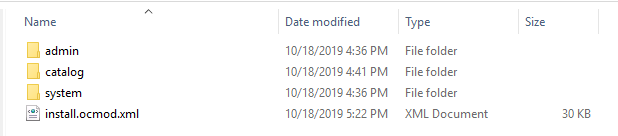
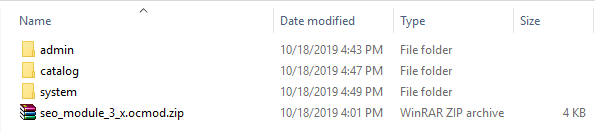
1. Unzip the zip file. You will get the folders as shown in the image below:
2. Copy all the folders of the zip file in the Root Directory of OpenCart setup via FTP manager.
Steps to install Ocmod file using Extension Installer (for v2.3)
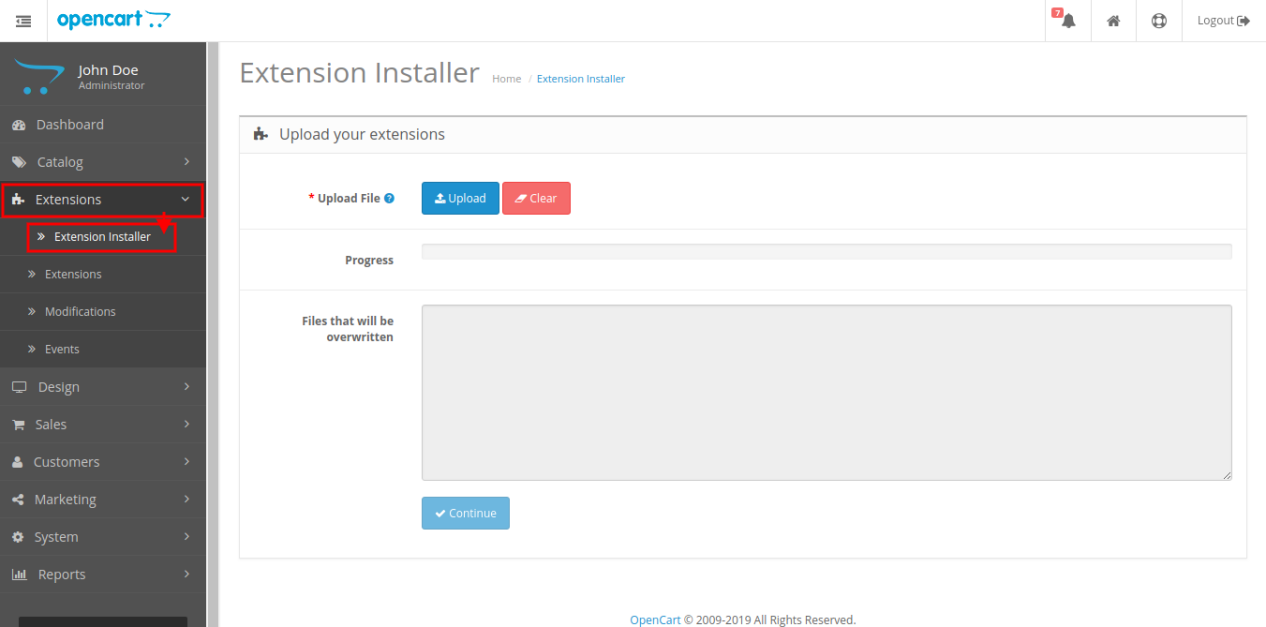
1. Open the Extension Installer window from the admin panel.
2. Click on Upload button to browse and upload the install.ocmod.xml file.
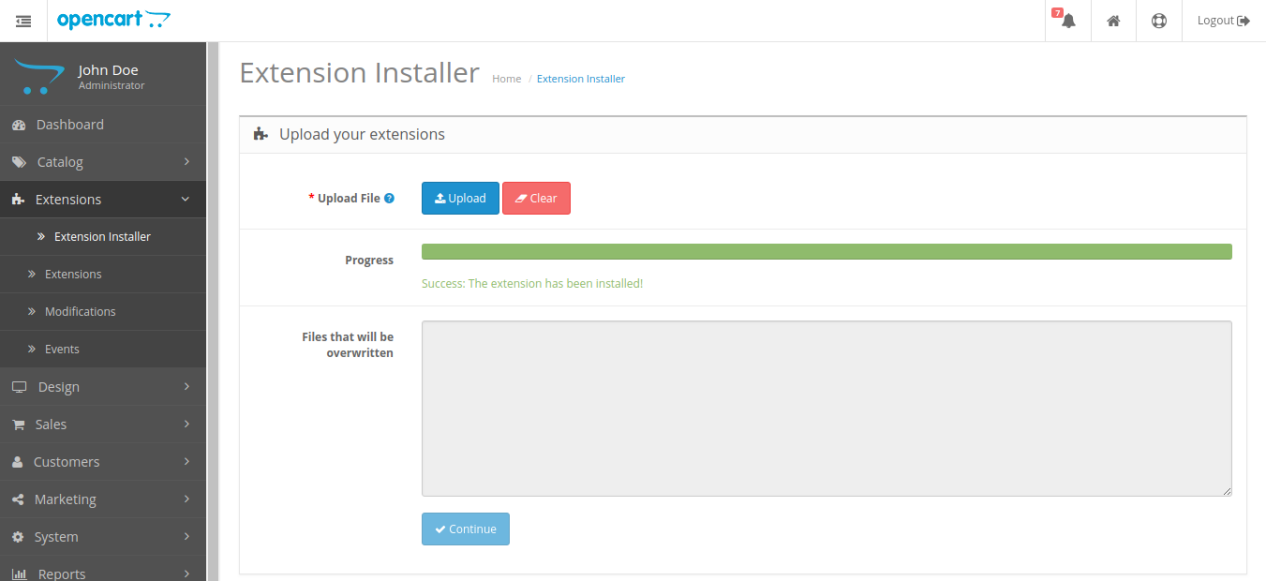
3. Once uploaded, you will see a success message on your screen as shown below.
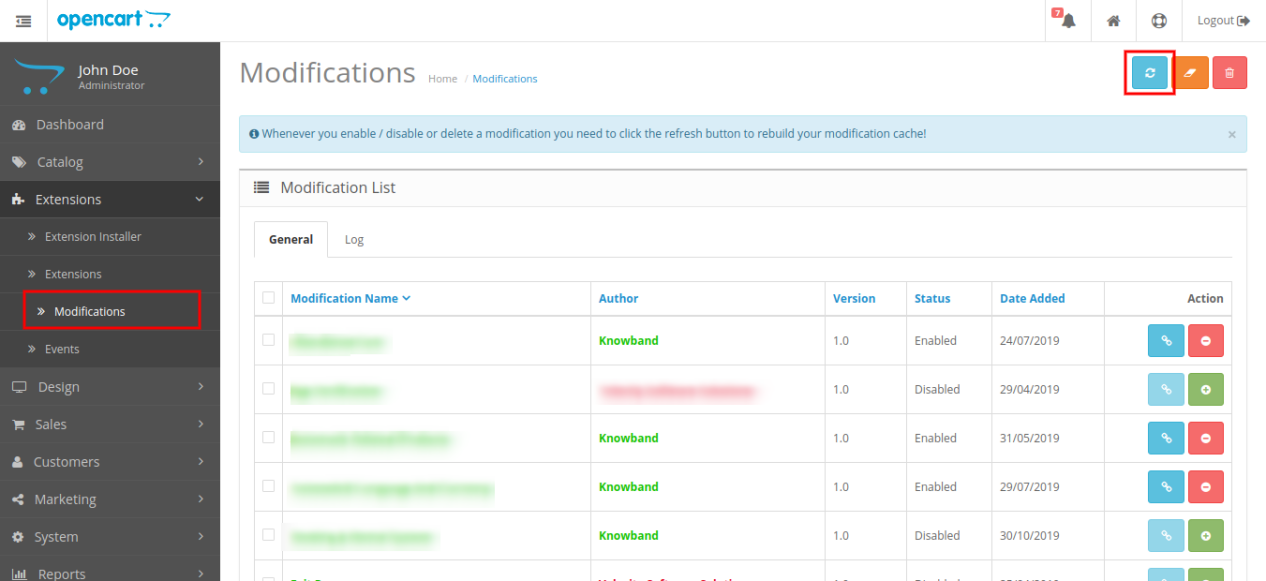
4. Next, go to Modifications tab and click on the Refresh button at the top right side of screen.
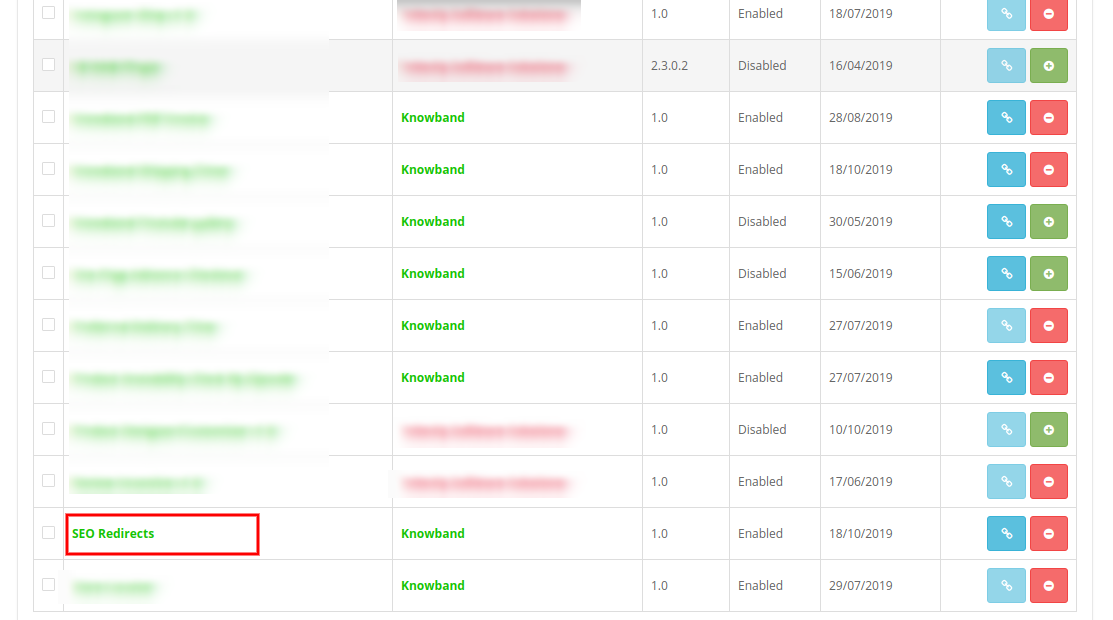
5. Now, scroll down the screen and you will find the SEO redirect module is installed as shown below.
Note:
1. Allow read-write permission to the “kbseoredirection” folder located on the following path: system\storage\download\kbseoredirection
2. For v3.x, you will find an installation file and folder structure as shown below:
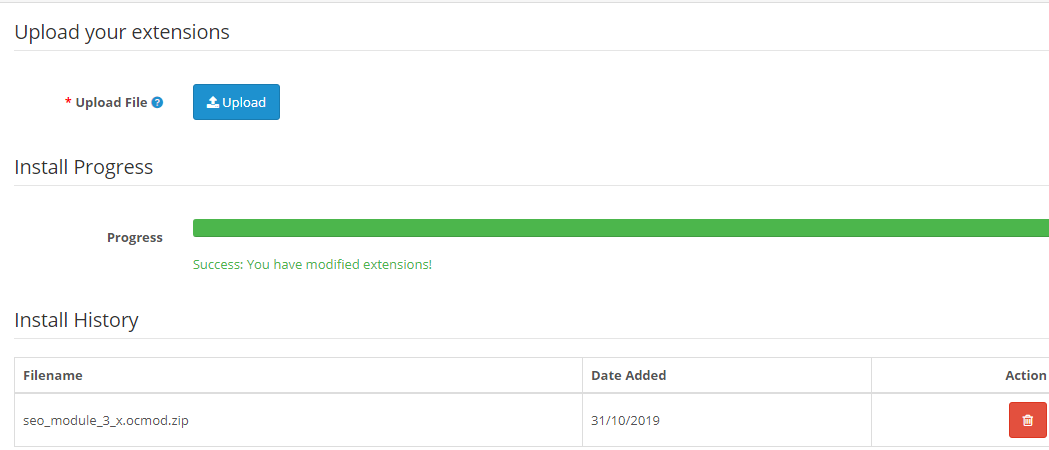
While installing the seo_module_3_x.ocmod.zip file, you will see the following image:
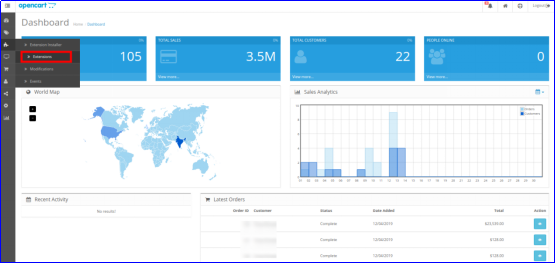
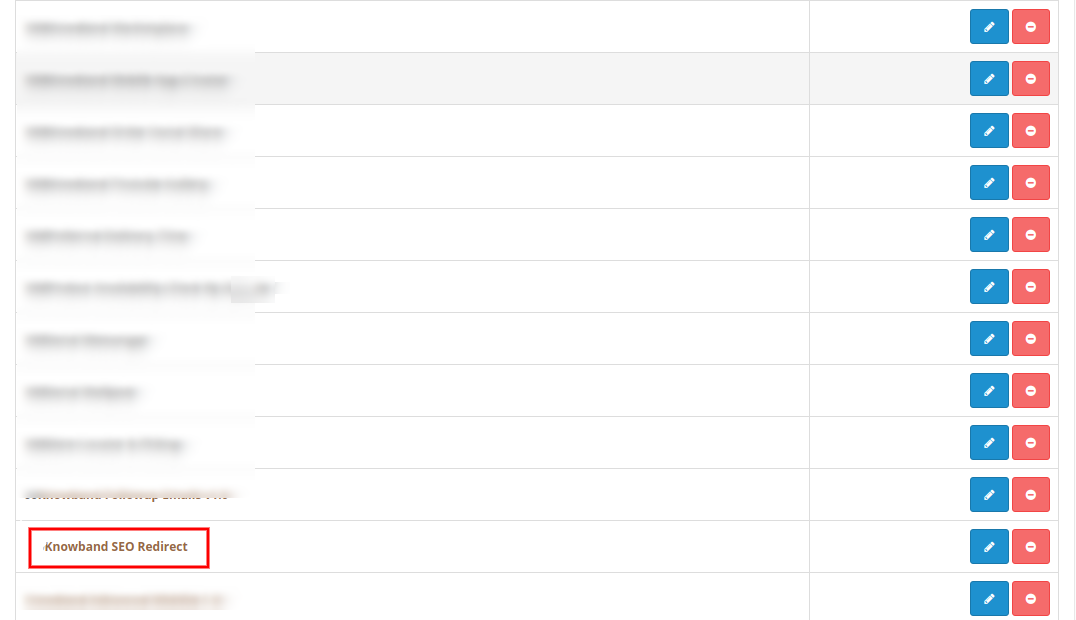
So, OpenCart SEO Optimizer is now installed and is ready to use at your store. Go to the admin menu and click on the extensions. Then, click on Modules and thereby click on Edit button next to Knowband SEO Redirect.
3.0 Admin Interface of OpenCart URL Redirect module
After the successful installation of OpenCart URL Redirect module for your website, you can create as many 404 redirection for your store including 301, 302 and 303. Additionally, OpenCart 404 Redirect plugin eases you in converting the default URL structure at your store into a clean and SEO friendly URLs.
Simply, navigate the settings in the given order: Admin Panel > Extensions > Modules > Knowband SEO Redirect.
The simple to understand admin interface of OpenCart SEO Friendly URL extension is divided into three sections as:
1. General Settings
2. Duplicate URLs
3. 404 Redirects
4. URL Redirects
5. Non SEO URLs
3.1 General Settings
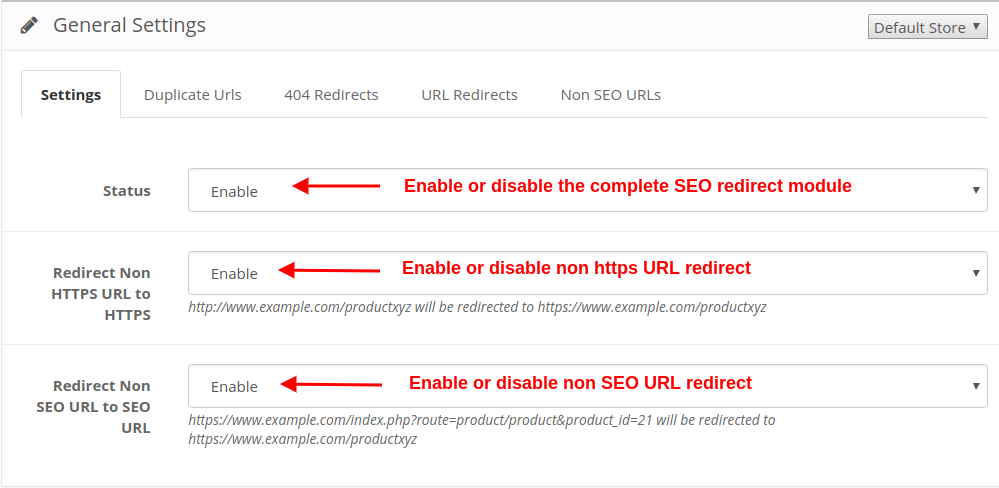
Status: This option will enable or disable the complete functionality of URL Redirect for OpenCart store.
Redirect Non HTTPS URL to HTTPS: By enabling this option, the non https URL will be automatically redirected to https URL. But if this setting is disabled, the non https URL will remain unsecured.
Redirect Non SEO URL to SEO URL: By enabling this option, the non SEO URL can be converted to SEO URL.
3.2 Duplicate URLs
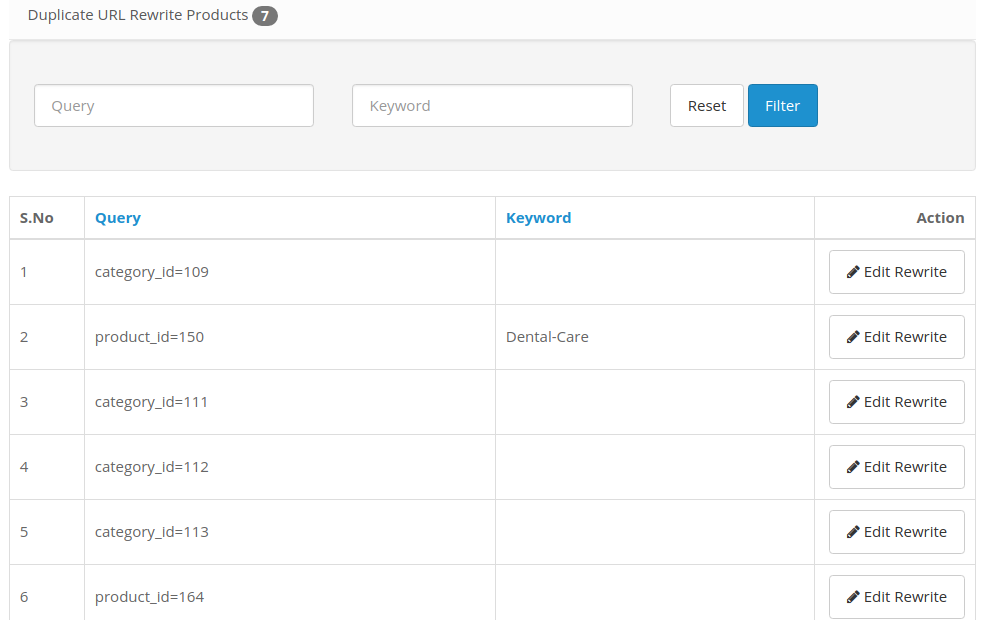
OpenCart URL Redirect module fetches all the duplicate URLs at your store and lists them under this Duplicate URL section. Here, you can simply rewrite any duplicate URL and change it into a new SEO friendly URL by adding an appropriate keyword.
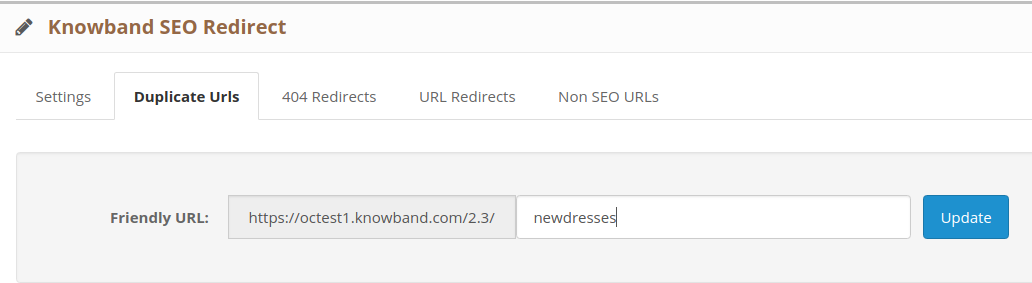
Click on “Edit Rewrite” button corresponding to a URL and you can update the URL as shown below:
The duplicate URL you rewrite and update is automatically removed from the list. This way, you can change all the duplicate URLs into a unique or SEO friendly URL.
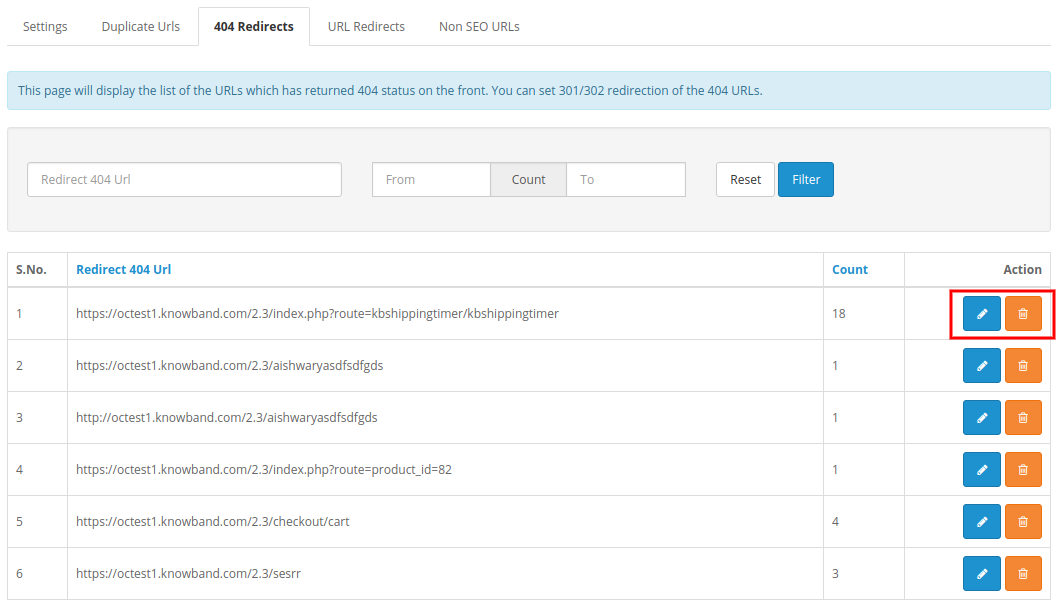
3.3 404 Redirects
From this section of OpenCart 301/302/303 Redirect Module, you can check the list of 404 redirects. You can find all the redirect 404 URL along with an option to “Edit Redirect” or “Delete Redirect”. Also, you can check the hit count corresponding to a specific wrong URL.
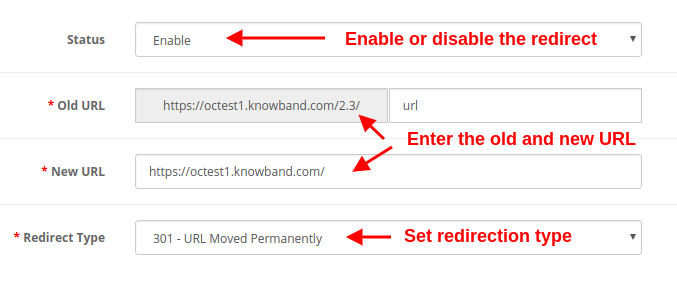
You can edit any wrong redirect with the options given below:
Status: This option enables or disables the specific 404 redirect.
Old URL: This field specifies the incorrect or wrong URL redirecting to 404 page.
New URL: With this field, you can specify the new URL to which you want to redirect the old URL.
Redirect Type: This option allows you to set the redirection type as 301, 302, and 303.
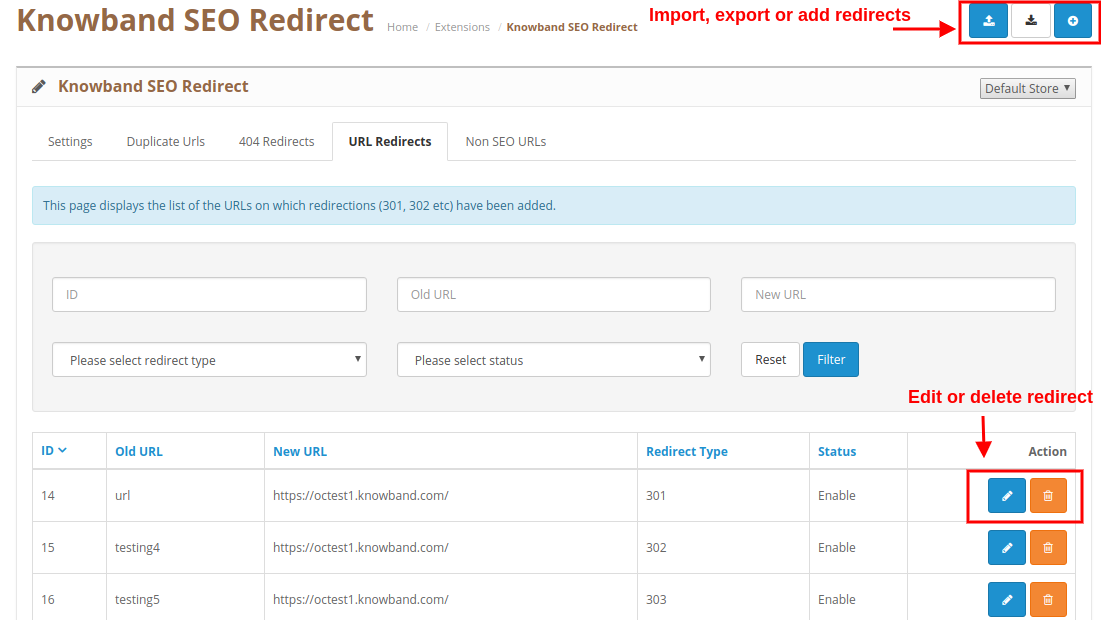
3.4 URL Redirects
From this section, you can view and manage all the SEO redirects at your store. These redirects can be edited or deleted by clicking on the “Edit” or “Delete” button.
You can add a new redirect or you can modify the existing redirection using the “Edit” or “Delete” button. Editing an existing Redirect
Bulk Upload
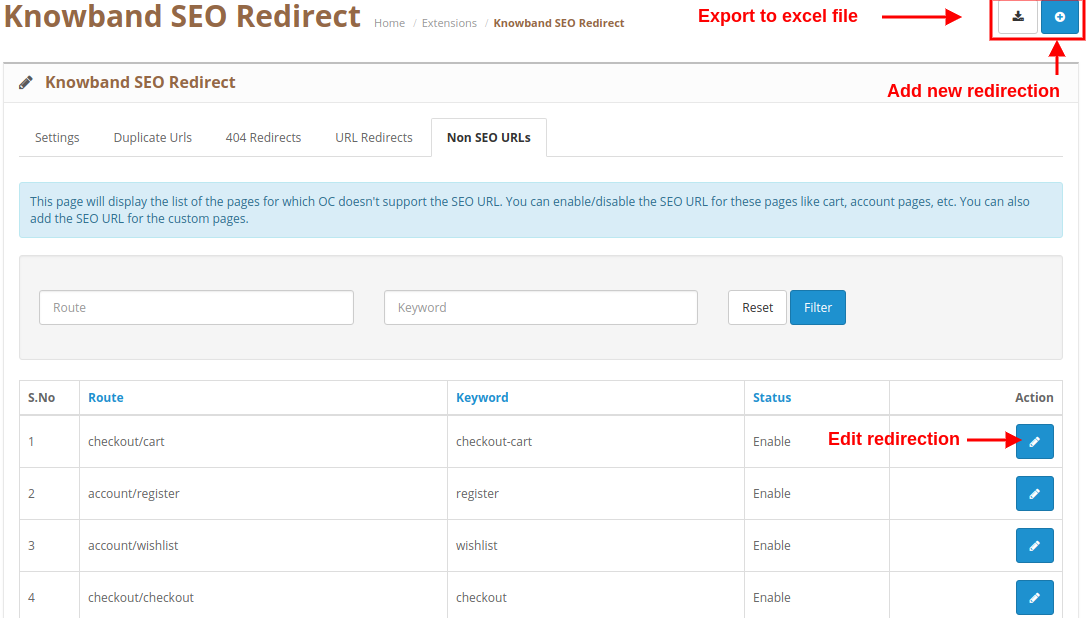
3.5 Non SEO URLs
OpenCart SEO Redirect module provides a detailed interface to check the non SEO URLs at your store. You can easily edit the existing redirection or can add a new redirection for your store.
For more details about this OpenCart 301/302/303 Redirect Module, visit here:
The online store merchant can now allow the online users to rent products, fix appointments and book hotels from the website. Knowband offers OpenCart Booking and Rental System Extension which is highly customizable and allows the online merchant to show hourly rental products, daily rental products, hotels for booking and appointment options. The online merchant can create a dynamic booking system easily without any hassle. This OpenCart Reservation And Booking Module allow the online merchant to set pricing, time slots, date availability, number of maximum available appointments/bookings/quantity from the admin interface.
The online users can fix appointments, book hotels, book hourly rental based products, book daily rental based products easily as per their requirements. The online merchant can also apply price rules for offering a reduced price on specific dates. The Online Booking module for OpenCart shows location using Google Map on the product pages for helping the users. The Hotel booking module for OpenCart is multi-lingual compatible and offers smooth functioning.
1.1 Features of this OpenCart Booking Calendar Extension
The online merchant allows the online users to fix appointments, book hotel rooms and rent any product daily or hourly basis.
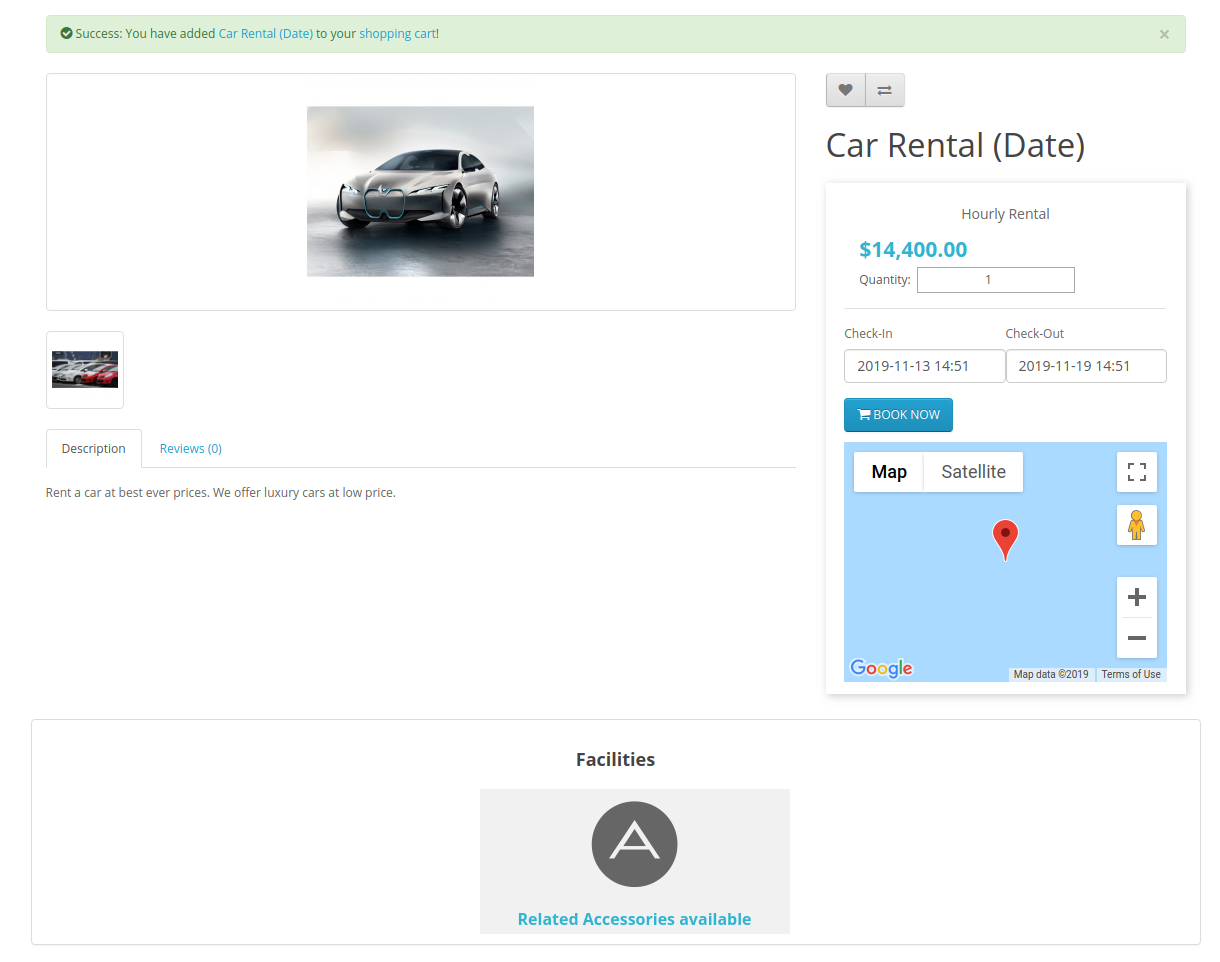
The OpenCart Booking and Rental System Extension allows showing Locations using Google maps on the booking/rental product pages.
Admin can create price rules for offering a discount on specific days. Admin can show/hide price rules on the booking/rental product pages.
The OpenCart Reservation And Booking Module allows selecting appointment(Date/Date-time), daily rental(Date/Date-time), hotel booking and hourly rental type products from the admin interface.
The Hotel booking module for OpenCart allows selecting service type ie. branch and home service for Appointment type products. In-home service, the users can get doorstep service and in-branch service type the users need to visit the service provider.
Admin can select the initial price of service, show Google map location, image and availability date/time. Admin can also select the days on which he doesn’t want to offer a particular service.
In hotel booking settings, admin can set the minimum-maximum days of booking, set the hotel rating, Facilities and add rooms of different types.
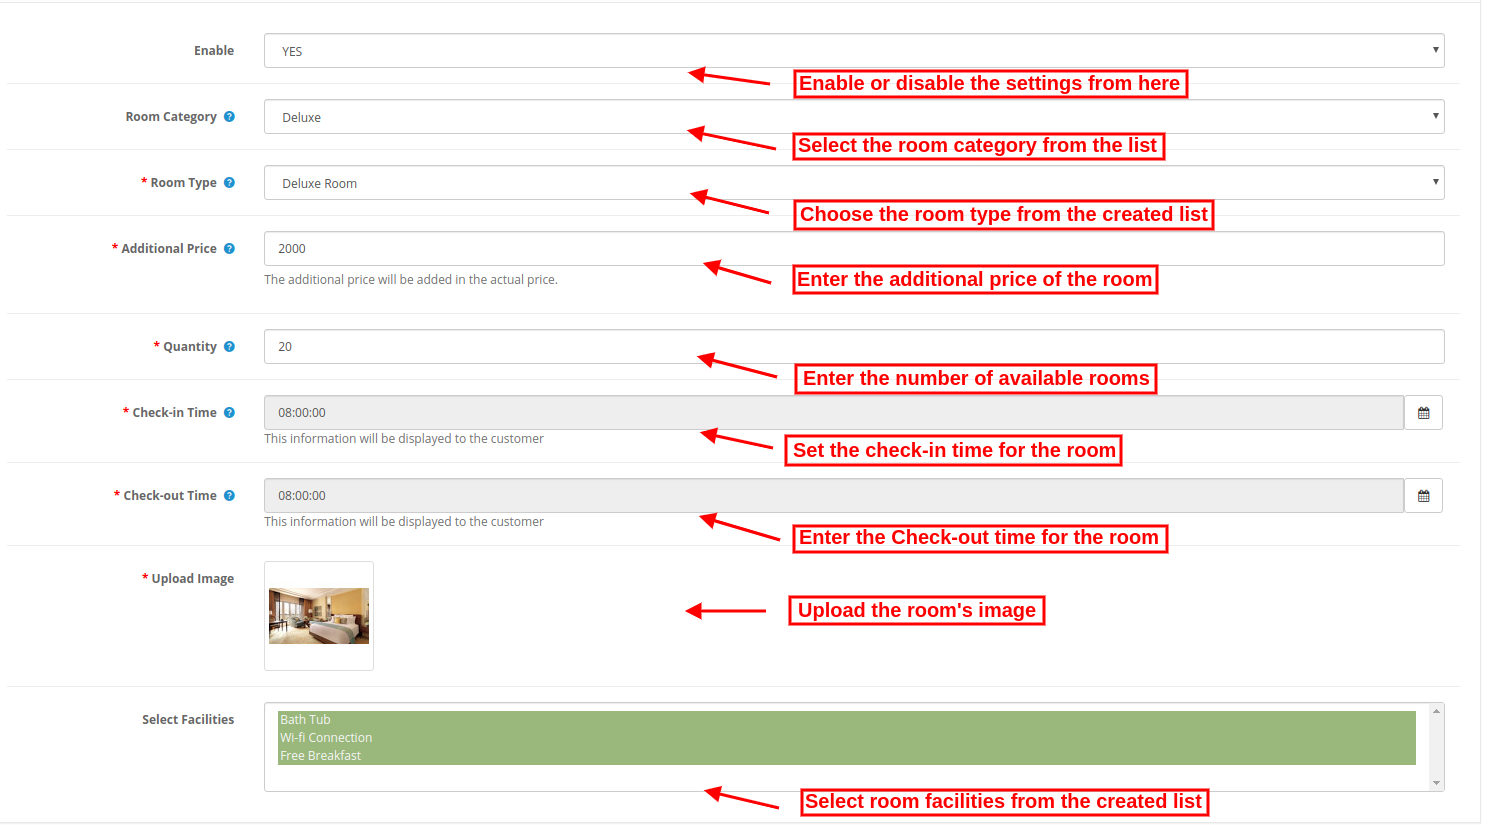
For a specific room, admin can set the additional price of that room, the number of available rooms, check in-checkout time. Admin can also upload a room image and its facilities.
Admin can create unlimited room categories and activate or deactivate it anytime.
The Booking System Extension for OpenCart allows admin to create multiple room types(ie Deluxe, super-deluxe, semi-deluxe) and set the maximum allowed child/adult count. The store merchant can enable or disable the room types easily as per the requirement.
The Online Booking module for OpenCart allows adding booking facilities and maps it with the product. Admin can add facilities like wifi availability, bathtub, free lunch and map it with hotel rooms. Admin can add images or font awesome for showing booking facilities.
The online merchant can create and apply price rules from the admin interface for offering a discount on particular dates/duration.
Admin can select the product, date type(specific/date range), reduction type(fixed/percentage-based) and reduction amount for applying price rule.
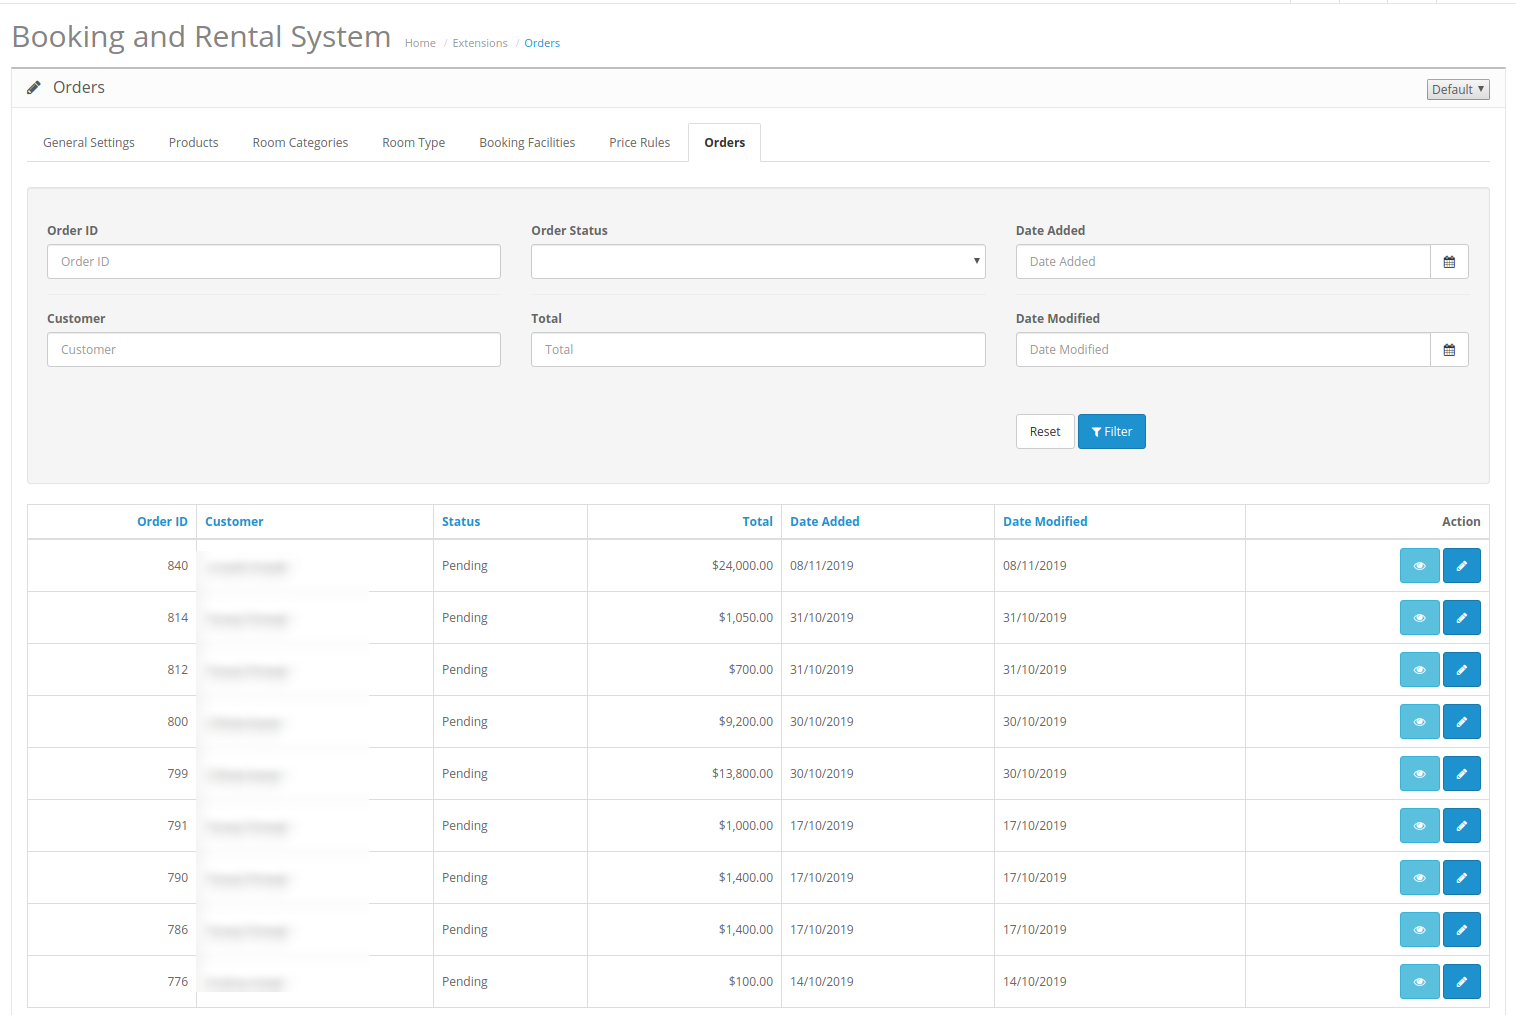
Admin can view a list of all the ordered based on booking and rental. The OpenCart Event Booking plugin allows admin to view and edit the orders from the admin interface.
The Online Booking module for OpenCart is multi-lingual compatible.
2.0 Installation Steps for Booking and Rental System
Purchase OpenCart Booking and Rental System Extension from our store. You will receive these files after purchasing the OpenCart Booking and Rental System Extension:
First, you will get a source code file of the OpenCart Booking and Rental System Extension in a zipped file format.
User Manual of this OpenCart Booking and Rental System module.
Follow below-mentioned steps to install OpenCart Booking and Rental System Extension:
1.Unzip the received zip file. You will get the folders.
2. Copy all the folders of the zip file in the Root Directory of OpenCart setup via FTP manager.
3. There will be a file named kbbooking_system.ocmod.xml (In case of Openvar v3.0.x file name would be kbbooking_system.ocmod.zip). Upload the same file from the page “Admin -> Extension -> Extension Installer -> upload”.
So, OpenCart Booking and Rental System Extension is now successfully installed and ready to use at your store.
Now go to the admin menu and click on the extensions and thereby click on the configure button next to Booking and Rental System.
3.0 Admin Settings
After installation, the online merchant can apply the settings to implement booking and rental functionality on the website.
There are seven configuration sections as shown below:
General Settings
Products
Room Categories
Room Type
Booking Facilities
Price Rules
Orders
3.1 General Settings
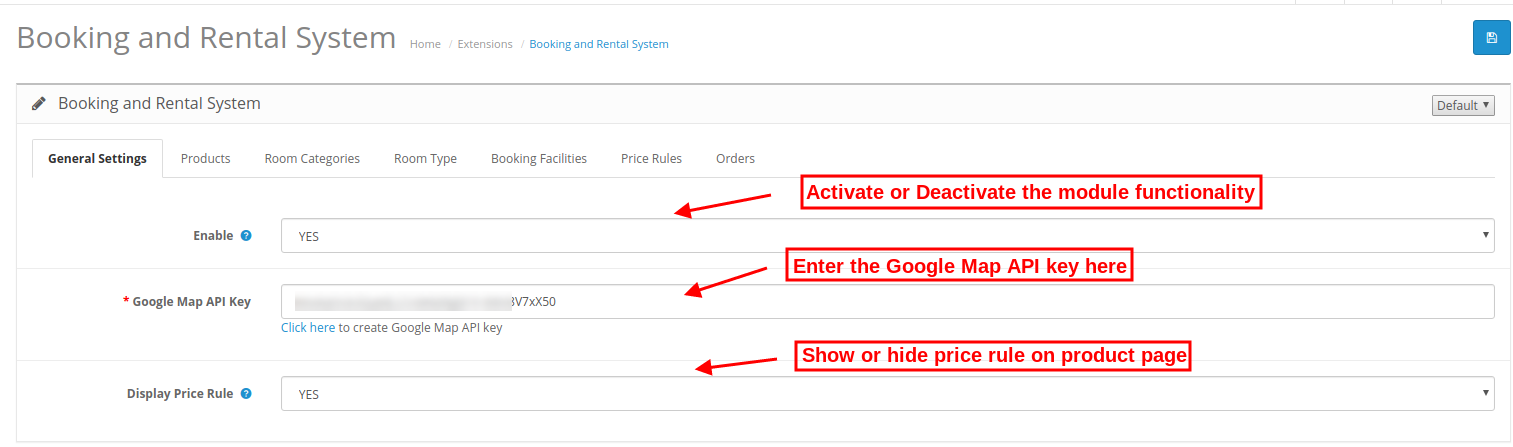
In general settings, the online merchant can apply basic settings related to the rental system.
Enable: Enable or disable the functionality by selecting yes or no option.
Google Map API Key: Enter the Google map API key for Google map integration. The store admin can also get the steps to generate a Google map API key.
Display Price Rule: Enable this option to show price rule on the product page.
3.1.1 How to generate the Google Map API key
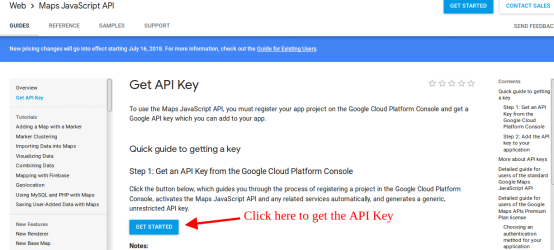
For generating Google map API key, admin can follow these steps:
Click on the “Get Started” button: First of all click on this button to get Google map API key.
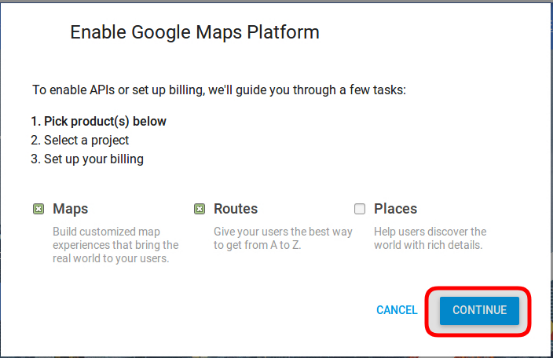
Pickup the products: On clicking the “Get Started” button, an admin will view this pop-up.
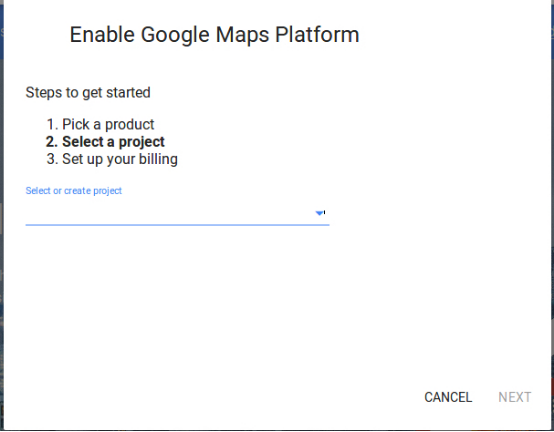
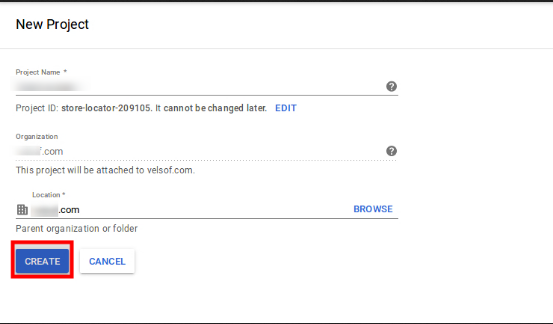
Project selection: Now, admin can create or select any project.
1. Select a project:
2. Create a new project:
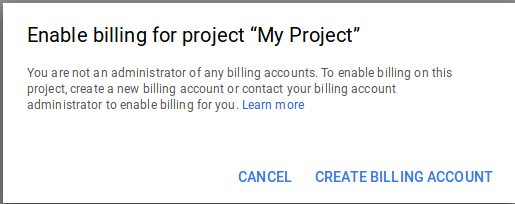
Setup the billing: After creating a new project set up the billing.
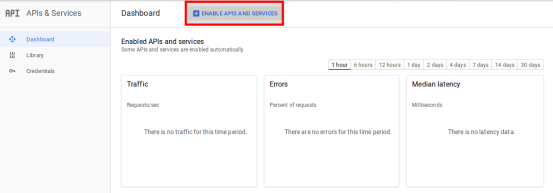
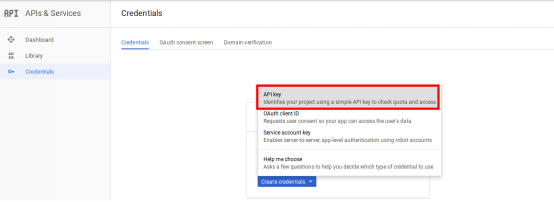
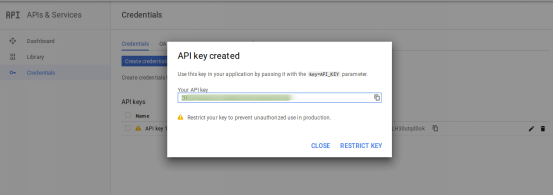
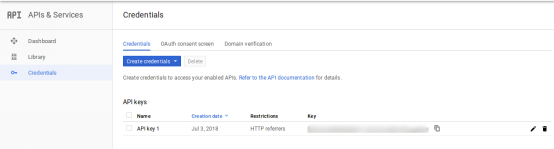
After billing the online merchant can get the Google map API key. On the Credentials page, get an API key:
The store admin can select the API key option:
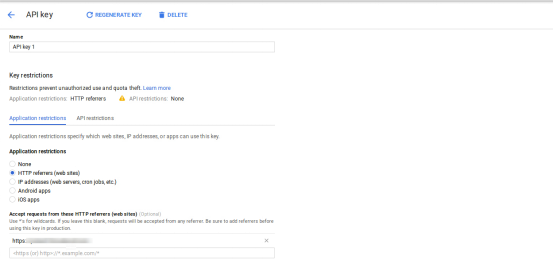
The admin can select the restrict key option from the dialog box to set a browser restriction on the API key.
In the Key restriction section, the store admin can select HTTP referrers (web sites), then follow the on-screen instructions to set referrers.
This way the admin can set the Google map API key.
3.2 Product
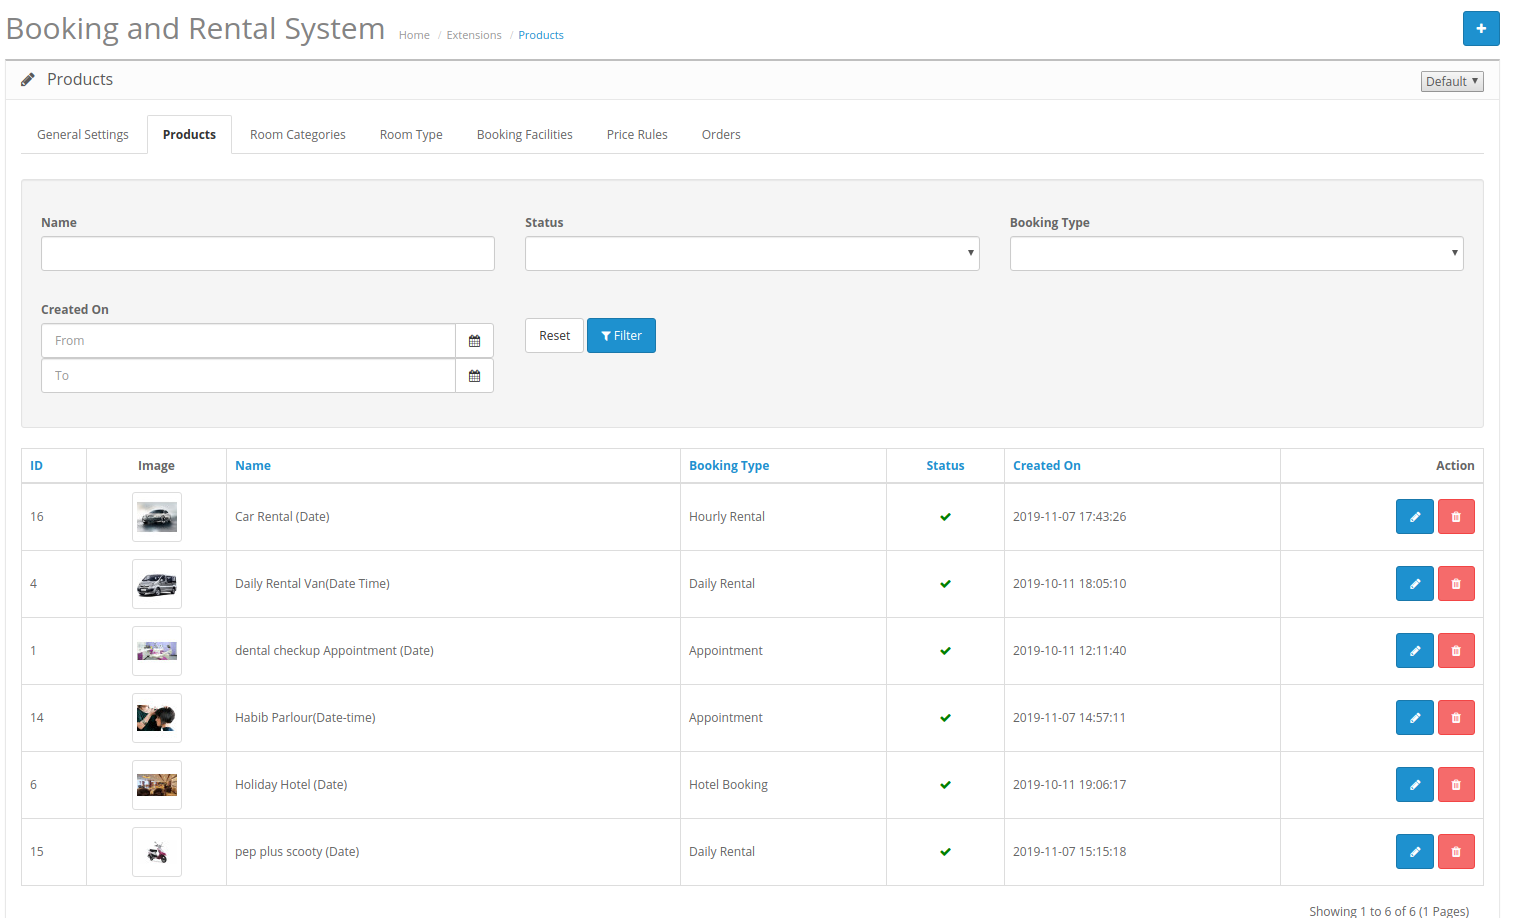
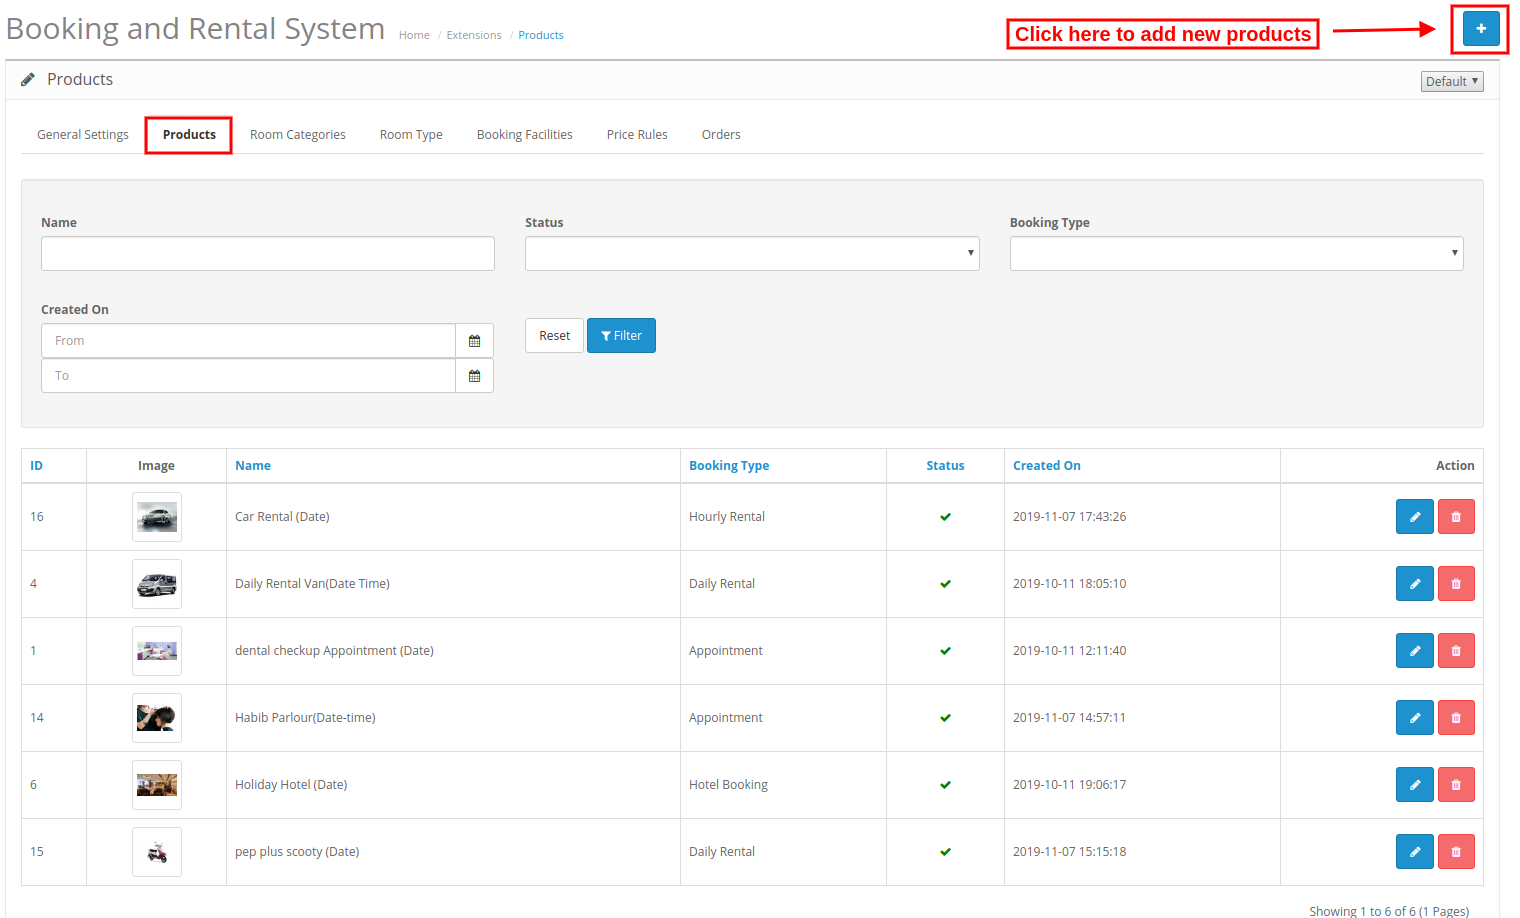
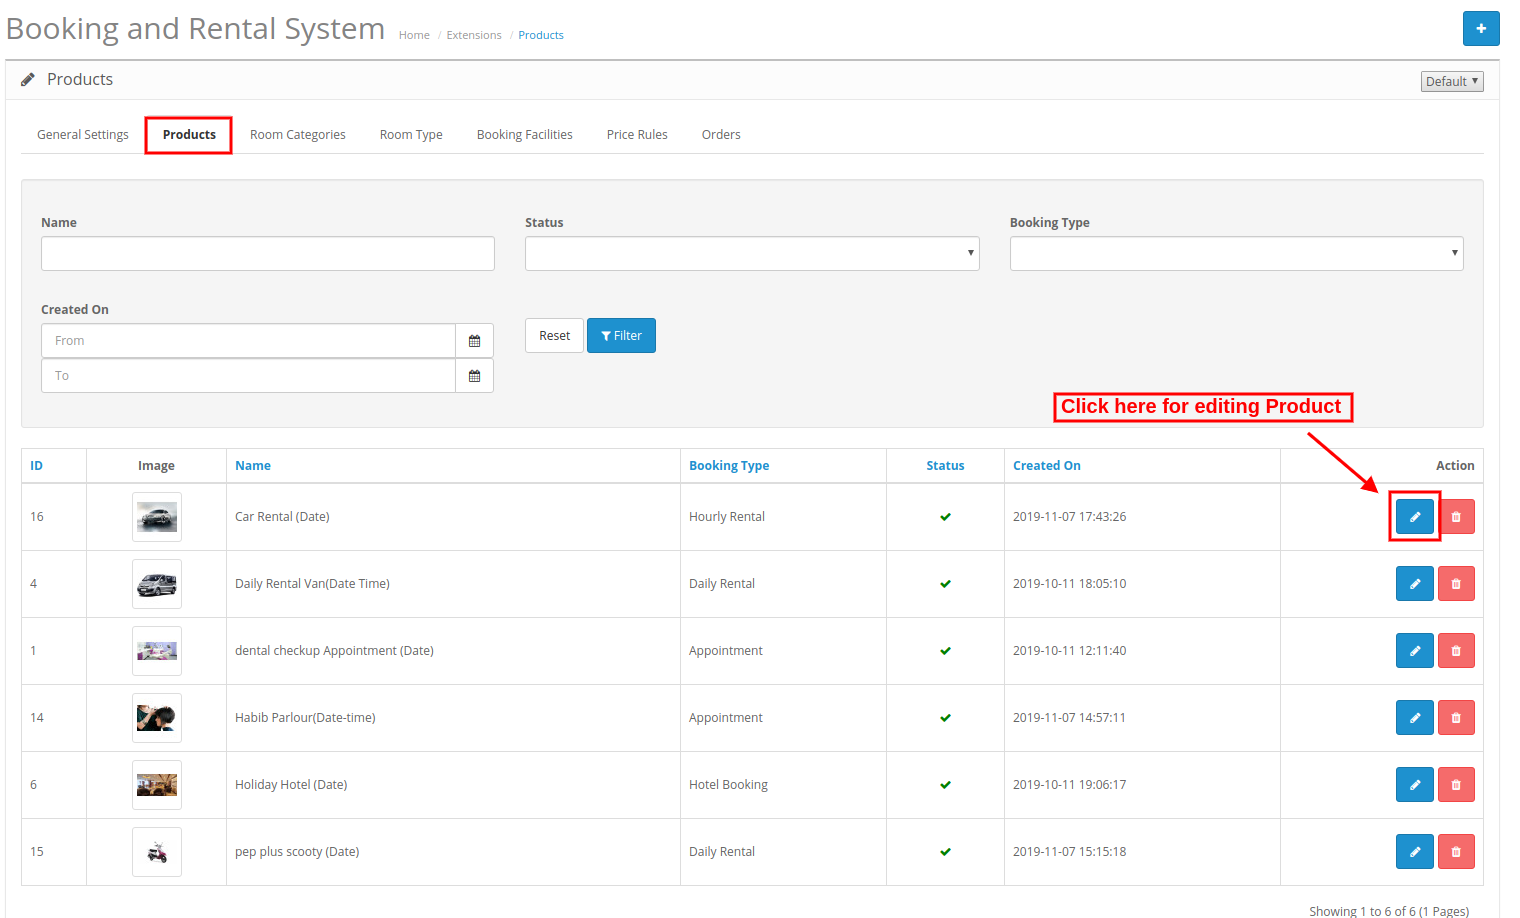
In the products tab, online users can view the list of added products. The store merchant can add, edit and delete any product easily without any hassle.
3.2.1 Add new Product
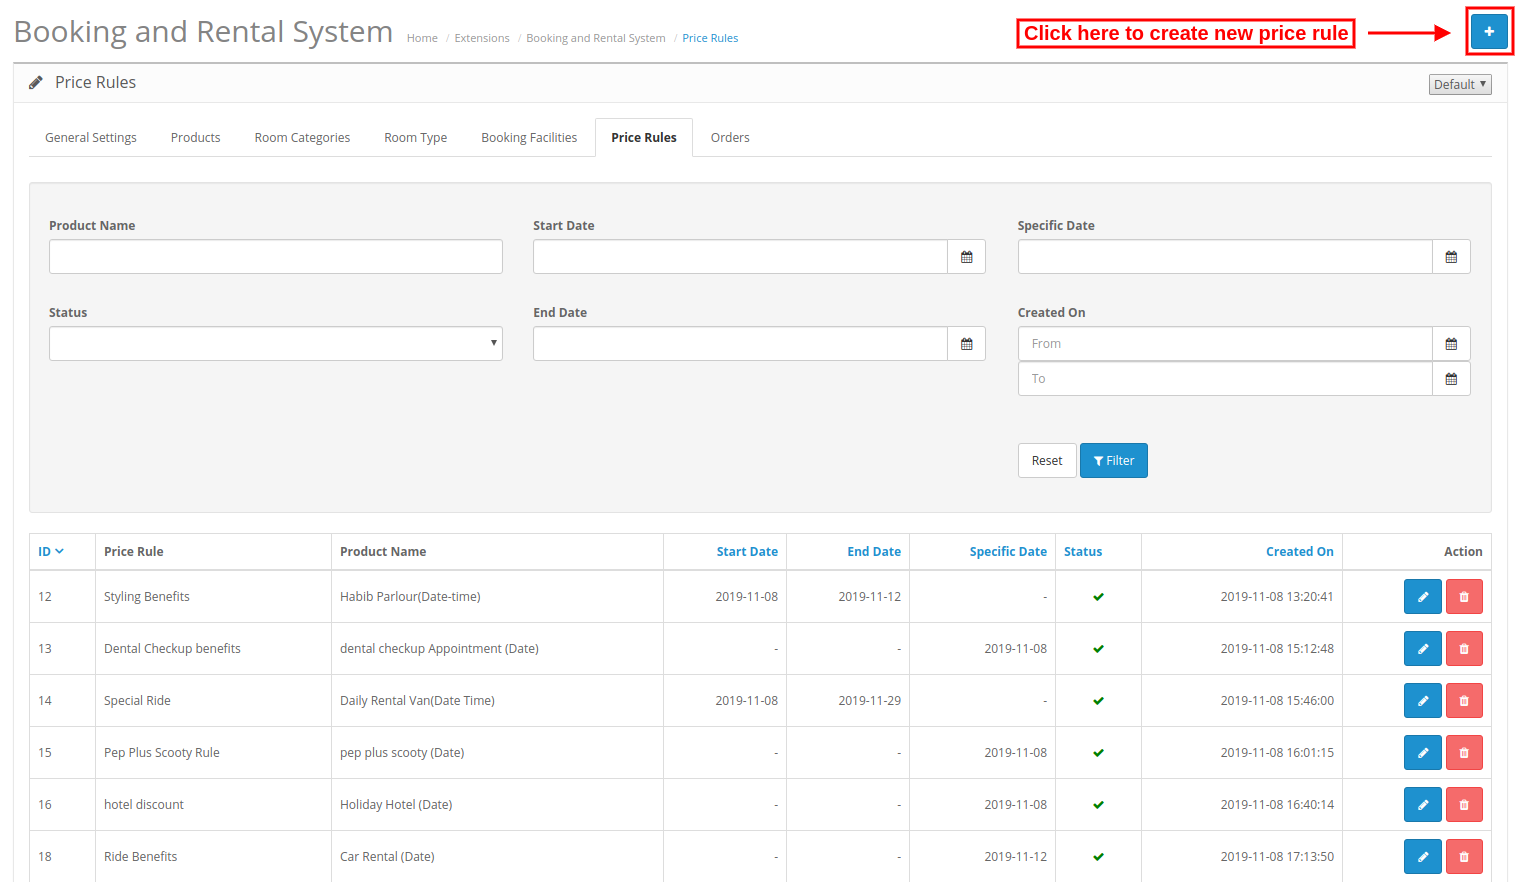
For adding a new product, the admin needs to click on the “+” button first.
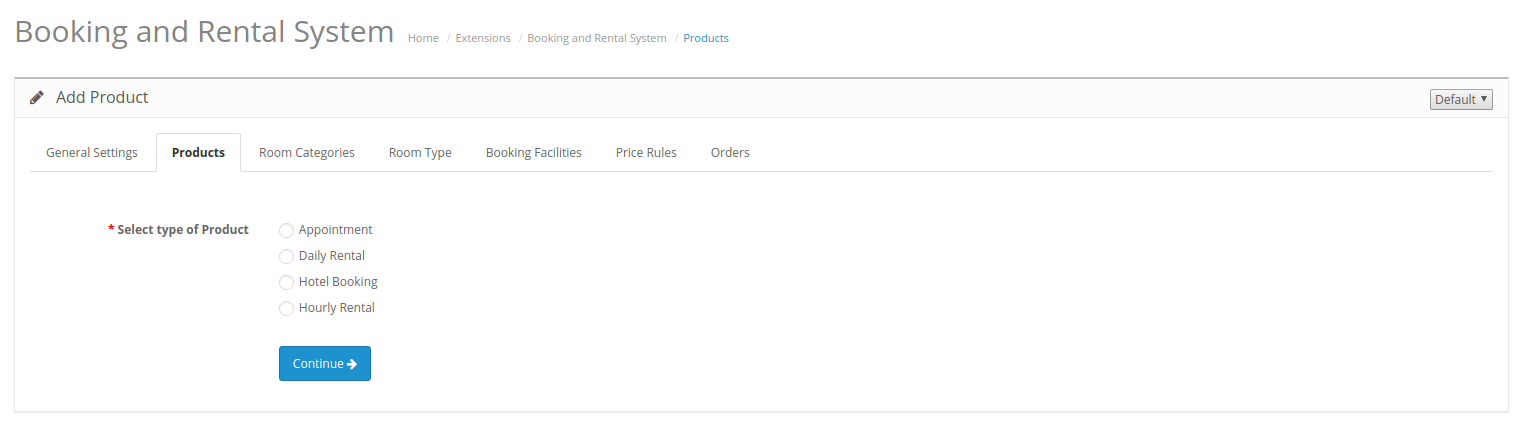
After clicking on the “+” button, an admin will get several options as shown below: Select Type of Product: Admin needs to select the type of product which he wants to add.
Admin can select from these product types:
Appointment
Daily Rental
Hotel Booking
Hourly Rental
There are a total of 6 cases:
Admin can add Appointment(Date and Date-type), Daily Rental(Date and Date-type), Hotel Booking(Date) and Hourly Rental(Date) type of products.
3.2.1.1 Appointment Type
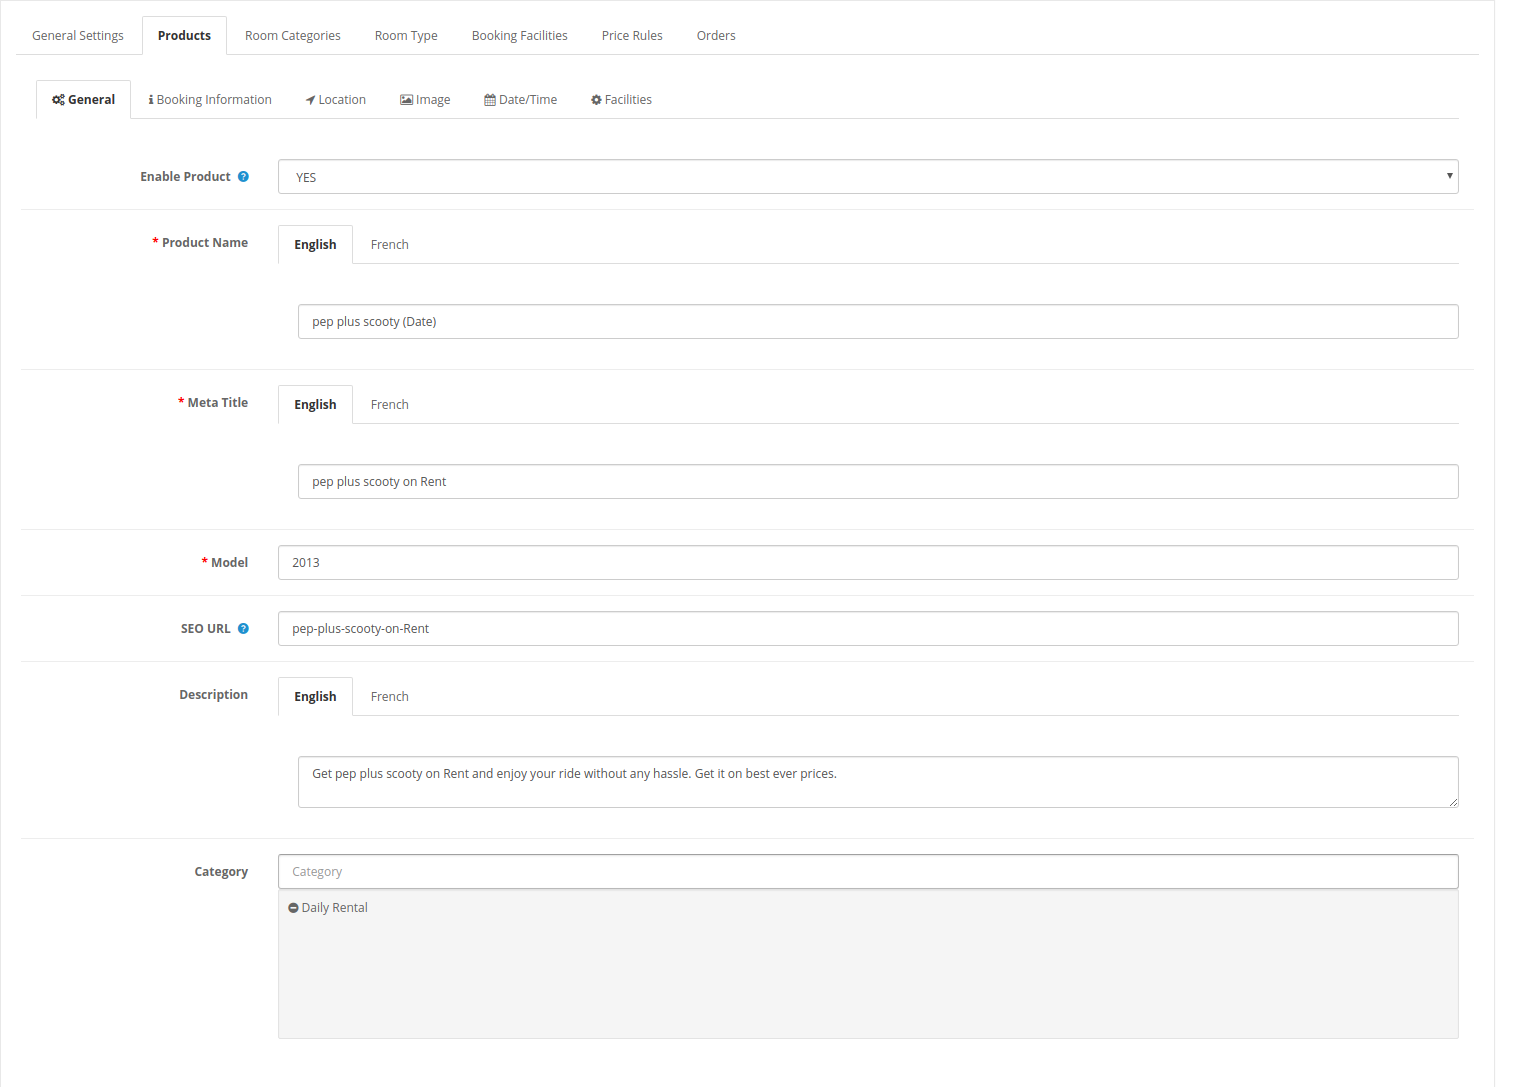
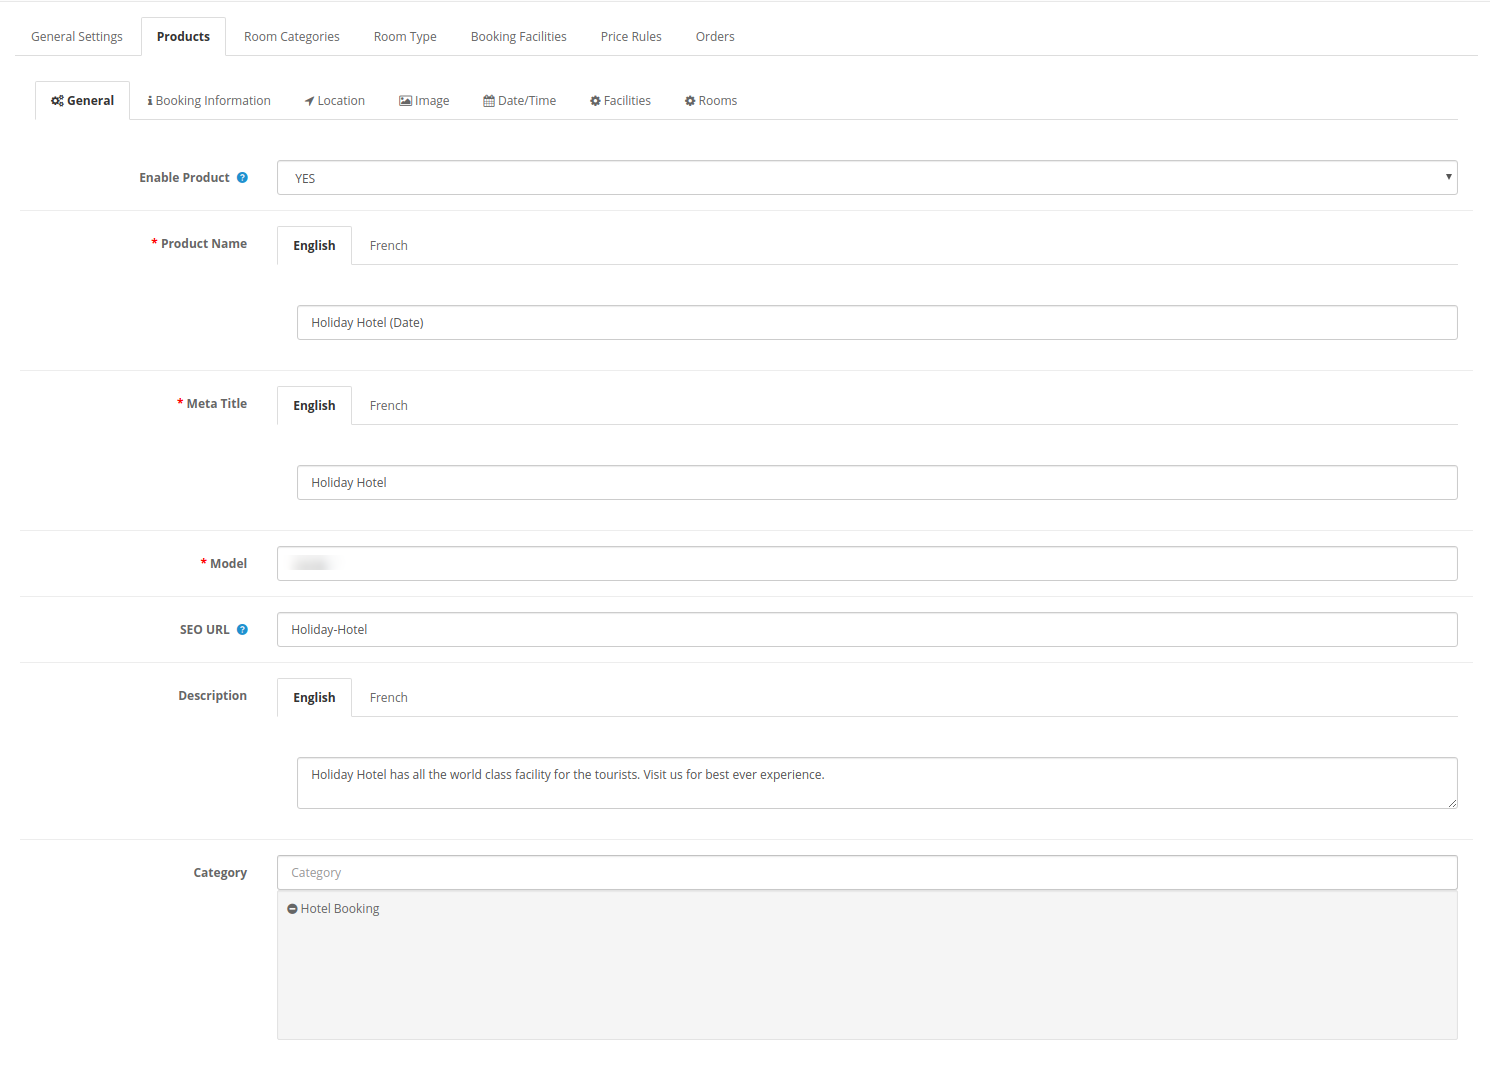
1. General:
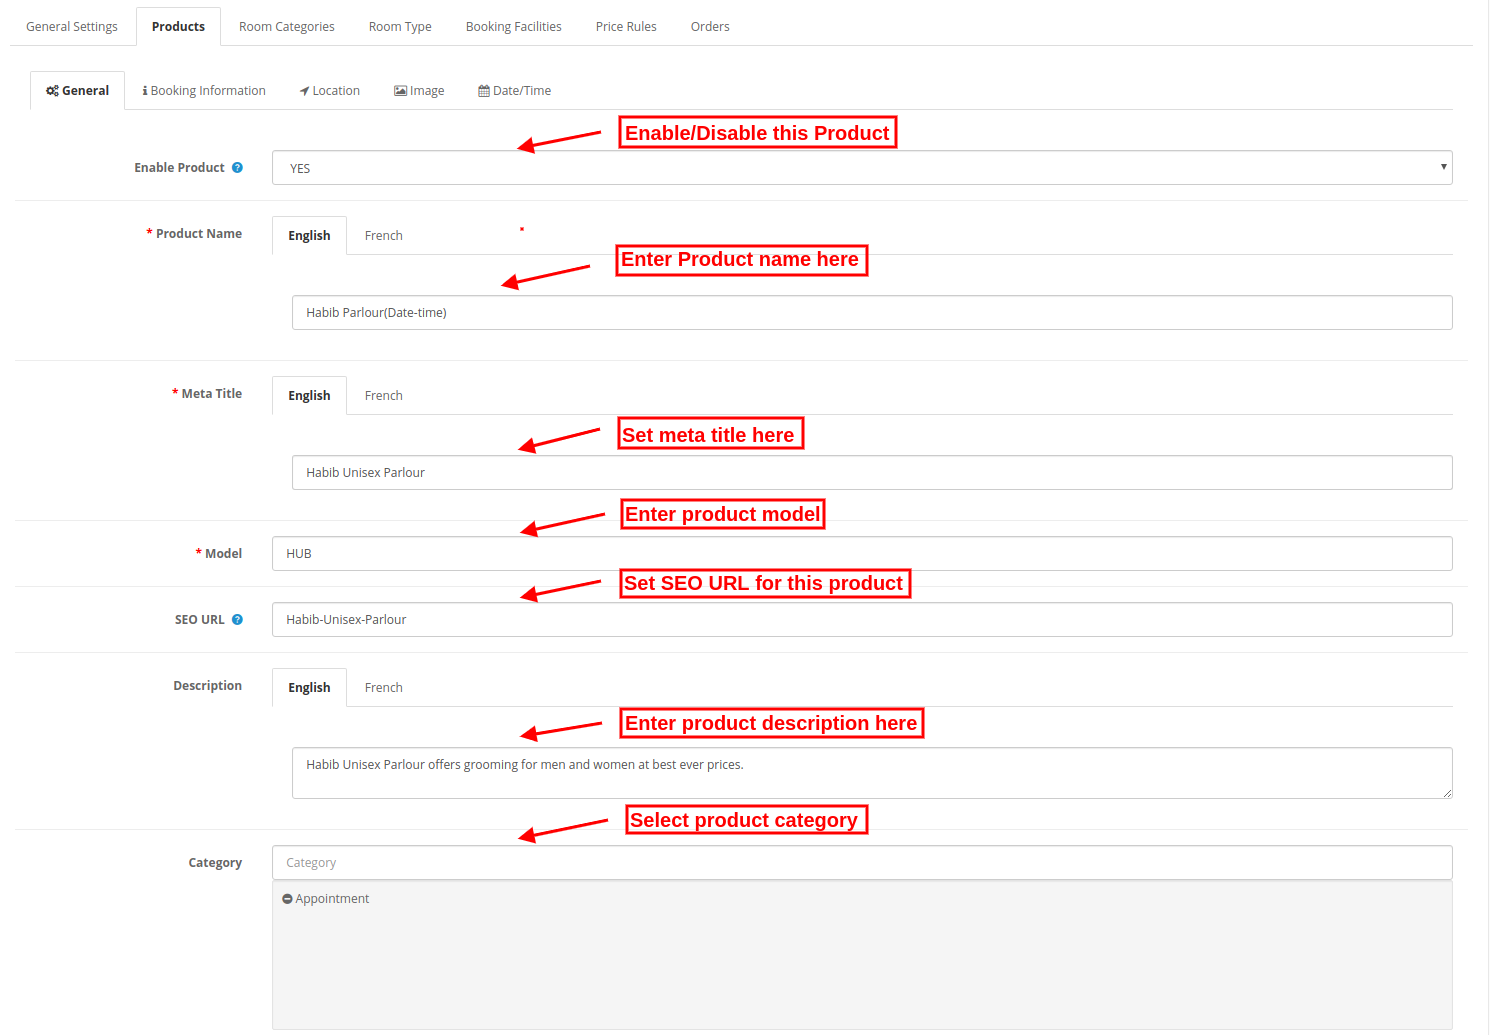
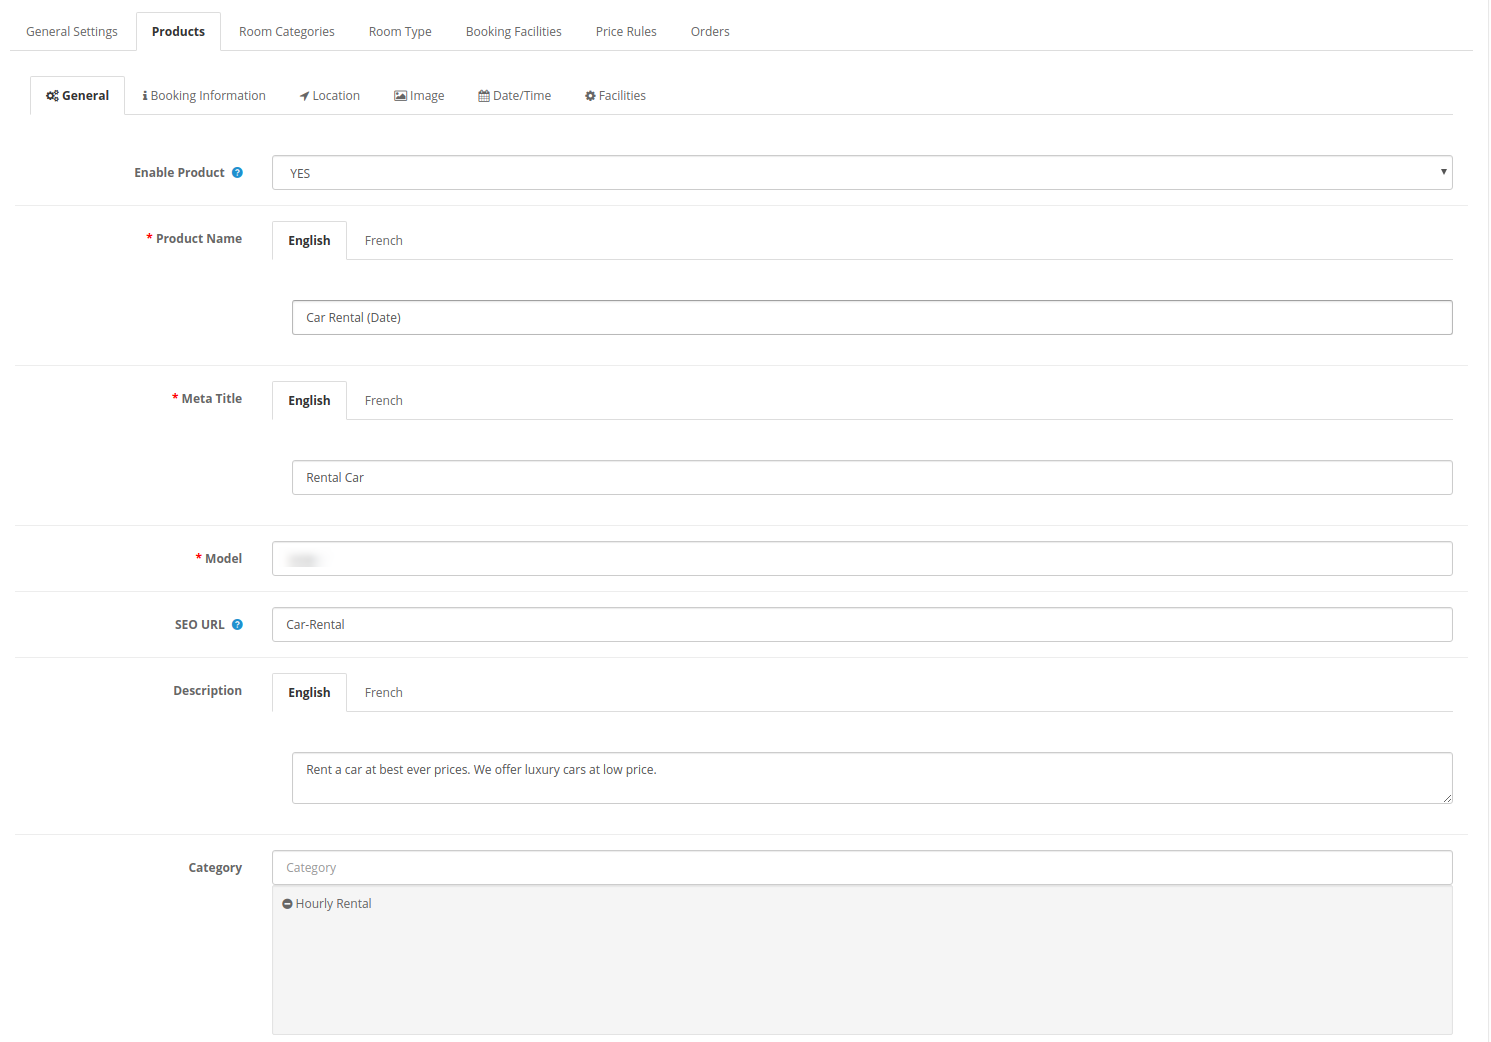
The store merchant can apply basic settings for products.
Enable Product: Select Yes or No to activate or deactivate the product.
Product Name: Enter the name of the product in multiple languages.
Meta Title: Set the meta title in multiple languages.
Model: Enter the model details here
SEO URL: Set SEO URL for this product. Do not use any space in the SEO URL.
Description: Enter the product description in various languages.
Category: Select the category for the product.
2. Booking Information:
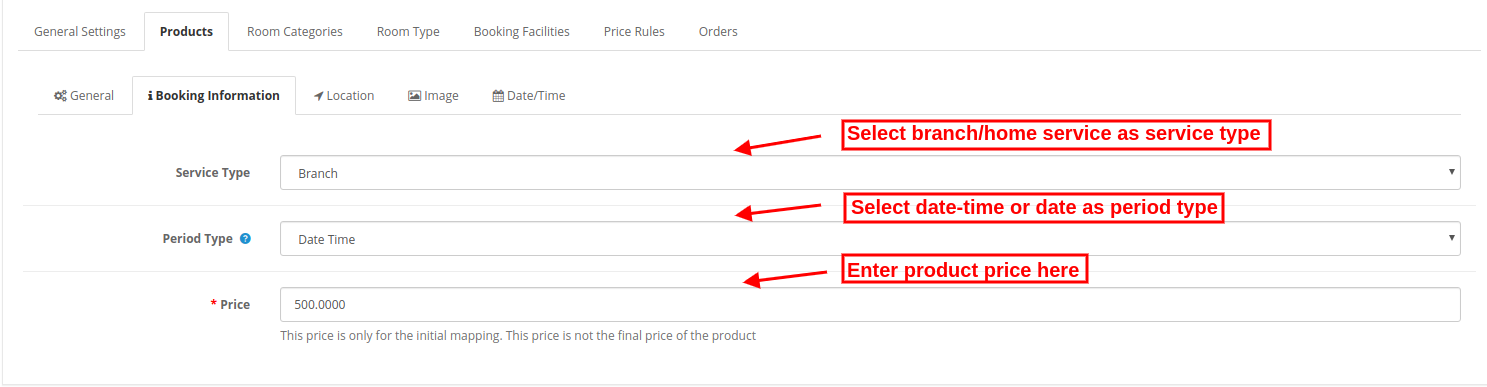
In booking information tab, admin can set the booking related settings as shown below:
Service Type: Select the Service type as Branch if you want the user to visit at your place. Select service type as Home service if you want to offer the home facility.
Period Type: There are two-period types one is date and the other is date-time. Admin can select any of the period types as per the requirements. According to the selected option, the fields will change in the Date/Time tab.
Price: Set the price of the product for initial mapping. It will not be considered as a final price.
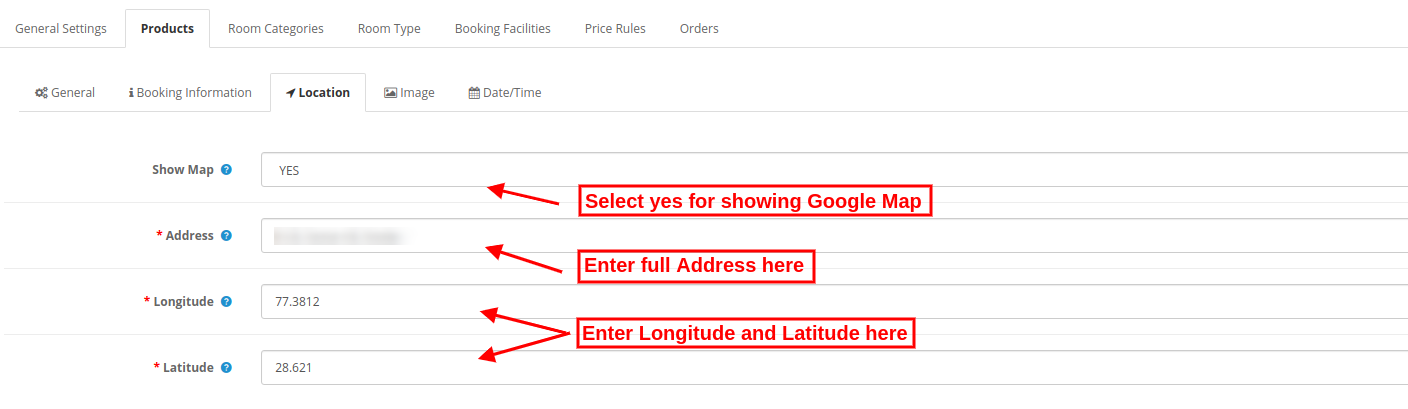
3. Location:
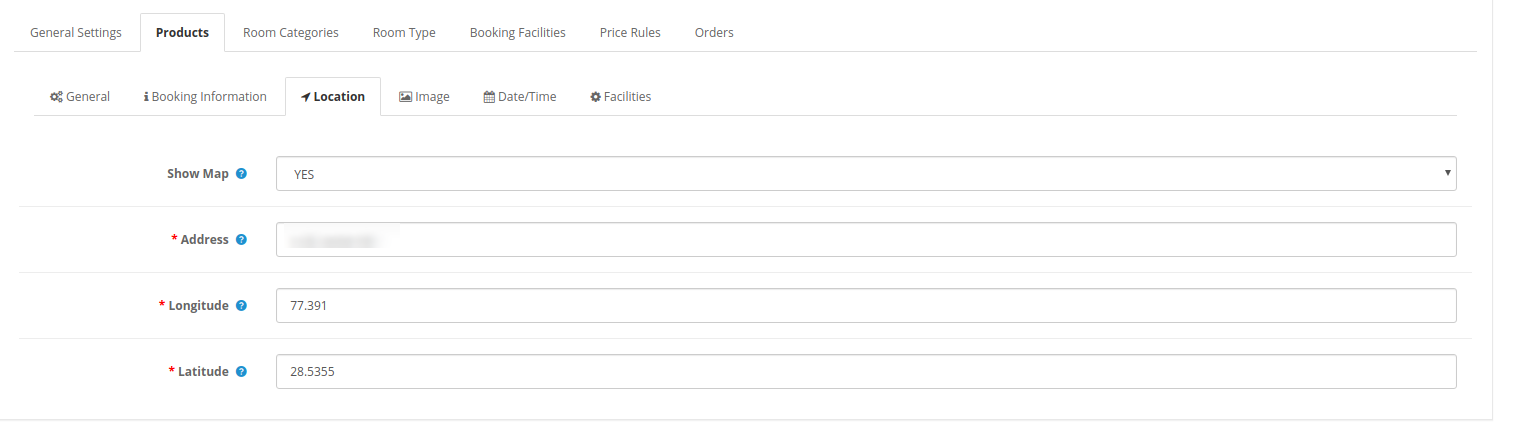
The online merchant can also show the service location at Google map by applying these location settings:
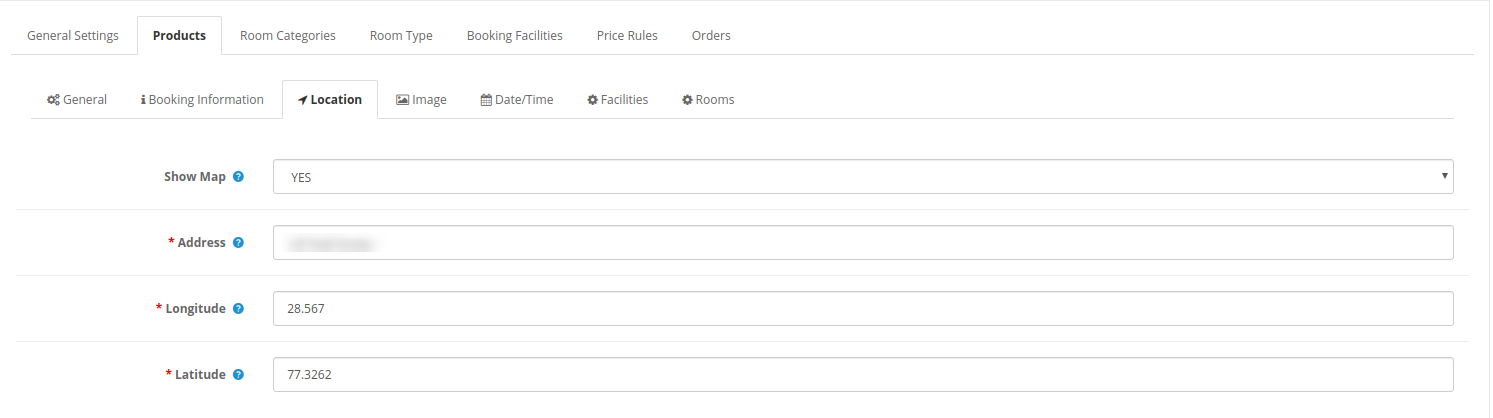
Show Map: Select yes for including a map and no if you don’t want to show map.
Address: Enter the full address here.
Longitude: Set the Longitude.
Latitude: Set the Latitude.
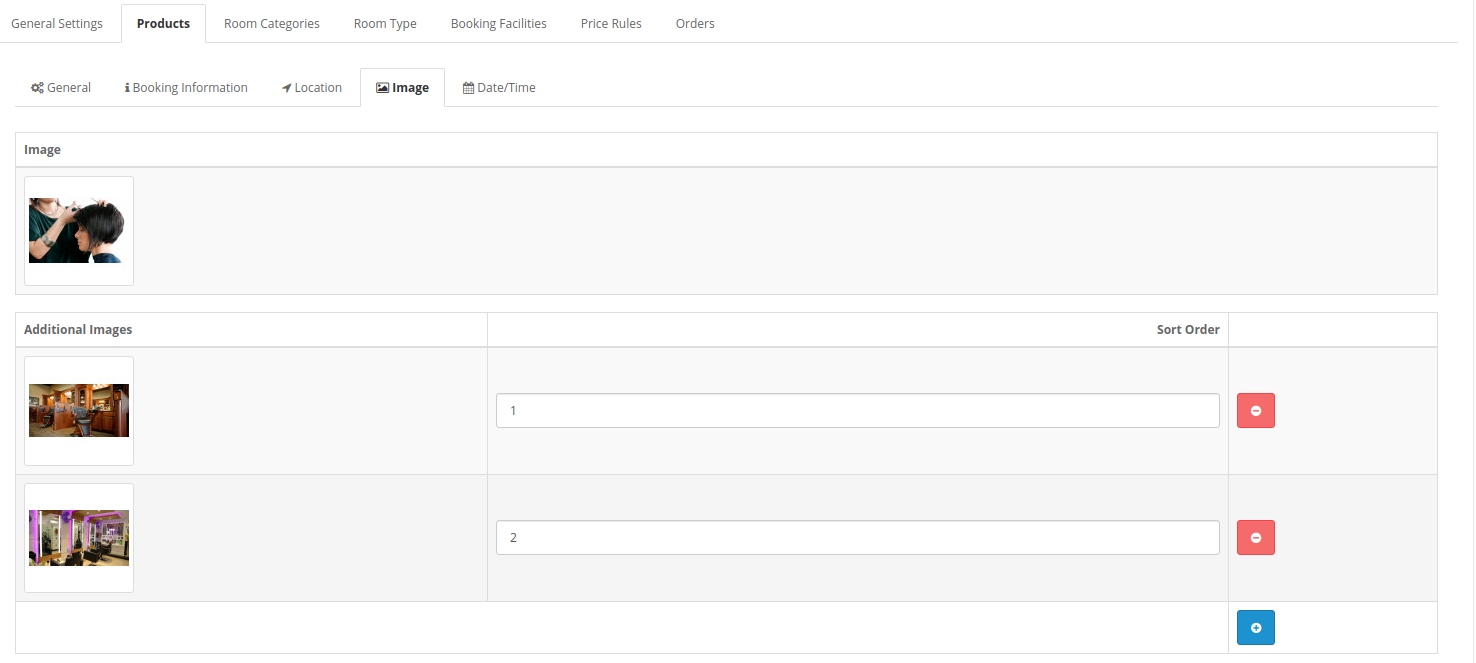
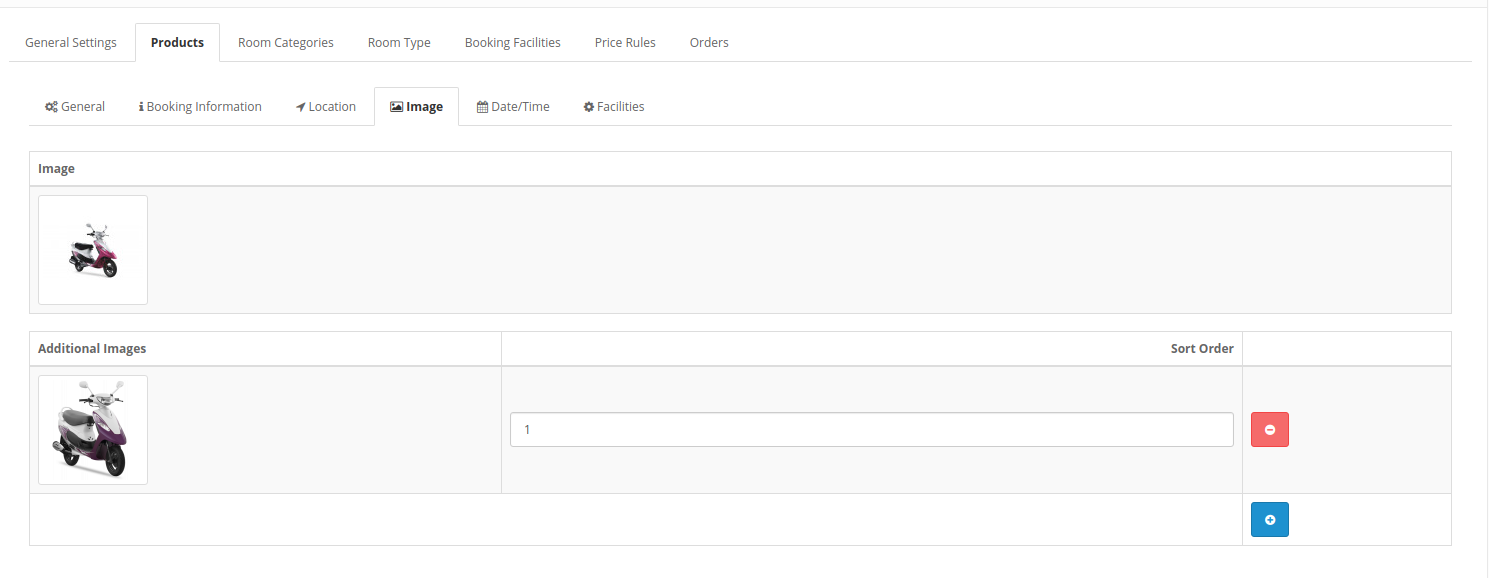
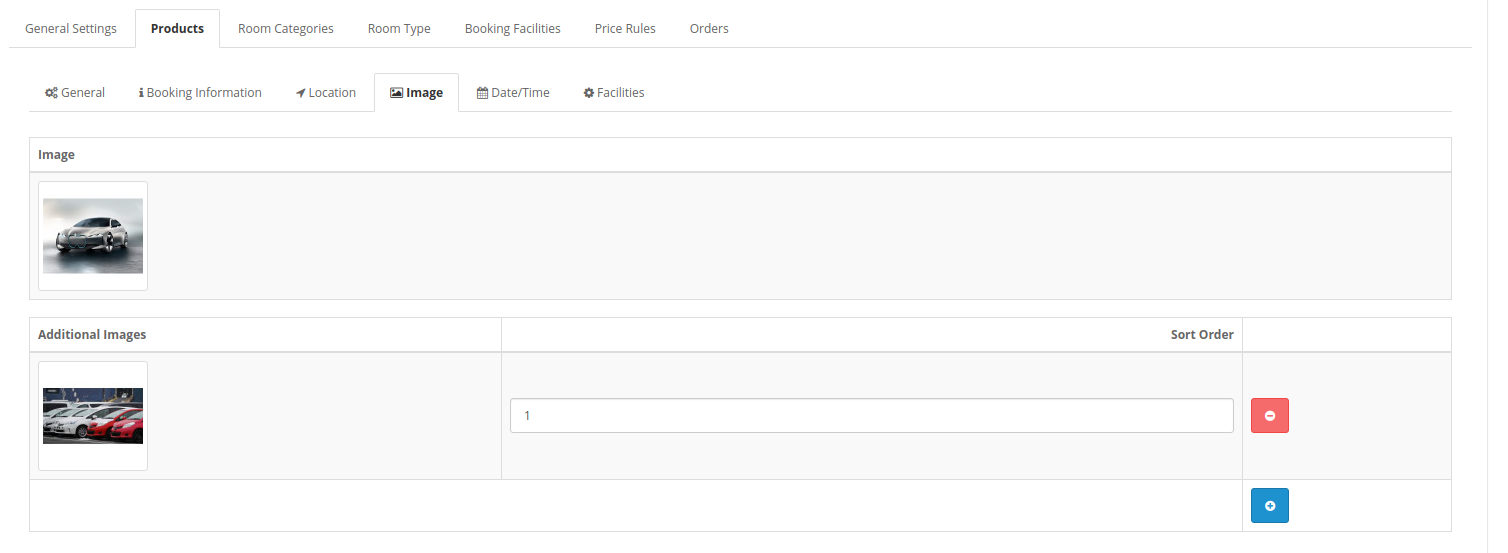
4. Image: Select the product image. Admin can select multiple images and set the sort order for setting the position.
5. Date/Time:
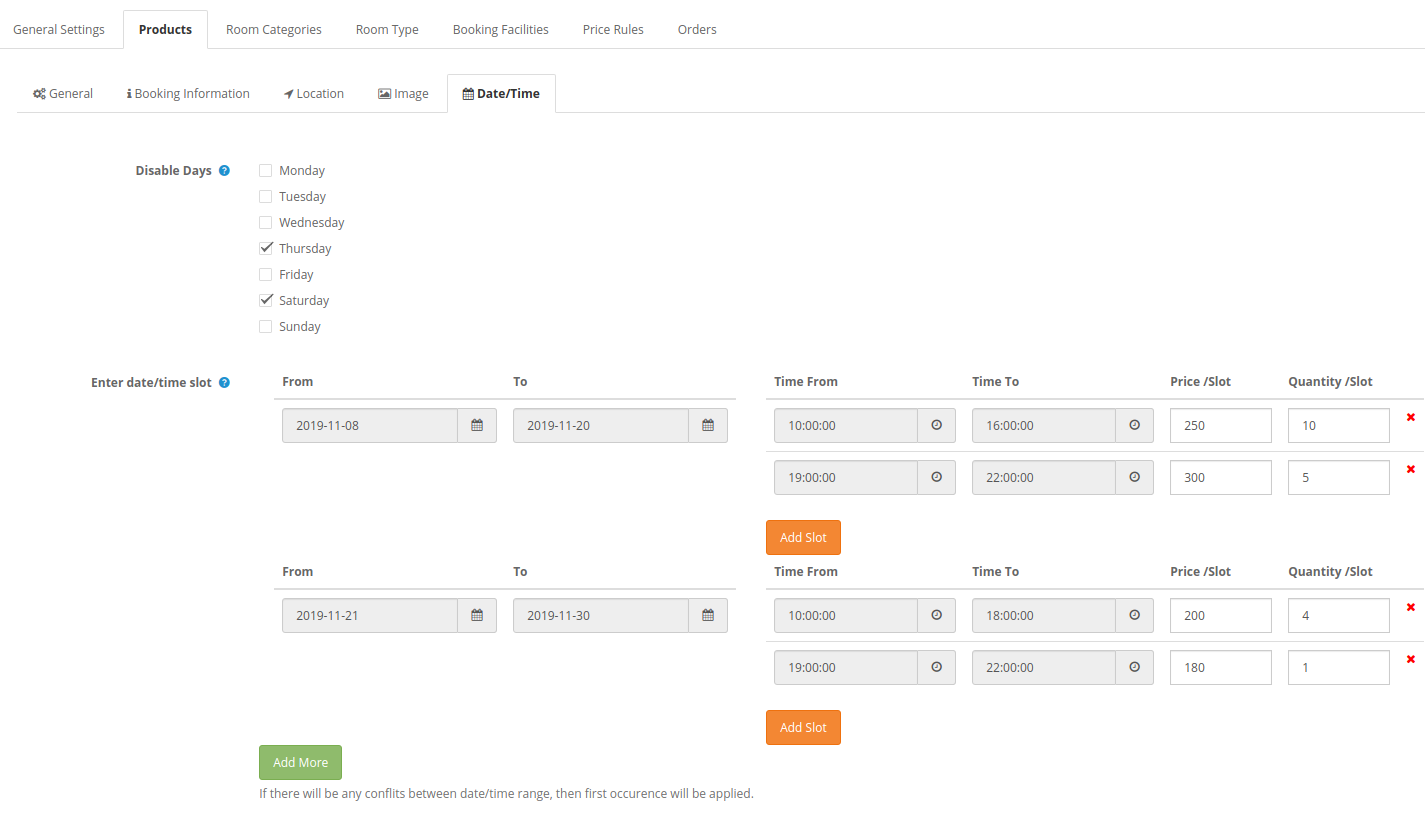
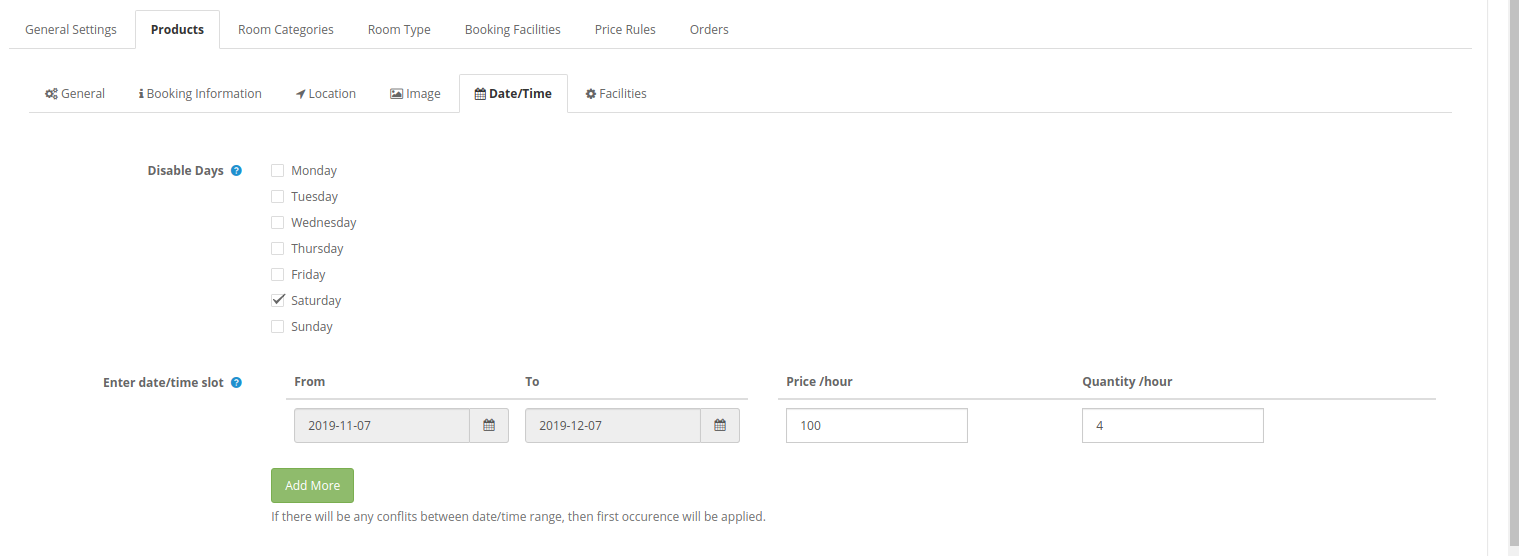
The online merchant can set date and time setting as shown below:
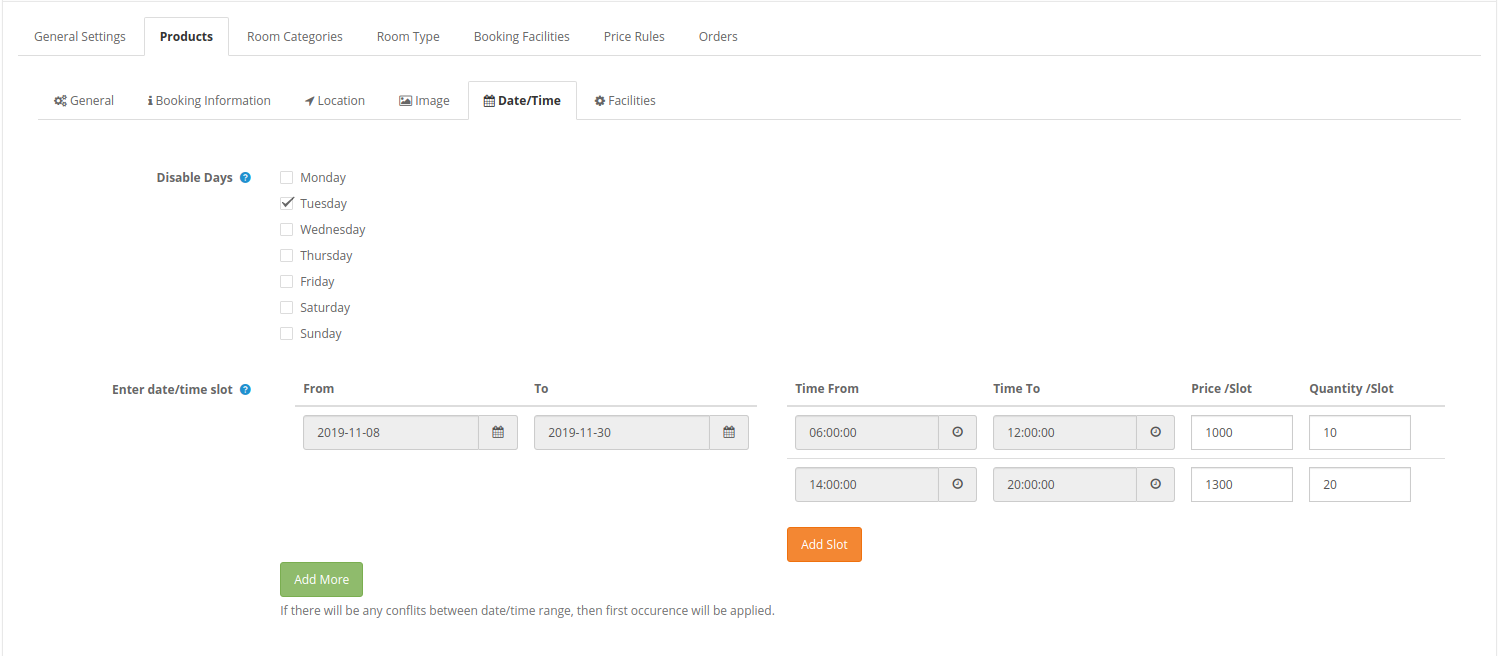
Date-time slots settings will display as below-mentioned image:
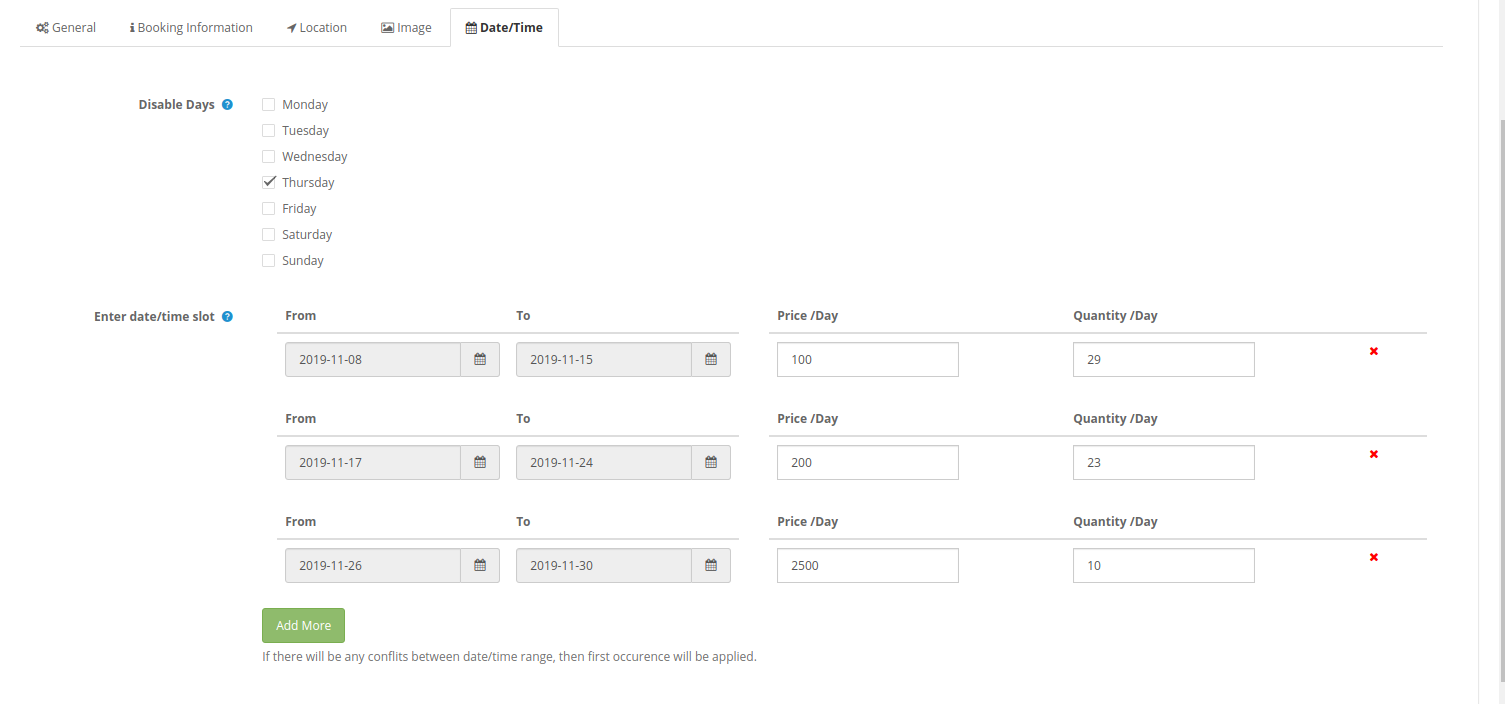
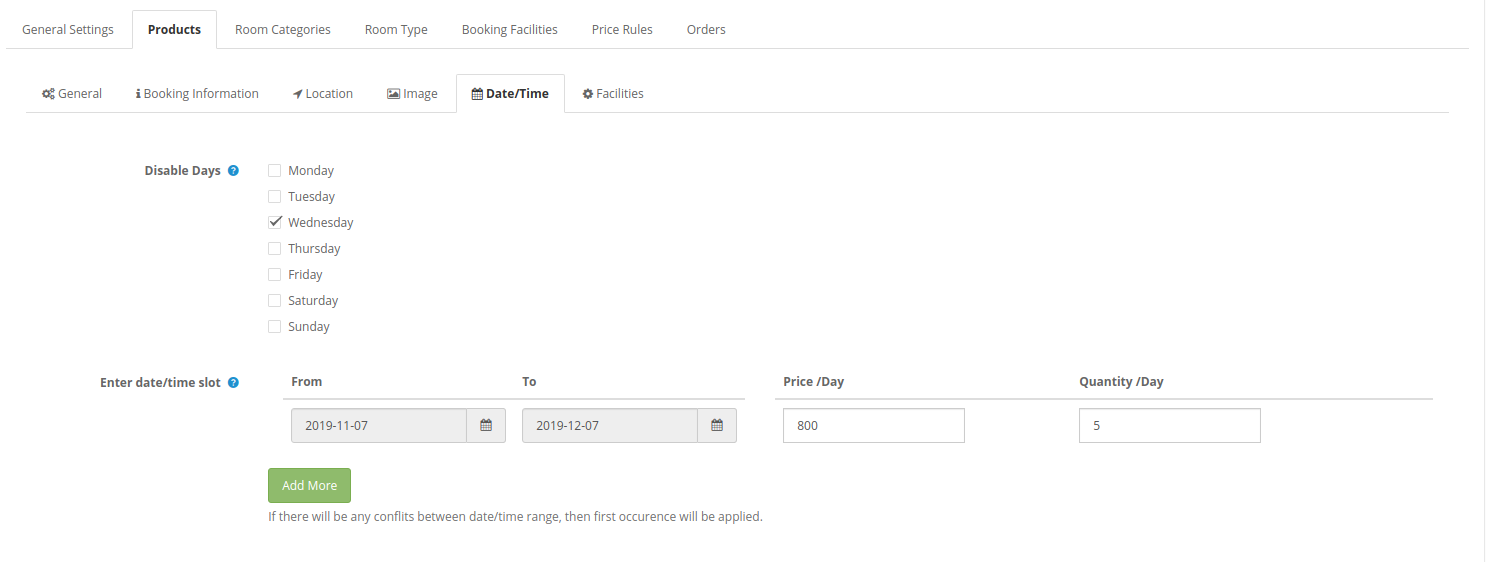
Disable days: A checkbox is available for every day, admin can click on the day which he wants to disable. There will be no service/product available on disable days.
Enter date/time slot: Admin can create multiple days/time slots by setting the dates/time duration, the price per slot and quantity per slot. The OpenCart Reservation And Booking Module shows an error if the admin overlaps any date/time.
Date Slot settings will show as below-mentioned image:
3.2.1.2 Daily Rental
Admin can select the product type as Daily rental and add products in this category.
1. General: General Settings will be the same as “Appointment” product type settings. Admin can enable/disable the settings, enter product name, meta title, model, description, SEO URL and also select the product category.
2. Booking Information:
Period Type: Admin can select the booking period type as date and date-time. While selecting period type as date, there will be two more settings for minimum and maximum days. According to the selected option the fields will change in the Date/Time tab.
Price: Set the product price for initial mapping.
Min Days: Set Minimum booking days.
Max Days: Set Maximum booking days.
3. Location:
Location Settings will be the same as “Appointment” location settings. Admin can show/hide the map, set address and enter longitude-latitude.
4. Image:
Select the product image. Admin can select multiple images and set the sort order for setting the position.
5. Date/Time:
Date/time Settings will be the same as “Appointment” Date/time settings. Admin can click on the checkbox for disabling days and enter date/time slots also.
Date slots:
Date-time Slots:
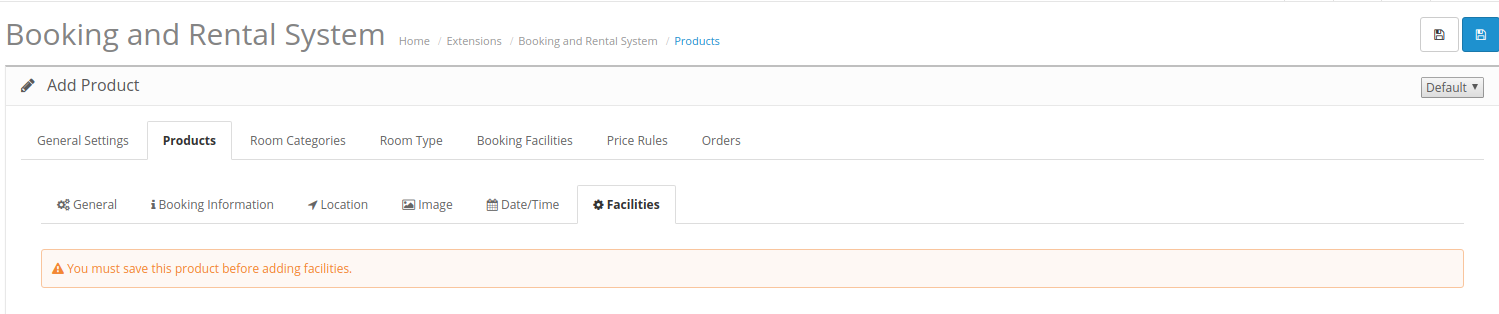
6. Facilities:
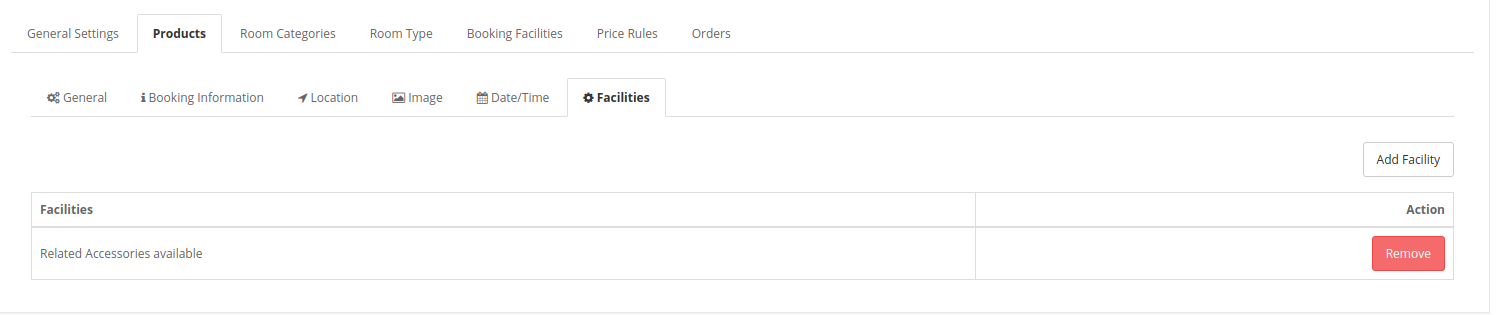
Admin can add facilities once he saves this settings. Only the “Rent” type of facilities will be listed here to add them.
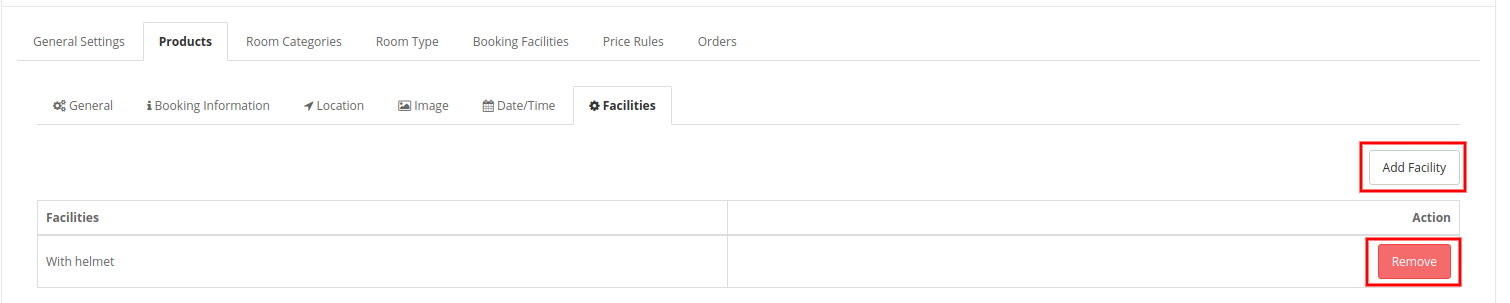
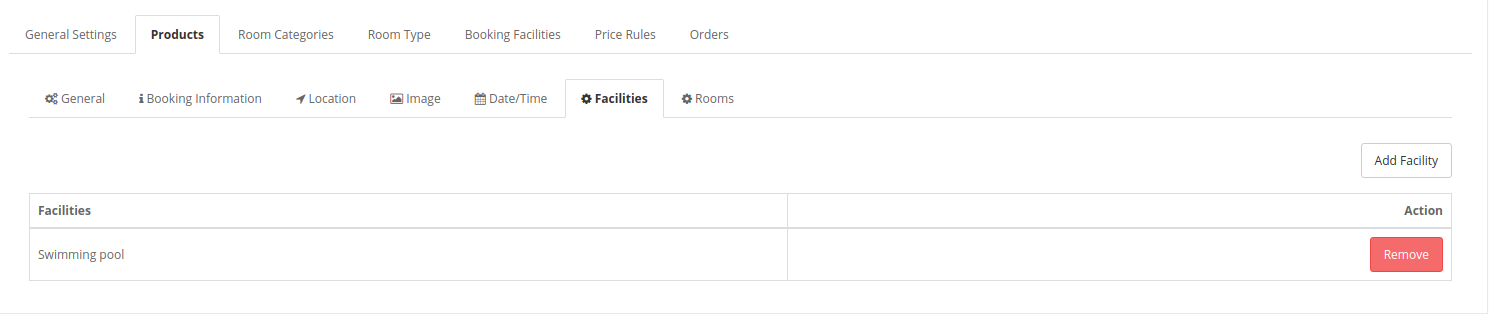
After saving the products and applying booking facility settings, admin can add facilities easily by clicking on the add facility button.
Admin can also remove any facility by clicking on the remove button.
3.2.1.3 Hotel Booking
Admin can select hotel booking product types and add multiple hotels easily.
1. General:
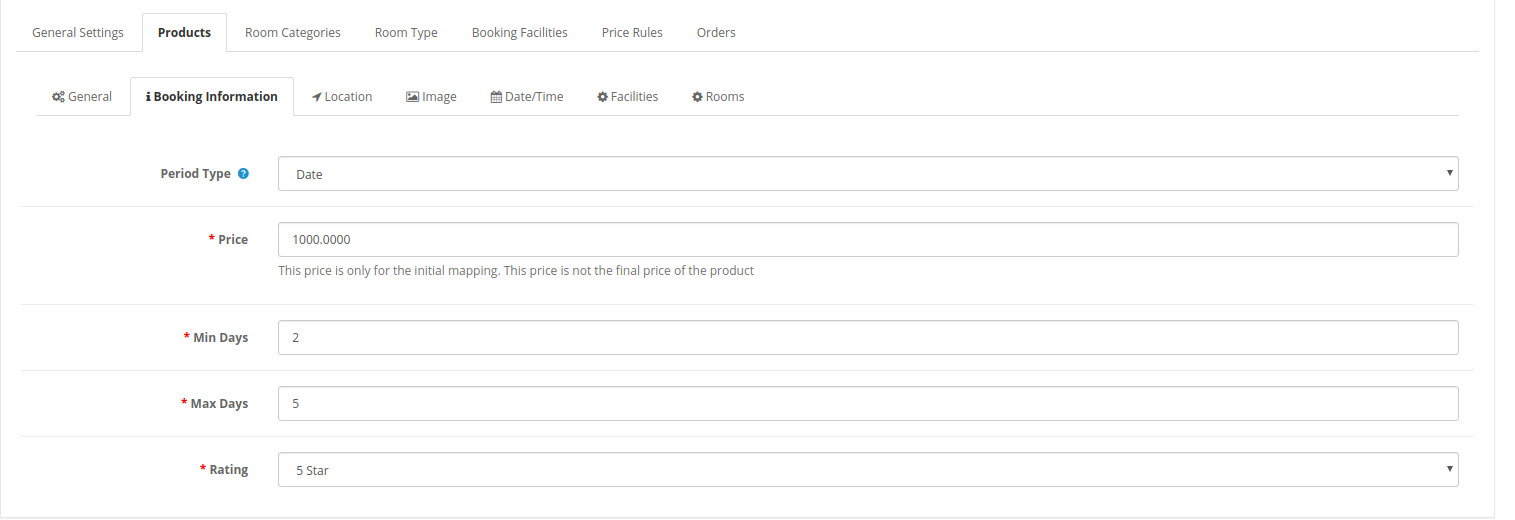
General Settings will be similar to previous settings. 2. Booking Information:
Period Type: Period type will be as date.
Price: Set the product price for initial mapping.
Min Days: Set minimum booking days for this hotel.
Max Days: Set maximum booking days for this hotel.
Rating: Set hotel Rating. The maximum rating will be 5 stars.
3. Location
Location settings will be the same as in previous settings.
4. Image:
Select the product image. Admin can select multiple images and set the sort order for setting the position. 5. Date/Time Set:
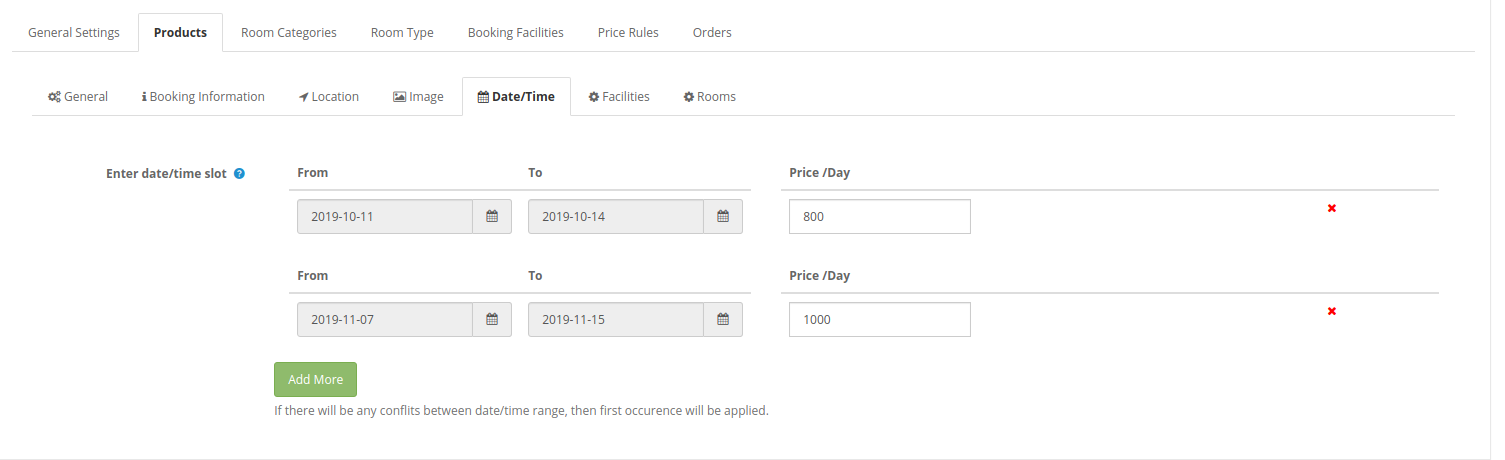
Enter Date/time Slot: Admin can create date slots and set hotel prices per day.
6. Facilities:
Admin can add facilities once he saves these settings. Admin just needs to click on “Add Facility” for adding facilities. Only hotel type of facilities will be listed to add them. 7. Rooms:
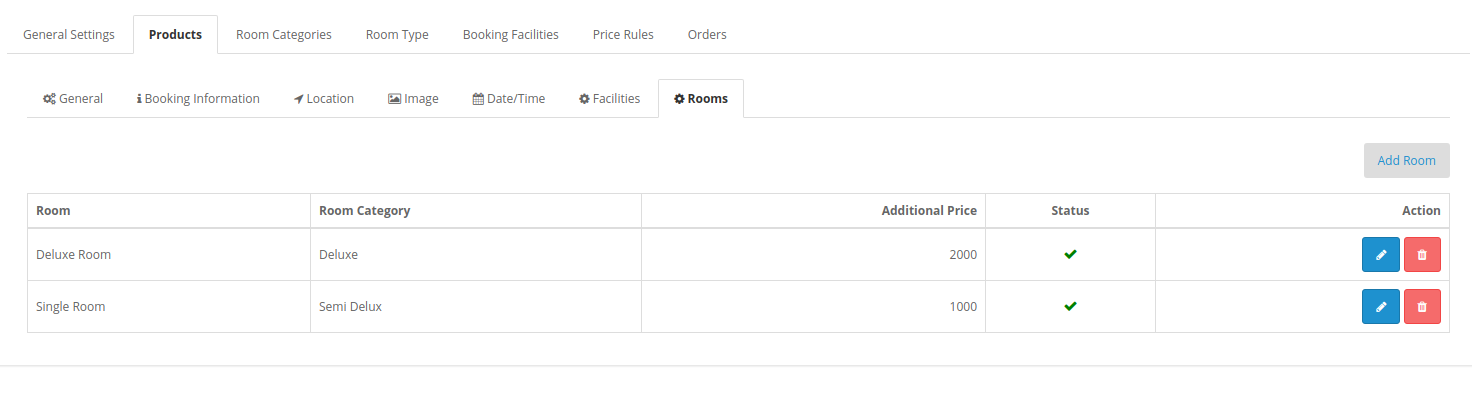
Admin can first save the settings and then add the details of the room. Rooms can be added only after applying room category settings, room type settings and booking functionality settings.
For adding any new room, follow these steps:
For adding a new room, admin just needs to click on “Add new” and apply these settings:
Enable: Select yes if you want to show this room at the front-end interface.
Room Category: Select from available room categories.
Room Type: Select the room type from the available room types.
Additional price: Set the room price which will be added in the hotel’s mapped amount.
Quantity: Enter the number of available rooms of similar type.
Check-in-time: Enter Check-in time in available format.
Checkout time: Enter Check-out time in available format.
Upload Image: Select the room image and upload it.
Select Facilities: Select facilities of room ie wifi, bathtub. Only the “Room” type of facilities will be listed here to select.
Admin can delete and edit room details from the rooms list page. He just needs to click on delete and edit icons.
3.2.1.4 hourly rental
Admin can select the hourly rental product types and add multiple products on the bases of hourly rent.
1. General:
General Settings are same as previous settings.
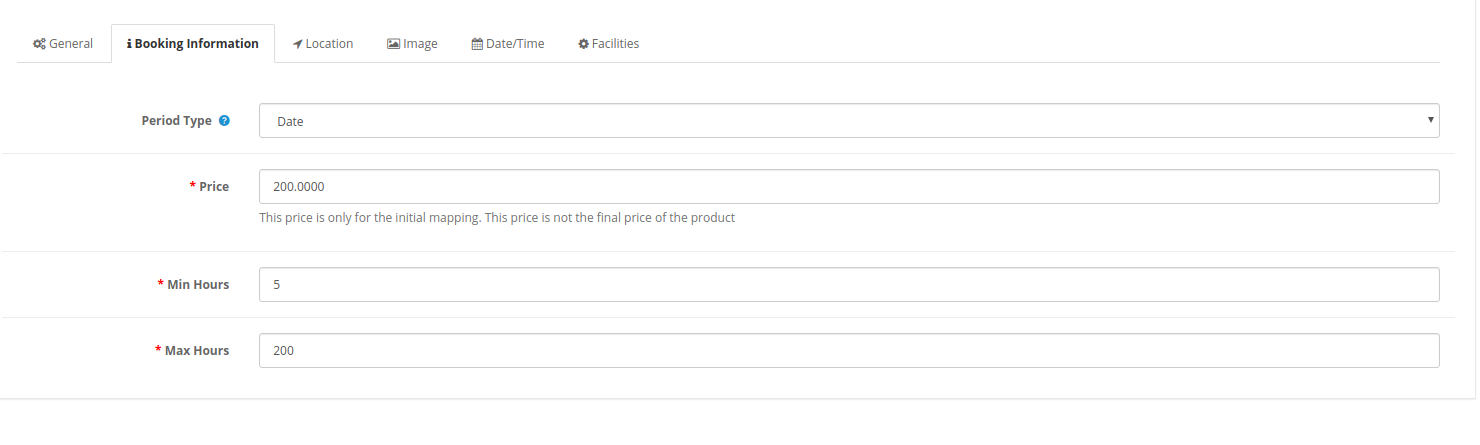
2. Booking Information:
Booking Information is the same as in previous settings. Admin can set date as period type, set initial mapping price, min-max hours. 3. Location
Location settings will be the same as in previous settings.
4. Image:
Select the product image. Admin can select multiple images and set the sort order for setting the position.
5. Date/Time Set:
Disable Days: Admin can click on check-box for disabling days and enter date/time slots also.
Enter Date/time Slot: Admin can create date slots and set hourly rental prices per hour and quantity per hour.
6. Facilities:
Admin can add facilities once he saves this setting. Only the “Rent” type of facilities will be listed here to add them.
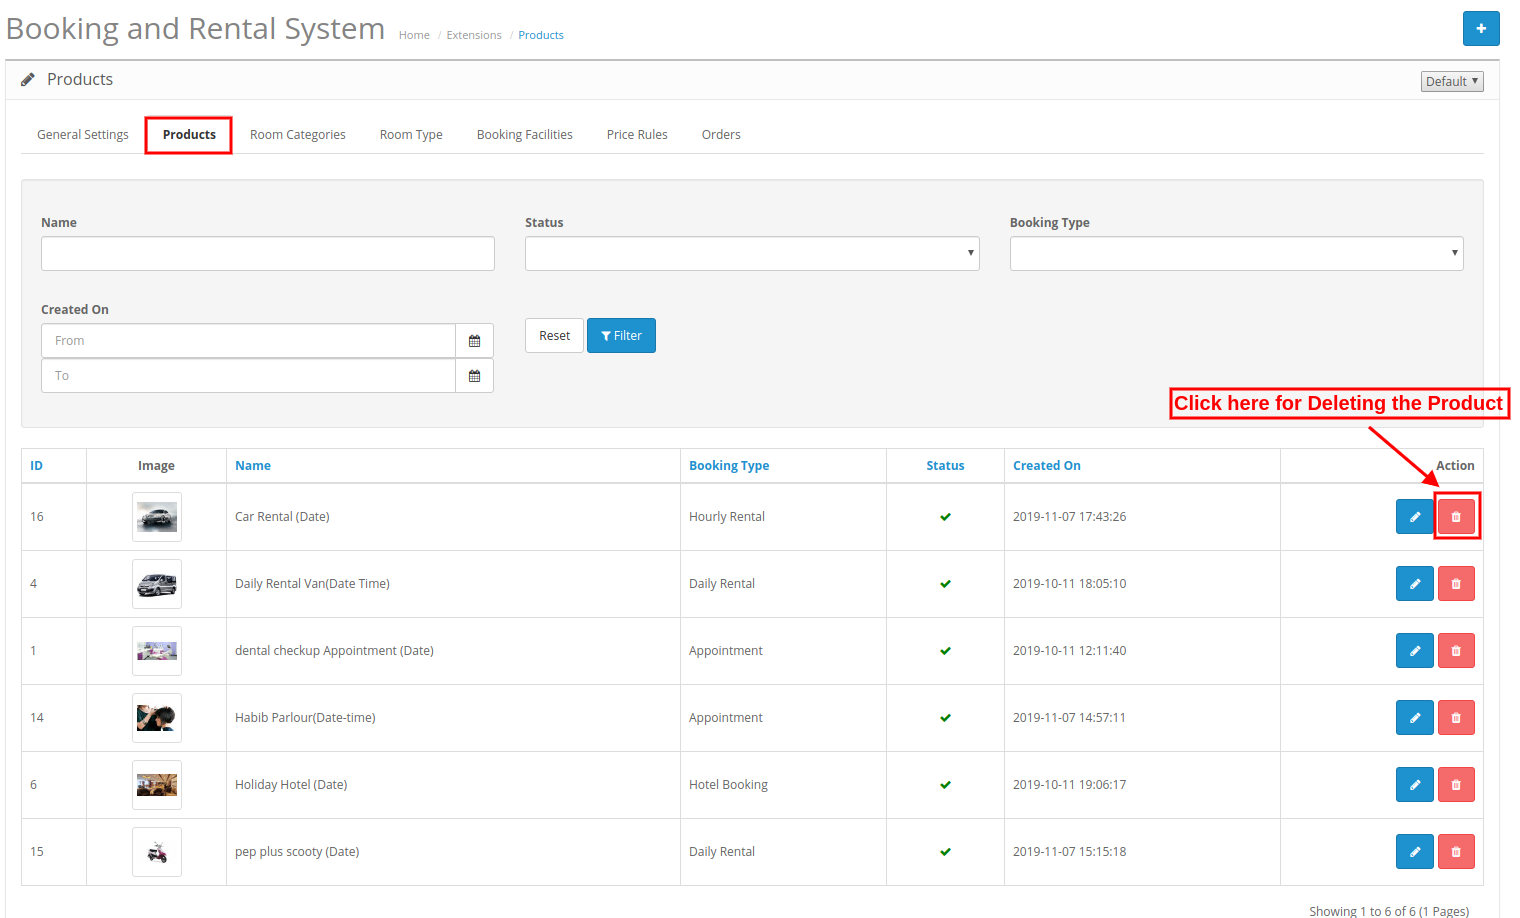
3.2.2 Delete Products
Admin can click on the delete button for deleting the products.
3.2.3 Edit Products
The online store merchant can also modify the product details easily from the admin interface of this Hotel booking module for OpenCart.
Admin just needs to click on the edit button and save after applying the changes.
3.3 Room Categories
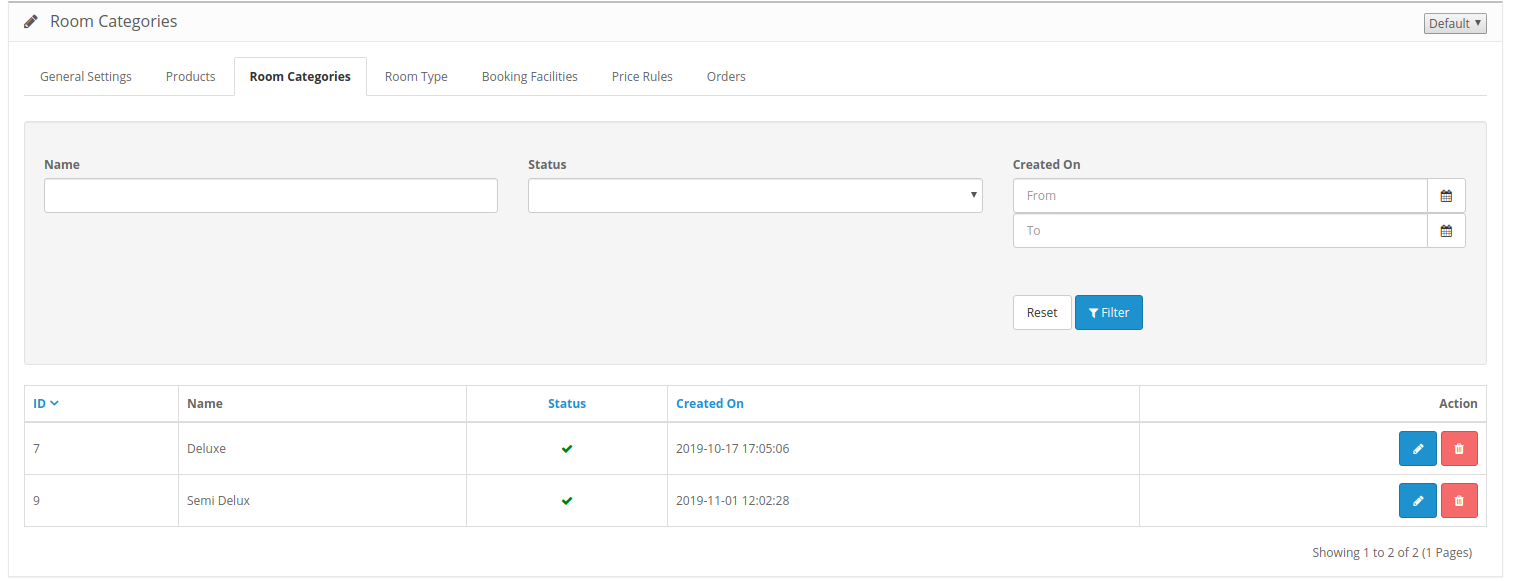
Here, in this tab, the online store admin can add various kinds of rooms and they can also delete and modify the room details. The store merchant can apply filters.
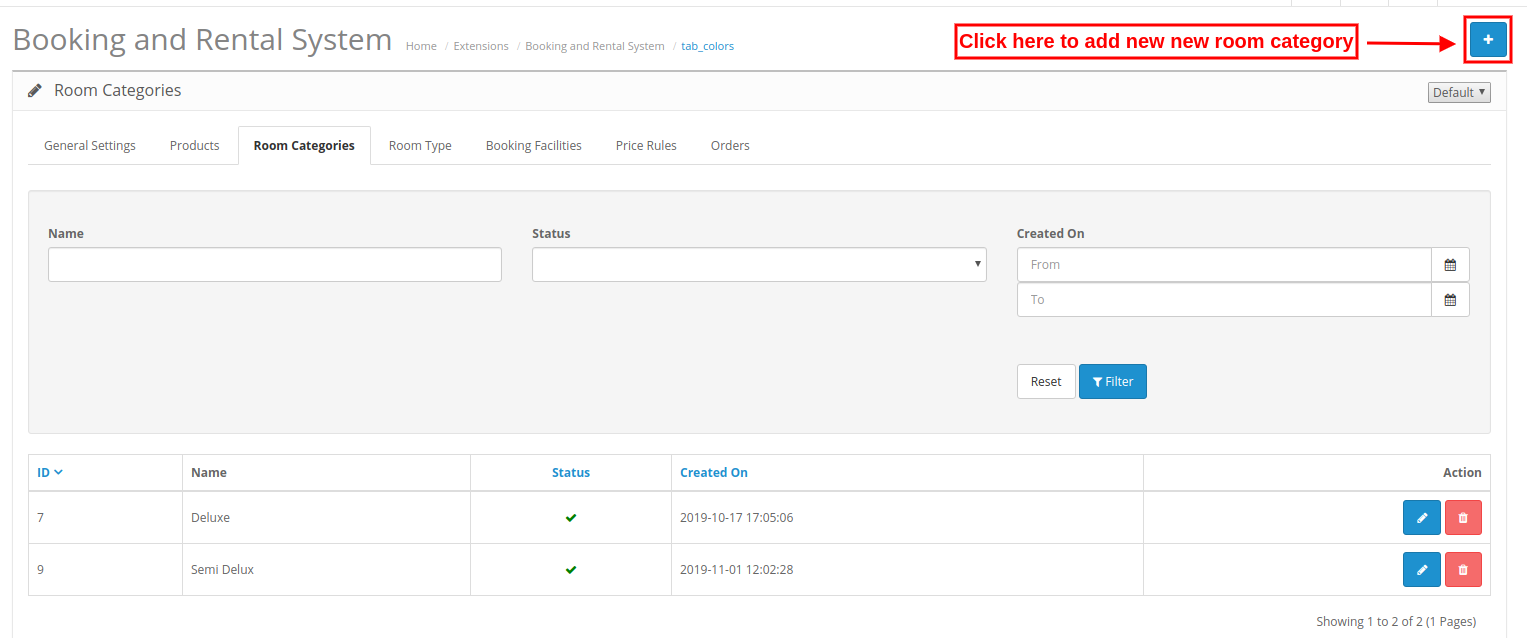
3.3.1 How to Add a room Category
For adding any new room category, click on the “+” button and apply these settings:
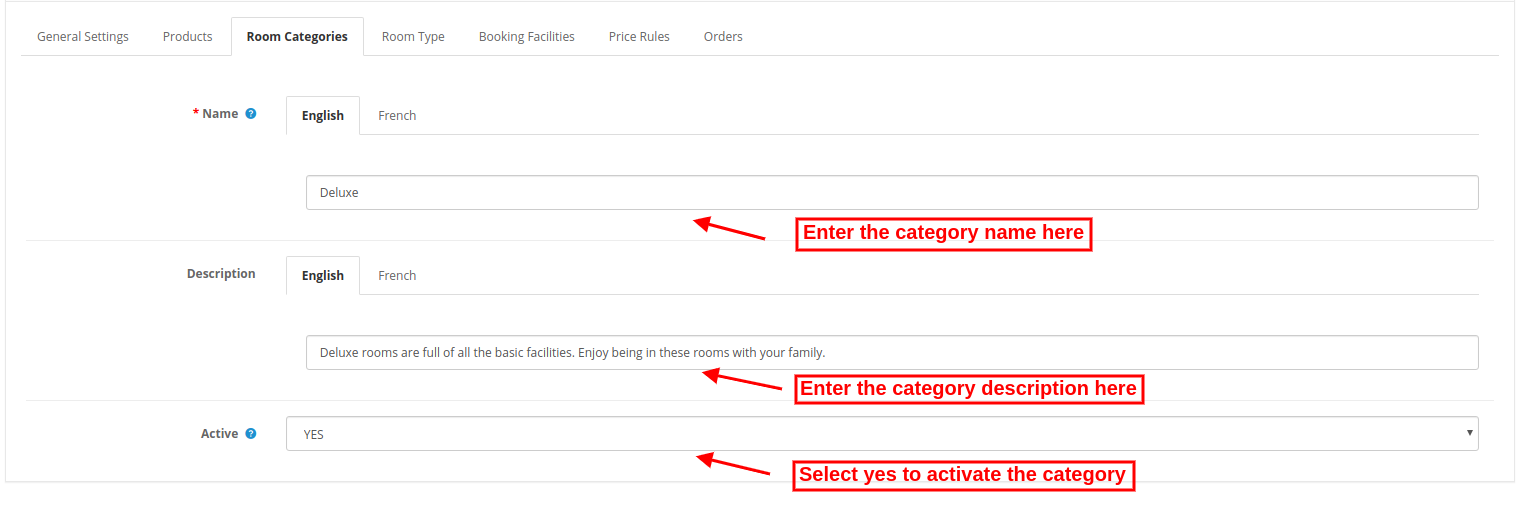
After clicking on the add button, the admin needs to apply these settings:
Name: Enter the Room category name in various languages.
Description: Enter the description of this room category in various languages.
Active: Select yes or no for activating/deactivating this room category.
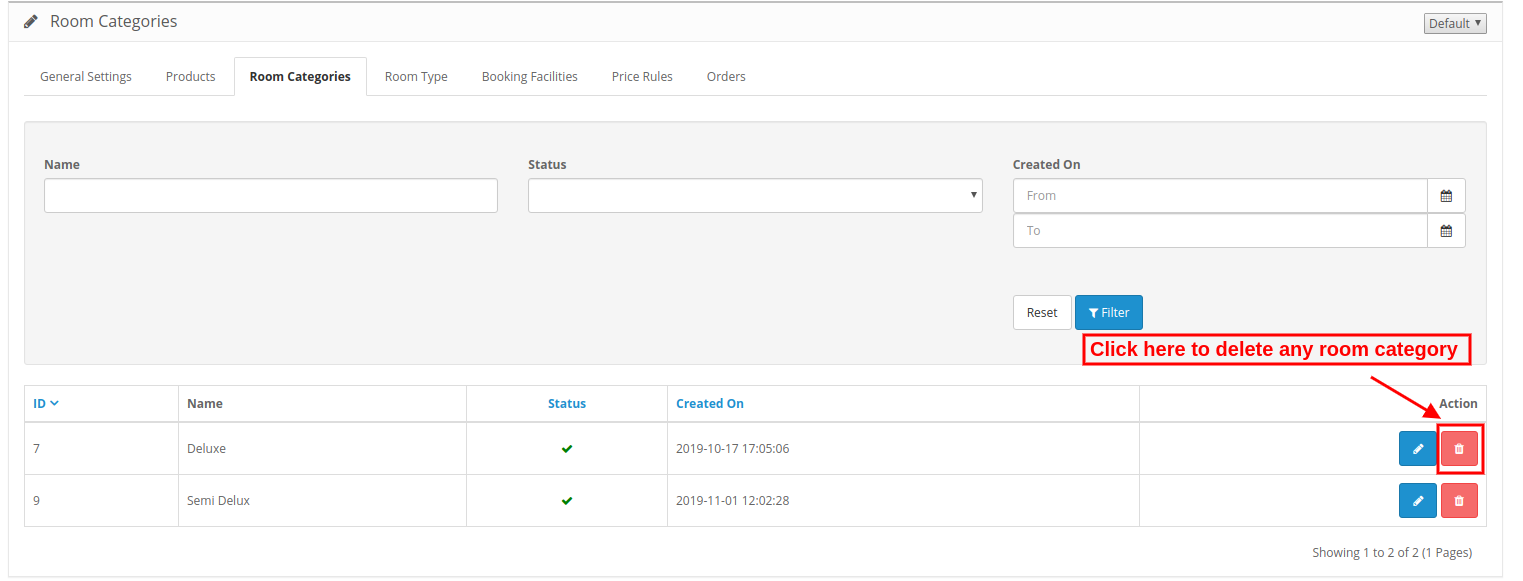
3.3.2 How to delete any room category
Click on the delete icon and delete any room category easily. You cannot delete or disable any such category which is mapped with any product.
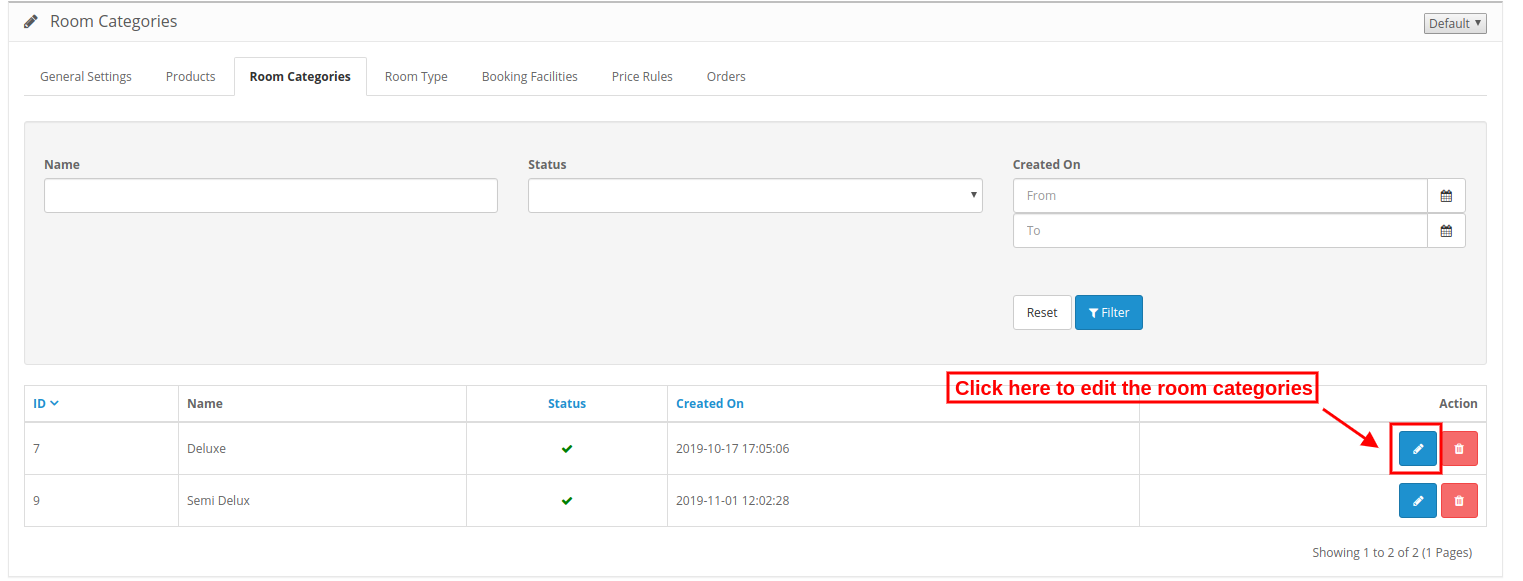
3.3.3 How to Edit any room category
Click on the edit icon for applying any changes in room categories.
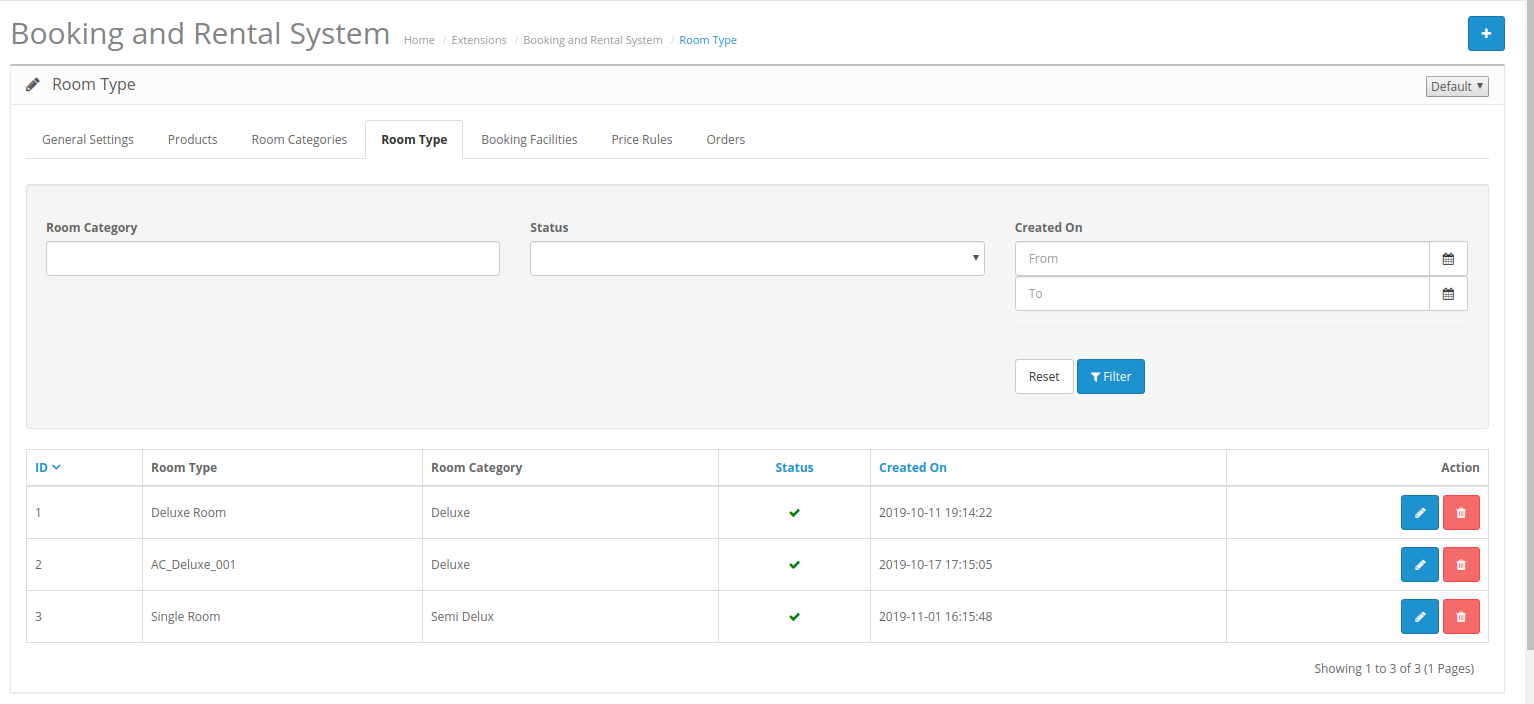
3.4 Room type
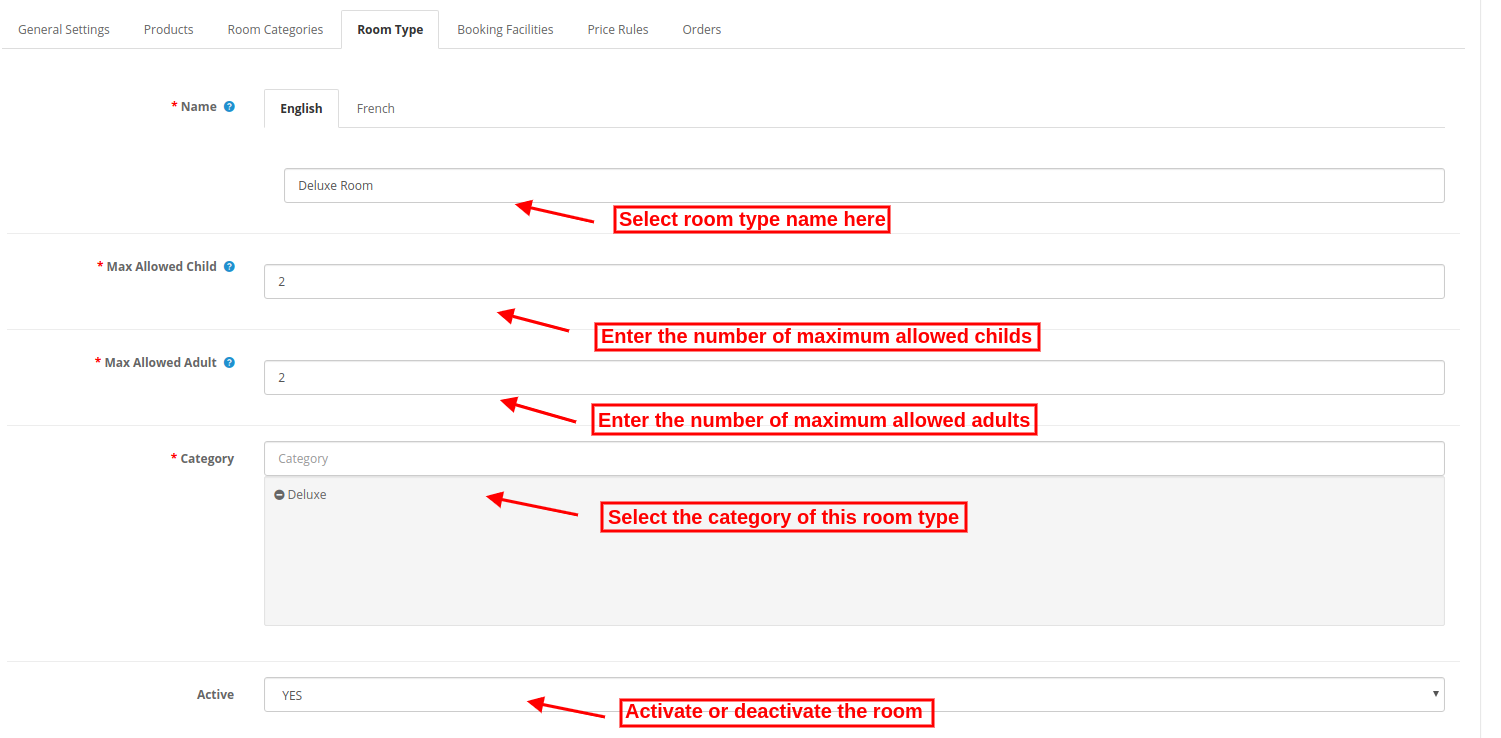
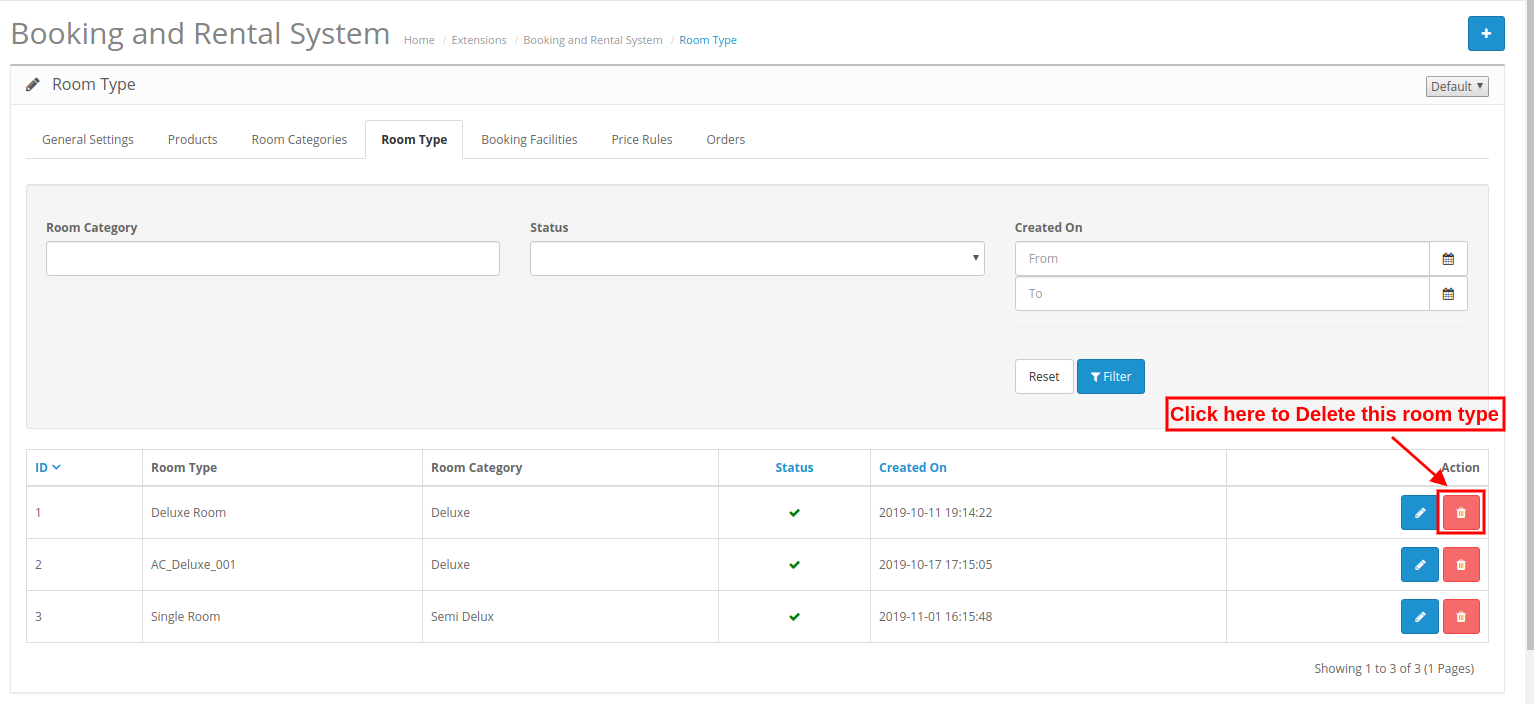
In this tab, the online merchant can set the room type from here. The admin is allowed to add, delete and edit the room type from the admin interface of this Online Booking module for OpenCart.
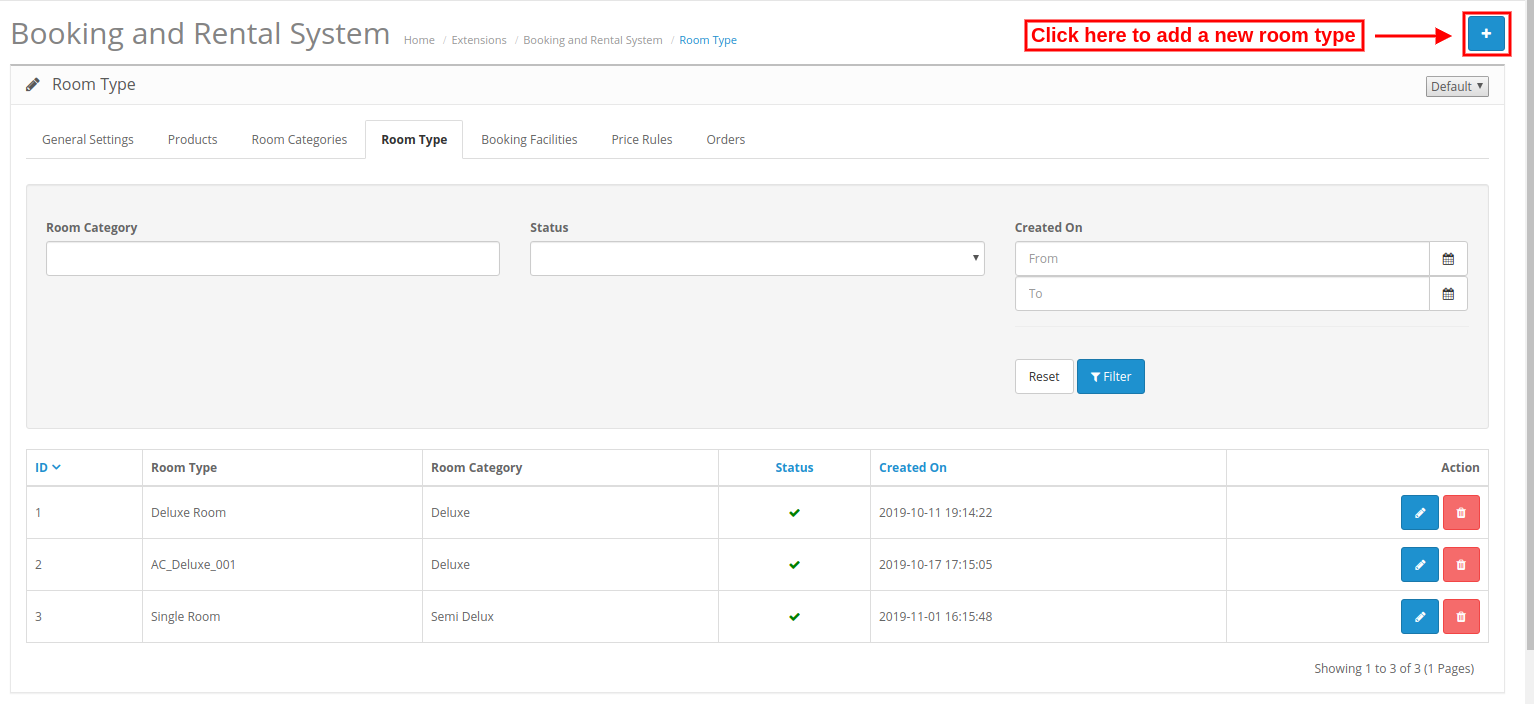
3.4.1 How to Add a new Room Type
For adding a new room type, click on the “+” sign and enter these details:
After clicking on the “Add” button, the admin needs to apply these settings:
Name: Enter the room type name in multiple languages.
Max Allowed Child: Enter the number of children who are allowed.
Max Allowed Adult: Enter the number of adults who are allowed.
Category: Select the room category from here.
Active: Select yes or no for activating/deactivating this room type.
3.4.2 How to Delete a Room Type
Admin just needs to click on the delete icon for deleting any room type.
3.4.3 How to Edit a Room Type
Admin just needs to click on the edit icon for editing any room type.
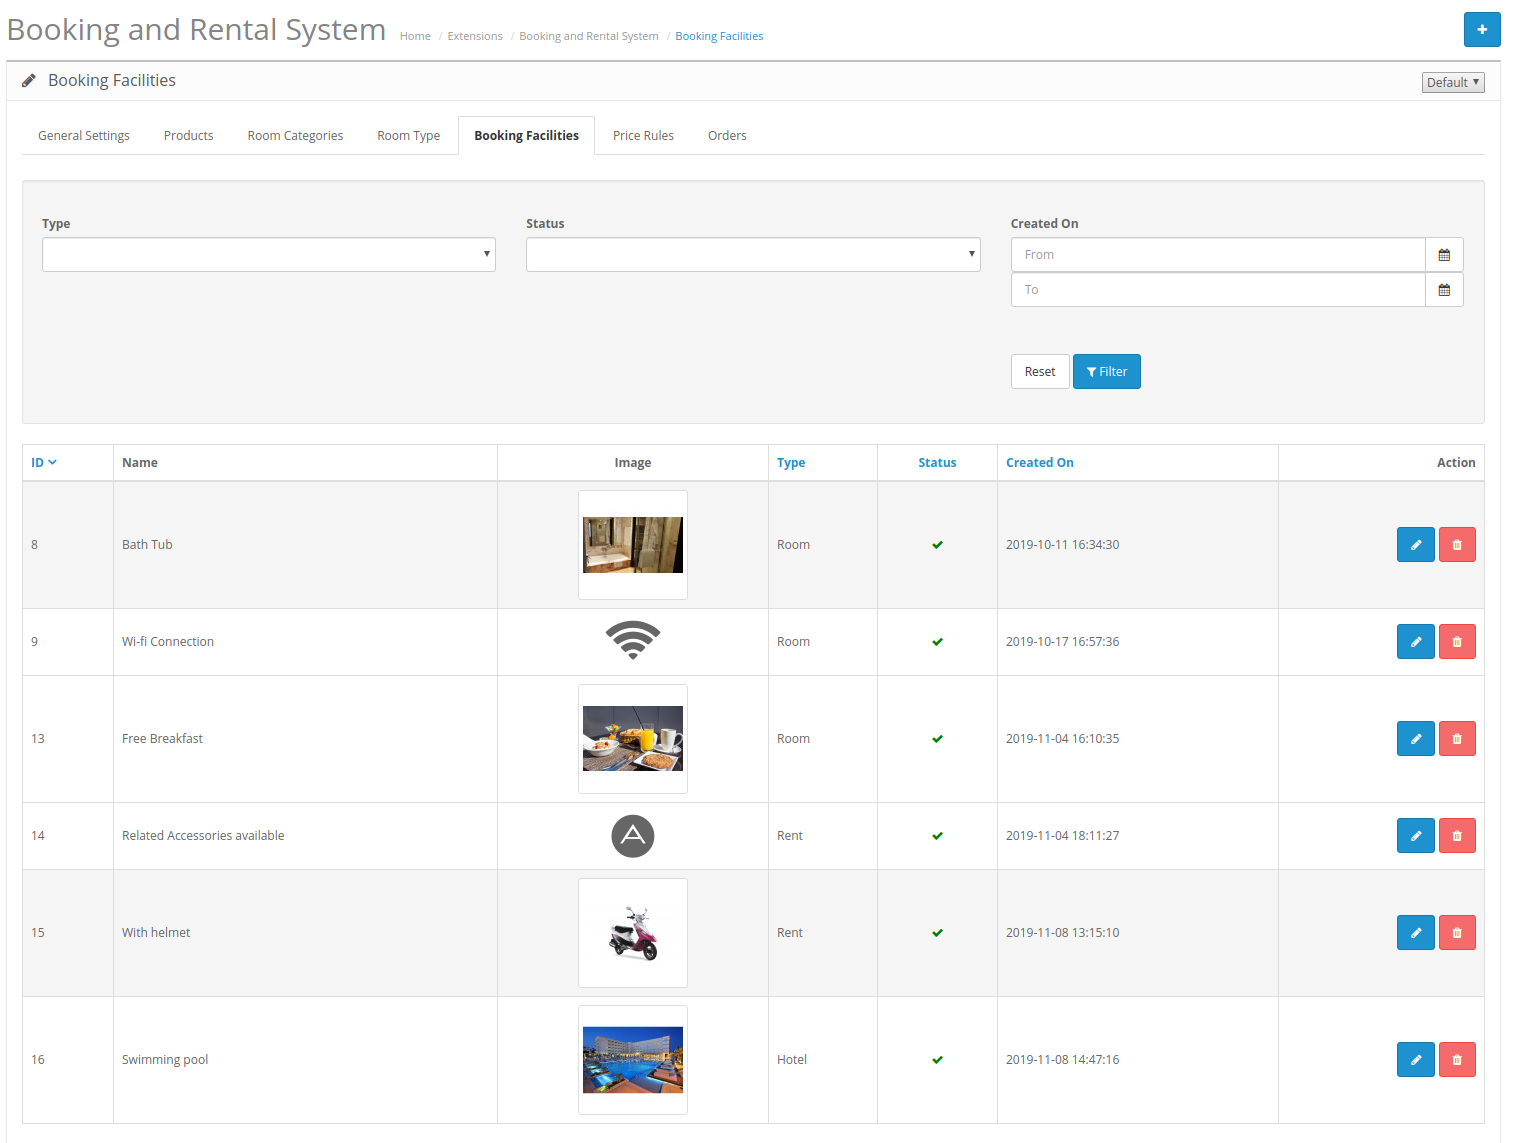
3.5 Booking Facility
The store merchant can add, delete and update the booking facilities from this tab.
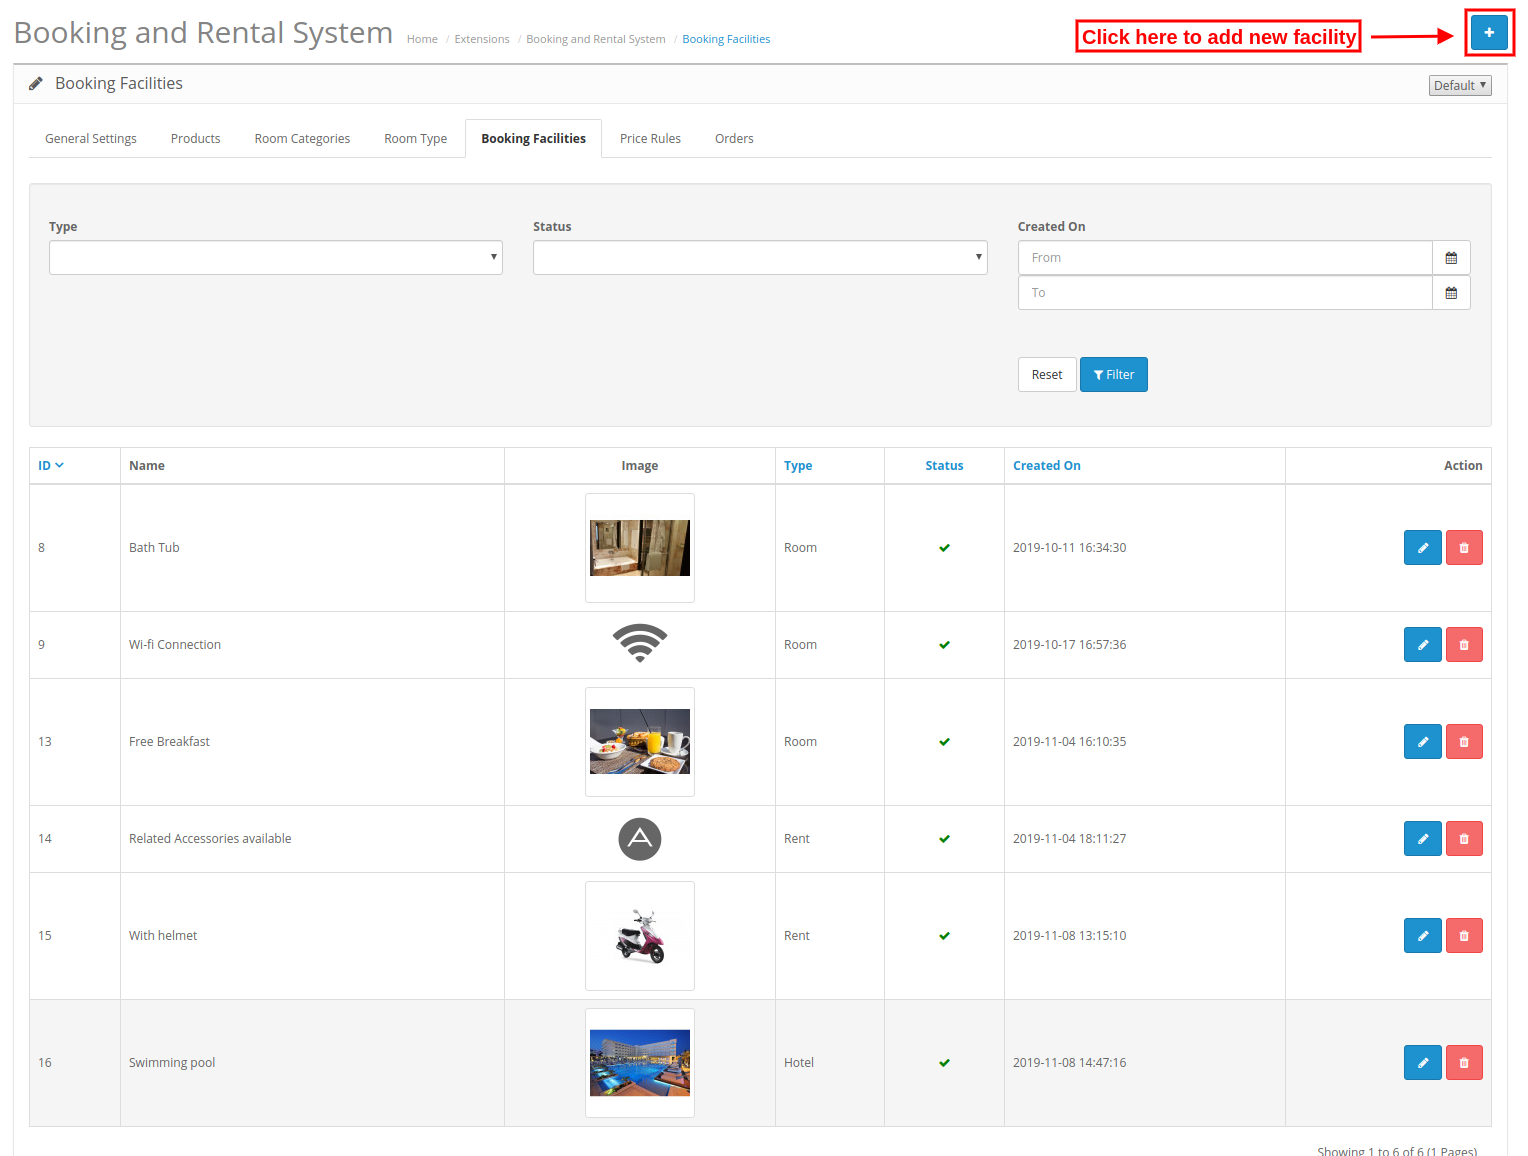
3.5.1 How to Add new booking facility
For adding a new booking facility, click on the “+” button as shown below:
After clicking this button admin needs to apply the following settings:
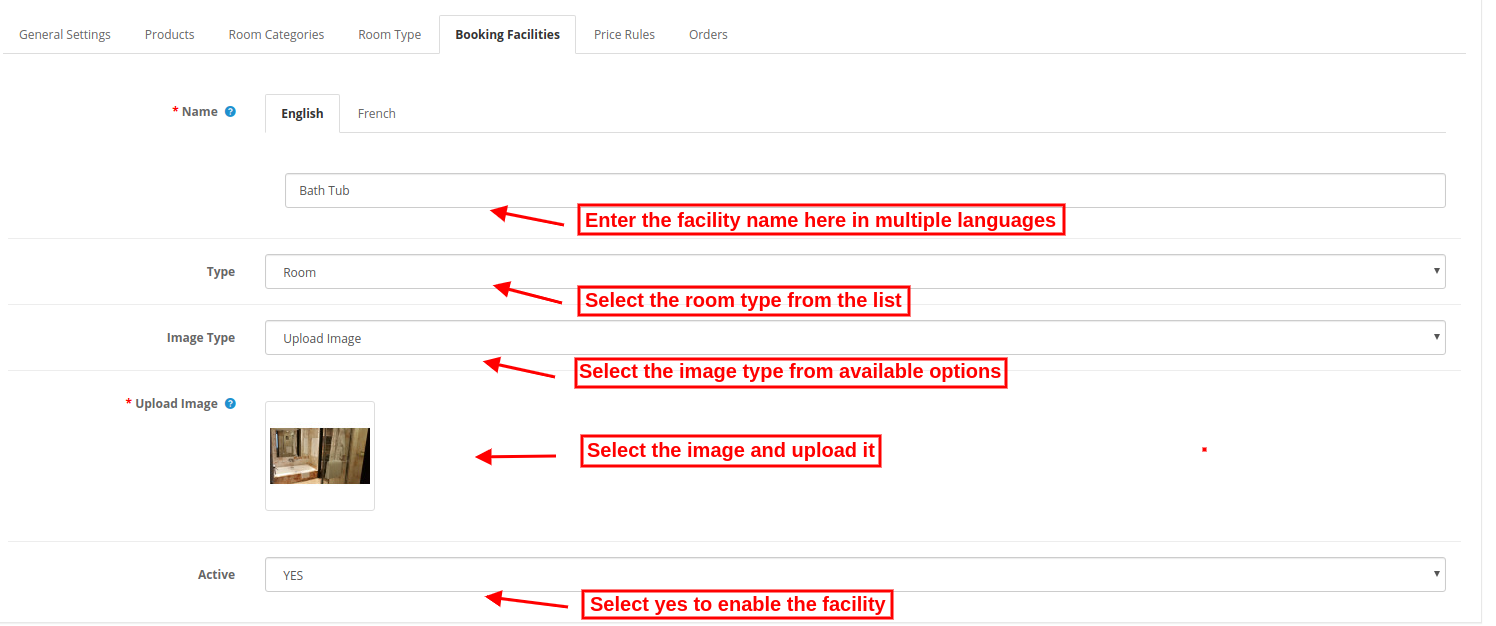
Name: Enter the facility name in various languages.
Type: Select from the available types ie room, rent or hotel. The facilities would be available to map with the product according to there type i.e. A hotel type of category can be mapped with only hotel type of products.
Image Type: Select the image type ie upload image or a font awesome.
1. Upload Image: Select the image which you want to upload
2. Font Awesome: Enter the font awesome icon.
Active: Select yes or no for activating or deactivating this booking facility.
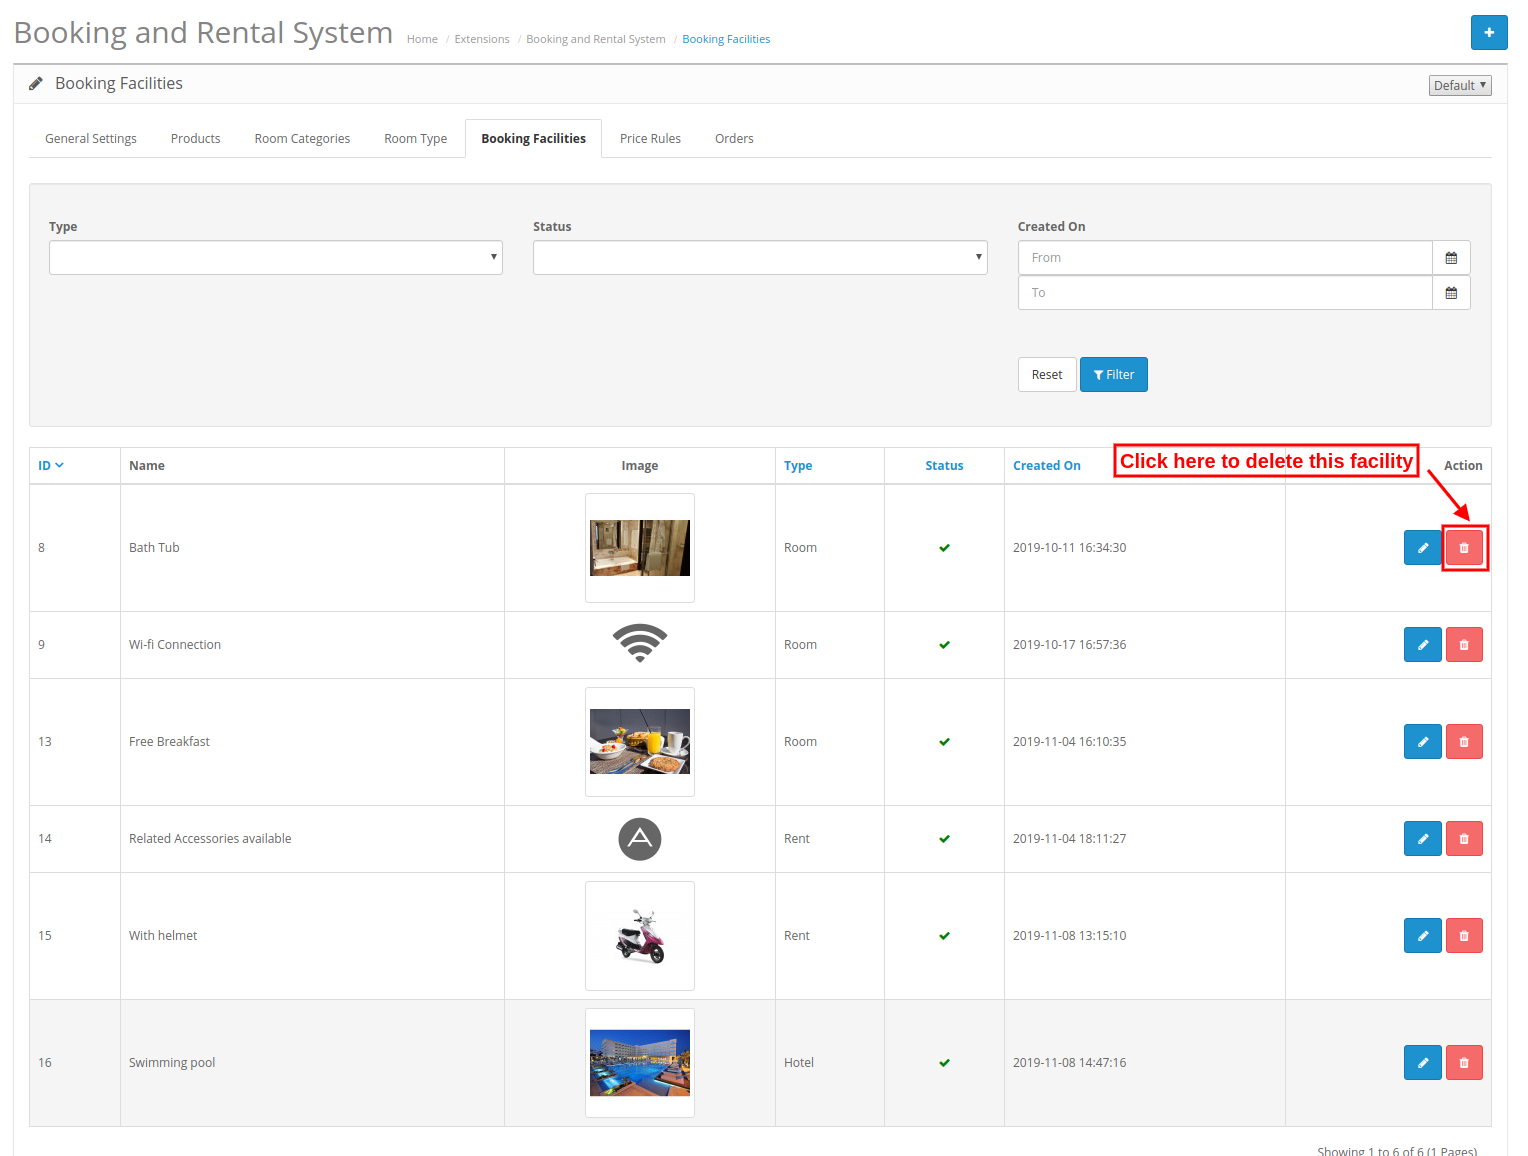
3.5.2 How to Delete booking facility
The online merchant just needs to click on the delete icon for deleting any booking facility.
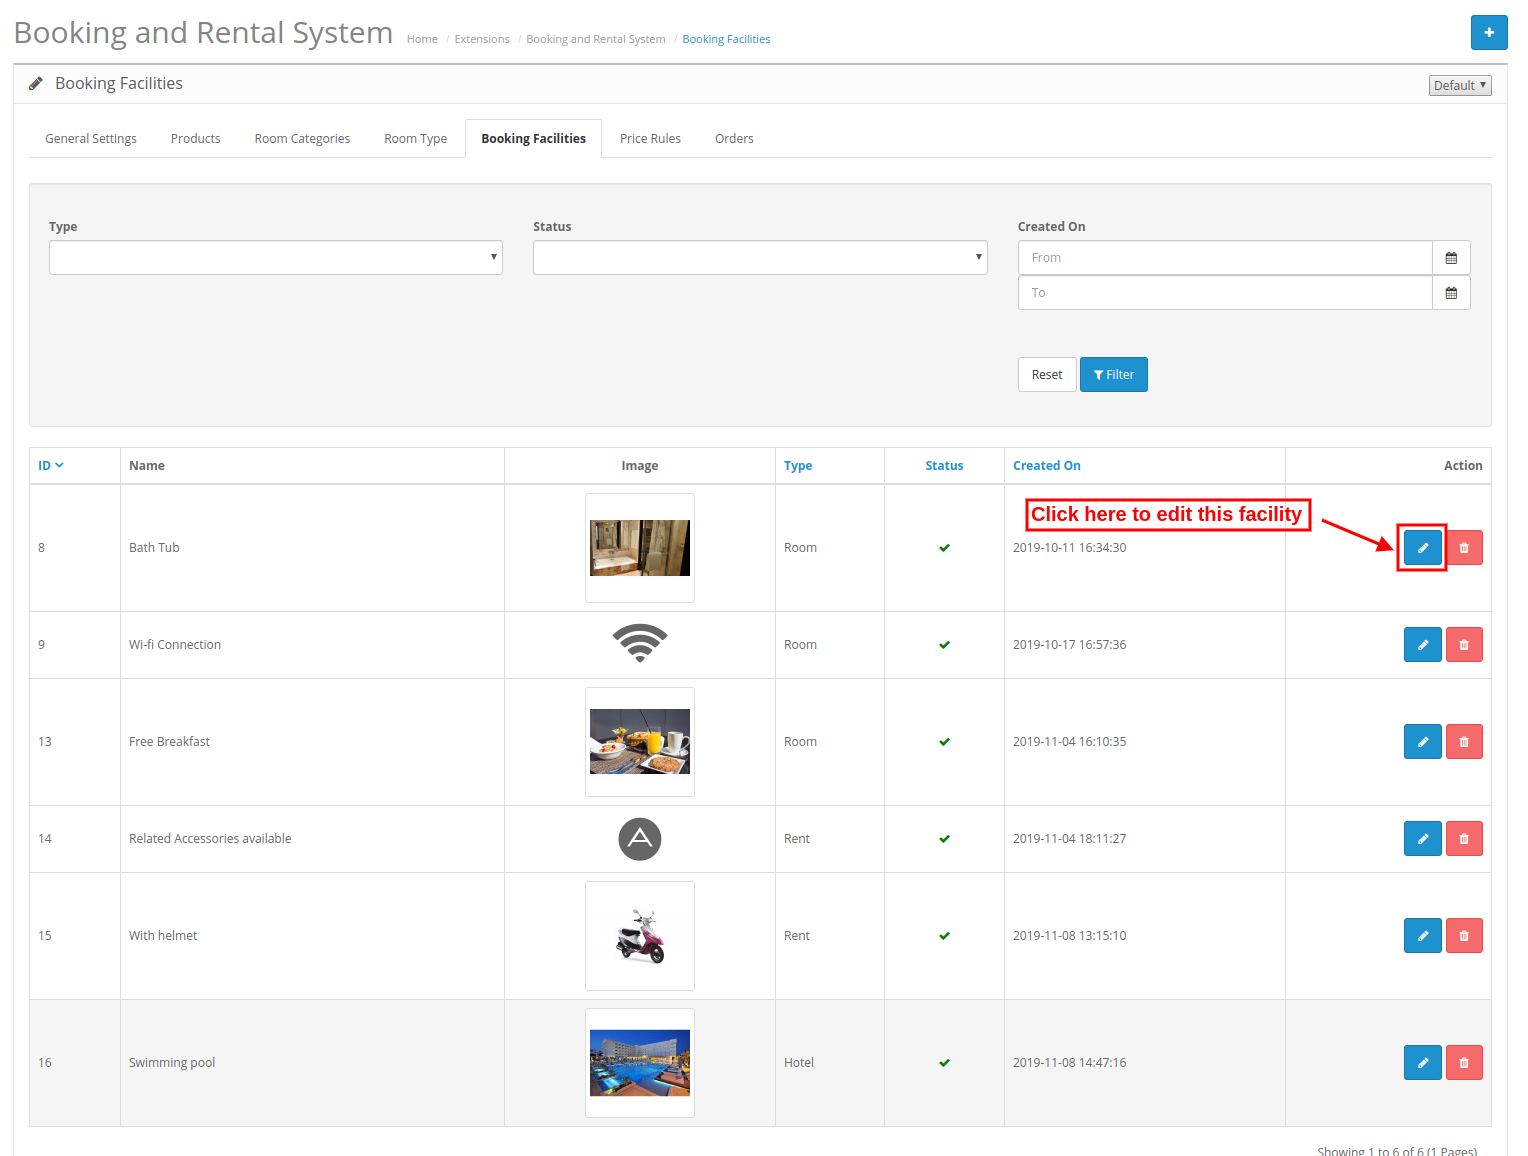
3.5.3 How to Edit booking facility
The online merchant just needs to click on the edit icon for editing any booking facility.
3.6 Price Rule
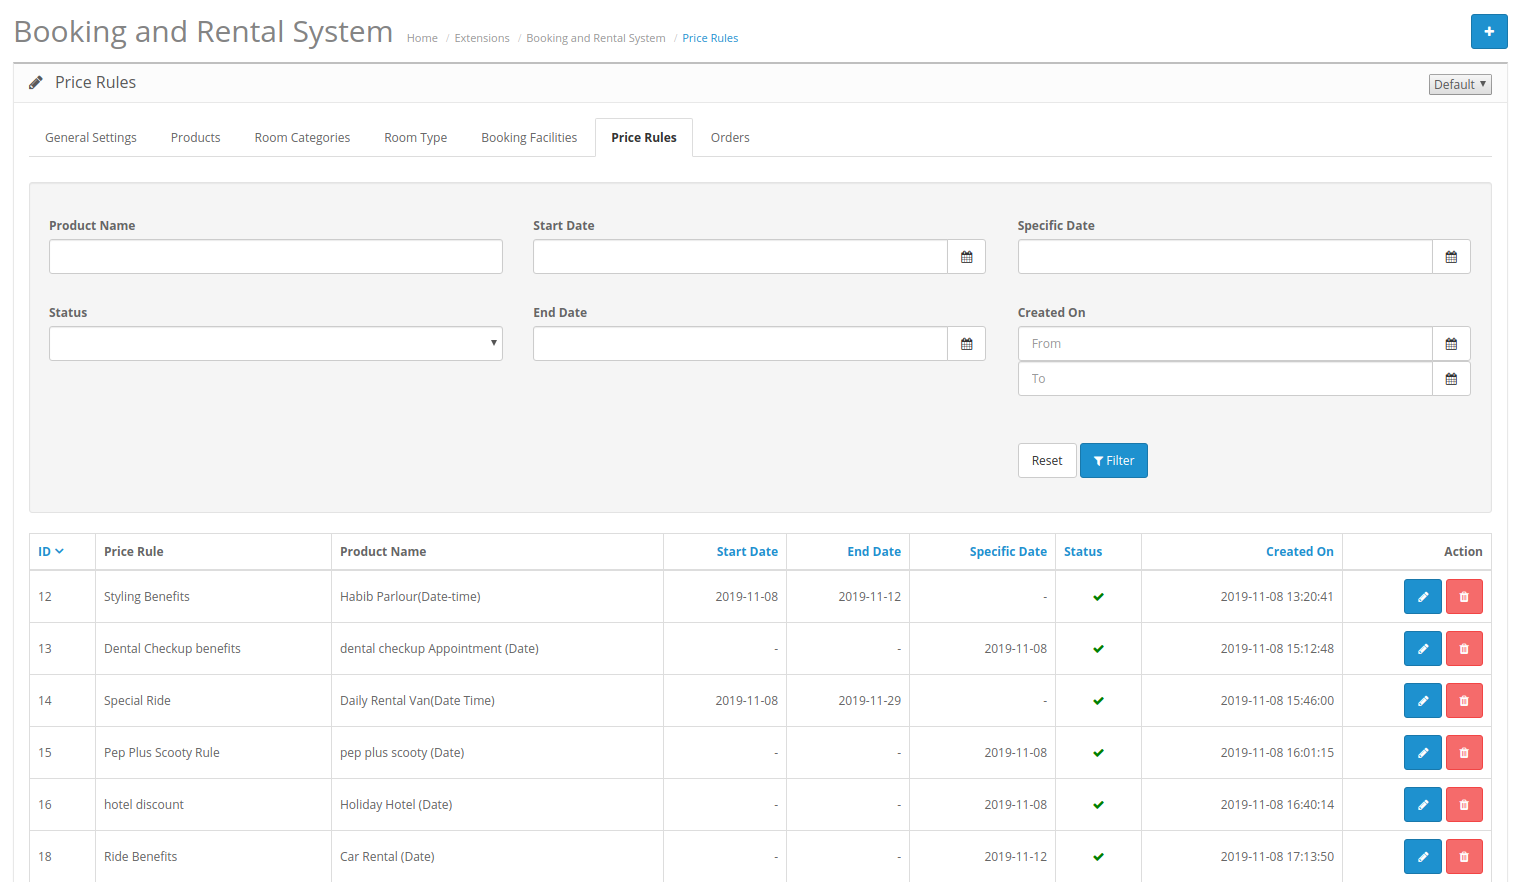
Here, admin can create, delete and update price rules easily by following the described steps.
3.6.1 How to Add new Price Rule
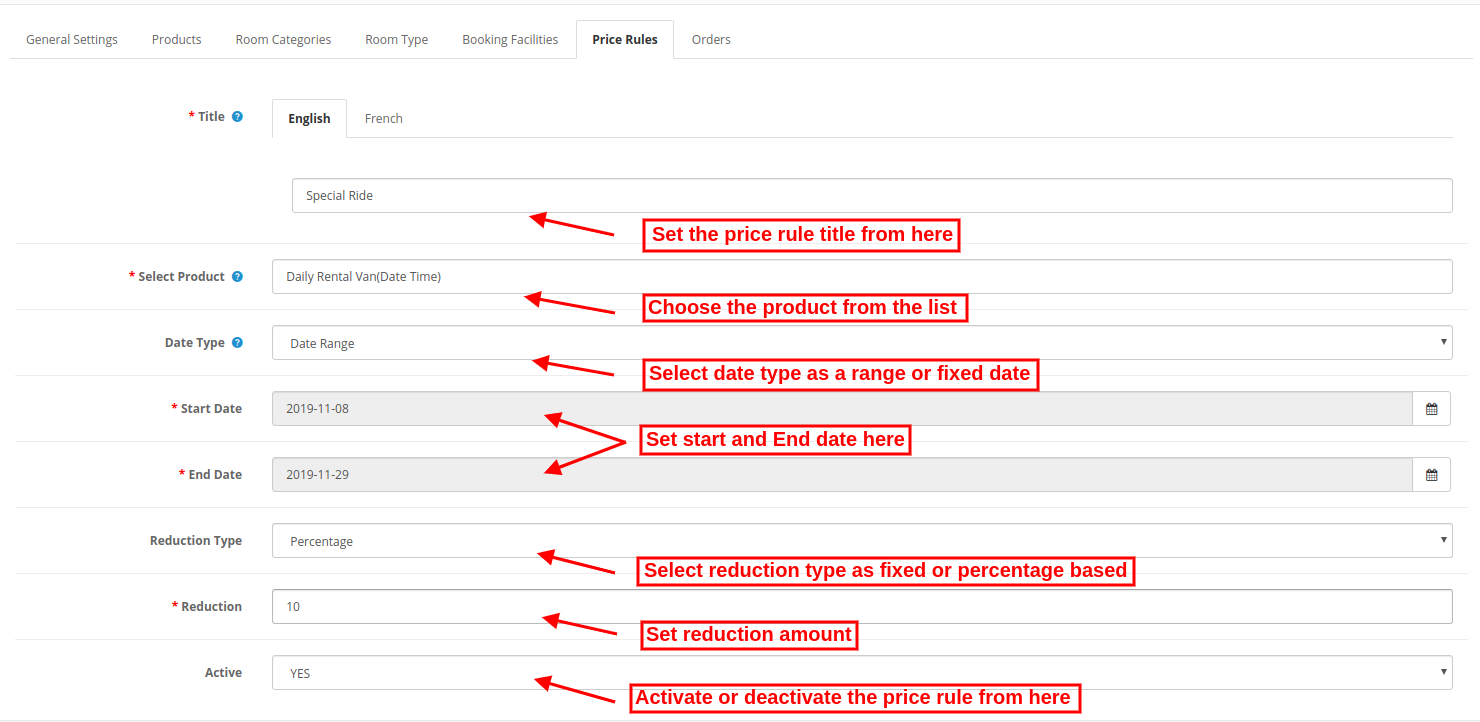
After clicking on Add new button, the admin needs to apply these settings:
Title: Enter the Price Rule Title in various languages.
Select Product: Select the product for mapping this price rule.
Data Type: Select the date type as a date range or a specific date.
While selecting date type as date range, you will get these customization options:
1. Start Date: Enter the starting date here.
2. End date: Enter the ending date.
While selecting a specific date, the admin needs to enter a specific date only.
Reduction Type: Select a fixed or percentage-based reduction type.
Reduction: enter the fixed/percentage based amount which you want to reduce.
Active: Select Yes or no for activating/deactivating this price rule.
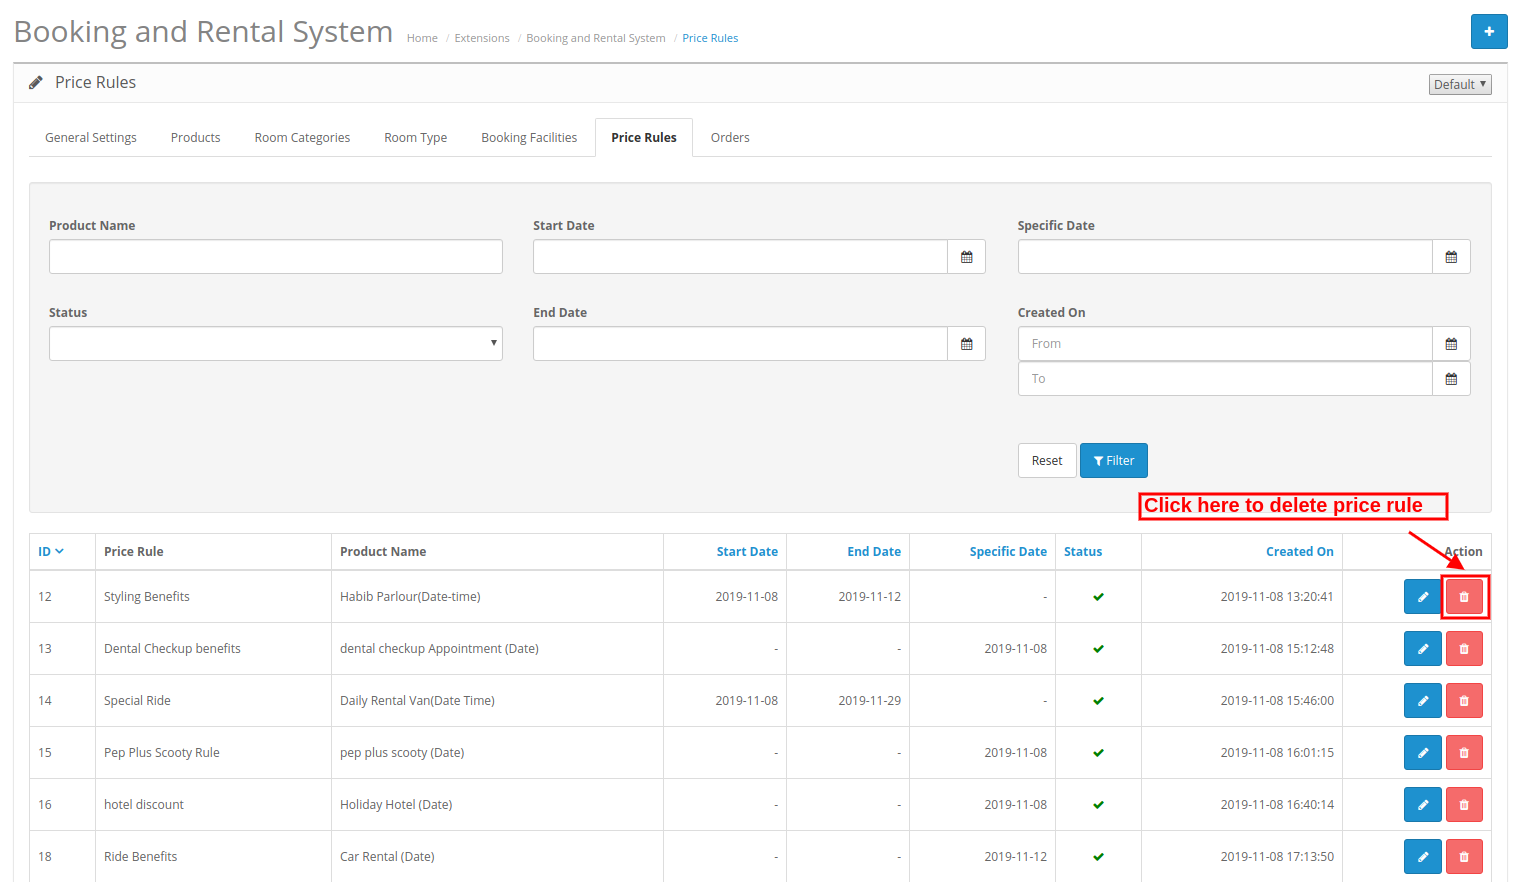
3.6.2 How to Delete Price Rule
The online merchant just needs to click on the delete icon for deleting any Price Rule.
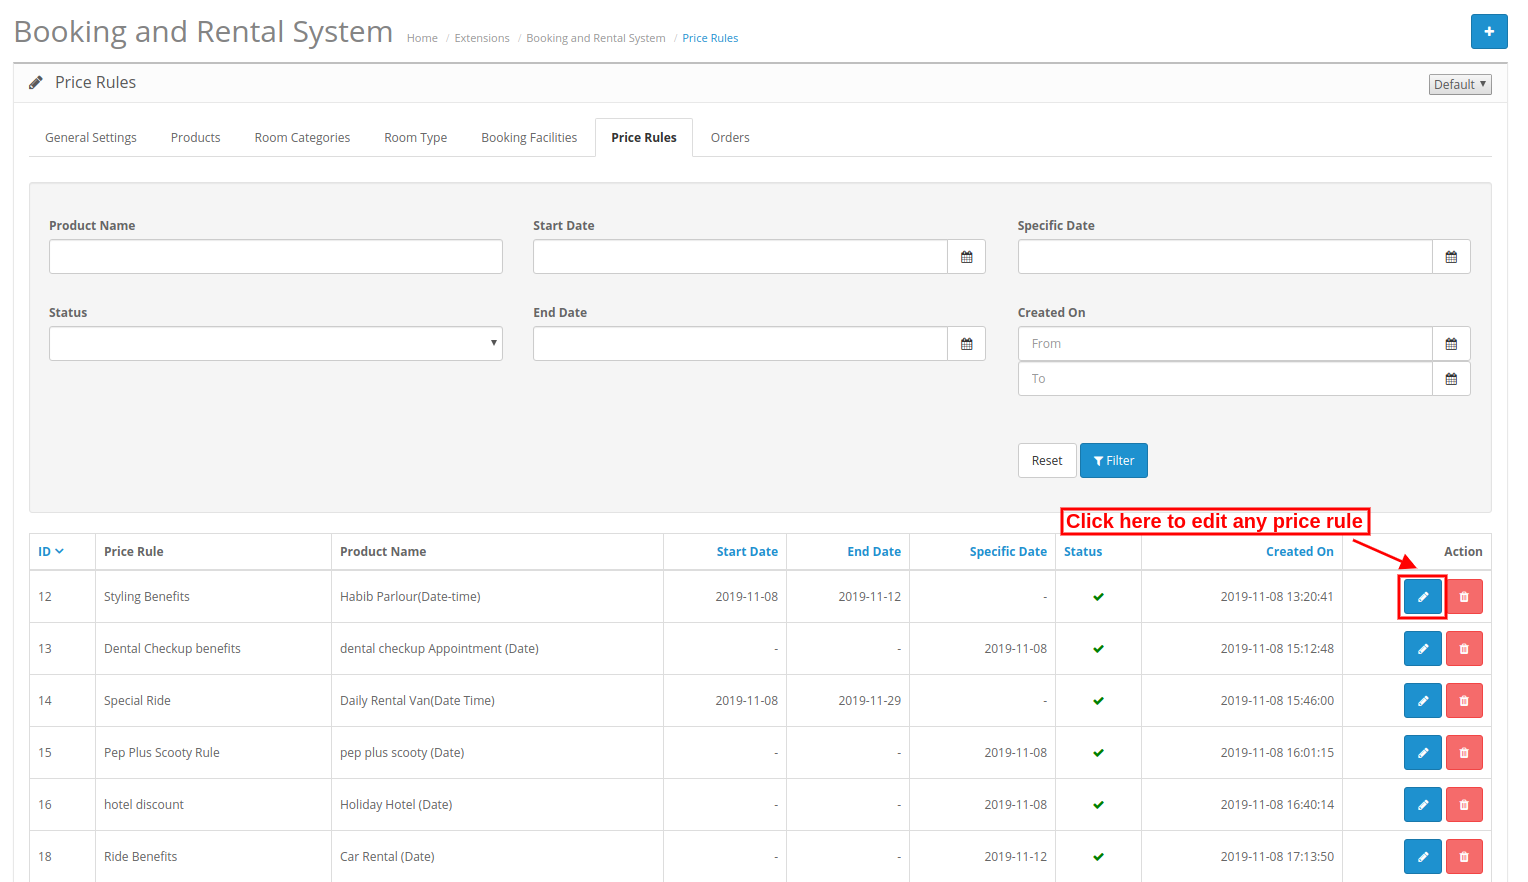
3.6.3 How to Edit Price Rule
The online merchant just needs to click on the edit icon for editing any Price Rule.
3.7 Orders
Admin can view all the booking and rental system based orders. Admin can view and edit order details.
4.0 Front-end Interface
1. Appointment:
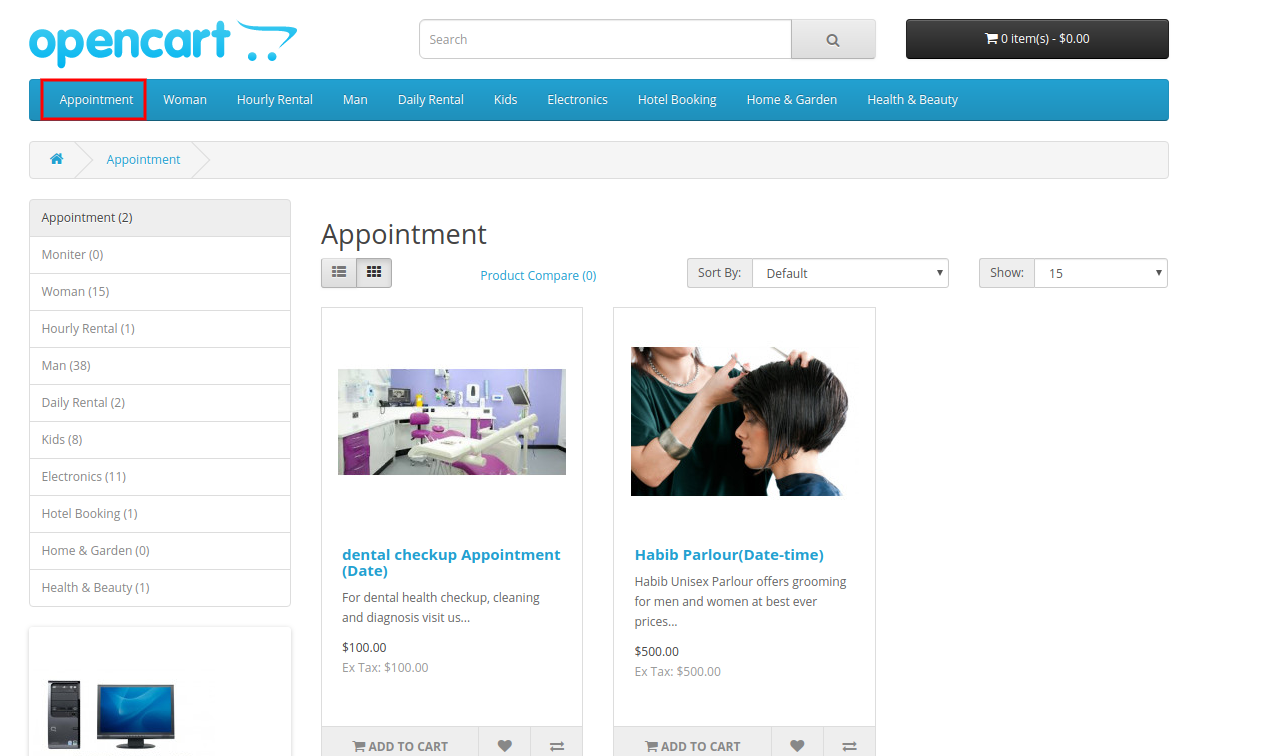
In the appointment category, the online users can view appointment type products as shown below:
Appointment Date Type:
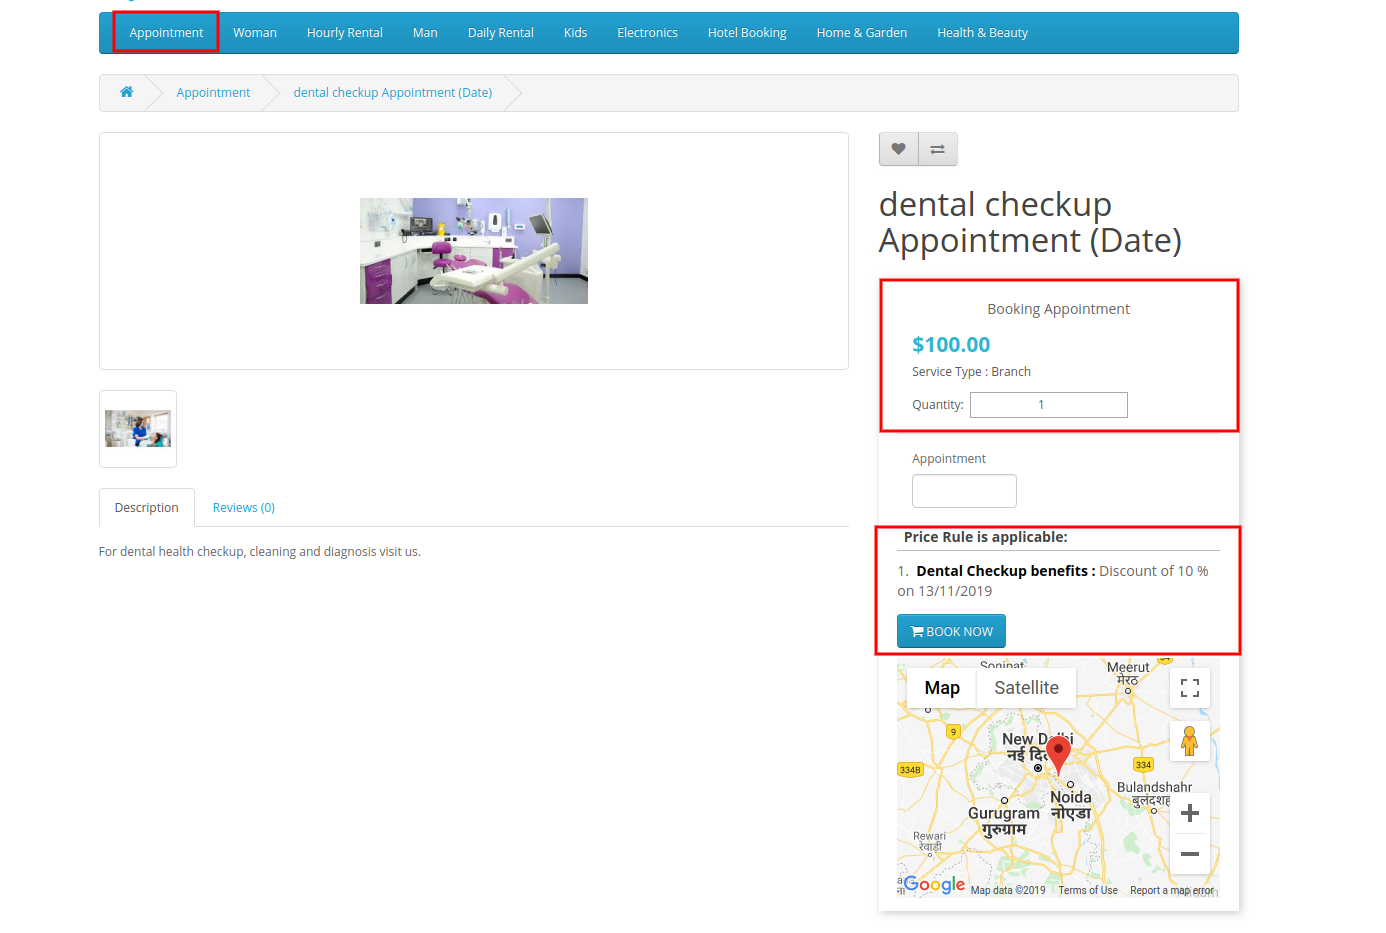
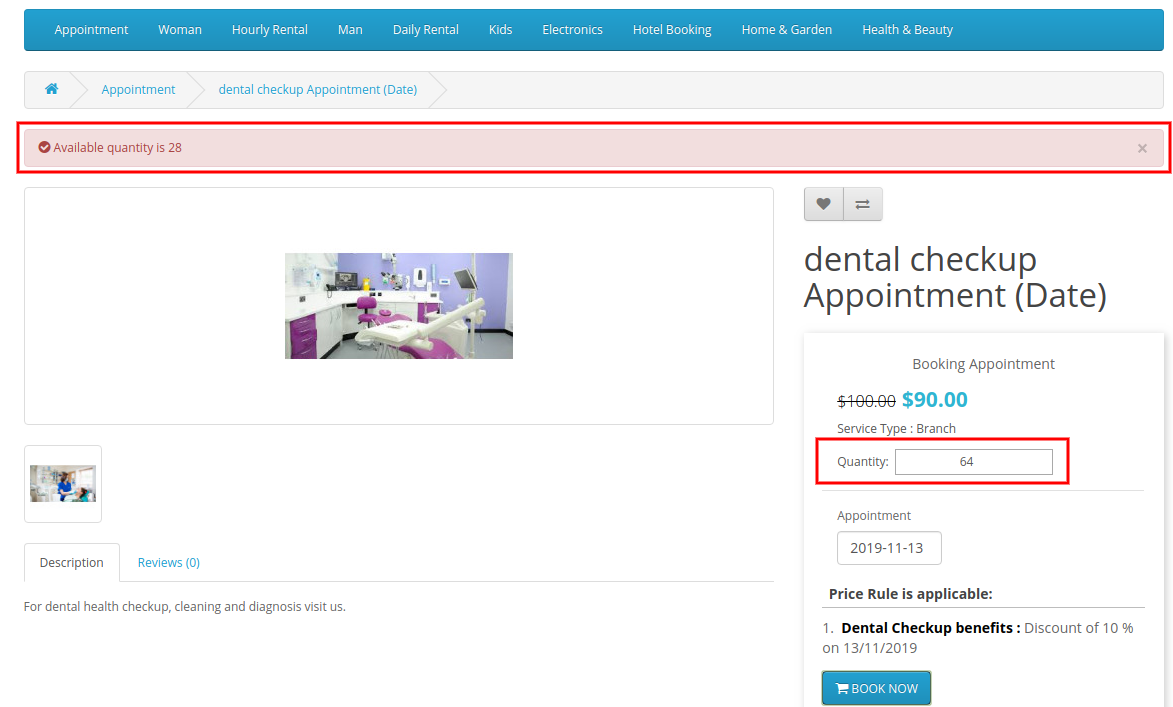
The online users can view the initial price of the appointment and view the price rule. The online users can also view the location on the map as shown below:
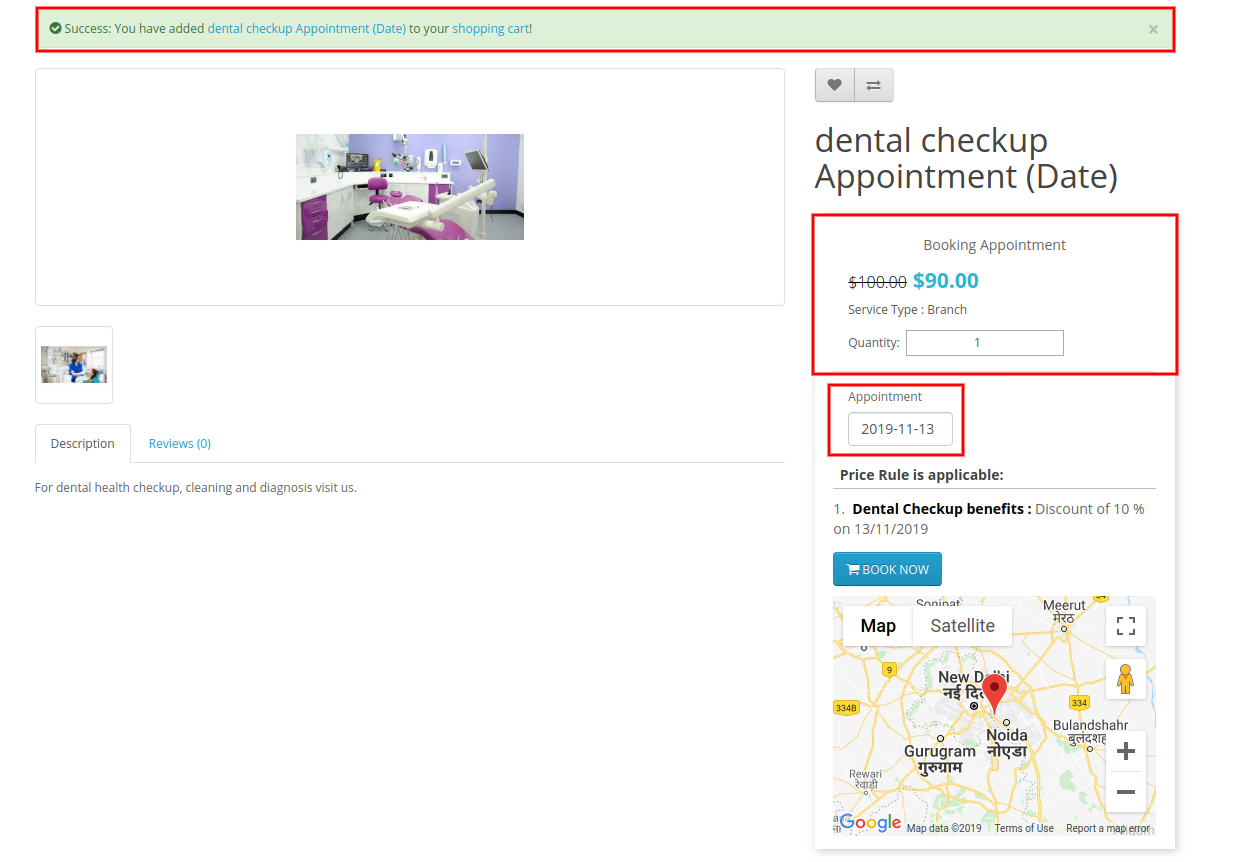
After selecting the appointment date, online users can view the location from the Google map. The online users can view the discounted amount at the same time when they select the appointment date.
There will be an error if customers select more quantity than the available number of appointments.
Appointment Date-time Type:
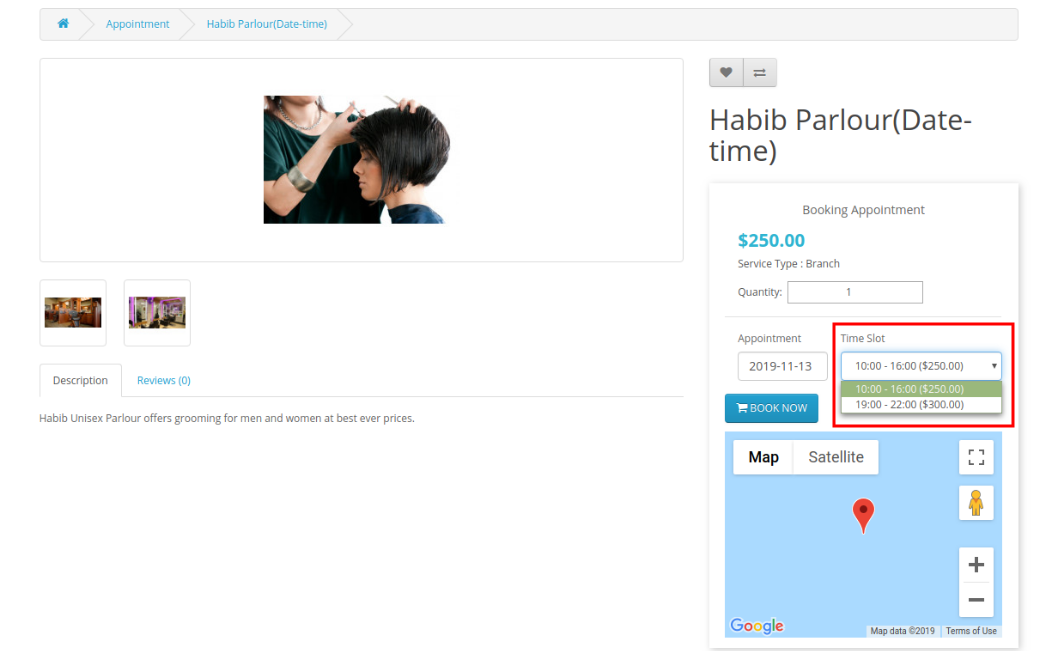
In Date-time based appointments, customers need to select time along with the date. They can view the charges of different time slots.
2. Daily Rental:
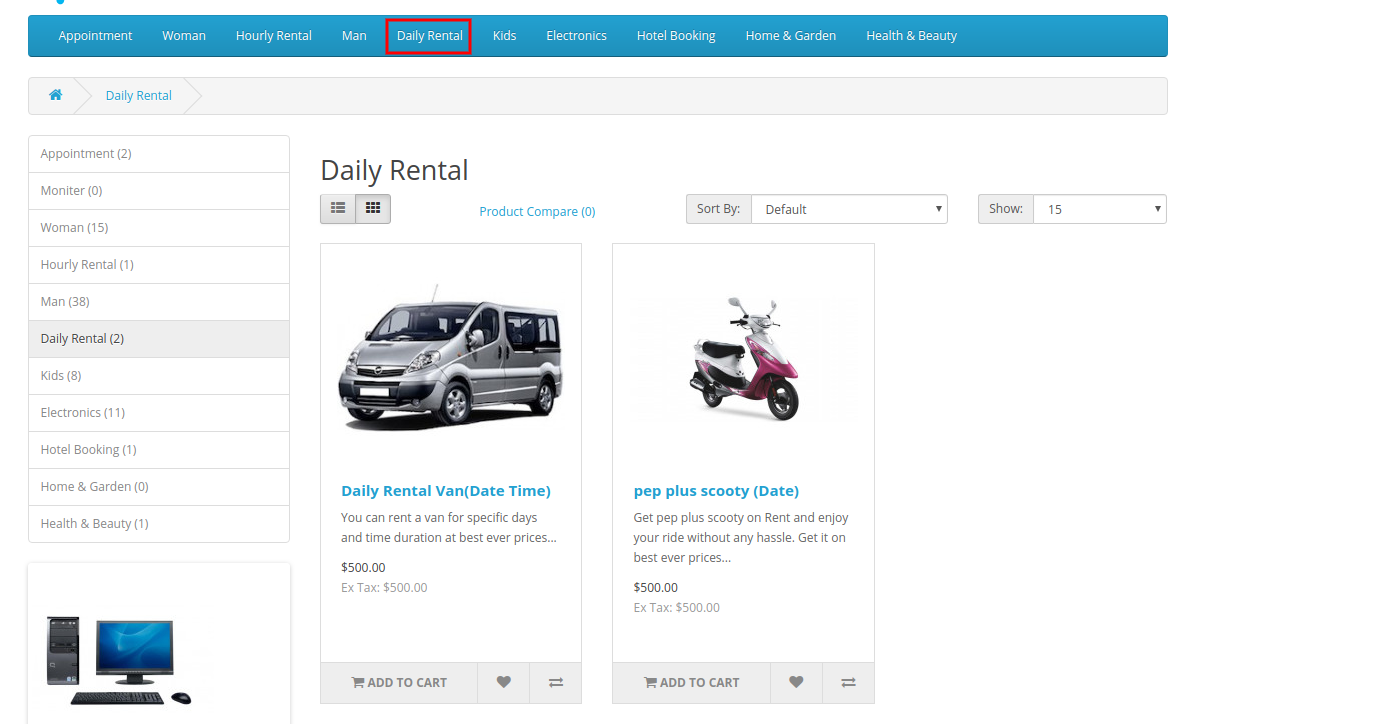
In the Daily rental category, online users can view all the activated daily rental products.
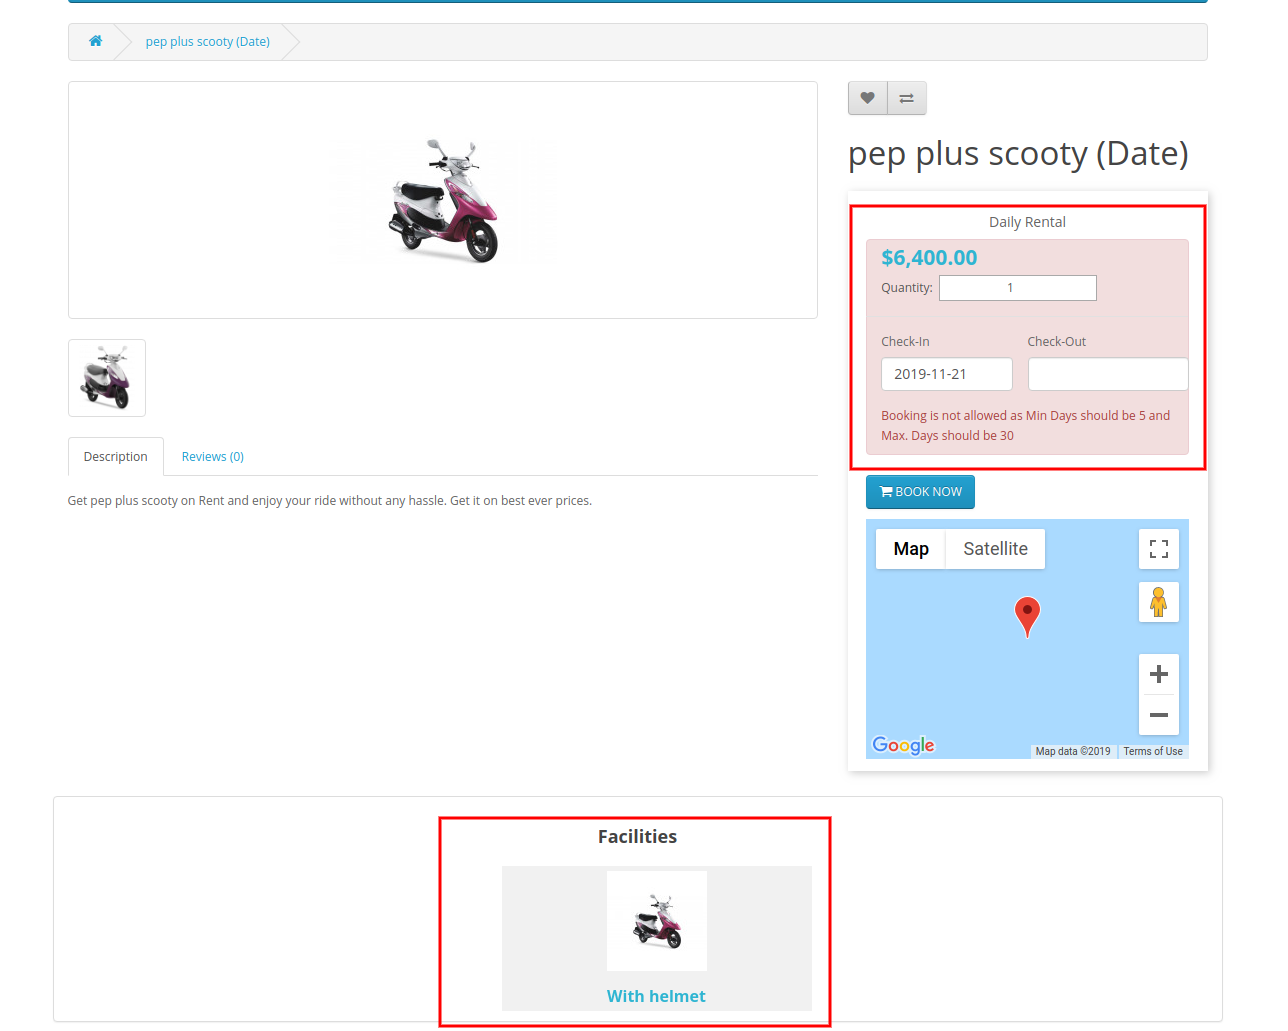
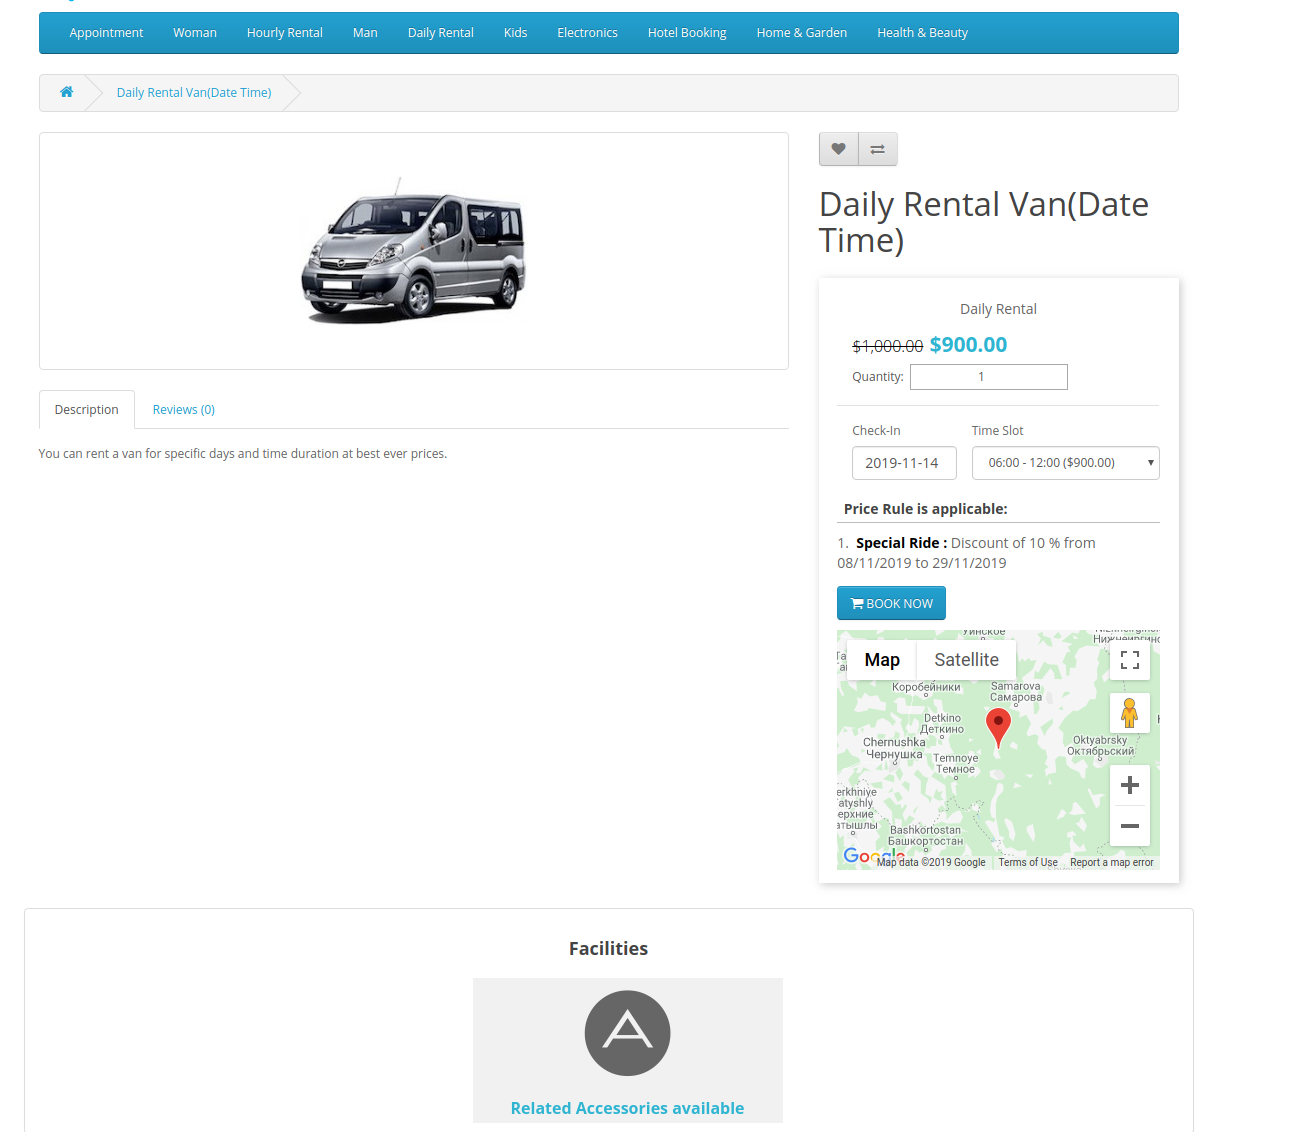
Daily Rental Date Type:
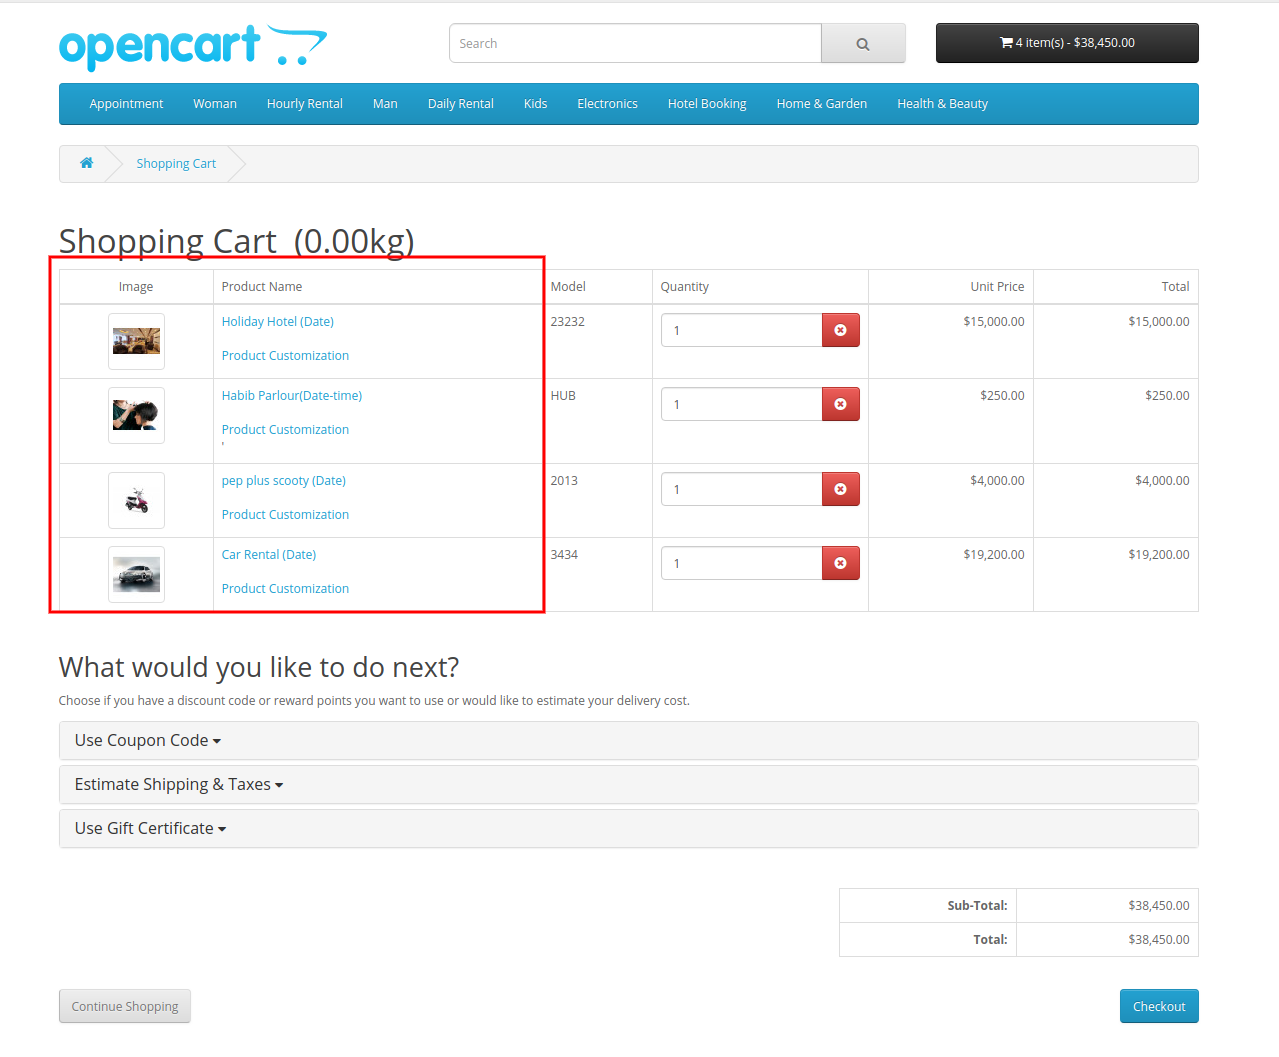
The online users can view the booking instructions and facilities on the product page.
Daily Rental Date-time type:
The online users can select the date and time slots. After that users can book daily rental based bookings.
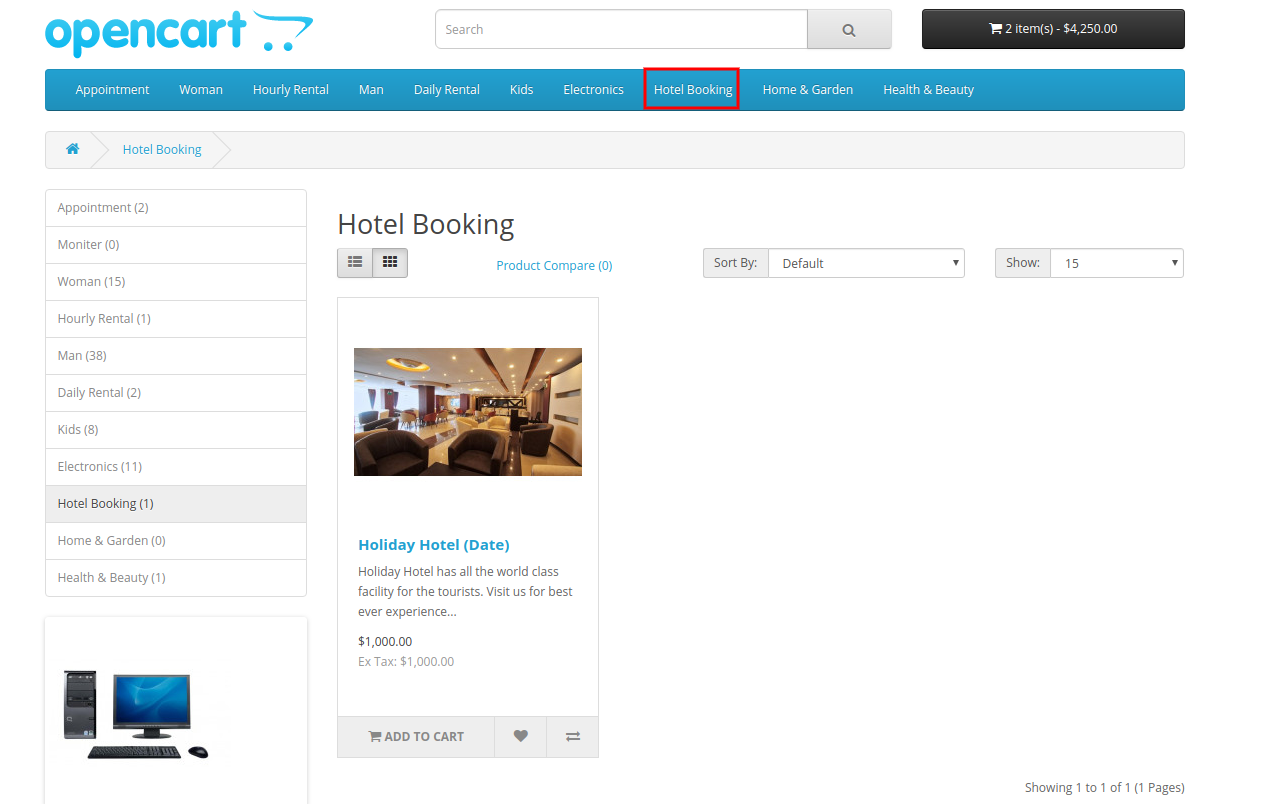
3. Hotel Booking:
The online users can view all the available hotels in hotel booking category as shown below:
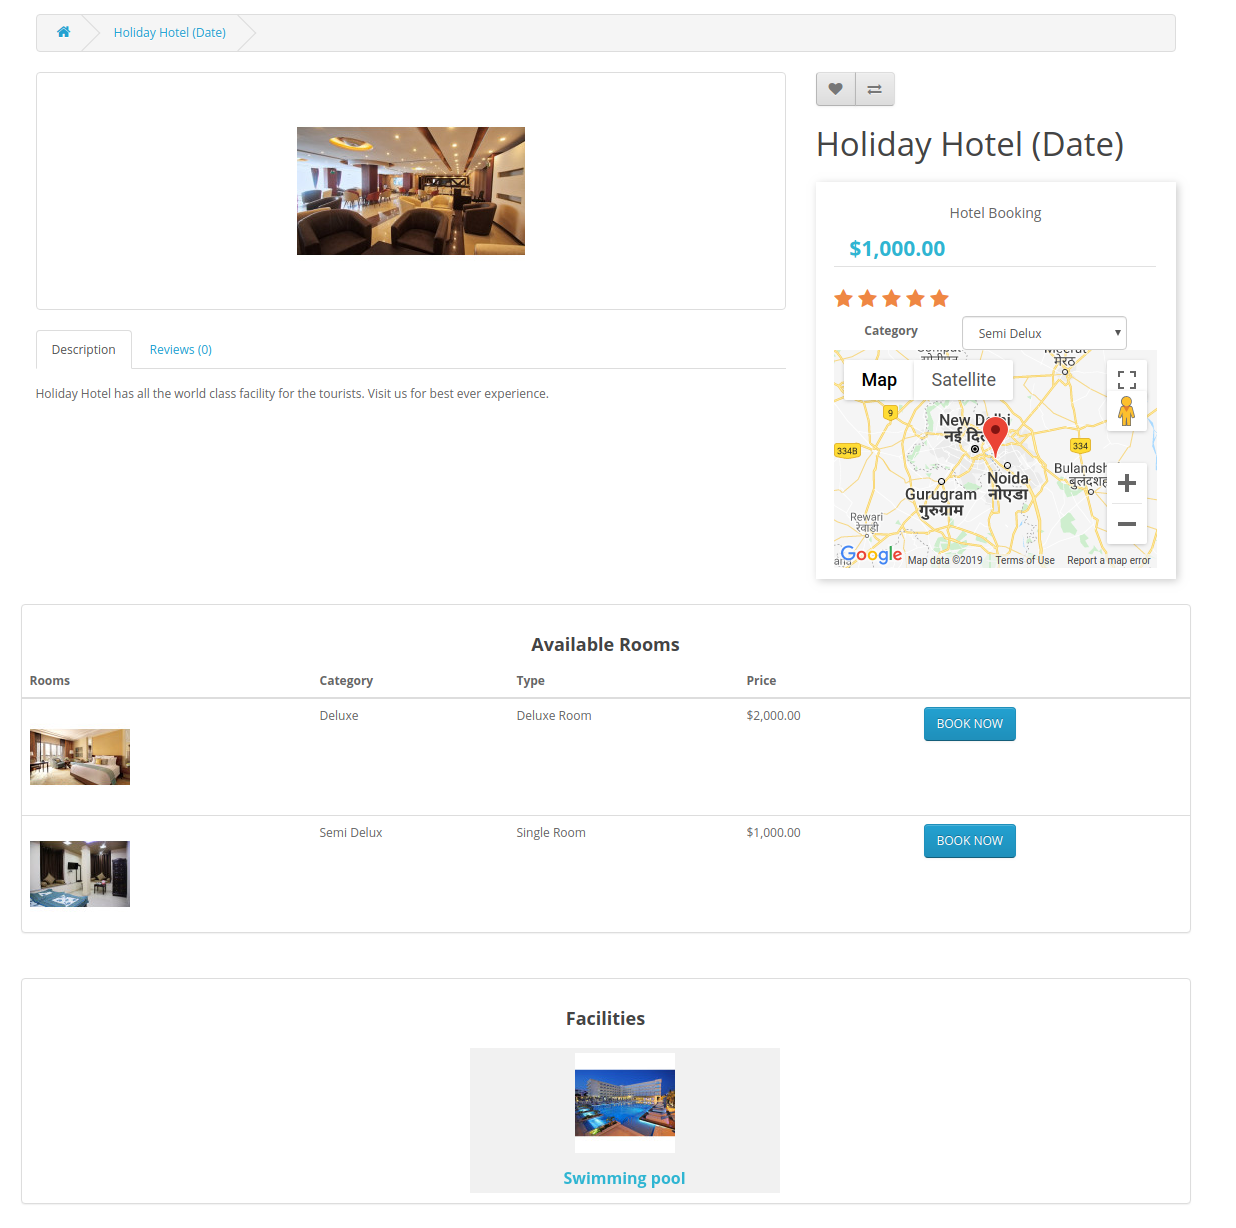
Initially, admin can view all room types and facilities as shown below:
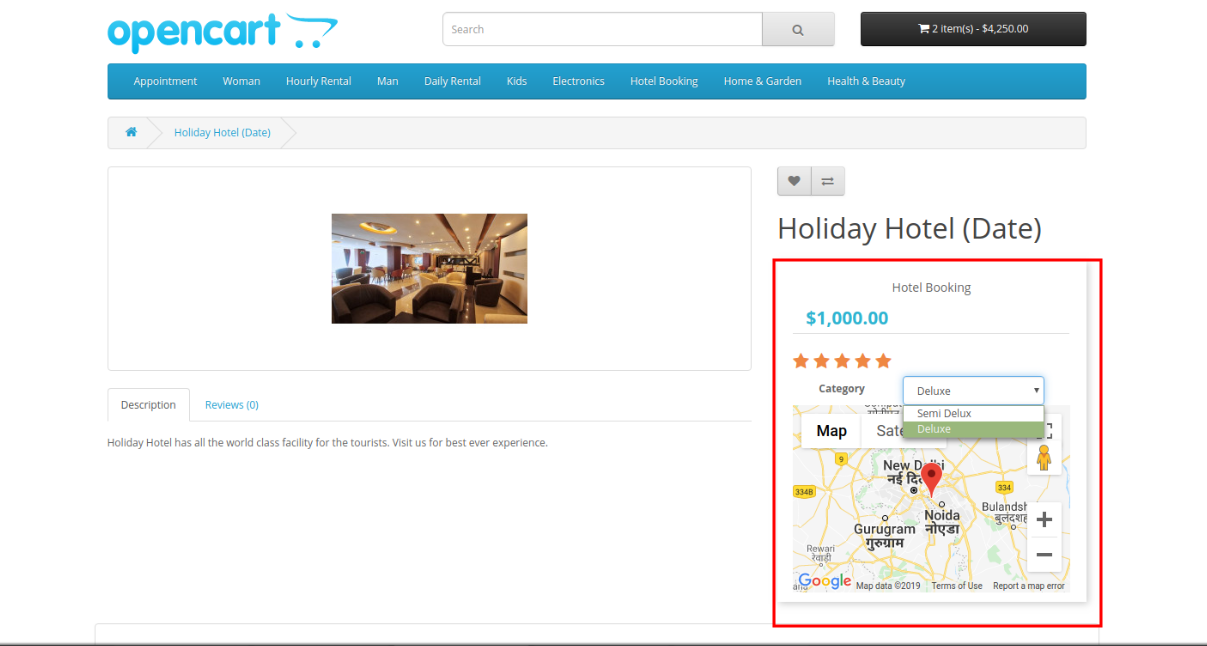
Admin can select from available room categories.
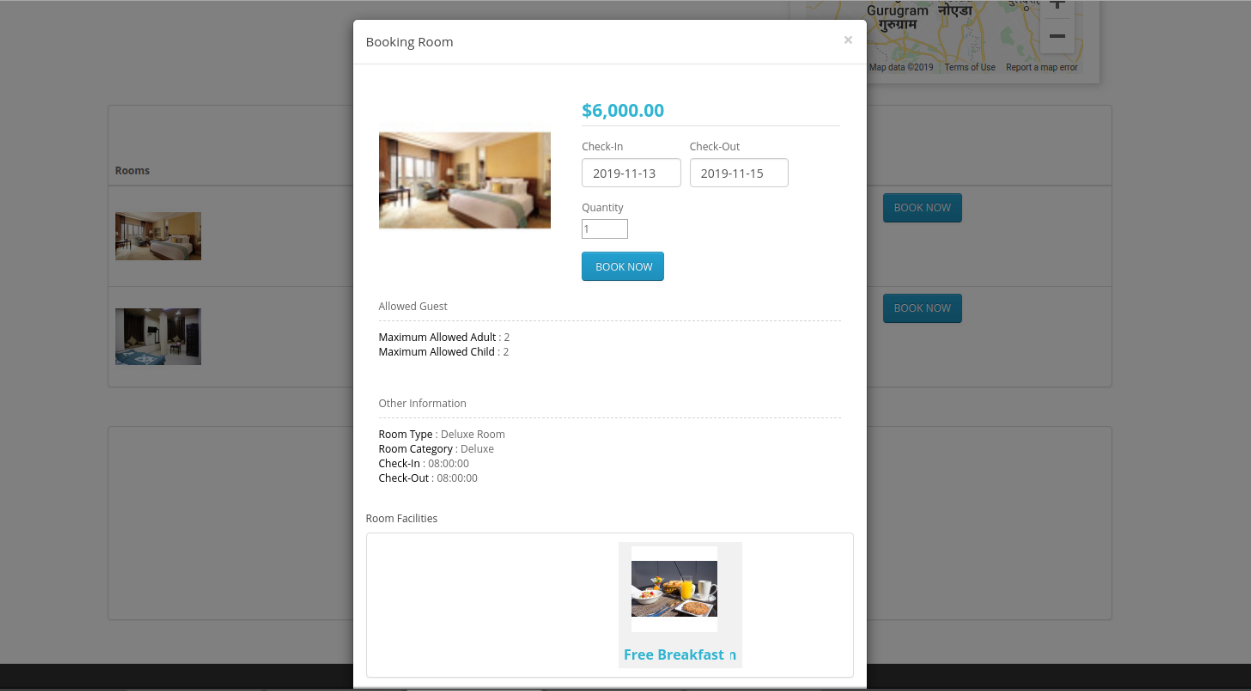
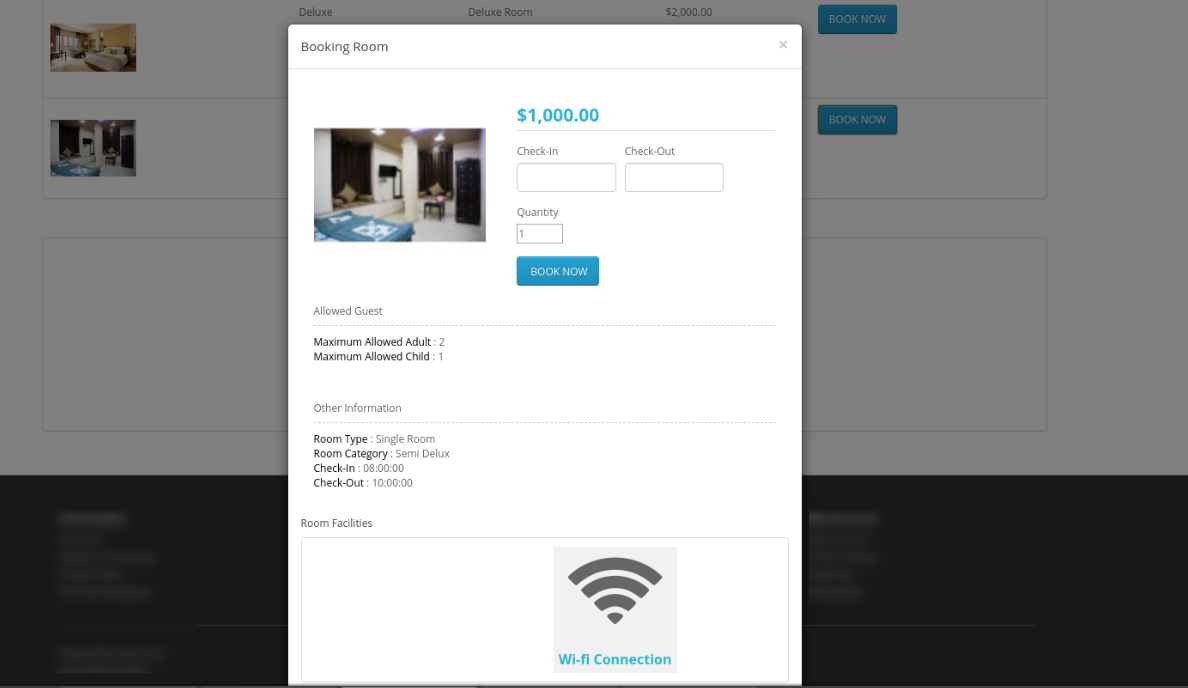
Online users can book the deluxe room as shown below:
Online users can also check conditions and facilities before booking any room.
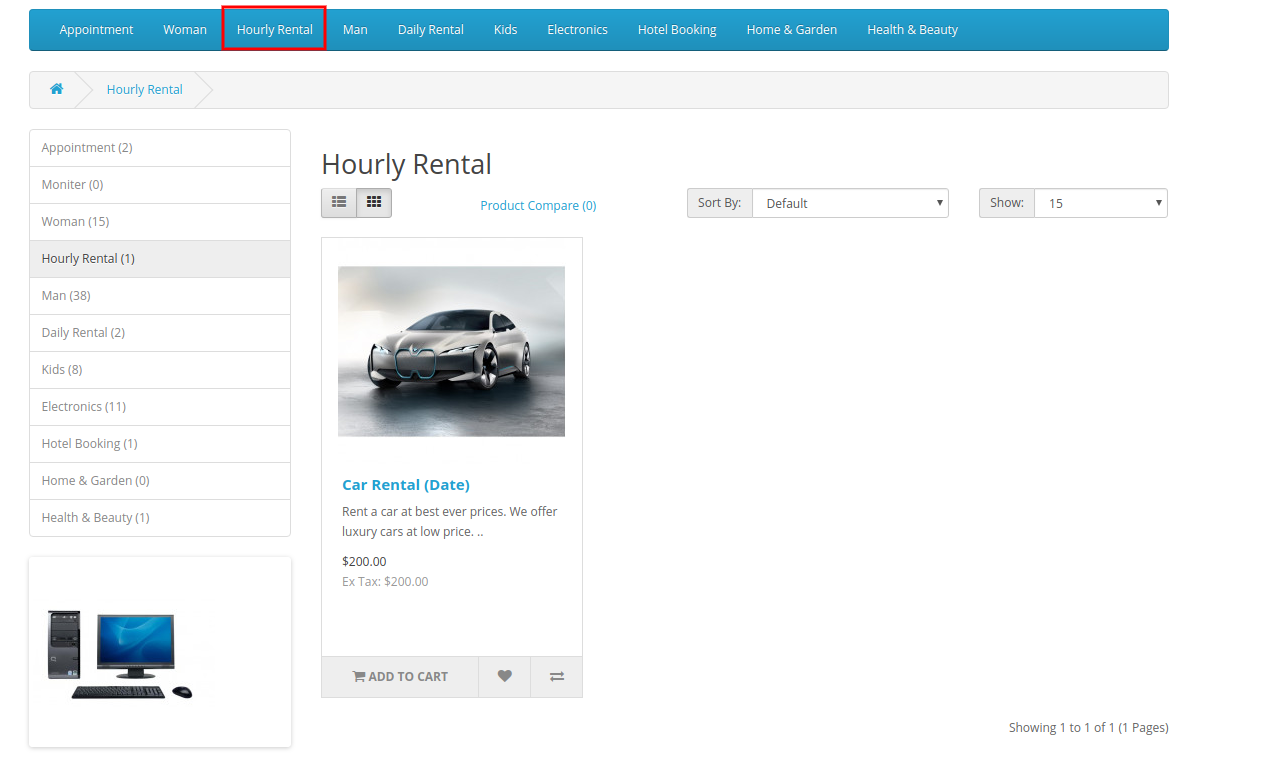
4. Hourly Rental:
In the hourly rental category, online users can use products based on hourly rent.
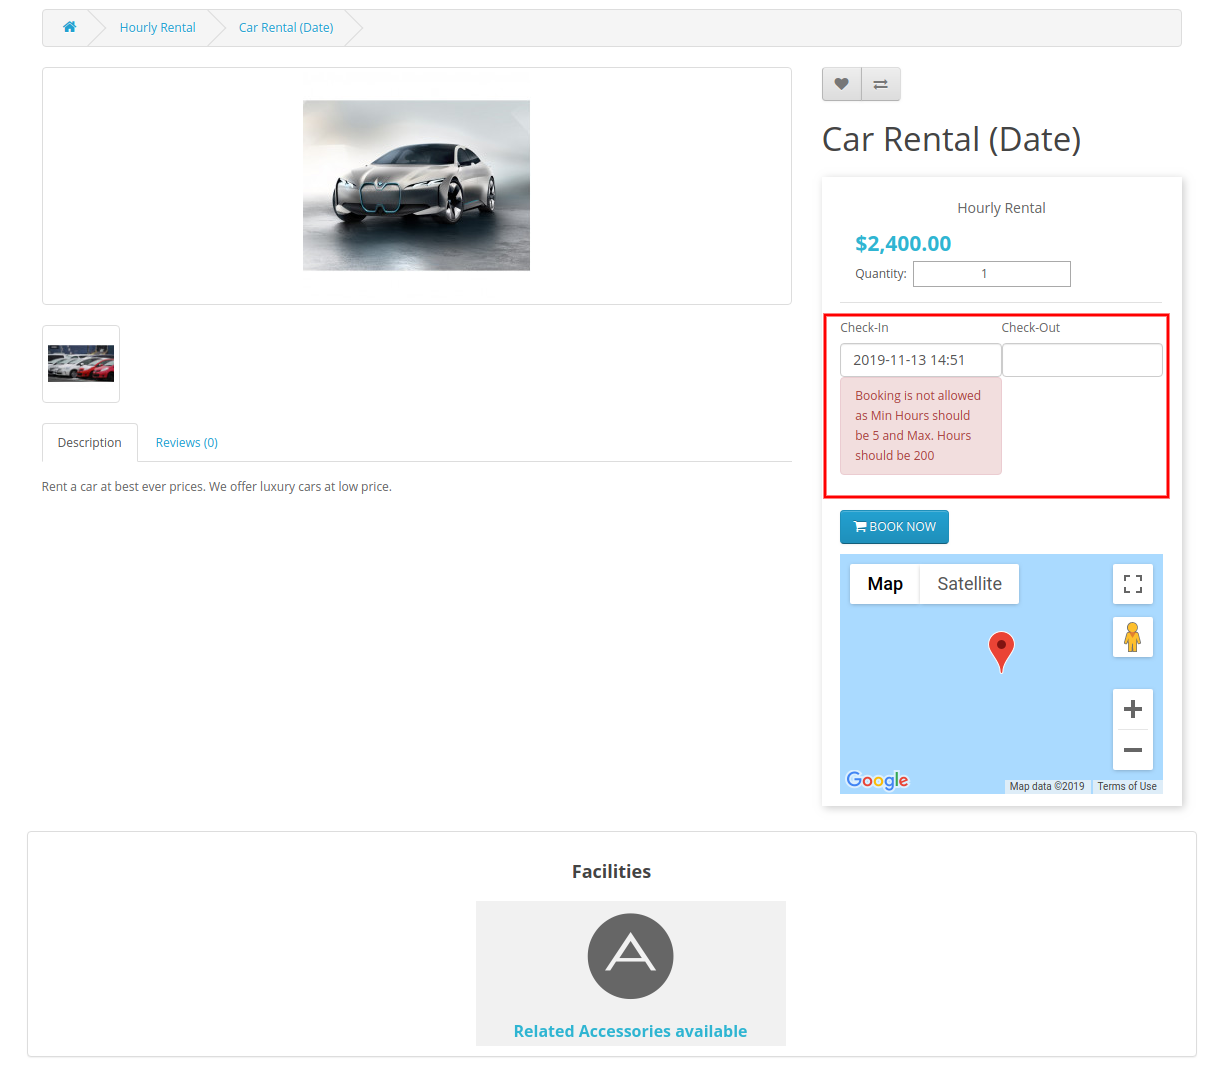
The online users can view the hourly rental conditions after selecting the check-in date as shown below:
Online users can select the quantity and duration for booking any hourly rental based product.
This way, the online store merchant can implement the functionality of booking and reservation with this Booking System Extension for OpenCart.
We take pride in announcing that KnowBand has received yet another achievement, this time being acknowledged as one of the leading eCommerce Tool Market Players in a market research conducted by Global Market Release.
The report shared by Global Market Release provided key statistics on the market status of the leading eCommerce Tool Market Players, also focusing on the trends and opportunities in the eCommerce market.
It is a proud moment for our entire team, at KnowBand whose efforts and persistence has led us to these achievements. We also thank our customers and clients who have shown their faith in us over the years and believed in our abilities.
KnowBand, a leading name as an eCommerce development company provides highest quality eCommerce plugins for multiple eCommerce platforms like PrestaShop, OpenCart, Magento, Magento 2, WooCommerce and Shopify.
We have hired experienced developers who work with utmost dedication and are committed to enhancing the functionalities of your eCommerce stores.
Want to start your journey with us? Visit our KnowBand store and check out a number of addons/extensions.
QR code is a type of two dimensional barcode which is abbreviated from Quick Response Code . It is an optical label which contains information about the item. It is simply attached to the item. It contains black squares which are arranged in a squares grid with white background.
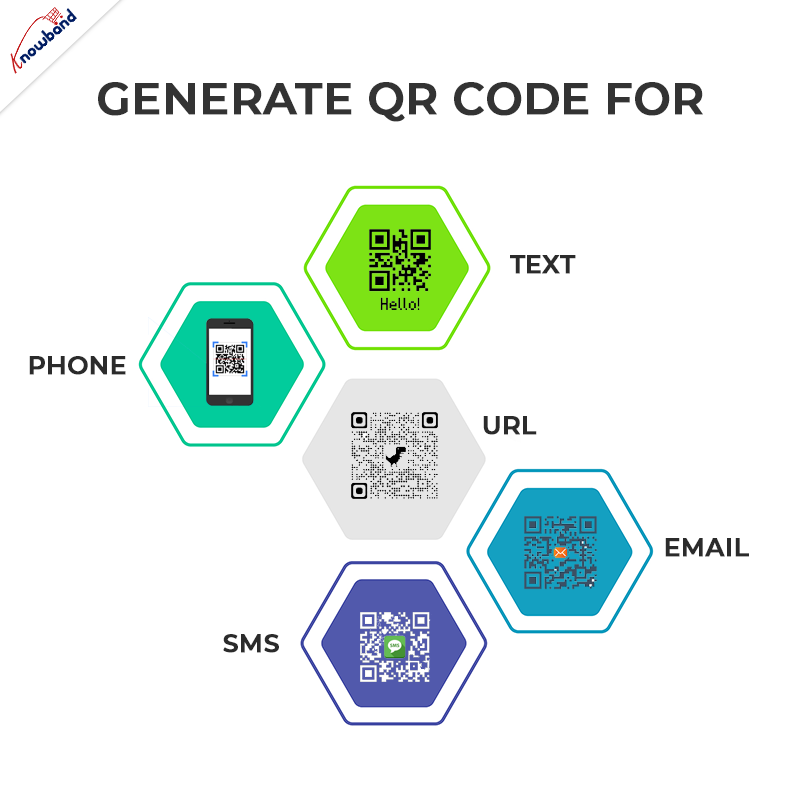
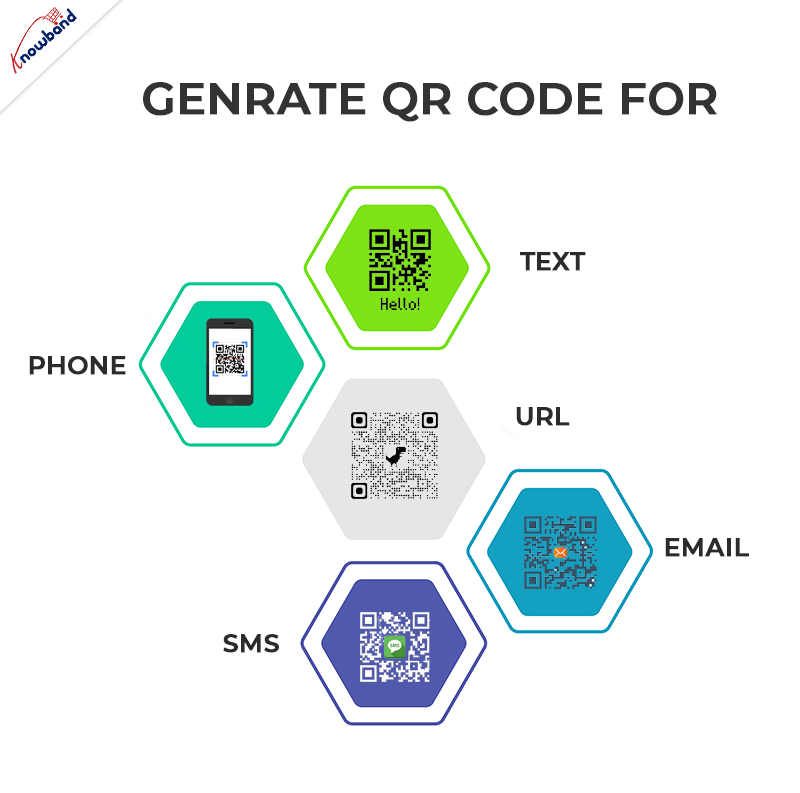
In this blog we will learn how to generate QR code using PHP step by step. With the help of simple PHP script you can generate QR code for Text, Phone, URL, Email and SMS.
In this project you need to create two files:
qrcode.php
index.php
STEP 1: Define class QrCode in qrcode.php:
1. Create a class QrCode. In this class, we will define the URL for GOOGLE CHART API and functions to generate the QR code for Text, Phone, URL, Email and SMS.
STEP 2: Define URL of Google chart API in QrCode Class:
1. We create variables to store the URL of Google chart API and data which is used to create the QR code.
<span style="vertical-align: inherit;"><span style="vertical-align: inherit;">class QrCode {</span></span><span style="vertical-align: inherit;"><span style="vertical-align: inherit;">
//URL OF GOOGLE CHART API</span></span><span style="vertical-align: inherit;"><span style="vertical-align: inherit;">
private $apiUrl = 'https://chart.apis.google.com/chart';</span></span><span style="vertical-align: inherit;"><span style="vertical-align: inherit;">
// DATA TO CREATE QR CODE</span></span><span style="vertical-align: inherit;"><span style="vertical-align: inherit;">
private $data;</span></span><span style="vertical-align: inherit;"><span style="vertical-align: inherit;">
}</span></span>
STEP 3: Define Functions to generate QR code of different types in QrCode Class:
We have the following types and functions for the same in which we can generate the QR Code:
1.URL
<span style="vertical-align: inherit;"><span style="vertical-align: inherit;">// Function which is used to generate the URL type of QR Code.</span></span><span style="vertical-align: inherit;"><span style="vertical-align: inherit;">
public function URL($url = null) {</span></span><span style="vertical-align: inherit;"><span style="vertical-align: inherit;">
$this->data = preg_match("#^https?\:\/\/#", $url) ? </span><span style="vertical-align: inherit;">$url : "https://{$url}";</span></span><span style="vertical-align: inherit;"><span style="vertical-align: inherit;">
}</span></span>
2.Text
<span style="vertical-align: inherit;"><span style="vertical-align: inherit;">// Function which is used to generate the TEXT type of QR Code.</span></span><span style="vertical-align: inherit;"><span style="vertical-align: inherit;">
public function TEXT($text) {</span></span><span style="vertical-align: inherit;"><span style="vertical-align: inherit;">
$this->data = $text;</span></span><span style="vertical-align: inherit;"><span style="vertical-align: inherit;">
}</span></span>
3. EMAIL
<span style="vertical-align: inherit;"><span style="vertical-align: inherit;">// Function which is used to generate the EMAIL type of QR Code.</span></span><span style="vertical-align: inherit;"><span style="vertical-align: inherit;">
public function EMAIL($email = null, $subject = null, $message = null) {</span></span><span style="vertical-align: inherit;"><span style="vertical-align: inherit;">
$this->data = "MATMSG:TO:{$email};SUB:{$subject};BODY:{$message};;";</span></span><span style="vertical-align: inherit;"><span style="vertical-align: inherit;">
}</span></span>
4.PHONE
<span style="vertical-align: inherit;"><span style="vertical-align: inherit;">// Function which is used to generate the PHONE type of QR Code.</span></span><span style="vertical-align: inherit;"><span style="vertical-align: inherit;">
public function PHONE($phone) {</span></span><span style="vertical-align: inherit;"><span style="vertical-align: inherit;">
$this->data = "TEL:{$phone}";</span></span><span style="vertical-align: inherit;"><span style="vertical-align: inherit;">
}</span></span>
5.SMS
<span style="vertical-align: inherit;"><span style="vertical-align: inherit;">// Function which is used to generate the SMS type of QR Code.</span></span><span style="vertical-align: inherit;"><span style="vertical-align: inherit;">
public function SMS($phone = null, $msg = null) {</span></span><span style="vertical-align: inherit;"><span style="vertical-align: inherit;">
$this->data = "SMSTO:{$phone}:{$msg}";</span></span><span style="vertical-align: inherit;"><span style="vertical-align: inherit;">
}</span></span>
6. CONTACT
Prestashop AI Chatbot Addon
Create and launch a perfect AI Chatbot created using PHP for prestashop store.
<span style="vertical-align: inherit;"><span style="vertical-align: inherit;">// Function which is used to generate the CONTACT type of QR Code.</span></span><span style="vertical-align: inherit;"><span style="vertical-align: inherit;">
public function CONTACT($name = null, $address = null, $phone = null, $email = null) {</span></span><span style="vertical-align: inherit;"><span style="vertical-align: inherit;">
$this->data = "MECARD:N:{$name};ADR:{$address};TEL:{$phone};EMAIL:{$email};;";</span></span><span style="vertical-align: inherit;"><span style="vertical-align: inherit;">
}</span></span>
STEP 4: Define Functions to save the QR Code image in QrCode Class:
With 13+ years of excellence in information technology, we provide web and app development technologies on various frameworks. You can also explore a wide range of Prestashop, Opencart, WooCommerce, Shopify, and Magento 2 ready-to-use eCommerce extensions.
In case you have queries/suggestions, you can reach out to our technical support portal at our email address support@knowband.com.
The Prestashop One Page Checkout by Knowband simplifies the checkout process, enhancing user experience and boosting conversions for your online store.
Black Friday is just around the corner. While online shoppers are desperately waiting for the occasion to arrive, e-retailers are making sure that they do not miss any opportunity to achieve sky-high sales on this Black Friday. From designing the website as per Black Friday to running attractive deals and promotions, merchants have tick-marked every option in their Black Friday checklist to catch the holiday spirit.
Magento Extensions for Black Friday
In this article, I have listed down 7 Magento Extensions that you shouldn’t miss out on this Black Friday. Have a look.
1. Magento Spin and Win
Magento Spin and Win extension adds a gamified interface to your website in the form of a spin and win wheel. The “Spin to Win” popup asks users to try their luck by spinning the wheel and win some exciting rewards.
The extension helps you with more user engagement and makes it a better way to catch the email address of your visitors rather than conventional pop-ups.
Set a Black Friday theme for this engaging pop-up and shoot up your conversions.
Magento Mobile App Builder extension transforms your Magento Website into a native mobile app for both Android & iOS.
The extension helps you with enhanced online shopping experience for your customers by reducing the hassle of visiting the website by typing its URL on the search engine. Magento Mobile App Builder makes it a one-click task.
It is a feature-packed extension that offers Home Page layout optimization, Social login, Fingerprint and OTP login, Zopim and WhatsApp Chat Support, Unlimited Push Notifications, Convenient Checkout, etc.
Apart from these, it lets you sync your website content into a mobile app in real-time and supports multiple shipping and payment methods.
So, launch a mobile app for your website and double your sales volume on this Black Friday. You can customize the look and feel of your mobile app by setting up a Black Friday theme.
Magento Gift Card extension adds a gift card section to your Magento website and lets you provide a range of gift cards to your customers. You can set up gift cards for multiple occasions like Birthday, Anniversary, Black Friday, Cyber Monday, etc.
The extension ends the customer’s time-consuming search for a perfect gift and helps them gift a desired/occasional gift card to their loved ones.
Digital Gift Cards have brought humongous sales for eCommerce merchants. You can expect higher sales too. Get the Magento Gift Card extension today.
Magento Abandoned Cart extension helps you recover your abandoned carts by sending follow-up reminders to the abandoned cart users.
You can set the duration after which the cart is assumed to be abandoned, and then send abandoned cart alerts to those users about the pending items in the cart. You can include the discount in your follow-up emails and encourage the prospects to complete the purchase.
Recover your lost sales on this Black Friday and scale-up your conversion graph. Though you cannot convert all abandoned carts, even a few conversions would make up for good revenue.
The extension allows you to send website notifications to your subscribers even if they are not present at your website and is supported for both mobile and desktop. (Subscriber here refers to the visitors who have approved to receive notifications)
With Magento Web Browser Push Notifications, you can announce abandoned cart alerts, product price alerts (drop in product price), Product back-in-stock alert, Order Status updates, etc.
Ask visitors to subscribe to alerts and make them grab their desired product instantly on your Black Friday sale.
Magento Affiliate and Referral Program extension adds an affiliate section on your Magento website and allows your visitors/customers to register as an affiliate partner.
Once registered, the user gets a commission for every successful referral; which can be a new user registration, order placement or both.
The extension encourages word-of-mouth marketing and boosts brand awareness. Run enticing offers and let your affiliates do the marketing for you for this Black Friday. It helps you acquire new customers and increases your sales.
While you would be capturing a huge number of orders on this Black Friday, there would surely be a few returns and it can get extremely difficult to manage them in the busy shopping hours. Avoid this headache with Magento Return Manager.
Magento Return Manager extension helps you manage your eCommerce returns conveniently. Apart from the usual refund and replacement choice, it offers store credits worth the product amount which a customer can utilize on his future purchases.
The extension speeds up your return process and helps you with improved customer loyalty and customer retention.
Hardly a few days left for Black Friday. Brands have already begun the preparations for the busiest shopping day of the year 2020in the U.S. and they are looking to scale-up the number in this season too. Last year Black Friday sales had hit the $7.4billion mark and the expectations are high for this year too.
Preparing for the biggest eCommerce sales of the year can be intimidating when you are competing with big brands like Amazon. But, here is a way of making your holiday e-commerce season run as efficiently as possible. This article will help you optimize your OpenCart store in all possible ways.
OpenCart Extensions for Black Friday
I am sure you also want to make the best use of the coming Black Friday. So if you are having an eCommerce website on the OpenCart platform, take a look at the following 8 OpenCart Extensions to boost your eCommerce sales during Black Friday.
Customers like Personalization
1. OpenCart Product Designer/Customizer
The concept of the eCommerce sale is never constant but it always changes and with that the personalization has become a part of the business. People love customized products and 2020 has witnessed a boom in personalized gifting solutions. Empower your clients with the opportunity to design and shop on your website for personalized items such as T-shirts, mugs, cushions, and a lot more.
The Product Customizer Extension designed for the OpenCart platform allows the shopper to customize the product by inserting the desired text and pictures. The Product Designer/Customizer extension provides you with the best way to sell your products on your website according to consumer needs.
Let them design and gift the custom products to their loved ones!
Time to attract new customers
2. OpenCart Gift Card Manager
There will be a heavy demand for Gift Cards when Black Friday makes a close approach. Many online shoppers would be short of time to purchase different gifts for their close ones. In this rush, shoppers would probably prefer the Gift Card option. Reduce the hassle to search for a perfect gift with OpenCart Gift Card Manager.
OpenCart Gift Card Manager helps you add a gift card section to your OpenCart store and encourages more sales. The extension lets you place the Gift card block on various places on your website, including the header and footer so that it is easily noticed by the user when he or she arrives at your website.
With the help of this OpenCart extension, you can create an attractive Gift Card template for the occasion of Black Friday.
When customers visit your OpenCart website, they will see the option to purchase the Black Friday Gift Card or they can create their own custom gift card by uploading a picture.they can send to the recipients over their email or deliver it at their doorstep.
3. OpenCart Facebook Share and Win Discount
While online shoppers would be searching everywhere to get discounts on Black Friday, you can make their task easy with Facebook Share and Win Discount.
OpenCart Facebook Share and Win Discount adds a “Share and Win Discount” tab on your product pages, clicking on which the user earns a discount code every time they share that product on their timeline. You can specify the products for which you want to provide a discount on sharing.
Increase Customer Engagement
4. OpenCart Spin and Win
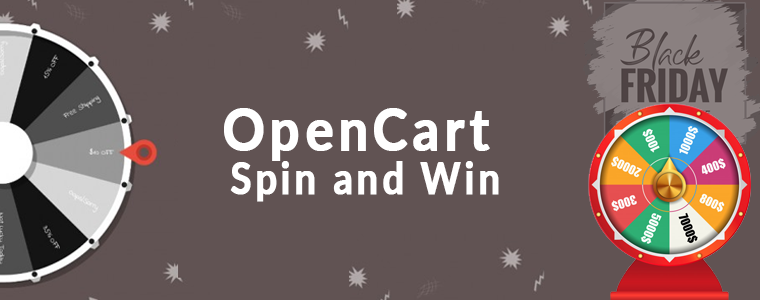
OpenCart Spin and Win extension integrates a Gamification popup on your website. The primary purpose of this OpenCart extension is to create more user engagement and make your visitors earn offers by involving them in a fun activity rather than approaching them through conventional popups.
OpenCart Spin and Win popup helps you capture more email addresses and ultimately drive more conversions. For amazing results on this Black Friday, you can set up your popup theme as per the occasion to catch the Black Friday spirit. Not just the Black Friday but the module is integrated with several attractive themes for every occasion.
5. OpenCart Exit Popup
Prevent visitors from leaving your website and present them with some exciting Black Friday offers and discounts at the last minute.
OpenCart Exit Popup lets you display an interactive popup right when the user intends to leave your website. The module senses as soon as the cursor reaches the close button and performs the specified task.
The OpenCart Exit Popup makes it a perfect way to turn the visitor into a potential customer at the last moment. It helps you with higher conversions and hence higher revenue.
You can find tons of customizations inside the module.
Create Urgency
6. OpenCart Countdown Sales Timer
How about creating awareness about your sales on Black Friday and generating a sense of urgency on your OpenCart website? Yes, this can be implemented through OpenCart Countdown Sales Timer.
OpenCart Countdown Sales Timer lets you set a timer for your sales and display it on the front end of your website to encourage quick purchases.
This OpenCart extension triggers impulse purchasing and helps you achieve higher sales within a limited time. You can display the timer on multiple pages and adjust its look and feel.
7. OpenCart Deal Timer
Provide enticing discounts on specific products with the help of OpenCart Deal Timer Extension. For the Black Friday occasion, you can set a special discount on your best sellers and increase the sales volume.
The horror of abandoned carts will scare you the most during Black Friday. Try to convert abandoned carts with OpenCart Abandoned Cart extension.
OpenCart Abandoned Cart extension lets you recover the abandoned carts by tracking the abandoned cart users. You can send an email reminder to those users about the pending items in their cart and ask them to complete the purchase by including a discount coupon in the follow-up email.
You can specify the duration after which the cart is assumed to be abandoned and also customize your abandoned cart emails.
Make your Store Gadget Friendly
9. OpenCart Mobile App Builder
Make the online shopping experience of your customers even better and convenient by launching a mobile app for your business. Black Friday is approaching and there would not be any better opportunity to get higher sales than having your mobile app ready before Black Friday arrives.
OpenCart Mobile App Builder transforms your OpenCart website into a native mobile app, be it for Android or iOS or both. It does not require any kind of coding knowledge.
It offers real-time synchronization of the website into the app, offers fingerprint and OTP login, provides Zopim and WhatsApp Chat support, Unlimited Push Notifications, Simplified Checkout, and much more.
Wrap-up:
The OpenCart extension helps you in free brand promotion through your customers and most importantly, improves customer retention.
That’s all! Best wishes for your Black Friday sales.
Need assistance with any of the mentioned modules? Leave a comment below or contact us at support@knowband.com
NetBeans is one of the best and powerful IDE for any WebDevelopment specially best for PHP frameworks such as ZenCart, OpenCart, CakePhp etc.
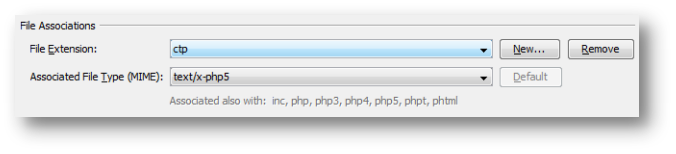
CakePhp use their own custom file extension for its View files i.e. *.ctp. NetBeans doesn’t know about this file by default. So there are no color coding will be shown when these types of files are opened in the NetBeans. We have to manually enable these features.
Below are the steps to enable highlighting for CakePHP .ctpfiles.
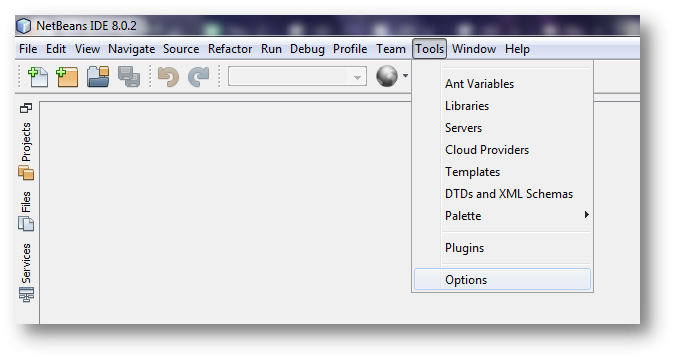
1. Go to Tools => Options
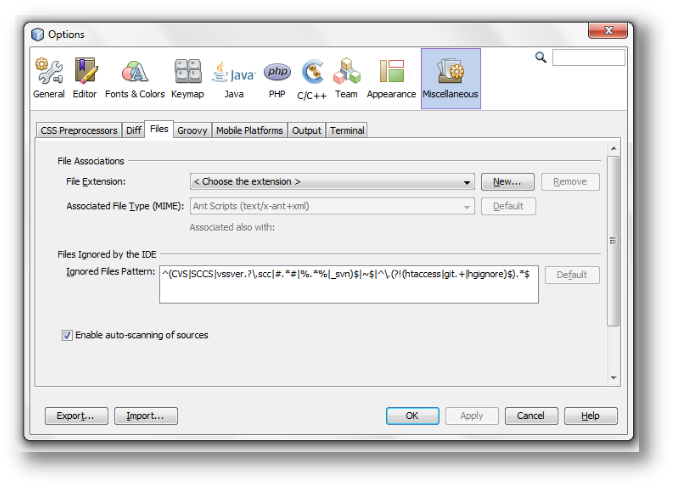
2. Click on Miscellaneous => Files
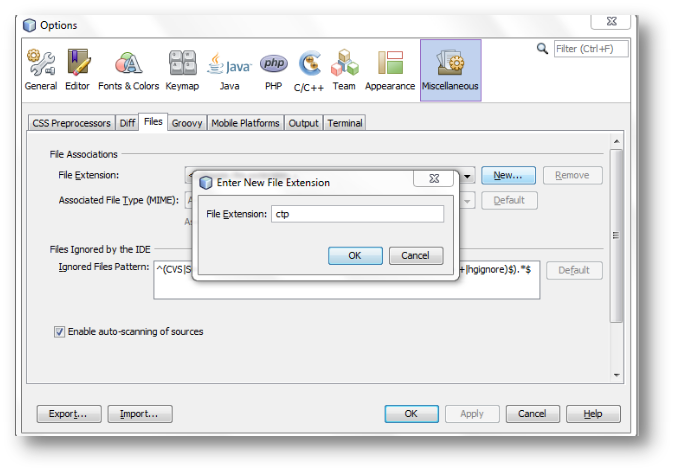
3. Click on New button and type ctp. Then click on Ok.
4. From Associated File Type (MIMI): Choose: text/x-php5.
5. Click on OK.
Note: Restart the IDE if changes don’t reflected after doing the above steps.
You can create straightforward applications that only retrieve the order information you require using the Orders API section of the Amazon Marketplace Web Service (Amazon MWS). This makes it possible for you to create unique applications quickly, easily, and adaptably in fields like demand-based decision support tools, order synchronisation, and order research.
Important: The role Amazon assigns you after you submit the Developer Registration and Assessment form determines your access to Amazon MWS data. See Registering to Use Amazon MWS for more details.
Objective of the blog
After reading this blog, you will be able to understand how sellers can get the Amazon orders using API.
Let’s know about the order’s API
Amazon orders API helps the sellers to get the order’s details and synchronized the Amazon orders on their custom application. This is very helpful for retrieving order updates in real-time and the sellers can also get the order status (shipped or unshipped) information easily for all orders by using API.
How to synchronized Amazon orders on custom application
First of all, you need the credential of Amazon MWS (Market Place Web Service) API. If you still don’t have, you can get the help from this blog
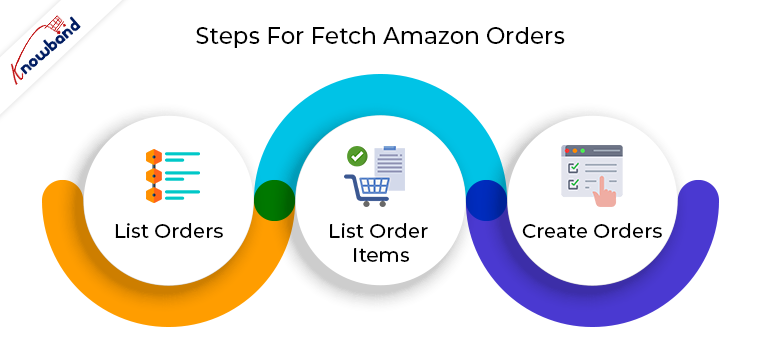
To fetch Amazon orders on your end, you need to follow the below steps:
1. List Orders – In this step, you need to send a request to Amazon to get the orders from Amazon for a particular time interval.
You need to send the following data given below in the request:
mws.amazonservices.co.uk/Orders/2013-09-01
?AWSAccessKeyId=XXXXXXXXXXXXXXX
&Action=ListOrders
&SellerId= XXXXXXXXXXXXXX                                // Here write your merchant id
&SignatureVersion=2                                             // Here write your signature version
&Timestamp= gmdate("Y-m-d\TH:i:s\Z", time())     // Write the time stamp &Version=2013-09-01
&Signature=1234Knowband1234example1234                              // Here you need to write the signature
&SignatureMethod=HmacSHA256                     // Here write your signature method
&LastUpdatedAfter=date("Y-m-d\TH:i:s\Z", strtotime('-24 hour'));  //request to get orders for last 24 hours only from Amazon
&OrderStatus.Status.1=Unshipped                // Here you need to add the status for which you want to fetch the orders
&OrderStatus.Status.2=PartiallyShipped
&OrderStatus.Status.3=Shipped
&MarketplaceId.Id.1= XXXXXXXXXXXXX
AWSAccessKeyId=XXXXXXXXXXXXXXXXXXXX
In the response, you will get an order feed file which will contain the list of orders which are placed on Amazon in the last 24 hours and have the requested order status.
Here is the sample order feed file.
2. List Order Items – From the first step, you will only get order details (like Amazon orders id, purchase date, etc) not order item details (ordered product detail). To get the order’s item details, you will need to send a separate request to Amazon. You need to send request corresponding to each order. If you need details for 5 Amazon orders then you will need to send 5 requests.
The request is given below:
e.g $Amazon_order_id = 112-5028700-7051869
mws.amazonservices.co.uk/Orders/2013-09-01
?AWSAccessKeyId=XXXXXXXXXXXXXXXXXXXX
&Action= ListOrderItems
&SellerId=‘XXXXXXXXXXXXXX’;           // Here write your merchant id,
&'AmazonOrderId'=$Amazon_order_id       // Here write the order id for which you want to get detail
// Here you need to write the signature, when you send HTTP requests to AWS, you need to sign the requests so that AWS can identify who sent the request
&Signature=1234Knowband1234example1234
&SignatureVersion=2                                 // Here write your signature version
&SignatureMethod=HmacSHA256               // Here write your signature method
&Timestamp=gmdate("Y-m-d\TH:i:s\Z", time())      // Write the time stamp
&Version=2013-09-01
In response of the request, you will get the descriptive detail of the order. The sample is given below:
3. Create Orders – This step is the final step and from step 1 & 2, you got all the details of the Amazon orders which you need to create orders on your application. By parsing the above XML feeds (list order and list order item), you can create orders on your application.
If an Amazon order is already created on your application then you can use the step 1 to update the order status of that order.
If you require any assistance or custom development, please feel free to reach us at support@knowband.com.
You can also check out marketplaces integration modules for Prestashop, Opencart, Magento, and Magento 2 here.
Convert your store into a native Android and iOS app with our No Code Mobile App Builder solution. Know more here:
Sometimes, while developing an e-commerce website, you’ll need to automatically check the payment status and mark the order status as “Completed”, “Pending” or as per your requirement. A default order status is set on the basis of payment done. The Front-end users can check their order’s status in their Account History page. In this blog we will learn how to change the default order status on Woo Commerce as “Invoice to be printed” step by step.
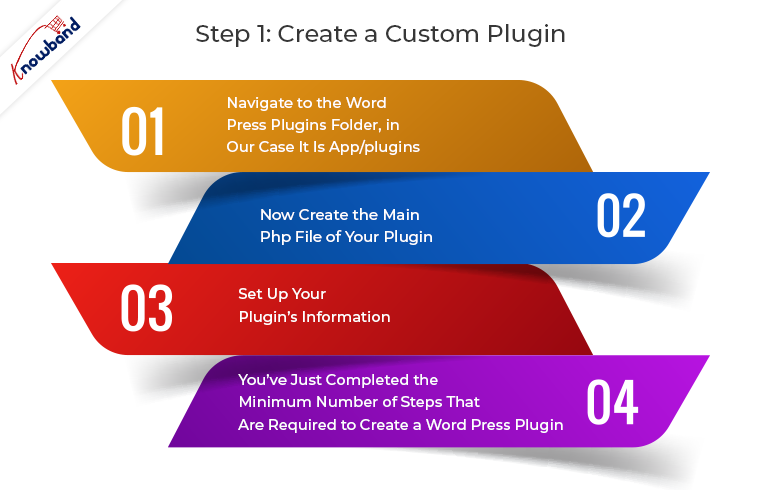
Step 1: Create a custom plugin
To create a custom plugin on your website follow the following steps:
1. Navigate to the Word Press plugins folder, in our case it is app/plugins. Create a folder as “customstatus”.
Important Note: Give your folder a unique name (Word press default plugins name should not conflict with your plugin name) using lowercase letters and dashes.
2. Now create the main PHP file of your plugin. To do so, create a PHP file within your plugin folder and give it the same name as the folder name. In our case, the folder name is “customstatus” so the file name will be customstatus.php.
3. Set up your plugin’s information. Just copy paste the below code in customstatus.php file.
/** * Plugin Name: My First Plugin * Plugin URI: https://www.mywebsite.com/my-first-plugin * Description: The very first plugin that I have ever created. * Version: 1.0 * Author: Your Name * Author URI: https://www.mywebsite.com */
Note: Edit the details such as Author Name, Plugin Name, Description, etc. as per your requirement.
4. That’s it! You’ve just completed the minimum number of steps that are required to create a Word Press plugin. You can now activate it from the Plugins tab in Word Press admin.
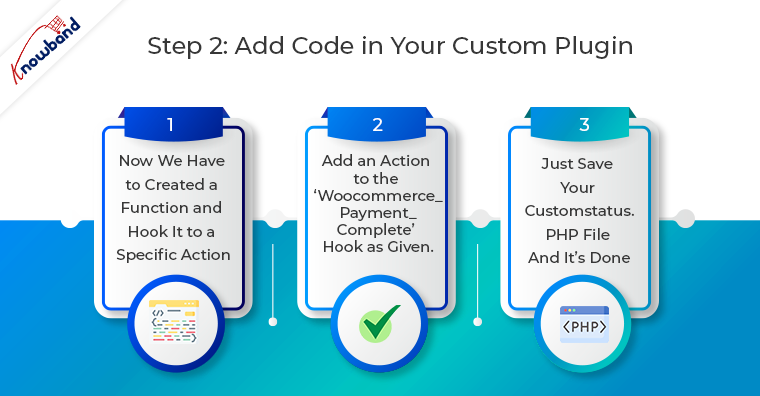
Step 2: Add Code in your custom plugin
1. Now we have to create a function and hook it to a specific Action. Simply copy the below function in your customstatus.php.
2. Since we want to update the order status on complete payment, add an action to the ‘woocommerce_payment_complete’ hook as given below in the highlighted code.
//COPY THE WHOLE CODE IN customstatus.php FILE.
#<editor-fold defaultstate="collapsed" desc="Default Status as Invoice To Be Printed">
function action_woocommerce_payment_complete( $order_id ) {
      if( ! $order_id ) return;
        $order = wc_get_order( $order_id );
        $order->update_status( 'wc-print-invoice' ); //Order status will be updated to “Invoice To Be Printed”.
};

// add the action
add_action( 'woocommerce_payment_complete', 'action_woocommerce_payment_complete', 10, 3 );
#</editor-fold>
3. Just Save your customstatus.php file and it’s done. From now on, the order status will be updated to “Invoice to Be Printed” when the payment is complete.
USEFUL NOTE: If you want to update the order status when “Thank You” or “Checkout Success” page is loaded you can add the action on “woocommerce_thankyou” hook. In customstatus.php replace
add_action( ‘woocommerce_payment_complete’, ‘action_woocommerce_payment_complete’, 10, 3 ); with add_action( ‘woocommerce_thankyou’, ‘ggb_custom_change_order_status’ ,10,3);
You can reach us at support@knowband.com for any queries regarding Woocommerce. We provide customized changes on Woocommerce and also specific modules to help you sell better.
One of the most popular module for Woocomerce is Spin And Win. This module has a proven record of generating sales and boosting conversion rate. See what client’s are saying about this module: