Copy “upload” module folder to your OpenCart root directory.
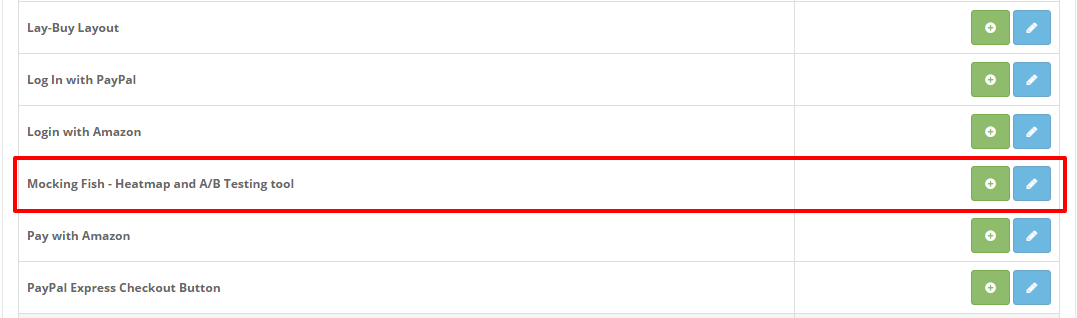
After upload, module will be listed on module listing page in admin panel as shown given below screen.
Note:
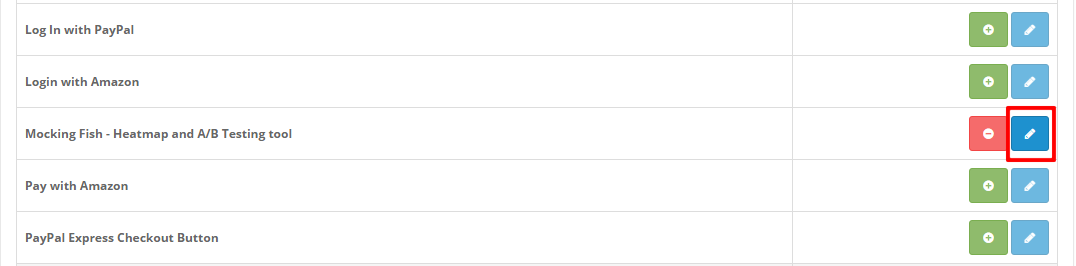
Install the module and a “Edit” button will be there in front of this plugin on module listing page as shown in screen below:
User Manual
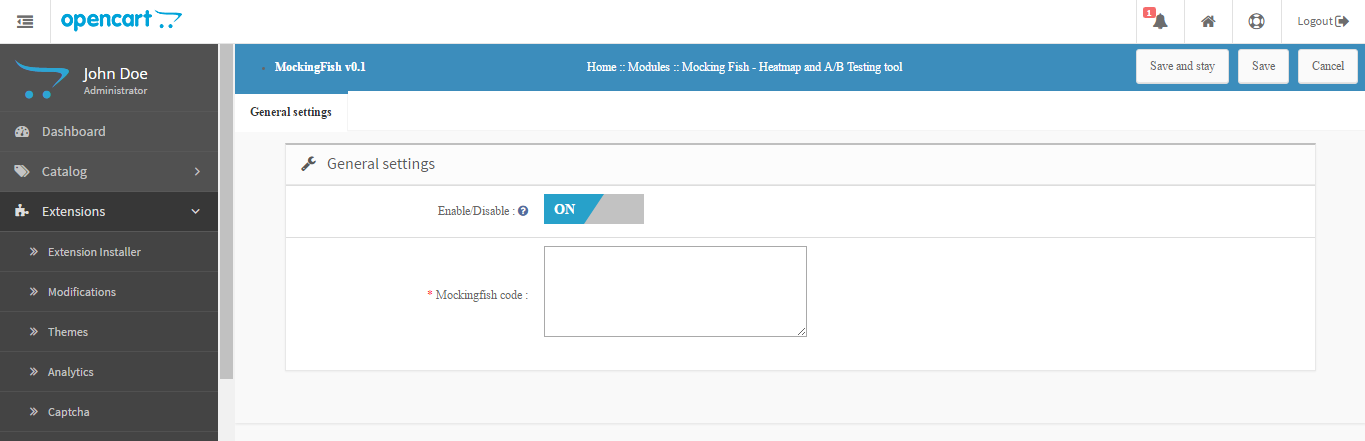
To access this module, Click on “Edit” button. On clicking, module interface will be opened and following screen will be display as given below:
Module back end has 1 tab:
General Settings
General Settings
This tab has following two options: Enable/Disable:
When enabled is selected module will insert added script in the front end.
MockingFish Script: This field will contain the script which needs to be inserted in website header. If you do not have any script, click on application details tab which lists down all steps to get MockingFish script.
In general terms a MarketPlace is ‘an open space where a market is/ was formerly held.’ It means that a space with relation between sellers and customers. There are several sellers selling goods to several customers.
An online marketplace (or online e-commerce marketplace) is a type of e-commerce site where product or service information is provided by multiple third parties, whereas transactions are processed by the marketplace operator. Online marketplaces are the primary type of multi channel e-commerce.
In an online marketplace, consumer transactions are processed by the marketplace operator and then delivered and fulfilled by the participating retailers or wholesalers (often called drop shipping). Other capabilities might include auctioning (forward or reverse), catalogs, ordering, wanted advertisement, trading exchange functionality and capabilities like RFQ, RFI or RFP.
In general, because marketplaces aggregate products from a wide array of providers, selection is usually more wide, availability is higher, and prices are more competitive than in vendor-specific online retail stores.
MarketPlace extensions for Magento is developed for simply converting a simple Magento store to a MarketPlace with lots of features to customers, sellers and store owner. Any customer can register as a seller and can enjoy the features of a seller as well as customer of the store.
The seller sells products on the store and in return the store owner gets a commission by percentage from the total sale made by the seller. The commission percentage that the store owner gets can be modified and the store owner can set percentage to any desired value.
Return Manager addon adds the functionality to manage return requests for any order placed by a customer as well as a guest customer. The plugin adds a link to the front-end through which any customer/guest customer can apply for return of any product contained in a order placed earlier.
This is a very flexible plugin and the customer can return any product in a order completely or partially, that means the customer can also return half or less quantity of any product in the order.
Installation Manual
Follow the following steps for installing Magento Marketplace Return Manager Extension
1. Download the extension package.
2. Unzip the package on your root folder of Magento setup via FTP manager (like Filezilla or WinSCP – download here: https://filezilla-project.org/).
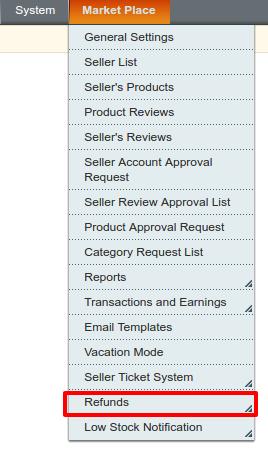
3. In Admin Panel under the Menu “Market Place” next to System menu, you will see a new menu option “Refund”. In case you are not able to see the link under System, please clear Magento Cache first then check again.
4. With this the extension gets installed on your system.
Admin Module
After installing plug-in into store, the plug-in will provide following interface:
1. Admin Panel
a) Configuration
Marketplace Refund Configurations
b) Refund Request
2. Front end
a) Customer interface
b) Seller Interface
Refund Request
Each interface is in form of a tab and each tab contains some specific settings/functionality that can be changed according to the need. Each tab is explained below.
Marketplace Refund Configurations
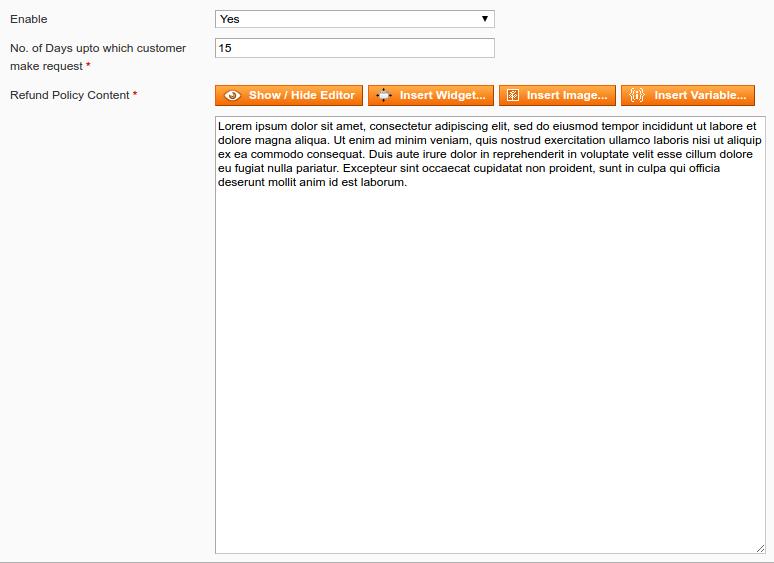
After clicking on configure link on MaketPlace>>Configuration (link will automatically appear once you install the plugin), system will open Marketplace Refund Configurations tabs by default as shown in screen below:
Initially fields in above form will be already filled with their default values.
1. Enable/Disable: Initially, this will be “OFF”. Admin can enable/disable plug-in by turning ON/OFF this setting by selecting “Yes” or “No”
2. Refund Policy Content : This option enables the admin to change the text as well as the format (HTML Design) of the text that will be displayed on successful submission of a return request by any customer.
3. No. of Days up to which customer make request : This option enables the admin to set the maximum number of days up to which the return of purchase is allowed.
Actions
1. The admin can edit any policy content and settings using the configuration link in the admin panel.
2. The second link in the actions column is for viewing the Refund request of the products for the sellers.
Return conditions
A return request can only be placed by a customer if the order status is changed to complete from pending.
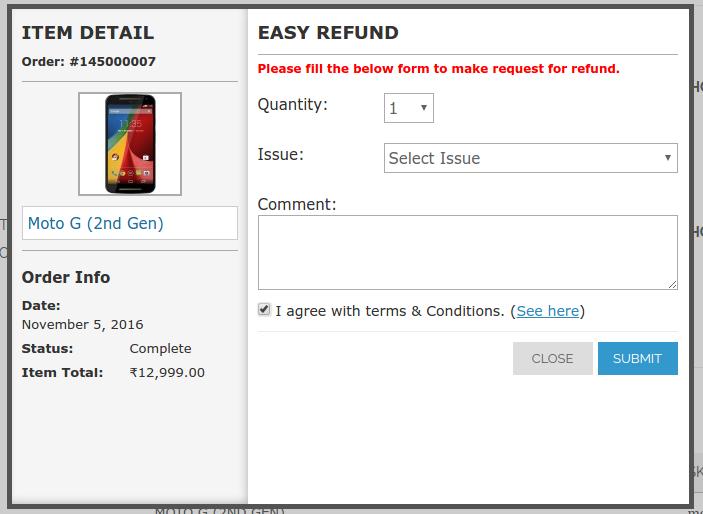
The customer has to fill the above form and then click on submit then a success form will appear showing the successful submission of the return request as shown below :
CUSTOMER’S REFUND REQUESTS
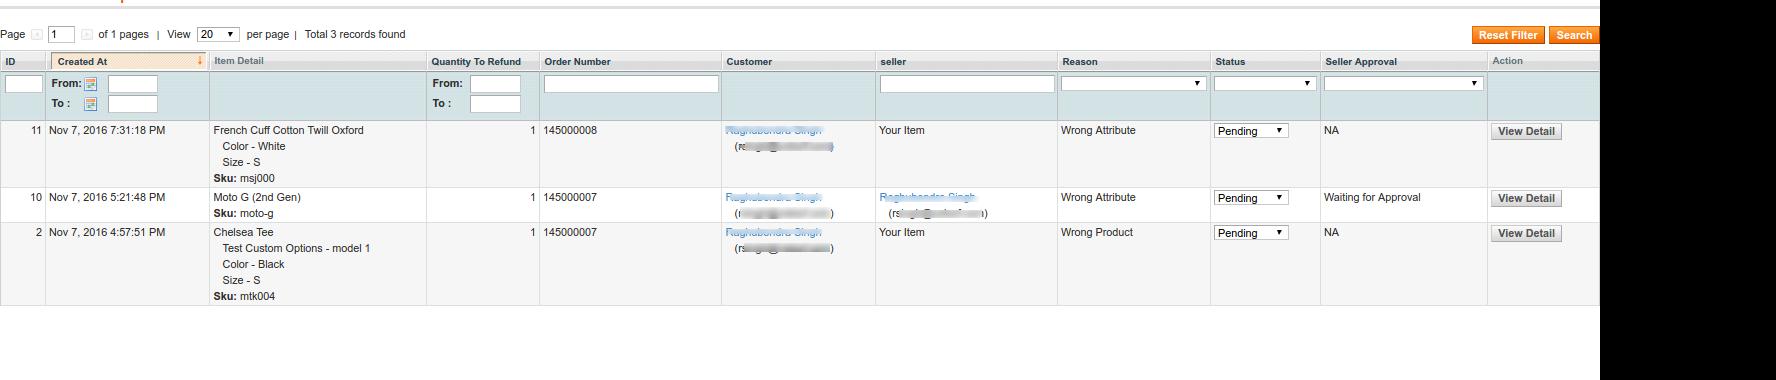
This tab contains a list of all the returns that are pending i.e. are not approved by the admin. The admin has to approve a return request in order to perform several operations on the return request like changing the status and completing the return process.
The admin can approve or deny a return request using the actions available in front of the list.
Once the admin approves a return request then it is moved to the Active Returns List.
On the other hand if the admin denies a return request that it is removed from the list and this action can not be undone.
The admin can view the detail of the product, the details of the order and also the details of the customer by clicking on the respective links from the list of the pending return.
SELLER INTERFACE FOR RETURN MANAGER
The Seller can also approve or deny a return request using the actions available in front of the list.
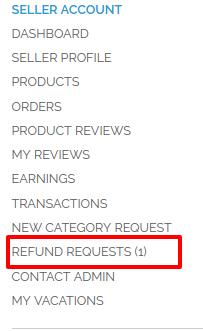
The seller interface can be seen in the Account>>REFUND REQUEST tab
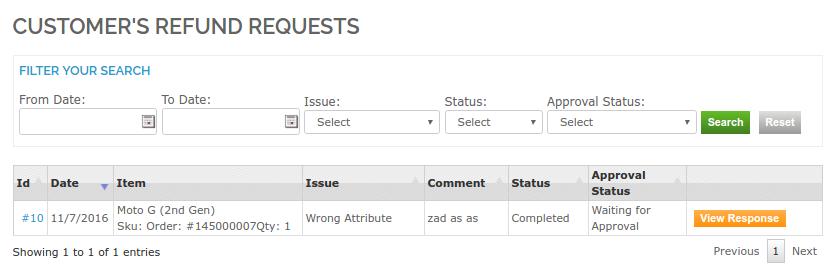
After clicking on Refund Requests, a new window will open as shown in the screen print below:
The seller can either approve or disapprove a request. If the return request is already approved by the admin, then the option to View Response would be available in Yellow button as shown in the screen print above.
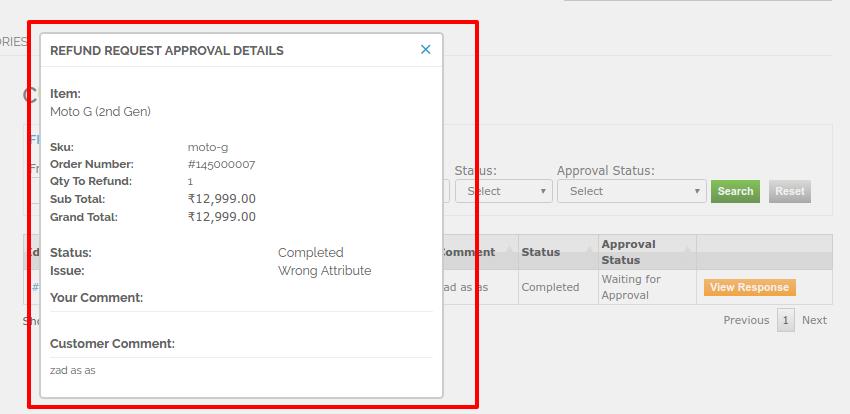
After clicking on View Response, new pop up will appear with the details of the return request by the customer.
Please note: The admin has the access to accept or deny a return request. A return denied by the admin cannot be approved by the seller. The response of the seller can be seen on the Return request listing on the admin panel in Marketplace>>Refunds>>Refund Requests tab
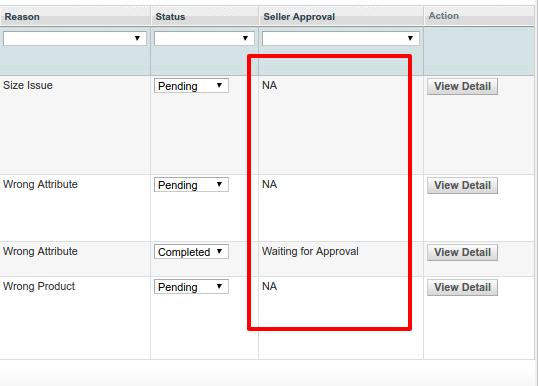
In this listing the admin products will show the column for Seller Approval as N/A if the return request has been placed for an admin product;not the Sellers product.
Front End Module
The link for the Returns link will appear on the ‘My Account’ page of any customer in View Order page. This link only appears to a logged in customer on the ‘My Account’ page.
When the customer clicks on this link than a new page will open on the basis of logged in status of the customer.
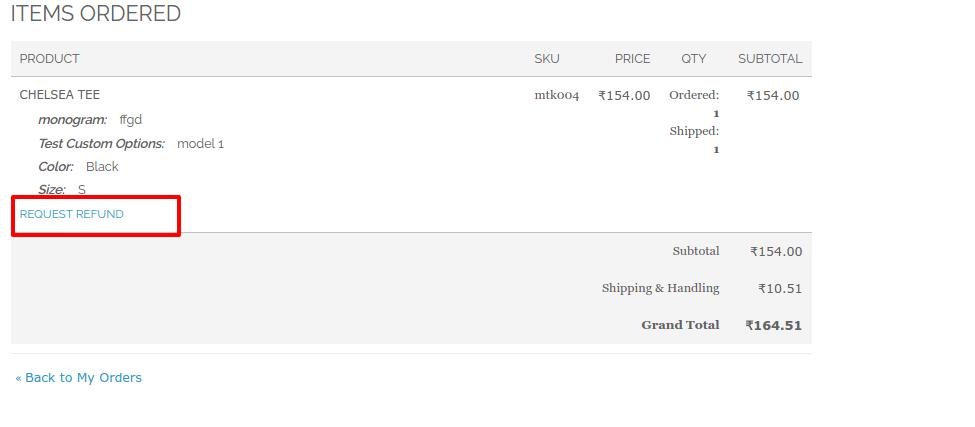
The products that are eligible for return in that particular order will have a return button. Through this button the customer can apply for return of that particular product.
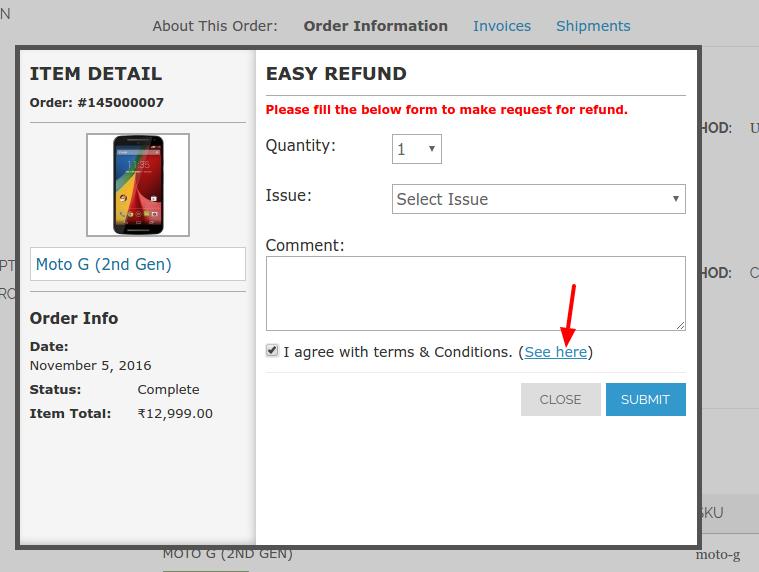
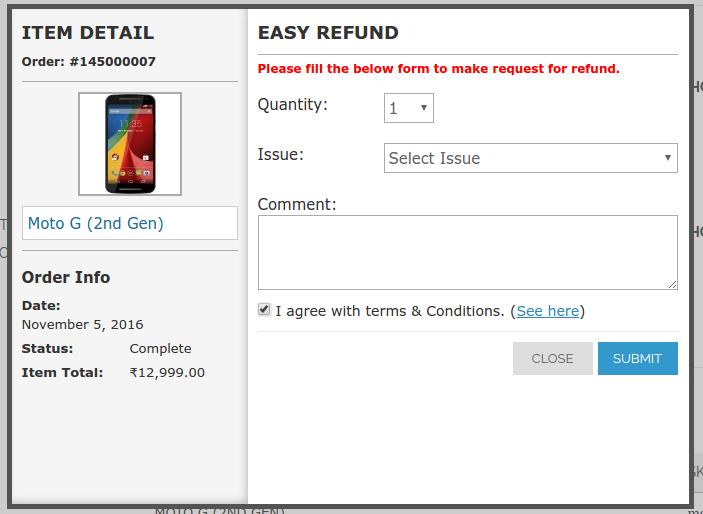
On clicking on the ‘ Request Refund’ button a pop-up will appear containing the form for return of that particular order. The form will appear as follows:
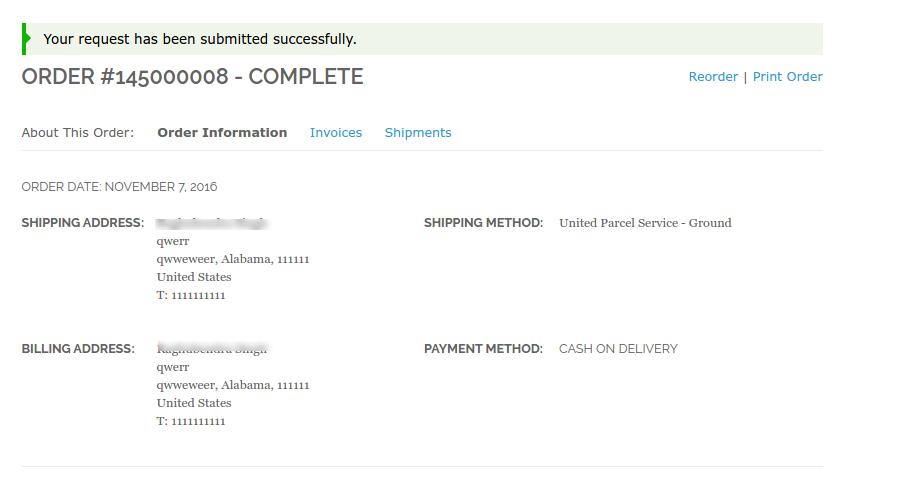
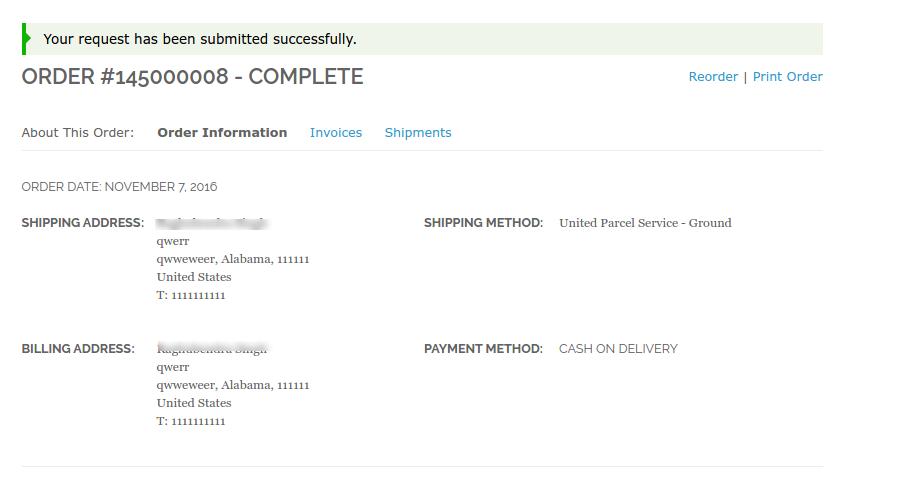
The customer has to fill the above form and then click on submit then a success form will appear showing the successful submission of the return request as shown below :
In general terms a MarketPlace is ‘an open space where a market is/ was formerly held.’ It means that a space with relation between sellers and customers. There are several sellers selling goods to several customers.
An online marketplace (or online e-commerce marketplace) is a type of e-commerce site where product or service information is provided by multiple third parties, whereas transactions are processed by the marketplace operator. Online marketplaces are the primary type of multi channel e-commerce.
In an online marketplace, consumer transactions are processed by the marketplace operator and then delivered and fulfilled by the participating retailers or wholesalers (often called drop shipping). Other capabilities might include auctioning (forward or reverse), catalogs, ordering, wanted advertisement, trading exchange functionality and capabilities like RFQ, RFI or RFP.
In general, because marketplaces aggregate products from a wide array of providers, selection is usually more wide, availability is higher, and prices are more competitive than in vendor-specific online retail stores.
MarketPlace extension for Magento is developed for simply converting a simple Magento store to a MarketPlace with lots of features to customers, sellers and store owner. Any customer can register as a seller and can enjoy the features of a seller as well as customer of the store.
The seller sells products on the store and in return the store owner gets a commission by percentage from the total sale made by the seller. The commission percentage that the store owner gets can be modified and the store owner can set percentage to any desired value.
Prerequisite
The Knowband MarketPlace Extension is necessary to be installed on the system for using this MarketPlace Extension.
The MarketPlace -Contact Admin extension is a MarketPlace extension developed by Knowband to facilitate a medium of conversation between the MarketPlace Admin and Sellers. By using this MarketPlace extension a seller can create a ticket with the MarketPlace admin. The Marketplace Admin receives an email in his registered email account regarding a new ticket that has been created by the seller or simply receives an email regarding a new message has been received from the seller. The extension provides a two way communication channel between the Admin-Seller or Seller-Admin
Installation Manual
Follow the following steps for installing MarketPlace – Contact Admin Extension
1. Download the extension package.
2. Unzip the package on your root folder of Magento setup via FTP manager (like Filezilla or WinSCP – download here: https://filezilla-project.org/).
3. In Admin Panel under the Menu “Market Place” next to System menu, you will see a new menu option “Seller Ticket System”. In case you are not able to see the link under System, please clear Magento Cache first then check again.
4. With this the extension gets installed on your system.
User Manual
This User Manual will guide you through the Admin Module/Store Front settings and features of the MarketPlace – Contact Admin extension.
Admin Module
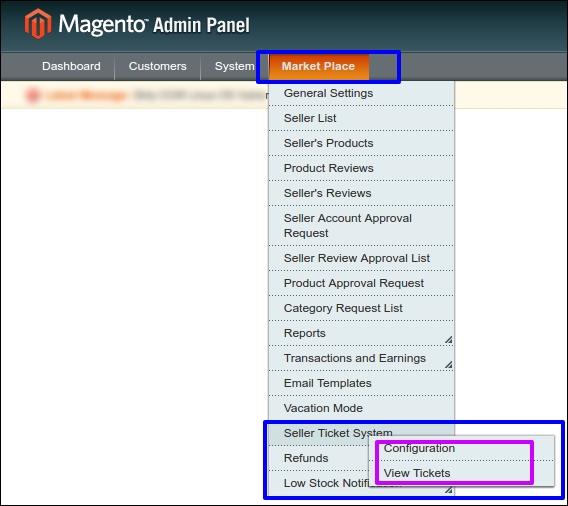
In the admin panel of Magento the MarketPlace Extension adds a separate menu (named “Seller Ticket System”) under the MarketPlace Menu tab.
MarketPlace Menu
The MarketPlace Menu consists of total 12 sub-menu options by default. With the addition of the MarketPlace – Contact Admin extension, a new menu option “Seller Ticket System” is listed which redirects to several pages for the MarketPlace Seller Ticket management.
Admin Interface
The Location of Admin Interface is under “MarketPlace>> Seller Ticket System”. The interface is then divided into two main categories i.e. “Configuration” and “View Tickets”.
Configuration
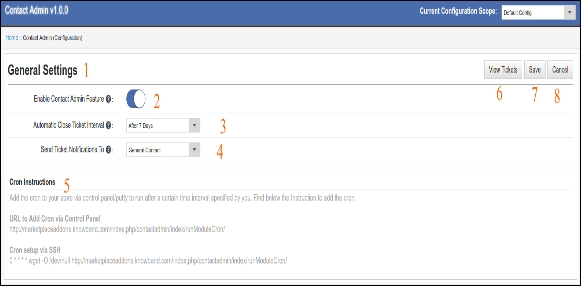
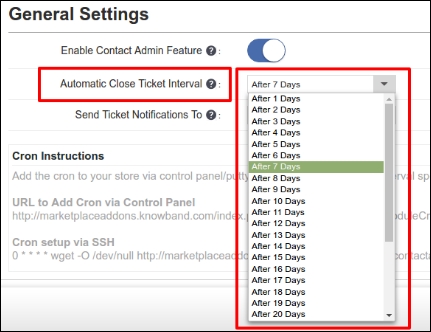
Clicking on the “Configuration” tab will open an interface to setup the “General Settings” on the extension. The general settings interface will look like this:
1. General Settings: General settings has been provided to the Admin to setup the preferences of the extension and manage the settings for the tickets and the interface of the front end on the seller panel.
2. Enable Contact Admin Feature: If this feature is enabled, the seller on the marketplace will be allowed to contact the admin from the interface provided by the extension in the seller front end.
3. Automatic Close Ticket Interval: The Admin can set a time interval after which the ticket status will be automatically changed to closed.
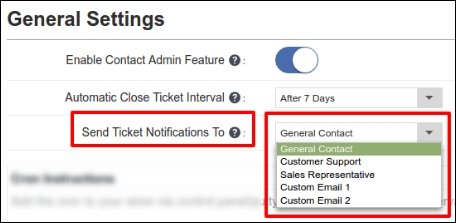
4. Send Ticket Notifications To: By selecting a category from the below drop down list , the admin can set up an email category where the notifications from the ticket system will go. The emails are already set in the Magento admin panel, you have to just select any email account here.
5. Cron Instructions: The Cron Instruction are set to close the ticket after the set time interval in step 3.
6. View Tickets: There are two links to views the ticket. One is as provided in the 6, and other in provided in the path “MarketPlace>> Seller Ticket System”. Clicking on View in 6 will direct the admin to a new interface to view, reply and manage the tickets. This menu option is discussed in comprehension in later part of the document.
7. Save: Click save to save your settings.
8. Cancel: Click cancel to discard your settings.
View Tickets
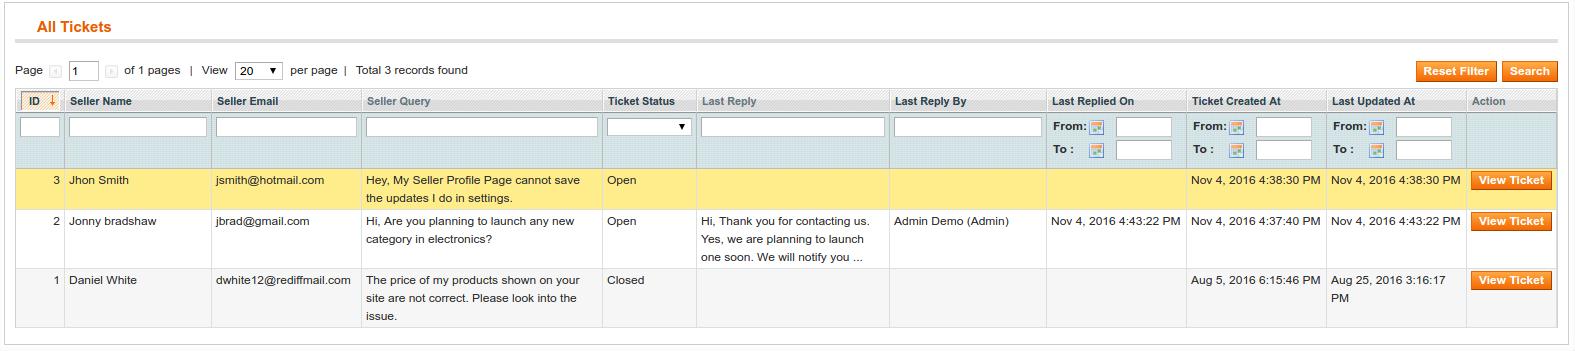
Clicking on “View Tickets” opens an interface where the admin can manage all the tickets created by the sellers on the MarketPlace. The admin can Reply to a ticket, set filters to find a ticket, close a ticket and so on.
The view Ticket interface looks like this:
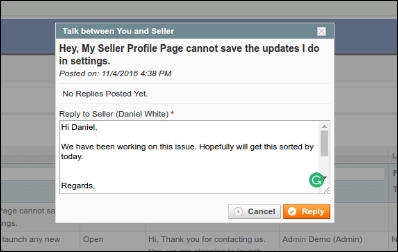
In Action tab, Clicking on View ticket will open a pop up window where the admin can reply to a ticket.
The Pop up will look something like this:
Reply: Clicking on Reply button will send the message to the seller. The seller will receive a notification on his registered email id and also on the seller inter face on the front end.
Filters in View Ticket interface
The Admin can apply multiple filters find the tickets in the list.
1. Filter by Ticket ID 2. Filter by Seller Name 3. Filter by Seller’s Email ID 4. Filter by entering a string in Seller’s Query 5. Filter by Ticket Status 6. Filter by Last reply by Admin 7. Filter by Replied date 8. Filter by date of Ticket Creation 9. Filter by last updated date
Seller Interface
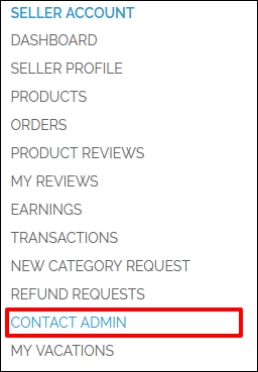
If the MarketPlace – Contact Admin extension is enabled by the admin, then all the seller Dashboards will add one extra option of “Contact Admin” in their interface on the front end.
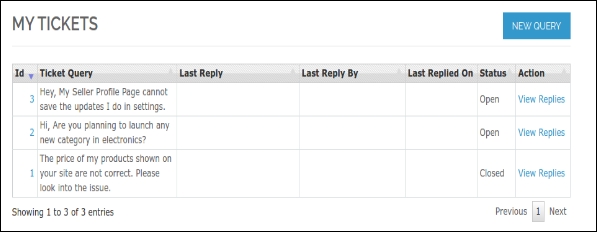
Clicking on contact admin will open an interface for ticket management which will look something like this:
To submit a new Query to the Admin
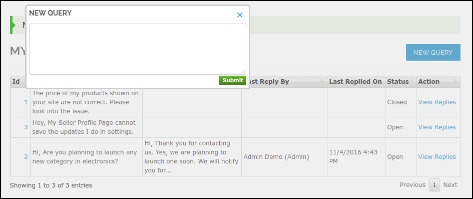
New Query: Clicking on New Query button at the top left in Blue color will allows the seller to create a new ticket with the admin. The New Query interface will look like this:
Submit: After writing the message in the text area, click submit to send a message to the MarketPlace Admin.
Viewing the tickets created by seller
1. View Replies: Click on “View Replies” at the left side of the ticket in the ticket listing.
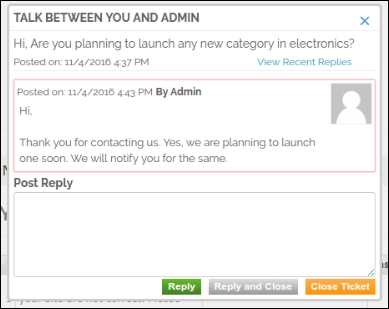
The interface to see the ticket and reply to the Admin will pop up like this:
2. Reply: After writing the message to the Admin, click Reply in Green button to send the message.
3. Reply and Close: Click Reply and close if you wan to close the ticket after sending the message.
4. Close: Click “Close ” in orange button if you wan to close the ticket simply.
In general terms a MarketPlace is ‘an open space where a market is/ was formerly held.’ It means that a space with relation between sellers and customers. There are several sellers selling goods to several customers.
An online MarketPlace (or online e-commerce marketplace) is a type of e-commerce site where product or service information is provided by multiple third parties, whereas transactions are processed by the MarketPlace operator. Online marketplaces are the primary type of multi channel e-commerce.
In an online marketplace, consumer transactions are processed by the MarketPlace operator and then delivered and fulfilled by the participating retailers or wholesalers (often called drop shipping). Other capabilities might include auctioning (forward or reverse), catalogs, ordering, wanted advertisement, trading exchange functionality and capabilities like RFQ, RFI or RFP.
In general, because marketplaces aggregate products from a wide array of providers, selection is usually more wide, availability is higher, and prices are more competitive than in vendor-specific online retail stores.
MarketPlace extension for Magento is developed for simply converting a simple Magento store to a MarketPlace with lots of features to customers, sellers and store owner. Any customer can register as a seller and can enjoy the features of a seller as well as customer of the store.
The seller sells products on the store and in return the store owner gets a commission by percentage from the total sale made by the seller. The commission percentage that the store owner gets can be modified and the store owner can set percentage to any desired value.
This Addon is basically developed for the sellers to let them inform their customers and the MarketPlace admin that they will not be available to sell for a particular time duration. In this module, the seller can set a specific time interval during which he will be unavailable on the MarketPlace. An alert is sent to the customers when a seller goes to vacation and a similar alert is sent once he/she is back from vacation. All these automation is done using the cron instructions.
The admin can also set a cron which will activate and deactivated the vacation mode and also sends an email to the sellers as soon as the vacation mode is activated or deactivated.
Installation Manual
Follow the following steps for installing MarketPlace – Magento MarketPlace Seller Vacation Mode Addon
1. Download the Addon package.
2. Unzip the package on your root folder of Magento setup via FTP manager (like Filezilla or WinSCP – download here: https://filezilla-project.org/).
3. In Admin Panel under the Menu “Market Place” next to System menu, you will see a new menu option “Vacation Mode”. In case you are not able to see the link under System, please clear Magento Cache first then check again.
4. With this the extension gets installed on your system.
Module Interfaces
This module will be accessible through Admin as well as seller’s account.
Seller Account Interfaces
These interfaces will be accessible only by a seller in his account section.
Admin Account Interfaces
These interfaces will be accessible only by the MarketPlace Admin in his account section.
User Manual
This User Manual will guide you through the Admin Module/Store Front settings and features of the MarketPlace – Seller Vacation Mode Addon.
Admin Module
In the admin panel of Magento the MarketPlace Extension adds a separate menu (named “Vacation Mode”) under the MarketPlace Menu tab
MarketPlace Menu
The MarketPlace Menu consists of total 12 sub-menu options by default. With the addition of the MarketPlace – Contact Admin Addon, a new menu option “Seller Ticket System” is listed which redirects to several pages for the MarketPlace Seller Vacation management.
Admin Interface
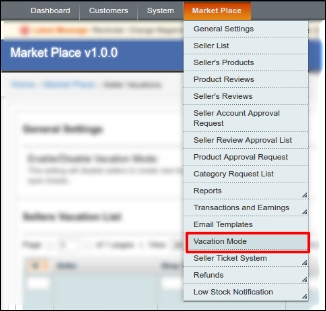
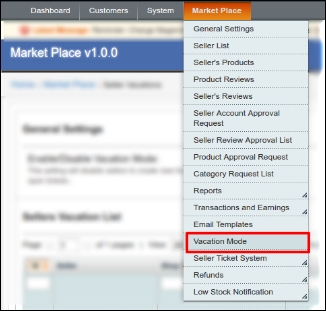
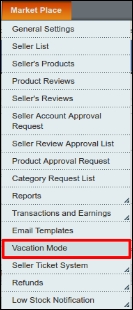
The Location of Admin Interface is under “MarketPlace>> Vacation Mode”.
Vacation Mode
How to allow/enable vacation mode for the sellers?
1. Navigate to “MarketPlace>> Vacation Mode” as shown in the screen print above. An interface similar to the below screen print will open:
2. Enable the module by enabling the setting number 2 “Enable/Disable Vacation Mode”.
3 . Click : “Save and Continue” to save the settings.
4. On the above interface in label 3, you can also view the list of sellers who have already activated the Seller vacation mode.
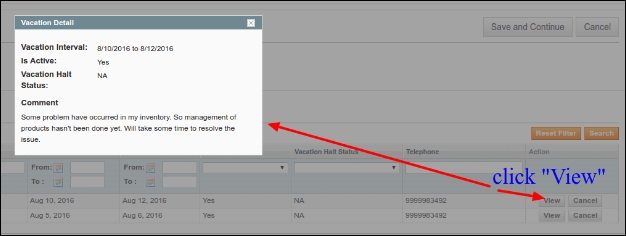
5. Click on “View” to open the details about the vacation mode activated by the seller.
Vacation Interval: The date set by the seller for starting and ending the Vacation is shown here.
Is Active: The current status of vacation mode is shown here.
Vacation Halt: If Seller has stopped the vacation mode before the specified date.
Comment: The comment or message used by the seller to inform the Admin regarding the reason for the vacation mode activation.
How to disapprove a seller vacation mode?
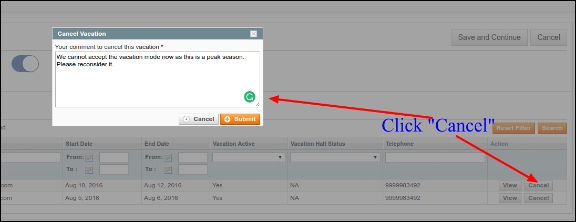
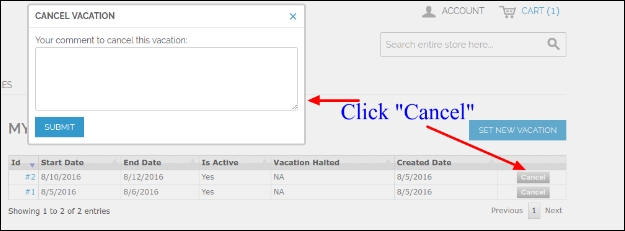
If for any reason the admin not want the seller to go on a vacation mode. The admin can deactivate the vacation mode for the particular seller at anytime by clicking “Cancel” as shown in the image below:
Clicking cancel will open a pop like above and the admin has to give a reason for not accepting the vacation mode request and then click “Submit”.
Seller Account Interfaces
This is the interface which will be accessible only through seller account section.
Menu Location
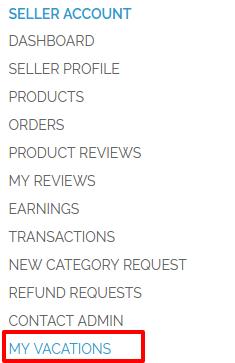
After installation, a menu(My Vacations) will be displayed to the seller in the “SELLER ACCOUNT” Menu tab as shown in below screen:
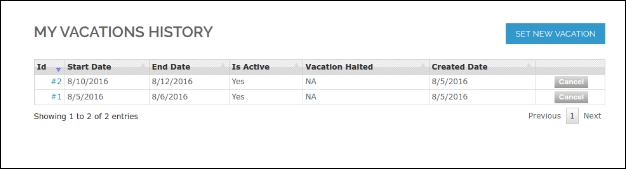
On clicking the highlighted link, the system will redirect seller to his “My Vacations History” window.
My Vacations time configuration
Here all the menu items and fields of the module are mentioned:
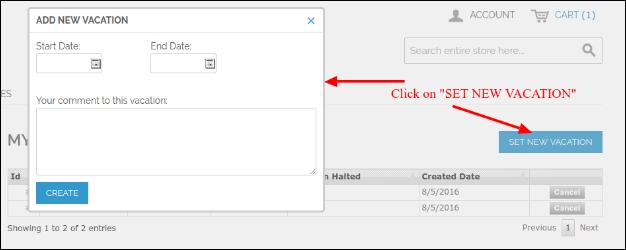
In the above window Click on “Set New Vacation” at the right top side of the interface. A new window appears for the configuration of your vacation mode.
Settings Description
1. Vacation Start Date: In this field, the seller will set the date for which he is going to vacation and will not to available on the MarketPlace. Please note : For testing also always mention the present date or date yet to come. Do not enter a past date in this field.
2. Vacation End Date: In this field, the seller will set the date when his vacation ends and will again be available on the MarketPlace.
3. Your comment to this vacation: Seller can specify the reason for activating the vacation mode. This message will be seen by the admin.
4. Save: Click Save button to save all your settings made.
Stop a vacation mode
The vacation mode automatically stops at the Vacation End Date specified by the seller.
The seller can stop a vacation mode any time manually by clicking “Cancel ” as shown in this screen print below: A pop up will appear where the seller has to mention the reason/comment and click “Submit” to stop a vacation mode.
Module Work Flow
When the admin will install this module on his MarketPlace, each seller will get a sub menu on their seller account page. The once a seller sets his vacation time through the interface provided to them on their seller’s account, the cron which has been already configured in the module will start working. The module will automatically start and stop a vacation mode for a particular seller according to the time set by the seller. During the time period of the vacation mode, the particular seller’s profile will be inactive on the MarketPlace and his products will not be shown to the customers either.
This is a very useful extension which seems to give both the sides i.e the admin and the customer certain benefits. This addon will help the admin to promote his website and product, and on the other side the customers will get discount on whatever product they purchase. This is a very interesting Magento extension because of its dual nature.
Admin will be having full control on the discount type and the discount value which he is giving and can also view the details of the discount applied on a particular product.
Installation Manual
Follow the following steps for installing Magento Facebook Share and Win Extension
1. Download the Extension package.
2. Unzip the package on your root folder of Magento setup via FTP manager (like Filezilla or WinSCP – download here: https://filezilla-project.org/).
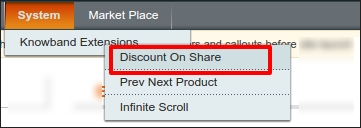
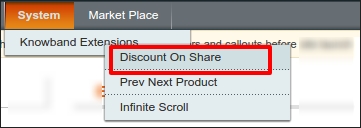
3. In Admin Panel under the Menu “System” , you will see a new menu option “Discount on Share”. In case you are not able to see the link under System, please clear Magento Cache first then check again.
4. With this the extension gets installed on your system.
Module Interfaces
Configuration of this module will be accessible through Admin account only.While the customers can view on front end product pages.
Menu Location
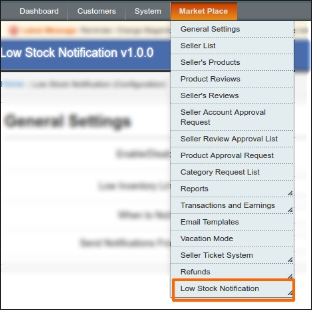
After installation, a menu will be displayed to the admin as shown in below screen:
On clicking the highlighted link, system will redirect admin to his low stock alert configurations page.
Administration Module
In admin module, there will be following options to configure this plug-in and customize its look at the front-end as follows –
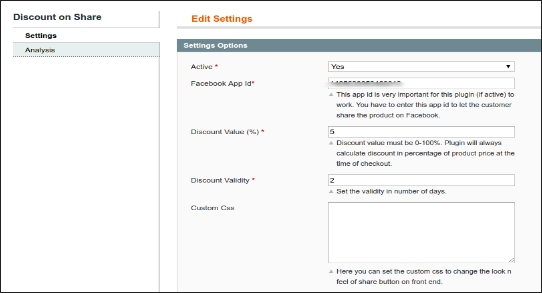
1. Settings 2. Analysis
Settings
This section will be having following options to configure the module –
1. Active: This option has a drop down button with two specific values ‘Yes and ‘No’. This module will only work if this is set to ‘Yes. If this is set to ‘No’ then none of the feature will be working and not even impacting any other section of website. By default, this option will be “No”.
2. Facebook app id: This app id is very important for this plugin to work. Admin has to enter this app id to let the customer share the product on Facebook.
3. Discount Value: In this field the admin has to give the discount value which is to be applied on that product.
4. Discount Validity: Here the admin has to enter the date up to which the discount coupon can be applied. If the validity date is expired than the coupon can be no longer applied.
5. Custom CSS: These are the fields which are given in this plugin in case if the admin wants to customize the look and feel of his plugin.
Analysis
Discount Used History
This is the tab in which the admin can view all the details of the discount coupon’s applied on every product.
1. Select Id: Here the admin has to select the Id of the product which he/she wants to look.
2. Select Product Name: When the admin will select the Provide the name of this field will automatically get refreshed and will be filed by all the product of that name.
3. Select SKU: Filter the discount on the basis of the SKU of the product.
4. Select Attribute: When the admin will select the category of this field will automatically get refreshed and will be filed by all the product of that category.
5. Total Coupon Table: When the admin will select the product in the above option then a table will appear which will be having the details of the discount coupon and their current status applied on that particular product.
Front End
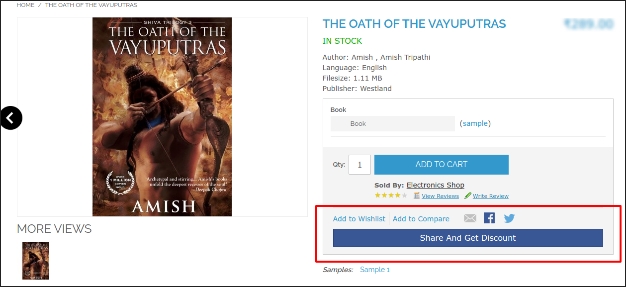
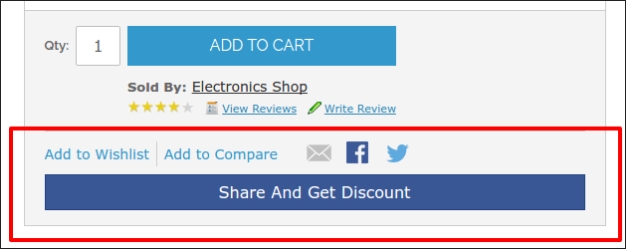
When this module is enabled from the back end then a button will start appearing in the front end of the shop on every product page. On which a text “Share to get discount!” will be written and on clicking on this button the customer can share the product and if he/she shares the product then a discount code will be shown to that customer which will be applied to that customer only.
In general terms a MarketPlace is ‘an open space where a market is/ was formerly held.’ It means that a space with relation between sellers and customers. There are several sellers selling goods to several customers.
An online MarketPlace (or online e-commerce marketplace) is a type of e-commerce site where product or service information is provided by multiple third parties, whereas transactions are processed by the MarketPlace operator. Online marketplaces are the primary type of multi channel e-commerce.
In an online marketplace, consumer transactions are processed by the MarketPlace operator and then delivered and fulfilled by the participating retailers or wholesalers (often called drop shipping). Other capabilities might include auctioning (forward or reverse), catalogs, ordering, wanted advertisement, trading exchange functionality and capabilities like RFQ, RFI or RFP.
In general, because marketplaces aggregate products from a wide array of providers, selection is usually more wide, availability is higher, and prices are more competitive than in vendor-specific online retail stores.
Examples of online marketplaces are Amazon.com, etsy, eBay, Snapdeal, Flipkart, Kaymu, Rakuten, and NASDAQ.
MarketPlace Extension
MarketPlace extension for Magento is developed for simply converting a simple Magento store to a MarketPlace with lots of features to customers, sellers and store owner. Any customer can register as a seller and can enjoy the features of a seller as well as customer of the store.
The seller sells products on the store and in return the store owner gets a commission by percentage from the total sale made by the seller. The commission percentage that the store owner gets can be modified and the store owner can set percentage to any desired value.
Prerequisite
The Knowband MarketPlace Extension is necessary to be installed on the system for using this MarketPlace Addon.
This module is basically for the sellers on Magento MarketPlace to let them know about the decreasing stock of their products. In this module the admin can set a specific quantity of the products and if any of his products got below this mark then the particular seller will receive an alert mail regarding the lowering of the product.
The admin can also set a cron which will send a mail to the seller as soon as the stock of any of the products is down or as soon as an order is placed making the stock of that product less from the given low stock quantity.
Installation Manual
Follow the following steps for installing Magento MarketPlace Low Stock Alert Addon
1. Download the Addon package.
2. Unzip the package on your root folder of Magento setup via FTP manager (like Filezilla or WinSCP – download here: https://filezilla-project.org/).
3. In Admin Panel under the Menu “Market Place” next to System menu, you will see a new menu option “Low Stock Notification”. In case you are not able to see the link under System, please clear Magento Cache first then check again.
4. With this the extension gets installed on your system.
Module Interfaces
This module will be accessible through Admin account only.
Admin Account Interfaces
This is the interface which will be accessible only through seller account section.
Menu Location
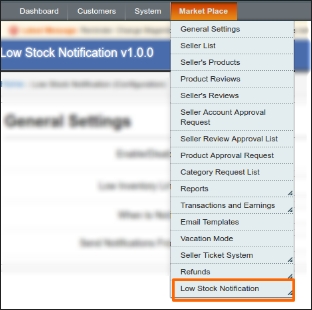
After installation, a menu will be displayed to the admin as shown in below screen:
On clicking the highlighted link, system will redirect admin to his low stock alert configurations page.
Low Stock Alert Configuration
Here all the settings of the modules are mentioned. These are explained below:
Settings Description
1. Enable/Disable : The module will only work if this field is set to enabled. If this module is disabled then the module does not work.
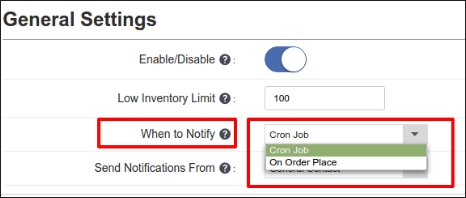
2. Low Inventory Limit : In this field the admin will set the low stock quantity. If the quantity of any of the products of the seller goes below this value then the seller will receive an email after the order is placed or when the cron works.
3. When to Notify : There are two options. If “Cron Job” is enabled then the cron set up by the admin works and if “On Order Place” field is enabled then the seller will receive the mails when an order is being placed by a customer.
4. Notification Email : This is the email of the seller in which the seller will receive the low stock alert mails.
Module Work Flow
When the admin will enable the module and set the low stock quantity then after every order is placed for the products of the seller, The seller will receive an alert email if the quantity of the product is now lower then the low stock quantity set by the seller.
The seller may also receive email according to the cron set up by the admin on his server but if the admin has disabled the cron settings from his interface then he wont receive any of the emails which will be generated from the cron.
MockingFish is a web optimization and testing tool which allows web marketers, online business entrepreneurs and product managers to perform A/B tests. Being an easy to use testing tool, it allows websites to load faster, have a user friendly layout and eventually increase conversion rate on the website. For more details: https://www.mockingfish.com/
How it works?
Following are the steps to initiate optimoid experiments on your store :
1. Create an account on MockingFish.
2. Create New Project and Experiment.
3. Configure the experiment and get the script code.
4. Open MockingFish Module in your Magento store’s admin console.
5. Paste the script, activate the module and save the settings.
6. That’s it. Your MockingFish script is now added to every page of you store for experiments.
Installation Guide
1. Download the zip from magento store & unzip into a folder.
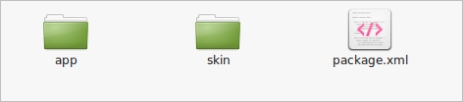
2. After unzip, following files/folders will be extract as shown in below screen:
3. Login via FTP & Drag drop all the folders into your server root directory.
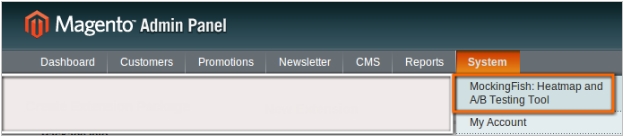
4. You will find the extension link will be displayed under System >> MockingFish : Heatmap and A/B Testing Tool.
User Manual
This module will basically work and visible in administration panel. There is no interaction of customers with this module and only administrator has access of this module.After copy this module, a link to access this module will be displayed under “System >> MockingFish : Heatmap and A/B Testing Tool”menu as shown below screen:
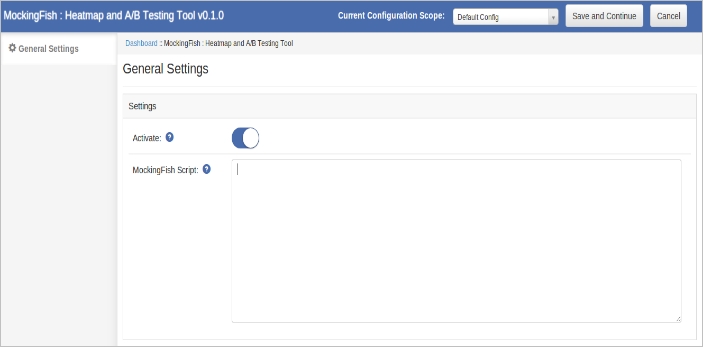
After clicking on this link, module page will be open as shown in below screen:
In module’s top navigation bar, there are following controls:
1. Current Configuration Scope : This option is used to change the store configuration scope.
2. Save and Continue : This option is used to save the module settings.
3. Cancel : This option will cancel the current changes in settings.
General Settings
On clicking the module link, this tab will be open by default as shown as above screen. This tab has following options :
1. Activate: This option is used to enable or disable the module.
2. MockingFish Script: Paste the script provided by MockingFish App Experiment.
Knowband offers Prestashop google+ badge module which allows eCommerce store admin to show goggle+ profile link in a customized block. This Prestashop extension allows admin to link community page, company page or personal profile. This is one of the most useful Prestashop addons which is highly customizable. Here is preview option for reviewing changes from admin panel. This Prestashop social badge plugin is multi-lingual compatible and multi-store compatible also.
1.1 Features of Prestashop Google Plus badge module
A preview option is available for review changes.
Do not conflict with any other third party module.
Google+badge for website is fully customizable module.
Customize Google+badge plugin is multi-store compatible.
The store admin can show or hide tagline as per the need.
Google+badge for website addon is multi-lingual compatible.
Google plus button generator extension is fully mobile responsive.
This Customize Google+badge is compatible with all Prestashop themes.
You can customize the look and feel of the block as per your website theme.
Prestashop social badge allows to show or hide the cover picture in the block.
The store admin can easily enable/ disable this module just by a button toggle.
Google+badge button allows admin to select from two color themes- Dark or Light.
Google plus button generator allows admin to choose from “Portrait” or “Landscape” layout.
Customize Google+badge addon allows admin to link company profile, Company page, or community page.
2.0 Installation Guide
1. Copy “googleplusbadgeage” module folder under your “root_directory/modules/”of your store via FTP or use Prestashop interface to upload the plugin.
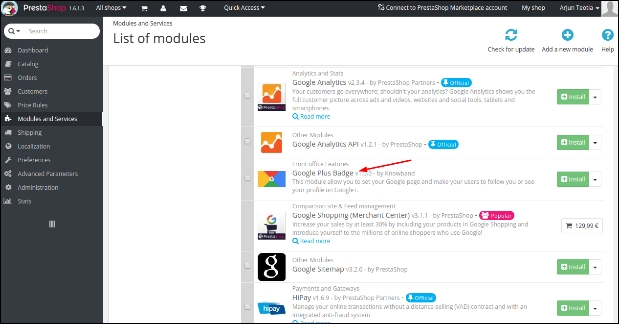
2. After copy, module will be listed on module listing page in admin panel as shown given below screen.
3. If module is not displaying on your module listing page, search it by filtering module with following details:
1. When you will click on install button, a pop-up box will appear which will display warning messages. You can ignore these messages and move ahead. There will be no negative impact of this warning message on your store.
2. After installing module, a “configure” button will be in front of this plugin on module listing page as shown in screen below:
3.0 User Manual
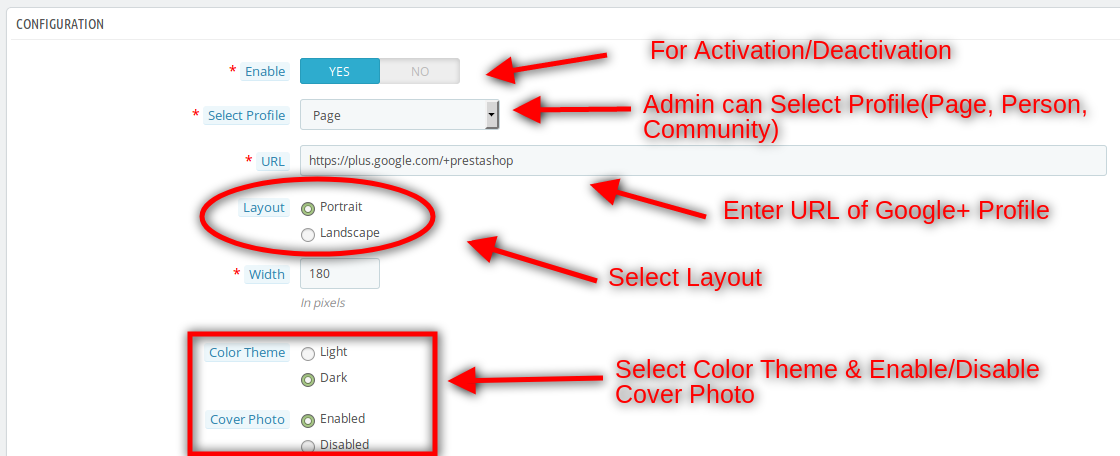
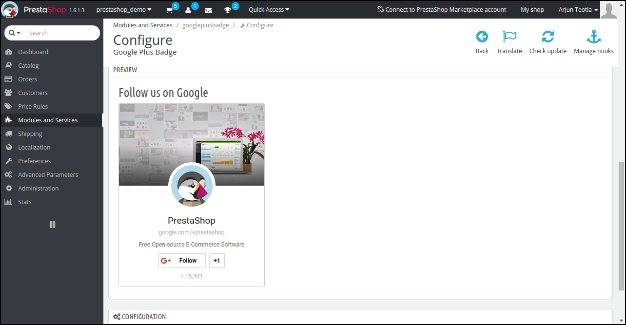
1. To access this Prestashop Google plus badge module, Click on “configure” button of googleplusbadgeage module. On clicking, module interface will be open and following screen will be display as given below:
3.1 Configuration Settings
1. Enable/Disable: To enable the Prestashop google+ badge plugin, switch the enable button from OFF to ON. The default value will be “OFF”.
2. Select Profile: The eCommerce store admin can select profile type here. Person, page or community profile can be selected.
3. URL: Enter the URL of your Google + profile which will be shown on front page.
4. Layout: The store admin can select layout of Google + badge. The default value will be “Portrait”.
5. Width: This is the width of your Google + badge. Default data will be “15” pixels. The store admin can set it as per the requirement.
6. Color Theme: This is the color theme of badge. You can either choose dark theme or light theme. The default value will be “Dark”.
7. Cover Photo: This is the option to add cover photo of your profile on the badge. The default data will be “Enabled”.
8. Tagline: This is the tagline of your badge. The default will be “Enabled”.
9. Language: You can choose any language in which your profile has been made or not. A different language badge will be like below-
4.0 Front Office Interface
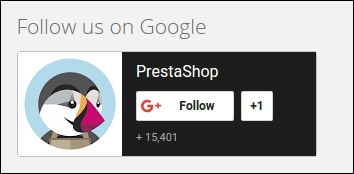
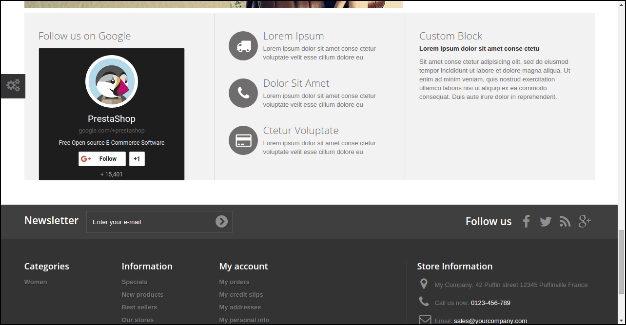
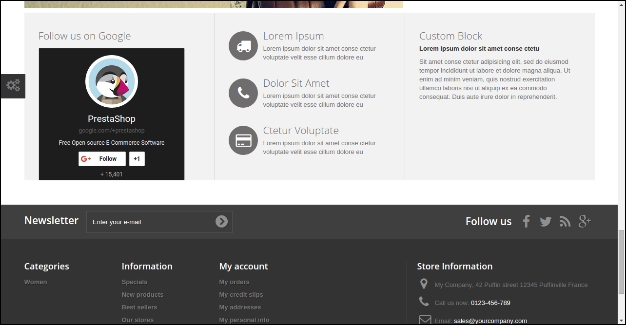
1. Default Settings Interface
2. Steps To improve the front interface:
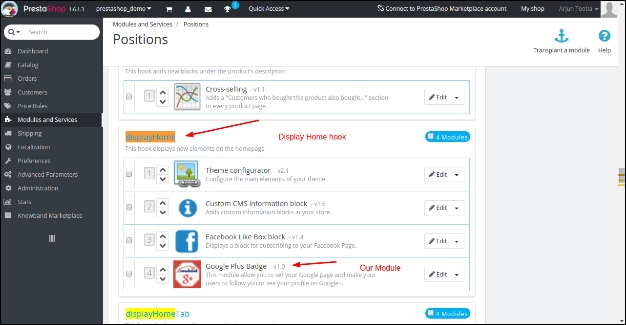
You can easily improve the interface by unhooking Facebook block from displayHome hook. And add this module to 2nd position by following these simple steps:
a. Open the admin panel of your shop.
b. Click on positions under Modules and Services in left column. Now you will see a screen like below-
c. Now press ‘ctrl + F’ on your keyboard and search for hook ‘displayHome’. You will see Google plus badge module there in the list.
d. Now drag and drop Google plus badge module to 2nd positions from 4th position.
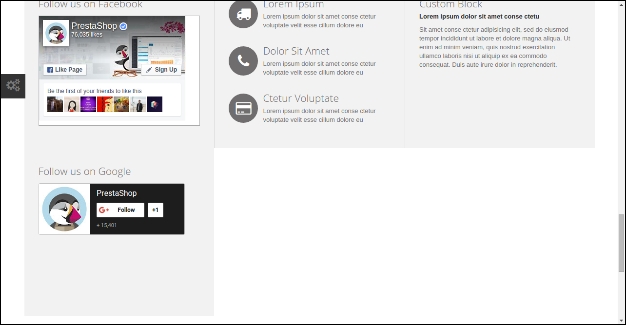
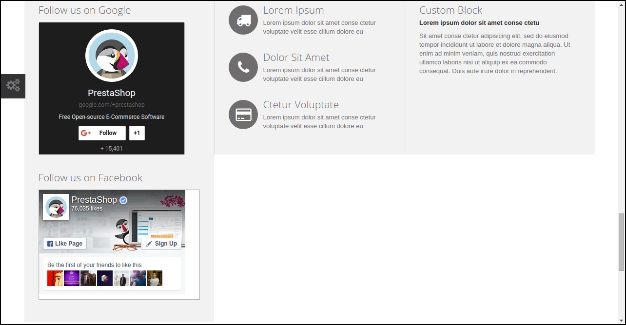
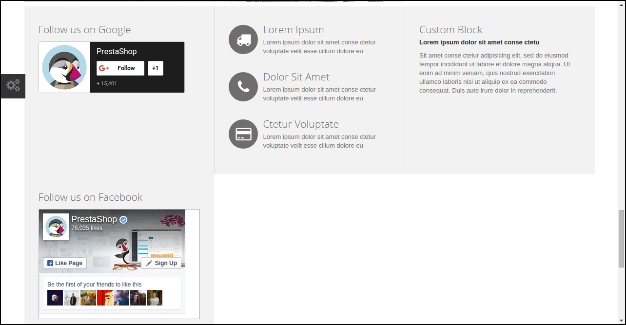
e. Now the front page will be like this-
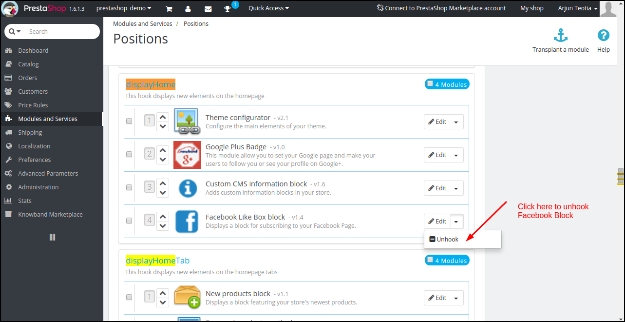
f. You can also remove Facebook block from there. To remove Facebook block follow steps, otherwise, ignore them.
g. Go back again to Positions from step ‘d’. Now click on the options of Facebook block. Click on unhook option there.
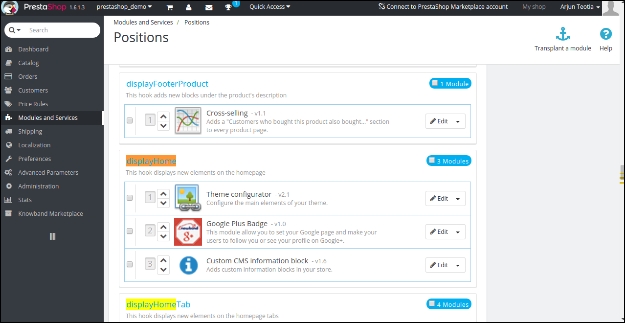
h. Now after removing Facebook block hook, your home page will look more beautiful like below-
Introduction to Prestashop Exit pop up(email subscription) addon
Prestashop Exit pop up is a highly responsive Prestashop addon which shows an email subscription pop-up whenever any user visits or intend to leave your store. The feature-rich email subscription pop up encourages the visitors to complete their purchases by giving them discounts or coupon code when they are about to exit the site. With the help of the Prestashop addon, you can even subscribe them to the newsletter or register them for a new user. Prestashop exit popup also serves as an entry popup for the visitors hence gains customer attention as they enter to the website. By offering attractive discounts, the admin is able to attain customer loyalty as they enter to the store or when they wish to close the website window.
Prestashop Exit intent (email subscription)popup offers a lead generation strategy to engage the customer on the website for a longer duration by showing an engaging email subscription pop up.It is a great tool to get your customers registered for email subscriptions. The Prestashop addon curbs the exit of the store visitors when they are just about to leave the website. The hold back visitor feature of this Prestashop subscription pop up addon is beneficial to the store owners especially when the visitor decides never to return back to the store. This addon ensures that the customer will either stay back or return to the site in future for grabbing special discounts.
Features of Exit intent (email subscription) pop up addon:
The Prestashop exit pop-up addon provides discount and enticing offers to the customers just when they are about to leave the site.
This reduces the exit rate of the site and increases the average session time of each visitor.
The fully customizable Prestashop Email subscription Pop up addon can be matched with the theme of your Prestashop store.
The admin can set two different themes for entry popup and exit popup.
The store admin gets an option to change the look and feel of the email subscription pop up that is displayed on the front-end of the website.
The admin can view the performance of Exit pop up by comparing the total generated vs used coupons.
The Prestashop extension even allows you to test the subscription block before it is incorporated into the store.
The admin gets Custom CSS and JS option to customize the email subscription pop up.
Mail Chimp Integration syncs the email generated by the Prestashop subscription pop-up with the Mail Chimp account of the seller. The other email marketing services include Klaviyo and SendinBlue.
The e-marketers can send Automated emails with discount coupon codes.
The Prestashop store owners can subscribe your store visitors to the newsletter or register them for a new user.
Multi-lingual support.
Compatible with all Prestashop themes.
The Prestashop plugin has a responsive design and is compatible with multiple devices.
Benefits to the Merchant
The email subscription pop up encourages the store visitors to stay on the site for a longer duration.
The coupon codes motivates them to complete their purchases
This is one of the ways to reduces the Abandoned Carts.
With an increase in the user engagement, the store conversions increase drastically.
The store admin can convert your store visitors into your subscribers for the newsletter
Collects emails which can be later used for Mail marketing or Personalized promotions.
Admin can set differernt themes for welcome and exit intent popup.
With this entry-exit popup module, admin can control whether popup needs to be displayed on user entry, user exit or both.
Installation of Exit pop up-email subscription addon
After purchasing this responsive Exit pop up addon, you will get following files as listed below:
1. Compressed File in ZIP format (contains source code of the module)
2. User Manual
Follow the steps to install the extension:
Unzip the compressed file. It would contain files and folders as shown below –
Copy all the files and folders of an unzipped folder into your PrestaShop store “modules” directory on the path – Root Directory/modules/.
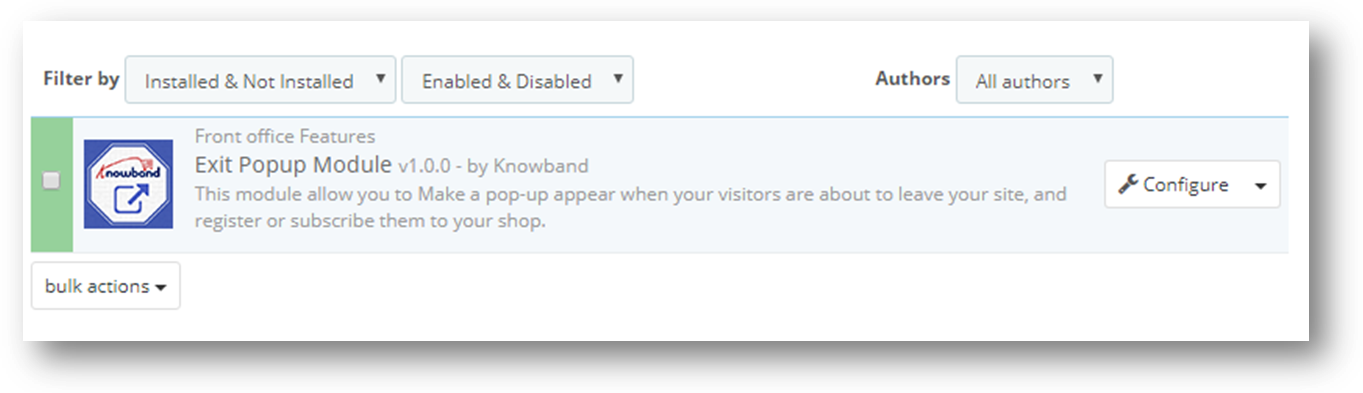
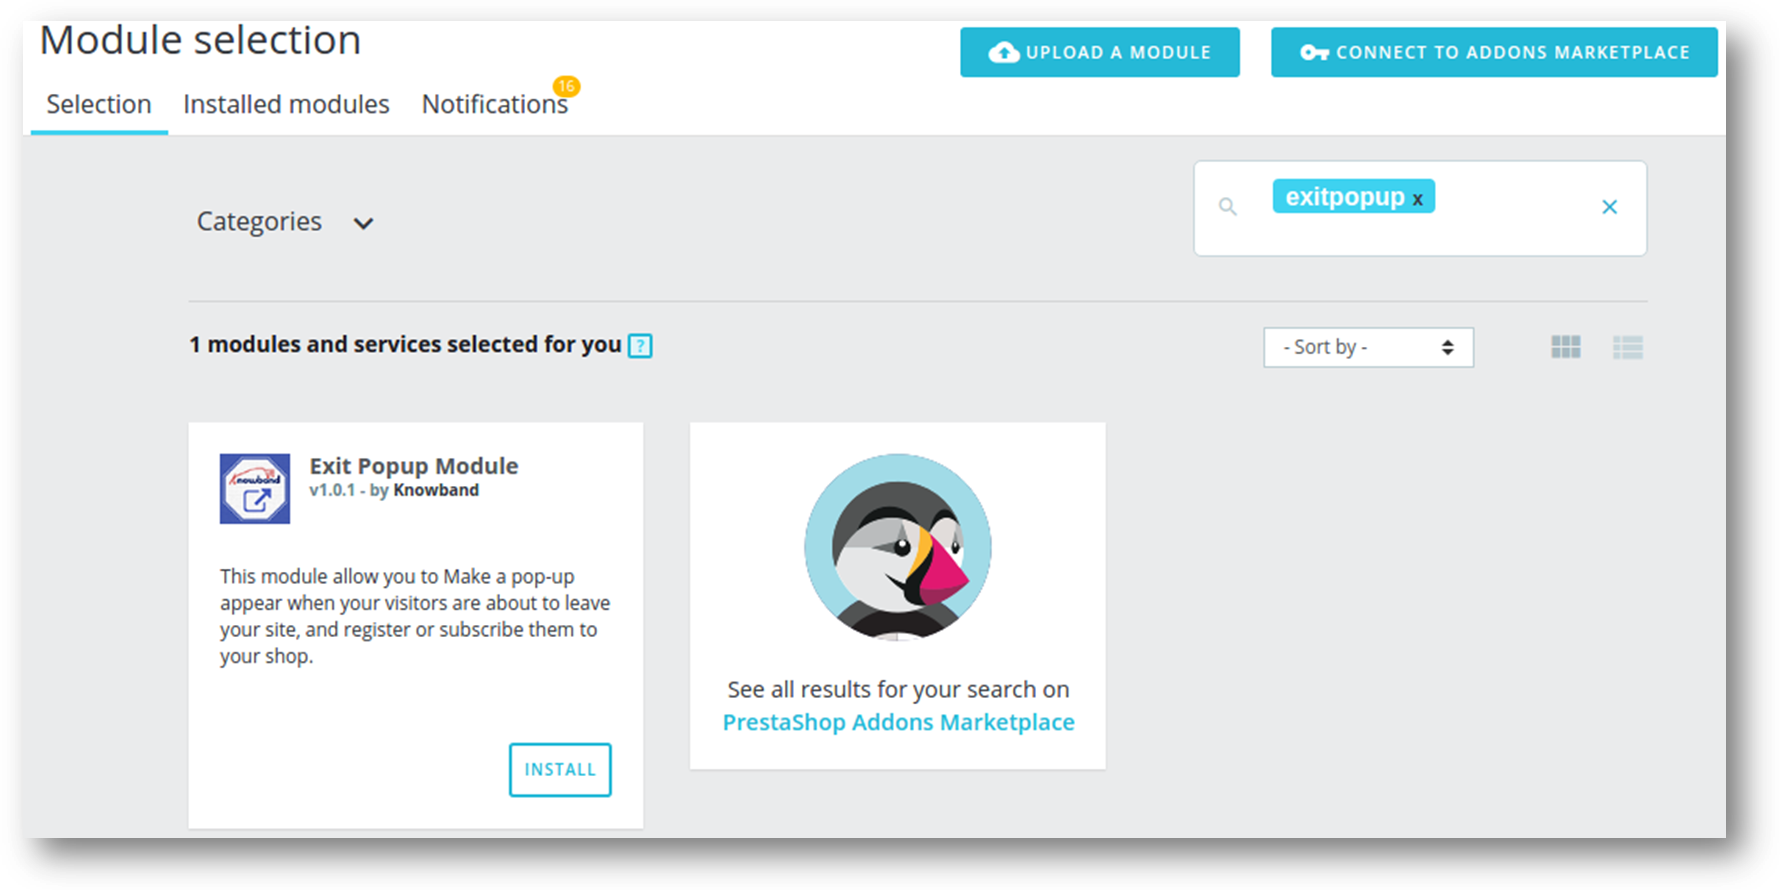
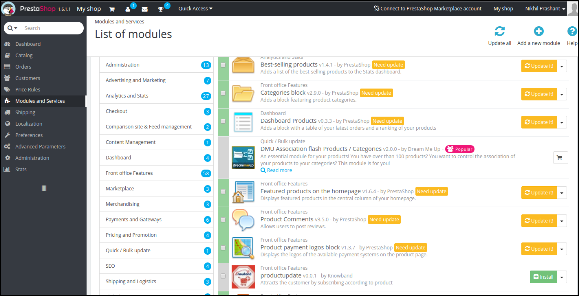
Now the exit pop up(email subscription)is ready to be installed on your store and you can find that in Store Admin -> Modules and Services. It would be shown as below –
For Prestashop 1.6.x.x-
For Prestashop 1.7.x.x-
4. Click on “Install” button to install the addon. It would show a pop-up for your confirmation. Click on “Proceed with the installation” option. This step will install the addon and show notification – “Module(s) installed successfully”.
How to configure Exit pop up-email subscription addon?
This addon is configurable and Prestashop Store Owner or Prestashop Store Admin can setup or configure this email subscription pop up through Admin Panel of store by following steps –
Go to Store Admin -> Modules and Services.
Find “Exit popup” and click “configure” button given corresponding to the addon.
It would open a new page as shown below.
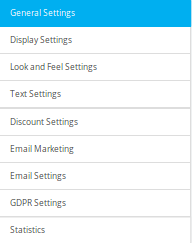
The configuration settings of this Prestashop welcome popup are divided into seven sections namely:
General Settings
Display Settings
Look and Feel Settings
Text Settings
Discount Settings
Email Marketing Settings
Email Settings
GDPR Settings
Statistics
Each section is described below.
Dashboard
You will see four statistics data in the dashboard.
Total Visitors- This is the count of total visitors who have seen the Email subscription pop up on exit.
Total Stayed User-This is the count of total users who stayed on your site after the Exit pop up appears on Prestashop storefront.On hover, you will also see the percentage of stayed users.
Total Newsletter Email subscription-This is the count of total newsletter subscription by the exit pop up addon.On hover, you will also see the percentage of total newsletter email subscriptions.
Total Coupons Generated- This is the count of total coupons generated by the email subscription pop up.On hover, you will see the percentage of total used coupons by Prestashop store visitors.
General Settings
You have to follow steps given below to configure General Settings –
Goto the Module and Services -> Module and Services
It would list all the modules of the Prestashop store. Find ‘Exit popup’ in modules list.
Now click on ‘Configure’ button given corresponding to the ‘Exit popup’ addon.
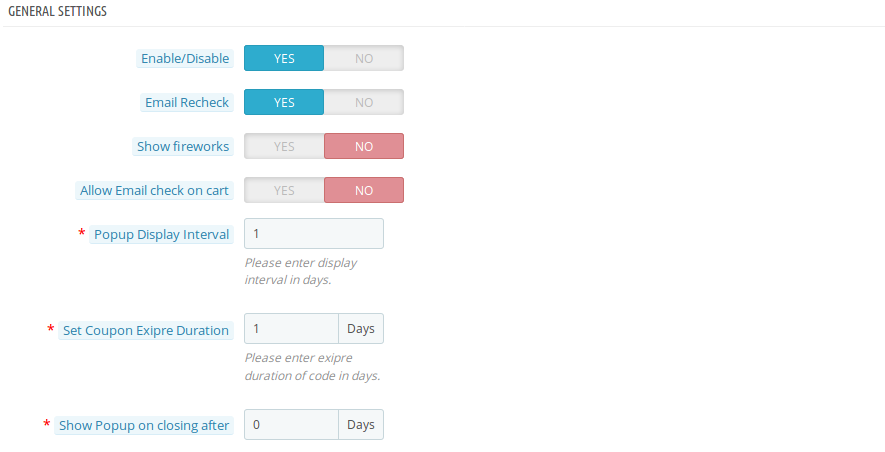
It would redirect Prestashop Store Owner or Admin to the general settings page as shown below
Update the values of given fields corresponding to ‘General Settings’ as per need.
Now click on ‘Save’ and it would validate and save the provided values.
That’s it.
This section has following input field which Prestashop store admin can update –
Enable/Disable: To enable the plugin, switch the enable button from OFF to ON. The default value will be set to “OFF”.
Email Recheck: This option lets admin to ensure that no user is provided coupon more than one time.
Show Fireworks: Admin can show fireworks in the background as the customer wins the coupon code.
Allow email check on cart: This option allows the admin to check whether the actual owner of this coupon and the one who is applying the coupon code are same or not. If this option is enabled, then no duplicate email ids will be accepted.
Popup Display Interval: Enter display interval(in days) after which the popup will be shown once the coupon is generated.
Set Coupon Expire Duration: This option lets you set the expire duration of the coupon(in days).
Show Popup on closing after: This allows the admin to set the number of days after which the entry popup or exit popup will be shown once closed by the user.
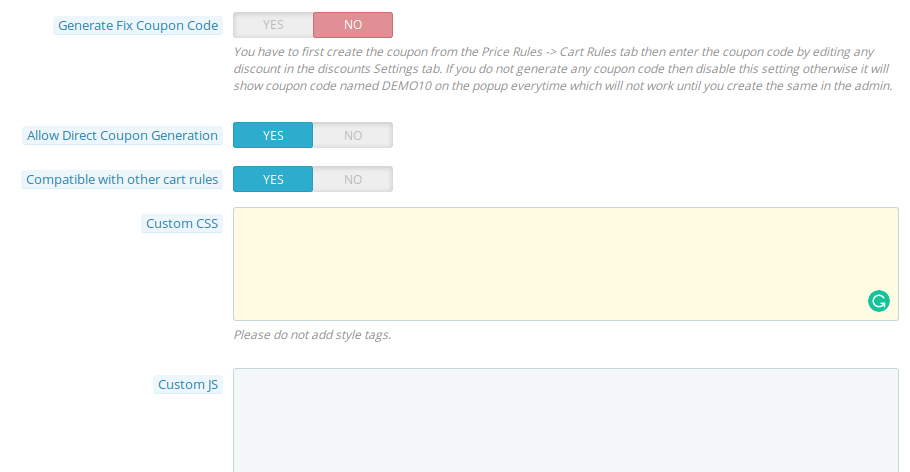
Generate Fix Coupon Code: Using this option, you can generate and set a fix coupon code for entry popup and exit poup.
Allow Direct Coupon Generation: If this setting is enabled, then the customer can generate the coupon code just by clicking the Get Coupon Code button.
Compatible with other Cart Rules: If you want that coupon generated from exit popup should not be used with the coupons generated from other sources, then set its compatibilty OFF.
Custom CSS and Custom JS: Admin can update the CSS and JS to customize the email subscription pop up without touching the base code of the addon. This field can help you in customizing the email subscription pop up according to your Prestashop store theme.
Display Settings
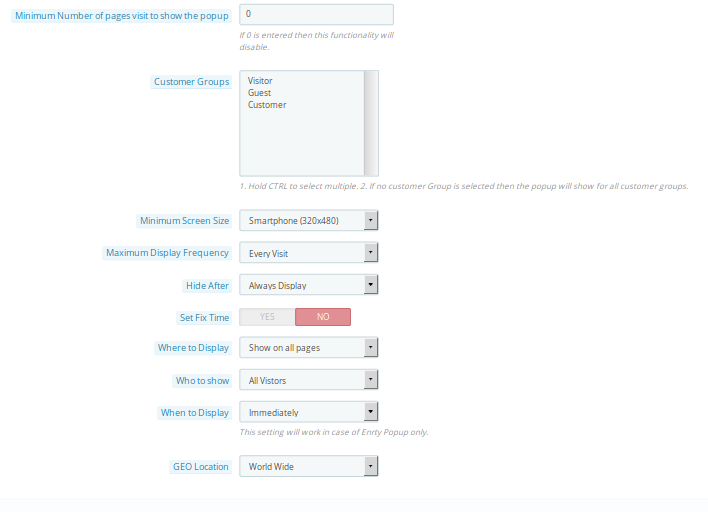
Maximum number of page visits to show popup: This option sets the page visit count after which the exit popup will be shown to the user.
Customer Groups: Admin can select the customer group from choices: Visitor, Guest or Customer.
Minimum Screen Size: Admin can select minimum screen size configuration to show entry-exit popup.
Maximum Display Frequency: Admin can also set maximum display frequency to display entry-exit popup.
Hide After: Select the time after which the popup hides automatically.
Set Fix Time: Admin can set fix time under which the customers can win discount coupons. This includes active popup date and expire popup date.
Where to Display: Admin can select the site pages where they want to display the entry-exit popup.
Who to Show: Admin can set the category of customers to which the entry-exit popup will be shown. This includes new visitors, returning visitors or all visitors.
When to Display: Admin can set when to display the popup to the users, after some specified time, scroll down percentage or immediately as the user enters the site. This setting will only work for entry popup.
Geolocation: Admin can set the geolocation where they want to show this entry-exit popup to the site users.
Look and Feel Settings
You have to follow steps given below to configure Look and Feel Settings –
Goto the Module and Services -> Module and Services
It would list all the modules of the store. Find ‘Exit popup’ in modules list.
Now click on ‘Configure’ button given corresponding to the ‘Exit popup’ addon.
It would redirect Prestashop store admin to a new page. Click on “Look and Feel Settings” tab and it would open a new section as shown below.
Update the values of given fields corresponding to ‘Look and Feel Settings’ as per need.
Now click on ‘Save’ and it would validate and save the provided values.
That’s it.
This section has following input field which Prestashop store admin can update –
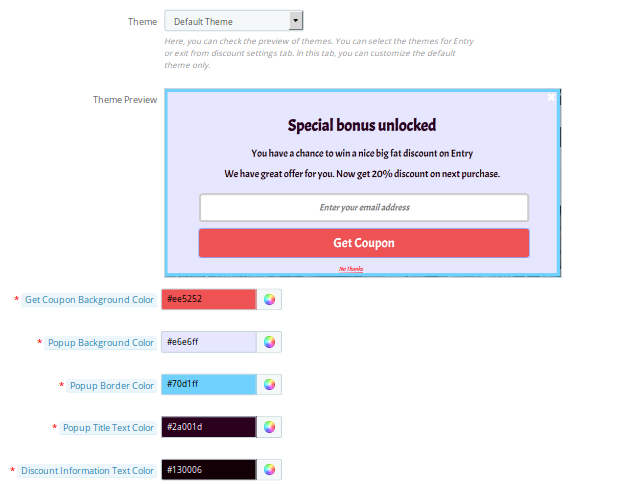
This Prestashop addon offers multiple themes to choose from. Other than five ready made popup templates, there is one default theme which is fully configurable from the backend interface. If the admin chooses any pre-defined template then he only requires to choose the background image for the entry-exit popup. But choosing default theme gives the following listed features to the admin.
Theme Preview: This option allows admin to preview various theme selection done in the above option.
Get Coupon background color: This option sets the background color of get coupon button shown over entry-exit popup.
Popup background color: Admin can set the background color of this exit popup using this option.
Pop up border color: Configures the border color of the Email subscription exit pop up.
Pop up title text Color: Configures the Title color of the Email subscription Exit Popup.You can set any color which matches your theme.
Discount information text color: Admin can configure the color of discount information text.
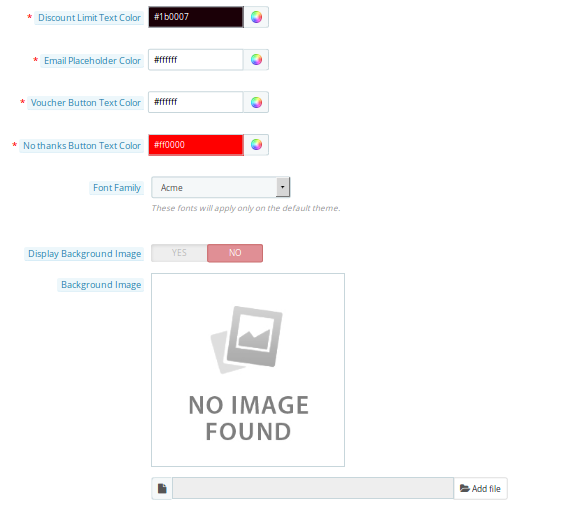
Discount limit text color: Admin can set the color of discount limit text.
Email Placeholder color: This option changes the background color of email placeholder.
Voucher button text color: Change font color of get coupon text using this option.
No thanks button text color: Change font color on No Thanks button.
Font family: Change font family of text shown over popup.
Display background image: Show or hide background image on popup.
Background image: If the above option is enabled, then you can browse and select desired image as background image.
Text Settings
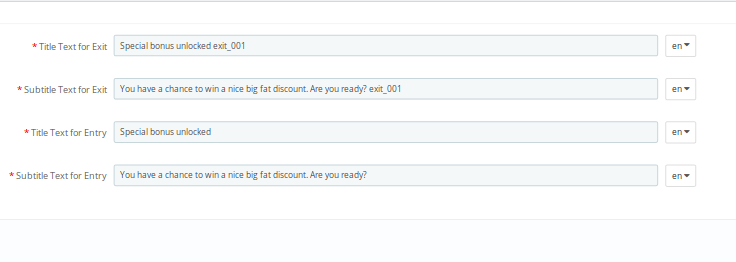
The text settings for Prestashop Exit Popup can be configured using the following options. The admin can set the various texts in different languages.
Title Text for Exit: This option sets the title text for the exit popup.
Subtitle text for Exit: This option sets the subtitle text for exit popup.
Title text for Entry: This option sets the title text for entry popup.
Subtitle text for Entry: This option sets the subtitle text for entry popup.
Discount Settings
You have to follow steps given below to configure Discount Settings –
Goto the Module and Services -> Module and Services
It would list all the modules of the store. Find ‘Exit popup’ in modules list.
Now click on ‘Configure’ button given corresponding to the ‘Exit popup’ module.
It would redirect Store Owner or Prestashop store admin to a new page. Click on “Discount Settings” tab and it would open a new section.
Update the values of given fields corresponding to ‘Discount Settings’ as per need.
Now click on ‘Save’ and it would validate and save the provided values.
That’s it.
This section has following input field which Prestashop store admin can update –
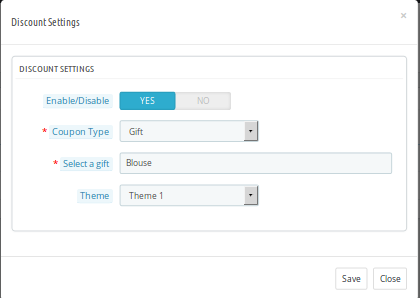
Admin can see the details of various discounts set for entry and exit popup. By clicking on the edit option admin can configure each of the set discounts separately. The discount settings popup contains the following options:
Enable/Disable: Admin can enable or disable the discount offered corresponding to welcome or exit popup.
Coupon Type: This option allows the admin to set the type of offer they want to provide on the entry-exit popup. It can be in the form of a fixed or percencentage discount, free shipping or a gift.
Select a Gift/Value: If its value then set the fixed or percentage value you want to offer as discount. If its a gift then select the product that you want to offer as gift to your customers.
Theme: This option allows the admin to set a separate theme for entry and exit popup.
Email Marketing
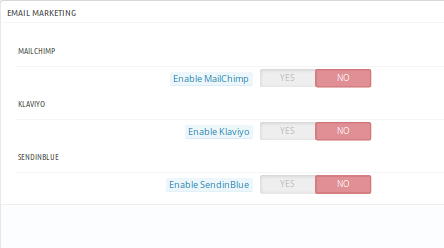
This section of Prestashop email subscription exit popup provides you three inbuilt choices for email marketing as given below:
This Prestashop module offers you three email marketing options as
MailChimp
Klaviyo
Sendin Blue
Each of them can be separately enabled/disabled and can be configured by setting up the required API keys from this backend panel.
Email Settings
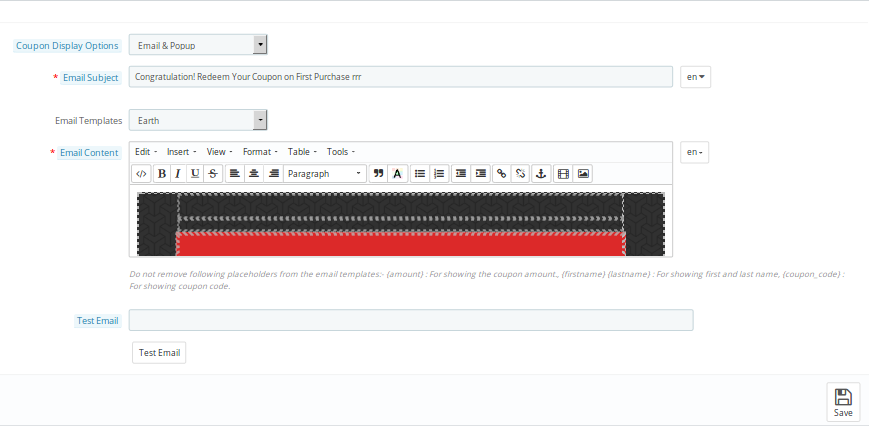
The email settings of Prestashop entry-exit(email subscription) popup offers you following configuration settings as given below:
Coupon Display Options: Admin can choose whether they want to display the coupon code on popup only, email only or both.
Email Subject: Admin can set the subject for the email sent to the customers as they win the discount coupon.
Email Template: This options lets admin choose the template for the discount winning email. This email template is same for entry and exit popup.
Email Content: Admin can set the content of the discount email sent to the customers. They can specify the coupon code and coupon validity in the discount email.
Test Email: Admin can use this option to test the discount emails on a specific email before sending them to the actual user.
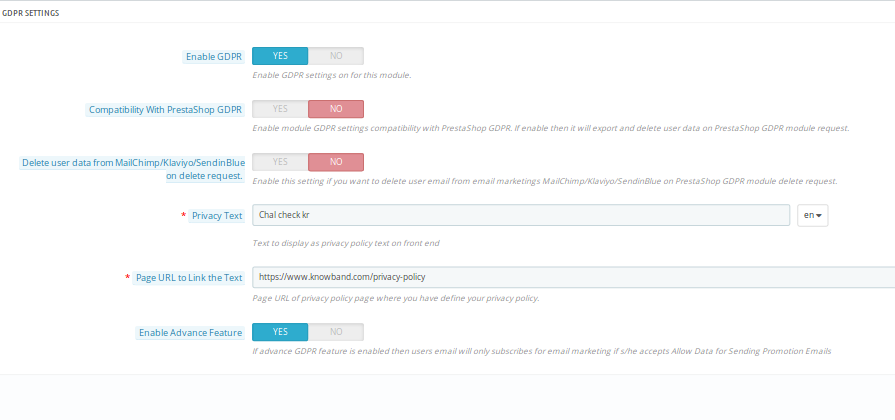
GDPR Settings
Prestashop email subscription exit popup addon is GDPR compatible and so the various GDPR settings can be configured using the given options listed below:
Enable GDPR: Enable or disable GDPR settings for this Prestashop exit popup module.
Compatibilty with Prestashop GDPR: Enable/disable module GDPR settings compatibility with PrestaShop GDPR. If enable then it will export and delete user data on PrestaShop GDPR module request.
Delete user data based on email marketing service request: Enable this setting if you want to delete user email from email marketings MailChimp/Klaviyo/SendinBlue based on PrestaShop GDPR module delete request.
Privacy Text: Admin can set a privacy text shown over the entry, exit popup.
Page URL to link the text: Admin can set a specific page URL of privacy policy page where you have defined your privacy policy for your website.
Enable Advance Feature: If advance GDPR feature is enabled then users email will only subscribes for email marketing if s/he accepts Allow Data for Sending Promotion Emails.
Statistics
You have to follow steps given below to configure Statistics-
Goto the Module and Services -> Module and Services
It would list all the modules of the store. Find ‘Exit popup’ in modules list.
Now click on ‘Configure’ button given corresponding to the ‘Exit popup’ addon.
It would redirect Prestashop store admin to a new page. Click on “Statistics” tab and it would open a new section as shown below –
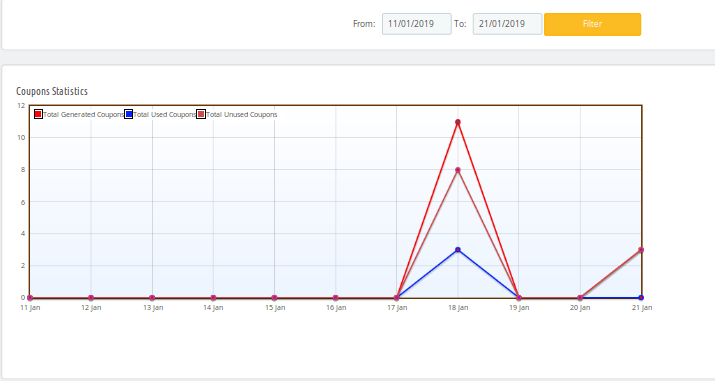
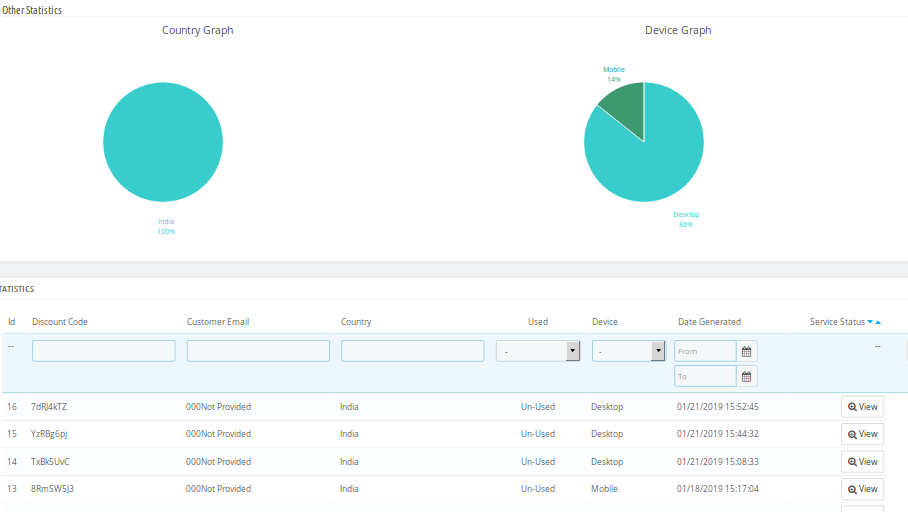
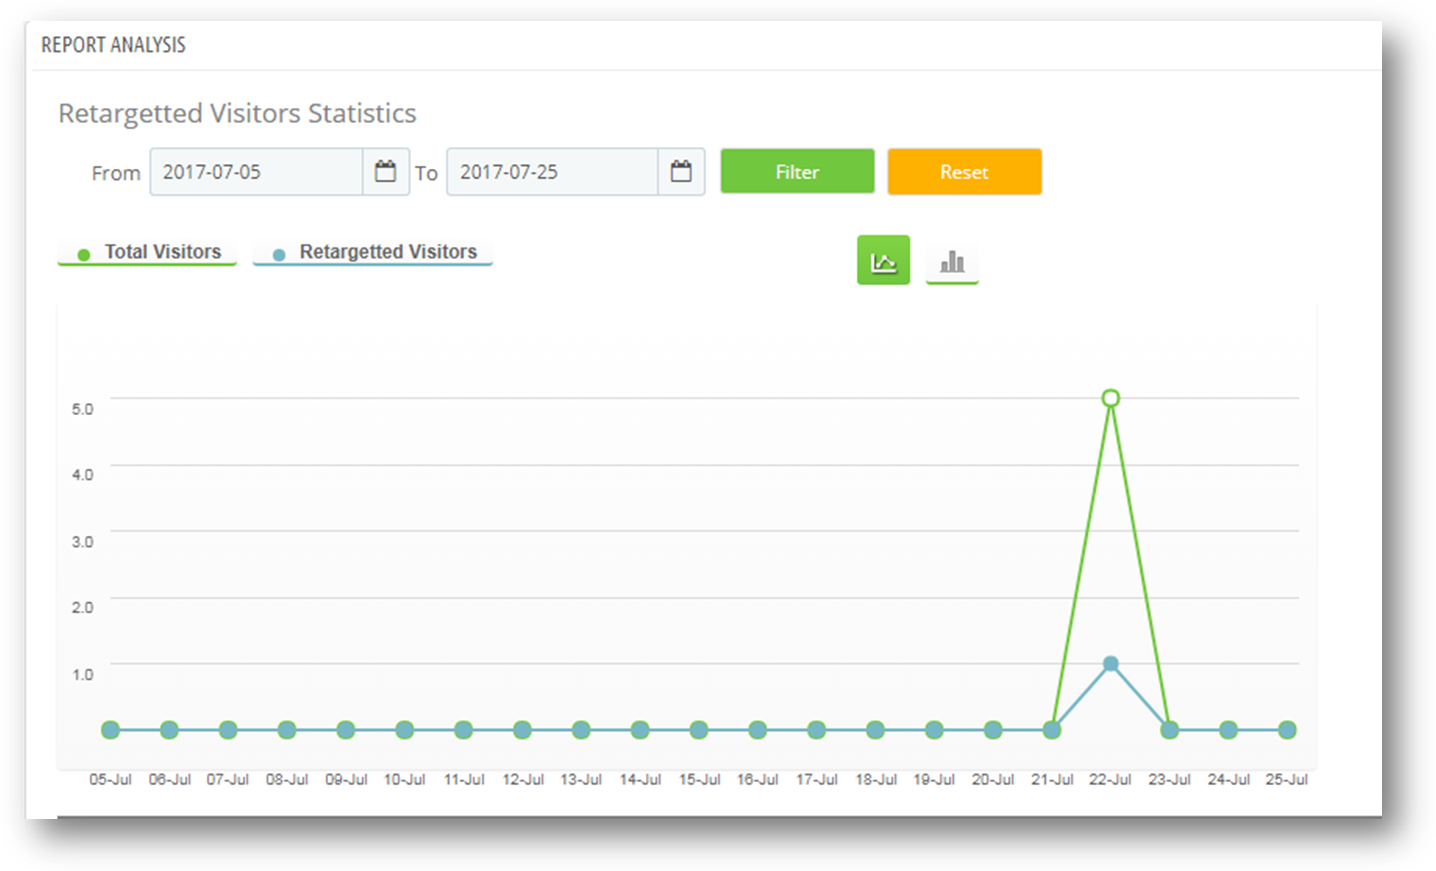
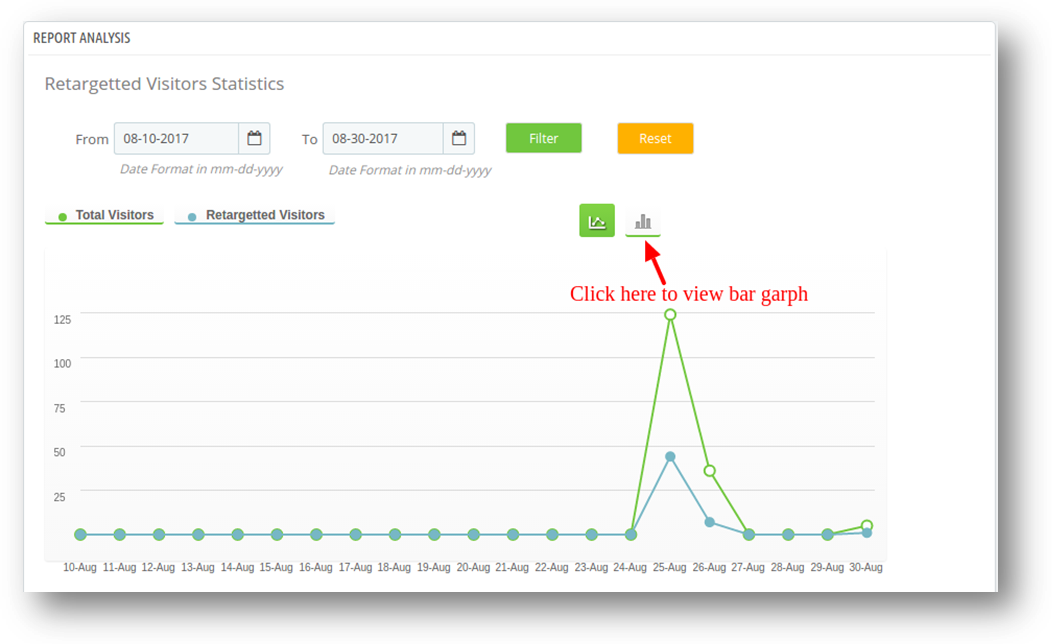
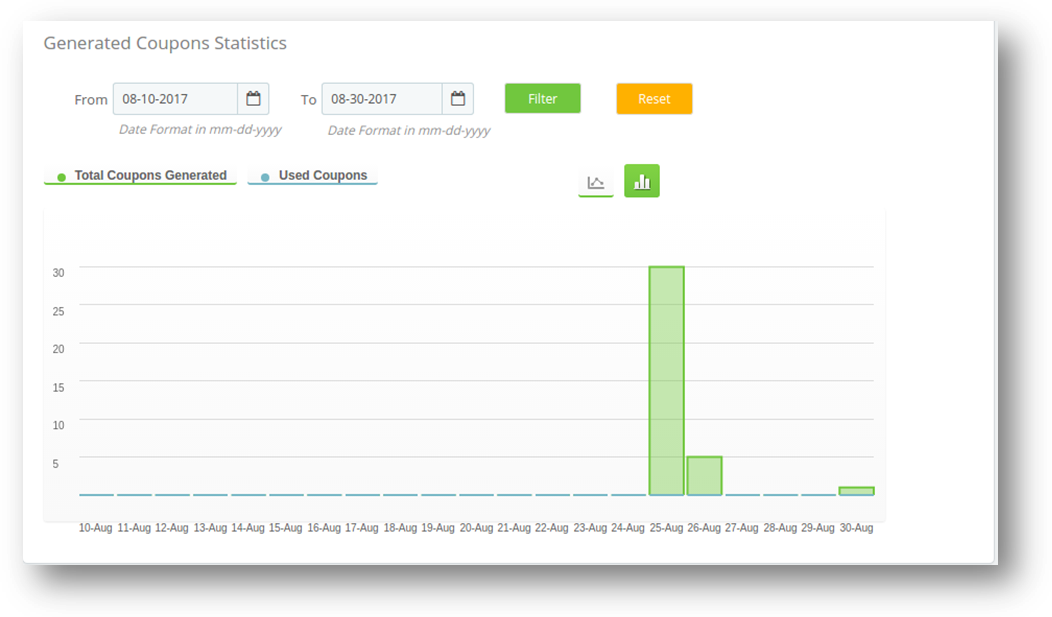
This tab shows the report analysis in graphs.You can filter the graph by selecting the date range in the ‘from’ and ‘to’ date fields.
There are two graphs in this tab-
Visitor graph: This is the graph between total visitors and retargeting visitors.
X-axis- Date and time
Y-axis- Total visitors and total staying users
Coupon Graph: This is the graph between the total generated coupon and total used coupons.
X-axis- Date and time
Y-axis- Total generated coupons and total used coupons
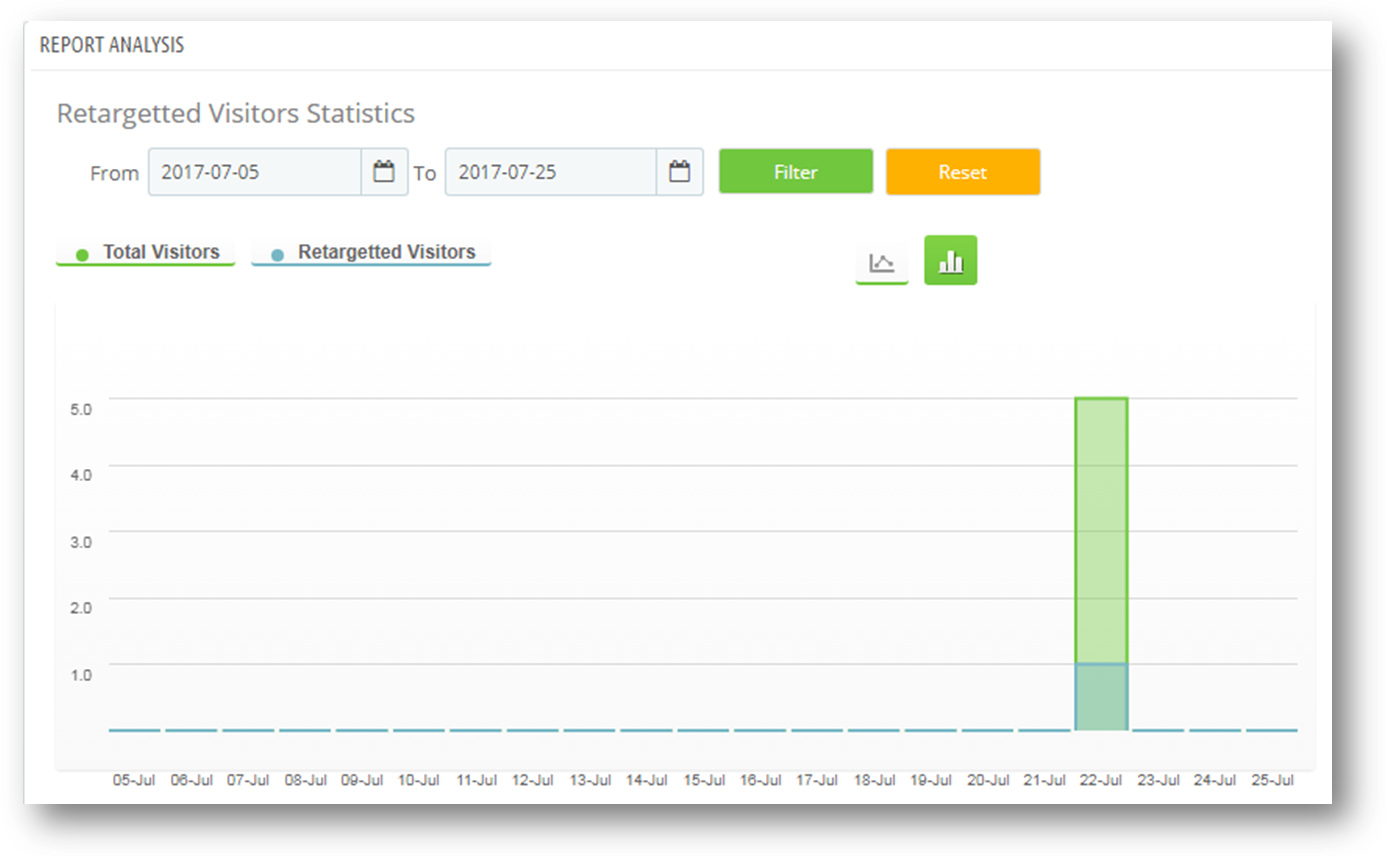
You can also view the graph in two form 1. Lines 2. Bars
1. Line graphs
Bar graph: To view bar graph.You need to click on its icon as shown in the following figure.
Bar graph will look like this.
MailChimp Settings
You have to follow steps given below to configure Statistics-
Goto the Module and Services -> Module and Services
It would list all the modules of the store. Find ‘Exit popup’ in modules list.
Now click on ‘Configure’ button given corresponding to the ‘Exit popup’ addon.
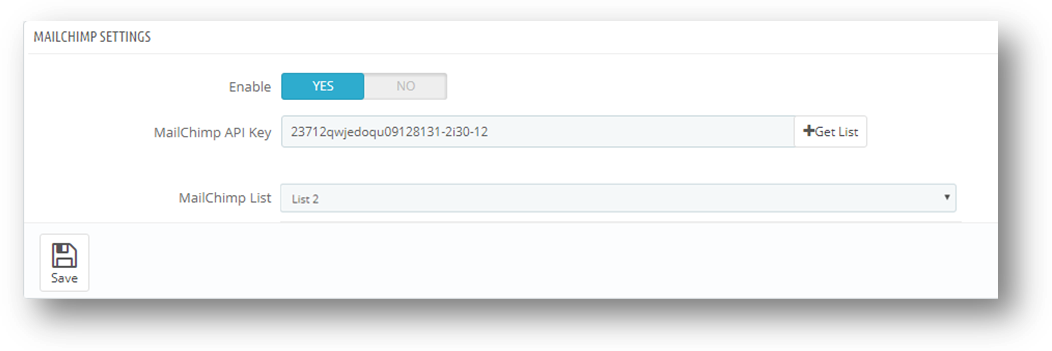
It would redirect Prestashop store admin to a new page. Click on “MailChimp settings” tab and it would open a new section as shown below –
Enable/Disable: The admin can enable/disable the Mailchimp settings. It will be initially set to “OFF”.
MailChimp API Key: MailChimp API key is the key that the user created on his/her MailChimp account at https://www.mailchimp.com. This API key will be used to connect to the MailChimp API. When user fills the “MailChimp API Key” field with a valid API key and click Get List button then the lists related to that MailChimp API key will display.
MailChimp Lists: MailChimp Lists will be available when the MailChimp API key is provided.
Frontend
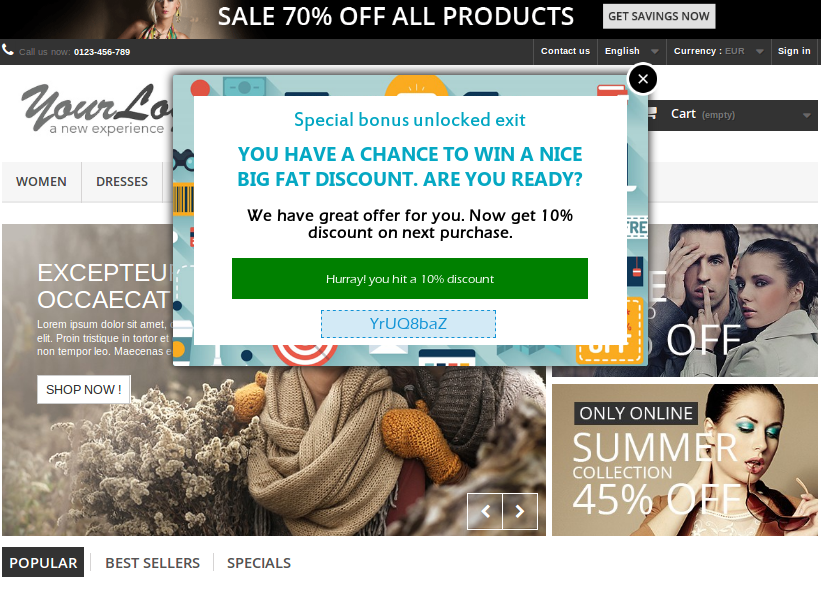
Prestashop Welcome or Entry popup shown as the customers enters on the site.
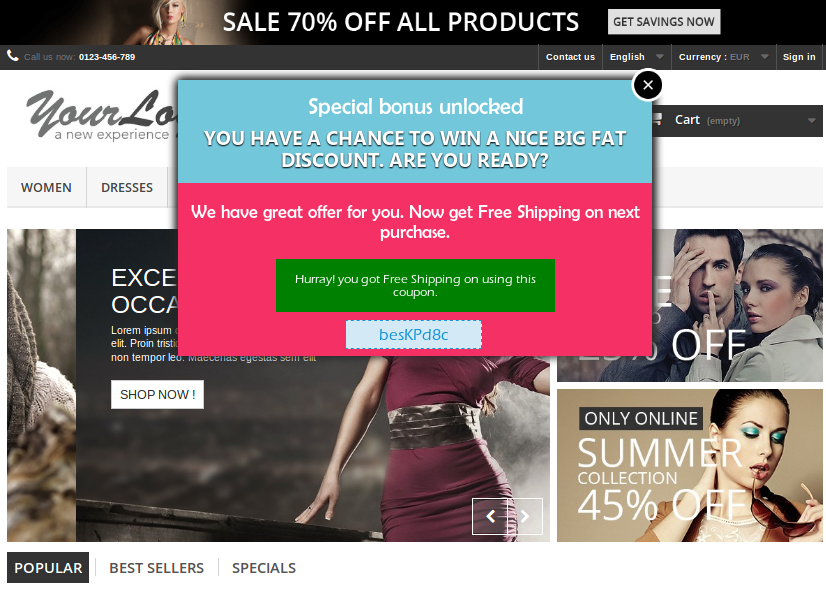
Prestashop Exit popup as the customer intends to leave the site or intends to close the window.
Recommendations
– If the plugin is not working after installation then please check permissions on modules folder. The folder should have write access. Please make the folder permission to 755.
Disclaimer: In case the “Exit” popup does not display at the front, kindly clear the cache or delete the cookies. Sometimes cookies prevent the popup from displaying at front.
Buy Prestashop Exit Pop up module on the Addon store
There are times when the store visitors land up on the website looking for a product, but leaves the website because the product are not in stock .They find the same on some other stores and you lose a conversion. You’ll never know why the visitors left your site without purchasing anything. In order to find the problem and rectify the issue, you must enhance customer’s engagement with your site, so that, you can get them back if they are leaving your store for this reason.
Here store owner can change the various settings of this Prestashop plugin according to requirements, which will be reflected on front end as well as in admin panel.
To install this plug-in, please follow the following steps:
1. Add all whole plugin folder to the modules folder into the root directory of the PrestaShop Store.
2. After adding plug-in files, the system will list the plug-in on module page.
3. Click on install/uninstall according to need.
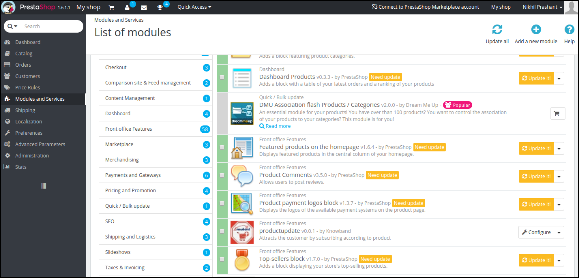
4. Another way is, you can zip the whole folder and then click on Add New Module link displaying on top right corner of module listing page as shown in below screen:
5. After installing this Prestashop module, Configure link will be displayed instead of Install link as shown in below screen:
6. Now, your Prestashop out of stock subscription module is ready to use and click on Configure link to configure module.
Admin Interface
After installing this Prestashop notification addon, the admin will get following interfaces:
General Settings
Request for Notification Email Settings
Notification Email Setting
Analysis
General Settings
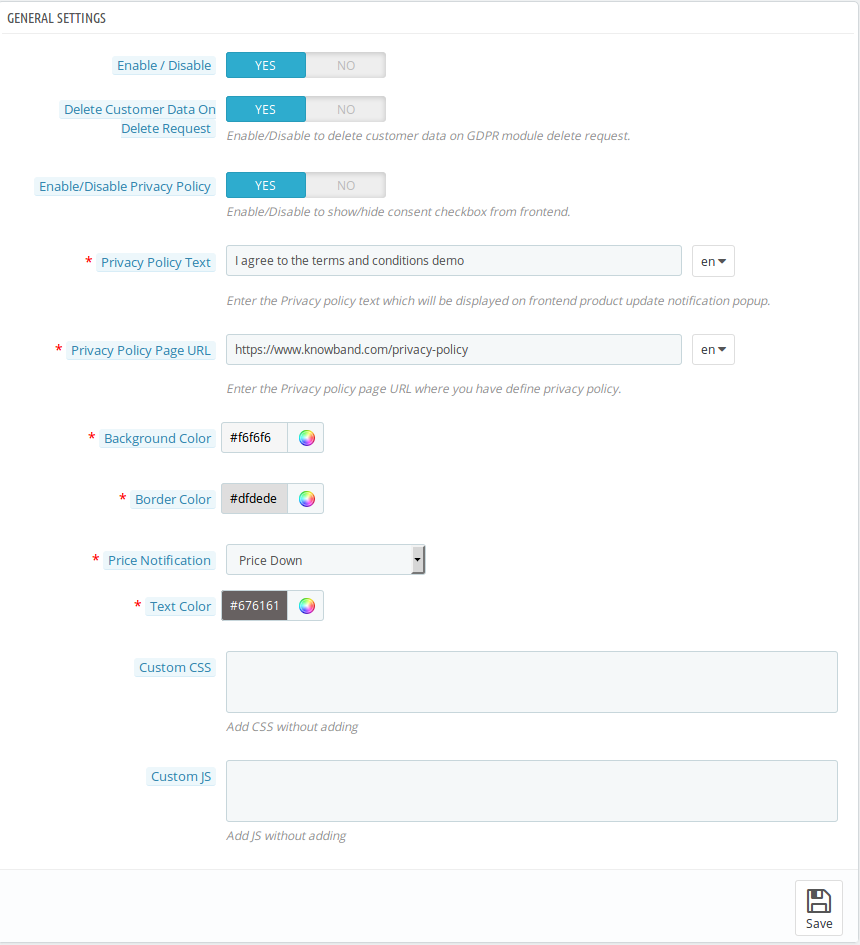
When you click on configure button, system will open general setting field by default. This field has following options:
Initially fields in above form will be already filled with their default values.
Enable/Disable: Initially, this Prestashop out of stock notification addon by Knowband is set to NO option. You must need to set this to YES in order to get the benefits of the addon.
Delete Customer Data on Delete Request: Enabling this functionality will enable the option for the customers to request for personal data deletion.
Enable/Disable Privacy Policy: The Prestashop product update notification module allows the admin to display or hide the privacy policy at front end.
Privacy Policy Text: This field of the Prestashop product update module allows the admin to set the desired privacy policy text. The privacy policy text can be edited whenever needed.
Privacy Policy URL: The admin can link the privacy policy to the desired choice of URL. The URL can also changed whenever required.
Background Color: This field of Prestashop product update notification addon is filled with some default value at initial level. Admin can change the background color of the subscription box by selecting a color from the color picker which will be reflected at the front end.
Border Color: In this field, the admin can change the border color of the subscription box according to his preference.
Price Notification: This field of the product update notifcation Prestashop provides the admin to select the type of price level to notify subscribers. The admin can either select Price Down, Price Up or Both type of price level.
Text Color: The respective Prestashop plugin even allows the admin to customize the text-color of the subscription box as per his choice.
Custom CSS & JS: Both of these option allows to the admin to change the look and feel of this Prestashop in stock notification addon by Knowband.
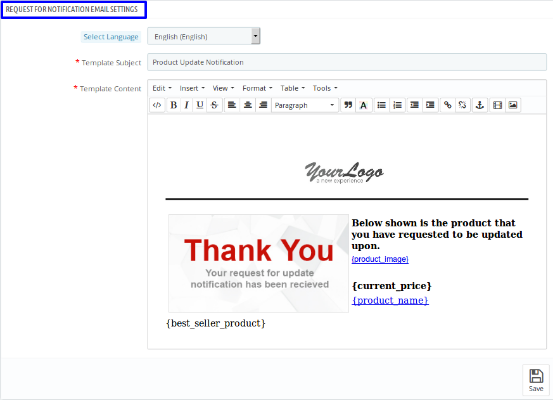
Request for Notification Email Settings:
Once you select the language, following fields will be shown:
Select Language: In this field of Prestashop product update addon, the admin can select from four of the languages, i.e. English, French, Spanish & Italian.
Template Subject: Here, the admin can enter the text of his choice as subject. By default, the subject of the email is Product Update Notification.
Template Content: This is the body of the email that user receives after subscription. The admin can modify the text as per his preferences.
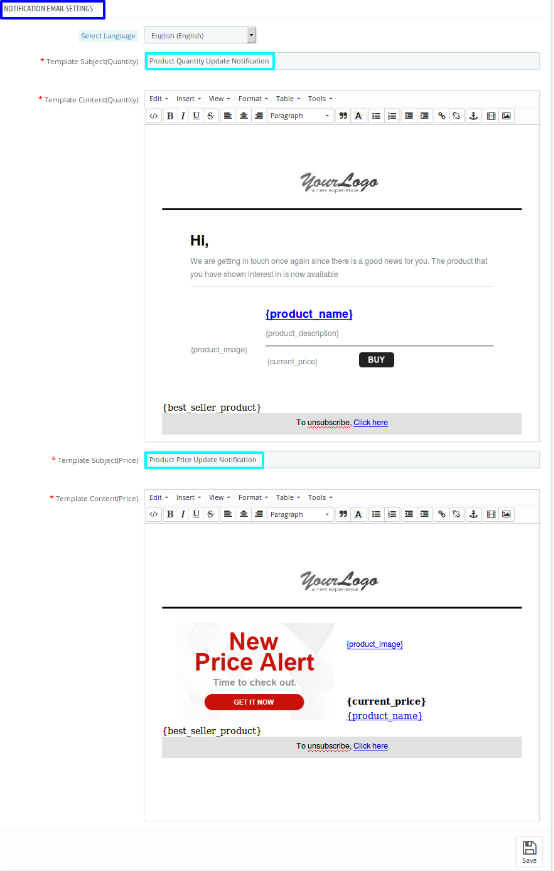
Notification Email Settings
The admin can manage the following two things under this category of Prestashop out of stock subscription module by Knowband:
Product Quantity Update Notification
Product Price Update Notification
Once you select the language of your choice, you’ll be able to see following settings:a.
Product Quantity Update Notification: Product Quantity Update Notification is the template subject of the email. This is for the Out of Stock products. When the product, for which, customer has subscribed will be in stock then this email will be sent to the subscribers automatically. The admin can change the template subject and template content as per his choice.
Product Price Update Notification: This is the second part of the Notification Email Setting have Product Price Update Notification as template subject. This is for when there is change in the product price according to your setting that you have saved in General Setting under “Price Notification” field. Here, also, the admin can change the template subject and template content as per his choice.
Analysis:
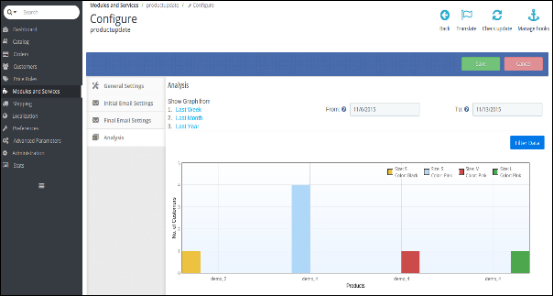
In analysis section of this Prestashop product update notification addon, the admin can see the overall report of subscribed product and customers in the form of graph and in the form of detailed list as well. When you select a date range, the graph will be displayed the top 10 products.
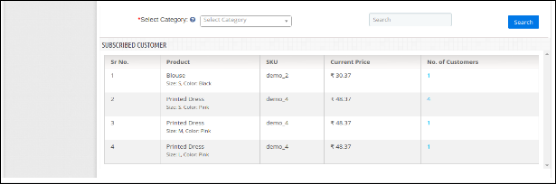
With the help of selected category and search element, the admin can see all the details about subscribed products along with the number of customer subscribed. For more details of the subscribed customer, admin will just need to click on the “number of customer”. By doing so, he can see the details about the subscribed customer in the pop-up menu.
Front End Module:
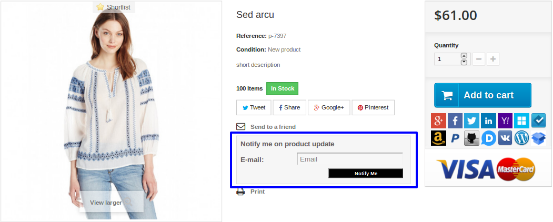
Once you enable this Knowband Prestashop notification addon at the back end, user will see the subscription box at the product page. The box contains a input field to enter the email id and a Notify Me button, through which, the customer will be subscribed to the respective product.
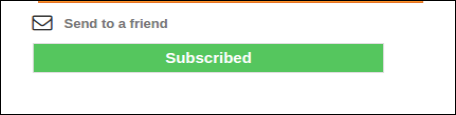
When a customer enters the email id and clicks to the button notify me the initial email will be sent to the entered email address and the message showing subscribed.
There will be a case when the entered email for subscription and the respective already exist, in that case the subscriber will be updated and the updated email will be sent again to the email.