Prestashop WordPress blog post manager addon allows the store admin to display to the WordPress blog post feed in Prestashop eCommerce store. Prestashop is an eCommerce CMS, hence, Prestashop blog is not as powerful as WordPress which is a blogging CMS. The Prestashop WordPress blogging module can merge the best of these two platforms and optimize the performance of your site. The admin can select the WordPress blogging site and can display its post feeds with the help of Prestashop WordPress blog post manager plugin.
1.2 Admin Benefits of Prestashop WordPress blog post manager extension
The admin can easily fetch the blog post of the selected WordPress site and display the post feed in the front-end with the help of Prestashop WordPress blog manager plugin.
Prestashop WordPress blog post manager addon allows the admin to select the category of the blogs that you want to display in the front-end of the site.
The admin can even customize the display options of the post feed from the back-end of the Prestashop WordPress post feed addon.
The admin can sort the display options from the back-end of the Prestashop WordPress blog post manager extension.
The Prestashop WordPress blog post manager offers multi-lingual support and can display the header text in multiple languages.
Prestashop WordPress blog manager extension allows the store owners to fix the number of blogs that they want to fetch and display.
The admin can create hooks to manage the post feeds with ease with the help of Prestashop blog post feed manager plugin.[Our the module doesn’t create a hook. Instead of it shows blog post in the selected hook.]
2.0 Installation
Follow the steps mentioned below in order to install the Prestashop WordPress Blog Post Manager addon in your Prestashop store.
1. Buy the Prestashop Blog Post Manager extension from the Knowband store. You’ll be provided with the following files:
a)Zipped file
b)User Manual
2. Unzip the zipped file. It would contain a number of files and folders.
3. Copy all the files and folders from the unzipped folder and paste them into your store “Modules” directory on the path – Root Directory/modules/.
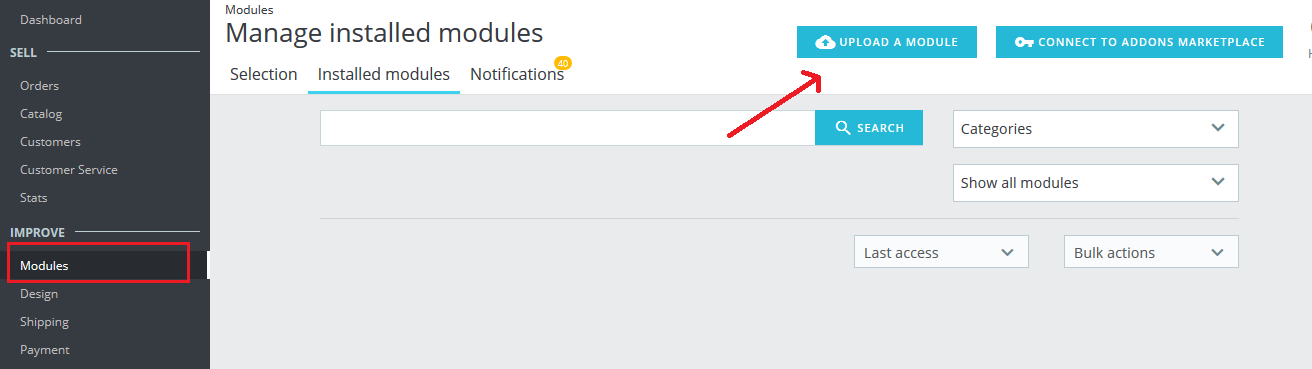
4. The Prestashop WordPress blog post manager module is now ready to be installed on your store and you can find that in Store Admin -> Modules and Services.
In case, you are not able to find Prestashop Blog Post Manager module in admin modules list, please try searching module with following details –
Keyword – WordPress Blog Post Manager Author – Knowband Category – Front office Filter By – Installed & Not Installed / Enabled & Disabled
5. Click on “Install” button to install the module. It would, then, ask for your confirmation. Click on “Proceed with the installation” option.
6. This step will install the module and show notification – “Module(s) installed successfully”.
3.0 Admin Interface
The Prestashop WordPress blog post manager extension offers easy customization options. The admin interface offers two options:
Module Configuration
Blog Post Hook Mapping
Both the tab of the admin interface are discussed below.
3.1 Module Configurations
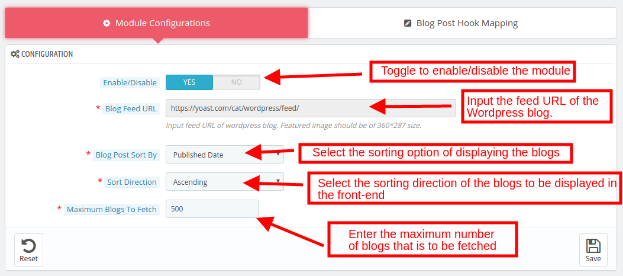
The module configurations tab of the Prestashop WordPress blog post manager plugin can configure the module is a few simple steps. The various options are discussed below.
Enable/Disable: Toggle the button in order to enable or disable the Prestashop addon. The WordPress blogs will be posted only when it is enabled.
Blog Feed URL: It refers to the URL of the WordPress blog whose posts are to be displayed in the front-end of the Prestashop store. Enter the feed URL of the WordPress site whose blogs are to be displayed on site’s front-end.[It is not editable once blogs are fetched. To make it editable you have to reset setting.]
Blog Post Sort By: Select the sorting option of the blogs. The blogs will be displayed as per the option selected.
Sort Direction: Select whether you want to sort the blogs in ascending or descending order of the selected sorting option.
Maximum Blogs to Fetch: Enter the maximum number of blogs that you want to fetch from the selected site[Add a point about the reset button. Which delete all previous saved blog setting and hook mapping of module
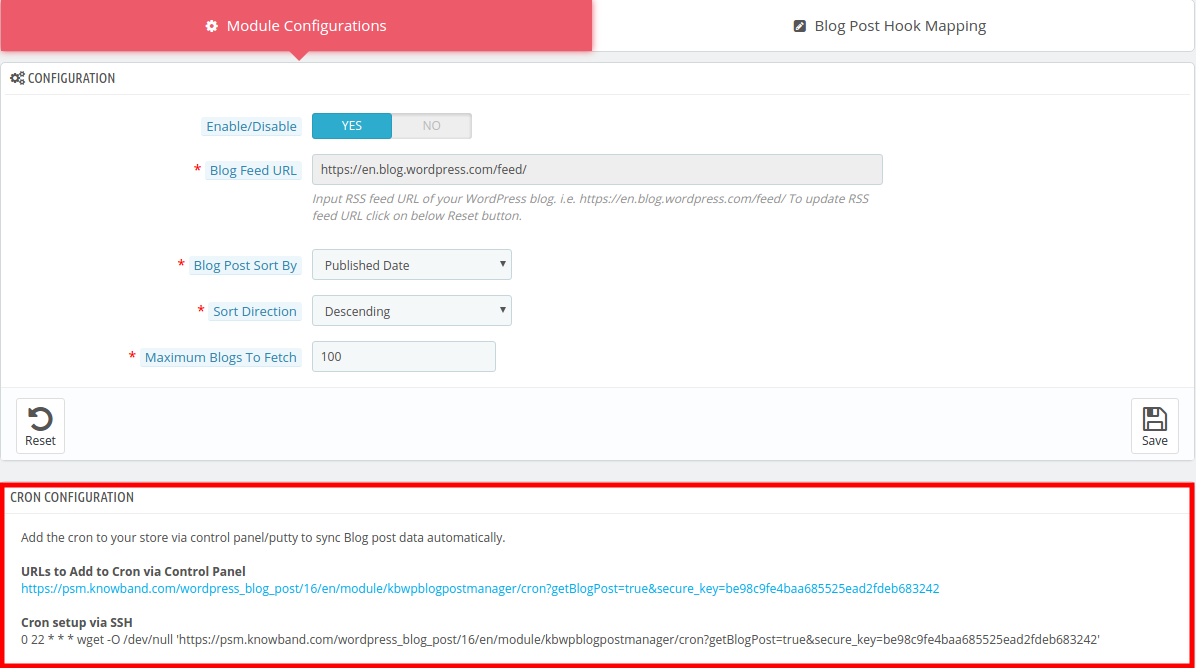
CRON Configuration:
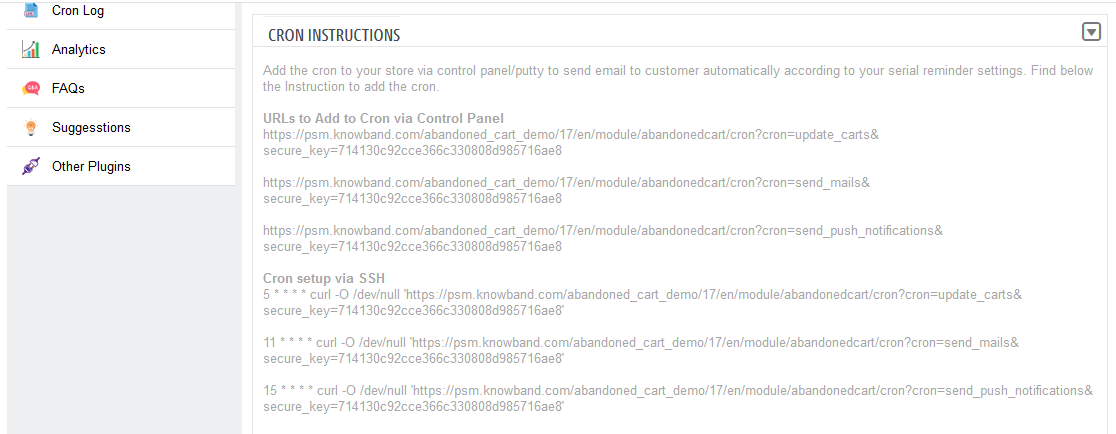
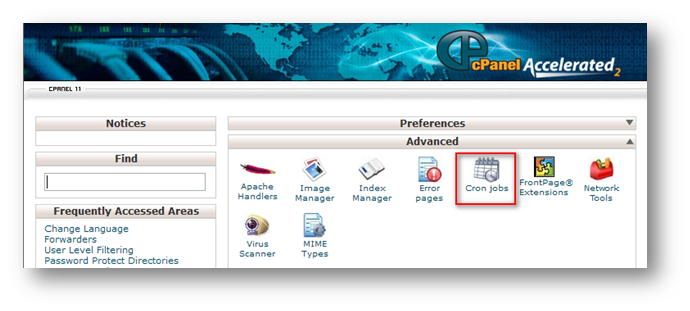
In order to sync Blog post data automatically the Prestashop store admin can setup the cron job there is two option available in the admin panel of the module.
1. The Admin can run the cron manually.
2. Cron setup via SSH: In order to automate the setup the admin can configure this setting.
3.2 Blog Post Hook Mapping
This tab of the Prestashop WordPress Blogging module allows the store admin to customize the look and feel of the blog post feed.
3.2.1. How to add New Blog Post Hook Mapping?
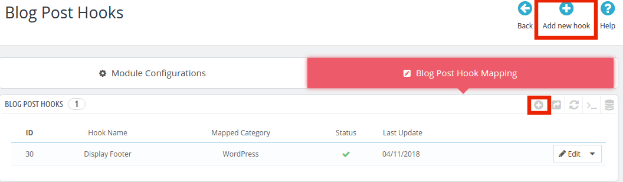
In order to create New Blog Post Hook Mapping, click on the ‘Add New Hook’ or the ‘+’ sign on the top right position.
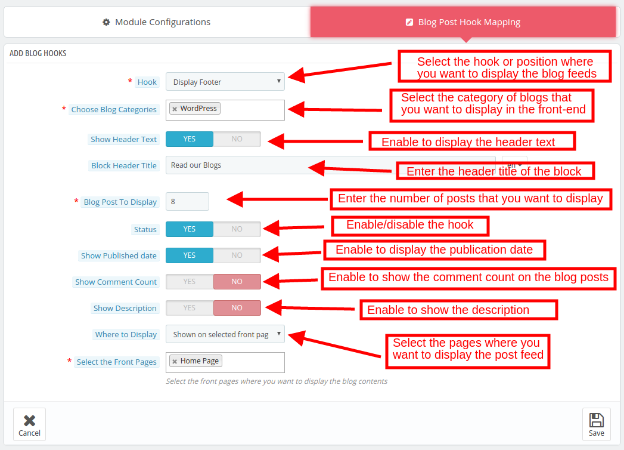
This will redirect you to the Hook creation page. The various fields of the same are discussed below:[Instead of hook creation it
Hook: Select the hook or position where on the web page where you want to display the post feeds.
Choose Blog Category: Select the category of the blogs that you want to display in the front-end.
Show Header Text: Enable the button in order to display the header text in the front-end.
Block Header Title: Enter the header title that you want to display in the front-end.
Blog Post to Display: Enter the number of the blog posts that you want to display in the front-end of the site.
Status: Toggle the button to enable/disable the hook.
Show Published Date: Enable the button in order to show the date when the blog was published.
Show Comment Count: Enable the button to show the comments of the blog post.
Show Description: Enable the button to display the description as well.
Where to Display: Select the web pages where you want to display the post feeds.[Explain this setting as it helps to show blog on the particular product page, category page, cms page or all page based on the setting.
3.2.2. How to Edit/Delete the Blog Post Hook Mapping?
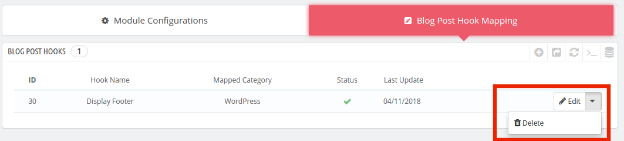
The create hooks will be displayed in this tab of Prestashop WordPress blog post manager plugin. The admin can edit or delete by clicking on the Edit or Delete button respectively.
4.0 Front-end UI
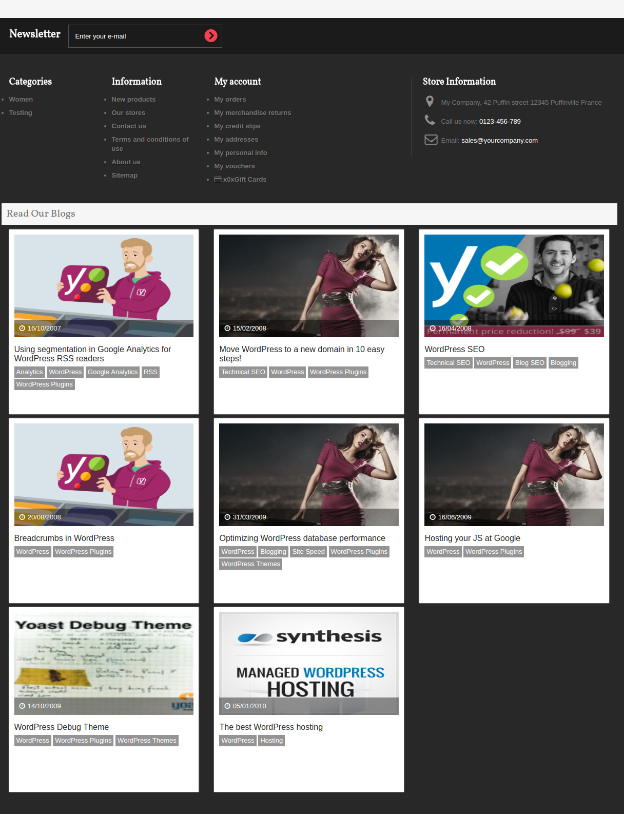
The blog post feeds will be displayed in the front-end of the Prestashop website as shown in the image below:
Prestashop Store Locator and Pickup addon by Knowband allows the store admin to provide an option to display the store in a particular location. With the Prestashop store location addon, the store visitors can find the closest store that has the products of their choice. The admin can display a store locator on the website with some additional details like distance, contact number, name, and timing. They can check the nearest store and select the one from where they want to pick up the product.
This Prestashop store locator and pickup addon offer a user-friendly interface and the admin can easily configure this Prestashop pick-up module. The admin can select multiple stores that are to be shown in the store locator. The Prestashop store locator and pickup addon allow the admin to set the minimum and the maximum number of days within which the product pickup will be initiated. The customers can easily check the nearest store and view the details also. They can pick up the product if they wish to. Thus they can get the product with greater and minimal time.
1.1 Features
The store owner can activate the store locator and pickup functionality just by a button toggle.
The e-merchant can set an image as a Google map marker and the zoom level of the map. The Prestashop plugin allows the admin to show contact numbers also.
The Customer can search the store by providing the distance in km or miles
The Prestashop store admin has an option to show the store locator on the homepage.
The store admin can add multiple stores and show them on the Google map. The admin can also select the default store.
The online merchant shows a “Get Directions” link on which customers can click for viewing the store directions.
The Prestashop store locator add-on allows showing store URLs on the Google maps store locations. Customers can view the website link with the store details on Google map.
The online merchant can also show store images along with the physical store list.
Admin can apply country restrictions by enabling this feature from the Prestashop in-store pickup addon admin interface.
The Prestashop in-store pickup addon allows selecting the banner image and showcases it on the store locator page.
The store merchant can enable or disable the functionality of showing the date calendar on the checkout page while selecting in-store pickup functionality.
Prestashop in-store pickup addon allows the e-merchant to set the maximum pickup days.
The online store owner can set the date and time format.
The e-merchant can enable the settings to display the pick-up time slot.
The admin can set the minimum hours for which the customer has to wait for the pickup of the ordered product.
The Prestashop store locator and pickup addon have a ready-made email template for sending an email notification to the pick-up stores about the order.
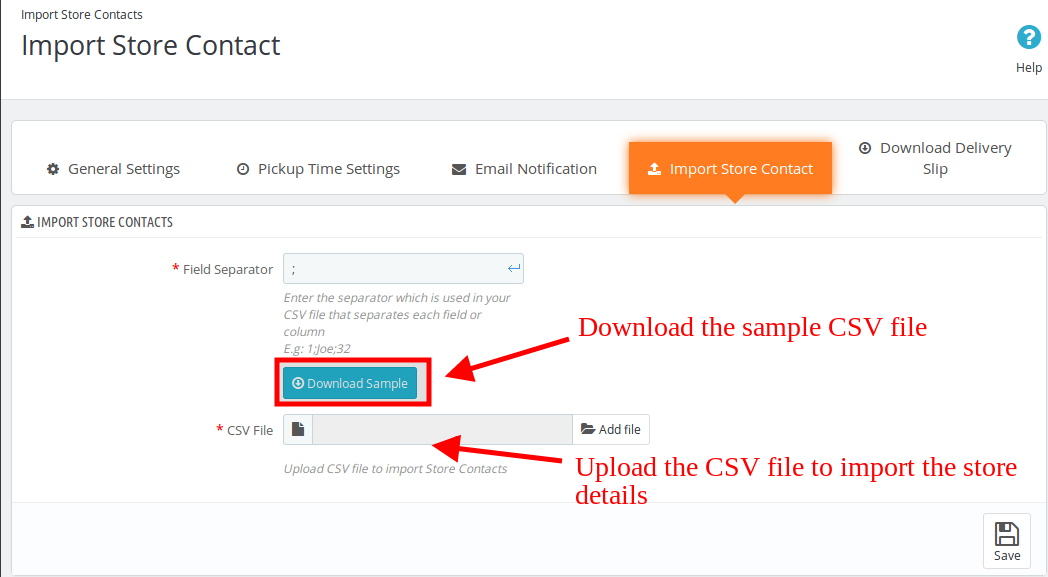
The PrestaShop Google Maps Store Locator plugin allows the admin to download a sample file in CSV format. The admin can also upload the CSV file to import store contacts.
The admin can download the delivery slip from the admin panel of this Prestashop store locator and pickup addon.
The Prestashop store locator and pickup addon are Multi-lingual compatible.
It is very easy to install, configure and activate this Prestashop store locator and pickup addon.
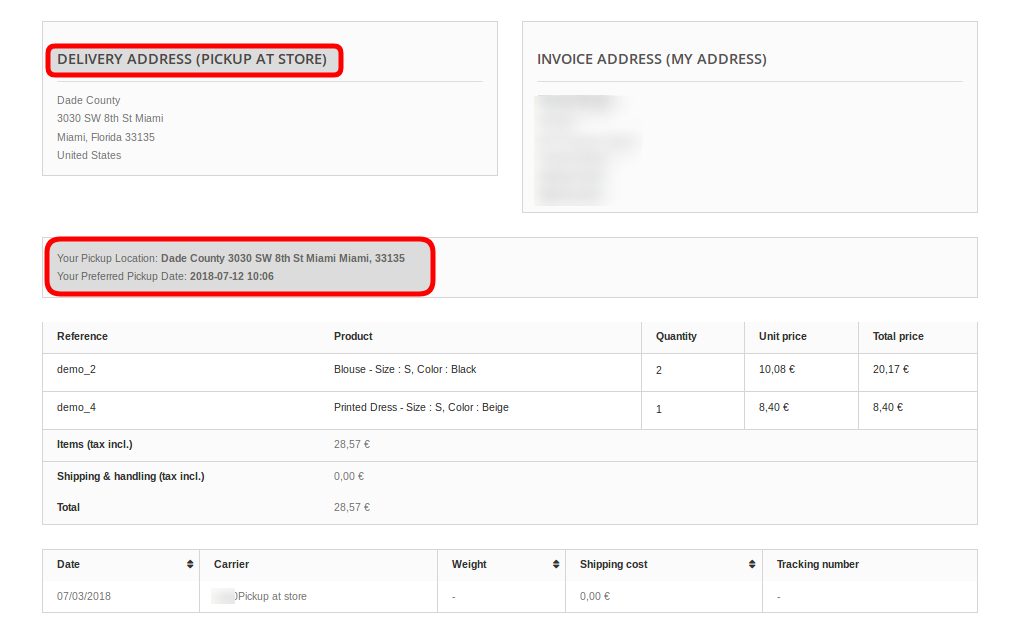
The product will be delivered to the selected store. The customer can pick up the product from the store.
The address of delivery will be the selected store’s address.
This Prestashop Store Locator and Pickup plugin are fully compatible with the Prestashop default checkout page.
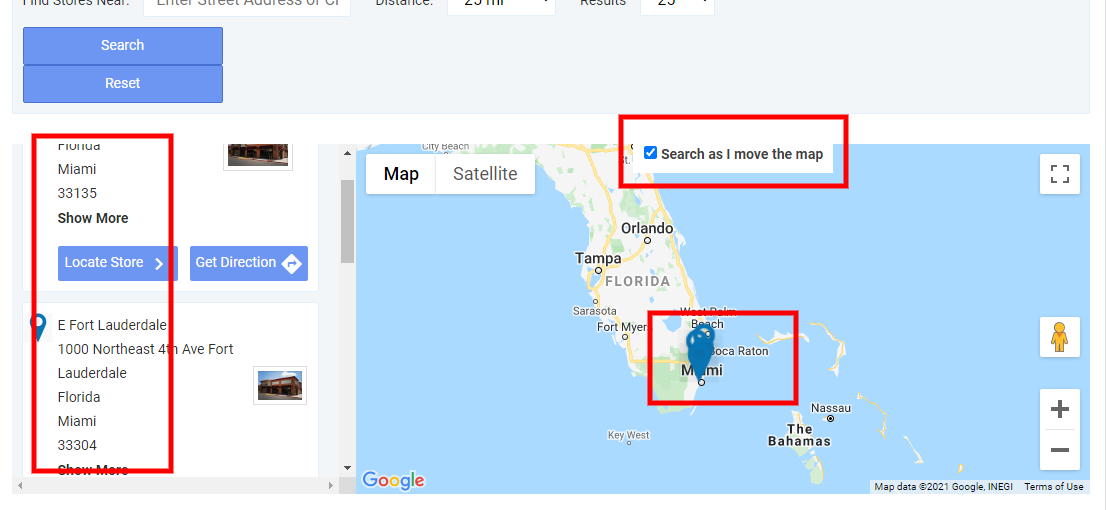
[New]: The store admin can allow customers to search the store as they move the Google map.
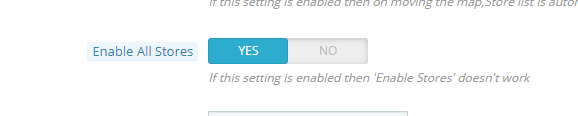
[New]: PrestaShop Google Maps Store Locator plugin allows admin to enable all the stores to display.
2.0 Installation Guide
Once you purchase the Prestashop store locator and pickup addon from the store you’ll get these files:
1. The zipped file consists of the source code of this Prestashop pick-up module.
2. User Manual
Follow the following steps to install the PrestaShop Google Maps Store Locator plugin:
First of all, you need to unzip the zipped file. It includes some files and folders.
After that, you need to copy the overall content of the folder and paste them into the “Modules” folder of the store’s directory. You can follow the path – Root Directory/modules/.
3. Now you can install the Prestashop Store locator addon. You can find that in Store Admin -> Modules and Services. It would be shown as below –
Now you just need to click on the “Install” button to install this Prestashop module. A confirmation pop-up will be shown. Click on the “Proceed with the installation” option. This step will install the module and show notification – “Module(s) installed successfully”.
3.0 User manual
The eCommerce store admin can now configure this PrestaShop store locator and pickup addon. The admin will get the following configuration option:
General settings
Pickup Time Settings
E-mail notification
Import Store’s contact
Download delivery slip
3.1 General settings
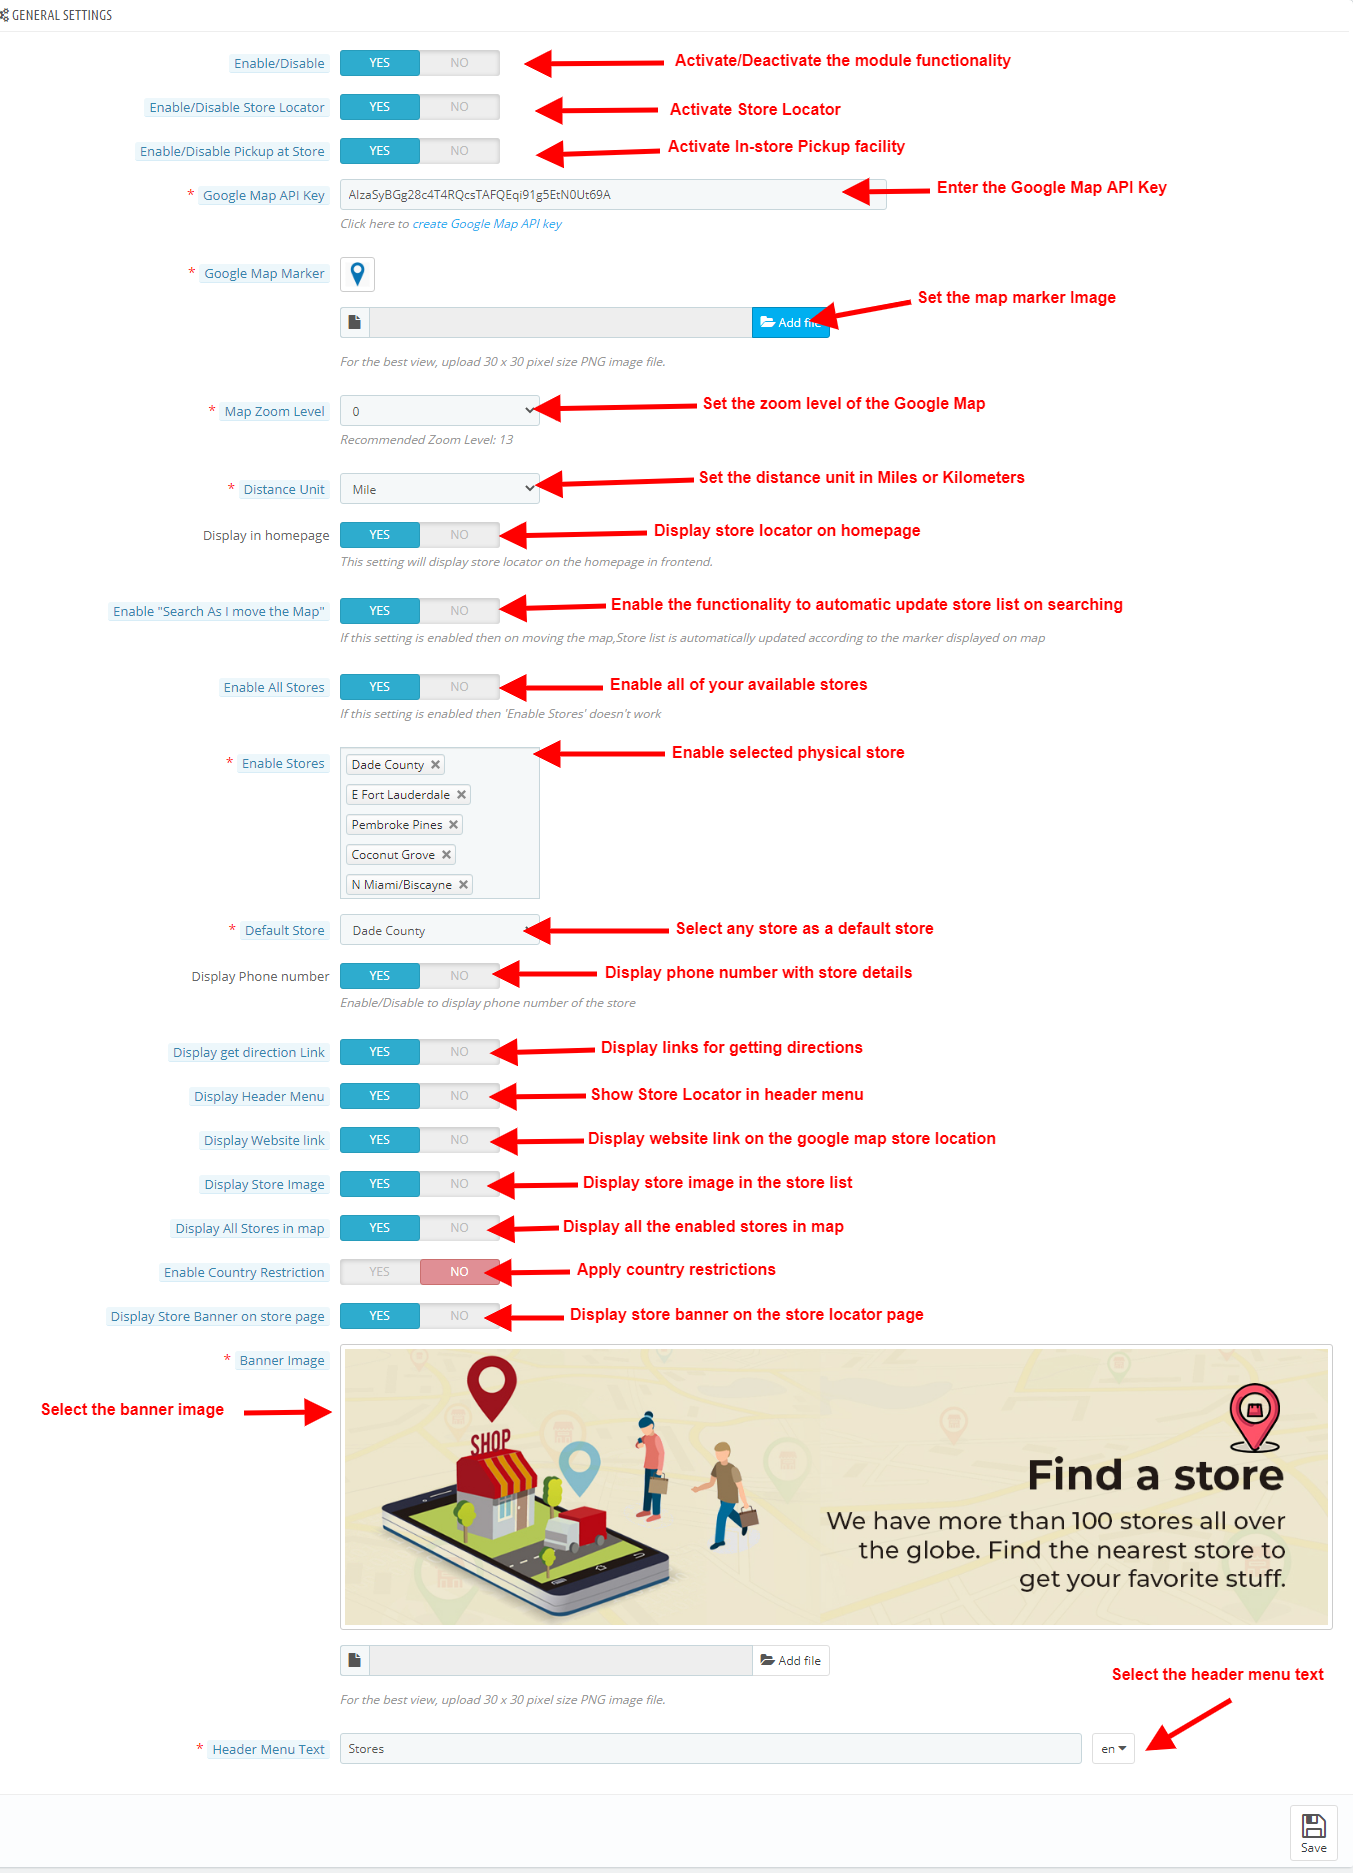
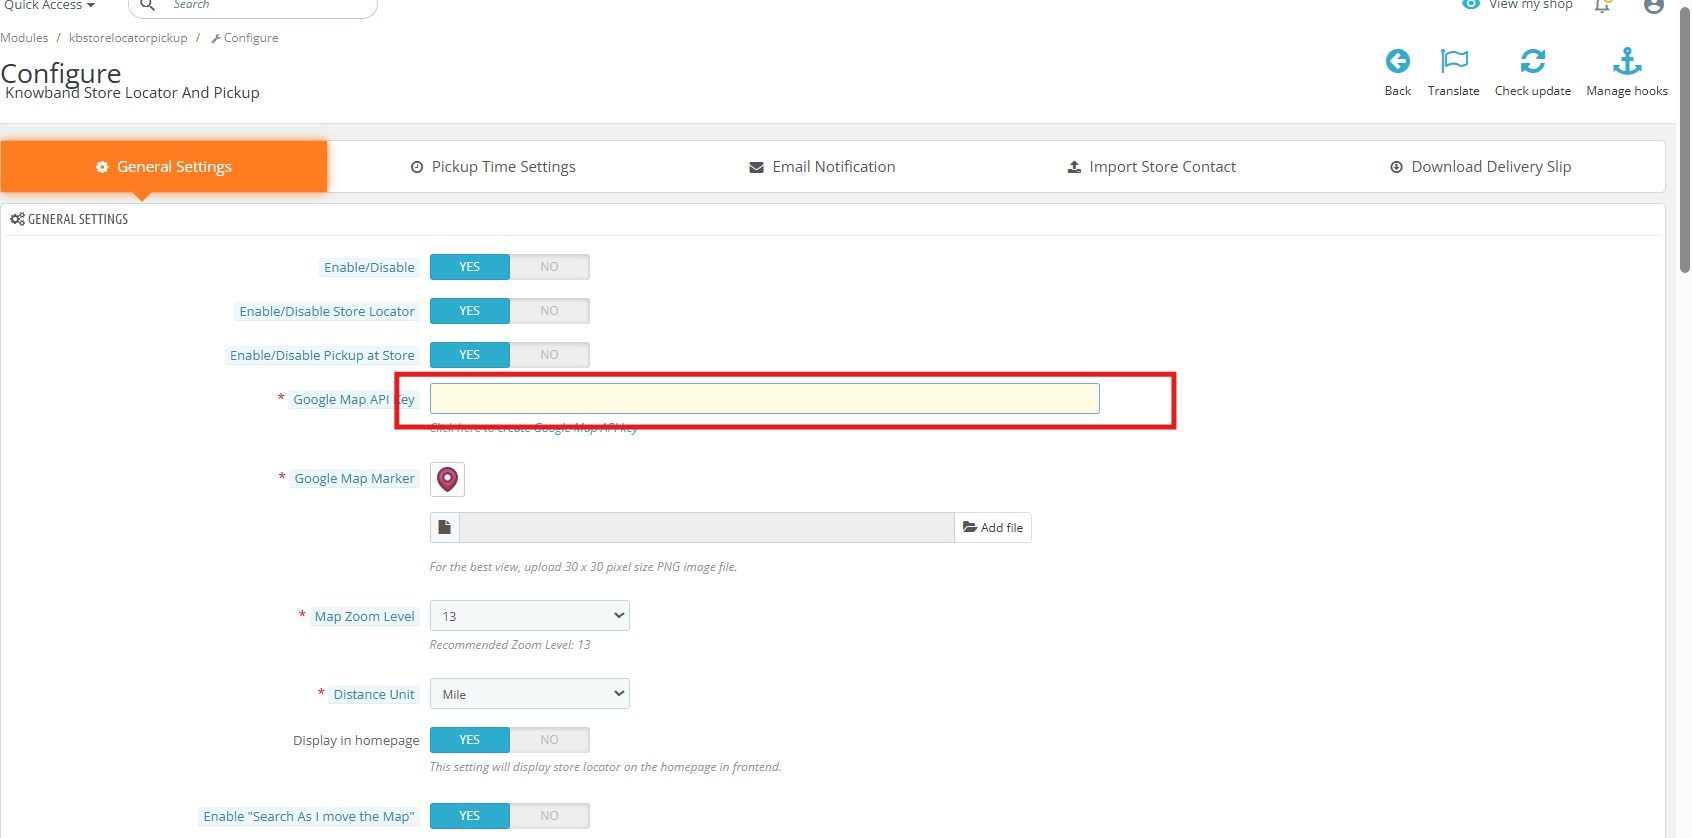
This General Settings page offer various configuration options as shown below:
Enable/Disable: The eCommerce store admin can activate or deactivate the store locator and pick-up plugin anytime just by toggling this button.
Enable/Disable Store Locator: The Prestashop Store locator addon allows the admin to enable or disable the store locator in the front-end. By default, it will be enabled.
Enable/Disable the Pickup at Store: The admin can activate the pickup from the store just by toggling this button.
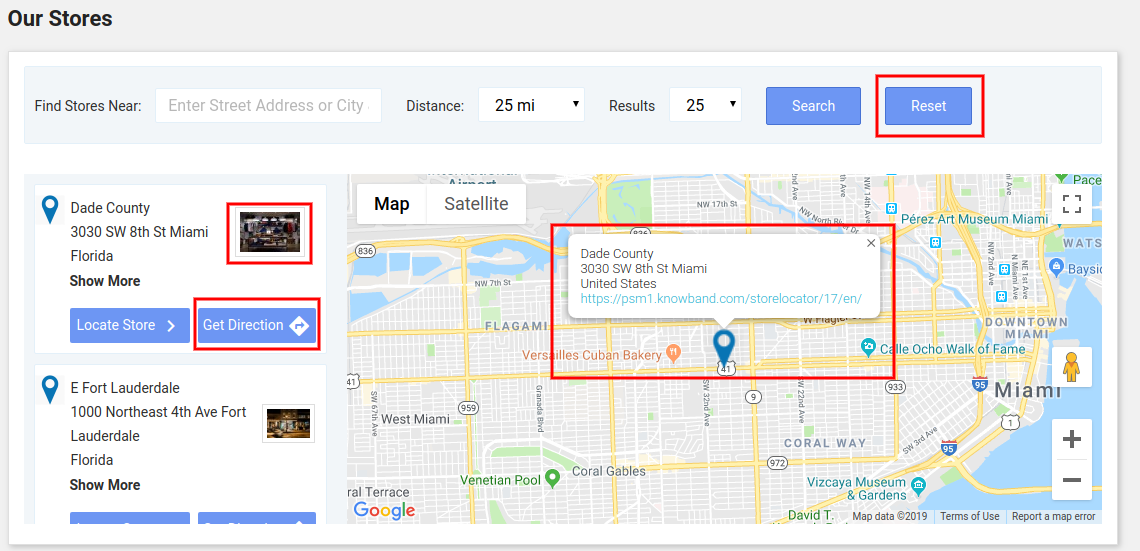
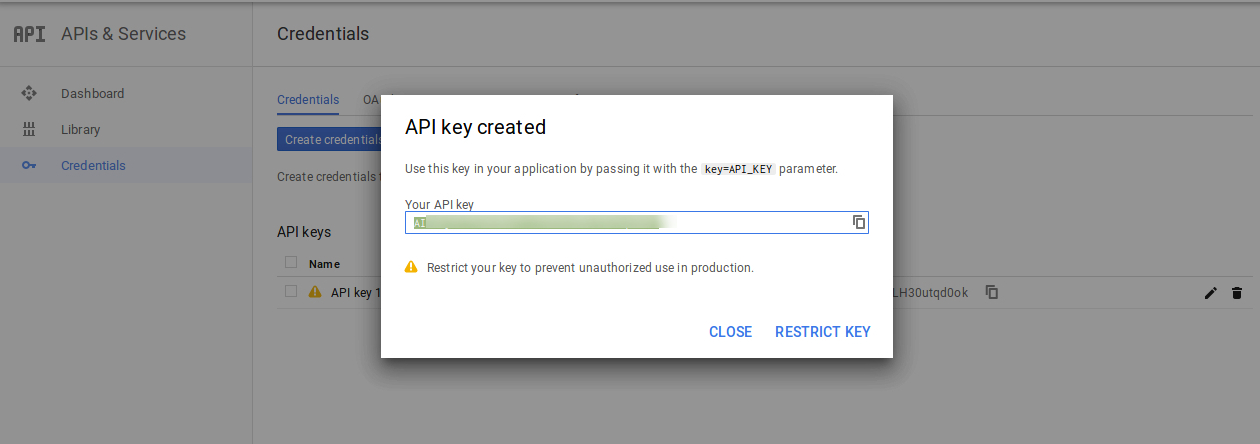
Google Map API Key: Enter the Google map API key in this section. A link is provided for generating an API key. Visit 3.1.1 for viewing the process of generating the Google map API key. In the front-end, the store locator will be displayed like the below-mentioned image:
Google Map Marker: The PrestaShop Google Map Store Locator plugin allows the admin to set an image as a Google map marker.
Map Zoom Level: The eCommerce store admin can set the zoom level of the map.
Distance Unit: The PrestaShop Google Maps Store Locator plugin allows the admin to set the unit of distance measure as Kilometers and miles.
Enable “Search As I move the Map”: Prestashop Store locator addon shows the list of available stores customers when they move the Google map to a different location.
Display on the homepage: The admin can display the store locator on the homepage by enabling this setting.
Enable All Stores: This feature allows the admin to enable all of his available stores.
Enable Stores: The admin can select the stores to display on the Google map. Select the stores that you want to display in the locator in this section.
Default Store: The Prestashop store locator and pickup addon allow the admin to set a store as the default store. Select the store from the drop-down list in this section.
Display Phone number: The Prestashop pick-up module allows the admin to show the contact number of the store. Enable this option to display the phone number.
Display Get Direction Link: Enable the option if you want to show the “Get Direction” link. The customers can view the directions for visiting the physical store.
Display header menu: The store admin can showcase a header menu on the front-end.
Display Website Link: Enable this setting if you want to show the website link on the google map along with the store locations.
Enable Country Restrictions: Apply country restrictions if you don’t want to show store locator functionality in all the countries.
Display Store Image: Enable the settings for displaying store images along with the store details in the physical store list.
Display Store Banner on the Store page: Show or hide store locator banner image by enabling/disabling the option. Admin can also select the banner image for showing on the store locator page.
Header Menu Text: The store admin can set the header menu text.
Sign in using your existing Google account. You’ll be prompted to create an account if you haven’t done so already.
Step 3: Finalize and Select the Project
Click “Create” to generate the new project.
After creation, click the project dropdown again.
Select your newly created project from the list to make it active.
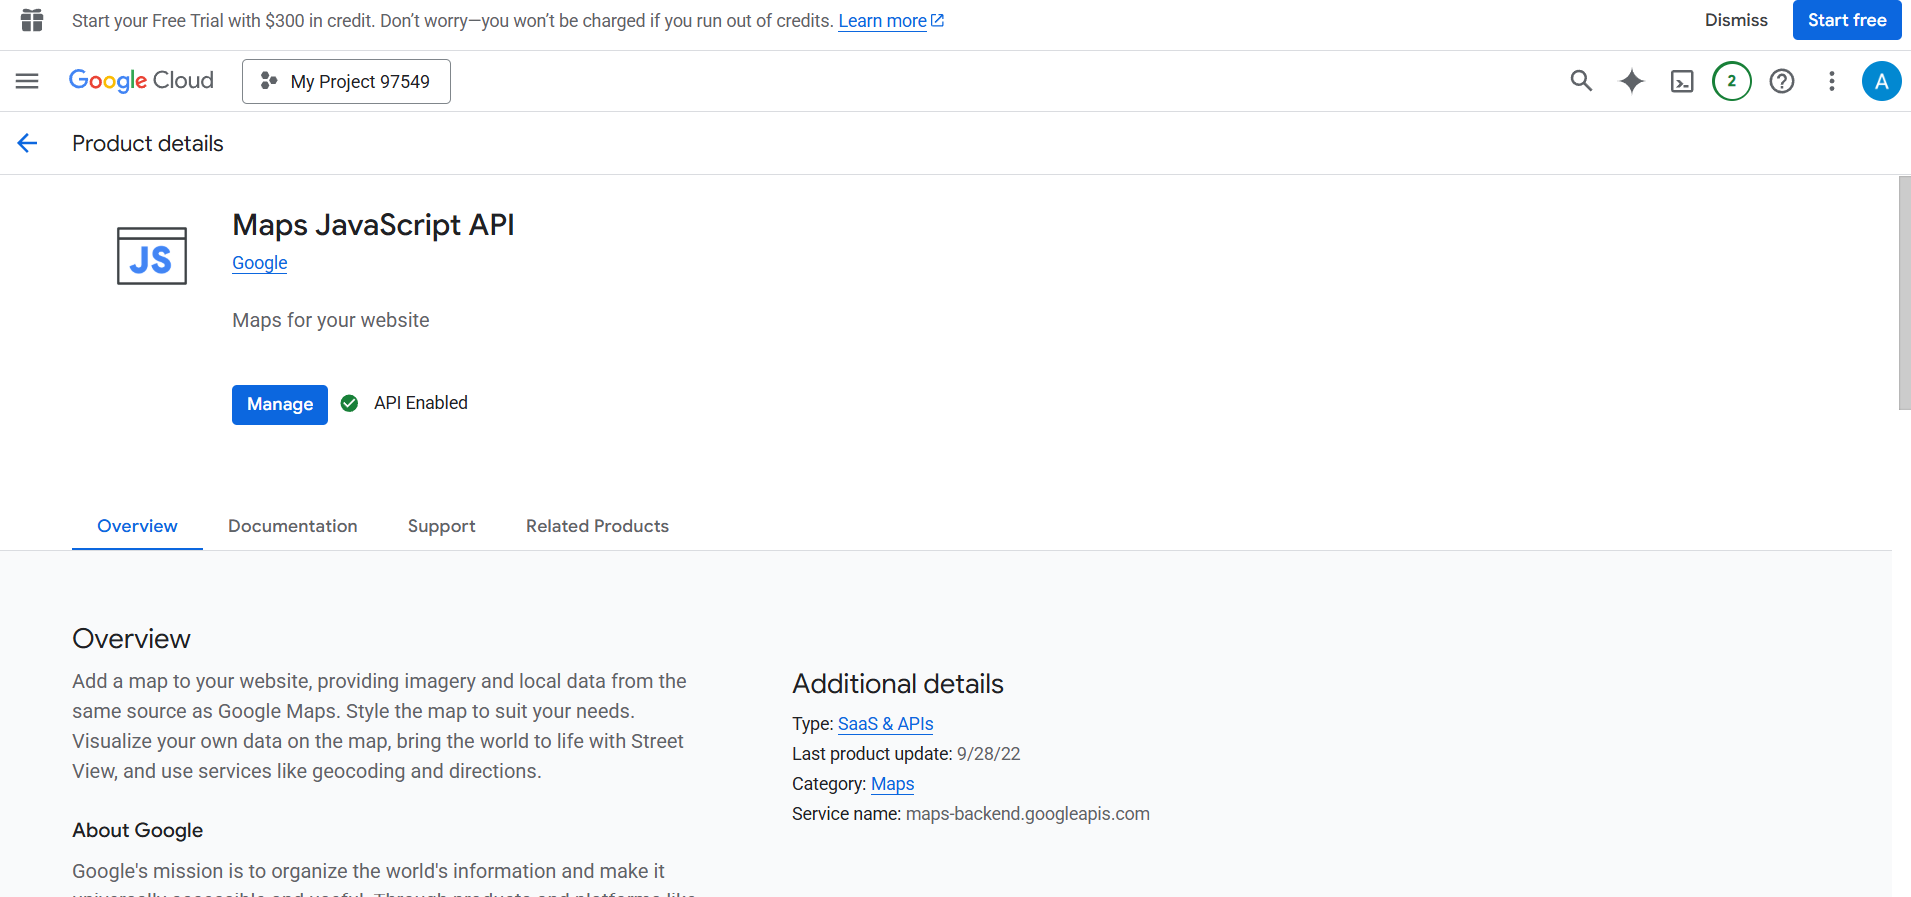
Step 4: Enable the Maps JavaScript API
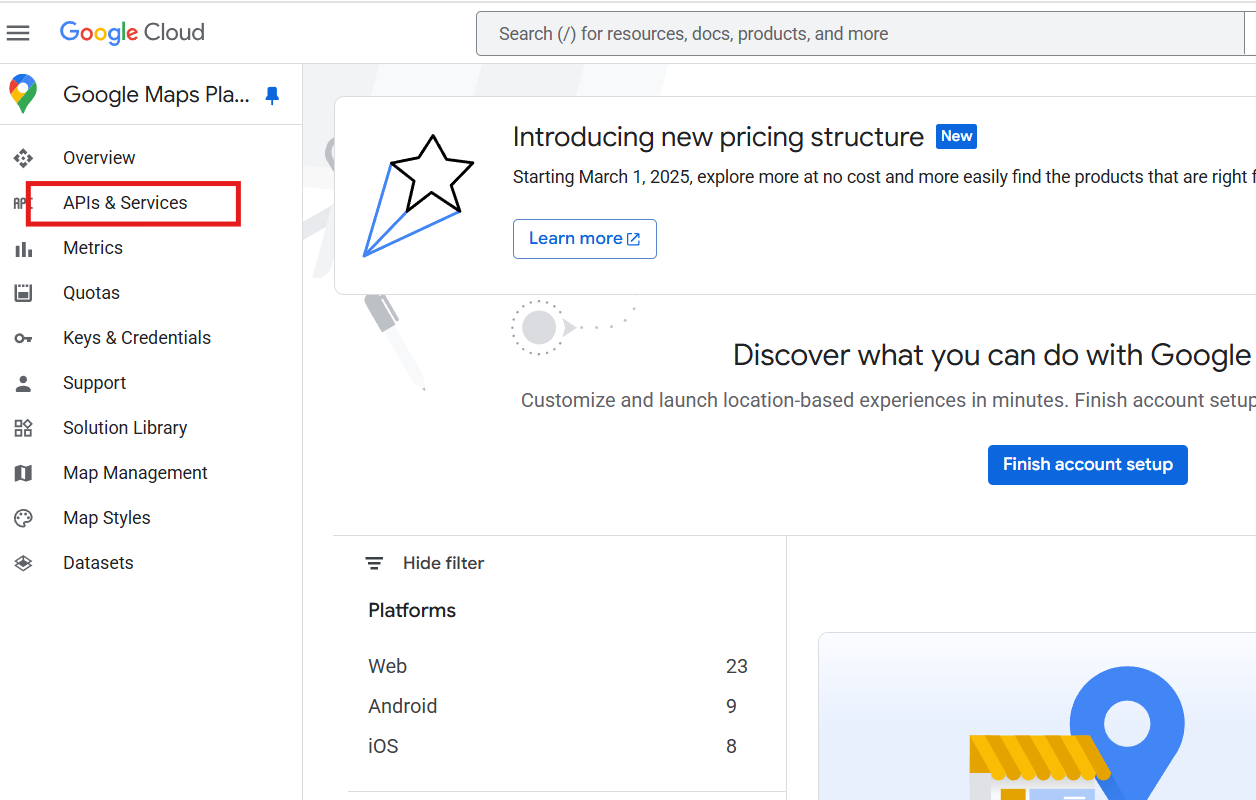
In the left sidebar, navigate to: APIs & Services > Library
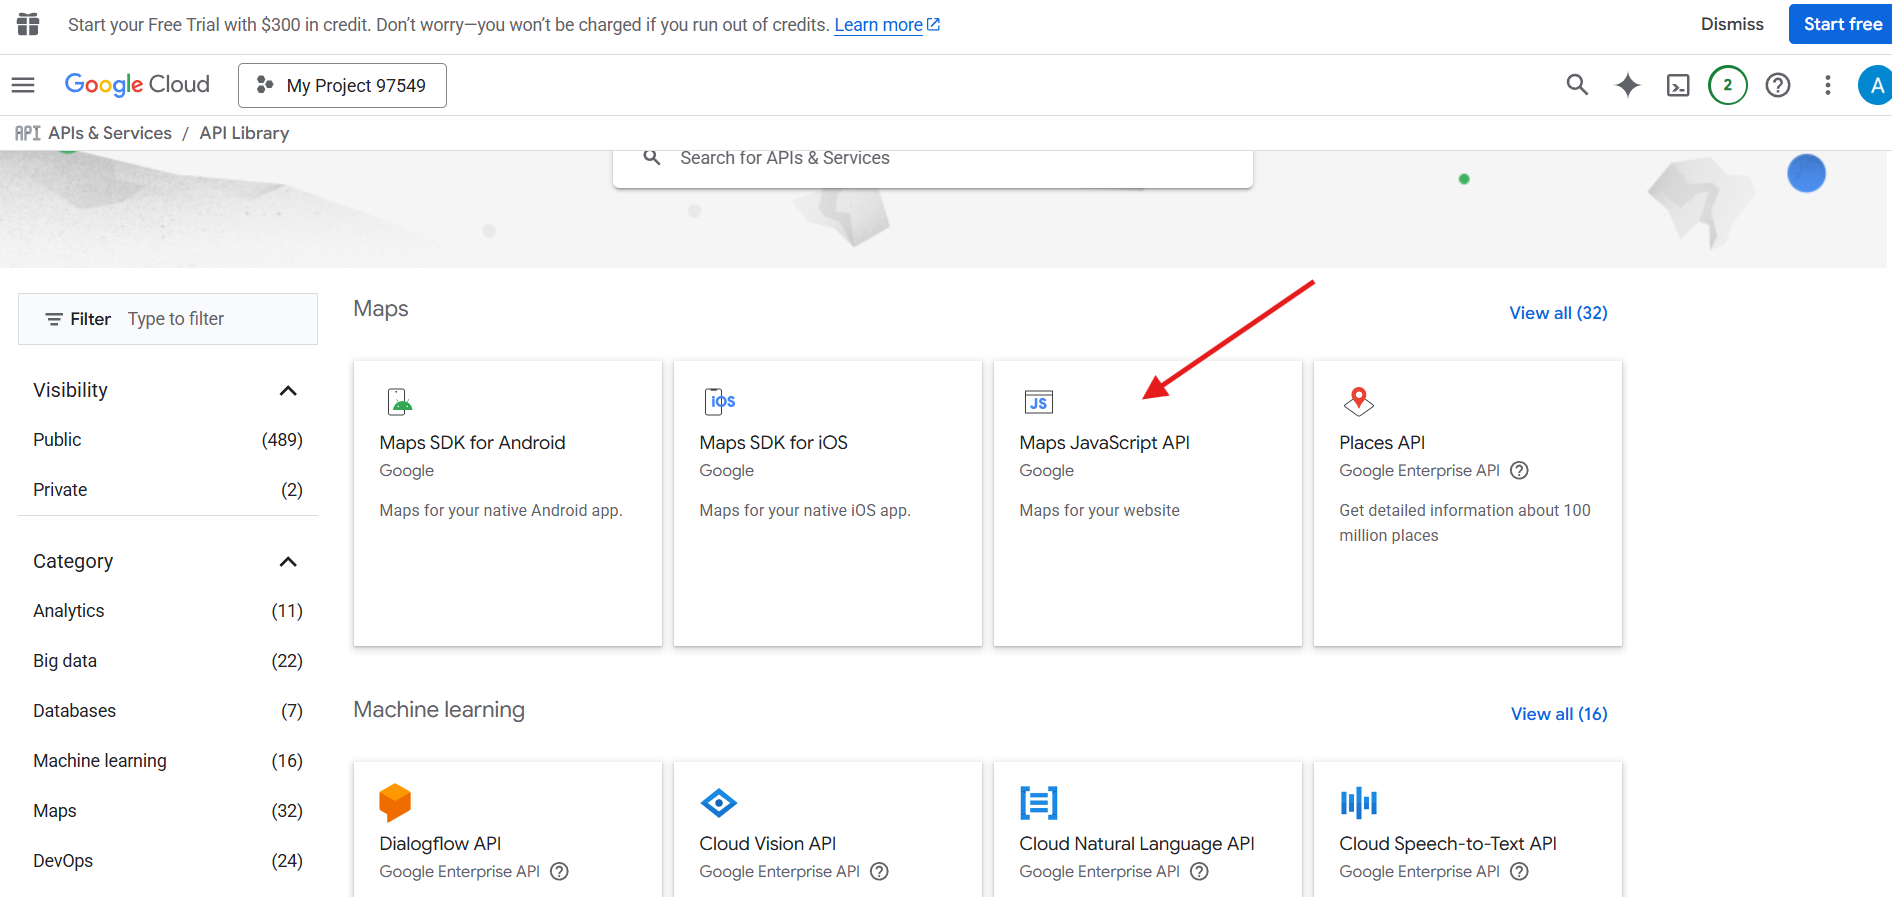
Use the search bar to type “Maps JavaScript API”.
Locate the Maps JavaScript API from the search results (usually listed as the third option).
Click on it, then click the blue “Enable” button on the API overview page.
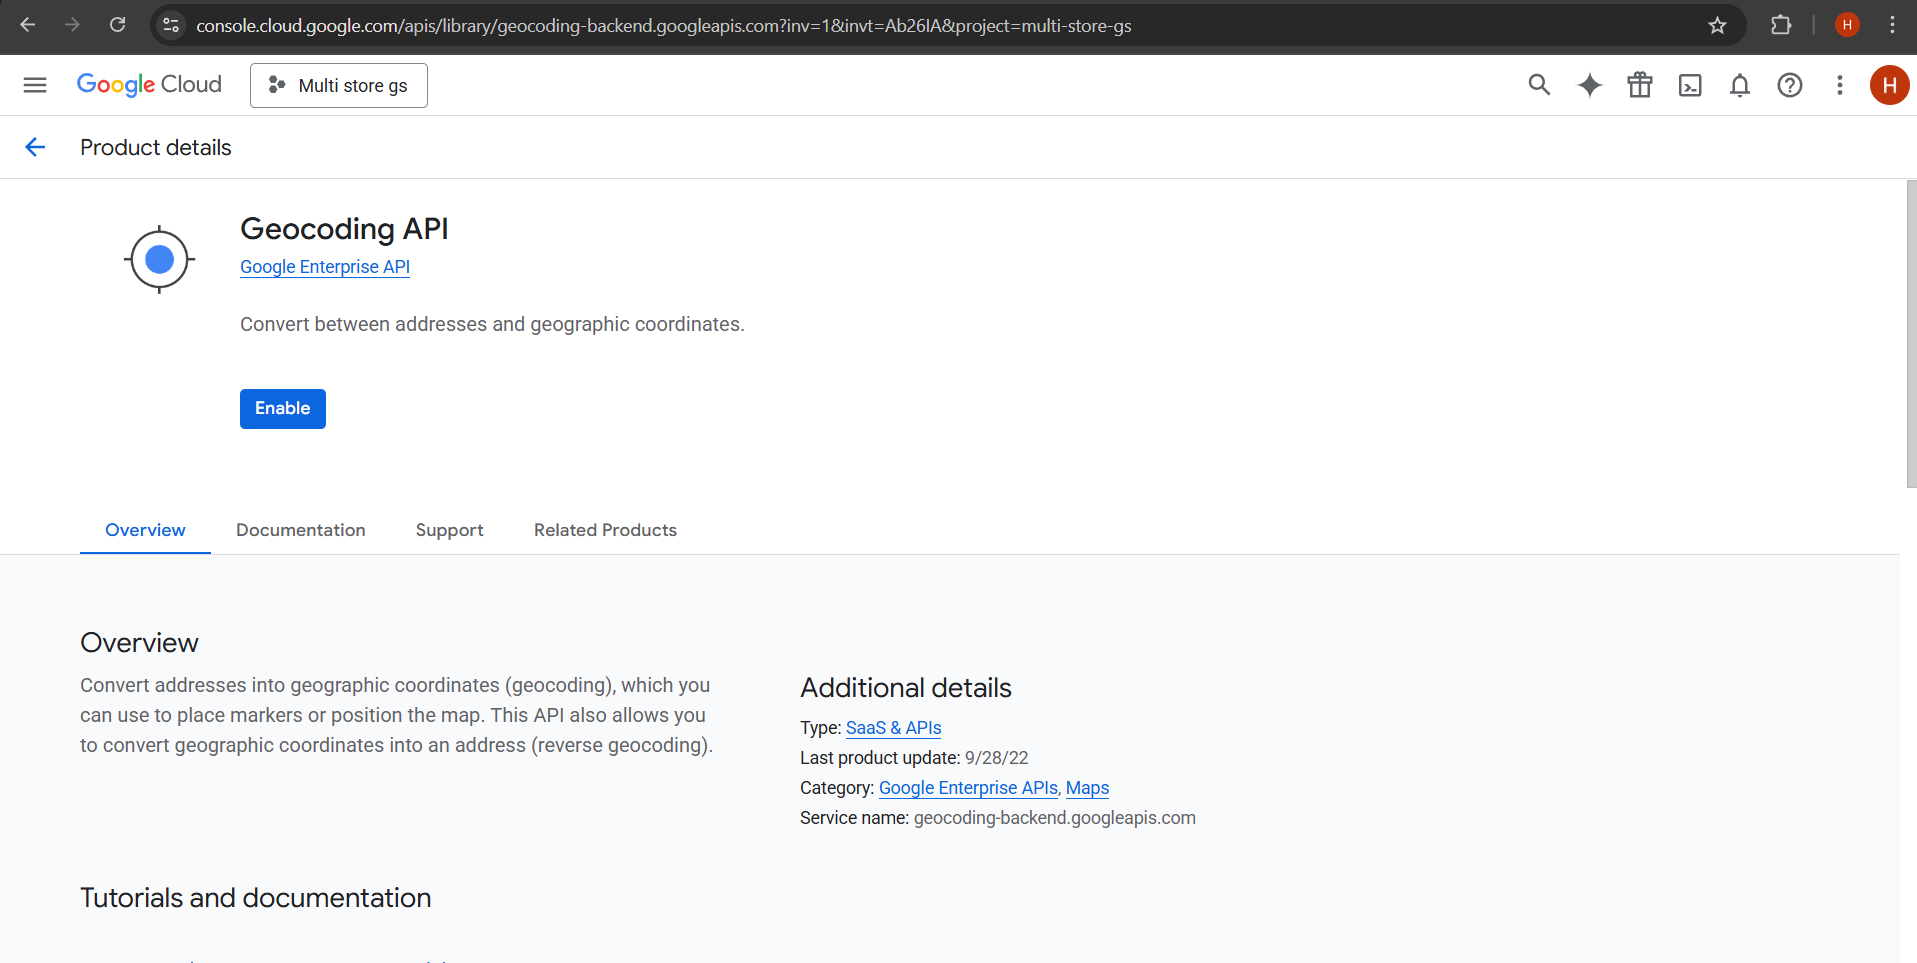
Use the search bar again to type “Geocoding API.”
Click on it from the results.
On the overview page, click “Enable.”
Hold or wait briefly as the API setup completes for your project
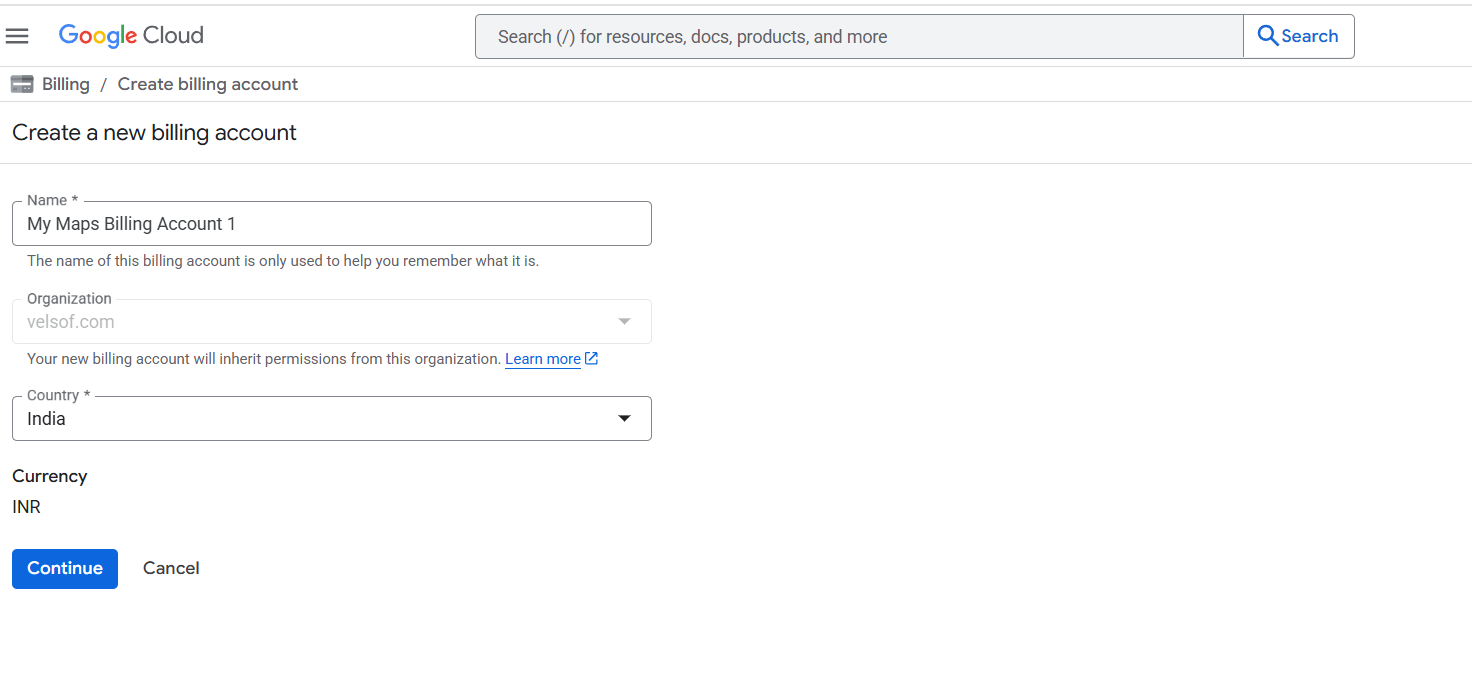
Step 5: Set Up a Billing Account
Important: Google Maps APIs require an active billing account, even for free-tier usage.
Navigate to Billing in the left-hand menu.
Ensure your Google Cloud project has a properly configured billing account.
After successfully linking billing, you can proceed to generate API credentials.
Step 6: Go to the Credentials Section
After enabling the API, go to the left sidebar.
Navigate to APIs & Services > Credentials.
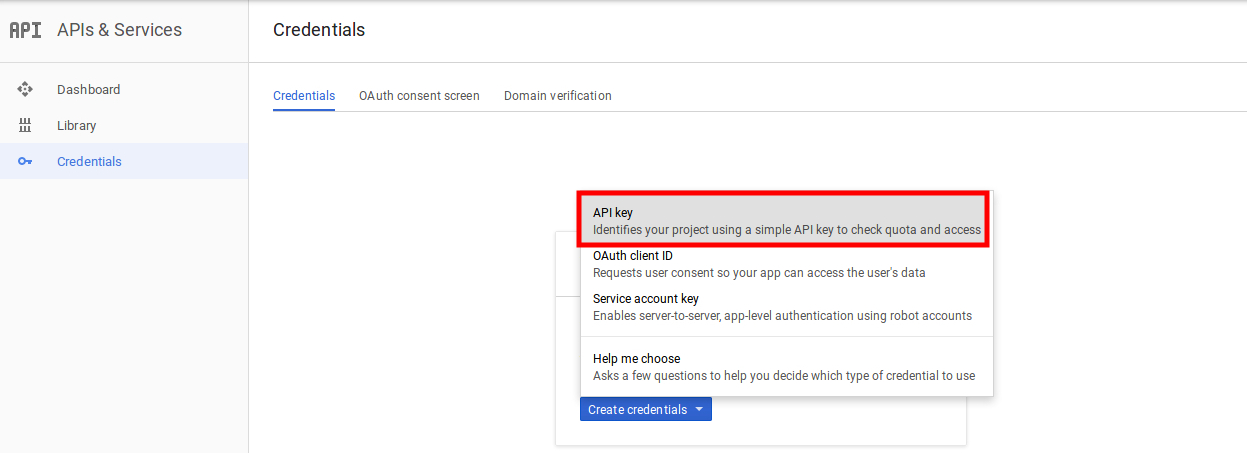
Step 7: Create a New API Key
Step 8: Hit the ‘+ CREATE CREDENTIALS’ option in the upper section of the interface
Step 9: Click the copy icon next to the key to copy it to your clipboard.
Step 10: You can now use this key in the Prestashop Store Locator API Field.
3.2 Pickup Time Settings
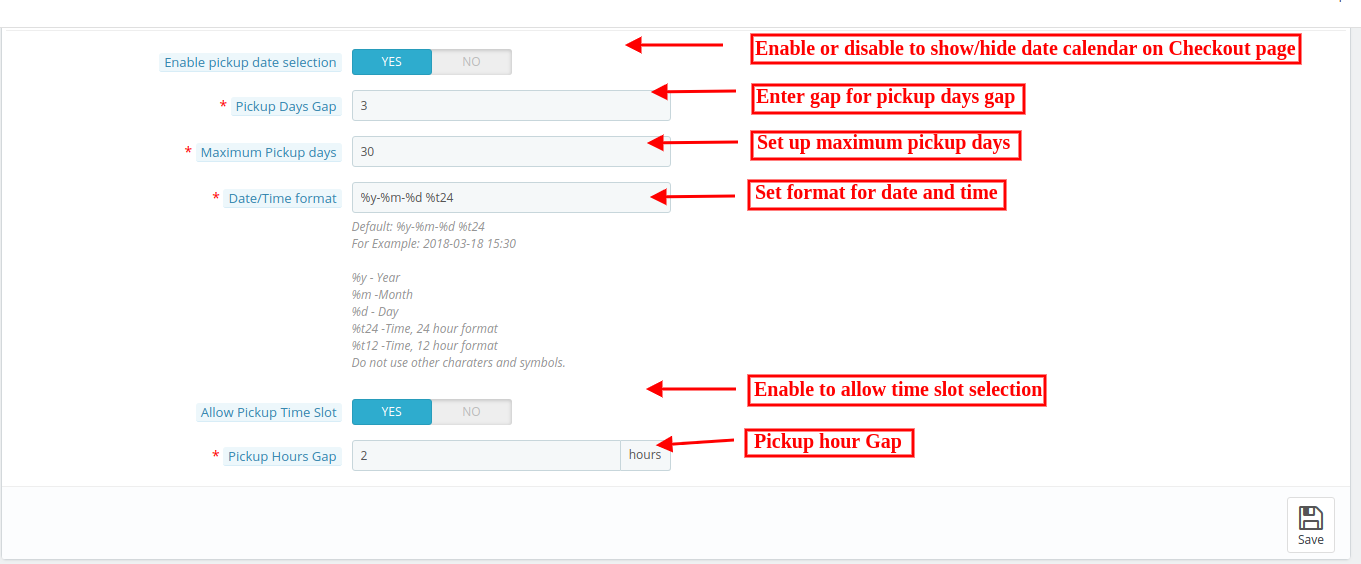
The various fields of this interface are discussed below:
Enable Pickup Date Selection: Enable the option if you want to show the date calendar on the checkout page for in-store pickup.
Pickup Days Gap: The admin can set the minimum days after which the customer can pick up their package from the store.
Maximum pickup days: In this option, the admin can set the Maximum days within which customer has to pick up their package from the store.
Date-time format: The eCommerce store admin can set the format of the pickup date and time.
Allow Pickup Time Slot: Enable to display the pick-up time slot.
Pickup Hours Gap: the admin can set the minimum hours for wait after placing the order. This time will be the last time for which the customers need to wait after placing their order. After the provided time they can pick up their package.
3.3 E-mail Notification
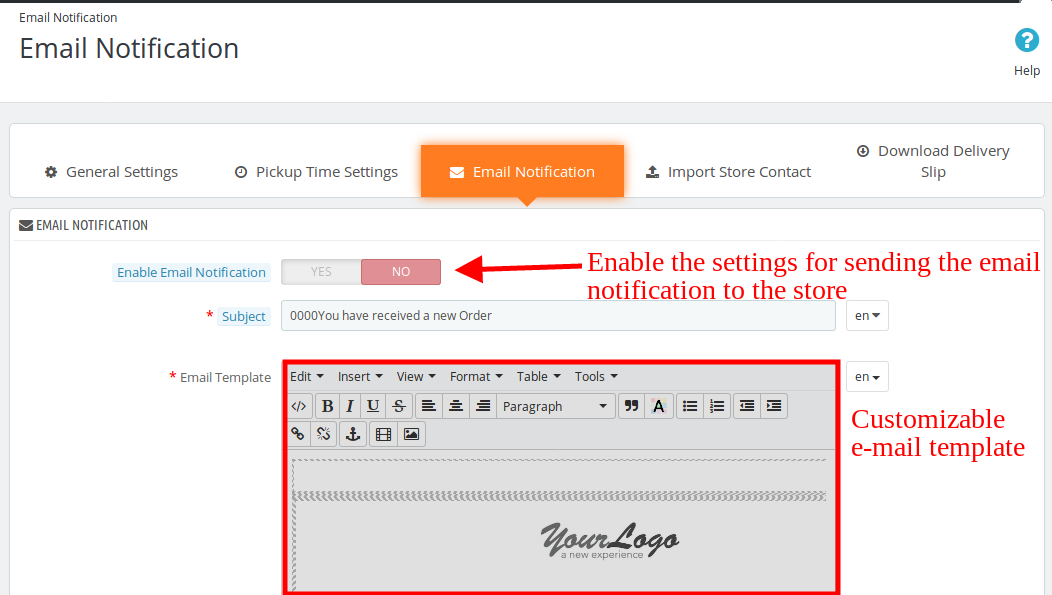
The store admin can send an email to notify the pickup store of the orders. Ready to send email templates to make this easy for the store admin to inform the pickup stores about the order.
Enable Email Notification: The eCommerce store admin can enable this option for sending e-mail notifications to notify the pick-up store about the order. The admin can set the subject line. Customizable email templates are available for sending the email to the stores. The ready-made email template automates the process.
3.4 Import Store’s Contact
The store admin can download a sample file in CSV format. The store owner can download the sample file and insert all the details in this file. The admin can upload this file to import the store details.
Field separator: The Prestashop pick-up module allows the admin to set the field separator for separating the fields in the CSV file. The separators can be a semi-colon, comma, or others. Using commas is recommended. The admin can download the sample CSV file from the admin panel. They can enter their data in the downloaded sample and upload the CSV file to import store contacts.
3.4.1 How to create new stores?
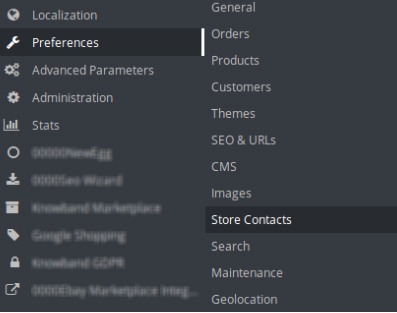
The store admin can also create new stores from the admin panel. The Prestashop store locator addon allows the admin to add, delete and edit the store-related details.
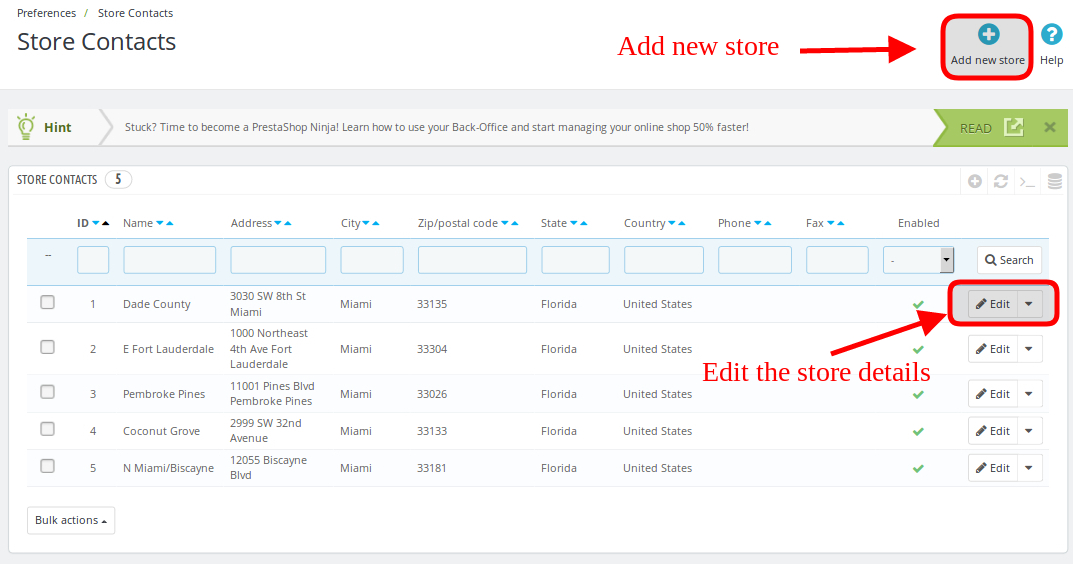
The admin can view the list of all the stores and also can add new stores easily from the admin panel.
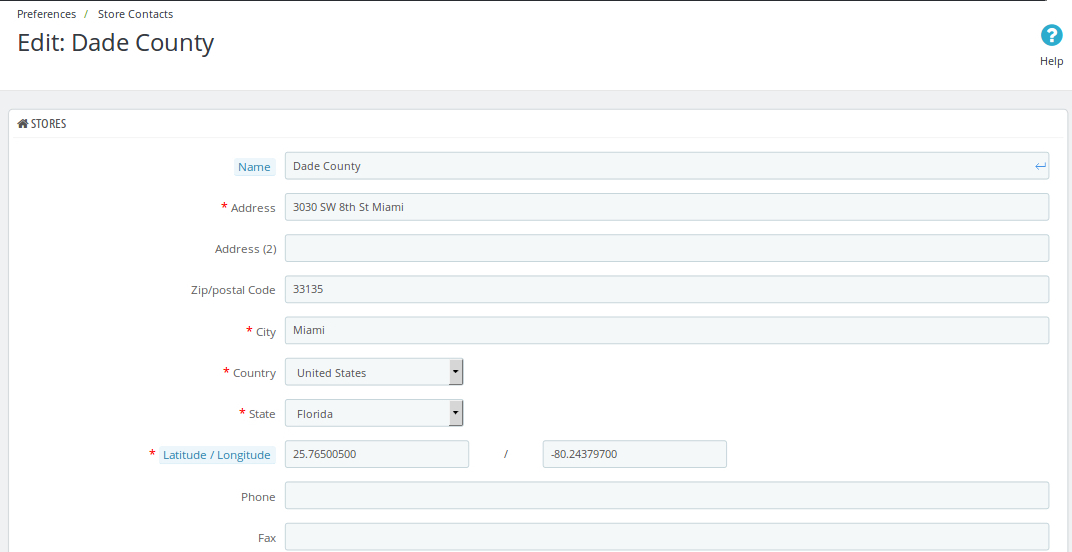
The store admin can easily add a store from the admin panel. After clicking on the “add new store” button, a screen will be shown like below:
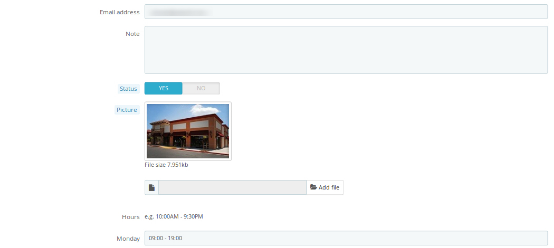
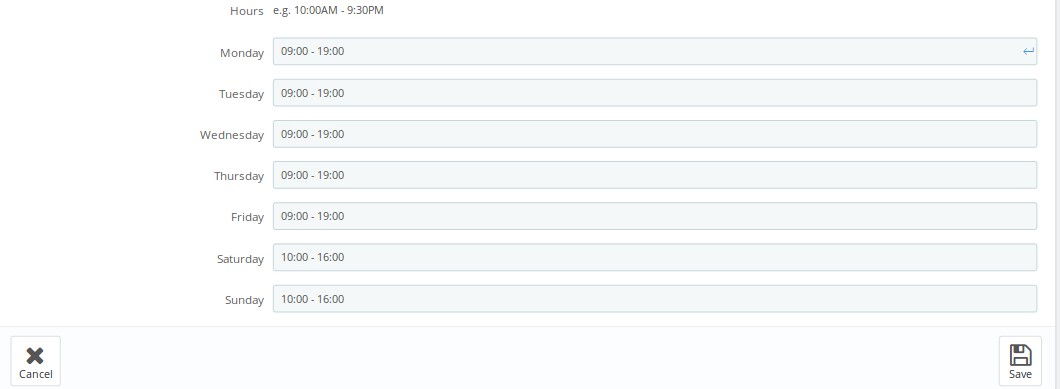
The store admin can easily add store name, full address of the store, and contact details also. The Prestashop pick-up module allows the admin to set the picture, status, and timing also.
The admin can easily insert the working hours of the store.
The customers can view the store on the front-end like this:
3.5 Download delivery slip
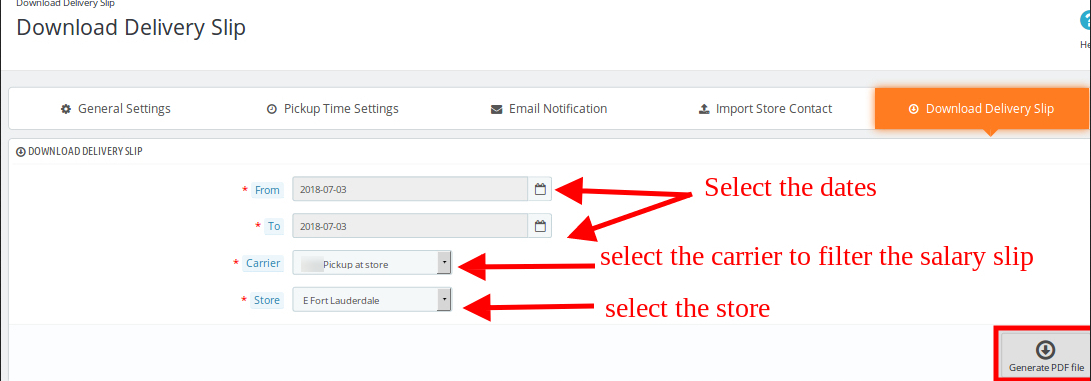
The Prestashop store locator and pickup addon allow the admin to download the delivery slip by inserting the dates. The eCommerce store owner can select the carrier to filter the delivery slip. The admin can download the PDF file just by clicking the “Generate PDF file” button.
4.0 Front-end Interface
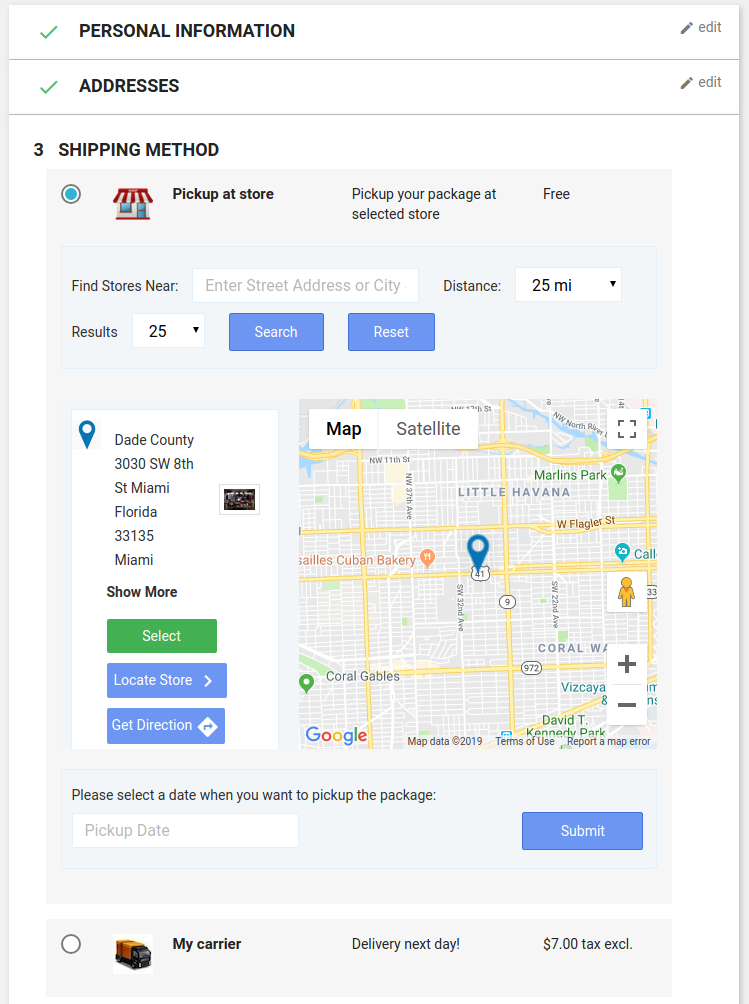
The customers can easily view the nearest store and pick up the product. They can view the contact details, name, distance, and timings also. The customers can get the product faster and without paying the shipping charges.
They can select the Pickup option:
After clicking the Pickup at store option the customers can view the store locator.
Store locator at Homepage:
If the store admin enables the settings to show the store locator on the homepage then the store locator will be displayed like the above-mentioned image:
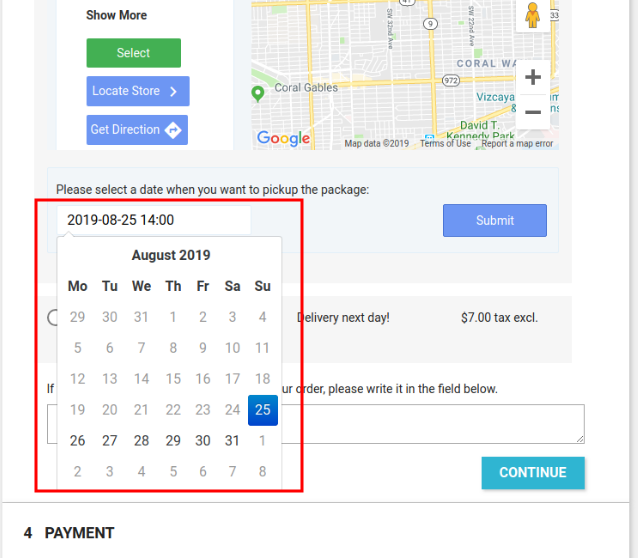
The customers can place their pickup orders easily. The customers can select the date and time to pick up the ordered product.
The admin order details will be shown like the below image:
The order details will be displayed like the below-mentioned image:
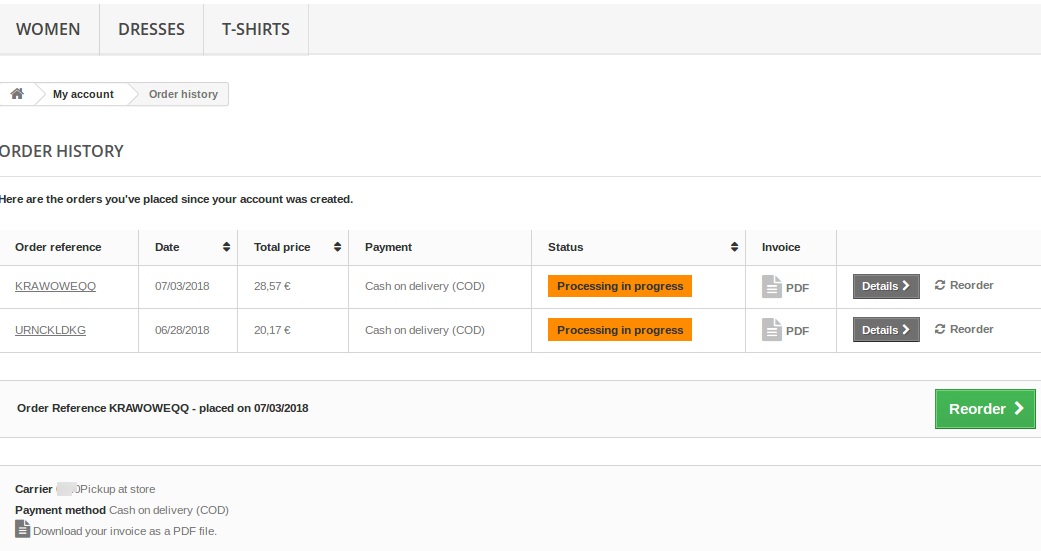
The eCommerce store admin can download the PDF file of the invoice.
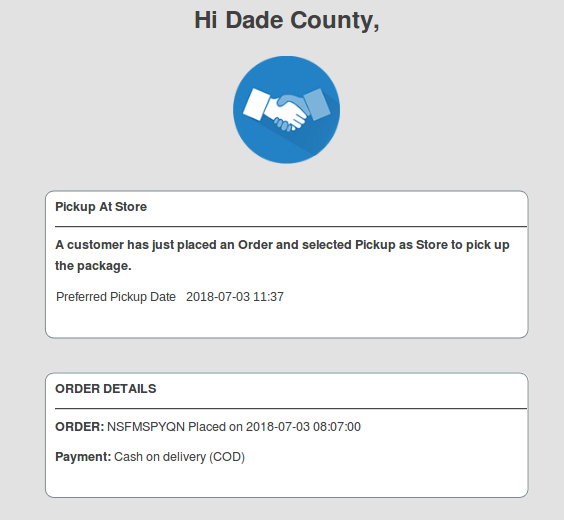
One email will go to the store for notifying it about the pickup order.
This way, the online store admin can offer an in-store pickup facility using Prestashop Store Locator and Pickup Addon. This PrestaShop Google Maps Store Locator plugin is highly customizable and offers smooth functioning. The online store merchant can show unlimited physical stores on the Google map and provide various details of the stores. The online users can view the physical store details on the website homepage and check the store details like store name, address, contact number, and email id details.
The eCommerce store admin can set the delivery days gap, pickup delay, and date-time format. The online store merchant can allow customers to select a suitable store for product delivery and pick the product from the physical store. The online merchant can send the email notification to the store for informing the physical store owner regarding any in-store pickup offer. The customers can get product delivery without any shipping charges and the admin doesn’t need to send the product to the customer’s address.
For additional guidance, please refer to the tutorial video available below, which provides a step-by-step walkthrough of this module.
1.0 Introduction Magento Gift Card Manager Extension.
Gift cards have become a major factor of eCommerce businesses. Knowband provides the Magento Gift Cart Manager Extension that allows the Magento store owner to offer gift cards to their customers. Magento gift voucher extension is a module that enables the admin to acquire new online consumers while retaining the existing customers.
This Magento gift card extension by Knowband gives the flexibility to a customer to buy the gift card online and send the Gift voucher to their friends via email on a specific date and time. The online shoppers can order the gift cards for the special occasions for their near and dear ones.
1.1 Features of the Magento Gift Card Manager Extension
By using the Magento gift card manager extension, the eCommerce store merchant can offer the e-gift card option to their store visitors.
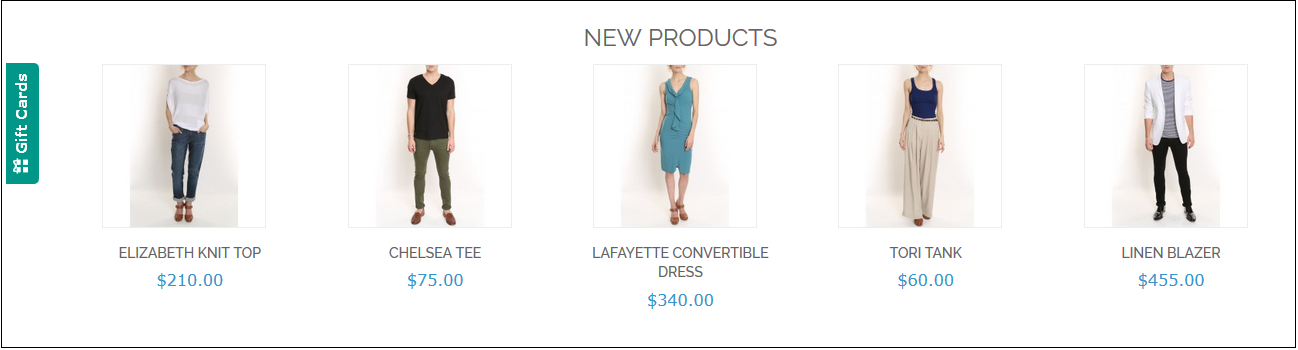
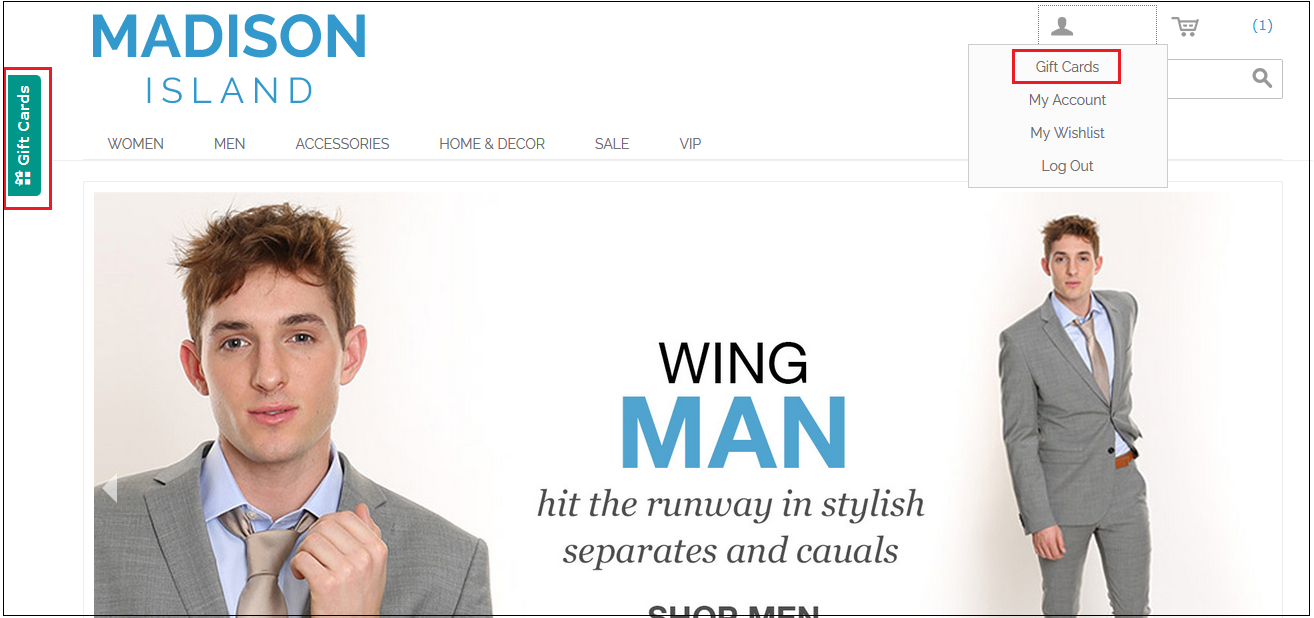
Magento store owner can place the link for Gift Card anywhere in the front-end of the website.
Knowband’s Magento send gift card manager extension allows the admin to fix the minimum duration within which the gift card is delivered to the end-user after the order for the same is placed.
Magento gift card module by Knowband enables the admin to set the prefix for the Gift card.
With the help of Magento gift voucher extension, the online store owners can customize the readymade email template subject and content as per desires.
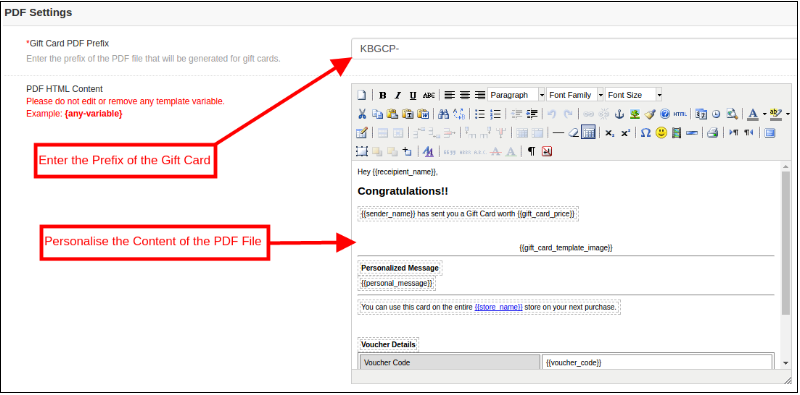
Magento gift card extension by Knowband offers the PDF customization option to the admin where they can change the Gift card prefix and content.
The Store admin can run the cron for implementing the changes automatically.
Magento gift card extension by Knowband allows the store admin to add, edit or delete the gift card template.
The online merchants can add the N number of gift card templates for various occasions including Anniversary, Birthdays, Holidays or any other special event. The default gift card designs or templates can be edited, disabled or deleted as required.
The store admin even gets an option to keep a track on the orders received for the gift card from the back-end of the Magento gift card manager extension.
Magento gift voucher extension helps the admin to increase the customer retention.
Knowband’s Magento send gift card extension is easy to install and configure.
Magento gift card extension is fully mobile responsive.
1.2 Magento Gift Card Manager Benefits for Customers:
1. Magento Gift card extension by Knowband save the valuable time of the customers. They can get the gift cards for the different occasion in case they are finding it hard to choose a tangible gift from the store.
2. The gift card option incorporated by Magento gift card module by Knowband is best for those customers who find it hard to select a gift for any occasion.
2.0 Installation
After purchasing the Magento gift card module from the store and you’ll get following files.
1. The zipped file that consists of the source code of the module
2. User Manual
Follow the following steps to install the Magento gift card manager extension:
1. The folder structure of the Gift Card Manager.
2. Copy all the folders of the zipped file and paste them into Magento root directory and clear the cash cache (if enabled).
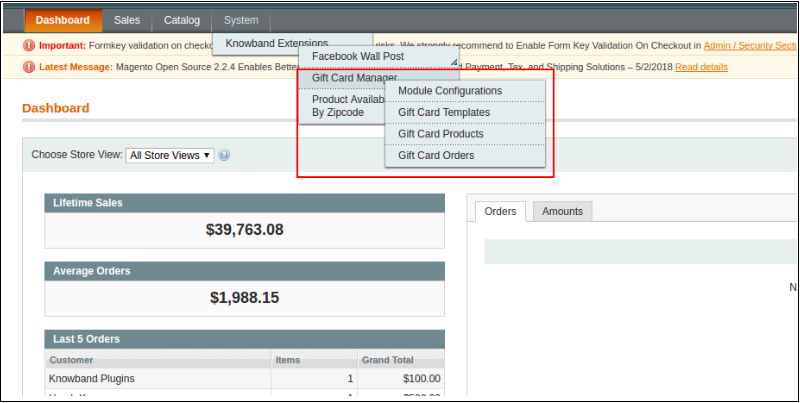
3. You will be able to find the “Gift Card Manager” option inside the “System > Knowband Extensions > Gift Card Manager”.
4. You can now configure the Magento Gift Card Manager as per your requirements and check its working in the front end.
3.0 Admin Panel
After installing Magento Gift Card Manager Extension in the Magento store, the admin gets a number of configuration options. There are following sections available to admin interface:
1. Module Configuration
2. Gift Card Template
3. Gift Card Products
4. Gift Card Orders
Let us discuss the various customization options of Magento gift voucher extension.
3.1.1 Module Configuration
The Module configuration tab of Magento gift card manager module by Knowband offers the basic configuration options to the store admin. The Module Configuration tab is discussed below.
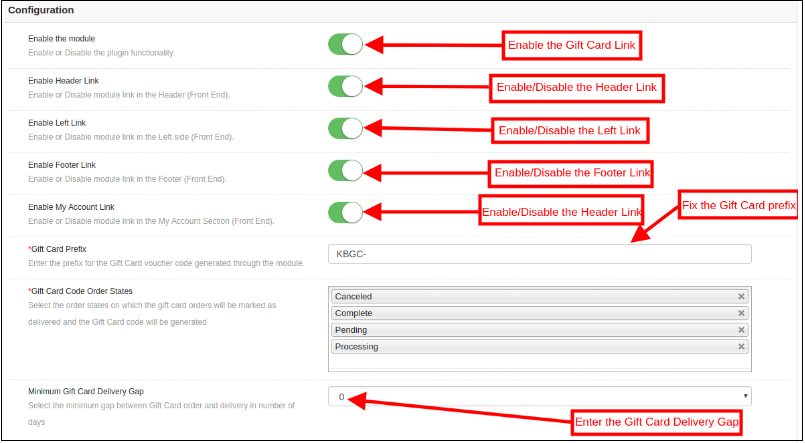
1. Enable the module: Initially, this Magento Gift voucher extension is disabled. The store admin can enable this option and offers their customer Gift card option. This can be done by toggling the button as shown below.
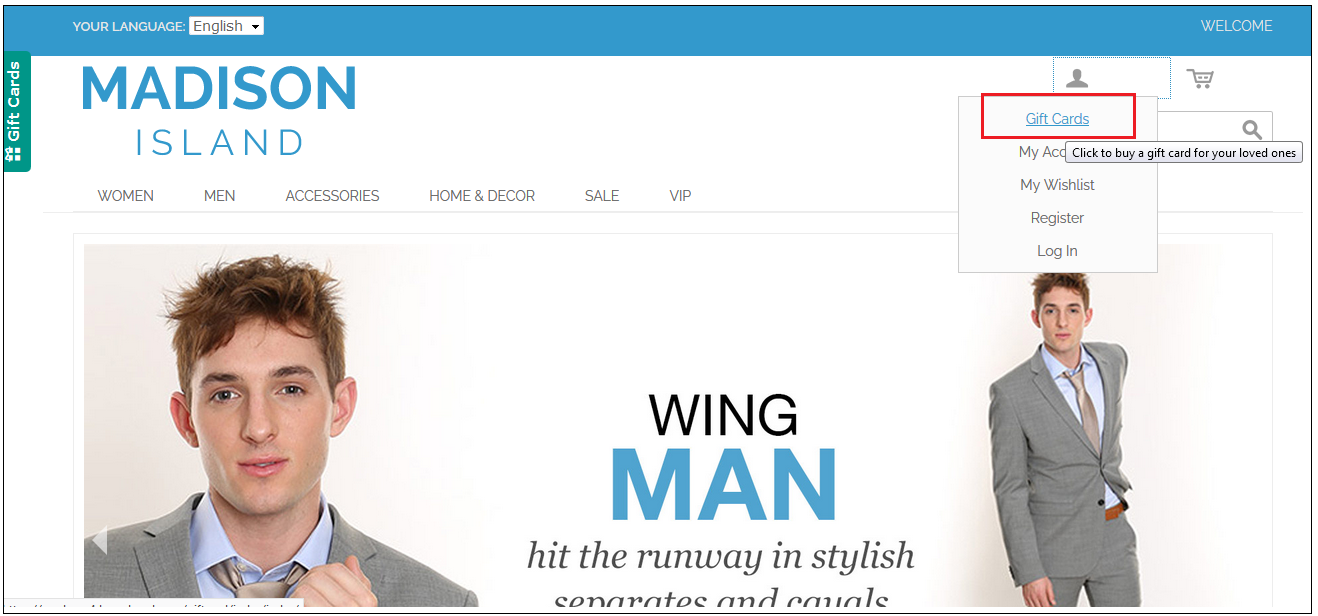
2. Enable Header Link: The Store admin can enable the button to display the gift card link in the header of the webpage.
Front End Preview:
3. Enable Left Link: In this section, the online retailer can enable the display of the link on the left side of the site.
4. Enable Footer Link: The admin can enable the display of the Gift cards link at the footer of the site.
Front End Preview:
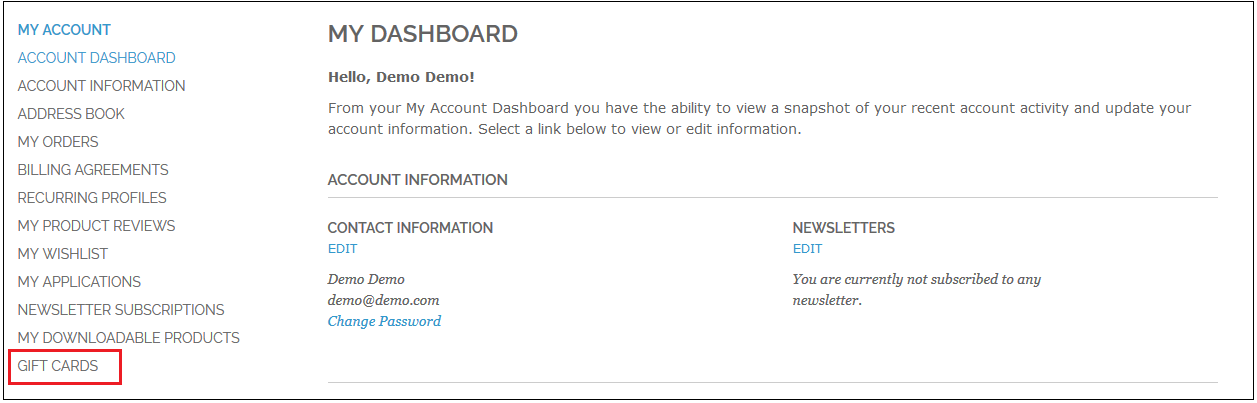
5. Enable My Account Link: The admin can enable the Gift card link in My Account page.
Front End Preview:
6. Gift Card Prefix: With this option of Magento gift card extension, the admin can set the prefix for the voucher code of the pre-paid gift card from here. For example, the code can be entered in the format KBGC – ******
7. Gift Card order Status: The admin gets an option to select the status of the orders.
8. Minimum Gift Card Delivery Gap: Knowband Magento gift voucher allows the store admin can specify the minimum duration of the day when the order was placed and day of the gift card delivery.
3.1.2 Email Setting
In this tab, the admin can customize the gift card email template as desires. This Magento gift card extension by Knowband offers default email templates. The entire email right from the subject line to the content can be edited and personalized as per the requirement.
This Magento gift card manager extension offers the two Email templates option.
Recipient Email Template
Sender Email Template
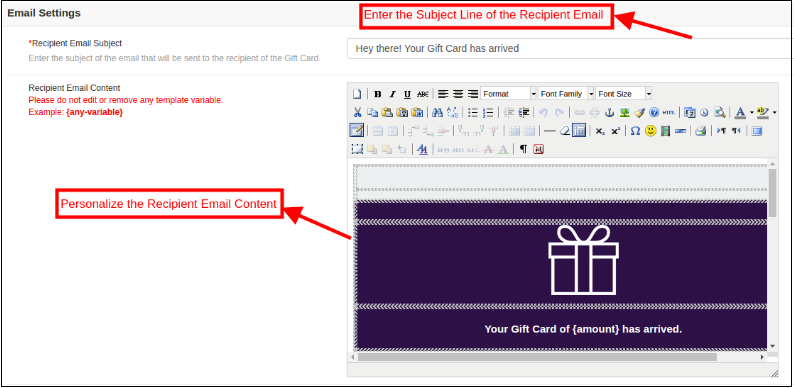
Recipient Email Template: In this section, the store admin can enter the subject line of the email and content as per the requirement.
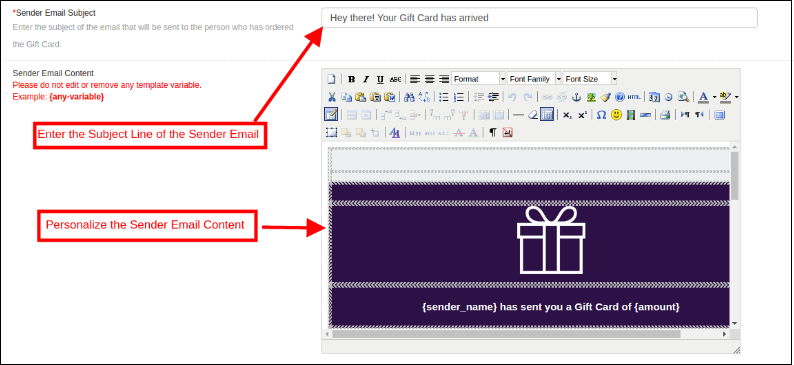
Sender Email Content: In this section of Magento gift card extension, the store merchant can customize the email content as per the business requirement.
3.1.3 PDF Setting
The admin can enable the customers to download the gift card in PDF format. Magento gift voucher module offers the PDF Settings option to the admin. The buyer can print the gift cards in PDF format with the help of Magento gift card manager module. The admin can change the Gift Card prefix and PDF content from the back-end and the changes will be reflected in the PDF.
3.1.4 Cron Setting
The admin can execute the cron manually by clicking on the button shown in the image below.
Or else, the eCommerce store admin can enable automatic execution of the cron option by toggling the button as shown below.
3.2 Gift Card Template
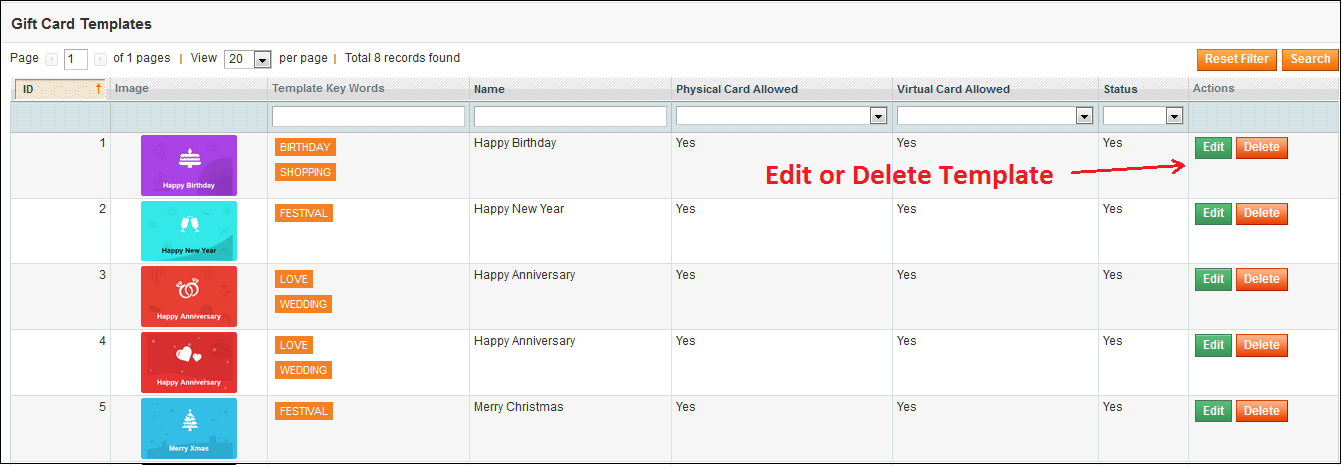
This tab lists out the default Gift card template. Admin can customize these Gift card template as per their desire. Other than this, the store merchant can edit or delete the Gift card template.
3.2.1 How to Edit and Delete Gift Card Template?
The admin even gets an option to edit the template or delete it. This can be done by clicking on the Edit or Delete button respectively as shown below:
3.2.2 How to Add New Gift Card?
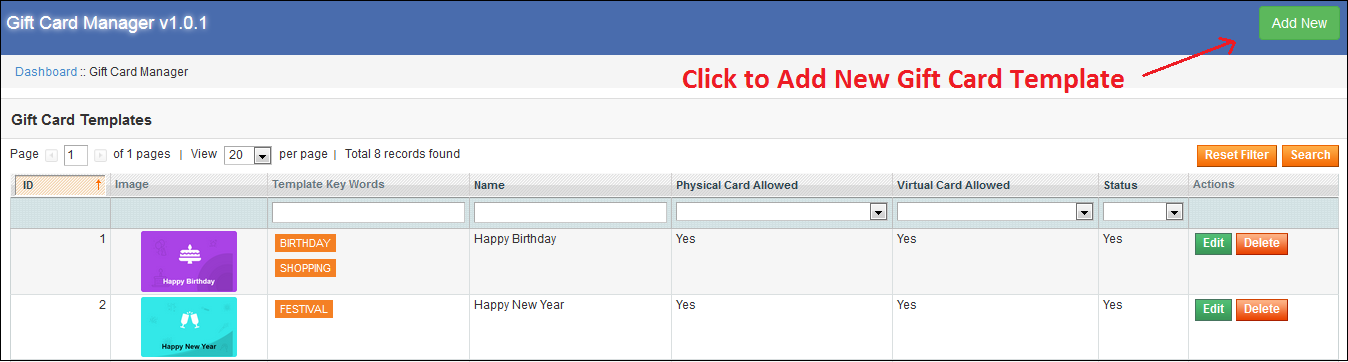
In order to create the new templates for the Magento gift card manager extension, go to the Gift Card template tab and then click on ‘Add New’ option at the top right side of the module.
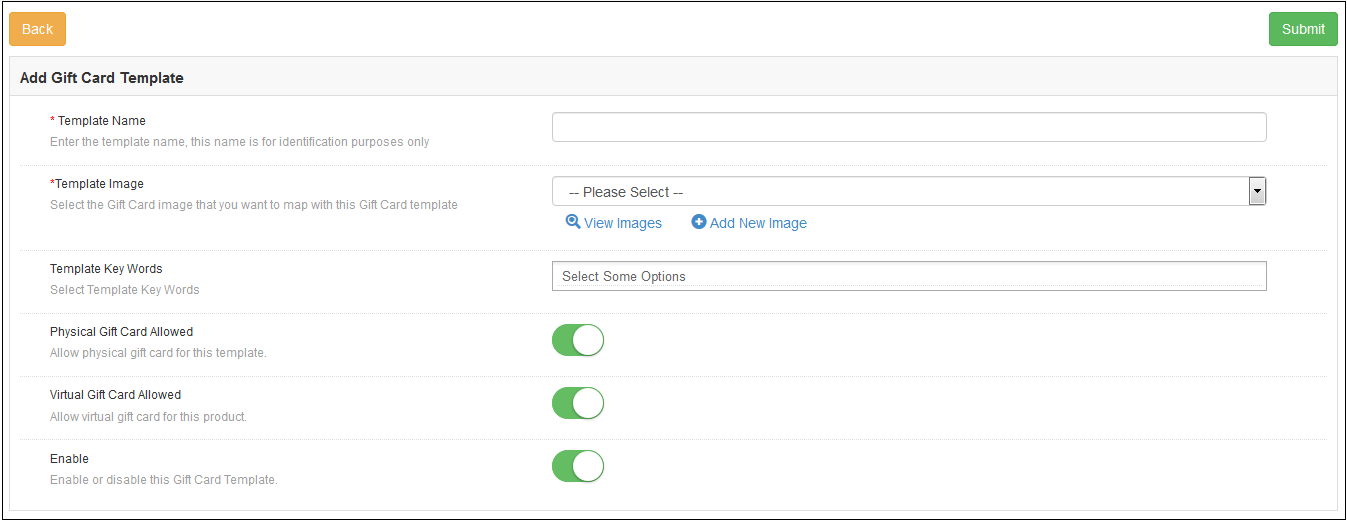
Fill-up the information in order to create the template as shown in the image:
1. Template Name: In this section of Magento send gift card extension, enter the name of the Gift Card template.
2. Template Image: The admin can select the image or the layout of the gift cards that will be shown in the front-end of the eCommerce site.
The images for the various occasions can be saved in the back-end of the Magento gift card manager extension by Knowband.
3.2.3 How to customize the template of the gift card?
3.2.4 View Gift Card Template Images
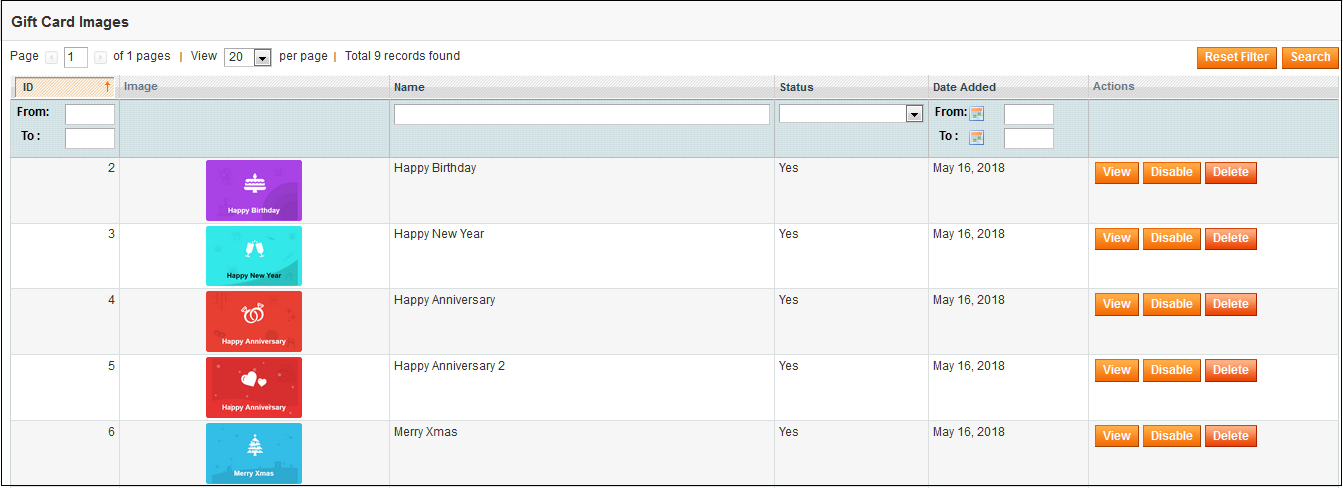
The store admin can even view the images for the various events has been saved or can create a new image for the same.
As you click on the ‘View Images’ you’ll be redirected to the page below.
The list showcases the entire images that were created and saved. You can view the complete image or even delete it if required.
In order to create new images, click ‘Add New Image’ as shown below.
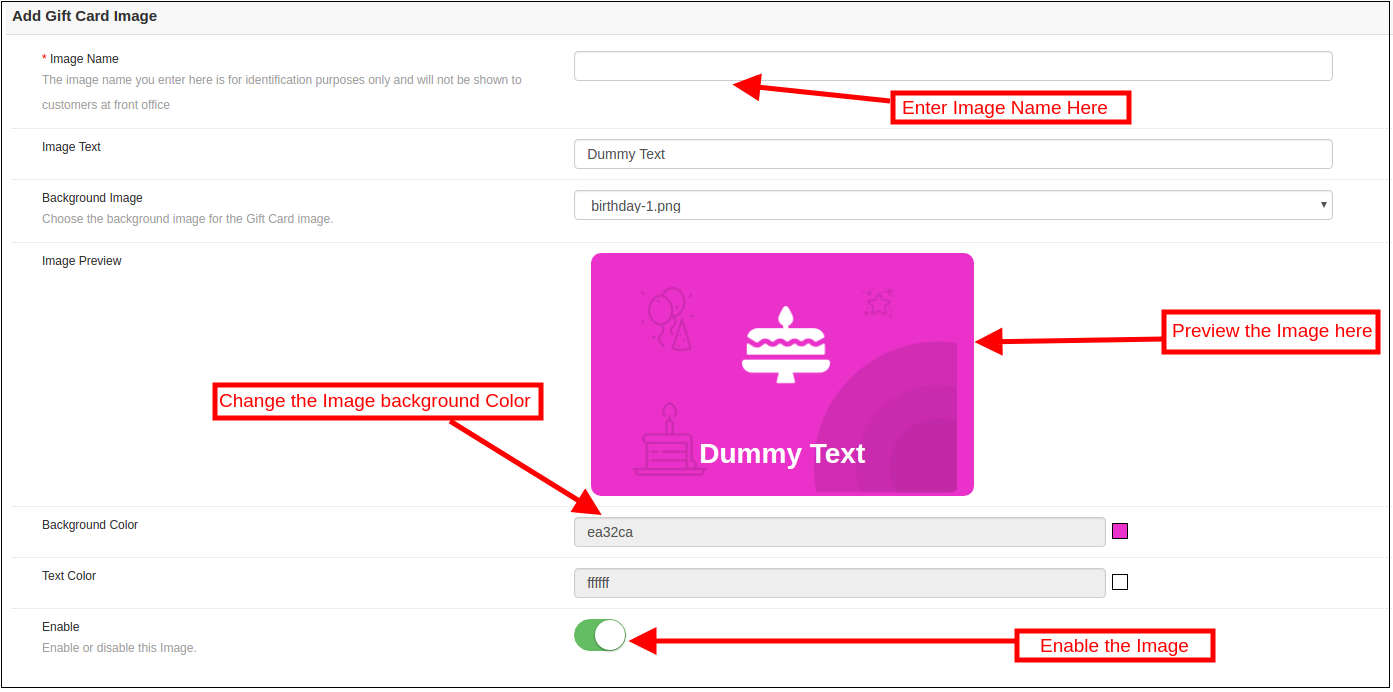
3.2.2 Add Gift Card Template Image
You can enter the image name and the text of the image to be shown on the gift card. Even the background image and color, as well as font color, can be changed at a button click. Preview the final image before making it live on the website.
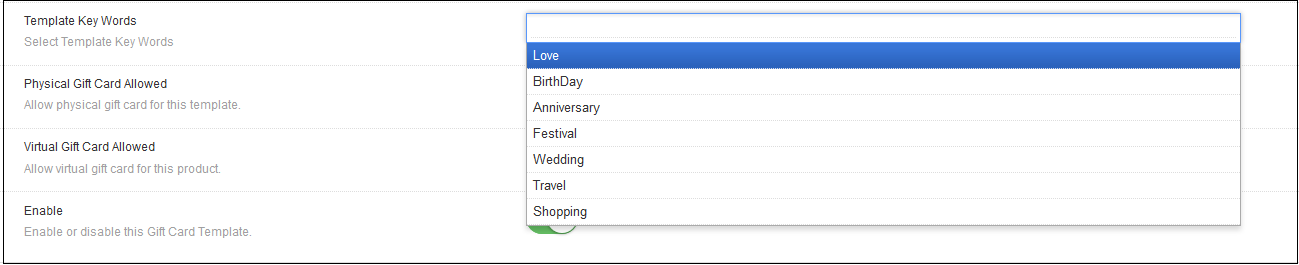
3.Template Keywords: The Magento gift card extension allows the admin to select the keywords of the gift cards.
4. Physical Gift Card Allowed: Enable this button if you want to offer the gift cards in physical form. If this functionality is enabled, then, the admin can allow the customers to send the gift card in physical form to the recipient.
5. Virtual Gift Card Allowed: The online retailer can enable the Virtual gift card functionality. This will allow the customers to download the e-cards.
6. Enable: Toggle this button to enable or disable the Gift card template.
3.3 Gift Card Product
Magento gift card template allows the e-merchants to customize the pre-paid gift card products in few simple steps.
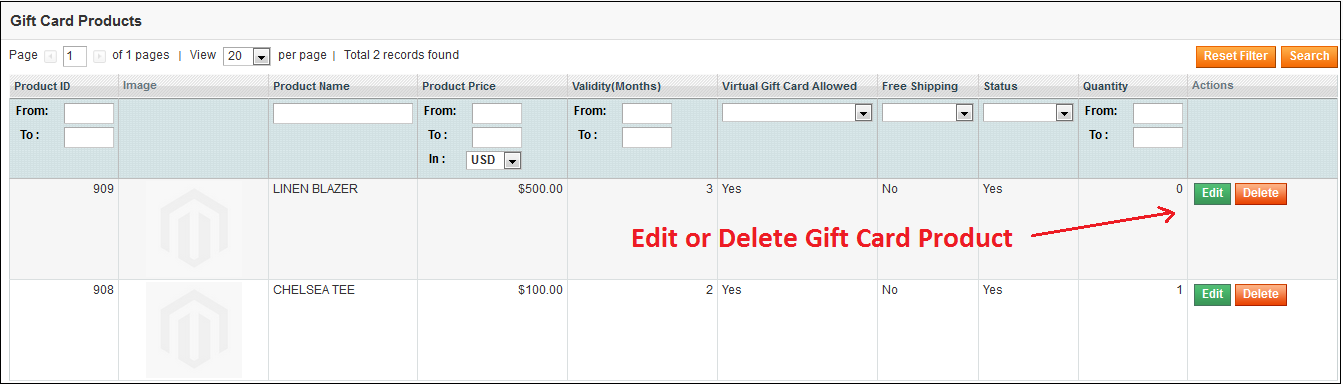
3.3.1 How to Edit and Delete Gift Card Product?
The admin even gets an option to edit/delete the gift card product from the section shown below:
3.3.2 How to Add New Gift Card Product?
In order to create the new gift card product for the Magento gift card manager extension, go to the Gift Card template tab, then, click the ‘Add New’ option at the top right side of the module.
Listed below is the information that you need to provide for creating the product.
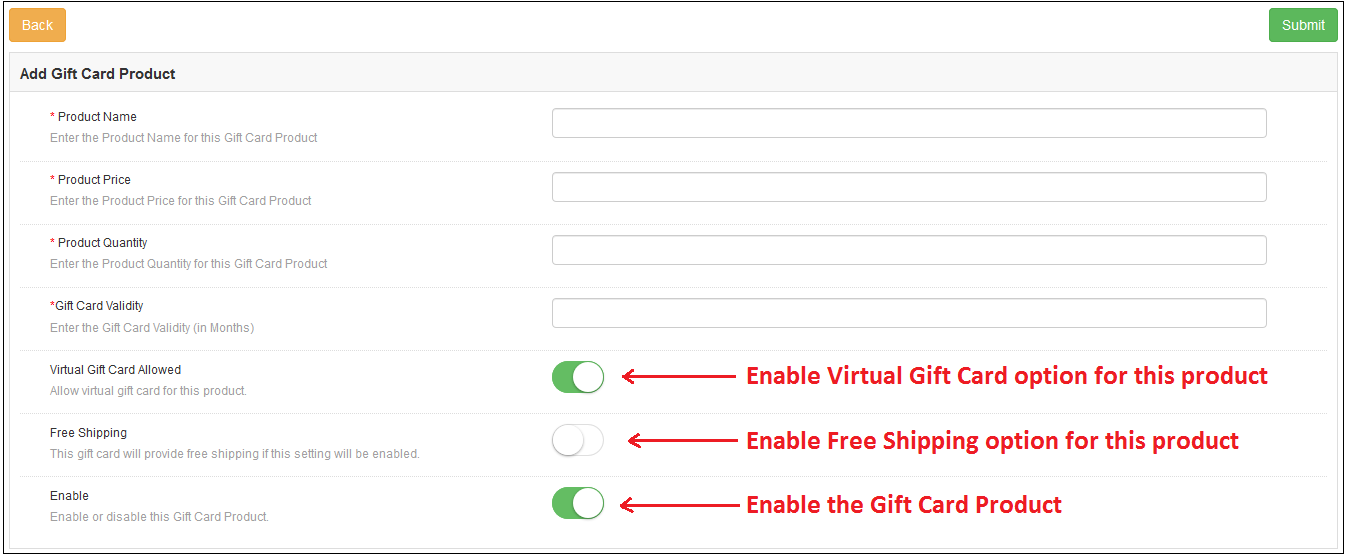
Product Name: Enter the name of the product here. It can be Happy Anniversary, Happy Birthday, Merry Christmas or any other.
Product Price: Enter the amount allowed in the gift card in this section.
Product Quality: Enter the product quality of this gift card product.
Gift Card Validity: The validity period in months of the gift card can be entered here.
Virtual Gift Card Allowed: Enable e-card by switching on the button.
Free Shipping: The eCommerce seller can even allow free shipping to the customer.
Enable: Gift Card Product can be enabled or disabled from here.
3.4 Gift Card Orders
The Gift Card Order tab provides the entire list of the orders received for the gift cards. It involves the recipient email, date of sending as well as the status of the gift cards.
In the ‘Gift Card Order’ tab go to the ‘View’ button in the right section. In this section shows the entire information about the order.
4.0 Website UI
The links to the gift cards page can be viewed in the front end as opted by the store admin.
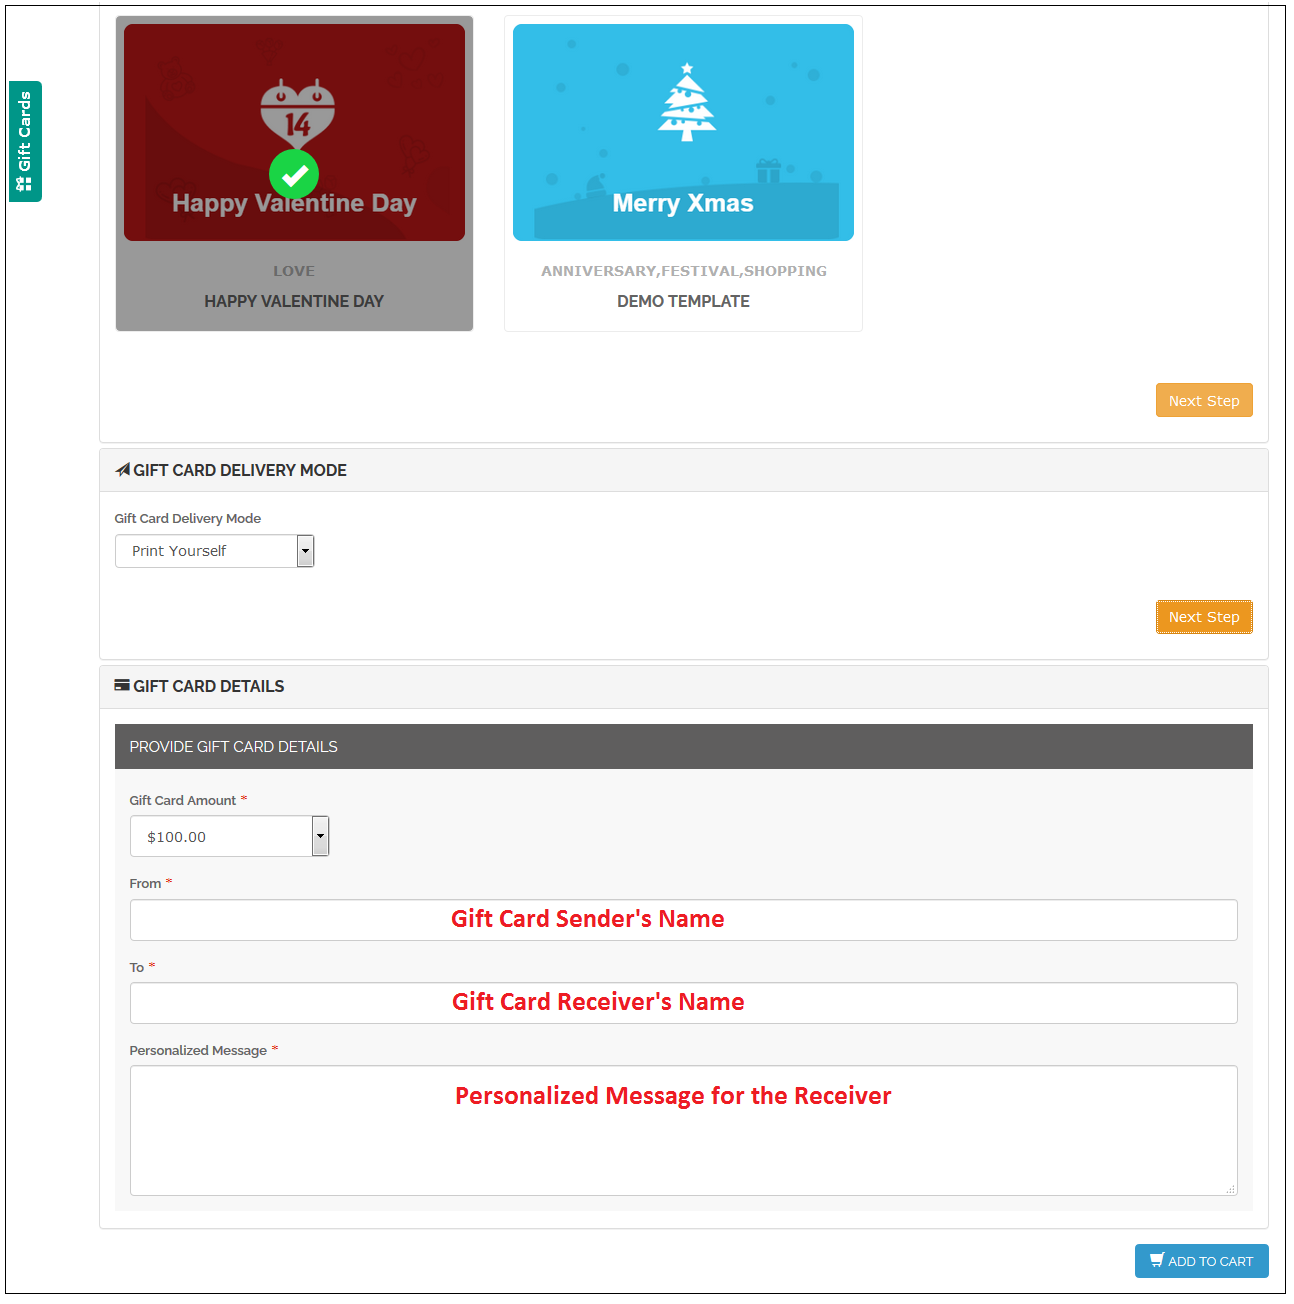
Once the store visitors click on the link, they will be redirected to the gift card page of the site.
Now, the Customer can buy the gift card and add the product to the shopping cart and proceed to the checkout page. The gift card will then be sent to the receiver.
For more details about this Magento Gift Voucher extension, you can visit here:
Knowband, one of the leading names in the field of eCommerce solution provider, offers the best solution to go for multi-channel selling to the Magento 2-based e-merchants. If you are planning to sell your products on the popular Walmart marketplace, then, Knowband’s Magento 2 Walmart Integrator is the smartest solution for the same. Walmart Magento 2 API integrator connects the two sites and allows automatic inventory, shipment and sales management.
1.1 Admin Features of Magento 2 Walmart Integration Module by Knowband:
Magento 2 Walmart Integrator is easy to understand and use.
Walmart Magento 2 integrator offers real-time synchronization and makes inventory and order management a cinch for the store admin.
Magento 2 Walmart integration module allows the admin to list the products in bulk at the marketplace.
The bulk upload can be done by creating profiles in the back-end of the Magento 2 Walmart integrator.
Via the profiles created in the Walmart Magento 2 integrator, the admin can update the products details and manage the inventory. The cron jobs allows the admin to remove or relist the already listed products.
The admin can add Number of shipping option or map shipment carrier for the store with that of the marketplace from the back-end of the Magento 2 Walmart API integrator. The sellers can even fix and update the shipping lag time with the help of Walmart Magento 2 synhronization addon.
Walmart Magento 2 API Integration plugin offers cron jobs with the help of which allows the admin to sync the orders with the Magento 2 store and process them from a single interface.
Magento 2 Walmart connector even updates the order status the help of cron options.
Walmart Magento 2 connector even offers an easy interface to manage the feed status.
The admin can offer promotional deals to the marketplace customers with the help of Walmart Magento 2 API integrator.
The automated approach of the Magento 2 Walmart Integrator allows the e-merchants to upload the tax code in one go.
The audit log of Magento 2 Walmart integrator allows the admin to track the status of the various jobs running the back-end.
The sellers can reprice their products and win the buy box. Magento 2 Walmart integrator offers buy box report to the store admin.
The admin interface of the Walmart Magento 2 integrator offers complete sales report.
The admin can easily track the errors occurred while product listing and rectify the same from the admin interface of Magento 2 Walmart Integration extension.
2.0 Installation
Follow the following steps in order to install Magento 2 Walmart Integrator at your store:
Download the Magento 2 Walmart Integrator from Knowband store.
You’ll receive a zipped file containing the user manual as well as the source code of Walmart Magento 2 Integration Plugin. Unzip the package.
Create a folder {Magento root}/app/code/Knowband/Walmart
Upload the extracted content in the above folder via FTP manager (like Filezilla or WinSCP – download here: https://filezilla-project.org/).
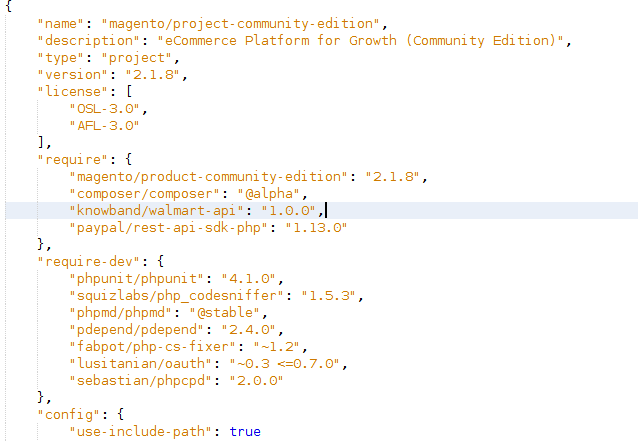
Add the “knowband/walmart-api”: “1.0.0” in the root composer file.
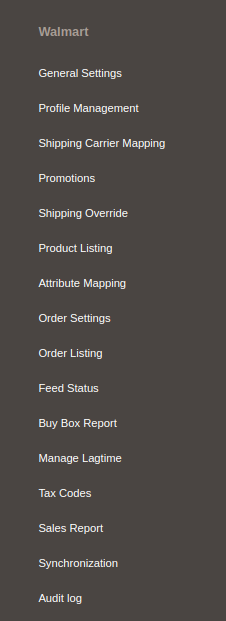
6. In Admin Panel go to the main menu -> Knowband -> Walmart Integrator.
7. The Magento 2 Walmart integration extension is now ready for use.
This User Manual will guide the users through the Magento 2 Walmart Integrator configuration and settings.
2.1 How to configure Walmart Magento Integration extension?
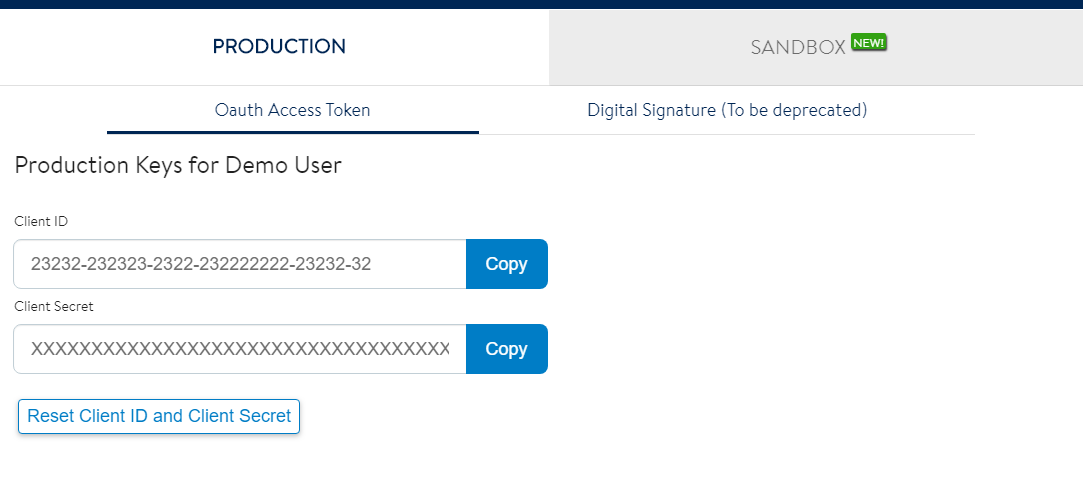
To configure the Walmart Marketplace Integrator, store admin needs to get the Client ID and Client Secret. In order to obtain Walmart Client ID, and Client Secret, follow the process given below:
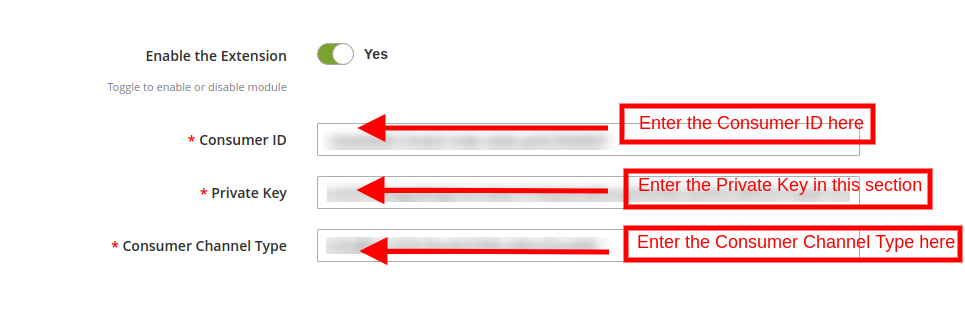
The connection between the store and the marketplace can be setup from the General Settings Tab of Walmart Magento 2 integration plugin. The various input fields are mentioned below:
1. Enable the Extension
Enable this button in order to establish the connection between the marketplace and the Magento 2 site.
2. Consumer ID
Enter the Walmart Consumer ID obtained from the seller’s account in this section. This will authenticate the connection being established between the Magento store and Walmart Marketplace.
3. Private Key
Copy the Private Key from your Walmart seller’s account and paste it in this section. It is mandatory for authenticating the integration between the Magento store and Walmart Marketplace.
4. Consumer Channel Type
Enter the Consumer Channel Type in the field to complete the setup.
Click on the ‘Save Settings’ to complete the setup.
3.2 Profile Management
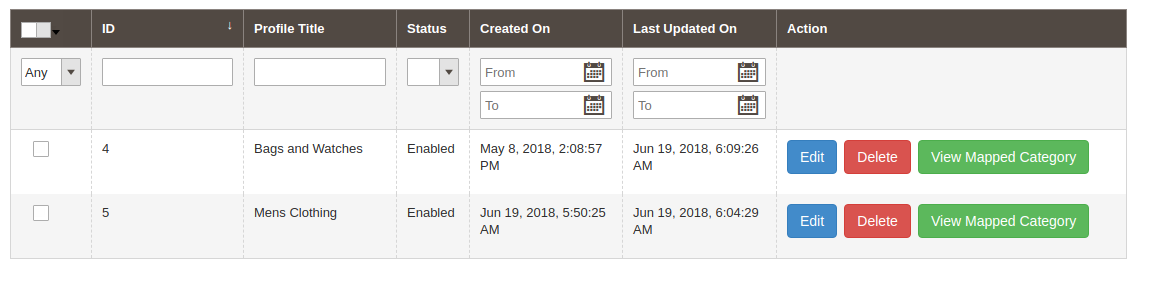
The Magento 2 Walmart Integration extension offers profile-based listing option that enables bulk inventory upload. The Profile Management tab of Walmart Magento 2 integrator offers a user-friendly interface to manage the profiles with ease.
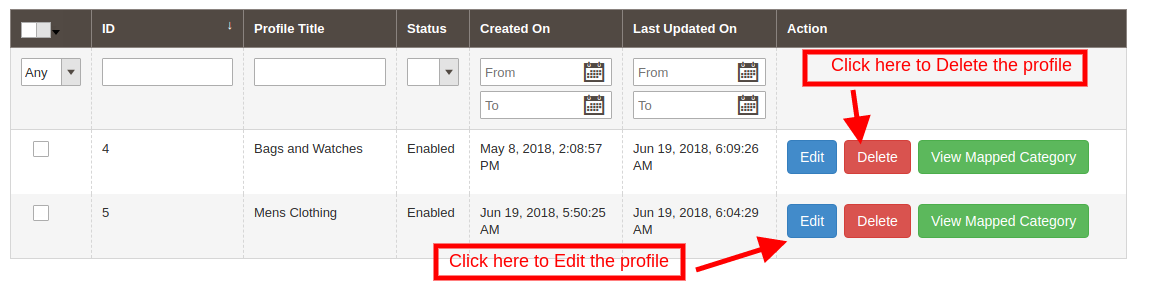
The store admin can view the profiles that are created as shown in the image below:
3.2.1 How to create new profiles?
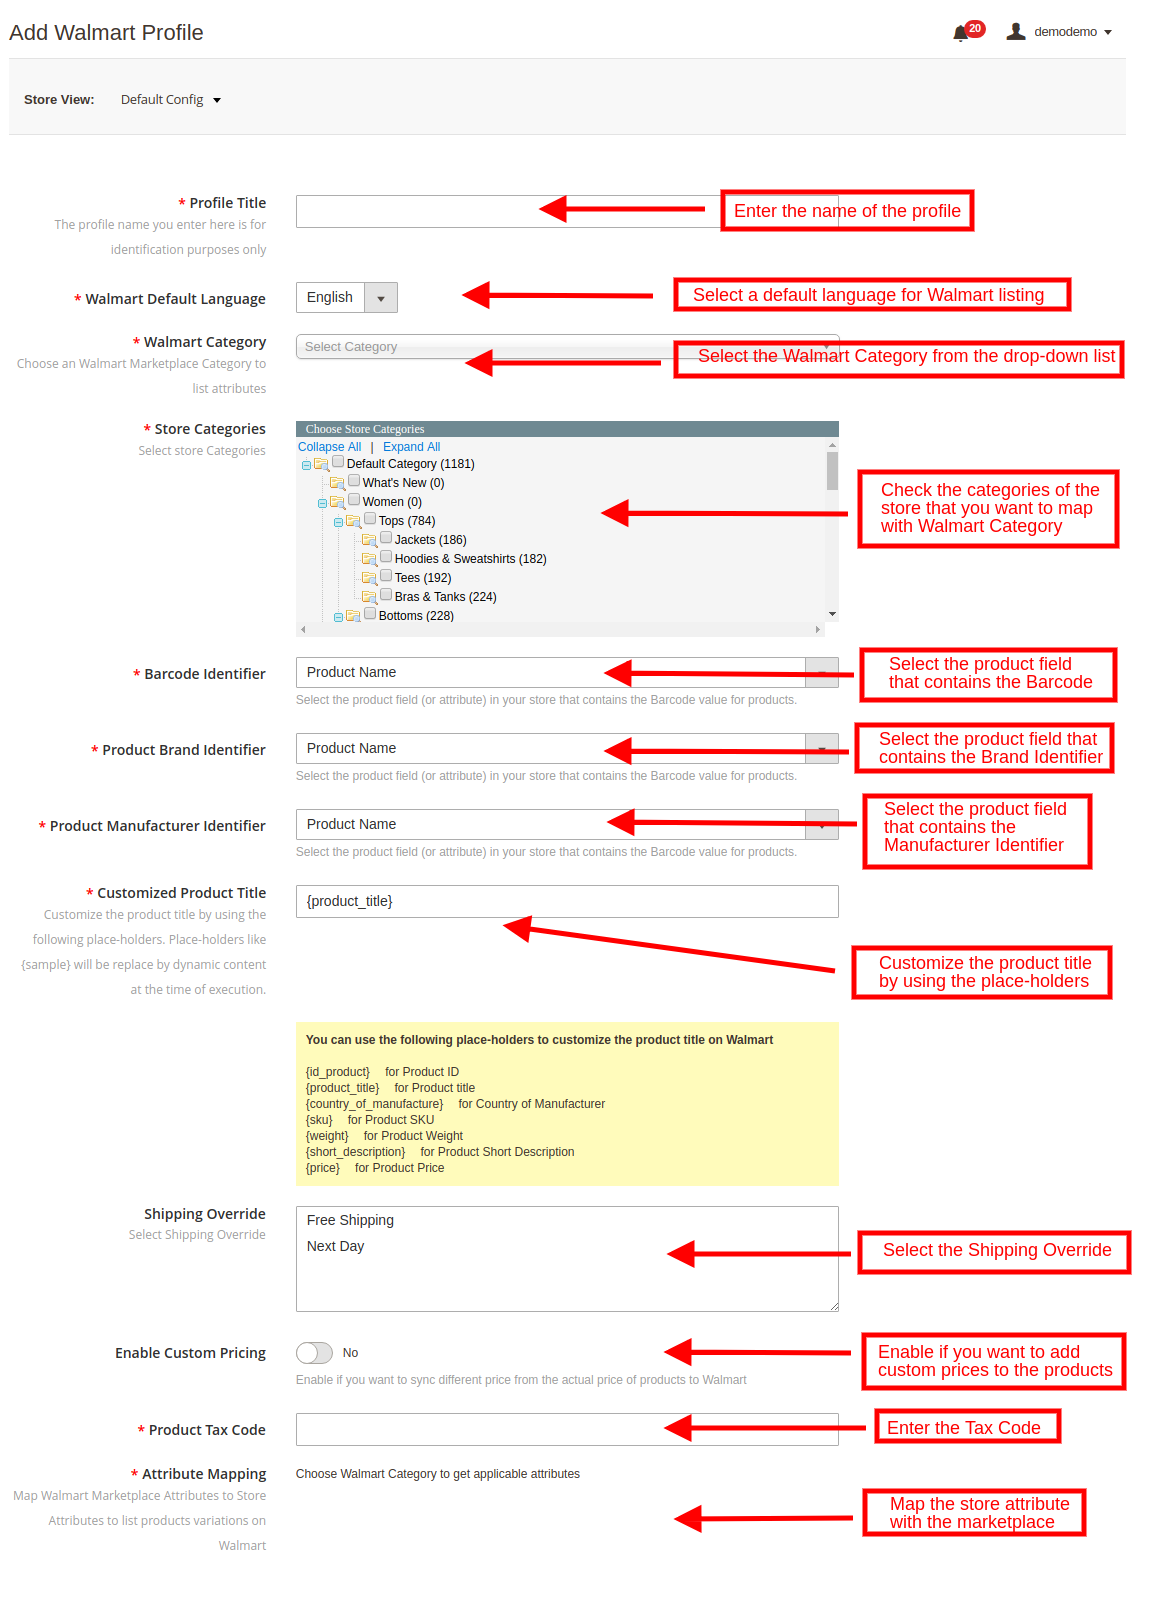
In order to create new profile, click on the ‘Add New’ button at the top right section of Magento 2 Walmart Integrator. This will redirect you to the profile creation tab as shown in the image below:
Profile Title: Input a unique name for the profile.
Walmart Default Language: The Magento 2 Walmart synchronization extension offers multi-lingual compatibility. Select the default language for your Walmart shop from the drop-down menu.
Walmart Category: Select the Walmart category from the drop-down list with which you want to map the Magento 2 store category.
Store Categories: Check the categories of the store that you want to map in the category of Walmart.
Barcode Identifier: Select the product field from the drop-down menu that has Barcode identifier.
Product Brand Identifier: Select the product field from the product field that has brand identifier from the drop-down.
Product Manufacture Identifier: Select the product field from the list that has product manufacturer identifier.
Customized Product Title: Product title can be customized by using the pre-defined place holders.
{id_product} for Product ID
{product_title} for Product title
{country_of_manufacture} for Country of Manufacturer
{sku} for Product SKU
{weight} for Product Weight
{short_description} for Product Short Description
{price} for Product Price
Shipping Override: Sync the shipping overrides created in the Shipping Overrides tab of the Walmart Magento 2 connector by executing cron (See Section 3.). Enter the shipping overrides in this section that you want to enable with that particular profile.
Custom Pricing: Magento 2 Walmart connector allows the store admin to list the products at custom prices. Enable this button for the changing the price of the product at the marketplace without changing it’s base cost from the eCommerce store.
If enabled, the admin will be able to increase or decrease the cost of the products by a fixed or percentage amount.
Select whether you want to increase or decrease the cost of the products from the drop-down list.
Select whether you want to increase/decrease the price by a Fixed amount or Percentage amount.
Enter the amount by which you want to change the price of the products.
Product Tax Code: Enter the product tax code in this section.
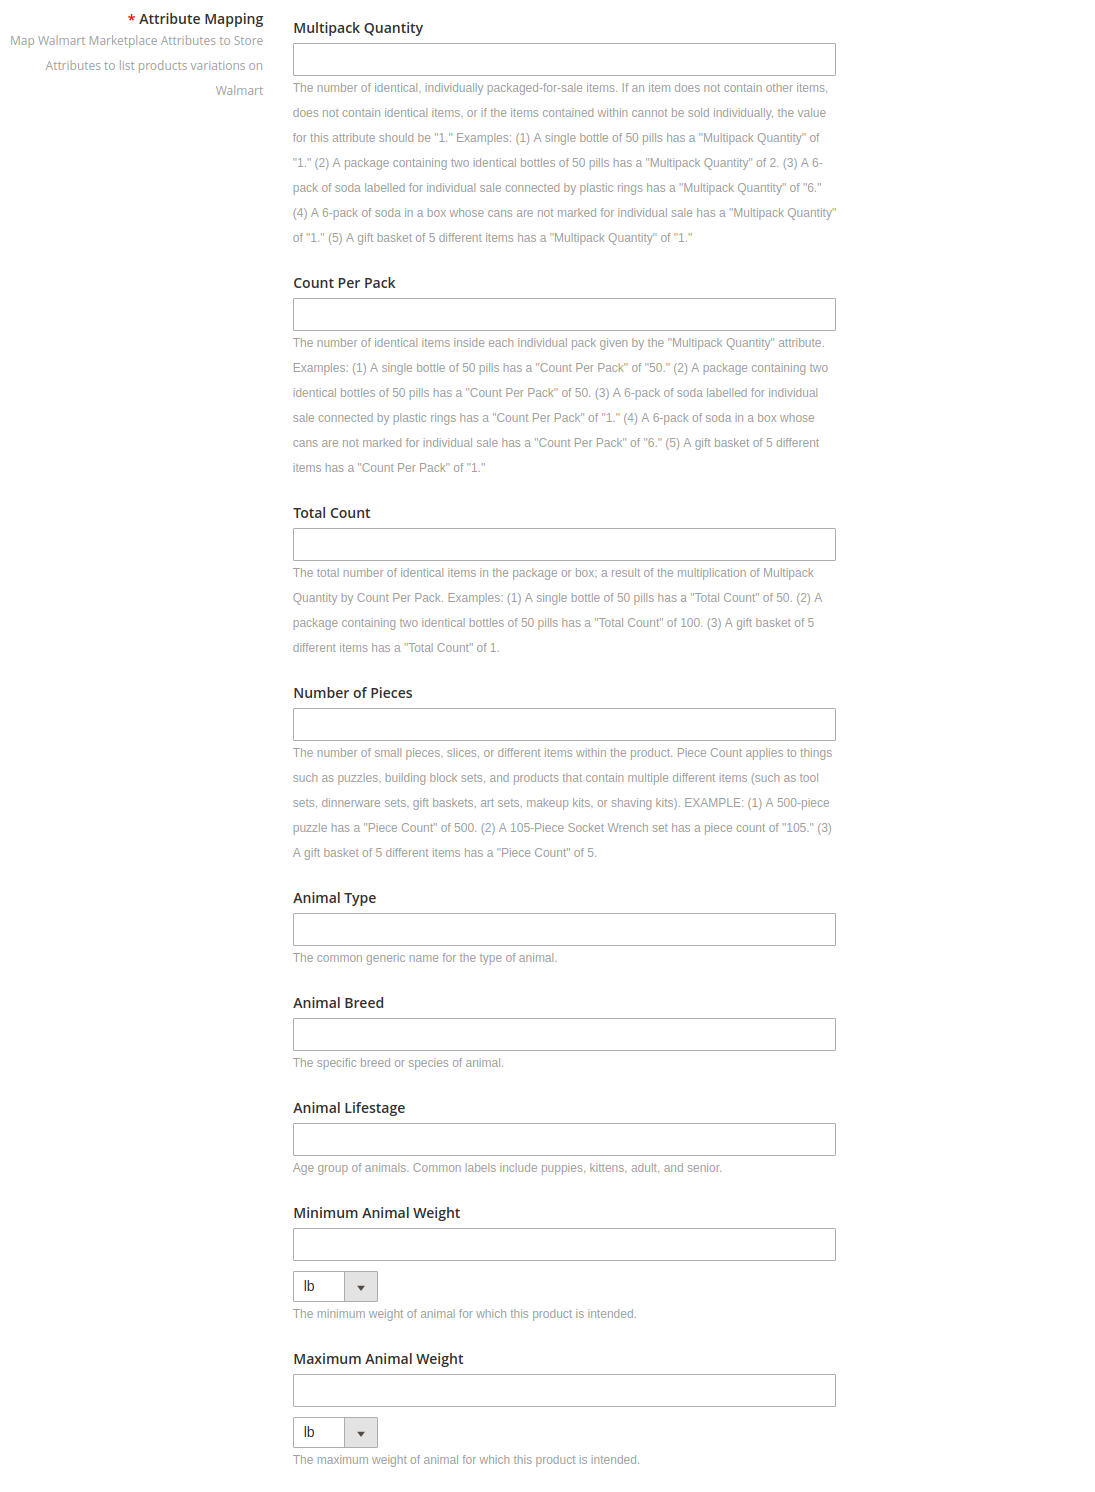
Attribute Mapping: Map Walmart Marketplace Attributes to Store Attributes to list products variations on Walmart. The attribute section include the attributes of the selected category as shown in the image below. Map the ones that you feel is mandatory.
3.2.1How to Edit/delete the Profiles?
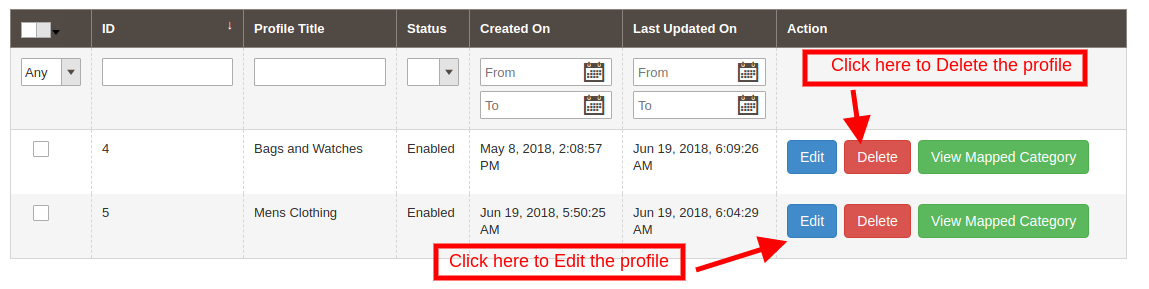
The list of the created profiles will listed in the Profile Management tab of Walmart Magento2 integrator. The admin can edit the profiles by clicking on the ‘Edit’ button corresponding to each profile.
In order to delete the profile, click on the ‘Delete’ button corresponding to each profile.
3.2.2How to View the Mapped Category of the profiles?
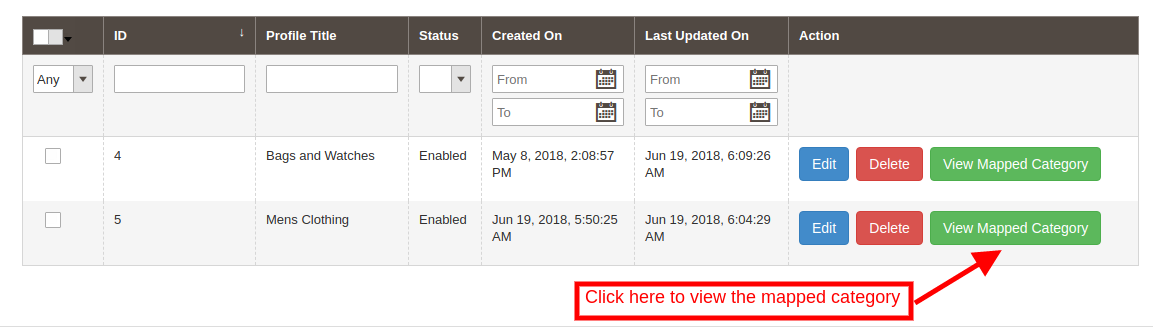
In case you want to view the mapped category, click on the ‘View Mapped Category’ link corresponding to each profile as shown in the image below:
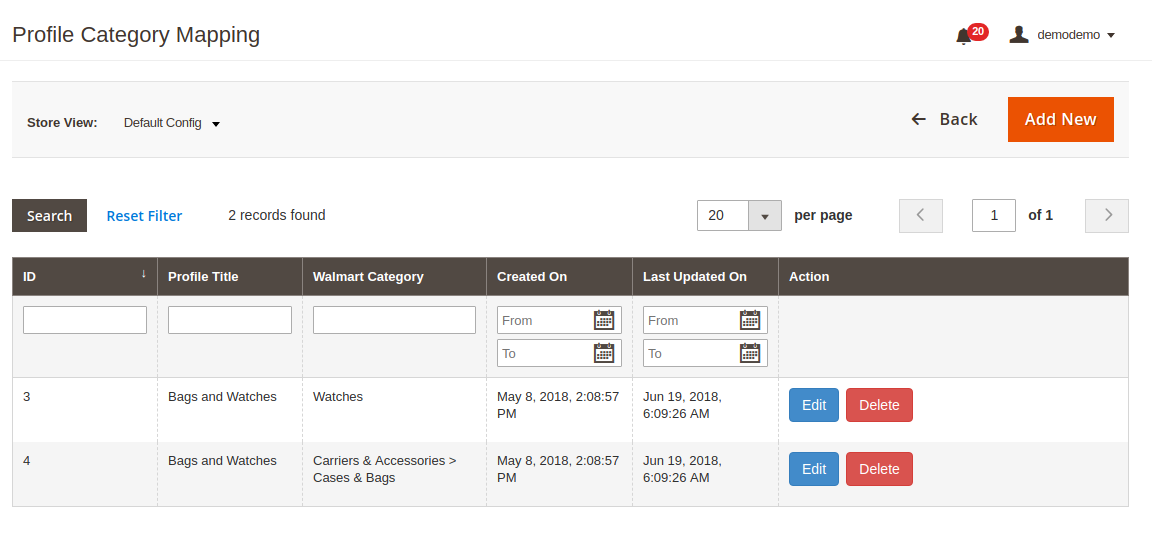
This will redirect you to the interface of the Walmart Magento 2 integration module where you can view the entire list of mapped category.
The admin even gets an option to edit or delete the mapping by clicking on the Edit and Delete button respectively as shown in the image below:
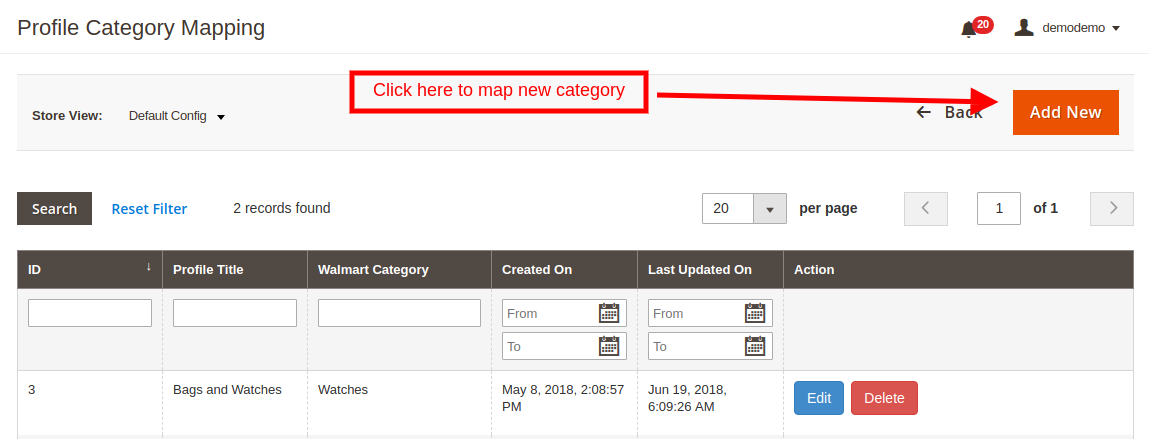
3.2.2.1How to Map New Category in the profile?
Additionally, the store admin even gets an option to map new categories. In order to map new category, click on Add New button at the top right section of Walmart Magento 2 Integrator.
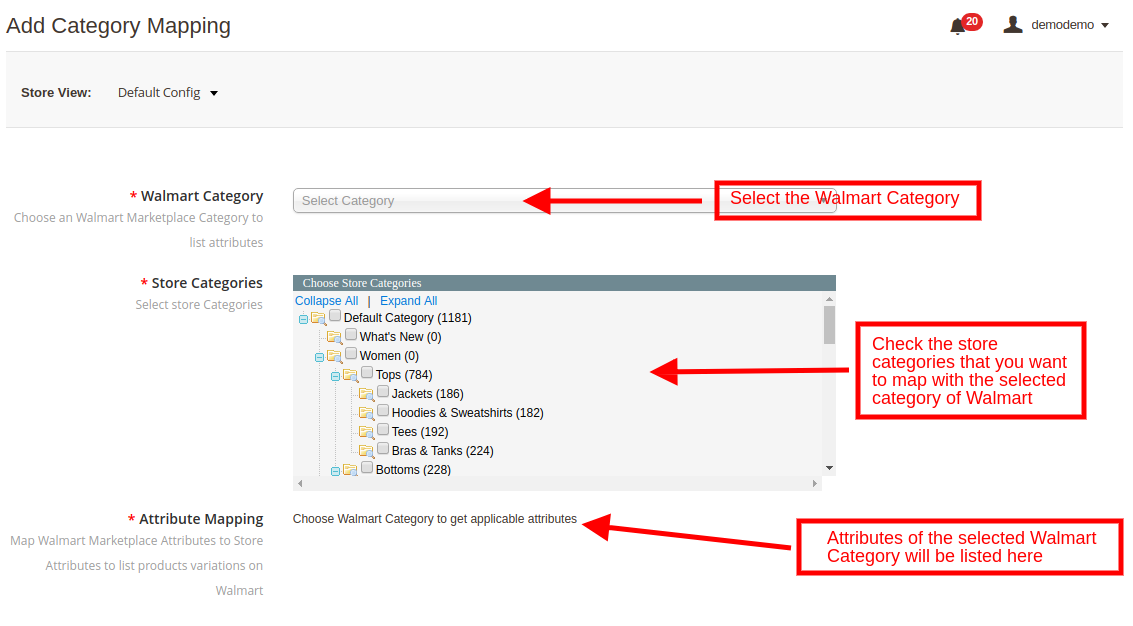
This will redirect you the category mapping page. The various fields of this mentioned below:
Walmart Category: Select the Walmart Category that you want to map with the store’s category from the drop-down menu.
Store Categories: Check the categories that you want to map with the selected category of Walmart.
Attribute Mapping: The attributes of the selected Walmart category will be listed in this section. You can map the attributes as per your business requirement.
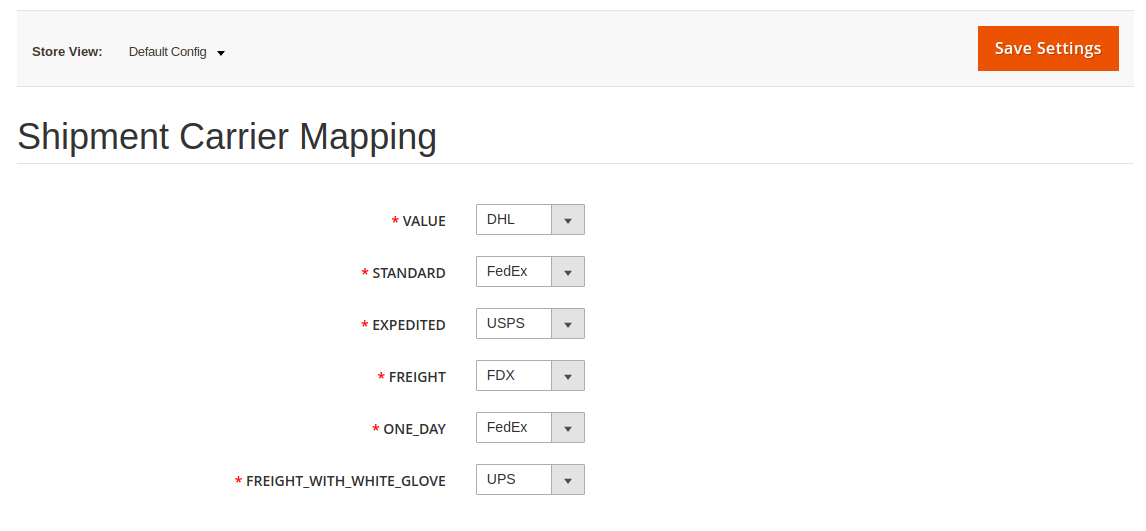
3.3 Shipment Carrier Mapping
The admin can map the shipment carrier of the store with that of the marketplace with the help of Magento 2 Walmart integration module. This can be done just by selecting the options from the drop-down list.
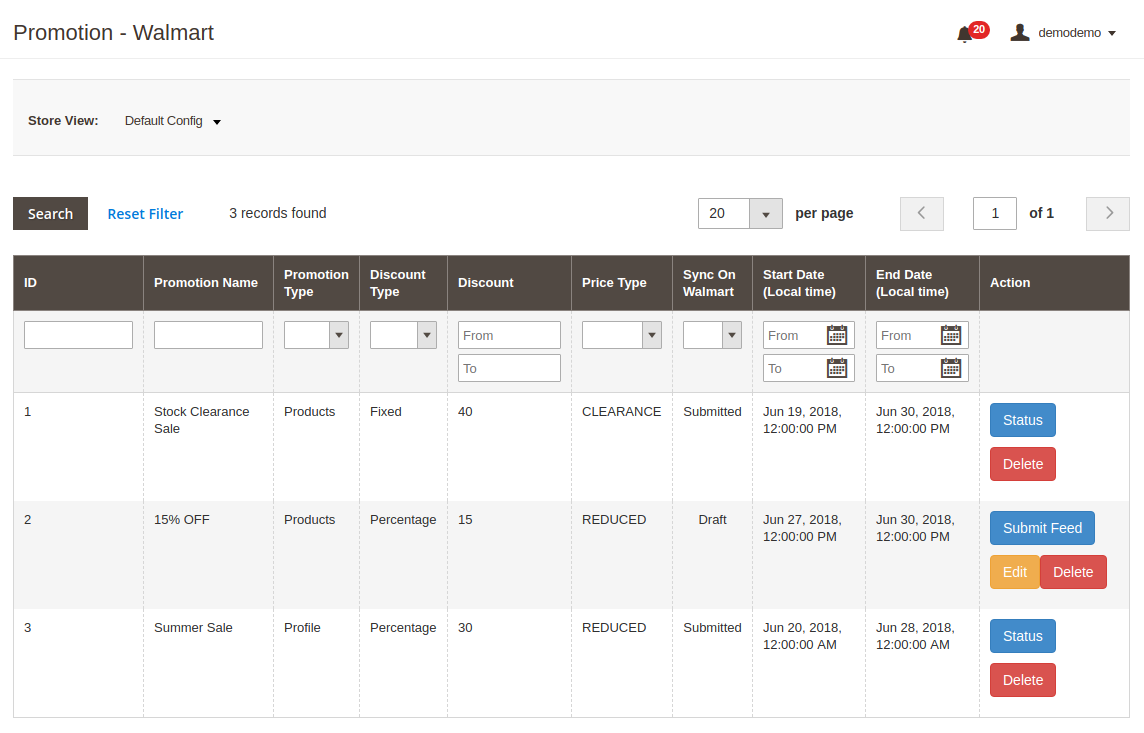
3.4Promotion
Magento 2 Walmart Integration plugin allows the admin to create promotions for the marketplace customer. The store owner can fix the rule and enable/disable the same from the back-end of the Walmart Magento 2 integration plugin.
3.4.1 How to create newPromotions for Walmart?
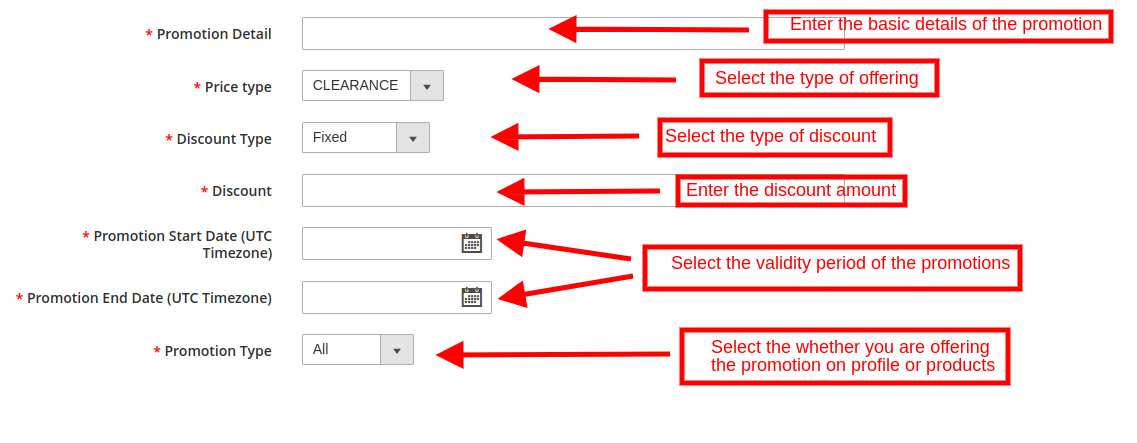
You can create new promotions by clicking on the Add New link at the top right section of the Magento 2 Walmart integrator. This will redirect your to the promotion creation page. The various fields of the tab are discussed below:
Promotions Details: Provide a details of the promotion. This will be displayed as the name of the deal.
Price Type: Select the type of the promotion that you are offering. It may be a clearance sale or price reduction offer.
Discount Type: Select the type of discount that you are offering. It can be a Fixed or Percentage discount.
Discount: Enter the discount amount in this field.
Promotion Start and End Date: Select the start and the end date for the validity of promotion.
Promotion Type: Select the type of promotion that you are offering. You may offer it to all the products, based on profile and products
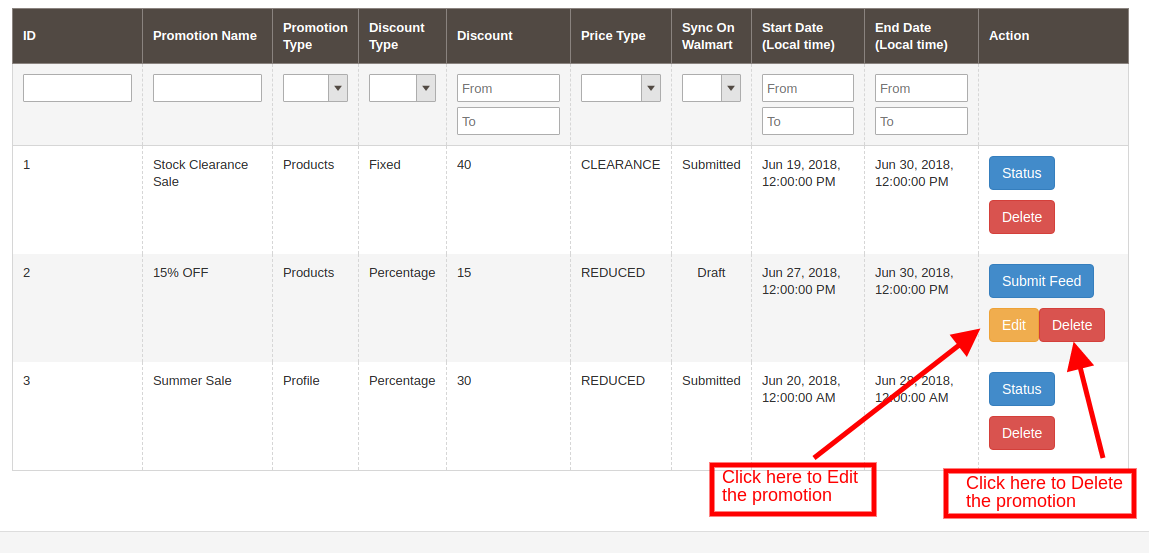
3.4.1 How to edit/delete Promotions for Walmart?
The promotions created by the admin is listed in the Promotions tab of Walmart Magento 2 integrator. The admin can edit or delete the same by clicking on Edit or Delete button respectively as shown below:
3.5 Shipping Override
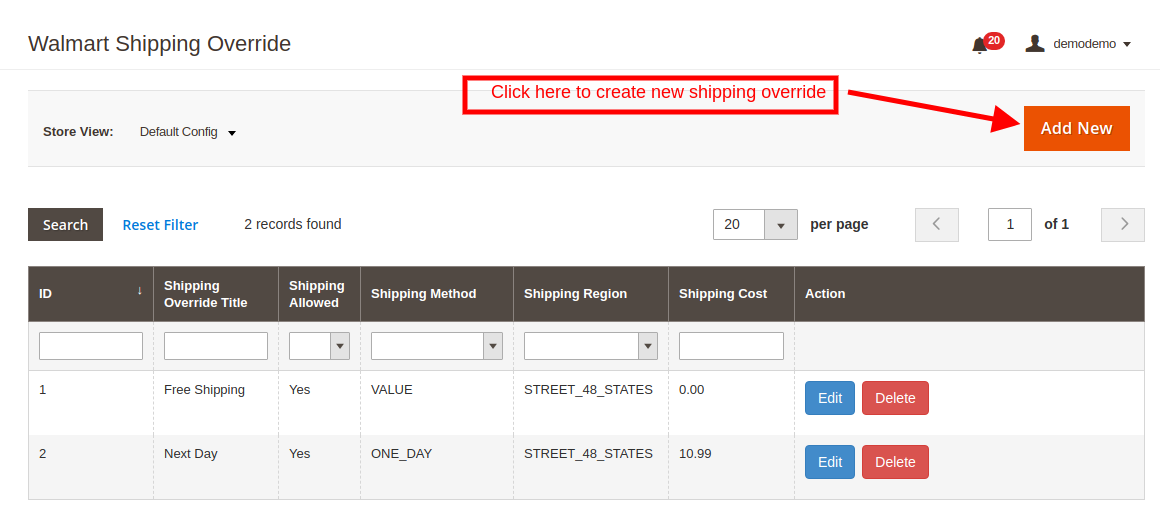
The admin gets an option to create N number of shipping overrides in this tab of Walmart Magento 2 synchronization plugin.
3.5.1 How to add Shipping Templates?
Follow the steps mentioned below to add Shipping Overrides:
To create new shipping override, click on ‘Add New’ at the top right section of Magento 2 Walmart synchronization extension.
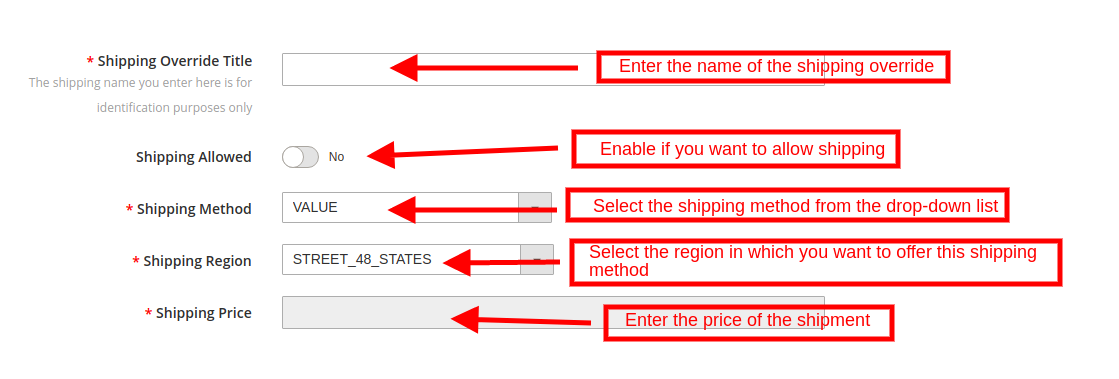
The various field of this tab are discussed below
Shipping Override Title: Enter a unique name for the Shipping Override Title in this section.
Shipping Allowed: Enable the button if you want to allow shipping.
Shipping Method: Walmart allows 6 types of shipping methods. Admin can easily configure the shipping methods as per the requirement from the admin panel of the Walmart Integration module. Shipping methods offered by Walmart are – VALUE, STANDARD, EXPEDITED, FREIGHT, ONE_DAY, FRIGHT_WITH_WHITE_GLOVE. Kindly refer to the below article for the details:
Shipping Region: Admin can select the region in which he wants to enable the respective shipping override.
Shipping Price: As per the selected shipping method and shipping region admin can set the shipping cost for the different shipping methods and regions.
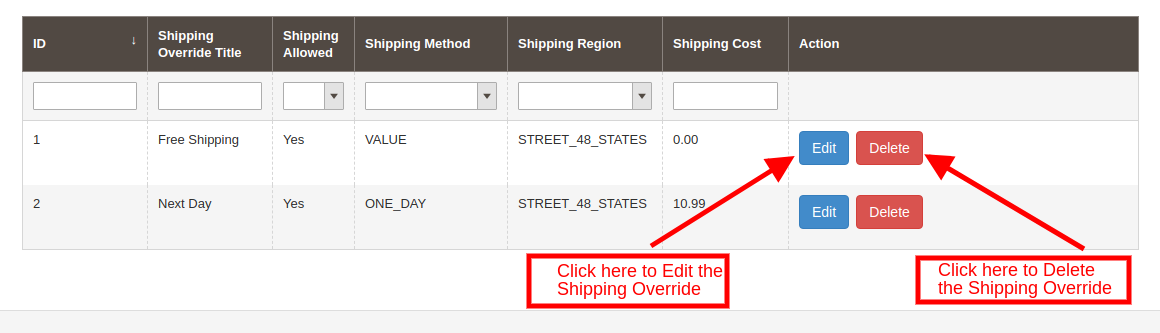
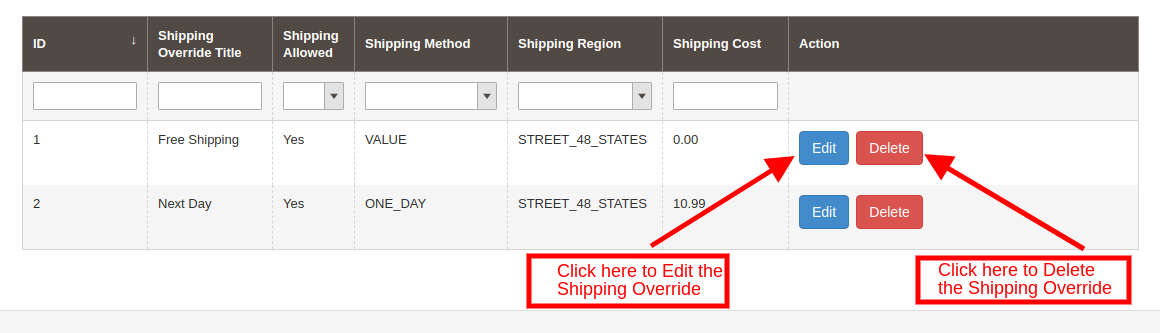
3.5.2 How to Edit/Delete the existing Shipping Override?
Click on the “Edit or Delete” button corresponding to each Shipping Method in order to edit or delete the same.
3.6 Products Listing
The Product Listing tab of Magento 2 Walmart integration module shows the list of all the products listed on Walmart Marketplace along with their statuses. In order to sync the product in the Walmart Marketplace, execute the Product Cron in the Synchronization tab. (See Section 3.15)
The admin can even renew or remove the products from this tab of Walmart Magento 2 integration plugin without visiting walmart.com.
3.6.1 Product Renewal
The admin can renew the expired product on Walmart Marketplace by clicking on the “Renew” action corresponding to each product.
After setting up a product for renewal, action “Renew” will be replaced with “Halt” action. This action is used to stop product renewal in case needed.
3.6.2 Product Listing Deletion
This option allows admin to delete product listing from Walmart Marketplace. Click on “Delete” action given corresponding to each product listing. After setting up a product for deletion, action “Delete” will be replaced with “Relist” action.
3.7 Attribute Mapping
The Attribute mapping tab of Magento 2 Walmart connector allows the admin to map the attribute of their Magento store attributes with the Walmart marketplace.
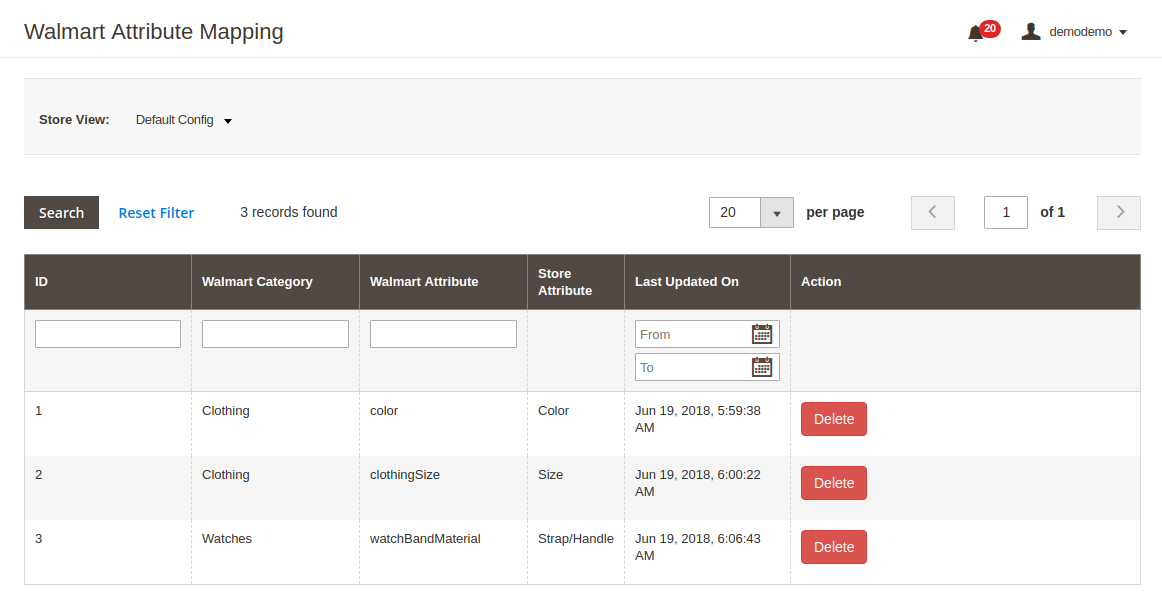
The mapped attributes are listed in this tab as shown in the image below:
3.7.1 How to Map New Attributes?
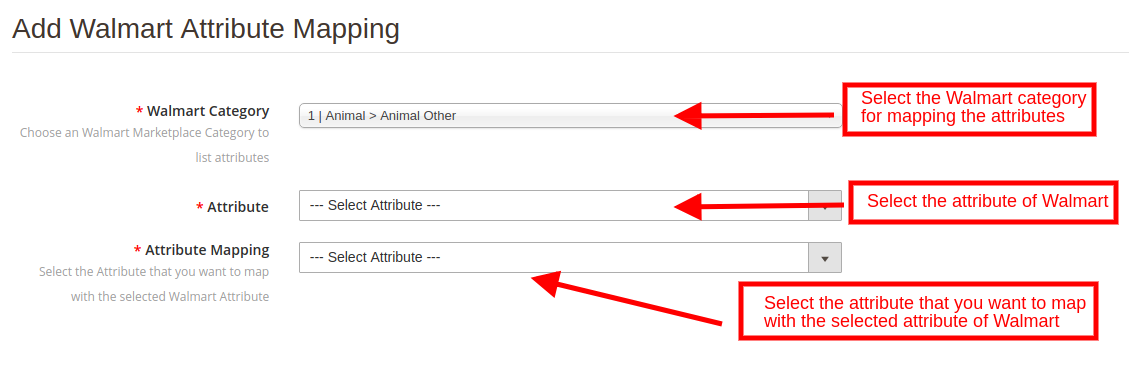
In order to map new attributes, click on the Add New button on the top of the page. This will open up attribute mapping tab. The various fields of this tab are discussed below:
Walmart Category: Select a category of Walmart. The attribute mapping will be done for the selected category.
Attribute: Select the attribute of the Walmart that you want to map with the marketplace.
Attribute Mapping: This drop-down list includes the attributes of Magento 2 store. Select the one that you want to map with the selected attribute of the Walmart.
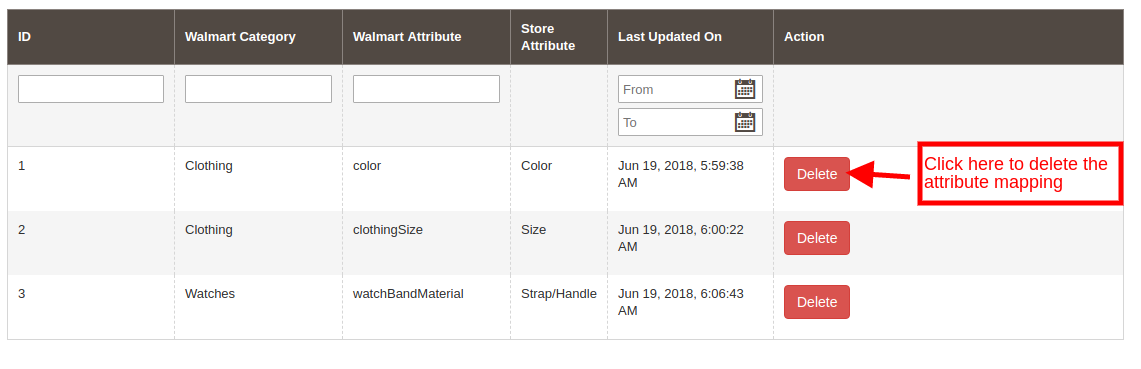
3.7.2 How to Delete Mapped Attributes
In order to delete the mapped attributes, click on the Delete button next to the mapped attributes on the Walmart Attribute Mapping tab.
3.8 Order Settings
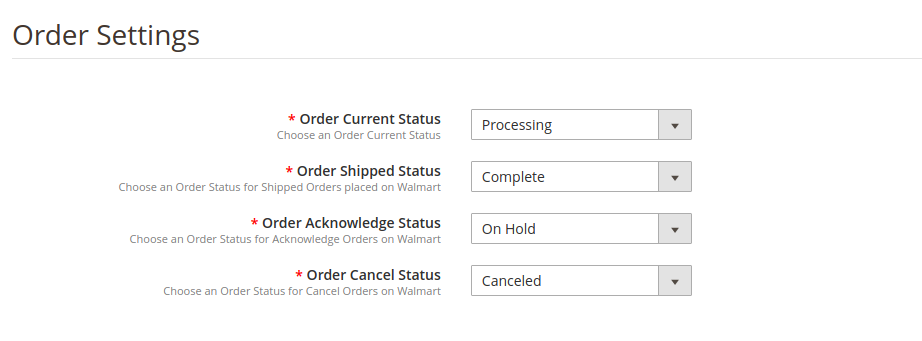
Order Settings tab of Magento 2 Walmart integration plugin helps the admin fix the order statuses and sync the same with Walmart Marketplace. This is done by capturing orders details from Walmart Marketplace. For mapping the orders from the Walmart Marketplace to the Magento store, you need to execute the Order cron in the Synchronization tab. (See section 3.15.)
The various fields are discussed below:
Order Current State: Choose a default status of the order from the drop-down.
Order Shipped State: Select an order state for the orders that are shipped. Select the order status from the drop-down list.
Order Acknowledge State: Select the order status once the order is acknowledged by the admin of the Magento store.
Order Cancel State: In case of order cancellation admin can sync the order status by using the Order Cancel state.
Note – Once the status of the order is changed in the Magento store, run the ‘Update Order Status to Walmart’ cron. This will sync all the changes to the marketplace.
3.9 Order Listing
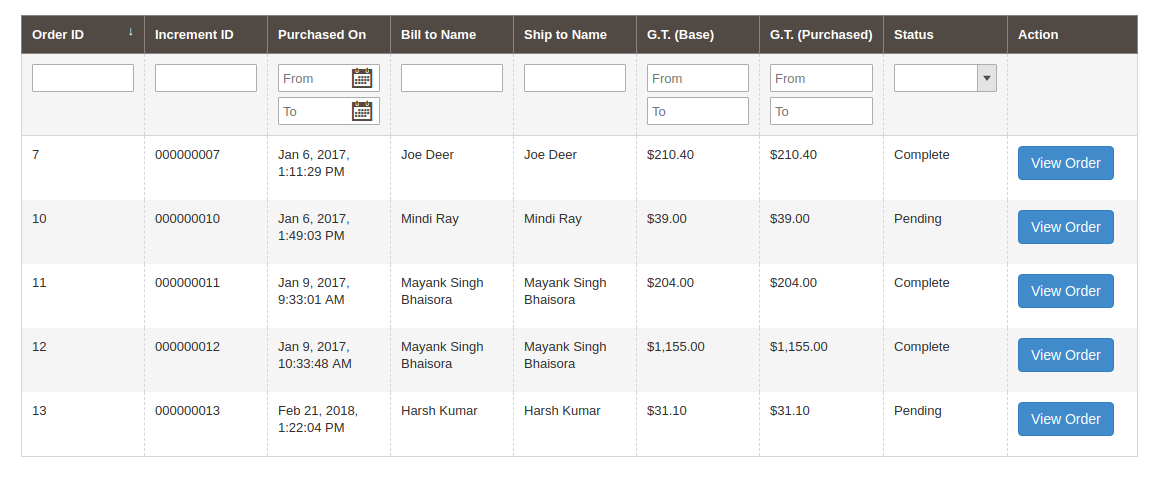
The orders received from the Walmart store can be sync with Magento 2 store by executing cron in the back-end of the Magento 2 Walmart integration extension. The received orders can be viewed in the Order Listing tab of the admin interface of Walmart Magento 2 integration extension. For this, the store owner needs to run the ‘Sync Order Listing from Walmart’ cron from the Synchronization tab. (See Section 3.15)
Once the cron is executed, the entire orders will be synced to the Magento store. These orders can then be processed by clicking on the ‘View Order’ button as shown below:
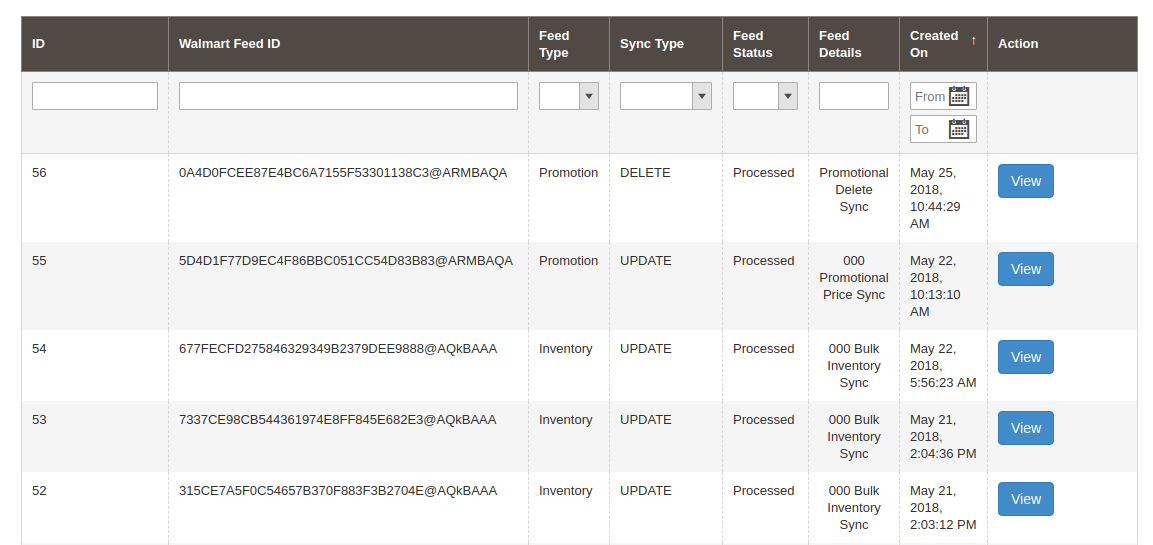
3.10. Feed Status
For every cron is executed in the back-end of the Magento 2 Walmart integration module, a Feed will be created in this tab. You can view the status of the feeds by clicking on the ‘View’ button as shown in the image below:
3.11. BuyBox Report
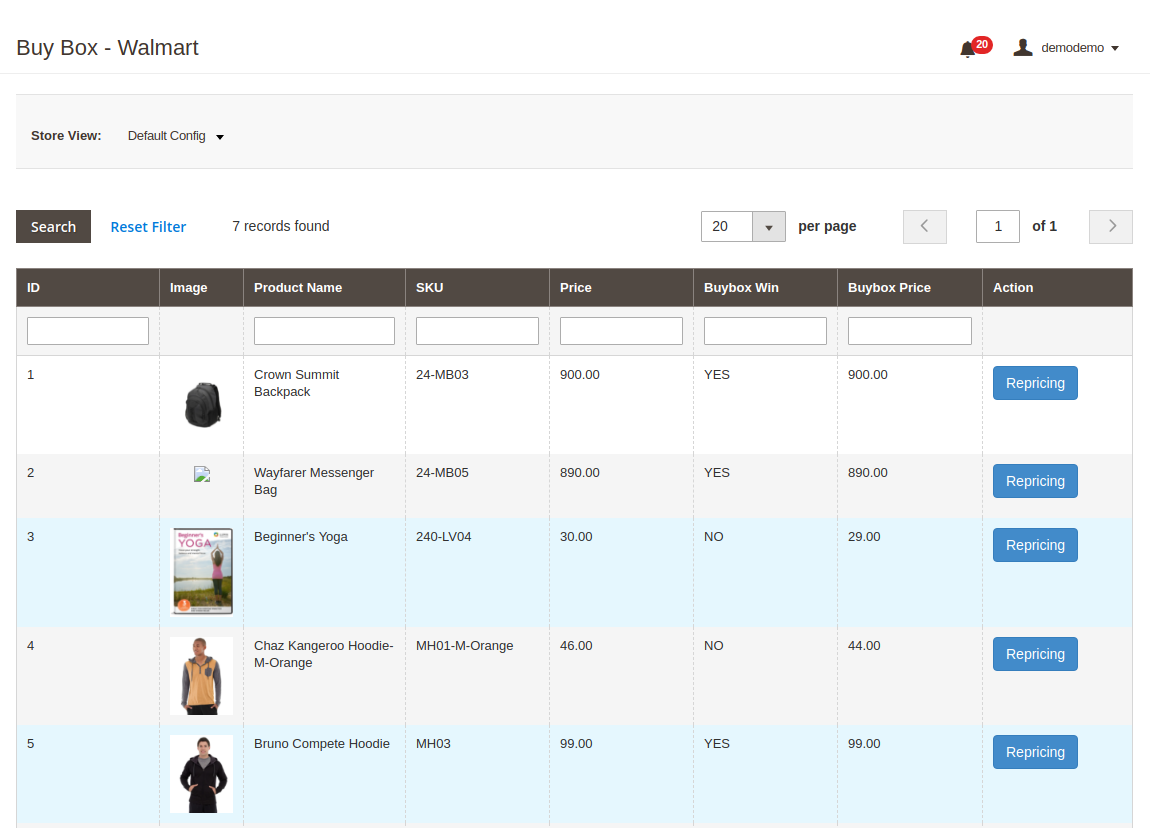
This tab of the Walmart Magento 2 Integration includes the BuyBox report of Walmart. The store owners can get the BuyBox report by executing cron in the admin interface of Walmart Magento integrator. See Section 3.15, in order to sync the Buy Box report from the walmart.com.
The Walmart Magento 2 integrator even allows the e-merchants to reprice the products in order to win the Buy Box.
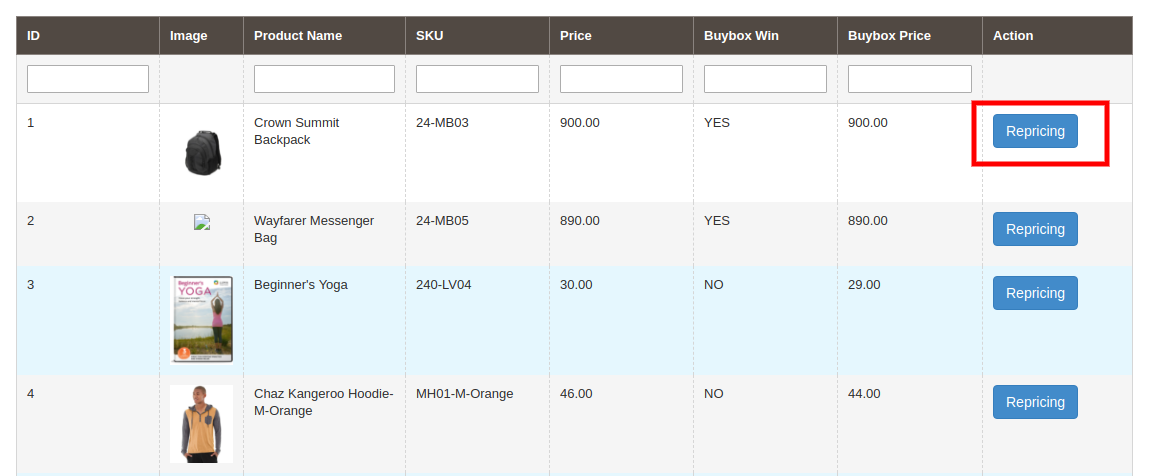
To reprice the product, click on ‘Repricing’ option corresponding to the respective product as shown in the image below:
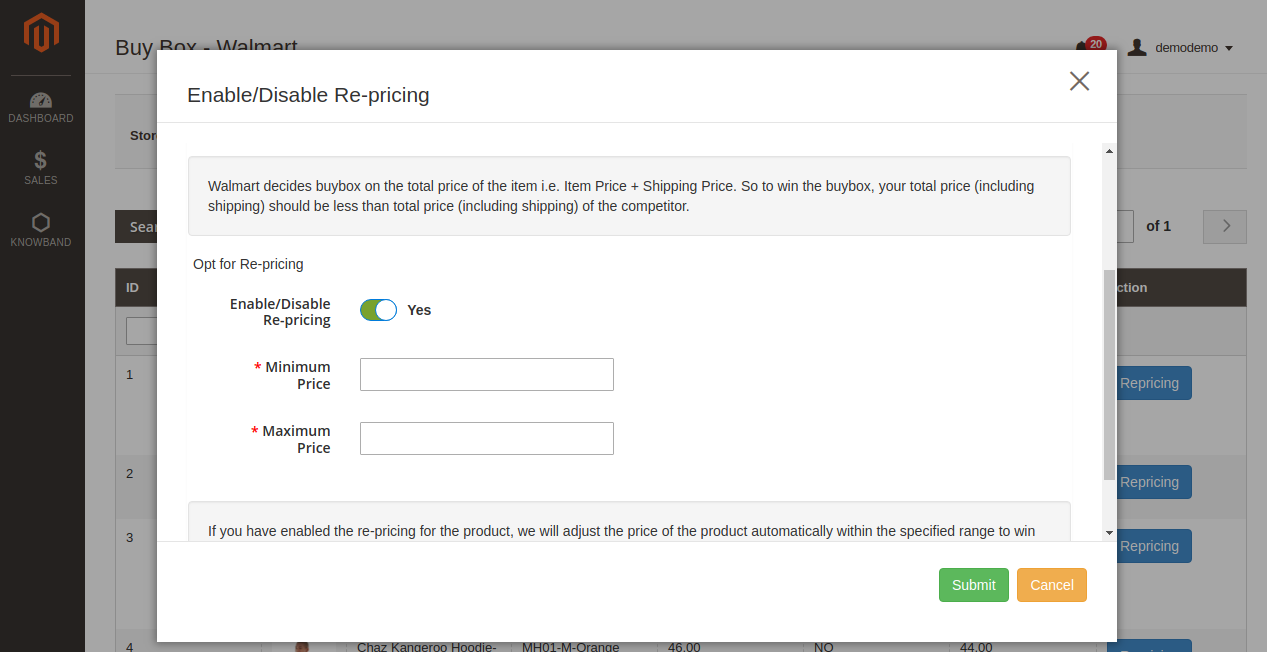
As you click here, a popup will appear. Here are the fields offered in the popup.
Enable Repricing: Select ‘Yes’ from the drop-down menu if you want to reprice the product.
Minimum and Maximum Price: Enter the minimum and maximum price of the product in the respective sections.
Once the repricing is done, sync the same with the marketplace by executing cron in the back-end of the Magento 2 Walmart Integrator. (See section 3.15)
3.12 Manage Lag Time
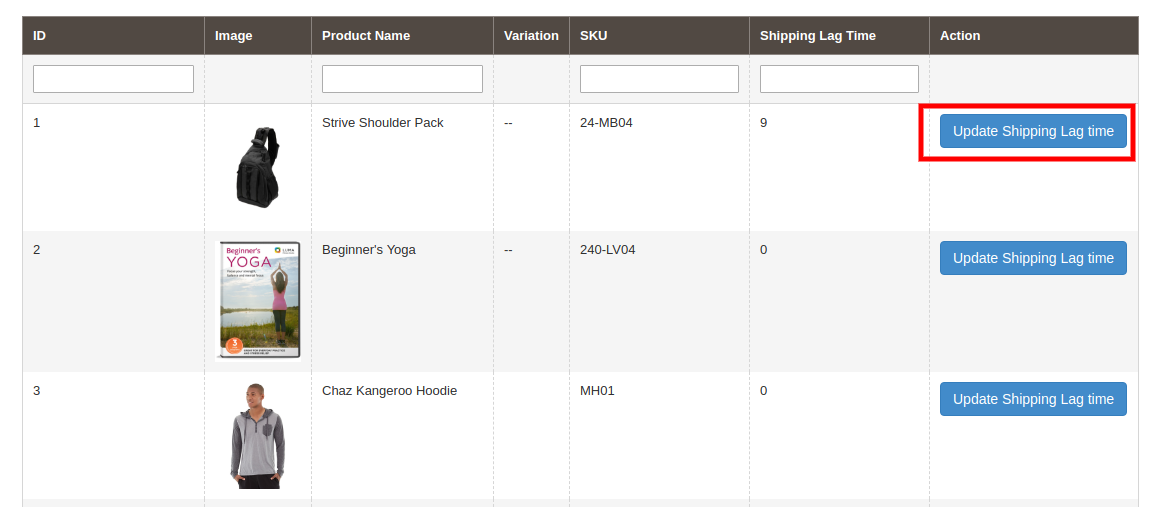
Lag time refers to the time between the order placement and order shipment. The admin can update the lag time of the products and sync it with the marketplace with the help of the cron offered by Walmart Magento 2 API integration. In order to fix the lag time, click on the Update Shipping Lag Time button as shown in the image below:
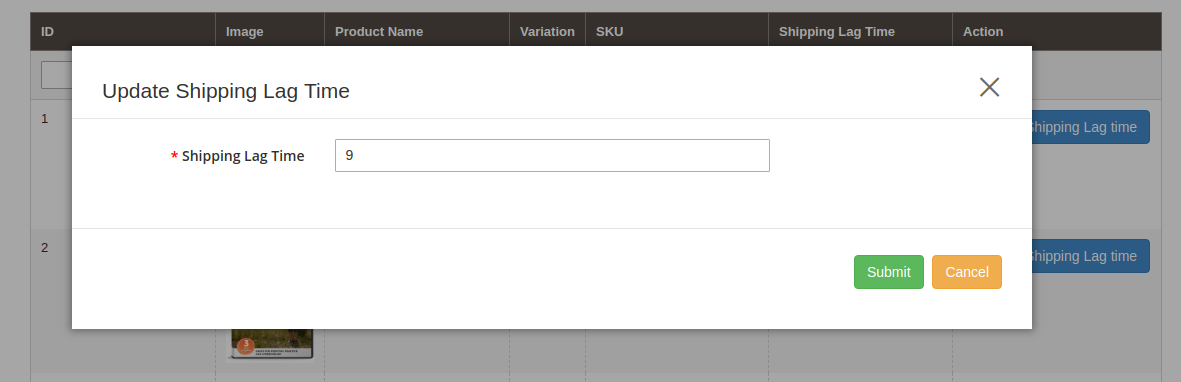
As you click on the link, a popup will appear as shown below:
Enter the lag time in days and click on the Update button. This will update the shipping lag time at walmart.com.
3.13 Tax Code
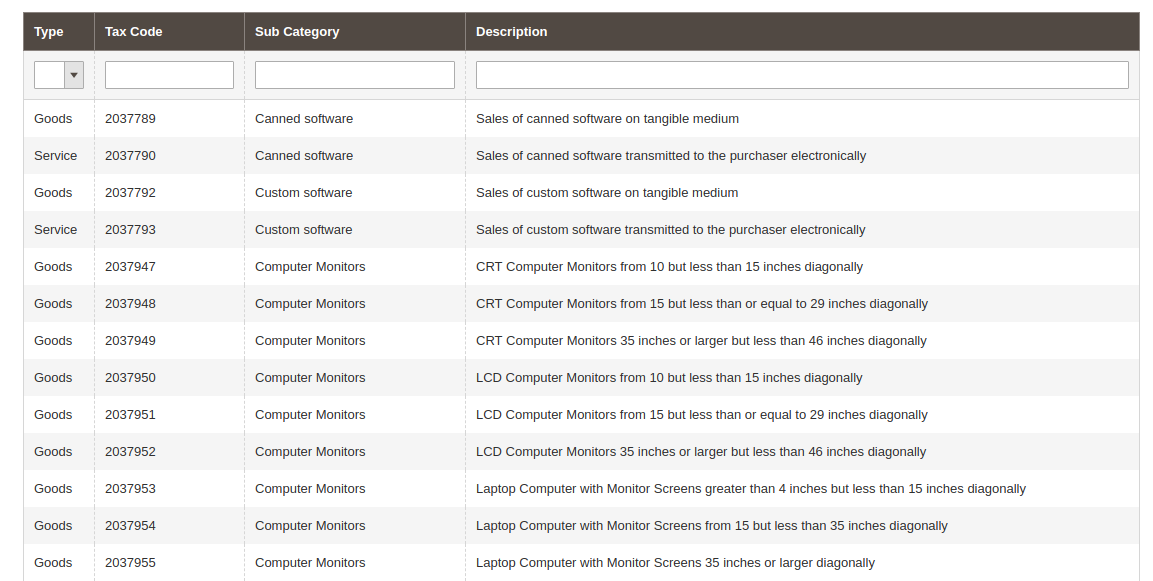
This tab of Magento 2 Walmart API integrator lists out the tax code of all the products listed at the marketplace.
3.14. Sales Report
This section of Walmart Magento 2 API integrator offers the complete sales report of the Walmart shop in both graphical and tabular form as shown in the image below:
3.15. Synchronization
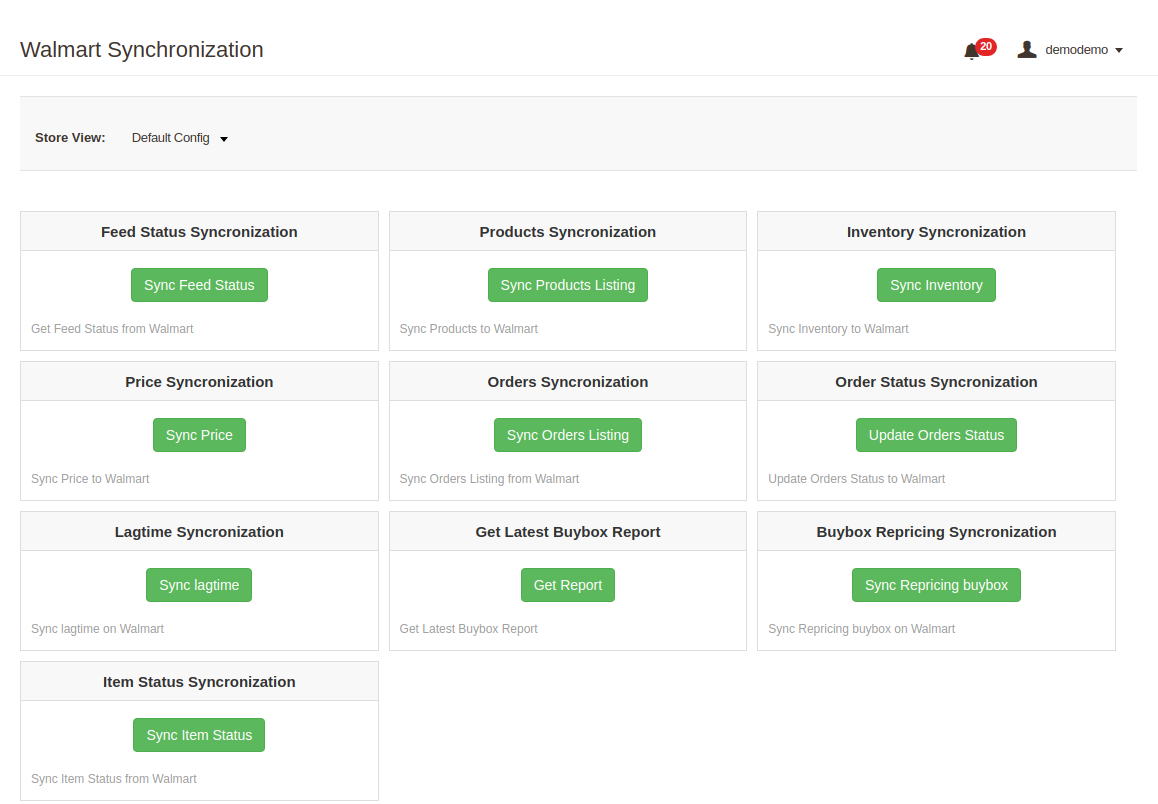
This tab synchronizes all the settings and changes done in the other tabs of the Module. The synchronization between the Magento 2 Store and Walmart Marketplace and vice-versa can be done from the ‘Synchronization‘tab.
The various cron jobs to synchronize the settings between Magento Store and Walmart Marketplace are shown below:
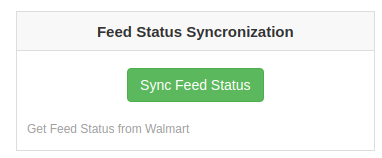
3.15.1 How to sync Feed Status from Walmart Marketplace to Magento store?
The status of the feeds can be synced with the Magento 2 store by clicking on the ‘Sync Feed Status’ in this tab of Magento 2 Walmart Integration Extension.
It would perform following actions –
Every time a cron is executed, a feed is created. This cron updates the feeds.
3.15.2 How to list the Products at Walmart Marketplace?
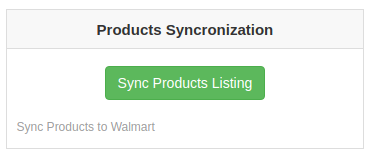
The product listed in the Products Listings tab will be synced with Walmart by clicking on ‘Sync Products Listing’ cron options offered by Magento 2 Walmart Integrator.
It would perform following actions –
The cron will list the products to the Walmart marketplace.
It will add products on the Walmart Marketplace with the mandatory product details like Description, Price, Quantity, Image etc.
3.15.3 How to sync Inventory to Walmart Marketplace?
The inventory or product quantity can be updated at walmart.com by executing the ‘Sync Inventory’ cron.
It would perform following actions –
This action will update the quantity of each product listed on Walmart Marketplace.
The change in the product quantity at the Magento 2 store is synced with the marketplace by executing this cron.
3.15.4 How to sync price of the products with Walmart Marketplace?
The Sync product price cron allows the store admin to sync the updated product prices to the Walmart marketplace.
It would perform following actions –
The cron job changes the price of the products at the marketplace.
The change in the price at the eCommerce site is reflected at the marketplace with the help of this cron.
3.15.5 How to sync Walmart Orderswith Magento 2 store?
This cron will sync the Orders from Walmart Marketplace to Magento store.
3.15.6 How to Update Order Status atwalmart.com?
The ‘Sync Order Status’ cron will update the order status as per the changes made from the Magento store on Walmart marketplace.
3.15.7 How to Synchronize the Shipping Lag Time?
Click on ‘Sync Shipping Lag Time’ of the synchronization tab of Magento 2 Walmart Integrator. This will sync the respective lag time of the products with walmart.com.
3.15.8 How to Synchronize the Buy Box status from Walmart?
The admin can sync the buy box status from Walmart by clicking on ‘Sync Walmart BuyBox’. This will update the status of the BuyBox for the respective products.
3.15.9 How to Synchronize the change in price of the Buy Box items on Walmart?
The admin can reprice the products and sync the revised products at the marketplace by executing Sync Repricingcron in this tab of Magento 2 Walmart Integrator.
3.16 Audit Log
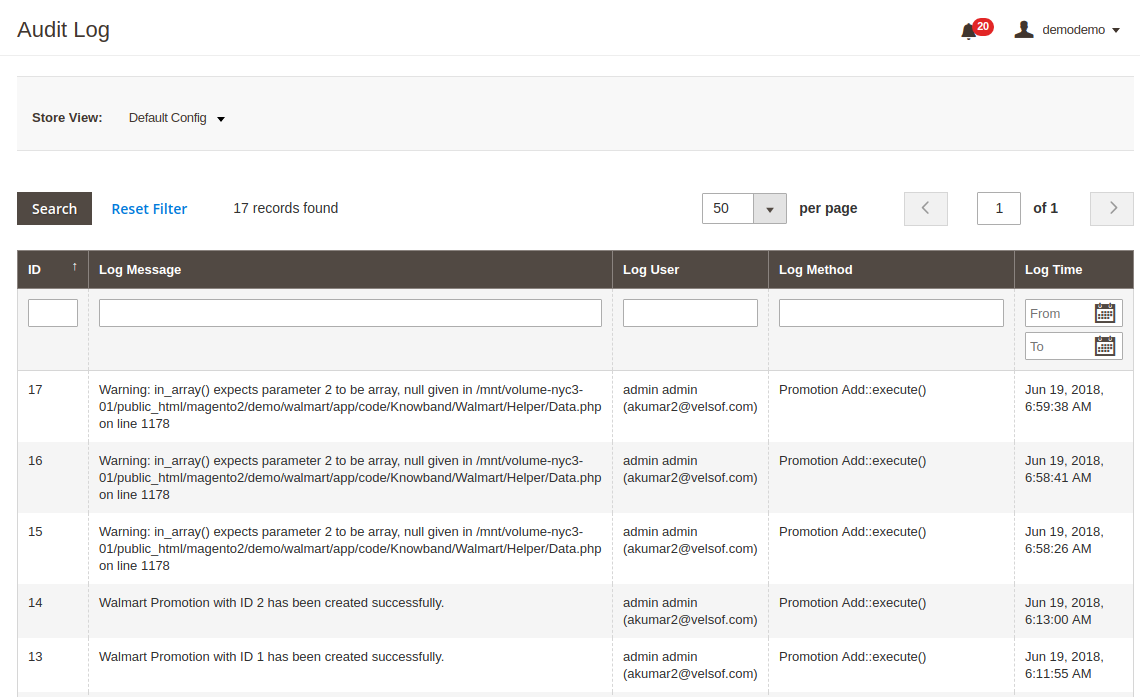
The admin can view all the jobs occurred in the Audit Log tab of Magento 2 Walmart Integrator. The status of the jobs can be viewed in this tab.
Exit popup offering discounts in exchange for email Ids has become very important when it comes to the e-commerce business. Exit Intent popup nowadays are one of the most important factors in customer engagement and increase revenue. Most e-commerce store owners use Exit popups as a tool to engage customers with the store.
Exit pop-up uses Exit-intent technology which tracks the movement of the mouse cursor and soon as the customer tries to leave the page the Exit popup appears offering discounts in exchange of the email Ids.
We at Knowband has developed an Exit Intent popup for Magento 2 users popularly known as Magento 2 Exit popup extension. This Magento 2 extension offers various features which make this Exit Intent extension far better than other Exit intent popups used. This Magento 2 Exit Intent extension offers look and feel settings which allows admin to customize the Exit popup in endless ways.
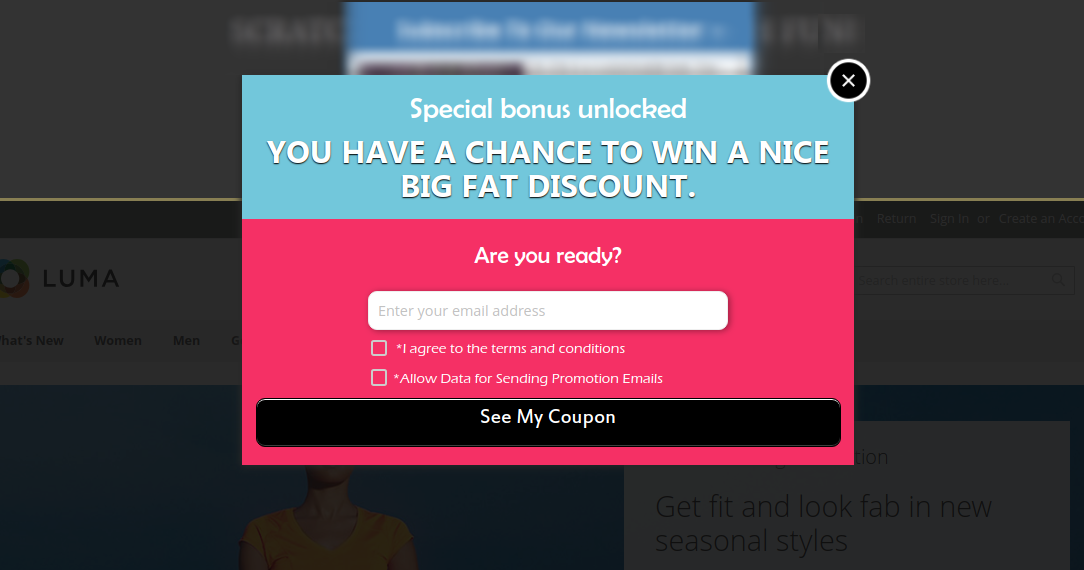
Magento 2 Exit pop up(email subscription) extension displays a responsive newsletter pop up every time a visitor tries to leave the store. The Magento 2 extension offers discount coupons to the visitors who enters their email Id in the subscription pop up and subscribe them for a newsletter or register them for a new user.
Magento 2 Exit popup offers integration with popular email service providers like MailChimp, Klaviyo, and Constant contact. All the email Ids entered in the Exit intent newsletter popup are automatically synced to the databases of these email service providers. Magento 2 admin can use these email Ids for personalized promotions or Mail campaigns.
1.1. Features of Magento 2 Exit popup extension
The Magento 2 Responsive exit popup extension incorporates the email subscription popup at Magento store front. The Newsletter popup appears as soon as the visitor tries to leave the website giving them one extra chance to engage with the store.
Magento 2 Exit popup extension offers Email Recheck option to prevent the same user to avail the discount more than once.
Magento 2 admin has an option to show the fireworks when a customer wins a discount by offering his/her email Id to make it more enticing and attractive.
Magento 2 Exit popup extension also allows admin the control over the display of the Exit popup by allowing “Popup display option”, Magento 2 admin can enter the number of days after which the popup is to be displayed to the same customer.
Magento 2 Exit Intent popup offers Custom CSS and JS for endless customizations without even touching the base code of the extension.
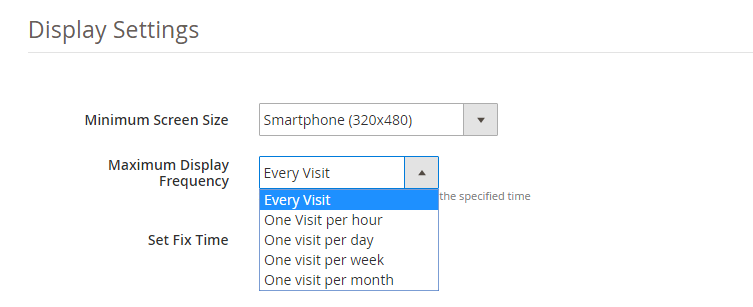
Magento 2 extension offers display settings under which the admin can set the maximum screen size compatibility of the Exit popup. The Exit popup will work efficiently in all the screen sizes above the selected size.
Magento 2 admin can also set the maximum display frequency for the Exit popup, the email subscription popup will appear as per the frequency selected from the dropdown.
Magento 2 admin can set the date range between which s/he wants to display the Exit intent popup to the visitors by selecting the data from the date picker field.
Magento 2 Exit popup extension allows admin to select the user group to whom s/he wants to display the Exit popup, the email subscription popup will be displayed to the selected user group only.
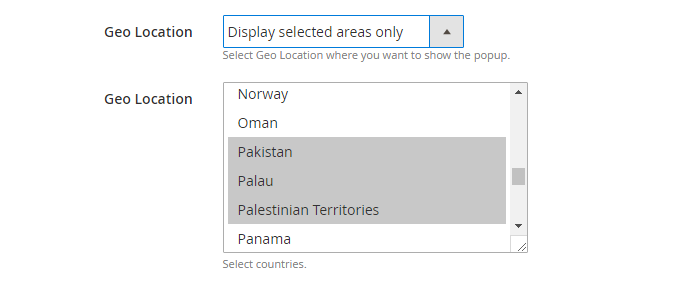
Magento 2 Exit Intent email subscription popup allows the admin to select the GEO locations where s/he wants to display the Exit Intent popup. The popup will be displayed only in the selected GEO location.
Magento 2 admin can also add a background image and website logo on the Exit intent popup.
Magento 2 admin can customize the text on the popup as per the requirement by customizing the Text settings offered by the Exit popup extension.
Magento 2 admin can set the discount being offered to the visitors using Discount settings, Magento admin can set the discount to be a percentage or fixed discount. Magento admin can also set the Coupon expiry time in days.
This even engages visitors for a longer time on your eCommerce store and increases the percentage of the customer retention.
Magento 2 exit intent popup offers integration with email service providers like Mailchimp, Klaviyo, and Constant contact.
Magento 2 email subscription popup offers 5 Readymade email templates which can be later customized by the admin as per the requirement.
Magento 2 Exit intent email subscription popup offers a detailed report for all the Generated and used coupons, country where the Exit popup was used and in which device and the details of the customers who have entered the email Id and won the discount in terms of beautiful Line and Pie charts.
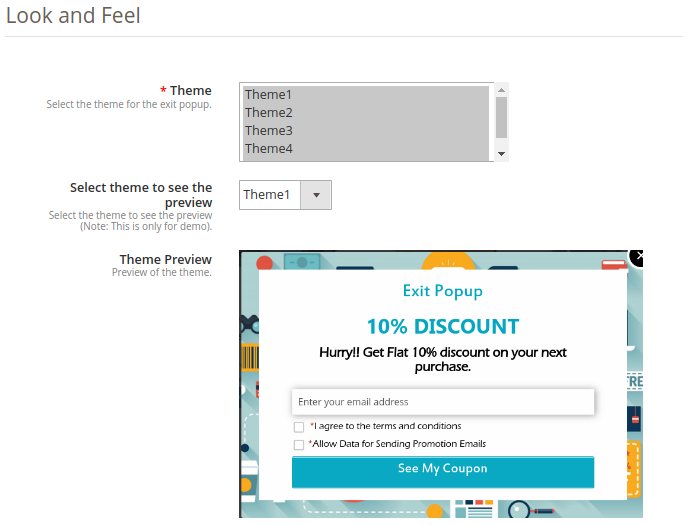
Magento 2 Exit Popup Plugin allows you to apply various appealing themes for the exit popup(email subscription popup). Theme preview option is also available for the admin before making it live.
With this Magento exit popup extension, admin can generate fixed type coupons or new coupon every time.
High Impact on sales, drastically increase store conversions
Multi lingual support
Compatible with all themes
Desktop, Mobile and Tablet responsive design
1.2. Installation
Follow the following steps in order to install Magento 2 Exit Popup extension in your store:
Download the Magento 2 Exit Popup module package from Knowband store.
You’ll receive a zipped file containing the user manual and the source code of Magento 2 Exit Popup plugin. Unzip the package.
Create a folder {Magento root}/app/code/Knowband/Exitpopup
Upload the extracted content in the above folder via FTP manager (like Filezilla or WinSCP – download here: https://filezilla-project.org/).
6. In Admin Panel go to the main menu -> Knowband -> Exit.
7. The Magento 2 Exit popup extension is now ready for use.
This User Manual will guide the users through the Magento 2 Exit popup extension configuration and settings.
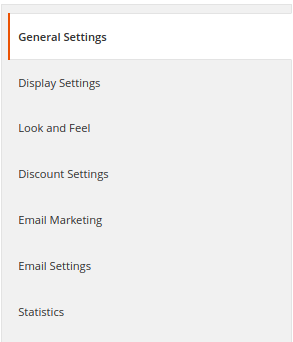
2.0 Admin Interface
The admin Panel of Magento 2 Exit Popup module contains the 8 following tabs.
General Settings
Display Settings
Look and Feel Settings
Text Settings
Discount Settings
Email Marketing
Email Settings
Statistics
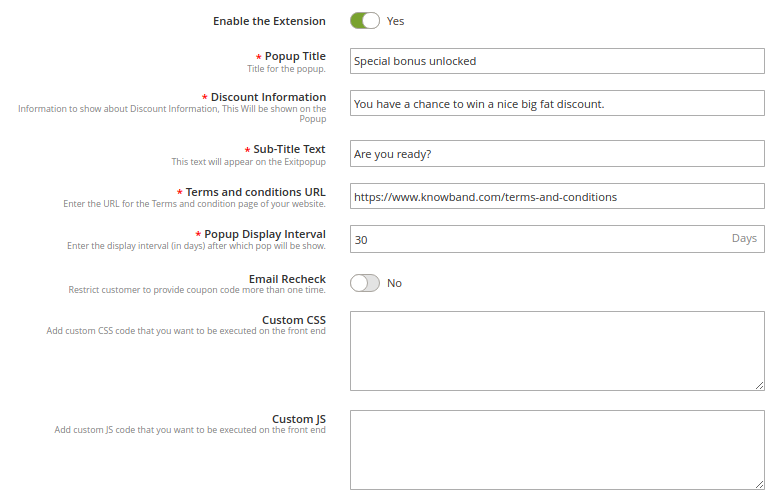
2.1. General Settings
1. Enable the Extension
Toggle this button in order to enable the Magento 2 Exit Intent email subscription popup extension. If enabled, the module and all its settings will work on the store.
2. Popup Title
This option allows you to set a custom title for the exit popup or email subscription popup.
3. Discount Information
Using this option, you can set any text which will be shown as discount information on the exit popup.
4. Sub-Title Text
This information is also shown on the exit popup below the main exit popup title.
5. Terms and Conditions URL
Using this option, you can set a URL for the Terms and Conditions page of your website.
6. Popup Display Interval
Using this setting Magento 2 admin can set the number of days after which the email subscription popup will display again to the same customer.
7. Email Recheck
Magento 2 Newsletter popup extension offers email recheck option to prevent same User/Email Id to avail the discount more than once. Toggle this button in order to enable/disable the Email recheck on the Exit Popup.
8. Custom CSS and JS
Magento 2 Exit Popup extension offers custom CSS and JS options to Magento admin for endless customization. The Newsletter popup can be completely customized and Magento 2 admin can match with the store theme.
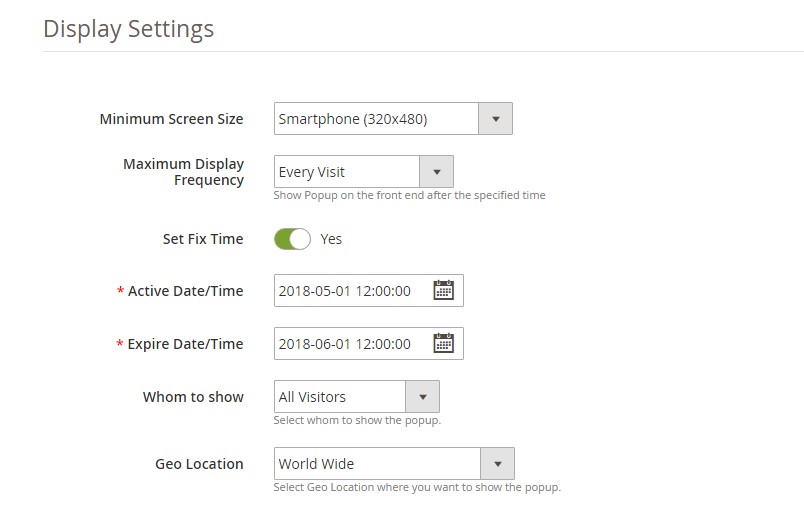
2.2 Display Settings
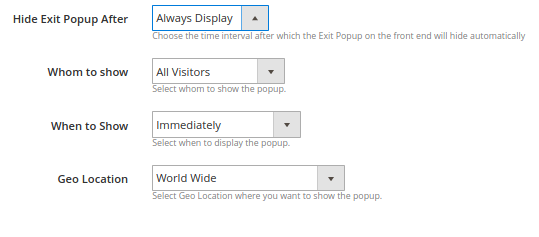
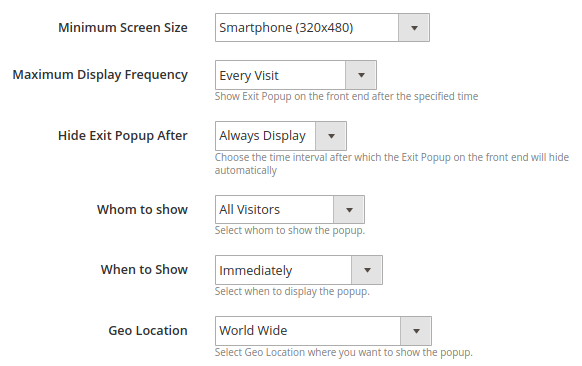
Magento 2 Exit popup extension by Knowband offers Display settings using which Magento 2 admin can control the display of the popup, like whom to show the newsletter subscription popup, in which country to show the newsletter popup etc. Let us see them in detail. But first please look at the screenshot below:
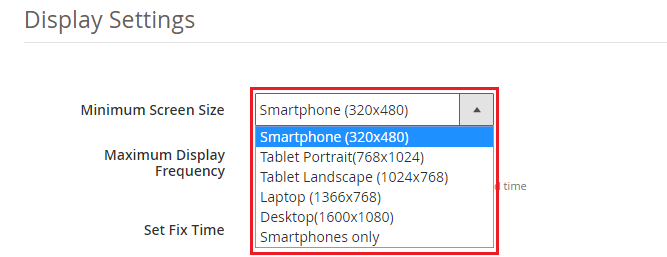
1. Minimum Screen Size
If mobile is selected as the Minimum screen size then the Exit Intent email subscription popup will work on all the screen sizes higher than the Mobile phone and on Mobile phone, if Desktop is selected as the Minimum size screen then the Newsletter popup will not display in the Mobile phone and any size screen smaller than the Desktop.
2. Maximum Display Frequency
Magento 2 Admin can set the Maximum Display Frequency of the Newsletter subscription popup using this option. The Admin can decide to show the Exit popup at every visit of the customer, or one visit per hour, per day, per week, and per month. If every visit is selected the Exit Intent popup will appear at every visit of the customer.
3. Hide Exit Popup After
This option of Magento 2 Exit Intent popup extension allows you to set the time interval after which the exit popup will automatically hide on the frontend.
4. Whom to Show
Magento 2 Exit popup extension offers store admin to choose the customer group whom to show the Newsletter popup using this setting. Magento 2 store admin can select to display the Exit intent popup only to the new visitors, only to the returning visitors or to all the visitors on the store. Please refer to the screenshot below:
6. When to Show
This option allows you to set the time after which the email subscription is shown to the user: immediately, after some time, after scroll down percentage or upon exit.
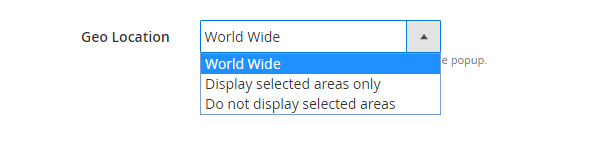
7. GEO Location
Magento 2 Exit Popup extension allows admin to select the GEO locations where s/he wants to display the Exit intent email subscription popup. Please refer to the screenshots below.
Screenshot 1
Screenshot 2
2.3 Look and Feel Settings
Magento 2 Exit popup extension gives an option to select and apply pre-defined templates for the exit popup.
1. Theme
Magento 2 store admin can choose any theme for the exit popup.
2. Preview:
The store admin can select any theme to see the preview. This option is helpful as they can check the theme before making it live on the store.
2.5 Discount Settings
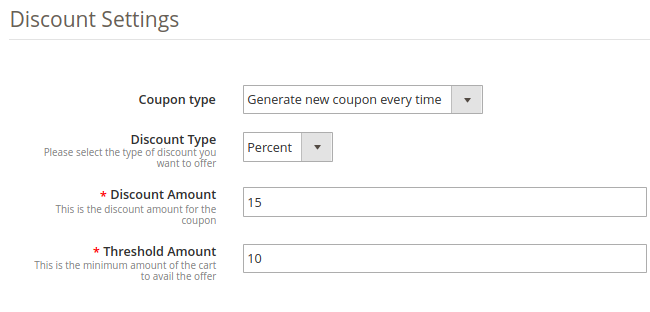
Discount settings offered by this Magento 2 Exit Intent email subscription popup extension allows Magento store owner to set the discount offered to the visitor who enters his/her email Id in the email subscription popup. Admin can offer the discount randomly or some fixed discount. There are three choices that have been provided to the store owner to set the discount. These are discussed below:
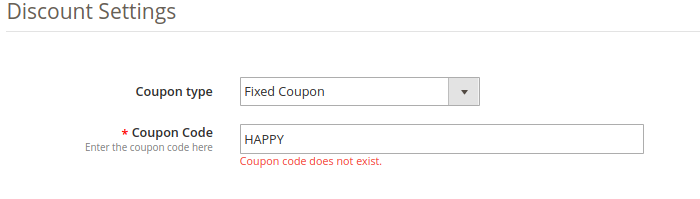
1. Coupon Type: Using this option, admin can set the coupon type as a fixed-type coupon or variable-type. In fixed type coupon, admin can specify the code which has to be first generated from the admin back-office under the Cart Price Rule Settings.
Note: If the admin tries to set a coupon code which has not been set under Cart Price Rule Settings, the following error will be shown to them:
2. Discount Type: With this option, admin can set the discount type as fixed or percentage which will be offered to the user through exit popup.
3. Discount Amount: If the admin has selected the discount type as fixed, they can set any value as a discount. If the discount type is selected as a percentage they have to set a percentage discount value.
4. Threshold Amount: This option sets the minimum cart threshold value which is required to avail the offer.
2.6 Email Marketing
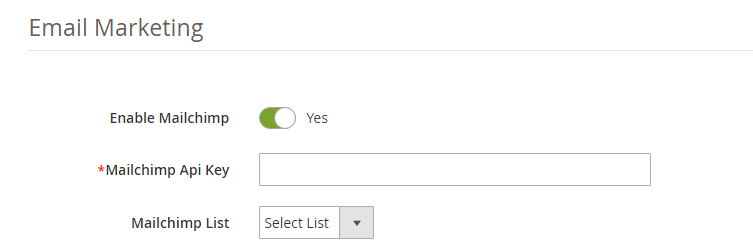
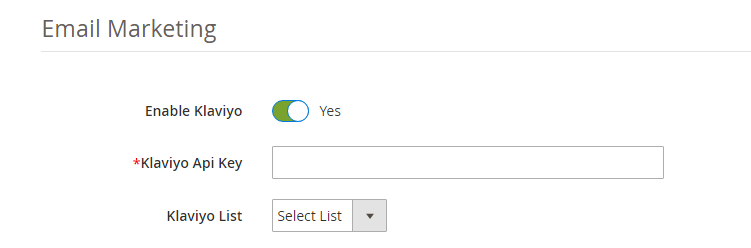
Magento 2 Exit popup extension offers Integrations with popular email service providers like MailChimp, Klaviyo, and Constant Contact. The email Ids captured by this Email subscription popup are automatically synced to the database of these email service providers which can be later used by the store admin to send personalized or promotional emails. Let us see how we can configure them.
1. MailChimp Integration:
Magento store admin is required to enter the MailChimp API key in order to sync it with your web store. Follow the below mentioned steps for the API key:
Step 1: Log in to your MailChimp account at https://mailchimp.com.
Step 2: Click on your Username from the menu on the top right corner.
Step 3: Select the Account in the flyout menu.
Step 4: From the account page select Extras and then API Keys.
Step 5: Your API Key will be listed in the table labeled Your API Keys. Copy the API key from there and paste in the “MailChimp API key” field.
Once this is done, the MailChimp account is synchronized.
2. Klaviyo Integration:
In order to Integrate Klaviyo with the store, Magento admin have to add the Klaviyo API Key in the provided field.
Step 1: Log in to your Klaviyo account at https://www.klaviyo.com/
Step 2: Click on your Username from the menu on the top right corner.
Step 3: Select the Account in the flyout menu.
Step 4: From the account page select Settings and then API Keys.
Step 5: Your API Key will be listed in the table labeled Your API Keys. Copy the API key from there and paste in the “Klaviyo API key” field.
Once this is done, the Klaviyo account is synchronized.
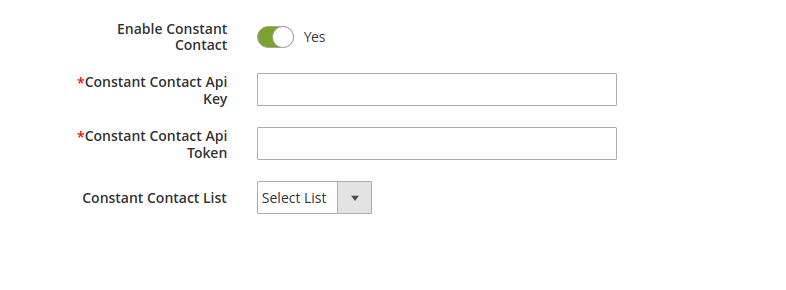
3. Constant Contact Integration:
In order to enable Constant Contact integration, toggle the Enable Constant Contact button as shown in the image below:
Enter the API key, API token in order to set up the integration. Select the list in which you want to sync the captured email IDs.
In order to generate the API Key of Constant Contact, follow the steps mentioned-below:
Step 2: Enter the Application Name field. Scroll to the bottom of the page and check the box indicating you agree to the terms of service and click Register Application.
You will, then,get your API Key information.
Step 3: Click the Get Access Token button, in order to obtain the Access Token.
2.7 Email Settings
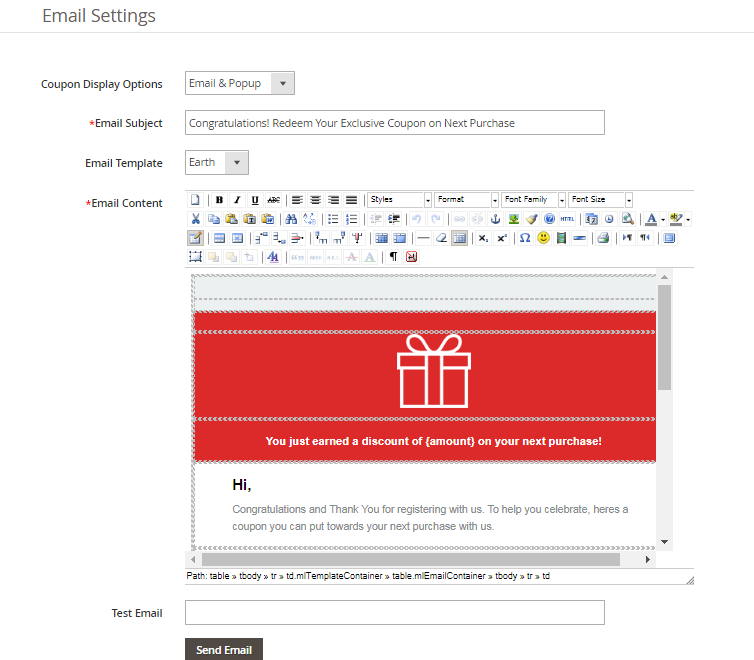
Magento 2 Exit popup extension offers Email Settings to manage the Email sent to the customer with discount coupon codes. The extension offers readymade email templates which can be customized further as per the requirement. There are three options in which admin can share the coupon code with the customers i.e. display the coupon code in the newsletter popup itself, share the coupon code in the email sent to the customer and an option to choose both. The coupon codes are generated automatically and the emails are sent automatically as soon as a customer enters the Email Id in the email subscription popup.
Coupon Display option: Magento 2 admin can choose how to display the coupon code to the customer i.e. either on the exit intent popup, either via email or admin can choose both the options.
Email Subject: Magento 2 exit popup allows store admin to set the Email subject for the email that is sent to the customer. Emails are sent automatically but the admin has full control over the customization of the Email template.
Email Template: Magento 2 exit popup extension offers 5 Readymade email templates. These email templates are fully customizable as per the requirement.
Test Email: Magento 2 newsletter subscription popup extension by Knowband offers Test email field option to test the functionality of the emails sent.
2.8 Statistics
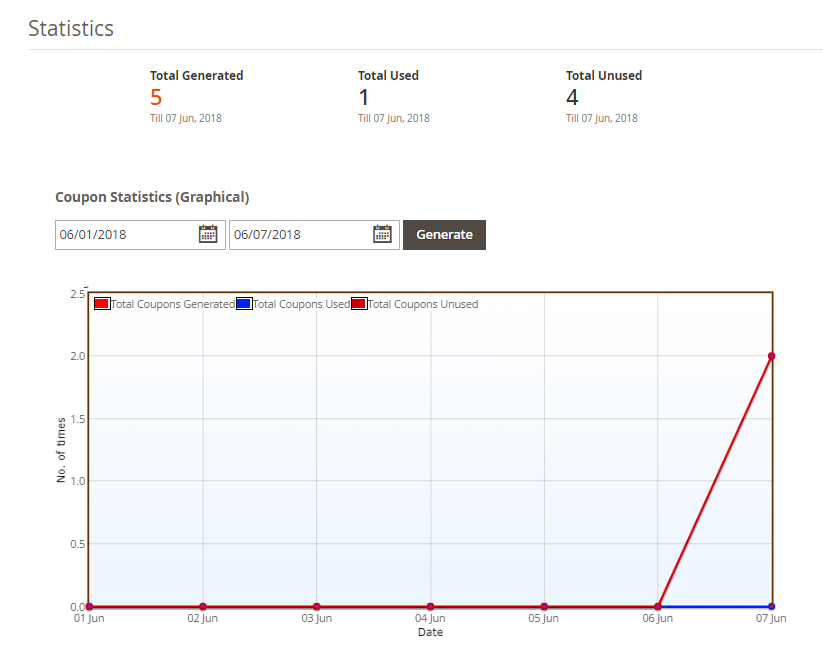
Magento 2 Exit popup extension offers statistics of its performance. The statistics show the comparison between the total generated and used coupons. Magento 2 newsletter subscription popup extension offers interactive graphs for total generated and used coupons. Magento 2 admin can filter the stats by selecting the date range from the date picker field, refer to image below:
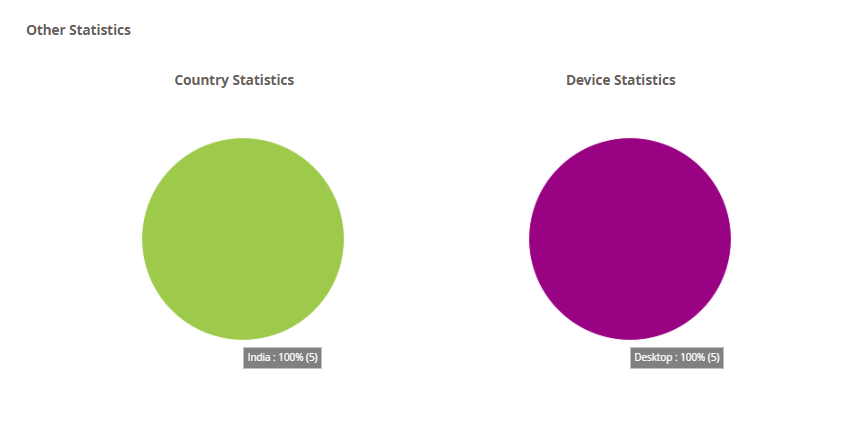
Not only this Email subscription popup extension also shows the statistics in a beautiful and interactive pie charts, in which country the Exit popup extension is used and in which device, refer to the screenshot below:
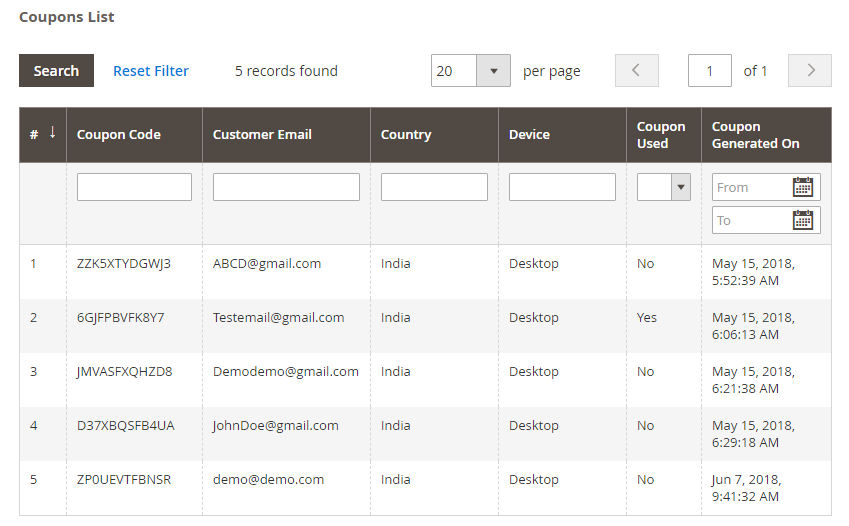
Tabular Report: Magento 2 Exit popup extension generates tabular reports which shows information of the customer who has entered the email Id in the Newsletter subscription popup. The information like Email Id, the Coupon code allotted, the country where the Exit Intent popups, the device on which it was used and if the customer has used the coupon or not, refer to the screenshot below:
3.0 Front Interface
A) Magento 2 Exit popup with Theme 1
B) Magento 2 Exit popup with Theme 2
C) Magento 2 Exit popup with Theme 3
D) Magento 2 Exit popup with Theme 4
E) Magento 2 Exit popup with Theme 5
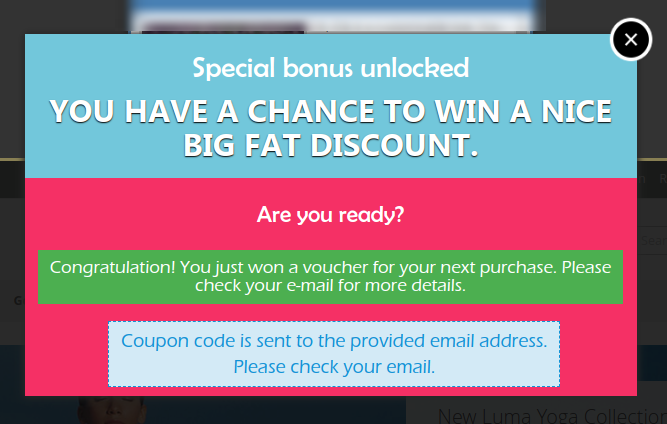
As the customer enters their email address, the following screen will be shown to them.
Disclaimer: In case the “Exit” popup does not display at the front, kindly clear the cache or delete the cookies. Sometimes cookies prevent the popup from displaying at front.
Magento Product Availability Check by Zipcode Extension by Knowband allows the user to check the availability of the product in a particular area just by entering the zipcode. The Magento Product Availability extension also offers the admin to restrict the availability in the particular area(s). With the help of this Magento Zipcode extension, the admin can change the availability status whenever he wants to.
1.1 Features offered by Magento Product Availability by Postal Code Extension:
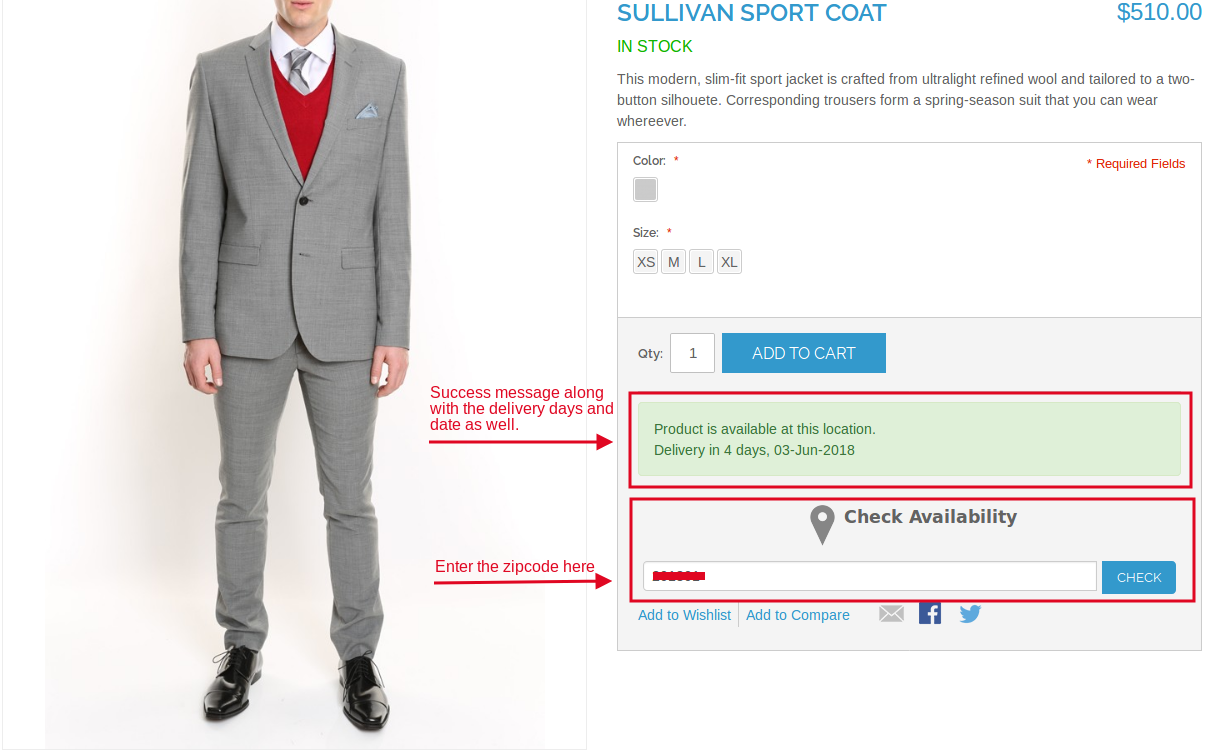
By installing the Magento product availability by zipcode, the store admin can allow the store visitors to check the availability of the product in a particular region based on the zipcode.
The Magento Product Availability Check by Zipcode Extension allows the admin to show number of days with estimated delivery date if the product is available to the entered zipcode.
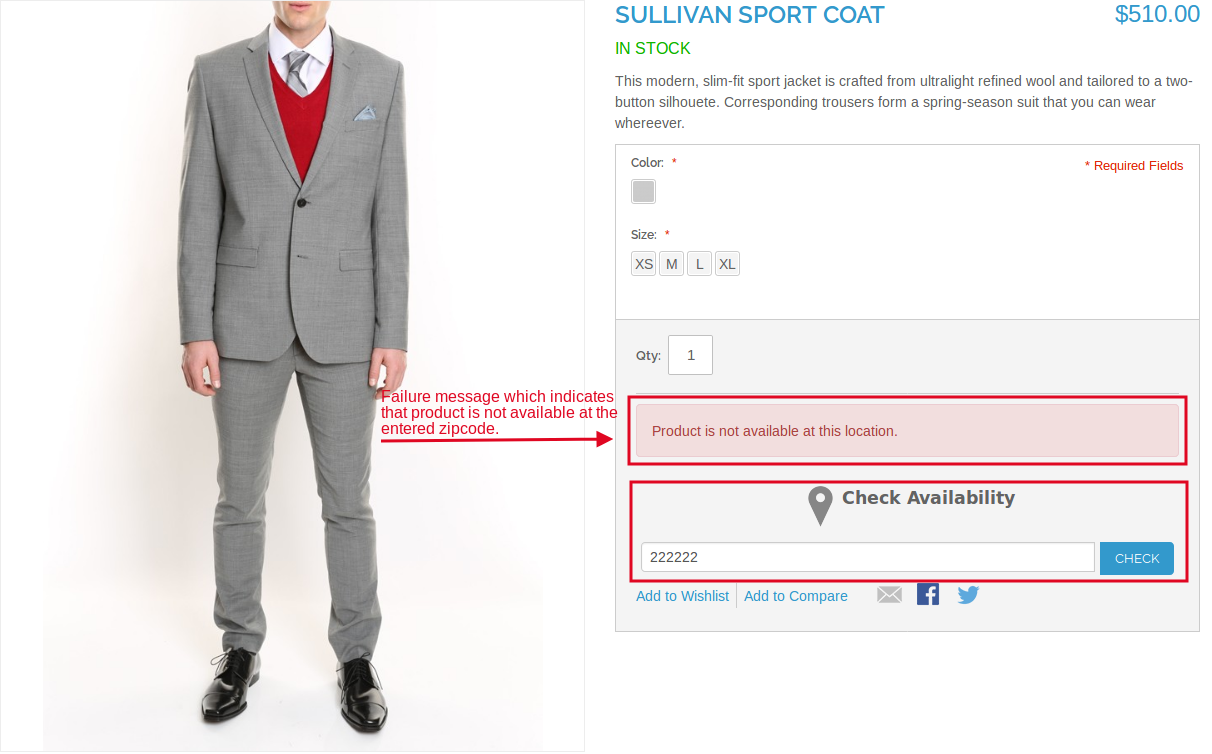
The Magento Product zipcode validator module offers the admin to disable the checkout option if the product is not available to the entered zipcode.
The admin can create various global zones.
The Magento product zipcode validator extension allows the admin to view all the list of created zones as well under the “Global Zone” configuration interface.
The module allows the admin to map the zones with product in order to specify their availability.
The global zone can be edited/deleted as well.
The admin can edit or delete the zipcodes from the created zones.
The admin can add/delete the any product(s) from the selected zone also.
The Product-Zone Mapping can be done manually or by uploading the CSV file as well.
The admin can restrict the availability in the particular area.
The admin can create the separate zones for the available and unavailable products.
2.0 Installation Steps of Magento Product Availability Check by Zipcode Extension:
Follow the simple steps in order to install the Magento Product Zipcode Validator Module:
1. Download the extension package from the Knowband store.
2. You’ll get a zipped file. Unzip the package on the root folder of your Magento setup via FTP manager (like Filezilla or WinSCP – download here: https://filezilla-project.org/). You’ll find the files and folders as shown in the image below:
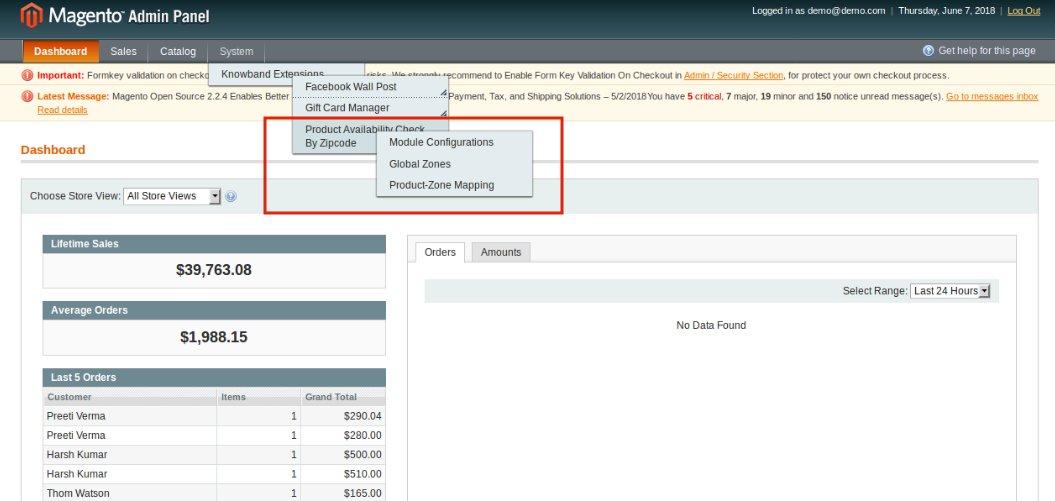
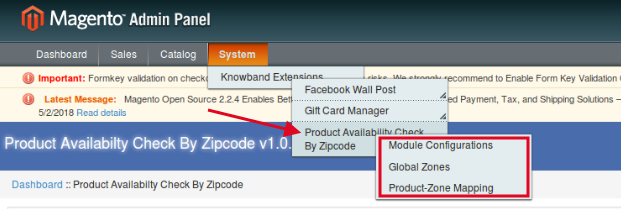
3. The extension is now installed and ready for use. In Admin Panel, go to “System > Knowband Extensions > Product Availability Check by Zipcode”.
You can now configure and use the Magento Product Availability extension.
3.0 Admin Interface of the Magento product zipcode validator extension:
The product zipcode validator Magento Extension offers following interfaces to be configured:
Module Configuration
Global Zones
Product-Zone Mapping
3.1 Module Configuration of Magento Product Availability by Zipcode extension:
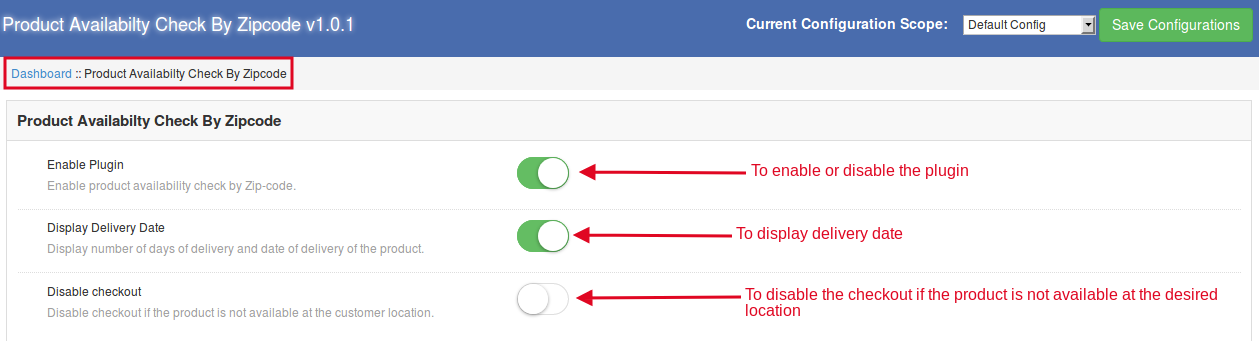
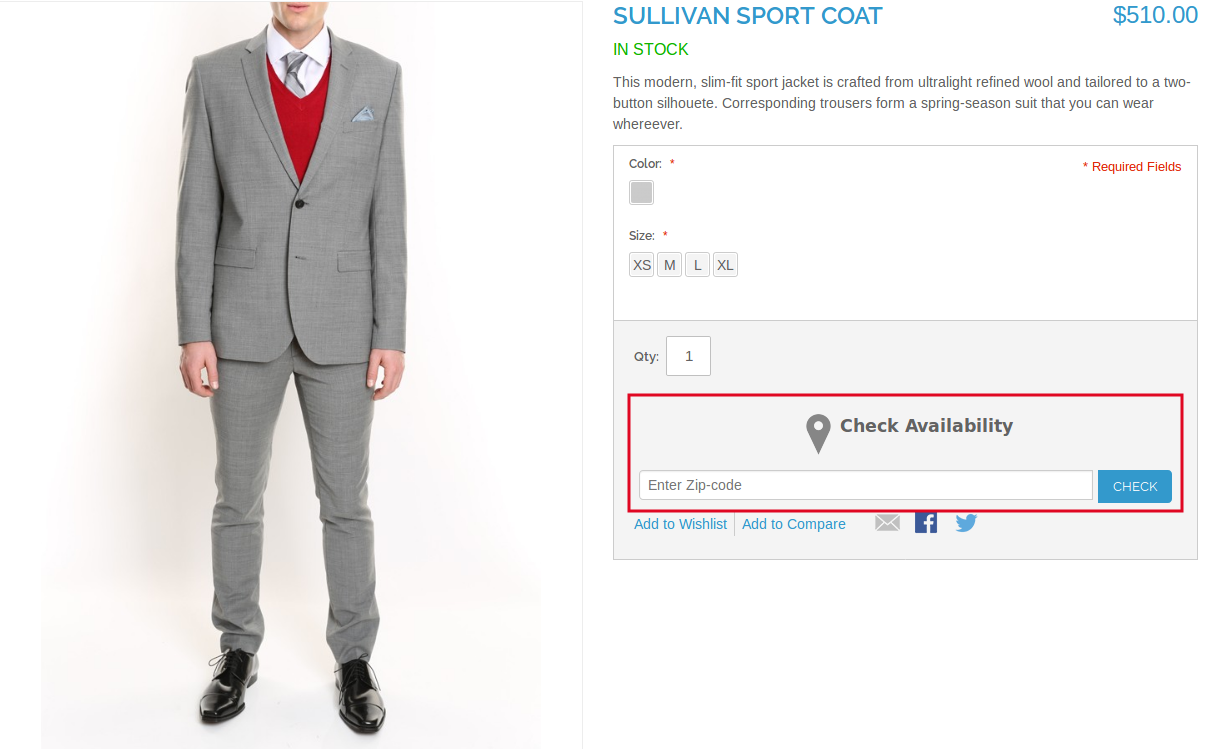
Enable Plugin: Enable the Magento Product Zipcode validator module by toggling this button. After enabling this, it will display a block on the product page to check the availability.
Display Delivery Date: Enable this toggle button to display the estimated delivery date of the product.
Disable Checkout: If this button is enabled, then, the customer can not place the order.
3.2 Global Zone Configuration of the Magento product zipcode validator extension:
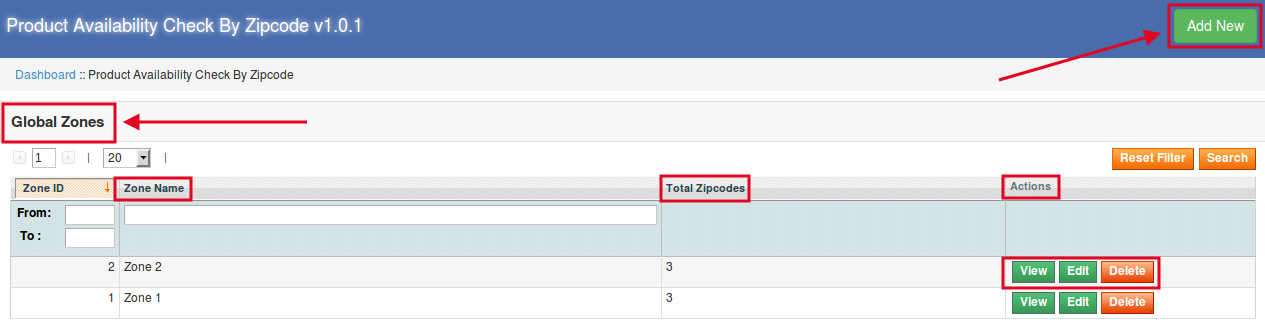
This interface contains the list of all the zones created by the store admin. The admin can add any number of global zones to make the product available or not available to the desired zipcode(s).
3.2.1 How to add New Zone?
In order to create new zones click on the ‘Add New’ link at the top right section of the admin interface.
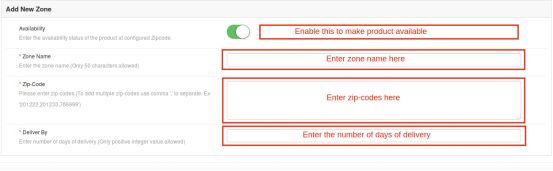
After clicking on the “Add New” button, you will see the following fields to configure:
Availability: Enable this button to make the product available for that particular zone.
Zone Name: Enter the name of the zone here.
Zipcode: Enter the zipcodes that are to be included in that particular zone. In case there are multiple zipcodes, enter the same separated by the comma.
Deliver By: Enter the number of days within which the products will be delivered to the customer. Only the positive integer value can be entered.
3.2.2 How to View/Edit/Delete the Global Zone(s)?
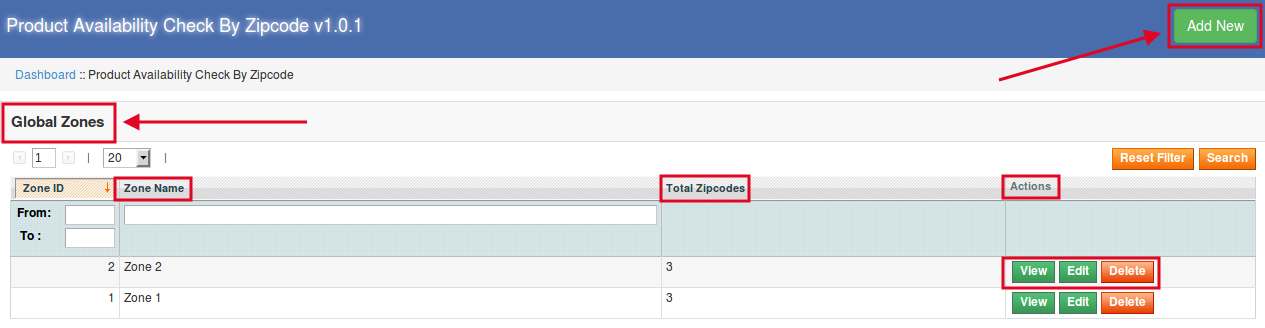
After clicking on the Global Zone configuration option, an interface will open containing all the list of created Global Zones. You can View/Edit/Delete the any of the Global Zones here.
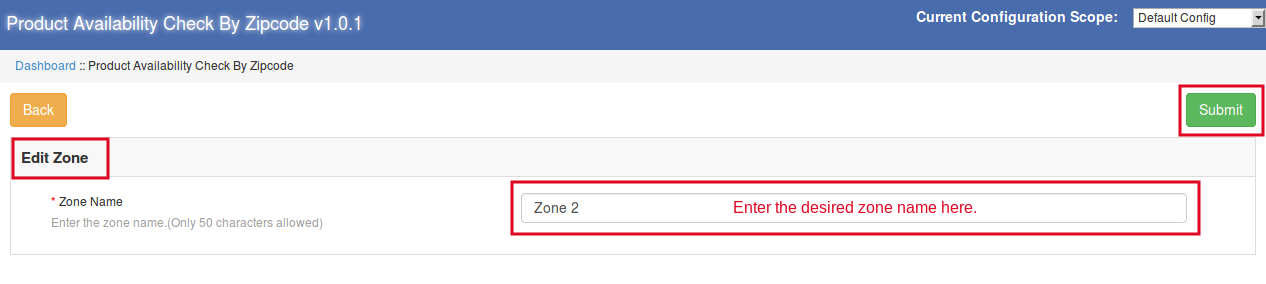
In order to edit the zones, click on the “Edit” button. On clicking here, you will be redirected to the new web page. Here you can change the zone name and click on “Submit “ button to make changes visible.
Editing the zone
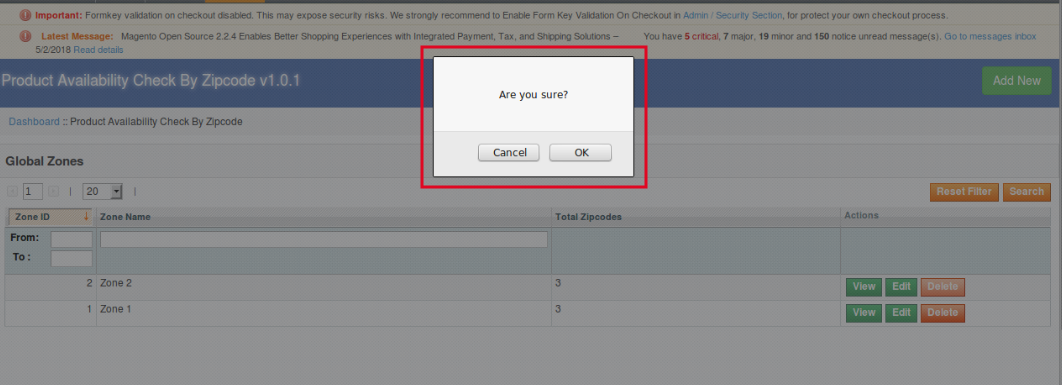
When the admin clicks on the “Delete” button under the “Global Zones” option, a popup will be shown quickly asking for the confirmation to delete the selected zone. Let’s take a look at the screen shot below:
Deleting the zone
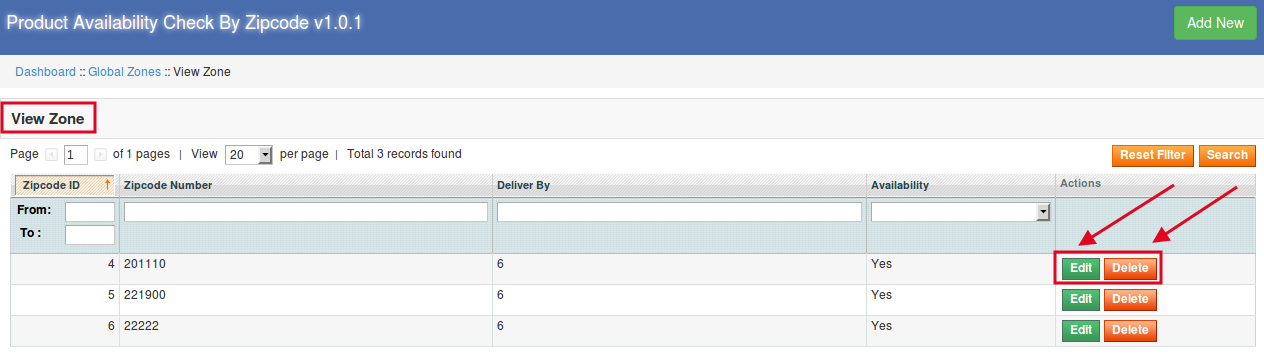
3.2.2.1 How to edit/delete the Zipcodes?
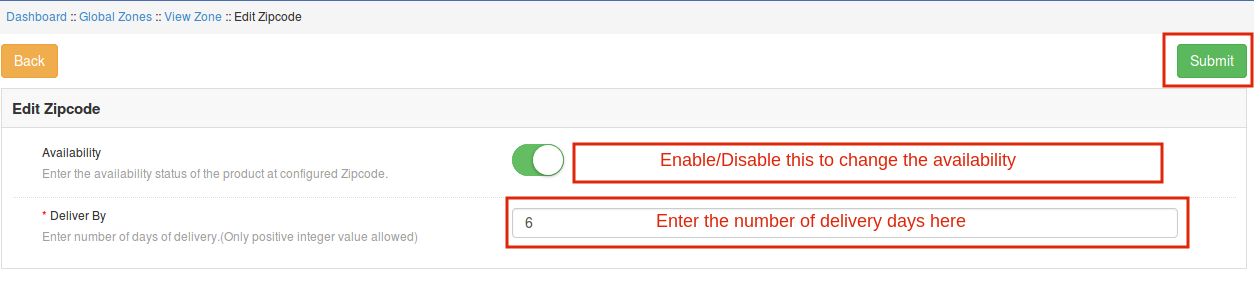
When you click on the edit option under the “View Zone”, you will get to see the following interface, where you can change the product availability for the particular zipcode and days of delivery as well.
Editing the zipcode
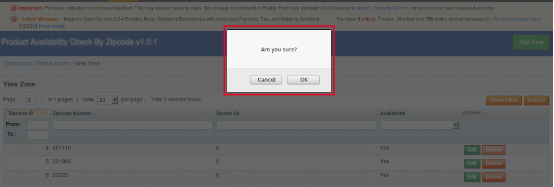
When you click on the “Delete” button under “View Zone” option, then a popup will appear asking for your confirmation whether to delete the zipcode or not. Take a look at the screenshot below:
Deleting the zipcode
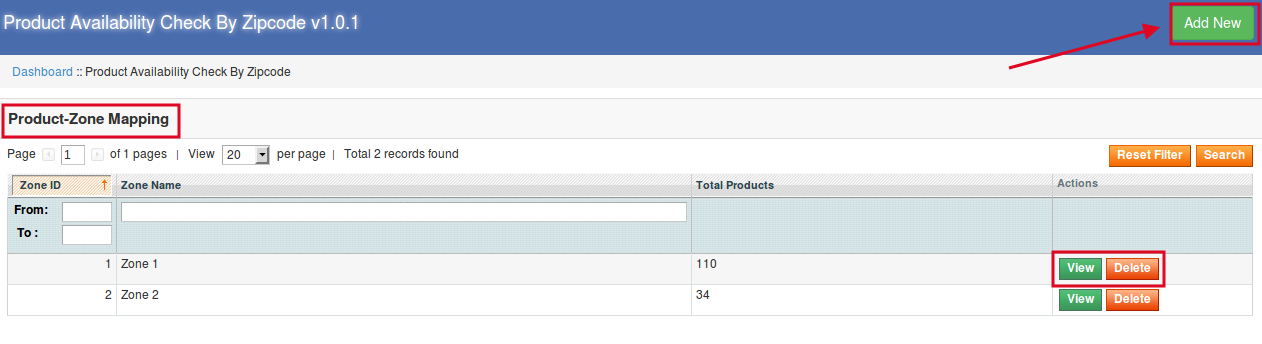
3.3 Product-Zone Mapping Configuration:
When you click on Product-Zone Mapping configuration, you will see the following interfaces to be configured.
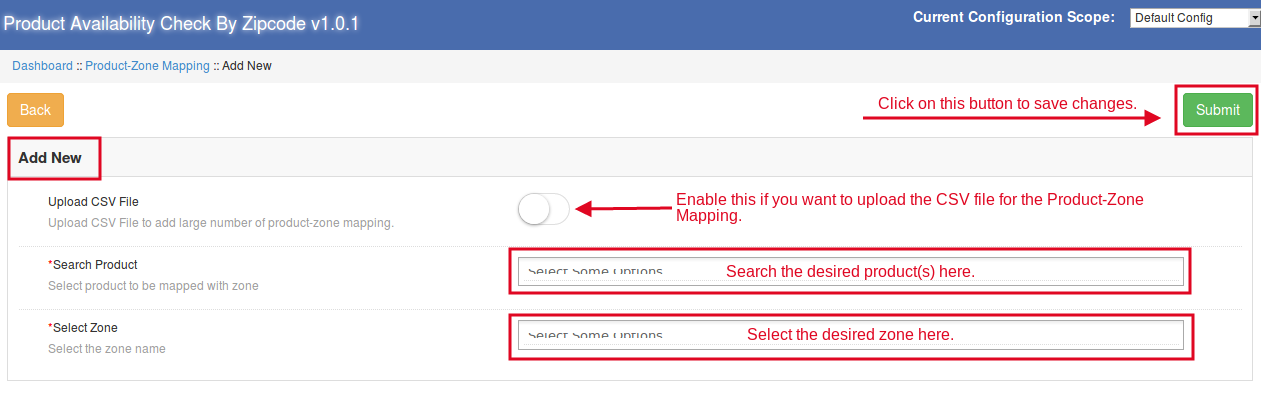
In this interface, the admin can add new product-zone mapping. He can do the same manually or by uploading the CSV file.
3.3.1 How to View/Delete the Zone:
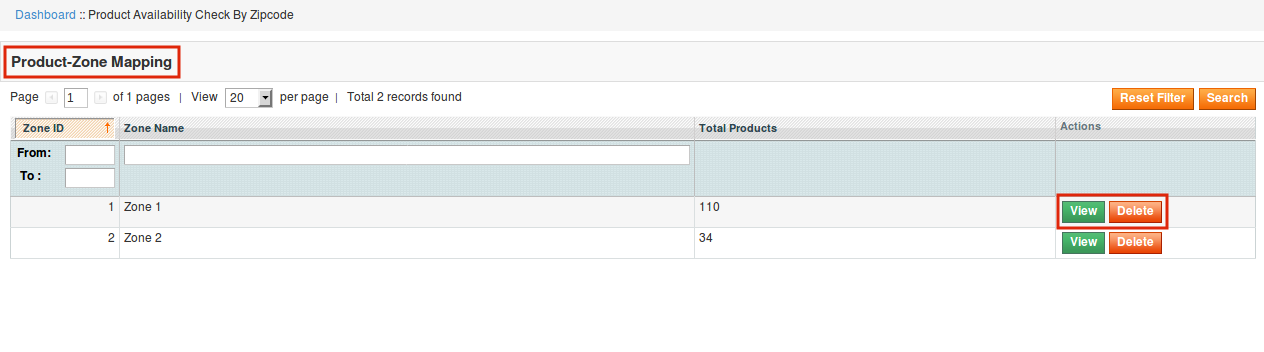
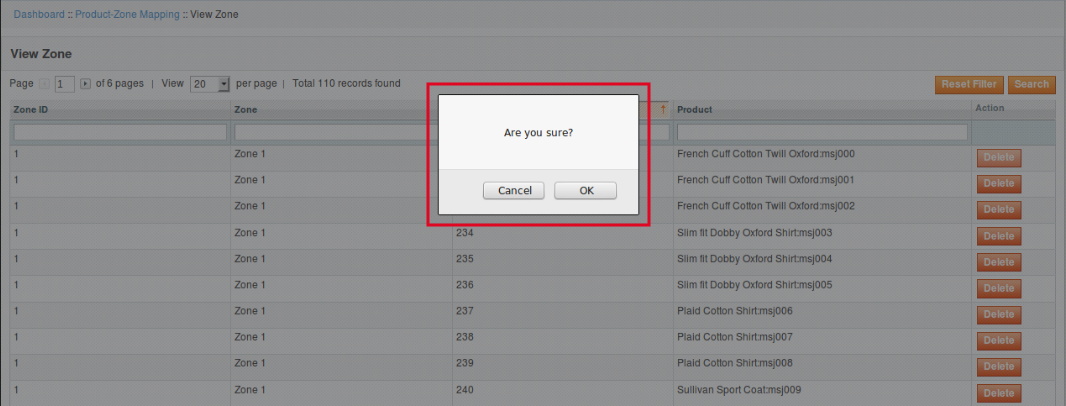
When the admin will click on “View” option, a new interface will be shown containing zone id, zone name, product id and product name along with the action of deletion of the product. Let’s take a look at the screen shot below:
View the zone
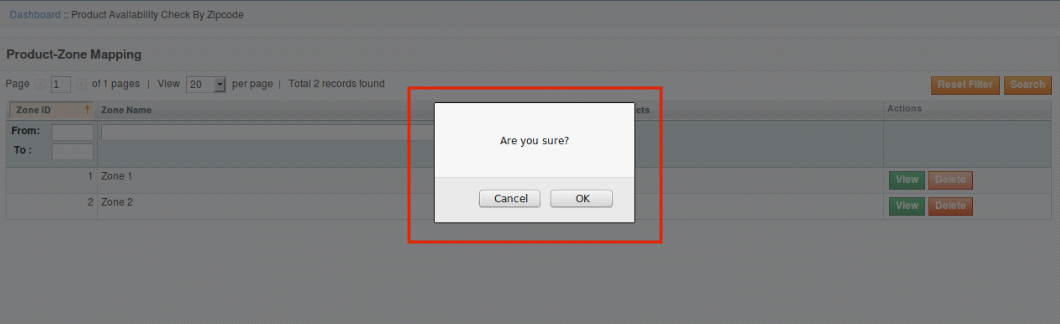
To delete the zone, the admin will just need to click on the “Delete” button. Once you click on the “Delete” button, a popup window will appear asking for the confirmation for the deletion. Take a look at the screen shot below:
Delete the zone
3.3.3.1 How to delete the product(s) from the zone:
Deletion of the product
If the admin wants to delete any particular product(s) from any zone, then he can do the same just by clicking on the “Delete” button under the Action category of the View Zone.
3.3.2 How to map the Product-Zone:
There are two ways of Product-Zone mapping. The admin can map the product-zone manually or he can do the same by uploading the CSV file as well.
3.3.2.1 How to Map the Product-Zone Manually:
Upload CSV File: This will be disabled if the admin is mapping the product-zone manually.
Search Product: Search and select the desired products from here.
Select Zone: Select the desired zone from here to which the admin wants to map the above-selected products.
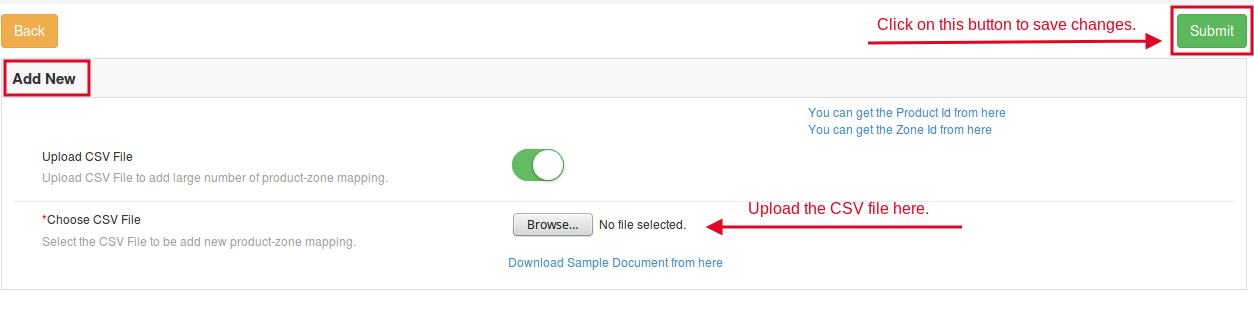
3.3.2.2 How to Map Product Zone by Uploading the CSV File:
If you enable the “Upload CSV File” option, then you will see the option to upload the CSV file. By clicking on “Browse” option, you will be able to upload the CSV file. After doing this, click on “Submit” button to save the changes.
4.0 Front End of the Magento product zipcode validator extension:
Once you configure all the interfaces of this Magento product zipcode validator extension, you will see a block on the product page where the users can enter the zipcode and check the availability of the product.
When the product is available:
When the product is not available:
Find more details about this Magento extension below:
Post your products on your Facebook page automatically with the help of Magento Facebook Wall Post Extension by Knowband. This Facebook Wall Post Extension Magento lets the admin boost their brand visibility on one of the most engaged social media platforms, Facebook, where billions of users come daily. The advanced and easy to configure Facebook Wall Post Magento Extension boosts the users’ engagement and helps in increasing the traffic of the website as well.
1.1 Merchant benefits of Magento Facebook Wall Post Extension
Facebook Wall Post Extension Magento helps in increasing the visibility of your products/brand on social media platform.
Facebook Wall Post Magento Extension helps in increasing the overall traffic of the website by redirecting the users from Facebook to the site.
Magento Facebook Post Extension increases customer’s engagement even while they are surfing their Facebook account.
Magento Facebook Wall Post Extension provides an easier way to showcase your products, new arrivals and coupon codes to the target audience.
1.2 Features of Magento Facebook Wall Post Extension
The Facebook post extension for Magento offers the admin to post their category(s) and products automatically..
The Magento Facebook Post extension offers the admin to post the products manually as well.
The admin can post the choice of the category(s) on the Facebook wall.
The Magento Facebook wall post extension allows the admin to select which type of description he wants to display on the Facebook wall, i.e long description, short or meta description.
The Magento Facebook wall post extension allows the admin to display the product price along with the wall post.
The Facebook post description is fully customizable. The admin can post his choice of description just in one click.
The Magento FB post module offers the admin to display the stock alert on Facebook post.
The Magento FB Post extension provides the admin to enter the desired quantity, below which the stock alert will be shown on the Facebook post.
The Facebook post extension for Magento also generates coupon for the stock alert.
The Magento Facebook wall post extension allows the admin to customize the coupon/voucher code as per his preferences.
The Facebook wall post extension Magento offers the feature to customize the voucher name, type, validity, and value as well.
The Magento FB post module offers two types of voucher to be given to the customers, i.e. Absolute or Percentage based.
The FB wall post extension Magento is easy to install, configure, and understand as well.
2.0 Installation Steps of Magento Facebook Post Extension
The steps to install the Magento Facebook Wall Post Extension are mentioned below:
Buy the Facebook Wall Post Extension Magento from Knowband. You can download the extension package.
The package has a zipped file that contains the user manual and the source code of Magento Facebook Wall Post Extension. Unzip the package.
Create a folder {Magento root}/app/code/Knowband/fbwallpost
Upload the extracted content in the above folder via FTP manager (like Filezilla or WinSCP – download here: https://filezilla-project.org/).
Now run below commands to install the Magento Facebook Wall Post Extension :
php -f bin/magento module:enable –clear-static-content Knowband_ fbwallpost
php -f bin/magento setup:upgrade
php -f bin/magento setup:di:compile
php bin/magento setup:static-content:deploy
The extension is now installed and ready for use. In Admin Panel go to “Knowband Extensions > FB Wall Post”.
You can now configure and use the Facebook Wall Post Extension Magento.
3.0 Admin Interface of the Facebook Wall Post Magento Extension
Magento Facebook Wall Post Extension offers following interfaces to be configured:
Facebook App Settings
General Settings
Alert Settings
Manual Post
Below is the detailed description of all the tabs of this Facebook Wall Post Extension Magento.
3.1 Facebook App Settings:
This interface of the Facebook Wall Post Magento Extension contains following fields to be configured:
Facebook App ID: In this field of the Facebook Wall Post for Magento, enter your Facebook App ID that is required to set up the connection with Facebook. In order to find the App id, go to the dashboard of your Facebook App. Copy the app id from the column shown in the image below and paste it in the setup page of the module.
Facebook App Secret: In this field of Magento Facebook Post Extension, the admin needs to enter the Facebook App Secret. Copy the App Secret from the next column as shown in the image below.
Facebook Access Token: After entering the Facebook App ID and App Secret, the admin will need to generate the Facebook Access token. The Facebook Wall Post for Magento allows the admin to generate the Facebook Access Token just by clicking on “Generate” option of the Magento Facebook Post Extension.
Choose A Page: This field of Magento Facebook Wall Post Extension allows the admin to select the desired Facebook page on which he wants to display the wall posts.
3.2 General Settings of the Facebook Wall Post Extension Magento
This interface of the Facebook Wall Post Magento Extension contains following fields to be configured:
Max No Of Products Per Cron: The admin can set the maximum number of products that has to be posted after the cron is executed. This field of the Facebook Wall Post for Magento offered the admin to avoid too many posts per cron. Magento Facebook Post Extension allows the admin to set the appropriate number of the products to be posted on the Facebook wall each time cron runs.
Product Description: This field of the Magento Facebook Wall Post Extension allows the admin to select the type of product description that they want to display in the Facebook wall post. It can be Short, Long or Meta Description.
Product Image Size: The Magento Facebook Wall Post Extension offers the admin to select the size of the image to be shown on the Facebook wall post.
Show Price: If the admin wants he can display the price of the products at the Facebook wall post.
Select Currency: The Facebook Wall Post Extension Magento provides the e-merchants to select the desired currency to be displayed on the Facebook wall post.
Select Categories: This Facebook Wall Post Magento Extension lets the admin to select the categories. The products of the selected category will be posted on the Facebook wall. If the admin will not select any of the category then products of all categories can be posted.
Post New Products: This field of Facebook Wall Post for Magento allows the admin to post the new products. In order to do so, he just need to toggle a button.
New Product Post Description: The admin can even change the description that will be displayed along with the wall post of new products. With the help of this field of the Magento Facebook Post Extension, the admin can do the same quickly.
3.3 Alert Settings of the Facebook Wall Post for Magento
In the alert settings of the Magento Facebook Post Extension, there are following fields to be configured:
Enable Stock Alert: Enable this button of the Magento Facebook Wall Post Extension in order to display stock ending alert at the Facebook wall posts.
Stock Quantity Left: In this field of Facebook Wall Post Extension Magento, enter the quantity, below which the stock alert will be displayed at the Facebook wall post.
Wall Post text for Stock Ending Alerts: In this field of the Facebook Wall Post Magento Extension, the admin can enter the text of his choice that would be displayed along with the stock alert. The stock alert message can trigger instant purchase intention of the prospective customers.
Generate Coupon For Stock Alert: This field of the Facebook Wall Post for Magento allows the admin to display the coupon code along with the stock alert.
Voucher Name: In this field of Magento Facebook Wall Post Extension offers the admin to enter the voucher name as per his preferences.
No Of Voucher: This field of Facebook Wall Post Extension Magento allows the admin to enter the number of voucher to be created.
Voucher Type: The Facebook Wall Post Extension Magento offers the e-merchants to select which type of voucher he wants to display at the Facebook wall. The admin can display whether vouchers with Absolute or percentage based discounts.
Voucher Value: This field of the Facebook Wall Post for Magento lets the admin enter the voucher value as per requirement.
Voucher Validity: This field of the Magento Facebook Post Extension allows the admin to enter the validity of the voucher as per his preferences.
3.4 Manual Post Settings of the Facebook Wall Post Extension Magento
This interface of the Magento Facebook Wall Post Extension has following fields for the manual posting of products:
Search Products: This field of the Magento Facebook Post Extension allows the admin to search for the desired product(s) to be posted on Facebook wall. The Facebook Wall Post for Magento offers the admin to post multiple products at a time.
Wall Post Text for Products: The Facebook Wall Post Magento Extension allows the admin to enter the text of his choice that would be displayed along with the product(s) on Facebook wall.
Search Categories: This field of the Facebook Wall Post Extension Magento allows the admin to search for the categories. The products of the selected category will be posted on Facebook wall. The admin can post multiple categories at a time.
Wall Post Text For Category: The Magento Facebook Wall Post Extension offers the admin to enter the text of his choice to be displayed along with the selected category post.
4.0 Front End of the Magento Facebook Wall Post Extension
Below is the screen shot of how the Facebook Wall Post will look like after configuring all the settings of the Magento Facebook Wall Post Extension.
When the product is posted manually:
When the products of desired category is posted:
When the stock alert is enabled:
Find more details about this Magento Facebook Wall Post Extension by Knowband below:
The OpenCart GDPR module by Knowband provides a tool to the OpenCart store owners to meet the GDPR requirements imposed by the European Parliament. GDPR directives provide more rights to the EU citizens to protect their personal data.
New Data Protection Rights under GDPR:
1) Right of access by the data subject
2) Right to rectification
3) Right to erasure (‘right to be forgotten’)
4) Right to restriction of processing
5) Notification obligation regarding rectification or erasure of personal data or restriction of processing
6) Right to data portability
7) Right to object
8) Automated individual decision-making, including profiling
The GDPR Extension for the OpenCart platform helps the store owner to provide an interface to the customers so that they can meet the GDPR requirements.
How can OpenCart GDPR module help you?
The OpenCart GDPR module by Knowband helps the sellers to comply with the GDPR directives without putting any extra efforts. By installing the OpenCart GDPR compliance module admin can display the GDPR Tools option on the account details page at the front-end of the customer or admin has the option to enable the GDPR rights for the guest users. The OpenCart GDPR Extension handles the following requests:
1) Cookies Consent Bar
2) Right of access to the personal data
3) Right to data portability
4) Right to be anonymous
5) Right to be forgotten
6) Right to data rectification
7) Right to restriction of processing
8) Rights related to the automated decision making
If the GDPR rights are enabled for the guest user then the GDPR Rights text will appear on the top of the home page. As per the need admin can modify the text.
If the GDPR rights are enabled for the registered users only then the customers will be able to access the GDPR rights after logging into their account. Under My Account section there will be an option to access the GDR rights. Please refer to the attaced screenshot:
On clicking the GDPR settings tab the customer will be directed to a new page.
As per the requirement admin has the choice to enable/disable any of these rights.
2.0 Installation of OpenCart GDPR Module:
After placing your order for the OpenCart GDPR plugin you can download the zip file of the module. This zip file contains:
1) OC_GDPR_v1.0.0.zip (source code of the module)
2) User Manual
In order to install the extension in your OpenCart store follow the below-mentioned steps:
1) Unzip the zip file.
2. Copy all the files and folders of the zip file in the Root Directory of OpenCart setup via FTP manager.
3. The OpenCart GDPR module is now installed and is ready to use. Go to Admin -> Main Menu -> Extensions
3.0 Admin Interface of OpenCart GDPR Plugin:
In the admin section of the OpenCart GDPR Customer rights module following options are available:
GDPR Settings
Cookies Consent Bar
GDPR Data Portability
GDPR Forgot Request
GDPR Anonymous Request
GDPR Rectification Request
GDPR Personal Data Request
GDPR Automated Decision Making Request
GDPR Email Templates
3.1 GDPR Settings:
The GDPR Settings tab of the OpenCart GDPR Rights of the Individuals module allows the store admin to enable/disable the customer’s rights as per need. As per the settings enabled by the admin, the customer will be able to access the rights from his/her account. Please refer to the attached screenshot below:
Enable the Module: As per the requirement, admin can Enable/Disable the OpenCart GDPR Compliance Module.
Maximum request per day: Customers have the right to make request for the GDPR rights. Admin can set the limit for the requests on daily basis. It will be recommended to set the maximum requests per day to a minimum number to avoid the spam requests.
Enable Right of access to personal data: The right of access to personal data allows the customers to request for their personal details which they have shared with the data controller.
If this setting is enabled from the admin interface of the OpenCart GDPR plugin only then customers will be able to check their personal details by logging into their account. The screenshot of customer end has been attached below:
Step-1 – Request for the GDPR Personal Data report – OpenCart GDPR Extension
Step: 2 – Confirm the GDPR Request
Step: 3 – As soon as customer will confirm the GDPR Personal Data Request, an email with the customer details will be sent to the customer.
Step: 4 – Send personal report via email:
Admin has the choice to display the customer data on the front-end or send the report to the entered email address. This setting will work for the logged-in customers only.
Step: 5 – Enable Right to Data Portability:
Right to data portability allows the customer to download his/her personal data so that he/she can access and reuse this data.
If this setting is enabled from the admin interface of the OpenCart GDPR Module only then the customer will be able to download their personal data in CSV format. As of now, the OpenCart GDPR Module allows the customers to download their personal data like –
Account information
Address details
Order details
The screenshot of the interface at the customer end has been attached below:
On requesting for the data portability customer will be able to download the CSV file with the required details.
Step: 6 – Data anonymization request:
Data anonymization option allows the customer to replace the personal details with the random data. The name, email-id and order details can be anonymized. As soon as customer will request for the data anonymization a confirmation email will be sent to the customer. If customer confirms the data anonymization request, as per the settings enable by the admin personal details like Name, Email Id will be replaced by random details. To process the data anonymization request the admin has the following option:
Enable the Data anonymization settings:
If the data anonymization settings are enabled from the admin interface of the OpenCart GDPR compliance module then customer will be able to request for the data anonymization and in this case, only customer name will be replaced by the random name.
If a customer request for the Data anonymization, then a confirmation email will be sent to the entered email address and customer will be requested to confirm the request.
Email confirmation:
On requesting for the data anonymization customer will receive the email with request to confirm the data anonymization request.
Note: In case you are using the third-party services and sharing the customer data with third-party, then you need to make the required changes as per the procedure followed by the service provider. This GDPR module will anonymize the data which you have stored in your database only.
Step: 7 – Enable to update information in Order:
If customer requests to make his/her information anonymous then admin can select the option to enable/disable the changes to the previous orders. If this setting is enabled from the admin interface of the OpenCart GDPR module then the previous order details will also get modified and shipping and billing details will be deleted.
Step: 8 – Enable to generate Fake Email ID:
Admin can select the option to replace the email id of the customer by fake email id. If the setting is enabled from the admin then after requesting for the Data anonymization customer will be requested to confirm the email-id anonymization. Please refer to the attached screenshot:
If customer submits the request for email-id anonymization then the email id of the customer will be replaced by the system generated email address. Please refer to the attached screenshot.
Step: 9 – Enable right to be Forgotten:
As per the new GDPR Directives customer has the right to request for the deletion of the personal data. OpenCart GDPR Compliance Module allows the customer to request for the deletion of his/her data by accessing his/her account. After receiving the request of the customer a confirmation email will be sent to the customer and as per customer’s approval, entire details of the customer will be deleted from the database.
The report request interface for the customer will be as below:
On requesting for the Account deletion request the customer will be notified that an email with the confirmation request has been sent to the registered email id.
Note: 1) It is recommended to consult with your legal team before enabling this setting. After deleting the customer’s personal data it cannot be retrieved. Admin has the option to enable the delete order setting which has been explained in the next topic. 2) In case you are sharing the customer data with third-party service providers then you need to delete the customer data manually. As of now, this module does not support the feature to delete the data shared with the third-party service providers. Example: If you are using MailChimp for sending promotional emails then you have to delete the customer details from MailChimp list manually.
Step: 10 – Enable to Delete Orders:
If a customer has requested for the data deletion request under the GDPR, then the admin has the choice to delete the personal data of the customer along with the previous order details. If this setting is not enabled from the admin interface of the GDPR module then only personal data will be deleted and order information will remain as it is.
Note: It is recommended to consult with your legal team before enabling the order deletion settings. The order details deleted from the system cannot be retrieved.
Step: 10 – Enable the right to data rectification:
A customer has the right to update the incorrect personal data. The OpenCart GDPR Customer Rights Module allows the store admin to let the customer modify the personal data like personal details, address etc.
Step: 11 – Enable the right to data rectification:
A customer has the right to update the incorrect personal data. The OpenCart GDPR Customer Rights Module allows the store admin to let the customer modify the personal data like personal details, address etc.
Step: 12 – Enable Rights in relation to automated decision making and profiling:
If this setting is enabled from the admin panel of the OpenCart GDPR compliance module then store admin will be able to list the services which make a decision by automated means. If a customer requests for the services which makes decision by automated means then customer will get email to confirm the request. As soon as the user will confirm the request, user will be redirected to a new link. Here all the services with the automated decision making will be listed and user can select the one which he/she would like to continue.
Admin can list all the such services to the under the List the services which makes a decision solely by automated means.
Step: 13 – Enable Store Policy Acceptance:
The admin interface of the OpenCart General data Protection Regulation Plugin allows the store admin to enable the setting so that a checkbox with the option to accept the Terms and Conditions will be displayed to the customer before requesting for the GDPR reports.
Step: 14 – Store Policy Page:
Admin can add the URL of the page on which all the Terms and Conditions are listed. The customer can check the Terms and Conditions by clicking the link available with the message at the time of raising the request.
Step: 15 – Services/ Other locations where you store customer data:
The third party services which process the customer data like MailChimp or you have stored the customer data on different places like Google Drive then you can list the details of the third party services which uses the customer data.
Step: 16 – Physical locations of servers where you host your website and other data:
You can mention the server location here, where you store the customer data.
Step: 17 – Display Header Menu
Display Header Menu option of the OpenCart GDPR compliance Plugin allows the store admin to display the GDPR option in the header section of the website. By enabling “Display Header Menu” setting of the OpenCart GDPR Plugin, store admin can allow the guest users to access the GDPR rights.
Step: 18 – Header Menu Text
Admin can define the text for the Header Menu.
3.2 Cookie Consent Bar:
The OpenCart GDPR Module allows the store admin to display the Cookie Consent Bar at the front end with the option to accept the cookie or discard the message. Admin can easily customize the appearance settings as well as the message on the cookie bar.
The Cookie Consent Bar tab has following settings:
1) Configuration: Admin has following options to set-up the Cookie Consent Bar.
Enable the EU Cookie Law Notification: The Admin can enable or disable the cookie message on the website.
Cookie Name: In this section define the name of the cookie to get the user consent. Please do not use the space to the cookie name.
Cookie Lifetime: Cookie Lifetime allows the store admin to set up the cookie duration that how long the cookie will be stored on the user’s device.
Terms and Condition of use: The admin can list the cookies details on a Cookie Policy page and add the link to the page on the message displayed to the user.
Display Close Button: Admin has the option to remove the Close button from the Cookie Consent Bar.
2) Appearance Settings:
Admin can easily control the following options for the Cookie Consent Bar.
Notification Position: Admin can select the position of the Cookie Notice on the Bottom of the page or Top.
Effect when hiding the notification: Admin can select the options like Fade, Hide or Slide from the drop-down list.
Notification Message: Admin can easily update the notification message as per the requirement.
Background Color
Background Opacity
Notification Message Font Color
Notification Message Font Color
Background Color of Accept Button
Font Color of Accept Button
Background Color of More Information Button
Font Color of More Information Button
3.3 GDPR Data Portability:
In the GDPR data portability section of OpenCart GDPR Module, admin can check the log of the data portability requests from the back-end.
3.4 GDPR Forgot Request:
OpenCart GDPR extension keeps the log of the data deletion requests. Admin can use this information to remove the customer data from the third party services.
Note:
1. As soon as customer request for the deletion of his/her details a confirmation email will be sent to the customer. As per the customer’s confirmation the details of the customer will be deleted from the system.
2. The OpenCart GDPR Module allows the admin to exclude the previous orders so that only the personal details of the customer will be deleted but order details will be saved for the future reference. Please use this setting carefully because the data deleted once cannot be retrieved. It is strongly recommended to consult with your legal team to make sure how to use this setting.
3. The OpenCart GDPR Module only deletes the customer data from the store database. If you share the customer data with the third-party service providers (eg. MailChimp) or store it on third-party platform (eg. Google Drive) then you need to delete the customer data from these platforms manually.
3.5 GDPR Anonymous Request
OpenCart GDPR extension keeps the log of the data anonymization requests. Admin can use this information to remove the customer data from the third party services.
3.6 GDPR Rectification Request
OpenCart GDPR extension keeps the log of the data rectification requests. Admin can use this information to modify the customer data on the third party services.
3.7 GDPR Personal Data Report Request
OpenCart GDPR Plugin keeps the log of all the personal data requests.
Note: As of now the OpenCart GDPR Module by Knowband allows the store admin to share the details like Personal Information, Address Details, Newsletter Subscription, Shopping Cart Contents, Order Details, Admin can also list all the third-party service providers details and the physical location of the server along with the details of the hosting company.
3.9 GDPR Automated Decision Making Request
3.10 GDPR Email Templates:
The OpenCart GDPR Plugin by Knowband allows the admin to sending following emails to the customer:
Confirm Your GDPR Account Deletion Request
Confirm Your GDPR Personal Data Anonymous Request
Customer has requested for GDPR
Your GDPR Personal Data Report
Customer has confirmed GDPR Request
Confirm Your GDPR Decision Making Request
Confirm Your GDPR Personal Data Portability Request
Confirm Your GDPR Account Deletion Request:
Admin can update the Subject line and the email text by using the GDPR Email Template Settings.
Default format of the email template is as below:
Confirm Your GDPR Personal Data Anonymous Request:
Admin can update the Subject line and the email text by using the GDPR Email Template Settings.
Default format of the email template is as below:
Customer has requested for GDPR
This Email template is used to send confirmation mail to the customer when customer requested for Personal Data Report.
The email at the customer end will be like below:
Your GDPR Personal Data Report
This email template will be used to send the Personal Data of the customer requested under the GDPR Right to the access to the Personal Data.
At the customer end the email design will be as below:
Customer has confirmed GDPR Request
Confirm Your GDPR Decision Making Request
This email template will be used to request the customer for the confirmation of the automated decision-making requests.
Email at the Customer end:
Note: The purpose of these features is to help you to meet with the GDPR requirements. Installing this module only does not guarantee merchant sites’ compliance with the new obligations imposed by the GDPR. It is your responsibility to put in place all the necessary measures to ensure you comply.
Customers, while shopping at an e-commerce store, often remain confused about the size of the product he/she is willing to purchase. As they shop online, a doubt always remains in their mind that whether the product is of appropriate size or not. Every brand manufacturer creates his products according to his own measurement criteria which are either based on some general standard or just an assumption based on the age and demographics. The doubt regarding the size of the products may lead to cart abandonment. Therefore, products size issues also increase the website’s bounce rates and they play a huge role in reducing revenue for any eCommerce online store.
To get past these problems, Knowband offers Magento 2 Product Size Chart extension for store owners which provides Magento 2 store owners a facility to set the size charts on the product pages of the online store. These size charts can be created with the help of the Magento 2 size chart extension for multiple categories as well as for a specific product. The size chart will be displayed on all the product pages of the selected category. Different measurement units are also used to provide correct size measure of products in Magento 2 size guide extension. The size chart will illustrate the exact measured size in desired measurement units for customer ease. In this way, Magento 2 size catalog module provides proper product size to customers and thus increases the chances of the conversions for the store.
Magento 2 Size Chart Popup extension allows Magento 2 store owners to prepare size charts and associate them with available products on the store as per market requirement. Size charts mainly offer clear specification about the product in terms of size, area etc and help in maintaining hassle-free shopping experience for users.
1.1 Features of Magento 2 Product Size chart Extension:
Magento 2 product size chart extension allows e-commerce store owners to show size charts for various available products on their website.
Size guide addon by Magento 2 is very easy to install and configure for store owners.
E-commerce store owners need not have any technical knowledge for using Magento 2 size catalog module.
Magento 2 product size table extension allows the online store owners to preview, edit size charts and can also add images and guidelines to them if required.
Product size chart extension for Magento 2 store merchants offers the simplest way of creating size charts just by entering required values of attribute sets.
It’s very easy to enable or disable this Magento 2 product size chart extension.
The product size chart module is highly customizable.
The admin can implement the functionality without any code changes.
The Magento 2 product size chart module allows the admin to add size chart on the product pages without any complicated process.
The Magento 2 size chart pop-up extension allows the admin to create multiple size chart and showcase them for a single product or any category of products.
This Magento 2 product size chart plugin allows the e-merchant to add unlimited rows and columns on the size chart without any restrictions.
The Magento 2 size chart popup extension offers a user-friendly interface.
1.2 Admin Benefits
Magento 2 size catalog extension provides online sellers the easiest way of creating size charts for various products available on their website.
Store admin can assign size charts with single products as well as with multiple product categories.
Magento 2 Size Chart addon is fully customizable. It allows Magento 2 merchants to add images and necessary content to size charts. Rows and columns can be added easily by the seller if needed.
Magento 2 Product Size chart extension by Knowband allows store owners to preview size charts before implementation.
Size catalog module of Magento 2 marketplace offers multi-lingual support and increases the conversion rate of the website.
Magento 2 Product Size chart extension reduces website’s bounce rate which results in increased revenue of the store.
Product return requests get reduced with the use of size charts extension of Magento 2 e-commerce platform.
1.3 Customer Benefits
Magento 2 product size catalog module provides a friendly and attractive interface to users with which they can check the size of the products.
Magento 2 Product Size chart extension reduces confusion of customers regarding product size and also increases their decision making while purchasing.
It provides a better shopping experience to users.
2. Installation
After purchasing Magento 2 size catalog module extension, the store admin will get following files: 1.Sizechart.zip which contain source code of the Magento 2 Size Chart link Module extension. 2.User Manual which includes all the details and help regarding extension.
Follow the following steps to install Magento 2 Size Chart Popup extension:
The steps to install the Magento 2 product size chart plugin are mentioned below:
1. Buy the Magento 2 product size chart module from Knowband. You can download the extension package. 2. The package has a zipped file that contains the user manual and the source code of Magento 2 size chart module. Unzip the package. 3. Create a folder{Magentoroot}/app/code/Knowband/Sizechart 4. Upload the extracted content in the above folder via FTP manager (like Filezilla or WinSCP – download here: https://filezilla-project.org/). 5. Now run below commands to install the plugin:
php -f bin/magento module:enable –clear-static-content Knowband_Sizechart
php -f bin/magento setup:upgrade
php -f bin/magento setup:di:compile
php bin/magento setup:static-content:deploy 6. The extension is now installed and ready for use. In Admin Panel go to “Knowband Extensions >Size Chart”.
You can now configure and use the Knowband Magento 2 size chart for product module.
3.Extension Interfaces
There are two ways in which user will interact with Magento 2 size catalog module functionality: A.Admin Interface (Can be accessed only by Magento 2 store admin) B.Customer Interface (any customer can view and access on Product Page)
Each interface has been explained with proper detailing in following sections.
4. Admin Interface
The admin interface of Magento 2 size guide extension by Knowband can be managed and accessed by Magento 2 store admin from the backend. After installing Magento 2 Product Size Chart extension, different sub-menus will appear under ‘SIZE CHART’ menu as displayed in below snapshot:
Using functionality of these four sub-menus Magento 2 store merchants can easily create and manage size charts for the products available on the store.
4.1 Chart Attribute Sets
In Chart Attribute Sets submenu of Magento 2 product size chart extension by Knowband, online sellers can prepare various attributes sets and their concerned measurements units related to product size charts. Chart attributes basically means Rows and Columns of product size chart.
4.1.1 Chart Attributes Set Listing
On opening the “Chart Attribute Sets” submenu of Magento 2 Size Chart Popup addon, store merchants will be automatically redirected to the page where all the attributes sets which are created earlier will be displayed. If there are no previous attribute sets present, then server will display empty list as shown in below snapshot:
List Columns:
1.ID: Denotes unique id of every attribute set.
2.Created At: Exact date and time when attribute set was created.
3.Attribute Set Identifier: This identifier column is used for identifying attribute set. It contains the label or name assigned to the corresponding attribute set.
4.Value Unit: Depicts various associated measurement units like cms, mm, mtr etc.
5.Status: Status displays current enabled/disabled situation of the corresponding attribute set.
6.Actions: There are different actions available, related to edit, delete and preview for available attribute sets.
4.1.2 How to add New Chart Attributes Set Listing?
There is a ‘ADD NEW‘ button present on the top right corner of attribute set listing webpage of Magento 2 product size guide module. The store merchants can easily add new attribute sets whenever they need by clicking on the button. Further details about its functionality are described in next section.
For creating new attribute set, ‘Add New’ option is used. By clicking on this, server will redirect store merchants to the attribute set configuration form as displayed in the below screen:
Fields:
A.Status: This option includes a dropdown list of the status. It is a required field and will be set as disabled by default. Select enable in order to incorporate the functionality.
B. Set Identifier: It is also a required field used for labeling/naming attributes sets.
C. Value/Measurement Unit: This field displays drop down list containing various predefined units. If store admin wants to add more units, please contact our support.
D. Help Guide: This section provides all the help that the store admin needs for creating the attribute sets for size chart.
E. X/Y Label: This field allows e-commerce admin to set the labels in multiple languages. Admin can input different label/text for each size chart display. This label will be displayed for common x-y axis of the chart.
F. Row Labels: Row labels are used for labeling the rows of size chart. Enter a unique name for the rows of the chart. The store merchant can add or delete rows as per the requirement.
G. Column Labels: This label is used for labeling columns of product size chart, that is, the admin can enter the name of the columns here. Magento 2 store merchants can add or delete columns as per their choice.
4.1.3 How to Preview available attribute sets?
Using preview action of Magento 2 Size Chart link extension, server will display a snapshot of size chart according to current attributes set as shown below:
Once Magento 2 store owner clicks on the Preview button, a matrix format pop up will appear displaying created size chart:
4.1.4 How to edit available attribute set?
In Magento 2 size catalog module, edit action lets Magento 2 store admin to edit the already created attributes. The store admin is authorized to make any changes in available attribute sets.
After opening edit action, following webpage will appear having attribute set editing fields:
4.1.5 How to Delete any existing attribute set?
Attributes set can be deleted either from attribute set listing page or from attribute set editing page. Delete action provided by Magento 2 Size Chart Popup addon is used by store owners to permanently delete any attribute from the system.
Note: E-commerce sellers should keep it in mind that if attributes sets are deleted then size charts associated with those attributes will also be deleted. This is done to prevent any issue of data inconsistency.
4.2 Size Charts
Knowband provides Magento 2 size guide extension which offers ‘Size Charts’ submenu where store owners can easily create and customize the size charts by using any of the attributes set created in last section ‘Chart Attribute Sets’.
4.2.1 Size Charts List
Whenever Magento 2 e-commerce merchant opens ‘SIZE CHART’ submenu, he/she will be redirected to a web page where all the size charts created earlier will be displayed as shown in below snapshot:
4.2.2 How to add new Size Chart?
There is a ‘ADD NEW’ button on top right corner of size charts listing page of Magento 2 product size table extension. Click on this button in order to add a new chart. Adding and updating size charts have been described with proper detailing in next section.
On clicking on this link, Magento 2 online sellers will get size charts configuration form as shown in below snapshot:
Fields:
A.Status: This field contains a dropdown list of status. It is a mandatory field and will be disabled by default.
B.Set Identifier: Identifiers are basically used for providing names/ labels to size chart.
C.Attribute Set: This field is also mandatory for store owners and is used for selecting attributes set related in creating size chart. D.Chart Values: Once the attribute sets is selected in the above point, Magento 2 store admin can enter the values of the chart in this section.
Magento 2 online sellers have to fill corresponding values of other store view. The chart with the values and specifications as entered by the admin will be displayed in the front-end. E.Instruction/Guidance: This field is a required field and size chart will be displayed under the content store admin will provide by writing into this field. Magento 2 store merchants can provide some extra guidance or instructions as pictorial help about size chart to customers. This field is specific to store view and admin need to provide proper content for each fields. Note: A variable “{{size chart}}” is written in instruction field. This variable will be replaced by with the corresponding size chart displayed on the front end. Removing this variable from instructions field will cause issues, but its position can be changed into instruction field as per the requirement.
4.2.3 How to preview available Size chart?
Using preview option available on Magento 2 Product Size chart addon, server will display a pop up window having preview of created size chart. Any size chart available in size chart list can be previewed by store admin.
Once the store admin clicks the preview button, a matrix format pop up will appear displaying the created size chart with available rows and columns measurements as displayed in below screen:
4.2.4 How to edit existing Size chart?
Magento 2 Size Chart Popup addon also allows editing of existing size charts. Magento 2 store owners can click on the Edit action as shown in the snapshot below in order to edit already created size charts –
This edit option will redirect online sellers to an interface from where size charts can be configured accordingly. This size charts editing form is displayed in following snapshot:
4.2.5 How to Delete existing Size Chart
If Magento 2 store admin wants to delete any size chart created earlier, it can be done using Delete action as shown in the snapshot below:
4.3 Category Charts
Magento 2 store owners can easily create and update mapping of product size charts with multiple categories of products available on the website using Magento 2 Product Size chart plugin by Knowband. Store admin can assign/map created size chart in the required product categories from the provided interface:
4.3.1 How to assign size charts to new product category?
Knowband provides Magento 2 size guide extension enables e-commerce merchants to map size charts with new available product category. There is an “Add New” button present on top right corner of category chart listing page. With this button, admin can assign any size chart to a new category. The various fields of this section are described below:
Whenever Magento 2 store owner clicks on “Add New” button, he/she will be redirected to the mapping page where any charts can be assigned to new product category or can be edited accordingly as shown in below snapshot:
Fields:
A.Status: It contains dropdown list of available status. Select enable in order to use this feature but by default will be set as disabled.
B.Category: It is also a required field and contain list of available product categories. Initially, no category will be selected. Admin can choose the category for mapping the size chart. The size chart will be displayed on the product pages of the selected category.
C.Size Chart: This required field contains list of active size charts created by Magento 2 store owners. Select the size chart that you want to display in the products pages of the selected category.
4.3.2 How to Preview Category Chart?
By using preview action of Category charts of Magento 2 size guide extension, e-commerce sellers can check preview of the selected category chart with detailed instructions.
Whenever Magento 2 store owners uses preview action, it displays a pop up window with attached size chart of associated category as shown in below snapshot:
4.3.3 How to edit existing Category Chart?
Magento 2 store owners can edit category chart mapping by clicking on the Edit button available on category chart listing web page of Magento 2 Size Chart link extension as displayed in following snapshot:
Whenever Magento 2 store merchant opens Edit Link, he/she is redirected to following category chart editing webpage. Here, status of chart, size chart, product categories are selected as shown through following snapshot:
4.3.4 How to delete Category Size Chart from listing page?
Magento 2 Size Chart Popup extension enables delete option to Magento 2 store owner in order to delete size chart from category chart listing page at any time. Chart mapping cab be deleted from both either from listing page or from edit page.
4.4 Product Charts
Magento 2 store merchants can create as well as update mapping of size charts with the corresponding products using Magento 2 size catalog addon.
4.4.1 Product Chart List
Knowband provides Product size chart extension, through which Magento 2 store admin can access “Product Chart” submenu, which redirects to a page where all the mappings of size charts are done with multiple product categories and is displayed as shown in below snapshot:
4.4.2 How to Add New Product Chart or Assign Chart to New Product?
For adding new Product chart, an “Add New” button is provided on the top right corner of product listing page through which store admin can add new mapping of size chart to a product whenever desired as displayed in following snapshot:
In Magento 2 size guide extension, Add New button is basically used for assigning size charts with new products as displayed in below snapshot:
Fields:
A.Status: It is a dropdown menu of status and a required field which is set as disabled by default.
B.Product: Select the product to which you want to map the size chart. Initially, no product will be selected, but admin can choose one from the menu.
C.Size Chart: It is also a drop down list of active size charts created by admin and also a required field. Select the size chart that you want to display on the product pages.
4.4.3 Preview of Existing Product Chart
Magento 2 size catalog module has preview action, server will display preview of selected product charts to Magento 2 store owners with detailed instructions.
Provided preview action will display the preview of size chart with instructions set to Magento 2 online sellers as shown in below screenshot:
4.4.4 Edit Product Size Chart
Magento 2 product size table extension provides ‘Edit link’ on product chart listing page through which Magento 2 e-commerce merchants can edit available product size charts very easily. Magento 2 store owners can use this action also for altering any existing mapping with available products.
Using Edit Product Size Chart action, store admin can check preview of the selected charts with detailed instructions as shown in below snapshot:
4.4.5 Deleting Product Size Chart
Magento 2 Size Chart link addon allows online merchants to delete any size chart mapping from product whenever required. This purpose could be fulfilled using delete option provided on the backend of website.
4.4.6 Size Chart Mapping on Product Page
Size charts can also be mapped with products on product edit page. Magento 2 store admin can also edit size charts mapping from Products section through “Size Chart” tab.
With the help of Magento 2 Size Chart Popup extension, Magento 2 online sellers can easily assign any size chart with the corresponding products. If there are no changes in the field value, no size charts will be assigned with the products. If admin don’t want to assign chart to any product he/she can leave it without changing any value in this section.
5.Customer Interface
Magento 2 customers can only access size charts through product page available on the front end of the website.
5.1 Size Chart on Product Page
When Magento 2 store admin enables size charts with products, ‘View Size Chart’ option will be appeared just below the product details. Customer can easily access the size charts associated with different products and enhance their shopping experience.
After full configuration of Magento 2 Product Size chart extension, ‘View Size Chart’ option will appear below product name with which user can check size of product before its purchase.
When customer opens ‘View Size Chart’ option, following window will be displayed containing size chart assigned for that product:
For more information about this Magento 2 size catalog extension:
1. Introduction to Prestashop Abandoned cart addon
Have you ever gone shopping for products online? Further, have there been times when you add the products to your cart and leave? Moreover, leave the store without buying them. Further, the process of leaving the cart without completing the purchase refers to as shopping cart abandonment. In fact, as per the report from Baymard, the average online shopping cart abandonment rate is 69.23%. Therefore, let us not talk about the Prestashop Abandoned cart (Email Follow up) Addon
Converting abandoned carts is a tough task. However, what if we can convince the owners of 20% of those abandoned carts to come back? Moreover, complete their purchases. Yes, it is difficult but possible.
Prestashop Abandoned cart addon by Knowband helps PrestaShop store owners to convert these abandoned carts. Further, into sales by regular email follow-up. Additionally, the “Abandon Cart Serial Reminders” addon sends automated emails with discount coupons. Furthermore, to the customers who abandoned their carts, thereby increasing the chances of conversion.
Prestashop Abandoned cart email follow up addon is very effective. Furthermore, when it comes to shopping cart abandonment. In fact, this Prestashop email follow up module by Knowband sends automated or manual follow up emails. Further, to the customers who abandoned their shopping carts. The Prestashop abandoned cart addon allows Prestashop store owners to create N number of Discounted and Non – Discounted Email templates. Further, they are for sending to the customers. The Admin can set the number of days after which the shopping cart is assumed abandoned. Moreover, the follow up email triggers.
Prestashop abandoned cart addon is now compliant with the GDPR. Further, the GDPR settings are available in the module. In fact, using which the Prestashop admin can comply with the rules of the GDPR. Additionally, please refer to the General Settings to know more about the GDPR.
What’s New?
Prestashop abandoned cart reminder provides the store owners to enable a reminder popup. Further, the customers will see as soon as they sign in to the store. Further, the display popup will contain the list of the abandoned cart items. Additionally, a discount coupon code so that the customers make purchases.
PrestaShop Reduce Cart Abandonment addon allows the store owner to send web browser push notifications to the visitors. In fact, even if they are not present on your website.
With the additional cron log functionality, the PrestaShop admin can check if the cron executes or not. In addition, they can also look for the abandoned cart details as well.
1.1 Prestashop Abandoned Cart Email Follow up- How it works
1. A customer visits your PrestaShop store.
2. He browses your store and adds products to his shopping cart.
3. During Checkout (sometimes before) the customer has to give the name and email address.
4. But due to some reason, they left your store without completing the purchase.
5. After some time their shopping cart, the admin assumes it to be abandoned.
6. After a defined time, you will send them the follow-up email. Further, reminding them about their left items in their shopping carts.
7. Some will visit your PrestaShop store again and convert, and some will ignore your follow up email.
8. After a few days of sending the first follow up email, you will send another email with the discount this time.
9. The customer proceeds to checkout and completes the purchase.
1.2 Key Features of Prestashop Abandoned cart addon:
The Knowband Prestashop abandoned cart reduces shopping cart abandonment.
Boost sales and conversion by convincing the owners of up to 30% of abandoned shopping carts on your PrestaShop store.
The Prestashop abandoned cart addon tracks abandoned carts of both Guest as well as Registered customers.
The Admin can send the abandoned cart to follow up emails with discount coupon codes. Further, all the changes can be done from the backend of the Prestashop email follow up addon.
Prestashop store admin can set the time after which the shopping cart abandons.
Admin can view details of the customers. For instance, their name, email id, IP Address, Time & Date from the back office.
The Prestashop abandoned cart addon by Knowband provides the test mode option for the admin to test the module. Furthermore, before making it live on the Prestashop store.
With the help of the Prestashop abandoned cart addon, the merchants can send the trigger to follow up emails. In fact, he can send them Manually or Automatically using cron.
The Prestashop email follow up module offers readymade email templates to the admin. In fact, the Prestashop store Admin can add and customize many more.
The Prestashop Abandoned cart recovery email addon facilitates the seller to view the abandoned and converted carts with ease.
Prestashop store admin can view the abandoned products in the shopping cart of the customers. Further, he can do it from the backend of the Prestashop reduce cart abandoned extension.
The Prestashop abandoned cart extension by Knowband enables the store merchant to analyze the store conversion rates. How? By analyzing the converted carts.
Prestashop Admin can analyze which products result in most shopping cart abandonment from the Prestashop email follow up addon backend.
The Prestashop Abandoned cart has an interactive pie chart to compare the Abandoned and Converted carts.
Interactive pie charts to compare the Abandoned and Converted amounts.
This Prestashop abandoned cart module by Knowband supports Multiple languages.
Prestashop email follow up addon is compatible with every theme.
The Prestashop cart abandoned addon is desktop, mobile, and desktop responsive design.
Prestashop email follow up addon is compatible with the GDPR module.
With the Prestashop abandoned cart module, the store owner can now display a popup reminder to the customers. Further, as soon as they visit the website. In fact, in this popup, the store admin can highlight the products. Furthermore, the ones that they left in the cart and can also highlight coupon codes.
The store owner can send the customers web browser notification reminders to customers to remind them about their incomplete purchase.
2. Installation Guide of Prestashop Abandoned cart addon
Extract the “abandonedcart” zip file.
Go to the “Modules” section and click on the “Upload a Module” button. Select the “abandonedcart” file. Moreover, the Prestashop abandoned cart addon will be ready for installation in the “Modules” (Module Listing Page) in your Prestashop store admin panel as shown below.
After successful installation, the system will redirect you to the module configuration page. Moreover, when you come back to the module listing page, the “install” button will be replaced by the “Configure” button.
Suppose, you don’t see the plugin displaying on your module listing page. Further, search it by filtering the module with the following details:
Keyword: Prestashop Abandoned Cart
Author: Knowband
Category: Checkout
Filter by: Installed & Not Installed/Enabled & Disabled
3. Useful Cron Instructions
3.1 Reasons/Cases when the email is not sent to the customers
A. Email Id is not available(Guest customer)
B. If the cart does not satisfy the condition of serial reminders
If the minimum cart value is greater than the abandoned cart value. For example, the minimum cart amount is $50 and the abandoned cart amount is $45. It will not send a reminder in this case.
If the delay is set to one day, the reminders will not be sent to the customers. Further, whose carts are abandoned for less than a day.
C. The Prestashop Abandoned cart email follow-up addon will not add the abandoned carts with the cart amount 0.00.
D. If you have not set up the Cron properly or if the Cron is not working.
3.2 Types of Crons
There are two types of cron that run every hour.
1. Cron to update the Abandoned cart: This cron runs every hour.
For instance, the cron runs at 11:05, 12:05… and so on. In addition, you have set “Mark Abandoned Cart” as 1 hour. When cron runs at 11:05 it will add all the abandoned carts created between 9:05 to 10:05. For instance, you have set “Mark Abandoned Cart” as 0 hours. Further, it will add all the abandoned carts created between 10:05 to 11:05.
2. Cron to send a reminder email: This cron also runs after every hour.
For example, suppose the cron runs at 11:11, 12:11…..and so on and you have set the Reminder for 1 day. Suppose, the cron runs at 11:11. Further, the emails will be sent to all the abandoned carts between 10:11 to 11:11 of the previous day. In fact, if you have set Reminder for 2 days then the emails will be sent to all the abandoned carts. Moreover, between 10:11 to 11:11 of the day before yesterday.
3. Cron to send reminder notifications: This cron also runs after every hour.
For instance, if you have set marked abandoned cart as 1 hour. Moreover, suppose the cron runs at 3:14. Further, all the visitors who have created abandoned carts between 1:14 to 2:14 will get a reminder notification.
3.3 Procedure to configure CRON job
3.3.1 What is a cron?
A cron is a service that allows a user to automatically execute a script at a specific time.
For instance, you can set a particular PHP script to automatically executes every day at midnight.
To set CRON for Abandoned Carts the following 2 URLs are supposed to add to the crontab of your server:
Note: Make sure to enter the proper command and the full path to the file.
2. By adding the CRON instructions to the crontab of your server (through Terminal/SSH)
For this method to work you are supposed to have crontab on your server. In fact, in case it is not installed then please contact the hosting provider.
– Login to the terminal (or SSH) of your server
– Run the following command: crontab -e
– It will list all the CRON jobs on the server in editing mode.
These lines will execute the desired CRON Jobs every hour.
– Save the crontab file.
4. Workflow of Prestashop Abandoned cart (Email Follow up) Addon
The Knowband Prestashop cart abandoned module configuration page will display the following tabs to configure the module as desired:
1. General Settings
2. Email Templates
3. Serial Reminders
4. Popup Templates
5. Popup Reminders
6. View Abandoned Carts
7. View Converted Carts
8. Web browser Configuration
9. Web browser reminders
10. View Notification Click Data
11. Cron Log
12. Analytics
13. FAQs
14. Suggestions
15. Other Plugins
Each interface is in form of a tab and each tab contains some specific settings that can be changed according to the need. In fact, each tab is explained below.
4.1 General Settings of Prestashop Abandoned cart addon
The General Settings tab of Prestashop abandoned cart module has the following options:
Enable/Disable: Prestashop store admin can Enable or Disable Abandoned cart module. In fact, if disabled, the cart abandonment will not be tracked and no coupon codes will be sent to the customers. Further, apart from this, the user can not see the content in other tabs.
Delete Customer Data on Delete Request: The Admin can enable the GDPR option. Furthermore, after enabling this option, the customer requests the admin to delete the data from their store. Therefore, the Module deletes the subscriber details automatically.
Note: If you are using the official GDPR module then you must need to enable this setting. Furthermore, the main purpose of this feature is to export and delete user data on PrestaShop GDPR module requests. In fact, it is also compatible with Prestashop GDPR Module developed by Knowband.
Mark Abandon Cart: The Delay time of Prestashop abandoned cart email follow up extension by Knowband is the period after which the cart considers to be abandoned. Further, the admin can mark the days after which the addon is assumed abandoned.
Enable Auto Email: This feature of Prestashop Abandoned cart recovery email addon will allow admin to schedule (Cron Setup) coupon email sending task or not.
Enable/Disable Mails functionality for Guest Customer: The functionality in question allows the administrator to share non-discount emails with guest customers when enabled.
Enable Testing Mode: Admin also has a Test mode feature to test the working of the module before making it live. Furthermore, add an email to the test mode section. In addition, mark the abandoned cart to 0 days and 0 hours to see the working of the Prestashop abandoned cart email follow up addon.
Enable UTM Parameters: Enable this by adding the UTM parameter in the module links so that customers can track the performance of the mail Google Analytics.
Enable/Disable Fix Coupon code functionality: The administrator can establish a fixed coupon code paired with a specific discount value. This ensures that each time a discount is shared via email, the system will exclusively consider the associated coupon code in the shared discount mail.
4.2 Email Templates- Readymade Email Templates
The Email Template tab of the Prestashop abandoned cart addon by Knowband has is the format of the email that will be sent to the customers. Further, this field of Prestashop reduces cart abandoned module contains some placeholders. In fact, whose values will be replaced when the email will be sent.
Prestashop abandoned cart addon offers 20 readymade email templates. Further, that can be sent to the customers. In fact, 10 with discount and 10 without discount.
Prestashop store admin can even add and customize N number of email templates. In fact, he can do it from the back-end of the Prestashop email follow up module.
4.2.1 Discount Email Template
Discount Follow up Email Template will contain the information about the Abandoned products along with the coupon details like coupon discount, Coupon code, validity, etc.
On choosing the template type the form for the email template will appear, this form will have the default template content by default and the Prestashop admin can change it as desired and then click on the “Save” button to save the changes.
Prestashop Admin can also choose the type of cart template which he/she wants to use the email template. This Prestashop cart abandoned addon are 10 different cart templates which the admin can use to make the templates look good.
4.2.2 Non-discount Email template
Non Discount Email Template will contain information about the Abandoned products. These emails are used as a follow up to the customers who abandon the shopping carts.
After saving the email template, it will appear at the bottom of the list of email templates, and to edit or translate the same the Prestashop admin has to click on the edit link in front of that email template.
Once the admin adds the email template, he has to translate it if there are any other languages (other than English) in the system by clicking on the edit button in front of the email template and choosing the desired translation language.
Note:
The Prestashop abandoned cart addon by Knowband provides an only English translation of the email templates, the admin has to manually translate the templates to any other language that is required.
4.3 Serial Reminders
There are two types of reminders that are addable to the Knowband Prestashop cart abandoned cart addon:
Reminder with a discount (This type of reminder contains a discount coupon with a discount type email template attached to it).
Reminder without discount (This type of reminder is just a regular follow-up to the customer about the abandoned cart. In addition, have a non-discount type email template attached to it).
In the “Serial Reminders” tab the Prestashop admin can add various reminders (both discount and non-discount) as desired. This tab contains a list of all the serial reminders present in the system.
Prestashop store admin can edit or remove any reminder by clicking on the Edit or Remove action button in front of the reminder.
On clicking on the button, you’ll get a pop-up as shown below:
Non-Discounted Serial Reminder Template:
Template Name: The templates created in the Email Template tab of the Prestashop abandoned cart module by Knowband will list here. Select anyone from the drop-down list.
Discount Type: This field of Prestashop abandoned cart email follow up extension allows the admin to select any one option from, Percentage or Fixed type.
Discount Value: This field of Prestashop abandoned cart addon by Knowband enables the admin to enter the discount amount or percentage that you want to offer.
Min. Cart Amount: In this field of Prestashop cart abandoned addon by Knowband, the store seller will have to enter the minimum cart amount required to avail of the offer.
Coupon Validity: This field of the Prestashop abandoned cart module offers the admin to enter the number of days for which the coupons will be valid.
Allow Free Shipping: Select whether you want to allow free shipping or not.
Minimum Cart Value: This tab allows you to add a minimum cart value to use the coupon code in the reminder.
Status: Select Enabled this option of Prestashop abandoned cart addon, if you want to enable this serial reminder.
Delay: This field of Prestashop email follow up extension provides the admin to enter some details. For instance, the number of days, from the day when the customer adds the product in his/her cart, and, after which this reminder will be sent.
4.4 Popup Templates
The Popup Template tab of the Prestashop abandoned cart addon by Knowband has is the format of the popup reminder that will display to the customers when they are on the site.
Prestashop Abandoned cart addon allows the PrestaShop admin to create as many popup templates as they want. They get in total 4 templates, out of which 2 are default templates and the other 2 are non-discounted templates.
4.4.1 Discounted Template:
On selecting the discounted template, a template form will appear, in which the admin will have to choose a translation language and cart template which he wants to display on the store. They can also customize the content of the popup the way they like.
4.4.2 Non-Discounted Template
If the admin wants to send a non-discounted popup reminder then he can select the non-discounted template and customize it accordingly.
4.5 Popup Reminders
Prestashop abandoned cart reminder addon offers to track the popup reminders templates active on the store front end. Here the admin can create as many popup reminders as they want.
On clicking the add new button, the admin will see a popup as shown below:
To create a popup reminder, the admin has to click on add new after which he has to fill in the following criteria
Template Name: The templates created in the Popup Template tab of the Prestashop abandoned cart module will list here. Select anyone from the drop-down list.
Discount Type: This field of Prestashop Abandoned cart addon allows the admin to select any one option from, Percentage, Fixed, or no discount type.
Discount Value: This field of Prestashop abandoned cart addon by Knowband enables the admin to enter the discount amount or percentage that you want to offer.
Priority: The admin can set the priority value of the reminder as well. For example, if they set the priority as 1 then this popup reminder will display 1st to the customers.
Available from and to: In here, the PrestaShop admin has to enter the validity period of the discount.
Coupon Validity: This field of the Prestashop abandoned cart module offers the admin to enter the number of days for which the coupons will be valid.
Allow Free Shipping: The admin can customize whether you want to allow free shipping or not.
Min. Cart Amount: In this field, the store seller will have to enter the minimum cart amount required to avail of the offer.
Status: Select Enabled if you want to enable the popup reminder otherwise disable it.
Delay: This field of PrestaShop email follow up extension provides the admin to enter the number of days, from the day when the customer adds the product to his/her cart, after which the popup reminder will display to the customers when they visit the store.
Display popup again after: The admin can choose to display the popup to the same customer after a certain number of hours. Further, by filling it in this field.
4.6 View Abandoned Carts
The abandoned cart tab contains a list of all the abandoned shopping carts in your store. Furthermore, the syncing of the list is done through Cron Instruction. Further, based on the delay time set for abandoned cart by the admin.
The list can also sync by clicking on the “Refresh” button at the top of the list.
The list contains pagination and several filters as well to sort and view the list more efficiently.
View Coupon Details
The details of the coupon sent to the customer are visible by clicking on the “Coupon Details” link in front of the abandoned cart.
Send Follow up EMail without Coupon
Click on the bell icon of this Prestashop abandoned cart addon. Furthermore, the admin can send reminders regarding the products saved in the cart of the customers. In fact, on clicking the same a pop-up will appear having all the fields that will be sent in the follow-up email.
Send follow up Email with Coupon
To send the follow-up email to the customer regarding the shopping cart abandonment with a discount coupon the admin has to click on the “Gift Icon” in front of the desired abandoned cart. In fact, on clicking the same a pop-up will appear having all the fields that will be sent in the follow-up email.
View Cart Details
To view the details about the abandoned cart the admin has to click on the “Cart Icon” in front of the desired cart. Further, a pop-up will appear having all the details of the cart.
Delete Abandoned Cart
To delete any abandoned cart, the admin has to click on the “Remove Button” in front of the desired cart. Therefore, a confirmation pop-up will appear asking for confirmation of the deletion. Further, once confirmed the abandoned cart will be gone forever.
4.7 Converted Carts
The Conversion Rate tab of Prestashop abandoned cart addon by Knowband enlists all converted orders for registered customers. Further, or we can say that the abandoned carts for whom the order has been placed after the reminder mail are sent.
Note: The abandoned cart is considered as converted only if the customer places an order for that cart after a reminder mail has been sent.
4.8 Web Browser Configuration
Abandoned Cart Serial Reminder module offers to configure a web browser reminder. The admin can integrate a web browser reminder by generating an API Key. To configure a firebase API following are the steps:
1. Visit the URL: https://console.firebase.google.com/u/0/?pli=1
2. Click on ‘Create a Project’
3. Enter your project name, check the terms and conditions. In addition, click on the continue button as pointed in the below screenshot.
4. Click again on the continue buttons pointed in the screenshot below.
5. Select your location. Further, hover on the? Mark to display the description and click on the continue button as pointed in the below screenshot.
6. Click on continue again
7. Click on the Project Setting button as pointed in the screenshot below.
8. Copy the project ID from here and paste it into [ Web browser configuration Project ID ]
9. Copy the server key and paste it into [ web browser configuration- server key]
10. Copy the legacy server key from here and paste it into [ web browser configuration- API Key]
11. Copy the sender ID from here and paste it into [ Web browser configuration- Messaging sender ID]
4.9 Web Browser Reminders
In the “Web Browser Reminders” tab the Prestashop admin can add various reminders (both discounted and non-discounted) as desired. In fact, this tab contains a list of all the web browser reminders present in the system.
Furthermore, the Prestashop store admin can edit or remove any reminder by clicking on the Edit or Remove action button in front of the reminder.
On clicking on the button, you’ll get a pop-up as shown below:
On choosing a reminder list form will appear. Further, the admin has to choose a reminder name. In fact, this form has the default notification subject and notification content. Moreover, the Prestashop admin can change it as desired. Furthermore, then click on the “Save” button to save the changes. Therefore, the Prestashop Abandoned cart addon offers multi-lingual support to the merchants. In fact, they can customize the subject and content in 3 different languages.
4.10 View Notification Click Data
Here, the admin can view if the customers have taken any action on seeing the browser popup. Further, they can check if the customers have clicked on the reminder popup or not, and more. For instance, the time of sending the popup, and the cart summary which will include customer information, products in their cart.
4.11 Cron Log
Prestashop abandoned cart reminder provides a cron log functionality to check if the cron executes successfully or not. In fact, they can also check the cart details of the customers as well.
4.12 Analytics – Shopping cart abandonment
The Analytics tab of the Prestashop email follow up module shows the overall insights of the store in a graphical interface.
4.12.1 Abandon cart vs Converted cart and Amount
This graph of Prestashop Abandoned cart recovery email addon by Knowband shows a do-nut chart which will display the information. For instance, the percentage of abandoned shopping carts on the store. Moreover, the percentage of abandoned shopping carts converted into orders.
4.12.2 Number of Carts and Cart Amount VS Time Interval
This chart of Prestashop abandoned cart addon by Knowband gives the overview of the total abandoned carts vs the carts converted. In addition, the amount abandoned vs the amount converts in the given period.
4.13 FAQs
This Prestashop abandoned cart addon by the Knowband tab contains several questions (with answers to them) that the customers ask. In fact, we recommend you go through the questions before raising any ticket for this addon.
4.14 Suggestions
In case you want to give any suggestions for some new features to be included in the new version of this Knowband Prestashop cart abandoned module then you can use this tab.
4.15 Other Plugins
This Prestashop email follow up by the Knowband tab redirects to our developer page having a list of other plugins developed by us. In fact, if you like this Knowband Prestashop abandoned cart addon then you can try our other addons as well.
5. Recommendations
– If Prestashop Abandoned cart email follow-up addon is not working after installation then please check permissions on modules folder. Further, the folder should be writable. Please make the folder permission to 755.
– It is necessary to add the CRON instructions to your cron without that this Prestashop abandoned cart addon is not as useful.
– Make sure that the Cart Re-Display Setting (Preferences -> Customers -> Cart re-display at login) is ON otherwise the Prestashop email follow up addon will not work as expected.