How to Setup SEO-Friendly URLs for your PrestaShop Store – A Comprehensive Guide

PrestaShop is a powerful eCommerce platform that enables businesses to create and manage online stores efficiently. One crucial aspect of running a successful online store is ensuring your website is optimized for search engines. A significant part of SEO (Search Engine Optimization) is creating clean, descriptive, and user-friendly URLs. In this guide, we’ll explore the steps to set up SEO-friendly URLs for your PrestaShop store.

Why Are SEO-Friendly URLs Important?

SEO-friendly URLs are crucial for improving visibility on search engines and enhancing user experience:

  • Improved Rankings: Search engines rely on URLs to interpret a page’s content. You can boost your search rankings by adding more descriptive URLs with relevant keywords
  • User Experience: Clean and readable URLs help users understand what to expect on a page.
  • Increased Click-Through Rates: Well-structured URLs encourage users to click on your links in search results.

Steps to Create SEO-Friendly URLs in PrestaShop

1. Enable Friendly URLs in PrestaShop

PrestaShop includes a built-in feature to generate friendly URLs. Follow these steps to enable it:
Log in to your PrestaShop Admin Panel.

Navigate to Shop Parameters > Traffic & SEO.

Scroll down to the Set Up URLs section.

Toggle the Friendly URL option to “Yes.”
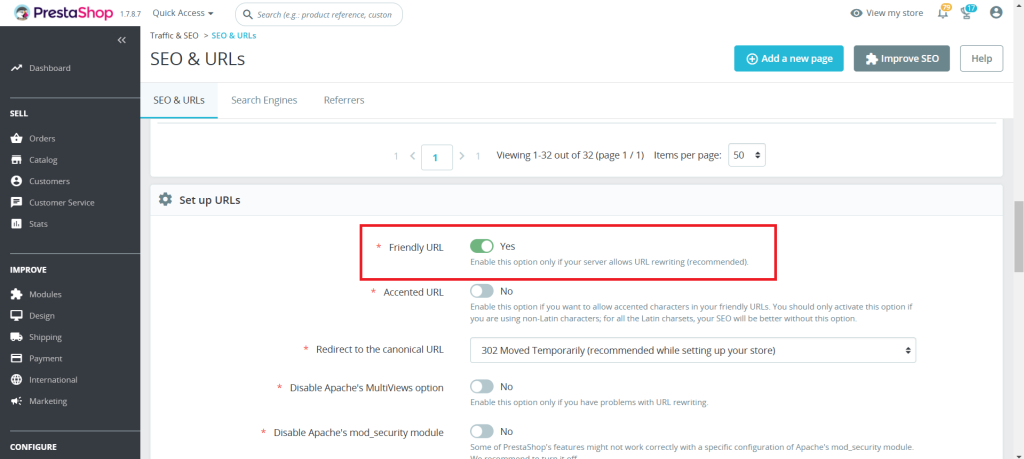
Click Save.

2. Configure URL Settings

1. In the same Traffic & SEO page, you can configure:

  • Accented URL: Decide if your URLs should include special characters.
  • Redirect to the Canonical URL: Enable this to avoid duplicate content issues.

2. Customize the Base URLs for your store’s language preferences if you run a multilingual store.

3. Optimize Individual Product URLs

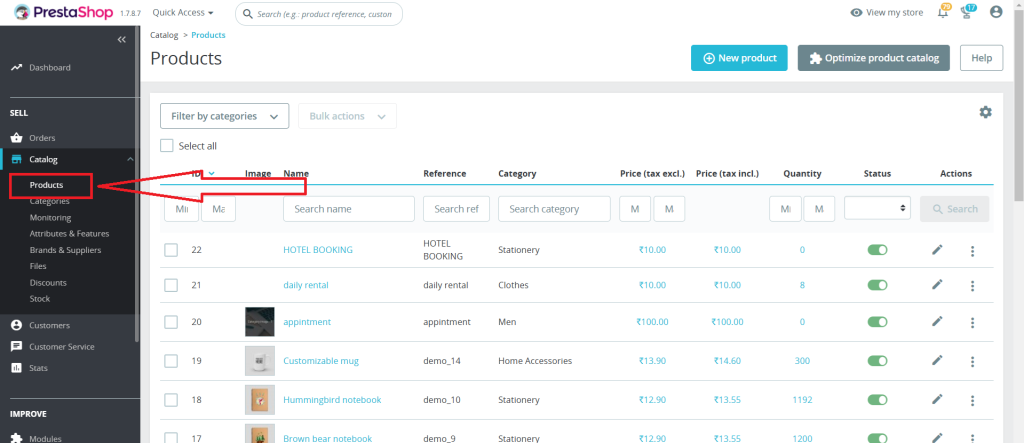
PrestaShop allows you to manually edit URLs for products, categories, CMS pages, and more. Below are the steps showing how to make the Product URLs SEO-Friendly:

1. In the Admin panel, Open Catalog > Products:
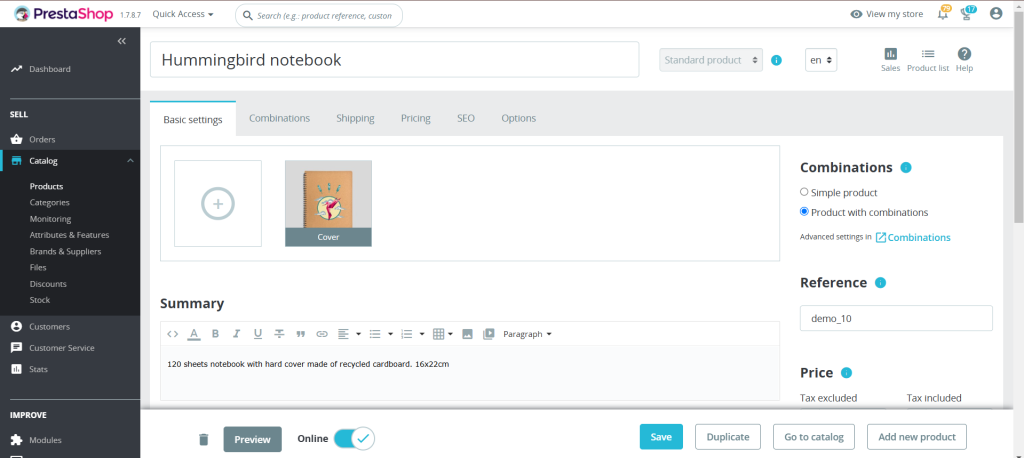
2. Select the product you want to edit.
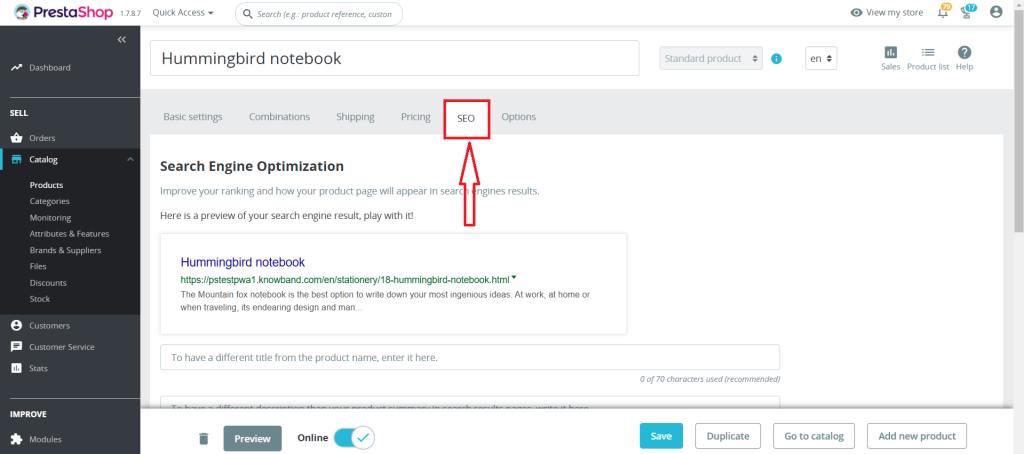
3. Navigate to the SEO tab.
4. Optimize the Friendly URL field by using a concise, keyword-rich URL.
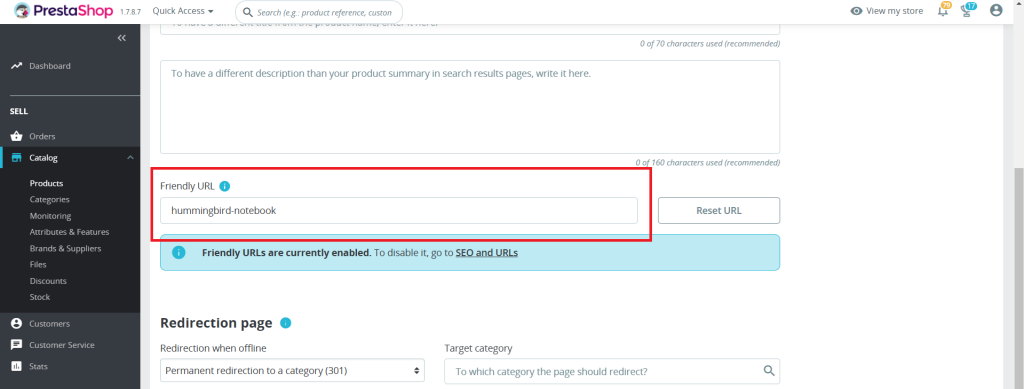
For example:
Instead of the product?id=123, use handmade-ceramic-mug.

5. Save your changes.

Add Clean URLs & 301/302/303 redirection

SHOP NOW

4. Use Keywords Strategically

When crafting your URLs:

  • Include primary keywords related to the page’s content.
  • Avoid stuffing URLs with unnecessary words or repetitive terms.
  • It is recommended to use hyphens (-) for separating the words instead of underscores (_).

5. Avoid URL Parameters

Dynamic URLs with parameters like ?id=123&ref=456 are harder for search engines and users to understand. Use PrestaShop’s friendly URL feature to replace these with clean, descriptive URLs.

6. Redirect Old URLs to New Ones

Implementing a 301 redirect from the old URL to the new one is an essential step that one should ensure while updating the SEO URLs. This helps maintain SEO rankings and prevents users from encountering 404 errors. Redirects can be managed through your server’s .htaccess file or an SEO module.

7. Test Your URLs

After configuring your URLs:

  • Verify they are working correctly.
  • Use online tools like Google’s URL Inspection Tool to check how search engines view your URLs.
  • Test for broken links and resolve them promptly.

Additional Tips for SEO-Friendly URLs

  • Use Lowercase Letters: URLs are case-sensitive. Stick to lowercase letters for consistency.
  • Avoid Stop Words: Words like “and,” “or,” “the” can be omitted unless necessary for clarity.
  • Limit URL Length: Keep URLs concise while still descriptive.
  • Update Sitemap: After making changes, update your sitemap and submit it to Google Search Console.

Recommended Modules for SEO in PrestaShop

To enhance your SEO efforts, consider using these modules:

Conclusion

SEO-friendly URLs are a cornerstone of an effective eCommerce SEO strategy. By following this guide, you can ensure your PrestaShop store’s URLs are optimized for search engines and user-friendly. Regularly review and update your URLs to maintain their effectiveness as your store grows.

Adopting these practices can significantly improve your website’s visibility on search engines, drive higher volumes of targeted traffic, and ultimately lead to an increase in conversions and overall engagement.
Happy optimizing!

Appendix: Common Issues and Troubleshooting

Friendly URLs Not Working

  • Ensure that your server supports URL rewriting (mod_rewrite for Apache).
  • Verify that the .htaccess file is correctly configured and writable.
  • Check permissions for the /var/www/html/ folder if hosted on a Linux server.

Broken Links after URL Changes

  • Whenever you modify URLs on your website, promptly update your sitemap to reflect these changes and resubmit it to Google Search Console. This ensures that search engines quickly discover, crawl, and index the updated URLs, preserving your site’s visibility and SEO performance.
  • Use a redirect manager module or .htaccess to map old URLs to new ones seamlessly.

3. Multilingual Store Challenges

  • Incorporate language-specific keywords in your URLs to enhance localization.
  • Make sure each language version of your store has a unique URL structure.

4. Duplicate Content Due to Canonical Issues

  • Enable “Redirect to Canonical URL” in Traffic & SEO settings.
  • Review all indexed pages using tools like Screaming Frog to detect duplicates.

SEO Checklist for New Websites: Essentials for a Successful Launch!

Launching a new website is an exciting venture. You get to design your digital presence and showcase your brand to the world. However, creating an appealing website is just the beginning. To ensure that your site reaches the right audience, you need to optimize it for search engines. Furthermore, optimizing a new website takes a lot to be fit for the search engines as well as customers.

Thus, in this detailed guide, we have provided an essential SEO checklist to help you achieve a successful website launch.

SEO Basics:

Before diving into advanced SEO tactics, it’s important to cover the basics. These initial steps lay the foundation for your SEO strategy:

1. Google Search Console:

Google Search Console is crucial for monitoring your site’s performance on Google. It allows you to submit your sitemap, track your rankings, and receive alerts about potential issues.

Steps to set it up:

  • Visit Google Search Console and sign in (or create an account if you don’t have one).
  • Add your website as a property.
  • Verify ownership by following the provided instructions.

2. Google Analytics:

Google Analytics provides insights into your audience’s demographics, interests, and how they interact with your site.

Steps to set it up:

  • Sign in to Google Analytics and create a new property for your website.
  • Add the tracking code to your website’s HTML or use a plugin if you’re using WordPress.

3. SEO Plugin for WordPress:

For WordPress sites, using an SEO plugin like Yoast SEO can simplify many optimization tasks. This tool helps you refine content, titles, and meta descriptions.

Steps to set it up:

  • Install the Yoast SEO plugin.
  • Follow the setup wizard to configure the basic settings.
  • Begin optimizing your content using the plugin’s recommendations.

4. Keyword Research:

Keyword research is the cornerstone of effective SEO. Identifying the right keywords ensures that your content aligns with what your target audience is searching for.

How to do it:

  • Use tools like Google Keyword Planner, SEMrush, or Ahrefs to find relevant keywords.
  • Integrate these keywords naturally into your content, including headings, body text, and meta tags.
  • If keyword research seems overwhelming, consider hiring an SEO agency to assist with this crucial task.

5. Technical SEO:

Technical SEO focuses on the behind-the-scenes elements that make your website accessible and efficient for search engines.

6. Mobile-Friendly Design:

With a growing number of users accessing websites via mobile devices, ensuring your site is mobile-friendly is essential. A responsive design enhances user experience across all screen sizes.

7. Secure SSL Certificate:

An SSL certificate (https://) not only secures your site but also serves as a ranking factor in Google’s algorithm. Make sure your website is secure to gain the trust of both visitors and search engines.

Knowband’s PrestaShop SEO Optimizer Addon

Enhance your online store’s visibility with our easy-to-use SEO Optimizer Addon. Boost search rankings and attract more visitors with improved SEO settings.

SHOP NOW

8. XML Sitemap:

Generating an XML sitemap and submitting the same on GSC can lead to faster indexing on the Google search engine. This helps search engines understand your site’s structure and index it efficiently.

9. Schema Markup:

Implementing schema markup provides structured data to search engines, which can result in rich snippets and improve click-through rates in search results.

10. On-Page SEO:

On-page SEO involves optimizing individual pages to make them more relevant and accessible to both users and search engines.

11. High-Quality Content:

Create valuable, informative, and engaging content tailored to your audience’s needs. High-quality content increases your chances of ranking well and attracting organic traffic.

12. Header Tags:

To enhance the quality of your product content, you can use header tags (H1, H2, H3) in your product descriptions or content. This not only enhances readability but also helps search engines understand the hierarchy of your content.

13. Image Optimization:

Optimize images by adding descriptive alt text and reducing file sizes. This improves page load times and makes your content more accessible to visually impaired users.

14. Internal Linking:

Internal linking improves navigation and helps search engines understand your site’s structure. Furthermore, a well-mannered internally linked website is preferred by search engines when defining the rankings on Google search results.

15. Off-Page SEO:

Off-page SEO refers to activities that enhance your site’s reputation and authority beyond its content.

16. Backlink Building:

These links serve as endorsements for your content and can significantly boost your search engine rankings.

17. Social Media Presence:

Engage with your audience on social media platforms. Furthermore, an active social media presence can indirectly influence your SEO by driving traffic and promoting your content.

18. Online Reviews and Reputation Management:

Reviews play a huge role in maintaining the brand image. Furthermore, the reviews provide customers with a true brand experience. Positive reviews not only build trust but also enhance your online reputation. Thus, you can encourage your happy customers to leave positive reviews.

19. Guest Blogging:

Guest blogging helps establish your authority and generates valuable backlinks.

In the END!

Implementing this SEO checklist is essential for a successful website launch. Remember, SEO is a process that requires continuous adoption of the latest trends and it takes huge monitoring efforts. By focusing on the basics, conducting thorough keyword research, optimizing technically and on-page, and engaging in off-page activities, you’ll be well on your way to achieving better search engine rankings and attracting organic traffic. Patience and consistency are key—stay committed, and your website will thrive in the digital landscape. You can also watch our video on the “Power of SEO URLs“:

Mastering Xcode: Tips for Faster iOS App Development by Knowband!

In the dynamic world of iOS app development, efficiency and productivity are key. Xcode, Apple’s integrated development environment (IDE), offers a plethora of features designed to streamline the development process. However, leveraging these features to their fullest potential requires insight and expertise.
Thus, in this article we will dive into the practical tips for mastering Xcode, focusing on accelerating your iOS app development journey.

Furthermore, you can not only streamline your Xcode deployment but also speed the process up.


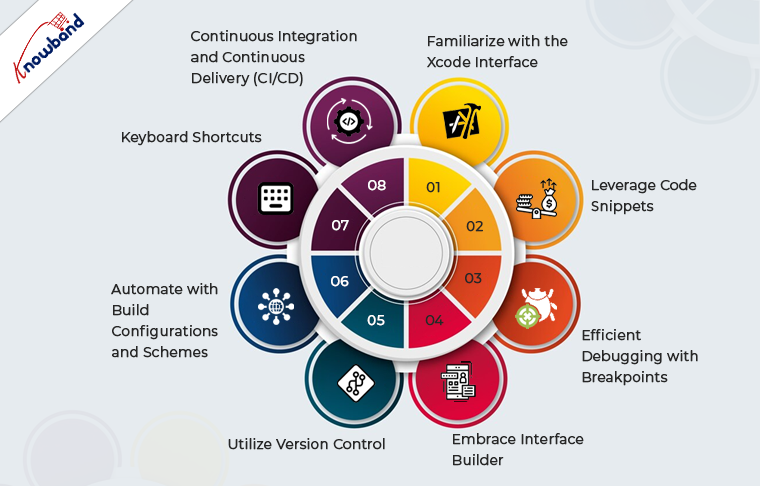
Familiarize with the Xcode Interface:

Understanding the Xcode interface is the cornerstone of efficient app development. Moreover, Apple has designed the Xcode to not only provide a robust but also a feature-rich experience to the app developers.

The Navigator, Editor, and Utilities areas are your primary workspaces. Use the Navigator for quick file access, the Editor for coding, and the Utilities area for property adjustments and documentation. Familiarity with these sections will significantly reduce development time.

Leverage Code Snippets:

Code snippets are a powerful feature in Xcode that can save you a considerable amount of time. Thus, by creating snippets of frequently used code blocks, you can avoid repetitive typing.
To create a snippet, simply select the code you wish to save, drag it into the Code Snippet Library, and give it a name and shortcut. This practice not only speeds up coding but also ensures consistency across your projects.

Efficient Debugging with Breakpoints:

Debugging is an integral part of development, and Xcode’s debugging tools are robust. The developers get the option to use breakpoints to pause execution at specific lines of code, that allow inspection of variables and evaluate expressions.
Moreover, the conditional breakpoints can be particularly useful for isolating issues without halting the program unnecessarily.

Embrace Interface Builder:

Xcode’s Interface Builder is a powerful tool for designing UIs. It allows developers to create interfaces visually, without writing extensive code.
Thus, instead of writing the design code manually, you can utilize Auto Layout to make your apps responsive across different devices and screen sizes.
Understanding and using Interface Builder efficiently can significantly accelerate UI development.

Utilize Version Control:

Version control is essential for managing changes and collaborating on projects. Therefore, Xcode integrates seamlessly with Git, providing a graphical interface for committing changes, branching, and merging. Regularly commit your changes to keep track of your project’s evolution and to facilitate collaboration with other developers.

Automate with Build Configurations and Schemes:

Build configurations and schemes are Xcode features that allow you to manage different versions of your app, such as development, testing, and production.
Thus, automating the tasks like setting environment variables, and API endpoints, and enabling debug options can significantly streamline your workflow.

Keyboard Shortcuts:

One of the most straightforward ways to increase efficiency in Xcode is to master keyboard shortcuts. Instance, common shortcuts for actions like running your app (Cmd + R), opening the Assistant Editor (Cmd + Option + Enter), and showing or hiding the Navigator (Cmd + 0) can save valuable time.

Continuous Integration and Continuous Delivery (CI/CD):

Implementing CI/CD with Xcode can automate the process of building, testing, and distributing your iOS apps. Furthermore, tools like Xcode Server, Jenkins, or GitHub Actions can be configured to automate these tasks, ensuring that your app is always in a deployable state.

Stay Updated!

Apple frequently updates Xcode with new features and improvements. Staying current with the latest versions ensures access to the most advanced tools and functionalities, which can enhance your development process.

Conclusion!

By familiarizing yourself with the IDE, utilizing its features to their fullest, and staying updated on the latest developments, you can significantly enhance your productivity and efficiency in iOS app development.
Whether you’re debugging with advanced breakpoints, designing interfaces, or automating builds, every aspect of Xcode offers an opportunity to streamline your workflow and bring your innovative app ideas to life more swiftly.

Additionally, at Knowband, we offer both native and hybrid app development services. If you have any project inquiries or need a quotation, please don’t hesitate to reach out to our team at “support@Knowband.com”.

Notable Changes in PrestaShop 8.0: A Major Leap Forward for E-commerce

PrestaShop, one of the most popular open-source e-commerce platforms, is known for its robustness, flexibility, and extensive range of modules. With the release of PrestaShop 8.0, there are several technical changes that can significantly enhance both the functionality of modules and the overall website experience. In this article, we will explore some of these changes and their potential impact on PrestaShop users.

Improved Module Management System:

PrestaShop 8.0 introduces an upgraded module management system that offers better control and customization options. It includes a revamped module dashboard, allowing merchants to manage and configure modules more efficiently. The new system also provides enhanced compatibility and improved security measures, ensuring a seamless experience while installing, updating, and removing modules.

Responsive Web Design:


In the era of mobile devices, responsive web design has become crucial for any successful e-commerce website. PrestaShop 8.0 focuses on delivering an exceptional user experience across different screen sizes and resolutions. The platform now offers responsive templates out of the box, ensuring that your website looks and functions flawlessly on desktops, tablets, and smartphones. This technical enhancement can lead to higher customer engagement and increased conversion rates.

Accelerated Mobile Pages (AMP) Support:


Continuing with the mobile optimization theme, PrestaShop 8.0 introduces support for Accelerated Mobile Pages (AMP). AMP is an open-source initiative that allows web pages to load almost instantaneously on mobile devices. By implementing AMP in PrestaShop 8.0, merchants can offer lightning-fast browsing experiences, reducing bounce rates and improving search engine rankings.

Advanced Search and Filtering Capabilities:

Searching and filtering products effectively is crucial for an e-commerce website’s success. PrestaShop 8.0 comes with advanced search and filtering capabilities, enabling customers to quickly find the products they are looking for. The updated search system offers improved relevance, autocomplete suggestions, and the ability to search across multiple product attributes. These enhancements empower customers to navigate the website effortlessly and make informed purchase decisions.

Integration with Progressive Web Apps (PWA):


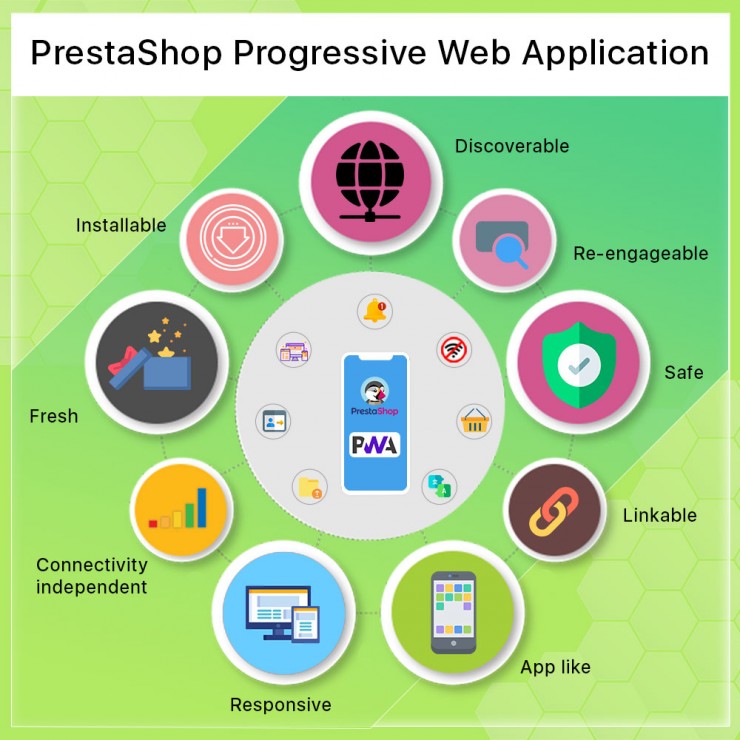
Progressive Web Apps have gained significant traction in recent years due to their ability to deliver an app-like experience within a web browser. PrestaShop 8.0 introduces seamless integration with PWAs, allowing merchants to leverage the benefits of both web and native mobile apps. PWAs offer features such as offline browsing, push notifications, and home screen shortcuts, enhancing customer engagement and retention.

Performance Optimization:

The performance of a website is essential in ensuring user satisfaction and driving conversion rates.. PrestaShop 8.0 focuses on performance optimization, leveraging the latest technologies and best practices. With improved caching mechanisms, code optimization, and database optimizations, the platform aims to deliver faster page load times and a smoother user experience. These technical changes can lead to improved search engine rankings, higher customer retention, and ultimately, increased sales.
Enhanced Security Measures in Prestashop 8.0:

In an increasingly digital world, ensuring the security of an e-commerce website is paramount. PrestaShop 8.0 includes enhanced security measures to protect both the platform and its users. This includes improved encryption algorithms, stricter validation checks, and proactive vulnerability management. By implementing these security enhancements, PrestaShop aims to provide a secure and trustworthy environment for online businesses and their customers.
In the end:

Prestashop 8.0 brings a host of technical changes that can significantly enhance the functionality and user experience of PrestaShop-powered websites.
From improved module management and responsive web design to advanced search capabilities and performance optimizations, these changes aim to empower merchants and provide a seamless shopping experience for customers. By staying up-to-date with the latest version of PrestaShop and leveraging these technical enhancements, businesses can stay competitive in the ever-evolving world of e-commerce.
Furthermore, at Knowband we provide Prestashop web and app development services at very reasonable prices. Not only you can check out a wide range of Prestashop v8.0 compatible addons but also we offer custom module development to our Prestashop eCommerce merchants.  Thus, in case you are having queries or suggestions regarding any of our plugins, feel free to find us at support@knowband.com.

7 Amazing Tips and Tricks to Boost Alibaba Sales in 2022

Alibaba is the largest B2B firm in the world. If you have chosen to target a global audience, chances are high that you will be selling on the Alibaba platform. Alibaba is the largest directory that links suppliers with international business people. Suppliers and manufacturers that offer their own-brand products, as well as wholesalers who buy manufactured goods in large quantities, are the most common sellers on Alibaba.com.

Before you jump into Tips and Tricks to Boost Sales, let’s first get familiar with some of the perks of selling on the Alibaba Store.

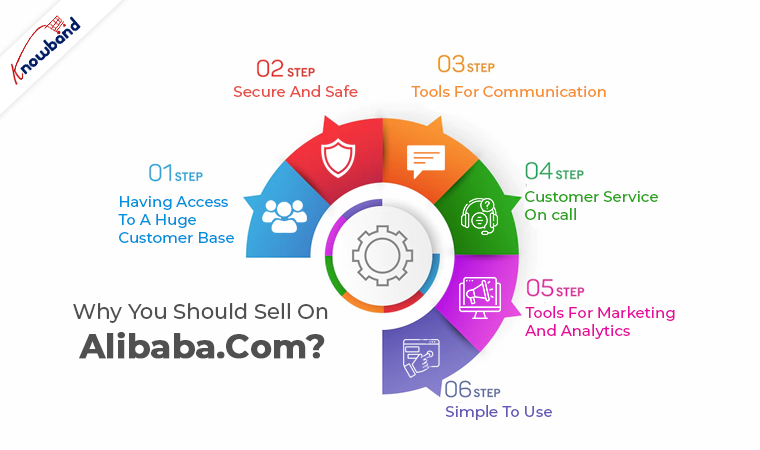
Why you should sell on Alibaba.com?

Having Access to a Huge Customer Base

You should be aware that using Alibaba.com will give you access to a sizable customer base. Millions of people use Alibaba.com, so you can reach a worldwide audience there. You have the advantage of generating a lot of sales and profit with a worldwide audience base. It’s like having all of your customers together without having to move an inch.

Secure and Safe

The fear of being scammed is one of the reasons why many people are hesitant to sell anything online. Fortunately, Alibaba.com is a trusted website that facilitates quick and simple purchases. There are several ways to pay on this platform, including credit cards, debit cards, and wire transfers. Trade Assurance, an order protection service that guarantees your product is of the greatest quality and your payment is secure, is another payment feature. This indicates that this platform will safeguard you against scammers, so you don’t have to worry about it.

Recommended Read:  Why you should sell on an eCommerce Marketplace?

Tools for Communication

A messaging feature included in the Alibaba.com app makes it simple to communicate with buyers and sellers. Buyers and sellers can now interact and communicate without problems. You can conduct business with Alibaba.com without integrating with any third parties.

Customer Service on Call

The expert services that are always available at Alibaba.com to assist customers at every turn are yet another fantastic feature. On this platform, experts and professionals can help you make the most of your time on Alibaba.com.

Tools for Marketing and Analytics

Alibaba.com provides users with a variety of marketing tools to help them strengthen their efforts and increase revenue. As a vendor, you may raise your profile, gain customer information, and perform inexpensive targeted advertising.

Simple to Use

The user interface of Alibaba.com is excellent, making it simple for vendors and customers to move throughout the site. Every action on Alibaba.com is simple, whether you wish to post your products or place an order.

Recommended Read: 8 tips to drive more customers on a Marketplace

Let’s Get into Tips and Tricks to Boost Sales in 2022

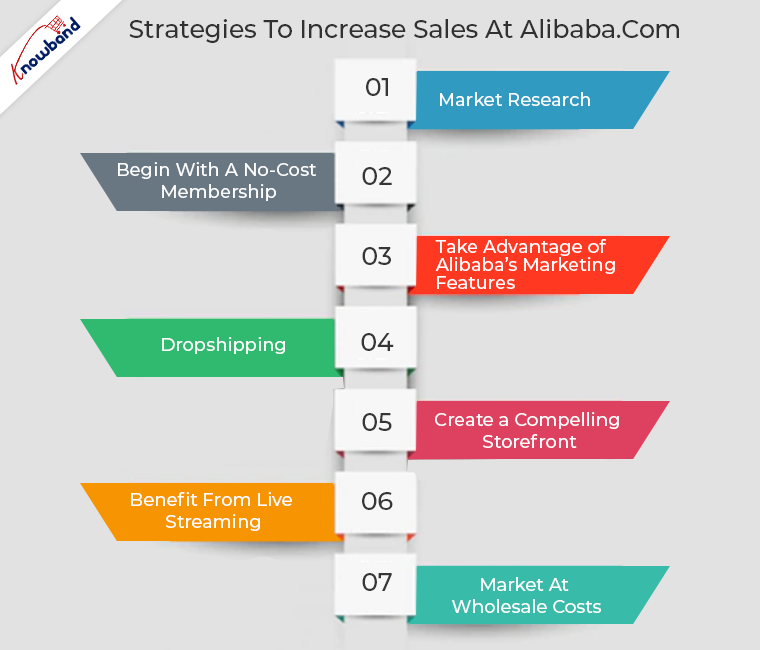
To begin your online business, you must create an account on Alibaba.com. Alibaba offers several packages based on where you are. Visit Alibaba.com and select “Seller” as your role to create an account. You should go above and beyond if you want your Alibaba eCommerce campaign to be truly effective. Here are a few strategies to increase your Alibaba sales!

1. Market Research

When you open an Alibaba account, one of the first things you should do is look into the state of the market.  What are people looking for exactly? Would you stand to gain the most by selling? What price range do consumers seem to be prepared to accept?

Your grasp of how to put up your store, including what products to list, how much they should cost, and who you should target with your marketing, will be improved as a result of your research.

2. Begin with a No-Cost Membership

A free membership will be another useful piece of advice for selling on Alibaba if you have just started your account. You may have big ideas for Alibaba and want to sell far more than the 50 products that the free account allows. You shouldn’t, however, put yourself in a dangerous position initially.

Do not immediately sign up for a Premium Gold membership after creating your account. Upgrades to your account are always available later! But initially, it’s best to be more cautious until you completely understand how the platform operates and whether you can successfully market it.

It is advised to spend money on becoming a verified or gold supplier once you are comfortable with the business. Why?

Being a verified supplier demonstrates your dependability and reliability to potential customers. Because of this, people are more inclined to buy from you than from a seller who lacks a verification badge.

3. Take Advantage of Alibaba’s Marketing Features

There is one thing you must always do if you want to sell anything: market it. Nobody will purchase your goods unless you first inform them of their existence and persuade them to do so. Fortunately, Alibaba provides several tools to assist you in marketing your products, so it would be wise to make the most of them.

Recommended Read: Benefits of Selling on Multi-Vendor Marketplace

4. Dropshipping

Dropshipping is a successful online business concept on Alibaba.com. With this company strategy, you can generate income without making big investments. Without stock management, online product listings are used. Instead, you make purchases from a third party to carry out customer orders.

5. Create a Compelling Storefront

You must create a store where customers may browse your products and profile. Setting up a captivating storefront on Alibaba.com is a terrific approach to generating sales there. Make sure to update your business profile, post a lot of products, and use high-quality images. If people find your online store intriguing, they are more likely to purchase from you.

6. Benefit from Live Streaming

Live streaming is one form of digital media that enables you to engage with and reach a larger audience. A live streaming function on Alibaba.com allows vendors to show off their goods in real-time. You can put your products on display, demonstrate how they function and respond to questions from potential buyers.

7. Market at Wholesale Costs

People shop on Alibaba.com because they can find a broad range of things to buy and because the prices are competitive. Sellers should deal in wholesale products and make sure that their prices are reasonable and competitive. When purchasing the goods they require, consumers constantly search for the best deal.

Recommended Read: Why Marketplace is in trend?

In the End:

Are you a manufacturer or a retailer with goods to sell? Using Alibaba.com to find millions of shops and customers is a terrific method to increase your company’s revenue. Open a seller account on Alibaba.com, list your products, and begin fulfilling orders to start earning money there.

Knowband an eCommerce plugin development offers various multi-seller marketplace modules to transform your Online shop into Amazon, or Etsy-like Marketplace. Also, the Knowband store provides marketplace connector modules to lessen the burden of online sellers catering for customers at both marketplace and online shops. In addition to the marketplace modules, Knowband offers a list top selling modules to its customers. Some of the Bestselling modules are One Page Checkout, Mobile App Builder, Abandonded Cart, Spin and Win Module and the list goes on. To know about these modules or have any queries related to eCommerce modules, feel free to get in touch with us at support@Knowband.com

How To Repair A Suspect Database In MSSQL

The database may occasionally be marked as SUSPECT when you connect to a SQL Server instance. You won’t be able to connect to the database to read and write data in this situation. The procedures you must follow to restore your database that has been marked as SUSPECT are discussed in the article.

Reasons of this error

Here are some following causes due to we have to face the suspected database error.

  1. Restart or shut down the Database without shutting down the SharePoint server.
  2. The database could have become corrupted.
  3. There is not enough space available for the SQL Server to recover the database during startup.
  4. The database cannot be opened due to inaccessible files or insufficient memory or disk space.
  5. The database files are being held by the operating systems, third-party backup software etc.
  6. There was an unexpected SQL Server Shutdown, power failure, or hardware failure.

Resolutions

Here are a few steps to resolve this issue. First, make sure you have Microsoft SQL Server Management Studio in your system.

1.   First, open your Microsoft SQL Server Management Studio and fill in your database credentials to connect to your database.

2.   Then right-click on your suspected DB and click on the New Query button to write a query.

3.  After that run the below commands one by one Here you need to replace [YourDatabase] with the name of your database Name.

a. Reset the database status to clear any error flags.

EXEC sp_resetstatus [YourDatabase];

This command resets the status of the specified database. If a database is marked as “suspect” or in a similar state, this command can clear that status. It’s the first step to attempt to bring the database back online.

b. Put the database into a state where it can be safely checked and repaired (emergency mode).

ALTER DATABASE [YourDatabase] SET EMERGENCY

This command sets the database to emergency mode. Emergency mode is a special state used for troubleshooting. In this mode:

  • The database is set to read-only.
  • Only members of the sysadmin role can access the database.
  • It’s used when the database is severely damaged and cannot be accessed normally.

c. Check for any issues in the database.

  DBCC checkdb([YourDatabase])

This command runs the DBCC CHECKDB utility, which checks the physical and logical integrity of the entire database. It identifies any corruption or issues within the database.

d. Ensure no other users are connected to interfere with the repair process (single-user mode).

  ALTER DATABASE [YourDatabase] SET SINGLE_USER WITH ROLLBACK IMMEDIATE

This command sets the database to single-user mode with immediate rollback. This means:

  • Only one user can access the database at a time.
  • Any other connections to the database are terminated immediately.
  • It’s necessary to prevent other users from interfering with the repair process.

e. Repair the database, accepting that some data might be lost to fix the issues.

  DBCC CheckDB ([YourDatabase], REPAIR_ALLOW_DATA_LOSS)

This command runs the DBCC CHECKDB utility again, but this time with the REPAIR_ALLOW_DATA_LOSS option. This option attempts to repair any detected corruption, but it can result in data loss because it may delete or modify corrupted data to make the database functional again.

f. Return the database to normal operation (multi-user mode).

 ALTER DATABASE [YourDatabase] SET MULTI_USER

This command sets the database back to multi-user mode, which allows multiple users to connect and use the database as normal.

4. After Execute the script refreshes the database.

For any queries, you can reach us at support@knowband.com. Knowband provides best-in-class solutions for everything eCommerce. We also offer custom development of all sorts like Plugins and Mobile apps for Prestashop, and Opencart. Magento and Magento 2. Click here to know more.

Knowband Mobile App Builder

Get the mobile app created for your store in a few hours with the Knowband Mobile App Builder Module.

KNOW MORE

Recommendations for you:

We highly recommend our No Code Mobile App solution to all eCommerce store owners. Know more:


How to use UDL File for check the database connectivity

What is UDL file

UDF file is a simple test file which we use for check database connectivity.

Create UDL File

Here are some steps to create a UDF file.

  1. First, create a test with (.txt) extension.
  2. Then open your file explorer click on view tab and checkmark the “File Name Extensions” option.
  3. Now right-click on your test file and click on rename and replace the (.txt) extension with (.udl).
  4. Now udl file has successfully created.

How to use UDL File

First, open your udl file and then fill your database details on the file and click on test connection. If connection is successful then your database connection is stable.

Zipping Issue: Last File is not zipping

Objective of the blog:

The objective of this blog is to help you know how to fix the issue –“last file is not zipping”. If you are facing the same issue then this blog will help you. Example- If there are 4 text files then only 3 files are zipping.

Reason for this issue:

The zip_close($zip) function is not working due to which the file was unlinking before creating zip.

Solution:

You need to replace zip_close($zip) by $zip->close() to fix this issue.

Sample Code is given below:

$zip = new ZipArchive();
// zip 2 days older files
foreach (glob($directory. '/*.txt') as $a_file) {
if (filemtime($a_file) < time() - 172800) { //2 days older 172800
$filename_array = explode("/", $a_file);
$key = sizeof($filename_array) - 1;
$filename = $filename_array[$key];
$source_path = $directory.'/';
$zip_file = $source_path.str_replace('.txt','',$filename).".zip";
if ($zip->open($zip_file, ZipArchive::CREATE) !== TRUE) {
exit("cannot open".$zip_file."\n");
}
$zip->addFile($a_file,$filename);
}
}
$zip->close(); // Replaced zip_close($zip) by $zip->close();

// Move 90 days olders in the Archive and remove the files which are older than 180 days
foreach (glob($directory.'/*.zip') as $a_file) {
// remove files which older than 180 days.
if (filemtime($a_file) < time() - 15552000) { //180 days older 15552000
unlink($a_file);
}
}

Summary

In this blog, we have changed the zipping close function in order to fix the given issue.

How to add setting for custom plugin in the WordPress setting menu?

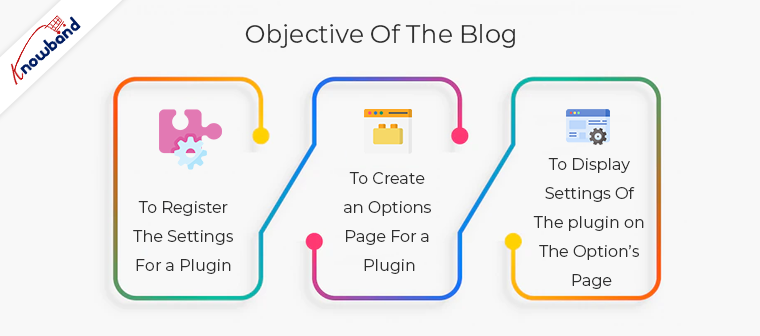
Objective of the blog:

The objective of this blog is to help you know how the setting of any custom plugin is created. Nowadays, most of the plugins contain settings to allow users to alter the functionality of the plugin according to their choice.


In this blog, we are creating the custom plugin for your reference. The basic requirements to add the setting of the plugin are:

  • To register the settings for a Plugin
  • To create an Options Page for a plugin
  • To display Settings of the plugin on the Option’s Page

Steps to add the plugin setting:

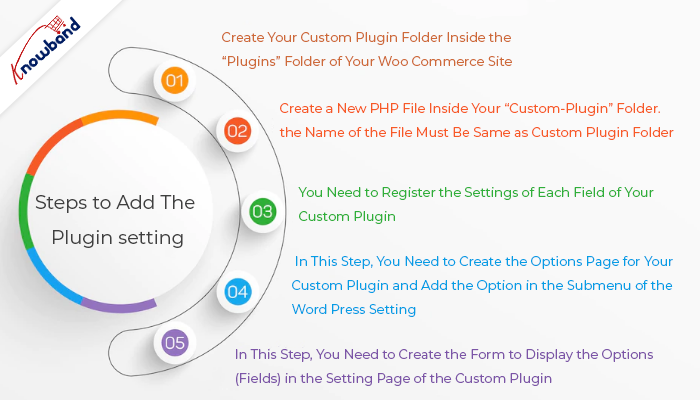
1. Create your custom plugin folder inside the “plugins” folder of your Woo Commerce site.
In the sample code, we have created a folder “custom-plugin”.

2. Create a new PHP file inside your “custom-plugin” folder. The name of the file must be same as custom plugin folder. In the sample code, we have created a file “custom-plugin.php”.

3. You need to register the settings of each field of your custom plugin. This step whitelist your plugin setting options (fields) that are used to save the plugin setting data in the wp_options table. Here, I have registered the setting for my custom-plugin as shown below and added that code to the “custom-plugin.php” file.

/*
* Plugin Name: Custom Plugin
* Description: This plugin is the custom plugin and created by velsof
* Version : 1.0.0
* Author: Velsof
*/
function custom_plugin_register_settings() {

register_setting(‘custom_plugin_options_group’, ‘first_field_name’);

register_setting(‘custom_plugin_options_group’, ‘second_field_name’);

register_setting(‘custom_plugin_options_group’, ‘third_field_name’);

}
add_action(‘admin_init’, ‘custom_plugin_register_settings’);

To learn more about “register_setting” you can check the document

“https://developer.wordpress.org/reference/functions/register_setting/”

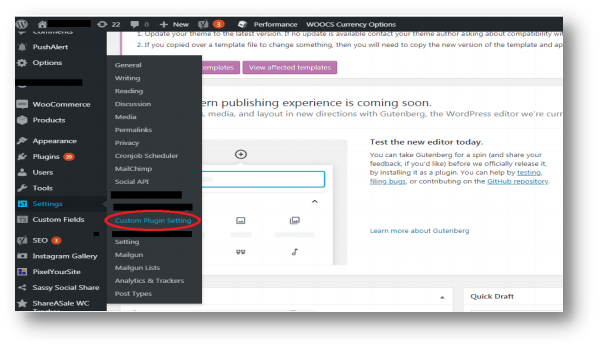
4. In this step, you need to create the options page for your custom plugin and add the option in the submenu of the Word Press setting. In the sample code, we have written the code of options page below and added the same to the “custom-plugin.php” file.

function custom_plugin_setting_page() {

// add_options_page( string $page_title, string $menu_title, string $capability, string $menu_slug, callable $function = '' )

add_options_page('Custom Plugin', 'Custom Plugin Setting', 'manage_options', 'custom-plugin-setting-url', 'custom_page_html_form');

// custom_page_html_form is the function in which I have written the HTML for my custom plugin form.
}
add_action('admin_menu', 'custom_plugin_setting_page');

After completing this step you will be able to see the option of your custom plugin in the Word press setting as shown in the image below:

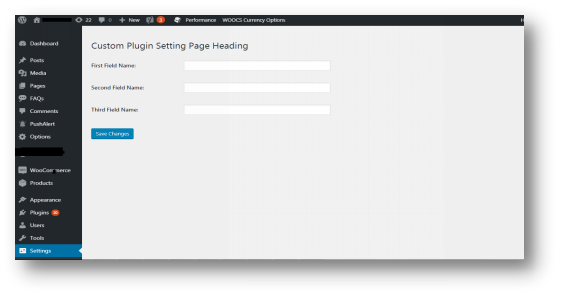
5. In this step, you need to create the form to display the options (fields) in the setting page of the custom plugin. Here, I have created a function “custom_page_html_form” as shown below and added the same to the “custom-plugin.php” file.

function custom_page_html_form() { ?>
    <div class="wrap">
        <h2>Custom Plugin Setting Page Heading</h2>
        <form method="post" action="options.php">
            <?php settings_fields('custom_plugin_options_group'); ?>

        <table class="form-table">

            <tr>
                <th><label for="first_field_id">First Field Name:</label></th>

                <td>
<input type = 'text' class="regular-text" id="first_field_id" name="first_field_name" value="<?php echo get_option('first_field_name'); ?>">
                </td>
            </tr>

            <tr>
                <th><label for="second_field_id">Second Field Name:</label></th>
                <td>
<input type = 'text' class="regular-text" id="second_field_id" name="second_field_name" value="<?php echo get_option('second_field_name'); ?>">
                </td>
            </tr>

            <tr>
                <th><label for="third_field_id">Third Field Name:</label></th>
   <td>
<input type = 'text' class="regular-text" id="third_field_id" name="third_field_name" value="<?php echo get_option('third_field_name'); ?>">
                </td>
            </tr>
        </table>

        <?php submit_button(); ?>

    </div>
<?php } ?>

After completing this step the form of your custom plugin will be created and the data will be saved in the database on clicking the button “Save Changes” as shown below:

Note: If you get the error “options page not found” on saving the setting of the custom plugin. Then you need to follow the below steps:

1.Open “options.php” file (File Location: wp\wp-admin\options.php).

2.Add the custom plugin option group in the $whitelist_options array.

Example:

$whitelist_options['custom_plugin_options_group’] = array('first_field_name’, ‘second_field_name’, ‘third_field_name’);

You can download the sample code here.

Summary

After reading this document you will be able to add the setting of your custom plugin in the WordPress setting menu.

Knowband also provides the best in class modules for Prestashop, Opencart, Magento, Magento 2, and Woocommerce.

We are providing a No Code Mobile App Solution for Woocommerce that every store needs to have. Know more here.