We boast of the best in the industry plugins for eCommerce systems and has years of experience working with eCommerce websites.
We provide best plugins for platforms like - Magento, Prestashop, OpenCart and Shopify. We also provide custom module development and customization services for the website and modules.
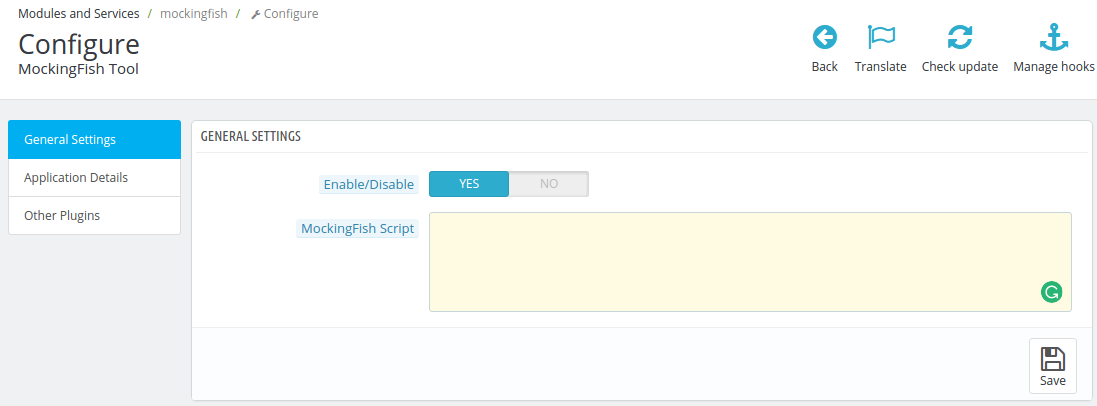
Włącz / wyłącz: Po wybraniu opcji moduł wstawi dodany skrypt z przodu.
MockingFish Script: This field will contain the script which needs to be inserted in website header. If you do not have any script, click on application details tab which lists down all steps to get MockingFish script.
2. Application Details
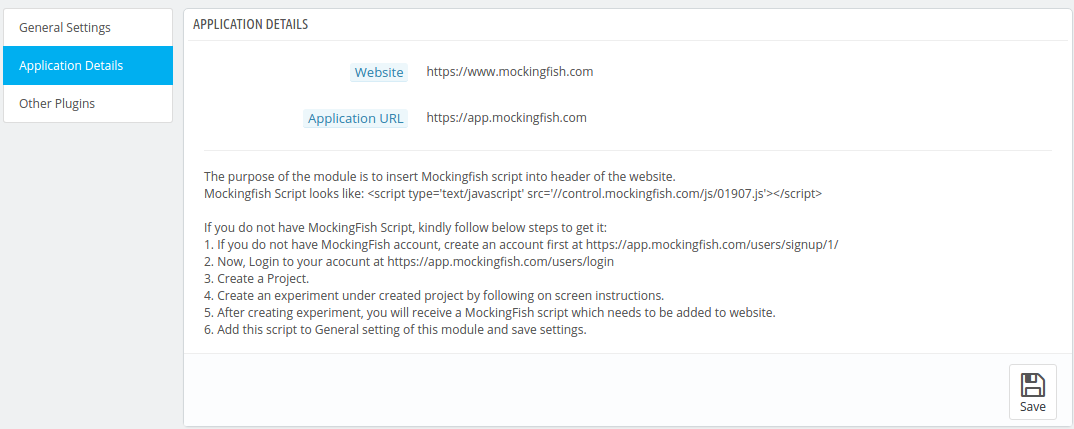
This tab shows admin, the MockingFish website URLs and also list down steps to get MockingFish Script.
3. Other Plugins
This tab lead admin to our others plugins listing page on PrestaShop sklep.
1. Copie a pasta do módulo mockingfish para seu root_directory / modules / de sua loja via FTP ou use a interface PrestaShop para fazer o upload do plugin.
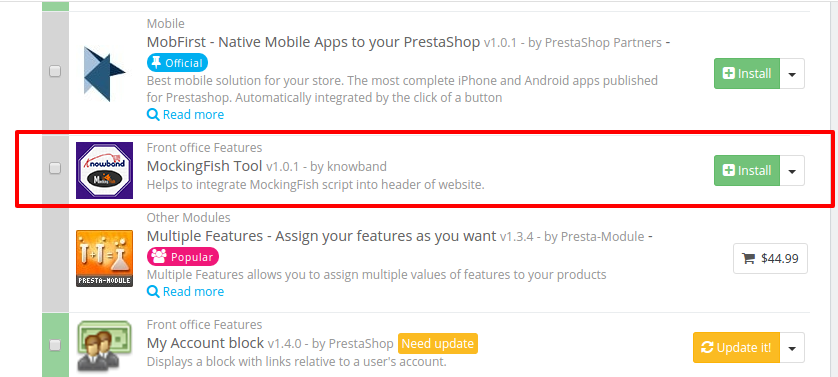
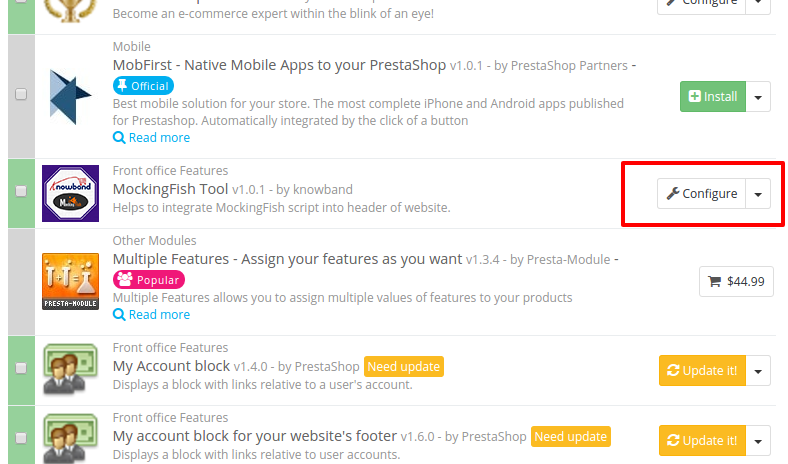
2. Após o upload, o módulo será listado na página de listagem do módulo no painel de administração, conforme mostrado abaixo da tela.
3. Se o módulo não estiver sendo exibido na página de listagem de módulos, pesquise-o pelo módulo de filtragem com os seguintes detalhes:
Palavra chave: mockingfish
Autor: Knowband
Nota:
1. Instale o módulo e um botão de configuração estará lá na frente deste plugin na página de listagem de módulos, como mostrado na tela abaixo:
Habilitar desabilitar: Quando habilitado é selecionado módulo irá inserir script adicionado no front-end.
Script MockingFish: Este campo conterá o script que precisa ser inserido no cabeçalho do site. Se você não tiver nenhum script, clique na guia detalhes do aplicativo, que lista todas as etapas abaixo para obter o script MockingFish.
2. Detalhes da aplicação
Esta aba mostra admin, o Mockingfish URLs de sites e listar as etapas abaixo para obter o MockingFish Script.
3. Outros Plugins
Esta guia leva o administrador à página de listagem de plug-ins PrestaShop armazenar.
There is a constant complaint among numerous online shoppers that they are not informed actively about other similar products or recommendations while making a purchase through an eCommerce store. This not only affects their shopping behavior but also has an adverse impact on the conversion rates, customer engagement and product sales of your eCommerce site. But, this would not be case with the PrestaShop store owners anymore as Knowband, a leading name in the field of eCommerce modules development has come up with this amazing PrestaShop Automatic Related Products Module that can provide instant product recommendations to customers while doing online shopping. It is really a massive game changer in the eCommerce world and can change the business fortunes of numerous PrestaShop sites around the world. Let us explore this PrestaShop extension in detail for redefining the online shopping experience for your targeted customers.
USP features of this PrestaShop extension :
This wonderful module from Knowband is simply amazing in more than one way. It is equipped with numerous features and functionalities that makes its unique among other available eCommerce modules. Those features are explained below:
1. Provides related product information about the current product-
For boosting your product sales and conversion rates, this PrestaShop extension has the functionality that allow online shoppers to get the various related products or product recommendations while purchasing a particular product. With this feature, customers can be easily persuaded to shop more and PrestaShop store owners can effortlessly improve your product sales and conversion rates.
2. Supports various mobile based devices-
This PrestaShop Automatic Related Products module is built on a responsive mobile design that makes it easier to be used on multiple devices like desktops, laptops, smart phones or tablets. This development ensures that the customers get the same functionality and user experience irrespective of the device used by them.
3. Works independently with other themes and browsers-
Now, PrestaShop store owners can use this PrestaShop extension without any trouble as it can work independently irrespective of the themes and browsers used by the site owners. With this addon, you don’t need any other update or extension to work seamlessly on any browser and theme.
4. Provides freedom to display the product on desired location-
With the various features of this amazing addon, you can now decide about where to display your related products on your PrestaShop site for grabbing the instant attention of the targeted customers. These related products can be shown on the left or right column of your PrestaShop site in order to persuade people to shop more through your online store.
5. Flexibility to show the related products according to the choice-
One of the specialty of this PrestaShop extension is that it allows site owners to display the related products according to their choice and preference. Apart from this, site admin can effortlessly configure the each product individually for boosting their product sales, site traffic and customer engagement.
6. It can be easily installed and configured-
This PrestaShop Automatic related product addon can be easily installed and configured by any individual having the basic knowledge about computers. But, if you still encounter any issue related to this addon, you can easily contact us any time for getting effective resolution of your problem.
7. It is faster in loading along with compatibility for SSL and multiple stores-
Compared to the other eCommerce modules that aim to improve the online shopping experience, this module load pages quickly and is compatible with the SSL for providing the enhanced shopping experience. Further, this PrestaShop extension can be effectively used for any eCommerce store regardless of the nature and size of its business.
For grabbing the immediate attention and for enhanced online shopping experience, this PrestaShop Automatic Related Products module is definitely the right choice to make. For more information about our other amazing modules for PrestaShop, Magento and OpenCart customers, you need to visit our eCommerce site at knowband.
Prestashop is one of the widely used eCommerce platforms because of the awesome themes, features, and extensions available for the store owners. Every store owner wants to provide a smooth and fast shopping experience to their customers to make their business more successful. The checkout process became the key point of this process. Hence, Prestashop One Page Checkout Addon is a solution to this issue.
The One Page Checkout options reduce the additional efforts of the customers. It allows them to complete the checkout process on a single page hence reducing the abandoned cart. The best part that comes with Prestashop one checkout module is Social login. With this feature, users can log in with Google and Facebook login.
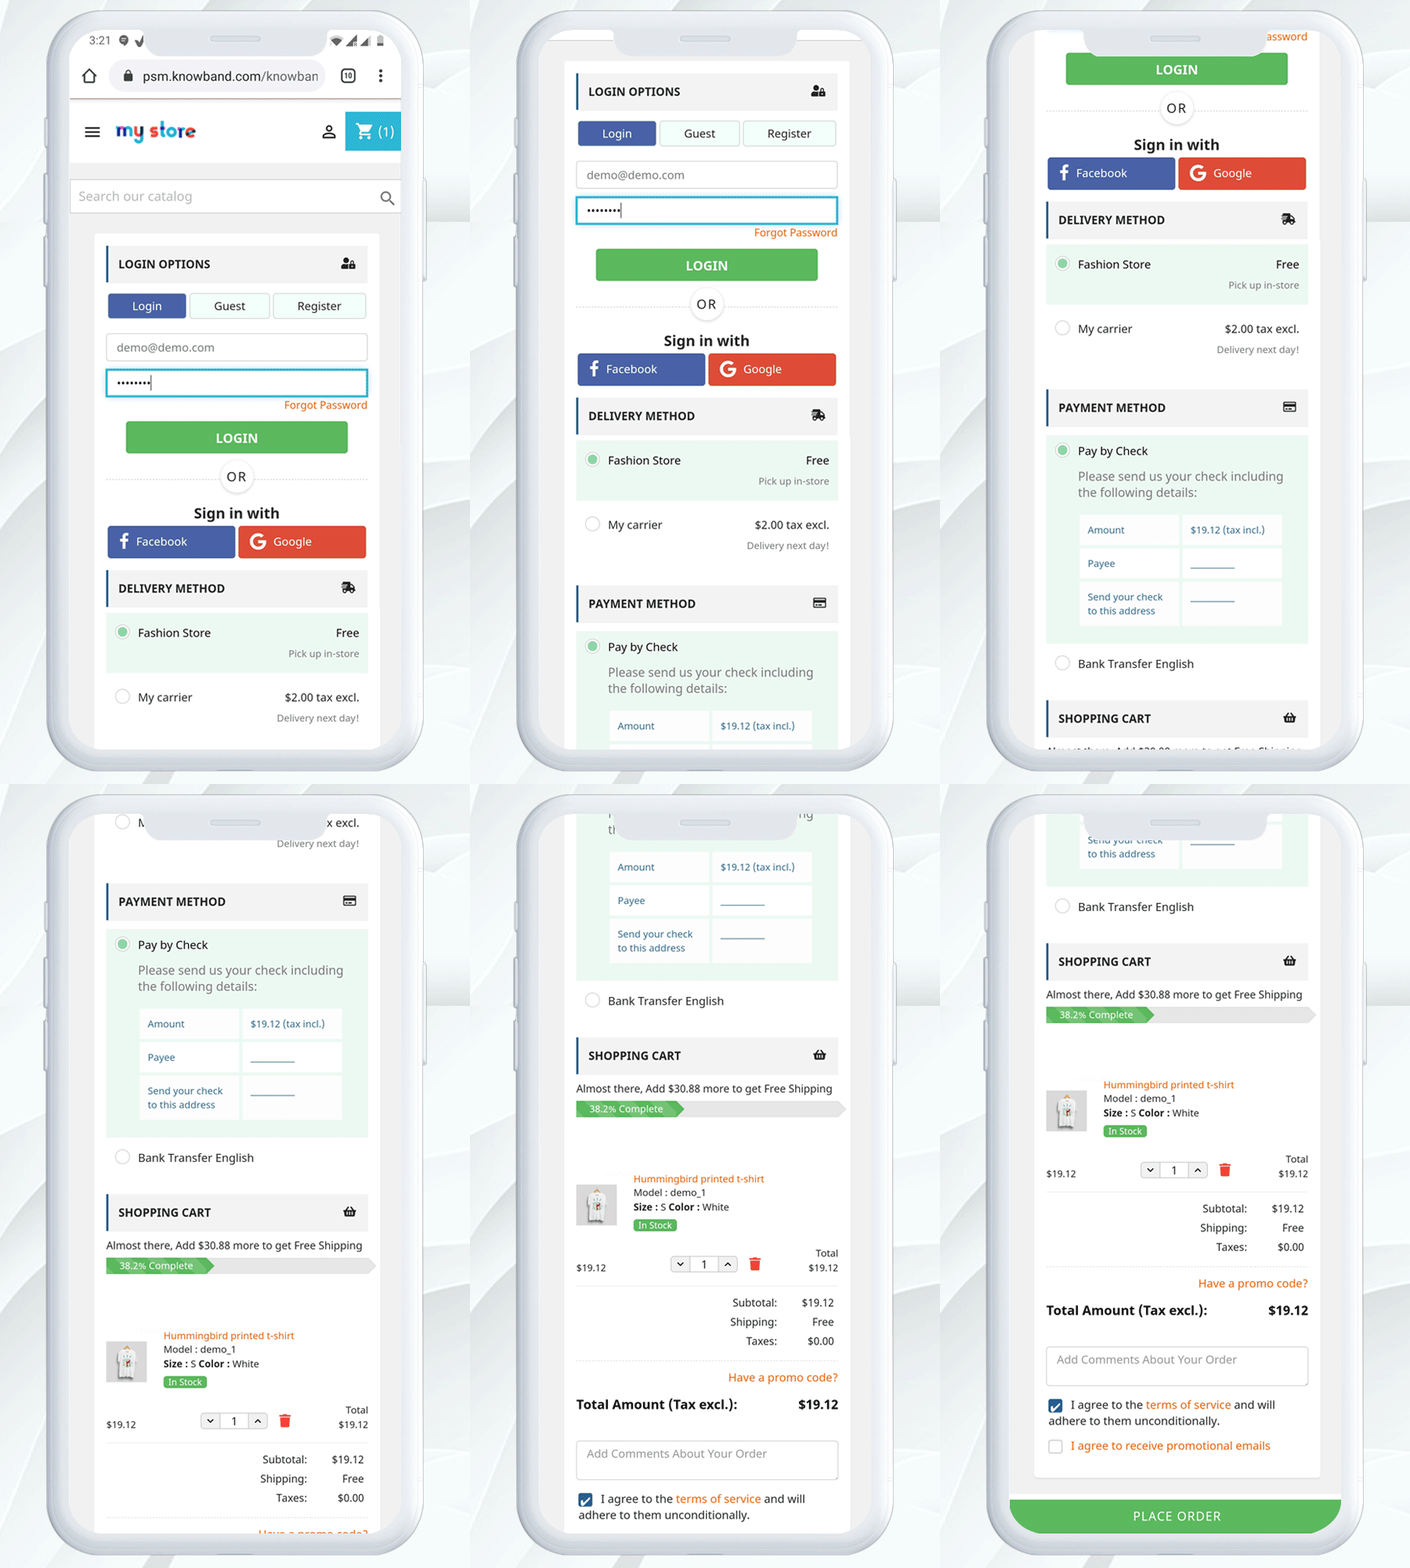
Mobile View:
Note: The Prestashop one step checkout Module by Knowband is GDPR compliant.
What’s New in PrestaShop One Page Checkout:
There are some newly added features in the PrestaShop One Page Supercheckout:
1) Choose Total Price Display Methods for the Checkout Page: Now the e-merchant can choose different methods to display the total price of the products on the checkout page. The store admin can choose default PrestaShop price, price inclusive tax, price exclusive tax, or both inclusive and exclusive price from the back office of the PrestaShop One Page SuperCheckout addon.
2) Option to Show the Custom Field in the Invoice: The store owner can now show the custom field’s data in the Invoice of the orders placed. The customers can check the custom field they added on the checkout page in their invoices.
3) Compatibility with Zasielkovna and gmparcellocker addons: Knowband’s PrestaShop One Page SuperCheckout addon is now fully compatible with the gmparcellocker and Zasielkovna addons.
4) Fixed Compatibility with Mollie Payment Method: In the latest update, the issues with the compatibility with the Mollie Payment Method have been fixed.
5) Compatible with PS v1.7.7.1: The PrestaShop One Page Checkout module is now compatible with the latest PrestaShop version v1.7.7.1.
6) The admin can make a detailed comparison between the order revenue earned and the revenue lost in abandoned carts in the form of a graphical data. They can filter analysis results in days, weeks, months and year to get a precise data.
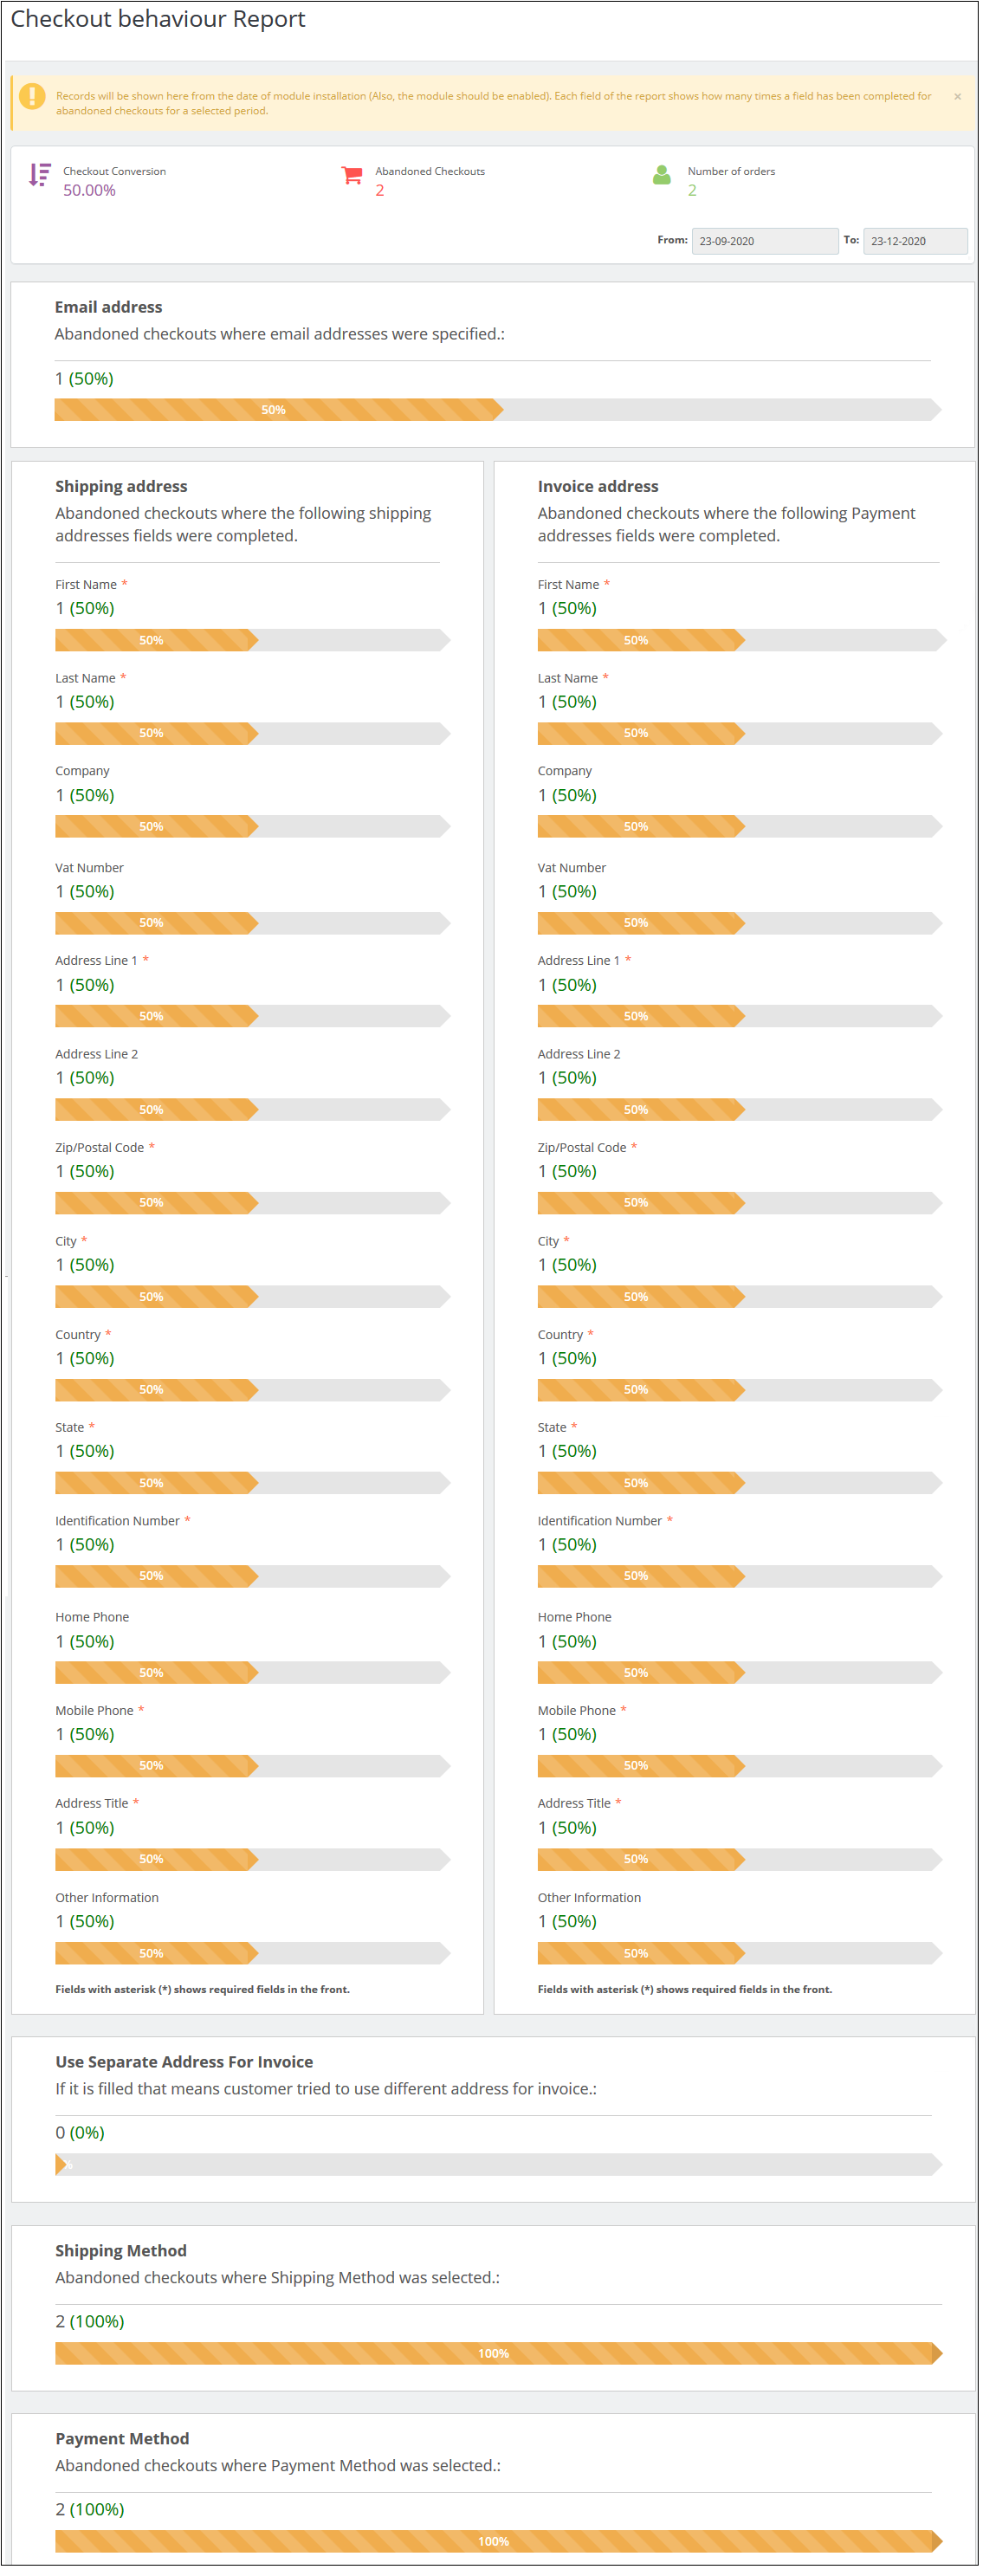
7) There is a new added functionality to track the checkout behaviour. The admin can check the percentage of data filled or skipped by the online users who left their cart abandoned so that the admin can remove the unnecessary steps which are bothering the customers.
8) There is an option to verify whether the identification number CFI/DNI/NIF entered by the customers of Spain is correct or not.
1.1 Admin-Benefits of One Page Checkout Prestashop Addon
Let’s take a quick look at the benefits of having a Prestashop One step checkout module on your Prestashop store:
Prestashop Quick checkout addon allows the store owners can design their own one page checkout page as per the website theme.
Prestashop simplified checkout addon is compatible with multiple stores and devices.
This quick checkout extension Prestashop Targets multi-lingual customers.
The Prestashop fast checkout addon offers less and relevant checkout steps.
This quick checkout add-on Prestashop serves a better customer experience.
Prestashop One Page Checkout addon eliminates page reload time and keeps checkout information at a single page.
With the help of this Prestashop One Page Checkout Extension, custom fields can be added as desired.
Prestashop One Step Checkout Addon allows the admin to get a thorough statistical report about the rate of abandoned checkouts and the completed orders.
The new checkout behavior report helps the eCommerce merchant to analyze the behavior of the customers who abandoned their carts during the checkout process.
1.2 Features of Prestashop One Step Checkout Addon
One Page Checkout Prestashop offers easy customization.
With the addon, you can offer Guest checkout functionality to your customers.
Prestashop One Page Supercheckout provides simple & quick Login.
Social login options are offered in this one page checkout Prestashop addon.
Prestashop One Step Checkout Addon has an inline validation feature that shows an error to customers if any wrong value is entered.
One Step Checkout Prestashop Extension is compatible with multiple payment and shipping methods.
Responsive one page checkout Prestashop is mobile and tablet responsive.
This one page checkout module is GDPR compatible.
The responsive one page checkout Prestashop module allows the admin to create as many privacy policies as per the requirement.
The one step checkout Prestashop addon offers the admin to make any of the privacy policies mandatory or optional.
The admin can view the customer consent along with all the details including order id, email id, customer name, accepted consent, time, and date as well.
Prestashop responsive one step checkout addon is compatible with free and virtual/digital products.
Cart Customization on Prestashop One Page Checkout Page.
Prestashop one page checkout addon offers an option to add custom fields as well.
MailChimp Integration is provided in this Prestashop Quick checkout addon. Other integrators SendInBlue and Klaviyo are also supported.
Offers Ship2Pay feature which allows the store owner to map payment methods with the selected delivery methods.
Supercheckout provides an option to update or delete the saved address.
You also get an option to create ‘Date’ and ‘File’ type custom fields.
One Page Checkout displays shipping and payment methods only when the customer saves the address.
Admin can test the one page checkout on a specific URL that is provided at the backend.
Provides compatibility with various payment methods like Amazon Pay(only 1.7 version), a4paypalpro, and Play plug.
Prestashop simplified checkout addon allows the admin to add custom CSS and JS.
This quick checkout extension Prestashop SEO Friendly.
The Prestashop fast checkout addon offers multilingual Support.
Prestashop One Page Checkout module allows the admin to show/hide any fields.
Prestashop One Page Checkout Extension offers automatic customer registration.
More attractive feature
Country Autofill: The autofill feature of this Supercheckout module helps in auto-selecting the country for the customers based on their IP.
Google Address Autofill: The auto-fill feature automatically fills up the address fields at the Supercheckout page. The auto-fillup functionality uses Google Places Integration services for which Google API Key has to be configured from the backend.
Gift message: Allow your customers to add a gift message with the order. Admin can check this message on the order details page from the backend interface.
Show/Hide total tax field: Admin can show/hide the total tax field in the cart summary section of one page checkout.
Address Fields Layout Changes: Admin can change the address fields layout from 1-column to 2 columns. Example: User detail fields like First name & last name can be shown in a single row.
One Page Checkout is now compatible with Stripe Official and PayPal Plus payment methods.
Set Condition for Free Shipping: Prestashop Supercheckout gives an option to set a minimum amount for showing a free shipping banner at the checkout page.
Enable validation for CIF/DNI/NIF: Prestashop fast checkout addon offers validation for CIF/DNI/NIF for Spain.
Abandoned Checkout Statistics: Prestashop Quick checkout addon offers a graphical analysis of the abandoned cart details and completed order details.
Checkout Behaviour Report: The admin can track the checkout behavior in a precise graphical format.
With the addon, the store owner can now allow customers to log in with their Paypal ID.
The e-merchant can now redirect the customers directly to the checkout page after clicking on the Checkout button. If the admin disables this feature, then the users will be redirected to the cart page.
The store owner can now allow the customers to register themselves with their Payment address name. Earlier the users had the option to register with the delivery address but now they can use their Payment address as well.
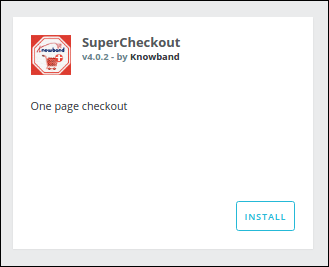
2. One Page Checkout Prestashop Module Installation Guide
2.1 Copy the “SuperCheckout” module folder under your root_directory/modules/of your store via FTP or use the Prestashop interface to upload the plugin.
2.2 After copy, Prestashop one page checkout module will be listed on the module listing page in the admin panel as shown given below screen
2.3 If Prestashop one page checkout module is not displaying on your module listing page, search it by filtering the module with the following details.
Filter by: Installed & Not Installed/Enabled & Disabled
Note:
When you will click on the install button, a pop-up box will appear which will display warning messages. You can ignore these messages and move ahead. There will be no negative impact of this warning message on your store.
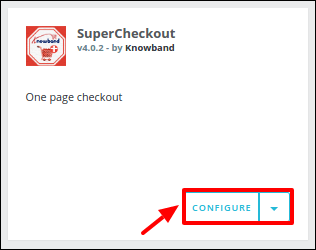
After installing Prestashop Supercheckout addon, a “configure” button will be in front of this one page checkout plugin on the module listing page as shown on the screen below:
3. User Manual
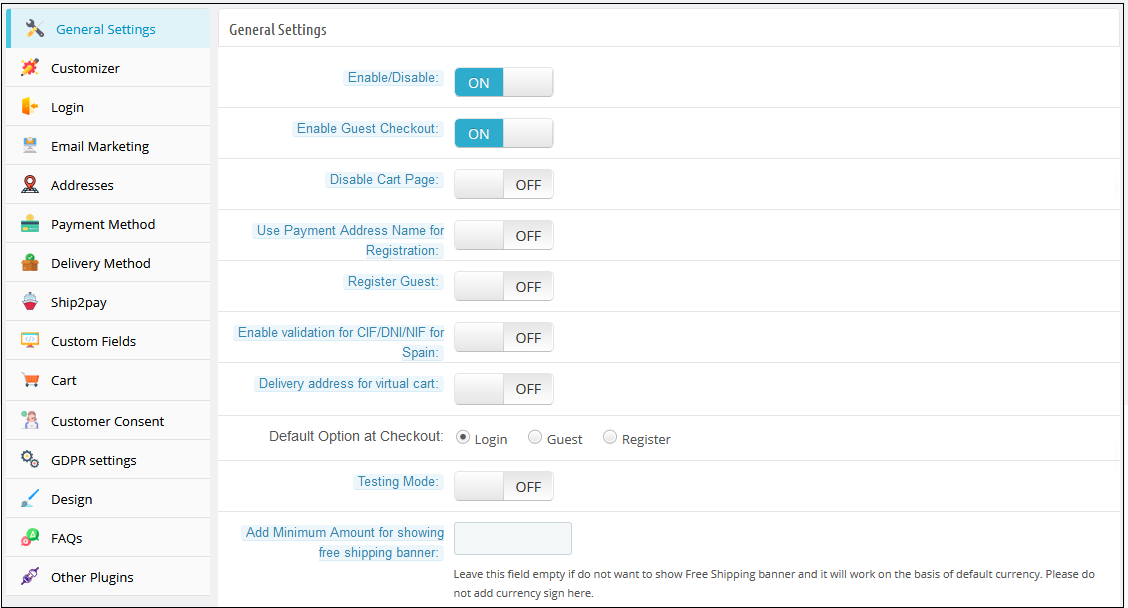
To access this Prestashop one page checkout addon, Click on the configure button of the Supercheckout module. On clicking, One Page Checkout Prestashop module interface will be open and the following screen will display as given below:
3.1 General Settings
3.1.1 General Settings of Prestashop Fast Checkout Addon
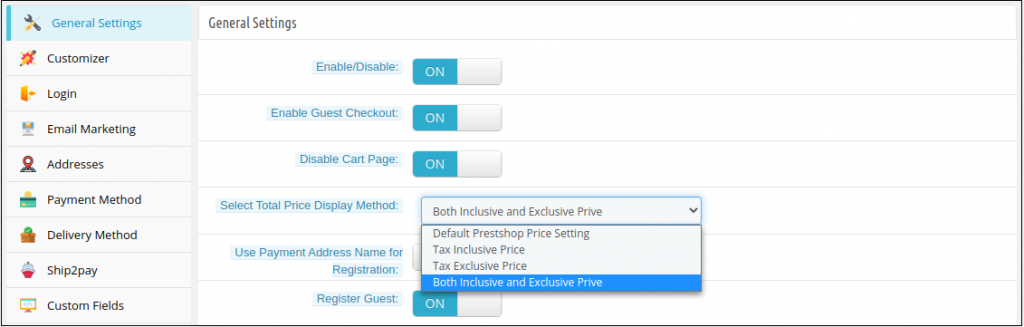
Enable/Disable: To enable the Prestashop one-page checkout plugin, switch the enable button from OFF to ON. The default value will be OFF.
Enable Guest Checkout: By enabling this option of the Prestashop quick checkout module, the store will allow the customer to checkout as a guest. The default value will be OFF
Register Guest: By enabling this option of the simplified checkout Prestashop module, the store will register guests automatically and send a registration email to the corresponding customer. The default value of this field of Prestashop One Step Checkout Addon will be OFF.
Enable validation for CIF/DNI/NIF for Spain: The admin can check and verify if the identification number CIF/DNI/NIF entered by the customers of Spain is valid or not.
Delivery Address for Virtual Cart: Admin can enable or disable this option to show/hide delivery addresses for the virtual or downloadable products.
Disable Cart page: With the module, the store admin can disable the cart page from the General Settings. If it is disabled, then the customer will be redirected directly to the Checkout page after clicking on the “Process to Checkout” button.
Select Total Price Display Method: With the addon, the store owner can select from various methods to display the product’s total price format on the checkout page. The admin can display the default PrestaShop price, price inclusive tax, exclusive tax, or both inclusive and exclusive tax.
Use Payment Address Name for Registration: The PrestaShop One Page Checkout module allows the customers to use the name mentioned in the Payment Address for registration.
Default Checkout Option: There are 3 options in this field of the One Step Checkout Prestashop Extension, which will display at the front end. With these options of the fast checkout Prestashop module, the admin can set which option will display to customers on the one page checkout. These options are:
1. Login: If this option of the Responsive one page checkout Prestashop addon is selected, the customer will see the login form in the login section.
2. Guest: If this option of the Prestashop responsive one step checkout addon is selected, the customer will see only the email field in the login section.
3. Register: If this option of the one page checkout Prestashop module is selected, the customer will see the registration form in the login section.
On the front, the customer can also change the checkout option. By default, the login option will be selected
Testing Mode: If you want to test the Prestashop one page checkout addon before making it live on your store then you can enable this option. While this option of the One Step Checkout Prestashop Extension is enabled your customers are redirected to the normal checkout page but you can open the SuperCheckout page directly through the URL. The URL for the same appears below this option once you enable it.
Add Minimum Amount for Showing Free Shipping Banner: Using this option, you can set a minimum amount for showing a free shipping banner at the checkout page.
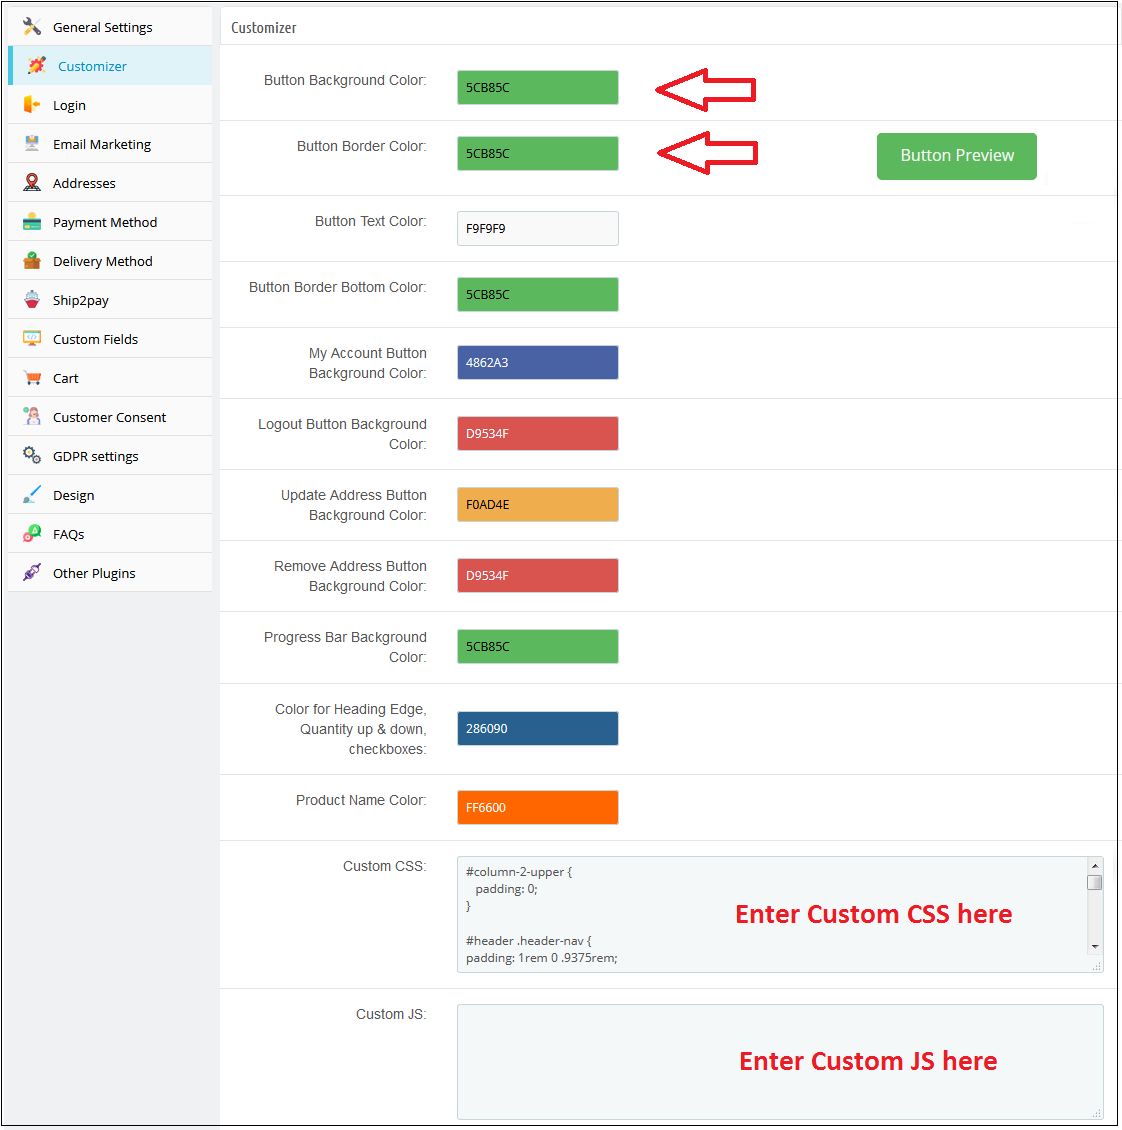
3.1.2 Customizer settings of Prestashop fast checkout module
This tab in Prestashop one page checkout addon has the features using which the admin can modify the checkout front end by adding some CSS or JS in its fields. This tab of Prestashop fast checkout addon already has the feature to change the colors of buttons that appear in the checkout. Whatever CSS will be placed in the custom CSS field that CSS will appear in the front of the store and the same is the case with the custom JS field.
3.1.3 Login Tab
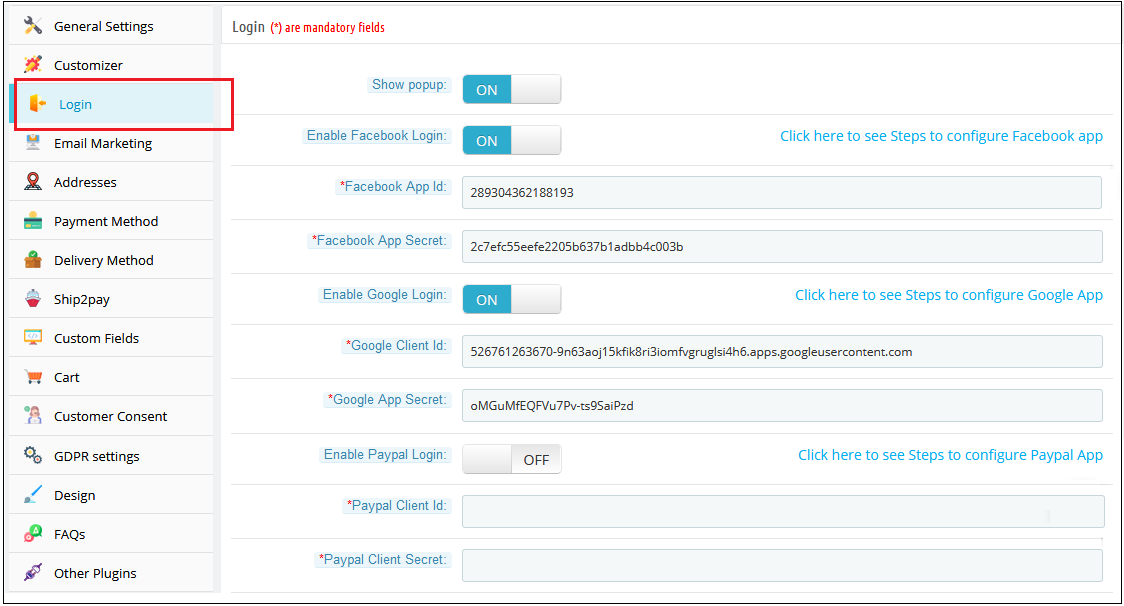
This tab of Prestashop fast checkout addon contains a setting to enable /disable Facebook and Google registration & login as shown below.
Enable Facebook Login: To enable Facebook Registration & Login, switch the button from OFF to ON. But before you do that do get Facebook APP ID and APP SECRET from https://developers.facebook.com without these keys, this functionality of the Prestashop single step checkout addon will not work. By default, this functionality of the one page checkout Prestashop addon will be disabled.
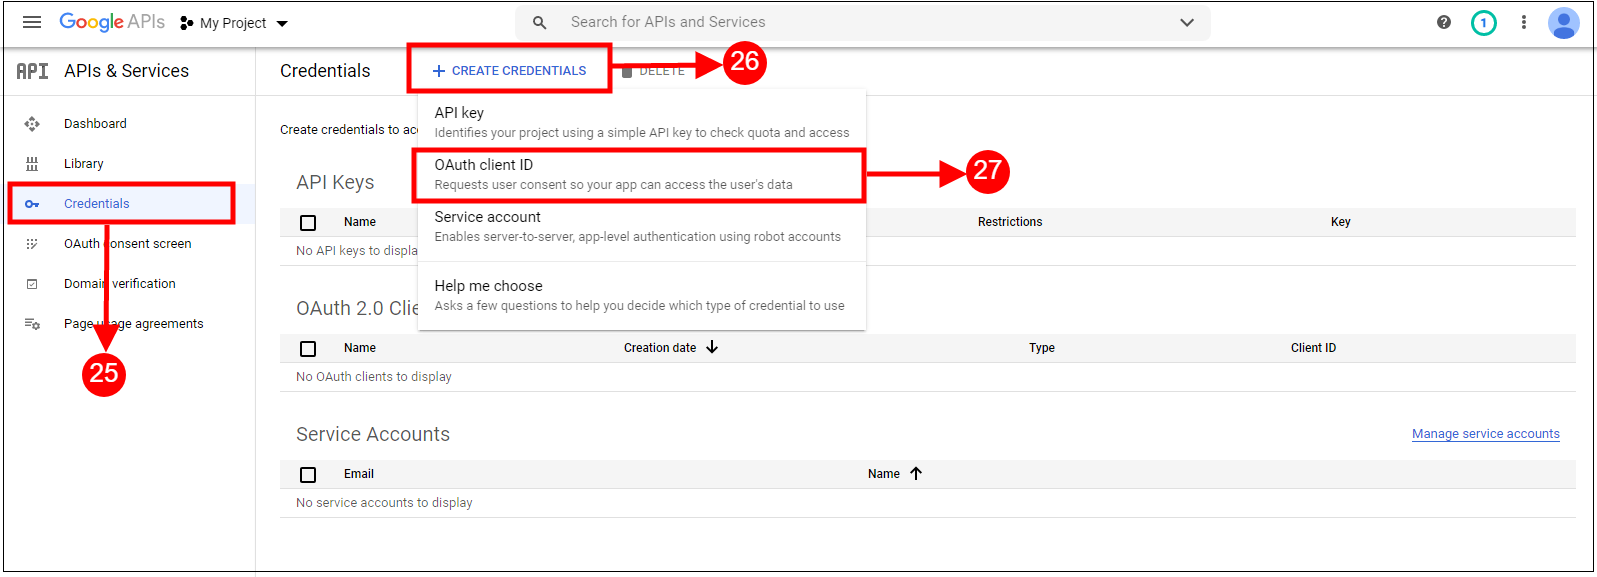
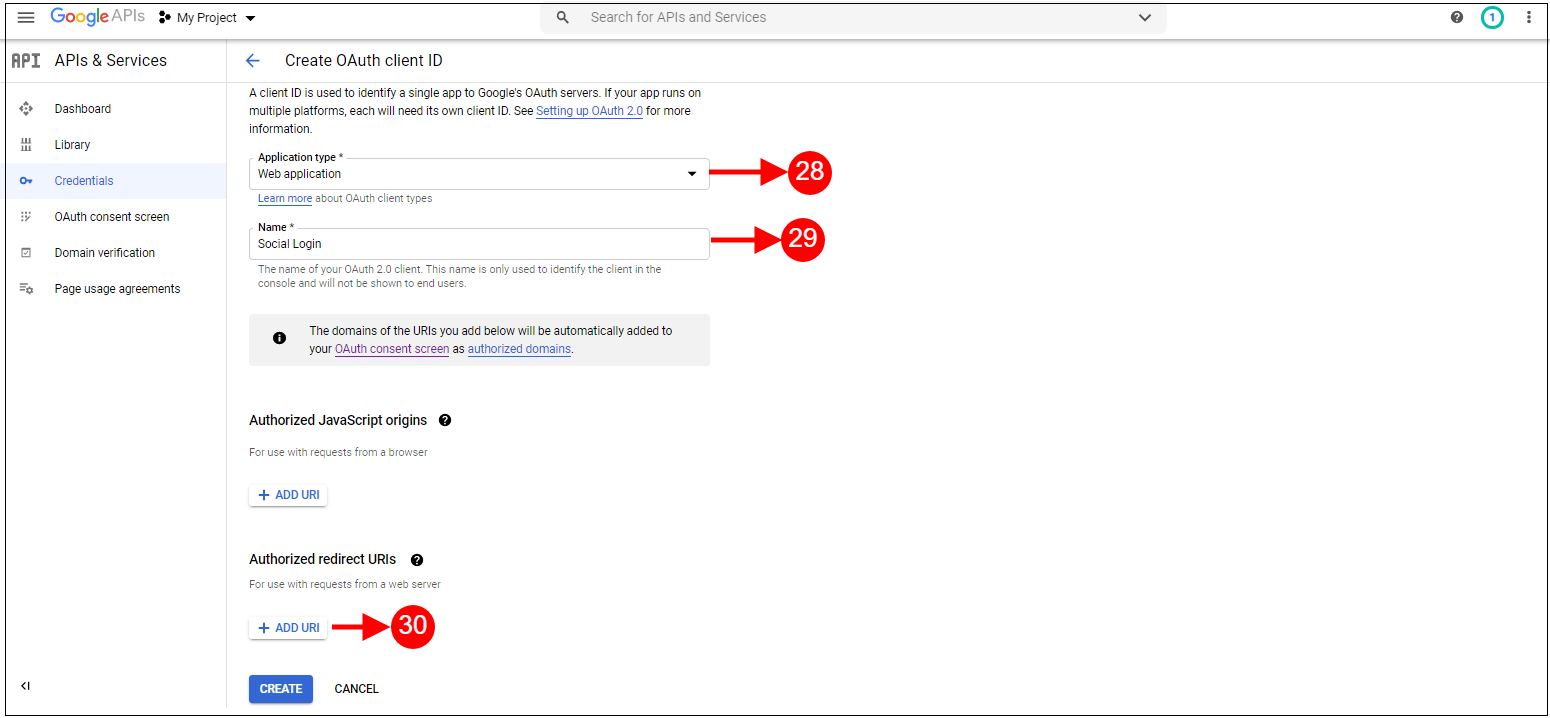
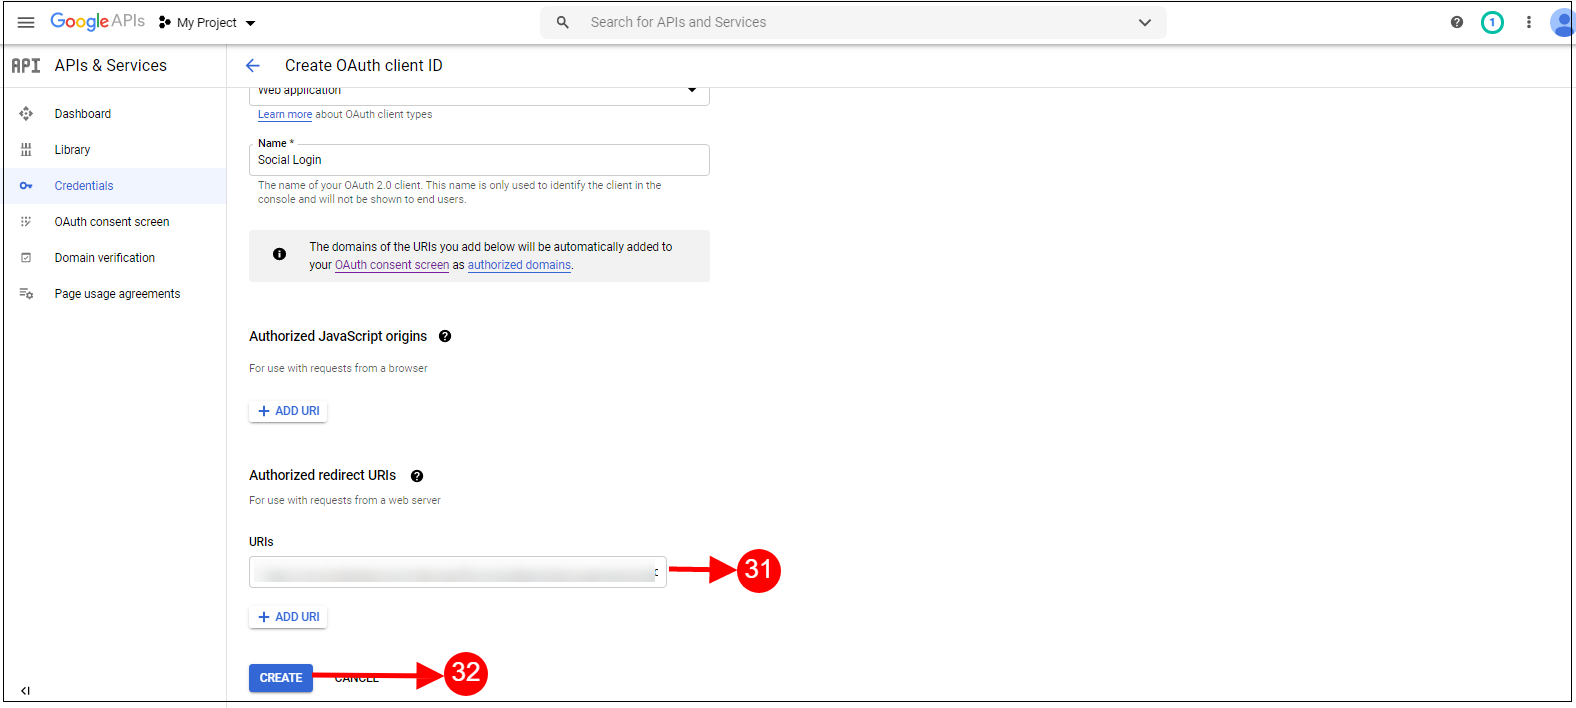
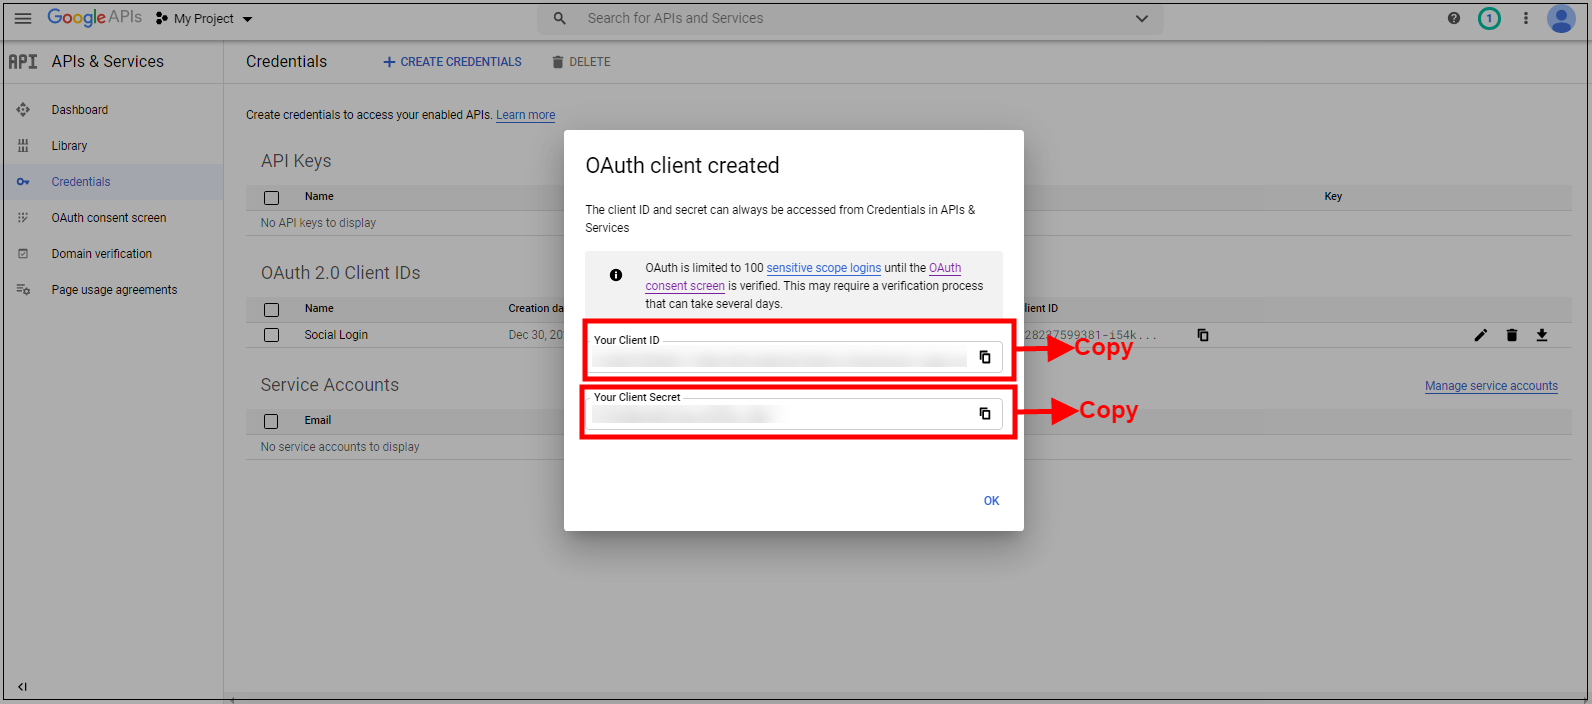
Enable Google Login: To enable Google Registration & Login, switch the button from OFF to ON. But before you do that do get Google APP ID, CLIENT ID, and APP SECRET from https://code.google.com/apis/console without these keys, this functionality of the quick checkout addon Prestashop will not work. By default, this field of the Prestashop One Step Checkout Addon will be disabled.
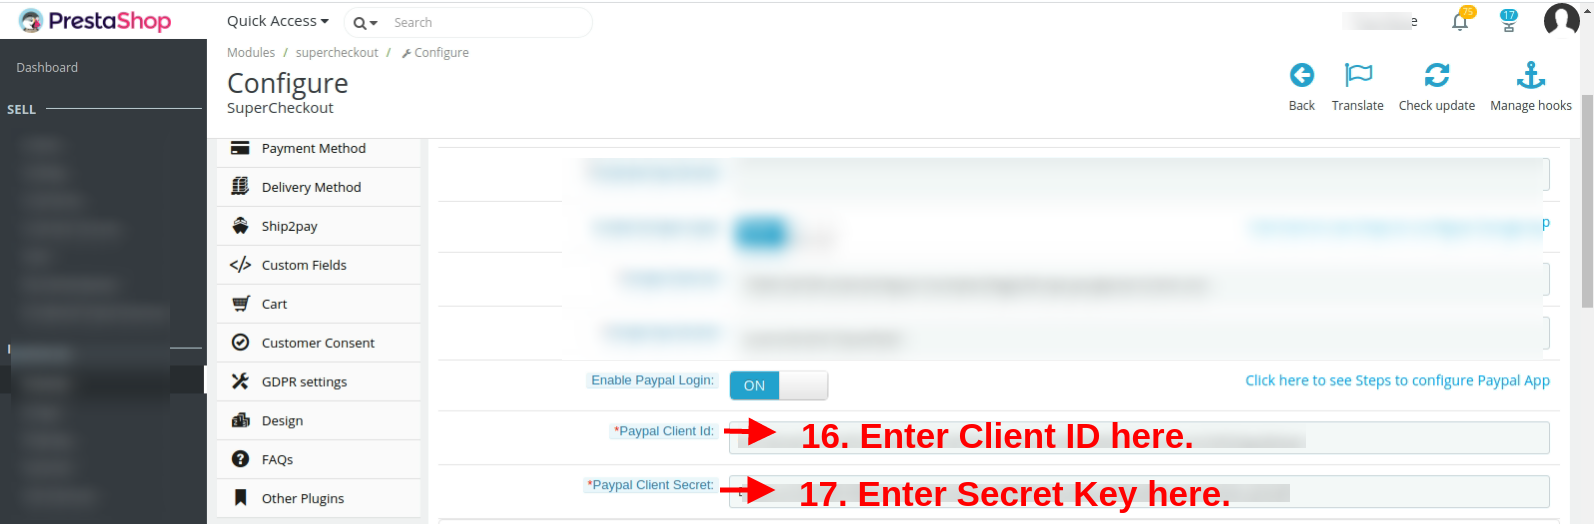
Enable Paypal Login: Activate or deactivate the login options from the admin interface. Enter PayPal client id and client secret from https://developer.paypal.com/developer/accounts/ and save the settings.
Please read Annexure A to set up Google, Facebook, and PayPal login.
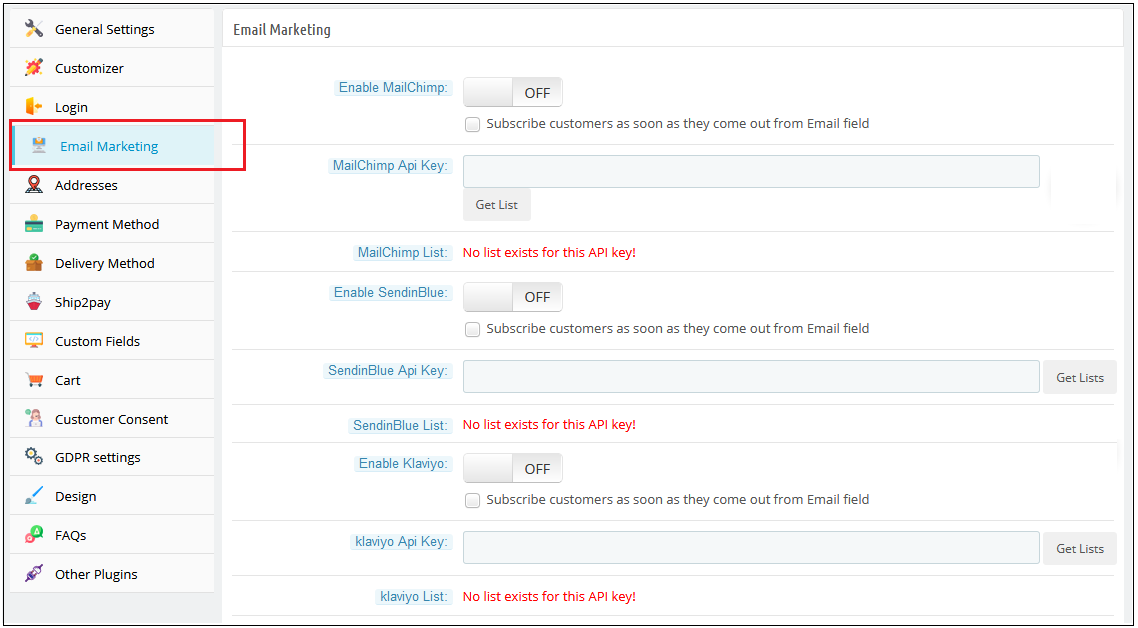
3.1.4 Email Marketing Tab of the One Step Checkout Prestashop Extension
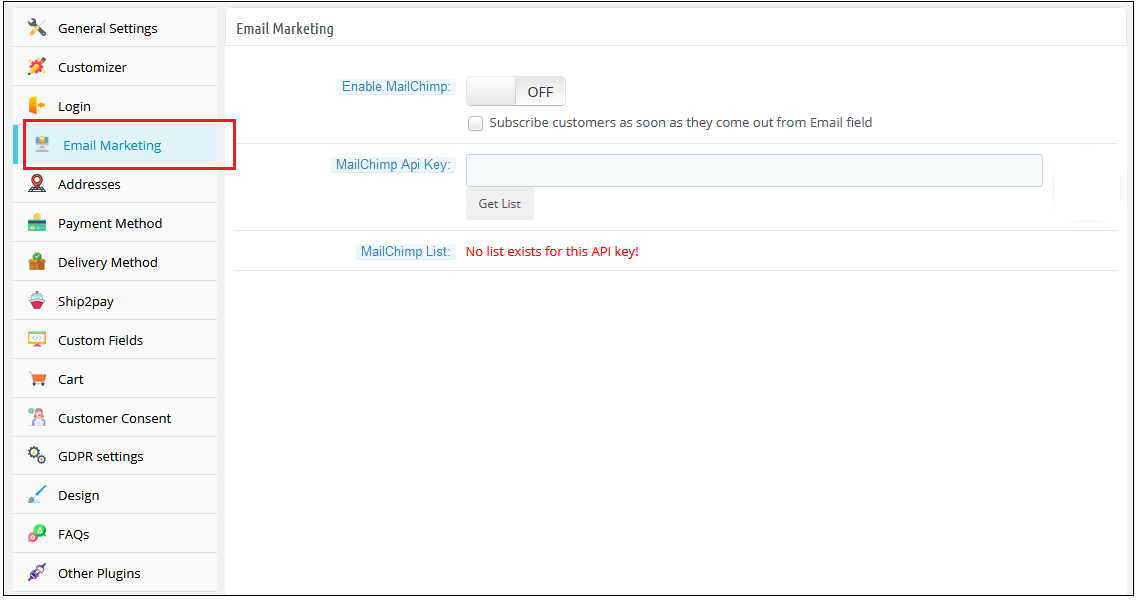
Mail Chimp is an email marketing service by which you can send bulk newsletters/offer emails to your customers. Mail Chimp also provides many attractive Templates and many more features. Our Prestashop one page checkout module allows you to add custom email directly to mail chimp list as soon as they register using our Prestashop one page checkout addon.
For using Mail Chimp you need to have an API Key.
A) How to configure Mail Chimp?
Login to your Mail Chimp account.
Click on the right corner tab > Choose Profile > Extras > API Keys.
Here Admin Can Create an API key by clicking on the “Create a Key” button.
Copy the API key.
Admin can also make a Different list for Each Social login customer by clicking on “List” in the Top Menu Bar.
Now Paste the API Key in the Provided Mail chimp API Key section and click on the “Get List” Button.
Select the list from the Dropdown menu.
B) Mail Chimp Settings:
Enable/Disable: To enable the Mail chimp, switch the enable button from OFF to ON. The default value will be “OFF”.
Subscribe Customer Checkbox: Check this option of the Responsive one page checkout Prestashop module, if you want to subscribe customers to mail chimp as soon as he comes out from the email field. Please note that this function will not subscribe them to the Prestashop list. Our mail chimp integration is responsible to subscribe only to the Mailchimp list.
Mail Chimp API Key: Enter Your Mail Chimp API Key and Click on the “Get List” button.
Mail Chimp List: Select your desired list and save settings.
Similarly, you can configure the other two email marketing integrators including Klaviyo and SendinBlue.
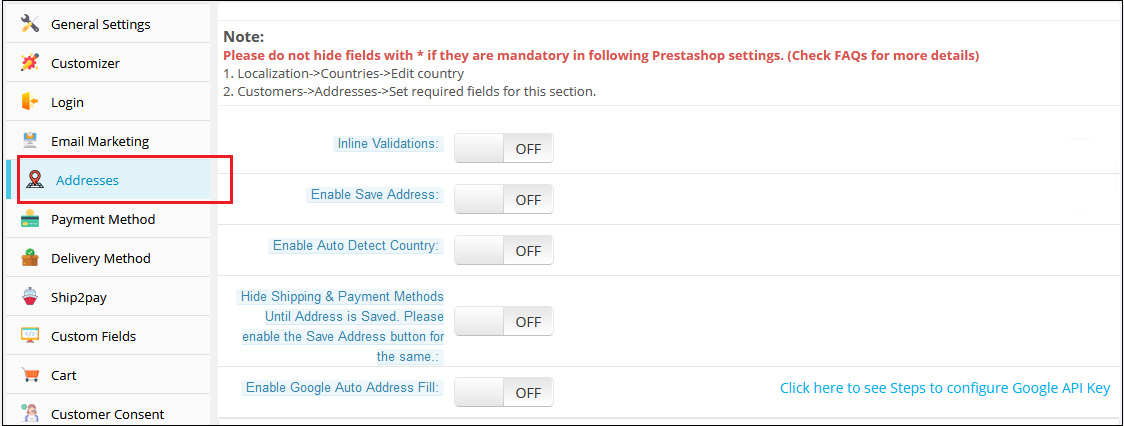
3.1.5 Addresses Tab
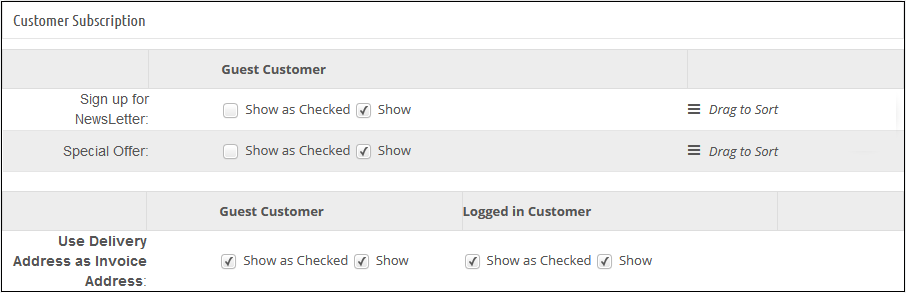
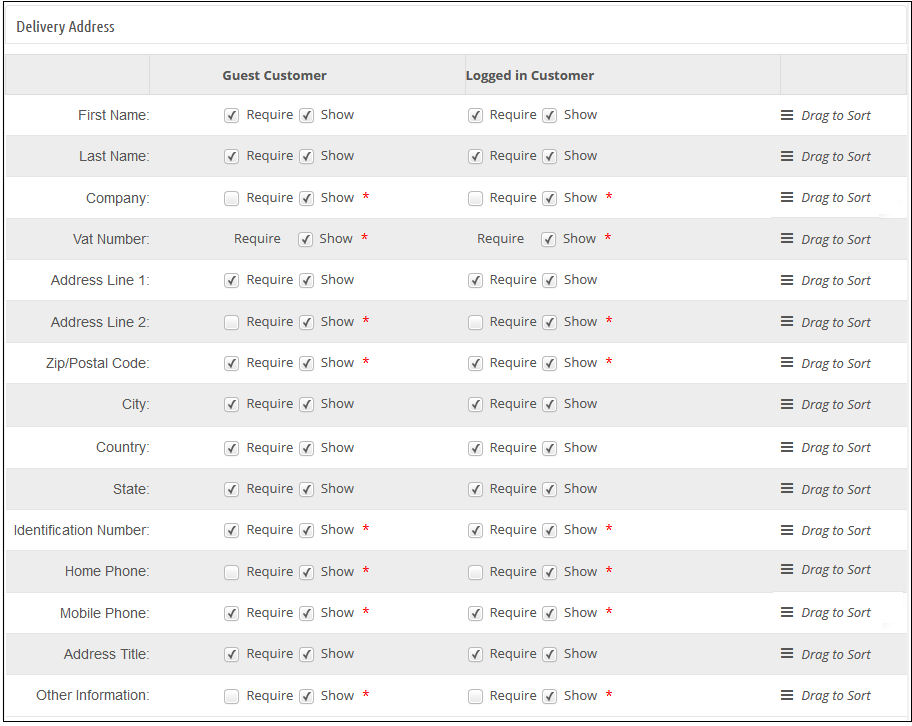
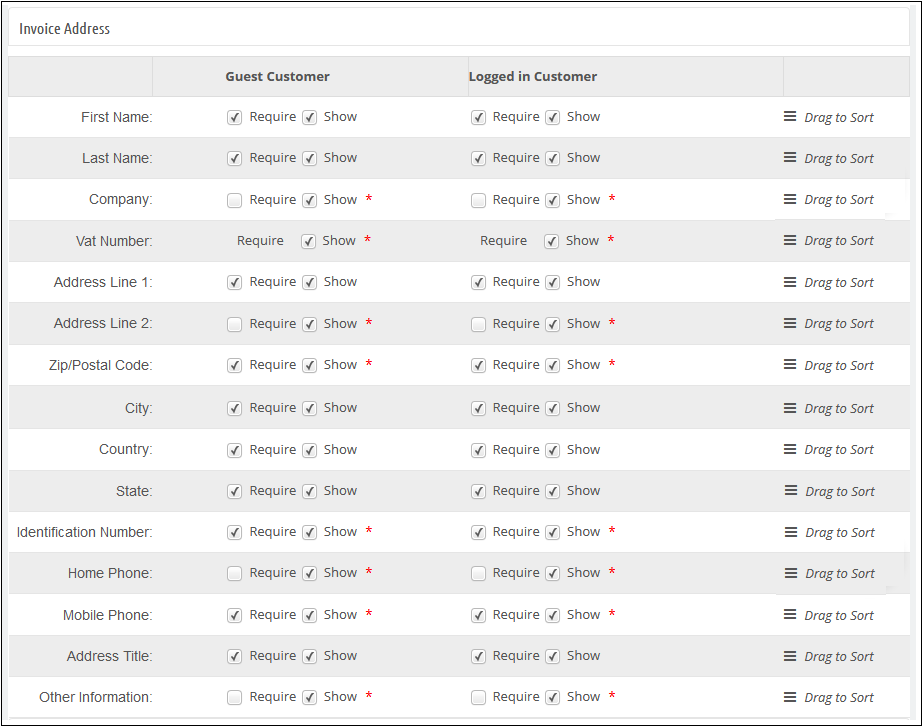
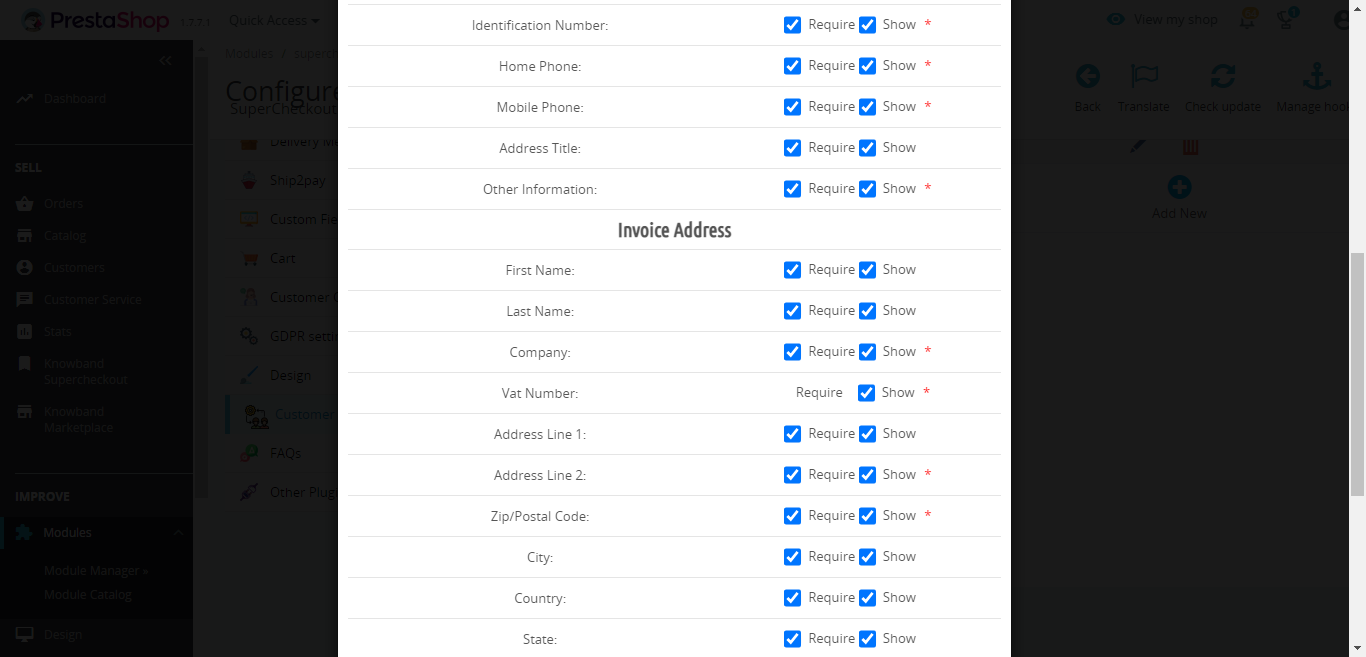
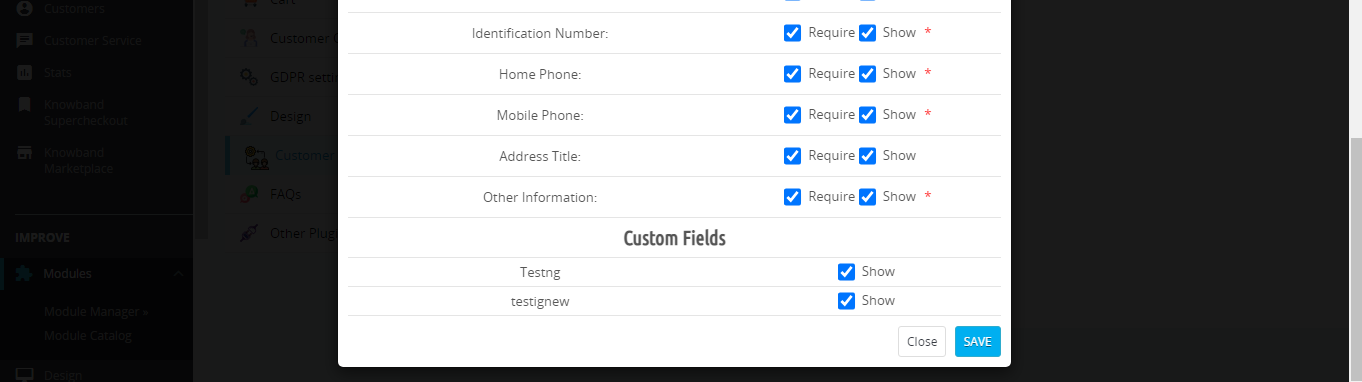
This tab in Prestashop one page checkout addon contains a setting for the fields which are to be shown in the customer registration, delivery address, and invoice address section on the front.
The Addresses Tab of the Prestashop Quick checkout addon consists of two sections. The one on the left is for Guest Customers and the right one for Registered Customers.
To make a field show/hide in the Prestashop one page checkout page, check the checkbox just to the left of the Show label.
To make a field of this fast checkout Prestashop checkout addon as mandatory (required field), check the checkbox just to the left of Require Label.
The fields of the Prestashop One Page Checkout Extension can also be rearranged according to the requirement. To rearrange just hold icon () and drag & drop the field vertically, wherever it is required.
On saving, the fields will be rearranged as per the changes.
This tab of the One Page Checkout Prestashop addon also has more features named inline validation and enables the save address feature. If inline validation is enabled then the fields like first name, last name, zip code are validated as soon as they are filled which lets the customer know that he/she is entering the wrong value. If the save address feature is enabled then a button with the text “SAVE” appears just below the address field of the Prestashop one page checkout addon and using that button the customer can save his/her address before placing the order.
Enable Auto Detect Country: If this option is enabled, then the country of the customer is automatically detected and filled into the provided country field on the Supercheckout page.
Enable Google Auto Address Fill: Using this option, the admin can enable auto-fillup of address with Google Places Integration.
Google API Key:For the above feature to work, the admin needs to set the Google API key through this configuration option.
3.1.6 Payment Method Tab of the Prestashop One Page Checkout Module
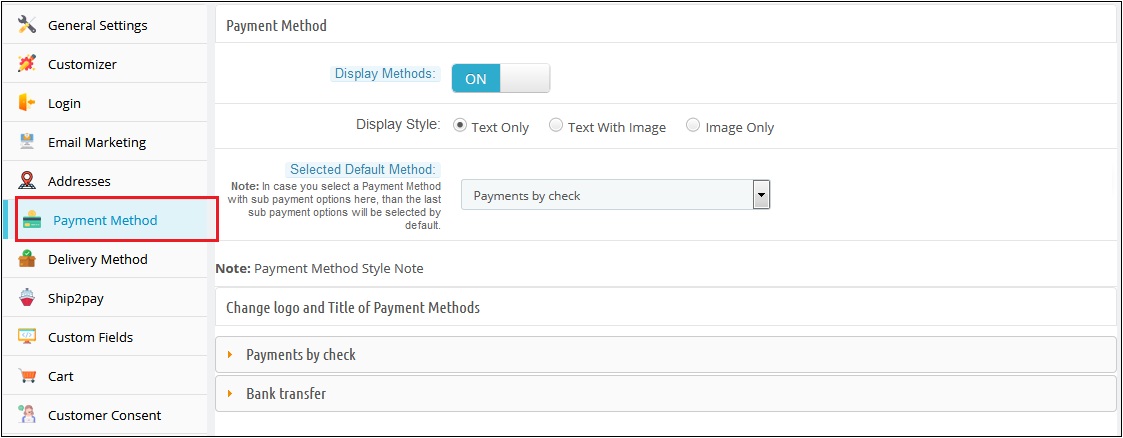
1. In Prestashop one page checkout addon, this tab contains settings for payment methods shown in one page checkout page like enabling/disabling, or selecting a default method.
2. Display Method: To Enable/Disable the payment methods on the checkout page, switch the button from ON to OFF or vice-versa. This will disable the payment method block from the checkout page. By default, this option of the Prestashop fast checkout addon will be enabled.
3. Display Style: There are 3 options in this field of the Prestashop One Step Checkout Addon to display how your payment methods will be displayed on the checkout page. By default, payment methods will be displayed with its name. If you select the style with the image, then please upload the image of size (95 X 20) for the corresponding payment method under the appropriate payment module directory.
4. Selected Default Method: This option of the One Step Checkout Prestashop module, will be a drop-down list of all installed payment modules. Here you can select the payment method, which will be displayed as selected at the time when a customer comes on the checkout page.
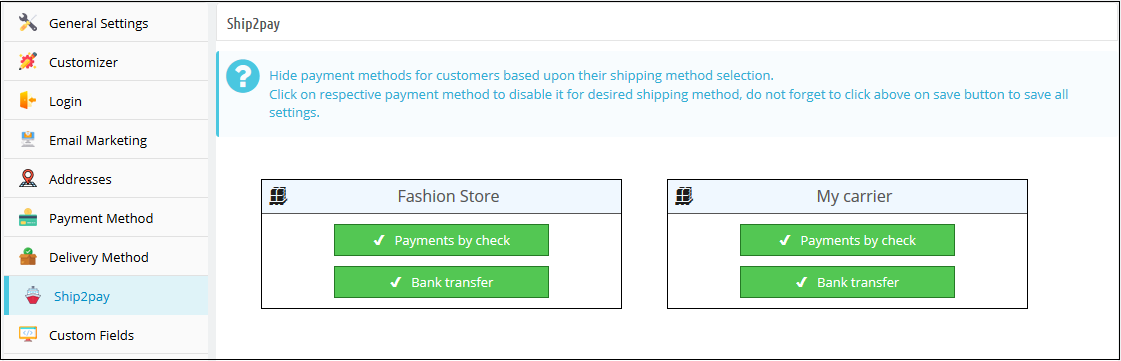
Ship2Pay: With the Ship2Pay feature, the store admin can map the payment methods with the selected delivery methods. If the admin has mapped some payment methods with a particular delivery method then other payment methods will be disabled for the customers on selecting this particular delivery method.
3.1.7 Delivery Method Tab of the Prestashop One Page Checkout Module
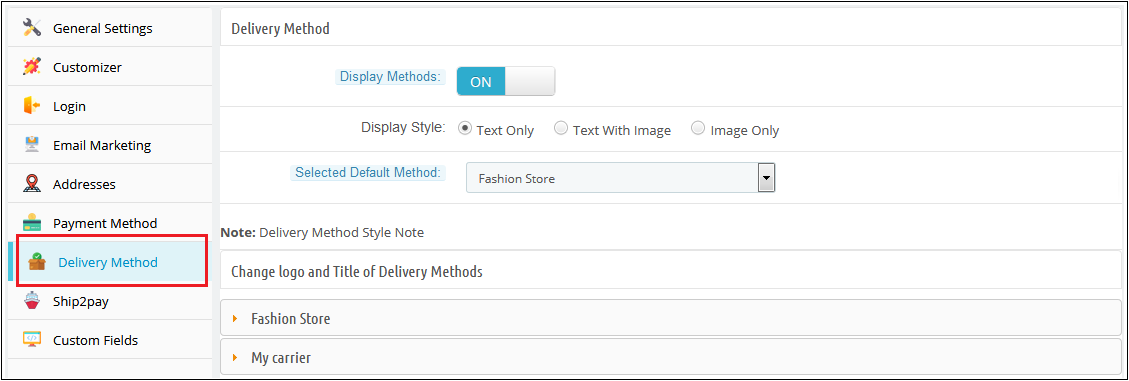
In one page checkout Prestashop, this tab contains settings for delivery methods shown on the checkout page like enabling/disabling, or selecting a default method
2. Display Method: To Enable/Disable the delivery methods on the checkout page switch the button from ON to OFF or vice-versa. This will disable the delivery method block from the checkout page. By default, this will enable.
3. Display Style: There are 3 options in this field of the Prestashop fast checkout addon to display how your delivery methods will display on the checkout page. By default, delivery methods will display with their name. If you select a style with an image, then please upload an image of size (95 X 20) for the corresponding delivery method.
4. Selected Default Method: This option of the Prestashop One Page Checkout addon will be a drop-down list of all active delivery methods. Here you can select the delivery method, which will be displayed as selected at the time when a customer comes on the checkout page. The selection will differ according to customer location. If your selected method maps with customer location, then the method will show as selected at the time of checkout page loading.
3.1.8 Custom Fields Tab of the Prestashop fast checkout module
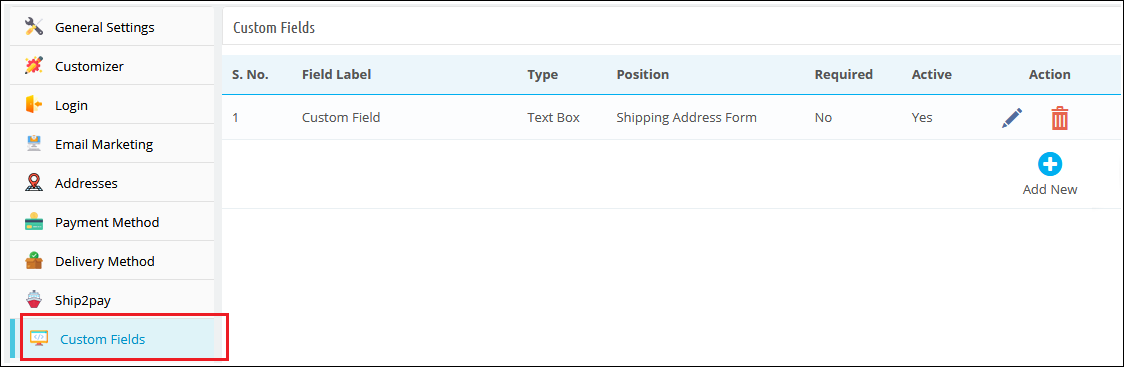
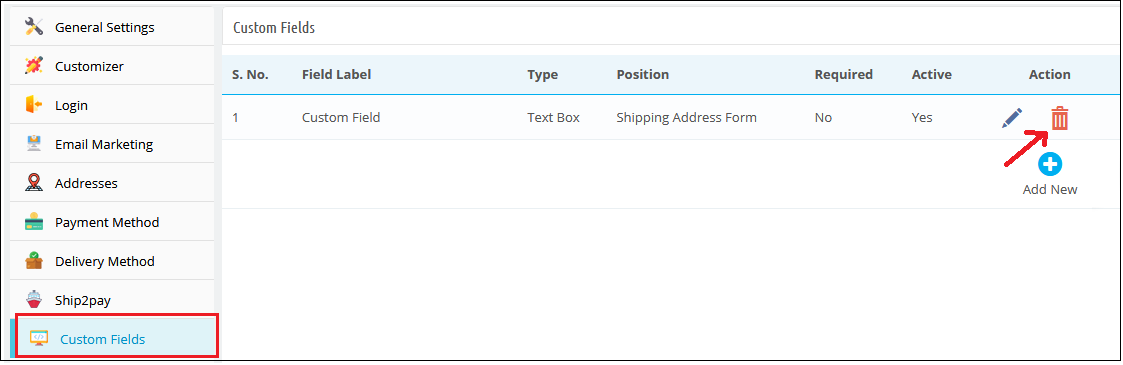
In Prestashop one page checkout module, this tab is used to add custom fields on the front checkout page. This tab of the Prestashop simplified checkout addon contains a list of custom fields and options to Add, Edit, or Delete any field.
These custom fields of the Prestashop fast checkout addon can be used to get some additional data from the customer and display it in different positions i.e. Shipping Address Form, Payment Address Form, Cart Block, or Customer Registration Block.
A) How to add a custom field?
Following are the steps to add a custom field on the checkout page:
Click on the “Add New” button.
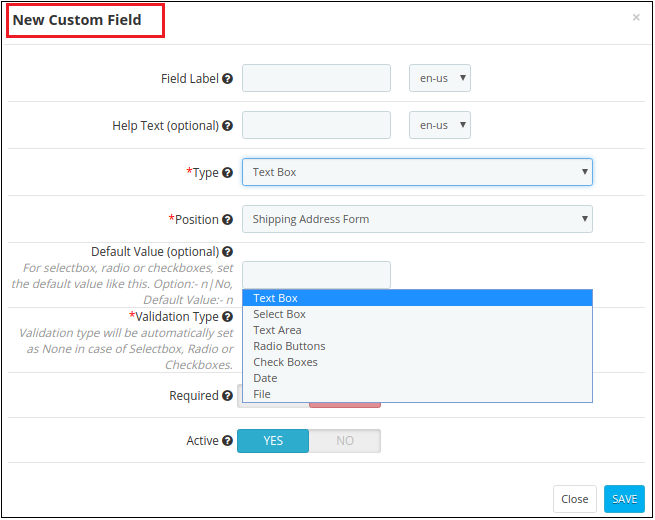
A pop-up will display, fill all the required fields and add your desired features.
Click on the “Save” button.
Example 1 – If the admin wants to add a drop-down with the label “Want to become Member ?”
Following are the steps to be followed –
1. Add a new custom field as shown below.
Configure its position as “Shipping Address Form”.
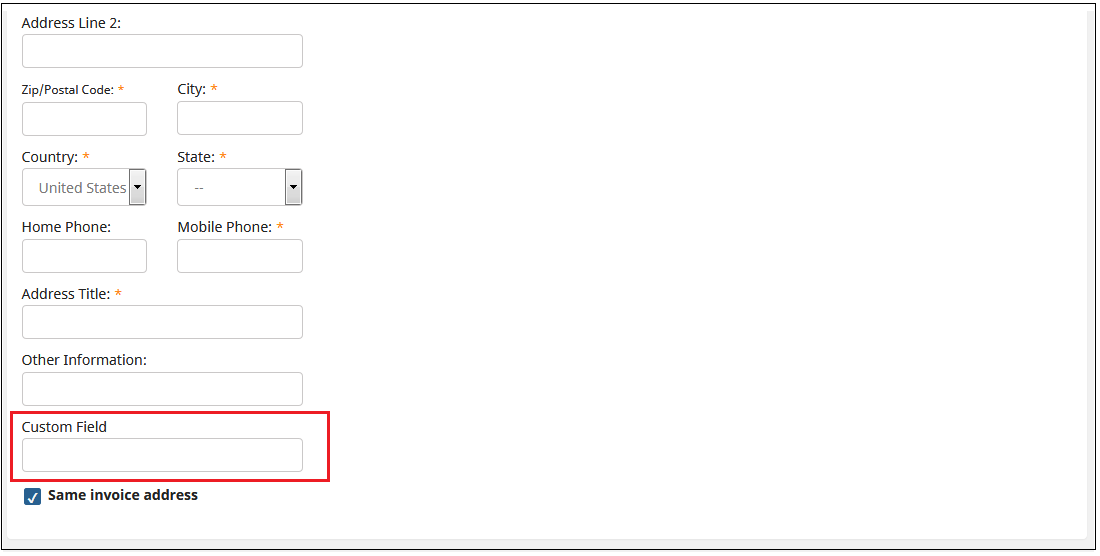
2. Go to Front End, add the product to the cart and proceed to “Checkout”. On the Checkout page, the custom field will be displayed as shown below.
3. Admin can check the data fetched from the customer by following steps –
(a) Go to the “Orders” tab. (b) Click on the “View” button for a particular order you want to check. (c) The Customer’s information will be displayed in the “SUPERCHECKOUT CUSTOM FIELDS” tab as shown below.
4. Customer can also check the Custom field by following steps-
(a) Go to the “My Account” page. (b) Click on “Order History and Details” (c) Click on the “Details” button (d) Image shown below will display.
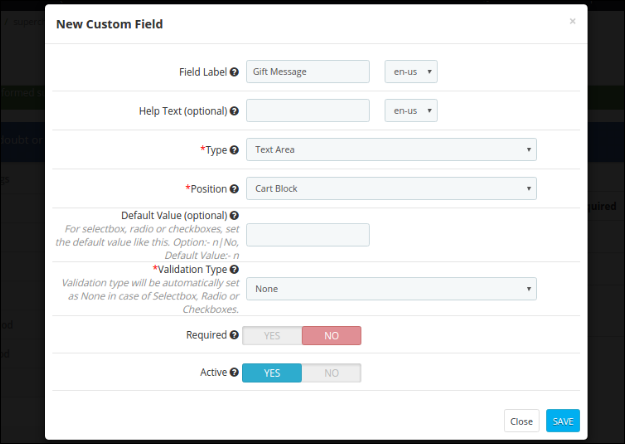
Example 2 – If the admin wants to add a text area with the label “Gift Message”. Following are the steps to be followed –
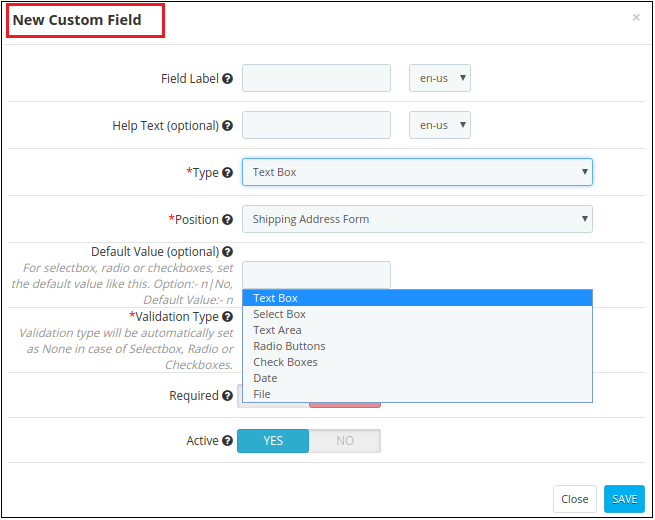
1. Add a new custom field as shown below.
Configure its position as “Shipping Address Form”.
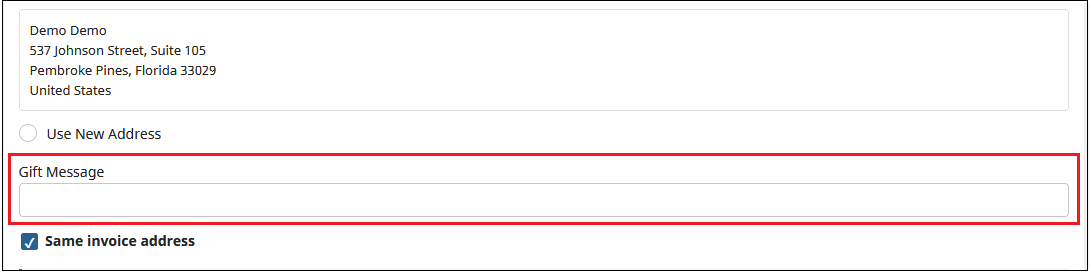
2. Go to Front End, add the product to the cart and proceed to “Checkout”. On the Checkout page, the custom field will be displayed as shown below.
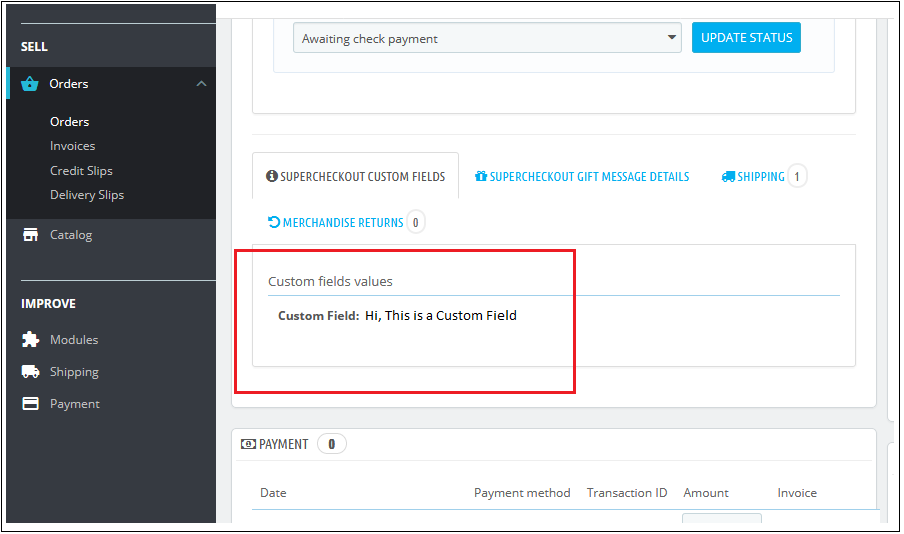
3. Admin can check the data fetched from the customer by following steps –
(a) Go to the “Orders” tab. (b) Click on the “View” button for a particular order you want to check. (c) The Customer’s information will be displayed in the “SUPERCHECKOUT CUSTOM FIELDS” tab as shown below.
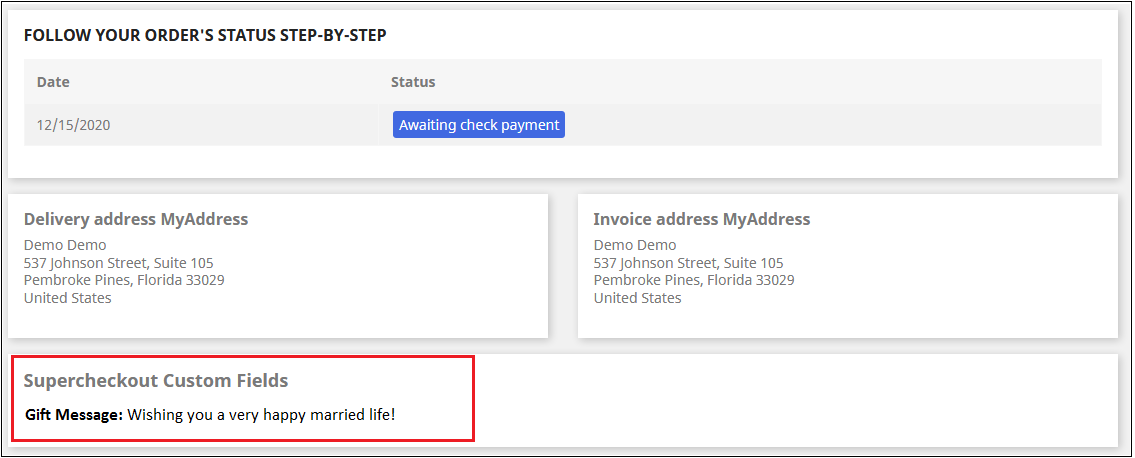
5. Customer can also check the Custom field by following steps-
(a) Go to the “My Account” page. (b) Click on “Order History and Details” (c) Click on the “Details” button (d) Image shown below will display.
B) How to edit a custom field?
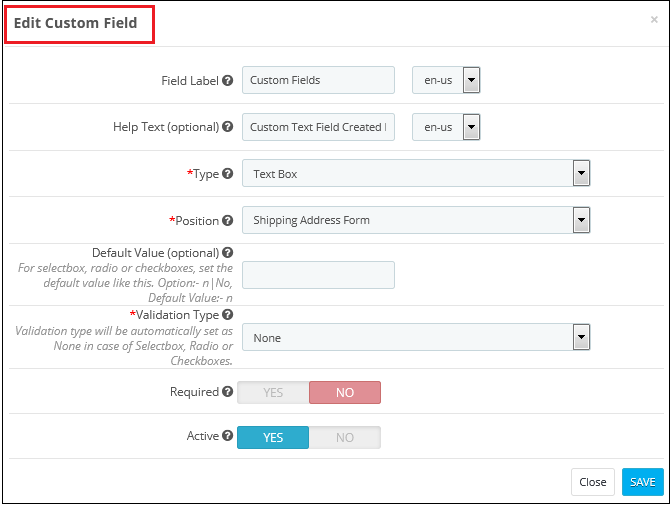
To edit a custom field, click on the ‘Edit’ icon shown in front of any row of this Prestashop quick checkout module. It will open a form shown below. Values of the form in this Prestashop quick checkout module will be filled already.
Admin will have to click on the ‘Save’ button to save the edited details.
C) How to delete a custom field?
To delete a custom field of the Responsive one page checkout Prestashop module, the admin will have to click on the delete icon shown next to every table row. It asks for confirmation to delete a row.
3.1.9 Cart Tab of the Prestashop responsive one step checkout addon
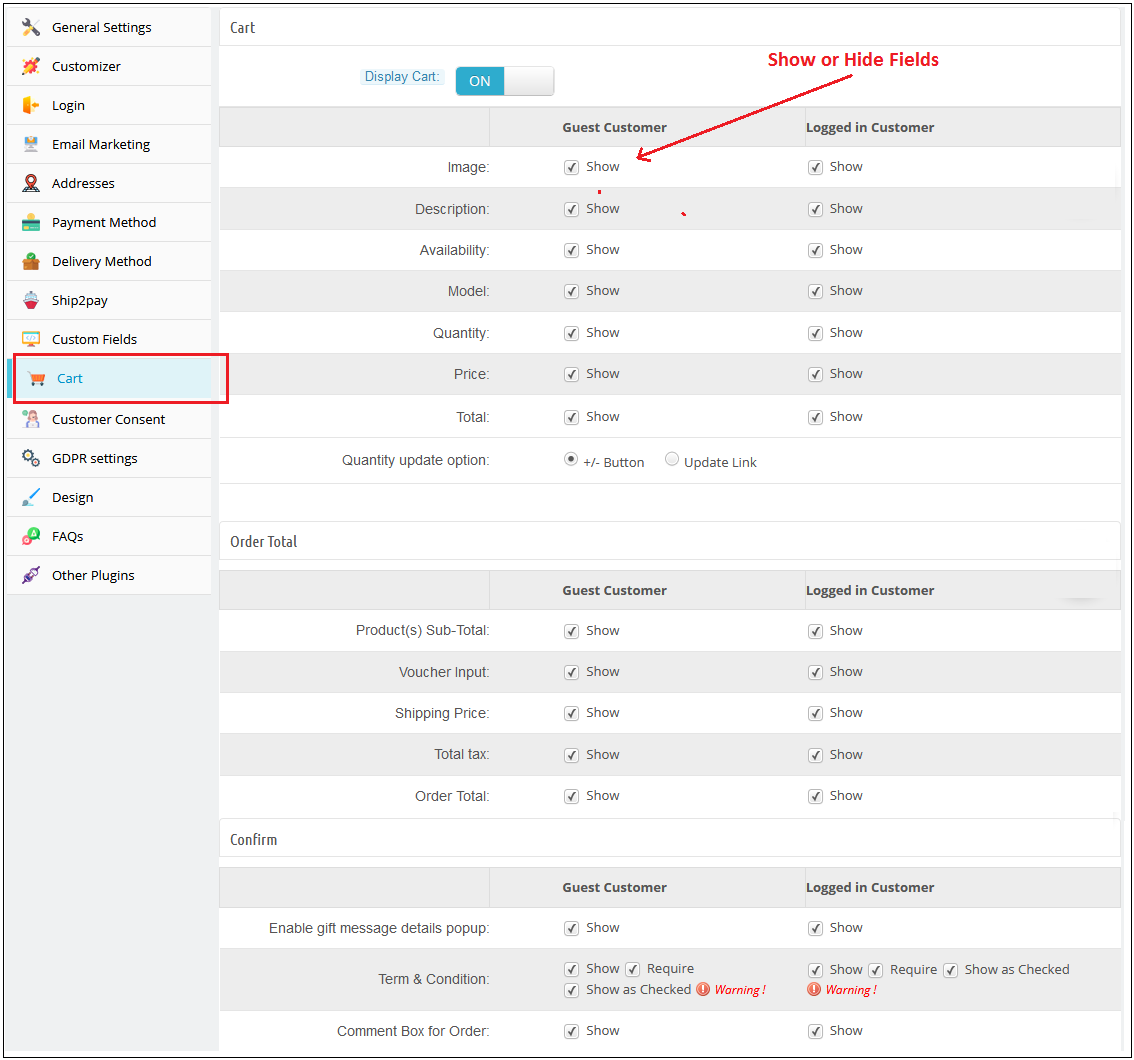
This tab One Step Checkout Prestashop module contains setting for the cart, order total, and confirming the order as shown below :
Its divides into three sections :
Cart
Order Total
Confirm
A) Cart
1. Display Cart: By default, cart display will enable.
2. To Show/Hide cart summary options from the checkout page, check to uncheck the checkbox present in front of the Cart Summary Option label.
3. Product Image Size: This option of the one step checkout Prestashop module will show which size of the product image will be displayed on the One checkout page. By default, this field of the Prestashop quick checkout addon will be shown with their default values.
B) Order Total
To Show/Hide cart summary options from the checkout page check uncheck the checkbox present in front of the Cart Summary Option label.
C) Confirm
To Show/Hide cart summary options from the checkout page check uncheck the checkbox present in front of the Cart Summary Option label. Admin can provide an option to add a gift message along with their product order. Admin will have the option to check this message on the order details page from the backend.
3.1.10 GDPR Setting Tab of the One Page Checkout Prestashop Addon:
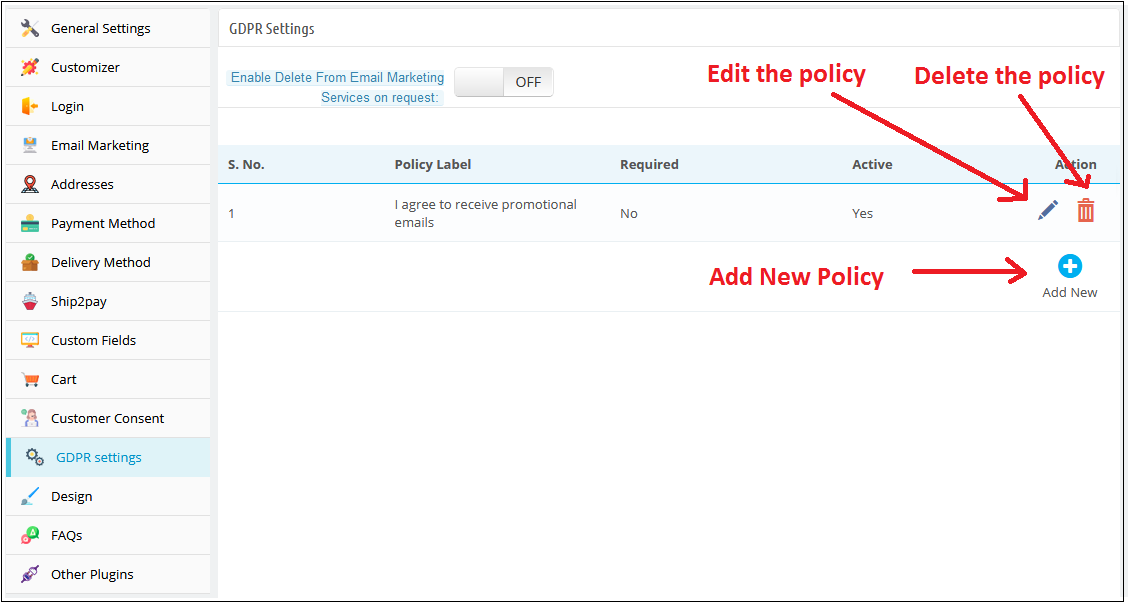
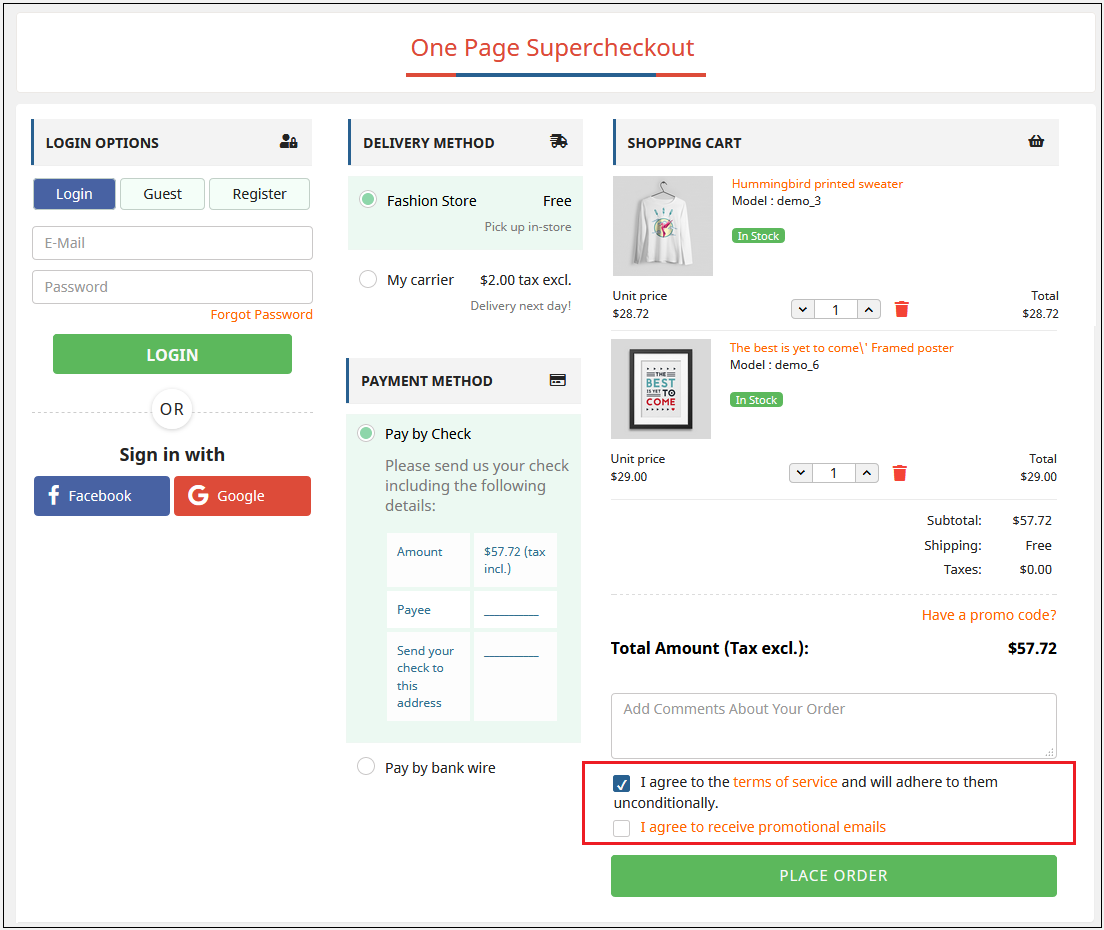
This field of the Prestashop one page checkout module allows the admin to add the opt-in boxes (checkbox) on the checkout page to meet the GDPR requirements. Admin can add the multiple opt-in boxes at the checkout page. As per the GDPR directives “The GDPR is clearer that an indication of consent must be unambiguous and involve a clear affirmative action (an opt-in). It specifically bans pre-ticked opt-in boxes. It also requires distinct (‘granular’) consent options for distinct processing operations. Consent should be separate from other terms and conditions and should not generally be a precondition of signing up to a service. You must keep clear records to demonstrate consent”.
Let’s take a look at the screenshot below:
Please refer to the attached screenshot of the front end:
3.1.10.1 Adding New Policy:
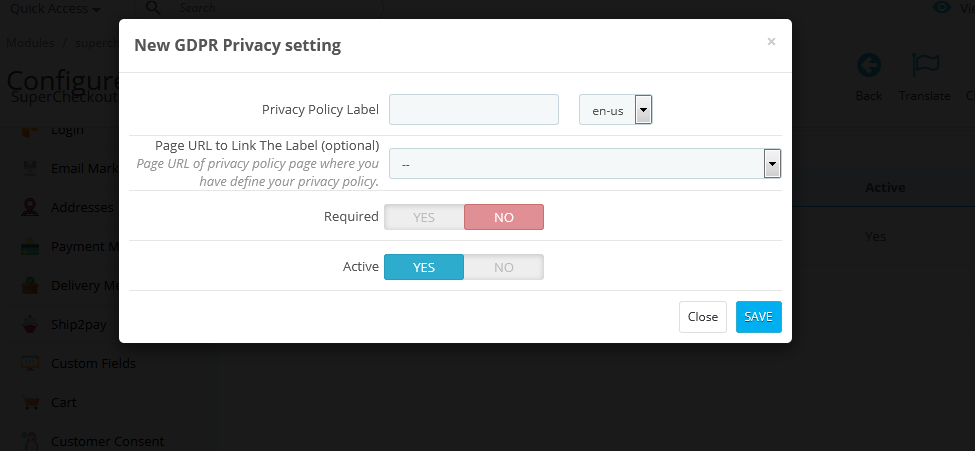
The one page checkout Prestashop addon allows the admin to add as many policies. To add a new policy, the admin will just need to click on the “Add New” option. After doing so, a popup will appear, where the admin will ask to fill in the details of the policy.
Privacy Policy Label: In this field, enter the privacy policy label. The text entered here will be visible to the user on the front end. Page URL to Link the Label: This field is not mandatory. But if you have any URL to link the label where you have defined your privacy policy, then enter the same here.
Required: This option is to make the policy field required or optional. If you make this field optional then the customers can continue to place his order without providing consent. Otherwise, only after providing consent, the user will be able to place the order.
Active: This field of the GDPR setting is to make the opt-in option enable or disable at the front end.
Let’s take a look at the screenshot below:
3.1.11 Customer Consent Tab of the one step checkout Prestashop module
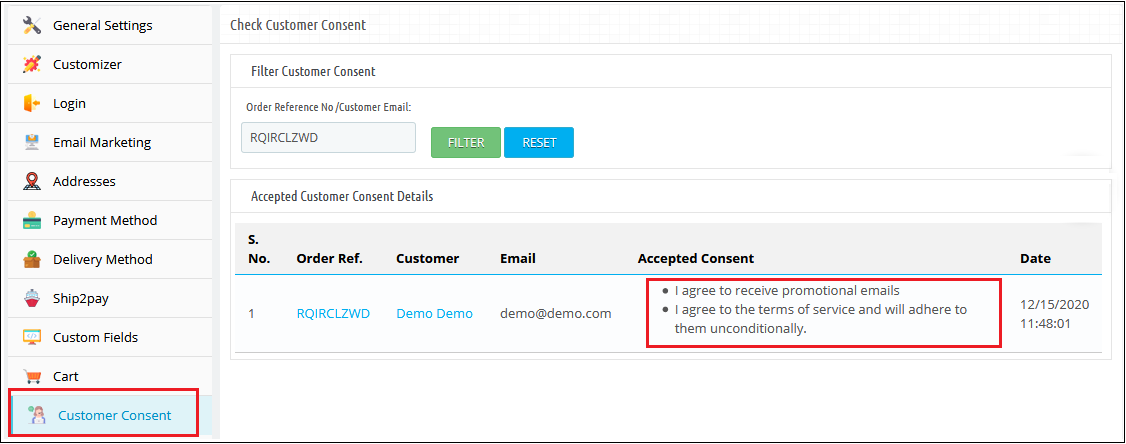
This field of the Prestashop one step checkout displays the data of all the customers who have agreed to any privacy policy(s) defined by the admin. The data will also display the date, time, and order reference number as well. To view the list, the admin must have to enter the email id or order reference number and click on the Filter button. The accepted customer consent details will be displayed along with the order reference number, customer name, email id, accepted consent, date, and time as well. Let’s take a look at the screenshot below:
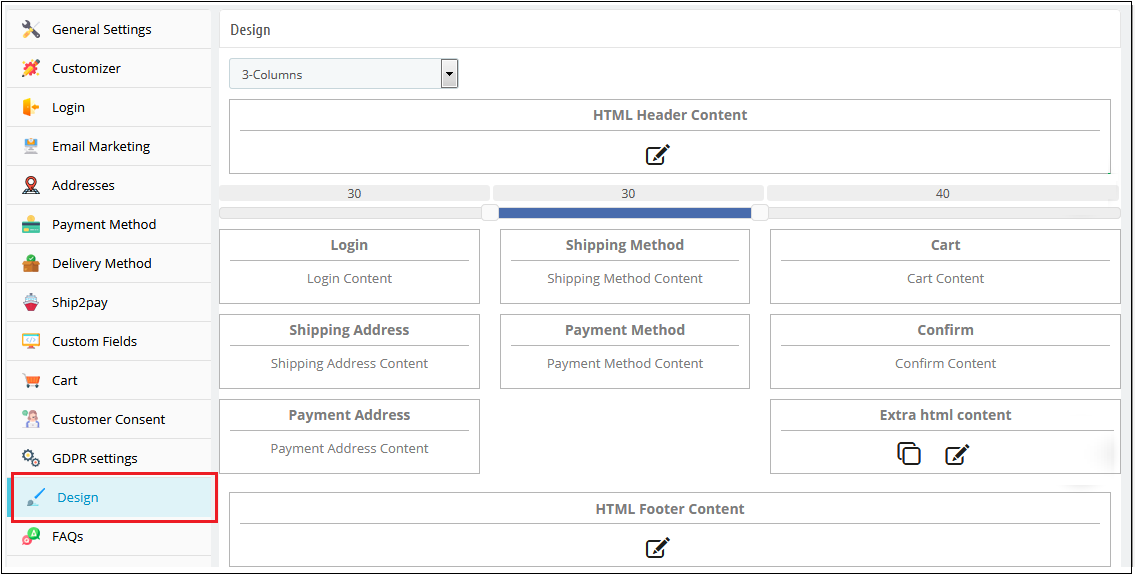
3.1.12 Design Tab of the Responsive one page checkout Prestashop module
This tab of the Prestashop one step checkout module contains the settings for the design of the checkout page in the catalog as shown below:
2. To change the width of any column adjust the slider present at the top as shown below :
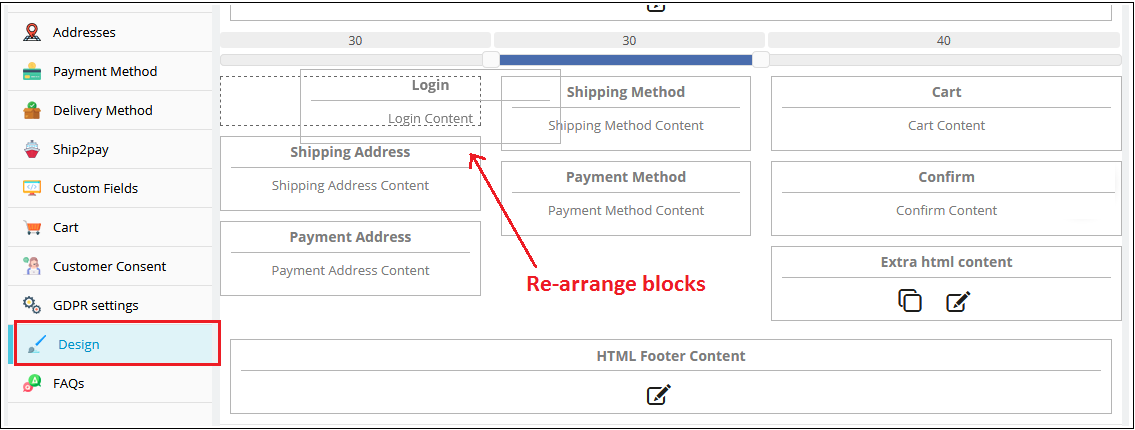
3. Block of different steps of the simplified checkout Prestashop module can also be rearranged from one column to the other or in the same column as shown below:
4. On saving, the block will be rearranged in the checkout page as per the changes
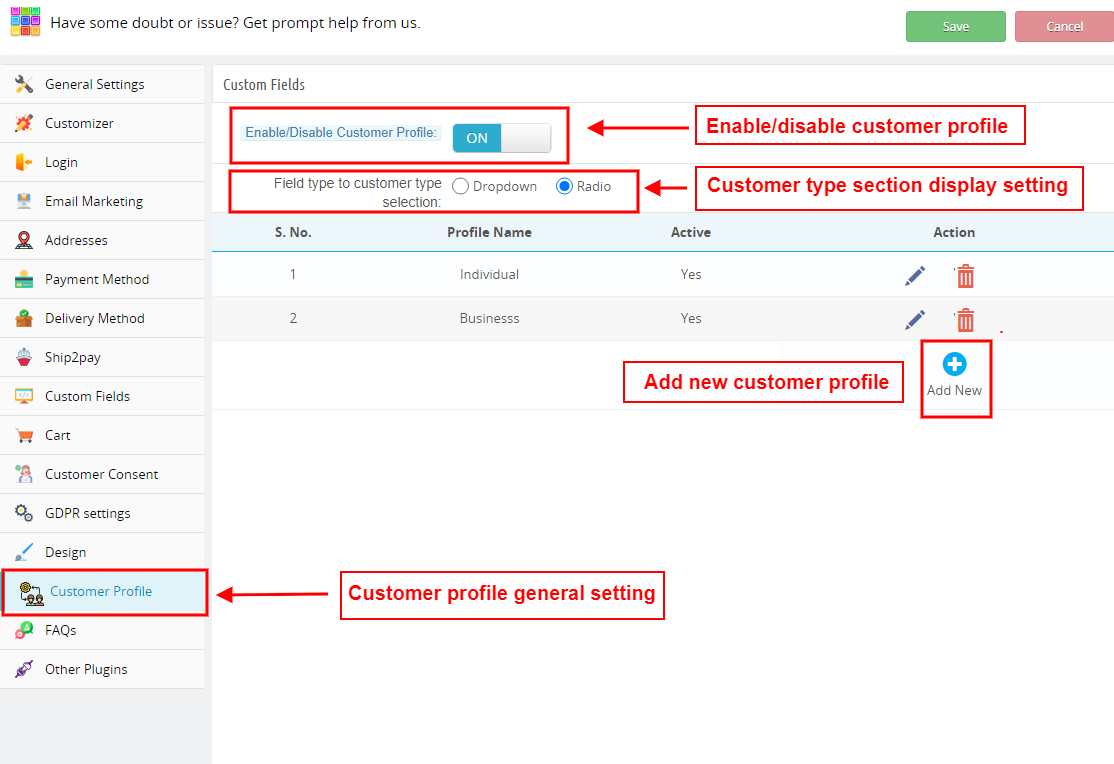
3.1.13 Add Customer profile type as a custom field in PrestaShop Supercheckout
This tab of One Page Checkout allows the seller to add a custom field to select the customer type for the users. Admin can add various profile type options.
Enable/Disable Customer Profile: Admin can show or remove the customer type custom field by choosing the Yes and No option
Field type to customer type selection: Admin can decide if this field will be displayed as a dropdown menu or with radio buttons.
How to add a new customer type?
The administrator can build separate profiles for different categories of clients, such as business customers and personal orders, and display different fields for checkout for each type of profile, as well as decide whether or not the information is mandatory.
Click on the ‘Add New’ button on the customer profile page.
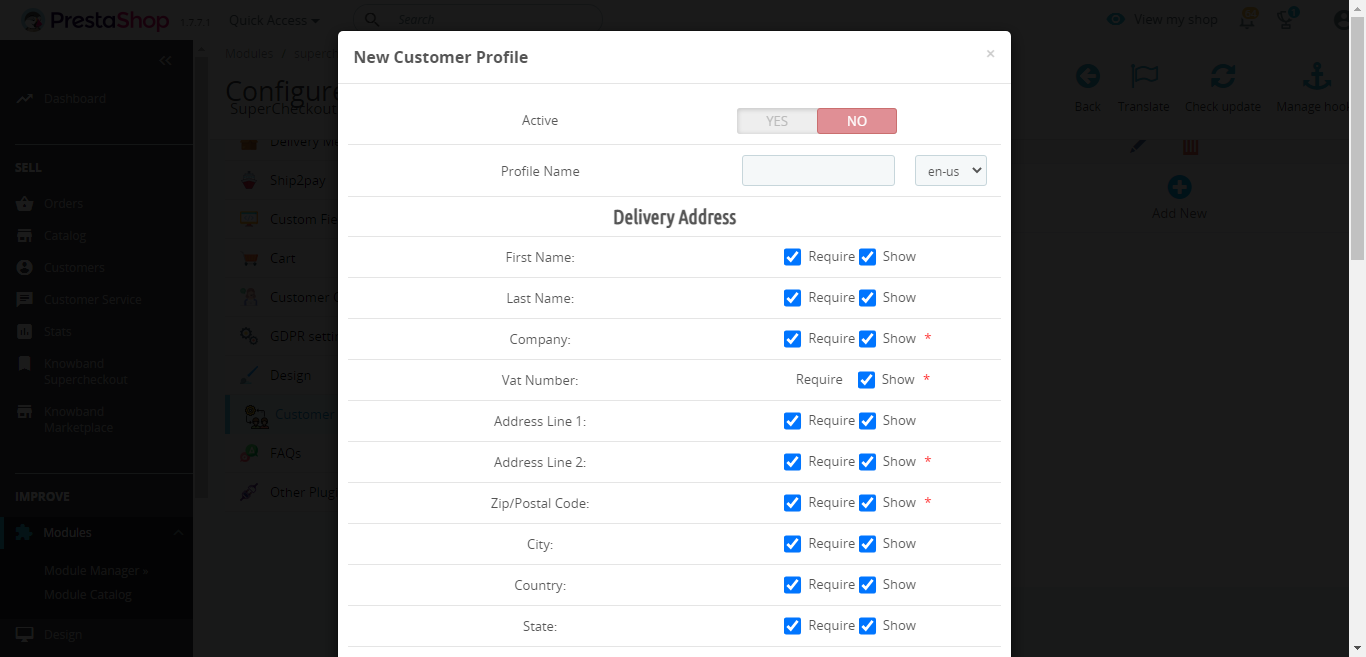
You will be redirected to a new page with the title ‘New Customer Profile’
Active: Enable or disable the profile from here.
Profile Name: Add or update the profile name
Delivery address: You will find various address field options like name, company, VAT number, address, city, country, contact number, etc. in this tab.
Make sure to select the ‘require’ checkbox if you want to make any field mandatory.
Display Address on Invoice: You will find various address field options like name, company, VAT number, address, city, country, contact number, etc. in this tab. The selected fields will be displayed on the invoice.
Make sure to select the ‘require’ checkbox if you want to make any field mandatory.
Enable/Disable Custom fields: You can show or hide the custom fields from this tab.
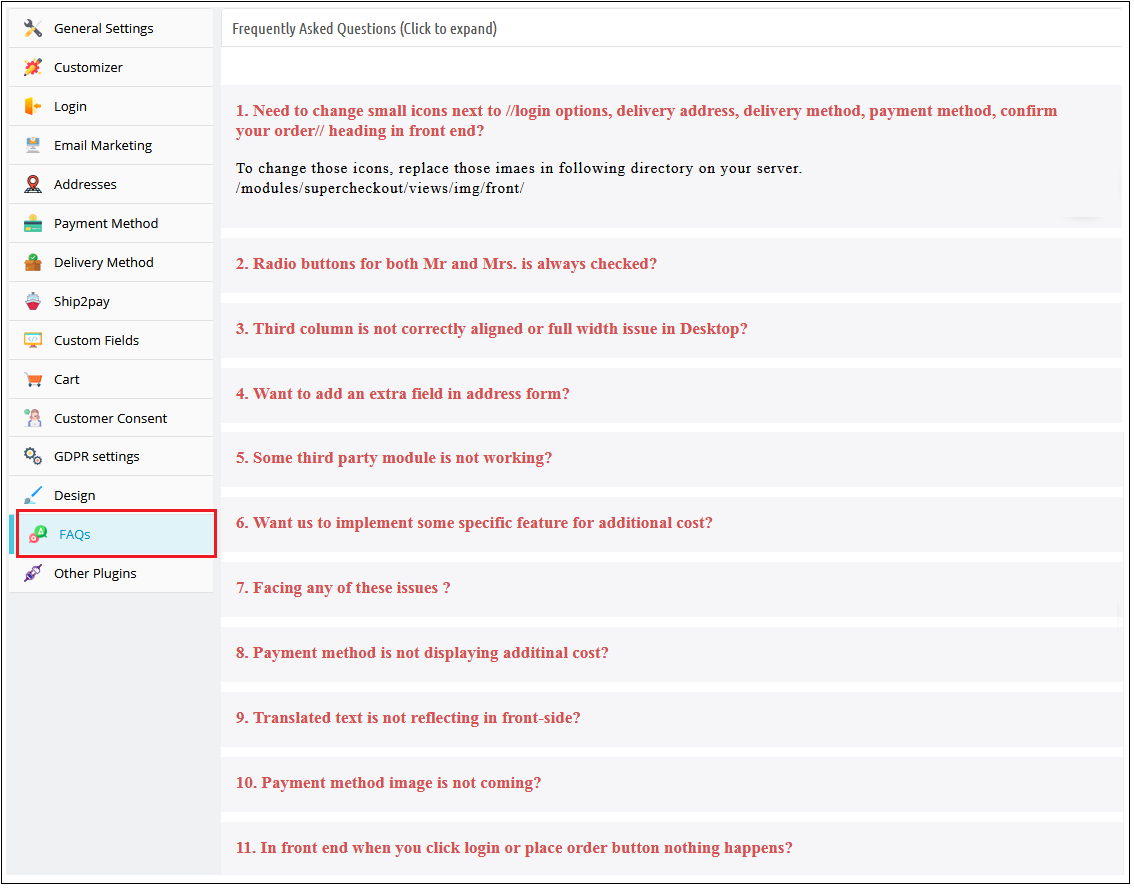
3.1.14 FAQ Tab of the Prestashop responsive one step checkout addon
This tab of the one page checkout Prestashop module contains several questions (with answers to them) that are asked by our customers. We recommend you go through the questions before raising any ticket for this Prestashop fast checkout addon.
3.1.15 Other Plug-ins Tab
This tab of the Prestashop fast checkout addon redirects to our developer page having a list of other plug-ins developed by us. If you like this Prestashop Quick checkout addon then you can try our other plug-ins also.
3.2 Abandoned Checkout Statistics
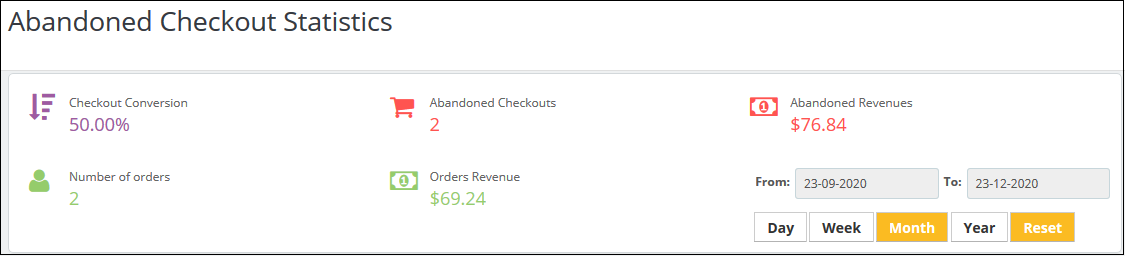
Here, the admin can look for the number of orders they have received, checkout conversion rate, abandoned checkouts, order revenue generated and revenues lost in abandoned carts.
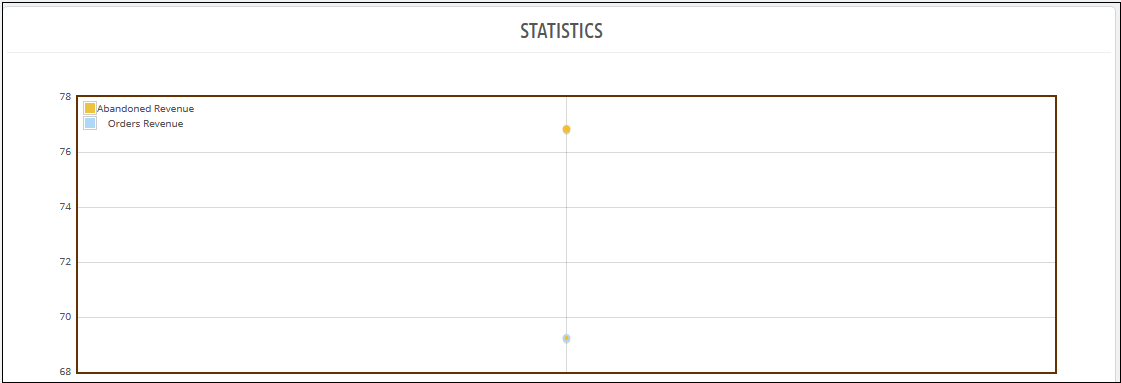
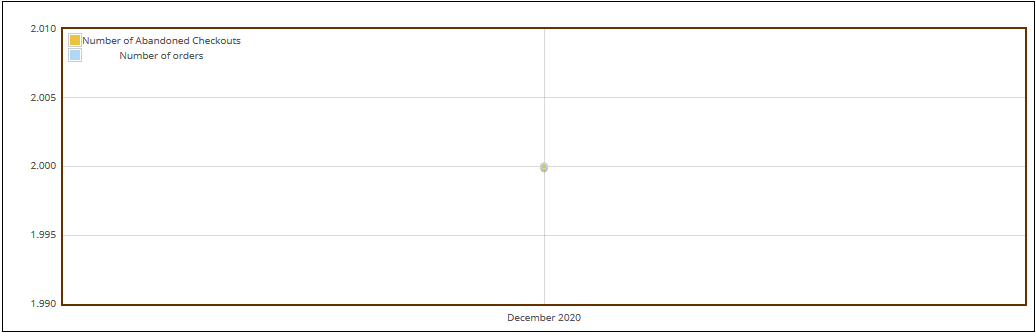
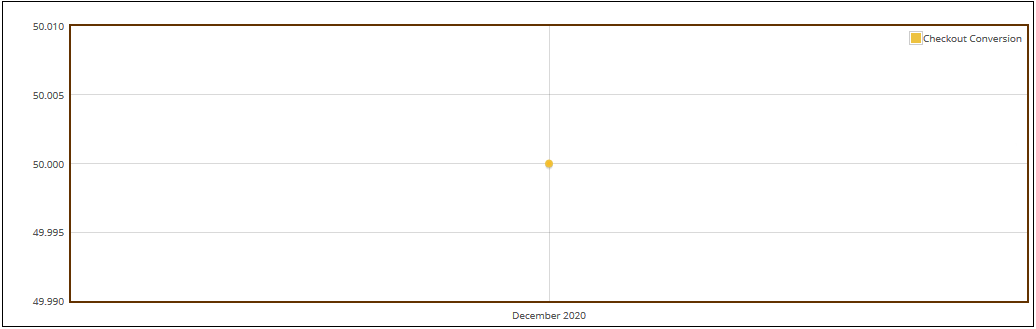
Prestashop simplified checkout addon offers a comparison report between the completed orders and abandoned cart orders. The admin can analyze reports for a specified day, week, month, and year. This PrestaShop\ module offers a total of 3 graphical reports. Those are:
Prestashop simplified checkout addon offers a comparison report between the completed orders and abandoned cart orders. The admin can analyze reports for the specified day, week, month, and year. This PrestaShop module offers a total of 3 graphical reports. Those are:
Abandoned Revenues v/s Order Revenues
Number of Abandoned Checkouts v/s Number of orders
Checkout conversion
The data will appear in tabular format. The table includes the number of orders received, number of abandoned checkouts, revenue earned from orders, revenue lost due to abandoned carts, and checkout conversion rate.
The admin can check the data for a specified day, week, month, and year.
3.3 Checkout Behaviour Report
This feature offers a detailed report of the customers who abandoned their carts. It gives the data if they left the checkout process. The online store merchant can check the filled information percentage provided by the users who left the cart abandoned. They can check reports for any specific day, just by filtering out these dates.
4. Annexure A
4.1 How to Set up Facebook Login?
Follow the steps below to create Facebook App:-
1: Go to the given URL: https://developers.facebook.com/apps/
2: Click on the “Create App” button.
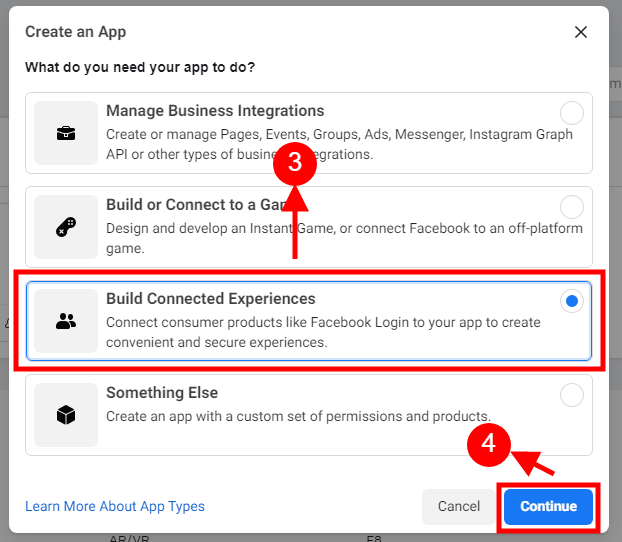
Step 3&4: Select the “Build Connected Experiences” option and click on the ‘Continue’ button.
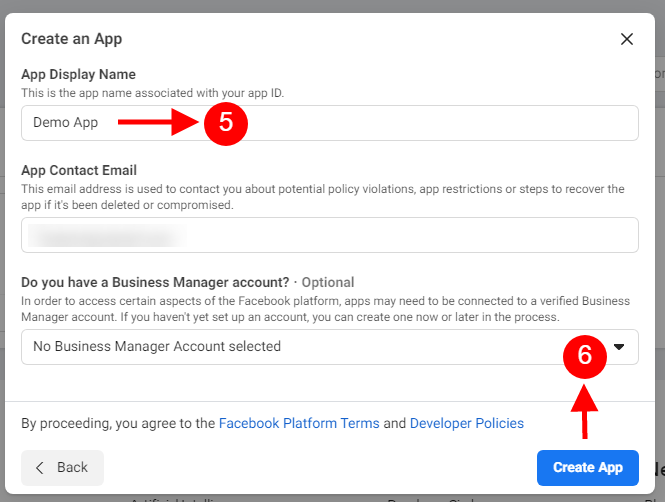
5&6: Add “App Display Name”, “App Contact Email”, and choose from the “Do you have a Business Manager Account?” and then click on the “Create App” button.
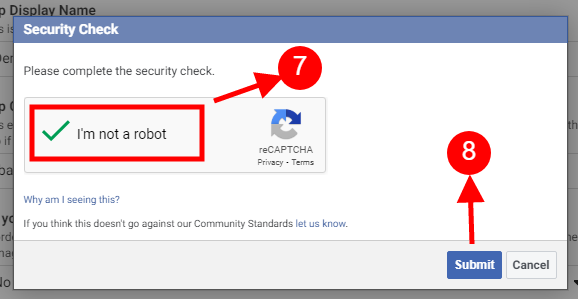
7&8: After clicking on Create App ID you will have to go through a security check as shown:
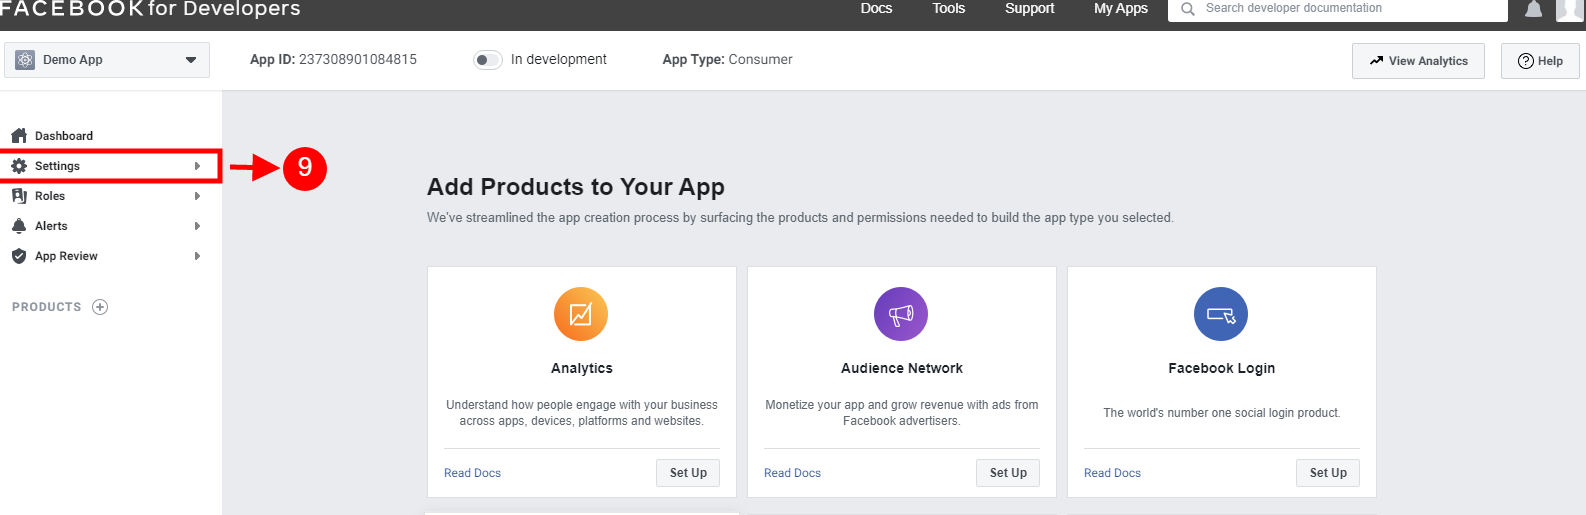
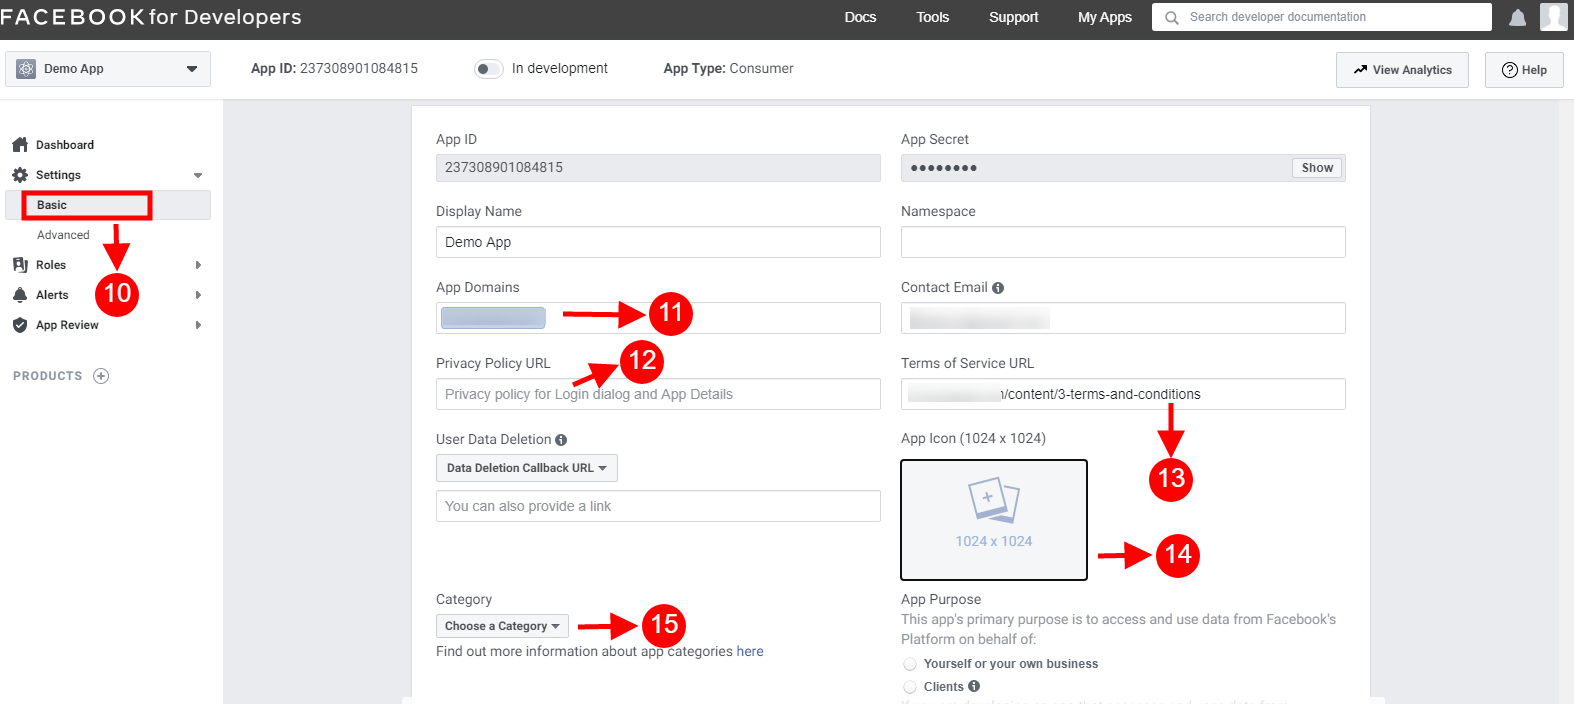
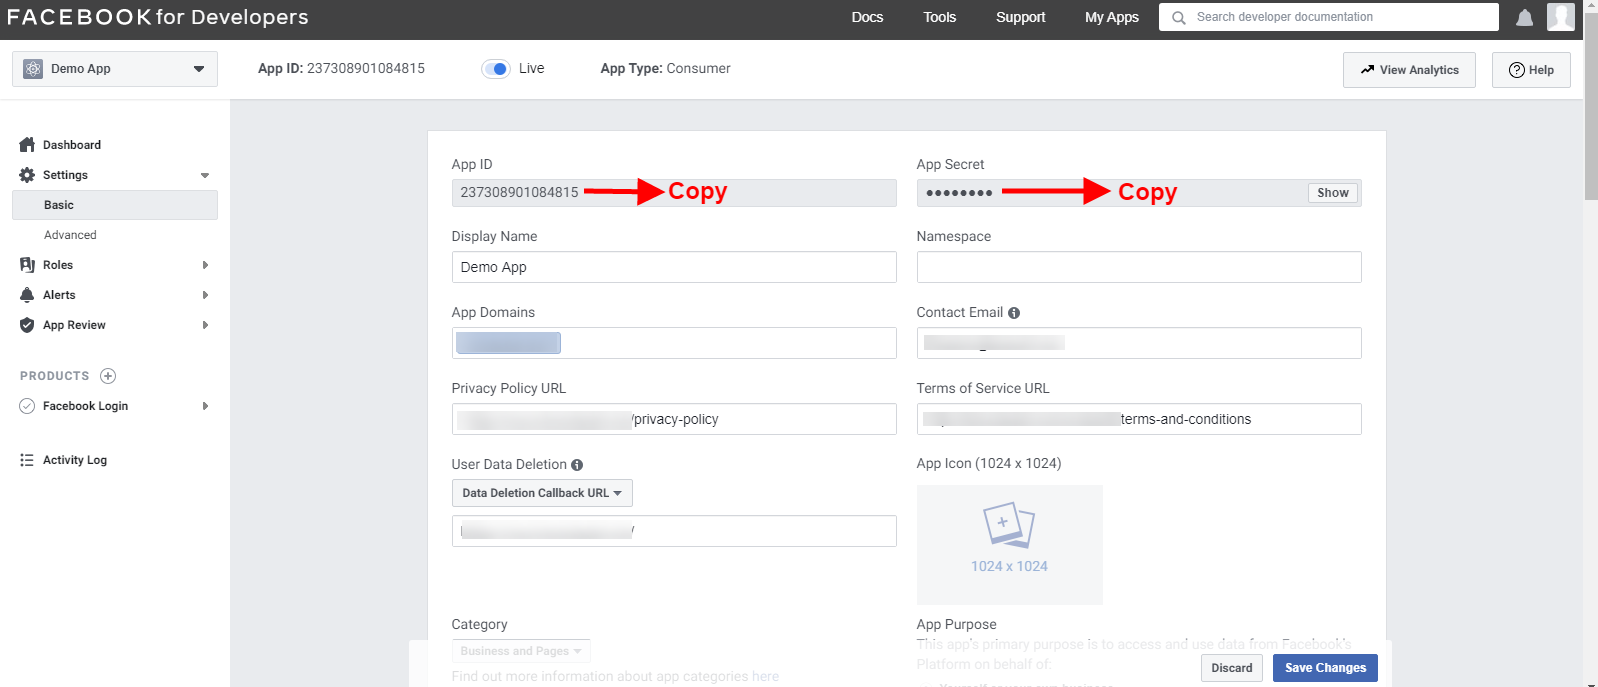
10-15: Two options will be available in the dropdown, Basic and Advanced, click on “Basic”. And then enter your “App Domain”, ”Privacy URL”, ”Terms of Service URL”, ”Add Icon”, ”Select Category” and click on the “Save Changes” button.
App Domains:
yourdomain.com is correct
yourdomain.com/store is incorrect
www.domain.com is incorrect
16: Now click on “+Add Platform”.
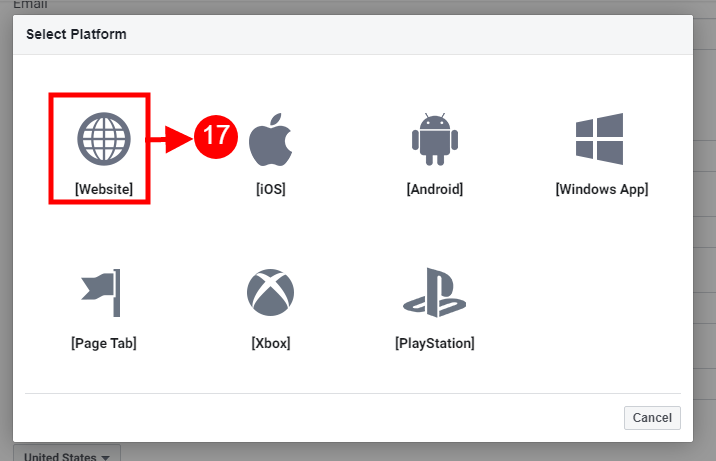
17: And select Website as Platform.
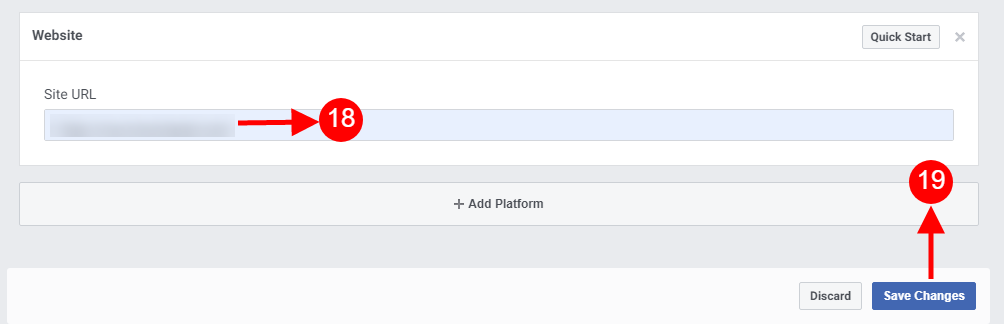
18&19: Now Enter your site URL.
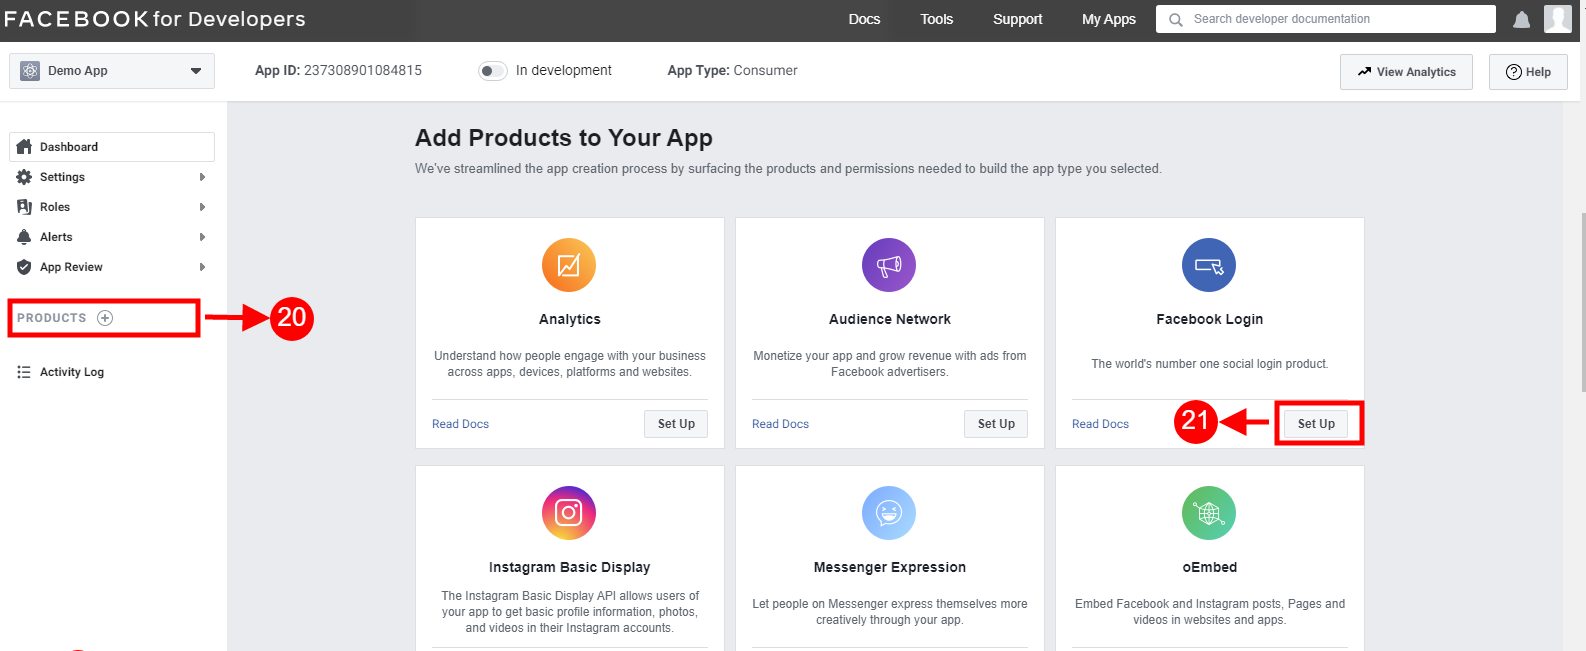
20&21: Click on “Products+” and click on the Setup button from the Facebook login tab.
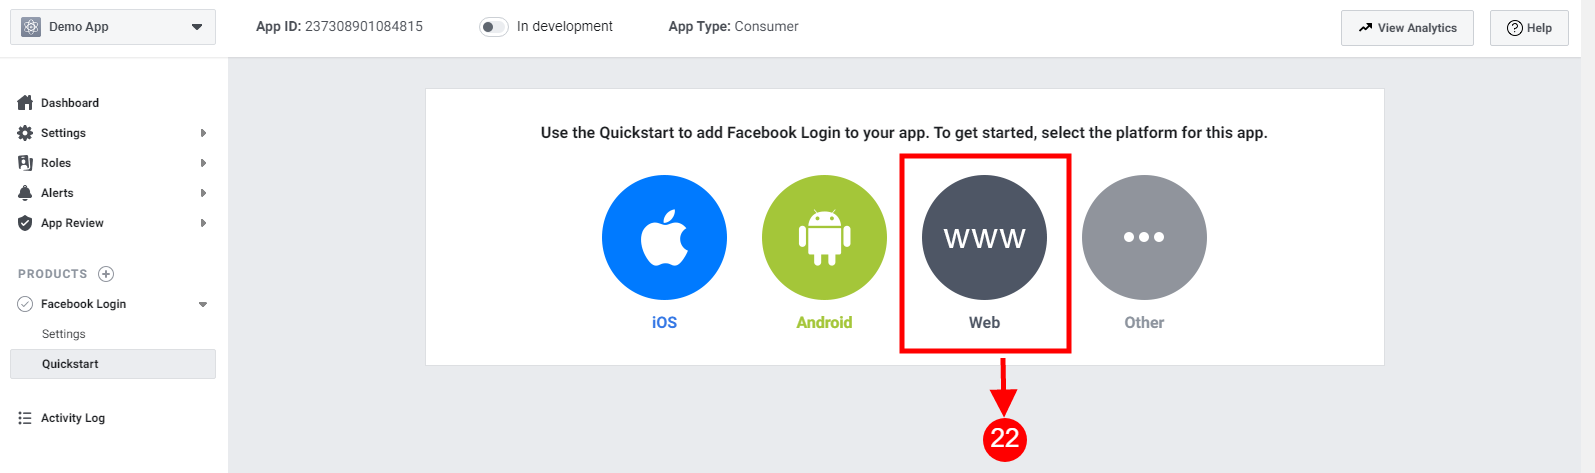
22: Select the web as the platform for the app.
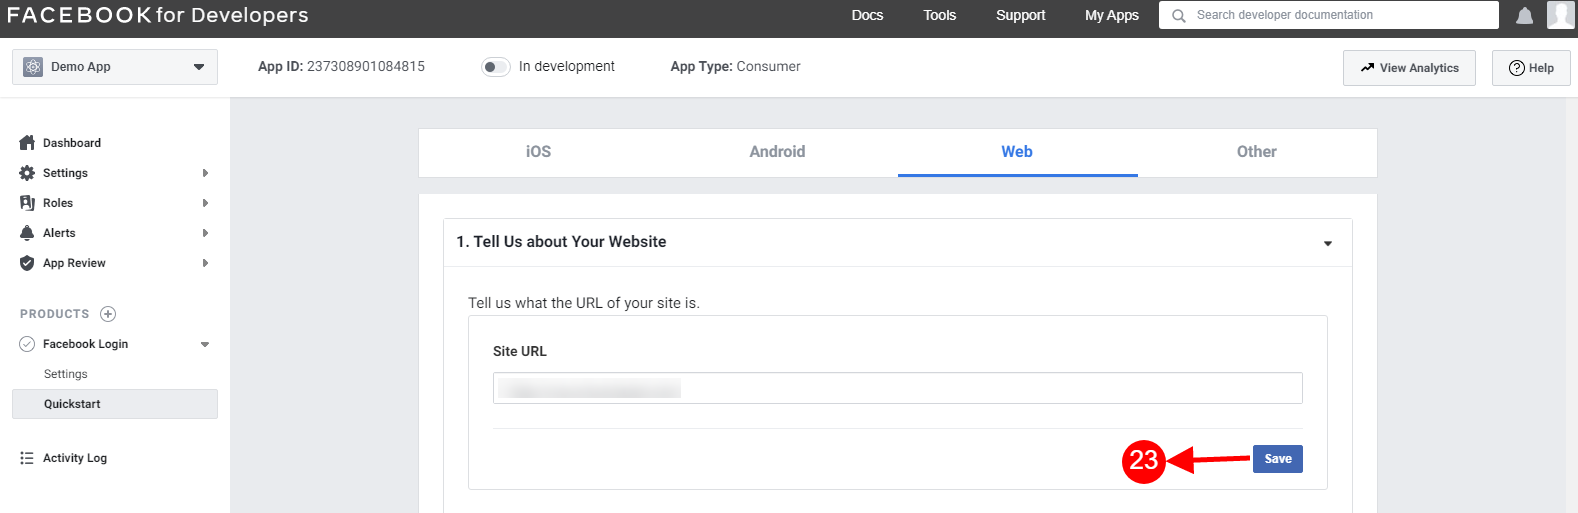
23: Add Site URL and click on save.
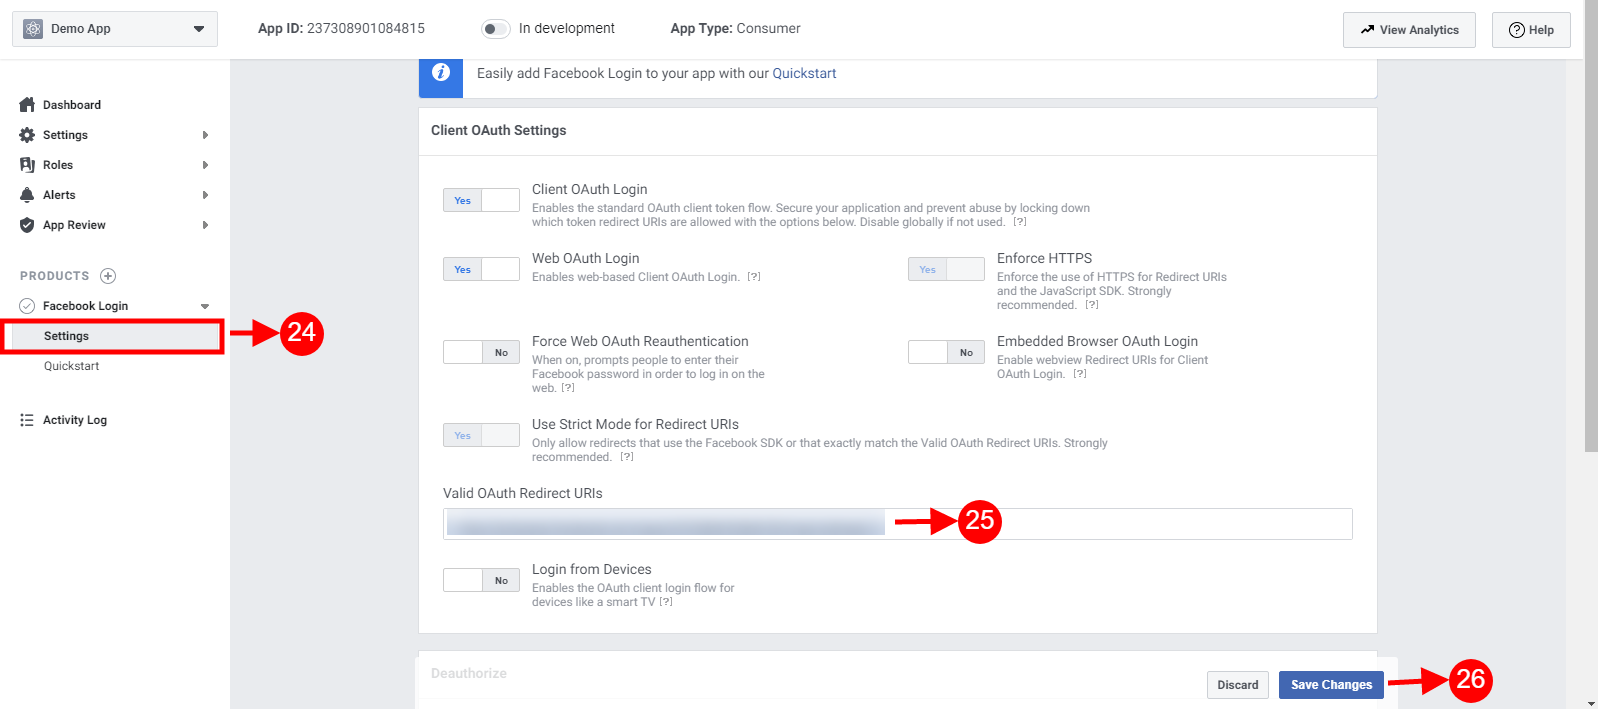
24-26: Click on Settings and add a Valid OAuth Redirect URIs.
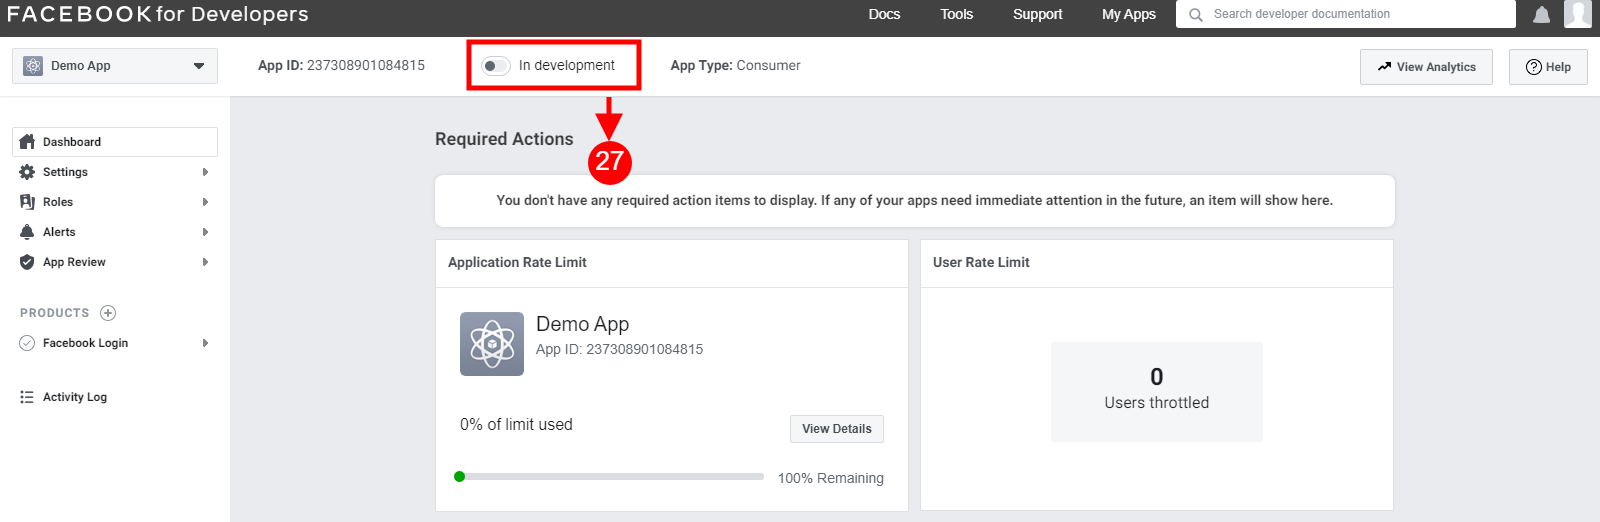
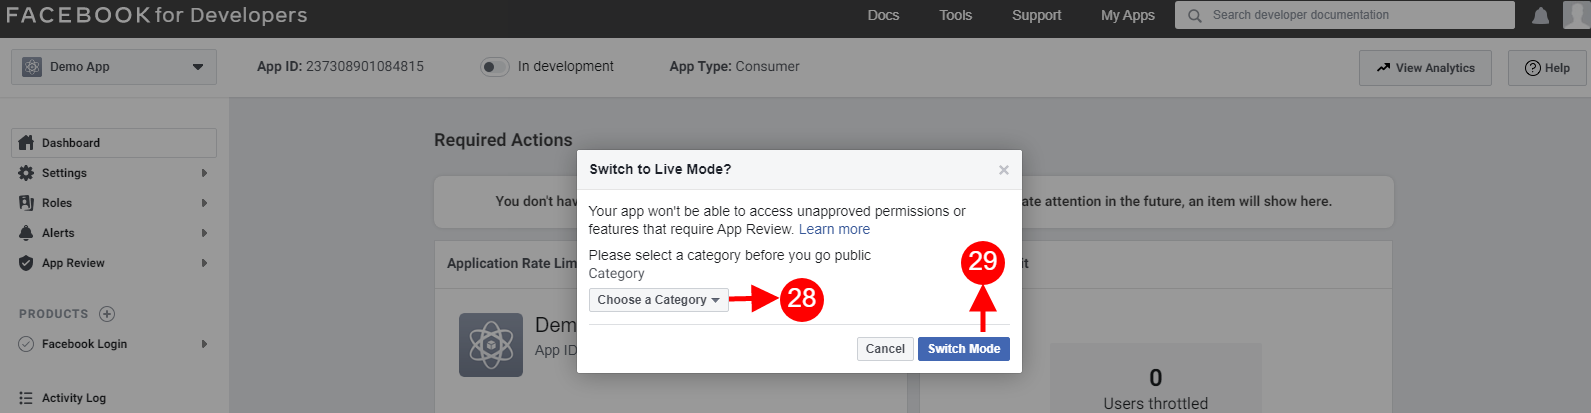
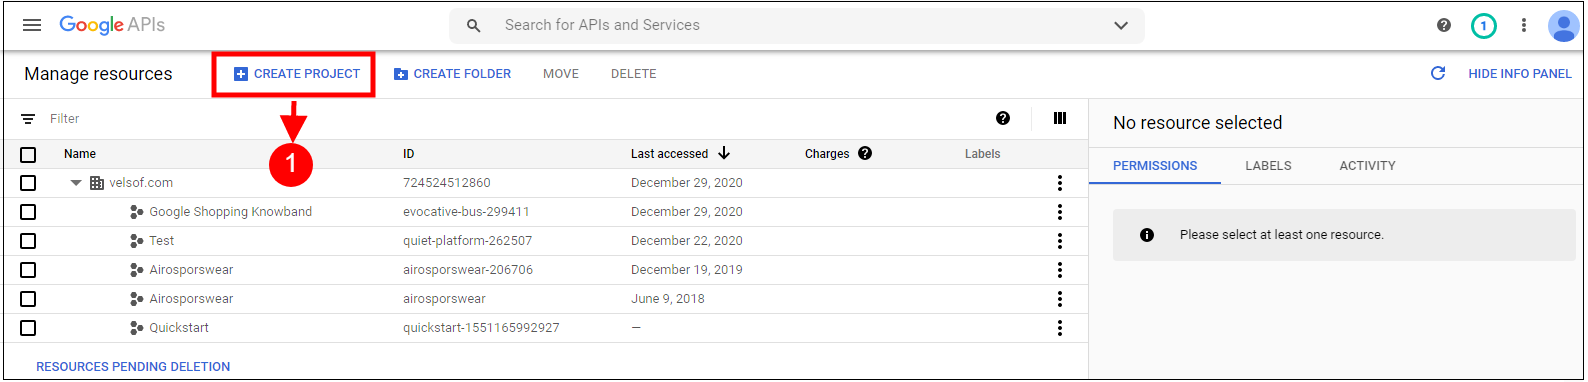
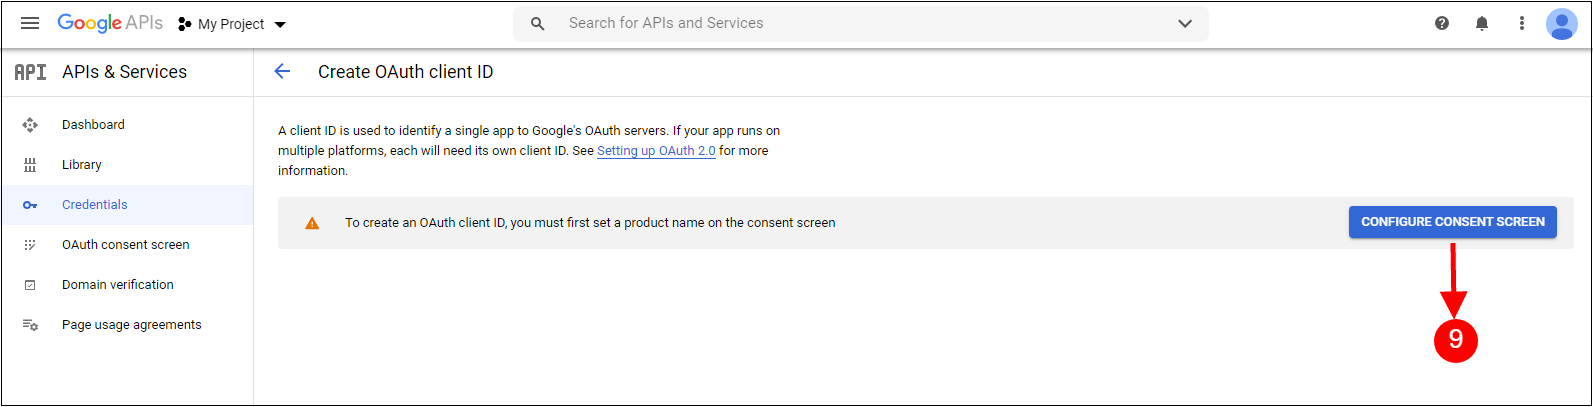
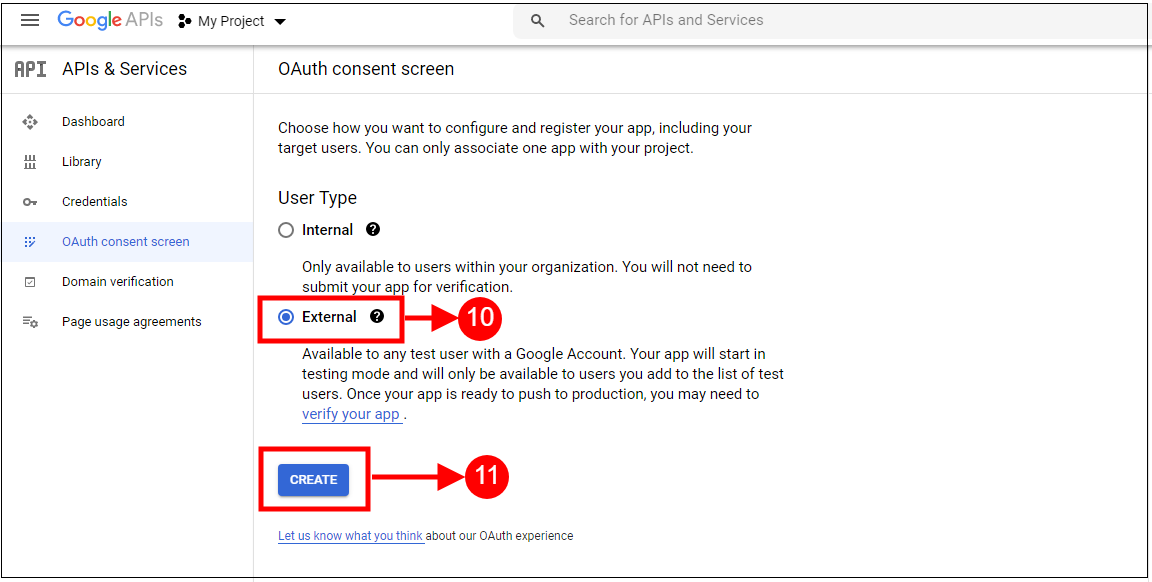
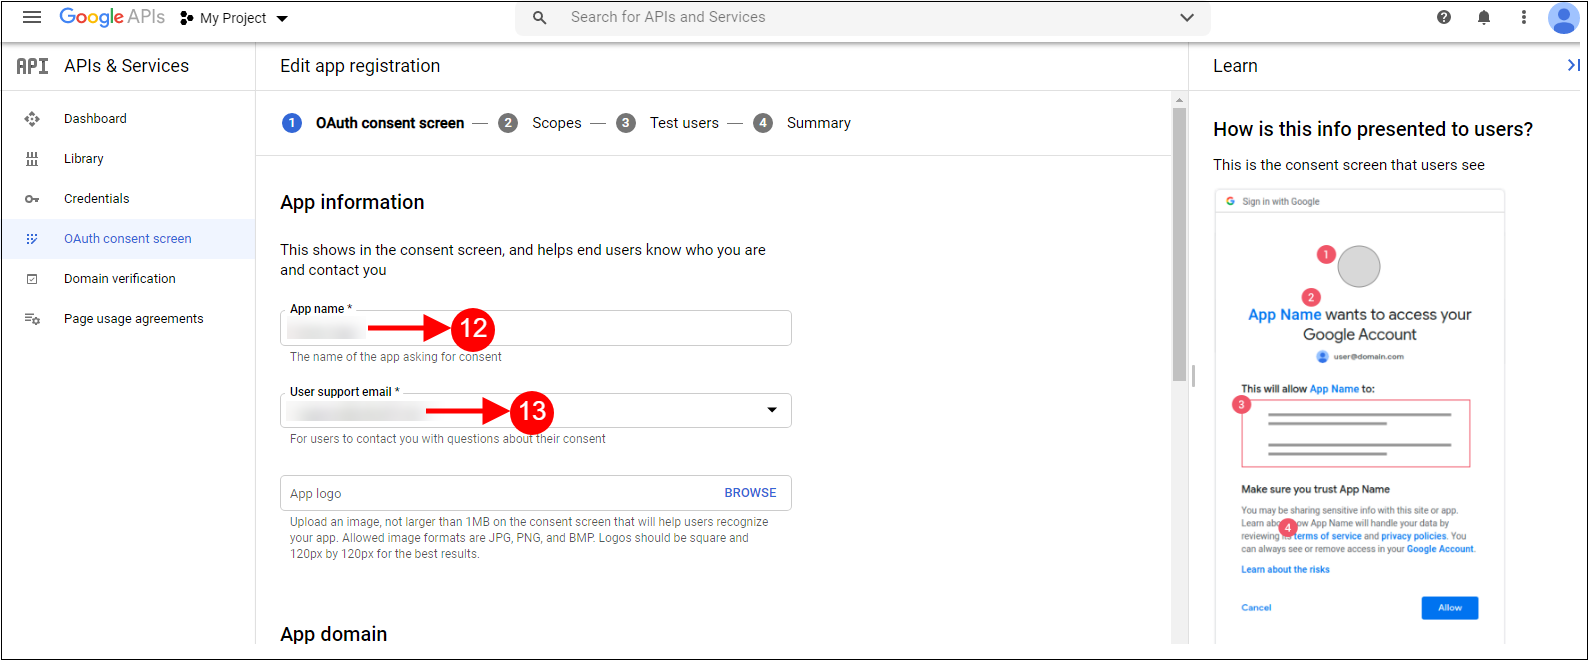
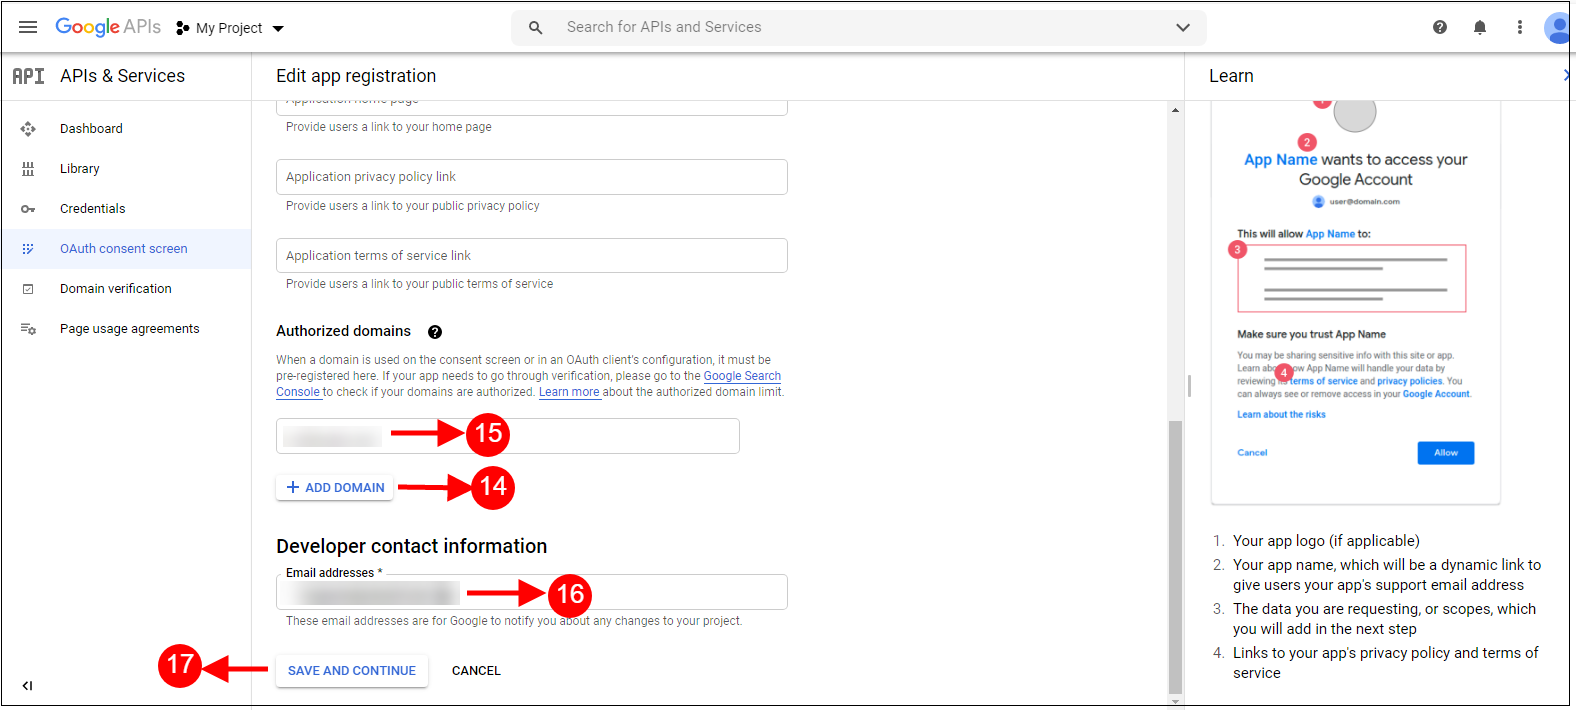
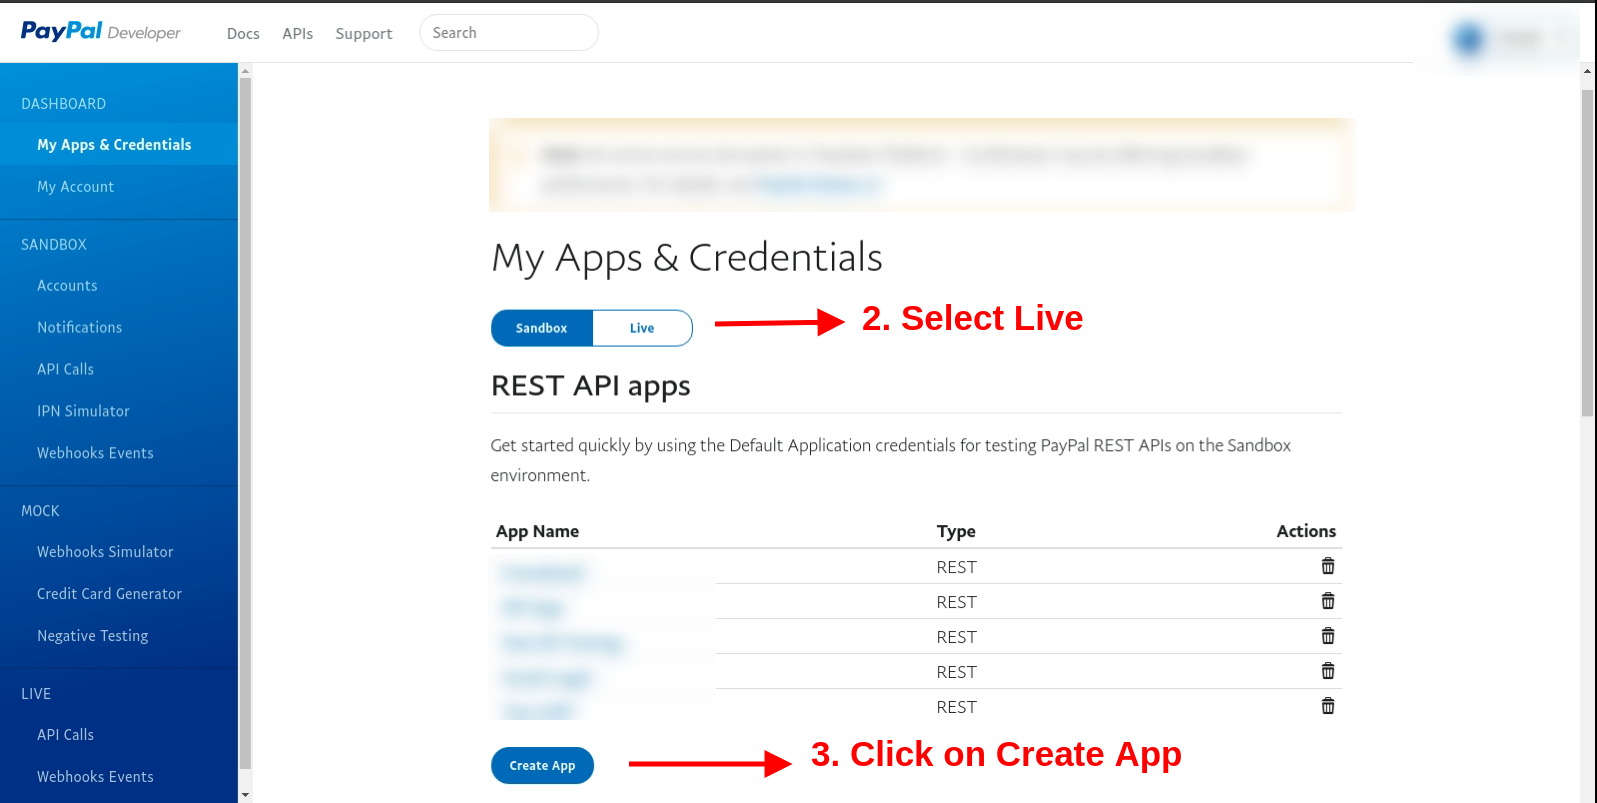
Select Live from the “My apps and credentials” section. After that click on Create App button.
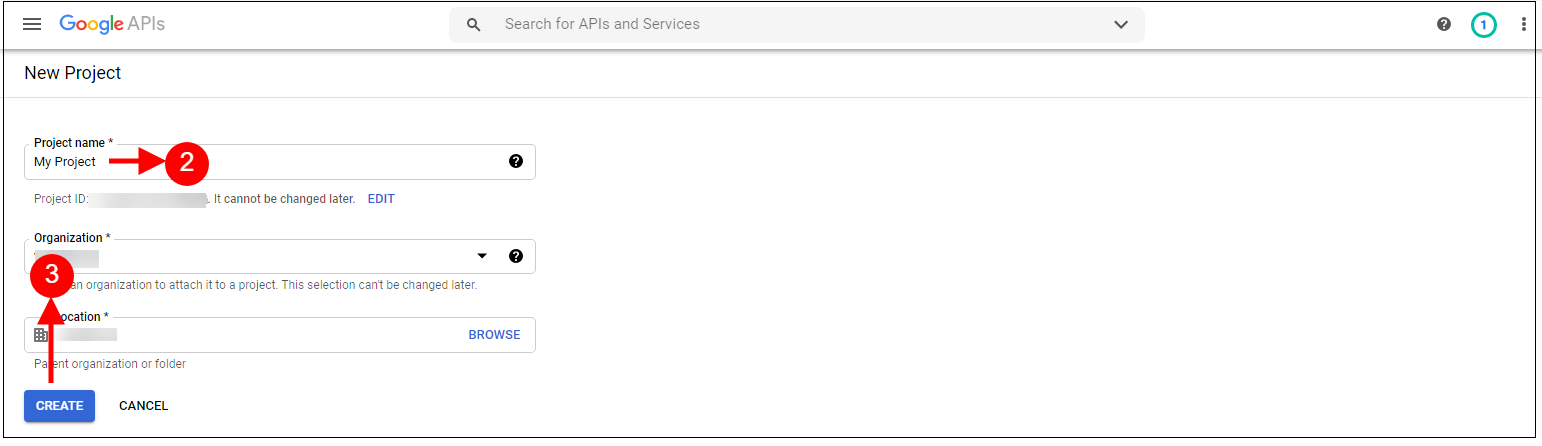
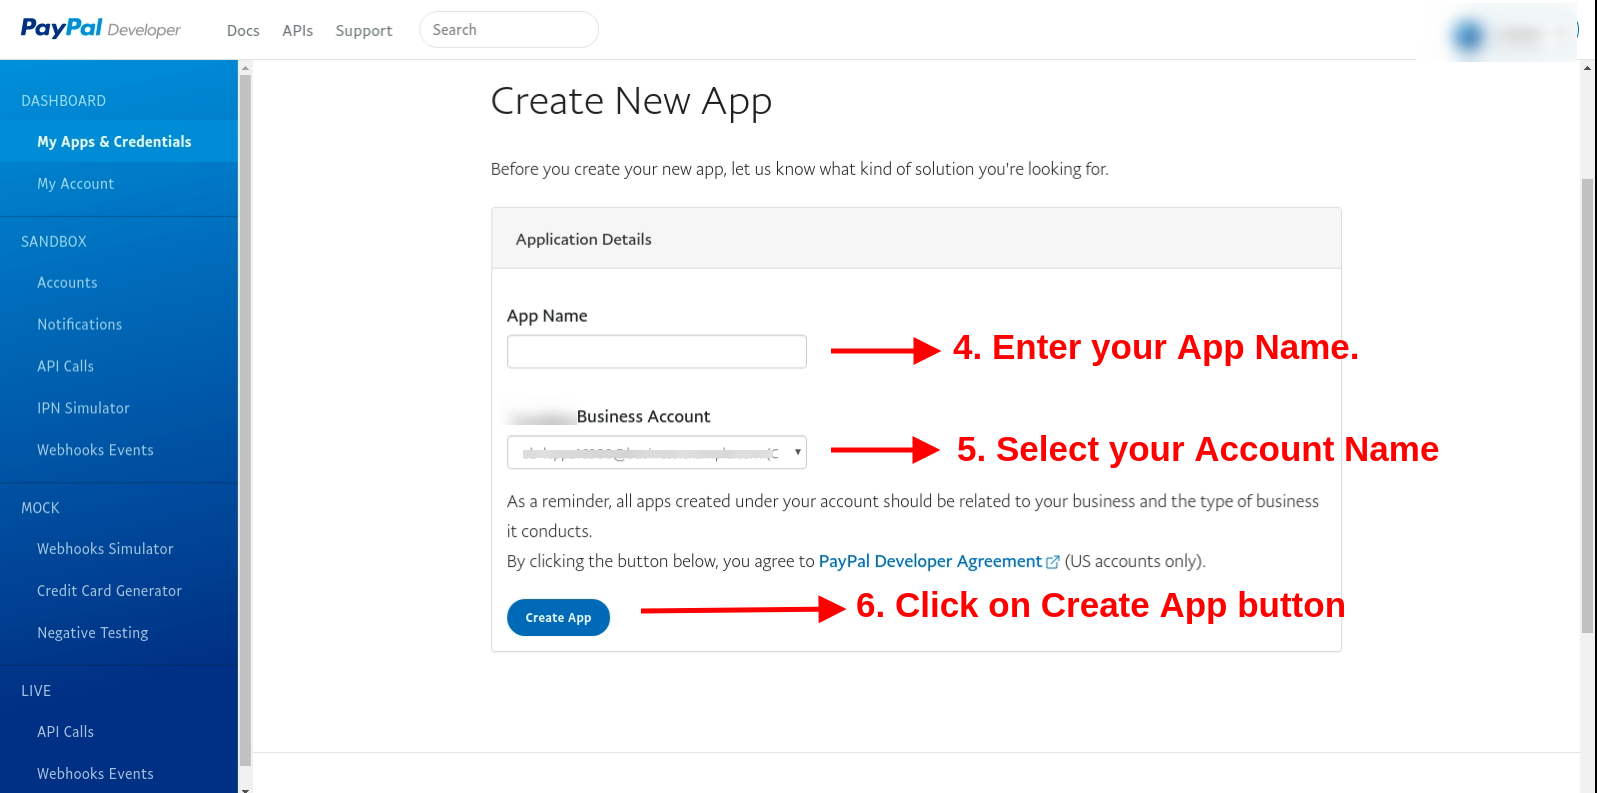
Now enter the app name, select the account name and click on create app button.
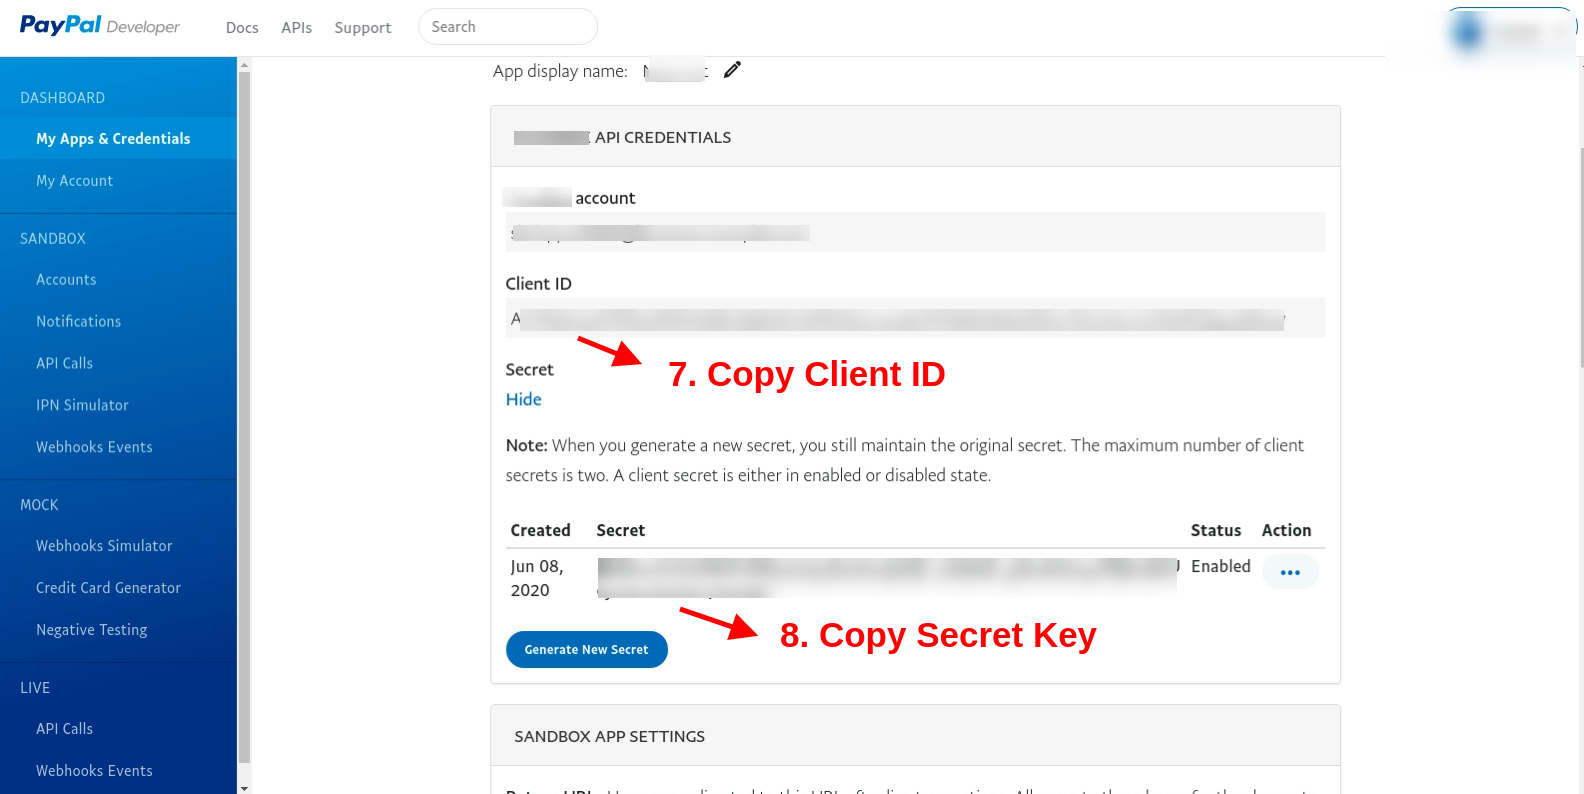
Copy client Id and secret key from here:
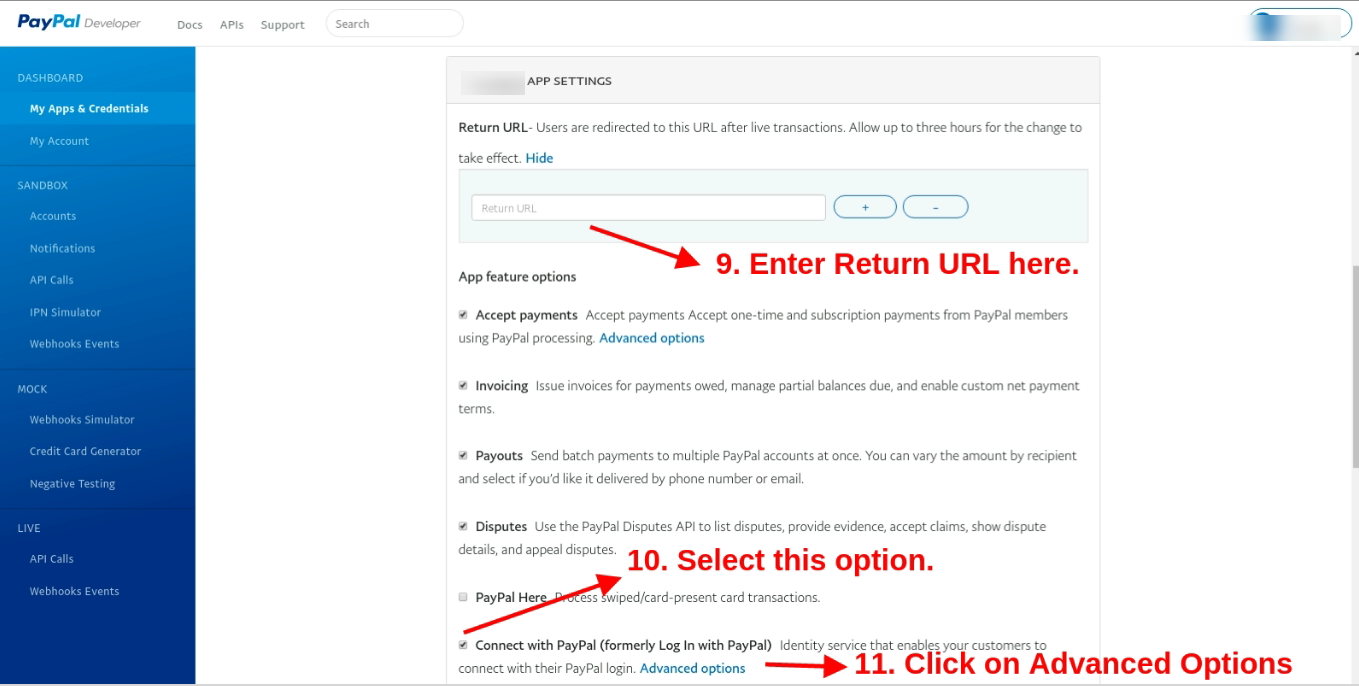
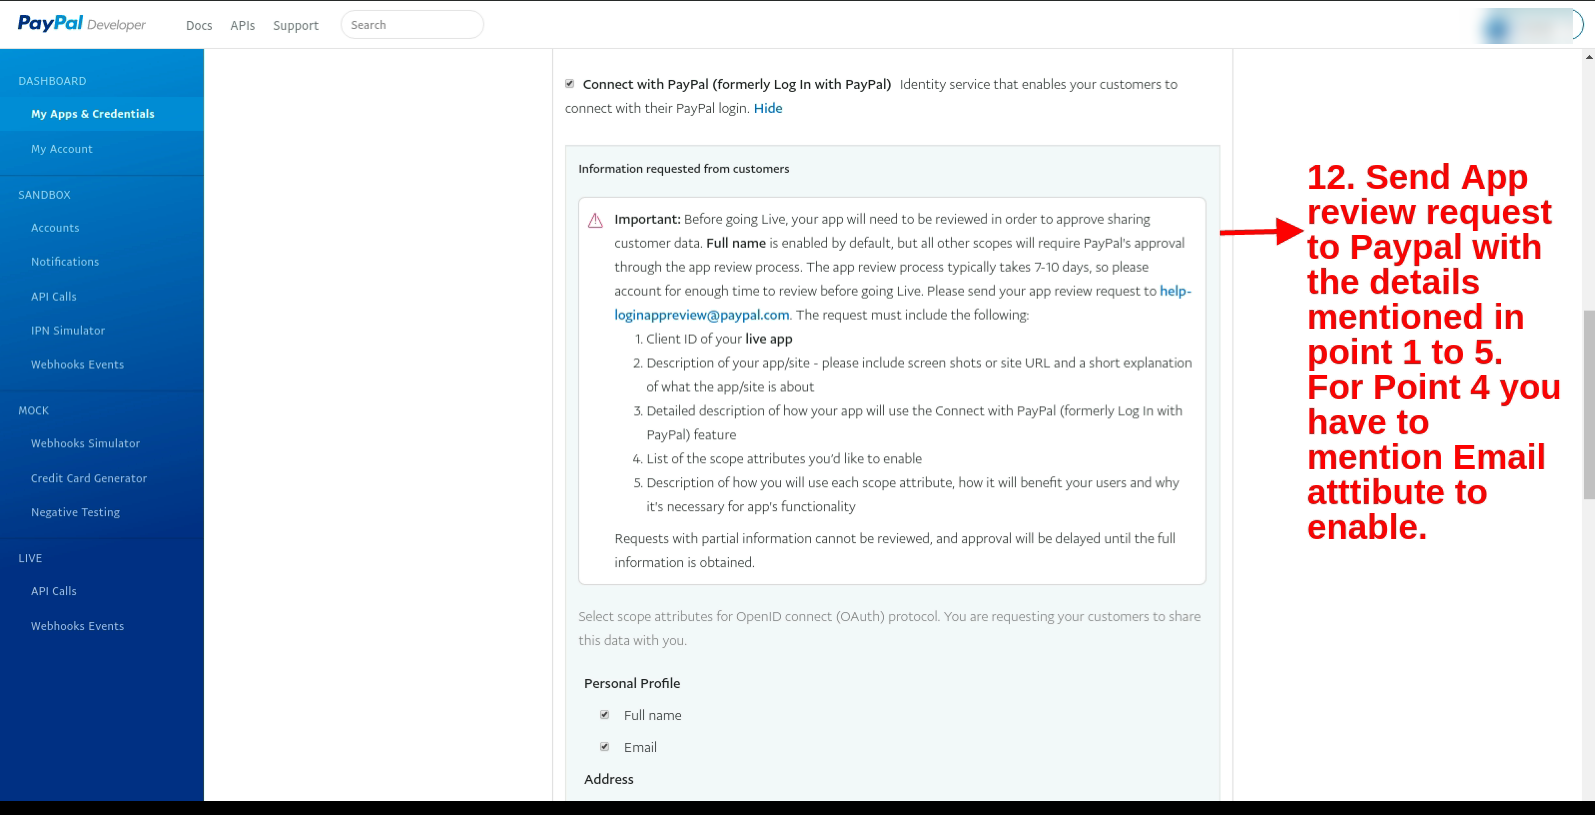
Here, enter the return URL ie. https://psm.knowband.com/supercheckout_demo/17/index.php?fc=module&module=supercheckout&controller=supercheckout&login_type=paypal after that select the “Connect with PayPal” option and click on “Advance options”
Send an App review request to Paypal with the details mentioned in points 1 to 5 (present in the screenshot). For Point 4 you have to mention the Email attribute to enable.
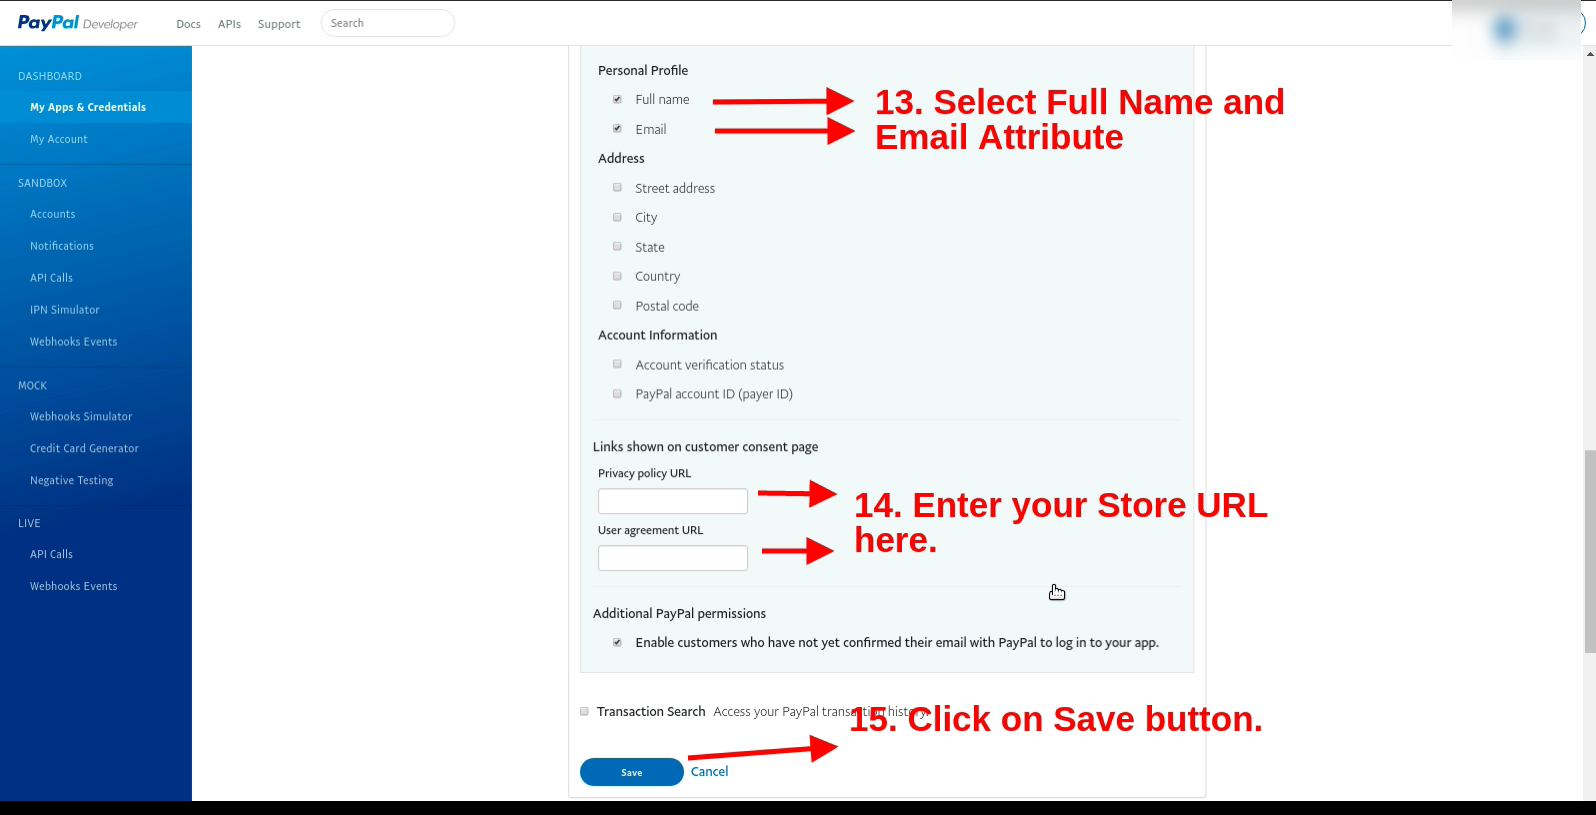
In the personal profile, section select the full name and email option. After that enter the store URL (https://psm.knowband.com/supercheckout_demo/17/) and click on the Save button.
Now enter the client ID and secret key after enabling the PayPal login page option.
5.0 Front-end Interface
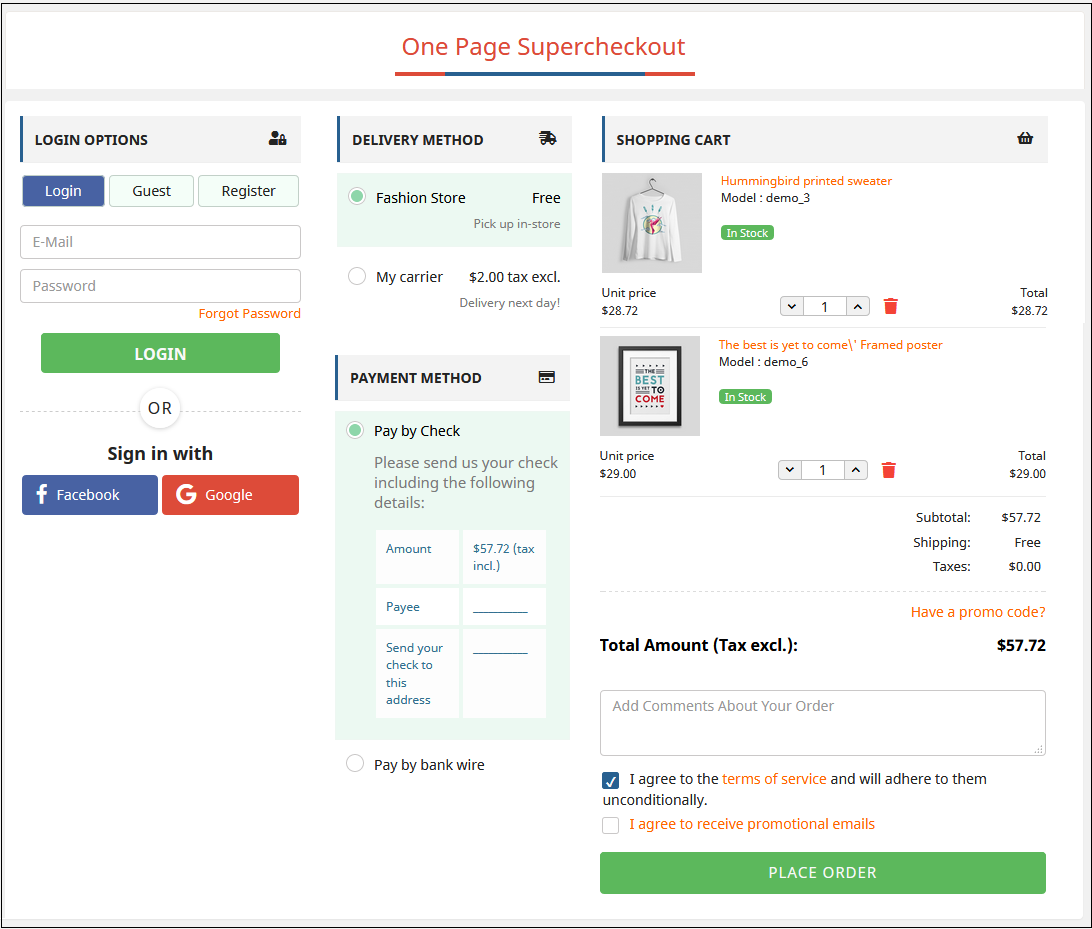
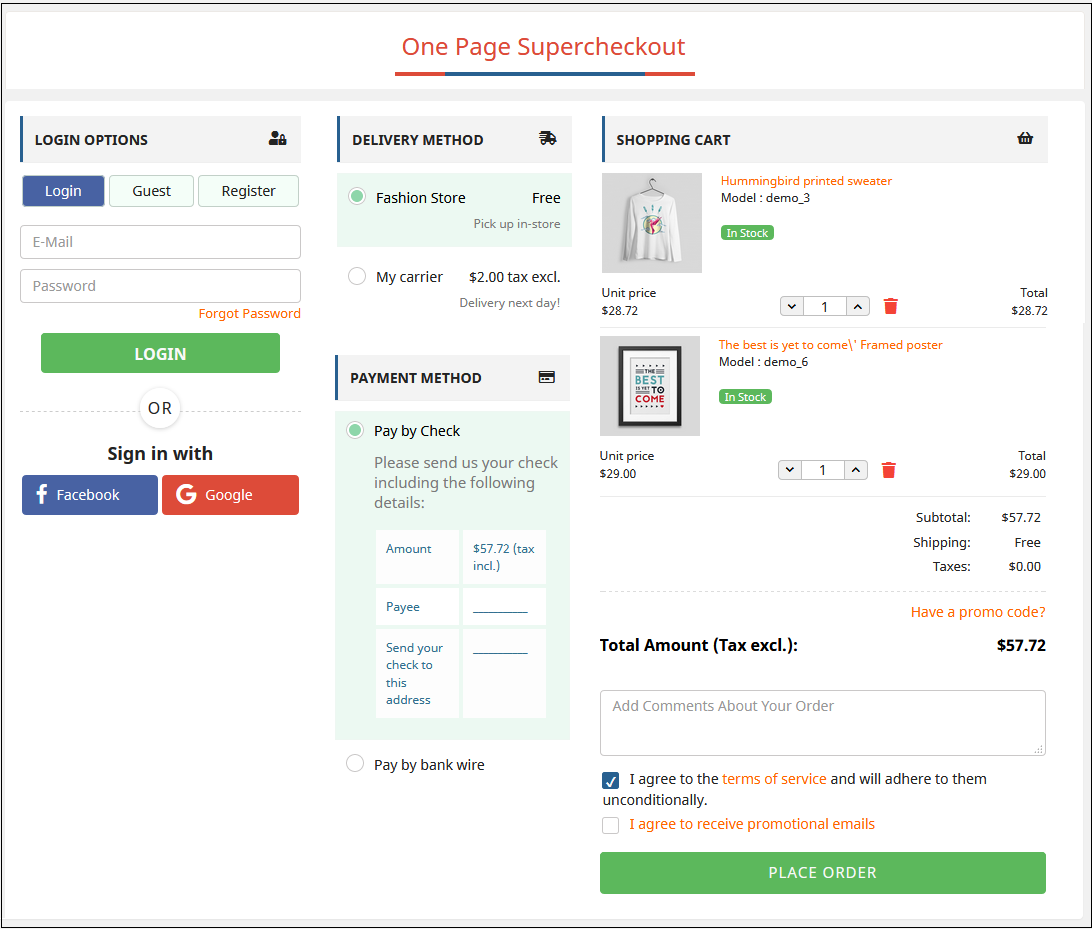
After successful installation, the Checkout page will look like this. The admin can add or remove fields from the checkout page and thus can display all the checkout steps in one place.
In the updated version, there is a Paypal login option for the users.
Watch how this Prestashop One Page Checkout Plugin works:
Find more details about this Prestashop Simplified Checkout Addon below:
Prestashop One Page Checkout Module Product Link:Click Here One Page Checkout Prestashop Addon Admin Demo: Click Here Responsive one page checkout Prestashop Addon Front Demo: Click Here
Find this Prestashop One Page Checkout Module on Addon Store as well.Visit: Click Here
This module of Prestashop is an ad-don to let the seller of a particular store generate their own invoice. Seller can add their shop name and logo on the invoice generated and can also change the invoice prefix which is appended in the invoice number.
Admin can also enable and disable this feature for a particular seller only.
Steps for Installation
To install this ad-don, please follow the following steps:
1. Add ad-don folder under modules folder of your system.
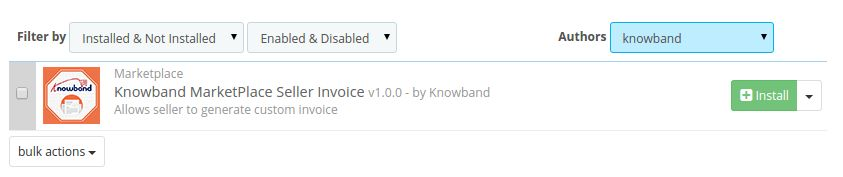
2. After adding this ad-don folder, system will list the ad-don on module page under front office feature category as given below:
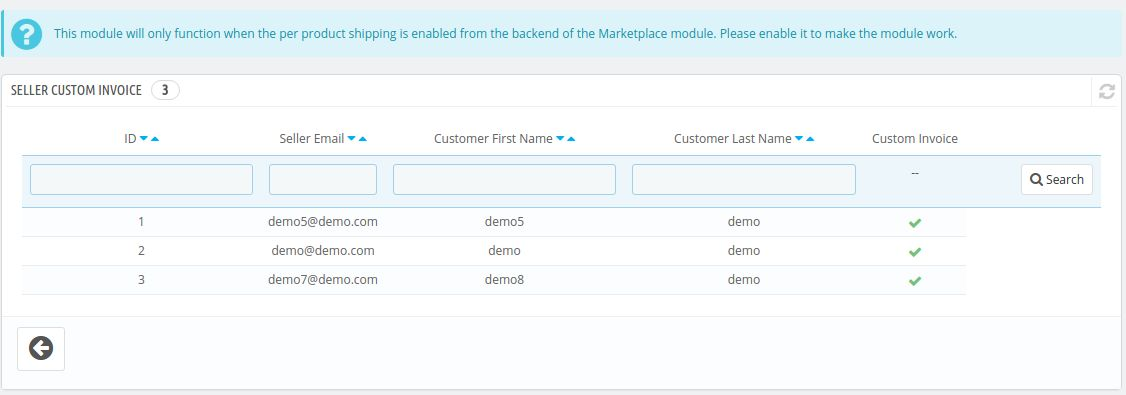
On this page, all the seller will be listed with their names and email ids. Admin can enable or disable the module by just clicking on the custom invoice displayed with every seller row. Admin can also search and sort for the seller in the listing given below.
Seller Account Interfaces
These are interfaces which will be accessible only through seller account section.
Menu Location
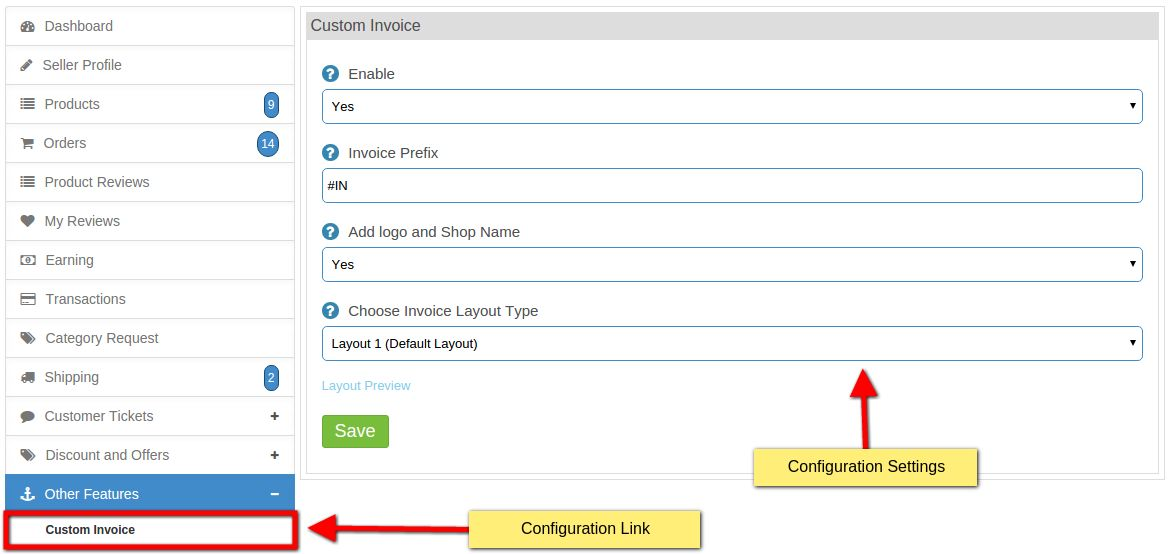
After installation, a menu will be displayed to the seller as shown in below screen:
On clicking the highlighted link, a new page will open in which the configuration settings for the seller invoice will be displayed. The seller can change these settings according to the invoice which he wants to generate for the seller.
Field Description
1. Enable : This module will only work for this particular seller if and only if he enables it from his end.
2. Invoice Prefix: Here the seller can enter the prefix of the invoice which he wants to generate.
3. Add logo and shop name: If this field is enabled by the seller then the sellers logo and name will be displayed on the invoice generated on the order of seller products.
4. Choose invoice layout: This module has four different layout which the seller can use for the invoice of his orders.
Hail this Knowband site! which has catapulted the eCommerce business environment to the top most level due to the presence of numerous out- of- the- box eCommerce extensions. The competition in the online business environment may be getting tougher day by day but with the support of these OpenCart modules, you can take a sigh of relief and can emerge victorious among your business rivals. You may opt for various plugins for your online store but for grabbing the instant returns in terms of conversion rates and product sales, all you need to do is just install these amazing 5 OpenCart plugins on your site. Let us take a look at these mind blowing plugins below:
Don’t let your shopping cart abandonments spoil the reputation and brand value of your online business entity as you can save the day for yourself by installing this OpenCart Abandoned Cart plugin on your store. It allows you to send the reminder emails to your targeted customers on a regular interval of time for reminding them about their pending shopping orders. Apart from this, it is now easier for your abandoned customers to recover their shopping cart easily along with the seamless customization in your email templates.
Start working actively towards improving social engagement on your OpenCart store by providing simple account registration and login facility with this OpenCart Social Loginizer extension. Your targeted customers don’t need to create a separate account for logging onto your online store and can accomplish this crucial account login task with their existing social media accounts. The pl ugin consists of multiple social media buttons like Facebook, Twitter, Google+, Linked in, Yahoo and other such sites for allowing quick customer login. Further, it is now easy to make customizations in your social buttons, login options and site interface with the help of enhanced back end functionality of this module.
Ensure an easy online shopping experience to your site visitors by simplying the checkout process on your OpenCart site. This OpenCart One Page Supercheckout has made the multiple checkout functionality into a single page checkout process by reducing the number of checkout fields and processes. Apart from this, store owners can add multiple payment and shipping options on their eCommerce store for persuading their site visitors to make online purchase through their site. Further, it allows quick customization on your checkout page with the help of its feature packed admin panel to boost your conversion rates and product sales.
For grabbing the instant customer attention and product sales of your targeted customers, you need to showcase appealing shopping deals and offers on your site. But, often this crucial task is difficult to be accomplished and thus most of the site owners are unable to convert maximum number of visitors on their site. However, the situation has simplified a lot with the introduction of this OpenCart Deal Timer extension. Now, store owners can effortlessly promote offers, discounts and deals on their eCommerce store and can grab the instant attention of their targeted customers to make bumper product sales.
5. OpenCart Sales Coupon Enhancer
With the help of this OpenCart Sales Coupon Enhancer module, it is now easier for the store owners to generate coupons for their targeted customers. You can create coupons for your customer groups, shipping methods and payment methods to grab the instant attention of your site visitors for making product sales and conversion rates. Apart from this, store owners have the freedom to create the random coupons and to set validation rules for their coupon codes.
If you want to create a niche place for your online store in this eCommerce segment, you need to install these amazing OpenCart modules by Knowband without any delay. These feature packed eCommerce extensions can provide the desired conversion rates, site traffic, product sales and customer engagement to your online business entity.
Knowband offers Prestashop Facebook Share and Win Discount addon which helps the eCommerce store admin to promote his website and products effortlessly. The Prestashop store admin can ask the online customers to share the product on Facebook and get the discount coupon. This is a very interesting addon because of its dual nature. The store owner can set the fixed or percentage based discount accordingly. The Product share and win plugin is a fully-featured module which can be customizable easily without any hassle or complications.
Admin will be having full control on the discount type and the discount value which he is giving. This Prestashop facebook share option allows the admin to view the product stats ie which product has been shared how many times and if the coupon code applied by the customers or not. Thus, the Prestashop product sharing module helps the online store merchant to promote the products easily without any complex process.
1.1 Features offered by this Prestashop share for win addon
The store admin can easily install, configure and implement this Prestashop Facebook Share and Win Discount addon.
The Product share and win plugin allows the admin to show a Facebook sharing option on the product page.
The online customers can share the product on Facebook and get discount coupon.
The Prestashop share on Facebook wall plugin allows offering fixed or percentage based discount.
The e-merchant can select the layout of the Facebook sharing button easily from the admin interface.
The Prestashop Social sharing addon is highly customizable and offers smooth functioning.
The Prestashop share and get discount module allows the advanced users to add custom CSS and JS code for the look and feel customization.
The admin can also set the coupon validity date from the admin interface of this Prestashop share on Facebook wall plugin.
The Prestashop product sharing module is mobile responsive.
The e-merchant can also view the product stats form the admin interface ie. which product has been shared how many time and if the generated coupon is applied by the customers or not.
This Prestashop share on Facebook wall plugin offers smooth and effortless functioning.
Once you purchase the Facebook share and get discount module from the store you’ll get these files:
1. The zipped file that consists of the source code of this Prestashop addon.
2. User Manual
Follow the below-mentioned steps to install the Facebook share and get discount module:
Unzip the zipped file which includes some files and folders.
After that, copy the overall content of the folder and paste them into the “Modules” folder of the store’s directory. You can follow the path – Root Directory/modules/.
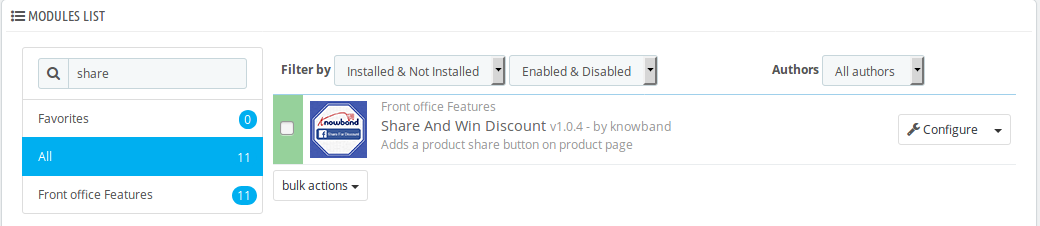
3. Now you can install the Facebook share and get discount module. You can find that in Store Admin -> Modules and Services. It would be shown as below –
Now you just need to click on “Install” button to install this Prestashop share on Facebook wall plugin. A confirmation pop-up will be shown. Click on “Proceed with the installation” option. This step will install the module and show notification – “Module(s) installed successfully”.
3.0 Admin Interface
In the admin interface of Prestashop product sharing module, there are following options to configure this plug-in and customize its look and feel at the front-end. The below mentioned customization options are available in the admin interface:
1. General Settings
2. Product Stats
Each section is described in details below.
3.1 General Settings
This section will be having following options to configure the Facebook share and get discount module:
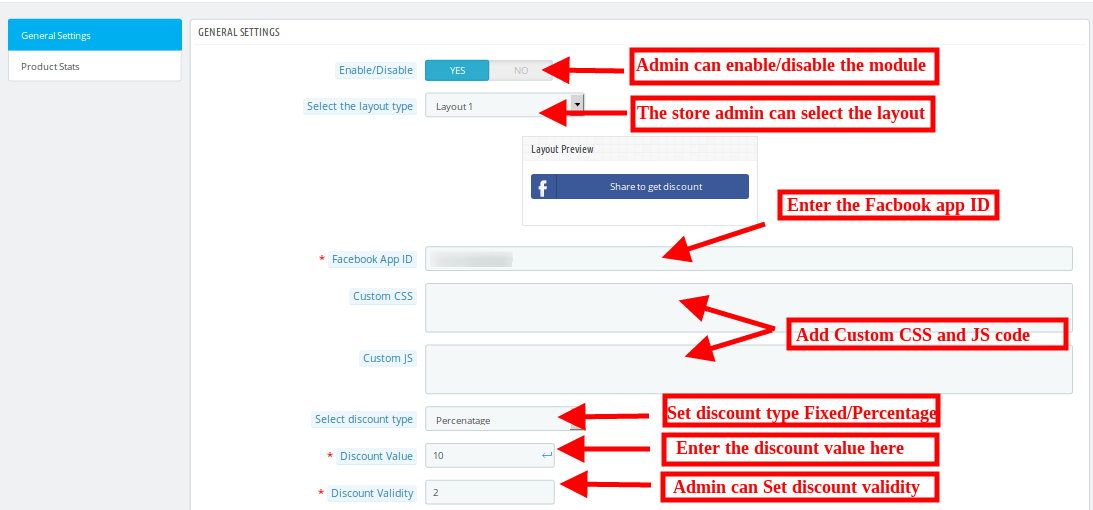
1. Enable/Disable: This option will be having a toggle button with two specific values ON and OFF. This Facebook share and get discount module will only work if this is set to ON. If this is set to OFF then none of the feature will be working and not even impacting any other section of website. By default, this option will be OFF.
2. Select the layout Type: The admin can select the layout of the sharing button from the admin interface easily. There are two layouts available. The layout preview is also available. The Prestashop product sharing module allows the admin to select the layout type according to the preferences.
3. Facebook app id: This app id is very important for this Prestashop share on Facebook wall plugin to work. Admin has to enter this app id to let the customer share the product on Facebook. For generating the Facebook App ID please visit 3.1.1 section.
4. Custom CSS: These are the fields which are given in this plugin in case if the admin wants to customize the look and feel. Prestashop product sharing module allows advanced users to add custom CSS code.
5. Custom JS code: The store admin can also enter the custom JS code for the look and feel customization from the admin interface of this Prestashop product sharing module.
6. Select Discount Type: Here, the admin can decide what type of discount is to be given to the customers who are sharing the product. It may be fixed or in percentage.
7. Discount Value: In this field the admin has to give the discount value which is to be applied on that product.
8. Discount Validity: Here, the admin has to enter the date up to which the discount coupon can be applied. If the validity date is expired than the coupon can be no longer applied.
Go to the “MY APPS” option and click on the ”ADD NEW APP”.
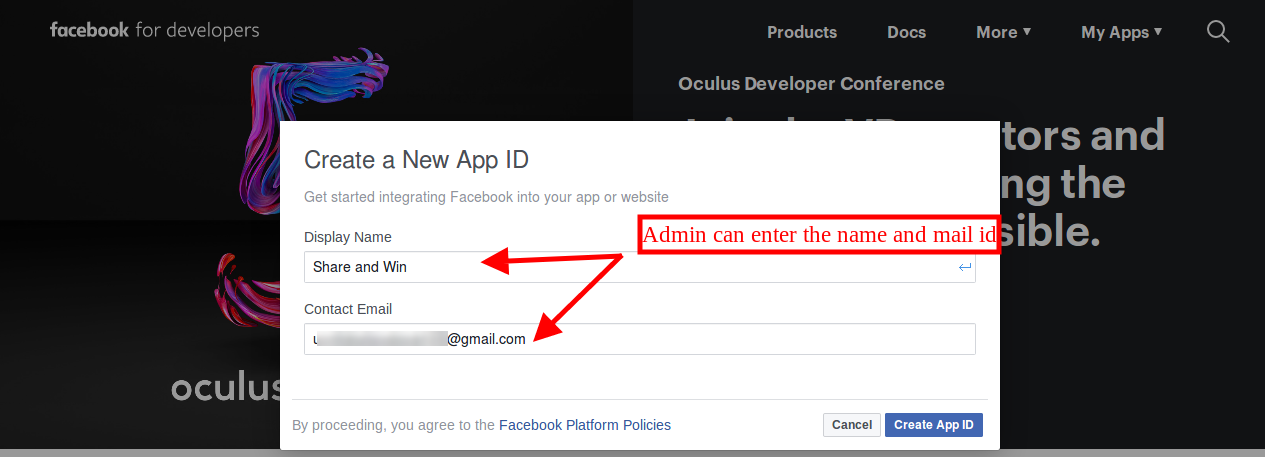
After that, the store owner needs to insert the “Display Name” and “contact email ID”. Click on the “Create App ID” button.
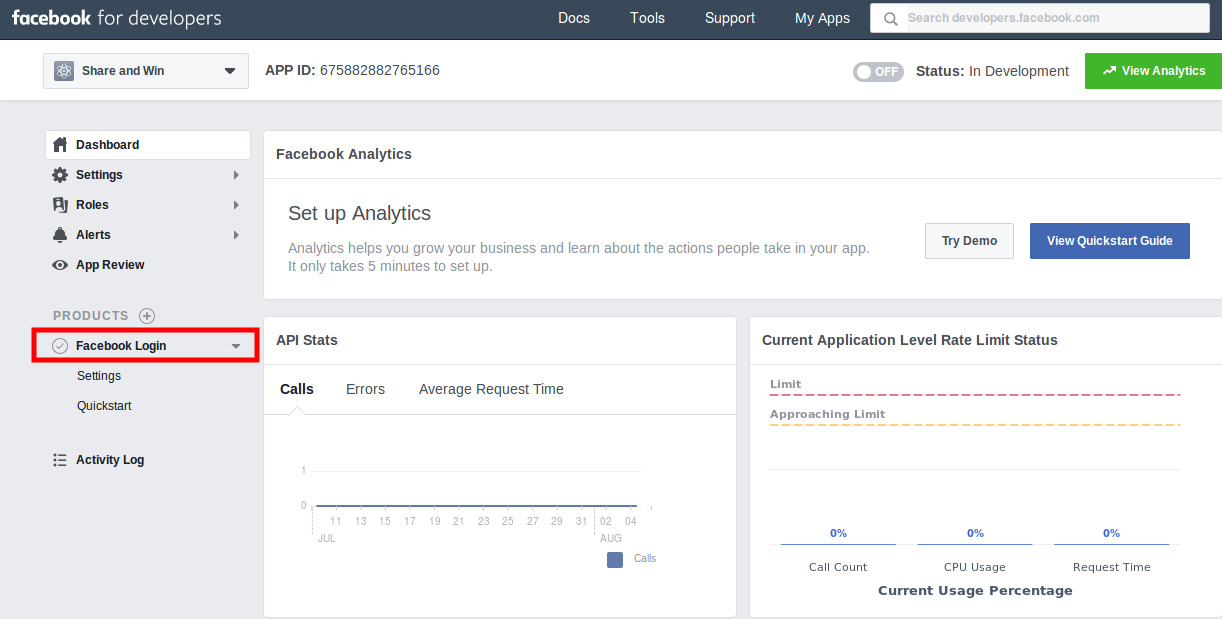
Go to the “Settings” and then select “Basic”. Here you can view the APP ID as shown below. You need to insert app domains, category, Privacy policy URL here.
After that click on “Products” option and then click on Facebook login “set Up” option. After clicking this “set up” option it will be displayed like below mentioned image:
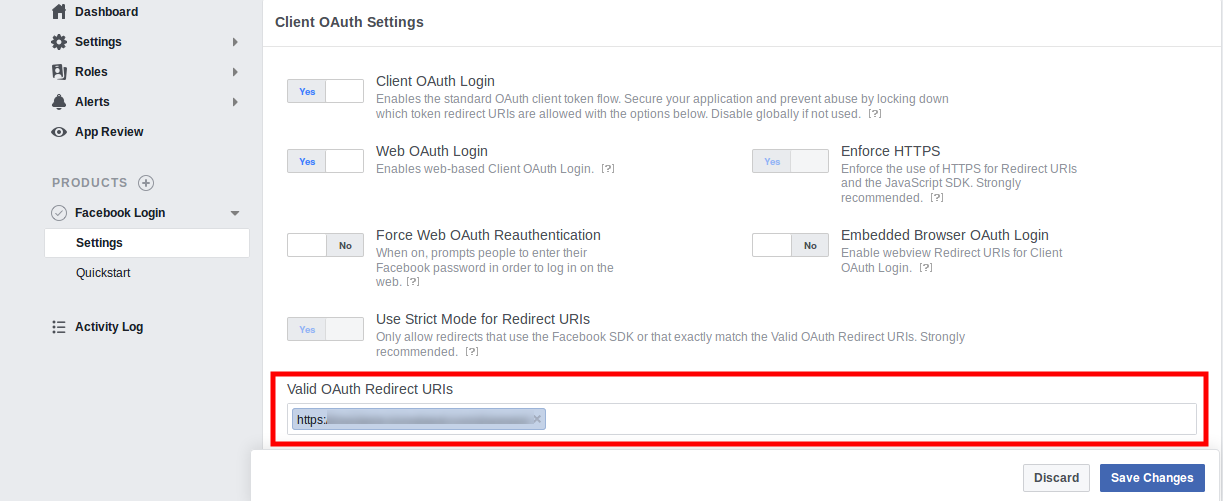
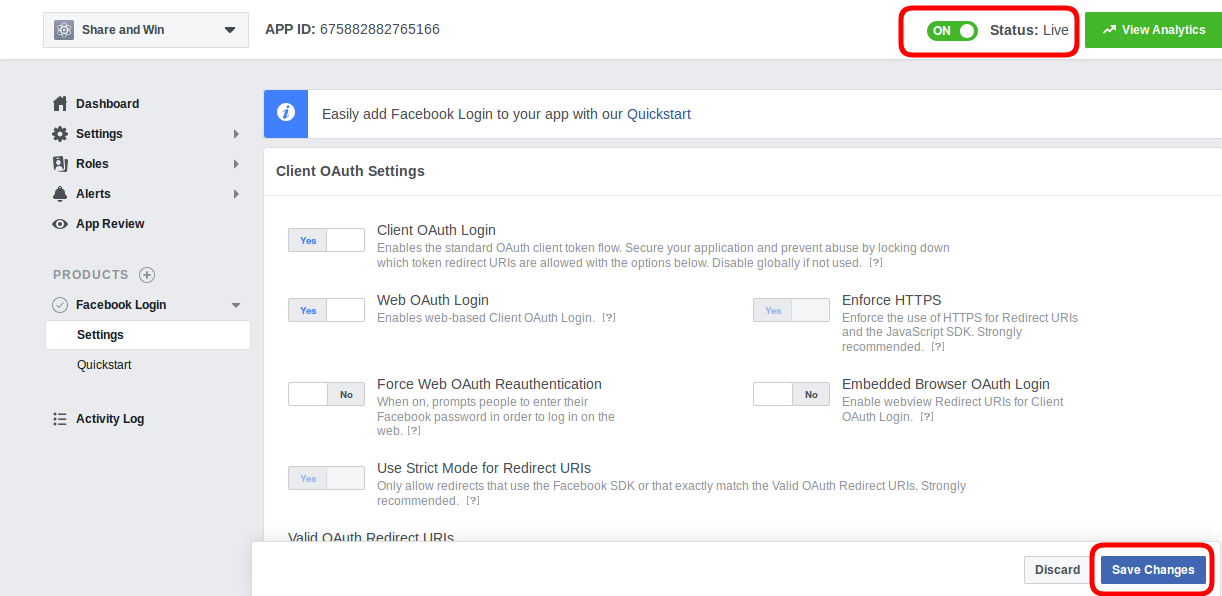
After that goto settings and insert the Valid oAuth Redirect URL’s and enable the status.
Once you enable the status, you need to click on the “save changes” option. Now the Facebook app id is ready for implementation.
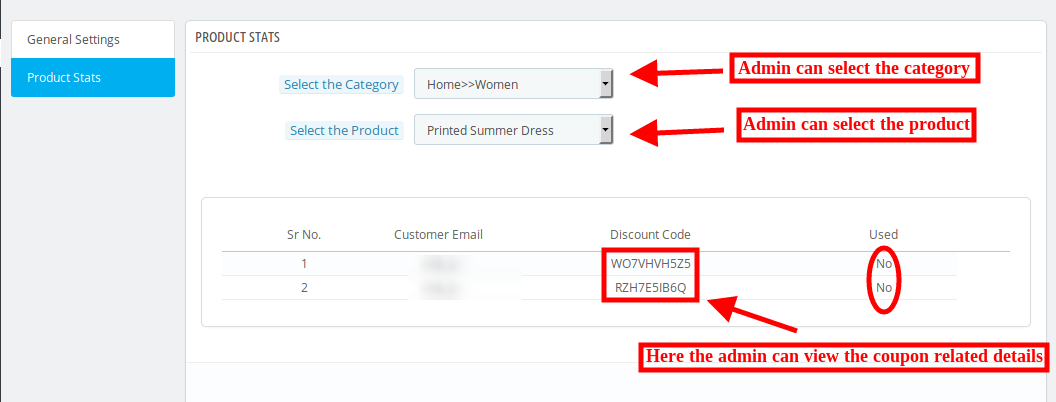
3.2 Product Stats
This is the tab in which the admin can view all the details of the discount coupons applied on every product.
1. Select Category: In this menu option of Prestashop product sharing module, the admin has to select the category of the product which he/she wants to look.
2. Select Product: When the admin will select the category of this field will automatically get refreshed and will be filed by all the product of that category.
3. Product Coupon Table: When the admin will select the product in the above option then a table will appear which will be having the details of the discount coupon and their current status applied on that particular product.
4.0 Front-end Interface
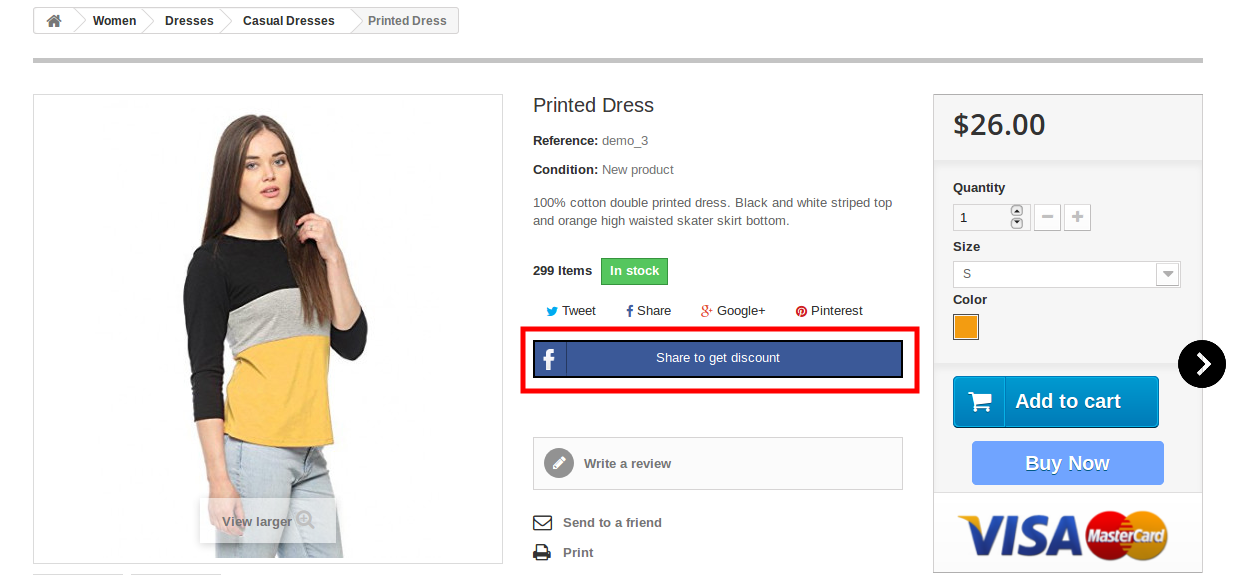
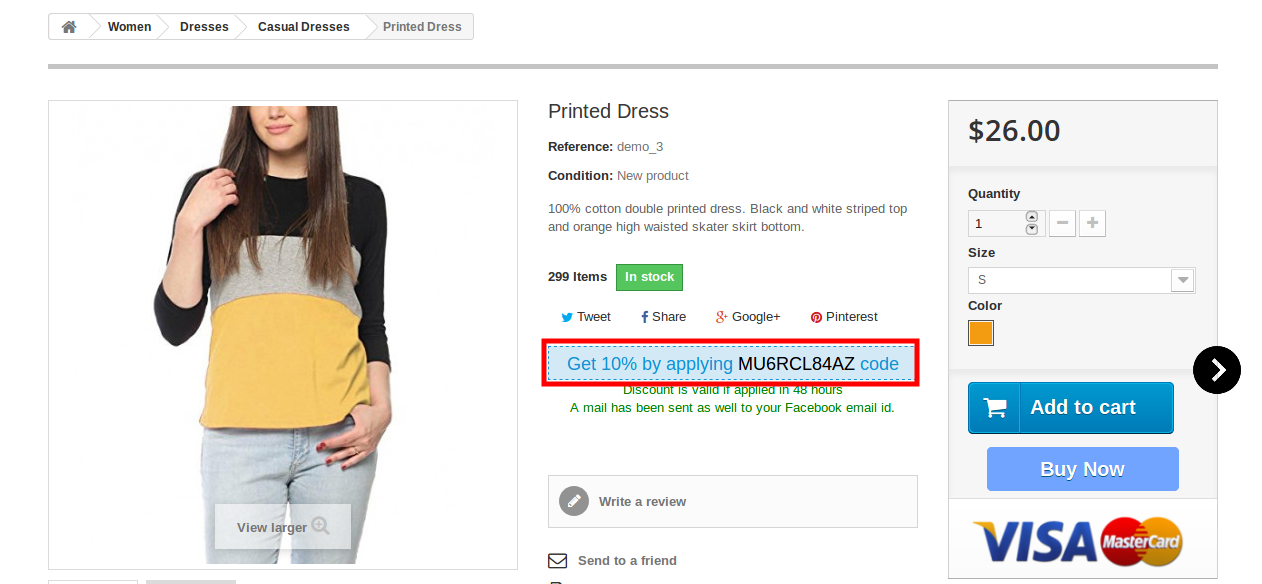
When this module is enabled from the back end then a button will start appearing in the front end of the shop on every product page. On which a text Share to get discount! will be written and on clicking on this button the customer can share the product and if he/she shares the product then a discount code will be shown to that customer which will be applied to that customer only.
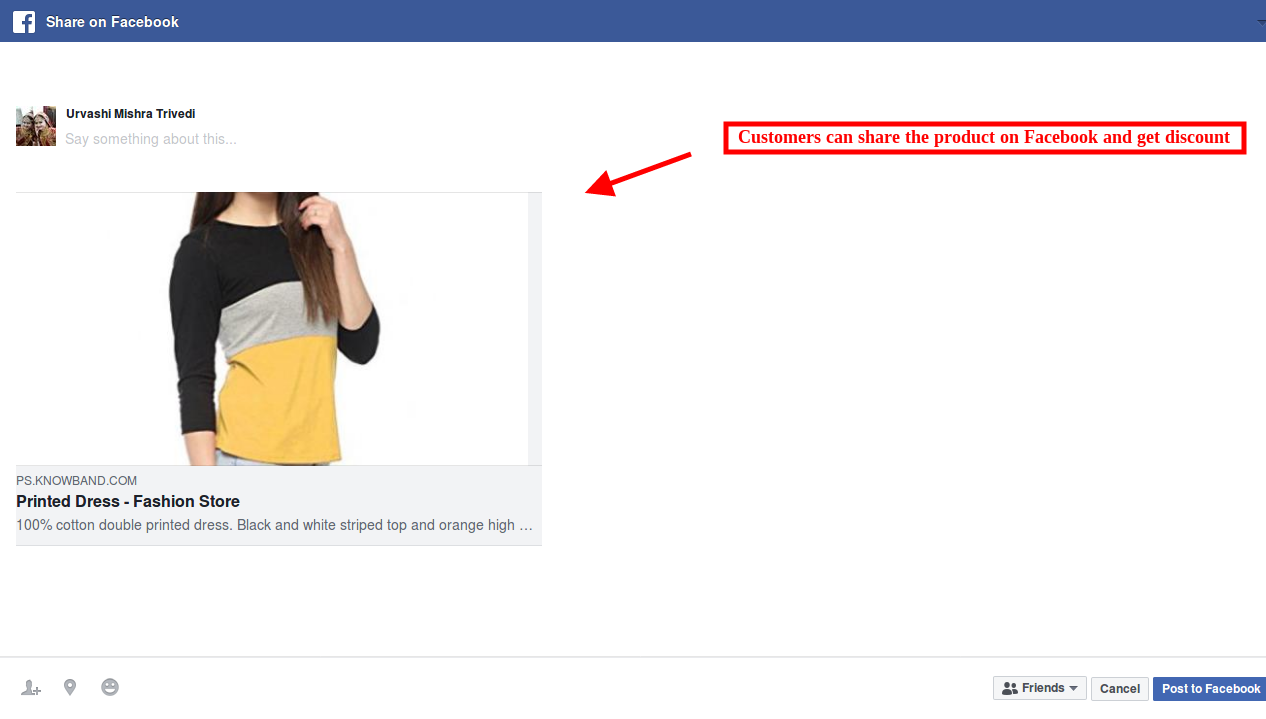
The customers can click on the “share to get discount” button and share the product on Facebook.
The customers can get the discount code on the same product page:
This way the Prestashop facebook share option extension allows the admin to improve product popularity and awareness of available brands. The customers can also get the exciting discount and enjoy the shopping experience.
Magento site owners have a reason to be cheerful again as up till now they have been able to perform some of the site optimization tips on their Magento store for making a significant improvement in terms of the conversion rates, product sales and site traffic. Further, in this final part of this article series, let us discuss some more mind blowing tips that can improve the website loading speed of your online store drastically. Take a close look below.
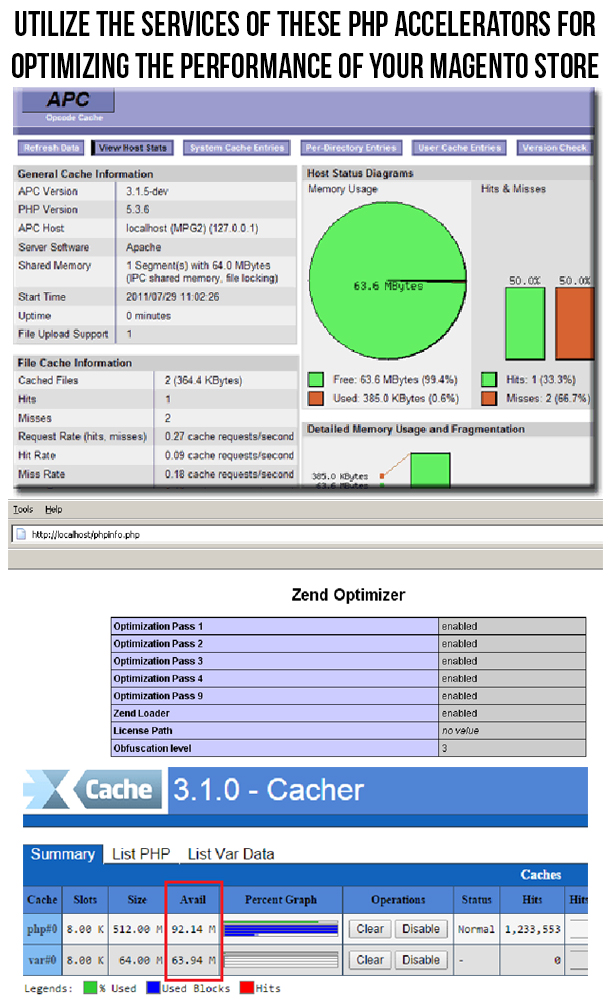
1. Utilize the services of PHP accelerators
For improving the performance of a Magento site, you can utilize the services of a PHP accelerator, which is another form of caching. With the help of these accelerators, it is now easy to improve the performance of your PHP scripts by caching them in their compiled state. Apart from this, you can utilize the various PHP accelerators like APC, ZendOptimizer+ or Xcache. Some of them are described below.
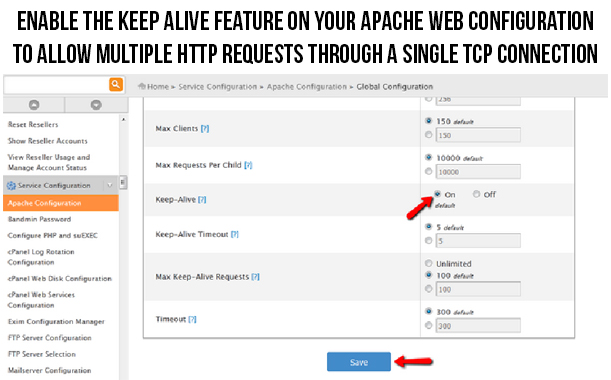
This Apache Keep Alive is a mind blowing feature that establishes open connection between the client and server platform. In order to improve the loading time of your site, you need to ensure that the multiple requests are handled on the same connection. To take required step in this direction, you need to check that the “Keep Alive” option on your Apache configuration is enabled. This option is an effective tricky solution that allow multiple HTTP requests to be funneled through a single TCP connection. Due to this, the additional time that is spent on the setting up of the individual TCP connection is reduced and thus the downloading time required for files like HTML, JavaScript, images and others are minimized to a significant level.
3. Replace Apache web server with other suitable alternatives
For improving the performance of your Apache web server, you need to look out for the suitable alternatives for your web server. LiteSpeed Enterprise web server that can be used as an effective replacement for the Apache web server due to various available features and facilities. With the help of this server, the performance of the PHP application can be increased by up to 50% and it is about 6 times faster than the Apache serving static content. Besides LiteSpeed, Nginx is also an effective replacement for Apache web server.
4. Make use of the advantage performance optimization
Due to the complexity of the Magento system, it is important to implement the caching in the workflow process of your Magento site. For situations like this, you need to have a full page cache extension that can save the excess load on your Magento server. Apart from this, you can utilize the services of Varnish Magento extensions to optimize the performance of your Magneto site. Check out this link to try out this free Magento extension for the purpose of full page caching.
5. Optimize the performance of your website on mobile devices
Due to the increased use of the mobile devices, more and more number of people are surfing the site through these mobile devices. Therefore, it is important to optimize the performance of your site on mobile devices for providing the same level of user experience to your customers irrespective of the device used by them. In order to carry out this crucial task, you need to take the help of various mobile optimization tools like PageSpeed Insights, Pingdom, Mobile Friendly Test, GT Metrix and such others. Apart from this, you need to utilize the various other factors like HTML5, CSS and Javascript files, mobile responsive design, optimized images and other such components that can make your Magento site more accessible on numerous mobile devices.
6. Disable ETags for the faster performance of your browsers
Browsers make use of ETags feature for validating the cached components across the various subsequent visits. Due to this, it can slow down the performance of a site if it is served from the cluster that has not implemented ETags properly. To avoid such a situation, it is important to disable them completely with the following syntax:
############################################
## If running in cluster environment, uncomment this
For optimizing the performance of your Magento site, you need to install a JS/CSS minifer like the Minify Javascript/CSS that can optimize the performance of your site drastically. This Minify JS/CSS Magento extension can effortlessly combine, compress and cache the Javascript and CSS file for faster site loading and performance. Apart from this, the minifer will also add forever expiry tags to your Magento files for ensuring the faster browser loading time.
8. Make required changes in the PHP realpath_cache settings
For optimizing the website loading speed of your Magento store, you need to update the realpath of your PHP coding accordingly. This is due to the fact that whenever a new file is added to the PHP, it is required to use a relative path so that the PHP does not have to spend a considerable time in looking out for that particular file. This Realpath cache minimizes the disk lookup time by allowing PHP to cache the reference paths and location of various files/directories that are being used by you. Further, in order to improve the efficiency of real path cache, you need to increase the parameter realpath_cache_size. If you are not capable to change your filepaths at a regular interval of time, it is recommended to increase the count of realpath_cache_ttl.
9. Reduce the logging time of your web server
For reducing the disk write up time of your web server, you need to take efforts towards reducing or disabling the logging time of your server. For Linux servers that are having access time logging enabled on any of their mysql, web server or any other cache partitions can easily get them disabled for optimizing the performance of their Magento site. Moreover, for the users that are using ext3 or reiserfs, you need to check out the faster journal write methods by clicking on this valuable link.
With the help of these mind blowing site optimization tips, Magento site owners can effortlessly improve the performance of their online store for grabbing the maximum site traffic, conversion rates, product sales and customer engagement. Therefore, it is your time to make the mark in your particular business segment by providing a seamless online shopping experience to your targeted customers.
Most of the online users are always in a dearth of time and are in mood to wait for even a few extra seconds while accessing a particular website. Due to this habit of impatience, they often leave a particular site without even completing a particular task and thus adds up to your list of shopping cart abandonments and thus affects your product sales to a great extent. All this significant loss to the credibility and popularity of your Magento site can be effectively tackled by reducing your website loading speed to an acceptance level. Don’t test the “patience” of your targeted customers while trying to access your particular website. But, try to provide them a seamless ride through the entire process by implementing these site optimization tips on your Magento site.
1. Make sure to enable flat catalog on your site
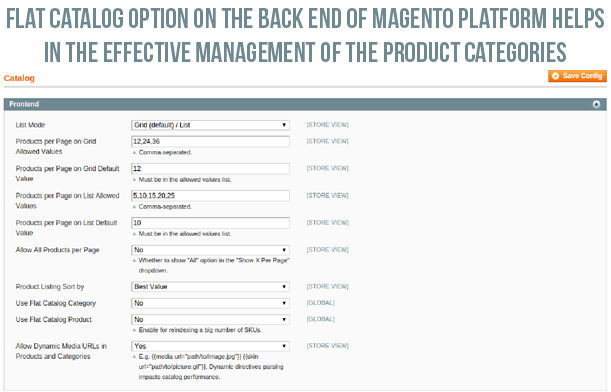
In order to improve the performance of your Magento store, it is important to enable the flat catalog for various categories and products on your site in order to facilitate their seamless merging into one single table. Due to this step, website performance is said to improve drastically as MySQL queries can now be processed in a faster manner. For utilizing this effective feature, you need to perform the following steps:
Click on the “System” -> “Configuration” and then “Catalog”.
Now, click on the “Frontend” and then change the “Use Flat Catalog Category” and “Use Flat Catalog Product” option to “Yes”.
After the above step, click on “Save Config” option.
It is advised to clear the cache. One of the recommended way to perform this is by deleting everything from the /var/cache directory. Otherwise, you can also do it by following these simple steps.
Navigate towards “System”-> “Cache Management” and then click on the “Flush Cache Storage” option for deleting the entire cache from your Magento site.
2. Delete unwanted files from Magento database and clear up your logs
Due to the default settings of the Magento, the log files in Magento are stored for upto a period of 180 days. This results in storage of a large number of log files which ultimately occupies a lot of your Magento server space. To avoid such a situation, site owners have the freedom to change their settings to a smaller time duration like two weeks (14 days) to reduce your occupied space. To perform this action, just follow these simple steps.
– Go to “System” -> “Configuration” -> “Advanced” -> “System”-> “Log”.
– Now, under the “Save Log, Days”, you need to change the settings over there to 14 days or any other specific time period of your choice.
– Finally, click on the “Save Config” option.
Apart from this, you can also perform the above task in another manner by clearing up your lob tables manually in your database. To do this, follow these steps,
– For this, you need to select all of the log_% tables from the phpMyAdmin and then select the “Empty” option from the drop down menu.
– Now, click on the “Yes” option when a popup asks you about whether you want to truncate the tables or not.
3. Install only limited number of extensions on your site
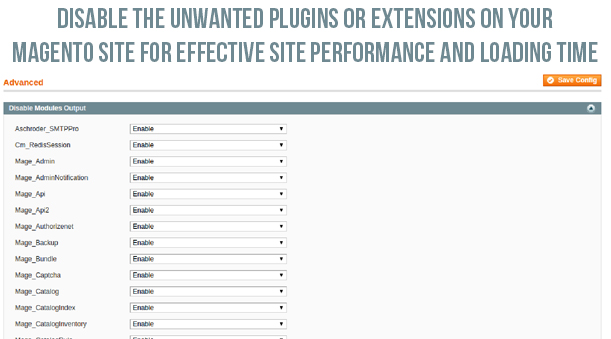
It is a known fact that too many extensions often utilize too many server space and resources which ultimately affects your website loading speed. This is due to the numerous reasons like running up of multiple HTTP requests along with the additional loading up of the CSS and Javascript files. In order to optimize your website performance, you need to install the only relevant Magento modules that can perform multiple tasks at one go. If you are clueless about which extensions to choose for your Magento store, you can check out the various amazing eCommerce plugins from our Knowband store. For disabling the other rarely used extensions, you need to perform the following steps.
Go to “System” -> “Configuration” -> “Advanced” -> “Advanced”-> “Log”.
Now, in front of the required plugins, you need to select the “Disable” from the drop down box and then click finally on the “Save Config” option.
4. Configure your MySQL database- This open source relational database management system (RDBMS), MySQL consists of its own “query cache” that is utilized on the Magento platform for the generation of dynamic pages and content in order to improve your site performance. Take a look at some of the recommended settings for your my.cnf file.
query_cache_type = 1
query_cache_size = 32M
query_cache_limit=2M
Apart from this, the recommended settings for php.ini file is as follows:
php_value memory_limit 128M
5. Optimize the Magento server configuration for your site
An effective web hosting server can play a decisive role in improving the website loading speed and is one of the important site optimization tips. If this is not the case with your Magento store, there are possible chances that your site may crash or go down due to the large incoming site traffic. Thus, to avoid such issues, you need to have a reliable and robust Magento server that can handle the multiple HTTP requests from numerous clients.
6. Use a productive theme for your website
For making your website as the ultimate obsession among your site visitors, you need to have an appealing Magento theme that can improve the functionality and performance of your Magento site. The theme allow site visitors to perform various tasks with great ease and without any headache. There are various free themes like Eros, Wine Store, Glamour, Blue Scale, Bag Store and such others that can help in giving a unique look, appeal and functionality to your Magento store for improving the customer engagement, site traffic and various other site performance metrics.
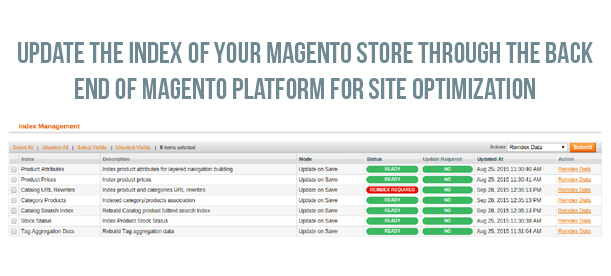
7. Update indexes of your Magento site
Although, indexes are automatically updated on the Magento platform by default whenever an object store is added. But, in some cases, this process does not take place automatically and needs to be done manually. This index updation is important as it improves the performance of your MySQL queries. To accomplish this crucial task, you need to implement the following steps.
Navigate towards the “System” -> “Index Management”.
Now, you need to select all the indexes or those indexes which you need to update. After this, you need to choose the “Reindex Data” option from the dropdown menu.
Finally, click on the “Submit” button.
Now, by implementing these mind blowing site optimization tips, Magento site owners can easily speed up the performance of their Magento store to a great extent. With this crucial information, you can effortlessly improve the online shopping experience, customer engagement and site traffic on your online store and can easily tread the “first step” towards being a market leader in your particular business segment. For making a drastic improvement in the field of site optimization and performance, you need to check out the final part of this series of article titled- Turbo boost your Magento site with these tips- Volume 3.
“Time is money” is an age old proverb that has not lost its pristine shine and significance in this jet age and people are now struggling hard to synchronize their daily life with their scheduled time duration. Similarly, when it comes to the web browsing, people often leave a particular site if it is not loading up quickly. The average website loading speed is around 2- 3 seconds and even a delay of few seconds can be catastrophic for the growth and expansion of your online business. In order to save your Magento site from the consequences of slow loading time, you need to implement these tips on your online store for getting the instant attention and engagement of your targeted customers.
1. Make sure that your site is on the latest Magento version-
For ensuring the seamless functioning of your Magento store, make sure that you are using the latest Magento 2 platform that is packed with various new features and functionalities. With the downloading of this newer update, various existing bugs and problems that were faced earlier has eliminated all together. This has made the working of various site tasks much faster and has improved the site performance to a great extent. Apart from this, you can try out the various Magento 2 extensions from Knowband that can help in optimizing the performance of your Magento store.
2. Utilize the services of Content Delivery Network (CDN)-
With the help of CDN, it is now possible to provide services to your targeted customers at the same speed irrespective of the location of your customers. You need to take the expertise of an effective CDN services that can ensure the seamless delivery of the product images, CSS files, javascript and other such components without any delay.
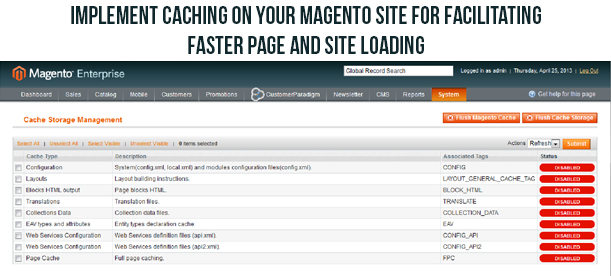
3. Implement caching on your Magento site-
Caching makes it easier to load a particular site and thus reduces the overall load that is falling on the site server. Various eCommerce sites use this caching technique that consists of NGINX + APC + Memcache + Varnish caching. Apart from this, you need to perform browser caching, Gzip compression, page caching and other such strategies for reducing the website loading speed.
4. Optimize your product images
For any Magento site, product images need to be detailed and optimized for getting the instant attention of your targeted customers. There are various image compression techniques like lossless image compression, TinyPNG extension, compressor extension and other such extensions that can help in the seamless compression of your product images without any loss of picture quality and clarity.
5. Make use of Expires headers for your Magento site optimization
By utilizing the services of Expires headers, browsers can easily determine the extent upto which a page component can be cached. Static components like images need to have far- future expires headers but it is recommended to have expires headers for all your page components. In order to enable this feature, you need to uncomment the required line and include “Expires Active On” above the line. Here is the sample code for enabling this feature. For more information about this topic, do check out this link–
Note- While using the far future Expires header, it is advised to rename the file name of component during the implementation of any changes.
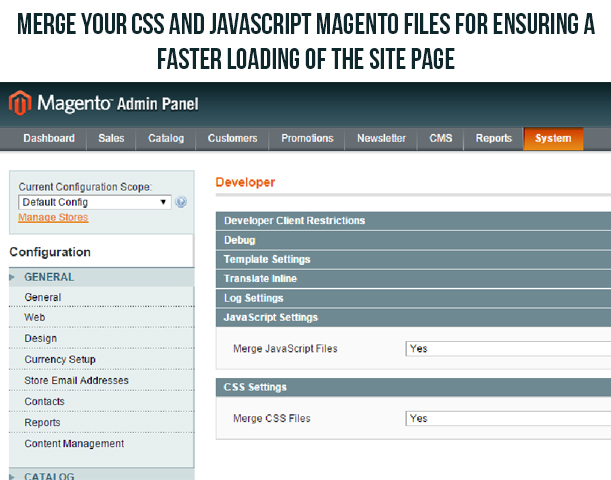
6. Merge the CSS and javascript files into one single component-
It is now easy to merge the CSS and javascript files of your Magento site into one single file with the inbuilt feature of the Magento platform. This concatenation will reduce the HTTP requests from your site and will in turn improve the page loading speed to a great extent. Here are the steps that can help you in enabling this feature.
You need to navigate towards the “System”- “Advanced” and then “Developer” option.
Ensure that the dropdown option under the “Javascript settings” and “CSS settings” is set to “Yes”. Now, click on the “Save Config” option.
Once, your CSS and javascript files are merged, you need to clear the cache of your Magento store.
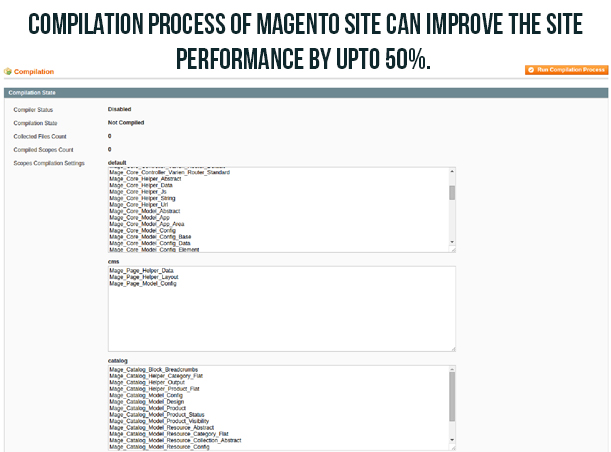
7. Initiate the Magento compilation process-
It has been seen that by utilizing the compilation feature of Magento store, the performance of the site can be enhanced by upto 50%. Due to searching of the application files of Magento platform in a particular order during the page loading process, a significant amount of filesystem reads are lost. Here are the steps that can help in utilizing this compilation feature.
You need to navigate towards the “System”- “Tools and then “Compilation” option.
Click on the “Run Compilation Process” option there.
These steps will start the compilation process on your Magento site.
If you want to keep your customers engaged to your online store for ensuring better product sales and conversion rates, you need to work towards improving your website loading speed. Always remember that online shoppers would not wait for your site to get loaded properly as they are always “short of time” and has plenty of online options to choose from. For more information on this crucial topic, you need to check out our next blog- Turbo boost your Magento site with these tips- Volume 2.



























%20.jpg)