After being listed as the top mobile commerce solution provider, KnowBand plugins once again featured as leading eCommerce plugins and solutions providers in the market. We feel privileged that the company will dominate the online retail industry from 2020-2026.
Various global researchers and analysts have predicted that the eCommerce industry is assured to witness a steep graphical growth from the year 2020 to 2026. The report has been drafted with the data & statistics in the past decade. Among leading key players in the online eCommerce industry, KnowBand has also made a prominent position.
One-Stop Solution To All E-Commerce Needs:
We, at KnowBand, are considering this acknowledgment as a responsibility to stand up-to-the expectations of store owners as well as front end audiences. With such thoughts, our entire pool of team members are highly motivated to make available plugins more promising and featured along with new launches as well.
Hence, for all the eCommerce store owners out there, check out these plugins and add more functionalities to your store:
Along with plugins/extensions for eCommerce, Mobile App Builder allows all retail store owners to launch a native shopping app. Selling products just via the website isn’t enough in 2020. Having a mobile shopping app enhances the reach of your business to a wide range of smartphone-based audiences.
To ease out the app development complexities, an automated framework Mobile App Maker develops Android & iOS apps in 3 simple steps:
1. Purchase & install the extension.
2. Fill the pre-requisites form.
3. Get them published on Google Play & Apple App Store.
That’s easy is it to own a mobile app with us. Along with that, the following features are the prime highlights of the apps:
A product video is an explainer video that effectively demonstrates the benefits of a product. A demo video increases conversion rates by providing a creative and engaging story that demonstrates how your product functions in the real world, and what kind of impact it has. By using narrative and metaphor, a product video can create a better lasting impression in the consumer’s mind, leaving the product features to be experienced rather than explained.
People are more likely to retain information received through video because the information is presented through audio and visual channels. Therefore, if you need to express something about a product quickly and memorably, video is the best way to do it. Knowband offers Prestashop Product Video module for the Prestashop store admin that allows him/her to add the product videos on their store’s product pages. This Prestashop extension allows the sellers to present their products confidently that make the customers sure about their products.
This Prestashop Product Video addon will provide an interface and functionality to the Prestashop eCommerce website admin to show their product pages with high-quality product videos from YouTube, Vimeo, and Daily Motion.
1.1 Benefits
1.2 Features
2.0 Admin Interface
Admin will have 4 settings available which are described below.
2.0.1 General Settings
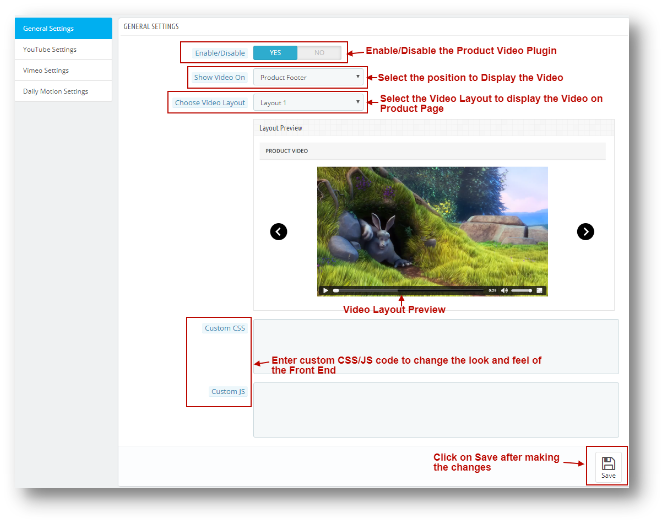
General Settings will have simple customization functionalities options like deciding the position and Layout of the Video. The page will look like as shown below:
Positions to Show Video:
Product Footer (Bottom of the Page)
Product Right Column
Video Layouts:
Layout 1
Layout 2
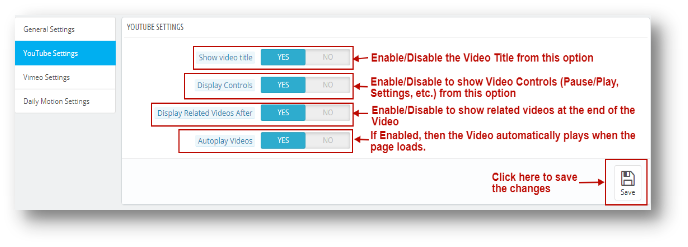
2.0.2 YouTube Settings
Admin can change YouTube video Settings from this Option. YouTube Settings Tab page will look like as the one below.
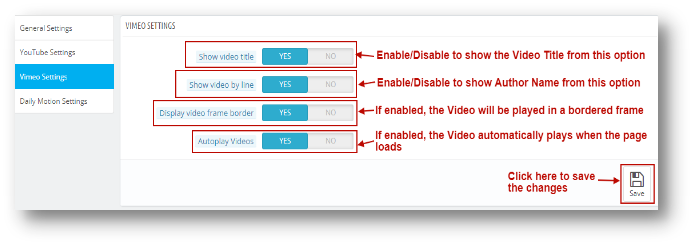
2.0.3 Vimeo Settings
Admin can change Vimeo video Settings from this Option. Vimeo Settings Tab page will look like as the one below.
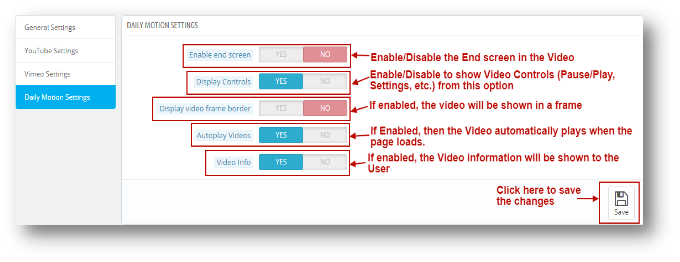
2.0.4 Daily Motion Settings
Admin can change Daily Motion video Settings from this Option. Daily Motion Settings Tab page will look like as the one below.
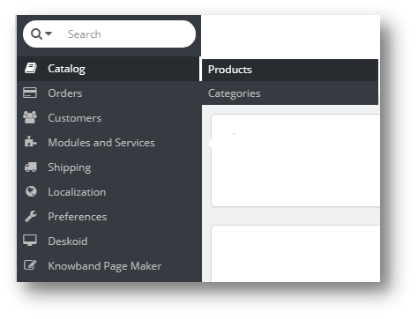
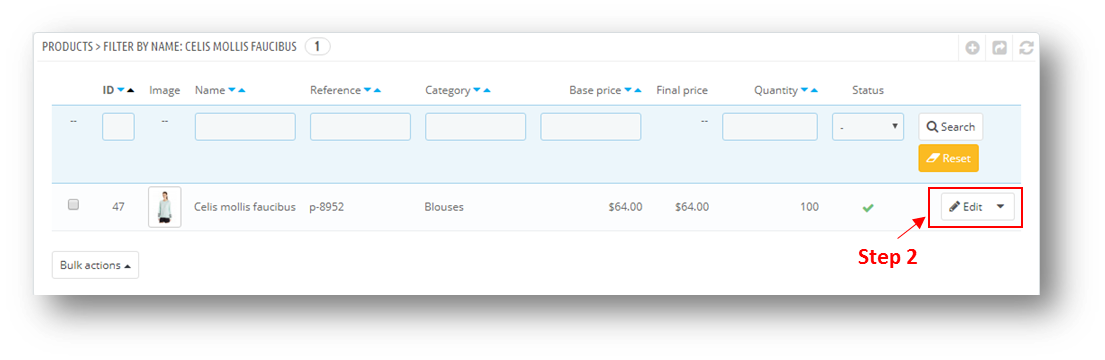
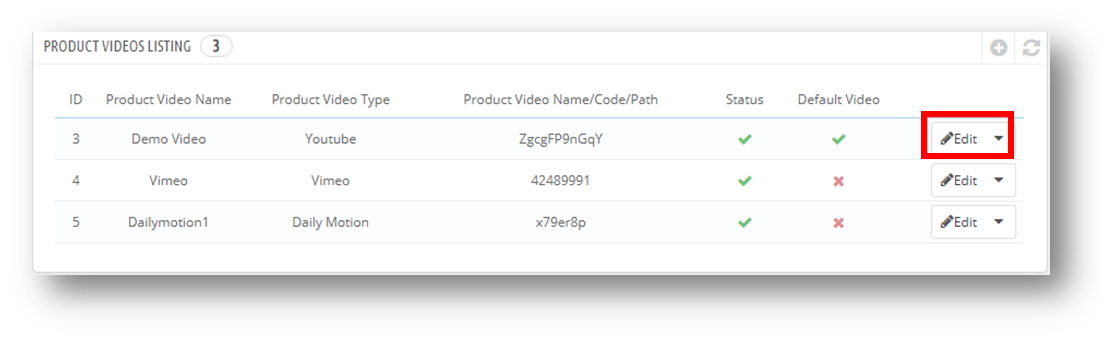
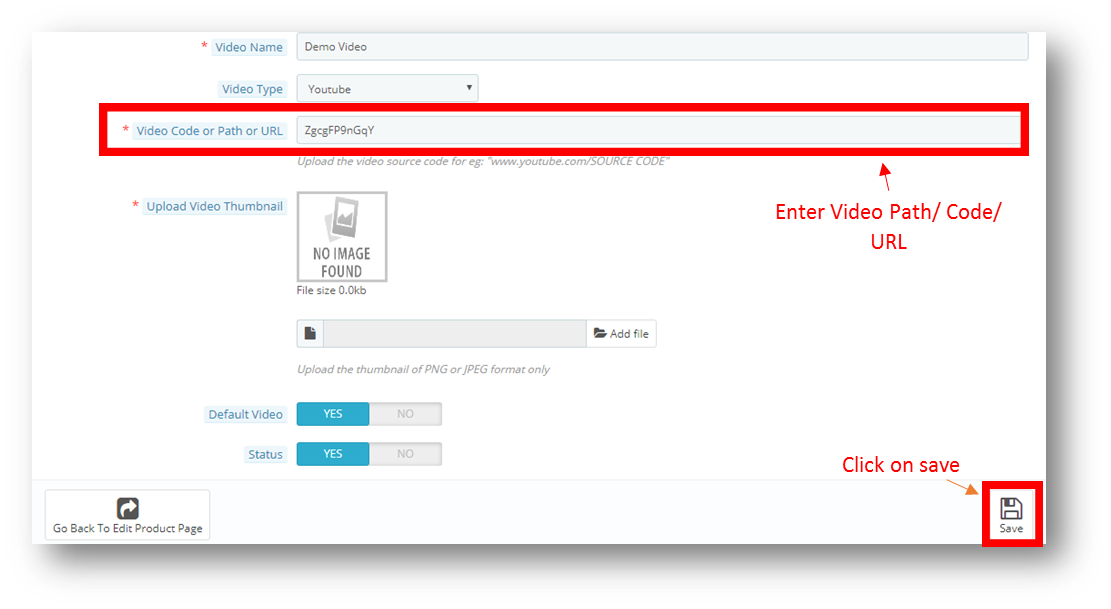
3.0 How to Add a New video to a Product?
To add a New Video to a Product, Follow these simple steps:
4.0 User Interface
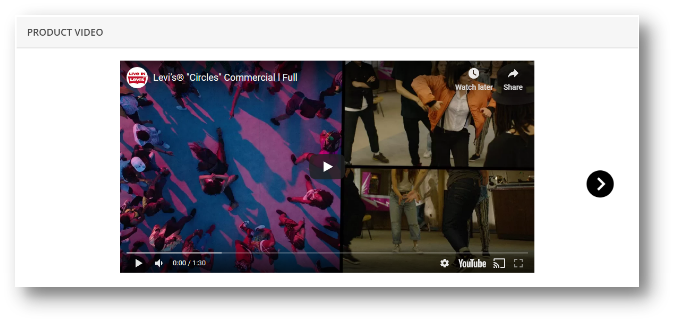
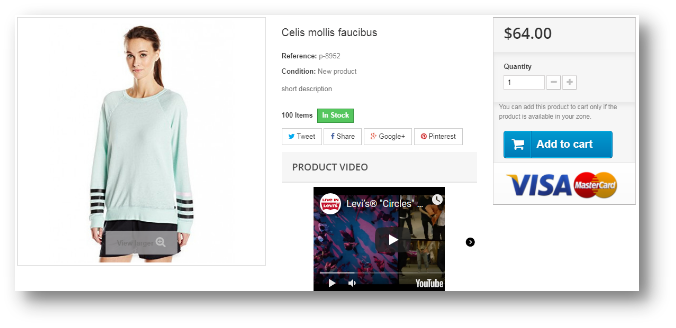
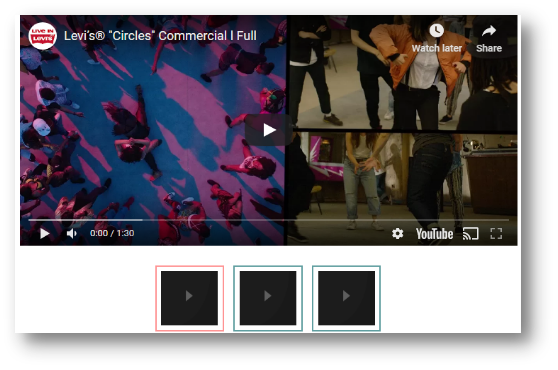
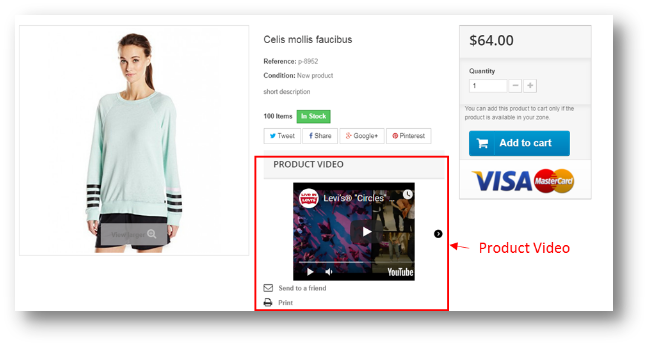
The Front end will look like as shown below to the customers.
This blog is all about how to create and use the Prestashop Webservices API. Prestashop has default Web Services tool available which allows accessing the store from remote applications.
Prerequisites
You Prestashop store should have “module rewrite” enabled for apache.
It is preferable to use SSL (https:) for web service calls, as it avoids the “man in the middle” type security issues.
Check that the five methods GET, POST, PUT, DELETE and HEAD are supported on the server.
To ensure the security and efficiency of your Prestashop Web Services, it’s essential to use SSL (HTTPS) for all web service calls. This prevents “man in the middle” attacks, safeguarding your data during transmission. Additionally, verifying that your server supports the HTTP methods GET, POST, PUT, DELETE, and HEAD is crucial for seamless operation. By configuring these settings, you optimize your store’s performance and security, ensuring reliable access and management of your Prestashop resources through the API.
How to configure Web Services in the Prestashop?
1. Login into the Prestashop Back-office.
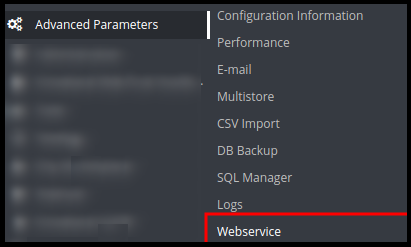
2. Navigate to Advance Parameters -> Web Services menu options to open the Web Services page.
3. It will redirect to the Web Services page having the listing of available Web Services and the configuration form to configure the service.
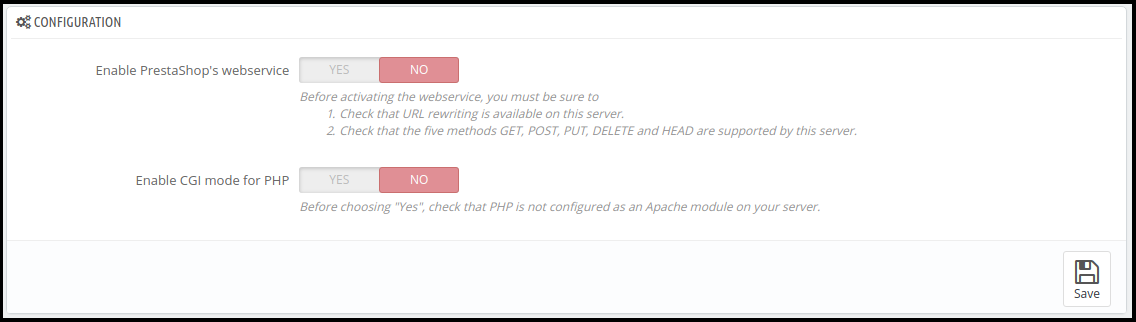
4. The Configuration form has the following fields:
a) Enable Prestashop’s web service: Enable the setting to use web service in the Prestashop Store.
b) Enable CGI mode for PHP: Enable the setting to use PHP as CGI script instead of Apache module.
5. Click on the Save button to save the configuration. Now, you can use the Web Services in your Prestashop Store.
How to add/Update Web Services in the Prestashop?
1. Login into the Prestashop Back-office
2. Navigate to Advance Parameters -> Web Services menu options to open the Web Services page.
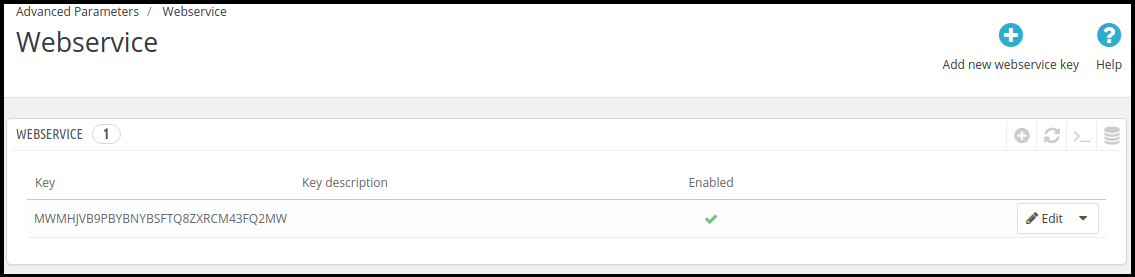
3. It will redirect to the Web Services page having a listing of available Web Services.
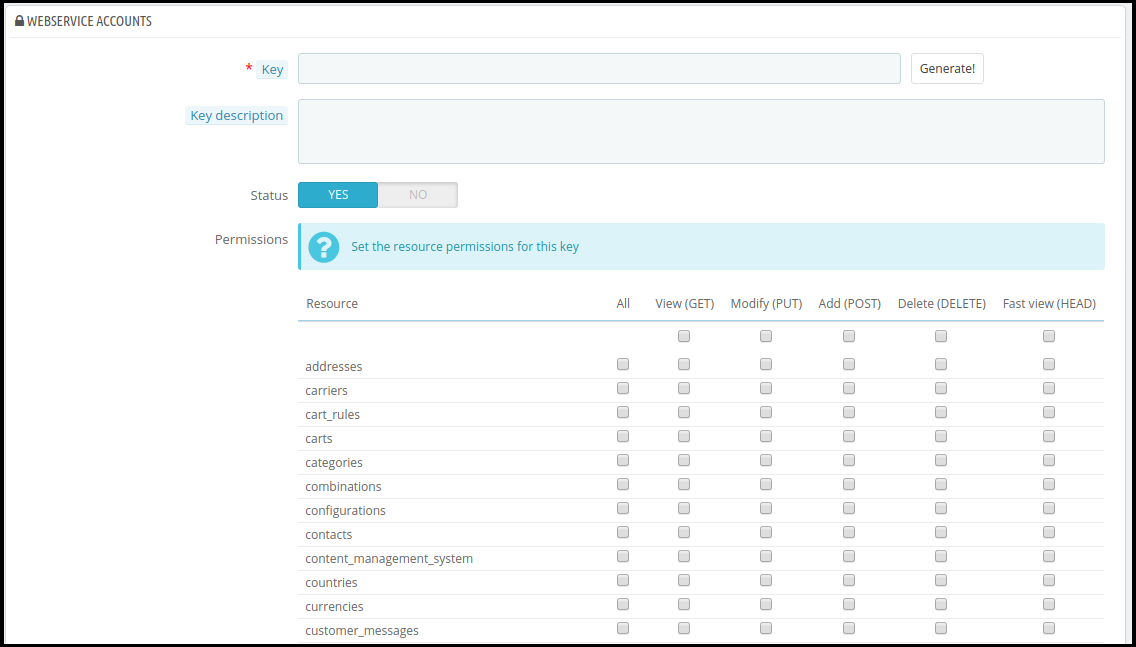
4. Click on the “Add new web service key” button to add new web service key to access only to the certain resources of the Prestashop store.
a) Key: This is a unique key. You can enter it manually or click on the Generate button to generate a random key for the Prestashop web service.
b) Key Description: You can provide the description regarding the key for better understanding.
c) Status: Enable the key to provide a grant to access the data using the key.
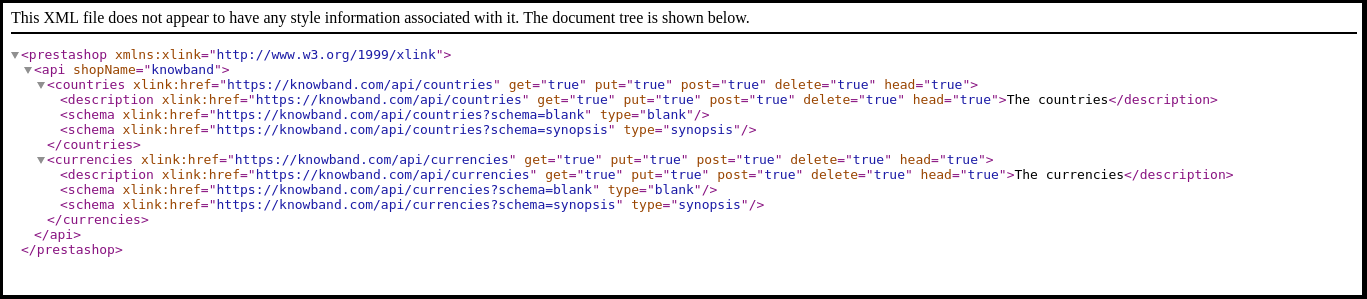
d) Permission: Provide the permission to access the data using the certain key. You can check the specific permission to grant access of the data like Add, Edit, delete or view. Here, we have checked the permission to Countries and Currency.
5. Click on the Save button to add the key to the web services.
How to the access the Web Service?
Once you have created the key for the web service and properly configured, you need to hit the following URL in your browser:
https://{store root path}/api/
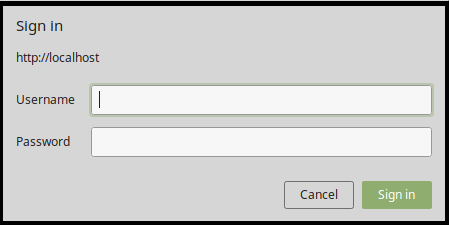
It will prompt you for username and password to access the resource.
a) Username: Enter the key of the web service which is generated in the above step. For Example MWMHJVB9PBYBNYBSFTQ8ZXRCM43FQ2MW
b) Password: It should be blank as no password required.
After sign in, you will access the list of the resources and all permitted CRUD options that you have configured in your Prestashop Store.
You are now successfully connected to the Prestashop web service.
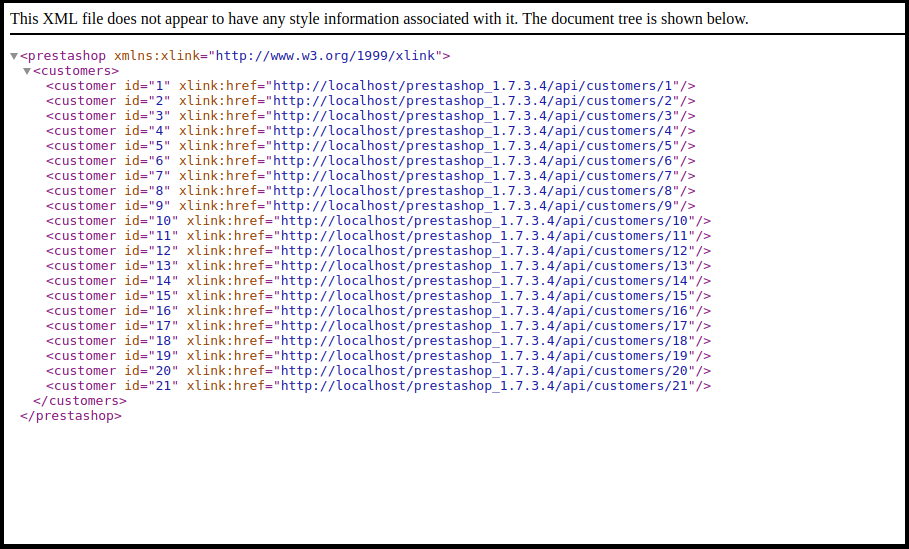
a) To GET the list of entities for a particular resource:
For Example: To get the detail of customer having ID 10
https://www.knowband.com/api/customers/10
Recommend Watch:
How to create Prestashop Module Webservice API for Prestashop 1.7?
We will show you how to create a module to fetch customers. For this, we will register a hook addWebserviceResources of ServiceRequest for the resources instead of overriding getResources() function of ServiceRequest Class in Prestashop 1.7.
Creating custom web service APIs in Prestashop 1.7 involves using the WebserviceSpecificManagement class. This allows you to define specific functionalities and manage data processing. For instance, implementing the WebserviceSpecificManagementKbCustomer class lets you handle customer data efficiently. Therefore, this approach provides a flexible and robust solution for extending Prestashop’s capabilities, enabling tailored interactions with your store’s data. By leveraging these advanced customization options, you can create more dynamic and responsive eCommerce solutions that meet unique business needs.
1. Register addWebserviceResources hook in the module.
public function install() {

parent::install();

$this->registerHook('addWebserviceResources');

return true;

}
2. Add a hook listener to define the class and description. Set specific_management to true if you want to use WebserviceSpecificManagement instead of ObjectModel file.
3. Create WebserviceSpecificManagement class file as WebserviceSpecificManagementCLASSNAME which implements WebserviceSpecificManagementInterface
For Example – WebserviceSpecificManagementKbCustomer which is similar to /classes/webservice/WebserviceSpecificManagementImages.php.
You must have to include the functions which are defined in WebserviceSpecificManagementImages.php class. These are:
setObjectOutput
setWsObject
getWsObject
getObjectOutput
setUrlSegment
getUrlSegment
getContent
manage (where data is processed)
1. Now add the key having resource kbcustomer in the web service in the back-office.
2. Now, visit the https://{youstore.com}/api/kbcustomer to see the response in XML. In the below example, we display the listing of all customer available in the store.
With over 13 years of technical expertise, Knowband offers comprehensive app and web development services using the latest technologies, including various PHP frameworks and React. We provide more than 100 ready-to-use extensions for popular eCommerce platforms like Prestashop, Opencart, WooCommerce, and Magento 2.
For any queries, please feel free to reach us at support@knowband.com. Knowband is also a Premium Prestashop Partner and a Superher Seller providing more than 100 Prestashop modules to suit all your eCommerce needs.
The Prestashop One Page Supercheckout addon by Knowband makes checkout faster and easier by putting everything on one page, helping to reduce cart abandonment.
A higher ranking on the search result page of the search engines like Google, Bing, and others is the biggest challenge for an online business. With a higher ranking, the chances of better sales also increase. In order to improve the search ranking, it is mandatory for the store owners to follow the guidelines issued by the search engines. SEO (Search Engine Optimization) is the way to increase your online presence for a better ranking on the SERPs. The On-Page SEO activities involve – website optimization, meta tag optimization, SEO-friendly URLs, keyword density and more. Among these factors, one factor is the SEO-friendly URLs which play an important role in the ranking. As per Google guidelines, Google recommends that the URL structure of a website should be as simple as possible. SEO-friendly URL is also useful for indexing process flow by the search engine bots. In clear words, comprising SEO-friendly URLs for a website increases the chances for a website to get higher ranks in the search results. The default URL structure of PrestaShop SEO Optimizer Module includes the product id in the product page URL, Category page URL in the category page URL.
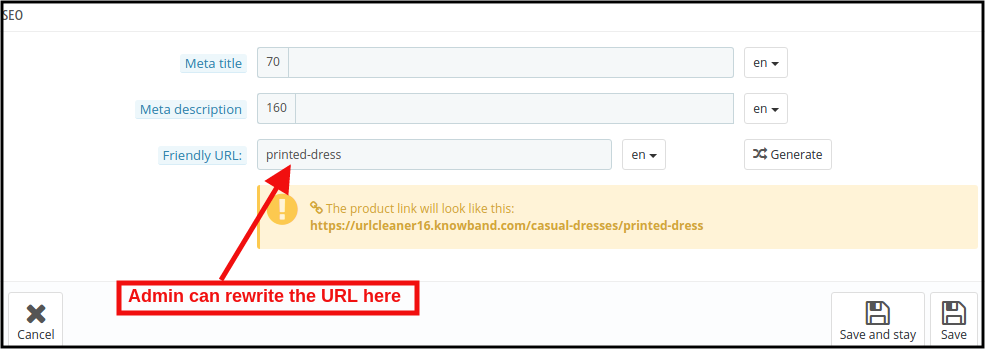
To help the store admin to create SEO-friendly URLs, Knowband has developed the URL Cleaner (SEO-friendly) Module. This PrestaShop SEO Optimizer – URL Cleaner Addon automatically generates the SEO-friendly URL by removing the ID from the URLs of products, categories, suppliers, manufacturers, CMS and all other pages of your store. It allows the admin to implement the 301, 302 or 303 redirection as per the requirement.
1.1 Features of the Prestashop URL Cleaner (SEO-friendly) Addon:
1. PrestaShop SEO-friendly URL Addon is a module that automatically converts the default URL into SEO-friendly URL.
2. The Knowband PrestaShop Rewrite URL Module removes the auto-generated ID from the URLs of the products, categories, suppliers, manufacturers, CMS and all other pages of your store.
3. With the help of this PrestaShop Fixed Duplicate URL Addon, the admin can view the duplicate URL list and modify or remove the URL as per the need.
4. PrestaShop URL Cleaner Module provides an option to the store merchant to redirect the old URL to the new URL. The Store admin has 3 choices on redirects i.e. 301 redirects, 302 redirects, and 303 redirects.
5. SEO URL PrestaShop extension is a module that helps the store merchant in improving SEO.
6. This PrestaShop URL Rewriting Module by Knowband helps the eCommerce owner to improve the website SEO.
7. The PrestaShop store admin can set the URLs to end with or without .html by using this Prestashop URL Cleaner Addon.
8. PrestaShop URL Id Remover Module is multi-store compatible.
10. With this PrestaShop 301/302/303 Redirect Module, the admin can redirect the N no. of the old URLs to new URLs.
Technology for Development
Language: PHP
FrameWork: PrestaShop
2.0 Steps For Installation
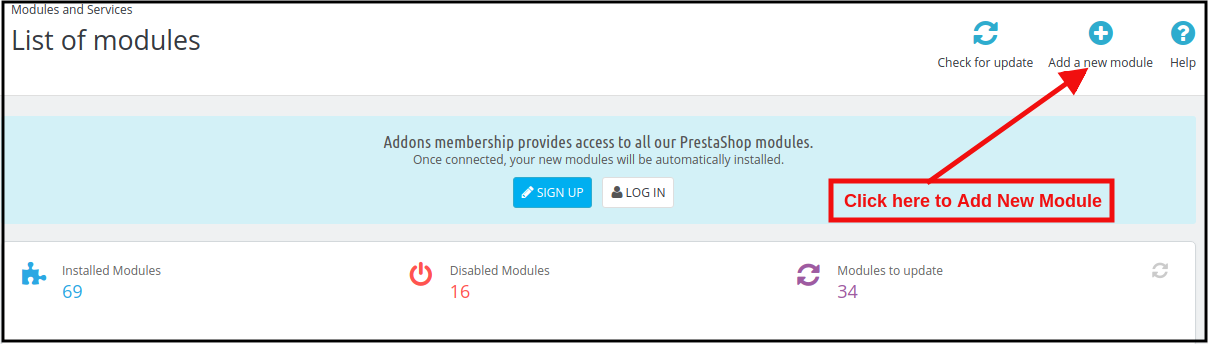
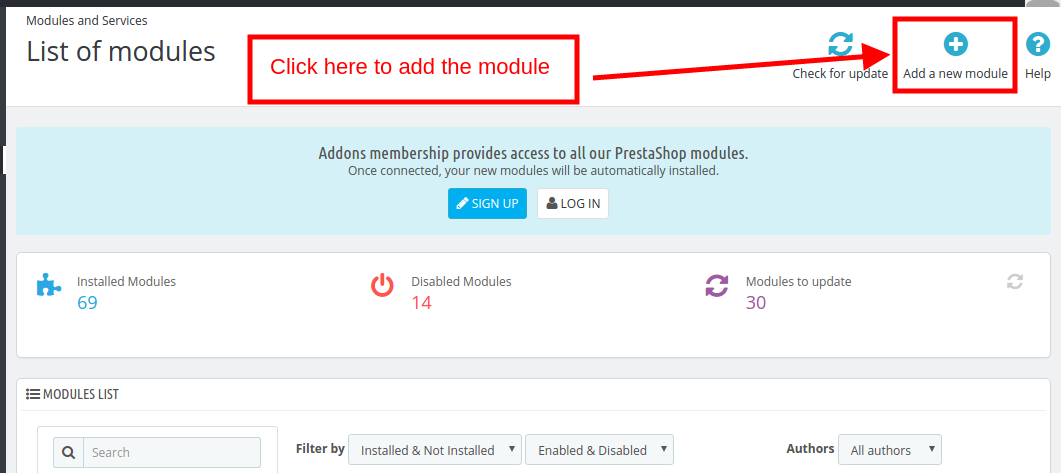
1. To upload the module click on the “Add a new module” button.
2. After clicking on Add New Module now select the module zip file.
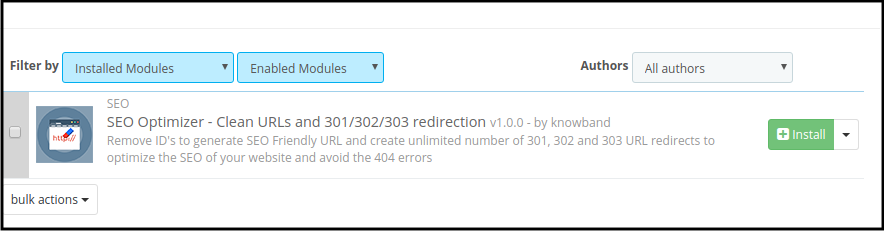
3. Now, You can find the PrestaShop SEO Optimizer Module in the module list and Click on the Install link to install the plugin.
4. After installing the module, the admin will be able to configure the module.
3.0 Admin Interface
After installing the module in the PrestaShop store, the store owner can make the changes without any hassles. There are the following sections available to the admin interface:
Each interface of this PrestaShop URL Cleaner (SEO-friendly) Module is explained below.
3.1 Module Configuration
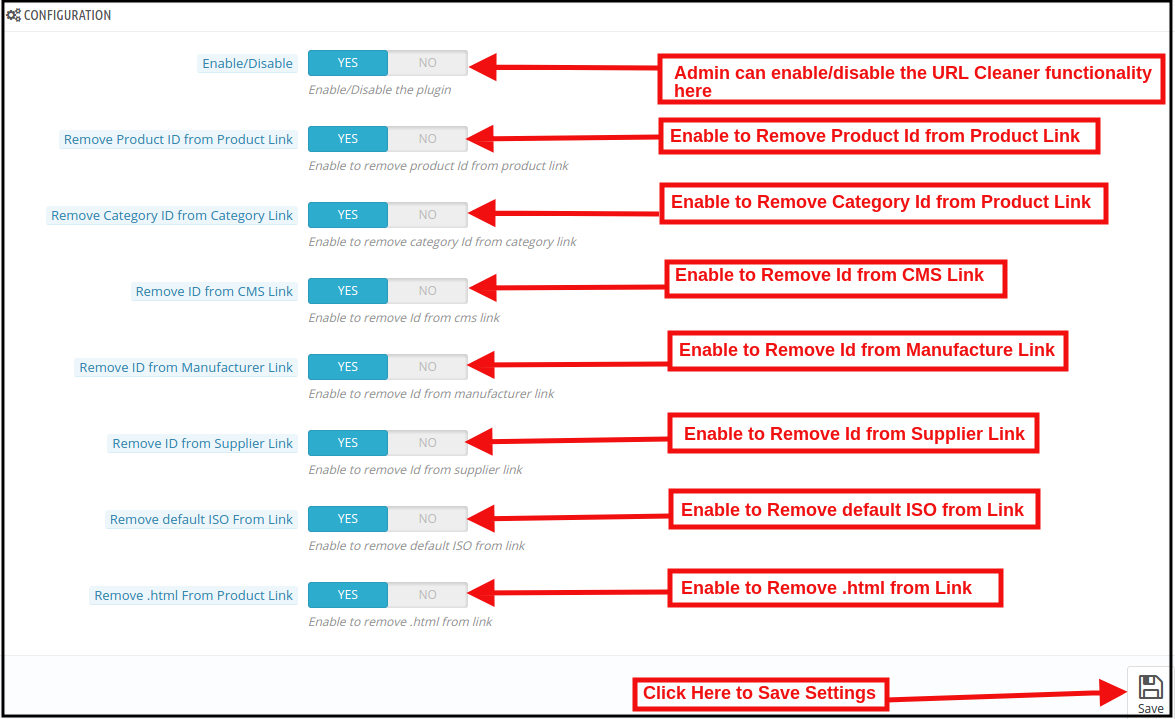
On clicking on the configure link on PrestaShop 301/302/303 Redirect Module, the system will open Configuration tabs of this Prestashop plugin by default as shown in the screen below:
Initially, the fields of this PrestaShop URL Cleaner(SEO-friendly) Addon in the above form will be already filled with their default values.
Enable/Disable: This field will enable the URL Cleaner feature. If enabled, the PrestaShop URL Cleaner will automatically convert the default store URL to SEO-friendly URLs.
Remove Product ID from the Product Link:
The default URL structure of the PrestaShop product page contains a product id and a URL like https://psm.knowband.com/urlcleaner/16/en/casual-dresses/3-printed-dress.html. As you can see the default product URL has the product id. After enabling this feature, the PrestaShop URL Cleaner Module will automatically remove the product id from the product link and the updated link will appear like this:
The default category page link contains the category id and a URL like https://psm.knowband.com/urlcleaner/16/8-dresses. This URL is complex and not SEO-friendly. By enabling this remove category option, the PrestaShop URL Id Remover Module removes the category id from the category link and after removing the category, the updated URL will appear like this: https://psm.knowband.com/urlcleaner/16/women/dresses
Remove ID from the CMS Link
The standard URL structure of the PrestaShop CMS page contains numeric values like
https://psm.knowband.com/urlcleaner/16/content/4-about-us. Using this option of PrestaShop SEO-friendly URL Module, the admin can enable this setting to remove the id from the CMS link and the automatic generated URL would look like:
By default, the Manufacture URL contains the Manufacture id in the manufacture URL. With the help of this extension, the admin can remove the id from the manufacturing link.
Remove ID from Supplier Link
PrestaShop does not have the feature to remove supplier link from the URL. After enabling this option, PrestaShop URL Cleaner Module automatically removes the id from the Supplier link.
Remove default ISO from Link
PrestaShop URL Cleaner (SEO-friendly) Module removes the default language’s ISO code from URLs and removes the language ISO code from shop’s default language. So, in this case, it will remove /es/ from all Spanish URLs, but other languages in your shop will still have ISO code in the URL.
For example: By default, the product URLs are like
https://urlcleaner16.knowband.com/en/casual-dresses/printed-dress after enabling the option URL would look like:
Remove .html from Product Link: By enabling this option, the PrestaShop SEO Optimizer – Clean URLs & 301/302/303 redirection module remove the .html from the default product URL.
3.2 Duplicate URL Rewrite Products
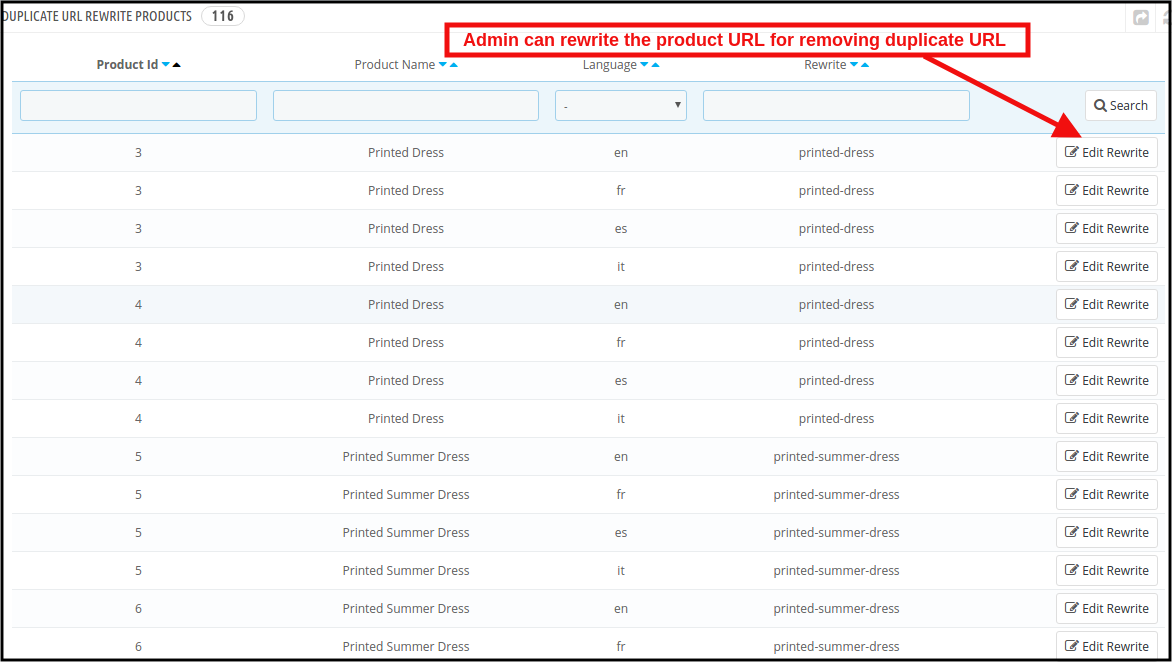
In case after removing the product ID from the product’s URL, if there are any two product’s URLs are same.
For example, The two product’s URL contains different Id like:
Then this product’s URL list will show on this tab. Find below the attached image:
In this tab, the admin can view all the Duplicate URLs and they can update rewrite value the products as per their convenience.
3.2.1 How to edit the Duplicate URL?
When the store admin clicks on the rewritten link, the PrestaShop URL Redirects Module will redirect the admin to the below-mentioned page:
Here, the store admin can rewrite the duplicate URLs. As soon as the admin will make changes to the URLs, these URLs get removed from the duplicate URL list.
3.3PrestaShop SEO Optimizer Module URL Redirection List
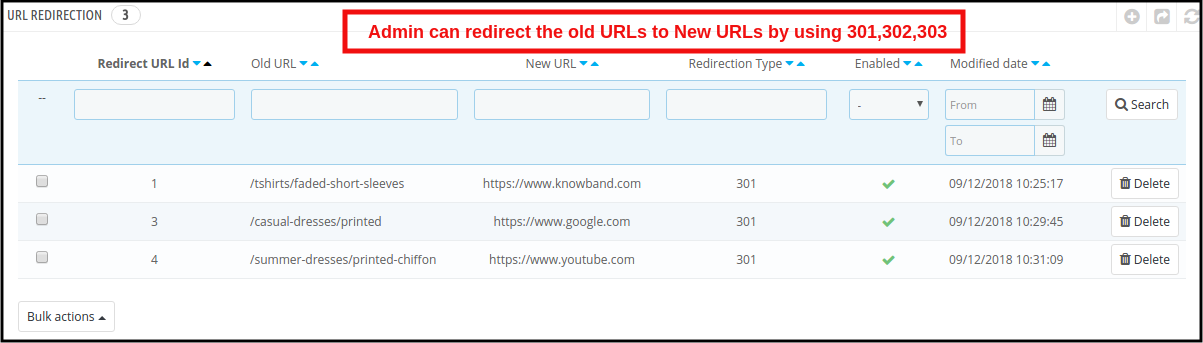
If the store admin changes the URL of any particular product page, the online retailer needs to redirect the old URLs to the new URLs. This PrestaShop 301/302/303 Redirect Module allows the PrestaShop store admin to redirect the old URLs to new ones. This PrestaShop SEO Optimizer Module offers the three redirection options including 301, 302 and 303 to the store owner.
3.3.1 How can Admin Redirect the Old URLs to New URLs?
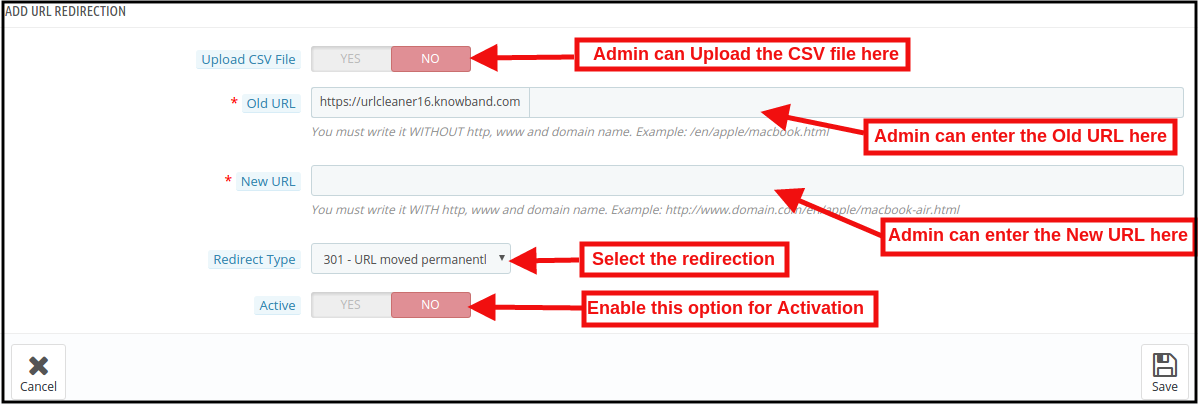
For the redirection of the old URLs to the New URLs, the store admin needs to click on the “Add New” button. After clicking on the Add New button, the below mentioned page open:
Here, the store admin can enter the Old URLs and New URLs, select the redirection from 301 (for permanent redirection), 302 (for temporary redirection) and 303 (to get the method used to retrieve information).
The admin can easily redirect the Old URLs to the New URLs.
URL Redirection through CSV file
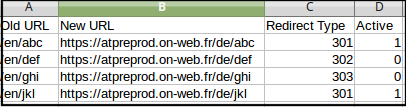
Upload CSV file: In order to redirect the multiple URLs. You can enable the Upload CSV file option. After enabling this option, the admin will be able to download sample CSV file and as per the fields defined in CSV file, the admin needs to enter the details in the CSV and upload the same.
After enabling CSV upload option, the below mentioned page open:
Choose CSV File: The Store admin can upload the sample CSV here for redirecting the products page.
Sample CSV File Format:
4.0 Front End
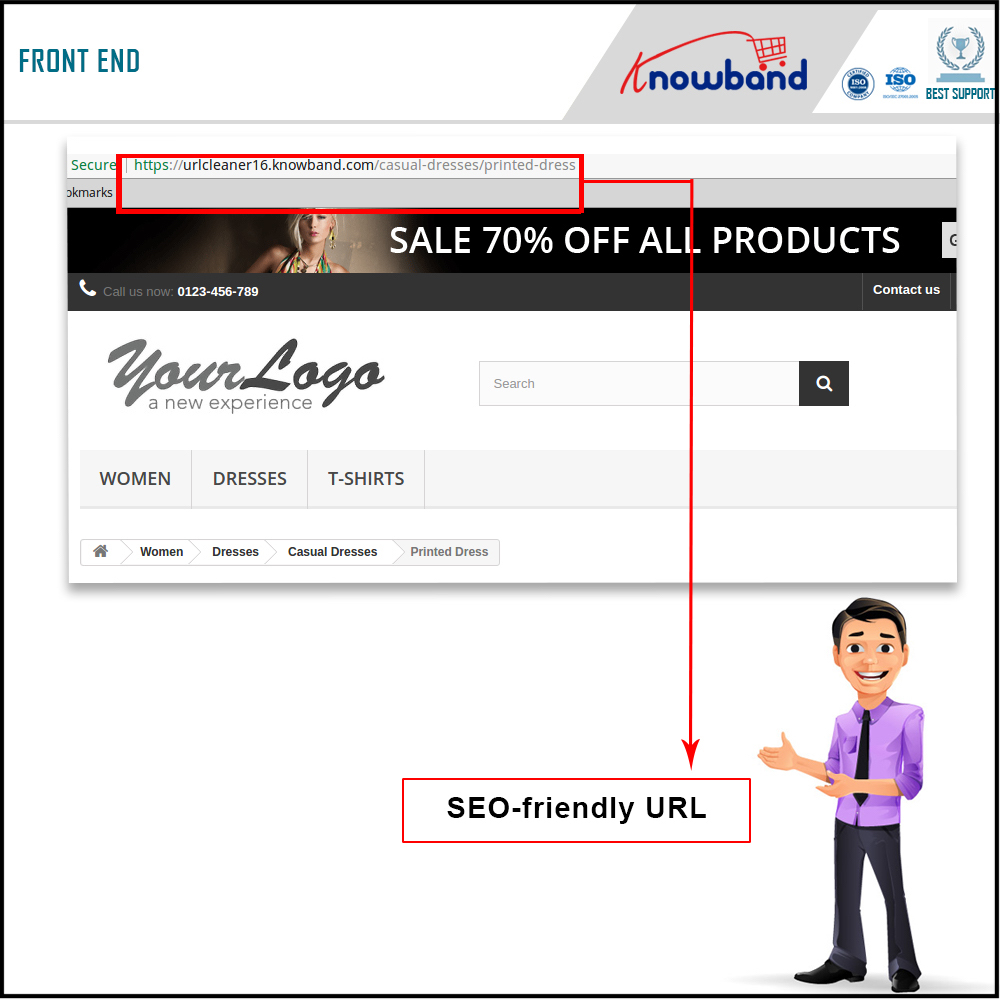
After enabling the PrestaShop URL Id Remover Module by Knowband at the front-end, the users will be able to see an SEO-friendly URL that will clearly highlight the purpose of the page. Google also recommends “A site’s URL structure should be as simple as possible. Consider organizing your content so that URLs are constructed logically and in a manner that is most intelligible to humans (when possible, readable words rather than long ID numbers).” This will also help the admin in improving the search results of the website.
The SEO-friendly URL would appear as follows:
For more information about PrestaShop SEO Optimizer- Clean URLs &301/302/303 Redirection Module:
1.0 Introduction of Knowband Prestashop Web Push Notification Addon:
Web Push notification is a service that allows the eCommerce store owner to send automated push notifications on the browser to all users who have allowed web push notification. Prestashop Browser push notification addon allows the admin to display unlimited push notifications on the user’s browser even when they aren’t browsing your website.
Knowband offers Prestashop Web Push Notification addon which sends automated push notifications like Welcome Notifications, Order Status Update Notifications, Price Alert and Back in stock alert notifications, etc. It increases the chances of conversion of the lost sales by sending automated abandoned cart notifications. Prestashop web browser push notification module helps the admin to get the customer’s attention back to their store. One of the best things about browser push notification is that the store admin re-engages with their visitors without knowing their email or any other contact details.
Important: Web Push Notifications are compatible with Chrome and Mozilla browser only.
What’s new in the updated version:
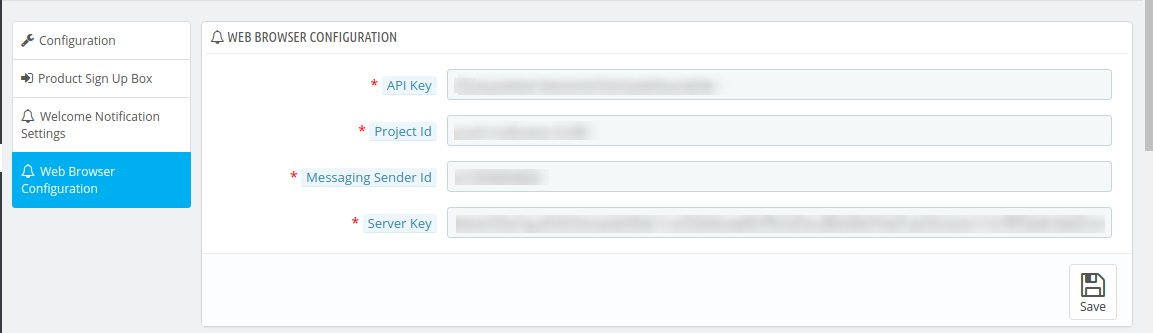
In the new version of this Prestashop web push notification module, the online store merchant can configure Firebase API by following the steps provided in the admin interface of this PrestaShop module. In order to show push notifications on the browser, the online store admin needs to set API key, Project id, message sender id and server key from the module back-end interface.
1.2 Features of the Prestashop Web Push Notification Addon:
1. Prestashop web push notification extension by Knowband adds push notification functionality in your Prestashop store with the help of which the admin can show browser notification to the users.
2. This user-friendly Prestashop Web Push Notification addon allows the admin enable/disable the order status update notification option.
3. The Admin can customize the confirmation block notification button from the back-end of the Prestashop Push Notification for web browsers module.
4. Prestashop Cart Reminder Push Notification module pushes the web notification to the customer from time to time when they abandon the cart.
5. The admin can send the price alert notification to the online shoppers when the price of the subscribed product is low.
6. Knowband’s Prestashop Browser Notification addon offers the store merchant to enable the product back in stock notification functionality. It pushes a browser notification on the customer’s browser once the product is back-in-stock.
7. The Prestashop store owner can customize the look and feel of the notification block from the back-end of the Prestashop Push Notification for web browsers addon.
8. Knowland’s Prestashop web push notification module allows the store owner can change the look and feel of the Subscription box as per the website theme.
9. Prestashop Website Push Notification module offers an option for the seller to customize the confirmation pop up from the back-end.
10. The admin can change the logo of the confirmation notification box.
11. Prestashop Web Push Notification module is easy to use and handle.
12. The Knowband Prestashop Browser Notification module offers multilingual support.
13. Prestashop Push Notification for web browsers Addon is compatible with all browsers.
14. Prestashop Web Push Notification Addon is multi-store compatible.
15. The online merchant can setup web browser configuration and configure firebase API by following the provided steps along with the screenshots. The online merchant can setup API key, Project id, message sender id and server key for showing web browser notifications to the online users.
Technology for Development
Language: PHP
FrameWork: PrestaShop
2.0 Steps for Installation of Prestashop Web Push Notification Addon:
1. The folder structure of the Prestashop Browser Push Notification module.
2. Copy the whole folder named as product update into your modules folder of the root directory of your PrestaShop store through FTP.
3. You will be able to find the product web push notification plug-in ready to be installed in the Modules in your PrestaShop store as shown below.
4. Click on the Install link to install the plugin.
4. Another way is, you can zip the whole folder and then click on “Add New Module” link displaying on the top right corner of Prestashop module listing page.
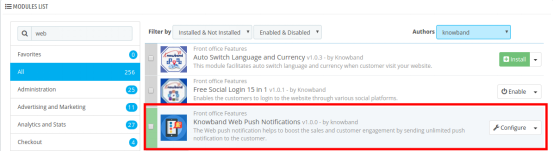
5. After installing the Prestashop Push Notification for Web Browsers module, “Configure” link will be displayed instead of “Install” link as shown in below screen:
Now, your Prestashop Web Push Notification Addon is ready to use and click on “Configure” link to configure this Prestashop module by Knowband.
3.0 Admin Interface
After installing Prestashop Web Push Notification module into the store, the Prestashop addon will provide the following interfaces:
Each interface of this Prestashop browser push notification module is explained below.
3.1 General Settings
General Settings tab of this Prestashop Web Push update notification addon has following options:
3.1.1 Configuration Settings
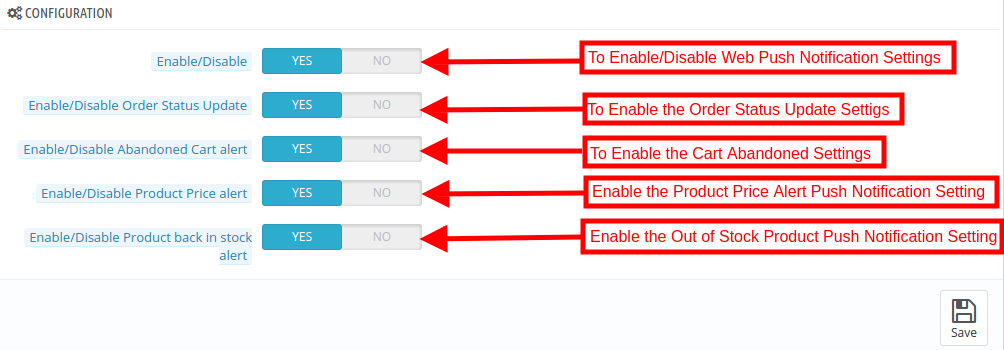
On clicking on configure link corresponding to Prestashop Website Push Notification addon, the system will open Configuration tabs of this Prestashop plugin as shown in the screen below:
Enable/Disable: Initially, this field of Prestashop browser push module by Knowband will be disabled. The admin can enable/disable the plugin by toggling the button.
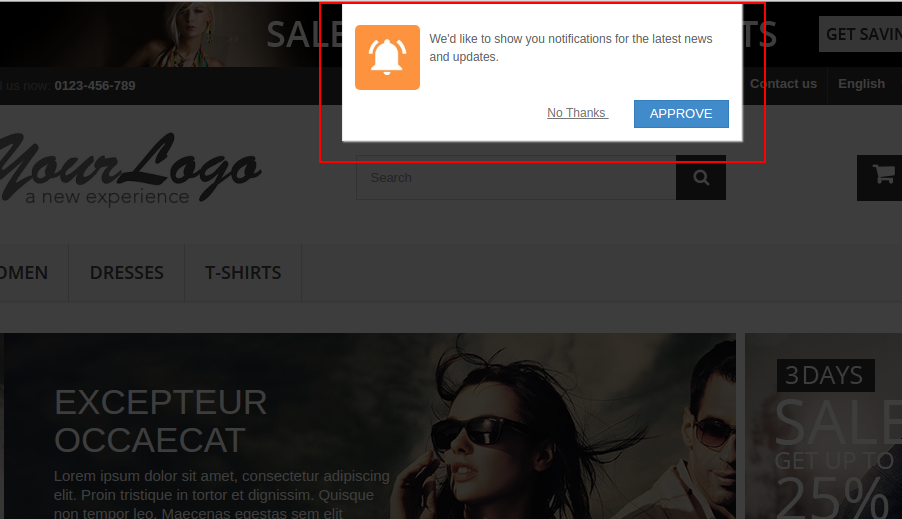
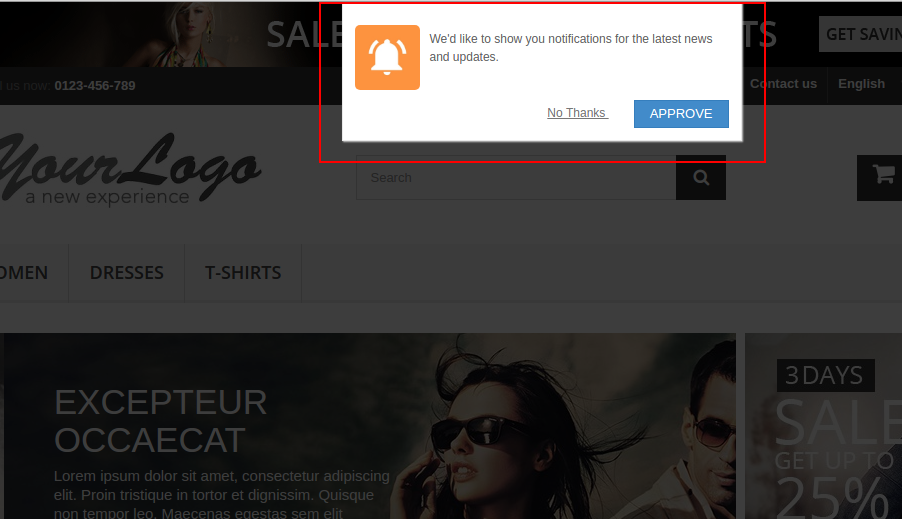
After enabling the settings the module, a confirmation box will be displayed in the in the front-end of the store. The store visitors or customers can click on ‘Approve’ to enable the push notifications.
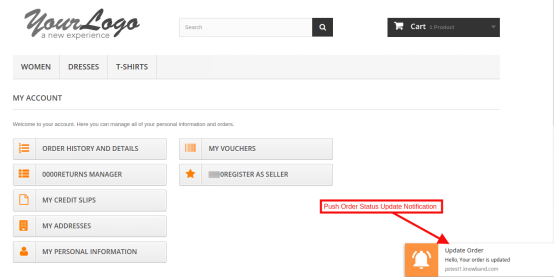
Enable/Disable the Order Status Update: In this section of Prestashop Push Notification for web browsers addon, the admin can enable the settings to send web notification for the order status. After enabling this setting, the admin can send order status notification the customer.
The push notification for order status will be displayed as shown in the image below:
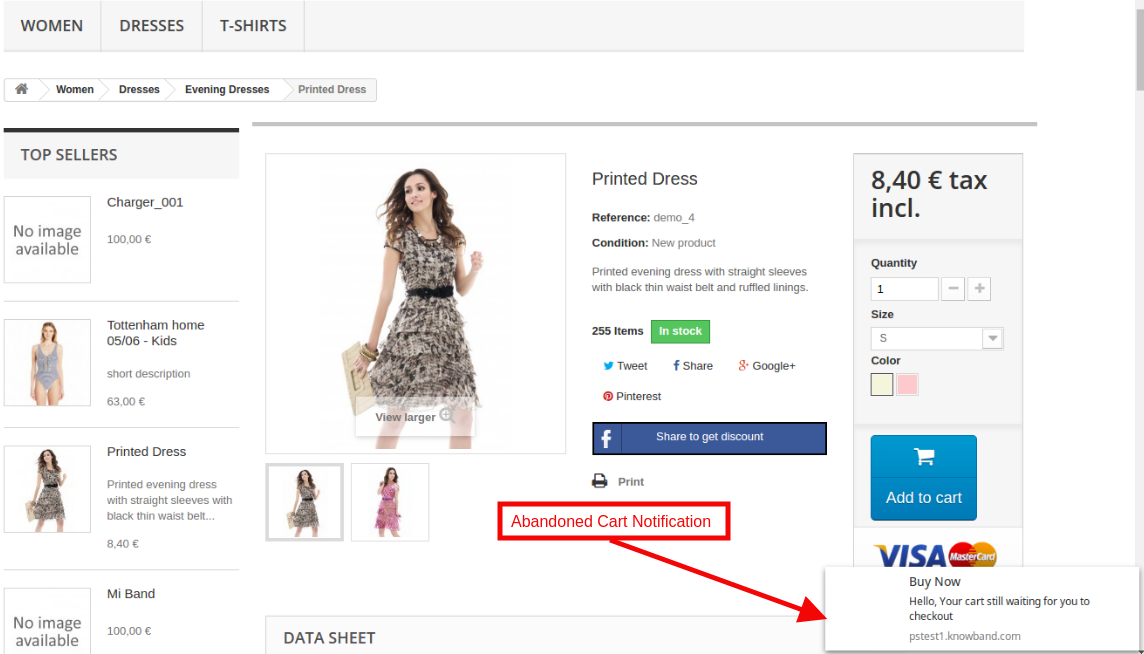
Enable/Disable the Abandoned Cart Alert: Using this option of the Prestashop Web Push Notification addon, the admin can enable the settings to send web notification for the abandoned carts of the customers.
These settings work only when the customers abandon their cart for some reasons. Then this module sends the web push notification to the customer saying “Your cart is waiting”.
Note: Web push notification module allows the admin to run cron to send the push notification immediately or after a fixed time.
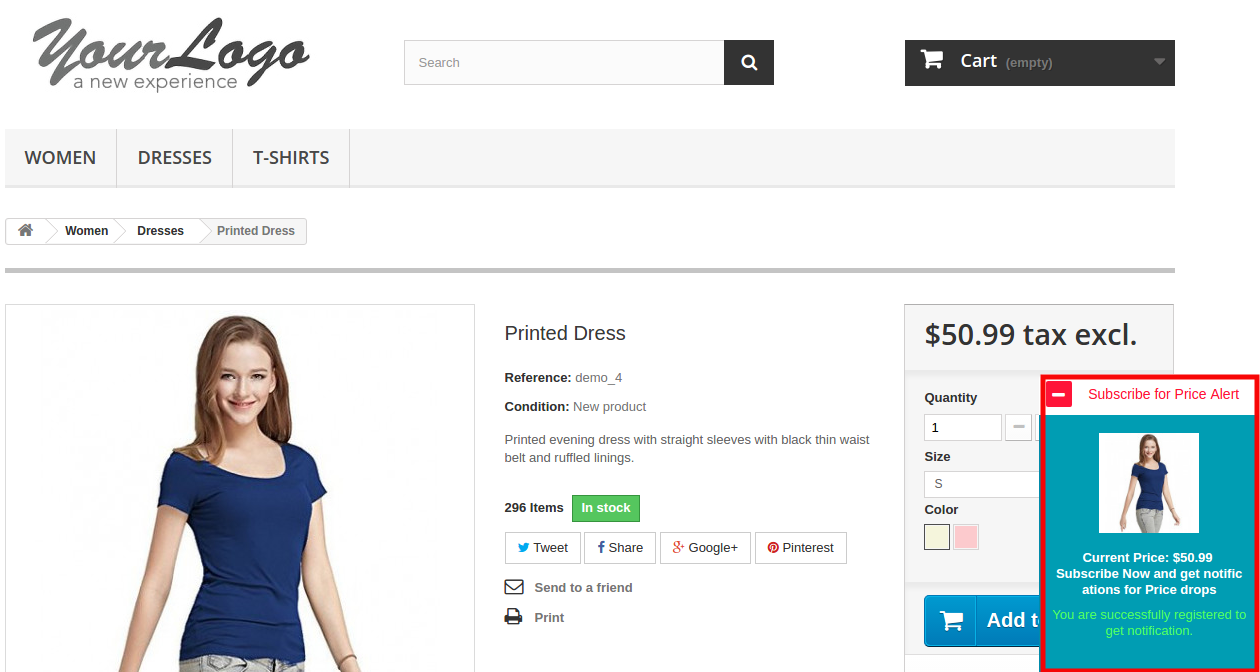
Enable/Disable the Product Price Alert Settings: Using this option of the Prestashop Browser Notification addon, the admin can enable the settings to send web notification for the customer when the product price is down.
At the front-end, this Price alert notification box will appear like below screenshot:
Note: These settings are only applicable when the users subscribe for the Price Alert.
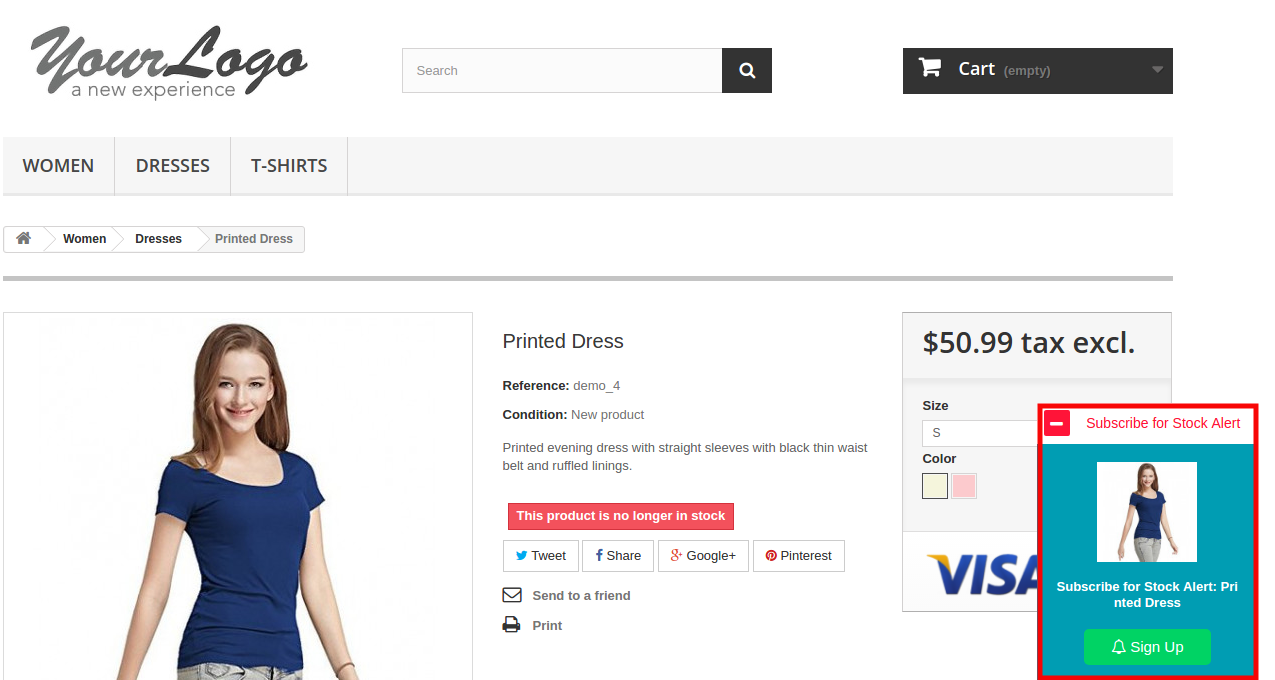
Enable/Disable the Product Back In Stock Alert Settings: Initially, this setting is enabled, this Prestashop Push Notification for web browsers Addon allows the admin to send product alert notification to the customer when the product is back in stock.
At the front-end this Back In Stock notification box will appear like below screenshot:
Note: These settings are only applicable when the user subscribes for the notification.
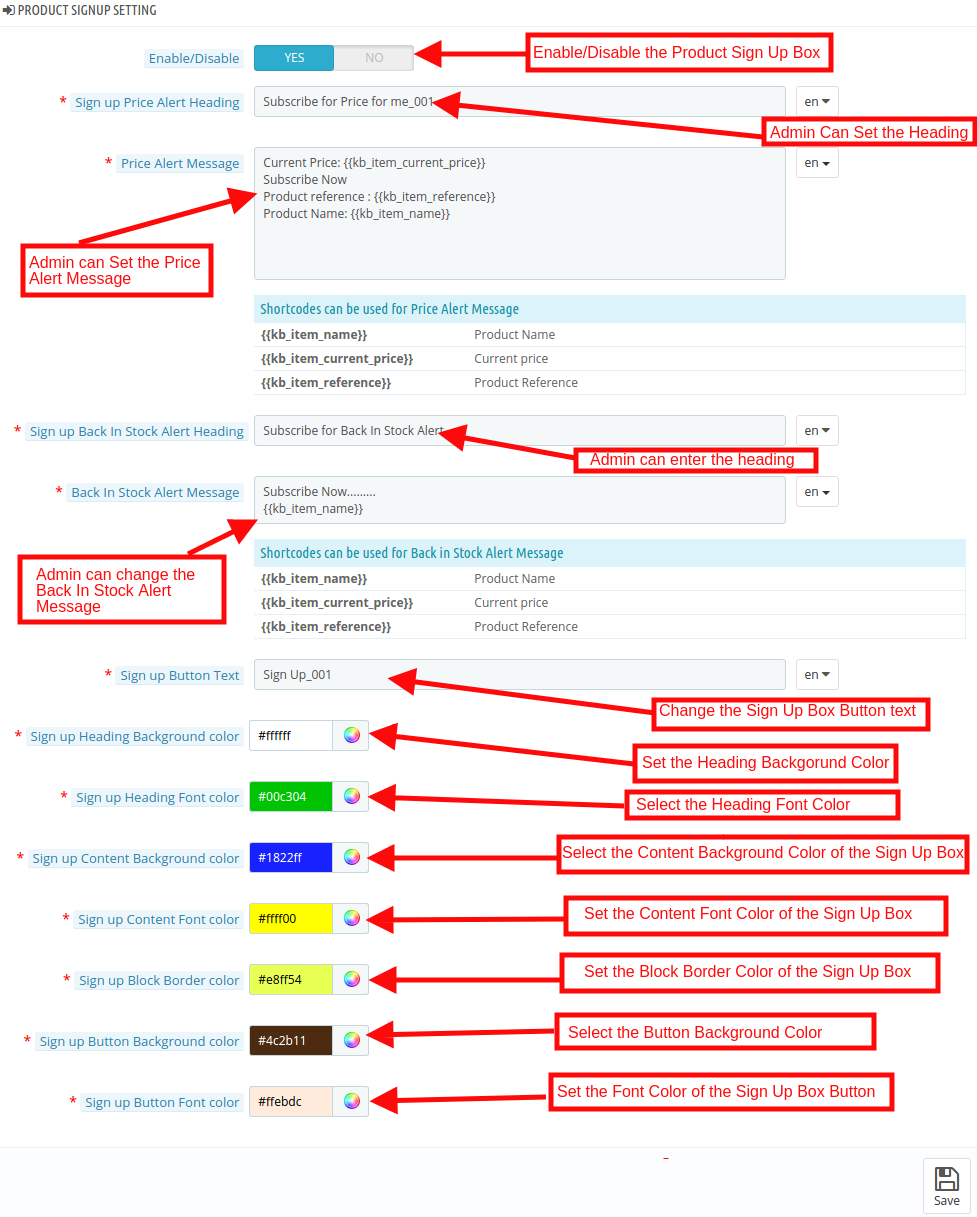
3.1.2 Product Sign Up Box
In this tab of the Prestashop Web Push Notification addon by Knowband, the admin can edit the Sign-Up Box settings of this Prestashop module in various languages. This tab will have the following options:
Enable/Disable Product Subscription Box Settings: In this tab, the admin can enable the product subscription box option. If enabled, the Prestashop Browser Push Notification module will show the Subscription box in the Front-end of the store where the customer can subscribe for the price alert or back in stock product.
Sign Up Price Alert Heading: Initially, this field of Prestashop Web Push Notification module allows the admin to change the heading price alert notification as per the requirement.
Price Alert Message: In this section of Prestashop Browser Push Notification module, the store admin can change the message flashed in the Price alert subscription box.
Sign Up Back In Stock Heading: This option of the Prestashop back in stock web push alert module allows the admin to edit the heading of the back-in-stock notification.
Back In Stock Message: In this Prestashop Push Notification for web browsers Addon tab, the Online retailer can change the message of the back in stock subscription box.
Sign Up Box text: The Prestahsop store admin can change the look and feel of the subscription box by picking the color from the color picker. The changes made in the back-end will be reflected in the front end.
Sign Up Box Heading Background Color: The Store merchant can change the background color of the heading of the signup box in this.
Sign Up Heading Font Color: This option of the Prestashop Website Push Notification module allows the admin to set the Heading font color as per requirement and will be reflected the front end of the site.
Sign Up Box Content Background Color: The Prestashop Merchant can change the Subscription box Content color in this section of Knowband Web Push Notification For Prestashop.
Sign Up Box Content Font Color: The admin can change the font color from this section.
Sign Up Box Content Border Color: This field of Prestashop Web Push Notification addon allows the admin to set the border color.
Sign Up Box Content Background Color: This option of the Prestashop back in stock web push alert module allows the admin to set the background color of the sign-up box.
Sign Up Box Button Font Color: Using this option of the Prestashop Browser Push Notification module, the admin can set the font color of the text displayed in the buttons.
3.1.3 Welcome Push Notification Setting
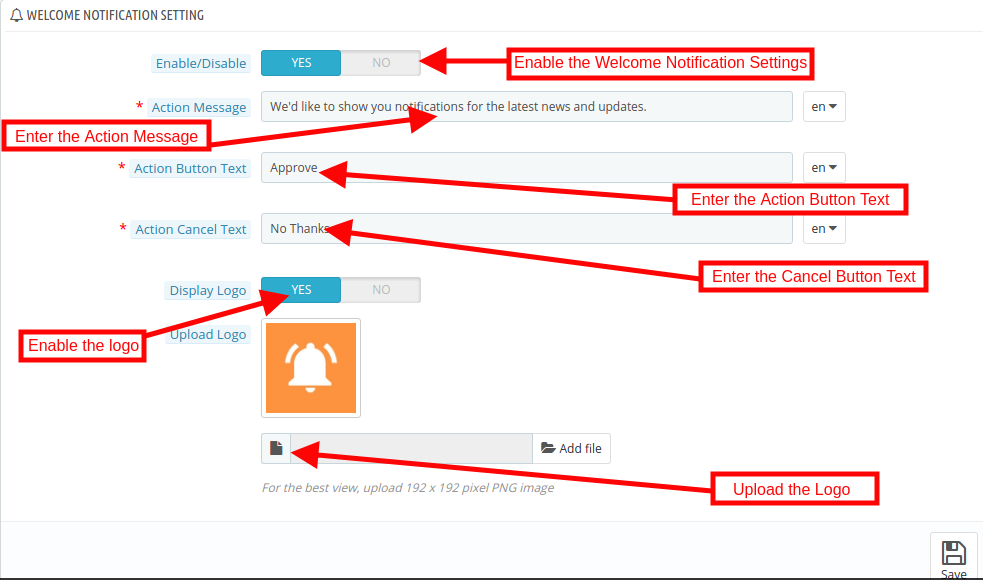
In this Prestashop Web Push Notification, the store admin can customize the look and feel of the Welcome notification box. This Welcome Notification box will be shown in the Front-end of the store when the customer enters the store. Users have an option to subscribe to the notifications or cancel the option. This tab will have the following options:
Enable/Disable: Admin will have the option to Enable/Disable the Permission Box. If enabled, the permission box in the front-end of the store.
Action Message: The Admin can change the action message that will be reflected the front end of the site.
Action Button Message: In this Prestashop Website Push Notification Addon, the store admin can change the message of the Permission box action button message.
Action Cancel Text: In this tab, the store admin can set the Cancel button text.
Display Logo: The store admin can enable/disable the option to display the logo.
Upload Logo: The online retailers can upload their own business in this section.
3.1.4 Web Browser Configuration
In the updated version, the online merchant got an option to configure Firebase API and setup these details for showing web browser notifications to the online users:
API Key: Enter the API key here.
Project ID: Enter Project Id here.
Messaging Sender ID: Here, enter messaging sender ID.
Server Key: Enter the server key here.
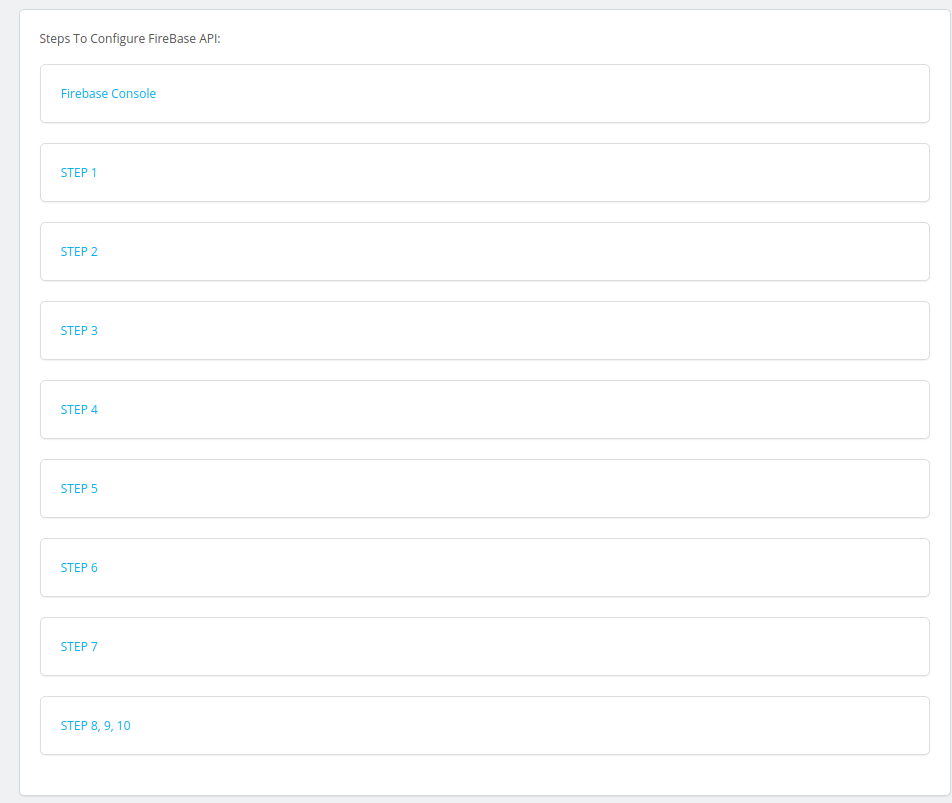
The online merchant can view the configuration steps along with the screenshots.
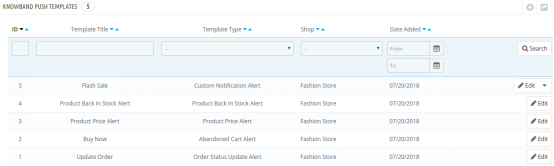
3.2 Templates
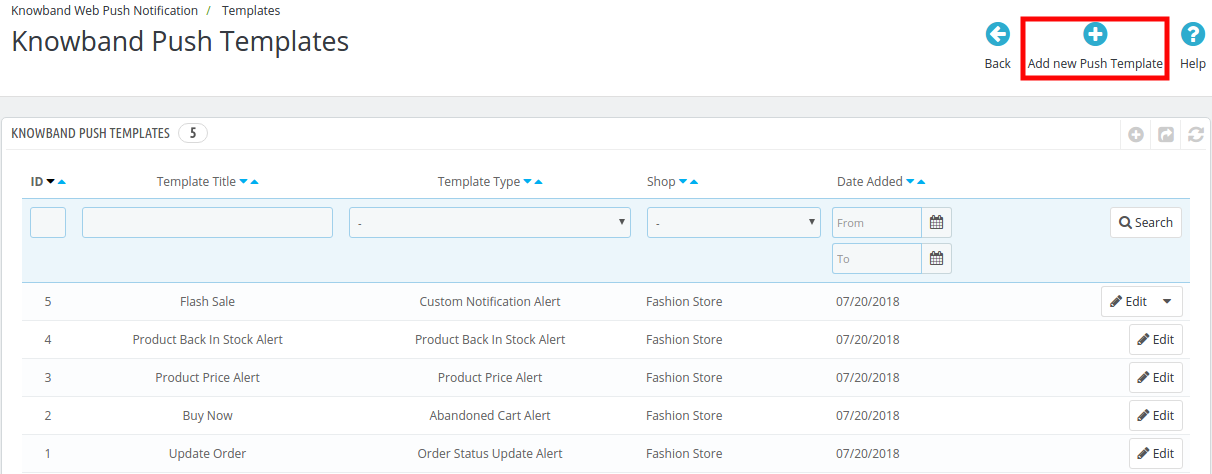
Here store owner can customize or add the Web Push notification template in this section of the Prestashop Website Push Notification addon according to the requirements.
Web push notification allows the store admin to customize the template for the following option:
1. Custom Notification Alert
2. Product Back In Stock Alert
3. Product Price Alert
4. Abandoned Cart Alert
5. Order Status Update Alert
3.2.1 How to add Custom Notification Template?
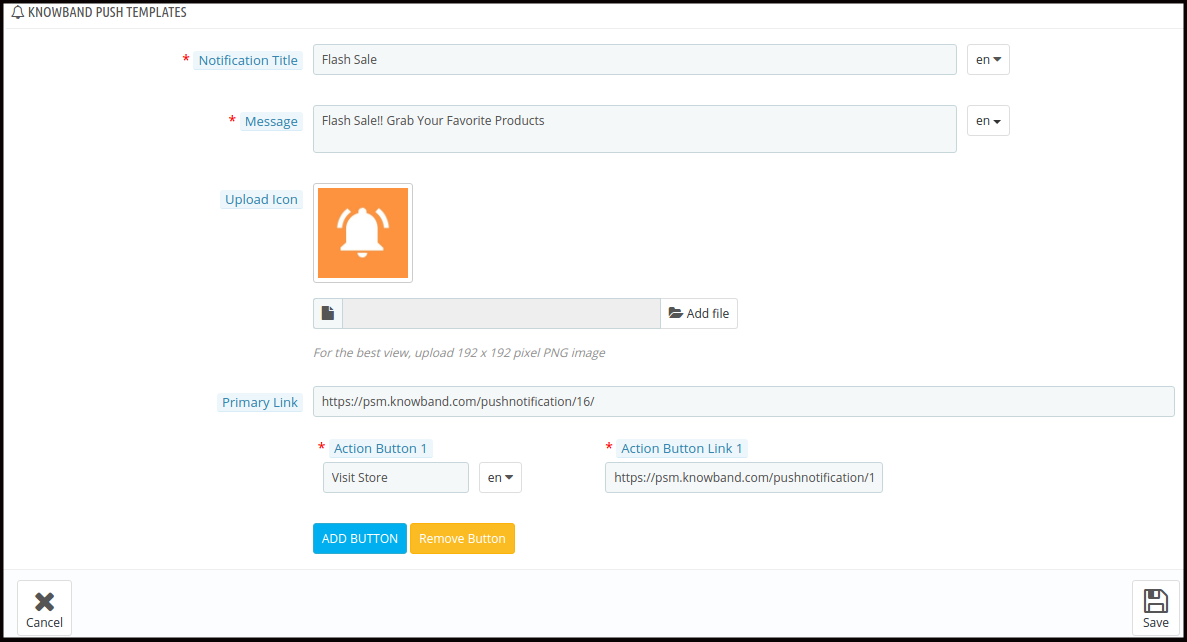
The Prestashop Web Push Notification addon by Knowband allows the store admin to add the new Custom Notification template. Following are the steps to add a Custom Notification template –
1. Go to “Web Push Template”.
2. Click on “Add New Push Template” tab. A pop-up will display to add a new push template.
3. Fill all the mandatory fields and click on the “Save” button.
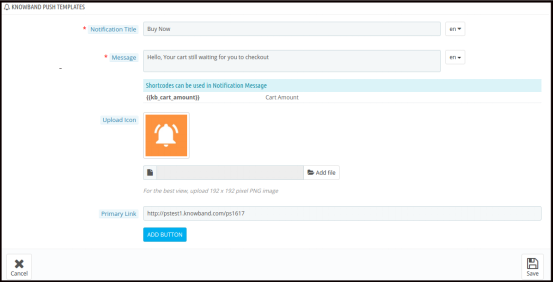
The various mandatory fields are discussed below. Please find the attached screen-shot:
Notification Title: Here the admin can set the Notification title.
Message: Using this option of the Prestashop web push notification module, the eCommerce store admin can set the message that will be displayed along with the notification.
Upload Icon: In this field, the store admin can upload the icon for the notification.
Primary Link: The Store admin can add the link of any specific page where they want to redirect the user.
Action Button: In this tab, the online merchant can add the two buttons that will be displayed along with the push notification. These action buttons can be used for various promotions.
4. After the successful enter the details, the new custom template would be added in the “Web Push Template” table.
Note: The Admin can add the N no of Custom template for various promotional offers like Flash Sale, Buy 2 Get 1, Happy hours and more.
The other notification options are discussed below:
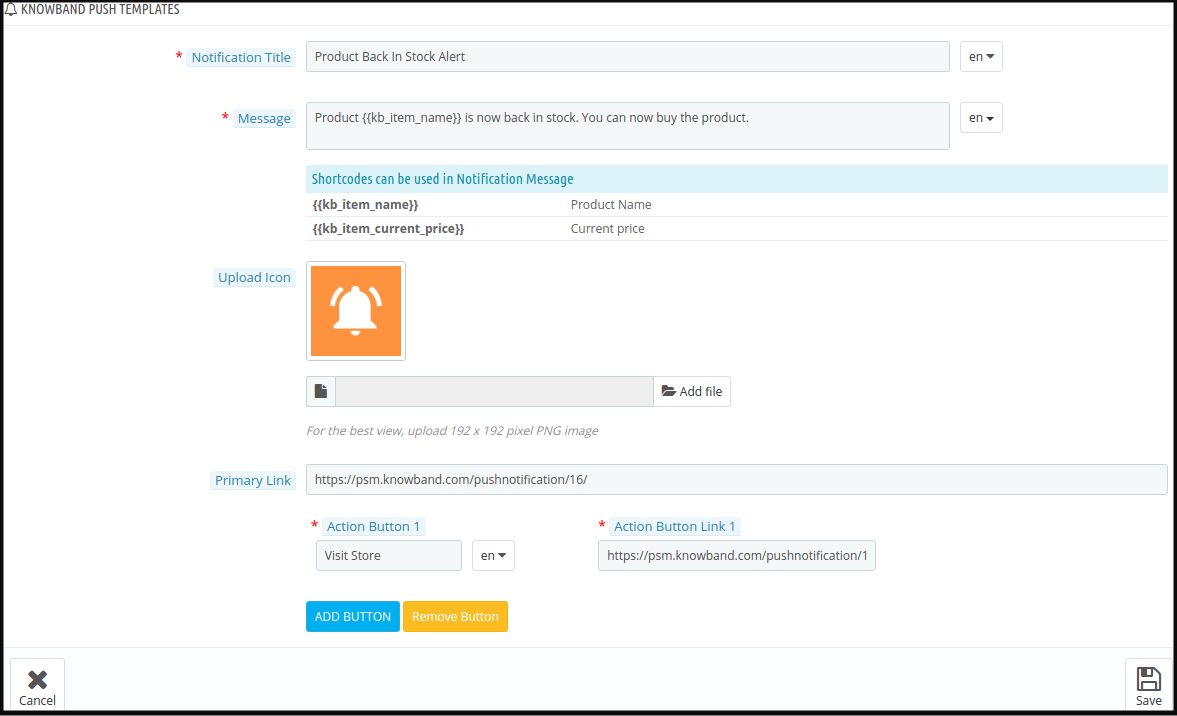
Product Back In Stock Alert: In this tab, the store admin can customize the settings of the back in stock notification like Your product is out of stock. Please find the attached screen-shot:
When the store admin changes the status of the Product quantity from the back-end of the Prestashop Web Push Notification module the Product quantity Push Notification send to the customer.
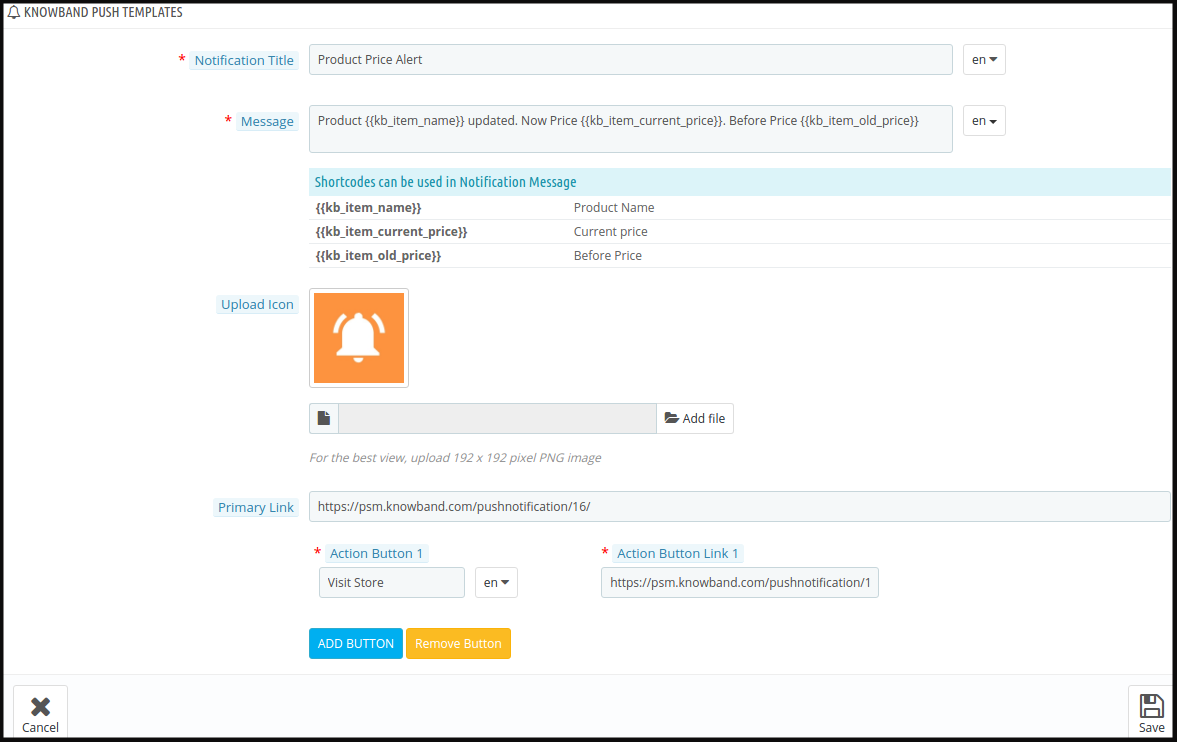
Product Price Alert: In this tab, the store admin can customize the settings of the product price alert notification. Please find the attached screen-shot:
When the store admin changes the product price/run the special deal from the back-end of the module the Push Notification send to the customer.
Abandoned Cart Alert Template: This Prestashop Browser Push Notification module offers an option for the admin to customize the abandoned cart template form the back-end.
Here the store admin can customize the Abandoned Cart template.
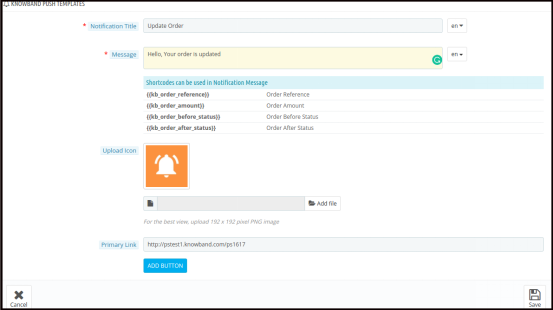
Order Status Update Alert: This Prestashop Web Push Notification module offers an option for the admin to customize the Order status template.
Here the store admin can customize the Order status template.
When the store admin changes the status of the order from the back-end of the Prestashop Web Push Notification module the Order Status Push Notification send to the customer.
3.3 Push Notification
Prestashop Web Push Notification module allows the admin to set up the cron to send a push notification. The Admin has the option to send push notification manually or by the setting of the cron.
3.3.1 How to send Push Notification Manually?
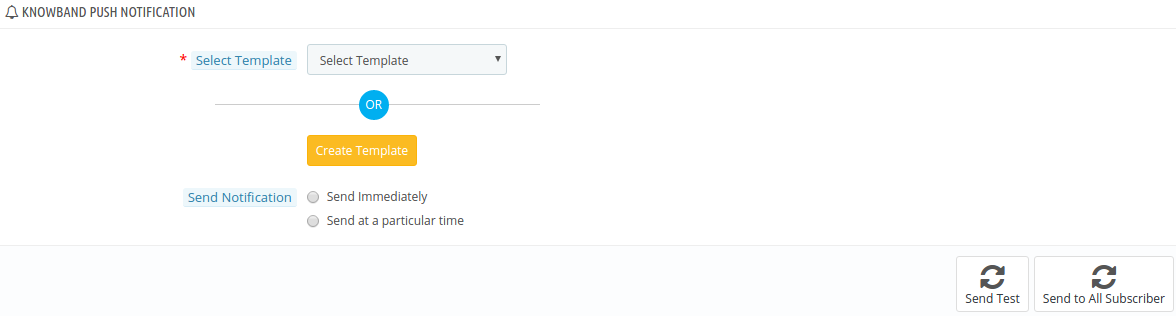
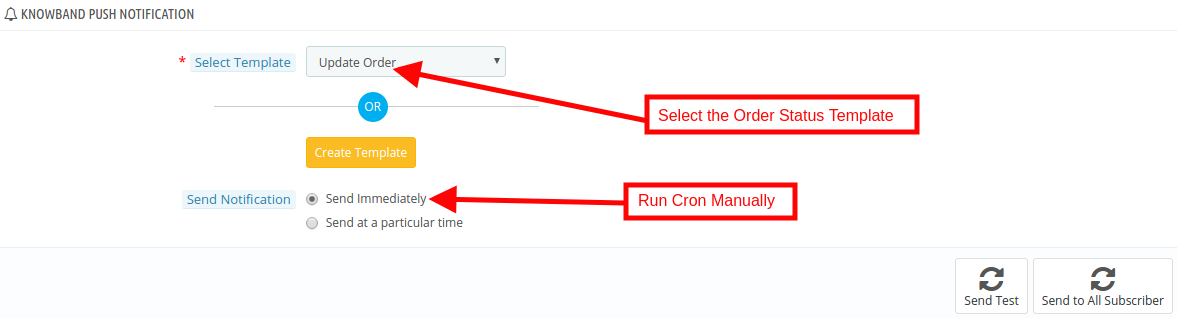
In order to send the Push notification manually for Update Order, Buy Now, Product Price Alert, Product back in stock and Custom Notification. The store admin needs to select the template type from the drop-down list.
For example: If the store admin wants to Push the “Order Status Notification” manually, then he has to select the “Update Order” option from the drop-down list and click on the Send to All Subscriber option.
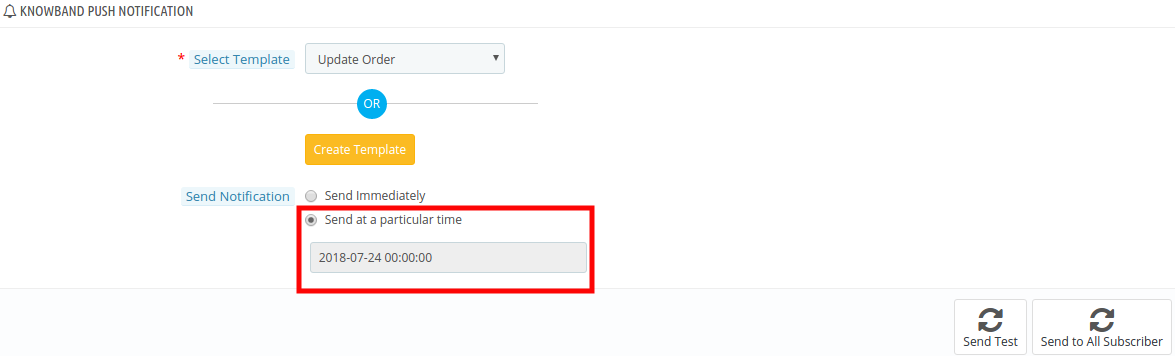
3.3.2 How to Schedule the Notification?
There are the steps for scheduling the Notification:
1. Go the Push Notification template.
2. Select the template which you want to schedule for future notification.
3.Set the time when the admin wants to send the notification.
4. Delay notification set.
CRON Configuration:
In order to send the Push Notification automatically, the Prestashop store admin can set up the cron job. There is two option available in the admin panel of the module.
1. The Admin can run the cron manually.
2. Cron Setup via Control Panel: In order to automate the setup the admin can configure this setting.
Please find the instructions to setup crons below –
Web Push Notification For Prestashop allows the Prestashop store admin to schedule the notification for a particular time. All the scheduled notification will be displayed in the Push Delay Notification tab along with their status.
3.5 Push Subscriber
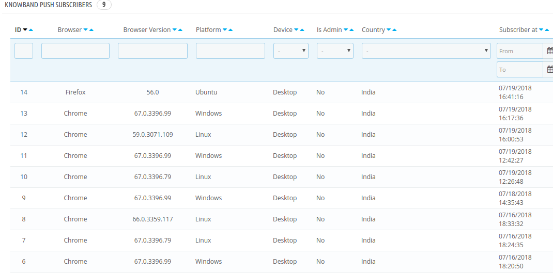
Prestashop web push notification plugin allows the admin to view the list of the subscribe browser.
3.6 Product Alert Subscriber
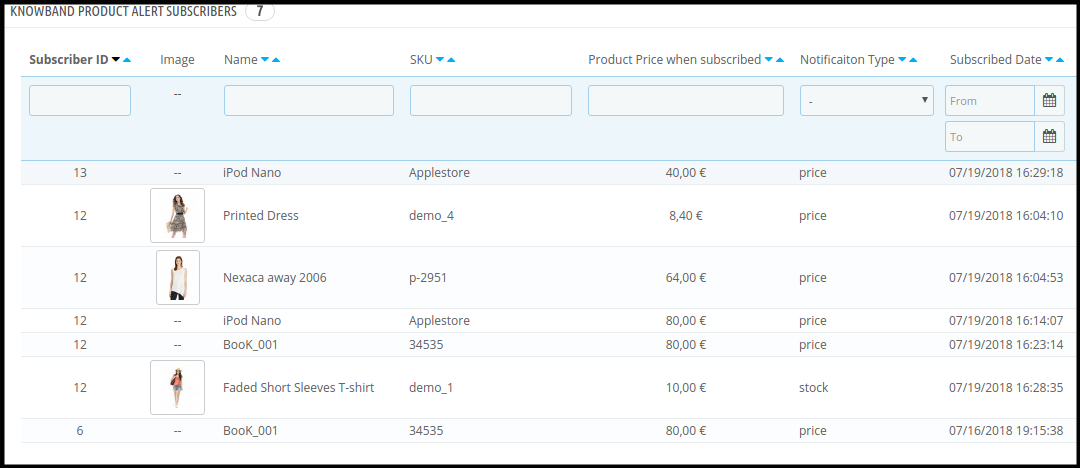
This Prestashop Push Notification for web browsers addon allows the online retailer to view the list of subscribed product. They can also view the product notification type like price alert or back in stock.
3.7 Push History
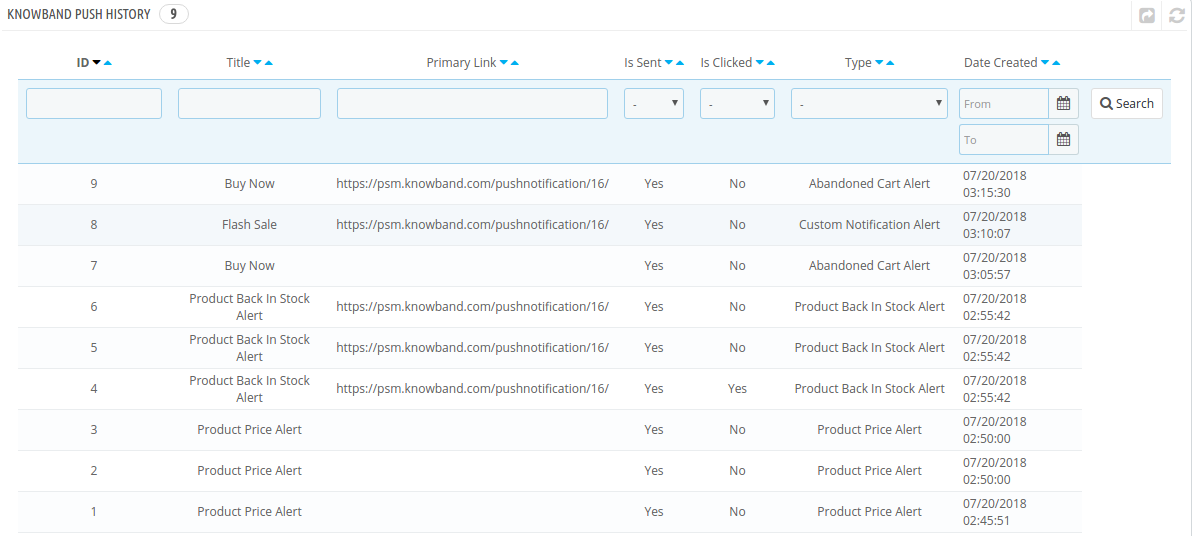
In this Prestashop web push notification module, the store admin can view the overall history of the web push notification. Apart from this, the admin can filter the history and view the notifications pushed for options like abandoned cart, price alert, back in stock and more.
3.8 Web Push Statistics
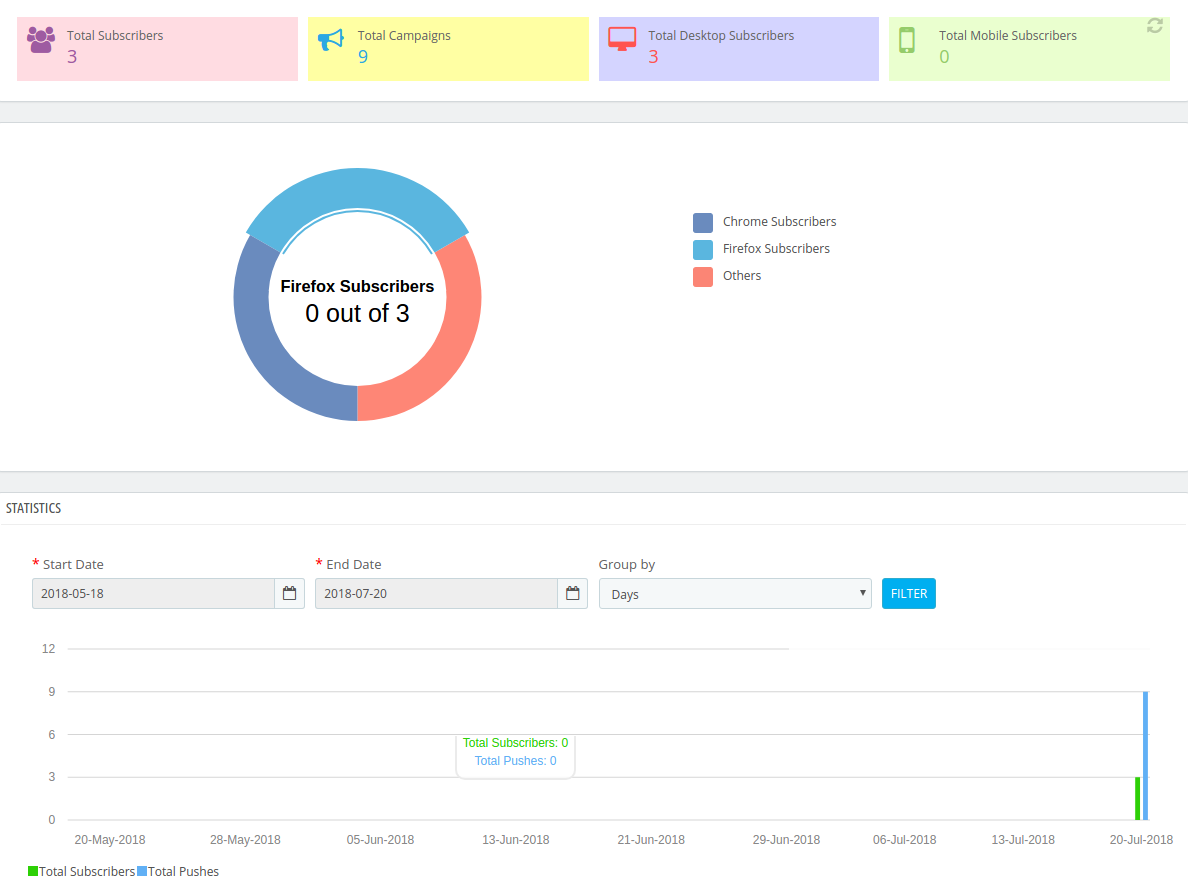
The complete analysis of the subscribed customers can be done with the help of report offered in this tab of the Prestashop web push notification module.
4.0 Front End Module of the Prestashop Web Push Notification module:
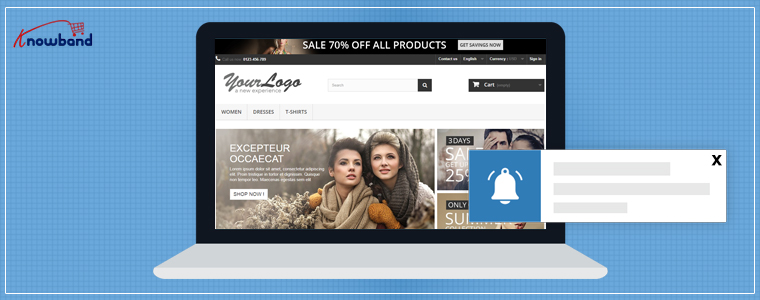
After enabling the Prestashop Website Notification module by Knowband the front-end user will see a confirmation block at the home page. The block of the Prestashop Browser Push Notification addon contains two buttons as to Approve or Cancel the notification. If the user Click the approve button they will be subscribed to the respective website.
The Confirmation block of Prestashop reminder email module would appear as follows:
The biggest soccer event has begun. Millions of the soccer fans across the globe are pumped to cheer for their teams. It happens once every four years when all the football fans go super crazy. Football is one such sport which has the fans following all over the world. This is also a golden chance for the companies to take advantage of all the excitements around and promote their businesses. But wait! You need to know that FIFA has strict rules and regulations for how the official marks can be used. To check out the details click here.
What is common in eCommerce and Soccer?
There are few similarities in the Football and eCommerce. The energetic game has so many learning’s which can be used to implement a successful strategy for your online store. The commercials and the news regarding the soccer match also give an idea to promote the products and services. Here we will discuss some similarities in Soccer and eCommerce.
Similarity 1: Study the moves of the competitor players and teams
In order to create a successful strategy for winning the match, it is required for the teams to study the moves of the top players of the competitor team and analyze the game plan of the competitor team.
Similarly, in eCommerce, it is required to keep the track of the competitors in order to stay ahead of the competition. You just can’t afford to ignore even the smallest factor as it may prove hazardous.
Listed below are some of the key points that should be kept in mind while competitor analysis –
1) What strategy are they using for the lead generation?
2) What special promotions they are running?
3) What strategy are they using for the SEO?
4) How are they promoting their products and services on Social Media?
5) How are they retargeting their customers?
6) How they are using the email marketing to reach existing customers and what is the email frequency?
7) What is the customer retention techniques used by the competitor stores?
Similarity 2: The ball is faster than the players
To win a match, it is essential for the players to spread out and cover the entire field. If the players will keep on moving the ball then they will able to make a goal. In order to achieve the same, the teams use the different formations. This is the best way by which players organize themselves at the ground is with a formation like 4-4-2, 4-4-1-1, 4-4-3 etc.
In a similar manner, the eCommerce companies need to spread out their wings and tap the various opportunities, trends and technological advancements. Here are some of the points that you to take care of:
1) User-friendly website
2) Beautiful and clear images of the products
3) Well organized product description
4) Awesome promotions
5) Social media presence
6) Multi-channel selling
7) Customer experience – Return, refund, replacement, live chat, helpdesk, shipping, payments etc
8) Review and testimonials
9) Mobile friendly websites/Mobile apps
10) Customer loyalty programs
Now that you are geared up with the rules and the similarities between Football and eCommerce, wonder what should you do next? Here’s the answer.
Prepare your game plan
If you are running any kind of promotion to seek advantage of the soccer-fever you need to play smartly. There are some key points which you need to consider before preparing your promotion strategy. There are 32 countries which are participating in 2018 World Cup. So, if your target audience is from one of these countries, you can plan your promotions based on the national team. Additionally, you can plan promotions based on the interest of the fans in your country. Make sure to follow the instructions given by FIFA regarding the use of the trademarks.
How can Knowband’s extension help you?
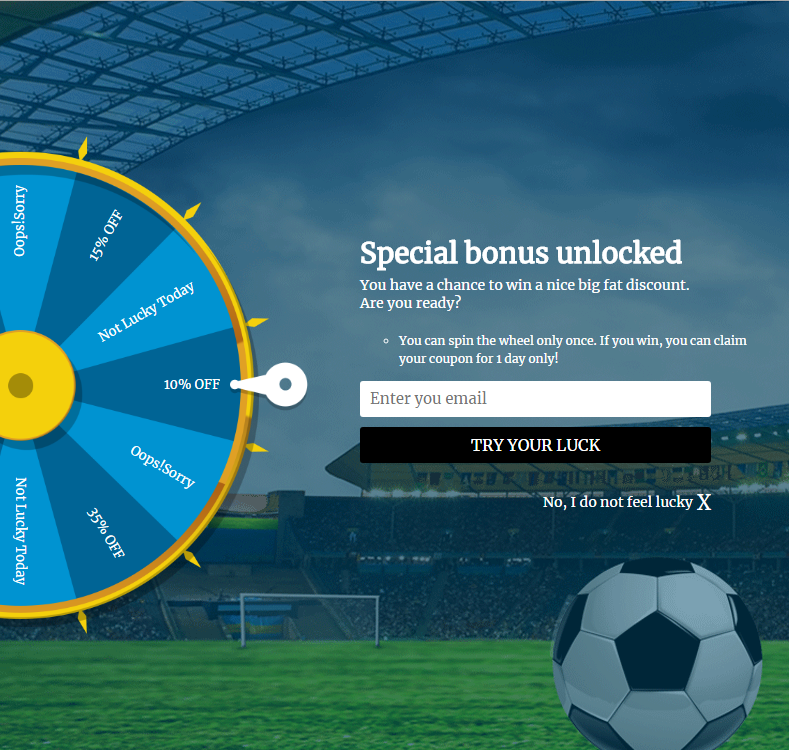
Knowband offers “Spin and Win Popup Extension” for Prestashop, Magento1, Magento2, Opencart and Shopify with the Soccer theme to trigger the sports feel of the fans and motivate them to shop from your site. With the eye-catchy soccer theme, you can grab the attention of the site visitors instantly. This will also help you to increase the rate of customer retention and boost the overall leads. As of now, 2 generic themes and one theme for the selected country are available. You can use these themes to grab the attention of your store visitors; this will help you to achieve your sales goals for the year 2018.
Why should you use Soccer theme at your site?
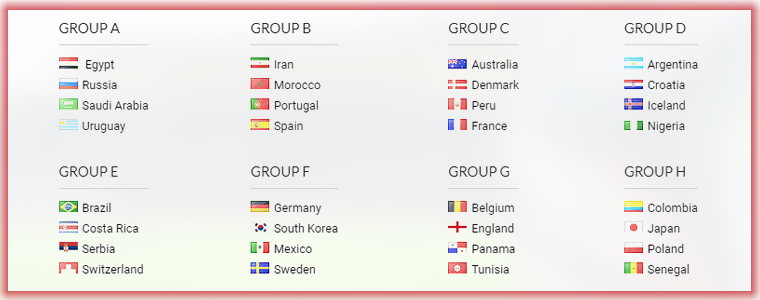
The viewership and fan-following of soccer are in millions across the world. It is the national sport of around 60 nations. There are 32 teams participating in the World Cup. The teams are following:
If your national team is participating in the World Cup, then, you can show your support for the team and even let your customers get the enticing discount during this sports season.
By analyzing these stats we can say that everyone loves the magic of soccer and this is the golden opportunity for you to promote your business as well as reach your business goals.
What is new in the Spin and Win?
We have added some new themes for the Prestashop Spin and Win Popup module. The store admin can change the theme of the Spin and Win Welcome Popup from the back-office. Please see the attached screenshots:
Apart from the generic themes of country, wise themes are also available which will help you to spread the magic of soccer and win the new customers.
Click here to get the Spin and Win Popup module for your Prestashop store.
Click here to get the Spin and Win Popup module for your Magento Store.
Click here to get the Spin and Win Popup module for your Magento 2 Store.
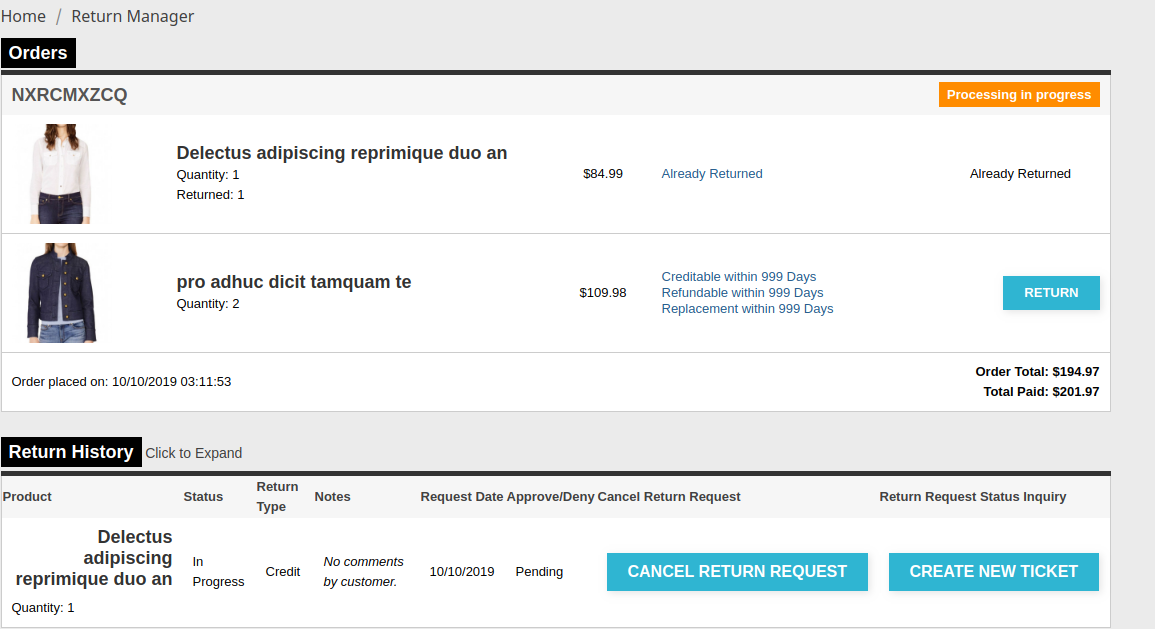
Managing the customer return request is not an easy task. It takes a lot of time and effort. The RMA system plays an important role in an eCommerce store. Without the RMA system, the store owner enables to manage of the customer request with ease and customer are also enabled to return and refund the product. Worry no more! The Prestashop Return Manager Addon adds the functionality to manage return requests for any order placed by a customer as well as a guest customer. The Prestashop return manager addon allows admin to adds a return manager button link to the front-end through which any customer/guest customer can apply for the return of any product contained in an order placed earlier.
IT is very easy to use and the customer can return any product in order completely or partially, which means the customer can also return half or less quantity of any product in the order.
How can Prestashop return manager work:
The first process this, the customer can initiate the product return request from their account page, after initiating the request the Store admin receives the return request.
When a user requests a product return, the admin can verify the return request genuine or not. If the request is genuine then they can approve the return request. The admin change return product status form the back end interface.
This Prestashop Return Manager addon offer two functionality:
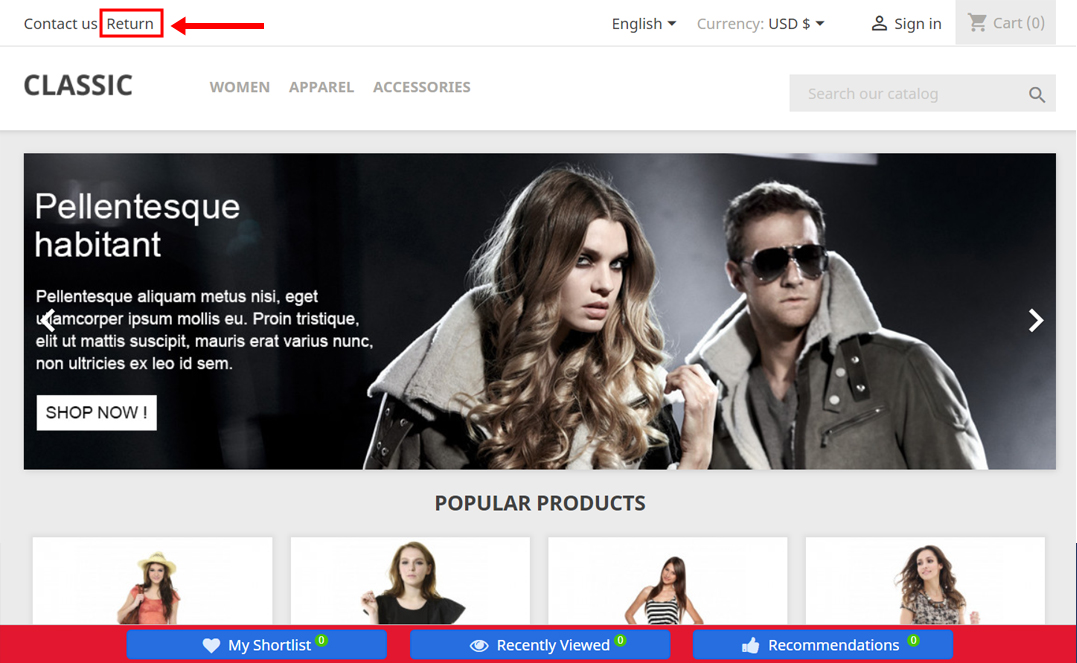
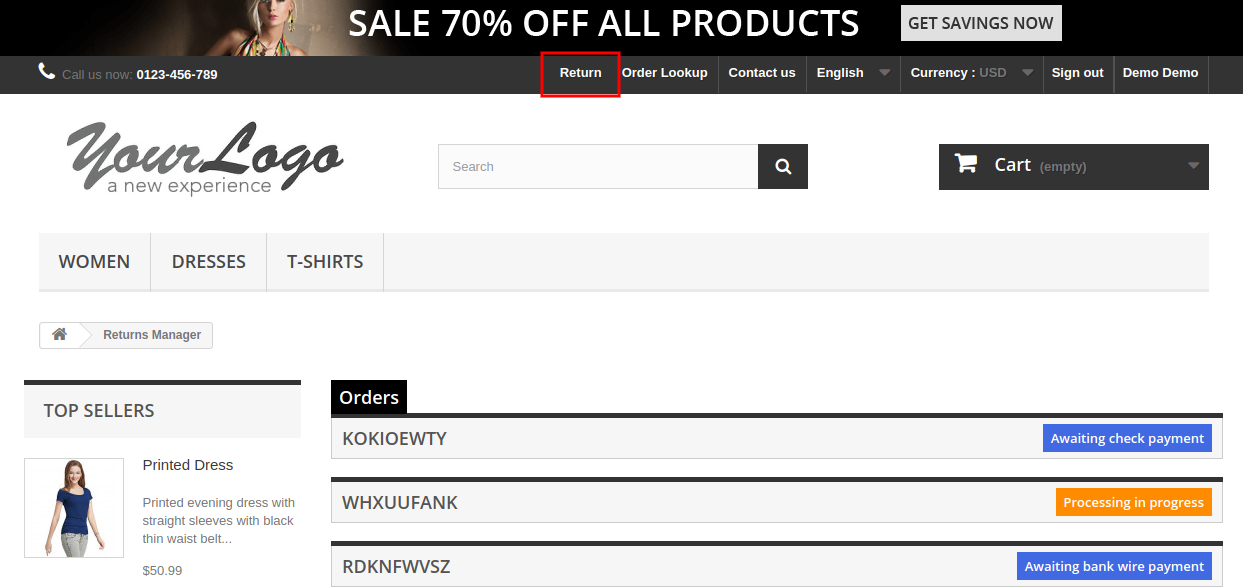
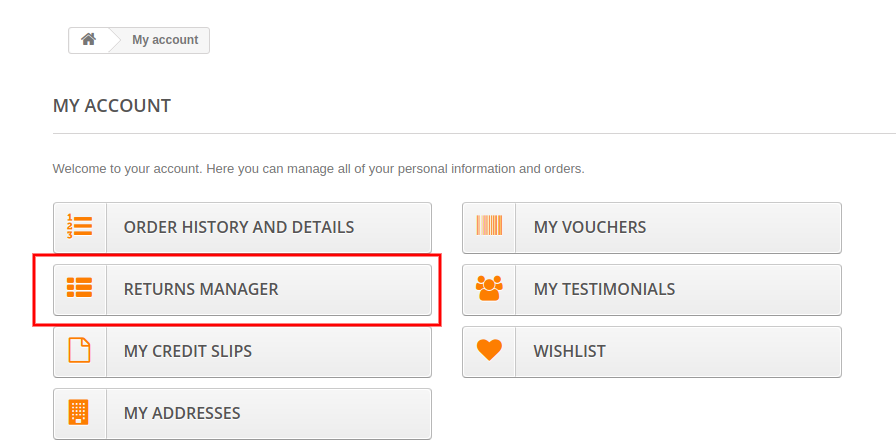
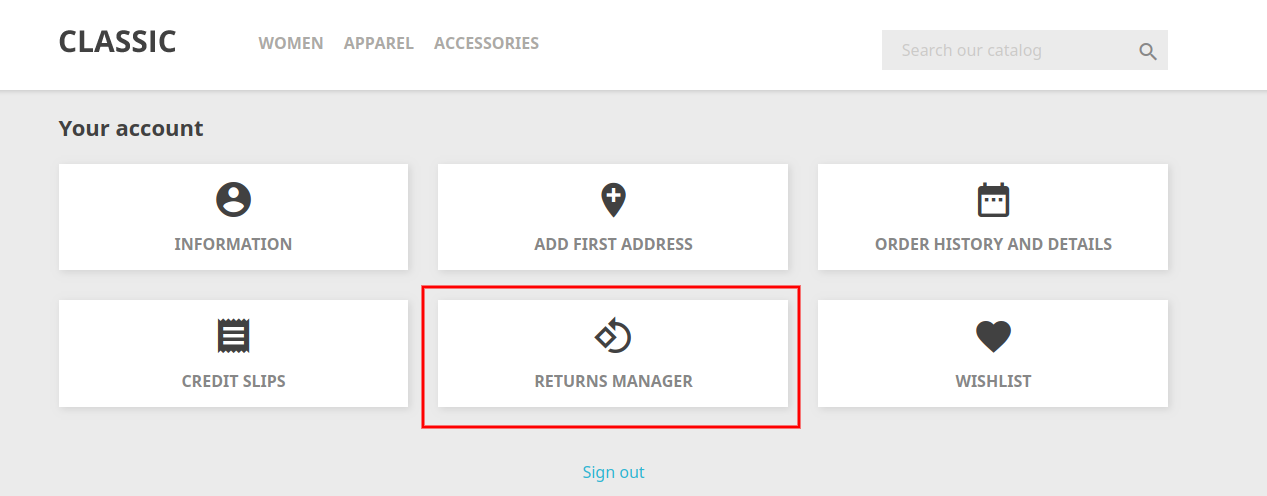
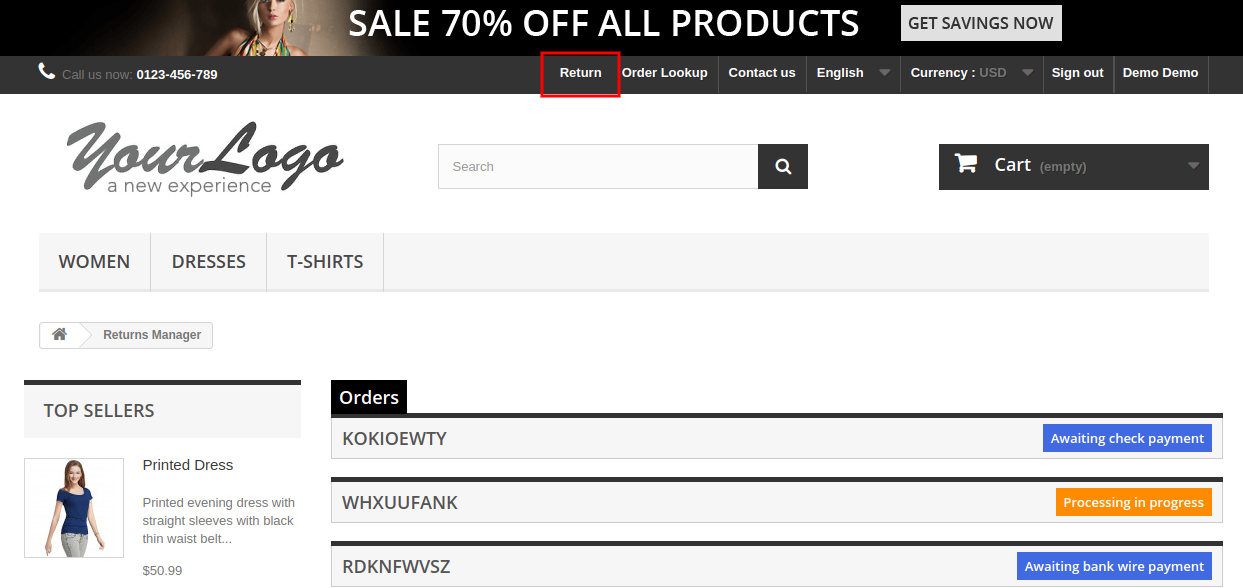
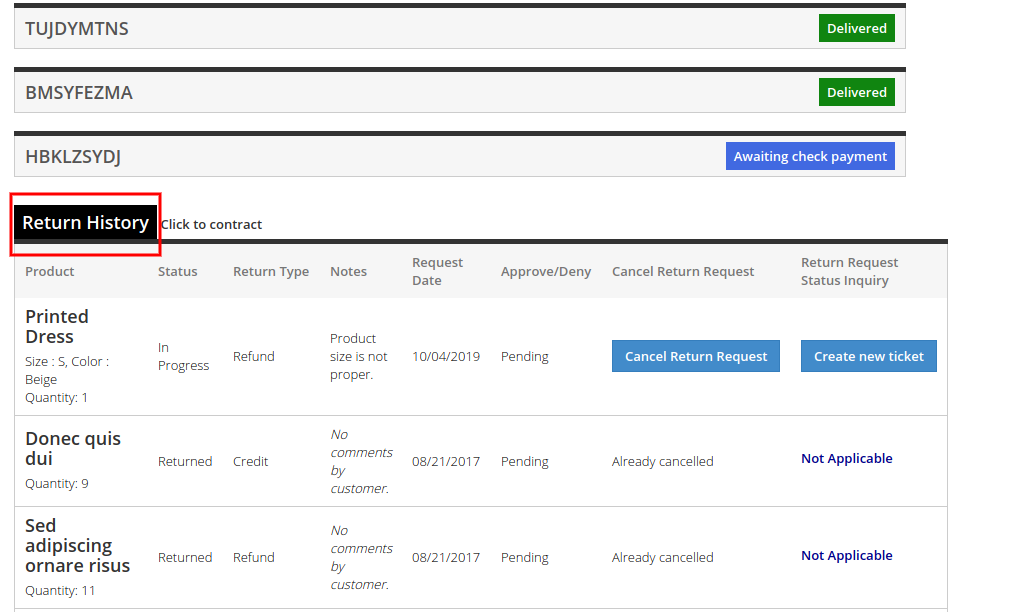
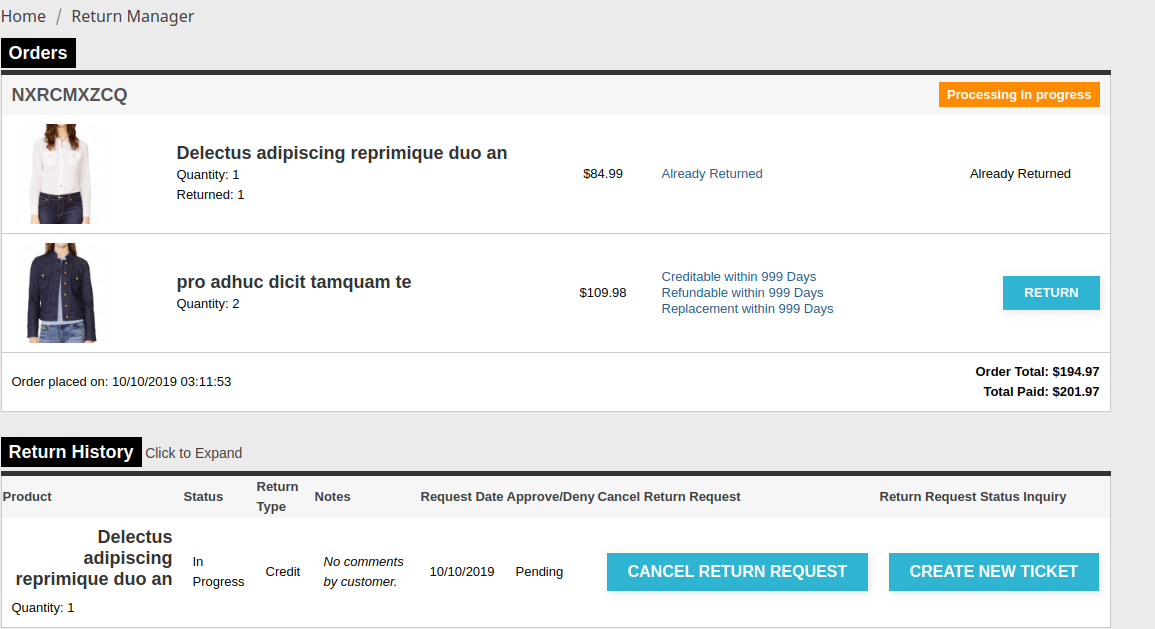
For the login users- The Prestashop order refund addon shows the return manager link appears in the header as well as the ‘My Account’ page. When the logged-in customer opens a My Account page this page containing the list of all the orders that he/she placed and the products that are eligible for return have a link to apply for a return. This page also contains the history of returns applied by the logged-in customer.
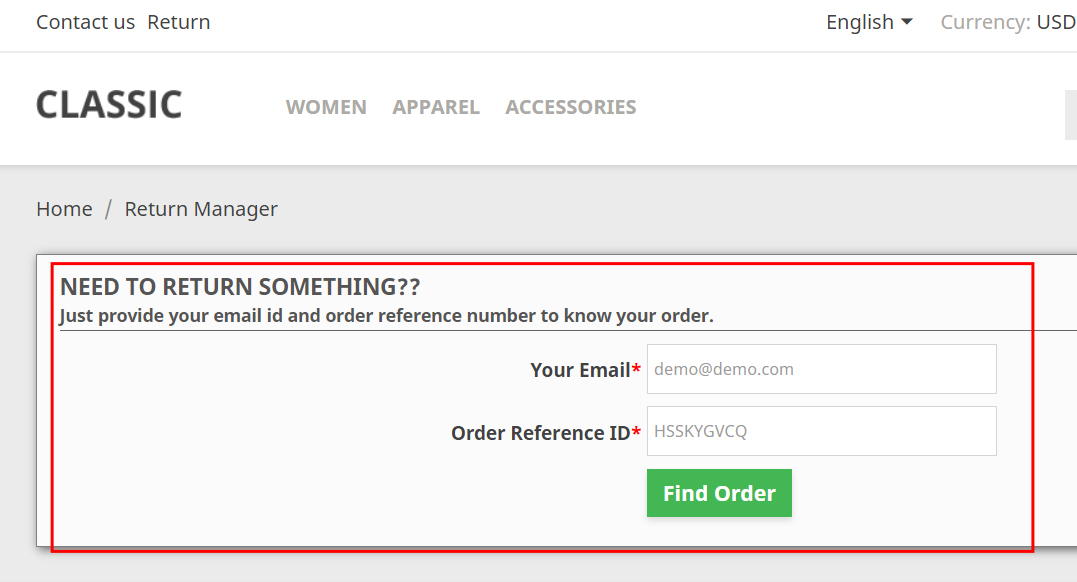
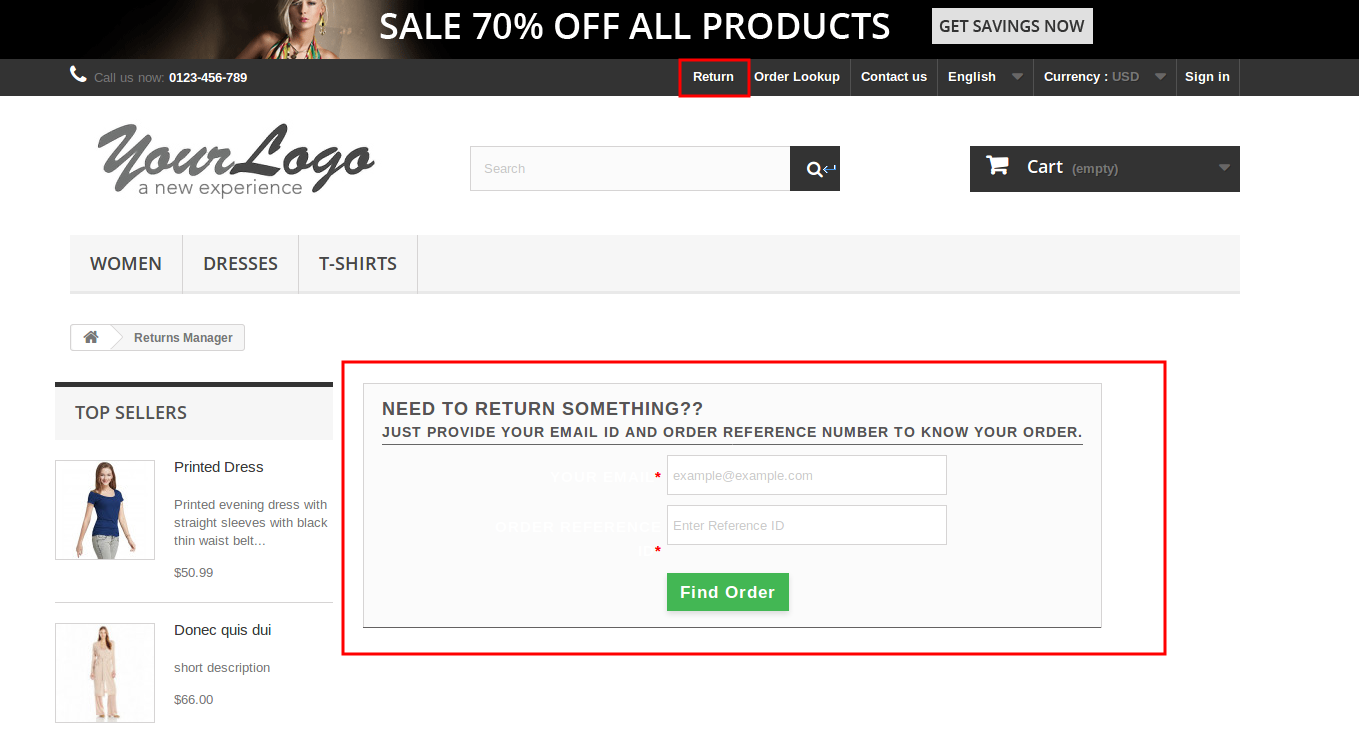
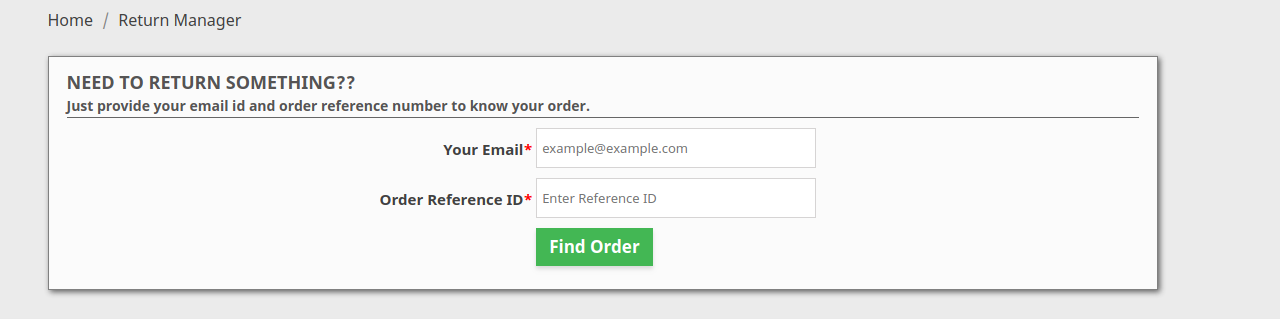
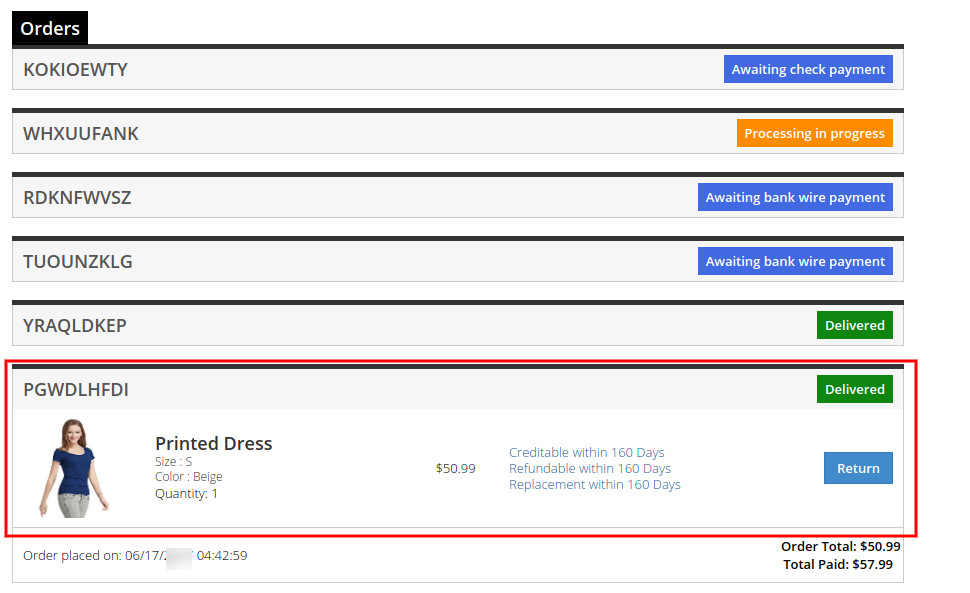
For the Guest users- In case the user is not logged-in the website then the return manager link opens a page containing a form to find any order. After finding an order using the form the order detail appears and the products from that particular order that is eligible for return have a link to apply for a return. This page also contains the history of returns applied by the guest customer who has placed this particular order.
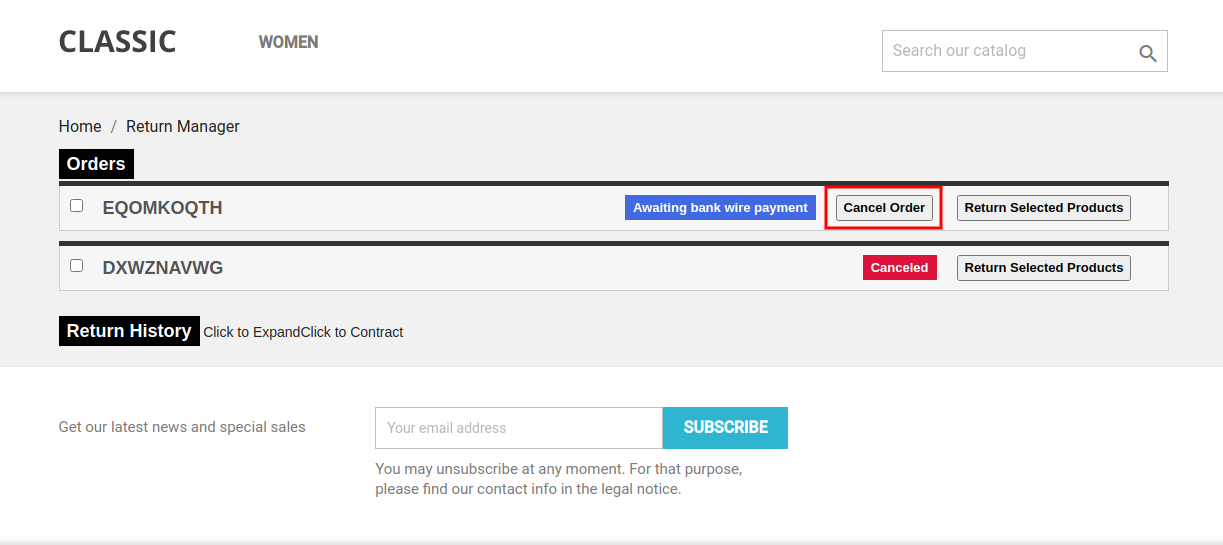
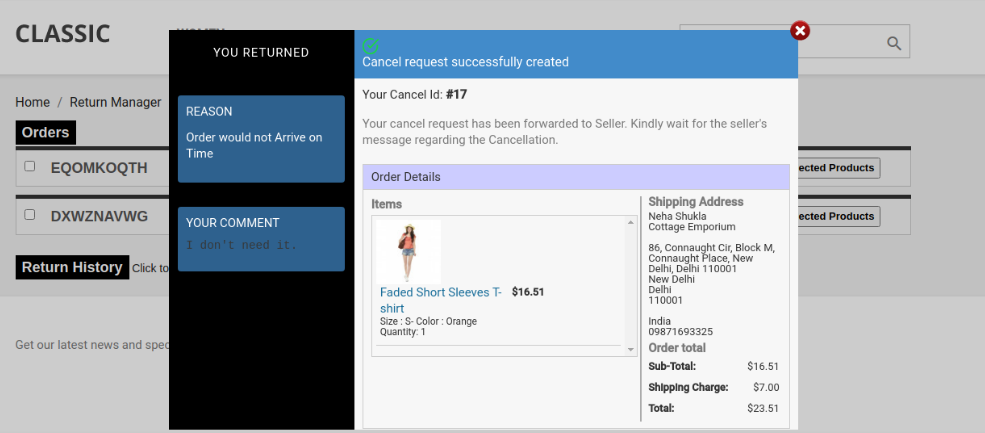
In the updated version of this Prestashop Order refund manager module, the online users can also cancel their order for a limited period. The online merchant can apply the related settings from the admin interface.
What is new in the version v3.0.8:
In the updated version,
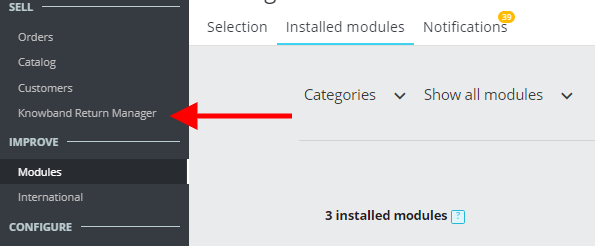
The Return Manager module allows the admin to use the module form the left menu of the Prestashop backend.
The admin can check the status of returns & cancellations at one place.
The admin can also a custom text explaining the order status or any other details in the return status email template.
The admin gets an option to select the order status from which he wants the return policy to apply for customers.
Return Manager module allows admin to send the test email before making the email live.
the Return Manager module allows the admin use the module form the left menu of the Prestashop backend.
The admin can check the status of returns & cancellations at one place.
The admin can also a custom text explaining the order status or any other details in the return status email template.
The admin gets an option to select the order status from which he wants the return policy to apply for customers.
Return Manager module allows admin to send the test email before making the email live.
1.1 Benefit of Merchant
This Prestashop return manager addon allows the admin to enable/disable the functionality as per the desires.
This Prestashop return manager Extension enables the admin to select the return method i.e. Credit, Refund, and Replacement.
The Admin can manage or change the credit return message, refund return message, and replacement return message from the admin interface of the Prestashop return manager Module.
ThisPrestashop order return manager Extension allows admin to customize the look and feel of the Return Manager link that shows the Front End.
Prestashop order return manager plugin gives the freedom to the merchant to manage the return slip settings. The store admin sets the return address or adds the return address and they can also change return guidelines that print on the return slip.
This Prestashop RMA enables admin to select the default return and refund policy and they can also add the new return policy.
This PrestaShop return product addon allows admin to set the return reason on the back-end and he/she also adds the new return reason.
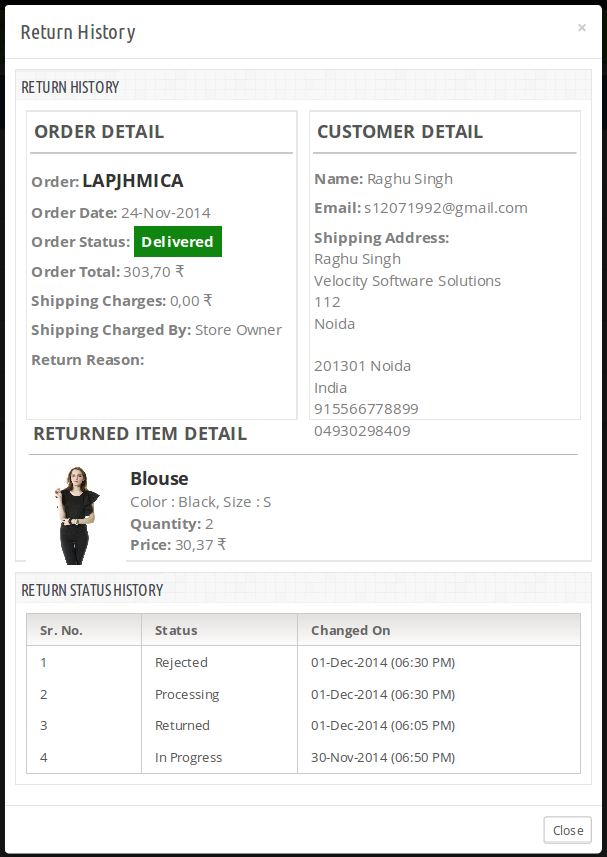
The Store admin can change the return status of the online customer from the back-end.
It generates a return request from the back-end and the admin can find any order by simply providing the reference number and the corresponding email and then apply for a return accordingly.
The Prestashop store admin can customize the email templates accordingly with the help of the Prestashop order refund addon.
Prestashop order return manager Addon allows the merchant to view all the pending returns and refunds of the buyers.
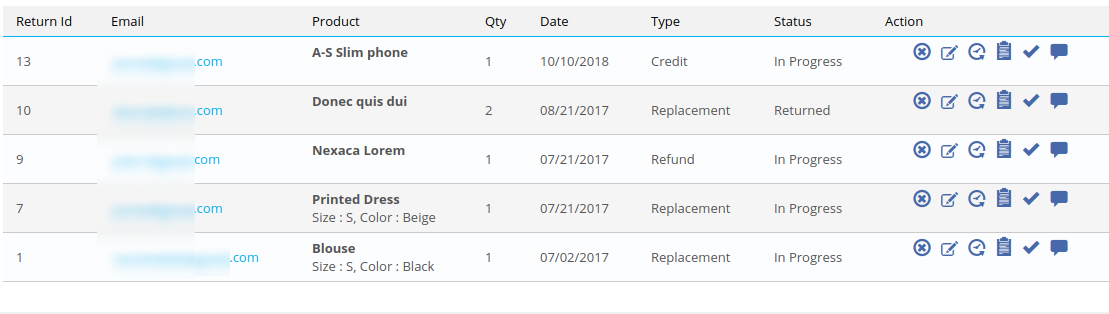
The Prestashop Return Manager plugin enables the admin to view the active return list.
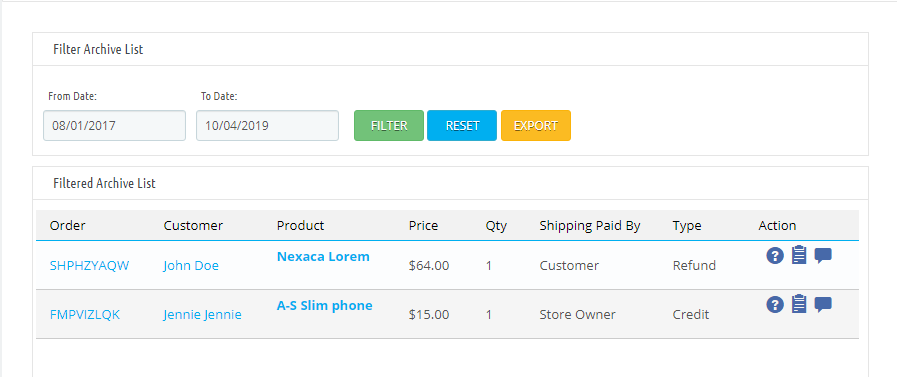
The Admin can set filter the archives list and view all return requests that are complete.
Customers can inquire about the status of their actions return requests. They also get an option to cancel that request.
Prestashop order return manager Addon allows customers to return their order for the selected order status.
Prestashop return manager extension allows you to set minimum and maximum days for each type “Credit/Refund/Replacement” within a return policy.
It is easy to update the pending and active return requests list by clicking the Refresh button provided at the Prestashop refund order Extension admin interface.
When the active return requests are marked completed, the inventory is automatically completed.
You can generate and send the discount voucher to the customers for submitting a refund request.
Admin can also include custom CSS and JS code from the admin interface of Return Manager for Prestashop.
The online store merchant can allow the online users to select the products which he/she wants in replacement.
The online merchant can allow the users to return the whole order by selecting products.
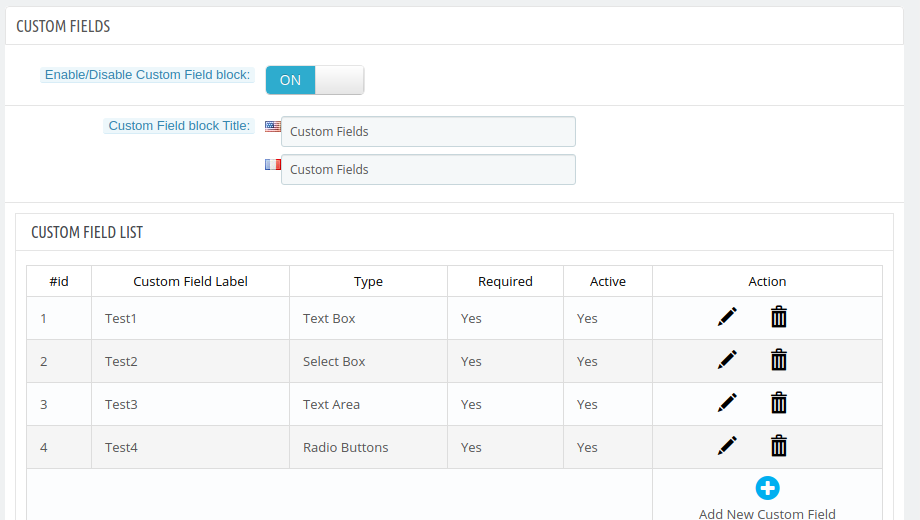
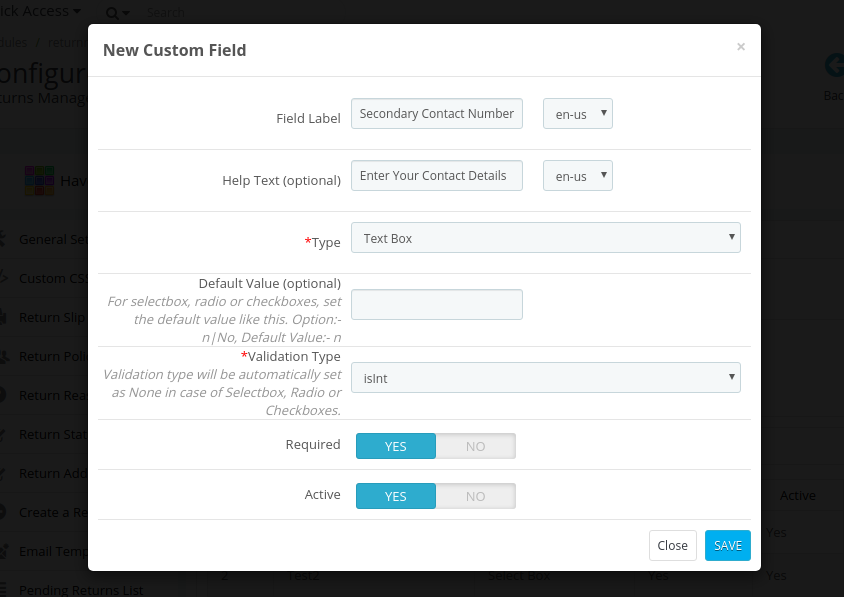
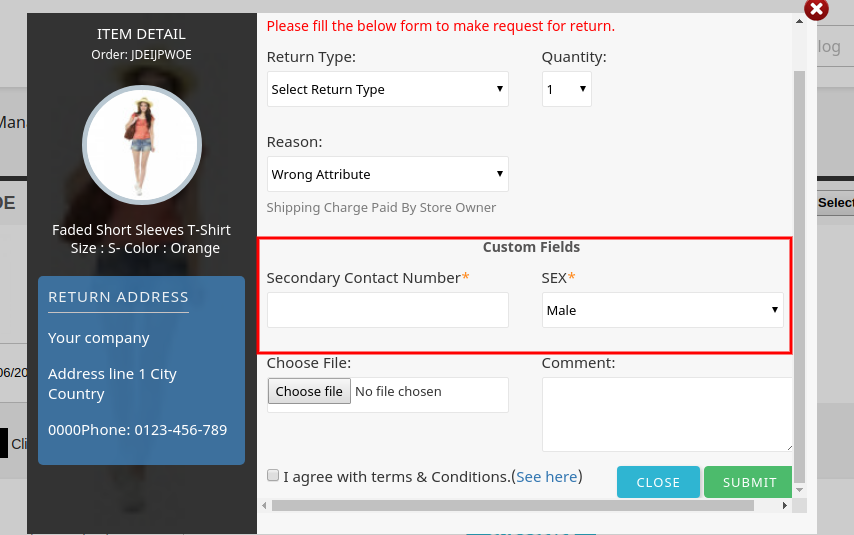
This Prestashop return manager module allows the store merchant to set custom fields from the admin interface.
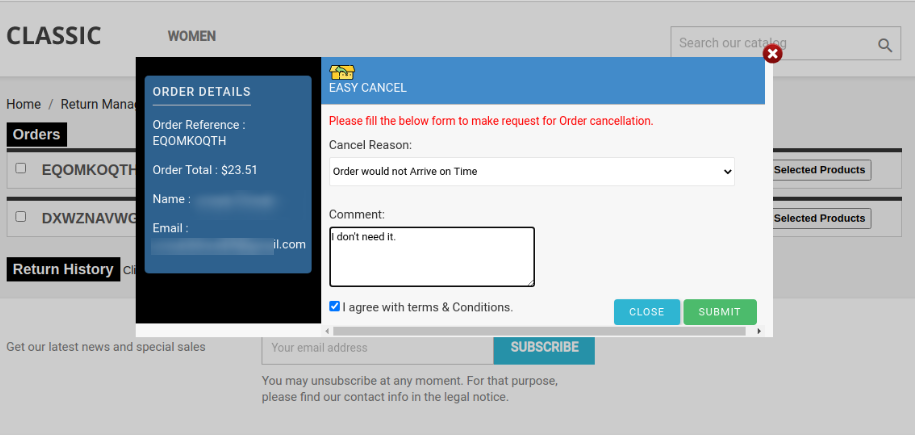
Admin can now allow the online users to send order cancellation requests from the website front-end interface.
The Prestashop Return Manager Module allows the admin to set up the order status on which the users can cancel their orders.
Note: Prestashop Return Manager Addon is now compliant with the GDPR. We have integrated the GDPR hooks on our return manager module. Please refer to the General Settings to know more about the GDPR.
2.0 Installation Guide
To install this Prestashop Return Manager Addon, please follow the following steps:
1. Copy the whole folder named as “return manager” into your modules folder of the root directory of your PrestaShop store through FTP.
2. You will be able to find the Prestashop return manager extension ready to be installed in the “Modules” in your PrestaShop store as shown below.
For version 1.6 – For version 1.7 –
Click on the Install link to install the Prestashop return manager addon.
2.1 Module Implementation
The Prestashop Return Manager Addon implementation will have two sections:
1- Admin Module 2- Front-End Module
3.0 Admin Module
In the admin module, there will be the following options to configure this Prestashop replacement manager Addon. The Prestashop replacement manager Module includes 18 tabs and they are as follows.
Return Manager Prestashop extension allows admin to check the status of all return and cancellation requests at a single click.
Easy Navigation: The admin can access the module from the left menu of the Prestashop backend easily.
The Prestashop return manager addon will provide the following interface:
General Settings
Custom CSS/JS
Return Slip Settings
Return Policies
Return Reasons
Cancel Reasons
Return Statuses
Return Address
Create a Return
Email Templates
Pending Order Cancel List
Complete Order Cancel
Pending Return List
Active Returns List
Canceled Returns List
Archives List
Custom Fields
Other Plugins
Each tab contains some specific settings/functionality that can be changed according to the need. Each tab of this Prestashop Return Manager Addon explained below.
3.1 General Settings
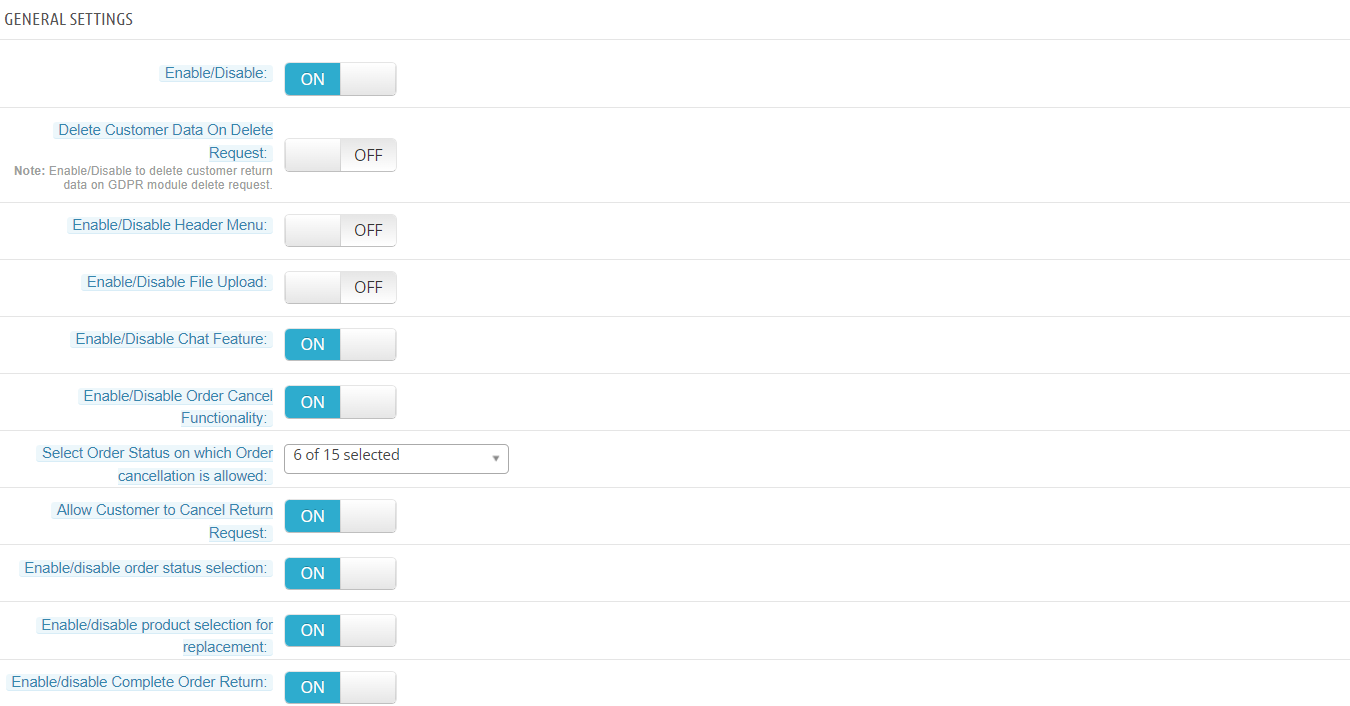
After clicking on the configure link on the Prestashop replacement manager Module listing page (configure link will automatically appear once you install the plugin), the system will open general settings tabs by default.
This tab will be having the following options to configure the Prestashop replacement manager Module.
Initially, fields in the above form will be already filled with their default values.
Enable/Disable: Initially, this Prestashop order return addon general settings will be “OFF”. The Online store admin can enable/disable this Prestashop order refund extension by turning ON/OFF in this setting.
Delete Customer Data on Delete Request: This feature allows the store admin to delete the customer data from the back-office. The module deletes the subscriber details automatically. If you are using the official GDPR module then you must need to enable this setting. The main purpose of this feature is to export and deletes user data on the PrestaShop GDPR module request. The Customer Data will be deleted on if this setting is ON. Note: It is also compatible with our Prestashop GDPR Module.
Enable / Disable Header Menu: When the field is enabled, the Return tab will be available in the store’s header through which placed orders can be returned.
Enable/Disable File Upload: In this tab, the admin can enable/disable the File Upload option button. This option allows the customer to upload the return product image.
Enable/Disable Chat Feature: This option enables or disables the ticket system for your store. If this feature is enabled, customers can raise a ticket and chat regarding their return requests.
Enable/disable Order Cancel Functionality: Activate or deactivate the functionality of order cancellation.
Select Order Status on which Order cancellation is allowed: Select the order status on which you want to allow order cancellation.
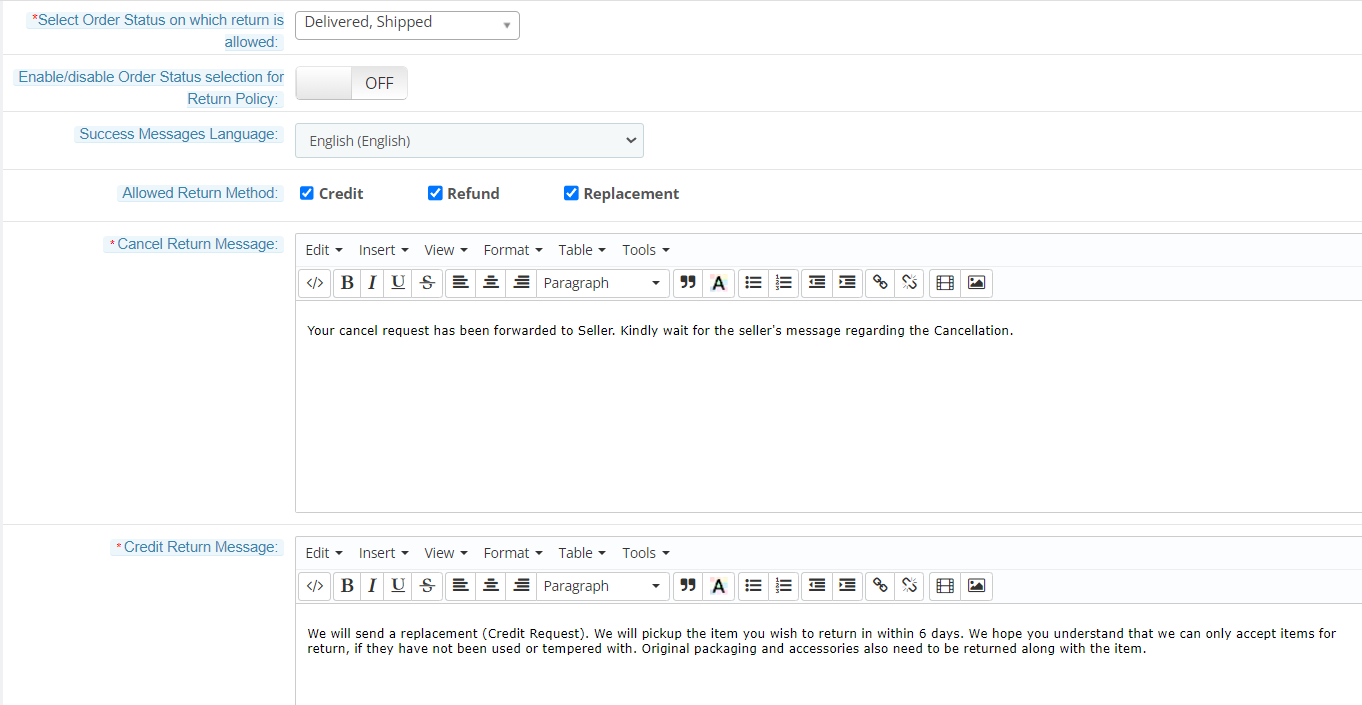
Enable/disable Order Status selection for Return Policy: Return Manager module Admin can set order status after reaching which the return policy will be considered. Once this feature is enabled then the admin can select the Order Status from which Return policies are applicable.
Allow Customer to Cancel Return Request: This option allows or disallows the customer to cancel their return request. if this option is enabled, the customer can cancel their return request.
Enable/Disable Order Status Selection: This functionality lets you enable or disable product returns on selected order status.
Enable disable product selection for replacement: The merchant can allow the online users to select the products which they want in replacement.
Enable Disable complete order return: Customers can return the whole order if they wish to do so. Admin can activate or deactivate the complete order return facility from the admin interface of the Prestashop order return manager Module. Users can select the products which he wants to return.
Select Order Status on which Order Return is Allowed: With this option, admin can set the specific order status on which they want to allow returns on the store.
Enable/disable Order Status selection for the Return Policy: When the field is enabled the user can select the order status on which the Return Policy will be applicable.
Success Messages Language: This drop-down contains all the languages available and enabled in the system, to save the success messages in a different language you have to choose the desired language from this dropdown. The success messages will be saved for the selected language when you submit the form.
Allowed Return Method: This option allows the admin to select the return method which they want to offer.
Order Cancellation Message: Here, the admin can set the message for display to the users after creating order cancel request.
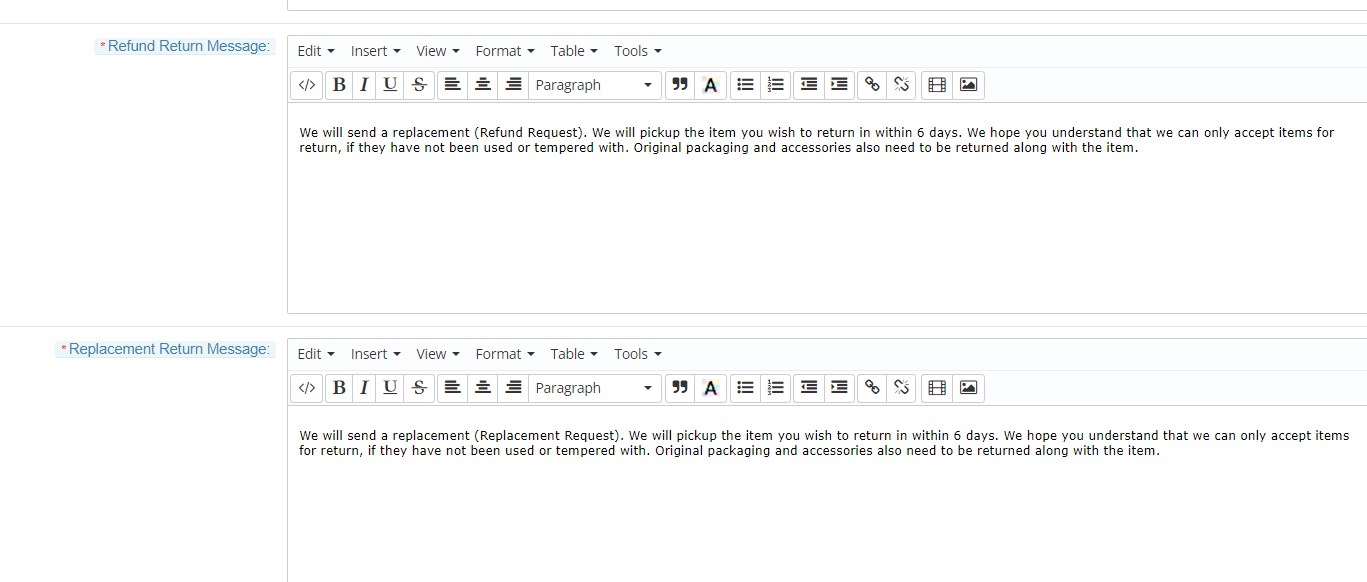
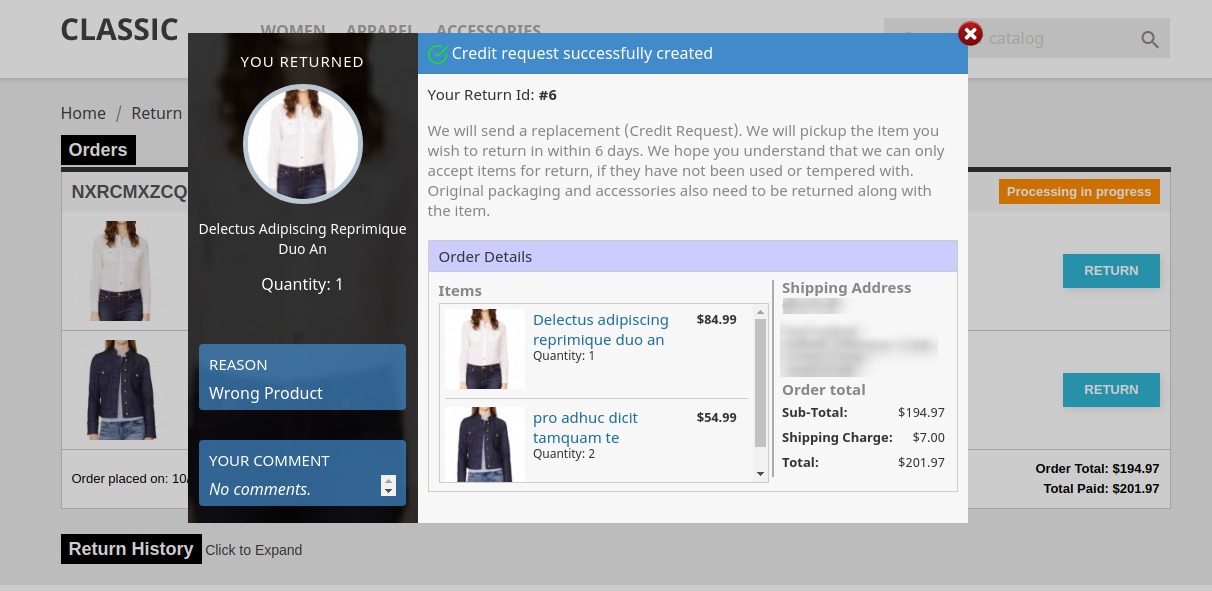
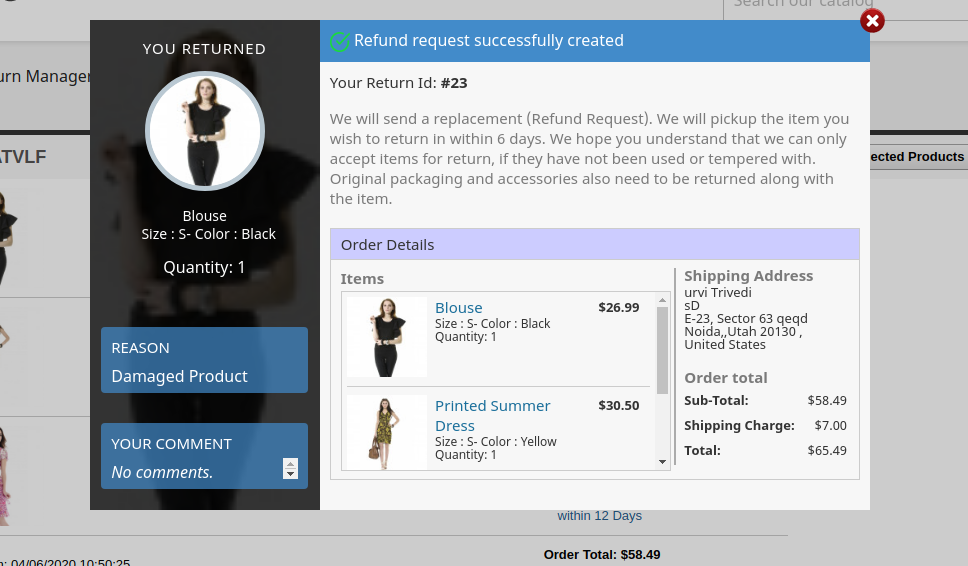
Credit Return Message: It allows the admin to change the text as well as the format (HTML Design) of the text that will be displayed on the successful submission of a return request (Credit Type) by any customer.
Refund Return Message: This option enables the admin to change the text as well as the format (HTML Design) of the text that will be displayed on the successful submission of a return request (Refund Type) by any customer.
Replacement Return Message: This Prestashop return manager addon enables the admin to change the text as well as the format (HTML Design) of the text that will be displayed on the successful submission of a return request (Replacement Type) by any customer.
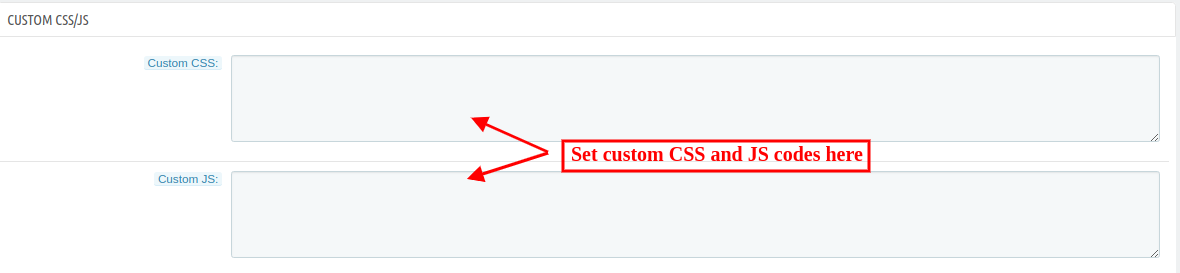
3.2 Custom CSS and JS
Add CSS Code: With this option, you can add additional CSS code.
Add JS Code: With this option, you can add additional JS code.
3.3 Return Slip Settings
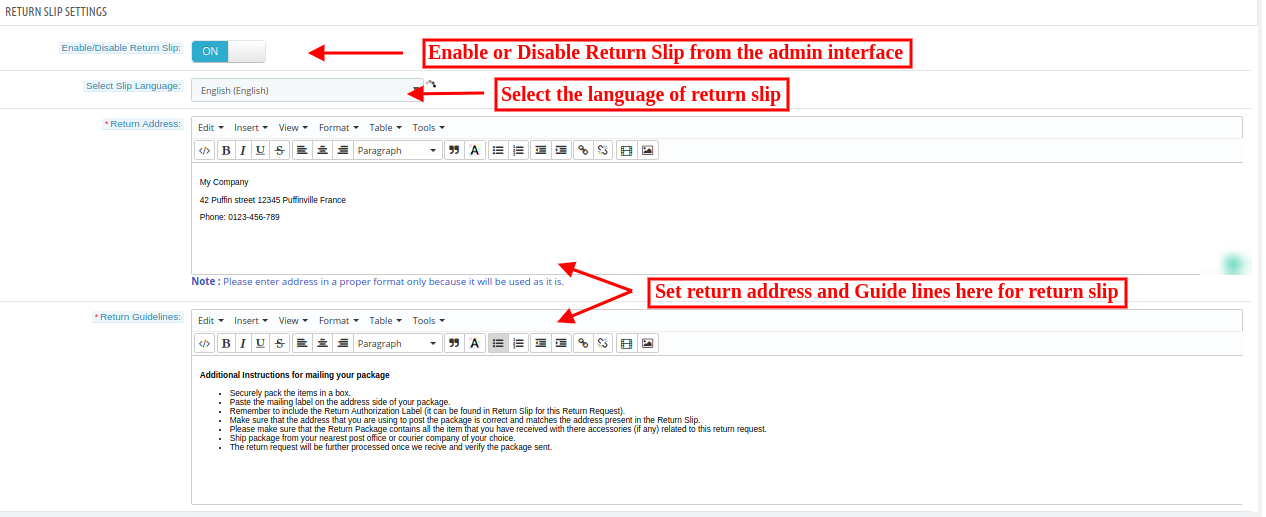
In this tab, the merchant can alter the settings and content of the Return Slip. This return slip is generated automatically when the admin approves any return request (if the feature is enabled). The return slip is generated in the ‘PDF’ format and is mailed to the customer in the mail for Return Request Approval Notification.
The Prestashop store admin needs to implement these settings:
Enable/Disable Return Slip: Initially, this will be “OFF”. Admin can enable/disable the Return Slip feature by turning ON/OFF in this setting. Return slips are only generated when the feature is turned ON.
Select Slip Language: This drop-down contains all the languages available and enabled in the system, to save the Return Slip content in a different language you have to choose the desired language from this dropdown. The content will be saved for the selected language when you submit the form.
Return Address: This address will be printed on the return slip and will also be displayed on the return request form.
Return Guidelines: These guidelines will be printed on the return slip.
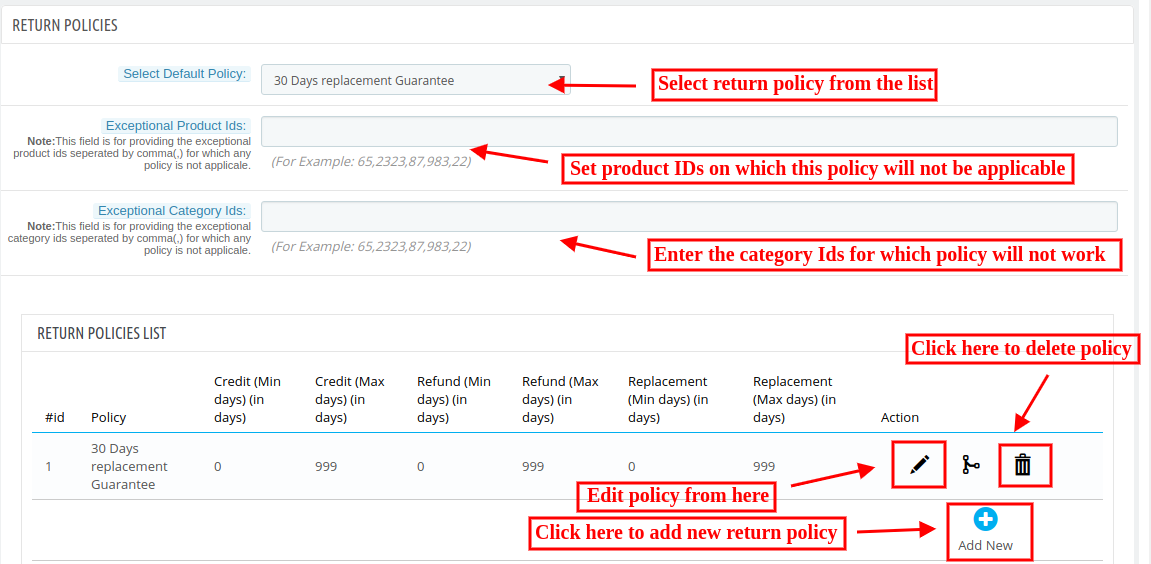
3.4 Return Policies
In this tab, the admin can add new return policies and can also edit or delete an existing return policy for the PrestaShop product return extension.
There is also an option to map the return policies to categories. A product is eligible for return only if it’s Default Category is mapped to a policy.
3.4.1 How to find the Default Policy of a product?
It allows the store admin to find the default policy. Following are the steps to find default policy of a product –
1. Go to Catalog > Products 2. Click on the “Edit” button of the desired product. 3. Click on the “Associations” tab.
The “Default Category” of the desired product will be displayed.
Note: One category can only be mapped with at-most one policy. But one policy can be mapped with more than one category.
This PS module provides an option to map the return policies to products.
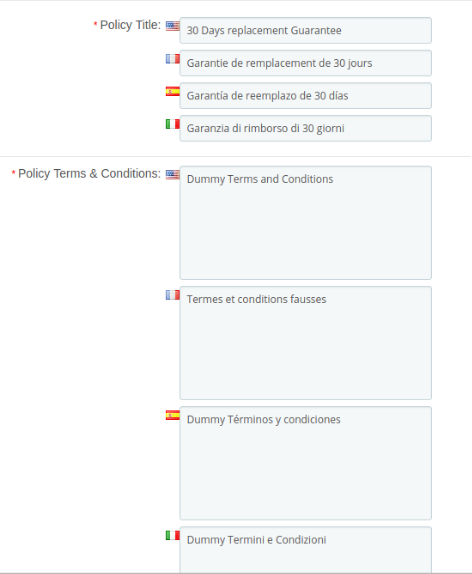
This tab contains a list of existing return policies for the Prestashop replacement manager Module. The admin can also create a new return policy using the Add New button at the bottom of the policies tab. After clicking on the add new button a pop-up appears containing the form to create the return policy.
3.4.2 How to add a new policy?
The Prestashop refund order Extension provides the store admin option to add the new return policy. Following are the steps to add a new policy –
1. Go to Module and Services > Search module “Return Manager” > Click on the “Configure” button. > “General Setting” tab will display.
2. Click on the “Return Policies” tab.
3. Click on the “Add New” button. A pop-up will display to add a new policy.
4. Fill all the mandatory fields and click on the “Save” button.
5. After the successful validation, the new policy would be added to the “Return Policies List” table.
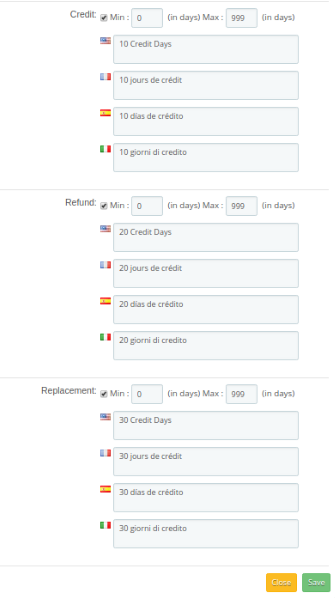
The form contains several input fields to enter the data of the policy like the name of the policy, validity, terms and condition of the policy and the option to choose the parameters i.e. Credit, Return and Replacement.
The admin can also enter the minimum and maximum days applicable to this return policy for different options as shown in the form below.
3.4.3 How to apply on policy for any product/category?
The Prestashop RMA extension allows the seller to apply policy for any product/category. Following are the steps to apply no policy for some product/category –
1. Go to Module and Services > Search module “Return Manager” > Click on the “Configure” button. > “General Setting” tab will display.
2. Click on the “Return Policies” tab.
3. Enter Product Id / Category Id at the field Exceptional Product Ids / Exceptional Category Ids respectively for which no policy would be applicable.
4. Click on the “Save” button.
3.4.4 How to edit a policy?
The Prestashop refund order Extension allows the eCommerce merchant to edit the already added policy. Following are the steps to edit a policy –
1. Go to Module and Services > Search module “Return Manager” > Click on the “Configure” button. > “General Setting” tab will display.
2. Click on the “Return Policies” tab.
3. Click on the “Edit” icon of the desired policy.
4. A pop-up will open with all the data already persist on the field as shown below.
5. Fill all the mandatory fields and click on the “Save” button.
Actions
1. The admin can edit any policy using the first link in the Action column from the policy listing table. On clicking this link a modal containing the form for the policy will appear and the data for that policy is already filled in the fields. The admin can edit any data and can save the changes made.
2. The second link in the actions column is for mapping categories to the policy. On clicking this link a modal will appear containing the options to map the categories to that particular policy.
3.4.5 How to map policy with categories?
The Prestashop RMA extension allows the admin to map. Following are the steps to map policy with categories –
1. Go to Module and Services > Search module “Return Manager” > Click on the “Configure” button. > “General Setting” tab will display.
2. Click on the “Return Policies” tab.
3. Click on the “map” icon of a particular policy.
4. A pop will display with a drop-down field to map this policy with the categories as shown below.
5. Click on the “Save” button.
Note: The policy for a particular product would be decided based on the “Default Category” of the product.
3. The third link in the Action column is for deleting any particular policy.
3.4.6 How to delete a policy?
The Prestashop product return manager module allows the eCommerce store merchant to delete the pre-defined. Following are the steps to delete a policy –
1. Go to Module and Services > Search module “Return Manager” > Click on the “Configure” button. > “General Setting” tab will display.
2. Click on the “Return Policies” tab.
3. Click on the “Delete” icon for the policy you want to delete.
4. Confirm by clicking on the “OK” button.
3.5 Return Reasons
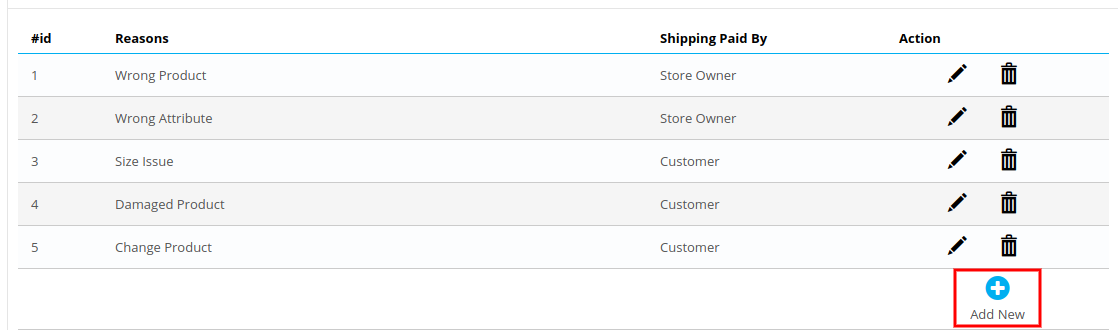
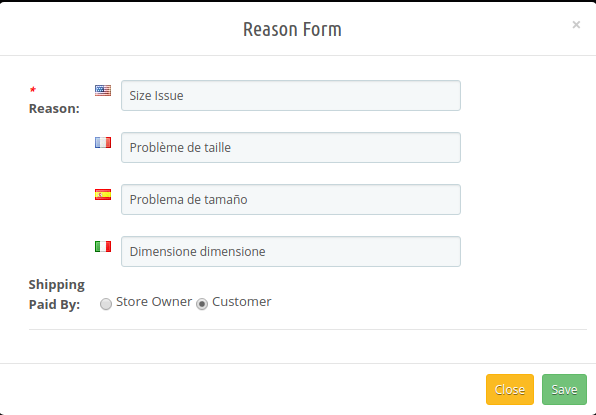
In this tab, a list of return reasons will appear in the form of a table. By default, there are 5 reasons already added into the Prestashop RMA and they are non-editable. The admin can further add any numbers of reasons into the Prestashop return manager addon.
The two links below the action column in the reasons list are for editing and deleting the existing return reasons.
3.5.1 How to add a new Return Reason?
The Prestashop return manager addon allows the store admin to add and edit the new return reason. Following are the steps to add a return reason –
1. Go to Module and Services > Search module “Return Manager” > Click on the “Configure” button. > “General Setting” tab will display.
2. Click on the “Return Reasons” tab.
3. Click on the “Add New” button. A pop-up will display to add a new Return Reason.
4. Fill all the mandatory fields and click on the “Save” button.
5. After the successful validation, the new return reason would be added to the “Return Reasons List” table.
The admin can add as many reasons as required to the system using the ‘Add New’ link at the bottom of the listing tab. On clicking on the link a form will appear to add new Return Reason into the Prestashop Order Refund Extension. The form is shown below:
3.5.2 How to edit a Return Reason?
The Prestashop return manager addon allows the store admin to edit the return reason. Following are the steps to edit a return reason –
1. Go to Module and Services > Search module “Return Manager” > Click on the “Configure” button. > “General Setting” tab will display.
2. Click on the “Return Reasons” tab.
3. Click on the “Edit” icon of the desired reason.
4. A pop-up will open with data already persist in the field.
5. Fill the mandatory fields and click on the “Save” button.
3.5.3 How to delete a Return Reason?
The Prestashop return manager module allows the store admin to delete the already added return reason. Following are the steps to delete a return reason –
1. Go to Module and Services > Search module “Return Manager” > Click on the “Configure” button. > “General Setting” tab will display.
2. Click on the “Return Reasons” tab.
3. Click on the “Delete” icon of the return reason you want to delete.
4. Confirm by clicking on the “OK” button.
3.6 Cancel Reasons
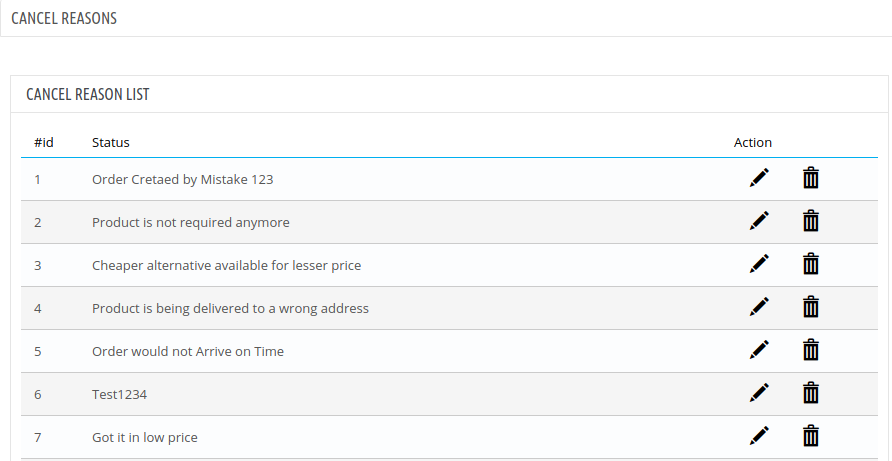
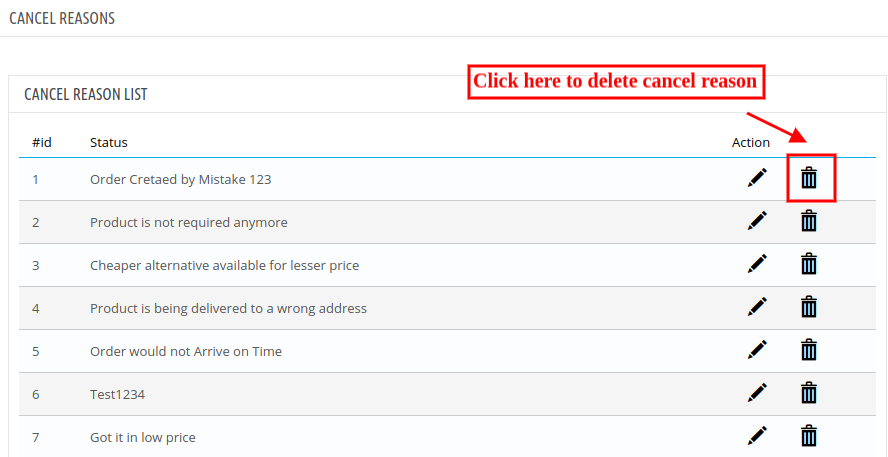
The online merchant can list the reasons for order cancellation. The online users can choose from these listed reasons while creating an order cancellation request.
Admin can add, delete and edit any cancel reason from the admin interface of this Prestashop Return Manager Module.
3.6.1 Steps for adding new cancel reasons:
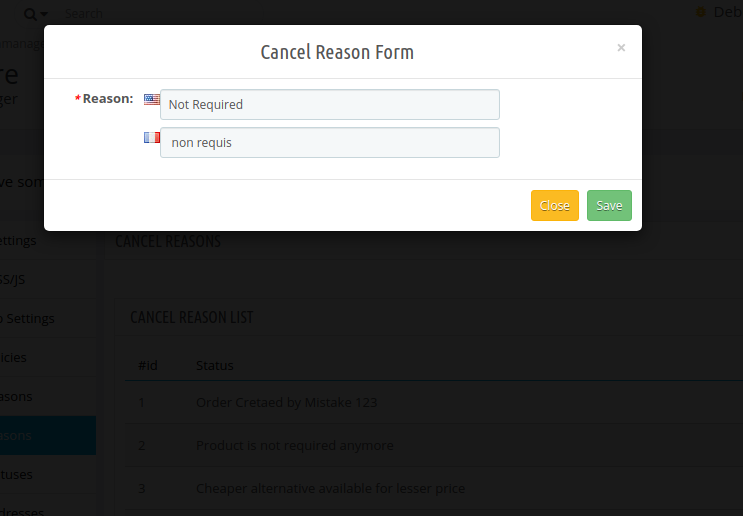
Admin needs to click on add new button and enter the reasons in different languages. Please check the below screenshot:
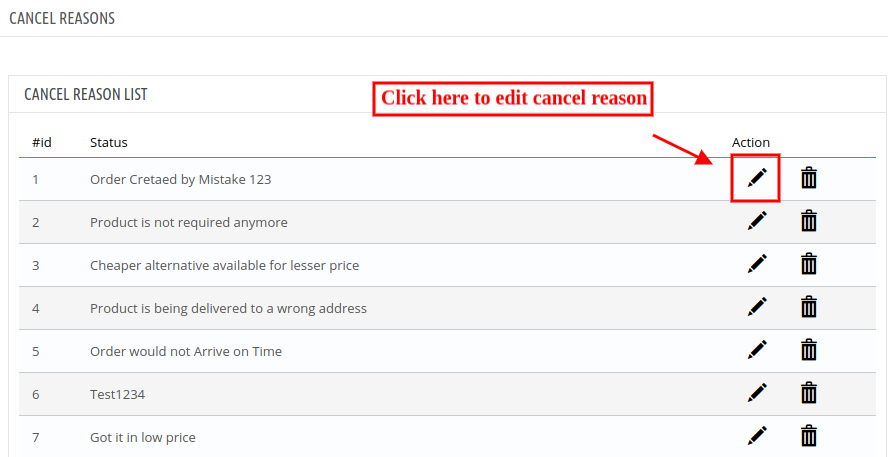
3.6.2 Steps for editing any cancel reason:
Admin needs to click on edit option and change the reason. After that, he can save it. Check the screenshot:
3.6.3 Steps for Deleting cancel reason:
Admin needs to click on the delete icon and in the message box click on ok button. Check the below screenshot:
3.7 Return Statuses
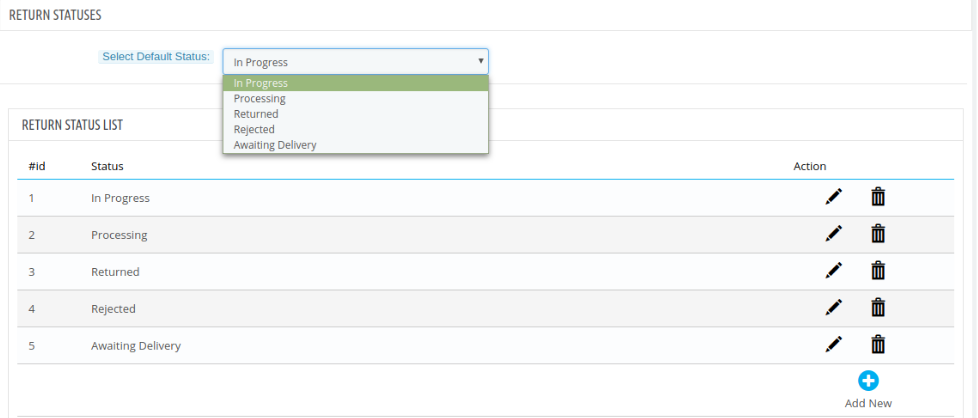
This tab contains a list of return statuses in the form of a table. By default, there are 5 statuses already added to the Prestashop return manager addon and they are non-editable. The admin can further add any numbers of statuses into the system. The tab also contains an option to choose default and the final status of any return request.
The two links below the action column in the statuses list are for editing and deleting the existing return statuses.
The admin can also change the default return status and final return status from the drop-downs in this tab.
3.7.1 How to add a new Return Status?
The Prestashop return manager addon allows the store admin to add the new return status. Following are the steps to add new return status –
1. Go to Module and Services > Search module “Return Manager” > Click on the “Configure” button. > “General Setting” tab will display.
2. Click on the “Return Statuses” tab.
3. Click on the “Add New” button. A pop-up will display to add a new Return Status.
4. Fill all the mandatory fields and click on the “Save” button.
5. After the successful validation, the new return status would be added to the “Return Reasons List” table.
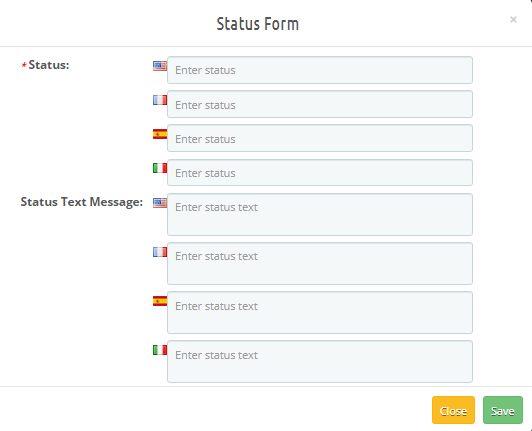
The admin can add as many statuses as required to the system using the ‘Add New’ link at the bottom of the listing tab. On clicking on the link a form will appear in a modal to add new Return Reason into the system. The form is shown below:
6.While adding the new return status admin can also add a status message explaining the meaning of that particular return status which he can highlight in the return status email as a Custom Text using placeholders.
3.7.2 How to edit a Return Status?
The Prestashop product return manager addon allows the store admin to edit the return status. Following are the steps to edit return status –
1. Go to Module and Services > Search module “Return Manager” > Click on the “Configure” button. > “General Setting” tab will display.
2. Click on the “Return Statuses” tab.
3. Click on the “Edit” icon of the desired return status.
4. A pop-up will open with data already persist in the field.
5. Fill the mandatory fields and click on the “Save” button.
3.7.3 How to delete a Return Reason?
The Prestashop RMA module allows the store admin to delete the return reason. Following are the steps to delete return status –
1. Go to Module and Services > Search module “Return Manager” > Click on the “Configure” button. > “General Setting” tab will display.
2. Click on the “Return Statuses” tab.
3. Click on the “Delete” icon of the return status you want to delete.
4. Confirm by clicking on the “OK” button
3.8 Return Addresses
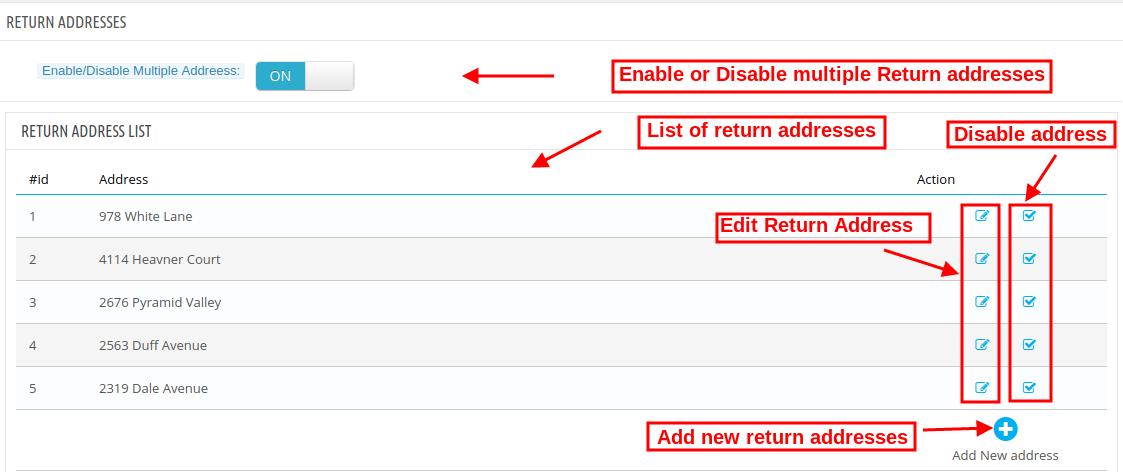
The online merchant can add, delete and modify return address from the admin interface of this Return manager module. The admin can view a list of added addresses and also modify it or disable it anytime.
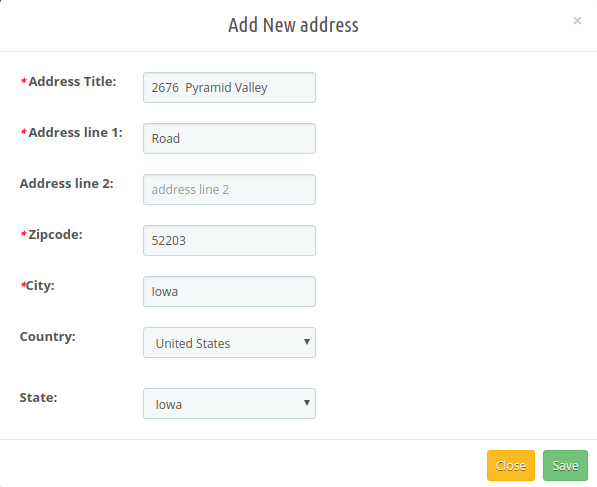
Admin can add a new address by clicking on the “+” sign. After that, the admin needs to add address details like area, zip code, city, country and state.
The online merchant can easily edit and disable the generated address without any hassle.
3.9 Create a Return
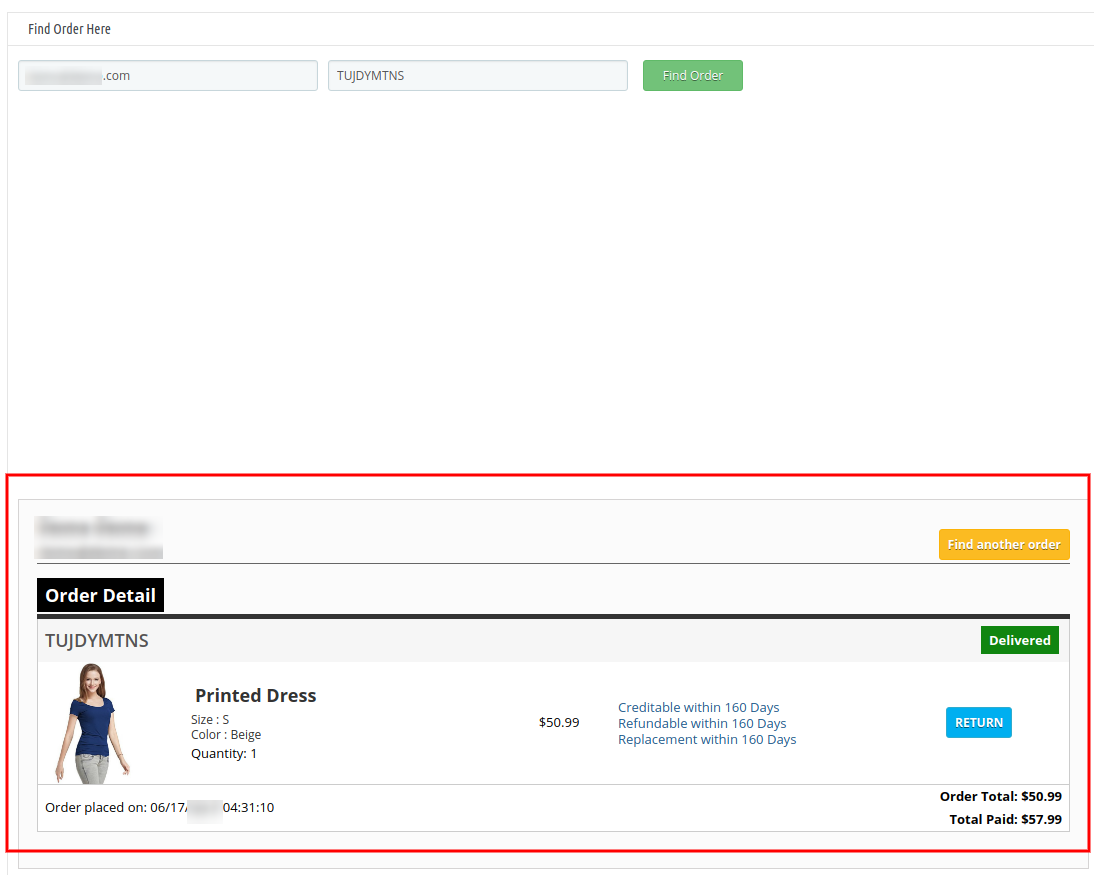
This tab is used to generate a return request from the admin panel itself. The tab contains a form through which the admin can find any order by simply providing the reference number and the corresponding e-mail and then apply for return accordingly.
3.9.1 How to Create a Return?
The Prestashop product return manager addon allows the store admin to create the return. Following are the steps to create a return –
Go to Module and Services > Search module “Return Manager” > Click on the “Configure” button. > “General Setting” tab will display.
Click on the“Create a Return” tab.
Enter Email Id of the customer and the Reference Id of the order.
Order Details will be displayed in that particular order as shown below.
Click on “Return Button” for the desired product. A pop up will be displayed to completed the return process.
Filled all the mandatory fields and agree to Terms and Conditions.
Click on the “Submit” button. The return request would be sent and order details would be added in “Pending Returns List” tab
Note:
Any return request whether it is created by admin or customer is moved to the pending returns and the admin has to approve it first to further change the status of the return request or to take any further action.
The orders that are delivered are only eligible for return.
By default, the status of the return request is set to default return status set by the admin in the ‘Return Statuses’ tab.
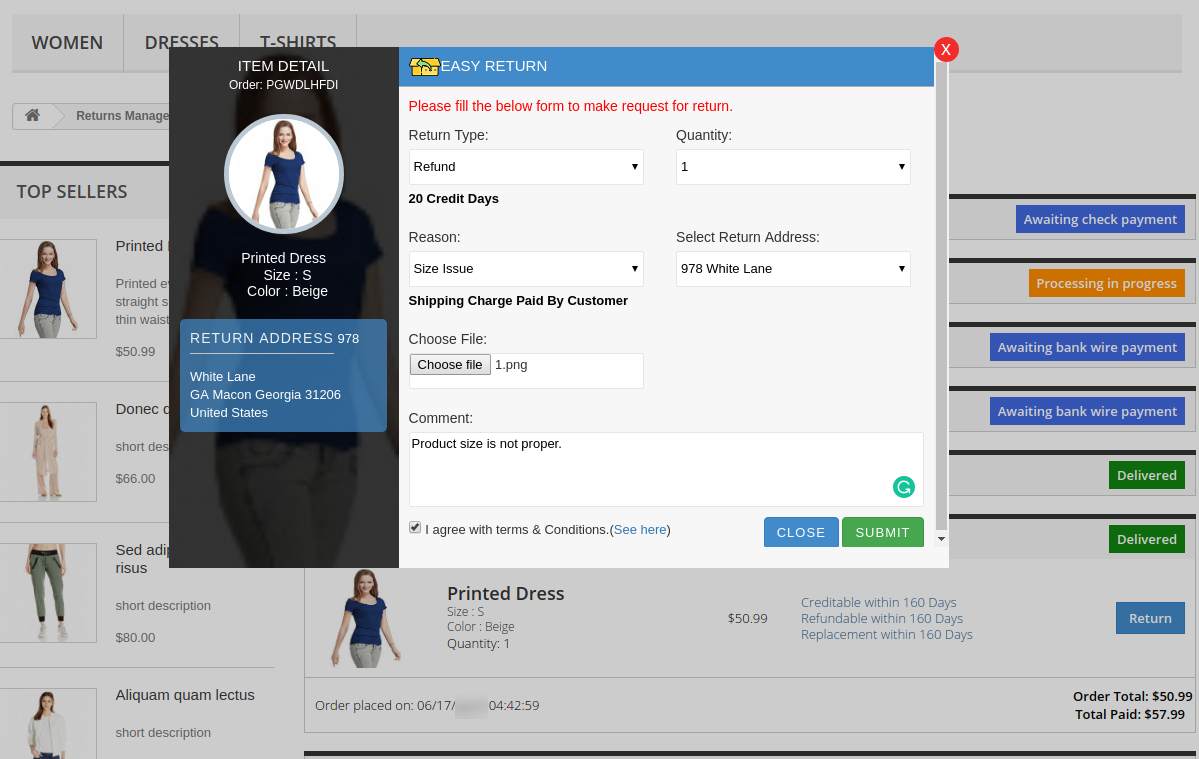
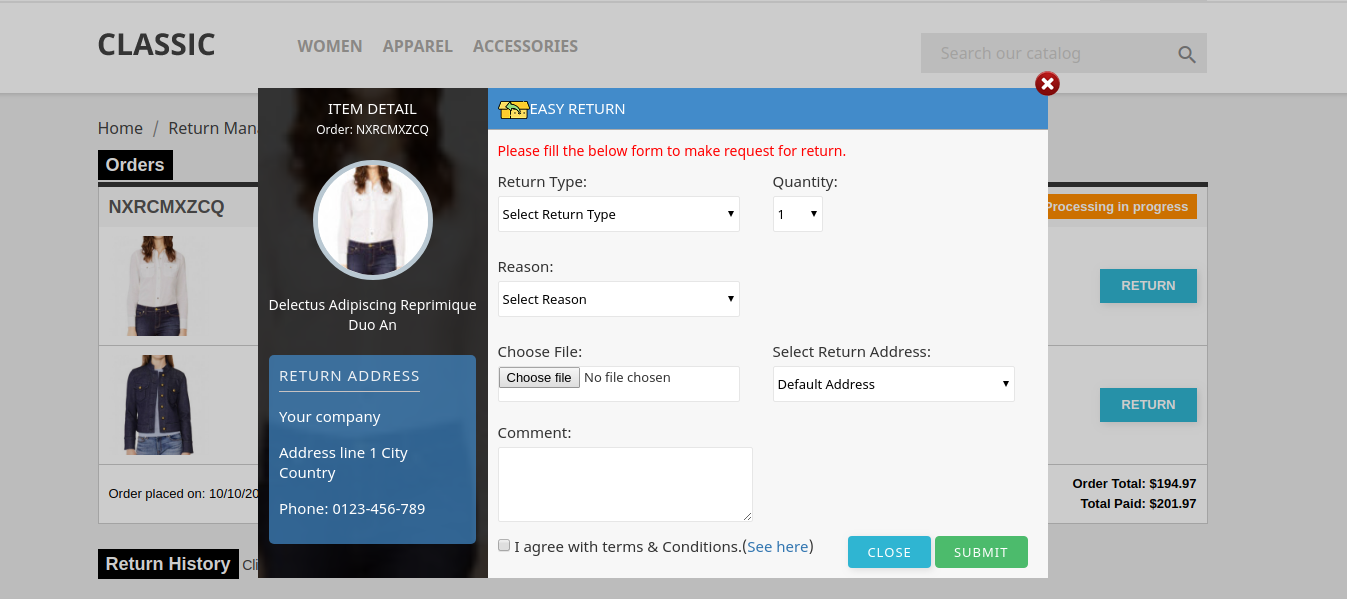
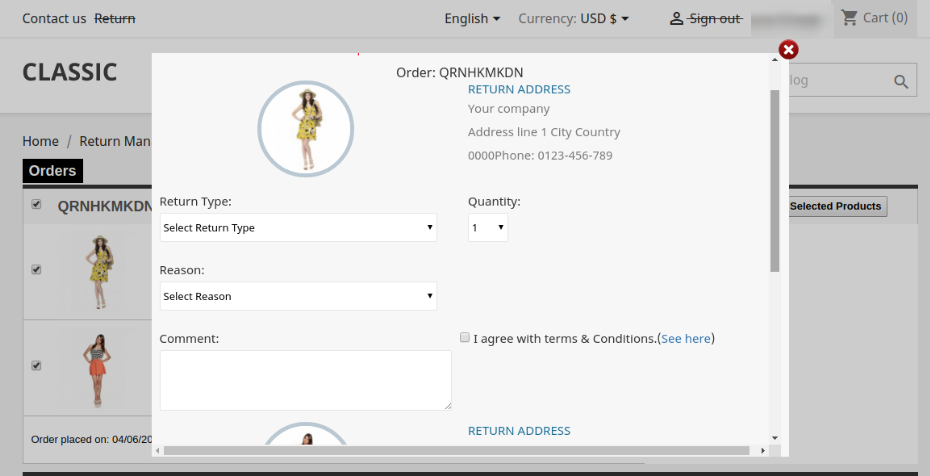
When the admin finds an order using the find order form then the order detail for the respective order will appear containing the list of products and a return button in front of products eligible for return. When the admin clicks on the return button a pop-up will appear containing the return form and enter specific data for the return request. Admin can fill the form for generating a return request on behalf of users.
3.10 Email Templates
This tab contains an interface through which the admin can edit or translate (to any language) any email template that is used in this system.
3.10.1 How to edit an Email Template?
The Prestashop order return manager Addon allows the store admin to edit the email template. Following are the steps to edit an email template –
1. Go to Module and Services > Search module “Return Manager” > Click on the “Configure” button. > “General Setting” tab will display.
2. Click on the “Email Templates” tab.
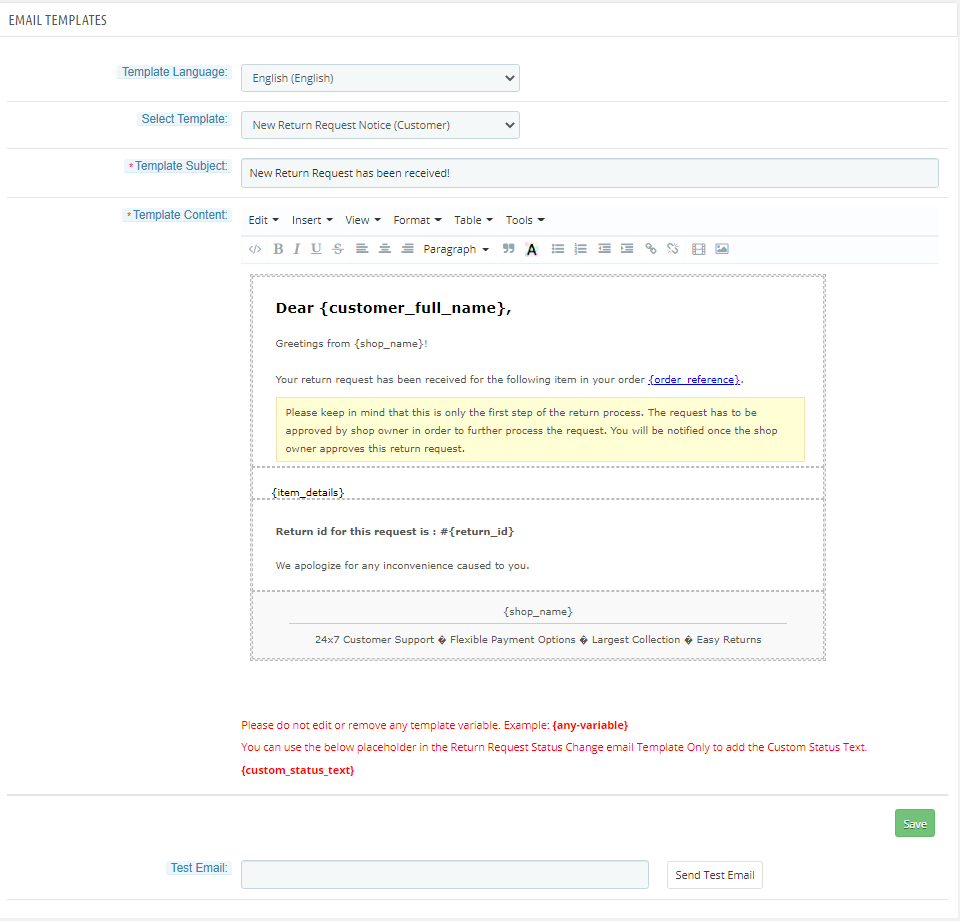
3. Select the desired template you want to edit.
4. Fill all the mandatory fields, apply the desired change and click on the Save button at the bottom of the form.
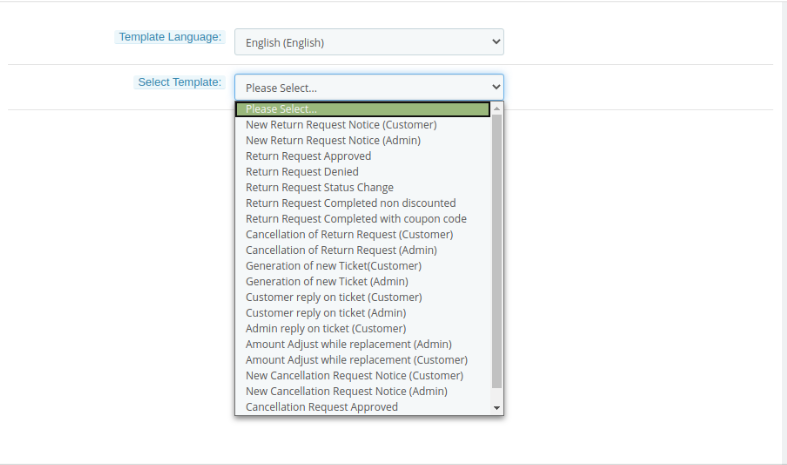
There are 20 email templates available that are used by this Prestashop return manager Addon:
New Return Request Notice (Customer): This mail template is used to notify the customer regarding the new Return Request generated by the customer itself. The customer who has created the return request will only receive this mail.
New Return Request Notice (Admin): This mail template is used to notify the Store Owner regarding the new Return Request generated by any customer.
Return Request Approved: This mail template is used to notify the customer regarding the Approval of the Return Request that is created by the customer earlier.
Return Request Denied: This mail template is used to notify the customer regarding the Dis-Approval of the Return Request that is created by the customer earlier.
Return Request Status Change: This mail template is used to notify the customer regarding the update in the status of the Return Request that is created by the customer earlier.
Return Request Completed non-discounted: This mail template is used to notify the customer regarding the completion of the Return Request that is created by the customer earlier.
Return Request Completed with coupon code: In this mail template, the customers will get return request completion information along with the coupon code.
Cancellation of return request(Customer): This email template will be used to notify customers regarding return request cancellation done by them.
Cancellation of return request(Admin): This email template will notify the store admin regarding return request cancellation.
Generation of New Ticket(Customer): When the customer generates any new ticket, this email template will be used for sending emails regarding this ticket generation.
Generation of New Ticket(Admin): Whenever customers generate a new ticket, this email template will be used to notify the store admin regarding ticket generation.
Customer Reply on Ticket(Customer): Customers will get an email notification when they reply on any ticket.
Customer Reply on Ticket(Admin): Admin will get the notification on customers to reply to the ticket.
Admin Reply on Ticket(Customer): Customers will get a notification on the admin’s reply on tickets.
Amount Adjust while replacement(Admin): Admin will get notification regarding Amount Adjust while replacement.
Amount Adjust while replacement(Customer): Customers will get notification regarding Amount Adjust while replacement.
New Cancellation Request Notice(Customer): Customers will get notification regarding their cancellation request.
New Cancellation Request Notice(Admin): Admin will get notification regarding the new cancellation request.
Cancellation Request Approved: Notification regarding approval of cancellation request.
Cancellation Request Declined: Notification regarding rejection of cancellation request.
To edit or translate any email template the admin has to choose the desired email template and language. On doing the same the email template data will appear in a form below, to save the changes made the admin has to click on the ‘Save’ button at the bottom.
Admin can send the test email while setting up the template before making it live.
Admin can add a custom text using placeholders in the return status emails.
3.11 Pending Order Cancel List
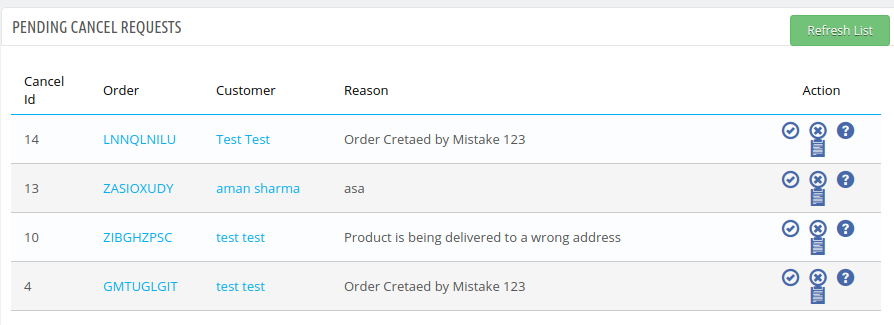
Admin can view the order cancellation requests which are pending. Admin can approve or decline the request from here. Admin can also refresh the list and check new cancellation requests.
3.12 Complete Order Cancel
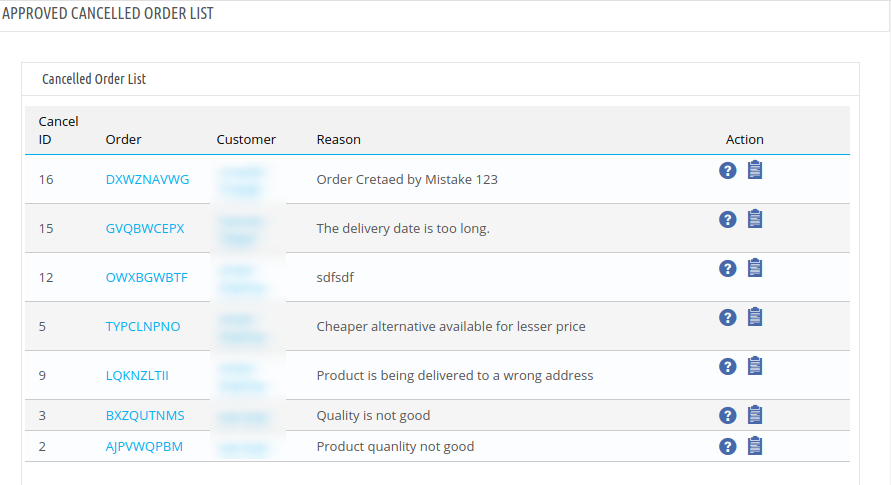
Here, the admin can view the approved canceller orders and also check the customer notes if available.
3.13 Pending Returns List
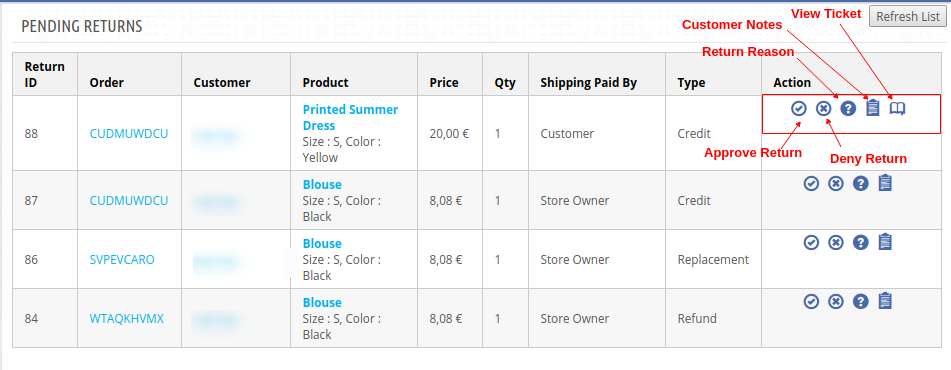
This tab contains a list of all the returns that are pending i.e. are not approved by the admin. The admin has to approve a return request to perform several operations on the return request like changing the status and completing the return process.
3.13.1 How to approve a return request?
The Prestashop product return manager addon allows the store admin to edit the return request. Following are the steps to approve a return request –
1. Go to Module andServices > Search module “Return Manager” > Click on the “Configure” button. > “General Setting” tab will display.
2. Click on the “Pending Returns List” tab.
3. Click on the tick button.
3.13.2 How to deny a return request?
The Prestashop RMA manager module allows the Prestashop store merchant to deny the return request. Following are the steps to deny a return request –
1. Go to Module and Services > Search module “Return Manager” > Click on the “Configure” button. > “General Setting” tab will display.
2. Click on the “Pending Returns List” tab.
3. Click on the cross button.
You will find the “Refresh List” button which fetches and updates all the pending return requests.
The admin can approve or deny a return request using the actions available in front of the list.
Once the admin approves a return request then it is moved to the Active Returns List.
On the other hand, if the admin denies a return request that it is removed from the list and this action can not be undone.
The admin can view the detail of the product, the details of the order and also the details of the customer by clicking on the respective links from the list of the pending return.
Admin can view the reason corresponding to a return request.
They can view extra product return notes if provided by the customer.
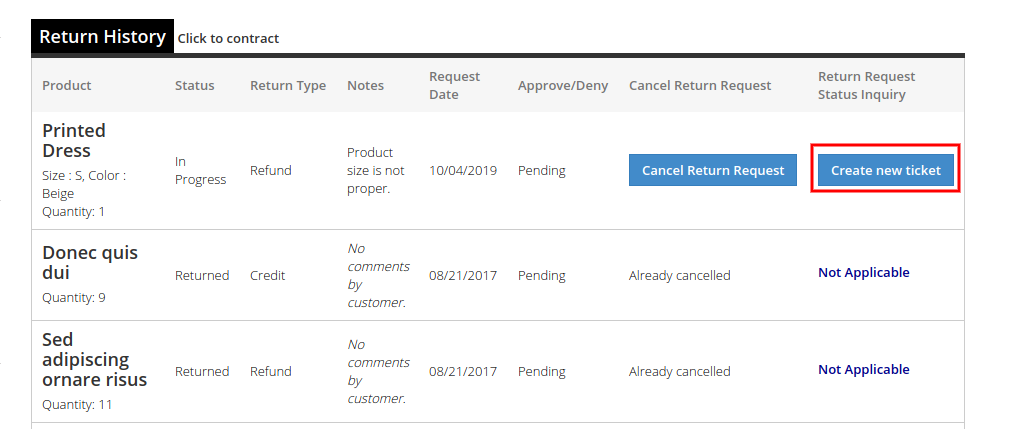
If the ticket system is enabled, customers can raise a ticket from the return section of their account. Corresponding to the order return request, admin can view the ticket as shown below:
3.14 Active Returns List
This tab contains a list of all the returns that are approved by the admin. The admin can proceed with the return process after approving the return request using this tab. The admin can view the return status history, change the status of the return request, and can also deny a request from this tab as well.
You will find the “Refresh List” button which fetches and updates all the active return requests.
The actions that can be performed from this tab for the active returns are:
Deny the return request.
Change the status of the return request.
View history of the return request.
View customer comments.
Mark the return request as complete.
View the ticket information
When the admin marks a return request as complete then it is moved to the archives list.
When the admin clicks on the view history link in front of the return from the active returns list then a modal will appear containing the details of the order and the return status history for that return request. The modal is as follows:
3.14.1 How to change return status?
The Prestashop return manager extension allows the store admin to change the return status. Following are the steps to change return status –
1. Go to Module and Services > Search module “Return Manager” > Click on the “Configure” button. > “General Setting” tab will display.
2. Click on the “Active Returns List” tab. A pop up will display with the field to change the status.
3. Change the status and click on the “Save” button
3.15 Canceled Return List
Customers can cancel their placed return requests from their account section. The information about those canceled requests can be checked under this section.
3.16 Archives List
This tab contains all the return requests that are complete. The tab also contains a form through which the admin can filter the archives list and can also export the list of completed return requests based on certain filters to a CSV file.
3.17 Custom Field
In the updated version, the online store merchant can also create custom fields from the admin interface. They can add, update and delete custom fields.
The online merchant can click on add new custom fields for creating new custom fields. After clicking on this, the admin will get these options as shown below:
The online merchant can enter these details and create a field as shown below:
Field Label: Enter Field Label in multiple languages.
Help Text: Set Help text in various languages.
Type: Select from available field type. Admin can select from the text box, select box, text area, radio buttons and checkboxes.
Default Value: Enter the default value here.
Validation Type: Select from available validation type. Admin can set none validation type, isint, isname and isemail validation type.
Required: Admin can set any field as required field.
Active: Admin can enable or disable any field.
3.18 Other Plugins
As the admin clicks on this “Other Plugins” tab, they will be redirected to the Addon store where they can buy other plugins for their Prestashop store.
4.0 Front End Module
After enabling the Prestashop Reward Point module the front-end user will see a link in the header of the front-end through which the user can navigate to a new page.
The link in the header of the front-end will appear as follows:
For Version 1.6-
For Version 1.7-
The link for the Returns Manager page will also appear on the ‘My Account’ page of any customer. This link only appears to a logged-in customer on the ‘My Account’ page.
For Version 1.6- For Version 1.7-
When the customer clicks on this link then a new page will open based on the logged-in status of the customer.
In case the user is a guest and is not logged into the website then the page will contain a form to find the order as follows:
For Version 1.6-
For Version 1.7-
After proving the order reference number and the respective email the details of that order will appear including the return history based on the email provided by the customer. The order details will appear as follows:
For Version 1.6-
There will be a popup on which customers can add details for generating the return request. For Version 1.7-
The products that are eligible for return in that particular order will have a return button. Through this button, the customer can apply for the return of that particular product.
On clicking on the Return button a pop-up will appear containing the form for return of that particular order. The form will appear as follows:
This PrestaShop Return Manager addon allows the customer has to fill the above form and then click on submit then a success form will appear showing the successful submission of the return request as shown below :
– In case the user is a registered customer and is logged into the website then the page will contain a list of all the orders placed by the customer. The page will appear as follows:
For Version 1.6- For Version 1.7-
Customers can also generate a ticket for return related information.
For Version 1.6-
For Version 1.7-
In the updated version, the online users can select the product for return and also enter the details in custom fields s shown below:
While selecting the replacement option, the online users can get an option to select the products which he wants in return.
The online users can return overall order or return only selected product which he wants to return.
The online users can also return the whole order if he wishes to do so.
Order Cancellation:
The online users gets an option to cancel the order for a short period. The customers need to go to the My Account >> Return Manager section to cancel the order as shown below:
The online users can select from the listed reasons and also write their comment for order cancellation.
After submitting the request, users can view this message:
Once the online merchant approves the request, the user will view the status as canceled and also get an email notification while requesting the order cancellation and approval/decline.
5.0 Tutorial: Watch the YouTube Video Guide
To help you set up and use the Knowband PrestaShop Return Manager (RMA) Module, we have prepared a detailed YouTube tutorial video. This video walks you through the installation, configuration, and usage of the module, making returns, refunds, and order cancellations easy to manage.
In This Tutorial Video, You Will Learn:
How to install and activate the Return Manager module in your PrestaShop store
How to configure return policies, reasons, and order status conditions
How customers can raise return and cancellation requests from their account
How the admin can approve or manage requests efficiently
Watch the tutorial here:
For any questions, assistance, or custom modifications related to the Return Manager module, contact our support team:
support@knowband.com
6.0 Recommendations
1. Refresh the home-page of your store every time you enable/disable plugin.
2. If the Prestashop product return manager is not working after installation then please check permissions on the modules folder. The folder should be writable. Please make the folder permission to 755.
This way, Knowband’s Prestashop return manager module makes return management simple and hassle-free for the online store admin. This feature-rich Prestashop addon offers a simple and user-friendly platform for handling return requests. At the same time, it makes the overall return process simple for online users. The online users can easily create return requests and also generate tickets for followup. This PrestaShop Return manager module is mobile responsive and offers smooth functioning.
You can try Prestashop addon for on your Prestashop website. Prestashop Return Product extension helps you increase customer engagement to your store & increase brand awareness.
For more details about Prestashop return manager Module, please visit here:
Every eCommerce store owner goal getting a higher sales and conversion. Promotion and sales can help you to get sales and traffic but it takes a bit of work to put together an effective eCommerce promotion. Prestashop Advance Promotion Manager Addon by Knowband one of the smoothest means to manage the various promotion rules of the Prestashop store. The promotional rules and discounts is an inevitable part of the customer retention and acquisition. However, managing the multiple promotional rules of the site becomes difficult for the store admin at times. This is when the Prestashop Promotion manager module can help the merchants manage the same with minimum hassle.
The Prestashop promotion rule manager addon offers a fully customizable interface. The admin can create desired promotional rules. The created rules can be edited and their priorities can be set from the back-end of the Prestashop addon.
How can Promotion manager help the admin to boost revenue?
Did I say that promotions can increase the revenue? That’s right, I did. Well strategic eCommerce promotions, when implemented correctly, It can great boost to your eCommerce business. Let us discuss some points:
Promotion is the ideal way to engage people.
Free shipping is one of the biggest factors in eCommerce business. Online store admin always looks for free shipping. As per the research, 73% of online shoppers stated that free shipping is the #1 criterion for making a purchase.
Abandoned Cart: Promotion and sales help the eCommerce store owners to get rid of the abandoned cart. 56% of consumers abandon carts when presented with unexpected costs.
40% of shoppers prefer receiving discounts over loyalty program points. We live in a world where instant gratification is expected. Meeting shopper’s needs immediately results in more sales.
Promotion and sales help the eCommerce seller retaining leads. As per the research, the old customers spend on average 67% more than first-time customers. If the admin offers the old customer some coupons and deals. They always excited to participate deals and you can retain the leads easily.
Cross-selling is another opportunity to increase your store revenue.
Buy Something, Get Something Else For Free is one of the best promotion to attracting the customers. Online shoppers always looking for free gifts, vouchers and coupon etc.
First Time Visitors You can make the deals when the customer visits the first time to get some additional discount. This helps you build the brand loyalty.
Holiday / Seasonal Promotions (Black Friday, Christmas New Year’s resolutions and other) Holiday promotion is great to help the admin to boost sales. The eCommerce seller can make the deal the Holiday seasons.
1.1 Merchant Benefits
Listed below are some of the benefits offered to the admin by the Prestashop advance promotion manager module:
This Prestashop Advance Promotion manager extension allows the e-merchant to create unlimited promotion rules and edit/delete the same just at a button click.
The front-end display pattern can be set as per the wish of the store admin.
The Prestashop promotions rules manager module by Knowband allows the store admin gets an option to set the computation rules for each deal.
Even the cart rules can be fixed from the back-end of the Prestashop extension.
The Prestashop deal manager addon enables the e-merchant to offer a fixed discount, percentage discount or a free gift to the store visitors.
This Prestashop advance promotion manager addon is one of the ways to increase the average cart value of the customers and motivate them to complete their transaction without abandoning their cart.
The validity duration of the deal can be fixed at a button click.
The e-merchant can select the category in which he wants to include the rules of the promotion.
The sore admin even get an option to choose the products that he want to exclude from the offers.
1.2 Project Objectives
Prestashop Advance Promotions Manager module offers a number of optimization options. The project objective are listed below:
1. The process of including the general information of promotion rules.
2. The ways to set the rules for each promotion deals.
3. The computation ways of the promotions.
4. The cart rule action computation.
2.0 Installation
After purchasing Prestashop deal manager module, you will get following files as listed below:
1. Zipped file containing the source code of the Prestashop promotion manager addon.
2. User Manual
Follow the following steps to install the Prestashop addon:
1. Unzip the zipped file. It would contain files and folders as shown below –
2. Copy all the files and folders of unzipped folder and paste them in the “Modules” directory of your store on the path – Root Directory/modules/.
3. Now module is ready to be installed on your store and you can find that in Store Admin -> Modules and Services. It would shown as below –
In case, you are not able to find module in admin modules list, please try searching module with following details –
Keyword – Advance Promotions Manager
Category – Pricing and Promotion
Filter By – Installed & Not Installed / Enabled & Disabled
4. Click on “Install” button to install the module. It would show a pop-up for your confirmation. Click on “Proceed with the installation” option. This step will install the module and show notification – “Module(s) installed successfully”.
3.0 Admin Interface
Prestashop promotions manager module offers an easy-to-use interface for effortless promotion management. The entire promotional deals created by the admin is listed in the back-end of the Prestashop plugin as shown in the image below:
The store admin can drag and drop the promotion rules to change their position as well as priority.
Let us discuss the various configuration options are discussed below:
3.1 How to create the Promotion Rules?
The already created promotional offers can be viewed in the admin interface. In order to create a new rule, click on ‘Add New Rule’ or the ‘+’ sign in the top right side as shown below:
You’ll be redirected to the Rule creation page. The promotional rules will be listed in the page. The e-merchant can set the position of the promotion rule just by dragging and dropping them.
Few examples of the Promotion rule:
A. Buy X Get Y Free (Buy 1 Get 1 Free)
1. You will go to General settings tab enter the deal name, description, status and select the store in which you want to offer the feature.
2. In the Rule Condition tab, you will enter the promotion rule validation date & time, applicability, minimum cart amount, cart amount currency, cart amount tax, cart amount shipping. They can also select the customer whom he/she want to offer the discount.
3. The computation rules for the promotions can be set from the back-end of the Prestashop promotion manager addon.
Computation Type: For applying Buy 1 Get 1 offer, you need to select Product option. After selecting Product. You need to fill following options:
Computation Method: The offer rules will be computed based on the number of products added in the cart or the cart value. The admin can select the desired option here.
Number of Product: For applying Buy 1 Get 1 offer, You need to enter the 1 no of products required to be present in the cart for the offer computation.
Consider Products with Reduction: Switch the button ‘On’ if the rule computation will consider the product with reduction.
Allowed Category: Select the categories in which you want to apply the offer rule. By default it will be applicable in all the categories.
Product to Exclude: Enter the name of the product that you want to exclude from the offer rules.
Minimum Cart Items Required: For applying Buy 1 Get 1 offer, You need to enter the 1 no of items required in the cart of the customers for availing the offers.
4. In the Cart rule action tab, the Prestashop store admin can set the cart rules for the offer in this section.
Reduction Type: In this tab, you can select Free Gift.
Select Gift Card Product: In this tab, select the name of the product that will be automatically shown on the checkout page of the customers.
Cart Rule Validity: Enter the validity period (in days) of the rule.
Allow Free Shipping: Enable to allow free shipping to the customers.
The number of impacted products: In this tab, you can enter the no of product that can be impacted by this promo rule.
B. Buy X Items & Get Free Shipping (Buy 1 Get Free Shipping)
1. You will go to General settings tab enter the deal name, description, status and select the store in which you want to offer the feature.
2. In the Rule Condition tab, you will enter the promotion rule validation date & time, applicability, minimum cart amount, cart amount currency, cart amount tax, cart amount shipping. They can also select the customer whom he/she want to offer the discount.
3. The computation rules for the promotions can be set from the back-end of the Prestashop promotion manager addon.
Computation Type: You can select either ‘Product’ or ‘Category’. You can select the Product. You want to enter this information.
Computation Method: The offer rules will be computed based on the number of products added in the cart or the cart value. The admin can select the desired option here.
Number of Product: Enter the 1 no of products required to be present in the cart for the offer computation.
Consider Products with Reduction: Switch the button ‘On’ if the rule computation will consider the product with reduction.
Allowed Category: Select the categories in which you want to apply the offer rule. By default, it will be applicable in all the categories.
Product to Exclude: Enter the name of the product that you want to exclude from the offer rules.
Minimum Cart Items Required: You can enter the 1 no of items required in the cart of the customers for availing the offers.
4. In the Cart rule action tab, The Prestashop store admin can set the cart rules for the offer in this section.
Reduction Type: The e-merchant can give a discount of Fixed Amount, Percentage or a Free Gift. Select any one option here.
Select Gift Card Product: In this tab, select the name of the product that will be automatically shown on the checkout page of the customers.
Cart Rule Validity: Enter the validity period (in days) of the rule.
Allow Free Shipping: Enable to allow free shipping to the customers.
Number of impacted products: In this tab, you can enter the no of product that can be impacted by this promo rule.
C. Buy X Items of a Product & Get Y% Discount(Buy 2 Items of a Product & Get 30% Discount)”
1. You will go to General settings tab enter the deal name, description, status and select the store in which you want to offer the feature.
2. In the Rule Condition tab, you will enter the promotion rule validation date & time, applicability, minimum cart amount, cart amount currency, cart amount tax, cart amount shipping. They can also select the customer whom he/she want to offer the discount.
3. The computation rules for the promotions can be set from the back-end of the Prestashop promotion manager addon.
Computation Type: You can select either ‘Product’ or ‘Category’. You can select the Product. You want to enter the these information.
Computation Method: The offer rules will be computed based on the number of products added in the cart or the cart value. The admin can select the desired option here.
Number of Product: Enter the 2 no of products required to be present in the cart for the offer computation.
Consider Products with Reduction: Switch the button ‘On’ if the rule computation will consider the product with reduction.
Allowed Category: Select the categories in which you want to apply the offer rule. By default it will be applicable in all the categories.
Product to Exclude: Enter the name of the product that you want to exclude from the offer rules.
Minimum Cart Items Required: You can enter the 2 no of items required in the cart of the customers for availing the offers.
4. In the Cart rule action tab, The Prestashop store admin can set the cart rules for the offer in this section.
Reduction Type: The e-merchant can select the Percentage. When Percentage is selected, enter the percentage value that you want to offer as discount as shown below.
For example: If you enter the 30% discount on the product. Set percentage apply on the front end.
Cart Rule Validity: Enter the validity period (in days) of the rule.
Maximum Amount Currency: Choose the currency in which the maximum amount fixed above is to be considered. For example, you can select the USD.
Maximum Amount Tax Included: Enable if you want to include the tax in the maximum amount fixed above.
Allow Free Shipping: Enable/Disable the free shipping to the customers.
Number of impacted products: In this tab, you can enter the no of product that can be impacted by this promo rule.
D. “Buy X Items of a Product & Get Y Discount(Buy 3 or more items for full price and get $50 discount)
1. You will go to General settings tab enter the deal name, description, status and select the store in which you want to offer the feature.
2. In the Rule Condition tab, you will enter the promotion rule validation date & time, applicability, minimum cart amount, cart amount currency, cart amount tax, cart amount shipping. They can also select the customer whom he/she want to offer the discount.
3. The computation rules for the promotions can be set from the back-end of the Prestashop promotion manager addon.
Computation Type: You can select either ‘Product’ or ‘Category’. You can select the Product. You want to enter the these information.
Computation Method: The offer rules will be computed based on the number of products added in the cart or the cart value. The admin can select the desired option here.
Number of Product: Enter the 3 no of products required to be present in the cart for the offer computation.
Consider Products with Reduction: Switch the button ‘On’ if the rule computation will consider the product with reduction.
Allowed Category: Select the categories in which you want to apply the offer rule. By default, it will be applicable in all the categories.
Product to Exclude: Enter the name of the product that you want to exclude from the offer rules.
Minimum Cart Items Required: You want to enter the 3 no of items required in the cart of the customers for availing the offers.
4. In the Cart rule action tab, The Prestashop store admin can set the cart rules for the offer in this section.
Reduction Type: The e-merchant can select the Percentage. When the Fixed amount is selected, then, the admin will be asked to fill this information.
Reduction Amount: This is the discount amount that will be offered to the customers. If You enter the $50. The $50 discount fixed on the front end.
Reduction Amount Currency: Select the currency in which the discount is to be offered.
Reduction Amount Tax Included: If enabled the tax will be included in the reduction amount.
Cart Rule Validity: Enter the validity period (in days) of the rule.
Allow Free Shipping: Enable/Disable the free shipping to the customers.
Number of impacted products: In this tab, you can enter the no of impacted products
E. Get X% Discount on Y Cart Total” For example (Get 20% Discount on $100 Cart Total)
1. You will go to General settings tab enter the deal name, description, status and select the store in which you want to offer the feature.
2. In the Rule Condition tab, you will enter the promotion rule validation date & time, applicability, minimum cart amount, cart amount currency, cart amount tax, cart amount shipping. They can also select the customer whom he/she want to offer the discount.
3. The computation rules for the promotions can be set from the back-end of the Prestashop promotion manager addon.
Computation Type: You can select either ‘Product’ or ‘Category’. You can select the Product. You want to enter the these information.
Computation Method: The offer rules will be computed based on the number of products added in the cart or the cart value. The admin can select the desired option here.
When the Cart Amount is selected, the admin will be asked to fill following options.
Cart Amount: If You want to fix $100 cart amount. The fixed Cart amount will be applicable on the Front end.
Cart Amount Currency: Choose the currency in which you want to consider the order amount.
Cart Amount Tax Included: Enable this feature to include the tax amount while considering the cart value.
Consider Products with Reduction: Switch the button ‘On’ if the rule computation will consider the product with reduction.
Allowed Category: Select the categories in which you want to apply the offer rule. By default, it will be applicable in all the categories.
Product to Exclude: Enter the name of the product that you want to exclude from the offer rules.
Minimum Cart Items Required: You can enter the 2 no of items required in the cart of the customers for availing the offers.
4. In the Cart rule action tab, The Prestashop store admin can set the cart rules for the offer in this section.
Reduction Type: The e-merchant can select the Percentage. When Percentage is selected, enter the percentage value that you want to offer as discount as shown below.
For example: If you want to enter the 20% discount on the product. Set percentage apply on the front end.
Cart Rule Validity: Enter the validity period (in days) of the rule.
Maximum Amount Currency: Choose the currency in which the maximum amount fixed above is to be considered. For example, you can select the USD.
Maximum Amount Tax Included: Enable if you want to include the tax in the maximum amount fixed above.
Allow Free Shipping: Enable/Disable the free shipping to the customers.
Number of impacted products: In this tab, you can enter the no of product that can be impacted by this promo rule.
F. Get X Discount on Y Cart Total “For example “Get $20 Discount on $200 Cart Total.
1. You will go to General settings tab enter the deal name, description, status and select the store in which you want to offer the feature.
2. In the Rule Condition tab, you will enter the promotion rule validation date & time, applicability, minimum cart amount, cart amount currency, cart amount tax, cart amount shipping. They can also select the customer whom he/she want to offer the discount.
3. The computation rules for the promotions can be set from the back-end of the Prestashop promotion manager addon.
Computation Type: You can select either ‘Product’ or ‘Category’. You can select the Product. You want to enter the these information.
Computation Method: The offer rules will be computed based on the number of products added in the cart or the cart value. The admin can select the desired option here.
When the Cart Amount is selected, the admin will be asked to fill following options.
Cart Amount: If you want to enter the $20 discount on the product. Set fixed discount to apply on the front end.
Cart Amount Currency: Choose the currency in which you want to consider the order amount.
Cart Amount Tax Included: Enable this feature to include the tax amount while considering the cart value.
Consider Products with Reduction: Switch the button ‘On’ if the rule computation will consider the product with reduction.
Allowed Category: Select the categories in which you want to apply the offer rule. By default, it will be applicable in all the categories.
Product to Exclude: Enter the name of the product that you want to exclude from the offer rules.
Minimum Cart Items Required: You can enter the 1 no of items required in the cart of the customers for availing the offers.
4. In the Cart rule action tab, The Prestashop store admin can set the cart rules for the offer in this section.
Reduction Type: The e-merchant can select the Percentage. When the Fixed amount is selected, then, the admin will be asked to fill this information.
Reduction Amount: This is the discount amount that will be offered to the customers. If You want to enter the $200. The $200 discount fixed on the front end.
Reduction Amount Currency: Select the currency in which the discount is to be offered.
Reduction Amount Tax Included: If enabled the tax will be included in the reduction amount.
Cart Rule Validity: Enter the validity period (in days) of the rule.
Allow Free Shipping: Enable/Disable the free shipping to the customers.
Number of impacted products: In this tab, you can enter the no of product that can be impacted by this promo rule.
3.1.1 General Information
Enter the basic information of the offers here. The various options in this tab are discussed below:
Rule Name: It specifies the name of the offer that will be displayed in the front-end of the website.
Description: enter the description of the offer in this section.
Status: You can enable/disable the promotion offer from here. If disabled, the offer will not be shown in the front-end.
Store: The Prestashop advance Promotion manager module offers multi-store compatibility. You can select the store in which you want to include the promotion offer rule.
Compatible with other Cart Rules: If this functionality is enabled, then, the offer will be compatible with other cart rules as well.
3.1.2 Rule Condition
The ‘Rule Condition’ tab allows you to set the rule for the offers.
Valid From and To: Enter the start and end date of the offer. The offer rules will be only applicable in this duration.
Applicable On: The rules will either be applicable on all the orders or the first order of the customer. The admin can select any one of the order type from this field.
Minimum Cart Amount: Enter the minimum cart amount for making offer rule applicable.
Minimum Cart Amount Currency: Select the currency in which the minimum cart amount is to be considered.
Minimum Cart Amount Tax Included: If enabled, the minimum cart amount will be considered including the tax.
Minimum Cart Amount Shipping Included: If enabled, the minimum cart amount will be considered including the shipping charges.
Allowed Customer Group: The admin can make the offer accessible to a selected customer group. You can choose from Visitors, Guest or Registered Customers.
3.1.3 Computations
The computation rules for the promotions can be set from the back-end of the Prestashop promotion manager addon.
1. Computation Type: The admin can select either ‘Product’ or ‘Category’. The computation will be done according to the type selected.
2. Computation Method: The offer rules will be computed based on the number of products added in the cart or the cart value. The admin can select the desired option here.
2.1 In case you choose the Number of Product option, then, you need to enter the minimum number of products required to be added in the cart in order to avail the offer.
On selecting this option, you’ll be required to fill following options.
Number of Product: Enter the minimum number of products required to be present in the cart for the offer computation.
2.2 When the Cart Amount is selected, the admin will be asked to fill following options.
Cart Amount: Enter the minimum cart value of the customers required for availing the promotional offer.
Cart Amount Currency: Choose the currency in which you want to consider the order amount.
Cart Amount Tax Included: Enable this feature to include the tax amount while considering the cart value.
3. Consider Products with Reduction:Switch the button ‘On’ if the rule computation will consider the product with reduction.
4. Allowed Category: Select the categories in which you want to apply the offer rule. By default it will be applicable in all the categories.
5. Product to Exclude: Enter the name of the product that you want to exclude from the offer rules.
6. Minimum Cart Items Required: Enter the minimum number of items required in the cart of the customers for availing the offers.
3.1.4 Cart Rule Actions
The Prestashop store admin can set the cart rules for the offer in this section:
1. Reduction Type: The e-merchant can give a discount of Fixed Amount, Percentage or a Free Gift. Select any one option here.
1.1 When Fixed amount is selected, then, the admin will be asked to fill these information.
Reduction Amount: This is the discount amount that will be offered to the customers.
Reduction Amount Currency: Select the currency in which the discount is to be offered.
Reduction Amount Tax Included: If enabled the tax will be included in the reduction amount.
1.2 When Percentage is selected, enter the percentage value that you want to offer as discount as shown below.
1.3 In case of Free Gift, enter the name of the product and hit the search button. The same product will be automatically shown in the checkout page of the customers.
2. Cart Rule Validity: Enter the validity period (in days) of the rule.
Maximum Amount: Enter the maximum amount of discount allowed.
3. Maximum Amount Currency: Choose the currency in which the maximum amount fixed above is to be considered.
4. Maximum Amount Tax Included: Enable if you want to include the tax in the maximum amount fixed above.
5. Allow Free Shipping: Enable to allow free shipping to the customers.
6. Number of impacted products:
4.0 Website UI
The promotion rule created in the back-end of the Prestashop promotion rule manager extension will be displayed on the checkout page of the website as shown in the image below. The discount offered will be automatically deducted from the cart value.
Now you can try Prestashop Advance Promotion manager addon for on your Prestashop website. KnowBand Prestashop deal manager extension helps you engage more customer to your store & increase the customer base.
Prestashop Walmart Integrator by Knowband gives you a handy mechanism to list the product on Walmart and manage the order in a few simple steps directly from the Prestashop store.
Walmart is one of the largest retail companies and has made a prominent presence in the eCommerce industry over the years. The marketplace is famous for Electronic goods and even deals with other products including home and furniture, home improvement, clothing, footwear, jewelry, toys, health and beauty, grocery, etc. The Prestashop store owners can now sync their store and sell the products on Walmart.com.
Walmart Prestashop Integration module by Knowband allows the store owners to integrate the store with Walmart.com. The Prestashop Walmart API Integrator automates the entire process of store synchronization, product and inventory management as well as order processing.
1.1 Features offered by Prestashop Walmart Integrator are listed below:
The Prestashop Walmart Integration Module connects the Prestashop store with Walmart.com in a few button clicks.
Real-time product listing from the back-end of the Prestashop Walmart integration plugin makes it easier for the sellers to display their products to the customers of the marketplace.
The easy inventory management and product synchronization of the Prestashop Walmart Integration extension allows the vendors to manage the products with minimal hassle.
The profile-based listing of the Prestashop Walmart Integration Module allows the admin to upload the products in bulk. The admin can update the prices and inventory by executing the cron from the admin interface of the Prestashop Walmart integrator.
The admin can even change the price of the product on the marketplace without changing their cost at their site.
Prestashop Walmart Integration addon offers easy order management that makes it easier for the store admin to keep a track of the orders received from the marketplace and manage the same from a single interface.
With easy shipping and product management from the back-end of the Prestashop Walmart Marketplace integration plugin, the store owners can effortlessly boost the overall revenue of their company.
The Prestashop Walmart API integration addon allows the admin to manage the shipping carrier and shipping methods with ease.
The admin gets an option to get the buy box report just by executing cron in the back-end of the Prestashop Walmart integration addon.
Based on the performance of the products, the admin can reprice the products and sync the same with the marketplace at a button click with the help of Walmart Prestashop integration addon.
Walmart Prestashop connector makes it easier for the admin to provide the tax code of Walmart Categories.
Admin can view the overall sales report along with the sales report of individual products from the admin interface of the Prestashop Walmart integrator.
The sellers can easily manage the lag time of the products from the back-end of the Walmart Prestashop connector.
1.2 Merchant Benefits of the Prestashop Walmart integration addon:
Walmart Prestashop Integration plugin automates the entire process of store integration.
With the help of Walmart Prestashop API integrator, the store admin can list the products and the corresponding details in the marketplace and manage the inventory without any manual synchronization.
Not just the inventory, even the orders received can be synced in the store by executing cron in the back-end of the Walmart integration module.
The orders can, then, be processed from the store and the status of the orders can be updated to Walmart.com at a button click.
The store admin can map the category of their store with that of the category of the marketplace with the help of the Prestashop Walmart integration extension.
Even the attributes of the products can be mapped with the attribute of the marketplace with the help of this Prestashop Walmart Marketplace Integration extension.
The Walmart Prestashop integration module is easy is to understand and use.
The Walmart Prestashop integration extension comes with free support of 3 months.
Along with version compatibility, the Prestashop Walmart Integration plugin doesn’t conflict with other modules of the store.
1.3 Project Objectives
Listed below are the project objectives of Walmart Prestashop Connector:
The installation process of the Prestashop Walmart integrator.
The process of seller account set-up in Walmart.com
Profile creation and synchronization in the marketplace.
Product listing and status update of the products on Walmart.
Order synchronization from Walmart and status updates.
2.0 Installation
Once the Prestashop Walmart Integration module is purchased from the store, you will get the zipped file (containing the source code of the Prestashop Walmart marketplace integration addon) along with the user manual. Please follow the below steps to install it:
Step 1: Go to Module listing page and “Add New Module” button.
Step 2: Upload the downloaded zipped file.
Step 3: Once this is done, the Prestashop Walmart Marketplace Integration extension will be listed on the module listing page as shown in below screen:
Step 4: Click on the install button. The module will be installed in your Prestashop store.
Note: Please set the read/to write permission on the module folder before installing the module into the system.
3.0 How to configure Walmart Magento Integrator Extension?
To configure the Walmart Marketplace Integrator, store admin needs to get the Client ID and Client Secret. In order to obtain Walmart Client ID, and Client Secret, follow the process given below:
5. Now you can get the New “Client ID” and “Client Secret” from here.
4.0 Admin Interface
Once the seller account setup is complete, the merchant can configure his shop on Walmart.com
The Prestashop Walmart Marketplace Integration extension offers 17 configuration tabs in the main menu of the admin interface. These options include the following:
General Settings
Profile Management
Shopping Carrier Mapping
Promotions
Shipping Override
Product Listing
Attribute Mapping
Order Setting
Order Listing
Feed Status
BuyBox Report
Manage Lagtime
Tax Report
Sales Report
Product Sales Report
Synchronization
Audit Log
Each option is discussed in detail below.
4.1. General Setting
To authenticate the Prestashop to Walmart integration, the Prestashop store admin needs to fill-up the following field:
1. Enabled the Plugin
Toggle the button to enable/disable the Prestashop Walmart Marketplace Integration addon from the store.
2. Consumer ID
Enter the Walmart Consumer ID that was copied while setting up the connection.
3. Private Key
Enter Walmart API Secret Key here that was copied from the seller’s account. It is mandatory for authenticating the integration between the store and Walmart Marketplace.
4. Consumer Channel Type
The value for the Channel Type header is used to send information to the API.
4.2. Profile Management
The Prestashop store admin can create, edit or delete N number of profiles from the back-end.
4.2.1 How to Create a New Profile?
Click on the ‘Add New Profile’ or ‘+’ sign to create a new profile.
Once the button is clicked, the admin will be redirected to the profile creation page. Here are the fields that you need to fill.
Profile Title: Enter a unique name for the profile.
Walmart Category: Select the category of the Walmart where you want to map the category of the store.
Store Category: Expand the category and select the category of the Prestashop that you want to map in the category of Walmart.com.
Barcode Identifier: This is the unique field of the product. Select anyone from the dropdown list, so that, the Prestashop extension can identify the product according to the mapped attribute. The various options to choose from include: UPC, EAN13.
The various place-holders are listed below.
{id_product} for Product ID
{product_title} for Product title
{manufacturer_name} for Manufacturer name
{supplier_name} for Supplier name
{reference} for Product Reference
{ean13} for Product EAN13
{short_description} for Product Short Description
{price} for Product Price
Enable Custom Pricing: Enable this option to change the price of the product without changing the price of the product on the Prestashop site.
The admin can enter the custom price change in this section.
Select whether you want to change the price by a fixed amount or a percentage amount.
Select whether you want to increase or decrease the price of the products by that particular value.
For instance, the admin chooses ‘Fixed’ and ‘Increase’ and enters the custom price of $5, then, the price of all the products of that particular profile will increase by $5.
Shipping Override: This is an optional field. Select the shipping options from the list provided. This section includes all the shipping templates added in the Shipping Override tab.
Product Tax Code: Enter the product tax code in this section.
Also, the store admin can add relevant attributes of the products.
4.2.2 How to Edit the Existing Profiles?
You can find the list of the created profile in the Profile Management tab of the admin interface.
To edit the profile, click on the ‘Edit’ button corresponding to the profile.
The Prestashop store admin can enable/disable by changing the status as shown in the image below.
The category mapped can even be viewed by clicking the ‘View Mapped Category’ button shown in the above image.
The mapped categories will be shown as the image below:
The store admin can even add new categories for mapping.
4.2.3 How to Add New Category?
To add a new category click on the ‘Add New Category’ on the top right side of the admin interface.
You’ll be redirected to the category creation page as shown below.
Walmart Category: Select the category of Walmart in which you want to map the category of the Prestashop store.
Store Category: Select the category of the Prestashop store that you want to map with the selected category of Walmart.
4.2.4 How to Edit/Delete the Categories?
There is an Edit and Delete button corresponding to every category as shown below. Click on the respective buttons to Edit and Delete the categories.
4.3. Shipment Carrier Mapping
The Prestashop Walmart Integration addon allows the admin to map the shipping carrier with ease.
Just the options from the drop-down menu for the various shipment carrier methods.
4.4. Promotions
The admin gets an option to add promotional deals for the marketplace customers with the help of the Prestashop Walmart Integration addon.
4.4.1 How to add Promotions on the Walmart marketplace?
To add promotional deals, click on the ‘+’ sign or ‘Add New Promotion’ on the top right side of the Walmart Prestashop Integration module.
You’ll be redirected to the promotion creation page. Fill in the required details that are discussed below:
Promotion Detail: Enter the detail of the promotion in this section. Price Type: Select the price change type. It can be Reduced or Clearance. Discount Price: Select the discount type, Fixed or Percentage. Enter the fixed amount or the percentage amount. Start Date: Enter the start date of the deal. End Date: Enter the date when the deal will end. Product Selection: Select the product group in which you want to offer the discount. It has 3 options:
All Products: This will apply for the promotion of all the products listed in the marketplace.
Products of Selected Profile: This will apply the deal on all the products of the selected profile. Once this option is selected, all the profiles will be listed in the Select Profile section.
Selected Products: This will allow the admin to offer discounts on the selected products. The products can be selected in the Select Product section.
4.4.1 How to Sync and Edit/Delete the Promotions?
The promotion deals will be listed in this tab of the Prestashop Walmart API integration extension as shown in the image below:
The promotions can be synced with the Walmart marketplace by hitting on the ‘Sync’ button corresponding to each promotion rules.
To edit or delete the promotion rules, click on the ‘Edit’ or ‘Delete’ button corresponding to each rule as shown below:
4.5 Shipping Override
The Prestashop Walmart Integration extension allows the store admin to add shipping methods for the Walmart consumers.
4.5.1 How to Create New Shipping Override?
The various information fields in this tab of the Prestashop Walmart Integration extension are listed below:
Shipping Override Title: Enter a unique title for the Shipping override.
Shipping Allowed: The dropdown menu includes the option of Yes and No. Select Yes, if you want to allow this shipping override.
Shipping Method: Select the shipping method that you want to include in this Shipping override.
Shipping Region: Select the region in which you want to incorporate the shipping override.
Shipping Price: Enter the shipping cost here.
Note: All the Shipping Override options created here will be listed in the Profile Management section.
4.5.2 How to Edit/Delete Shipping Override?
All the Shipping Override options can be viewed in this tab of the Prestashop Walmart Marketplace Integration plugin. To edit or delete the shipping override option, click on the Edit or Delete button corresponding to each option as shown in the image below.
4.6. Product Listing
The listed products can be viewed from the back-end of the Prestashop Walmart integration module as shown in the image below. The Prestashop Walmart Integration addon allows the admin to renew, delete or remove the product from the marketplace. These actions can be performed for individual products as well as in bulk.
This section shows the list of all the products listed on Walmart Marketplace with their statuses.
To list the products on Walmart, run the Sync Inventory to Walmart cron. The products will get listed on the Walmart marketplace. (See Section 4.16)
Once the inventory is synced, the corresponding product details will be synchronized accordingly. To sync the price of the products, run the ‘Sync Price of the Product’ cron in the Synchronization tab.
Here are some of the options offered in this section:
Product Listing Renewal
The Prestashop store admin can renew the product, in case the listing has expired from the Walmart Marketplace or the product is updated, by clicking on the “Renew” action corresponding to each product.
After the renewal of the products, action “Renew” will be changed to “Halt” action. This action is used to stop product renewal in case needed.
Product Listing Deletion
The store admin can disable the product from the marketplace by clicking on the “Delete” button corresponding to each product listing. To revert the action, click on the “Relist” button. The delete action will then be replaced with Relist action. Execute the Sync Products on Walmart cron to remove the products or mark them as inactive in the product listing page.
View Error
The admin can view the error occurred in listing the product by click on ‘View Error’ action.
Bulk Update of Products
The Walmart Prestashop integration addon allows the admin to update the products in bulk. The bulk action offers the following options:
Delete Selected
RelistSelected
RenewSelected
HaltSelected
Select the products in which you want to perform any of the above-mentioned action as shown in the image below:
Once the products are selected, click on the action that you want to perform. The same action will be performed on all the selected products.
Mapping of Existing Products on Walmart
If you already have the products in Walmart, execute the Item Report cron first. Once this cron is executed, Walmart & Prestashop matching SKU will be mapped automatically. They can match the SKU, create the Listing ID and change the status as ‘Published’.
4.7. Attribute Mapping
The Prestashop Walmart Integration extension offers easy means to map the attribute of the Prestashop store with the Walmart marketplace. The store admin can map the attribute of Walmart.com with the attribute of the Prestashop eCommerce store in this tab.
4.7.1. How to create New Attribute Mapping?
To create new attributes, click on the ‘+’ sign on the top right side of the admin interface. You’ll be redirected to the Attribute creation page. Follow the steps below for the Attribute mapping.
Select the Walmart Category in which you want to map the attribute as shown in the image below:
Attribute: Select the attribute of Walmart in which you want to map the attribute of the Prestashop.
Prestashop Attribute: Select the attribute of the Prestashop store that you want to map with the attribute of the marketplace.
4.8. Order Setting
The store admin can set the status of orders placed on Walmart that are mapped in the Prestashop store from the Order Setting tab of the Prestashop Walmart Integration plugin. This section consists of four different order statuses. They are:
Order Current Status, Order Shipped Status, Order Acknowledgment Status, and Order Cancel Status.
Once the status of the order is changed in the Prestashop store, run the ‘Update Order Status to Walmart’ cron. This will sync all the changes to the marketplace. (See Section 4.16)
4.9. Order Listing
The orders received from the Walmart.com is listed in the admin interface of the Prestashop Walmart API Integration. For this, the store owner needs to run the ‘Sync Order Listing from Walmart’ cron. (See Section 4.16)
Once the cron is executed, the entire orders will be synced in the Prestashop store. These orders can then be processed by clicking on the ‘View’ button as shown below.
4.10. Feed Status
Every time a cron is executed, a Feed will be created in this tab as shown here. The status of the feeds can be seen by clicking on the ‘View’ button.
On clicking the button, you’ll be redirected to the feed status detail page.
4.11. BuyBox Report
In case more than one seller is selling the same product, walmart.com displays them on a single page. This page displays the products and their pricing to the customer. Out of these products, one item wins the Buy Box. The customers are drawn to the very first option that they see. Hence, winning the buy box is essential for the vendors.
The sellers can see the products listed on the Buy Box with their status in the ‘Buy Box’ tab of the Prestashop Walmart Integration extension. To sync the latest buy box report, execute a cron job in the Synchronization tab of the Walmart Prestashop API integration addon. (See Section 4.16)
Also, Prestashop Walmart Integrator offers an easy means to reprice the products to win the buy box. The sellers can reduce the cost to boost their product visibility.
To reprice the products, click on the ‘Repricing’ option corresponding to each product.
Once you click here, you’ll get a popup. Toggle the Enable/Disable Re-pricing option for the same.
Once you enable this functionality, you’ll be asked to enter the Minimum and Maximum Price.
Enter the minimum and maximum price and click on the ‘Submit’ button. Sync the reprice with the marketplace by executing cron in the Synchronization tab of the Prestashop Walmart API integration addon. (See Section 4.16)
4.12. Lag Time
Lag Time refers to the minimum number of days when the shipment of the order is initiated. The lag time is the interval between the day when the order is placed and when it is shipped.
To update the shipping lag time, the admin is required to click on the ‘Update Lag Time’ button as shown below.
On clicking, a popup will appear as shown below:
Enter the lag time for each product. Once this is done, the admin can sync the lag time in bulk by executing cron in the synchronization tab of the Prestashop Walmart connector.
Refer to Section 4.15 for the cron job details.
4.13. Tax Code
Walmart makes it mandatory for the sellers to provide the Tax Code for the products at the time of product listing. The store admin can check tax codes in this tab of the Prestashop Walmart marketplace integration module.
4.14. Sales Report
The seller gets a complete report of the marketplace sales from the Sales Report tab of the Walmart Prestashop connector. The sales report will appear in both graphical and tabular format.
Apply filter by selecting the Start and End date. The seller can even group the report by days, months and years.
4.15. Product Sales Report
The seller can even view the sales report of a particular product in the Product Sales Report tab of Walmart Prestashop Integrator.
Enter the SKU, Start Date, End Date and apply the filter to view the sales report of that particular product.
4.16. Synchronization
This tab of the Prestashop Walmart Integration module synchronizes all the settings and changes done in the other tabs of the Prestashop Walmart Marketplace Integration Module. The synchronization between Prestashop Store and Walmart Marketplace and vice-versa can be done from the ‘Synchronize‘ tab.
The various cron jobs to synchronize the settings between Store and Walmart Marketplace are shown below –
4.16.1 How to sync the status of the Feed?
Every time a cron is executed, a feed is created in the Feed Management tab. The initial status of the feed is submitted. To change the status of submitted or processing feed, click on Sync Feed Status.
It would perform following actions –
A feed will be created every time a cron is executed in the admin interface.
This particular cron updates the status of the Feeds.
4.16.2 How to sync Products to Walmart Marketplace?
The product listed in the Prestashop Walmart Marketplace Integration addon will be synced to Walmart.com by clicking on ‘Sync Products to Walmart’.
It would perform following actions –
The cron will update the products list in the Walmart marketplace.
It will add products on the Walmart Marketplace with the respective product details (e.g. Price, Quantity, Image, etc.).
It will update the products on the Walmart marketplace which are already listed.
It will update the expired products on Walmart Marketplace for the items in which ‘Renewal’ is enabled.
It will remove the products from Walmart Marketplace which are marked deleted on Store.
4.16.3 How to sync Inventory to Walmart Marketplace?
The quantity of the products can be updated on the Walmart Marketplace by executing the ‘Sync Inventory to Walmart’ cron from the Prestashop Walmart Integration module.
It would perform following actions –
It updates the quantity status of each product listed on Walmart Marketplace.
4.16.4 How to sync the price of the products to Walmart Marketplace?
The price of the products can be synced to the marketplace by executing ‘Sync Price to Walmart’ cron
It would perform following actions –
The cron execution will display the updated price of the products on Walmart Marketplace.
It will update the changes in the price of the products.
4.16.5 How to sync Order Listing from Walmart Marketplace?
The orders received from the Walmart Marketplace can be synced in the store by executing ‘Sync Order Listing from Walmart’ cron.
It would perform following actions –
The cron will sync the Orders and Transaction details from Walmart Marketplace.
It creates Orders into the Store as per the order received from Walmart Marketplace.
4.16.6 How to sync Lag time with the marketplace?
The lag time of the products fixed in the Lag time tab of the Prestashop Walmart Integration addon can be synced with the marketplace by executing ‘Sync Lag time on Walmart’ cron.
It would perform following actions –
The cron will sync the lagtime with the marketplace.
Any change in the lag time can be updated just by executing cron.
4.16.7 How to sync Repricing Buy Box on the marketplace?
The admin can sync the Buy Box repricing by executing ‘Sync Repricing Buy Box on Walmart’.
It would perform following actions –
The cron will sync the change in the price of the Buy Box products.
4.16.8 How to get the latest Buy Box report from the marketplace?
The sellers can get the latest buy box report from the marketplace by executing the ‘Sync Latest Buy Box Report’ cron.
It would perform following actions –
The cron syncs the latest buy box report from the marketplace to the Prestashop Walmart API integrator.
Note:
On successful completion of synchronization, a message will be display – “Success”. Otherwise “Failed” will be displayed.
4.15. Audit Log
The admin can view all the jobs running occurred in the Audit Log tab of the Prestashop Walmart Integration extension. The status of the jobs can be viewed in this tab.
You can get Prestashop Walmart Integration at budget-friendly prices from the Knowband store.
Prestashop Category Product Display Order addon by Knowband allows the eCommerce store owners to sort their products in bulk and display it on the website as per their wish. The display order sorting can be done by Product ID, name of the manufacturer as well as the date the product upload and updation. The admin even gets to sort the products as per their wish. The order display can either be ascending or descending as per the requirement of the admin.
With ‘N’ number of products available in the product listing, it sometimes becomes difficult for the customers to end up finding the item of their choice. By showcasing the products in the desired order, the e-merchants can magnetize the store visitors to pick up a product that they find interesting easily. Reducing the purchase decision time of the store visitors, Prestashop product sorting module boosts the chances of conversion.
Features:
The Prestashop Product Sorting Module can be enabled or disabled as per Prestashop admin requirement.
The Prestashop eCommerce store admin can select the particular brand or manufacturer for adding the sorting feature.
The sorting can be done on the basis of specific product name. All the Prestashop store admin needs to do is to enter the name in the web admin panel.
The Prestashop Product Sorting Module increases the chances of conversions as customer don’t wast time for the required product.
The store admin can change the sorting of the product display by Price, Product ID, Date when it was added or updated, Manufacturer or by Position.
With the help of this Prestashop plugin the products can be either sorted in ascending or descending order.
Prestashop Product Sorting addon is compatible with the latest version of Prestashop. That’s why it can work flawlessly on any of the eCommerce website.
The Prestashop extension does not conflict with any other module operating on the web store.
Along with this, the Prestashop addon is SSL compatible.
This Plugin is multi-lingual compatible.
No technical knowledge is required for implementation.
Merchant Benefits:
You can analyze the behavior of store visitors and make changes in default display setting of the category pages.
The Prestashop Category Product Sorting modules sort the inventory of the web store as per the requirement of the customers.
This Prestashop module offers multiple sorting options to select from. The admin can improve the user experience by reducing their time consumed in searching.
The Prestashop admin can select the particular web pages where he wants to sort the products. This can be either done on the entire website or on a particular product. Moreover, different sorting can be done on the different categories of product.
The sorting options are easy to understand and implement. Thus, the store merchants can use the module without any technical knowledge.
By sorting the products admin can reduce the time consumed in making the purchase decision by customer.
Customers Benefits:
The Prestashop product order display module makes shopping very easy for the customers.
This Prestashop extension reduces the time and effort invested in searching the products, thus, making shopping flawless.
With the help of this module purchase decision becomes easy and quick by customer.
Project Objectives
The Prestashop module is a must-have for the eCommerce websites in order to achieve better user experience. Here are some of the objectives that are served by the Prestashop addon:
The Prestashop Category Product Order plugin is the easiest and quickest ways to sort the products of the website’s catalogue in one go. The module is designed for the eCommerce store and helps the admin to customize the display of the products as per their need.
By displaying the products in an ordered way, it makes website browsing easier for the store visitors. The price-conscious customers can now find the products sorted by price.
The Prestashop admin can choose from the varied sorting options in the web admin panel. The sorting can be done in ascending or descending order as per the requirement.
Installation
On purchasing the Prestashop module from Knowband store, you’ll get following files and folders as listed below:
productsorting.zip (contains source code of the module)
User Manual
Follow the following steps to install the module in your Prestashop store:
Unzip the productsorting.zip file. The zipped file contain files and folders.
Copy all entire the files and folders of unzipped folder into the “Modules” folder of the Root Directory of your store. The address path for the same is mentioned below:
Root Directory/modules/
The module is ready to be installed on the web store. You can find it in the Store Admin -> Modules and Services. It would be shown as below –
In case, you are not able to find module in admin modules list, you can search it with the following details – Keyword – category Product Display Author – Knowband Category – Front office Filter By – Installed & Not Installed / Enabled & Disabled
Click on “Install” button to install the module. It would show a pop-up for your confirmation. Click on “Proceed with the installation” option. This step will install the module and show notification – “Module(s) installed successfully”.
Admin Interface
Prestashop product sorting module allows easy customization and implementations. Let us discuss the various customization processes one-by-one.
How to start configuration process?
The web admin panel of the module offers below mentioned configuration options.
Enable/Disable
Select Categories
Product Name
Select Manufacturer
Order By
Order Way
The various customization options are mentioned below:
Enable/Disable option: Once the addon is successfully installed on the web store, the admin can enable it by toggling the button in the admin panel.
Select Category: The store admin can select the product category in which he wants to sort the products. By default the module selects the Home Page. This will enable the sorting option in all the categories. However, if the admin wants to specifically add this in a particular category page, then, he can select the same from the back end. This even allows different sorting option to be enabled in the different category pages as per the requirement of the store owners. The product of the selected category can be previewed in the admin panel. The store owner can then do the customization from the back end.
Product Name: Prestashop Category product display order module helps the admin to sort the product by name as well. On entering the name, only the products with that name will be displayed in the preview. The admin can set the position of the accordingly.
Select Manufacturer: The admin can select the manufacturer in which he is looking to include the sorting option. The merchant can select from the list of the manufacturers that is being offered on the web store.
Sort Product Order By: The Prestashop addon allows the e-merchants to sort the categories of products by following custom orders:
Product ID
Date when the products were uploaded
Date when the products were updated
Product name
Manufacturer of the product
Position
That is, the store admin can either sort the products by product ID, the date when it was added or updated on the web store. The items on the website can be even sorted by their product or manufacturer name. At the same time, the admin can specify the position where he wants to display a particular product on the website. However, only one order can be applied to a particular category or sub-category. It is not possible to apply multiple orders in a single category.
Change the Order Way
The display order can either be set in the descending or ascending order. The admin can select the sorting option from the Prestashop Category Product Display Order extension.
Website UI
The entire display order method set by the admin in the back end of the Prestashop Category Product Display Order plugin will be reflected on the front end. For instance, if the products are sorted in the ascending order, then, the products will be displayed on the website accordingly as shown in the image below.
In case, the sorting is done in the descending order, then, the product order will be displayed accordingly.