Magento Ajax Cart Extension – User Manual

Introduction of Magento Ajax Cart Extension:

Ajax Cart is an addon which (when enabled) replaces the default “Add To Cart” action with the module’s custom action. After enabling this Magento Ajax Cart Extension, whenever a customer clicks on the “Add To Cart” button, the user is not redirected to the view cart page instead a popup is displayed. In the popup, items are shown. Cart items can be removed, updated, edited from the Ajax add to cart extension. Coupons can be also applied on Magento popup cart extension and user can checkout from there. The merchant can also show his/her banners or show the best-selling products on Magento popup cart page with the help of this Magento plugin.

Installation of Magento Ajax Cart Extension:

  • Follow the following steps for installing Magento Ajax Cart Extension:
  • Download the extension package.
  • Unzip the package on your root folder of Magento setup via FTP manager (like Filezilla or WinSCP – download here)
Magento Ajax Cart Extension User Manual | KnowBand

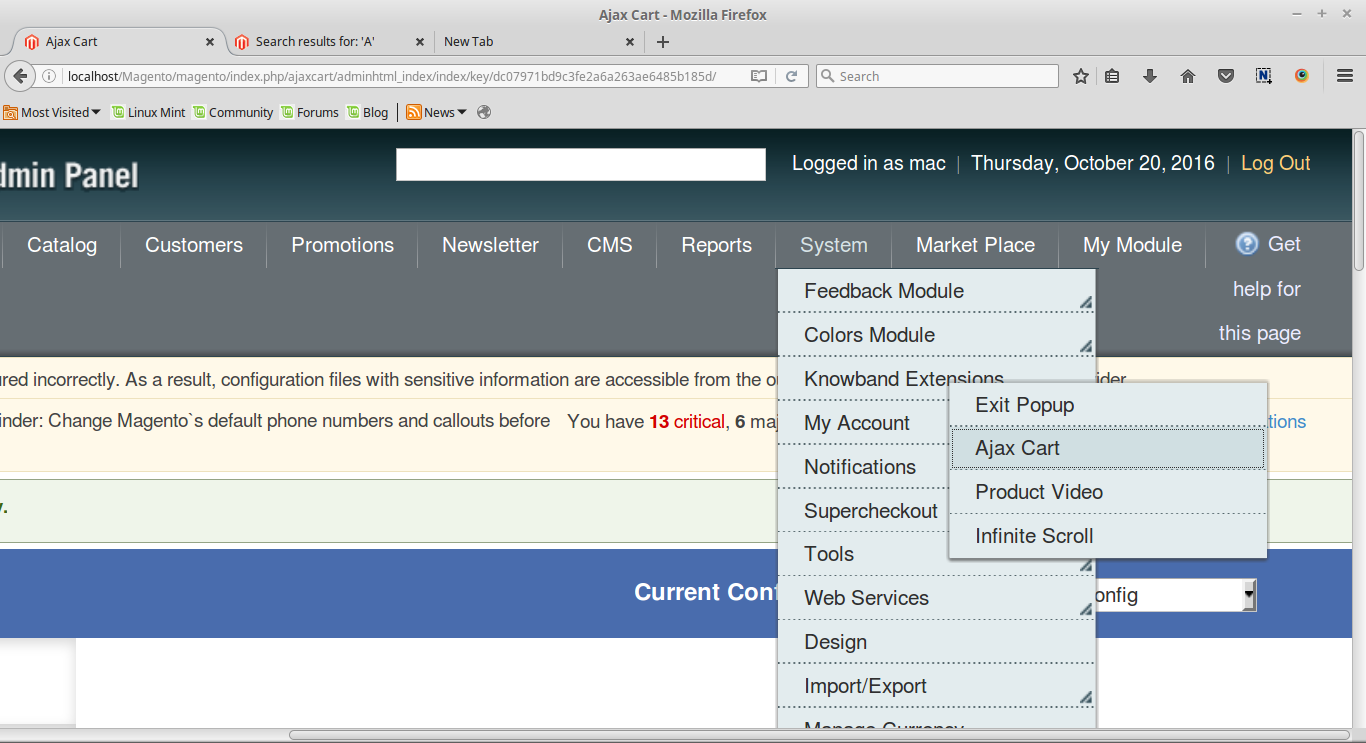
  • In Admin Panel go to “System > Knowband Extensions > Ajax Cart”.
  • That is all – Your system is ready.

User Manual

This User Manual Guide users through the Admin Module/Store Front settings and features of the Magento Ajax Cart Extension by Knowband.

Admin Panel Setting of Magento Ajax Cart Extension

Admin Panel Settings of the Magento ajax cart popup extension contains the 3 tabs for settings.

1. General Settings of Magento Ajax Cart Extension

The General Settings of the Magento popup cart module has following options:
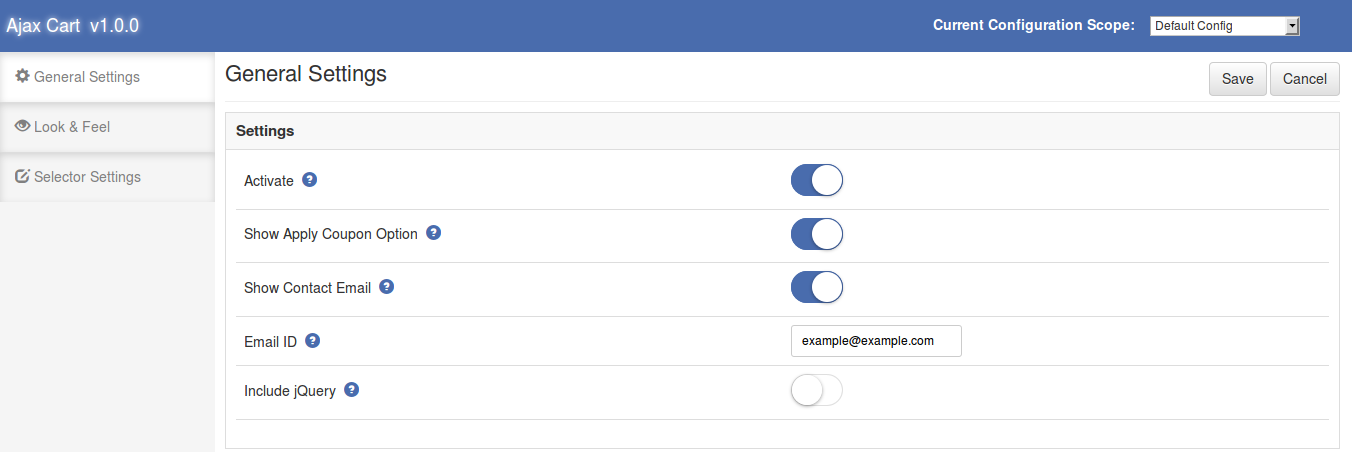
  • Activate: Enables or Disables the Magento plugin. Switch it on to enable the Magento pop-up cart module.
  • Show Apply Coupon Option: This option of the Magento ajax cart extension allows the admin to show or hide the apply coupon division on the pop-up window shown on the front website.
  • Show Contact Email: Switch on this option of Magento Ajax Cart Extension to show the Contact Email option on the pop-up cart.
  • Email ID: This field of Magento add to cart popup extension offers the admin to set the default email id for the contact email option shown on the front. By default, the email id of the store admin will be filled in the field.
  • Include jQuery: This option of the Magento add to cart ajax popup allows us to include jQuery in our Magento module.

2. Look and Feel of Magento Ajax Cart Extension

This tab of Ajax add to cart extension is used to customize the pop-up window shown in the front.
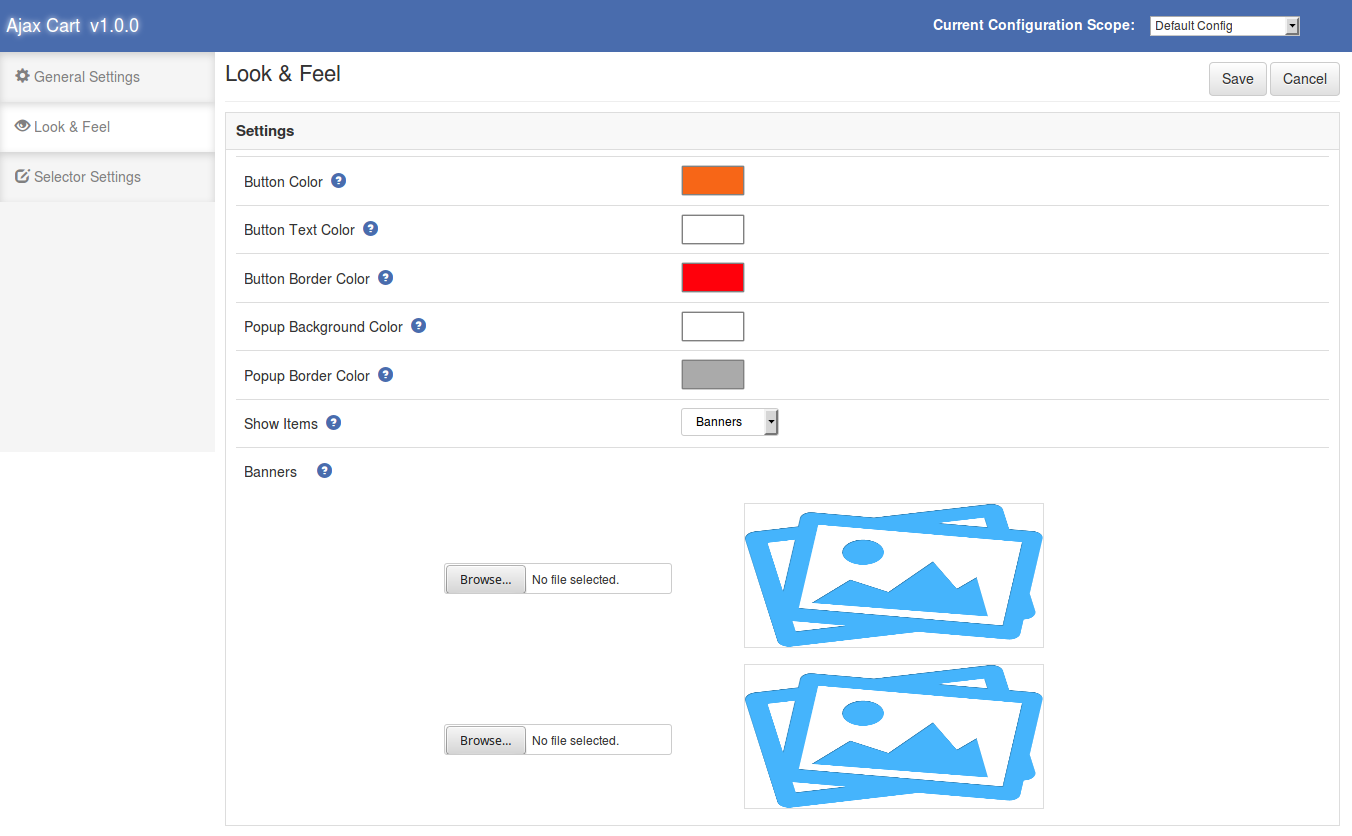
  • Button Color: This option of Magento cart popup extension changes the background color of the checkout button.
  • Button Text Color: Color of the text shown inside the checkout button on the pop-up. The admin can change the text color of this Magento ajax cart popup extension button.
  • Button Border Color: Color of the border of the button can be changed using this option of Magento add to cart popup extension.
  • Popup Background Color: Background color of the main pop-up window is set from this Magento add to cart ajax popup module.
  • Popup Border Color: Background color of the main pop-up window is set from this field of Ajax add to cart extension.
  • Show Items: This option of the Magento Ajax Cart Extension is to show the banners or the top selling items on the front pop-up window. When this option is selected as “None”, no item is shown on the pop-up. If this option is selected as “Top Selling” then 4 most top-selling products are shown on the right panel on pop-up window and if selected as “Banners” then a decision is shown from where we can choose the banners to show on the front of this Magento extension.

3. Selector Settings of Magento Ajax Cart Extension

Selector Settings tab of the Magento add to cart ajax popup is used to make the module work in case checkout buttons have different class names. The field of Magento plugin has the following options:
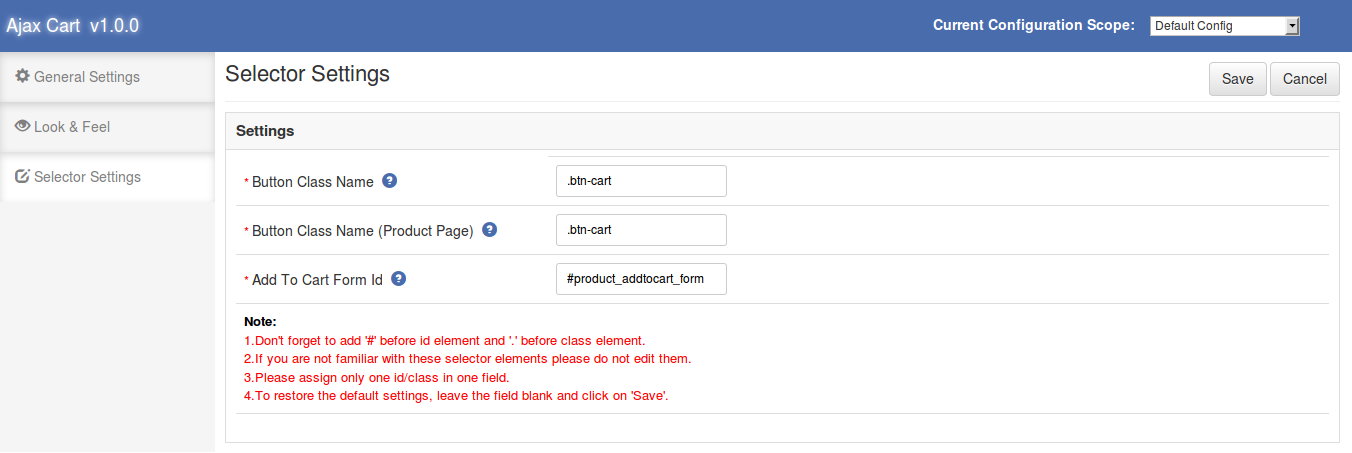
Button Class Name: By default this field of Magento pop-up cart extension is auto-filled. If the Magento module still does not work then we have to enter the correct class name for the checkout buttons shown on the front site (except product view page). To get the class name of the button right click on the “Add to cart” button and click on “Inspect Element”.
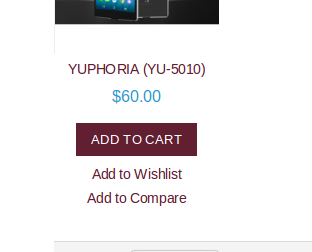
When the inspector opens find the class name inside “button” tag.

Take a look at following image.
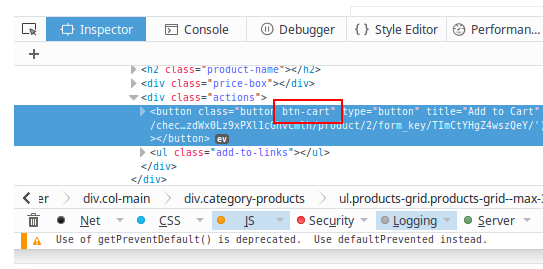
  • Button Class Name (Product Page): This field of Magento popup cart is also filled by default. To get the class name of the “Add to cart” button shown on product view page. Go to the product view page of Magento Ajax Cart Extension and follow the same process as shown above.
  • Add To Cart Form Id: This field of Magento Ajax Cart Extension is also filled by default. To change the form id of the Magento Ajax Cart Extension, Go to the product view page and right click on the “add to cart” button then click on the “Inspect Element”. When inspector opens to find the form as shown in the below image.
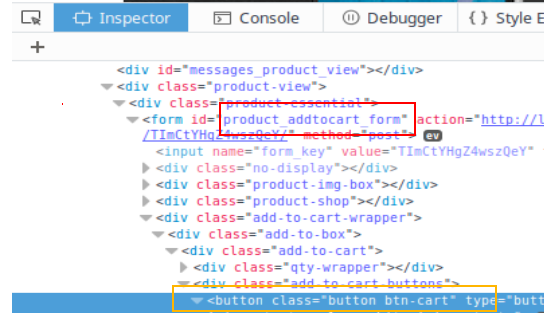
 

Yellow box is the location of the “Add to cart” button and the red box is the location to find the id of the form.

Store Front End of Magento Ajax Cart Extension:

When the Magento add to cart ajax popup module is enabled and the user clicks on the “Add to cart” button, a pop-up is opened. The product is added to the cart and sown in the pop-up. The Magento Ajax Cart Extension allows us to update product quantity or remove them from the cart. From the popup, the user can go to checkout and apply for the coupon also.
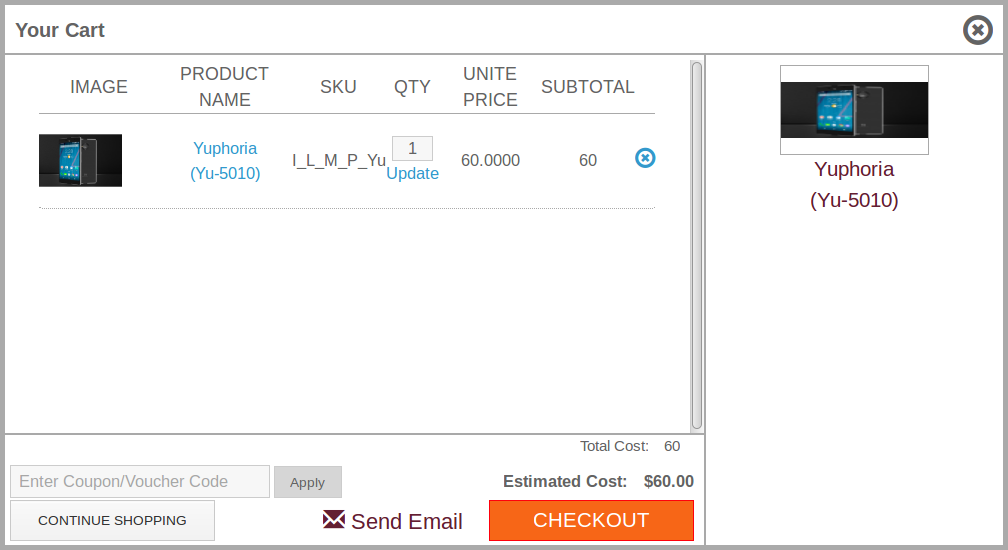
  • To update the quantity of the product enter the quantity in the input field and click on the update link of the Magento Extension.
  • To remove a product from the pop-up, click on the cross icon shown in front of every product row.
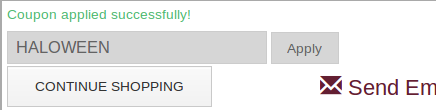
  • To apply the coupon, switch on the “Show Apply Coupon” option from admin panel of the Magento cart popup extension and the coupon division will be visible on the front pop-up cart. Enter the coupon code in the input field of the Magento Ajax Cart Extension and click on the “Apply” button.
To send mail for any help or suggestions, click on the “Send Email” option. A window will open, from where the user can send email to the admin.

Watch the video tutorial of Magento Ajax Cart Extension here:

Click here for Admin Demo of Magento Ajax Cart Extension and Front Demo of Magento Ajax Cart Extension.

5 Questions to ask while going for an OpenCart Platform

It is important to opt the right eCommerce platform for the growth and development of your online business. The successful operation and performance of an eCommerce website depend upon the right selection of the eCommerce platform. You need to take this crucial decision with utmost attention and care in order to grab the maximum site conversions. This is because any random eCommerce platform can’t help you win desired conversions and product sales for your site.

Out of the various eCommerce platforms such as Magento, OpenCart, PrestaShop, Shopify, WooCommerce, 3d Cart and others, OpenCart is definitely a good choice to go ahead. The OpenCart is packed with various useful OpenCart extensions and themes that can together make your site more engaging. Here are the 5 questions that you need to ask your OpenCart development services company for a promising online store.

Did your company provide you the required level of support?

In this competitive business environment, it is important to check the level of support provided by your OpenCart development services company in order to tackle various issues. No site owner would like to be left alone at the time of any website issues and this is where any effective OpenCart development services can be of great help.

Do that company take care of your site backup?

While making the transition onto an OpenCart platform from any other existing eCommerce platform, it is important to initiate the complete backup of your website. You can take the help of any eCommerce backup extension that can help in providing quick database backup of the website within no time.

Is your company offering you a shared hosting service or a dedicated server?

Dedicated server hosting can reduce the chances of slow website loading and server response time.

Most of the site owners are facing this critical question about

Whether to go for a shared web hosting service for their OpenCart site or choose a dedicated server. While the former seems to be the good option in terms of operating cost, there is also associated problem with it. If one of the websites is having certain security issues, it might affect the other websites that are sharing the same hosting server.

However, in the case of a dedicated server, OpenCart site owners don’t have to face any server uptime issues, bandwidth issues, disk storage space requirements, and other such problems. So, make the right selection based on your business and budget requirements.

Are they able to handle your future business requirements?

With the growth of your business, new customers are added on to your site and the customer traffic is also increased accordingly. You need to ask out your company to be hired about how are they going to handle the large traffic volume, how will they respond to higher server requests, how will they cater to the growing bandwidth requirement of the company and other such business concerns. If they can answer your question effectively, you need to avail the expertise of that OpenCart development company for your site.

Are they providing adequate server uptime?

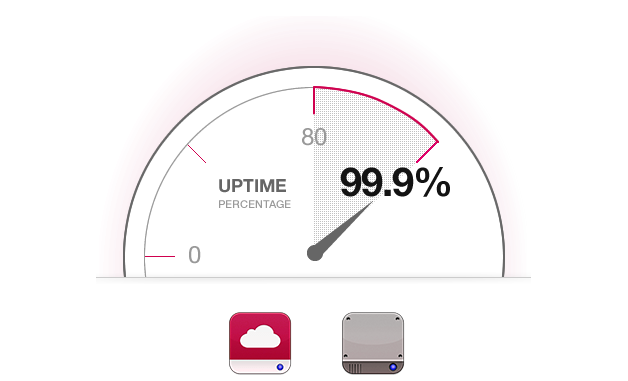
Higher server uptime means the fewer chances of network issues in your site for optimum business performance.

Your site server needs to perform effectively for the faster loading and performance of your website. Do ask your eCommerce services provider company about their average server uptime in order to analyze the performance of your website. Always remember that lower the server uptime, greater will be the loading time of your OpenCart site. It is important to hire the right company that can offer you an average percentage uptime of at least 99 percent in order to ensure the smooth performance of your eCommerce website.

Conclusion

The field of eCommerce is both promising and equally challenging also. You can either grab maximum conversions and sales for your site within a short period of time or it can be a case of total business failure. Using the right eCommerce platform plays a decisive role in the performance of your eCommerce site, so make the right selection for your unprecedented business growth. If you are failed in this critical task, your eCommerce website will certainly face a tough day in terms of conversion rates, product sales and customer engagement.

This Would Also Interest You:

5 Fragen, die Sie sich stellen müssen, wenn Sie sich für eine OpenCart-Plattform entscheiden

Es ist wichtig, die richtige eCommerce-Plattform für das Wachstum und die Entwicklung Ihres Online-Geschäfts zu wählen. Der erfolgreiche Betrieb und die Performance einer E-Commerce-Website hängen von der richtigen Auswahl der E-Commerce-Plattform ab. Sie müssen diese entscheidende Entscheidung mit größter Aufmerksamkeit und Sorgfalt treffen, um die maximale Website-Conversions. Dies liegt daran, dass jede beliebige E-Commerce-Plattform nicht dazu beitragen kann, gewünschte Conversions und Produktverkäufe für Ihre Website zu erzielen.

Aus den verschiedenen eCommerce-Plattformen wie Magento, OpenCart, PrestaShop, Shopify, WooCommerce, 3d Cart und anderen ist OpenCart definitiv eine gute Wahl, um weiter zu machen. Der OpenCart ist vollgepackt mit verschiedenen nützlichen OpenCart-Erweiterungen und Themen, die zusammen Ihre Seite ansprechender machen. Hier sind die 5-Fragen, die Sie fragen müssen OpenCart Entwicklungsdienstleister für einen vielversprechenden Online-Shop.

Hat Ihr Unternehmen Ihnen die erforderliche Unterstützung geboten?

In diesem wettbewerbsintensiven Geschäftsumfeld ist es wichtig, den Grad der Unterstützung durch Ihr OpenCart-Entwicklungsdienstleistungsunternehmen zu überprüfen, um verschiedene Probleme anzugehen. Kein Website-Inhaber möchte bei irgendwelchen Website-Problemen in Ruhe gelassen werden, und hier können effektive OpenCart-Entwicklungsdienste eine große Hilfe sein.

Ist diese Firma für die Sicherung Ihrer Site verantwortlich?

Wenn Sie von einer anderen bestehenden E-Commerce-Plattform auf eine OpenCart-Plattform umsteigen, ist es wichtig, die vollständige Sicherung Ihrer Website zu initiieren. Sie können die Hilfe einer beliebigen eCommerce-Backup-Erweiterung nutzen, die Ihnen dabei helfen kann, eine schnelle Datenbanksicherung der Website in kürzester Zeit durchzuführen.

Bietet Ihr Unternehmen Ihnen einen Shared-Hosting-Service oder einen dedizierten Server an?

[Caption id = "attachment_2135" align = "Aligncenter" width = "492"] Dediziertes Server-Hosting kann die Wahrscheinlichkeit eines langsamen Ladens der Website und der Antwortzeit des Servers verringern. [/ Caption]

Die meisten Website-Inhaber stehen vor dieser kritischen Frage

Ob für einen gemeinsamen Webhosting-Service für ihre OpenCart-Website oder wählen Sie einen dedizierten Server. Während Ersteres in Bezug auf die Betriebskosten die beste Option zu sein scheint, gibt es auch damit verbundene Probleme. Wenn eine der Websites bestimmte Sicherheitsprobleme aufweist, kann dies Auswirkungen auf die anderen Websites haben, die denselben Hosting-Server verwenden.

Im Fall eines dedizierten Servers OpenCart Site Besitzer müssen sich nicht mit Server-Uptime-Problemen, Bandbreitenproblemen, Festplattenspeicheranforderungen und anderen derartigen Problemen auseinandersetzen. Treffen Sie also die richtige Auswahl basierend auf Ihren Geschäfts- und Budgetanforderungen.

Sind sie in der Lage, Ihre zukünftigen Geschäftsanforderungen zu bewältigen?

Mit dem Wachstum Ihres Unternehmens werden neue Kunden auf Ihrer Website hinzugefügt und der Kundenverkehr wird entsprechend erhöht. Sie müssen sich bei Ihrem Unternehmen erkundigen, wie das große Datenaufkommen gehandhabt wird, wie sie auf höhere Serveranforderungen reagieren, wie sie die wachsende Bandbreitenanforderung des Unternehmens und andere Geschäftsanforderungen erfüllen. Wenn sie Ihre Frage effektiv beantworten können, müssen Sie das Know-how dieser OpenCart-Entwicklungsfirma für Ihre Website nutzen.

Stellen sie eine ausreichende Serververfügbarkeit bereit?

[Caption id = "attachment_2136" align = "Aligncenter" width = "564"] Höhere Serververfügbarkeit bedeutet, dass Netzwerkprobleme auf Ihrer Website für eine optimale Geschäftsleistung weniger wahrscheinlich sind. [/ Caption]

Ihr Standortserver muss effektiv für das schnellere Laden und ausführen Leistung Ihrer Website. Fragen Sie Ihren eCommerce-Dienstanbieter nach der durchschnittlichen Serververfügbarkeit, um die Leistung Ihrer Website zu analysieren. Denken Sie immer daran, dass die Ladezeit Ihrer OpenCart-Site verlängert wird. Es ist wichtig, das richtige Unternehmen einzustellen, das Ihnen eine durchschnittliche prozentuale Verfügbarkeit von mindestens 99 bietet, um die reibungslose Leistung Ihrer eCommerce-Website zu gewährleisten.

Fazit

Der Bereich E-Commerce ist sowohl vielversprechend als auch gleichermaßen anspruchsvoll. Du kannst entweder Nimm maximale Conversions und Verkäufe für Ihre Website innerhalb einer kurzen Zeit oder es kann ein Fall von Total Business Scheitern sein. Die Nutzung der richtigen eCommerce-Plattform spielt eine entscheidende Rolle für die Leistung Ihrer eCommerce-Website. Treffen Sie also die richtige Wahl für Ihr beispielloses Geschäftswachstum. Wenn Sie bei dieser kritischen Aufgabe versagt haben, wird Ihre eCommerce-Website sicherlich einen harten Tag in Bezug auf Conversion-Raten, Produktverkäufe und Kundenbindung erleben.

Das würde Sie auch interessieren:

5 Domande da porsi mentre sei alla ricerca di una piattaforma OpenCart

È importante scegliere la giusta piattaforma eCommerce per la crescita e lo sviluppo del tuo business online. L'operazione e le prestazioni di successo di un sito Web eCommerce dipendono dalla giusta scelta della piattaforma eCommerce. È necessario prendere questa decisione cruciale con la massima attenzione e attenzione al fine di afferrare il conversioni massime del sito. Questo perché qualsiasi piattaforma eCommerce casuale non può aiutarti a vincere le conversioni e le vendite di prodotti desiderate per il tuo sito.

Tra le varie piattaforme di eCommerce come Magento, OpenCart, PrestaShop, Shopify, WooCommerce, 3d Cart e altri, OpenCart è sicuramente una buona scelta per andare avanti. OpenCart è pieno di vari utili Estensioni OpenCart e temi che possono rendere il tuo sito più coinvolgente. Ecco le domande 5 che devi chiedere al tuo Società di servizi di sviluppo OpenCart per un negozio online promettente.

La tua azienda ti ha fornito il livello di supporto richiesto?

In questo ambiente di business competitivo, è importante verificare il livello di supporto fornito dalla società di servizi di sviluppo OpenCart per affrontare vari problemi. Nessun proprietario del sito vorrebbe essere lasciato solo al momento di eventuali problemi del sito Web e questo è dove qualsiasi efficace servizio di sviluppo OpenCart può essere di grande aiuto.

Questa azienda si occupa del backup del tuo sito?

Mentre si effettua la transizione su una piattaforma OpenCart da qualsiasi altra piattaforma eCommerce esistente, è importante avviare il backup completo del proprio sito Web. È possibile avvalersi dell'aiuto di qualsiasi estensione di backup eCommerce che possa aiutare a fornire rapidamente il backup del database del sito Web in pochissimo tempo.

La tua azienda ti offre un servizio di hosting condiviso o un server dedicato?

[Caption id = "attachment_2135" align = "alignCenter" width = "492"] L'hosting dedicato del server può ridurre le possibilità di caricamento lento del sito Web e tempo di risposta del server. [/ Caption]

La maggior parte dei proprietari dei siti si trova di fronte a questa domanda critica

Se andare per un servizio di web hosting condiviso per il loro sito OpenCart o scegliere un server dedicato. Mentre il primo sembra essere la buona opzione in termini di costi operativi, vi è anche un problema associato. Se uno dei siti Web presenta determinati problemi di sicurezza, potrebbe influire sugli altri siti Web che condividono lo stesso server di hosting.

Tuttavia, nel caso di un server dedicato, Sito OpenCart i proprietari non devono affrontare problemi di uptime del server, problemi di larghezza di banda, requisiti di spazio su disco e altri problemi simili. Quindi, effettua la giusta selezione in base ai requisiti aziendali e di budget.

Sono in grado di gestire i tuoi futuri requisiti aziendali?

Con la crescita della tua attività, nuovi clienti vengono aggiunti al tuo sito e anche il traffico dei clienti aumenta di conseguenza. Hai bisogno di chiedere alla tua azienda di essere ingaggiata su come gestiranno il grande volume di traffico, come risponderanno alle richieste dei server più alte, in che modo saranno in grado di soddisfare il crescente fabbisogno di larghezza di banda dell'azienda e altri problemi di business. Se possono rispondere efficacemente alla tua domanda, devi avvalerti dell'esperienza di tale società di sviluppo OpenCart per il tuo sito.

Stanno fornendo un tempo di attività del server adeguato?

[Caption id = "attachment_2136" align = "alignCenter" width = "564"] Una maggiore operatività del server significa minori possibilità di problemi di rete nel vostro sito per prestazioni aziendali ottimali. [/ Caption]

Il server del tuo sito deve essere efficiente per il caricamento e il caricamento più rapidi prestazioni del tuo sito web. Chiedi al tuo fornitore di servizi di eCommerce circa il tempo di attività del server medio per analizzare le prestazioni del tuo sito web. Ricorda sempre che ridurre il tempo di attività del server, maggiore sarà il tempo di caricamento del tuo sito OpenCart. È importante assumere la compagnia giusta in grado di offrire una percentuale media di uptime di almeno 99 per cento al fine di garantire la regolare performance del tuo sito eCommerce.

Conclusione

Il settore dell'eCommerce è sia promettente che altrettanto impegnativo. Puoi o ottieni le conversioni massime e le vendite per il tuo sito entro un breve periodo di tempo o può essere un caso di fallimento aziendale totale. L'utilizzo della giusta piattaforma eCommerce gioca un ruolo decisivo nelle prestazioni del tuo sito eCommerce, quindi scegli la scelta giusta per la tua crescita aziendale senza precedenti. Se non si riesce in questa attività critica, il sito Web eCommerce dovrà affrontare una giornata difficile in termini di tassi di conversione, vendite di prodotti e coinvolgimento del cliente.

Questo ti interesserebbe anche:

5 Pytania, które należy zadać, przechodząc na platformę OpenCart

Ważne jest, aby wybrać odpowiednią platformę eCommerce do rozwoju i rozwoju swojej działalności online. Pomyślne działanie i wydajność witryny eCommerce zależy od właściwego wyboru platformy eCommerce. Musisz podjąć tę kluczową decyzję z najwyższą uwagą i troską, aby złapać maksymalna konwersja stron. Dzieje się tak dlatego, że każda losowa platforma handlu elektronicznego nie może pomóc w uzyskaniu pożądanych konwersji i sprzedaży produktów dla Twojej witryny.

Z różnych platform handlu elektronicznego, takich jak Magento, OpenCart, PrestaShop, Shopify, WooCommerce, 3d Cart i inne, OpenCart to zdecydowanie dobry wybór. OpenCart ma wiele przydatnych funkcji Rozszerzenia OpenCart i motywy, dzięki którym Twoja strona będzie bardziej wciągająca. Oto pytania 5, które musisz zadać Firma deweloperska OpenCart na obiecujący sklep internetowy.

Czy Twoja firma zapewniała wymagany poziom wsparcia?

W tym konkurencyjnym środowisku biznesowym ważne jest sprawdzenie poziomu wsparcia zapewnianego przez Twoją firmę usługową OpenCart w celu rozwiązania różnych problemów. Żaden właściciel witryny nie chciałby zostawać sam na sam z żadnymi problemami z witryną. W tej sytuacji skuteczne usługi programistyczne OpenCart mogą być bardzo pomocne.

Czy ta firma zajmuje się tworzeniem kopii zapasowej witryny?

Przechodząc na platformę OpenCart z jakiejkolwiek innej istniejącej platformy e-commerce, ważne jest, aby zainicjować pełną kopię zapasową witryny. Możesz skorzystać z pomocy dowolnego rozszerzenia kopii e-commerce, które może pomóc w szybkim tworzeniu kopii zapasowej bazy danych w krótkim czasie.

Czy Twoja firma oferuje Ci wspólną usługę hostingową lub serwer dedykowany?

[Caption id = "attachment_2135" align = "aligncenter" width = "492"] Hosting dedykowanego serwera może zmniejszyć szanse na powolne ładowanie strony i czas reakcji serwera. [/ Caption]

Większość właścicieli witryn napotyka na to krytyczne pytanie

Niezależnie od tego, czy chcesz udostępnić usługę hostingową dla swojej witryny OpenCart, czy wybrać dedykowany serwer. Podczas gdy pierwsza wydaje się być dobrą opcją pod względem kosztów operacyjnych, istnieje również związany z nią problem. Jeśli jedna z witryn ma pewne problemy z bezpieczeństwem, może to wpłynąć na inne witryny, które współdzielą ten sam serwer hostingowy.

Jednak w przypadku serwera dedykowanego Witryna OpenCart Właściciele nie muszą mierzyć się z problemami dotyczącymi czasu pracy serwera, problemami z przepustowością, wymaganiami dotyczącymi miejsca na dysku i innymi tego typu problemami. Dokonaj właściwego wyboru w oparciu o wymagania biznesowe i budżetowe.

Czy są w stanie poradzić sobie z przyszłymi wymaganiami biznesowymi?

Wraz z rozwojem Twojej firmy, nowi klienci są dodawani do Twojej witryny, a ruch związany z klientami jest odpowiednio zwiększany. Musisz poprosić firmę, aby została zatrudniona, w jaki sposób mają obsłużyć duży ruch, w jaki sposób odpowiedzą na wyższe żądania serwerów, w jaki sposób zaspokoją rosnące zapotrzebowanie na przepustowość firmy i inne tego typu problemy biznesowe. Jeśli potrafią skutecznie odpowiedzieć na twoje pytanie, musisz skorzystać z wiedzy specjalistycznej tej firmy deweloperskiej OpenCart dla swojej witryny.

Czy zapewniają one odpowiedni czas pracy serwera?

[Caption id = "attachment_2136" align = "aligncenter" width = "564"] Wyższy czas pracy serwera oznacza mniejsze szanse problemów z siecią w Twojej witrynie, co zapewnia optymalną wydajność biznesową. [/ Caption]

Twój serwer witryny musi wydajnie działać, aby przyspieszyć ładowanie i wydajność Twojej witryny. Poproś swojego dostawcę usług e-commerce o średni czas pracy serwera, aby przeanalizować wydajność Twojej witryny. Zawsze pamiętaj, że mniej czasu pracy serwera, większy będzie czas ładowania twojej witryny OpenCart. Ważne jest, aby zatrudnić odpowiednią firmę, która może zaoferować średni czas pracy wynoszący co najmniej 99 procent w celu zapewnienia sprawnego działania witryny eCommerce.

Wnioski

Dziedzina eCommerce jest zarówno obiecująca, jak i równie trudna. Możesz albo chwyć maksymalne konwersje i sprzedaż Twojej witryny w krótkim czasie lub może to być przypadek całkowitej porażki biznesowej. Korzystanie z odpowiedniej platformy eCommerce odgrywa decydującą rolę w wydajności Twojej witryny eCommerce, więc dokonaj właściwej selekcji w celu osiągnięcia bezprecedensowego wzrostu biznesu. Jeśli nie spełnisz tego ważnego zadania, Twoja strona internetowa z pewnością będzie musiała sprostać trudnym dniom pod względem współczynników konwersji, sprzedaży produktów i zaangażowania klientów.

To również Cię zainteresuje:

Perguntas 5 para perguntar enquanto vai para uma plataforma OpenCart

É importante optar pela plataforma de e-commerce certa para o crescimento e desenvolvimento do seu negócio online. A operação e o desempenho bem sucedidos de um site de comércio eletrônico dependem da seleção correta da plataforma de e-commerce. Você precisa tomar esta decisão crucial com a maior atenção e cuidado para agarrar o conversões de site máximas. Isso ocorre porque qualquer plataforma de e-commerce aleatória não pode ajudá-lo a obter as conversões desejadas e as vendas de produtos para seu site.

Das várias plataformas de eCommerce, como Magento, OpenCart, PrestaShop, Shopify, WooCommerce, 3d Cart e outros, OpenCart é definitivamente uma boa escolha para ir em frente. O OpenCart é embalado com vários Extensões do OpenCart e temas que podem, em conjunto, tornar o seu site mais envolvente. Aqui estão as perguntas 5 que você precisa perguntar ao seu Empresa de serviços de desenvolvimento OpenCart para uma loja online promissora.

Sua empresa forneceu o nível necessário de suporte?

Nesse ambiente de negócios competitivo, é importante verificar o nível de suporte fornecido pela sua empresa de serviços de desenvolvimento OpenCart para lidar com vários problemas. Nenhum dono de site gostaria de ficar sozinho no momento de qualquer problema no site e é aí que qualquer serviço de desenvolvimento eficaz do OpenCart pode ser de grande ajuda.

Essa empresa cuida do backup do seu site?

Ao fazer a transição para uma plataforma OpenCart a partir de qualquer outra plataforma de comércio eletrônico existente, é importante iniciar o backup completo do seu site. Você pode contar com a ajuda de qualquer extensão de backup do eCommerce que possa ajudar no rápido backup do banco de dados do site em pouco tempo.

Sua empresa está oferecendo um serviço de hospedagem compartilhada ou um servidor dedicado?

[Caption id = "attachment_2135" align = "aligncenter" width = "492"] A hospedagem dedicada do servidor pode reduzir as chances de lentidão no carregamento do site e no tempo de resposta do servidor. [/ Caption]

A maioria dos donos de sites está enfrentando essa questão crítica sobre

Quer ir para um serviço de hospedagem compartilhada para o seu site OpenCart ou escolher um servidor dedicado. Enquanto o primeiro parece ser a boa opção em termos de custo operacional, também há um problema associado a ele. Se um dos sites estiver com problemas de segurança, isso poderá afetar os outros sites que compartilham o mesmo servidor de hospedagem.

No entanto, no caso de um servidor dedicado, Site do OpenCart os proprietários não precisam enfrentar nenhum problema de tempo de atividade do servidor, problemas de largura de banda, requisitos de espaço de armazenamento em disco e outros problemas desse tipo. Portanto, faça a seleção correta com base nos seus requisitos de negócios e orçamento.

Eles são capazes de lidar com seus requisitos futuros de negócios?

Com o crescimento do seu negócio, novos clientes são adicionados ao seu site e o tráfego do cliente também é aumentado de acordo. Você precisa pedir à sua empresa para ser contratada sobre como eles vão lidar com o grande volume de tráfego, como eles responderão a solicitações mais altas do servidor, como eles atenderão à crescente demanda de largura de banda da empresa e a outras preocupações comerciais desse tipo. Se eles puderem responder à sua pergunta com eficácia, você precisará aproveitar a experiência dessa empresa de desenvolvimento do OpenCart para o seu site.

Eles estão fornecendo tempo de atividade adequado do servidor?

[Caption id = "attachment_2136" align = "aligncenter" width = "564"] O maior tempo de atividade do servidor significa menos chances de problemas de rede em seu site para um desempenho comercial ideal. [/ Caption]

O servidor do seu site precisa executar com eficiência o carregamento e desempenho do seu site. Pergunte ao seu provedor de serviços de comércio eletrônico sobre o tempo médio de funcionamento do servidor para analisar o desempenho do seu site. Lembre-se sempre que quanto menor o tempo de atividade do servidor, maior será o tempo de carregamento do seu site OpenCart. É importante contratar a empresa certa, que pode oferecer uma porcentagem média de tempo de atividade de pelo menos 99 por cento, a fim de garantir o bom desempenho do seu site de comércio eletrônico.

Conclusão

O campo do comércio eletrônico é promissor e igualmente desafiador também. Você também pode pegar conversões máximas e vendas para o seu site dentro de um curto período de tempo ou pode ser um caso de falha total do negócio. O uso da plataforma de comércio eletrônico correta desempenha um papel decisivo no desempenho do seu site de comércio eletrônico, portanto, faça a seleção certa para o crescimento do seu negócio sem precedentes. Se você falhar nesta tarefa crítica, seu site de comércio eletrônico certamente enfrentará um dia difícil em termos de taxas de conversão, vendas de produtos e envolvimento do cliente.

Isso também lhe interessaria:

OpenCart Mailigen Integrator – User Manual

Opencart Mailigen Integrator

Opencart Mailigen Integrator is an open-cart plug-in that allows you to automatically synchronize email addresses of customers of your store with your Mailigen account. This plugin will synchronize the emails of users even if they opt out of subscribing to the newsletter. Opencart Mailigen Integrator will provide multiple settings to store owners like synchronizing the customer email as soon as the user enters it in an email field. Opencart Mailigen Integrator can also be configured to synchronize emails from third party email fields on the store.

User Manual

This User Manual will guide you through the Admin Module/Store Front settings and various features of the this Opencart Mailigen Integrator.

Admin Panel

The admin panel have 2 tabs for configuring this plugin, as listed below:

  • General Settings
  • Mailigen Settings

General Settings

General Settings tab have following options:

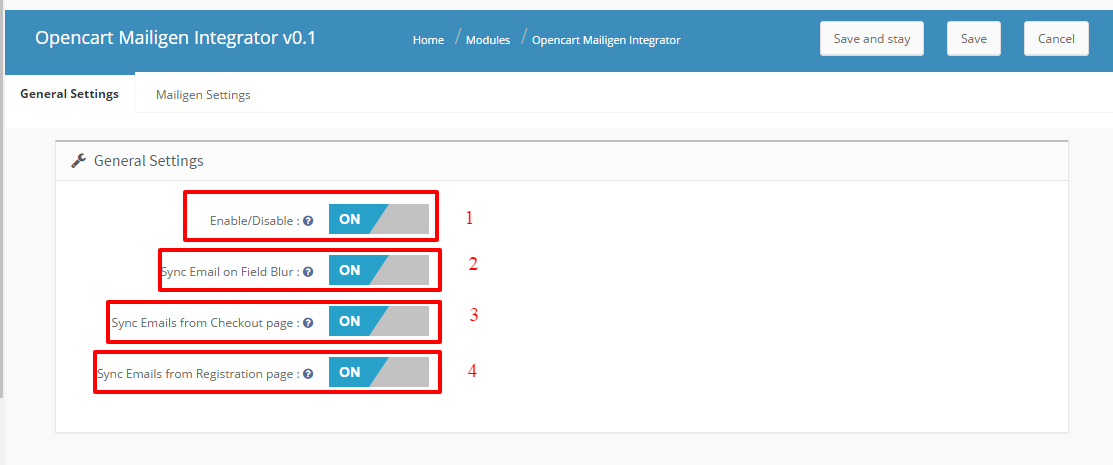
  • Enable/Disable : In this General setting’s tab of Admin panel , Admin will have the option to Enable/ Disable the plugin. This is the global enable switch. On switching this on, the entire module is switched on and similarly switched off on turning it off.
  • Synchronize Email on Blur From Input Field : This option when enabled , module will synchronize the email id on the javascript blur event of email field irrespective of the fact if the user have submitted the form or an error occurred in form submission.
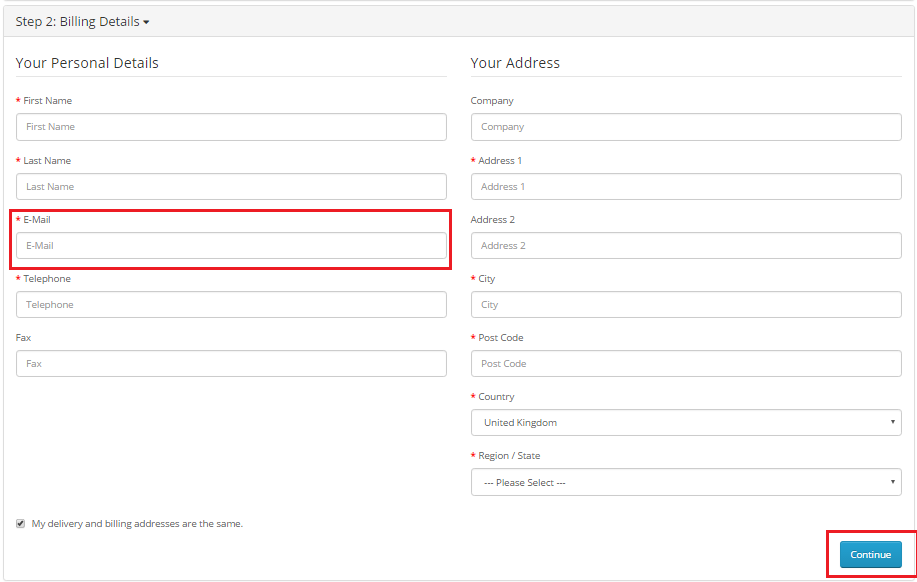
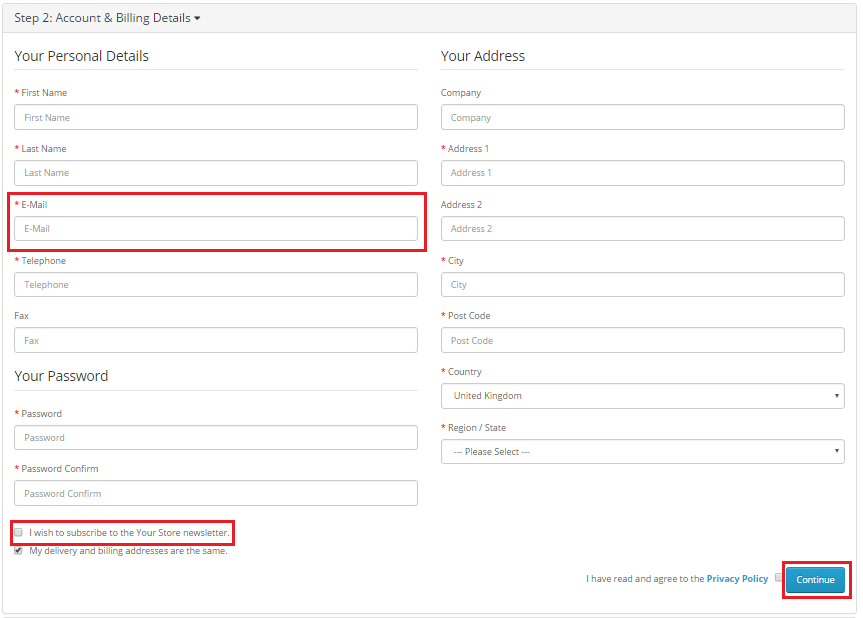
  • Synchronize Email from Checkout page : This option when enabled , module will synchronize the email field values from the checkout page when user fills ‘billing Details’ and click ‘Continue’. Email id will be synchronized even if customers choose not to subscribe to the newsletter.
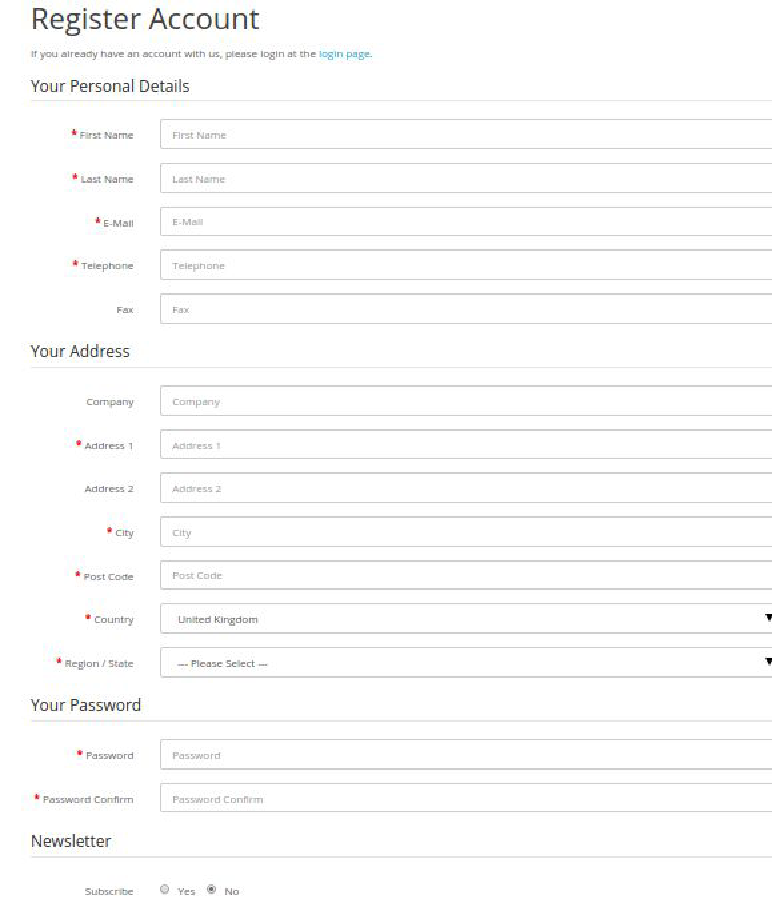
  • Synchronize Email from Registration page : This option when enabled , module will synchronize the email field values from the Registration page. Email id will be synchronized even if customers choose not to subscribe to the newsletter
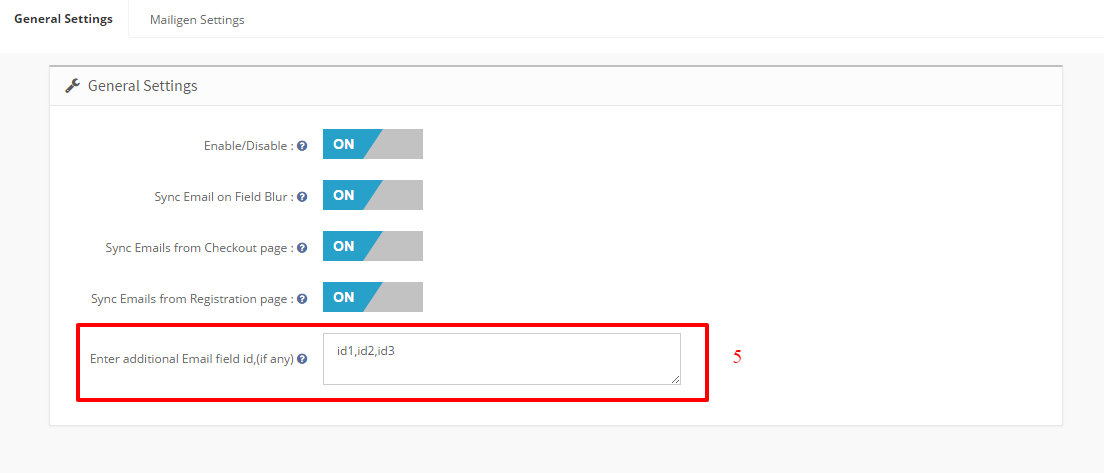
  • Third-party Selectors : This option features a text area that will be hidden and for developer purpose only. This input will be used to synchronize emails from the fields with the given selectors. This option is to synchronize emails from the non-default email fields. This text area will be used to collect comma-separated selectors of the email fields that the user wants to synchronize emails from. The purpose of this field is to enable admin to make module compatible with other newsletter forms which are coming because of theme or third party module.

Mailigen Settings

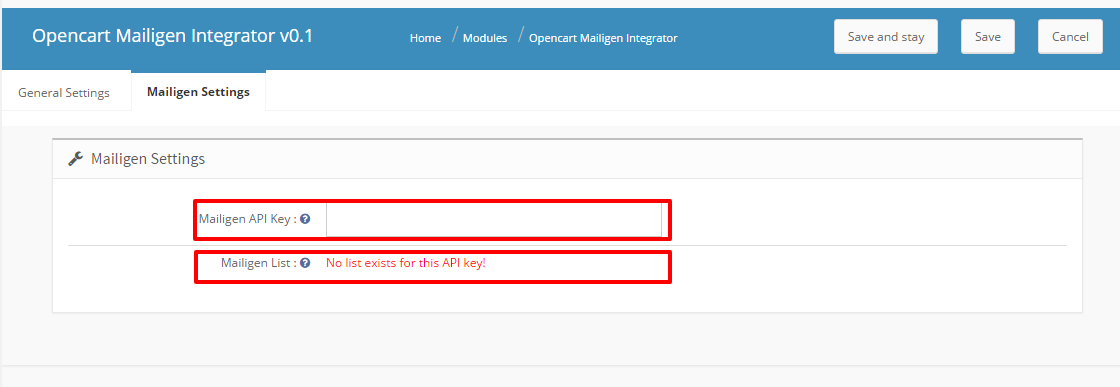
The Mailigen Settings tab will  provide users the interface to provide their Mailigen account credentials so that API connection can be made.

  1. Mailigen API Key : Mailigen API key is the key that the user created on his Mailigen account at www.mailigen.com. This API key will be used to connect to the Mailigen API.
  2. Mailigen Lists : Mailigen lists are those lists that the user has created in his Mailigen account at www.mailigen.com . Mailigen Lists will be available only when a valid Mailigen API key  is provided.

NOTE : If the Mailigen Setting fields > Mailigen API key field is empty then no lists will be shown , but an error message will be shown instead saying ‘No lists available for these credentials’.

Front End

Newsletter Subscription

Whether the customer opts for the newsletter subscription or he do not , In both the cases customer is automatically added to the lists configured in admin panel when clicked on continue.

Registration Page

if the ‘Add module on  Registration Page’ setting is enabled in Admin panel, Then customer will also be added to the configured lists on registration page whether or not he/she chooses the option to subscribe to newsletter.

Checkout Page

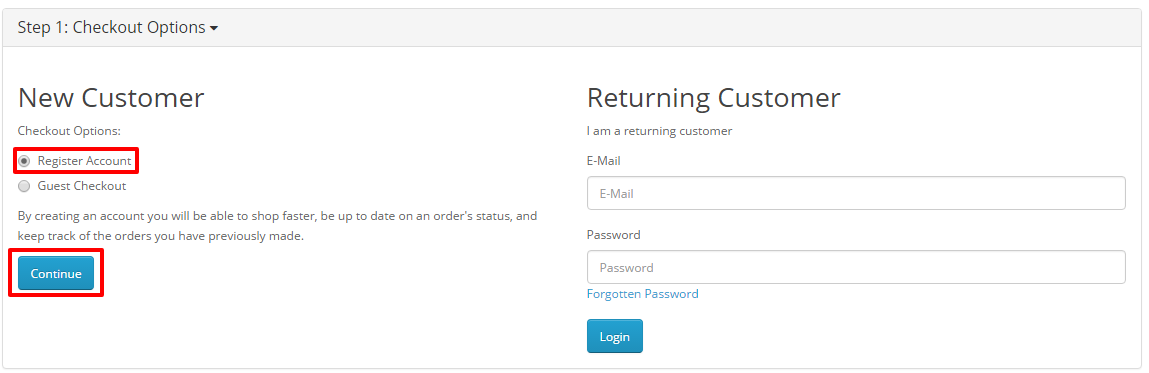
If the ‘Sync Email from checkout page’ is enabled in admin panel,  then on the Checkout page , customer’s email address will be synchronized to the configuration lists , neglecting the fact if the user is logged on in or a guest user.

For logged in customers :

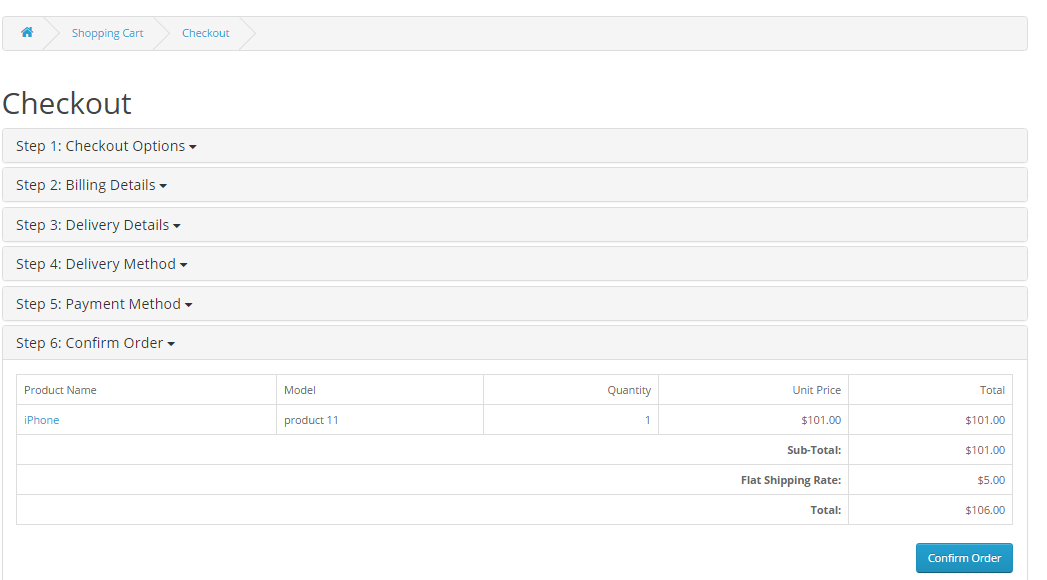
For the logged in customers , If the ‘Sync from Checkout page’ is enabled in admin panel, then on the checkout page, Customer’s email address will be synchronized to the mailigen  configuration lists as soon as the customer ‘Confirm’ the ‘ Billing Details ‘.

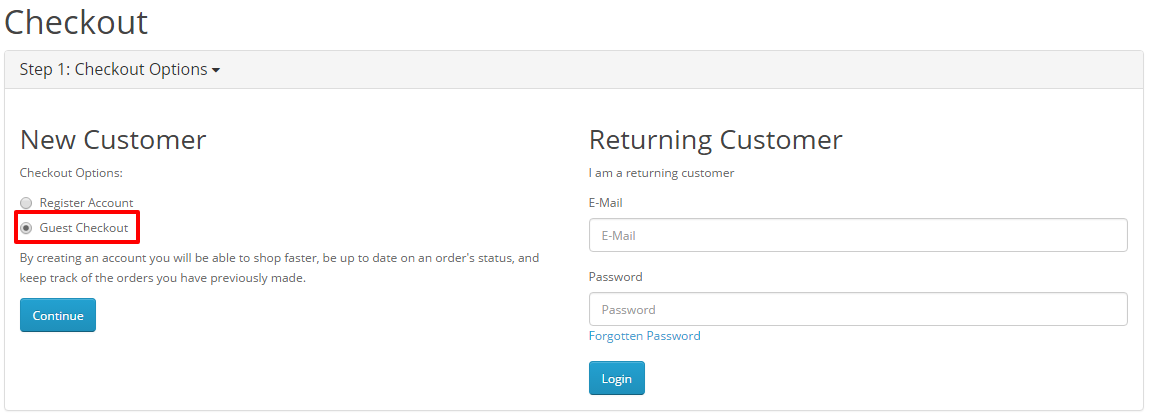
For Guest Users:

For Guest users (users that are not logged in ) , if the ‘Sync Email from checkout page’ and ‘Sync Email on Field Blur’ is enabled in admin panel, then on the Checkout page , customer’s email address will be synchronized to the mailigen configuration lists as soon as the user fills his email address in email field of ‘ Billing Details ‘.

If the ‘Sync Email on Field Blur ‘ is disabled in admin panel, then the entered email will be sent to the configuration lists when the user click on ‘continue’ at the ‘Billing Details’ section of the checkout page.

For Users Registering on Checkout Page

For Guest users (users that are not logged in ) and who want to register , if the ‘Sync Email from checkout page’ and ‘Sync Email on Field Blur’ is enabled in admin panel,  then on the Checkout page , customer’s email address will be synchronized to the mailigen configuration lists as soon as the user fills his email address in email field of ‘ Account & Billing Details ‘.

If the ‘Sync Email on Field Blur ‘ is disabled in admin panel, then the entered email will be sent to the configuration lists when the user click on ‘ Register ‘ at the ‘Account & Billing Details’ section of the checkout page. The email will be sent to the configuration list of mailigen account irrespective of the choices the user made about the subscription to the newsletter.

Installation Manual

  • Download the Opencart Mailigen Integrator package.
  • Unzip the package, and open the /upload folder  and upload the contents of upload folder  via FTP manager (like Filezilla or WinSCP – download here: https://filezilla-project.org/). Folder structure for opencart Mailigen Integrator plugin is shown in the image below:
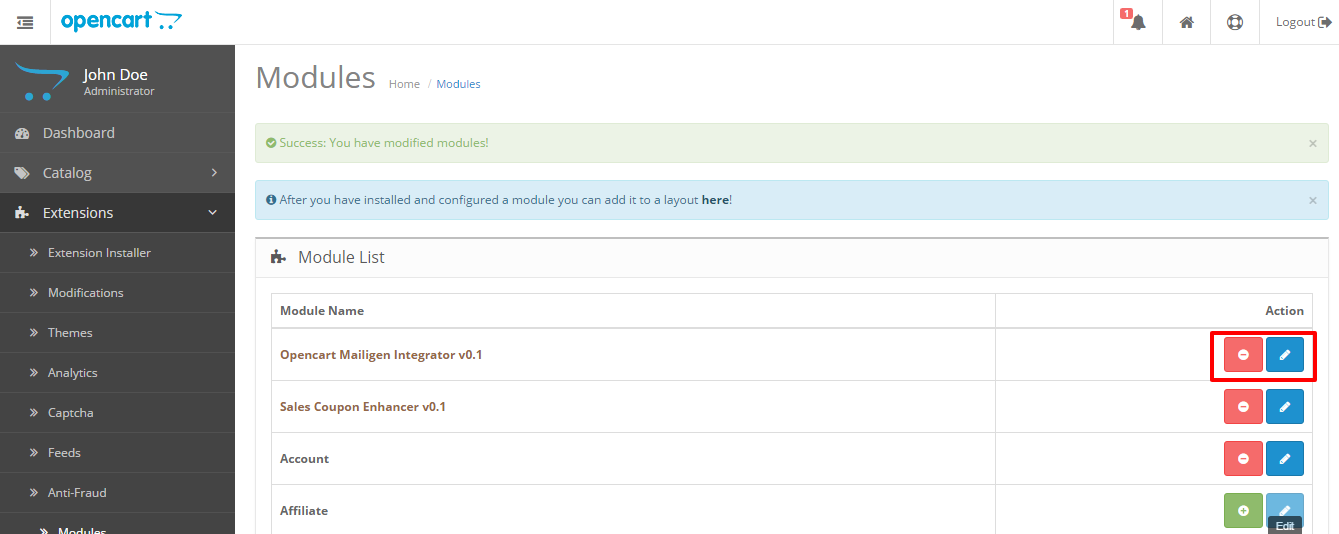
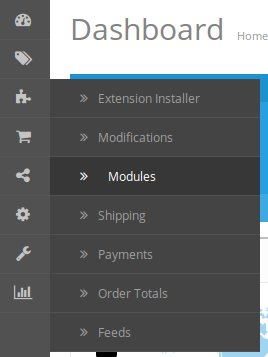
  • You will be able find the Opencart Mailigen Integrator module that is ready to be installed in the “Modules List” in your Opencart store as shown below.

  • Click on the Install link to install. Once the module is installed properly the ‘’ link will be converted to ” and the ” button will be enabled.

Related Stories:

OpenCart Exit Popup Extension – User Manual

OpenCart Exit PopUp Module

Introduction

OpenCart Exit Popup is an addon which when enabled shows a popup in the front website whenever the customer tries to leave the web page from the upper side. The front popup values and functionality can be changed from the admin panel. Admin can also set the cookie life to make the popup disabled for the given amount of time on a same device. The text can also be changed from the admin panel.

Installation

Follow the following steps for installing Exit Popup Module:

  • Download the extension package.
  • Unzip the package on your root folder of Opencart setup via FTP manager (like Filezilla or WinSCP – download here).
  • In Admin Panel go to “Extensions > Modules > Exit Popup>Install”.

  • That is all – Your system is ready.
  • Click Edit link to edit settings.

User Manual

This User Manual Guide users through the Admin Module/Store Front settings and features of the Exit Popup Module.

Admin Module

The Admin Module contains these 7 tabs for settings and view.

  1. General Settings
  2. Display Settings
  3. Look and Feel Settings
  4. Discount Settings
  5. Email Marketing
  6. Email Settings
  7. Statistics

All the information provided below is for the case if Admin has only one store.

In case of more than one store, drop down of store list will be seen. Admin can change store and can set different settings for different store front.

After changing store, settings or values of selected store will be visible.

All the functionality will be same no matter if anyone have 1 store or many. All you have to do is just select the store and save the settings accordingly.

1. General Settings 

The General Settings has the following options:

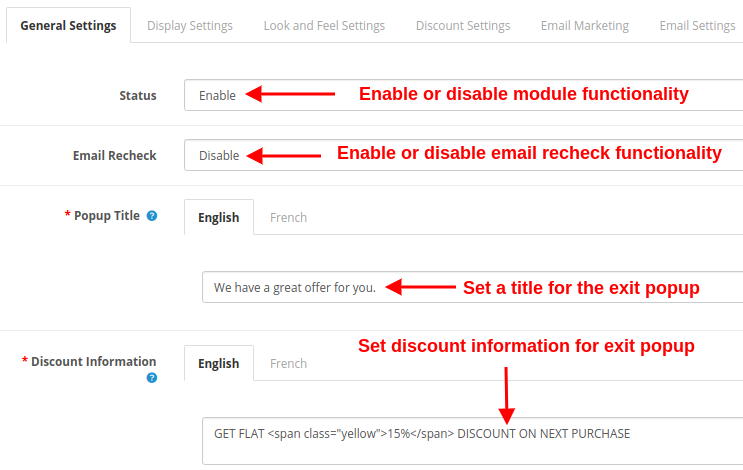
  • Status: This option will enable or disable the complete functionality of the OpenCart Exit Intent popup module.
  • Email Recheck: This option will enable or disable the email recheck functionality of the store. If enabled, no same email address is provided discount voucher more than one time.
  • Popup Title: With this option, you can set the desired title for the exit intent popup in English or French language.
  • Discount Information: You can set any discount information which will be shown over the exit intent popup.

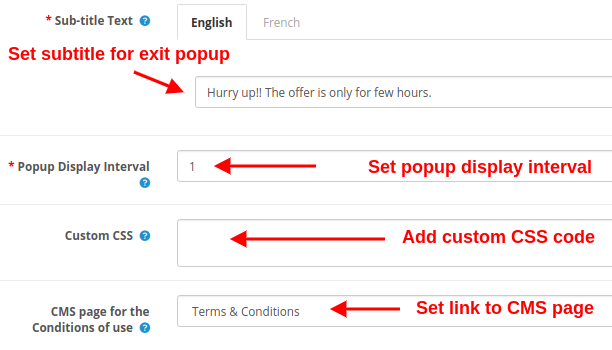
  • Sub-title Text: This field will set the title for the discount or email subscription popup.
  • Popup Display Interval: You can set a fixed time interval (in days) after which the responsive exit popup will be shown to the same user.
  • Custom CSS: This option allows you to include additional CSS code from the backend of this module.
  • CMS Page for the Conditions of use: Using this option, you can set the desired CMS page on which user is redirected when they check the Conditions of use.

2. Display Settings 

  • Minimum Screen Size: This option sets a minimum screen size to display exit popup on frontend.
  • Maximum Display Frequency: This option lets you show the exit popup on frontend after the specified time.
  • Hide Popup After: This option lets you choose the time interval after which the exit popup will hide automatically.
  • Set Time Interval: Using this option, you can set a specific date range when you want to display the exit popup on frontend.
  • Where to Display: This option will let you choose the page where you want to display the exit popup on frontend.
  • When to Display: This option allows you to set display time after which the exit popup will be shown on the frontend to users. The options include immediately, after some time, after scroll down percent, or upon exit.
  • GEO Location: With this option, you can select the countries where you want to show/hide the exit popup to users.

3. Look and Feel Settings

The Look & Feel settings is to change the colors of popup window. It has the following options:

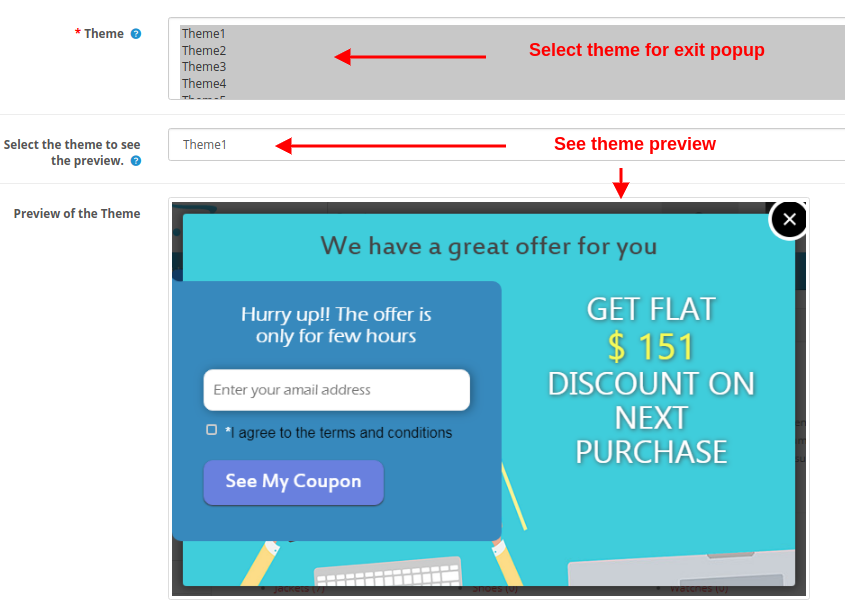
  • Theme: This option allows you to select the theme you want to apply for an exit popup.
  • Select the theme to see a preview: Select the theme you want to check the preview.

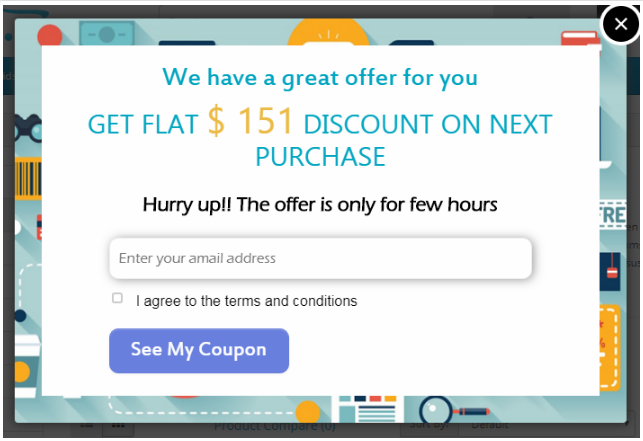
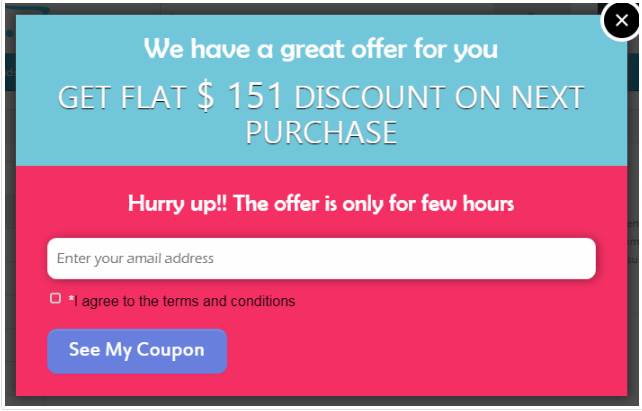
You get five pre-defined templates for exit popup as shown below.

Theme 1:

Theme 2:

Theme 3:

Theme 4:

Theme 5:


4. Discount Settings

The discount which is offered using OpenCart exit pop extension can be configured with the listed settings:

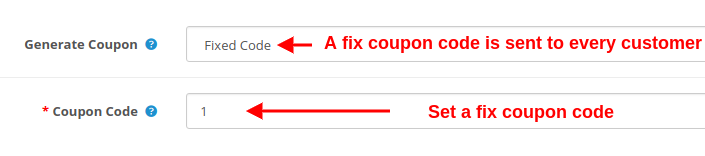
  • Generate Coupon: If generate coupon type is set to “Fixed Code”, a fixed code is sent to every customer with fixed discount value.
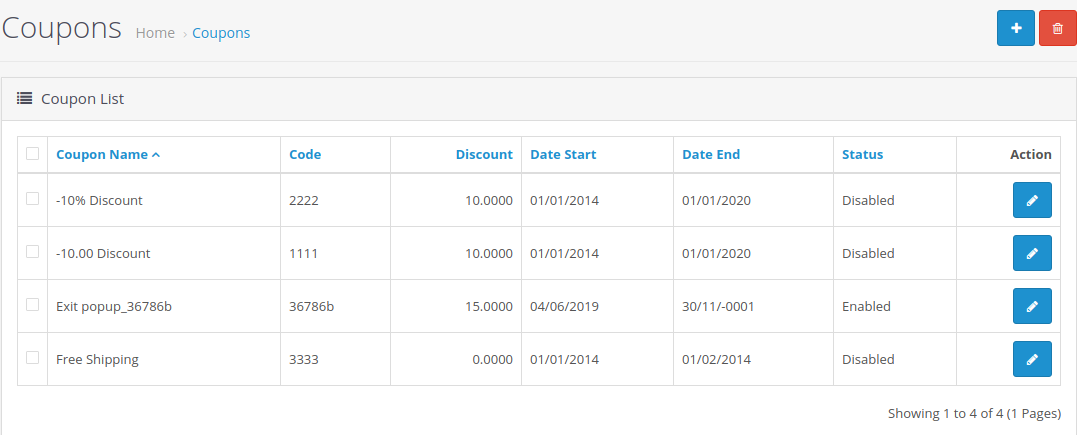
  • Coupon Code: Using this option, you can specify the fixed coupon code which is sent to all the customers. This coupon is generated at the backend under the Coupons section.
This fixed coupon code has a unique code value, discount value, validity period and status(enabled/disabled). You can change these details under the Coupon section of Marketing Tab at the backend as shown below.

The second way to offer a discount is by generating a new coupon code for every user.

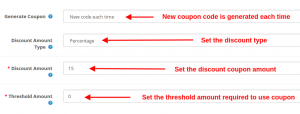
  • Generate Coupon: If generate coupon mode is selected to “New code each time”, then new coupon code is generated each time for every new user.
  • Discount Amount Type: This option allows you to select the coupon discount type as Fixed or Percentage. Percentage discount will be deducted from the total cart balance by given percentage. Another option is Fixed amount. The fixed amount will be deducted from the cart.
  • Discount Amount: Using this option, you can specify the discount which you want to offer to your customers through the exit popup. This discount can be a fixed value or a percentage value.
  • Threshold Amount: This option allows you to set a minimum cart amount which is required to use the discount voucher. The coupon will not work if the cart amount is less than the Minimum Cart Amount.


5. Email Marketing Settings

Email Marketing settings involves the following options:

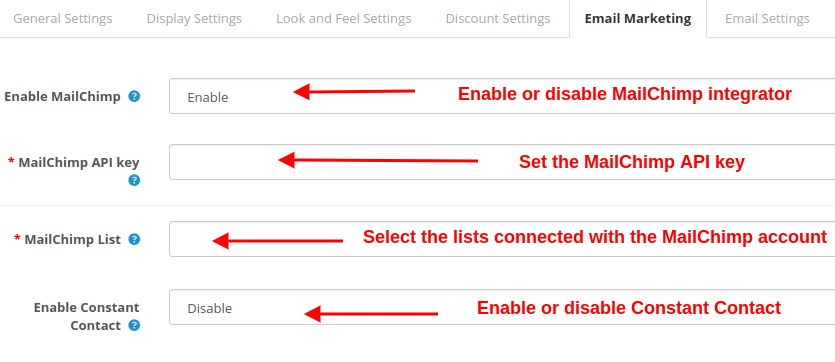
  • Enable MailChimp: Enable or disable MailChimp Integrator services for your eCommerce website.
  • MailChimp API Key: With this option, you can set the API key for connecting with the MailChimp account.
  • MailChimp List: This option shows you the fetched lists connected with the particular MailChimp account. You can select one out of those lists.
  • Enable Constant Contact: This option allows you to enable or disable the Constant Contact integration service. The process is similar for this email marketing service. You have to set the API key, Token, and lists associated with that account.

6. Email Template Settings

Under this section of the OpenCart Exit Intent Popup module, you can configure the discount email sent to the customers. This includes the following options:

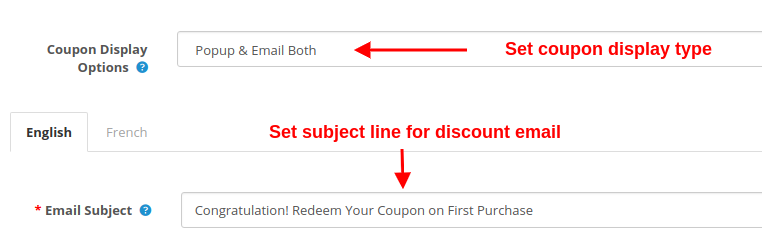
  • Coupon Display Options: This option will set the location where you want to show the discount coupon code: over popup or email. The discount coupon can be shown on exit popup, discount email, or both.
  • Email Subject: With this option, you can set the subject for the discount email.


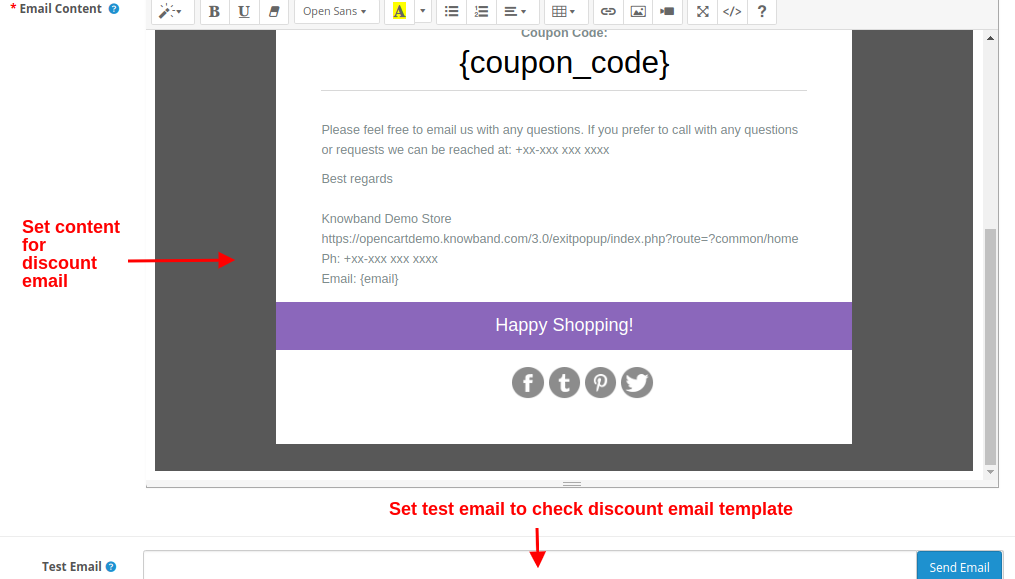
  • Email Content: This option allows you to set the content of the discount email. You can add as much text, images or links in the email content.
  • Test Email: With this option, you can set a test email address which can be used for testing purposes.

7. Statistics

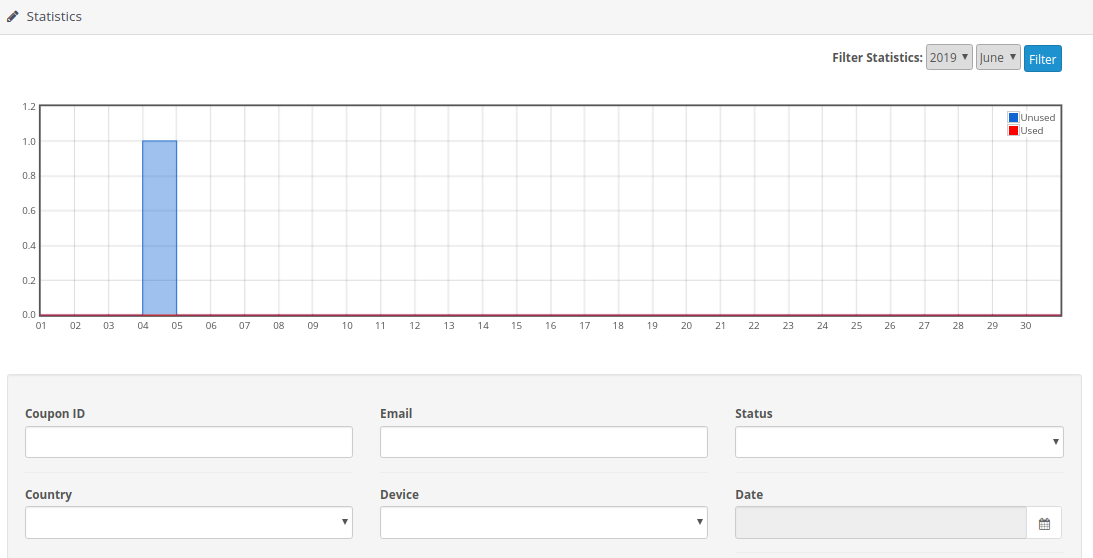
The Statistics feature of Opencart Exit popup extension allows you to check the coupon details in tabular and graphical format. You can see the number of visitors, Visitor stayed, Visitors not stayed, coupons generated, coupons used. You can use filters to filter the data which is getting displayed. By default all data of 8 days is shown.

  • Date Range Filter: In this filter, there are two date pickers and one filter button in visitor statistics. From date and to date are given using date picker and when the Filter button is clicked, all the data between those two dates is shown. If From date is greater than To date than message will be displayed “No Data Found for specified date”.

In Coupon statistics there is one filter and a filter button. Total 7 days stats can be seen.If admin selected date 2016-01-01. Then stats will be from 2015-12-26 to 2016-01-01.

Store Front

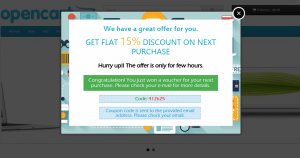
After enabling this plugin the Popup is shown in the front website whenever the customer tries to leave the web page from the upper side.

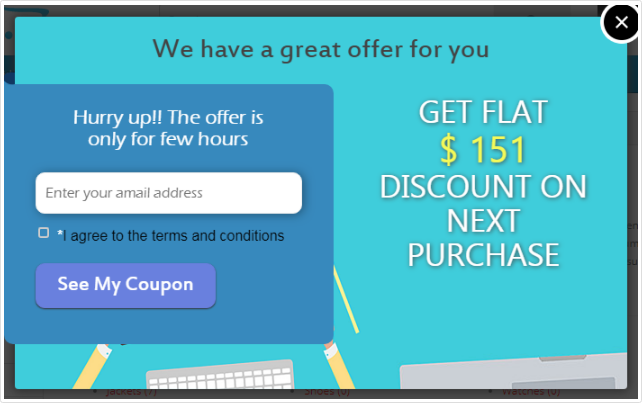
The module at the front-end appears as follows:

Visitor has to enter the email id and click on the button.
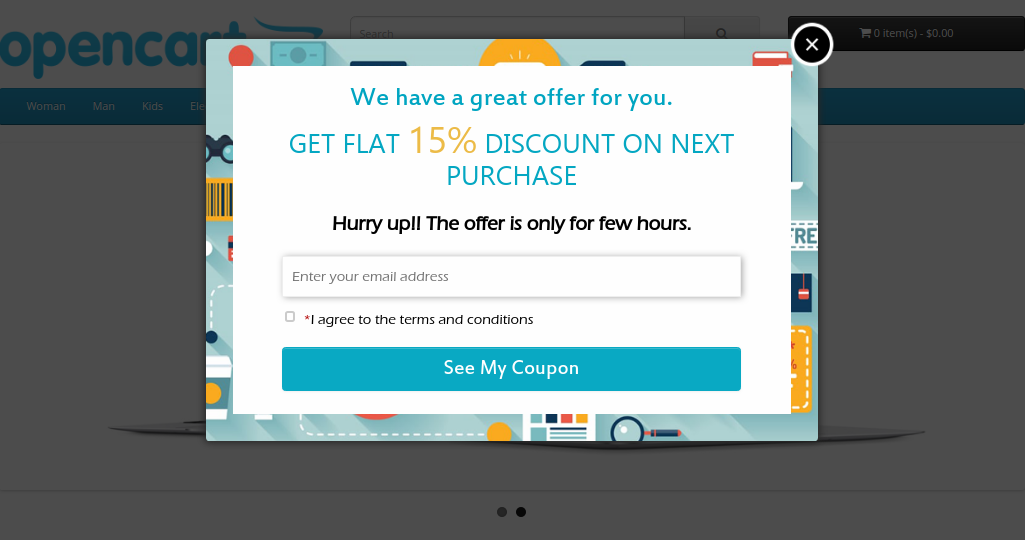
A coupon is generated and the success message is shown in the popup window and an email is sent to the provided email id containing coupon code, Coupon value in percentage or fixed amount and validity.

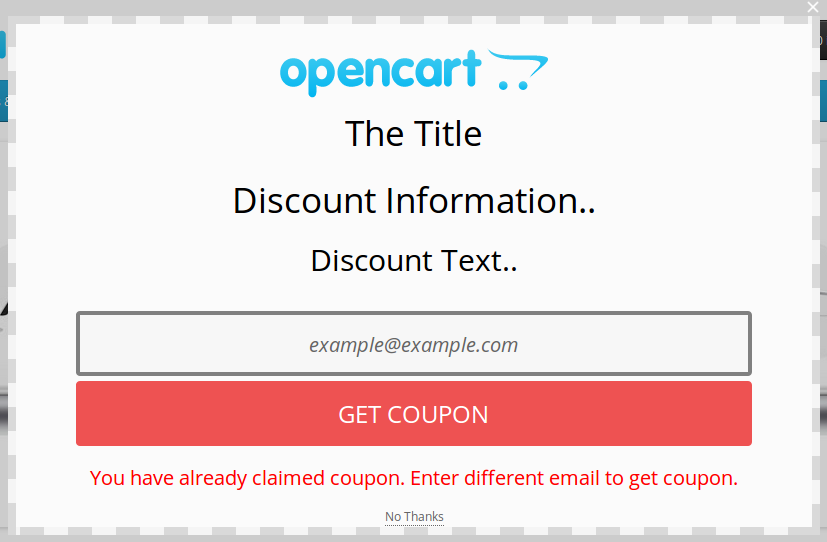
If user has already claimed coupon then a failure message will be seen.

Disclaimer: In case the “Exit” popup does not display at the front, kindly clear the cache or delete the cookies. Sometimes cookies prevent the popup from displaying at front.

OpenCart Better Thank You Page Extension- User Manual

Introduction

Opencart Better Thank you page is a plugin which when enabled makes the order confirmation page look better than the previous OpenCart Order Confirmation page.

Through this Opencart Better Thank You Page plugin, Admin can show three different blocks at order confirmation page:-

  1. Products Block: All the related products which the customer might be interested to buy can be shown.
  2. Discount Block: In this block of the Opencart custom thank you page plugin, discount coupon code will be shown which can be applied for next purchase.
  3. Advertisement Block:  In this block of the Opencart custom success page module, banner can be shown for advertisements.

Installation

Follow the following steps for installing “Better thank you page” Module:

  • Download the extension package.
  • Unzip the package on your root folder of Opencart setup via FTP manager (like Filezilla or WinSCP – download here: https://filezilla-project.org/).
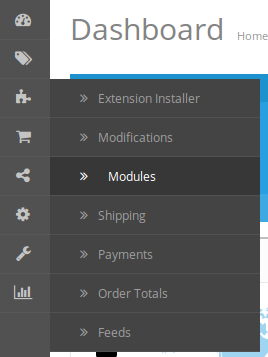
  • In Admin Panel go to “Extensions > Modules > Better Thank You Page>Install”.

  • That is all – Your system is ready.
  • Click Edit link to edit settings.

User Manual

This User Manual Guide users through the Admin Module/Store Front settings and features of the Better Thank You Page Module.

Admin Panel Settings

Admin Panel Settings of the Opencart success page extension contains the 4 tabs for settings:

1. General Settings

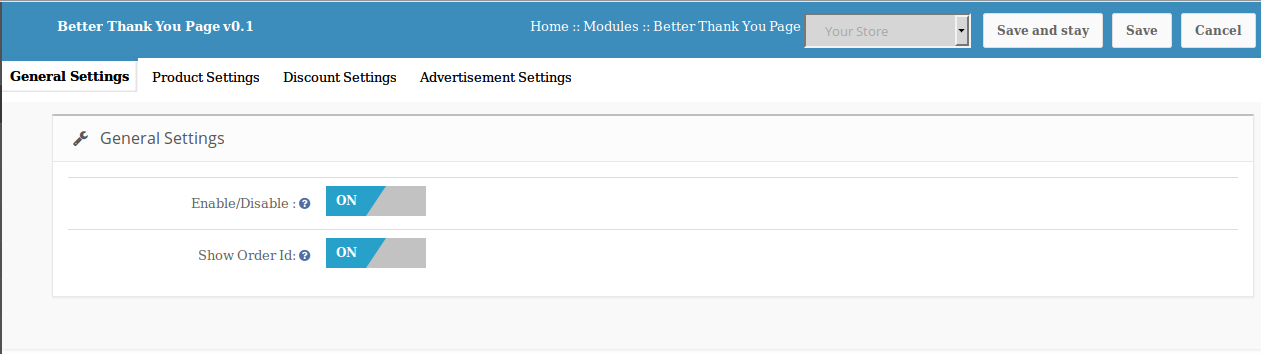
The General Settings of this Opencart module by Knowband has following options:

  • Enable/Disable: This option of the Opencart Better Thank you page plugin allows user to enable or disable the plugin. Switch it on to enable the Opencart module.
  • Show Order Id: Enable this option of the Opencart custom thank you page module to show Id to customers at order success page.

2. Products Settings

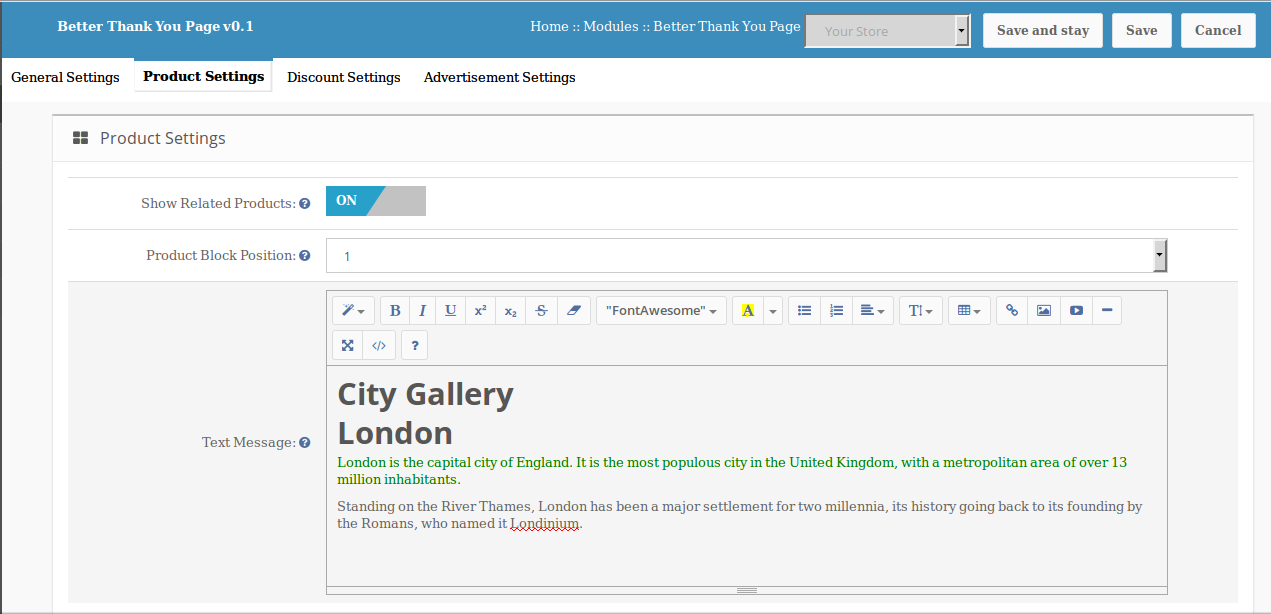
After clicking on the products settings tab of the Opencart custom success page module, the below screen appears. It has following options:

  • Show Related Products: Enable this option of the Opencart success page extension to show related products block at the order success page. All products related to products ordered by customer will be shown here.
  • Product Block Position: It decides the sort order in which Related Products Block will be shown on screen with respect to Discount and Advertisement section.
  • Text Message: Here HTML or any text message can be added to show at the end of all 3 blocks.

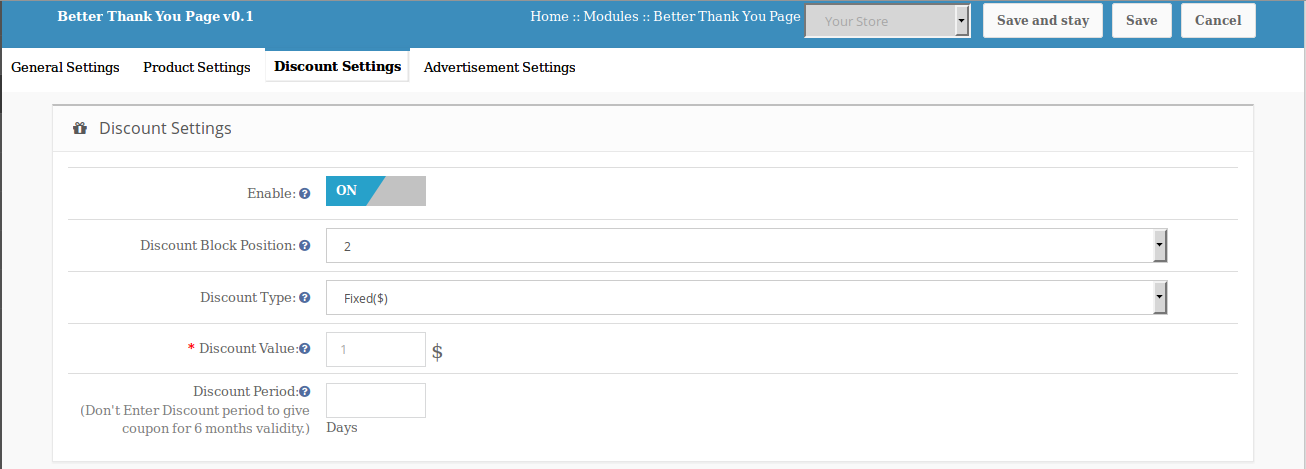
3. Discount Settings

After clicking on the discount settings tab of the Opencart Better Thank you page module by Knowband, the below screen will appear. It has the following options:

  • Enable: By enabling this option of the Opencart module, admin can generate discount coupon on every successful order. This coupon can be used only one time.
  • Discount Block Position: It decides the sort order in which Discount section will be shown on screen with respect to Related Product List section and Advertisement section.
  • Discount Type: Discount type can be percentage discount or fixed value discount. Coupons will be generated as per this setting of the Opencart custom thank you page plugin.
  • Discount Value: Here, in thsi field of the Opencart custom success page module, the admin can set discount value of coupon based on discount type. For Percentage type discount, discount value can be in between 1 to 100.
  • Discount Period: In this field of the Opencart success page extension, the admin can set the validity of coupon generated at successful checkout.

4. Advertisement Settings

After clicking on the advertisement settings tab of the Opencart Better Thank you page, below screen appears. It has following options:

  • Enable: If admin enables this option of the Opencart custom thank you page, then he/she can upload any banner or picture to be displayed as advertisement on the order confirmation page.
  • Banner Position: It decides the sort order in which Advertisement section will be shown on screen with respect to Related Product List section and Discount section.
  • Background Image: This field of the Opencart custom success page module by Knowband allows the admin to upload the banner which he/she wants to be shown on the front end of the order confirmation page. Already uploaded image can be removed by clicking remove button.

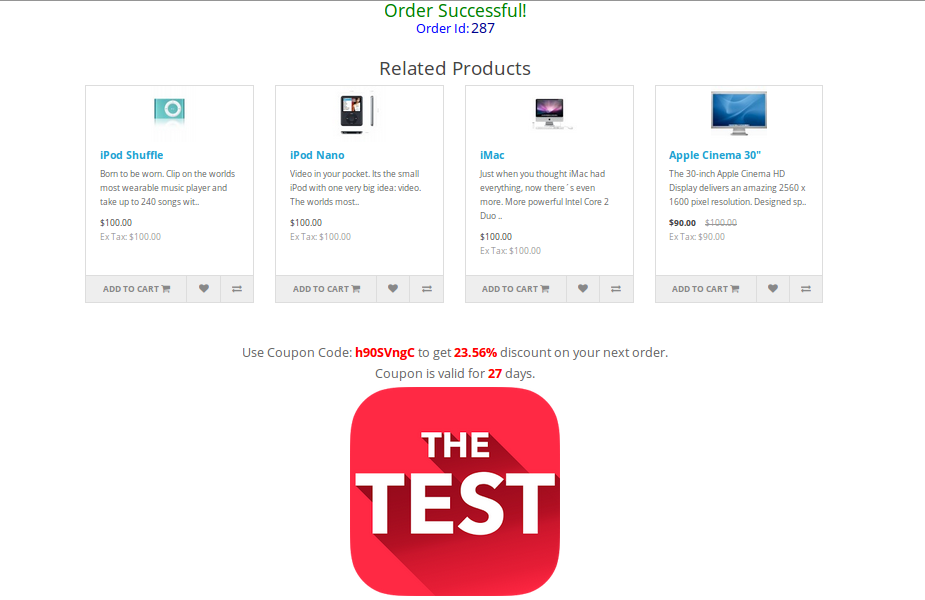
5. Store Front

After enabling this Opencart success page extension the order confirmation box of the front end will be changed and a new order confirmation page will appear with the features of the back-end settings done in the better thank you page.

The Opencart module at the front-end will appear as follows:

Module Link:
https://www.knowband.com/opencart-better-thank-you-page

Admin Demo:
https://ocdemo.knowband.com/2.0/admin/index.php?route=module/btyp&token=7f45e8b4986f806a3e445643cb4a622c

Front Demo:
https://ocdemo.knowband.com/2.0/

How to show Opencart product reviews to search engines?

In Opencart, product reviews are not visible to Google because they are loaded using Jquery code. It is not good from SEO perspective because product reviews can help merchants to improve SEO of their website.

In Opencart, product page loads its main content first and then it uses a Jquery function to load product reviews of the product, due to which product reviews do not come in the source code of the page. Since Google only sees the first loaded content which is available in the page source, therefore products reviews are not crawled by Google.

This issue can be fixed in following three 3 ways:

Method #1

You can use our OpenCart Review Incentive plugin which not only shows your product ratings in Google search result but also makes required changes in Opencart product page so that Google can see all product reviews and can crawl them.

Follow the steps mentioned-below to incorporate the same.

Step 1: Purchase OpenCart Review Incentive extension from the Knowband store and install it in your store. For more information regarding the installation and configuration, click here.

Step 2: Once the installation is complete, enable it from the back-end. Set the content that you want to display at the front-end of the site.

That’s it. The customers can give reviews and they will get incentives in return.

Here are some of the other features offered by OpenCart Review Incentive module:

  • The OpenCart plugin replaces the default review system of OpenCart and shows the reviews in the page source code, so that, search engines can read the reviews.
  • Additionally, the store admin can send email reminders notifying the customers to give their reviews.
  • The customers get incentives in return of the reviews given by them. The store admin can fix the amount that they offer as an incentive to the customers.
  • The automated approach of the OpenCart customer review plugin allows the admin to set the frequency of the email.
  • Additionally, they can track the reviews received and incentives redeemed from the back-end of the OpenCart review incentive module.

Method #2

You can make all required changes by following steps which are mentioned below:

  • Edit file “/catalog/view/theme/your_theme/template/product/product.tpl”
  • Replace the following code

<div id=”review”></div>

with

<div id=”review”><?php echo $allreviews;?></div>

In the same file, you also need to replace the following code

$(‘#review’).load(‘index.php?route=product/product/review&product_id=<?php echo $product_id; ?>’);

with

//$(‘#review’).load(‘index.php?route=product/product/review&product_id=<?php echo $product_id; ?>’);

  • Now edit file “catalog/controller/product/product.php”
  • Search for “$this->load->model(‘catalog/product’);” without double quotes and add following code before first search result.

$result=$this->customreview($product_id);
$data[‘allreviews’]=$result;

Also, search for “public function index() {” without double quotes and add following code before search result.

public function customreview($product_id) {
$this->load->language(‘product/product’);

$this->load->model(‘catalog/review’);

$data[‘text_no_reviews’] = $this->language->get(‘text_no_reviews’);

if (isset($this->request->get[‘page’])) {
$page = $this->request->get[‘page’];
} else {
$page = 1;
}

$data[‘reviews’] = array();

$review_total = $this->model_catalog_review->getTotalReviewsByProductId($product_id);

$results = $this->model_catalog_review->getReviewsByProductId($product_id, ($page – 1) * 5, 5);

foreach ($results as $result) {
$data[‘reviews’][] = array(
‘author’ => $result[‘author’],
‘text’ => nl2br($result[‘text’]),
‘rating’ => (int)$result[‘rating’],
‘date_added’ => date($this->language->get(‘date_format_short’), strtotime($result[‘date_added’]))
);
}

$pagination = new Pagination();
$pagination->total = $review_total;
$pagination->page = $page;
$pagination->limit = 5;
$pagination->url = $this->url->link(‘product/product/review’, ‘product_id=’ . $product_id . ‘&page={page}’);

$data[‘pagination’] = $pagination->render();

$data[‘results’] = sprintf($this->language->get(‘text_pagination’), ($review_total) ? (($page – 1) * 5) + 1 : 0, ((($page – 1) * 5) > ($review_total – 5)) ? $review_total : ((($page – 1) * 5) + 5), $review_total, ceil($review_total / 5));

if (file_exists(DIR_TEMPLATE . $this->config->get(‘config_template’) . ‘/template/product/review.tpl’)) {
return $this->load->view($this->config->get(‘config_template’) . ‘/template/product/review.tpl’, $data);
} else {
return $this->load->view(‘default/template/product/review.tpl’, $data);
}
}

Method #3:

Knowband offers a free module that can help you show the reviews in the page source code and makes it readable by the search engines. Download this free module and install it on your store. Follow below instructions to install it.

  1. Extract the downloaded zip file.
  2. Upload the XML file from Admin panel’s Extensions > Extension Installer page.
  3. Now refresh the modifications from Admin panel’s Extensions > Modifications page.

If you face some issue or need some help to fix this bug, feel free to contact us.

This Would Also Interest You: