
OpenCart Exit PopUp Module
Introduction
OpenCart Exit Popup is an addon which when enabled shows a popup in the front website whenever the customer tries to leave the web page from the upper side. The front popup values and functionality can be changed from the admin panel. Admin can also set the cookie life to make the popup disabled for the given amount of time on a same device. The text can also be changed from the admin panel.
Installation
Follow the following steps for installing Exit Popup Module:
- Download the extension package.
- Unzip the package on your root folder of Opencart setup via FTP manager (like Filezilla or WinSCP – download here).
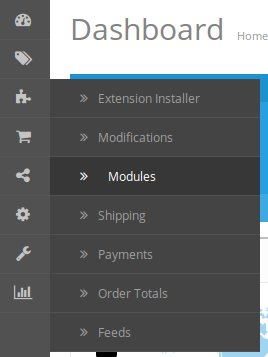
- In Admin Panel go to “Extensions > Modules > Exit Popup>Install”.

- That is all – Your system is ready.
- Click Edit link to edit settings.

User Manual
This User Manual Guide users through the Admin Module/Store Front settings and features of the Exit Popup Module.
Admin Module
The Admin Module contains these 7 tabs for settings and view.
- General Settings
- Display Settings
- Look and Feel Settings
- Discount Settings
- Email Marketing
- Email Settings
- Statistics
All the information provided below is for the case if Admin has only one store.
In case of more than one store, drop down of store list will be seen. Admin can change store and can set different settings for different store front.
After changing store, settings or values of selected store will be visible.
All the functionality will be same no matter if anyone have 1 store or many. All you have to do is just select the store and save the settings accordingly.
1. General Settings
The General Settings has the following options:
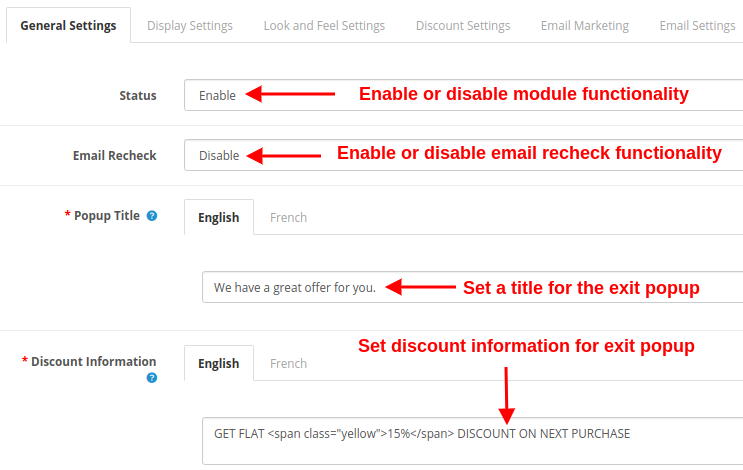
- Status: This option will enable or disable the complete functionality of the OpenCart Exit Intent popup module.
- Email Recheck: This option will enable or disable the email recheck functionality of the store. If enabled, no same email address is provided discount voucher more than one time.
- Popup Title: With this option, you can set the desired title for the exit intent popup in English or French language.
- Discount Information: You can set any discount information which will be shown over the exit intent popup.
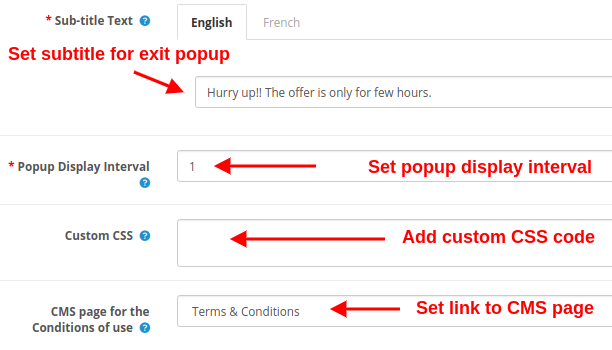
- Sub-title Text: This field will set the title for the discount or email subscription popup.
- Popup Display Interval: You can set a fixed time interval (in days) after which the responsive exit popup will be shown to the same user.
- Custom CSS: This option allows you to include additional CSS code from the backend of this module.
- CMS Page for the Conditions of use: Using this option, you can set the desired CMS page on which user is redirected when they check the Conditions of use.
2. Display Settings

- Minimum Screen Size: This option sets a minimum screen size to display exit popup on frontend.
- Maximum Display Frequency: This option lets you show the exit popup on frontend after the specified time.
- Hide Popup After: This option lets you choose the time interval after which the exit popup will hide automatically.
- Set Time Interval: Using this option, you can set a specific date range when you want to display the exit popup on frontend.
- Where to Display: This option will let you choose the page where you want to display the exit popup on frontend.
- When to Display: This option allows you to set display time after which the exit popup will be shown on the frontend to users. The options include immediately, after some time, after scroll down percent, or upon exit.
- GEO Location: With this option, you can select the countries where you want to show/hide the exit popup to users.
3. Look and Feel Settings
The Look & Feel settings is to change the colors of popup window. It has the following options:
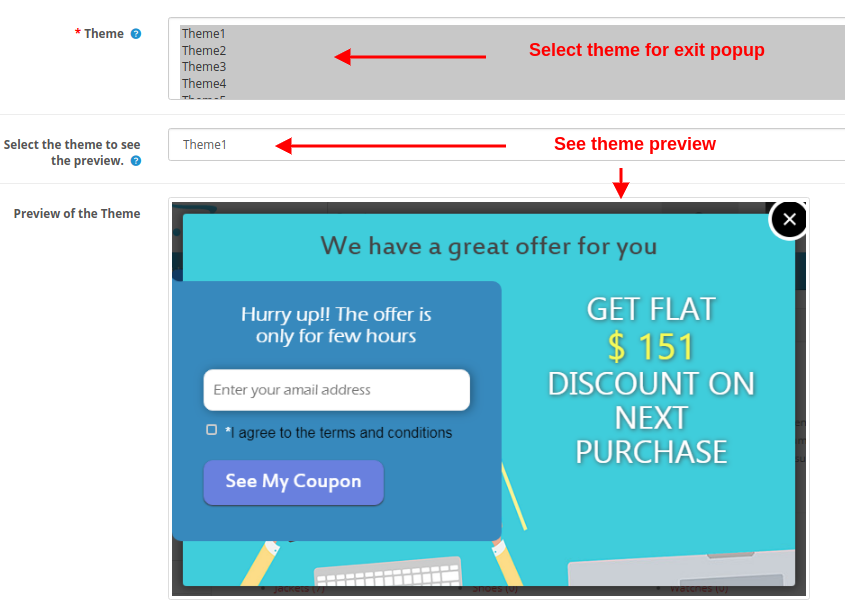
- Theme: This option allows you to select the theme you want to apply for an exit popup.
- Select the theme to see a preview: Select the theme you want to check the preview.
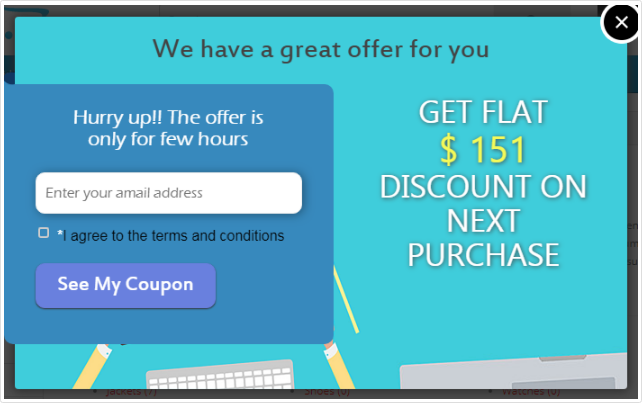
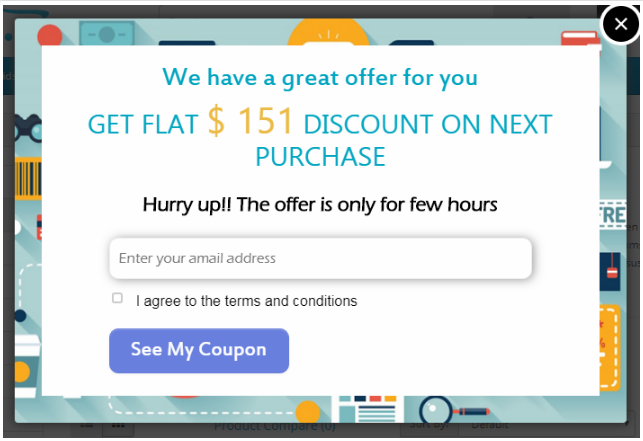
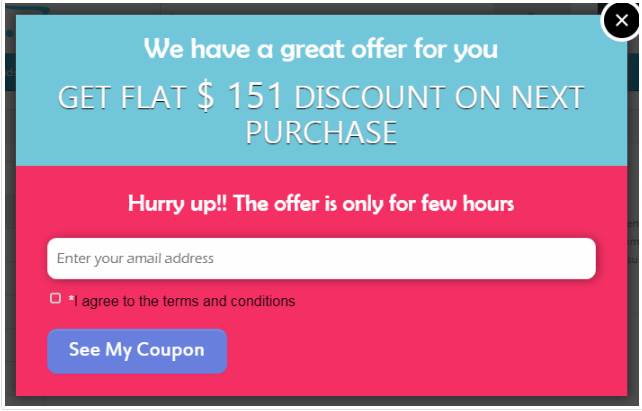
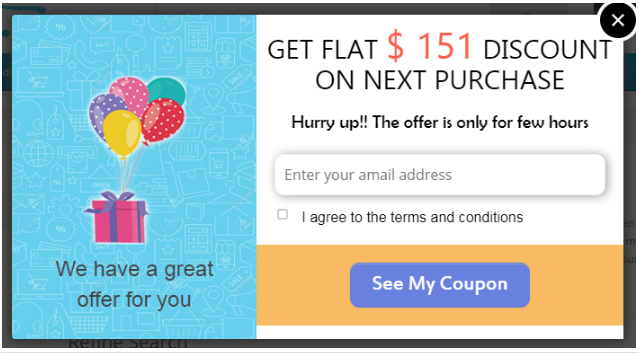
You get five pre-defined templates for exit popup as shown below.
Theme 1:
Theme 2:
Theme 3:
Theme 4:

Theme 5:
4. Discount Settings
The discount which is offered using OpenCart exit pop extension can be configured with the listed settings:
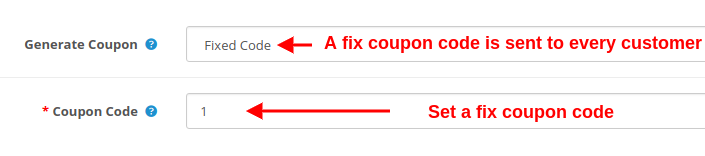
- Generate Coupon: If generate coupon type is set to “Fixed Code”, a fixed code is sent to every customer with fixed discount value.
- Coupon Code: Using this option, you can specify the fixed coupon code which is sent to all the customers. This coupon is generated at the backend under the Coupons section.
This fixed coupon code has a unique code value, discount value, validity period and status(enabled/disabled). You can change these details under the Coupon section of Marketing Tab at the backend as shown below.

The second way to offer a discount is by generating a new coupon code for every user.
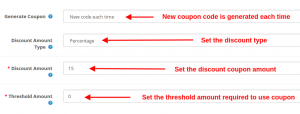
- Generate Coupon: If generate coupon mode is selected to “New code each time”, then new coupon code is generated each time for every new user.
- Discount Amount Type: This option allows you to select the coupon discount type as Fixed or Percentage. Percentage discount will be deducted from the total cart balance by given percentage. Another option is Fixed amount. The fixed amount will be deducted from the cart.
- Discount Amount: Using this option, you can specify the discount which you want to offer to your customers through the exit popup. This discount can be a fixed value or a percentage value.
- Threshold Amount: This option allows you to set a minimum cart amount which is required to use the discount voucher. The coupon will not work if the cart amount is less than the Minimum Cart Amount.
5. Email Marketing Settings
Email Marketing settings involves the following options:
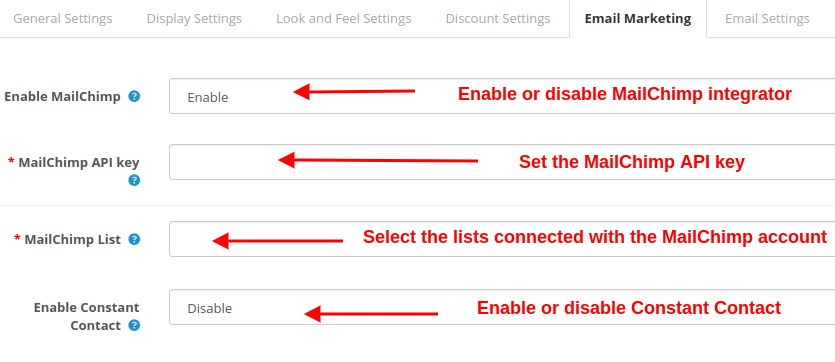
- Enable MailChimp: Enable or disable MailChimp Integrator services for your eCommerce website.
- MailChimp API Key: With this option, you can set the API key for connecting with the MailChimp account.
- MailChimp List: This option shows you the fetched lists connected with the particular MailChimp account. You can select one out of those lists.
- Enable Constant Contact: This option allows you to enable or disable the Constant Contact integration service. The process is similar for this email marketing service. You have to set the API key, Token, and lists associated with that account.
6. Email Template Settings
Under this section of the OpenCart Exit Intent Popup module, you can configure the discount email sent to the customers. This includes the following options:
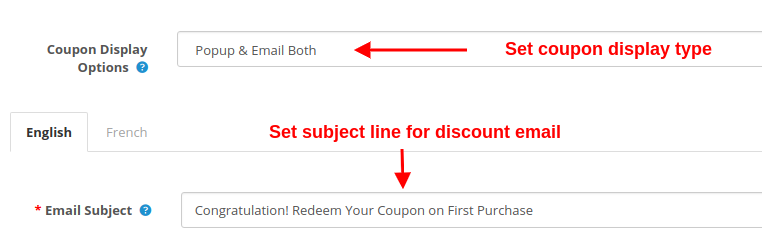
- Coupon Display Options: This option will set the location where you want to show the discount coupon code: over popup or email. The discount coupon can be shown on exit popup, discount email, or both.
- Email Subject: With this option, you can set the subject for the discount email.
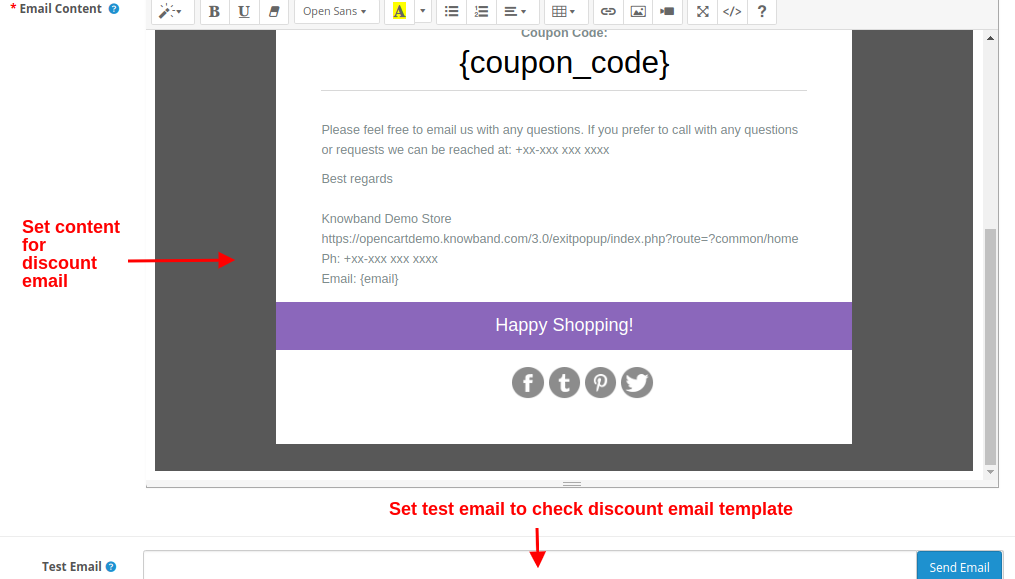
- Email Content: This option allows you to set the content of the discount email. You can add as much text, images or links in the email content.
- Test Email: With this option, you can set a test email address which can be used for testing purposes.
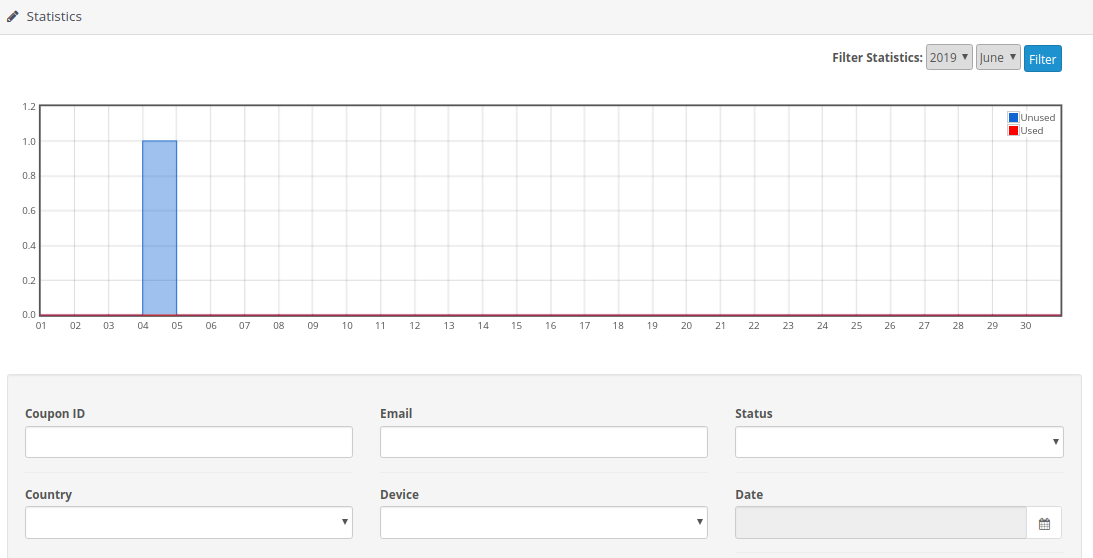
7. Statistics
The Statistics feature of Opencart Exit popup extension allows you to check the coupon details in tabular and graphical format. You can see the number of visitors, Visitor stayed, Visitors not stayed, coupons generated, coupons used. You can use filters to filter the data which is getting displayed. By default all data of 8 days is shown.
![]()
- Date Range Filter: In this filter, there are two date pickers and one filter button in visitor statistics. From date and to date are given using date picker and when the Filter button is clicked, all the data between those two dates is shown. If From date is greater than To date than message will be displayed “No Data Found for specified date”.
In Coupon statistics there is one filter and a filter button. Total 7 days stats can be seen.If admin selected date 2016-01-01. Then stats will be from 2015-12-26 to 2016-01-01.
Store Front
After enabling this plugin the Popup is shown in the front website whenever the customer tries to leave the web page from the upper side.
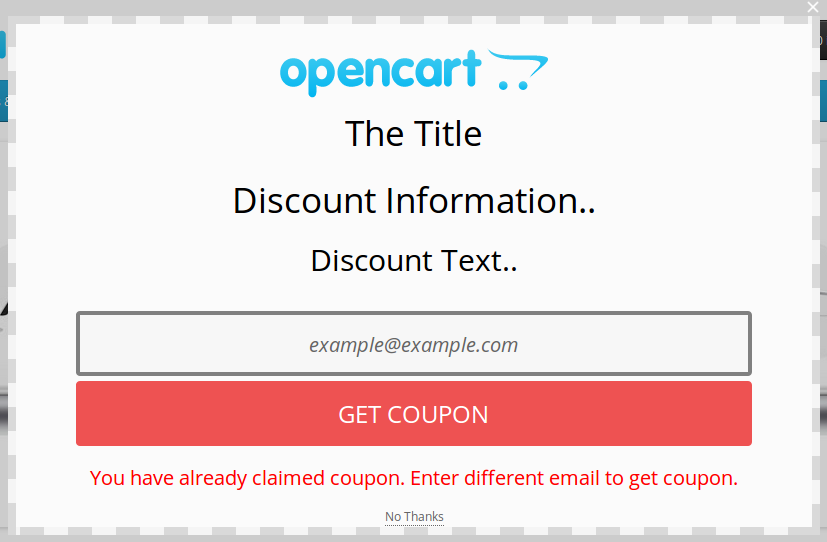
The module at the front-end appears as follows:
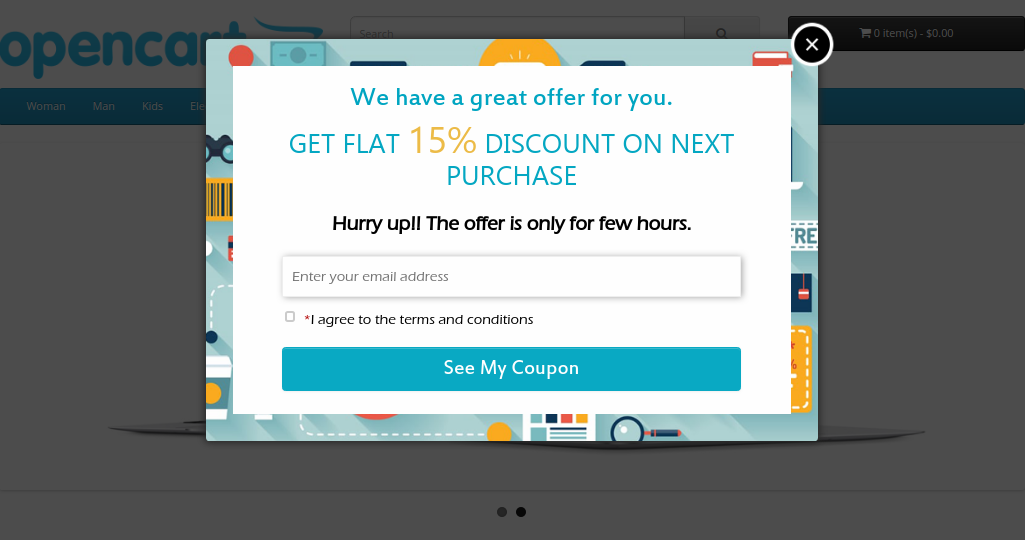
Visitor has to enter the email id and click on the button.
A coupon is generated and the success message is shown in the popup window and an email is sent to the provided email id containing coupon code, Coupon value in percentage or fixed amount and validity.
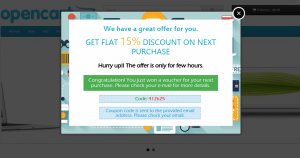
If user has already claimed coupon then a failure message will be seen.
Disclaimer: In case the “Exit” popup does not display at the front, kindly clear the cache or delete the cookies. Sometimes cookies prevent the popup from displaying at front.
