GitHub is a web-based version control repository with around 20 million users across the planet. With 75 million repositories it is the world’s largest host of source codes. To provide an intuitive user experience to the GitHub users on your store, you may want to integrate a GitHub social login. Well, this is a good idea. 20 million users are not a few users, it’s huge. Your online customers are more likely to have an account on GitHub. So, offering a GitHub social login option is a good idea to boost customer registration. For this social login integration, GitHub API detail, Client ID and Client Secret is required.
New Release by Knowband
Knowband has introduced advanced AI Chatbot modules for eCommerce stores, designed to improve customer support and enhance user interaction. These intelligent chatbots help online stores deliver instant responses, guide shoppers, and improve overall customer experience.
The Live AI chatbots are integrated with leading AI models such as ChatGPT, DeepSeek, and other popular AI technologies.
To ensure faster and more precise answers, the real-time chatbots are also connected with vector search databases like Qdrant.
These AI chatbot modules are ideal for automating customer queries, reducing support workload, and improving engagement across your eCommerce store.
So, to achieve this improved UX, you will require Knowband’s social login module available for various platforms like Prestashop, Opencart and Magento and the following GitHub API details:
GitHub Client ID and
GitHub Client Secret
Prestashop Social Loginizer Addon
Improve the user experience on your Prestashop store by enabling seamless social media logins with this excellent addon by Knowband.
Step 2: It will ask you to login to your GitHub account first. After logging in click on the Applications tab.
Step 3: Here you will see two tab- Authorized Applications and Developer applications. Click on the Developers applications, You will see the following screen. Enter the details as shown in the image below:
Enter Application Name, Your Home-Page URL and redirect URL in Authorization call back URL.
Step 4: Hit the “Register application” button after filling all the required details.
Step 5: The next interface will show the Client ID and Client Secret details.
Step 6: Copy these details and keep them with you. You can use these details in your Social login module if it supports Social Login via GitHub.
For example, in Social Loginizer module (PrestaShop, OpenCart, or Magento), the interface to enter the GitHub API details looks something like this:
At Knowband, with over 13 years of experience in web and app development, we offer more than 100 plugins for major eCommerce platforms including Magento 2, Prestashop, WooCommerce, and Opencart. In addition to plugin development, we provide comprehensive web and app development services across various frameworks and technologies. For any technical support, please reach out to us at our official email address: support@knowband.com.
Foursquare is a local search cum discovery service that runs as a mobile app to provide personalized search results. The App provides personalized suggestions of places nearby based on “browsing history, previous purchases, and check-ins etc”.
With around 45 million users, this social networking platform can be a wise addition to your website.
To integrate the Foursquare with the applications like Social login (PrestaShop, OpenCart, Magento 2 and Magento), you need the following two Foursquare API details:
Foursquare Client ID
Foursquare Client Secret
How to get Foursquare API detail? You can follow these quick steps for the same.
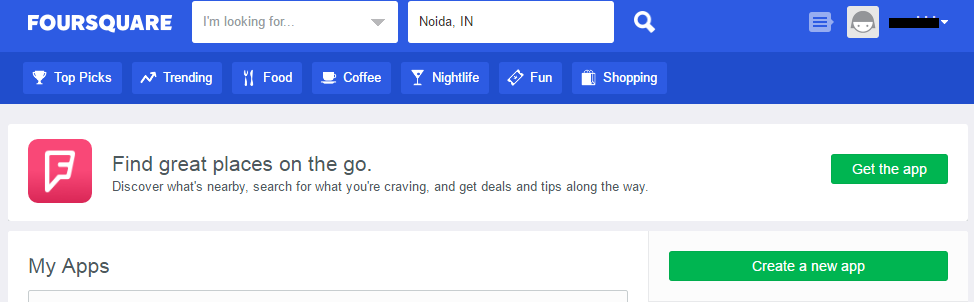
Step 2: On the welcome screen, click on the ‘Create a new app’ button.
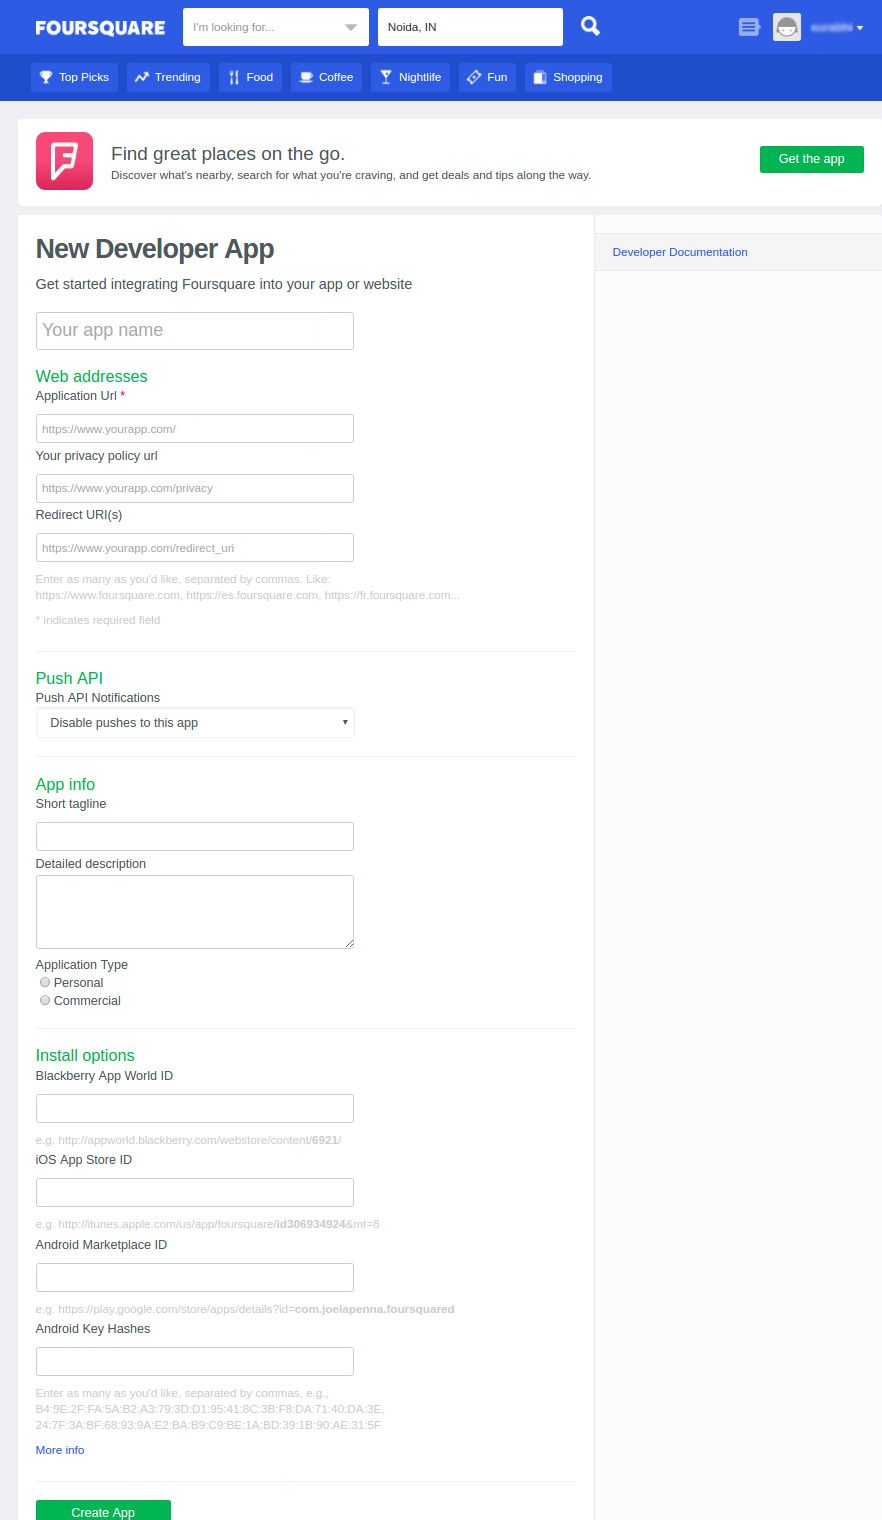
Step 3: The next screen will ask you to fill up some details. Fill the details, set the redirect URL and Save changes of the application.
PS: For redirecting URL, if you are using our Social login module and In case you are using SEO Friendly URL for your store then use this for redirect URL –
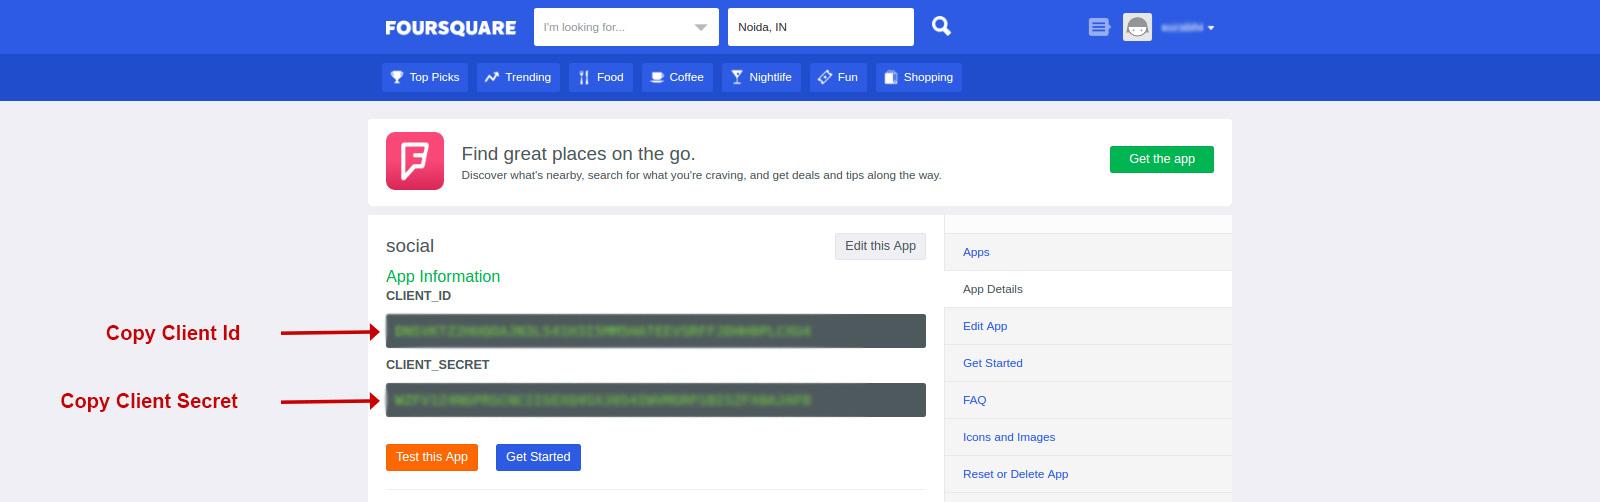
Step 4: After creating the App, you will be taken to a screen where you can copy your API credentials.
Step 5: You can use these API credentials on various Foursquare based solutions. Social login is one such solution. To use these details on a social login module, just copy and paste them in the specified field in the module configuration.
For example, our Social login modules (PrestaShop, OpenCart, and Magento) integrates the Foursquare social login option in the respective platforms with the help of the API details. If you own any of the above mentioned
This tutorial aims at educating the readers about the steps for getting the Facebook App ID and Facebook App Secret from the Facebook developers console. So here is a step by step guide for getting the Facebook API details. These details can be used for many purposes and on several modules and extensions. For example, we use these details in our Social loginizer modules for PrestaShop, OpenCart and Magento to set up a Facebook Social Login on these platforms.
Steps to get Facebook API details
Step 1: First of all you need to visit the Facebook Developer’s Console because you cannot extract these details from your regular Facebook profile.
Step 2: These are the steps you need to follow on Facebook developer’s website.
Click on My Apps -> Add a New App or Add a New App button. Choose Website and proceed.
Step 3: Type the name of your App and click on Create New Facebook App Id, choose App category and proceed.
Step 4: Now Click on Skip Quick Start.
You will get the Facebook Application ID and App Secret (Click Show button).
Step 5: Now, go to Settings from the left menu.
Step 6: Click on Add Platform button and select website.
Step 7: Enter your App Domain and Site URL. Also, provide your contact email (It is necessary to make your app live).
Step 8: Click Save Changes button.
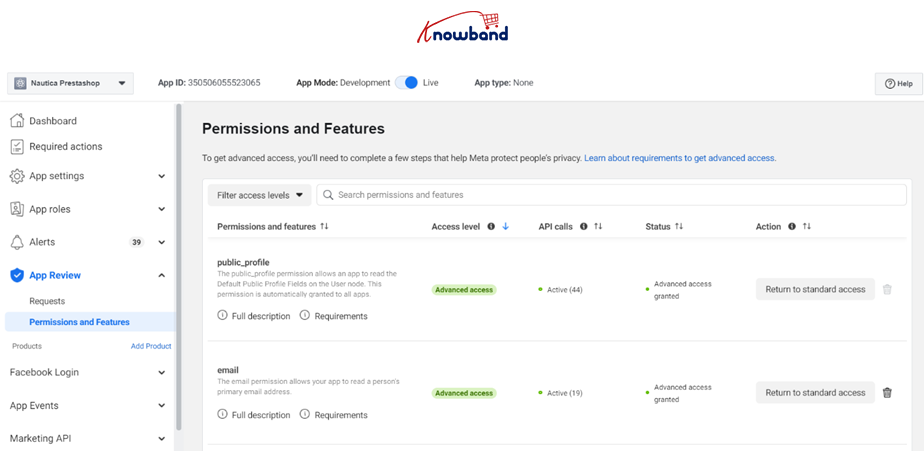
Step 9:The last step is to make the Facebook app live that you have recently approved from Facebook. You can see the option App Mode on the header menu of the Facebook Developer account.
However, you need to make sure that all the advanced accesses have been granted before that. Visit App Reviews>>Permission and Features and enable the accesses that you need for your project.
Once enabled, you can make the app live.
Step 10: Now you can use the API details of the app to let your customers log in to your store using their Facebook account. You can copy and paste these details on the social login module and extensions to activate Facebook social login on your store.
If you are using our Social Loginizer module (PrestaShop, OpenCart and Magento), the interface to configure the API details looks as shown in the image below.
Thus, this is how you can easily get and configure the Facebook API details without any hassle. Extract these details for your own store and use it on the social login modules to improve your sign up conversions today.
Simple Approaches to Boost your Sales using Facebook
Discover simple approaches to boost sales using Facebook for your Prestashop store. Learn effective strategies like Facebook stores, ads, albums, campaigns, and sharing to enhance engagement and conversions.
With the evolution of eCommerce industry, many Marketplaces like Etsy, eBay, Walmart, Amazon etc. have achieved their goals to establish themselves between consumers. Amazon being one of the fastest growing marketplaces has a huge base of potential customers. Its necessary step of account creation before purchasing a product has played an important role in increasing the number of Amazon accounts on the internet.
Not just the Amazon marketplace, different services from Amazon (Like Amazon Prime Video) has also played a crucial role in growing the numbers of Amazon account.
Amazon provides an API to the developers using which they can develop the solutions to integrate Amazon social login on different platforms like, PrestaShop, OpenCart, and Magento etc.
That is, users would be able to login to your store using the same credentials they use to login to their Amazon account. This can be easily achieved by installing a social login module (PrestaShop, OpenCart, and Magento) that supports Amazon social login.
How to get the Amazon API details for Social Login?
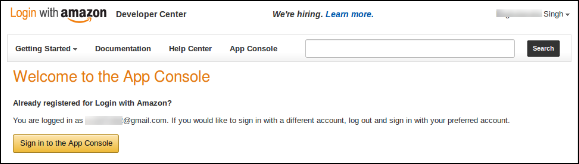
Step 1: To get the Amazon API details, you need to go to Amazon Developer Network page, also called as App Console.
Step 2: Click on Sign into App Console button.
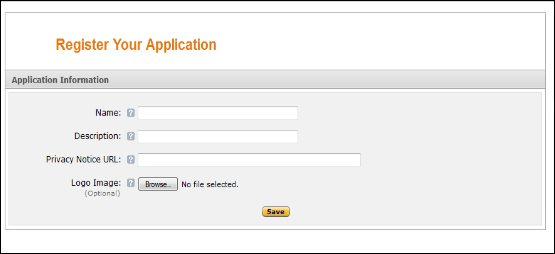
Step 3: After successfully logging into App Console click on Register New Application button in top right of the page and you will be redirected to the Register Your Application Page.
Step 4: Enter Application Details as follows:
Name: Name of your Application.
Description: A short description of your application.
Privacy Notice URL: Url of the page where you have mentioned the privacy policy page of your store.
Logo Image: Select optional logo image of your store.
After filling these details, click on the Save button.
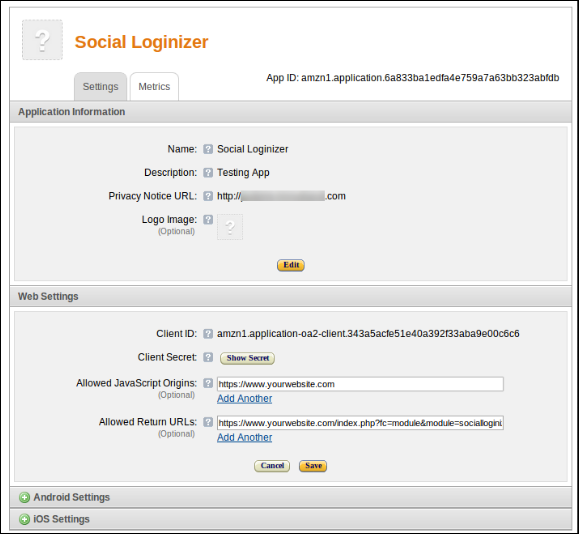
Step 5: Now click on Web Settings to get your client id and client secret.
Step 6: Fill in the Allowed Return URL:It is the redirect-page URL of your store.
In case you are using our Social loginizer module (PrestaShop, OpenCart, and Magento), and SEO Friendly URL for your store then use this for redirect URL –
Disclaimer: To enable and use Amazon social login into your website, your website must be secured with HTTPS, or the Amazon login will not work.
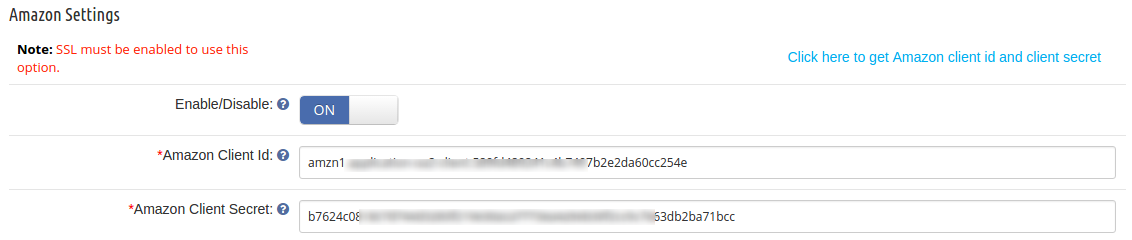
Step 7: Now you can use this client secret and client ID to let your customers log in to your store using their Amazon account credentials. To configure the details on a social login module, just copy and paste them into the specified field, and save the configuration.
Please note: Step 7 is valid only for Knowband Social loginizer modules for PrestaShop, OpenCart, and Magento.
Disqus is a worldwide popular blog commenting host for websites and communities that use a networked platform. Disqus is a very popular solution used by various websites and users who are fond of commenting on different blogs, communities, and forums using a networked platform.
Disqus provides an API to the developers using which different social login solutions have been developed. That is, a user having an account on Disqus can use the same account to log on to your site if you allow Disqus social login on your site.
To use the Disqus social login on your website, you can install a social login module (PrestaShop, OpenCart, and Magento) that supports Disqus. Later, after few initial API configurations, you are ready to accept social login via Disqus on your website. You need two Disqus API details for that:
Step2: On the next interface, Click on Applications Tab. Next, click on “Register new application” as shown in the image below.
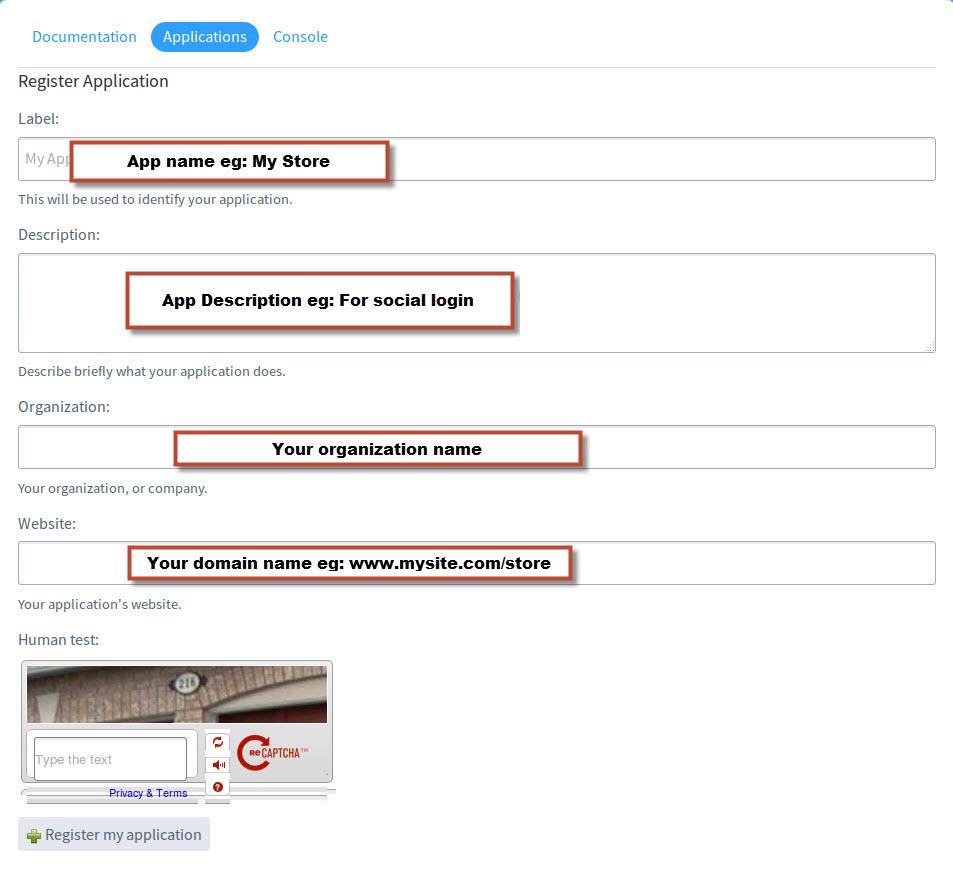
Step3: It will show you a small form to fill. Fill up the form as shown in the image below and then click on “Register my application”:
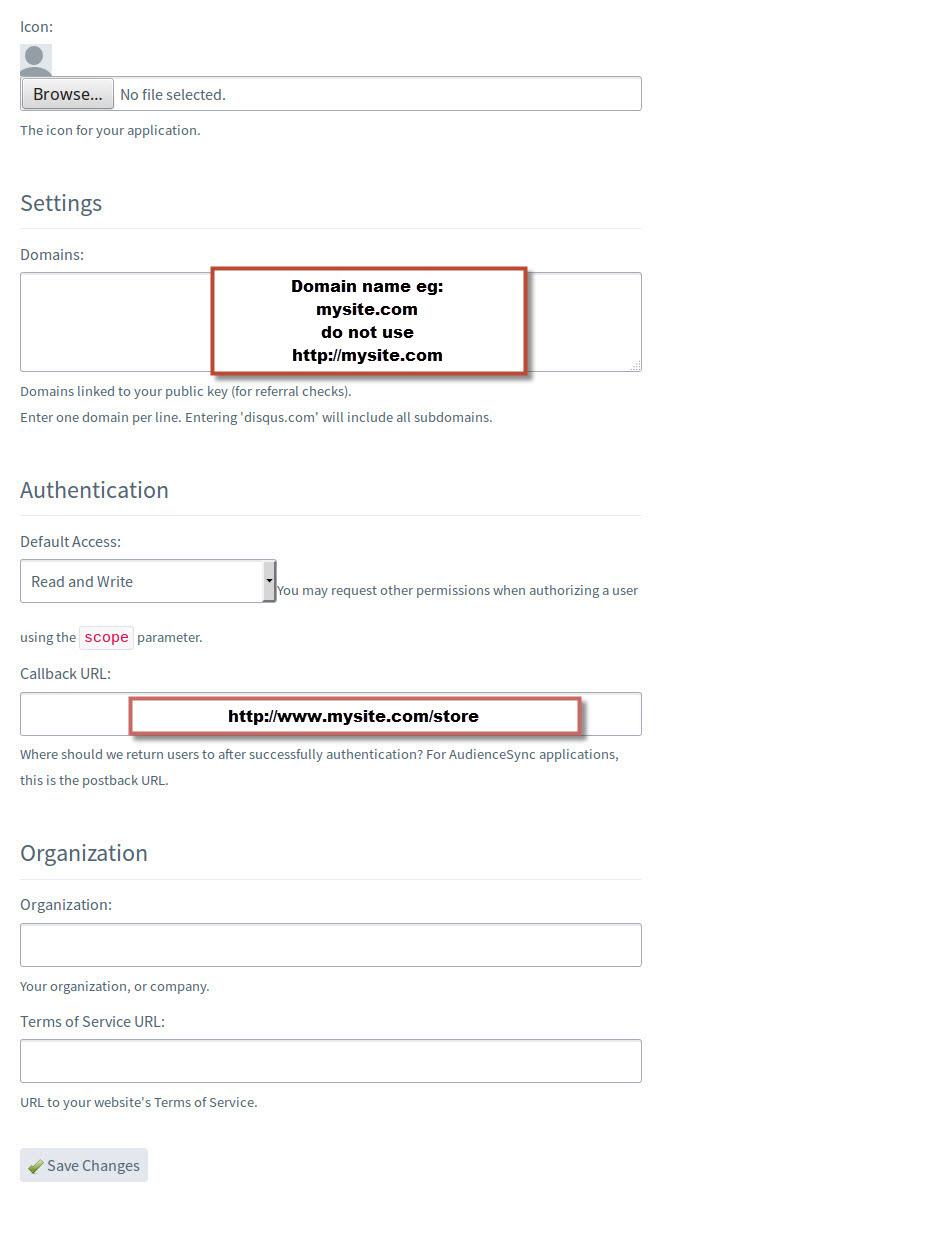
Step 4: On the next interface, you need to provide your domain name, call back URL (redirect URL) as shown in the image below and click “Save changes”:
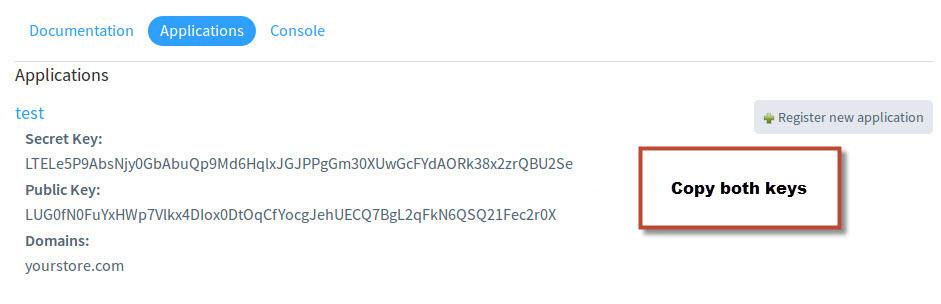
Step 5: The next screen will show up all your API details that you need. Copy these details and keep them with you.
Now you can use these details in your social login module and configure the Disqus login in few seconds. Just copy and paste these details in the specified fields.
For example, if you are using the knowband social loginizer module for PrestaShop, OpenCart, or Magento, your interface will look something like this:
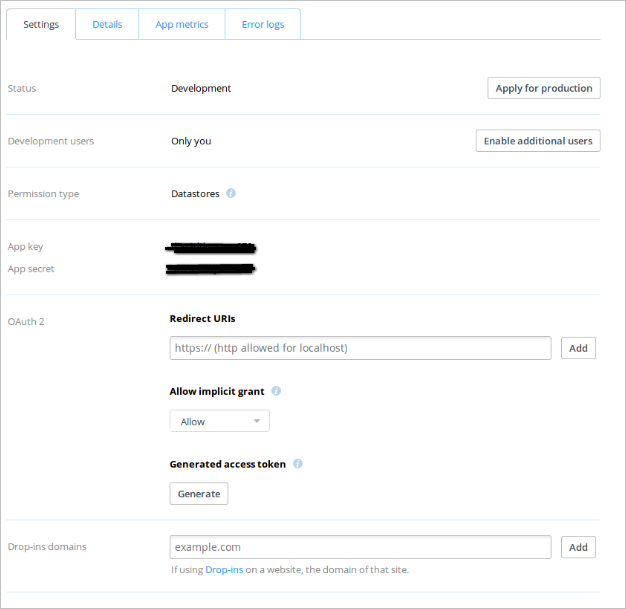
Dropbox is a cloud storage solution used by millions of users across the planet. If you want to setup a social login with Dropbox on your site, you need the following two details.
Dropbox App Key
Dropbox App Secret
You have to copy and paste these details in your social login module (PrestaShop, OpenCart, and Magento) to configure the login.
How to get the Dropbox App key and Secret?
Follow these quick steps to get these Dropbox API details. Please Note: To enable Dropbox login into your website, your website must be secure with HTTPS otherwise Dropbox login will not work.
Step 2: Click On the Create App button on the first screen that appears.
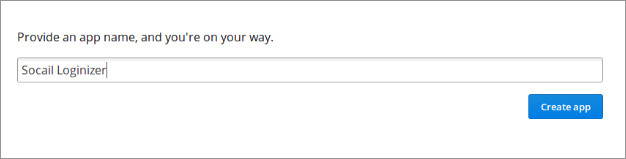
Step 3: Provide a name for your Application
Step 4: Fill up the details in the next screen, set redirect URL and save the settings.
PS: In case you are using our Social loginizer module (PrestaShop, OpenCart, and Magento) and SEO Friendly URL for your store then use this for redirect URL –
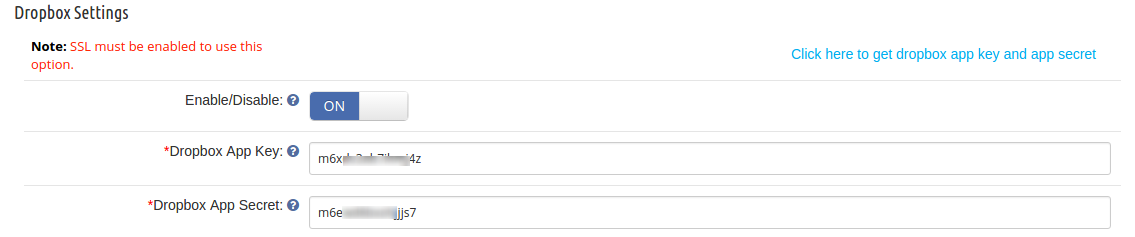
Step 5: Now, If you are using the Social Loginizer module (PrestaShop, OpenCart, and Magento), You can copy and paste the App key and Secret in your module’s admin panel as shown in the image below:
PS: Step 5 is valid only if you are using our Social Loginizer module. In case you are using any other social login module, you have to confirm with your developer if it supports Dropbox Login.
The Prestashop Page Maker module by Knowband will provide a feature to the store owner through which the store owner can make the page(s) look like CMS page according to his need. With the help of this Prestashop create page feature, the store owner can create multiple pages in which he/she can display banners, blogs, products, etc.
Technology for Development
Language: PHP
FrameWork: PrestaShop
Installation
Installation Guide
Follow the following steps for installing Prestashop Page Maker Module:
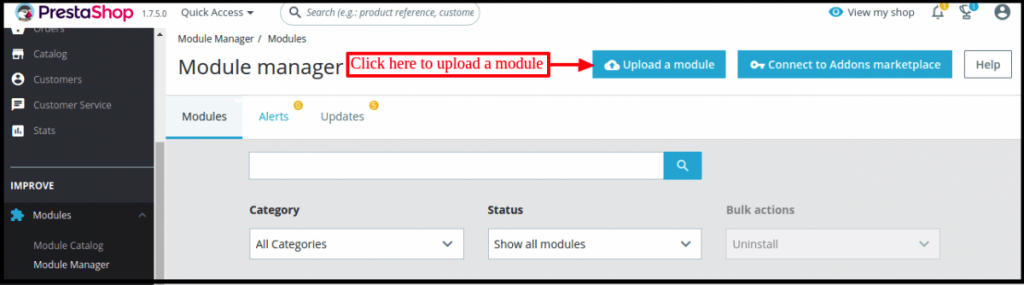
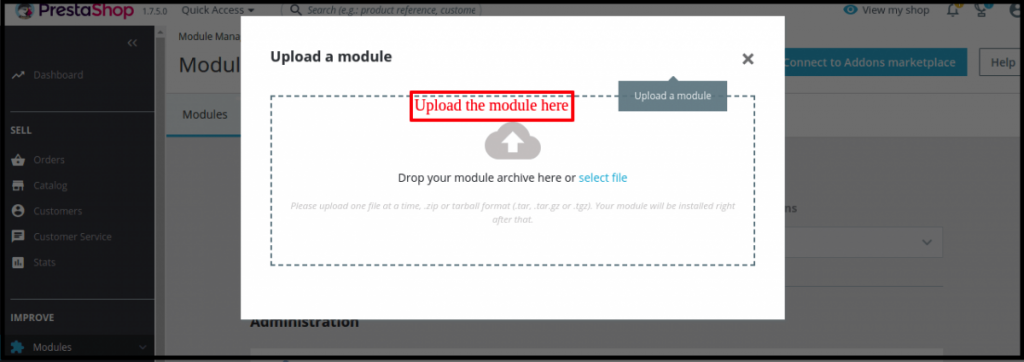
Copy “pagemaker” module folder under your “root_directory/modules/”of your store via FTP or use prestashop interface to upload the plugin.
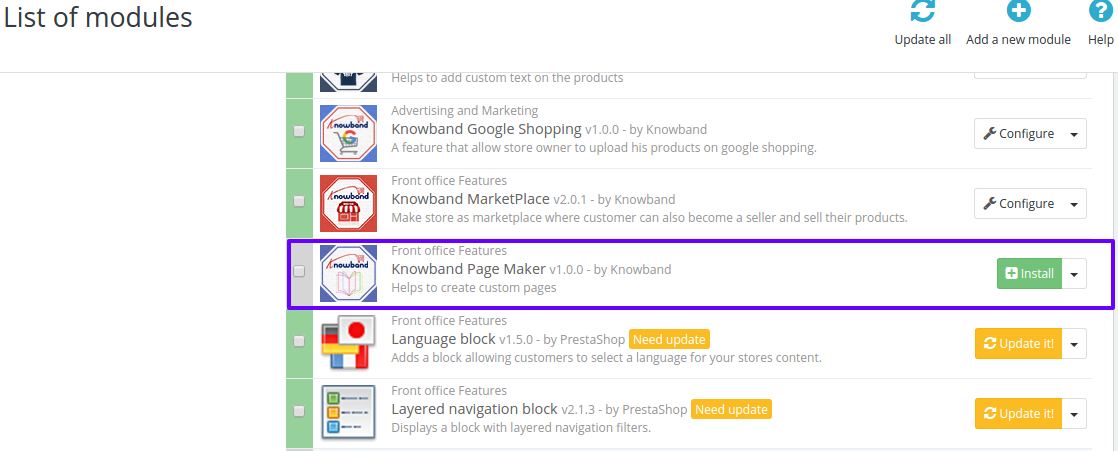
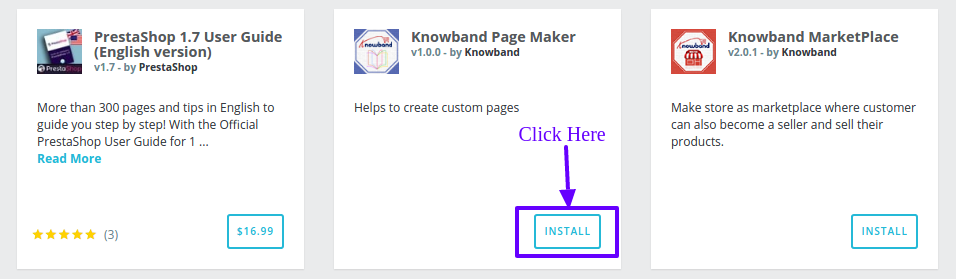
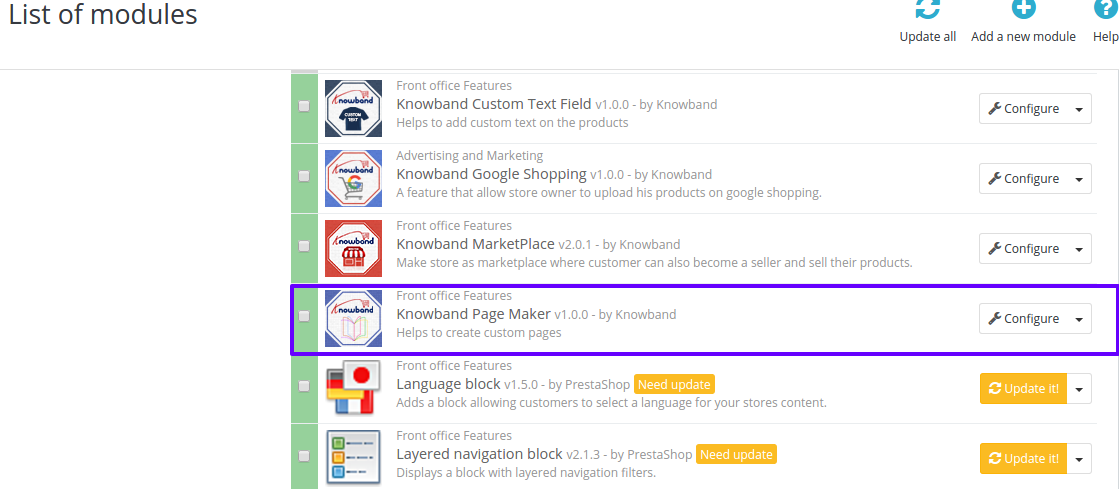
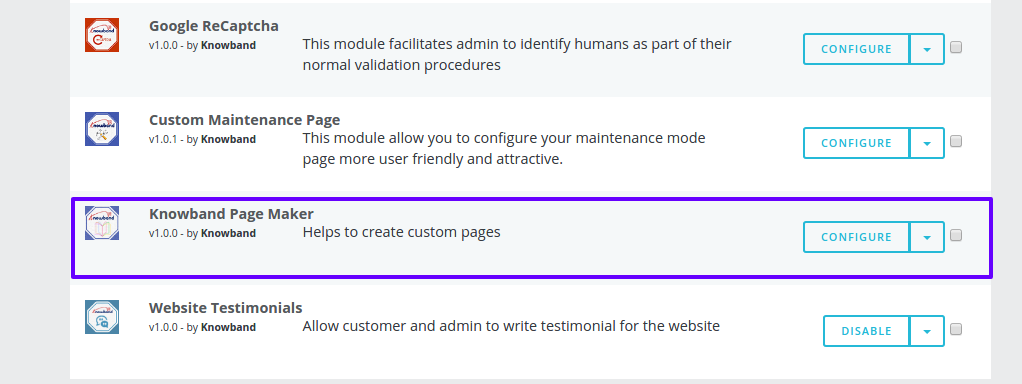
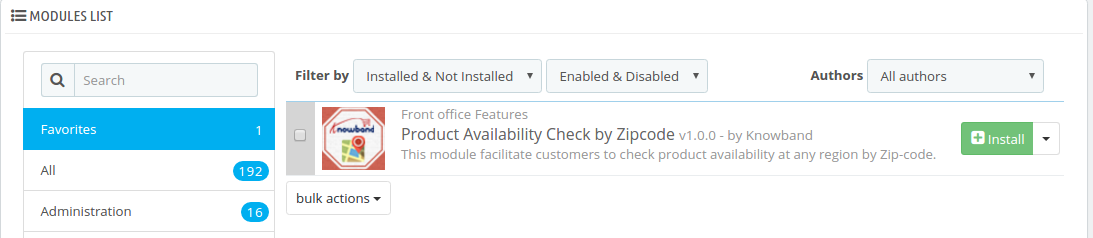
After copying, the Knowband page maker module will be listed on module listing page in admin panel as shown given below screen.
(for Prestashop 1.6)
(for Prestashop 1.7)
In Prestashop 1.6, if you are not able to find module in the admin module list, please try searching the module with following details –
Keyword: pagemaker
Category: front-office feature
Filter by: Installed & Not Installed/Enabled & Disabled
In Prestashop 1.7, you can search the Prestashop page maker module by typing the name of the module in the search box provided in the admin module page.
Note:
When you will click on install button, a pop up box will appear which will display warning messages. You can ignore these messages and move ahead. There will be no negative impact of this warning message on your store.
After installing the Prestashop create page module, a “configure” button will be in front of this plugin on module listing page as shown in the screen below:
(for Prestashop 1.6)
(For Prestashop 1.7)
Admin Interface
The Prestashop CMS page creation module is configurable and the configuration settings can be updated via the admin interface.
Configuration
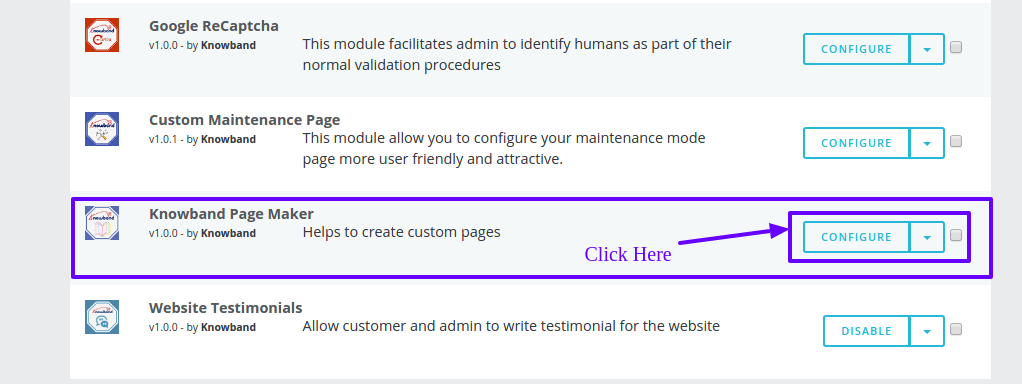
To configure this Prestashop module, click on the “Configure” button in Module listing page as shown below:
(For Prestashop 1.6)
(For Prestashop 1.7)
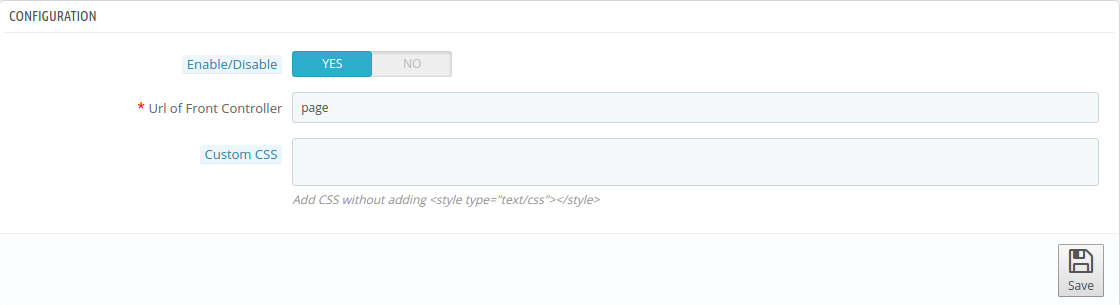
After clicking the “Configure” button, PageMaker Configuration page will be displayed which have the following blocks:
Configuration
Best Seller
New Arrival
Special Products
Featured Products
You can find below the description of each block:
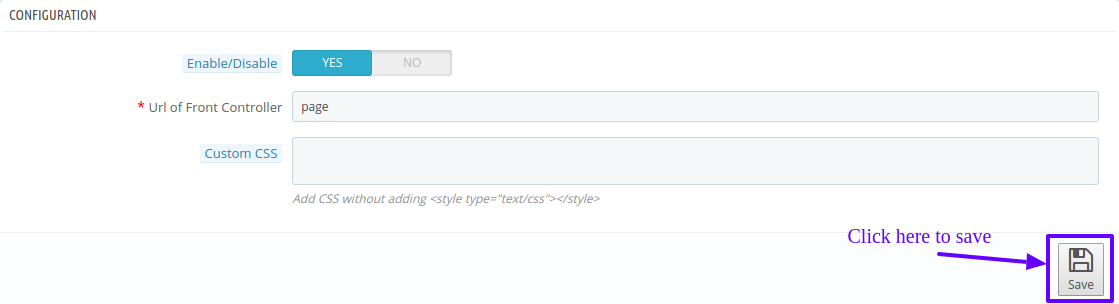
Configuration:In the Configuration block, module settings can be configured. Please find the description of each input below:
Enable/Disable: This is on/off switch. Admin has the option to Enable/Disable the page composer module. If enabled, then only this Prestashop module and its settings will be working otherwise, there will be no impact of this page builder module on the store.
URL of Front Controller: This is for the front controller sub- URL. Admin can set the sub URL of page builder module’s front controller so that page created by admin can be viewed as “yourdomain/URL of Front Controller/Page URL”
Custom CSS: This field of Prestashop landing page maker offers a text box in which admin can add their custom CSS in all pages created by admin.
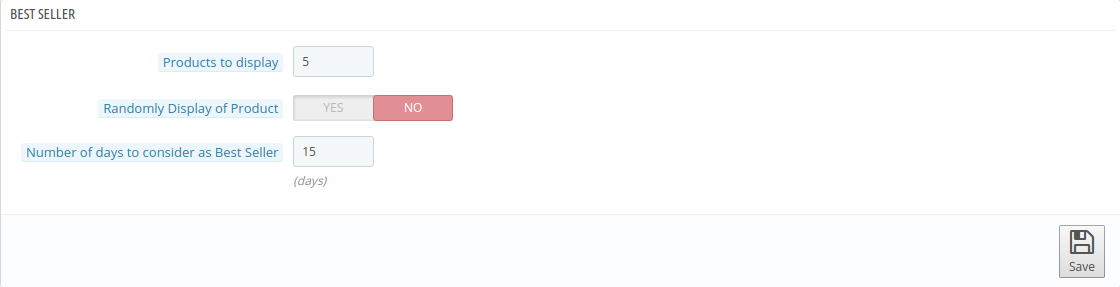
Best Seller:You can configure the settings for “Best Seller” block which will be displayed in the page maker module’s front end. Please find the description of each input field below:
Products to Display: In this field of Prestashop landing page maker, the admin has to enter the number of products to be displayed in “Best Seller block” for front end. By default, this will be 5 Products.
Randomly Display of Product: This is the on/off switch of this Prestashop plugin. Admin has the option to enable/disable this field of page composer module. If enabled, then only products will be displayed randomly otherwise, they will be displayed based on the best seller on the front end.
Number of days to consider as Best Seller: In this field of Prestashop create page, the admin has to enter the number of days from which best seller product to be considered. By default, it will be 15 days.
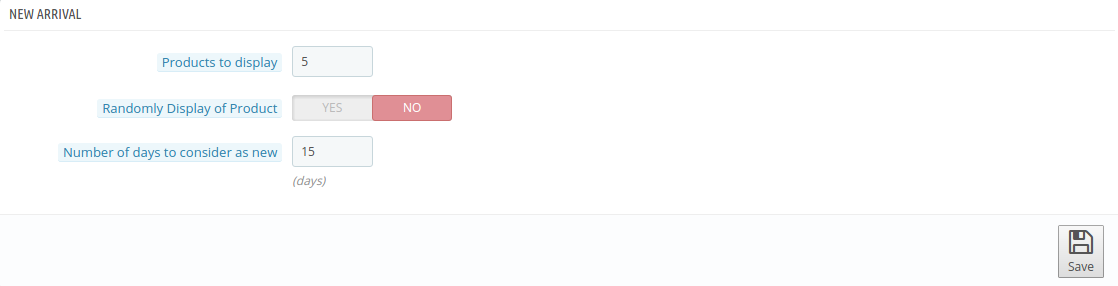
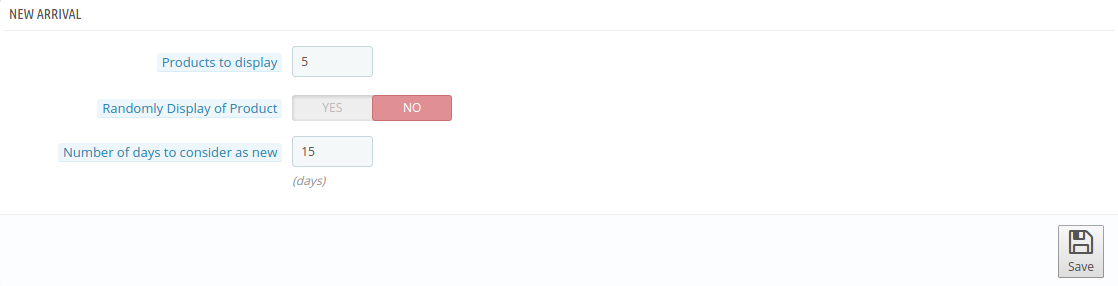
New Arrival:You can configure the setting for “Best Seller” block which will be displayed on the landing page maker module’s front end. Please find the description of each input field below:
Products to display: In this text box of Prestashop CMS page creation module, the admin has to enter the number of products to be displayed in “New Arrival” block for the front end. By default, this will be 5 Products.
Randomly Display of Product: This is on/off switch. Admin has the option to enable/disable this field of the page builder plugin. If enabled, then only products will be displayed randomly otherwise will be displayed based on the arrival date in the front end.
Number of days to consider as New: In this text box of Prestashop create page module, the admin has to enter the number of days from which new product can be considered. By default, it will be 15 days.
Special Product:You can configure the setting for “Special Product” block which will be displayed in this Prestashop addon’s front end. Please find the description of each input field below:
Product to display: In this field of Prestashop page builder module, the admin has to enter the number of products to be displayed in “Special Product” block on the front end. By default, this will be 5 Products.
Randomly Display of Product: This is on/off switch of the Prestashop page builder addon. Admin has the option to enable/disable this field. If enabled, then only products will be displayed randomly otherwise, will be displayed based on arrival date in the front end.
Featured Products:You can configure the setting for “Featured Products” block which will be displayed in the Prestashop module’s front end. Please find the description of each input field below:
Products to Display: This is text box of Prestashop CMS page creation plugin, in which admin has to enter the number of products to be displayed in “Special Product” block for the front end. By default, this will be 5 Products.
Randomly Display of Product: This is the on/off switch of the Prestashop create page plugin. Admin has the option to enable/disable this field. If enabled, then only the products will be displayed randomly otherwise, they will be displayed based on arrival date in the front end.
Product Category:In this field of Prestashop page builder module, the admin has to enter the category id so that products which are mapped to that category id will be displayed in the “Featured Products” block.After filling up the form, click on “Save” button present in any block as shown below.
It will validate each form input before saving into the system. If there is any error/ issue, it will be displayed as shown below:
If there is no error/issue, it will save the form data into system and display the success message as shown below:
Page Maker:
This section of the Prestashop create page module manages the pages. Admin can create new pages, update existing pages and delete pages of Pagemaker. Admin can find a menu named “ Page Maker” in the left panel of Admin as shown below:
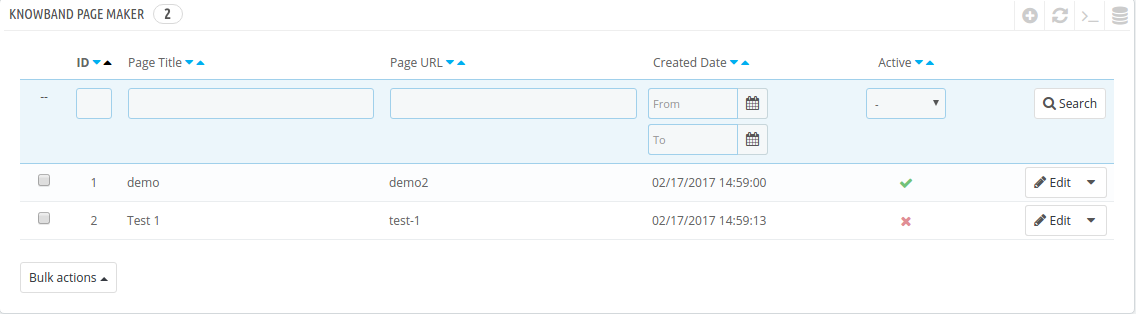
On clicking “ Page Maker” displayed on Admin Menu, the listing of Page Maker added by admin is open as shown below:
There are also several other filters as well to filter the list of the page as shown in the above screenshot.
Admin can also enable or disable pages using the bulk actions. If a page is disabled then that page will not be visible on the store front. Admin can enable/disable page by clicking on “Tick” or “Cross” in the “Active” field of the list for the particular page.
How to create New Page:
Following are the steps to follow to add the new page with the help of this Prestashop addon into the system:
Click on “ Page Maker” menu displaying in the admin menu.
It would display the page where already added Pages will be listed (If any). Click on the “+” (Plus Icon – as shown in above screenshot).
It would redirect admin to the new page where a form with some input field will be shown (Screenshot is shown below).
Fill up the following described input fields of multiple form:
There are four forms displaying in four different tabs as shown above.
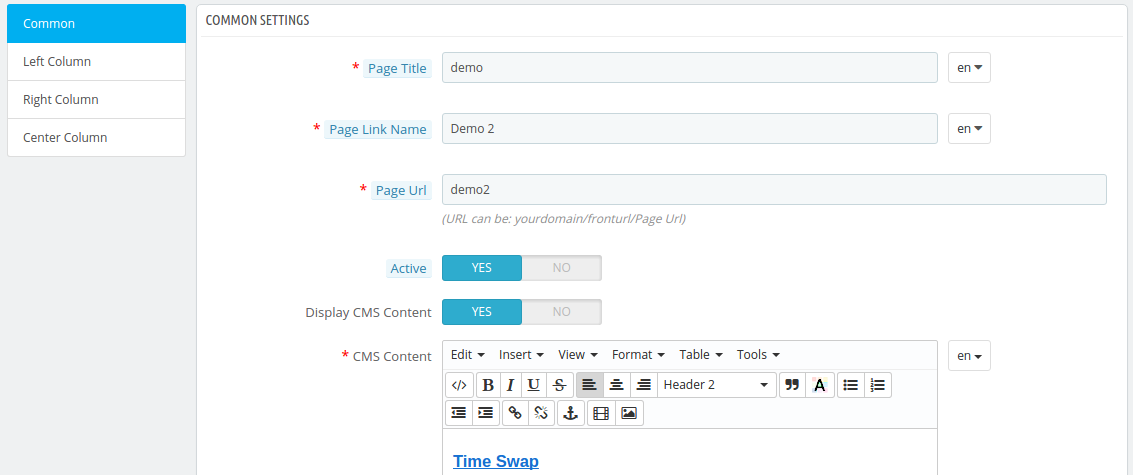
Common Settings:
Page Title: Enter the page title which can be displayed on the top of the page.
Page Link Name: Enter the text which can be displayed as link on the menu header of front end.
Page URL: This field of landing page maker allows the admin to enter the valid and distinct sub URL for the page.
Active: By default, it is “ON”. Admin can disable/enable the display of page in front side by turning OFF/ON
Display CMS Content: By default, this field of Prestashop create page is “ON”. Admin can disable/enable the display of page on front side by turning OFF/ON
CMS Content: By default, it is “ON”. Admin can disable/enable the display of CMS content written in “CMS Content” field on the page.
Display on Menu Header: By default, it is “OFF”. Admin can add page link on Header Menu of Front side be enabling the field.
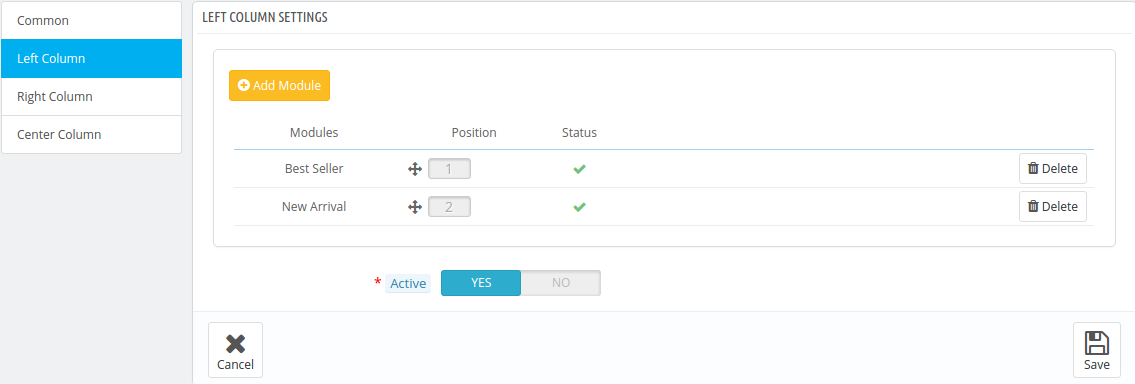
Left Column:
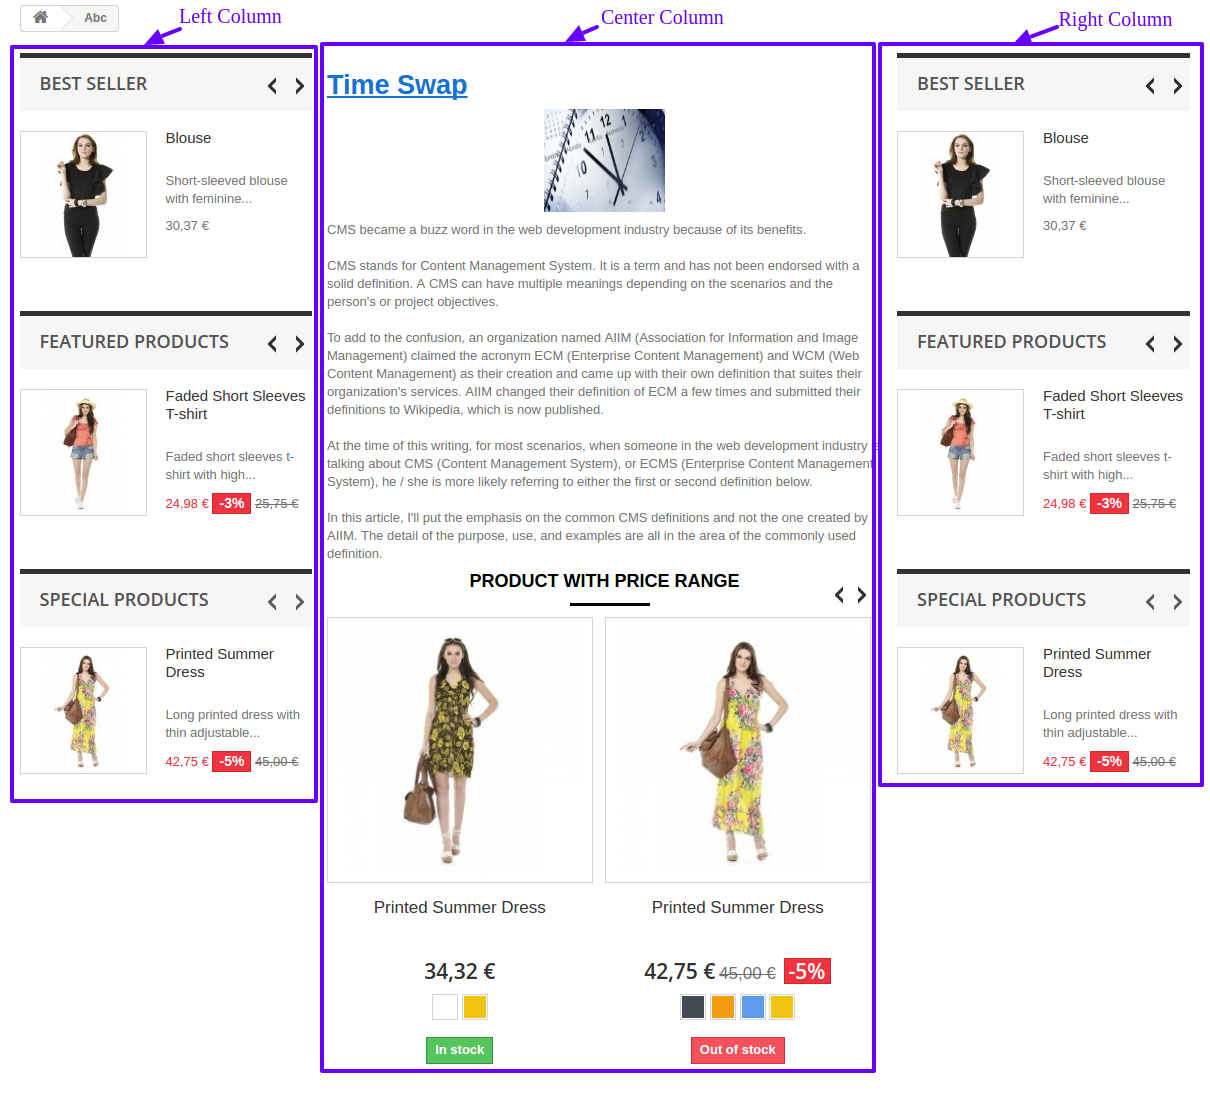
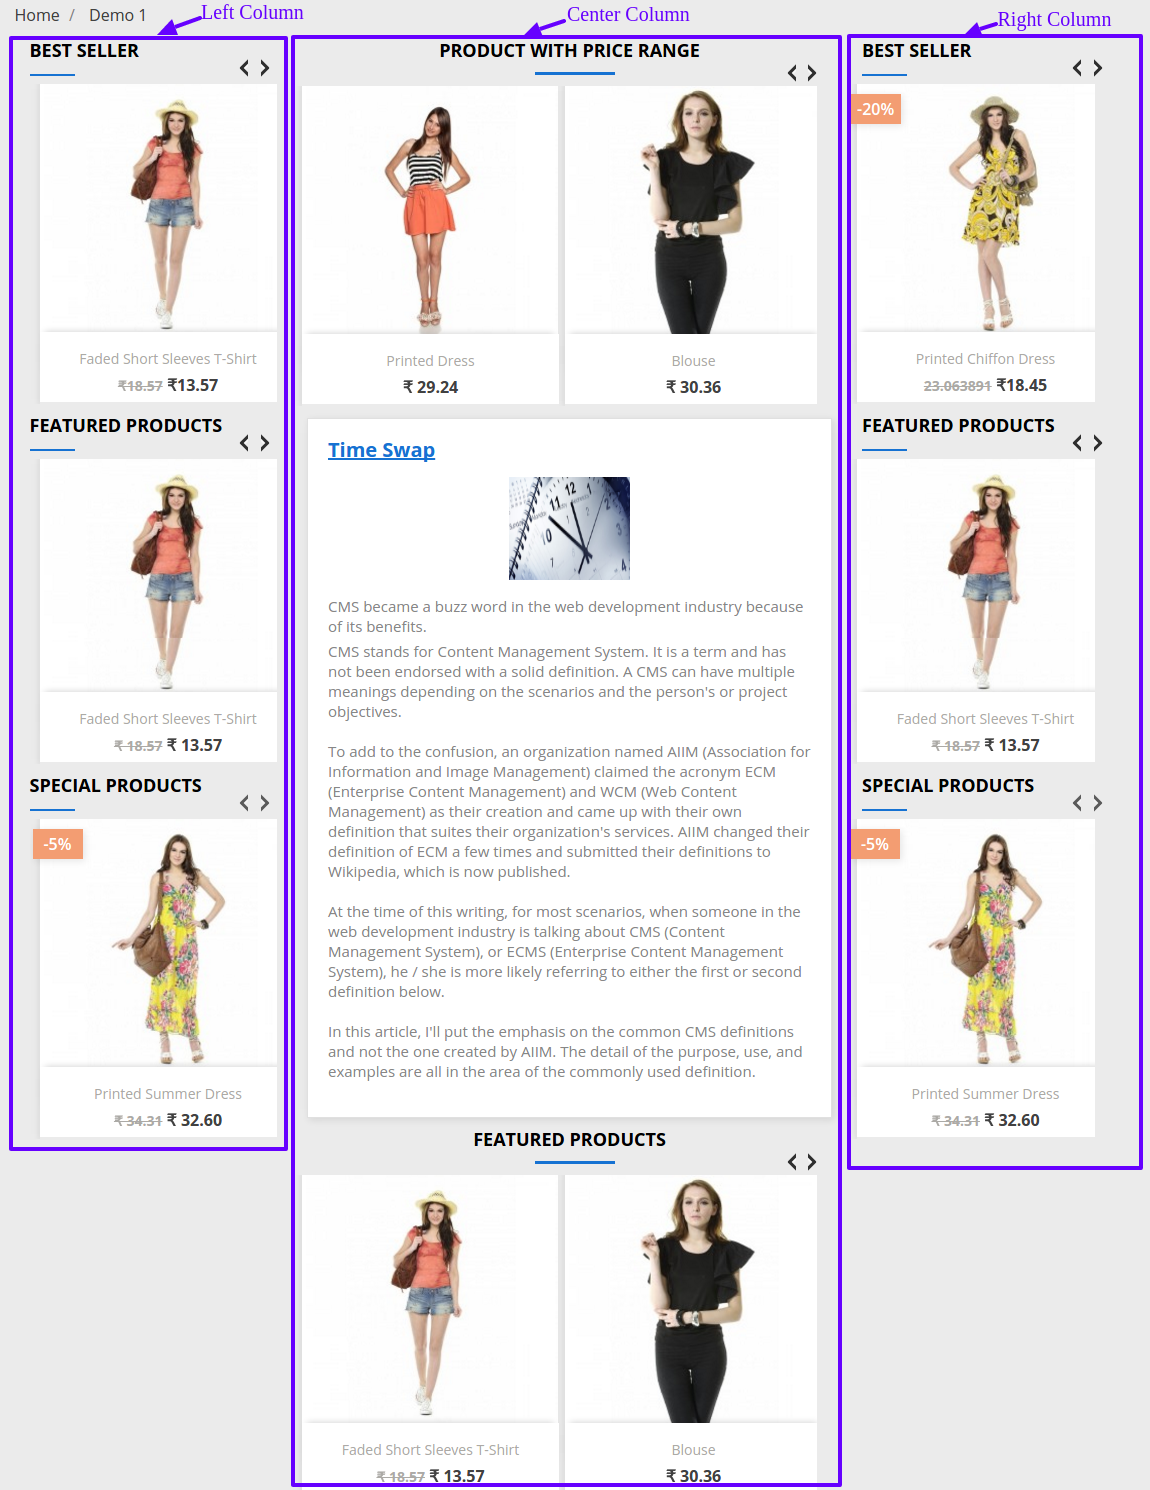
This setting is for Left Column displayed on the page in Front Side as shown below:
There is an block to add “Modules” for left Column which can be displayed after adding the page.
Active: By default, this is “ON”. Admin can add or remove left column displayed on page on front end by turning ON/OFF.
Right Column:
This setting of the Prestashop page builder module is for Right Column displayed on the page on Front Side as shown below:
There is a block to add “Modules” for right column which can be displayed after adding the page.
Active: By default, this is “ON”. Admin can add or remove right column displayed on the page on the front end by turning ON/OFF.
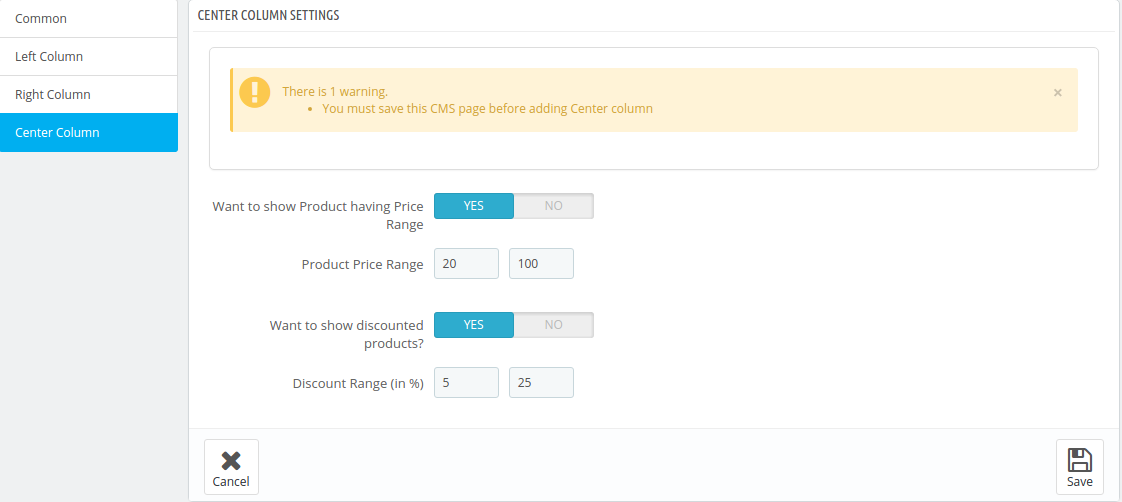
Center Column:
This setting is for Center Column displayed on page in Front Side as shown below:
There is a block to add “Modules” for the right column which can be displayed after adding the page.Want to show
Product having Price Range: By default, this is “ON”. Admin can disable/ enable the display of Price Range Block in the center column.
Product Price Range: By default, the Price Range is 20 to 100. Admin can set the price range for the products to display on Price Range Block in the center column.
Want to show discounted Products: By default, this is “ON”. Admin can disable/ enable the display of Product Discount Block in the center column.
Discount Range: By default, the discount range is 5 to 20%. Admin can set the discount range for the products to display on Product Discount block in center column.
After filling the form, Admin can click on “Save” button to add the new page or click on “Cancel” button to go back to listing page.
If you click on save button, it would validate the provided data and save the details into the system if valid.
How to Edit Page:
Following the steps to follow to edit the page from the system-
Click on the “ Page Maker” menu present in Admin Menu.
It would display the page where already added pages will be listed (if any). Click on the “Edit” link shown corresponding to each page.
It would redirect admin to a new page where forms with already filled input field will be shown. Admin can simply update values and save the details by clicking on “Save” button.
You can find the screenshot of Edit Section below:
Add Module:
Click on any column setting like the left column. It would display column form.
To add module, click on “Add Module” button as shown below:
If more module is available, the select box will then appeared to add module otherwise error message “No More module is available” is displayed.
After selecting the module, click on “Add Module” button. It will add the module with the display of success message.
You can find the scrrenshot to add module in the column setting:
Change Position:
Click on any column setting like Left Column. It would display left column form.
To change the position of any existing row, drag it to the desired position and drop it.
It then updates the current position of each existing modules with the display of success message.
You can find the screenshot as below:
Change Module Status:
Click on any column setting like Left Column. It would display left column form.
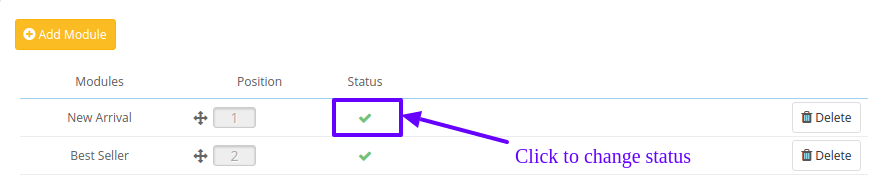
If modules are added, tick icon displayed for Enabled and cross icon displayed for Disabled in the Status column.
To change the status of existing modules, click on the icon displayed in “Status” column corresponding to the particular module.
If already enabled, it then changes to “Cross” icon otherwise “Tick” icon with the display of the message.
You can find the screenshot as below:
How to Delete Page:
Click on “ Page Maker” menu present in Admin Menu.
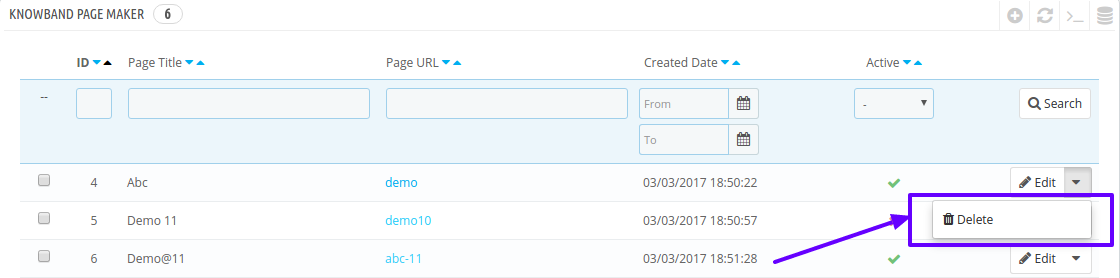
It would display the page where already added pages will be listed (if any). Click on the “Delete” link given under the drop-down being shown corresponding to each page.
It then, the system will confirm the admin before deleting by asking “Delete Selected Item”. If click on “Yes”, it will delete the page.
You can find the screenshot as below:
How to access Page:
Click on “ Page Maker” menu present in Admin Menu.
It would display the page where already added pages will be listed(if any).
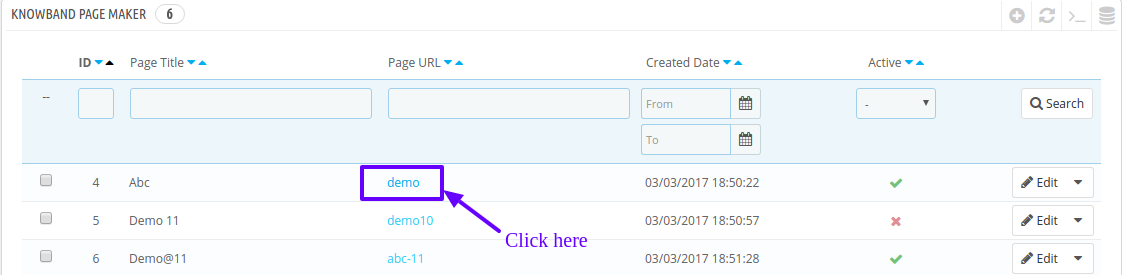
Click on the link in “Page URL” column corresponding to particular page. It then opens the created page for the front side in new tab.
You can find the screenshot as below:
Front End Module
After enabling the Prestashop CMS page creation module, the front-end user can see the added paged by manually entering of URL in Address bar or create a link for the page.
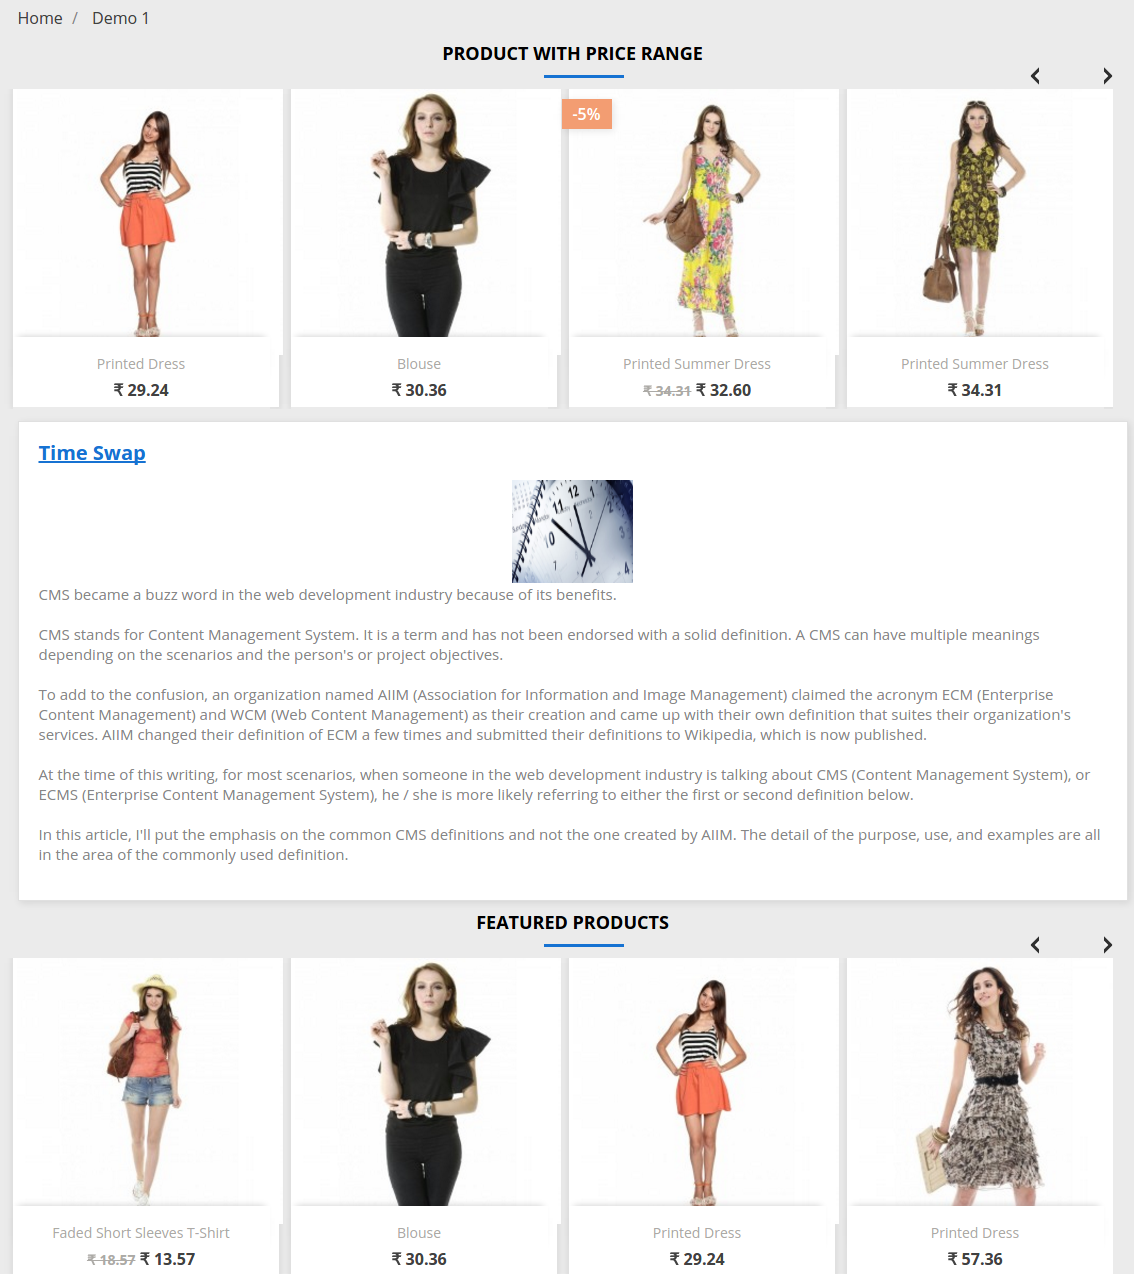
The page with both the column enabled can be displayed as shown below:
(for Prestashop 1.6)
(for Prestashop 1.7)
Page with one column enabled as shown below:
(for Prestashop 1.6)
(for Prestashop 1.7)
Page with no column as shown below:
(for Prestashop 1.7)
Watch how this Prestashop Page Builder plugin by Knowband works in this video tutorial:
Prestashop eBay Integration addon by Knowband is the solution if you are planning to integrate your Prestashop store with eBay Marketplace.
Headquartered in San Jose, California, eBay is a multinational eCommerce corporation that popular as an online auction and shopping site. It facilitates consumer-to-consumer and business-to-consumer sales and offers an easy. In addition, customizable interface for sellers across the globe to list and sell their products effortlessly. Further, eBay operates in over 30 nations. The product listing of eBay combines 800+ million product listings that are not just unique but are even coupled with great deals. eBay is a marketplace where people around the world connect to sell and buy different seller products which would help store owners to increase the sale and extend the store reach.
The Prestashop store owners can now sell their products in the eBay marketplace with the help of Knowband’s eBay integrator. Prestashop eBay marketplace connector module integrates Prestashop Store with eBay Marketplace. The store admin can now perform various operations in the marketplace which include product listings, category mapping, order listing, etc with the help of Prestashop eBay Marketplace Integration Extension.
1.1 Features offered by Knowband Prestashop eBay integrator:
The eBay Prestashop Integration addon makes it easier for sellers to sell their products on the popular marketplace.
The eBay Prestashop connector module offers a profile-based listing that allows the store admin to list the product in the marketplace in bulk.
The seller can add, remove or relist the products from the back end of the eBay Prestashop integrator.
The automated approach of the eBay Prestashop integration plugin makes inventory management effortless.
The admin gets an option to offer desired shipping methods to the marketplace customers from the back end of the eBay Prestashop integrator module.
The admin can sync the orders received from the marketplace into their Prestashop site. The change in the order status can sync back to ebay.com.
With easy inventory and order management of eBay Prestashop integrator, online merchants get to tap the larger audience base with the least effort.
The eBay Prestashop integrator addon lists the error that occurs while listing the products.
The latest feature of the eBay Connector module will enable the store admin to select the product country while creating their profile.
Now, the online store owner with Action validates the order hook can sync the product inventory data on both eBay and the Prestashop store after an order gets placed at the Prestashop store.
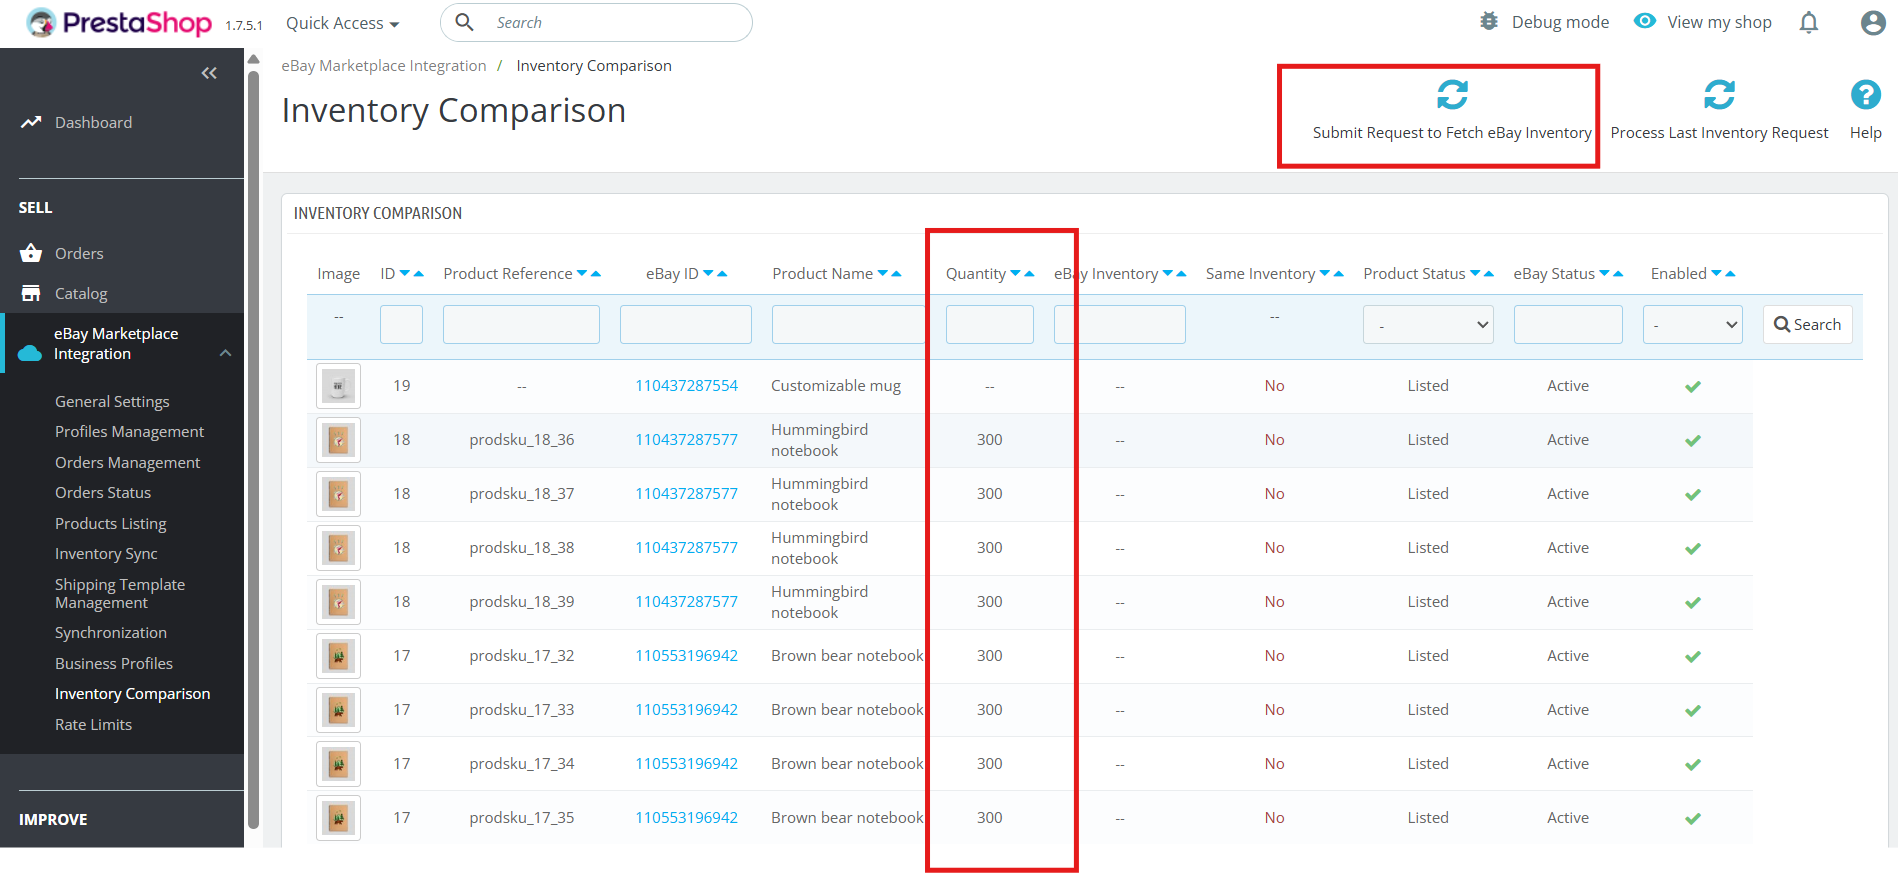
[New] Now store admins can easily compare their eBay inventories with their prestashop store using the Prestashop eBay Marketplace integrator. This enhancement is specially developed to ensure the accurate no. of products available across both the eBay marketplace as well as prestashop store.
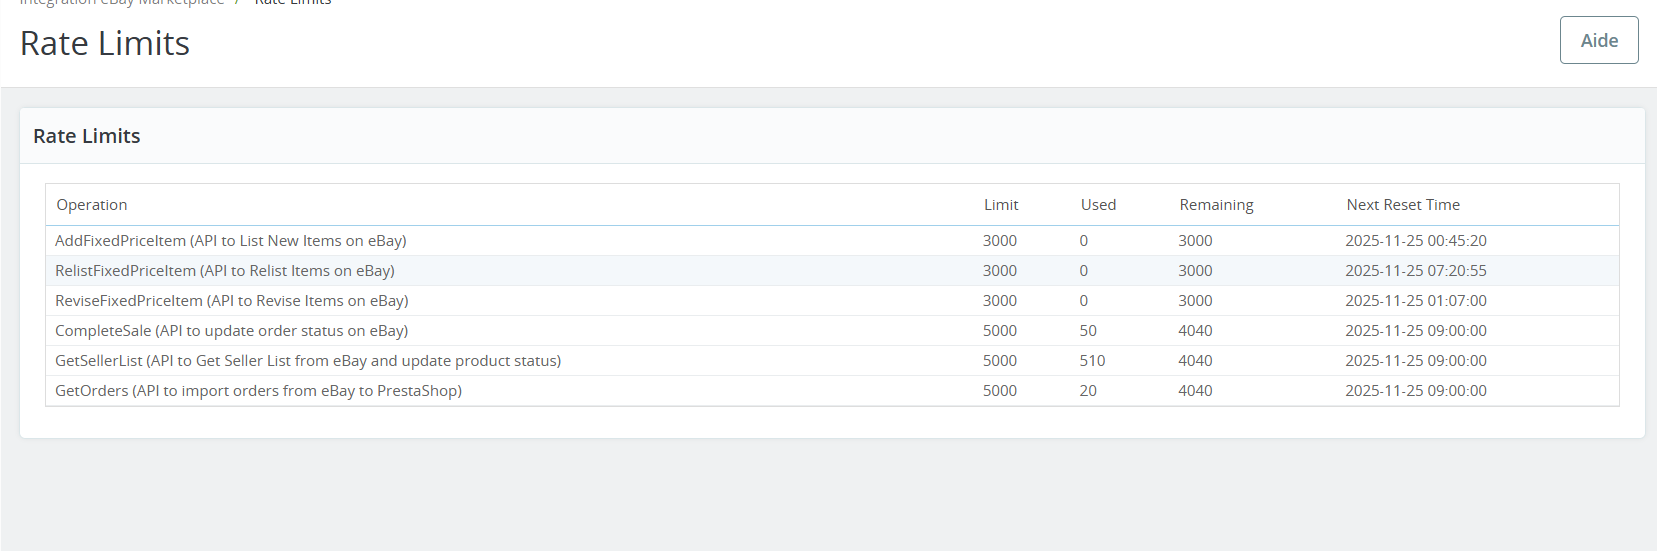
[New] The module now provides the feature to track the rate limits of the APIs that are called. Through this feature, store owners can check the no. of times the APIs have been called.
What’s New in the Recent Enhancements!
Profile Level Product Synchronization:
Knowband’s Prestashop eBay marketplace connector addon now supports profile-level product synchronization. This feature enables merchants to manage and synchronize their product listings more efficiently by categorizing them into profiles. Furthermore, each profile can be customized with specific synchronization settings, streamlining inventory management and ensuring consistency across platforms.
Product Listing with Custom Product Title and Description:
The enhanced eBay Prestashop connector addon allows for product listings with custom titles and descriptions on eBay. Moreover, the merchants can now tailor their product titles and descriptions to better match eBay’s search criteria and buyer preferences. This customization helps improve visibility, attract more potential buyers, and ultimately increase sales.
eBay Business Policy Import:
The latest update to Knowband’s Prestashop eBay marketplace connector includes eBay business policy import. This feature simplifies the process of importing eBay’s business policies into Prestashop, ensuring alignment in shipping, return, and payment policies. It enhances compliance, reduces manual errors, and saves time for merchants managing multiple platforms.
PrestaShop eBay Marketplace Integration Module
The Knowband Prestashop eBay Marketplace Integration Addon enables seamless product synchronization, order management, and automated updates between your Prestashop store and eBay.
You can watch our video on “New Features in Knowband’s eBay marketplace Integration Module v2.1.6 for Prestashop” here:
2.0 Installation
After purchasing the Prestashop eBay Connector module, you will get the following files:
1. Zipped file with the source code of the eBay Prestashop integration module.
2. User Manual
You can upload the module in two ways:
Manual by uploading files from FTP
Automatic by uploading a zip file from the admin
Manual
Follow the following steps to install the extension:
1. Unzip the zip file. It would contain files and folders as shown below –
2. Copy all the files and folders of the unzipped folder into your store “Modules” directory on the path – Root Directory/modules/.
Now Prestashop eBay Connector is ready to install on your store. Moreover, you can find that in Store Admin -> Modules and Services.
Automatic
Login to admin and click on Module & Services from the left-hand column. Go to the Store Admin -> Modules and Services
Click on “Upload a module”. Drag the file or simply select the file from the system.
Now module is ready for installation on your store and you can find that in Store Admin -> Modules and Services.
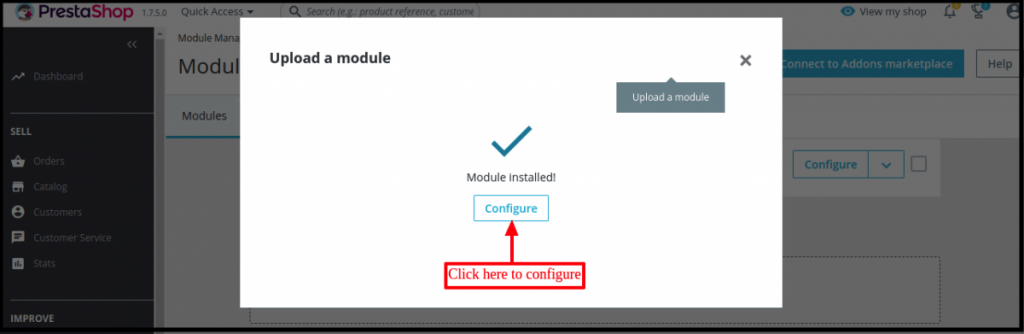
Once the file completely uploads, a notification of “Module(s) successful installation” will display.
After the eBay Prestashop Connector Module installs properly, the Install button will automatically change to Configure.
In case, you are not able to find eBay Prestashop Connector in the admin modules list, please try searching module with the following details
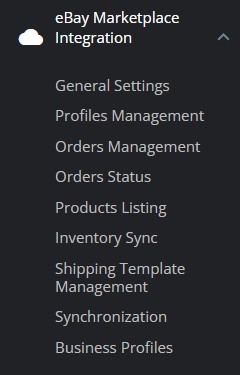
After installation, store admin can find a menu named “eBay Marketplace Integration” in the left panel of Admin as shown below –
3.0 System Setup
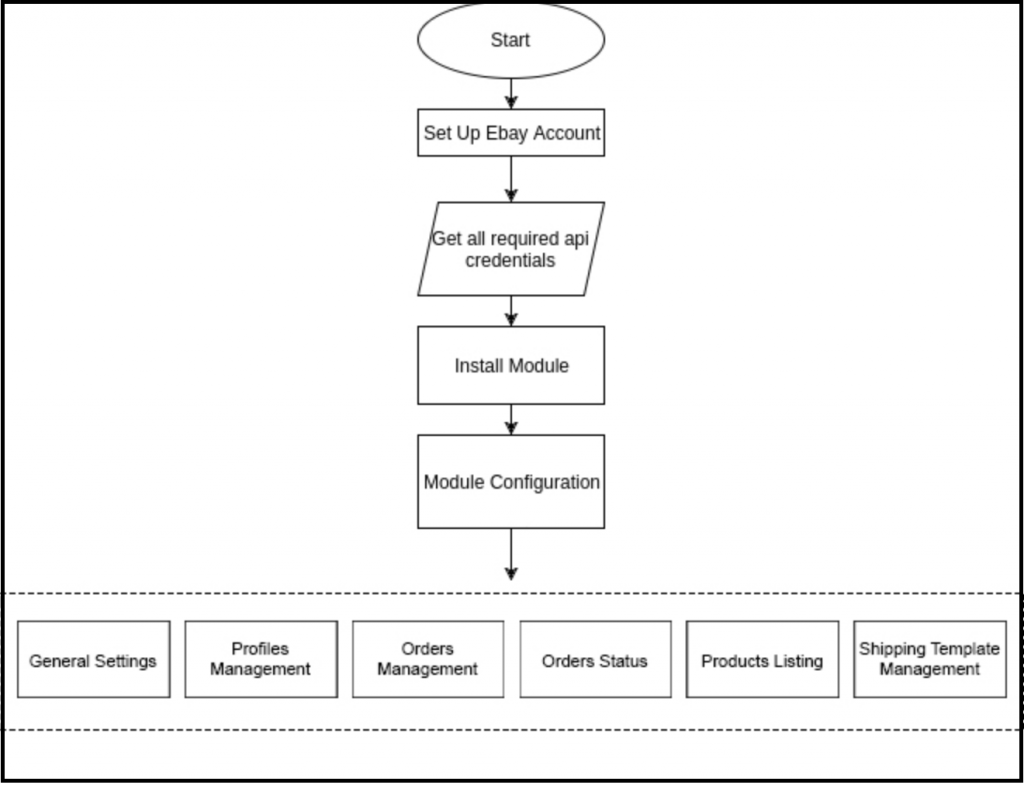
Before proceeding ahead, it is important to know that what is the correct flow of actions to set up this system as several things are dependent on other things and if we do not take care of them then it would become difficult to process smoothly or maybe error-prone.
4.0 eBay Marketplace – Seller Account Setup
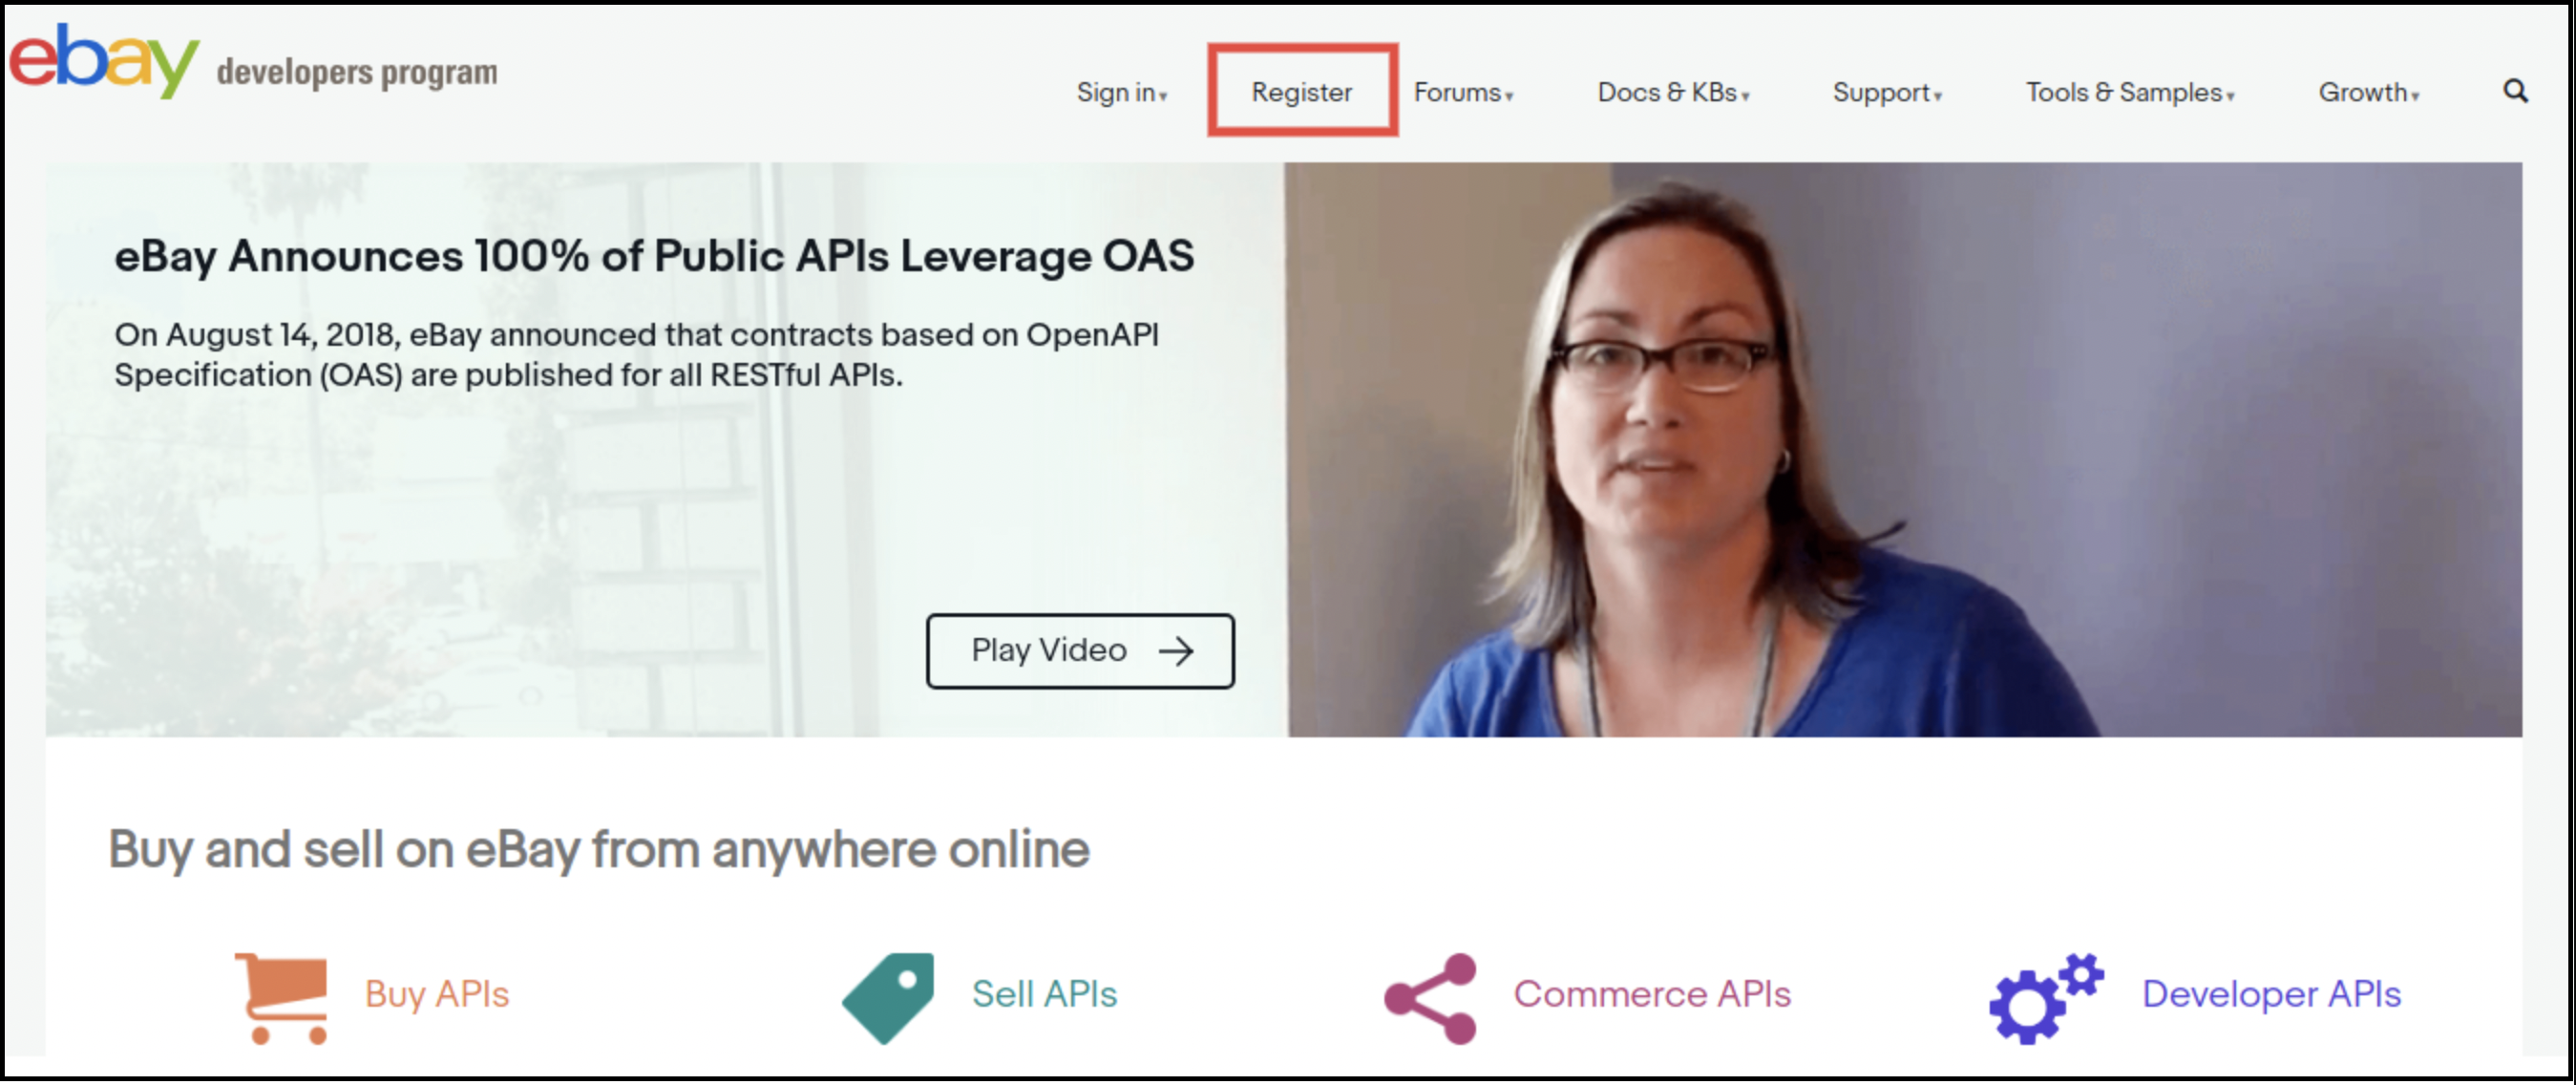
To start selling on eBay Marketplace you need to have a seller account on eBay. In this section, we are listing all the steps to create a seller account on eBay. Please find them below –
After filling in the valid data, click on the “join” button. You will head to the application creation page.
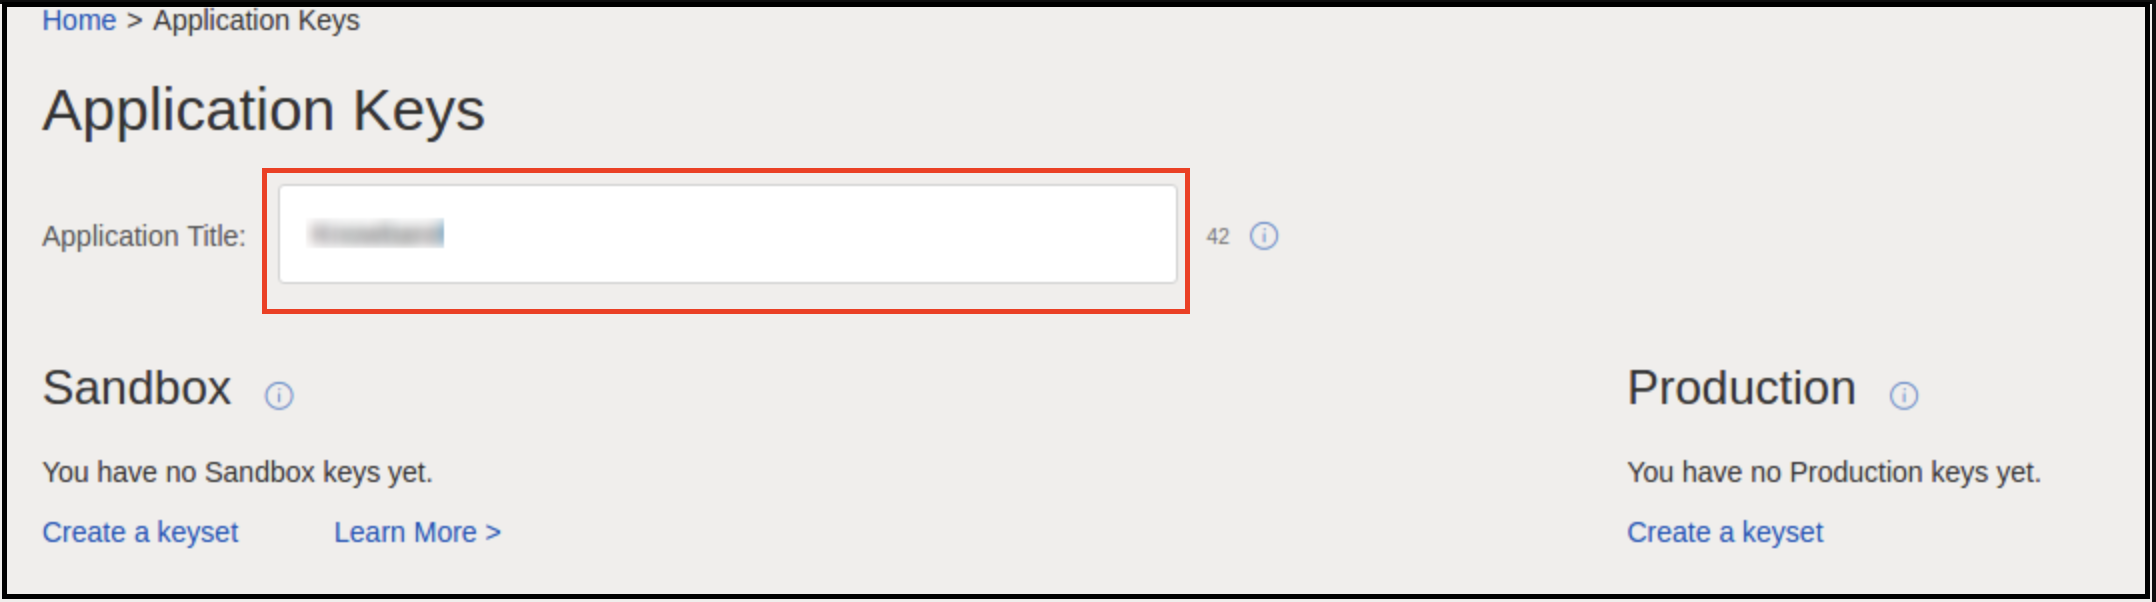
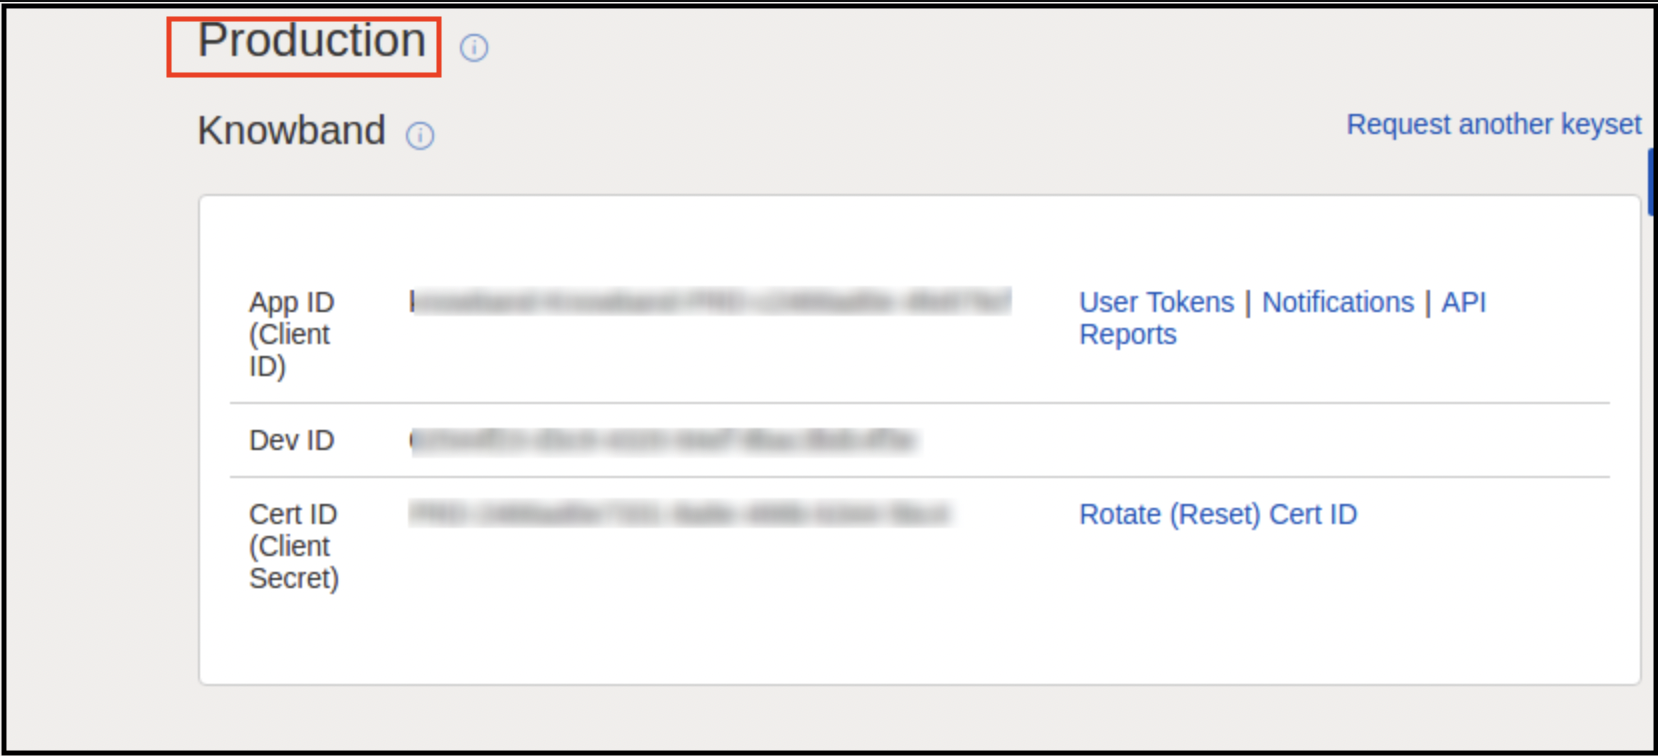
Enter the application name and click on create key set under the Production section, a new form will be opened.
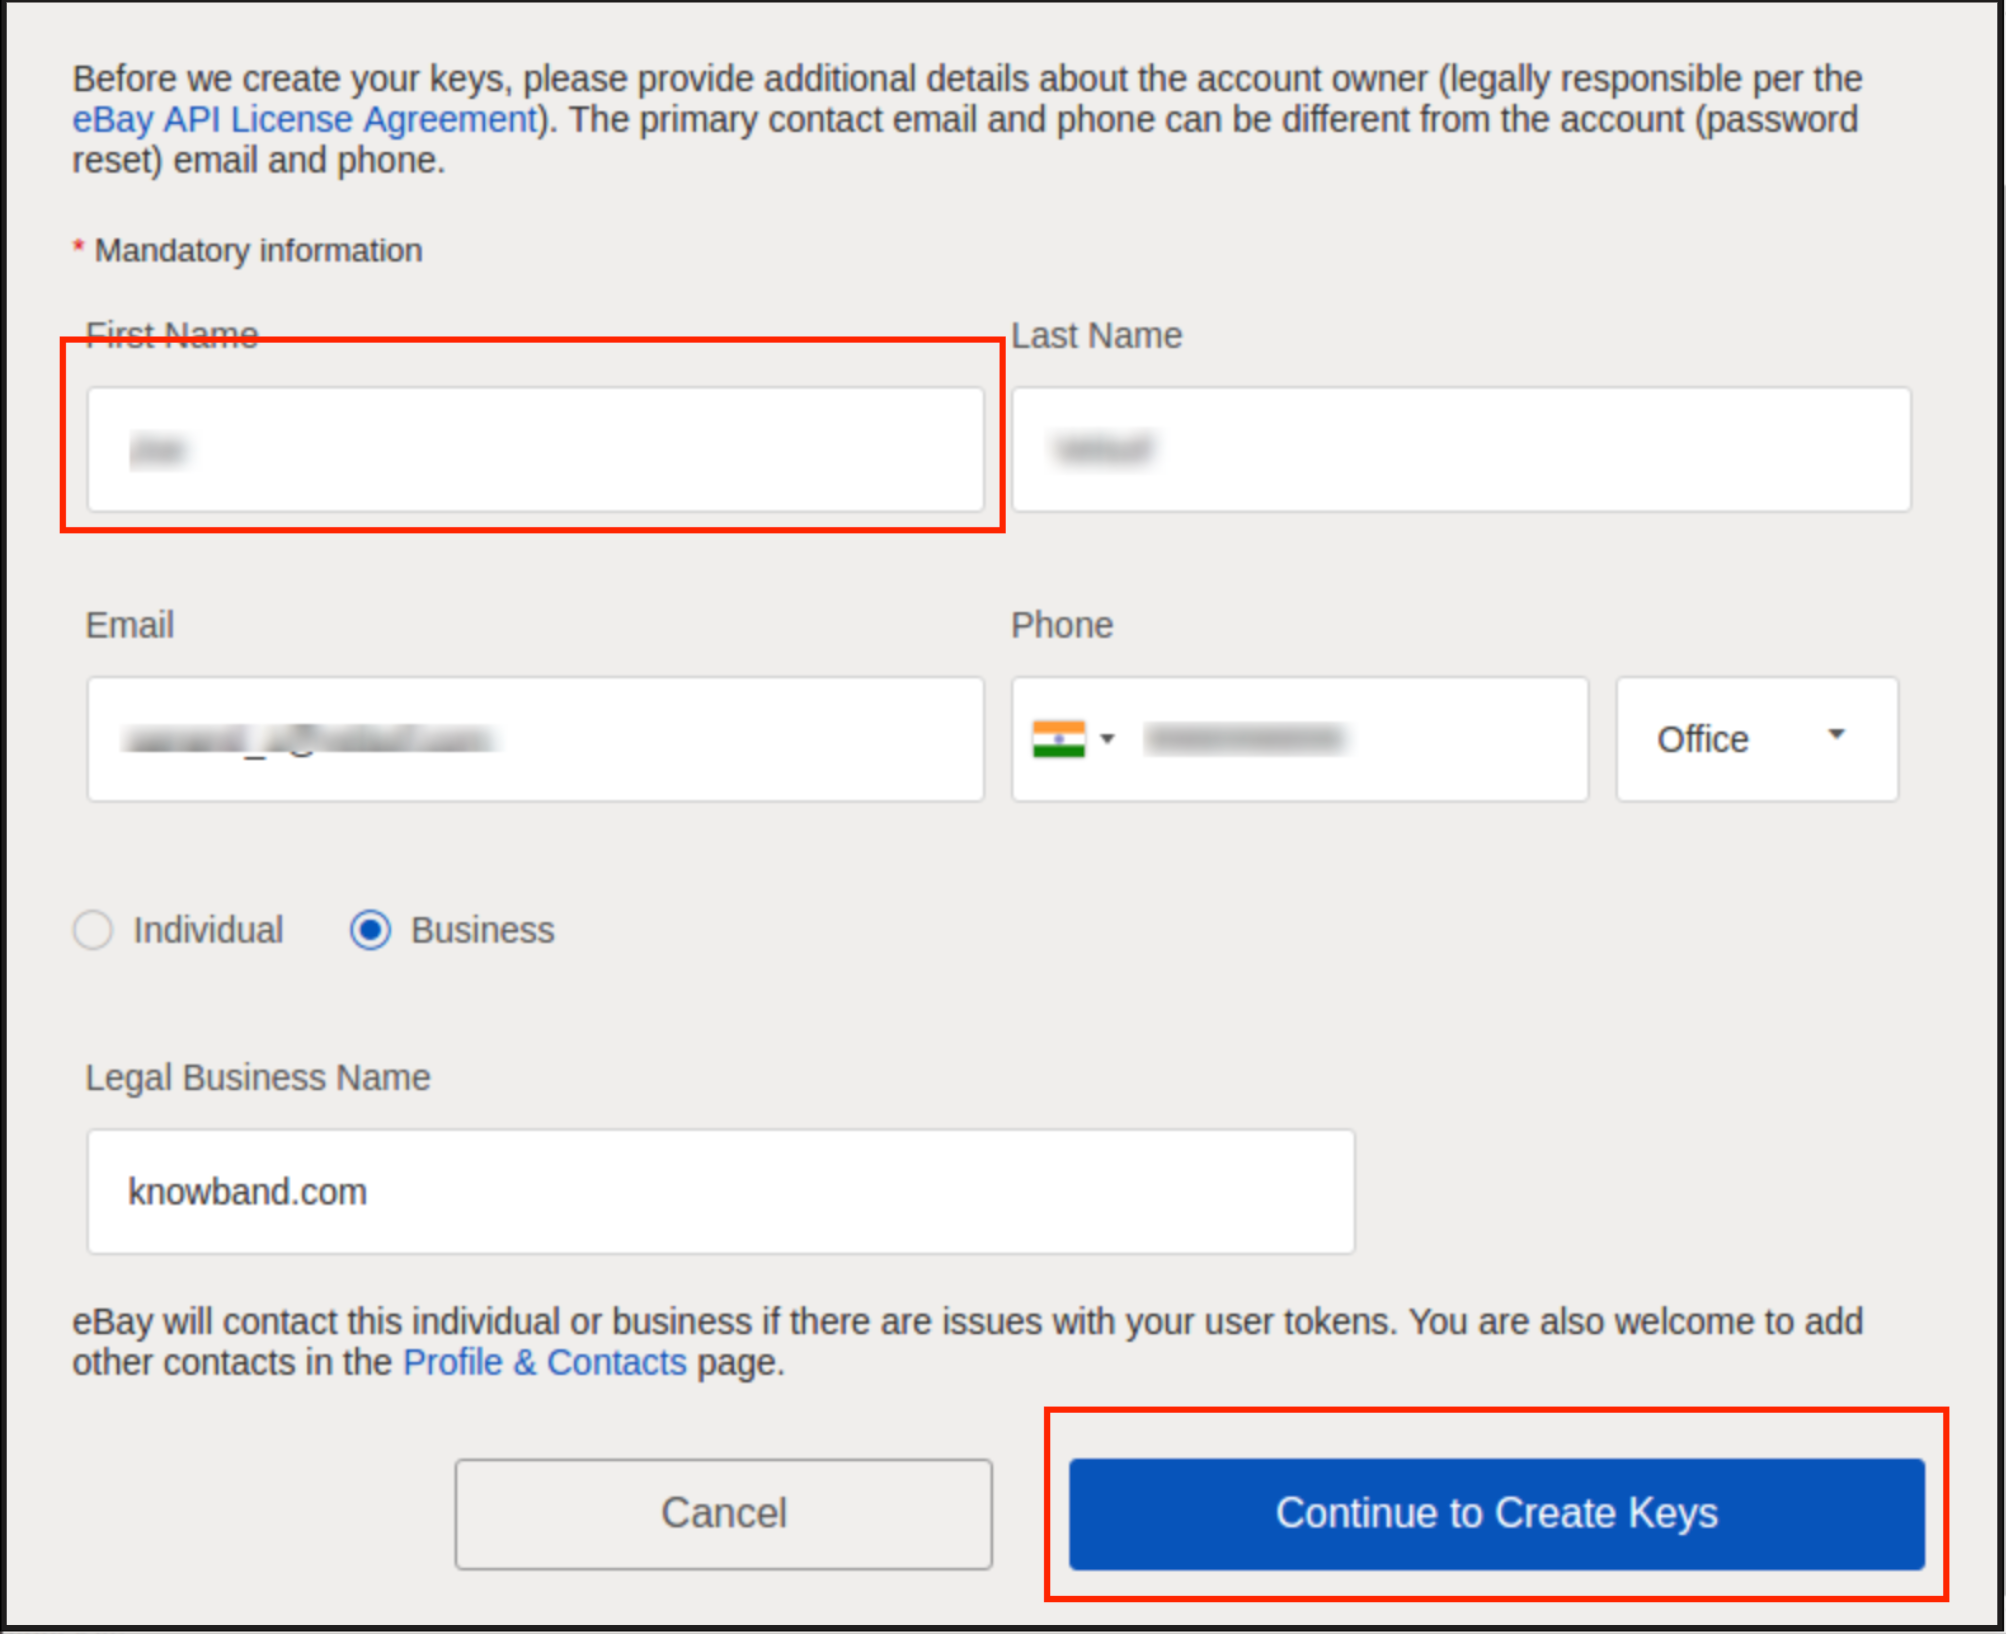
Enter the details and click on Continue to create Keys.
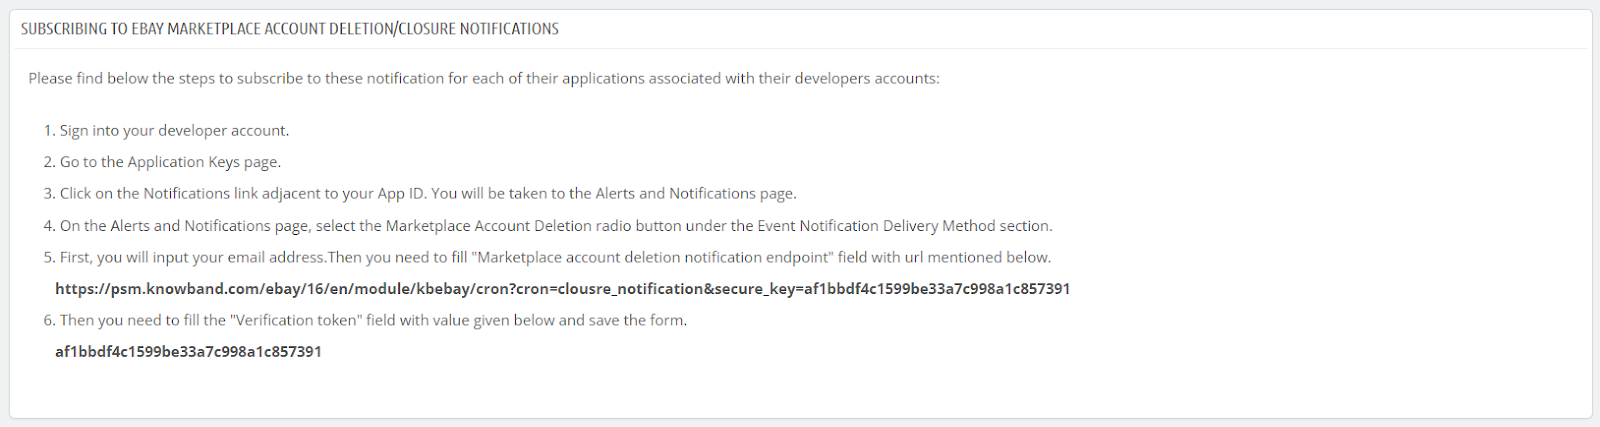
The application keys will be disabled until subscribed to eBay Marketplace Account Deletion/Closure Notifications.
To comply witheBay Marketplace Account Deletion/Closure Notifications follow the steps mentioned in the general setting steps of the Prestashop eBay Marketplace Integrator module.
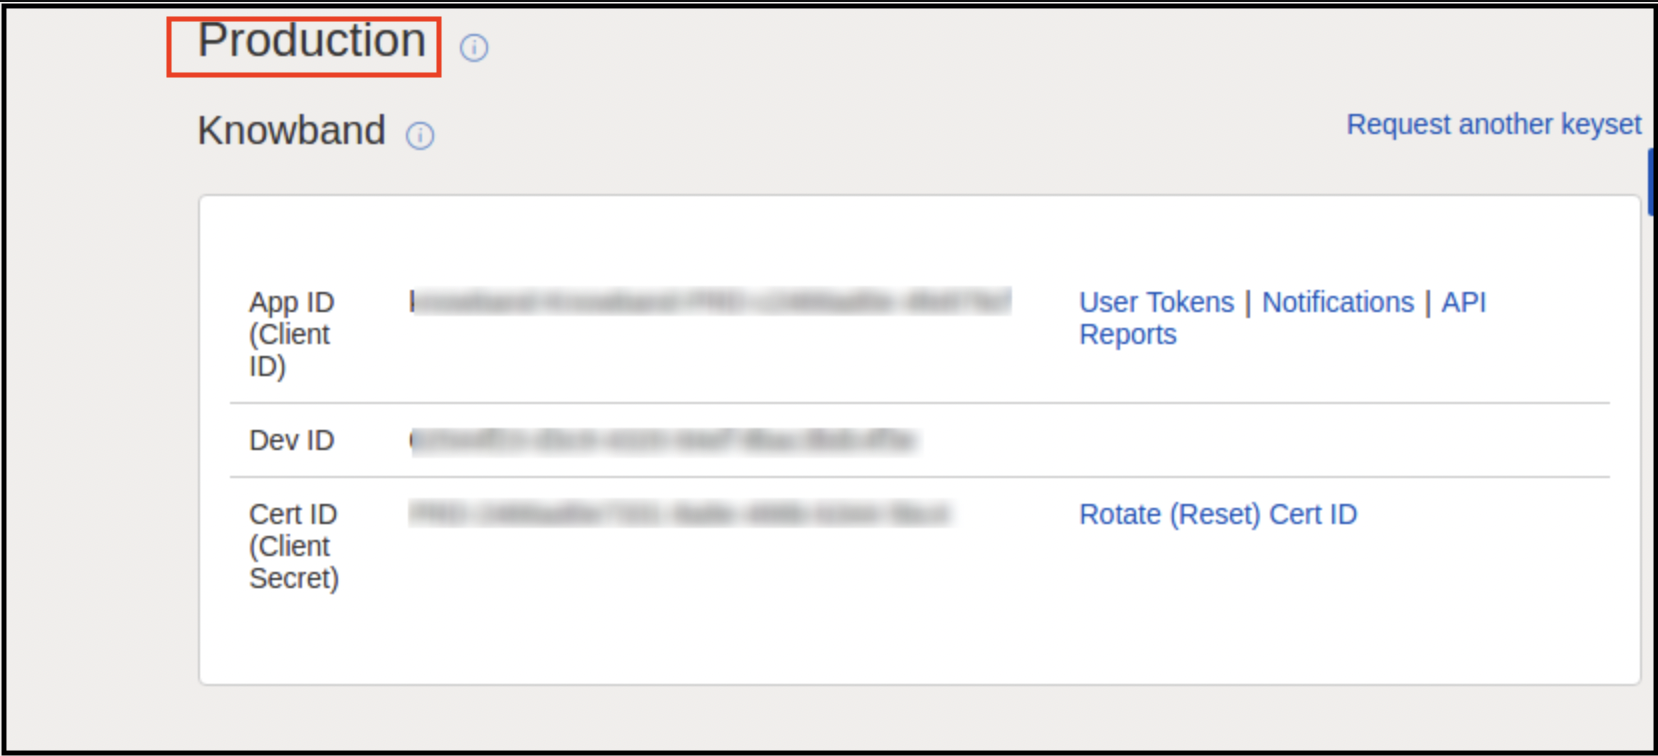
Once your enrolment to eBay account deletion/closure will be done successfully. You can easily access eBay API keys.
The application keys will be shown.
RU Name:
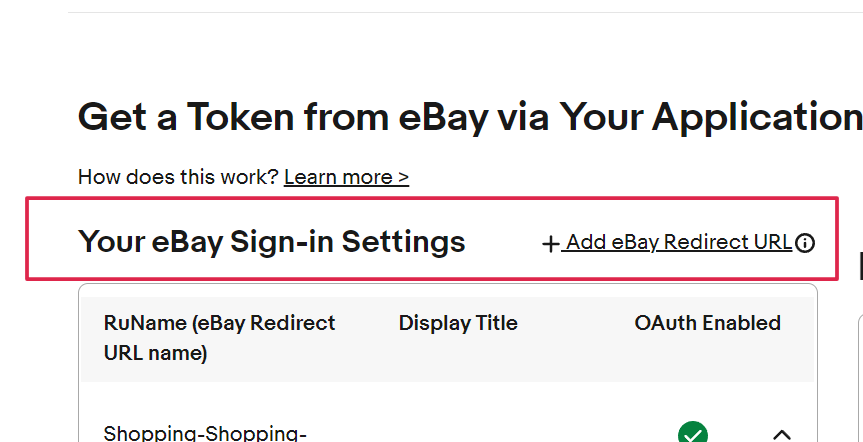
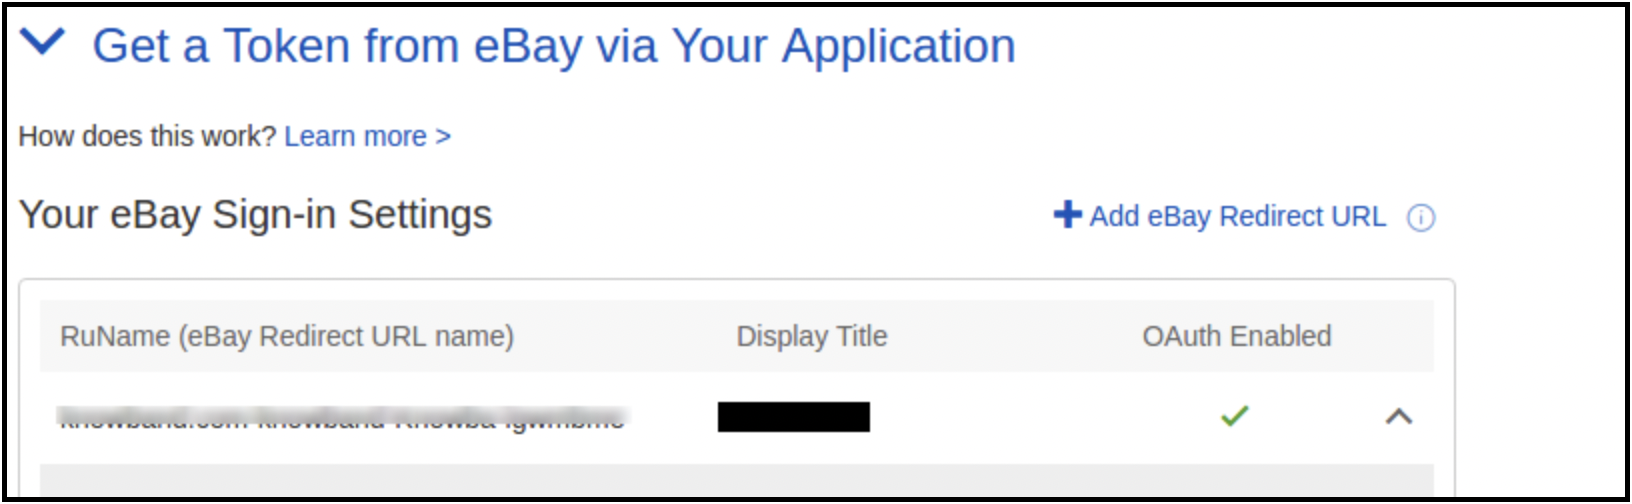
For creating your RU name hit the “Add eBay Redirect URL” button as shown in the below image.
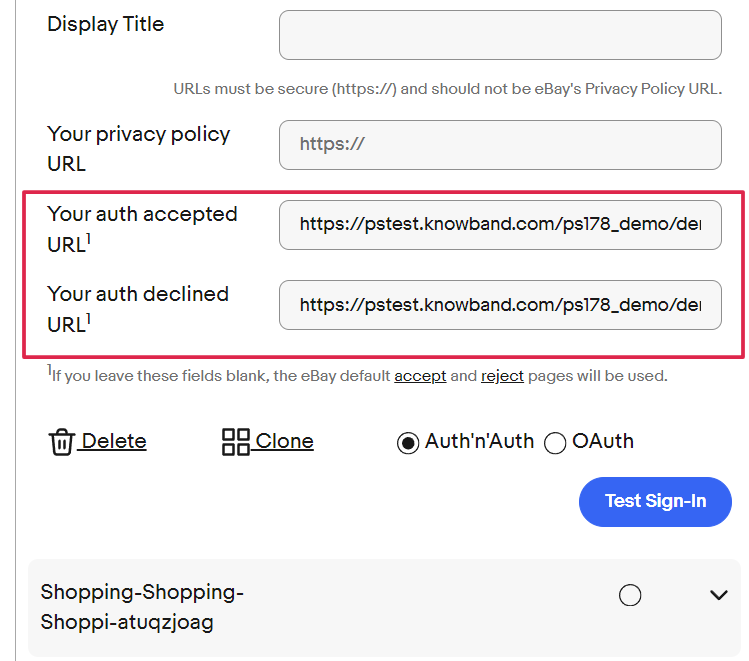
Kindly copy the redirected URL from the module general setting and place it in the “Your auth accepted URL1” and “Your auth declined URL1”.
Click Save and Test Sign-in.
5.0 Assumptions
1. All products having default categories as the selected categories for the profile will list on eBay.
2. By default free shipping will add to products, Shipping details for listing will be
Shipping Service:- UPSGround
Shipping Type:- Flat
It is changeable from the eBay account.
3. By default, the return policy will add. Policy details are:-
RefundOption – MoneyBack
Days – 30 days
Description-If you are not satisfied, return the item for a refund
ShippingCostPaidBy – Buyer
It is also changeable from the eBay account.
4. eBay account of the admin is connected to the PayPal account.
6.0 Admin Interface
The Prestashop eBay Integrator menu contains the following options:
General Settings
Profiles Management
Orders Management
Orders Status
Products Listing
Inventory Sync
Shipping Template Management
Synchronization
Each tab of the Prestashop eBay integrator module is explained in detail below.
6.1 General Settings
The very steps involve connecting your store with the eBay Marketplace. Go to Module and Settings of the admin interface of the Prestashop eBay API Integration module. You’ll find your module as shown below:
Each field for the configuration panel of eBay Prestashop integrator is explained below:-
Activate
This is an on/off switch. Admin has the option to Activate/Deactivate the module. If enabled, then only this module and all its settings will be working otherwise there will be no impact of this module on the store.
Account Type
This field choice allows the admin to select the account type. The store owner can select the sandbox or live site from the dropdown.
Image Size of Product
In this dropdown option, store owners can select the type of image that will be sent to eBay.
Dev Id
This is a text field. In this field, you will have to input the Dev Id of the eBay account. Dev Id can be found by signing in to the eBay developer account.
App Id
This is a text field. In this field, you will have to input the App id of your eBay account. App ID can be found as shown in the above image.
Cert Id
This is a text field. In this field, you will have to input the Cert Id of the eBay account. Cert Id can be found as shown in the above image.
RU Name
This is a text field. In this field, you will have to input the RU Name of your eBay account. RU name can be found in the tab for Getting a Token from eBay Via Your Application after adding a redirect URL.
Paypal Email
This is a text field. You have to enter a valid PayPal mail id for will all listing will happen.
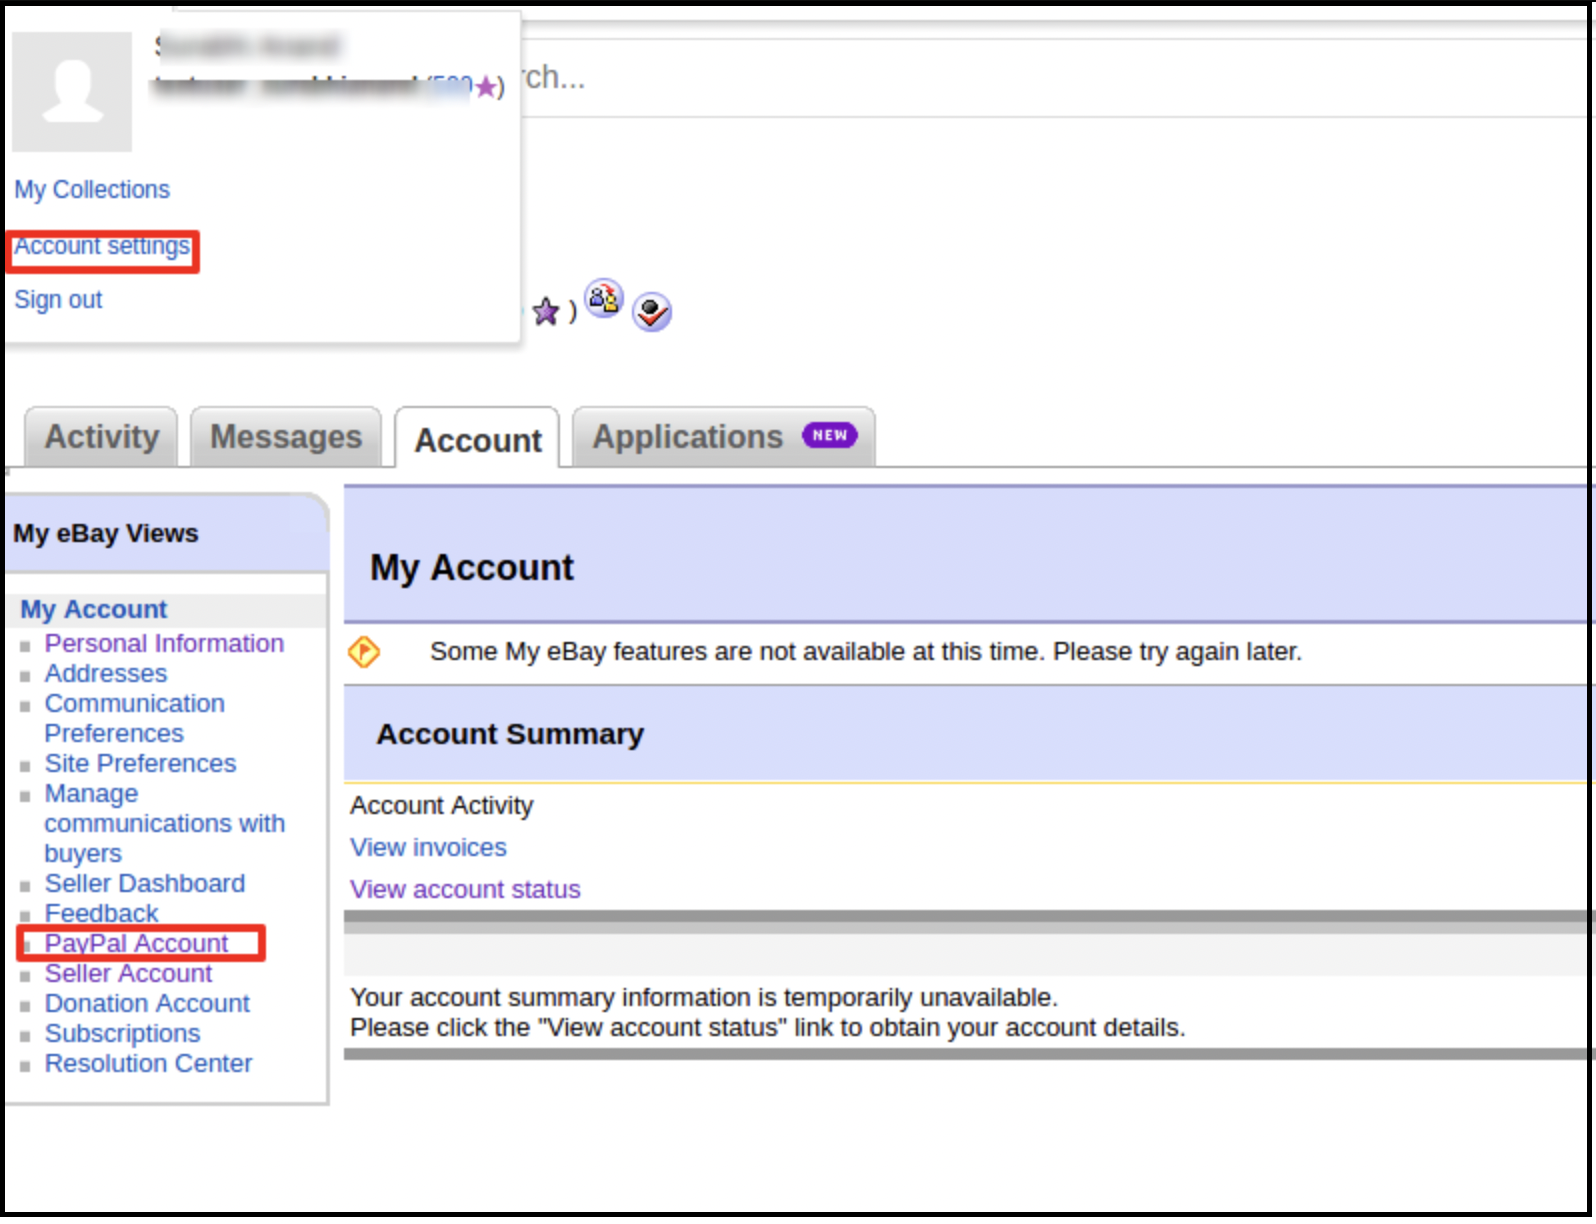
Log in to your eBay seller account.
Click on account settings from the top-left dropdown and click on PayPal account.
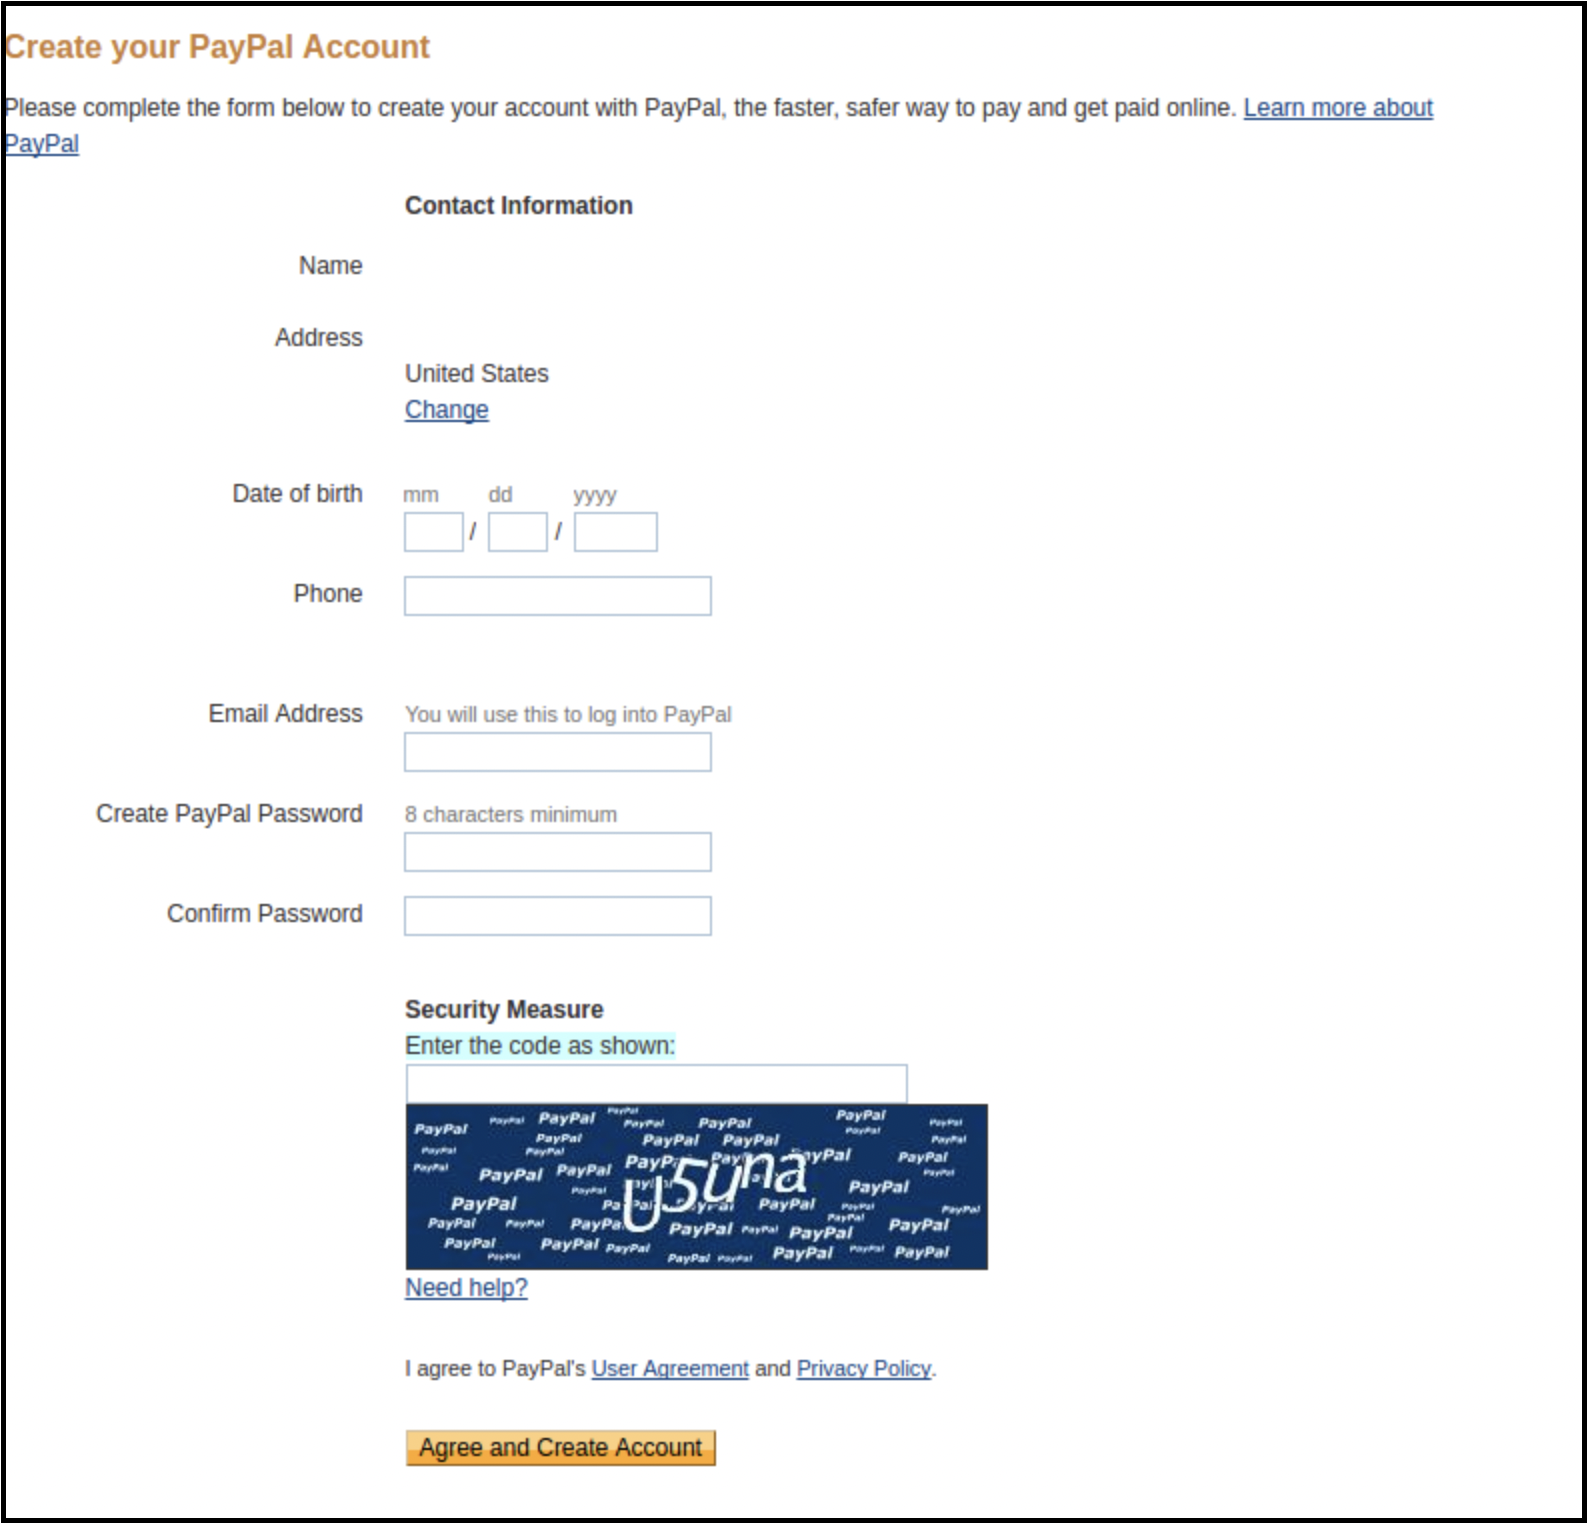
3. Now Sign up or link your already created PayPal account with the eBay seller account.
On clicking Sign Up, you will be redirected to the PayPal account creation page. Just create a profile by filling in details and linking it with your seller account.
Token listing link
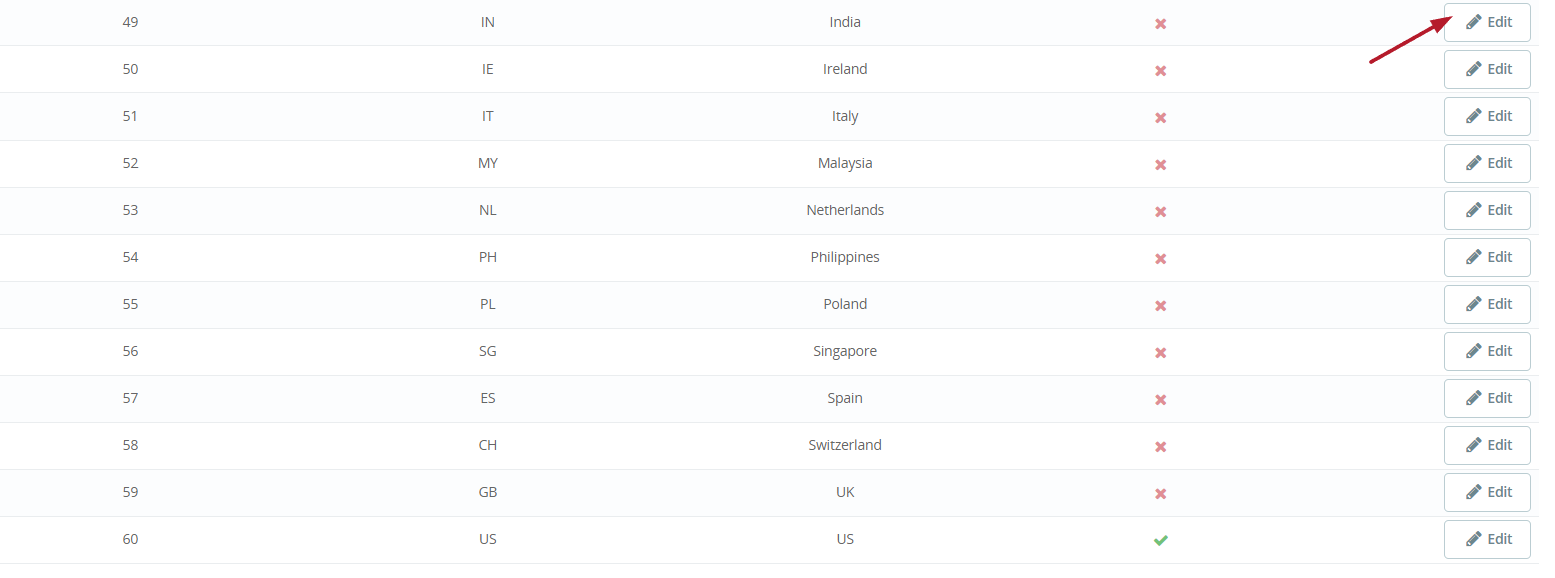
Click on \”Click here to add tokens for all the eBay Countries\” from the general settings of the module.
2. On the next page, click on the Edit button against the country for which you want to generate a token.
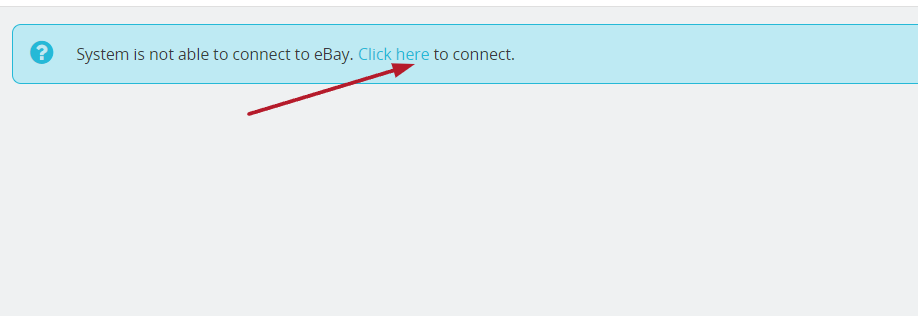
3. On the next page, click on the “Click here” to generate a token.
6.2 Profiles Management
The Profile Management tab of the Prestashop eBay integrator provides options to create a profile for product listing. In this section, the admin will be able to map the eBay category with the Prestashop store category and other product listing details can be saved.
6.2.1 How to add Profile to the system?
Following are the steps to add Profile into the system –
Step 1: Go to the eBay Marketplace Integration-> Profiles Management (Menu Option)
Step 2: It would redirect admin to a page where already available profiles will list (If any). Click on the “+” (plus icon as shown in the screenshot below) and it would redirect admin to a new page where a form with some input fields will be shown.
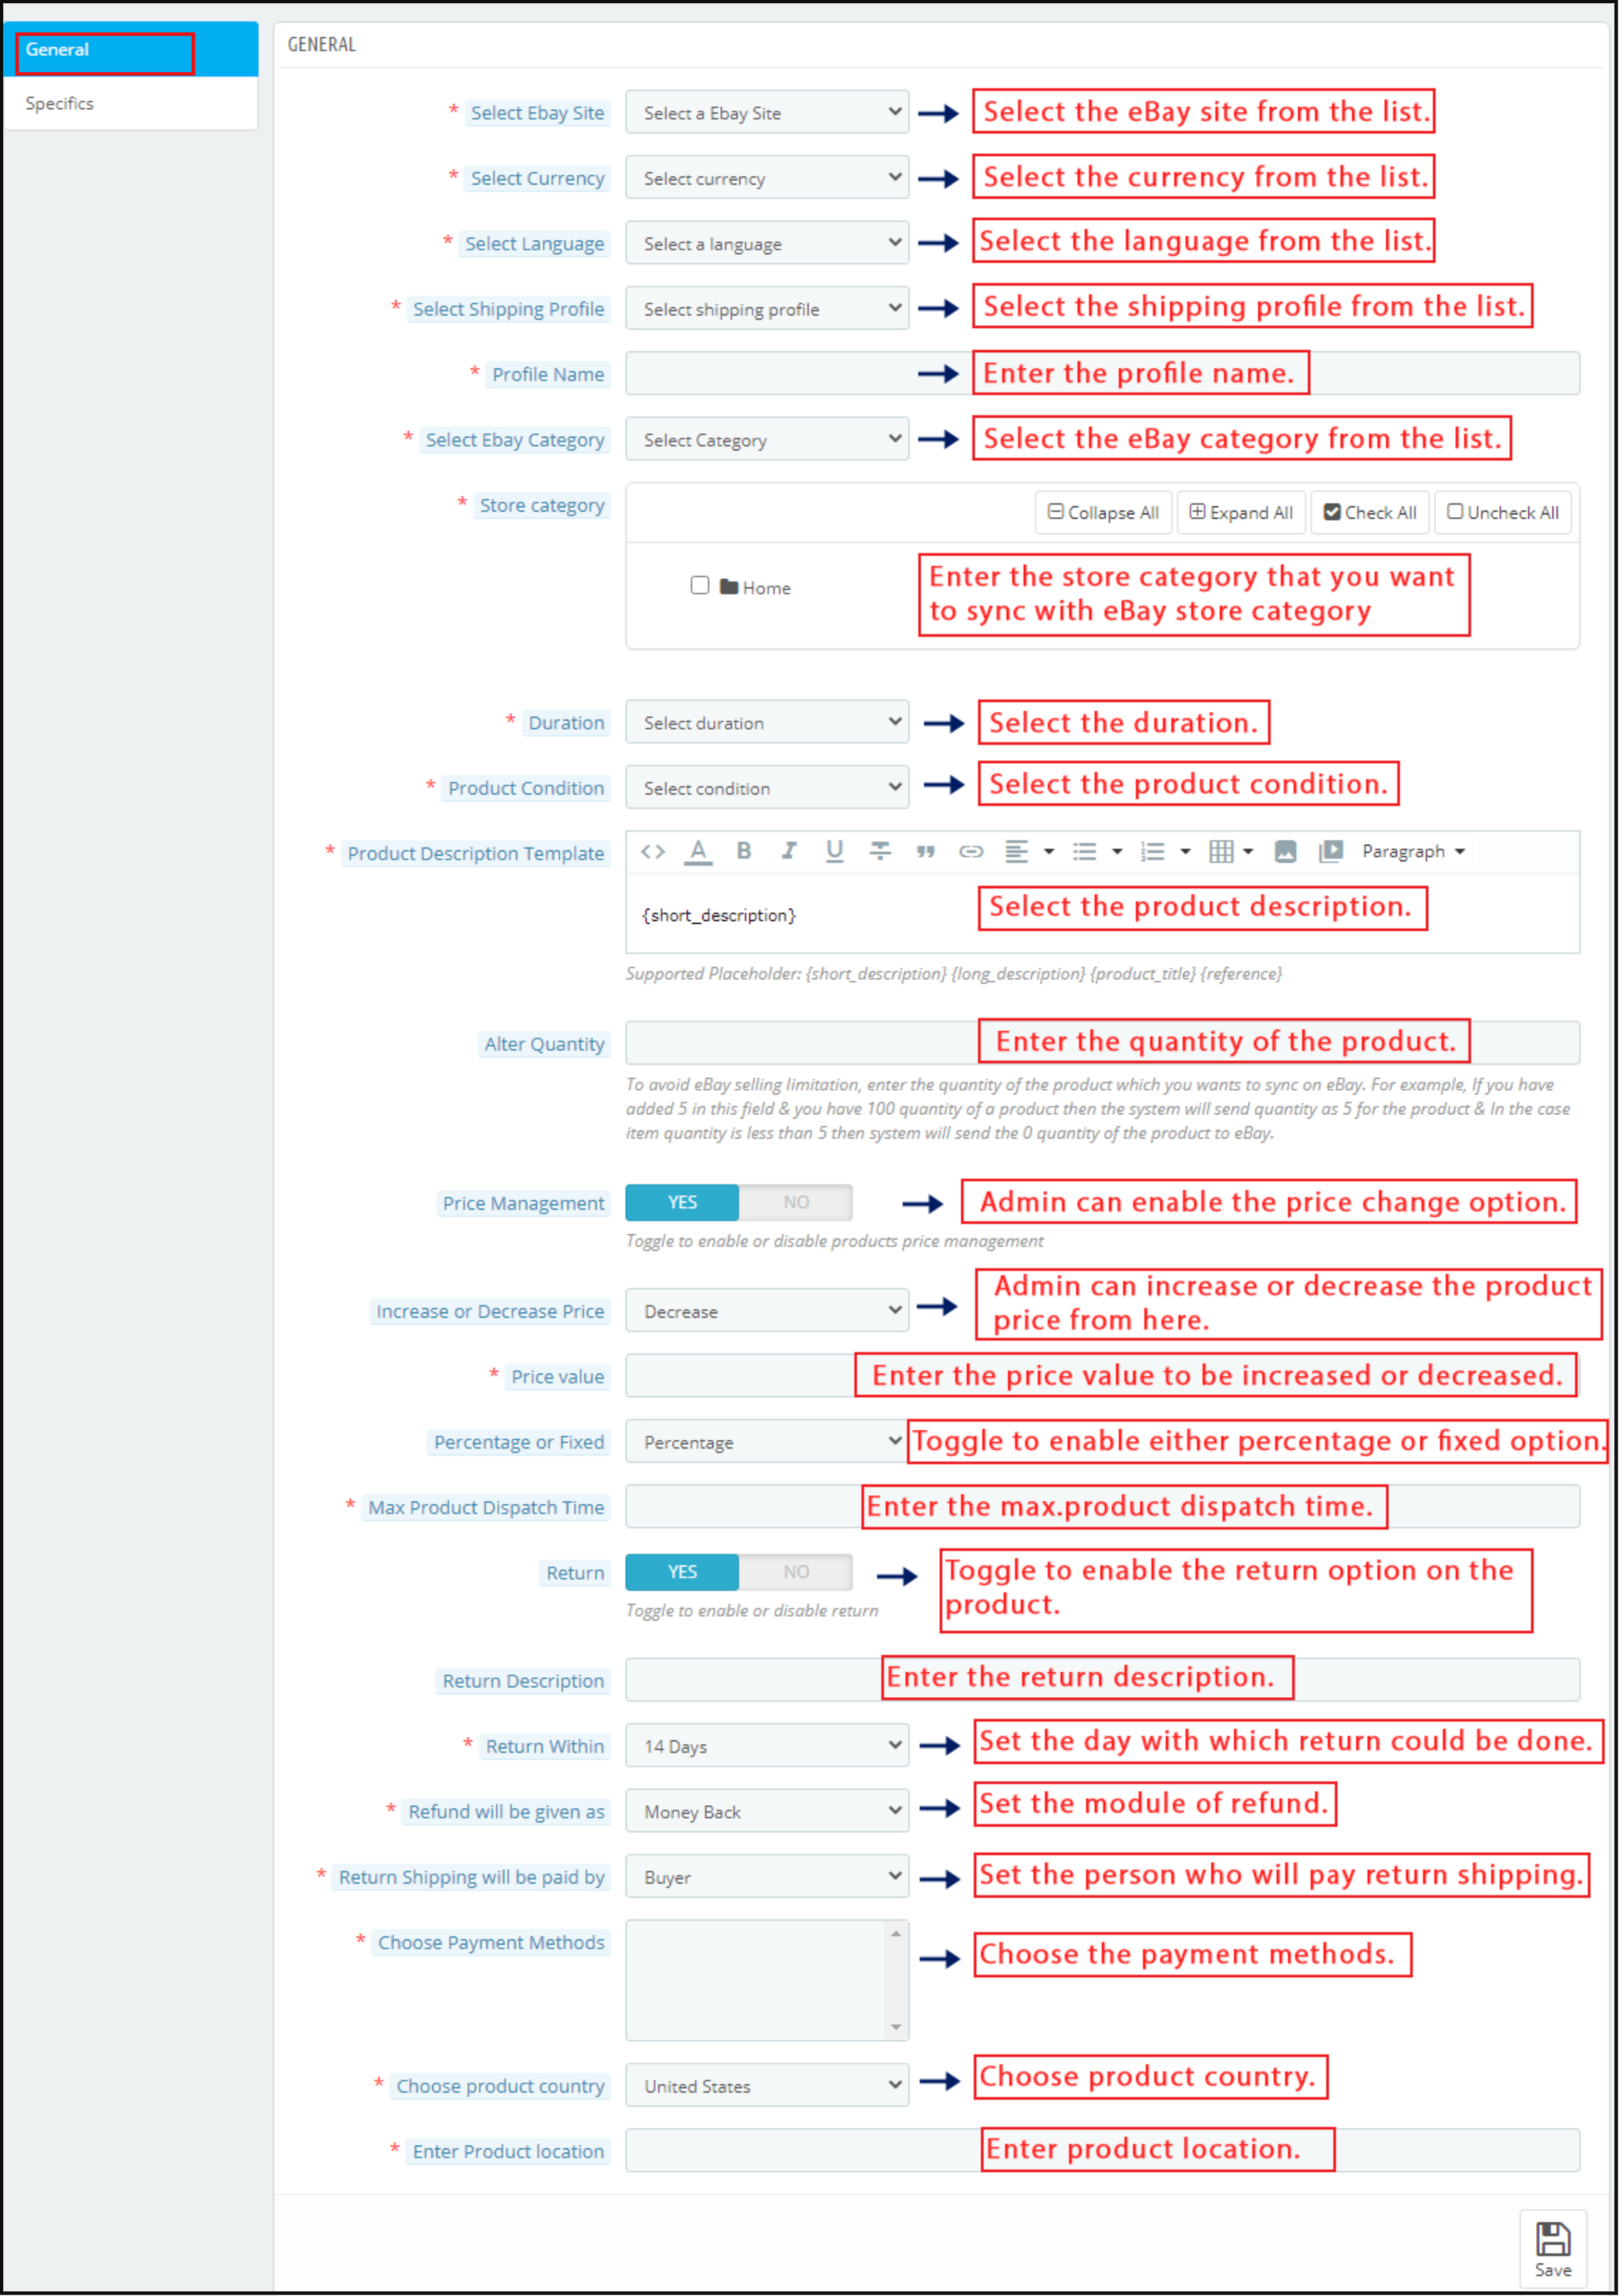
Step 3: There will be two tabs:- General and Specifics. Before adding General and Specifics we need to click on Sync Categories.
Sync Categories will sync the eBay categories. Further, that will be usable in mapping with Prestashop store categories in Profile management > General section.
Now, we need to add the General and Specifics settings of Profile Management.
Select eBay Site: The Prestashop eBay API integrator allows you to connect your site with the various eBay marketplace across the globe. Choose the site from the given list.
Choose Language: The Prestashop eBay integrator offers multi-lingual support. Select the desired language from the drop-down menu.
Select Shipping Profile: The shipping profiles created in the Shipping tab will list in this section of the eBay Prestashop API Integrator. Choose the option that suits your requirements.
Profile Name: Enter a unique name for the Profile.
Select the eBay category: The drop-down menu lists out the eBay categories in which the products are to be listed. The Prestashop store admin can select the eBay category. In addition, the products will be mappable in the selected one with the help of Prestashop eBay Marketplace Integration.
Store category: Select store categories that you want to map with the eBay category. All the products of this category will then be mappable in the selected category of eBay with the help of the Prestashop eBay Marketplace Integrator module.
Duration: Select the duration for which the product lists.
Product Condition: Dropdown to select product condition i.e. New or Used etc.
Product Description Template: Enter the product description for the creation of a template.
Alter Quantity: Enter the quantity of the products that list on eBay.
Price Management: Prestashop eBay Integration Plugin enables the admin to sell the products at eBay Marketplace at different prices.
Increase or Decrease price: With eBay Prestashop API Integrator, the online merchant can increase or decrease the price value from the backend of their Prestashop store.
Price Value: The store owner can enter the amount value that he wants to increase or decrease in the price value of products at the Marketplace.
Percentage or Fixed: Prestashop eBay API Integration Module allows the admin to change the price value of the product at the Marketplace by a fixed amount or a percentage value.
Max. Product Dispatch Time: Enter the maximum expected dispatch time of the products that the admin maps.
Return: Enable the button if you want to provide the return option on the products to your customers. In the following section, you get the option to choose from existing eBay business policies or you can also create your own return policy from the module admin settings.
The Return Description: Enter the return description.
Return Within: Enter the days within which the return can happen.
Refund will be given as: Enter the mode of refund.
Return shipping will be paid by: Select the person who will pay for the return shipping from the list.
Choose Payment Methods: Select the payment methods from the various options available in this section.
Choose Product Country: Choose the product country from the list of country choices available.
Enter Product location: Submit the location of the product while creating the admin profile in the admin panel.
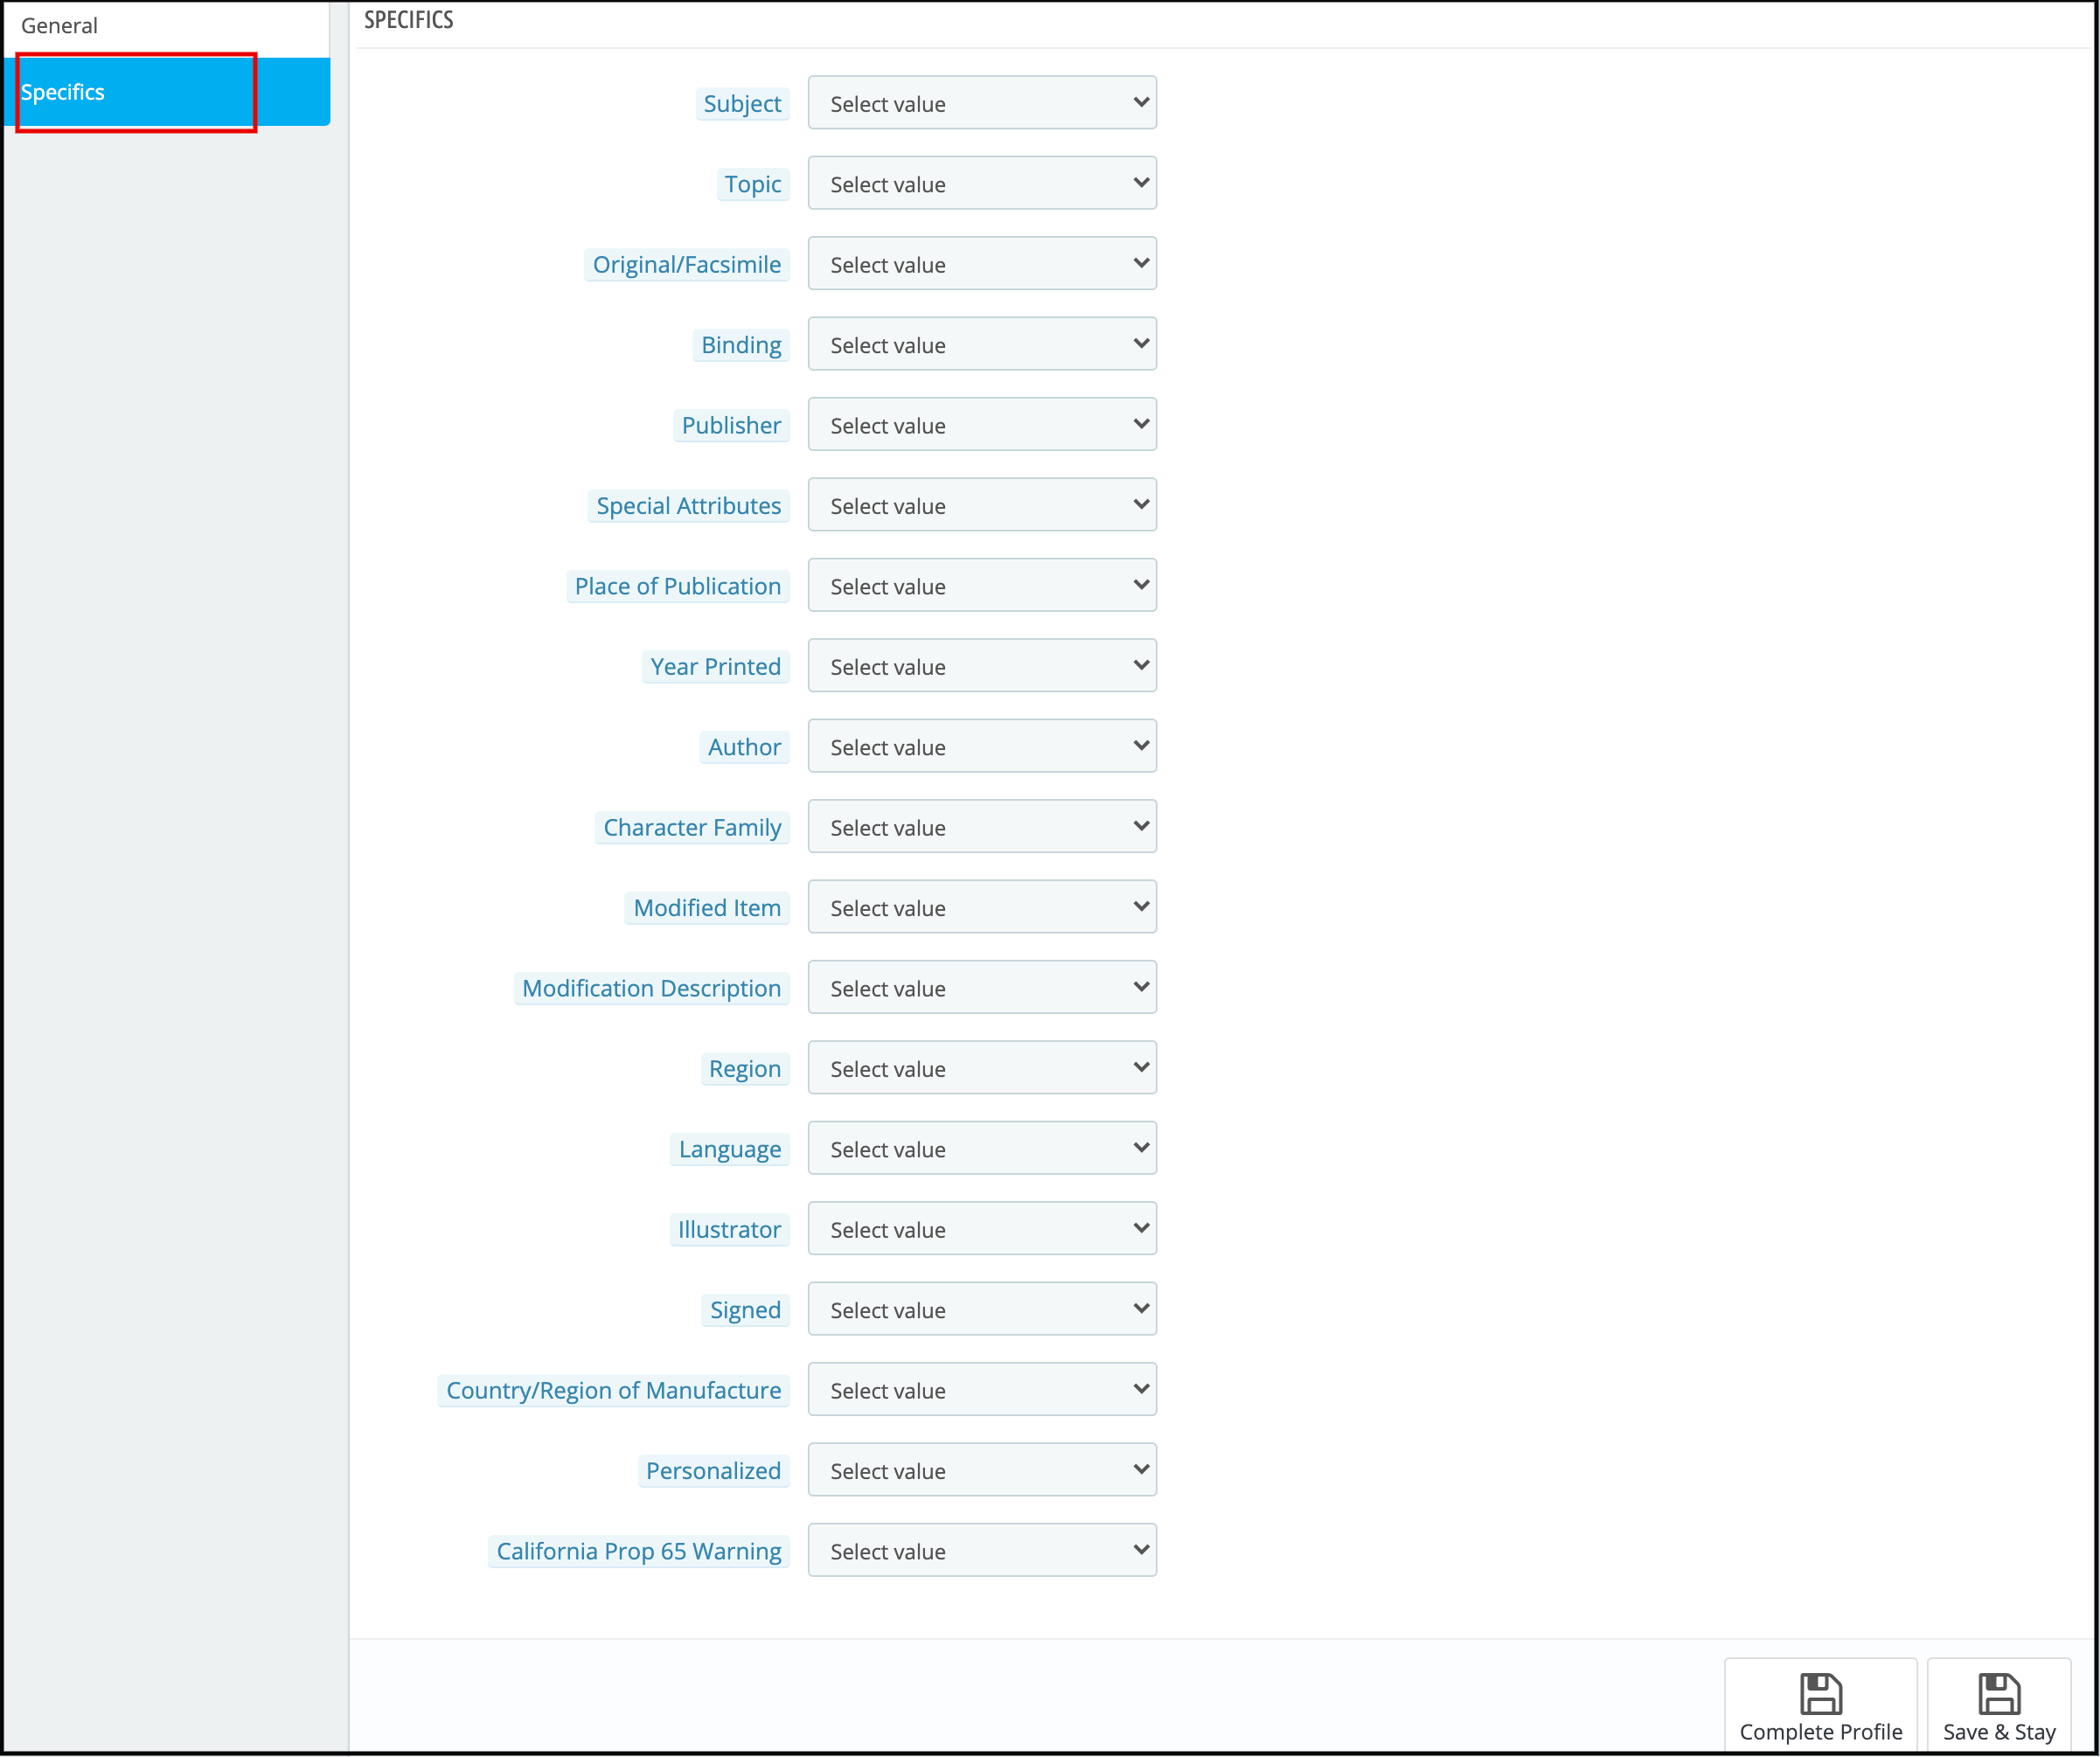
Once you fill-up the form and save the general settings, you need to add the specifications related to the category selected in the Specifics tab. Enter the attributes of the same as shown in the image below and save the changes.
Step 4: Click Save, all data will be validated and saved if valid and Profile will be created in the completed state.
6.2.2 How to Edit the Existing Profile?
Following are the steps to edit profile –
1. Go to the eBay Marketplace connector-> Profiles Management (Menu Option)
2. It would redirect admin to a page where already available profiles will list (If any, shown in the screenshot below).
3. Click on the “Edit” button corresponding to each profile as shown in the above screenshot.
4. It would redirect the admin to a new page where a form with some already filled input fields will be shown. Admin can simply update values and save the details by clicking on the “Save” button.
6.2.3 How to Enable/Disable Profile?
Following are the steps to enable/disable profile created in the Prestashop eBay integration extension-
1. Go to the eBay Marketplace connector-> Profiles (Menu Option)
2. It would redirect admin to a page of the Prestashop eBay Marketplace Connector where already available profiles will list.
3. To disable the Profile, the admin has to click check the option under the active column for the table.
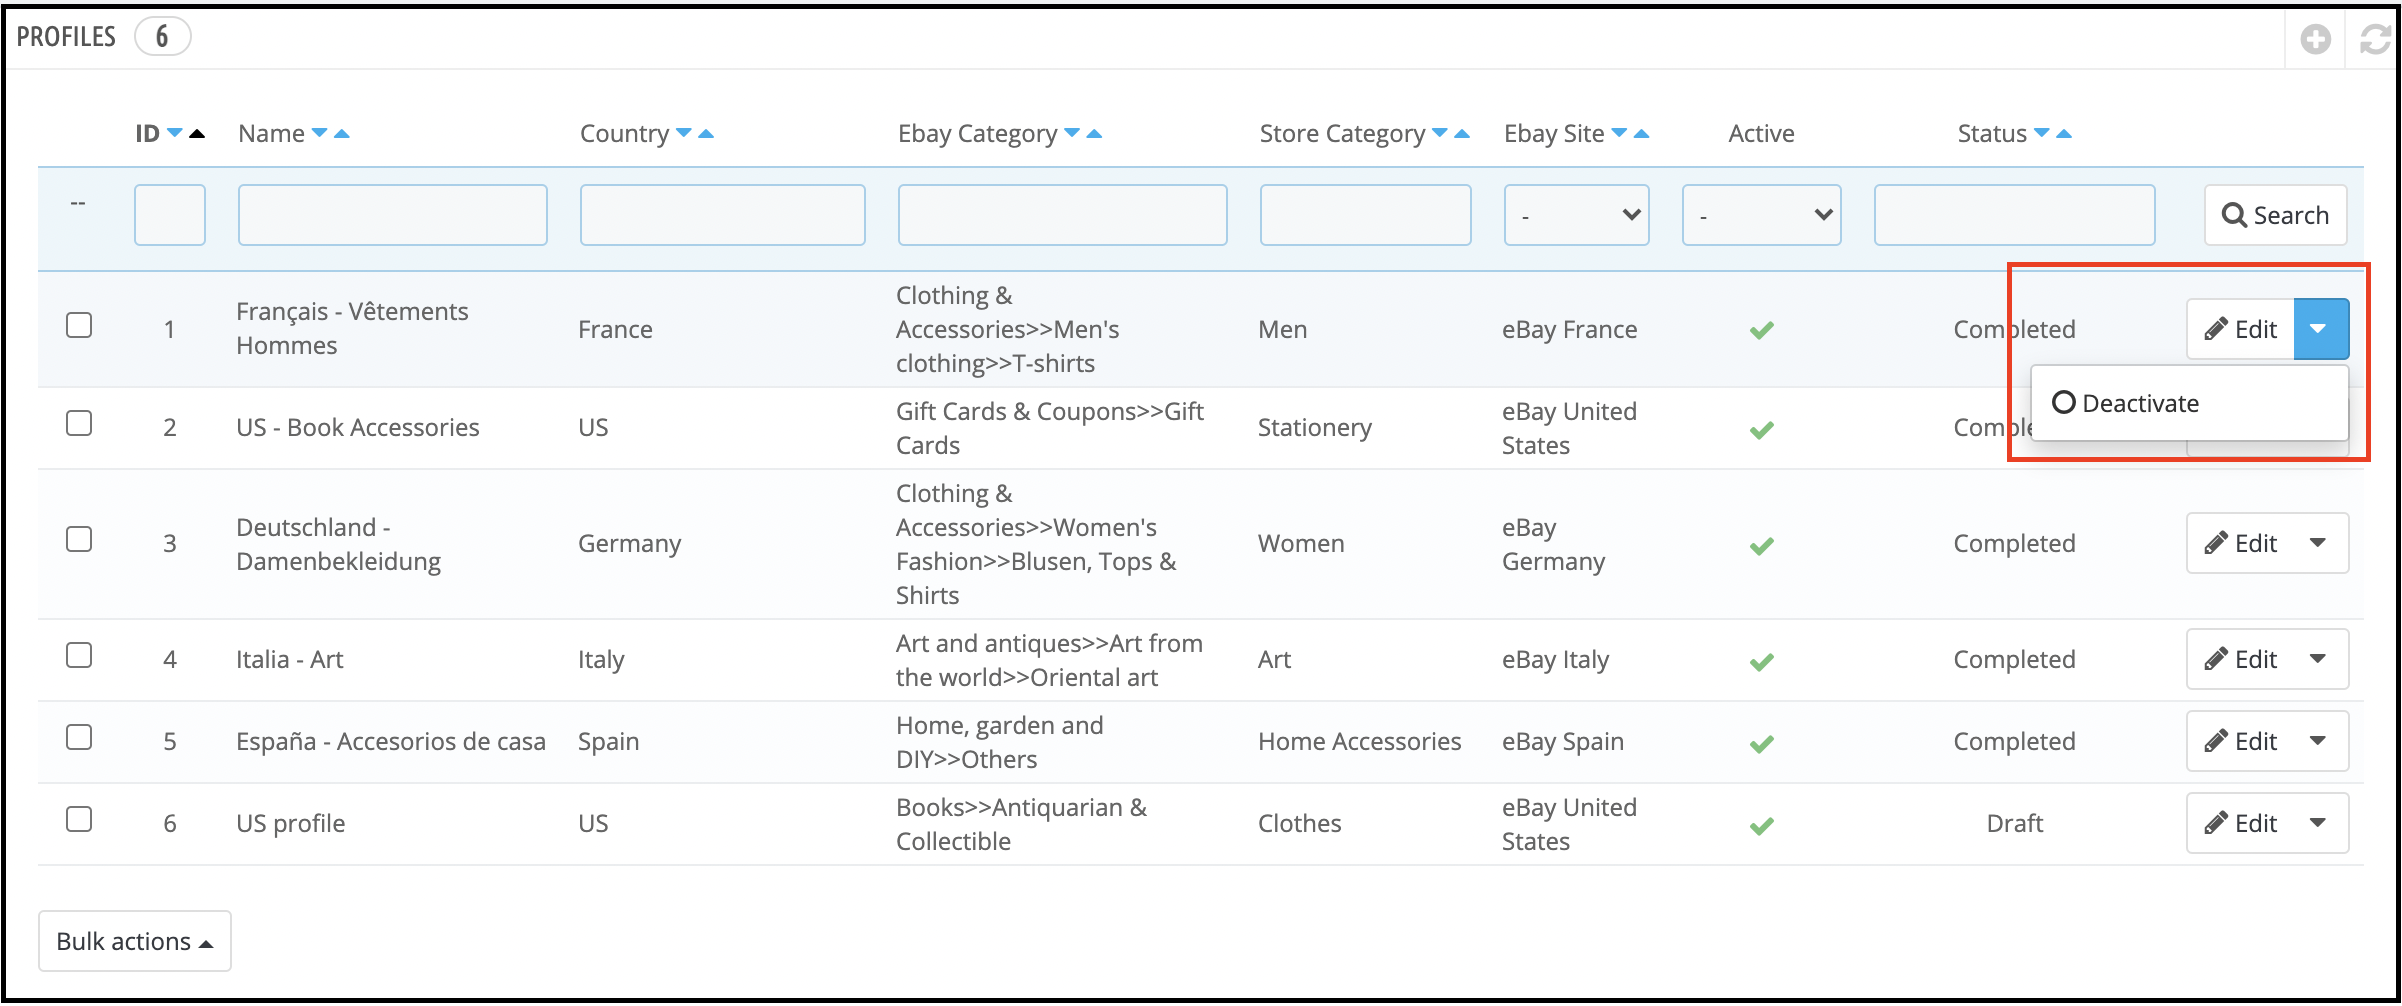
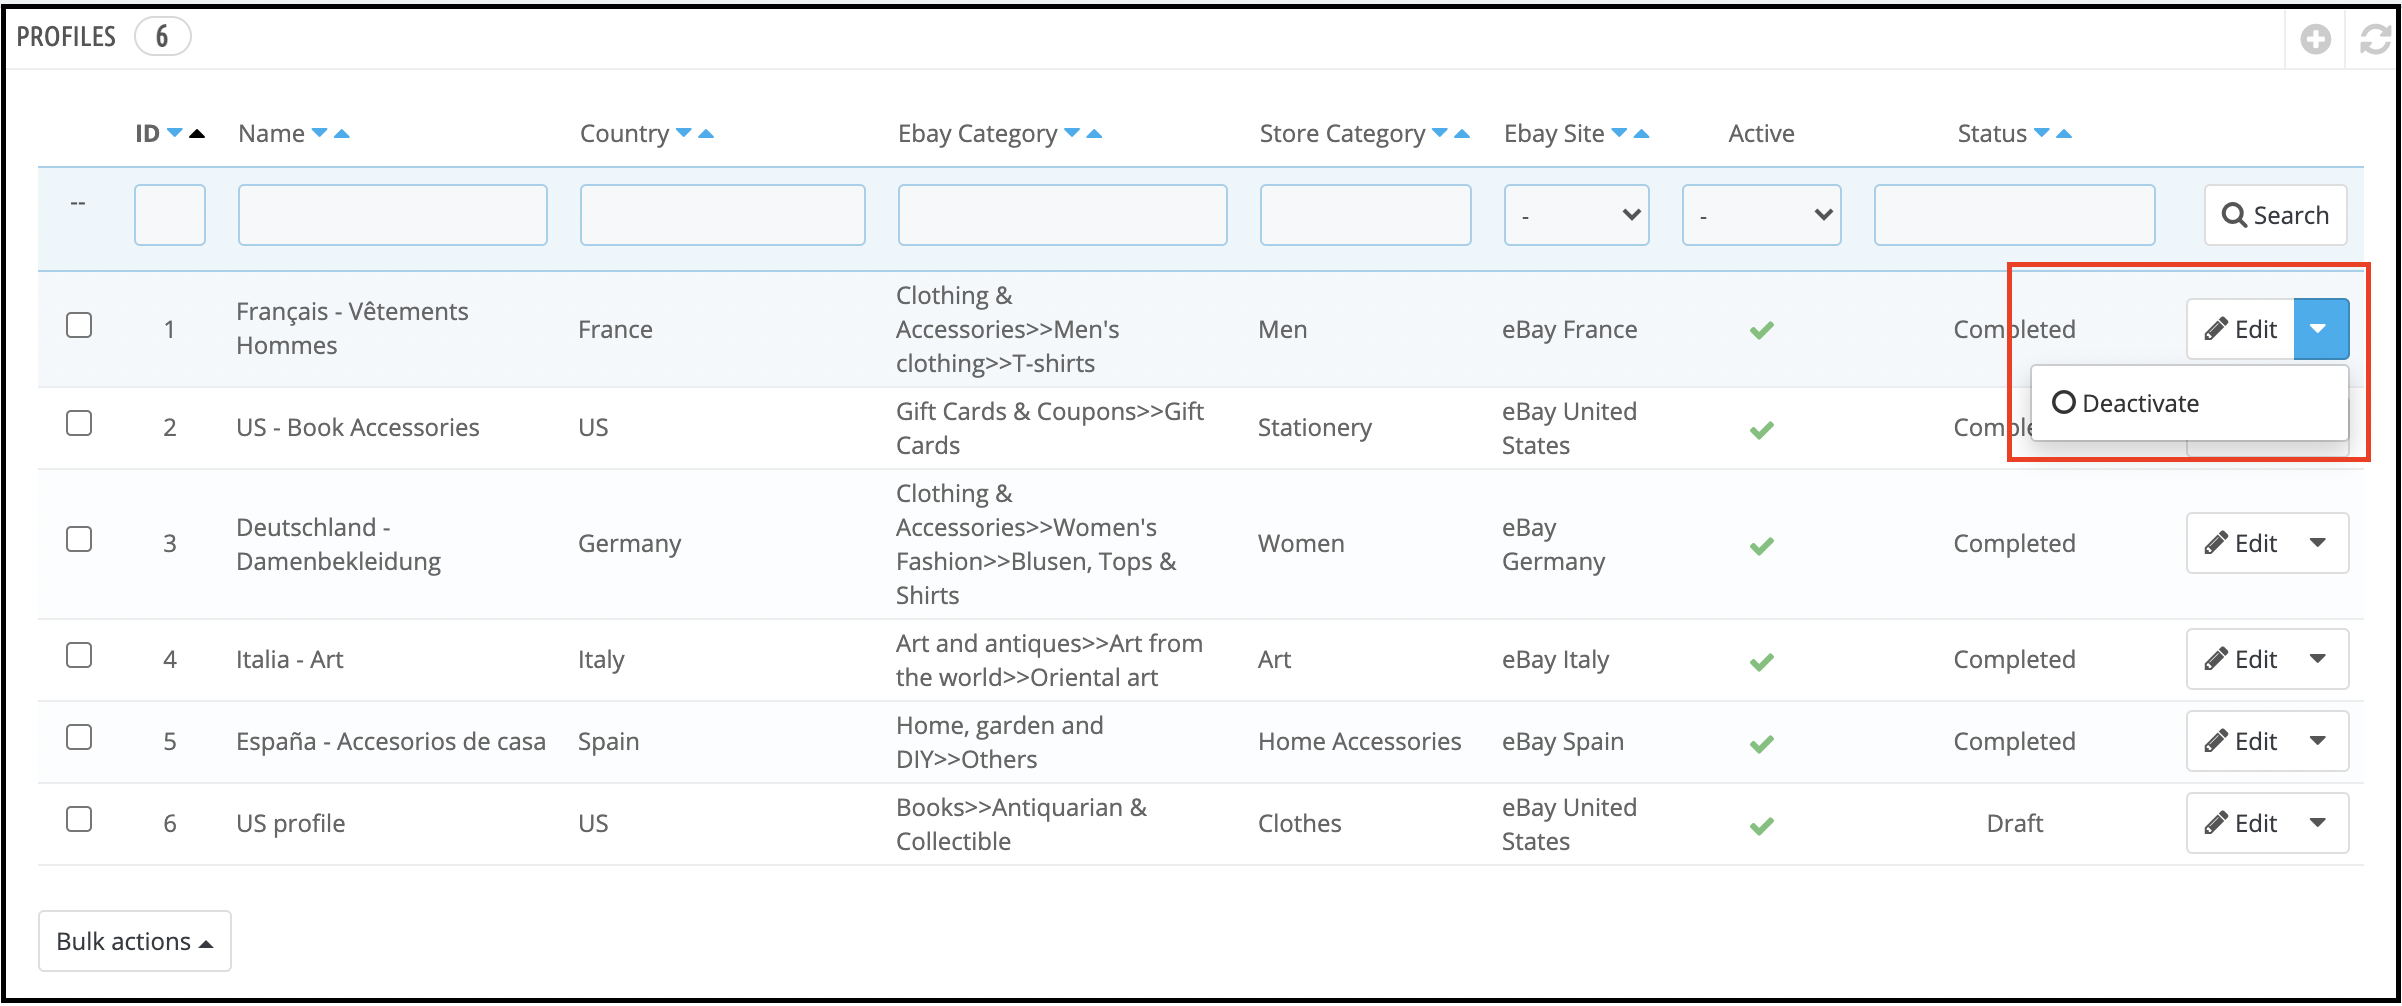
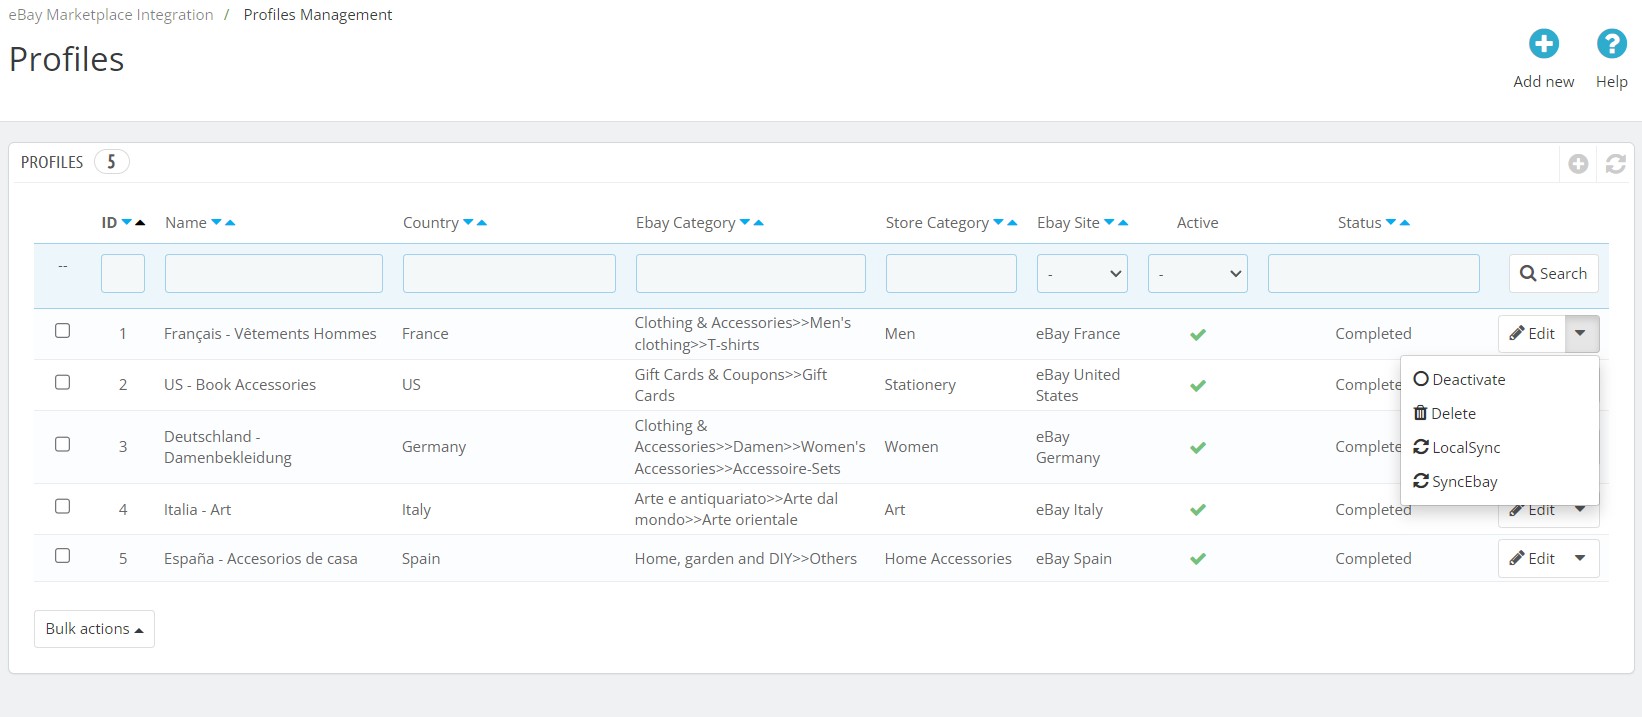
4. The green check sign shows that the profile is active. To deactivate it, click on the Deactivate button as shown below.
Note:- Disabling profile will end all the listed products from eBay listing and admin will have to relist them once the profile is again enabled.
6.3 Orders Management
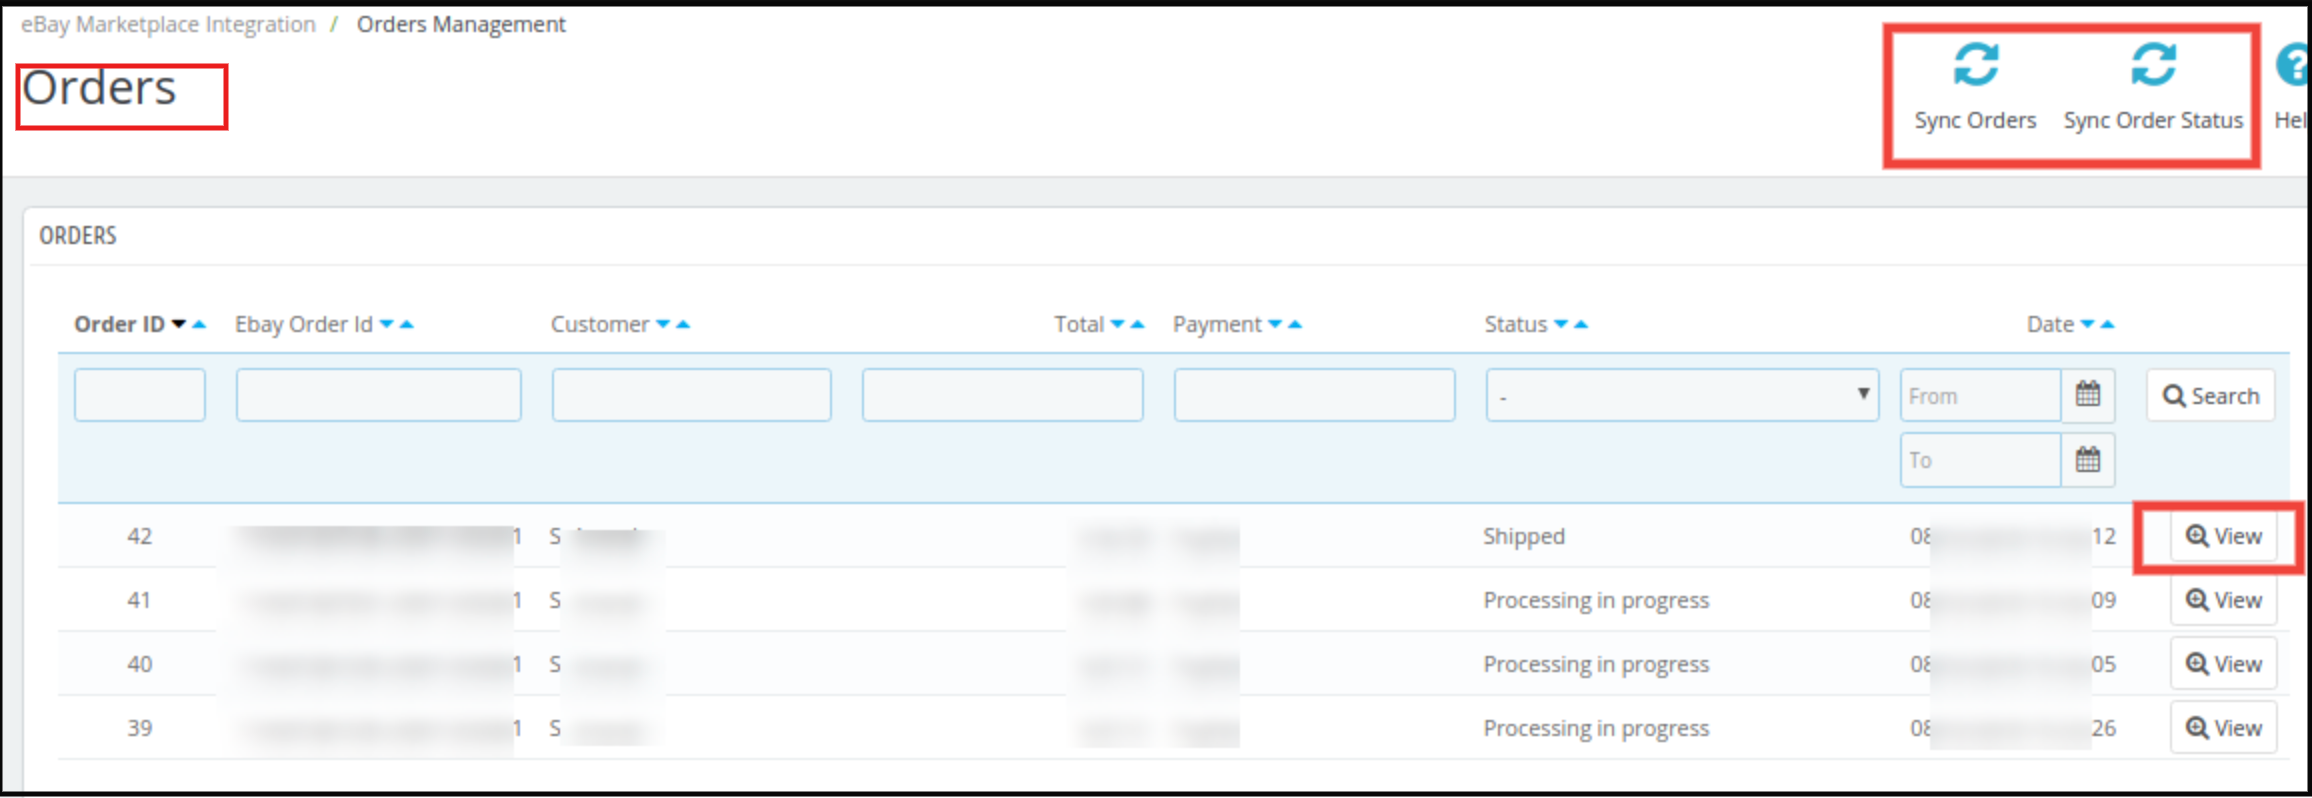
Prestashop eBay integration plugin allows the store admin to sync the orders received from the marketplace. Once the orders are imported, they can be processed from the back-end of the Prestashop eBay connector module.
1. Go to the eBay Integration-> Orders Management(Menu Option)
2. All the orders from eBay will be available here.
To sync the orders from the eBay marketplace to the Prestashop store, execute Sync eBay Orders cron present on the top right corner.
3. Click on view to see order details and update the status of the order.
6.4 Order Status
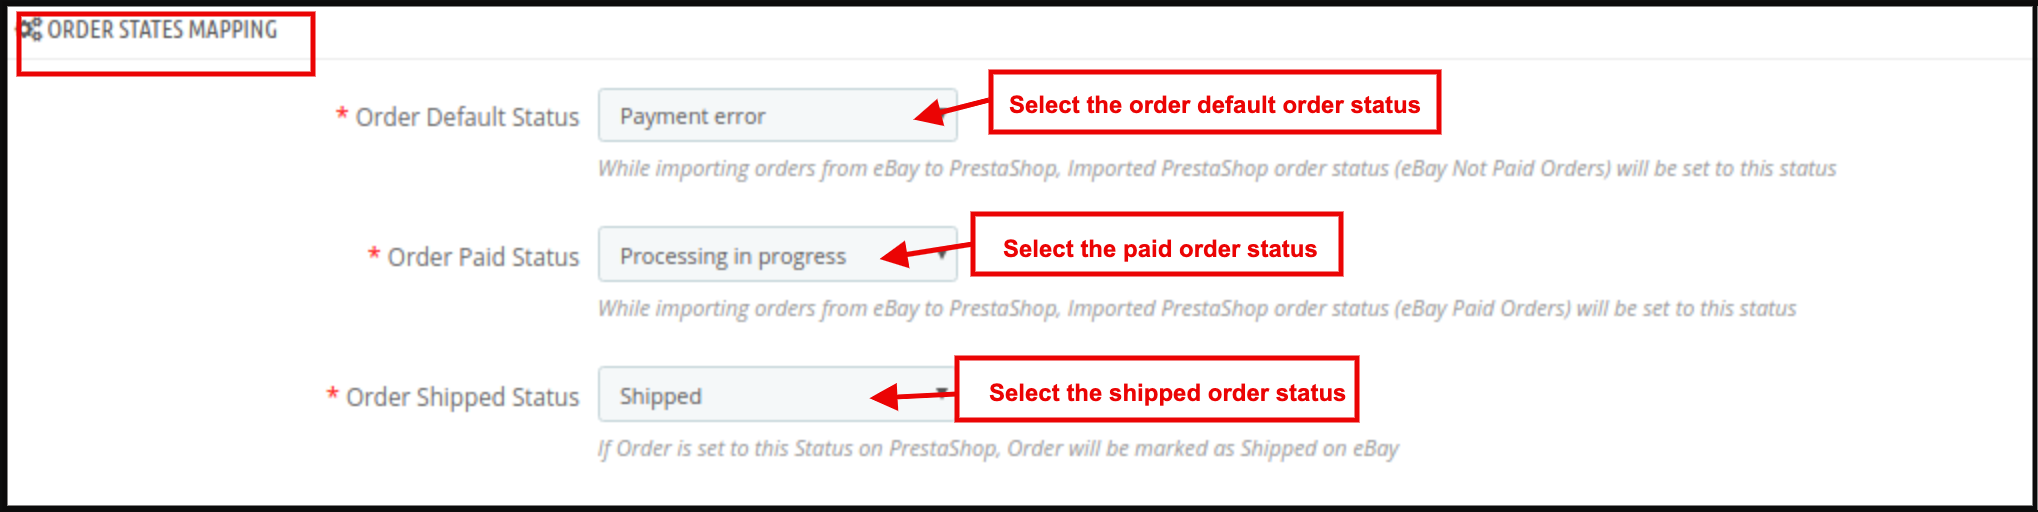
Order Status tab of the Prestashop eBay integration plugin can map the order statuses updated by the store admin with the eBay Marketplace order statuses.
6.4.1 How to map Order Status?
Following are the steps to map order status –
1. Go to the eBay Marketplace integration module-> Order Status (Menu Option)
Once the status changes, execute the Update Order Status cron in the Orders Management tab. The changes will sync in the marketplace as well. (See section 6.3)
Note –
1. Default status means that the first status of an order when it is placed on the store.
2. Paid status means that order payment has been made and accepted.
3. Shipped status means that ordered items have been shipped.
6.5 Products Listing
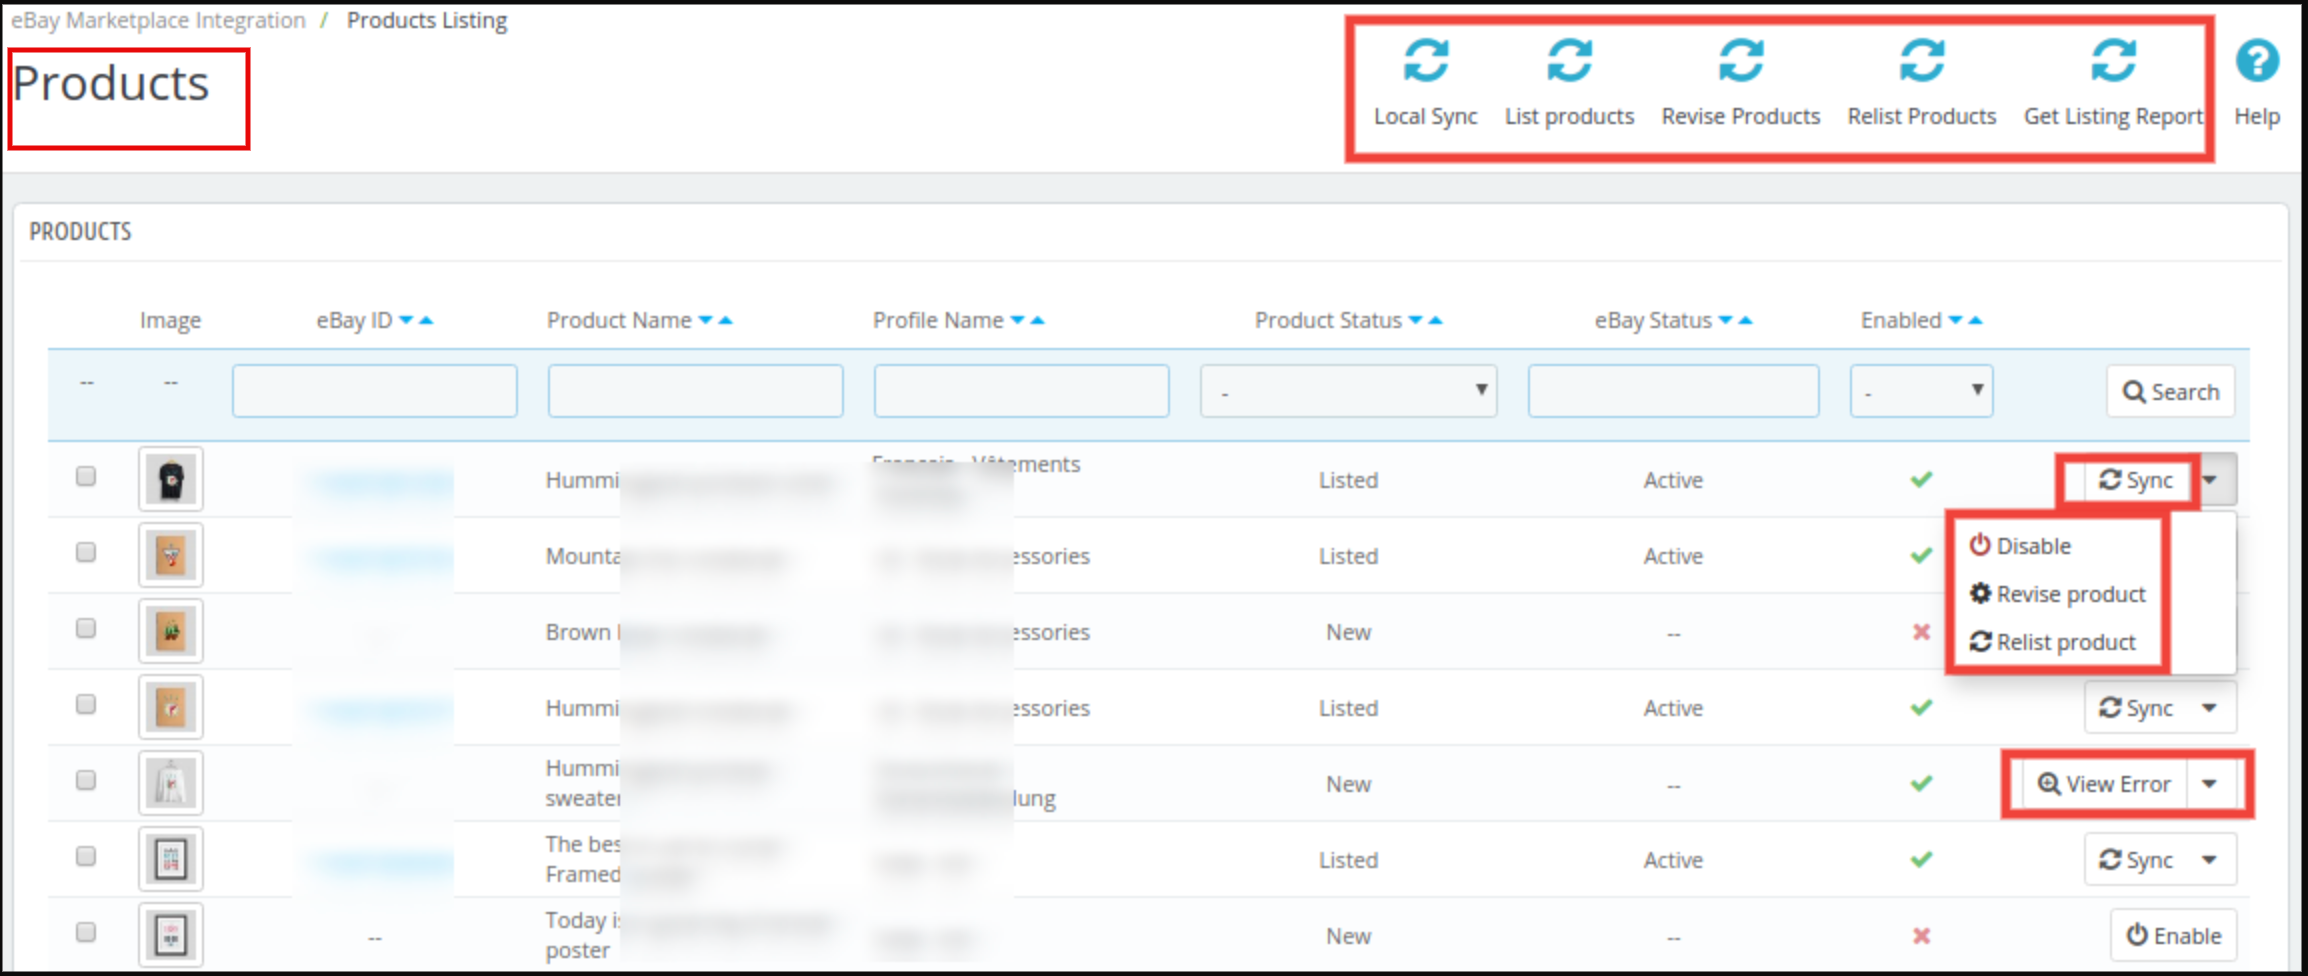
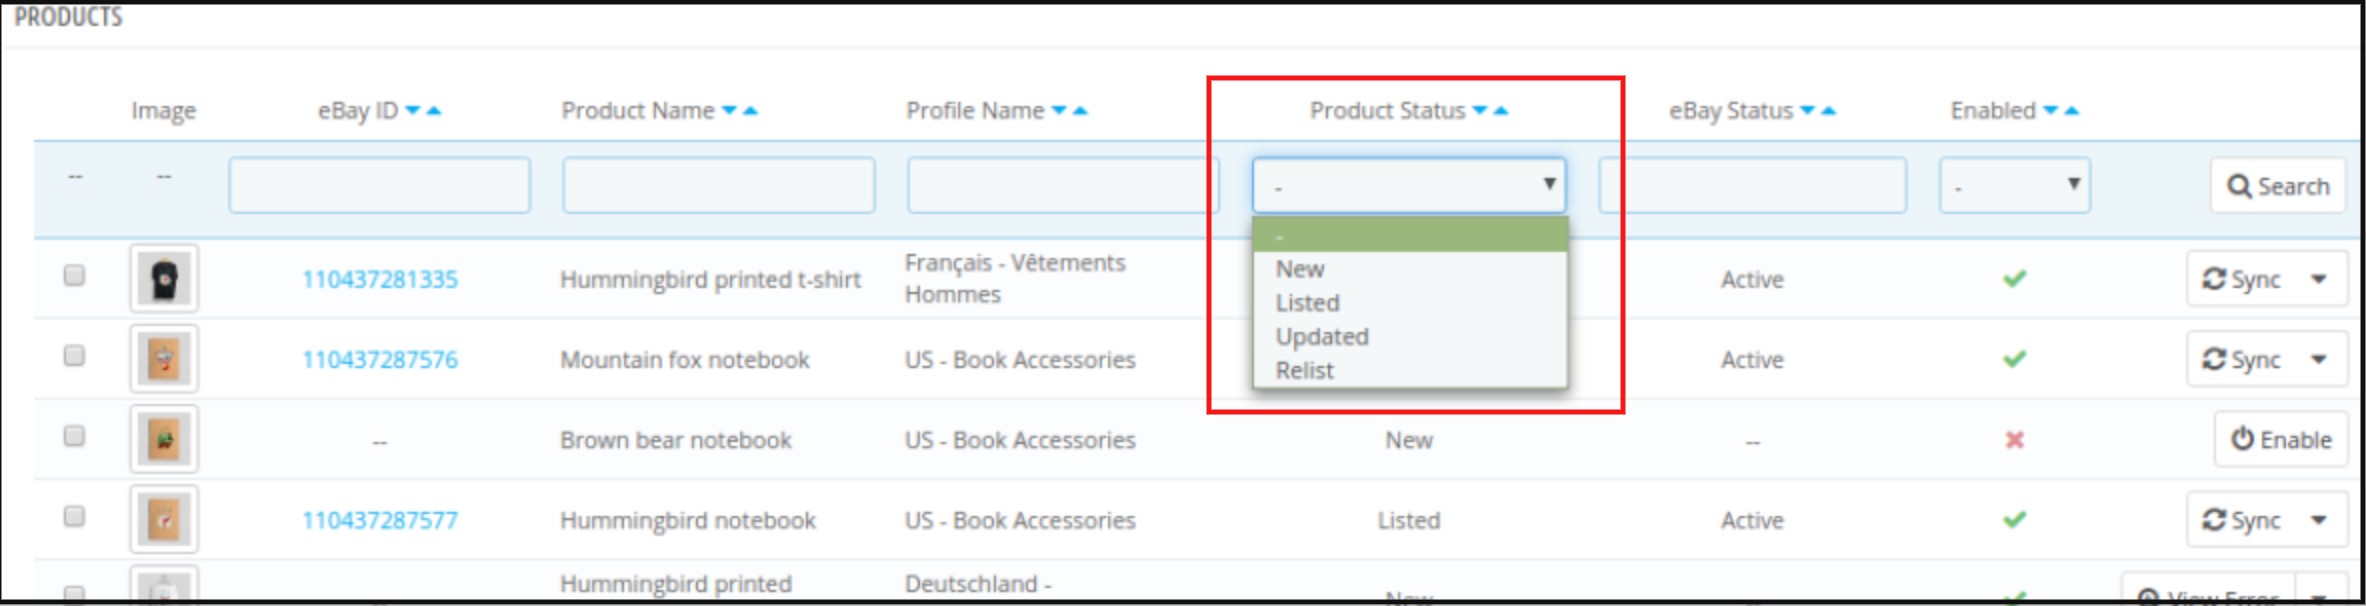
This section of Prestashop eBay integrator addon shows the list of all the products selected to list or listed on eBay Marketplace with their status and values as shown in the screenshot below
There are the following options available corresponding to each product listing:
Disable the Product
This tab enables the admin to disable the product from the backend of the module. After disabling the product, it will not be shown on the front-end of the Marketplace. It can be only visible after enabling the product from the backend.
Product Listing Relisting
This option offered by eBay Prestashop integrator allows the admin to relist products in case the listing is expired on eBay Marketplace. To relist the product, the admin has to click on the “Relist” action given in bulk actions.
Product Listing Revision
If any update happens in product details, then by default it marks as updated and if cron is set for this action then it will be sent for revision. If the admin manually wants to send products for revision then he can mark the product and click on “revise” from bulk actions.
Individual Product Synchronization
This feature enables the admin to sync the products one by one (Along with the bulk sync option at the top right corner). By this, the admin can filter out the products that need not be shown on the front end of the eBay Marketplace.
View Errors
This feature enables the admin to view errors in the product. Admin can simply click on the View Error button and the error will display on the screen.
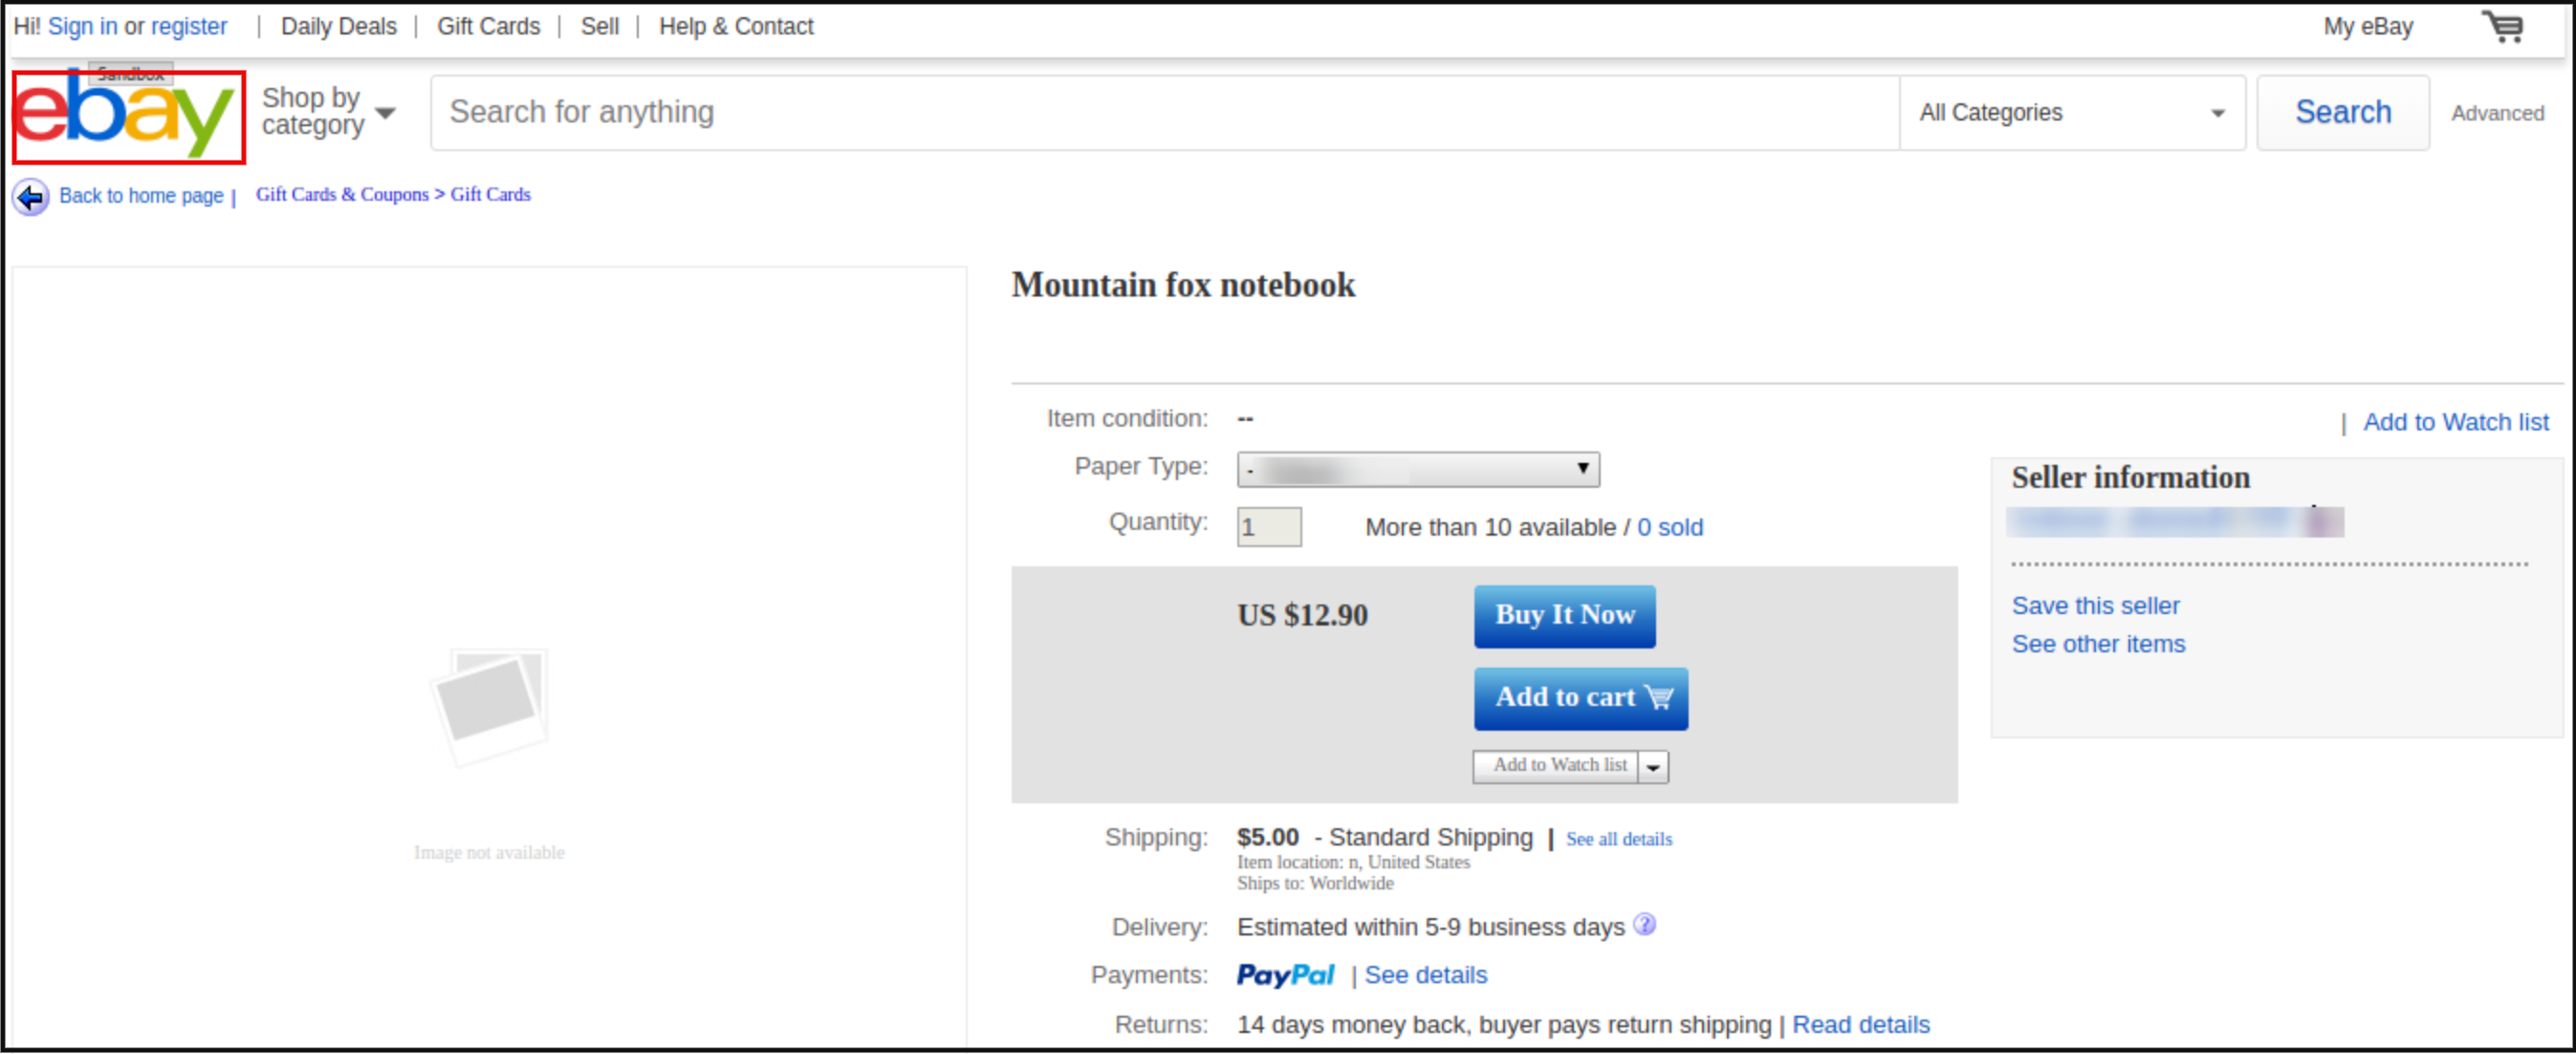
Visit eBay Product Page from the backend
This feature provides an option to go to the eBay product page from the module product page directly. For that, the admin has to click on the eBay ID and he would on the eBay Product page as shown below
Adding products from the product listings tab
If you want to add a product to the product listing tab, the admin has to create a profile of the product in the Profile section of the module. (read section 6.2.1) There you will get a step-by-step procedure of creating a profile and adding the product in the products listing tab.
Different statues in the filter of the product listing
Here are some different statuses in the filter of the product listing.
New: After applying this filter, the admin can view the new products on the Marketplace.
Listed: After applying this filter, the admin can view the products on the Marketplace.
Updated: After applying this filter, the admin can view the updated products on the Marketplace.
Relist: After applying this filter, the admin can view the relist products on the Marketplace.
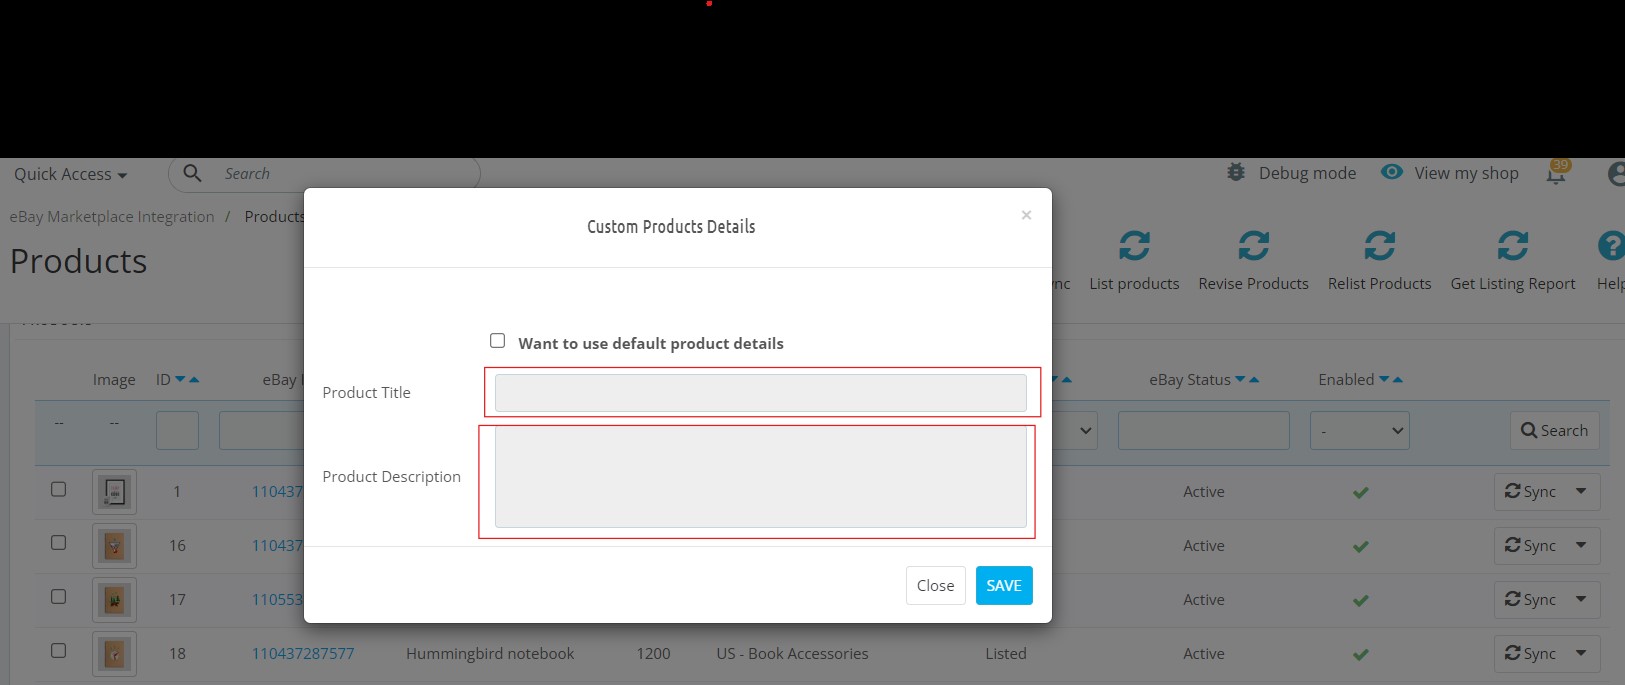
Custom Product Title: The Prestashop store admin can list the same products with different product titles on eBay with this option.
Custom Product Description: This option allows the admin to list the products with different product descriptions on the eBay marketplace.
6.6Shipping Template Management
The Prestashop eBay Integrator allows the Prestashop admin to create an N number of domestic and international shipping methods.
6.6.1 How to Create New Shipping methods?
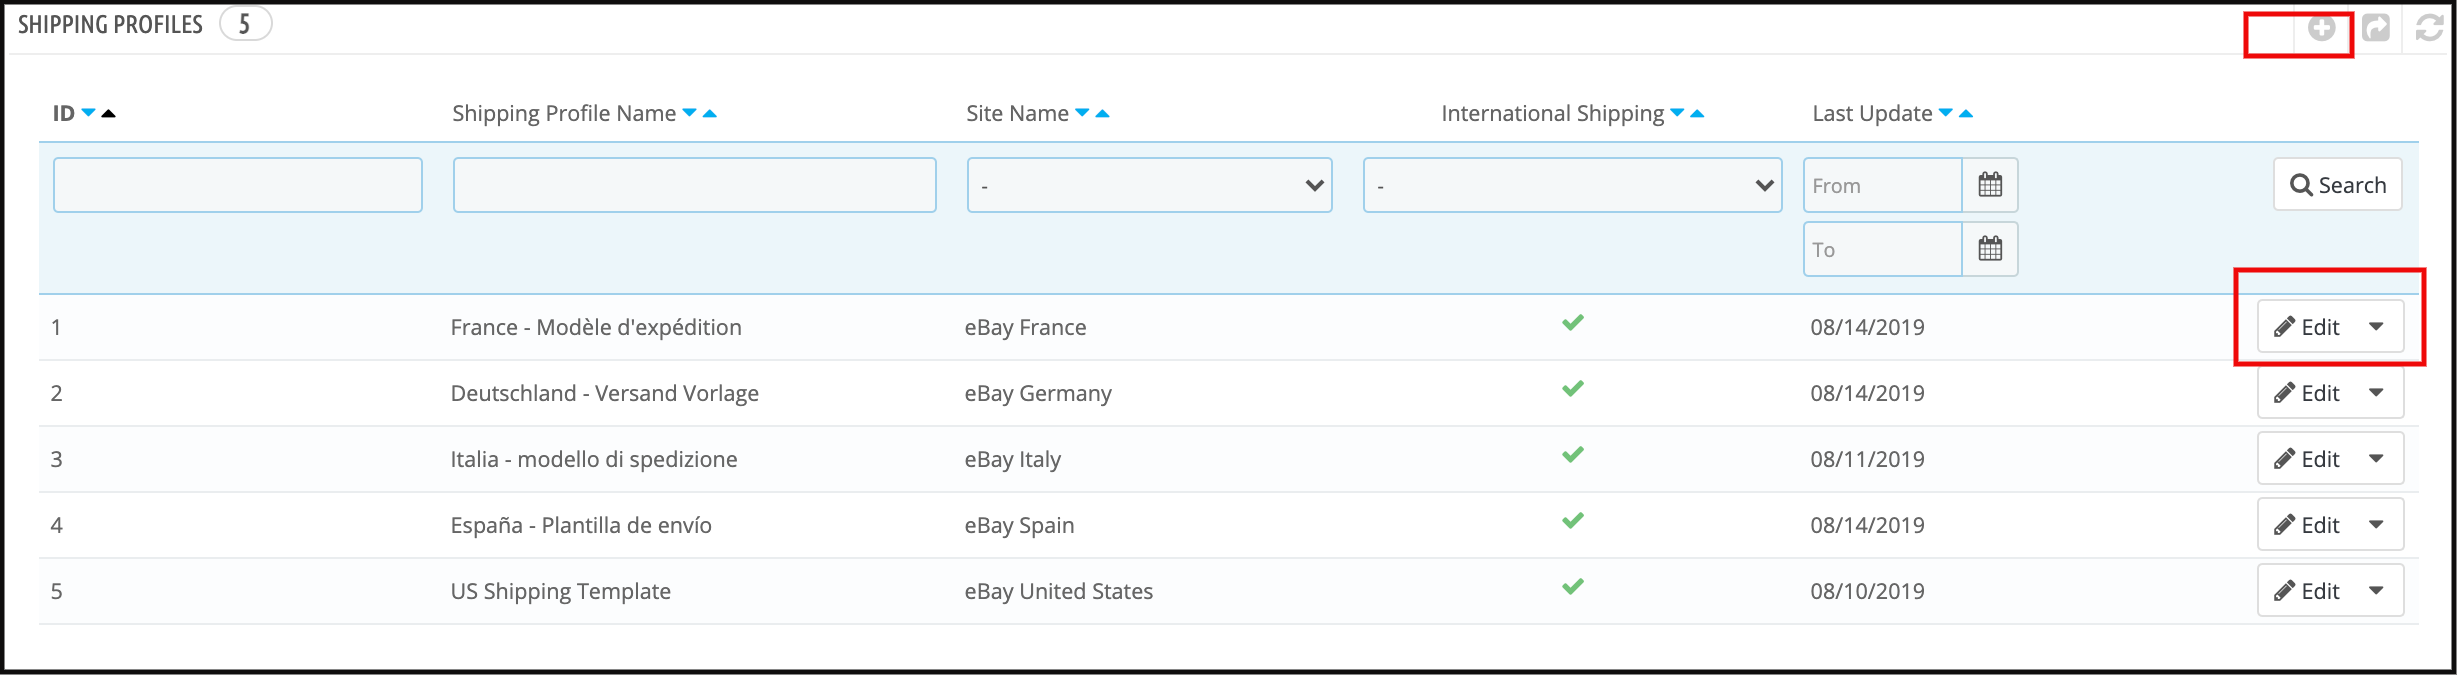
Click on the ‘+’ sign in the top right portion of the Prestashop eBay connector extension to create a new shipping method.
Once you click here, you’ll head to an interface. For the first time, you need to click on “Import eBay shipping methods” to import shipping methods of eBay to this module.
Now, fill-up the form as mentioned below:
Select eBay Site: Select the eBay site in which you want to include the shipping option.
Service Type: Select the service type for shipping.
Shipping Profile Name: Enter a unique name for the shipping profile.
International Shipping Allowed: Enable the button if you want to allow international shipping with this shipping method.
Exclude Location: Select the location that you want to exclude from availing of the shipping option.
6.6.2 How to Edit/Delete Shipping methods created in the back-end of the Prestashop eBay API Integration Module?
The store admins can even edit or delete the shipping as per the requirement from the backend of the Prestashop eBay Integrator.
To do so, click on the Edit and Delete buttons respectively as shown in the image below.
Once the shipping methods are created admin can either import or export the shipping methods to eBay Marketplace.
6.7 Synchronization
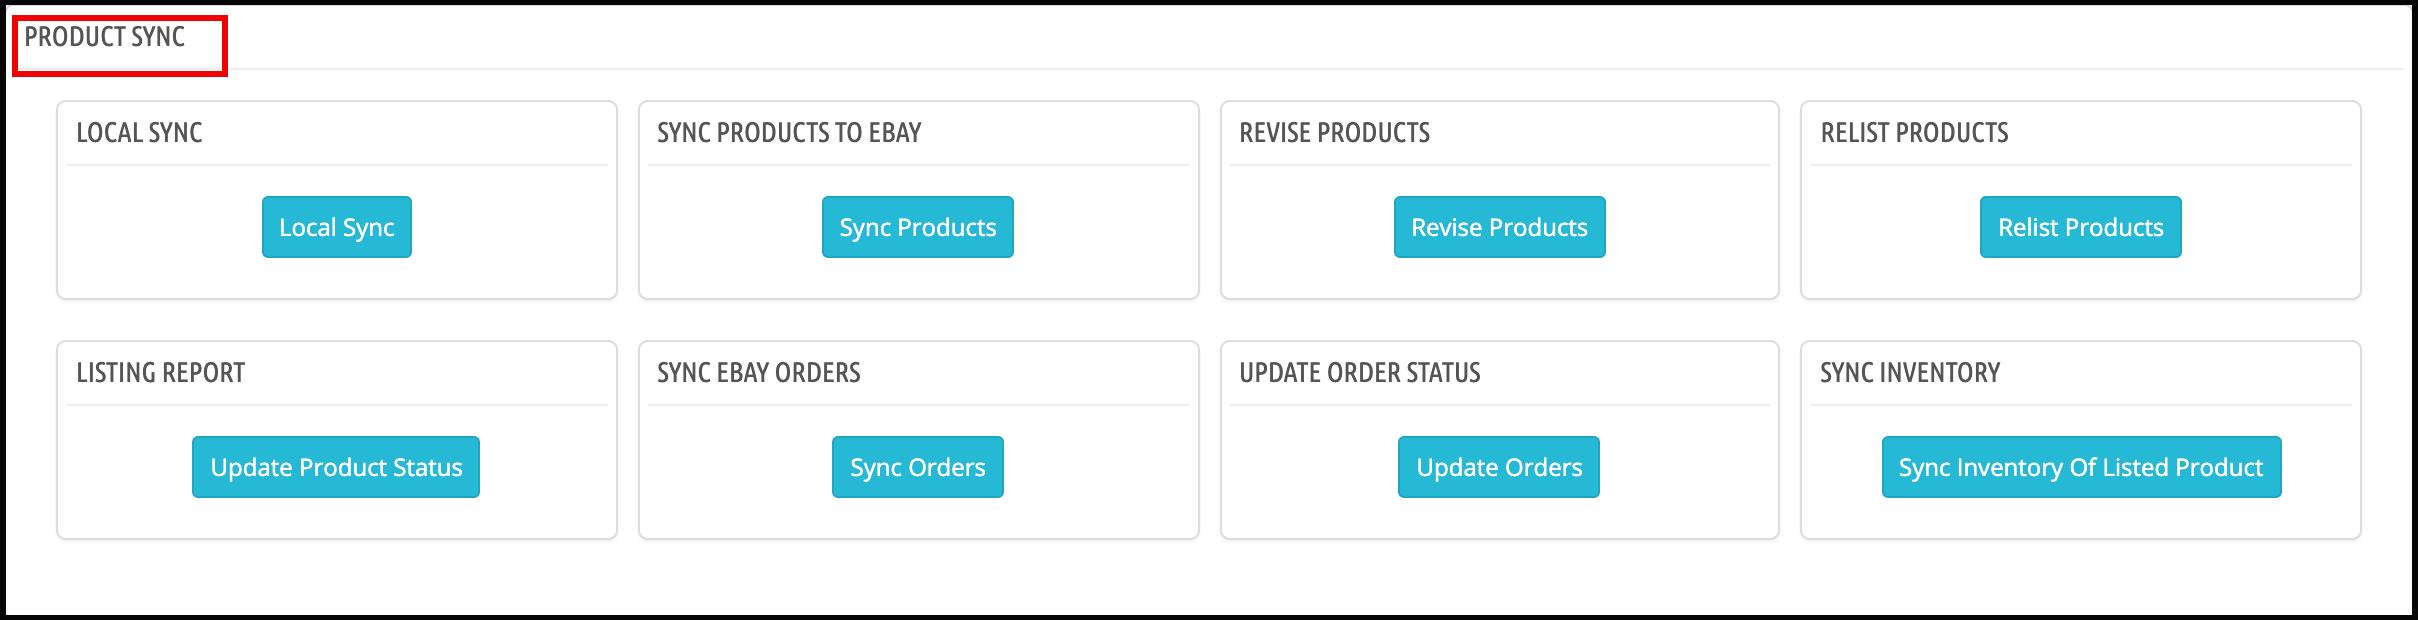
This tab adds the following CRONS to the Control panel/SSH to synchronize data between your store and eBay Marketplace automatically.
You can find all the crons listed in the following tab, however, it is to be noted that these crons will work for all the product listings in a single go. If you want to update any particular profile only, you can find the option for the same in the profile management tab itself.
LocalSync: This cron allow the store admin to list the products locally for a single profile only.
SyncEbay: If you want to list/make changes for the products within a single eBay profile, you can hit the SyncEbay cron shown in the above screenshot.
6.7.1 Local Sync
This action will prepare the PrestaShop products to sync on eBay i.e sync products from the PrestaShop store to eBay Module.
6.7.2 Sync Products To eBay
This action will sync the PrestaShop products to eBay. Products of only those categories will sync on eBay which maps under the profile section of the module.
6.7.3 Revise Products
This action will update the product information (including quantity, price, etc) on eBay which updates into the PrestaShop.
6.7.4 Relist Products
This action will relist those products on eBay which has been ended on eBay and marked to relist on the product listing page of the eBay module.
6.7.5 Listing Report
This action will pull the latest product listing report from eBay and update the listing status of the products into the module.
6.7.6 Sync eBay Orders
This action will pull the orders from eBay and will add them to PrestaShop.
6.7.7 Update Order Status
If eBay orders are marked as shipped on PrestaShop, this order will be marked as shipped on eBay.
Also, the available Action Validate Order hook feature will auto-sync the product inventory on both eBay and the Prestashop store after an order is placed.
6.7.8 Sync Inventory
This action will update the inventory of the list of products.
6.7.9 Update Inventory Status
This Cron will update status of inventory task from eBay to Prestashop.
6.8 Inventory Sync
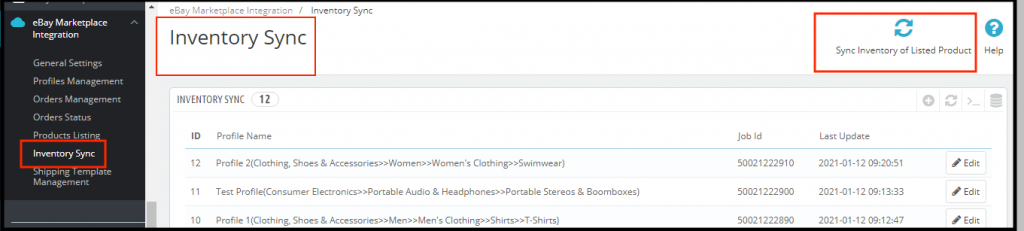
This section has a button “Sync Inventory of Listed Product” on the top right side to sync the inventory of all the available barcodes to eBay.
It also shows the list of Job IDs corresponding to the profile with the date of the last inventory sync of all products.
On click of Edit button, it will open the log of inventory sync for that Job Id where we can see the barcodes for inventory updates with eBay status.
6.9 [New] Inventory Comparison
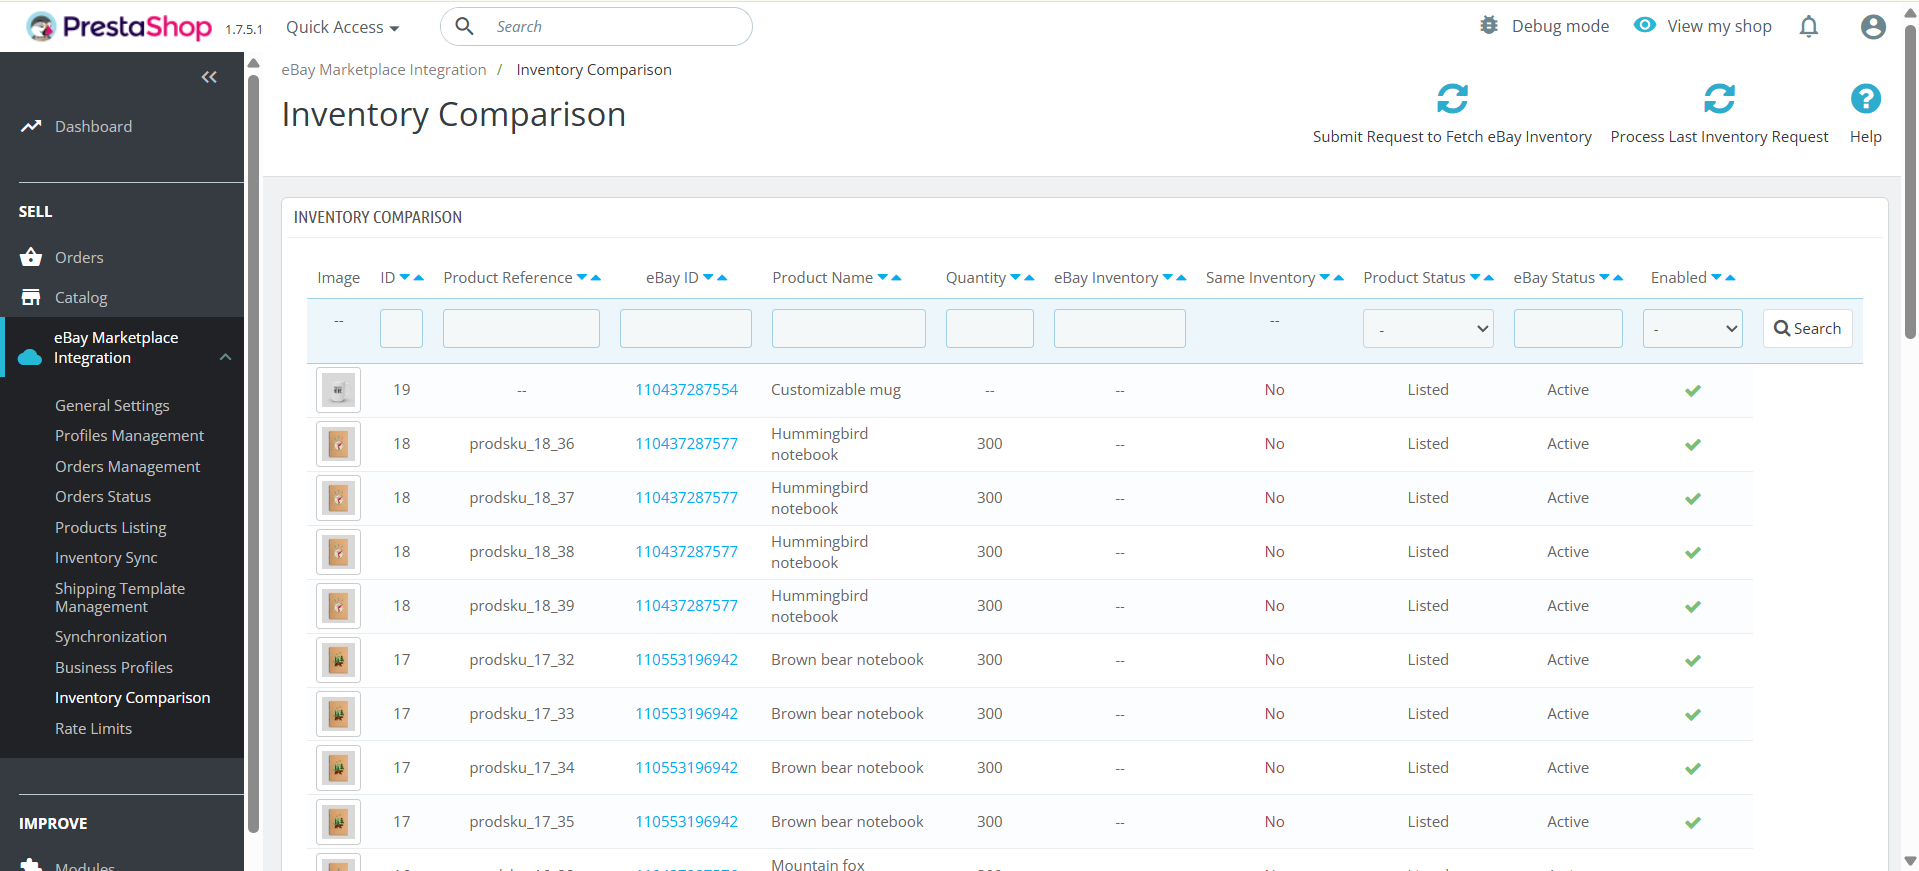
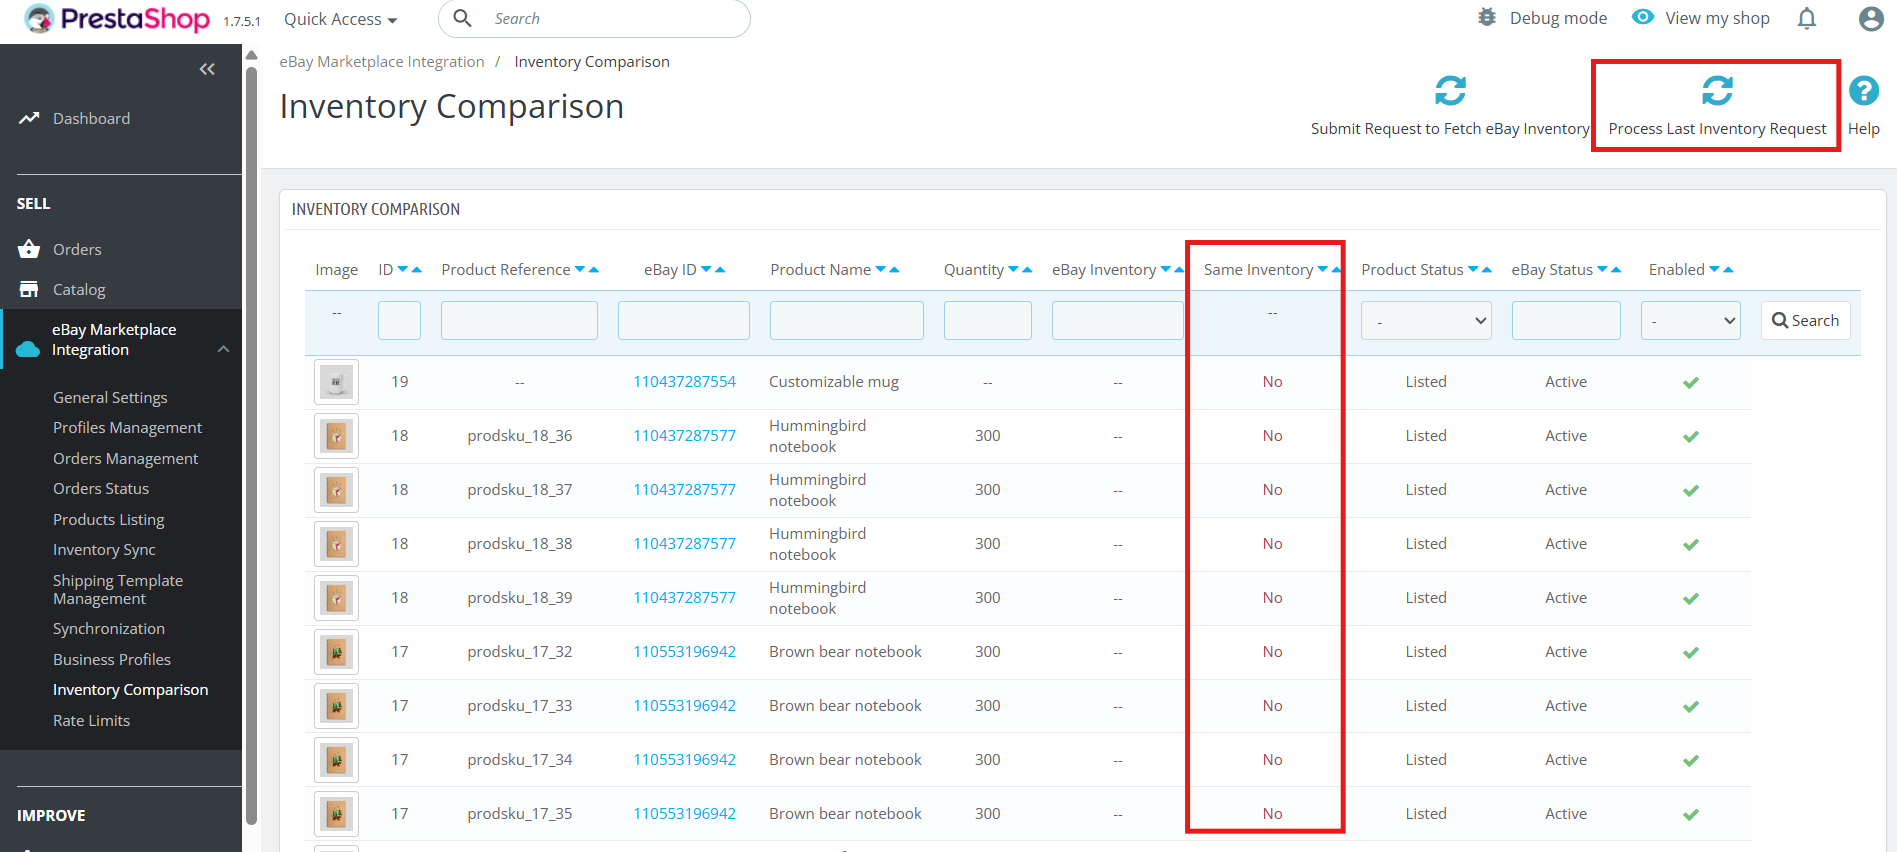
This inventory comparison tab in Prestashop eBay Marketplace Integrator allows you to compare your Prestashop inventories with your eBay inventories, quickly identifying discrepancies and ensuring accurate product availability across both platforms.
Moreover, this helps prevent overselling, stockouts, and keeps your inventory perfectly synchronised, saving you time and reducing errors.
The inventory sync provides the two crons including ‘Submit request to fetch eBay Inventory’ and ”Process Last Inventory Request’ Cron.
6.9.1 Submit a Request to fetch eBay Inventory
This cron allows the store owners to fetch the current inventory from your eBay store. Submit a request to fetch eBay Inventory cron add the current inventory in the quantity section in the tab.
6.9.2 Process Last Inventory Request
This cron processes the last inventory request and matches the current inventory, marking discrepancies with Yes or No in the inventory comparison tab
These tabs in the inventory comparison, Knowband’s Prestashop eBay Marketplace connector Addon include the following cron jobs:
Submit Request to Fetch eBay Inventory
This cron fetches the latest inventory data from your eBay store.
Ensures that the system always has the most up-to-date information for comparison.
Process Last Inventory Request
This cron processes the previously fetched eBay inventory data.
6.10 Rate Limit Feature
Additionally, the module provides comprehensive API rate limit tracking, displaying the number of times each API has been called and monitoring all operations, including product and inventory syncing. Furthermore, it highlights when an API call exceeds its limit, offers detailed logs of module activities, and simplifies troubleshooting.
Together, these enhancements give you greater control, transparency, and reliability in managing your prestashop to eBay listings.
6.11 Business Profile:
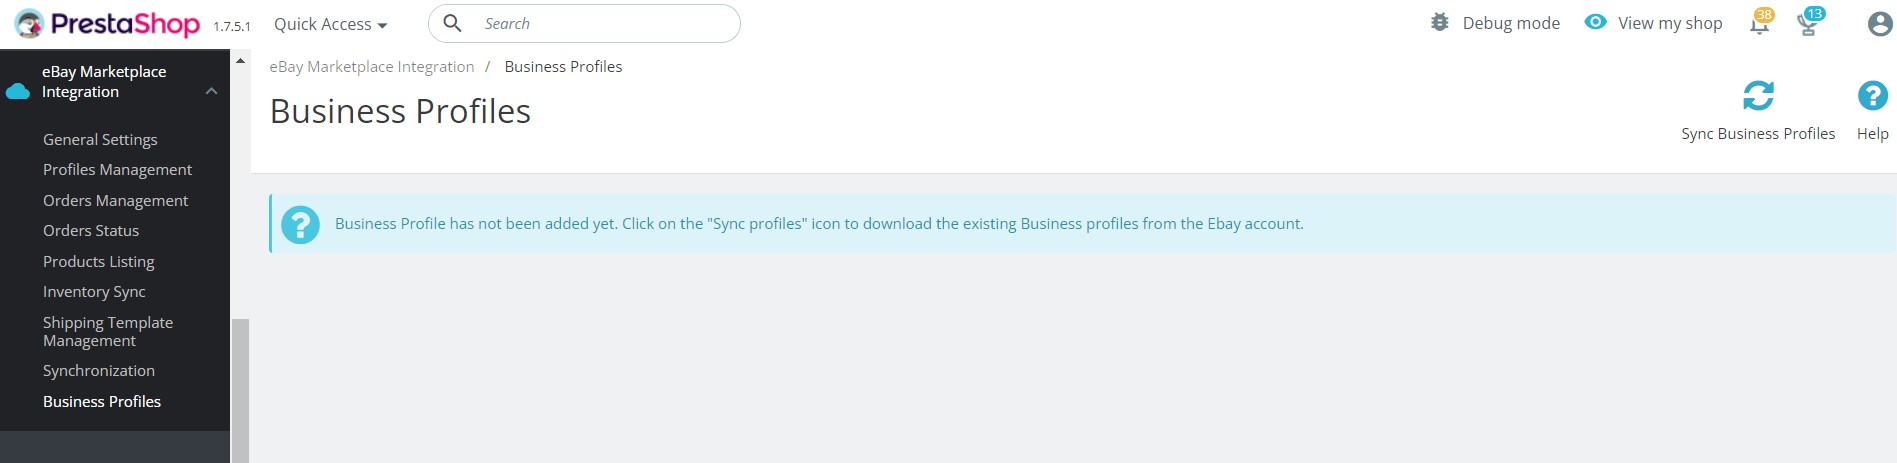
Knowband’s eBay Connector addon for Prestashop allows the store admin to import eBay business profiles in the module. These profiles included necessary configurations such as return policies, eBay shipping templates, and eBay payment policies.
Once the business profiles are imported, you can use the same while creating your shipping templates and eBay profiles.
Watch the Tutorial of Prestashop eBay Connector Plugin:
To help you set up and use the Prestashop eBay Connector module, we have created a YouTube tutorial. This step-by-step video guide walks you through the installation process, configuration options, and how to list and manage your product listing on eBay from your store through module.
Contact us at support@knowband.com for any query or custom change request as per your business requirement.
1.0 What is Product Availability Check By Zipcode?
As you know that after finding a suitable product, the customer wants to know the availability of the same in a particular region.
By this Prestashop Availability Check by Zipcode Addon, the customer can check the availability of the product in a particular location using its Zipcode. This Prestashop zipcode validator will ease the work of the customers to check the availability of the product in any particular area before placing an order.
2.0 Product Availability Check By Zipcode
2.1 Introduction
This Prestashop Zipcode addon has a functionality through which the customers can check the availability of the products in a particular region.
The Prestashop Zipcode validator addon provides lots of enticing features which are as follows:
Prestashop zipcode addon allows the customer can check the availability of a product at any location using Zip-code.
A popup will be displayed on the frontend of the PrestaShop store when the user visits the website.
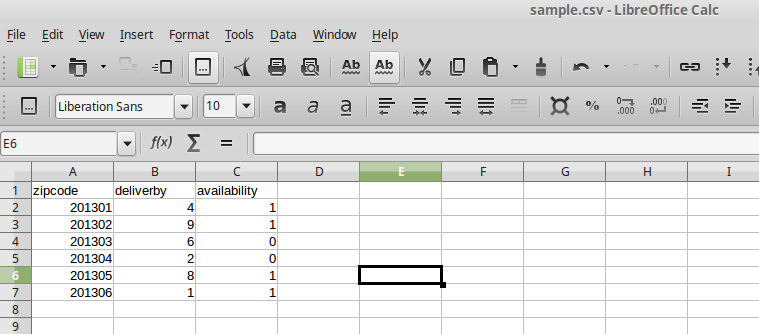
With the help of this Prestashop zip code validator module, the admin can easily map Zones with Zip-codes by uploading a CSV file.
This zip code validator module offers the admin to easily map Zones with the Product by uploading the CSV file.
The Prestashop Product Availability module helps in displaying the Delivery date, Success message, and Failure message on the front end.
The product availability check PrestaShop module lets the admin Enable/Disable the availability of the product for a specific Zip-code at any time.
The product availability check by zipcode Prestashop module allows the admin to map multiple Products with multiple Zones.
This Prestashop Postal Code Validator module offers to add the multiple Zip-codes with Zones by comma separated values.
The Prestashop Postal Code Validator Addon provides the admin to search, delete, or even modify Zones.
The product zipcode validator module allows the admin to search, delete, modify Zip-codes.
The Prestashop product zipcode validator plugin offers the admin can search, delete Product-Zone Mapping.
This Prestashop Availability check by zipcode module allows the admin to add Custom CSS and Custom JS at Product Page of the front end to change the look and feel of the box.
Prestashop Product Postal Code Validator allows the admin to disable product availability check for specific products.
With autofill feature of Prestashop product zipcode validator, the user need not fill zipcode field for every product on the store. Once the zipcode is entered for a product, it will automatically show availability for every product they visit.
2.2 Installation Manual:
Follow the following steps for installing the Product Availability Check By Zipcode addon:
Download the Prestashop zipcode validator package.
Unzip the package in your modules folder of Prestashop setup via FTP manager (like Filezilla or WinSCP – download here).
In the admin Panel go to “Modules and Services> Product Availability Check By Zipcode >Install”.
Click ‘Configure’ to edit settings of this Prestashop zipcode module.
3.0 User Manual:
This User Manual will guide the the admin through the Module/Store Front settings of the Prestashop zipcode validator module and the various features of the Prestashop Product Availability Check By Zipcode Addon.
4.0 The Admin Interface:
After installation, when the the admin clicks on Configure, a screen will be displayed where he/she can configure general settings of this product zipcode validator module.
4.1 Configure Product Availability Check By Zipcode Setting:
Following are the steps to configure this Prestashop Zipcode module –
Go to Modules and Services.
Search module ‘Product Availability Check By Zipcode ’ .
Click on ‘Configure’ button.
Fields:
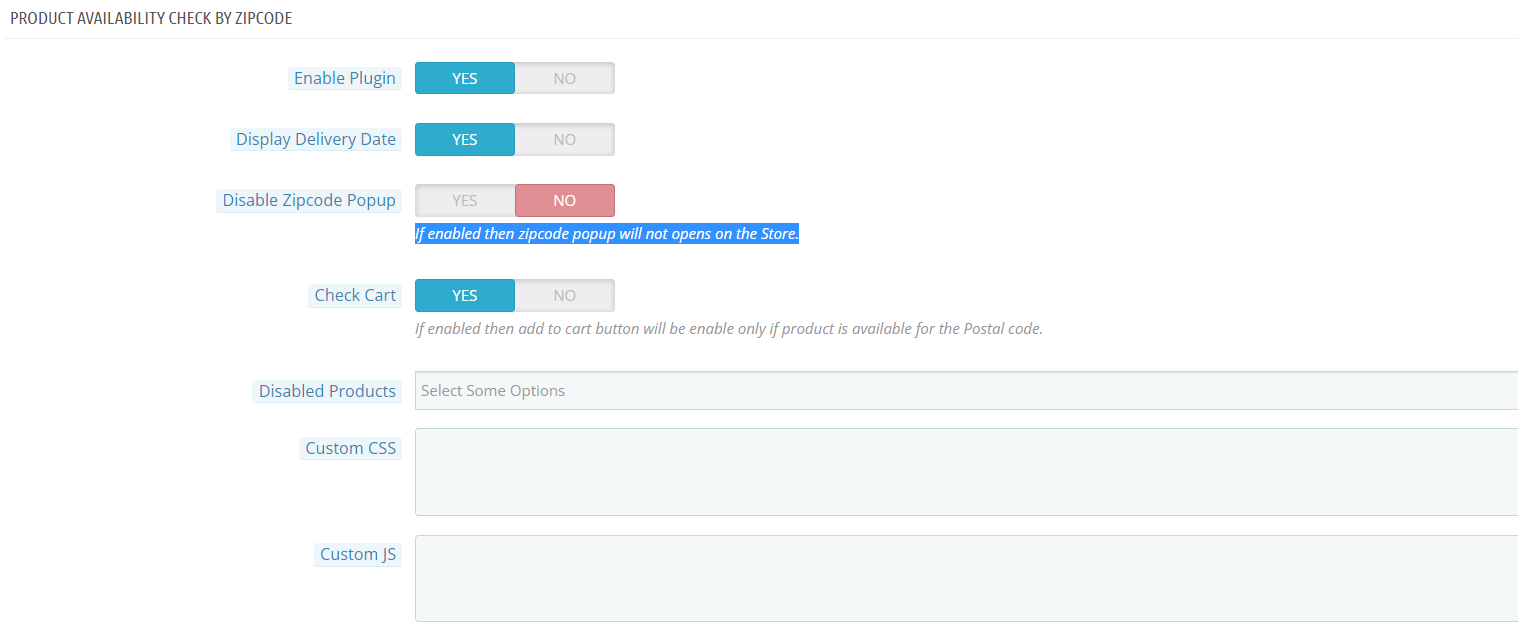
Enable: By default, this setting of the product availability check Prestashop module will be OFF. Whole Prestashop zipcode validator module functionality depends on this toggle button. When it is enabled, a text field to check product availability will be displayed on the product page on the front end of the product zipcode validator module.
Display Delivery Date: This field of the Prestashop Postal Code Validator Module is offered to the admin to display the delivery date of the products. The admin just needs to turn on the setting to display the delivery date. But, if he doesn’t want to show the delivery date, then he can set the toggle button on OFF mode.
Display Zipcode Popup – If this option is enabled then the module popup doesn’t appear on the front.
Check cart: Check cart feature restricts the visitor to go to the checkout page if any of the product is not available in the zip code entered by the customer in the address field.
Disabled Product: The store admin can restrict zipcode check functionality for particular products using this option.
Custom CSS: This field of Prestashop Prestashop product zipcode validator is offered to the admin to add custom CSS to the product page if required.
Save: By clicking this button, this Prestashop Zipcode module will save setting into the database and return back with success message.
4.2. Zipcode Availability Check:
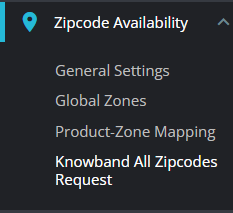
After installing the product zipcode validator module, a separate menu (named “Zipcode Availability Check”) will be added at the end of menu listing as shown below.
.
Figure 3.1 – Product Availability Check by Zipcode – Menu Tabs(1.6.x.x)
Figure 3.2 – Product Availability Check by Zipcode – Menu Tabs(1.7.x.x)
In this tab of the Prestashop zipcode validator module, there will be 3 sub-tabs described below.
4.3. Global Zones:
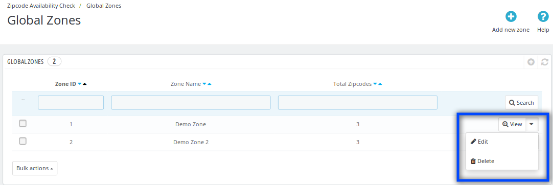
This tab of the Prestashop Postal Code Validator Addon contains the list of zones that are created by the the admin by adding new zones from ‘Add new Zone’ button appears at the top right of the page. The admin can perform operations like searching the zone, view a zone, delete zones, edit zones and add a new zone in the image mentioned below.
Following are the steps-
Hover on ‘Zipcode Availability Check ’ menu.
Go to ‘Global Zones ’.
Figure 4 – Product Availability Check by Zipcode – Global Zone
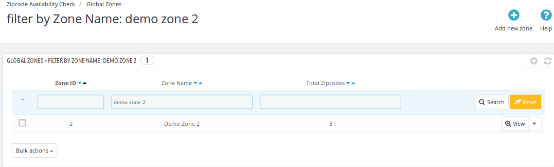
The image below would be displayed when the admin searches any zone.
Figure 5 – Product Availability Check by Zipcode – Search Global Zone
4.3.1 Add New Global Zone:
In this field of the Prestashop zipcode addon admin can add a new Global Zone and the image mentioned below will display when the admin clicks on the ‘Add New‘ button.
Following are the steps –
Hover on ‘Zipcode Availability Check’ menu.
Go to ‘Global Zones’.
Click on ‘Add new zone’.
Figure 6.- Product Availability Check by Zipcode – Add New Zone
Fields:
Availability: By default, this setting of the zipcode validator module will be ON/enabled. When the admin disables this button then the product will not be available at added zipcode location.
Zone Name: In this field of Prestashop Availability check by zipcode, the admin can define zone names according to his/her understanding.
NOTE: Zone name must be unique.
Zip-code: This is text-area Field. In this field of Prestashop product zipcode validator module, the admin can enter multiple Zip-codes here separated by the comma (,). Ex- 201301, 983923, 345453
Deliver By: This is the estimated day of product delivery. The Prestashop zipcode addon offers the the admin to configure the number of days of delivery. When the customer will enter the zip code, a message will be showen with the estimated delivery date.
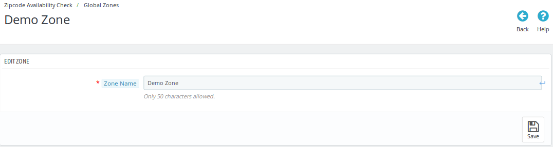
The image mentioned below will be displayed when the admin clicks on the ‘Edit‘ button.
Figure 7.2 – Product Availability Check by Zipcode – Edit Zone
Fields:
Zone Name: The Prestashop Postal Code Validator Addon offers the admin to define the zone names according to his/her understanding.
4.3.3. Delete Global Zone:
The admin can delete a particular Global Zone.
Following are the steps to Delete Zone –
Hover on ‘Zipcode Availability Check ’ menu.
Go to ‘Global Zones ’.
Click on ‘Delete ’.
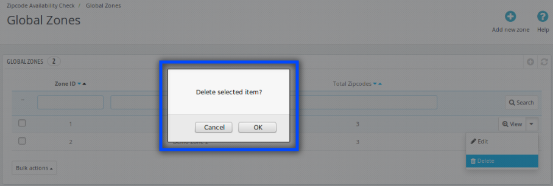
Click on ‘OK ’.
Note: If Admin delete a zone then all the zip-codes in that zone will also be deleted.
The image mentioned below will display when the admin clicks on the ‘Delete’ button.
Figure 8.1- Product Availability Check by Zipcode – Delete Zone
4.3.4. View Global Zone
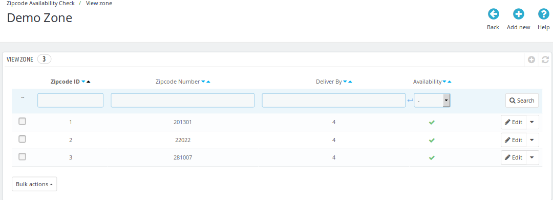
This field of Prestashop Product Availability module lets the the admin view a particular Zone by clicking on ‘View ’. Each zone contains a list of zip-codes with their number of days of delivery and availability status. The admin can perform the search, edit and delete operations in this list of the product availability check Prestashop module.
Following are the steps to View Zone –
Hover on ‘Zipcode Availability Check’ menu.
Go to ‘Global Zones’.
Click on ‘View’.
Figure 9 – Product Availability Check by Zipcode – Delete Zone
4.3.4.1. Add new Zipcodes:
In this field of Prestashop Postal Code Validator Addon, the admin can add more zipcodes in a particular Zone by clicking on ‘Add new’ button to a particular zone.
Following are the steps to add new Zone –
Hover on ‘Zipcode Availability Check’ menu.
Go to ‘Global Zones’.
Click on ‘View’ for a particular Zone.
Click on ‘Add new’.
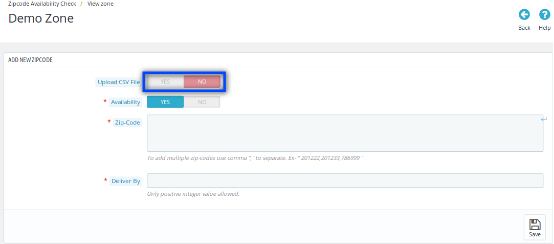
When ‘Upload CSV File’ option is Disabled:
Figure 10.1- Product Availability Check by Zipcode – Add new Zipcodes
Fields:
Availability: By default, this setting of the product availability check by zipcode Prestashop addon will be ON. When the admin disables this button, then the product will not be available at added zipcode location.
Zone Name: This Product Availability Check by Zipcode module lets the the admin define zone names according to his/her understanding.
NOTE: Zone names must be unique.
Zip-code: This is text-area Field. In this field of Prestashop Postal Code Validator plugin, the admin can enter multiple Zip-codes here by the comma (,) separated. Ex- 201301, 983923, 345453.
Deliver By: In this field of Prestashop product zipcode validator module, the admin can configure the number of days of the delivery.
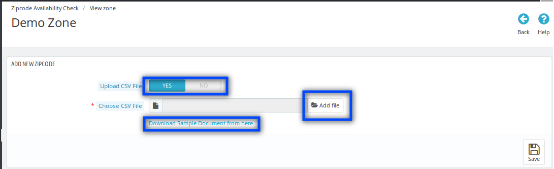
When Upload CSV File option is enabled:
Figure 10.2 – Product Availability Check by Zipcode – Add New Zone
Field:
Upload CSV File: By enabling this option of the Prestashop zipcode validator module, Choose CSV file Option with a link to download the sample ‘.csv ‘ file will be displayed.
Add File: In this field of Prestashop product zipcode validator module, the admin can choose the CSV file by clicking on Add file option.
Download Sample Document from here: When the admin clicks on this link, this file will be downloaded.
Figure 11 – Product Availability Check by Zipcode – Download Sample (Add New Zone)
4.3.4.2. Edit Zip-codes:
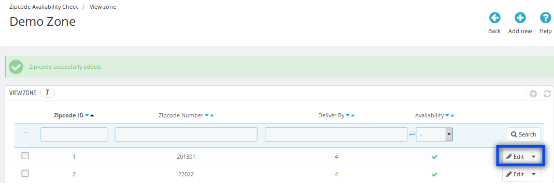
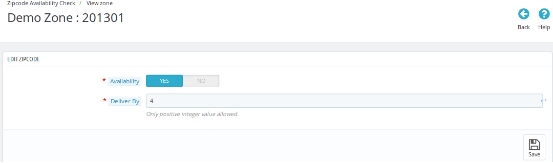
This Prestashop Product Availability addon offers the admin to edit the particular zip code. This can be done just by clicking on ‘Edit’ option of that particular zip code. The image mentioned below will be displayed when the admin clicks on ‘Edit’ button of a particular zip-code from ‘View Global Zones’ page.
Figure 12- Product Availability Check by Zipcode – Edit Zipcodes
Field:
Availability: By default, this setting of the product availability check by zipcode Prestashop addon will be OFF. When the admin enables this toggle button, then the products added to the ‘Product Details Tab’ will be available at this location. But if the admin sets the option to NO, then the product mapped to that particular zip code will not be available.
Delivery By: In this field of product availability check Prestashop addon, the admin can edit the day of delivery to that particular zipcode just by entering any positive integer value.
4.3.4.3. Delete Zipcode
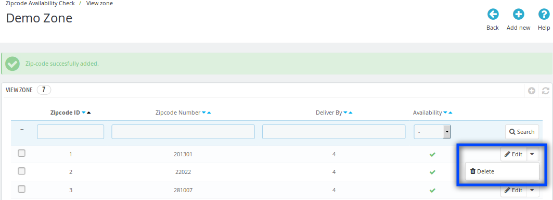
This Prestashop Availability check by zipcode allows the admin to delete a particular Zipcode.
Figure 13- Product Availability Check by Zipcode – Delete Button
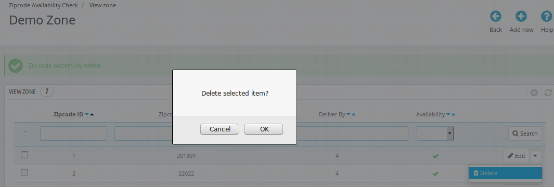
The image mentioned below will be displayed when the admin clicks on the ‘Delete‘ button of the zipcode validator module.
Figure 13.2- Product Availability Check by Zipcode – Delete Zipcodes
4.4. Product-Zone Mapping:
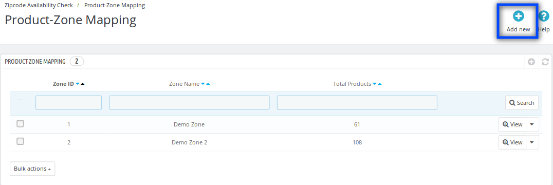
This tab of Prestashop Product Availability Check by Zipcode module contains the list of the zones which are mapped with some products. The admin can search, view, delete and can map (add) new Products with Zones.
The admin can view the products which are mapped to a particular zone by clicking on ‘View‘ button of the Prestashop Availability check by zipcode module.
Figure 14- Product Availability Check by Zipcode – Product Zone Mapping
4.4.1 Add new Product-Zone Mapping
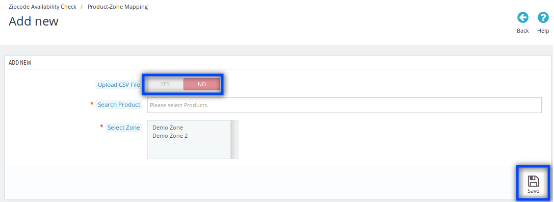
When the admin clicks on ‘Add New’ button of the ‘Product-Zone Mapping Tab‘ then the image mentioned below will be displayed.
When ‘Upload CSV File’ option is disabled:
Figure 15.1- Product Availability Check by Zipcode – Add New Product Zone Mapping
Fields:
Upload CSV File: In this field of Prestashop zipcode addon, the admin can upload a CSV file to add the large number of Zip-codes.
Search Product: In this field of Prestashop Zip code addon, the admin can select and enter any searched product/multiple products.
Select Zone: This is a multiple-select drop-down. In this field of zipcode validator module, the admin can select zones from this drop-down.
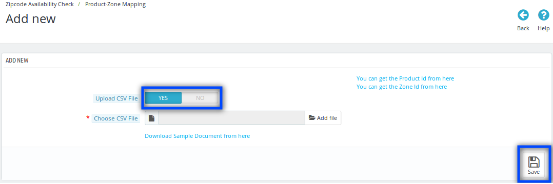
When Upload CSV File option is enabled
Figure 15.2- Product Availability Check by Zipcode – Add New Product Zone Mapping
Fields:
Upload CSV File: By enabling this field of the Prestashop Postal Code Validator Module, Choose CSV File option will be displayed with a link to Download Sample Document from here.
Choose File: In this field of product availability check by zipcode Prestashop addon, the admin can choose a file by clicking on Add File option.
Download CSV file format from here: In this field of Prestashop Product Availability addon, when the admin clicks on this link, file inside the image mentioned below will be downloaded.
Figure 16- Product Availability Check by Zipcode – Document Sample (Add New Product-Zone Mapping)
You can get the Product ID from here: In this field of Prestashop Zipcode plugin, when the admin clicks on this link the admin will be redirected to Products Listing Page of the admin panel.
You can get the Zone ID from here: After clicking on this link of the Prestashop zipcode addon, the admin will be redirected to Global Zones Page of the admin panel.
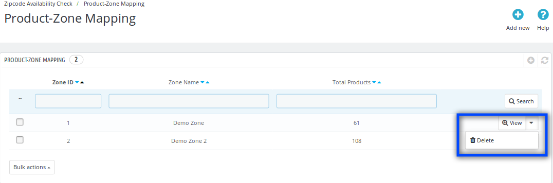
4.4.2 Delete Product-Zone Mapping
This field of zipcode validator module allows the admin to delete zone which is mapped with the products.
Figure 17.1- Product Availability Check by Zipcode – Delete Button
Following are the steps to Delete Zipcode-
Hover on ‘Zipcode Availability Check’ menu.
Go to ‘Product-Zone Mapping’.
Click on ‘Delete’.
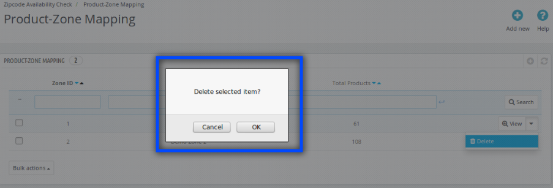
Click on ‘OK’.
The image mentioned below will be displayed when the admin clicks on the ‘Delete’ button.
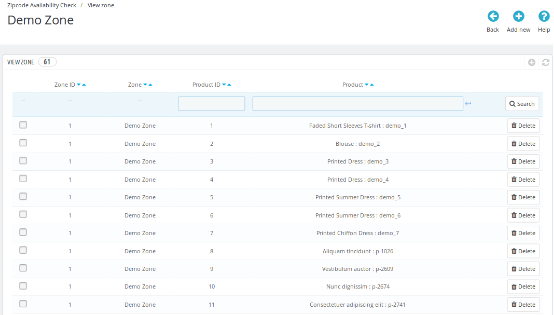
When the admin clicks on the View Button of the Prestashop Availability check by zipcode plugin, then the list of products mapped with that selected zone will be displayed. The admin can search and delete any product.
The admin can delete a particular product which is mapped to a zone.
Following are the steps to Delete Zipcode –
Hover on ‘Zipcode Availability Check’ menu.
Go to ‘Product-Zone Mapping’.
Click on ‘View’ for a particular zone.
Click on ‘Delete’ for a particular product.
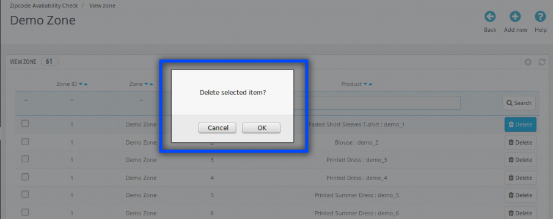
Click on ‘OK’.
The image mentioned below will be displayed when the admin clicks on the ‘Delete‘ button.
Figure 19- Product Availability Check by Zipcode – Delete Product
4.5. Knowband All Zipcode Request:
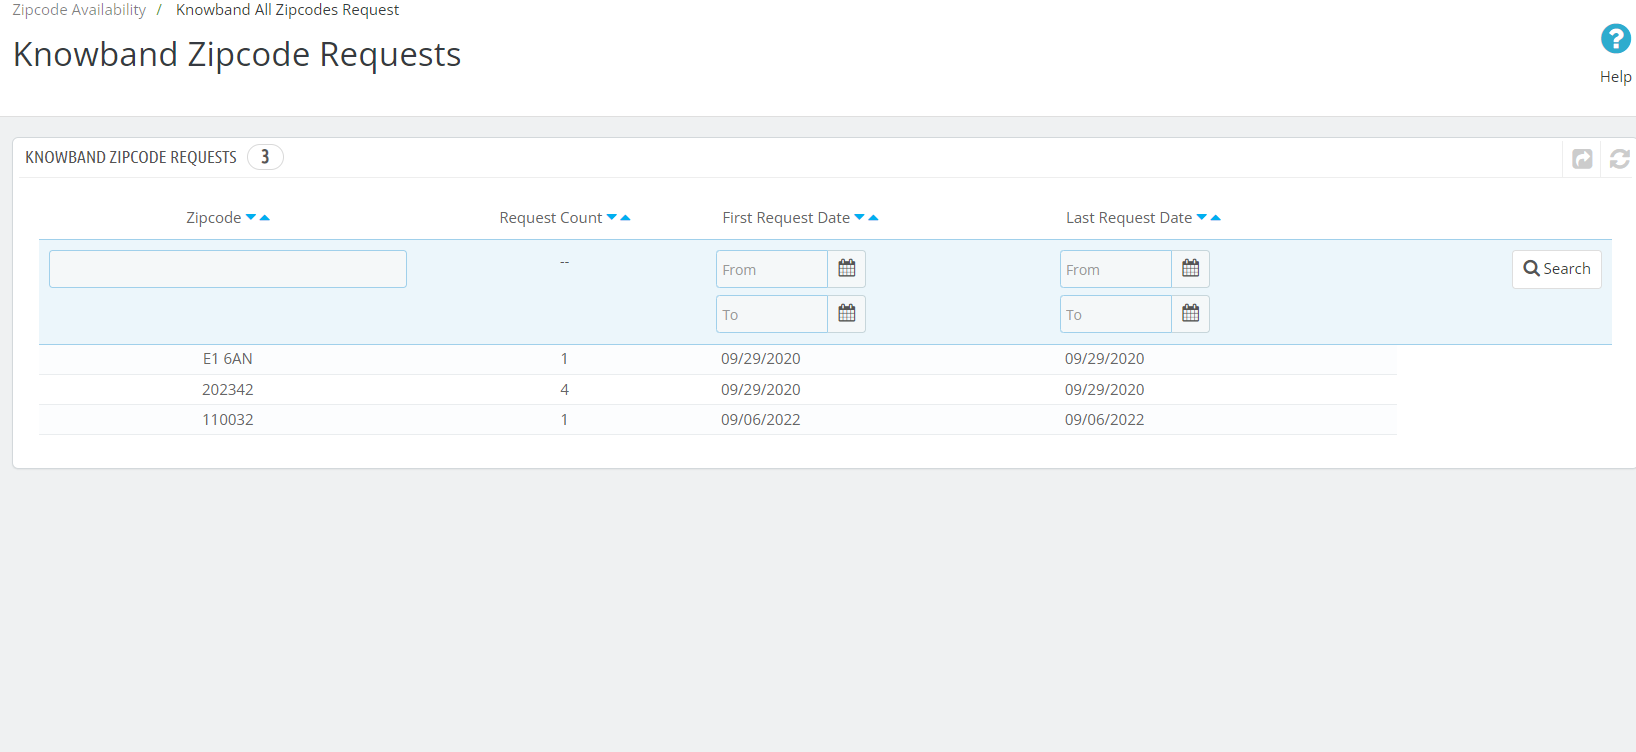
Using this option the Admin can see the product availability requested under the specific Zipcode area.
5.0 Front End Interfaces:
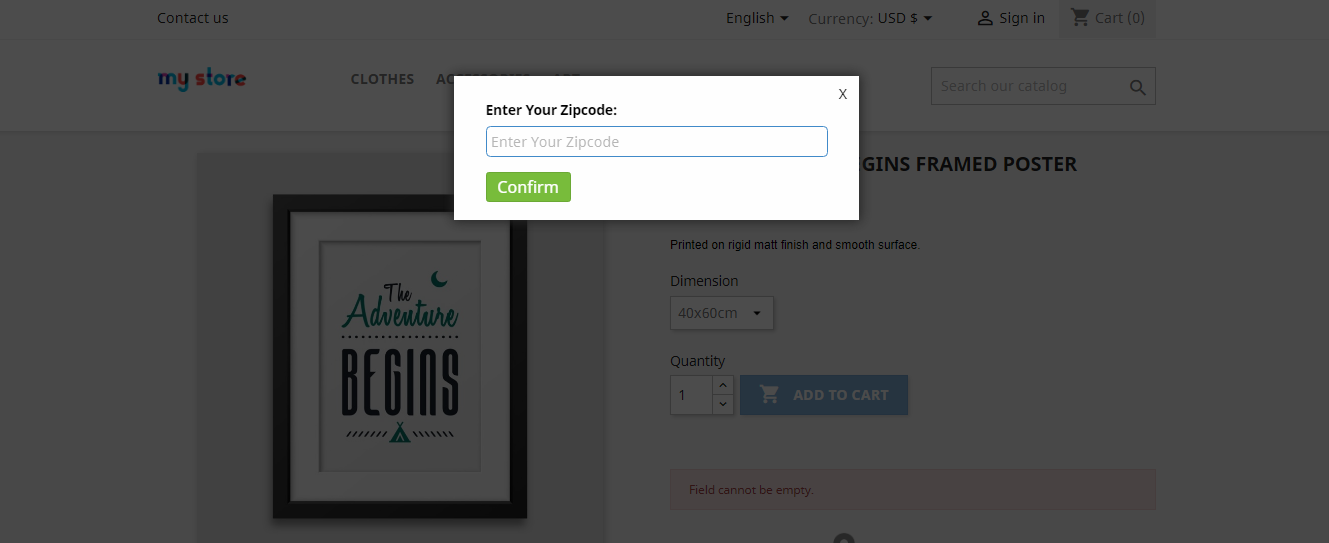
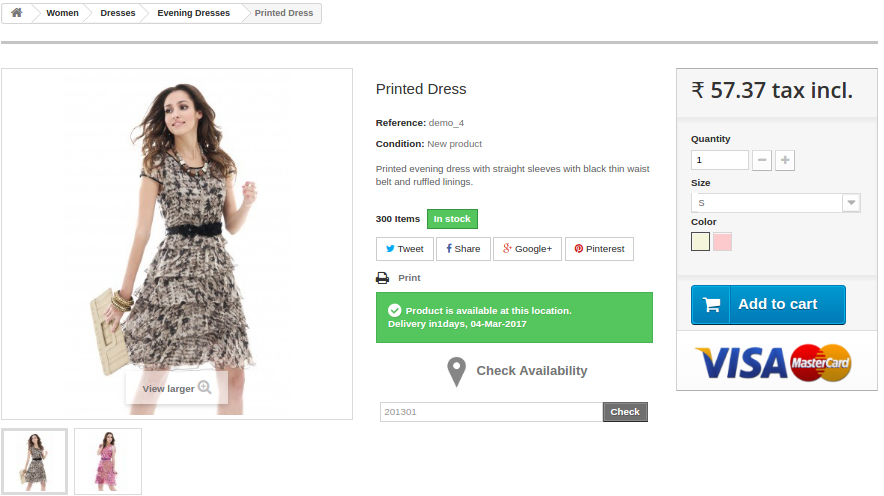
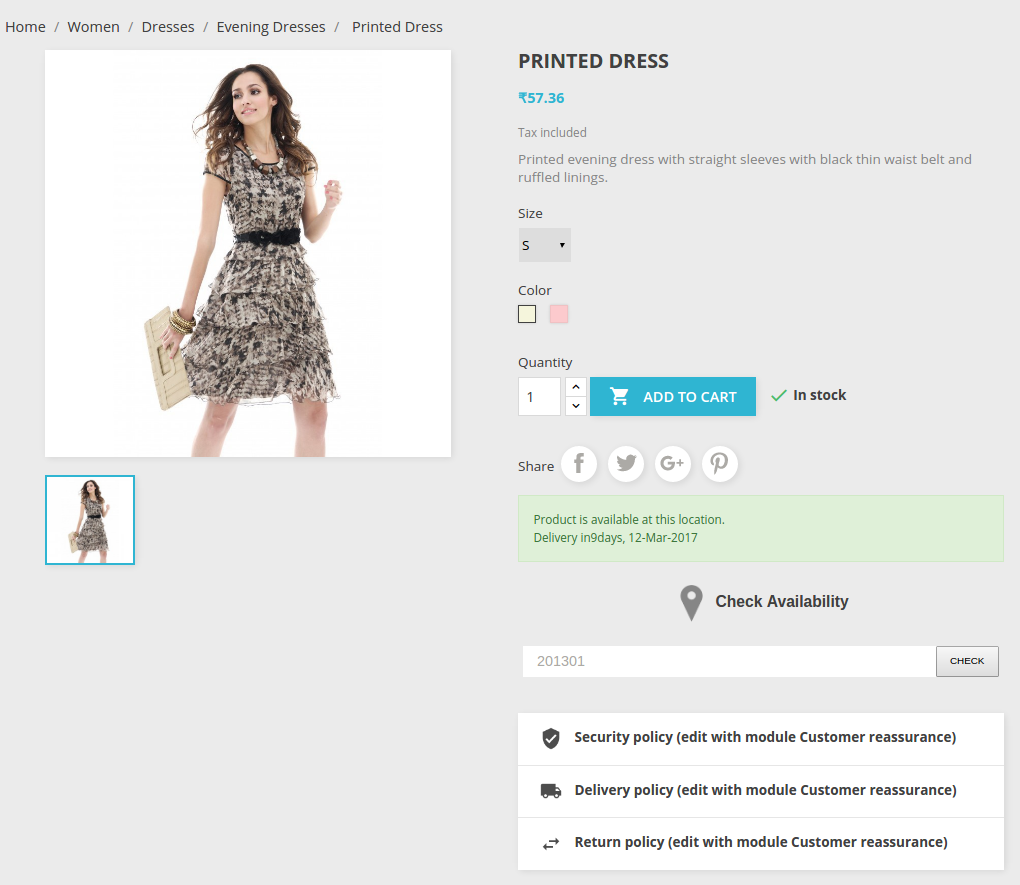
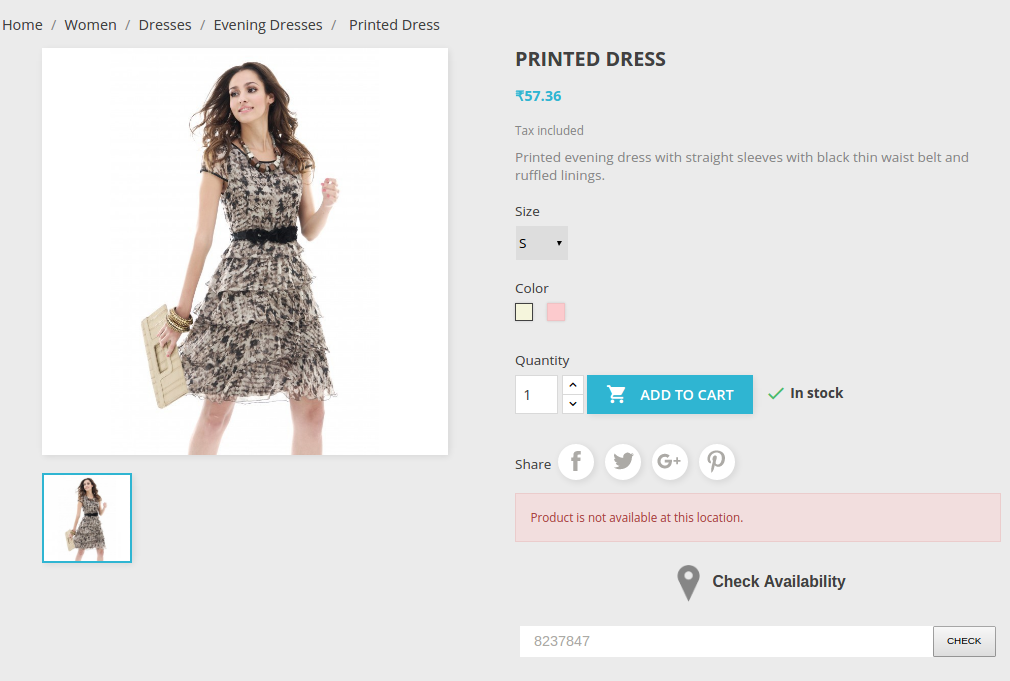
If the Prestashop zipcode validator module is enabled, then the customer can check the availability of a product in a particular location by entering the Zip-code of the region. The customer will see a popup on the screen when he/she visits the website as displayed in the picture below:
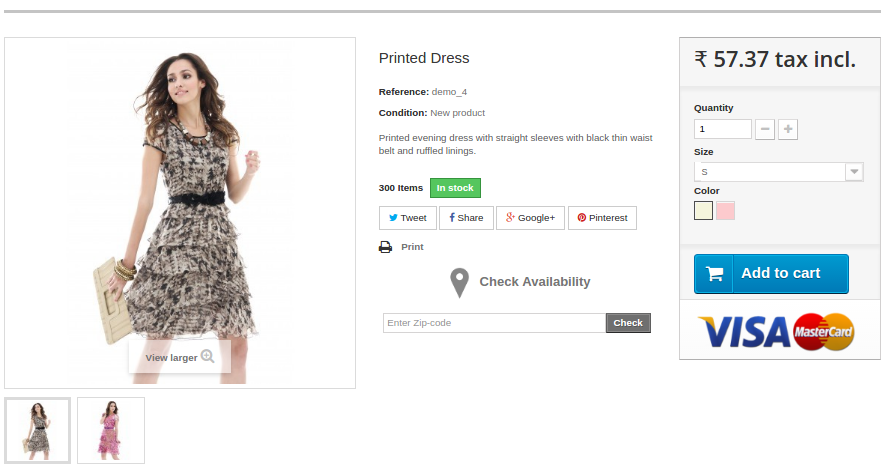
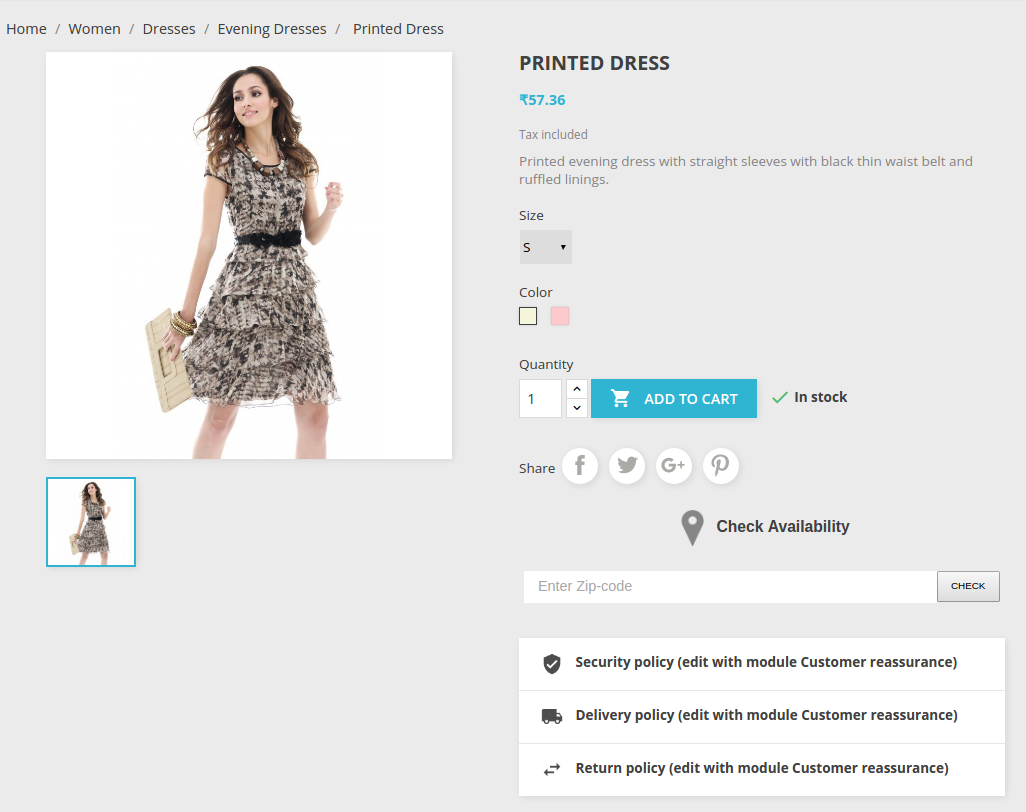
On the frontend, the image mentioned below will be displayed.
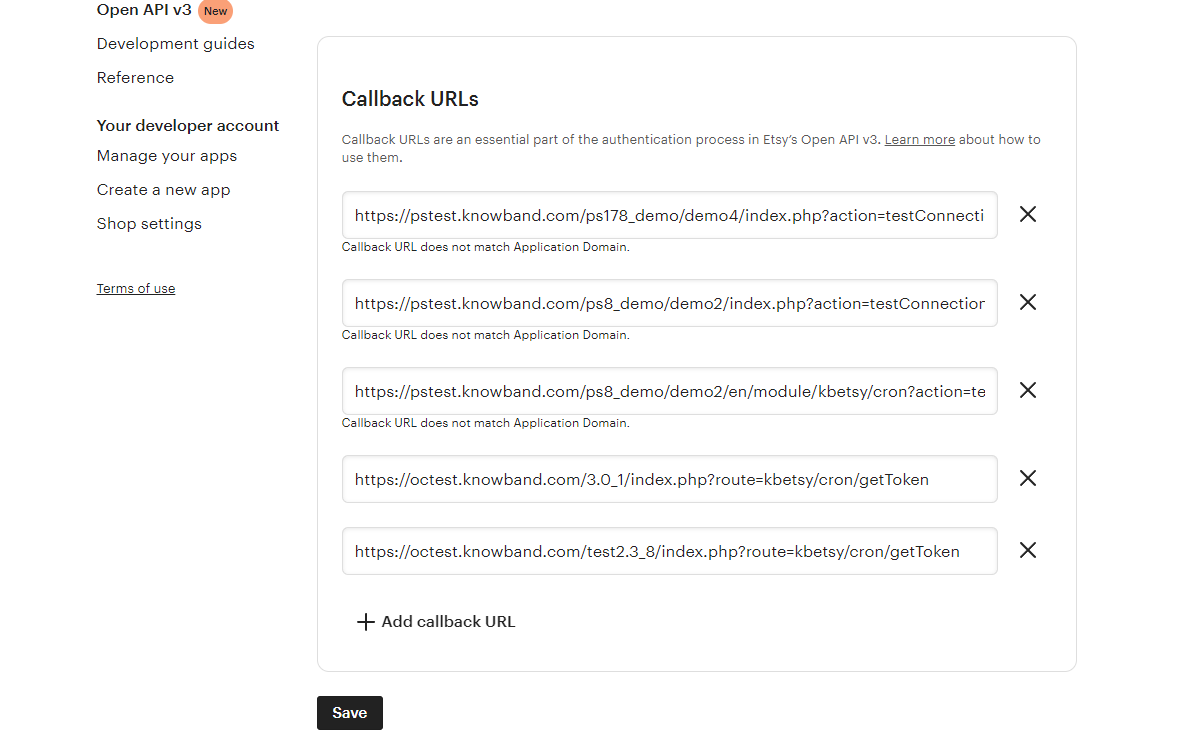
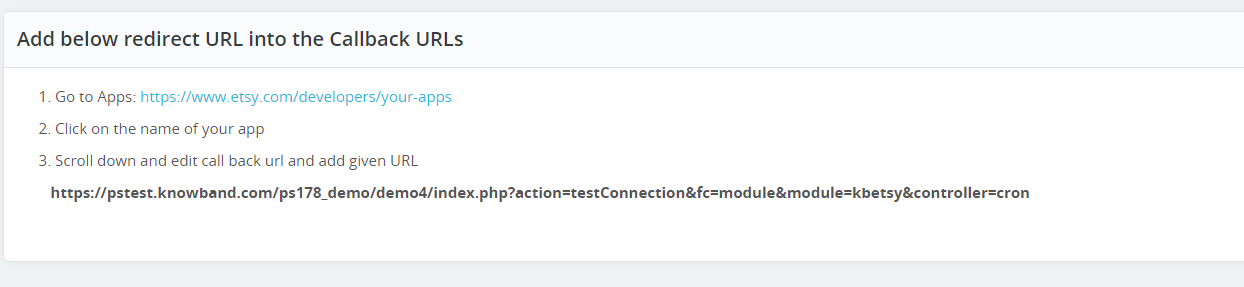
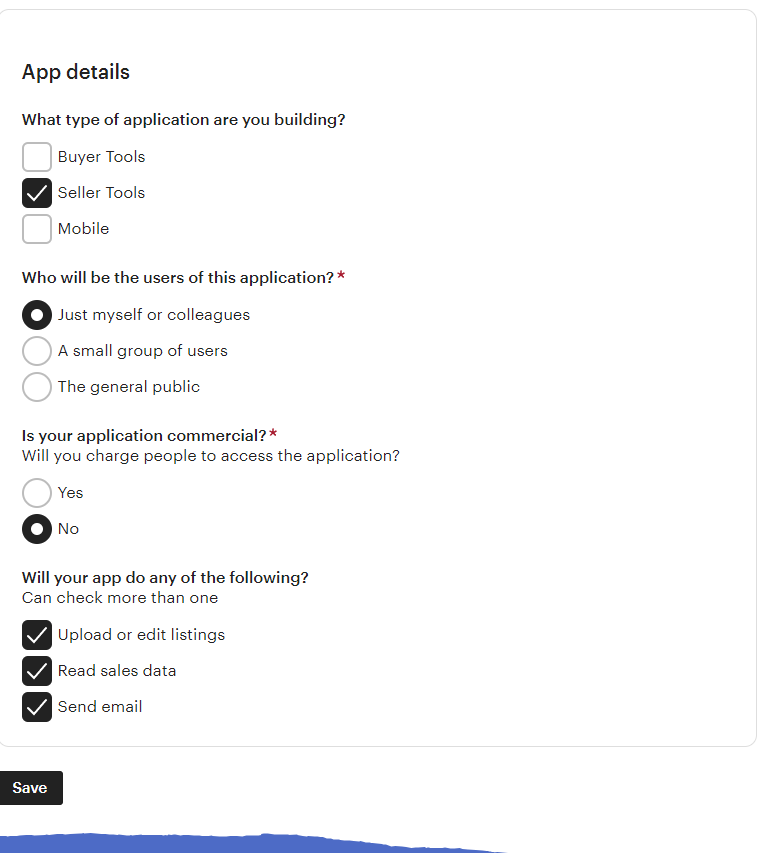
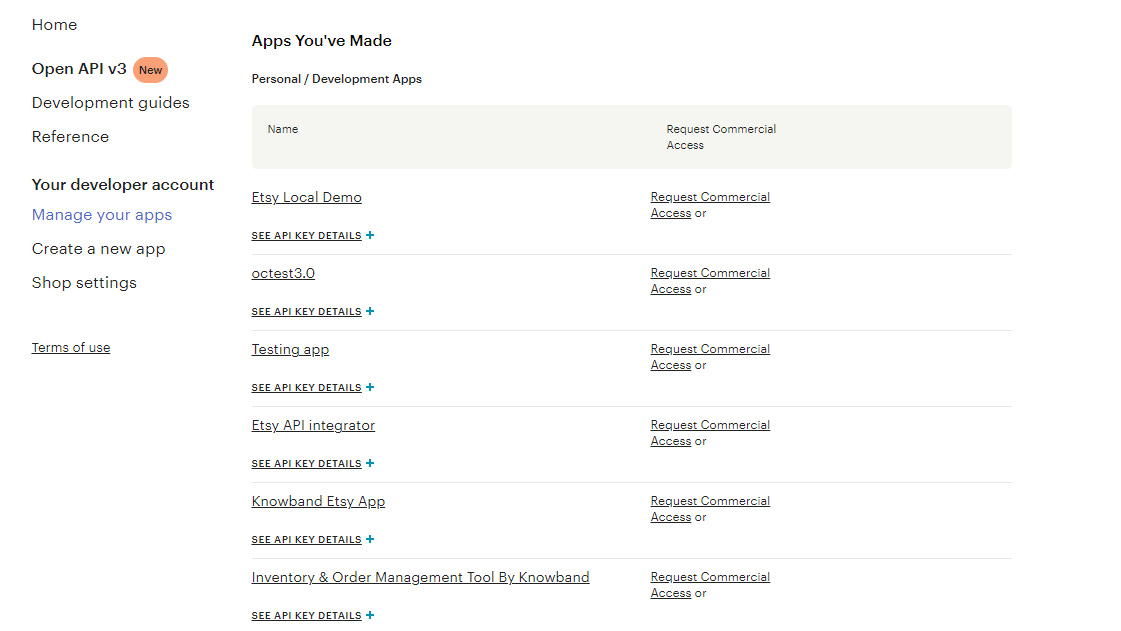
Knowband has developed an interface for the Prestashop store owners that can help them start selling on the Etsy marketplace. Further, the Prestashop Etsy integration addon saves the time of the sellers. How? By reducing the time involved in the manual listing process. In fact, the Prestashop Etsy marketplace integration module offers them a feature to handle the inventory. In addition, handle orders for the Etsy shop from the Prestashop back office.
Etsy is a marketplace that works as an intermediary between customers and artists. In addition, craftsmen of handmade items, or collectors of vintage products. Furthermore, the Etsy marketplace connector provides a unique platform to sellers to showcase their products. Thus, they can spread awareness regarding their products and services through this platform. It is also important for the marketplace to offer the best services to consumers. In fact, consumers like to have options and alternatives to choose from. Hence, the marketplaces are competing to win the sellers and offer great services to them to connect with their stores. Further, Etsy has more than 25 million visitors each month. Further, which gives sellers a wonderful opportunity to reach a larger audience network.
1.1 Key features of the Prestashop Etsy Integration module:
Simple installation and quick starting: The Etsy Prestashop integration module can install quickly. Further, the user-friendly interface of the Prestashop Etsy integration allows an easy process to list the products on the Etsy marketplace.
Bulk uploading of the products: By using this Prestashop Etsy integration addon, the admin can upload products in bulk.
Mapping of the store category with Etsy category: Sellers can easily map the product attributes and category with the Etsy category. Further, with the profile-based listing of the Prestashop Etsy API integrator.
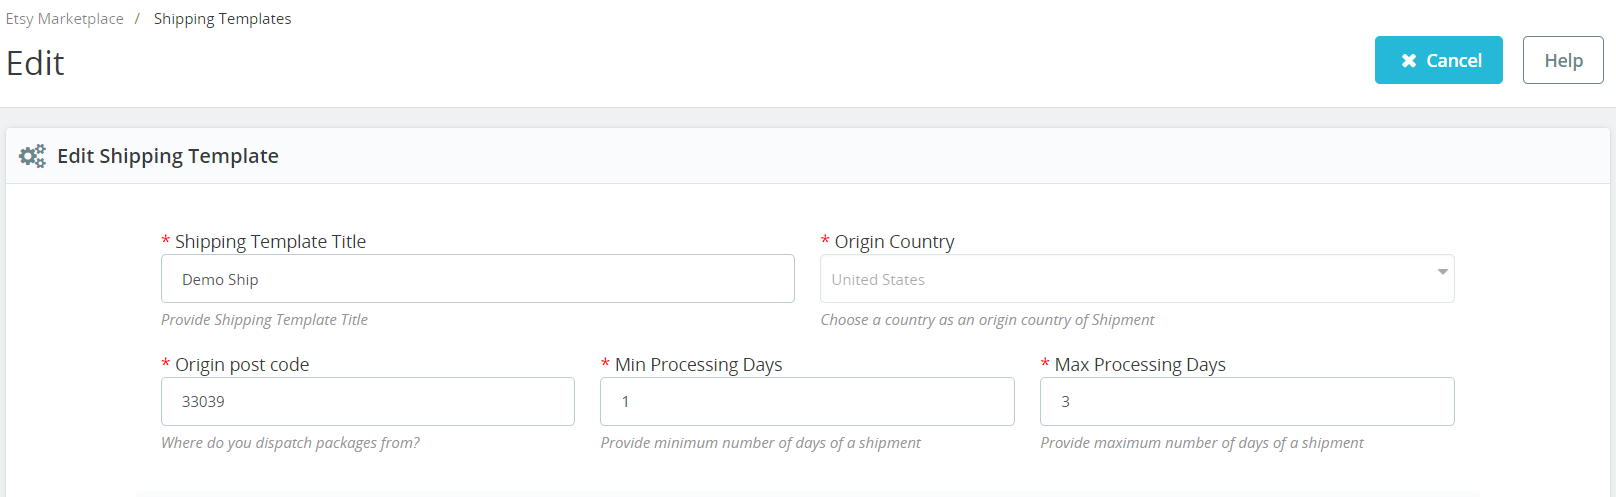
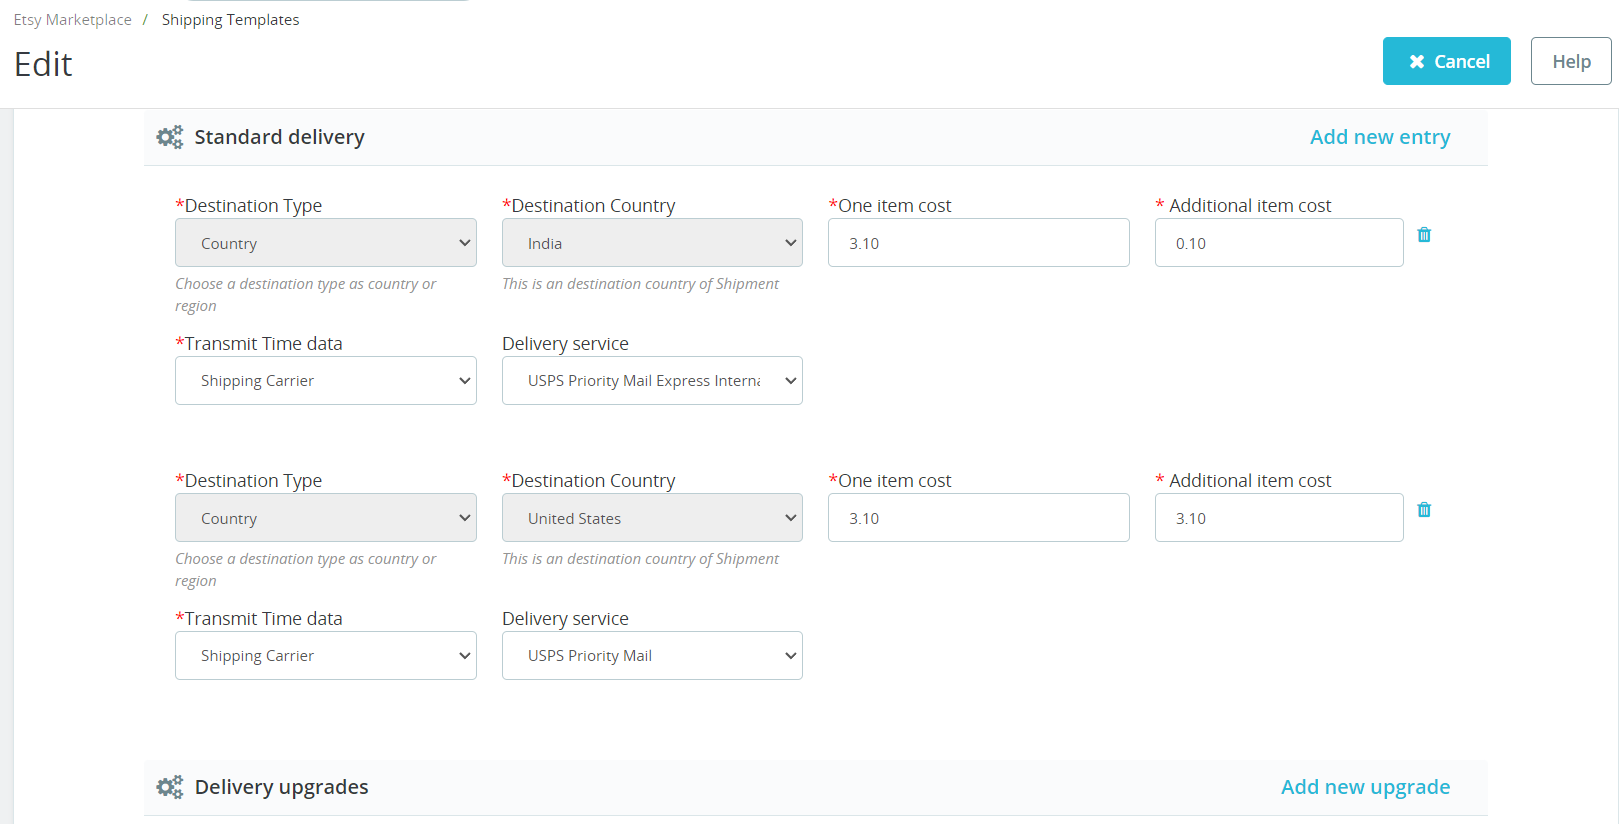
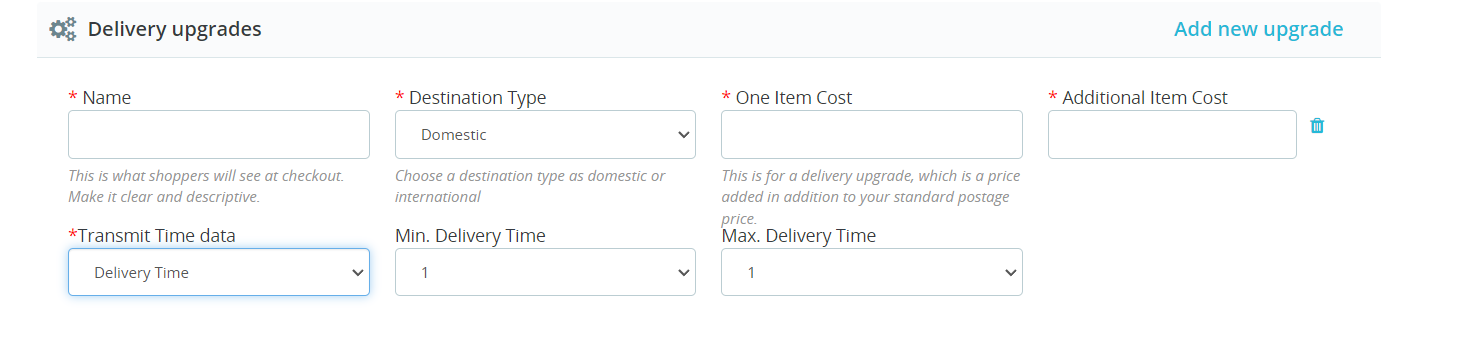
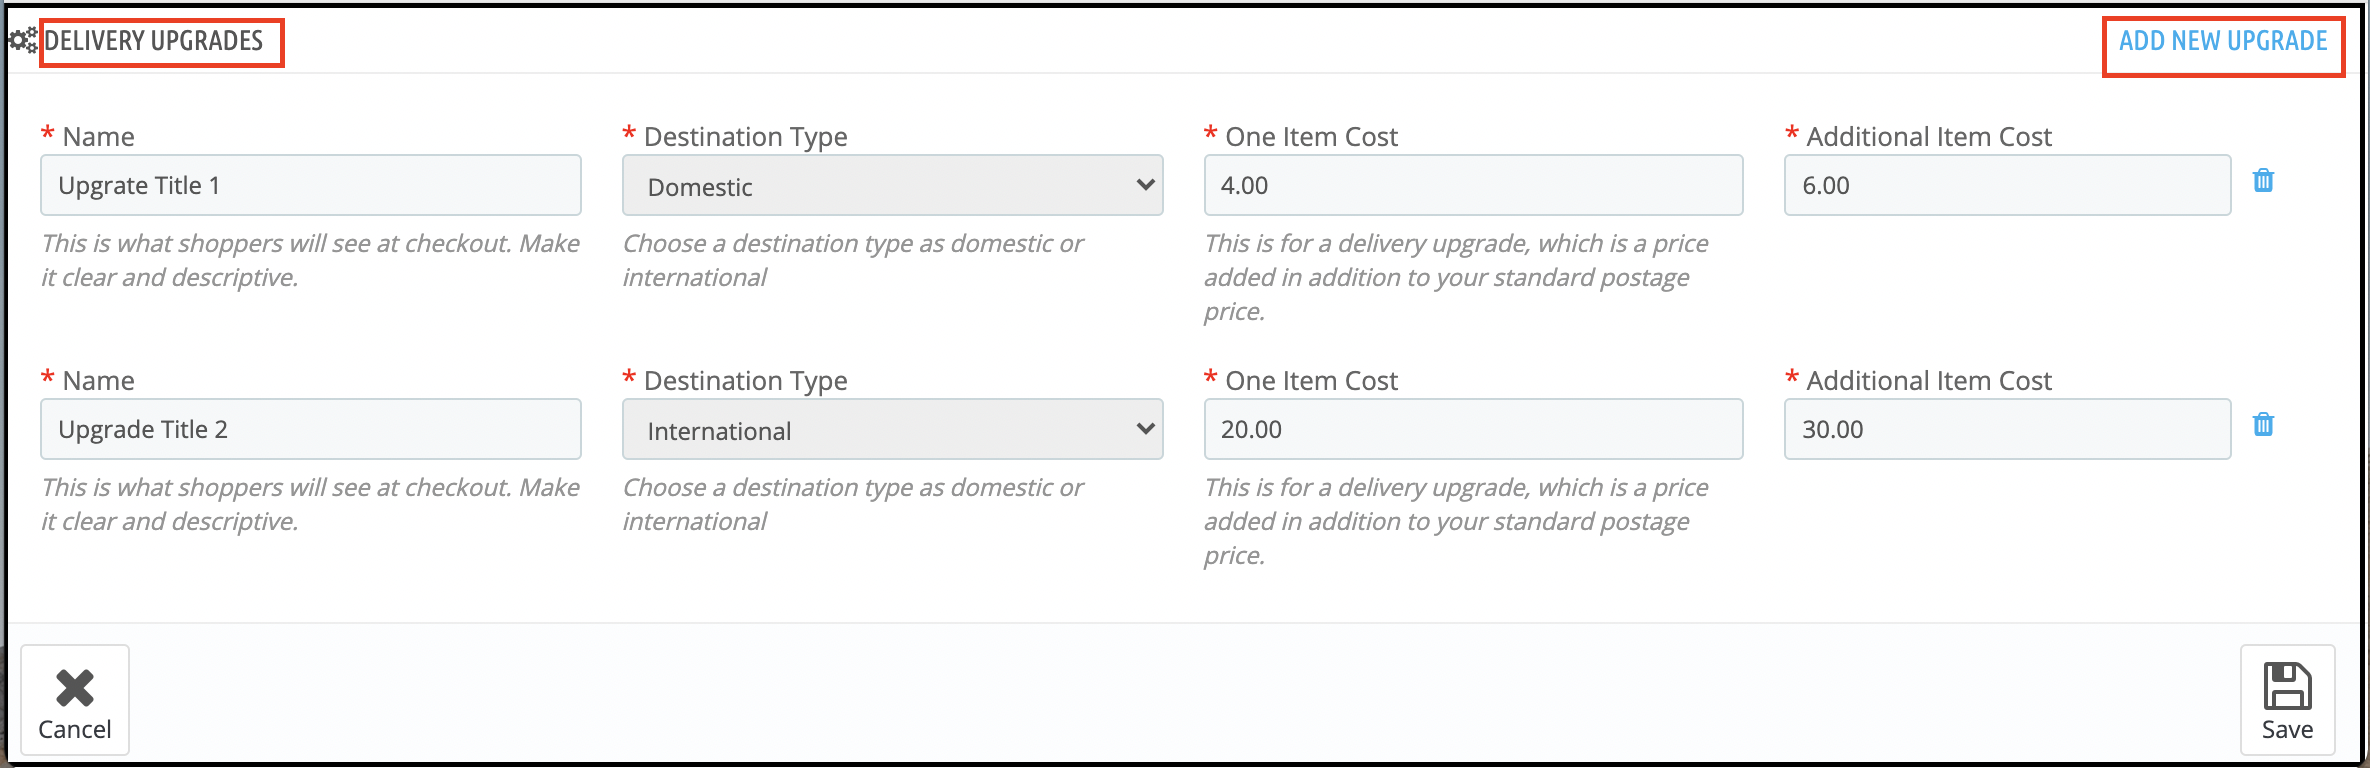
Shipping template synchronization: Create shipping templates from the back-end of the Prestashop Etsy integration extension. Moreover, sync these templates with Etsy with the help of the cron jobs.
Order Synchronization: Manage and keep track of Etsy orders from the admin interface of the Etsy Prestashop API integration addon.
Order Status update: The Admin can update the order status of the Etsy marketplace orders with the help of the cron jobs. Furthermore, offered by the Prestashop Etsy integration module.
Inventory management: The admin can manage inventory for the Etsy store products from the Prestashop Back Office. The current status of the products can sync with the help of the cron jobs. Further, offered by the Prestashop Etsy synchronization extension. Suppose, they make any changes in the product inventory or attributes in the Prestashop store. Further, they can synchronize with Etsy with a button click with the Etsy Prestashop synchronization module.
Language translations: Prestashop Etsy integrator offers multi-lingual support. The admin can select the second language for the store. Moreover, easily synchronizes it with the Etsy marketplace shop. Further, through the cron job offered by the Etsy Prestashop integrator.
New Features offered by Knowband’s Prestashop Etsy Integrator Version 4.0.1:
OpenAPI Authentication for Etsy APIs: We have updated the module to work with Etsy’s new OpenAPI authentication. Now, all Etsy API requests include the required authentication headers, following Etsy’s latest standards, so your integration continues to work smoothly.
Return Policy Configuration & Mapping: A new return policy feature has been added to the module. Now admins can now create and manage multiple return policies and map them to specific profiles. Any products linked to a profile will automatically update on Etsy with the assigned return policy.
Key Features offered by Knowband’s Prestashop Etsy Integrator Version 2.0.0:
UX-related changes: To improve the user experience the interface of the shipping template has been changed. In addition, all the options for shipping template creation have been merged onto the same page. Furthermore, just like the Prestashop Etsy Marketplace interface.
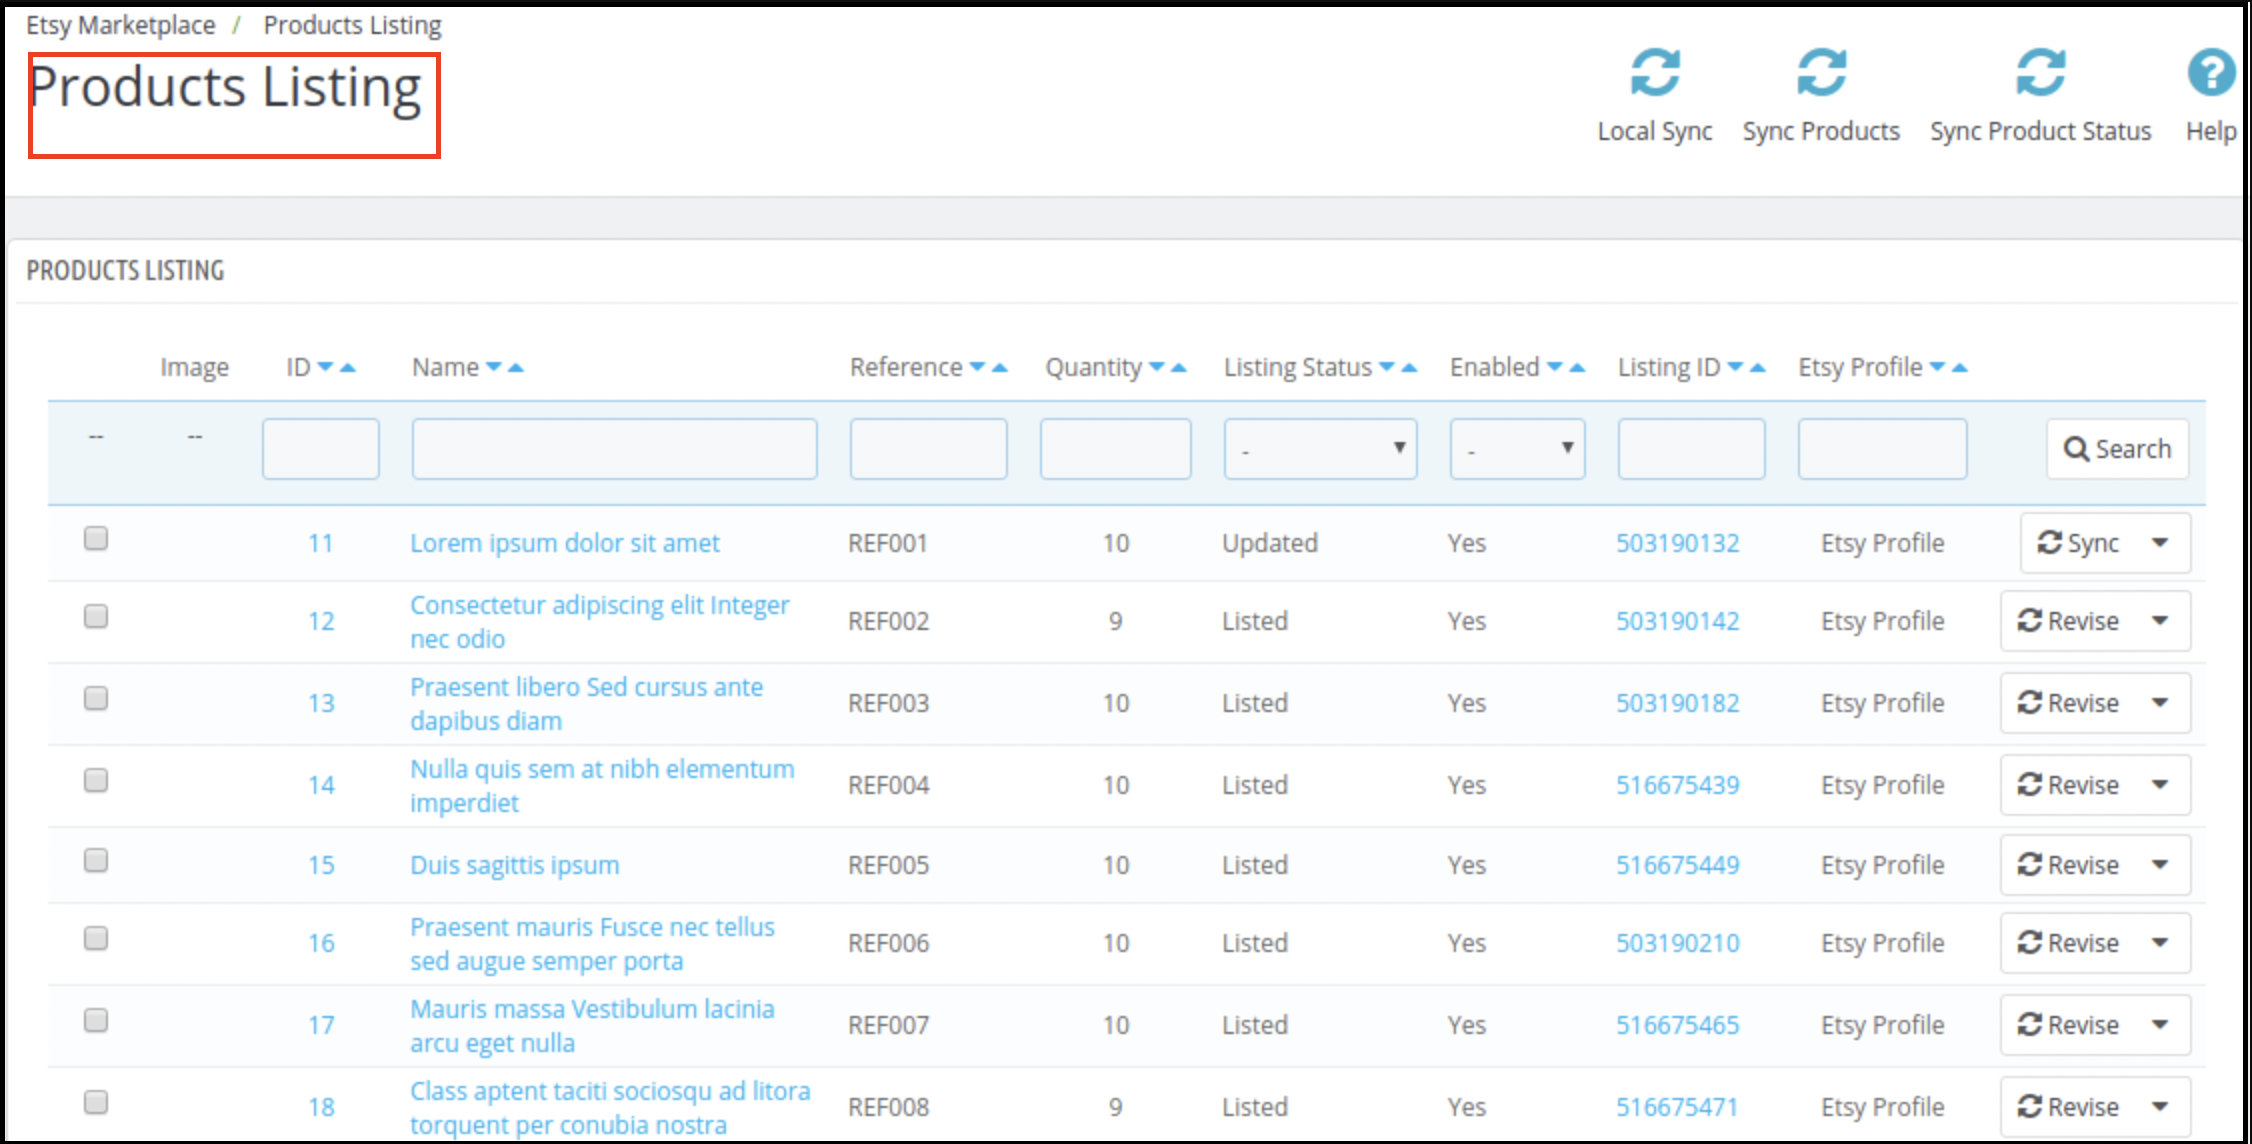
Code Optimization: Now the admin can sync the products from the Products Listings page. There are 3 options for product sync:
Local Sync: Local Sync option allows the admin to sync the PrestaShop store products to the Etsy PrestaShop Integration module. All the products which are mappable to a Profile will list in the Product Listings. Moreover, the admin can list the individual products on the Etsy Marketplace.
Sync Products: Sync Products option will sync the products to the Etsy Marketplace. All the enabled products will sync to the Etsy Marketplace. To avoid the syncing error, the admin can select the number of products. Further, to sync in one go under the General Settings. Cron setup is available to automate the process to list the products.
Sync Product Status: The admin can get the listing status of the syncing products by using the Sync Product Status.
Products Listings: In case you want to set the products as Inactive, Delete those products from this page only (Instead from the Etsy account). In fact, setting the product as Inactive on the Etsy account directly will relist the item on Etsy. Further, on the next CRON run.
The admin can view the Etsy store products from the Products Listings tab. Further, click on the Listing Id. In addition, it will open the Etsy store listing.
The admin can view the PrestaShop store listing by clicking the Product Name.
The admin can view the product listing page in the back office by clicking the ID.
Store admin can add Etsy store orders with store carriers.
Store admin can add the tracking numbers on Etsy orders.
Stora admin can add a size chart image for each profile and this additional image will be uploaded to Etsy.
Now instead of listing the variations separately on the Products Listings page, all the variations list under the product name.
The admin can sync the individual products to the Etsy Marketplace instead of listing the entire profile.
The admin can Disable/Enable Items before syncing and only enabled items will list to the Etsy store.
Custom Product Information: Now, the Prestashop Etsy Connector addon allows the admin to list the same product with different product details (product title and description) on Etsy Marketplace.
Profile Level Synchronization: We have recently introduced the profile level synchronization feature that allows the store admin to list/update the products from a particular category only instead of all.
Prestashop Etsy Marketplace Integration module
Knowband’s Prestashop Etsy Marketplace Integration module helps Prestashop store owners seamlessly connect their stores with Etsy to expand their reach and increase sales.
Additional features of the Etsy Prestashop Integration module
Attribute Mapping: All the PrestaShop store attributes will sync to the Etsy Marketplace Integration module automatically. In addition, the admin just needs to map these attributes to the Etsy Marketplace.
Etsy Category Attribute: The Etsy Category Attributes are now available in the Etsy Marketplace Integration module. Further, the admin can set the various attributes. For instance, Primary Color, Secondary Color, Holiday, and Accessory Style.
Product or Category Mapping: The PrestaShop Etsy marketplace Integration module enables syncing. Further, the selected products or entire category to the Etsy Marketplace. Furthermore, under the Profile Management tab of the Etsy Marketplace connector module, the admin can select the Product/Category option to sync the store products.
Custom Pricing: Etsy Prestashop integration module allows the admin to list the products on the marketplace at a different price. In fact, the admin can change the price of the products. Further, that displays on the marketplace by a fixed amount or a percentage amount. As per the requirement, the admin can increase or decrease the price of the products. In fact, he can do it from the back-end of the Prestashop Etsy integration addon.
Sales Report: The sales report tab of the Etsy Prestashop integration plugin allows the sellers to check the order and revenue report.
Product Sales Report: The admin can even view the sales report of particular products. In fact, he can do it from the back-end of the Prestashop Etsy integration plugin.
Shop Section: The Prestashop addon offers an option of adding a shop section in the front-end of the Etsy marketplace to the e-sellers. Further, the shop section allows the admin to categorize the products in a particular category. In fact, the created shop section will display at your Etsy shop.
Product Description Template: The e-sellers can use different placeholders for their product description to make them more impactful.
You can also watch the video on “Upgrade Guide – Knowband’s Prestashop Etsy Connector v3.0.4” here:
2.0 Installation
After purchasing the Prestashop Etsy integration extension, you will get the following files as available below:
1. kbetsy.zip (contains source code of the module)
2. User Manual
Follow the following steps to install the Etsy Prestashop integration extension:
Unzip the kbetsy.zip file. It would contain files and folders as shown below –
Copy all the files and folders of the unzipped folder into your store “modules” directory on the path – Root Directory/modules/.
Now module is ready to install on your store. Moreover, you can find that in Store Admin -> Modules and Services. Further, it would be shown as below –
In case, you are not able to find the module in the admin modules list. Further, please try searching the module with the following details –
Keyword – Etsy
Category – Other
Filter By – Installed & Not Installed / Enabled & Disabled
Click on the “Install” button to install the module. It would show a pop-up for your confirmation. Further, click on the “Proceed with the installation” option. In fact, this step will install the module and show a notification – “Module(s) installed successfully”.
3.0 System Setup
Before proceeding ahead, it is important to know what is the correct flow of actions. Further, to set up this system as several things are dependent on other things. In addition, if we do not take care, then it will become difficult to process smoothly or may be error-prone.
You need a seller account on Etsy to start selling on Etsy Marketplace. Moreover, to configure the Etsy Prestashop integration addon. In this section, we are listing all the steps to create a seller account on Etsy. Please find them below –
Click on the “Sell on Etsy” button present at the top right corner.
Click on the “Register” button on the page you are visiting now. Further, refer to the screenshot given below.
Fill up the registration form and click on the “Register” button. In fact, it would create your seller account and send a verification email to the provided email address.
Now, it would also redirect you to another page as shown below.
Now, it is asking to set up your shop preferences. Further, complete all the highlighted sections. For instance, Shop Preferences and Name your shop, Stock your shop, How you will get paid, and Set up Billing.
5.0 Etsy Marketplace Integration- Setup an App
To start communication between Prestashop Store and Etsy Seller Account, you need to create an App on Etsy Marketplace. Further, the following are the steps to create an App on Etsy –
It would open a page where a form will be shown with a few input fields as shown below.
Fill up the form and click on “Read Terms and Create App”. Further, please make sure that you left the “Inventory Management Compatibility” checkbox is checked.
It would ask to accept “terms and conditions”. In fact, accept and click on the “Create App” button.
It would register your App on Etsy Marketplace and provide API details.
Once you successfully created the API, add the callback URL.
Click on the name of your App
Click on edit your callback URLs. After clicking on the following button, the page shown in the image will appear.
For finding the callback URL, please refer to the general setting section of our Prestashop Etsy Marketplace module. Copy the shown URL in the below image and paste the same on Etsy.
Click on the save button.
After saving the data, you will find the API page, where you can manage all of your Etsy Apps.
6.0 Admin Interface
This Prestashop Etsy Integration addon is configurable. Moreover, the configuration settings can be updated via the admin interface. Further, after installation, store admin can find a menu named “Etsy Marketplace” in the left panel of Admin as shown below –
“Etsy Marketplace integration addon” menu contains the following options –
General Settings
Attribute Mapping
Shop Section
Shipping Templates
Profile Management
Products Listing
[New]Return Policy
Orders Listing
Synchronization
Sales Report
Product Sales Report
Audit Log
Each tab is explained below.
6.1 General Settings
The General Settings tab of the Prestashop Etsy API integrator is there for capturing details. Further, of Etsy Prestashop Marketplace API like API Key, Host, etc. Please find the description of each input field below –
1. Enabled
Admin can Enable/Disable this Etsy Prestashop API integration module by the toggling button. If enabled, the Prestashop Etsy connector and all its settings will be working. Further, otherwise, there will be no impact of this module on the store.
2. Etsy Currency
This is a drop-down where the admin has to choose the appropriate currency. Further, for their which is similar to their Etsy Account.
3. Etsy API Key
This is a text box in which the admin has to enter Etsy API Key. Furthermore, which will authenticate the connection being established between the store and Etsy.
4. Image Size of Product
This feature allows the admin to select the size of the product image. Further, that will sync to Etsy Marketplace from PrestaShop.
5. Etsy API Secret
This is a text box in which the admin has to enter Etsy API Secret Key mandatory for authentication. Furthermore, between the Prestashop store and Etsy Marketplace.
6. Map Etsy Orders with Store Carrier
If enabled then the imported orders will be mappable with the select carrier.
7. Select Shipping Methods for Etsy orders
Store admin can select the shipping methods for Etsy Orders from the given list.
8. Etsy Default Language
The Etsy Prestashop Integration module allows the store admin to select the default language of the store.
9. Select Language to Sync
Admin can select the secondary languages to sync with Etsy Marketplace.
10. Select the Description type to sync on Etsy
This option enables Etsy sellers to the long description and short descriptions. In fact, or both they want to sync with the marketplace. Furthermore, they can select any one option from the descriptions that will sync according to the selection.
11. Upload the Order Tracking Number On Etsy
If enabled then the store admin can add the tracking number on orders and it will be uploaded on Etsy.
12. Etsy Carrier Name for Tracking Url
Store admin can choose the carrier used for tracking Etsy orders.
13. Order Default Status
This is a drop-down menu. Moreover, the admin has to choose order default status for orders imported from Etsy to PrestaShop.
14. Order Unpaid Status
This is a drop-down menu. Moreover, the admin has to choose order unpaid status imported for orders imported from Etsy to PrestaShop.
15. Order Shipped Status
This is a drop-down menu and the admin has to choose order shipped status for orders imported. In addition, if the order status is set to this status the orders will be marked as shipped on Etsy.
16. Show taxes in Etsy Order Invoice
If enabled then the tax breakup will be shown in Etsy orders.
17. No. of Items sync per cron
This is a text box and the admin has to define several items that he wants to sync per cron.
After providing these details or filling up the form, click on the “Connect” button. In fact, it would redirect admin to Etsy Marketplace to allow the App Access to the store. Furthermore, click on the “Allow Access” button as shown below. Moreover, it would establish a connection between the store and Etsy Marketplace.
It would also redirect admin back to the same page of “General Settings”. In addition, show the “Disconnect” button instead of “Connect” as the connection has now been set up with Etsy Marketplace. In fact, you can find the screenshot below –
6.2 Attribute Mapping
All the PrestaShop store attributes will sync to the Etsy Marketplace Integration module automatically. Moreover, the admin just needs to map these attributes to the Etsy Marketplace attributes.
6.3 Shop Section
The shop section option offered by the Prestashop Etsy API integrator enables the e-merchants to create separate sections. Further, for the products of the same type. For instance, they can create sections like fashion, sports, and others. In fact, the customers can hit the section of their choice. Moreover, directly land on the products of their choice without browsing the entire assortment.
6.3.1 How to create new shop sections?
To add new shop sections, click on the Add New option at the top right position of the admin interface.
This will redirect you to the shop section creation interface.
Enter the name of the shop section in ‘Shop Section Title’ and save the changes.
To sync the section with the marketplace click on the Sync Shop Sections button at the top right corner of the interface. Further, the cron option will sync all the sections in one go.
The synced sections will display in the ‘Profile Management’ tab. Further, the Prestashop Etsy Integrator is shown in the image below.
The admin can select the shop section and the products of that particular profile will list under the selected section.
6.3.2 How to edit or delete the shop sections?
To edit a particular shop section, click on the ‘Edit’ button corresponding to it. Likewise, to remove the same, click on the corresponding ‘Delete’ button.
The created sections will display at the front-end as shown in the image below:
6.4 Shipping Templates
Etsy Prestashop connector allows the store admin to create the Shipping Templates to manage shipping options on the Etsy marketplace. Further, in this tab of the Prestashop Etsy integrator, the admin can create Shipping Templates. Furthermore, that contains shipping details. For instance, Shipping Origin Country, Minimum and maximum processing time for the orders, etc. In fact, the admin can create multiple Shipping Templates as per the need of the system. Further, the admin will have to map Shipping Templates to the Profiles (In Profile Management Tab) to make it work on Etsy Marketplace. This is explained later in this document. Thus, each Shipping Template can have multiple shipping entries. Further, to define shipping destinations and their cost according to the destinations.
Note – One Shipping Template can have one origin. However, multiple destinations with their costs. Further, the admin can add different standard entries and delivery upgrades for the shipping templates.
6.4.1 Steps to Add Shipping Templates
Following are the steps to add a Shipping Template to the system –
Go to the Etsy Marketplace connector addon-> Shipping Templates (Menu Option)
It would display the page where already added Shipping Templates will list (If any). Click on the “+” (Plus Icon – as shown in the above screenshot).
It would redirect the admin to the new page where a form with some input field will be shown (Screenshot is shown below).
Fill up the following input fields of the form –
Shipping Template Title
Origin Country
Origin Post Code
Processing Days (Min and Max)
Destination Type
Destination Country
One Item Cost
Additional Item Cost
Transmit Time Data (Choose Shipping career or add custom Delivery time.)
Choose Delivery Service (If the previous option is selected as a shipping career).
Or Choose Min and Max Processing days (if the previous option is selected as Delivery time).
Click on the “Save” button.
It would validate the provided data and save the details into the system if valid.
6.4.2 Steps to Edit/Delete Shipping Template
Following are the steps to edit/delete Shipping Template from the system –
Go to the Prestashop Etsy Marketplace Integration addon-> Shipping Templates (Menu Option)
It would display the page where already added Shipping Templates will list (If any). In fact, click on the “Edit/Delete” link given under the drop-down being shown corresponding to each Shipping Template.
If the admin has chosen the “Edit” option then it would redirect the admin to a new page. Further, where a form with an already filled input field will be shown. Admin can simply update values. Moreover, save the details by clicking on the “Save” button.
If the admin has chosen the “Delete” option then it would delete the Shipping Template. In addition, all its Shipping Template Entries are from the system.
After creating shipping templates it is required to synchronize the Shipping Templates. Further, the admin needs to click the “Sync Shipping Templates” button under the “Shipping Templates” tab of the Etsy marketplace integration module. In fact, only after successful synchronization, these shipping templates will appear on the listing page.
6.4.3 Delivery Upgrades
Admin can add the delivery upgrades to the Shipping Templates from this tab of the Etsy Prestashop integrator. In fact, the Delivery Upgrades tab of the Etsy Prestashop integration module displays the list of the Delivery upgrades added to the shipping templates.
6.4.4 Add Delivery Upgrades for a Shipping Template
Following are the steps to add Delivery Upgrades to the Shipping Templates-
Go to the Prestashop Etsy Integrator -> Shipping Templates (Menu Option)
It would display the page where already added Shipping Templates will list (If any). Click on any of the Shipping Templates in which you want to add Delivery Upgrades.
It would redirect to that particular Shipping Template Page.
Click on the “Add New Upgrade” at the bottom right side of the Etsy Prestashop Integrator and it would open a drop-down form with, the input field will be shown.
Fill up the following form fields –
Delivery Upgrade Name
Destination Type
One Item Cost
Additional Item Cost
Transmit Time Data (Choose Shipping career or add custom Delivery time.)
Choose Delivery Service (If the previous option is selected as a shipping career).
Or Choose Min and Max Processing days (if the previous option is selected as Delivery time).
Click on the “Save” button.
It would validate and save the details to the system if valid.
6.5 Profile Management
The Profile Management tab provides options to create a profile for product listing. Further, profile-based listing allows the seller to list the attribute and categories of the Prestashop products. Furthermore, with the Etsy marketplace attributes and categories. In fact, the seller can select multiple Prestashop store categories at a time if there is only one category on Etsy for these products.
Under Profile Management admin can select the Shop Section in which he wants to show products for that profile.
In the recent enhancements, we have also provided the option to synchronize products on the profile level. Thus, if you want to update/list products on Etsy for particular profiles only, you can find the crons in the profile management tab itself.
Note: Please make sure to synchronize the Shipping Templates otherwise these details will not reflect in the Profile Management. Go to the Shipping Template tab of Prestashop Etsy Integration Addon and run the “Sync Shipping Templates” cron.
6.5.1 Add Profile to the System
Following are the steps to add Profile into the system –
Go to the Prestashop Etsy Integration Module -> Profile Management (Menu Option)
It would redirect the admin to a page where already added profiles will list (If any). Click on the “+” on the top right side of Etsy Prestashop Integrator (Plus icon as shown in the screenshot below) and it would redirect the admin to a new page where a form with some input fields will be shown.
Fill up the following input fields –
Profile Title
Etsy Category (List of Etsy Marketplace categories)
Store Category (List of Store Categories)
Shipping Template (List of Shipping Templates)
Primary Color
Secondary Color
Holiday
Accessory Style
Product Selection Type
Customize Product Title
Enable Custom Pricing
Customizable Product
Alter Quantity
Enable AutoRenewals
Who made it
When did you make it
Recipient
Occasion
Materials Used
Shop Section
Enable Size Chart Image
Size Chart Image
and click on the “Save” button.
It would validate and save the details into the system if valid.
6.5.2 Edit/Delete Profile
Following are the steps to edit/delete a profile from the system created in the Prestashop Etsy Integration plugin-
Go to the Prestashop Etsy Integration plugin -> Profile Management (Menu Option)
It would redirect the admin to a page of the Prestashop Etsy Integration module where already added profiles will list (If any, shown in the screenshot below).
Click on the “Edit/Delete” link given corresponding to each profile as shown in the above screenshot.
If the admin has chosen the “Edit” option then it would redirect the admin to a new page where a form with some already filled input fields will be shown. Admin can simply update values and save the details by clicking on the “Save” button.
If the admin has chosen the “Delete” option then it would delete the selected Profile from the system.
6.5.3 Product Selection Type
This is a drop-down and from this admin can select whether he wants to select the whole category to list or select particular products to add.
6.5.4 Etsy Category Attribute
Etsy Category Attributes are now available in the Etsy Marketplace Connector module. The admin can now choose the Primary Color, Secondary Color, Holiday, and Accessory Style.
6.5.5 Size Chart Image
By using this feature admin can also add an image for the product.
6.6 Products Listing
This section of Etsy Prestashop Integrator shows the list of all the products selected to list or listed on the Etsy Marketplace with their listing status and other details as shown in the screenshot below:
There are the following options cron options offered in the product listing tab of the Prestashop Etsy Integration module –
6.6.1 Sync Products
This option syncs the products of the category that was mappable in the profile. As the ‘Sync Products’ is executed, all the products of the profile will be listed at etsy.com.
6.6.2 Sync Product Status
The listing status of the products can sync back from the marketplace to the store by executing this cron of the Prestashop Etsy integrator.
6.6.3 Delete Products
This option allows the admin to delete product listings from Etsy Marketplace in bulk. To delete a product listing, the admin has to select the products that they want to remove and click on “Delete Product”. This will remove all the selected products from the listing.
6.6.4 Renew Products
This option allows the admin to renew the product in case the listing has expired on Etsy Marketplace in bulk. Furthermore, to renew the product, the admin has to select the products that they want to renew and click on the “Renew Product” action.
Along with this, the admin even gets the option to renew or relist one particular product. In fact, there is a Renew option corresponding to each product that has expired.
After setting up a product for renewal or relisting, these actions will be replaced with the “Delete” action.
Note – Product Renewal is chargeable on Etsy Marketplace.
6.6.5 Local Sync
Admin can sync all the products of their profiles using Local Sync and then every profile’s products list on the Product Listing Page. From there, the admin has an option to list individual products or lists in bulk.
6.6.6 Custom Product Details
In this section, the store admin can create different product titles and descriptions for Etsy product listings. Here, we provide an option for using the existing product details or create different ones for Etsy.
6.7 [New Feature] Return Policy Synchronisation
This tab allows the admin to manage and synchronize return policies between the module and Etsy. You can create, edit, and delete multiple return policies and assign them to specific profiles. Once mapped, any category associated with a profile will automatically update on Etsy with the corresponding return policy.
Add New: Create new return policies or modify existing ones directly from the module.
Sync Return Policies: Use the Sync Return Policy cron to fetch all available return policies from Etsy to your PrestaShop store. The synchronization includes details such as accept return/exchange options, the number of allowed returns/exchanges, and return deadline dates.
Profile Mapping: Within profile mapping, you can select a return policy to be assigned to the products in the chosen category.
Automatic Updates: When a product is added or updated in a mapped profile, the assigned return policy is automatically applied on Etsy.
This feature ensures your return policies remain consistent across your store and Etsy listings, saving time and reducing manual effort.
6.8 Order Listing
This tab of Etsy Prestashop Integrator shows the list of orders placed on Etsy Marketplace for your store products on Etsy as shown in the screenshot below –
Note: Please make sure to click on the “Sync Orders Listing” option under the Synchronization tab of the Etsy Prestashop integration module. Furthermore, only after successful sync orders will synchronize to the Prestashop back office.
6.9 Synchronization
All tabs offered by the Etsy Prestashop integration addon defined above are basically for saving the settings. Further, also the options in the system are used during synchronization between the Prestashop Store and Etsy Marketplace. In fact, there are the following cron jobs to synchronize content between the Prestashop Store and Etsy Marketplace which you can find below –
6.9.9 Products Listing on Etsy Marketplace
Following are the steps to synchronize Products Listing on Etsy Marketplace –
Go to the Etsy Prestashop Integration addon -> Synchronization (Menu Option)
It would redirect the admin to a new page where all synchronization actions are listed as shown in the above screenshot.
Click on the “Sync Products ” button shown below.
It would perform the following actions –
Update the Product list based on the profiles created in the system.
Add Products to Etsy Marketplace with product details (e.g. Price, Quantity, Image, etc.)
Update Products on Etsy marketplace which are already listed on Etsy Marketplace
Renew Products on Etsy Marketplace for that renewal are enabled.
Delete Products on Etsy Marketplace which are marked deleted on the Store.
Update the Listing Status of each product listed on Etsy Marketplace.
If synchronization completes successfully then it will display a message – “Synchronization completed” else “Synchronization failed”.
6.9.2 Orders Listing from Etsy Marketplace
Following are the steps to synchronize Products Variations Listing on Etsy Marketplace –
Go to the Prestashop Etsy Connector -> Synchronization (Menu Option)
It would redirect the admin to a new page where all synchronization actions are listed as shown in the above screenshot.
Click on the “Import Orders” button shown below.
It would perform the following actions –
Get Orders and Transaction details from Etsy Marketplace
Create Customers and Shipping Carriers into the Store as per the details that come from Etsy Marketplace
Create Orders into the Store as per the details that come from Etsy Marketplace and set the order status as per the configuration settings updated in the “Order Settings” tab of this module in admin.
If synchronization completes successfully then it would display the message – “Synchronization completed” else “Synchronization failed”.
6.9.3 Orders Status on Etsy Marketplace
Following are the steps to update the status of orders on Etsy Marketplace –
Go to the Prestashop Etsy connector -> Synchronization (Menu Option)
It would redirect the admin to a new page where all synchronization actions are listed as shown in the above screenshot.
Click on the “Update Orders Status on Etsy” button shown below.
It would perform the following actions –
Check if there is any status update recorded by the module for any Etsy Order.
Update the Status of Orders as per the configuration settings updated in the “Order Settings” tab of this module in the admin
If synchronization completes successfully then it would display the message – “Synchronization completed” else “Synchronization failed”.
6.9.4 Update Product Listing Status from Etsy Marketplace
Sync the product status from Etsy to the Prestashop store by clicking this cron under the Synchronization tab.
1. Go to the Etsy Integration module -> Synchronization.
2. Click on the Update Listing Status from Etsy Marketplace.
6.10 Sales Report
The Etsy Prestashop integration module allows the store admin to check the sales report for the Etsy shop orders. Admin can use the date filter to check the sales report.
6.11 Product Sales Report
Etsy Prestashop Integration extension allows the store admin to generate the reports product-wise.
6.12 Audit Log
The audit log section of the Etsy PrestaShop connector helps to keep track of all the takes performed by the administrator.