Opencart Admin Orders – User Manual

1.0 How to install the OpenCart Admin Orders plugin on your server?

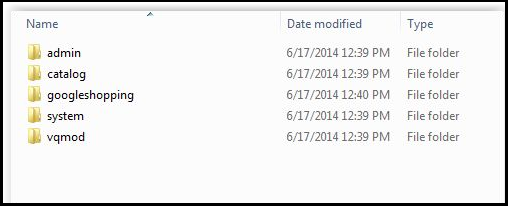
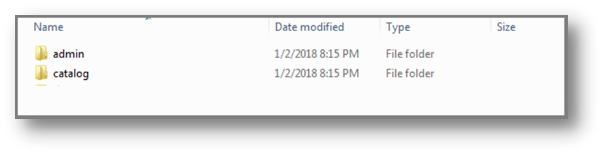
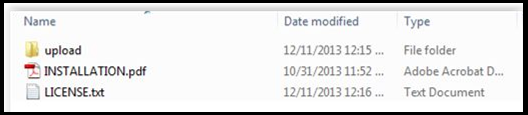
  • Download the zip from OpenCart & unzip into a folder. After unzipping the folder structure of the OpenCart Admin Orders plugin, you will be able to see a similar screenshot like mentioned below.

191

  • Open the upload directory & you will see following folder structure.
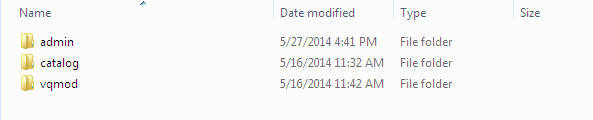
  • Login via FTP & drag-drop all the folders into your server root directory. You don’t have to the change the default theme folder name to your theme folder name.

You must have VQMOD installed for this OpenCart manage order plugin to work. If VQMOD is not installed please download and install from the URL below:
https://code.google.com/p/vqmod/

  • You will find the OpenCart back-end order plugin ready to be installed in the Modules of your OpenCart.

  • Click on Install link to install the Opencart plugin.
  • Delete the vqcache files from the vqmod/vqcache folder.
  • To excess Admin Orders extension, Click on the edit button in the Admin Orders module as shown below.

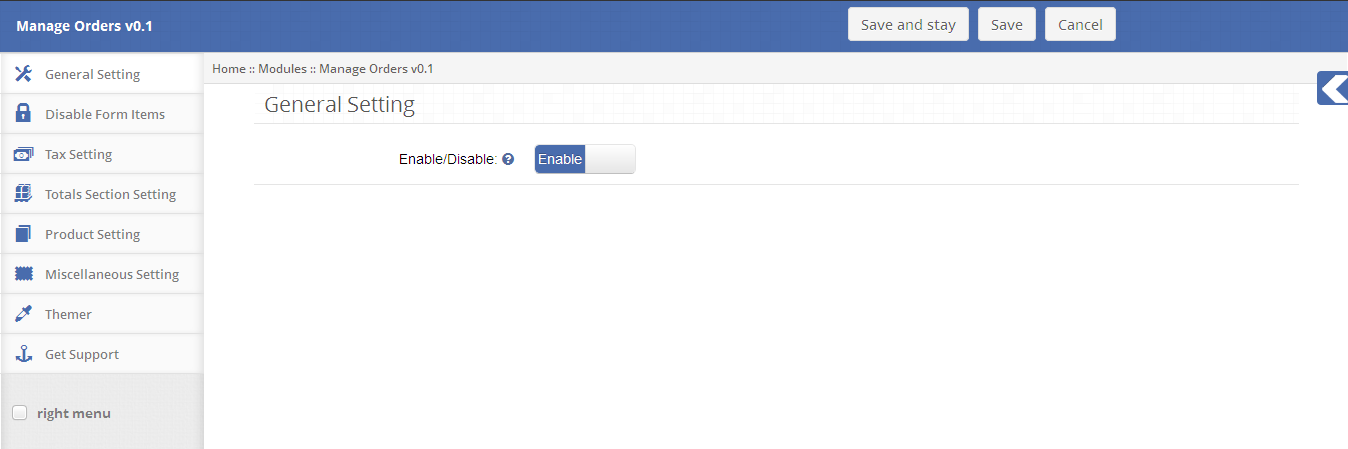
  • On clicking the edit button, the Opencart order manager module by Knowband for the plugin will open. It contains navigational bar at the top, the menu on the left and main content in the center as shown below.
2.0 User Manual

2.1 General Setting Tab

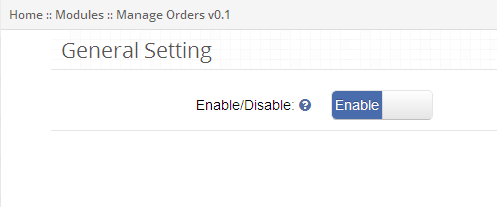
  • To enable this Opencart order editor plugin, switch the enable button from Disable to Enable which is just on the right of Enable/Disable label.
2.2 Disable Form Setting Tab

  • This tab contains settings for the items which are to be shown/hidden according to the user group in Admin Orders as shown below.
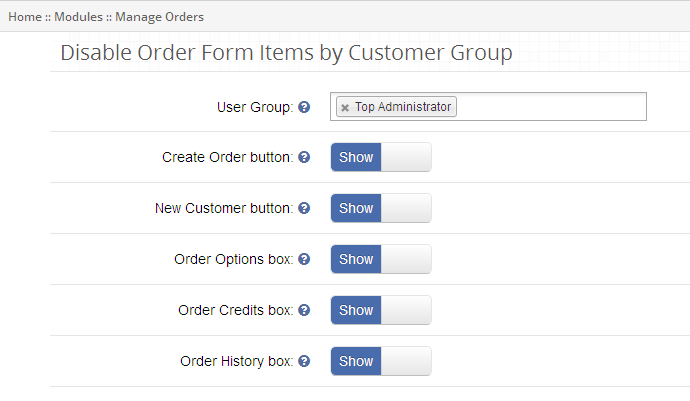
  • To disable Create Order from the order form, select the user group from the drop-down and switch the button from Show to Hide which is just on the right of Create Order Button label.
  • To disable New Customer from order form, select the user group from the drop-down and switch the button from Show to Hide which is just on the right of the New Customer Button label.
  • To disable Order Options from ‘Create order form’, select the user group from the drop-down and switch the button from Show to Hide which is just on the right of Order Option Box label.
  • To disable Order Credits (i.e., Coupon and Voucher) from ‘Create order form’, select the user group from the drop-down and switch the button from Show to Hide which is just on the right of Order Credits Box label.
  • To disable Order History from ‘Create order form’, select the user group from the drop-down and switch the button from Show to Hide which is just to the right of Order History Box label.

2.3 Tax Setting Tab

  • This tab of the Opencart admin order contains tax settings for the custom shipping and optional fees which is to be applicable to the Admin Orders as shown below.
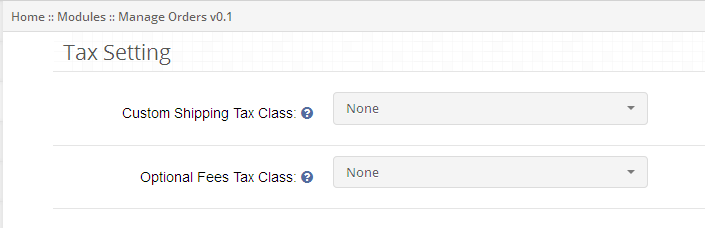
  • To apply the tax to custom shipping, select the tax class from the drop-down else custom shipping won’t be applicable to the default setting.
  • To apply tax optional fees, select the tax class from the drop-down else optional fees won’t be applicable to the default setting.

2.4 Totals Section Setting

  • This tab in the Opencart manage order contain settings for the total section items which are to be shown/hidden in the Admin Orders as shown below.
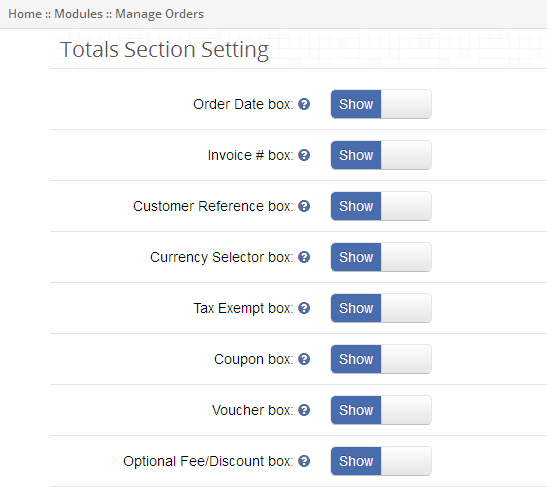
  • To hide Order Date from order options, switch the button from Show to Hide which is just to the right of Show Order Date Box label.
  • To hide Order Invoice from order options, switch the button from Show to Hide which is just to the right of Show Invoice Box label.
  • To hide Customer Reference from order option, switch the button from Show to Hide which is just to the right of Show Customer Reference Box label.
  • To hide Currency Selector from order option, switch the button from Show to Hide which is just to the right of Show Currency Selector Box label.
  • To hide Tax-Exempt from order option, switch the button from Show to Hide which is just to the right of Show Tax Exempt Box label.
  • To hide Coupon from the total section, switch the button from Show to Hide which is just to the right of Show Coupon Box label. By default, this will be shown on create order form.
  • To hide Voucher from the total section, switch the button from Show to Hide which is just to the right of Show Voucher Box label. By default, this will be shown on create order form.
  • To hide Optional Fees/Discount from the total section, switch the button from Show to Hide which is just to the right of Show Optional Fees/Discount Box label.

2.5 Product Section Setting Tab

  • This tab of the Opencart backend order contains settings for the product section items which are to be shown/hidden in the Admin Orders as shown below.
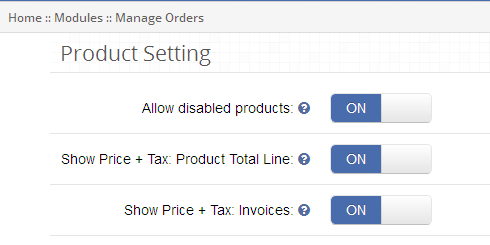
  • To allow disabled products to be listed in the product list, switch the button from OFF to ON which is just to the right of Allow disabled products label.
  • To show tax with product totals on the product list, switch the button from OFF to ON which is just to the right of Show Price + Tax: Product Total Line label.
  • To show tax with the invoice on order invoice, switch the button from OFF to ON which is just to the right of Show Price + Tax: Invoice label.

2.6 Miscellaneous Setting Tab

  • This tab of the Opencart order manager contains the various settings for the Admin Orders as shown below.
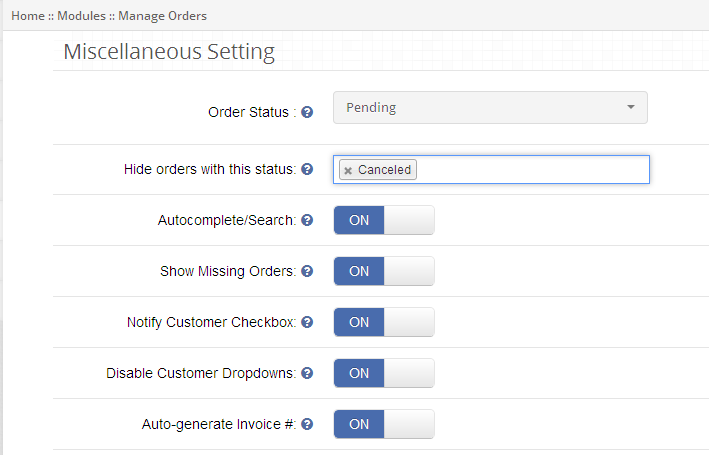
  • To hide the orders according to their status, select the order status from the drop-down which is just to the right of ‘Hide orders’ with this status label.
  • To enable auto-complete on search, switch the button from OFF to ON which is just to the right of Require Shipping Address label.
  • To show missing orders in order list, switch the button from OFF to ON which is just to the right of Show Missing Orders label.
  • You can start the order with Notify Checkbox checked by switch the button from OFF to ON, which is just to the right of Notify Customer Checkbox label.
  • To disable Customer drop-down from creating order form, switch the button from OFF to ON, which is just to the right of Disable Customer Drop-down label.
  • To enable auto-generate invoice number for order invoice, switch the button from OFF to ON, which is just to the right of Auto-generate Invoice # label.

3.0 Dashboard

To excess Admin Orders in the Opencart order editor by Knowband, navigate to Sales and Click Admin Orders link from the drop-down as shown below.

3.1 Admin Order Dashboard

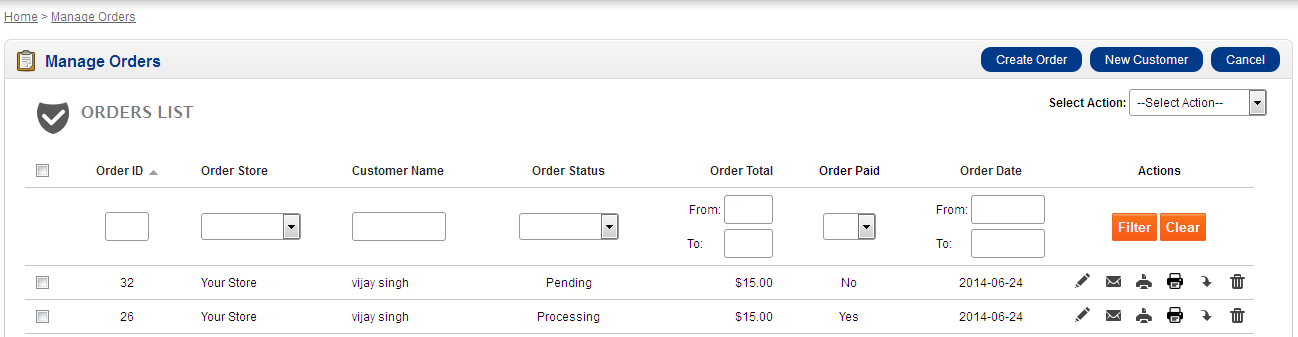
Admin Orders dashboard of the Opencart admin order displays orders list with an option to create, edit, delete, search, email order, print invoice, print packing slip or export order.
3.2 Order Actions

You can perform the following actions on orders listed in order list:

  • Edit Order: To edit order details, click on Edit Order button as shown in order list action column.
  • Mail Order: To mail order details to the customer, click on Mail Order button as shown in order list action column.
  • Print Order: To take print of order, click on Print Order button as shown in order list action column.
  • Print Packaging Slip: To take the print of order packaging slip, click on Print Packaging Slip button as shown in order list action column.
  • Export Order: To export order details, click on Export Order button as shown in order list action column.
  • Delete Order: To delete an order, click on Delete Order button as shown in order list action column.

3.3 Order Search/Filter:

You can search/filter orders according to various order fields in the Opencart manage order such as:

a. Order Date: To search/filter orders in the Opencart backend order according to their creation date, enter order start and end date and click on Filter button as shown in order list action column.
b. Order ID: To search/filter orders according to their order ID, enter order ID and click on filter button as shown in order list action column.
c. Product Name: To search/filter orders according to their product name, enter the product name and click on Filter button as shown in order list action column.
d. Order Total: To search/filter orders according to their total, enter order total range and click on Filter button as shown in order list action column.
e. Order Paid: To search/filter orders according to their paid status, select the value from the drop-down and click on Filter button as shown in order list action column.
f. Order Status: To search/filter orders according to their status, select the value from the drop-down and click on Filter button as shown in order list action column.

3.4 Bulk Status Update

Following steps are involved in updating status of the order in bulk:
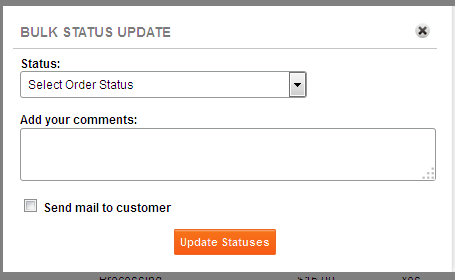
  • Select orders by checking the checkbox associated with each order.
  • Click on Bulk Status Update button as shown in order list page.
  • Select the status to be updated from the drop-down list.
  • Provide any comment (Optional).
  • Check Notify Customer if wants to notify customers about order status.
  • Click on Update Status button.

4.0 Create Order

Admin Orders Opencart extension allows the administrator to create order on customer behalf. To add a new order, click the “Create Order” button shown at the top of the page.
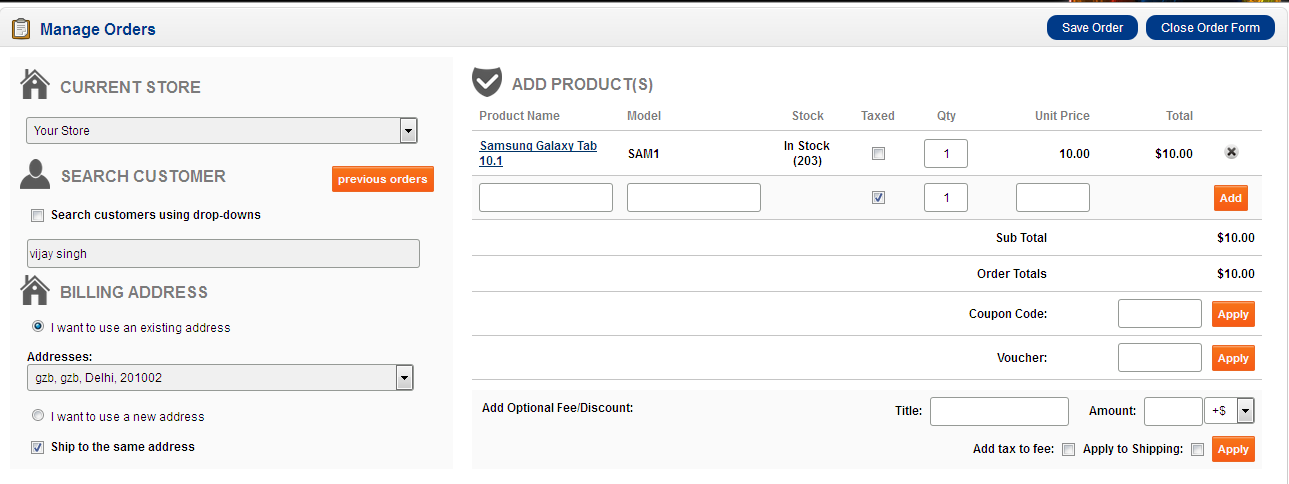
Following steps are involved in creating a new order from Admin Orders:

4.1. Search Customer

A customer can easily be searched using methods provided in Admin Orders:

4.1.1 Search customer using a textbox

  • A customer can be searched according to their name, email, company, postcode and phone number.
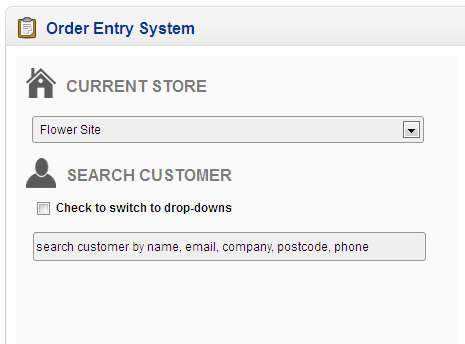
4.1.2 Search customer using the drop-down

  • You can also search customers either by their name or by their address.
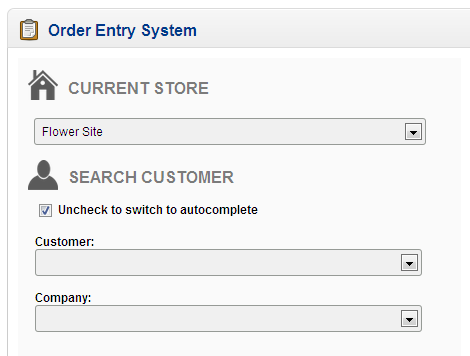
  • Search customer by name: To search customer by their name, click Check to switch to drop-down checkbox and select customer name from the drop-down.
  • Search customer by address: To search customer by their address, click Check to switch to drop-down checkbox and select customer address from the drop-down.

4.2 Customer Previous Orders

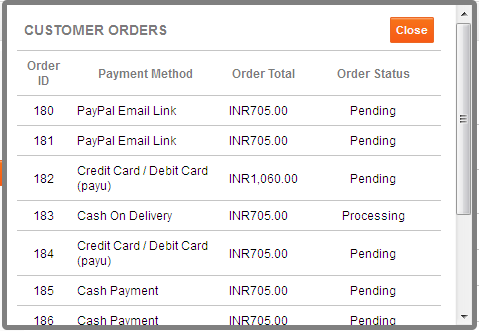
  • You can view the details of previous orders placed by the customer by clicking Previous Order button in the Opencart order manager as shown below:
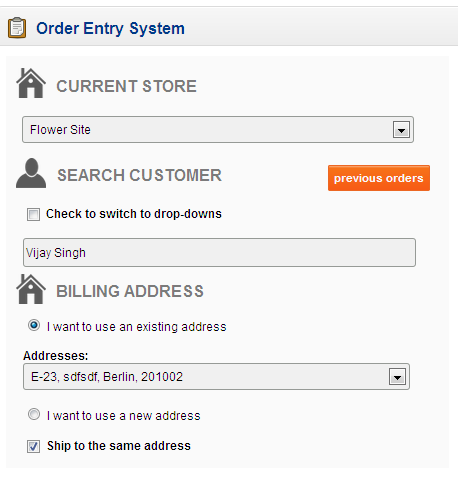
  • You can view the following details for any order in the Opencart order editor such as:
  1. Order ID
  2. Payment Method
  3. Order Total
  4. Order Status

4.3 Billing and Shipping Address

On selecting a customer, the customer billing and shipping address details are auto-filled, which can be edited.
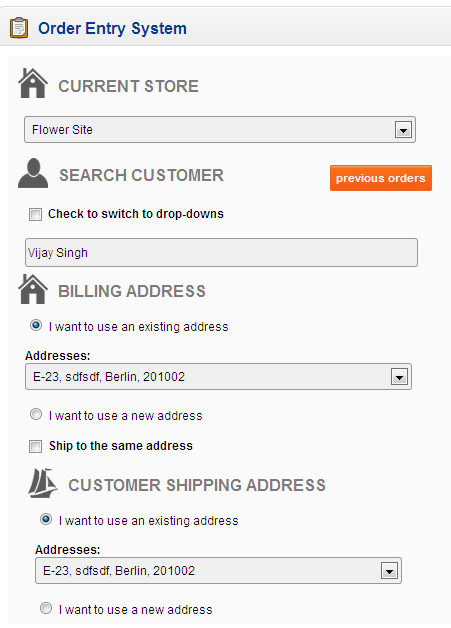
  •  To edit billing address, click I want to use a new address checkbox as shown below.
  • To edit shipping address, click I want to use a new address checkbox as shown below.

4.4 Add Product(s):

  • To add product to cart, select product by their name or model and click on Add button.
  • You can also update the quantity of any product added to the cart.
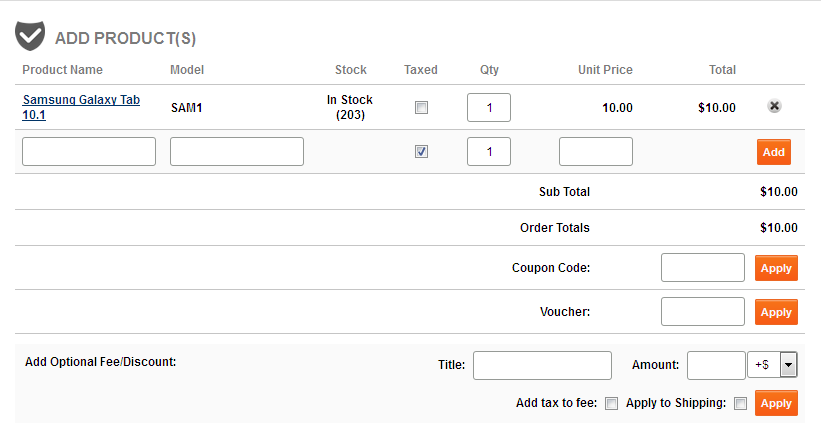
  • Apply Coupon (Optional)

To apply a coupon to order, select the coupon value from the drop-down as shown above.

  • Apply Voucher (Optional)

To apply the voucher to order, enter the voucher value in the text field and click Apply button.

  • Apply Optional Fees/Discount (Optional)

To apply optional fees/discount to order, enter the optional fees/discount name and value in the text field and click Apply button.

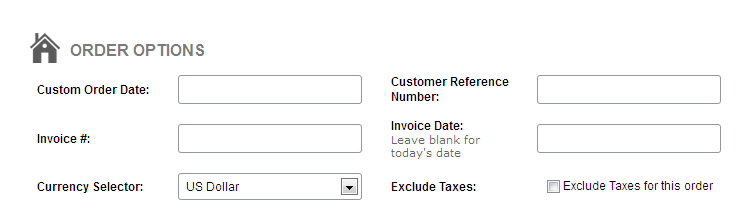
4.5 Order Option Details (Optional)

You can provide the following details for any order such as:

  1. Customer Order Date
  2. Customer Reference Number
  3. Invoice Number
  4. Invoice Date
  5. Currency Selector
  6. Excluded Taxes

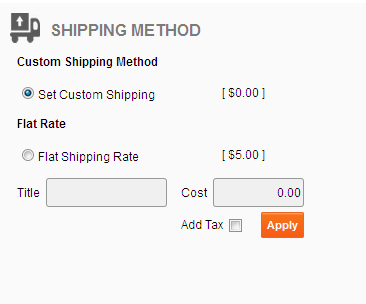
4.6 Shipping Method

1. You can select any of the following shipping methods:

  •  Custom Shipping method:
    To use custom shipping method in the Opencart extension, click Set Custom Shipping checkbox and enter custom shipping title and cost and click Apply button as shown below.
  • Flat Rate:

4.7 Payment Method

You can select any of the following payment methods:
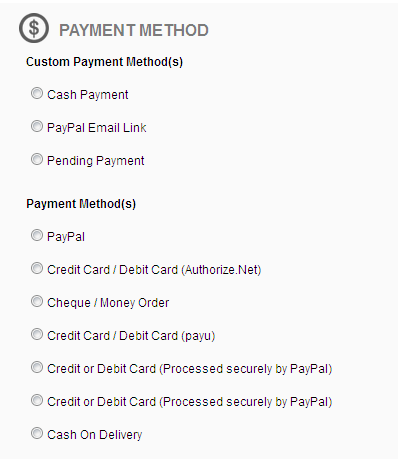
  • Custom Payment Method

To make payment using Admin Orders custom payment method, select any method from Admin Orders Custom Payment Methods.

  1. Cash Payment
  2. Credit Card (Offline)
  3. PayPal Email Link
  4. Pending Payment
  • Configured Payment Method

To make payment using system configured payment method, select any method from Your Configured Payment Methods.

4.8 Comment and Notify Customer

  • To add a comment for an order, enter your comment in the textbox.
  • To send order detail to the customer, check Notify Customer checkbox as shown below.
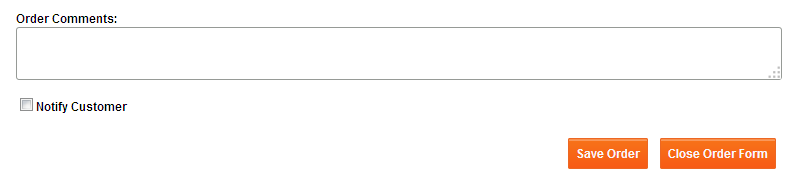
  • To place an order, click Save Order.

4.9 Notification Mail and Make Payment

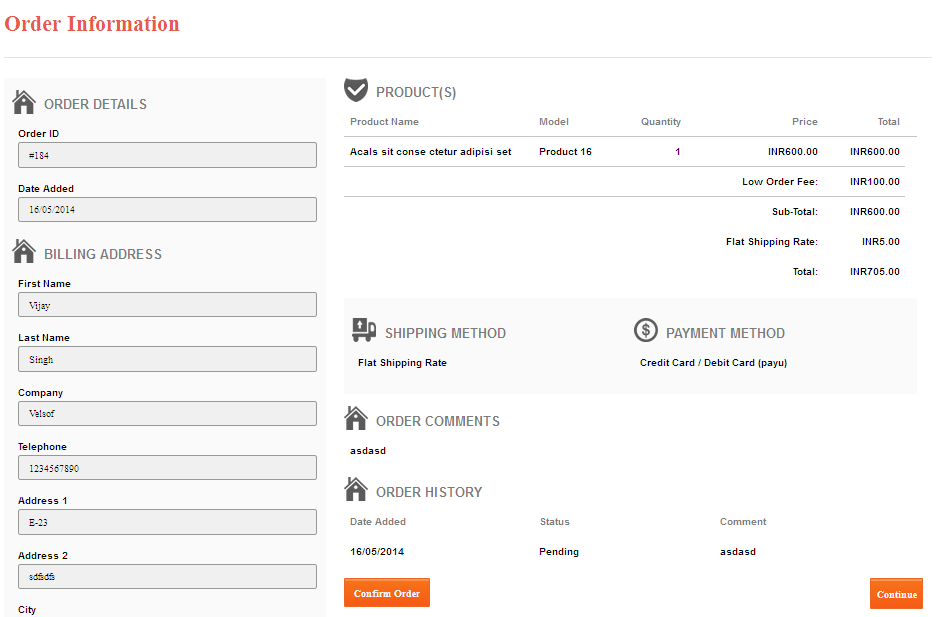
  1. A notification mail will be sent to a customer if Notify Customer checkbox is checked which will be containing the link for Order Information page will allow the customer to make payment for their order.
  2. After the payment is successfully processed, the order status will be updated accordingly.

Note: Customer can only be able to make payment for the system configured payment methods.
5.0 New Customer

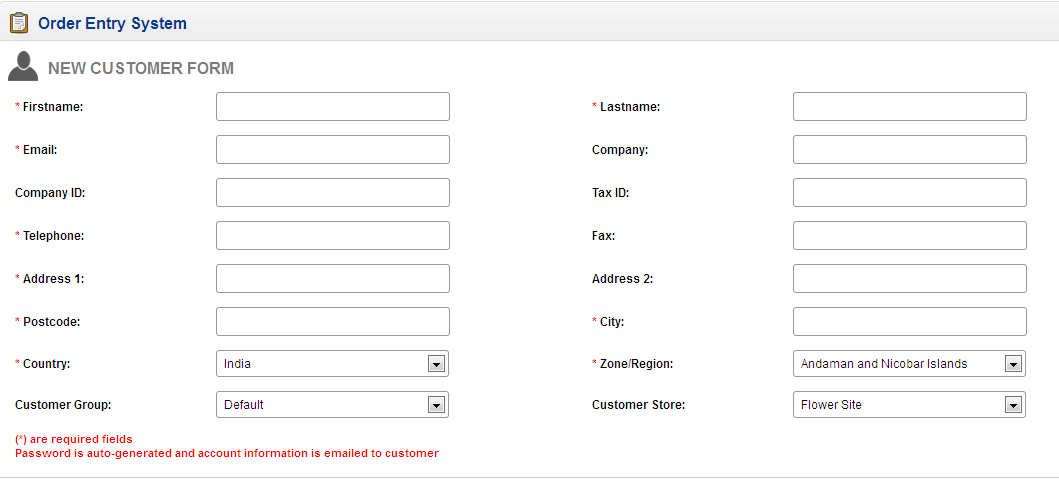
To add a new customer, click the “New Customer” button shown at the top of the page and provide the necessary details needed for new customer registration.
OpenCart Google Shopping Integration – User Manual

1.0 Introduction

OpenCart Google Shopping Integration Plugin by Knowband offers an excellent and fully-functional integration solution to the OpenCart store admin. Further, he can list and display their products on Google sponsored ads. In fact, the most advanced OpenCart Google Shopping Integration module offers an easy way to display your products on Google Shopping. Moreover, get thousands of new customers on your online shop.

[Important Update]Google Merchant API Update (July 1, 2026)

The OpenCart Google Shopping module has been updated to use the Google Merchant API for product synchronization and store authentication with Google Merchant Center, replacing the previous integration built on the Content API for Shopping (deprecated).

  • Improved reliability for Google Shopping feed sync and product data upload
  • Modern OAuth-based authentication aligned with Google’s current API standards
  • Required migration – the Content API for Shopping will cease operating on 18 August 2026, making migration essential for any business relying on API-based product management
  • Continued Google Merchant Centre compatibility, avoiding feed disruption, sync errors, or product listing removal after the shutdown deadline
  • Access to newer capabilities such as improved product data management for Google Shopping ads and free listings

1.1 Merchant Benefits of Knowband’s OpenCart Google Shopping Integration Plugin:

  • OpenCart Google Shopping Marketplace Integration allows the store admin to well-rank their products on Google Shopping in the shortest time.
  • OpenCart Google Shopping Marketplace Integration Module makes it easier for the store admin to connect the store and list the products.
  • The OpenCart Google Shopping Marketplace Integration Extension makes it easier to set up the connection. Further, this happens in a few simple steps.
  • OpenCart Google Shopping Marketplace Integration Plugin offers profile-based product upload. Thus, the products can list in bulk and inventory is manageable with ease.
  • With the help of the Google Shopping OpenCart Integration, the store admin can map the categories of the OpenCart with the category of Google Shopping.
  • Multiple categories of OpenCart are mappable with a single category of Google Shopping via Google Shopping OpenCart API Integration.

  • The admin can remove the category at a single click from the back-end of the OpenCart Google Shopping API Integration.
  • The attributes of the products are mappable with the attribute of Google Shopping with the help of the Google Shopping OpenCart Connector.
  • OpenCart Google Shopping synchronization module can upload thousands of products in one go. In fact, the products of the mappable category can upload in bulk.
  • The inventory is manageable from the back-end of the admin interface of the OpenCart Google Shopping Integration plugin. Further, the products can remove easily.
  • OpenCart Google Shopping Connector allows the merchants to create feeds and schedule their uploads.
  • The admin can set the country and the corresponding language for feed.
  • The Google Shopping integration module allows for easy integration. In fact, the admin can download the feed file and upload it to Google Merchant Center.
  • In case the admin is not comfortable with a cron job, the admin can get manual synchronization. Additionally, the synchronization happens page-wise with the help of Google shopping OpenCart integration.
  • The audit report offered by the OpenCart Google Shopping feed synchronization extension allows the admin to keep a track of the various task being performed in the back-end.
  • The admin can see the errors that occurred while product listing with the help of the OpenCart to Google Shopping Synchronization.
2.0 How to install the OpenCart Google Shopping plugin?

1. Download the zipped file of the OpenCart Google Shopping module from OpenCart & unzip it into a folder. Further, after unzipping the folder structure of the Google Shopping plug-in will be similar to shown in the below screen.

2. Open the upload directory & you will see the following folder structure.

3. Login via FTP & Drag-drop all the folders into your server root directory.

4. Give write permission (775 OR 777) to the google shopping folder and its subsequent folders. the google shopping folder can be one of the locations mentioned below.

system/google shopping

5. The OpenCart Google Shopping extension is now ready to be installed in your OpenCart store.

6. Click on the Install link to install the OpenCart Google Shopping Synchronization plug-in.

7. To access the Google Shopping plugin, Click on the edit button in of OpenCart Google Shopping module as shown below.

8. On clicking, the edit button, the admin interface of the OpenCart Google Shopping module will open. In fact, it contains 7 different tabs as mentioned below:

3.0 Admin Interface

The OpenCart Google Shopping Integration plugin offers several configuration options that allow the store admin to connect their store. Moreover, list their products. Further, the various customization tabs offered by the Google Shopping OpenCart Integration extension includes:

  • Connection Settings
  • General Settings
  • Profile Management
  • Feed Management
  • Product Listing
  • Synchronization

Lets us discuss the various tabs one by one.

3.1 Connection Settings

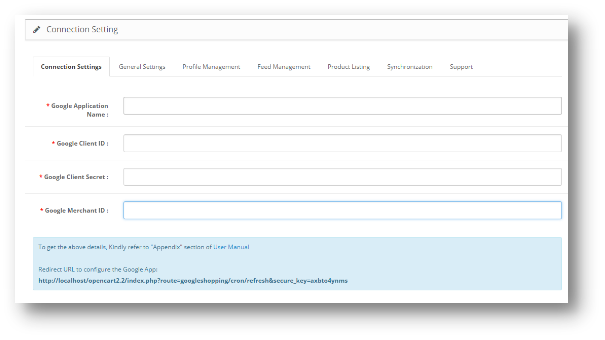
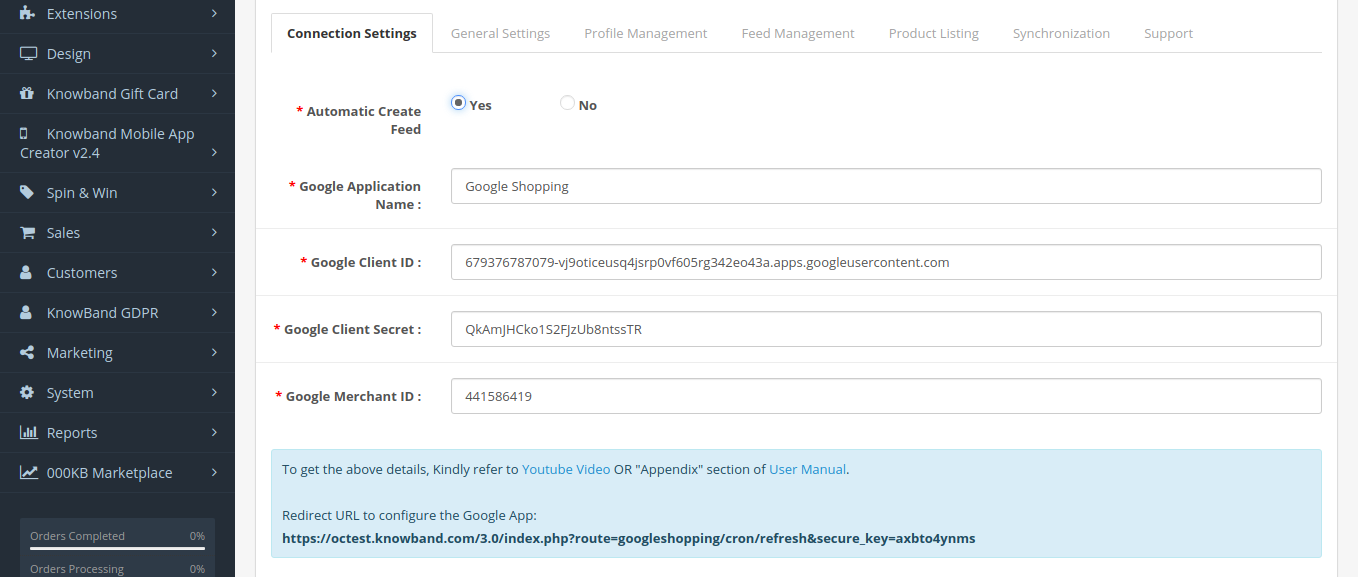
On the connection settings page, there is an option provided “Automatic Create Feed  Yes, No.

  • If it’s set to Yes, then only the connection settings field will display. Moreover, If it’s set to No, Fields will hide there is no need to add the Google Credentials.

  1. Google Application Name: Enter the name of the project/application that you created for Google Shopping. (See Appendix)
  2. Google Client ID: Enter the Client ID that will authenticate the connection between the store and Google Merchant. By default empty but required field. (See Appendix A)
  3. Google Client Secret: Enter the client secret to set up the connection. By default empty but required field. (See Appendix A)
  4. Google Merchant ID: By default empty but required field. Here, you will provide the merchant ID of your Google merchant center account.

3.2 General Settings

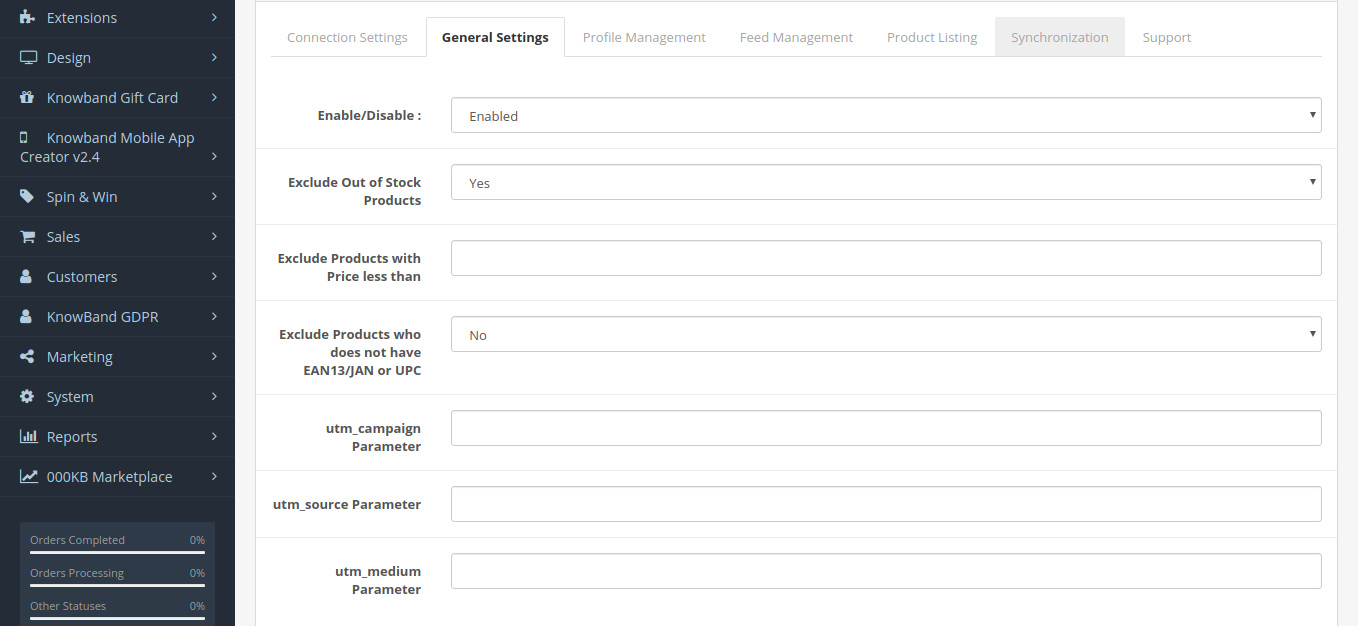
The General Settings tab of the Google Shopping OpenCart Integration plugin allows the admin to make some basic changes and authenticate the OpenCart Google Shopping integration.
  • Enable/Disable: Enable/disable the OpenCart Google Shopping integration plugin by selecting the options from the drop-down menu.
  • Image Size of Product: Select the default size of the images from the drop-down menu.
  • Exclude Out of Stock Products: Select Yes from the drop-down menu if you want to exclude the out-of-stock products. In fact, if yes is selected, then, the products that are not in the inventory will not display in the Google search results.
  • Exclude Products with Price Less than This field enables you to exclude the products whose price is below a specified limit. For instance, if the admin enters the amount ‘X’ here, then, any product whose price is below ‘X’ will not display in the Google Shopping results.
  • Exclude Products that do not have EAN13/JAN or UPC: If you want to exclude the products that do not have EAN13/JAN or UPC, then, select Yes.
  • Sync Type: Select the type of synchronization from the drop-down menu.
  • Utm_campaign, Utm_source, Utm_medium Parameter: Enter the UTM for tracking the performance.
  • Select your Default Language: Select the default language that you want to use for feed synchronization. Therefore, the OpenCart Google Shopping Feed synchronization extension offers multi-lingual support.
3.3 Profile Management

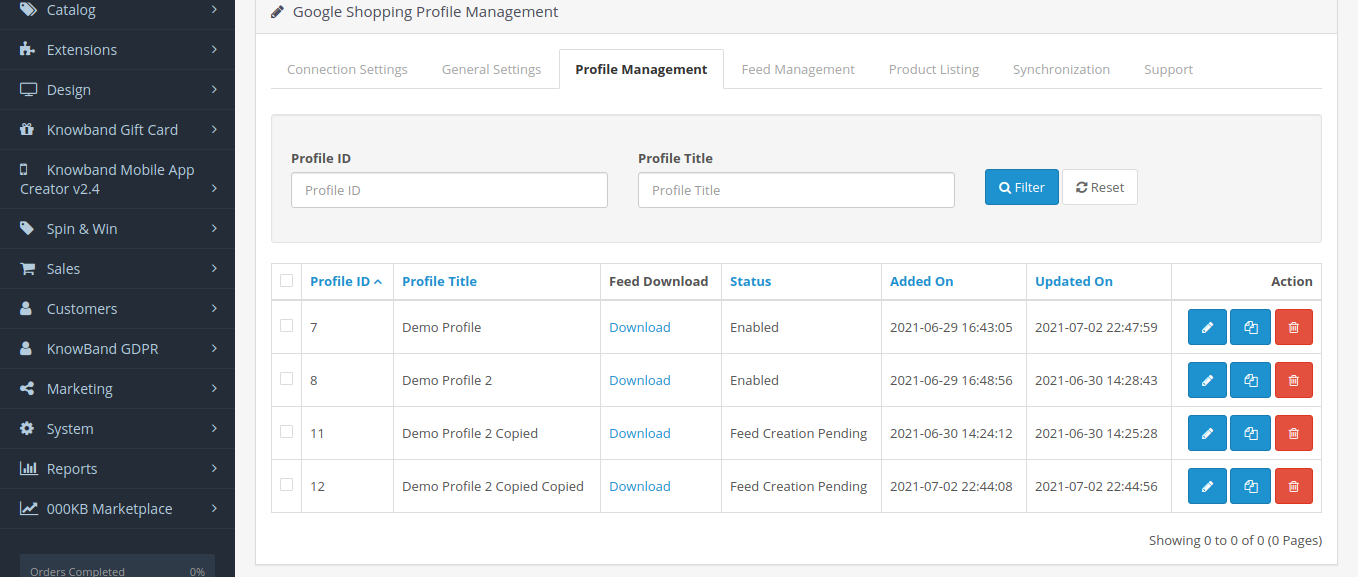
In the “Profile Management” tab clicking on the copy link again, the profile will copy the profile data. However, the profile will be disable. Store category will also not be copied. Further, once the store category will be selected in the copied profile the status will change to enabled.


3.3.1 How to Create New Profiles?

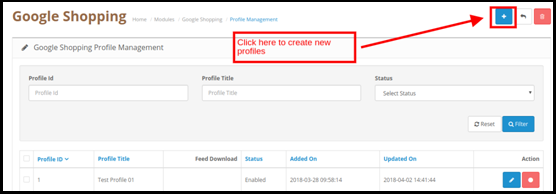
To create a new profile, click on the ‘+’ sign on the top right position of the admin interface of the OpenCart Google Shopping Feed synchronization plugin.

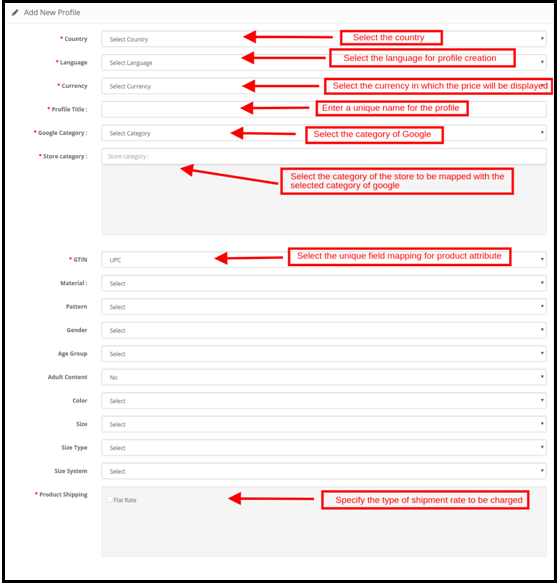
On clicking, you’ll head to the profile creation page. Further, the various fields are discussed in detail below:

  • Country: Select the country where you want to showcase the products of the profile in the Google Shopping section.
  • Language: Select the language for profile creation.
  • Currency: Select the currency in which you want the price of the products to display.
  • Profile Title: Enter a title for the respective profile.
  • Google Category: Select the category of Google that is to map with the categories of the OpenCart store.
  • Store Category: OpenCart Google Shopping connector offers one-to-many category mapping. In fact, select the categories of the store that you want to map with the selected category of Google.
  • GTIN: Select the unique field mapping for the product attributes. Furthermore, the Google Shopping OpenCart connector will identify the products according to the mappable attribute.
  • Material: Select the material of the product from the drop-down list.
  • Pattern: Choose the pattern from the list.
  • Gender: Select the Gender for which the product is intended. In fact, the various options list in the drop-down list.
  • Age Group: Select the expected age group of the users of the product.
  • Adult Content: Specify if the product has any adult content or not.
  • Color: The color attribute describes the color of the product. Further, these attributes help create accurate filters and narrow down the search results.
  • Size: The size attribute specifies the standardized size of the product.
  • Size Type: The attribute describes the cut of your product. In fact, this helps create accurate filters.
  • Size System: With this attribute, you can explain which country’s sizing system your product uses.
  • Product Shipping: Select the type of shipping rate that is to be charged.

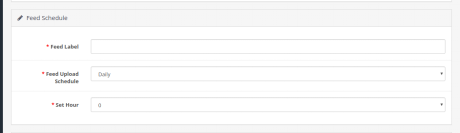
In addition, the Feed Schedule option is now provided under the profile creating a page. Further, no need to create the feed separately under the Feed Management tab.

  • Feed Label: Enter a unique name for the feed.
  • Feed Upload Schedule: Select the schedule for the feed synchronization.
  • Set Hour: Set the Hours of the days for the feed upload schedule.

3.3.2 How to Edit/Delete the Profiles?

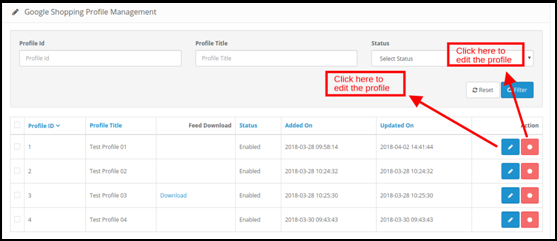
The admin can easily edit or delete the profiles from this section of the OpenCart Google Shopping integrator. In fact, to do so, click on the ‘Edit’ or ‘Delete’ button corresponding to each profile.

3.4 Feed Management

The Google Shopping OpenCart integrator offers a user-friendly interface to manage the feeds. Further, the admin can create feeds and sync the same with the Google Merchant Center with the least hassle.

3.4.1 How to Create new Feeds?

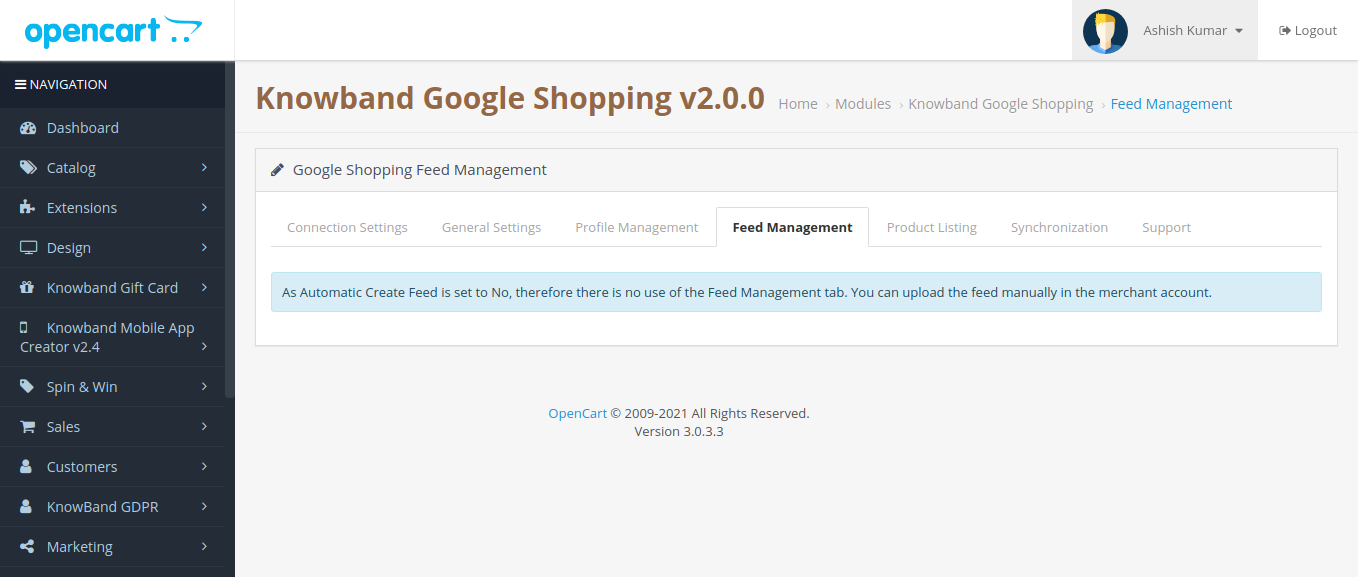
If the Automatic Create Feed is set to No, then in the “Feed Management”, Show the message “As Automatic Create Feed is set to No, therefore there is no use of the Feed Management tab. In fact, you can upload the feed manually in the merchant account”.


If the Automatic Feed is set to No, then the Feed URL will be generated so that customers can copy the feed URL & create the feed in the Google Merchant account manually.

Synchronize the feeds by executing cron in the synchronization section of the OpenCart Google Shopping integration plugin. (See Section 3.)
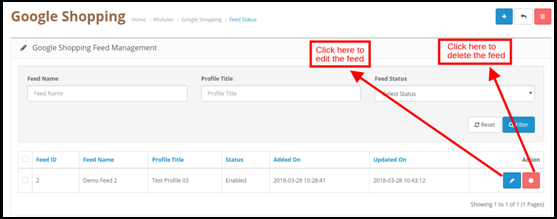
3.4.2 How to Edit/Delete Feeds?

To edit/delete the feeds, click on the Edit or Delete corresponding to each feed as shown in the image below:

3.4 Product Listing

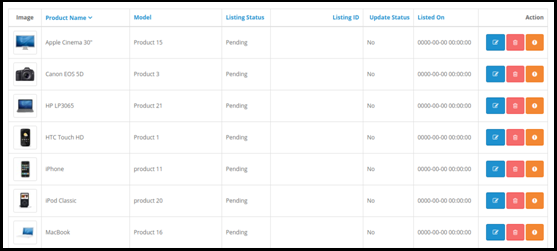
The product listing is available in this tab of the Google Shopping OpenCart integrator.
You can renew or remove the products by clicking the ‘Relist’ or ‘Remove’ button corresponding to each product.

The admin can even view the errors that occurred while product listing by clicking on the ‘View Error’ button.

The listing status specifies the status of the products. The status of the products can be synced from Google Shopping by executing cron in the Synchronization tab of the Google Shopping OpenCart connector. (See Section 3.5)

3.5 Synchronization

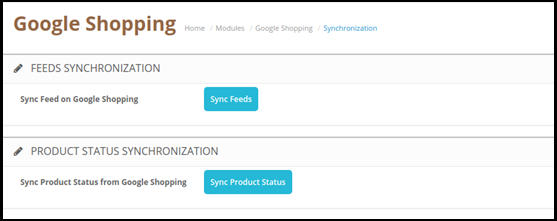
The cron jobs offered by the OpenCart Google Shopping feed integration module allow the admin to keep everything up-to-date without any manual synchronization.

  • Feed Synchronization: This cron job allows the admin to sync the feeds on Google Shopping.
  • Product Status Synchronization: Product Status CRON will also give the message that “This functionality is not available as Automatic Create Feed is selected NO in the Connection Settings Tab”. In case, the Automatic Create Feed is set to Yes, then it will synchronize the Product Status from Google Merchant to the Knowband module.

Appendix

How to Create Google Shopping Account?

Before uploading your products on Google shopping, you must have your Google merchant account. If you don’t have then please follow the below URL:

https://merchants.Google.com

Follow the instructions given on the above URL and create your account.

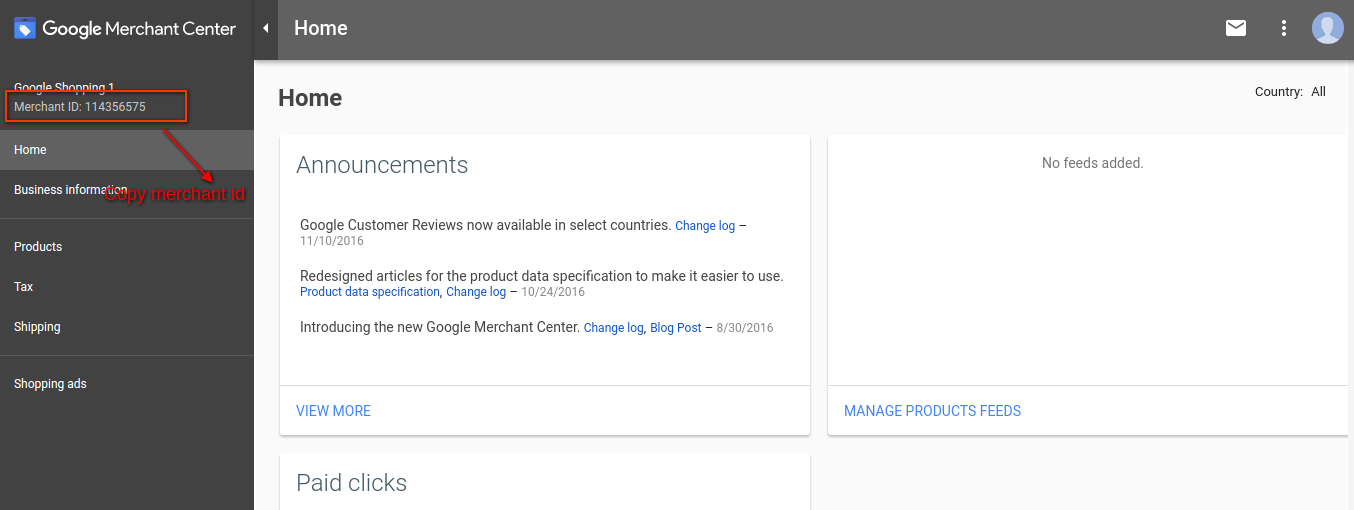
After creating your account, you will head to your merchant center homepage as shown in below screen:

Copy your merchant id highlighted in the above screen and save it in module configurations.

Verify your Website for Google Merchant Account

This verification process is a compulsory process to upload your products to Google Shopping. If you do not verify your site then the module will not be able to upload products and may result in an error.

To verify your website, please follow the below instructions:

Step 1: Go to the “Business Information” tab in your Google Merchant Account.

Step 2: Under the “About Your Business” tab, provide the URL of your store. For example, https://www.example.com. Save URL.

Step 3: After saving a website URL, Under the “Website” tab, click on the “Claim Your Website” link. Furthermore, this will show you the link to an HTML file. Hence, download this file and upload it to your root directory of the store.

Step 4: After uploading the HTML file, execute the URL given by Google in step 3.

Step 5: Click on the “Verify & Claim” link.

How to get Client ID and Secret

To get a Google client id and secret you need to create a project in a Google developer account. Further, please go to the below URL to sign in to the Google developer account.

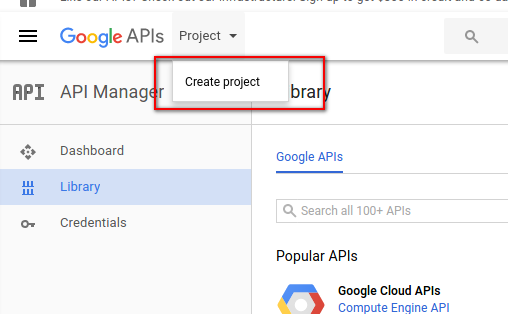
https://console.developers.Google.com

On the above URL, create a project by clicking the link shown in below screen:

Step 1: Name your Project Name. In addition, click on the “Create” link. Furthermore, after creating a project, Google will redirect to the same page and your new project will be selected.

Step 2: Go to the library tab, search for “Content API for Shopping ”. Furthermore, enable this API for this project.

Step 3: Click on the “Credentials” tab. Therefore, this tab will show 3 tabs.

Stage 4: Set your application name in “OAuth Consent Screen” and save it.

Step 5: Click on the “Credentials” tab. Moreover, click on the “Create Credentials” button.

Step 6: After clicking the “Create Credentials” button, Google will be shown credentials type options. In fact, choose “OAuth client ID”.

Step 7: Set application type as “Web Application”.

Step 8: Set the “Authorized Redirect URIs” field. Further, your redirect URI is given on the module configuration page. Additionally, please copy from there and paste it into this field.

Step 9: Click on the “Create” button. After saving credentials, Google will generate the client id and secret for you. Copy and paste them into the corresponding field in module configuration.

Note: For more detailed instructions, follow URL https://developers.Google.com/identity/sign-in/web/devconsole-project

Note: If you are getting an error while getting your refresh token. Further, please also try after “Allowing Less Secure App” in your Google account.

In fact, For more values, please follow the below URL and read the documentation:

https://support.google.com/merchants/answer/7052112?hl=en

Check Tutorial Guides for Opencart Google Shopping Plugin

These videos walk you through:

  • Installing the OC Google Shopping extension

  • Configuring basic settings

  • Connecting your OpenCart store to Google Merchant Centre

  • Generating your first product feed

These tutorials are ideal for new users who need a step-by-step walk-through without technical jargon.

Click Here for Module Link.

Click Here for Admin Demo.

Opencart Landing Page Creator – User Manual

How to install OpenCart Landing Page Creator plugin on your server

1. Folder structure of the Landing Page Creator plug-in folder.

2. Open the upload folder and you will find the following folder structure:

You must have VQMOD installed for this plug-in to work. IfVQMOD is not installed please download and install from theURL below:
https://code.google.com/p/vqmod/

3. Select all the folder and drag and drop them to the root directory of your OpenCart store through FTP.

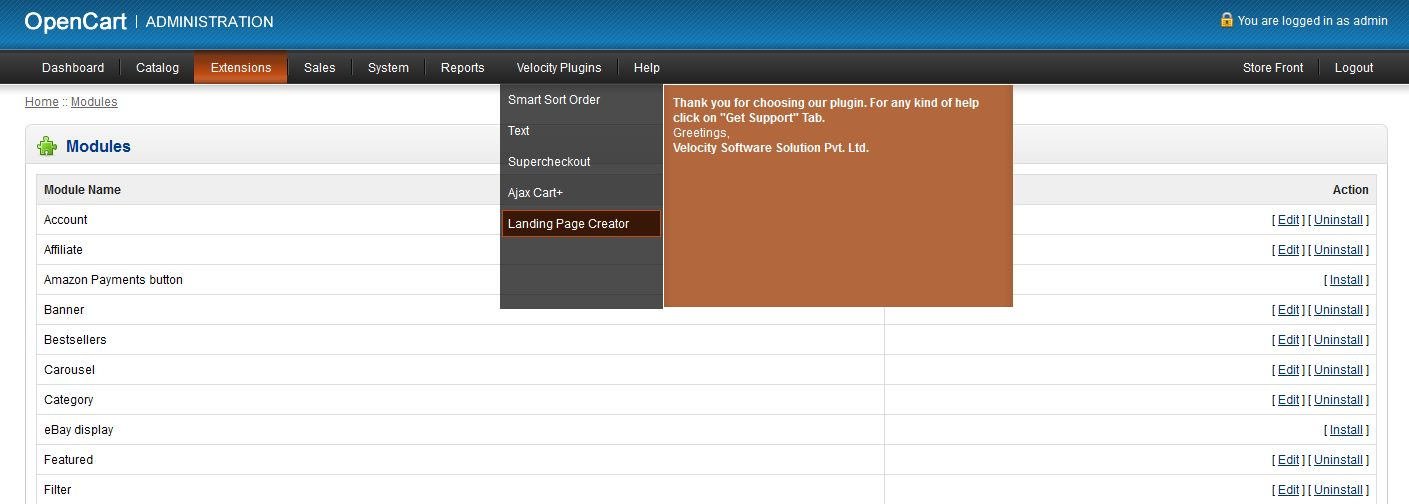
4. You will be able find the plug-in ready to be installed in the Modules in your OpenCart store as shown below.

5. You will also get another module Text ready to be installed in the Modules in your OpenCart store as shown below.

6. Click on the Install link to install the plug-in. This will also add a dropdown option in your menubar which will list all plug-ins by Velocity installed on your store for fast navigation. This dropdown also has a message box, using which we can inform you about new launched plug-in ornew update.

7. Delete the Vqcache files from the vqmod/vqcache folder.

8. To access Text module click on edit button in module section as shown below:

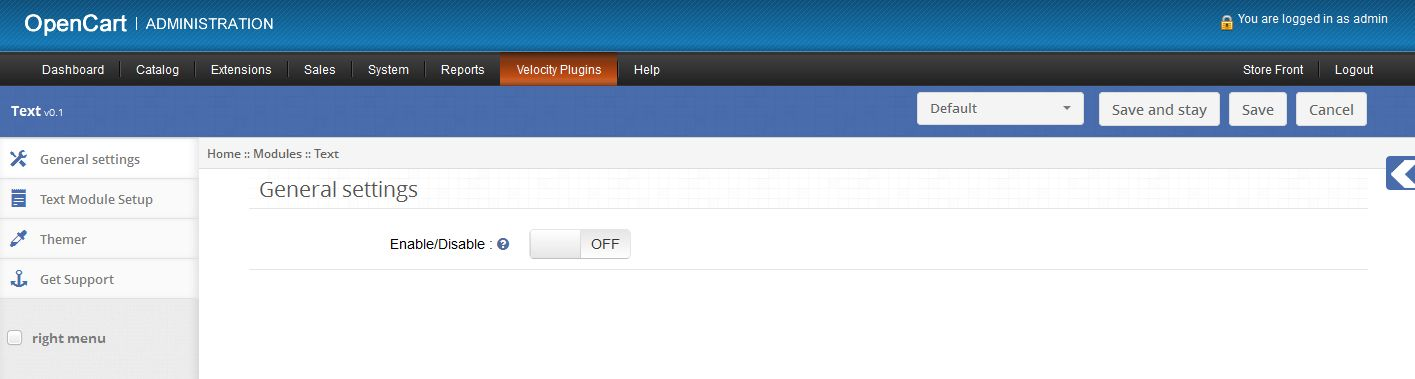
9. On clicking edit button the module for plug-in will open. It contains navigational bar at top, menu at left and main content at center as shown below.

1. General Settings

1.To enable/disable module, Switch the enable button OFF to ON / ON to OFF this is just to the right of Enable/Disable label.


2. Text Module Setup tab

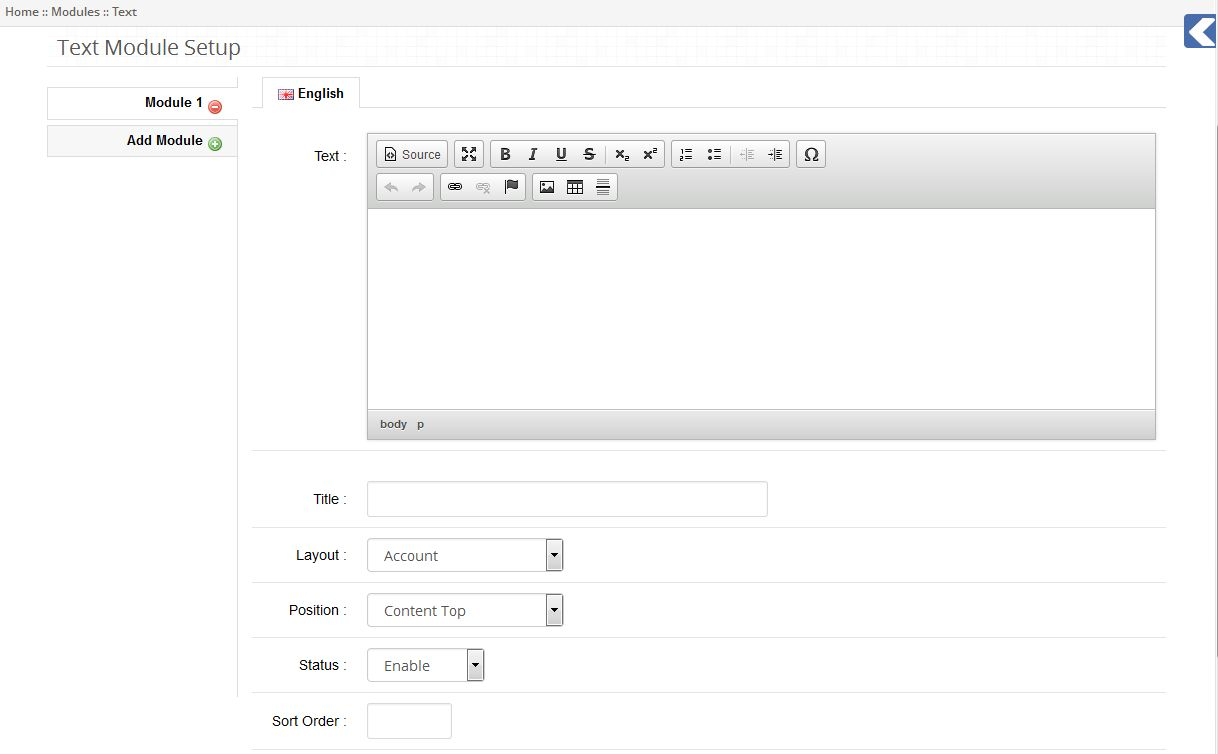
1. Here admin can set text to display on front end in any layout.

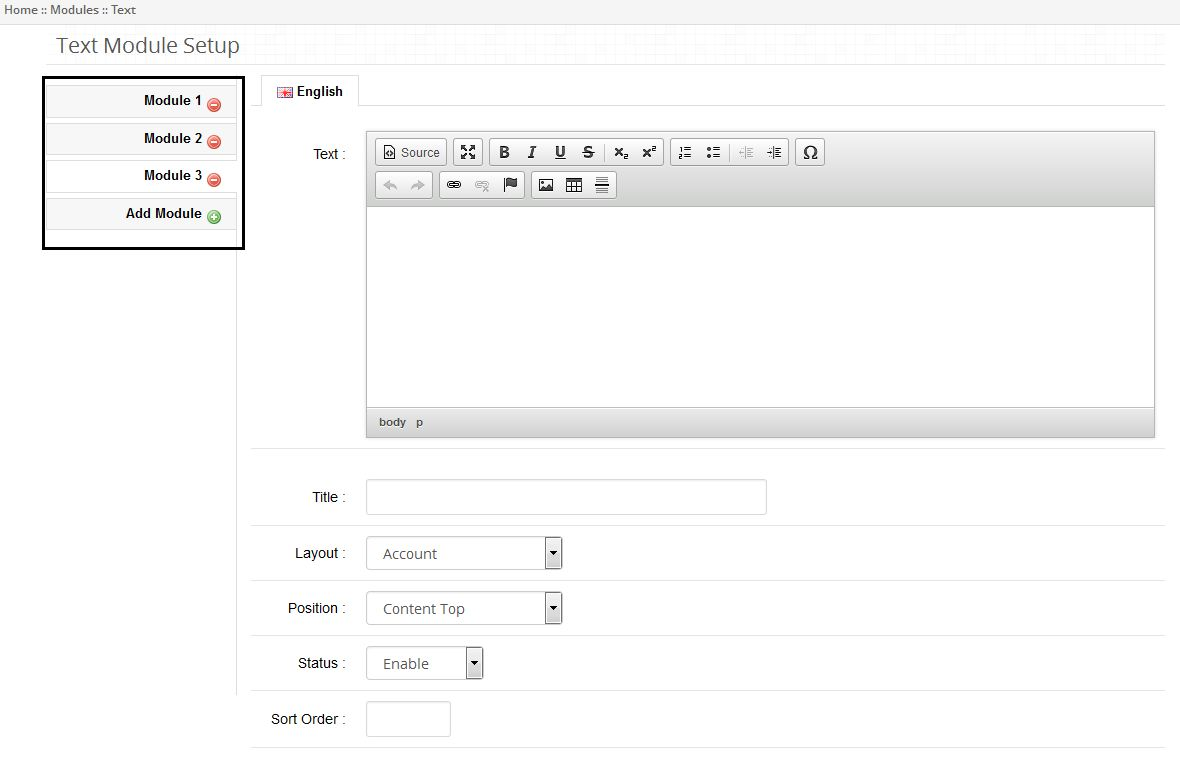
2. Click on plus button in front of Add Module tab to add a module and set properties of the module.

3. Admin can write the text in text editor. Text written in text editor will be displayed in front end.

4. Admin should give any title to this module. This title will be used to select module in Landing Page Creator plug-in.

5. Admin can select the layout where he/she wants to display text.

6. To show text in any landing page select layout Landing Page.

7. Admin can select the position of text on web page by selecting particular position and sort order.

8. Admin can also enable/disable this module by selecting status of the module.

9. Admin can add such multiple modules to show on front end by clicking plus button in front of Add Module tab.

10.Admin can remove a particular module by clicking on minus button in front of Module name in vertical tabs.


1. Installation

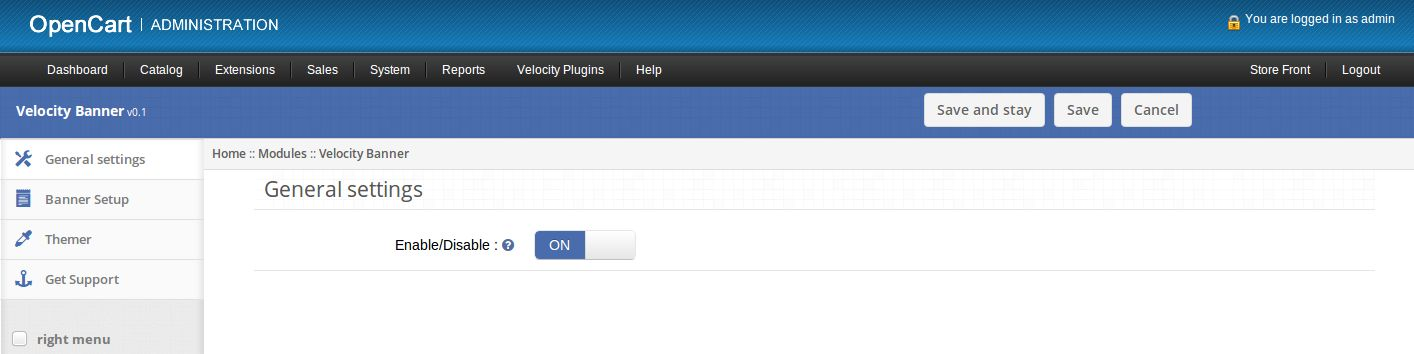
2. To access Velocity Banner module click on edit button in module section as shown below:


3. On clicking edit button the module for plug-in will open. It contains navigational bar at top, menu at left and main content at center as shown below.

2. General Settings

1.To enable/disable module, Switch the enable button OFF to ON / ON to OFF this is just to the right of Enable/Disable label.

3. Banner Setup tab

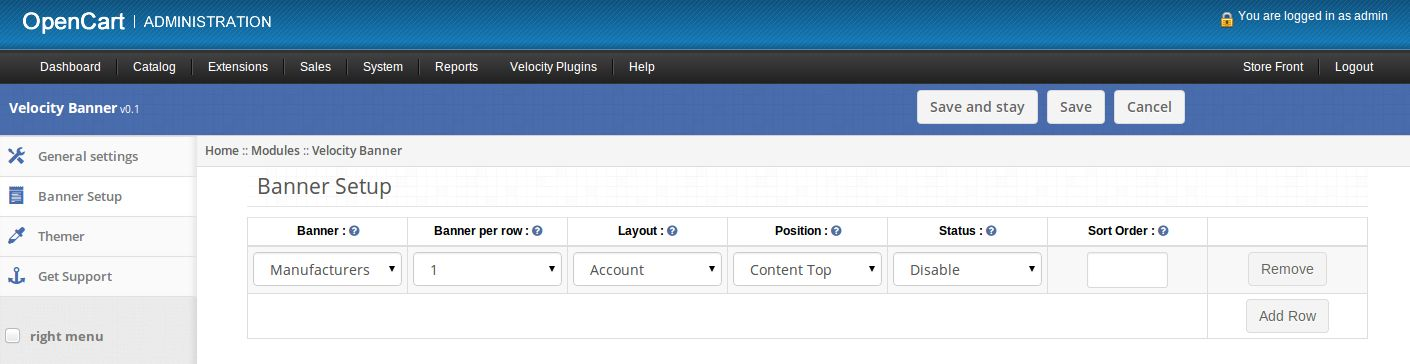
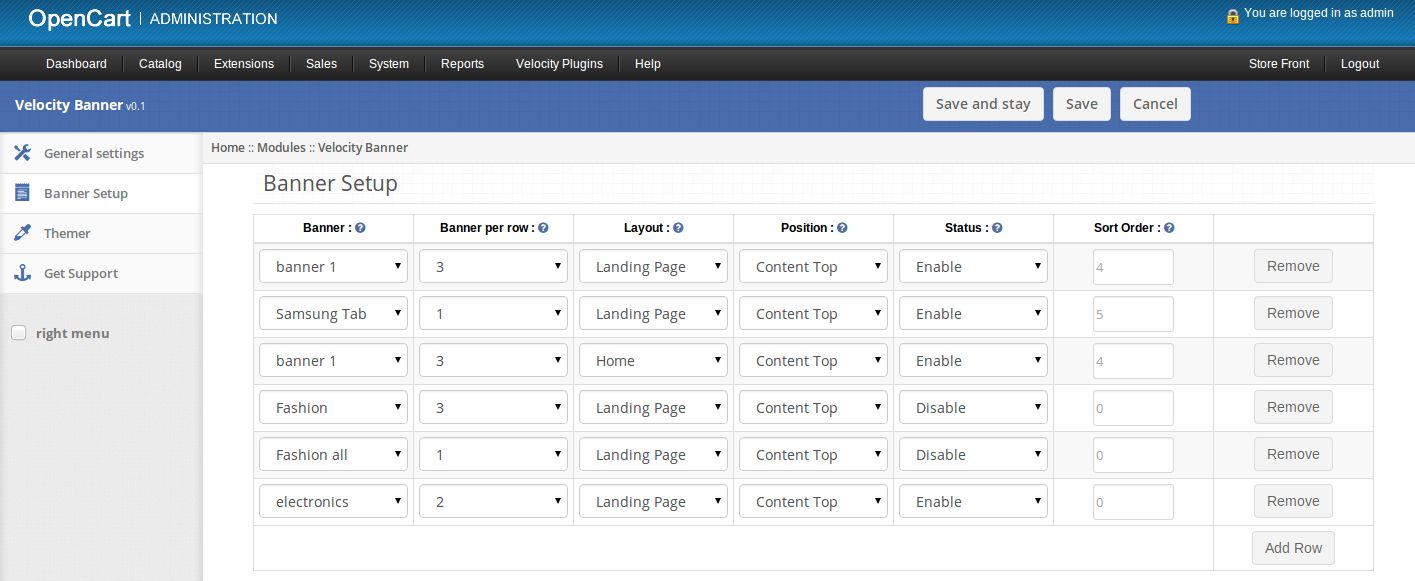
1.Here admin can select banners and number of sub banners to show in one row on front end in any layout.

2. Click on Add Row button to add a new banner and set its properties.


3. Banner: Select a banner from drop down to show it on front end.

4. Banners per row: Select the number of sub banners to show on front end.Admin can set sub banner from System -> Design -> Banners.

5.Layout: Select a layout for showing banners on front end. Select layout as Landing Page to show banners on landing page.

6. Position: Select a position of web page where you wish to show banners.

7. Status: Enable or Disable banners.

8. Sort Order: Set sort order of banners along with position to banners on a particular section of webpage.

1. Installation

1. To access Landing Page Creator plug-in click on edit button in module section as shown below:

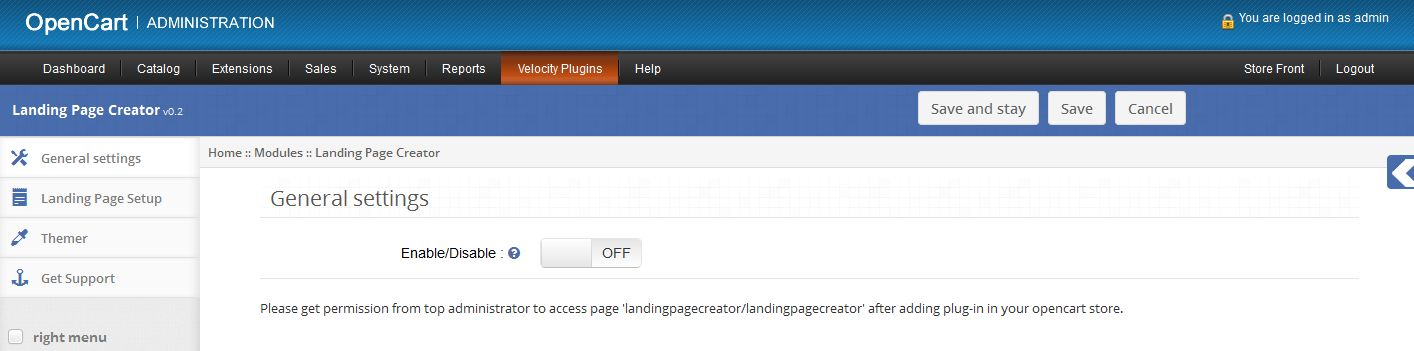
2. On clicking edit button the module for plug-in will open. It contains navigational bar at top, menu at left and main content at center as shown below.

2. General Settings

1. To enable/disable plug-in, Switch the enable button OFF to ON / ON to OFF this is just to the right of Enable/Disable label.

3. Landing Page Setup tab

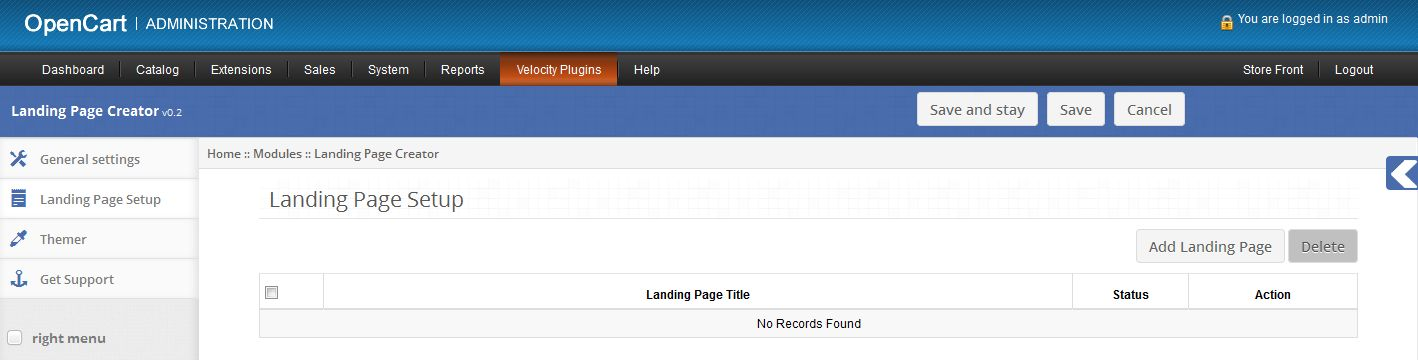
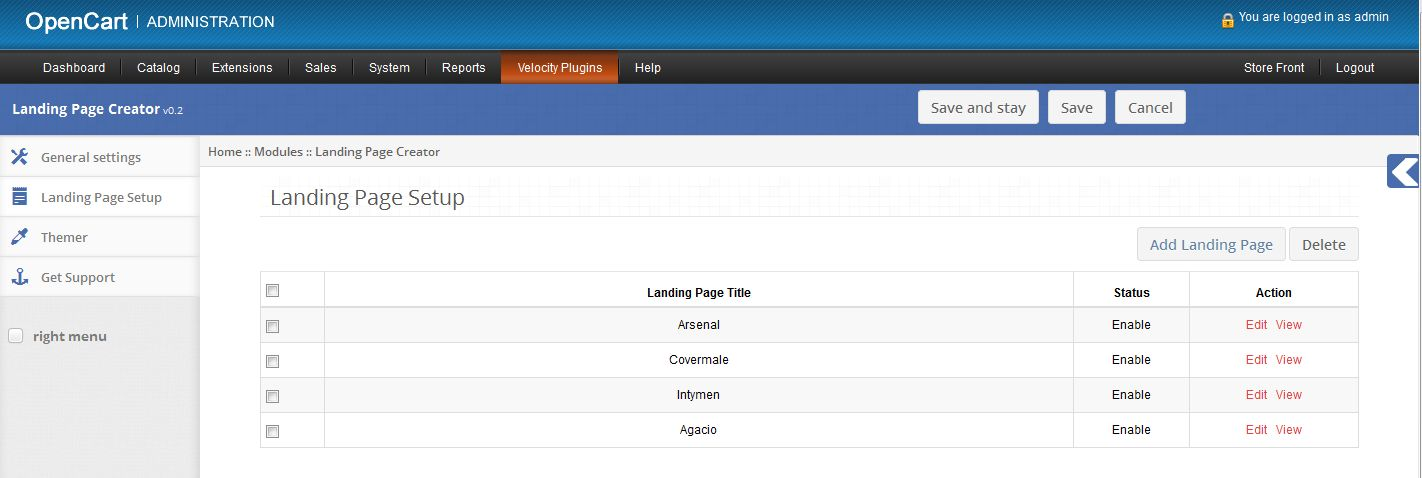
1. Here admin can see list the list of already created landing pages for the selected store.

2. If there are no existing landing pages then this tab will look as shown in following image.

3. If there are some existing landing pages then this tab will look as shown in following image.

4. Landing Page Title will show the title of landing pages.

5. Admin can edit any page by clicking Edit link provided in front of every landing page.

6. Admin can view landing pages from front end by clicking View link provided in front of every landing page. Plug-in and status of landing page both should be enabled to view page on front end otherwise Page not Found message will appear.

7. Admin can delete landing paging pages by checking check boxes of pages and click delete button.

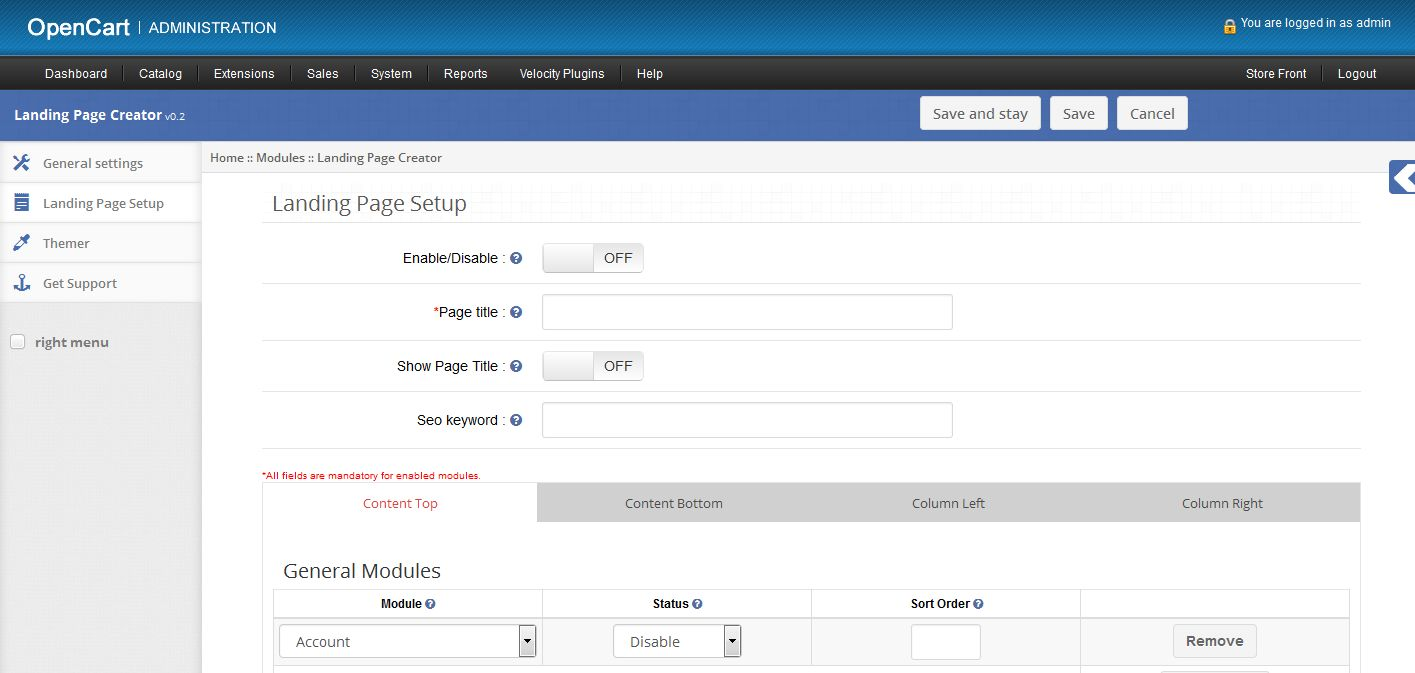
8. Admin can create a new page by clicking Add Landing Page button. On clicking this button a form to add new landing page will appear.

9. Enable/Disable: Admin can enable or disable a particular landing page by switching it OFF to ON/ON to OFF.

10. Page title: Admin can set title of landing page. This is mandatory field.

11. Show Page Title: Admin can choose to show or hide title of page on front end.

12. Seo text: Admin can set seo url for a particular landing page.

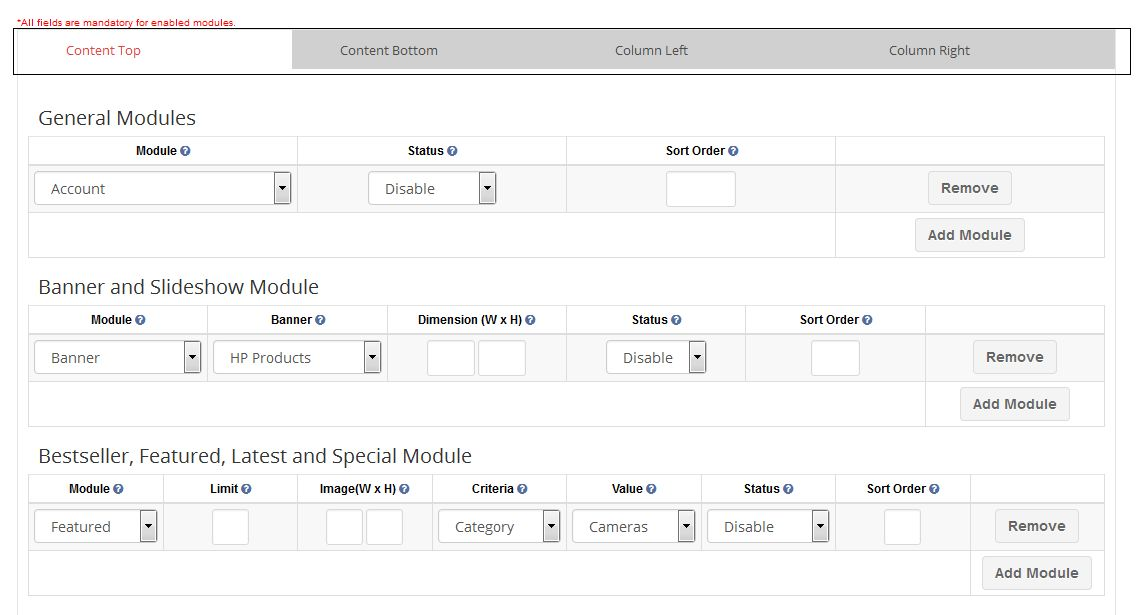
13. Admin can call different installed modules for different positions of webpage from the tabs shown in following image.

14. To call a module in Content Top Position, admin should use Content Top tab. Similarly use other tabs for other positions.

15. Each tab contains a table to call modules in their respective positions.

16. Select a module from Module column set its status as Enable and provide a sort order to call a module in a landing page.

17. Click Add Module button to add another module.

18. Click Remove button to remove a particular module.

19. If any module is not appearing in the drop down of Module column then please install and enable that plug-in in your OpenCart store.

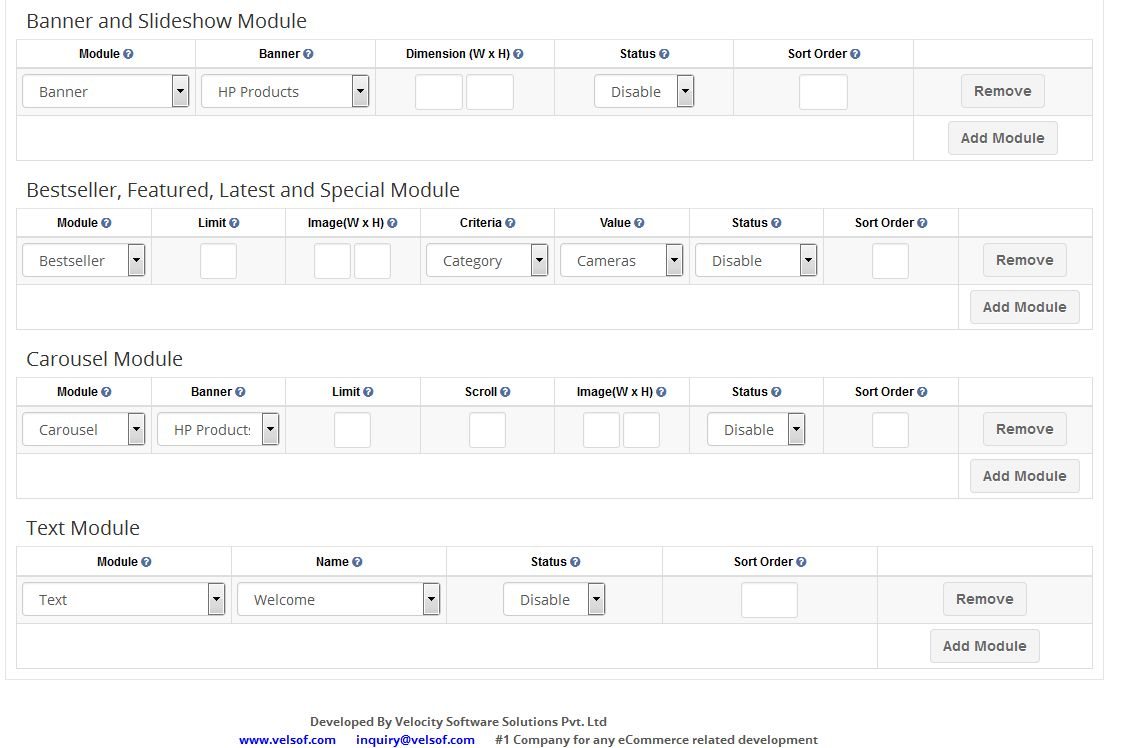
20. Content Top and Content Bottom tab contain another table to call Banner and Slideshow modules on landing page. This table will appear when at least one of Banner and Slideshow modules are installed.

21. Admin should select Banner/Slideshow module from Module column, select a banner from Banner column, set dimensions of banner/slideshow, set status and sort order to call Banner or Slideshow module.

22. To call a module one of Bestseller, Featured, Latest and Special there is another table. Fill all the fields of that table and call those modules on front end.

23. Admin can select criteria and value to show products from a particular category or manufacturer in modules of Bestseller, Featured, Latest and Special.

24. Admin can also show products by providing keywords. Multiple keywords can be entered using comma(,) as separator.

25. To call carousel module there is another table in Content Top and Content Bottom tabs.

26. To call carousel module select banner and set values for limit, scroll, image dimensions and sort order.

27. There is another table to add text module in all the tabs. If this table is not appearing then install Text module and create some modules with layout Landing Page and status enabled for current store.

28. To call a text module select the title of module in Name column and set sort order.

29. Save the data by clicking Save or Save and Stay button.

30. After creating a landing page admin can view the page by clicking view link given in front of landing page in landing page setup tab.

31. Admin should set up a link to landing page in front end according to his choice.

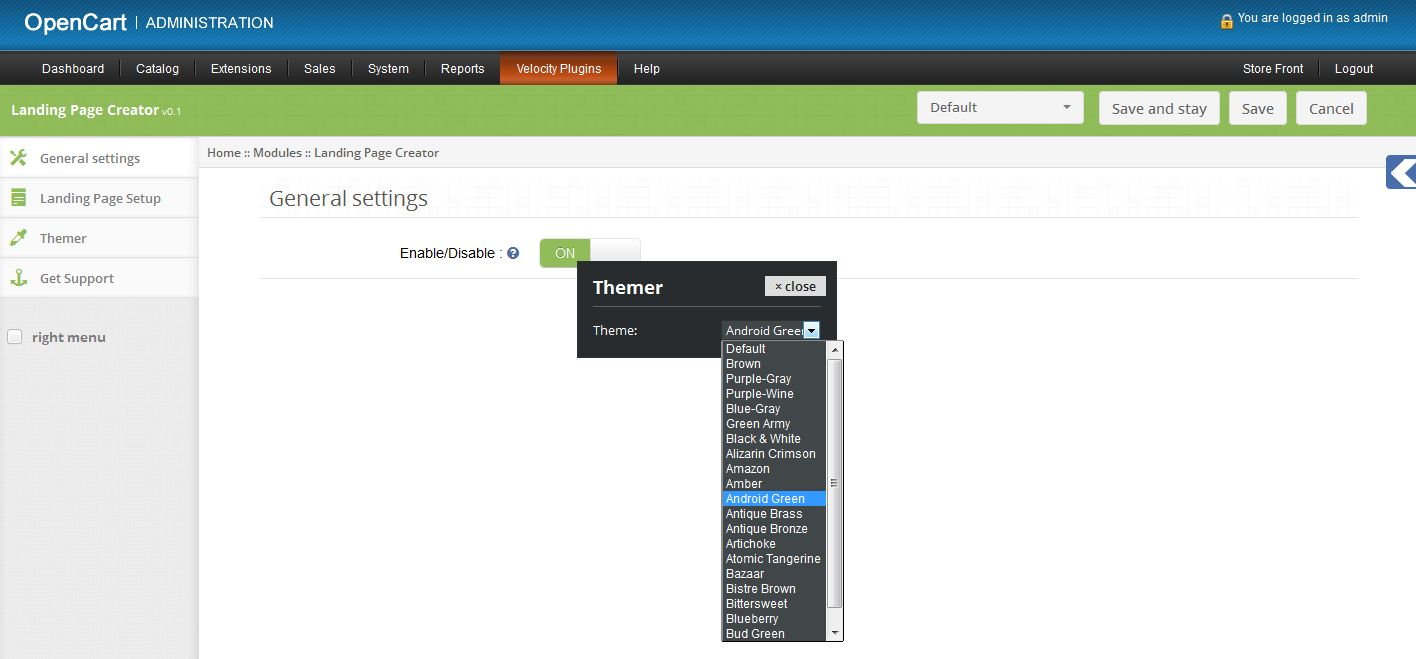
Themer tab

1. By clicking on themer tab, you will have an option to change the theme of Smart Sort Order admin panel.

Get Support

1. By clicking on Get Support tab, you will be redirected to our support website, where you can contact our support for help. Use this tab in case you some query/issue or found some bug.

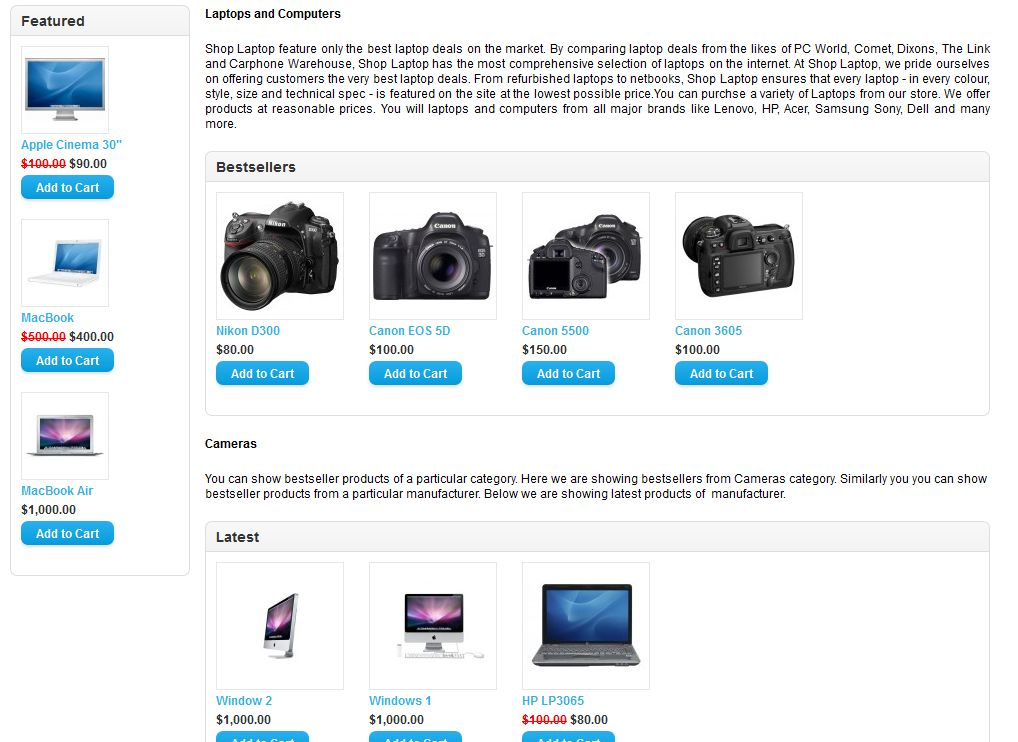
Description

If admin wishes to show bestseller products of a particular category (say Desktops) then admin should select criteria as Category and Value as Desktop for Bestseller module.

If admin wishes to show bestseller products of a particular manufacturer (say Canon) then admin should select criteria as Category and Value as Desktop for Bestseller module.

If admin wishes to show bestseller products from products whose name contain words like Apple, Macbook etc then admin should select criteria as Keyword and Value as Apple, Macbook (keywords will fetch products only on basis of product names.) for Bestseller module. Multiple keywords can be entered using comma(,) as separator.

Select criteria and value similarly for Latest, Special and Featured modules.

Screen shots

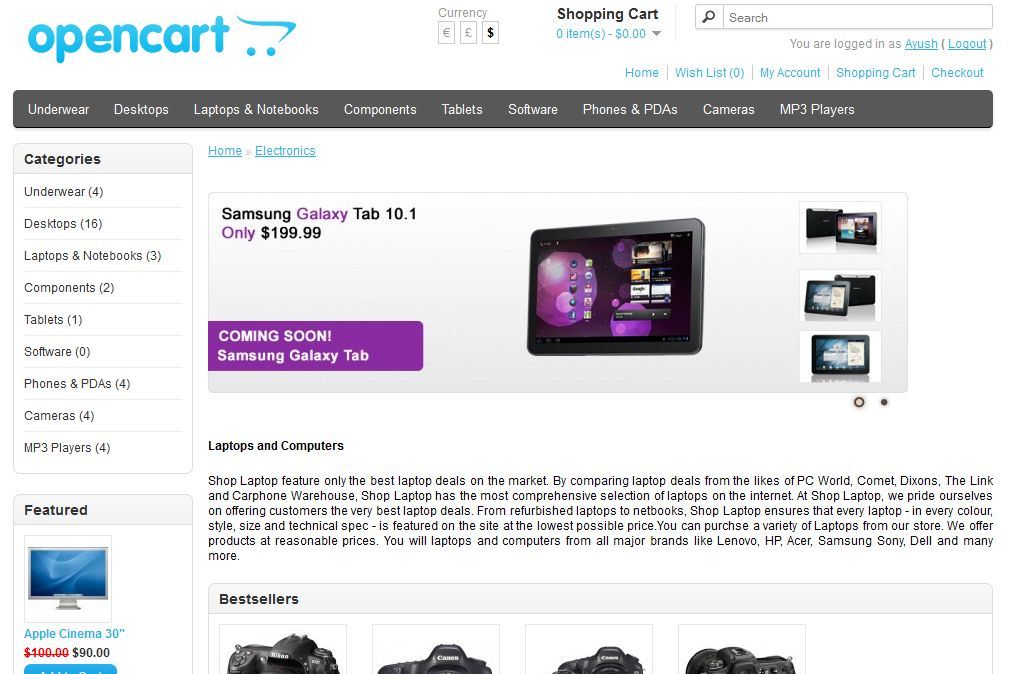
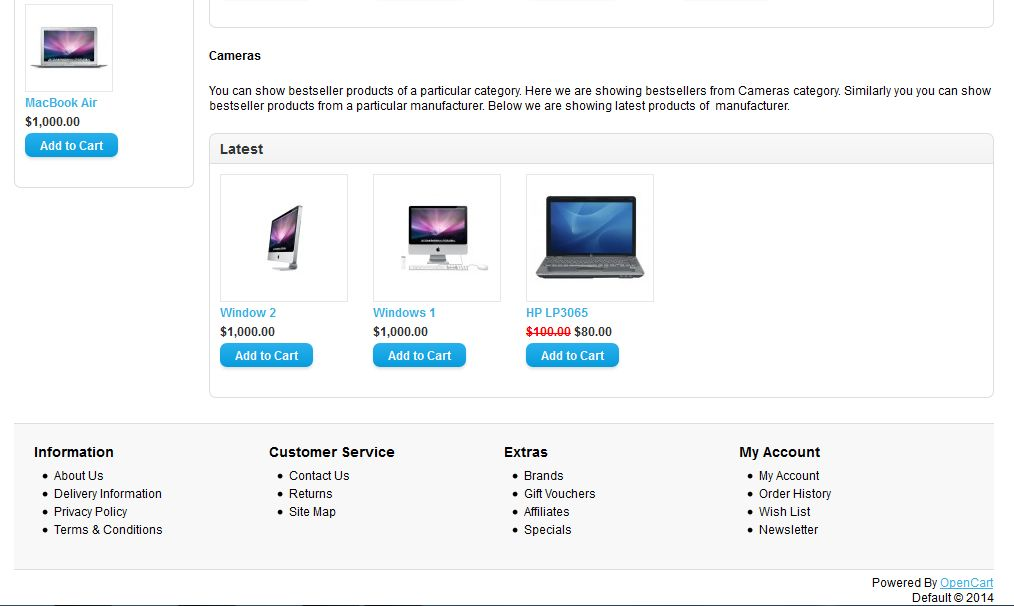
A sample landing page by calling different modules.


Recommendations

1. Set Seo Url setting to on in store settings and rename htaccess.txt file to .htaccess to use seo text ofplug-in.

2. Top administrator should give permissions to access page landingpagecreator/landingpagecreatorafter moving the plug-in to root folder of your store.

3. To call Text module in landing page, first create it from edit page of Text module and set layout as Landing page.

4. Give unique titles to all modules in Text module. These titles are used for selecting particular text module in landing page creator.

5. Set featured products from featured modules before calling this module on landing page.

Opencart Importer – User Manual

How to install Opencart Importer plugin on your server

Follow the following steps for installing Importer:

1. Install VQmod (if not yet installed, visit
https://code.google.com/p/vqmod/wiki/Install_OpenCart).

2. Unzip the archive and find Upload folder.

3. via FTP manager (like Filezilla or WinSCP – download here: https://filezilla-project.org/)upload to you main directory the files and folders in the Upload folder.

4. In Admin Panel go to Menu > Extensions > Modules > Importer v0.1.

5.Install Importer.

6.That is all – Your system is ready. Click on Edit and explore.

1. Export tab

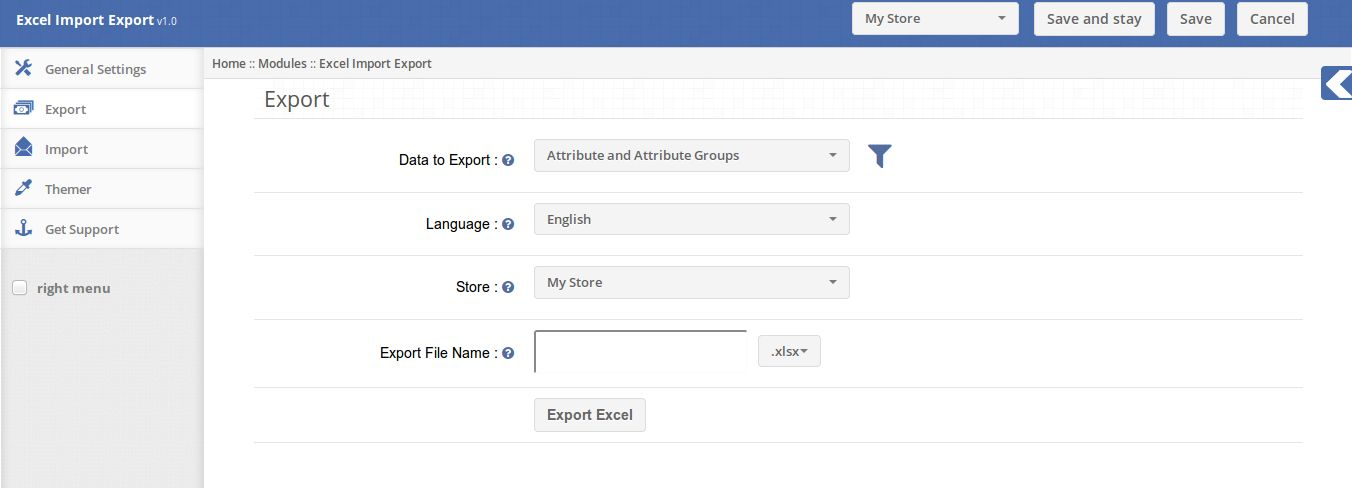
The Export tab has option to export the store data in excel or zip file:

  • Data To Export: Choose which data needs to be export either customer, customer groups,orders etc.
  • Language: The store language in which data will be exported.
  • Store: The store from which data will be exported
  • Export File Name: The name of the excel file which will be generated.

2. Import Tab

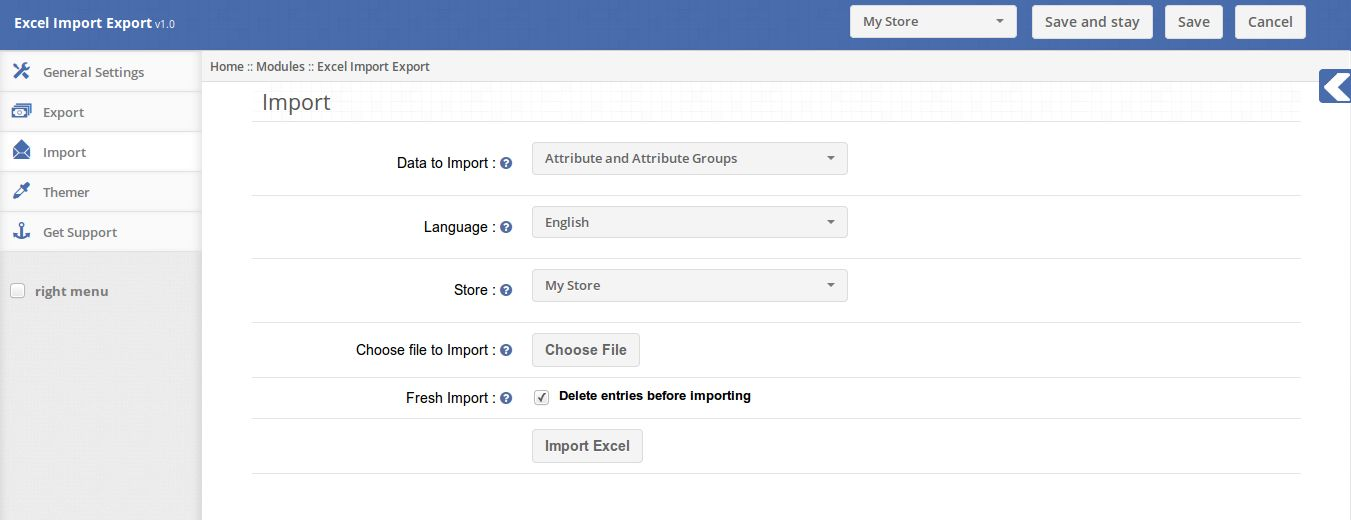
The Import Tab lets the Admin to import the data to the store.

  • DataTo Import: Choose the data to import either customer, customer groups etc.
  • Language: Choose the language of which data is imported.
  • Store: Choose the store for which data is supposed to be imported.
  • Choose File to Import: The excel file contains the data.

Opencart Advanced Wishlist Extension – User Manual

1.0 Introduction

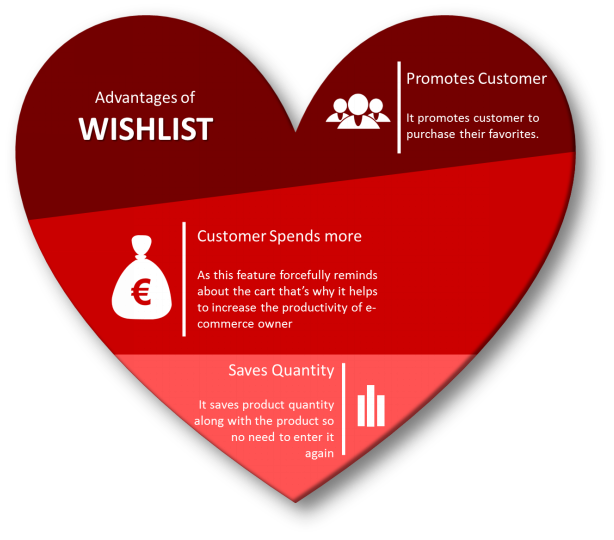
Imagine you are browsing through your mobile phone and saw that pretty dress but couldnt buy it right now because its month’s end and let’s face it you are broke! You added it to your wishlist so that if its price comes down or when you get your salary credited, you will buy it. Suddenly a support Team member of that eCommerce site calls/e-mails you and offers you a coupon on that Dress. You feel happy and buy that Dress because now it’s affordable. Offering wish lists is an effective way to reduce Shopping Cart Abandonment and fulfill sales from customers who showed intent but didn’t end up purchasing. Wish lists are mutually beneficial: they give customers an easy way to remind themselves of a product and help merchants measure product interest beyond a clear-cut sale. OpenCart Advanced Wishlist Extension by Knowband helps customer to shortlist their favorite products so that they can be aware of the products they want to purchase or view later.

This OpenCart save for later extension is like a basket in hand where you add whatever you like and proceed with the checkout when you are ready to buy it. As a Store Admin you can keep a track on the requirements of your customers and proceed accordingly with your sales plan.


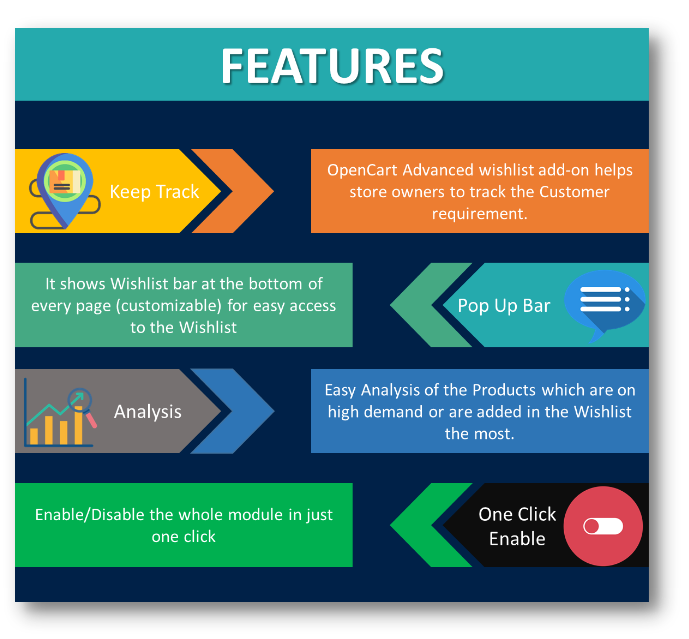
1.0.1 Features of OpenCart Advanced Wishlist Extension

2.0 Installation Guide

Before starting the installation process, you have to buy the Opencart Advanced order list extension by the Knowband store. Once purchased, you will receive the following files on your registered email.

  • Source code of Opencart Advanced order list extension in zipped file format.
  • User Manual of Opencart save for later plugin.

Now in order to install this on your online shop, follow the given steps:

Step 1: Unzip the zip file. You will get the folders as shown in the image below


Step 2: Copy all the folders of the zip file in the Root Directory of OpenCart setup via FTP manager.

Step 3: There is a file name kbadvancedwishlist.ocmod.xml (for oc<3.0)
kbadvancedwishlist.ocmod.zip (for oc>3.0). You need to install this file in the following Location:


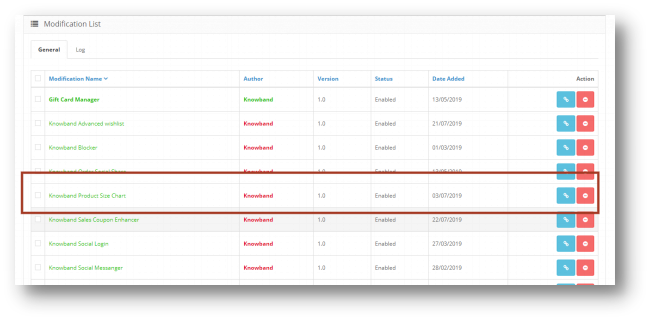
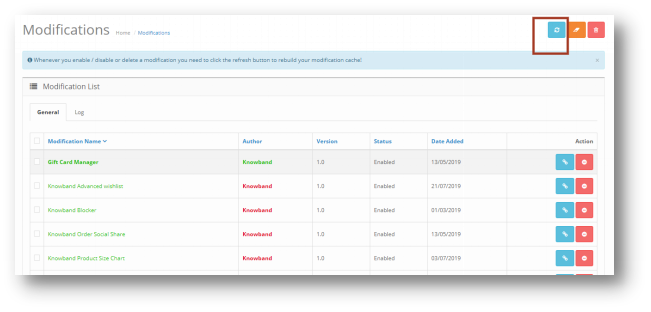
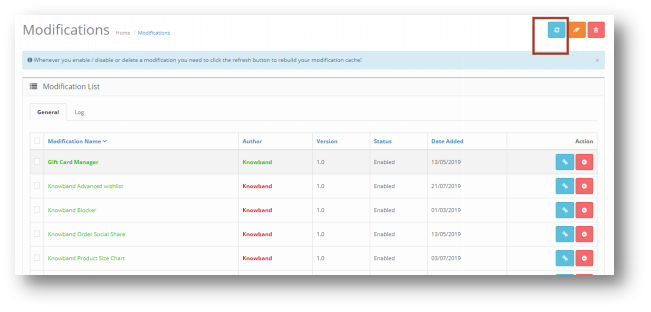
Step 4: After Installation you need to select this file and refresh Modifications:


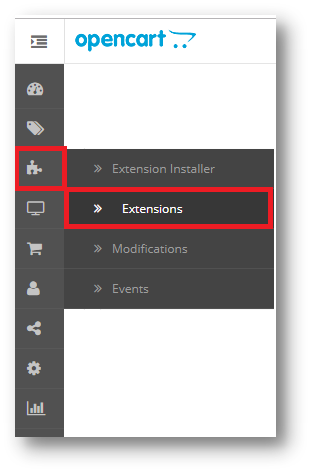
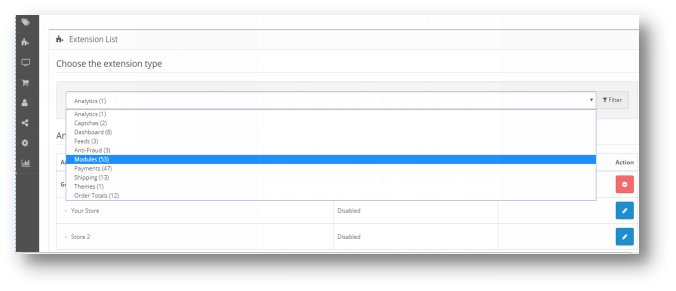
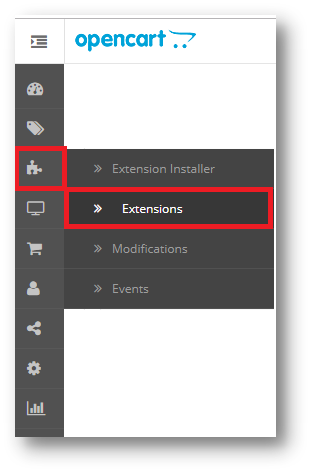
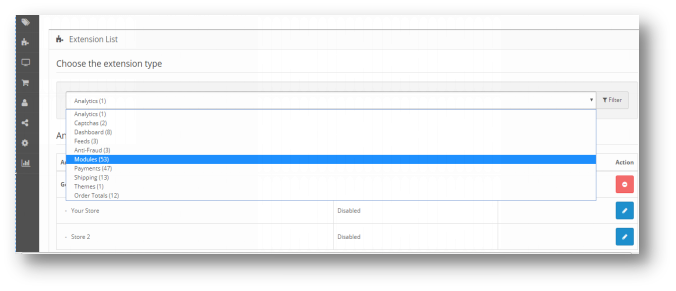
So, Opencart save for later plugin is now successfully installed and is ready to use at your store. Go to the admin menu and click on the extensions. Choose the Extension Type as Modules. You will find a list of modules. Select the Knowband Advanced Wishlist.

3.0 Admin Interface of OpenCart Advanced Wishlist Extenstion

To configure the Size guide module for OpenCart, Navigate the settings in the following order:
Admin Panel > Extensions >Modules>Knowband Advanced Wishlist

The Admin Interface of OpenCart Advanced Wishlist Extension is divided into 6 Tabs:

  • General Settings
  • Product Analysis Report
  • Customer Analysis Report
  • Order Analysis Report
  • Support

3.0.1 General Settings

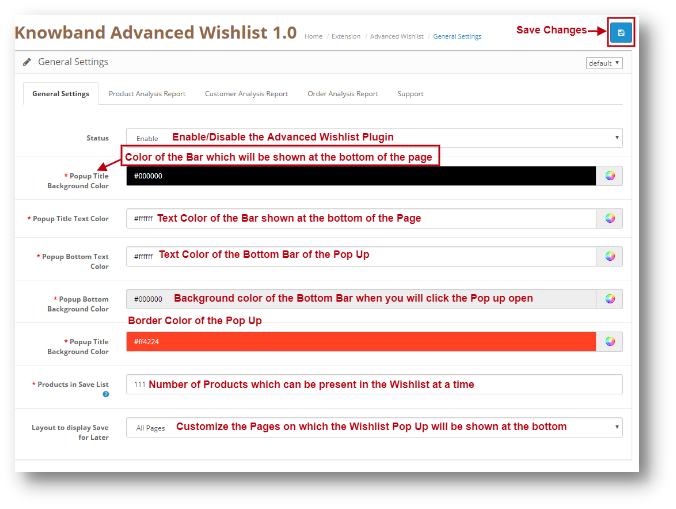
This setting will have the Option to enable/disable the plugin. The page will look like as shown below:


3.0.2 Product Analysis Report

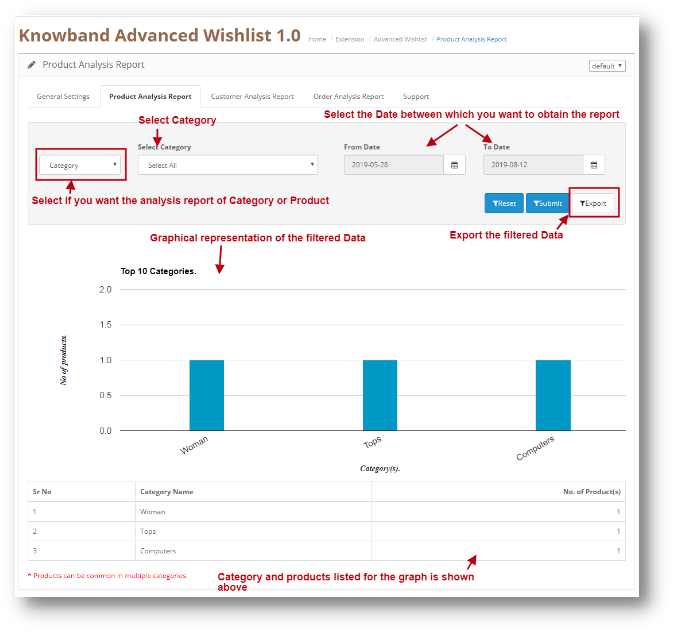
Through this setting of OpenCart save for later module, you can view the reports of a Particular Category. You can analyze the most popular category or the Category which was added in the Wishlist of the Users the most. The Screen will look like as shown below:


Filter your Report:
You can filter your Report on the basis of the categories added in your web Store and also on the basis of Date. You can just Enter the ‘To’ and ‘From’ Date and the reports will be shown to you.

3.0.3 Customer Analysis Report

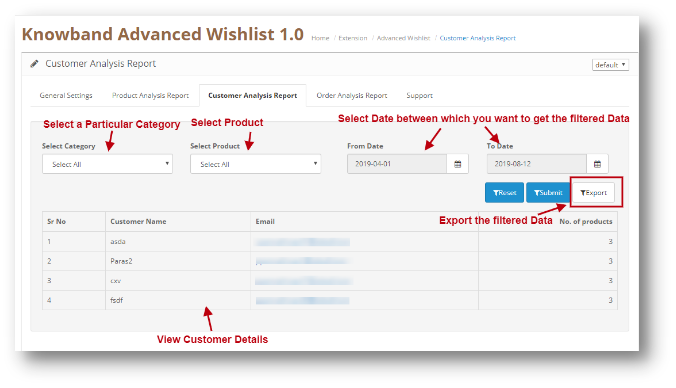
Through this setting of OpenCart Advanced Wishlist module, you can view the reports of a Particular Customer. You can analyze the most loyal customers of yours in your Store. The customer information will be shown here. The Screen will look like as shown below:


Filter your Report:
You can filter your Report on the basis of the categories and Products added in your web Store and also on the basis of Date. You can just Enter the ‘To’ and ‘From’ Date and the reports will be shown to you.

3.0.4 Order Analysis Report

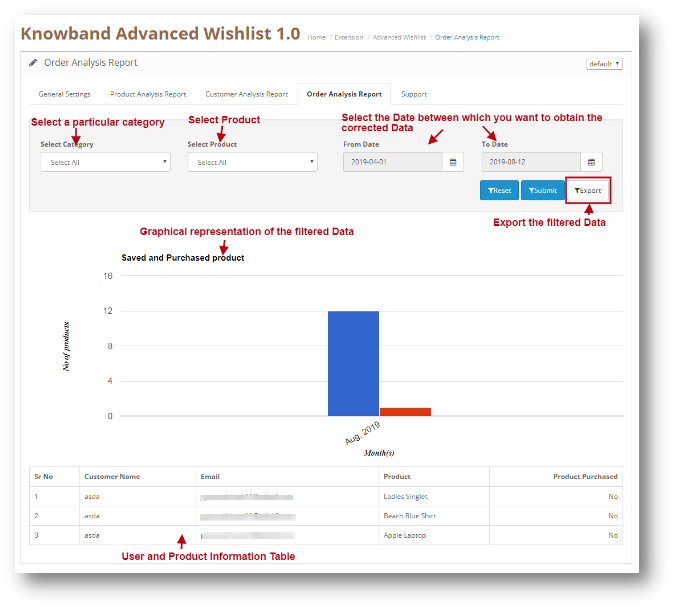
Through this setting of OpenCart Advanced Wishlist module, you can view the reports of a Particular Product on the basis of how much it was ordered by customers. You can also view the report of the products which was in the Customer’s Wishlist and were later added in the Cart and were ordered. You can analyze the most popular Product in your Store or the Product which was added to the Cart of the Users the most. The Screen will look like as shown below:

Filter your Report:
You can filter your Report on the basis of the categories and Products added in your web Store and also on the basis of Date. You can just Enter the ‘To’ and ‘From’ Date and the reports will be shown to you.

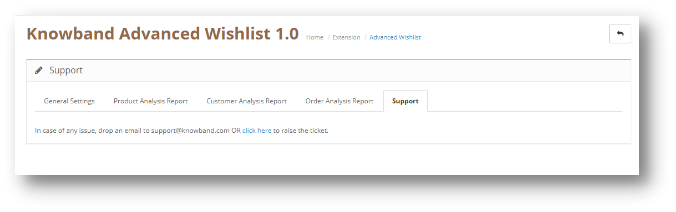
3.0.5 Support

In case of any issue, drop an email to support@knowband.com OR click here to raise the ticket.

4.0 User Interface of OpenCart Advanced Wishlist Extention

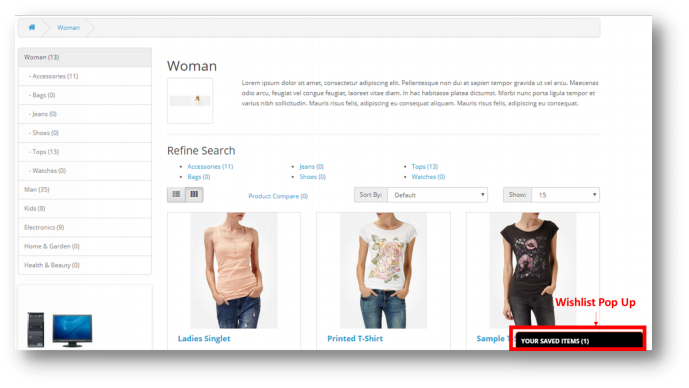
The Wishlist pop up will be shown to the user at the bottom of the page as shown below:

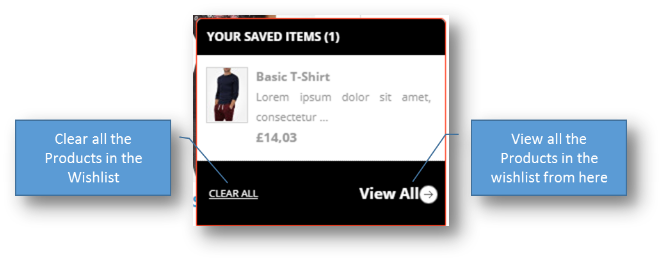
When User will click on the Pop-Up Bar, the following pop-up will show:

5.0 Opencart Advanced Wishlist Tutorial

In this comprehensive tutorial, we walk you through everything you need to know about the OpenCart Advanced Wishlist. From installation to complete configuration, we cover all the settings step by step.

You’ll also learn how to set up and customise the wishlist for the frontend, ensuring a seamless experience for your customers.

This video provides complete guidance from start to finish, making it easy for you to implement and manage the Advanced Wishlist on your OpenCart store.

6.0 Knowband Support

If you face any issues or need assistance with the OpenCart Advanced Wishlist, Knowband provides dedicated support to help you resolve your queries quickly. Our support team can assist with installation, configuration, customisation, and troubleshooting.

You can reach Knowband support via email at support@knowband.com or by raising a support ticket through our official website. We will guide you step by step to ensure the extension works perfectly for your store.

Explore more plugins

Opencart Video Manager extension:  https://www.knowband.com/opencart-videomate-extension

Opencart AI Content Generator Plugin: https://www.knowband.com/opencart-ai-content-generator

OpenCart Sales Coupon Enhancer – User Manual

1.0 Introduction

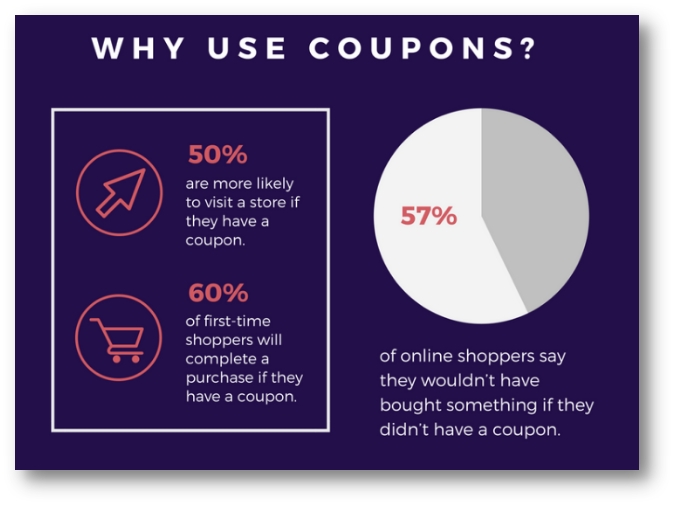
Coupons are the best way to get your Customer’s Attention. The goal of any offer or coupon is to encourage the consumer to try the product or service. Offering Coupons introduce new customers to your store, introducing new product lines, providing a way to get rid of unwanted inventory to make room in your warehouse or store for a newer product, encouraging customers to try a new brand that is more profitable to you or getting customers to come back to your Web store. Opencart Sales Coupon Enhancer by Knowband makes the job of generating these coupons easy for you. You are just one click away of generating your Discount coupons as per your needs by OpenCart Coupon Code generator Extension.

The key to maximizing the advantage of coupons in today’s digital world is using coupons as a way to build your customer base. Coupons can become a crucial part of your social media marketing provided you use them strategically.

Using discounts coupons can be a powerful tool to get you the spike in sales that you are looking for. And once you’ve achieved that, you can then use it as a springboard to skyrocket your sales to even greater heights. You can easily generate your coupons using Opencart coupon code generator extension and thus increasing your sales.


1.1 Features

2.0 Installation Guide

Before starting the installation process, you have to buy the Opencart sales coupon enhancer by the Knowband store. Once purchased, you will receive the following files on your registered email.

  • Source code of Opencart sales coupon enhancer in zipped file format.
  • User Manual of Opencart sales coupon enhancer.

Now in order to install this on your online shop, follow the given steps:

Step 1: Unzip the zip file. You will get the folders as shown in the image below:


Step 2: Copy all the folders of the zip file in the Root Directory of OpenCart setup via FTP manager.

Step 3: There is a file name kbsales_coupon_enhancer.ocmod,xml (for OC<3.0) or  kbsales_coupon_enhancer.ocmod,zip (for OC>3.0). You need to install this file in the following Location:

Step 4: After Installation you need to select this file and refresh Modifications:

So, Opencart sales coupon enhancer is now successfully installed and is ready to use at your store. Go to the admin menu and click on the extensions. Choose the Extension Type as Modules. You will find a list of modules. Select the Knowband Sales coupon Enhancer.

3.0 Admin Interface of OpenCart Sales Coupon Enhancer

To configure the Sales Coupon Enhancer module for OpenCart, Navigate the settings in the following order:

Admin Panel >> Extensions >> Modules >> Knowband Sales Coupon Enhancer

The Admin Interface of OpenCart Sales Coupon Extension includes four main settings:

  • General Settings
  • Configure Coupons
  • Statistics
  • Coupons

3.0.1 General Settings

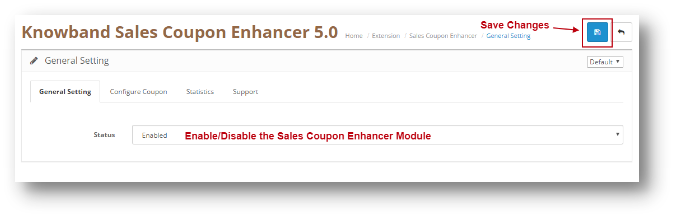
This setting will have the Option to enable/disable the plugin. The page will look like as shown below:

3.0.2 Configure Coupon

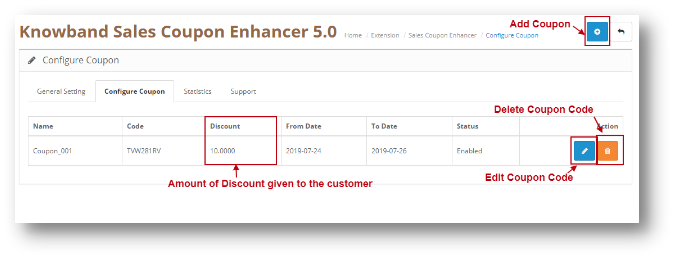
Through this setting of OpenCart Sales Coupon Extension, you can add a New Coupon Code or make changes in the Existing Coupon Codes. The screen will look like as shown below:

  • Edit a Coupon: You can Edit an existing Coupon using the Edit option. The screens for Editing Coupon will be same as Adding a Coupon. The only difference will be that Edit will have the fields already filled.
  • Delete a Coupon: You can delete a Coupon by clicking on the ‘Trash’ Icon.

3.0.2.1 Add a Coupon

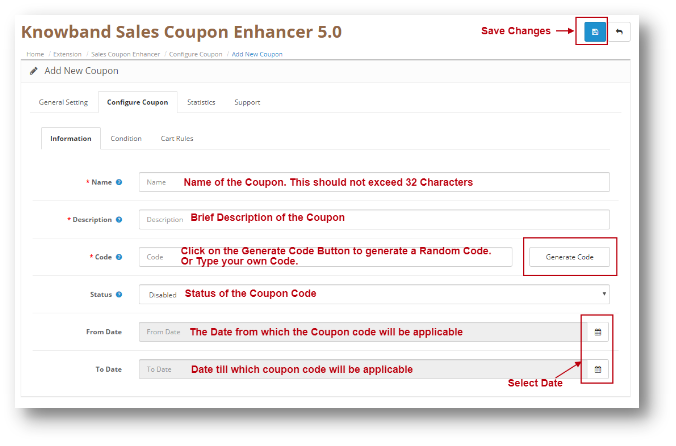
You can add a Coupon Code by Clicking on the ‘+’ Icon provided on the Top of the Page. The following screen will show up. Add Coupon will have three Tabs as explained below:

Information


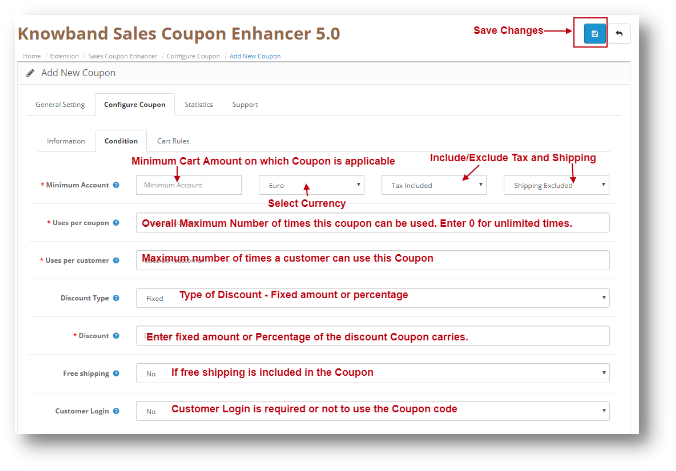
Condition Tab


Cart Rules

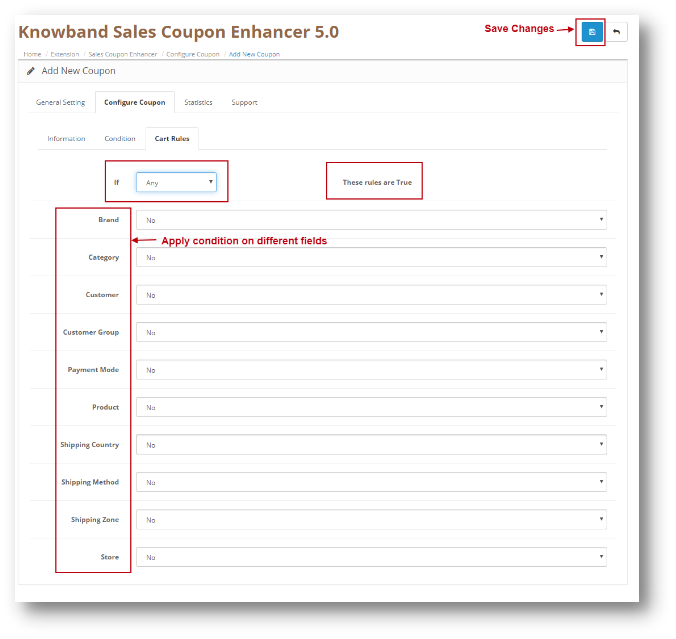
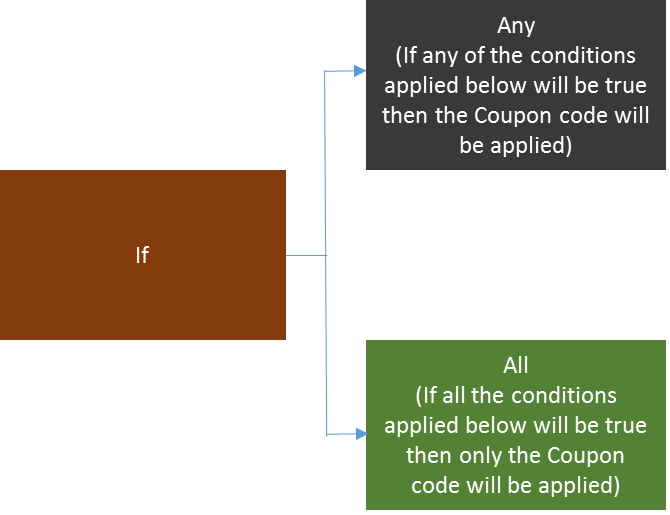
You can apply different conditions on a coupon using Cart Rule Tab in OpenCart promotional vouchers Generator. Conditions are explained in detail below. Let’s have a look at the screenshot:

Conditions on Different fields:

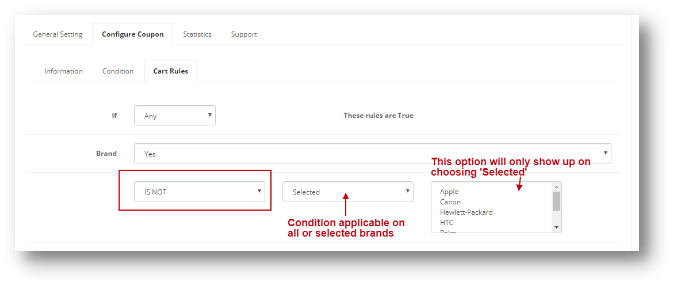
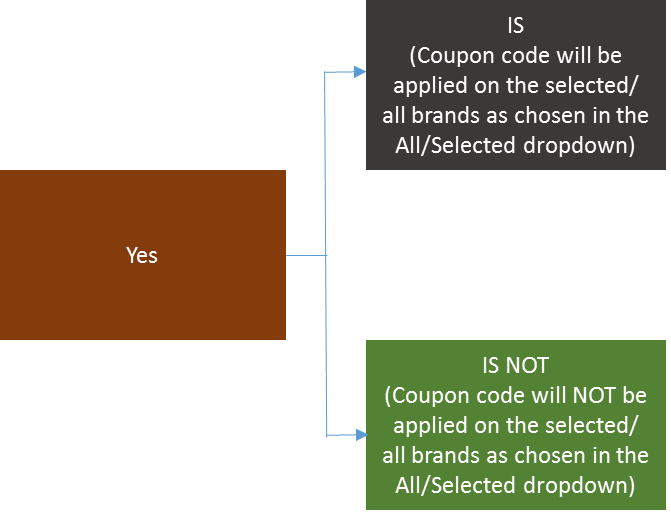
Various fields are shown in the Opencart Promotional Vouchers Creator. Let’s take one example of Brand and apply a condition on it. To apply a condition, select Yes in the dropdown of the Brand. The screen will look like as shown below:


This is how you can select the condition for different fields in the Cart Rules Tab.

3.0.3 Statistics

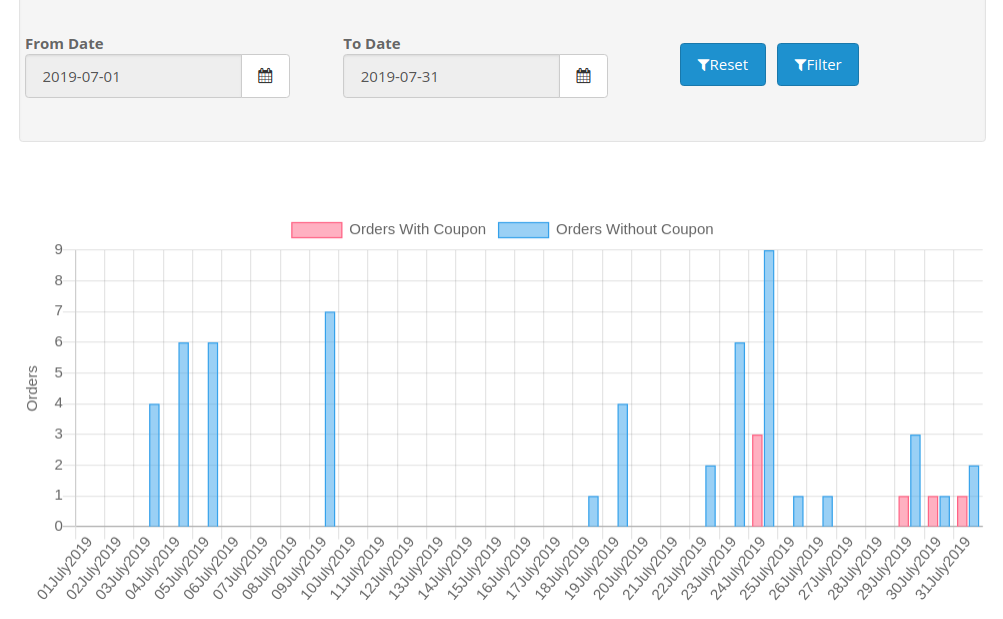
Through this setting of OpenCart Sales Coupon Extension, you can view the statistics of your Coupons. It will show you the graphical representation of Order placed which used coupons and which did not. The screen will look like as shown below:

3.0.4 Support

If you need any Support, then drop an email to support@knowband.com OR click here to raise the ticket.


4.0 User Interface of OpenCart Sales Coupon Enhancer

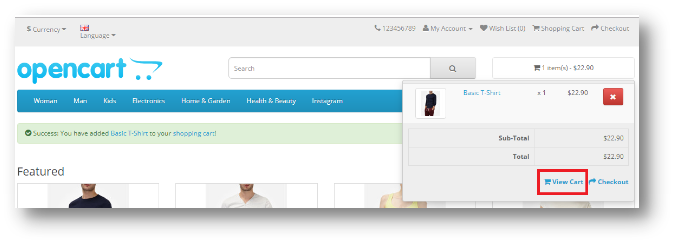
Once you add a Product from cart, Click on View cart as shown in the screenshot below:

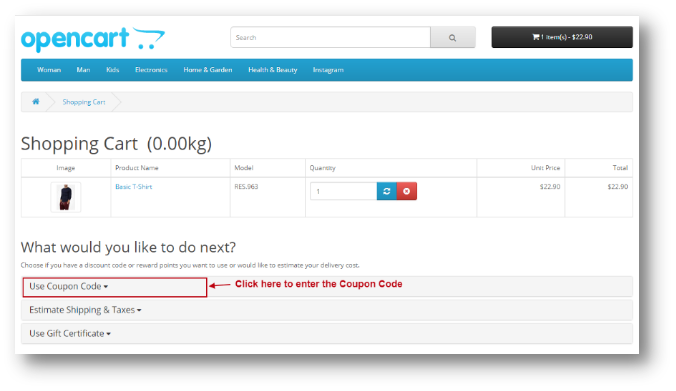
The following page will open up:

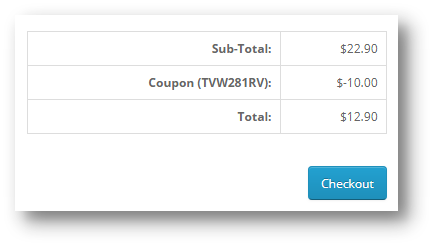
Once the Coupon Code is applied, Amount will be discounted in the Total Section and User can proceed with the Checkout.

Knowband OpenCart Search More Module – User Manual

Introduction:

Knowband offers OpenCart more search module which helps you to make product searching easy for your website store customers. This OpenCart plugin implements a special functionality which auto-completes search. Thus the store visitors can get search suggestions without any hassle. When customer type anything, at the same time-related search suggestions, appears as a suggestion.

Features:

  • Check out the salient features of this OpenCart search mechanism:
  • The OpenCart search products module is absolutely easy to install and configure.
  • It is very simple to enable/disable this OpenCart plugin.
  • It offers you to display product price and caption in search results.
  • The OpenCart search mechanism is highly customizable.
  • You can implement this functionality without any codes changes.
  • OpenCart refined search offers hassle-free implementation.
  • You can choose the layouts on which you want to display search suggestions.
  • You can manage the look and feel.
  • Allows editing the color of highlight text in the search results.
  • You can show/hide out of stock products in search suggestions.
  • You can decide the number of search suggestions at a time.
  • You can view the total number of top ten searched keywords.
  • It provides search results at the same time of searching.
  • It offers fast AJAX product search for better user experience.
  • The OpenCart improve filter is fully mobile responsive.
  • This plugin allows searching products in the product description, tags, SKU, UPC etc.

How to install OpenCart Search More plugin on your server

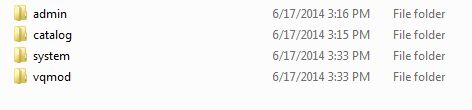
1. Folder structure of the Slideup Promotion plug-in folder.

2. Open the upload folder and you will find the following folder structure:

You must have VQMOD installed for this plug-in to work. If VQMOD is not installed please download and install from the URL below:
https://code.google.com/p/vqmod/

3. Select all the folder and drag and drop them to the root directory of your OpenCart store through FTP.

4. You will be able find the plug-in ready to be installed in the Modules in your OpenCart store as shown below.

5. Click on the Install link to install the plug-in. This will also add a dropdown option in your menu bar which will list all plug-ins by Velocity installed on your store for fast navigation. This dropdown also has a message box, using which we can inform you about new launched plug-in or new update.

6. Delete the Vqcache files from the vqmod/vqcache folder.

7. To access Slideup Promotion plug-in click on edit button in module section as shown below:

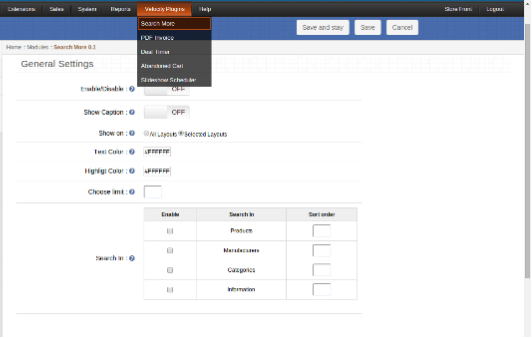
8. On clicking edit button the module for plug-in will open. It contains navigational bar at top, menu at left and main content at center as shown below.

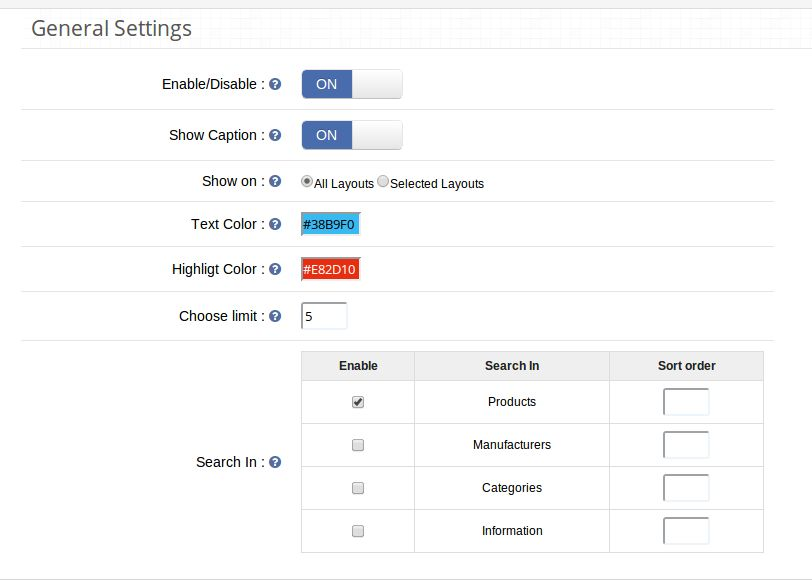
1. General Settings tab

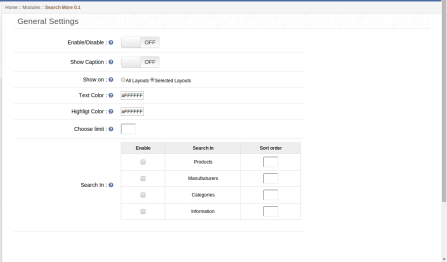
General Settings tab will have following options:

1. Enable/Disable :

This is the main switch to enable/disable the entire Module

2. Show Caption:

You can show captions below each search result. You can also show the price of the products.Admin can choose the show or hide price along with the name of the product in the search result. In case of manufacturers, category, and information, a caption can be shown or hidden instead of price.

3. Choose layouts to be shown on :

You can choose to show the show more search box on layouts of your choice, you have two options to choose from :

a) All Layouts

b) Selected Layouts.

In case option b) is selected, another field will start appearing with a multiple selection box with list of all layouts. User may select any number of layouts here.

4. Choose Text color for search results:

Admin can choose text color for the search result to come up with when used on the front end.

5. Choose highlight color for search results:

Admin can choose highlight color for the search result to come up with when used on the front end.

6. Choose search results limit:

Admin can choose max limit for the search results.

7. Show caption:

Admin can choose show or hide price along with the name of the product in search result. In case of manufacturers, category and information, a caption can be shown or hidden instead of price.

8. Search In:

Here you can choose to search not only products but also categories , manufacturers and Information. That is, if someone for example types a character in search box, search result will come up showing not only products but also name of manufacture

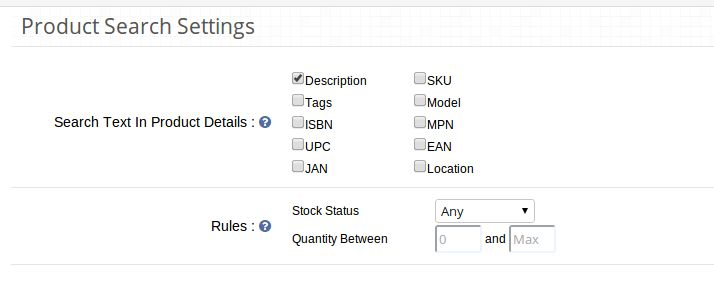
2. Product Search Settings tab

This tab will help admin decide on what basis should products be searched.

1. Search Products in:
Here you will get number of options, out of which you can select as many as you want to. These options will be in form of check boxes. Some of the options being Description, Tags, Model, SKU, UPC, EAN, JAN, ISBN, MPN etc.

Note that, in case product search has been selected, search term will be searched in a products name.

2. Rules:

In order to improve search results, admin can use these filters/rules :

A. Stock Status: This will be a dropdown field with all possible stock statuses as options to choose from.

B. Quantity between: This field essentially has two text boxes that only allow numeric values. You can type in the min and max values or leave them blank if you don’t want to filter on basis of quantity.

3. Search Statistics tab

Using this module, you can not only search fast and better, but also view the most searched keywords. A detailed list of keywords will be listed in this tab of admin panel where admin can view the most searched keywords , count, date when it was last searched, date when it was first searched.

Also, you can view upto 10 most searched keywords in form of a pie chart for better visualization.

Store Front

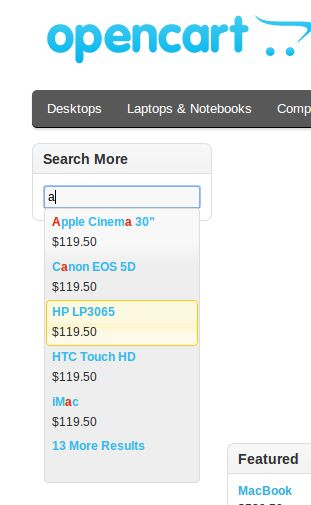
On the front end, the default search box will be replaced by the new search box which will display products along with there price via auto-suggest functionality on basis of the options selected in admin panel.

Also, in a module too search results can be seen via auto-suggest.

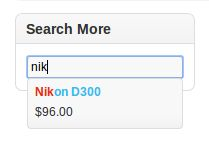
Search word highlight:

When the user will type in any characters and search results are displayed on basis of the search characters, the search characters will be highlighted in all the search results. The characters will be highlighted in the configured color.

Clicking on any of the search results will redirect user on the appropriate page. Clicking a products name will land you on that products page, clicking on a manufacturers page will land you on that manufacturers page and similarly for category and information.

For more details please visit:

Module Link: https://www.knowband.com/opencart-search-more

Admin Demo Link:

https://ocdemo.knowband.com/?url=admin/index.php?route=module/searchMore&token=a261b78f42e6ddd5a8dbd9a17bd60825

Front Demo: https://ocdemo.knowband.com/1.5/index.php?route=common/home

Please contact us at support@knowband.com for any query or custom change request as per your business requirement.

OpenCart Deal Timer – User Manual

1.0 Installation

You can follow the steps mentioned below to install the OpenCart Deal Timer extension by Knowband on your server.

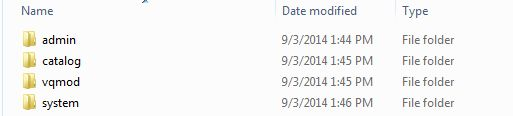
  • The folder structure of the Opencart master deal timer folder.

  • Open the uploaded folder and you will find the following folder structure:

https://code.google.com/p/vqmod/

  • Select all the folders, drag and drop them to the root directory of your OpenCart store through FTP.
  • You will be able to find the Opencart product countdown plugin ready to be installed in the OpenCart modules on your OpenCart store as shown below.

  • Click on the Install link to install the Special offer timer Opencart extension. This will also add a drop-down option in your menu bar which will list all plugins by Velocity installed on your store for fast navigation. This drop-down also has a message box, using which we can inform you about newly launched plugins or new updates.

  • Delete the Vqcache files from the vqmod/vqcache folder.
  • To access Opencart countdown timer module, click on the edit button in the module section as shown below:

On clicking the edit button, the module for the plugin will open. It contains navigational bar at the top, the menu on the left and main content at the center as shown below.

2.0 User Manual

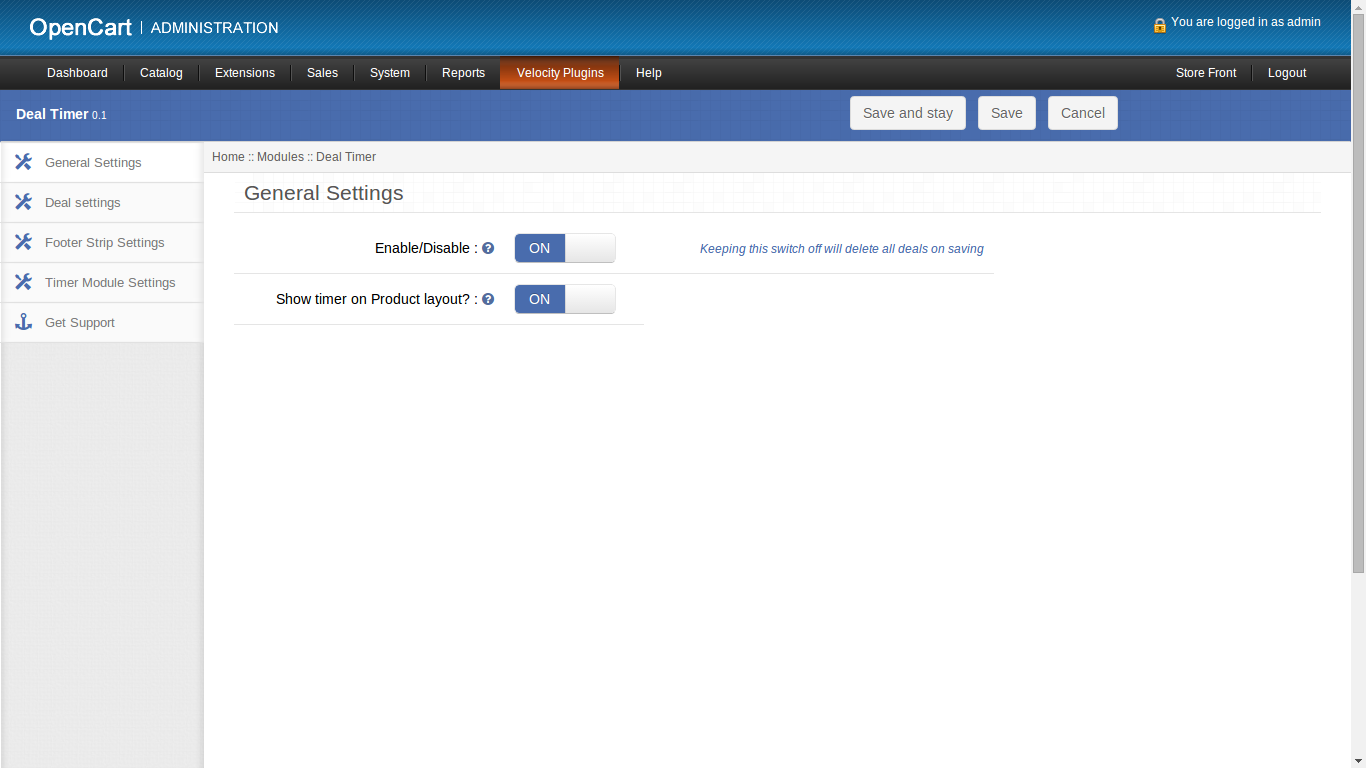
2.0.1 General Settings

General Settings of the Special offer timer Opencart extension tab by Knowband has following options as shown below:

  1. Enable/Disable: This is the global enable switch. On switching this ON, the entire Opencart countdown timer module is switched on and similarly switched off on turning it OFF. If the switch is off, no footer strip, module or product timer will be visible, also the deals added in deals settings tab will also be deleted.
  2. Show timer on product layout: Enabling this will start showing a small timer beside the discounted price for each special product (On which discount can be availed).

2.0.2 Deal Settings tab

This tab lets the admin create deals and group products in these deals. He can provide a discount ‘%’ for a group of products for a period of chosen duration. It has a table like structure with each having the following fields:

  • Deal Name: This textbox is a required field which describes the name of your deal. This name won’t be displayed on front end though.
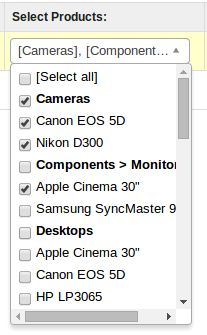
  • Select Products: This field in the Special offer timer Opencart extension is also required. Its a multiple selection drop-down with check-boxes. Main categories are the group heading and products under it are option values. You can select any number of products to include in this deal.

  • Discount %: You can specify the discount % which will be applied to each product in this group. In this required field, you can only type in numbers. Also, it shouldn’t be greater than 100.
  • Priority: You can choose the priority of a deal over another if they are falling in the same duration on a product. (This is optional)
  • Title: This field is a required textbox with a restriction of characters to be entered as this will be displayed on the footer strip and the front-end of the Opencart extension.
  • URL: This field is a textbox where you can enter the URL on which the user will be redirected by clicking the title of footer strip or Opencart special price timer module.
  • Start Date: This required field is a date picker. This will mark from which date shall discount be provided for the group of products chosen.
  • End date: This required field is a date picker. This will mark until which date shall the discount be provided for the group of products.

Other than these fields, there’s an option to add more deals or remove the existing deals from the system.
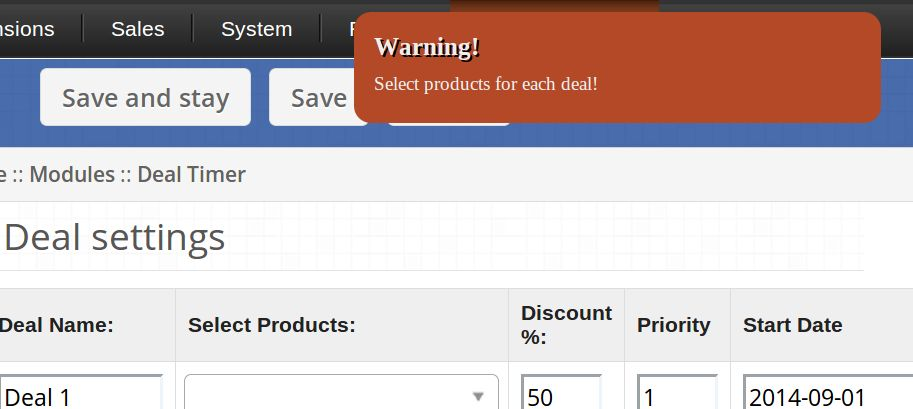
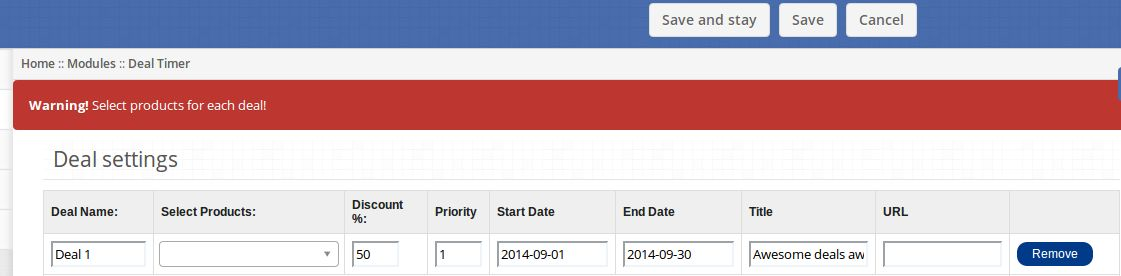
If one tries to save and stay on the page without filling up the required fields, appropriate warning messages will be displayed telling the problem with data entered.

On clicking the save button, the user is restricted as follows:

2.0.3 Footer Strip Settings tab

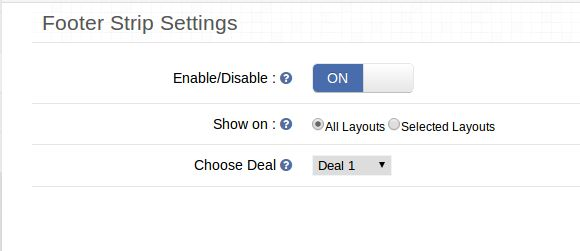
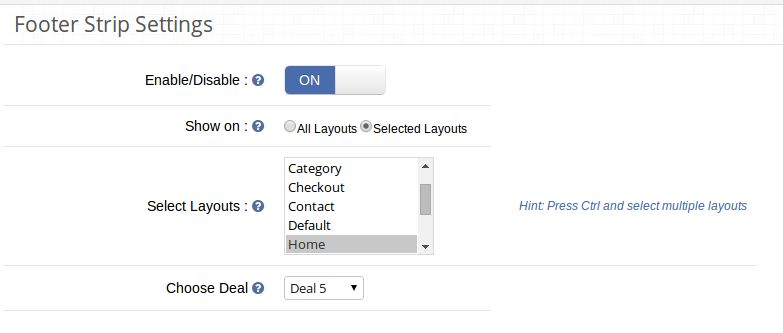
This tab lets you enable/disable the footer strip that displays the text and timer for the deal. It has following fields:

  • Enable/Disable: Enabling this setting will show the footer strip when a deal is active.
  • Show on: You can choose to show the footer strip on layouts of your choice, you have two options to choose from: a) All Layouts b) Selected Layouts. In case option ‘b)’ is selected, another field will start appearing with a multiple-selection box with the list of all layouts. The user may select any number of layouts here.

Choose Deal: A drop-down lists down all Deals added to the system. The selected deal will be the one, whose text and URL will be displayed on footer strip.

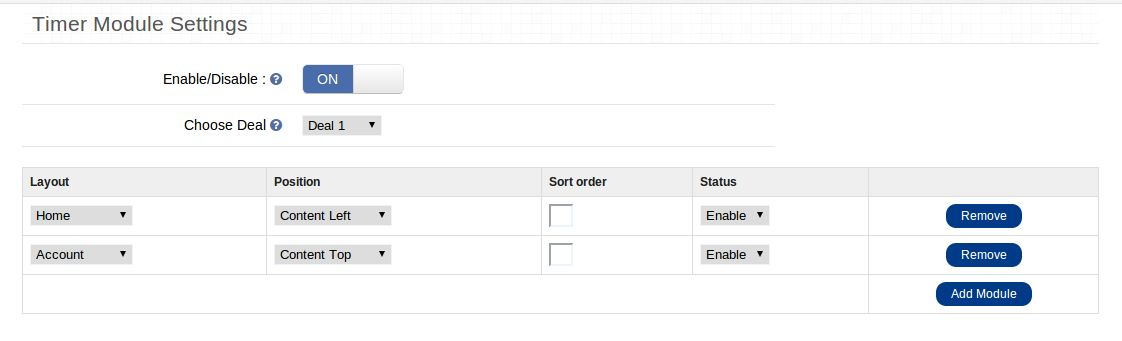
2.0.4 Timer Module Settings tab

With this Opencart master deal timer plugin, you can also have a separate module in addition to footer strip that can be applied to any layout and position. This OpenCart module by Knowband essentially contains a timer whose countdown is based on the deal chosen for this module. It has following fields:

  • Enable/Disable: Enabling this setting will show all active timer modules on respective layouts.
  • Choose Deal/group: A dropdown will list all deals added with this plugin. The selected deal will be the one, whose start Date and end date will determine countdown of the timer of the module. If you choose to show a deal whose start date is in future, the countdown for the deal to start will be displayed otherwise countdown for a deal to end will be shown.

A table like structure follows with each row having following fields:

  1. Layout: Choose layout on which you want to add the module.
  2. Position: Choose a position on which you want to add a module.
  3. Sort Order: Choose sort order.
  4. Status: Enable/disable each module individually.

Note: In order to view a module you must ensure that it has enabled status, Timer module setting also is enabled, and the global enable is enabled as well. If anyone of the three fields is disabled, the OpenCart module will be disabled and thus, not displayed.

Other than these fields, there are buttons to remove each row and to add another row (Module).

2.0.5 Get Support tab

By clicking on ‘Get Support tab’, you will be redirected to our support website, where you can contact our support for help. Use this tab in case you some query/issue or found some bug.

Store Front

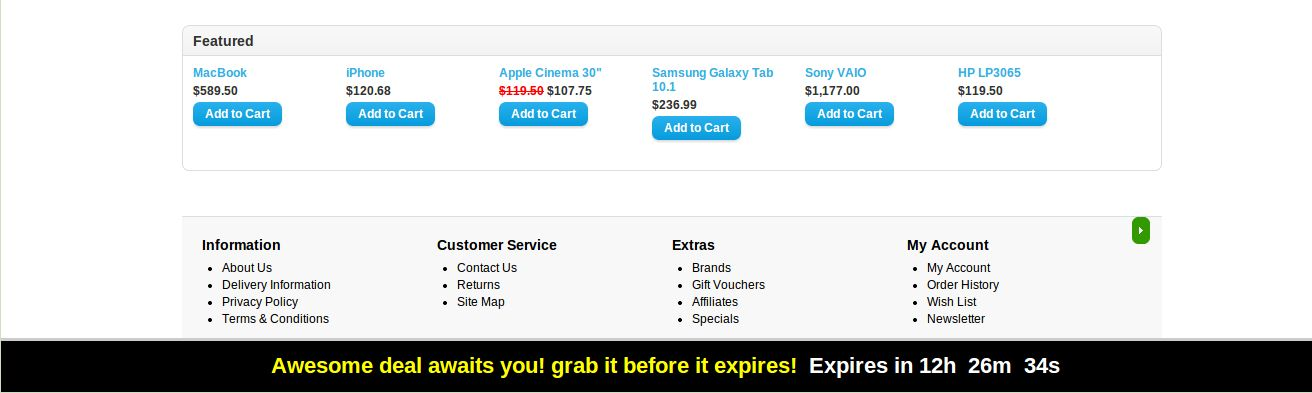
Footer Strip

On the front end, visitors will see the footer strip for the selected deal on either each page or selected ones.

You may click on the title being displayed in the footer and you’ll be redirected to the URL associated with the deal.

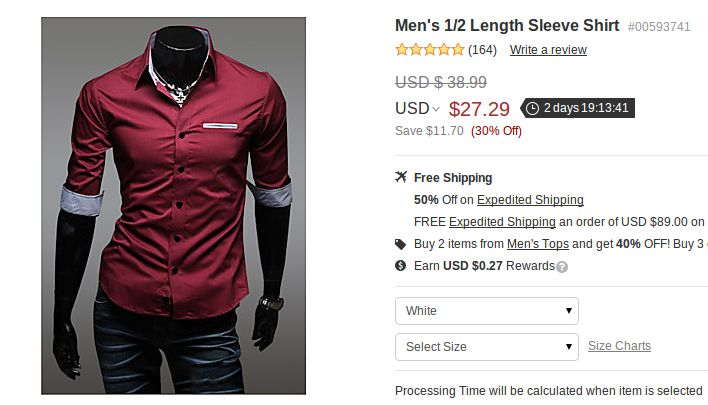
A timer on Special Products

A timer will be displayed beside the discounted price on viewing a special product if you have enabled showing products timer in the admin panel.

OpenCart Review Incentive – User Manual

How to install OpenCart Review Incentive plugin on your server

1. Folder structure of the Review Incentive plug-in folder.

2. Open the upload folder and you will find the following folder structure:


You must have VQMOD installed for this plug-in to work. If VQMOD is not installed please download and install from the URL below:
https://code.google.com/p/vqmod/

3. Select all the folder and drag and drop them to the root directory of your OpenCart store through FTP.

4. You will be able find the plug-in ready to be installed in the Modules in your OpenCart store as shown below.

5. Click on the Install link to install the plug-in. This will also add a drop down option in your menu bar which will list all plug-ins by Velocity installed on your store for fast navigation. This drop down also has a message box, using which we can inform you about new launched plug-in or new update.

6. Delete the Vqcache files from the vqmod/vqcache folder.

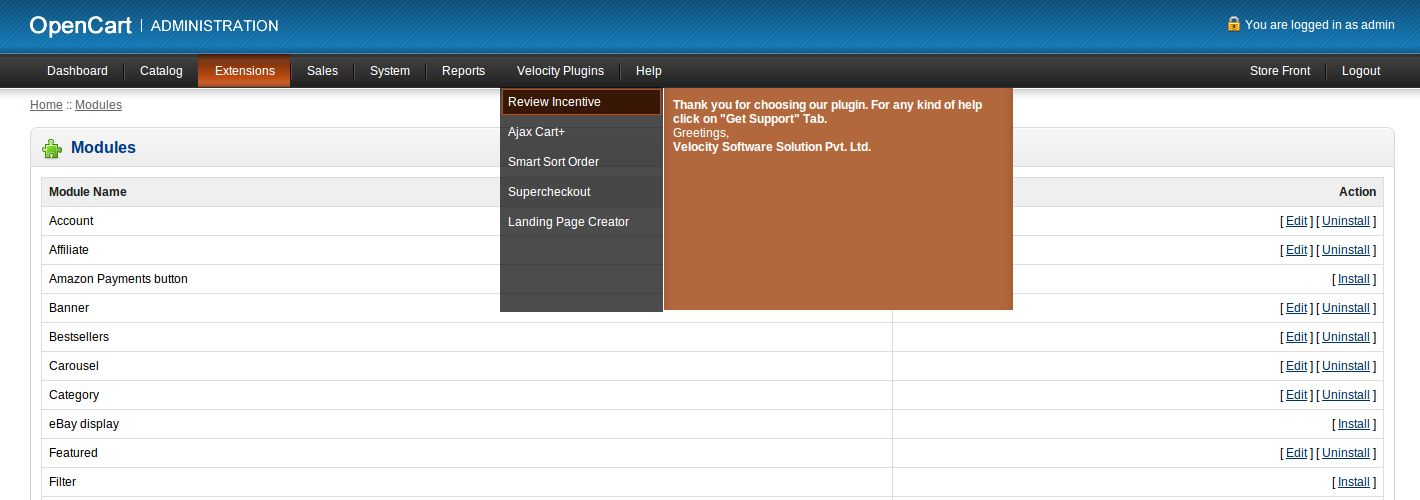
7. To access Review Incentive plug-in click on edit button in module section as shown below:

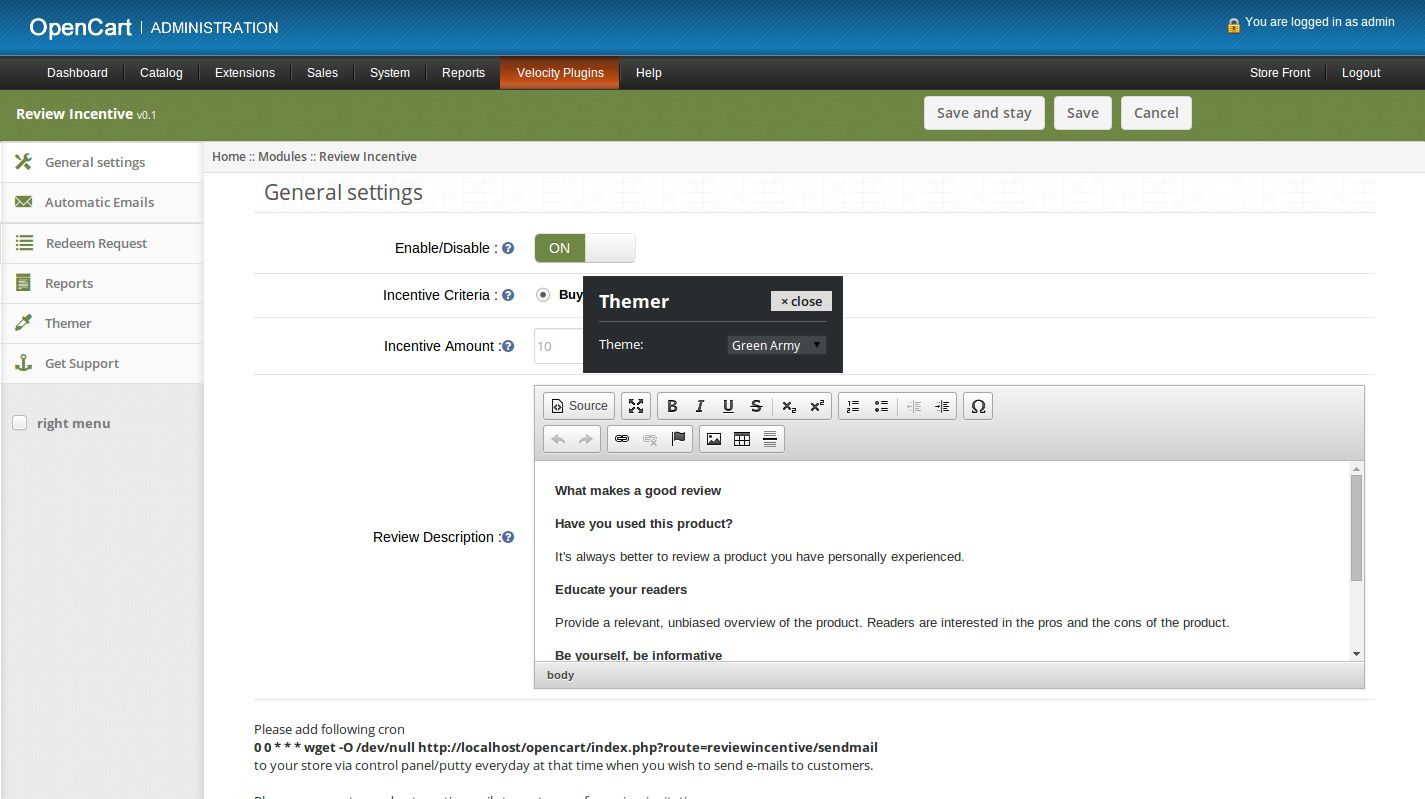
8.On clicking edit button the module for plug-in will open. It contains navigational bar at top, menu at left

and main content at center as shown below.

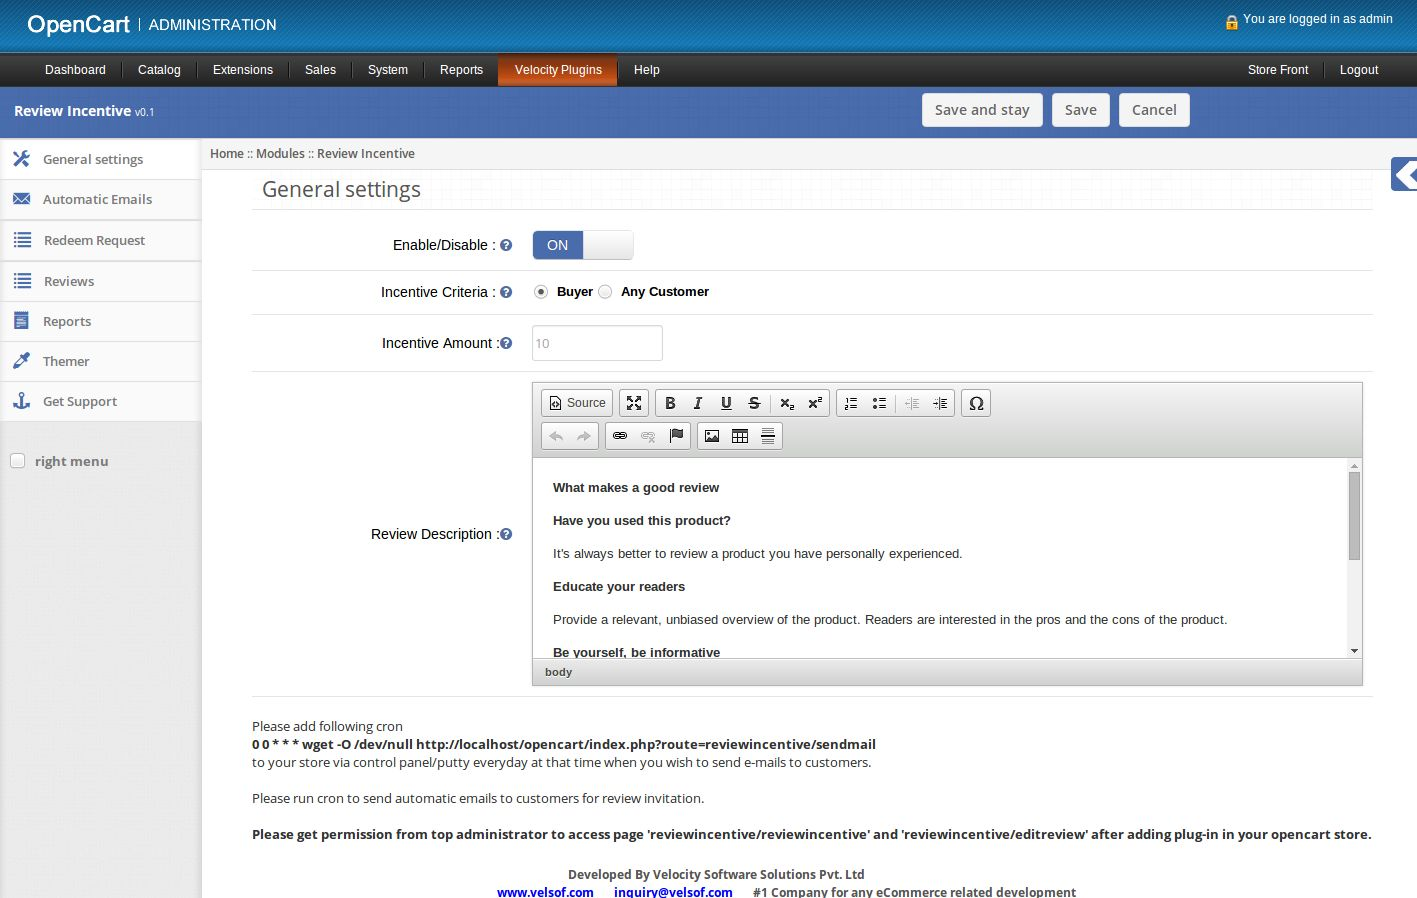
1. General Settings

1. To enable/disable plug-in, Switch the enable button OFF to ON / ON to OFF this is just to the right of
Enable/Disable label.

2. Incentive Criteria – Select Buyer if you wish to give incentive to only those customers who purchased the product he/she reviewed. If you wish to give incentives to all customers who reviewed the product then select Any Customer.

3. Incentive Amount – Set the amount to give as incentive to customers on writing a review.

4. Review Description – Set content to show on left column in Write Review page.

2. Automatic Emails tab

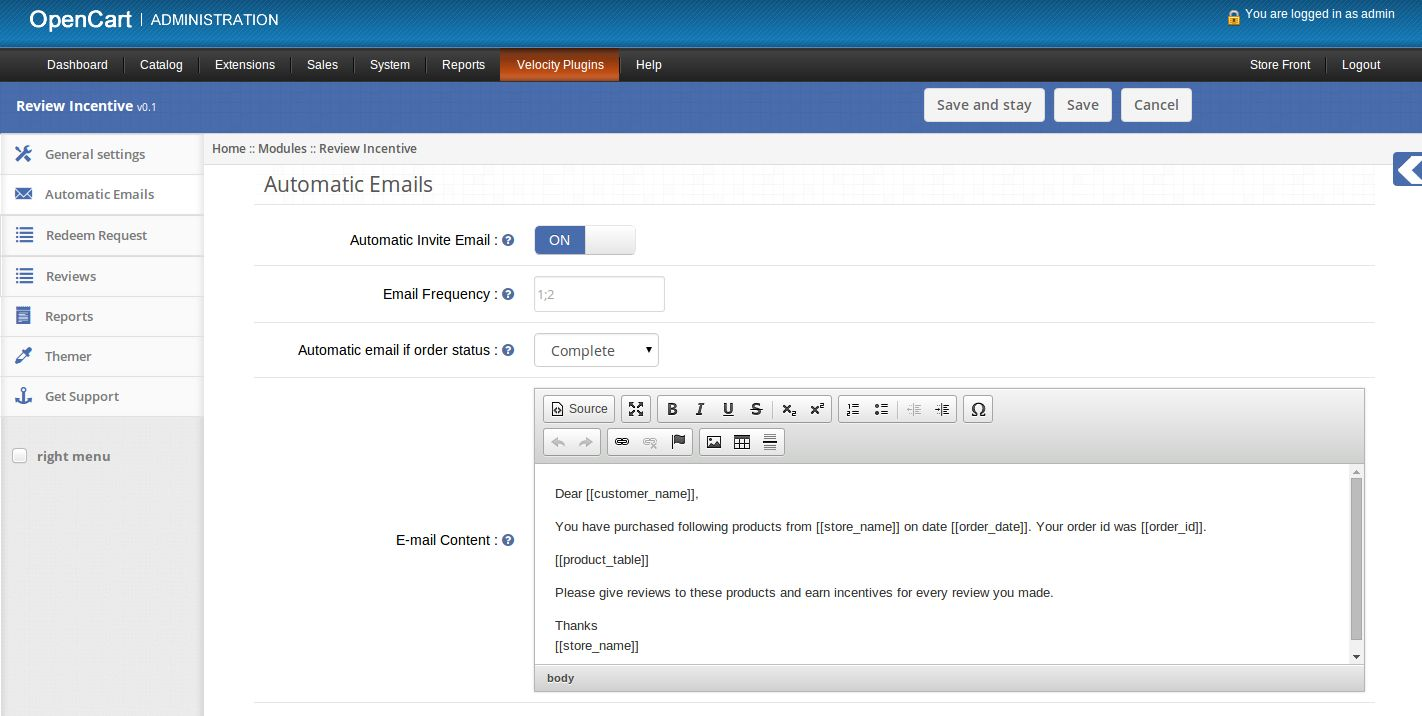
1. Here admin can set values for sending automatic emails to customer for inviting them to write review.

2. Automatic Invite Email – Enable or Disable sending of automatic emails to customers.

3. Email frequency – Set the number of days after which the automatic email will be sent to customers.
Admin can set multiple reminders (in days) using semicolon(;) as separator. If admin wish to send reminder after 2 and 3 days then he should set email frequency as 2;3.

4. Automatic email if order status – Set order status after which automatic email will be sent to customer.

5. Email Content – Set the content of email to be sent to customer .

6. Admin can use following variables in email content.
[[store_name]] — To write name of store.
[[customer_name]] –To write name of customer.
[[order_date]] — To write date on which order was made.
[[order_id]] — To write order id of order.
[[product_table]] — To show all products of order in tabular form.

7. If admin sets Email frequency as 2 and Order Status as Complete then automatic email.
will be sent to customer 2 days after his/ her order status is Complete.

8. If admin sets Email frequency as 2;3 and Order Status as Complete then automatic email will be sent to customer 2 days and 3 days after his/ her order status is Complete.

3. Redeem Requests tab

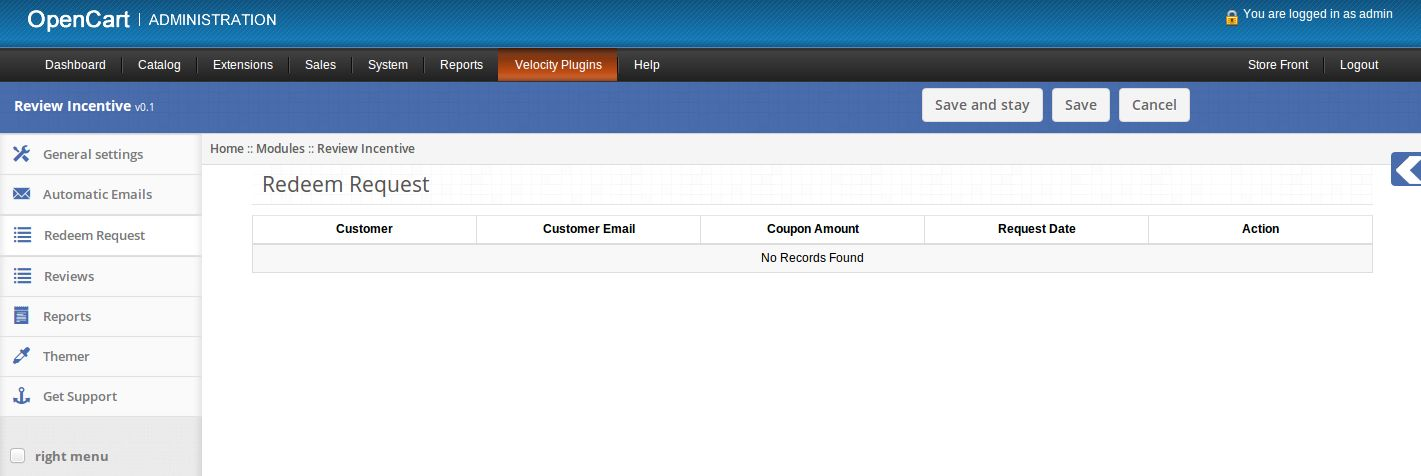
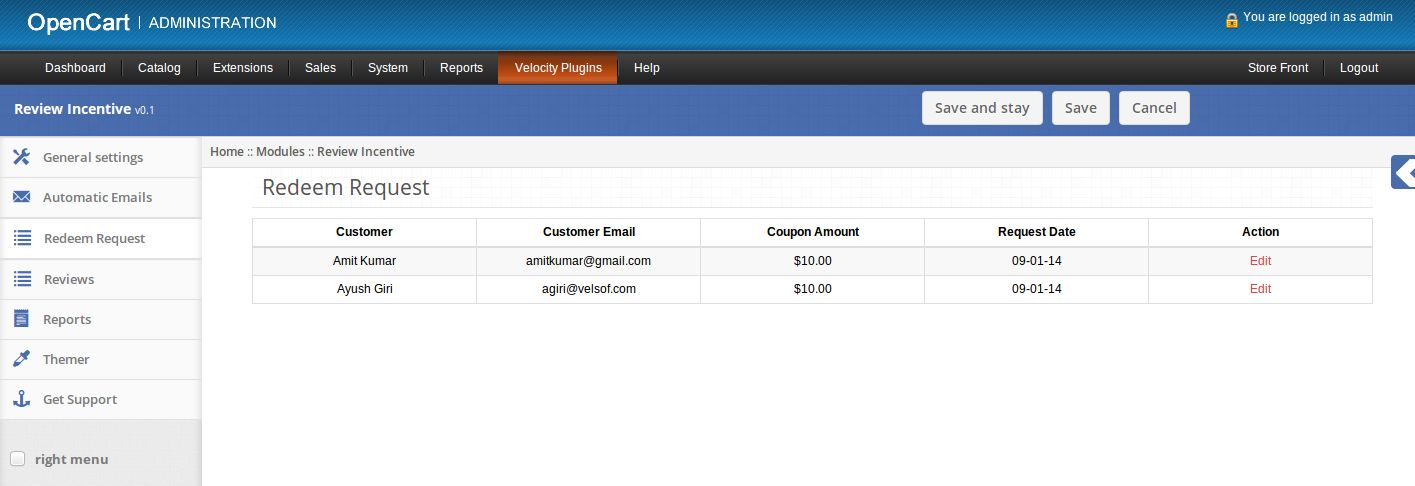
1. Here admin can see list of requests made by customers to get coupon as exchange of their incentives.

2. If their are no pending requests then this tab will look as follows:

3. If their are some requests then this tab will look as follows:

4. Click on edit link provided in front of each request to generate a coupon for the customer.

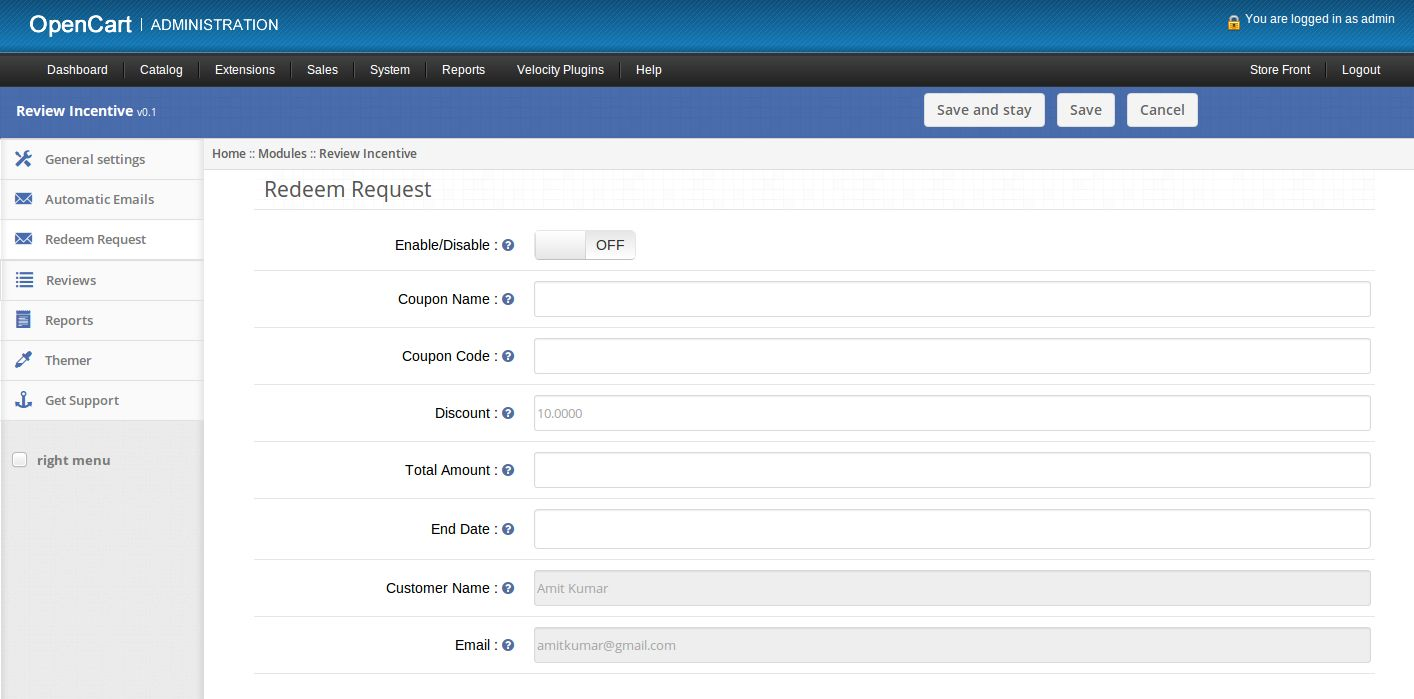
5. On clicking the edit link a new page will open to add coupon for the customer.

6. Enable/Disable: Enable or disable new coupon.

7. Coupon Name: Set name of new coupon.

8. Coupon Code: Set unique coupon code.

9. Discount: Fixed discount to give on coupon. This value should be same as requested by customer,but admin can change this value.

10. Total amount: The total amount that should reach before the coupon is valid.

11. End Date: Expiry date for coupon. Start date will be the date of enabling the coupon.

12. An email will be sent to give coupon code when new coupon is set enabled and saved.

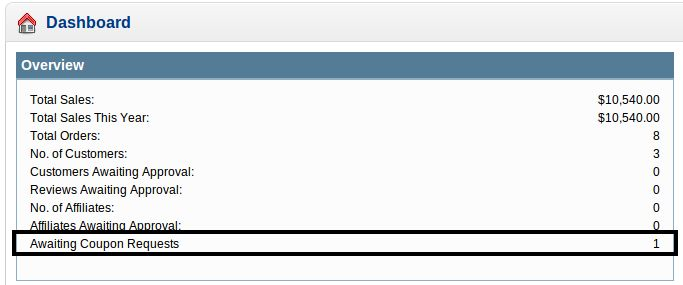
13. Total number of awaiting coupon requests is also displayed in dashboard of admin.

4. Reviews tab

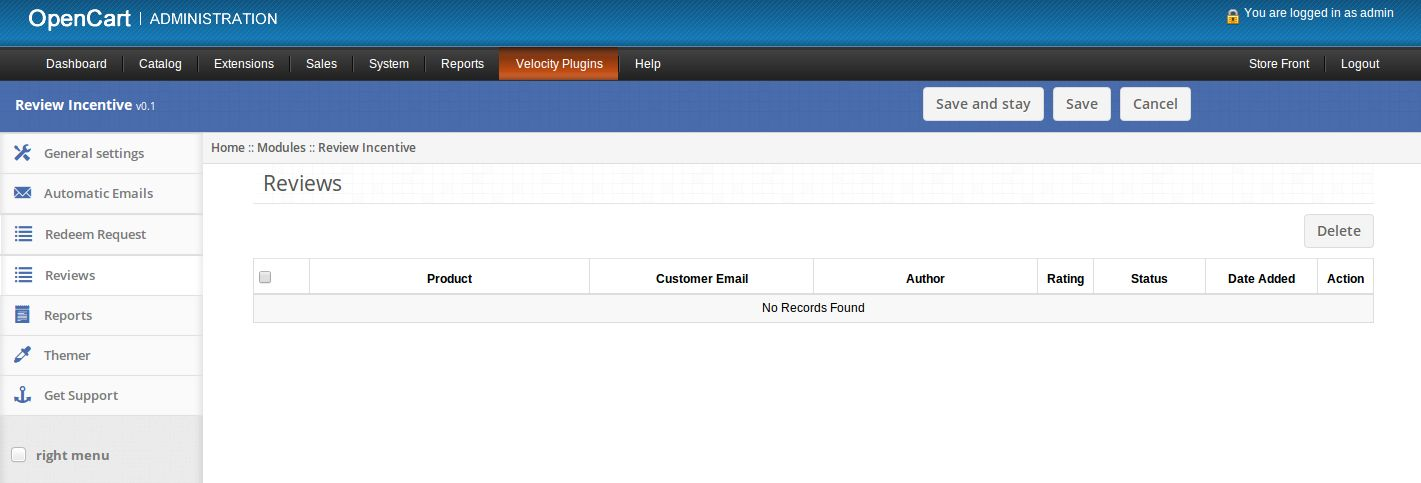
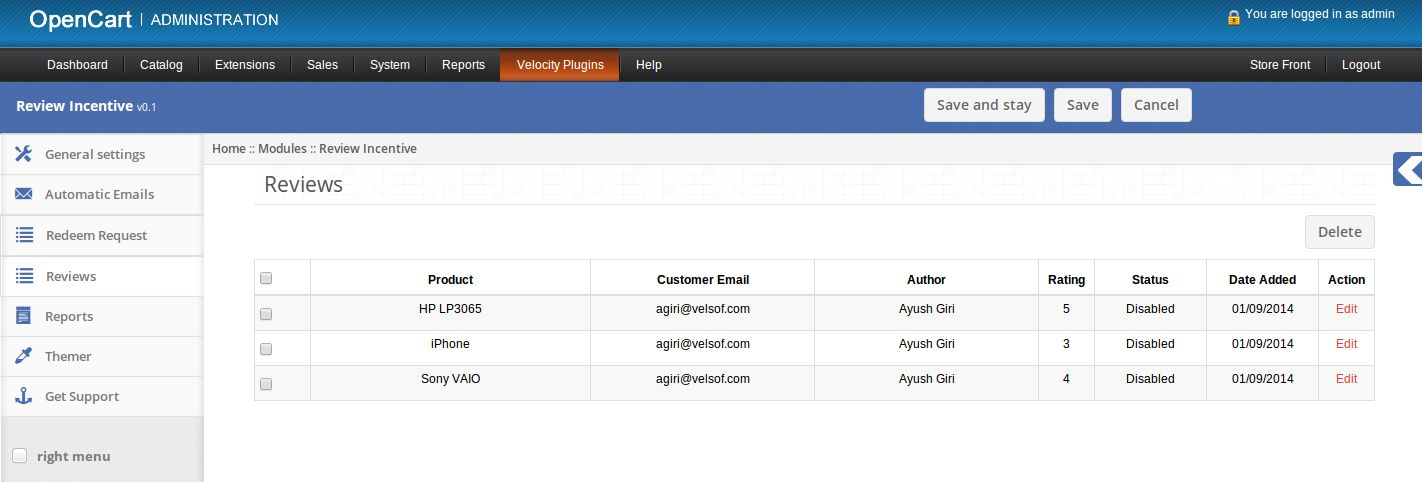
1. Here admin can see list of reviews made by customers and can edit those reviews.

2. If their are no reviews then this tab will look as follows:

3. If there are some reviews then this tab will look as follows:

4. Click on edit link provided in front of each review to edit/approve that review.

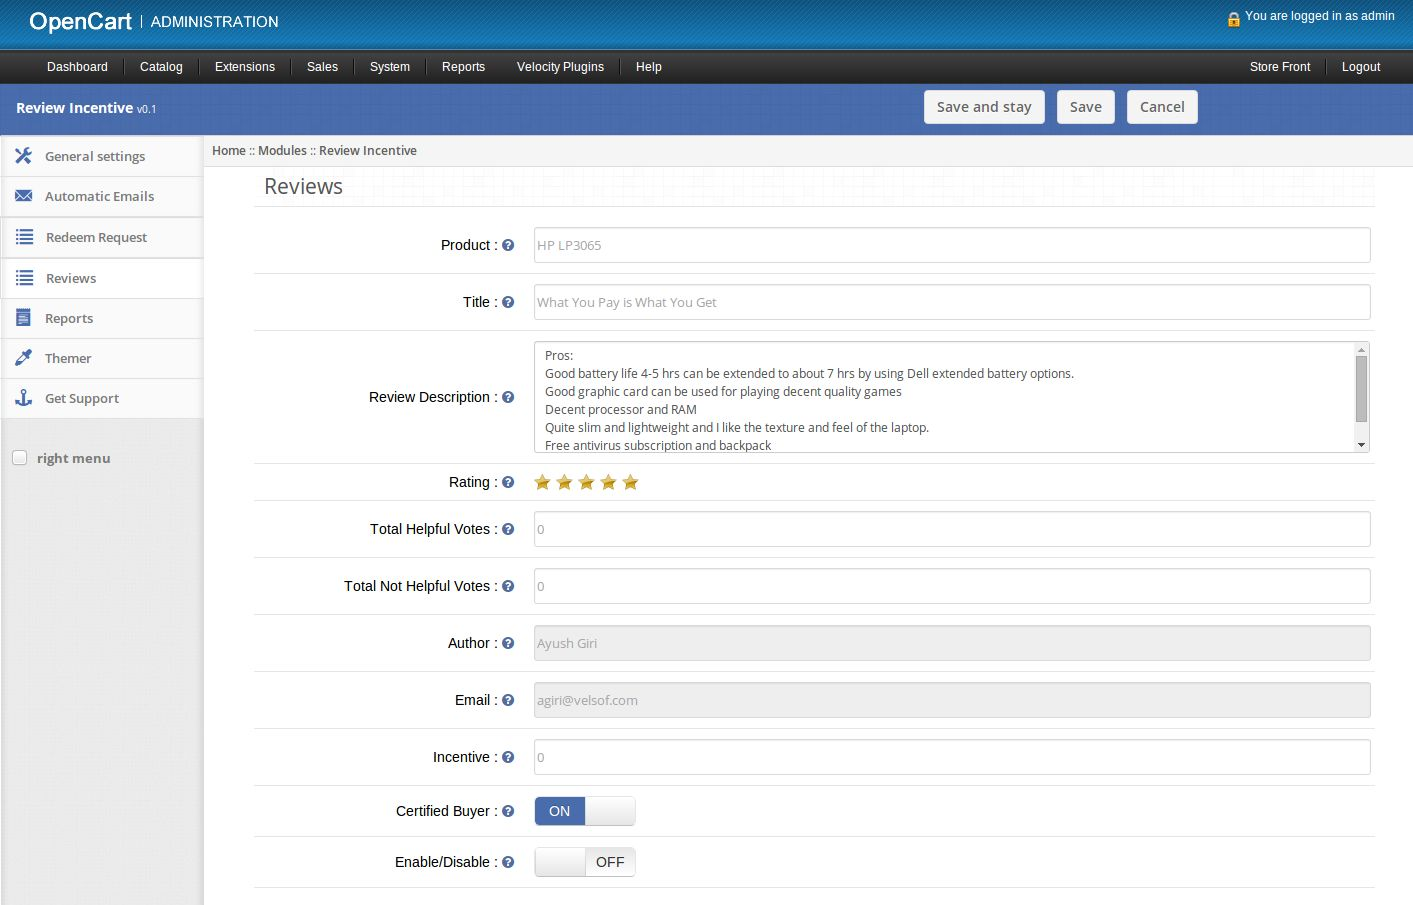
5. On clicking the edit link a new page will open to edit review.

6. Product: Set name of product.

7. Title: Set title of review.

8. Review Description: Set main text of review.

9. Rating: Set rating points for the product.

10. Total Helpful votes: Set the total number of users who found this review helpful.

11. Total Not Helpful votes: Set the total number of users who found this review not helpful.

12. Author: See the name of Author who wrote the review.

13. Email: Email of customer/author who wrote the review.

14. Incentive: Set incentive given to customer for writing the review.

15. Certified Buyer: Add or remove badge of certified buyer from the review for the customer.

16. Enable/Disable: Enable or Disable the review.

5. Reports tab

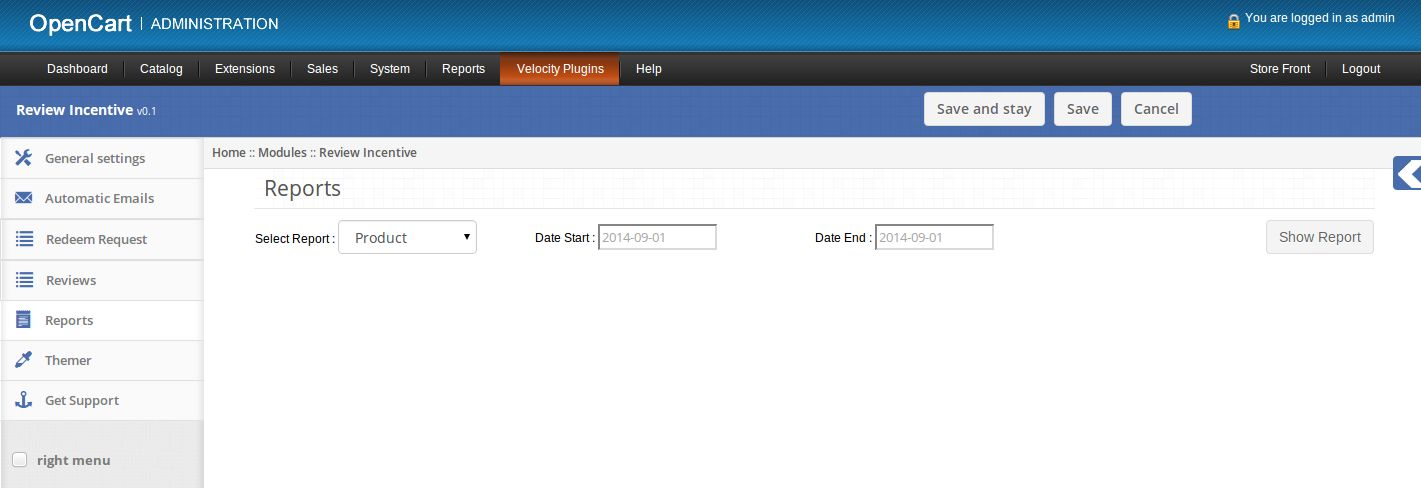
1. Here admin can see different reports related to review incentives.

2. Admin can select the type of report, start date and end date.

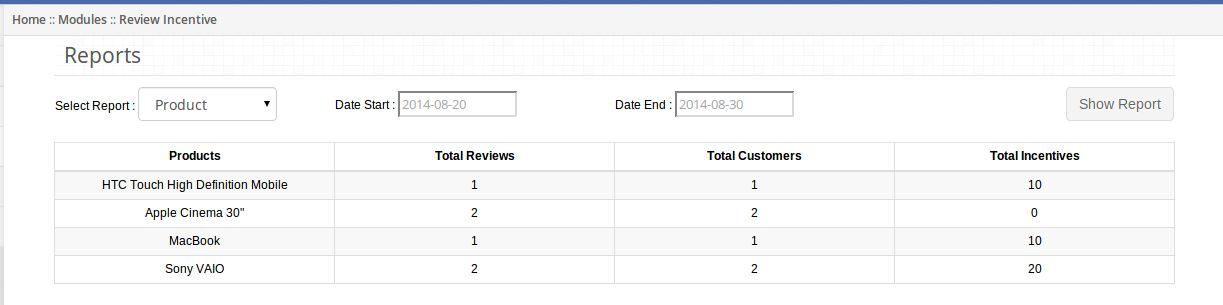
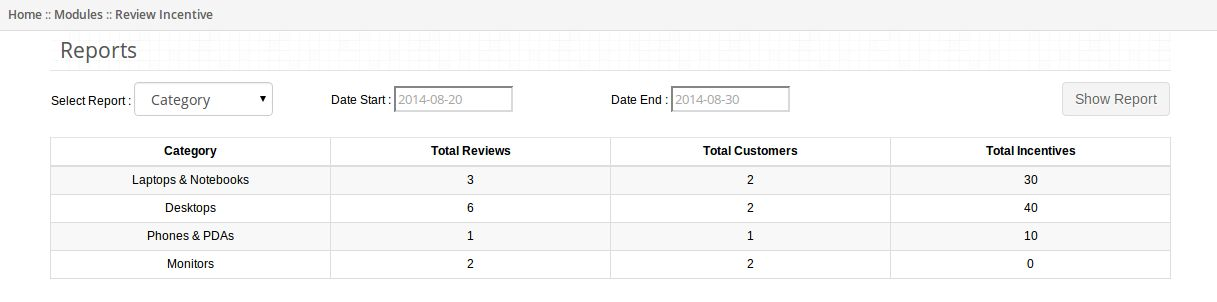
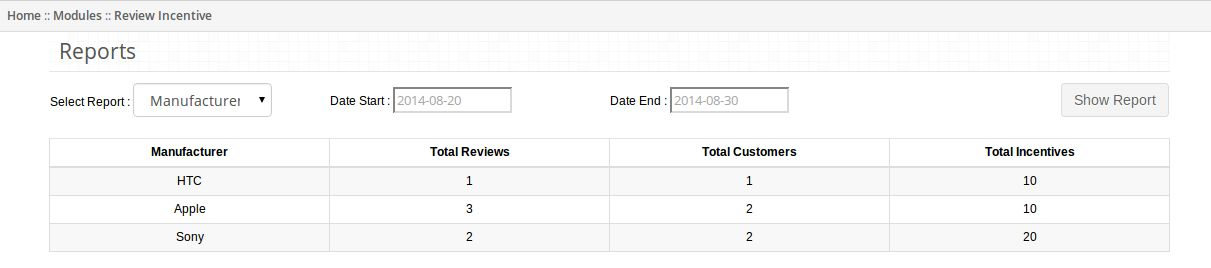
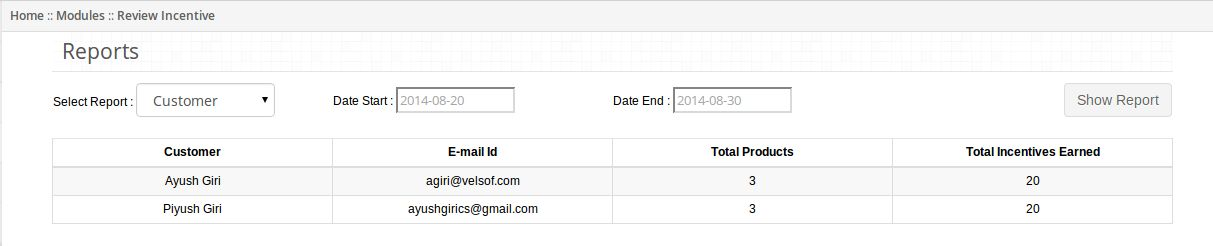
3. On clicking Show Report button, selected report will appear on screen.


4. If admin selects Product report then product wise report will appear.


5. If admin selects Category report then category wise report will appear.


6. If admin selects Manufacturer report then manufacturer wise report will appear.


7. If admin selects Customer report then customer wise report will appear.

6. Themer tab

1. By clicking on themer tab, you will have an option to change the theme of Review Incentive admin panel .

7. Get Support

1. By clicking on Get Support tab, you will be redirected to our support website, where you can contact our support for help. Use this tab in case you some query/issue or found some bug.

8. Short hand Code

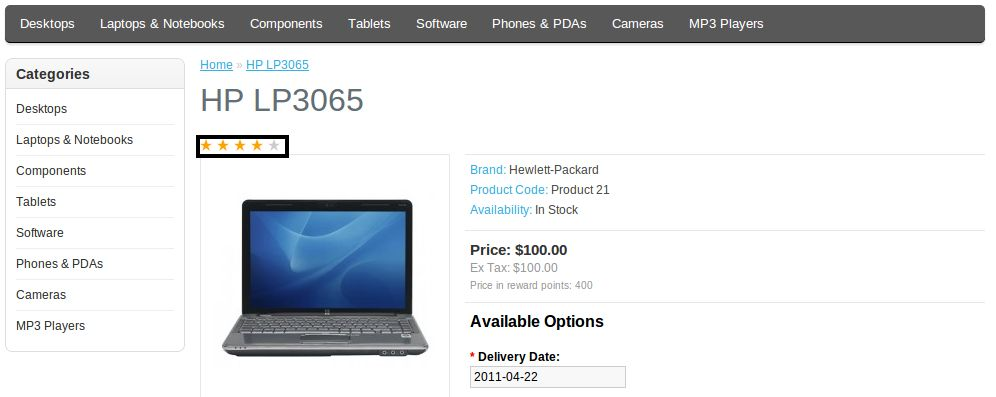
1. Admin can show average rating of product at any position on web page by calling a function in tpl file.

2. Admin should call function show Rating(product_id, store_id) as

3. Here first argument is the id of product whose rating is to be displayed and second argument is id of the store.

4. This function will show average product rating at the place where it is called.

5. Average rating is displayed in black box in following image:

Screenshots

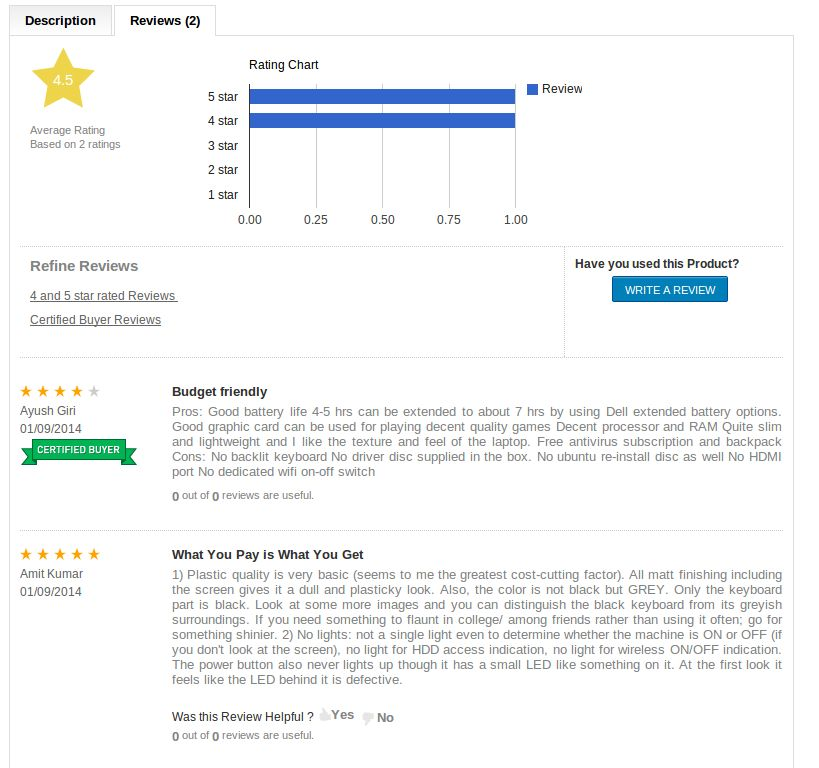
Review tab in product page showing reviews of product.

Certified Buyer badge is added to those customers who purchased the product from your store.

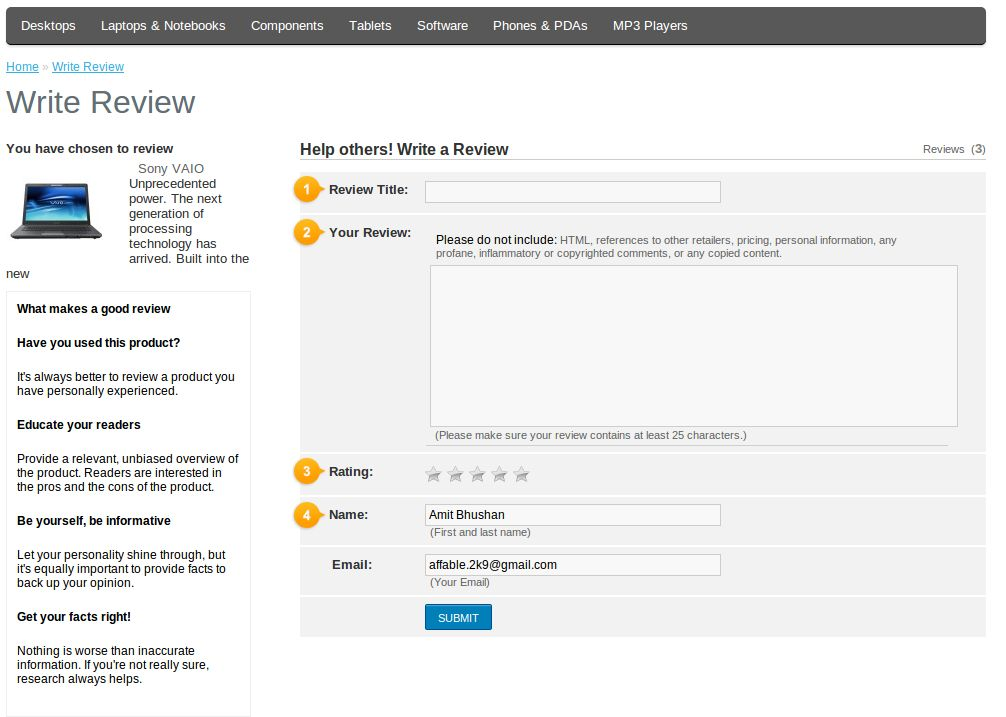
Screenshot of Write Review page.

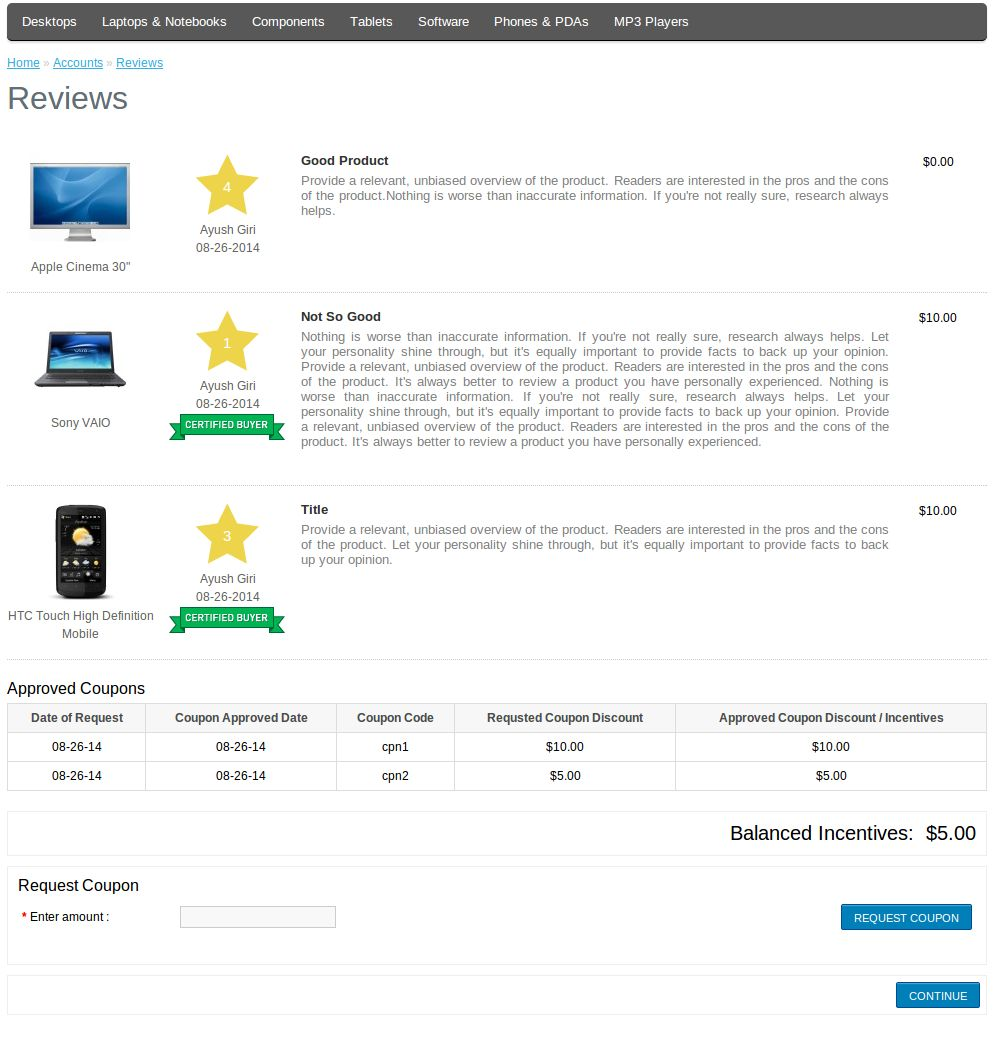
Screenshot of Reviews page

Recommendations

1. Top administrator should give permissions to access page reviewincentive/reviewincentive after moving the plug-in to root folder of your store.

2. Set cron file to run everyday.

Related Stories:

Opencart Abandoned Cart – User Manual

How to install OpenCart Abandoned Cart plugin on your server

Follow the following steps for installing Abandoned Cart Module:
1. Install VQmod (if not yet installed, visit
https://code.google.com/p/vqmod/wiki/Install_OpenCart).

2. Unzip the archive and find Upload folder.

3. via FTP manager (like Filezilla or WinSCP – download here: https://filezilla-project.org/)
upload to you main directory the files and folders in the Upload folder.

4. In Admin Panel go to Menu > Extensions > Modules > Abandoned Cart.

5.Install Abandoned Cart.

6.That is all – Your system is ready. Click on Edit and configure it.

1. General Settings tab

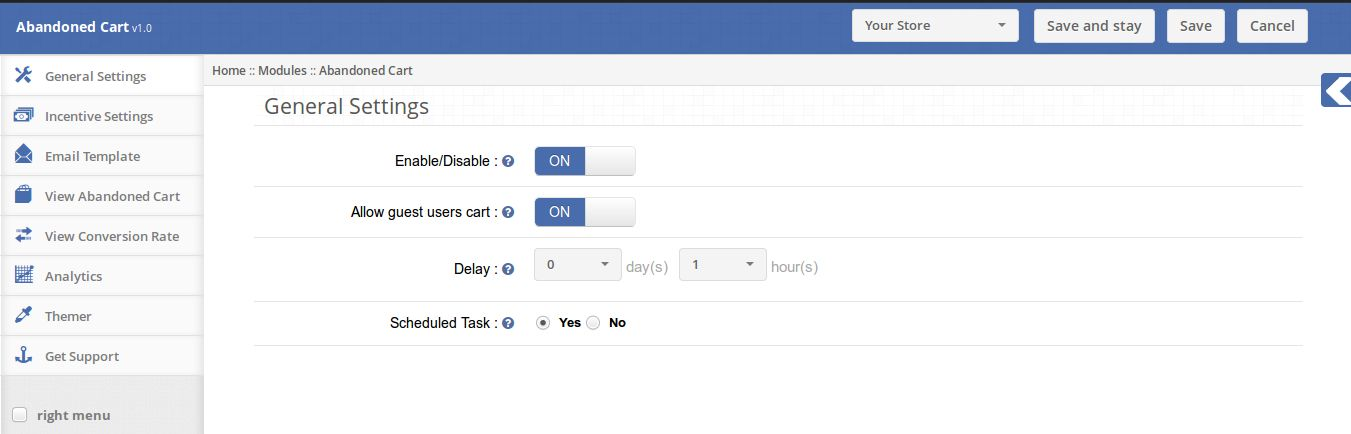
The General Settings tab has following options:

1. Enable/Disable: Enables or Disables the plugin on the store front. If disabled, the abandoned will not be saved to the database and no coupon codes will be send to the customers.

2. Allow guest users cart: This feature will allow admin to decide whether guest customers will be saved or not.

3. Delay: The Delay time is the time period after which the cart will be assumed to abandon.

4. Scheduled Task: This feature will allow admin to schedule coupon email sending task or not.

2. Incentive Settings tab

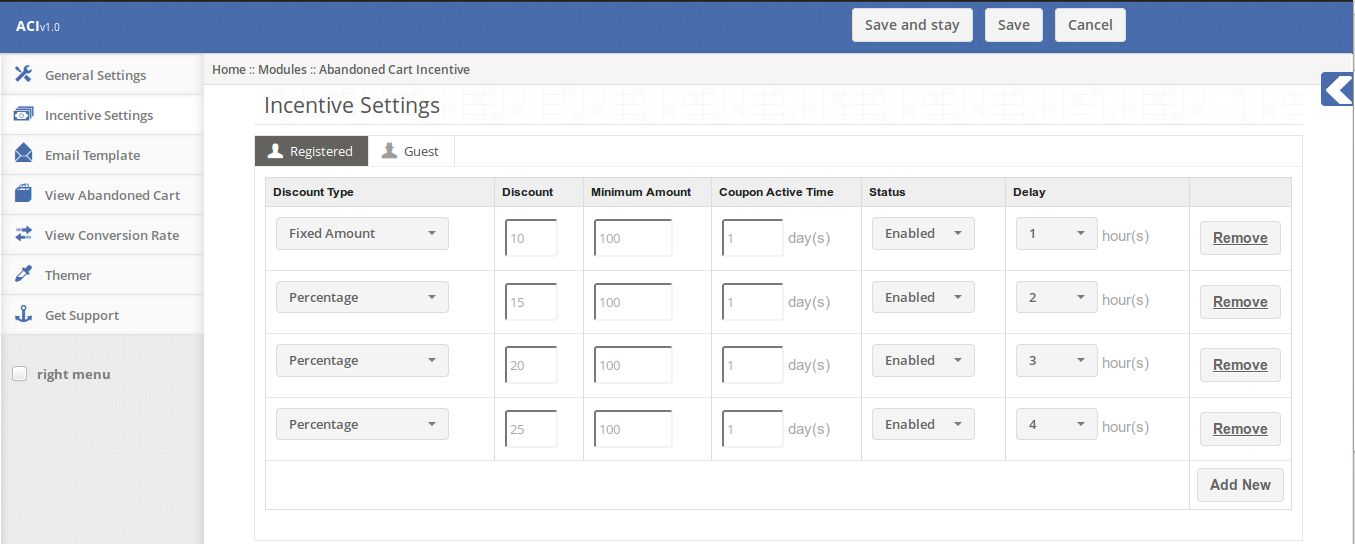
The Incentive table will manage the incentive details for each coupon mail either for Registered Customers or Guest Customers. The total number of rows in this table will indicate the number of emails scheduled for each abandoned cart.

1. Discount Type: The discount might be fixed amount discount or some percentage of the cart total.

2. Discount: This field holds the value of the discount, either fixed or percentage, given to the customer.

3. Minimum Amount: The minimum cart total against which the coupon is valid.

4. Coupon Active Time: The time period (in days) for which the coupon will be active, after that the coupon will be expired.

5. Status: Status, as the name defines, manages whether the particular incentive is enable or disable. The disabled incentives will not be sent to the customers.

6. Delay: This is the time period in hours after which the particular mail will be send. This time will be calculated once the cart is assumed as abandoned.
(These fields are same for the guest customers also.)

3. Email Template tab

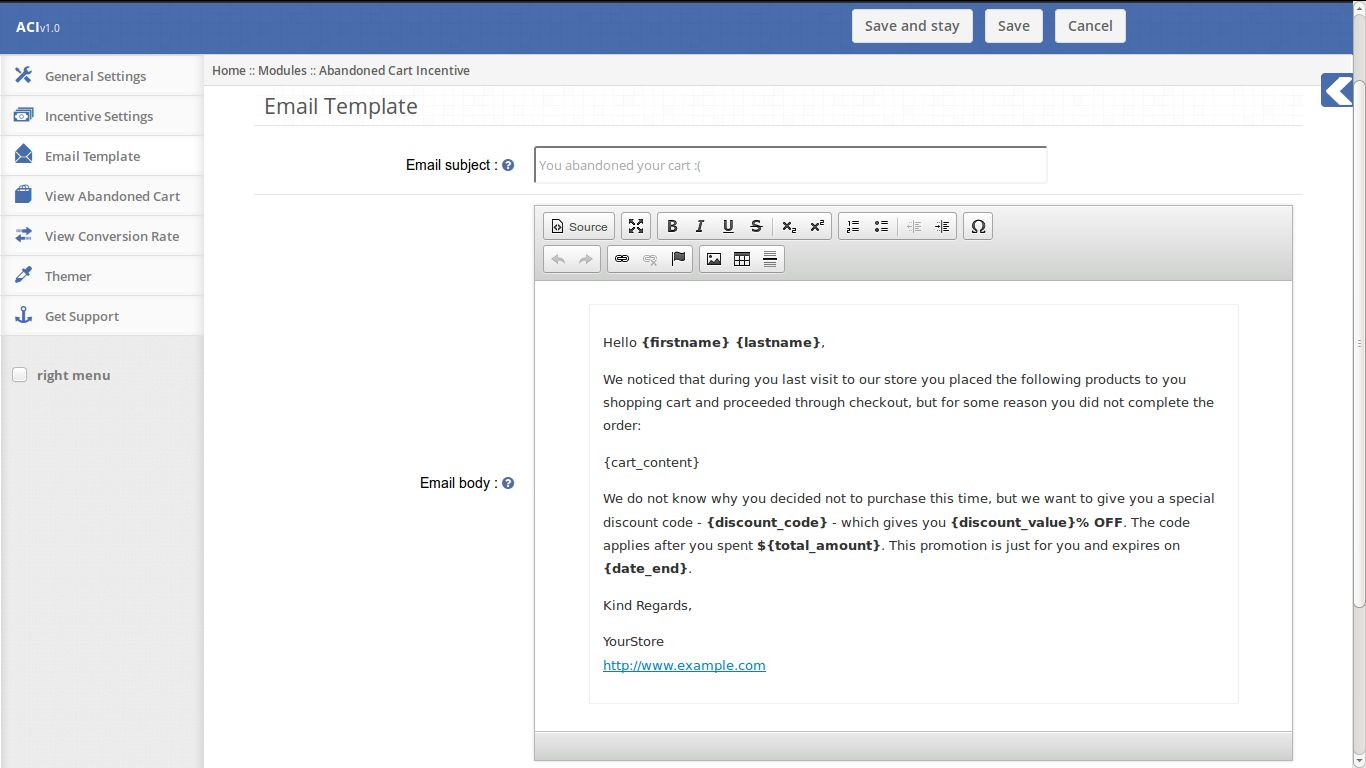
The Email Template is the format of the email that will be send to the customers. It contains some place holders whose values will be replaced when the email will be sent.
The place holders are:
{firstname}
{lastname}
{cart_content}
{discount_code}
{discount_value}
{total_amount}
{date_end}
Keep these place holders as it is.

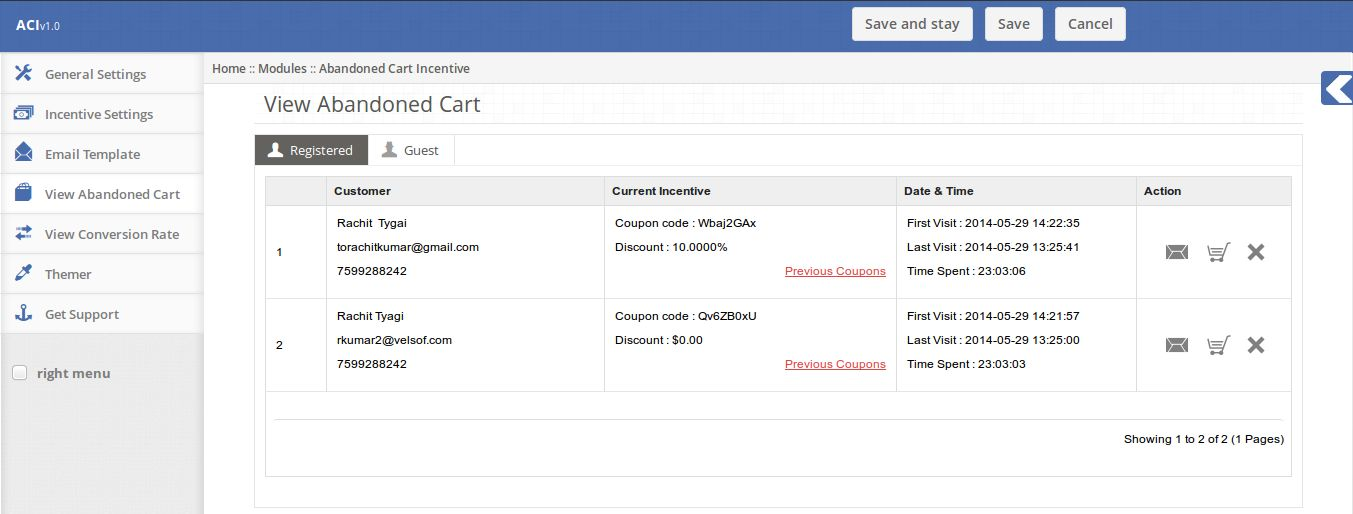
4. View Abandoned Cart tab

This tab enlists all carts which will be assumed to abandoned. It contains two sub-tabs,

1. Registered:
The Registered Sub-tab enlists all the carts of the registered users which are assumed as abandoned.

2. Guest: (Unregistered customers of the Store)
The Guest Sub-tab enlists all the carts of the guest customers which are assumed as abandoned.

The table consists of the following columns:

1. Customer: The basic information of the customer i.e. Name, Email, Contact Number.

2. Current Incentive: The Current Incentive shows the details of the latest coupon code which was sent to the customer either manually or automatically. This field contains a link for all previous coupons sent to the user.

3. Date & Time: This field shows the First Visit, Last Visit & Time Spent by the customer on the store for that particular abandoned cart.

4. Action: The Action column contains a set of actions which can be performed on that abandoned cart. These action are (from left to right):

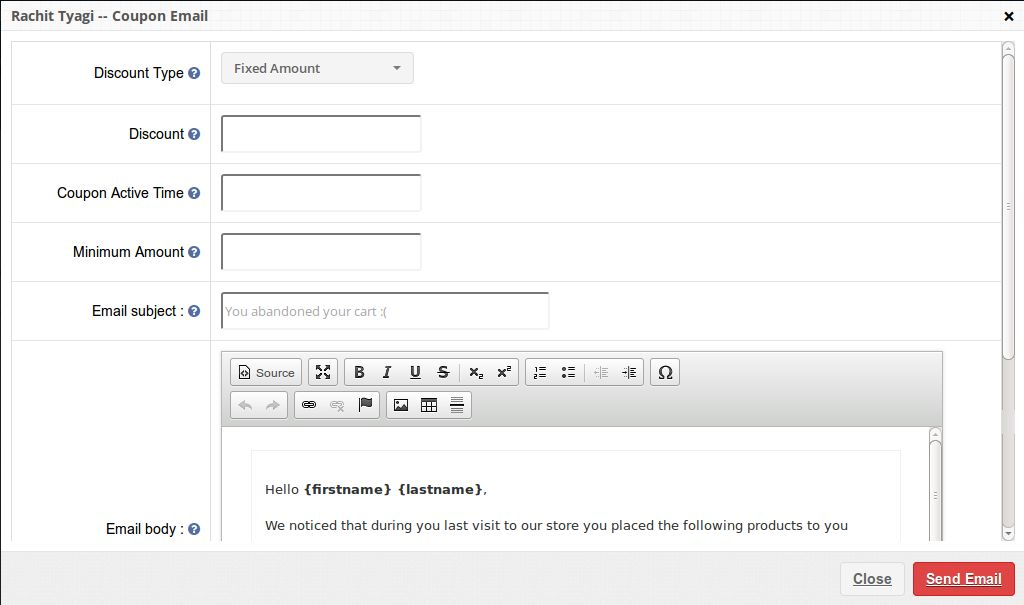
1. Email: Shows a form for sending a coupon code for the selected abandoned cart. This coupon will be listed in the current incentive section of the table.

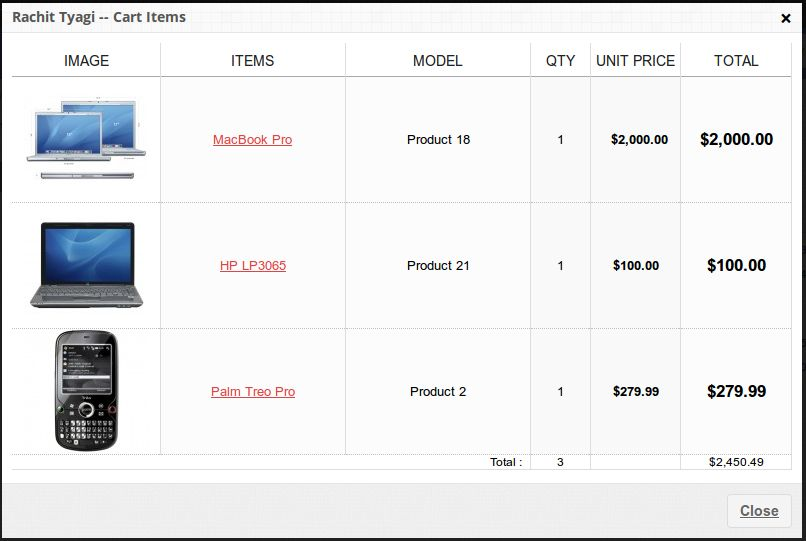
2. Shopping Cart: Shows the items in the abandoned cart of the customer.

5. View Conversion Rate tab

The Conversion Rate tab, enlists all converted orders for registered and guest customers both.
The converted orders list consists of following columns:

1. Order ID: The Order Id column displays the Order Id generated by the system for that order

2. Customer: Displays the customer information.

3. Status: Shows the status of the order.

4. Total: The total amount paid by the customer.

5. Date & Time: Time at which the order was placed.

6. Actions: Set of actions performed on selected order.

7. View: View the complete details of the order in new tab.

6. Analytics tab

The Analytics tab shows the overall insights of the store in graphical interface.

This tab contains following graphs,

1. Abandoned Amount vs Converted Amount:

This chart gives the overview of the total abandoned amount and the amount converted by the coupons provided by the abandoned cart module.


2. Abandoned Cart vs Converted Cart:

This chart gives the overview of the total abandoned carts and the carts converted by the coupons provided by the abandoned cart module.

3. Carts Count Vs Days Vs Amount:

This chart gives the overview of the total abandoned carts vs the carts converted and theamount abandoned vs the amount convertes in given time span.

This chart also contains filters on the basis of date to filter out and group the data for aconcise view of store sales.

Description

Store Front

In store front section of the Abandoned Cart Module, nothing is visible to the customers visiting
the stores but their abandoned carts will be captured and saved to the system for sending the
coupon codes and reminder e-mails. This all will be done by the Cron Job which is scheduled
to run on server after every half hour.

This Would Also Interest You: