1.0 How to install the OpenCart Admin Orders plugin on your server?
- Download the zip from OpenCart & unzip into a folder. After unzipping the folder structure of the OpenCart Admin Orders plugin, you will be able to see a similar screenshot like mentioned below.

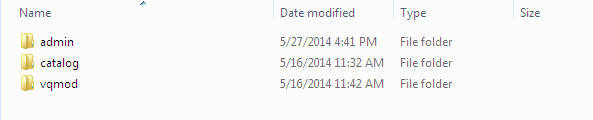
- Open the upload directory & you will see following folder structure.
- Login via FTP & drag-drop all the folders into your server root directory. You don’t have to the change the default theme folder name to your theme folder name.
You must have VQMOD installed for this OpenCart manage order plugin to work. If VQMOD is not installed please download and install from the URL below:
https://code.google.com/p/vqmod/
- You will find the OpenCart back-end order plugin ready to be installed in the Modules of your OpenCart.

- Click on Install link to install the Opencart plugin.
- Delete the vqcache files from the vqmod/vqcache folder.
- To excess Admin Orders extension, Click on the edit button in the Admin Orders module as shown below.

- On clicking the edit button, the Opencart order manager module by Knowband for the plugin will open. It contains navigational bar at the top, the menu on the left and main content in the center as shown below.
2.0 User Manual
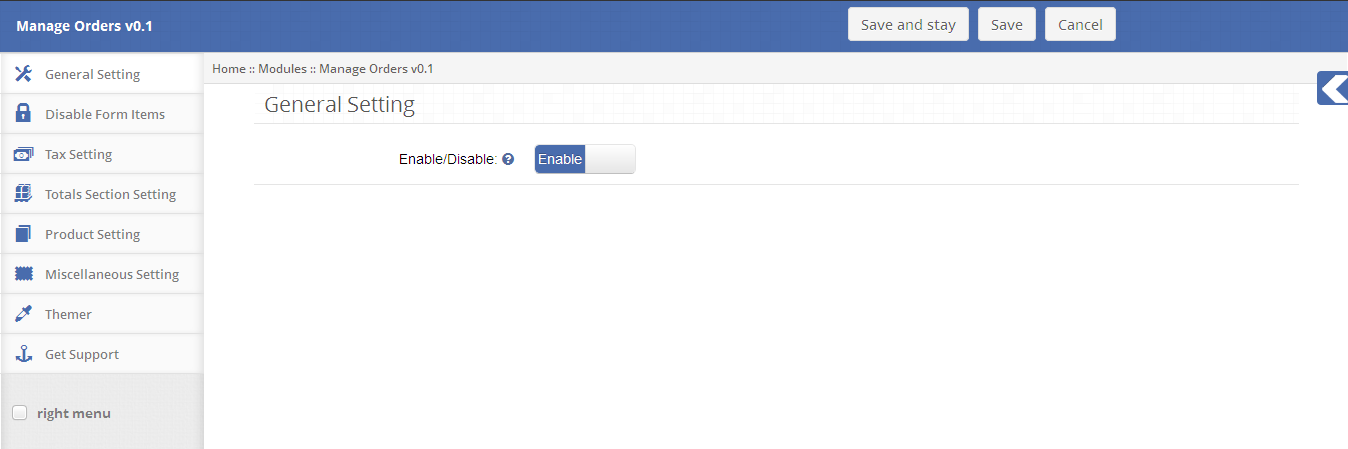
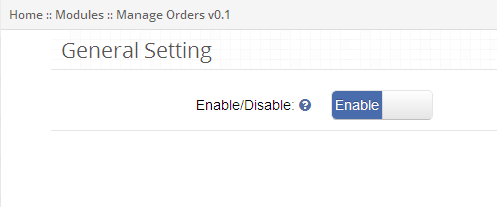
2.1 General Setting Tab
- To enable this Opencart order editor plugin, switch the enable button from Disable to Enable which is just on the right of Enable/Disable label.
2.2 Disable Form Setting Tab
- This tab contains settings for the items which are to be shown/hidden according to the user group in Admin Orders as shown below.
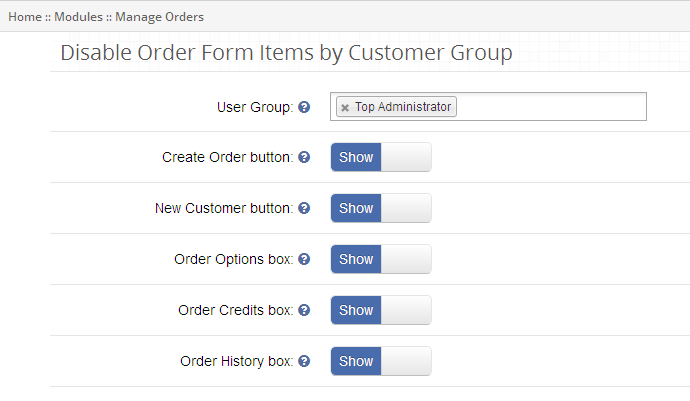
- To disable Create Order from the order form, select the user group from the drop-down and switch the button from Show to Hide which is just on the right of Create Order Button label.
- To disable New Customer from order form, select the user group from the drop-down and switch the button from Show to Hide which is just on the right of the New Customer Button label.
- To disable Order Options from ‘Create order form’, select the user group from the drop-down and switch the button from Show to Hide which is just on the right of Order Option Box label.
- To disable Order Credits (i.e., Coupon and Voucher) from ‘Create order form’, select the user group from the drop-down and switch the button from Show to Hide which is just on the right of Order Credits Box label.
- To disable Order History from ‘Create order form’, select the user group from the drop-down and switch the button from Show to Hide which is just to the right of Order History Box label.
2.3 Tax Setting Tab
- This tab of the Opencart admin order contains tax settings for the custom shipping and optional fees which is to be applicable to the Admin Orders as shown below.
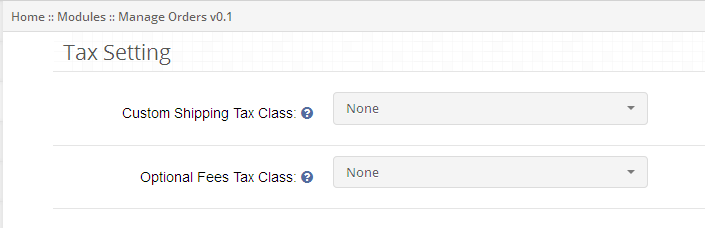
- To apply the tax to custom shipping, select the tax class from the drop-down else custom shipping won’t be applicable to the default setting.
- To apply tax optional fees, select the tax class from the drop-down else optional fees won’t be applicable to the default setting.
2.4 Totals Section Setting
- This tab in the Opencart manage order contain settings for the total section items which are to be shown/hidden in the Admin Orders as shown below.
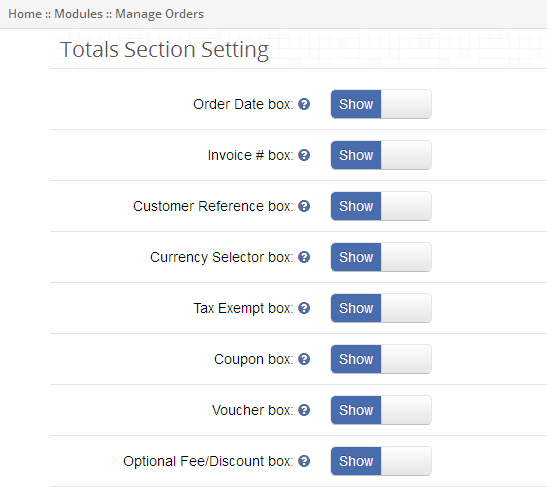
- To hide Order Date from order options, switch the button from Show to Hide which is just to the right of Show Order Date Box label.
- To hide Order Invoice from order options, switch the button from Show to Hide which is just to the right of Show Invoice Box label.
- To hide Customer Reference from order option, switch the button from Show to Hide which is just to the right of Show Customer Reference Box label.
- To hide Currency Selector from order option, switch the button from Show to Hide which is just to the right of Show Currency Selector Box label.
- To hide Tax-Exempt from order option, switch the button from Show to Hide which is just to the right of Show Tax Exempt Box label.
- To hide Coupon from the total section, switch the button from Show to Hide which is just to the right of Show Coupon Box label. By default, this will be shown on create order form.
- To hide Voucher from the total section, switch the button from Show to Hide which is just to the right of Show Voucher Box label. By default, this will be shown on create order form.
- To hide Optional Fees/Discount from the total section, switch the button from Show to Hide which is just to the right of Show Optional Fees/Discount Box label.
2.5 Product Section Setting Tab
- This tab of the Opencart backend order contains settings for the product section items which are to be shown/hidden in the Admin Orders as shown below.
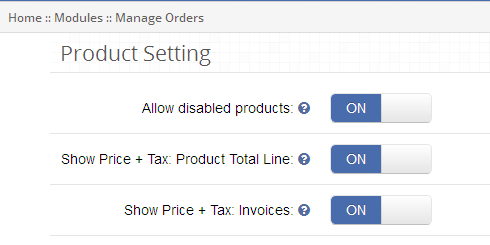
- To allow disabled products to be listed in the product list, switch the button from OFF to ON which is just to the right of Allow disabled products label.
- To show tax with product totals on the product list, switch the button from OFF to ON which is just to the right of Show Price + Tax: Product Total Line label.
- To show tax with the invoice on order invoice, switch the button from OFF to ON which is just to the right of Show Price + Tax: Invoice label.
2.6 Miscellaneous Setting Tab
- This tab of the Opencart order manager contains the various settings for the Admin Orders as shown below.
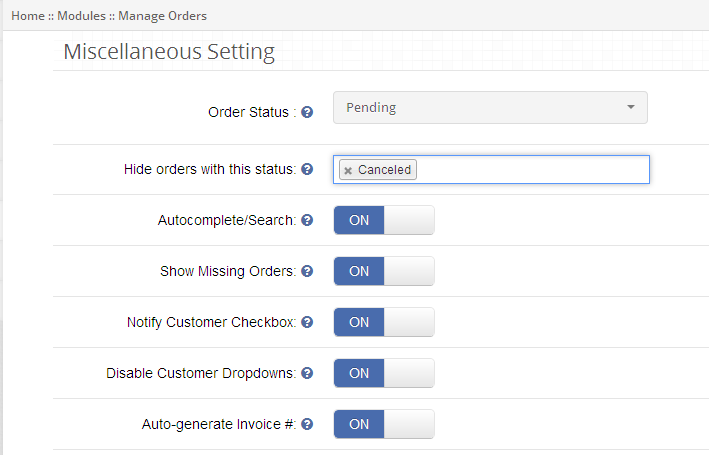
- To hide the orders according to their status, select the order status from the drop-down which is just to the right of ‘Hide orders’ with this status label.
- To enable auto-complete on search, switch the button from OFF to ON which is just to the right of Require Shipping Address label.
- To show missing orders in order list, switch the button from OFF to ON which is just to the right of Show Missing Orders label.
- You can start the order with Notify Checkbox checked by switch the button from OFF to ON, which is just to the right of Notify Customer Checkbox label.
- To disable Customer drop-down from creating order form, switch the button from OFF to ON, which is just to the right of Disable Customer Drop-down label.
- To enable auto-generate invoice number for order invoice, switch the button from OFF to ON, which is just to the right of Auto-generate Invoice # label.
3.0 Dashboard
To excess Admin Orders in the Opencart order editor by Knowband, navigate to Sales and Click Admin Orders link from the drop-down as shown below.

3.1 Admin Order Dashboard
Admin Orders dashboard of the Opencart admin order displays orders list with an option to create, edit, delete, search, email order, print invoice, print packing slip or export order.

3.2 Order Actions
![]()
You can perform the following actions on orders listed in order list:
- Edit Order: To edit order details, click on Edit Order button as shown in order list action column.
- Mail Order: To mail order details to the customer, click on Mail Order button as shown in order list action column.
- Print Order: To take print of order, click on Print Order button as shown in order list action column.
- Print Packaging Slip: To take the print of order packaging slip, click on Print Packaging Slip button as shown in order list action column.
- Export Order: To export order details, click on Export Order button as shown in order list action column.
- Delete Order: To delete an order, click on Delete Order button as shown in order list action column.

![]()
3.3 Order Search/Filter:
You can search/filter orders according to various order fields in the Opencart manage order such as:
a. Order Date: To search/filter orders in the Opencart backend order according to their creation date, enter order start and end date and click on Filter button as shown in order list action column.
b. Order ID: To search/filter orders according to their order ID, enter order ID and click on filter button as shown in order list action column.
c. Product Name: To search/filter orders according to their product name, enter the product name and click on Filter button as shown in order list action column.
d. Order Total: To search/filter orders according to their total, enter order total range and click on Filter button as shown in order list action column.
e. Order Paid: To search/filter orders according to their paid status, select the value from the drop-down and click on Filter button as shown in order list action column.
f. Order Status: To search/filter orders according to their status, select the value from the drop-down and click on Filter button as shown in order list action column.
3.4 Bulk Status Update
Following steps are involved in updating status of the order in bulk:
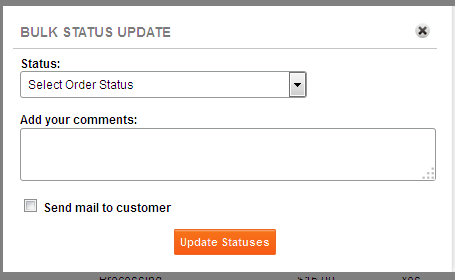
- Select orders by checking the checkbox associated with each order.
- Click on Bulk Status Update button as shown in order list page.
- Select the status to be updated from the drop-down list.
- Provide any comment (Optional).
- Check Notify Customer if wants to notify customers about order status.
- Click on Update Status button.
4.0 Create Order
Admin Orders Opencart extension allows the administrator to create order on customer behalf. To add a new order, click the “Create Order” button shown at the top of the page.
 Following steps are involved in creating a new order from Admin Orders:
4.1. Search Customer
A customer can easily be searched using methods provided in Admin Orders:
4.1.1 Search customer using a textbox
- A customer can be searched according to their name, email, company, postcode and phone number.
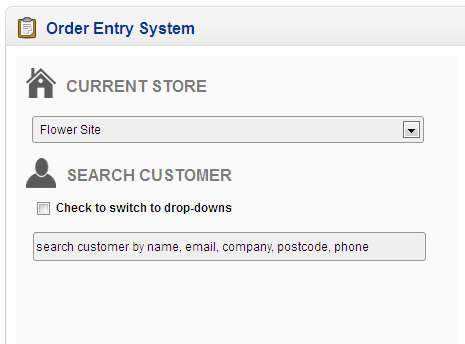
4.1.2 Search customer using the drop-down
- You can also search customers either by their name or by their address.
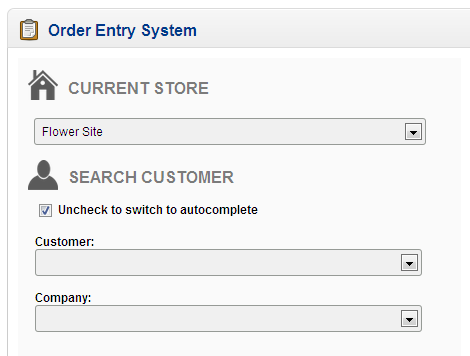
- Search customer by name: To search customer by their name, click Check to switch to drop-down checkbox and select customer name from the drop-down.
- Search customer by address: To search customer by their address, click Check to switch to drop-down checkbox and select customer address from the drop-down.
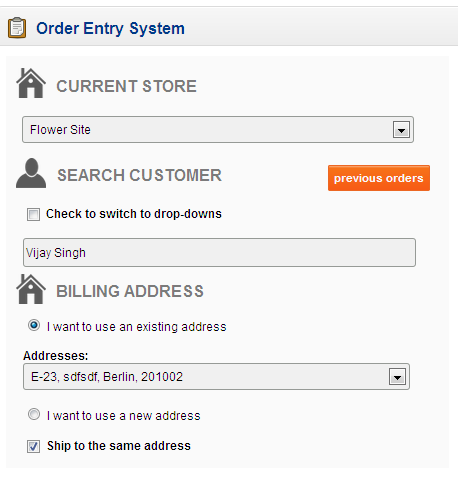
4.2 Customer Previous Orders
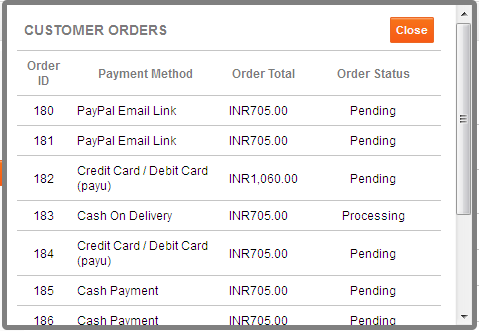
- You can view the details of previous orders placed by the customer by clicking Previous Order button in the Opencart order manager as shown below:
- You can view the following details for any order in the Opencart order editor such as:
- Order ID
- Payment Method
- Order Total
- Order Status
4.3 Billing and Shipping Address
On selecting a customer, the customer billing and shipping address details are auto-filled, which can be edited.

- To edit billing address, click I want to use a new address checkbox as shown below.
- To edit shipping address, click I want to use a new address checkbox as shown below.
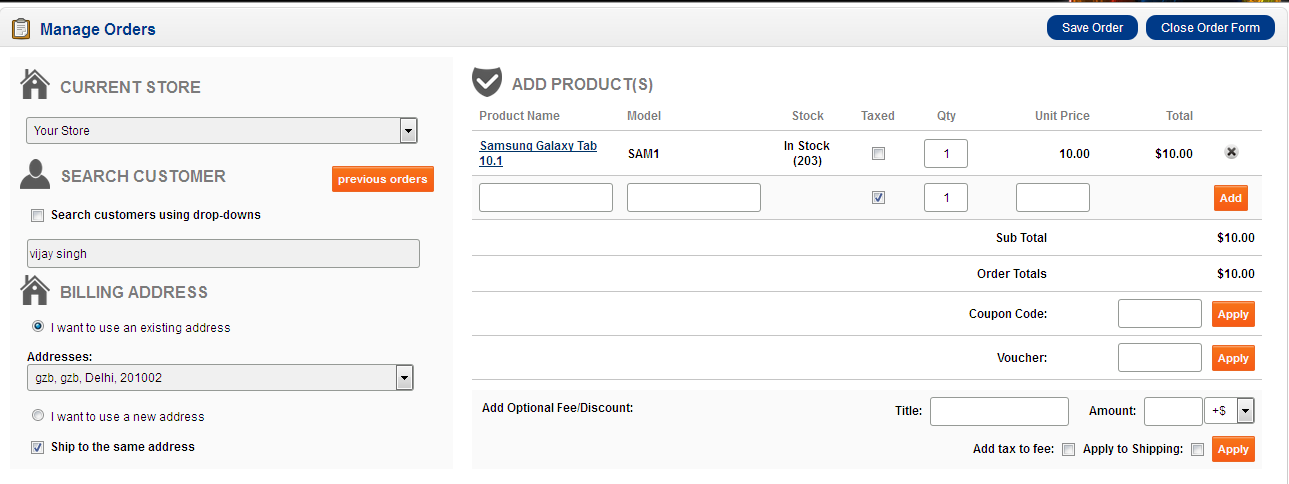
4.4 Add Product(s):
- To add product to cart, select product by their name or model and click on Add button.
- You can also update the quantity of any product added to the cart.
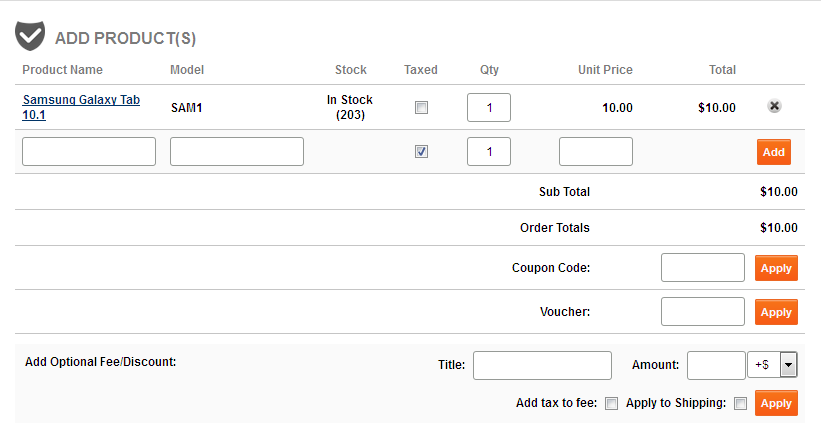
- Apply Coupon (Optional)
To apply a coupon to order, select the coupon value from the drop-down as shown above.
- Apply Voucher (Optional)
To apply the voucher to order, enter the voucher value in the text field and click Apply button.
- Apply Optional Fees/Discount (Optional)
To apply optional fees/discount to order, enter the optional fees/discount name and value in the text field and click Apply button.
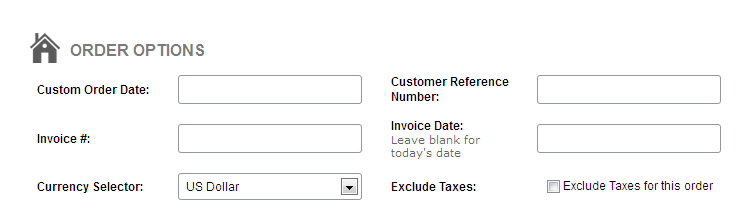
4.5 Order Option Details (Optional)
You can provide the following details for any order such as:
- Customer Order Date
- Customer Reference Number
- Invoice Number
- Invoice Date
- Currency Selector
- Excluded Taxes
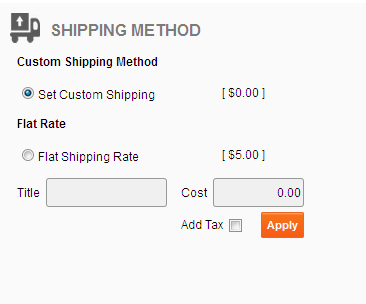
4.6 Shipping Method
1. You can select any of the following shipping methods:
- Custom Shipping method:
To use custom shipping method in the Opencart extension, click Set Custom Shipping checkbox and enter custom shipping title and cost and click Apply button as shown below. - Flat Rate:
4.7 Payment Method
You can select any of the following payment methods:
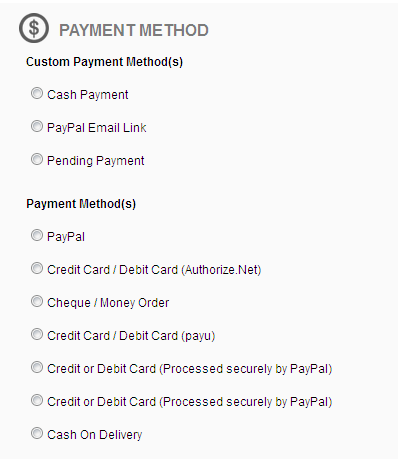
- Custom Payment Method
To make payment using Admin Orders custom payment method, select any method from Admin Orders Custom Payment Methods.
- Cash Payment
- Credit Card (Offline)
- PayPal Email Link
- Pending Payment
- Configured Payment Method
To make payment using system configured payment method, select any method from Your Configured Payment Methods.
4.8 Comment and Notify Customer
- To add a comment for an order, enter your comment in the textbox.
- To send order detail to the customer, check Notify Customer checkbox as shown below.
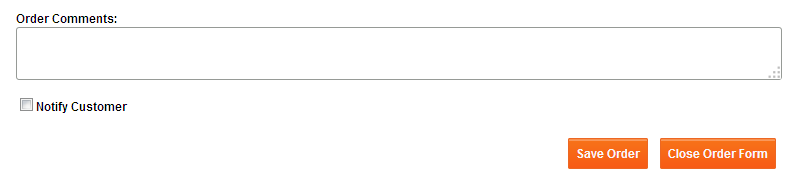
- To place an order, click Save Order.
4.9 Notification Mail and Make Payment
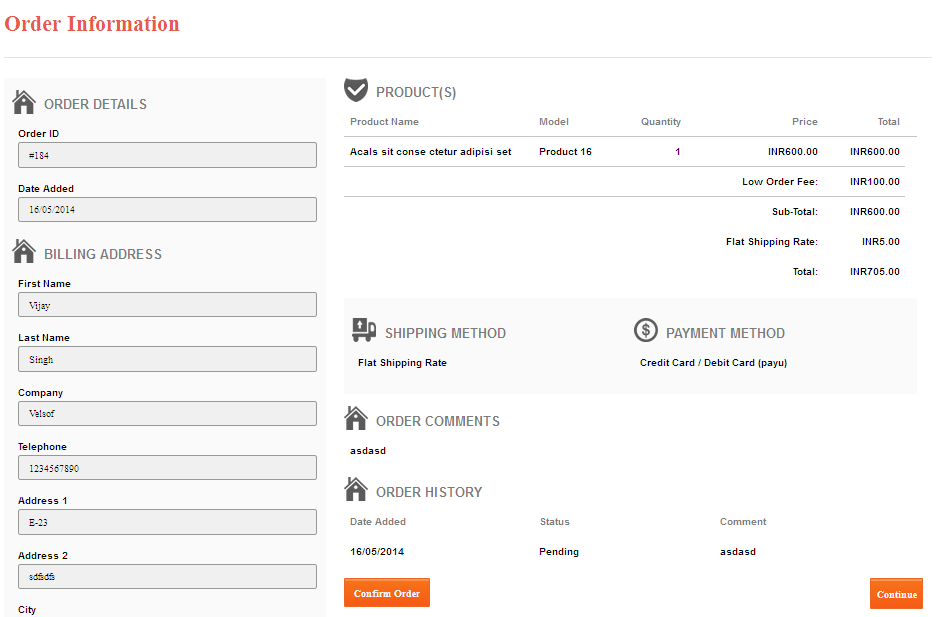
- A notification mail will be sent to a customer if Notify Customer checkbox is checked which will be containing the link for Order Information page will allow the customer to make payment for their order.
- After the payment is successfully processed, the order status will be updated accordingly.
Note: Customer can only be able to make payment for the system configured payment methods.
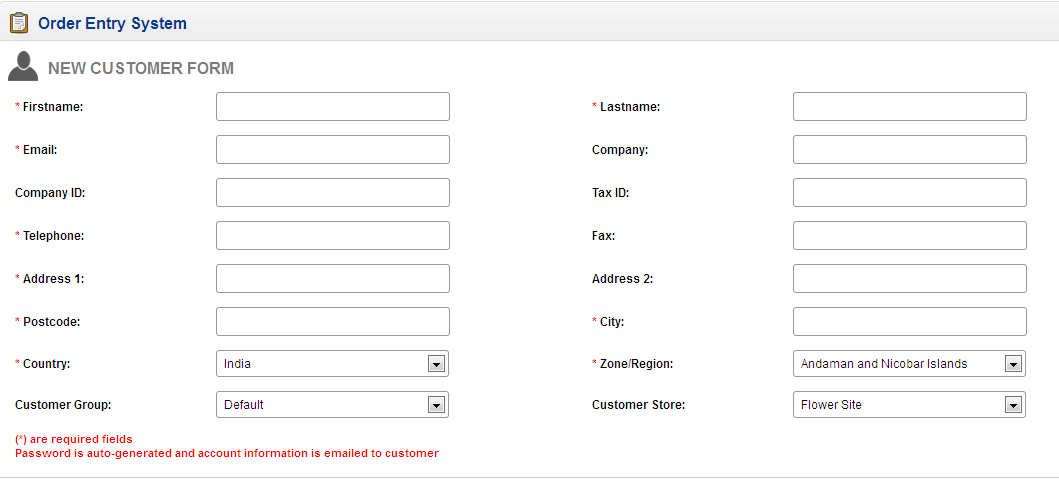
5.0 New Customer
To add a new customer, click the “New Customer” button shown at the top of the page and provide the necessary details needed for new customer registration.