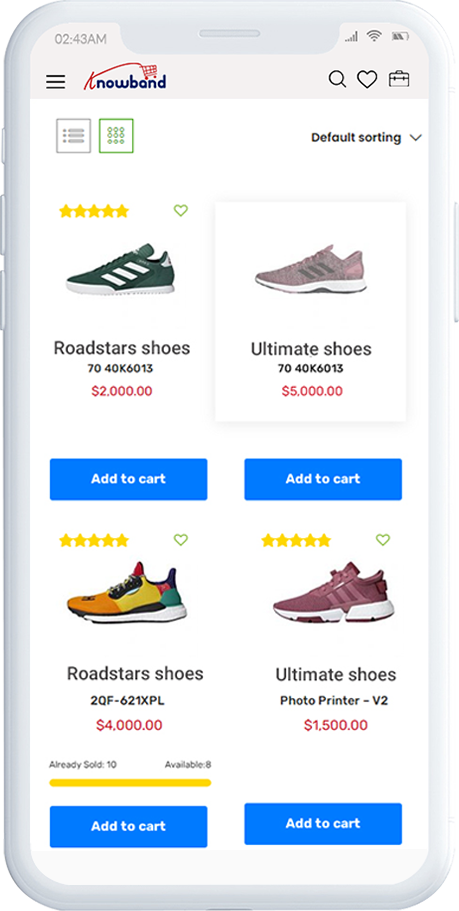
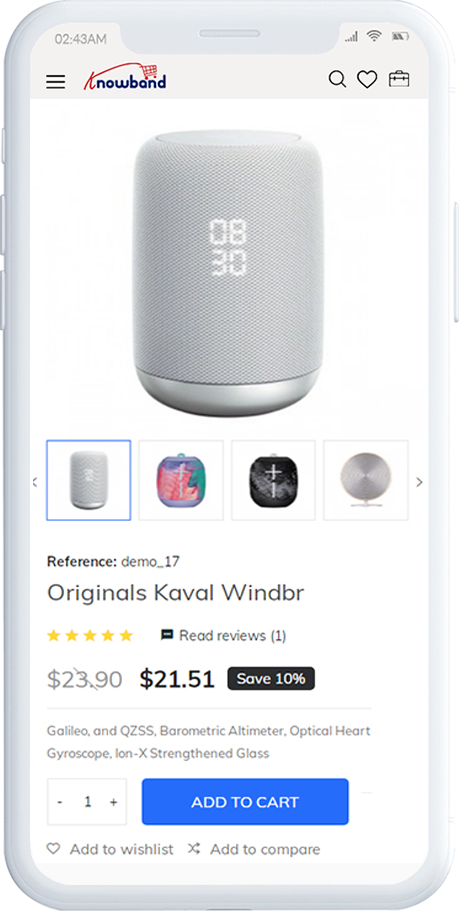
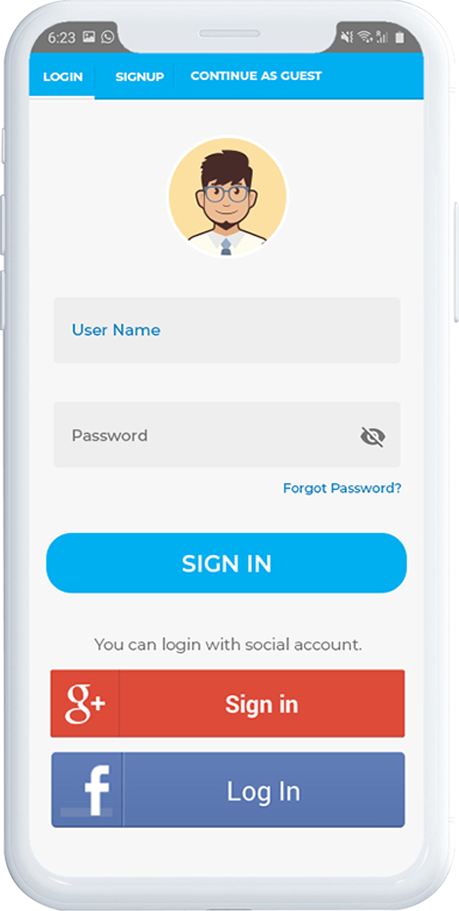
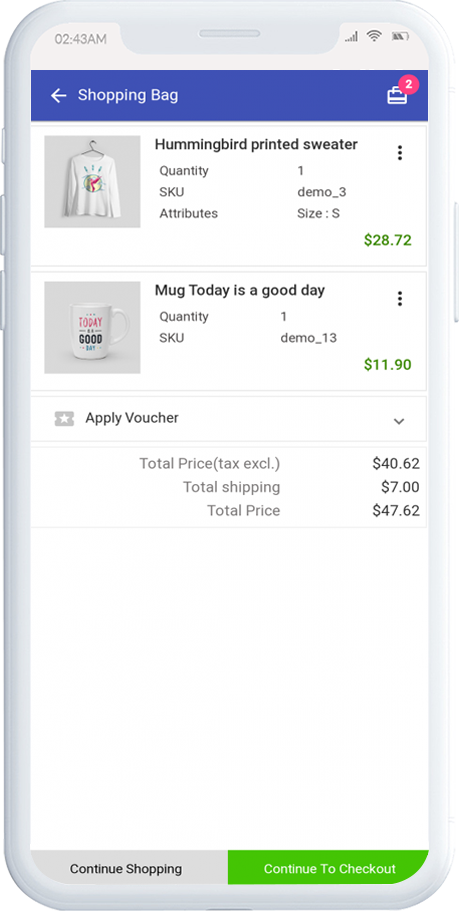
We all have experienced & acknowledged the shift of eCommerce biggies from websites to mobile apps. Utilizing the functionalities of the smartphones & tablets, eCommerce Mobile Apps provide more personalization, user engagement & hence help in the improvement of your business services. With smartphones being the most commonly & widely used device for all purposes, the rise of Mobile Commerce is quite obvious.
With eCommerce Mobile App Development, you can build a new app or you could even modify an existing eCommerce app. Adding custom enhancements not only helps to make your app stand out from the competitors but also improves brand recognition. Whether your requirements fall under the former or latter category, under a team of expert App Development & Quality Assurance team, you can rest assured that your eCommerce Mobile App gives you & your customers the best experience.
At KnowBand, we equip businesses with eCommerce Mobile Apps laced with the latest features that are not only convenient to use for customers but also for the eStore merchants & vendors.
Factors from Customers’ Point of View:
1.Omni-Channel Presence:
For customers to be able to access the mobile app on all the operating systems & devices, prefer to keep your eCommerce App completely omnichannel by making it compatible with both Android & iOS for smartphones as well as tablets.
2. Customer-Centric UI (User Interface):
To make it easier for customers to navigate through & browse your app in order to make faster purchases, having a customer-focused design is a must-have for all kinds of businesses these days.
3. Enhanced Layered Navigation:
Add layered navigation with multiple sort & filter options according to each of the product categories on your App. This further enhances the user experience.
4. Language & Currency Support:
Based on your business needs, equip your app with support for multiple languages & currencies. Also, consider the support for RTL scripts like Arabic, Persian, Hebrew, etc.
5. Offline Mode Accessibility:
Unlike websites, Mobile Apps can be equipped with offline mode accessibility through which app users can access the app even with slow or no internet. Hence, they can access previously loaded pages, cart, wishlist, my-account pages, etc.
6. Product Search via Image:
Add the Image Search feature in your eCommerce Mobile App so that the app users can easily search for a product on your store using a reference image either taken via their device’s camera or via selected images in their photo gallery.
7. Voice Search:
This feature allows the app users to search for products on your eStore using voice commands.
8. Payment Methods:
Add options for multiple payment methods & be sure to have the security at par.
9. Optimized Checkouts:
Lengthy checkouts can increase the cart abandonment rate & frustrate the customers. To aid that, optimize the checkout process by having a quick yet secure one-page checkout & by prefilling some entries from the previous purchases, like delivery address, phone number, etc.
10. Order Tracking:
Add order tracking features in your app. Allowing your customers to track order improves customer satisfaction & also makes it easier for the support team to resolve any delivery related issues if any arises.
11. Push Notifications:
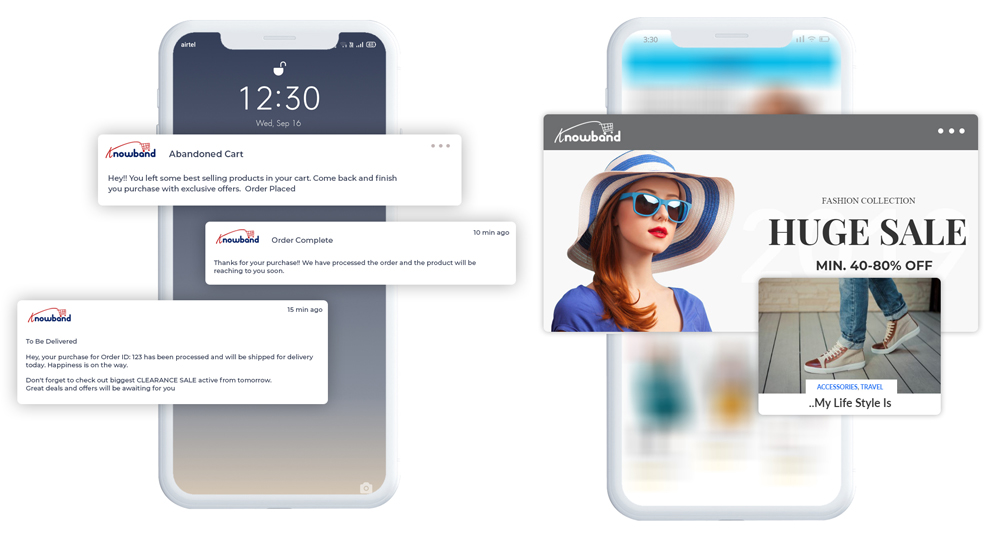
Push Notifications drive more sales by improving user engagement & retention. They also provide effortless personalization using automated notifications. Some of the common usages of Push Notifications are for birthday wishes, abandoned cart reminders, price drop notifications, upcoming sale reminders, etc.
12. Chat Support & Chatbot Integrations:
Allow your customers to reach out to your support team at any time of the day. Adding chatbot fulfills that need & also is a preferred mode of communication by the app users. Chatbots can even be automated with AI to reduce a load of your chat support team from manually handling every query.
13. Load Speed Optimization:
Having an app that takes too long to load its pages & content, is not ideal for the fast-paced users. So, make sure to optimize the loading time so that your eCommerce Mobile App runs smoothly.
Factors From Admins’ Reference:
1. Choice of eCommerce Solution:
If you are willing to build a new eCommerce App, then choose the right solution to build your app. Some of the common platforms are PrestaShop, Magento, OpenCart, WooCommerce, Shopify, etc.
2. Custom App Theme Development:
If required, businesses can opt to develop a custom-designed theme that’s unique to their app. This allows more personalization of the app & improves brand recognition.
3. Security:
Have all the useful encryptions & relevant certificates to keep your eCommerce Mobile App secure to every last bit. Having security on platforms that use online payment is a must.
4. Admin Panel:
The backend/admin panel of an eCommerce must be convenient to use even for the admins/ vendors/ merchants. Make sure that your eCommerce Mobile App Development team equips your business with such a dashboard.
5. Branding:
Choosing the theme design from pre-existing templates can limit some of your design needs according to your business. You could either opt for getting your own custom theme designed or you could make heavy customizations in an existing theme. For both the route, the result is a personalized theme that is unique to your business & helps in improving your brand recognition.
6. Quick HomePage Editing:
The homepage is something that eCommerce businesses need to change from time to time. Hence, admins must have a quick editor especially for customizing the homepage. Also, the editing panels must be user friendly & less time-consuming.
7. Live Synchronization:
Businesses with both an eCommerce website as well as a mobile app must have both their platforms synchronized. In such cases, it is likely that both your app and website use the same database. This ensures Automatic Inventory Management & both the platforms remain synchronized in real-time with each other. Therefore, changes made on one instantly reflect on the other.
8. Testing & Quality Assurance:
Rigorous testing must be done before the app is launched on the app stores. Accordingly, faults must be debugged for quality assurance.
9. Multi-Vendor Marketplace:
If your business model demands so, then your app must support multivendor marketplace configuration.
10. ASO (App Search Optimization):
Just like SEO is for improving the search engine rank of websites, apps can also be made to stand out on the app stores by following the ASO. Have the ASO features in your from the beginning itself. It helps to increase the visibility of your eCommerce Mobile App on Play Store / App Store.
11. Analytics & CRM Integration:
Mobile Apps help businesses to get deeper insights into their app users. To fully utilize that, integrate an analytics tool like Google Search Console/ Analytics. Similarly, choose a CRM that serves your business needs. They ease the decision making a task for the eStore owners & admins & helps make smarter marketing strategies.
12. Add-ons & Plugin Integration:
Add more functionalities in your eCommerce Mobile App using plugins/ add-ons. Under an expert app development team, you could even develop your own custom plugin to suit your exact business needs.
13. Scope For Unlimited Customizations:
Most businesses end up going customizations in the future to keep up with the ever-changing trends. So, make sure that your eCommerce Mobile App can undergo desired customizations. Keeping the mobile app updated with the latest trends is a crucial factor while eCommerce Mobile App Development.
If you are looking for custom eCommerce mobile app development and give a boost in sales and revenue of your business. Drop us a message at support@knowband.com.
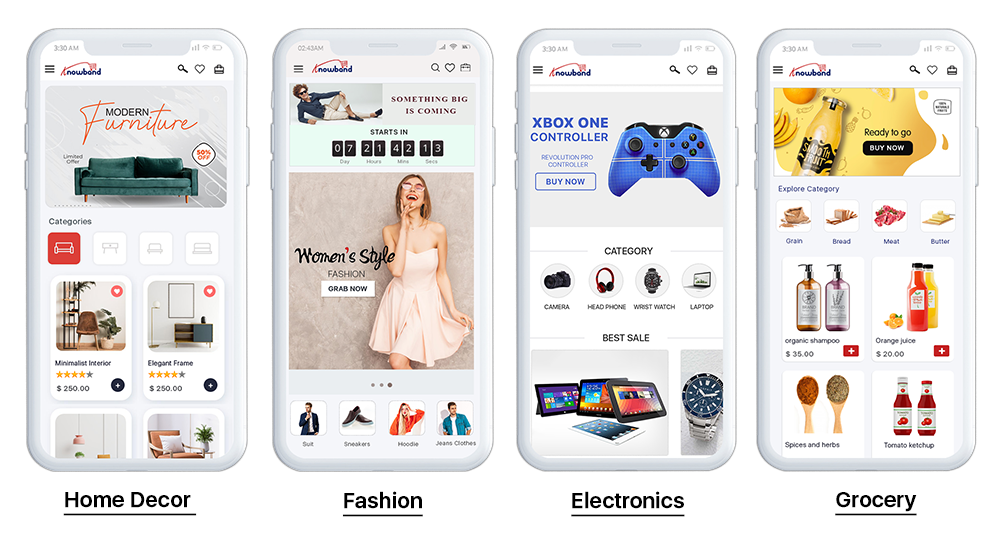
At KnowBand, we also offer ready-to-go native Mobile App Builder for following eCommerce platforms:
The objective of this blog is to help you know how to fix the issue –“last file is not zipping”. If you are facing the same issue then this blog will help you. Example- If there are 4 text files then only 3 files are zipping.
Reason for this issue:
The zip_close($zip) function is not working due to which the file was unlinking before creating zip.
Solution:
You need to replace zip_close($zip) by $zip->close() to fix this issue.
Sample Code is given below:
$zip = new ZipArchive();
// zip 2 days older files
foreach (glob($directory. '/*.txt') as $a_file) {
if (filemtime($a_file) < time() - 172800) { //2 days older 172800
$filename_array = explode("/", $a_file);
$key = sizeof($filename_array) - 1;
$filename = $filename_array[$key];
$source_path = $directory.'/';
$zip_file = $source_path.str_replace('.txt','',$filename).".zip";
if ($zip->open($zip_file, ZipArchive::CREATE) !== TRUE) {
exit("cannot open".$zip_file."\n");
}
$zip->addFile($a_file,$filename);
}
}
$zip->close(); // Replaced zip_close($zip) by $zip->close();

// Move 90 days olders in the Archive and remove the files which are older than 180 days
foreach (glob($directory.'/*.zip') as $a_file) {
// remove files which older than 180 days.
if (filemtime($a_file) < time() - 15552000) { //180 days older 15552000
unlink($a_file);
}
}
Summary
In this blog, we have changed the zipping close function in order to fix the given issue.
The COVID-19 pandemic has created a frightening situation worldwide. Businesses are experiencing a heavy downfall and the global economy has dipped due to the current crisis.
While the countries remain in lockdown with almost everything being shut, stores providing essential items such as Grocery and Pharmacy are still available so that people can fulfill their basic needs.
This is the time when Grocery retail store owners can take their business online and give it a huge boost. Besides, you can set up the store pick up facility on your website using the Store Locator and Pick up module and manage your orders efficiently.
How does Online Store Pick-up module help?
The module lets you add your retail stores on your website and allows customers to safely pick up their order at their desired time. This will help you avoid a massive crowd near the stores and would save customers a lot of time.
You can configure the pick-up timing, upload your stores through CSV and do much more. More details are mentioned at the end of this blog post.
The grocery business is currently the most benefited in eCommerce amid the Coronavirus outbreak. Due to intense demand, many physical grocery stores have moved towards the online platform. If you are also looking to make a shift and set up an online grocery store, this write-up is specifically for you.
Did you know the online shopping grocery sales hit nearly $29 billion in the United States in 2019? And it is expected to reach the $60 billion mark by 2023, says Statista.
How to create your Online Grocery Store?
To start an online grocery business, follow the below-mentioned steps.
1. Register your Business
The first thing to do when you are thinking to set up your business online is to register a business name. Think of a catchy brand name. Purchase a domain with that name along with the hosting plan. Afterwards, you need to choose the desired eCommerce platform where you want to set up your grocery store, for example, PrestaShop, Magento, OpenCart, Shopify, etc.
You need to register your business legally to avoid troubles since you would be involved in buying and selling of goods.
2. Customize Your Website
You can customize the website design as per your taste and preference. Starting from scratch, you can choose the desired theme, font, add banners, etc.
Moving further, you can create the navigation bar highlighting the product categories and subcategories, and other important links.
You will have the option to customize a product page, cart page, checkout page, etc. Put simply, you will have all the options to design the website your way.
3. Add Products
Once you have the platform ready, you can start adding your products or to be specific, your grocery items. Set a category for them, specify the price, description, use images or whatever necessary.
Ensure you are using high-quality product images so that your product pages leave a great impression and speak about the product quality.
4. Set up Payment Methods
Now comes the main part of an eCommerce website, i.e. setting up your payment methods. Just like you receive cash in physical retail, you will need a payment portal from where the user can pay the amount.
Different eCommerce platforms help you connect with different payment options.
5. Shipping and Delivery Settings
Once the payment options are linked, the next thing is about shipping and delivery of the products.
Just like the payment options, you will also find different kind of shipping options on different eCommerce platforms.
Specify the shipping zones where you can ship the products. Choose the type of shipping options that you want to provide to your customers such as Free Shipping, Flat Rate, Store Pickup, etc. You will also need to pick your courier partners to deliver your products.
That’s it. Your online grocery store is ready.
BUT! Before you start selling,
– Study your Target Audience
Determining your target audience is the first step towards starting an online business. You should be very specific about the age group you want to target along with the gender type, location, occupation, marital status, and income level.
Besides, you should conduct market research, understand your existing competitors and prepare your marketing strategies.
Though an online grocery business would not require narrowing your audience as everyone requires grocery stuff, having a defined audience helps you reach out to relevant and potential customers.
– Optimize your Website for SEO
There’s no point of going online if people cannot discover you. That is why SEO is important. Hire SEO experts to make your website visible in front of your target audience. Once your site is SEO-optimized, you will start receiving organic traffic after some time.
How to set up your Online Grocery Store using PrestaShop?
PrestaShop is amongst the best open-source eCommerce platforms and has an intuitive interface. Today, there are more than 270,000 stores worldwide that are powered by PrestaShop.
Why PrestaShop?
PrestaShop provides you with many rich features. First of all, it is a free and open-source platform and is easy to use. Secondly, it lets you add custom features to your website such as special offers, free shipping, discount mode, etc. Thirdly, it supports multiple payment gateways such as First Data, PayPal, and Amazon Pay.
Now, if you are thinking to have your online grocery store on the PrestaShop platform, follow the below steps.
Step-1: Get a domain name and a web hosting server.
Step-2: Install PrestaShop and add your domain
Once you have successfully installed PrestaShop, you will be presented with default PrestaShop back-end configurations which you can modify as per your requirements. First, disable your shop.
Step-3: Delete the pre-existing products.
Step-4: Customize your website by adding your brand name, logo, pages, social media links, menu bar, etc.
Step-5: Configure your Payment Methods and Shipments
Step-6: Choose your theme and PrestaShop modules
Step- 7: Add your Products
Step-8: Activate your shop by enabling Shop option
Once your online grocery store is set-up, you are ready to go. But since in the current ongoing scenario, delivering products is becoming very challenging, you can encourage the online grocery pick up facility on your website. This is possible with the PrestaShop Store Locator and Pickup module.
PrestaShop Store Locator and Pickup
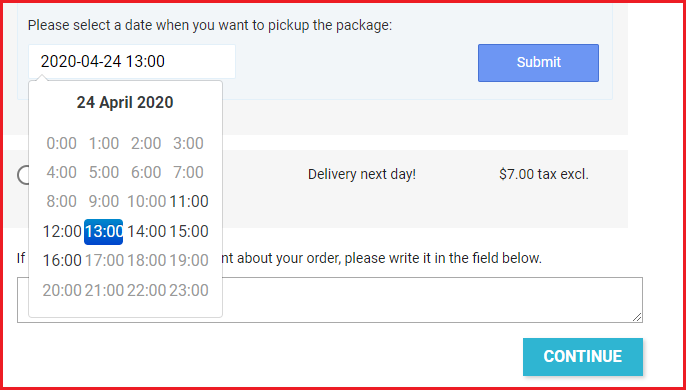
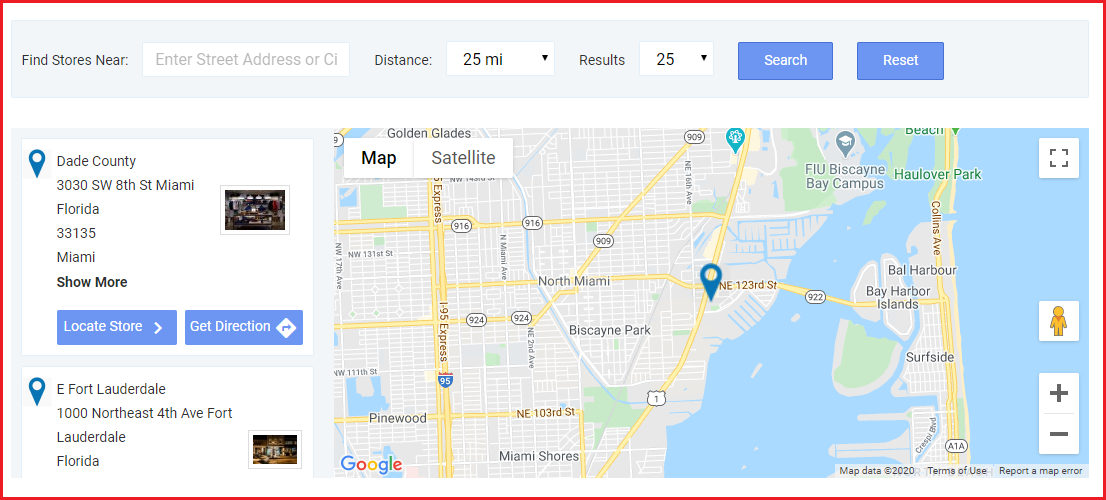
The module lets you map your stores on your website and provides buyers with the option to choose the “pickup from store” facility. They can choose their nearby store; specify the pickup date and time, and then pick up the item at their convenience.
So, like for your grocery business, you can list the stores from where people can get the essential grocery items. They can select the items and choose the date and time at which they want to pick up their items.
Benefits
1. Customers do not need to spend hours standing outside the store to collect their order.
2. Safe pickup since there would not be many gatherings around the shop.
3. Pick up at a convenient time.
4. Customers can find the stores by specifying the location or filter stores by distance; to find the nearest stores.
5. Reduces shipping and delivery cost
6. Minimum interaction involved
Set your Online Grocery Business Today!
By now, you would have probably made up your mind of taking your grocery business online. Want to start your grocery website? Request a quote from here or you can reach out to us with your queries and requirements at support@knowband.com
Knowband is amongst the leading eCommerce solution providers. We provide eCommerce development services for multiple eCommerce platforms like PrestaShop, OpenCart, Magento, Magento 2, and Shopify.
Knowband is also a leading mobile commerce solution provider. We provide mobile app development services for multiple platforms. The PrestaShop Store Locator and Pickup module is also compatible with our Mobile App Builder, letting you allow your customers to shop from your grocery mobile app.
It’s 2020 now, & mCommerce has already marked its lead in almost every aspect eCommerce and retail industry. If you are associated with an eCommerce business that still doesn’t have your eCommerce Mobile Application, then there is a possibility that your might be missing out numerous sale and growth opportunities.
Just having an eCommerce app isn’t enough, you must keep it optimized & well-tailored according to your unique business needs. To stand out from the competitors & to serve the customers better to make more profits, modified eCommerce apps play a huge role. Here are some of such factors that you must consider while developing or customizing a shopping app for eCommerce. Get to know these and keep a match with the trends.
Customer-Centric Approach:
1. User-friendly Interface:
Having a complicated front interface can scare off a few visitors from the app. Hence, the easier an app is to operate, the more positive engagement it gets from the app users. To complement that, keep the UI & UX at par. The best option is to go for the DIY editor customizable home screen. The benefit with that is the store admin can design the home screen as per their choice and business requirements.
2. Simplified Onboarding Process:
Whenever a new user onboards the app, add interactive instructions & graphics to guide the user with the basic functionalities of your app. Also, to make the signup & login easier, integrate social logins like Facebook, Google, etc. You can also use the fingerprint scanning feature of the smartphone devices to add one more option for login, i.e. fingerprint authentication.
3. Layered Navigation:
If your business has products with different categories, make sure to add proper sorting & filtering options. Also, while adding links for categories & subcategories on the navigation menu, make sure that the user doesn’t need to make more than 4 to 5 clicks to reach their choice of subcategory. Easier it is to find products on the app, more are the chances of purchase.
4. Multi-lingual & Multi-Currency Support:
If you serve non-English speaking customers as well, equip your app with all the relevant languages. You may or may not need to include RTL scripts as well as the Arabic language. Similarly, for different countries, you must configure your app to support payment in multiple currencies. The integrated languages in the eCommerce apps can be regional as well.
5. Offline Mode Accessibility:
The best thing about mobile apps (when compared to websites) is that apps can be configured to function even with no internet connection. Although app users can’t browse & load newer pages can access their cart, wishlist, my-account page & recently loaded products & categories.
6. Advanced Search Options:
Equip your eCommerce mobile apps with advanced product search features like ‘image search’, ‘voice search’ & ‘bar code search’. Using such features, the app users can easily search for products on the eCommerce app using a reference image or via giving voice commands or even via the image of a barcode.
7. One-Page Checkout:
The checkout page can be optimized by placing only the necessary entries on a single page. Also, some of the entries can be optimized to have pre-filled data from the previous purchases, like shipping address, phone number, etc.
8. Order Tracking:
Allow your customers to track their orders by adding order tracking features in your eCommerce app. It not only makes it easier for customers but also eases the task for customers to resolve any delivery related issues (in case any arises).
9. Multiple Payment Methods:
Make sure that all the payment methods on your eCommerce website are functional on your eCommerce mobile app as well. You can also introduce mobile-friendly payment options like eWallet integrations like PayTm, PayPal, Google Pay, etc.
10. Chatbot & Chat Support:
Provide improved customer support by integrating static or dynamic chatbots in your app. Especially the dynamic chatbots have a lot of scope with AI automation & can serve the customers with accurate automated response 24/7.
11. Security:
Above all, security is one of the most important factors in an eCommerce Mobile App. The shopping apps for eCommerce must have secure payment gateways. The overall app must be secure because of personal data of users being stored like addresses, phone numbers & payment details like card numbers, etc.
Admin-Friendly Approach:
1. Convenient Admin Panel:
Whichever platform your eCommerce Mobile App Development suggests you opt for, make sure that the admin panel is user-friendly for admins & vendors to use. Because eCommerce mobile apps always need to be re-designed every now & then, a simplified yet feature-rich backend is a must.
2. Push Notifications:
Set up the firebase in a way that you can send an unlimited number of Push Notifications to your App Users. You must also be able to easily create, automate & send those notifications conveniently from the backend.
3. ASO Integrated Features:
Building a spectacular eCommerce pays off well if it gets more visibility on the app stores. Hence, from the beginning itself, you must add necessary App Search Optimization elements in your app to make it rank better on the app stores.
4. Scope For Future Customizations:
With the technology & consumer trends being regularly evolving, your Mobile App is sure to require customizations in the future. Hence, while building an eCommerce Mobile App make sure that your app can undergo heavy customizations of any kind in the future. Certain third-party plugins & extensions can also prove to be useful for certain modifications.
5. Live Synchronization:
Have both your eCommerce app as well as the website to be synchronized in real-time. This way all the changes made on one reflects on the other & keeps the inventory management automatic.
6. Multivendor Marketplace:
If your business model requires multivendor configuration, then your Mobile App must have all the necessary features & elements to run smoothly on such a configuration.
7. Audience Insights:
Integrate analytic tools with your eCommerce app so that you can get deeper insights into your app users. This also helps your team to make smarter marketing decisions & to add customizations according to users’ needs.
Ending Comments:
We, at KnowBand, make sure that your eCommerce website & mobile app serve both store admin and online shoppers in the best way possible. If you require any assistance in custom eCommerce Mobile App Development, feel free to reach out to us at support@knowband.com.
In case you have a running eCommerce store on any of the following platforms, launch a pair of native shopping apps with ready-to-go plugins:
The rapid growth in the mCommerce industry has led to the urgency of having an eCommerce mobile app. But, creating mobile apps involves a lot of coding & other technicalities. Why not turn your online website into a web-app instead?
Offering an optimized PrestaShop eCommerce PWA app i.e. would enhance the mobile shopping experience to the users. This PrestaShop PWA App Builder module is designed & built to transform your store into a web-application which can be managed from a friendly backend panel. These apps come up with various extended features than native apps like offline mode & platform independency which makes them a hassle-free & seamless shopping solution for users.
1.1 View Demo App:
Before purchasing the extension, view demo app functioning by opening PrestaShop PWA Demo App URL on your browser.
–> iOS devices do not offer any inbuilt “Add To Home Screen” prompt, so users need to manually add the PWA Mobile App to the home screen of iPhone or iPad.
–> iOS does not support web push notifications, hence the push notifications can be sent only to the Android device from the admin panel of PrestaShop PWA Mobile App Builder.
[NEW UPDATE] PrestaShop PWA supports RTL Language Scripts
The PrestaShop PWA Mobile App Creator now supports all worldwide languages including RTL (Right To Left) ones like Arabic, Hebrew, Persian, etc. The store admin can bring all languages of their store on the Progressive Web App and can even add any RTL languages as per the requirement. On the other hand, the mobile shoppers won’t face any issue in accessing the PrestaShop PWA Mobile App in their preferred language.
Compatible With PrestaShop Multi-vendor Marketplace
The PrestaShop Multi-vendor Marketplace module is fully compatible with PrestaShop PWA Mobile App. The Progressive Web App displays the seller section with all marketplace sellers on the same application. The seller details remain in real-time sync with the marketplace web and will be updated automatically on the PrestaShop eCommerce PWA application.
Note: The multivendor PWA mobile app for PrestaShop is only customer-centric. This means there won’t be any seller dashboard or management from the app-end. The store admin can manage the sellers from PrestaShop Marketplace module and the same will be updated on the app instantly.
2.0 Admin Panel Screens
The PrestaShop PWA Mobile App can be fully configured using these handy admin tabs and settings. All you need to do is to make some necessary clicks and button toggles to make the changes in the Progressive Web App. Let’s discuss each one of them in detail:
2.1 General Settings
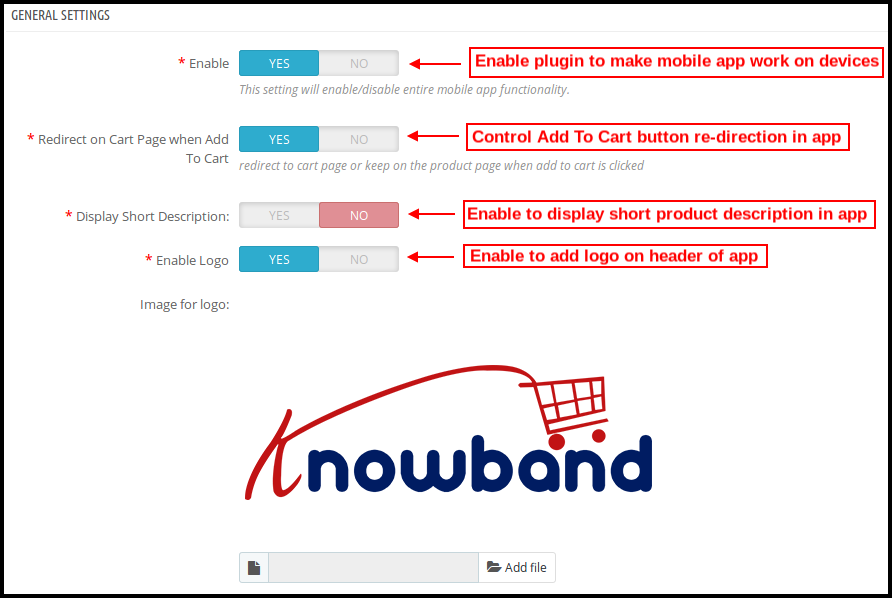
As the name suggests, these general configuration settings are for all sorts of regular change in Progressive Web Applications(PWA). The options under this tab make the app function on online shopper’s devices.
a) Enable Plugin: Enable the PrestaShop PWA module to make the app work on mobile devices. b) Redirect on Cart Page when Add To Cart: This functionality allows admin to control “Add To Cart” button redirection. The users can be redirected to the shopping cart or kept on the product screen on tapping “Add To Cart”. c) Display Short Description: Enable to display short product description on the product screen of Progressive Web App(PWA). d) Enable Logo: Add logo of your store on the header of Progressive Web App (PWA) and showcase your brand to users.
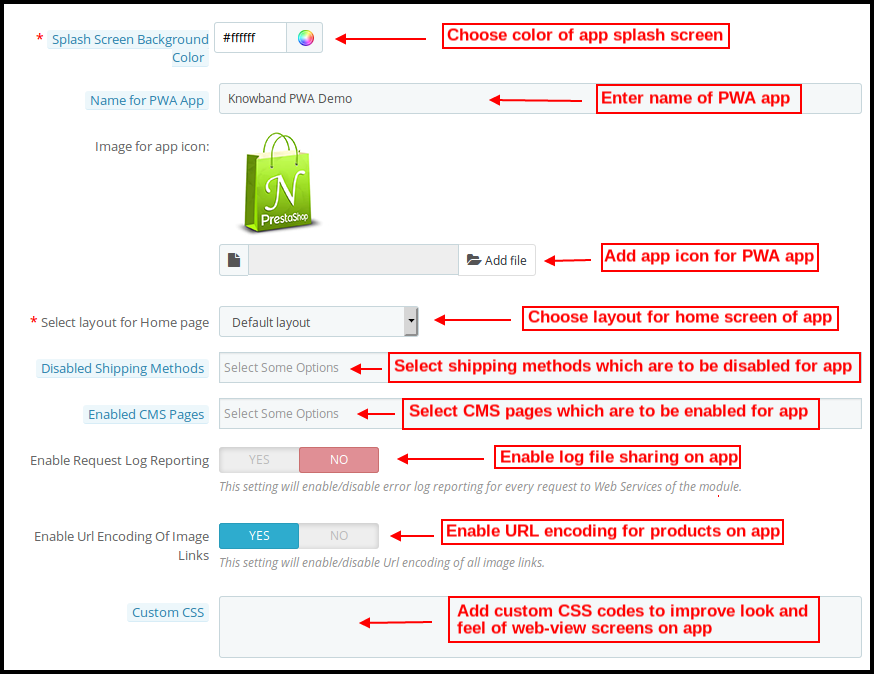
e) Splash Screen Background Color: Choose the right color option for the background of Progressive Web App(PWA) splash screen. f) Name For PWA App: Choose the name of your PWA for Prestashop as per your choice. g) Select Layout: Choose the desired Home Page Layout for your PrestaShop app. You can create multiple home screen layouts in the backend as per various festivals & themes & use them as per your store requirement. h) Disabled Shipping Methods: Disable shipping methods from working in Progressive Web App(PWA) whichever you don’t feel right. On the website, they will work usually fine. i) Enabled CMS Pages: Choose desired CMS pages to be displayed on the PrestaShop PWA app. j) Enable Request Log Reporting: Enable option to share log file on the progressive web apps in order to get details of any sort of abnormal behavior from app. k) Enable URL encoding of Image links: Enable this functionality to support Non-ASCII characters on the Progressive Web App(PWA).
2.2 Push Notifications Settings
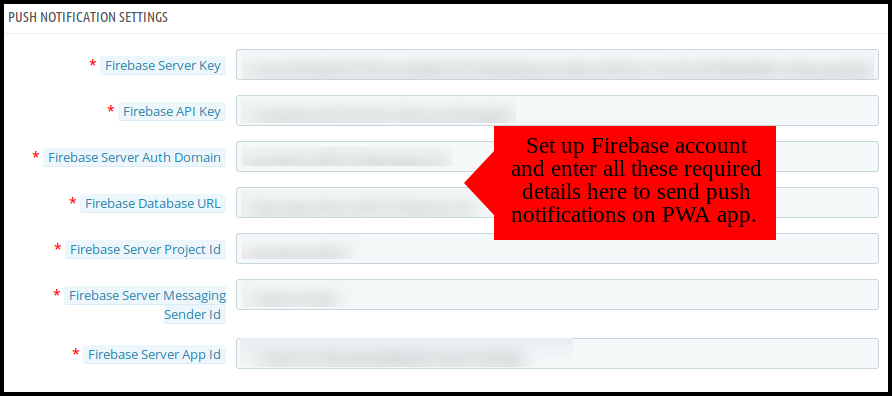
Push notifications are the handy tool to market and promote your store products, deals and sale offers. The settings under this tab allow users to configure and send unlimited push notifications on PrestaShop PWA app.
The various details under these settings will be obtained when you’ll set the Firebase account. Here is step by step process to do so:
2.21 How To Set Up Firebase Account?
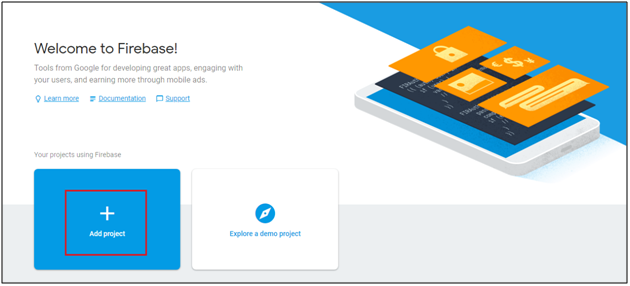
Step 1: Login Google Firebase
Step 2: Create New Project
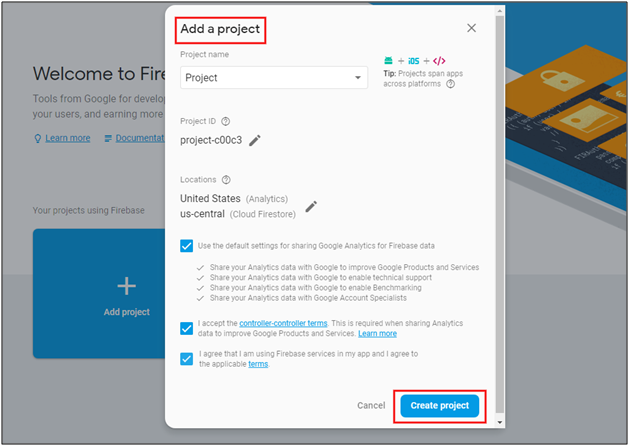
As you click on Add Project, following dialog box will pop up:
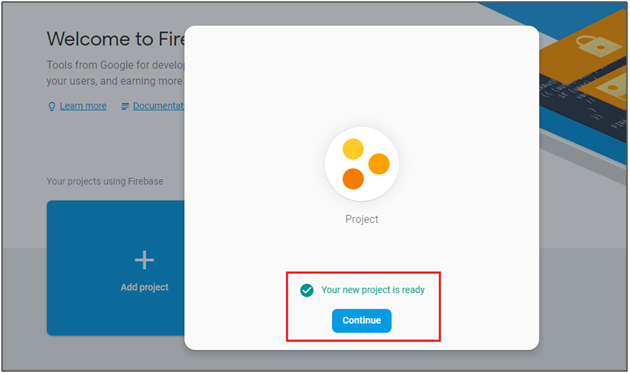
It will take a few seconds to create the project. Once the project is ready, click continue.
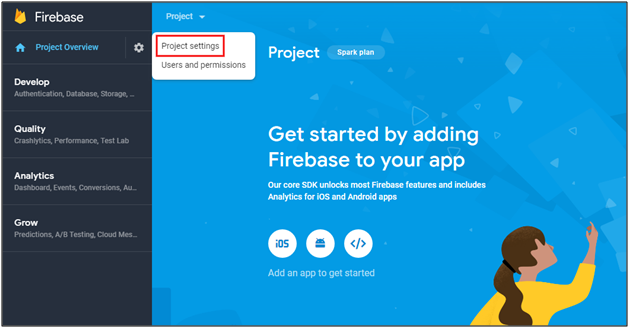
Step 3: Manage Project Settings
Once the project is created, click on Project settings.
Step 4: Go to Authentication options:
Step 5: Find Firebase Keys
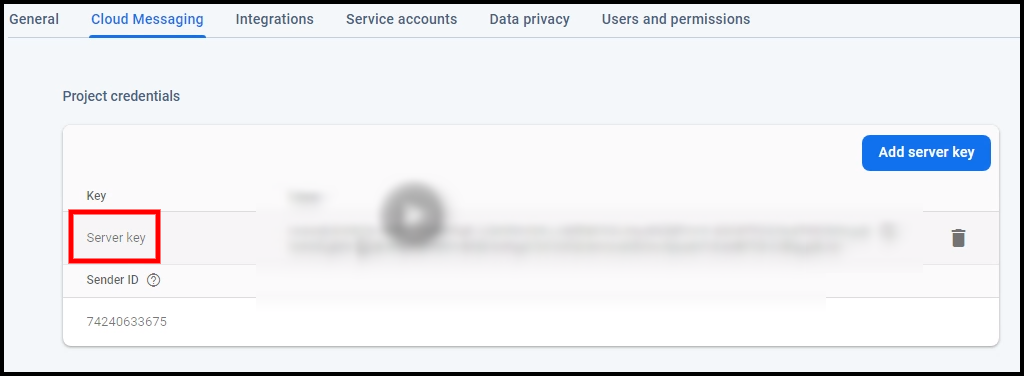
In the project settings, click on Cloud messaging settings. From here, you can directly get the server key.
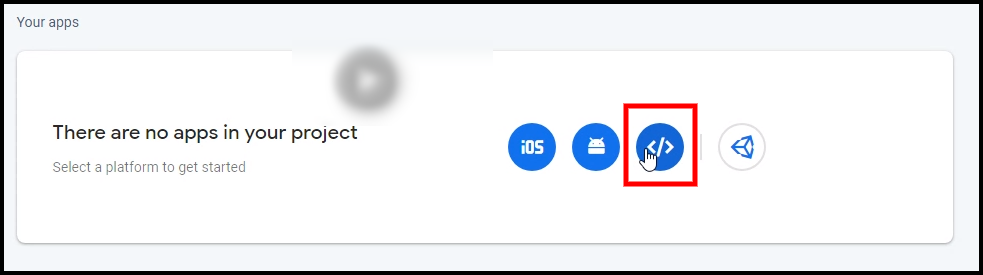
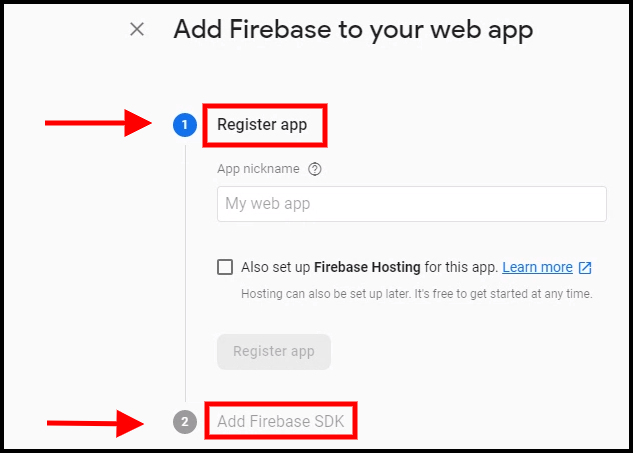
Step 6: Add your Web-App to Firebase
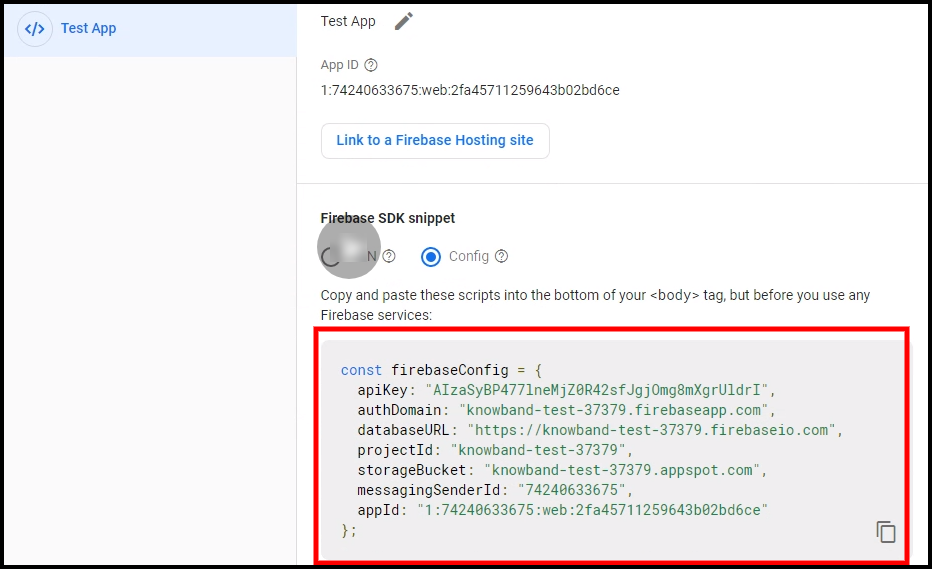
Step 7: Get other firebase related details and paste the same in PWA for Prestashop module admin panel.
Step 8: Get firebase server key from cloud messaging tab in Settings:
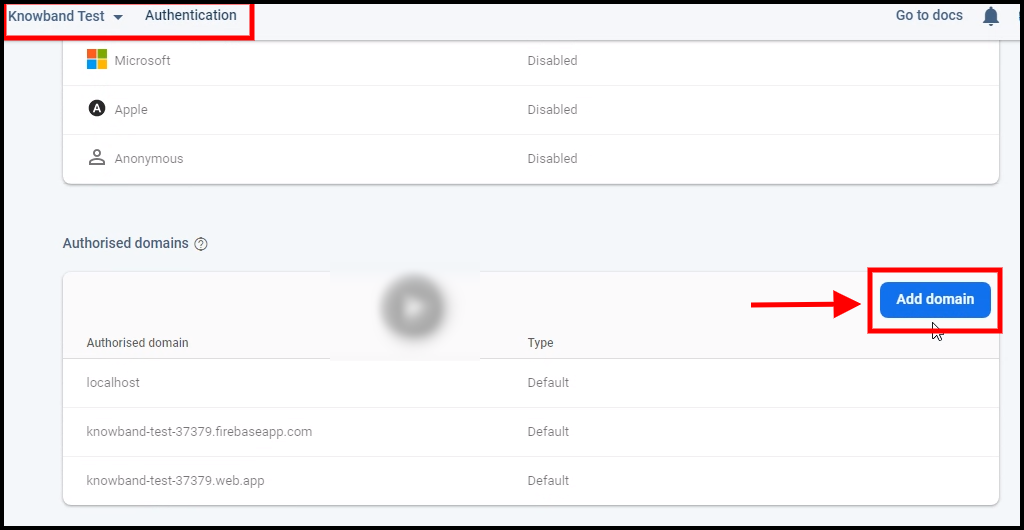
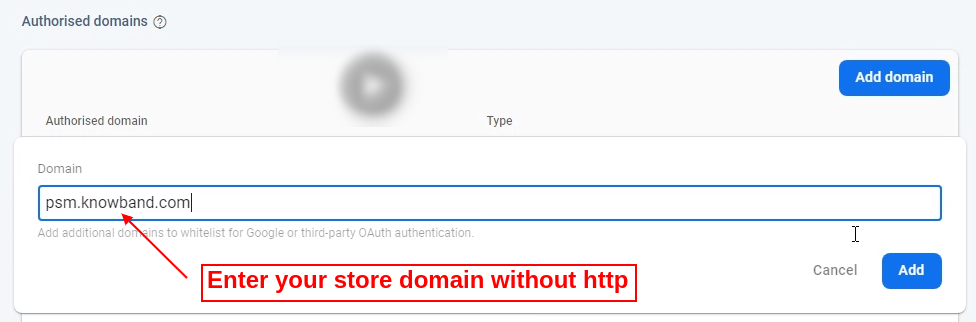
Step 9: Add your domain in authentication>>sign-in.
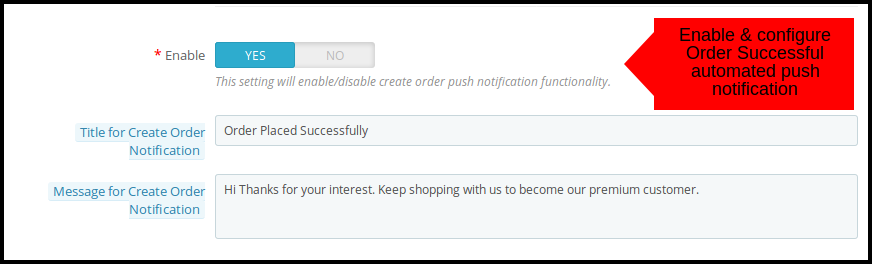
A) Successful Order Push Notification:
Enable/Disable automated Push Notification sent to the app users for successful order creation from PrestaShop PWA app Builder.
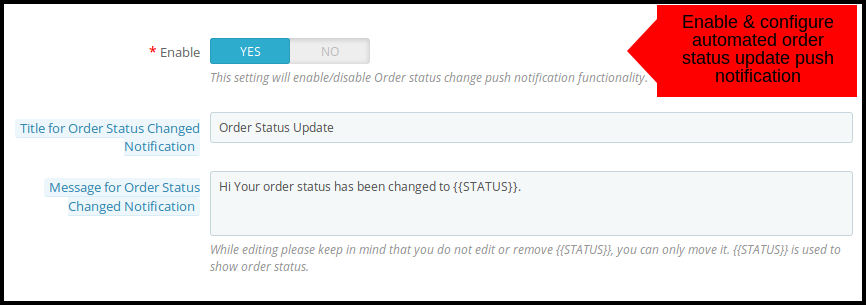
B) Order Status Update Push Notification:
Enable/Disable automated Push Notification sent to the app users for any update regarding their previous order delivery status. The users get to view this status under “Order Details” tab of PWA app
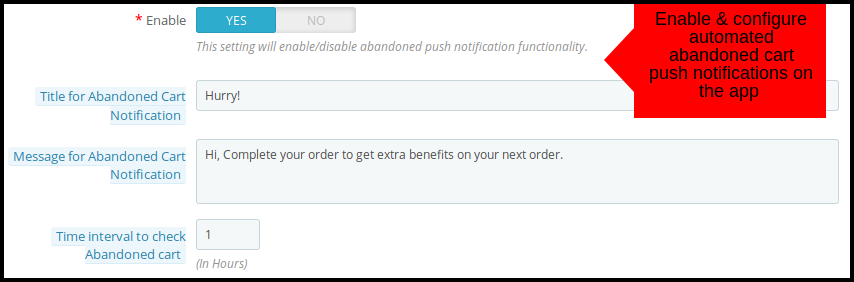
C) Abandoned Cart Push Notification:
Enable/Disable automated push notification sent to the users who have abandoned cart without successful purchase. This push notification will be sent to users automatically after entered time interval.
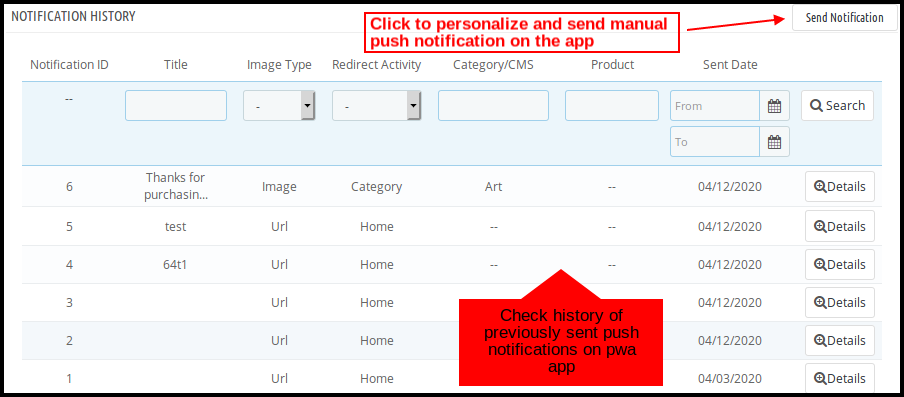
2.2 Push Notifications History
Here the store admin can view complete history of push notifications sent to Progressive Web App (PWA). Along with that, the store admin can even personalize the manual notification and send the same to Progressive Web App users.
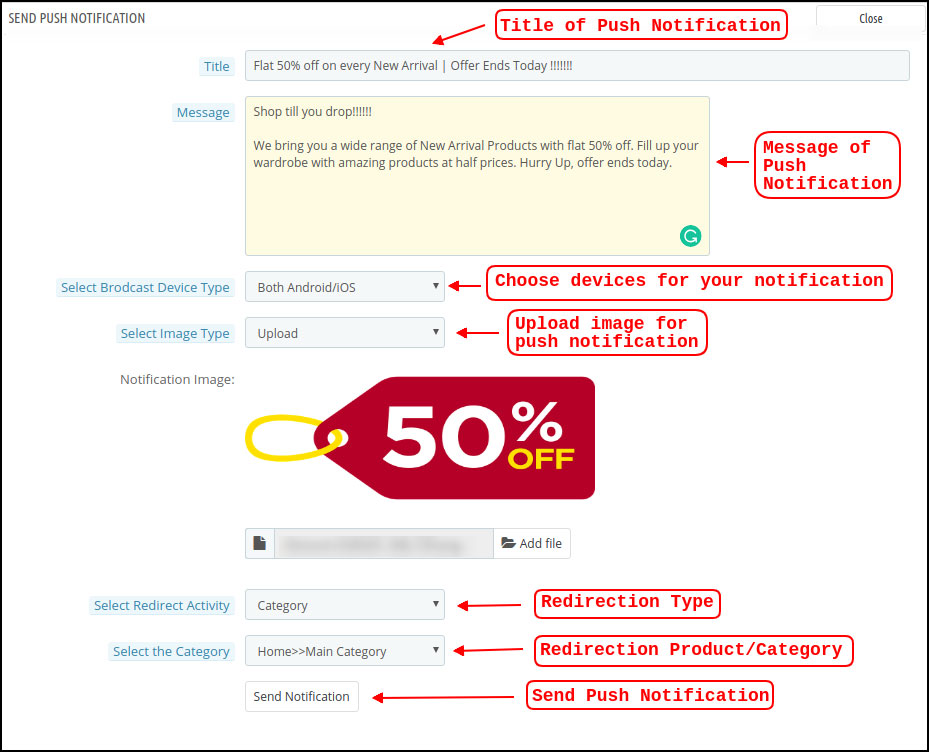
A) Send Notification:
What’s better to design and send push notifications as per the need? This option allows store owners to configure and send a custom notification manually to PrestaShop PWA app users.
2.3 Home Page Layout
The PrestaShop PWA module allows the store admin to bypass the restrictions of having fixed home screen UI and design the one suiting their business need. This tab allows the store admin to craft and save multiple layouts and use them as per the running occasions and festivals.
In order to configure the home page layouts of PWA app, following elements are available in the back-end:
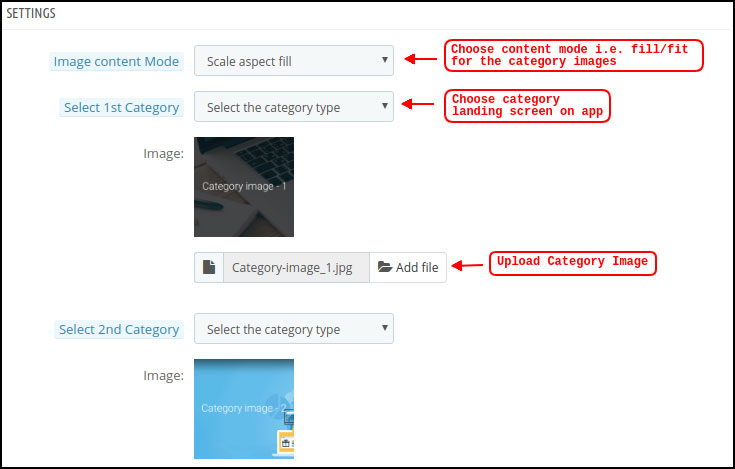
A) Top Categories:
Top categories are displayed in the form of small squares on the home screen of Progressive Web App(PWA). Their images and redirection links can be configured from here. These categories can be used for highlighting top brands on the app home screen. The PrestaShop PWA module allows maximum 8 categories in which minimum 4 are mandatory.
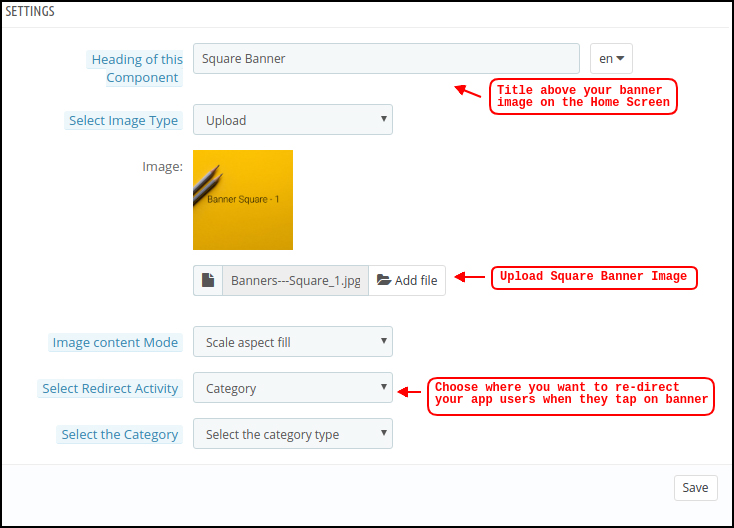
B) Square Banner:
Square Banner listing on the Progressive Web App(PWA) home screen offers a square-shaped banner block in which the store admin can use desired image. The relevant redirection link can be used for these banners.
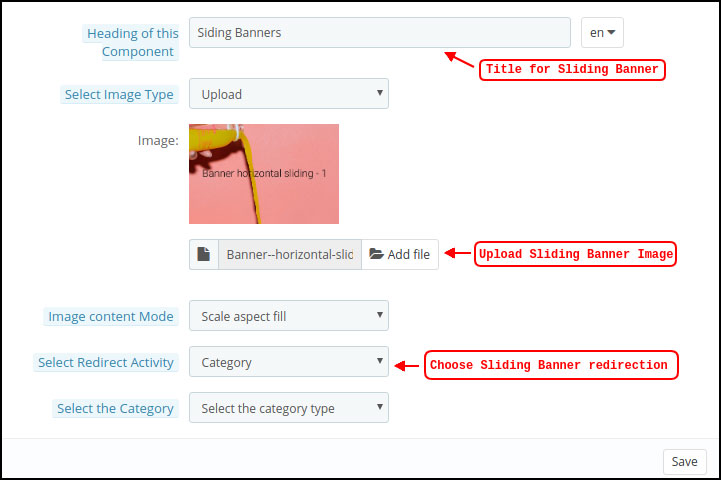
C) Horizontal Sliding Banner:
These are the rectangle-shaped banner block available in horizontal sliding on the home screen of PrestaShop PWA app. For this also, image and redirection link is fully configurable.
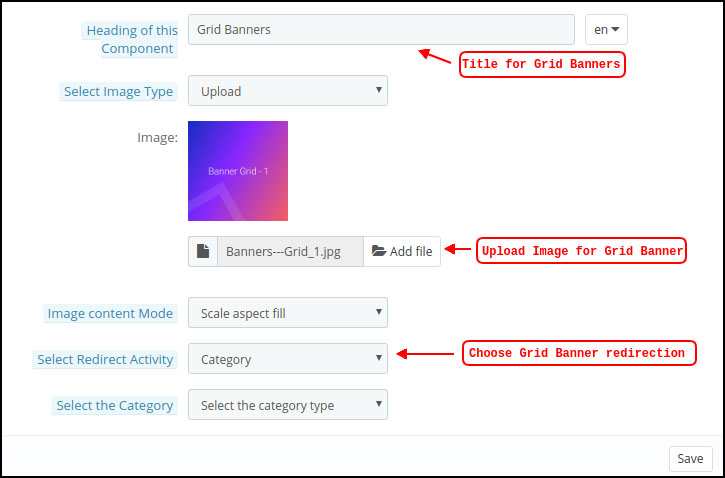
D) Grid Banners:
These are square-shaped banners listed on the home screen of Progressive Web App(PWA) in the form of grid view. The store admin can add as many banners as required and set their redirection link.
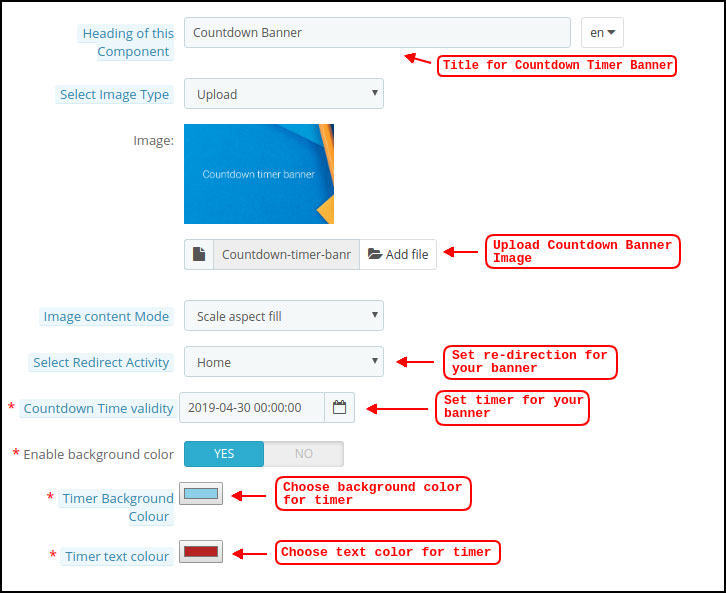
E) Countdown Timer Banner:
The PrestaShop PWA module allows the store admin to configure and add a timer based banner on the home screen of web-app. The store admin can add banner image & landing screen along with timer till the banner is to be displayed on the progressive web app home screen. Once the timer is over, the banner will be removed automatically.
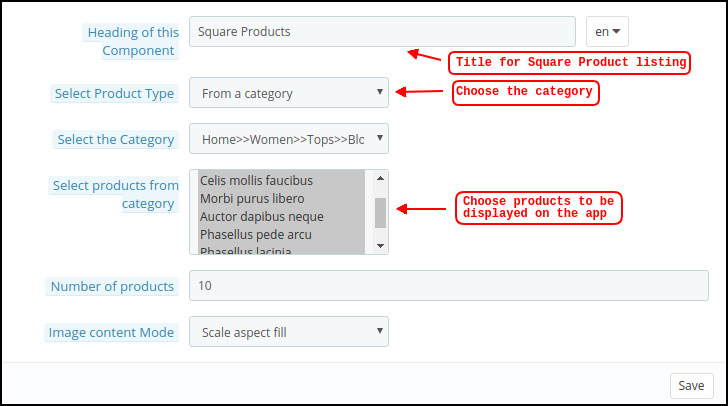
F) Square Products:
As of banners, the PrestaShop PWA mobile apps allows showcasing products in square block listing. The admin get to choose the products for this element.
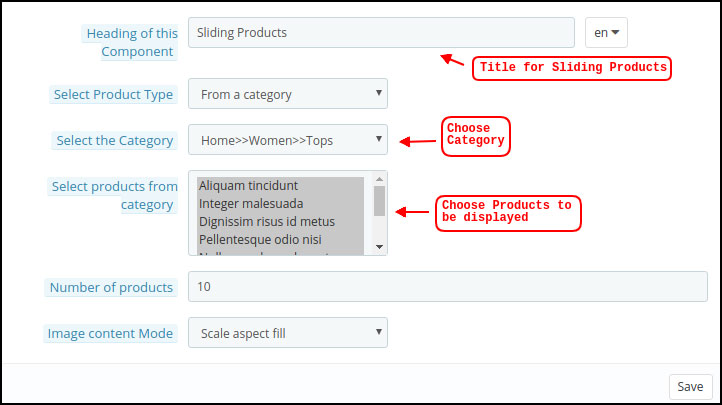
G) Horizontal Sliding Products:
You can add the products in the form of horizontal sliding. The chosen products could be of the store admin choice like New Arrivals, Best Sellers, custom products etc.
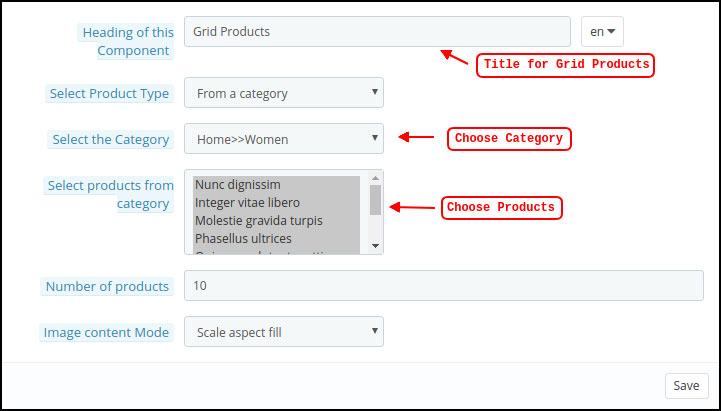
H) Grid Products:
Products can also be added on the home screen in the form of grid view block listings. The store admin can choose desired products and quantity to be displayed on the home screen of PrestaShop PWA app Builder.
I) Recently Accessed Products:
The PrestaShop Mobile PWA module allows store owner to add a recent tab element on home screen of web application. It will display all products which are browsed by users recently.
Note: The store admin can add up to 20 elements while designing layout in the backend panel.
2.4 How to get Facebook App details?
Facebook App can be created by following below-mentioned steps:-
Step 1: Go to given URL: https://developers.facebook.com/apps/
Step 2: Click on the “Add a New App” button.
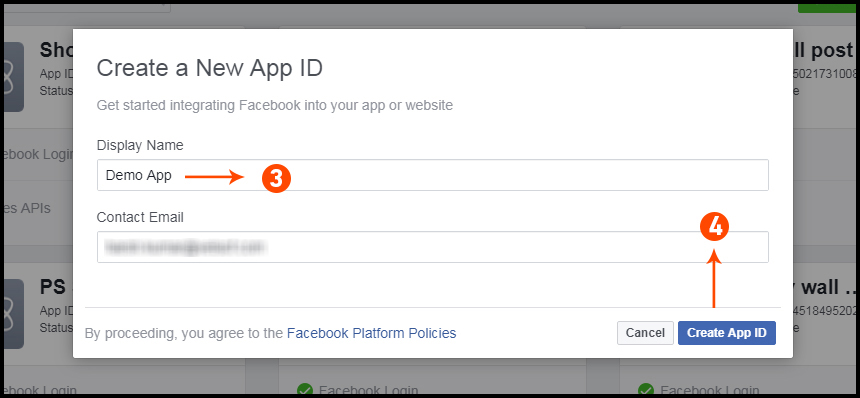
Step 3&4: Enter your App name and email id, then click on “Create App ID” button.
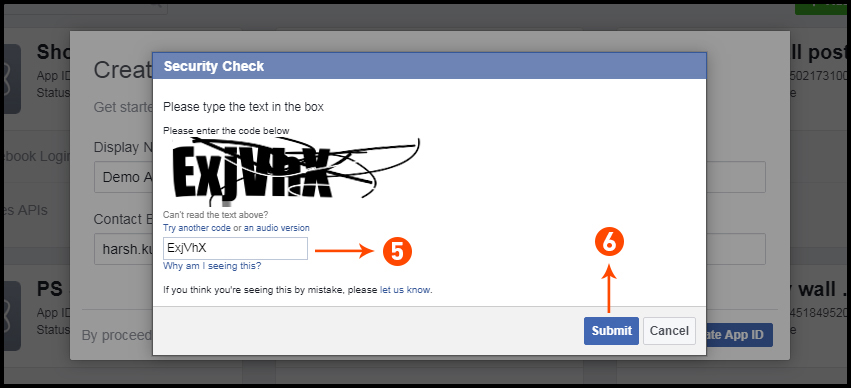
Step 5&6: After clicking on Create App ID you will have to go through a security check as shown:
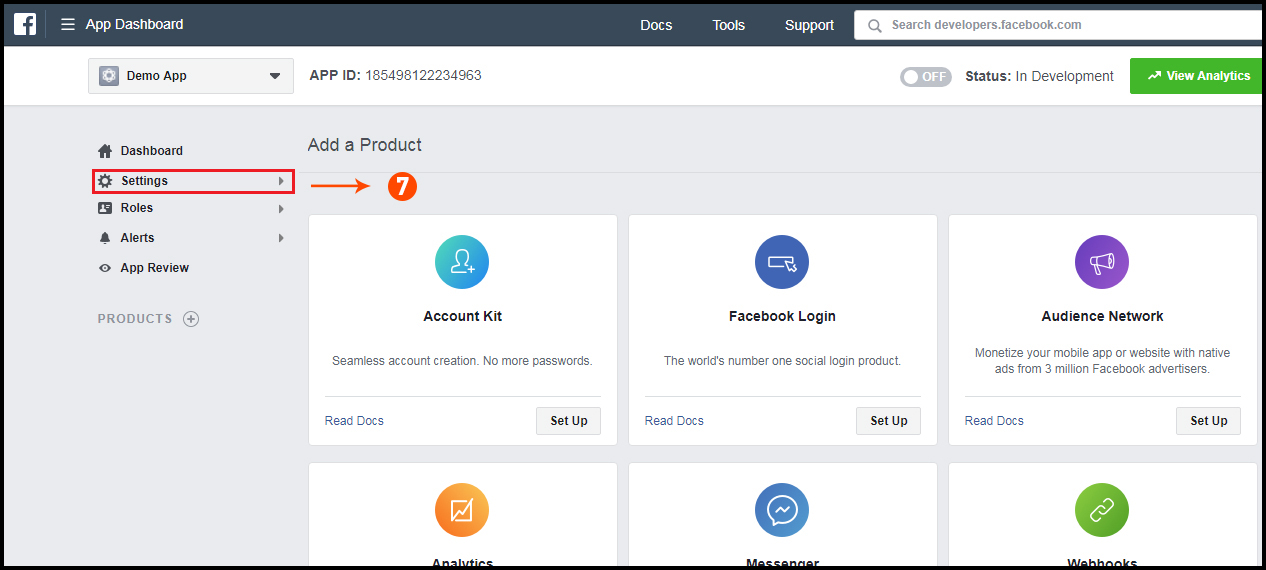
Step 7: Click on “Setting” tab.
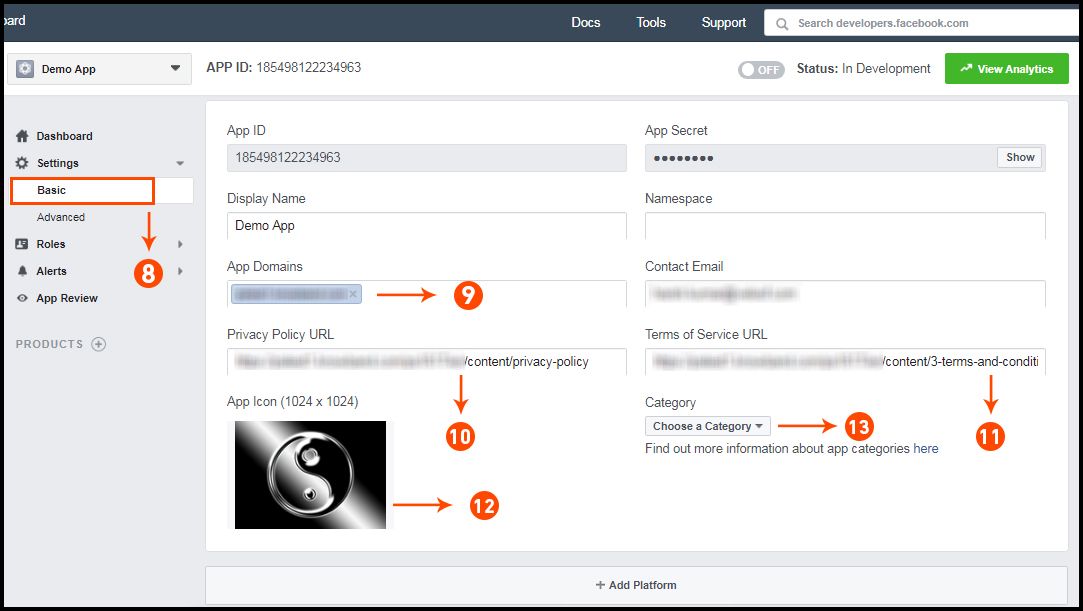
Step 8-13: Two option will be available in the dropdown, Basic and Advanced, click on “Basic”. And then enter your “App Domain”, “Contact Email”, ”Privacy URL”, ”Terms and Conditions URL”, ”Add Logo”, ”Select Category” and click on “Save Changes” button.
App Domains:
yourdomain.com is correct
yourdomain.com/store is incorrect
www.domain.com is incorrect
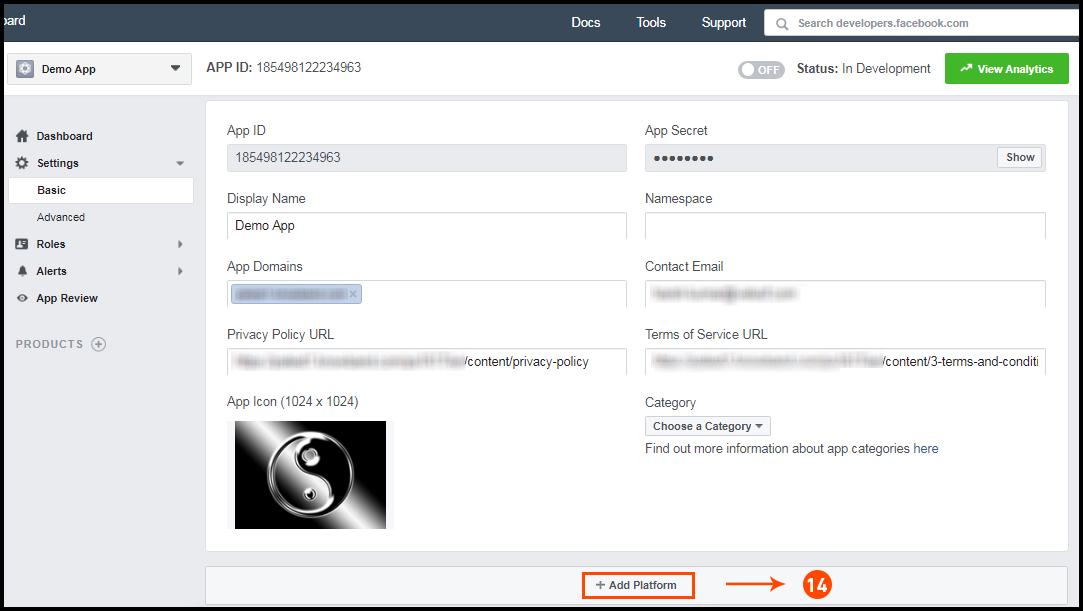
Step 14: Now click on “+Add Platform”.
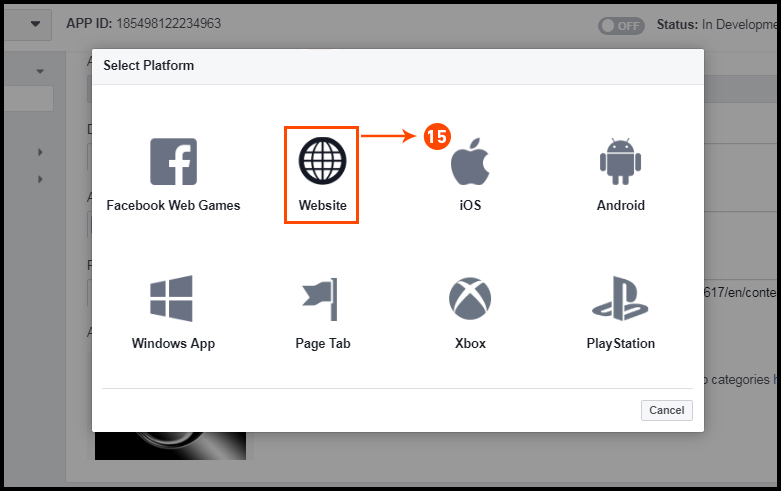
Step 15: And select Website as Platform.
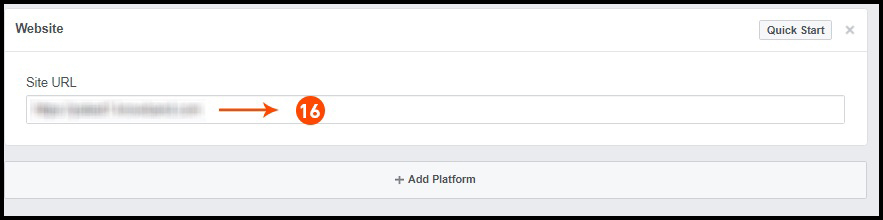
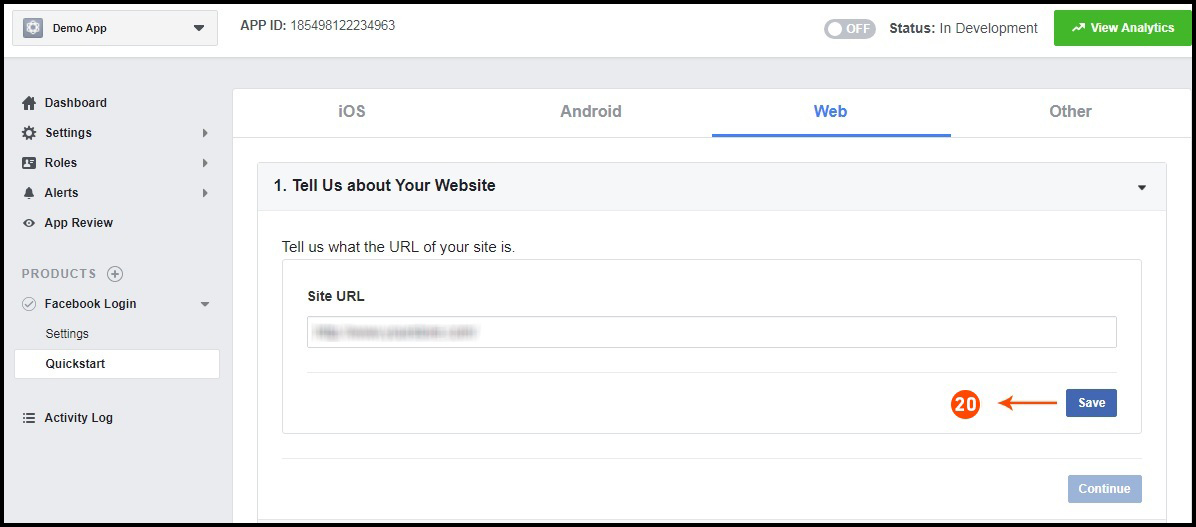
Step 16: Now Enter your site URL.
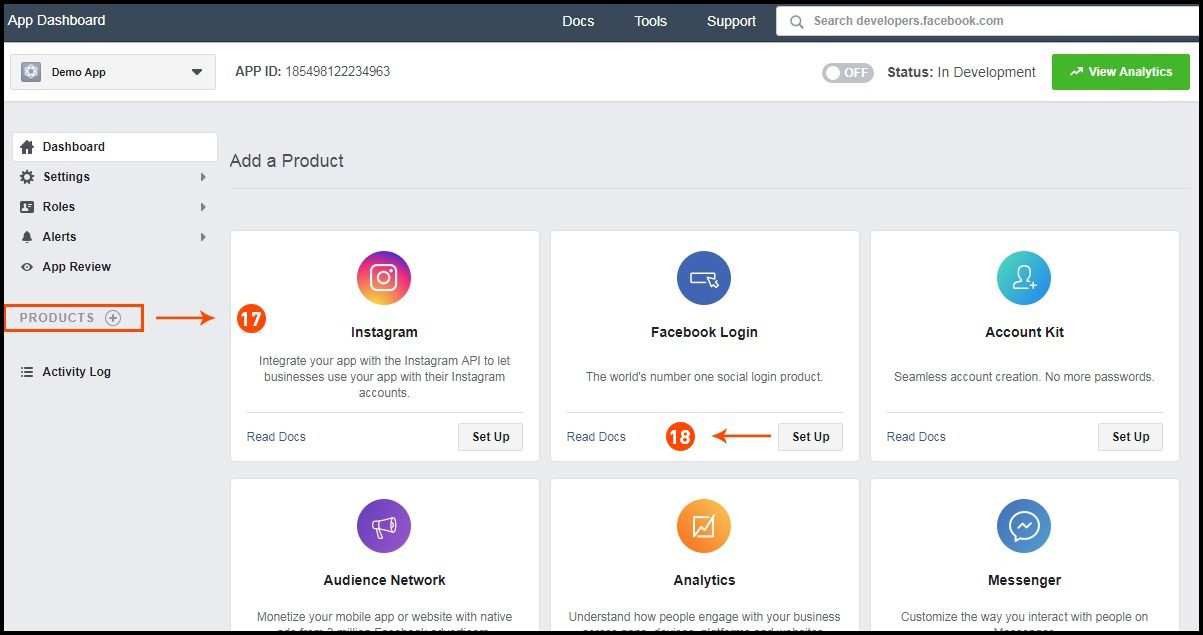
Step 17&18: Click on “Products+” and select Facebook login.
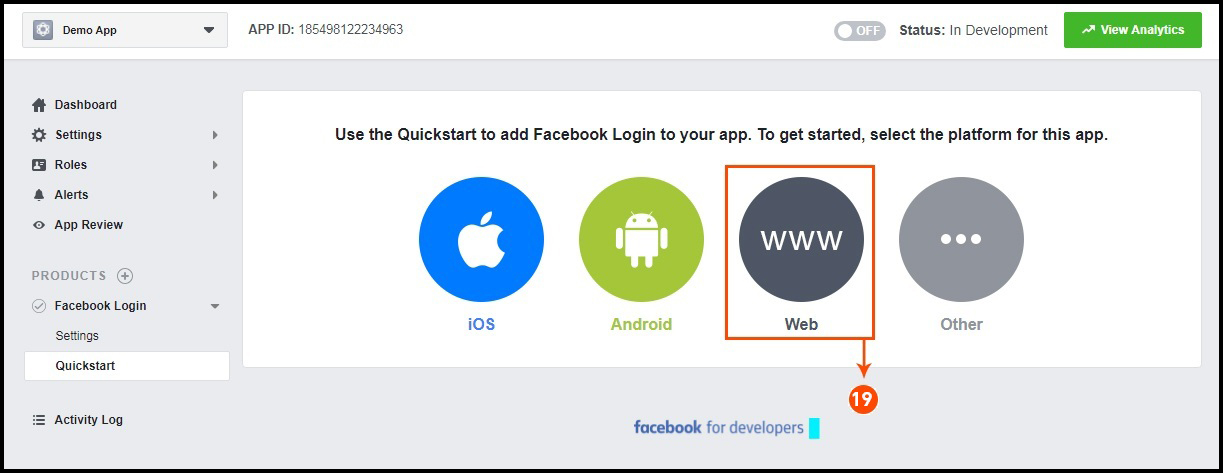
Step 19: Select web as the platform for the app.
Step 20: Now click on save.
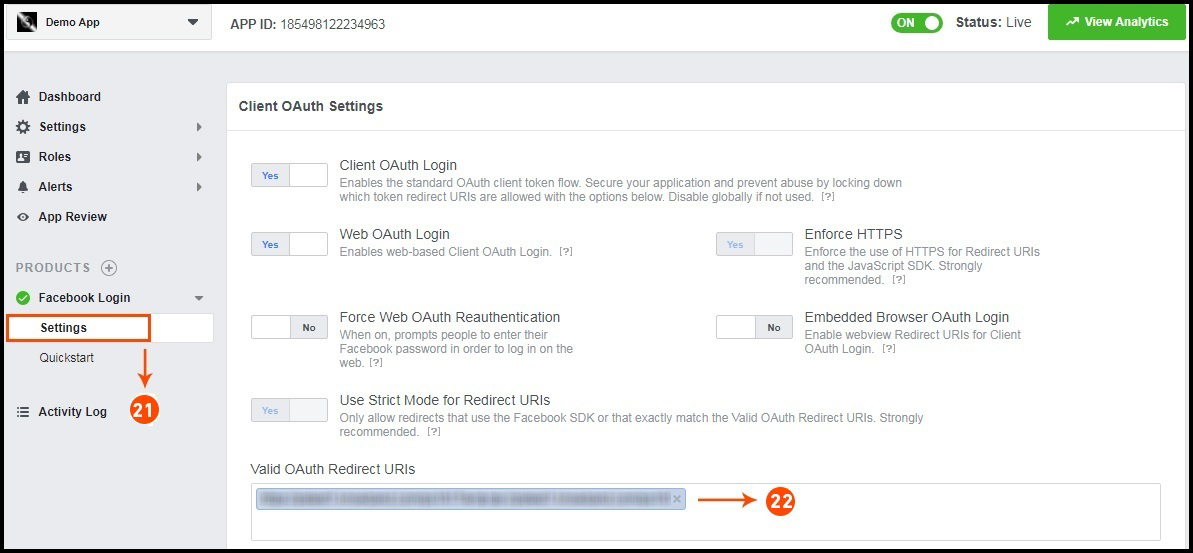
Step 21&22: Click on Settings and add a Valid OAuth Redirect URIs.
Valid OAuth Redirect URIs:
https://example.com/pwa-app/login
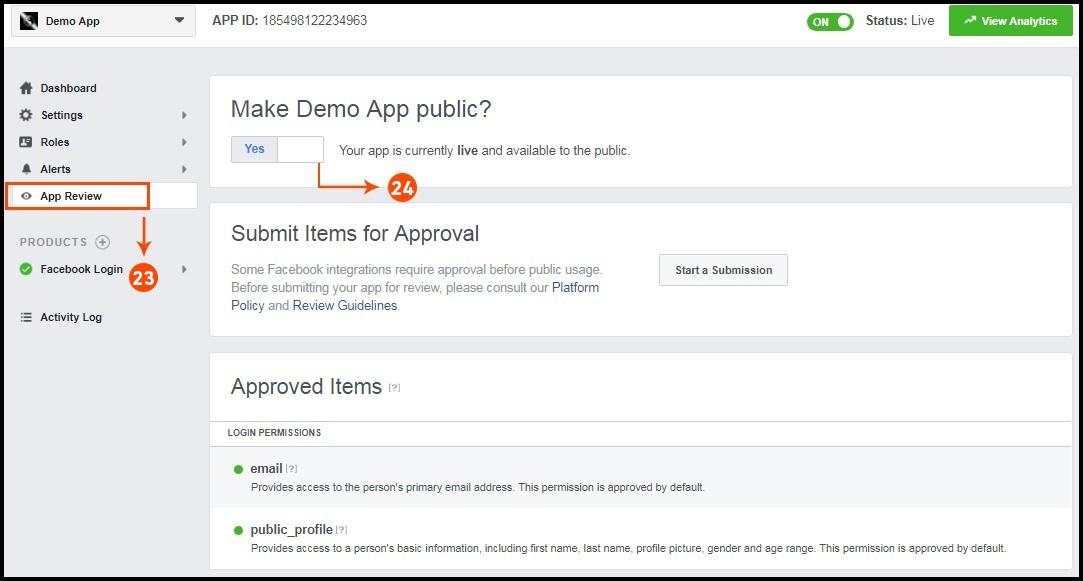
Step 23&24: Click on “App review”. And mark “Make ‘your app name’ Public” to Yes.
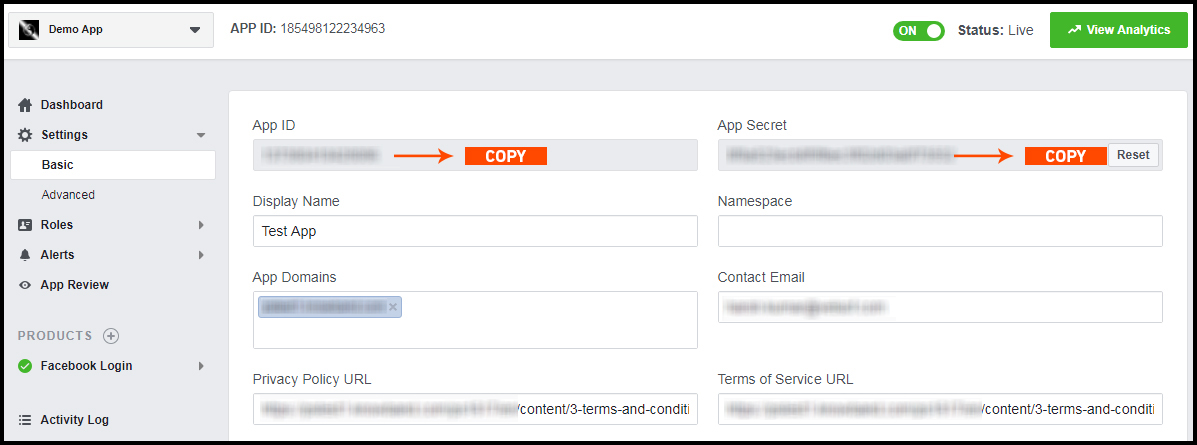
Final Step: Copy the App ID and App Secret and paste it into the fields provided in the module.
2.5 How to get Google App details?
Go to Google Developers Console
(https://console.developers.google.com/project) or click on link given top right of the respective tab in module configuration page.
Now click on Create Project on the left of the page.
Enter a name for your project and proceed to the next step.
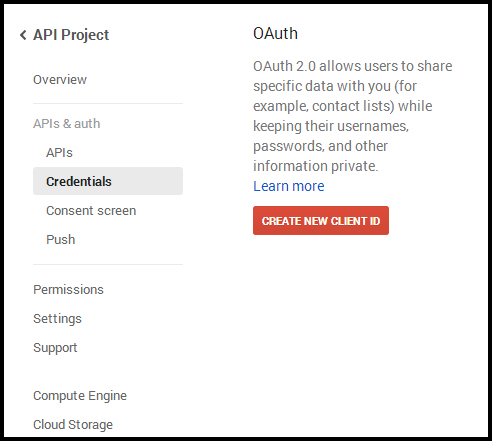
Now click on APIs and auth-> Credentials from the left menu as shown below.
Click Create New Client ID button from the right panel of the screen.
You may have to fill the form for Consent Screen before proceeding. To do so, that you have to click on Consent Screen in the left menu as shown in the image above.
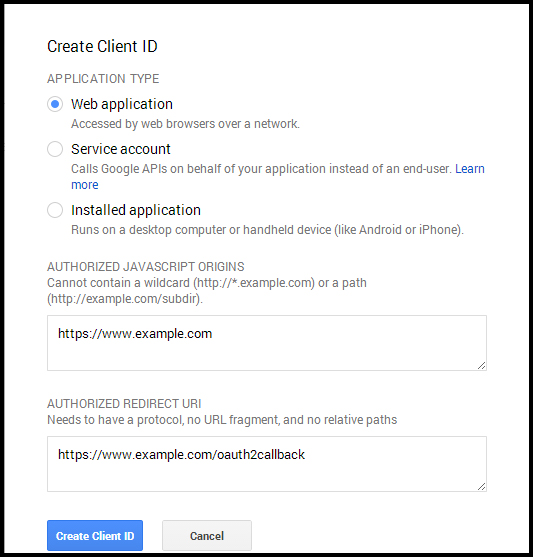
Fill the pop-up form with below details:
Application Type: Web Application. Authorized JavaScript Origins: Your store domain name (https://www.yourstore.com). Authorized redirect URI or URI of Loginizer redirect page:
https://example.com/pwa-app/login
Now click Create Client ID button to get your Client ID and Client Secret Key.
Now you can use the client secret and client ID to let your customers login to your store using their Google account.
3.0 Front End PWA App Screens:
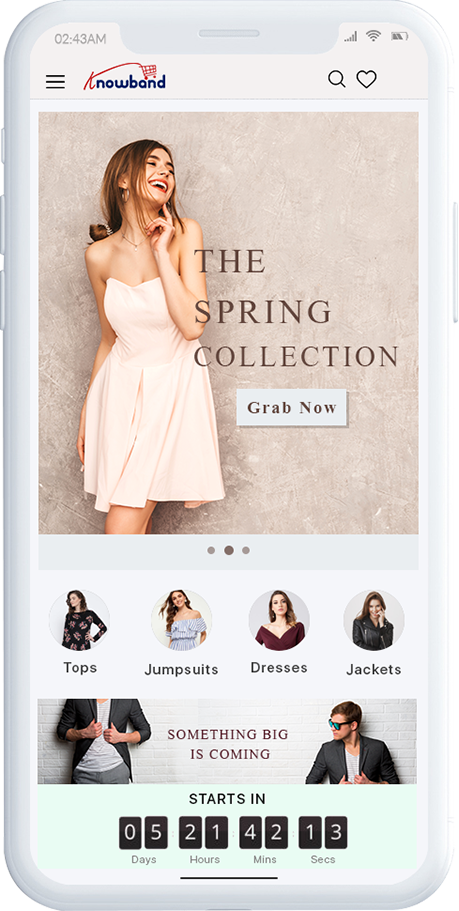
3.1 Home Screen
1. Dynamic Layout:
Using various designing elements, the store admin can create dynamic layout as per the need.
2. Store Logo:
Add store logo on the header of the Progressive Web App(PWA).
3. Shopping Cart:
The shopping cart icon on the top-right corner of the home screen allows users to switch on cart screen.
4. Navigation Menu:
Browse the categories in the apps with left navigation menu on the home screen.
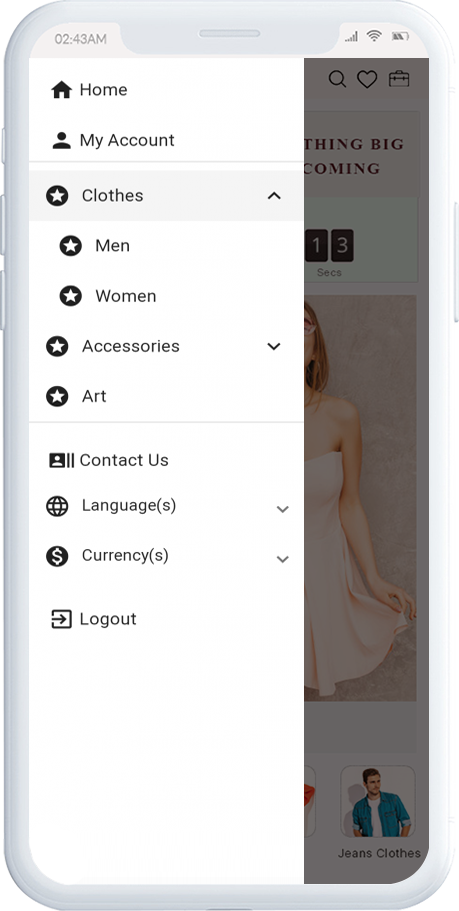
3.2 Accordion Menu (Navigation Bar)
The Progressive web app come up with proper categorization of products as available on the website. Mobile shoppers can easily browse products from multiple categories. All CMS pages are also available in Accordion Menu. It provides the following options:
1. My Account:
My Account option contains all the user personal, shipping, order information. The PWA app shoppers get to view all the stored data related to them & can update the same as well.
2. Categories
Categories displayed in left navigation menu of Progressive Web app(PWA) are the same as of your website.
3. CMS Pages:
Various CMS pages like About Us, Contact Us, Terms & Conditions, etc. Can be accessed from here.
4. Language(s)
The language option allows PWA app users to view the web-app in their desired language. All available languages are displayed under this option only.
5. Currency(s)
All available currencies on your website are displayed here on PrestaShop PWA app Creator Module.
6. Login/Logout
Users can easily sign-in/sign-out from PrestaShop Progressive Web App via this option.
3.3 Category Screen:
1. Multiple Views:
The categories on Progressive Web App(PWA) for PrestaShop can be viewed in both list and grid view.
2. Sorting:
This option allows the online shoppers to choose the sort order in order to narrow down the search and get desired product with ease.
3. Filter:
Option to filter products simplifies product search. Users can filter all products under categories using various attributes like size, color, price etc.
3.4 Product Screen:
The product screen of your Progressive Web App(PWA) is simple & intriguing. Multiple images of the same product are displayed along with name & price. The product availability is also displayed as “In Stock” or “Out Of Stock” based on inventory status. It contains the following other options:
1. Product Info & Care
The complete product information as available in the inventory will be displayed here.
2. Short Description
Users get to read the short description of your product to quickly make up their mind about purchase.
3. Product Options:
All the options related to the product like size, color, etc. are displayed here.
5. Add To Cart:
This button allows users to add product into cart. The users can further process the cart for purchase.
6. Product Social Sharing:
Sharing option for the product allows users to share product on multiple social channels.
3.5 Login Screen
The Progressive Web App(PWA) offers various one-tap login options & make sign-in/registration process more seamless:
1. Login
The app users can easily authenticate & login into PWA apps using their previous email login credentials.
2. Sign Up
All the new app users can sign-up & create their account on the store from the PrestaShop PWA App. The sign-up form asks for only necessary details to create account.
3. Login with Facebook
The users can log in into PWA app using their Facebook Account Credentials.
4. Login with Google+
The users can login into Prestashop Progressive Web application (PWA) using their Google Account Credentials.
3.6 Shopping Cart Screen:
The Shopping Cart screen of your Prestashop Progressive web application will display all products added into the shopping cart. The app users can view Product name, quantity, total price & shipping cost. This screen has the following options:
1. Apply Voucher
This option allows the users to use website coupons and grab discount offers.
2. Total Product Price
The users get to view the complete cost of their shopping bag before proceeding further. It is automatically updated according to any update with product quantity or new addition.
3. Update Product Quantity
The PWA app users can even update the product quantity with the “Update Quantity” option.
4. Remove Product
The app users can simply remove the product from the cart by simply tapping “Remove” option.
5. Continue Shopping
Users can leave the cart to browse more products on your progressive web app for Prestashop.
6. Continue To Checkout
The PWA app users can proceed further to the checkout & payment screens just by tapping the “Continue To Checkout” option.
3.7 Checkout Screen
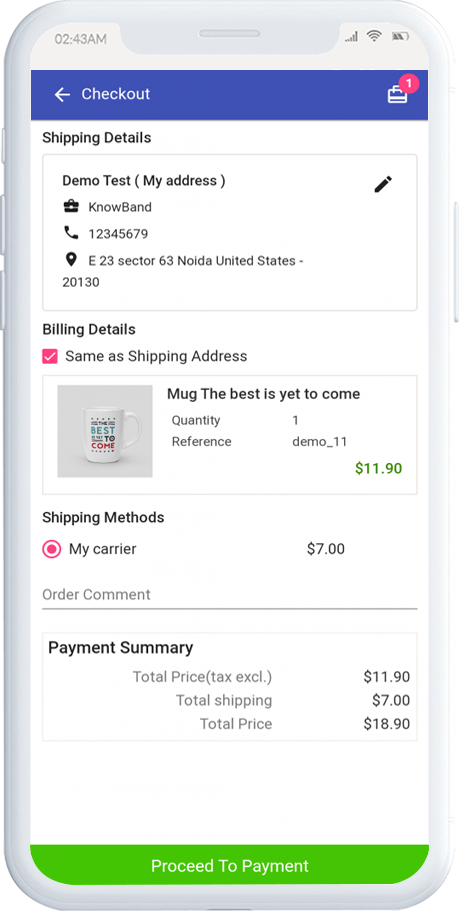
The progressive web apps with PrestaShop Progressive Web App (PWA) module have a simplified single-screen checkout with only relevant information. The users can view complete checkout details like shipping details, billing details, order summary, order comment, payment summary.
1. Shipping & Billing Details
This screen provides details of the shipping & billing addresses saved by the user. The user can also edit/save the new shipping address if needed.
2. Order Summary
The progressive web app for Prestashop users get to view product details before making payment.
3. Shipping Methods
All available shipping methods are displayed here. Users can choose the one suiting their need.
4. Order Comment
Users can also add any comment related to their order which will be visible to store admin on the order web-page in the backend.
6. Payment Summary
This section displays the complete breakdown payment details involved with purchase.
7. Proceed To Payment
The Prestashop Progressive Web Application (PWA) app users will be re-directed to the Payment screen after tapping the “Proceed To Payment” button.
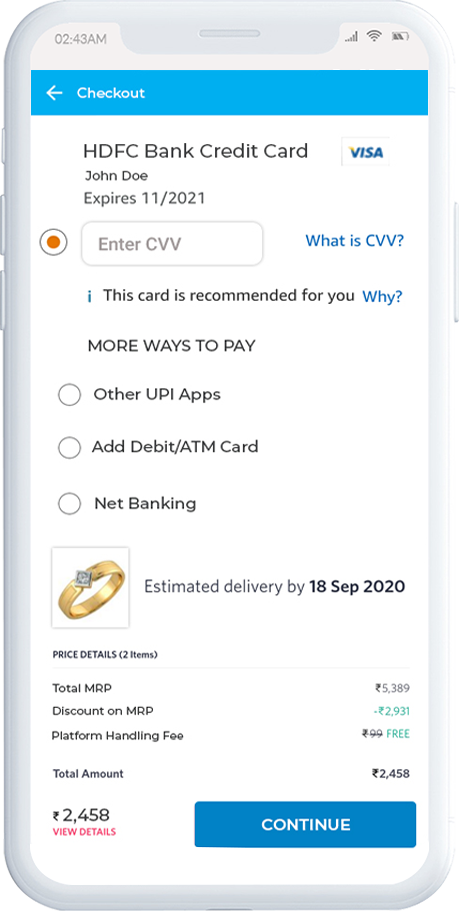
3.8 Payment Screen:
The payment screen of PrestaShop PWA App has all web-view payments available on the store. Online shoppers can find similar payment experience on both website and progressive web apps.
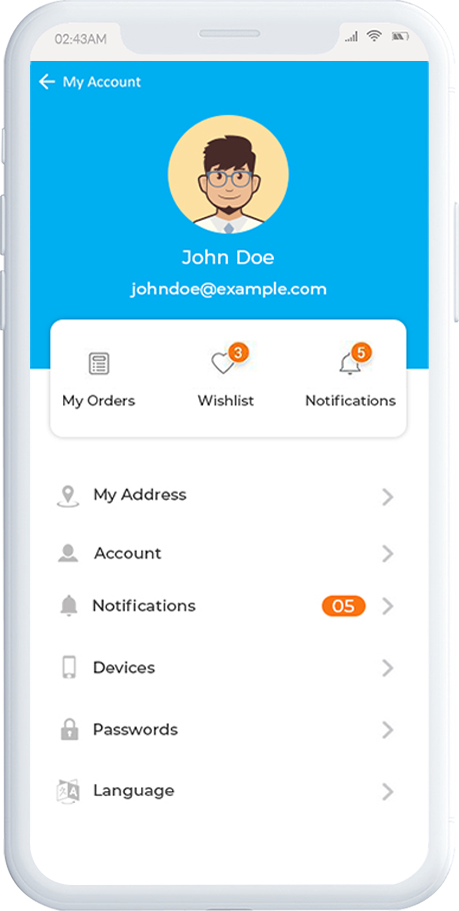
3.9 My Account Screen
My account screen of the PrestaShop Progressive Web App (PWA) allows users to view their complete details saved on the app including a list of previous orders.
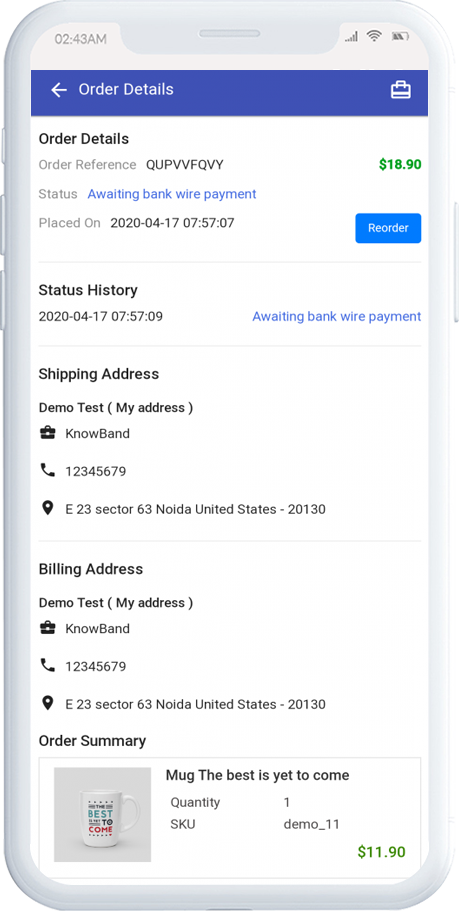
3.10 Order Detail Screen
Order details screen of PrestaShop Progressive Web App Maker provides complete details of specific order from PWA app. Users can easily view shipping address, product summary, shipping and payment method, and total cost summary etc. There is even an option to keep a track of order status and its delivery.
For every email marketer, an increase in the number of email unsubscribers is a major concern. Now and then, they keep looking for ways to reduce the email unsubscribe rate.
Reality is, you will have to deal with unsubscribers very often, and you can’t help it because users do opt-out of emails.
Sometimes, you may get worried thinking about it. But you also need to understand that you cannot please everyone in your email list. You will find critics even for the movie “The Godfather”.
The problem arises when the email unsubscribers’ count increases.
So, in this article, I will be providing you with some few tips or say best practices to reduce the churn rate. Though it is something that cannot be eradicated, it can surely improve your email unsubscribe rate.
Let’s begin.
How to Reduce Email Unsubscribe Rate?
I have listed down 6 effective methods that can be helpful to reduce the number of unsubscribers.
1. Ask Them When They Want To Receive Updates
At the first place when you are asking a visitor to subscribe to your newsletters or email updates, you should give them a choice regarding how often do they want your emails to land in their inbox. It’s a healthy way to start your relationship with your subscribers.
Whether they want to get daily updates, one email per week, twice per week, the choice should be theirs. And this shouldn’t be taken casually. Be committed to delivering the way a user demands it.
If you are sending emails on a daily basis when they have opted to receive it weekly, you are indirectly telling them that you do not value their opinion. So do not send emails too frequently.
On the other hand, if they are not receiving emails weekly, it is not going to leave a good impression either. You need to be consistent. Inconsistency in your communication may weaken the trust of your subscribers in your Brand.
If you stick to your promises, the email unsubscribe rate will drop.
2. Sending At The Right Time Is Important
Though it is impossible to know the perfect time to send an email to someone, you can figure out the timing when you have the highest open rates. In general, in between 8 am- 9 am and 4 pm is considered to be the best time to send emails to your subscribers.
Your emails will be impactful when the readers are in a fresh state of mind and a bit free. Sending them emails at a time when they haven’t even opened their eyes properly or when they are home with their family after office hours would not do anything good for you.
Users will get annoyed and it is likely to happen that they unsubscribe to your emails.
3. Use Double Opt-in And Double Opt-out
If you want to have a quality email list that does not contain junk in the form of an irrelevant audience, use double Opt-ins. It is one of the best ways to reduce your email unsubscribe rates.
A double opt-in is when visitors submit their email address but are asked to verify it. So, they are sent an email where they have to confirm their email address, and only after that, they become your subscriber. A single opt-in, on the other hand, doesn’t require email verification.
Why is it helpful?
You know those users are genuine and relevant if they are putting the effort to confirm their email address. Double Opt-in ensures lesser spams and unsubscribes.
Although the conversion rate is slightly less in double opt-in as compared to single opt-in, which is very obvious, it gives you a valid audience to target.
Just like double opt-in, you should use a double opt-out unsubscribe option too. This doesn’t unsubscribe users immediately. They are presented with a confirmation message that asks them whether they are sure that they do not want to receive emails. You can make an emotional attempt here and convince them not to unsubscribe.
4. Segment Your Audience
Is there any point of selling a shirt to someone who needs a mobile phone? Totally irrelevant, right? This is exactly what happens in traditional email marketing. A hierarchy is not followed and many users unsubscribe because they feel the emails are not relevant to them.
Segmentation is necessary. You want your emails to deliver to the right people, segmenting your list is the best option. Segment users according to their age, location, gender, activity, etc. and then target them accordingly.
Do not fumble up things. If your emails are not reaching the right audience, the email unsubscribes rate is bound to increase.
5. Do Not Create Misleading Subject Lines
While you want to be creative with your subject lines to capture user attention, it should be strictly kept in mind that they are not misleading and goes well with the email content.
Do not create click-baits. You may succeed in making people open your emails but the happiness won’t last for long. Sooner or later, there will be many unsubscribers.
To improve your email unsubscribe rate, write encouraging and catchy subject lines that aroused curiosity in the users to check out the inside email content. If it is worth their attention, they will become your loyal readers and would never unsubscribe to your emails.
6. Collect Feedback
Though I know you do not want to get unsubscribes, it would be ideal to ask why they are unsubscribing. Have a few options on the unsubscribe page that lets them select their unsubscribe reason along with the comment box so that they could leave feedback.
You might not be able to stop that particular user but through feedback, you will able to prevent unsubscribes in the future.
Also, on the unsubscribe page, you can also let users unsubscribe from some specific type of emails rather than unsubscribing from everything. You can highlight the different types of marketing emails that you send and ask them which among those are not relevant to them.
Final Thoughts
Getting new subscribers on your list is not a difficult task. The challenge lies in keeping those users in your list in the long run. If you are able to do that, you are on the right track.
Follow the above-mentioned six ways to reduce your email unsubscribe rate. Besides all this, make sure that your emails are equally optimized for mobile devices as a majority of the people read their emails through their smartphones.
What are your strategies to improve email unsubscribe rates?
Mobile Commerce shouldn’t be ignored in 2020 for all the eCommerce business owners. The steady shift of eCommerce (online retail) to mobile commerce (smartphone shopping) is leading to eCommerce mobile app development becoming a necessity than just a luxury.
With such a boom in the usage of smartphones and handheld devices, it’s more likely for e-merchants to take such a route. Also, from the online users’ point-of-view, eCommerce Mobile Apps have been serving in a better manner when compared to desktop websites & mobile sites. If you are willing to get a custom-built eCommerce Mobile App, now is the right time. Seeing such a demand for apps & also rise in the competition in the market, it is quite obvious to extend your reach to the most-used channel i.e. mobile devices.
In this write-up, you will get to know about the eCommerce shopping app & how can you get one custom solution for your business?
Types of E-Commerce Mobile Applications
Following are the types of eCommerce Mobile Apps based on different business models:
B2C eCommerce Mobile Apps
B2B eCommerce Mobile Apps
B2A eCommerce Mobile Apps
C2C eCommerce Mobile Apps
C2B eCommerce Mobile Apps
Hybrid eCommerce Mobile Apps
Each of these categories of eCommerce apps mostly requires some unique features & functionalities that are different from each other. To meet such a requirement, it’s best suited to have custom-built apps according to specific business needs.
We mostly come across two scenarios when any businesses decide to build their eCommerce Apps:
a) The first scenario is when e-business already has its eCommerce website running & decides to be available on mobile platforms too. For example, Amazon.
b) The second scenario is when a business initially decides to directly build a custom Mobile App for their online presence. For instance, food delivery apps.
The former would require to make both the app & the website be in real-time synchronization with each other whereas the latter would require to build all things in the app from scratch with no reference from its parent website (if there is any).
Factors To Check While eCommerce Mobile App Development:
#1. Platform Support:
In case, you have a running online store on any of the eCommerce platforms, here are the perfect solutions:
But for those who are building an eCommerce Mobile App from scratch (with no parent website), be sure to choose the right platform according to your business needs. Take expert consultation & guidance before investing huge amounts in the project.
In case you don’t have any website and looking for a custom application, drop us an email at support@knowband.com or visit KnowBand.
#2. Omni-Channel eCommerce App:
Ideally, it’s good to be available on both operating systems i.e. Android & iOS & the app must be compatible with smartphones as well as tablets. But if the business model requires, you must choose only the channels selectively.
#3. Custom mCommerce Theme:
Take expert assistance to develop a well-tailored & unique theme for your eCommerce Mobile App. The eCommerce App Developers’ team at KnowBand ensures that all such goals are accomplished & you can make the best out of your custom mobile app Theme.
#4. User-Centric Design:
To cater to the app users in a better way, having a customer-centric design is a must these days. Such designs not only improve the UI & UX of the app but also help in boosting sales.
#5. Enhanced Navigation:
Have convenient navigation in your App using sorting & filtering options. Also, keep the navigation bar/ toggle-menu as a sticky bar so that users did need to scroll to the top to access the menu.
#6. Language & Currency Support:
Based on the audiences & the countries that your business is serving, set your app in one or multiple languages as well as currencies. Catering global or regional audiences can be an effective way to increase sales.
#7. Offline Mode Accessibility:
The reason why apps stand out from the websites is their ability to be accessed in offline mode. Adding this functionality, while developing your eCommerce Mobile App, ensures that users can access previously loaded data (like wishlist, cart, previously loaded products & categories) even if there is no internet connection.
#8. Advanced Search Options:
Ease the task of searching & browsing products by adding advanced search options like Voice Search, Bar-Code Search & Image Search options.
#9. Payment Gateway Setup:
To cater to all kinds of customers, add multiple payment methods on the application. Some of the payment methods are debit/ credit cards, net banking, eWallets, Gift Cards, mobile banking, cryptocurrencies, cash-on-delivery, EMI, etc. Also, be sure to have secure payment gateways that are convenient to use as well.
#10. Checkout Optimization:
Add a simplified version of the checkout page, like one-page checkout with limited yet necessary entries. This aids the app users to shop without the hassle to go through lengthy checkout pages.
#11. Order Tracking & Shipment:
Develop your eCommerce Mobile App with efficient shipping methods & order tracking. The order tracking feature is what most online shoppers look for these days as it keeps them updated with the whereabouts & estimate of their ordered products. Also, in case of any shipment mishap, it’s easier for the customer support team to track down the fault using the order tracking feature.
#12. Returns, Exchange & Refunds:
Configure your eCommerce Mobile App to have options for returns, exchange & refunds. At KnowBand, we ensure that on the vendor panel/ admin panel, the merchants get full control of the products on which they want to enable/ disable the return or exchange options. Similarly, the modes of refunds are also configured so that admins & customers don’t face any glitch while sending/ receiving the refunds by desired payment methods.
#13. Security:
On every eCommerce platform, adding an extra layer of security is a must. Be sure to have all the relevant encryption & certificates to have your eCommerce App secure on both frontends as well as backend.
#14. Brand Uniqueness:
Don’t go for the pre-existing templates & styles as it may set your app off-brand. Have your own unique Mobile App design as it also helps in brand recognition & hence promotion.
#15. Push Notifications:
Set up Push Notifications using Firebase to drive more user engagement & retention. They are mostly used to inform the app users about upcoming offers, about their abandoned carts, price drops & a lot more. Push Notifications help reduce the cart abandonment rate & increase overall sales.
#16. Quick HomePage Editing:
Because of the nature of the eCommerce Industry, the homepage must undergo frequent changes designed to be in line with the new arrivals, trending items, sale & offers. So, be sure to have to feature quick-edit options for effectively modifying the home page. Also, such editing panels must be user friendly for the non-tech savvy admins as well.
#17. Chat Support & Chatbot Integrations:
Add chat support options in your eCommerce Mobile App to easily communicate with your customers. You can even add automated chatbots. These chat support options help resolve the issues your customers could be facing. Be sure to choose the right platform for your chat support.
#18. Live Synchronization With The Website:
If you also have an eCommerce website, both your app and website likely are to use the same database. This ensures Automatic Inventory Management & both the platforms remain synchronized in real-time with each other. Hence, changes made on one must instantly reflect on the other.
#19. Testing & Quality Assurance:
Upon the completion of the eCommerce Mobile Development task, have your developers thoroughly test & debug the app for better Quality Assurance.
#20. Option For Unlimited Customizations:
Like most businesses, you may want to customize your app in the future. So, make sure that your eCommerce Mobile App can undergo heavy modifications of any kind. Having the app updated according to the latest trends is a must-considered factor while eCommerce Mobile App Development.
Magento 2 Preferred Delivery Time Extension allows your customers to choose the desired delivery date and time while they place their order.
In an eCommerce website, the estimated delivery time is normally between 3 to 4 days. There is no confirmation as to which date and at what particular time would the product be delivered. A customer can only assume and hope to get the order at the desired time.
To enhance the shopping experience of such customers, you can install the Magento 2 Preferred Delivery Time extension and provide your customers with the option to choose the desired delivery date and time.
Overview
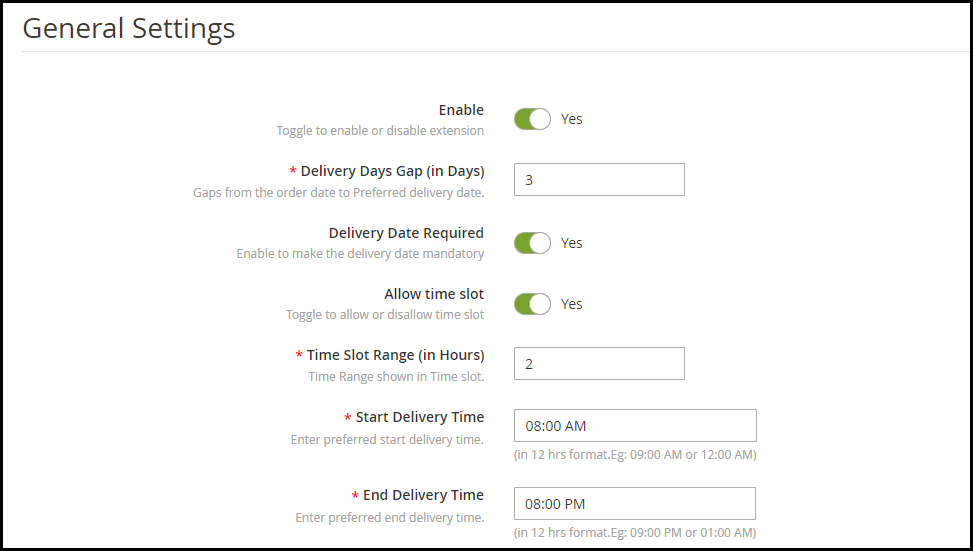
1. Specify the minimum delivery gap between the order placement date and preferred delivery date.
2. Set the delivery time [Start time and End time]
3. Set up multiple time slots for delivery
4. Specify non-delivery days
5. Let customers update the delivery date and time even after placing the order
6. Set a time limit to update the delivery date and time
Description
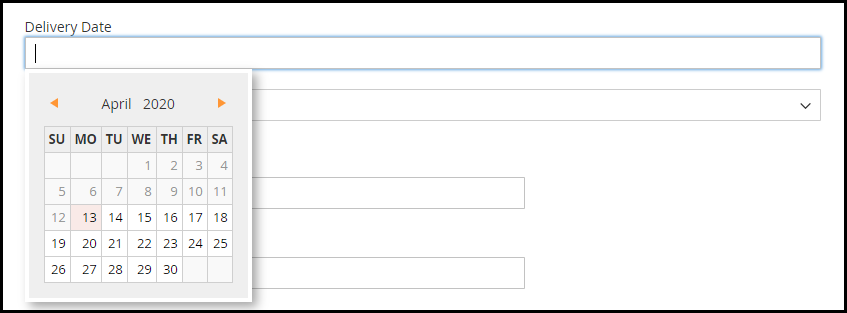
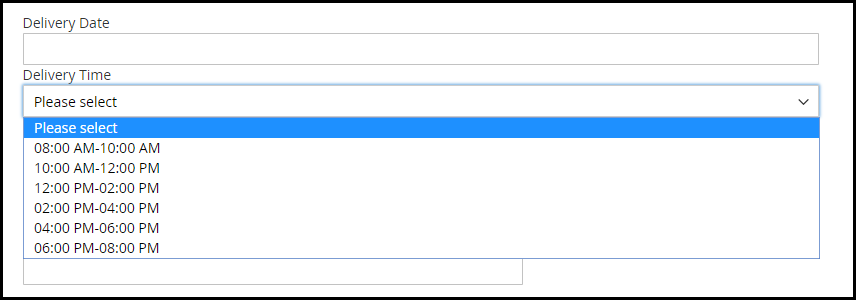
1. On the checkout page, the user is asked to select the desired date and time slot for their order. This can also be made optional hence allowing shoppers to follow the standard delivery procedure if they do not wish to opt for a preferred delivery date and time.
2. Magento 2 Preferred Delivery Date Extension lets you define the time period within which the order delivery will take place. For example, from 8 am to 6 pm.
3. Magento 2 Preferred Delivery Time slot extension lets you set up multiple delivery time slots. You need to specify the time slot range for it. For example, if the delivery happens in between 9 am to 6 pm and the time slot range is 2 hours, then the shopper would be provided with time slots like 9 to 11, 11 to 1, 1 to 3 and so on.
4. In cases where time slots do not adjust well with the delivery timing, for example, let’s say the delivery time is between 10 to 3 and time slot defined is 2 hours, then 10 to 12, 12 to 2 would be okay. But how would the remaining one hour fit into this?
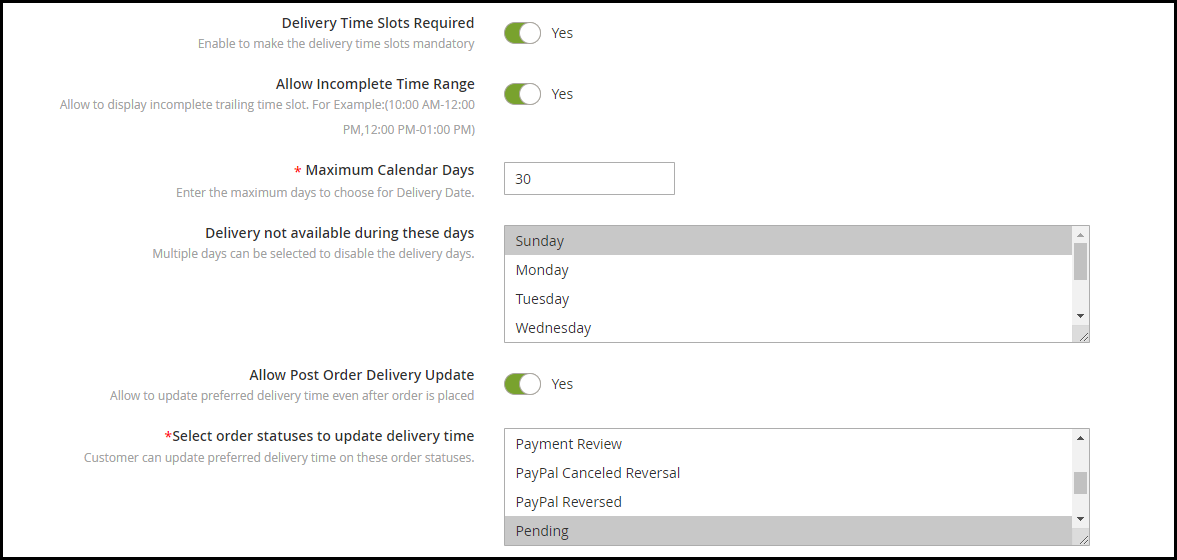
Well, inside the configuration, there’s an option that says “Allow incomplete time range.” Enabling it would display that remaining 1-hour slot in the time slot else it would not be displayed if disabled.
5. You can define a minimum delivery gap for a customer to pick the desired delivery date and time. For example, if the order is placed on 10th of April and the delivery gap defined by the admin is 4 days, then the customers would be allowed to pick the desired date and time for or after 14th of April.
6. You can also specify the maximum numbers of days gap between the order placement date and the preferred delivery date.
7. Magento 2 Preferred Delivery Date and Time Extension lets you specify the days on which orders would not be delivered.
8. With the help of this module, you can also allow your customers to update their delivery date and time even after they have placed their order. You can also set the time limit (in hours) within which the changes can be made. Changes cannot be made once the time limit expires.
9. You can specify the order status on which delivery date and time can be changed.
10. Magento 2 Preferred Delivery Date and Time extension also lets you notify customers via email if they update their delivery date.
Benefits
1. Enhance the customer shopping experience.
2. Improve customer loyalty and brand loyalty.
3. Improve customer satisfaction
For any kind of assistance with this module, you can contact us at support@knowband.com
How do I optimize my landing page? What are the best ways to do it? What exactly is landing page optimization?
If you have these questions running through your mind, you have landed at the right place to get answers to these questions.
What is a Landing Page?
Marketers define a landing page in many ways. Some say it is a conversion page that aims to converts visitors into leads while some call it a destination page where the visitors land when they click on a promoted link, be it through Email, Google search results or social media.
Put simply, a landing page is a web page that is designed to make visitors take a certain action. It could be about making them download an eBook, getting them enrolled in a course, or it could be normal sign-up page.
The landing page usually contains form fields such as the name and email address along with the communication message that speaks about the purpose of that landing page.
Landing pages are free from other website elements so that the visitors are not distracted from the purpose and their attention remains on the landing page. Most of the landing pages are plain simple pages with a nice solid background; hiding distractions like the navigation bar, footer, etc.
What is Landing Page Optimization?
As the words indicate, Landing Page Optimization means optimizing the elements of your landing page to get more conversions/leads. It is needed when you are getting a lot of visits on the landing page but the conversions are not happening.
So you pay focus to the elements and design it or say enhance it not only to maximize the conversion rate but also to improve the user experience.
6 Tips to Optimize your Landing Page
When designing a landing page, keep the following points in mind-
1. Keep It Simple
Do not clutter your landing page with unnecessary elements. When you fill it up with too much text and colors, it does not look pleasing at all, and doing so might compel visitors to bounce off from that landing page straightaway.
Keep it as simple as you can and try to put the entire focus of the users on the call to action.
2. Less Text, More Impact
You need to be very creative with the words that you are using to get their attention. They should be persuading enough to achieve the results that you are expecting.
A simple one-liner can be more powerful than long texts. It just depends on how strong your convincing power is. Use less text but make sure it leaves a significant impact.
Highlight the benefits/offers. When you are designing a landing page, the first thing to give a thought to is how you are going to make customers feel that it can add value to them. You need to build the excitement and at the same time, be a kind of an influencer to push them to grab what you are offering.
3. Use Triggering Call-to-Action
Your call-to-action plays the most important role in your landing page. It should be clearly visible and hit the visitor’s eyes as soon as they enter the landing page.
Using triggering CTAs like “Get my eBook now”, “Download Now”, Claim my offer” can be more effective than other normal CTAs like “Sign Up”, “Learn More,” etc.
The color of your call-to-action is something you simply cannot overlook. Use colors that are pleasing to the eyes and display the CTA text in a crystal clear manner.
Not only does the CTA, but the color of your landing page also has a vital role to play in your conversions. Use contrasting colors that fit well with the text. Besides, keep everything spacious.
4. Develop Curiosity
You would have often seen marketers using phrases like “Limited Time Offer” or “Limited Grabs Available” or “Valid only for first XXX customers”. There is a reason why these terms are so successful in bringing positive results. When you use such terms, visitors act quickly as they know they might miss out on that opportunity later. They want to grab it before it expires.
You could also try adding a countdown timer and let visitors know how much time they have before the offer ends.
5. Use Exit Popups
Adding to our list of Landing Page optimization practices is using Exit Popups. Having an exit popup on your landing page provides you with one more opportunity to convert a visitor. So you can say it is like a Plan B of your Landing Page Conversion strategy. If Plan A does not work, plan B might.
An exit popup appears when a website visitor intends to leave the web page he or she is present at. They are more effective and less irking than other popups that could appear anytime and break the flow of the visitor.
Knowband also provides the Exit Popup module for PrestaShop, OpenCart, Magento and Magento 2 that lets you customize your popup and adjust its functionality as per your requirements.
6. Keep doing A/B Testing
It’s important to keep doing A/B testing of your landing pages as they would help you understand what kind of a landing page your visitors are more inclined to and what sort of changes you can make to optimize it further for better results.
If you do not perform A/B testing, you would not be able to clearly identify what’s lacking in your landing page even if you made it perfect from your end.
Final Word
Landing page optimization would not happen in an hour or a day and it cannot bring you results overnight. You will have to look from a user’s point of view and understand if it is good enough to bring you conversions.
Consider these 5 Landing Page Optimization tips and let me know if it worked for you.
In most of the holiday seasons, e-shoppers are very active & excited when it comes to online shopping. Irrespective of the religion, online shopping is something every netizen engages in. The upcoming festival is Easter & Good Friday, & we have already started to see some eCommerce websites giving teasers of their holiday season based sale. For all eCommerce website owners, here are some of the PrestaShop website customization that should be tried out for sale boosting strategies in the e-store.
This article is helpful for eCommerce businesses with their website built on PrestaShop. With PrestaShop, it becomes very convenient for e-store admins to customize their website in-line with the theme of Easter / Good-Friday. Some of those useful customizations are mentioned below:
1. PrestaShop Hooks for Easter & Good Friday:
Hooks in PrestaShop are images that can be used just for display or as a hyperlink too. Hooks are something that is primarily utilized to highlight anything. To highlight the offers, new arrivals, Easter goodies, etc. use various hooks on your home-page, footer, sidebar, etc. & keep the user informed.
a) Action Hooks:
These sorts of hooks allow the images to have hyperlinks. So, these hooks are clickable & hence can be used to redirect the site visitor to a relevant page. Use easter images & redirect the user to a specific product/ category page. These kinds of hooks also act like a CTA ( Call to Action ) & must be placed strategically to get better click-through-rate & hence conversions.
b) Display Hooks:
Just as its name suggests, display hooks are merely just plain images. These hooks don’t allow adding of hyperlinks & are simply to display only. For your Easter sale, use the images with some informative & catchy text to let your users know about various ways they would benefit from your Easter Sale. Show your coupon codes, promotional offers & more on these display hooks.
Apart from creating these hooks, a good amount of attention must be given to their placement as well. Some common areas where hooks can be placed are:
a) Multiple areas on the homepage.
c) Left/ Right widget areas.
d) Footer.
2. Top Side Banner Customizations:
PrestaShop has the top banner configured by default which e-store admins can simply enable & disable. You must be having any special discounts or easter coupon codes for sale. Display them to the users on this top banner. This thin banner, on the extreme top of the page, is easily visible to your site visitors.
3. Notify Your Customers:
Using web notifications, push notifications & emails, let your customers know the reasons why they shouldn’t miss out on the Easter / Good Friday Sale. Lure them with promotional offers & referral programs. From the backend of your PrestaShop site, you can create & send these notifications to your existing customers. If you own a PrestaShop Mobile App as well, send in-app Push Notifications to your Mobile App users.
Wondering how to build a PrestaShop App from your website? Try the PrestaShop Mobile App Builder module to launch an eCommerce Mobile App.
4. Offer Limited-Time Discounts As Well:
Keep your easter special discounts & coupons valid only for a limited time duration & keep your site visitors aware of that. This is one of the instances why sales during such festivals go high. You can also design a time-based countdown banner. Seeing the countdown timer running, more e-shoppers are likely to engage with it & the offers mentioned on it.
5. Gamify Some Easter Based CTAs:
Rather than using simple CTA (Call To Action) elements on your page, use a few gamified versions of them. Such as the ‘Spin & Win Discount Wheel’ or an interactive Easter Bunny kind of lottery quiz.
You can also add a PrestaShop Scratch card to your eCommerce store to increase customer engagement. Since Easter is celebrated for the resurrection of Jesus, why not design the scratch card with an Easter theme that attracts visitors.
Another way to show your warmth on the day of Easter is by offering reward points or loyalty points to your PreatShop customer. Customers will relish the opportunity and with the right eligibility rules, this also increases the average cart value and accelerates your business.
Wrap Up
There were some of the PrestaShop Customization tips that, I hope, can help you in preparing your PrestaShop website for the upcoming sale season. With PrestaShop being an open-source module, you can make many more customizations by simply utilizing various of its backend features & 3rd party modules, or even custom-designed codes. Now it’s up to you to make the best out of this festival & to serve your customers in delightful ways this Easter.