Prestashop One Click(Single Click) Checkout – User Manual

Introduction to One Click (Single click) Checkout Addon:

Prestashop One click checkout addon adds a functionality in the PrestaShop’s front end (on Product Page) through which the customer can buy any product instantly, keeping the current cart on hold.

If a customer has some items in their cart already, and come across another product to purchase and likes it so much that the customer wants to buy that product first, The module provides a ‘Buy Now’ button on the product page for this functionality, so that user can buy only a particular product and the current cart products are not included in the order and after completion of order the previous cart items are restored automatically.

Features of Prestashop One Click or Single click Checkout Addon:

1. Prestashop One click (single click) checkout adds a Buy Now button on every product page in the store.

2. Prestashop One click (single click) checkout extension offer the customers a fast and hassle-free direct checkout option.

3. The Quick checkout addon simplifies the checkout process for the online shoppers.

4. Customize the One click checkout(Buy Now) button and match it with your Prestashop theme.

5. Single click checkout way ensures high impact on direct sales.

6. One Click Checkout Addon holds the current cart and checks out the current product only.

7. If the order is not completed through fast cart checkout, then automatically the product is added to the current cart.

8. The Fast checkout addon has a potential to turn your visitors into potential buyers and improves the conversion rates by offering a faster way to checkout.

9. Extremely easy to use backend interface of Prestashop Instant Checkout addon.

10. Prestashop Direct Checkout module is Multi-lingual compatibilty.

11. Prestashop Single Click Checkout addon is Multi-store compatible

12. The Quick checkout addon is compatible with all Prestashop themes and do not conflict with other modules

13. Prestashop Single button checkout addon offers Desktop, Mobile and Tablet responsive design.

14. Prestashop Fast checkout addon is compatible with our One-page checkout module is compatible with our One page checkout module

How Merchant will benefit from Prestashop One Click or Single click Checkout Addon:

1. Prestashop One click(Quick) checkout addon adds a new button to your store, there providing a new feature to your store.

2. Prestashop Fast Cart Checkout Addon increases the conversion rates and increases the rate of returning customers.

3. With the integration of Prestashop Fast Cart Checkout Addon, customer are likely to purchase products in a single click rather than going through multiple checkout steps.

4. Customize the One click checkout (Buy Now) button and match it with your Prestashop theme.

How Customer will benefit from Prestashop One Click or Single click Checkout Addon:

1. Customer will get a Quick and Hassle free way to direct Checkout.

2. Customer can checkout in a single click

Installation Steps for Prestashop Fast Cart Checkout Addon

After purchasing Prestashop One click(Single click) checkout addon, you will get following files as listed below:

1. Compressed File in ZIP format (contains source code of the Prestashop Fast Cart Checkout module)

2. User Manual

Follow the steps to install Prestashop One click checkout addon:

  1. Unzip the compressed file. It would contain files and folders as shown below

  1. Copy all the files and folders of unzipped folder into your store “modules” directory on the path – Root Directory/modules/.
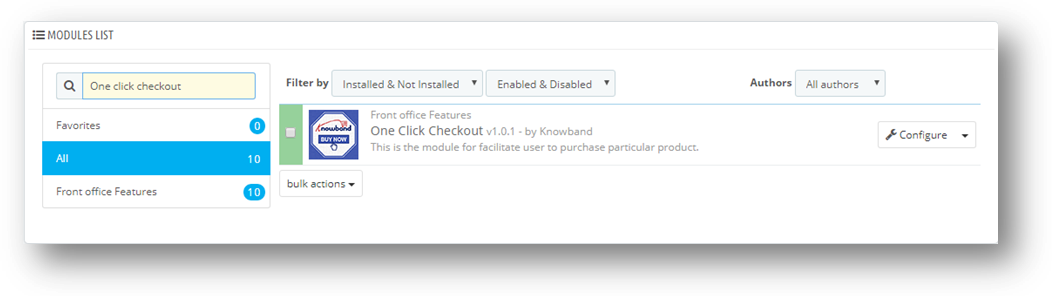
  2. Now the addon is ready to be installed on your Prestashop store and you can find that in Store Admin -> Modules and Services. It is shown below:

PrestaShop 1.6
PrestaShop 1.7
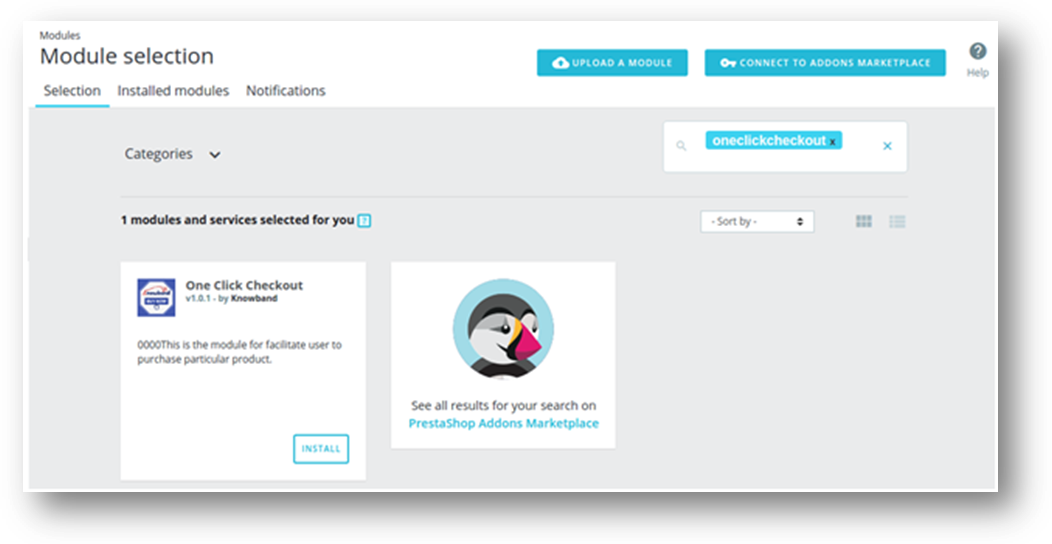
  1. Click on “Install” button to install the addon. It would show a pop-up for your confirmation. Click on “Proceed with the installation” option. This step will install the module and show notification – “Module(s) installed successfully”.

Reference: https://addons.prestashop.com/en/content/13-installing-modules

How to configure Prestashop One Click Checkout or single click checkout addon?

Admin Interface

Following interface is provided to Prestashop store admin :

  1. General Settings

The single page interface of Prestashop Instant Checkout addon has been explained below:

General Settings

After clicking on configure link of Prestashop One Click(Direct) Checkout module on modules listing page, system will open General Settings tabs by default as shown in screen below:
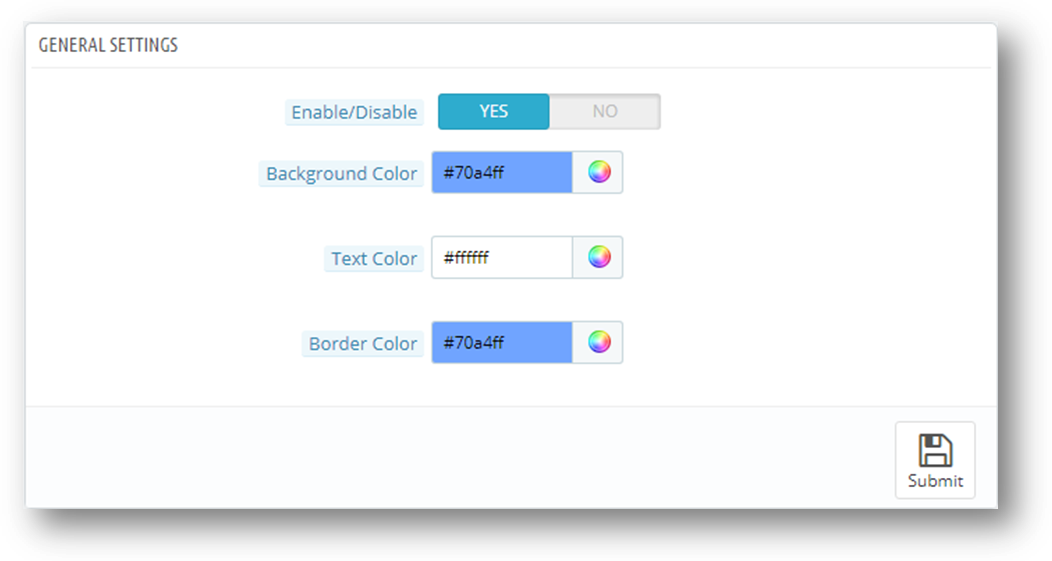
The configurations will be having respective default values on page load.

  1. Enable/Disable: Initially, this setting will be “OFF”. User can enable/disable the module’s functionality by turning this “ON/OFF”.
  2. Background Color: Background color for the Buy Now button at the front product page can be changed by picking a color from color picker of this field.
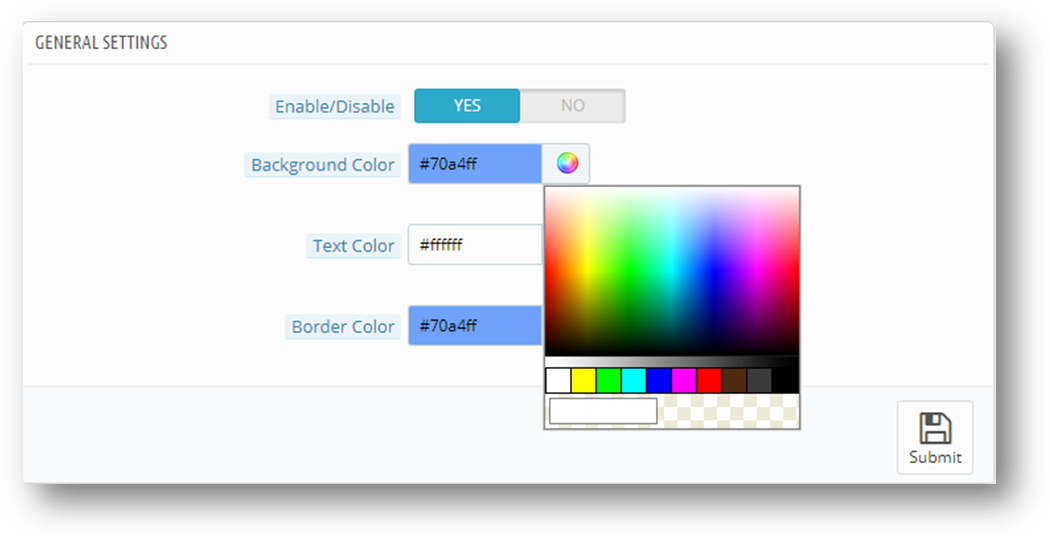
  1. Text Color: Text color for the Buy Now button on product page at the front can be changed from here.
  2. Border Color: Border color of the Buy Now button at the front product page can be selected from here.

Front End of Prestashop One click checkout Addon

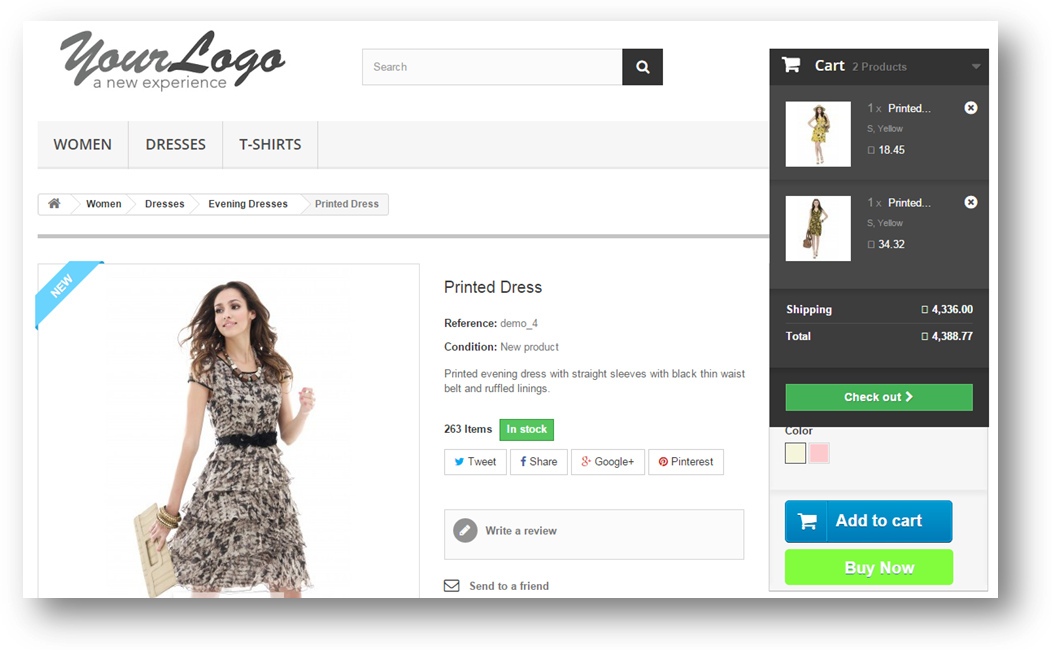
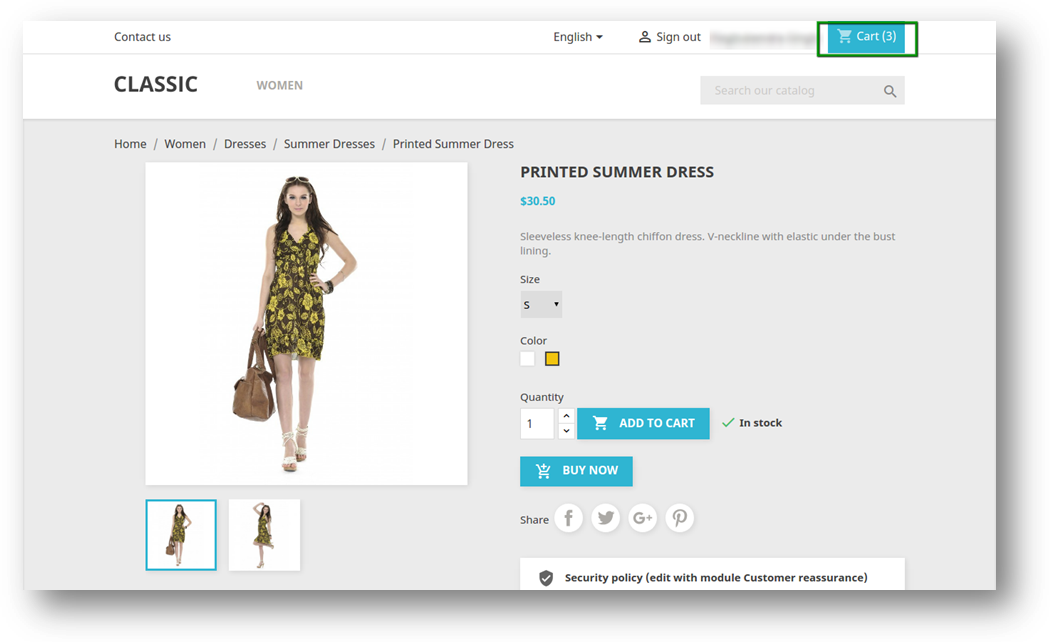
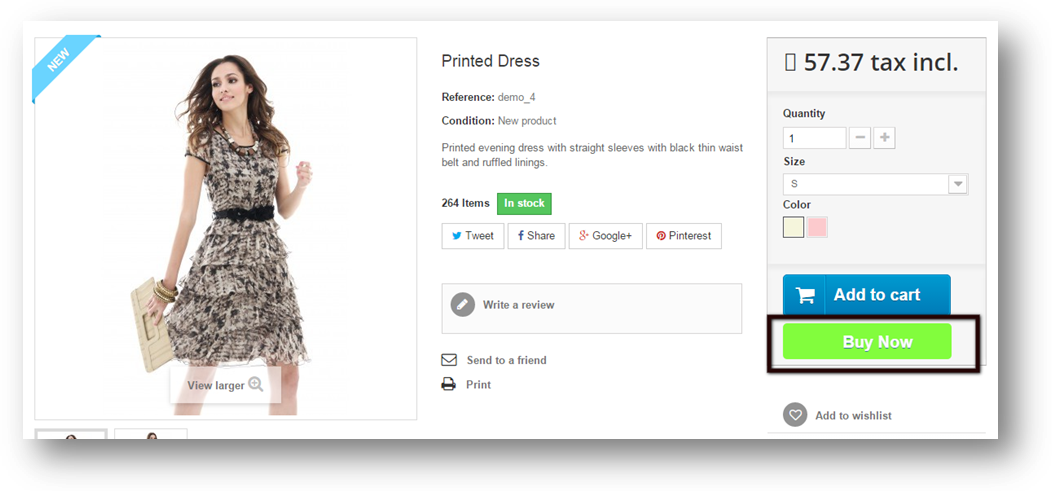
After enabling Prestashop Fast checkout addon the front-end user will see a button (i.e. Buy Now) on the product pages.

The ‘Buy Now’ button at the front-end appears as follows:

PrestaShop 1.6
 

PrestaShop 1.7
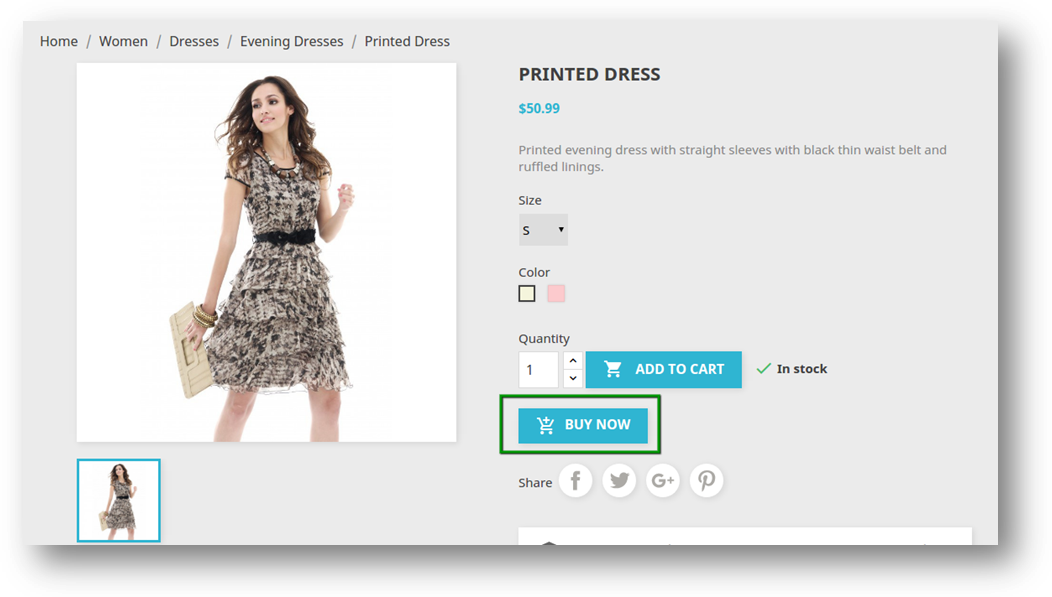
After Clicking on Buy Now button user can directly purchase a product excluding the current cart products. The user will be redirected to order page for that particular product. When clicked on the ‘Buy Now’ button following are the possible cases:

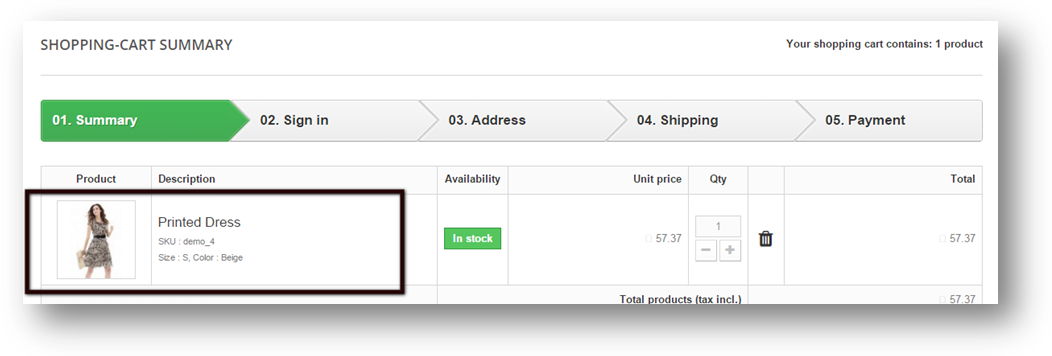
  1. Proceed to the checkout process and confirm order
  2. Did not Proceed to the checkout process and add the item to the cart with other products
  3. Proceed to the checkout process and confirm order

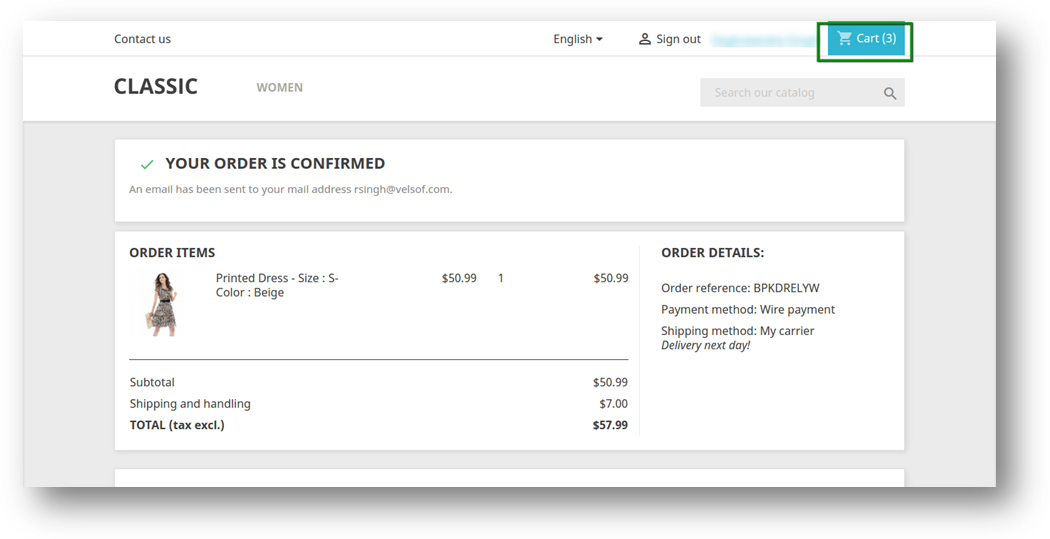
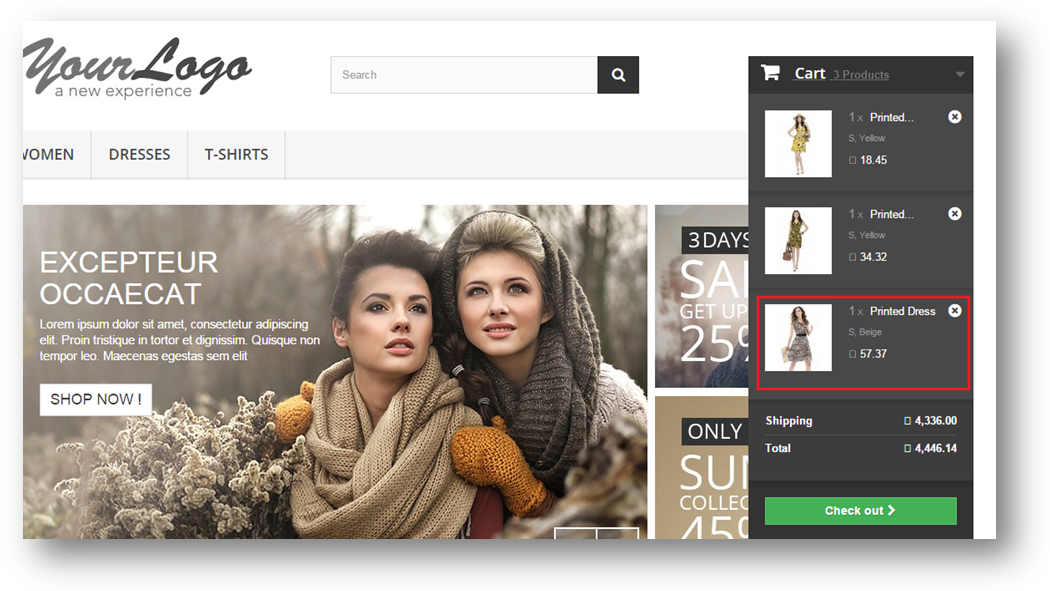
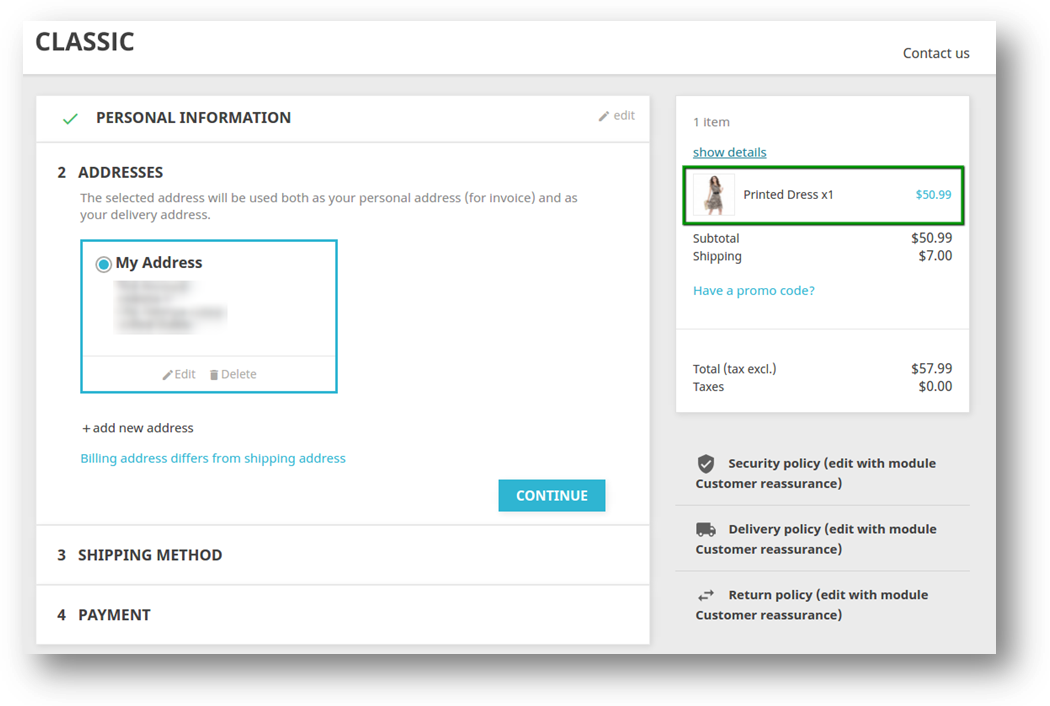
If user shopping cart already has some products and a user clicks on buy now button then the user will be redirected to the order page for that particular product and the user completes the checkout process and confirms the order for that particular product. After confirming the order previous cart of the user will be restored.

PrestaShop 1.6
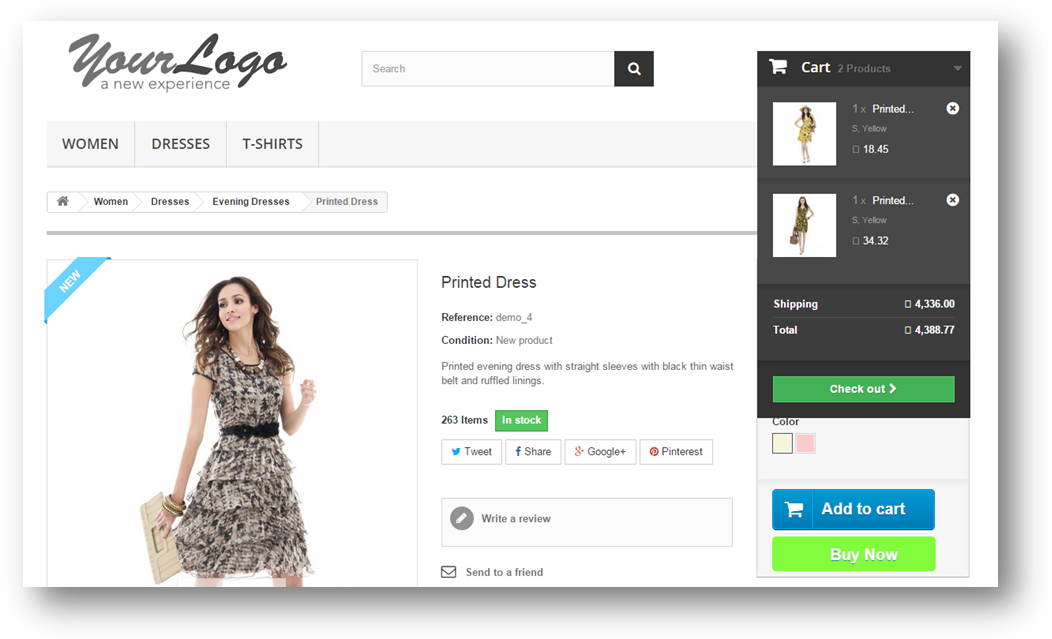
PrestaShop 1.7
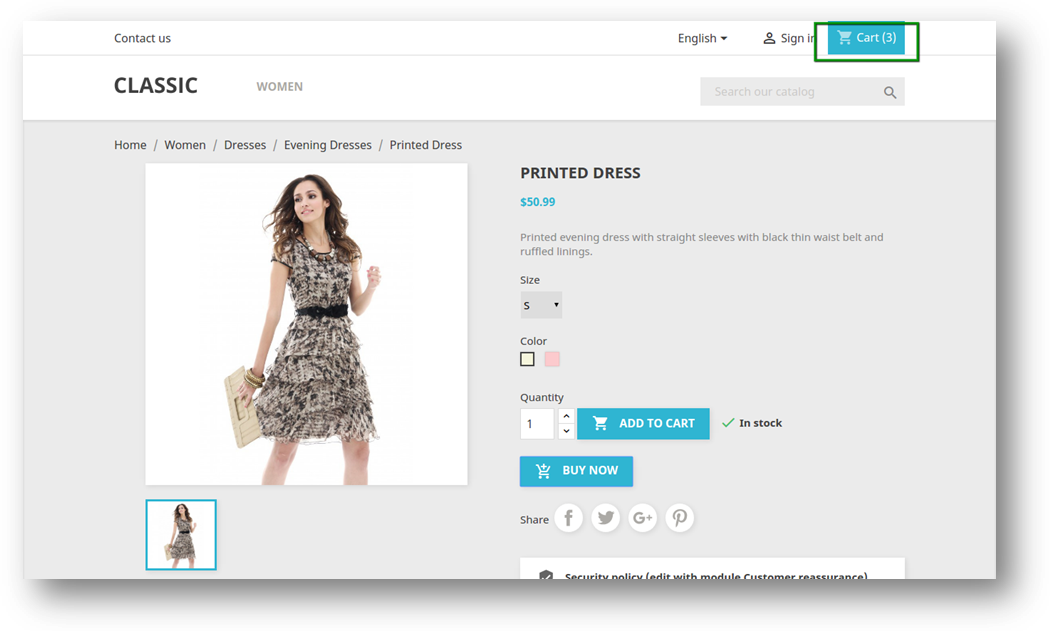
  1. Did not proceed to the checkout process:

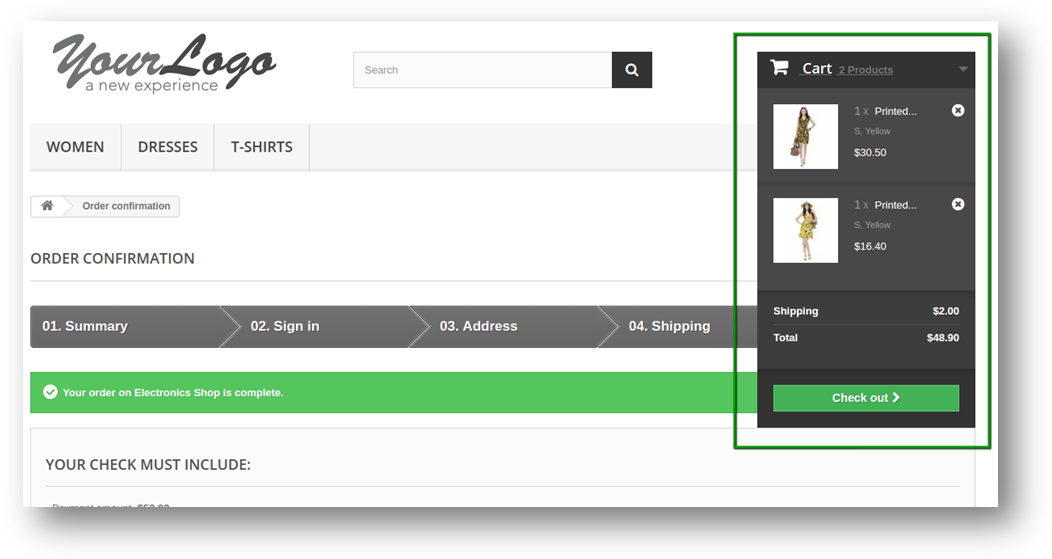
If Prestashop user clicks on Buy Now button and user have some products already in the cart then user will be redirected to the order page but at that time user don’t want to proceed the checkout and user navigates to some other page (e.g. home page), in that condition the particular product is added to the previous cart of the user and the previous cart is restored.

PrestaShop 1.6

PrestaShop 1.7
Recommendations

1. Refresh home page of your store every time you enable/disable the One click(single click) checkout addon. If Fast checkout addon is not working after installation then please check permissions on modules folder. The folder should be writable. Please make the folder permission to 755.




Find more information Prestashop One Click Checkout module

Buy Prestashop Single Click Checkout module
How to get a Marketplace site: a step by step guide

When you have a limited number of customer base and sales, it is important to think big and go for a major store overhaul. Getting just an eCommerce store will not guarantee you maximum conversions and sales as there are other players in the race. You would not have to lag behind now as there is a golden opportunity to transform your online store into a marketplace store. The term Marketplace is  not  new  to the  eCommerce marketplace. It was a time when someone has to go through a lot technical coding and planning for implementation of an eCommerce site. With the introduction of CMS platforms like Magento,  PrestaShop, OpenCart, Magento 2 the gap between an excellent business mind and an online site is now has been reduced to the minimal. Now, you would not have to suffer the market pressure due to the absence  of an effective eCommerce store that has a much larger customer base and  site traffic. All you need to do is just install the Multi seller Marketplace extension for a major transformation of your eCommerce store. Let us now discuss the various ways by which the Marketplace module can be of great help to your online business.

3 Easy Steps to get your own Marketplace site and start accepting seller registrations:

Step 1: Choose and install a marketplace extension for your eCommerce store.

Choosing a Marketplace extension is even a tougher task. A large number of developers are already offering their competent Multi seller extensions and some are very popular too.

Look for the basic features in the Marketplace module:

a). Which is competent to accept seller registrations.

b). Which is competent to manage even a large number of sellers.

c). Which allows admin to approve and disapprove sellers registrations and even block the already approved sellers at any time.

d). Which allows the approved sellers upload and manage their own products.

e). Which allows the sellers to control manage their own delivery and shipping process.

f). Which has an efficient reporting system that allows the admin and sellers both to track all the respective sales and transactions?

g). Most of all, which allows the extension of the marketplace functionalities by able to choose from a large number of already available Marketplace addons.

However, you can also try the free version for Prestashop, Magento, etc platforms  and  later  upgrade  to the  paid  version  when you  find  it satisfying. It’s a demo version to check the compatibility and testing, has some restrictions but can be useful in testing the compatibility  with your online site. There are a large number of expectations you can make with a marketplace Magento extension, but these are some basics that all marketplace extension should possess.

Step 2: Configure your marketplace extension

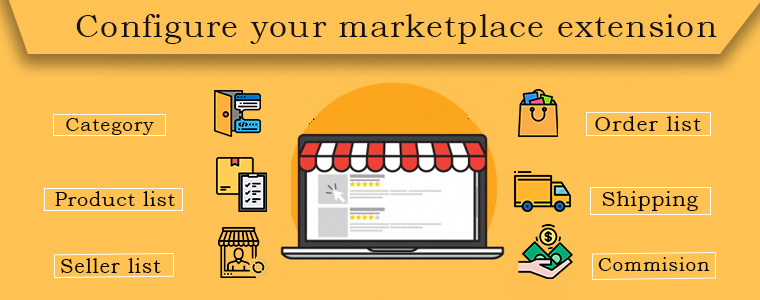
After installation, a configuration panel is provided by these extensions where you can personalize and set up the extension for use.You have to enable the extension from the back end and then perform the configurations. You can set the commission rate or fixed commission price  you want to take from the Sellers.

Step 3: Enable the seller registration access on the front end

After configuration, your new Multi seller extension is ready to use. Now you are ready to accept the seller registrations. The front end customer registration panel will now show an option to the users to also register as a seller. Any registration request will now be notified to the admin. You can set your email id to receive the notification when one arrives.

Final words

Now you need to review and accept the seller registration requests. Any seller who is approved will be allowed to show his products on your site and upload any number of products. All the products uploaded will be first reviewed by you and after you approve them they will be visible on your site.These are the 3 simple steps you can take to get a marketplace site for you. Take the advantages of a large number of modules and extension that are already available. Always choose a CMS platform whose modules and extensions are easily available.

You Might Also Like:

Why you should sell on an eCommerce Marketplace?
5 Ways to Attract Sellers on your Online Multi vendor Marketplace
2019 Holiday Calendar: How can a Seller Attract Customers on a Marketplace during Holiday?
How is Multi vendor Marketplace module a good bargain for store admin?
How to Launch a Marketplace like Etsy and Ebay?
Why Marketplace is in trend?

Cómo obtener un sitio de Marketplace: una guía paso a paso

CuandoMercado?is? not? new? to?the? eCommerce?marketplace.?It?was?a?time?when?someone?has?to?go?through?a?lot?technical?coding?and?planning?for?implementation?of?an?eCommerce site. With?the introduction?of?CMS platforms?like?Magento,??PrestaShop,?OpenCart,?Magento 2?the gap between an excellent business mind?and an?online site?is?now?has?been?reduced?to?the?minimal. Now, you?would not have to?suffer the?market pressure due to the absence? of an effective eCommerce?store?that has?a?much larger customer base?and? site?traffic. All you need?to do is just install?the Ampliación de Marketplace de vendedores múltiples?for a major?transformation of?your eCommerce store. Let?us now discuss the various ways by which the Marketplace module?can?be?of?great?help?to?your?online?business.

3 Easy Steps para obtener su propio sitio de Marketplace y comenzar a aceptar registros de vendedores:

Paso 1: elige e instala una extensión de marketplace para tu tienda de comercio electrónico.

Eligiendo

Mira

una). Que es competente para aceptar registros de vendedores. segundo). Que es competente para gestionar incluso un gran número de vendedores. do). Lo que le permite al administrador aprobar y desaprobar los registros de vendedores e incluso bloquear a los vendedores ya aprobados en cualquier momento. re). Lo que permite a los vendedores autorizados subir y gestionar sus propios productos. mi). Lo que permite a los vendedores controlar y gestionar su propio proceso de entrega y envío. F). ¿Cuál tiene un sistema de informes eficiente que permita a los administradores y vendedores rastrear todas las ventas y transacciones respectivas? sol).?Sobre todo, lo que permite la extensión de las funcionalidades del mercado al poder elegir entre un gran número de ya disponibles. Complementos de mercado. Sin embargo, Prestashop, Magento, etc plataformas

Paso

Después

Paso

Después

Ultimas palabras

Ahora

También puede interesarte:

¿Por qué deberías vender en un mercado de comercio electrónico?
Formas de 5 para atraer vendedores en su mercado en línea de múltiples proveedores
2019 Holiday Calendar: ¿Cómo puede un vendedor atraer clientes en un mercado durante las vacaciones?
¿Cómo es el módulo de mercado de proveedores múltiples una buena ganga para el administrador de la tienda?
¿Cómo lanzar un mercado como Etsy y Ebay?
¿Por qué Marketplace está en tendencia?


Comment obtenir un site Marketplace: un guide étape par étape

QuandMarché?is? not? new? to?the? eCommerce?marketplace.?It?was?a?time?when?someone?has?to?go?through?a?lot?technical?coding?and?planning?for?implementation?of?an?eCommerce site. With?the introduction?of?CMS platforms?like?Magento,??PrestaShop,?OpenCart,?Magento 2?the gap between an excellent business mind?and an?online site?is?now?has?been?reduced?to?the?minimal. Now, you?would not have to?suffer the?market pressure due to the absence? of an effective eCommerce?store?that has?a?much larger customer base?and? site?traffic. All you need?to do is just install?the Extension multi-vendeurs du marché?for a major?transformation of?your eCommerce store. Let?us now discuss the various ways by which the Marketplace module?can?be?of?great?help?to?your?online?business.

3 Easy Steps pour créer votre propre site Marketplace et commencer à accepter les inscriptions de vendeurs:

Étape 1: Choisissez et installez une extension de marché pour votre boutique de commerce électronique.

Choisir

Regardez

une). Qui est compétent pour accepter les inscriptions du vendeur. b) Ce qui est compétent pour gérer même un grand nombre de vendeurs. c) Ce qui permet à l’administrateur d’approuver et de désapprouver les inscriptions des vendeurs et même de bloquer à tout moment les vendeurs déjà approuvés. ré). Ce qui permet aux vendeurs approuvés de télécharger et de gérer leurs propres produits. e) Ce qui permet aux vendeurs de contrôler leur propre processus de livraison et d’expédition. F). Qui a un système de reporting efficace qui permet à l’administrateur et aux vendeurs de suivre toutes les ventes et transactions respectives? g).?Surtout, ce qui permet l’extension des fonctionnalités du marché en permettant de choisir parmi un grand nombre de Addons Marketplace. cependant, Prestashop, Magento, etc. plates-formes

Étape

Après

Étape

Après

Mots finis

À présent

Vous pourriez aussi aimer:

Pourquoi devriez-vous vendre sur un marché eCommerce?
Moyens 5 d'attirer les vendeurs sur votre marché en ligne multi-vendeurs
Calendrier de vacances 2019: Comment un vendeur peut-il attirer des clients sur un marché pendant les vacances?
En quoi le module de marché multi-vendeurs est-il une bonne affaire pour l'administrateur du magasin?
Comment lancer un marché comme Etsy et Ebay?
Pourquoi le marché est à la mode?


So erhalten Sie eine Marketplace-Site: eine schrittweise Anleitung

WannMarktplatz?is? not? new? to?the? eCommerce?marketplace.?It?was?a?time?when?someone?has?to?go?through?a?lot?technical?coding?and?planning?for?implementation?of?an?eCommerce site. With?the introduction?of?CMS platforms?like?Magento,??PrestaShop,?OpenCart,?Magento 2?the gap between an excellent business mind?and an?online site?is?now?has?been?reduced?to?the?minimal. Now, you?would not have to?suffer the?market pressure due to the absence? of an effective eCommerce?store?that has?a?much larger customer base?and? site?traffic. All you need?to do is just install?the Multi Seller Marketplace Erweiterung?for a major?transformation of?your eCommerce store. Let?us now discuss the various ways by which the Marketplace module?can?be?of?great?help?to?your?online?business.

3 Easy Steps, um Ihre eigene Marketplace-Site zu erhalten und Verkäufer-Registrierungen zu akzeptieren:

Schritt 1: Wählen Sie eine Marktplatzerweiterung für Ihren E-Commerce-Shop aus und installieren Sie sie.

Auswahl

Aussehen

ein). Welches ist für die Annahme von Verkäuferregistrierungen zuständig. b). Welches ist fähig, selbst eine große Anzahl von Verkäufern zu verwalten. c). Dadurch kann der Administrator die Registrierung von Verkäufern genehmigen und ablehnen und sogar die bereits genehmigten Verkäufer jederzeit blockieren. d). Dadurch können die zugelassenen Verkäufer ihre eigenen Produkte hochladen und verwalten. e). Dadurch können die Verkäufer ihren eigenen Liefer- und Versandprozess steuern. f). Welches verfügt über ein effizientes Berichtssystem, das Administratoren und Verkäufern ermöglicht, alle jeweiligen Verkäufe und Transaktionen zu verfolgen? G).?Vor allem, was die Erweiterung der Marktplatzfunktionalitäten ermöglicht, indem aus einer großen Anzahl von bereits verfügbaren ausgewählt werden kann Marktplatz-Add-ons. Jedoch, Prestashop, Magentousw. Plattformen

Schritt

Nach dem

Schritt

Nach dem

Schlussworte

Jetzt

Sie mögen vielleicht auch:

Warum sollten Sie auf einem E-Commerce-Marktplatz verkaufen?
5 Möglichkeiten, Verkäufer auf Ihrem Online-Multi-Anbieter-Marktplatz zu gewinnen
2019-Ferienkalender: Wie kann ein Verkäufer im Urlaub Kunden auf einem Marktplatz anziehen?
Wie ist das Multi Vendor Marketplace-Modul ein gutes Geschäft für den Shop-Administrator?
So starten Sie einen Marktplatz wie Etsy und Ebay
Warum ist der Marktplatz im Trend?


Come ottenere un sito di Marketplace: una guida passo passo

quandoMercato?is? not? new? to?the? eCommerce?marketplace.?It?was?a?time?when?someone?has?to?go?through?a?lot?technical?coding?and?planning?for?implementation?of?an?eCommerce site. With?the introduction?of?CMS platforms?like?Magento,??PrestaShop,?OpenCart,?Magento 2?the gap between an excellent business mind?and an?online site?is?now?has?been?reduced?to?the?minimal. Now, you?would not have to?suffer the?market pressure due to the absence? of an effective eCommerce?store?that has?a?much larger customer base?and? site?traffic. All you need?to do is just install?the Estensione per più venditori?for a major?transformation of?your eCommerce store. Let?us now discuss the various ways by which the Marketplace module?can?be?of?great?help?to?your?online?business.

3 Facili passaggi per ottenere il tuo sito di Marketplace e iniziare ad accettare le registrazioni del venditore:

Passo 1: scegli e installa un'estensione marketplace per il tuo negozio eCommerce.

scelta

Guarda

un). Quale è competente per accettare le registrazioni del venditore. b). Qual è competente per gestire anche un gran numero di venditori. c). Che consente all'amministratore di approvare e disapprovare le registrazioni dei venditori e persino bloccare i venditori già approvati in qualsiasi momento. d). Che consente ai venditori approvati di caricare e gestire i propri prodotti. e). Che consente ai venditori di controllare gestire la propria consegna e il processo di spedizione. f). Quale ha un sistema di reporting efficiente che consente all'amministratore e ai venditori di tenere traccia di tutte le vendite e le transazioni rispettive? g).?Soprattutto, che consente l'estensione delle funzionalità del mercato grazie alla possibilità di scegliere tra un gran numero di funzionalità già disponibili Addon del Marketplace. Però, Prestashop, Magento, piattaforme ecc

Passo

Dopo

Passo

Dopo

Parole finali

Adesso

Potrebbe piacerti anche:

Perché dovresti vendere su un eCommerce Marketplace?
5 Modi per attirare i venditori sul tuo marketplace online multiplo
2019 Holiday Calendar: in che modo un venditore può attirare i clienti su un Marketplace durante le vacanze?
In che modo il Multi vendor Marketplace costituisce un buon affare per l'amministratore del negozio?
Come lanciare un mercato come Etsy e Ebay?
Perché il mercato è di tendenza?


Jak zdobyć witrynę Marketplace: przewodnik krok po kroku

Gdyrynek?is? not? new? to?the? eCommerce?marketplace.?It?was?a?time?when?someone?has?to?go?through?a?lot?technical?coding?and?planning?for?implementation?of?an?eCommerce site. With?the introduction?of?CMS platforms?like?Magento,??PrestaShop,?OpenCart,?Magento 2?the gap between an excellent business mind?and an?online site?is?now?has?been?reduced?to?the?minimal. Now, you?would not have to?suffer the?market pressure due to the absence? of an effective eCommerce?store?that has?a?much larger customer base?and? site?traffic. All you need?to do is just install?the Rozszerzenie Marketplace dla wielu sprzedawców?for a major?transformation of?your eCommerce store. Let?us now discuss the various ways by which the Marketplace module?can?be?of?great?help?to?your?online?business.

Łatwe kroki 3, aby uzyskać własną witrynę Marketplace i rozpocząć rejestrację sprzedawcy:

Krok 1: Wybierz i zainstaluj rozszerzenie rynku dla swojego sklepu eCommerce.

Wybór

Popatrz

za). Który jest kompetentny do akceptowania rejestracji sprzedawcy. b). Który jest kompetentny do zarządzania nawet dużą liczbą sprzedawców. do). Dzięki temu administrator może zatwierdzać i odrzucać rejestracje sprzedawców, a nawet blokować już zatwierdzonych sprzedawców w dowolnym momencie. re). Co pozwala zatwierdzonym sprzedawcom przesyłać i zarządzać własnymi produktami. mi). Dzięki temu sprzedawcy mogą kontrolować własny proces dostawy i wysyłki. fa). Który ma skuteczny system raportowania, który pozwala administratorowi i sprzedawcom zarówno śledzić całą sprzedaż, jak i transakcje? sol).?Przede wszystkim, co pozwala na rozszerzenie funkcjonalności rynku poprzez możliwość wyboru spośród dużej liczby już dostępnych Dodatki do Marketplace. Jednak, prestashop, Magento, itp. platformy

Krok

Po

Krok

Po

Ostatnie słowa

Teraz

Może ci się spodobać również:

Dlaczego powinieneś sprzedawać w Marketplace eCommerce?
5 sposoby na przyciągnięcie sprzedawców na rynku online dla wielu dostawców
Kalendarz świąteczny 2019: Jak sprzedawca może przyciągać klientów na rynku podczas wakacji?
W jaki sposób moduł Multi vendor Marketplace jest dobrą okazją dla administratora sklepu?
Jak uruchomić Marketplace jak Etsy i Ebay?
Dlaczego Rynek jest w trendzie?


Como obter um site do Marketplace: um guia passo a passo

QuandoMercado?is? not? new? to?the? eCommerce?marketplace.?It?was?a?time?when?someone?has?to?go?through?a?lot?technical?coding?and?planning?for?implementation?of?an?eCommerce site. With?the introduction?of?CMS platforms?like?Magento,??PrestaShop,?OpenCart,?Magento 2?the gap between an excellent business mind?and an?online site?is?now?has?been?reduced?to?the?minimal. Now, you?would not have to?suffer the?market pressure due to the absence? of an effective eCommerce?store?that has?a?much larger customer base?and? site?traffic. All you need?to do is just install?the Extensão de mercado para vários vendedores?for a major?transformation of?your eCommerce store. Let?us now discuss the various ways by which the Marketplace module?can?be?of?great?help?to?your?online?business.

3 Easy Steps para obter seu próprio site do Marketplace e começar a aceitar registros de vendedor:

Etapa 1: escolha e instale uma extensão de mercado para sua loja de comércio eletrônico.

Escolhendo

Veja

uma). Qual é competente para aceitar registros de vendedor. b). Qual é o competente para gerenciar até mesmo um grande número de vendedores. c). Que permite ao administrador aprovar e reprovar registros de vendedores e até mesmo bloquear os vendedores já aprovados a qualquer momento. d). O que permite que os vendedores aprovados enviem e gerenciem seus próprios produtos. e). O que permite que os vendedores controlem gerenciar seu próprio processo de entrega e envio. f). Qual tem um sistema de relatório eficiente que permita que o administrador e os vendedores localizem todas as vendas e transações respectivas? g).?Acima de tudo, o que permite a extensão das funcionalidades do mercado, podendo escolher entre um grande número de já disponíveis Addons do Marketplace. Contudo, Prestashop, Magento, etc plataformas

Degrau

Depois de

Degrau

Depois de

Palavras finais

Agora

Você pode gostar também:

Por que você deve vender em um mercado de comércio eletrônico?
5 Maneiras de atrair vendedores no seu mercado de vários fornecedores on-line
2019 Holiday Calendar: Como um vendedor pode atrair clientes em um mercado durante as férias?
Como o módulo do mercado de vários fornecedores é uma boa pechincha para o administrador da loja?
Como lançar um mercado como Etsy e Ebay?
Por que o Marketplace está em tendência?


How to put your eCommerce site on a fast track? (Part 2)

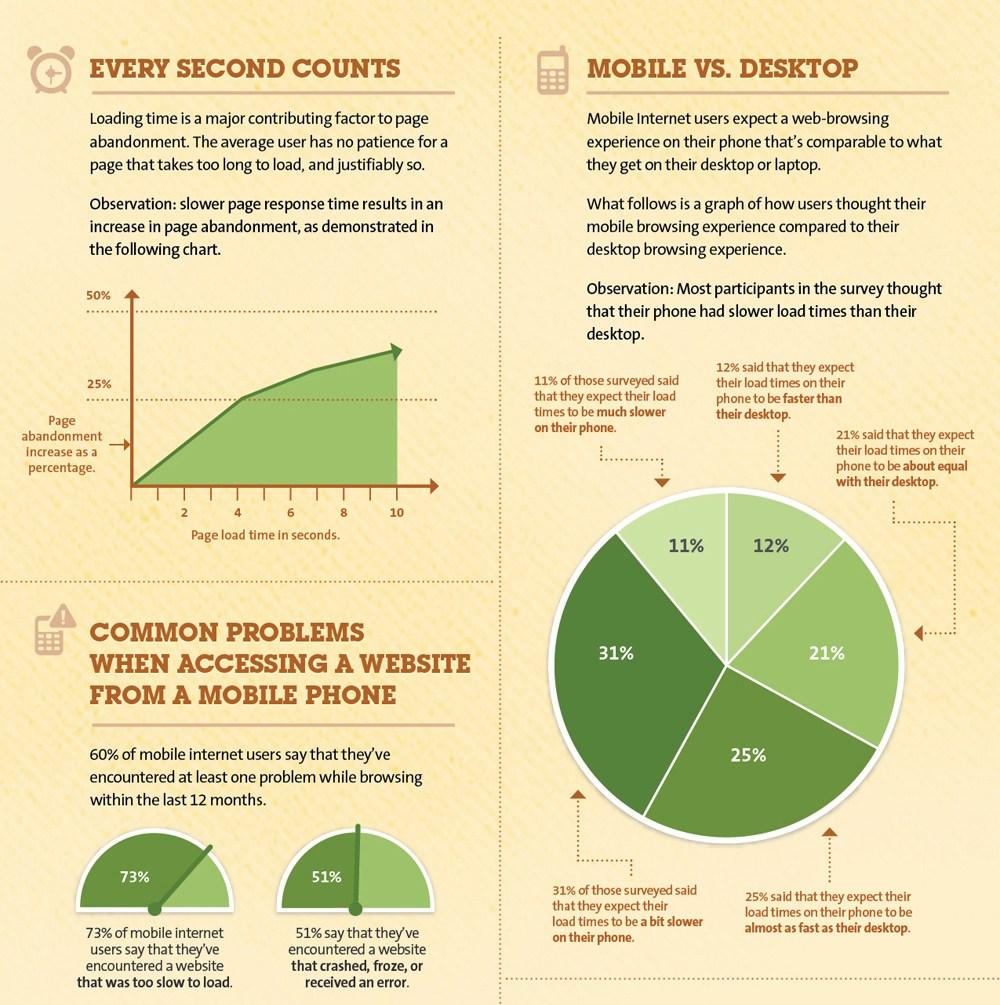
In an online business, keeping a customer waiting for more than 3 seconds is an “unpardonable crime” that invites harsh penalties from Google and loss in terms of online search rankings. A slow loading website is the biggest roadblock for higher conversions and sales on an eCommerce site.

As per a survey done by Akamai and Gomez.com, some startling facts came into notice. Some of these are discussed below:

  • 47% of consumers want a web page to load in 2 seconds or less.
  • Around 40% of people leave or abandon a site if it takes more than 3 seconds to load properly.
  • Moreover, a 1 second delay in the response time of a web page often results in a 7% loss in the conversions of a website. To understand it in a better way, it is time to take a quick look at the statistical image given below:

Analyzing the above picture, a slow performing website is a matter of serious concern as it can affect your business chances severely. If you continue to ignore this issue, it can cost your eCommerce site heavily in terms of conversions and sales. For those who are dedicated to improving the loading speed of their website, here are the few website speed optimization tips that can guide them in the right direction.

Reduce the HTTP requests on the server- 

Reducing the HTTP requests on a website can improve the site speed to a great extent.

As per the website speed optimization insights by Yahoo, around 80% of the web page loading time is spent on downloading the various parts of a web page such as images, stylesheets, scripts, Flash media files and such others. In a normal scenario, individual HTTP request is sent to each element of the web page that slows down the server response time. To minimize the number of HTTP requests on your site, you need to perform the following steps:

  • Take required steps to streamline the number of elements on your web page.
  • Utilize optimized images or CSS sprites in your website for speed optimization.
  • Integrate multiple style sheets into a single sheet.
  • Minimize the number of java scripts and place them at a bottom location of the web page.

Apply compression techniques on your website- 

Compress the media files and web pages for optimizing the performance of a website.

Larger web pages on a website typically in the size of 100 kb often takes much time to load, thereby slowing down the entire website. The compression technique can reduce the overall size of a page and can increase the website speed. According to the varvy, the use of compression techniques can remove around 50-70% HTML and CSS related files which in turns improves the website performance tremendously. There are tools like Gzip that can reduce the bandwidth of your pages that helps in reducing the HTTP response. Below are some of the compression settings for various servers that can help in optimizing your site speed.

  • For Apache, use the mod_deflate function for compressing data.
  • In the case of Nginx Server, utilize HttpGzipModule settings.
  • Similarly, with the IIS server, it is recommended to configure HTTP Compression for optimizing the store performance.

Take steps to optimize the CSS Delivery-

                                                Optimize the CSS files for achieving a fast performing website.

CSS are the files that load before the actual website is loaded. The more time required in downloading the CSS files has a direct impact on the loading time of a website. You need to eliminate the extra spaces in your CSS files to decrease their size for increasing the speed of your website. If your CMS does not have any option for the minimization of CSS files, you can take the help of free online service such as csscompressor.com to minimize CSS files. Site owners just have to paste their CSS files in the required space on the website and then press the “Compress” button to achieve the reduced CSS stylesheet. Some helpful tips that can help in the crucial task of CSS minimization are explained as below:

  • Don’t use CSS in the HTML coding such as divs, headings, and other such areas.
  • Add all the CSS files in your external stylesheet for achieving cleaner CSS files coding.

In case, you are facing problems in customizing the CSS files on your PrestaShop store, you can also avail the PrestaShop Addons from Knowband store.

Optimize your site loading time- 

Take the help of speed optimization tools to improve the loading speed of your website.

If your website is not able to load properly within 3 seconds, it is definitely going to hurt your business in a big way. In order to get a proper idea about the loading time of a website, it is important to take the help of various speed optimization tools like PageSpeed Insights, Pingdom, and others.

In the real time scenario, customers are not interested in waiting for a website to load properly. According to the speed statistics by PageSpeed Insights from Google, a score of 85 and higher during speed check is said to be a sign of fast loading website. Here is some of the data about various eCommerce sites regarding their performance on a website speed optimization tool.

Amazon.com:83/100
Ebay.com:86/100
Walmart.com:37/100
Staples.com:54/100
Target.com:69/100
Zulily.com:72/100
Overstock.com:84/100
Newegg.com:66/100
Nordstrom.com:75/100
Gilt.com:63/100

So, check the score of your website and take the required steps to optimize its loading time. You can remove heavy background elements/graphics, flash player, non-optimized images or videos and other such elements that tend to affect the loading time of your website.

Conclusion

It is definitely the right moment to spend some time on your website to check the areas that are affecting its performance and loading speed. Once, it is clear which are the grey areas, it will be easier for site owners to take required steps for improving the site speed. Remember, time is money and if you don’t value the time of customers while doing online shopping, it is going to hurt your sales badly. So, be active now and start focusing on this crucial area.

Liked This? You’ll Like These Too

How can you change the currency format in an OpenCart platform?

OpenCart is an engrossing eCommerce platform that is being used on a large scale globally due to the presence of a wide range of features and functionalities. Also, it has emerged as a promising platform for new and experienced site owners equally with its impeccable eCommerce features.

With its multi-currency support feature, brilliant themes, and OpenCart extensions, it has found its clients all across the world that want to carry out their business in their native language. However, I have seen numerous site owners who are unable to implement changes in the currency format on their OpenCart store. Through interaction with those customers, I found the common problem “How to change the currency format in OpenCart as per the Indian currency system?”

Recommended Read: 5 Questions to ask while going for an OpenCart Platform

How to change the currency format in OpenCart as per the Indian currency system?

Understanding the sensibilities and concerns of all those store owners that are facing this issue, here is the solution for you. Before we move ahead in this direction, let us have an insight into the standard currency format in the OpenCart platform.

By default, OpenCart follows a standard currency format that places a comma (,) after every three-digit in a number while displaying the price but this is not the case with the Indian currency format. For example, store owners who are targeting customers residing in India want to change the price format from $ 1,000,000 to INR 10,00,000 which represents the Indian decimal value system.

To carry out this customization, OpenCart store owners need to understand the fact that there is no back-end functionality available in the admin panel to make this change. However, the required changes can be accomplished by making the required changes in the core OpenCart files.

Recommended Read:  Decoding the OpenCart Platform Briefly in eCommerce Scenario

Below are the steps that can guide OpenCart store owners in the right direction.

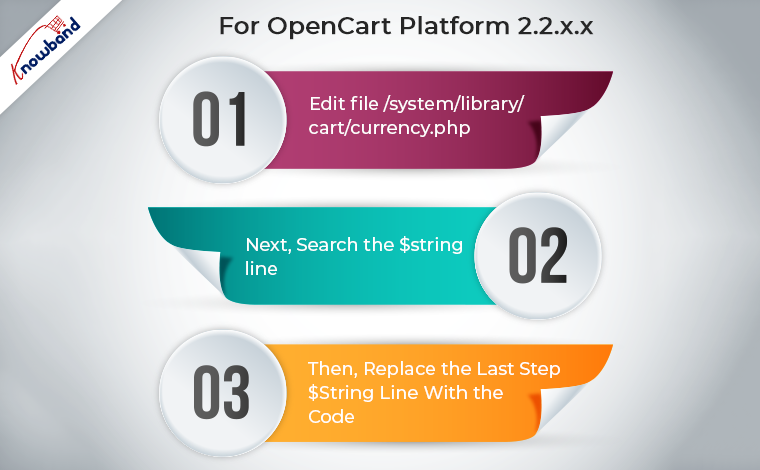
For OpenCart Platform 2.2.x.x and above

  • Edit file /system/library/cart/currency.php. We recommend you create a backup of this file before editing it.
  • You need to search the below line,

$string .= number_format($amount, (int)$decimal_place, $this->language ->get(‘decimal_point’), $this->language->get(‘thousand_point’));

  • Now, you need to replace the above line with the code given below,

$string .= number_format($amount, (int)$decimal_place, $this->language->get(‘decimal_point’), $this->language->get(‘thousand_point’));
$string1=substr($string,0,1);
$string2=substr($string,1);
$string2=str_replace(‘,’,”,$string2);
setlocale(LC_MONETARY,’en_IN’);
$string = $string1.money_format(‘%!i’, $string2);

  • You need to save the file with implemented changes for acquiring the desired currency format.

For all other OpenCart Versions before 2.2.x.x

  • First, edit file /system/library/currency.php. We recommend you create a backup of this file before editing it.
  • Next, you need to search the line given below,

$string .= number_format(round($value, (int)$decimal_place), (int)$decimal_place, $decimal_point, $thousand_point);

  • Then, you need to replace the above line with the code given below,

$string .= number_format(round($value, (int)$decimal_place), (int)$decimal_place, $decimal_point, $thousand_point);
$string1=substr($string,0,1);
$string2=substr($string,1);
$string2=str_replace(‘,’,”,$string2);
setlocale(LC_MONETARY,’en_IN);
$string= $string1.money_format(‘%!i’, $string2);

Finally, you need to save the file with the implemented changes to get the desired currency format.

Recommended Read: What are the merits and demerits of using an OpenCart platform?

These are the simple steps that need to be implemented by OpenCart site owners to achieve the Indian currency format while displaying the product pricing to its customers. In case, you need any other OpenCart extensions to improve the functionality and performance of an OpenCart store, you need to visit the Knowband site. Besides, providing wonderful extensions for Magento 2, OpenCart, WooCoomerce and PrestaShop sites, the company is capable of providing customized plugin development services to its worldwide clients.

For platforms like Magento 2, Prestashop, OpenCart, and WooCommerce, we offer the greatest plugins. Also, for the website and modules, we offer custom module development and modification services. Besides that, we have a dedicated support team that is always available to aid clients when they need any assistance from us in order to deliver the best and most effective post-sale support to our customers. Moreover, on weekends, we continue to fulfil our obligations to customers who need assistance with urgent website problems. Also, in case of doubts or queries related to the OpenCart Module functionality feel free to drop us an email at support@Knowband.com