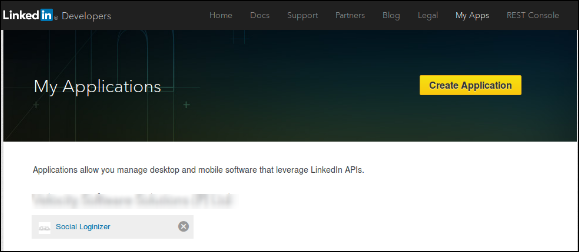
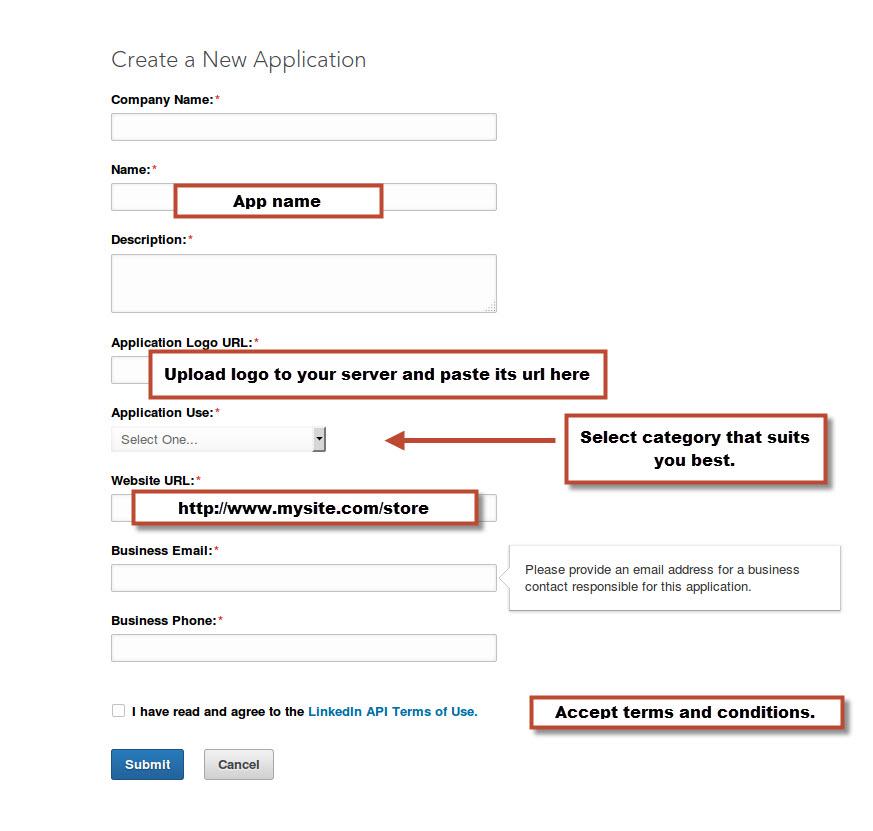
LinkedIn is one of the most popular social networking site used by professionals across the globe. With a high share of LinkedIn users, utilizing this platform as a social login option on your store is quite useful. In our Social Loginizer modules for PrestaShop, Magento, and OpenCart, LinkedIn is one of the 15 social login options. You require LinkedIn API key and App secret to configure a LinkedIn Social login option on your store. Discussed below are steps to get the LinkedIn Client ID and Client Secret Key. Read on to know.
Steps to get LinkedIn API Details, Client ID and Client Secret Key
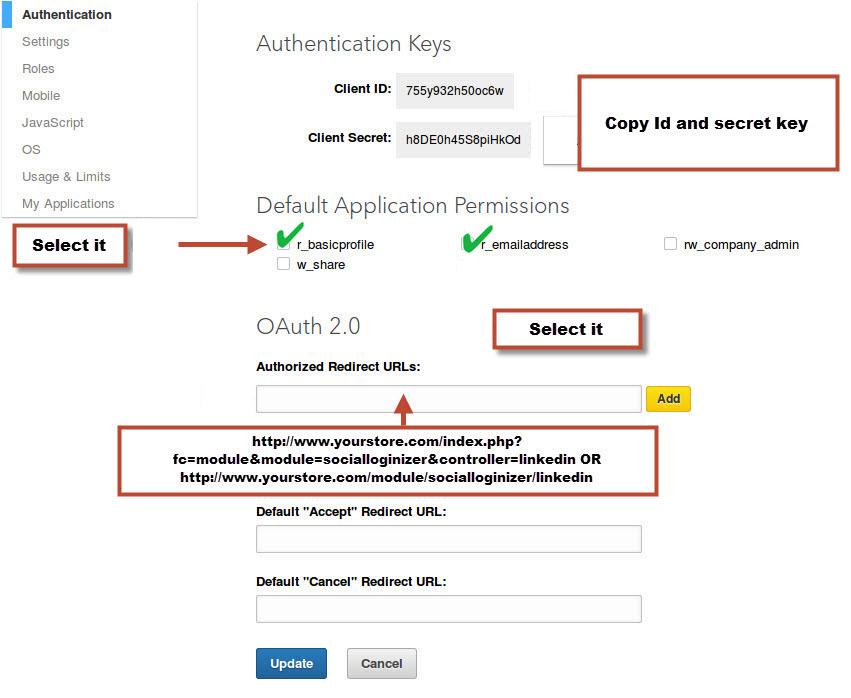
PS: Please make sure that the Default Application Permissions are selected properly in order to use the app. As shown in the above image.
Step 5: Now you can use these API details in your LinkedIn social login module to let your customers log in to your store using their LinkedIn account.
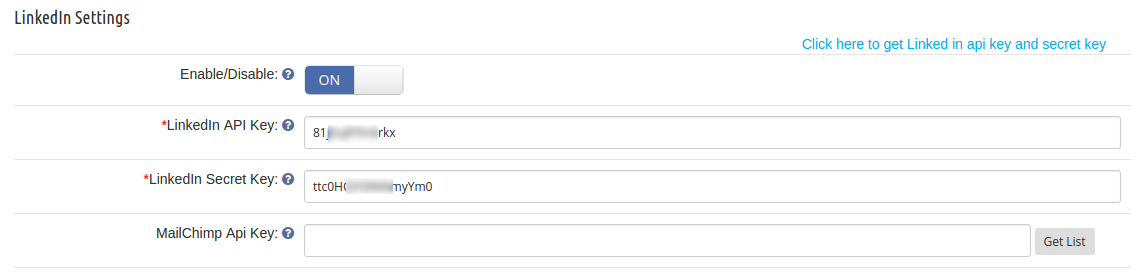
In case you are using our Social Loginizer module (for PrestaShop, OpenCart, or Magento) then you can setup the extracted API details on the following interface in the module settings.
Instagram is one of the most popular photos and image sharing social networking site which was taken over by Facebook in 2012. The billion dollars company has a massive base of users, more than 600 million to be precise.
The social networking platform provides an API which is used by the developers to develop Social login solutions for various platforms like PrestaShop, OpenCart, and Magento etc.
To use an Instagram social login on your site, first of all, you will need a social login module (PrestaShop, OpenCart, or Magento), and then the following Instagram API details to configure the module:
Instagram Client ID
Instagram Client Secret
How to get these Instagram API details?
You need to follow these quick steps to the API details.
Step 1: The first step includes going to Instagram Developer Network page and then clicking on Register a New Client button on top right of the page.
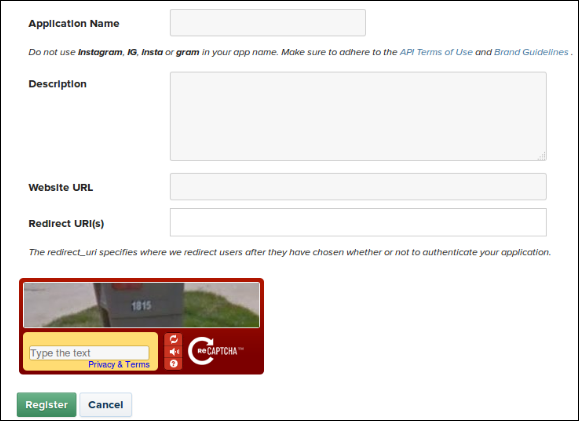
Step 2: Next, fill in the following form that asks for:
Application Name: Name of the application for which you are extracting the API details. In our Case, it would be “Social login”.
Description: A short description of the application.
Website URL: You website’s full URL. Say, https://yoursite.com
Step 3: Set your Redirect URL
In case you are using our Social Loginizer module (PrestaShop, OpenCart, or Magento) and SEO Friendly URL for your store then use this for redirect URL –
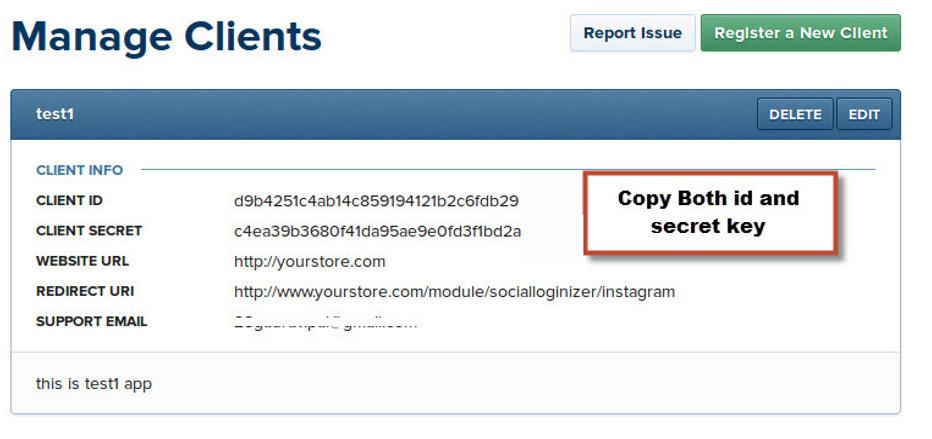
Step 4: After filling in the form, click Register button to get the API details. Copy and paste Client Id and Client Secret in the admin panel of your plug-in.
In case of you are using our Social Loginizer module for PrestaShop, OpenCart, or Magento, the screen to enter the API details will look something like this.
After filling these details in the specified field in your module/plugin, you can use the details to let your customers log in to your store using their Instagram Account.
GitHub is a web-based version control repository with around 20 million users across the planet. With 75 million repositories it is the world’s largest host of source codes. To provide an intuitive user experience to the GitHub users on your store, you may want to integrate a GitHub social login. Well, this is a good idea. 20 million users are not a few users, it’s huge. Your online customers are more likely to have an account on GitHub. So, offering a GitHub social login option is a good idea to boost customer registration. For this social login integration, GitHub API detail, Client ID and Client Secret is required.
New Release by Knowband
Knowband has introduced advanced AI Chatbot modules for eCommerce stores, designed to improve customer support and enhance user interaction. These intelligent chatbots help online stores deliver instant responses, guide shoppers, and improve overall customer experience.
The Live AI chatbots are integrated with leading AI models such as ChatGPT, DeepSeek, and other popular AI technologies.
To ensure faster and more precise answers, the real-time chatbots are also connected with vector search databases like Qdrant.
These AI chatbot modules are ideal for automating customer queries, reducing support workload, and improving engagement across your eCommerce store.
So, to achieve this improved UX, you will require Knowband’s social login module available for various platforms like Prestashop, Opencart and Magento and the following GitHub API details:
GitHub Client ID and
GitHub Client Secret
Prestashop Social Loginizer Addon
Improve the user experience on your Prestashop store by enabling seamless social media logins with this excellent addon by Knowband.
Step 2: It will ask you to login to your GitHub account first. After logging in click on the Applications tab.
Step 3: Here you will see two tab- Authorized Applications and Developer applications. Click on the Developers applications, You will see the following screen. Enter the details as shown in the image below:
Enter Application Name, Your Home-Page URL and redirect URL in Authorization call back URL.
Step 4: Hit the “Register application” button after filling all the required details.
Step 5: The next interface will show the Client ID and Client Secret details.
Step 6: Copy these details and keep them with you. You can use these details in your Social login module if it supports Social Login via GitHub.
For example, in Social Loginizer module (PrestaShop, OpenCart, or Magento), the interface to enter the GitHub API details looks something like this:
At Knowband, with over 13 years of experience in web and app development, we offer more than 100 plugins for major eCommerce platforms including Magento 2, Prestashop, WooCommerce, and Opencart. In addition to plugin development, we provide comprehensive web and app development services across various frameworks and technologies. For any technical support, please reach out to us at our official email address: support@knowband.com.
Foursquare is a local search cum discovery service that runs as a mobile app to provide personalized search results. The App provides personalized suggestions of places nearby based on “browsing history, previous purchases, and check-ins etc”.
With around 45 million users, this social networking platform can be a wise addition to your website.
To integrate the Foursquare with the applications like Social login (PrestaShop, OpenCart, Magento 2 and Magento), you need the following two Foursquare API details:
Foursquare Client ID
Foursquare Client Secret
How to get Foursquare API detail? You can follow these quick steps for the same.
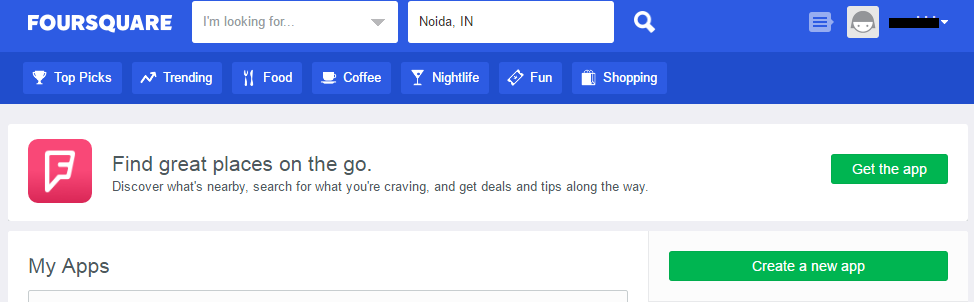
Step 2: On the welcome screen, click on the ‘Create a new app’ button.
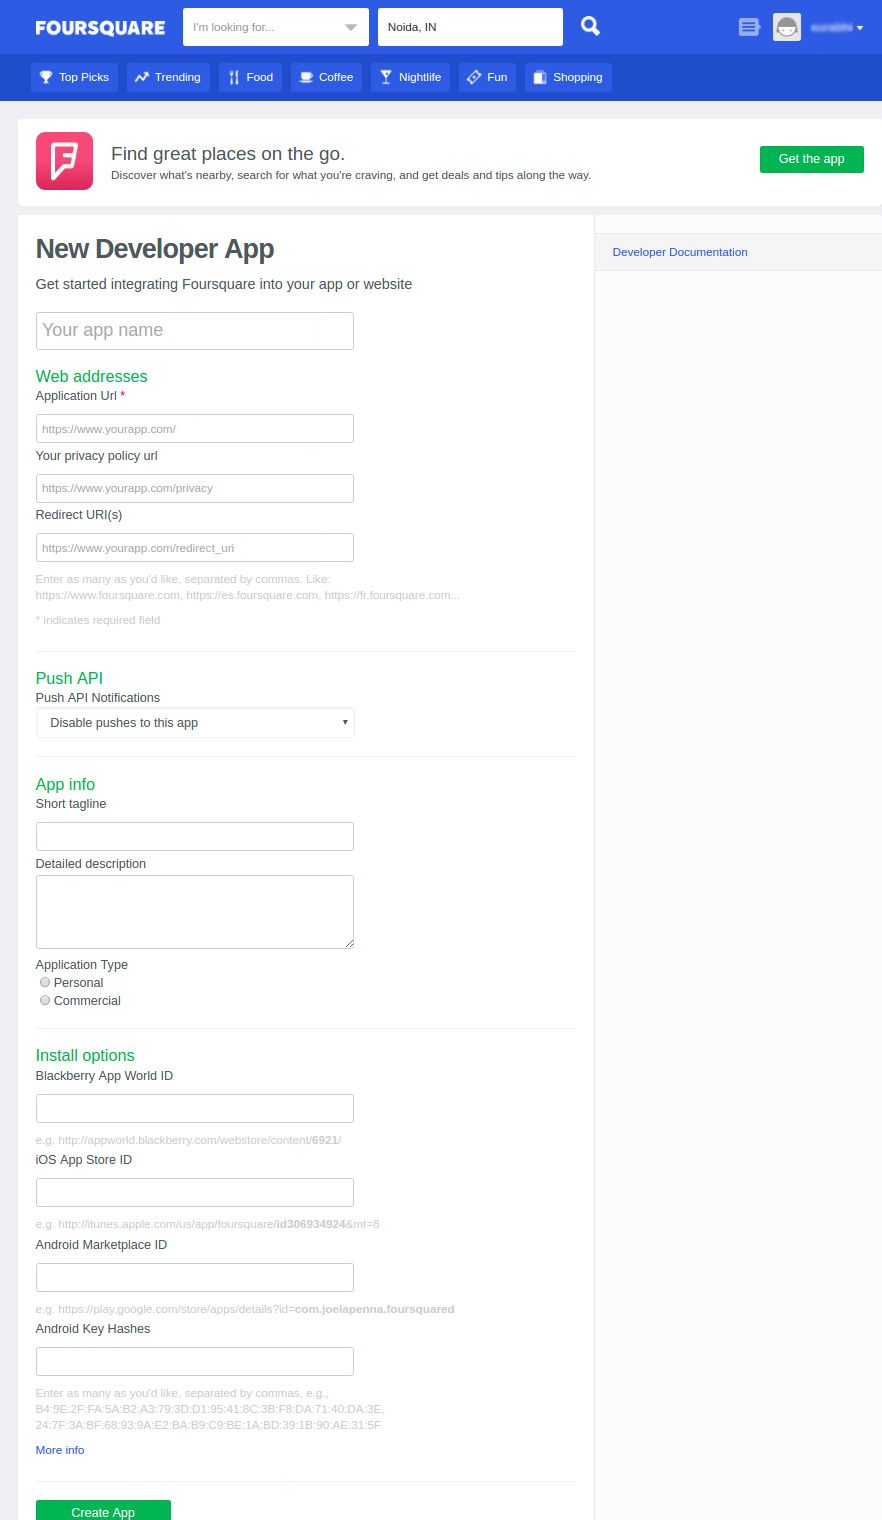
Step 3: The next screen will ask you to fill up some details. Fill the details, set the redirect URL and Save changes of the application.
PS: For redirecting URL, if you are using our Social login module and In case you are using SEO Friendly URL for your store then use this for redirect URL –
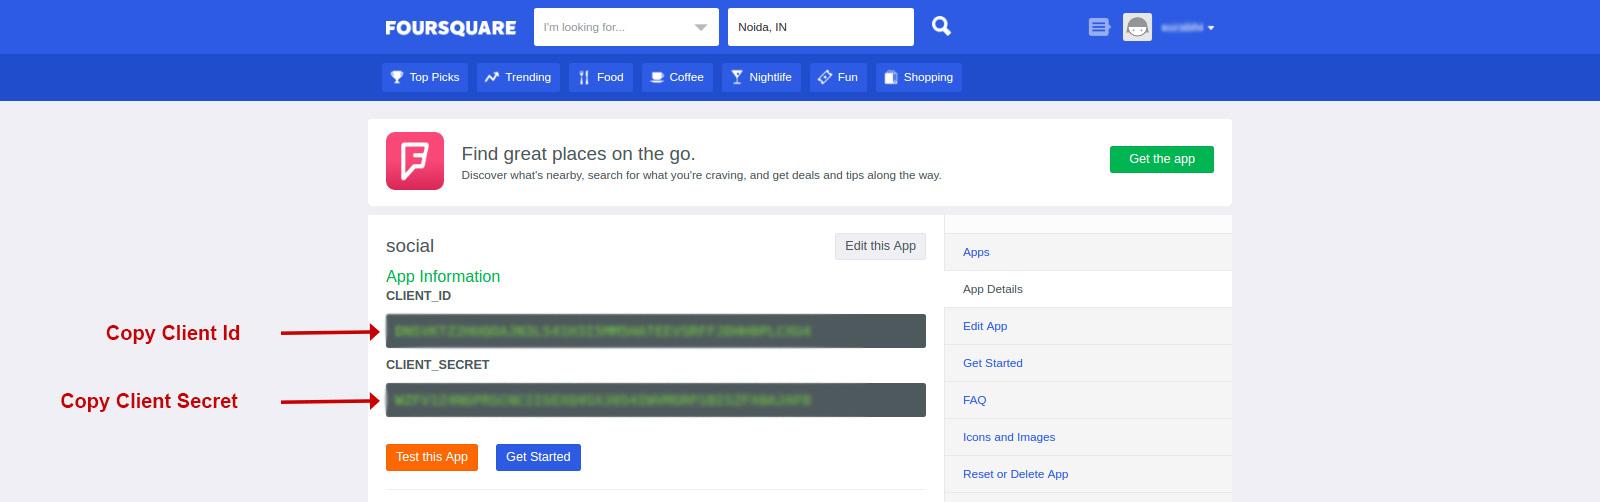
Step 4: After creating the App, you will be taken to a screen where you can copy your API credentials.
Step 5: You can use these API credentials on various Foursquare based solutions. Social login is one such solution. To use these details on a social login module, just copy and paste them in the specified field in the module configuration.
For example, our Social login modules (PrestaShop, OpenCart, and Magento) integrates the Foursquare social login option in the respective platforms with the help of the API details. If you own any of the above mentioned
This tutorial aims at educating the readers about the steps for getting the Facebook App ID and Facebook App Secret from the Facebook developers console. So here is a step by step guide for getting the Facebook API details. These details can be used for many purposes and on several modules and extensions. For example, we use these details in our Social loginizer modules for PrestaShop, OpenCart and Magento to set up a Facebook Social Login on these platforms.
Steps to get Facebook API details
Step 1: First of all you need to visit the Facebook Developer’s Console because you cannot extract these details from your regular Facebook profile.
Step 2: These are the steps you need to follow on Facebook developer’s website.
Click on My Apps -> Add a New App or Add a New App button. Choose Website and proceed.
Step 3: Type the name of your App and click on Create New Facebook App Id, choose App category and proceed.
Step 4: Now Click on Skip Quick Start.
You will get the Facebook Application ID and App Secret (Click Show button).
Step 5: Now, go to Settings from the left menu.
Step 6: Click on Add Platform button and select website.
Step 7: Enter your App Domain and Site URL. Also, provide your contact email (It is necessary to make your app live).
Step 8: Click Save Changes button.
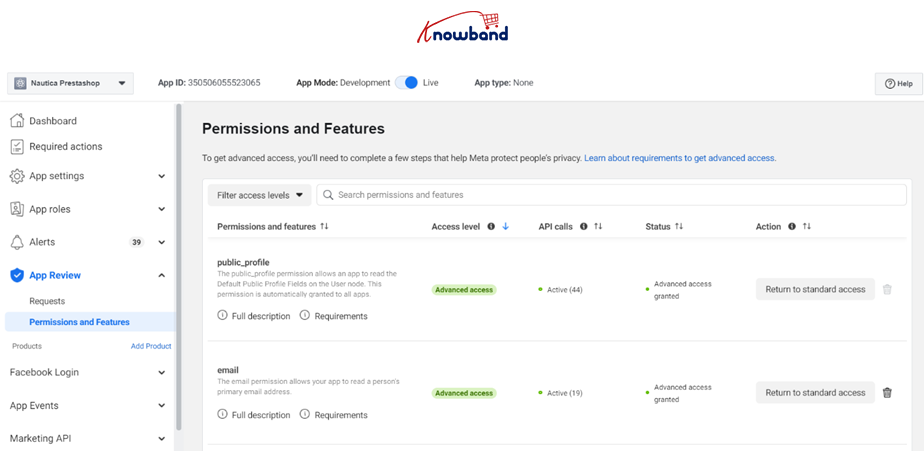
Step 9:The last step is to make the Facebook app live that you have recently approved from Facebook. You can see the option App Mode on the header menu of the Facebook Developer account.
However, you need to make sure that all the advanced accesses have been granted before that. Visit App Reviews>>Permission and Features and enable the accesses that you need for your project.
Once enabled, you can make the app live.
Step 10: Now you can use the API details of the app to let your customers log in to your store using their Facebook account. You can copy and paste these details on the social login module and extensions to activate Facebook social login on your store.
If you are using our Social Loginizer module (PrestaShop, OpenCart and Magento), the interface to configure the API details looks as shown in the image below.
Thus, this is how you can easily get and configure the Facebook API details without any hassle. Extract these details for your own store and use it on the social login modules to improve your sign up conversions today.
Simple Approaches to Boost your Sales using Facebook
Discover simple approaches to boost sales using Facebook for your Prestashop store. Learn effective strategies like Facebook stores, ads, albums, campaigns, and sharing to enhance engagement and conversions.
With the evolution of eCommerce industry, many Marketplaces like Etsy, eBay, Walmart, Amazon etc. have achieved their goals to establish themselves between consumers. Amazon being one of the fastest growing marketplaces has a huge base of potential customers. Its necessary step of account creation before purchasing a product has played an important role in increasing the number of Amazon accounts on the internet.
Not just the Amazon marketplace, different services from Amazon (Like Amazon Prime Video) has also played a crucial role in growing the numbers of Amazon account.
Amazon provides an API to the developers using which they can develop the solutions to integrate Amazon social login on different platforms like, PrestaShop, OpenCart, and Magento etc.
That is, users would be able to login to your store using the same credentials they use to login to their Amazon account. This can be easily achieved by installing a social login module (PrestaShop, OpenCart, and Magento) that supports Amazon social login.
How to get the Amazon API details for Social Login?
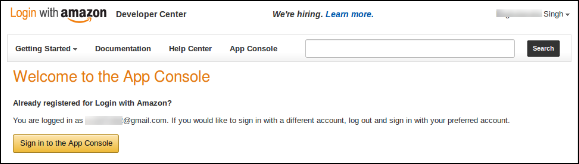
Step 1: To get the Amazon API details, you need to go to Amazon Developer Network page, also called as App Console.
Step 2: Click on Sign into App Console button.
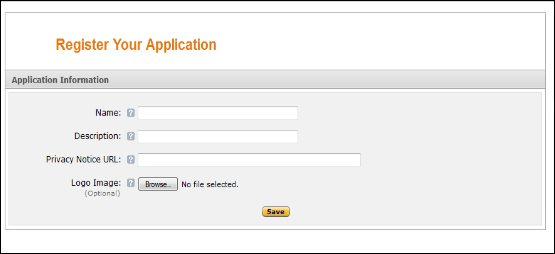
Step 3: After successfully logging into App Console click on Register New Application button in top right of the page and you will be redirected to the Register Your Application Page.
Step 4: Enter Application Details as follows:
Name: Name of your Application.
Description: A short description of your application.
Privacy Notice URL: Url of the page where you have mentioned the privacy policy page of your store.
Logo Image: Select optional logo image of your store.
After filling these details, click on the Save button.
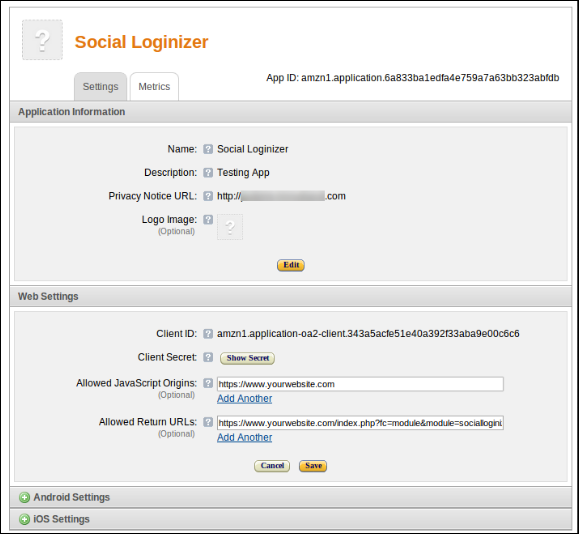
Step 5: Now click on Web Settings to get your client id and client secret.
Step 6: Fill in the Allowed Return URL:It is the redirect-page URL of your store.
In case you are using our Social loginizer module (PrestaShop, OpenCart, and Magento), and SEO Friendly URL for your store then use this for redirect URL –
Disclaimer: To enable and use Amazon social login into your website, your website must be secured with HTTPS, or the Amazon login will not work.
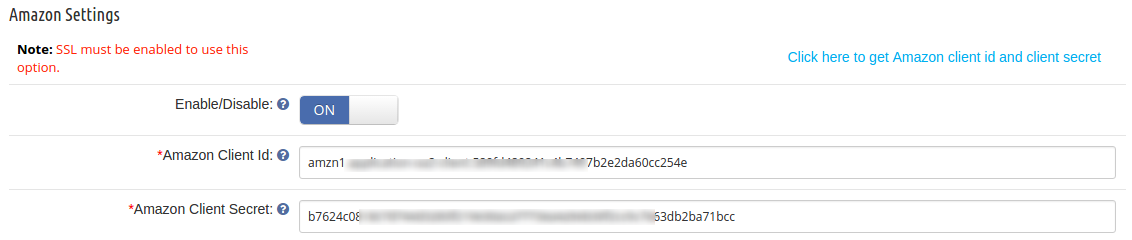
Step 7: Now you can use this client secret and client ID to let your customers log in to your store using their Amazon account credentials. To configure the details on a social login module, just copy and paste them into the specified field, and save the configuration.
Please note: Step 7 is valid only for Knowband Social loginizer modules for PrestaShop, OpenCart, and Magento.
Disqus is a worldwide popular blog commenting host for websites and communities that use a networked platform. Disqus is a very popular solution used by various websites and users who are fond of commenting on different blogs, communities, and forums using a networked platform.
Disqus provides an API to the developers using which different social login solutions have been developed. That is, a user having an account on Disqus can use the same account to log on to your site if you allow Disqus social login on your site.
To use the Disqus social login on your website, you can install a social login module (PrestaShop, OpenCart, and Magento) that supports Disqus. Later, after few initial API configurations, you are ready to accept social login via Disqus on your website. You need two Disqus API details for that:
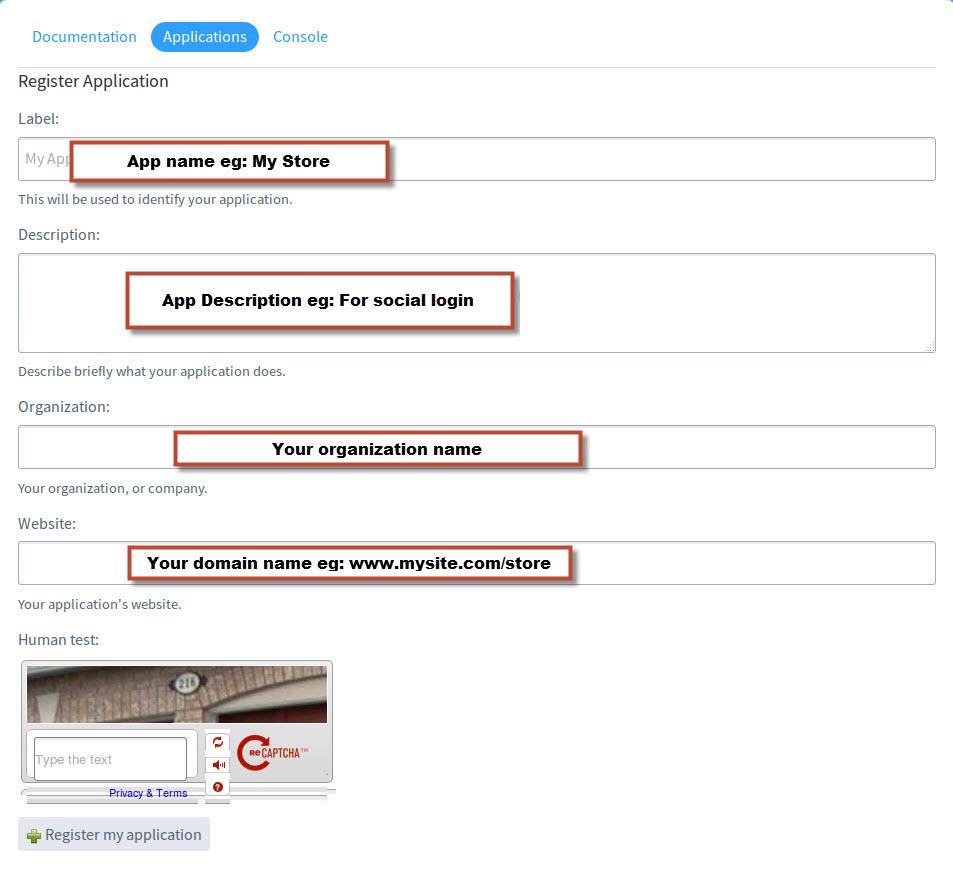
Step2: On the next interface, Click on Applications Tab. Next, click on “Register new application” as shown in the image below.
Step3: It will show you a small form to fill. Fill up the form as shown in the image below and then click on “Register my application”:
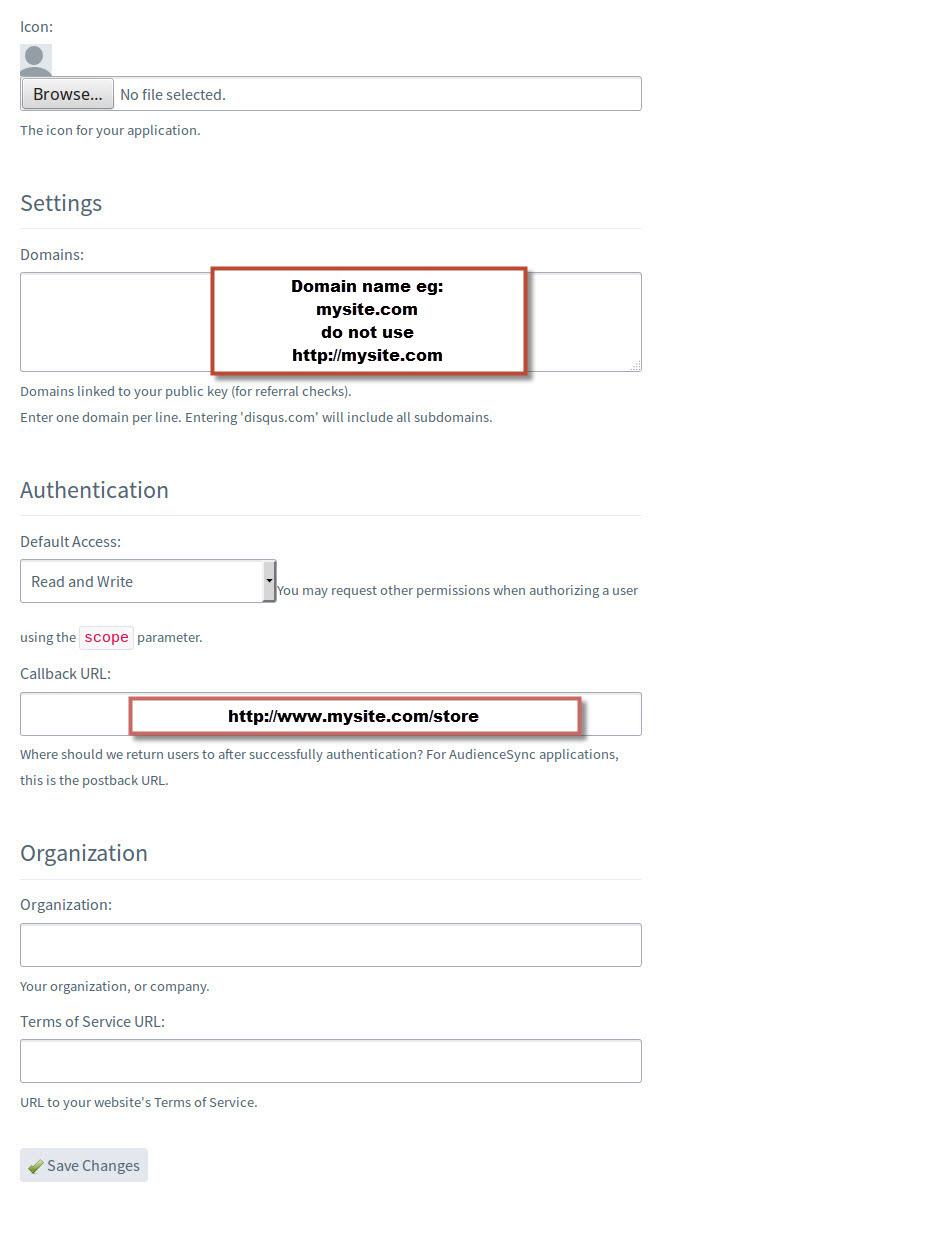
Step 4: On the next interface, you need to provide your domain name, call back URL (redirect URL) as shown in the image below and click “Save changes”:
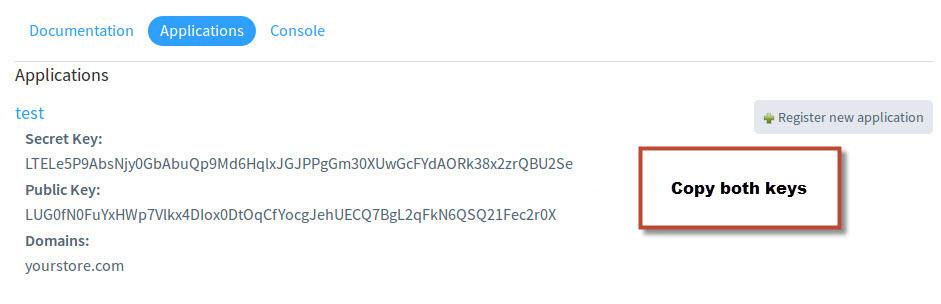
Step 5: The next screen will show up all your API details that you need. Copy these details and keep them with you.
Now you can use these details in your social login module and configure the Disqus login in few seconds. Just copy and paste these details in the specified fields.
For example, if you are using the knowband social loginizer module for PrestaShop, OpenCart, or Magento, your interface will look something like this:
Dropbox is a cloud storage solution used by millions of users across the planet. If you want to setup a social login with Dropbox on your site, you need the following two details.
Dropbox App Key
Dropbox App Secret
You have to copy and paste these details in your social login module (PrestaShop, OpenCart, and Magento) to configure the login.
How to get the Dropbox App key and Secret?
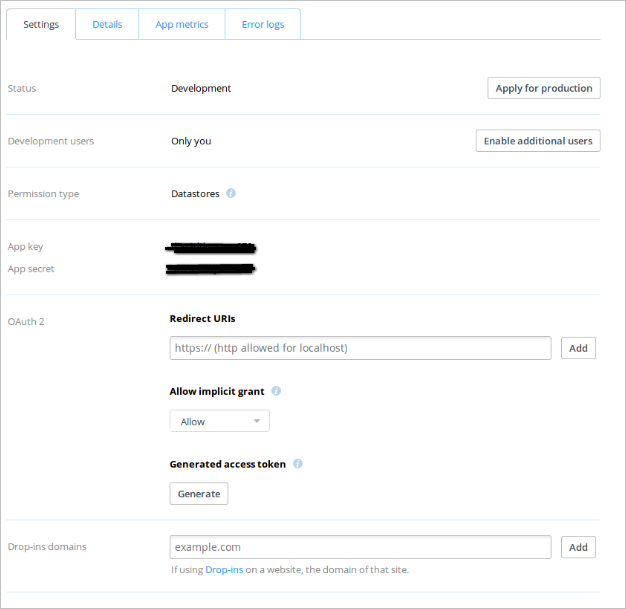
Follow these quick steps to get these Dropbox API details. Please Note: To enable Dropbox login into your website, your website must be secure with HTTPS otherwise Dropbox login will not work.
Step 2: Click On the Create App button on the first screen that appears.
Step 3: Provide a name for your Application
Step 4: Fill up the details in the next screen, set redirect URL and save the settings.
PS: In case you are using our Social loginizer module (PrestaShop, OpenCart, and Magento) and SEO Friendly URL for your store then use this for redirect URL –
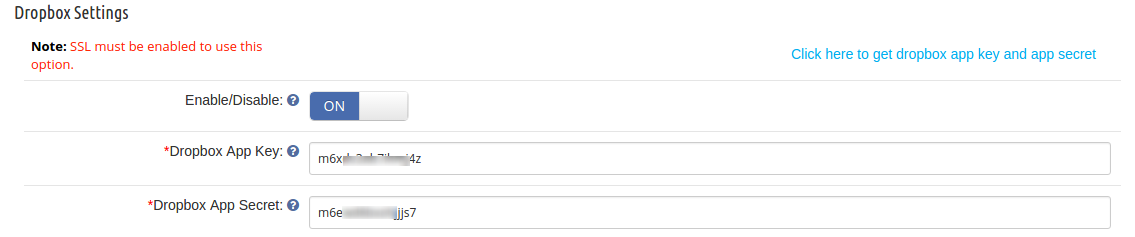
Step 5: Now, If you are using the Social Loginizer module (PrestaShop, OpenCart, and Magento), You can copy and paste the App key and Secret in your module’s admin panel as shown in the image below:
PS: Step 5 is valid only if you are using our Social Loginizer module. In case you are using any other social login module, you have to confirm with your developer if it supports Dropbox Login.
The Social Loginizer for OpenCart is one of our most cost-effective extensions. Due to its ability to provide multiple social login options (9 to be exact) using a single plugin, it adds high value for money returns to OpenCart users.
You have the option to configure the popular social login accounts like Facebook, Google, Twitter, Yahoo, Linked-In, WindowsLive etc.
Twitter Login is one of the social login options this extension provides. In this Q&A, we have prepared the most commonly asked questions for Twitter Login. However, this Q&A would also clarify most of your queries regarding any of the social login options on this extension.
Q1. How to set and get the Twitter API key and API secret?
Twitter API key and API secret are two important details that you need to get from Twitter to configure the Twitter social login on your OpenCart store. These details would help in establishing a secure connection between your store and your Twitter account which will be used in verifying the login attempts by your users through the Twitter option.
For more information on how to get these details, we would suggest you to follow the instructions in the module documentation. We have explained each and every step there.
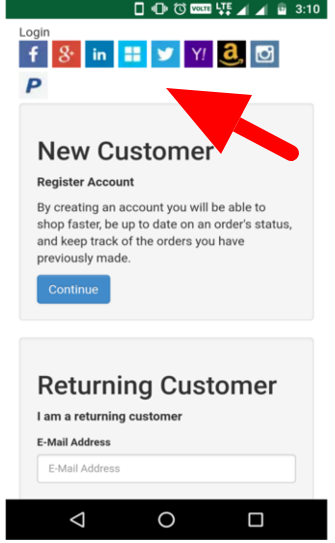
Q2. I just installed the plugin, but it would not display the icons anywhere on the front. What am I doing wrong?
There are two possible reasons for that:
1. You have just installed the extension and not configured the login options-
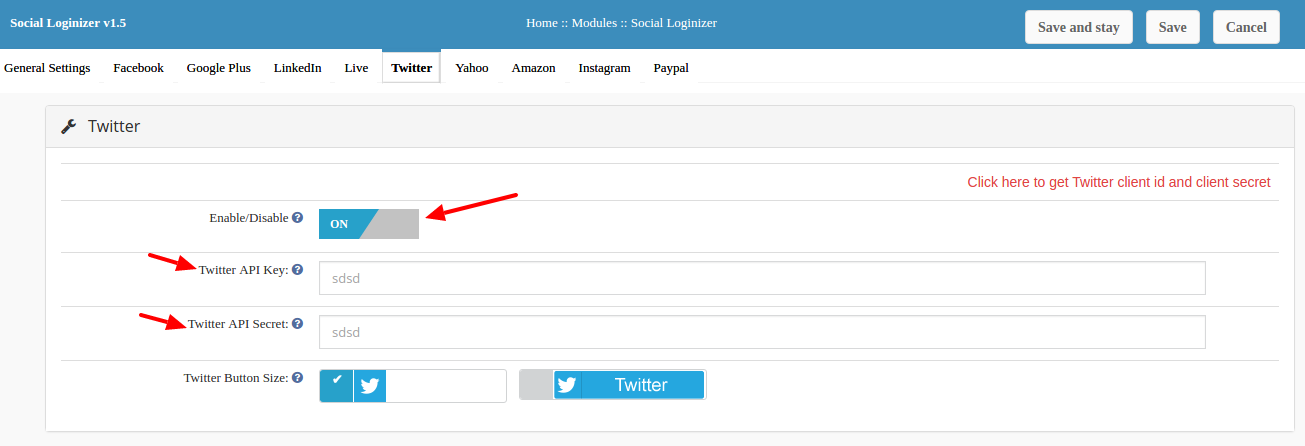
Once you install the plugin/extension, you need to setup the configuration for whichever social login option you choose to use. For example, in Twitter Login you need to fill the fields for Twitter API key and API secret, then only you will be able to “Enable” the icon in the front.
PS: If the details are not filled, the login option remains inactive and it will not show the icon on the front side of your store.
2. You have configured the login, but have not enabled where you want to show it-
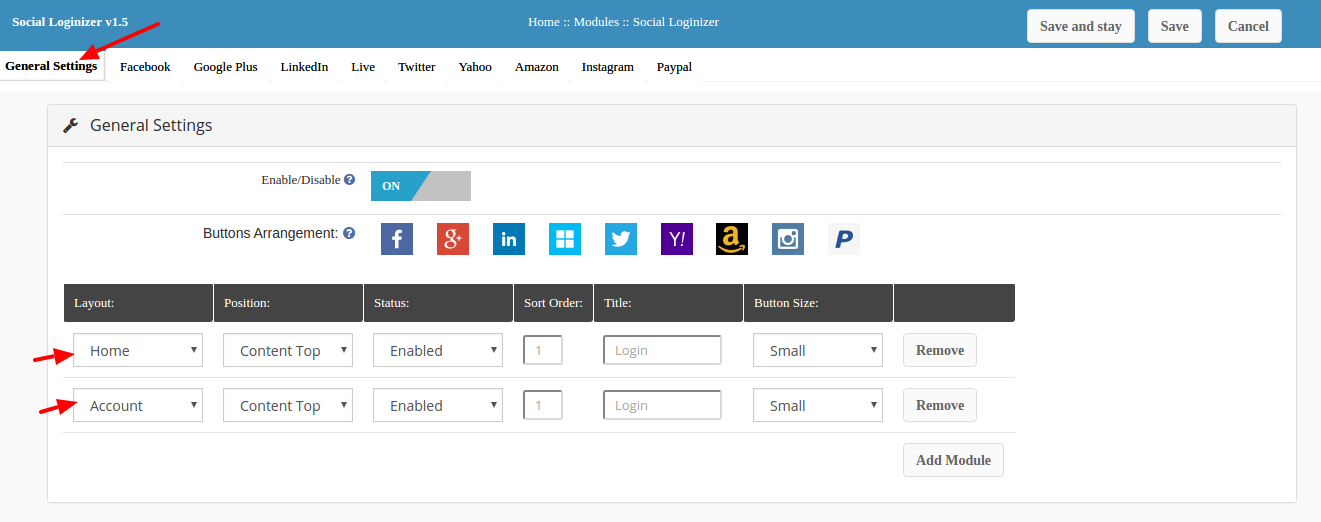
The social loginizer extension provides the option to website admin to choose where he wants to display the social login icons. For that, you have to go to the “General Settings” of the plugin and add the page. For example, in the below screenshot I have set the icons to show on Home Page and Account page (login/sign up page).
You need to add the pages from here, and consequently also change the status of the page as “Enabled”. Moreover, you also need to check the status of the global Enable/Disable button, right on the top in the “General Settings” tab. It should be “ON.
Q3. Does the Twitter Login display on the Mobile or Tablet devices?
Yes, the plugin is fully responsive to all the standard screen resolutions. All the social login icons fit well in the mobile or tablet display.
Q4. Does this plugin work on OpenCart 2.x versions?
This plugin is compatible with Opencart v1.5.3 – v2.2.0.0. So, yes it works on OpenCart 2.x.
We have made the demo available for both the series separately. You can check the demo as per your interest.
PS: There are separate files for version 1.5.x and 2.x. You will get the option to download the plugin for all the version. So, choose the files to install accordingly.
Q5. My hosting server runs on PHP 5.4. Will the Twitter login work for me?
Yes, the whole extension will work well on your web host. You will need PHP 5.4 or above to run the OpenCart Social Loginizer extension on your store.
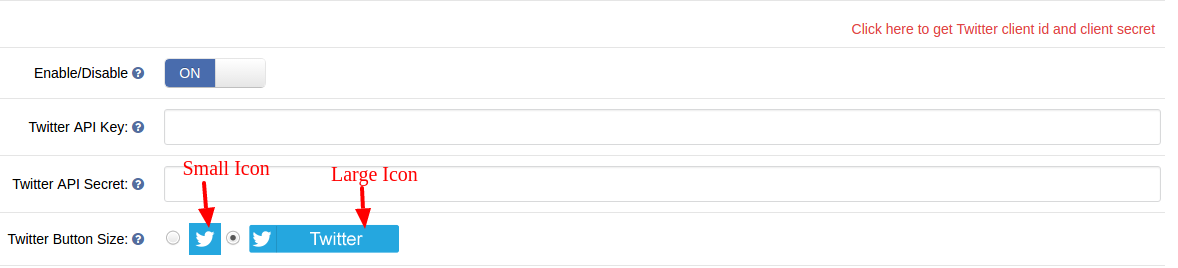
Q6. Can I change the size of the social login icons?
You have two size options to select from- Small (in square shape) and large (in rectangular shape). It looks something like this:
Q7. What Should I do if I need some customization in the plugin?
We recommend you to not to mesh with plugins code all by yourself. All your customization would be lost if you upgrade the plugin in the future.
To make this easy for you, we provide the customization services to personalize or plugins as per your requirements. You can contact us with your requirements and our team would definitely guide you with the proceedings.
If you have already availed the customization service and want to upgrade the plugin now, feel free to contact us, we will upgrade the plugin for you. We hope this post helped you well. If you still have any other query, you can always reach out to us.
Amazon, the most popular marketplace with the huge base of loyal customers. Started as an online bookstore, today after 20 years, it is the digital retailer of choice for customers across the globe.
In 2016, in U.S alone, Amazon made the net sales worth $136 billion. With more than 310 million active customer accounts worldwide, Amazon is definitely a pool of leads and sales for the sellers.
Want to leverage this huge pool of opportunities?
Thinking about selling on Amazon now?
Hold on for a moment!
Big opportunities do not just knock on your doors without any benefit for themselves. There are risks and vulnerabilities attached to everything that glitters.
So, as a seller, to make sure your products get prime success on the giant marketplace, read this post till the end because I am going to answer some really important questions that we often come across about selling on Amazon.
I am certain that these answers would clear countless confusions that you might already have in your mind as a seller on Amazon.
FAQs regarding selling on Amazon
The fundamental questions
1. What is Amazon Buy Box?
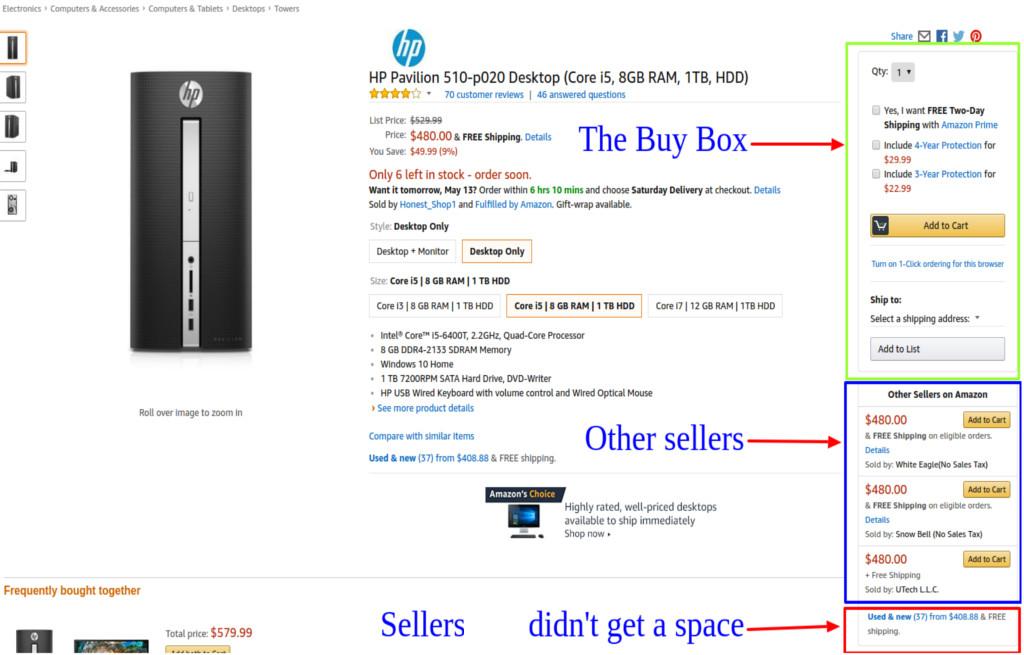
Simply, the Buy Box is a section on the product detail page where customers get the direct option to add a product to the shopping cart.
Amazon in-houses uncountable number of sellers on its marketplace. Many of these sellers offer products that are also being offered by various other sellers on the site. Since Buy Box is the highlighted area on the product page, sellers ending up in the box receive more sales than those who missed it.
Sellers compete on various grounds to get into the buy box so that their product receives the maximum sale.
2. How does Amazon decide the winner of the Buy Box?
As Amazon is the home to thousands of sellers like you, becoming a featured seller in the Buy box is really a tough nut to crack. You will always find a huge number of sellers already competing for space.
It’s pretty unrealistic to think your store is ever going to rank that higher to get featured on the Buy Box. You many think of ‘Other Sellers’ section which is comparatively lesser competitive. However, not that lesser as you think, the sellers who miss the Buy Box with few scores usually get featured in the other sellers section.
But still, it’s really important to know how the Buy Box ranking works. Who knows you might be able to leverage some of the requirements and end up in the Buy Box someday.
A number of factors affect the listing in the Buy Box as well the Other Sellers section.
Product Pricing- Products pricing does not only include the price of the product but also the shipping cost included with it. Customers mostly prefer low prices while browsing the marketplace. Offering a competitive price with shipping cost included may get you significant attention, if not the Buy Box.
Selling history on Amazon- Seller with long, and positive selling histories generally have stronger chances to get in the featured list.
Reviews and feedback- On Amazon, reviews are important like nothing else. Customers get the best possible ways to post honest reviews about the experience with the product delivery, product itself, and sellers too. Though Amazon does not use reviews and rating as a factor in ranking the sellers, a significant amount of negative reviews and feedbacks can still force the marketplace site to ban your shop or suspend your listing.
There are numerous other factors that act as a determiner in deciding your seller ranking. As a rule of thumb, the most effective measure is to deliver the best quality products on time and ensure a communication with the customer if required.
3. What is Amazon FBA?
Amazon FBA or so-called Fulfillment by Amazon is a service offered by this marketplace to its sellers. Here, using this service you, as a seller, can send your merchandise to one of the Amazon’s fulfillment centers to be stocked. When you receive an order for that merchandise, Amazon ships it to the customers directly from their stock.
This service helps the sellers to concentrate on selling, while Amazon will handle the product delivery and customer care. Of course, there is a cost involved in using the FBA services.
Other benefits of FBA involves:
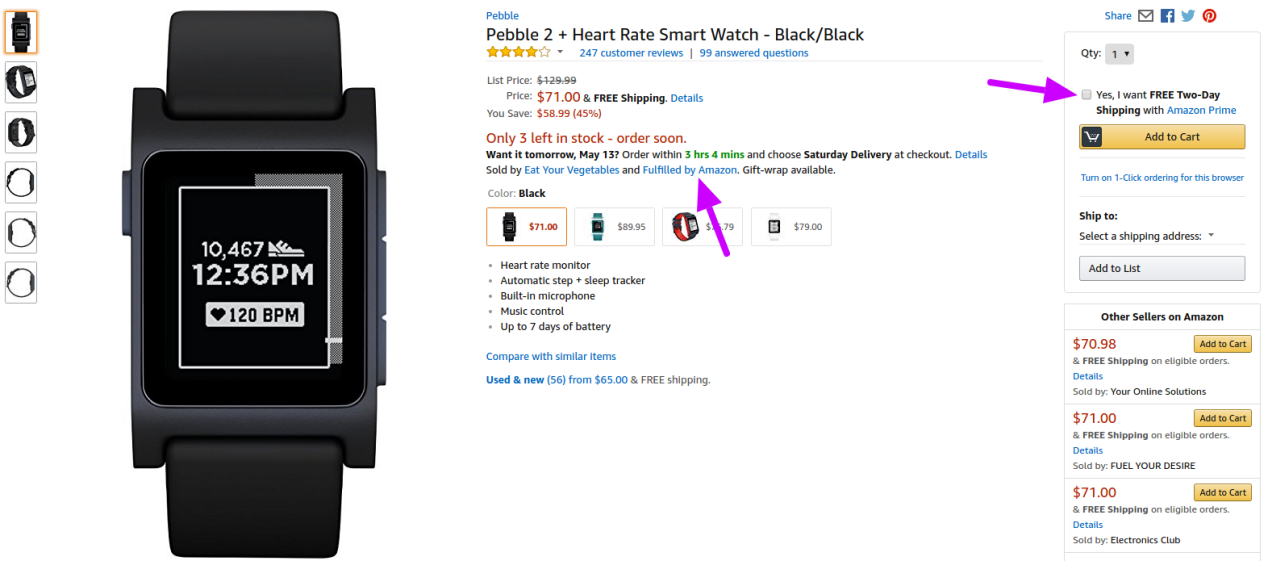
An extended reach to the Amazon Prime members who generally order the Amazon-fulfilled products.
More chances to win the Buy Box as compared to the non-FBA sellers.
FBA is definitely a serious program to try out when you are thinking about selling on Amazon.
4. I already have my own eCommerce site, should I sell on Amazon?
Having your own eCommerce store is never a restriction. In fact, Amazon does not care if you have your own site or not. You can always create an Amazon seller account and start listing your products.
77 % of sellers use multiple sales channels- Marketplace, own site, and brick and mortar shop. Out of these, a quarter of sellers have their own webshops based on different platforms like Magento, OpenCart, PrestaShop, Shopify etc.
When so many multi-channel selling options are already there, the marketplace giant cannot allow sellers to promote their own sites on its platform. That’s understandable. Any marketplace would not want you to steal the commission and traffic it can generate with your sales on the marketplace itself.
5. Can I sell on Amazon from my own eCommerce site?
When you have your own eCommerce site and you are a seller on Amazon too, you won’t want to drop the sales anywhere. However, it becomes so cu-cumbersome to maintain the best efforts on both the platforms at the same time.
When you concentrate on your Amazon listings, you are somewhat pulled off your site and vice versa. This dilemma makes many sellers rethink the idea of selling on Amazon. Still, they completely understand that selling on Amazon can bring some serious sales, it would be foolish to give up the Amazon shop. On the other hand, giving up your own eCommerce site is also not a wise decision.
This is where Amazon integration services come as a savior. Amazon provides the amazing MWS (Amazon Marketplace Web Service) that allow developers to use the MWS API and develop some integration solutions to make the life of sellers easier.
These integration solutions are simply an extension to your eCommerce site which connects your site with your Amazon seller account.
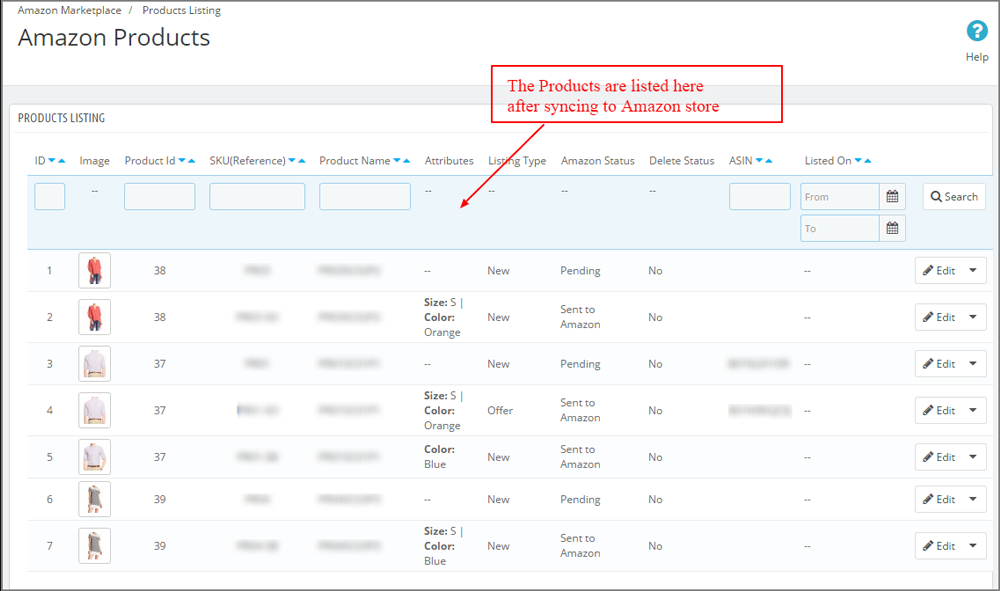
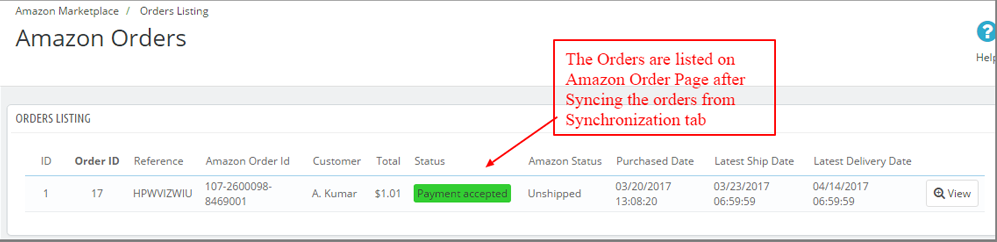
For example, if you install our PrestaShop Amazon Marketplace integrator on your PrestaShop based store, you will be able to manage all your Amazon listings from your PrestaShop store itself. You will not have to go to your Amazon seller account to:
So, yes, you can always sell on Amazon from your own eCommerce site directly by using the Amazon integration services and solutions.
Other Important FAQs
6. A product that I want to sell is already listed on Amazon by other sellers too, should I list a new product or just associate it with this listing?
Amazon allows only a single listing for a particular product in its catalog. All the sellers who want to sell a product that has already been listed in the catalog must associate their listing with the old listing in the catalog.
If you create a second product, Amazon will consider it as a duplicate listing and will immediately remove it.
7. Why does Amazon not reimburse me the correct amount for shipping cost?
Amazon decides the shipping cost reimbursement on the basis of the distance between the merchant’s origin and customer’s shipping address and also the weight of the product. However, sometimes the calculation does not match with the actual expense of the seller on shipping.
PS: The cost reimbursed by the Amazon can be less as well as more than the actual expense by the seller.
8. Why Can’t I map some of the shipping options with my products?
Amazon typically does not want to take the risk of delayed product delivery. A delayed product delivery, (even if it’s the mistake of the seller) directly affects the marketplace’s reputation. So, it’s better to tell correctly about the delivery time, it does not matter if it’s a slower one; customers should get the product on or before the committed date.
So, at the initial phase of your seller account on Amazon, you might not get the access to map quick delivery options like same day, or next day, or two days to your products. You have to earn the access to those options by establishing a history of reliable shipping with the slower shipping speeds. Once you have a nice long history of on-time product delivery with the slower options, you will gradually get the access to quick shipping options.
9. What should I do when I am on a vacation and not available to fulfill the order?
Amazon provides a great option for sellers to temporarily remove all the open listings in the event of taking a holiday, going for vacation, or for any random reason. By using the Listing Status feature, you can deactivate all your self-fulfilled listings while you don’t have to worry regarding your FBA listings. The FBA listings will be fulfilled by the Amazon itself, so you don’t have the option to take down FBA listings using the same option.
Please note: Before changing the status of your listings, you should make sure none of your previous orders are pending. The already placed orders will not get automatically canceled; you have to manage it manually either by canceling the order or by fulfilling it before activating the vacation mode.
10. How to activate or deactivate the vacation mode using Listing Status?
When you are going for the vacation, you can set your listings “Inactive” by following these steps:
Go to Listing Status page from your seller account.
Select the status as Inactive.
Click Submit button to save your selection and within one hour your self-fulfilled listings will be removed from the live product listing on Amazon.
When you come back from the vacation, you can reactivate all your listings by following these steps:
Go to Listings Status page in the same way from your seller account.
Now, select the Status as Active.
Save the selection by clicking Submit button. The listings will be live again within one hour.
PS: This feature is only available to some sellers. If you cannot find the “Edit” button next to Listing Status, you don’t have the authorization to use this feature.
11. Which policies should I be aware of before starting to sell on Amazon?
You should be aware of the following Amazon’s policies that concern the sellers:
While deciding to sell on Amazon, the best thing to consider is how well you know your business and how can you manage the complexities of selling on marketplaces. If you already own an eCommerce site and want to drive more sales, selling on a popular marketplace is the obvious and best recommendation with integration solutions.