OpenCart WhatsApp Live Chat Manager Plugin by Knowband – User Manual

Introduction:

Introducing the Knowband OpenCart WhatsApp Live Chat Manager Plugin. With the OpenCart WhatsApp Live Chat Manager Plugin, you can effortlessly engage with your customers in real-time. By providing them with instant assistance and personalized support. Gone are the days of lengthy email exchanges or waiting for customers to call your helpline. Now, you can meet your customers where they are, on their preferred messaging platform.

Furthermore, the OpenCart WhatsApp Chat plugin offers a user-friendly interface, making it easy for you to manage and respond to customer queries efficiently. Whether it’s answering product inquiries, resolving issues, or providing pre or post-sales support. You can do it all through WhatsApp, ensuring a seamless and convenient customer experience.


2.0. Features Offered by OpenCart WhatsApp Chat Module:

  1. Real-time Chat: The Knowband’s WhatsApp live chat plugin for Opencart enables real-time communication between website visitors and store owners or support staff via WhatsApp.
  2. WhatsApp Integration: The plugin integrates the WhatsApp messaging platform into your OpenCart website. Allowing customers to directly communicate with your business through their WhatsApp accounts.
  3. Quick Setup: The extension offers an easy setup process, allowing you to connect your WhatsApp account with your OpenCart store. Furthermore, it takes zero coding skills to make your shop customer support ready with the WhatsApp Chat plugin.
  4. Chat Notifications: The OpenCart WhatsApp Live Chat Manager plugin provide notifications for incoming messages. Ensuring that you don’t miss any customer inquiries or messages.
  5. Multiple Agent Support: If you have a team managing customer support, the extension allows assigning different timing slots to different chat agents.
  6. Offline Messages: If you or your support staff are unavailable, the OpenCart WhatsApp Chat extension helps capture offline messages from customers, which can be responded to later.
  7. Mobile-friendly: The extension is mobile-responsive, allowing customers to initiate chats and receive responses easily on mobile devices.
  8. Multiple Language Support: The extension supports multiple languages, allowing customers to communicate in their preferred language.
  9. Condition-Based Chat Options: The store admin can choose specific product categories and product pages where they want to provide the WhatsApp chat option. Furthermore, it helps to resolve customer queries within a very limited time in an effective way.


3.0. Benefits of Using Knowband’s OpenCart WhatsApp Live Chat Plugin on Your Website:

Improved Customer Communication:

Live chat allows for direct and real-time communication with customers. This further enables prompt responses to their inquiries, providing a better customer experience, and increasing customer satisfaction.

Increased Sales and Conversions:

Live chat offers an opportunity to engage with customers during their buying journey, answer their questions, address concerns, and provide personalized recommendations. This can not only lead to higher conversion rates but will also lead to increased sales.

Instant Customer Support:

With Knowband’s Opencart WhatsApp live chat plugin installed, customers can get immediate assistance without having to wait for an email response or phone call. This improves customer satisfaction and builds trust in your business.

Cost-Effective Support Solution:

Live chat can be more cost-effective compared to traditional customer support channels like phone support. It allows support agents to handle multiple chats simultaneously, reducing the need for a large support team.

Efficient Issue Resolution:

Furthermore, the live chat enables real-time back-and-forth conversation. Making it easier to understand and resolve customer issues quickly. This can help in reducing customer frustration and resolve problems promptly.

Increased Customer Engagement:

The interactive nature of live chat encourages customers to engage with your website and ask questions. This engagement can lead to a deeper understanding of their needs and preferences, enabling you to offer personalized recommendations and build long-term relationships.

Enhanced Customer Insights:

Knowband Opencart WhatsApp Live chat extensions often provide visitor information, such as location and referral source, allowing you to gather valuable insights about your customers. This information can be used to tailor your marketing strategies and improve overall customer targeting.

Improved Cross-Selling and Upselling Opportunities:

During live chat conversations, agents can identify opportunities to recommend related products or upsell additional services. Thereby, increasing the average order value and revenue per customer.

Easy Integration with Existing Systems:

Live chat extensions, including the “OpenCart WhatsApp Live Chat Extension,” are typically designed to integrate smoothly with your existing OpenCart store, making it convenient to set up and manage without major disruptions.

Competitive Advantage:

By offering live chat support, you differentiate your business from competitors that may rely solely on traditional support methods. This can attract customers who value quick and convenient support and give you an edge in the market.

4.0. Installation Guide:

To install this OpenCart WhatsApp Live Chat Manager Plugin, please follow the following steps:

Purchase the OpenCart WhatsApp Live Chat Manager Extension from the Knowband store. You’ll get the following files:

Zipped File containing the source code of the OpenCart WhatsApp Chat Extension and the User Manual.

Follow the steps below to install the OpenCart WhatsApp Chat Plugin in the OpenCart store:

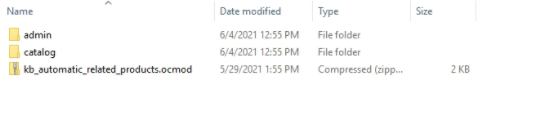
  1. Unzip the zipped File: You’ll get the folders as shown in the image below:

 

  1. Copy all the files and folders of the zip file in the Root Directory of OpenCart setup via FTP manager.

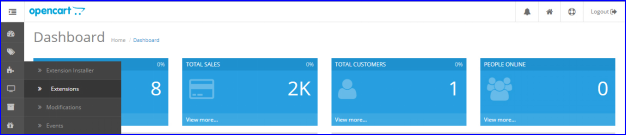
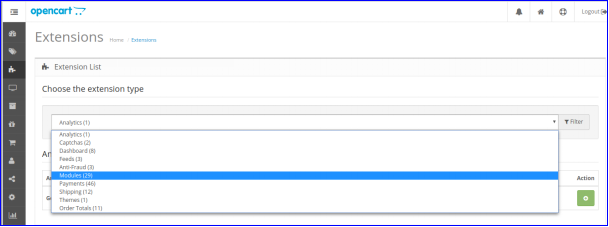
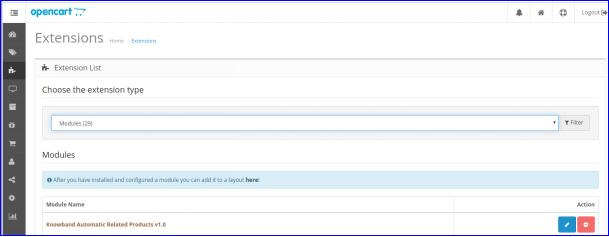
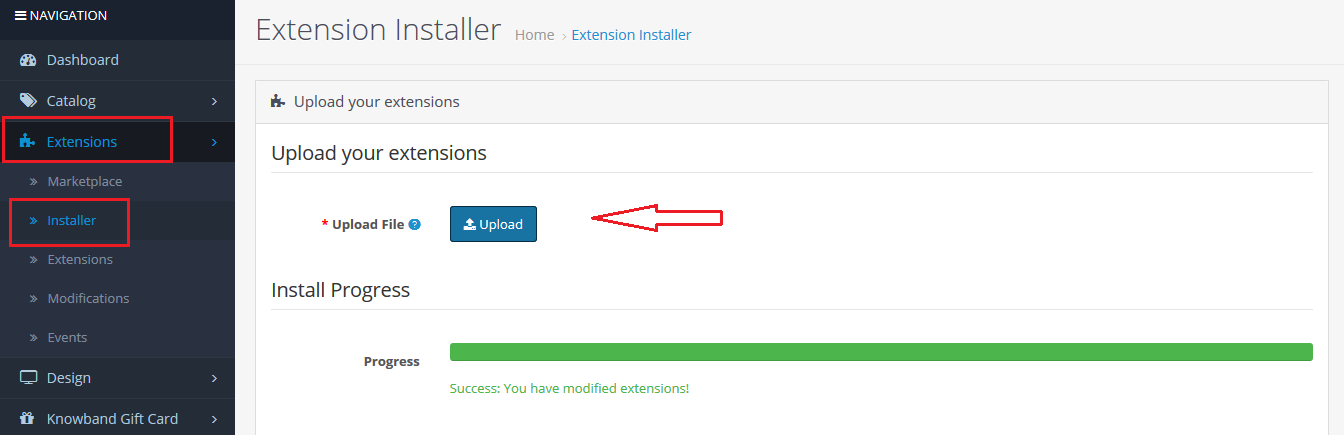
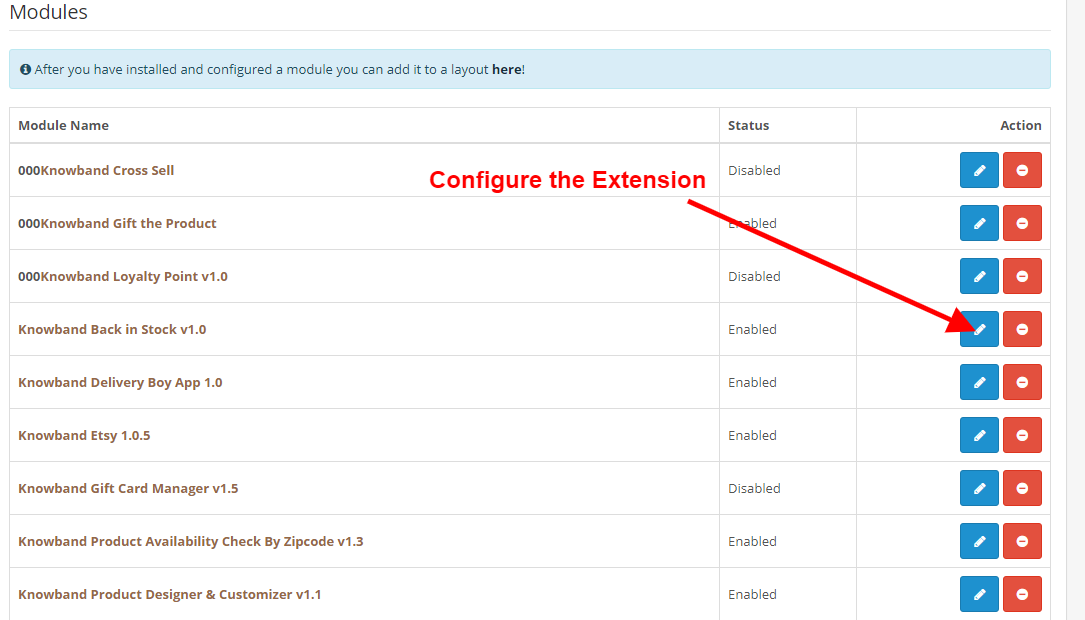
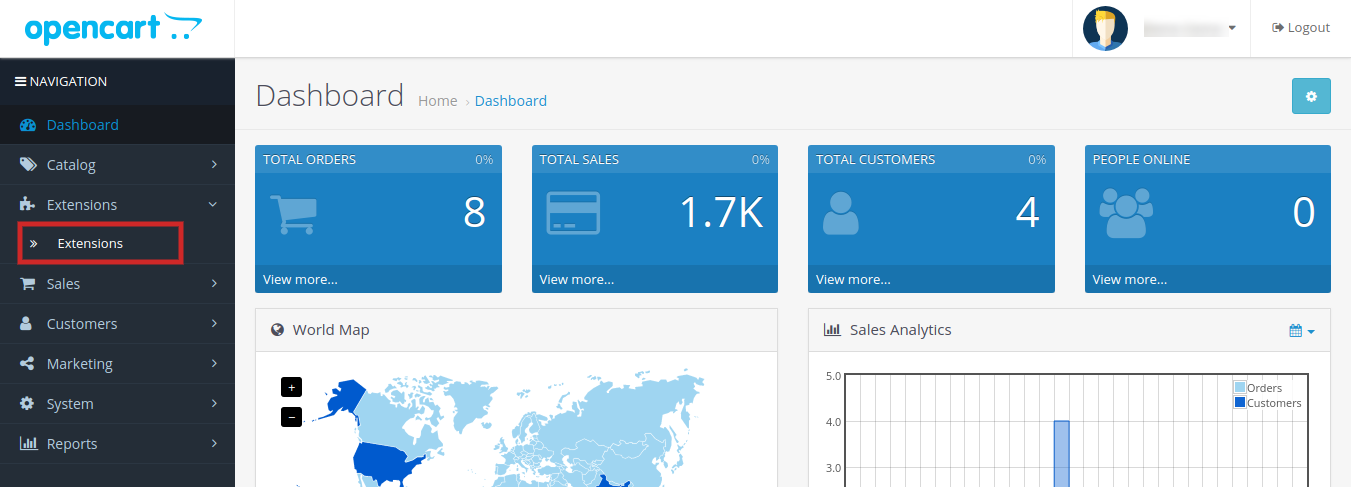
3. The OpenCart Infinite Scroll module is now installed and is ready to use. Go to Admin -> Main Menu -> Extensions as shown in the image below:
 

5.0. Admin Interface:

The OpenCart WhatsApp Chat Extension provided a dedicated and easy-to-manage admin panel for the module configurations.
The store admins can modify module settings at their convenience without the need for coding or technical skills.

5.1.0 General Setting:

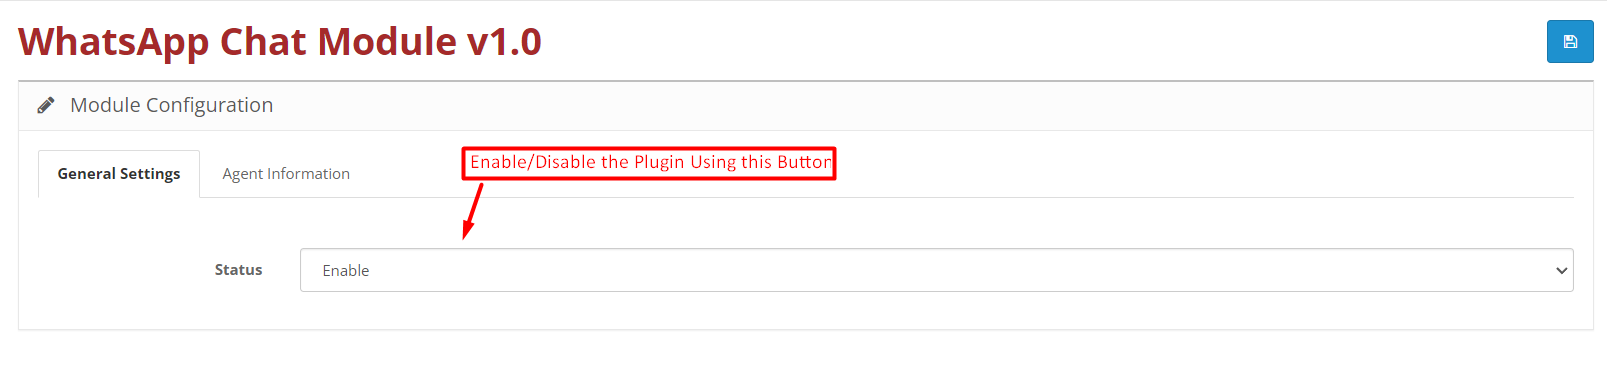
The store admin can enable/disable the WhatsApp Chat Plugin using the shown button in the below image.
5.2.0 Agent Information:

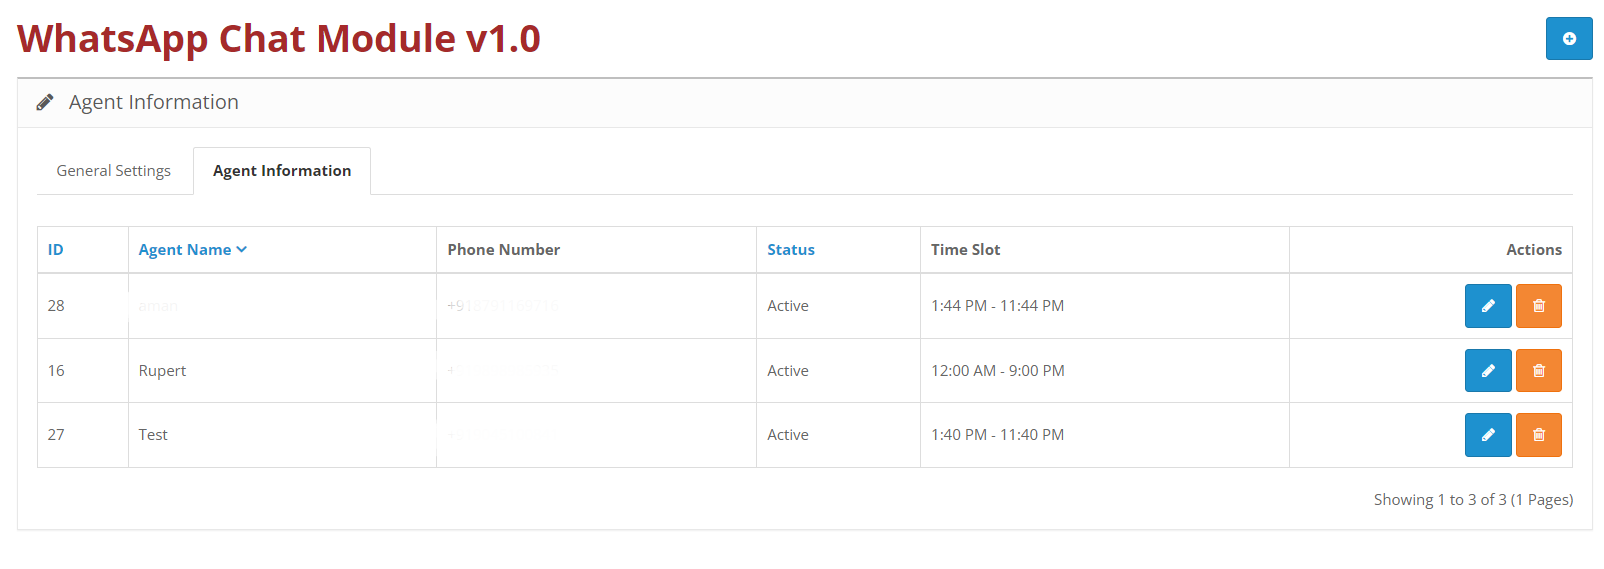
In the following tab, the admin can find the list of all the chat agents and can manage (edit/delete) any chat agent information if required.
 

5.2.1 Agent Information Setting:

We have provided the agent configuration options in the following tab. The OpenCart store admin can choose the specific products, specific categories, agent timing slots, etc. from the agent information tab provided by Knowband OpenCart WhatsApp Live Chat Manager Plugin.
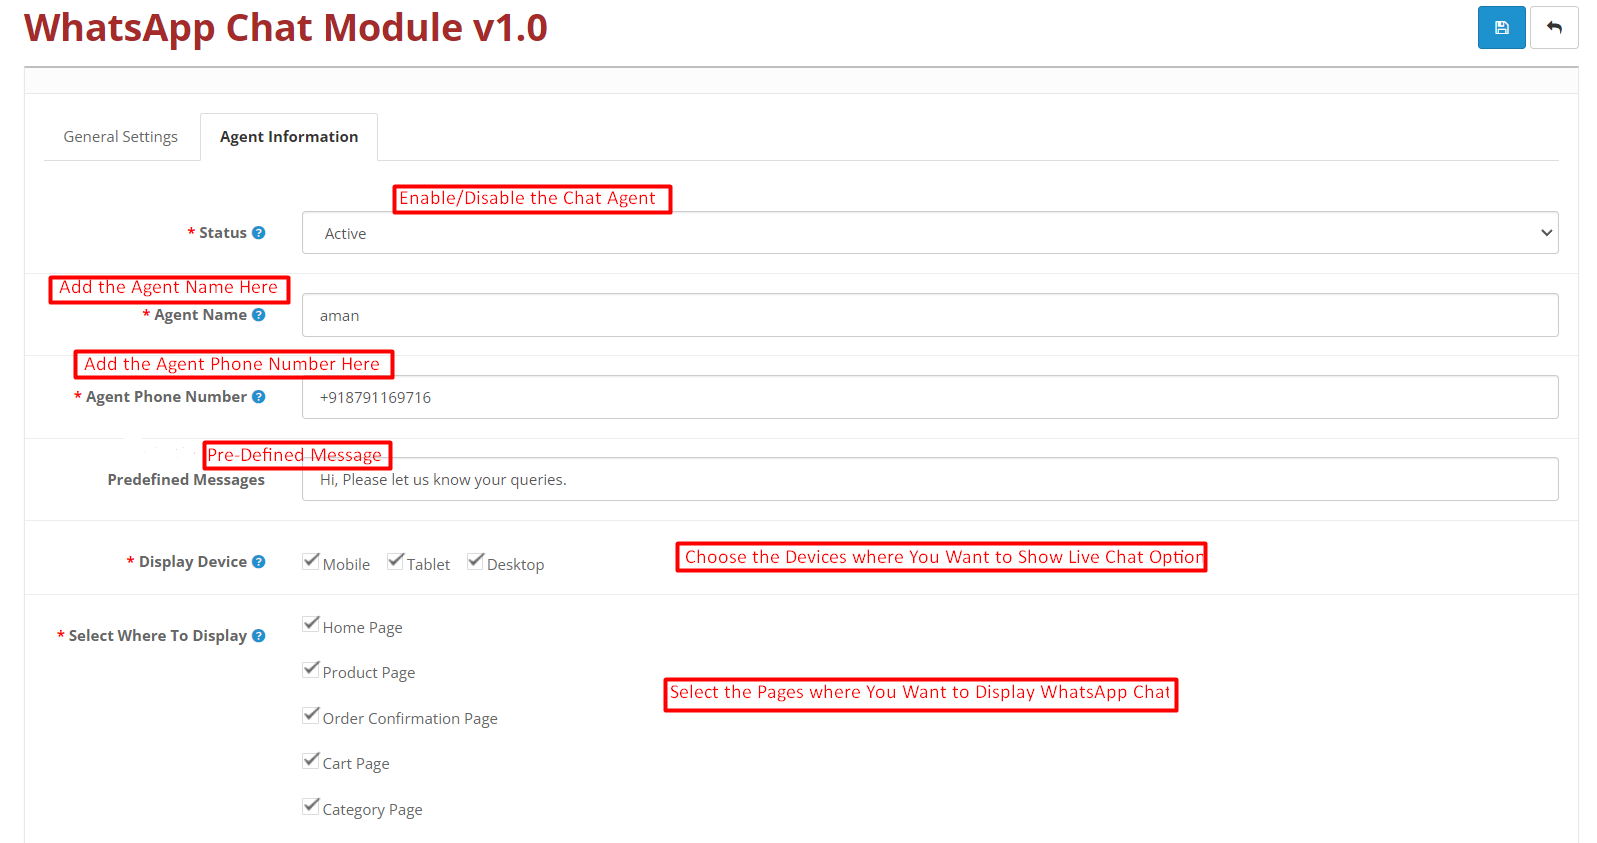


Status: The admin can enable/disable any particular chat agent with the following button.

Agent Name: You can modify your chat agent name in the following section.

Agent Phone Number: The following text field is designed to contain the chat agent phone number to which the customers will be redirected after clicking on the WhatsApp chat button.

Predefined Message: The store admin can add pre-defined messages for customers in this field.

Display Device: You can choose the specific devices where you want to display the WhatsApp chat option. Select Mobile, Tablet, Desktop, or all as per your business needs.

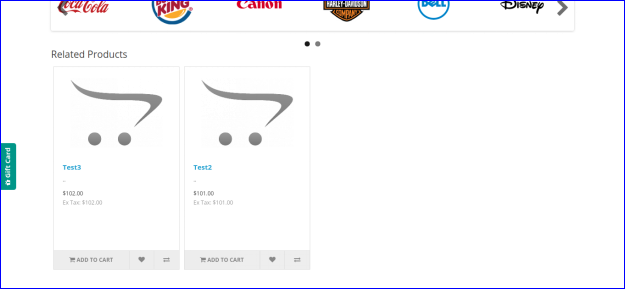
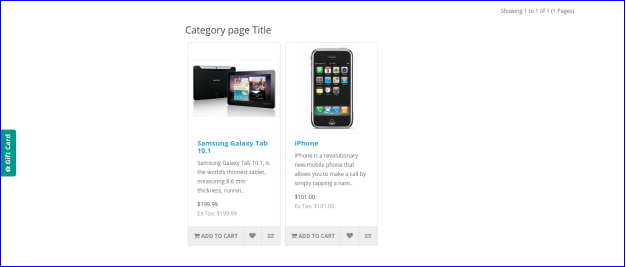
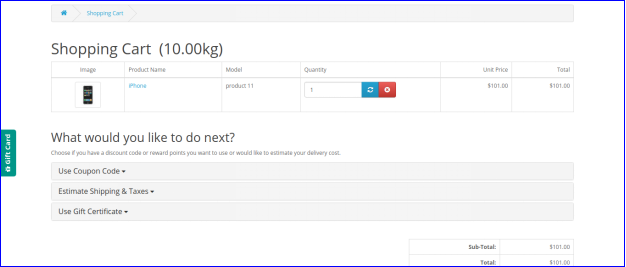
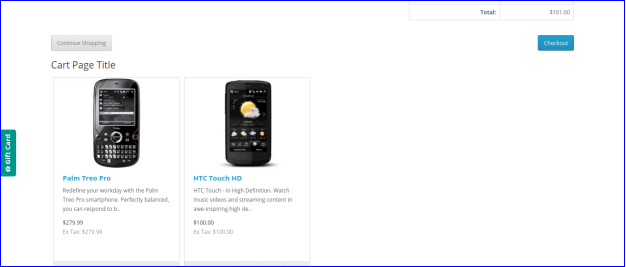
Select Where to Display: The admin can choose the specific pages where he is looking forward to providing the chat support option. For example, we have provided the option for selecting the home, product, order confirmation, cart page, and category page.
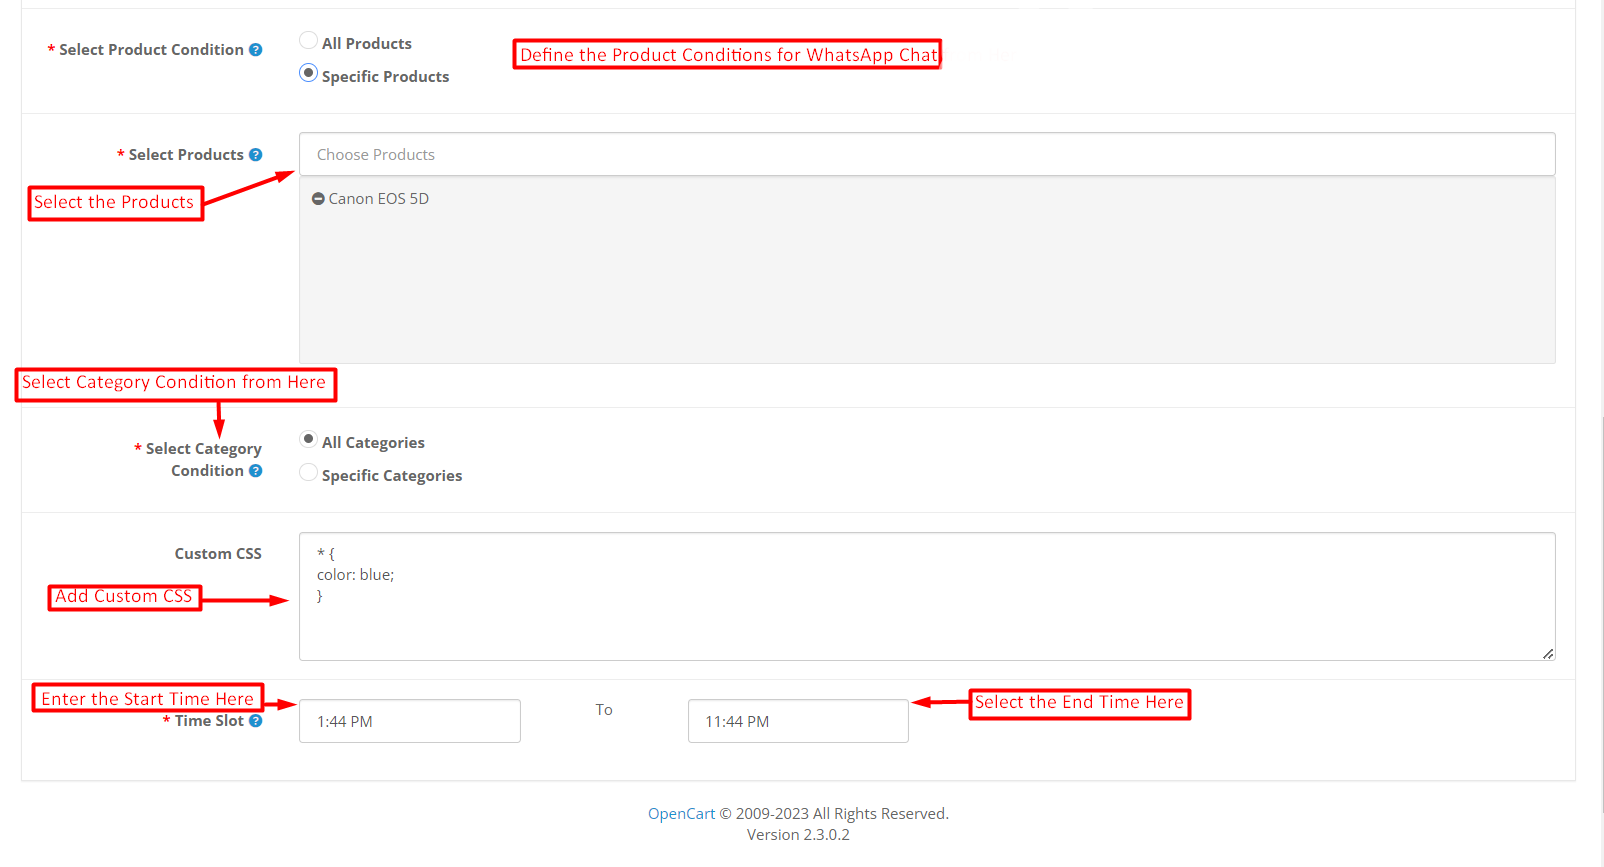


Select Product Condition: The store admin can choose the specific products for the WhatsApp chat option from here. If you want to show the chat option for all the products, you can select the “All Products” checkbox.

However, if you just want to show the WhatsApp chat option on some specific product pages, you can enter the name of the same in the shown field.

Select Category Condition: This option is provided for allowing the admins to choose if they just want to provide the WhatsApp chat option for specific categories or all categories.

If you want to show the WhatsApp Chat option for some specific categories only, you can enter the name in the provided fields.

Add Custom CSS: In this particular text field, the OpenCart store admin can custom CSS to modify the look and feel of the WhatsApp Chat icon.

Time Slot: We provide a time slot option in OpenCart WhatsApp Chat Extension. In the start and end fields shown in the above image, the admin can add shift starting and ending dates for the live chat agents.

6.0.0. Front End: OpenCart WhatsApp Chat Manager Plugin:

As we have discussed the easy to configurable back-end settings offered by OpenCart WhatsApp Live Chat Extension. After making the required configurations, the store admin can enable the customer support option on the storefront within no time.

Furthermore, you can also check out the module demo for checking the live front-end and back-end preview of the WhatsApp Chat Plugin for Opencart.

Moreover, in case you are having any queries or suggestions regarding the WhatsApp Chat Manager Plugin, you can also reach out to our support staff at support@knowband.com.
 

Prestashop Product Sticker & Label Addon – User Manual

1.0 Introduction:
Modern customers have a limited attention span. Meaning that when they visit an eCommerce website, the administrator has a limited time to provide them with relevant information and enticing offers. The reason behind the same is various types of information are crucial for customers to determine if a product meets their requirements.

Considering the same, we have developed the PrestaShop Product Label addon specifically for PrestaShop eCommerce merchants. The Prestashop product sticker and label module enables administrators to add dynamic stickers to their storefronts. Additionally, administrators have the flexibility to upload their stickers, customize their dimensions, and choose their desired position on the website pages.

Moreover, if you aim to inform your customers about sales, promotions, delivery times, and other important details. Knowband’s Prestashop Product badge addon for PrestaShop is the perfect solution for all your promotional business needs. This extension provides a wide range of useful features and ensures peace of mind. Let’s explore some of the key highlights offered by the PrestaShop product sticker plugin.

2.0. Major Highlighted Features Offered by Knowband’s Product Badge Addon:

The PrestaShop product sticker plugin is empowered by tons of incredible features. Not only the plugin is configurable from the back end but also provides high-quality pre-loaded stickers.

We have tried to cover up some of the most sounding features of the PrestaShop product sticker module.

  1. The admins can boost their revenue by showing the offer discounts on products.
  2. The PrestaShop store admins can choose the pages where they want to show the product stickers. For example, the store administrators can choose the options from the product page, product listing page, search page, home page, and much more.
  3. The PrestaShop admins can choose to include or exclude specific products for the sticker appearance.
  4. With the help of the PrestaShop Product Sticker module, the store admins can include the PrestaShop store categories where they want to show the responsive stickers.
  5. Along with pre-available stickers, the admins can also upload the stickers of their own will in the module and make them appear within no time on the shopfront.
  6. The PrestaShop Product Label plugin allows showing the stickers based on the products’ available stock conditions.
  7. Create as many labels as you want within clicks.
  8. The PrestaShop store admins can manage the sticker positions on the product images right from the module backend.
  9. The admins can schedule the start and end dates for particular stickers.
  10. The admins can choose between all products, specific products, and special categories for the sticker appearance.
  11. The admins can also select the rules of products like best seller products or can set minimum or maximum prices of products or new products for the sticker appearance.

3.0 Installation Guide for Prestashop Product Sticker and Label Addon:

Once you purchase the addon, follow the below steps:

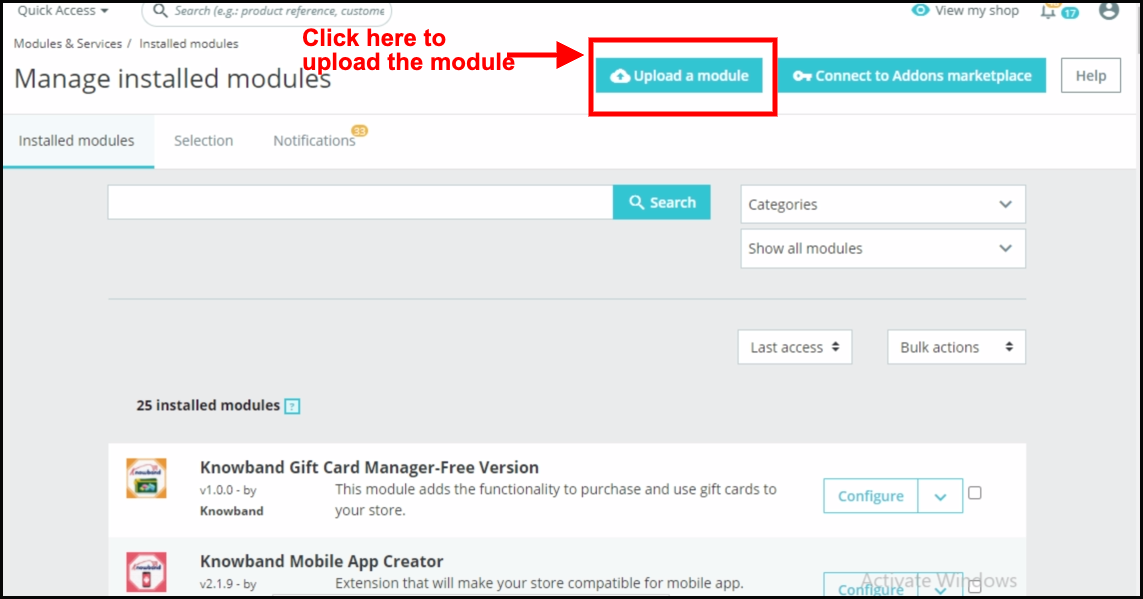
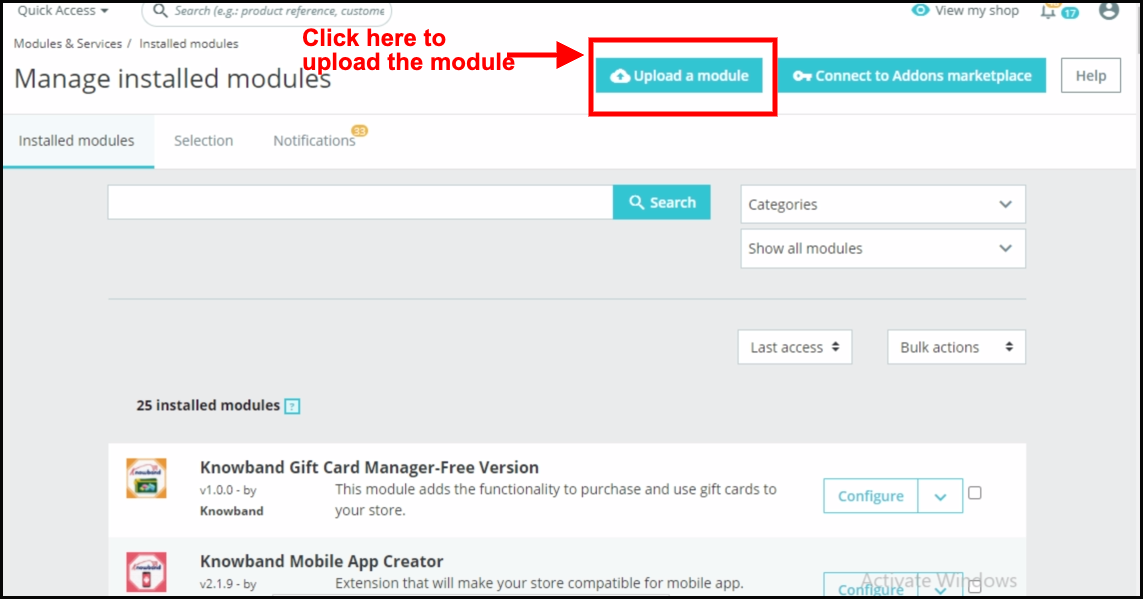
  1. Go to the Store Admin -> Modules and Services.

  1. Click on “Upload a module”. You can drag or drop the file or can simply select the file from the system.


Once the file is completely uploaded, a notification of “Module(s) installed successfully” will display.

4.0. Admin Interface: Prestashop Product Badge Module!

The Prestashop product badge addon comes with an easy-to-configure admin panel. Using the same the Prestashop store administrator can simply configure the sticker settings and can further manage the Product stickers for the shopfront. 

  • 4.1. General Setting:


In the following tab, the admin can manage the plugin’s general settings.

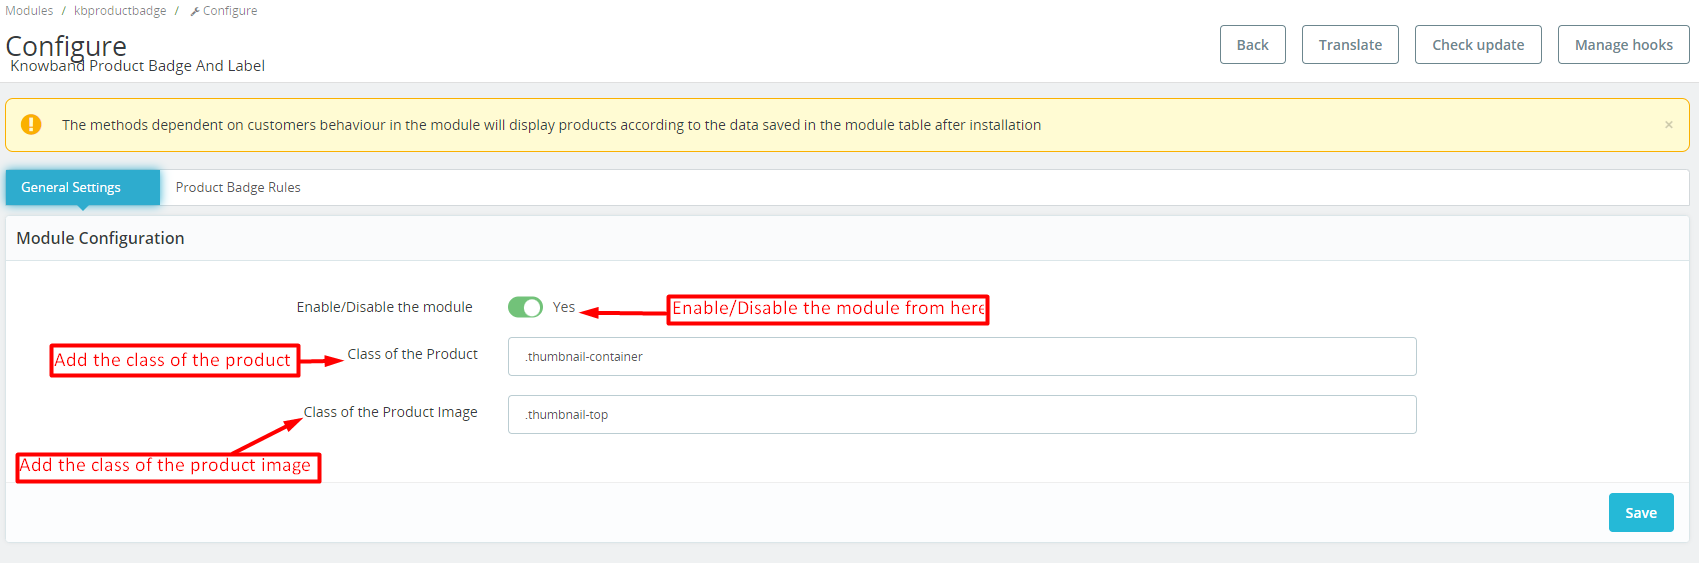
Enable/Disable: You can use the following button for enabling/disabling the module. 

Class of Product:

The admins can add the class of their store products on store front in this particular text box. 

Class of Product Image:
The particular text field is provided for the admins to enter the class of the store’s product image on storefront.

4.2. Product Badge Rules:

In the following tab, the store admin can manage basic setting operations for the product badges.
we have provided the options for adding new, editing, or deleting all the stickers. Moreover, the Prestashop store admins can find the list of all the stickers in the following tab.

Add Sticker Rule:
By clicking on the following button, the store admins can create new sticker rules. 

Edit Sticker: If you have already created and configured a sticker rule and now want to change the sticker settings, you can modify the same from here.

4.2.1. Product Badge Rules: General Rule Setting:

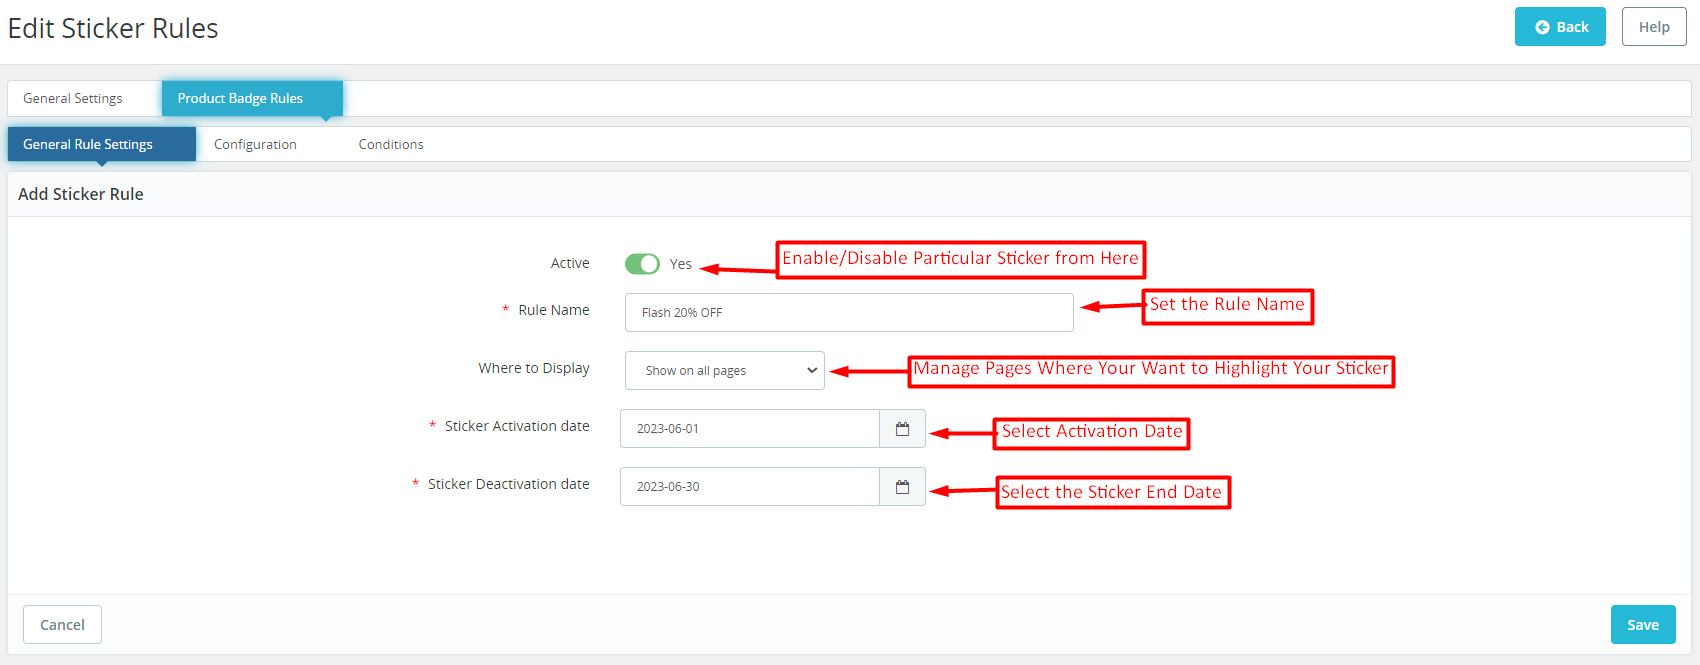
Prestashop Product sticker and Label addon provide a separate tab for managing the general sticker rules. In case the admin wants to modify the general configurations of the sticker, he can modify the same from here. 

Active: With the help of this button, the store admins can enable/disable a particular product sticker. 

Rule Name: You can add the sticker name from here at your convenience. 

Where to Display: The Prestashop store retailers can manage the pages where they want to display the stickers. For example, we have provided the options for showing stickers on all pages and the admins can even select the specific pages where they want to show the product badges. 

Sticker Activation Date: Choose the starting date of product stickers from here. 

Sticker Deactivation Date: The Prestashop admin can select the end date for a particular sticker from here.

4.2.2. Product Badge Rule: Configurations:

The sticker configuration tab offered by Knowband Prestashop Product Sticker and Label Addon simplifies the sticker look and feel management.
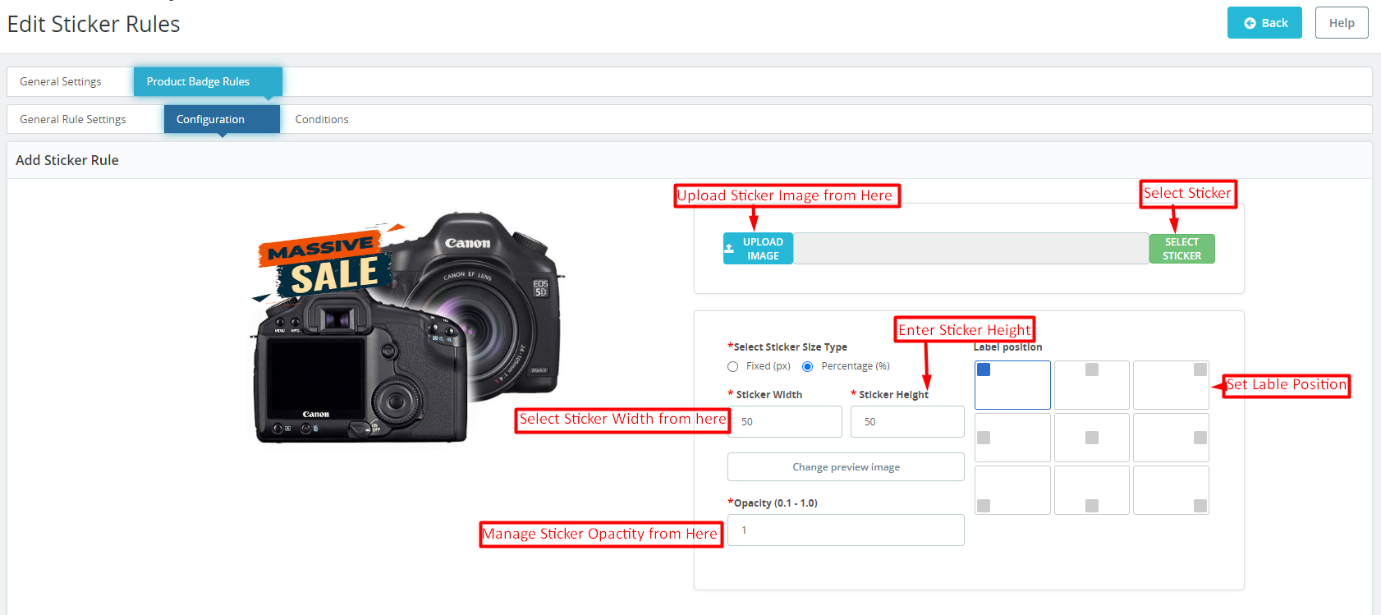
The following tab allows the eCommerce store admins to choose from 20+ pre-loaded stickers and the admins can also add new stickers at their convenience. 

Sticker Upload:

If you wish to upload a new sticker from your system, simply use the “Upload Sticker” button.

Sticker Size Type Selection:

We provide two options in the button below. If you prefer to set the sticker size using fixed dimensions (in pixels), click on the corresponding radio button.

Alternatively, if you want to configure the sticker size based on a percentage, we have also provided an option for the same. 

Sticker Height and Width:

Using the button below, you can adjust the height and width of your product label. You can also preview the sticker’s appearance in real-time as you change its size. For percentage, the maximum height and width should be 100%.

Change Preview Image:

Administrators can select a new preview image to visualize how the product labels will look on their product images using the button.

Opacity:

You can adjust the opacity of the sticker using the following option.

4.2.3. Product badge Rules: Conditions:

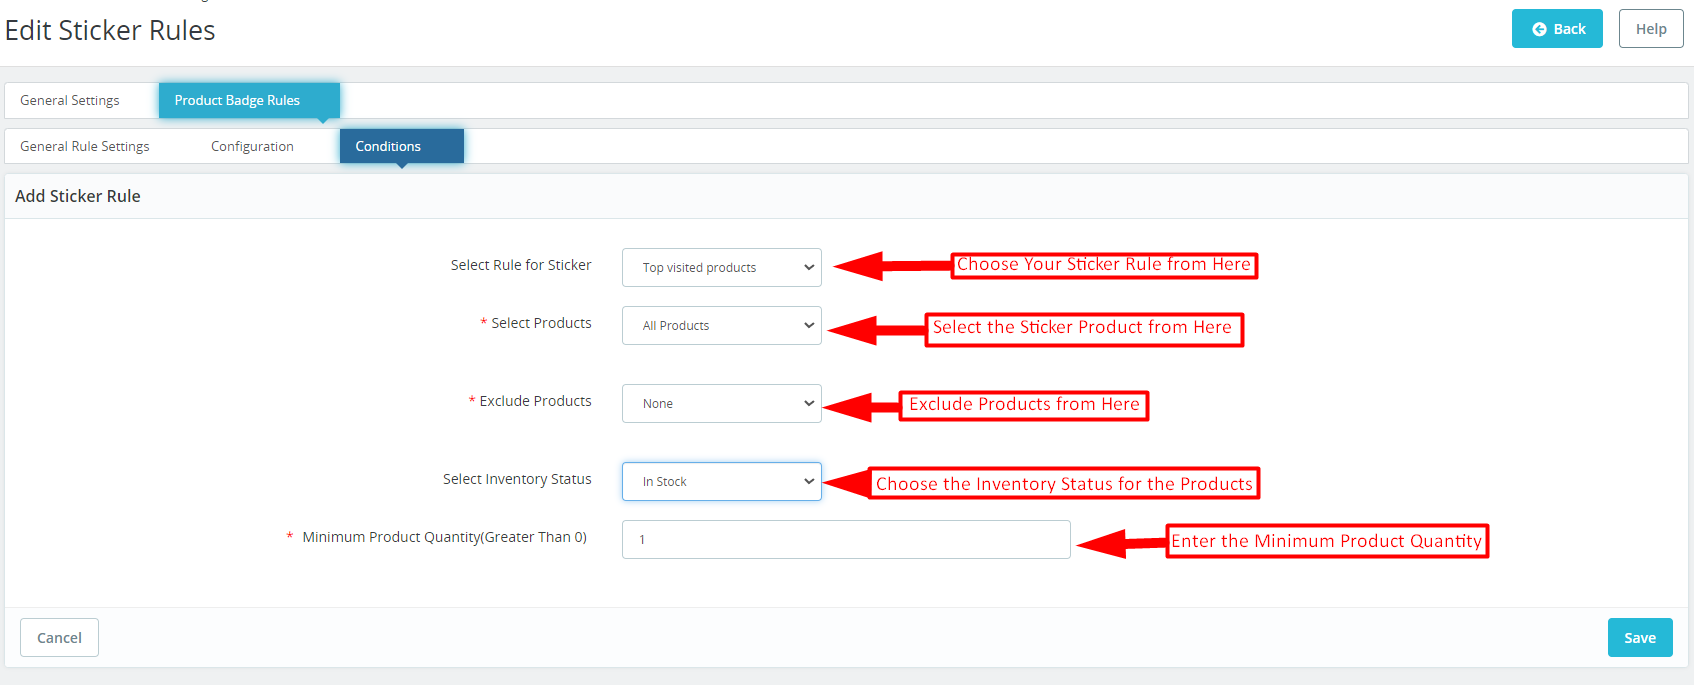
In the sticker conditions tab offered by Knowband Prestashop product sticker and label module. The store admins can set different conditions for the product badges.

Select Rule for Stickers: You can select your sticker rule from various options provided here. We have added rules for showing stickers based on top visited products, on-sale products, best-seller products, and new products, and even the admins can add stickers based on the price value.

Select Products: As a Prestashop store admin, you can select products from here (on which you want to display the stickers). You can select the option as all products in case you do not want to exclude any specific product or category.
Furthermore, you can also enter specific products and specific categories for a sticker appearance. 

Exclude Products: In the following tab, the admins can exclude specific products for the product badges. 

Select Inventory Status:

From here, you can select if you want to show the stickers for the in-stock or out-of-stock products only.

Minimum Product Quantity:
If you are looking for showing product labels based on the product quantity in your store, you can add the specific value in the following field. 

5.0. Prestashop Product Sticker and Label Addon: Front End:

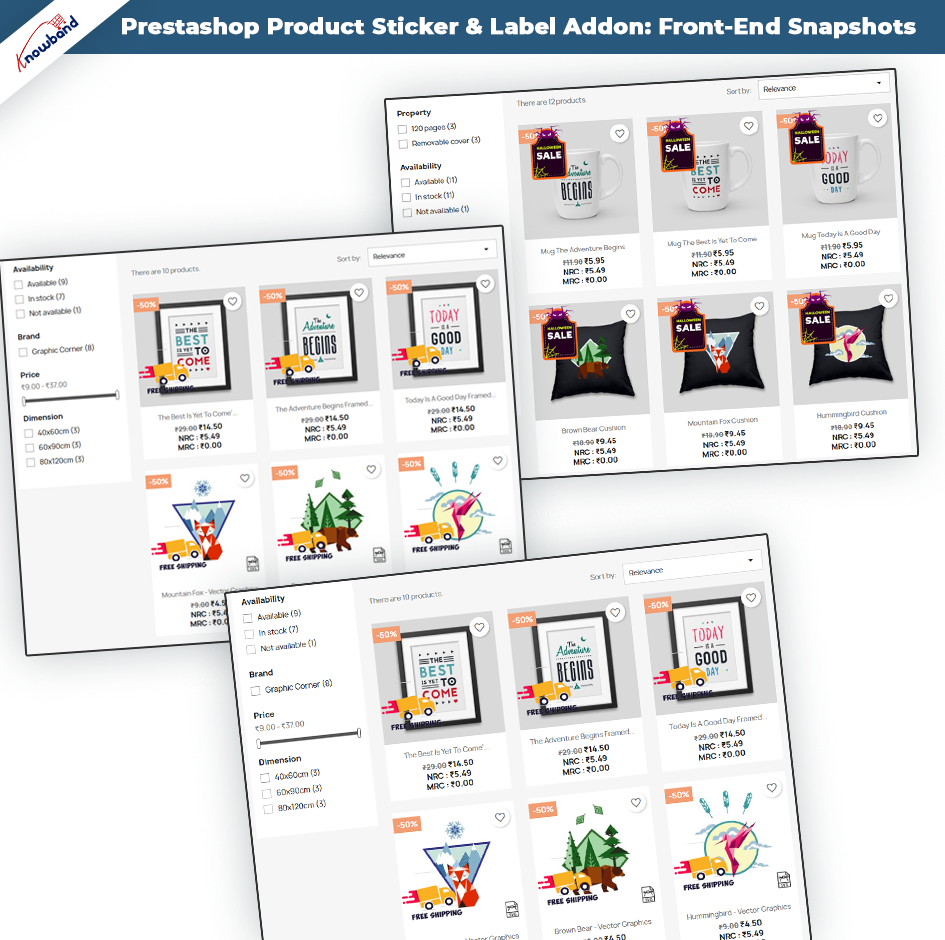
After making the changes as per convenience and saving the data from the module back-end. Prestashop store administrators can immediately assess the impact of their modifications. Prestashop Product Sticker module empowers administrators to effortlessly showcase a stunning array of high-quality stickers on their shopfronts. These visually appealing stickers serve as eye-catching elements that captivate the attention of customers. Which further helps in enhancing the overall aesthetics and professionalism of the online store.


The samples above exemplify the seamless integration and impressive front-end displays. The following examples showcase the versatility and creativity that administrators can harness to create compelling product showcases and leave a lasting impression on their customers.


Note: – Only one sticker can be displayed at once on the product image. 

The stickers will be shown based on the most recent date of creation of the sticker rule. This means that the sticker rule that was created most recently will determine which stickers are displayed first.

For a quicker understanding, please refer to the demo tutorial.

Opencart Product Label | Product Sticker Extension – User Manual

1.0 Introduction

Modern customers have a very short attention span. In other words, if they are hovering over an eCommerce website, the admin has very less time to provide them with the information and offers at the same time. Even, many kinds of information help the customers to understand if the product is a perfect fit for their needs or not.

Following the same, we have designed the Opencart Product label extension for the Opencart eCommerce merchants. Using the extension, the admins can add responsive stickers on their shopfronts. Moreover, the admins can even upload the stickers and set the dimensions and sticker position at their convenience.

Likewise, if you are willing to make your customers aware of sales, offers, delivery time, and other pieces of information. We have got you covered with Knowband’s Product Label Extension for Opencart. On top of that, the extension comes with tons of richly loaded features to make sure your piece of mind. Let’s find out some of the most highlighted features offered by the Opencart product sticker plugin.

1.1 Major Highlighted Features Offered by Knowband’s Product Label Extension:

The Opencart product sticker plugin is empowered by tons of incredible features. Not only the plugin is configurable from the back end but also provides high-quality pre-loaded stickers.

We have tried to cover up some of the most sounding features of the Opencart product sticker module.

  • The admins can boost their revenue by showing the offer discounts on products.
  • The Opencart store admins can choose the pages where they want to show the product stickers.
  • For example, the store administrators can choose the options from the product page, product listing page, search page, home page, and much more.
  • The Opencart admins can include or exclude specific products for the sticker appearance.
  • With the help of the Opencart Product Sticker module, the store admins can include the Opencart store categories where they want to show the responsive stickers.
  • Along with pre-available stickers, the admins can also upload the stickers of their own will in the module and make them appear within no time on the shopfront.
  • The Opencart Product Label plugin provides the option to show the stickers based on the products’ available stock conditions.
  • Create as many labels as you want within clicks.
  • The Opencart store admins can manage the sticker positions on the product images right from the module backend.
  • Moreover, the admins can choose the start date and end date for particular stickers.
  • The admins get an option for choosing between all products, specific products, and special categories for the sticker appearance.

2.0 Installation Guide

The installation of the Opencart product label module is pretty easy. You can simply install the module by just following the below-mentioned steps.

After you will proceed with the order of Knowband OpenCart product label extension, you will get the following files at your end.:

  • Zipped File containing the source code of the OpenCart product label extension.
  • User Manual of OpenCart product label extension.

Follow the steps below to install the OpenCart Product Label Extension in the OpenCart store:

  1. For the first step, Unzip the zipped file (you will find the same in my account>>downloads). You’ll get the folders as shown in the image below:

  1. Copy all the files and folders of the zip file in the Root Directory of OpenCart setup via FTP manager.
  2. The Opencart product label module installation is done and the module is ready to configure now.

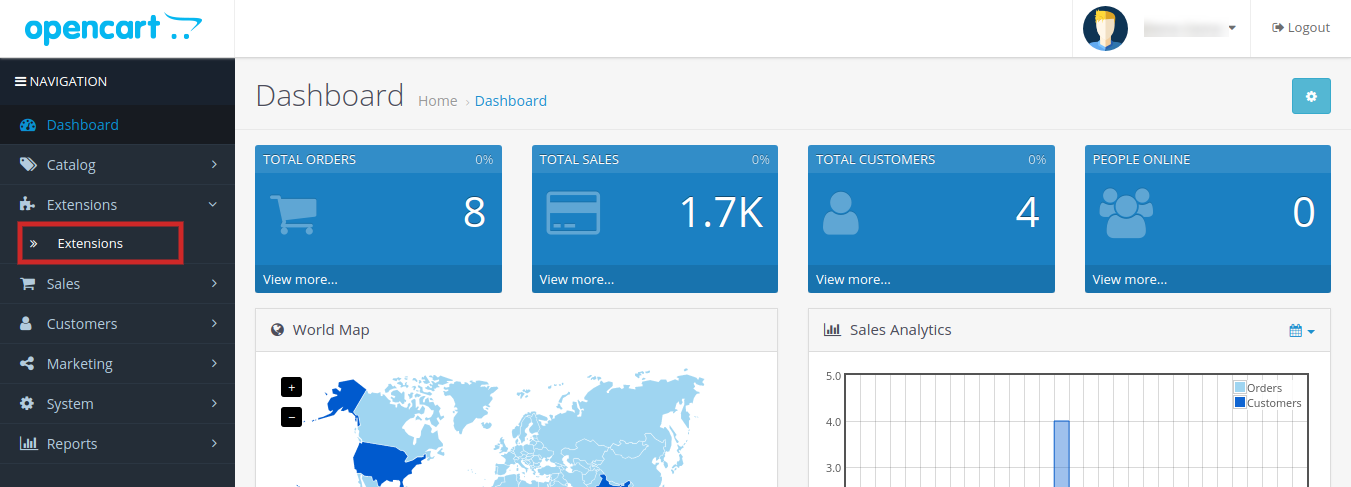
Go to Admin -> Main Menu -> Extensions as shown in the image below:

  1. Choose the product label by Knowband extension from the list of extensions and click on the Edit button.

3.0 Admin Interface of OpenCart Product Label/Sticker Extension:

The Opencart product sticker module comes with an easy-to-manage admin dashboard. The admins can manage every ounce of their extension within just a few clicks. The control panel for all the incredible features is managed in apple-pie order to deliver the piece of mind to the store admins.

Let’s discuss the admin panel configuration of Opencart Product Label Extension one by one.

3.1 General Setting:

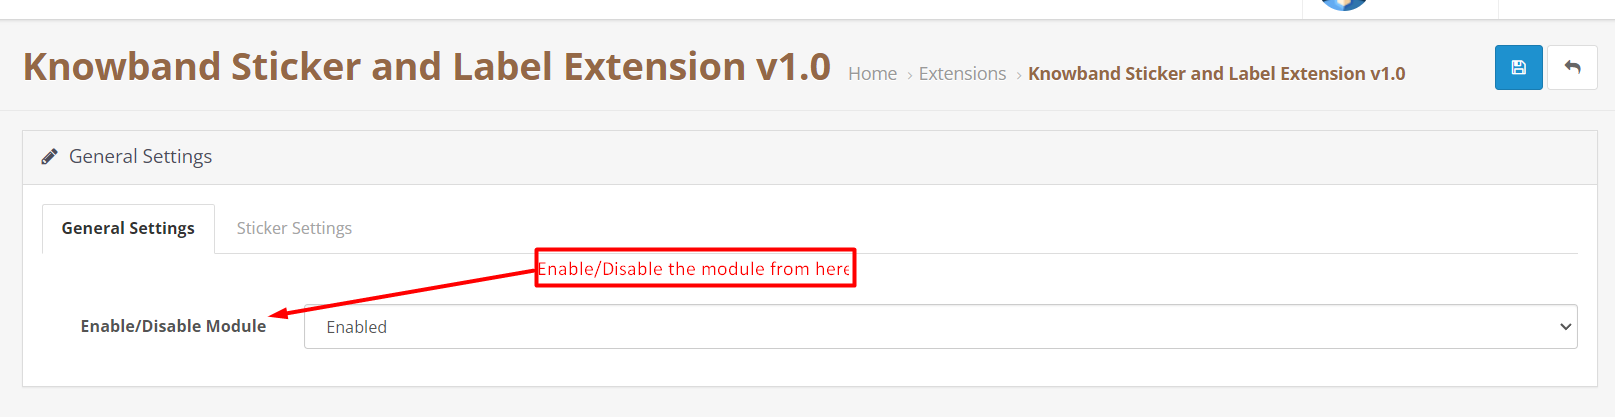
Under the General setting tab, we have provided an option for enabling/disabling the module.

Enable/Disable:

The admins can enable/disable the extension with the help of the following button.

3.2 Sticker Setting:

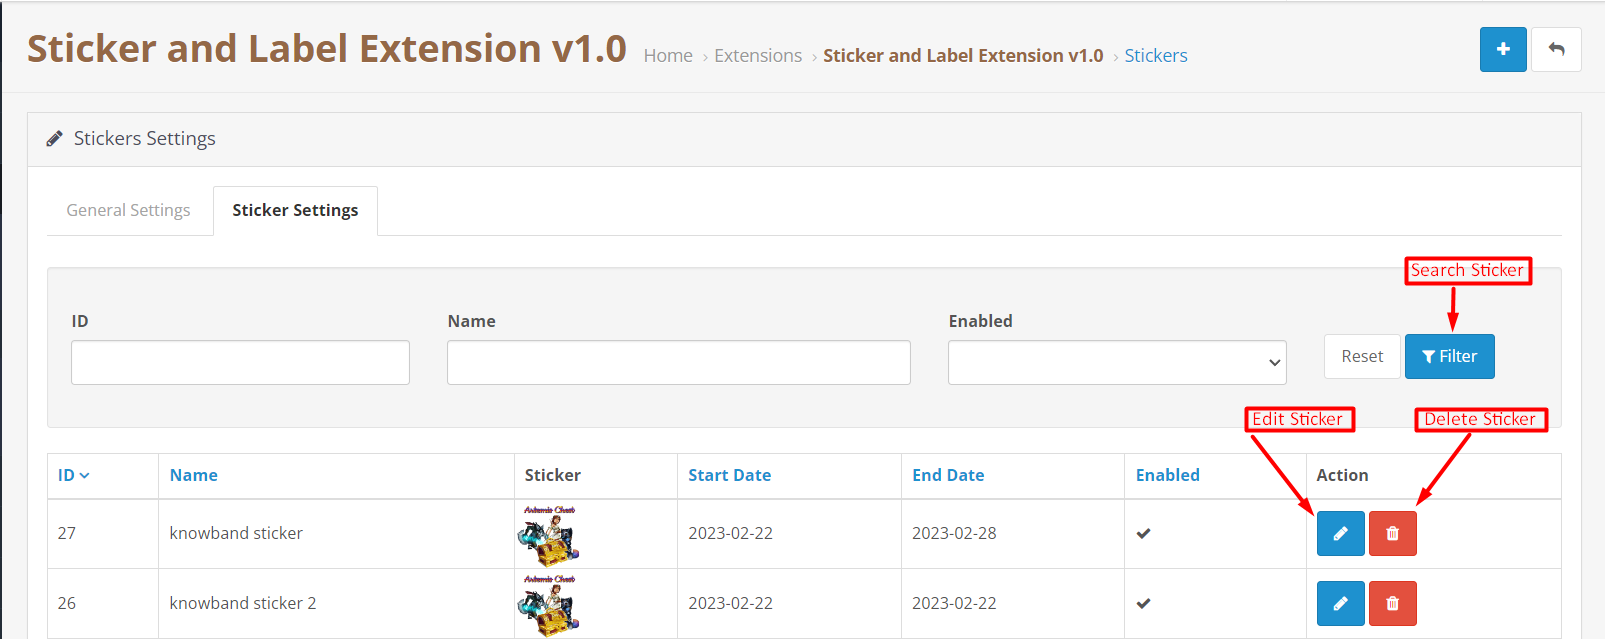
In the following tab of the Opencart Product Label plugin, we have provided options for showing all the added stickers. The admins can perform basic operations for stickers under the sticker setting tab.

Search Sticker Button:

You can search the sticker by sticker ID, Sticker Name, or by enable/disable condition in the following section.

Delete Sticker:

By the following option, the admins can remove the sticker permanently.

Edit Label:

The following option is for managing the sticker configuration. By clicking the following option, the admins will be redirected to the sticker setting page.

3.2.1 Sticker Setting: General

In the following tab, we have covered all the general settings for the Opencart Product Label Extension.

Enable/Disable Sticker:

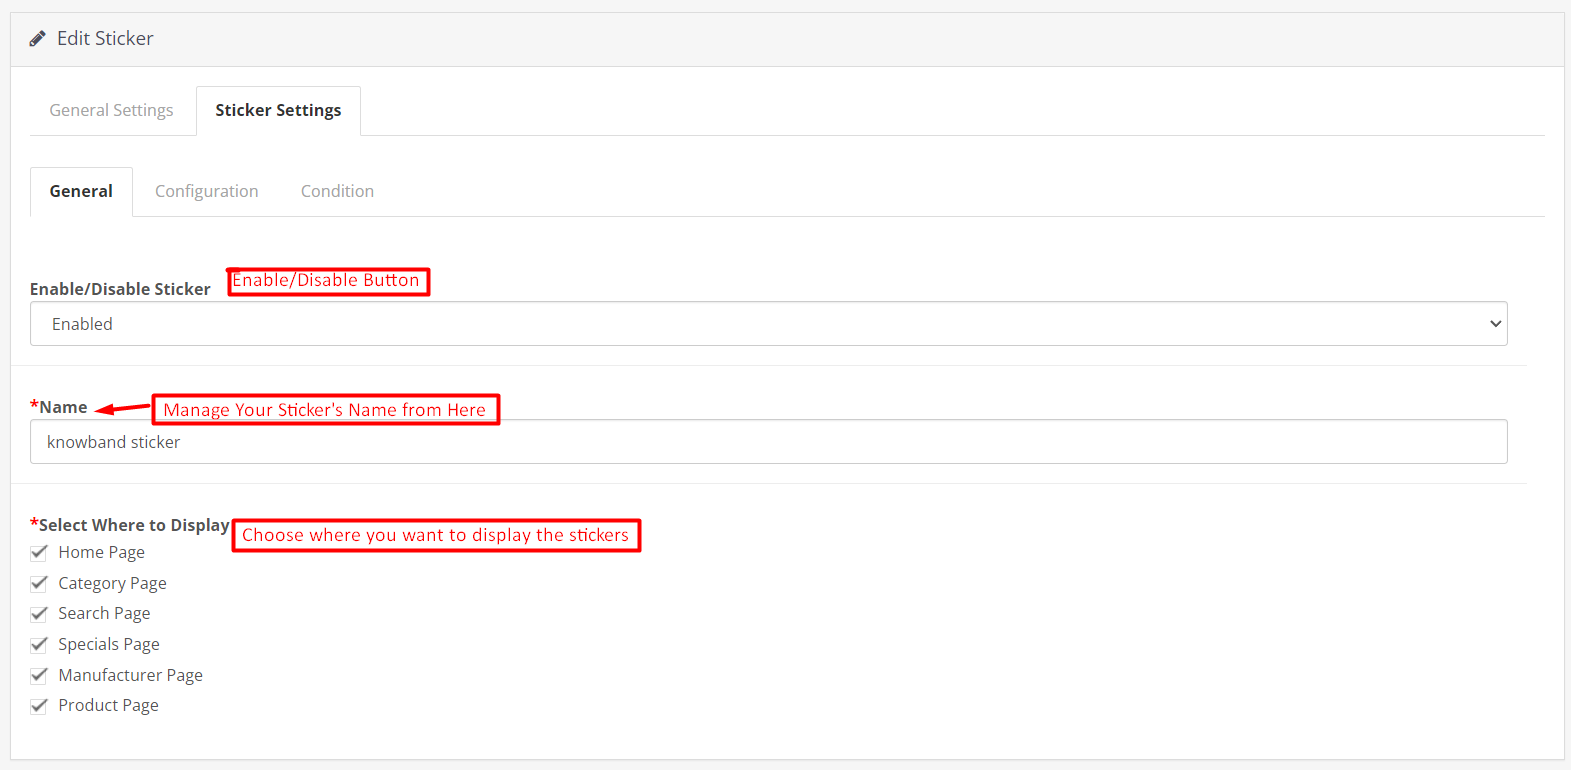
The admin can choose the sticker appearance status from this button by simply choosing to enable/disable the button.

Name:

In the following text field, the Opencart store retailers can assign the name to a sticker.

Select Where to Display:

This particular section is added to provide the options of choosing the sticker appearance place. The admins can simply check the boxes where they want to show the stickers from the general setting tab.

For example, if you have selected the option product page and home page from this section. The added sticker will only appear on the home page and the product pages on the website’s front end.

3.2.2 Edit Sticker: Configuration:

Opencart Product Label Extension’s edit sticker tab allows the store admins to configure the physical appearance of the product label.

Select Sticker:

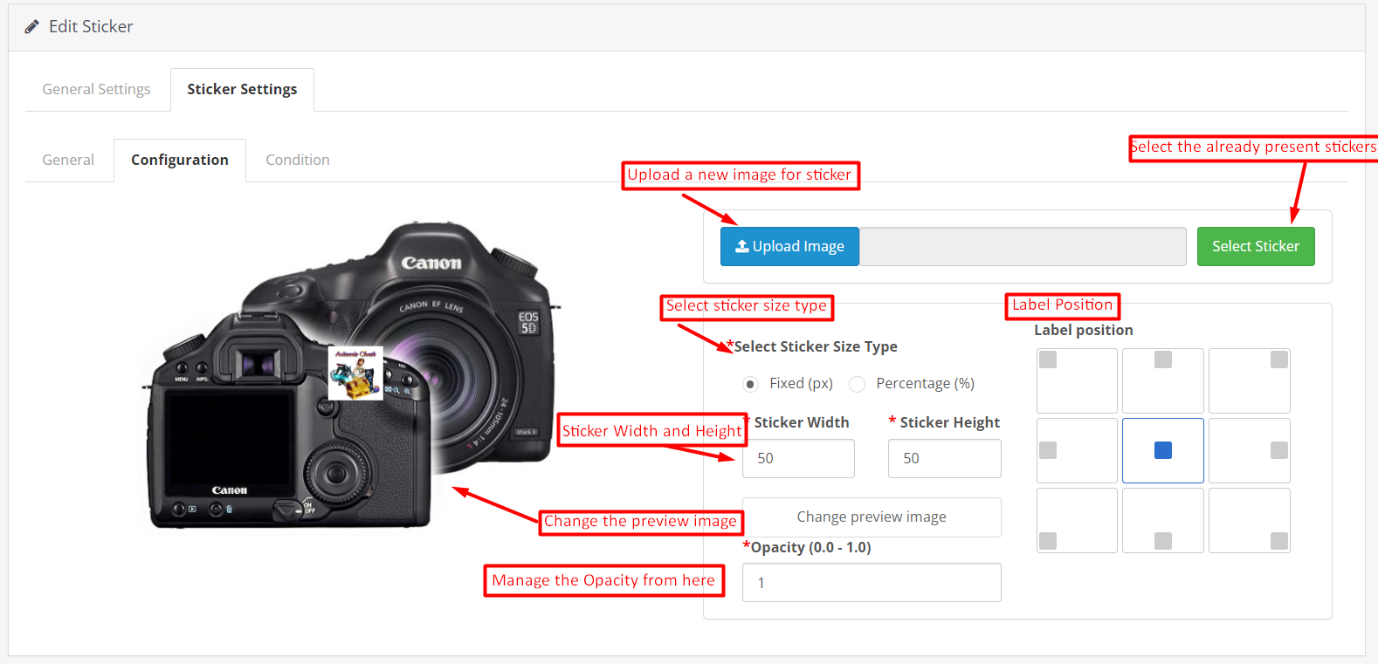
We provide various pre-loaded stickers along with the Product sticker module plugin for Opencart. By hitting the following button you can simply choose from the already available stickers. Apart from it, the stickers you will add from the module will also appear in the following section.

Upload Sticker:

If you want to upload a new sticker from your system, you can simply choose the upload sticker button.

Select Sticker Size Type:

In the following button, we have provided 2 options. If you want to manage the size of the sticker based on fixed (px.) you can click on the radio button.

Moreover, if you want to configure the sticker size based on percentage, we also provide the option for percentage.

Height and Width of Sticker:

By the following button, you can manage the height and width of your product label. Moreover, you can also see a live preview of the sticker appearance along with the size change. Maximum height and width for sticker should be mentioned for both cases i.e. 300px for fixed size and 100% for percentage.

Change the Preview Image:

With the following button, the admins can choose a new preview image for checking the appearance of the product labels.

Opacity:

In the following option, you can choose the opacity of the sticker.

3.2.3 Edit Sticker: Condition:

The condition tab in the sticker configuration tab is for managing the condition of stickers to appear on the front end.

Select Products:

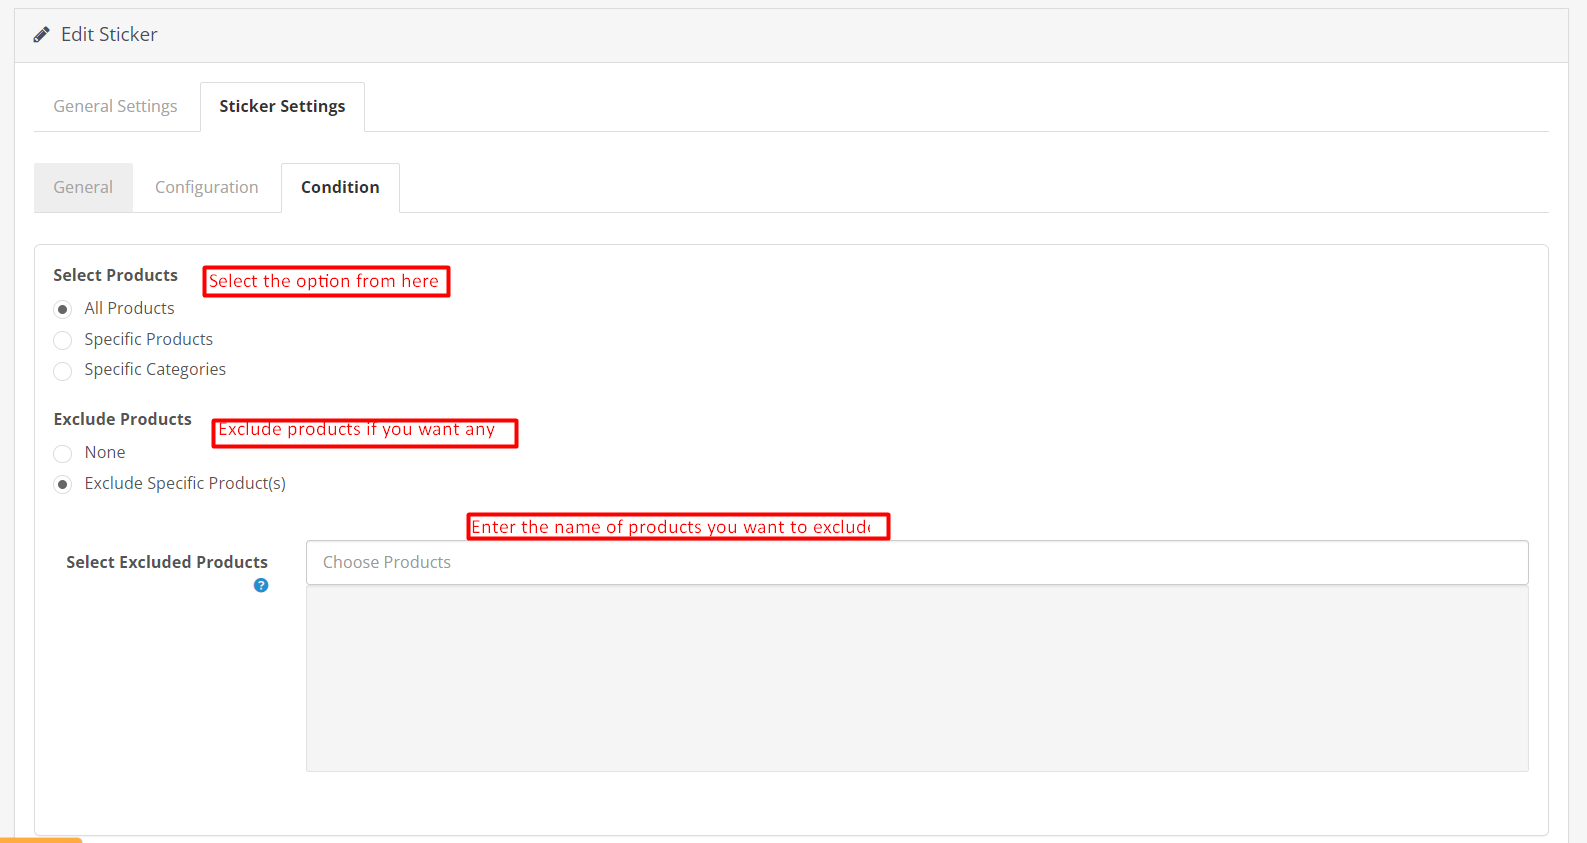
In the following button, the admins can choose the products where the sticker needs to appear.

Exclude Products:

If you do not want to exclude any product from the above-selected condition, you can go with the none option.

However, if you are planning to hide any specific product from the above-selected product group. You can simply choose the option to exclude products as shown in the image.

Select Excluded Products:

For excluding any product all you need to do is to enter the name of the product in the following text box field.

Select Inventory Status:

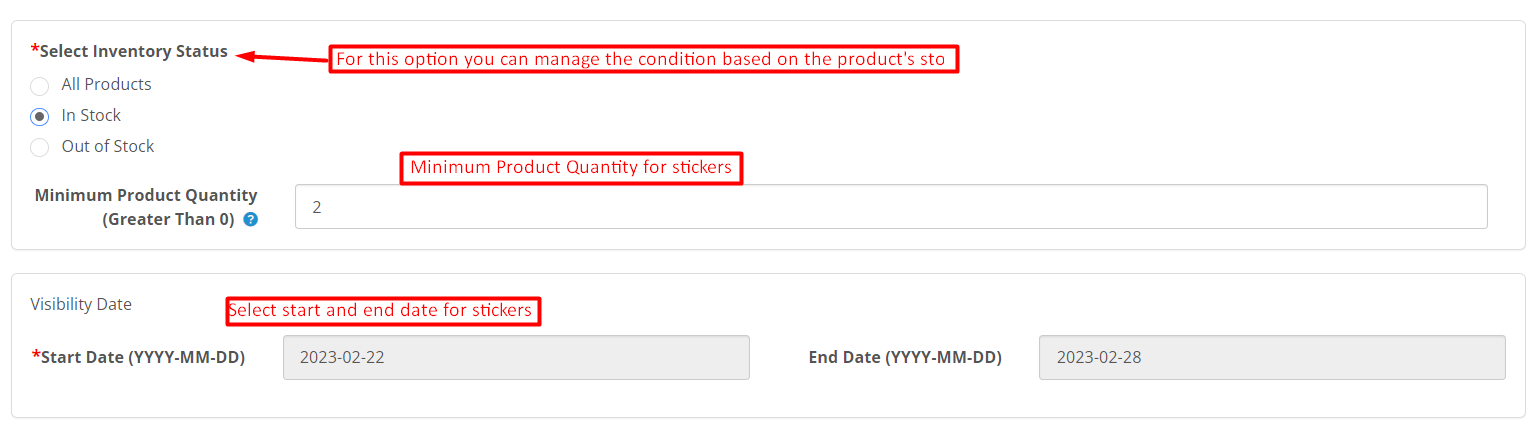
This particular section allows the admins to choose the sticker appearance based on the inventory status of the products.

All Products:

If you select this particular option, the sticker will appear for all the products.

In Stock:

If you select this option, the label will only appear for the in-stock products. Moreover, you can also add the minimum product quantity which needs to be considered for stickers.

Out of Stock:

By selecting the following option, the admins can show the product label for the out-of-stock products only.

Visibility Date:

Knowband’s Opencart Product Label Extension provides the following option for selecting the start and end date for the sticker.

You can simply pick any starting date and visibility end date for the sticker.

4.0 Front End of Opencart Product Label Plugin:

After making the changes as per convenience and saving the data from the module back-end. The Opencart store admins can check the preview of the made changes within no time. On top of that, the Opencart Product Sticker Extension allows the admins to show off high-quality stickers on their shopfronts. Below are some samples of the product sticker extension’s front end.

WooCommerce eBay Integration Module– User Manual

eBay WooCommerce Integrator plugin is the modern solution if you are planning to sell on eBay Marketplace. In fact, eBay is one of the major marketplaces that rule over the entire online business industry. Moreover, not only eBay is known for Business-to-Business Market but also these days eBay is a great platform for individuals for shopping. On top of that, eBay has its wings spread over 30+ countries. Furthermore, merchants around the globe gather on eBay to present their inventory to a huge eBay audience base. Likewise, for making eBay selling easy, the Knowband WooCommerce eBay Integration Module module allows WooCommerce shop owners to sell their products on eBay Marketplace. Therefore, in other simple words, the WooCommerce eBay Marketplace Integration Extension allows the WooCommerce admins to set up a connection between WooCommerce and eBay Marketplace.

1.0 Features offered to WooCommerce Online Retailers:

  • The WooCommerce eBay Integration Plugin allows WooCommerce online merchants to enjoy an API-based integration between WooCommerce and eBay.
  • Moreover, WooCommerce online sellers can list their shop inventory in bulk on the eBay Marketplace. In fact, all thanks to the Profile based listing offered by Knowband eBay WooCommerce Integrator.
  • The WooCommerce store admins will get an option to add, remove and re-list their eBay listings from their WooCommerce shop backend.
  • eBay WooCommerce Connector offers an Inventory Management feature to the WooCommerce shop admins.
  • In other words, WooCommerce online retailers can sell their WooCommerce shop products even with the same stock as they are having on their shop.
  • eBay WooCommerce API Integrator offers a Log reporting option to the sellers. Further, the same feature will show a detailed activity log to the online sellers.
  • WooCommerce eBay Integrator allows the WooCommerce admins to manage their eBay orders right from their WooCommerce shop back end.
  • WooCommerce eBay Integration Plugin allows the WooCommerce merchants to validate order hooks to hook product inventory data on both eBay and WooCommerce.
  • If you are planning to sell on eBay and are just hesitating about the commission charges, we got you.
  • KnowbandWooCommerce eBay Integration Extension offers a unique feature of price variation. In fact, by using the same, WooCommerce online sellers can sell their shop products on eBay at an increased price.

2.0 Installation Guide:

After completing the purchase, all the WooCommerce admins will have to install and connect the Knowband WooCommerce eBay Integration Plugin with eBay Marketplace.

In the downloadable package, the store admins will get 2 files.

  • Zip File (Containing Source Code of WooCommerce eBay Marketplace Integration).
  • User Guide.

Here are the steps to install the eBay WooCommerce Integrator.

  1. Unzip the zip file containing Files and Folders related to the source code of the module.
  2. Copy the same into the root directory of your WooCommerce back end.
  3. And that’s all. The WooCommerce store admins can find the Knowband eBay WooCommerce Connector at their shop back-end just by following the above-mentioned steps.

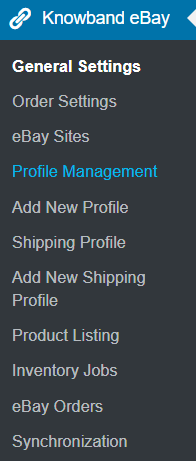
After Installing the eBay WooCommerce API Integrator, the admins can find the module in the side menu of their WooCommerce online shop as mentioned in the below image.

3.0 Connection Guide:

It is required to set up the connection between eBay Marketplace and WooCommerce shop before starting to sell on the Marketplace. In fact, now, WooCommerce online sellers will have to follow some steps by step guidelines.

Here is a detailed description of them.

3.1 eBay Seller Account Set Up:

Before putting selling on eBay on the list, it will require an eBay seller account. Moreover, individuals can create their eBay seller account by following the steps mentioned here.

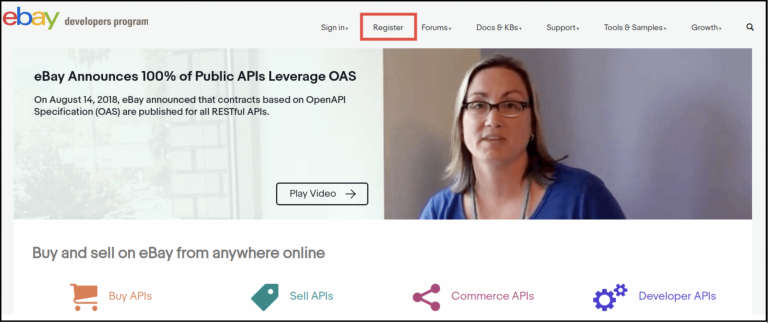
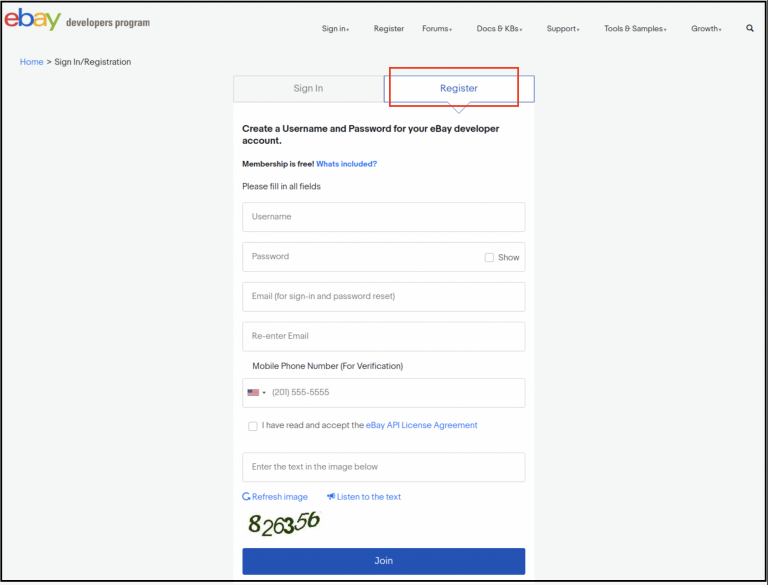
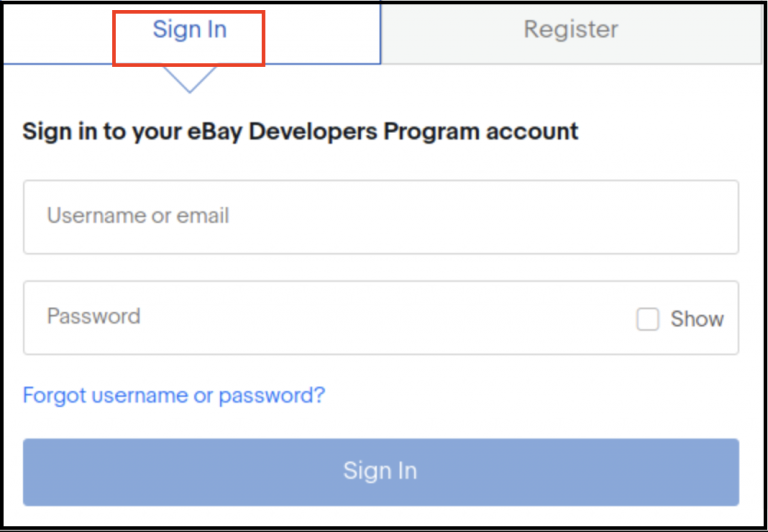
  • Click on the register button on the page.

  • After entering all the valid data, you will be headed to the join option.
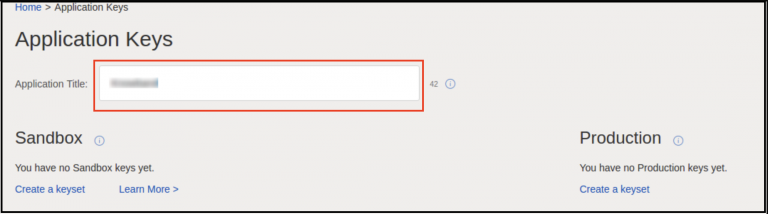
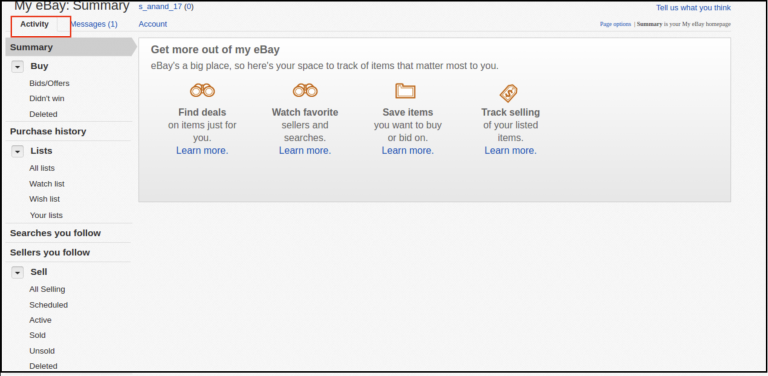
  • In this very next step, eBay will redirect you to the application creation page.

  • In the newly opened form, enter the application name and click on create a key set.

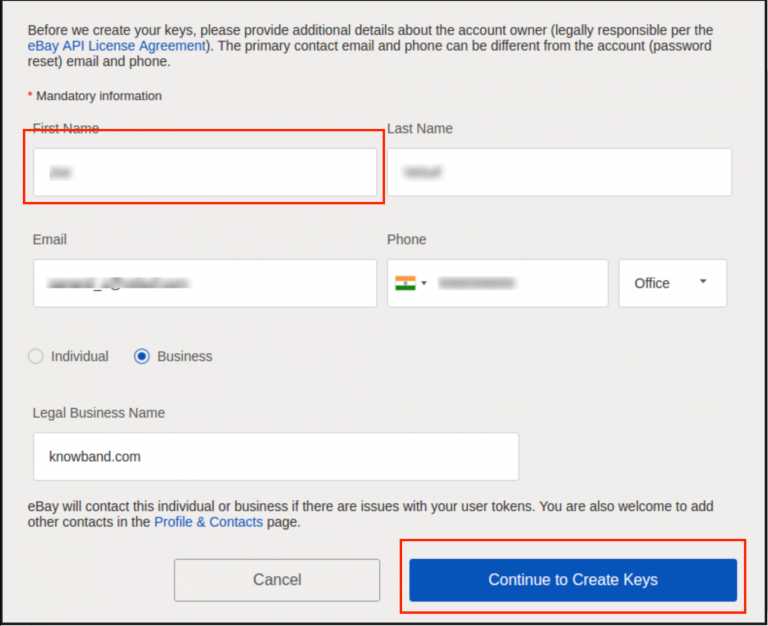
  • Fill out the appeared form and click on continue to create keys.
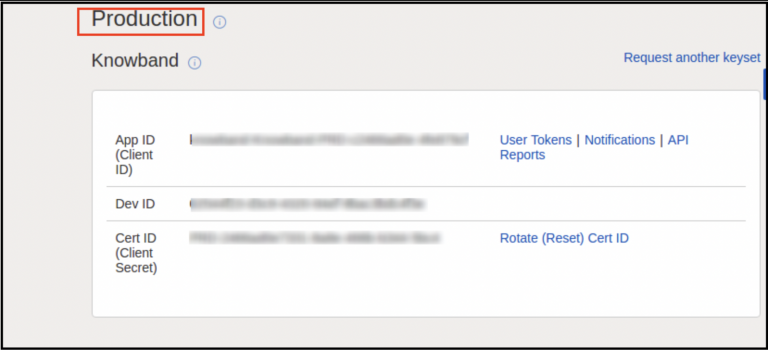
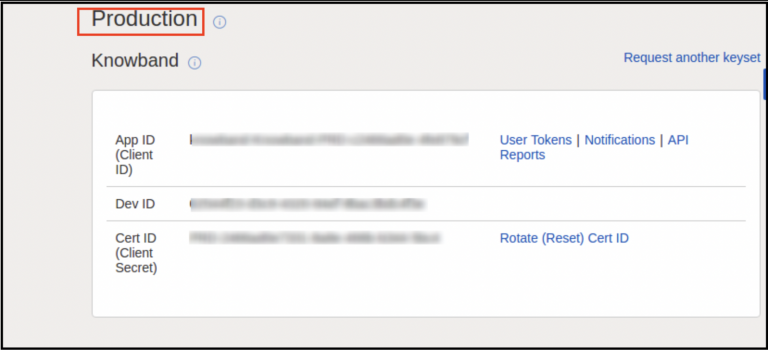
  • You can find the Application ID, Developer ID, and Client Secret on this page.

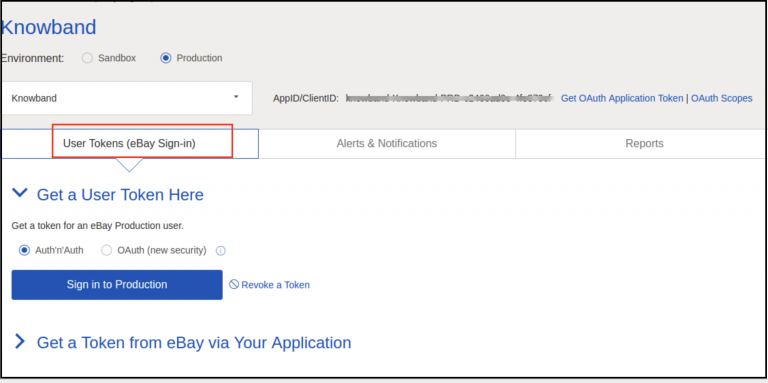
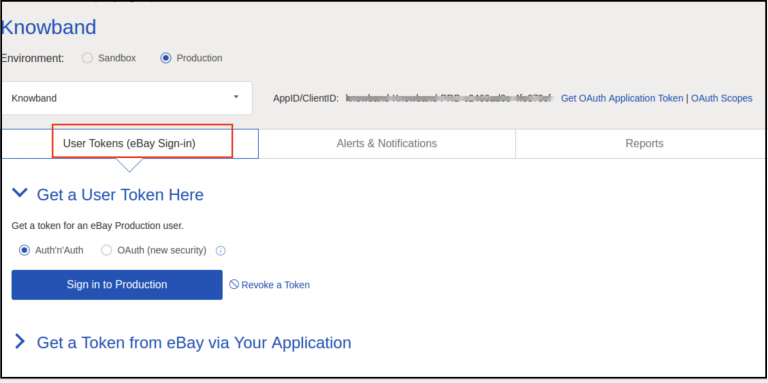
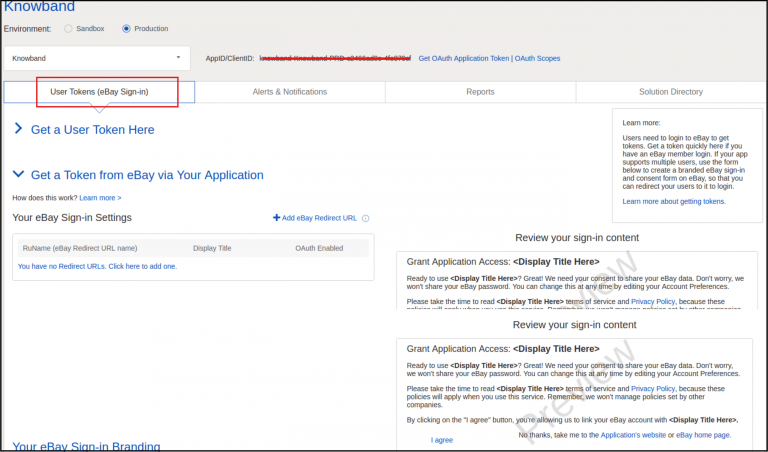
  • For the further step, you will require to generate the user token. Click on the button mentioned in the below image.

  • Click on sign-in to production for getting the token.
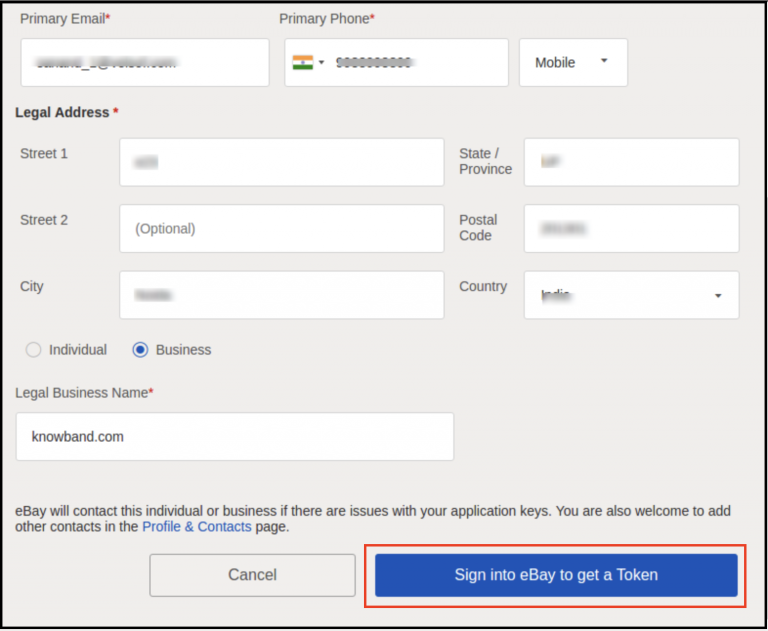
  • Fill in all the validated data, and click on sign-in to get a token.

  • After clicking on the above-mentioned option, the users will redirect to eBay sign-in. Further, if you are already having an account, log in with the same, or you can always register a new one.

  • All done. If everything went nice and perfect, you will be headed to eBay.

4.0 Token generation via Your Application:

  • For this option, you will have to click on the user token in the below image.

  • On the appeared page, click on Get a token from eBay via your Application.

  • You will find here the option for adding an eBay redirect URL. Further, click on the same, fill out the form and save.

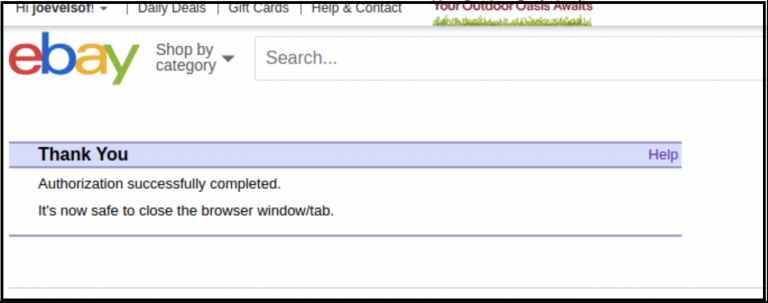
  • Done. All you need to do now is click on I agree from the right side of the form. Moreover, if you have followed the process completely, you will receive a successful authentication message.

5.0 Default Settings:

  1. In the initial phase, all the products will have default categories while listed on eBay.

2. By default, the online sellers will get a free shipping option with the following detail.

  • Shipping Service: UPS Ground.
  • Shipping Type: Flat.

Later the sellers can also change the same from eBay Account.

3. The sellers will find the return policy added by default.

  • Refund Option: Money Back.
  • Days: 30 days.
  • Description: If you are not satisfied, return the item for a refund.
  • Shipping Cost Paid By: Buyer

Note: The online sellers can also change the same later from their eBay Accounts.

6.0 Admin End of Knowband WooCommerce eBay API Integration Module:

WooCommerce online sellers will have options to manage their eBay business with the following options offered by WooCommerce eBay Integrator Extension.

  • General Setting.
  • Order Setting.
  • eBay Sites.
  • Profile Management.
  • Add a new Profile.
  • Shipping Profile.
  • Add a new Shipping Profile.
  • Product Listing.
  • Inventory Jobs.
  • eBay Orders.
  • Synchronization

Not only the WooCommerce online vendors can manage their eBay shop with the help of these tabs but also they can do many more.

Let’s find out, what these tabs are designed for.

6.1 General Settings:

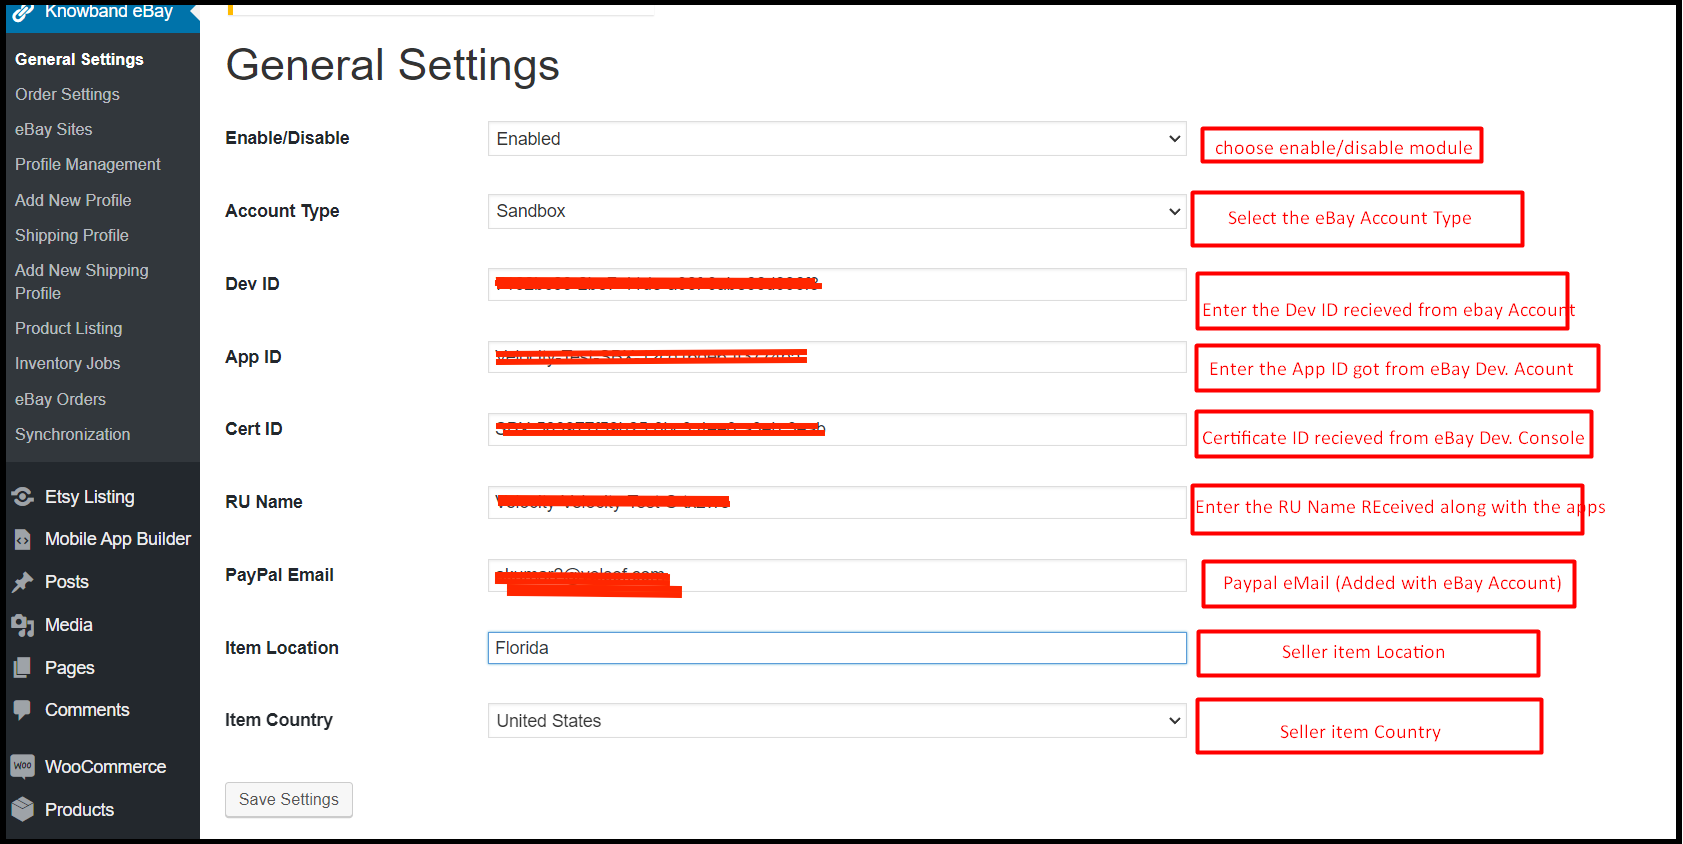
In this section, the WooCommerce admins will get options for entering the essential details for the connection. Further, you will find the General setting tab of the Knowband WooCommerce eBay Integration Module as mentioned in the below image. In fact, to set up the connection between eBay and WooCommerce shop, the admins will have to fill in the data in all of the mentioned fields.

  • Enable/Disable: By turning on this option the online WooCommerce sellers will be able to connect or disconnect their shop from eBay.
  • Account Type: This option is provided for choosing the account type. In case you want to test the module first, you can always choose the option of a sandbox. However, choose the production option from the dropdown list.
  • ID: In this field, enter the dev ID. Generated on the eBay developer console (Follow the steps mentioned above to get the Dev. ID).
  • Cert ID: Enter the cert. ID. In this field, that was generated while generating the token.
  • RU Name: Likewise, for App ID and Cert ID, the sellers can find their RU name also on the eBay Developer Console.
  • PayPal Email: In this field, enter the PayPal email which you are using on your eBay seller account.
  • Item Location: This field was designed for choosing the item location. Furthermore, enter the location from where you will be managing to ship for eBay orders.
  • Item Country: For item location, enter the item country you want to choose for shipping handling.

6.2. Order Setting:

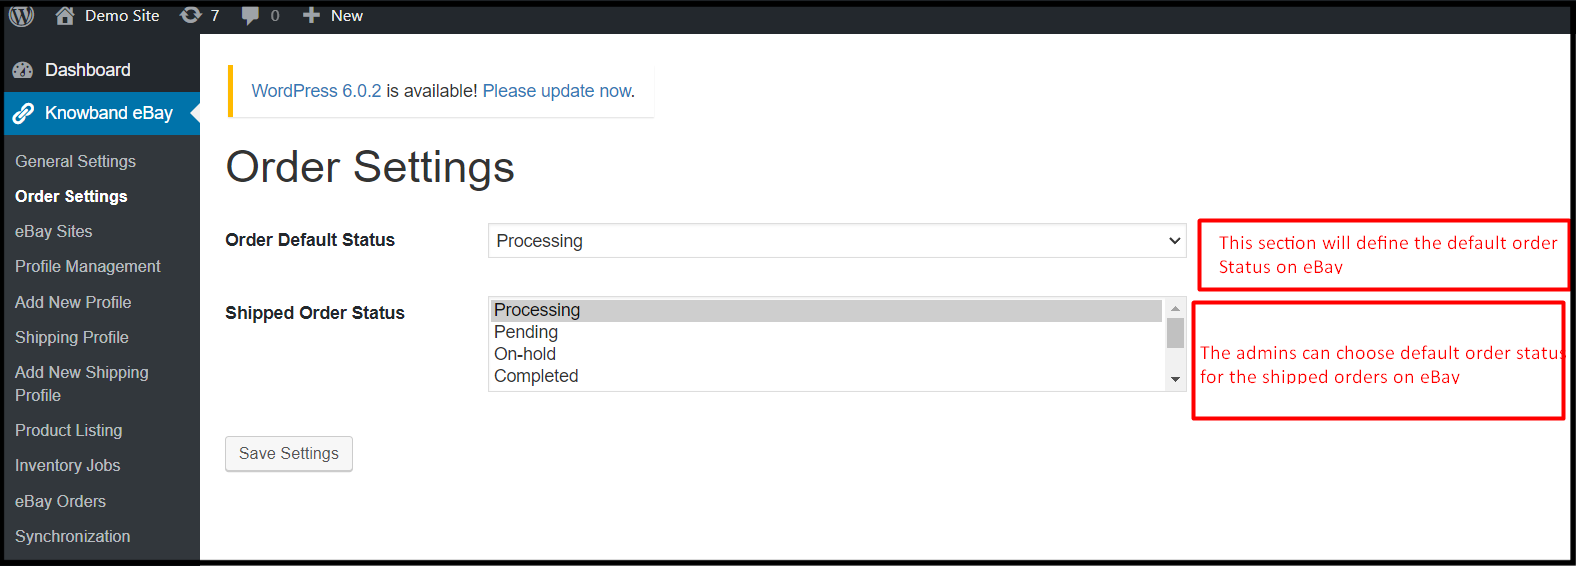
Knowband WooCommerce eBay Marketplace Integration Extension offers a separate tab for order management. Further, in this tab, the WooCommerce store admins can select the default order status for the default orders and shipped orders.

  • Order Default Status: The default order status stands for the first order status the online sellers want to show on eBay as soon as they get an order.
  • Shipped Order Status: The WooCommerce shop admins can select the order statuses for the shipped products.

6.3 eBay sites:

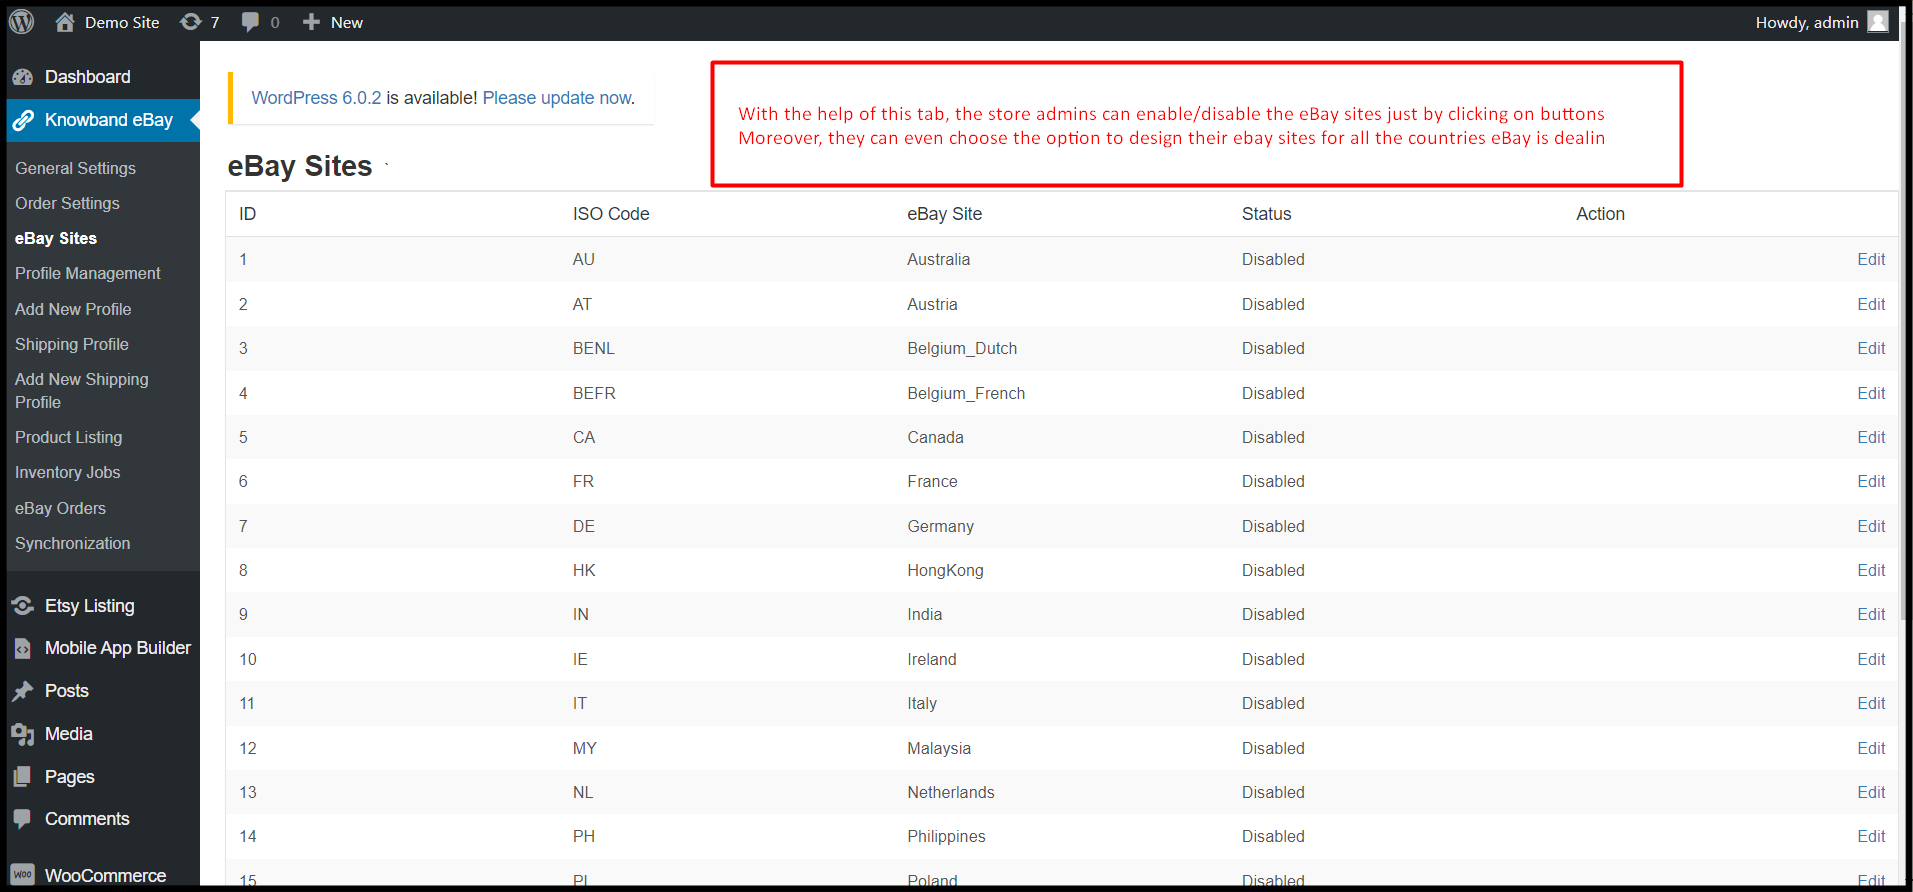
Not only the WooCommerce eBay Integration Plugin allows the sellers to list their products on eBay. However, also they can create various eBay sites from the module backend. In fact, as shown in the below-described image, the WooCommerce store admins can enable as many eBay sites as they want for selling their products in multiple countries.

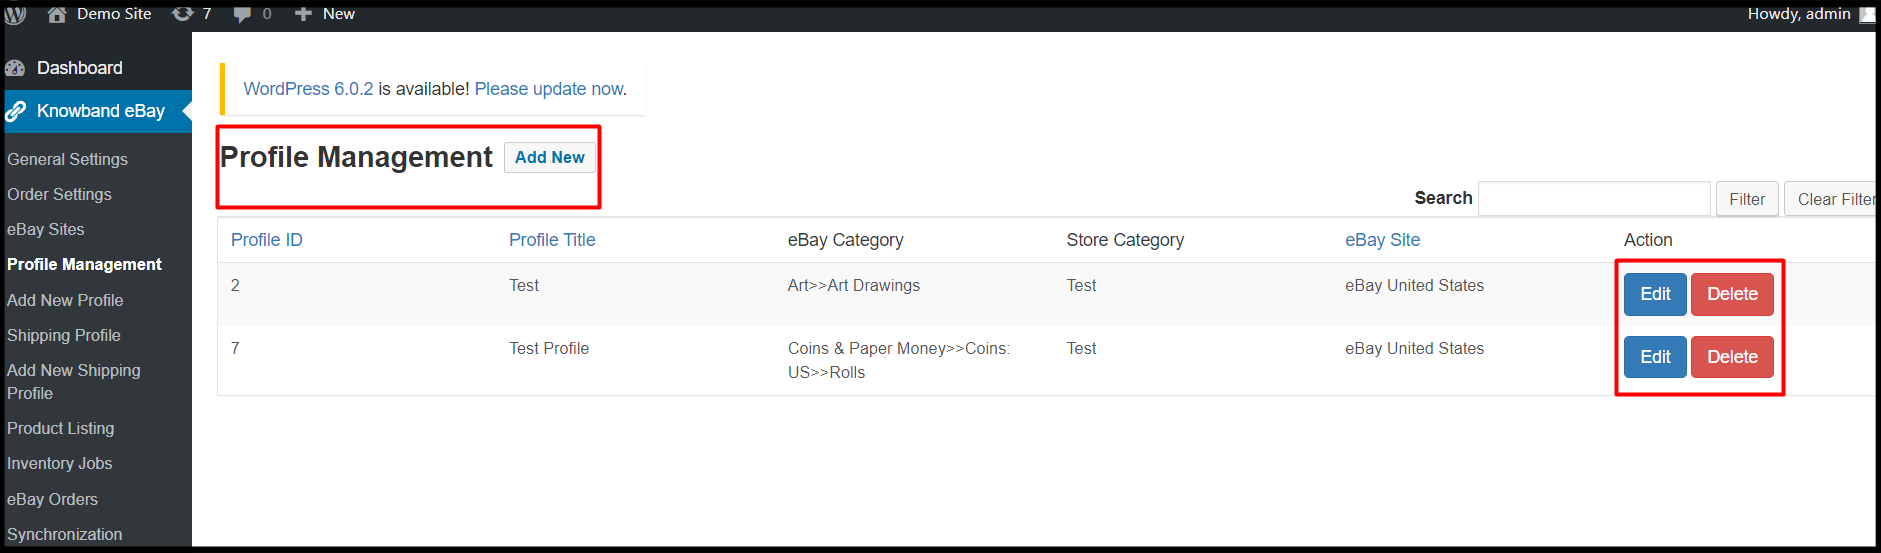
6.4 Profile Management:

The WooCommerce online vendors can design their eBay profiles right from their WooCommerce back-end. Moreover, Knowband eBay WooCommerce Integrator allows the admin to edit and delete the created profiles even after profile creation.

  • Edit: Choosing the following option will allow online sellers to edit their already created profiles.
  • Delete: If you want to delete the eBay profile, just a single click on this button will erase all the data from that particular profile.

6.5 Add New Profile:

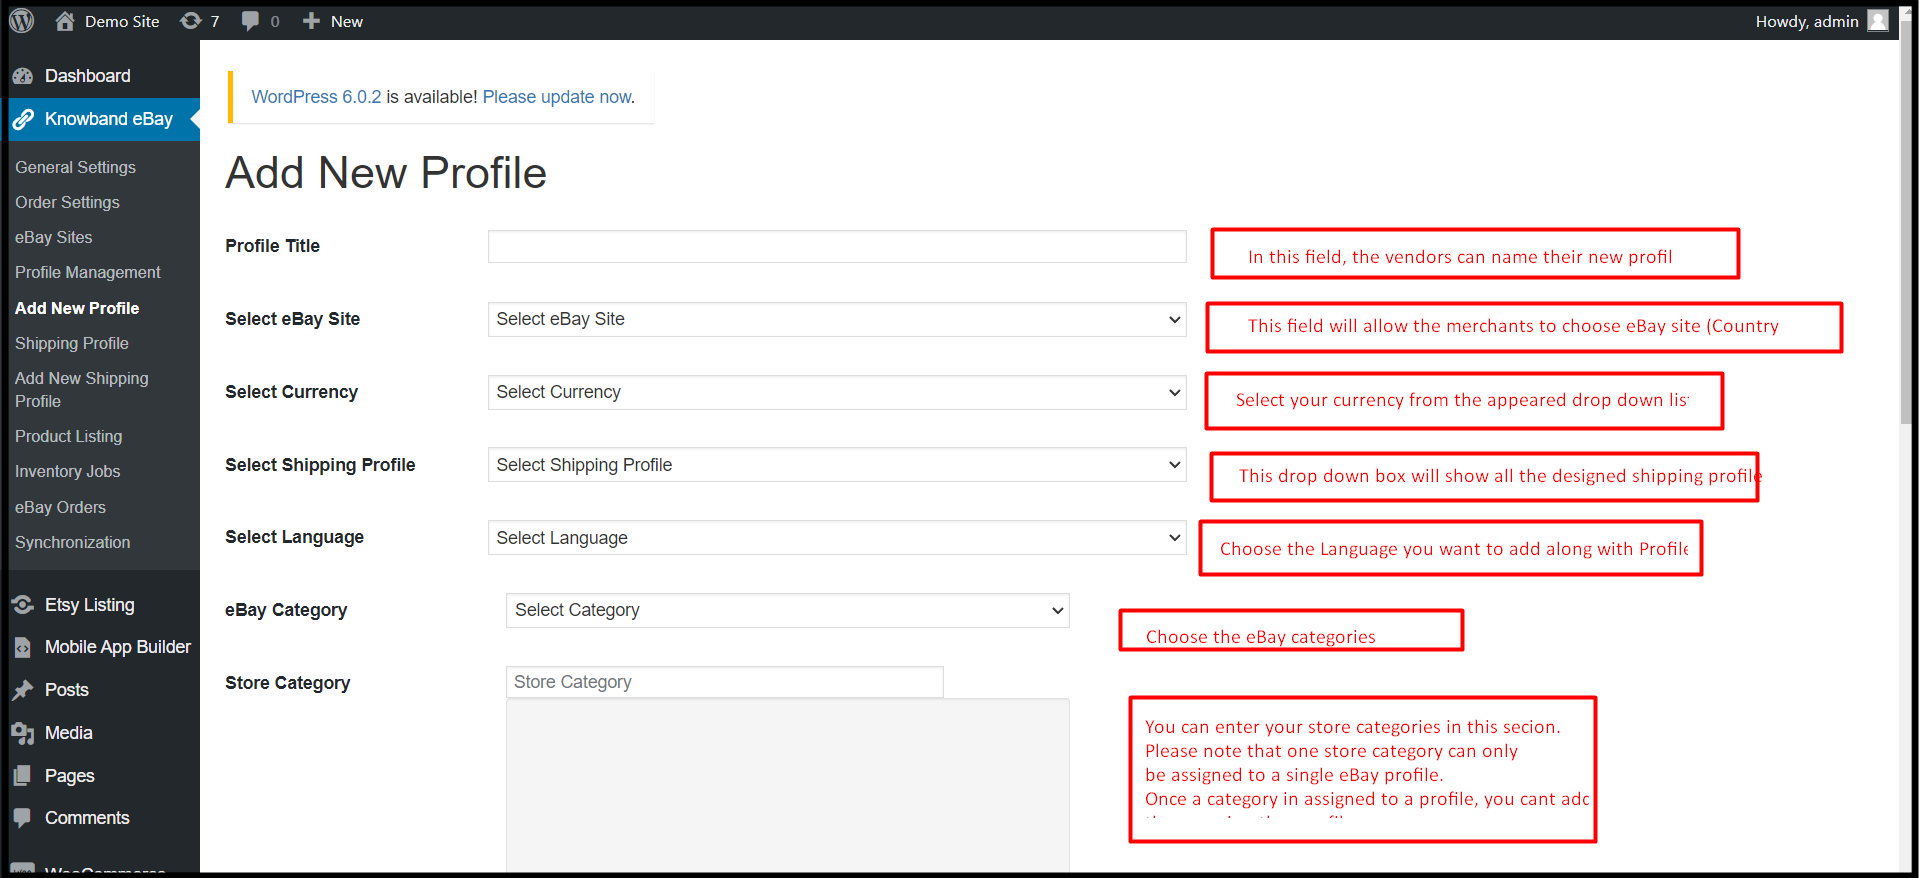
In this very section, the WooCommerce eBay Integrator module offers admins to create their eBay profiles. In fact, not only the store admin can create their eBay profiles but also if they want to, they can also add modifications in the same at a later time.

  • Profile Title: Enter the most suitable eBay profile title in the following field.
  • Select eBay Sites: WooCommerce store admins can add eBay sites in this field.
  • eBay Category: Admins can choose the eBay categories from the appearing drop-down. In simple words, they can map for which eBay category, their profile will appear.
  • Select Currency: Choose the currency you want to deal in on the eBay Marketplace.
  • Select Shipping Profile: In this drop-down field, all the created shipping profiles will appear. Moreover, the admins can choose any of the shipping profiles for their eBay profile.
  • Select Languages: The WooCommerce store admins can choose the languages they want to go on eBay with. Moreover, for every eBay Profile, they can choose a different language.
  • Store Category: The WooCommerce store admins can choose their store categories for the profile. Moreover, they can add as many store categories as they want into a single profile. Furthermore, once a category will be assigned to a profile, admins cannot use the same in other profiles.

  • eBay store Category: Admins can choose eBay store categories from this option.
  • Product Description Template: The admins can design custom product description templates for their eBay listings.
  • Select eBay Payment Method: Choose the eBay Payment Method from the help of this option.
  • Duration: The store merchants can choose the duration for the profiles with the help of the following option.
  • Product Condition: From the appeared dropdown, like eBay, the vendors can choose the product condition. For instance, they can select the options such as used, new, old, etc.
  • Alter Quantity: Using the following option, WooCommerce online sellers can list their WooCommerce inventory with altered quantity on eBay Marketplace.
  • Maximum Product Dispatch Time: Enter the maximum product dispatch time on eBay in the following text field.
  • Return: This option will allow the sellers to enable/disable return management. Moreover, if the sellers want to enable returns on their listings, the eBay WooCommerce Connector allows vast options for return management.
  • Price Management: This feature helps the admins to stand against the eBay commission. Furthermore, not only the WooCommerce sellers can increase their listing price based on percentage but also can increase with a fixed value amount.

6.6. Shipping Profile:

The next tab Knowband WooCommerce eBay Connector addon offers shipping profiles. Moreover, WooCommerce online sellers can choose the shipping profile they want to assign to the eBay Profiles. Also, they can even edit or delete the already-added shipping profiles.

6.7. Add a New Shipping Profile:

In add new shipping profile tab the WooCommerce online vendors will get an option for adding new shipping profiles. These shipping profiles can later be used for eBay order management.

  • eBay Sites: The WooCommerce store admins can choose eBay sites from the appearing dropdown.
  • Service Type: In this option,eBay WooCommerce API Integrator offers 2 options, flat and calculated. If you want to charge a flat fee from the customers you can choose the flat. Moreover, if you are planning to charge according to the locations of customers, you will also have the option for the same.
  • Profile Name: The store retailers can give a reasonable name to their shipping profile by entering values in this field.
  • International Shipping Allowed: This is a Boolean button that allows WooCommerce sellers to choose the yes and no options. The admins can allow/disallow international buyers from completing purchases.
  • Excluded Locations: The admins can prohibit the users for special locations from orderings the products. All they need to do is to enter the locations they want to exclude from their selling list.

6.8. Product Listings:

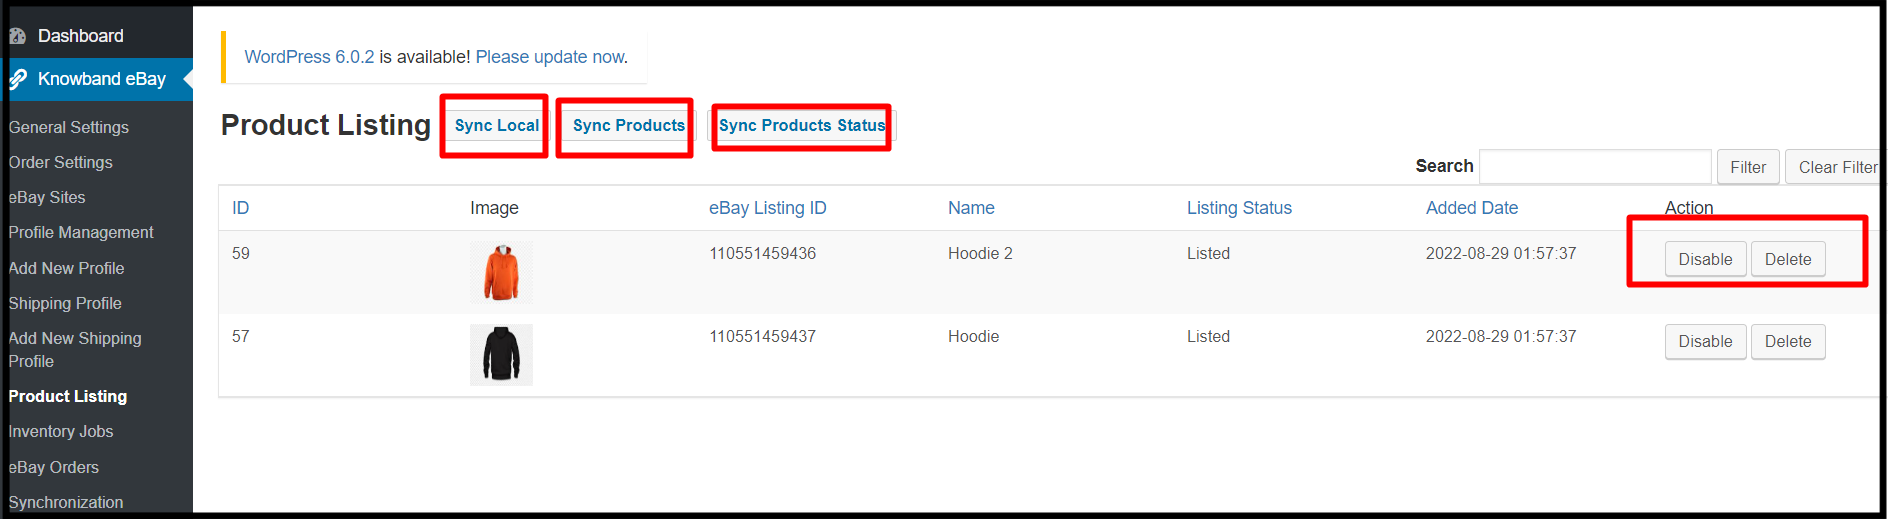
Knowband WooCommerce eBay API Integration Module offers a different tab for managing product listings. In this tab, the store admins can keep track of all of their eBay listings and can manage the same easily.

  • Sync Local: The admins can locally synchronize by hitting the same button.
  • Products Sync: Online WooCommerce sellers can synchronize products with the help of the sync product button.
  • Sync Product Status: In case you have added or removed a new product on eBay Marketplace, you can check the same here if that is listed or not.

6.9. Inventory Jobs:

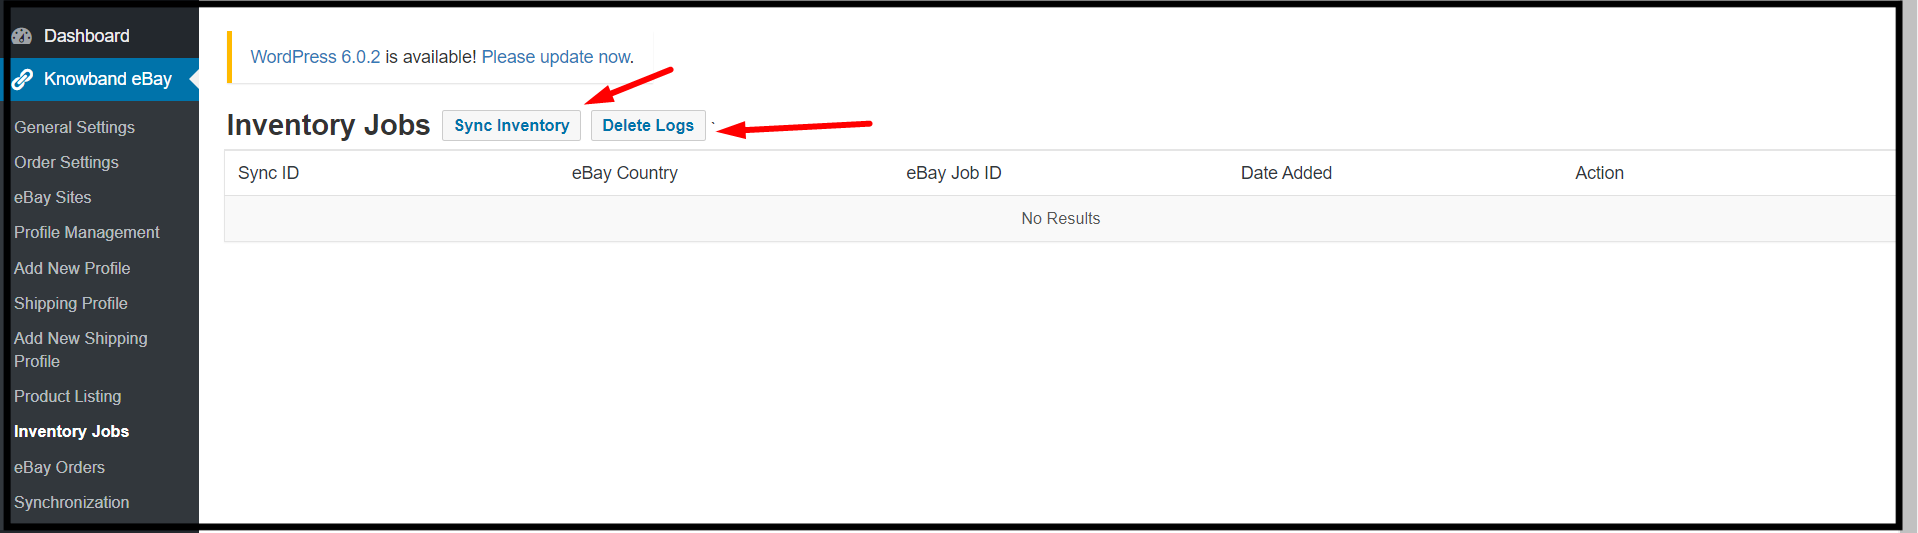
In this tab offered by the Knowband WooCommerce eBay Marketplace Integrator addon, the admins can keep track of their data. Moreover, they can check eBay inventory and logs. Further, in simple words, the back store admins can have a look at all of the activities in the inventory jobs table.

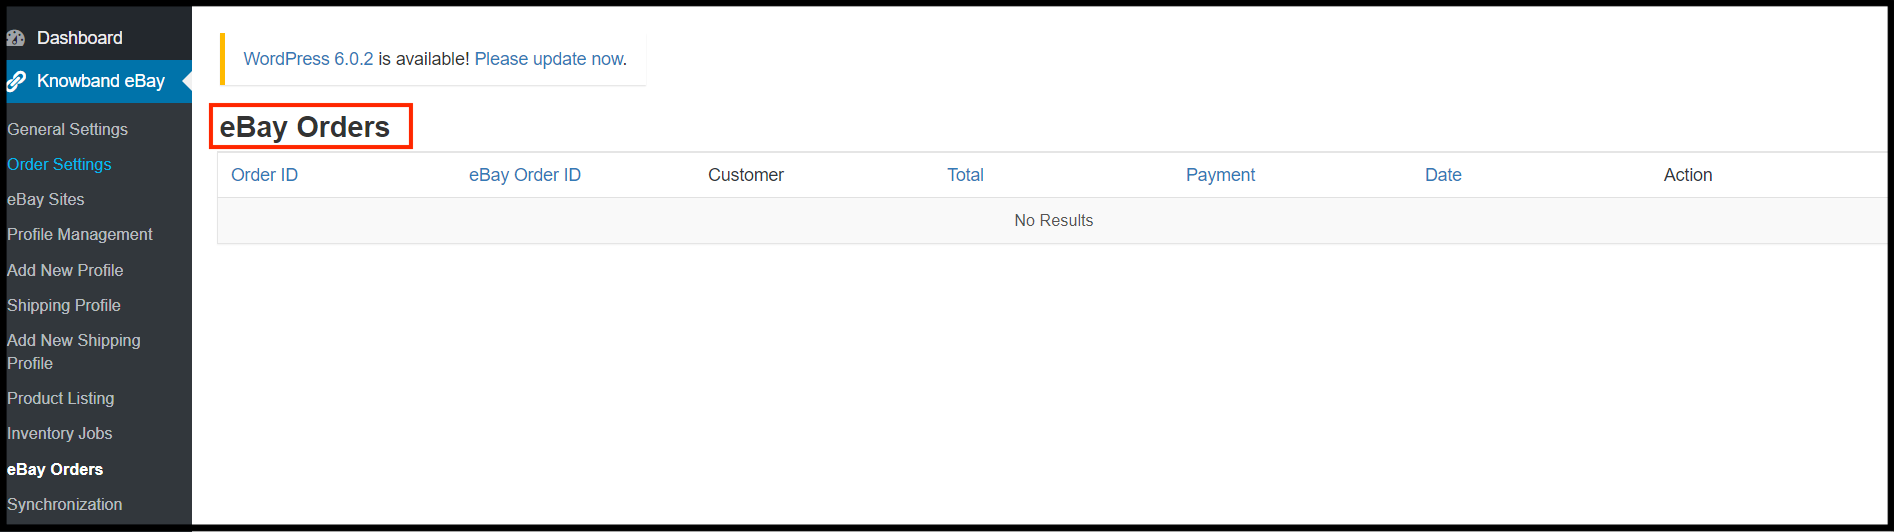
6.10. eBay Orders:

This particular tab is specially designed for keeping up track of eBay Orders. In fact, not only the WooCommerce admins can keep the track of their eBay orders from this tab but also, they can even update the same.

6.11. Synchronization:

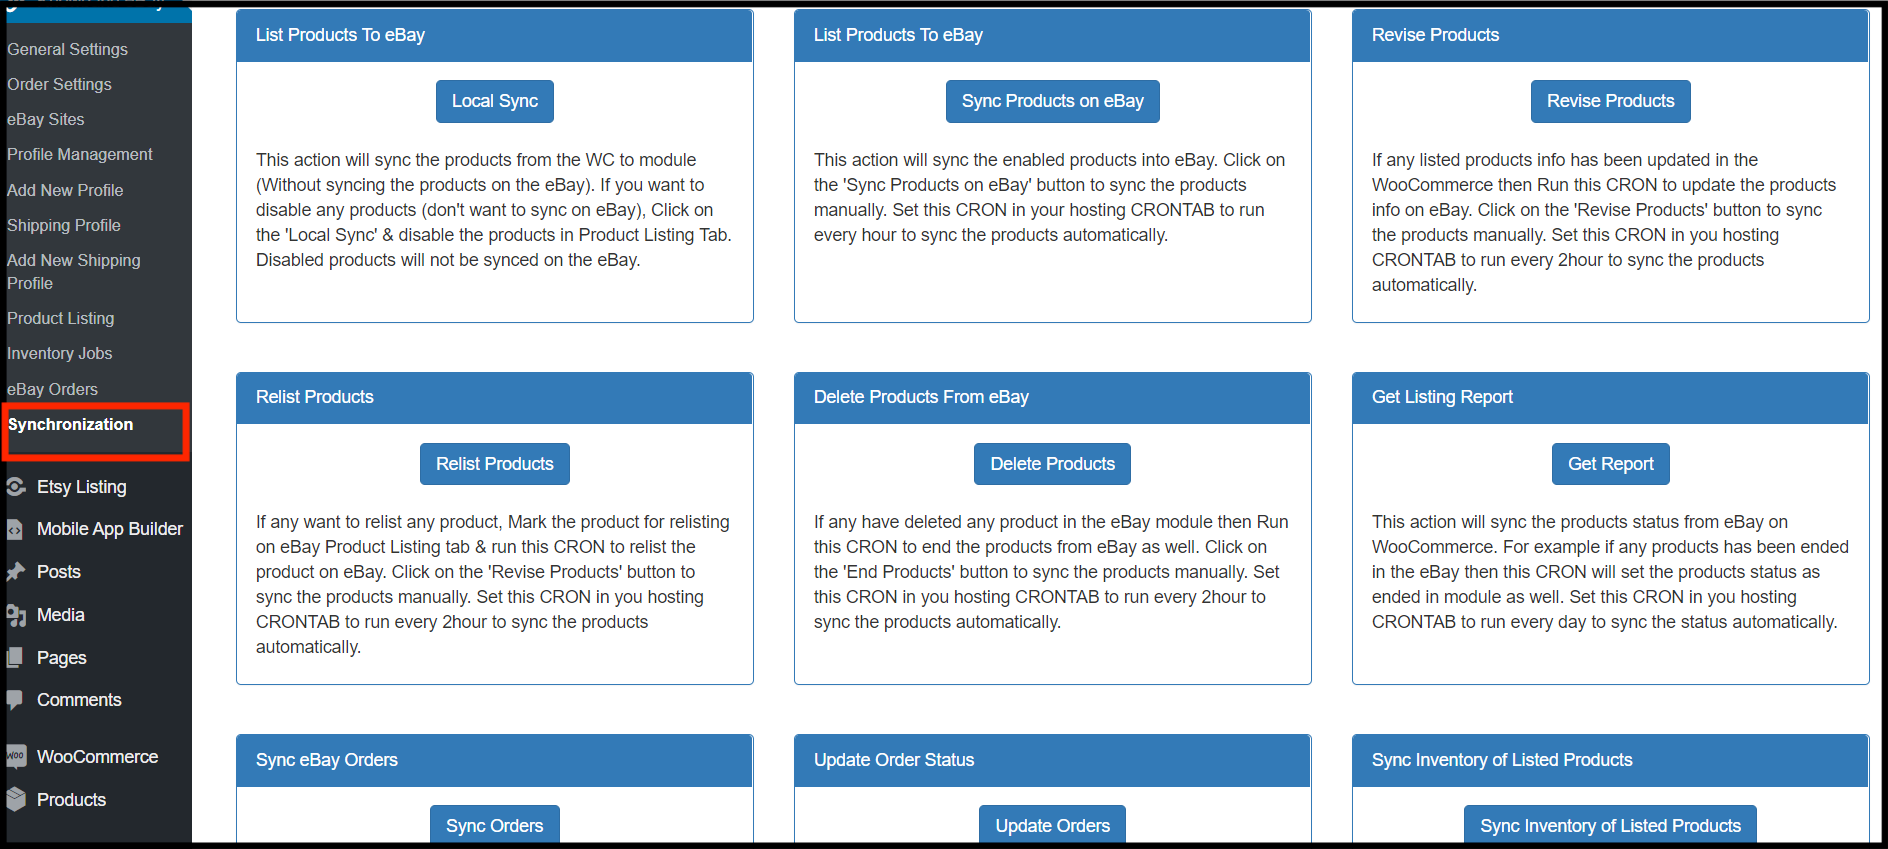
The following tab is loaded with one-tap cron buttons. Knowband WooCommerce eBay Integrator offers the following tab to take care of all of the manual selling essentials in automated ways. Further, not only the sellers can use this cron with a single click but also the same works on most advanced API-based technologies.

  1. Local Sync: This cron button will load the module with all of the products from the WooCommerce shop. Furthermore, this button could come in handy for you if you want to edit a profile before publishing it to eBay.
  2. Sync Products on eBay: The following cron button will synchronize the store products on the eBay Marketplace.
  3. Revise Products: Do you have recently updated any product information on your WooCommerce store and want to update the same on eBay? In fact, the revise products button simply updates the details of the product on eBay Marketplace within no time.
  4. Relist Products: When you wish to relist a product on the eBay Marketplace, you can use the Relist Products cron.
  5. Delete Products: This feature is useful if you want to remove a product from eBay Marketplace after removing it from the module.
  6. Get Listing Report: The listing Report cron will load all the listing reports and will show them in the admin panel.
  7. Sync Orders: Synchronize Orders button will help the admins to get all the eBay orders on the WooCommerce shop back end.
  8. Update Order: Synchronize Order Status cron button will update the modified order status on the eBay Marketplace.
  9. Sync Inventory of the Listed Products: The stock levels of all the items posted on the eBay Marketplace will be updated by this cron. In fact, running this cron will automatically adjust the stock to 99 on both eBay and WooCommerce if you have 100 on both sites and one product sells through either one.

In the End,

Since more than ten years ago, Knowband has been offering services to its cherished community of internet sellers. Further, all we have accomplished in this lovely trip is a family of more than 80,000 content online retailers. In fact, a smooth connection between an online seller’s business and the eBay Marketplace is also made possible by our most sophisticated WooCommerce eBay Integration module.

Find out some more related stories:

Woocommerce Google Shopping Module – User Manual

1.0 Introduction

Woocommerce Google Shopping Integration addon offers a way to upload the products of the store on Google Shopping. Further, displaying the product ads on the search result is one of the ways to get thousands of visitors to your site.

Google Shopping allows e-merchants to display its product on Google’s search result page. Further, it is powered by AdWords and Google Merchant Center. This is one of the ways to allow users to search for the products. Further, on online shopping websites. Moreover, compare prices between different vendors. Therefore, the Woocommerce Google Shopping Integration makes it easier for store owners to display their products on Google’s SERP.

The Woocommerce Google Shopping Integration module automatically syncs feed from the Woocommerce store to the Google Merchant Center Account. Additionally, the store admin can sync the product status back to the store’s database. How? By executing cron in the back-end of the Google Shopping Woocommerce Feed Synchronization plugin.

Features that Knowband’s Woocommerce Google Shopping Integrator Offers Are:

  • The Woocommerce Google Shopping Integration addon automates the entire process of listing the products. Further, on Google Shopping from the eCommerce site.
  • The store admin can automatically update the product inventory between the two stores. This happens from the back end of the Google Shopping Woocommerce Integration extension.
  • The Woocommerce Google Shopping API integration offers real-time synchronization. For instance, of products, and inventory. Furthermore, this happens between the Google Shopping API and Woocommerce store. It is an easy means to excel in online businesses.
  • The store admin gets an option to create an N number of profiles. Further, this happens in the back end of the Woocommerce module.
  • The profile-based upload allows the admin to list the products in bulk. Moreover, any changes in the product details happen by making changes in the profile. Further, this happens in the back-end of the Google Shopping Woocommerce API integration addon.
  • The store admin gets an easy option to keep a track of the products listed in the Google merchant center. Further, in the ‘Product Listing’ tab of the Woocommerce Google Shopping connector.
  • The expired products are renewable just by executing cron in the back-end of the Woocommerce Shopping Integration plugin.
  • Woocommerce Google Shopping Feed synchronization plugin even allows the admin to delete the products.
  • The real-time synchronization offered by the Woocommerce Google Shopping Integration module makes tracking easier. Moreover, it also makes feed management easier for the store admin.

1.1 Project Objectives

Listed below are the project objectives:

1. The Woocommerce Google Shopping Integration module installation and configuration.

2. The method of the Woocommerce Google Shopping Integration extension connection with the Google Merchant Center.

3. Profile management, Category mapping, and feed management.

4. Product listing and synchronization.

2.0 Installation

Purchase the Woocommerce Google shopping integration plugin from the Knowband store. Further, you will get the zipped file along with the user manual. Moreover, please follow the below steps to install it:

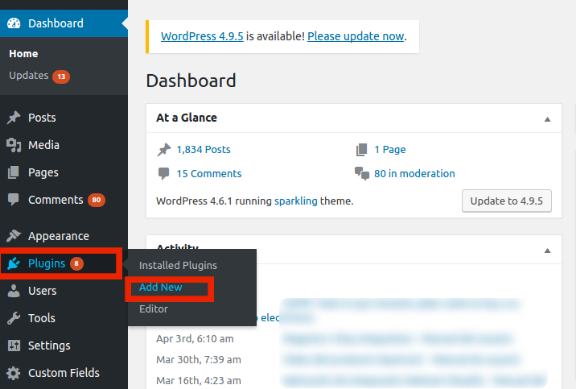
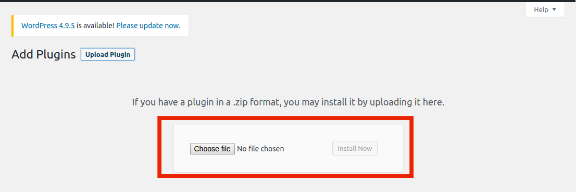
Step 1: Go to the Dashboard of WordPress -> Plugin -> Add New

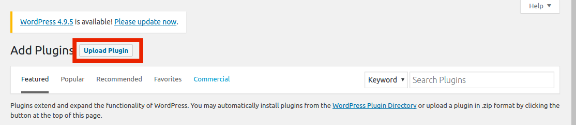
Step 2: You’ll be redirected to an interface. Click on Upload Plugin.

Step 3: Click on Choose File and upload the zipped file.

3.0 Admin Interface

After installing the Woocommerce Google Shopping Integration extension, it will list on the plugin listing page. Further, kindly see the screen below:

Now, the Woocommerce Google Shopping Integration extension add-on is installed. Further, it will display 6 sections in the main menu of the admin interface. Each tab explains one by one in the next section.

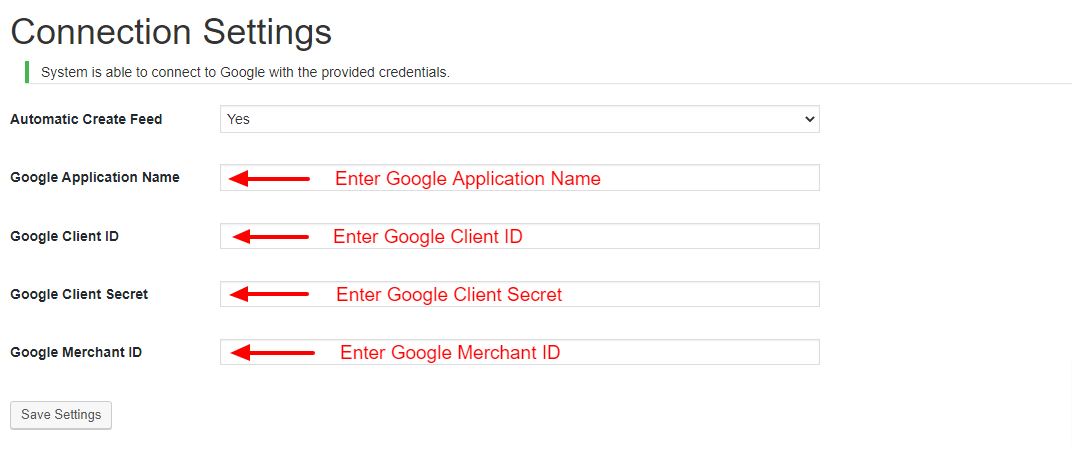
3.1. Connection Setting

This section of the Woocommerce plugin allows the store admin to connect their store with Google Merchants. Here are the information fields that you need to mention for setting up the connection.

Google Application Name: Enter the name of the project/application that you created for Google Shopping.

Google Client ID: Enter the Client ID that will authenticate the connection between the store and Google Merchant. By default empty but required field. (See Appendix A)

Google Client Secret: Enter the client’s secret to set up the connection. By default empty but required field. (See Appendix A)

Google Merchant ID: By default empty but required field. Here, you will provide the merchant ID of your Google merchant center account.

3.2. General Settings

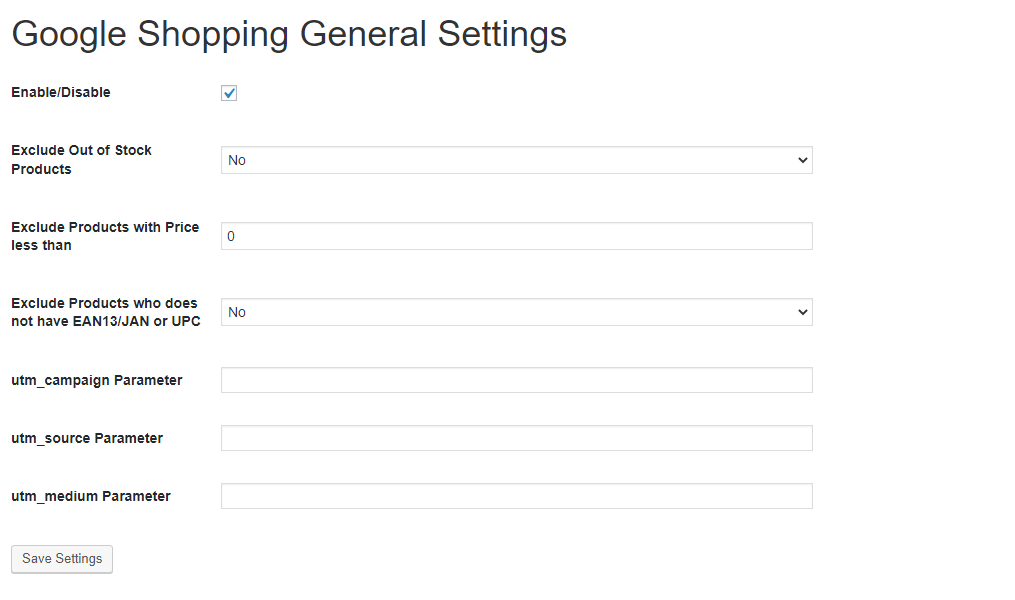
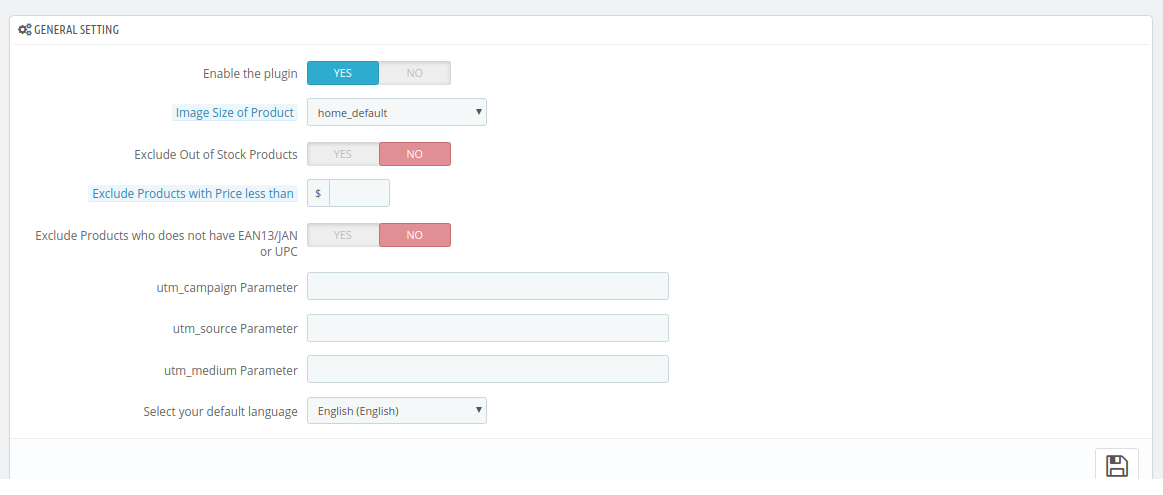
This section of the Woocommerce Google Shopping API integration allows the store admin to set up the basic features.

Enable the plugin: By default, this setting will be OFF. The Woocommerce Google Shopping Integration module will sync the products to Google shopping if this setting will be ON.

Exclude Out of Stock Products: If disabled, only the in-stock product will be displayed in Google search results. Additionally, enable the display of out-of-stock products.

Exclude Products with Prices less than Enter a fixed amount. Further, the products below this amount will not display in the search results only.

Exclude Products that do not have EAN13/JAN or UPC: If the admin disables this, the products that don’t have the EAN13/JAN or UPC will not display.

utm_campaign Parameter, utm_source Parameter, utm_medium Parameter: Enter the UTM for tracking the traffic received via Google Shopping.

3.3. Profile Management

The admin can create, edit or delete profiles from this tab of the Woocommerce Google Shopping Integration extension

3.3.1 How to Create a New Profile?

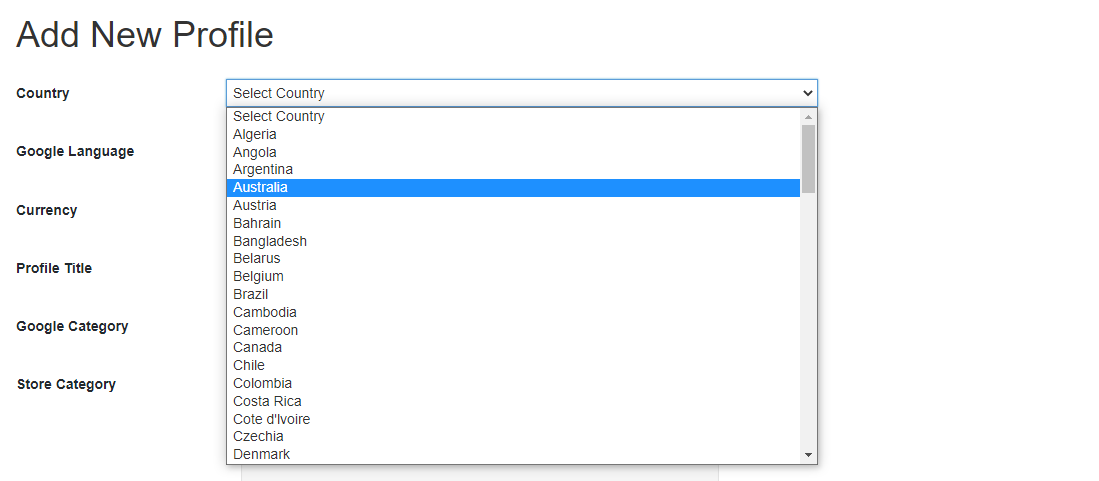
Click on the “Add New” button to create a new profile.

You’ll be redirected to the profile creation page of the Google Shopping Woocommerce Integrator.

Select the Country from the drop-down list.

Google Language: Select the language for profile creation.

Currency: Select the desired currency for the selected location.

Project Title: Enter the name of the project.

Google Category: Select the Google category where you want to map the category of the store.

Store Category: Expand the category and check the categories that you want to map in Google Shopping.

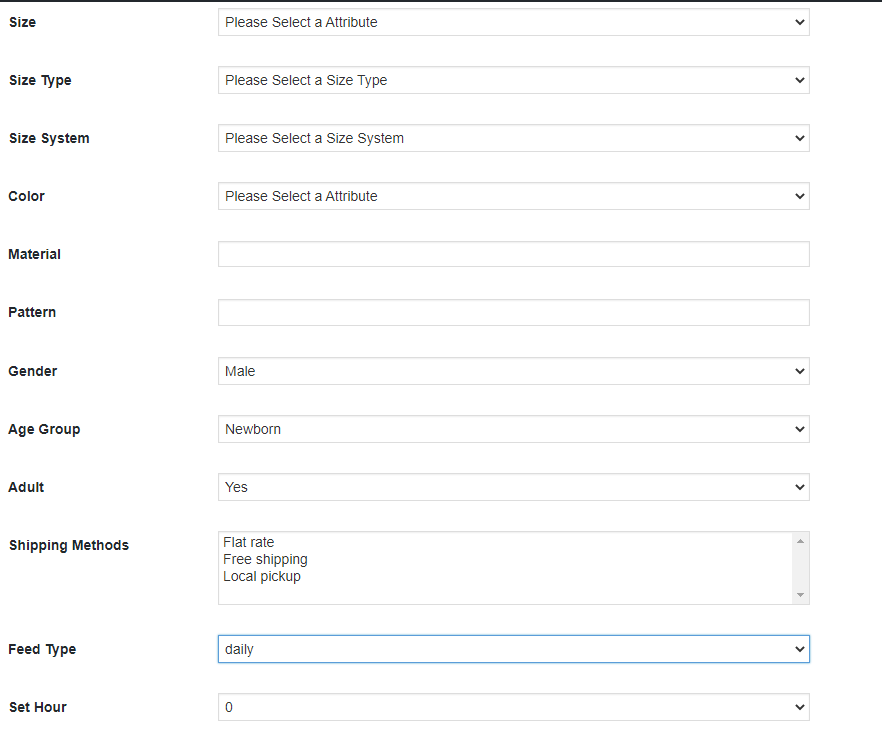
GTIN: Here, you will map the product’s unique field. Further, the Woocommerce Google Shopping Connector module can identify products according to the mapped attribute. You must also have to provide unique field mapping for product attributes as well. Furthermore, the various options to choose from include SKUs. Thus, the mapping can then be done based on the selected attribute.

Size: The size attribute describes the standardized size of your product. Your product ad will appear in the results that are filtered by size.

Size Type: The attribute describes the cut of your product. Further, the supported value for this field includes a variety. For instance, regular, petite, plus, big, tall, and others. Therefore, this helps create accurate filters.

Size System: With this attribute, you can explain which country’s sizing system your product uses.

Color: Use the color attribute to describe your product’s color. Further, this information helps create accurate filters, which users can use to narrow search results.

Material: Select the material of the product.

Pattern: Choose the pattern from the drop-down menu.

Gender: Select the Gender for which the product is intended. Further, the options are Male, Female, or Unisex.

Age Group: Select the age group that is expected to use the product.

Adult: Specify if the product has any adult content or not.

Shipping Methods: Select the shipping method for the particular product.

Feed Type: Select the frequency when you want to upload the feed.

Set Hour: Select the number of hours in which you want to schedule the feed.

Google Adsense

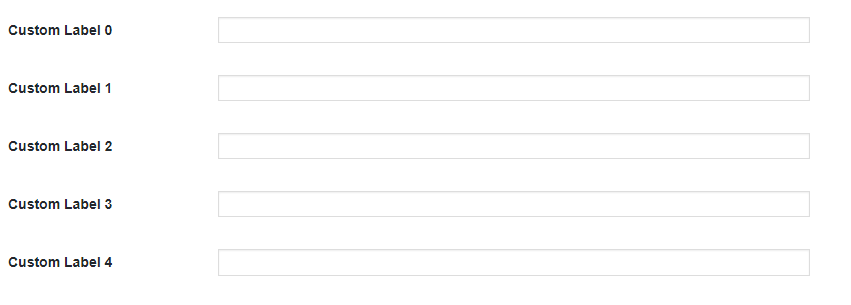
Google Adsense refers to the campaign that you’ll run on Google Adwords. Further, Custom Labels, Custom Label 0 through Custom Label 4, allows you to create specific filters to use in your Shopping campaigns. Use these filters for reporting and bidding on groups of products. Furthermore, the information you include in these attributes won’t be shown to users.

3.3.2 How to Edit the Existing Profile?

The created profile in the Woocommerce Google Shopping Synchronization addon can be viewed in the admin interface. Further, click on ‘Edit’ to edit the profile or Click on ‘Delete’ to delete the profile

3.4. Product Listing

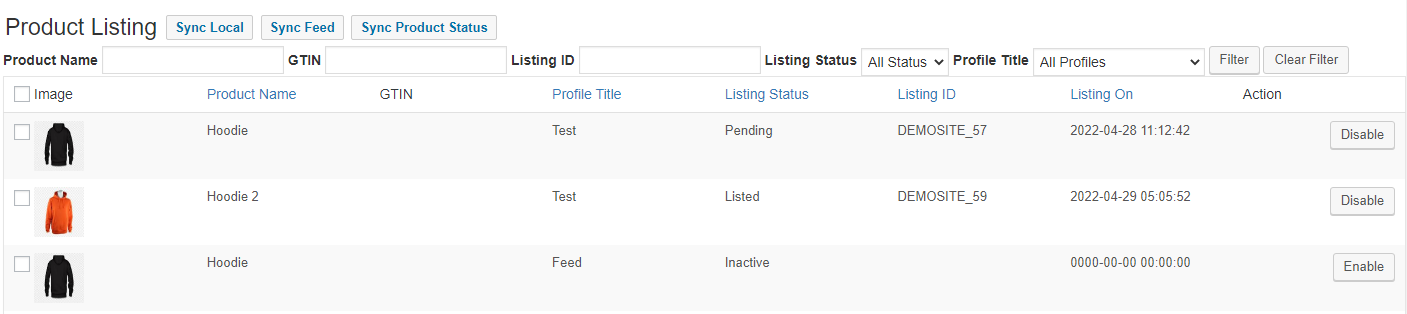
The listed products can be viewed in this section. Further, the Google Shopping Woocommerce Connector is shown in the image below.

The admin can disable the product by clicking on ‘Disable’.

The Enable button will mark the products for listing.

3.5. Feed Management

In this tab of the Google Shopping Woocommerce Integrator, the admin will be able to get the details of the feed and profile mapping. The admin can check which profiles are mapped with feeds.

3.6. Synchronization

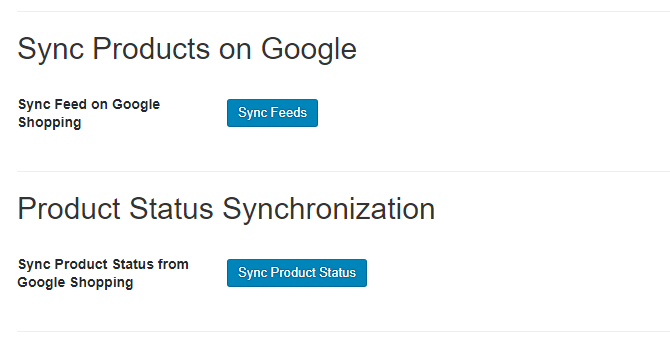
The Synchronization tab of the Woocommerce Google Shopping Integration extension offers easy integration with the help of cron jobs. Additionally, the Woocommerce Google Shopping Feed synchronization allows the admin to sync the feeds to Google Merchants. Moreover, syncs the product status back to the store.

Sync Feed on Google Shopping: ‘Sync Feed’ cron will synchronize the feed on Google Shopping.

Sync Products Status from Google Shopping: This button can sync the product status from Google shopping to the web store.

4.0. Appendix

How to Create Google Shopping Account?

Before uploading your products on Google shopping, you must have your Google merchant account. If you don’t have then please follow the below URL:

https://merchants.Google.com

Follow the instructions given on the above URL and create your account.

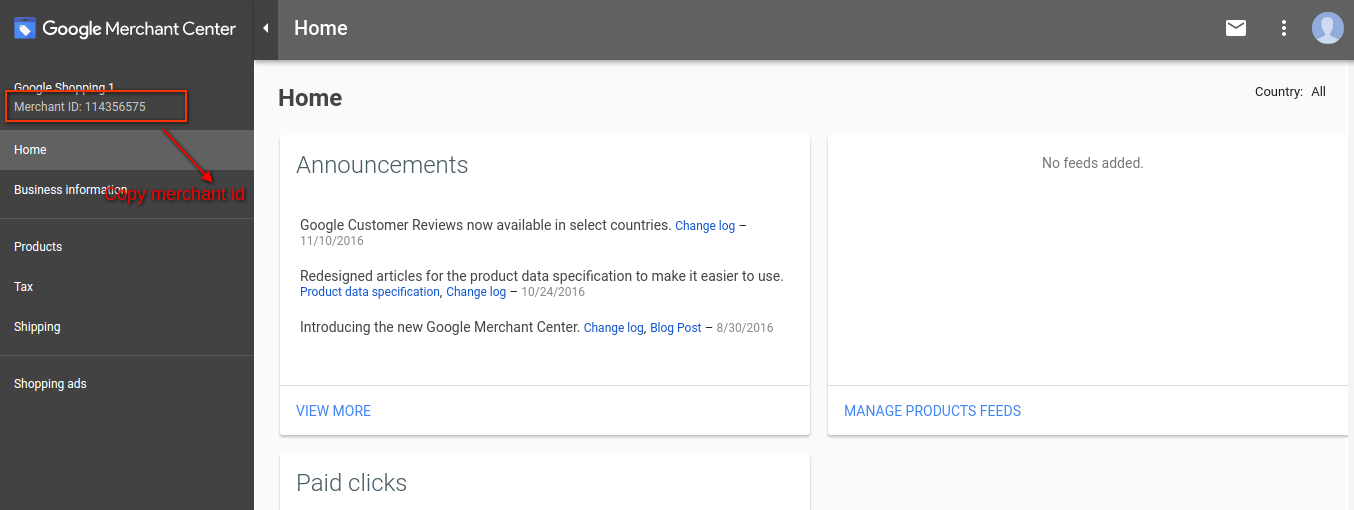
After creating your account, you will be redirected to your merchant center homepage as shown in below screen:

Copy your merchant id highlighted in the above screen and save it in module configurations.

After this, click on the Connect button so that your module gets integrated with your PrestaShop store, In addition, you will be able to fetch the report details.

Verify your Website for Google Merchant Account

This verification process is a compulsory process to upload your products to Google Shopping. If you do not verify your site then the module will not be able to upload products and may result in an error.

To Verify Your Website, Please Follow the Below Instructions:

Step 1: Go to the “Business Information” tab in your Google Merchant Account.

Step 2: Under the “About Your Business” tab, provide the URL of your store. For instance, https://www.example.com. Save URL.
Step 3: After saving a website URL, Under the “Website” tab, click on the “Claim Your Website” link. This will show you the link to an HTML file. Hence, download this file. In addition, upload it to your root directory of the store.

Step 4: After uploading the HTML file, execute the URL given by Google in step 3.

Step 5: Click on the “Verify & Claim” link.

After this, you can fetch your product report under the product tab of your Merchant store.

How to get the Client ID and Secret?

To get a Google client id and secret you need to create a project in a Google developer account. In fact, please go to the below URL to sign in to the Google developer account.

https://console.developers.Google.com

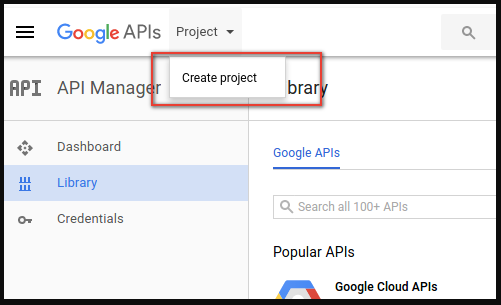
On the above URL, create a project by clicking the link shown in below screen:

1: Name your Project Name. Moreover, click on the “Create” link. In fact, after creating a project, Google will redirect you to the same page and your new project will be selected.

2: Go to the library tab, and search for “Content API for Shopping ”. Further, enable this API for this project.

3: Click on the “Credentials” tab. This tab will show 3 tabs.

4: Set your application name in the “OAuth Consent Screen” and save it.

5: Click on the “Credentials” tab and click on the “Create Credentials” button.

6: After clicking the “Create Credentials” button, Google will be shown credentials type options. Therefore, choose “OAuth client ID”.

Step 7: Set the application type as “Web Application”.

Step 8: Set the “Authorized Redirect URIs” field. Additionally, your redirect URI is given on the module configuration page. Further, please copy from there and paste it into this field.

Step 9: Click on the “Create” button. Further, after saving credentials, Google will generate the client id and secret for you. Copy and paste them into the corresponding field in the module configuration.

Note: For more detailed instructions, follow the URL https://developers.Google.com/identity/sign-in/web/devconsole-project

Note: If you are getting an error while getting your refresh token. Further, please also try after “Allowing Less Secure App” in your Google account.

In fact, for more values, please follow the below URL and read the documentation:

https://support.google.com/merchants/answer/7052112?hl=en

Find Out Some More Related Stories:

  1. How seller can take benefit from Google shopping’s free listing
  2. Now List your products on Google Shopping for free
  3. How to sell on Google Shopping?

OpenCart Affiliate and Referral Program Extension – User Manual

1.0 Introduction

As a shopper, you must have seen many of the online stores provide their customers with additional income from the store by providing them the option to become affiliate customers and invite new customers to the store. So, there are several tools out there to provide affiliate customer and referral commissions to the customers. However, with the OpenCart Affiliate Program extension, the admin allows the customers to become an affiliate and earn a commission whenever a new customer registers using the affiliate customer’s referral code or order products. And even can customize the commission rate globally or individually for an affiliate customer and so on.

2.0 Salient Features of OpenCart Affiliate and Referral module

  1. Users can register as affiliates to earn commissions on referrals.
  2. The admin can enable or disable the new affiliate register option.
  3. Admin can select the referral methods which will be available on the affiliate customer dashboard by which affiliate can invite customers.
  4. The admin can enable or disable the social sharing for Facebook, Twitter, and Pinterest.
  5. Admin can set if the affiliate is permanent or it will auto become a normal customer after input days.
  6. The admin can set if the affiliate always gets commissions for orders from the referrals or the commission will be closed after how many orders.
  7. Admin can set when the referral will be counted for commission.
  8. The admin can view affiliate customers and edit and update their details like commission rate and all.
  9. The admin can view the list of referrals that have been entered by the customer. Moreover, he can approve and reject them for commission.
  10. Admin can see the total commission earned by the affiliate customer and his commission history.
  11. The admin can see the lists of payout requests and can accept and reject them.
  12. Users can see the list of all the commissions earned by him/her, also can see the commission is from order or user register.
  13. Users can pay out the commission using vouchers and direct payout requests.

3.0 Installation Guide

Before starting the installation process, you have to buy the Affiliate & Referral Program Extension by Knowband. Once purchased, you will receive the following files in your registered email.

  • Source code of OpenCart Affiliate & Referral Program extension in zipped file format.
  • User Manual of OpenCart Affiliate & Referral Program extension.
  • Now to install this on your online shop, follow the given steps:

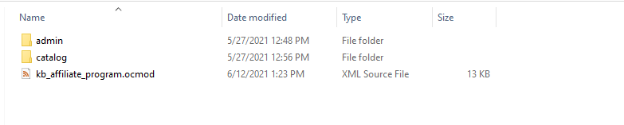
Step 1: Unzip the zip file. You will get the folders as shown in the image below

Step 2: Copy the content of one of the folders as per your OpenCart version. You will get the following files inside.

Step 3: Copy these folders to the root folder of your website. In case of any issue, you can reach us.

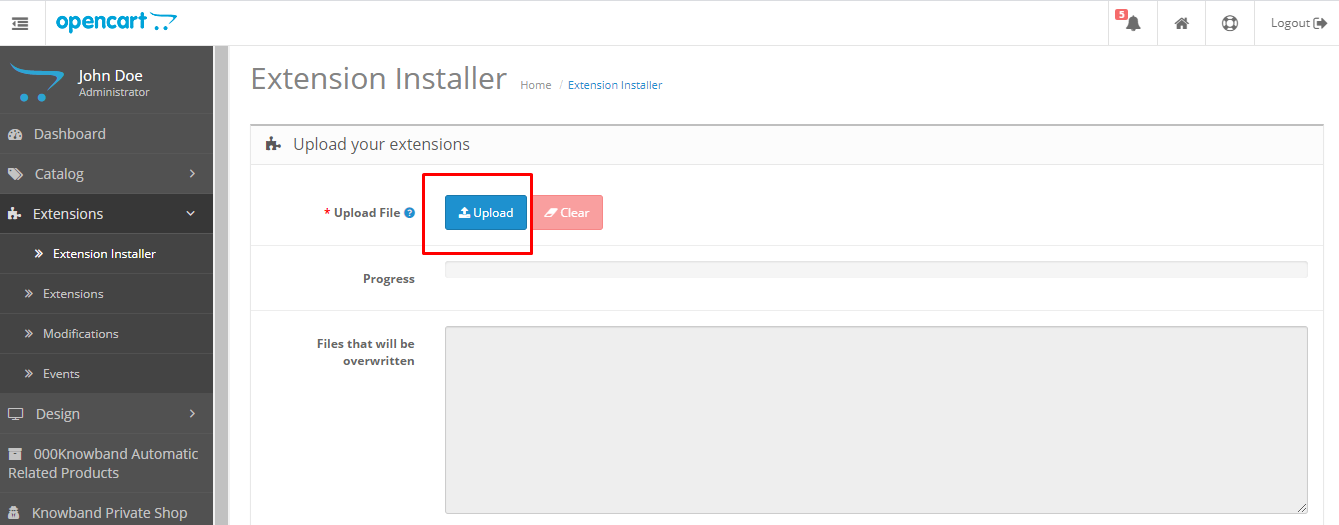
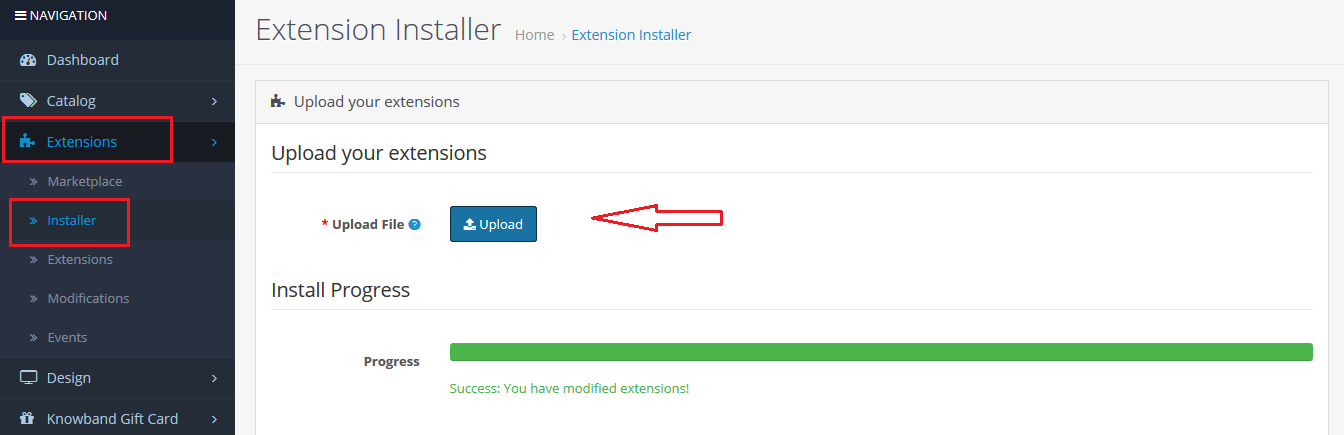
Step 4: After copying this go to your admin panel and install the module with the modification file.

Step 5: After uploading the ocmod file your module will be ready to use. You can go to the extensions and install and configure the module as per your need.

4.0 Admin Interface of OpenCart Affiliate Program

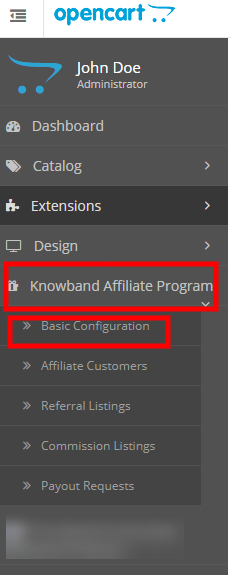
To configure the OpenCart Affiliate Program extension you can navigate to the module configuration page either by clicking on the Knowband Affiliate Program menu in the side menu.

Or you can go to the Extensions > Modules > Knowband Affiliate Program.

In the admin you will see the following main settings tabs those are:

  1. Basic Configuration
  2. Affiliate Customers
  3. Referral Listing
  4. Commission Listing
  5. Payout Requests

4.0.1 Basic Configurations

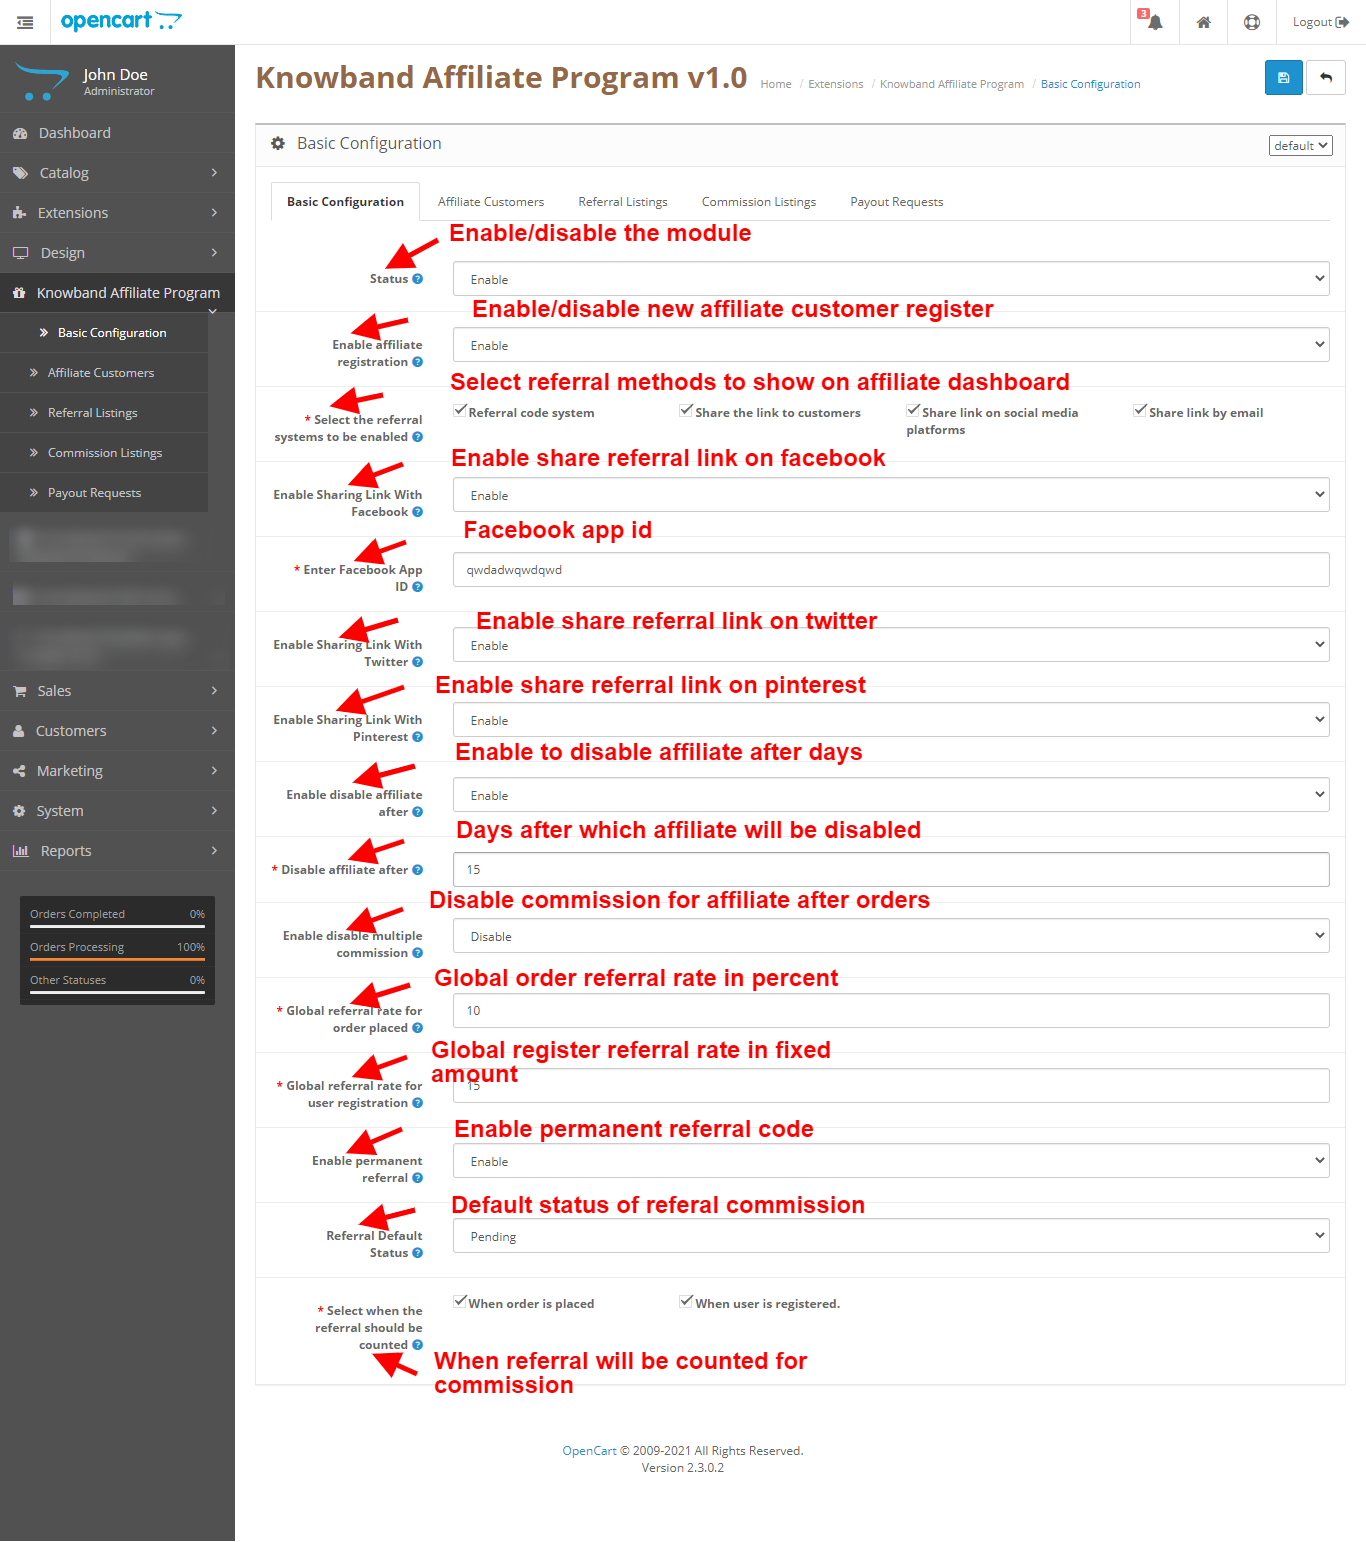
These are the basic settings that you can apply regarding the referral rates, referral methods, and module settings. Here you have the option to enable disable the module and much more.

4.0.1.1 Status

Enable/Disable this module.

4.0.1.2 Enable affiliate registration

Enable the option for normal customers to become affiliate customers and get a chance to earn a commission.

4.0.1.3 Select the referral systems to be enabled

Referral methods to show on affiliate customer dashboard using which he/she can share the referral link and get commission.

4.0.1.4 Enable Sharing Link With Facebook

Enable to show share on Facebook in referral methods on affiliate customer dashboard.

4.0.1.5 Enable Sharing Link With Twitter

Enable to show share on Twitter in referral methods on affiliate customer dashboard.

4.0.1.6 Enable Sharing Link With Pinterest

Enable to show share on Pinterest in referral methods on affiliate customer dashboard.

4.0.1.7 Enable/disable affiliate after

Enable to disable the affiliate customer after the number of days.

4.0.1.8 Disable affiliate after

Several days after which affiliate gets disabled.

4.0.1.9 Enable/disable multiple commission

Enable this to disable affiliate commission after several orders.

4.0.1.10 Disable commission after

The number of orders after which the affiliate gets disabled.

4.0.1.11 Global referral rate for orders placed

Input the global rate for orders placed which the affiliate customer will get as a commission, will be treated as a percent of order value.

4.0.1.12 Global referral rate for user registration

Input the global rate for user registers which the affiliate customer will get as a commission will be treated as a fixed amount.

4.0.1.13 Referral Default Status

Default status of referral and commission when a new referral is entered into the system.

4.0.1.14 Select when the referral should be counted

Options when the referral and commission will be counted.

4.0.2 Affiliate Customer

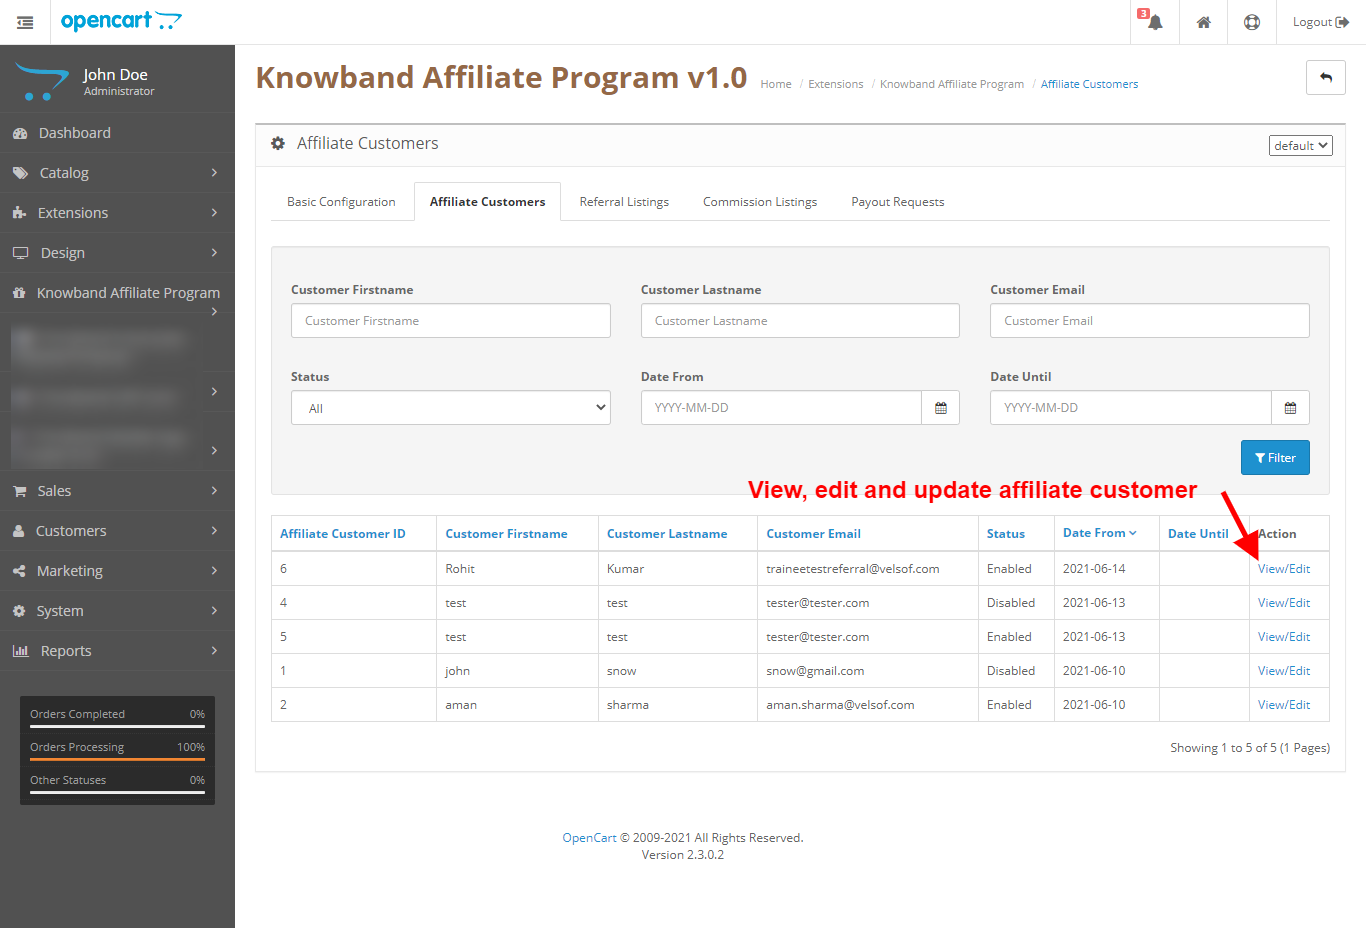
In this tab, the admin can view the list of affiliate customers with their status and also have the sorting functionality and filters.

In the list of customers, the admin has the option to sort the columns on the and have the options to filter data based on customer first name, customer last name, customer email, customer status, customer date from, and customer date until.

Also, the admin has the link to the customer view/edit page.

4.0.3 View/Edit Affiliate Customer

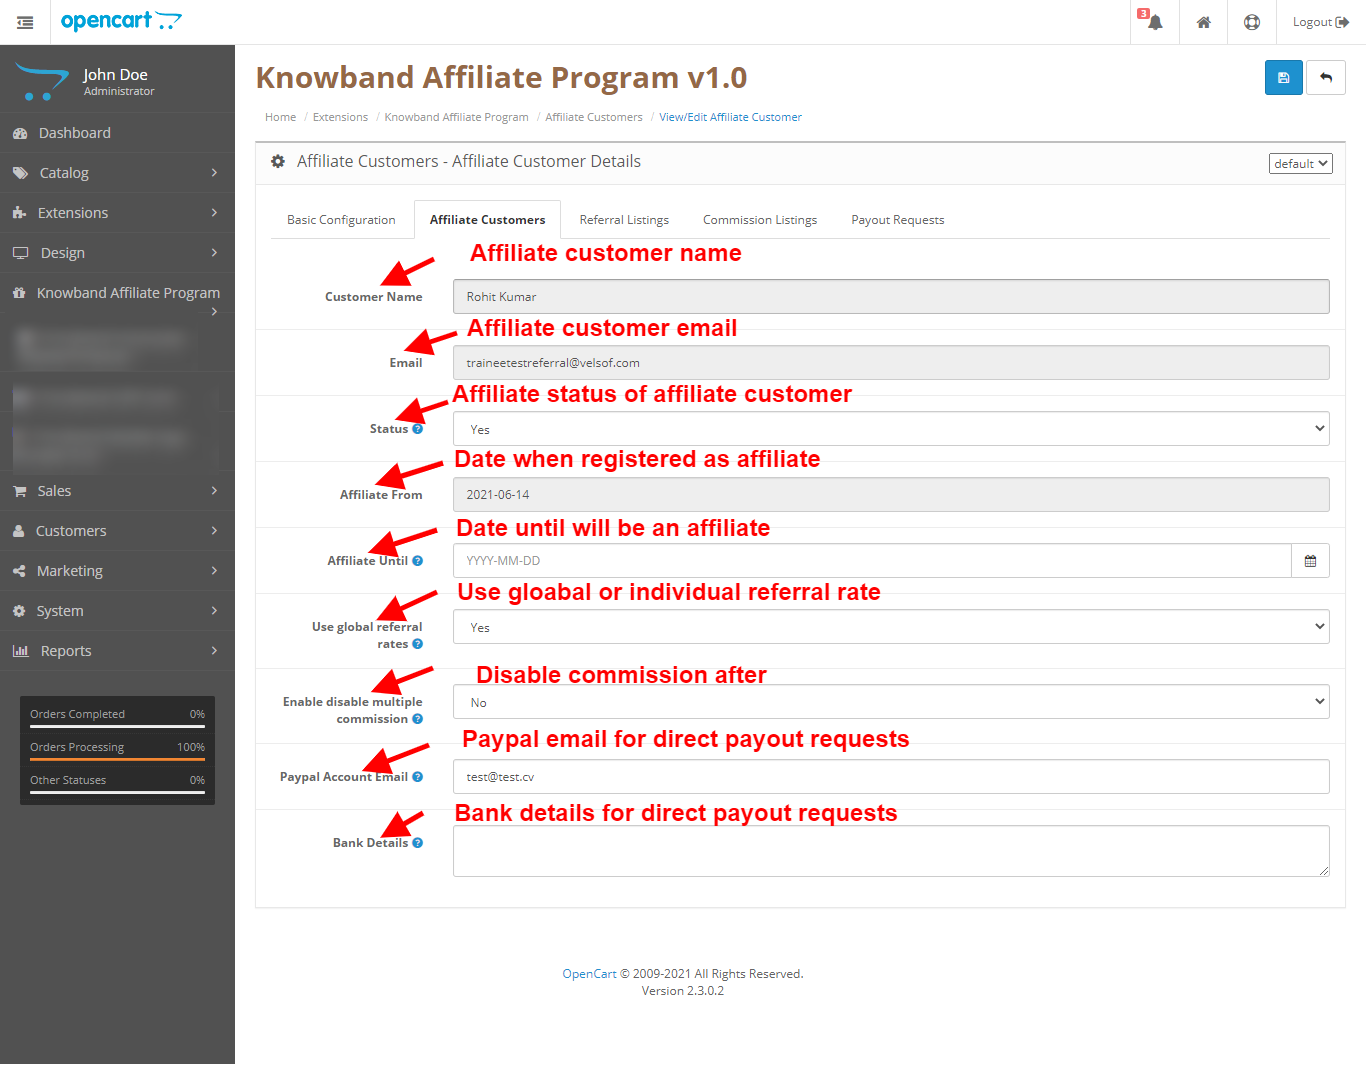
On this page of the OpenCart Affiliate and Referral program extension, the admin can view the details of the individual affiliate customer and can edit them individually.

4.0.3.1 Customer Name

Affiliate customer name.

4.0.3.2 Email

Affiliate customer email.

4.0.3.3 Status

Affiliate customer status.

4.0.3.4 Affiliate From

Date when customer joined as an affiliate customer.

4.0.3.5 Affiliate Until

Date till when the customer will be treated as an affiliate customer.

4.0.3.6 Use global referral rates

Option to set whether to use global rates for orders defined in basic configuration or use individual affiliate customer rates.

4.0.3.7 Paypal Account Email

Paypal email to send approved payout request amount directly to the customer Paypal account(manually).

4.0.3.8 Bank Details

Bank details to send approved payout request amount directly to the customer bank account(manually).

4.0.4 Referral Listing

In this tab of the OpenCart Affiliate Program extension, the admin can view the list of referrals that have been interacted after getting the referral code from the affiliate customers.

In the list of customers, the admin has the option to sort the columns on the and have the options to filter data based on customer first name, customer last name, customer email, and customer status.

Also, the admin has the link to the referral view/edit page.

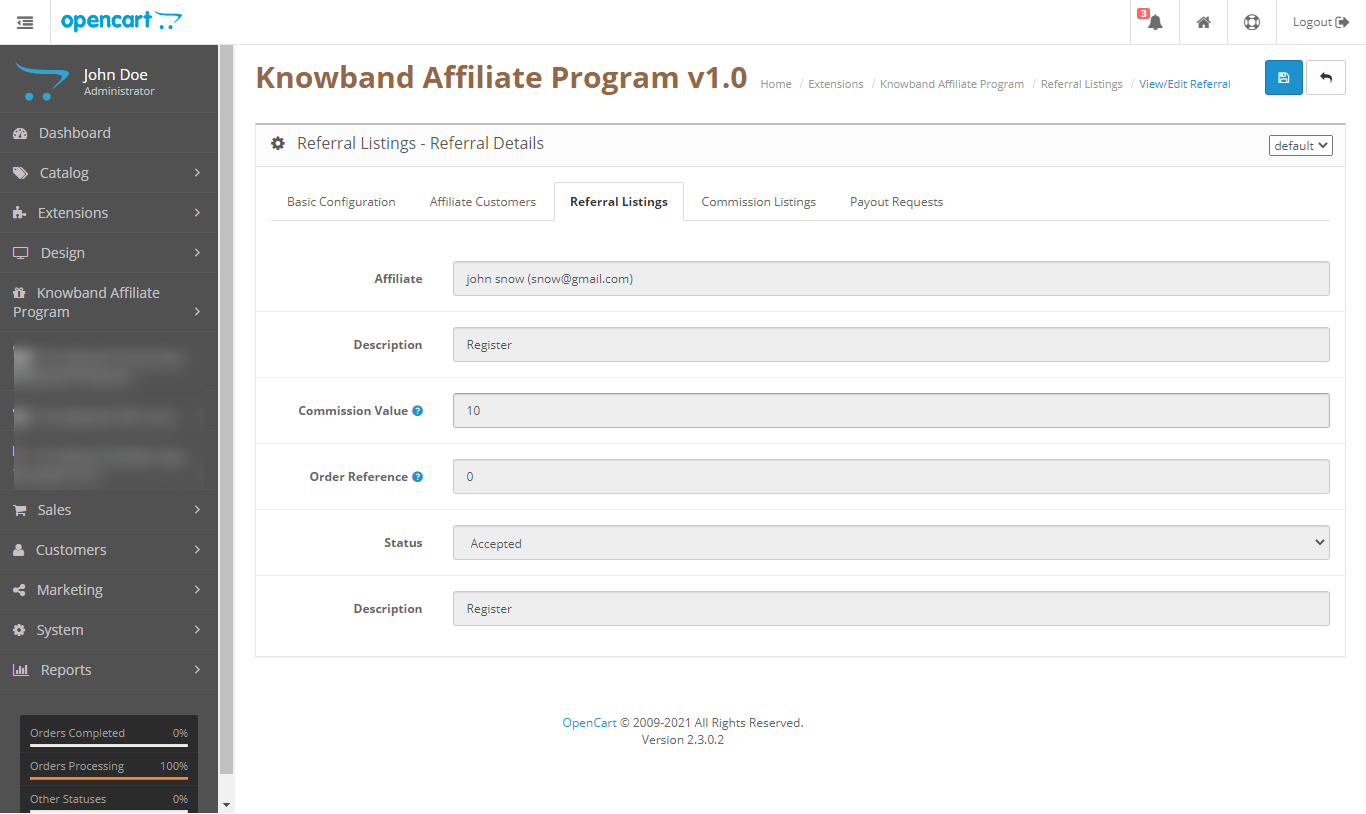
4.0.5 View/Edit Referral

In this tab of the OpenCart Referral Program extension, the admin can view the referral and edit their status only when it is not accepted, once accepted nothing can be changed.

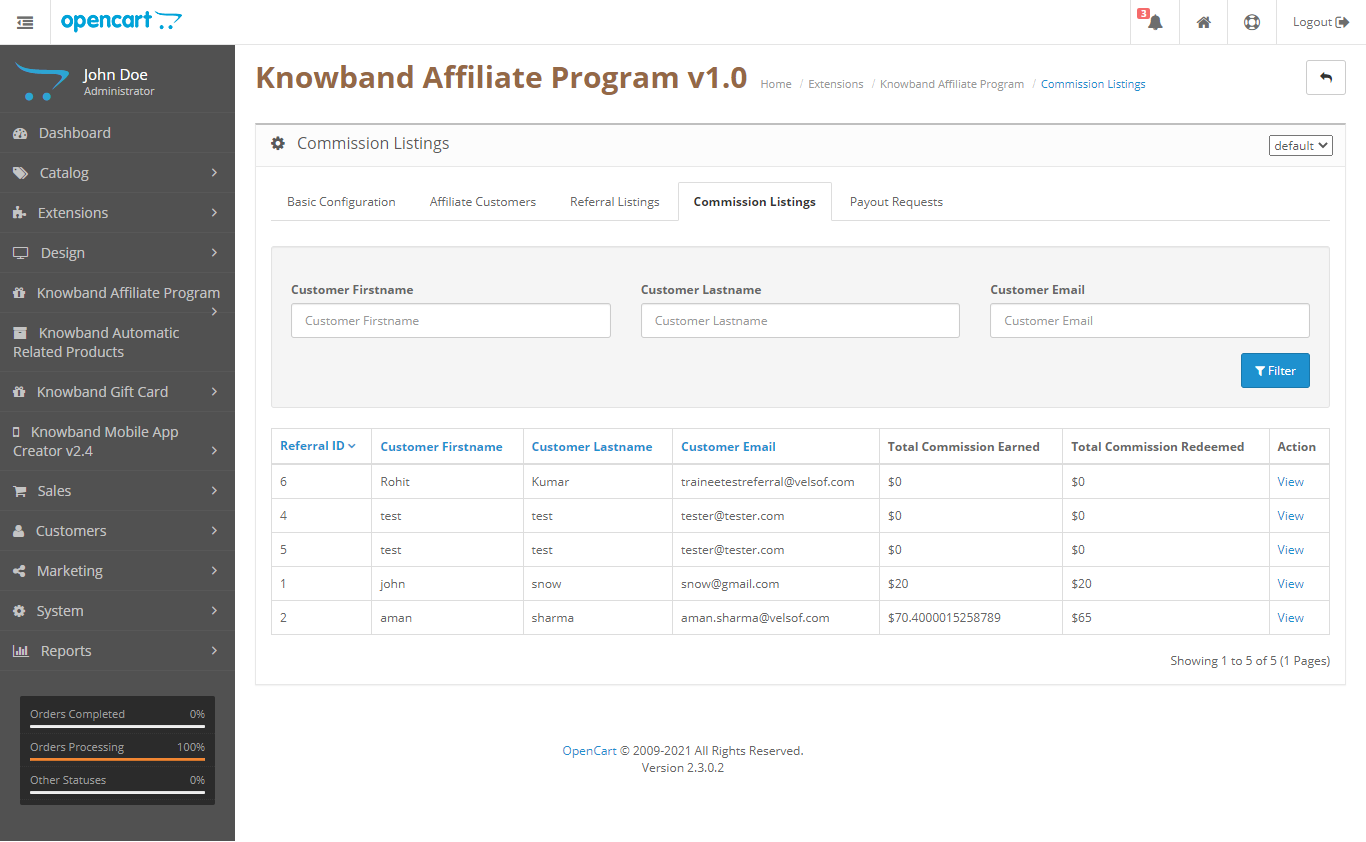
4.0.6 Commission Listing

In this tab, the admin can view all the affiliates with the data like how much in total they have earned as commission and how much they have redeemed.

Also, they have the link to view the commission history as per each referral for that affiliate customer.

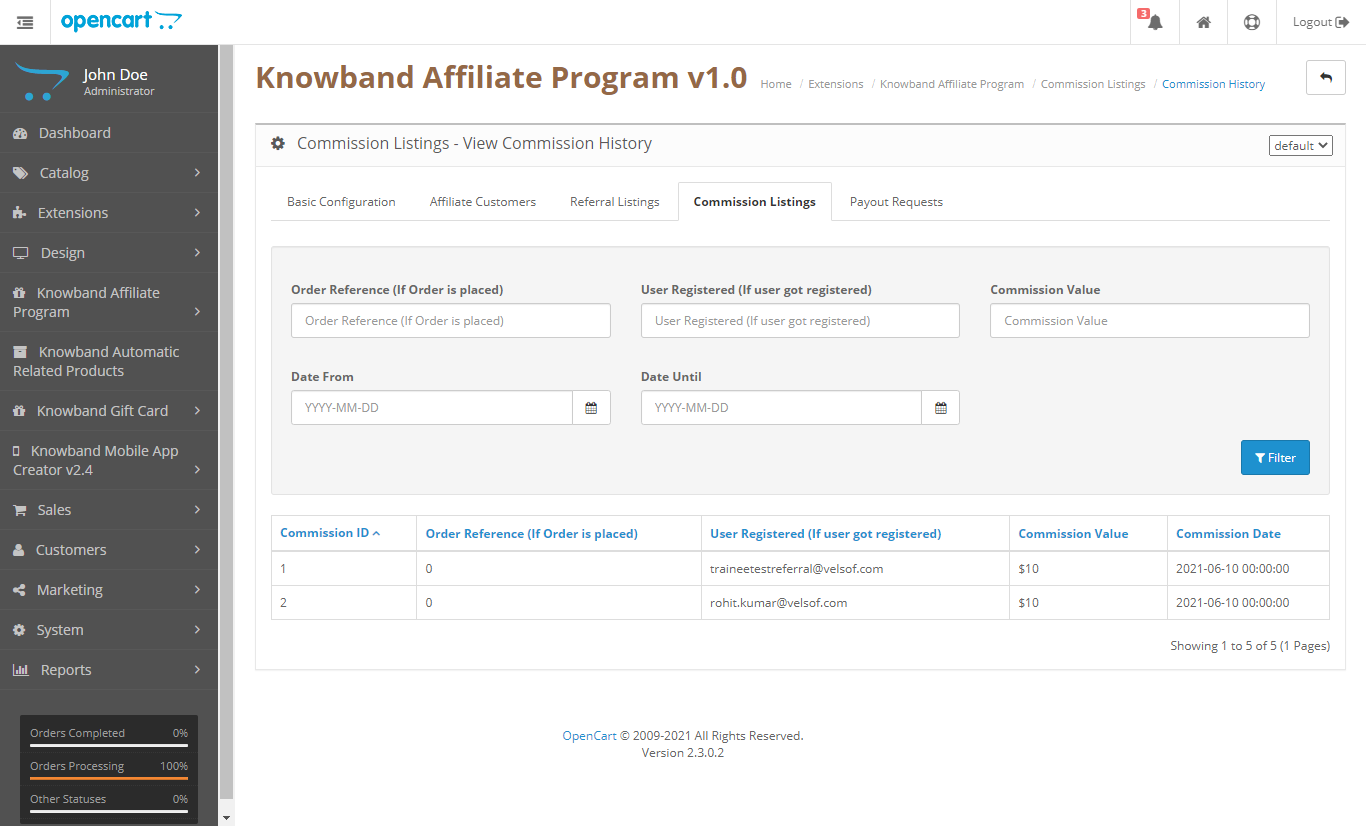
4.0.7 View Affiliate Commission History

In this tab, the admin can view the commission history of the individual affiliate.

4.0.8 Payout Requests

In this tab of the OpenCart Affiliates module, the admin can view the payout request from the affiliate customers and can accept them and reject them.

5.0 Front End Interface for the OpenCart Affiliate Program

On the front end, we will have a separate dashboard for the affiliate customers in which we have the following tabs:

  1. Affiliate Dashboard
  2. Referral Methods
  3. Commission Listing
  4. Payouts:
  • Voucher
  • Payout

5.0.1 Affiliate Dashboard

In the affiliate dashboard, customers can see his statistics as the affiliate customer like how much commission he has earned till now, how much he has redeemed, how much is not accepted yet, and how much payment request is not accepted yet.

Also, there is a graph that shows the last 8 day’s commission earned statistics.

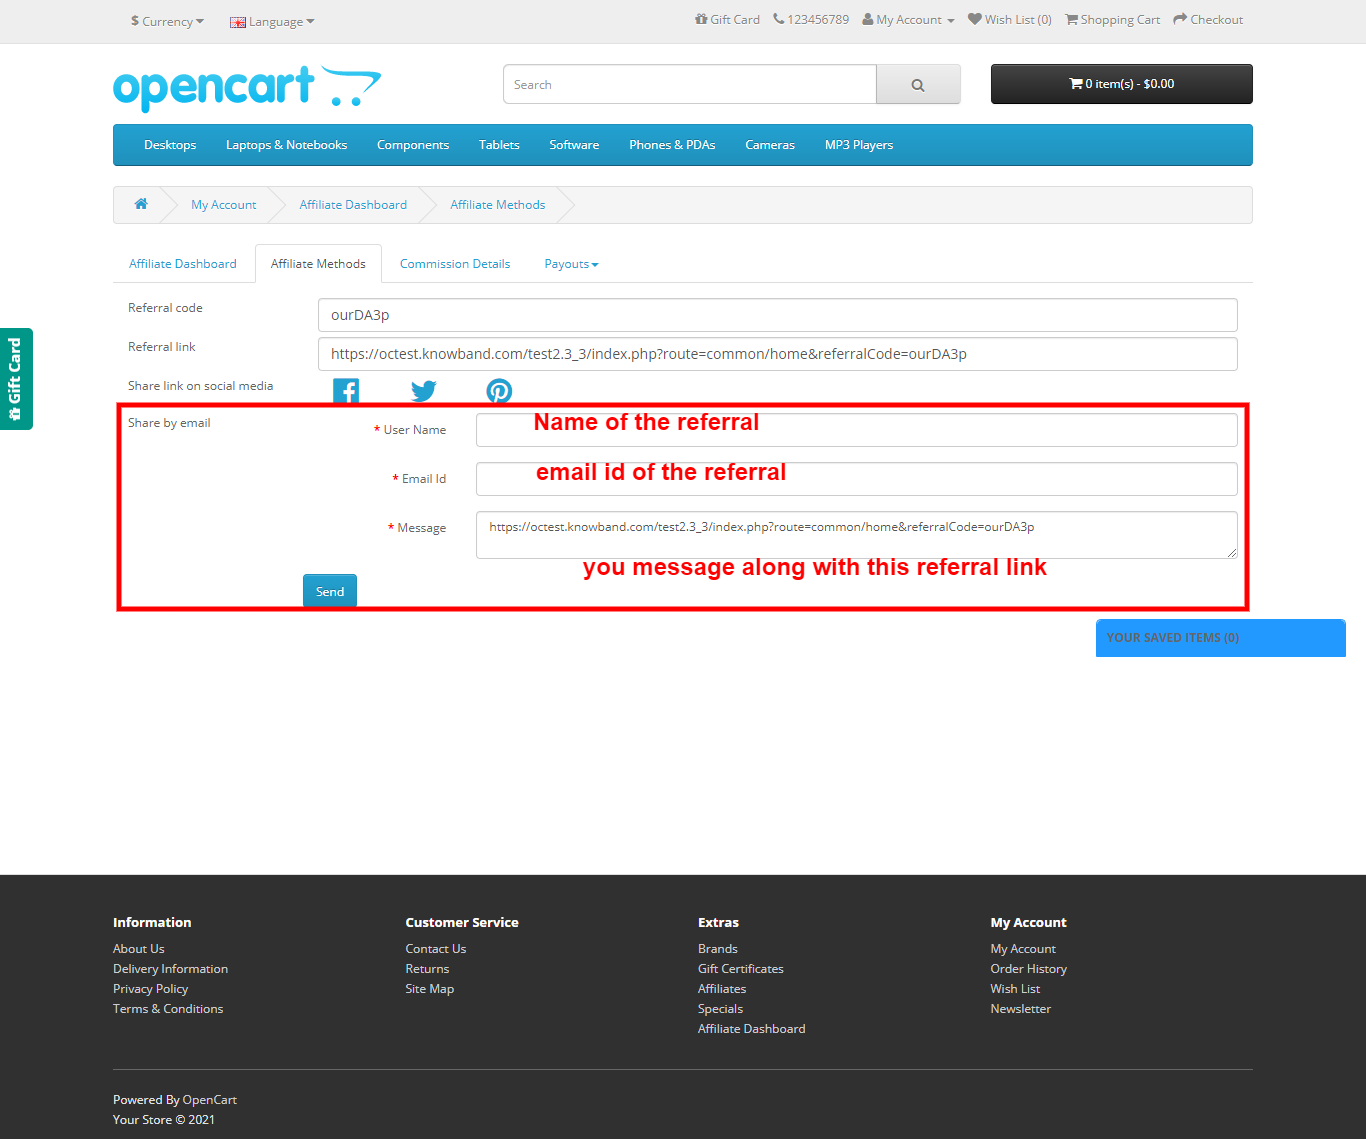
5.0.2 Referral Methods

In this tab of the OpenCart Referrals plugin, we have all the options listed that were selected as the referral system in the basic configuration settings of the OpenCart Affiliate and Referral module.

In this, you can directly copy the referral code and referral link and give it to your friends.

Also, you have the option to share the referral code on social media.

Moreover, you have the option to share the referral code by email.

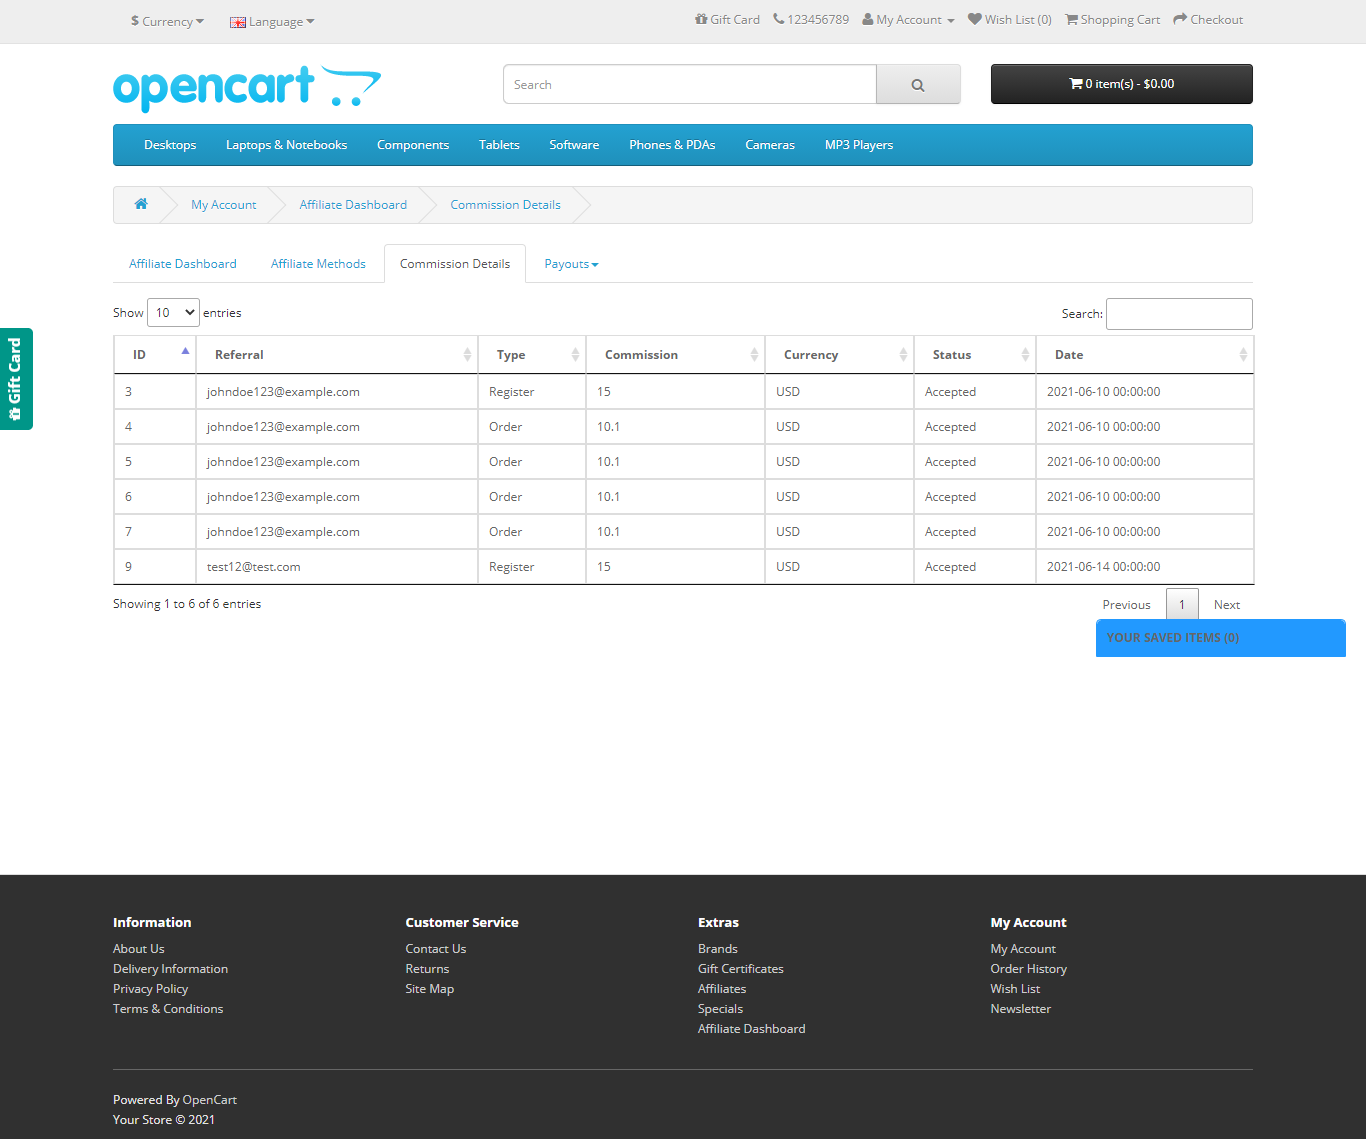
5.0.3 Commission Details

In this tab of the OpenCart Referral Program extension, we have all the details of the commission for the affiliate customer which he has earned with their status even if they are accepted or not yet.

5.0.4 Payout > Vouchers

In this tab, we have all the details of the coupons that were generated by the affiliate customer to redeem his commission in the form of vouchers to use on the site.

Also, affiliate customers can generate vouchers from this page and will receive those on their email.

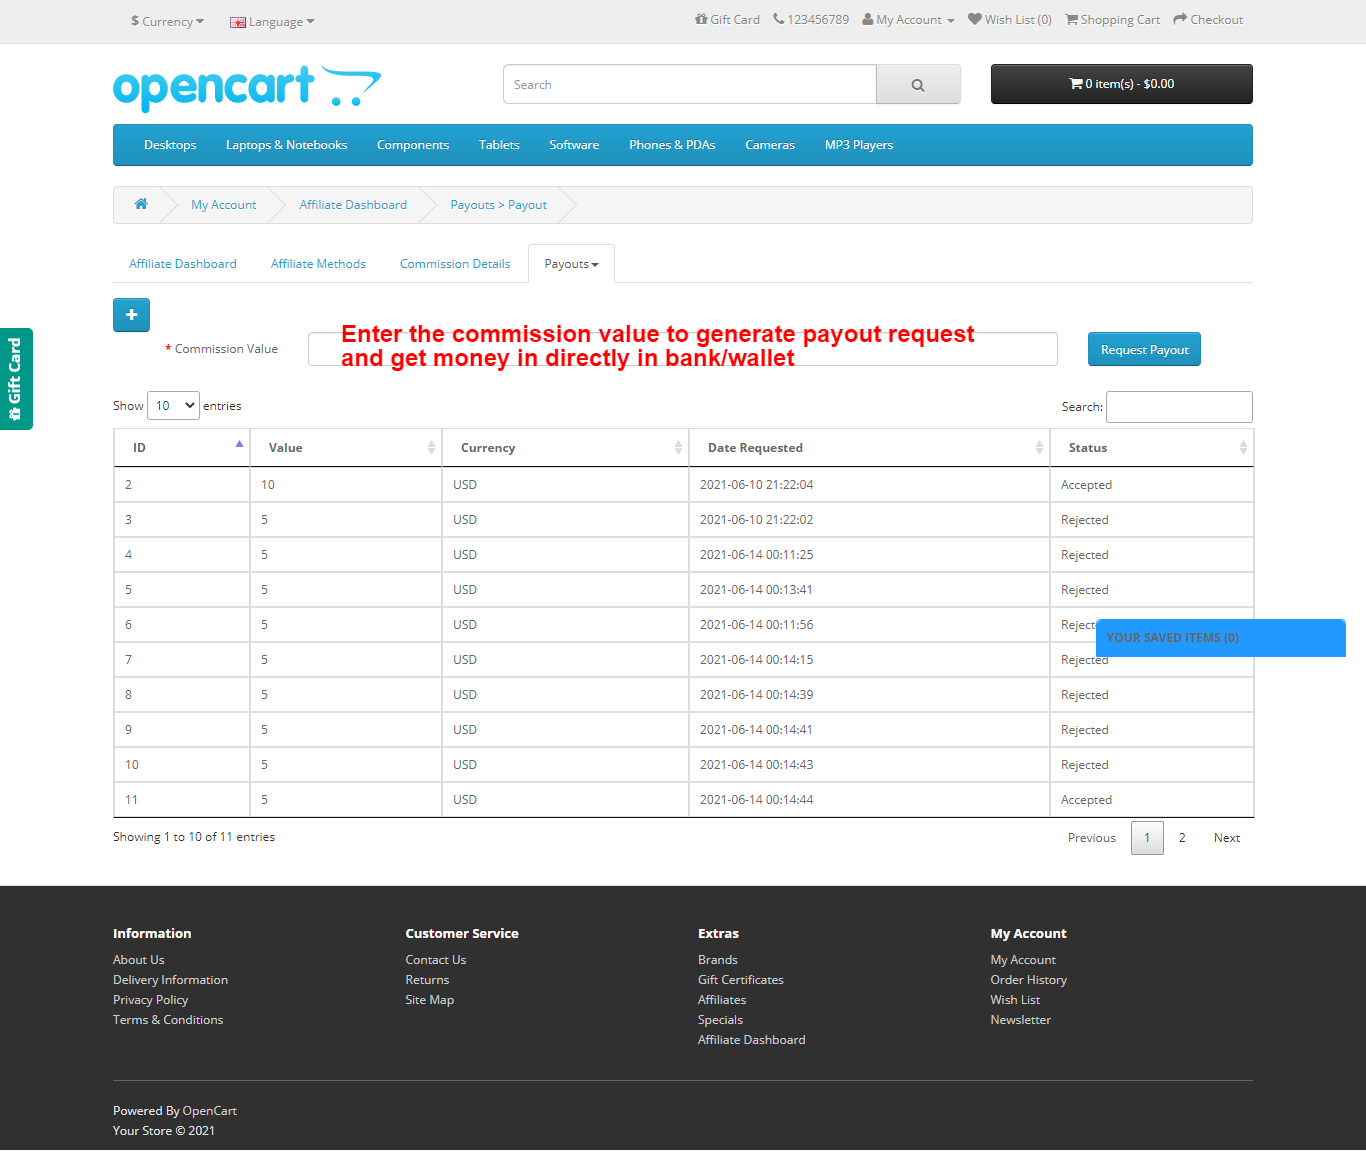
5.0.5 Payout > Payout

In this tab of the OpenCart Affiliate and Referral module, we have all the details of the payout request. Further, the details the affiliate customer made to get the commission amount directly into his bank account/wallet.

Affiliate customers can request payout requests and their status and payout request will be visible in the list.

For more details, click below:

Knowband’s OpenCart Affiliate and Referral module Product Link

OpenCart Affiliates module Marketplace Link

The OpenCart Referrals plugin Admin Demo

OpenCart Affiliate and Referral module Front Demo

Prestashop Wallet System module_User Manual

1.1 Introduction

The Prestashop Wallet System module is an addon that enables the customer to make the payment for the product purchased at the time of check-out using the e-wallet system. Thus, simplifying the customer buying experience by providing them with a simple and easy-to-use digital payment method.

2. Installation Guide

The folder structure of the Prestashop Customer Wallet System module folder.

Copy the module folder under the “root_directory/modules/” of the admin store via FTP or use the Prestashop interface to upload the plugin.
Further, after copying, the Prestashop module will be listed on the module listing page in the admin panel as given in the below screen.

The admin will be able to find the Prestashop Wallet System ready to be installed in the Modules in the admin PrestaShop store as shown below.
Therefore, click on the Install link to install the plugin.

3. User Manual

This User Manual provides the admin with the guidelines of this Prestashop Wallet System Addon. In fact, this e-wallet module contains 2 interfaces:

  • Admin Interface
  • Front-End Interface

3.1 Admin Interface

To access this module, click on the “Wallet Module” button of Prestashop Customer Wallet Addon. Further, on clicking, the admin will get three different options:

  • General Settings
  • Customer Wallets
  • Orders

3.1.1 General Settings

3.1.1.1 Enable/Disable the Module

Using this button the admin can easily enable the Prestashop Customer Wallet plugin. In fact, the admin just needs to toggle from No to Yes.

Note: The default value will be “No.”

3.1.1.2 Enable/Disable the partial payment

This Prestashop Customer Wallet Addon will help the admin empower the customer to make a part payment using the digital wallet. In addition, the remaining payment is usable from the other payment options. In fact, to enable this option the admin just needs to switch the Enable button from No to Yes.

3.1.1.3 Activate/Deactivate Allow negative balance

Through this option, the admin can simply allow the negative balance in the e-wallet. Further, the default option selected here will be No. In fact, if the admin wants to enable it, he needs to toggle the button to Yes.

Note: If the wallet amount is less than the total order amount then still the order will be placed and the wallet amount will be set in negative value.

3.1.1.4 Enable/Disable Allow order discount

Using this option, the admin can either enable or disable the option to permit a discount on placing an order using the wallet. However, the customer will be able to enjoy the discounted price of the product only when they choose Wallet as their payment option.

In addition to this, if the admin enables it, he will get different options

3.1.1.5 Minimum Cart Amount

This will help the admin to set the minimum order amount on which the discount will be applicable. For Instance, $100.

3.1.1.6 Discount Type

Using the Prestashop customer wallet addon, the admin will be able to choose between two different types of discounts:

a. Fixed: For Instance $10

b. Percentage: For Instance 10%

On the basis of this, the customer will be able to reap the benefits of discounts under this e-wallet system plugin.

3.1.1.7 Validity

This option of Prestashop Customer wallet addon will help the admin to set the time period for which the discount will be valid.

3.1.1.8 Initial Order Status

The admin can choose the initial order status to display when the customer chooses to pay from the wallet. The following are the options:

  • Awaiting Bank Wire Payment
  • Awaiting Cash on Delivery Validation
  • Canceled
  • Awaiting Check Payment
  • Delivered
  • Mobile App Awaiting PayPal Payment
  • Mobile App PayPal Payment Accepted
  • On Back Order (Not Paid)
  • On Back Order (Paid)
  • Payment Accepted
  • Payment Error
  • Processing in Progress
  • Refunded
  • Remote Payment Accepted
  • Shipped
3.1.1.9 Recharge Statuses

Depending on the Order status, the admin can set the recharge statuses. The options available are:

  • Awaiting Bank Wire Payment
  • Awaiting Cash on Delivery Validation
  • Canceled
  • Awaiting Check Payment
  • Delivered
  • Mobile App Awaiting PayPal Payment
  • Mobile App PayPal Payment Accepted
  • On Back Order (Not Paid)
  • On Back Order (Paid)
  • Payment Accepted
  • Payment Error
  • Processing in Progress
  • Refunded
  • Remote Payment Accepted
  • Shipped
3.1.1.10 Cancel Recharge Statuses

Depending on the Order status, the admin can cancel the recharge statuses. The options available are:

  • Awaiting Bank Wire Payment
  • Awaiting Cash on Delivery Validation
  • Canceled
  • Awaiting Check Payment
  • Delivered
  • Mobile App Awaiting PayPal Payment
  • Mobile App PayPal Payment Accepted
  • On Back Order (Not Paid)
  • On Back Order (Paid)
  • Payment Accepted
  • Payment Error
  • Processing in Progress
  • Refunded
  • Remote Payment Accepted
  • Shipped
3.1.1.11 Display a deposit funds link

By utilizing this option, the admin can easily enable or disable the static quick link. If this option is enabled the customer will be able to recharge the wallet while staying on the product page.

3.1.1.12 Product Name for the wallet

As the option suggests, the admin can easily set the e-wallet name. For instance, PSWALLET.

3.1.1.13 Upload Image

By using this option of the Prestashop customer wallet plugin, the admin can easily upload and set the image for the e-wallet.

3.1.1.14 Enable Minimum and Maximum Amount for Recharge

This option will allow the admin to set the minimum and maximum range for recharging the e-wallet. To enable this feature Switch the option from No to Yes.

  • Minimum Amount for Recharge: For instance $100
  • Maximum Amount for Recharge: For instance $500

Note: If you disable this option, the admin needs to set the default values for digital wallet recharge. Moreover, the admin needs to keep in mind that he needs to separate the default recharge values by comma.

3.1.1.15 Executing Cron functionality

The admin can add the cron to the store via control panel/putty to delete Recharge products automatically.

3.2 Customer Wallets

In this section of the Prestashop Customer Wallet System addon, the admin can track all the customers using the wallet. In fact, he can even view the following details of the customers:

  • Customer ID
  • Email
  • First Name
  • Last Name
  • Total Recharge
  • Amount Spent
  • Canceled/Pending Balance
  • Remaining Balance; and
  • Date Created

In fact, the admin can view a detailed report of every customer in this section. In addition, he can also edit the same. For instance, he can recharge the customer’s wallet. Further, he can even debit an amount from the same.

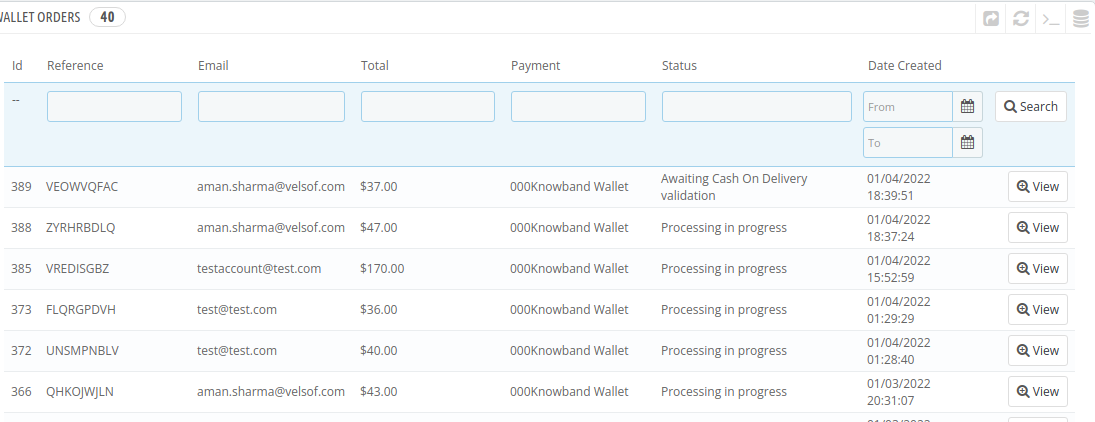
3.3 Wallet Orders

In this section of the Prestashop Customer Wallet Addon, the admin can view all the transactions made with the wallet. In addition, he can apply filters as per the date the orders were placed.

Please contact us at support@knowband.com for any query or custom change request as per your business requirement.

OpenCart Loyalty Points Extension – User Manual

1.0 Introduction

Did you know that increasing your customer retention rate by 5% boosts your profits by as much as 95%? But far too often, businesses choose to focus on attracting new shoppers – not looking after existing ones. Understandably, you want to grow your customer base. But how do you keep hold of the people who are more likely to buy from you again? Well, one solution is to create a customer loyalty program that rewards those shoppers who come back. Knowband OpenCart Loyalty Points Extension can easily solve this problem.

1.1 What are Loyalty Points?

Loyalty points are the reward-based points that are awarded to the customers when they fulfill some conditions on your online store. These conditions can be anything like a specific product, minimum cart value, category, etc. The points collected by the customer can be converted into discounts which can be used by the customer to decrease some amount of the cart.

A loyalty points program is a marketing strategy designed to encourage customers to continue to shop or use the services of a business associated with the program. This is used to engage the customer in making more and more shopping decisions on our web store by giving them more and more points so that the customer has more and more interest in buying more items from the store.

The process of creating a loyalty point program can be a very difficult task, hereby Knowband’s OpenCart Loyalty Points extension will simplify this task for you. This plugin allows the admin to create different types of conditions, if the customer satisfies any of these conditions, the customer will be automatically awarded the loyalty points defined by the admin. This reward point extension will also keep the track of the loyalty points rewarded.

1.2 How does it work?

The working of the OpenCart Loyalty Points module is explained by the following points.

  • Firstly the Admin needs to create rules in the loyalty point rules tab.
  • The Admin also needs to add conditions according to the rules type he/she is creating.
  • Once the rules are created, if the customer fulfills the conditions of a rule, the customer will be rewarded according to the points stated in that particular rule he/ she fulfilled.
  • Once the customer gains some points, they can use those points to get discounts on their next purchase.
  • Once the customer has applied points in the cart and placed an order, the points will be automatically removed according to the points they have used.

1.3 Salient Features of the OpenCart Loyalty Point module

  1. OpenCart Loyalty points system grants loyalty points to your customers for placing an order with a specific cart value, creating an account, ordering a certain product, etc. The loyalty points are defined specifically for different rules.
  2. OpenCart Loyalty reward points can be offered manually or automatically to the customers based on their cart value, product selection, or site activity.
  3. With this Loyalty points module, you can set the discount equivalent to a single loyalty point. A custom conversion rate can be set to different currencies of the module.
  4. OpenCart Loyalty points module gives an option to set minimum cart amount to be eligible to apply loyalty points discount.
  5. The tax over OpenCart loyalty discount coupons can be enabled or disabled from the backend.
  6. The loyalty points module for OpenCart allows you to set various progression names in multiple languages.
  7. OpenCart Loyalty Points module lets you create unlimited loyalty points rules based on the customer’s Cart, Product, or Behavior.
  8. With this reward point plugin, you can set the title, description, the number of loyalty points, start date, end date, and validity for each rule.
  9. You can modify, enable, disable or delete the existing rules from the module Admin settings of the Reward points extension.
  10. The status and detailed history of OpenCart loyalty discount points can be viewed at the backend.
  11. With the OpenCart customer loyalty system, you can easily get into the details of loyalty points earned by the customers of the store. It keeps a list of customers with how many points they have spent, available, and on hold.
  12. The different emails sent for points, credit points cancellation and points redemption can be modified from the back-office of this OpenCart Loyalty reward points module.
  13. OpenCart Loyalty points system is simple to enable or disable from the module Admin settings interface.
  14. The OpenCart loyalty points module is multi-lingual compatible.

2.0 Installation Guide

Once purchased, you will receive the following files in your registered email.

Source code of OpenCart Loyalty Points module in zipped file format.

User Manual of OpenCart Loyalty Points module.

Now to install this on your OpenCart Store, follow the given steps:

Step 1: Unzip the zip file. You will get the folders as shown in the image below

Step 2: Now choose the OpenCart version according to your store and open that specific OC folder. After opening it you will see the following content.

Step 3: Copy and paste the content inside the upload folder inside your Opencart store folder.

Step 4: Go to Extensions and then Installer. From here, you can upload the ” kbloyalty_point.ocmod.zip” (for OC3.0.x) file and install the extension.

So, the OpenCart Loyalty Points Module is now successfully installed and is ready to use at your store. Go to the admin menu and click on the extensions. Choose the Extension Type as Modules. You will find a list of modules. Select the Knowband Loyalty Point Module.

3.0 Admin Interface

The Admin Interface of OpenCart Abandoned cart recovery email extension includes the following main settings:

  • Module Configuration
  • Loyalty Points Rules
  • Loyalty Points Balance
  • Loyalty Point History

3.0.1 Module Configuration

This tab consists of all the module configurationally settings.

3.0.2.1 General Settings

  1. Enable/Disable: Initially, this field of the OpenCart loyalty points module by Knowband will be “OFF”. Admin can enable/disable the Opencart module by turning ON/OFF in this setting.
  2. Point Conversion: In this field, you can set the conversion rate for each currency added to your store.
  3. Minimum Cart Amount: This filed allows you to set a minimum cart amount on which the points can be used or not.
  4. Apply Taxes:  If enabled, the discount generated by the points will be applied to the taxes as well and if it is disabled the discount will not be applied to the taxes.
  5. Order Status for Available points:  If the order status gets the selected status from admin the points will be automatically available to the customer.
  6. Order status for Cancelled points: If the order status gets the selected status from admin the points will be automatically available to the customer.
  7. Cron Settings: Details of the cron are showed, This cron is used to deduct available points from the customer who has not used and passed the expiration date.

3.0.2.2 Points Progression Settings

This allows you to change the language/text as per your requirement of the loyalty points progression statuses. You can change the language for each status in each language added to your store.

3.0.2.3 Email Notification.

In this tab, you can customize the credit, deduct and redeem notification emails for each language.

3.0.3 Loyalty Point Rules

In this tab, you can see all the rules that are created in the store. The Admin can create new rules and edit the existing rules using this tab.

3.0.3.1 New Rule

When the Admin will click on the new rule button, they will be redirected to the New rule page. On this page, you can create a new rule by filling the form.

  • Title: Add a title to the rule in each language added to the store.
  • Description: Add description to the rule in each language added to the store.
  • Rule Type: Select the rule type. It can be a cart, product, or behavior rule.
  • Points: Add the number of points that will be awarded to the customer if the conditions are fulfilled.
  • Rule Start Date: This field will be used to add a Start date for the rule.
  • Rule End Date: This field will be used to add an End date for the rule.
  • Validity: This field is used to add validity to the points which will be added to the customer. You can add no. of days in the field.
  • Rule Status: To enable/disable the rule.

3.0.3.2 Edit Rule

This page is used to edit the rule data. It consists of the following tabs:

  • Configuration: This tab is exactly similar to add a new tab but here you can change the details of the rules except for the rule type.
  • Condition: This tab is used to add the condition to the rule. The admin can add or delete the conditions as per their liking and different rule types have different conditions.

  • Email Notification: This is to add a custom rule notification. This email will be sent if the rule condition is satisfied by the customer and points are awarded to the customer.

3.0.4 Loyalty Point Balance

This tab consists of a listing of each customer that has been awarded points. It will contain a list which will describe how many points are available to the customer, how much are on hold, how much they have spent.

3.0.4.1 Loyalty Point History

When the Admin will click on the edit history button, they will be redirected to the history page which will show all the transactions of the selected customer.

3.0.4.1.1 Edit Point Data

This page can be used to change the point data. This can be used to change the status of the point, point value, point title, and validity. This page is also similar to add a new point data page but this is used to update the data.

3.0.4.1.2 Add New Point Data

This will be opened when the admin will click on the add points button in the balance tab. This is used to add new points to the selected customer.

4.0 User Interface

4.1 Once the module is enabled from the customer can go to their loyalty point dashboard by clicking the Loyalty points dashboard in the account section.

4.2 In the dashboard the customer can see all the point transactions as well as how many points are available to them, how many they have spent and how many points are on hold.

4.3 If the customer has some loyalty points then an accordion will be shown on the cart page where the customer can use those points to convert them into discounts. They just have to click on the redeem now button and the points will be converted into discounts.

4.4 Once the points are redeemed they will be shown in the cart total section and the customer can also cancel points if they want to by clicking on the remove points button.

In case of any issue, drop an email to support@knowband.com OR click here to raise the ticket.

Buy OpenCart Loyalty Points extension: https://www.knowband.com/opencart-loyalty-points

Admin Demo:

Front Demo:

OpenCart Loyalty Points extension from the OpenCart Marketplace:

OpenCart Automatic Related Product – User Manual

1.0 Introduction

With the help of the OpenCart Automatic Related Product extension, the eCommerce merchants can easily get the customers to increase their cart value. Further, this is done by displaying the Related Products block on the front-end. Hence, when the merchant displays related products on the website pages including Product Page, Home Page, Checkout Page, and others. With the help of the OpenCart Automatic Related Product Module, the store admin can easily integrate the feature of displaying related products on the website to generate more sales.

1.1 Benefits for Merchants

  1. This OpenCart related products module helps the admin encourage the customers to increase their cart value.
  2. The OpenCart similar products extension builds potential sales. Thus, by allowing the customers to see what similar options they have in the similar product block, they choose better.
  3. The store admin can showcase absolutely relevant products to increase sales and offer a better store experience to the customers.
  4. The OpenCart related products plugin allows the admin to place the Related Products block in the right place on the website. Further, this is done where the customers can easily notice the products.
  5. There are multiple conditions available for showing similar products in an advanced way.
  6. This OpenCart related products extension allows the store admin to hide the ‘Out-of-Stock products’. In addition, only the in-stock products will be displayed.
  7. With the help of this OpenCart alike product module, the admin can reduce the bounce rate of the website. Moreover, it is done by engaging the customers with similar products.
  8. With the OpenCart advance related product extension, the admin can display new arrivals, bestsellers, and selected products as similar products. In fact, the merchant can show any product in order to promote it.
  9. The OpenCart Automatic Related Product module allows the store admin to display the related products on different website pages. For instance, Home Page, Product Page, Category Page, Cart Page, Manufacturer Page, and Order Confirmation Page.

1.2 Salient Features of the OpenCart Automatic Related Product module:

  1. The store admin can display the relevant products on the different pages of the website. The pages include Home Page, Product Page, Category Page, Cart Page, Manufacturer Page, and Order Confirmation Page. He/she can do it easily with the OpenCart product cross-selling module.
  2. The admin can effortlessly hide the out-of-stock products and display only the in-stock products on the front end. With the help of the OpenCart Automatic Related Product extension, the admin can disable the out-of-stock products from showing on the front-end.
  3. The OpenCart advance related product extension provides the opportunity to the admin to show different categories in the related products block. The merchant can display specific products, top visited products, best sellers, new arrivals or even use the user history for showing the related products.
  4. The admin can easily set the maximum number of the related product to be shown on the different pages. He/she can fix the number from the back-end of the OpenCart similar products extension.
  5. The OpenCart related products extension allows the admin to set the method priority to show the related products.

2.0 Installation Guide

Before beginning the installation, make the purchase of the OpenCart related products plugin from Knowband. Once purchased, the admin will receive the following files on your registered email.

  • The zipped file consists of the source code of this Automatic Related Product extension.
  • User Manual

Next, follow these steps to install the OpenCart Automatic Related Product extension:

The admin needs to unzip the zipped file. This file includes some files and folders and paste them into the “Modules” folder of the store’s directory. Further, the admin can follow the path – Root Directory/modules/.

  • Now in the admin panel, click on Extensions in the left side menu. Then click on Installer (Home->extension).

After uploading the OCMOD file your module will be ready to use.

Now, the store owner can install the Automatic Related Product extension. In fact, as an eCommerce store owner, the admin can find that in Extensions. Follow the image below:

3.0 Admin Interface

The Admin Interface includes the following main settings:

  1. Basic Settings
  2. Home Page Settings
  3. Product Page Settings
  4. Category Page Settings
  5. Cart Page Settings
  6. Manufacturer Page Settings
  7. Order Confirmation Settings

3.0.1 Basic Settings

Through this setting of OpenCart similar products extension, the admin can do a lot of changes. Further, follow below to know all the settings. The screen will look like as shown below:

  • Status: The admin can click on the tab to either enable the OpenCart related products plugin or disable it.
  • Show only in-stock products: When the admin enables this setting, only the ‘in-stock will be displayed on the front-end in the Related Products block. If disabled, both – out of stock and in-stock products will be shown.
  • Show price with tax included: When the admin enables this function, the product prices will include the tax and be displayed to the customer. If disabled, the product prices will exclude the tax from the price.
  • Enter slider Previous/Next button Color: This setting of the OpenCart related products extension allows the admin to change the color of the Previous/Next button color on the front end.
  • Custom CSS: With this setting of the OpenCart alike product module, the admin can add the Custom CSS.
  • Custom JS: With this setting of the OpenCart advance related product extension, the admin can add the Custom JS.

3.0.2 Home Page Settings

  • Enable/Disable Home Page Setting: With this part of the setting for Home Page, the admin can click the button to either enable the function or disable it. Furthermore, the admin can either display the Related Products block on the Home Page or hide it.
  • Block Title: With the Block Title setting, the admin can change the name of the Related Products block on the front.
  • Show Home block title on the front: With this setting of the OpenCart Automatic Related Product extension, the admin can either display or hide the Block Title on the front end.
  • Select Display Column: When the admin clicks on this setting, he/she can show the related products on the content top, left column, right column, or page bottom.
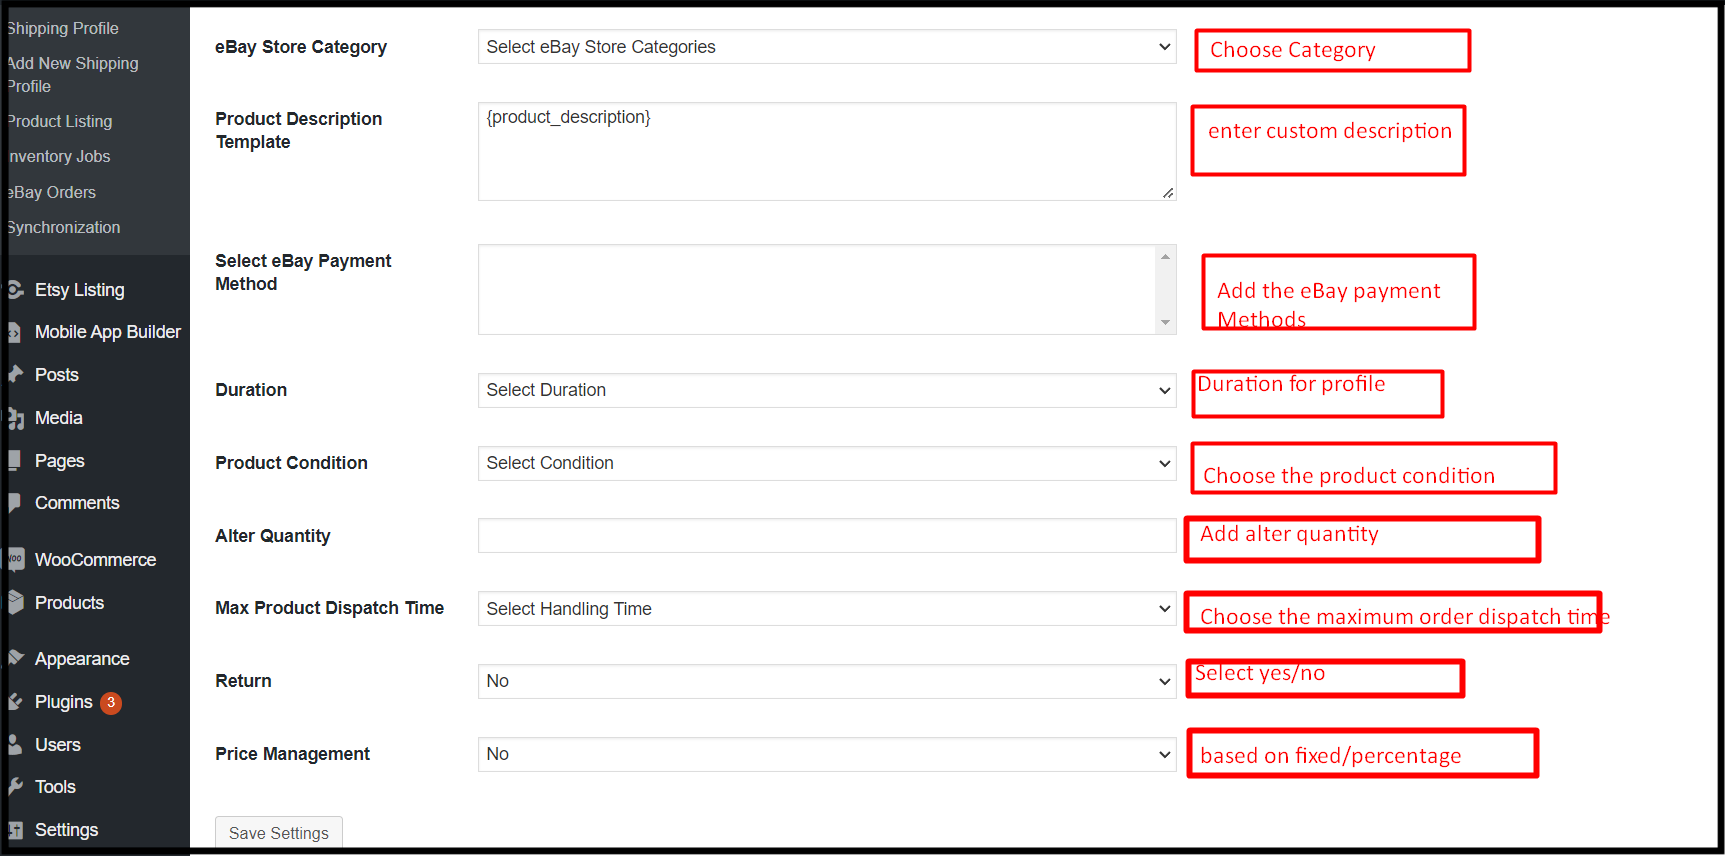
  • Select Display Position: When the admin clicks on this setting of the OpenCart related products module, he/she can change the position of the related products. The Related Products block can be displayed at the top, below slideshow, below featured, or below the carousel.
  • Select Methods: The admin can select the method which has to be displayed on the front-end. There are various methods including top-visited products, bestsellers, new products, user’s user history products, and specific products.
  • Choose Specific Products: In this setting of the OpenCart similar products extension, the store admin can type in the name of specific products that he/she wants to display in the Related Products section.
  • Max Products to be Displayed: The store admin can select the maximum number of products to display as related products.

The store admin can set the priority of the methods. if there is no product on the higher priority method, then the OpenCart advance related product extension will show the product from the lower priority.

3.0.3 Product Page Settings

  • Enable/Disable Product Page Setting: This setting of the OpenCart Automatic Related Product extension allows the store admin to either enable the function of Related Products on the front-end or disable it.
  • Block Title: The store admin can change the title of the Related Products block on the front end with this setting.
  • Show Home block title on the front: This setting of the OpenCart related products module allows the admin can choose to either display or hide the Block Title on the front end.
  • Select Display Column: The Related Products section can be displayed at various columns including top, column left, column right, or bottom of the content.
  • Select Display Position: The store admin can set the position of the related products with this setting of OpenCart similar products extension. The Related Products block can be displayed at the top.
  • Select Methods: The store admin can choose the methods which have to be shown on the front-end. The methods included in this setting are top-visited products, bestsellers, new products, user’s user history products, and specific products.
  • Choose Specific Products: With this setting of the OpenCart related products plugin, the store admin can enter the name of specific products that he/she wants to display in the Related Products section.
  • Max Products to be Displayed: The store admin can select the maximum number of products to display as related products.

The store admin can set the priority of the methods. if there is no product on the higher priority method, then the OpenCart related products extension will show the product from the lower priority.

3.0.4 Category Page Settings

  • Enable/Disable Category Page Setting: The store admin can change the settings for Home Page. If the admin wants to either enable the function or disable it, the admin can do that. By doing so, the admin can either display the Related Products block on the Category Page or hide it.
  • Block Title: This setting of the OpenCart related products plugin allows the admin to change the title of the Related Products block on the front end.
  • Show Home block title on the front: With this setting of the OpenCart alike product module, the admin can choose to either display or hide the Block Title on the front end.
  • Select Display Column: The Related Products block can be displayed at the different columns of the page. The columns can be content top, column left, column right, or content bottom.
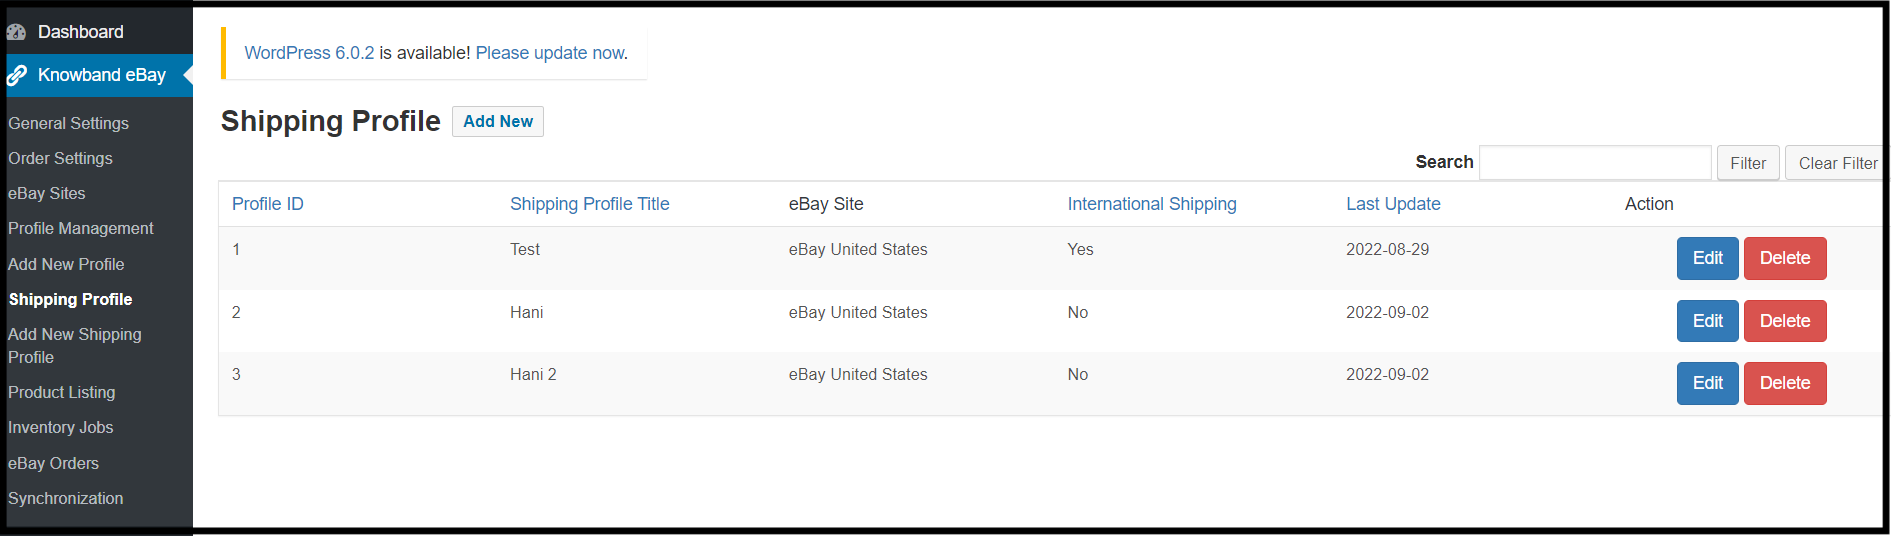
  • Select Display Position: The store admin can set the position of the related products with this setting of OpenCart advance related product extension. The Related Products block can be displayed at the top, below slideshow, below featured, or below the carousel.
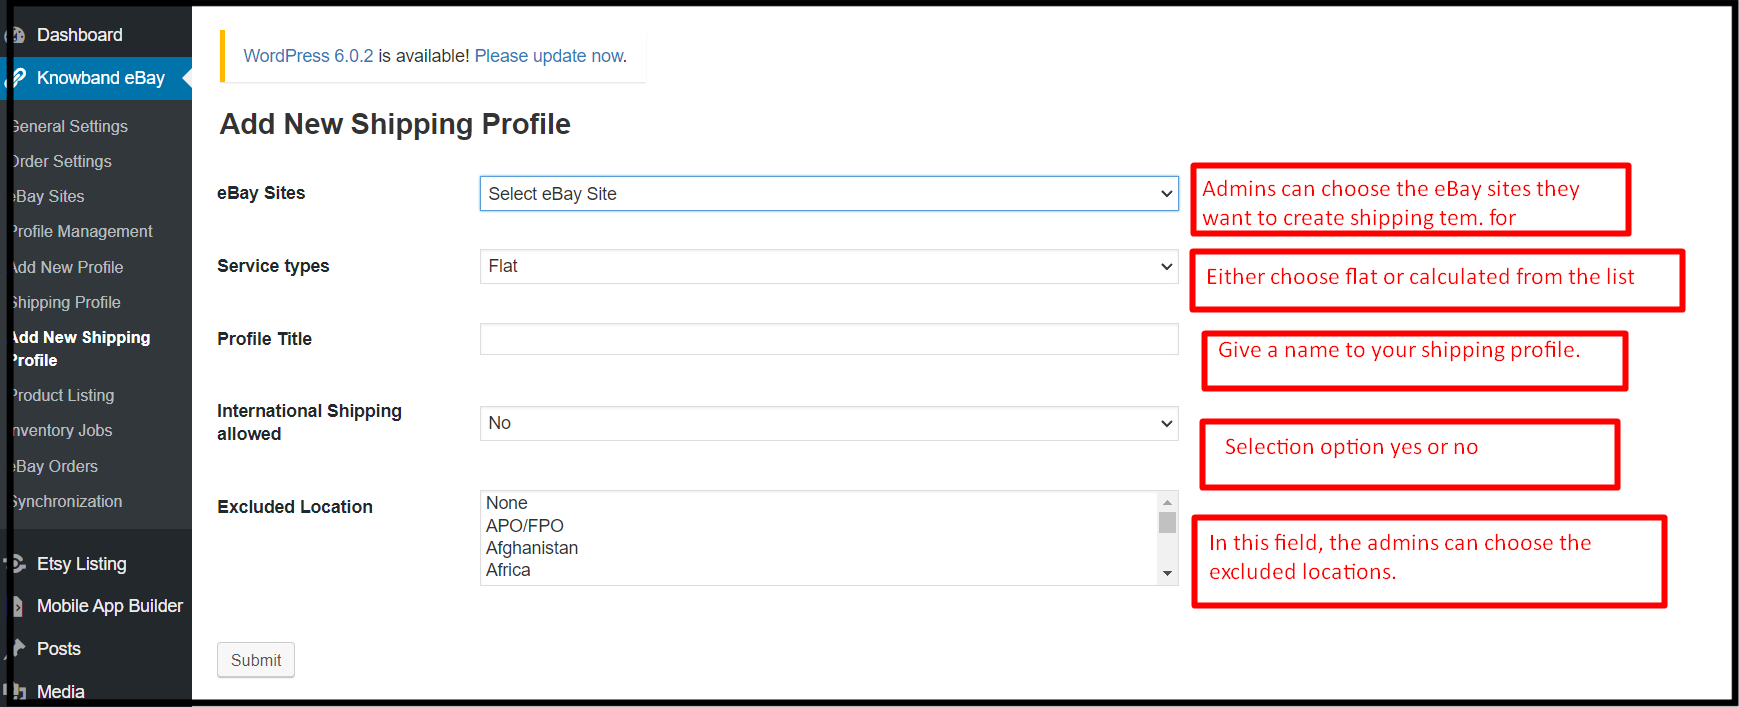
  • Select Methods: The store admin can choose the methods which have to be shown on the front-end. The methods included in this setting are top-visited products, bestsellers, new products, user’s user history products, and specific products.
  • Choose Specific Products: With this setting of the OpenCart product cross-selling module, the store admin can enter the name of specific products that he/she wants to display in the Related Products section.
  • Max Products to be Displayed: The store admin can select the maximum number of products to display as related products.

The store admin can set the priority of the methods. if there is no product on the higher priority method, then the OpenCart Automatic Related Product extension will show the product from the lower priority.

3.0.5 Cart Page Settings

  • Enable/Disable Cart Page Setting: The store admin can change the settings for Home Page. Moreover, if the admin wants to either enable the function or disable it, the admin can do that. By doing so, the admin can either display the Related Products block on the Cart Page or hide it.
  • Block Title: This setting allows the admin to change the title of the Relevant Products block on the front end.
  • Show Home block title on the front: With this setting of the OpenCart advance related product extension, the admin can choose to either display or hide the Block Title on the front end.
  • Select Display Column: The Related Products block can be displayed at the different columns of the page. The columns can be content top, column left, column right, or content bottom.
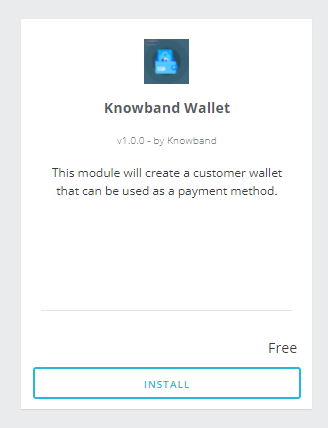
  • Select Display Position: The store admin can set the position of the related products with this setting of OpenCart product cross-selling extension. The Related Products block can display at the top, below slideshow, below featured, or below the carousel.
  • Select Methods: The store admin can choose the methods which have to be shown on the front-end. The methods included in this setting are top-visited products, bestsellers, new products, user’s user history products, and specific products.
  • Choose Specific Products: With this setting, the store admin can enter the name of specific products that he/she wants to display in the Related Products section.
  • Max Products to be Displayed: The store admin can select the maximum number of products to display as related products.

The store admin can set the priority of the methods. Howsoever, if there is no product on the higher priority method, then the OpenCart related products module will show the product from the lower priority.

3.0.6 Manufacturer Page Settings

  • Enable/Disable Manufacturer Page Setting: Using this setting, the admin can either display the function of Related Products or hide it.
  • Block Title: The store admin can change the name/title of the Related Products block on the front with this setting.
  • Show Home block title on the front: With this setting OpenCart similar products extension, the admin can either display or hide the Block Title on the front end.
  • Select Display Column: The store admin can show the related products on the different columns of the page. The columns include content top, left column, right column, or page bottom.
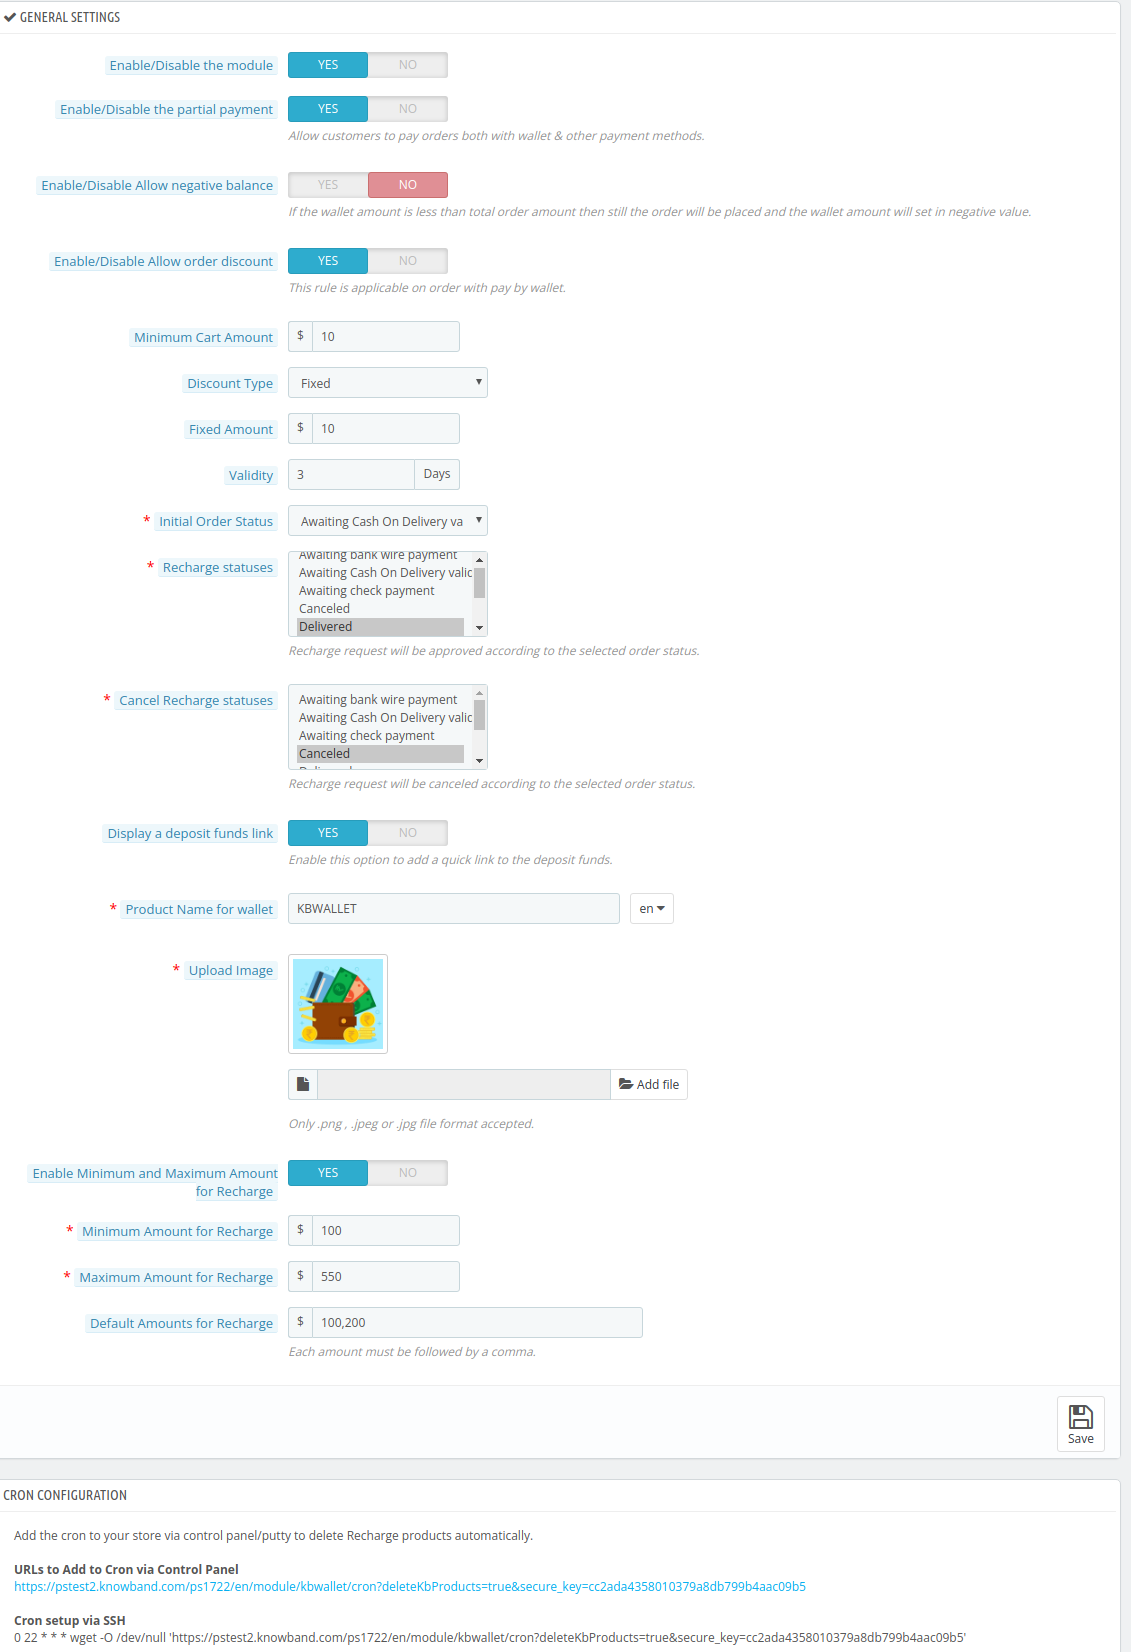
  • Select Display Position: The store admin can change the position of the related products. The Related Products block can be shown at the top, below slideshow, below featured, or below the carousel.
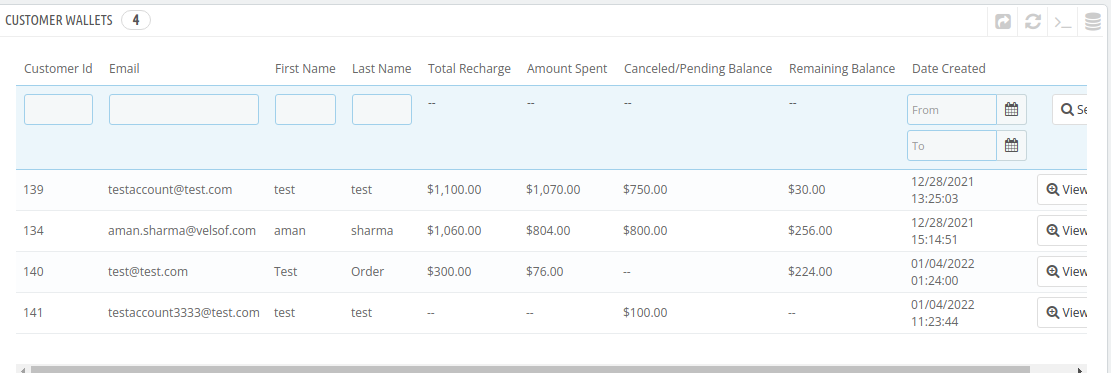
  • Select Methods: The admin can select the method which has to be displayed on the front-end. There are various methods included in this setting. For instance, top-visited products, bestsellers, new products, user’s user history products, and specific products.
  • Choose Specific Products: In this setting of the OpenCart similar products extension, the store admin can type in the name of specific products. The ones that he/she wants to display in the Related Products section.
  • Max Products to be Displayed: The store admin can select the maximum number of products to display as related products.

The store admin changes the priority of the methods. Moreover, if there is no product on the higher priority method, then the OpenCart related products plugin will show the product from the lower priority.

3.0.7 Order Confirmation Settings

  • Enable/Disable Category Page Setting: The store admin choose to either enable the function or disable it from the front-end.
  • Block Title: This setting allows the admin to change the title of the Related Products block using the OpenCart Automatic Related Product extension
  • Show Home block title on the front: With this setting, the store admin can choose to either display or hide the Block Title on the front end.
  • Select Display Column: The Related Products block can display in the different columns of the page. The columns can be top, column left, column right, or bottom of the content.
  • Select Display Position: The store admin can set the position of the related products with this setting of OpenCart advance related product extension. The Related Products block can be displayed at the top.
  • Select Methods: The store admin can choose the methods which have to be shown on the front-end. Furthermore, the methods included in this setting are many. For instance, top-visited products, bestsellers, new products, user’s user history products, same category products from the, and specific products.
  • Choose Specific Products: With this setting, the store admin can enter the name of specific products to display in the Related Products section.
  • Max Products to be Displayed: The store admin can select the maximum number of products to display as related products.

The store admin can set the priority of the methods. Further, if there is no product on the higher priority method, then the OpenCart related products extension will show the product from the lower priority.

4.0 Front-end Interface

The customers can view the related products as shown in the below-mentioned images.

4.0.1 Home Page

4.0.2 Category Page

4.0.3 Cart Page

4.0.4 Manufacturer Page

4.0.5 Order Confirmation

For more, you can visit Knowband.

The OpenCart Automatic Related Product extension Product Page

OpenCart similar products extension Admin Demo link

The OpenCart product cross-selling extension Front Demo link

OpenCart alike product module User Manual link

Please contact us at support@knowband.com for any query or custom change request as per your business requirement.

OpenCart Back in Stock Notification – User Manual

1.0 Introduction

Online shoppers get disappointed when the product they are looking to purchase is out-of-stock. This majorly happens during the launch of a smartphone when it gets out of stock even before the user has added it to his cart. Furthermore, if the shopper is not notified, when the product comes back in stock, the store owner can lose that sale. Hence, this problem can be solved with the help of the simple Back in Stock notification with the OpenCart Back in Stock Extension by Knowband.

1.0.1 What is Back in Stock notification?

A back-in-stock notification is an email that is sent to those users who have subscribed to receive updates regarding an out-of-stock product. When the product is back-in-stock, the shoppers are informed via email about its availability so that they can purchase it as soon as possible or before it goes out of stock again.

Many of the users can miss out on the purchase if they aren’t notified and this eventually leads to some lost revenue.

The sole purpose of the back-in-stock email is to boost your sales. Besides, it helps you drive huge traffic to your website, encourages customer retention, helps you understand the touchpoint of your customers, and builds a strong connection between the brand and the consumers.

To save these missed out sales and make the shopper buy the product when it comes back in stock, You need to mail every shopper which will take a lot of time and effort.

Hereby, the OpenCart Back in Stock Extension will simplify this for you. This module allows the Admin to view all the customers who have subscribed to the product and can send the back-in-stock email accordingly. The admin can also create, edit or use the default email template for notification. The Admin can also choose to whether send a Low Stock Alert email or not via this module.

1.0.2 How does it work?

The working of the OpenCart Back in Stock module is explained by the following points.

  1. If the shopper visits a product page where the product is out of stock, The user will be shown a Back in the Stock box where the user can add his/her email id to get subscribed to that product.
  2. Once a product is subscribed it will be shown to the Admin, Where The Admin can see who and which product has subscribed and whether the email is sent to them or not.
  3. Admin can manually run or schedule the cron file to send the Back in Stock email. The cron file will automatically send the email to the users who have subscribed to the product. It will also check whether the email is not sent to the user already to prevent spam.
  4. If the Admin has enabled the Low Stock Alert functionality, Then Admin can also send the Low Stock alerts via Cron file using a similar process.

1.0.3 Salient Features of the OpenCart Back in Stock extension

  1. The online merchant can use this OpenCart Back in Stock module for sending email notifications of the product back in stock to those users who subscribed for the same.
  2. Admin can enable privacy policy settings and apply the related configurations from the admin interface of this OpenCart Back in Stock module.
  3. In OpenCart Back in Stock module, the online users have an option to view the subscribed products list.
  4. The online merchant can also send low stock alert notifications to the subscribers for the subscribed products.
  5. OpenCart Back in Stock module allows adjusting the color of the notification box as well as the background color of the heading using the color picker tool.
  6. Admin can also enter the custom CSS and JS code for the advanced look and feel management.
  7. The Admin can integrate Mailchimp, Constant Contact email integrator for creating a list of customers for email marketing activities in the future.
  8. The store admin can view a list of highly demanded products from the dashboard section.
  9. The Admin can download the subscriber list in CSV format from the subscriptions tab of the Back In Stock Module.
  10. The OpenCart Back in Stock module offers multi-store and multi-lingual support.
  11. OpenCart Back in Stock module Admin can share subscribed products, in stock, and low stock updates via email. The Admin can easily customize the subject and body of the emails.

2.0 Installation Guide

Once purchased, you will receive the following files in your registered email.

  1. Source code of OpenCart Back in Stock module in zipped file format.
  2. User Manual of OpenCart Back in Stock module.

Now to install this on your OpenCart Store, follow the given steps:

  • Unzip the zip file. You will get the folders as shown in the image below

  • Now choose the OpenCart version according to your store and open that specific OC folder. After opening it you will see the following content.

  • Copy and paste the content inside the upload folder inside your Opencart store folder.
  • Go to Extensions and then Installer. From here, you can upload the ” kbback_in_stock.ocmod.zip” (for OC3.0.x) file and install the extension.

So, Opencart Back in Stock Extension is now successfully installed and is ready to use at your store. Go to the admin menu and click on the extensions. Choose the Extension Type as Modules. You will find a list of modules. Select the Knowband Back in Stock.

3.0 Admin Interface

The Admin Interface of OpenCart Back in Stock extension includes the following main settings:

  • Dashboard
  • Settings
  • Subscriptions

3.0.1 Dashboard

This tab is used to display different types of graphs which can be used to analyze which products are most subscribed, past week subscription, etc.

3.0.2 Settings

This tab consists of all the module configurationally settings.

3.0.2.1 General Settings

  • Enable/Disable: Initially, this field of OpenCart back in the stock module by Knowband will be “OFF”. Admin can enable/disable the Opencart module by turning ON/OFF in this setting.
  • Privacy Policy: Enable this toggle button to display the privacy policy option at the front end. The Privacy Policy will be shown at Notify Me block.
  • Privacy Policy Text: The admin can enter the desired text for a privacy policy. The text can be changed whenever needed.
  • Privacy Policy Page URL: The admin can easily set his choice of URL to the privacy policy.
  • Background Color: Initially, this field of our module will be filled with some default values. Admin can change the background color of the subscription box by picking the color from the color picker that will be reflected on the front end of the OpenCart back in the stock notification module.
  • Border Color: Using this option of the OpenCart back in stock notification module, the admin can set the border color of the subscribed box using the color picker.
  • Text Color: This field of OpenCart back in the stock module allows the admin to change the text color of the notify box.
  • Heading Background Color: This field of OpenCart Back in Stock Extension allows the admin to change the Heading background color of the notify box.
  • Custom CSS: This option of the OpenCart stock alert module allows the admin to write their CSS as per requirement and will be reflected in the front end of this OpenCart module.
  • Custom JS: This field of OpenCart Back in Stock Extension allows the admin to write their JavaScript as required.

3.0.2.2 Initial Email Settings

In this tab, you can configure custom subject and content for the initial email which will be sent to the user for subscription confirmation.

3.0.2.2 Final Email Settings

In this tab, you can configure custom subject and content for the final email which will be sent to the user when the product comes back in stock.

3.0.2.2 Low Stock Email Settings

In this tab, you can configure enable/disable the low stock alert functionality. You can also configure the custom subject and content for the low stock alert email which will be sent to the user when the product goes low in stock than the specified quantity.

3.0.2.3 Email Marketing Settings

To enable/disable the Mailchimp/Constant Contact functionality this tab is used.

3.0.3 Subscription

This tab contains the list of all the subscriptions and It also contains a button that is used to download the CSV file for the subscriptions.

3.0.4 Useful Cron Instructions

3.0.4.1 Reasons/Cases when the email is not sent to the customers

  • Low Stock Alert not sent.

  • Check the product quantity if an email is not sent for a particular product, The product might still be out of stock (quantity = 0).
  • If you have not set up the Cron properly or if the Cron is not working.

3.0.4.2 Types of Crons

Two types of cron can run according to Admin con settings.

  • Cron to send Back in the Stock email: This is used to send the back in stock emails to all the customers in the list of the subscription if they did have already sent them back in stock for the same product.
  • Cron to send the low stock email: This cron will send the low stock alert email if it is enabled from the settings tab. It will check the quantity of the product is lower than the specified quantity in the module settings and If the back-in-stock mail is already sent to the customer then it will send low stock alert mail.

3.0.4.3 Procedure to configure CRON job

What is a cron?

A cron is a service that allows a user to automatically execute a script at a specific time.

For example, you can set a particular PHP script to be automatically executed every day at midnight.

Add the cron to your store via control panel/putty to send reminder mail automatically.

Example URLs to Add the Cron via Control Panel

https://octest.knowband.com/test2.3_1/index.php?route=kbback_in_stock/cron/backStock

https://octest.knowband.com/test2.3_1/index.php?route=kbback_in_stock/cron/lowStock

Cron setup via SSH

10 * * * * wget -O /dev/null https://octest.knowband.com/test2.3_1/index.php?route=kbback_in_stock/cron/backStock

5 * * * * wget -O /dev/null https://octest.knowband.com/test2.3_1/index.php?route=kbback_in_stock/cron/lowStock

4.0 User Interface

4.1

The online users can view an out-of-stock product notification box on the product pages which are out of stock and they can share email id for notification. The subscription block of the OpenCart Back in Stock module would appear as follows:

4.2

When the customer enters the email id and clicks on the button notify me the initial mail is sent to the entered email address and the message showing subscribed.

4.3

OpenCart Back in stock module will prevent the customer from subscribing to the same product twice. It will display an “already subscribed” message on the front end of the store.

4.4

The users can get an email notification when the product is available in stock.

4.5

They can also view a low stock alert email for the subscribed product in the case of running stocks.

In case of any issue, drop an email to support@knowband.com OR click here to raise the ticket.
Buy OpenCart Back in Stock Extension: https://www.knowband.com/opencart-back-in-stock-notification
Admin Demo: https://opencartdemo.knowband.com/3.0/backinstock/admin/
Front Demo: https://opencartdemo.knowband.com/3.0/backinstock/