Magento 2 Mobile App Builder – User Manual

1.0 Introduction

Have you recently migrated to Magento 2.x from Magento 1.x? It’s time to build native Apps for your store. We all are aware that eCommerce mobile apps are one of the most unavoidable needs of online businesses today. So, if you are a Magento 2 store owner and planning to take your website to the Mobile platform, KnowBand has made the job simpler for you. Find out how?

The Magento 2 Mobile App Builder extension lets you upgrade your eCommerce store into a pair of featured & flawless Mobile Apps. The fully functional Android & iOS apps developed with Magento 2 Mobile App Maker would definitely fulfill all the requirements for the growth of your store. This is the most seamless solution for mCommerce development. All you need to do is to specify your business requirements and leave the rest to our skilled development team.
The Mobile Apps for Magento 2 stores developed by this ready-to-go solution provide a flawless and reliable shopping experience to the users. This will definitely boost conversions & sales of your store.

1.1 New Updates:

a) Home Screen Layout Backend Preview:

In the latest version (v1.0.6) of Magento 2 Mobile App Creator, the store admin can preview the home screen layout there only while setting up it from the admin panel. No need to open the app, refresh every time to visualize the changes. Just design your home screen with more ease and change it whenever required.

b) Flutter Update:

We have recently updated our both Android and iOS Mobile Apps to the latest Mobile App Development technology Flutter. Now, users can experience robust speed with all the updated features.

c) QR Code/Bar Code Scanner:

Now, the mobile app users can also search their favourite data by searching via QR/Bar codes. Android and iOS App users can find the updated option on the search page.

d) Video Banner Elements:

Knowband’s Magento 2 Mobile App Builder now includes video banner components on the home page. This feature allows store admins to showcase engaging videos by uploading them directly or embedding YouTube videos, enhancing the visual appeal and user experience of the app’s home page.

e) List/Grid View:

With Knowband’s Magento 2 Native Mobile App Builder for Android and iOS, app users can seamlessly switch between list and grid views while browsing products. This feature enhances the overall shopping experience by offering a flexible and visually appealing way to explore products. Users can easily toggle between the views using the list/grid button available on the product listing pages.

f) Video/Banner Options on Category Product Listing Pages:

The updated Knowband Mobile App Maker for Magento 2 now allows store admins to enhance category product listing pages with video and banner upload options. Admins can upload videos (under 2 MB) or directly showcase YouTube videos, offering a more engaging and dynamic browsing experience. This feature provides greater UI control for the store admin while significantly improving customer interaction and experience.

g) Automated Banner Sliders:

The latest Knowband Magento 2 Mobile App Builder introduces an automated banner slider feature, enabling store admins to configure the sliding interval directly from the module backend. This functionality is particularly useful for the “Banner Horizontal Sliders” on the home page, where admins can add both video and image banners for a dynamic and engaging display.

h) Enhanced Review Section:


The Knowband mobile app offers an enhanced review section. Approved reviews are now displayed with an improved UI, providing a visually appealing and seamless experience for both Android and iOS app users.

i) Login and Sign-up Pop-up option:


Capturing the visitors’ emails is one of the biggest challenges in eCommerce. However, we have simplified this process by introducing the login/sign-up pop-up in the recent Mobile App Builder version.
The store admin can add a login pop-up that will appear for non-logged-in customers, increasing the email opt-in chances by providing simple login options to the users.

1.2 Module Installation

The steps to install the Magento 2 Mobile App Creator module are mentioned below:

  • Buy the Magento 2 Mobile App Builder module from KnowBand.
  • The package has a zipped file that contains the user manual and the source code of the Mobile App Builder Extension. Unzip the package.
  • Create a folder{Magentoroot}/app/code/Knowband/Mobileappbuilder
    Upload the extracted content in the above folder via FTP manager (like Filezilla or WinSCP – download here: https://filezilla-project.org/).
  • Now run the below commands to install the plugin:
    php -f bin/magento module:enable –clear-static-content Knowband_Mobileappbuilder
    php -f bin/magento setup:upgrade
    php -f bin/magento setup:di:compile
    php bin/magento setup:static-content:deploy

The extension is now installed and ready for use. In Admin Panel go to “Knowband > Mobile App Builder”. You can now configure and use the Magento 2 Mobile App Builder module.

2.0 Magento 2 Mobile App Demo

Before going for the purchase of the Magento 2 Mobile App Maker extension, it’s better to test our demo apps.

2.1 View Our Demo Store working on Apps

We have developed two demo apps & set us a demo store for seamless testing of the module before actual Mobile App development. Follow the steps mentioned below:

Step 1: Download and install Nautica Magento 2 Mobile Apps on your testing device. Here, are the links to Magento 2 Android & iOS Apps:
Apple App Store  
Google Play Store

Step 2: Open the App and tap “View Demo” option. That’s it, you can easily test all the app functionalities now.

Note: To access the Admin Panel of KnowBand’s Magento 2 Mobile App Builder on our demo store, visit here.

2.2 View Your Store working on Demo Apps

Want to test your own website on these demo Mobile Apps? We even made that possible in just 3 simple steps:

Step 1: Download & install FREE Magento 2 Mobile App Builder plugin on your Magento 2 website.

Step 2: Install the Demo Apps (links in the previous section) on your mobile device. Open the App & enter your website URL in the “View Your Store” option.

Step 3: Tap “View Your Store” and start analyzing your own website working on our demo apps.

Note: This Free version of Mobile App Builder is just for the demo purpose & no APK/IPA files will be provided with this module. In order to get your own APK/IPA files, you need to purchase the paid version of the Magento 2 Mobile App Builder.

3.0 Build your own Magento 2 Mobile Apps

After successful testing of Magento 2 Mobile App Builder, build a pair of mobile apps for your website. KnowBand has made it as simple as it could get.

Step 1: Purchase & Install Module on your website.
Purchase Magento 2 Mobile App Builder & install the same on your store using your store FTP details.

Step 2: Share your App Specifications
Share some details regarding app development with us through a pre-requisite form.

Step 3: Get Your Android & iOS Apps in 1-2 days
The final APK & IPA files can be shared with you in just 2-3 days. You can review the same & suggest changes (if any).

Note: You can publish these APK/IPA files on respective app stores. Refer to the following links for the same:

How to publish Android app on Google Play Store?
How to publish iOS app on the Apple App Store?

If there is any issue while app publishing, we would get it done for you.

4.0 Admin Panel Screens

After the successful installation of Magento 2 Mobile App Builder, the store admin will get the following tabs for customization:

4.1 General Settings:

  1. Enable the Extension: Enable the Magento 2 Mobile App Builder to make the mobile apps work on the user’s devices.
  2. Redirect to Cart Page when Add To Cart: Whenever any user clicks on Add To Cart button, it will be redirected to the shopping cart screen.
  3. Display Short Description: Enable to display of the short product description on the product screen.
  4. Enable Request Log Reporting: Enable the error log on the mobile apps which is used to identify & rectify any abnormal behavior of the mobile apps.
  5. Show App Preview: This option will show/hide a preview of the app.

  1. Enable/Disable Spin and Win: If you are using Knowband’s Spin and Win module, this option will enable/disable the spin and win pop-up in the apps.
  2. Enable Social Login: This option will enable/disable social login options in the apps.
  3. Enable/Disable Fingerprint Login: Enable Fingerprint login on the Mobile Apps.
  4. Enable/Disable Phone Number Login: Enable Phone Number login on the Mobile Apps.
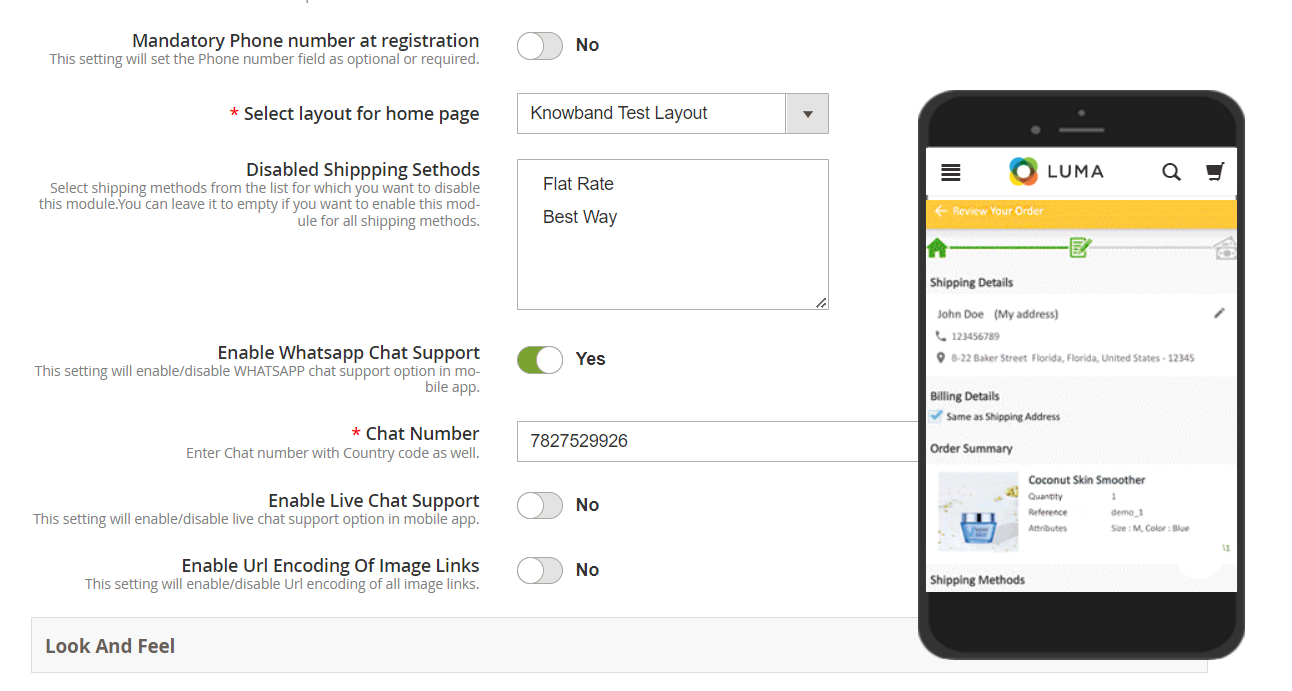
  5. Mandatory Phone number at registration: The store admins can make the mobile number optional/mandatory by the help of the following button.
  6. Select Layout for Home Page: Choose the desired Home Screen layout for the mobile apps.
  7. Display Notifications in App: Show/Hide Notification tab in the app for the customers.
  8. Enable/Disable Login Pop-up: The admin can enable the login pop-up on the home page with this button.

  1. Disabled Shipping Methods: The admins can disable specific shipping methods for the app only from the following button.
  2. Enable Live Chat Support: Enable/disable Zopim(Zendesk) chat option on mobile apps. You need to enter the chat API key provided along with the final apps.
  3. Enable WhatsApp Chat Support: Enable/disable the WhatsApp chat option on mobile apps.
  4. Enable Logo: Enable logo on your mobile apps. You can upload the logo image which will be displayed on the header of the mobile apps.
  5. Select Font of the apps: With the help of the following button, the admins can change the fonts of both Android and iOS Apps.
  6. App Button Color: Choose the button color for your apps.
  7. App Theme Color: Choose the theme color for your apps.
  8. App Button Text Color: Choose the button-text color for your apps.
  9. App Background Color: Choose the background color for your apps.
  10. App Icon Theme Color: Choose the app icon theme color.

4.2 Menu Settings:

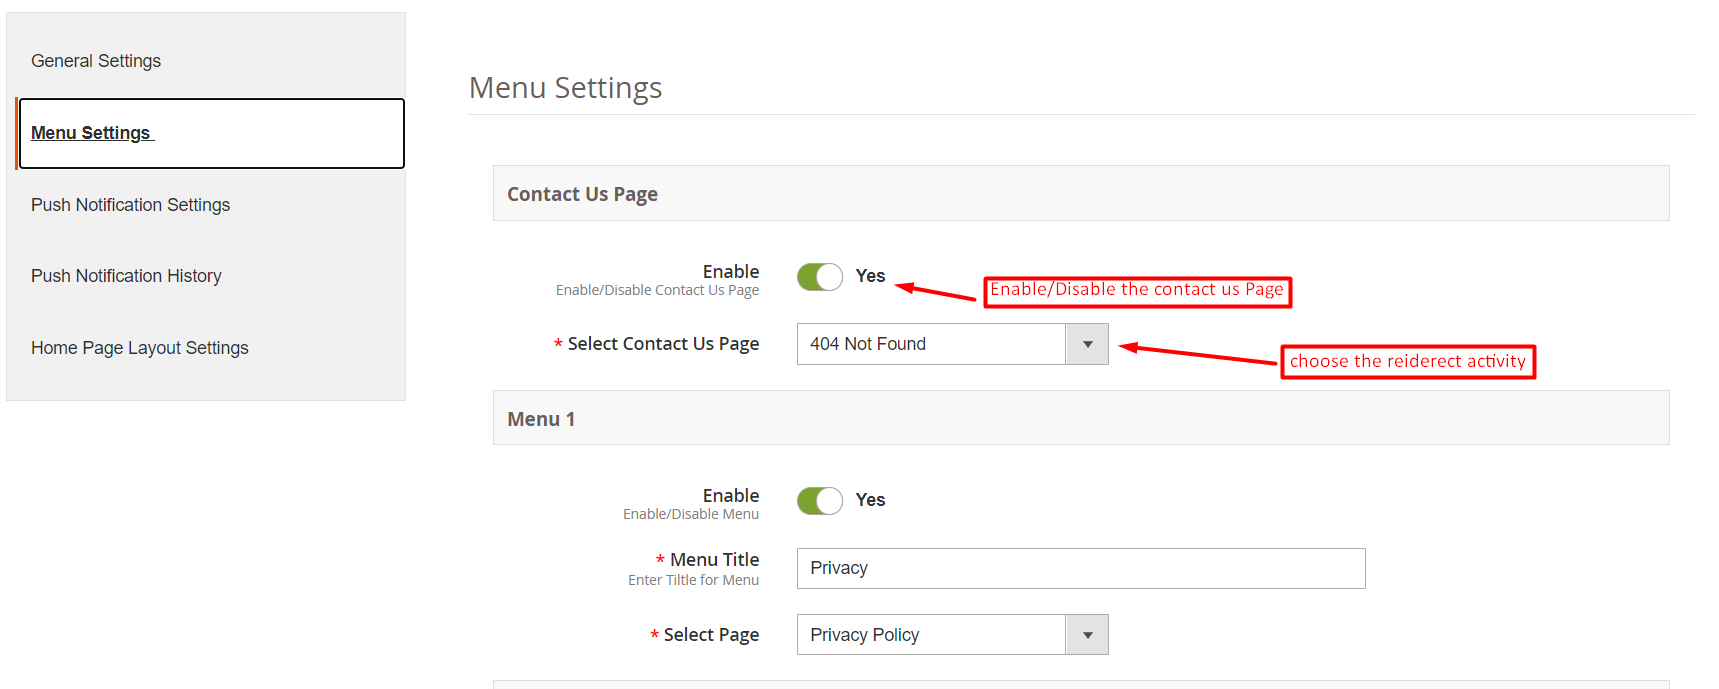
With the Menu Settings tab in Magento 2 Mobile App Maker, you can easily add and manage CMS pages on your mobile app. The Contact Us page can be enabled or disabled as per your preference, and you can also add new CMS pages to the menu. This allows you to provide your customers with easy access to important information such as your store policies, FAQs, and more. Additionally, you can customize the order of the menu items to make it easier for your customers to navigate through the app.
4.3 Push Notifications:

  1. Service Account JSON: With the deprecation of the traditional Firebase push messaging API, it has been replaced by a Service Account JSON file. This section allows admins to configure the JSON file obtained from their Firebase account. You can either set this up on your own, or we will provide the Service Account JSON file during the app creation process for your convenience.
  2. Order Success Notification: Configure automated Order Creation push notification which would be sent automatically to the user’s apps who successfully create an order through your app.
  3. Order Status Update Notification: Configure Order Status Update notification which would be sent automatically to the users whenever there is an update in order delivery status.
  4. Abandoned Cart Notification: Configure automated Abandoned Cart notification which would be sent automatically to the users who left their products in the cart.

4.4 Push Notifications History:

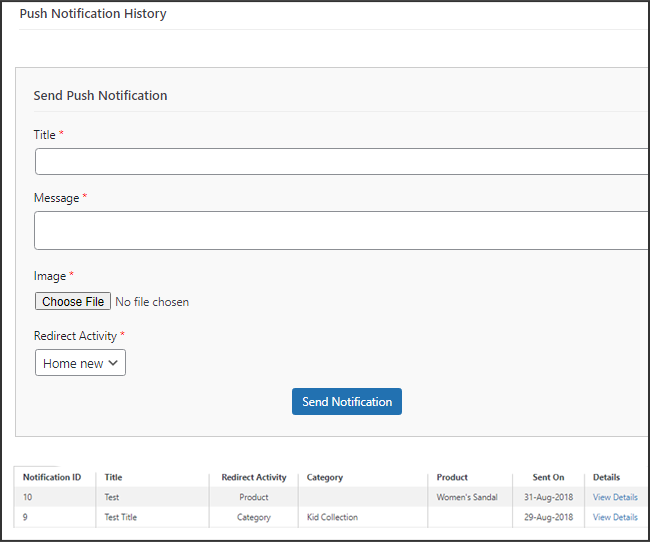
In the following tab, we have provided the option to check all the previously shared notifications along with the date and time. Moreover, by clicking on the send a new notification, the users can also send new notifications to the app users.
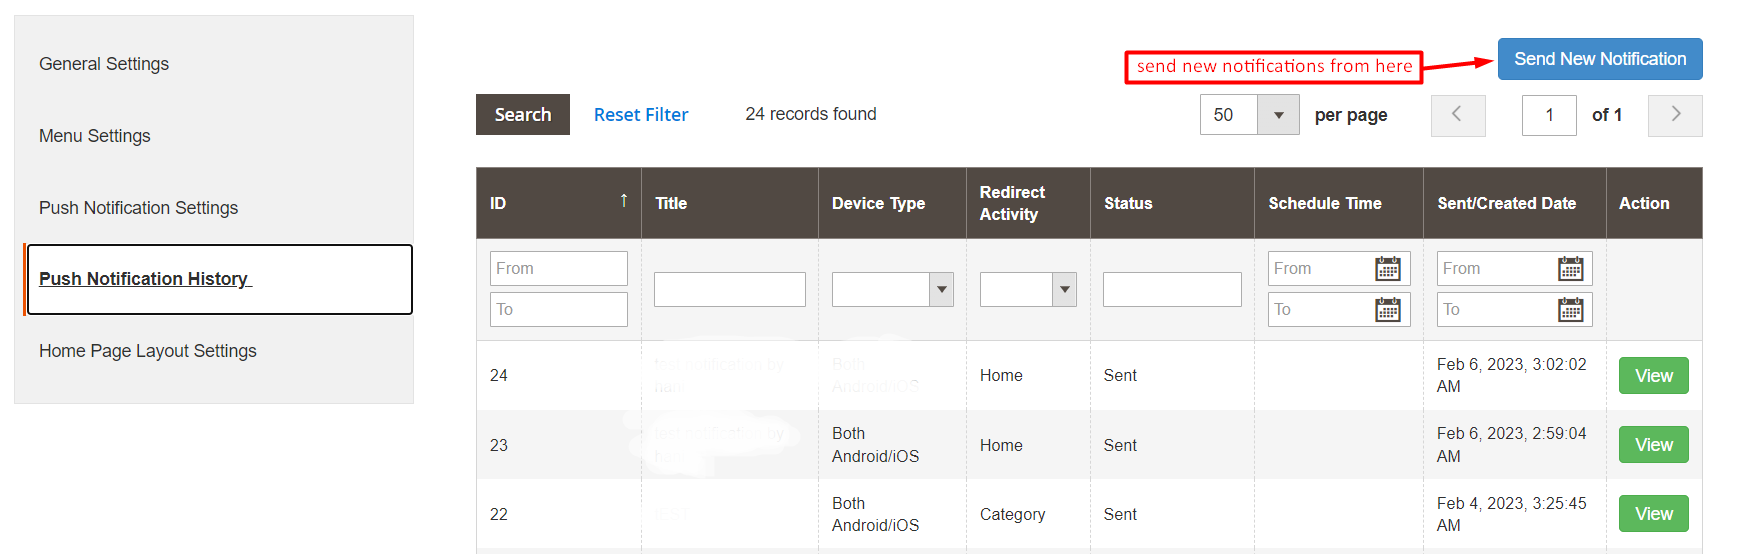
We have also added a special feature in the Magento 2 mobile app Builder module. Now the admins can send new notifications immediately or can also schedule them for the future.  

4.5 Home Page Layout

The Magento 2 Mobile App Builder offers a customizable Home Screen with all sorts of design elements in the module backend. You can create any layout for your mobile app’s Home Screen & offer it to your users.
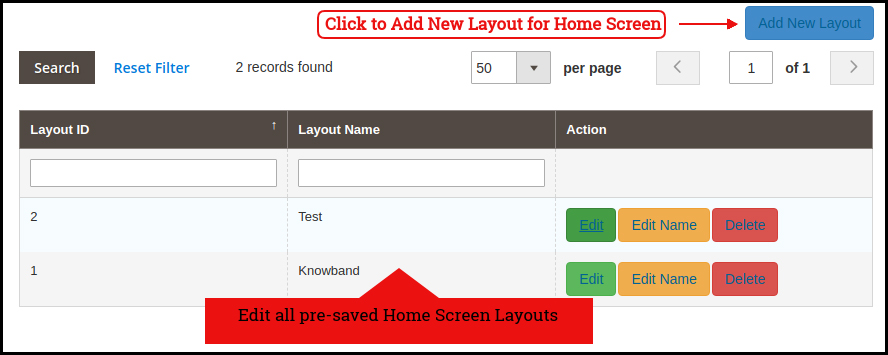
After adding the layout, click on the Edit option & start configuring various designing attributes for your Magento 2 App Home Screen.

The store admin can configure the following design elements under the Home Page Layout tab of the Magento 2 Mobile App Builder:

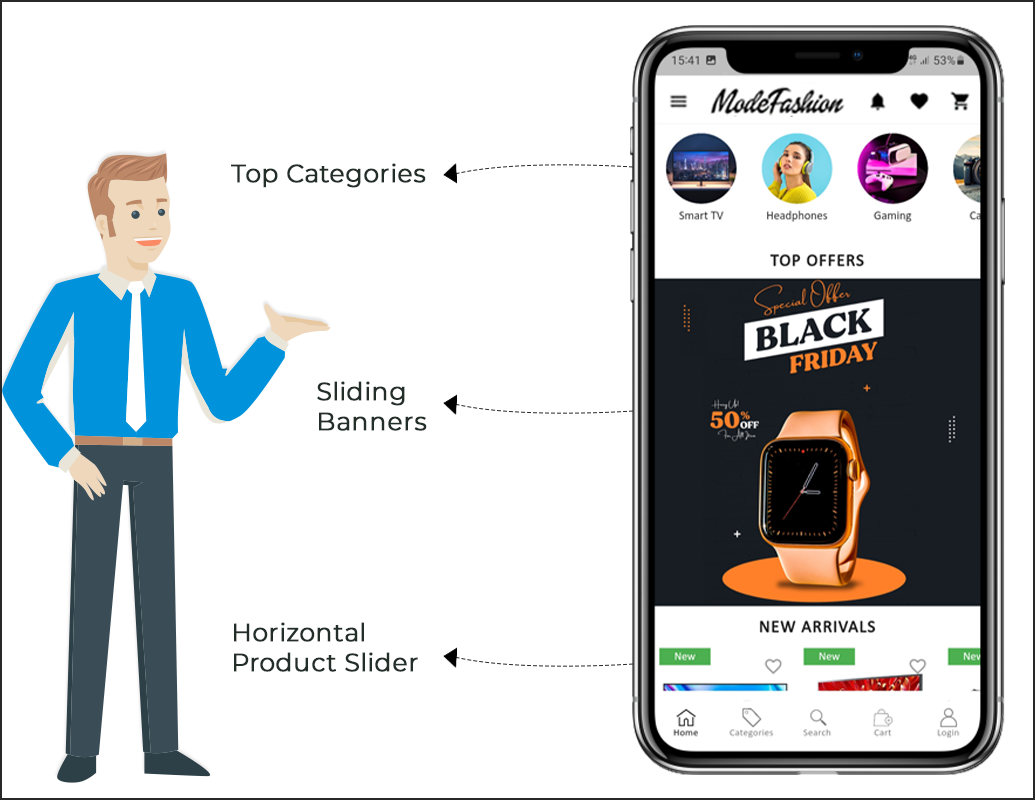
Top Categories:

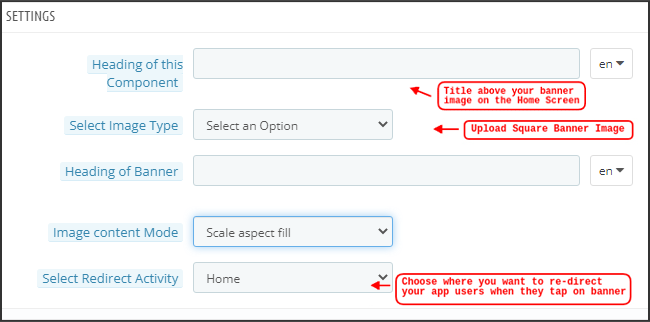
These square-shaped categories can be used to highlight all the major categories of your website on the Home Screen. These categories can be added from the module backend as shown in the below snapshot:
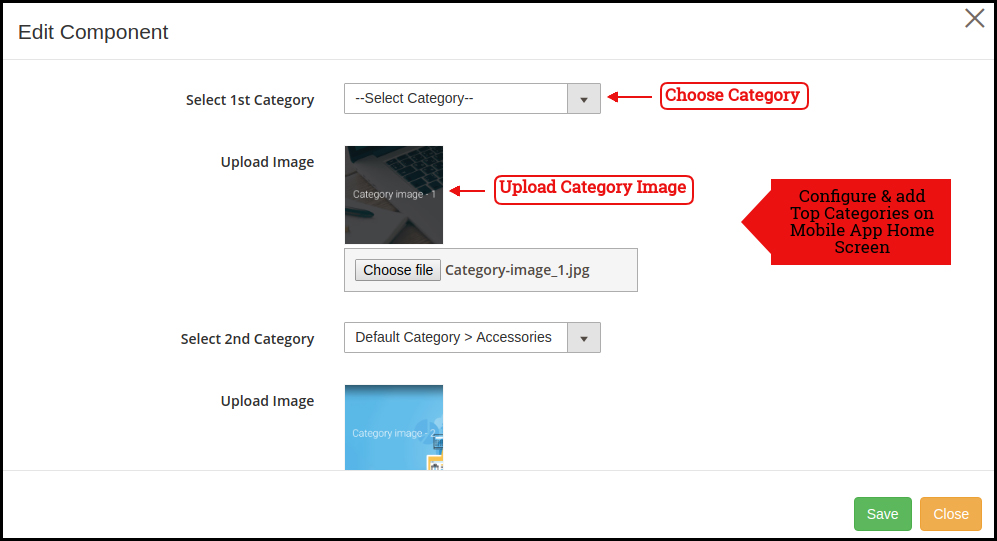
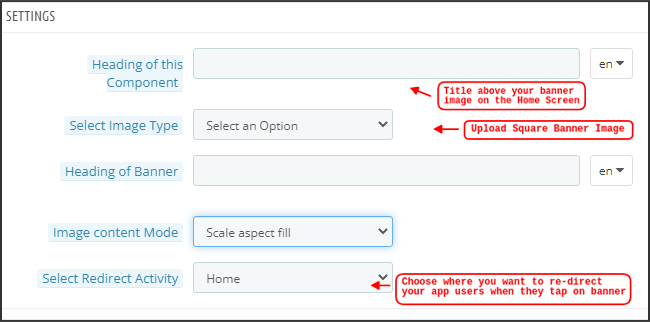
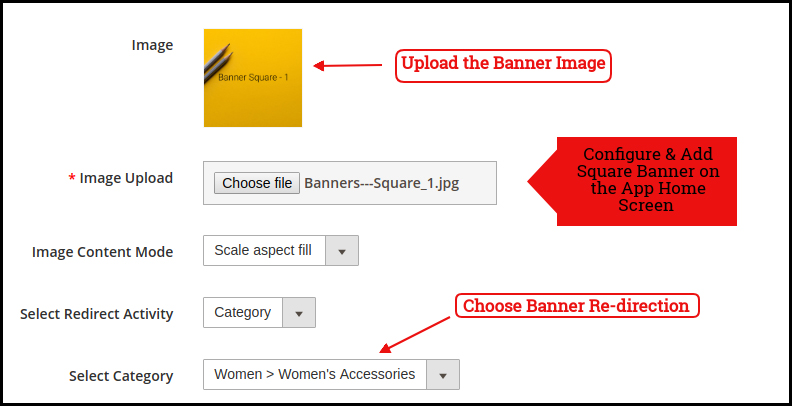
Square Banner:

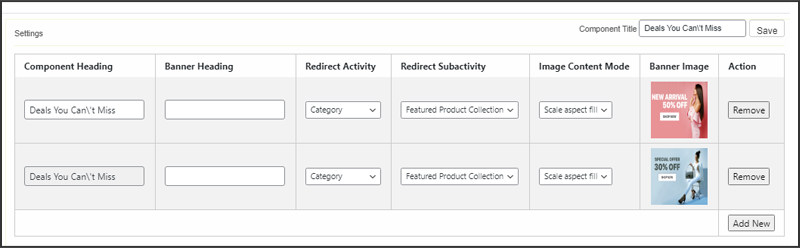
The Banner can be displayed in square form on the Mobile App Home Screen. Now, the store admin can add or upload YouTube videos for the banner square layout components with the relevant options provided in the redirect activity section. The landing page, image can be configured as shown in the below snapshot:
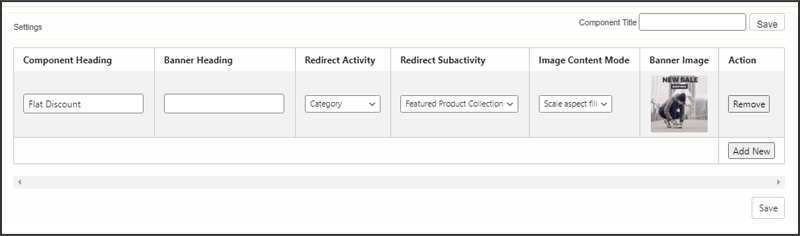
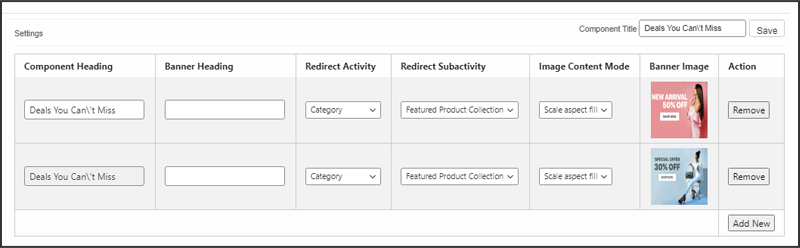
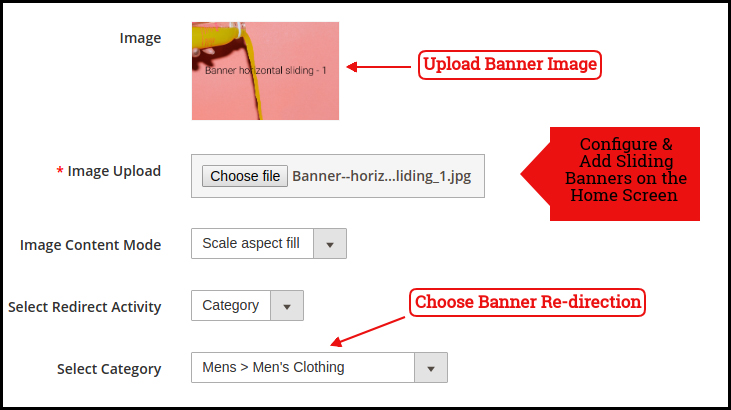
Sliding Banner:

The Magento 2 store admin can also add video elements in the horizontal sliders. We have also provided a time interval section in the recent updates that will allow the admin to configure the interval for the automated banner sliders.
The sliding banners can be displayed on the mobile app Home Screen which can be configured as shown in the snapshot below:
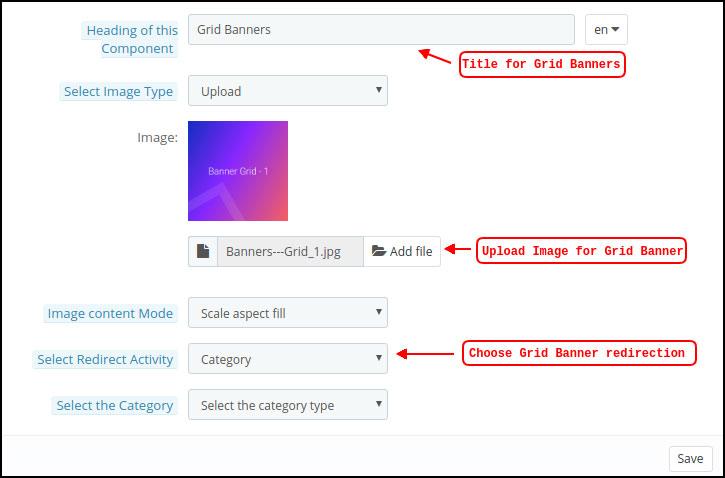
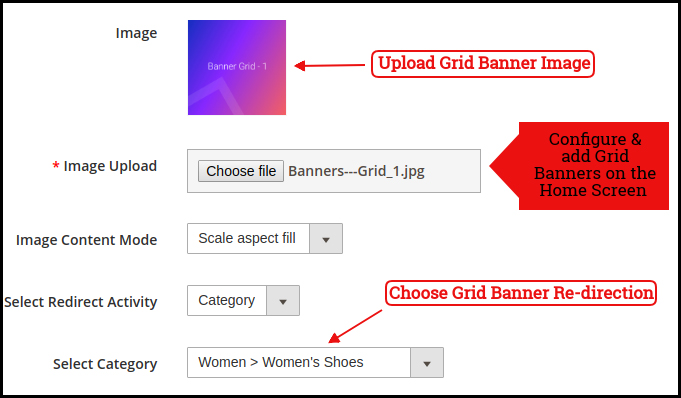
Grid Banner:

Like horizontal banner sliders, the store admin can also add videos in the grid banner layout components. These are the banners for the app home screen displayed in the form of a grid listing & can be customized as shown in the below snapshot:
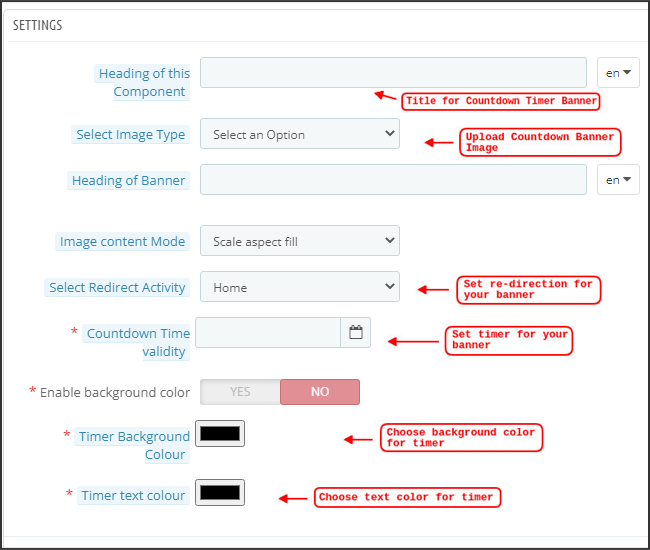
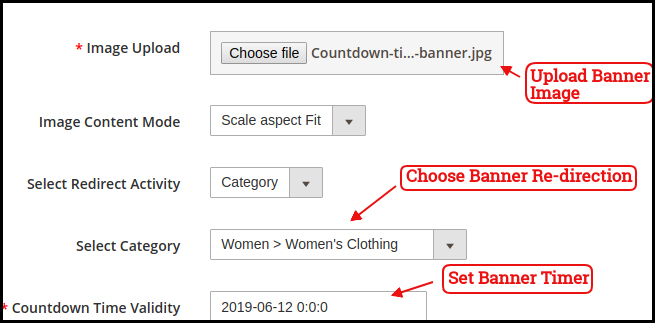
Countdown Timer Banner

Display a countdown timer banner on Magento 2 Mobile App home screens & offer a time-based/flash sale to your users:
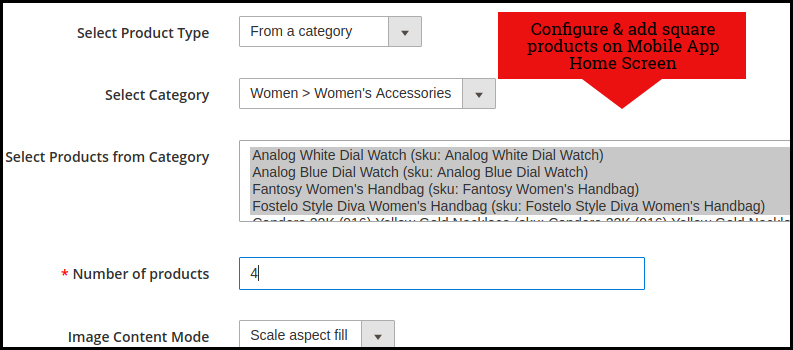
Square Products:

The products can also be listed in the square listing on the Mobile App Home Screen. This can be configured as shown in the snapshot below:
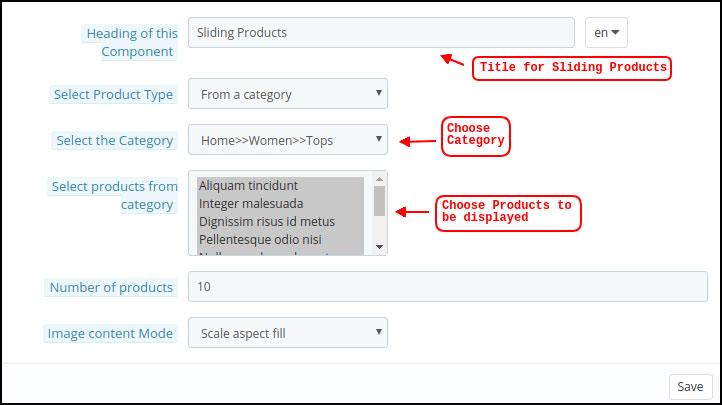
Sliding Products

The products can be displayed in the slider view on the mobile app Home Screen & can be configured from backend panel.
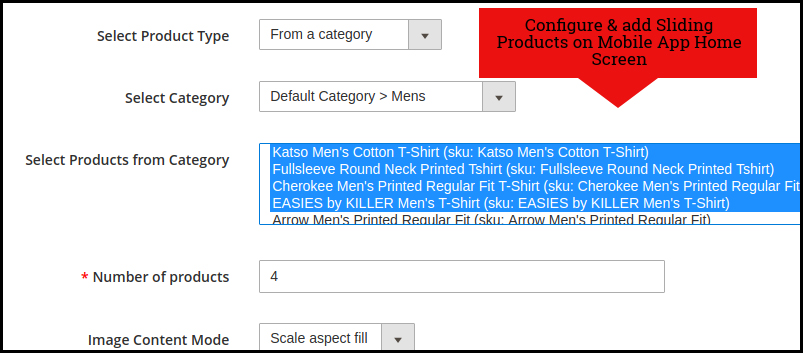
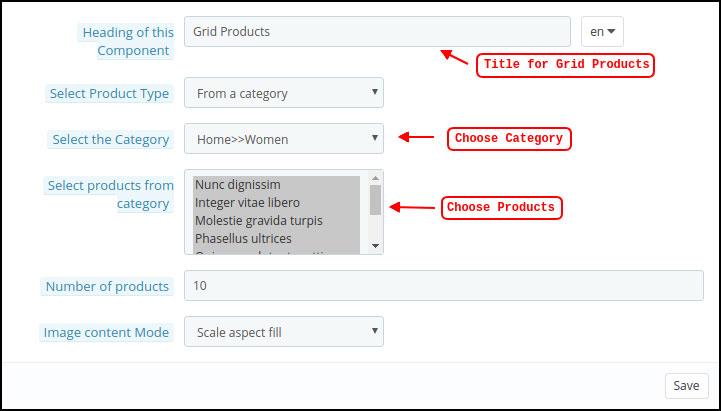
Grid Products:

The products can be displayed in the grid view on the Mobile App Home Screen:
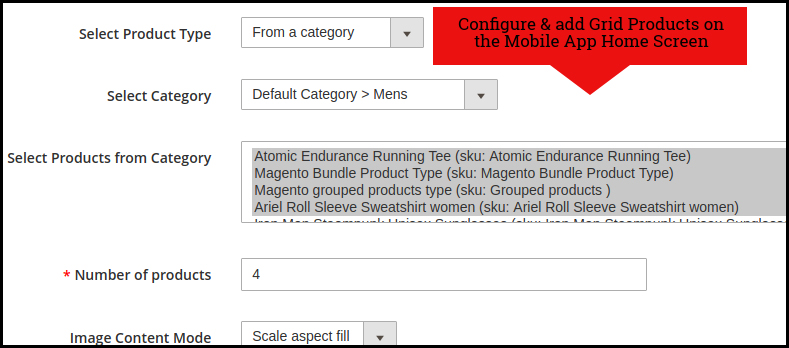
Products Recently Accessed:

The Magento 2 Mobile App Creator offers the recent products tab on the mobile app home screen which displays recent products viewed by the user. You can just add the element in your layout to display the same on the home screen.

Login Pop-Up:

The enhanced Magento 2 Mobile App Maker comes with a login pop-up on the home page. With the help of this layout component, the admin can showcase a login pop-up on the home screen of the app. This pop-up will only appear for non-logged-in users.

Note: The store admin can add up to 20 elements while designing a layout in the backend panel.  

5.0 Mobile App Screens

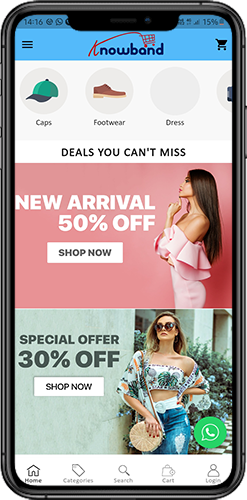
5.1 Home Screen:

The Magento 2 Mobile App Builder brings the complete flexibility to design the mobile app Home Screen on your own. The Android & iOS mobile apps can be designed from the backend panel using the following designing attributes:
–> Top Categories
–> Square Banners
–> Sliding Banners
–> Grid Banners
–> Square Products
–> Sliding Products
–> Grid Products
–> Countdown Timer Banner
–> Recently Viewed Products
–> Login Pop-Up.
–> Video Banner Elements
–> Enhanced Review Page.
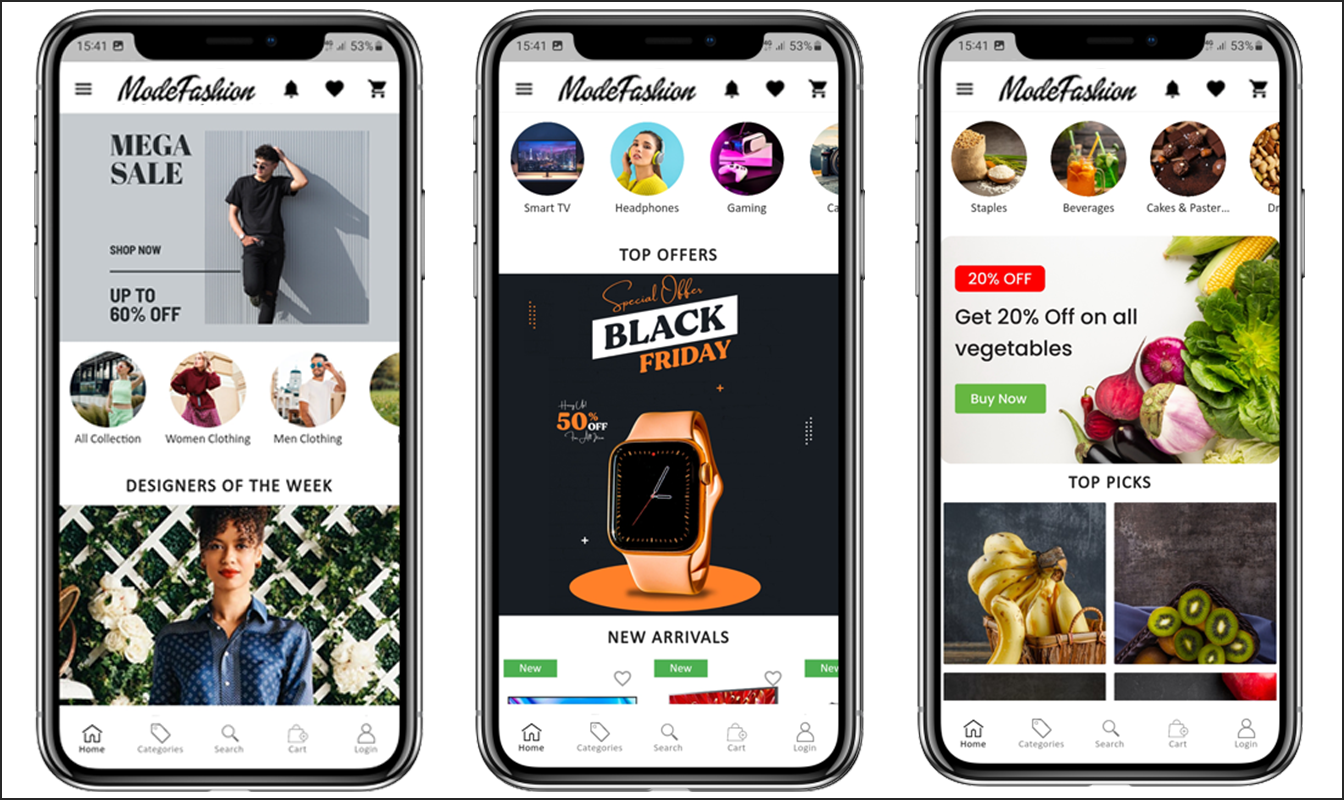
The positioning of all the elements can be changed with a simple drag & drop.

a) Dynamic Layouts: Create & save various alluring & intuitive layouts in the backend & change your app’s look & feel in just one click.

b) Store Logo: Add your store logo image in the module backend & display the same on the header of the apps.

c) Search: The Magento 2 Mobile Apps have keyword search options that allow users to search for products without any hassle. Along with Keywords, the users can also search products via QR and Bar code scanner.

d) Wishlist: Wishlist option in Magento 2 Mobile App lets you bookmark the desired products for future purchases.

e) Shopping Cart: The users can easily access the shopping cart from the top-right corner of the home screen.

f) WhatsApp: The Magento 2 Mobile App Maker offers two live chat options in mobile apps with Zopim & WhatsApp. The app users can directly message you regarding any issue or query regarding purchase.

g) Login-in Pop-up: We have recently introduced the all new login-signup pop-up in Magento 2 Android and iOS Apps. If the customer is not logged in, he simply complete the login/signup buttons provided under the sing-up pop-up.

5.2 Accordion Menu (Navigation Bar)

The Magento 2 Mobile App Maker offers an Accordion Menu in the mobile apps which displays the store categories on the Mobile Apps. Your app users can easily browse all the categories from this menu & access all CMS pages. This menu has the following options:
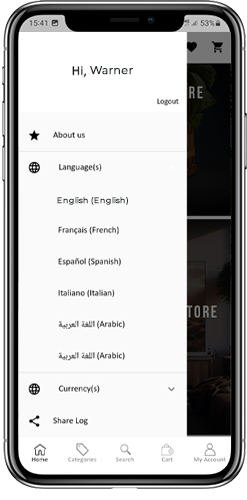
Categories: All sorts of categories on your store are fetched on the Android & iOS mobile apps as well. The apps even offer a multi-level categorization & allow the users to browse products with ease.

CMS Pages: All CMS pages on your store like About Us, Contact Us, Terms & Conditions, etc will be displayed on this Menu.

Language(s): The Magento 2 eCommerce Mobile Apps are both multi-lingual & RTL languages supported. The users can choose the desired app language & the entire app contents will be translated accordingly. Every sort of language available in the store is displayed here under this menu.

Currency(s): Just like multiple languages, all sorts of currency options running on your website will be displayed in Magento 2 Mobile Apps. This allows app users to make payments with the desired currency option.

5.3 Category Screen:
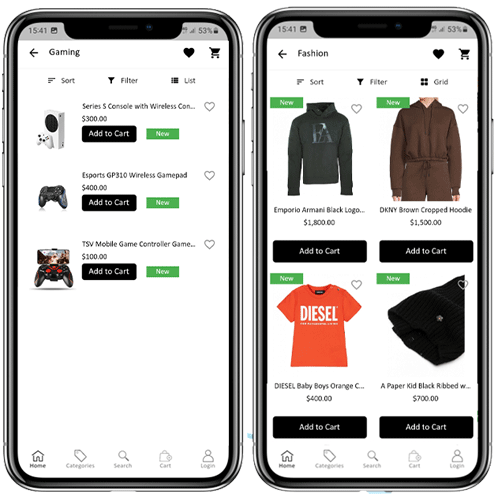
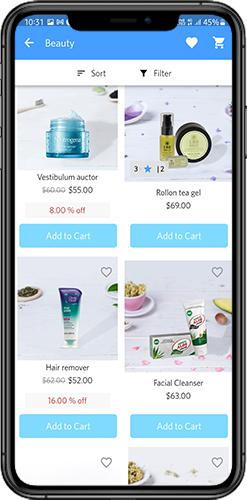
All categories on your Magento 2 website are fetched on the Magento 2 Mobile Apps as well. The category screen of the Magento 2 Mobile App has two views: Grid & List view. This screen has the following options:

Grid & List View:

The products can be displayed in both grid & list view.

Sort:

The sort option in Magento 2 Mobile Apps allows the users to view products in the Low to High or High to Low categories.

Filter:

Filter down the category products with various attributes like price, cost, etc. & search for desired products without any effort.

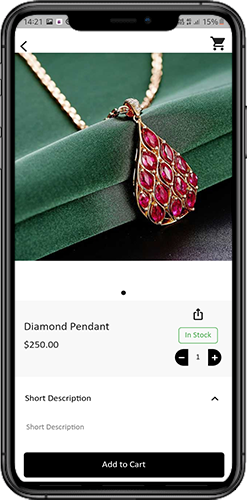
5.4 Product Screen:

The Magento 2 Mobile App product screen is completely clutter-free & appealing. Every product has multiple images displayed along with its name & price. The product availability is also displayed as “In Stock” or “Out Of Stock” along with the price discounts. The Product Screen has the following options:
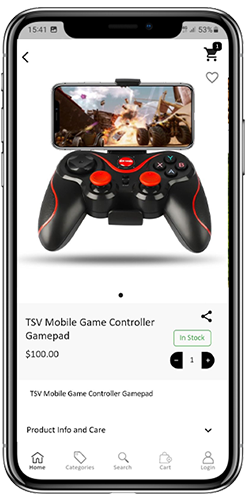
Product Options:
Various options related to the product like size, color, etc. are displayed on the product screen. These options are the same as those available on your website.

Short Description:
Users get to read the short description of your product to quickly make up their minds. The Magento 2 Mobile App displays both short & full descriptions of the products.

Product Info & Care:
All the information related to the specific product is displayed in this section. This is the same information as on the website.

Add To Wishlist:
The users can even add the products to the wishlist bag from here. The products added to the wishlist are bookmarked for future purchases.

Add To Cart:
The Add To Cart button allows you to add products to the cart which can be processed further in successful order creation.

Product Social Sharing:
The Magento 2 Mobile App has the option to share the products on different social platforms, Bluetooth & e-mail. The users can share the products with their friends & relatives & bring potential users to your store.

5.5 Wishlist Screen:
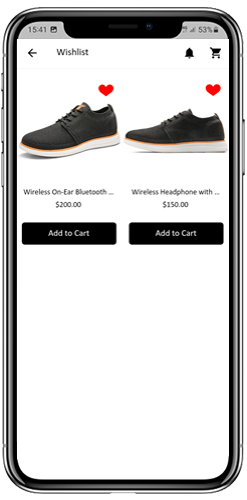
The Magento 2 Mobile App Builder offers a wishlist bag allowing the users to bookmark products for future purchases. The app users can view the list of all wishlist products from this screen. It has the following options:

Add To Cart:
The app users can add the wishlist product directly into the shopping cart with Add To Cart option.

Remove From Wishlist:
The users can even remove any wishlist product with a remove option if required.

5.6 Login Screen

The Magento 2 Mobile App Maker offers various one-tap login with the following options:
1. E-mail Login
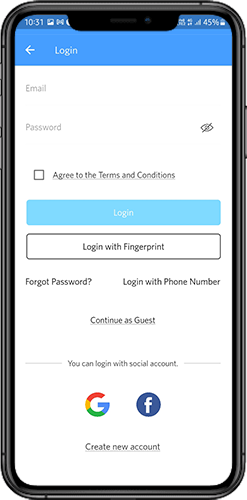
2. Google & Facebook Login
3. OTP & Fingerprint Login

Login:
The Magento 2 App users can authenticate & access using e-mail sign-in credentials.

Sign Up:
All the new users can sign-up & create their account on the store from the mobile App. The sign-up form for the Magento 2 Mobile App is fully seamless.

Login with Phone Number:
Your Magento 2 Mobile App comes up with a phone number login option allowing the users to verify OTP.

Login with Fingerprint:
Your app users also get an option to log in with a fingerprint. This biometric authentication makes the app log in just a matter of a few seconds.

Login with Facebook:
The users can log in to mobile apps using their Facebook Account Credentials.

Log in with Google+:
The users can log in to the app using their Google+ Account Credentials.

5.7 Shopping Cart Screen:

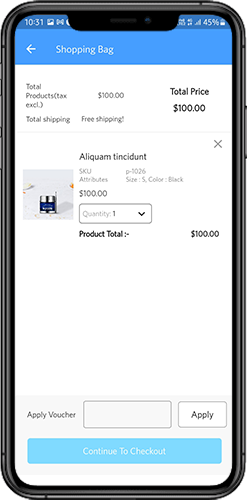
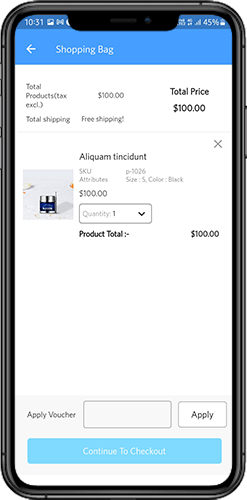
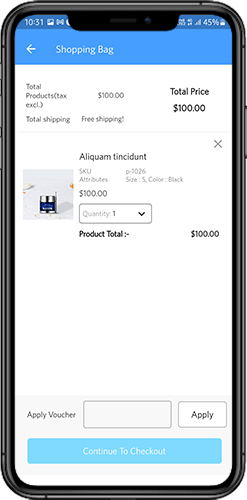
The Shopping Cart screen of the Magento 2 Mobile App will display all products added to the shopping cart. The mobile app users can view Product name, quantity, total price & shipping cost from the cart. The Shopping Cart screen has the following options:
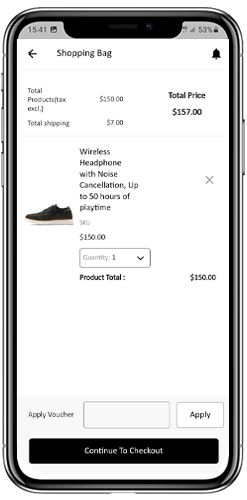
Apply Voucher:
This option allows the users to get discounts & offers by entering valid coupons & vouchers running on your website.

Total Product Price:
The users can view the complete cost of their shopping bag which is automatically updated as per any addition to the cart.

Update Product Quantity:
The users can even update the specific product quantity.

Remove Product:
The app users can simply remove the product from the cart.

Continue Shopping:
The app users can leave the cart to browse more products on your app. The shoppers will be redirected to the home screen by tapping the Continue Shopping option.

Continue To Checkout:
The app users can proceed further to the checkout & payment screens just by tapping the “Continue To Checkout” option. It will redirect users to the checkout screen.

5.8 Checkout Process

The Magento2 mobile app Builder consists of a simplified checkout process. The front-end mobile app users have the option to select shipping details, billing details, order numbers, order comments, and so on in the checkout process of the mobile app.

Users of the Android and iOS apps only need to follow a few simple steps to place their orders.

1. Customers can select the desired product and add it to the shopping cart. After clicking on the shopping bag, he or she can also select the desired product quantity. Moreover, the front-end mobile app users can see the total number of products and shipping costs.

The customer also has the option to apply any voucher and coupon code at the bottom of the same page.

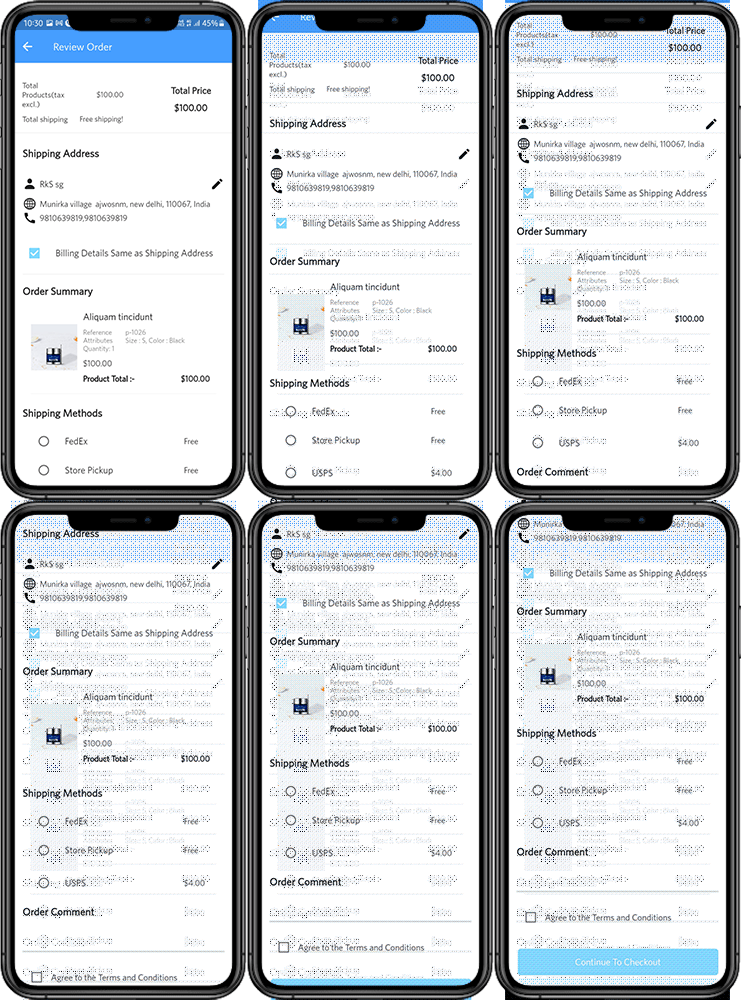
2. After clicking on the Continue to Checkout option, the user can review the order where he or she can see several details. Such as product price, shipping cost, shipping address (It can be edited on the same page), order summary (Number of the products), total price, and so on.

Additionally, the customer has the option to select their preferred mode of shipping on the same page. The user can also put his or her special request or requirement in the order comment option appearing at the bottom of the screen.
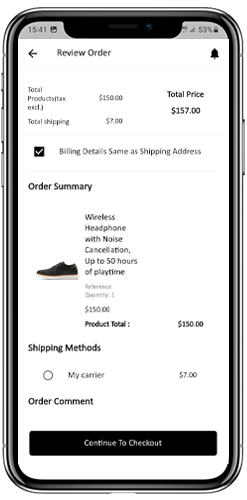

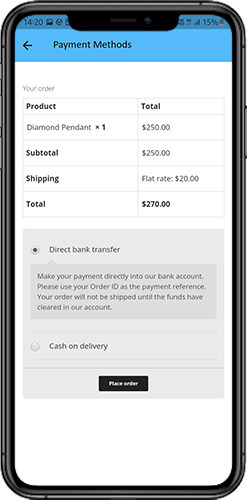
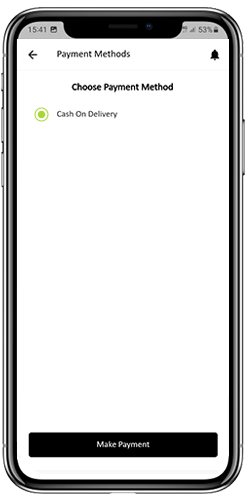
The user will be redirected to the payment method screen after clicking on the continue to checkout option.

On this screen, users have the option to select from all of the website payment options. By default, the shopping app consists of a cash-on-delivery option as a mode of payment.

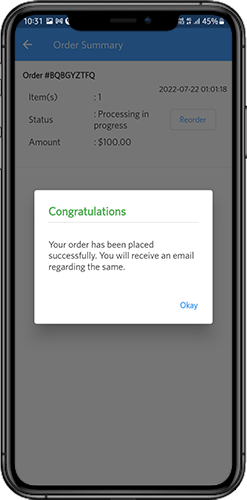
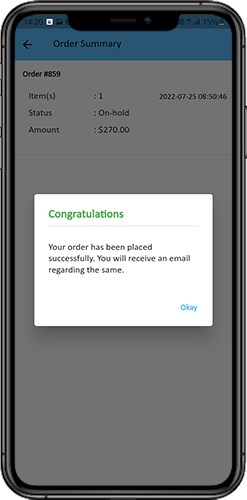
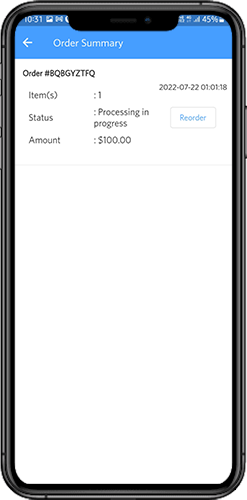
When the user performs the payment activity, then he or she will be redirected to the order summary screen. where the customer can see the order status, order number, amount, and so on. The front-end mobile app users will get the order confirmation popup message on their mobile phone screens as well.
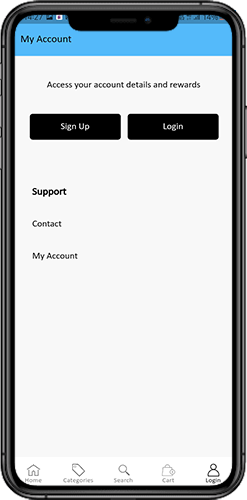
5.9 My Account Screen

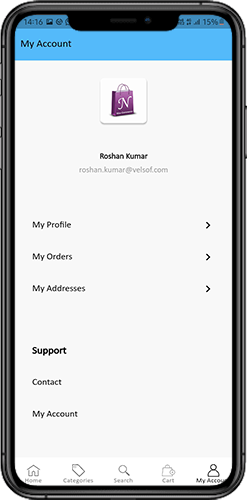
My Account screen of the Magento 2 Android/iOS App allows the users to view the complete account details including a list of all previous orders. This screen has the following options:
Order History:

The users can view the complete details of their past orders, including the date of submission, order reference, pricing, and delivery status.

Update Profile:

The users can update their profile details, such as their first and last name, phone number, and password, using the app’s account settings.

Shipping Address(s):

The users can view all the saved shipping addresses in the Magento2 Mobile App, and they can also add a new shipping address from this screen.

Order Details:

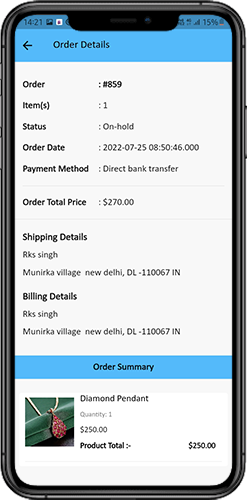
The Magento2 Mobile App allows users to view their order history in the app. The users can see a list of all their previous orders, along with the order date, order number, order status, and total cost. They can also view the details of each order, including the products ordered, shipping and billing address, payment method, and delivery status. This feature makes it easy for users to keep track of their past purchases and reorder products if needed.

6.0 Order Detail Screen

The Order Details screen in your Magento2 eCommerce App displays the complete order details, including the shipping address, product summary, shipping and payment method, and total cost summary. The app users can track the delivery of previously placed orders directly from this screen, providing them with a hassle-free shopping experience.

7.0 Advanced Magento 2 Marketplace with Mobile App

KnowBand’s Magento 2 Marketplace converts your online website into a fully-fledged marketplace. The Magento 2 Mobile App Builder is fully compatible with Magento 2 Marketplace extension. This means you can bring the entire marketplace listing on the same Magento 2 Mobile Apps. Thus, launch a pair of Marketplace-compatible Mobile Apps with KnowBand & attract a large base of sellers & customers to your store.

–> As the user clicks on the Seller option, he/she is redirected to the Seller page of the mobile store. The user can view the list of the sellers in the marketplace along with their ratings.

–> The customers can click on the name of the seller in order to see his profile and the product being offered. The sellers can log in with their username and password. They are then redirected to the dashboard.

Get to know more about Magento 2 Marketplace with Mobile App from here.

That’s it! For More Info on KnowBand’s Magento 2 Mobile App Builder, refer the following links:

Magento 2 Mobile App Builder
Magento 2 Mobile App Builder Admin Demo
Magento 2 Android App Demo
Magento 2 iOS App Demo
Watch how this plugin works?

Magento FB Store Extension by Knowband – User Manual

1.0 Introduction

If you already own a Magento store, you can now start selling your shop’s products to the Facebook community as well. Whether you want to showcase your products on the social platform or you want to drive Facebook audience to your store, you can simply accomplish it by setting up a Facebook Shop. Magento Facebook Store Extension integrates your online store with the Facebook page in just a few clicks and allows you to showcase your products on the Facebook business page.

Connect & Sell to over 2 Billion+ Facebook users with the help of Magento FB Store extension. Store merchants can effortlessly customize the Facebook store product catalog to showcase the best products and offers they would like to sell on Facebook. Using Magento Facebook Shop extension, they can add desired products from the Magento store on their FB Store page and style up the page interface to make it look attractive to the Facebook users. The potential customers can view the store products direct from the FB Shop page and can shop for the desired products by clicking ‘Add to Cart’ button. Clicking the button will redirect them to your Magento store.

1.1 Striking Features of Magento FB store Integration for merchants

The ease in install and configuration of Magento FB Shop extension eliminates the need for any coding efforts, so the store admins can implement FB store on their Magento website without any assistance. Moreover, Magento Facebook shop integration offers other numerous features to the merchant that are listed below:

  • Magento FB Store extension lets you integrate your online shop with your Facebook page which requires a Facebook App ID to setup connection with Facebook.
  • Admin can use the Google Analytics feature to gain the insight of their Facebook Shop page performance using Magento Facebook store extension.
  • With Magento Facebook Shop extension, admin can change the look and feel of the Facebook Store by adding a logo image, multiple sliders, banners on the FB Store Homepage.
  • Additionally, admin can even set a theme color and font color for their FB Store page.
  • Magento Facebook Store Integration module allows admin to show popular, best sellers, specials and new products on their FB Store page.
  • Store merchants can even add a footer to their FB Store to add a store appeal.
  • Magento Facebook Store Setup adds a search field at the top of FB page which allows the customers to search for a particular product and service.
  • With Magento Facebook Integration extension, Admin can easily select the menu items for the configurable navigation bar present at the top of the FB store.
  • Using Magento FB shop integration module, Admin can also set featured products and featured categories on Homepage of their Facebook business page.

 1.2 Magento FB Shop Benefits to Customer

  • Magento FB Store extension offers the ease of browsing and shopping to the customers for the store products while accessing their Facebook account.
  • The ‘Add to Cart’ button added using Magento Facebook Integration extension automatically redirects the customers to the Magento eCommerce store.

1.3 Technology for Development

Language: PHP
Frame Work: Magento

2.0 Installation Guide for Magento Facebook Store Extension

The store admin can follow these simple steps for installing the Magento FB Store extension:

1. First of all download the extension package from the Knowband store.
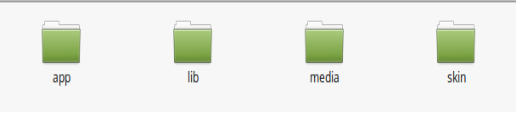
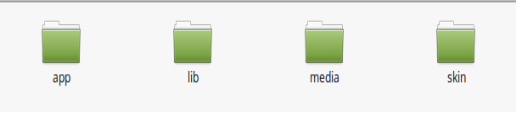
2. You will get a zipped file containing the source code and user manual. Unzip the package on the root folder of your Magento setup via FTP manager (like Filezilla or WinSCP – download here: https://filezilla-project.org/). You’ll find the files and folders as shown in the image below:

The extension is now installed and ready for use. Now the store admin can now use and configure the Magento Facebook integration extension.

3.0 Admin Interface of Magento FB Store extension

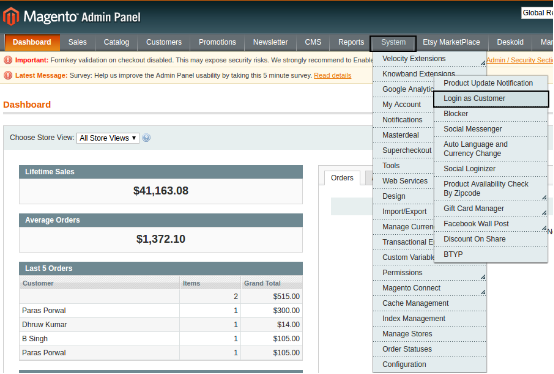
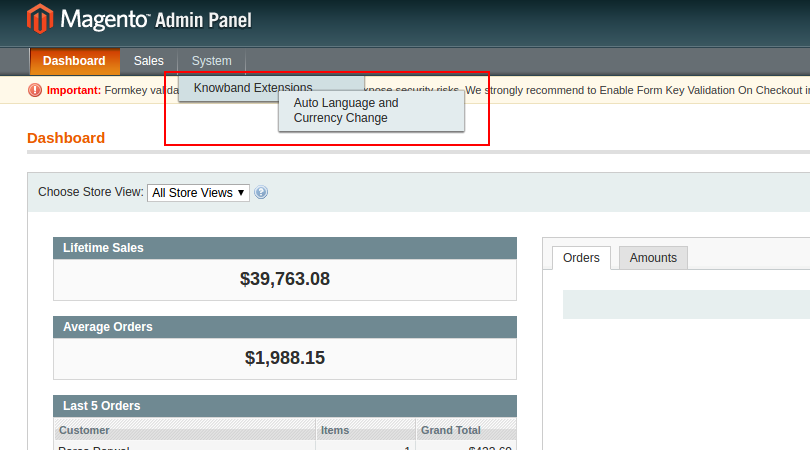
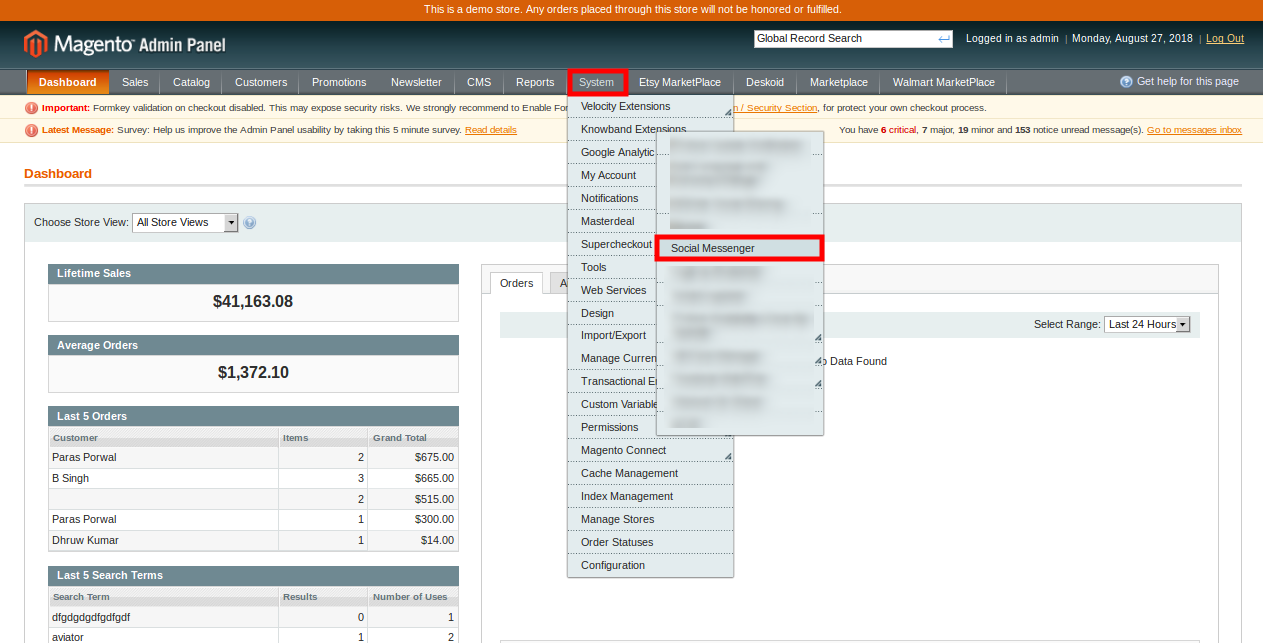
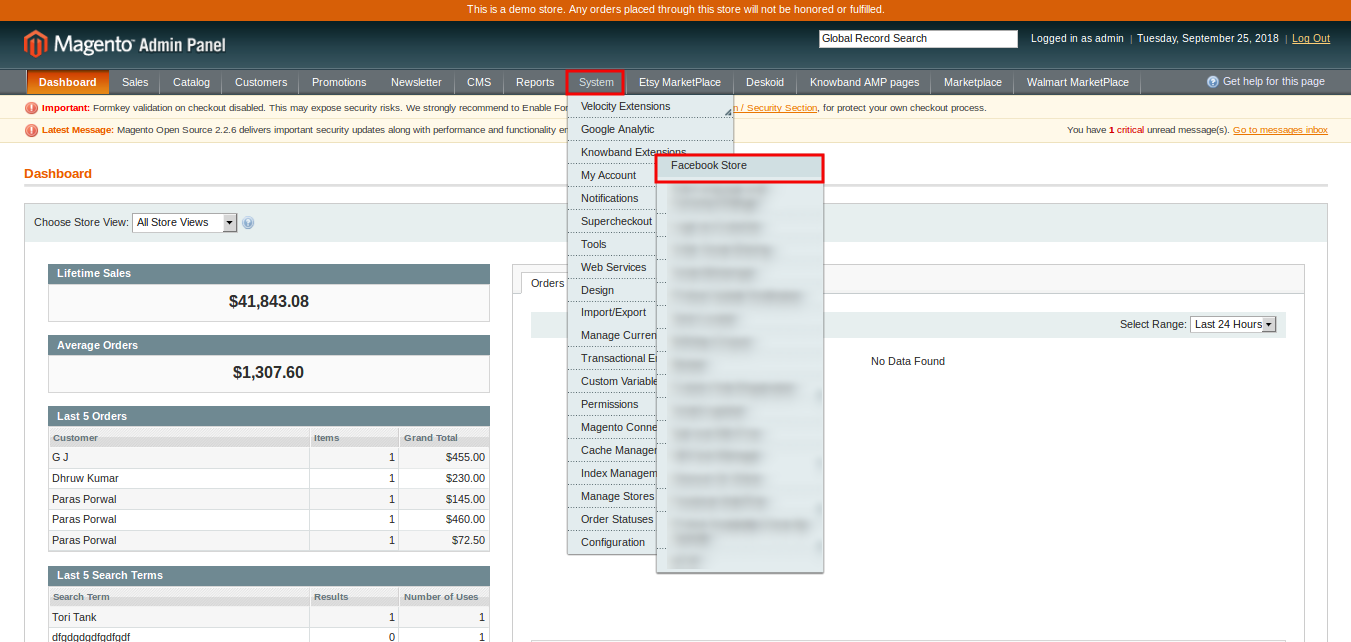
Just after successful installation of Magento Facebook Store Setup on the Magento site, you can configure the FB Store module as per your needs.  In the Admin Panel, go to System > Knowband Extensions > Facebook Store.

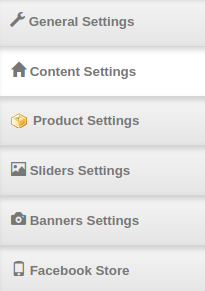
This Knowband extension offers you the following sections:

  1. General Settings
  2. Content Settings
  3. Product Settings
  4. Sliders Settings
  5. Banners Settings
  6. Facebook Store

Each Tab of the Magento FB store extension are discussed below:

3.1 General Settings

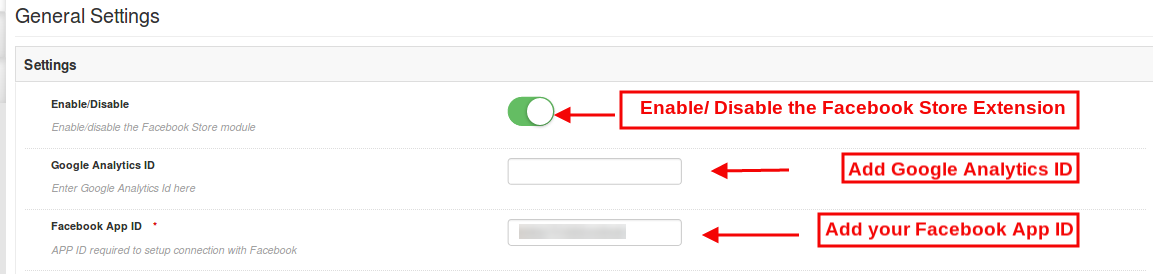
On clicking on the General Settings tab, you will see the following options as given below:

Initially, the above fields are set to their default values.

  1. Enable/Disable: Initially, Magento Facebook Shop extension is enabled, you can disable its functionality by turning OFF this setting.
  2. Google Analytics ID: You can enter the Google Analytics ID in this section and track the traffic and performance of your Facebook shop in Google Analytics.
  3. Facebook App ID: Input the Facebook App ID required to setup connection with the Facebook. Admin can generate Facebook ID and add it to their Facebook Store. Refer the section 3.1.1 to obtain the Facebook App ID.

After this, click on the “Save” button shown at the top right corner of admin panel to save the module settings.

3.1.1 Steps to generate Facebook app ID

In order to generate Facebook app id please follow these steps:

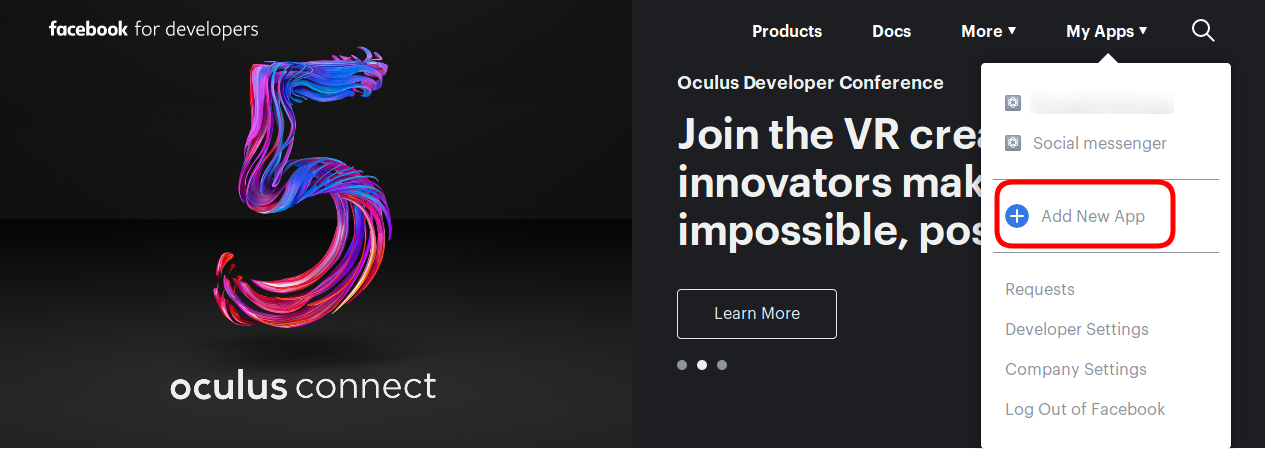
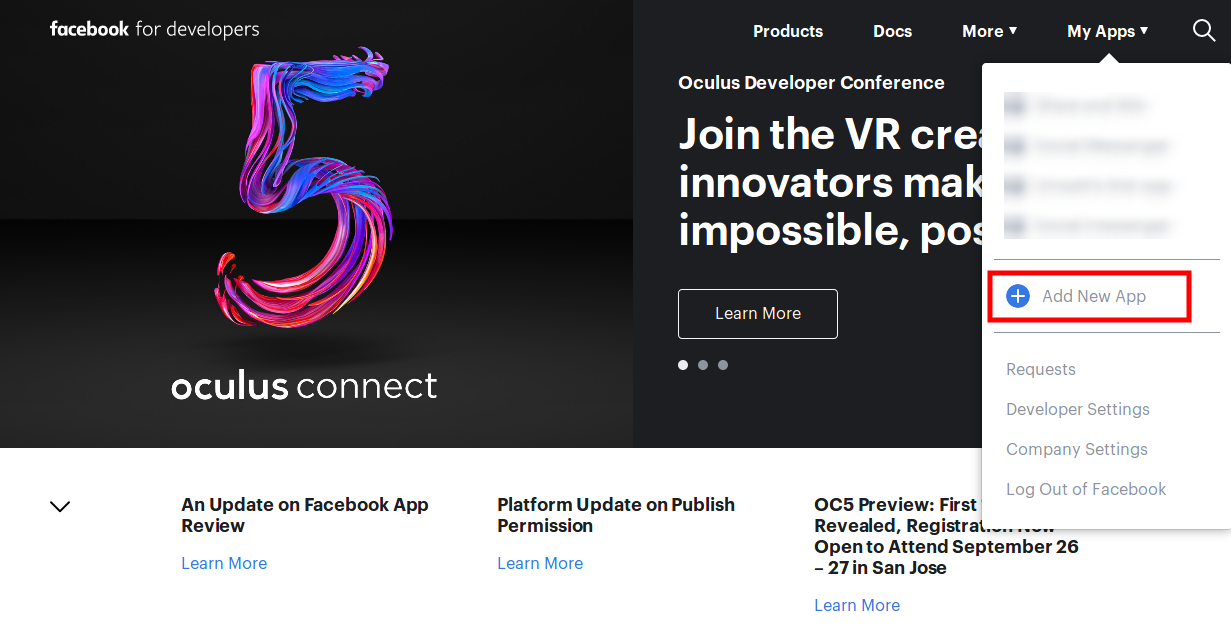
  • First of all log-in to the Facebook account and go to the link mentioned here: https://developers.Facebook.com/
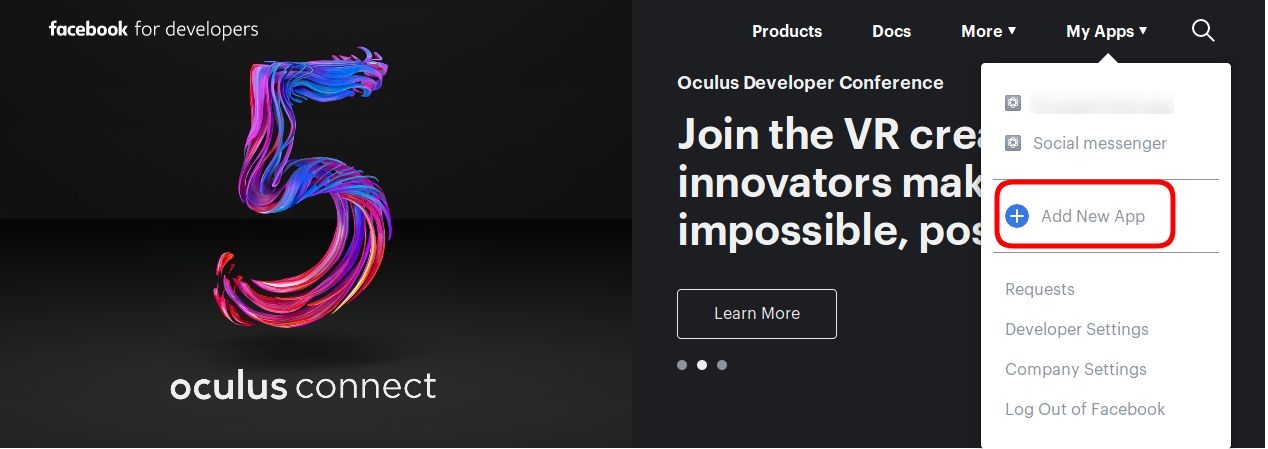
  • Go to “MY APPS” and click on the ”ADD NEW APP” option.

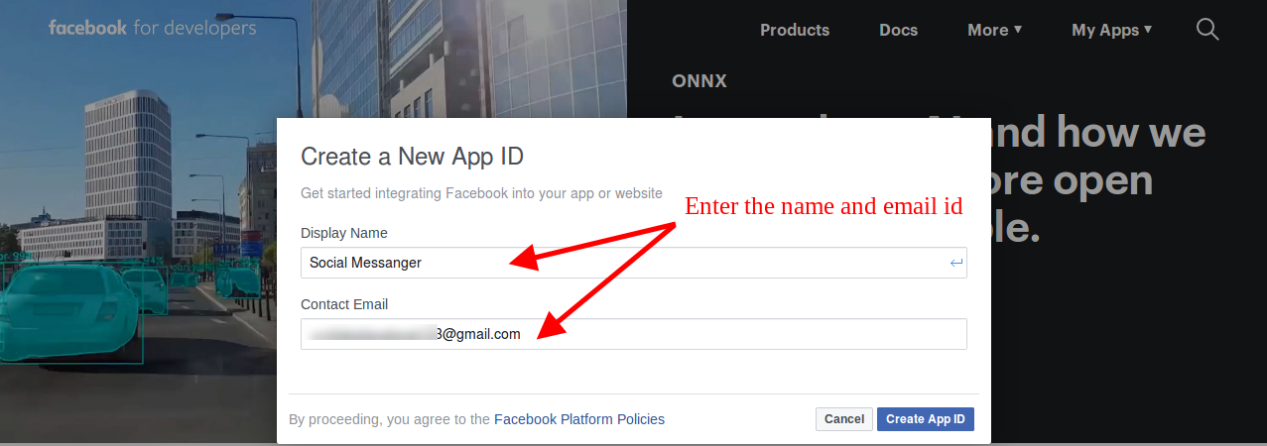
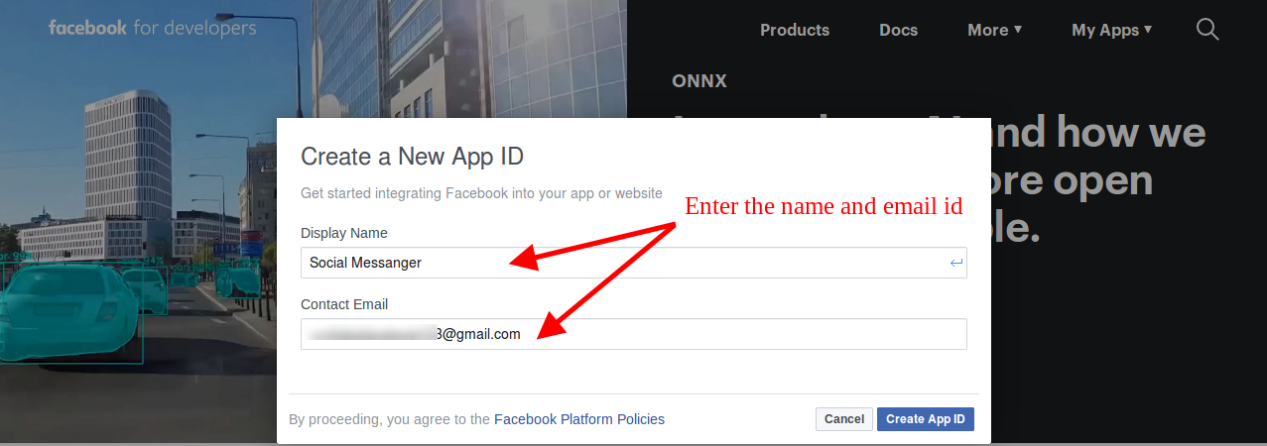
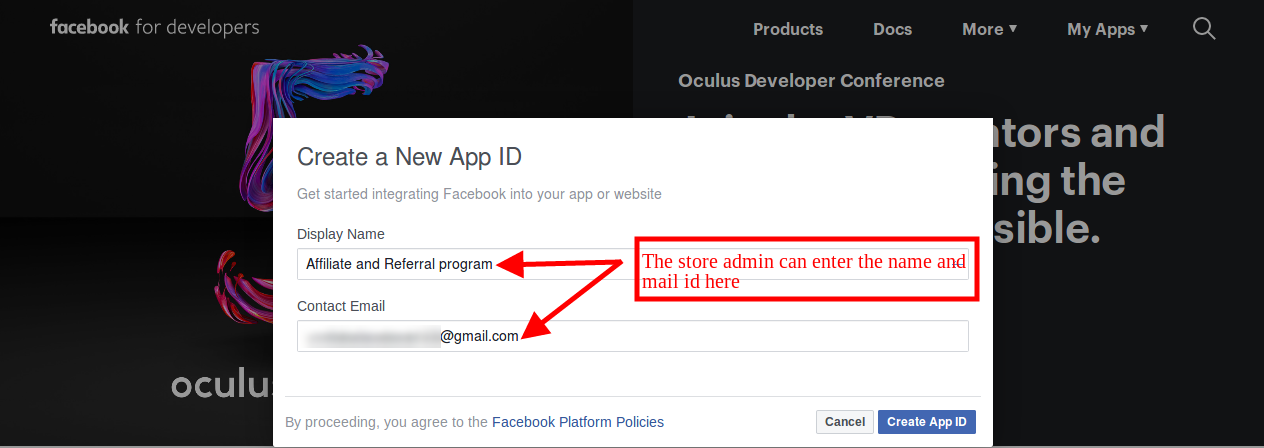
  • Enter the details in “Display Name” and “contact email ID”. After that, click on the “Create APP ID” button.

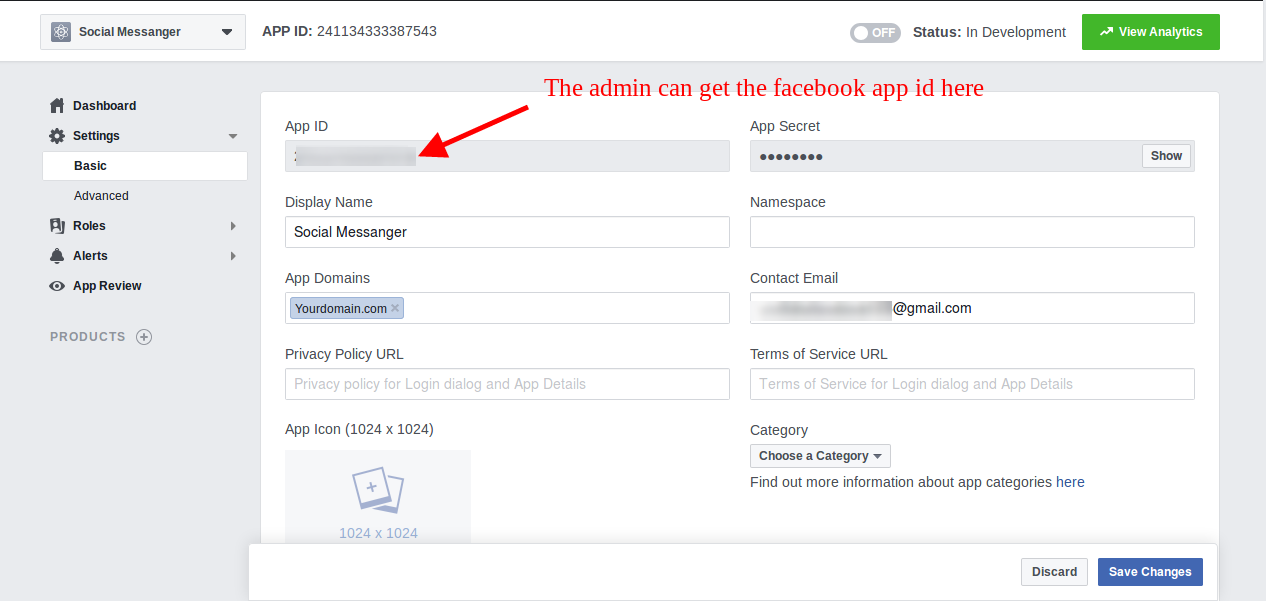
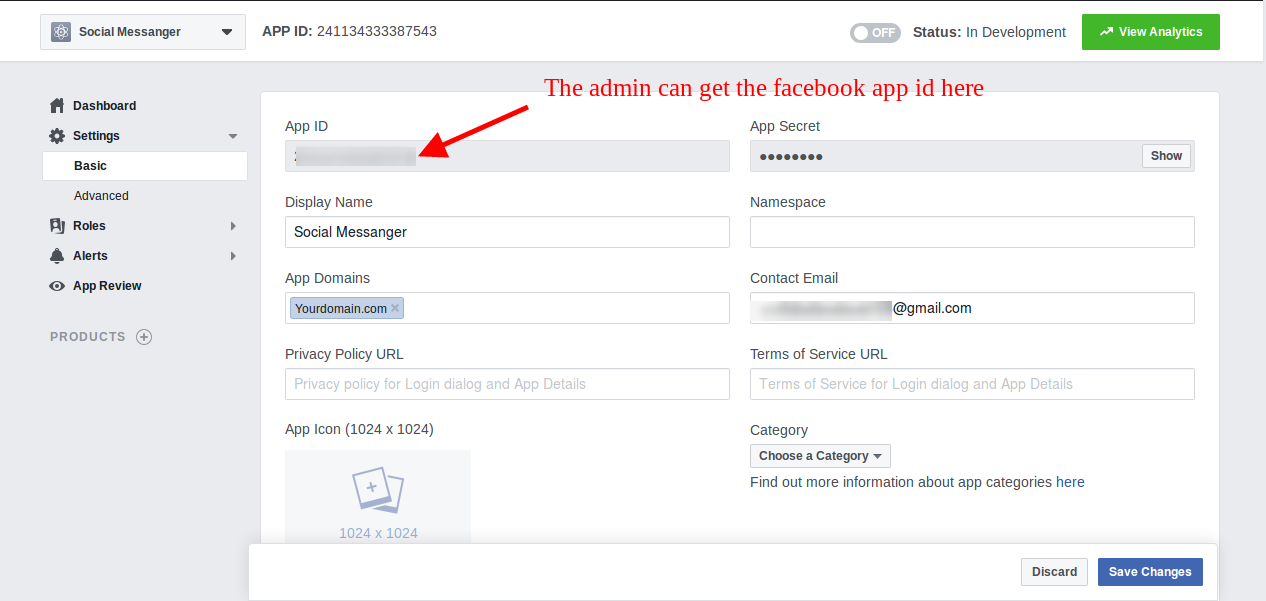
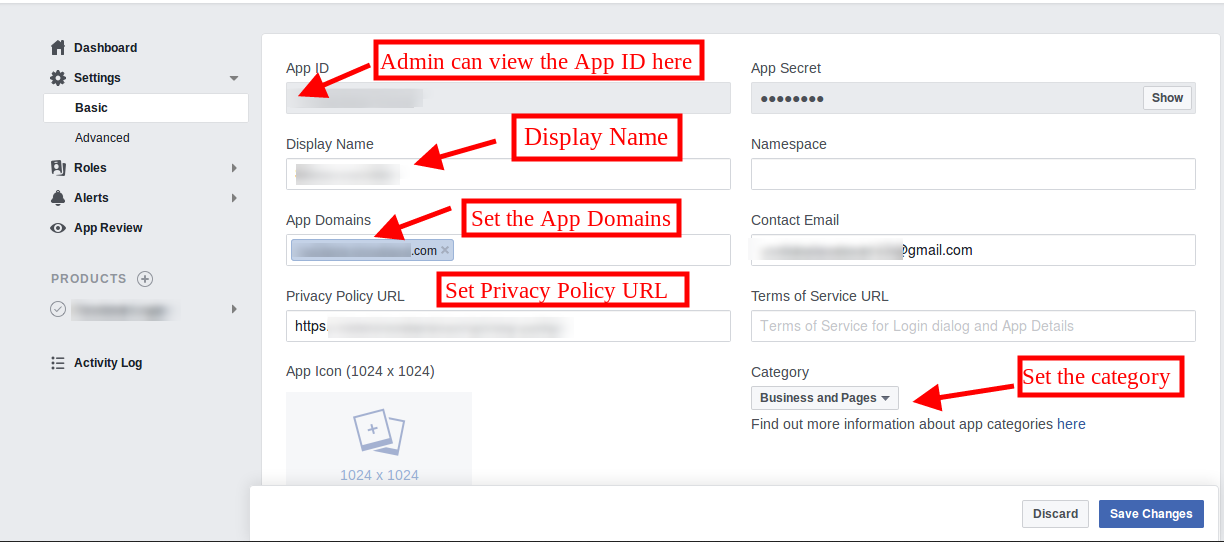
  • After clicking the “create app id” button, go to the “Settings” and then select “Basic” option. Here, the store admin can view the APP ID. The admin needs to copy this Facebook app id and copy to the admin interface app id option.

  • Admin can insert the App Domain. After that click on the “save changes” option.

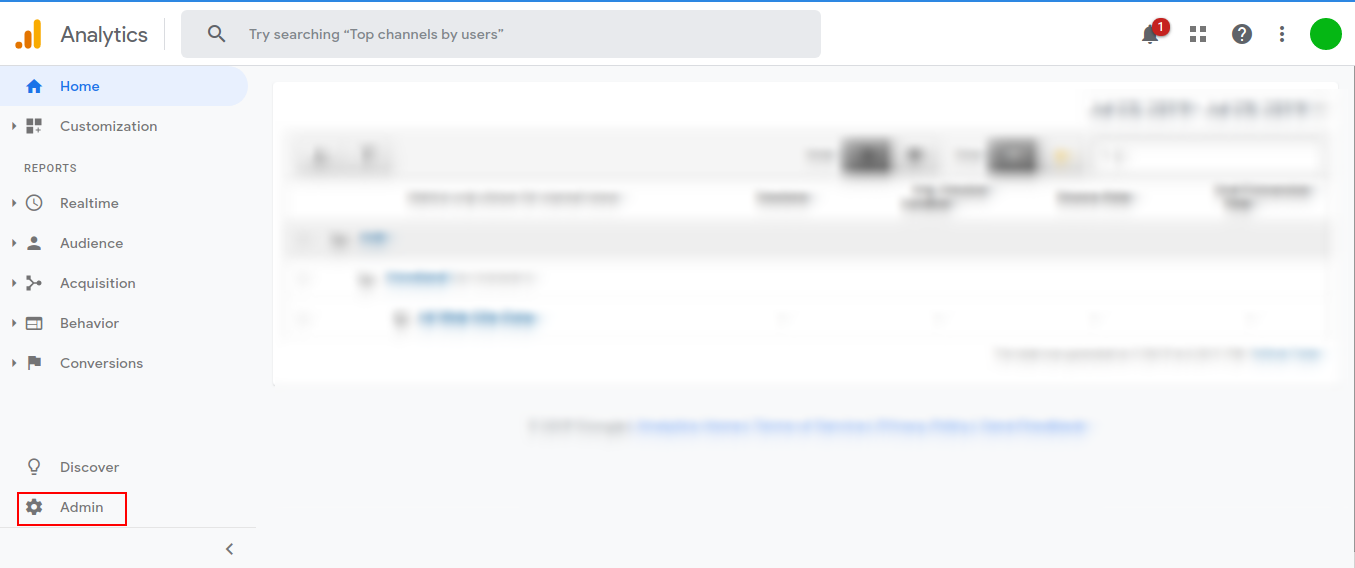
3.1.2 Steps to Find your Google Analytics ID

To find the Google Analytics ID:

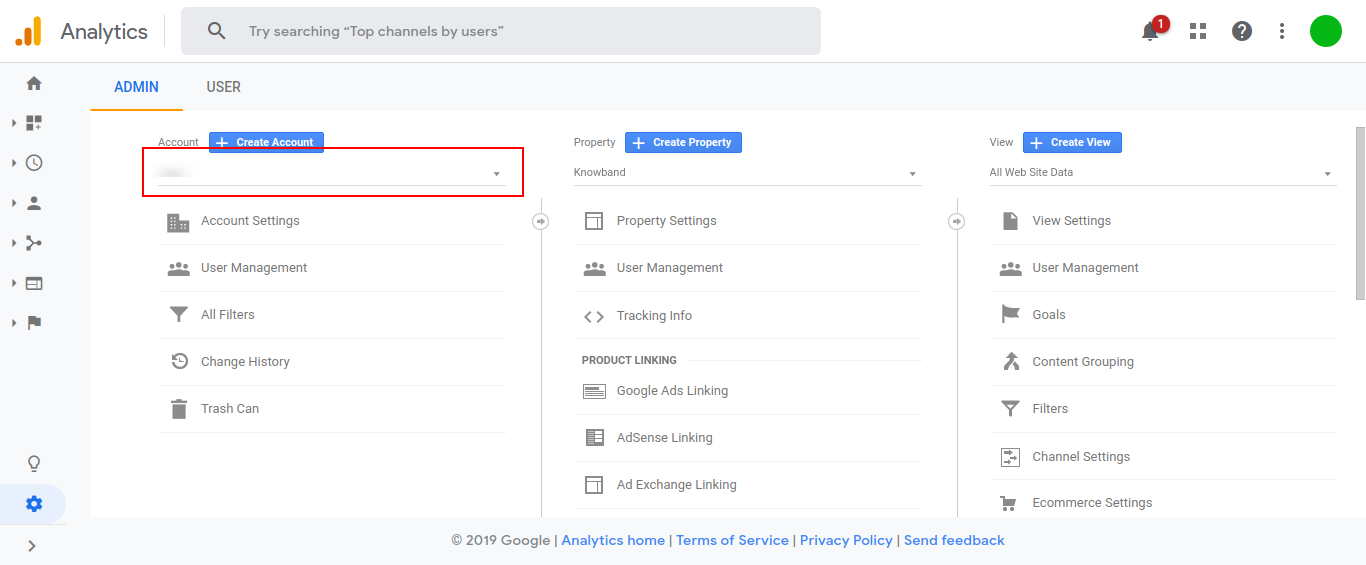
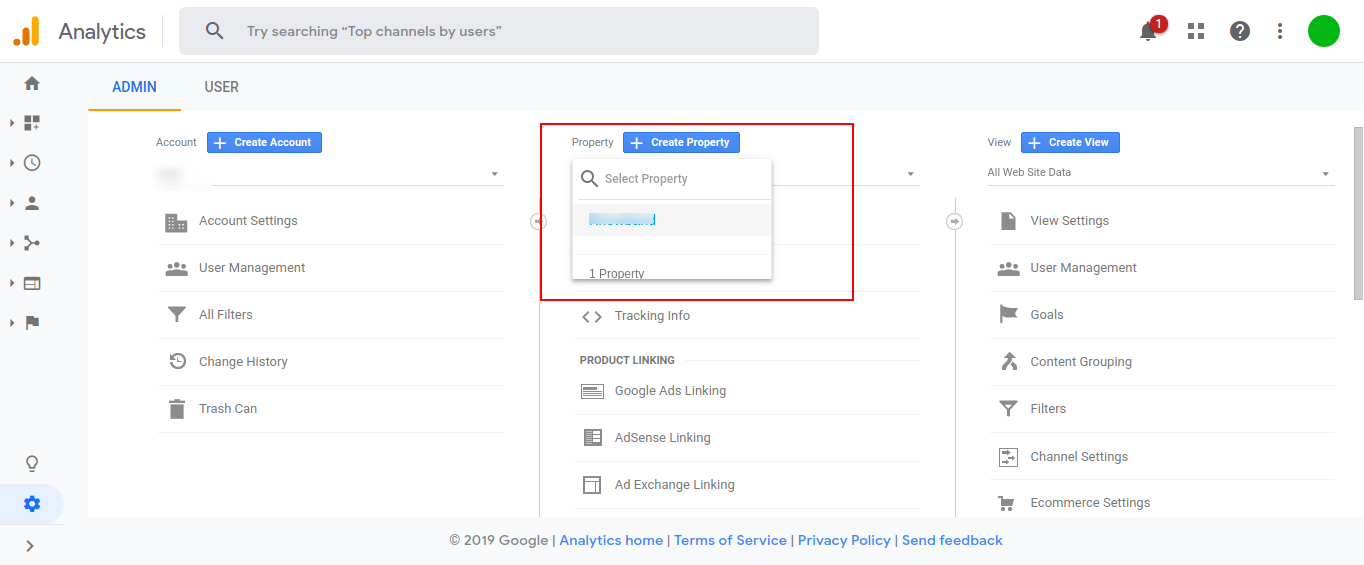
  • Select an account from the menu in the ACCOUNT column.

  • Select a property from the menu in the PROPERTY column.

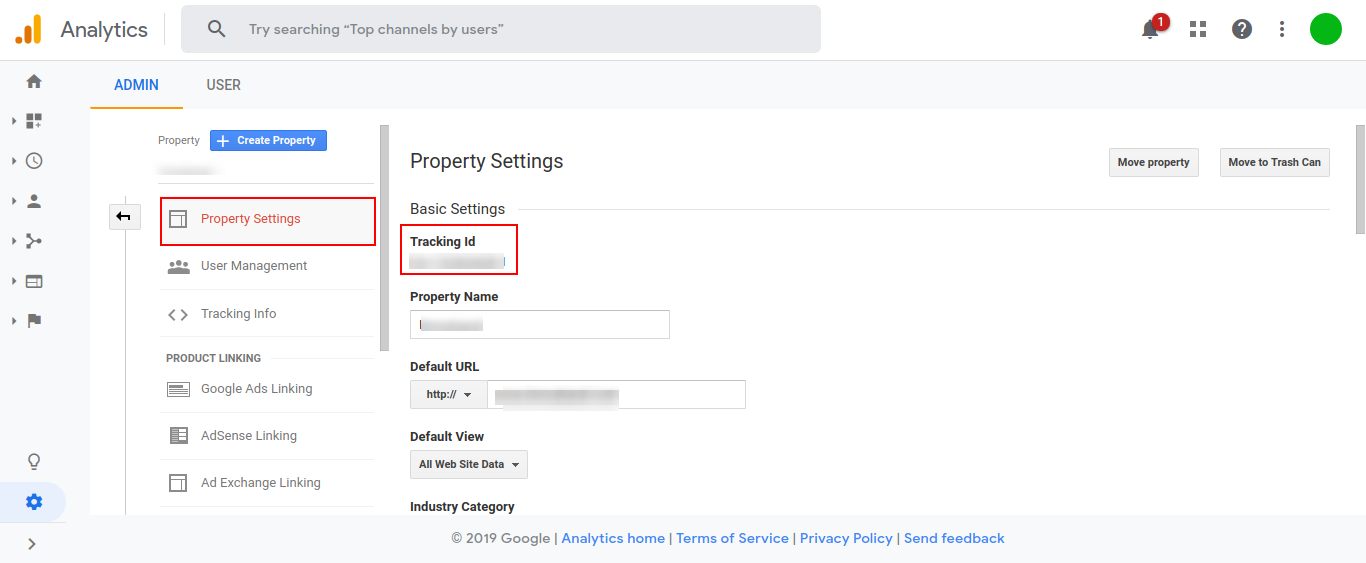
  • Under PROPERTY, click Tracking Info > Tracking Code. Your Google Analytics ID is displayed at the top of the page.

3.2 Content Settings

The various fields of this section of Magento Facebook store extension are mentioned below.

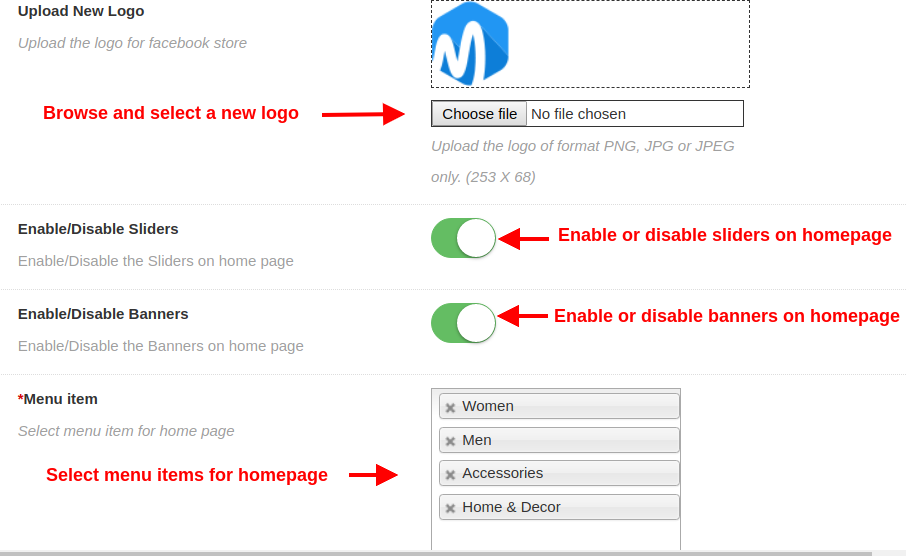
  • Upload New Logo: Admin can set a custom logo for their Facebook Store by uploading the logo image of format PNG, JPG, or JPEG only.
  • Enable/Disable Sliders: Admin can enable or disable the slider images shown on the Facebook store page.
  • Enable/Disable Banners: Admin can enable or disable the banner images shown on the Facebook store page.
  • Menu Item: Admin can select the menu items that will be displayed on the FB shop.

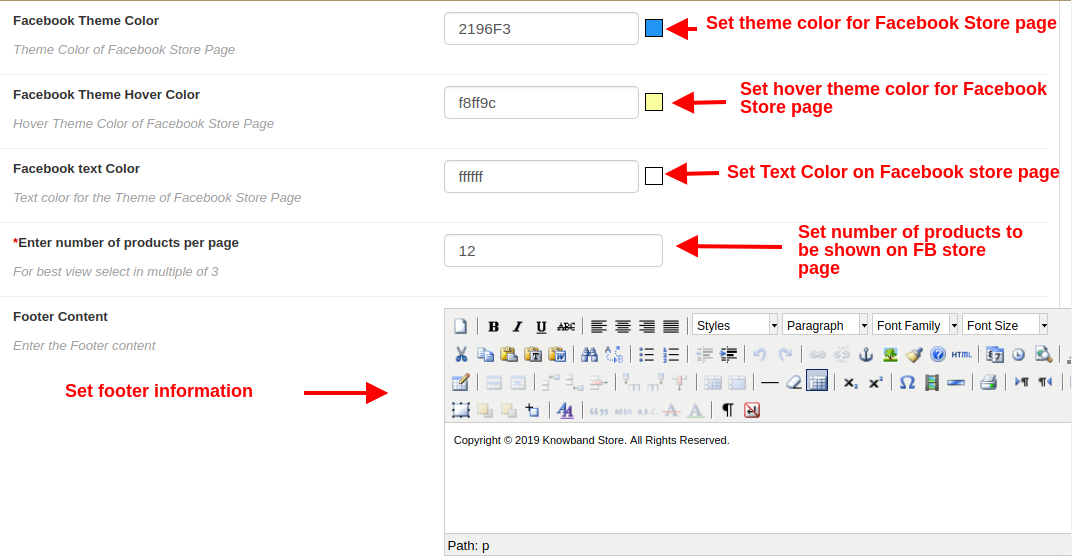
  • Facebook Theme Color: Using this option of Magento Facebook store extension, admin can set the theme color for their Facebook Store.
  • Facebook Theme Hover Color: With this option, admin can set the theme hover color for their Facebook Store.
  • Facebook Text Color: Admin can even set the font color for the text displayed on Facebook Shop page.
  • Enter Number of Products per Page: Admin can specify the count of products which will be displayed on the Facebook store page.
  • Footer Content: Admin can specify the Footer content which is to be displayed at the bottom of the Facebook Store.

3.3 Product Settings

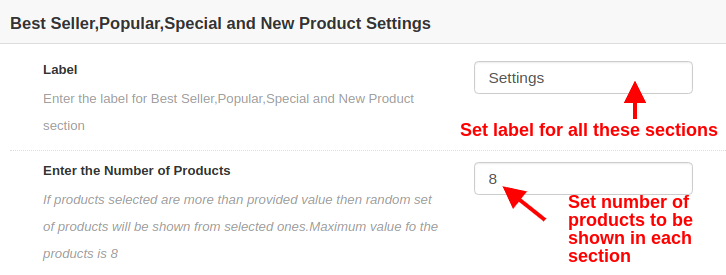
  • Label: Admin can enter the label for displaying bestseller, popular, special, and new products on the Homepage.
  • Enter the number of products: Admin can set the number of products which will be displayed in each section of products.

FOR BEST SELLER PRODUCTS

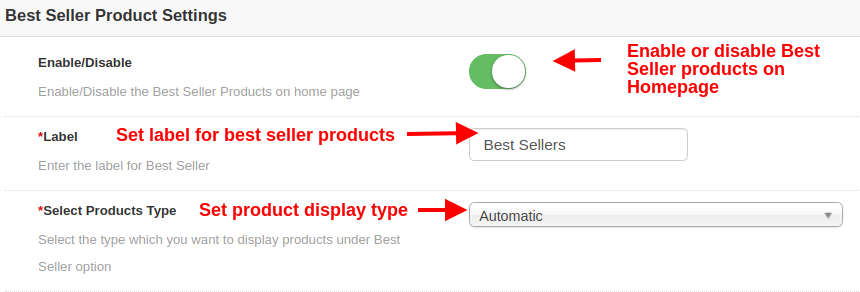
  • Enable/Disable: This option will enable or disable the Best Seller products on Homepage.
  • Label: This option sets the label for displaying Best Seller products on Homepage.
  • Select Products Type: This option selects the product display type as automatic or manual. If automatic is selected then random products will be shown from Best Seller category of the website.

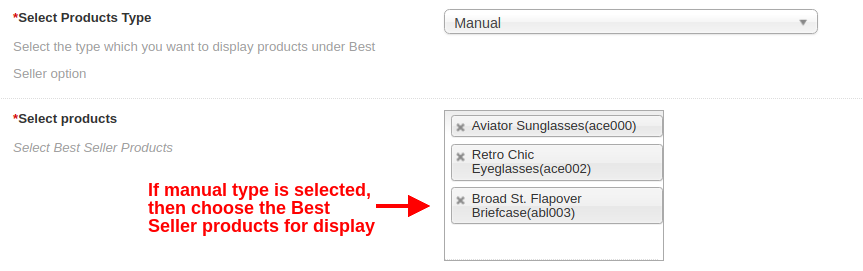
  • Select Products Type: If this option is selected as manual, then the products selected below will be shown on the Homepage under Best Seller section.
  • Select Products: Using this option, admin can choose the desired products shown as Best Seller products.

FOR NEW PRODUCTS

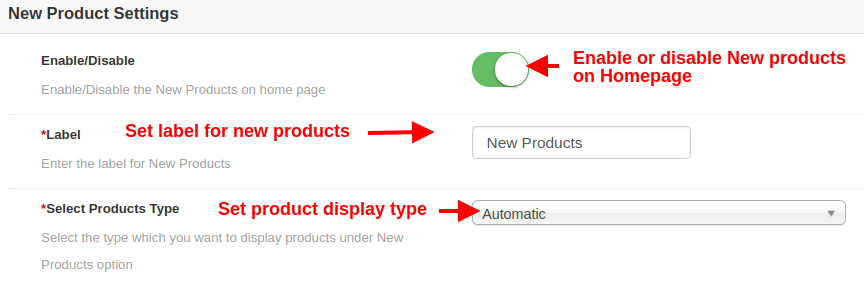
  • Enable/Disable: This option will enable or disable the New products on Homepage.
  • Label: This option sets the label for displaying New products on Homepage.
  • Select Products Type: This option selects the product display type as automatic or manual. If automatic is selected then random products will be shown from New products category of the website.

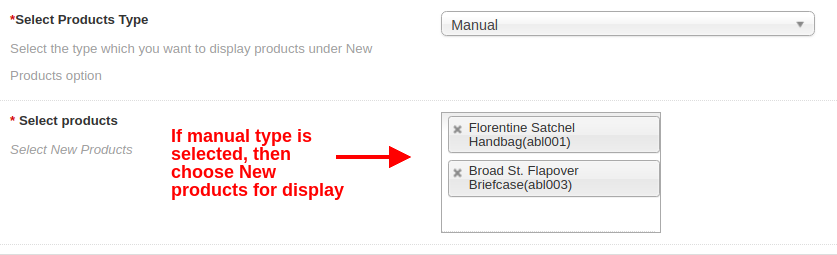
  • Select Products Type: If this option is selected as manual, then the products selected below will be shown on the Homepage under New Products section.
  • Select Products: Using this option, admin can choose the desired products shown as New products.

FOR POPULAR PRODUCTS

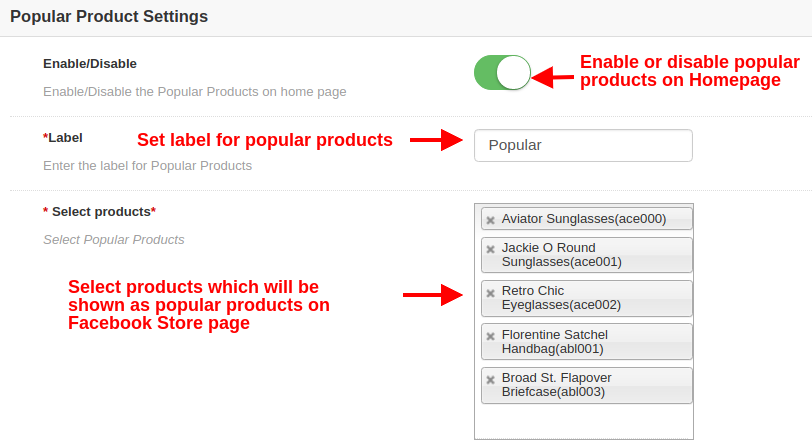
  • Enable/Disable: This option will enable or disable the popular products on Homepage.
  • Label: This option sets the label for displaying popular products on Homepage.
  • Select Products: Using this option, admin can choose the desired products to show as Popular products on Homepage.

FOR SPECIAL PRODUCTS

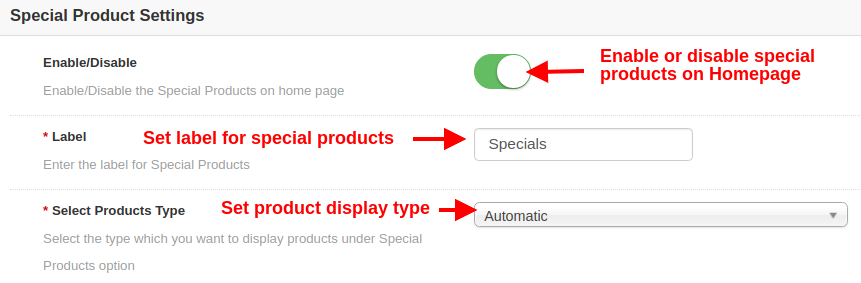
  • Enable/Disable: This option will enable or disable the Special products on Homepage.
  • Label: This option sets the label for displaying Special products on Homepage.
  • Select Products Type: This option selects the product display type as automatic or manual. If automatic is selected then random products will be shown from Special products category of the website.

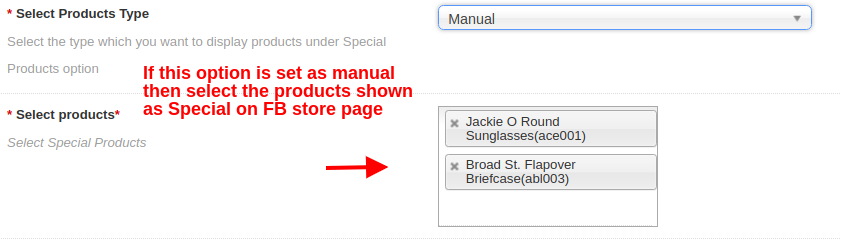
  • Select Products Type: If this option is selected as manual, then the products selected below will be shown on the Homepage under Special Products section.
  • Select Products: Using this option, admin can choose the desired products shown as Special products.

FOR FEATURED PRODUCTS

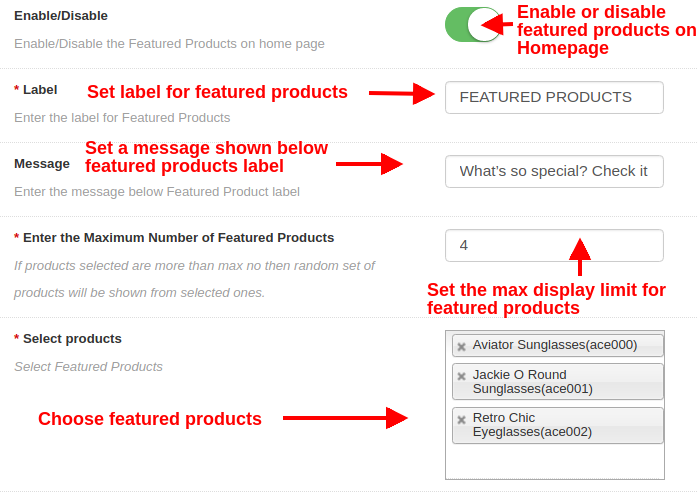
  • Enable/Disable: This option will enable or disable the featured products on Homepage.
  • Label: This option sets the label for displaying featured products on Homepage.
  • Message: This option sets a message shown below featured products label.
  • Enter the Maximum Number of Featured Products: With this option, you can set the maximum display limit for featured products.
  • Select Products: Using this option, admin can choose the desired products they want to show as featured products on Homepage.

3.4 Slider Settings

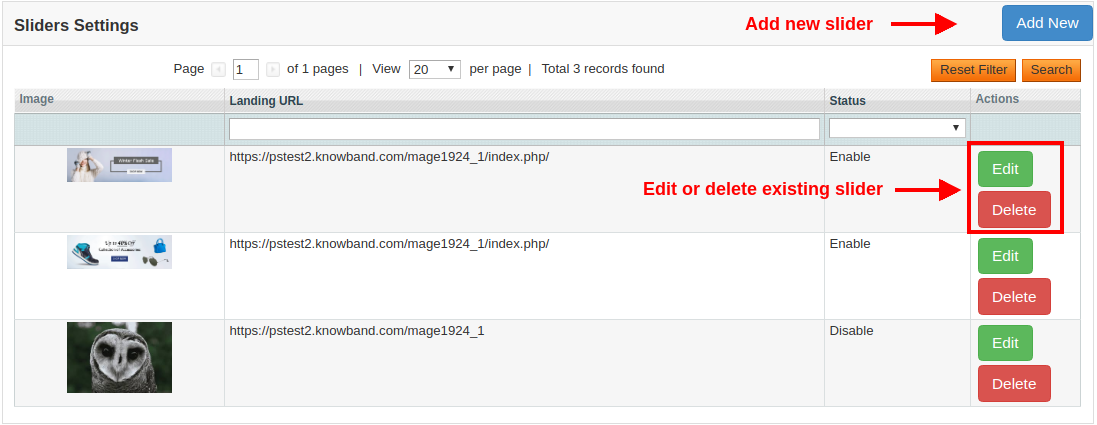
From this section, you can add and show as many sliders on the Facebook store homepage. These sliders are shown on the top of the Facebook store page. Below screen shows a list of existing sliders, there are shown randomly on the FB store homepage. You can either delete each of the sliders or can modify their settings by clicking on the “Edit” and “Delete” buttons respectively.

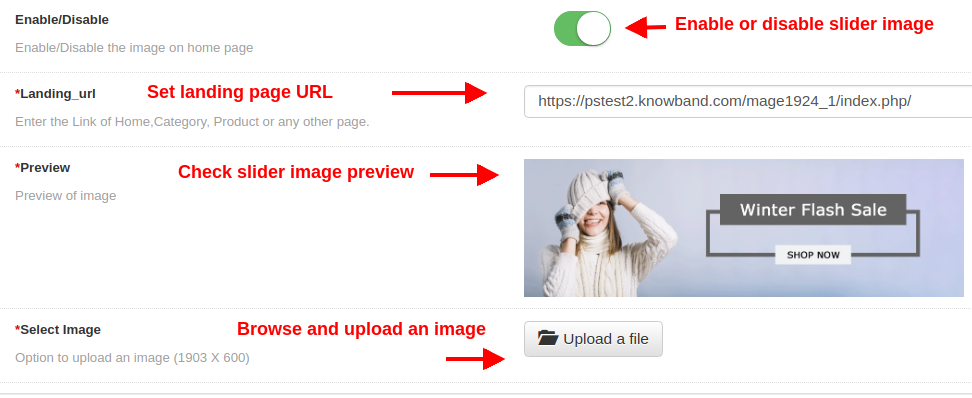
To add a new slider, click on the “Add New” button at the top right side of the admin screen. It will show the following configuration options: 

  • Enable/Disable: This option enables or disables the slider image on the FB store homepage.
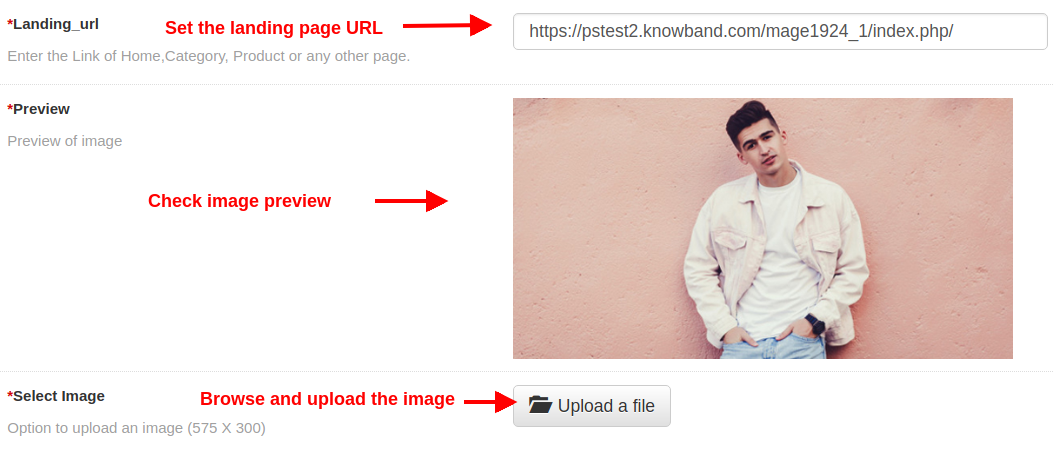
  • Landing URL: By this option, admin can set a link of Homepage, Product Page, Category Page or any other page of the website. On clicking this slider image, the customer will be redirected to the specific link.
  • Preview: This option shows the preview of the image which is selected from the below option.
  • Select Image: This option allows the admin to browse and upload any image as a slider image.

3.5 Banner Settings

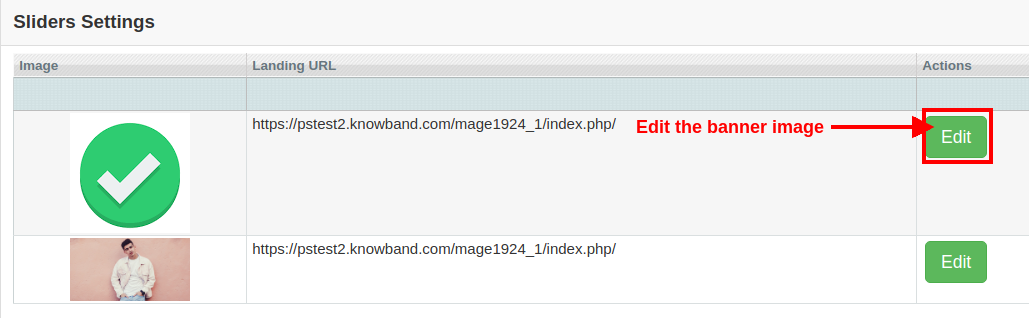
From this section, you can add and show as many banners on the Facebook store homepage. These banners are shown just below the sliders on the Facebook store page. Below screen shows a list of existing banner images. You can modify their settings by clicking on the “Edit” button corresponding to the record.

  • Landing URL: By this option, admin can set a link of Homepage, Product Page, Category Page or any other page of the website. On clicking this banner image, the customer will be redirected to the specific link.
  • Preview: This option shows the preview of the image which is selected from the below option.
  • Select Image: This option allows the admin to browse and upload any image as a banner image.

4.0 Front Interface of Magento Facebook Store Integration Module

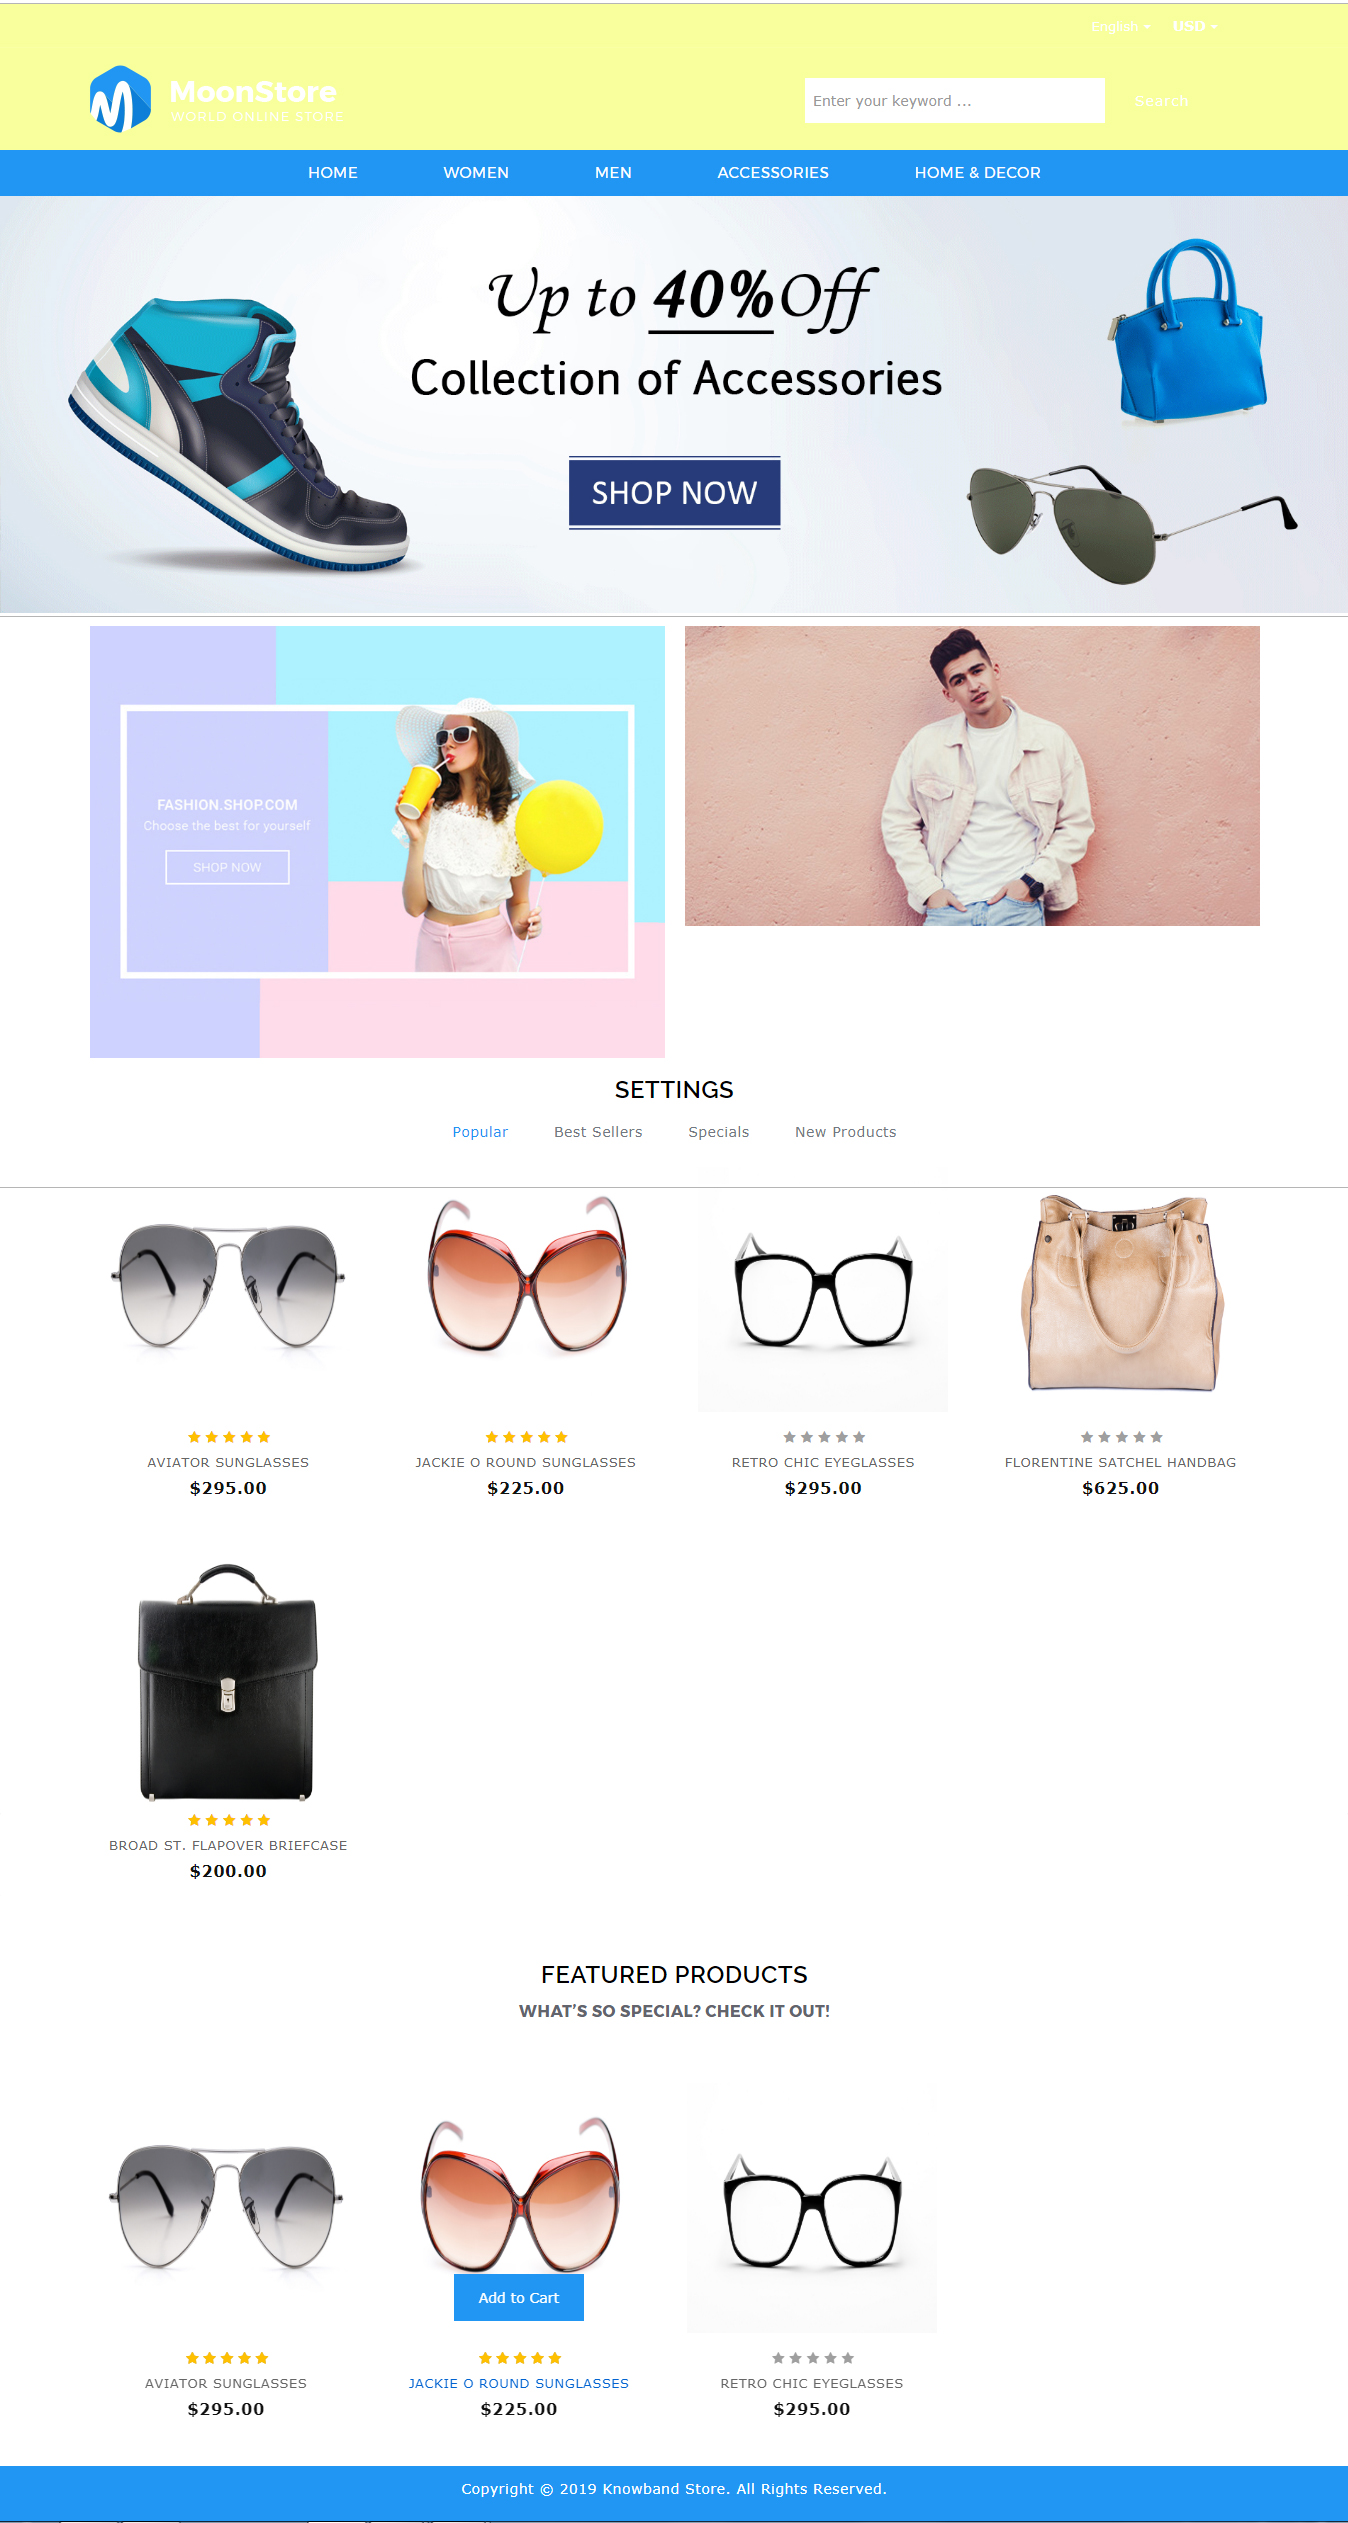
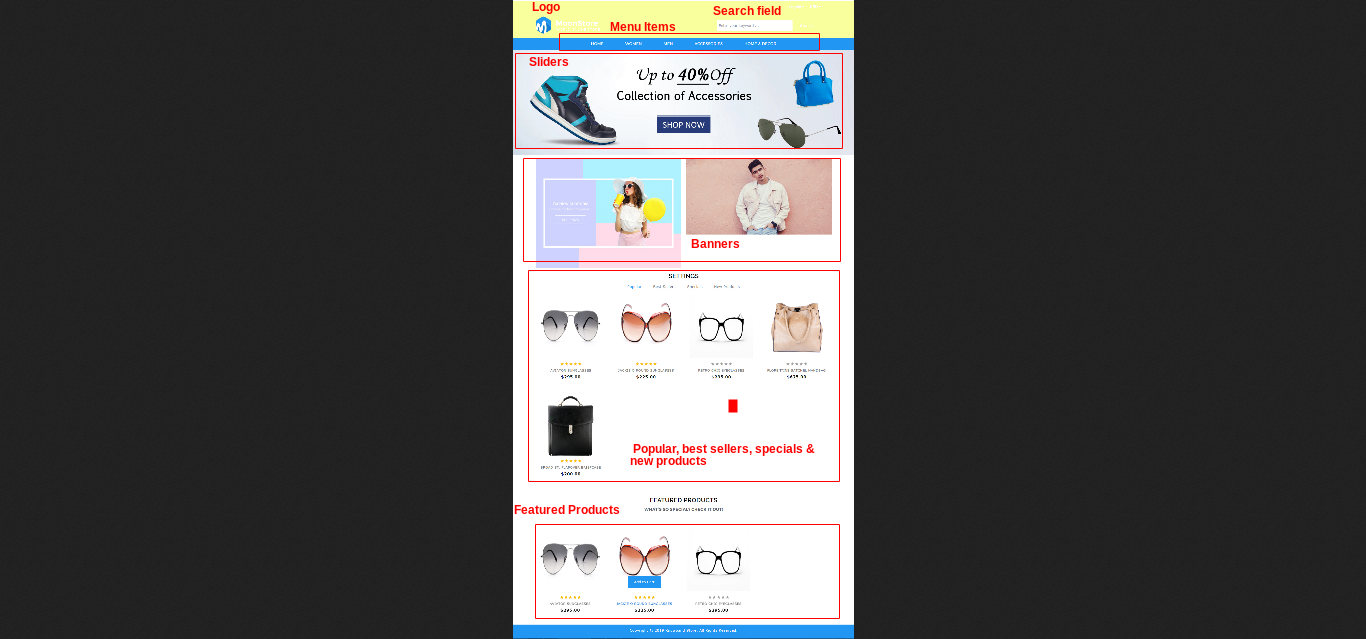
Once after setting up the Facebook App ID and the configuration settings, your customers can find the Facebook shop tab in your Facebook account.

Below screenshot gives you complete understanding about different elements of FB Store page.


Find below more details about this Magento Facebook Store Extension:

Magento Facebook Store Extension Link

Please contact us at support@knowband.com for any query or custom change request as per your business requirement.

WooCommerce Mobile App Builder – User Manual

Get fully Flutter Android & iOS apps for your WooCommerce website & start selling your products on Mobile Apps!

1.0 Introduction

This is the user manual for WooCommerce Mobile App Builder’s cutting-edge and ready-made Flutter mobile app solution. This eCommerce website plugin was created and expertly crafted to help you create flawless and feature-rich Android and iOS shopping apps.

1.1 Introduction to WooCommerce Mobile App Builder

The most sophisticated and automated way to expand your online business to mobile platforms is with the WooCommerce Mobile App Builder. It turns your entire website into a mobile app with features and enables you to sell products on mobile devices in addition to the traditional website. The app’s features and operation perfectly mirror those of the website and are compatible with both Android and iPhone devices.

The pre-configured framework used by our WooCommerce Mobile App Builder was created by experts and professionals to create two Flutter eCommerce apps (Android and iOS). The apps can bring every item in your store to the user’s fingertips and increase sales and revenue. Therefore, this is your best opportunity if you are a WooCommerce store merchant looking for a complete mobile app solution. To get complete information on WooCommerce Mobile App Development, read the article in its entirety.

Additionally, the Multi-vendor Marketplace plugin is fully compatible with our WooCommerce Mobile App Builder extension. The same Mobile Apps can be used to access the entire marketplace listing. Even better, we provide a bundle that includes both WooCommerce Advanced Marketplace With Mobile App and WooCommerce Multi-Vendor Marketplace.

Moreover, You would be persuaded to choose this Flutter app solution if you considered the following advantages of WooCommerce Mobile App Maker:

  1. A mobile app solution with no coding.
  2. A welcoming administrative panel with full access.
  3. Free assistance for three months
  4. Completely Flutter remedies (Android & iOS)
  5. Synchronization of your apps and website at all times
  6. Extremely flexible in terms of design and operation.
  7. Uses practical marketing tools to boost user engagement.
  8. Increases your store’s revenue and traffic.

Top Qualities of the WooCommerce Mobile App Builder:

The following is a list of some of the major features that your apps with WooCommerce Mobile App Builder will include:

  • The layout of the home screen can be changed (Complete Flexibility)
  • Store Identities
  • (24/7) WhatsApp Chat Support
  • OTP and fingerprint login for both tablets and smartphones with Google and Facebook
  • Support iOS 9 and subsequent iOS versions, as well as Android 4.2, and up versions support.
  • automatic inventory updates.
  • Numerous Font & Color Options
  • bilingual and RTL (Right To Left)
  • Support All Product Types
  • Support Multi-currency
  • Support Website Shipping Method Supported on Apps
  • Support Website Payment Method
  • Push Notifications indefinite
  • Options for Product Social Sharing
  • Numerous options for sorting and filtering
  • Wishlist Functionality
  • Internet coupons or vouchers backed by apps.
  • Checkout Screen with Fewer Details
  • Live Order Monitoring
  • Unbroken Accordion Menu
  • Clear-cut Category & Product Screen

Latest Version Updates in WooCommerce Mobile Apps:

With an integrated “Add To Cart” button for products on the Home & Category screen, the WooCommerce Mobile App has been made more usable for online shoppers. By simply tapping the cart button, users can quickly add products to the cart.

The category screen of mobile apps also features an Add To Cart button. Users only need to scroll to the bottom of the page to browse the products and keep adding items to their shopping cart by tapping the Add To Cart button.

A) App Reviews for Products

Our WooCommerce Mobile App is currently compatible with WooCommerce’s built-in Product Comments module. The user can now post product reviews on the website, and those reviews will also show up on the app. The user has access to both read and write reviews on the app.

b) Related App Store Products

The Automatic Related Products module is now compatible with the WooCommerce Mobile App Builder. On the product page of the website and mobile app, related products can be shown. This compatibility can be a wonderful tool for your company to increase cross-selling.

C) Deep Linking: A deep linking feature is built into the WooCommerce Mobile App. Now, when a link is shared, the user will be taken to the application rather than the website. Installing the app on the mobile device is the only requirement. The user will even be directed to the appropriate app screen by the shared link.

D) Accessibility in Offline Mode: With this extension, eCommerce mobile apps will now function even when there is no internet connection. Users are able to browse any time the pages that were loaded while the internet was active. Products, categories, the cart screen, etc.

–> Explore WooCommerce GDPR Module

E) Spin & Win (Gamified Email Subscription) Compatibility:

The WooCommerce Spin & Win extension is also compatible with the WooCommerce Mobile App Creator. On the web store, a spin-wheel interactive pop-up that can be scheduled for entry or exit display is provided by the gamified email subscription pop-up. The same pop-up will now be automatically displayed on the apps thanks to this integration. The extension only needs to be installed on your website.

F) Video Banner Elements: Knowband’s WooCommerce Mobile App Builder now supports video banners on the home page. Store admins can upload videos directly or embed YouTube videos, making the home page more visually appealing and improving the user experience.

G) List/Grid View: Knowband’s WooCommerce 2 Native Mobile App Builder for Android and iOS allows app users to easily switch between list and grid views while browsing products. This feature improves the shopping experience by providing a flexible and attractive way to explore products. Users can toggle between views using the list/grid button on the product listing pages.

H) Automated Banner Sliders: The latest Knowband Magento 2 Mobile App Builder includes an automated banner slider feature. Store admins can easily set the sliding interval from the module’s backend. This is especially helpful for “Banner Horizontal Sliders” on the home page, allowing admins to add both video and image banners for a more dynamic and engaging display.

I) Enhanced Review Section: The Knowband mobile app features an improved review section. Approved reviews are displayed with a better user interface, offering a more visually appealing and seamless experience for both Android and iOS users.

–> Investigate the WooCommerce Spin Win Module

This is not the end of the list. Learn more about the features in-depth from this page.

2.0 Demo of the WooCommerce mobile app

KnowBand is aware of your hesitation to use the solution and has provided all owners of eCommerce stores with a free demo in order to allay your worries. The merchants can see their store operating on our demo apps as well as our demo store operating on mobile devices.

2.1 Check Out Our Demo Store for Apps

Want to see the features of the eCommerce app? In order for you to explore the app and see all of its features, we have integrated our demo store with it. Just adhere to the guidelines below:

Step 1: Your mobile device can be used to download and install the Nautica WooCommerce Mobile App. The following are links to download trial versions of the following apps:

Apple App Store  – https://testflight.apple.com/join/mrvIRLfw

Google Play Store- https://play.google.com/store/apps/details?id=com.velsof.woocommercegenericapp

Secondly, the Click the view demo button after launching the Nautica WooCommerce App.

I’m done now! On the demo app, you will see our demo store operating. You can browse it, test out every feature, place orders, etc.

Note: Click here to access the KnowBand Mobile App Builder Admin Panel on our demo store.

2.2 Watch Your Store Operate with Demo Apps

Not content? Do you wish to test the demo apps on your store? We have everything covered for you, though. On our demo app, you can also experience your store, and at no cost. You only need to follow these 3 steps to achieve the same results:

  • Install the FREE WooCommerce Mobile App Builder plugin on your store as the first step.
  • Install the Demo Apps on your mobile device in step 2 (links are in the previous section). Open the app and type in the store URL.
  • Click “View Your Store” to begin using demo apps to explore your store.
  • Type your store’s URL into the box that appears.

For instance, see https://www.example.com/

Note: No APK or IPA files will be provided with this module; this Free version of Mobile App Builder is only for demonstration purposes. You must buy the WooCommerce Mobile App Builder’s paid version in order to obtain your own APK/IPA files.

3.0 Create a mobile WooCommerce app in 3 easy steps

We hope you enjoyed the WooCommerce Mobile Apps demo and discovered what you were looking for. So now is the perfect time to add a pair of Flutter apps to your store. An eCommerce mobile app can be created in the most straightforward manner possible. Your app will be ready in just 3 easy steps and 1-2 working days.

First, add the module to your website.

Install WooCommerce Mobile App Builder on your store after downloading it.

Step 2: Share the details of your application

Use our prerequisites form to share your app’s specifications.

Step 3: In 1-2 days, receive your apps

Our knowledgeable and experienced developers create your apps precisely in accordance with the shared details. In 1-2 days, we would reply with APK/IPA files.

Note: These APK/IPA files can be published on the appropriate app stores.


Still a problem? Tell us, and we’ll help you publish the apps. Furthermore, you can contact us at support@knowband.com if you have any questions or suggestions.

4. Installation of Module

You will receive the files listed below once you have purchased the WooCommerce Mobile App Builder module:

1. ZIP-formatted compressed file (contains the source code of the addon)

2. User Guide

You can now continue the installation process in one of the two ways listed below:

Details of module installation via FTP

Installing a module using admin details

5.0 Screens for the admin panel

It’s time to set up the WooCommerce Mobile App Creator’s Admin Panel after it has been successfully installed on your website. You will see the following tab with user-friendly interfaces as soon as you select the “Configure” option on the KnowBand Mobile App Builder. Let’s eliminate each one individually.

5.1 General settings:

The settings needed for users’ devices to run your mobile app are all covered under the General Setting tab. This tab has every generalized option required to sync the app.

A) Enable Plugin: To make your mobile app functional on users’ devices, enable the WooCommerce Mobile App Creator plugin.

B) Enable Spin and Win: When any user opens the app, enable the display of a gamified spin-wheel pop-up on the home screen. It can be used to provide discounts and deals in exchange for their email addresses, which are then used for marketing. The Spin and Win module from Knowband must be installed on your website in order for this functionality to function.

The Spin and Win Module will only function if the plugin has been installed in your store end.

C) Redirect on Cart Page when Add To Cart: This feature enables you to manage the “Add To Cart” button’s navigation. When a user taps the Add To Cart button, you have the option of sending them to the shopping cart or keeping them on the product page. This increases the likelihood of making additional purchases.

D) Display Short Description: Allow the short description of the product to appear on the product screen alongside the full description and other information.

E) Choose Layout: Pick the Home Page Layout you want for your WooCommerce app. According to different holidays and themes, you can create a variety of home screen layouts in the backend and use them as needed for your store.

Choose the preferred button color for your WooCommerce Mobile App under Option

F) App Theme Color: Pick your WooCommerce Mobile App’s preferred theme color.

G) Logo image: Put your store’s logo on the app’s top header by uploading it. This helped your brand gain recognition among global mobile customer s.

H) Disabled Shipping Methods: Select the shipping options you want to be hidden from the WooCommerce Mobile App.

I) Enabled CMS Pages: Select the CMS pages you want to appear on mobile apps.

J) Enable Request Log Reporting: Enable the log feature on mobile apps to learn more about any unusual behavior exhibited by your app.

K) Enable WhatsApp Chat Support: On your WooCommerce Mobile Apps, enable the WhatsApp chat option. Your WhatsApp number entered in the backend can be used by users to get in touch with you directly.

L) Enable/disable Phone Number Registration: In your WooCommerce Mobile App, enable the Phone Number login option and enable OTP authentication for your users.

M) Enable URL encoding for Image Links: Turn on this feature to allow the app to support characters other than ASCII.

N) Show Add to Cart Button on Product Block: The admin can show/hide the “add to cart” button for the product listing pages with the help of this button.

O) Enable Notification List Feature: The button allows the admin to enable the notification listing features for the app users. If this option is disabled, the notification tab will not appear in the app.

P) Enable Sign In Login Popup: The admin can enable or disable the login/sign-up pop-up for the new customers with this option.

5.2 Settings for Push Notifications

The Google Primary Services for the Push Notification to Mobile Devices are used by the WooCommerce Mobile App Creator for Android and iOS to harness the power of push notifications. It provides this practical marketing tool to increase sales by grabbing users’ attention right away. With the help of your WooCommerce Mobile App, you can easily highlight your current specials and offers. WooCommerce Mobile App Maker offers both automated and customized notifications.

A) Service Account JSON: With the deprecation of the traditional Firebase push messaging API, it has been replaced by a Service Account JSON file. In this section, admins can configure the JSON file from their Firebase account. You can either set it up yourself, or we can provide the Service Account JSON file during the app creation process for your convenience.

B) Order Creation Notification Enable/Disable: Enable/Disable automated Push Notification sent to app users upon successful order creation.

–> Title and Message for Push Notification: To create an order successfully, enter the title and message in the push notification setting.

C) Order Status Changed Notification: Users of the app can choose whether to receive automated Push Notifications when their previous order’s delivery status changes.

-> Title and Message for Push Notification: Enter the title and message whenever the delivery status of an earlier order is updated on the push notification setting.

D) Enable/Disable Abandoned Cart Notification: Enable/Disable automated push notifications that are sent to users whose carts have been abandoned but no successful purchase has been made.

Enter the title and message for the push notification sent to app users who have abandoned their carts.

E) Time Interval: The amount of time (in hours) between which app users who have abandoned their carts without making a purchase will receive Push Notifications.

5.3 History of Push Notifications

This tab includes a history of each type of push notification that was sent to a user with relevant information. The retailer has access to all previously sent notifications. Additionally, a custom notification created in the backend can be sent to the users using this tab. Through manually sent notifications, you can easily inform customers about any information or discounts pertaining to the store.

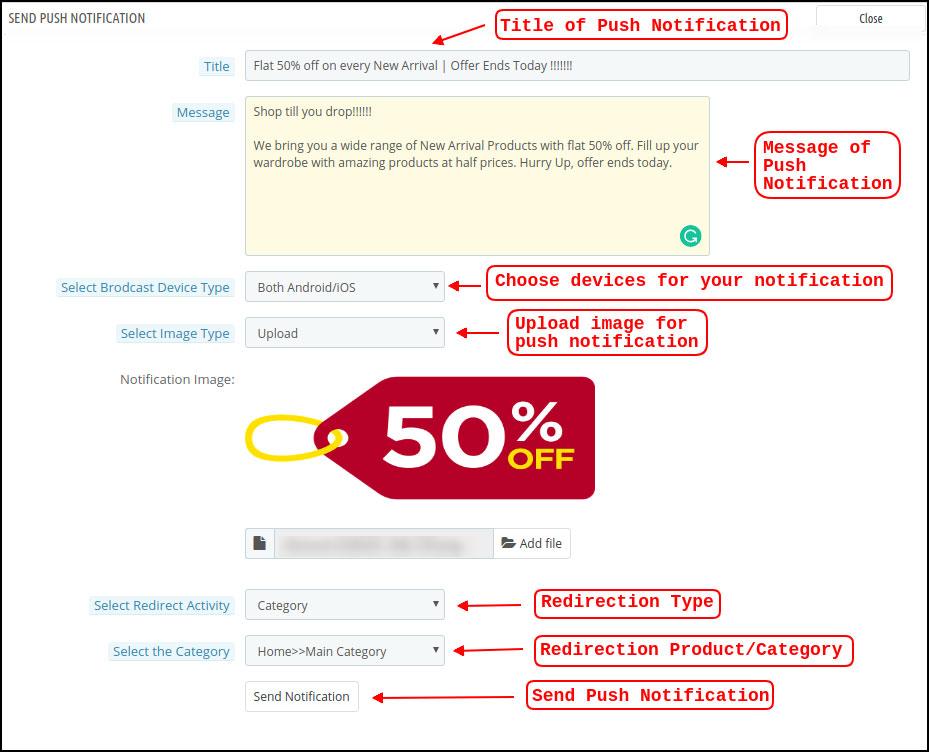
Send Notification: You can choose to manually send a notification to app users using this option. According to the screenshot below, you can customize the notification’s title, message, landing page, image, etc.

a) Push Notification Title: This is the name of the manual Push Notification you will be sending to app users.

b) Push Notification Message: The text of your manual notification that needs to be sent to app users.

c) Device Type: You can specify which users on Android, iOS, or both platforms you want to receive your manual push notification.

d) Image Type: You are able to upload the banner or image you want to use to support your notification. The banner image can be used directly through a URL or uploaded.

e) Notification Image: The store administrator is given the opportunity to preview the notification image and assess how it will appear on users’ apps.

The actual URL of the notification image that will be sent to app users is listed under item f.

f) Redirection Activity: Here, you can select from the Home Screen, Any Category, or Any Product to redirect your notification. Your users will be directed to whatever you specify when they tap the push notification.

g) Choose the Category/Product: For your notification, you can select any relevant category/product screen.

h) Send Notification: After creating and previewing your notification, it’s time to send it to your apps.

5.4 Payment Procedures

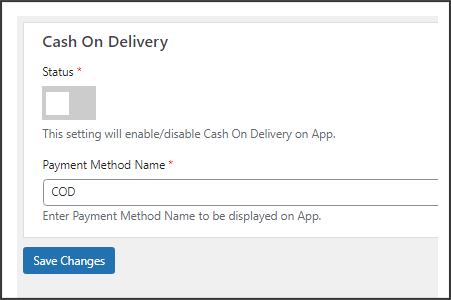
All types of website payment methods are supported by the WooCommerce Mobile App Creator for Android & iOS apps. It also includes the option for COD payments and the flexibility to include additional Web-View payment methods.

In our mobile app, the only available payment option is cash on delivery by default. Disable the COD method from the module’s back end, though, if you want to add the same payment methods as on your WooCommerce store. All of the payment options that are available on your website will work as intended in your mobile apps after the COD method is disabled.

.

5.5.1 Home Page Design

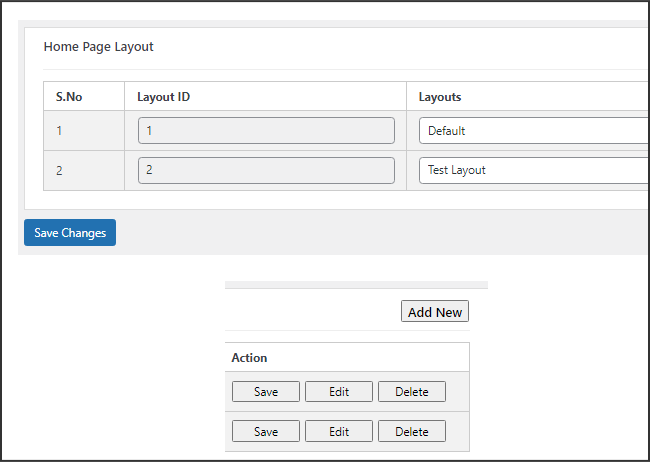
The WooCommerce Mobile App Builder plugin’s ability to design and create multiple home screen layouts using different designing attributes and elements is one of its most amazing features. As can be seen in the screenshot below, this tab contains a list of home screen layout that has been previously configured using different themes & fonts:

The following elements are available in the back-end to configure the home page layouts:

  • Top categories
  • Square Banner
  • Horizontal Sliding Banner
  • Grid Banners
  • Countdown Banner
  • Grid Products
  • Horizontal Sliding Products
  • Recently Accessed Products
  • Add YouTube videos/upload videos on the home page layout.
  • Login/sign-up pop-up for the non-logged-in users.
  • Add custom banners with custom dimensions.

Any of these attributes can be set up by the store merchant and used to create and save multiple layouts. These layouts can be utilized based on the theme and specifications. Additionally, using just a drag and drop functionality, different elements’ positions can be changed.

Top Categories:

Top categories can be configured, including their image and landing categories or products, and are shown as small squares on the home screen. Maximum categories available through the WooCommerce Mobile App Maker are 8, with a minimum of 4 required.

Square Banner:

Top categories can be configured, including their image and landing categories or products, and are shown as small squares on the home screen. Maximum categories available through the WooCommerce Mobile App Maker are 8, with a minimum of 4 required.
In the recent updates, we have also provided the option to showcase different videos with the YouTube Video/Video Upload section added in the “Select Image Type” section.

Horizontal Sliding Banner:

These rectangular sliding doors are available and fully customizable from the backend. Like banner squares, the admin can also highlight the banner sliders by adding video elements. Furthermore, now the admin can get the option to enter the time that he wants to set for the automated banner sliding.

Grid Banners:

These are square-shaped banners that are listed in a grid format on the home screen. On the home screen, you can place as many banners as you like. You can also change the landing page’s image as needed.

Countdown Timer Banner:

A countdown timer is available on the banner provided by the WooCommerce Mobile App Builder. You can choose the landing page and banner image, as well as set a timer for when you want to display the banner. The banner will automatically disappear when the timer expires.

Square Products:

Regarding banners, the WooCommerce Mobile App Creator provides products to show as square listings on the home screen.

Horizontal Sliding Products

The products can be added as horizontal sliders. The products chosen may fall under any one particular category or may be highlighted as Best Sellers, Featured Products, etc.

Grid Products:

Grid listings of the products can also be added to the home screen. Any category can be used to select the goods.

Products Recently Viewed: The WooCommerce Mobile App Creator offers the recent tab element, which shows the most recent products the user has viewed. To display the element on your home screen, simply include it in your layout.

Sign-Up Pop-Up: Capturing visitors’ emails is a major challenge in eCommerce. To simplify this, the latest version of the Magento 2 Mobile App Builder includes a login/sign-up pop-up feature. Store admins can add a pop-up that appears for non-logged-in customers, making it easier to collect emails by offering simple login options and increasing the chances of email opt-ins.

Note: When designing a layout in the backend panel, the store administrator can add up to 20 elements.

6.0 Screens for Mobile Apps

6.1 Home Screen

Your WooCommerce Mobile App’s Home screen will be exactly how you want it to be. You have complete creative control over how to design and create a home screen with the WooCommerce Mobile App Maker. You can create user-friendly home screen layouts using a variety of banners (Square, Grid, Sliding), products (Square, Grid, Sliding), countdown timer banners, and recent products tabs in the backend.


Additionally, different design elements’ placements can be changed based on the situation.

1. Dynamic Layouts: You can create and save different layouts in the backend and reuse them for different events and festivals by using a variety of elements. Your app’s home screen can be created and customized dynamically.

2. Brand Logo: The WooCommerce Mobile App’s top header’s left-middle section displays your store’s logo. The logo can be enabled or disabled, as well as having its image changed, from the module backend.

3. Search: The search feature enables mobile app users to find what they’re looking for quickly and easily. The WooCommerce Mobile App offers two ways to search for products: On the WooCommerce Mobile App’s bottom tab bar layout, there is a search option.

–> Text: Users of your app can search for desired products by entering a few relevant keywords. The WooCommerce Mobile App will display results for that keyword that are pertinent.

4. Wishlist Bag: The wishlist bag, which contains all bookmarked products, is visible on the top header of your WooCommerce Mobile App. Users of the app can store their wishlist items in a bag for potential future purchases.

5. Shopping Cart: The Shopping Cart can be found on the app’s home screen in the top-right corner.

The users can get to know about the products added to their cart right from there.

6. WhatsApp:

A live seller-buyer chat option can be found at the bottom right of the home screen. Customers who use your mobile app can easily and directly message you with any questions, and you can answer them right away.

6.2.1 An Accordion Menu (Navigation Bar)

On the website, there are WooCommerce Mobile Apps for Android & iOS that have been developed with accurate product categorization. Mobile shoppers can browse a variety of products with ease. The Accordion Menu is also available for all CMS pages. It offers the following alternatives:


1. My Account

All user data, including personal details, shipping addresses, and order details, can be found on the My Account screen. The customers have access to all of their information and can update both their login credentials and personal information.

2. Categories

These categories match those on your website exactly. For easy browsing, you can map them appropriately and provide a 3-level categorization to app users.

3. CMS Pages

Here, a variety of CMS pages from your website, including About Us, Contact Us, Terms & Conditions, etc., are displayed. From the WooCommerce Mobile App Builder backend, you can select the one you want to be shown on the mobile app.

4. Language

Your users can view the WooCommerce Mobile app in their native language using the language selection option.

5. Currencies(s)

The WooCommerce Mobile App also shows all currencies that are offered on your e-commerce website. Customers can view and buy products for the price in the currency of their choice.

6. Sign in/Sign out

This option makes it simple for your users to log in and out of the WooCommerce Mobile App.

6.3 Category Screen:

Your WooCommerce Mobile App includes all of the associated categories, parent categories, and subcategories. The category screen is created with minimal clutter in

1.Two fundamental views:

Grid and List. In every listing, the product name, image, price, and discount are shown along with a button to add them to your wishlist bag. Layered navigation on mobile apps created with the WooCommerce Mobile App Builder makes finding products much easier. The category screens offer the following choices:


2. Sort:

Customers can choose the preferred order for sorting the category product pricing using this option. Your apps have two sorting options: Price: Low to High and Price: High to Low.

3. Filter:

The users can filter out the products using various selection options provided under the filter tab.

6.4 Product Screen:

Your WooCommerce Mobile App’s product screen is straightforward and interesting. Along with the name and price, various images of the same item are displayed. Depending on inventory status, the product availability is also indicated as “In Stock” or “Out Of Stock”. It includes the next additional items.

1. Options

Product Options: This screen shows all available options for the product, including size, color, and so forth. The product choices here match those on the website.

2. Brief Description

Users can quickly decide after reading the brief description of your product.

3. Product Details and Care

This page displays all of the product information that is listed on the website. Users of the app can access this page for detailed product information.

4. Add To Wishlist: By tapping “Add To Wishlist” on the left bottom of the product screen, users of the mobile app can directly bookmark the product.

5. Add To Cart: As the name implies, clicking the “Add To Cart” button adds the product directly to the shopping cart, allowing users to continue with the transaction.

6. Product Social Sharing

On this screen, you have the option to share your product on various social networks, including Bluetooth and email. Users of the app can invite many users to your app by sharing the products with their friends and family on various social media platforms.

6.6 Login Screen

The WooCommerce Mobile App Creator streamlines the sign-in/registration process and provides a variety of one-tap login options:

1. Login

Using their email addresses as sign-in credentials, app users can authenticate and access apps.

2. Register

The mobile app allows all new app users to register and create an account on the store. Only pertinent information is requested on the WooCommerce Mobile App sign-up form.

3. Use Phone Number to Log In

The easier and more reliable phone number login option that your mobile app offers makes it simpler for users to login and verify their OTP.

4. Use your fingerprint to log in

Additionally, your users have the option of using fingerprint authentication to sign in. Users can now quickly access apps thanks to this.

5. Login with Facebook

Users can access the app by logging in with their Facebook credentials.

6. Login with Google

The users can log in to the app using their GoogleAccount within no time.

7. Shopping Cart Screen:

All of the items in your shopping cart are displayed on the WooCommerce Mobile App’s shopping cart screen. The product’s name, quantity, total price, and shipping cost are all visible to app users.

1.Use Voucher

By entering active coupons and vouchers that are currently active on your website, this option enables users to receive discounts and offers.

2. The full product cost

Users can access this page to view the full cost of their shopping bag. It is automatically updated whenever there is a change in the quantity of a product or an addition.

3. Revision of Product Quantity

With the “Update Quantity” option, app users can even change the product quantity.

4. Remove the item

Users of the app can easily remove a product from their cart by selecting “Remove” from the menu.

6. Continue To Checkout

By selecting “Continue To Checkout,” front-end mobile app users can continue to the checkout & payment screens. On the checkout screen, they will receive a redirect.

6.8 Checkout Process

The checkout process in the WooCommerce mobile app Builder is made simple. In the mobile app’s checkout process, front-end users have the option to choose the shipping details, billing details, order numbers, order comments, and so forth.

Orders can be placed using just a few easy steps on the Android and iOS apps.

1. Customers can choose and add the desired item to their shopping carts. When the shopping bag is clicked, the user can also choose the desired product quantity. Users of the mobile front-end app can also view the total number of products and shipping costs.

At the bottom of the same page, the customer can also choose to use any coupon or coupon code.

2. The user can review the order and see several details after selecting the Continue to Checkout option. such as the cost of the product, the cost of shipping, the shipping address (which can be changed on the same page), the order summary (the number of products), the total cost, and so forth.

On the same page, the customer can also choose their preferred method of shipping. The order comment option that appears at the bottom of the screen allows the user to also include any special requests or requirements.

3. After selecting the option to “continue to checkout,” the user will be taken to the screen that asks for their payment method.

Users can choose from all of the website’s payment options on this screen. The shopping app includes a cash-on-delivery option as a standard form of payment.

The user will be taken to the order summary screen after completing the payment activity. where the customer can view the status, cost, and other information regarding their orders. Users of the front-end mobile apps will receive the order confirmation popup messages on their mobile phone screens as well.

6.9 My Account Screen

Users of the Android/iOS eCommerce app can view all account information, including a history of previous orders, on the My Account screen. The following options are available on the My Account screen:

  1. Order History

The users learn all the details of the earlier-placed order. The date the order was submitted, the order number, the price, and the delivery status are all visible to the users screen.

2. Update Profile:

Users can also update their previously saved profile information, such as their first or last name, phone number, and password.

3. Delivery Address (s)

Users of the app have access to the full list of saved shipping addresses. From here, you can also add a new shipping address.

4. Order Details:

The complete list of previously placed app orders is available to app users.

5. Reorder function

By selecting the “Reorder” button, you can directly reorder a product. By pressing a single button, all previous orders will be added to the cart.

6.10 Order Detail Screen

The WooCommerce eCommerce App’s order details screen shows every aspect of the order, including the shipping address, a summary of the products, the shipping and payment options, and the total cost. From this screen, users can even follow the delivery of previously placed orders.

7.0 Video Tutorials

PrestaShop SEO Optimizer- Clean URLs & 301/302/303 Redirection Module- User Manual

1.0 Introduction

A higher ranking on the search result page of the search engines like Google, Bing, and others is the biggest challenge for an online business. With a higher ranking, the chances of better sales also increase. In order to improve the search ranking, it is mandatory for the store owners to follow the guidelines issued by the search engines. SEO (Search Engine Optimization) is the way to increase your online presence for a better ranking on the SERPs. The On-Page SEO activities involve – website optimization, meta tag optimization, SEO-friendly URLs, keyword density and more. Among these factors, one factor is the SEO-friendly URLs which play an important role in the ranking. As per Google guidelines, Google recommends that the URL structure of a website should be as simple as possible. SEO-friendly URL is also useful for indexing process flow by the search engine bots.  In clear words, comprising SEO-friendly URLs for a website increases the chances for a website to get higher ranks in the search results. The default URL structure of PrestaShop SEO Optimizer Module includes the product id in the product page URL, Category page URL in the category page URL.

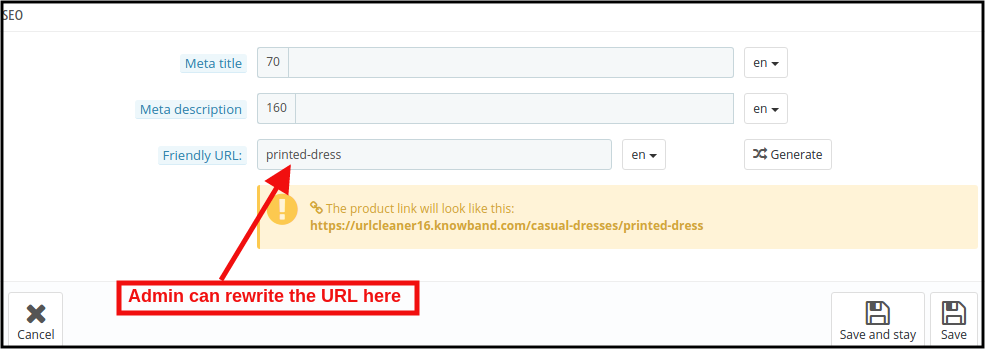
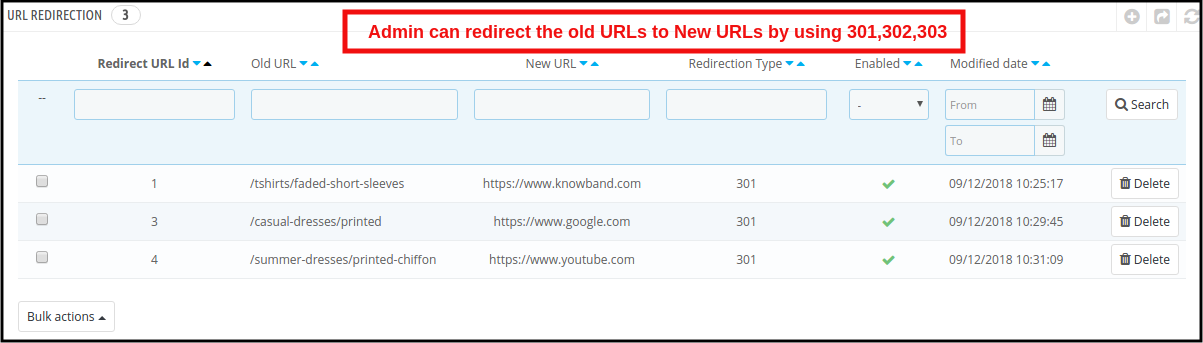
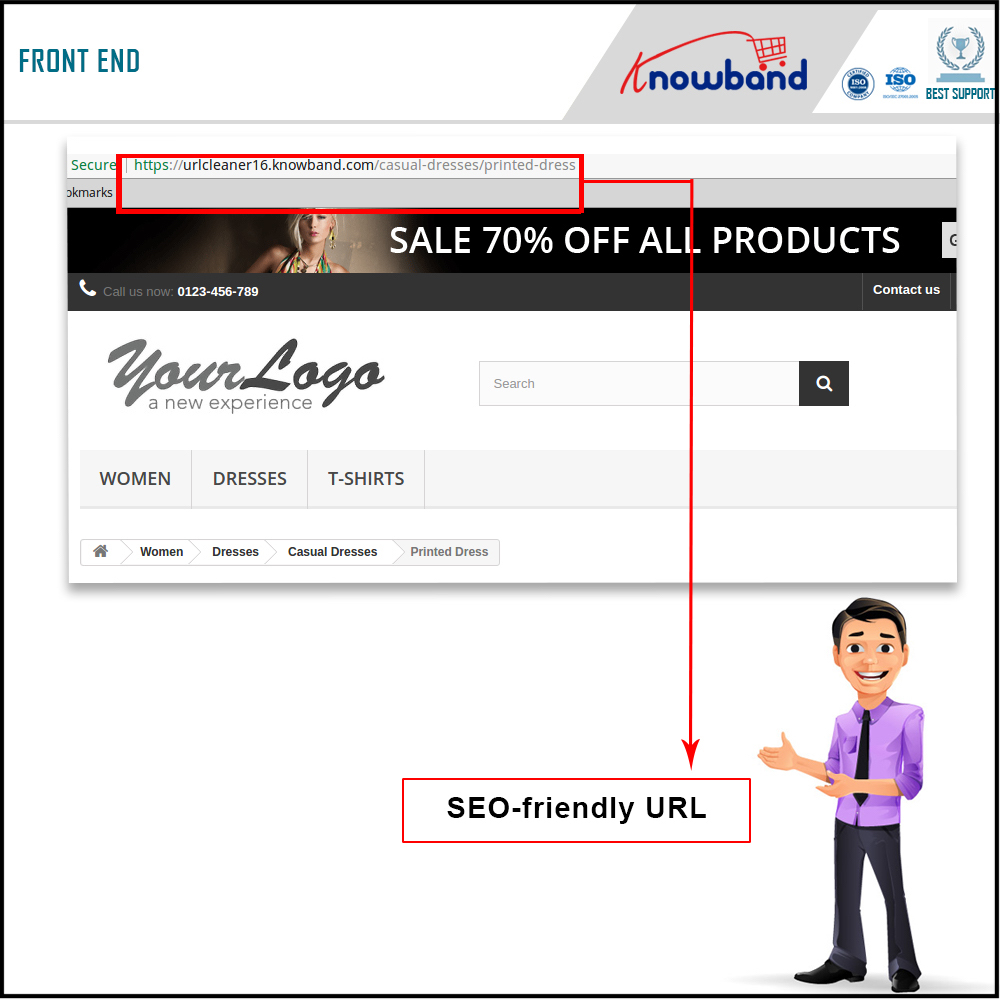
To help the store admin to create SEO-friendly URLs, Knowband has developed the URL Cleaner (SEO-friendly) Module. This PrestaShop SEO Optimizer – URL Cleaner Addon automatically generates the SEO-friendly URL by removing the ID from the URLs of products, categories, suppliers, manufacturers, CMS and all other pages of your store. It allows the admin to implement the 301, 302 or 303 redirection as per the requirement.

1.1 Features of the Prestashop URL Cleaner (SEO-friendly) Addon:

1. PrestaShop SEO-friendly URL Addon is a module that automatically converts the default URL into SEO-friendly URL.

2. The Knowband PrestaShop Rewrite URL Module removes the auto-generated ID from the URLs of the products, categories, suppliers, manufacturers, CMS and all other pages of your store.

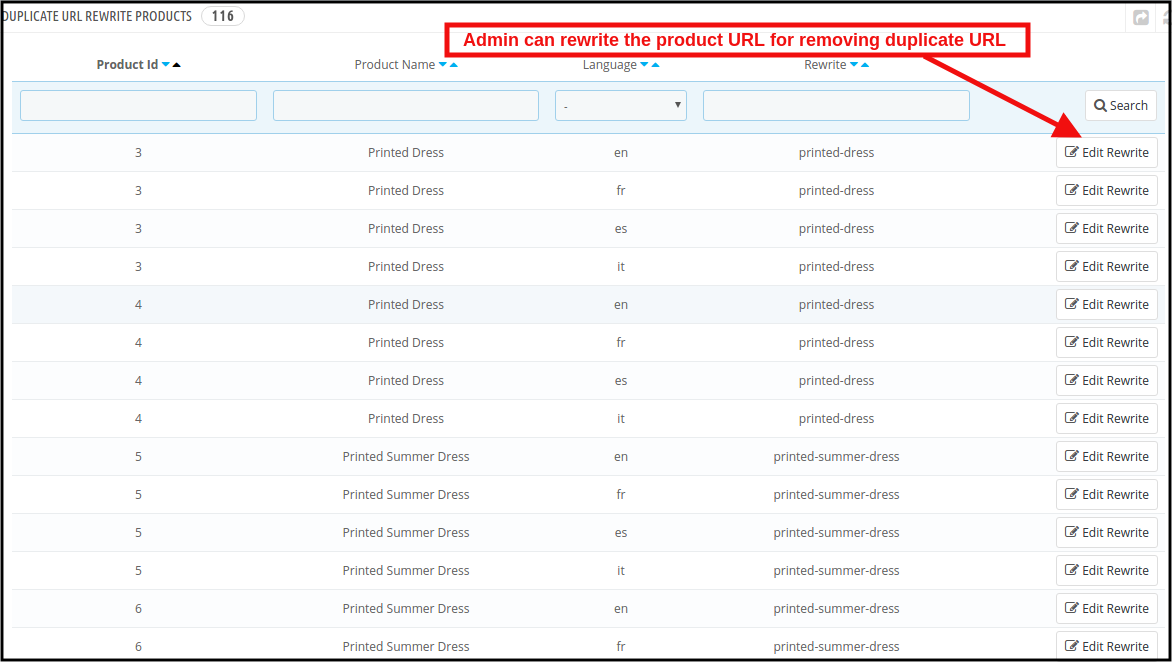
3. With the help of this PrestaShop Fixed Duplicate URL Addon, the admin can view the duplicate URL list and modify or remove the URL as per the need.

4. PrestaShop URL Cleaner Module provides an option to the store merchant to redirect the old URL to the new URL. The Store admin has 3 choices on redirects i.e. 301 redirects, 302 redirects, and 303 redirects.

5. SEO URL PrestaShop extension is a module that helps the store merchant in improving SEO.

6. This PrestaShop URL Rewriting Module by Knowband helps the eCommerce owner to improve the website SEO.

7. The PrestaShop store admin can set the URLs to end with or without .html by using this Prestashop URL Cleaner Addon.

8. PrestaShop URL Id Remover Module is multi-store compatible.

9. SEO-friendly Prestashop URL Cleaner Module back-end interface extremely easy to use.

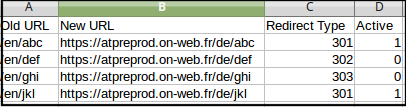
10. With this PrestaShop 301/302/303 Redirect Module, the admin can redirect the N no. of the old URLs to new URLs.

Technology for Development

Language: PHP

FrameWork: PrestaShop

2.0 Steps For Installation

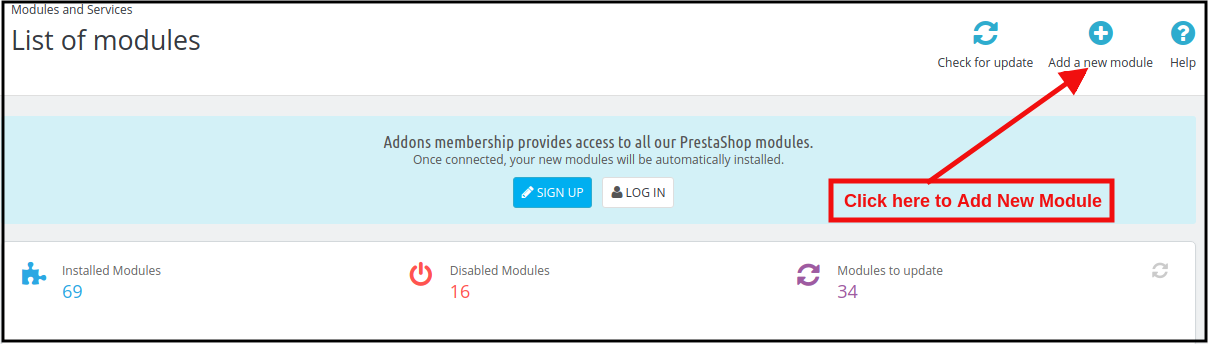
1. To upload the module click on the “Add a new module” button.

2. After clicking on Add New Module now select the module zip file.

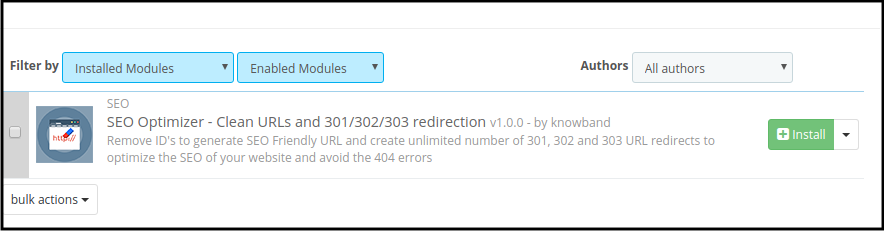
3. Now, You can find the PrestaShop SEO Optimizer Module in the module list and Click on the Install link to install the plugin.

4. After installing the module, the admin will be able to configure the module.

3.0 Admin Interface

After installing the module in the PrestaShop store, the store owner can make the changes without any hassles. There are the following sections available to the admin interface:

1. Module Configuration
2. Duplicate URL Rewrite Products
3. URL Redirection List

Each interface of this PrestaShop URL Cleaner (SEO-friendly) Module is explained below.

3.1 Module Configuration

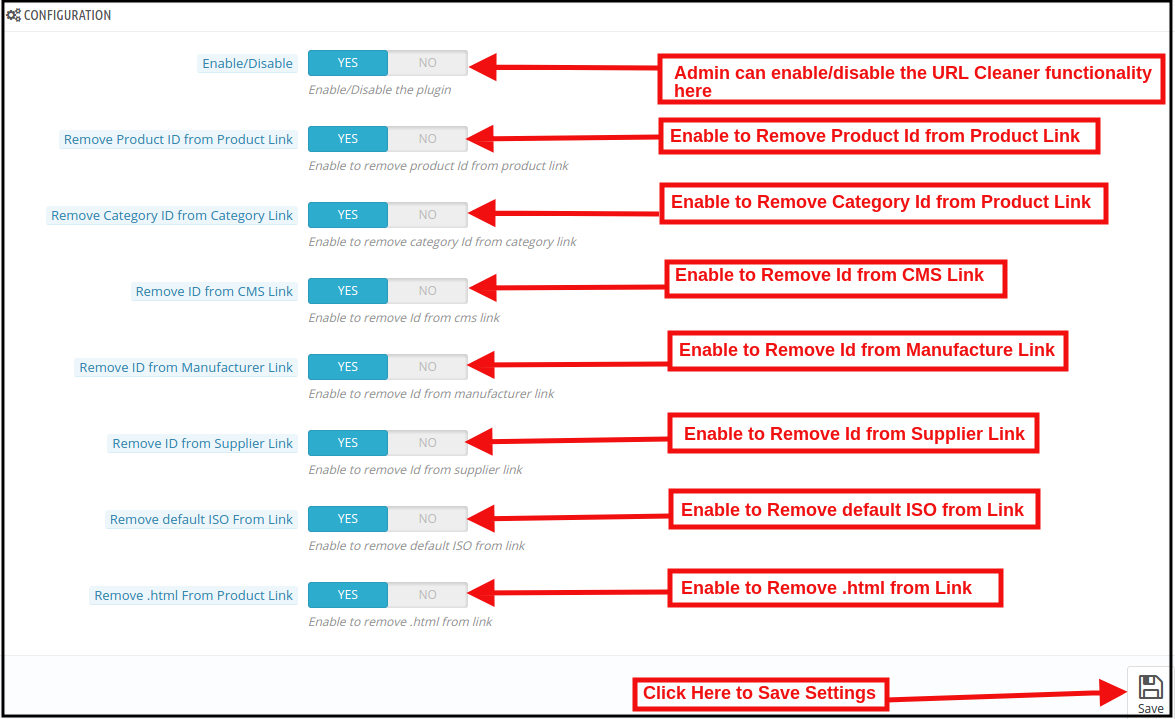
On clicking on the configure link on PrestaShop 301/302/303 Redirect Module, the system will open Configuration tabs of this Prestashop plugin by default as shown in the screen below:

Initially, the fields of this PrestaShop URL Cleaner(SEO-friendly) Addon in the above form will be already filled with their default values.
Enable/Disable: This field will enable the URL Cleaner feature. If enabled, the PrestaShop URL Cleaner will automatically convert the default store URL to SEO-friendly URLs.

Remove Product ID from the Product Link:

The default URL structure of the PrestaShop product page contains a product id and a URL like https://psm.knowband.com/urlcleaner/16/en/casual-dresses/3-printed-dress.html. As you can see the default product URL has the product id. After enabling this feature, the PrestaShop URL Cleaner Module will automatically remove the product id from the product link and the updated link will appear like this:

https://psm.knowband.com/urlcleaner/16/blouses/blouse

https://psm.knowband.com/urlcleaner/16/casual-dresses/printed-dress.html

Remove Category ID from the Category Link:

The default category page link contains the category id and a URL like https://psm.knowband.com/urlcleaner/16/8-dresses. This URL is complex and not SEO-friendly. By enabling this remove category option, the PrestaShop URL Id Remover Module removes the category id from the category link and after removing the category, the updated URL will appear like this:                  https://psm.knowband.com/urlcleaner/16/women/dresses

Remove ID from the CMS Link

The standard URL structure of the PrestaShop CMS page contains numeric values like

https://psm.knowband.com/urlcleaner/16/content/4-about-us. Using this option of PrestaShop SEO-friendly URL Module, the admin can enable this setting to remove the id from the CMS link and the automatic generated URL would look like:

https://urlcleaner16.knowband.com/content/about-us

Remove ID from Manufacture Link

By default, the Manufacture URL contains the Manufacture id in the manufacture URL. With the help of this extension, the admin can remove the id from the manufacturing link.

Remove ID from Supplier Link

PrestaShop does not have the feature to remove supplier link from the URL. After enabling this option, PrestaShop URL Cleaner Module automatically removes the id from the Supplier link.

Remove default ISO from Link

PrestaShop URL Cleaner (SEO-friendly) Module removes the default language’s ISO code from URLs and removes the language ISO code from shop’s default language. So, in this case, it will remove /es/ from all Spanish URLs, but other languages in your shop will still have ISO code in the URL.

For example: By default, the product URLs are like

https://urlcleaner16.knowband.com/en/casual-dresses/printed-dress after enabling the option URL would look like:

https://urlcleaner16.knowband.com/casual-dresses/printed-dress

Remove .html from Product Link: By enabling this option, the PrestaShop SEO Optimizer – Clean URLs & 301/302/303 redirection module remove the .html from the default product URL.

3.2 Duplicate URL Rewrite Products

In case after removing the product ID from the product’s URL, if there are any two product’s URLs are same.

For example, The two product’s URL contains different Id like:

https://psm.knowband.com/urlcleaner/16/en/casual-dresses/3-printed-dress.html
https://psm.knowband.com/urlcleaner/16/en/casual-dresses/4-printed-dress.html

After enabling the remove product id option, the module removes the product id from the URL and product URL like:

https://psm.knowband.com/urlcleaner/16/en/casual-dresses/printed-dress.html

Then this product’s URL list will show on this tab. Find below the attached image:

In this tab, the admin can view all the Duplicate URLs and they can update rewrite value the products as per their convenience.

3.2.1 How to edit the Duplicate URL?

When the store admin clicks on the rewritten link, the PrestaShop URL Redirects Module will redirect the admin to the below-mentioned page:

Here, the store admin can rewrite the duplicate URLs. As soon as the admin will make changes to the URLs, these URLs get removed from the duplicate URL list.

3.3PrestaShop SEO Optimizer Module URL Redirection List

If the store admin changes the URL of any particular product page, the online retailer needs to redirect the old URLs to the new URLs. This PrestaShop 301/302/303 Redirect Module allows the PrestaShop store admin to redirect the old URLs to new ones. This PrestaShop SEO Optimizer Module offers the three redirection options including 301, 302 and 303 to the store owner.

3.3.1 How can Admin Redirect the Old URLs to New URLs?

For the redirection of the old URLs to the New URLs, the store admin needs to click on the “Add New” button. After clicking on the Add New button, the below mentioned page open:

Here, the store admin can enter the Old URLs and New URLs, select the redirection from 301 (for permanent redirection), 302 (for temporary redirection) and 303 (to get the method used to retrieve information).

The admin can easily redirect the Old URLs to the New URLs.

URL Redirection through CSV file

Upload CSV file: In order to redirect the multiple URLs. You can enable the Upload CSV file option. After enabling this option, the admin will be able to download sample CSV file and as per the fields defined in CSV file, the admin needs to enter the details in the CSV and upload the same.

After enabling CSV upload option, the below mentioned page open:

Choose CSV File: The Store admin can upload the sample CSV here for redirecting the products page.

Sample CSV File Format:

4.0 Front End

After enabling the PrestaShop URL Id Remover Module by Knowband at the front-end, the users will be able to see an SEO-friendly URL that will clearly highlight the purpose of the page. Google also recommends “A site’s URL structure should be as simple as possible. Consider organizing your content so that URLs are constructed logically and in a manner that is most intelligible to humans (when possible, readable words rather than long ID numbers).” This will also help the admin in improving the search results of the website.

The SEO-friendly URL would appear as follows:

For more information about PrestaShop SEO Optimizer- Clean URLs &301/302/303 Redirection Module:

PrestaShop SEO Optimizer- Clean URLs &301/302/303 Redirection Module Admin Demo

PrestaShop SEO Optimizer- Clean URLs &301/302/303 Redirection Module Front Demo

Magento Block User Extension- User Manual

1.0 Introduction

The Magento store owner can now protect their eCommerce store from spams and bots. The Magento block user/bot by IP, country or user agent extension by Knowband allows the store owner to block the user/bot by restricting IP addresses, Country or User-agent. This way the eCommerce store admin can restrict or ban suspicious and unnecessary store users. The admin can show a customized message on the website for providing banishment notification.

Magento Block User by IP plugin provides an option to restrict the access of the users by IP, Country, and User-agent. The banishment can be enabled or disabled anytime from the admin interface. The online customers can also send a request to unblock them. They can send a message from the front-end, the admin can review the requests from the admin interface and take further decision to unblock the banned customers or deny the request.

1.1 Features of Magento block user by IP, country or user agent extension

  • The eCommerce store owner has multiple options to block the bot by blocking IP address, country code and user agent.
  • Admin can enter any particular IP for blocking the customer or a range of IP addresses.
  • The Magento Block User Extension allows the admin to enable or disable the ban anytime.
  • The store admin can display a custom message on the website for the banned customers.
  • The e-merchant can show or hide header and footer to the blocked customers.
  • The blocked customers can also send a request to unblock them.
  • There is no need to change codes from the admin interface.
  • It is very easy to configure this Magento Block bot by country extension.
  • The Magento Block User/bot by IP plugin is multi-lingual compatible.
  • Magento block user by IP, country or user agent extension can be installed and configured easily.
  • The store owner can easily activate or deactivate this Magento block bot by IP, country or user agent extension just by a button toggle.

1.2 Admin benefits

  • With this Magento Block User module, the store admin can take initiatives to protect the website from spammers and bots by blocking the suspicious customers and activities.
  • The Magento Block User module helps the store admin to remove the irrelevant website.
  • The admin can protect the store from malicious attacks by blocking the spammers and bots.
  • This Magento Block bot by country extension is highly customizable and hassle-free.
  • Multiple Blocking options are available to make sure that the genuine customer will not suffer.
  • The customers can request to unblock them from the front-end interface.
  • No technical help required for implementation.

2.0 Installation Steps

The store admin can follow these simple steps for installing the Magento Block User Extension:

1. First of all download the extension package from the Knowband store.

2. You will get a zipped file. Unzip the package on the root folder of your Magento setup via FTP manager (like Filezilla or WinSCP – download here: https://filezilla-project.org/). You’ll find the files and folders as shown in the image below:

3. The extension is now installed and ready for use. In the Admin Panel, go to “System > Knowband Extensions >Magento Blocker ”.

Now the store admin can now use and configure the Magento Block User Extension.

3.0 Admin interface

After successful installation, the store admin can configure the settings from the admin interface. The admin panel has five tabs as shown below:

  • General Settings
  • Block User by IP Address
  • Block User by Country
  • Block User by User Agent
  • Blocked Customer Request

The admin can customize the Magento Block User/bot by country extension as per the requirement

3.1 General Settings

In general settings the admin can view below-mentioned customization options:

1. Enable/Disable this module: The store admin can activate or deactivate the functionality by toggling this button.

2. Display Custom Message: The online store admin can enable or disable this option for showing or hiding a custom message. This message will be displayed to the blocked customers.

3. Custom Message: The store admin can enter the custom message here. The admin can enter a ban notification to the customers in order to inform them about banishment.

4. Include Header/Footer on Page: If this option is enabled, then, the header and footer will be shown in the webpage that displays the ban message, otherwise, the visitors will only be able to view the block notification message.

5. Customer Email Notification: The admin can enable or disable the custom email notification option. The customers can request the admin to unblock them.

6. Mail Subject: The store admin can set the Mail subject form the admin interface that is to be send with the mail.

3.2 Block User by IP Address

Here the store admin can view the list of blocked IP addresses of the customers. Admin can delete, edit and add new IP address to block the users. The admin can enter particular IP address or a range of IP addresses.

3.2.1 How to block a user by IP address?

The store admin can click on the “Add New” option in order to stop a customer from accessing the site by restricting his/her IP address.


After clicking on the “Add New Option”, the admin can view the below-mentioned options:

  • IP Address: The store admin can enter the IP address of the customers in order to restrict them. The admin can enter a range of IP addresses like 182.*.*.* if required.
  • Activate: The store admin can activate or deactivate the settings to block or unblock the customers by IP address.

3.2.2 How to Edit “block user by IP address” settings?
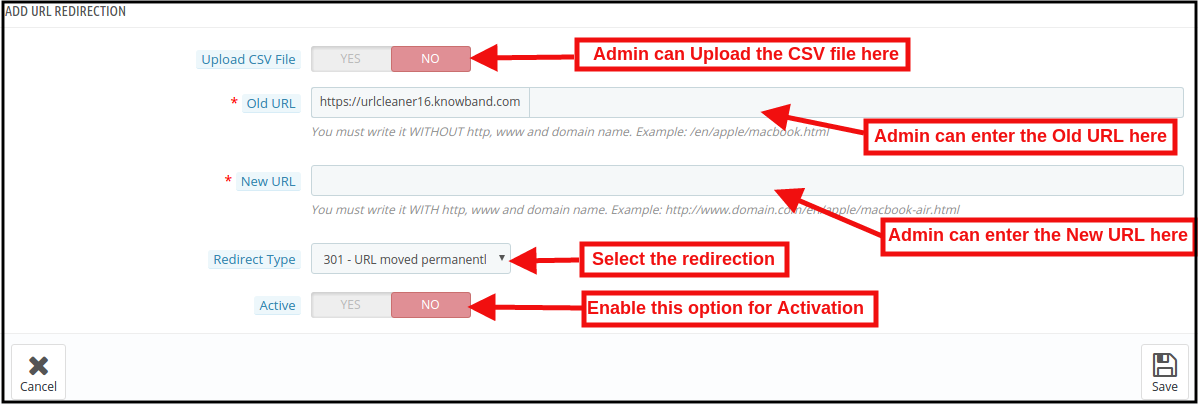
The admin can click on the below-mentioned icon in order to edit the previously applied settings.

3.2.3 How to delete “block user by IP address” settings?

The admin can delete the settings by clicking on the below-mentioned icon. After that, the customers can access the website easily.

3.3 Block User by Country

Here the eCommerce store owner can view the list of blocked countries. The store admin can add, delete or modify the country.

3.3.1 How to block a user by Country

The store admin can block the users of any specific country. The admin can select the country from the drop-down list and block the customers of that country.


After clicking on the “Add New” option the admin can view the below-mentioned options:

  • Select Country: The admin can select the country from the available drop-down list.
  • Activate: The admin can activate or deactivate the banishment from the admin interface.

3.3.2 How to Edit “block user by Country” settings?

The admin can also edit the previous settings just by clicking on the “Edit Icon”.

3.3.3 How to delete “block user by Country” settings?

The store admin can also delete the settings by clicking on the below-mentioned icon:

3.4 Block User by User Agent

The Magento Block User Extension allows the eCommerce store admin to block the user by user agent. Here the admin can view the list of blocked user agents as shown below:

3.4.1 How to block a user by User Agent

In order to block the customer by user agent, the admin can enter the user agent name and block the customers by user agent.

The admin can view below-mentioned information:

  • User Agent: The e-merchant can enter the user agent name here.
  • Activate: The admin can enable or disable blocking by activating and deactivating the option.

3.4.2 How to Edit “block user by User Agent” settings?

The eCommerce store admin can edit the previous settings by clicking on the “Edit Icon”. The store admin can click on this icon for editing the settings:

3.4.3 How to delete “block user by User Agent” settings?

The admin can delete the previous settings by clicking on the below-mentioned icon:

3.5 Blocked Customer Request

The online store users can send a request to unblock them from the admin interface. The admin can view these requests from the admin interface. Here in this “Blocked Customer Request” section, the admin can view the email id of the customers, message send by the blocked customers, IP address and user agent details. The admin can also view the details on which bases the customer has been blocked. The admin can view the request date from the admin interface.

The e-merchant can view the message and take appropriate actions.

4.0 Front-end Interface

If the admin blocks the customer, then the customers won’t be able to explore the website. The message will be displayed on the website as shown below:

If the store admin disables the settings to show header and footer, then the front-end interface will display as shown below:

The customers can send a request to the store admin in order to unblock them and allow accessing the website. The users can enter their email id and message. After submitting the message they will see a success message on the same page.

The store admin can view the request from the admin interface and decide to unblock the customer or deny the request.

Magento Auto Switch Language and Currency Extension- User Manual

1.0 Introduction of Magento Auto Switch Language and Currency Extension:

Knowband Magento Auto Switch Language and Currency Module automatically change the language and currency of the eCommerce site according to the visitor’s country or region. The admin in Magento auto switch currency can offer a better store experience to the store visitors by providing them the relevant information in their preferred language. This is one of the must-have extensions to improve the user experience and the customer base globally.

1.1 Features of the Magento Auto change language and currency:

1. Magento language and currency autoswitcher automatically convert the language of the online store based on the location of users by detecting their IP address.

2. Magento Language and Currency switch Extension can be easily implemented on the store.

3. Knowband’s Magento Automatic language and currency converter tracks the IP address of the user and finds out their country or region of the user.

4. Magento Auto Switch Language and Currency Module convert the default language and currency according to the customer’s geolocation.

5. This Magento Auto Change Language Module is supported in multiple languages.

6. The Magento auto switch currency are SSL compatible also.

7. The Magento language and currency auto switcher by Knowband is multi-store compatible.

8. With the help of this Knowband Magento Automatic Switch Language and Currency Extension, the store admin can offer a better user experience to the customers by showing the content in their preferred language and currency.

9. The Magento auto switch currency back-end interface is extremely easy to use.

2.0 Installation

1. The folder structure of the Auto Switch Language and Currency folder.

2. Copy all the folders into Magento root directory and clear the cache (if enabled).

3. You will be able to find the “Auto Switch Language and Currency” option inside the “System > Knowband Extensions > Auto Switch Language and Currency”.

4. You can now configure the Magento language and currency autoswitcher as per your requirements and check its working in the front end at following URL:

3.0 Admin Panel

After installing Magento Language and Currency Switcher Module in the Magento store. The admin interface of the Magento language and currency switcher offers two tabs. They are mentioned below:

1. General Settings

2. Country List

Let us discuss the various customization options of Magento Automatic language and currency converter:

3.1 General Settings

The various fields of the tab of Magento Auto Change Language and Currency Extension are listed below:

1.Language Switching
2.Currency Switching

1. Language Switching: In this section of Magento Auto Switch Language Module, the admin can enable/disable the auto switch language option. After enabling this feature, it will automatically change the website language whenever customers will visit the website.

2. Currency Switching: This Knowband Magento Auto Switch Currency Extension allows the admin to enable the auto switch currency option. If this button is enabled, then, the Magento Auto Currency Switch plugin will automatically change the currency being used in the front-end.

3.2 Country List

The Automatic Language and Currency Converter for Magento offers an option to the online retailer to add the Countries with preferred language and currency. For all the countries listed here with default language and currency will be different for the language.(As per the option selected by the admin)

3.2.1 How to Add New location/Country with the respective language and currency?

As per the requirement of the store the admin can add the countries here.

For adding the country the Store admin needs to Click on the ‘Add New’ button.

By clicking on the Add New button, the store admin will be redirected to the below-mentioned page:

Select Country: In this field of Magento Auto change currency and language, the online merchant can select the country from the drop-down list.

Select Default Language: This contains the list of languages. The admin in Magento Auto Switch Currency Module can select the language used in that particular country.

Select Default Currency: By Select default currency option of the Magento Auto change currency the Magento store admin can select the currency for the selected country.

In case of admin need to update the Currency and Language for any particular Country then the admin can update the information by click on the ‘Edit’ button in Magento language and currency switcher.

Please refer the below screenshot for edit the details:

They can delete the specific country by clicking on the Delete button.

4.0 Front End

In the Front End, the Language and Currency will automatically switch according to admin configuration in Back-Office of

Magento language and currency switcher.

With Magento Auto change currency and language, the IP of the user will be detected and the default language and currency is changed automatically as shown in the image above. The changes will be based on the configuration of done in the back-end of the Magento Auto Switch Language and Currency Extension.

Magento Social Messenger Extension- User Manual

1.0 Introduction

Magento messenger chat module for Magento store is a feature-rich Magento extension for providing live chat support to the store customers. Magento Facebook messenger integration extension by Knowband integrates the Facebook messenger on the website. The customers can ask their concerns and query easily just by sending a message. This Magento social live chat support plugin is the best way to provide support and improving customer experience.

By using this Magento live chat support extension the store admin can communicate with the customers directly, this way the admin can build a better customer relationship with the buyers. The store owner can configure this Magento Facebook messenger integration extension according to the requirement and activate or deactivate the module anytime. The online seller can incorporate the functionality by entering Facebook page id and app id in the admin interface. With the help of this Magento Messenger live chat extension, the admin can provide online customer support just by following some easy steps. The e-merchant can also set the look and feel of the social messenger icon by selecting its color. this way the store owner can easily implement the Magento Messenger live chat extension and improve the product/brand popularity.

1.1 Features

  • The eCommerce store admin can offer live chat support option on the website for providing better customer support and communicate with the customers directly.
  • The store admin can incorporate Facebook messenger on the website with the help of this Magento messenger chat module for Magento store.
  • It is absolutely easy to install, configure and activate this Magento Facebook messenger integration extension.
  • The eCommerce store owner can easily communicate with the customers and resolve their issues at the same time.
  • The admin needs to generate and enter the Facebook app id and page id in order to display Facebook messenger on the website.
  • The store owner can also set the look and feel of the messenger by selecting its color from the admin interface of this Facebook messenger and live chat extension.
  • The admin can show social messenger on selected pages. The Magento social live chat support plugin allows the admin to select the pages for showing the live chat option.
  • The Facebook messenger and live chat extension allow the admin to set the time after which the messenger will display.
  • The store admin can also set different greeting messages for Facebook logged-in and logged-out customers.
  • The messenger multilingual live chat support module is multi-lingual and SSL compatible.
  • User-friendly and easy to understand interface makes this Magento social messenger extension more useful.
  • No technical skills are required for implementing this Magento facebook messenger integration extension.

1.2 Admin benefits

  • Online store admin can communicate with the customers and resolve their concerns and answer their queries by chatting on Facebook messenger.
  • The customers can get a chance to connect with the store admin directly and clear all the confusions.
  • The store admin can increase sales and conversions by developing a customer relationship.
  • The highly customizable Magento social live chat support plugin is very easy to implement.
  • The store owner needs to generate and enter the Facebook app ID and page ID in order to integrate the Facebook messenger on the store.
  • The store admin can set the messenger color according to the website theme easily from the admin interface of this Magento Messenger live chat extension.
  • By using this Magento messenger chat module for Magento, the store admin can offer live chat support to the users.
  • By resolving the concerns and answering the queries the store admin can boost the sales and conversion rate easily.
  • The admin can build a relationship with the customers by offering them the best class support.

2.0 Installation Steps

The store admin can follow these simple steps for installing the Messenger live chat module:

1. First of all download the extension package from the Knowband store.

2. You will get a zipped file. Unzip the package on the root folder of your Magento setup via FTP manager (like Filezilla or WinSCP – download here: https://filezilla-project.org/). You’ll find the files and folders as shown in the image below:


3. The extension is now installed and ready for use. In the Admin Panel, go to “System > Knowband Extensions >Magento social messenger”.
Now the store admin can now use and configure the Magento social messenger extension.

3.0 Admin interface

After installing the Magento social messenger module, the store admin can view the below-mentioned configuration option:


1. Enable/Disable: The store admin can activate or deactivate the Magento social live chat support extension just by clicking on this option.

2. Facebook APP ID: The store admin can generate the enter the Facebook app id here. The admin can generate the Facebook app id by following the steps provided in 3.1 section.

3. Theme Color: The admin can set the theme color by selecting the messenger color. The admin can select the messenger color as per the store theme.

4. Page ID: The store admin can generate the Facebook page id and enter the page id in order to offer a live chat option. For generating the Facebook page id, please follow the steps provided in 3.2 section.

5. Select the Page: The Magento Facebook messenger integration extension provides an option to select the pages for displaying the Facebook messenger.

6. Set Greeting Message Delay: The online store owner can set the time (in seconds) after which the customers can view the greeting message on the website. If the store owner wants to show the greeting message without any delay, then he can enter the time ”0”.

7. Logged-in Greeting Message: The Magento social live chat support plugin allows the admin to display a greeting message for Facebook logged-in customers. The store admin can leave this customization option if he doesn’t want to show this message.

8. Logged-out Greeting Message: The admin can show a specific message for those customers which are logged-out to the Facebook. The admin can leave the section empty if he doesn’t want to show any message.

3.1 Steps to generate Facebook app ID

In order to generate a Facebook app id please follow these steps:

  • First of all log-in to the Facebook account and go to the link mentioned here: https://developers.Facebook.com/
  • Go to “MY APPS” and click on the ”ADD NEW APP” option.

  • Enter the details in “Display Name” and “contact email ID”. After that, click on the “Create APP ID” button.

  • After clicking the “create app id” button, go to the “Settings” and then select “Basic” option. Here, the store admin can view the APP ID. The admin needs to copy this Facebook app id and copy to the admin interface app id option.

  • Admin can insert the App Domain. After that click on the “save changes” option.

3.2 Steps to generate Facebook page ID

  • The admin needs to open the Facebook page and go to “about” page. Here, the admin can view the “page id”.

  • After that go to the settings option and select the “messenger platform” option. Here, the store admin can enter the domain in the “White-listed domains” option.

  • Now, the admin can enter the page id in the admin interface page id option.

4.0 Front-end interface

The front-end view of the Facebook messenger and live chat extension will look as shown below:

The online customers can send a message and ask their queries. They can get the quick resolution of the issues.

This way, the online store admin can easily increase the customer’s trust over the website and offer better support to the customers. Magento facebook messenger integration extension is very easy to implement and there is no need to change even a single code from the admin interface. The eCommerce store owner can easily implement live chat functionality and resolve customers concerns. Facebook messenger and live chat extension allows store admin to set the look and feel of this messenger for offering better user-experience. The Magento social live chat support plugin is highly customizable and offers smooth functioning.

The store admin can answer the queries of the customers and resolve the issues easily. This way the admin can offer live chat support on the website without any hassle. This way, the Magento social messenger extension is helpful for both the store admin as well as customers.

For more Magento extensions please visit Knowband.

Magento social messenger module Link.

Magento live chat support extension User Manual.

Magento messenger chat module plugin admin demo link.

Knowband Facebook messenger and live chat front demo link.

Knowband Messenger live chat video link.

Please contact us at support@knowband.com for any query or custom change request as per your business requirement.

PrestaShop Affiliate and Referral Program Addon –User Manual

1.0 Introduction

Referral marketing is one of the best tactic to drive more traffic to your online store. Now the eCommerce store owner can get more customers and improve the sales of the website with the help of affiliate partners. The Prestashop Affiliate and Referral program addon provide an option to promote your store without investing a lot of amount and time. Knowband offers Prestashop Affiliation Program by which you can allow your customers to register as an affiliate and refer a promotion code to their friends. The affiliate customers can earn the commission for referring the customers and purchases made by those customers. This is one of the ways to spread the word-of-mouth and boost the reach of your eCommerce site.

Affiliation program helps the store admin to generate more traffic of your online store which ultimately increases the chances of sales in the future. There are several ways of referrals like link sharing, referral code sharing, voucher sharing and mail sending.

1.1 Features of this Prestashop Affiliate and Referral program addon

  • The Prestashop Affiliate and Referral program addon allows the store admin to enable/disable automatic approval of affiliate customers.
  • The affiliate customer has various ways of sharing the links with their referrals.
  • Admin can set specific commission for different affiliates.
  • Prestashop Affiliate Program addon allows the admin to set the validity for the affiliates.
  • A separate dashboard is available in the front-end through which the affiliate customers can view their commission stats and also request for the pay-out.
  • The affiliate shares the website link with their referrals. It increases website traffic.
  • The admin can provide a commission to the affiliate customers for referral registration.
  • The affiliate customers can also get a commission for referral orders.
  • The affiliate customers can redeem the commission by generating a voucher or pay out request.
  • Affiliates have an option to share the vouchers with their referrals. This voucher can be used while checkout.
  • With this Prestashop Affiliate and Referral program addon, admin can also offer multiple commission functionality for the affiliate customers.

2.0 Installation Steps

The store admin will get the above files while purchasing this Prestashop Affiliate and Referral program addon:

1. The zipped file that consists the source code of this Prestashop Affiliate Program addon.

2. User Manual

In order to install this Prestashop Referral Program addon, the admin needs to follow these steps:

  • Unzip the zipped file which includes some files and folders.
  • After that, admin can copy the overall content of the folder and paste them into the “Modules” folder of the store’s directory. The admin can follow the path – Root Directory/modules/.

3. Now the store owner can install the Prestashop Referral Program addon. As an eCommerce store owner, you can find that in Store Admin -> Modules and Services.

Now you just need to click on “Install” button to install this Prestashop Affiliates module. A confirmation pop-up will be shown. Click on “Proceed with the installation” option. This step will install the Prestashop Affiliates module and show notification – “Module(s) installed successfully”.

3.0 Admin Interface

After successful installation, the store admin can configure this Prestashop Affiliate Program addon easily. There are several configuration options as shown below:

  • Basic Configuration
  • Affiliate Customers
  • Referrals Listing
  • Commission Listing
  • Pay Out Requests


3.1 Basic Configuration

In the Basic Configuration sub-menu, the store admin can apply the settings to manage the affiliate system on the website front-end interface. The admin can configure the above options:


1. Enable: The store owner can activate or deactivate the Prestashop Affiliate Program addon just by toggling this button.

2. Compatibility with Prestashop GDPR: Admin can enable this option to export and delete user data on Prestashop GDPR module request.

3. Enable Affiliate registration: Enable this to activate or deactivate affiliate registration from the admin interface.

4. Select the referral System to be enabled: The e-merchant can choose the referral type like referral code system, Share the link to the customers, share voucher customers, Share link on social media platform, Share link by email.

5. Enable sharing link with Facebook: The store admin can activate or deactivate the option to share referral link on Facebook. Social sharing will be automatically enabled if the store admin enable this option.

6. Enable Facebook App ID: The store admin can enter the Facebook app id. The store admin can create the facebook app id by following the steps described in 3.1.1 section.

7. Enable Sharing Link With Twitter: The e-merchant can display link sharing option on twitter. The affiliate customers can share the site link to the referrals through twitter.

8. Enable Sharing Link With Pinterest: The link sharing on Pinterest option will be shown on the front-end.


9. Enable disable affiliate after: The store admin can enable or disable this option as per the requirement. Admin can set the days after which the affiliate customer will not get any referrals.

10. Disable affiliate after: The module allows the admin to select the days after which the affiliate customer will not get referrals. If the admin disables the “Enable disable affiliate after” settings, then, this option will not be displayed.

11. Enable Disable multiple commission: This option allows admin to enable or disable multiple commission system for the affiliates.

12. Disable commission after: Admin can set the order limit after which the affiliates will not be offered commission value.

13. Global referral rate for order placed: The store admin can enter a common referral rate for all the affiliates. The global referral rate will be in percentage.

14. Global referral rate for user registration: The Prestashop Referral Program addon allows the store admin to set the basic referral rate for the user registration. The admin can set the fixed value as referral rate.

15. Generate voucher for affiliate customer on registration: The store admin can also generate a voucher and assign it to the customers if they register as an affiliate customer. The admin needs to edit the affiliate customer to assign him vouchers if this field is not active.

16. Global voucher type: Here, the store admin can select the voucher type fixed or percentage based. This voucher will be common for all the affiliate customers.

17. Global voucher value: The store admin can enter the value of global voucher.

18. Global voucher quantity: The store admin can enter the quantity of the vouchers which will be provided to all the affiliate customers for sharing with the referrals.

19. Global voucher quantity per user: The admin can enter the quantity of the vouchers which can be used by the customers at a time.

20. Enable permanent referral: Enable this option to allow permanent referral to the affiliate customers by enabling this option.

21. Referral Default Status: The store admin can set the referral default status as rejected, pending or accepted.

22. Select when the referral should be counted: The referral will be counted when user is registered or when order is places. The admin can also select both the options.

3.1.1 Steps to generate Facebook app ID

  • After that insert the “Display Name” and “contact email ID”. Click on the “Create App ID” button.

  • Go to the “Settings” and then select “Basic”. The admin can view the APP ID as shown below. The admin needs to insert app domains, category, Privacy policy URL here.

This way the admin can get the Facebook app id.

3.2 Affiliate Customers

The store admin can view a list of the affiliate customers in this section of the back-end interface.

3.2.1 How to Edit Affiliate Customers details?

The store admin can apply the settings to edit the details related to each and every affiliate customer.

1. Status: The store admin can enable or disable the status of the affiliate customer from the admin interface.

2. Affiliate From: The admin can view the details when the customer registered as affiliates.

3. Affiliate Until: The admin can set the date till the customer will be affiliate.

4. Use global referral rates: The store admin can use the global referral rate or set referral rate specifically for the different affiliates.

  • Referral rate for order placed: The admin can set the percentage based referral rate for order placement.
  • Referral rate for user registration: The admin can set the fixed amount of referral for user registration.

5. Use global voucher configuration: The store admin can use global voucher or configure the unique voucher for specific customer.

6. Voucher type: The admin can set percentage or fixed voucher type.

7. Voucher value: The store admin can set the voucher value from the admin interface.

8. Voucher quantity: The store owner can decide the number of the vouchers.

9. Voucher quantity per user: The admin can set the number of vouchers per users.

10. Vouchers: The admin can view the voucher code.

3.3 Referrals Listing

The store admin can view the referrals and their details from the admin interface. The list of the referrals will be shown as below mentioned image:

The store owner can also edit the affiliate’s status. The admin can view the above details:

1. Affiliate: The admin can view the affiliate email id from here.

2. Description: The store admin can view the activity performed by customer.

3. Commission value: The admin can view the commission value as per the configuration.

4. Commission currency: The currency type can be viewed from this section.

5. Order reference: If the new customer place any order then the order reference will be displayed here.

6. Referral status: The admin can set the status of the referral as accepted, rejected and pending.

7. Referral date: The store admin can edit the referral date from the admin interface.

3.4 Commission Listing

The store admin can view the commission details from the admin interface. The store admin can view the overall commission provided to every affiliate customer.

3.4.1 How to view the affiliate commission?

The Prestashop Affiliates module allows the eCommerce store admin to affiliates commission from the “commission listing”. The store owner can get details about the order reference, email id of the referrals, commission amount and the date on which the commission offered.

3.5 Pay Out Requests

The affiliates can redeem the commission just by clicking on the payouts option. The affiliates request to generate voucher or can send a payout request to the store admin.

The store admin can view the payout request in the “Payout request” option and then accept or reject the request.

The store admin can click on the action option and accept or reject the payout request easily. Once the admin accept the payout request, then, the status of the request will be changed to “accepted” on the website front-end.

4.0 Front-end Interface

The online customers can view the affiliate registration option on the admin interface. Once they register as an affiliate customer, they can view their affiliate account as shown below:

The affiliate customers can view the graphical representation of the total commission, redeem commission and total referral.

The affiliates can share referral code, share referral link, share vouchers, share link on social media platforms and share the store link via email.

The affiliate customers can view the rewarded commission on referrals. They can also view the status of the commission.

The affiliates can click on the payout option and after that click on the “+” for generating a voucher. The minimum value of the voucher is “10”. The affiliate can click on the “voucher generate” option for getting a voucher.

The affiliate can view the success message on the top of the website.

The affiliate customer can also get an email with the voucher code information as shown below:

The affiliate can also send payout request from the front-end. For generating the payout request, the affiliates can click on the payout option and then click on “+”. Now enter the amount of payout and click on “payout” button.

By default the request status will be “pending”.

Once the store admin accept the payout request from the admin interface, the affiliate customers can view the status.

Need Help Getting Started? Watch Our Video!

We have created an easy-to-follow YouTube tutorial to help you understand and configure the PrestaShop Affiliate and Referral Program Module. The video shows you how to enable the module, customise referral settings, and monitor affiliate activities without any hassle.