The Magento product update notification extension by Knwoband adds an attractive functionality to your Magento website, which is beneficial for both the store owner and the customers. This Magento extension helps the customers to subscribe for product updates i.e. if product price or stock availability changes customer will be notified by an email. Magento back in stock module adds a simple block to the product page of Magento store through which the user can subscribe by entering the email id for the respective product.
The subscribed customers for product will be visible to store owner and helps in updating the product according to requirement so that customer can buy those products.
The Magento stock alert provides simple input field to enter email Id and a notify button that will be displayed on the product page itself. Customers can easily get subscribed to the product by entering email id and start getting email corresponding to that.
Installation
After purchasing this Magento extension, you will get following files as shown below:
magentoproductupdatenotification.zip(contains source code of the extension)
User Manual
Follow the following steps to install the Magento extension by Knowband:
Unzip the magentoproductupdatenotification.zip file.
Copy all the files and folders of unzipped folder into your store root directory.
After copying all the files and folders, clear the cache.
Open any page of your store. Magento will install the Magento module at the time of loading any page.
After installing, please login into your admin panel and go to the below menu:
System > Configuration > Advanced
Here you will see that “Vss_Productupdate” module is listed.
Extension Interfaces
There are two interfaces in this Magento price alert notification extension. Each interface have different functionality according to its use. These interfaces are:
Admin Panel Interface(Only be accessible by admin/store owner)
Front End Interface(accessible to front end user)
Each interface of this Magento product update extension has been described in separate section.
Admin Panel Interface
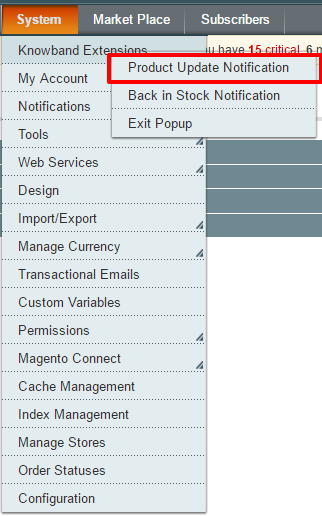
This part of the plug in will be for admin user, through which the admin can configure the settings. After installing Magento extension, Product Update Notification menu will be visible under System > Knowband Extensions menu in the menu bar as shown in below screen:
On clicking above mentioned menu, admin panel interface of the Magento stock alert extension will open.
There are four tabs in the admin panel of this Magento price alert through which the admin will be able to manage the functionality of the Magento plugin. These are listed below:
General Settings
Request for Notification Email Settings
Notification Email Settings
Analysis
General Settings
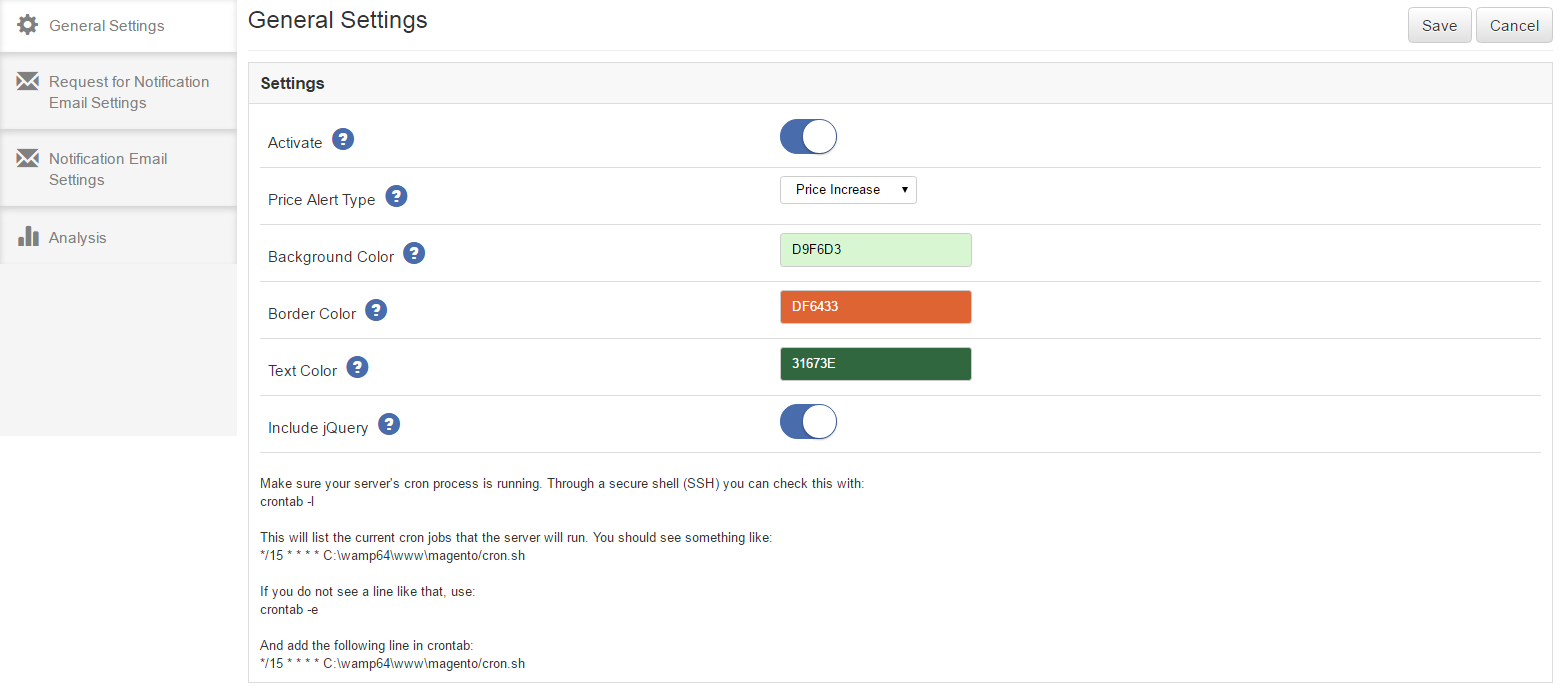
This tab will be opened by default when you click on the menu. General Settings tab will have following options:
Activate – This will be an on/off switch. Admin will have the option to Enable/ Disable the Magento back in stock extension. If enabled Magento stock alert will be enabled on front end product page otherwise not.
Price Alert Type – This will be a drop down list having options “Price Decrease”, “Price Increase” and “both”. It means if “Price Decrease” is set then mail will be triggered to customer only when price of subscribed product decreases. If “Price Increase” is set then mail will be triggered when price of subscribed product increases. And if “both” is set then mail will be triggered in both cases. Default value of this Magento price alert notification extension will be set to “Price Decrease”.
Background Color – This will be a color picker palette. It will set the background color of Magento product update extension block on the product page.
Border Color – It will also be a color picker palette. It will set the border color of Product update extension block on the product page.
Text Color – This will also be a color picker palette. It will set the text color in the Magento stock alert extension block on the product page.
Include j-Query – This field of Magento price alert will also be an on/off switch. By default it will set to off but if you are using Magento version lower than 1.9 then turn it on. It will include required j-Query files.
*Note 1: Stock notification mail will be sent to the customers at every time when product goes in stock from out of stock.
*Note 2: You have to make sure that Magento CRON process is running on your server to get notified your customers when any subscribed product comes in stock. Through a secure shell(SSH), you can check this with:
crontab -l
This will list the current CRON jobs that the server will run. You should see something like:
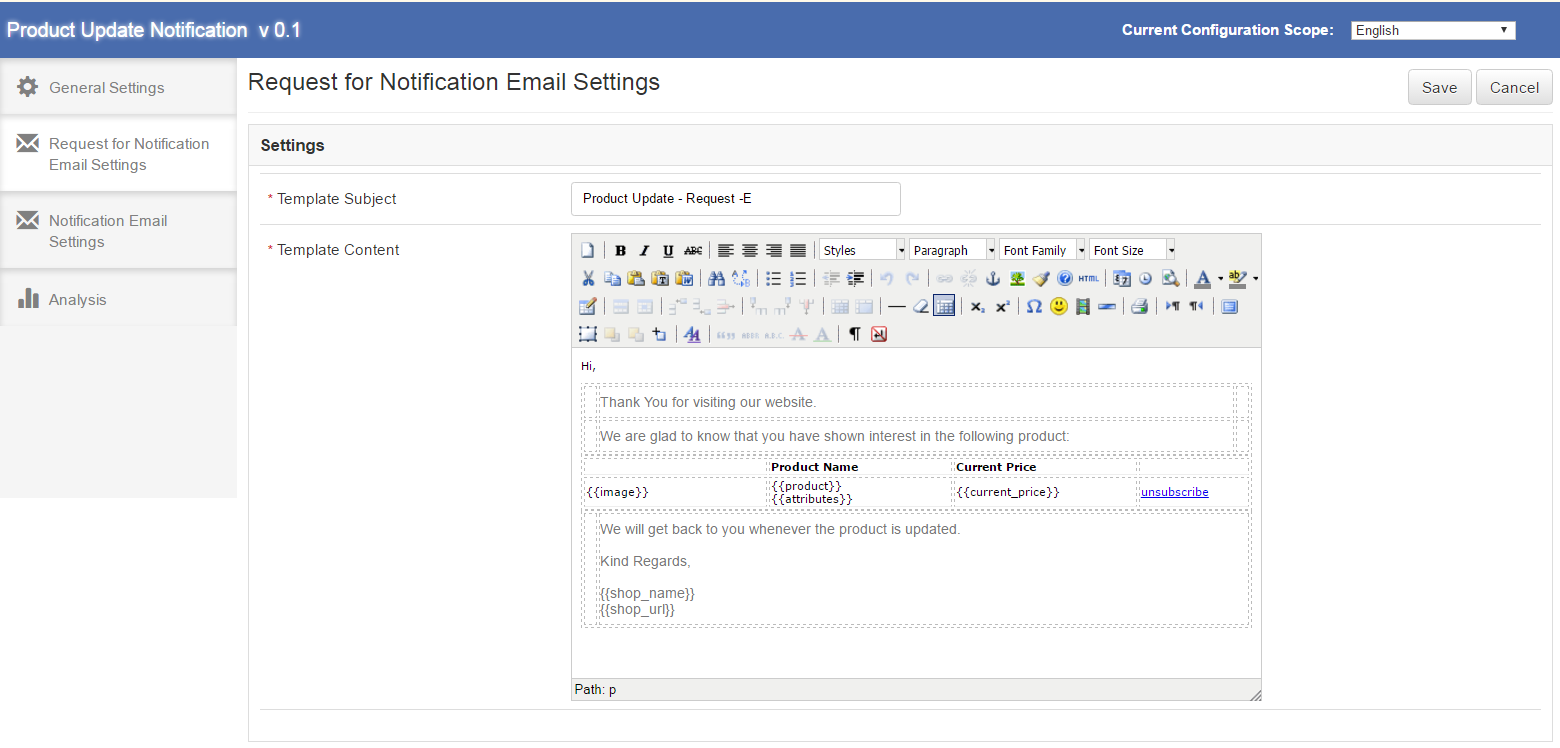
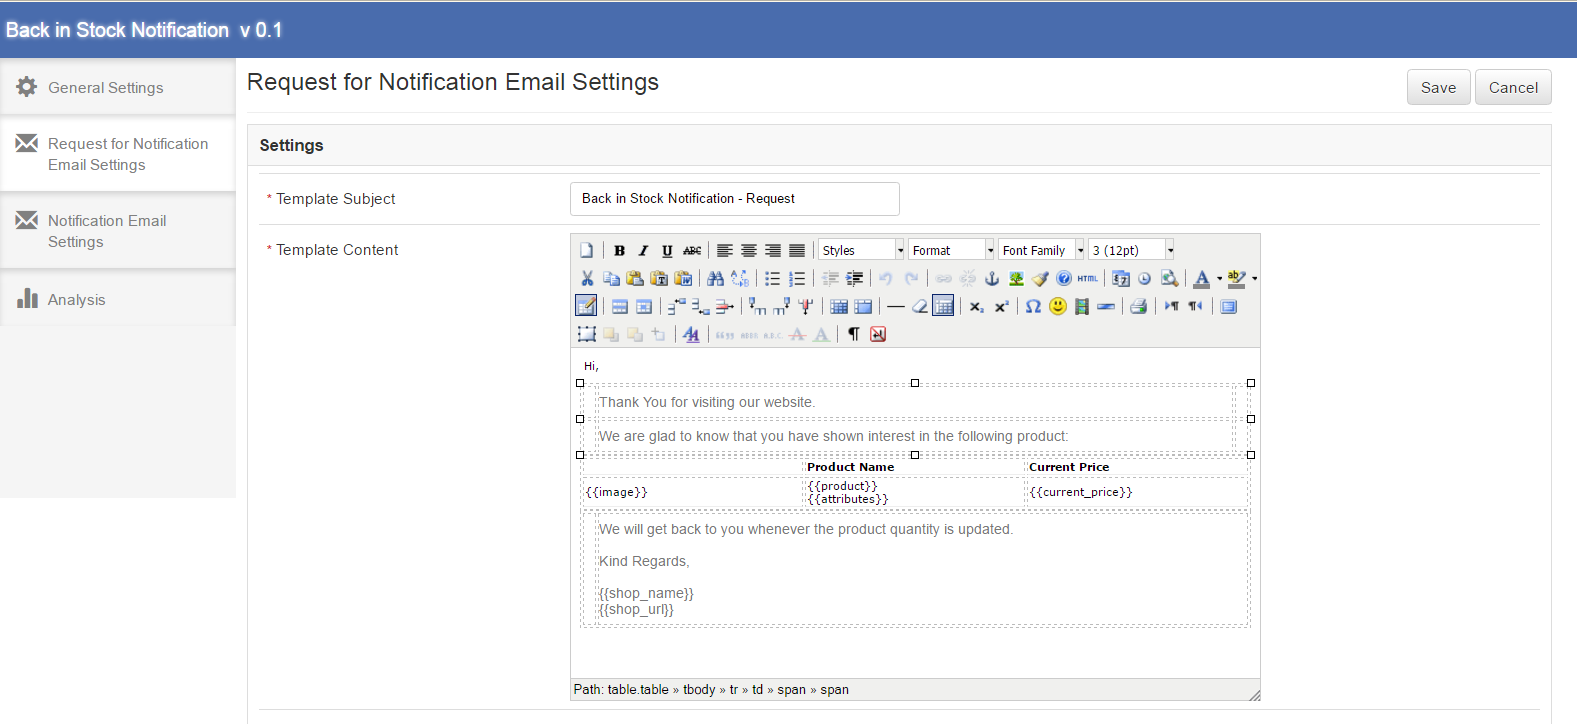
This tab of product update notification Magento will have the Email settings which will be sent when customer subscribes himself for notifications for a particular product. This tab will have the following options:
Template Subject – It will be the subject of the mail which will be sent. This field of the Magento product update will be mandatory and default value will be ‘Product Update – Request’.
Template Content – This will be the content of the mail which will be sent initially to the customer. This field will also be mandatory. The default content of the Magento back in stock plugin will be as shown in the proposed screen below. The content enclosed in {{}}, will be the variables which will be used when sending actual mail. Other than these all content would be static. There will also be “Unsubscribe” link against the product clicking on which customer will be redirected to a page on store showing “You have been unsubscribed successfully”.
Below is the screen shot of the this tab :
Notification Email Settings
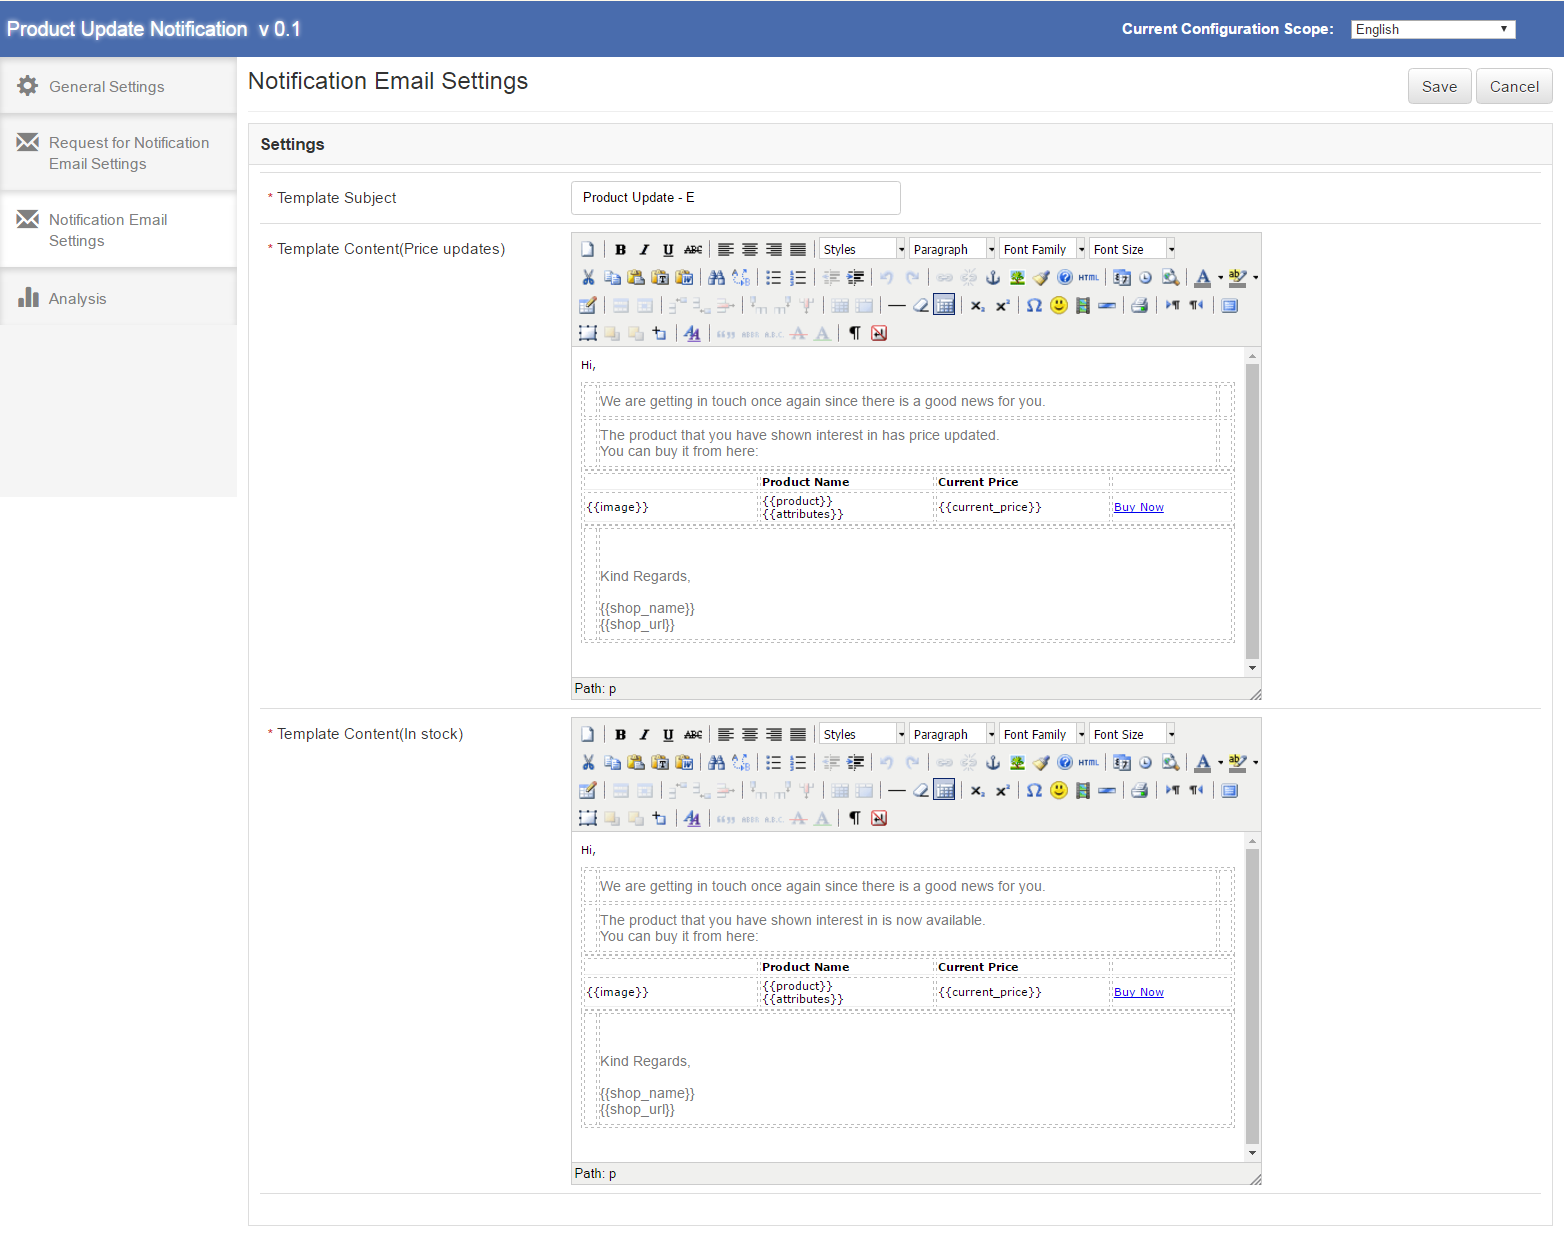
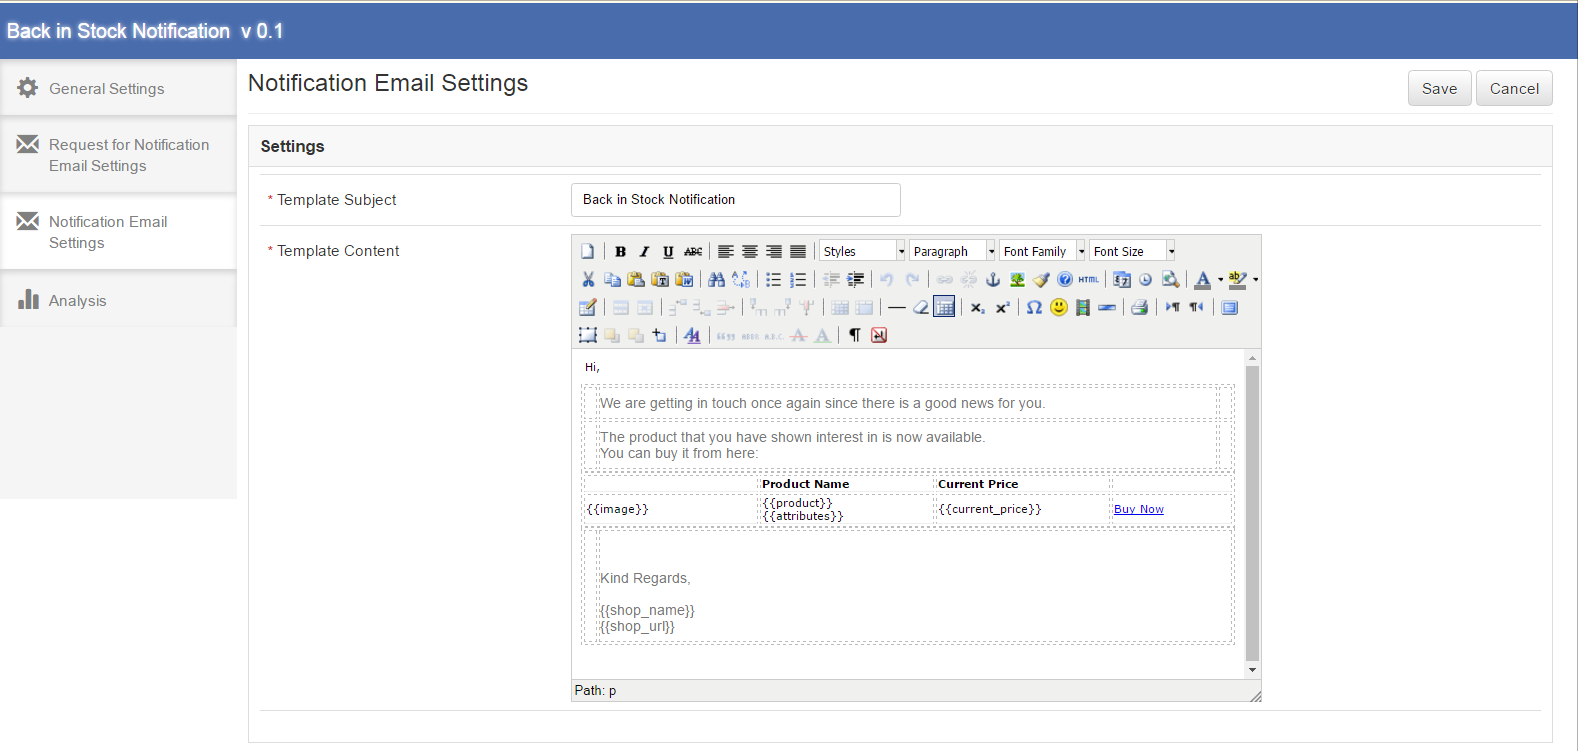
This tab of Magento stock alert extension will have the Email settings which will be sent to the subscribed customers for a particular product and that product gets updated i.e. either price updated or comes in stock from out of stock. This tab of Magento price alert extension will have the following options:
Template Subject – It will be the subject of the mail of the Magento product update extension which will be sent to the customer when product gets updated. This field will be mandatory and default value will be ‘Product Update’.
Template Content(Price Updates) – This will be the content of the mail of product update notification extension which will be sent finally to the customer when a particular subscribed product gets price update. This field of Magento price alert notification extension will also be mandatory. The default content will be as shown in the proposed screen below. The content enclosed in {{}} will be the variables which will be used when sending actual mail. Other than these all content would be static.
Template Content(In Stock) – This will be the content of the mail which will be sent finally to the customer when a particular subscribed product comes in stock. This field will also be mandatory. The default content of the Magento stock alert will be as shown in the proposed screen below. The content enclosed in {{}} will be the variables which will be used when sending actual mail. Other than these all content would be static.
Below is the screen shot of the this tab :
Analysis
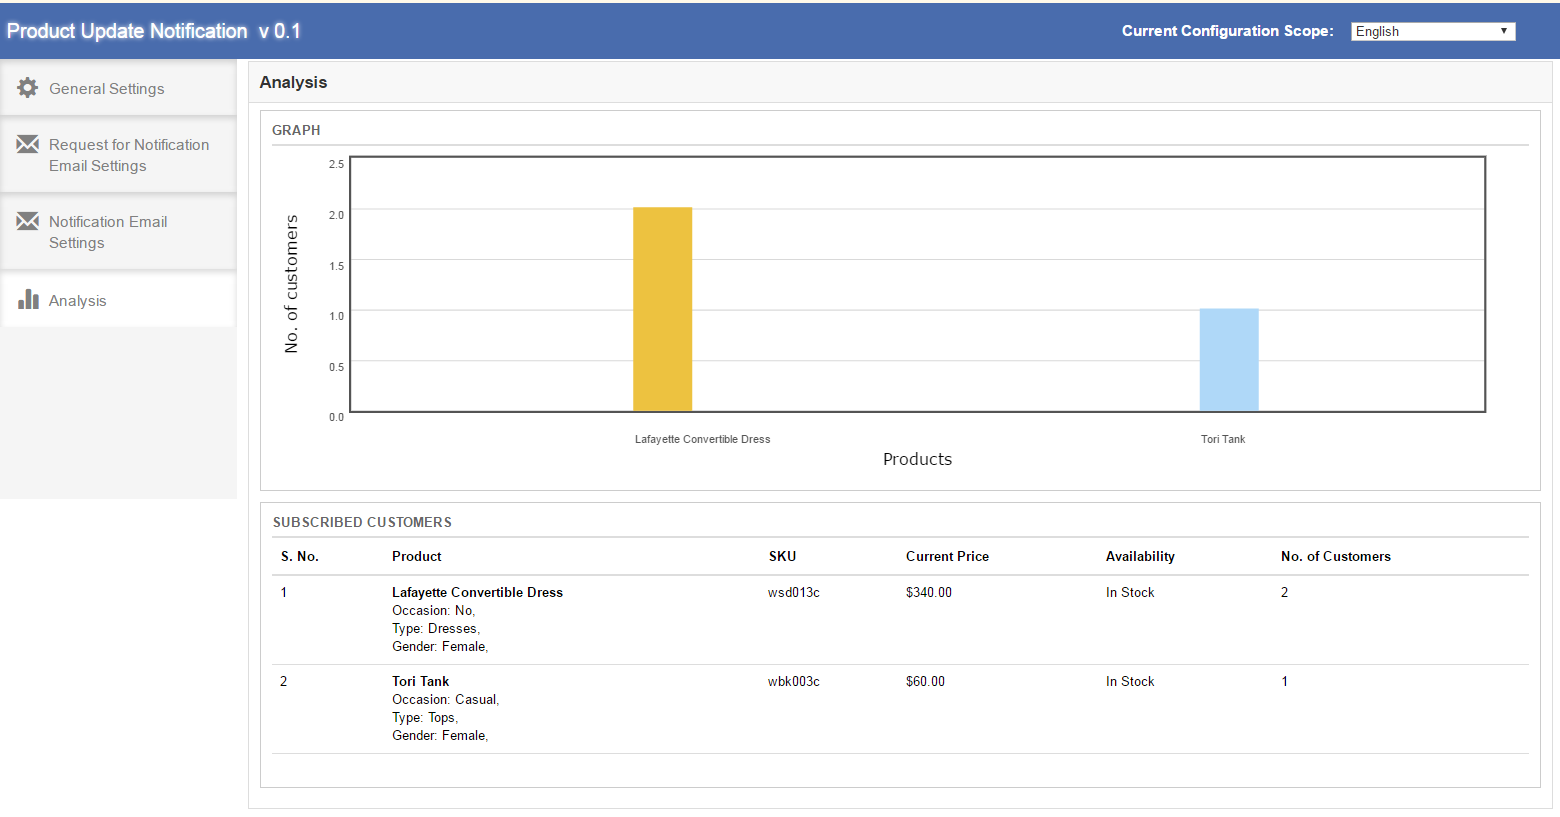
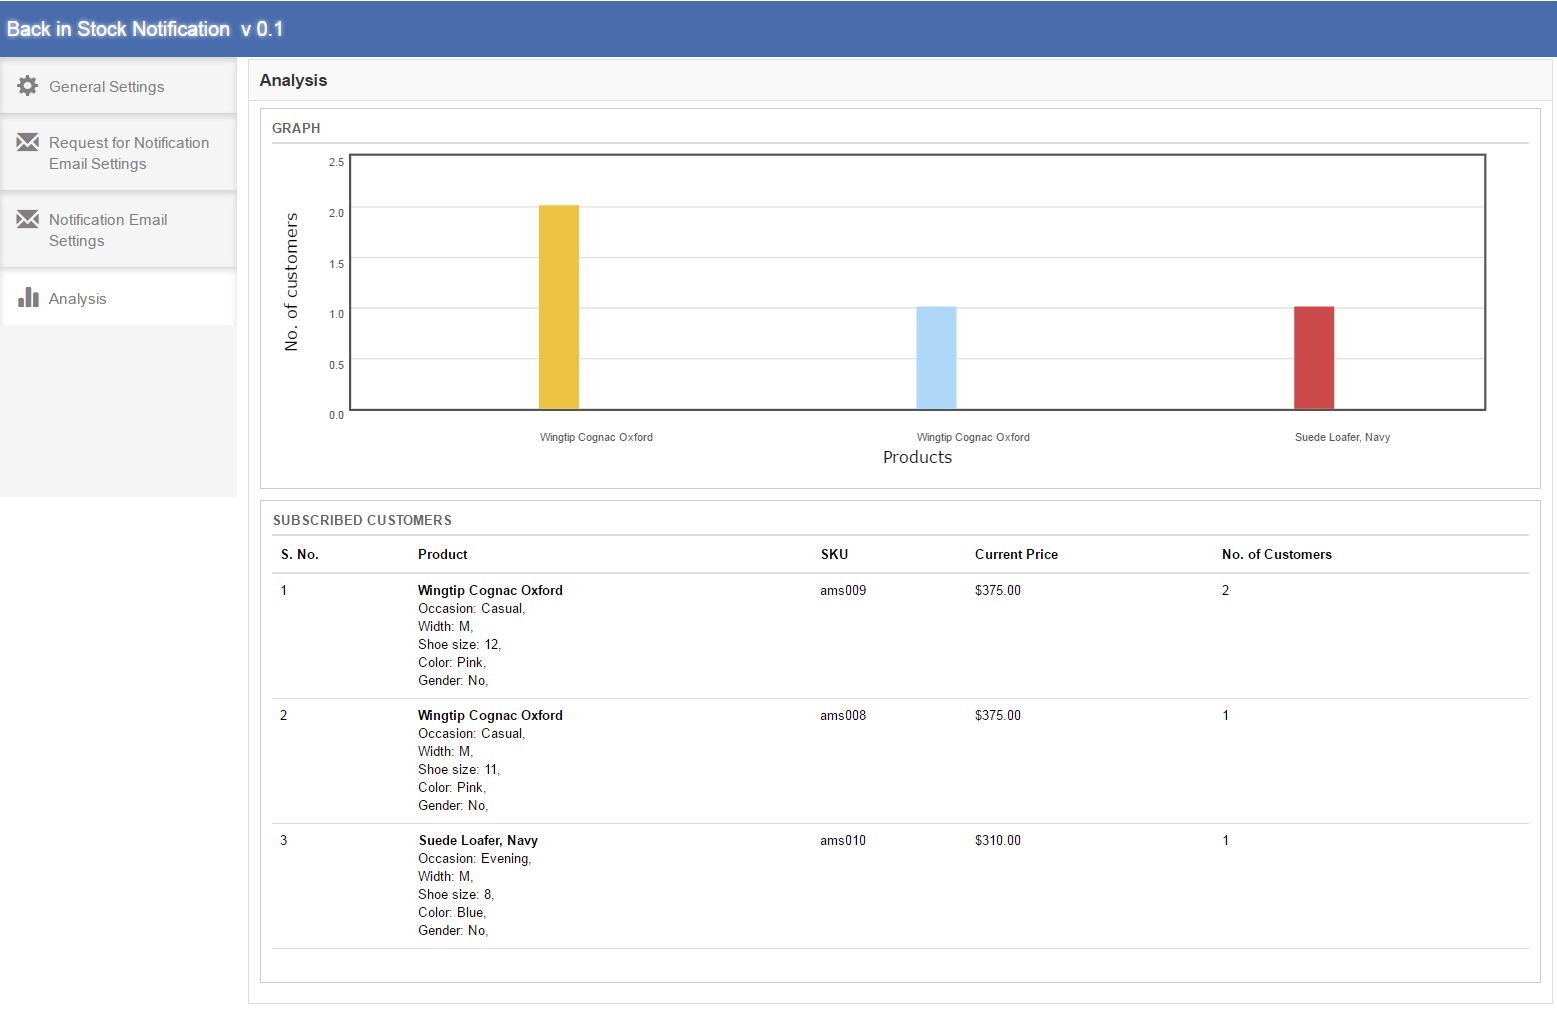
In this tab of product update notification extension, complete analysis of the subscribed customers can be found. This analysis would be in form of graph and in form of detailed list. It will be the analysis of top 10 products. Also, this list would only include the customers who are waiting for the notification email(either price update mail or stock availability mail). This tab of Magento product update extension will have two sections, which are described below:
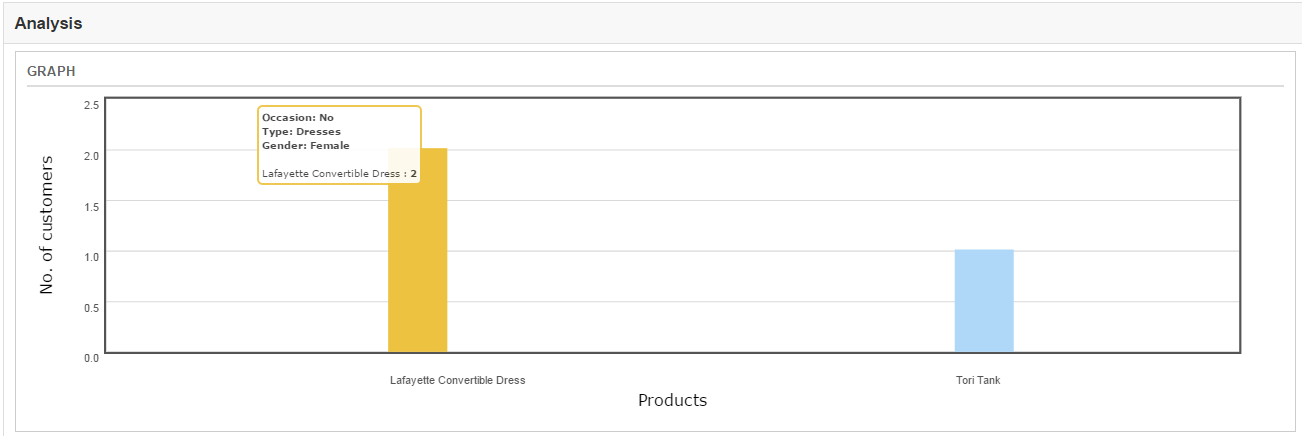
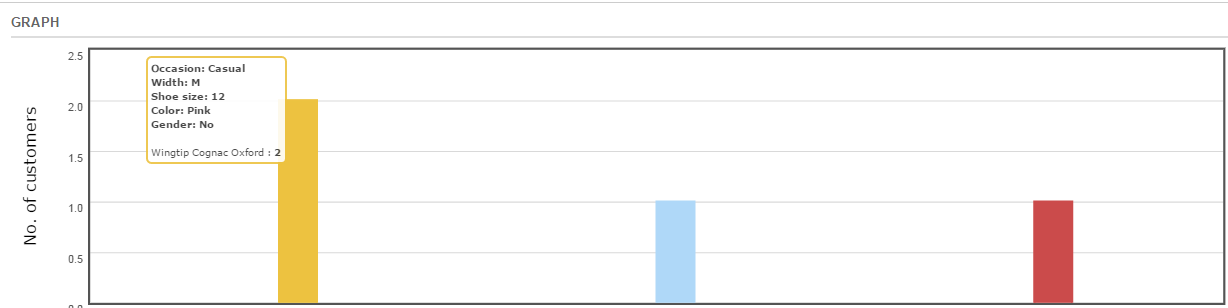
GRAPH – The graph of the Magento stock alert will show the analysis of top 10 products. Horizontally products would be shown and vertically number of customers would be shown. On hovering a bar in the graph name of the product, product attributes and number of customers which have subscribed for this product will be shown in a pop up.
SUBSCRIBED CUSTOMER – Subscribed customer would be a product wise detailed list. In first column of the list S. No., in second column product name and product attributes, in third column SKU of the product, in fourth column current price and in fifth column availability of the product(In stock or out of stock) and in sixth column number of customers that have subscribed for this product would be shown. This list of Magento price alert notification extension would also show top 10 products.
Below is the screen shot of the this tab :
On hovering a bar in the graph a small pop up will come as below:
Front End Interface
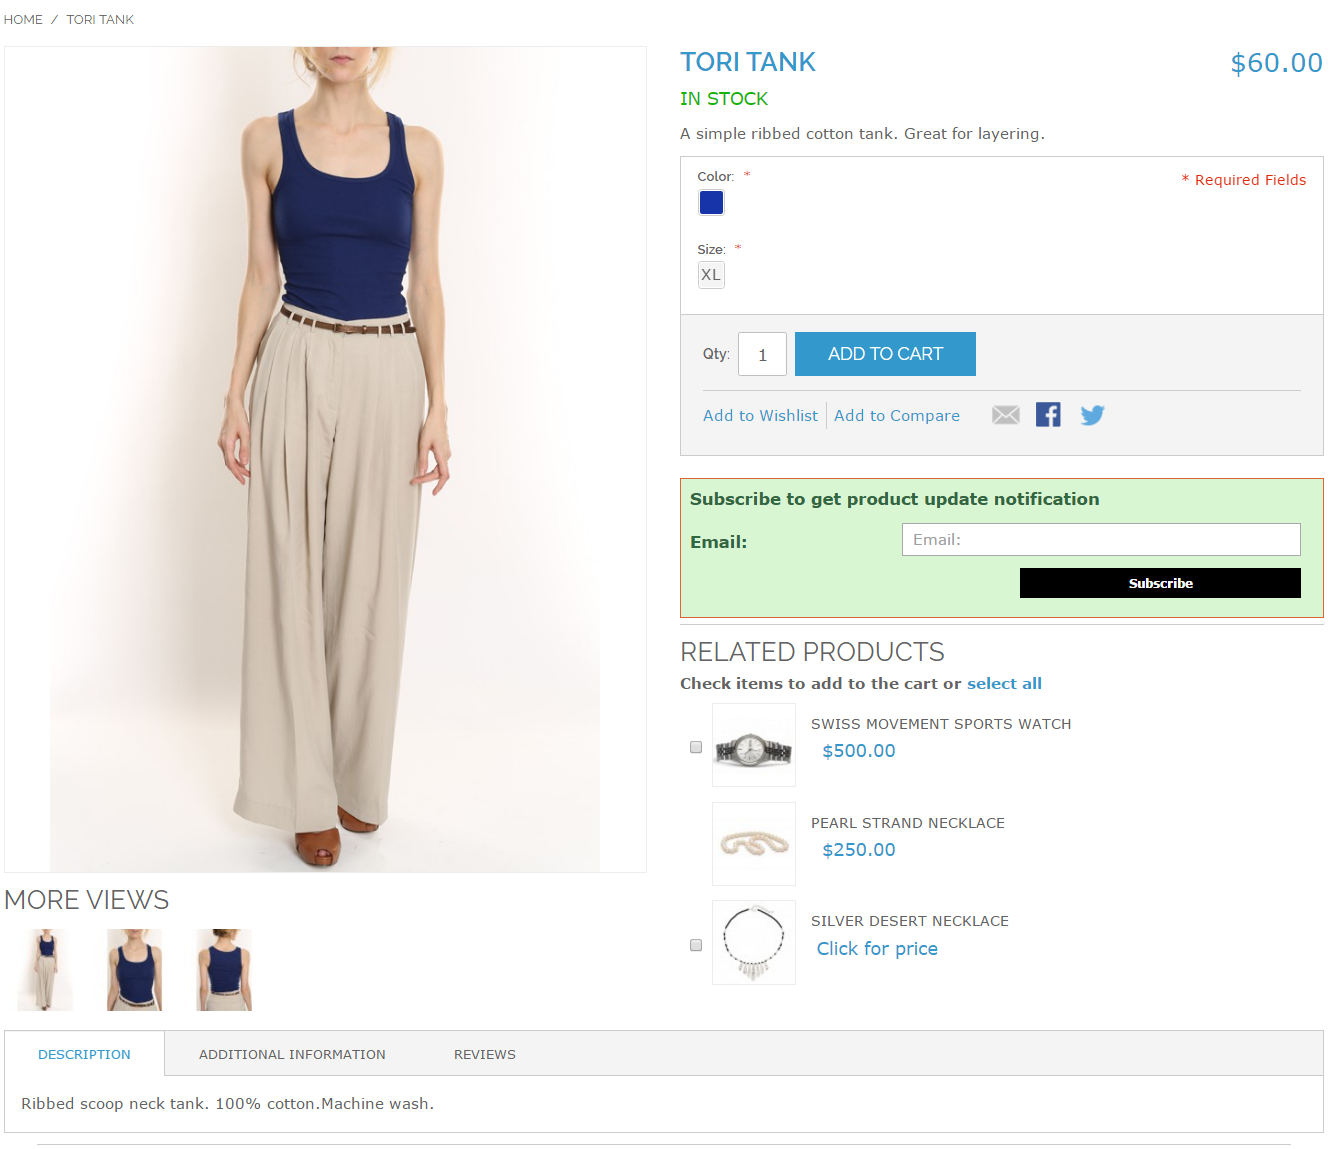
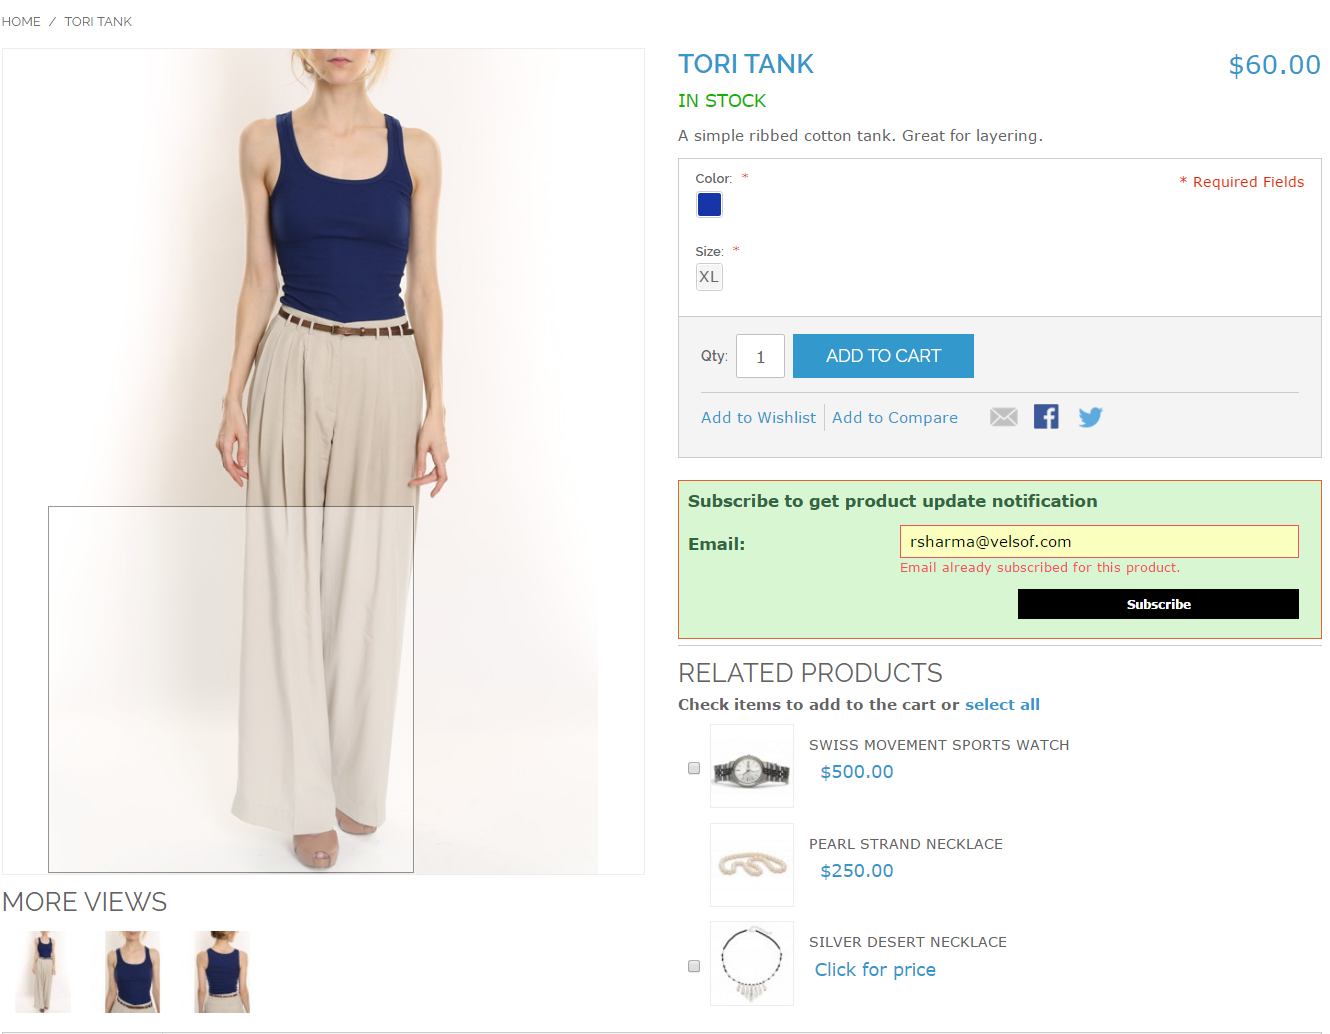
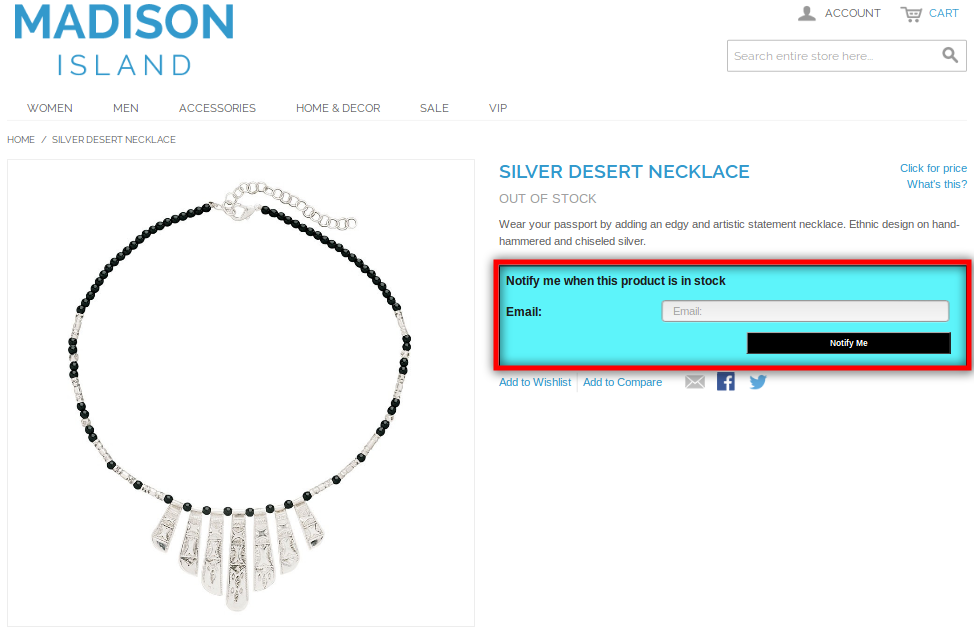
After enabling the Magento product update extension, the front end user will see a subscribe box at the product page. This block will contain an input field as to enter email id and a notify button through which the user will get subscribed for the respective product.
The front end of product update extension would appear as follows:
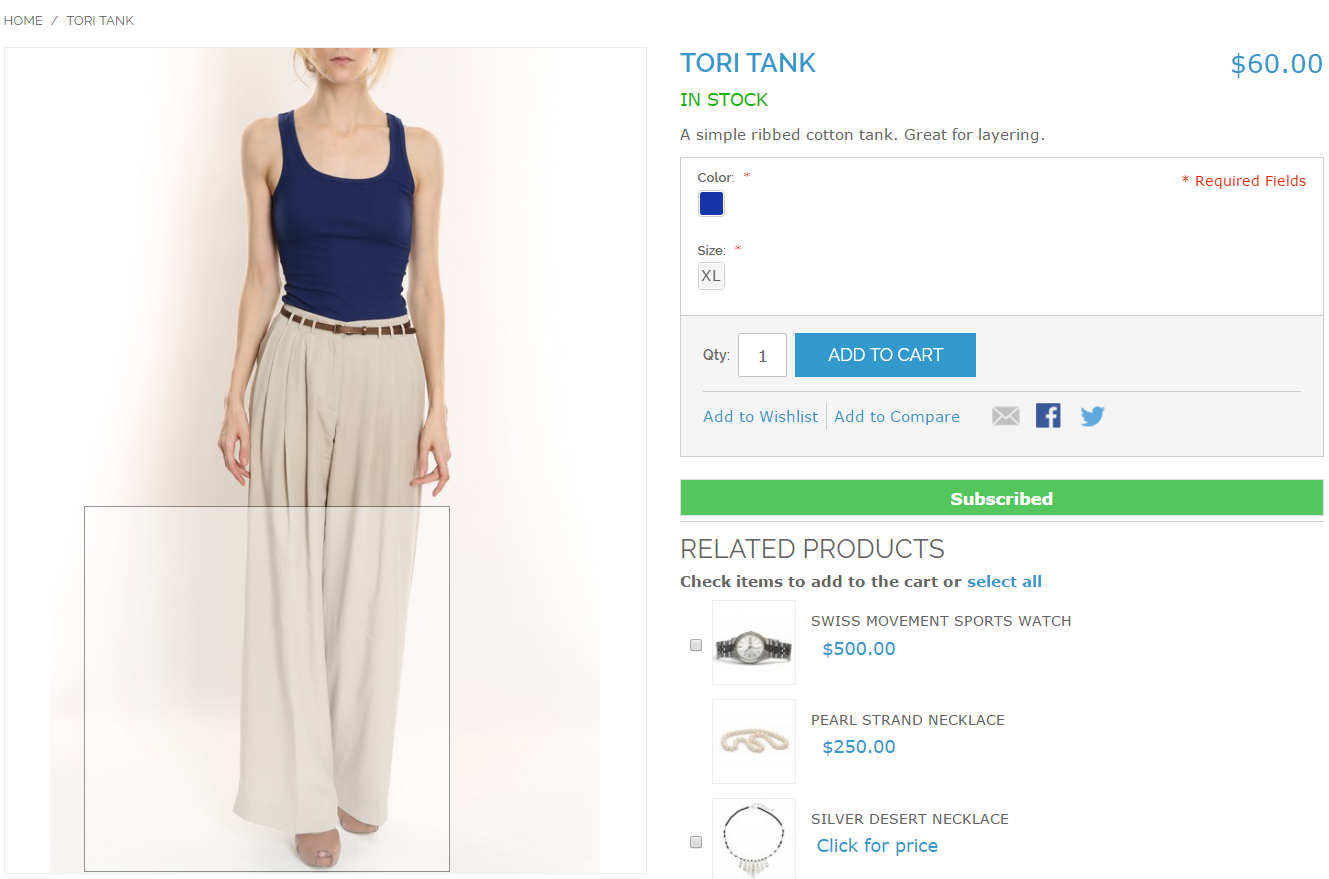
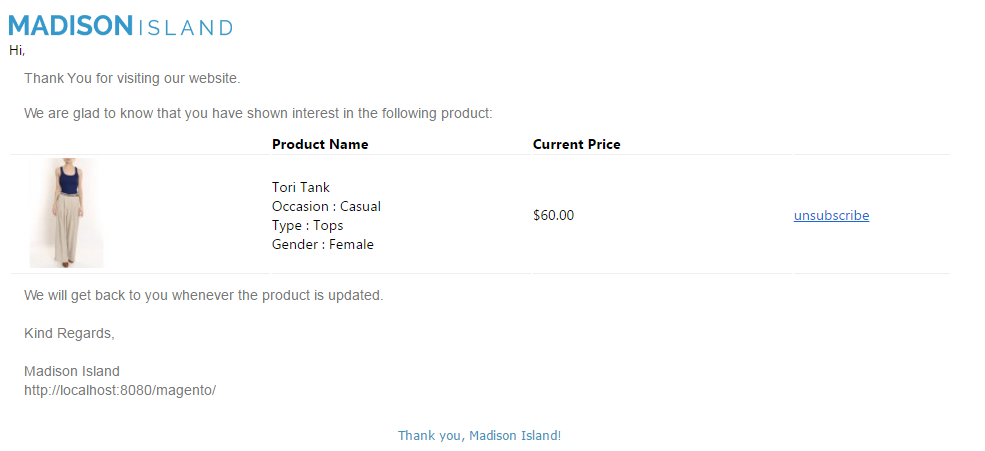
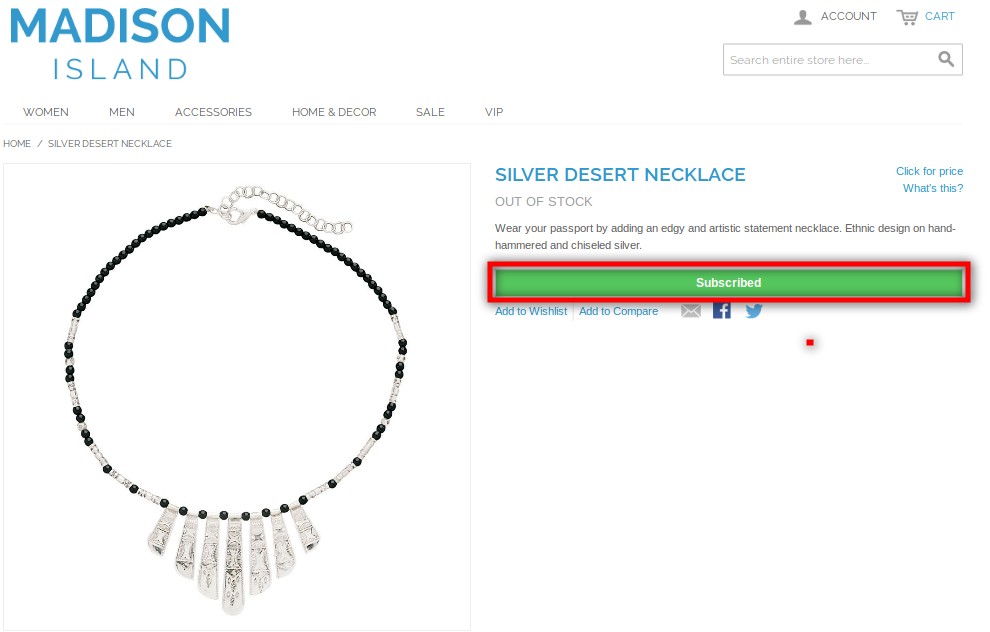
When customer enters the email id and click to the button “Subscribe” the initial mail will be sent to the entered email address and the message showing subscribed as below.
Note*
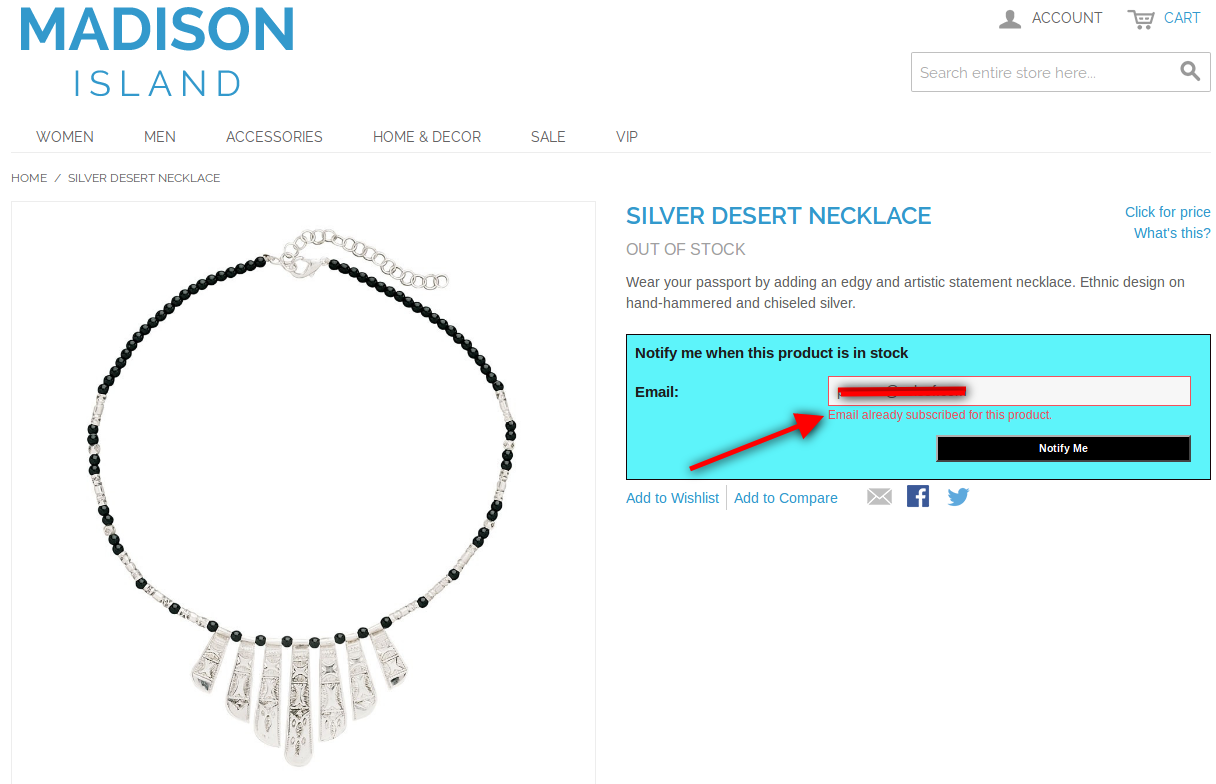
If a customer who has already subscribed for a particular product for Product Update tries to subscribe again with same email id for the same product then a message will appear showing “You have already subscribed for this product.”.
The screen shot is as following:
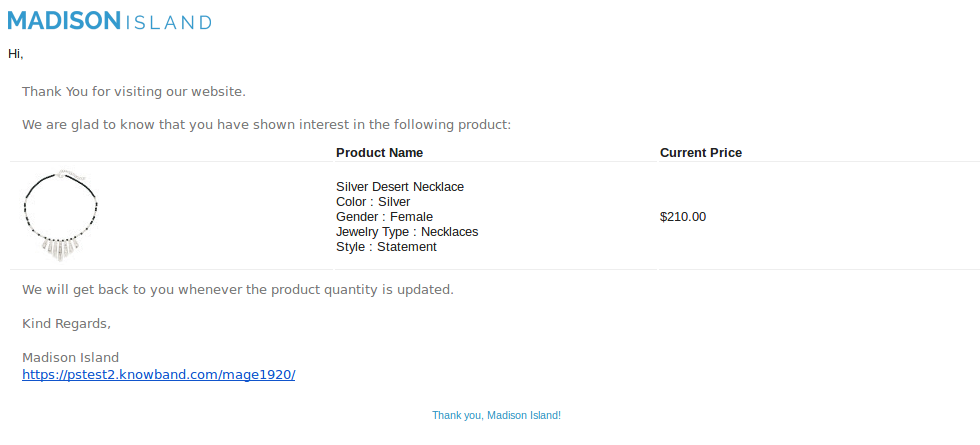
The initial email of the Magento stock alert extension by Knowband that will be triggered to the entered email id is as following:
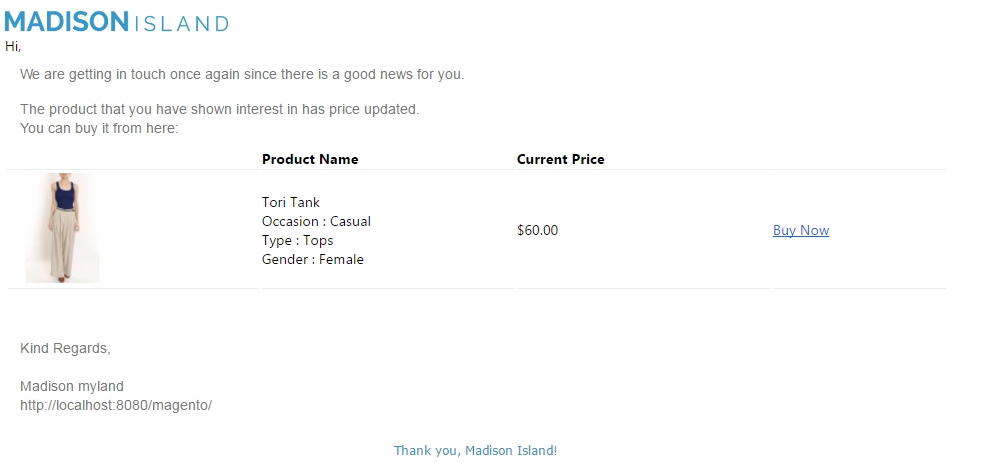
* Whenever the price of the product changes from admin panel and CRON for the module runs, the product update mail that will be triggered will be as following –
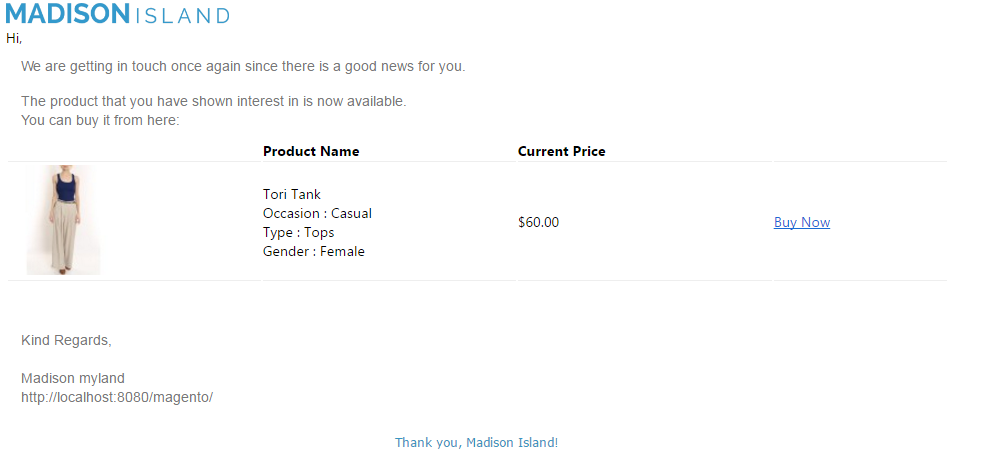
* Whenever product goes In stock from Out of stock and CRON for the module runs, the product update mail that will be triggered will be as following –
Magento 2 Social Login extension allows the customers to login/signup using their social media accounts like Facebook, Google, Yahoo and 9 other options. This Magento 2 Social Login module will add a new link ‘Quick Log In’ next to the default login link. This text can be customized. On the click of this link, a login popup will be opened.
The Magento 2 Social Login plugin gives the freedom to the eCommerce store admin to enable or disable login through several platforms, the admin can also change the behavior of the Magento 2 Social Media Login extension at the front-end and also enables or disable login through any available social platform.
1.1 Features offered by Magento 2 Social Login Extension
With this Magento 2 Social Login extension, admin can offer a simple and hassle-free login/signup option to the customers.
Using this Magento 2 Social Login module, the store merchant can set up 12 different social media buttons for offering simple login/registration to the customers.
The store admin can select small/large and circular/rectangular icons for showing social login options.
The Magento 2 Social Login module allows setting different animation in social login buttons like zoom/highlight/rotate.
The store merchant can set a header link on the website for providing a popup login/signup option.
Facebook login, Google login, Yahoo login, Paypal log in, Instagram login, Twitter login, Amazon login, Linkedin login, Live login, Dropbox login, Foursquare and WordPress login options are available for login/signup.
By offering a simple and hassle-free way, the store merchant can increase customer registration on the website.
The store merchant can also change the position of social login buttons by the following drag and drop function.
Admin can set up API for various social login options from the admin interface of this Magento 2 Social Login extension.
The Magento 2 Social Login module is mobile responsive and offers smooth functioning.
Magento 2 Social Media Login extension is multi-lingual compatible and offers hassle-free implementation.
2.0 Installation
After purchasing Magento 2 Social Login extension, the store admin will get the following files:
1. zip which has the source code of this Magento 2 Socialloginizer program plugin.
2. User Manual, with all the basic details and information.
The steps to install the Magento 2 Social Loginizer Program Extension are mentioned below:
Buy the Magento 2 Social Loginizer Program module from Knowband. You can download the extension package.
The package has a zipped file that contains the user manual and the source code of the Magento 2 Social Loginizer Program module. Now, Unzip this package.
Create a folder {Magentoroot}/app/code/Knowband/Socialloginizer
Upload the extracted content in the above folder via FTP manager (like Filezilla or WinSCP – download here: https://filezilla-project.org/).
Now run below commands to install the plugin:1. php bin/magento module:enable Knowband_Socialloginizer2. php bin/magento setup:upgrade3. php bin/magento setup:di:compile
The extension is now installed and ready for use. In Admin Panel go to “Knowband Extensions -> Social Loginizer ”.
You can now configure and use the Knowband Magento 2 Social Login extension.
3.0 Admin Settings
Log into your Magento Admin, then goto Stores -> Configuration -> Knowband -> Social Loginizer and configure the plugin.
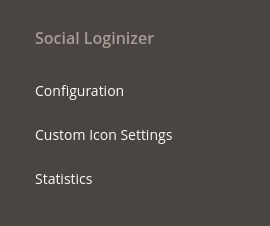
To access Knowband plug-in, go to Stores -> Configuration -> Knowband -> Social Loginizer. Store admin will have various settings options categorized as follows:
Admin can easily configure the Magento 2 Social Login module and show social login options on the website easily.
3.1 Configuration
In configuration section, the store admin can configure the module and apply basic settings. Admin can also apply website settings from this section.
3.1.1 General Settings
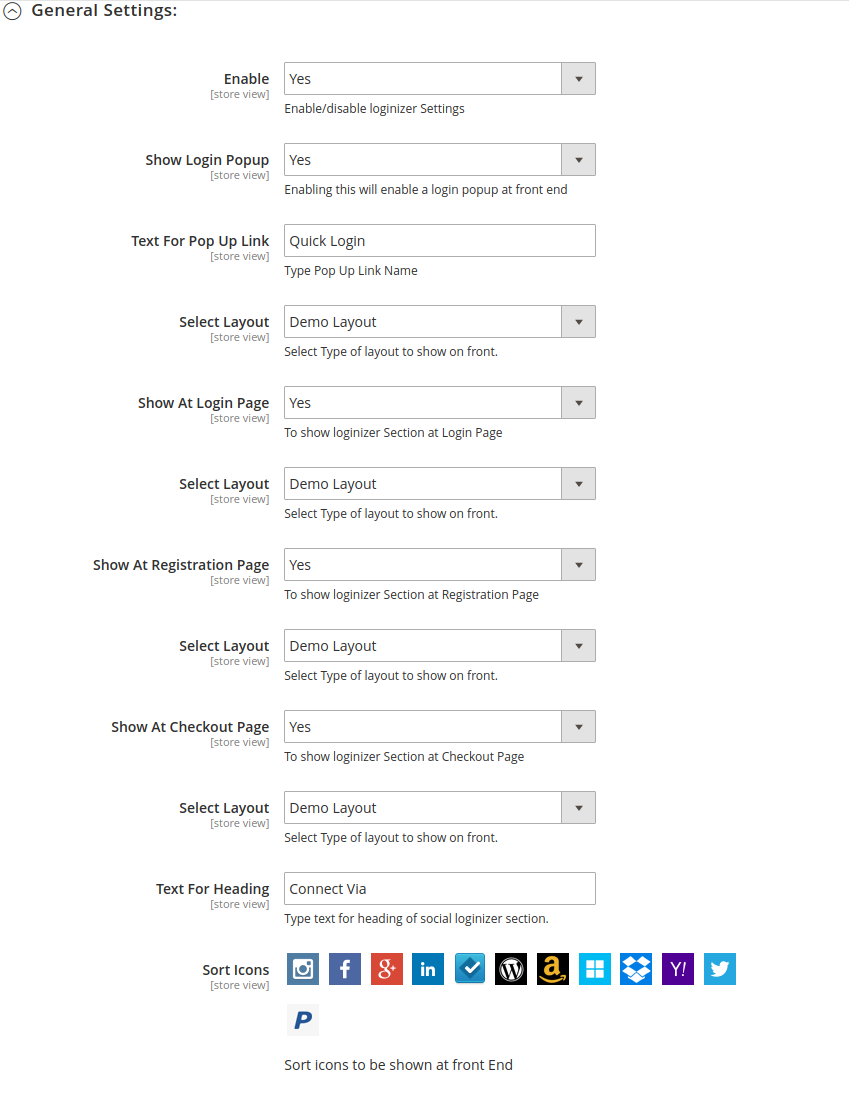
Admin can customize the general settings by using the following settings options:
Enable: Activate or deactivate the Social Login Magento 2 module functionality from here.
Show Login Popup: Enabling it will create a link saved in “Text for popup link”. On clicking this link, a popup will appear with a login option and a social loginizer section.
Text for Pop Up Link: This text will appear as a link for login popup at the header in the front end.
Select Layout: Admin can select a layout for showing login buttons in the popup.
Show At Login Page: By enabling this configuration option, admin can show social login buttons on the login page.
Select Layout: Admin can select the layout for showing social login options on the login page.
Show At Registration Page: By activating this option, admin can show social login buttons on the customer registration page.
Select Layout: The store merchant can choose from available layouts for showing social login buttons at the registration page.
Show At Checkout Page: Admin can also show social login options at the checkout page.
Select Layout: Admin can choose from available layouts for showing social login options on the checkout page.
Text For Heading: This text will appear before the social organizer block.
Default Visible Option: It will be the no of icons that will be shown by default at the social loginizer block.
3.1.2 Websites Settings
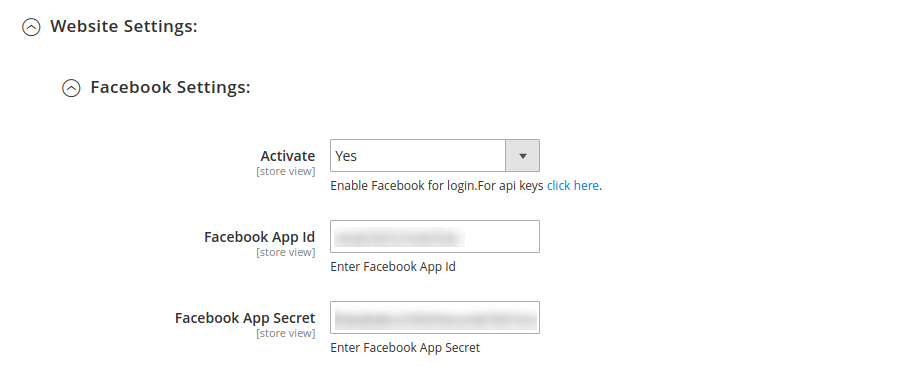
Admin can add websites setting here.For each website, there will be similar settings like as below:-
Active: To enable the website for login and signup, select Yes.
App ID (eg. for Facebook: Facebook App Id) : Enter your Application ID/Client. ID/Consumer ID is provided by corresponding website.
App Secret (eg. for Facebook: Facebook App Secret) : Enter your Application Secret/Client .Secret /Consumer Secret is provided by the corresponding website.
3.2 Custom Icon Settings
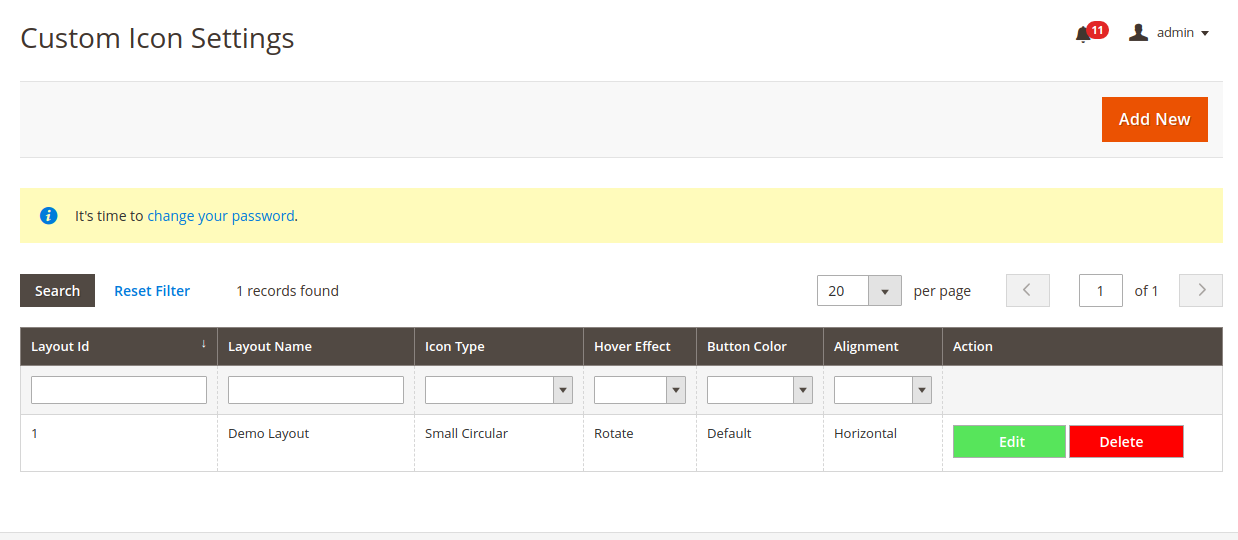
In the custom icon set, the admin can add, edit and delete the social login button layout. The Magento 2 Social Login extension allows the store admin to apply layout settings and show social login options in an attractive manner.
3.2.1 How to Add New Layout?
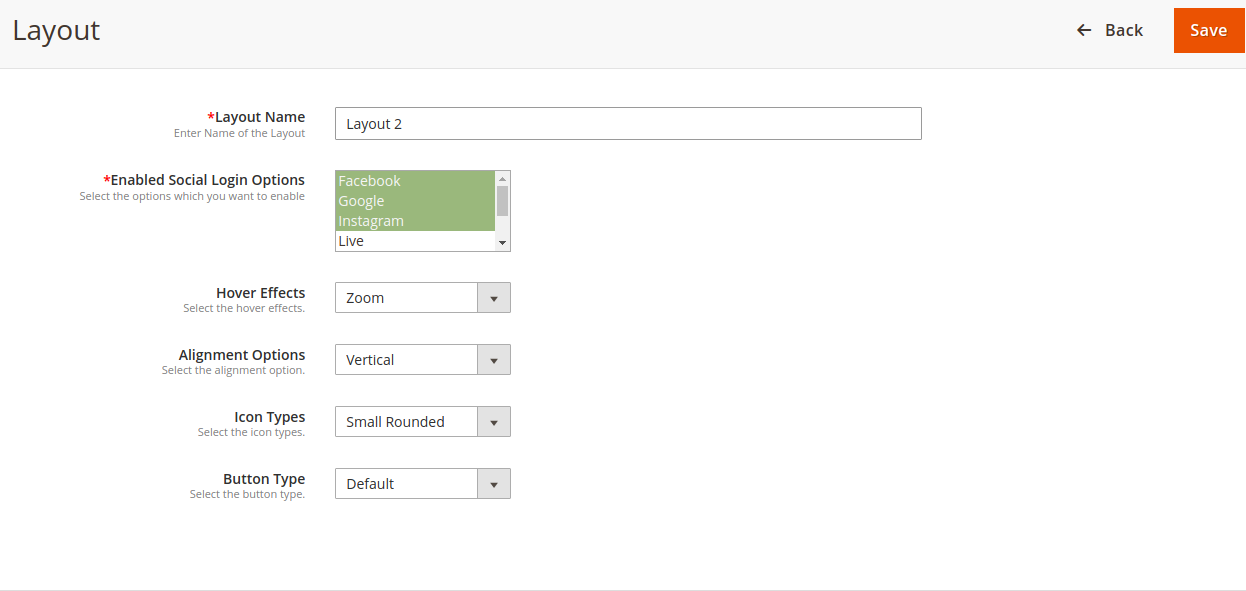
Admin can click on add new button and apply these settings for adding new layout:
Layout Name: Admin can set layout names from here.
Enable Social Login Options: Select the social login options from the available list which you want to show in this layout.
Hover Effects: Admin can select from different hover effects like highlight, zoom and rotate.
Alignment Option: The online merchant can set login option alignment as vertical or horizontal.
Icon Types: Admin can select icon type as small circular, small rectangular, small rounded, large rounded and large rectangular.
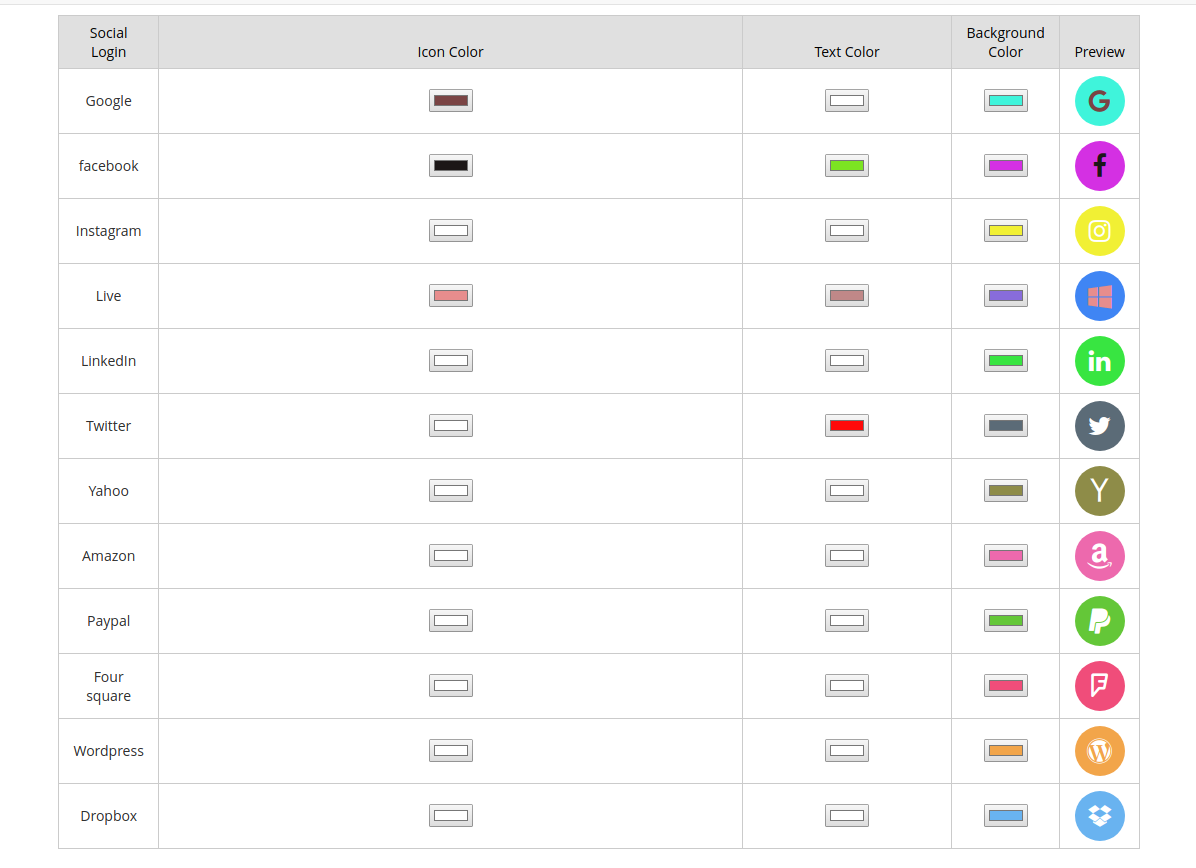
Button Type: Admin can select button type as default or customized.
In Customizable option, admin can apply these settings:
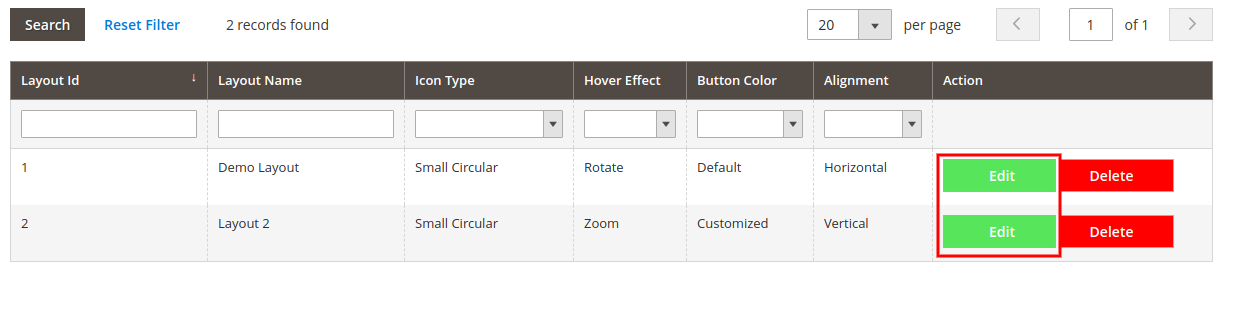
3.2.2 How to Edit Layout?
Admin can click on the edit button for editing the layout settings.
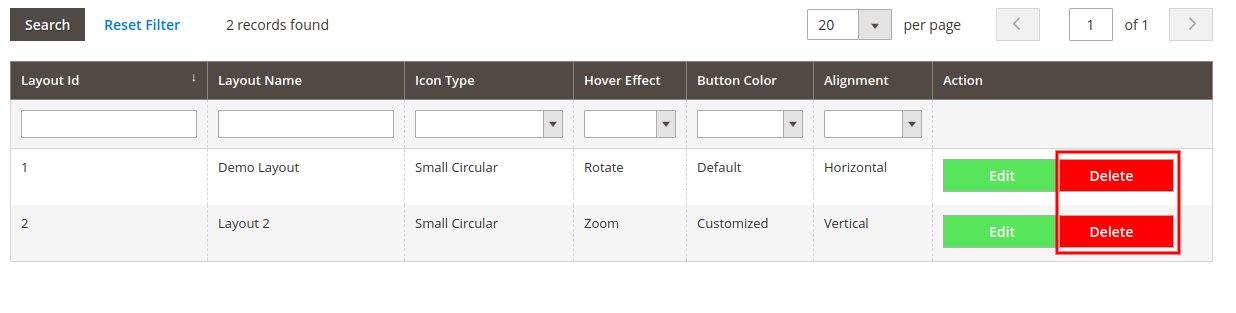
3.2.3 How to Delete Layout?
For deleting any layout admin just need to click on the delete button.
3.3 Statistics
There is a “Statistics” tab in the menu from where admin can view the report.
3.3.1 Website Graphical Report
It shows social login and registration data in graphical form.
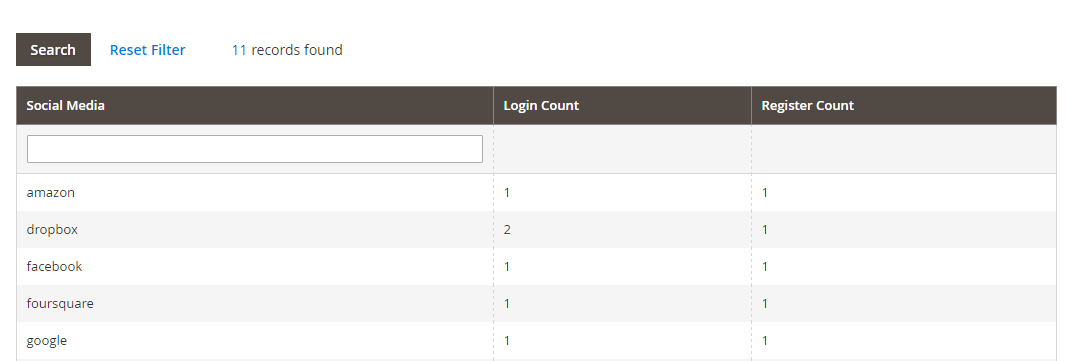
3.3.2 Social Login report
It shows a table containing data related to each social login website like login count, registration count etc.
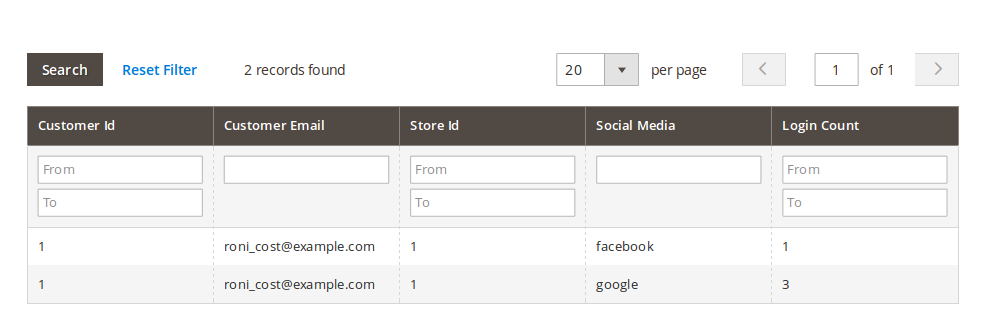
3.3.3 Social Login User Report
It shows a table containing data related to customer and social login sites like customer email, login count etc.
Reset Database:- There is a “Reset Database” Button. On clicking this button all the social login plugin related data will be deleted.
4.0 Front-end Interface
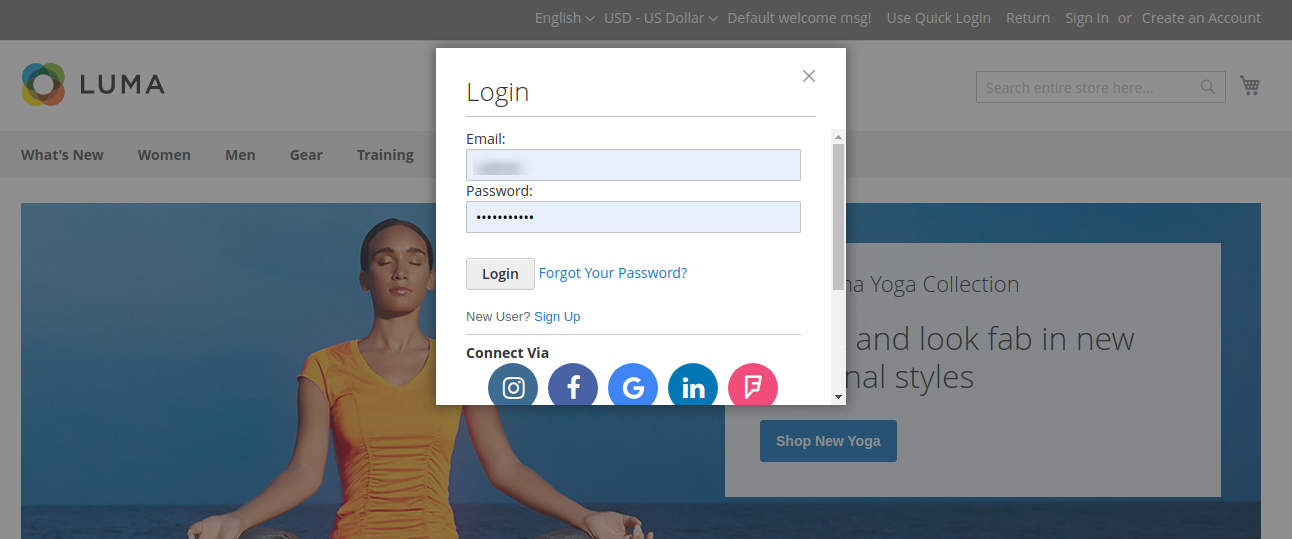
Login Popup: On enabling login Pop Up a link will appear with text as fixed in the admin interface.
On clicking this link a popup appears with a social login option.
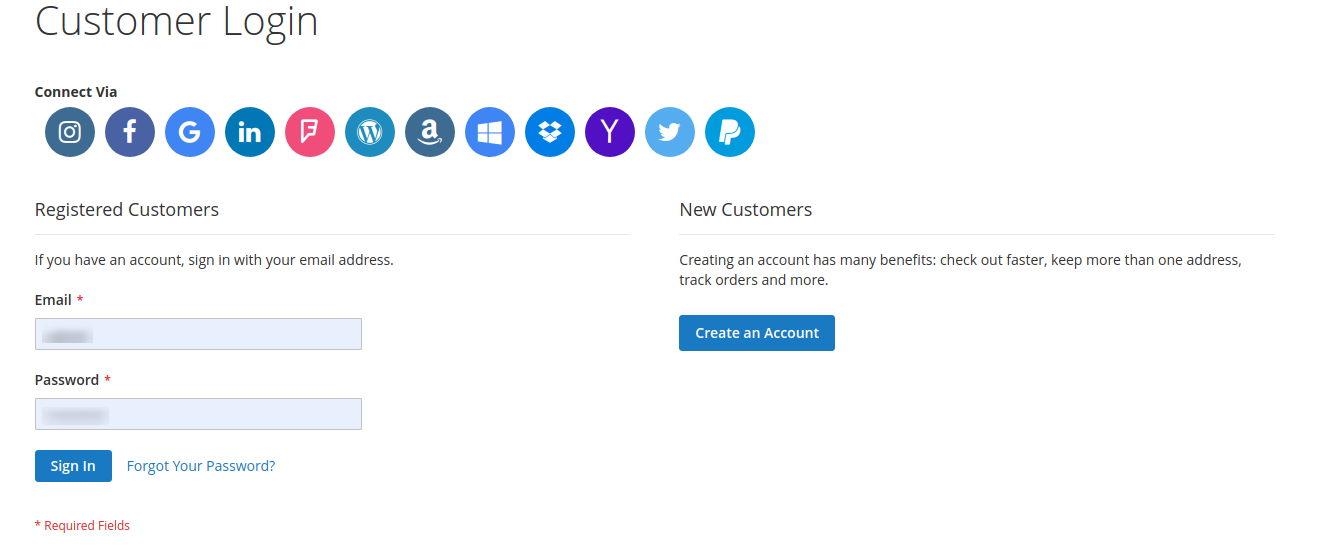
Login Page: If enabled Social Login Block will appear at Customer Login Page.
Registration Page: If enabled Social Login Block will appear at Customer Account creation Page.
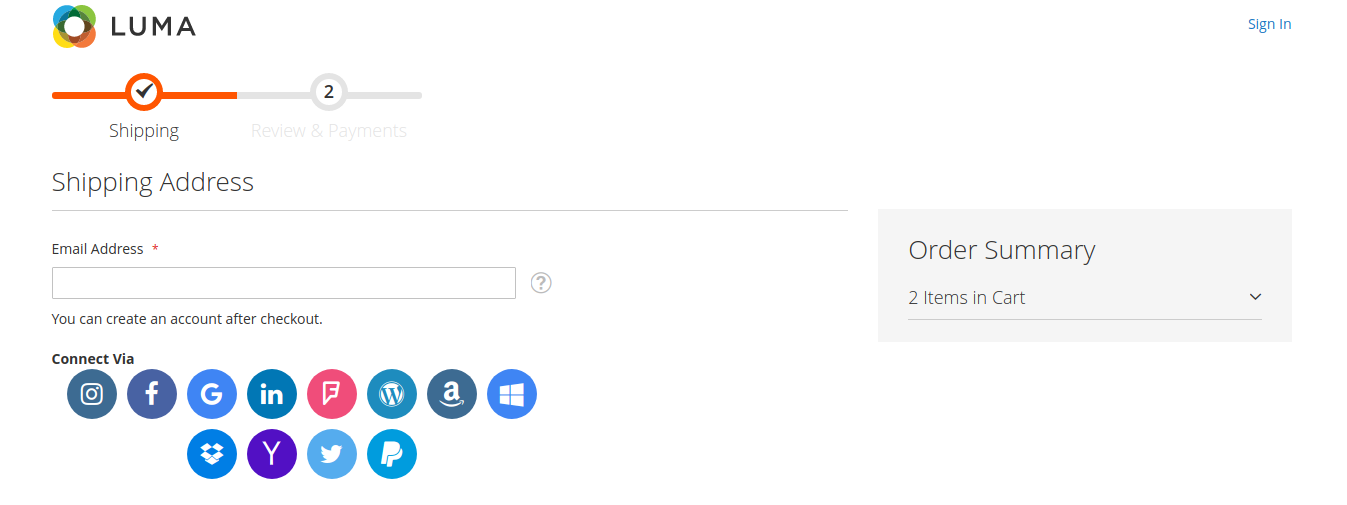
Checkout Page:- If enabled Social Login Block will appear at checkout Sign In Popup.
Appendix
How to set Redirect Url?
Let your website URL be ‘www.example.com’. and social login site is “Facebook”.
If Url Rewrite is enabled in your website then redirect URL will be
Go to Facebook Developers Website (https://developers.facebook.com) or click on the link given top right of respective tab in the module configuration page.
Click on Apps -> Create a new App.
Follow the instructions on the screen.
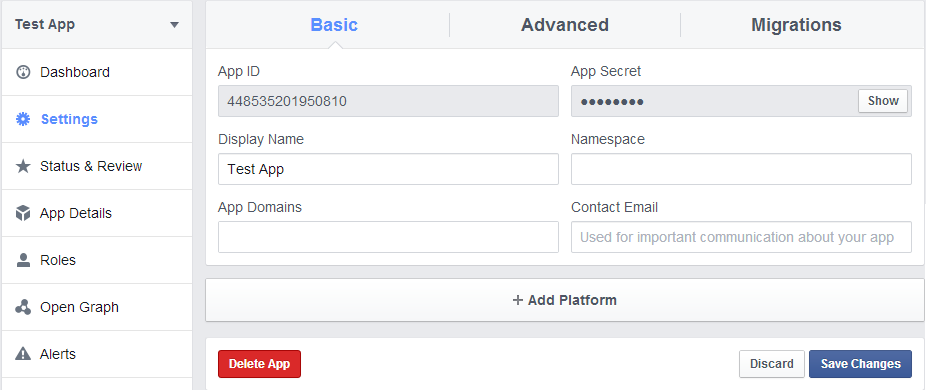
You will get the App ID and App Secret (Click “Show” button).
Now, go to Settings from left menu.
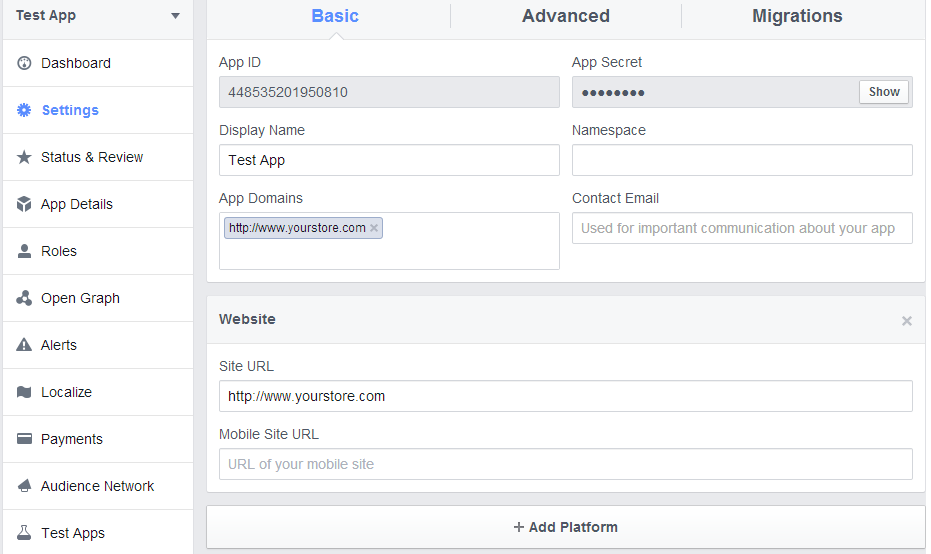
Click on “Add Platform” button.
Select Website.
Enter your App Domain and Site URL.
Application Type: Web Application.
Authorized JavaScriptorigins: Your store domain name. (https://www.example.com)
Click the “Save Changes” button.
Now, go to the “Status & Review” tab from the left menu and make the Application Live.
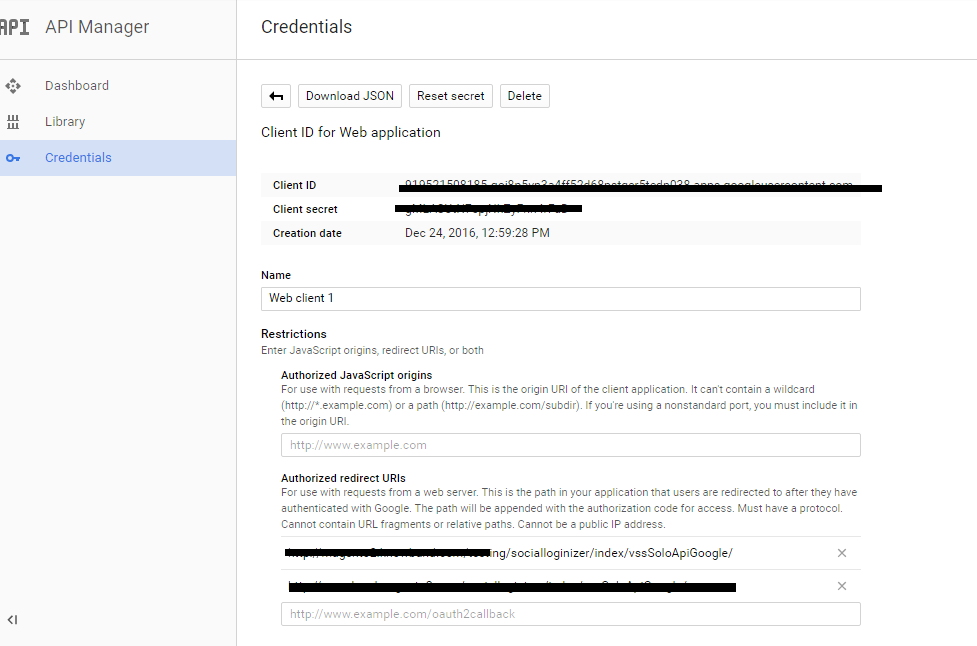
2. How to get Google App details?
Steps:
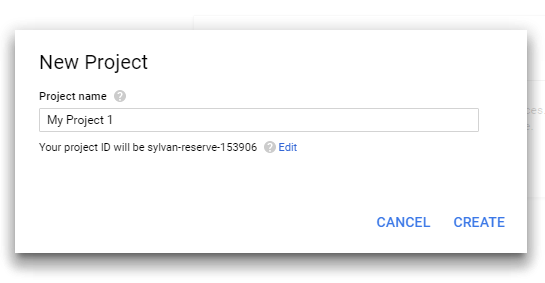
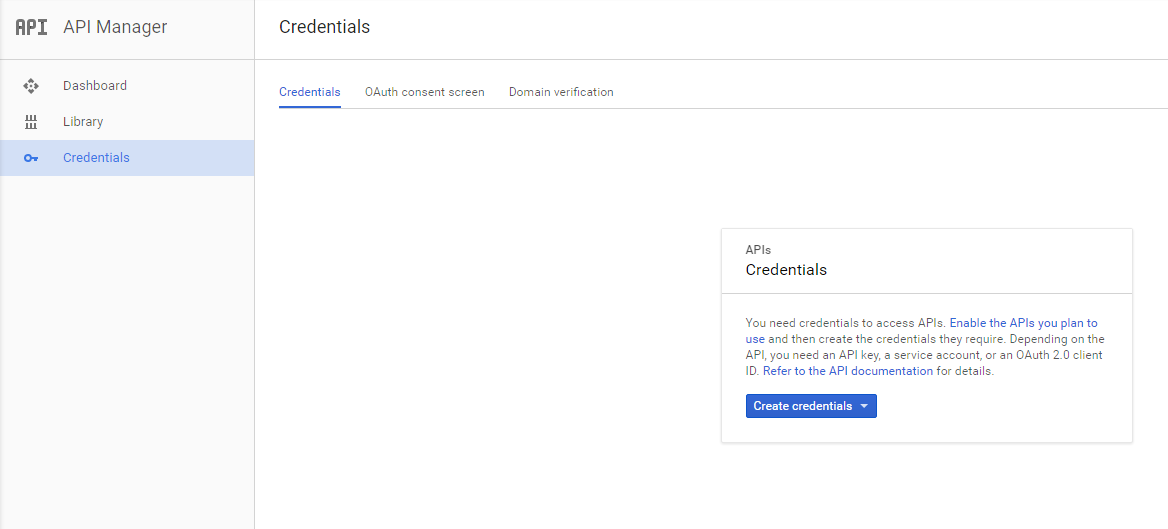
Go to Google Developers Console (https://console.developers.google.com/projectselector/apis/library)or click on create project link given top left dropdown of the page or at the center of the page.
Provide name of the project.
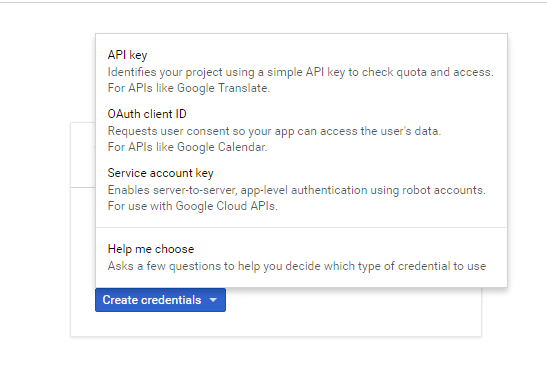
Create credentials by clicking on “Create Credentials” Button and selection oAuth client id.
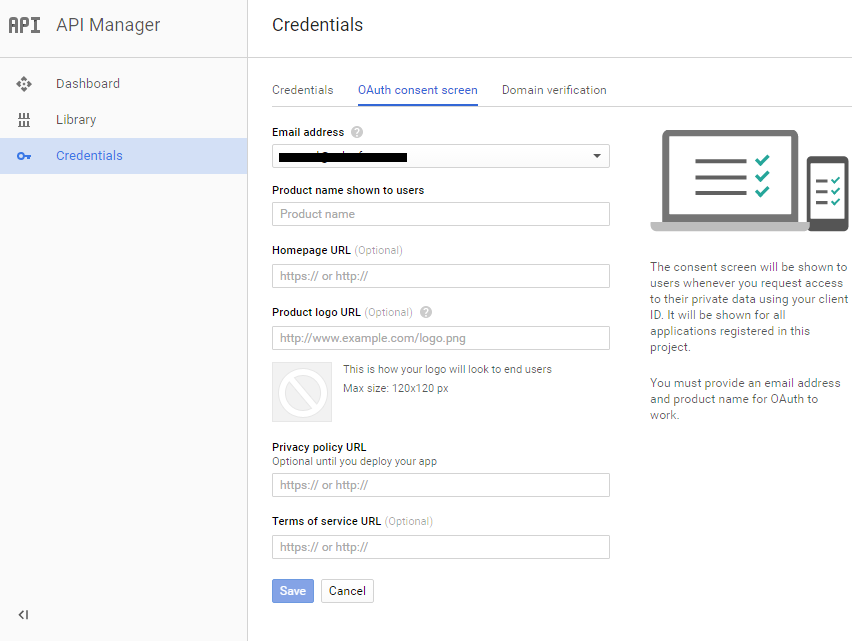
Credentials can be created only after providing details in oAuth form. Click same and now credentials can be found.
Redirection URL can be set at credentials screen
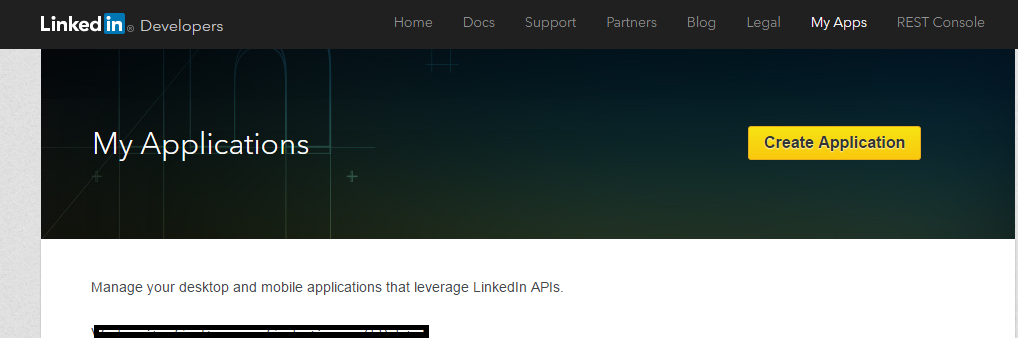
3. How to get LinkedIn App details?
Steps:
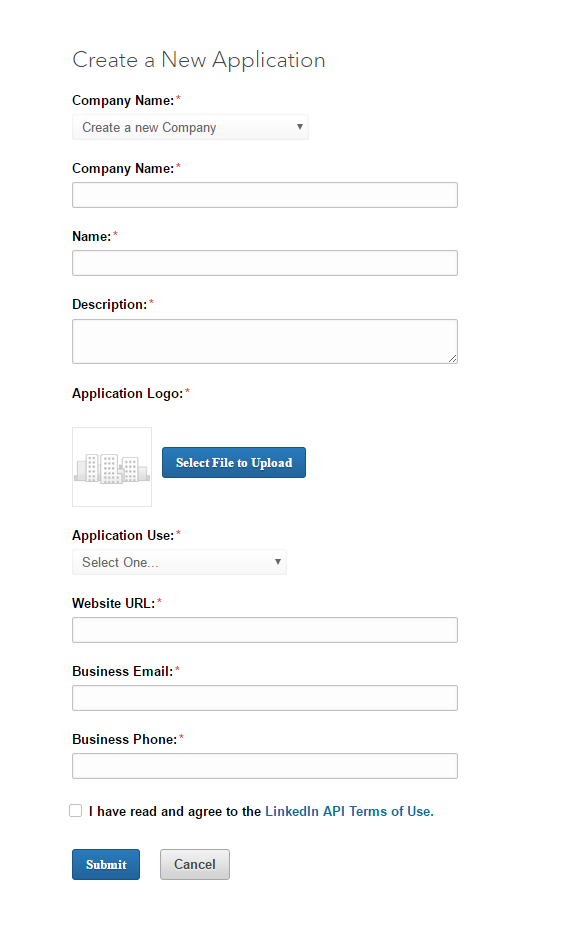
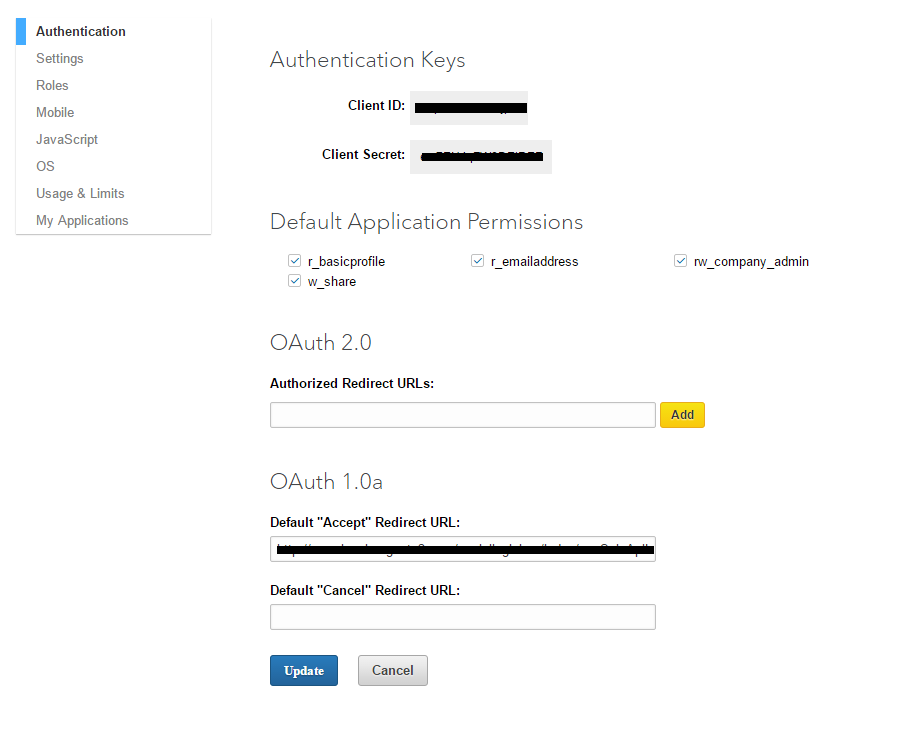
Go to LinkedIn Developers (https://www.linkedin.com/developer/apps) or click “Create Application” and follow the steps.
Authentication details can be added in authentication tab.
4. How to get Live App details?
Steps:
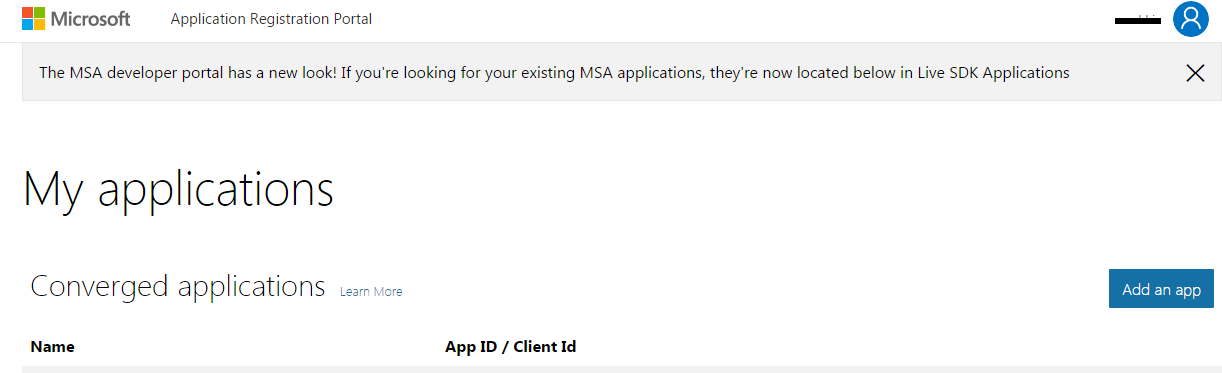
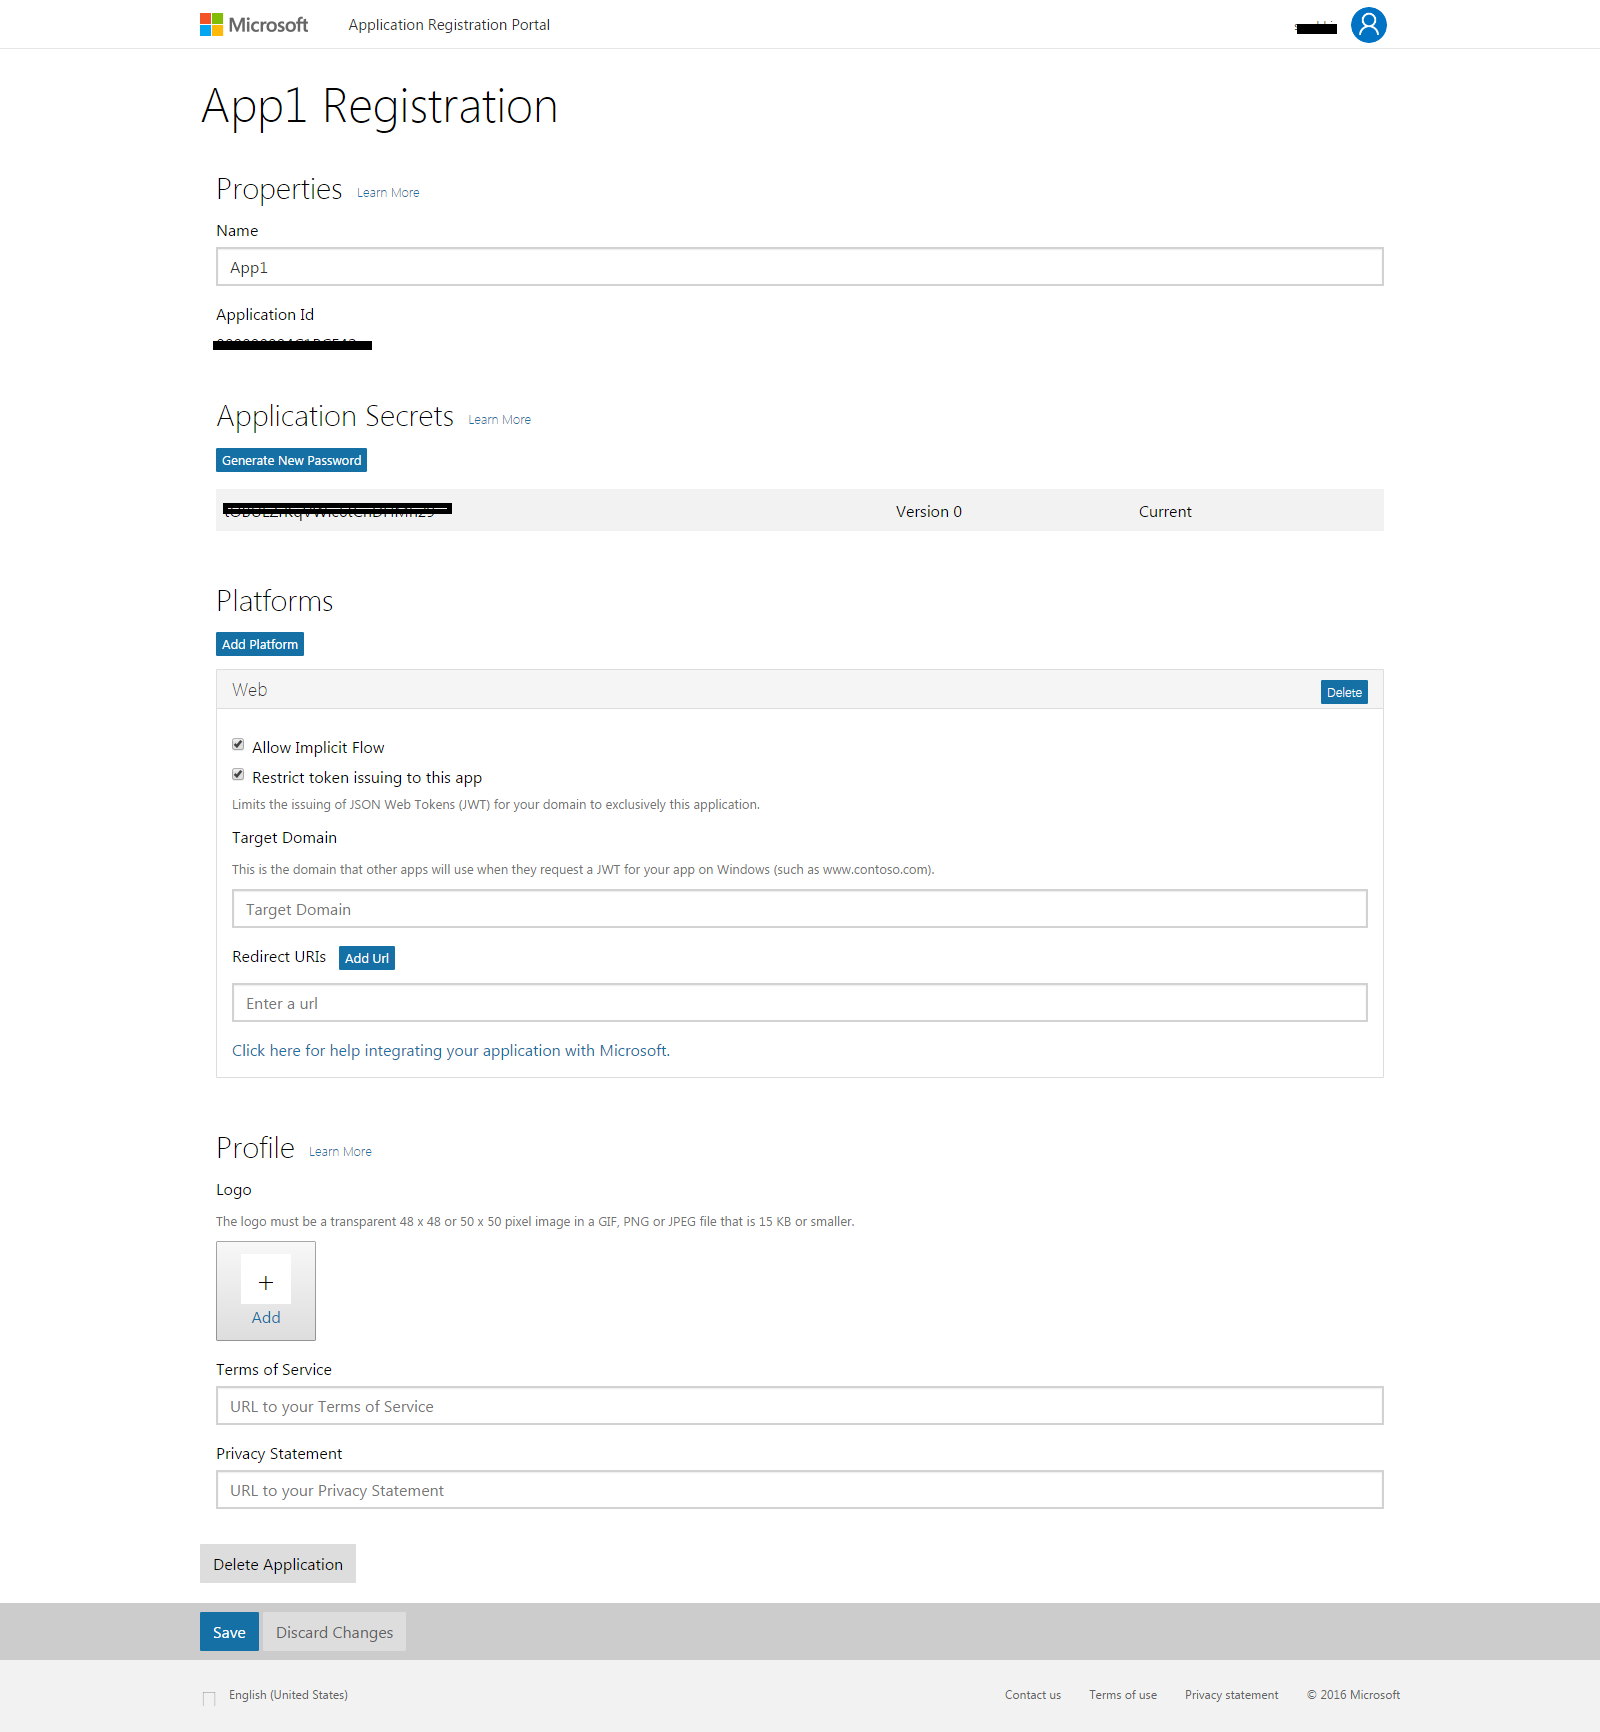
Go to Microsoft Development Center (https://apps.dev.microsoft.com/#/appList) or click on Add an App.
Fill details in form and click on save.
5. How to get Twitter App details?
Steps:
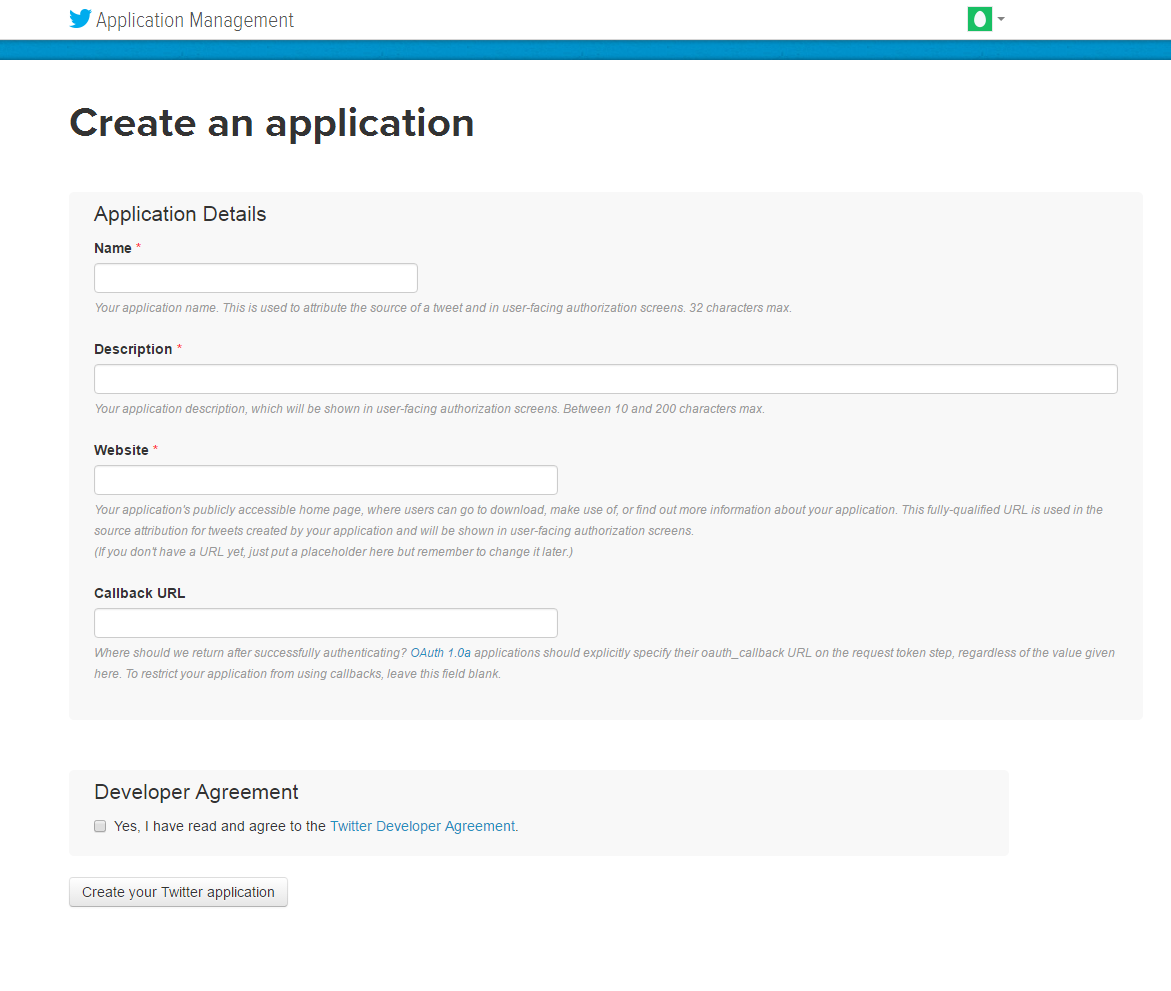
Go to Twitter App Management (https://apps.twitter.com/) or click on the link given top right of respective tab in the module configuration page.
Click the “Create New App ”button.
Enter the Application Details as follows:
Application Name: Name of your Application.
Description: 10 to 200 characters description of your application.
Website: Your store URL.
Callback URL: Loginizer redirects the page URL of your store.
Now, Click “Yes, I agree” and then click “Create your Twitter application”.
Now, select the “API Keys” from the menu below your Application Name and copy your API Key and API Secret.
6. How to get Yahoo App details?
Steps:
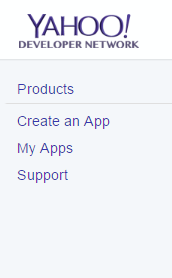
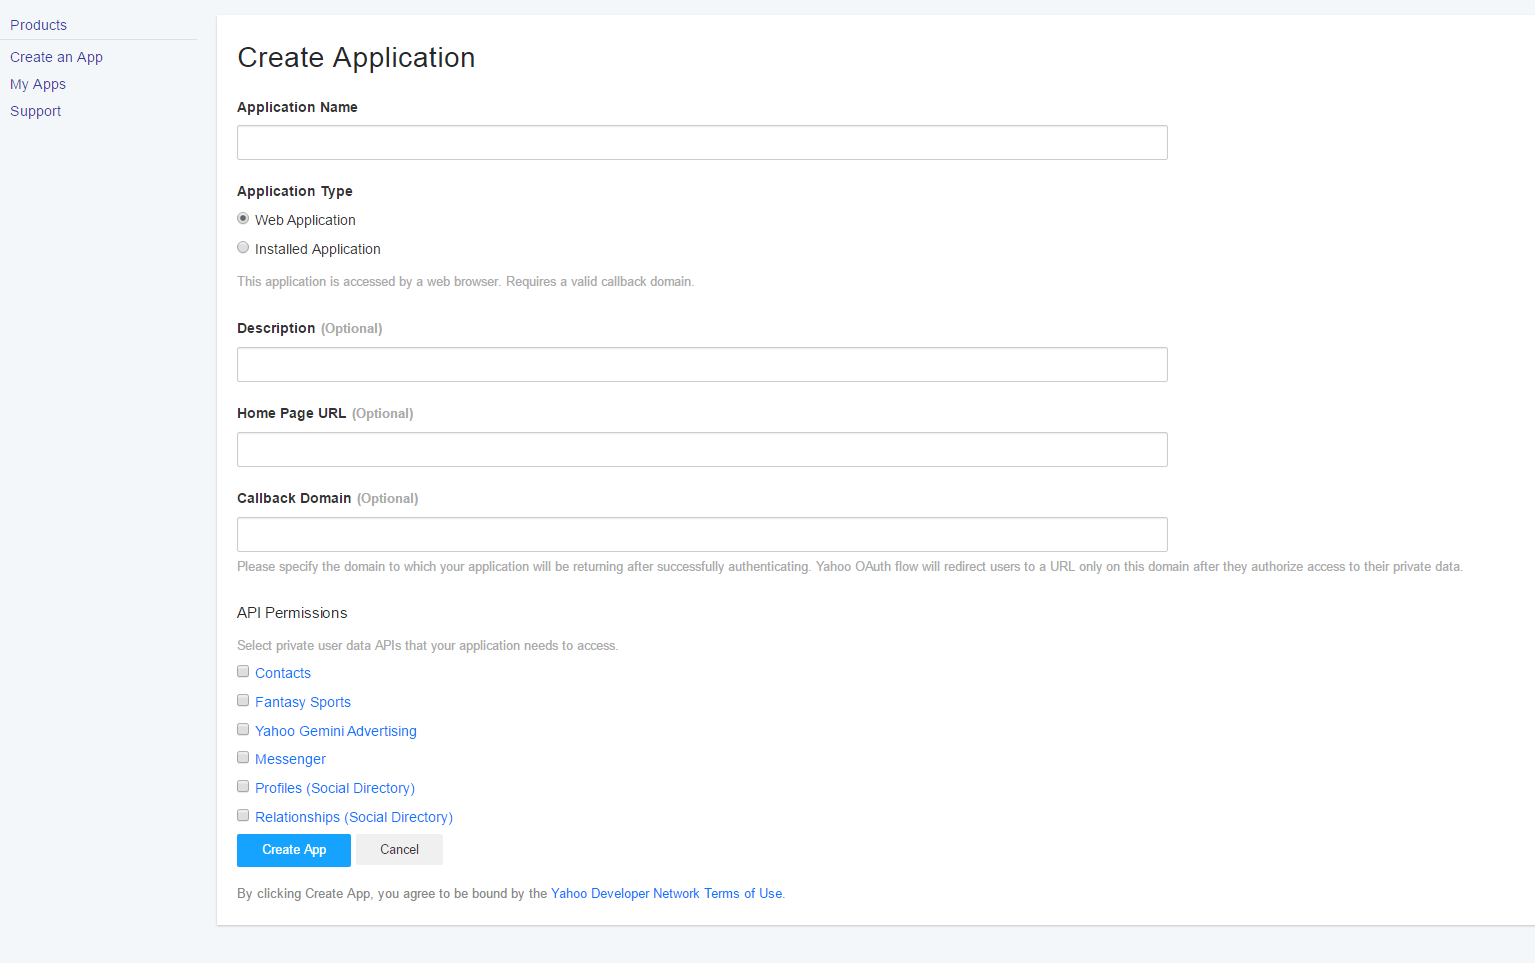
Go to Yahoo Developer Network (https://developer.yahoo.com/apps/) and click on the “My Apps” link given top right and header menu of the configuration page.
Click “Create An App”.
Fill the required details as per instructions
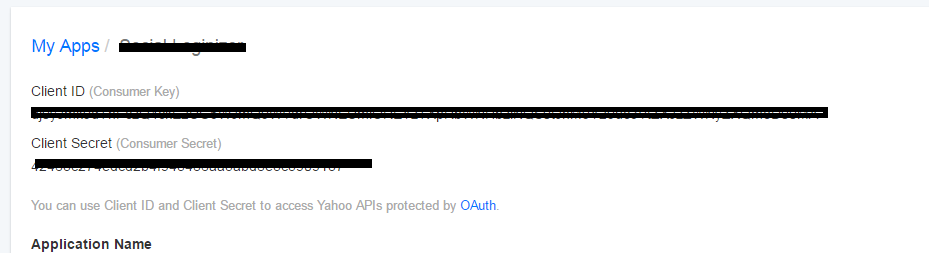
Copy your “Client Id” and “Client Secret”.
7. How to get Amazon App details?
Steps:
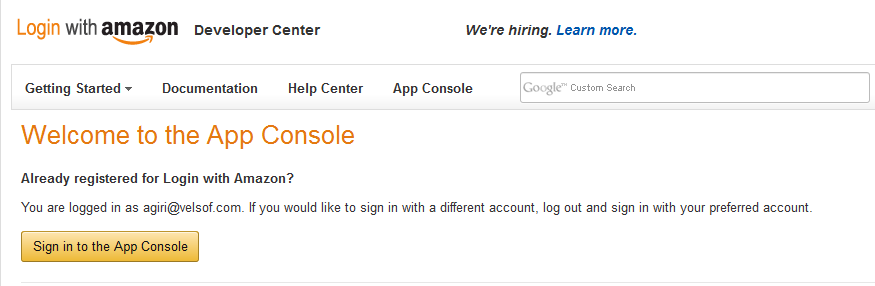
Go to Amazon Developer Network (https://login.amazon.com/manageApps) or click on link given top right of respective tab in module configuration page.
Click on Sign in to App Console button.
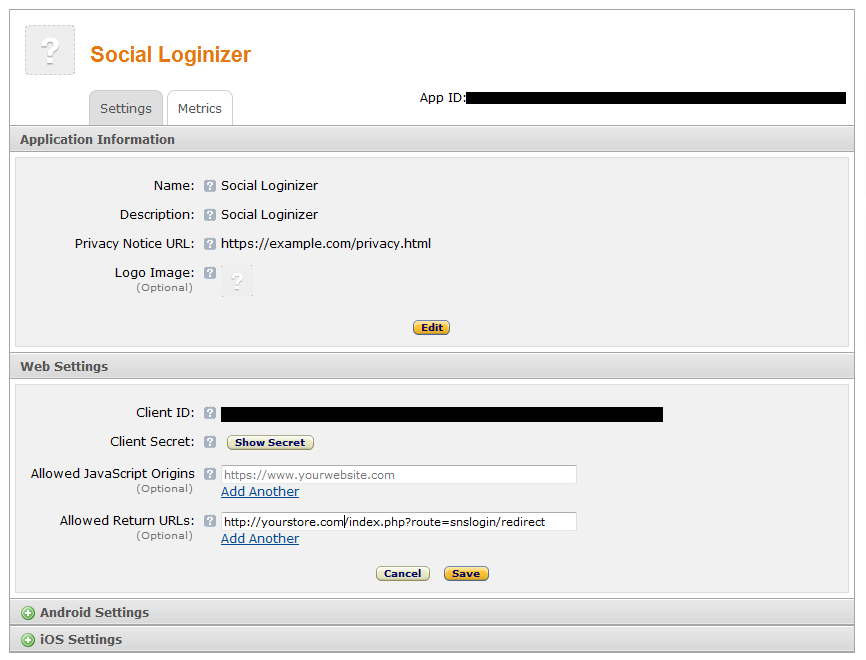
After successful login to App Console click on Register’s new application button in the top right of the page and you will be redirected to the following page.
Enter the Application Details as follows:
Name: Name of your Application.
Description: Description of your application.
Privacy Notice URL: Url of privacy policy page of your store.
Logo Image: Select the optional logo image of your store.
Click the Save button.
Now click on Web Settings to get your client id and secret.
Allowed Return URL: Loginizer redirects the page URL of your store.
Note: To enable Amazon to login into your website, your website “must be secure with HTTPS” otherwise Amazon login will not work.
8. How to get Instagram App details?
Steps:
Go to Instagram Developer Network (https://instagram.com/developer/clients/manage/#) or click on the link given top right of respective tab in the module configuration page.
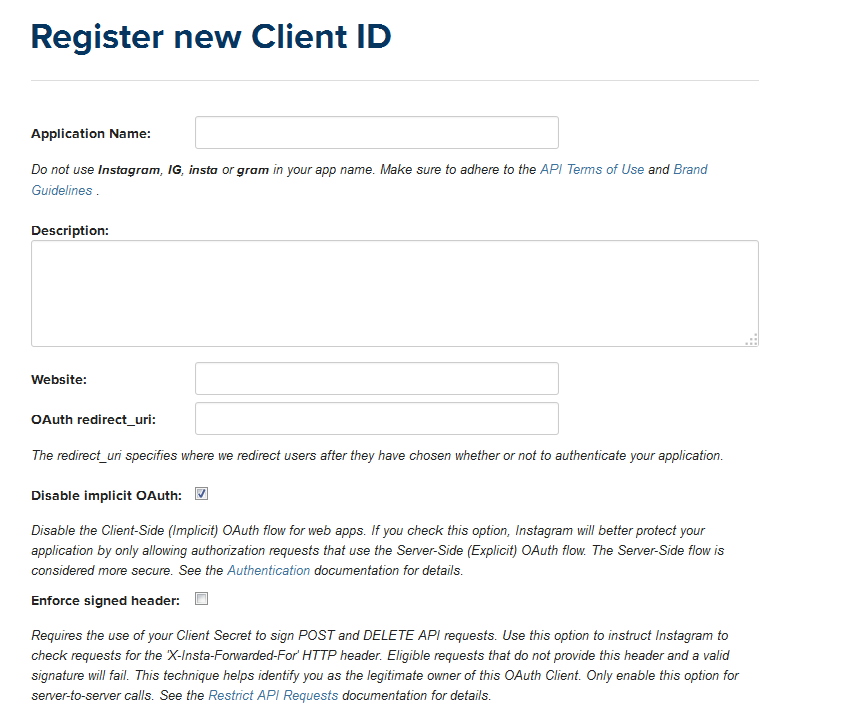
Click on Register a New Client button on the top right of the page.
Fill the following form
Set OAuth redirect_uri as Loginizer redirect page URL of your store. (https://www.example.com/module/socialoginizer/index/vssSoloApiInstagram).
Click Create button then copy and paste Client Id and Secret in the admin panel of the plug-in.
9. How to get Paypal App details?
Steps:
Go to Paypal Developer Network (https://developer.paypal.com/developer/applications/) and log in.
Click My Apps and Credentials.
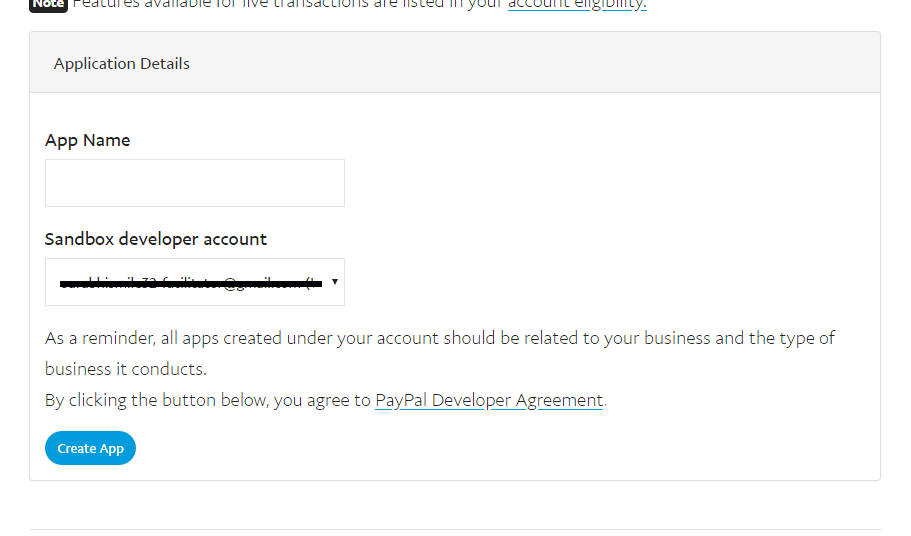
Now enter name of your Application and click Create App Button.
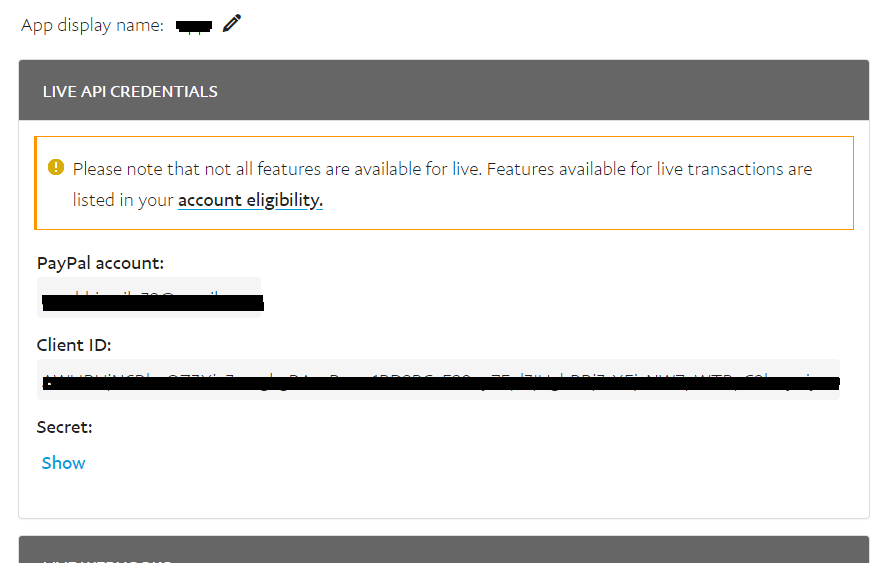
By default sandbox details is selected, switch it to live and input other app details.
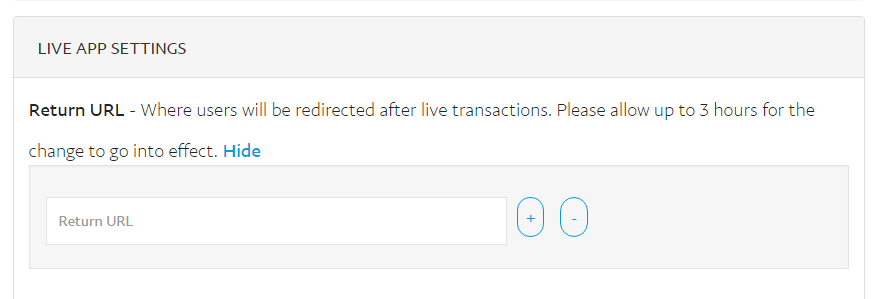
Now set the redirection URL in live App Settings.
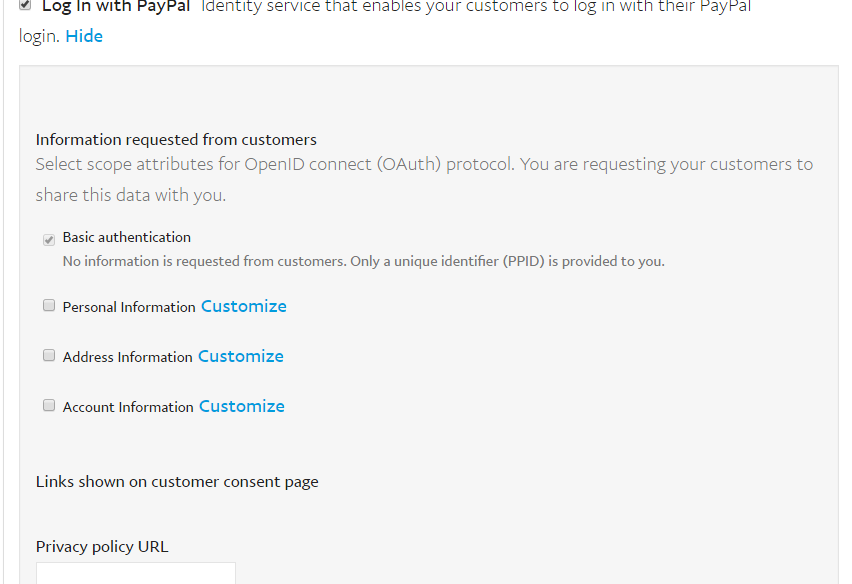
Check Login with PayPal and save details.
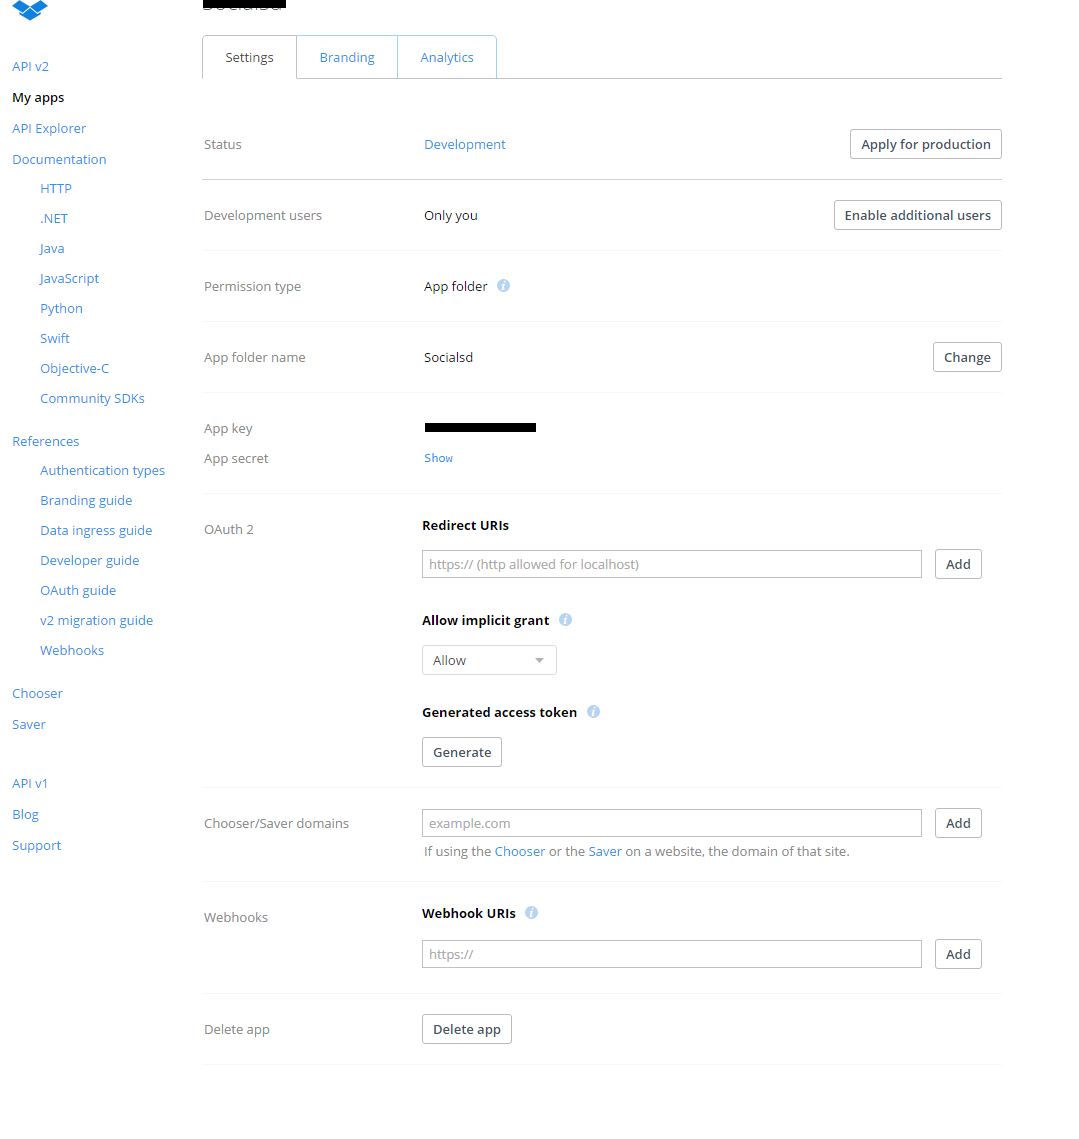
10. How to get Dropbox App details?
Go to Steps:
Note: To enable Dropbox login into your website, your website “must be secure with HTTPS” otherwise Dropbox login will not work.
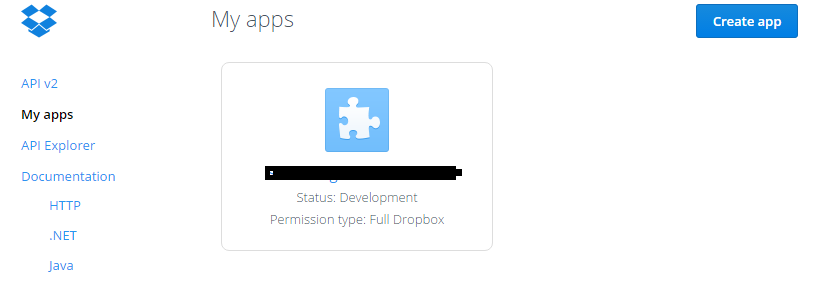
Go to Dropbox Developer Website (https://www.dropbox.com/developers/apps) or click on link given bottom of the respective tab in the module configuration page.
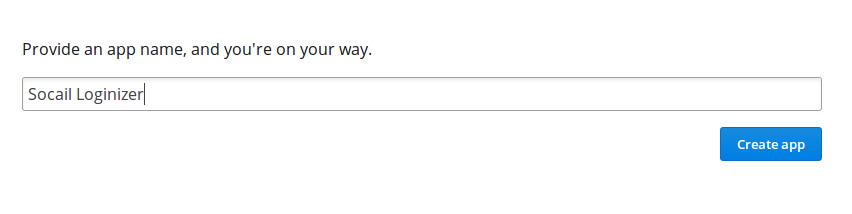
Click On the Create App button and provide a name for Application.
Fill up the details , set redirect url and save the settings.
Copy and paste the key and secret in plugin admin panel.
11. How to get WordPress App details?
Steps:
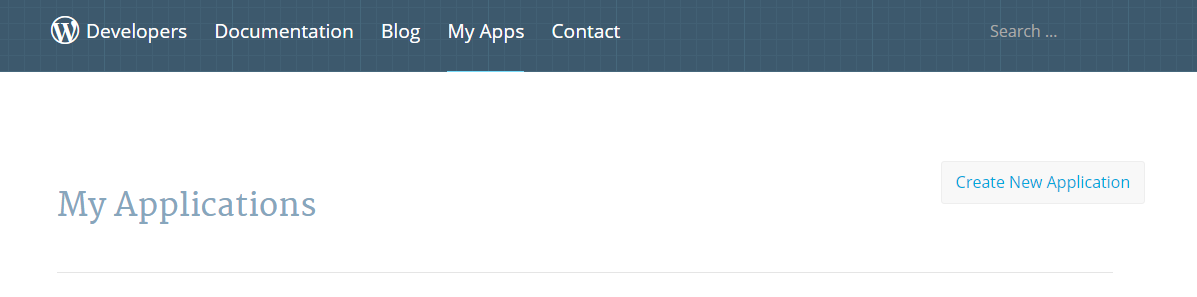
1. Go to WordPress Developer Website (https://developer.wordpress.com/apps/) or click on link given bottom of respective tab in module configuration page.
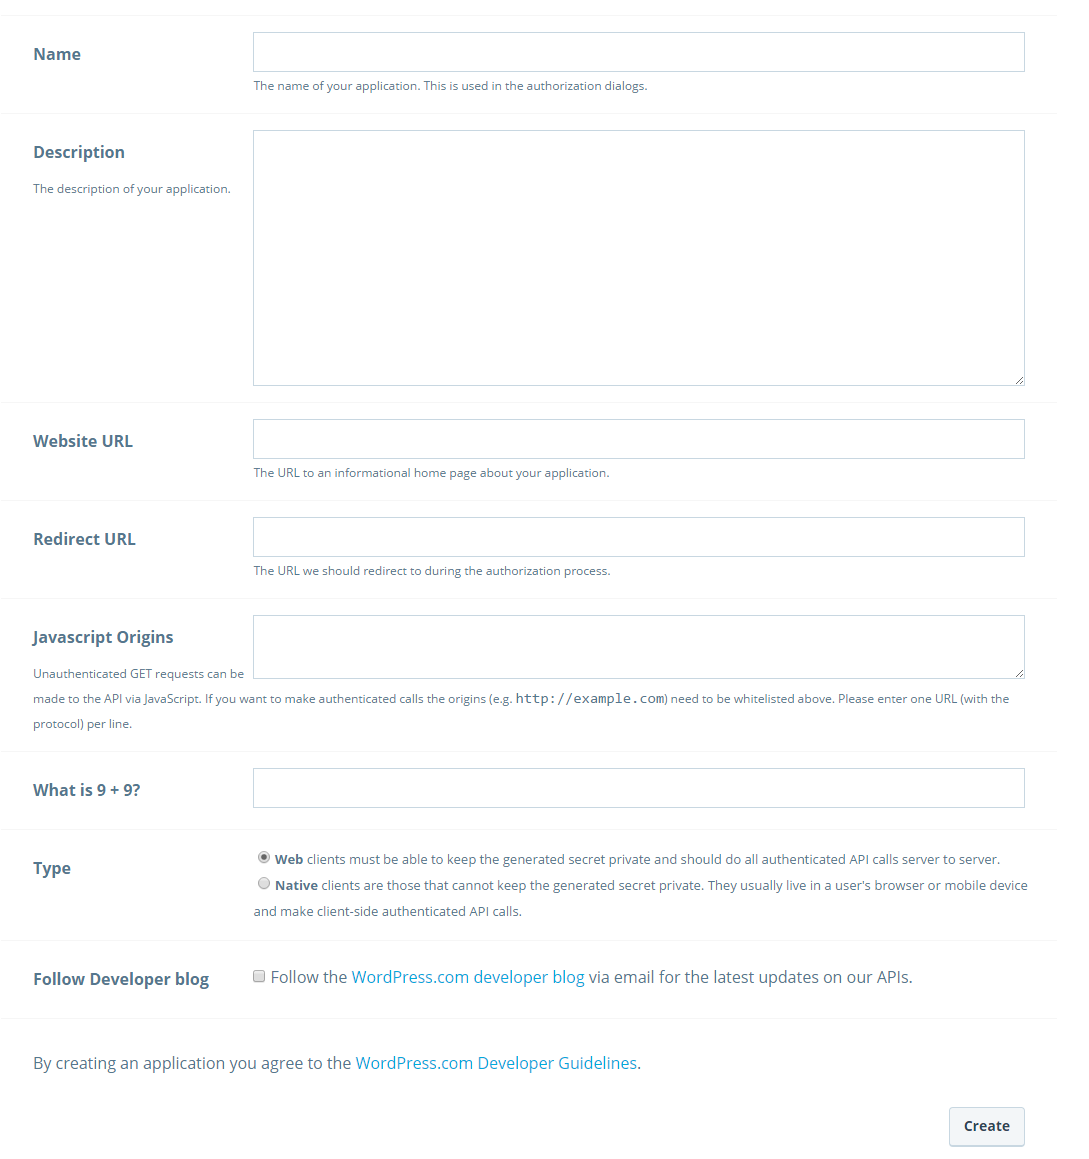
2. Click On the “Create New Application” button and provide a name for Application.
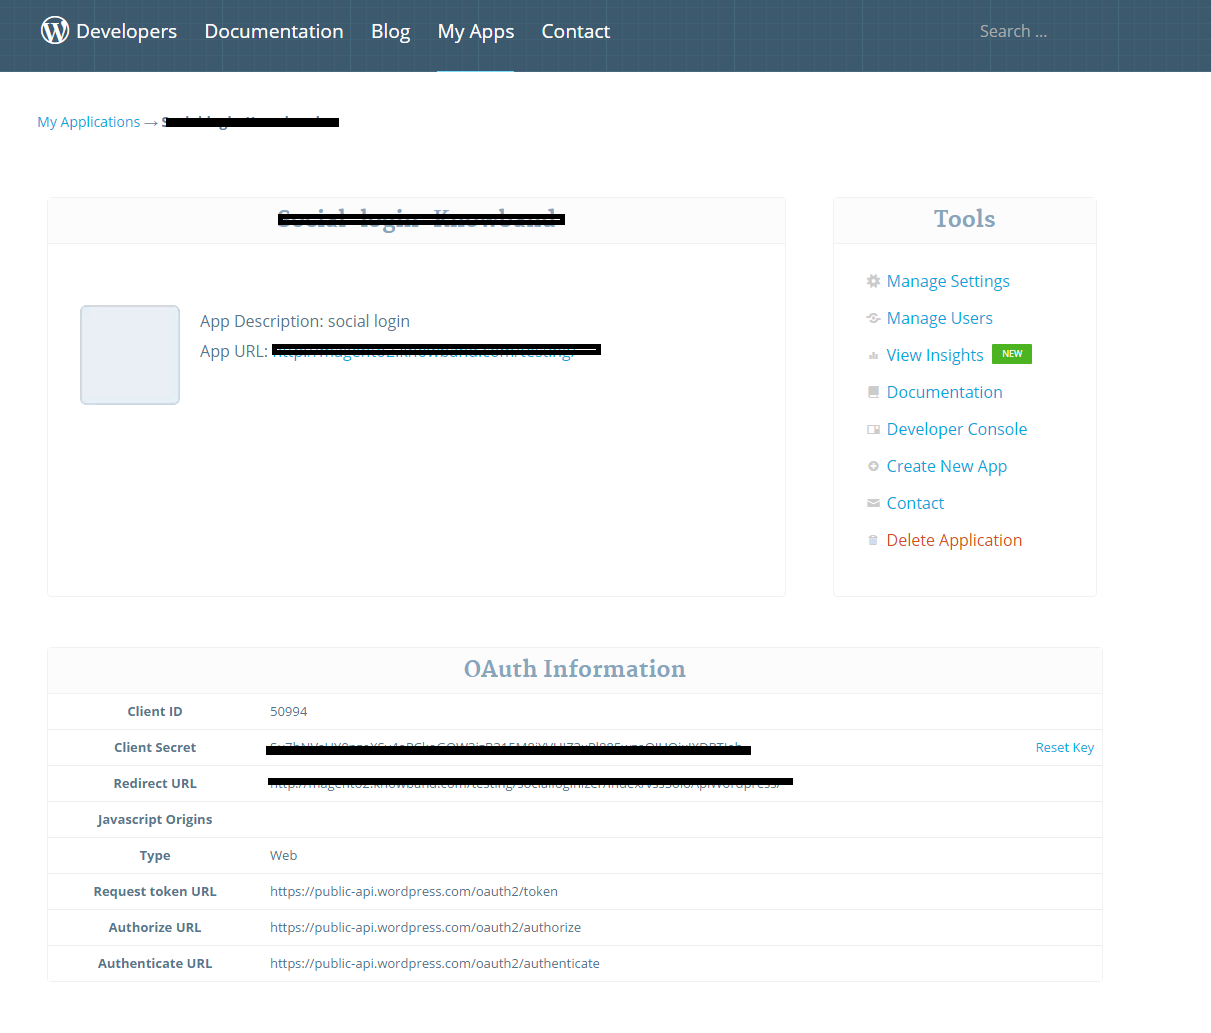
Fill up the details and save the application.
Copy and Paste the credentials in plugin admin console.
12. How to get FourSquare App details?
Steps:
Go to the foursquare developer website(https://foursquare.com/developers/apps) or click on the bottom link in the Plugin admin console.
Click on the ‘Create a new app’ button.
Fill the details , set the redirect URL and save the application.
Copy the credentials.
For more details about this Magento 2 Facebook Login plugin, visit here:
This extension is the sub extension of Magento Marketplace. In Marketplace, there is no option for sellers to add shipping charges on his products. All time seller has to depends on shipping applied by store owner.
With this extension, seller will have functionality to apply his own shipping charges on product as well as create invoices for his orders.
Note: This module require Magento Marketplace extension developed by Knowband. Before isntalling it, your store must have Marketplace module.
2. Installation
After purchasing extension, you will get following files as shown in below screen:
marketplaceproductshipping.zip (contain source code of the extension)
User Manual
Follow the following steps to install extension:
Unzip the marketplaceproductshipping.zip folder
Copy all the files and folder of unzipped folder into your store root directory
After coping all the files and folders, clear the cache.
Open any page of your store. Magento will install the module at the time of loading of any page.
After installing, please login into your admin panel. And go to the below menu:
System > Configuration > Advanced
Here you will see that, the “Vss_Marketplaceproductshipping” module is listed.
3. Extension Interfaces
There are two ends from where user will interact with extension functionality. They are following:
Admin Interface (Only be accessible by admin/store owner)
Seller Interface (Onl Seller can access this interface)
Each interface has been explained in next section.
4. Admin Interface
This interface will only be accessible in admin panel. After installing extension, system will add one more shipping methods into your system configuration panel as shown in below screen:
You can access the above page by going: System >> Configuration >> Shipping Methods
4.1 Global Level Shipping Setting
In the above screen, you can configure this shipping method for all your products as well as seller’s products. This method will work like regular flat rate shipping methods.
Fields
Enable: By default method will be disabled. This method will only work if the shipping method is enabled.
Title : Title of the method. Default name will be “Knowband Flat Shipping”
Method Name: Name of the method. Default name will be “Shipping Per Product”.
Type: Type of the shipping method. There will be two types:
Per Item: With this setting, system will apply defined shipping charges on whole ordered quantity at once. For example, if customer ordered 3 qty of same product and shipping charge is $5 per item then system will apply only $5 shipping sharge instead of $15.
Per Quantity: With this setting, system will apply shipping charge by per quantity. Shipping charges will be applicable as per quantity ordered.
Price: Cost of shipping in price format.
Display Error Message: System will show this error message to customer, if something gone wrong on front with this method.
Sort Order: Order in which this shipping will be displayed.
4.2 Product Level Settings
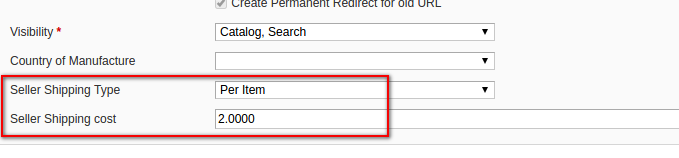
Apart from global level shipping charges, you can also apply different shipping charges on different product as per your need. After installing this method, system will show shipping charge fields on product edit page under “General”tab as shown in below screen:
5. Seller Account Interface
5.1 Product Level Shipping Settings
With this extension, seller will also enable to apply shipping charge on his own products. Seller will only have option to set shipping charge on product level. They will not have option for global level shipping charges.
Shipping fields will be shown to seller on product edit or product new page as shown in below screen:
5.2 Create Invoices for Orders
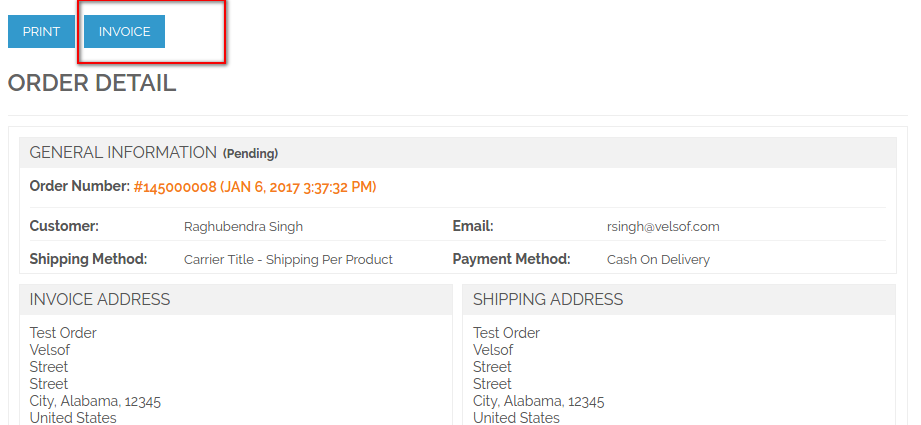
As seller will have option to set his own shipping charges for his products. With this feature, extension will also enable seller to create invoices for his orders. If any order placed at website and order has seller products with this shipping method then extension will shown “Invoice”option to seller on corresponding order on order view page as shown in below screen:
On clicking “Invoice”button, system will redirect seller to create invoice page from where seller can create invoice for corresponding order as per his need.
This extension is the sub extension of Magento Marketplace. In Marketplace, there is no option for sellers to add products into system by using file upload. Seller must have to add all products into system one by one.
Suppose, if seller has 1000 products then it will be little frustrating to seller to add all products one by one just because of time consuming effort.
To overcome this type headache to seller, this extension will provide the interface to sellers from where seller can upload his product data in excel file into system and then system will add product into system.
Note: This module require Magento Marketplace extension developed by Knowband. Before installing it, your store must have Marketplace module.
2. Installation
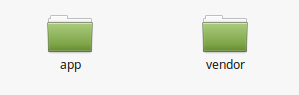
After purchasing extension, you will get following files as shown in below screen:
marketplacebulkimport.zip (contain source code of the extension)
User Manual
Follow the following steps to install extension:
Unzip the marketplacebulkimport.zip folder
Copy all the files and folder of unzipped folder into your store root directory
After coping all the files and folders, clear the cache.
Open any page of your store. Magento will install the module at the time of loading of any page.
After installing, please login into your admin panel. And go to the below menu:
System > Configuration > Advanced
Here you will see that, the “Vss_Marketplacebulkimport” module is listed.
Extension Interfaces
There are two ends from where user will interact with extension functionality. They are following:
Admin Interface (Only be accessible by admin/store owner)
Seller Interface (Onl Seller can access this interface)
Each interface has been explained in next section.
Admin Interface
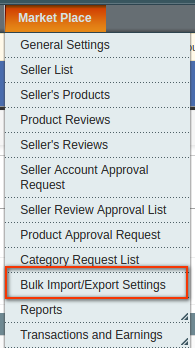
This interface will only be accessible in admin panel. After installing extension, import/export menus will be visible under Marketplace menu in the menubar as shown in below screen:
4.1 Bulk Import or Export Settings
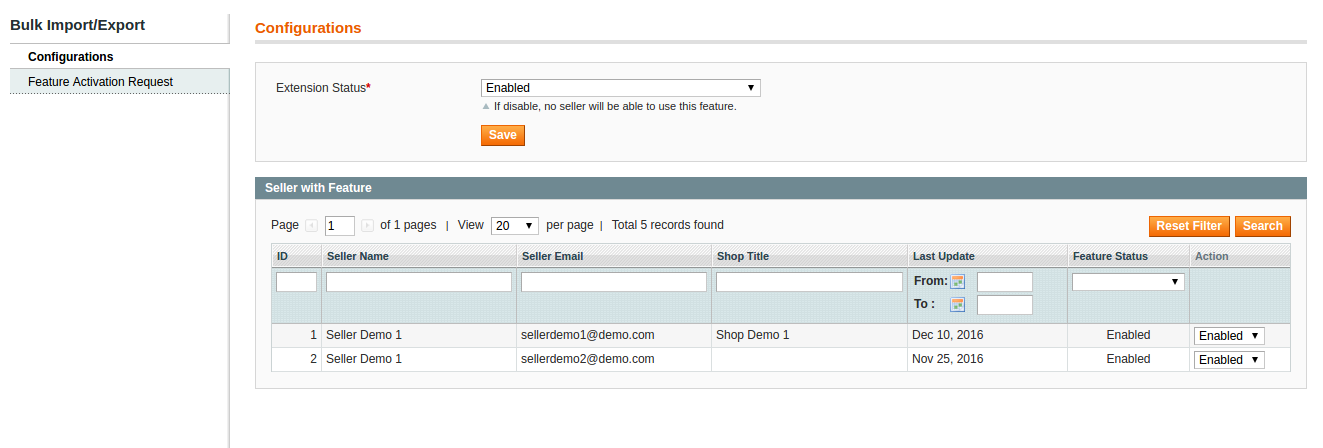
Here admin can enable/disable extension at any time. Also can enable/disable this feature on any seller. On Configuration page there will be two tabs. Each tab is explained in next section.
4.1.1 Configuration
This tab will be open by default when you will click on menu. Below is the screen of this tab:
Sections
Extension Status:
By default, extension will be disabled. With this setting you can enable/disable this feature for all seller at any time.
Feature Status on Sellers
This will be a list of all sellers with status of corresponding seller is using this feature or not. To enable/disable this feature on seller, you have to change the feature status on corresponding seller by choosing action in last column of list.
On any action, seller will recieve the feature enable/disable notification so that seller can aware about this feature.
4.1.2 Feature Activation Request
In this tab, admin can see list of all requests made by seller to activate import/export feature into his account. Following is the screen of this tab:
Fields
Seller Name: Name of the seller who has request for import/export feature.
Seller Email: Email id of the seller.
Shop Title: Title/Name of the shop (if any).
Seller Comment: Comment or reason for activation import/export feature.
Your Comment: Comment reason given by you for taking action on corresponding request.
Request Status: Current status of corresponding request. See Appendix A to see list of all statuses.
Active Feature: In this column, there will be two action: a) Yes, b) No. These action will only be visible if the corresponding request status is “Waiting for Approval”.
Yes Action: By choosing this action, system will open a pop up box from where system will ask for comment before activating import/export feature into corresponding seller account. After approving request, system will send notification to seller.
No Action: On choosing this action, system will open a pop up box from where system will ask for comment before disapproving corresponding request. After disapproving request, system will send notification to seller.
YES/NO action will only be shown for request having status “Waiting For Approval”.
5. Seller Account Interface
If extension is installed and enabled, a menu will be shown in seller account menu as shown in below screen:
“Product Import/Export”menu will only be shown to approved sellers.
5.1 If Feature is Disabled
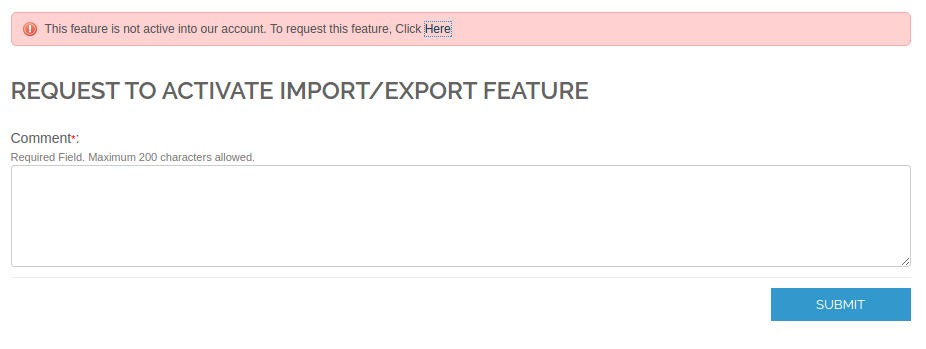
If this case, menu will still visible to seller. When seller will click on “Product Import/Export”menu, system will show a message as shown in below screen:
To activate this import/export feature into his account, seller must has to send activation request to you. To send request, there will be a link “here”shown in above screen. On clicking this link, system will open a form just below above message as shown in below screen:
In the above screen, seller must have to provide his reason for using this feature to send request to you. After clicking send button, system will notification email on store email id and request will be shown in “Feature Activation Request”list in admin panel.
If the seller has already requested for import/export feature and still waiting for admin response, then in this case, system will show different message to seller and will not allow seller to make further request until unless reqsponse is reviewed by admin. In this case, given below screen will be display to seller:
5.2 If Seller is inactive or Not Approved
In this version, we will not allow seller who is not approved or disabled by admin, to use this import/export feature. If any of one condition is true then system will show following message to seller as shown in given below screen:
5.3 If Feature is Active in Seller Account
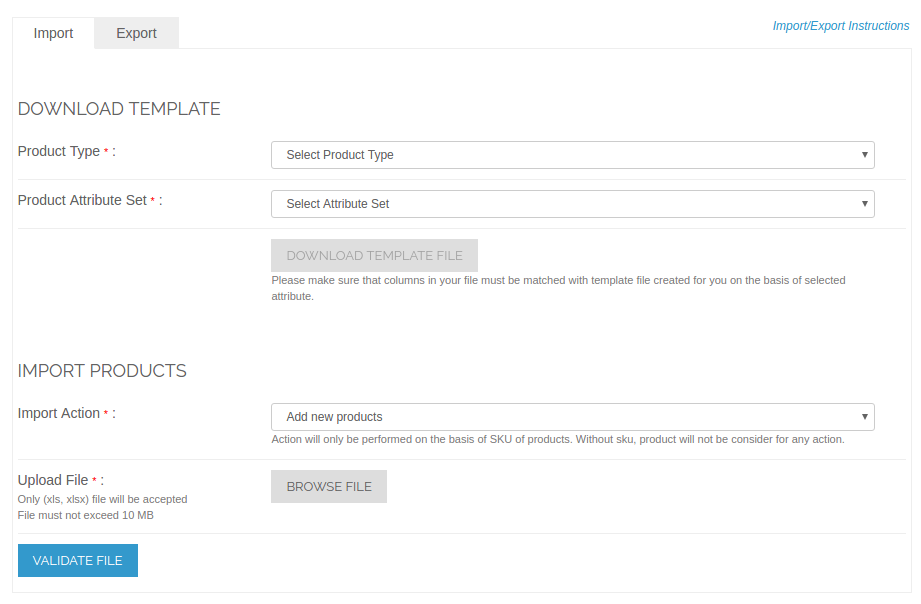
If the feature is active into seller account, then system will show the import/export form to seller on clicking of “Product Import/Export”menu. Given below is the screen of import/export form:
5.3.1 Download Template
System will only accept excel file with predefined format. To upload products, seller must have to upload excel sheet in proper format. To get the sheet format, seller must have to download template according to product type and attribute set.
On the basis of product type and attribute set, system will generate template file and seller must have to upload product into same format.
“Download Template”button will only be enable, if seller select both product type as well as attribute set.
5.3.2 Import Products
To import products, seller must have to select import action as well as upload valid file. By default “Add New Product”action will be selected. To see available import action, go to Appendix A.
After uploading excel file, system will first validate sheet data as per product type and attribute set in uploaded file.
If uploaded file has any type of error, then system will redirect seller to a page from where seller can download the same uploaded file with errors in it. Following is the screen of this download page:
On clicking “Download File with Error”will download the same uploaded file with errors.
If the file is valid, then system will show the given below screen to seller:
On clicking “Import Products”, system will start process of adding/updating product into system.
5.3.3 Export Data
In seller account, when seller will click on “Export” tab, following screen will be shown to seller:
Exporting Categories
To export categories, seller must have to select export type as “category”. On clicking “Export Data”button, system will download all categories in excel sheet.
Note:Only those categories will be downloaded which are assigned to you.
Exporting Products
To export products, seller must have to select export type as “product”. After selecting export type, following fields will be shown to seller as shown in below screen:
Seller must have to select product type as well as attribute set to export his products. Exported product data will be in excel format.
There are also other options to minimize the exported data as per your need given in above screen.
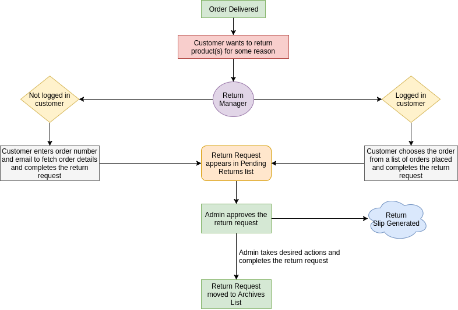
Magento 2 Return Manager extension by Knowband adds the functionality to manage return requests for any order placed by a customer as well as a guest customer. The Magento 2 order return module adds a link to the front-end through which any customer/guest customer can apply for return of any product contained in an order placed earlier.
This Magento 2 return manager extension is a very flexible plugin and the customer can return any product in a order completely or partially, that means the customer can also return half or less quantity of any product in the order.
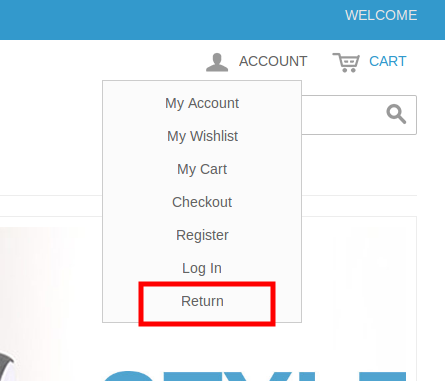
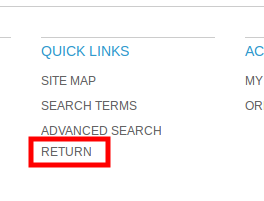
For a logged in user (if the Magento 2 product return manager extension is enabled from backend) the return manager link appears in Account options list (near the cart link) and in the quick links shown in the footer and opens a page containing the list of all the orders placed by that particular customer and the products that are eligible for return have a link to apply for return. This page also contains the history of returns applied by the logged in customer.
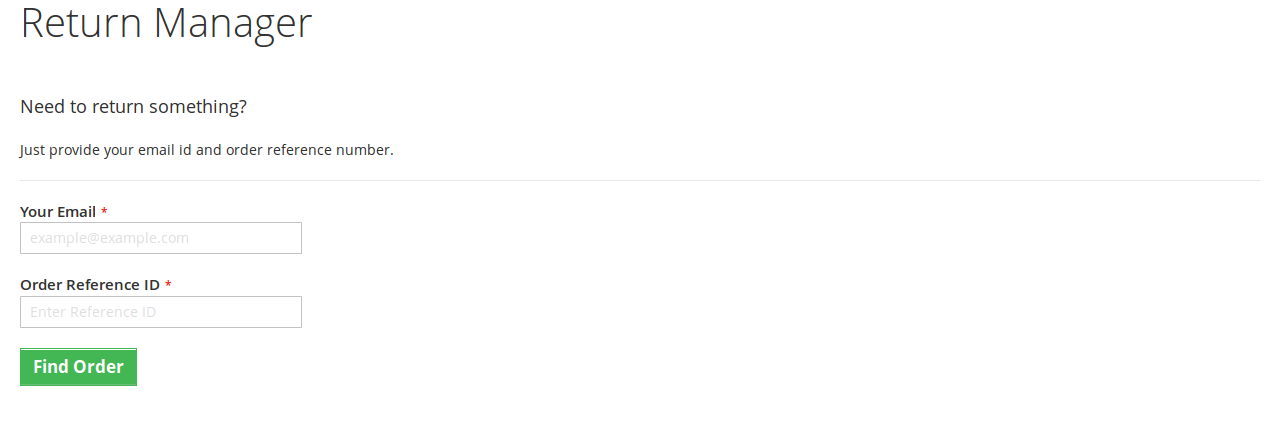
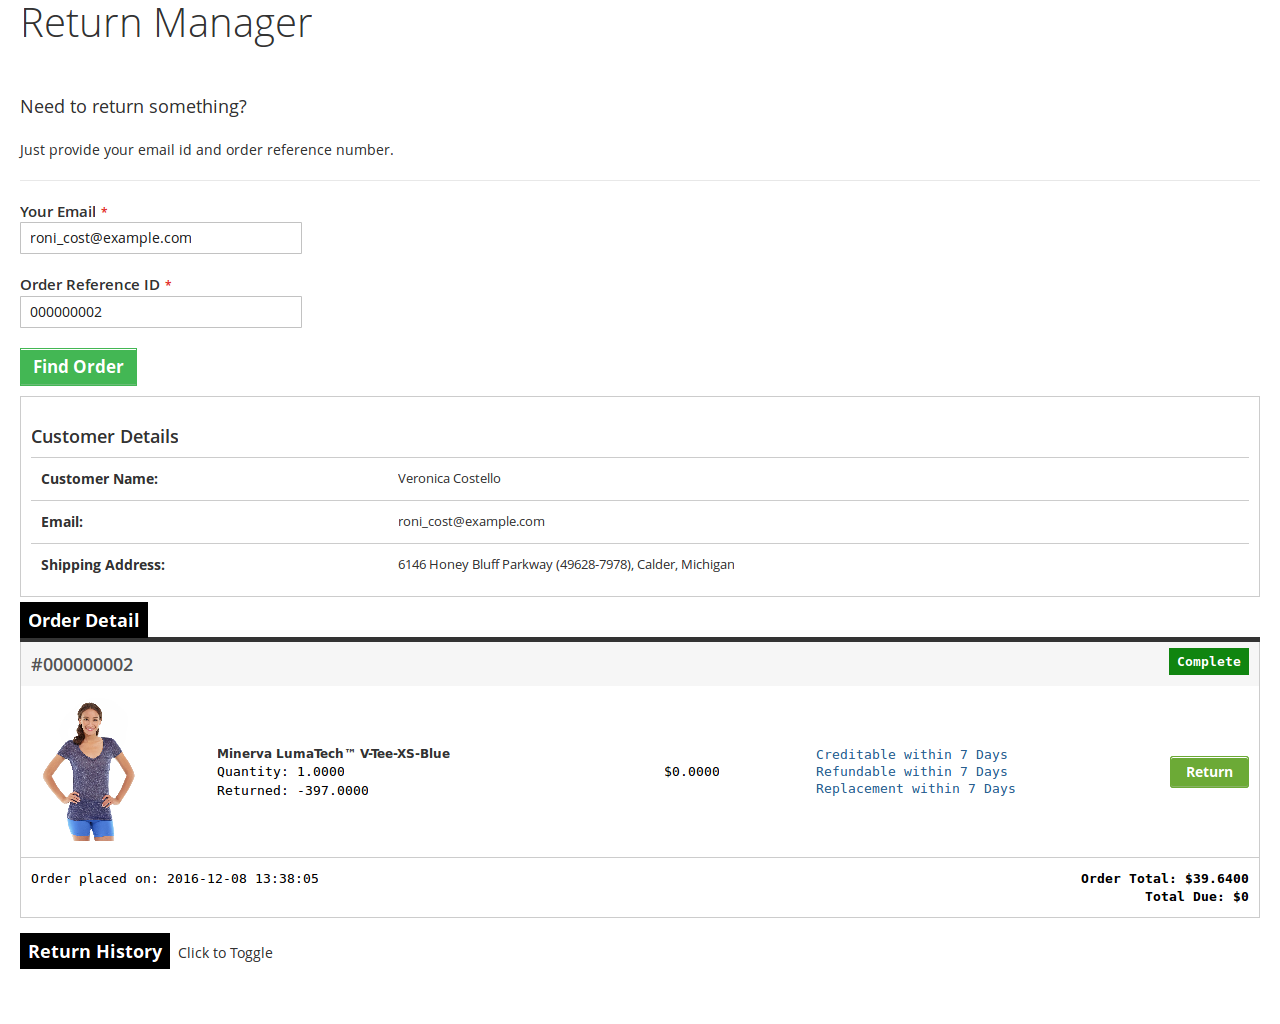
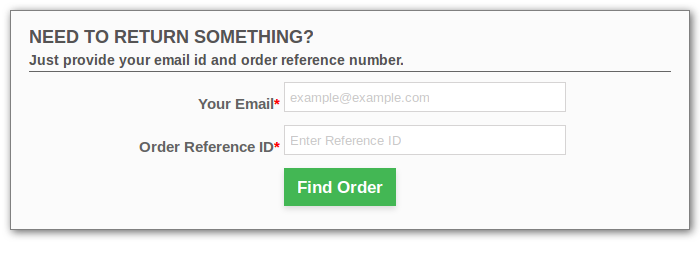
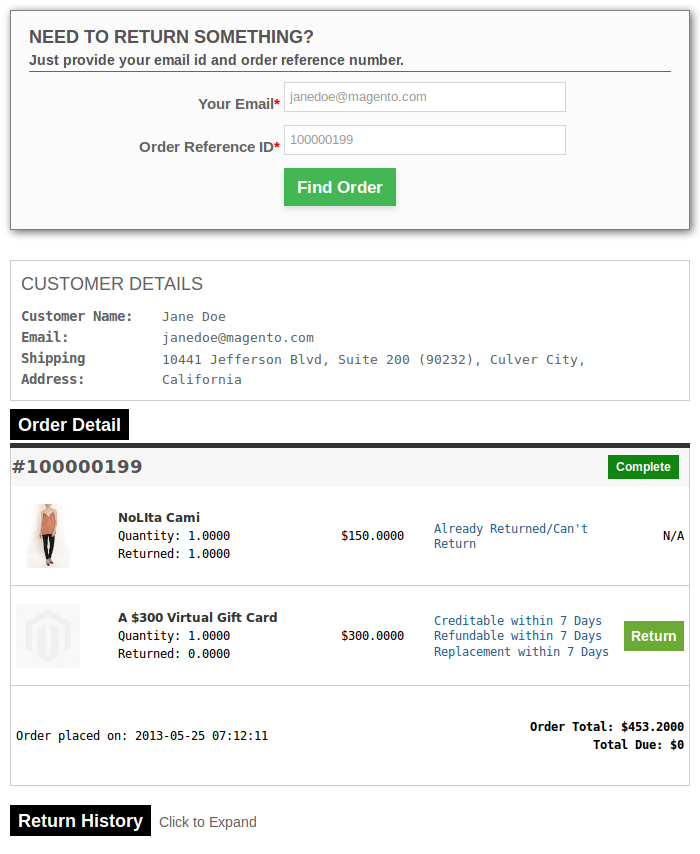
In case the user is not logged in the return manager link opens a page containing a form to find any order. After finding an order using the form the order detail appear and the products from that particular order that are eligible for return have a link to apply for a return. This page also contains the history of returns applied by the customer who has placed this particular order.
What’s New in the updated version:
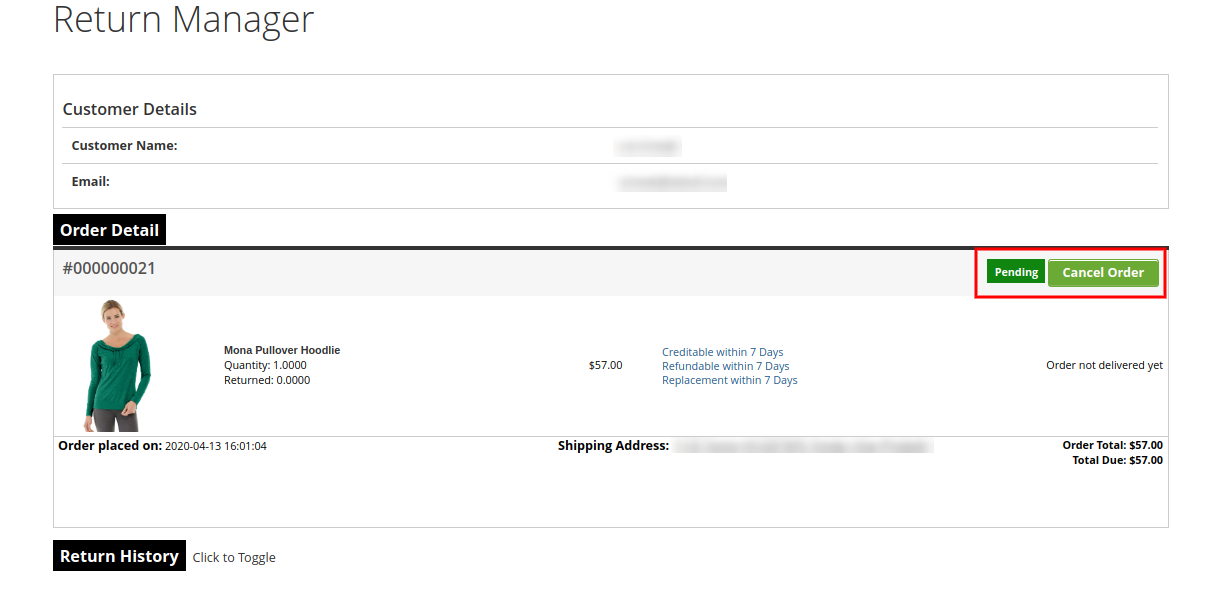
In the updated version of the Magento 2 return manager extension, the online merchant gets an option to add custom CSS and JS codes for the look and feel related settings. The e-merchant can also allow online users to cancel their orders and return requests if they wish to do so. Admin just needs to activate the related settings from the admin interface of this Magento 2 return product extension.
Apart from this, admin can also show or hide multiple return methods like a replacement, refund or product return. Online store merchants can add multiple return addresses from the admin interface and also update it as per the requirements.
1.1 Merchant Benefits of the Magento 2 Return Manager Extension
The Magento 2 return manager extension by Knowband allows the store admin to enable/disable the extension as per the desires.
Magento 2 product return module provides an option the merchant to create the own return policy.
With the help of the Magento 2 order refund module, the store merchant to add the N of return reasons.
The Online retailer can view the customer pending request from the back-end of the Magento 2 return manager extension.
The admin allows the Guest customer to initiate the return request for the purchases product from the back-end of the Magento 2 return manager module.
Magento 2 return manager extension by Knowband enables the attachment file option. Apart from this, the admin can limit the size of any attachment.
The Magento 2 product return extension provides an option for the seller to customize the return slip settings and guidelines attached to the customer email.
The eCommerce vendor can customize the email template subject and title from the admin interface of the Magento 2 RMA extension.
The Admin can add the own return policy.
Knowband Magento 2 order return extension allows the store admin to change the return status of the placed request.
With the help of the Magento 2 product return extension, the Magento 2 store admin can create the RMA request on behalf of the customer.
The Magento store merchant can view all pending return request from the back-end of the Magento 2 return extension.
The Online store retailer can be approved or deny the shopper’s return request only just button click.
The Admin can export the all return request via CSV format from the backend of the Magento 2 order return module.
The Admin can also change the success message of the Credit RMA, Refund RMA and Replacement.
The online merchant can allow online users to delete their orders and return requests.
There is an option to add custom CSS and JS codes for the look and feel related customization.
The online merchant can allow online users to return, refund and replace the products.
There is an option to add multiple addresses from the Magento 2 refund order Extension admin interface.
2.0 Technology for Development
Language: PHP
Frame Work: Magento
3.0 Installation Guide
1. The folder structure of the Magento return manager extension folder.
2. Copy all the folders into Magento root directory and clear the cash (if enabled).
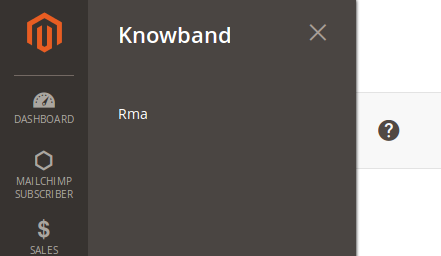
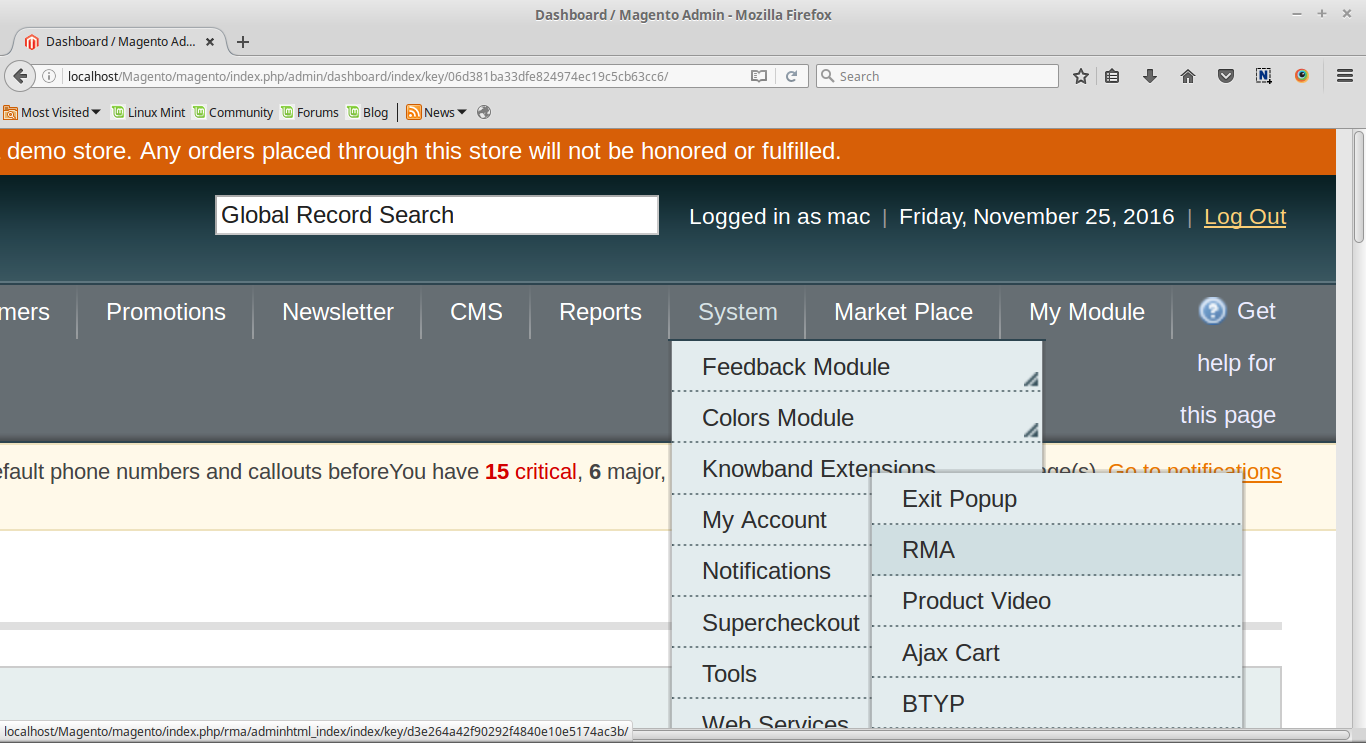
3. You will be able to find the “RMA” option inside the “Knowband” option.
4. Now you need to install tcpdf library (Only if not already installed). TCPDF is a library to generate pdf.
5. Make sure that composer is installed on your device.
6. To install tcpdf library, go to the Magento 2 installation directory root and run following command from the terminal:
Sudo composer require tecnickcom/tcpdf
7. After this command, it will ask for credentials.
8. If you don’t have credentials then go to the following site and create a new account.
9. After logging in, go to the Connect tab and click on Developers, then click on the “Secure Keys” option and generate a new key.
10. Now use the public key as the username and private key as password (look step 7). These are the credentials you have to enter.
11. Sit back and relax. TCPDF library will be installed on your device soon.
12. It may ask you to run upgrade command when any page is opened. To do that, go to Magento 2 root folder, open terminal there and run following command
sudo bin/magento setup:upgrade
After this command run next command
sudo bin/magento setup: static-content:deploy
And then provide permissions (read, write, execute) to the all magento directories.
Eg. chmod -R 777 <root_installation_directory>
13. Now you are ready to go.
4.0 Admin Module
After installing Magento 2 return manager extension into thestore, the Magento 2 return module will provide following interfaces inside “RMA” option:
General Configuration
RMA Configuration
Return Slip Settings
Pending Requests List
Approved Requests List
Archived Requests List
Canceled Requests List
Each interface is in the form of a tab and each tab contains some specific settings/functionality that can be changed according to the need. Each tab is explained below.
4.1 General Configuration
In general settings, there are two different configuration tabs available, both are described below:
4.1.1 General Settings
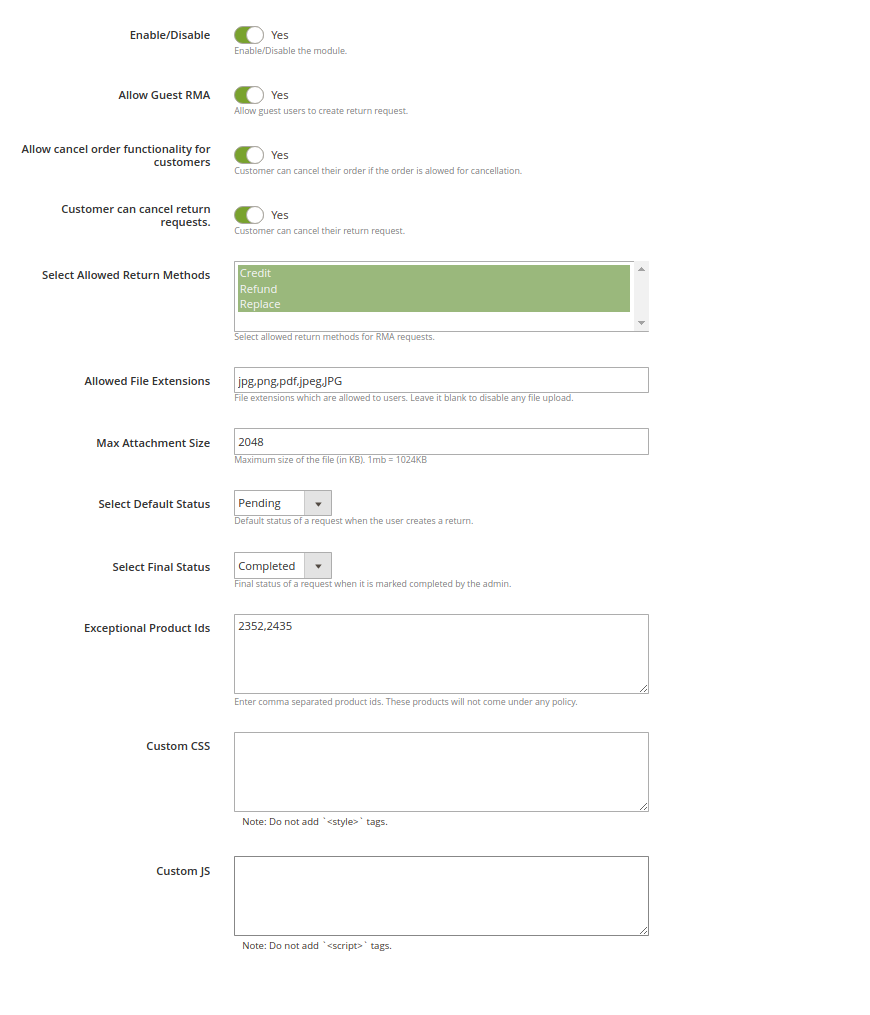
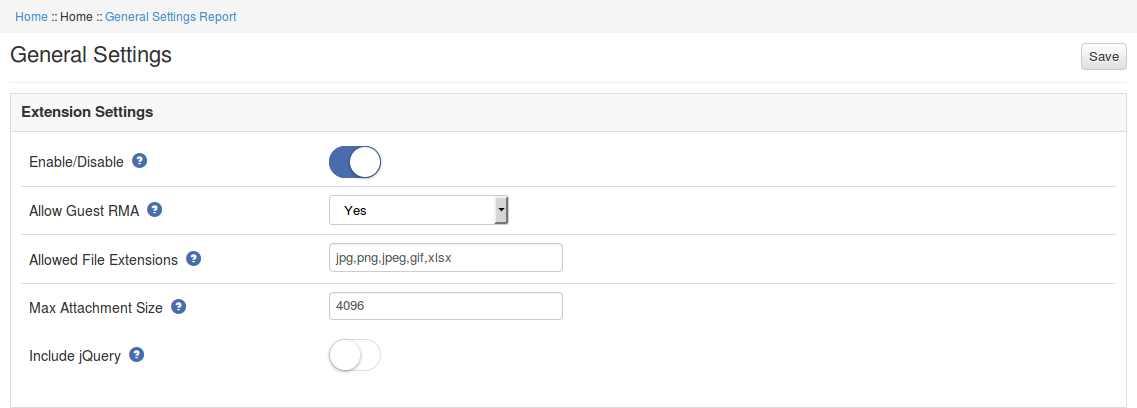
After clicking on the RMA tab, the system will open general settings tabs by default as shown in the screen below:
Initially, fields in the above form will be already filled with their default values.
Enable/Disable: Initially, this will be “OFF”. Admin can enable/disable Magento 2 return manager extension by turning ON/OFF in this setting.
Allow Guest RMA: This drop-down contains “Yes” and “No” options. Set this as “Yes” to enable the return feature for those users also who are not logged in.
Allow Cancel Order Functionality for Customers: Activate this option for allowing the users to cancel their orders.
Customers can cancel return requests: Users can cancel the return request if this option is enabled from the admin interface of this Magento 2 order return manager Module.
Select Allowed Return methods: Select from the credit, refund and replacement options.
Allowed File Extensions: This option accepts the comma (,) separated file extensions (without space) which can be uploaded when customer uploads file related to the return request.
Max Attachment Size: In this field maximum allowed file size is accepted. The file size will be in KB. Eg- To allow files up to 1MB set this field as 1024.
Select Default Status: Admin can set the default status of the customer’s return requests.
Select Final Status: Admin can select the final status of return request.
Exception product Ids: Enter the product ids which you don’t want to map with any return policy.
Custom CSS: Enter Custom CSS code for the look and feel management.
Custom JS: Enter JS codes for the look and feel settings.
To save the settings, click on the “Save” button shown in the right upper area.
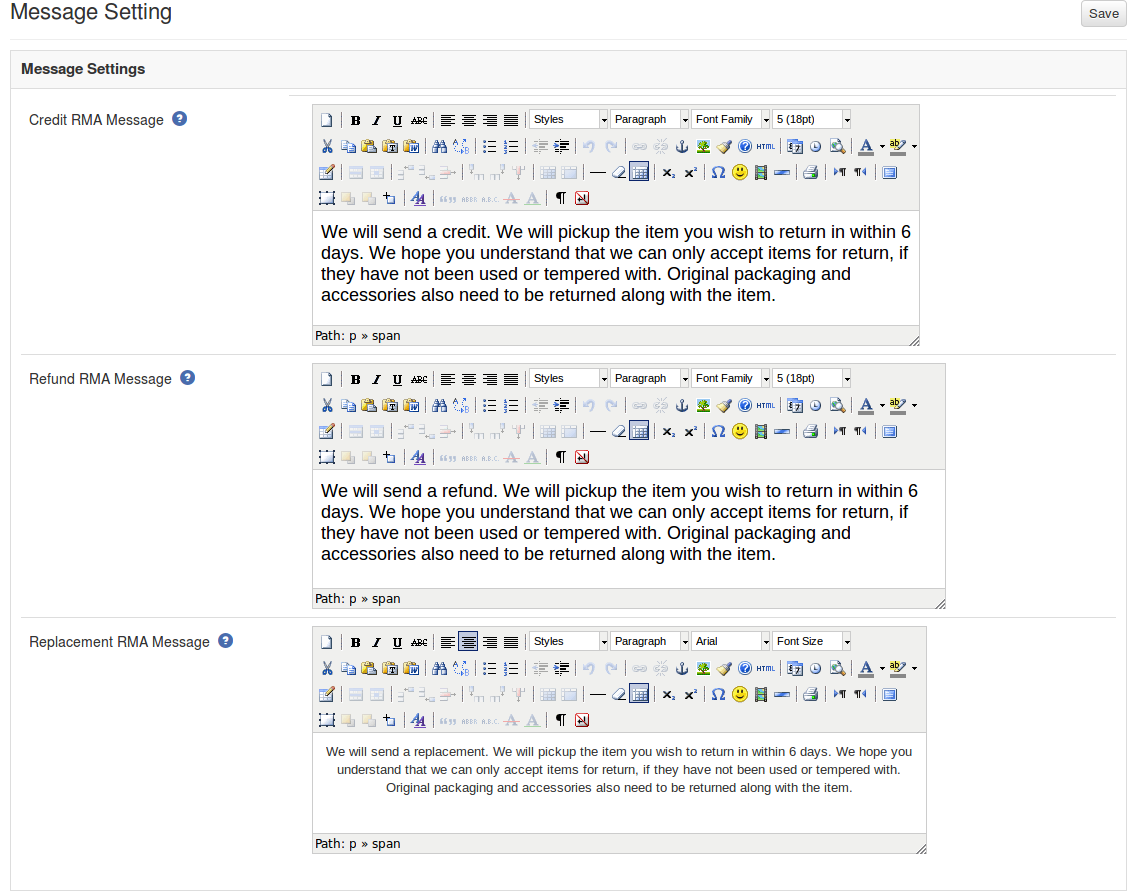
4.1.2 Success Messages
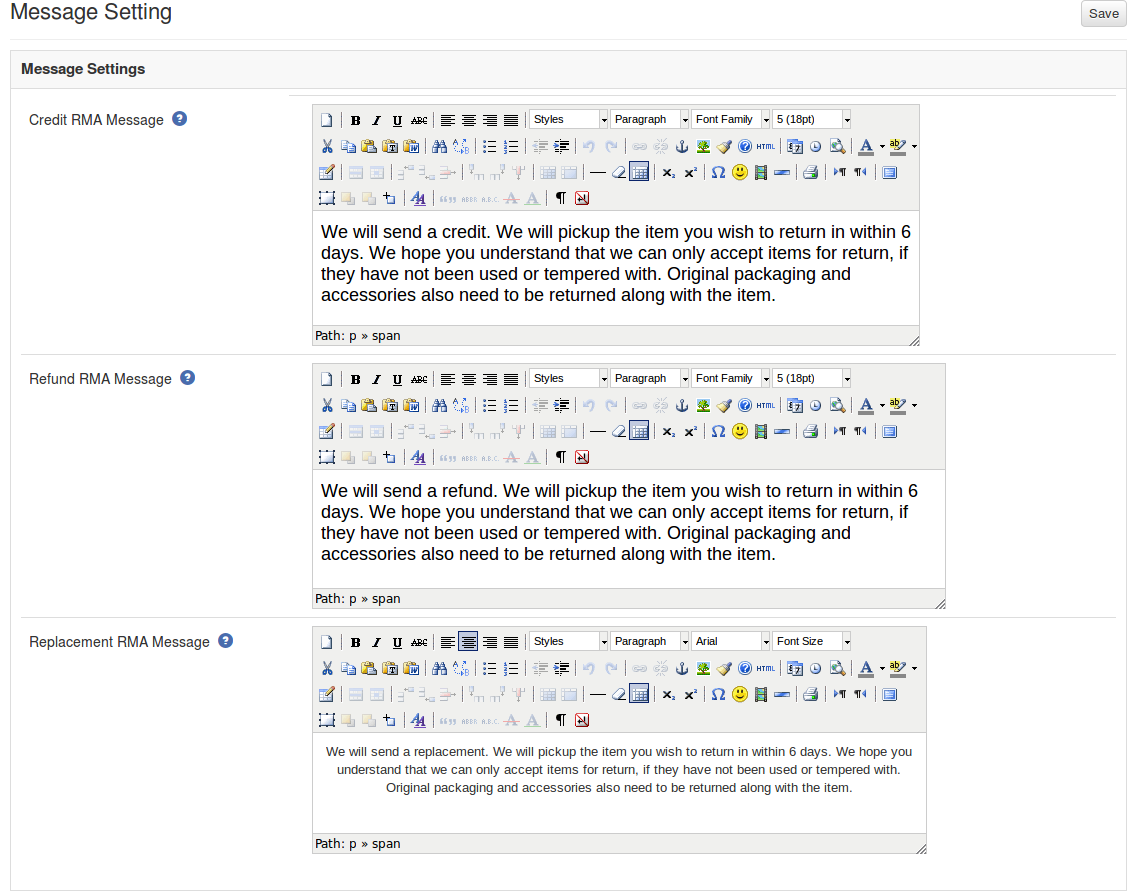
This tab contains three text areas having html editors. Using the editors, the admin can set the style of the success message to be shown in the pop-up whenever the request is successful.
There are three messages.
Credit
Refund
Replacement
4.2 RMA Configuration
In RMA Configuration, there are multiple configuration options as shown below:
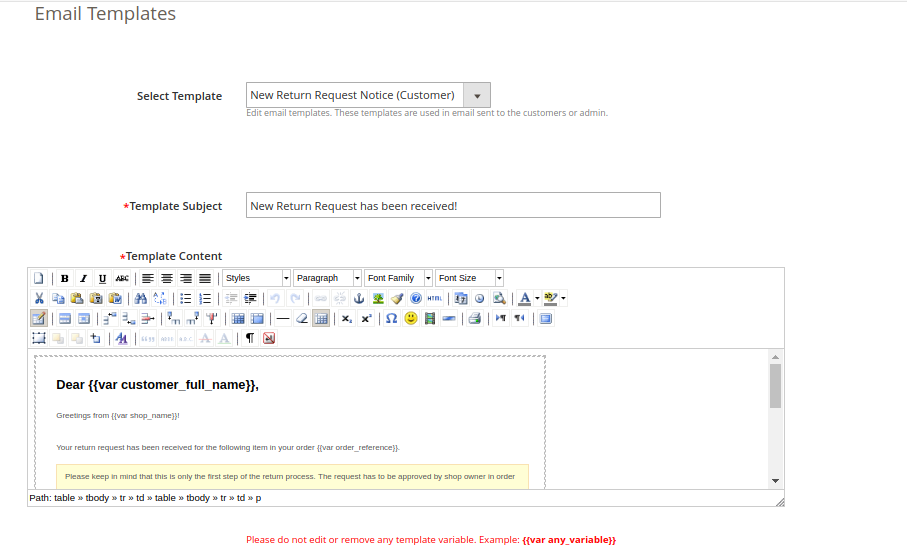
4.2.1 Email Template Settings
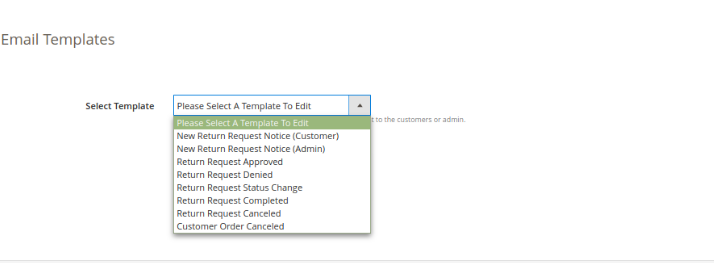
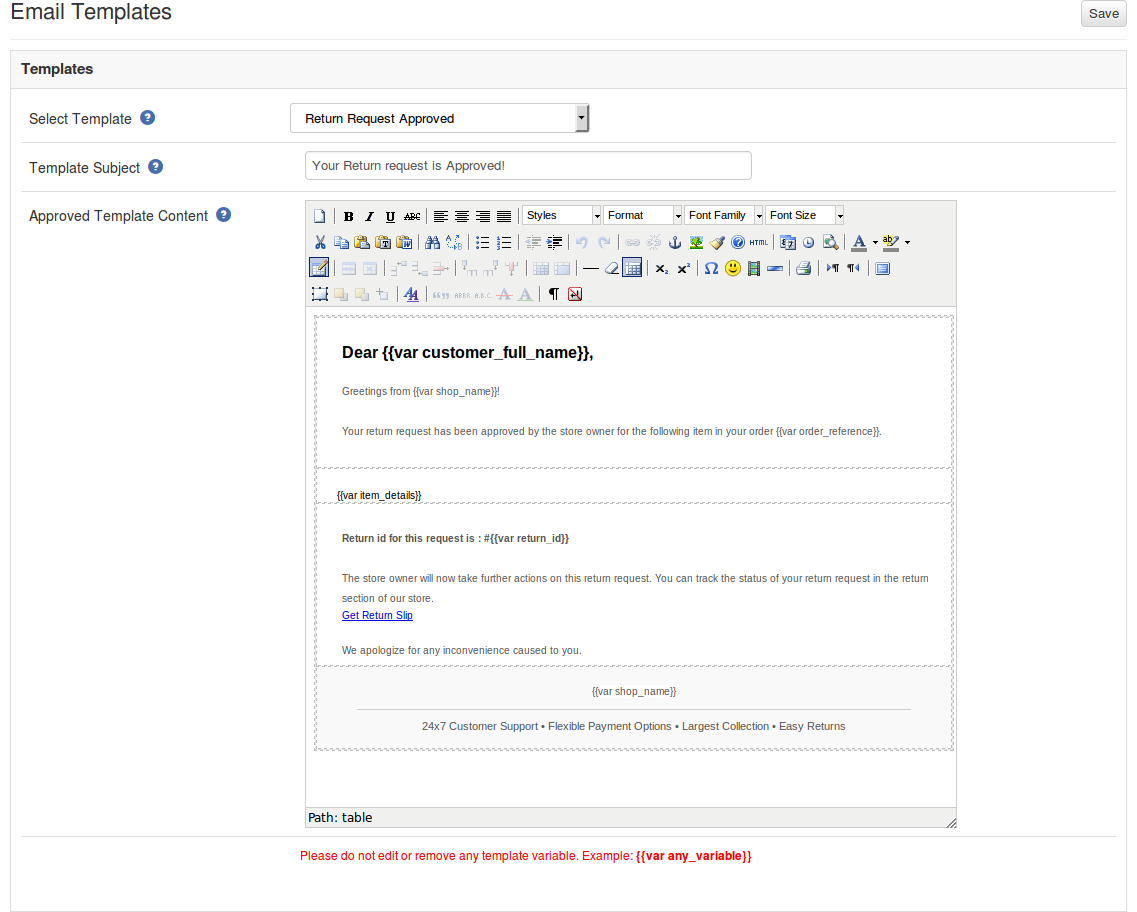
This tab contains an interface through which the admin can edit any email template that is used in this system.
There are 8 email templates available that are used by this plugin:
New Return Request Notice (Customer): This mail template is used to notify the customer regarding the new Return Request generated by the customer itself. The customer who has created the return request will only receive this mail.
New Return Request Notice (Admin): This mail template is used to notify the Store Owner regarding the new Return Request generated by any customer.
Return Request Approved: This mail template is used to notify the customer regarding the Approval of the Return Request that is created by the customer earlier.
Return Request Dis-Approved: This mail template is used to notify the customer regarding the Dis-Approval of the Return Request that is created by the customer earlier.
Return Request Status Change: This mail template is used to notify the customer regarding the update in status of the Return Request that is created by the customer earlier.
Return Request Completed: This mail template is used to notify the customer regarding the completion of the Return Request that is created by the customer earlier.
Return Request canceled: This Email Template is available for notifying the online users regarding return request cancelation.
Customer Order Canceled: The email template is available for notifying the customers regarding order cancelation.
To edit an email template the admin has to choose the desired email template. On doing the same the email template data will appear in a form below, to save the changes made the admin has to click on the ‘Save’ button.
4.2.2 Policy Settings
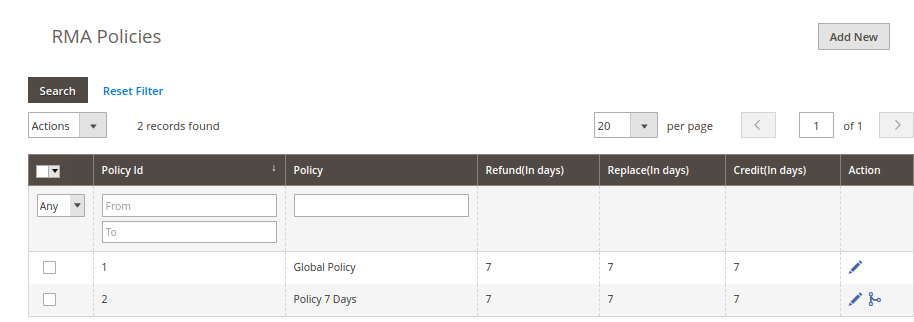
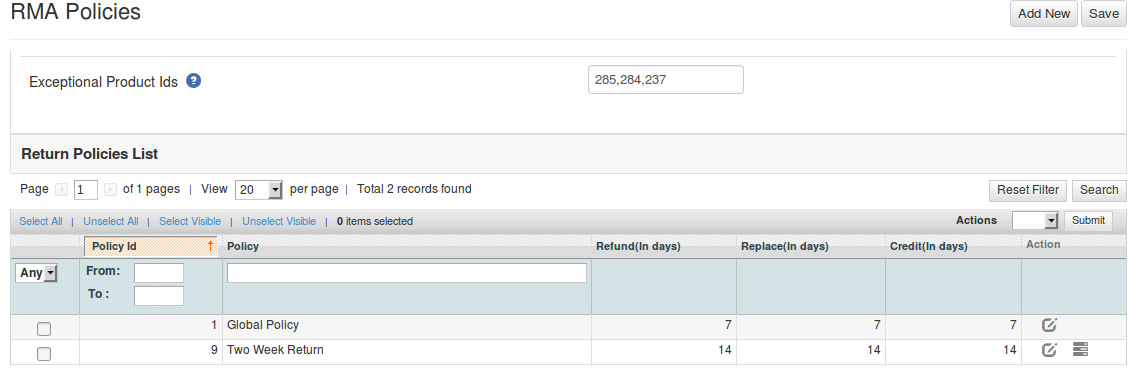
In this Magento 2 return extension, the admin can add new return policies for the plugin and can also edit or delete an existing return policy for the plugin.
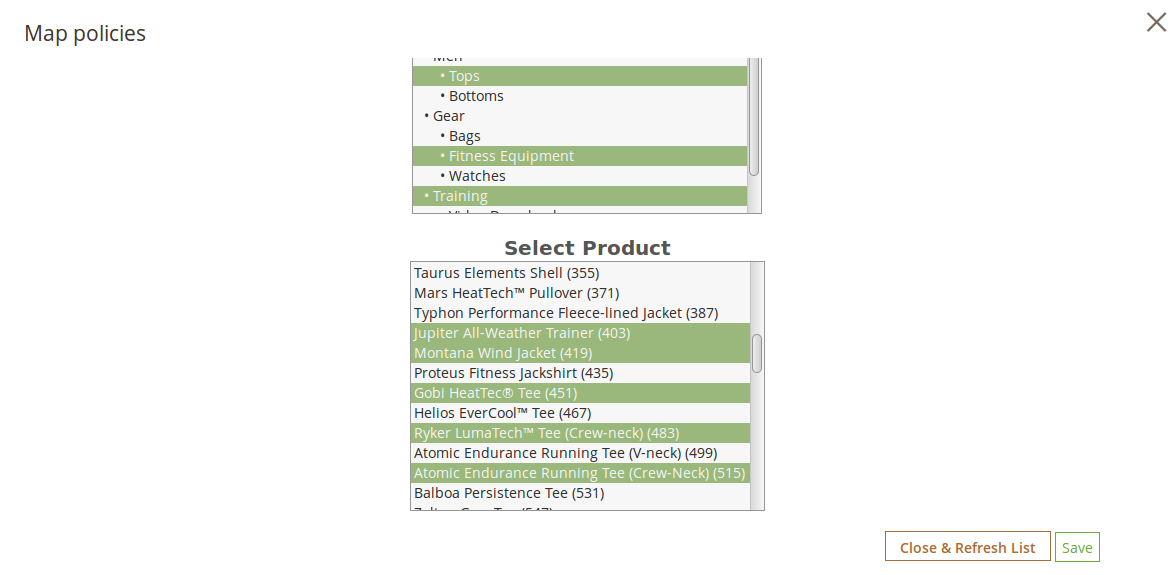
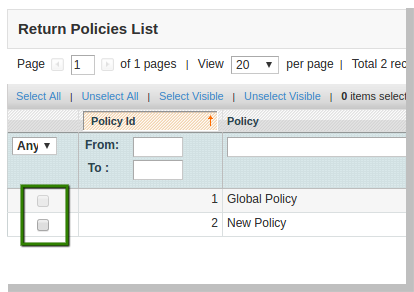
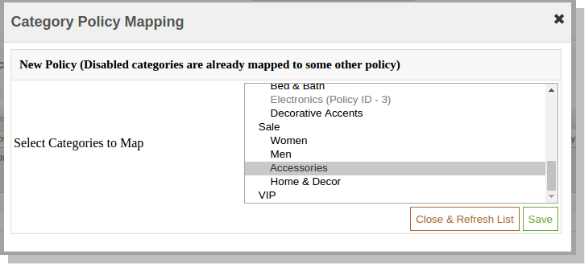
There is also an option to map the return policies to products.
Note: A product can only be mapped to a maximum of one return policy.
This tab contains a list of existing return policies for the plugin. The admin can also create a new return policy using the ‘ Add New ’ button shown near to the “Save Settings” button.
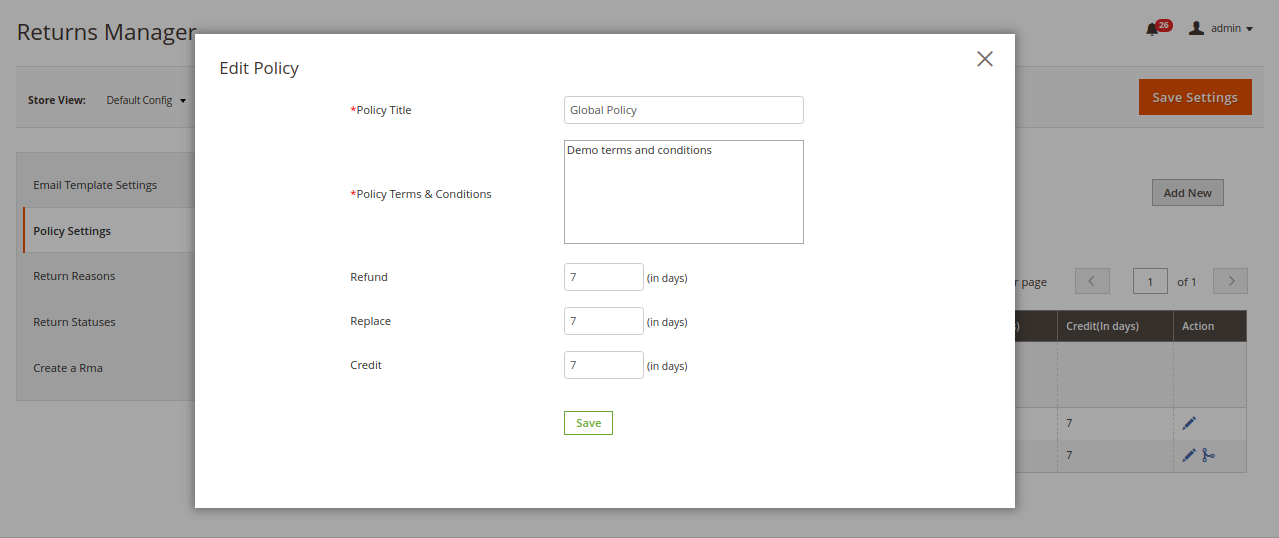
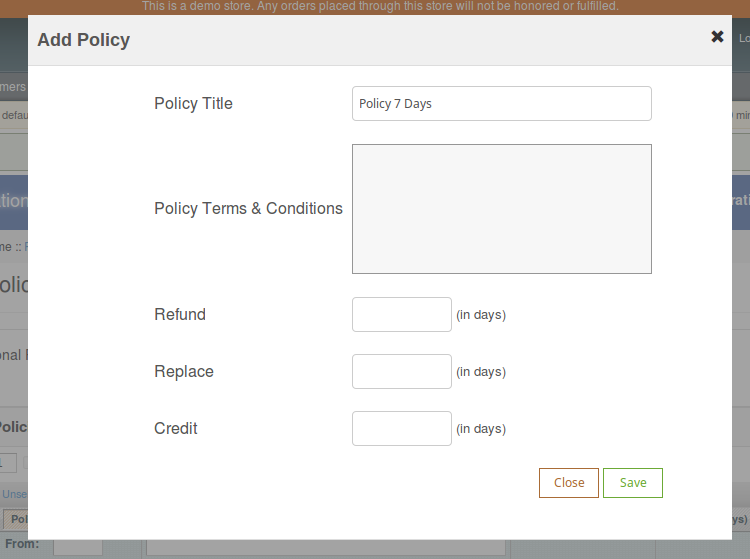
After clicking on the add new button a pop-up appears containing the form to create the return policy.
The form contains several input fields to enter the data of the policy like the name of the policy, terms and condition of the policy and the option to choose the parameters i.e. Credit, Return and Replacement.
The admin can also enter the days applicable to this return policy for different options as shown in the form below.
The add new policy form will look as shown in the screen below:
Actions
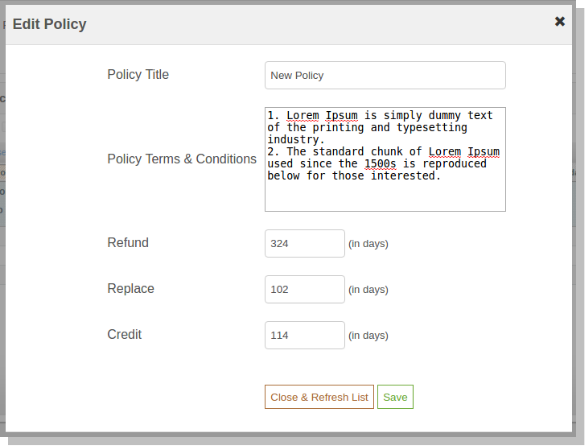
1. The admin can edit any policy using the first link in the Action column from the policy listing table. On clicking this link a modal containing the form for the policy will appear and the data for that policy is already filled in the fields. The admin can edit any data and can save the changes made.
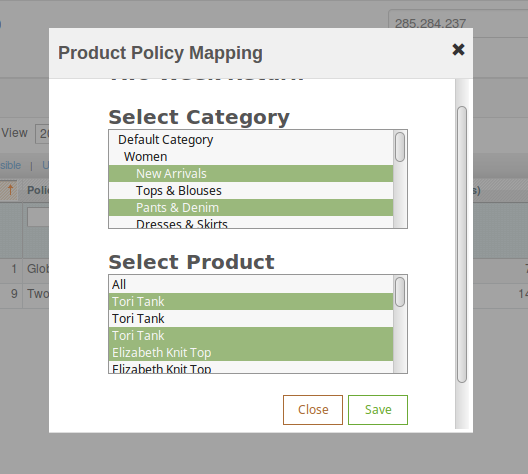
2. The second link in the actions column is for mapping products to the policy. On clicking this link a modal will appear containing the options to map the products to that particular policy.
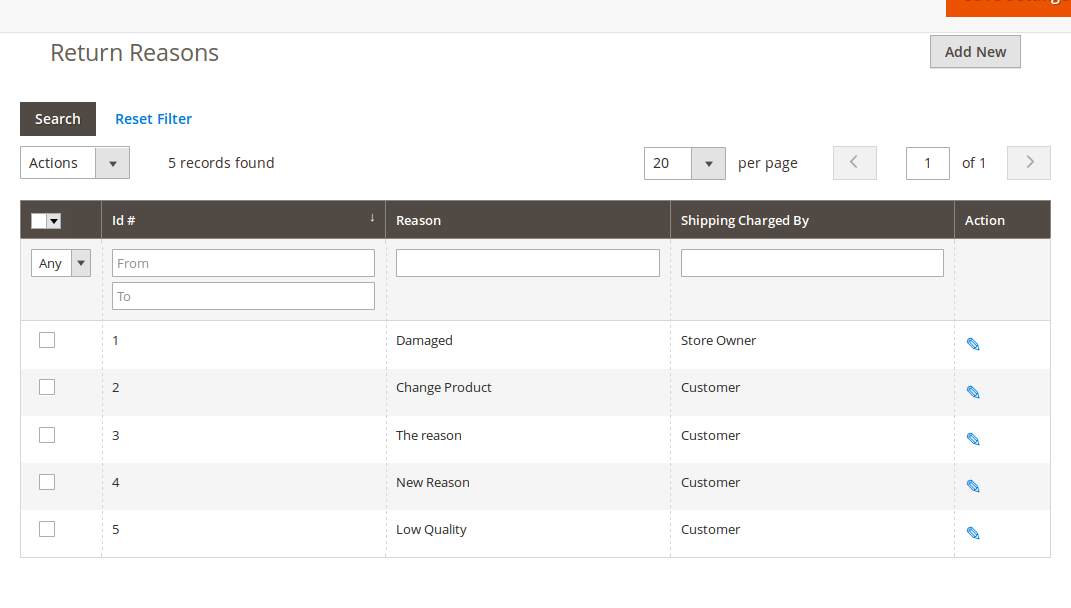
4.2.3 Return Reasons
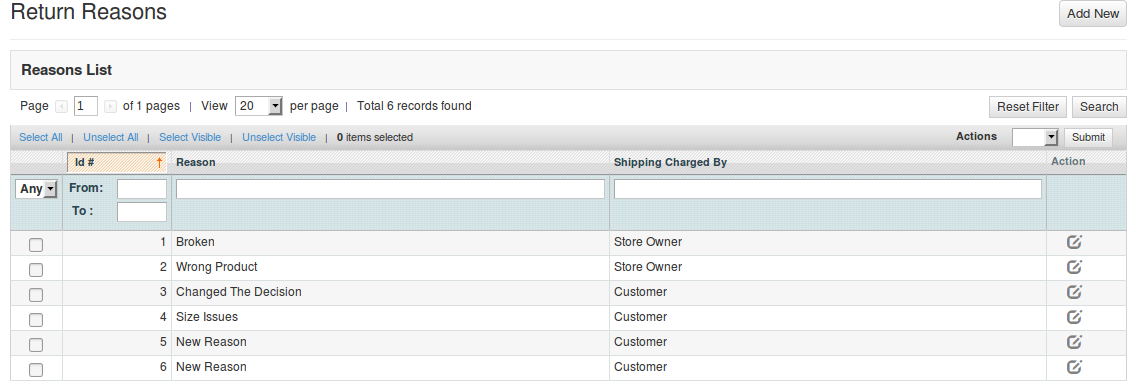
In this Return Manager for Magento 2 tab, a list of return reasons will appear in the form of a table. By default, there are 2 reasons already added to the system.
In the Action column, there is a link to edit the reason in front of every row.
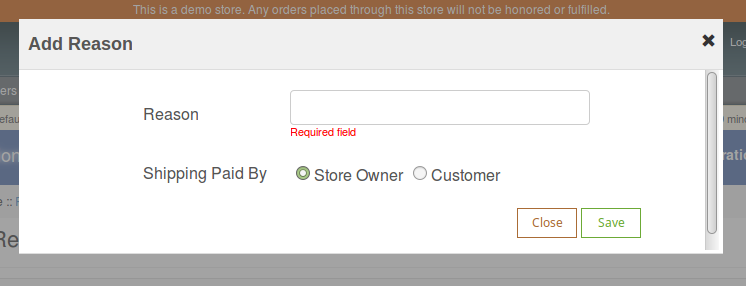
The admin can add as many reasons as required to the system using the ‘Add New’ button. On clicking on the button a form will appear to add new Return Reason into the system. The form is shown below:
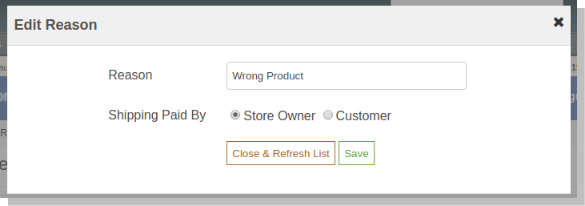
Admin can edit any reason as well by clicking on edit icon shown in front of every reason.
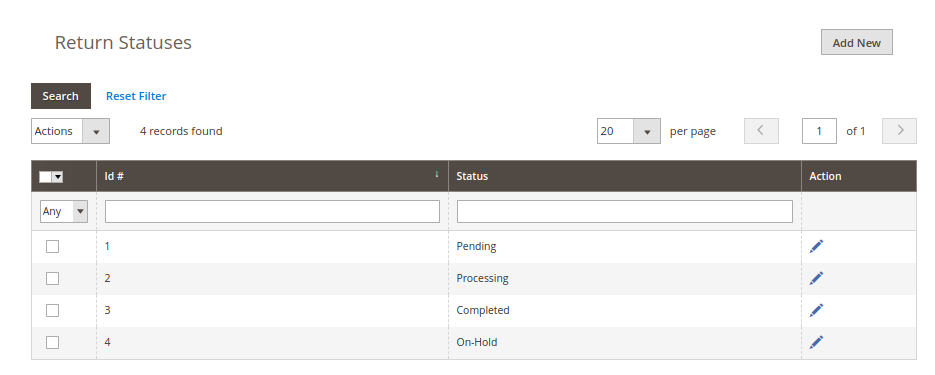
4.2.4 Return Statuses
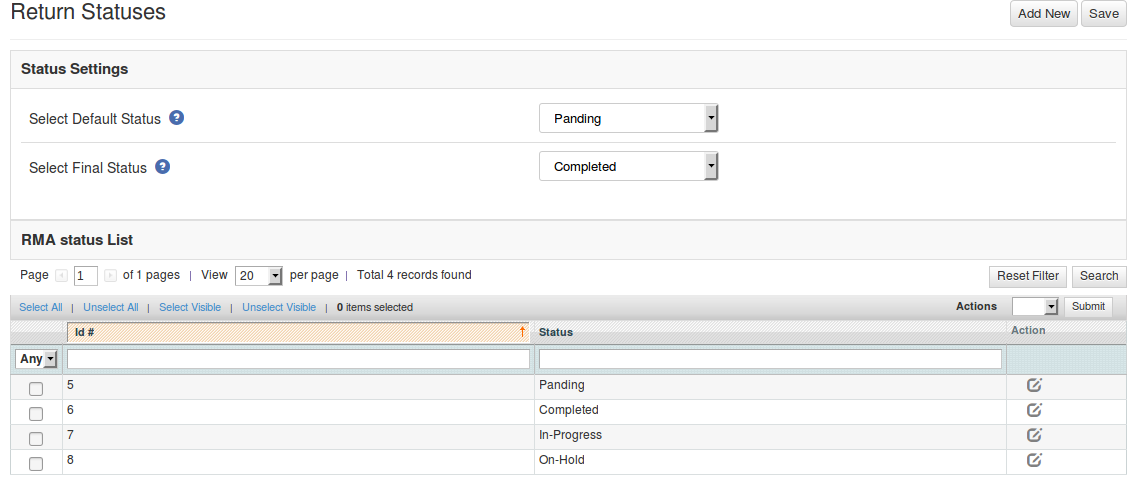
This Magento 2 return manager tab contains a list of return statuses in the form of a table. By default, there are 4 statuses already added into the system. The admin can further add any numbers of statuses into the system.
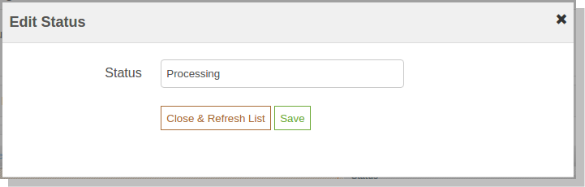
The links below the action column in the statuses list is for editing the existing return statuses.
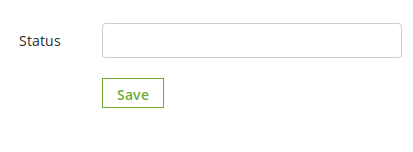
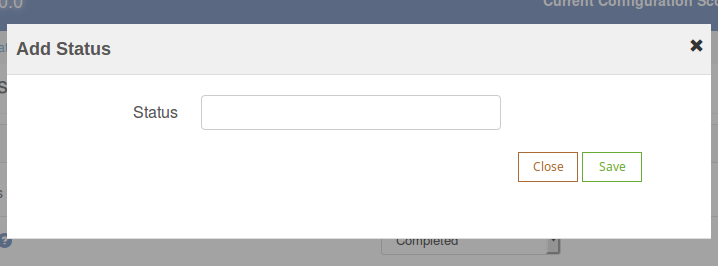
The admin can add as many statuses as required to the system using the ‘Add New’ button. On clicking on the button a form will appear in a modal to add new Return Reason into the system. The form is shown below:
4.2.5 Create a RMA
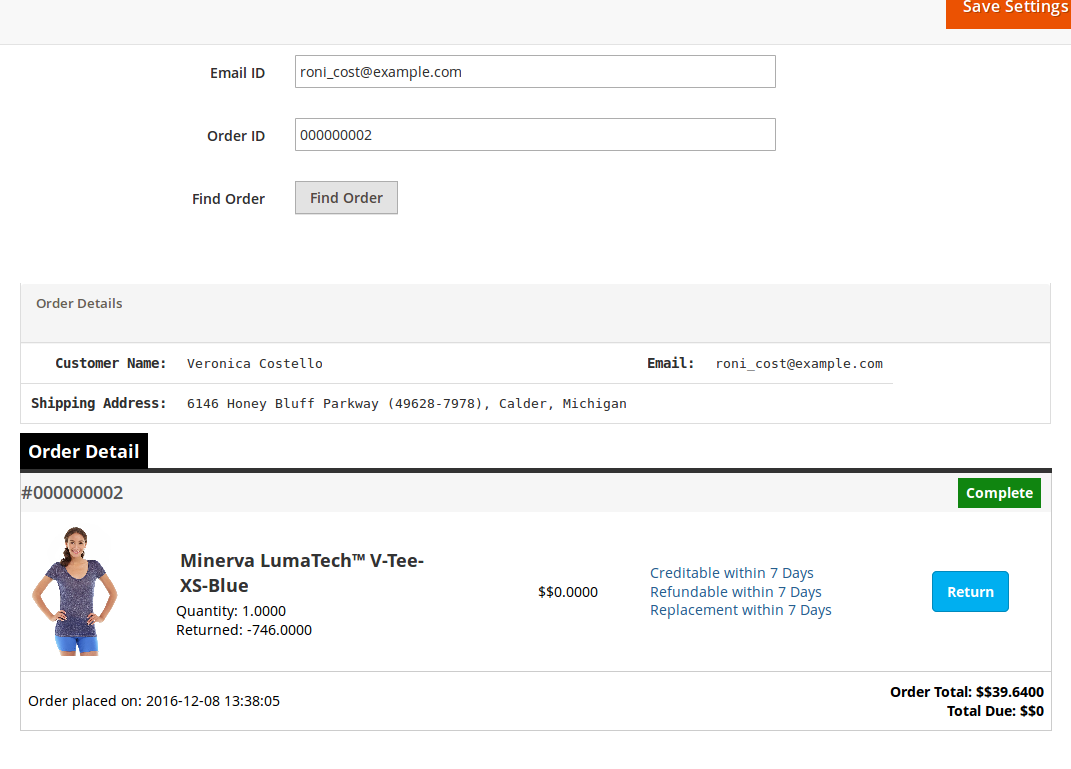
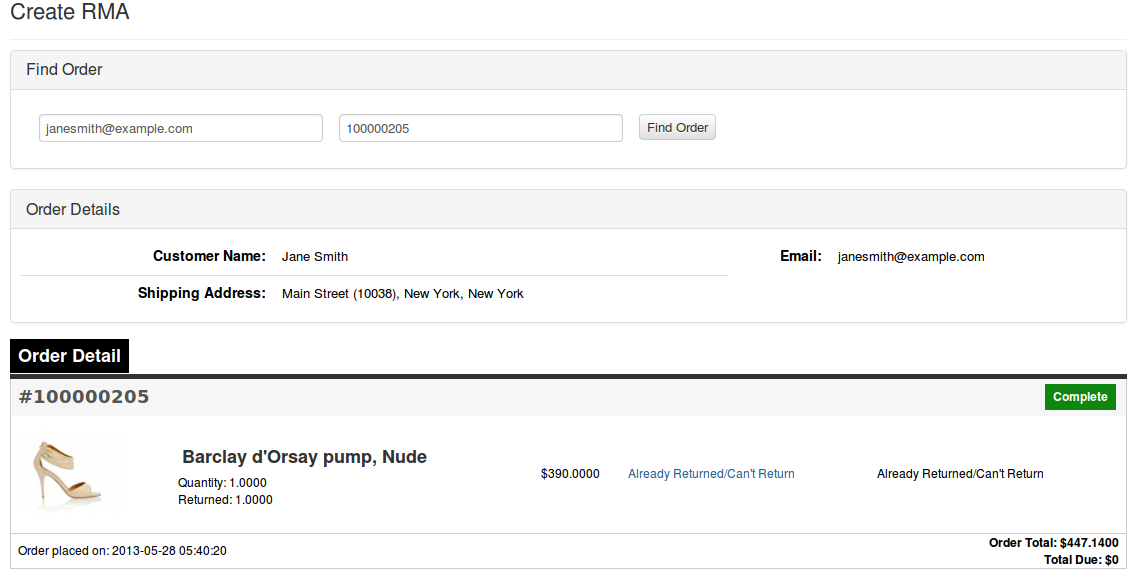
This tab is used to generate a return request from the admin panel itself. The tab contains a form through which the admin can find any order by simply providing the reference number and the corresponding e-mail and then apply for return accordingly.
Note:
Any return request whether is created by admin or customer is moved to the pending returns and the admin has to approve it first to further change the status of the return request or to take any further action.
The orders that are delivered or completed are only eligible for return.
By default the status of the return request is set to default return status set by the admin in the ‘ Return Statuses ’ tab.
When the admin finds an order using the find order form then the order detail for the respective order will appear containing the list of products and a return button in front of products eligible for return. When the admin clicks on the return button a pop-up will appear containing the return from and enter specific data for the return request.
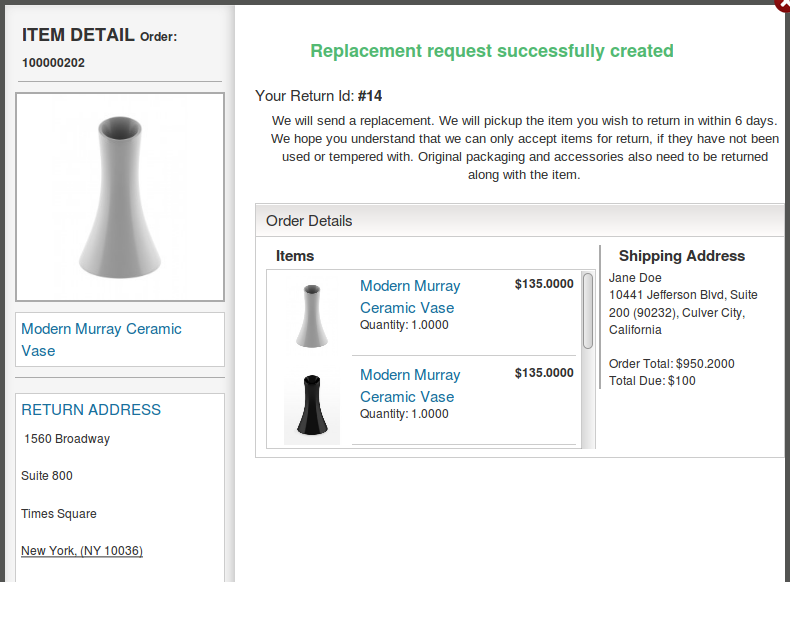
The admin has to fill the above form and then click on submit then a success form will appear showing the successful submission of the return request as shown below :
4.3 Return Slip Settings
In return Slip settings section, the online merchant will again get two configuration settings:
4.3.1 Return Slip Settings
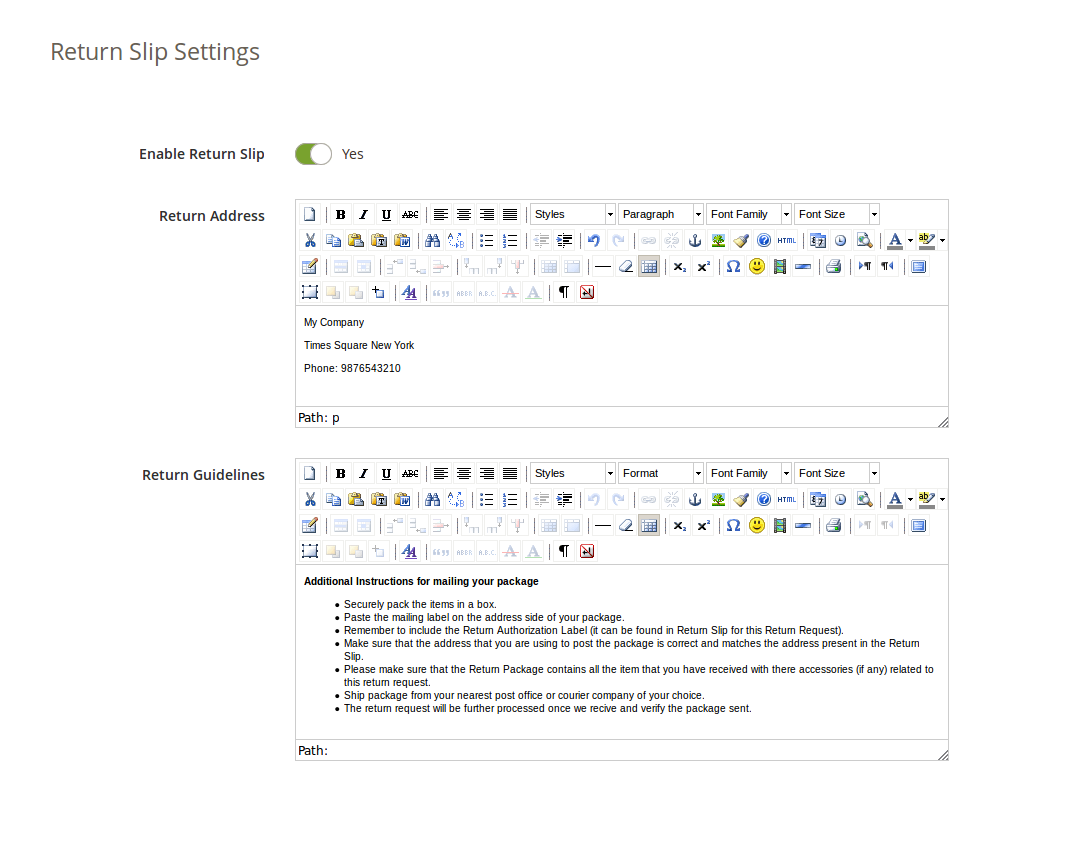
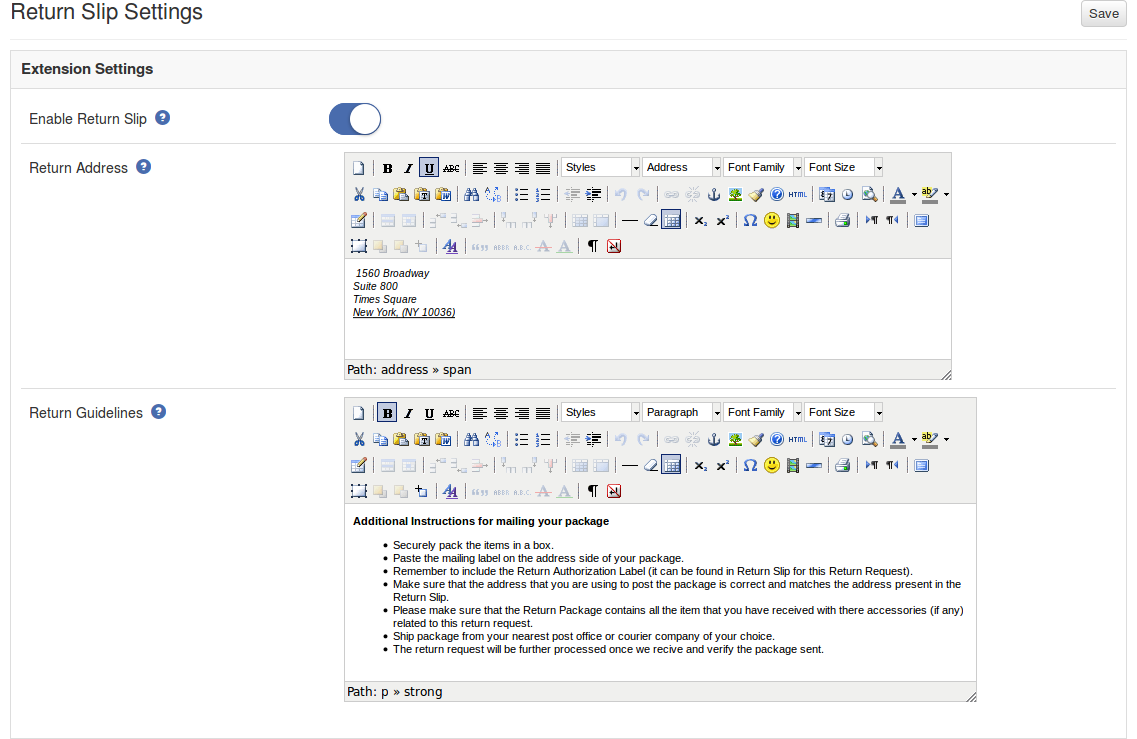
In this Magento 2 RMA module tab, the admin can alter the settings and content of the Return Slip. This return slip is generated automatically when the admin approves any return request (if the feature is enabled). The return slip is generated in ‘.pdf’ format and the link are mailed to the customer in the mail for Return Request Approval Notification.
Enable/Disable Return Slip: Initially, this Magento 2 return manager extension will be “OFF”. Admin can enable/disable the Return Slip feature by turning ON/OFF in this setting. Return slips are only generated when the feature is turned ON.
Return Address: This Magento 2 product return extension has an option to print the address on the return slip and will also be displayed on the return request form.
Return Guidelines: These guidelines will be printed on the return slip.
4.3.2 Return Addresses
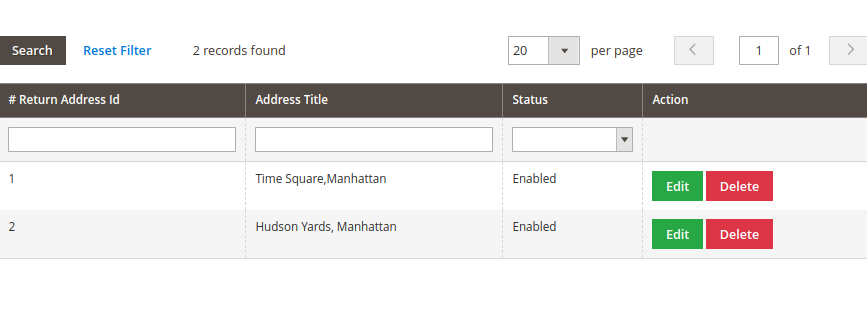
In return addresses section, the online merchant gets an option to add multiple return addresses from the admin interface. Admin can add, update and delete the return addresses easily.
Admin can edit the return address easily as shown below:
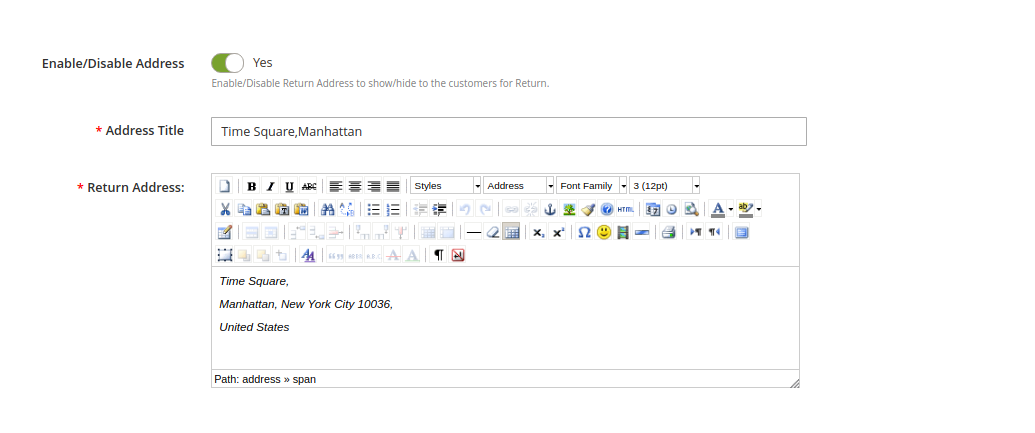
Admin needs to enter these details as shown below:
Enable/Disable Address: Activate or deactivate the settings.
Address Title: Set Address title from here.
Return Address: Enter the return address here.
4.4 Pending Requests
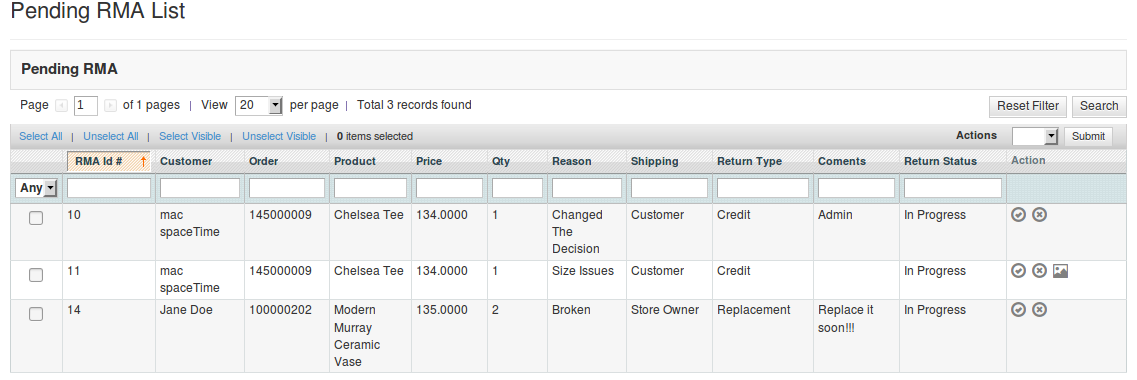
This tab contains a list of all the returns that are pending i.e. are not approved by the admin. The admin has to approve a return request in order to perform several operations on the return request like approve and dis-approve the request or download/view the file uploaded by the customer.
The admin can approve or deny a return request using the actions available in front of the list.
Admin can also download or view the file uploaded by the customer. View option is only available if the customer has uploaded the file.
Once the admin approves a return request then it is moved to the Active Returns List.
On the other hand if the admin denies a return request that it is removed from the list and this action can not be undone.
4.5 Approved Returns List
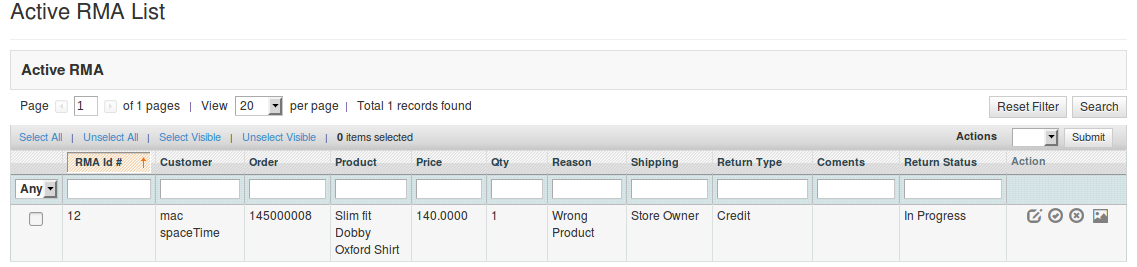
This tab contains a list of all the returns that are approved by the admin. The admin can proceed with the return process after approving the return request using this tab. The admin can change the status of the return request and can also deny a request form this tab and can archive the request as well.
The actions that can be performed from this tab for the active returns are:
Deny the return request.
Change the status of the return request by clicking on the edit icon.
Mark the return request as complete / add to archive.
When the admin marks a return request as complete then it is moved to the archives list.
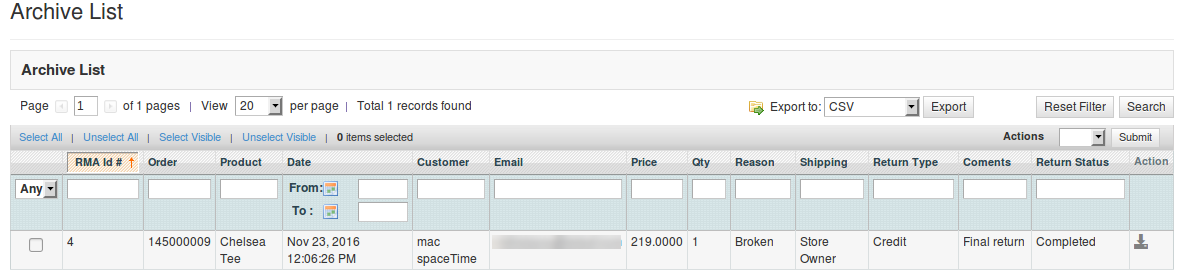
4.6 Archived Requests
This tab contains all the return requests that are complete. The tab also contains a form through which the admin can filter the archives list.
There are options to export the data into csv file.
Single row can be exported and the whole data can also be exported using mass export option.
4.7 Canceled Return Requests
In the canceled return requests section, all the canceled return requests will be listed.
5.0 Front End Module
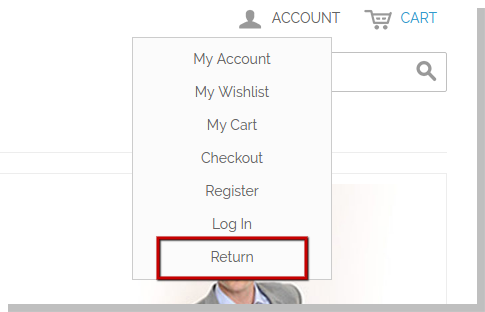
After enabling the plugin the front-end user will see a link in the header of the front-end through which the user can navigate to a new page.
The link in the header of the front-end will appear as follows:
When the customer clicks on this link than a new page will open on the basis of logged in status of the customer.
In case the user is a guest and is not logged into the website then the page will contain a form to find the order as follows:
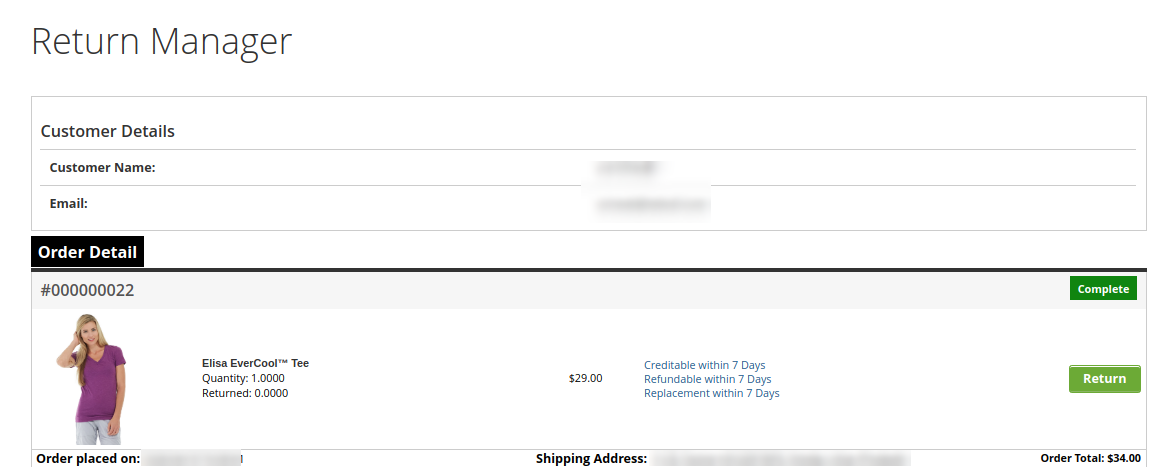
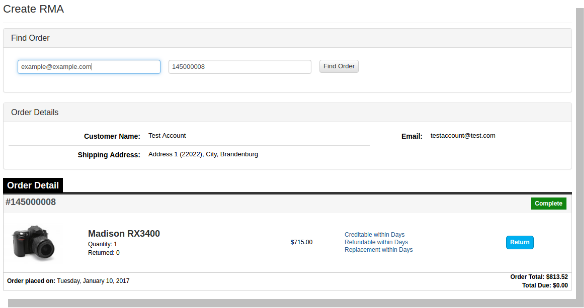
After proving the order reference number and the respective email the details of that order will appear including the return history on the basis of the email provided by the customer. The order details will appear as follows:
The products that are eligible for return in that particular order will have a return button. Through this button the customer can apply for return of that particular product.
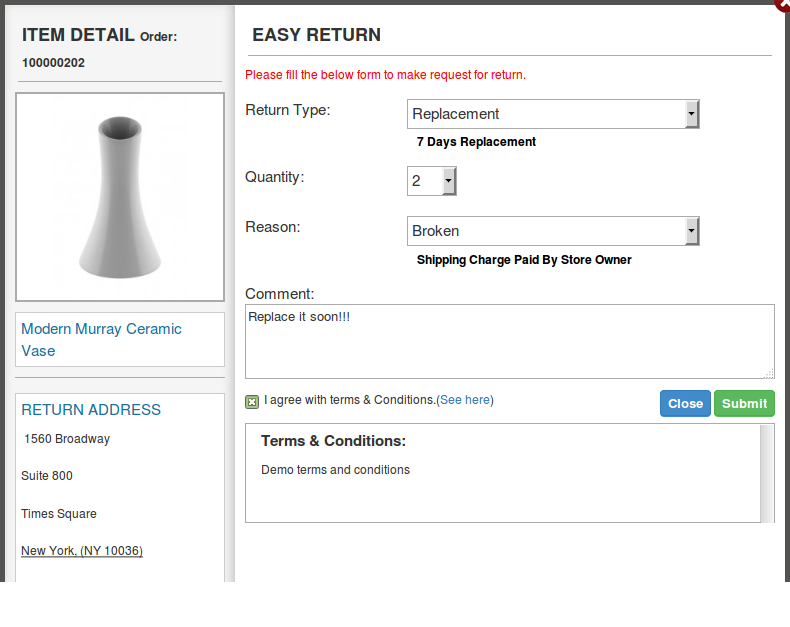
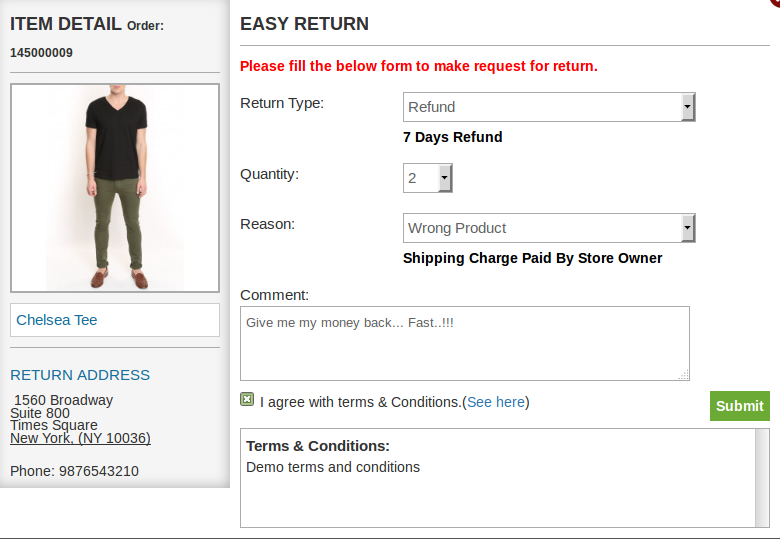
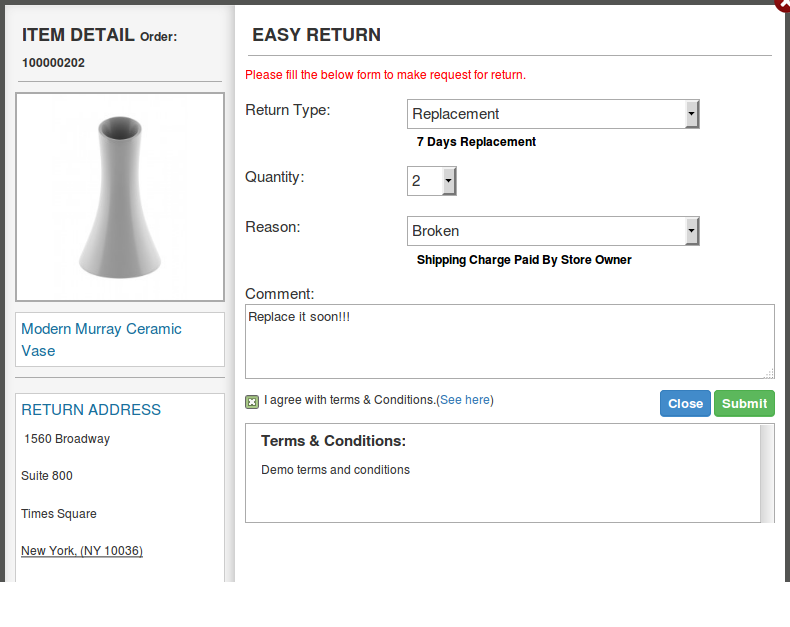
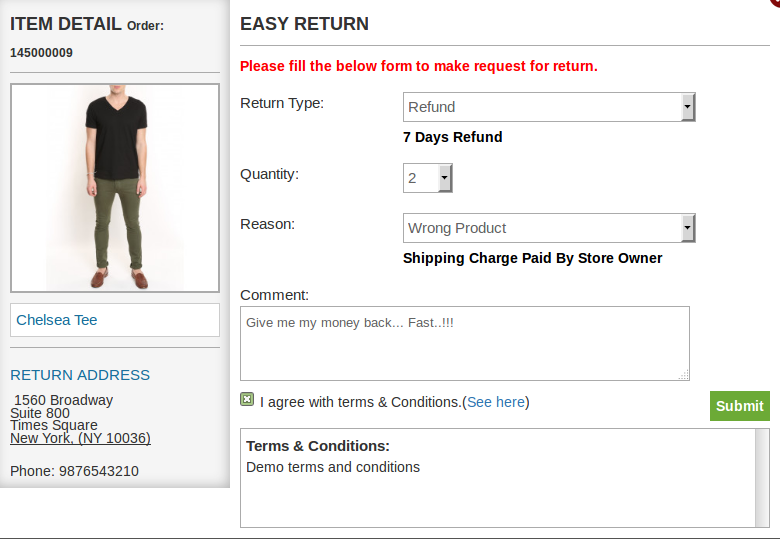
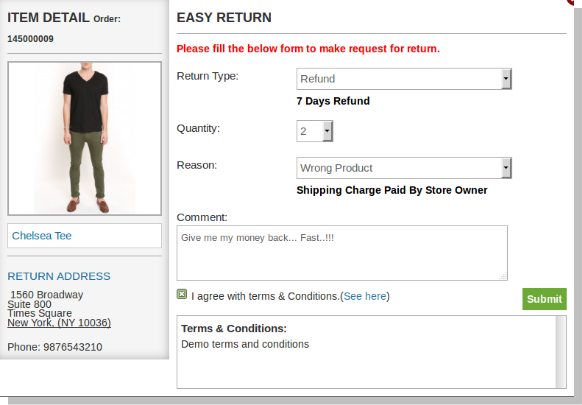
By clicking on the ‘Return’ button a pop-up will appear containing the form for return of that particular order. The form will appear as follows:
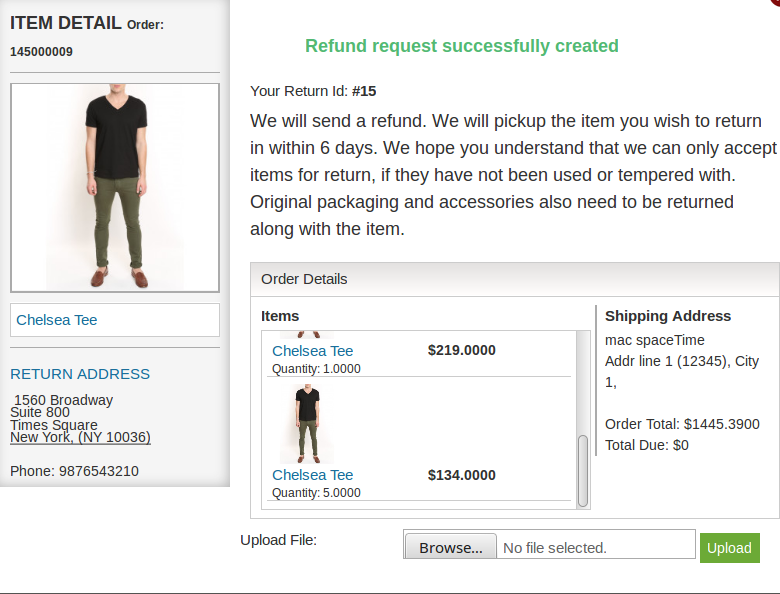
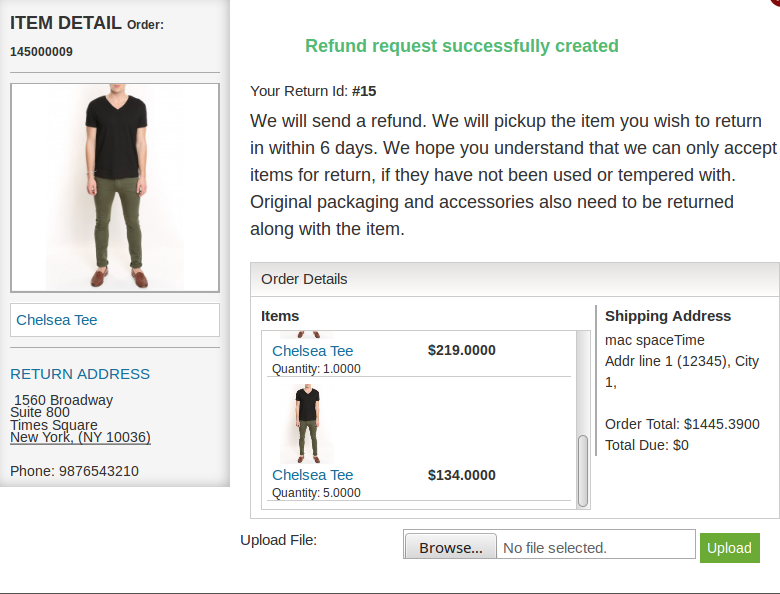
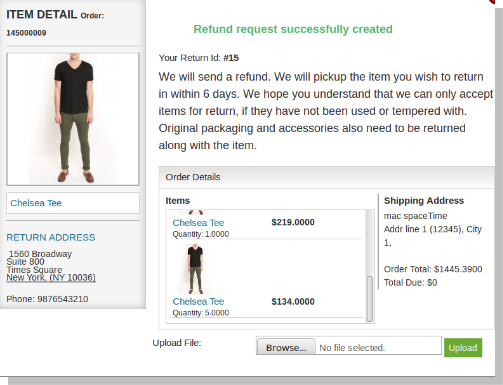
The customer has to fill the above form and then click on submit then a success form will appear showing the successful submission of the return request as shown below :
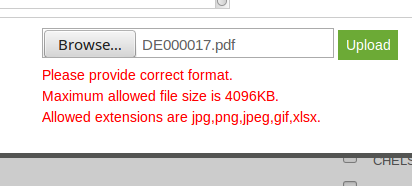
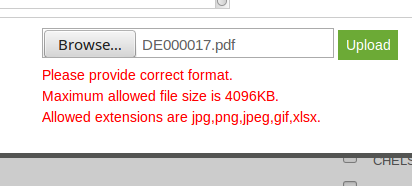
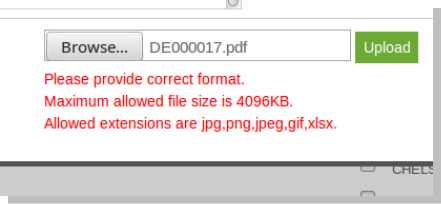
There is as option to upload files in the success page. From where you can upload file and admin can view/download that file from aamin panel. File limitations are set from admin panel.
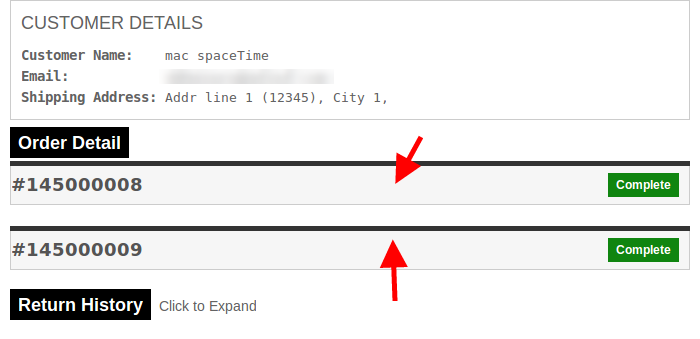
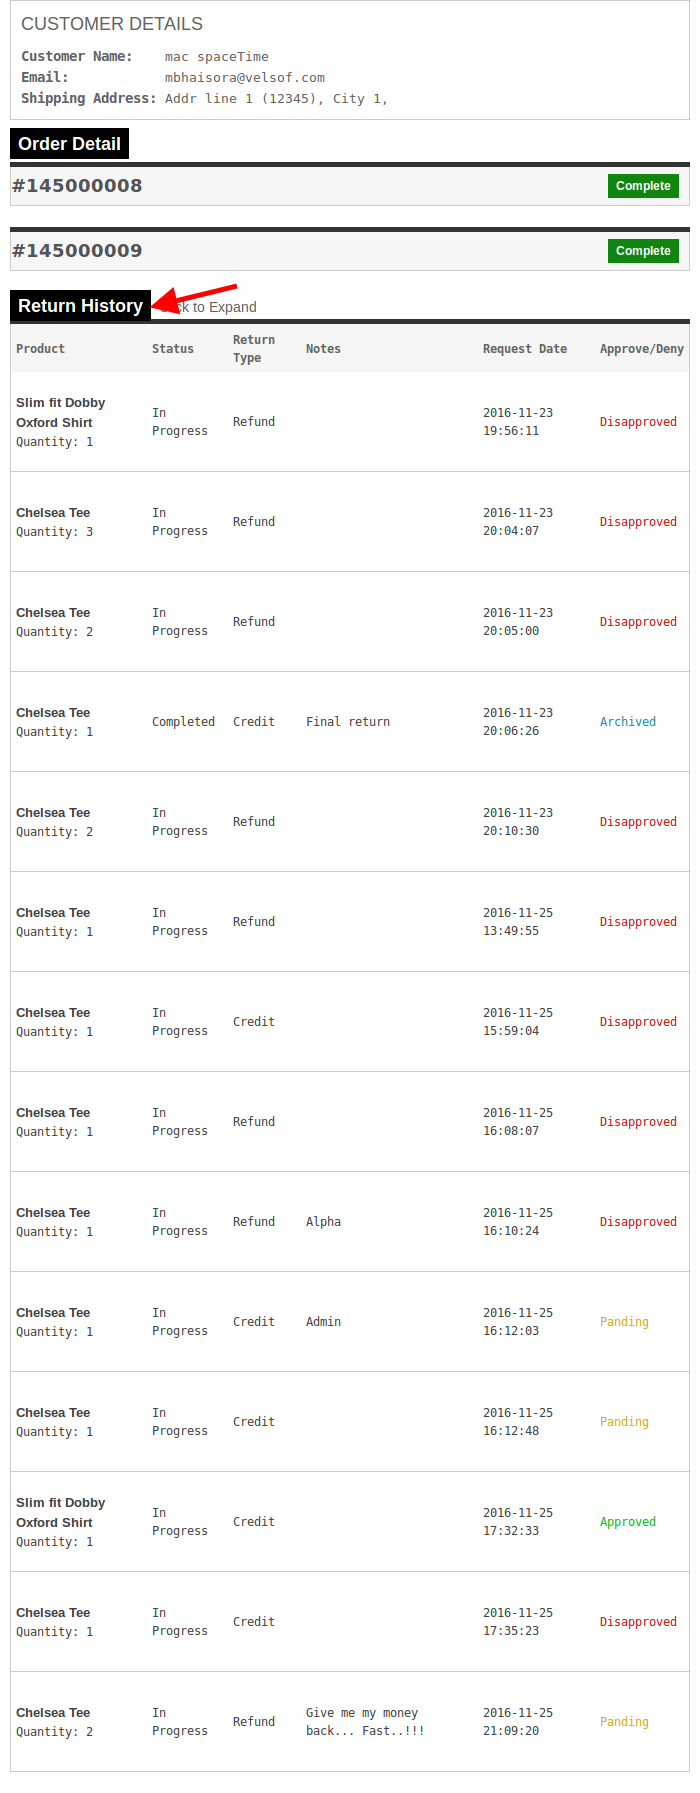
– In case the user is a registered customer and is logged into the website then the page will contain a list of all the orders placed by the customer. The page will appear as follows:
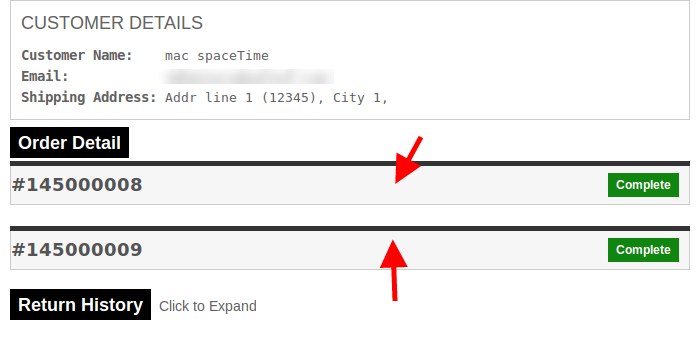
There will be the details of every order. We can expand any of the order division (will have to click where the arrows are pointed). On click the respective order division will be expended.
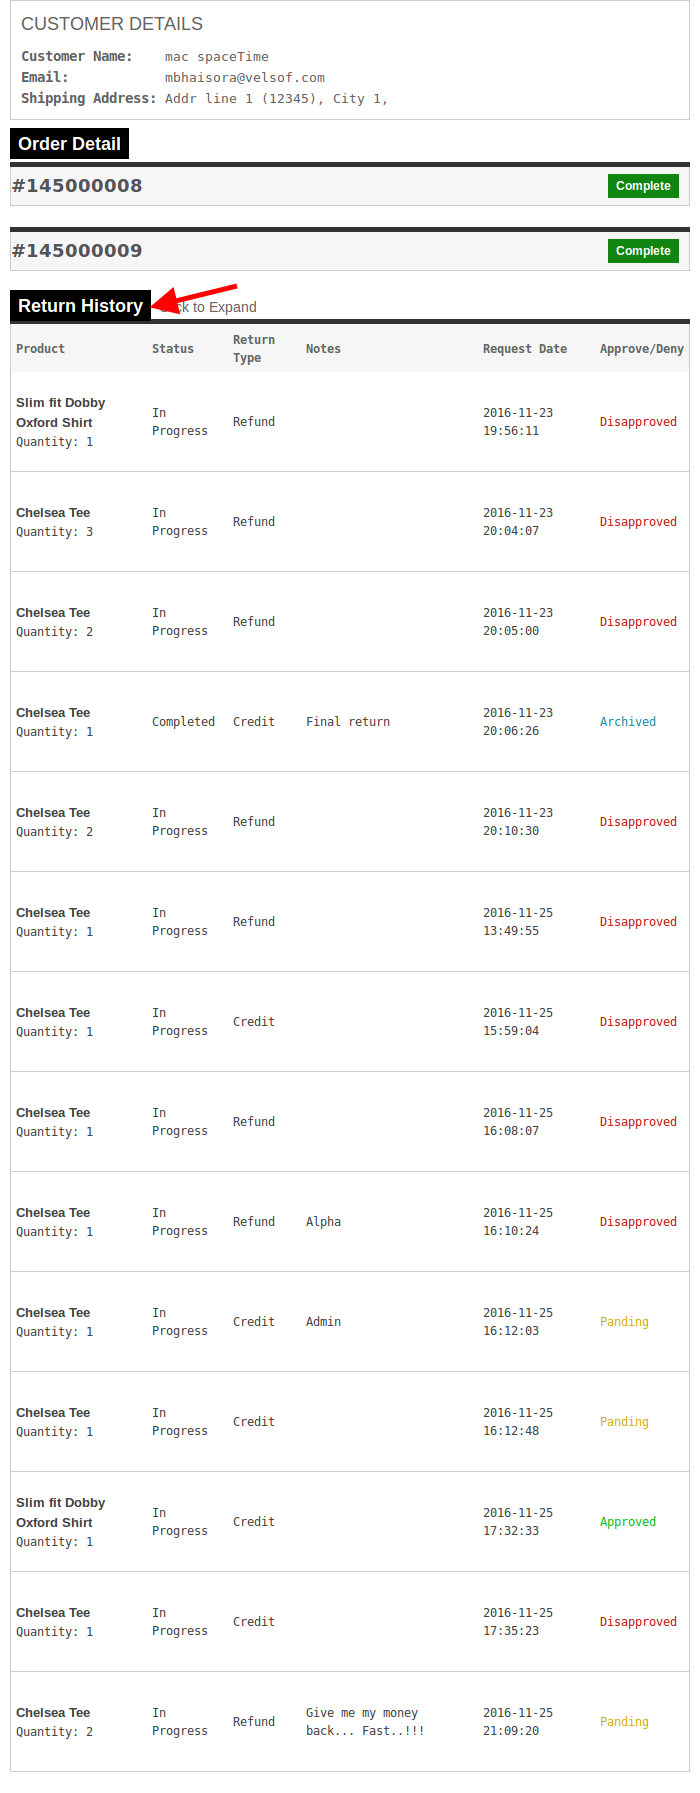
To view all the history of the return requests, user will have to expand the “Return History” tab.
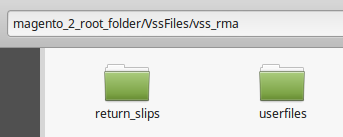
Additional Notes: Please make sure that there is a folder in you magento root directory named VssFiles. Inside VssFiles, one folder called “vss_rma” should exist and two more folders should be created (if not exist) inside “vss_rma” folder. Names of the folders inside “vss_rma” are “return_slips” and “userfiles”.
“magento_2_root_folder” is the same folder (directory) in which other folders like “app”, “bin” etc exist. “return_slips” folder contains all the slips generated during return process and customers can download return slip and the “userfiles” folder is the folder where files uploaded by users are stored.
After creating folders please give all of these folders full permissions. If folders exist already, then also give full permissions (-w-r-x).
In the updated version of Magento 2 Return Manager module, the online users get an option to cancel their orders:
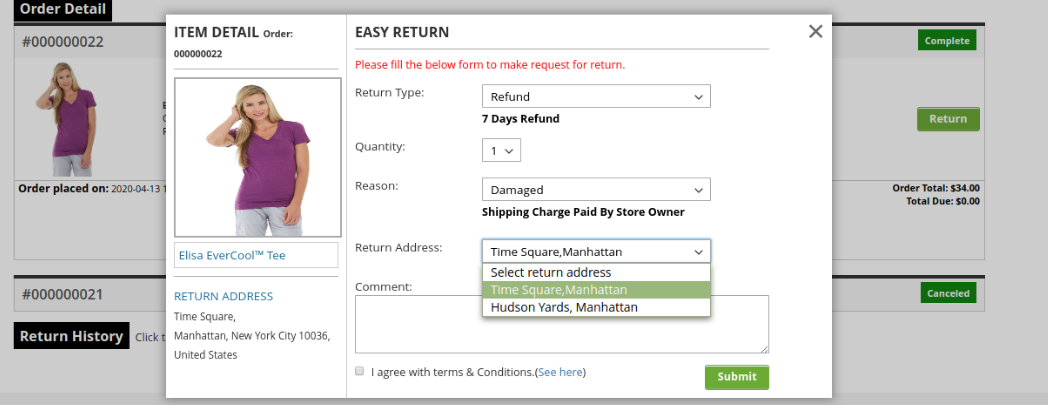
The online users can also place return request as shown below:
Online users can select from multiple addresses as shown below:
This way, the online merchant can manage product returns easily on the website and make the overall process simple for online users. The Magento 2 return manager extension is highly customizable and offers a user-friendly interface to the users. The Magento 2 order return manager extension is mobile responsive ie. the online users can also view the return related details on their mobile devices. Magento 2 refund order Extension allows adding multiple return reasons, set return policies and default return status from the admin interface. The Magento 2 return product extension makes it easy to check return related details through pending, archive and approved request details.
For more details about this Magento 2 return manager extension, Visit here:
Introduction of Magento Custom Maintenance Page Extension
1. Introduction
The Magento custom maintenance page module adds a feature into the website which is useful when the store owner puts the website under maintenance. By default, Magento shows a normal page to the site users/customers that “Service Temporary Unavailable” which doesn’t put any impact on the front-end users. To overcome this Knowband Magento website maintenance extension, this Magento extension allows the store admin to design a custom page to show during “site maintenance”. This is not the limit of this Magento maintenance page extension, the online retailers have also added some more features which certainly reduce overhead from the admin and allow him/her to do some more with the website.
This Magento custom maintenance page module is fully customizable where the store admin can easily customize the maintenance page as per desires.
1.1 The Benefit of the Magento Store Merchant:
Magento custom maintenance page allows the e-merchant to enable/disable maintenance mode on the website.
The online retailers can set the fix time period of the website maintenance mode.
The Magento maintenance mode extension gives an opportunity to the online store owner to change the look and feel of the maintenance page by changing colors easily with color picker tool, no technical knowledge is required.
The Magento maintenance page extension enables the store admin to add the content of the maintenance page as per desires.
This Magento maintenance page extension allows the admin to enable/disable the notification option. When admin enables the module, the customer to get mail alert when the website is active again.
The Admin can customize the email template as per desires.
With the help of this Magento website maintenance extension, the store admin can completely customize maintenance page by changing the background image, text color, text size and margin from the top or left.
The Magento maintenance page module enables the e-merchant to easily customize the cut down settings of the maintenance page.
The Store admin can easily upload the logo of the website with only a button click.
1.2 Features of the Magento Custom Maintenance Page Extension:
The Visitors have no access to website
Countdown timer.
This Magento extension provided by Knowband works for multiple stores.
It shows the custom message.
Customized page title
Notification Box for Users
Notify customers when the website is back from maintenance mode.
1.3 The Customer Benefits:
The customers can timely and easy access to the website.
The customer gets the notification when the website is live.
2. Installation
After purchasing the Magento extension, you will get the following files as listed below:
1. magentocustommaintenancepage.zip (contains source code of the extension)
2. User Manual
Follow the below steps to install the Magento website maintenance page extension:
1.Unzip the magentocustommaintenancepage.zip file.
2. Copy all the files and folders of unzipped folder into your store root directory.
3. After copying all the files and folders, clear the cache.
4. Open any page of your store. Magento will install the module at the time of loading any page.
5. After installing, please login into your admin panel and go to the below menu:
System > Configuration > Advanced
Here you will see that ” Vss_Storemaintenance” module is listed.
3. Extension Interfaces
There are two interfaces in this extension. Each interface has a different functionality according to its use. These interfaces are:
Admin Panel Interface (Only be accessible by admin/store owner)
Front End Interface (accessible to front end user)
Each interface has been described in separate section.
4. Admin Panel Interface
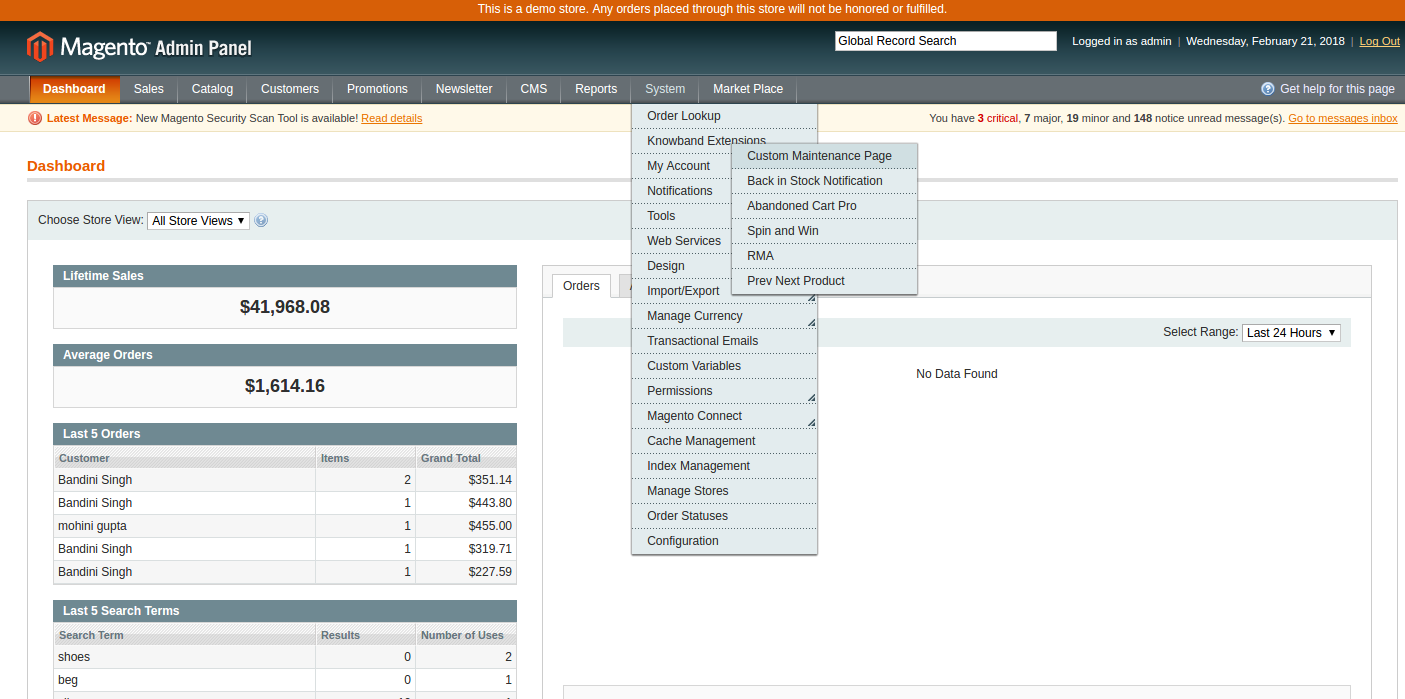
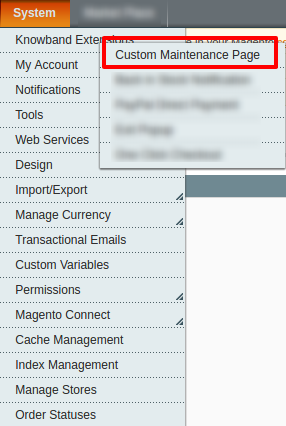
This part of the Magento custom maintenance page extension is for admin user, through which the admin can configure the settings. After installing the extension, Custom Maintenance Page menu option will be visible under System > Knowband Extensions menu in the menu bar as shown in the below screen:
On clicking the above menu, admin panel interface of the Magento maintenance page extension will open.
There are three tabs in the admin panel through which the store admin will be able to manage the functionality of the Magento custom maintenance page extension. These are listed below:
General Settings
Look and Feel
Countdown Settings
4.1 General Settings
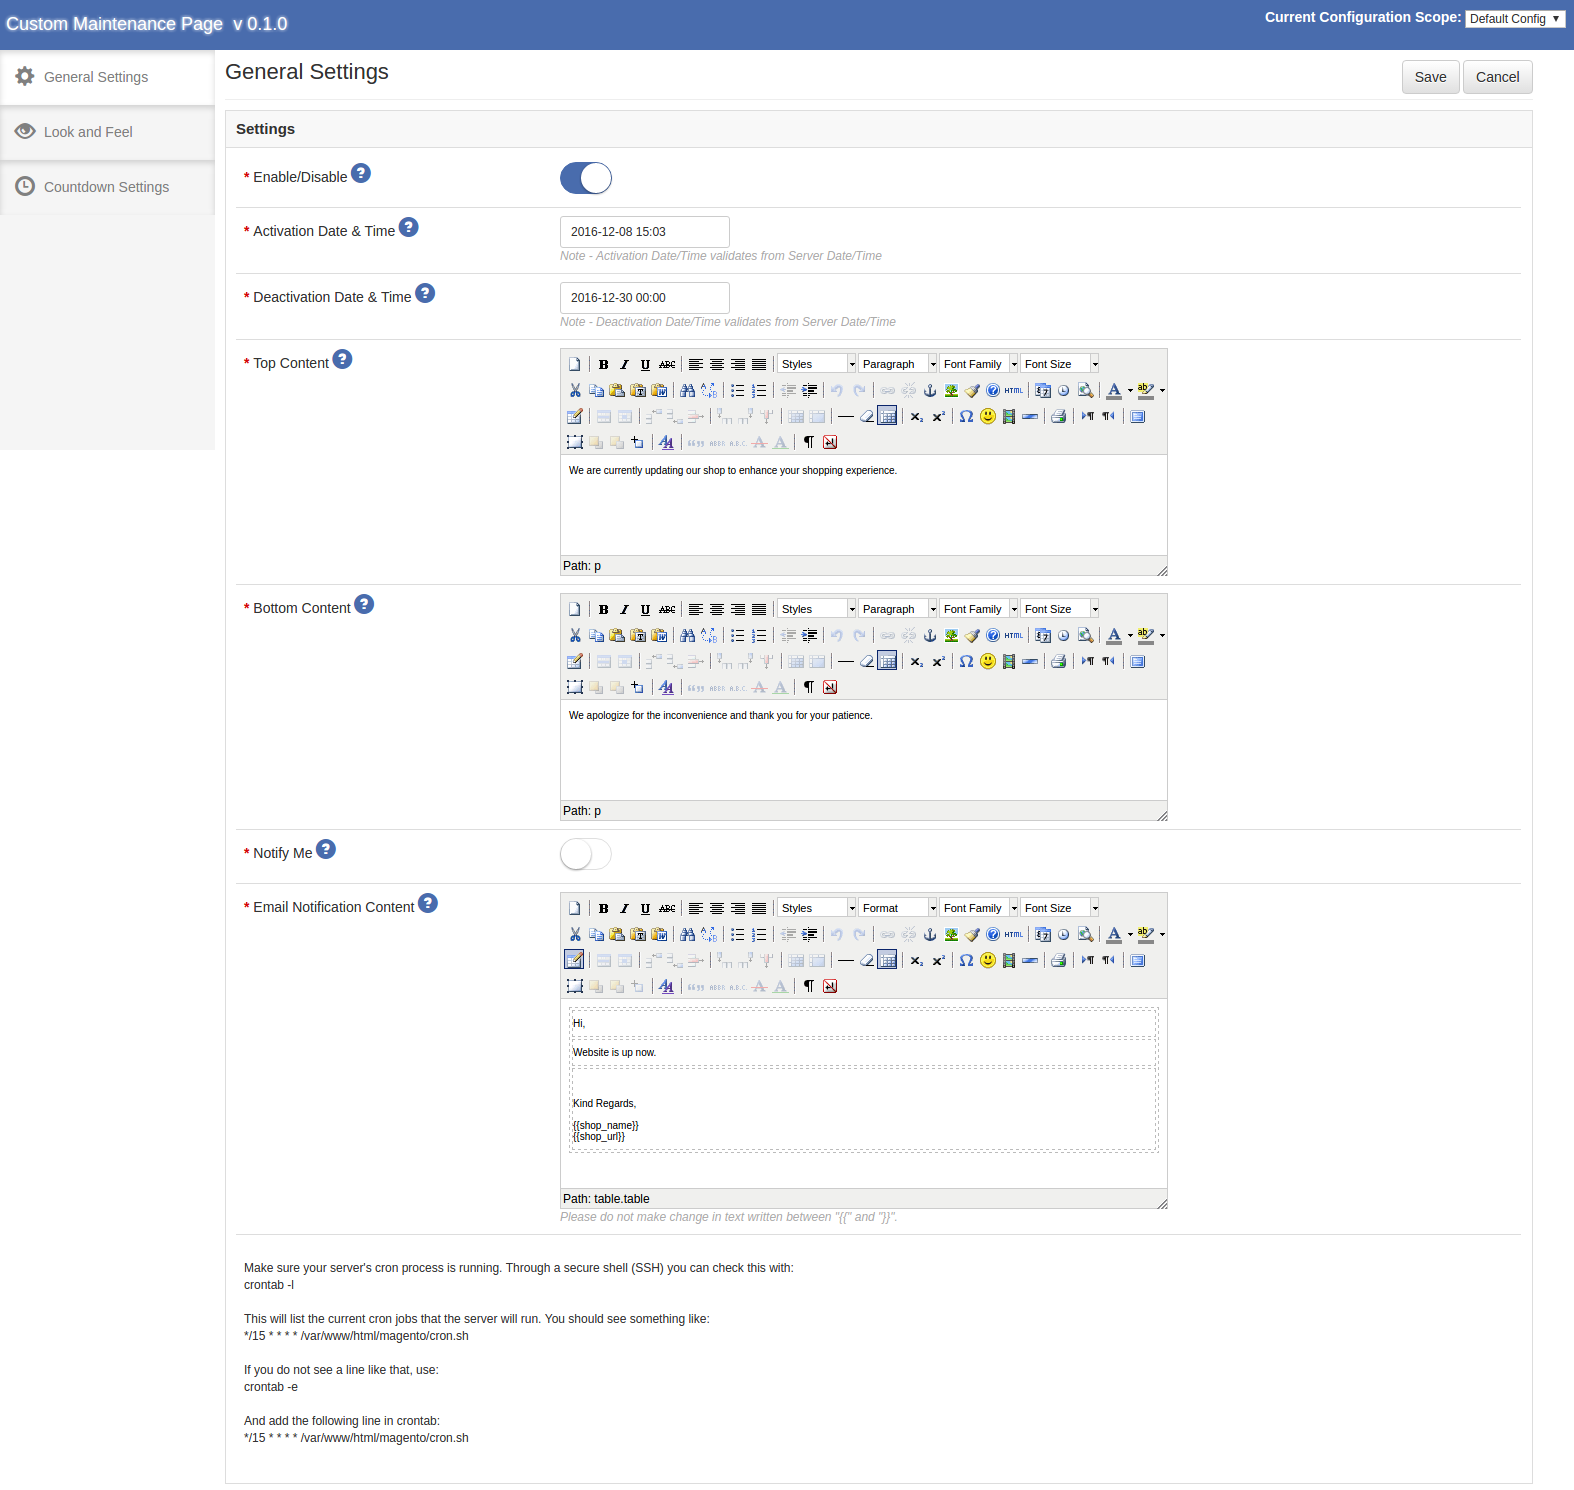
This tab will be opened by default when you click on the menu. General Settings tab has following options:
1. Enable/Disable
This is an on/off switch. The Store admin will have the option to Enable/Disable the extension. If enabled, then the website will go under maintenance and show custom maintenance page to the end users. (Certainly this action depends on some other factors/parameters of this extension like Activation/Deactivation date, etc.)
2. Activation Date & Time
This is a date picker which allows admin to select any future date to schedule site maintenance activation.
3. Deactivation Date & Time
This is a date picker which allows admin to select date greater than Activate Date & Time value to schedule site maintenance deactivation.
4. Top Content
This is a text editor which allows the store admin to provide some text to show on custom maintenance page at the top section.
5. Bottom Content
This is a text editor which allows the e-merchant to provide some text to show on custom maintenance page at the bottom section.
6. Notify Me
This is an On/Off switch. The admin will be able to enable/disable this feature. If enabled, customers will be able to subscribe their email ids on custom maintenance page to get mail notification when site will come out of maintenance.
7. Email Notification Content
This is a text editor which allows admin to provide email notification content to send to subscribers.
*Note: There is tool-tip for each label and default values for settings.
*Note: You have to make sure that Magento CRON process is running on your server to send notification to your customers when site comes out of maintenance. Through a secure shell (SSH), you can check this with:
crontab -l
This will list the current CRON jobs that the server will run. You should see something like:
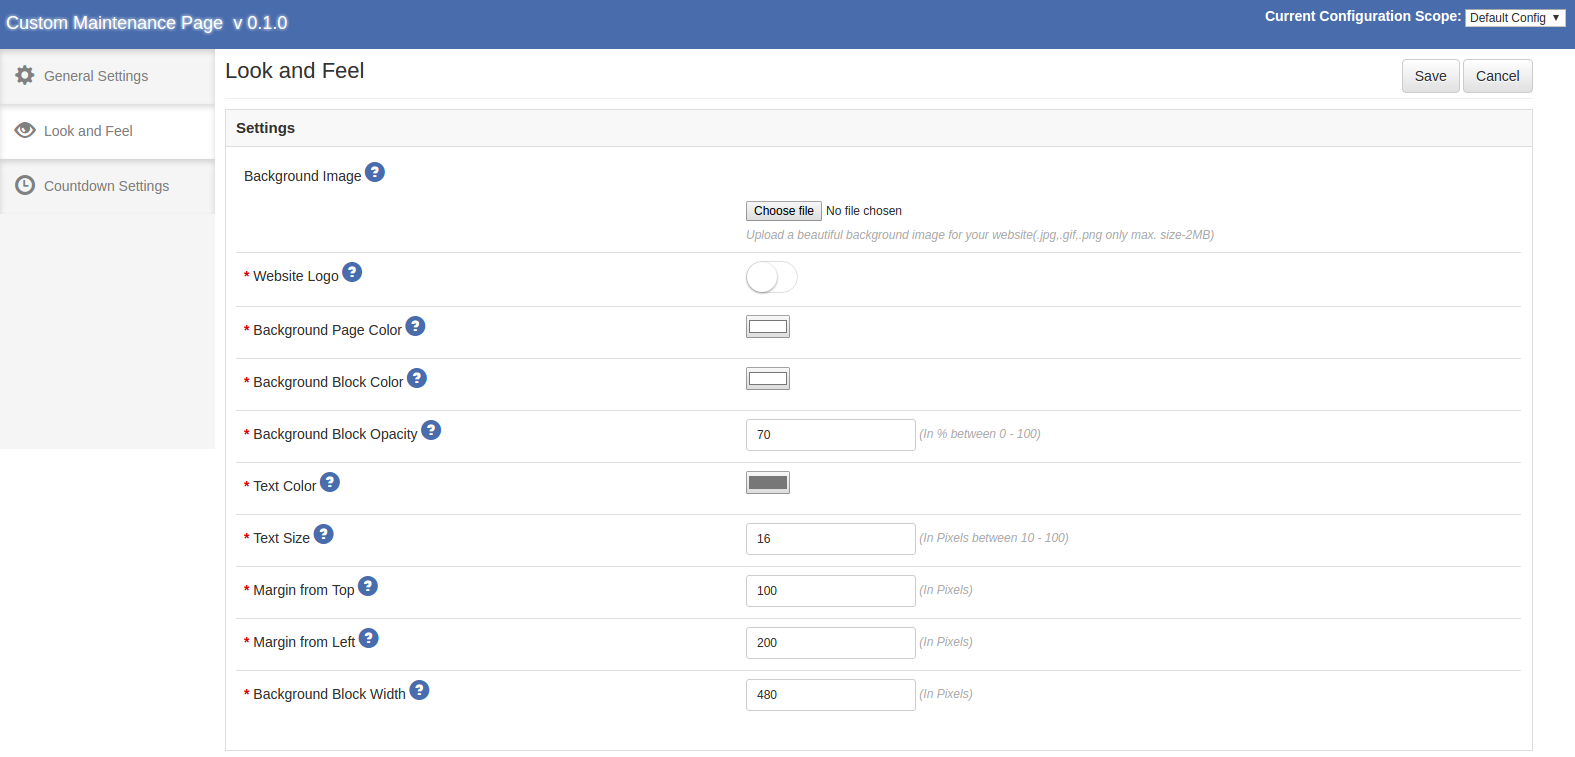
This tab contains the setting options to manage look and feel of the custom maintenance page of the store. You can find them below:
1.Background Image
This is the option through which the Magento store admin can upload an image which will be shown on the custom maintenance page to let the front-end users know that site is under maintenance.
2.Website Logo
This is the option through which the e-merchant can decide to show or hide the logo on the custom maintenance page.
3.Background Page Color
This is the option through which the admin can decide the background color of the custom maintenance page.
4.Background Block Color
This is the option through which the online retailers can decide the background color of the block shown on the custom maintenance page with the top and bottom content as provided in General Settings section.
5.Background Block Opacity
This is the option through which the eCommerce admin can decide the transparency of the block shown on the custom maintenance page with the Top and Bottom content as provided in General Settings section.
6.Text Color
This is the option through which the admin can decide the text color of the custom maintenance page.
7.Text Size
This is the option through which the online retailers can decide the text size of the custom maintenance page.
8.Margin from Top
This is the option through which the merchant can decide the margin from the top to display block on the custom maintenance page.
9.Margin from Left
This is the option through which the store owner can decide the margin from the left to display block on the custom maintenance page.
10.Background Block Width
This is the option through which the admin can decide the width of the block shown on the custom maintenance page. *Note: There is tool-tip for each label and default values for settings.
Below is the screen shot of the this tab :
4.3 Countdown Settings
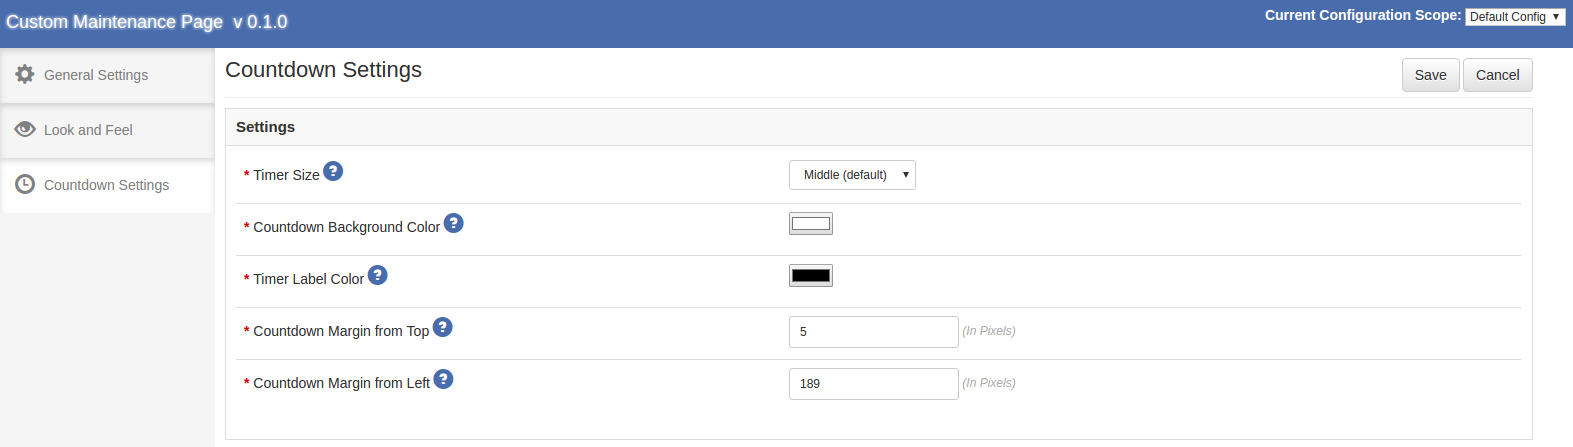
1.Countdown Timer Size
This is the option through which the store admin can decide the size of timer to be shown on the custom maintenance page. This option will be having following values – Default (Middle), Small, Extra Small, Large.
2.Countdown Timer Background Color
This is the option through which the online merchant can decide the background color of the countdown timer to be shown on the custom maintenance page.
3.Countdown Timer Label Color
This is the option through which the admin can decide the label color of the countdown timer to be shown on the custom maintenance page.
4.Countdown Timer Margin from Top
This is the option through which the store admin can decide the top margin of the countdown timer to be shown on the custom maintenance page.
5.Countdown Timer Margin from Left
This is the option through which the merchant can decide the left margin of the countdown timer to be shown on the custom maintenance page.
Note – There is tool-tip for each label and default values for settings.
Below is the screen shot of the this tab :
5. Front End Interface
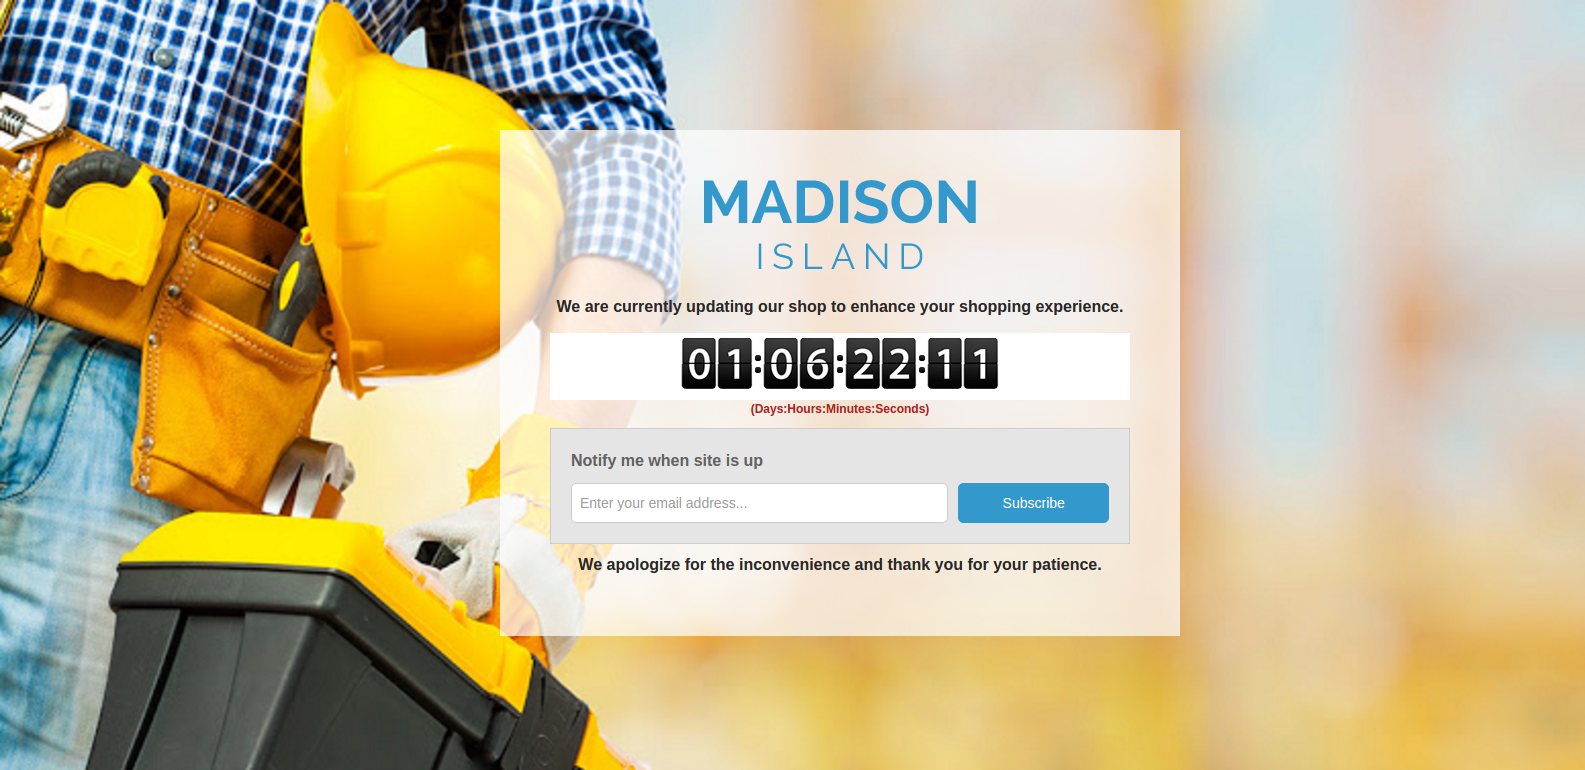
Front End Interface will show the custom maintenance page with configured settings set through the admin panel of this Magento custom maintenance page extension. You can find screenshot below –
You can see that a “Notify Me” block with an input box and “Subscribe” button is displayed in the above screenshot. This box appears only if admin has enabled the “Notify Me” option through the admin panel of this Magento maintenance mode extension (In General Settings tab). Front end users are able to subscribe themselves through this block by providing their email addresses.
*Note: You have to make sure that Magento CRON process is running on your server to send notification to your customers when site comes out of maintenance. Through a secure shell (SSH), you can check this with:
crontab -l
This will list the current CRON jobs that the server will run. You should see something like:
You can try Knowband’s Magento custom maintenance page extension for on your Magento store. KnowBand’s Magento maintenance mode module helps give the better user experience to your eCommerce customer.
This Magento back in stock extension by Knowband adds an attractive functionality to the website, which is beneficial for both store owner and customer. This Magento module helps the customers to subscribe for those products which are out of stock. Magento product stock extension adds a simple block to the product page of Magento store through which the user can subscribe by entering the email id for the respective product.
The subscribed customers for product will be visible to store owner and helps in updating the product quantity according to the requirement so that customer can buy those products.
The simple input field to enter email Id and a notify button will be available on the product page itself. Customers can easily get subscribed to the product by entering email id and start getting email corresponding to that
Installation
After purchasing Magento extension, you will get following files as shown below:
1. magentobackinstocknotification.zip(contains source code of the extension)
2. User Manual
Follow the following steps to install the Magento extension:
1. Unzip the magentobackinstocknotification.zip file.
2. Copy all the files and folders of unzipped folder into your store root directory.
3. After copying all the files and folders, clear the cache.
4. Open any page of your store. Magento will install the Magento Stock Alert module at the time of loading any page.
5. After installing, please login into your admin panel and go to the below menu:
System > Configuration > Advanced
Here you will see that ” Vss_Productnotify” module is listed.
Extension Interfaces
There are two interfaces in this Magento product stock extension. Each interface have different functionality according to its use. These interfaces are:
Admin Panel Interface(Only be accessible by admin/store owner)
Front End Interface(accessible to front end user)
Each interface has been described in separate section.
Admin Panel Interface
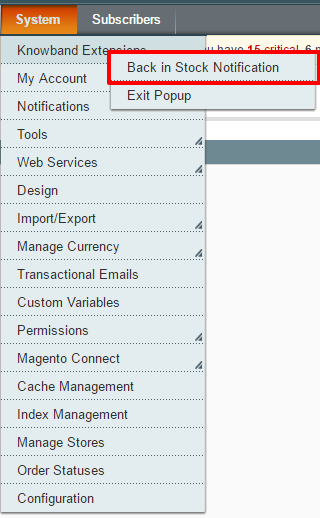
This part of the Magento Stock Alert plugin will be for admin user, through which admin can configure the settings. After installing Magento extension, Back in stock Notification menu will be visible under System > Knowband Extensions menu in the menu bar as shown in below screen:
On clicking of above menu, admin panel interface of the Magento product stock extension will open.
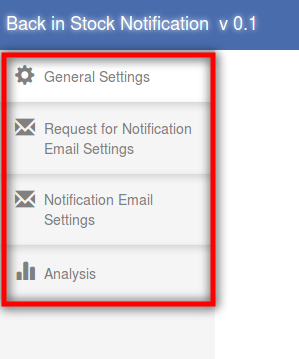
There are four tabs in the admin panel through which admin will be able to manage the functionality of this Magento plugin. These are listed below:
General Settings
Initial Email Settings
Final Email Settings
Analysis
General Settings
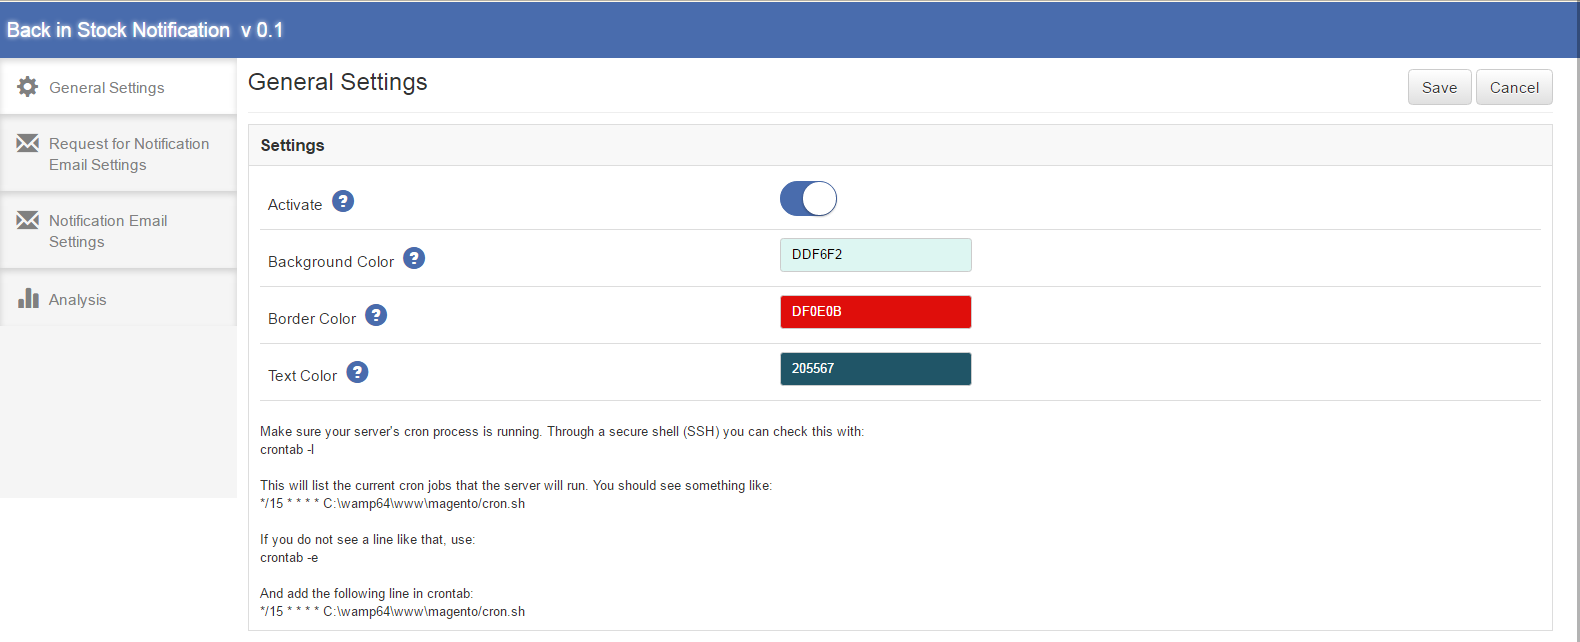
This tab will be opened by default when you click on the menu. General Settings tab of Magento Stock Alert module will have following options:
1. Activate
This will be an on/off switch. Admin will have the option to Enable/ Disable the Magento back in stock. If enabled notify block will be enabled on front end product page otherwise not.
2. Background Color
This will be a color picker palette. It will set the background color of Magento back in stock block on the product page.
3. Border Color
It will also be a color picker palette. It will set the border color of Magento product stock extension block on the product page.
4. Text Color
This will also be a color picker palette. It will set the text color in the Magento stock alert front end block on product page.
*Note: You have to make sure that Magento CRON process is running on your server to get notified your customers when any subscribed product comes in stock. Through a secure shell(SSH), you can check this with:
crontab -l
This will list the current CRON jobs that the server will run. You should see something like:
This tab of Magento back in stock extension will have the Email settings which the email will be sent when the customer subscribes himself for notifications for a particular product. This tab will have the following options:
1. Template Subject
It will be the subject of the mail which will be sent. This field of Magento back in stock module will be mandatory and default value will be ‘Back in Stock Notification – Request’.
2. Template Content
This will be the content of the mail which will be sent initially to the customer. This field will also be mandatory. The default content of Magento stock alert plugin will be as shown in the proposed screen below. The content enclosed in {{}}, will be the variables which will be used when sending actual mail. Other than these all content would be static.
Below is the screen shot of the this tab :
Notification Email Settings
This tab of Magento product stock extension will have the Email settings which will be sent to the subscribed customers for a particular product and that product comes in stock. This tab will have the following options:
1. Template Subject
It will be the subject of the mail which will be sent to the customer when product comes in stock. This field will be mandatory and default value of this Magento plugin will be ‘Back In Stock Notification’.
2. Template Content
This will be the content of the mail which will be sent finally to the customer when a particular product comes in stock. This field will also be mandatory. The default content of the Magento stock alert extension will be as shown in the proposed screen below. The content enclosed in {{}}, will be the variables which will be used when sending actual mail. Other than these all content would be static.
Below is the screen shot of the this tab :
Analysis
In this field of Magento product stock extension, the complete analysis of the subscribed customers can be found. This analysis would be in form of graph and in form of detailed list. It will be the analysis of top 10 products. Also, this list would only include the customers who are waiting for the notification email. This tab of the Magento stock alert extension will have two sections, which are described below:
1. GRAPH
The graph of the Magento back in stock module will show the analysis of top 10 products. Horizontally products would be shown and vertically number of customers would be shown. On hovering a bar in the graph name of the product, product attributes and number of customers which have subscribed for this product will be shown in a pop up.
2. SUBSCRIBED CUSTOMER
Subscribed customer would be a product wise detailed list. In first column of the list S. No., in second column product name and product attributes, in third column SKU of the product, in fourth column current price and in fifth column number of customers that have subscribed for this product would be shown. This list would also show top 10 products.
Below is the screen shot of the this tab of Magento stock alert plugin:
On hovering a bar in the graph a small pop up will come as below:
Front End Interface
After enabling the plug in from admin, the front end user will see a subscribe box at the product page if the product is out of stock. This block will contain an input field as to enter email id and a notify button through which the user will get subscribed for the respective product.
The subscription box of Magento back in stock module should appear as follows:
When customer enters the email id and click to the button “notify me” the initial mail will be sent to the entered email address and the message showing subscribed as below.
Note*
If a customer who has already subscribed for a particular product for Back in Stock notification tries to subscribe again with same email id for the same product then a message will appear showing “You have already subscribed for this product.”.
The screen shot is as following:
The initial mail of the Magento stock alert that will be triggered to the entered email id is as following:
Magento Return Manager extension by Knowband adds the functionality to manage return requests for any order placed by a customer as well as a guest customer. The Magento order return manager extension adds a link to the front-end through which any customer/guest customer can apply for return of any product contained in a order placed earlier.
This is a very flexible plugin and the customer can return any product in a order completely or partially, that means the customer can also return half or less quantity of any product in the order.
For a logged in user (if the Magento module is enabled from admin panel) the return manager link appears in Account options list (near the cart link) and in the quick links shown in the footer and opens a page containing the list of all the orders placed by that particular customer and the products that are eligible for return have a link to apply for return. This page also contains history of returns applied by the logged in customer.
In case the user is not logged in the return manager link opens a page containing a form to find any order. After finding a order using the form the order detail appear and the products from that particular order that are eligible for return have a Return button to apply for return. This page also contains history of returns applied by the customer who has placed this particular order.
1.1 Benefit of the Merchant
The Magento Return Manager extension provides a seamless interface for the customer as well as the store owner for placing and processing the returns in the most efficient way possible.
The Magento order return manager module allows the e-merchant to add or edit the return slip at the back of the plugin.
The Magento RMA enables the store admin to select and customize email templates as per the store’s requirements.
The Magento Return Merchandise Authorization can deny or approve the return request of the customer as his/her desires.
This Magento order refund manager extension allows the e-merchant to add the own return policy.
The Admin can add the return reason or edit the already added return reason.
This Magento return product extension gives the facility to store admin to allow the guest customers to place a return request.
The Magento RMA allows the Magento store admin to add custom return statuses.
The online store admin creates the return RMA request at the backend of the plugin.
This Magento order return manager module gets notified the customer as well as the store admin when return request approve and return request raised by modulethe customer.
This Magento return manager extension allows the e-merchant to filters the customer in archive list.
This Magento RMA always stores return request of the customer.
The Admin can view the pending and active return request of the customer at the backend of the RMA plugin.
This Magento refund order helps the admin to improve the user experience.
This Magento RMA module compatible with multi-lingual stores.
This Magento return manager extension simple and easy to use.
1.2 Benefit of the Customer:
The Customer can view the return status and return history from their account.
This Magento order return extension allows the online buyers to return even a single product or multiple products out of the full order.
The Customer can easily raise the return, refund and replacement request.
2.0 Technology for Development
Language: PHP
Frame Work: Magento
3.0 Installation Guide
Folder structure of the Return Manager plugin folder.
2. Copy all the folders into magento root directory and clear the cash (if enabled).
3. You will be able find the “RMA” option inside the “System > Knowband Extensions > RMA”.
4. You can now configure the Magento RMA as per your requirements and check its working in the front end at following URL:
https://www.yourstore.com/rma/index/index/
4.0 Admin Module
After installing the Magento order return manager plugin into magento store, the module will provide following interfaces inside “RMA” menu:
General Settings
Return Slip
Email Templates
Return Policies
Return Reasons
Return Statuses
Create a RMA
RMA List
Active Returns
Archives List
RMA Messsage
Each interface is in form of a tab and each tab contains some specific settings/functionality that can be changed according to the need. Each tab is explained below.
4.1 General Settings
After clicking on RMA tab , system will open general settings tabs by default as shown in screen below:
Initially fields in above form will be already filled with their default values.
Enable/Disable: Initially, this will be “OFF”. The Store admin can enable/disable plug-in by turning ON/OFF this setting.
Allow Guest RMA: This drop down contains “Yes” and “No” options. Set this as “Yes” to enable the return feature for those users also who are not logged in.
Allowed File Extensions: This option accepts the comma (,) seperated file extensions (without space) which can be uploaded when customer uploads file related to the return request.
Max Attachment Size: In this field Magento Return Merchandise Authorization allows the e-merchnt to add maximum allowed file size is accepted. The file size will be in KB. Eg- To allow files upto 1MB set this field as 1024.
Include jQuery: If the RMA module does not work in Magento versions lower than 1.9, then switch on this option.
To save the settings, click on the “Save” button shown at right upper area. All the settings save the changes are view on the front end of the Magento return product extension
4.1.1 How to enable the plugin?
1.Admin panel -> System -> Knowband Extensions -> RMA
2.Navigate to ‘Return Policies’ tab.
3.Enable the switch for ‘Enable/Disable’ setting in this tab.
4.Save the settings using the ‘Save’ button to update the configurations.
5.The module is now enabled, you can check the same in the front-end header menu.
4.2 Return Slip
In this tab, the admin can alter the settings and content of the Return Slip. This return slip is generated automatically when the admin approves any return request (if the feature is enabled). The return slip is generated in ‘.pdf’ format and the link is mailed to the customer in the mail for Return Request Approval Notification.
Enable/Disable Return Slip: Initially, this will be “OFF”. Admin can enable/disable Return Slip feature by turning ON/OFF this setting. Return slips are only generated when the feature is turned ON.
Return Address: This address will be printed on the return slip and will also be displayed on the return request form.
Return Guidelines: These guidelines will be printed on the return slip.
4.3 Return Policies
In this tab, the store admin can add new return policies for the Magento return manager plugin and can also edit or delete a existing return policy for the plugin.
There is also a option to map the return policies to products.
Note: A product can only be mapped to a maximum of one return policy.
This tab contains a list of existing return policies for the plugin. The admin can also create a new return policy using the ‘ Add New ’ button shown near to the “Save” button.
After clicking on the add new button a pop-up appears containing the form to create the return policy.
The form contains several input fields to enter the data of the policy like name of the policy, terms and condition of the policy and the option to choose the parameters i.e. Credit, Return and Replacement.
The admin can also enter the days applicable for this return policy for different options as shown in the form below.
4.3.1 How to add a return policy?
1.Admin panel -> System -> Knowband Extensions -> RMA
2.Navigate to ‘Return Policies’ tab.
3.Click on ‘Add New’ button to add a policy. A modal will appear having the form to add the policy.
4.dd the values in the above form as per your requirements.
5.Click ‘Save’ to save the policy and it will be added to the system.
4.3.2 How to edit a return policy?
1.Admin panel -> System -> Knowband Extensions -> RMA
2.Navigate to ‘Return Policies’ tab.
3.Click on button in front of respective policy to edit the policy. The following modal will appear to containing a form to edit the policy.
4.Change the values in the above form as per your requirements.
5.Click ‘Save’ to update the policy.
4.3.3 How to delete a return policy?
There is no action button to delete a Return Policy added in the module, but the multi-action feature of Magento Admin grid can be used to delete return policy in bulk or one at a time.
Steps for deleting a return policy to categories is as follows:
1.Admin panel -> System -> Knowband Extensions -> RMA
2.Navigate to ‘Return Policies’ tab.
3.Select return policy or return policies to delete using the check box in front of respective return policy.
4. The select the action (i.e. Delete) and click on ‘Submit’ to delete selected return policies.
4.3.4 How to Map categories to a return policy?
In the configuration panel (Return Policies tab) there is a list of all the return policies in the system. The list contains 2 action buttons, second button is for mapping policies.
Steps for mapping a return policy to categories is as follows:
1. Admin panel -> System -> Knowband Extensions -> RMA
2. Navigate to ‘Return Policies’ tab.
5.Click on in front of respective policy
6.A modal will appear with multi-select field for selecting the categories to map. The modal is shown as follows:
7. Select desired categories from the multi-select field to map them to the policy.
8. Click on ‘Save’ to save the mapping.
Actions
1. The admin can edit any policy using the first link in the Action column from the policy listing table. On clicking this link a modal containing the form for the policy will appear and the data for that policy is already filled in the fields. The admin can edit any data and can save the changes made.
2. The second link in the actions column is for mapping products to the policy. On clicking this link a modal will appear containing the options to map the products to that particular policy.
4.4 Return Reasons
In this tab, a list of return reasons will appear in the form of a table. By default there are 2 reasons already added in to the system.
In Action column there is a link to edit the reason in front of every row.
4.4.1 How to add a return reason?
1.Admin panel -> System -> Knowband Extensions -> RMA
2.Navigate to ‘Return Reasons’ tab.
3.Click on ‘Add New’ button to add a reason. A modal containing the reason form will appear.
4.Add the values in the above form as per your requirements.
5.Click ‘Save’ to save the reason and it will be added to the system.
4.4.2 How to edit a return reason?
1.Admin panel -> System -> Knowband Extensions -> RMA
2.Navigate to ‘Return Reasons’ tab.
3.Click on button in front of respective return reason to edit the reason. The following modal will appear to add/edit policy.
4.Change the values in the above form as per your requirements.
5.Click ‘Save’ to save/update the reason.
4.5 Return Statuses
This tab contains a list of return statuses in the form of a table. By default there are 4 statuses already added into the system. The admin can further add any numbers of statuses into the system. The tab also contains a option to choose default status of any return request. This default status will be assigned to the all the new return requests.
The links below the action column in the statuses list is for editing the existing return statuses.
4.5.1 How to add a return status?
Admin panel -> System -> Knowband Extensions -> RMA
Navigate to ‘Return Statuses’ tab.
Click on ‘Add New’ button to add a status. A modal containing the form for adding a status will appear.
4.Add the values in the above form as per your requirements.
5.Click ‘Save’ to save the status.
4.5.2 How to edit a return status?
1.Admin panel -> System -> Knowband Extensions -> RMA
2.Navigate to ‘Return Statuses’ tab.
3.Click on button in front of respective return status to edit the status. The following modal will appear to add/edit status.
4.Change the values in the above form as per your requirements.
5.Click ‘Save’ to update the status.
4.6 Create a Return
This tab is used to generate a return request from the admin panel itself. The tab contains a form through which the admin can find any order by simply providing the reference number and the corresponding e-mail and then apply for return accordingly.
Note:
Any return request whether is created by admin or customer is moved to the pending returns and the admin has to approve it first to further change the status of the return request or to take any further action.
The orders that are delivered or completed are only eligible for return.
By default the status of the return request is set to default return status set by the admin in the ‘ Return Statuses ’ tab.
4.6.1 How to create a Return Request from the admin panel?
In the module there is an option to create a return request from the admin panel as well. Steps for the same are as follows:
1.Admin panel -> System -> Knowband Extensions -> RMA
2.Navigate to ‘Create a RMA’ tab
3.Enter order number and email in the ‘Find Order’ form and click on ‘Find Order’ button.
4.The order detail for the respective order will appear containing the list of products and a return button in front of products eligible for return.
5.Click on the ‘Return’ button in front of respective product in the order details.
6. A pop up will appear containing the return form, fill the form accordingly
7.Click on ‘Submit’ button to complete the return request.
8.A pop up showing success message for return request and other details will appear, as shown below.
4.7 Email Templates
This tab contains a interface through which the admin can edit any email template that is used in this system.
There are 6 email templates available that are used by this plugin:
1. New Return Request Notice (Customer)
This mail template is used to notify the customer regarding the new Return Request generated by the customer itself. The customer who has created return request will only receive this mail.
2. New Return Request Notice (Admin)
This mail template is used to notify the Store Owner regarding the new Return Request generated by any customer.
3. Return Request Approved
This mail template is used to notify the customer regarding the Approval of the Return Request that is created by the customer earlier.
4. Return Request Dis-Approved
This mail template is used to notify the customer regarding the Dis-Approval of the Return Request that is created by the customer earlier.
5. Return Request Status Change
This mail template is used to notify the customer regarding the update in status of the Return Request that is created by the customer earlier.
6. Return Request Completed
This mail template is used to notify the customer regarding the completion of the Return Request that is created by the customer earlier.
To edit any email template the admin has to choose the desired email template. On doing the same the email template data will appear in a form below, to save the changes made the admin has to click on the ‘Save’ button.
4.7.1 How to Edit an Email Template?
1.Admin panel -> System -> Knowband Extensions -> RMA
2.Navigate to ‘Email Templates’ tab.
3.To edit any email template the admin has to choose the desired email template from the ‘Select Template’ field.
4.On doing the same the email template data will appear in a form as shown below:
5. To save the changes made click on the ‘Save’ button.
4.8 RMA List
This tab contains a list of all the returns that are pending i.e. are not approved by the admin. The admin has to approve a return request in order to perform several operations on the return request like approve and dis-approve the request or download/view the file uploaded by the customer.
The admin can approve or deny a return request using the actions available in front of the list.
Admin can also download or view the file uploaded by the customer. View option is only available if the customer has uploaded the file.
Once the admin approves a return request then it is moved to the Active Returns List.
On the other hand if the admin denies a return request that it is removed from the list and this action can not be undone.
4.8.1 How to Approve a RMA?
1.Admin panel -> System -> Knowband Extensions -> RMA
2.Navigate to ‘RMA List’ tab.
3.Click on button in front of the respective return request.
4.The return request will be approved and moved to ‘Active RMA’ list in Active Returns tab.
4.9 Active Returns List
This tab contains a list of all the returns that are approved by the admin. The e-merchant can proceed with the return process after approving the return request using this tab. The online retailors can change the status of the return request and can also deny a request form this tab and can archive the request as well.
The actions that can be performed from this tab for the active returns are:
Deny the return request.
Change the status of the return request.
Mark the return request as complete / add to archive.
When the store admin marks a return request as complete then it is moved to the archives list.
4.9.1 How to Reject an RMA?
1.Admin panel -> System -> Knowband Extensions -> RMA
2.Navigate to ‘RMA List’ tab or ‘Active Returns’ tab.
3.Click on the button in front of the respective return request.
4.The return request will be rejected. Please note that the online shoppers will not be able to apply for return again for the same order item.
4.9.2 How to Complete an RMA?
After approving a return request (or RMA) the customer is supposed to send the received order item back to the store owner. After receiving the order item successfully admin will take desired actions for that return request.
The return request will me marked as complete when no more actions are needed to be taken from customer/store owner.
1.Admin panel -> System -> Knowband Extensions -> RMA
2.Navigate to ‘Active Returns’ tab.
3.Click on button in front of the respective return request.
4.The return request will be marked as complete and will be moved to the ‘Archive List’ in ‘Archive List’ tab. Please note that this action cannot be reverted.
4.10 Archives List
This tab contains all the return requests that are complete. The tab also contains a form through which the admin can filter the archives list.
There are options to export the data into CSV file.
Single row can be exported and the whole data can also be exported using mass export option.
4.11 RMA Message
This tab contains three textareas having html editors. Using the editors, admin can set the style of the success message to be shown in the pop-up whenever the request is successful.
There are three messages.
Credit
Refund
Replacement
5.0 Front End Module
After enabling the plugin the front-end user will see a link in the header of the front-end through which the user can navigate to a new page.
The link in the account option of the front-end will appear as follows:
The link in the account option of the front-end will appear as follows:
When the customer clicks on this link than a new page will open on the basis of logged in status of the customer.
5.1 How to create return request for guest user from front office?
1. Navigate to the front return page by clicking on the ‘Return’ link in header account menu or from the footer (as shown above).
Note: Customer should not be logged in.
2. The following page will open containing a page to find order details for any order.
3. Provide the order reference number and the respective email the details of that order will appear including the return history on the basis of the email provided by the customer. The order details will appear as follows:
The products that are eligible for return in that particular order will have a return button. Through this button the customer can apply for return of that particular product.
Note: The return history on the basis of the email provided by the customer will also appear at the bottom.
4. On clicking on the ‘Return’ button a pop-up will appear containing the form for return of that particular order. The form will appear as follows:
5. Complete the above form and then click on submit to submit the return request.
6. A success popup will appear showing the successful submission of the return request as shown below:
7. There is as option to upload files in the success page. From where you can upload file and admin can view/download that file from aamin panel. File limitations are set from admin panel.
5.2 How to create return request for logged in user from front office?
1.Navigate to the front return page by clicking on the ‘Return’ link in header account menu or from the footer (as shown in heading 4.0).
Note: Customer should be logged in.
2.The following page will open containing order details of all the orders placed till date by the current customer.
Note: There will be the details of every order. We can expand any of the order division (will have to click where the arrows are pointed). On click the respective order division will be expended.
3. To view all the history of the return requests, user will have to expand the “Return History” tab.
4.The products that are eligible for return in that particular order will have a ‘Return’ button. Through this button the customer can apply for return of that particular product.
5.On clicking on the ‘Return’ button a pop-up will appear containing the form for return of that particular order item. The form will appear as follows:
6. Complete the above form and then click on submit to submit the return request.
7. A success popup will appear showing the successful submission of the return request as shown below:
8. There is as option to upload files in the success page. From where you can upload file and admin can view/download that file from admin panel. File limitations are set from admin panel.
You can try Magento Return Manager extension for on your Magento store. KnowBand’s Magento Return Merchandise Authorization helps you increase customer enagaement to your store & you can easily manage the return request of the product.
The Magento Helpdesk extension by Knowband will act as a Ticket Management System for a particular store and will make easier for the store owner to manage the ticket which will be raised on his store by the customers.
It is a very useful Magento extension for both the ends i.e for merchant and the customer because it lets the customer to raise the ticket in a very convenient way and at the other end lets the merchant manage the ticket in a very efficient way. The Magento desktop helpdesk also shows the merchant the details of the customer those who have raised the ticket on his/her store.
2. Installation
After purchasing Magento customer helpdesk extension, you will get following files as shown in below screen:
deskoid.zip (contain source code of the extension)
User Manual
Follow the following steps to install Magento customer contact extension:
Unzip the deskoid.zip folder
Copy all the files and folder of unzipped folder into your store root directory
After coping all the files and folders, clear the cache.
Just open any page of your store. Magento will install the Magento module at the time of loading of any page.
After installing, please login into your admin panel. And go to the below menu:
System > Configuration > Advanced
Here you will see that, the Magento ticket system module is listed.
3. Extension Interfaces
There are two ends from where user will interact with helpdesk extension functionality. They are following:
Admin Interface of Magento customer support extension(Only be accessible by admin/store owner/support)
Customer Interface of Magento customer support extension (anyone can see and customer raised tickets from here)
Each interface of the Magento desktop helpdesk by Knowband has been explained in the next section.
4. Admin Interface
This interface of the Magento customer helpdesk will only be accessible in admin panel. After installing Magento customer contact extension, deskoid menus will be visible in the menubar as shown in below screen:
There will be 4 submenus from where you can configure your Magento ticket system as well as manage your tickets.
4.1 Configurations
Here admin can enable/disable his Magento desktop helpdesk at any time. Also will give option to fetch customer replies from his email. The configurations panel of the Magento customer helpdesk is given below:
Fields
Status: By default this field of Magento customer contact will be disabled. On the basis of this setting whole system on front will work accordingly. If the Magento ticket system is disabled, then system will not allow customers to create new tickets
Sender/Support Email: Required field of the Magento contact us extension and default will be empty. This will be the email id of sender or store owner or something else that admin wants. All the emails related to tickets will be send to customers by using this email id.
Sender/Support Name: Required field of the helpdesk extension and default will be empty. Can be any name that admin wants. This name will be set as sender name in the email send to customer related to tickets.
Support Link Position: Default position of the Magento customer support extension will be left edge of the website. From here, you can change the position of “Get Support”link on front end as per your need.
IMAP Status: Default will be disabled. With the help of this, system can fetch replies send by customer on the sender/support email will be fetched by system and tracked into system.
IMAP Url: Required if IMAP is enabled. Here you have to give IMAP url of sender email ID. To know about IMAP URL, see appendix A.
Port: Required in case of IMAP is enabled. Default values will be 993. See appendix A.
Password: Required field of Magento extension, in case if IMAP is enabled. Password of the sender email ID. See appendix A.
Save & Continue: After clicking this button, system will first validate settings and then save settings into system.
4.2 Ticket Topics
In this field of Magento customer helpdesk, admin will manage all the topics related to customer queries. With the help of these topics admin will be able to identify what type of issues customers mostly faces.
4.2.1 Topic List
When admin will click on “Ticket Topics” menu, then Magento customer contact will by default open the list of all the available ticket topics that he has created. The list will be shown to admin as shown in below screen:
Columns
ID: Unique id of the topic.
Topic/Subject: Label or Topic or Name of the subject. By default label will be shown in this list in default store view.
Date Added: Date on which corresponding topic is created.
Date Updated: Date at which corresponding topic is last updated.
Status: Status of the corresponding record.
Edit: Link to edit corresponding topic.
Delete: Link to delete corresponding topic
Add New: By clicking this button, system will redirect you to page from where you can add new topic.
4.2.2 Add/Edit Ticket Topic
Whenever admin will click on “Add New” or “Edit” button on topic listing page, the Magento extension will open a form where admin can create/edit topic as shown in below screen:
Fields
Status: Required field of the Magento ticket system and by default will be enabled. According to this value, the corresponding topic will be available to customers on front end.
Label/Subject: Required field and default will be empty. This field of Magento contact us extension will be a store specific field. Admin must have to provide value for each store view.
Back: To return back to list.
Save: On clicking this, helpdesk extension will first validate form values and then save in to database. After saving, Magento customer support extension will redirect admin to topic listing page with success message.
Save and Continue Edit: This button of Magento desktop helpdesk will also have simliar functionality as like “Save” button with the difference that, it will redirect back to same form with success message.
Delete: Display only in case of topic editing. On clicking this button, Magento customer helpdesk will delete corresponding topic from system.
4.2.3 Delete Topic
To delete the topic of Magento customer contact, we have given delete option with each topic in list as well as topic edit page. On clicking this link, Magento ticket system will first ask for confirmation. As per your confirmation, system will delete the corresponding topic from system.
There will be no impact of this deletion on tickets raised by customers by using deleting topic.
4.3 Customer Tickets
In this field of Magento contact us extension, admin can see all the customer queries and resolve queries by making reply on him.
4.3.1 Customers Ticket List
By default, when admin will click on “Tickets” menu, system will open list of all tickets as shown in the below screen:
Columns
Ticket Number: System generated unique identifier for each ticket. This will be unique for each ticket.
Customer Name: Name of the customer who has raised the ticket.
Customer Email: Email id of the customer who has raised the ticket.
Subject/Topic: Topic on which ticket is based on.
Summary: Summary of the ticket.
Last Message: Time at which last message/reply send to customer by support or to support by customer.
Website: Name of the website on which ticket has been raised by customer.
Priority: This column of Magento customer support extension will show the priority of each ticket in different color. So that your can easily identify which ticket is critical or not.
State: Display the current state of ticket.
Action: Here you will have following option to each ticket:
View Ticket: By selecting this option of Magento extension by Knowband, system will open ticket view page on which you can see all the details of ticket as well as replies on the ticket. From here, you will be able to send reply on ticket to customer.
View State History: On selecting this option of Magento desktop helpdesk, system will shown priority change history in popup box as shown in below screen:
State of the ticket will shown as last state will shown on top.
View Priority Change History:
On selecting this, system will shown priority change history in popup box as shown in below screen:
Recent changed priority will be shown on top.
Change State:
With this action, you can change the state of ticket at any time. On selecting this option system will open popup box to as shown in below screen:
By default, system will show the dropdown list of all available state and current state will be selected. There will also be a checkbox and default it will be checked.
When you will change state and click on “Change” button, system will change the state of corresponding ticket. Also send the notification email to customer if the checkbox is checked.
Change Priority:
With this action, you can change the priority of ticket at any time. On selecting this option system will open popup box to as shown in below screen:
By default, this option of Magento desktop helpdesk will show the dropdown list of all available prioritiy options and current ticket priority will be selected.
When you will change priority and click on “Change” button, system will change the priority of corresponding ticket.
4.3.2 View Ticket and Replies
In this field of Magento customer helpdesk you can see all the details of particular ticket and replies made on corresponding ticket. Also you can send replies on corresponding ticket from this page.
When the you will select “View Ticket” option in action column of ticket listing page, system will open the ticket view page.
General Information
In this tab of Magento extension, system will show you the information of tickets as shown in below screen:
There are following 3 sub sections into this tab of Magento customer contact:
General Information: This section of Magento ticket system will contain all the basic infomation about ticket and customer who has raised the ticket.
Issue Information: This section of Magento contact us extension will show the issue raised by customer in this ticket.
Quick Action: In this section of helpdesk extension, system will show state and priority dropdown. With these action, you can just change the state or priority without sending reply to customer.
Conversations
In this tab of Magento customer support extension, system will show you the all conversation/replies made on corersponding tickets by you as well as customer as shown in below screen:
You can clearly see that, there will be form from where you can send reply to customer as well as change state and priority.
Below this, all the conversation starting from ticket will be shown to you with latest/recent reply will be shown on top.
4.4 Customers
In this section of Magento desktop helpdesk, system will only display the list of customers who has raised the tickets as shown in below screen:
Front End Interface
On the front end of the Magento customer helpdesk, system will show a link “Get Support” on each page except ticket related pages as shown in below screen:
When customer will click on “Get Support” link as highlighted in above screen, system will open a page from where customer can either create new ticket as well as check status of previous ticket. The screen is given below:
Figure 5.1
5.1 Create New Ticket
On clicking “Open a New Ticket” button in above screen, system will redirect customer to a form from where customer can raise his issue with his contact information as shown in below screen:
Figure 5.2
Fields
Help Topic: Required field of the Magento customer contact and drop down list of all the enabled help topics which are created by you from admin panel.
Email Address: Required field of the Magento ticket system. Here customer will provide his email address. If the customer is logged in then system will fill this field with logged in email id. If logged in, this will not be editable.
Full Name: Required field and name of the customer who is raising ticket. If customer is logged in then Magento ticket system will fill this field with logged in customer’s name.
Phone Number: Optional field of the Magento contact us extension. Here customer will provide his phone number.
Summary: Required field of helpdesk extension. Customer will provide issue summary in this field.
Issue: Required field of the Magento customer support extension and will have minimum 30 characters.
Create Ticket: On clicking this field of Magento desktop helpdesk, system will validate the information filled by customer into this form. If anything system find wrong then it will show error message to customer and stay on form otherwise create the ticket.
After creating ticket, Magento ticket system will send acknowledgment email to customer as well as alert email to support.
5.2 Check Ticket Status
Customer can check his ticket status either by click on “Check Ticket Status” showed in figure 5.1 or 5.2. When customer will clicked on “Check status” button, the repective Magento extension will open a form as shown in below screen:
figure 5.3
Fields
Ticket Number: Required field of the Magento plugin. Customer must have to provide the ticket number of ticket for which he/she wants to check status.
Email Address: Required field of the Magento customer helpdesk and already be filled in case of logged in customer. Field will be editable in both cases. Here customer will provide the email address for which the ticket was created.
If the ticket is not exist into system, then Magento ticket system will return back to this form with error message. If the ticket is exist then system will show all the details of ticket to customer as shown in below screen:
Figure 5.4
In the above screen of Magento customer contact, customer can view all the previous replies made by him as well as store support. There will also be a form to send reply to store support on corresponding ticket.
In post reply form, customer must have to provide reply text with minimum 30 characters and submit to system.
After submitting reply, Magento ticket system will send alert email to admin about customer reply.
5.3 Customer Ticket List
This option willonly be visible for registered customer. If the registered customer has raised a ticket then a link to his ticket list will be visible to customer in his “My Account Section” as shown in below screen:
Figure 5.5
On clicking the above highlighted link, Magento ticket system will open ticket listing page where all the tickets created by corresponding logged in customer will be displayed as shown in below screen:
Appendix A
IMAP BASICS
To know about IMAP, please read the article on given url:
https://whatismyipaddress.com/imap
IMAP Terminology:
IMAP URL:
The first kind of URL is an IMAP UR which look like this:
imap.hostname.com
Hostname is the internet host name or IP address of the IMAP server
For example, if your email id is on gmail then IMAP url will be as:
imap.gmail.com
IMAP PORT:
Port is the server’s IP port. Defaults port is 993
IMAP PASSWORD:
Password of your email account as you use to open your inbox.
HOW TO ENABLE IMAP
To enable IMAP into our email id please follow the given steps. For example, we are using gmail IMAP configuration process.
Step 1: Open your gmail email account.
Step 2: Go to your inbox setting page by clicking setting option as shown in below screen:
On clicking above highlighted link, gmail will redirect you to setting page.
Step 3: Go to in our POP/IMAP tab.
Step 4: Enable IMAP and save changes.
HOW TO INSTALL CRON JOB
Deskoid need to install cron job on your server to get fetch replies from email server withing predefined time interval.
To install cron job, follow the given instructions:
Step 1: Open your Terminal(for linux server) and login into your store.
Step 2: Type “crontab -e”and hit enter button.
Step 3: After step 2, editor will be opend in the same window. Here paste the given url:
Sometimes, the customer becomes confused about the size of product which he wants to purchase. Because every brand/manufacturer design his product according to own size specification and it may result in the different size of the same thing as per brand/manufacturer. Due to this type of confusion, customer avoids his purchasing and go away from the store.
To overcome this type of barriers, Knowband’s Magento Product Size chart extension will provide facility to store owner to set chart on products according to the category as well as prepare specific chart for products. This chart will show the exact size of given measurement unit. So that, the customer can get clear about the size and buy the item.
Magento size guide extension just provides an easy way to store owner to prepare size charts for his products as per need. Size chart provides ease as well as give clear specification about the product in terms of size, area etc.
Features:
The Magento Product Size chart module is very easy to install and configure.
The store admin can display size charts just by entering values.
This Magento size guide module allows the admin to show size charts on a category of products or a single product.
N number of rows and columns can be added easily in the size chart easily.
Magento size guide offers preview option for checking the implementation.
There is an option to add images, guidelines or any HTML content to the size chart pop-up.
Magento product size table is multi-lingual compatible.
The store admin can easily enable/disable the Magento product size table plugin.
Magento Size Chart link Module is highly customizable
No technical knowledge required for implementation of this functionality.
The admin can easily implement this functionality without changing a single line of code.
The Magento size chart link module has a mobile responsive layout.
Admin Benefits:
Magento size catalog extension provides a simple and easy way of creating size charts for specific products.
The eCommerce store admin can assign size charts with single products as well as with multiple product categories.
Magento Size Chart extension is highly customizable. The admin can also add images and necessary content to size charts.
Multiple rows and columns can be added easily without any restriction.
Magento Product Size chart extension allows the store owners to preview the size charts before implementation.
Size catalog module offers multi-lingual support.
Magento Product Size chart extension reduces website’s bounce rate which results in increased revenue of the store.
There will be reduced product return requests when the customers will purchase the product after viewing the size chart.
Customer Benefits:
Magento product size catalog module provides an attractive and user-friendly interface to users.
The customers can easily view the size chart just by clicking the size chart link.
Magento Product Size chart extension reduces confusion of customers regarding product size and also increases their decision making while purchasing.
This Magento size chart popup extension provides a better shopping experience to the online.
2. Installation
After purchasing the extension, you will get following files as shown in below screen:
Sizechart.zip (contain source code of the extension)
User Manual
Follow the following steps to install the extension:
Unzip the sizechart.zip folder
Copy all the files and folder of unzipped folder into your store root directory
After coping all the files and folders, clear the cache.
Just open any page of your store. Magento will install the module at the time of loading of any page.
After installing, please login to your admin panel. And go to the below menu: (System > Configuration > Advanced)
Here you will see that the size chart module is listed.
3. Extension Interfaces
There are two ends from where the user will interact with size chart functionality. They are following:
Admin Interface (Only be accessible by admin)
Customer Interface (anyone can see and only accessible on Product Page)
Each interface has been explained in next section.
Admin Interface
This interface will only be accessible in the admin panel. After installing the extension, size chart menus will be visible under catalog menu as shown in below screen:
There will be 4 submenus from where you can create and manage charts for your products.
4.1 Chart Attribute Sets
This is the section where you can prepare chart attributes and measure unit for the chart. Chart attributes mean Rows and Columns of your chart.
4.1.1 Chart Attributes Set Listing
On clicking the “Chart Attribute Sets” menu, you will be redirected to the page where all the previously created attributes sets will be displayed. If there is no set created yet, the system will the list as empty list as shown in below screen:
List Columns
ID: Unique id of the attribute set.
Created At: This column will show you the date and time at which the corresponding attribute set is created.
Attribute Set Identifier: This is nothing except just a label or name to the corresponding attribute set.
Value Unit: Measurement unit like cms, mtr, mm etc.
Status: Status (Enable/disable) of the corresponding attribute set.
Actions:
Preview: On clicking this action, system will show you the preview/snapshot of the chart with dummy values as shown in below screen:
Edit: By clicking this link, the system will redirect to you attributes set edit page where you will get the form with already filled values.
Delete: With this action, you can delete the corresponding attribute set at any time.
Add New
There will be a button on the top right corner of listing page. From here, you can add a new attribute set at any time. Adding and updating attribute set has been described in next section.
4.1.2 Add New or Update Attributes Set
On clicking “Add New”button or clicking “Edit” link on any attribute set, system will redirect you to the attribute set configuration form as shown in below screen:
Fields
Status: This is a drop-down list of status. This will be a required field and by default will be disabled.
Set Identifer: Required field. This field is just used for labeling/naming your attributes set. This field will not be visible to customers.
Value/Measurement Unit: Optional field. This will be drop down list with some predefined measurement units. If you want to more unit, please contact our support.
Help Guide: This will be a just help text to guide admin to how to create attribute sets for the chart.
X/Y Label: Optional field. This field will be visible to you with each store view as the website can have many languages. So you have to provide label/text for each store view. This label will be shown for the common x-y axis in the chart.
Row Labels: Required field and initially will be blank. This will be the label used for labeling rows of your chart. You can add or delete rows as per your need. Each row label will be shown to you for each store view and you have provided label for each store view.
Column Labels: Required field and initially will be blank. This will be the label used for labeling columns of your chart. You can add or delete columns as per your need. Each column label will be shown to you for each store view and you have provided label for each store view.
Actions
Back: This action will redirect you to listing page.
Preview: On clicking this button, the system will show you the snapshot of the chart as per current attributes set as shown in below screen:
Save: By clicking this button, the system will save your attributes set configurations and redirect to you on attributes set listing page.
Save and Continue Edit: By clicking this button, the system will save your attributes set configurations and redirected back to form again.
Delete (In case of Editing/Updating): This action will delete the corresponding attributes set from the system.
4.1.3 Deleting Attributes Set
We have given delete options to you to delete attributes set record at a time. You can delete attributes set either from listing page or edit page.
Note: If you want to delete attributes sets and you have created some charts by using this attributes set then the system will also delete that chart from system to prevent data inconsistency.
4.2 Size Charts
Here you can create and manage your size chart by using any attributes set created in the last section.
4.2.1 Size Charts List
On clicking “Size Chart” menu, the system will redirect you to page where all the created size charts will be shown as shown in below screen:
List Columns
ID: Unique id of the size chart.
Size Chart Identifier: This is just a label or name to the corresponding size chart.
Attribute Set Identifier: Name/Label of the attributes set by which you have created the corresponding size chart.
Status: Status (Enable/disable) of the corresponding size chart.
Created At: This column will show you the date and time at which the corresponding size chart is created.
Actions:
Preview: On clicking this action, the system will show you the preview/snapshot of size chart with values set by you as shown in below screen:
Edit: By clicking this link, the system will redirect to your size chart edit page where you will get the form with already filled values.
Delete: With this action, you can delete corresponding size chart at any time.
Add New
There will be a button on the top right corner of listing page. From here, you can add new size chart at any time. Adding and updating size chart has been described in next section.
4.2.2 Adding New or Updating Size Chart
On clicking “Add New” button or clicking “Edit” link on any size chart in list, system will redirect you to the size chart form as shown in below screen:
Fields
Status: This is the dropdown list of status. This will be a required field and by default will be disabled.
Set Identifier: Required field. This field is just used for labeling/naming your size chart. This field will not be visible to customers.
Attribute Set: Required field and initially will be nothing selected. Here you will select attributes set to create size chart.
Chart Values: Required. Initially, there will be nothing to show you at the time adding new size chart. To create the chart, you have to select attribute select from point c. After selecting attributes set from the drop-down, the system will render the chart values form in matrix form as shown in below screen:
The system will create the matrix with the number of rows and columns created by you for selected attributes set. There is also a store view drop-down the list. At a time only one matrix form will be visible to you to fill chart values. You have to fill values of another store view then you have to change the store view from displayed stores drop down list.
Instruction/Guidance: Required field and size chart will be displayed under the content you will write into this field. Here you can also provide some extra guidance as well as pictorial help about size chart to customers. This field will also be store view specific and you have to provide content for each field.
Note: There will be a variable “{{size_chart}}”in the instruction field. This variable will be replaced by the system with corresponding size chart on the front end. So, Please do not remove this variable from instructions field. But you can change the position of this variable into instruction as per your need.
Actions:
Back: This action will redirect you to listing page.
Save: By clicking this button, the system will save your size chart data and redirect to you on size chart listing page.
Save and Continue Edit: By clicking this button, the system will save your size chart data and redirected back to form again.
Delete (In case of Editing/Updating): This action will delete the corresponding size chart from the system.
4.2.3 Deleting Size Chart
We have given delete options to you to delete size chart at any time. You can delete size chart either from listing page or edit page.
Note: If you want to delete size chart and you have created assign this size chart to product or categories then system will also delete that mapping with products or categories from system to prevent data inconsistency.
4.3 Category Charts
Here you can create and update the mapping of your size charts with categories.
4.3.1 Category Chart List
On clicking “Category Chart” menu, system will redirect you to page where all the mapping of size charts with categories (if any) will be shown as shown in below screen:
List Columns
ID: Unique id of the category and size chart mapping.
Category Name: Name of the category
Size Chart Identifier: Name/Label of the size chart mapped with the corresponding category.
Status: Status (Enable/disable) of the corresponding mapping.
Created At: This column will show you the date and time at which the size chart mapped or assign to the corresponding category.
Actions:
Preview: On clicking this action, the system will show you the preview with instructions set on size chart as shown in below screen:
Edit: By clicking this link, the system will redirect to your page where you can assigned other chart to category or change status.
Delete: With this action, you can delete the corresponding mapping at any time.
Add New Category Chart or Assign Chart to New Category
There will be an “Add New” button on the top right corner of listing page. From here, you can add assign size chart to the new category at any time. Adding and updating mapping has been described in next section.
4.3.2 Assign Chart to New Category/Update Mapping
On clicking “Add New” button or clicking “Edit” link on any category chart in list, system will redirect you to the mapping page from where you can assign charts to the new category or change on the category as shown in below screen:
Fields
Status: This is a dropdown list of status. This will be a required field and by default will be disabled.
Category: Required field and a dropdown list of categories. Initially, no category will be selected.
Size Chart: Required field and the drop-down list of active size charts created by you in section 4.2.
Back: This action will redirect you to listing page.
Preview: On clicking this button, the system will show you the preview of the selected chart with instruction as shown in below screen:
Save: By clicking this button, the system will save mapping into the database and redirect to you on category chart listing page.
Delete (In case of Editing/Updating): This action will delete the corresponding mapping from the system.
4.3.3 Deleting Category Size Chart
We have given delete options to you to delete size chart from the category at any time. You can delete mapping either from listing page or edit page.
4.4 Product Charts
Here you can create and update the mapping of your size charts with products.
4.4.1 Product Chart List
On clicking “Product Chart” menu, the system will redirect you to page where all the mapping of size charts with products (if any) will be shown as shown in below screen:
List Columns
ID: Unique id of the product and size chart mapping.
Product Name: Name of the product.
Product SKU: Sku of the corresponding product.
Size Chart Identifier: Name/Label of the size chart mapped with corresponding product.
Status: (Enable/disable) of the corresponding mapping.
Created At: This column will show you the date and time at which the size chart mapped or assign to the corresponding product.
Actions:
Preview: By clicking this action, the system will show you the preview with instructions set on size chart as shown in below screen:
Edit: By clicking this link, system will redirect to you page where you can assigned other chart to product or change status.
Delete: With this action, you can delete the corresponding mapping at any time.
Add New Product Chart or Assign Chart to New Product
There will be an “Add New” button on the top right corner of listing page. From here, you can add assign size chart to a new product at any time. Adding and updating mapping has been described in next section.
4.4.2 Assign Chart to New Product/Update Mapping
On clicking “Add New” button or clicking “Edit” link on any product chart in list, system will redirect you to the mapping page from where you can assign charts to new product or change on the product as shown in below screen:
Fields
Status: This is the dropdown list of status. This will be a required field and by default will be disabled.
Product: Required field and dropdown list of products. Initially, no product will be selected.
Size Chart: Required field and the drop-down list of active size charts created by you in section 4.2.
Actions:
Back: This action will redirect you to listing page.
Preview: On clicking this button, the system will show you the preview of the selected chart with instruction as shown in below screen:
Save: By clicking this button, the system will save mapping into the database and redirect to you on product chart listing page.
Delete (In case of Editing/Updating): This action will delete the corresponding mapping from the system.
4.4.3 Deleting Product Size Chart
We have given delete options to you to delete size chart from the product at any time. You can delete mapping either from listing page or edit page.
4.4.4 Size Chart Mapping on Product Page
You can also map size chart with the product on product edit page. Whenever you will edit your product then there will be a tab “Size Chart” will be shown to you as shown in below screen:
Clicking on the above-highlighted tab, the system will show you form as shown in below screen:
From here you can map any enabled size chart with the corresponding product. Here these fields are not required. If you don’t to want to assign chart to this product then you can leave it without changing any value in this section.
5. Customer Interface
On the front end, size chart will only be accessible on the product page.
5.1 Size Chart on Product Page
If the product has any enabled size chart, then the system will show the “view size chart” link just below the product name as shown in below screen:
If the product has no enabled size chart then the system will try to find a chart from his associated categories. If size chart found on any associated category then the system will show that chart for this product.
On clicking the above-highlighted link, the system will open the size chart in popup box as shown in below screen: