
1. Introduction Magento Marketplace Bulk Import Export Extension
This extension is the sub extension of Magento Marketplace. In Marketplace, there is no option for sellers to add products into system by using file upload. Seller must have to add all products into system one by one.
Suppose, if seller has 1000 products then it will be little frustrating to seller to add all products one by one just because of time consuming effort.
To overcome this type headache to seller, this extension will provide the interface to sellers from where seller can upload his product data in excel file into system and then system will add product into system.
Note: This module require Magento Marketplace extension developed by Knowband. Before installing it, your store must have Marketplace module.
2. Installation
After purchasing extension, you will get following files as shown in below screen:
- marketplacebulkimport.zip (contain source code of the extension)
- User Manual
Follow the following steps to install extension:
- Unzip the marketplacebulkimport.zip folder
- Copy all the files and folder of unzipped folder into your store root directory
- After coping all the files and folders, clear the cache.
- Open any page of your store. Magento will install the module at the time of loading of any page.
- After installing, please login into your admin panel. And go to the below menu:
System > Configuration > Advanced
Here you will see that, the “Vss_Marketplacebulkimport” module is listed.
Extension Interfaces
There are two ends from where user will interact with extension functionality. They are following:
- Admin Interface (Only be accessible by admin/store owner)
- Seller Interface (Onl Seller can access this interface)
Each interface has been explained in next section.
Admin Interface
This interface will only be accessible in admin panel. After installing extension, import/export menus will be visible under Marketplace menu in the menubar as shown in below screen:
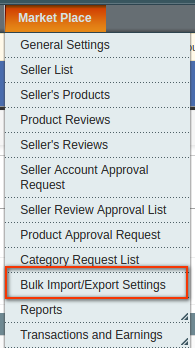
4.1 Bulk Import or Export Settings
Here admin can enable/disable extension at any time. Also can enable/disable this feature on any seller. On Configuration page there will be two tabs. Each tab is explained in next section.
4.1.1 Configuration
This tab will be open by default when you will click on menu. Below is the screen of this tab:
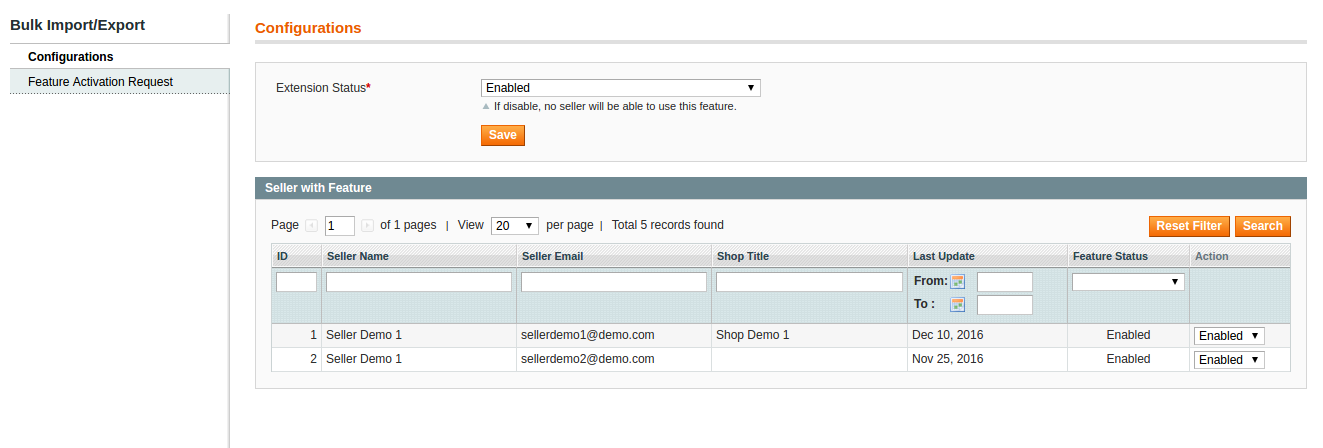
Sections
Extension Status:
By default, extension will be disabled. With this setting you can enable/disable this feature for all seller at any time.
Feature Status on Sellers
This will be a list of all sellers with status of corresponding seller is using this feature or not. To enable/disable this feature on seller, you have to change the feature status on corresponding seller by choosing action in last column of list.
On any action, seller will recieve the feature enable/disable notification so that seller can aware about this feature.
4.1.2 Feature Activation Request
In this tab, admin can see list of all requests made by seller to activate import/export feature into his account. Following is the screen of this tab:

Fields
- Seller Name: Name of the seller who has request for import/export feature.
- Seller Email: Email id of the seller.
- Shop Title: Title/Name of the shop (if any).
- Seller Comment: Comment or reason for activation import/export feature.
- Your Comment: Comment reason given by you for taking action on corresponding request.
- Request Status: Current status of corresponding request. See Appendix A to see list of all statuses.
- Active Feature: In this column, there will be two action: a) Yes, b) No. These action will only be visible if the corresponding request status is “Waiting for Approval”.
- Yes Action: By choosing this action, system will open a pop up box from where system will ask for comment before activating import/export feature into corresponding seller account. After approving request, system will send notification to seller.
- No Action: On choosing this action, system will open a pop up box from where system will ask for comment before disapproving corresponding request. After disapproving request, system will send notification to seller.
YES/NO action will only be shown for request having status “Waiting For Approval”.
5. Seller Account Interface
If extension is installed and enabled, a menu will be shown in seller account menu as shown in below screen:

“Product Import/Export”menu will only be shown to approved sellers.
5.1 If Feature is Disabled
If this case, menu will still visible to seller. When seller will click on “Product Import/Export”menu, system will show a message as shown in below screen:

To activate this import/export feature into his account, seller must has to send activation request to you. To send request, there will be a link “here”shown in above screen. On clicking this link, system will open a form just below above message as shown in below screen:
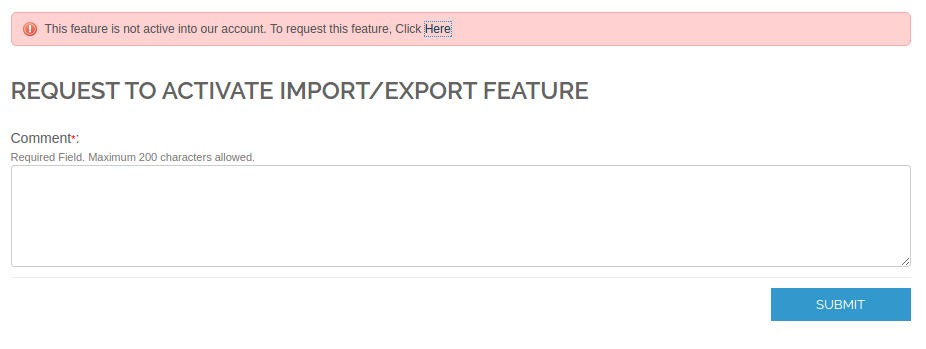
In the above screen, seller must have to provide his reason for using this feature to send request to you. After clicking send button, system will notification email on store email id and request will be shown in “Feature Activation Request”list in admin panel.
If the seller has already requested for import/export feature and still waiting for admin response, then in this case, system will show different message to seller and will not allow seller to make further request until unless reqsponse is reviewed by admin. In this case, given below screen will be display to seller:

5.2 If Seller is inactive or Not Approved
In this version, we will not allow seller who is not approved or disabled by admin, to use this import/export feature. If any of one condition is true then system will show following message to seller as shown in given below screen:

5.3 If Feature is Active in Seller Account
If the feature is active into seller account, then system will show the import/export form to seller on clicking of “Product Import/Export”menu. Given below is the screen of import/export form:
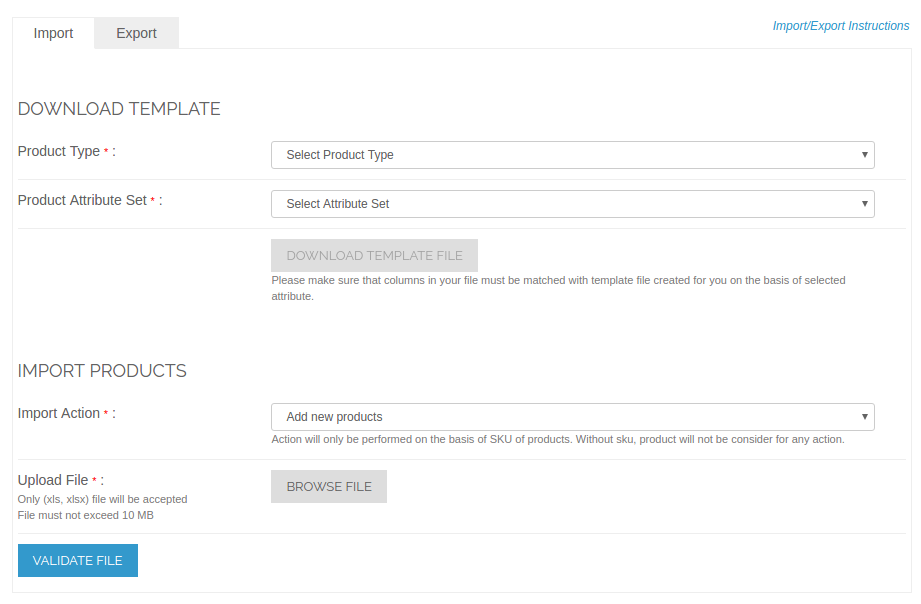
5.3.1 Download Template
System will only accept excel file with predefined format. To upload products, seller must have to upload excel sheet in proper format. To get the sheet format, seller must have to download template according to product type and attribute set.
On the basis of product type and attribute set, system will generate template file and seller must have to upload product into same format.
“Download Template”button will only be enable, if seller select both product type as well as attribute set.
5.3.2 Import Products
To import products, seller must have to select import action as well as upload valid file. By default “Add New Product”action will be selected. To see available import action, go to Appendix A.
After uploading excel file, system will first validate sheet data as per product type and attribute set in uploaded file.
If uploaded file has any type of error, then system will redirect seller to a page from where seller can download the same uploaded file with errors in it. Following is the screen of this download page:

On clicking “Download File with Error”will download the same uploaded file with errors.
If the file is valid, then system will show the given below screen to seller:

On clicking “Import Products”, system will start process of adding/updating product into system.
5.3.3 Export Data
In seller account, when seller will click on “Export” tab, following screen will be shown to seller:

Exporting Categories
To export categories, seller must have to select export type as “category”. On clicking “Export Data”button, system will download all categories in excel sheet.
Note: Only those categories will be downloaded which are assigned to you.
Exporting Products
To export products, seller must have to select export type as “product”. After selecting export type, following fields will be shown to seller as shown in below screen:

Seller must have to select product type as well as attribute set to export his products. Exported product data will be in excel format.
There are also other options to minimize the exported data as per your need given in above screen.
