
1. Introduction of Magento Helpdesk Extension:
The Magento Helpdesk extension by Knowband will act as a Ticket Management System for a particular store and will make easier for the store owner to manage the ticket which will be raised on his store by the customers.
It is a very useful Magento extension for both the ends i.e for merchant and the customer because it lets the customer to raise the ticket in a very convenient way and at the other end lets the merchant manage the ticket in a very efficient way. The Magento desktop helpdesk also shows the merchant the details of the customer those who have raised the ticket on his/her store.
2. Installation
After purchasing Magento customer helpdesk extension, you will get following files as shown in below screen:
- deskoid.zip (contain source code of the extension)
- User Manual
Follow the following steps to install Magento customer contact extension:
- Unzip the deskoid.zip folder
- Copy all the files and folder of unzipped folder into your store root directory
- After coping all the files and folders, clear the cache.
- Just open any page of your store. Magento will install the Magento module at the time of loading of any page.
- After installing, please login into your admin panel. And go to the below menu:
System > Configuration > Advanced
Here you will see that, the Magento ticket system module is listed.
3. Extension Interfaces
There are two ends from where user will interact with helpdesk extension functionality. They are following:
- Admin Interface of Magento customer support extension(Only be accessible by admin/store owner/support)
- Customer Interface of Magento customer support extension (anyone can see and customer raised tickets from here)
Each interface of the Magento desktop helpdesk by Knowband has been explained in the next section.
4. Admin Interface
This interface of the Magento customer helpdesk will only be accessible in admin panel. After installing Magento customer contact extension, deskoid menus will be visible in the menubar as shown in below screen:

There will be 4 submenus from where you can configure your Magento ticket system as well as manage your tickets.
4.1 Configurations
Here admin can enable/disable his Magento desktop helpdesk at any time. Also will give option to fetch customer replies from his email. The configurations panel of the Magento customer helpdesk is given below:
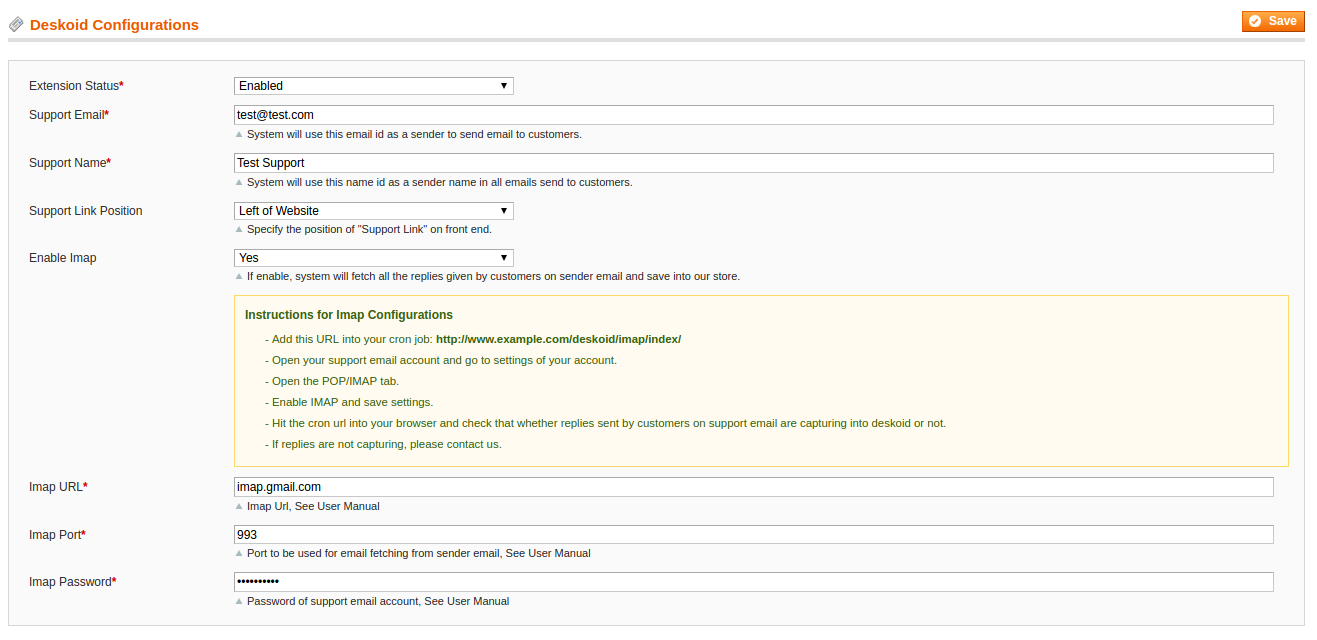
Fields
- Status: By default this field of Magento customer contact will be disabled. On the basis of this setting whole system on front will work accordingly. If the Magento ticket system is disabled, then system will not allow customers to create new tickets
- Sender/Support Email: Required field of the Magento contact us extension and default will be empty. This will be the email id of sender or store owner or something else that admin wants. All the emails related to tickets will be send to customers by using this email id.
- Sender/Support Name: Required field of the helpdesk extension and default will be empty. Can be any name that admin wants. This name will be set as sender name in the email send to customer related to tickets.
- Support Link Position: Default position of the Magento customer support extension will be left edge of the website. From here, you can change the position of “Get Support”link on front end as per your need.
- IMAP Status: Default will be disabled. With the help of this, system can fetch replies send by customer on the sender/support email will be fetched by system and tracked into system.
- IMAP Url: Required if IMAP is enabled. Here you have to give IMAP url of sender email ID. To know about IMAP URL, see appendix A.
- Port: Required in case of IMAP is enabled. Default values will be 993. See appendix A.
- Password: Required field of Magento extension, in case if IMAP is enabled. Password of the sender email ID. See appendix A.
- Save & Continue: After clicking this button, system will first validate settings and then save settings into system.
4.2 Ticket Topics
In this field of Magento customer helpdesk, admin will manage all the topics related to customer queries. With the help of these topics admin will be able to identify what type of issues customers mostly faces.
4.2.1 Topic List
When admin will click on “Ticket Topics” menu, then Magento customer contact will by default open the list of all the available ticket topics that he has created. The list will be shown to admin as shown in below screen:

Columns
- ID: Unique id of the topic.
- Topic/Subject: Label or Topic or Name of the subject. By default label will be shown in this list in default store view.
- Date Added: Date on which corresponding topic is created.
- Date Updated: Date at which corresponding topic is last updated.
- Status: Status of the corresponding record.
- Edit: Link to edit corresponding topic.
- Delete: Link to delete corresponding topic
- Add New: By clicking this button, system will redirect you to page from where you can add new topic.
4.2.2 Add/Edit Ticket Topic
Whenever admin will click on “Add New” or “Edit” button on topic listing page, the Magento extension will open a form where admin can create/edit topic as shown in below screen:

Fields
- Status: Required field of the Magento ticket system and by default will be enabled. According to this value, the corresponding topic will be available to customers on front end.
- Label/Subject: Required field and default will be empty. This field of Magento contact us extension will be a store specific field. Admin must have to provide value for each store view.
- Back: To return back to list.
- Save: On clicking this, helpdesk extension will first validate form values and then save in to database. After saving, Magento customer support extension will redirect admin to topic listing page with success message.
- Save and Continue Edit: This button of Magento desktop helpdesk will also have simliar functionality as like “Save” button with the difference that, it will redirect back to same form with success message.
- Delete: Display only in case of topic editing. On clicking this button, Magento customer helpdesk will delete corresponding topic from system.
4.2.3 Delete Topic
To delete the topic of Magento customer contact, we have given delete option with each topic in list as well as topic edit page. On clicking this link, Magento ticket system will first ask for confirmation. As per your confirmation, system will delete the corresponding topic from system.
There will be no impact of this deletion on tickets raised by customers by using deleting topic.
4.3 Customer Tickets
In this field of Magento contact us extension, admin can see all the customer queries and resolve queries by making reply on him.
4.3.1 Customers Ticket List
By default, when admin will click on “Tickets” menu, system will open list of all tickets as shown in the below screen:

Columns
- Ticket Number: System generated unique identifier for each ticket. This will be unique for each ticket.
- Customer Name: Name of the customer who has raised the ticket.
- Customer Email: Email id of the customer who has raised the ticket.
- Subject/Topic: Topic on which ticket is based on.
- Summary: Summary of the ticket.
- Last Message: Time at which last message/reply send to customer by support or to support by customer.
- Website: Name of the website on which ticket has been raised by customer.
- Priority: This column of Magento customer support extension will show the priority of each ticket in different color. So that your can easily identify which ticket is critical or not.
- State: Display the current state of ticket.
- Action: Here you will have following option to each ticket:
- View Ticket: By selecting this option of Magento extension by Knowband, system will open ticket view page on which you can see all the details of ticket as well as replies on the ticket. From here, you will be able to send reply on ticket to customer.
- View State History: On selecting this option of Magento desktop helpdesk, system will shown priority change history in popup box as shown in below screen:
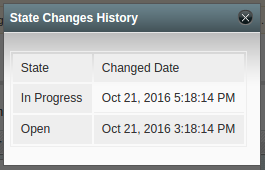
State of the ticket will shown as last state will shown on top.
-
- View Priority Change History:
On selecting this, system will shown priority change history in popup box as shown in below screen:
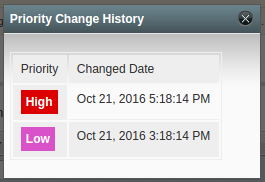
Recent changed priority will be shown on top.
-
- Change State:
With this action, you can change the state of ticket at any time. On selecting this option system will open popup box to as shown in below screen:
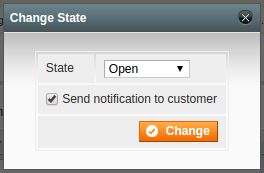
By default, system will show the dropdown list of all available state and current state will be selected. There will also be a checkbox and default it will be checked.
When you will change state and click on “Change” button, system will change the state of corresponding ticket. Also send the notification email to customer if the checkbox is checked.
-
- Change Priority:
With this action, you can change the priority of ticket at any time. On selecting this option system will open popup box to as shown in below screen:

By default, this option of Magento desktop helpdesk will show the dropdown list of all available prioritiy options and current ticket priority will be selected.
When you will change priority and click on “Change” button, system will change the priority of corresponding ticket.
4.3.2 View Ticket and Replies
In this field of Magento customer helpdesk you can see all the details of particular ticket and replies made on corresponding ticket. Also you can send replies on corresponding ticket from this page.
When the you will select “View Ticket” option in action column of ticket listing page, system will open the ticket view page.
General Information
In this tab of Magento extension, system will show you the information of tickets as shown in below screen:

There are following 3 sub sections into this tab of Magento customer contact:
- General Information: This section of Magento ticket system will contain all the basic infomation about ticket and customer who has raised the ticket.
- Issue Information: This section of Magento contact us extension will show the issue raised by customer in this ticket.
- Quick Action: In this section of helpdesk extension, system will show state and priority dropdown. With these action, you can just change the state or priority without sending reply to customer.
Conversations
In this tab of Magento customer support extension, system will show you the all conversation/replies made on corersponding tickets by you as well as customer as shown in below screen:
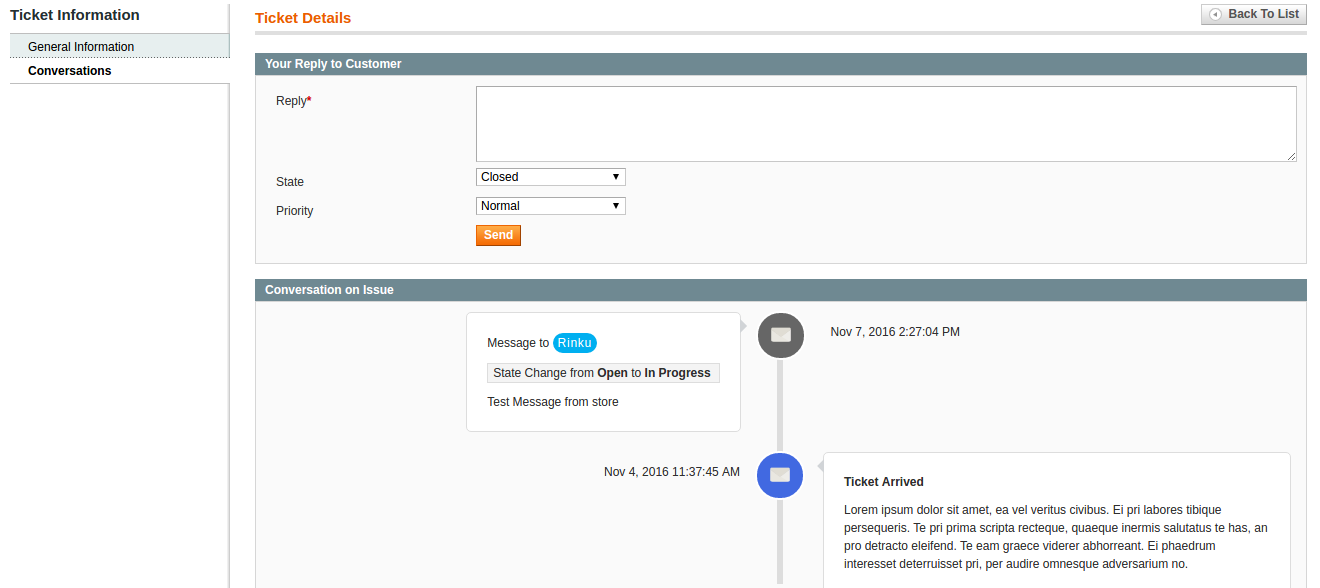
You can clearly see that, there will be form from where you can send reply to customer as well as change state and priority.
Below this, all the conversation starting from ticket will be shown to you with latest/recent reply will be shown on top.
4.4 Customers
In this section of Magento desktop helpdesk, system will only display the list of customers who has raised the tickets as shown in below screen:

Front End Interface
On the front end of the Magento customer helpdesk, system will show a link “Get Support” on each page except ticket related pages as shown in below screen:
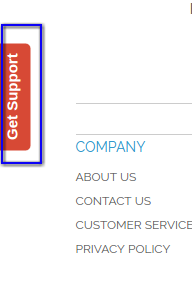
When customer will click on “Get Support” link as highlighted in above screen, system will open a page from where customer can either create new ticket as well as check status of previous ticket. The screen is given below:
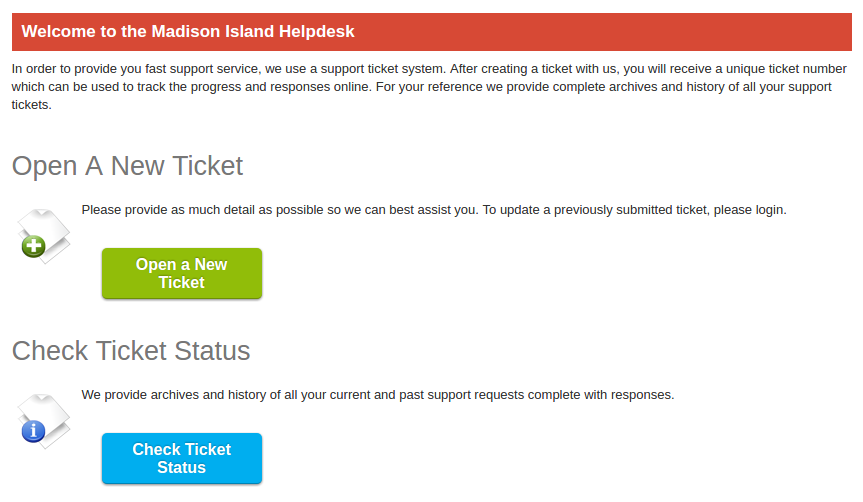
Figure 5.1
5.1 Create New Ticket
On clicking “Open a New Ticket” button in above screen, system will redirect customer to a form from where customer can raise his issue with his contact information as shown in below screen:
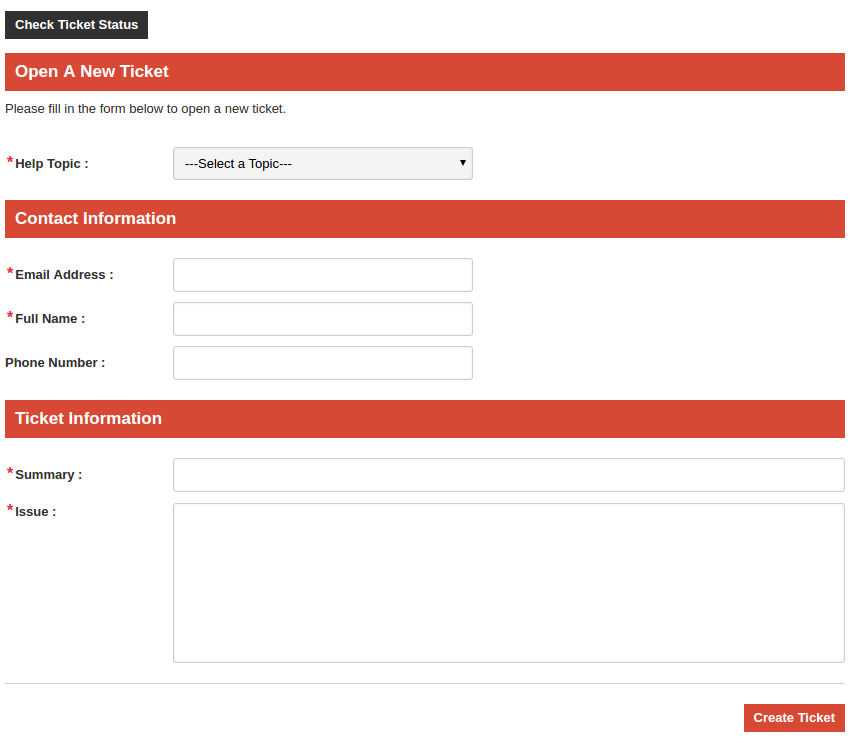
Figure 5.2
Fields
- Help Topic: Required field of the Magento customer contact and drop down list of all the enabled help topics which are created by you from admin panel.
- Email Address: Required field of the Magento ticket system. Here customer will provide his email address. If the customer is logged in then system will fill this field with logged in email id. If logged in, this will not be editable.
- Full Name: Required field and name of the customer who is raising ticket. If customer is logged in then Magento ticket system will fill this field with logged in customer’s name.
- Phone Number: Optional field of the Magento contact us extension. Here customer will provide his phone number.
- Summary: Required field of helpdesk extension. Customer will provide issue summary in this field.
- Issue: Required field of the Magento customer support extension and will have minimum 30 characters.
- Create Ticket: On clicking this field of Magento desktop helpdesk, system will validate the information filled by customer into this form. If anything system find wrong then it will show error message to customer and stay on form otherwise create the ticket.
After creating ticket, Magento ticket system will send acknowledgment email to customer as well as alert email to support.
5.2 Check Ticket Status
Customer can check his ticket status either by click on “Check Ticket Status” showed in figure 5.1 or 5.2. When customer will clicked on “Check status” button, the repective Magento extension will open a form as shown in below screen:

figure 5.3
Fields
- Ticket Number: Required field of the Magento plugin. Customer must have to provide the ticket number of ticket for which he/she wants to check status.
- Email Address: Required field of the Magento customer helpdesk and already be filled in case of logged in customer. Field will be editable in both cases. Here customer will provide the email address for which the ticket was created.
If the ticket is not exist into system, then Magento ticket system will return back to this form with error message. If the ticket is exist then system will show all the details of ticket to customer as shown in below screen:

Figure 5.4
In the above screen of Magento customer contact, customer can view all the previous replies made by him as well as store support. There will also be a form to send reply to store support on corresponding ticket.
In post reply form, customer must have to provide reply text with minimum 30 characters and submit to system.
After submitting reply, Magento ticket system will send alert email to admin about customer reply.
5.3 Customer Ticket List
This option willonly be visible for registered customer. If the registered customer has raised a ticket then a link to his ticket list will be visible to customer in his “My Account Section” as shown in below screen:

Figure 5.5
On clicking the above highlighted link, Magento ticket system will open ticket listing page where all the tickets created by corresponding logged in customer will be displayed as shown in below screen:

Appendix A
IMAP BASICS
To know about IMAP, please read the article on given url:
https://whatismyipaddress.com/imap
IMAP Terminology:
IMAP URL:
The first kind of URL is an IMAP UR which look like this:
imap.hostname.com
Hostname is the internet host name or IP address of the IMAP server
For example, if your email id is on gmail then IMAP url will be as:
imap.gmail.com
IMAP PORT:
Port is the server’s IP port. Defaults port is 993
IMAP PASSWORD:
Password of your email account as you use to open your inbox.
HOW TO ENABLE IMAP
To enable IMAP into our email id please follow the given steps. For example, we are using gmail IMAP configuration process.
Step 1: Open your gmail email account.
Step 2: Go to your inbox setting page by clicking setting option as shown in below screen:
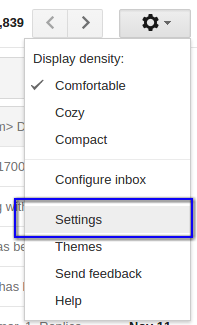
On clicking above highlighted link, gmail will redirect you to setting page.
Step 3: Go to in our POP/IMAP tab.
Step 4: Enable IMAP and save changes.
HOW TO INSTALL CRON JOB
Deskoid need to install cron job on your server to get fetch replies from email server withing predefined time interval.
To install cron job, follow the given instructions:
Step 1: Open your Terminal(for linux server) and login into your store.
Step 2: Type “crontab -e”and hit enter button.
Step 3: After step 2, editor will be opend in the same window. Here paste the given url:
* 0/1 * * * wget -O – https://www.yourstore.com/deskoid/imap/index/ >/dev/null 2>&1
With the above url, deskoid will run this address every hour to fetch email replies from support email id.
Step 4: Save changes.
Watch the video tutorial here:
Find more details here:
Module Link: https://www.knowband.com/magento-deskoid-helpdesk
Admin Demo: https://mademo2.knowband.com/admin
Front Demo: https://mademo2.knowband.com/
