The logistics sector’s global leader is DHL. Specializing in transportation, courier services, and international shipping.
While booking shipment on DHL using API (In our case, the delivery country was “Ireland”), we got an error in response to the capability request. The error was “The destination location is invalid. Please check the data“.
Solution:
For this issue, we raised a ticket on DHL, and in response, they replied as below:
When requesting capabilities, it is important to provide complete and quality address data. It is necessary to determine accurate routing information and capabilities for the origin and destination. The following might be the reason for the error:
It might be possible that there are more than one city with the same name in different suburbs. So to get a successful response, we need to add suburbs in destination address specially, for deliver country “Ireland”.
For the destination countries, which do not have any zip codes, city name must be spelled accurately. For example, there is no city called NORTH ROAD in IE, the actual city is called M50 NORTH ROAD.
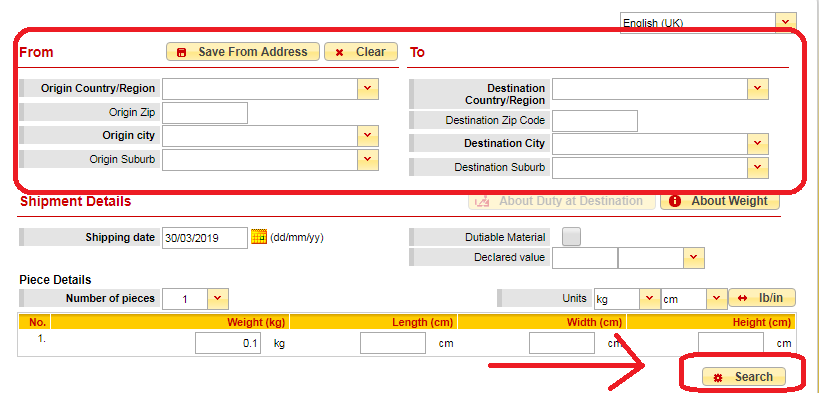
From this response, we were not clear about the validation of address means how do we know that the address is correct or not or the city name is correct or not. For example, if we are sending the city name as “Co. Dublin” in the create shipment request, we get an error of Invalid Location. So we have raised a ticket again to know how we can validate address and in response, DHL suggested a tool named DHL Capability Tool (https://dct.dhl.com/). Just enter the sender and destination address in the form and click on search button as shown in the screen shot below:
This tool will give the result if the address is valid or not. So if you are getting any error regarding location, you can validate address using this capability tool.
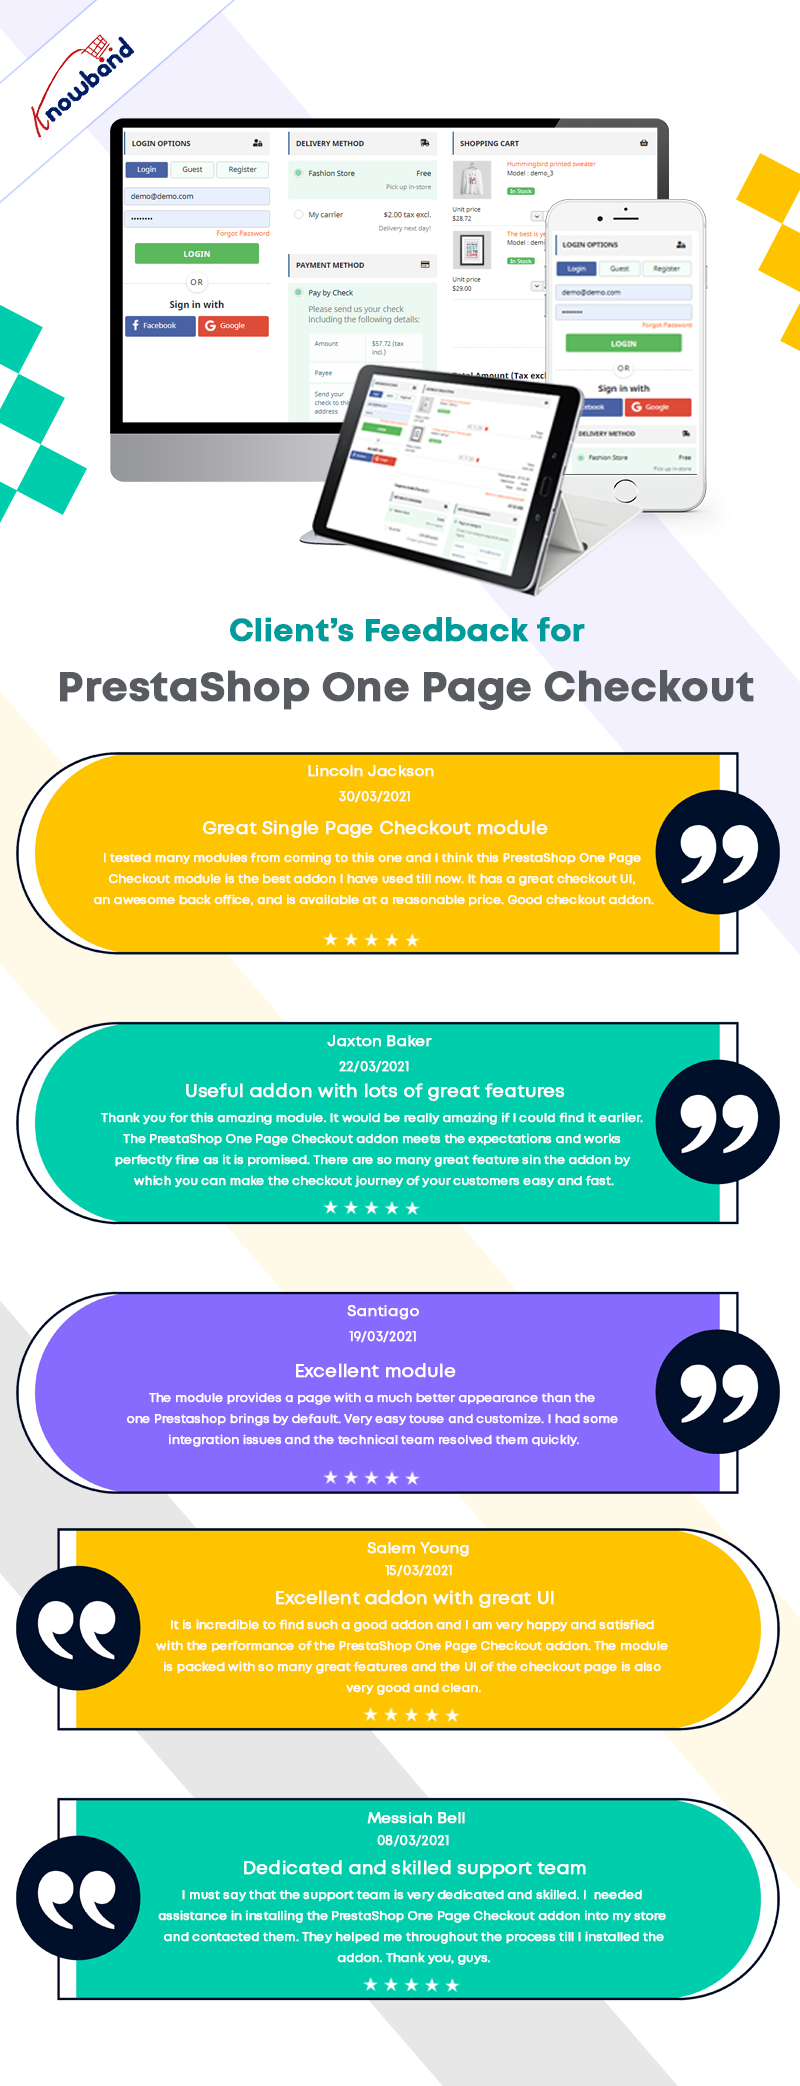
Knowband is proving One Page Checkout modules for eCommerce stores that are compatible with DHL. This is available for all major CMS platforms like Prestashop, Opencart, Magento, and Magento 2.
One Page checkout is a must-have for an eCommerce store as it helps in greater conversion rate, reduced abandoned cart rate, and ease of checkout for the user. Find what customers are saying about this module below:
In this age of the digital world, awareness has become a prerequisite for every individual and all the industries are growing so rapidly that we never know what becomes trendy like how. The one such industry which has grown manifolds and thanks to the 4G Internet is the eCommerce industry. For those who are not aware of it, the eCommerce industry is one of the fastest growing industries all over the world. And the biggest gift given by this industry is the trend of online shopping ruling the world. Individuals from every corner of this globe are indulged in this process and saving their time and energy. According to Statista, e-retail revenues are projected to grow to 4.88 trillion US dollars in 2021.
However, rapid growth also brought huge competition between different eCommerce merchants. The increase in eCommerce businesses led to the competition heat up between these merchants. This made them responsible to keep pace with some new eCommerce trends especially those involving technical advances to shape consumer behavior.
Here are the 5 tips and tricks to ensure fast growth in eCommerce business:
1. Enhance video content and marketing:
Video marketing is one of the best and most popular ways of content marketing nowadays. As consumers love watching videos nowadays, it’s an easy and fun way to actively engage customers on your eCommerce website resulting in the upliftment of sales and revenues.
To overcome the competition, it’s the most beneficial way to improve your eCommerce growth and take it up to new heights of success. By embedding the videos from social media like youtube or adding video-based design elements, sellers can easily enhance their home page or product page which can attract more customers towards your store.
2. Serve Omnichannel consumers:
In today’s interconnected digital era, customers are searching for their favorite product on more than one online channel or Marketplace. According to Statista, Amazon accounted for 56.1 percent of the segment’s traffic, eBay accounted for 19.5% traffic, Walmart 3.8% and Etsy accounted for 3.5% of traffic. These numbers are clearly the resemblance of the crucial need to serve omnichannel consumers by marketing the products and services on all the available channels or Marketplaces.
Today, it’s easier than before to promote your brand or product online but before that, sellers need to turn their ideas into an eCommerce business. Just be sure to market your website on different platforms like social media, renowned marketplaces like Amazon, eBay, Etsy, Walmart as well as on small retail stores too. Never ever leave an opportunity to promote your brand store in any possible way. And no matter which channel you are selling, always sell genuine and reliable products to build customer’s trust in your brand and eCommerce store too. It will not only help you to increase customer traffic but also differentiate your eCommerce store with others.
3. Mark ways towards success with AI Chatbots:
If you want to give tough competition to other sellers, you can try your hands on the 24/7 assistance feature given by AI empowered chatbots. Customers love immediate response for their queries and chatbots are the perfect solution for this. Automated chatbots can resolve any kind of query of numerous customers at the same time. However, they can’t think outside the box, recognize misspelled words or evaluate incomplete queries as their creativity is limited by the code that created them.
But, thanks to these technological advancements as they have made these chatbots smart and sophisticated too. They are SSL compatible and multilingual too which helps you attain customer satisfaction in regional areas too. Therefore, it will increase the consumer traffic on your website leading to a lump sum amount of sales and revenues.
4. Voice search is a new boon:
It usually happens when customers are unable to write the correct spelling of their desired product and are unable to find it on the website. This leads to a decrease in the conversion rate of the website as the qualified leads also turn into non-qualified ones. Voice search is the new trend in these online stores as it helped many who were unable to write the correct spelling on the search tab. They can just simply speak the name of their product and it will be presented on their mobile screens.
According to Statista, 35 percent of users stated that they would consider purchasing food via their voice assistant in the future. Some latest gadgets for voice search like Google Play, Alexa by Amazon, Amazon Echo, etc. are some of the best innovations for eCommerce platforms. Many online store owners have already adopted the voice search functionality for their online eCommerce business. The advancement of voice search is an outgrowing opportunity when it comes to enhancing your SEO and this could also be enhanced by improving your product description on the website.
5. Safe and secure payment method:
When it comes to checkout, customers believe in a safe and secure checkout and payment method as there are many people who leave the cart abandoned due to the lack of trust which can end up losing potential customers. The final stage of online shopping should be smooth and simple as many people get frustrated due to the complex checkout process and payment gateways.
According to Statista, 69.23 percent of digital shopping carts and baskets were abandoned in the year 2017 and the purchase was not completed. Many times, it is due to the lack of trust in payment gateways on the checkout. So, if you want to improve the conversion rate of your website and want to be an extra edge over other competitors, be sure to provide a simple checkout process and secured payment options. You can apply PrestaShop one page checkout addon on your eCommerce store.
Final Verdict:
As the eCommerce industry continues to evolve, the most important responsibility is to provide a positive consumer shopping experience. Sellers should remain aware of the latest eCommerce trends which include omnichannel marketing, chatbots, video content and marketing, and a simplified checkout and payment process, and it will definitely help you to stand out from your eCommerce competitors.
Competition is at its peak and we have to overcome this. To remain an extra edge over others, KnowBand offers Marketplace integrators that enable sellers to integrate their eCommerce store to some renowned marketplaces like Etsy, eBay, Walmart, Google Shopping and Newegg. You can now list the products and the descriptions at a few button clicks. Thus, it becomes easier to update the details in bulk. Moreover, the attribute mapping becomes a cake-walk with the automated approach. So, integrate your eCommerce store and earn a huge chunk of profits.
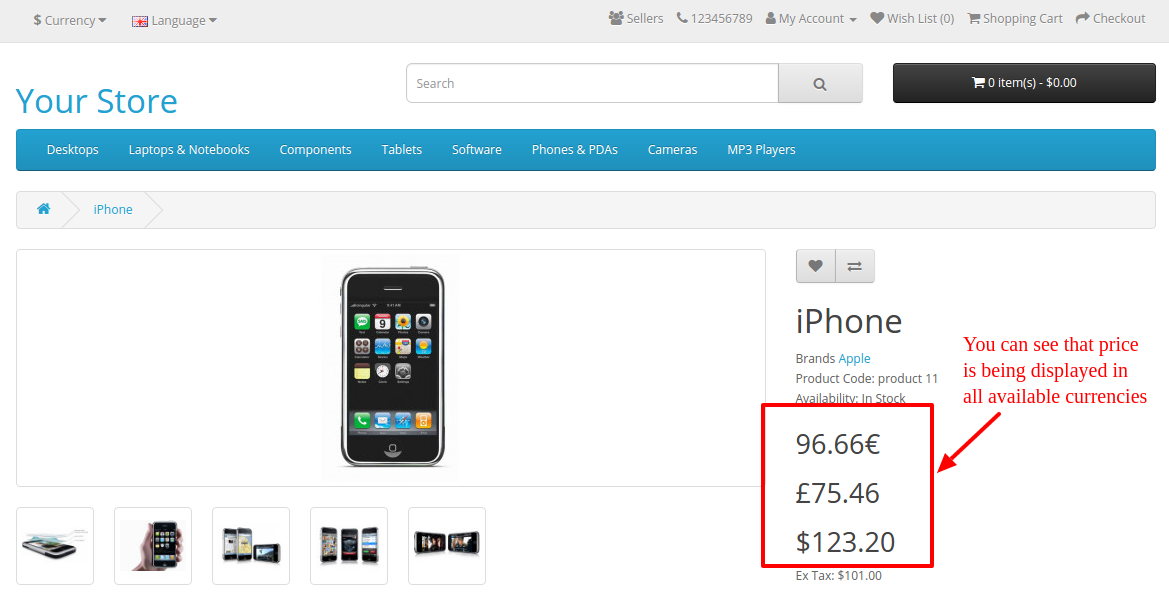
After reading this blog we will be able to display price in all currencies in the product page of OpenCart 3.x
Problem Statement
By default, OpenCart 3.x display price of the product into the currency set as default or chosen by the end user. And to display the price in all available currencies there will be few changes in the default or core files of OpenCart. (In case you do not want to change the core files then it can be done either through VqMod or OcMod.)
Requirement
We would need to modify the below-mentioned files to show the price of the product in all available currencies in the product page.
Procedure to solve the issue-
Follow the below-mentioned steps –
Open product.php from Catalog/Controller/Product and search for
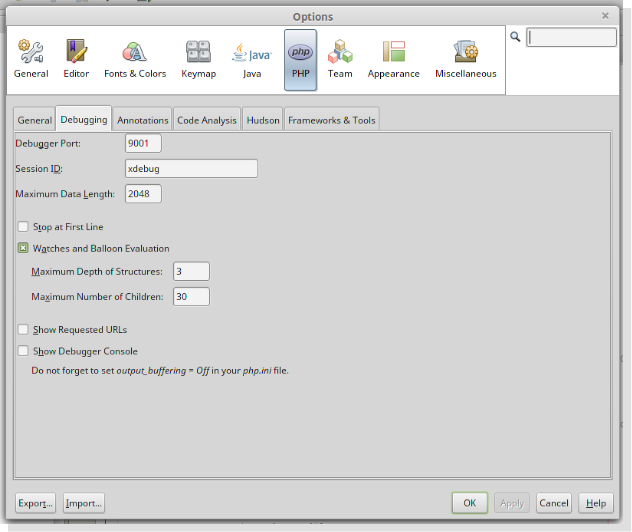
This document is all about the Xdebug installation & configure it with Netbeans in Windows.
How to debug through Xdebug in a project?
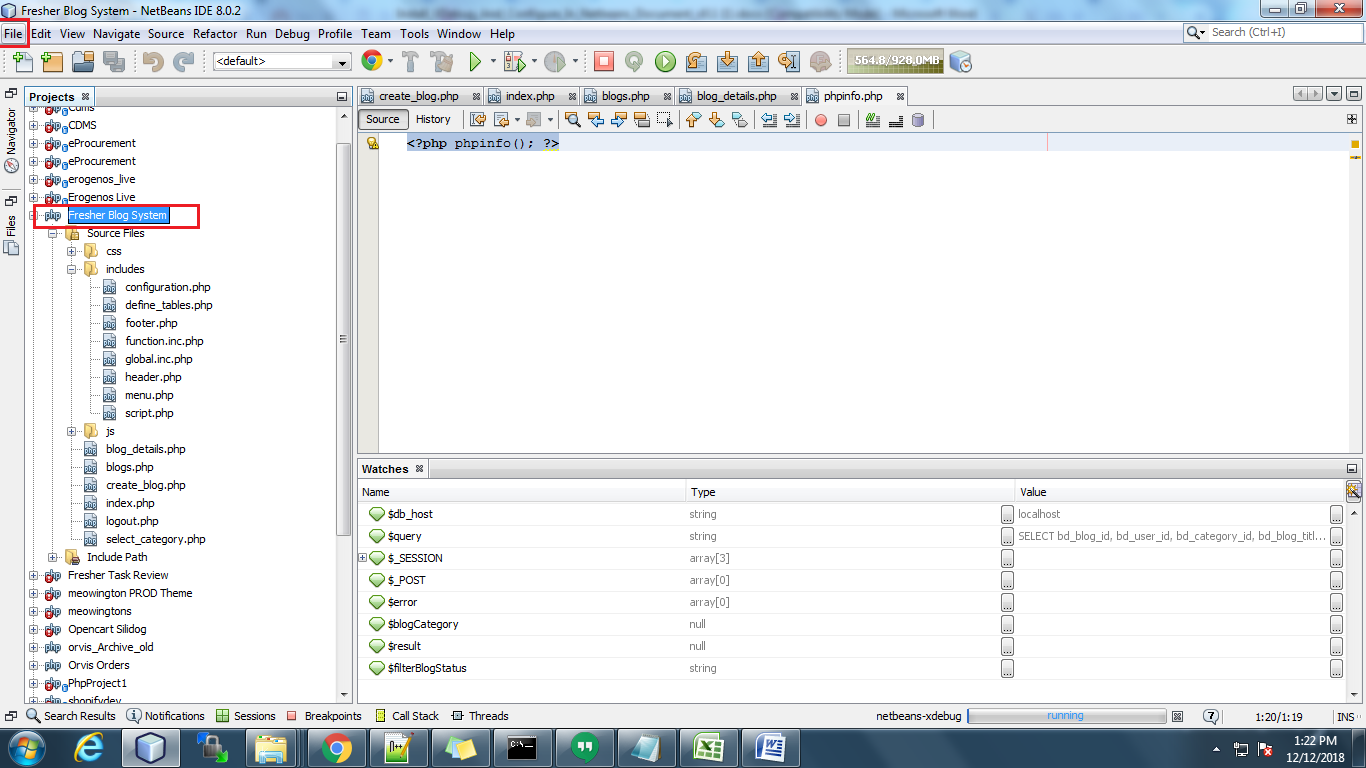
To debug through Xdebug you have to set up the project in Netbeans. Setup the Blog system project in NetBeans. After setting up the project in NetBeans select the project for which you want to debug. Now, go to the File menu in the top menu bar.
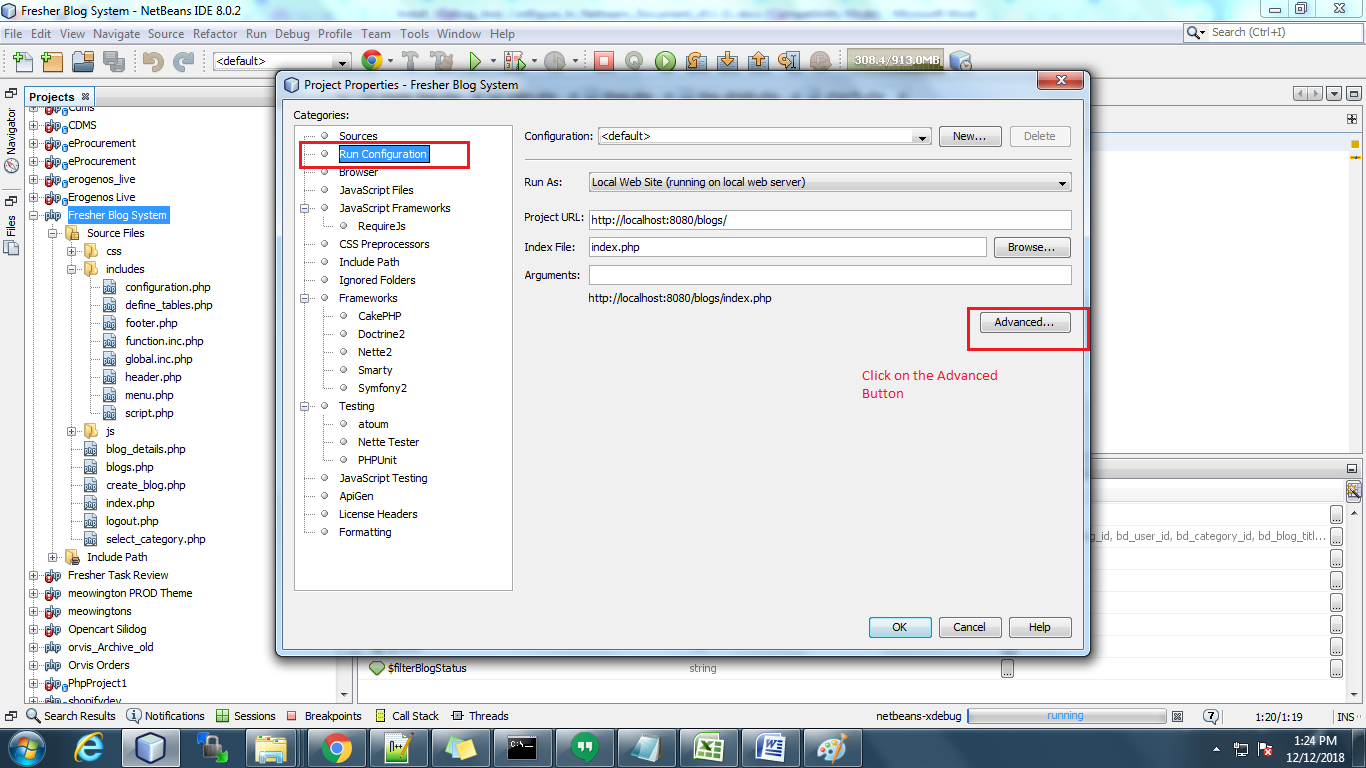
Then click on Project properties.
After clicking on this, a popup will open where you have to select the Run Configuration tab.
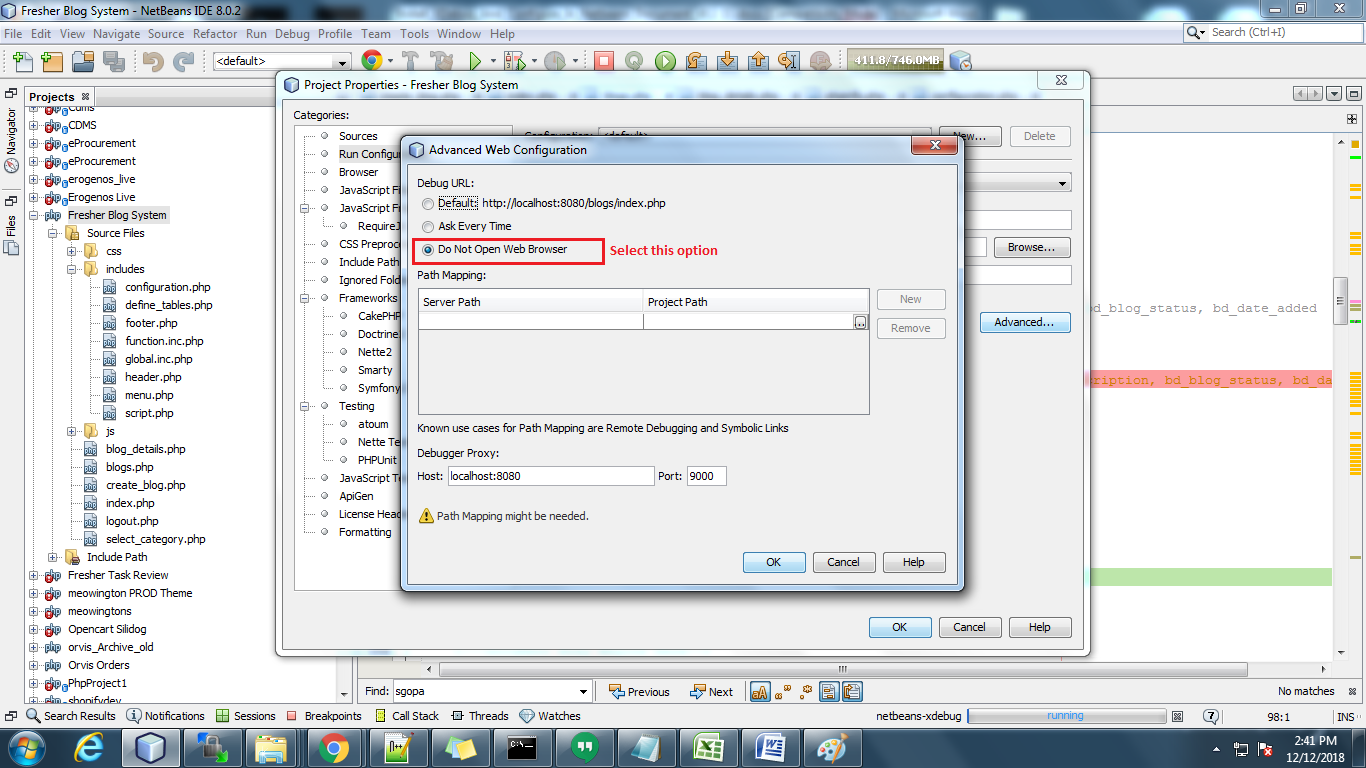
After clicking on this, a popup will open where you have to select the Run Configuration tab. Then you can see the Advanced button there. Click on this and select the “Do not Open Web Browser” option and click on OK.
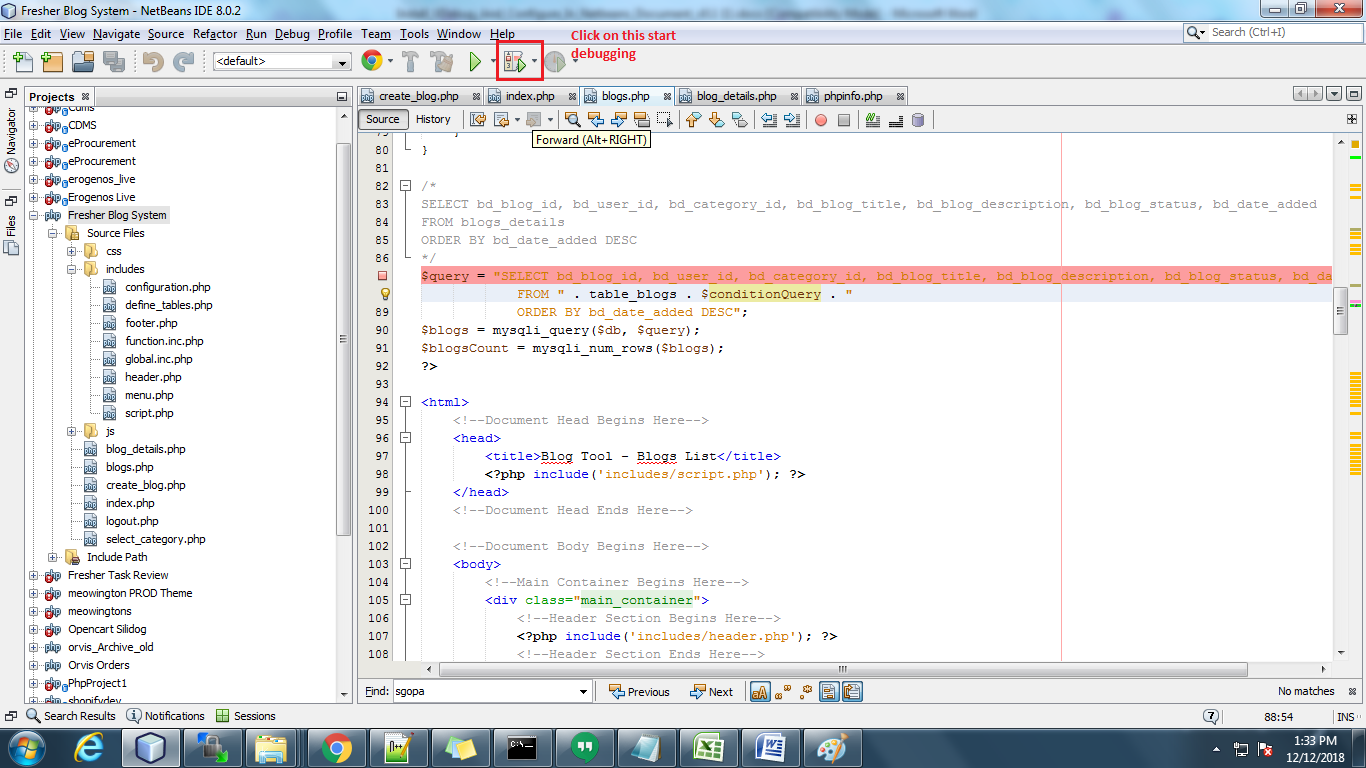
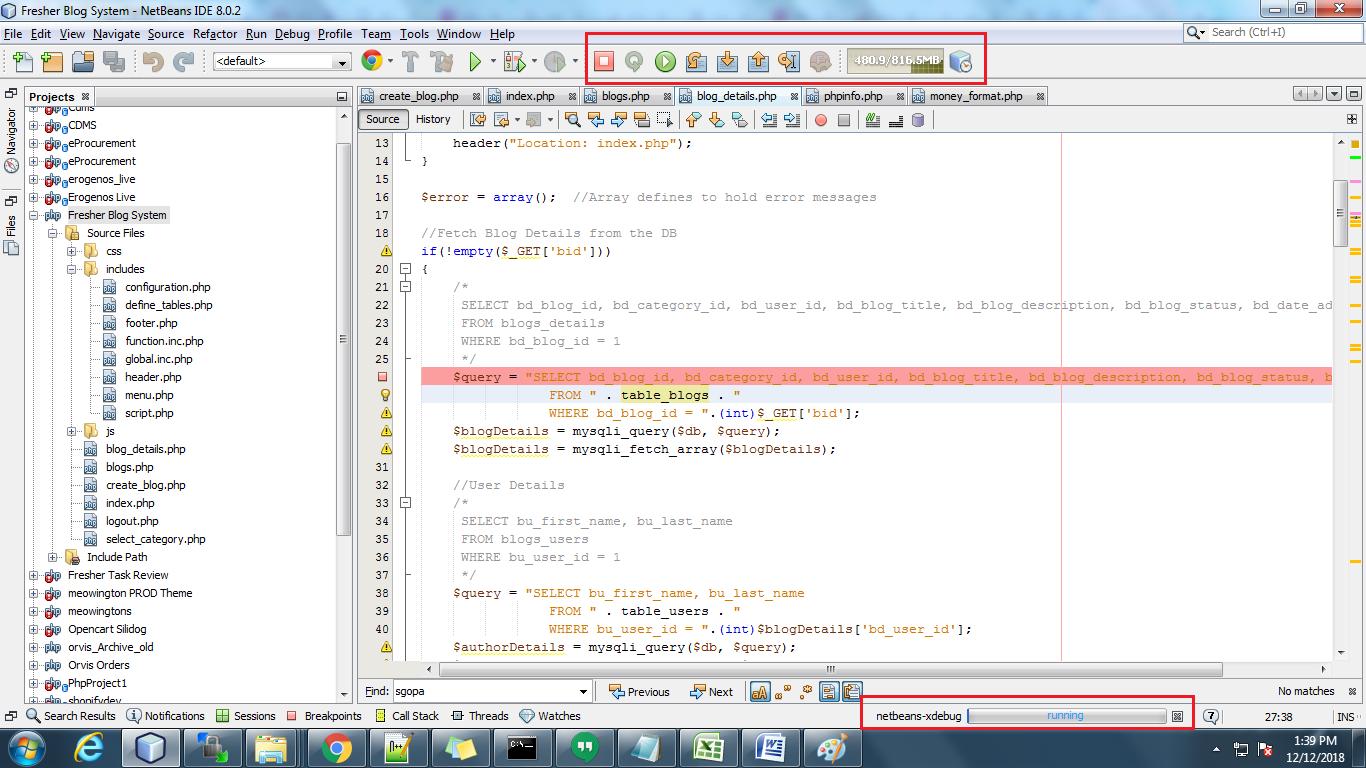
Now click on debugger to start debugging. Please see in screenshot. And before that you have to open the project in browser :
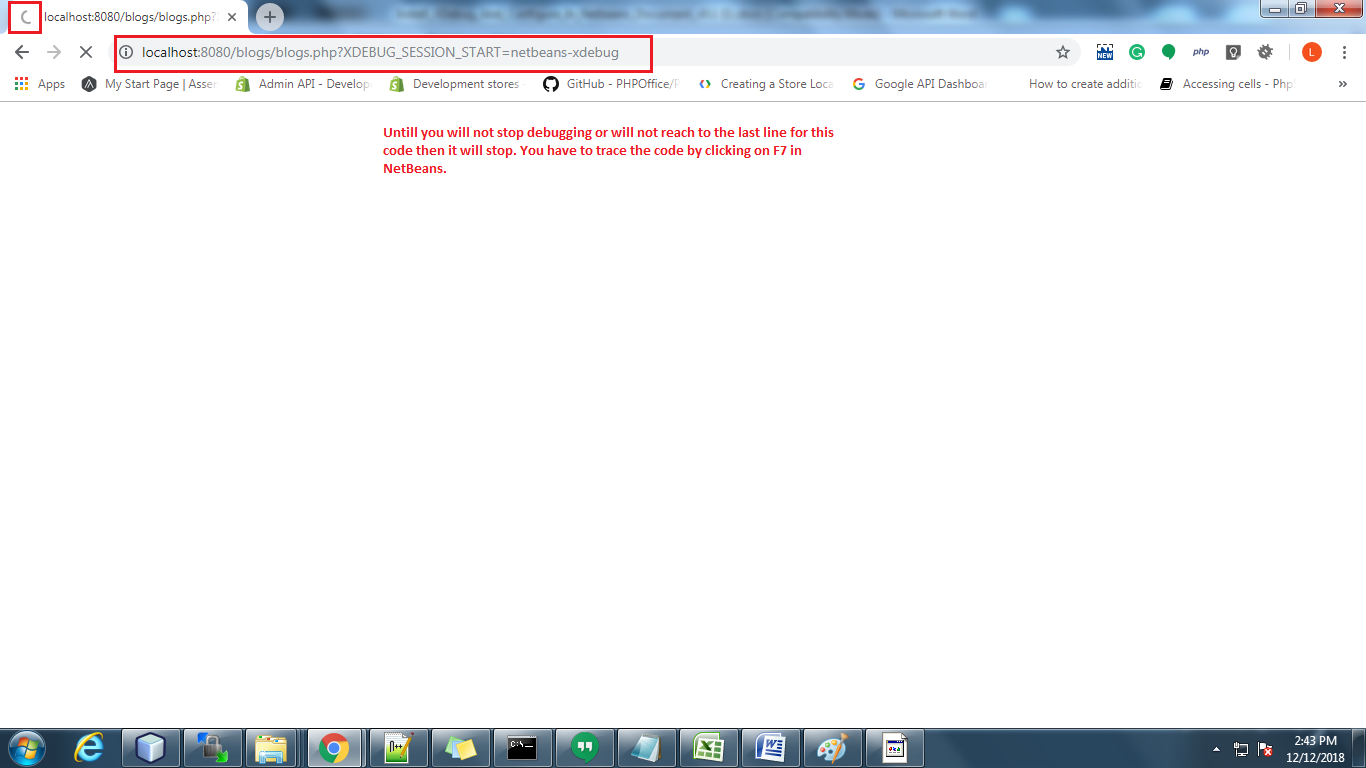
For example: https://localhost:8080/blogs/blogs.php?XDEBUG_SESSION_START=netbeans-xdebug
Note: The Highlighted part in the URL above is the xdebug session id. You have to pass it on the page which you want to debug.
You can see the Xdebug in running state in below the NetBeans notification bar in the snapshot below:
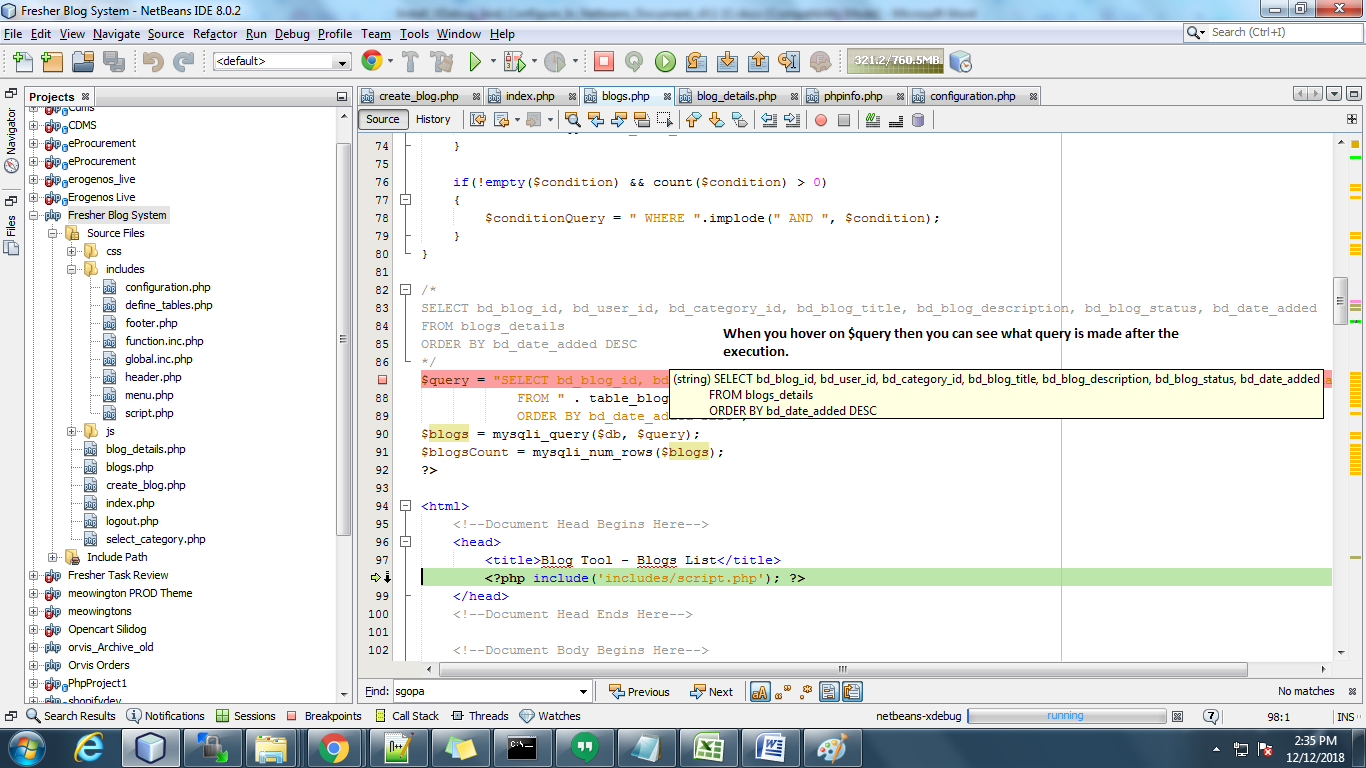
Then you have to add a breakpoint in the code file. The code will stop at that point and you can check the values. You can trace the code by clicking on F7 in NetBeans.
You can check the value of dynamic variables by hovering the variables. You can also add the variable in watch list.
Until you will not complete or reach the last line for the code which you are debugging, in the browser, it will stop. It just showed loading. After completing the debugging or closing the debugging session it will come to page ((in browser) which you are opening.
Watch the complete tutorial in the following video:
Looks helpful? Also, read the other part of the article for complete & detailed information:
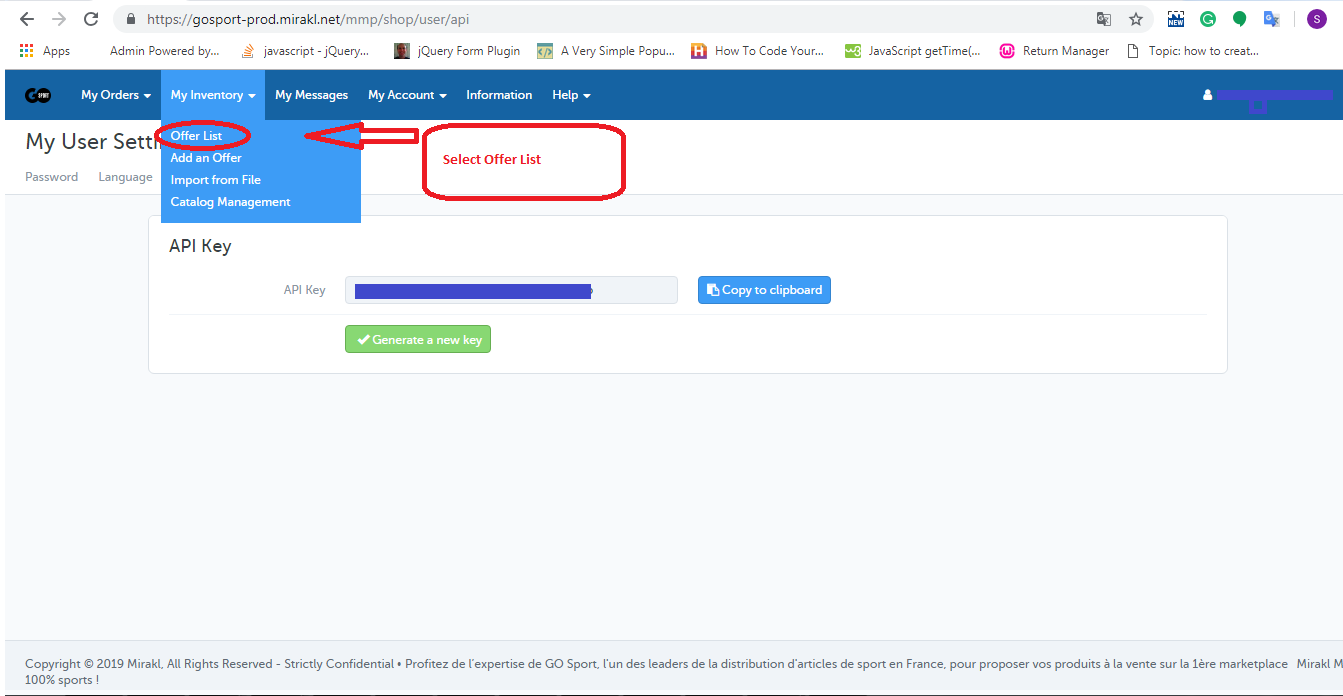
2. After logging you will need to select the offer list from the “My Inventory” tab as shown in the image given below:
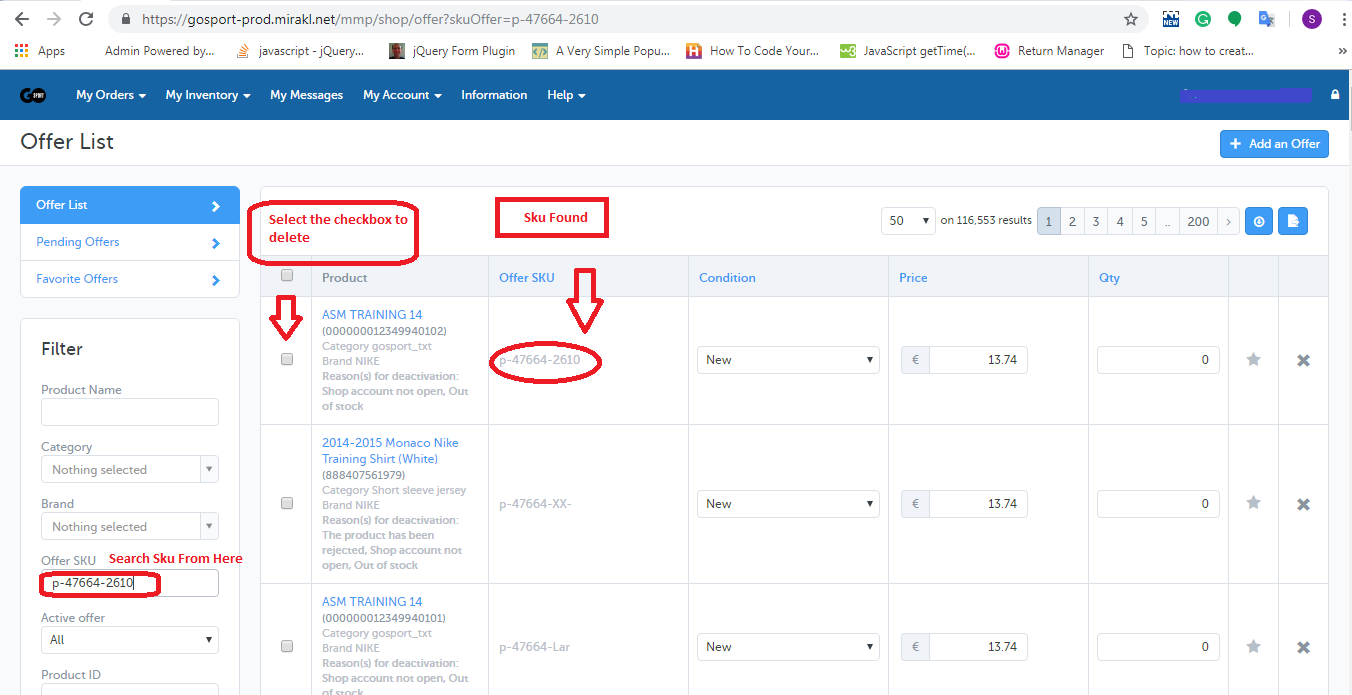
3. In the offer list page, you will need to search the SKU by using “Offer SKU” field and check the checkboxes corresponding to those SKU which you want to delete as shown in the image below.
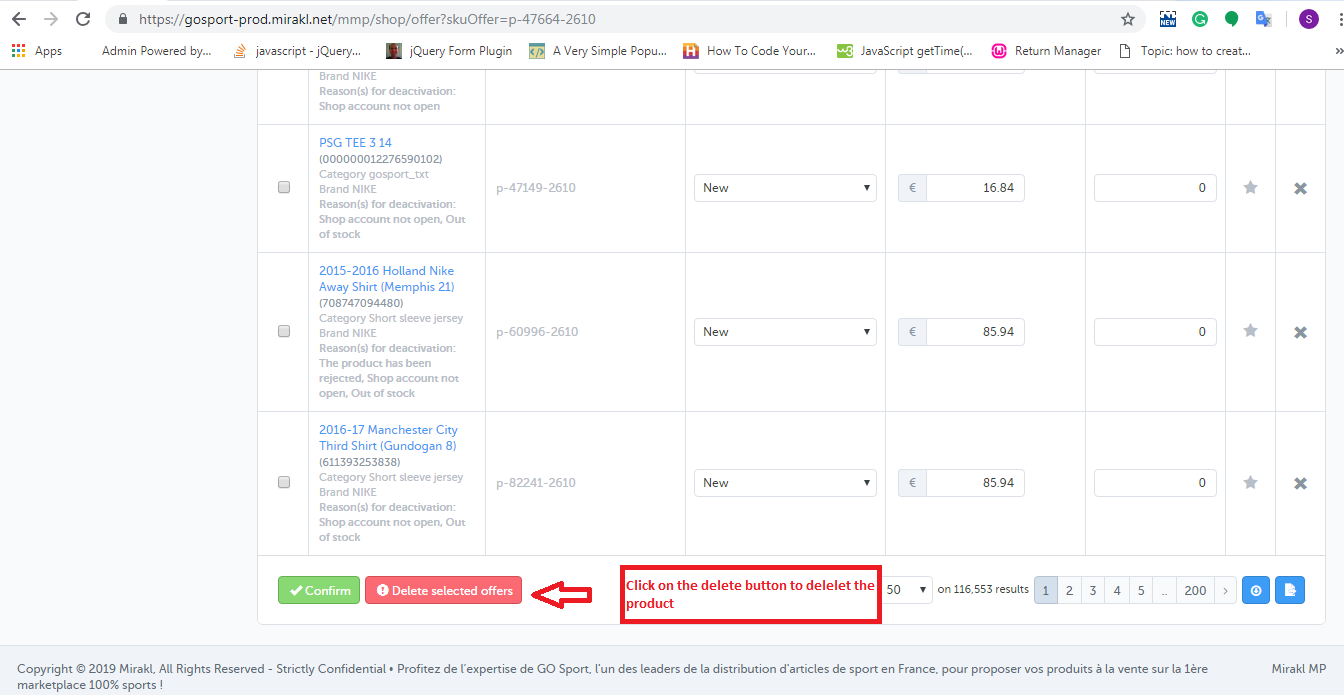
4. At the bottom of the page, you will find a button to delete the product as shown in the image below.
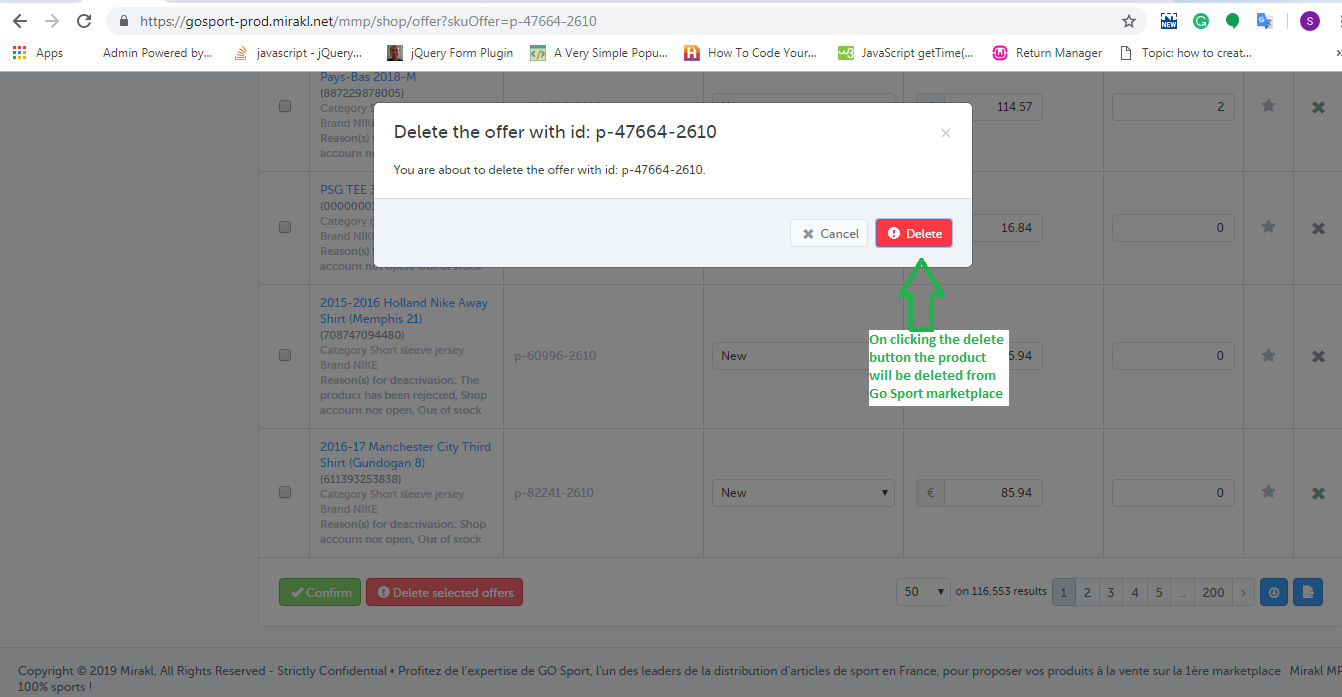
5. On clicking that button, a popup will be appeared on the screen which will show the list of SKUs that you have selected to delete and the button to delete those SKUs. This is shown in the image below:
2.0 Using Inventory Feed
You can delete the products in bulk from the Go Sport marketplace using inventory feed. You can download the sample inventory feed from the link given below:
In this feed, you need to fill the data in the following fields:
SKUs: Enter the SKU which you want to delete
update-delete: Enter “DELETE” in this column. After creating the feed, you will need to upload the feed on the Go Sport merchant account. The steps are given below:
2. After logging in, you will need to select the “Import From File” option from the “My Inventory” tab.
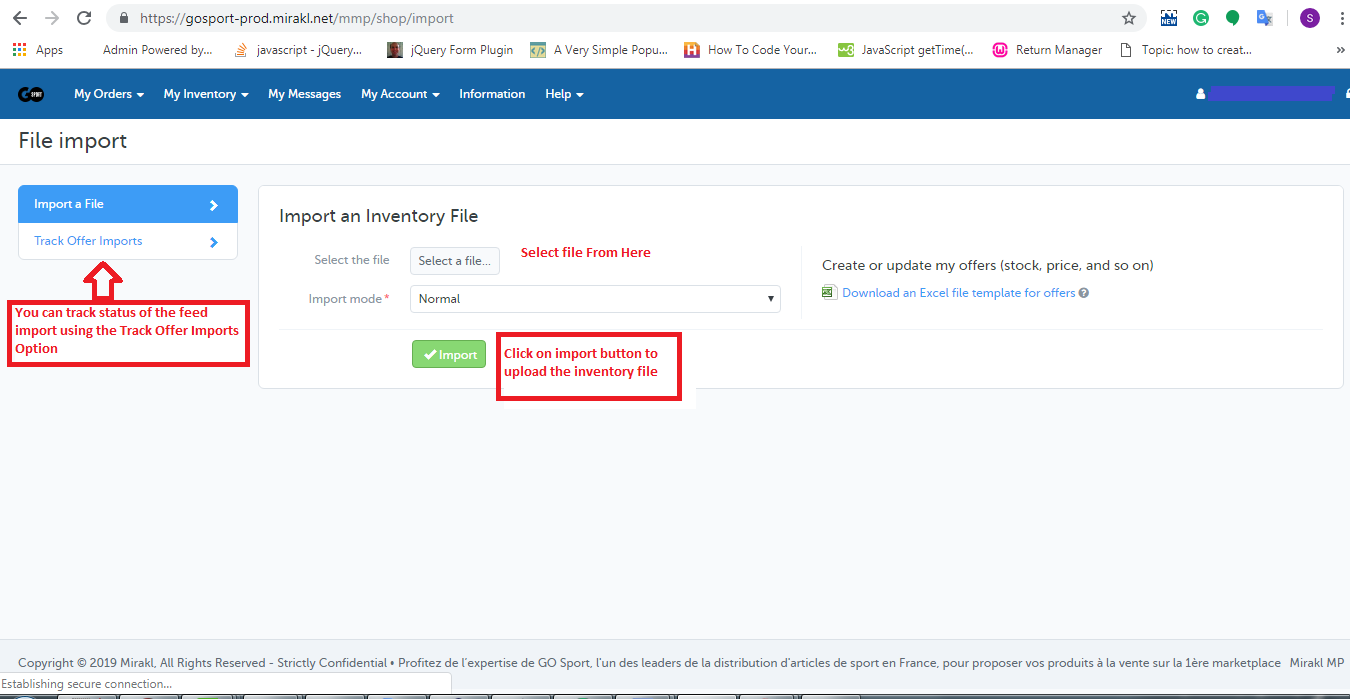
3. On the Import file page, you will need to upload the feed as shown in the image:
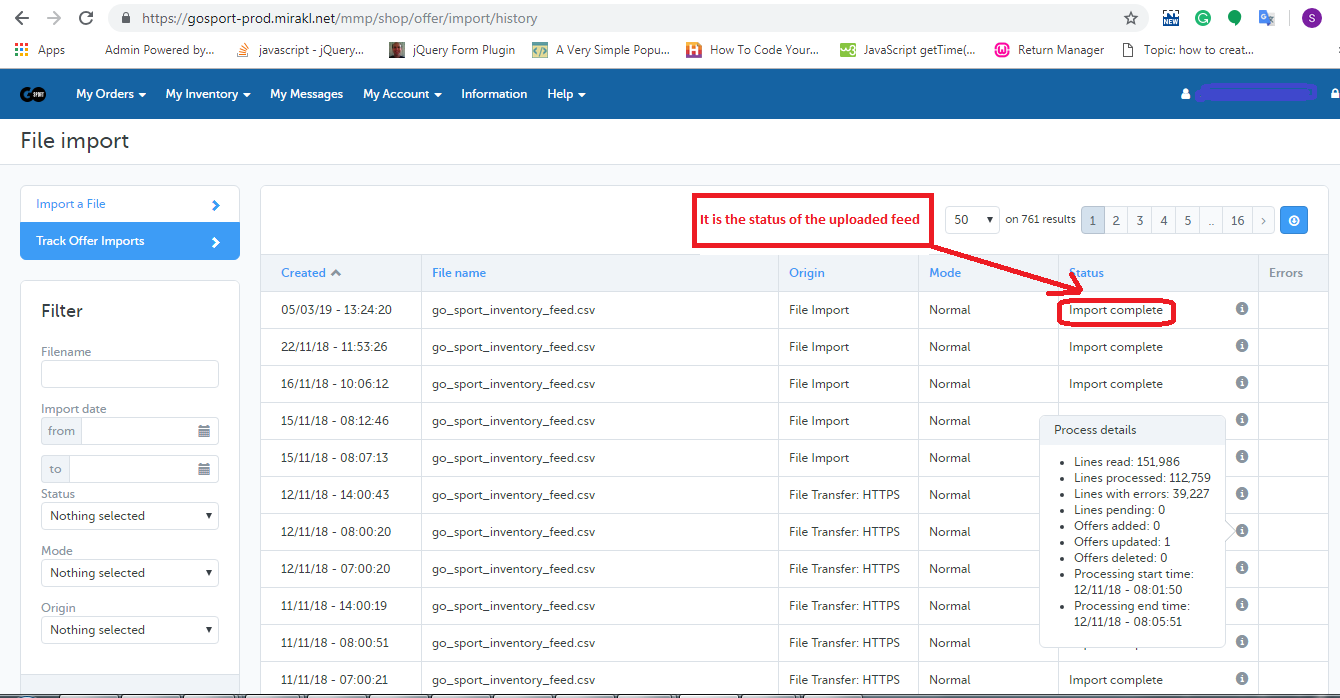
4. You can track the status of the uploaded feed using Track Offer Import Option as shown in the image given above. On clicking on the Track Offer Import option, a new page will be opened where you can check the status of the uploaded feed. If the feed is imported successfully then you can also check the processing status of the feed as shown in the image below:
Summary
After reading this document you (seller) can easily delete your products from the Go Sport marketplace.
After reading this blog, you will be able to understand how SQS is setup and how MWS is subscribed for any notification.
Let’s Create an Amazon SQS and Enable this for MWS Subscription
The Amazon MWS Subscriptions section enables us to subscribe to receive notifications. To receive notifications, you must first create and register a Destination, such as an Amazon Simple Queue Service (Amazon SQS) queue. Then, you will need to create a Subscription for the NotificationType that you want to receive.
How the queue is created and how MWS Subscription is done for the NotificationType are described below.
Create Amazon Simple Queue Service (Amazon SQS) queue
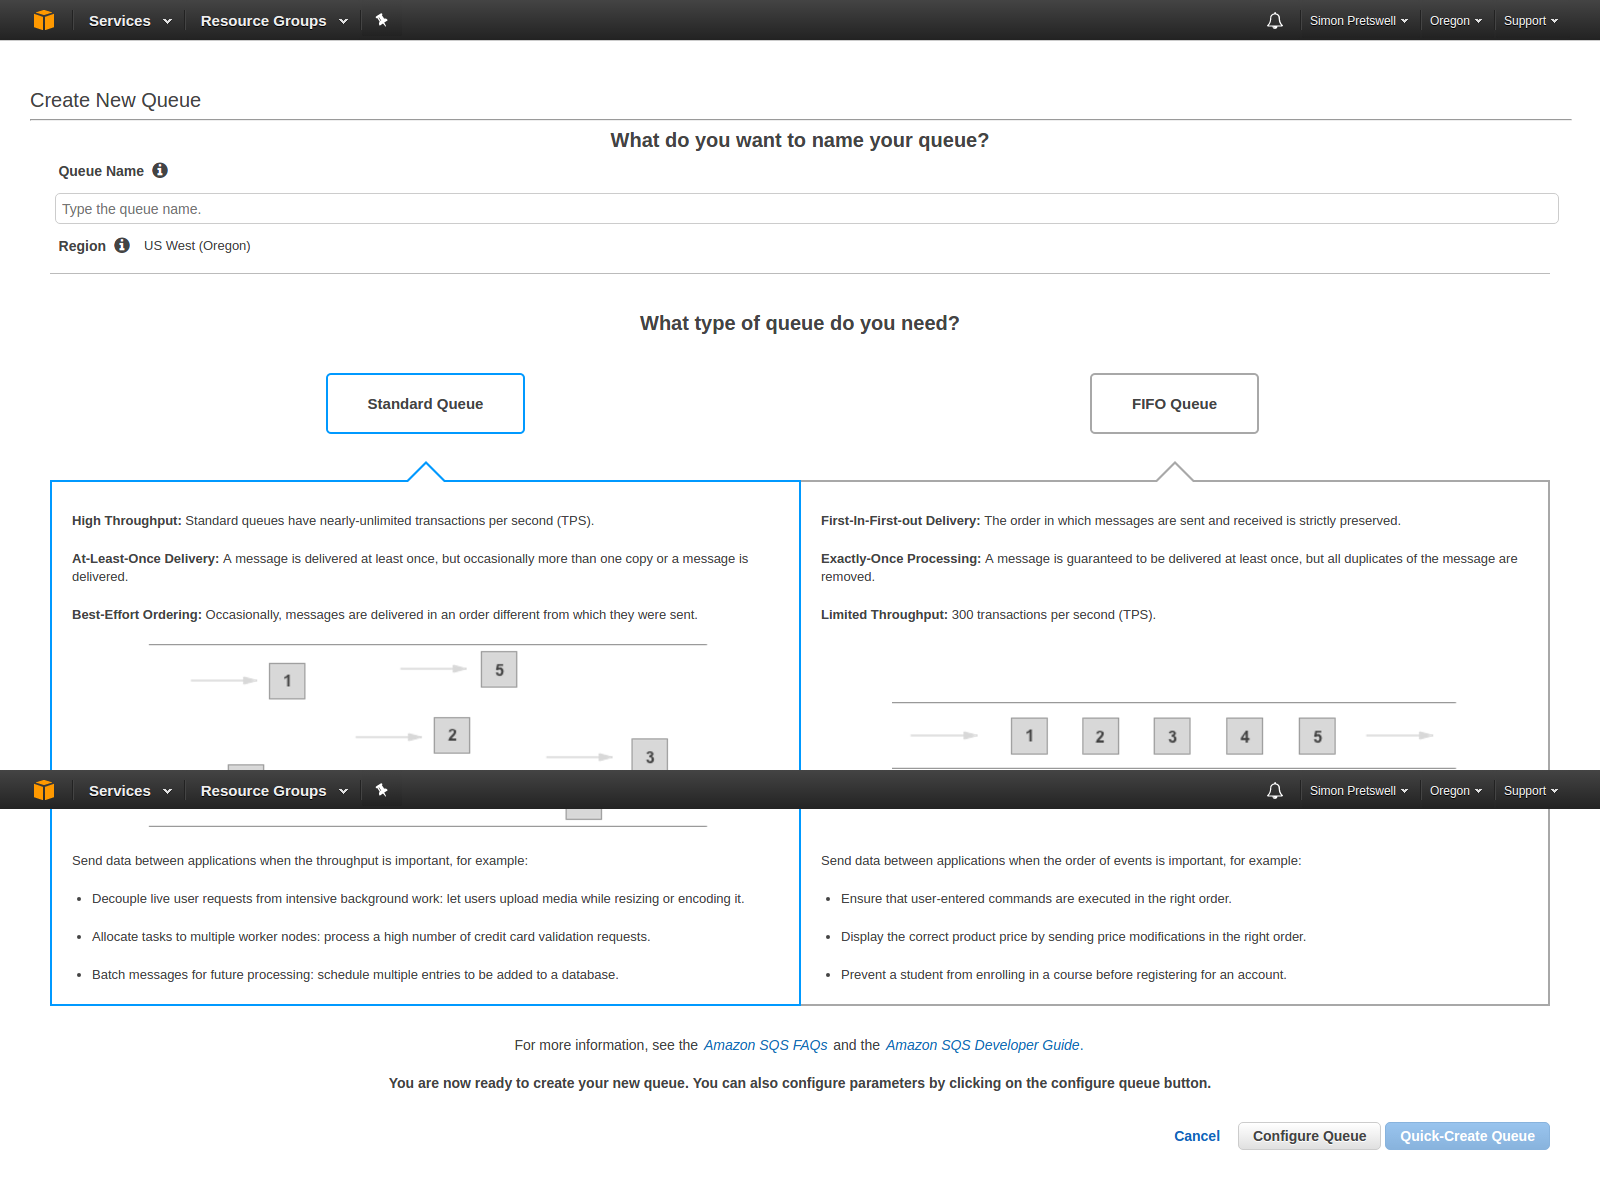
2. Click on Create New Queue button. Page to create and configure queue will be opened and this will look like below image.
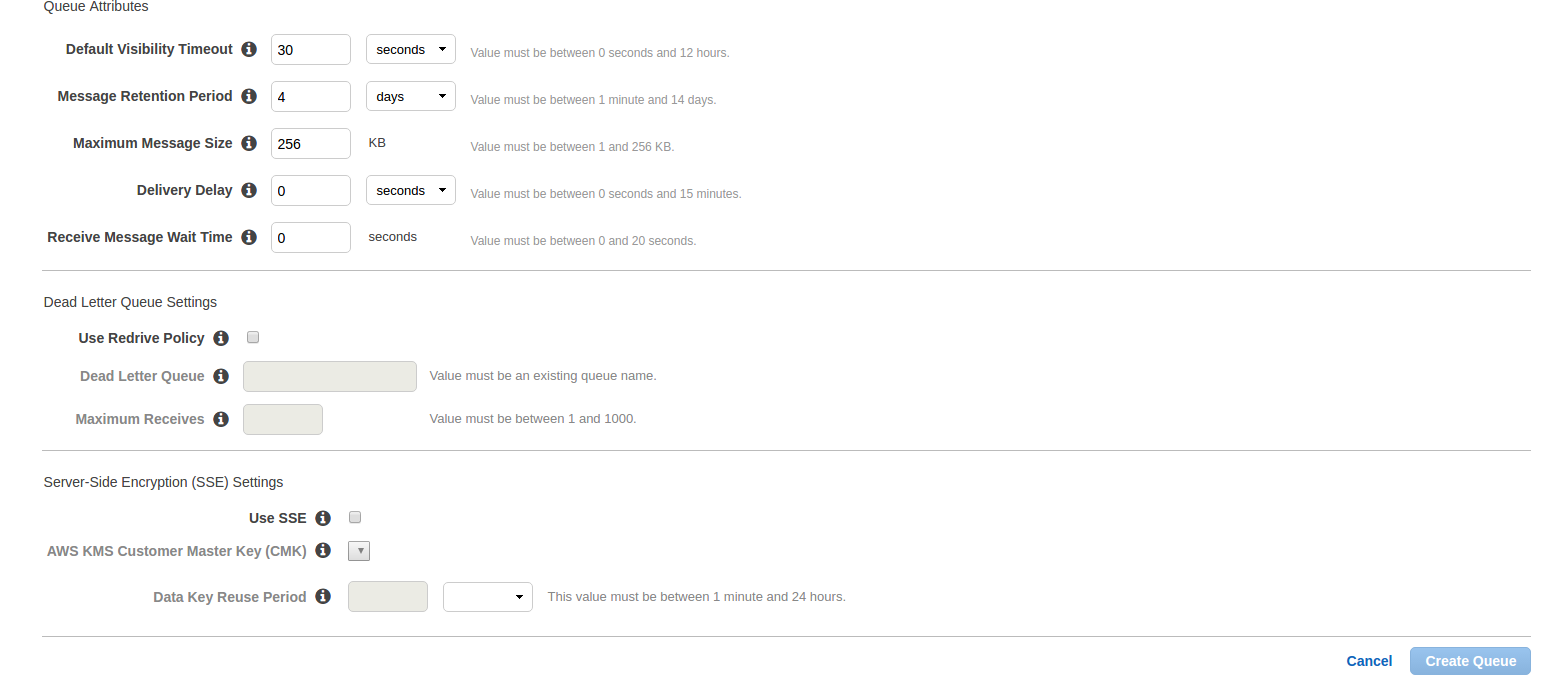
Here, enter Queue Name which you want. Select queue type. By default, Standard Queue will be selected. Now click on Configure Queue and after click on this, you will get the options to configure queue like below image.
Default Visibility Timeout: This is the time for which a received message from the queue will not be available to receive again.
Message Retention Period: This is the time for which any message will reside in the queue if that message is not forcefully deleted. After entered time, that message will be automatically deleted from the queue.
These are two most important fields. Other fields are:
Maximum Message Size: Highest message size (in bytes) accepted by Amazon SQS.
Delivery Delay: The amount of time to delay the first delivery of all messages added to this queue.
Receive Message Wait Time: The highest amount of time that a long-polling receive call will wait for a message to become available before returning an empty response.
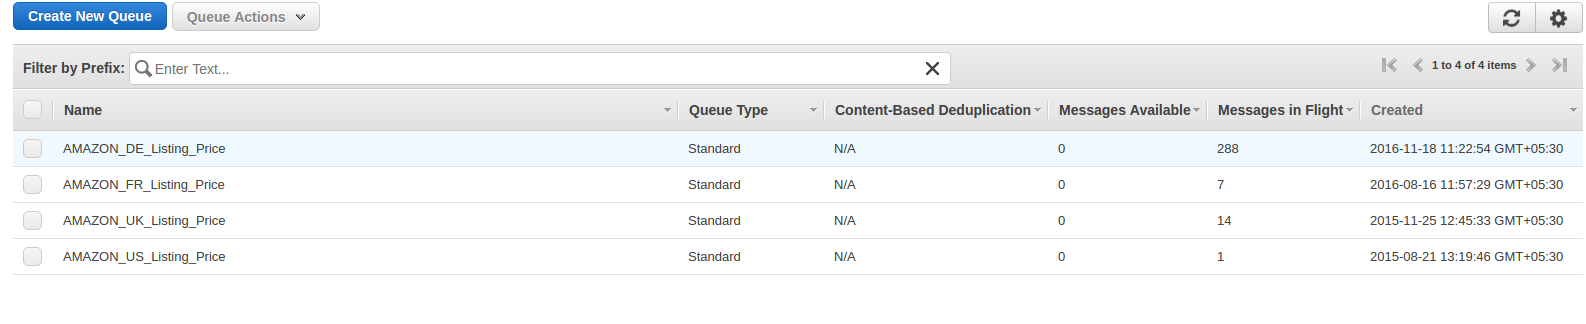
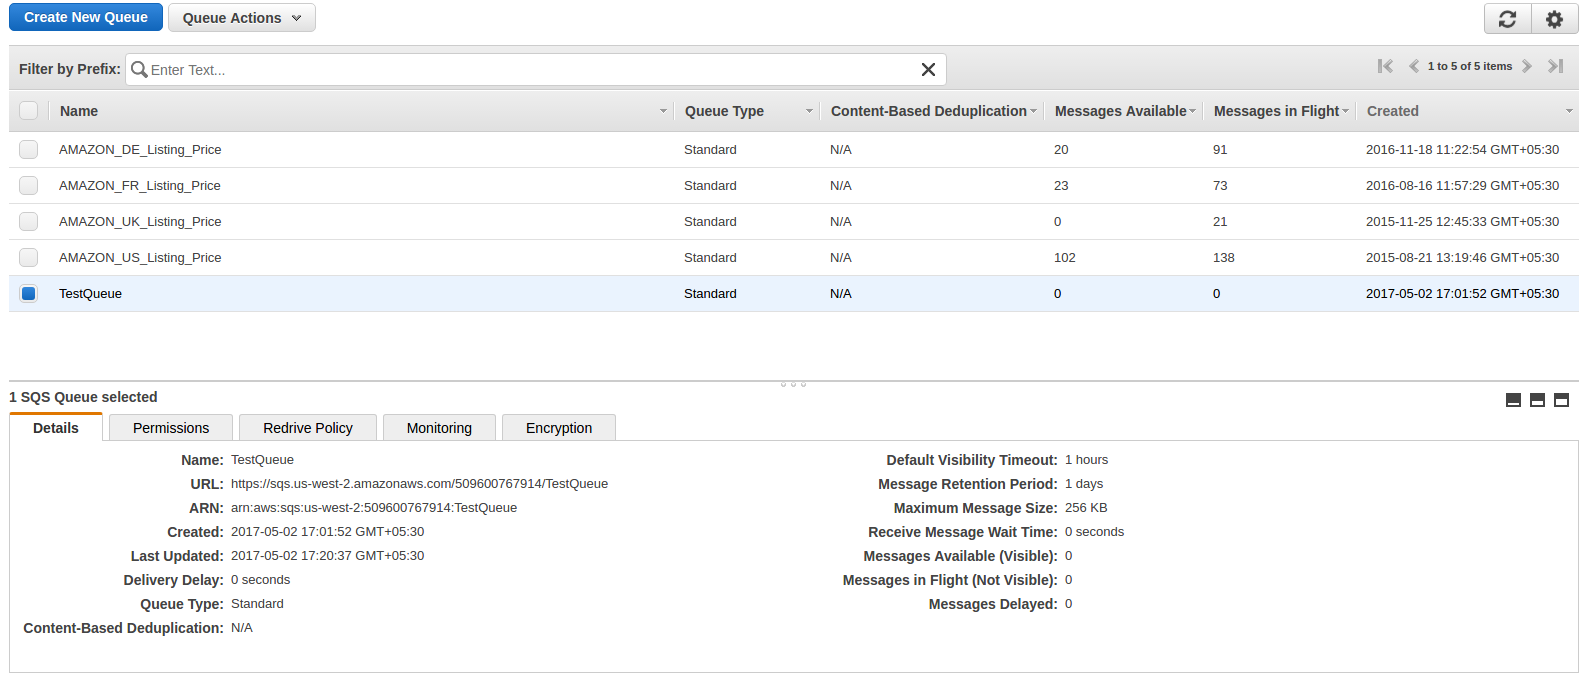
After enter detail, click on Create Queue button and you will be redirected on queue list page and your new queue will also be shown as shown in below image and basic detail of queue will also be displayed.
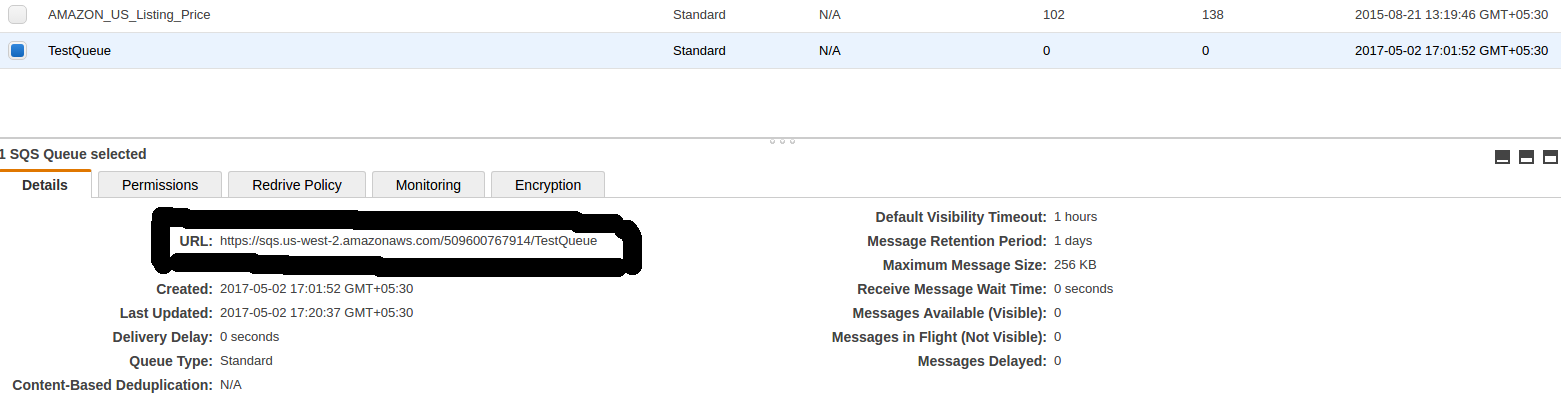
In basic detail, there is URL which is the most important attribute and this will be used to register and subscribe for notification.
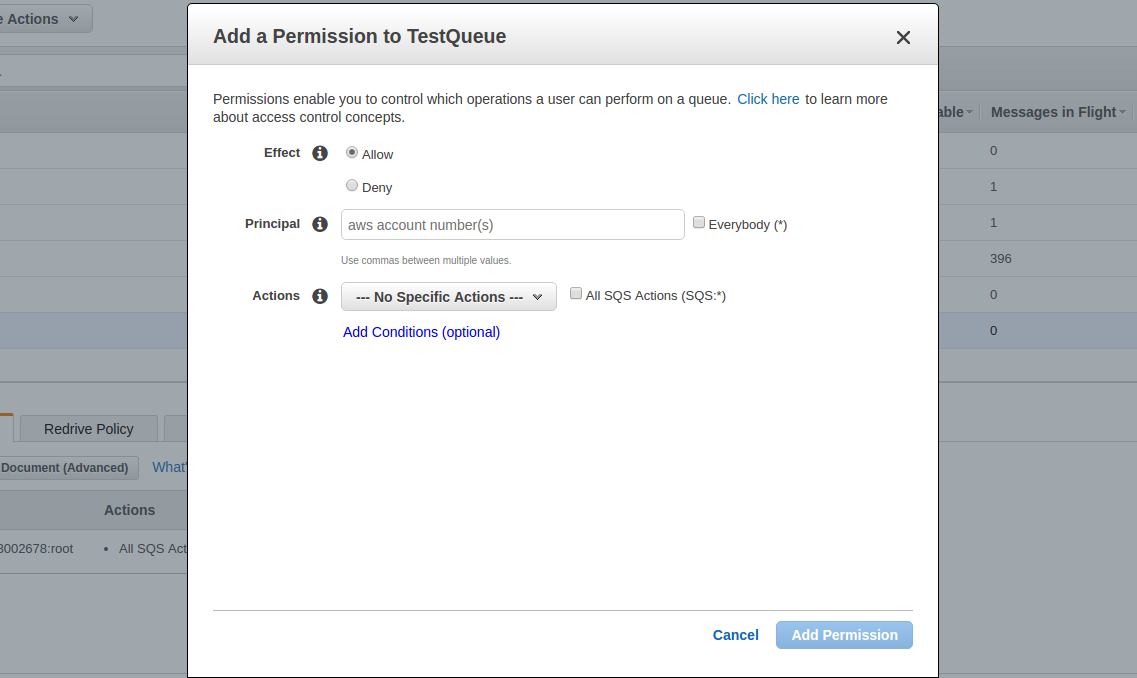
Now click on Permissions tab and click on Add a Permission button. A popup will be opened like below image. Enter your AWS account number and in action, check All SQSActions checkbox and click on Add permissions.
You can add multiple permissions as you want.
Register a Destination (Created Queue)
Now queue has been created and you need to register this queue for notifications. For this, you need to use RegisterDestination operation on MWS. The RegisterDestination operation specifies a location where you want to receive notifications and adds it to the list of registered destinations.
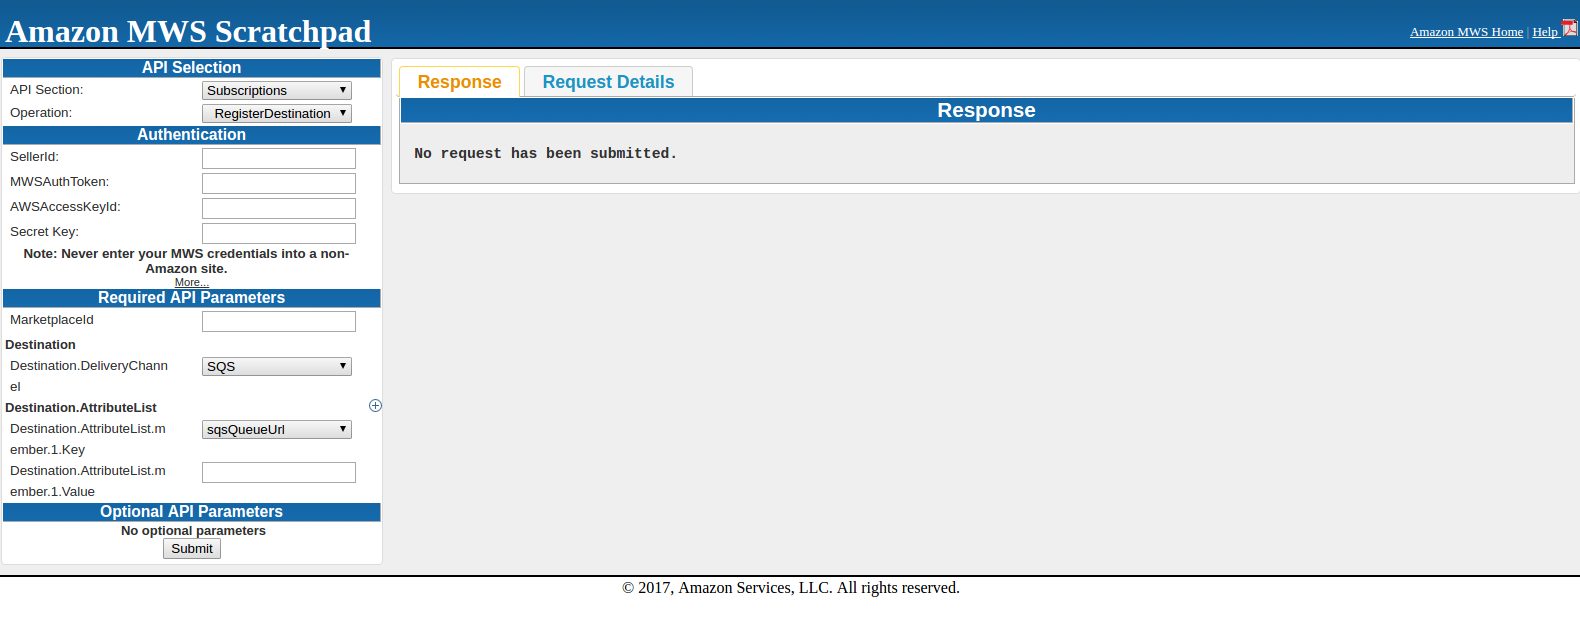
Here enter SellerId, AWSAccessKeyId, Secret Key and MarketplaceI. In Destination, SQS should be selected because you are using SQS queue as destination. Destination.AttributeList.member.1.Key should be sqsQueueUrl and in Destination.AttributeList.member.1.Value, you need to enter SQS URL which was under details in SQS Queue like below image.
When submitting the request, either you can get success response or error response. If you get below response, it means registered successfully.
If a request is unsuccessful, the main response element will be ErrorResponse, irrespective of the action requested and error detail will also be in response.
<ErrorResponse xmlns="https://mws.amazonservices.com/doc/2009-01-01/">
    <Error>
        <Type>Sender</Type>
        <Code>InvalidClientTokenId</Code>
        <Message> The AWS Access Key Id you provided does not exist in our records. </Message>
        <Detail>com.amazonservices.mws.model.Error$Detail@17b6643</Detail>
    </Error>
    <RequestID>b7afc6c3-6f75-4707-bcf4-0475ad23162c</RequestID>
</ErrorResponse>
After register Destination, try SendTestNotificationToDestination operation to verify that notifications are receiving or not. This operation sends a test notification to the Destination that you specify.
Subscribe for Notification
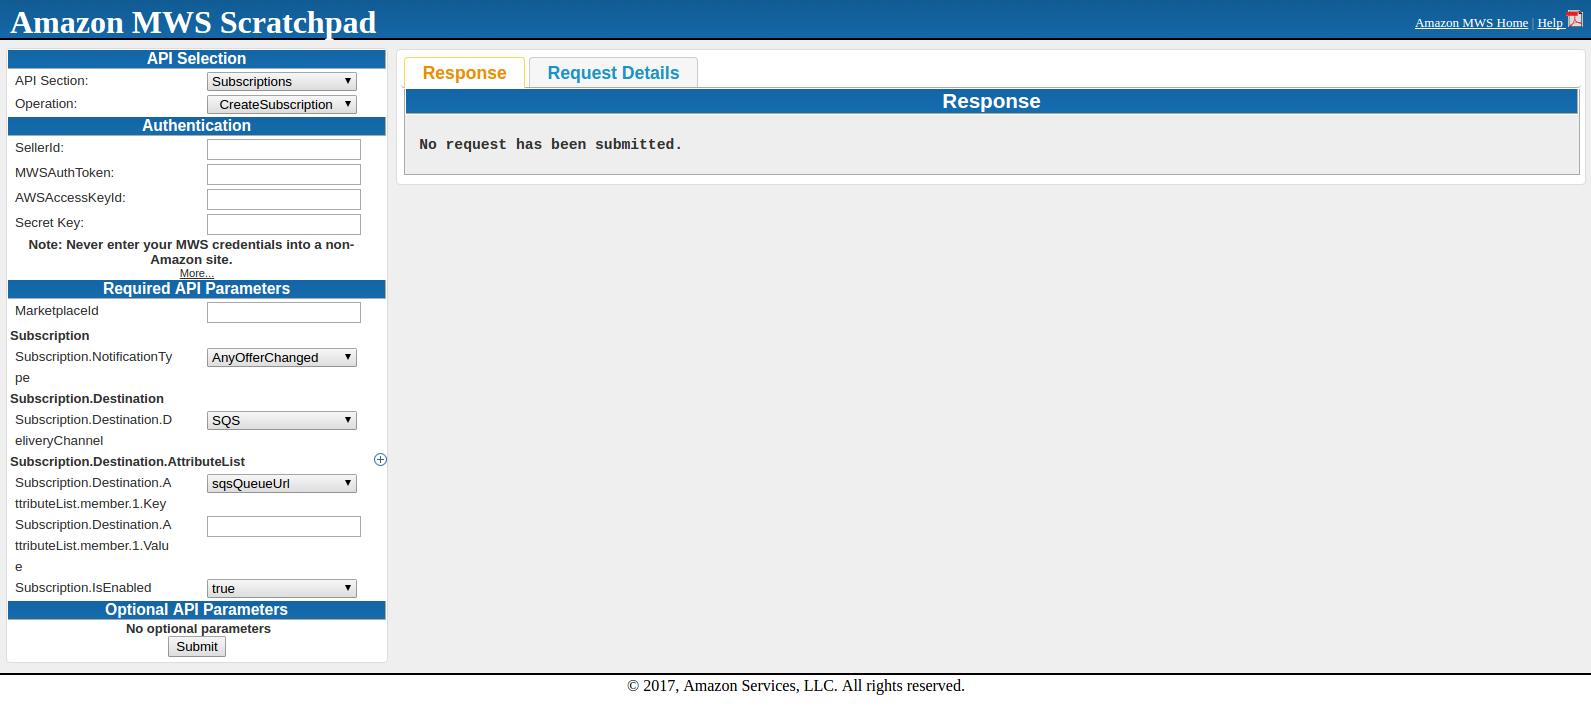
For this, you need to use CreateSubscription operation and this operation creates a new subscription for the specified notification type and destination. Select subscriptions from API Section and CreateSubscription from operation as below image.
Here enter SellerId, AWSAccessKeyId, Secret Key and MarketplaceId. Subscription.NotificationType should be AnyOfferChanged if you want to get other seller offer price. In Subscription.Destination.DeliveryChannel, SQS should be selected because SQS queue is being used as destination. Subscription.Destination.AttributeList.member.1.Key should be sqsQueueUrl and in Subscription.Destination.AttributeList.member.1.Value, you need to enter SQS URL which was under details in SQS Queue. Subscription.IsEnabled will be true.
When submitting the request, either you will get success or error in response. Once you get success in response, all is done to get notifications.
After this, you can fetch notification from SQS using CURL request.
After reading this blog, you will be able to understand how cache_lite is used to create cache for the HTML.
Let’s know about the Cache_Lite
Cache_Lite is a caching system which can be used for high traffic website. The simple logic of cache lite is to serve the HTML from cache if cache is already created for that HTML so that time to fetch/prepare from the database/code execution for creating the HTML can be saved.
Cache_Lite creates cache of HTML for a page on basis of an id when request of that page comes first time and simply serve the page first time without cache. Now, when request for the same page will come again, HTML will be simply fetched from the cache corresponding to the id and will show the page i.e. system will not create HTML again and will throw the HTML from cache.
Checking before Cache_Lite Implementation
Before implementing cache_lite, you need to check whether PEAR is installed or not. For this, create a file in the root and save the below lines of code in that file and run the same on browser.
If you get boolean true in response, the PEAR is already installed and have Cache_Lite package. But if you get boolean false or any other error in the response, you further need to check whether PEAR is not installed or PEAR does not have Cache_lite package. For this create a file in the root and save the below lines of code in that file and run the same on browser.
If you get boolean true in response, the PEAR is installed but PEAR does not have Cache_Lite package. In this case, please refer https://pear.php.net/package/Cache_Lite. If you still get boolean false or any other error, either PEAR is not installed or include_path is not set. In this case, please refer https://pear.php.net.
Cache_Lite Implementation
If PEAR is installed and have Cache_Lite package, you can start implementing the Cache_Lite. The process to create cache lite is as below:
Firstly, include Cache_Lite package. For this require Cache/Lite.php file.
Create an id which should be unique for that HTML so that it can be identified in the cache folder at the time of fetch from cache. Encrypt this id using md5.
Define the directory where you want to save cache and refresh time after which you want to refresh the cache. If you want to refresh cache once in a day then set 86400. Now when a page is opened first time, cache will be created and that page will be served by cache for next 24 hour (this 24 hour will be calculated after creating cache). Now cache will be refreshed only when page will be loaded again after 24 hour.
After that, create an object of cache_lite and check whether cache is created for id or not. If cache is created, uncompress the cache data and load the data on browser. And if cache is not created, get data from output buffer, compressed this data and save in cache.
For more understanding, please look the code snippet written below:
define('CACHE_LITE_STATUS', 'ON'); //Set other than ON if you don't want to serve HTML from cache
define('CACHE_LITE_REFRESH_TIME', '43200'); //This is cache lifetime after which you want to refresh cache.
if (CACHE_LITE_STATUS == 'ON') {
    require_once('Cache/Lite.php');
    $id = 'testid';//This is the unique id using which cache will be created.
    $id = md5($id);
    $options = array(
        'cacheDir' =>  "testDir/",//testDir is the directory where cache will be saved. Cache will be created with the same name as id so director name should be with a trailing slash at the end
        'lifeTime' => CACHE_LITE_REFRESH_TIME
    );
    $Cache_Lite = new Cache_Lite($options);
    if ($data = $Cache_Lite->get($id)) {
        echo gzuncompress($data); //To uncompress a compressed string. This is to uncompress the data fetched from cache
    }else{
        ob_start(); //Turn on output buffering
        $data = ob_get_contents(); // This will return the contents of the output buffer
        $data = gzcompress($data, 9); //To compress output buffer data
        $Cache_Lite->save($data); //To save the compressed data in the cache
        ob_end_flush(); //Flush the output buffer and turn off output buffering
    }
}
Summary
After reading this document you can try the same code on your system to serve the HTML using Cache_Lite. Please let us know for further improvement.
After reading this blog, you will be able to get the MWS credentials so that you can build applications using MWS.
Let’s know how get MWS credentials
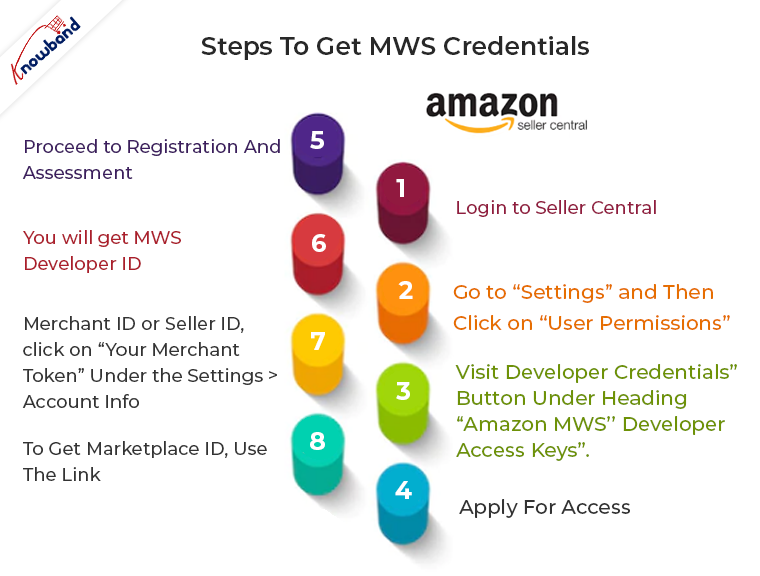
Below are the steps to get MWS credentials.
1. Firstly login to seller central using the credentials.
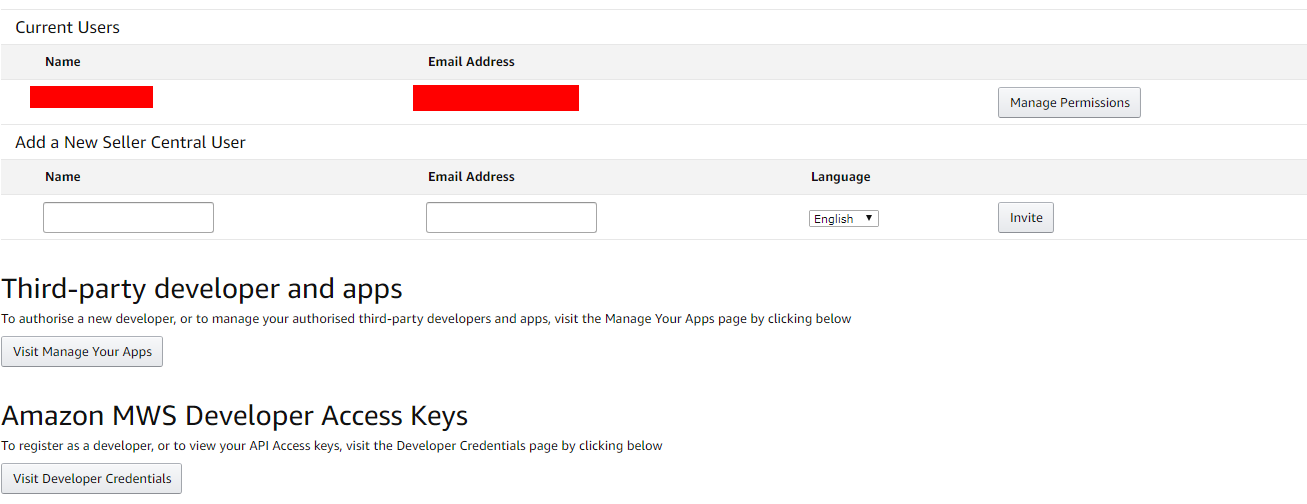
2. After this, go to “Settings” (at the top right corner) and then click on “User Permissions”. A page will be open which will look like below image.
3. Now click on “Visit Developer Credentials” button under heading “Amazon MWS Developer Access Keys”.
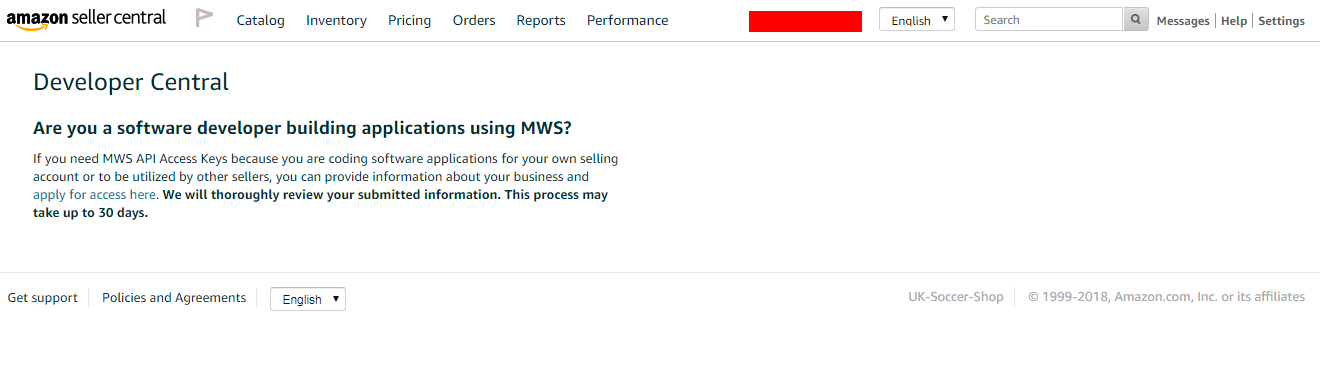
4. You will get the page as shown in below image if till now you are not registered as developer. In this case, click on “apply for access here”.
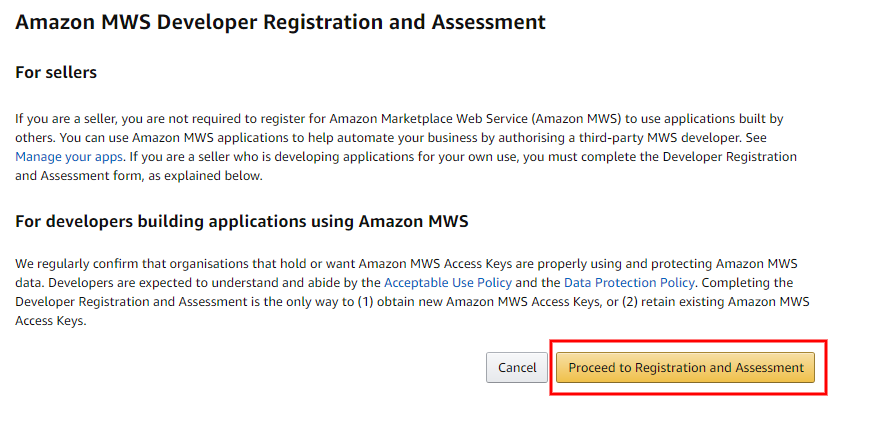
5. You will be redirected on a page which will look like below image. Here click on “Proceed to Registration and Assessment” and follow further steps.
6.If you are already registered as develop, in this case you will get page which will look like below image when you will follow the Step 3.
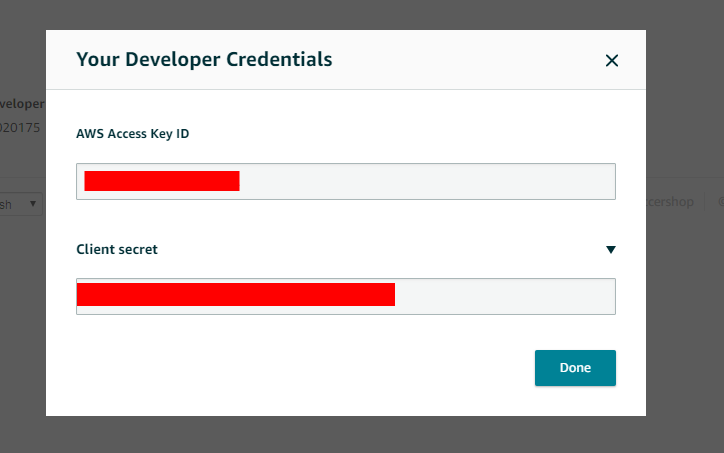
7.Here, you will get MWS developer id. For Access key id and Client secret, you need to click on “View” button and on click of this, a popup will be opened which will look like below image from where you will get both credentials.
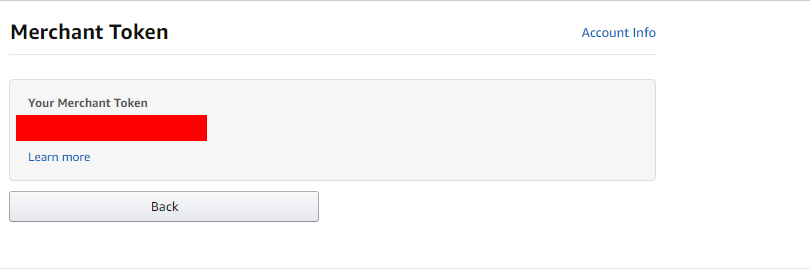
8.To get Merchant ID or Seller ID, click on “Your Merchant token” under the Settings > Account Info. You will be redirected to the page which will look like below image. This Merchant token is the Merchant id (Seller id).
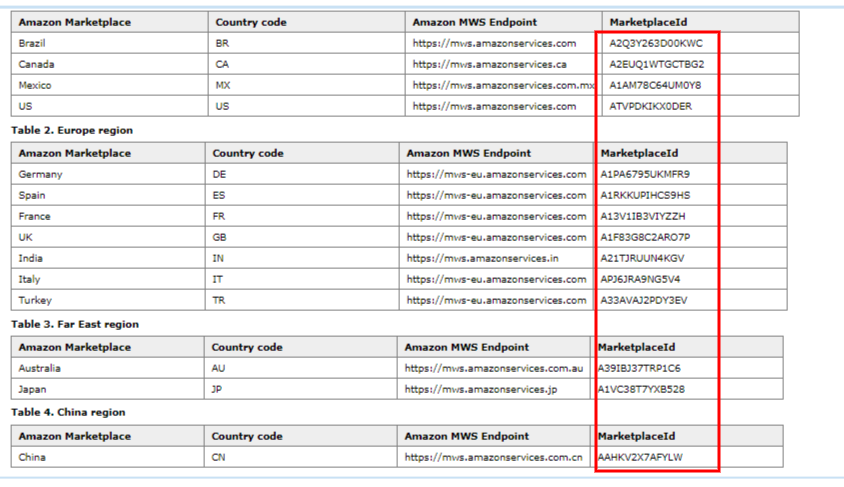
9.To get Marketplace ID, use the link -https://docs.developer.amazonservices.com/en_ES/dev_guide/DG_Endpoints.html
Summary
After reading this document, you are able to get MWS credential from seller central.
If you face any issues, please feel free to get in touch with us at support@knowband.com. Knowband also provides marketplace integration for the major CMS platforms like Prestashop, Opencart, Magento, Magento 2.