PrestaShop Security in the AI Era: What Are Your Concerns?

Running a PrestaShop store means protecting more than a website. Your store holds customer accounts, order histories, addresses, admin credentials plus whatever payment, shipping, marketing, and analytics services you’ve plugged in. So PrestaShop security isn’t really a technical checkbox. It’s a business risk, full stop.

AI hasn’t changed security threats so much as it’s sped them up. Phishing emails don’t have the broken grammar and weird phrasing they used to; they read like something a colleague would actually send. Scanning a store for outdated, vulnerable modules used to take a person real time and effort. Now it’s automated and near instant. Same with credential stuffing: what used to require manual grinding can now run at a scale one attacker alone could never have managed a few years ago.

Whether AI is “good” or “bad” for security is kind of the wrong debate anyway. The question that actually matters for a store owner is simpler: is your current setup built to handle attacks that move faster and hit harder than what you were dealing with two or three years ago?

That comes down to the basics, done properly. An out-of-date PrestaShop core version and module version is still the most common source of store compromise. Control access to administrator accounts and their privileges. Authenticate properly and not just using password. Watch for unusual activity instead of assuming silence means safety. Run malware scans regularly. Vet third-party integrations before installing them. And have an actual recovery plan, tested, not just assumed, because eventually something will get through, AI-assisted or not.

1.0 Why PrestaShop Security Concerns Are Changing

Security problems haven’t suddenly become entirely new because of AI. SQL injection, XSS, stolen passwords, malware, vulnerable modules, malicious file changes, and payment-page attacks have existed for years.

The difference lies in how rapidly and in what numbers these vulnerabilities can be found by the attackers.

With the help of AI, they can automate their reconnaissance activities, produce credible phishing material, detect vulnerabilities, and multiply the number of credential attacks.

For a web store, this means that an otherwise unobserved vulnerability may be discovered much sooner.

A typical PrestaShop store may include:

  • PrestaShop core
  • Payment modules
  • Shipping integrations
  • Analytics and advertising scripts
  • Custom modules
  • Third-party themes
  • Server software
  • CDN or WAF services
  • APIs and webhooks
  • Administrator accounts
  • Customer accounts

Every additional module/scripts creates another dependency that needs to be maintained. 

That doesn’t mean you should avoid integrations. It means you need visibility into what is installed, what has access to your store, and what happens when one component becomes vulnerable.

2.0 The Biggest PrestaShop Security Concerns for Store Owners

1. Outdated PrestaShop Core and Modules

One of the most basic security controls is still one of the easiest to neglect: keeping software updated.

PrestaShop maintains a security advisory process, and its current security policy states that security updates are typically applied to the latest release.

This becomes particularly important when a vulnerability affects an older version or a third-party component.

Patching a vulnerability and cleaning a compromised website are two different jobs.

If you discover suspicious PHP files, unexpected JavaScript, modified templates, unfamiliar administrator accounts, or unexplained redirects, don’t assume that upgrading PrestaShop alone has removed the attacker.

Investigate the store first.

2. Administrator Accounts Are High-Value Targets

Your PrestaShop back office deserves the same level of protection as your storefront. A compromised administrator account can give an attacker access to sensitive settings, customer data, modules, and store content. With sufficient permissions, they could even make changes that introduce malicious code or redirect parts of the shopping experience.

That’s why password-only authentication is increasingly difficult to justify for privileged accounts.

Use MFA/2FA for administrators wherever possible. Also review which employees actually need administrative access and remove dormant accounts.

The principle is simple: give each person only the permissions required to perform their job.

Additional controls can help too. Depending on your environment, you might restrict back-office access through trusted IP addresses, VPN access, firewall rules, or additional authentication layers.

Hiding an administrator URL can reduce exposure to some automated scanning, but it shouldn’t be treated as a replacement for authentication, authorisation, or patching.

3. Credential Stuffing and Automated Login Attacks

Credential stuffing is particularly relevant to e-commerce.

Password guessing is not always needed for attackers; they can use stolen username/password pairs from completely different breaches and try them against other sites.

In case the client reused the password, the attacker might use your store as the next victim.

It is also a case with admin accounts, and the situation is much worse in that case.

Rate limiting, brute-force prevention, strong passwords, MFA, suspicious login detection, and proper account controls should be used in conjunction.

AI and automation make this more relevant because attackers can operate at high volume. AI-related cybersecurity guidance also identifies credential stuffing and password attacks as areas where automation can increase the threat.

4. Malware and Unexpected File Changes

A compromised PrestaShop store doesn’t always look broken.

The storefront may continue to load normally while malicious code sits inside a theme, module, PHP file, JavaScript file, or another part of the application.

That is why malware scanning and file-change monitoring matter.

A particularly serious scenario is payment-page manipulation. PrestaShop issued a security alert in February 2026 describing a digital skimmer that could replace legitimate payment buttons with fraudulent ones. The malicious script was loaded through a modified theme file.

For a merchant, this is a useful reminder that “the website is working” doesn’t mean “the website is secure.”

Regular scanning should be combined with investigation of unexpected changes. If a critical file changes unexpectedly, you need to know:

  1. What changed?
  2. When did it change?
  3. Who or what changed it?
  4. Was the change legitimate?
  5. What other files or accounts should be investigated?

5. Third-Party Modules and Custom Code

PrestaShop’s extensibility is one of its strengths, but every module and customization expands the attack surface.

Security testing should therefore consider more than the PrestaShop core.

A security audit can examine the core application, themes, add-ons, custom code, integrations, authentication controls, and server configuration. Astra’s PrestaShop audit guidance similarly emphasizes examining the broader application rather than treating the core platform as the entire security boundary.

This matters especially for stores that have existed for several years.

A module installed five years ago may still be active even though nobody remembers why it was installed. A custom override may remain after the original developer has left. An abandoned integration may still have API credentials.

A useful maintenance exercise is to create an inventory of:

  • Installed modules
  • Active themes
  • Custom overrides
  • External APIs
  • Webhooks
  • Cron jobs
  • Administrator accounts
  • Server services
  • DNS/CDN/security services

Remove what you no longer need.

3.0 What Does AI Actually Change for PrestaShop Security?

AI isn’t a substitute for a secure PrestaShop installation. Think of AI as an accelerator on both sides.

3.1 Attackers can automate more

The bigger concern for an online store is speed. An attacker no longer needs to perform every step manually. Automated and AI-assisted tools can help with target research, phishing, stolen-credential testing, and large-scale bot activity. For e-commerce businesses, that can translate into more attempts at account takeover, payment fraud, credential stuffing, and scraping,

3.2 Defenders can analyse more

The same basic capability can help defenders.

Security systems can analyse login activity, request patterns, IP reputation, API activity, traffic anomalies, and other events much faster than a person manually reviewing raw logs.

For instance, a manager usually logs into the system from a usual country during office hours. Then, many login failures occur, followed by a successful login from an unusual location. If the system can perform behavioral analysis, then such an event can be detected much quicker than analysing the access logs from yesterday.

AI can also help prioritize alerts. That’s useful because a store generating thousands of requests per minute cannot realistically have a person inspect every event.

4.0 PrestaShop Security Best Practices: A Practical Layered Approach
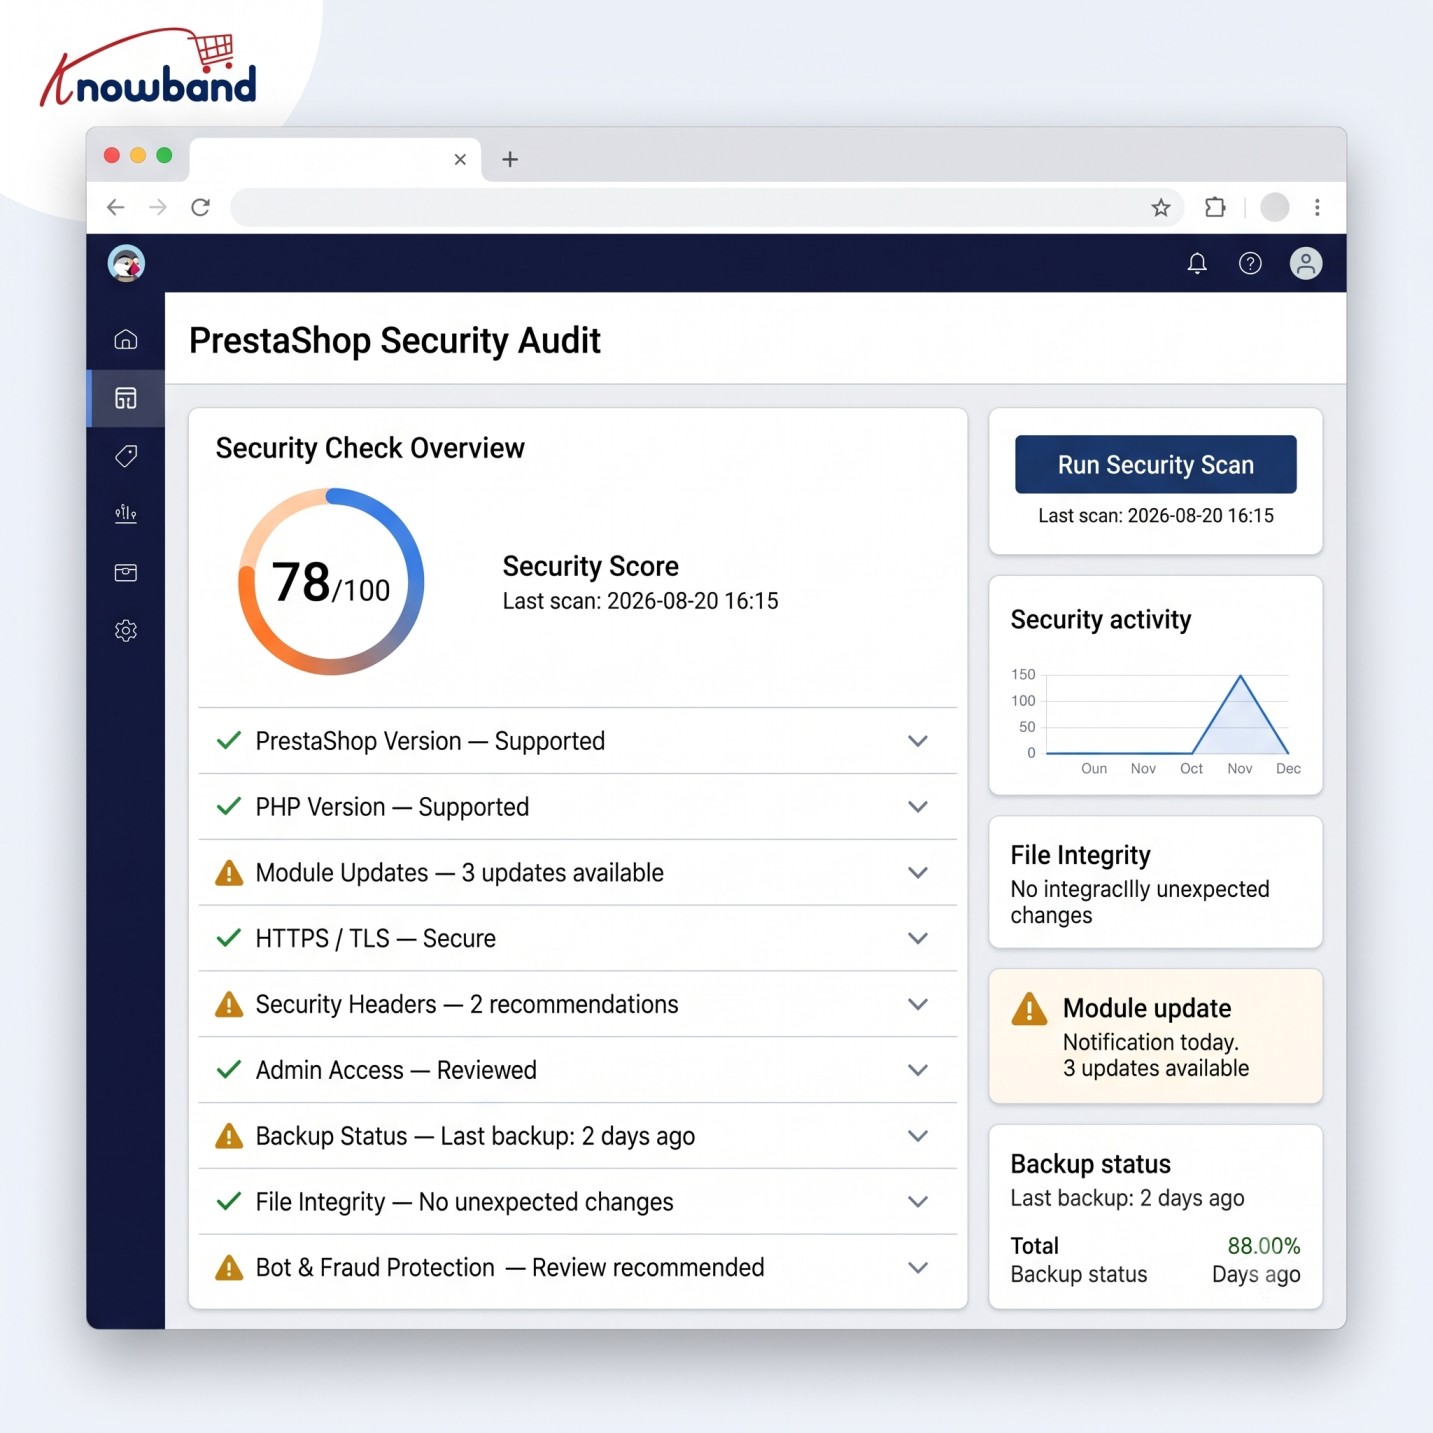
Security works better as layers than as one “security plugin.”

A practical setup for a PrestaShop store should include several levels.

Layer 1: Keep the application current

Maintain supported versions of:

  • PrestaShop
  • PHP
  • Server software
  • Themes
  • Modules
  • Libraries

Test updates in a staging environment where the store has substantial customizations.

Don’t postpone security updates indefinitely because a normal feature upgrade is inconvenient.

Layer 2: Protect privileged access

For administrator accounts:

  • Enable MFA/2FA.
  • Use unique passwords.
  • Remove unused employees.
  • Apply least-privilege permissions.
  • Consider IP/VPN restrictions for sensitive environments.
  • Monitor successful and failed logins.

Layer 3: Protect the application

A WAF can help filter malicious HTTP requests before they reach the application. Security headers can add browser-level protections. CAPTCHA or bot controls can reduce automated abuse of public forms.

These controls don’t eliminate vulnerabilities in the application itself, rather they add a defensive layer.

Layer 4: Monitor the filesystem

Regular malware scan and file change monitoring can help in detecting the compromises that aren’t visible from the storefront.

Pay particular attention to:

  • Theme files
  • PHP files
  • JavaScript
  • Configuration files
  • Upload directories
  • Module directories

Unexpected modifications deserve investigation.

Layer 5: Monitor the infrastructure

The PrestaShop application isn’t the only thing that needs protection.

Review:

  • SSH access
  • Firewall rules
  • Database exposure
  • Server users
  • File permissions
  • Cron jobs
  • SSL/TLS configuration
  • Backup access
  • Cloud credentials
  • CDN/WAF configuration

A secure application on an exposed or poorly maintained server is still vulnerable.

5.0 Where a PrestaShop Security Manager Can Fit

Store owners often end up assembling security controls from several independent tools. That can create its own maintenance problem: different settings, update schedules, logs, compatibility issues, and configuration interfaces.

The Knowband Prestashop Advanced Security Manager is one option worth evaluating as part of a layered PrestaShop security setup. Its current product documentation lists controls including 2FA, brute-force protection, administrator IP restrictions, a WAF, security headers, CAPTCHA, login monitoring, and scheduled malware scanning. It supports PrestaShop 1.7, 8, and 9 according to the vendor’s current documentation.

The important point is not to treat a security module as a complete security strategy.

A module can strengthen application-level defenses, but it doesn’t replace:

  • Secure server configuration
  • Timely patching
  • Safe development practices
  • Backups
  • Incident response
  • Vulnerability assessment
  • Secure third-party integrations

6.0 Don’t Forget Backups and Recovery in Prestashop

Store owners need to have a reliable recovery plan when something goes wrong.

A backup is useful when it’s available, protected, and can be restored. Ideally, keep backups separate from the production environment and test restoration periodically.

You should have reliable backups of:

  • Database 
  • Product images and other store files 
  • Customer and order data 
  • Configuration 
  • Themes 
  • Custom modules 
  • Critical server files 

In case of store owners looking to automate the whole process, one of best backup module which is Prestashop Backup & Restore Module can be taken into consideration. This software enables users to take scheduled backups of their databases and files, provides offsite storage, encryption, retention, and restoration facility.

7.0 When Should You Consider a Security Audit?

Automated scanning is useful, but it isn’t the same as a security audit or penetration test.

Vulnerability scanning finds known bugs on the surface & inform what is broken, but can’t tell you how deep a hacker can go.

Penetration testing simulates a real attack. It chains small flaws together to break deep into your systems and tests the business logic.

For a mature or high-revenue store, consider periodic security assessments, particularly after:

  • A major PrestaShop upgrade
  • A large custom development project
  • A new payment integration
  • A major module installation
  • A server migration
  • A security incident
  • Significant infrastructure changes

A proper assessment should cover the application and the surrounding environment rather than focusing exclusively on the storefront.

8.0 A Store Owner’s Security Checklist

Before considering your PrestaShop website secure, check the basics:

  • PrestaShop is running a supported/current release appropriate to your environment.
  • Modules and themes are maintained and updated.
  • Unused modules and accounts have been removed.
  • Administrator accounts use MFA/2FA.
  • Administrator privileges follow least privilege.
  • Failed and successful admin logins are monitored.
  • Brute-force protection is enabled.
  • A WAF or equivalent application-layer protection is configured where appropriate.
  • Security headers are configured correctly.
  • Public forms have appropriate bot/spam protection.
  • Malware scanning is performed regularly.
  • Unexpected file changes can be detected.
  • Server access is restricted and monitored.
  • Backups are isolated from production and restoration has been tested.
  • Payment and third-party integrations are reviewed.
  • There is a documented incident-response procedure.
  • A security audit or penetration test is performed when the store’s risk justifies it.

9.0 The Real Concern: Speed of Attack Versus Speed of Response

The biggest change brought by AI isn’t that every PrestaShop store suddenly faces an entirely new category of vulnerability.

It’s that the gap between a weakness becoming available and someone exploiting it can become smaller.

That changes how store owners should think about security.

Waiting for a customer to report a strange checkout page isn’t monitoring. Discovering a compromised administrator account after fraudulent orders have been placed isn’t detection. Installing a security tool but never reviewing its alerts isn’t a security process.

A secure PrestaShop store needs layers that work before, during, and after an attack: patching to reduce vulnerabilities, authentication to protect accounts, application controls to filter malicious traffic, monitoring to detect abnormal activity, malware/file scanning to identify compromise, and tested backups to support recovery.

AI can make defensive systems faster and more capable, but the foundation remains the same: reduce the attack surface, control access, monitor what changes, and be prepared to recover.

For store owners looking to strengthen application-level protection, a solution such as Knowband Prestashop Advanced Security Manager can be considered as one component of that layered approach. The right choice depends on your PrestaShop version, hosting environment, existing security stack, and operational requirements.

The best time to discover a security weakness is before an attacker does.

Managing Database Changes During Module Updates in PrestaShop

There’s a particular support ticket I’ve learned to dread. A merchant updates a module; it appears to go through, then something stops behaving. Never the whole store. One PrestaShop controller page misbehaving, or a config value that refuses to save, or a listing column that has emptied itself. When I look, the module code is on the new version and the database underneath is still on the old.

That gap is what this article is about. A PrestaShop module is not only the PHP you shipped but it is that PHP plus the tables and columns the PHP expects to find. Skip the PrestaShop database update that should travel with a code release, and you get a module that is installed, apparently working, and quietly wrong.

I have done this to myself more than once. What follows is what I learned about PrestaShop module database updates, the hard way.

1.0 How PrestaShop module updates actually handle the database

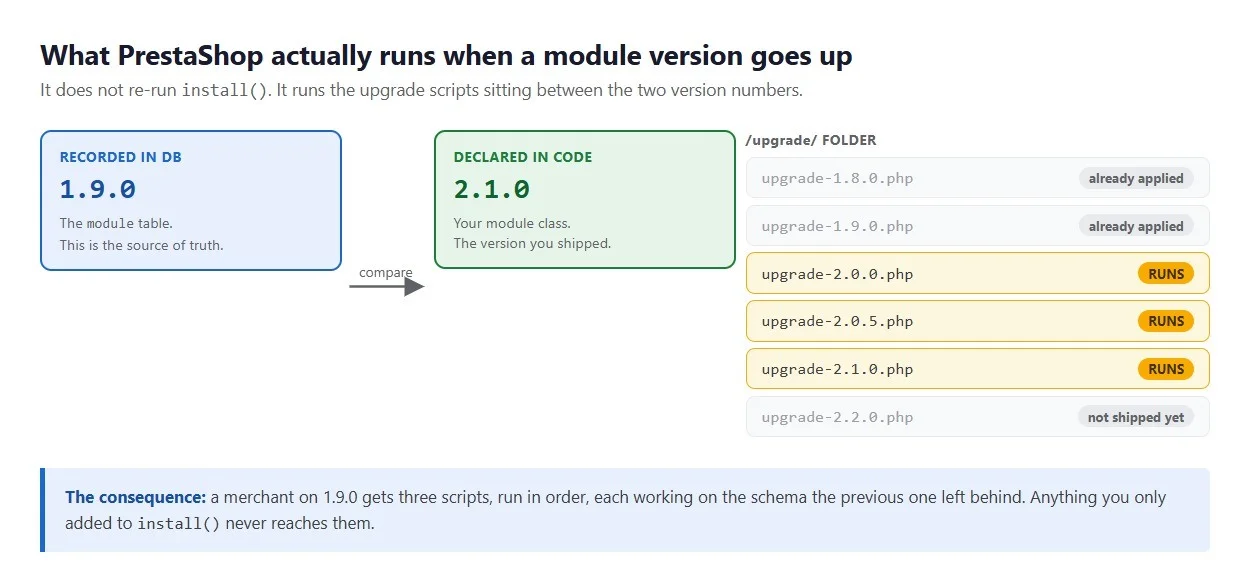
store jumping from update from1.9.0 to 2.1.0 doesn’t skip ahead, it runs every upgrade script in between, in order.

Plenty of assumptions float around here, and some are wrong.

Drop a new version into /modules/ and your install routine does not re-run. Tables untouched. What happens instead: PrestaShop reads the module’s upgrade/ folder, finds the files named upgrade-<version>.php sitting between the recorded version and the one your module class declares, and runs those in order.

A store on 1.9.0 receiving 2.1.0 runs three scripts, in order.

Three things follow from that, and all three matter for PrestaShop database changes.

The version in the `module` table is the source of truth. Not the one in your main class file. PrestaShop reads both. What it acts on is the recorded one, and that decides how many upgrade scripts you are about to run.

Your `install()` method is for fresh installs only. Say version 2.0 needs a new table. Put it in install() and anybody coming to 2.0 fresh is covered. The store sitting on 1.9 gets nothing, because its install ran a year ago and is never running again.

One failure stops everything. Return false from an upgrade function and three things happen: PrestaShop halts, records which version fell over, and disables the module. No moving on to the next script. That is deliberate, though it means a half-applied schema change leaves you disabled rather than broken.

The enabling auto-update for modules page sets out the file-naming rules. Read it once properly rather than from memory.

The upgrade function naming trap

This one cost me an afternoon. Either upgrade_module_2_0_1 or upgradeModule201 works as a function name, and PrestaShop looks for both. What it also does, before your file is included, is check whether one of those names exists already. Find it and the file gets marked a duplicate and skipped.

Copying an old upgrade script as a template is exactly how people get here. The name inside it never gets changed. Nothing upgrades, and the error message won’t tell you much.

2.0 PrestaShop database migration: what goes wrong on real stores

All of these happened on stores I worked on.

PrestaShop database schema changes that drift between installs

Version 2.0 needs a new column, so you update install() and write an upgrade script. Both correct. Three versions on, somebody renames the module folder or a merchant reinstalls. On some installs, install() created that column. On others the upgrade path did. Two definitions, drifting apart, and a single version number now covers both of them.

So the definition lives in a single method both paths call. PrestaShop database schema changes cannot drift if there is only one.

Upgrade scripts that assume a clean starting point

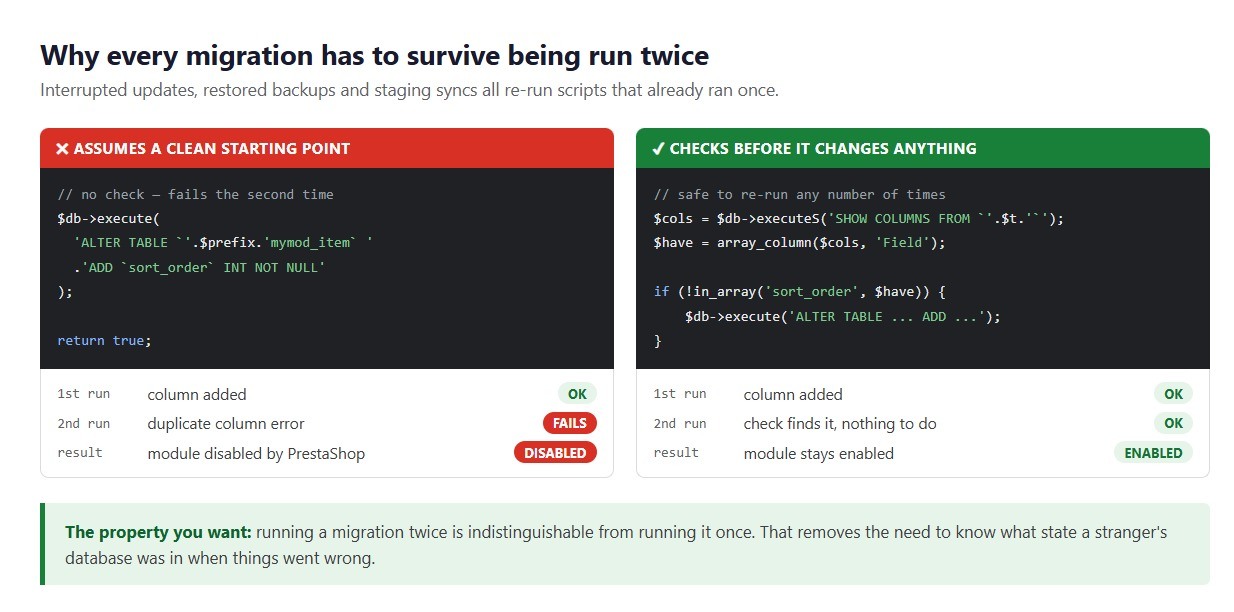
ALTER TABLE … ADD COLUMN on a column that already exists throws an error, your function returns false, the module gets disabled. Interrupt a previous update, restore a partial backup, sync from staging twice over: any of those and you are there.

Every schema change I write now checks first. Adding a column means a SHOW COLUMNS beforehand, creating a table means SHOW TABLES, an index means SHOW INDEX. A few lines, and the script survives a second run. That matters, because a stranger’s database can be in any state at all. There is IF NOT EXISTS in both MySQL and MariaDB, but only on some operations, so the explicit check travels better.

Multistore: configuration rows written for one shop only

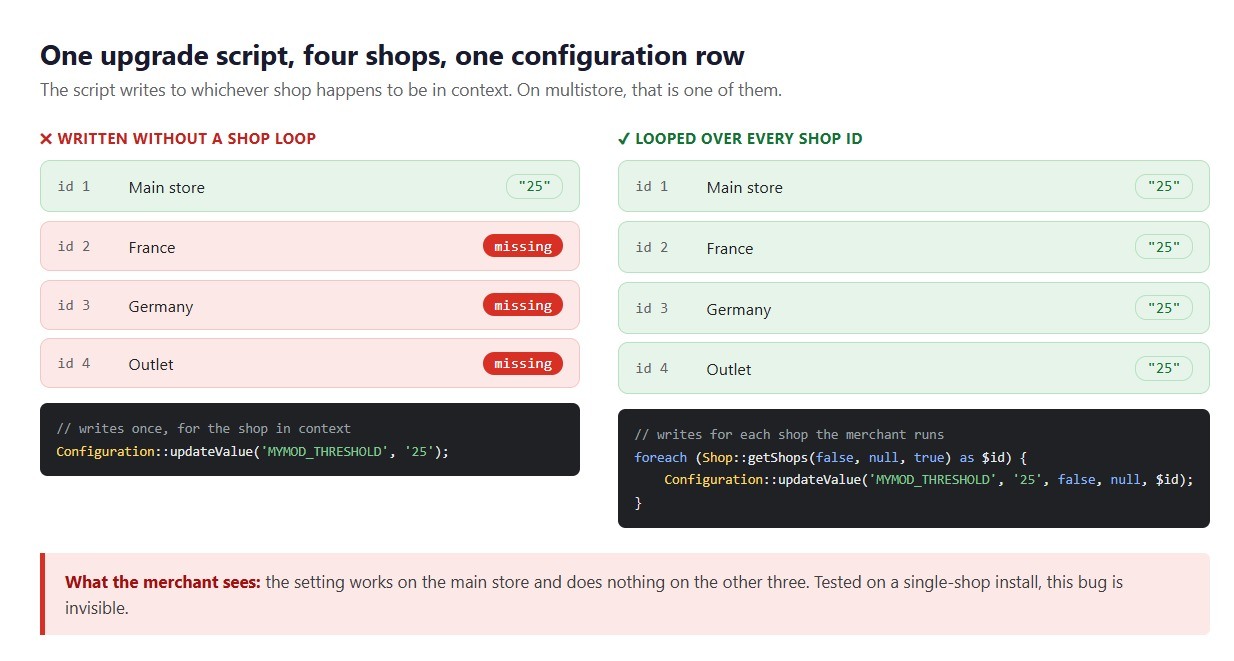
Quiet and nasty, this one. A per-shop setting arrives in the new version. Default row created by the upgrade script, tested by the developer, all looking fine. But one row got written, for whichever shop was in context, and the merchant runs four.

Three stores are now missing it. Depending how your code reads that, you get a PHP notice, an empty value treated as a real setting, or a blank where a price should be. The multistore documentation covers the context rules. Loop every shop ID in any upgrade touching configuration or per-shop data.

On a single-shop install, this bug is invisible.

ALTER TABLE locks on large catalogue tables

Nothing about adding a column to a 400,000-row table is instant. Depending on the operation, the MySQL version and the storage engine, the whole table may get copied. On a live store during trading hours that lock runs long enough for customers to notice.

So I check table size before writing the migration. If it’s large: maintenance window, or restructure to avoid the rebuild.

The config key with no default value

The one I see most often in other people’s modules, and no table involved.

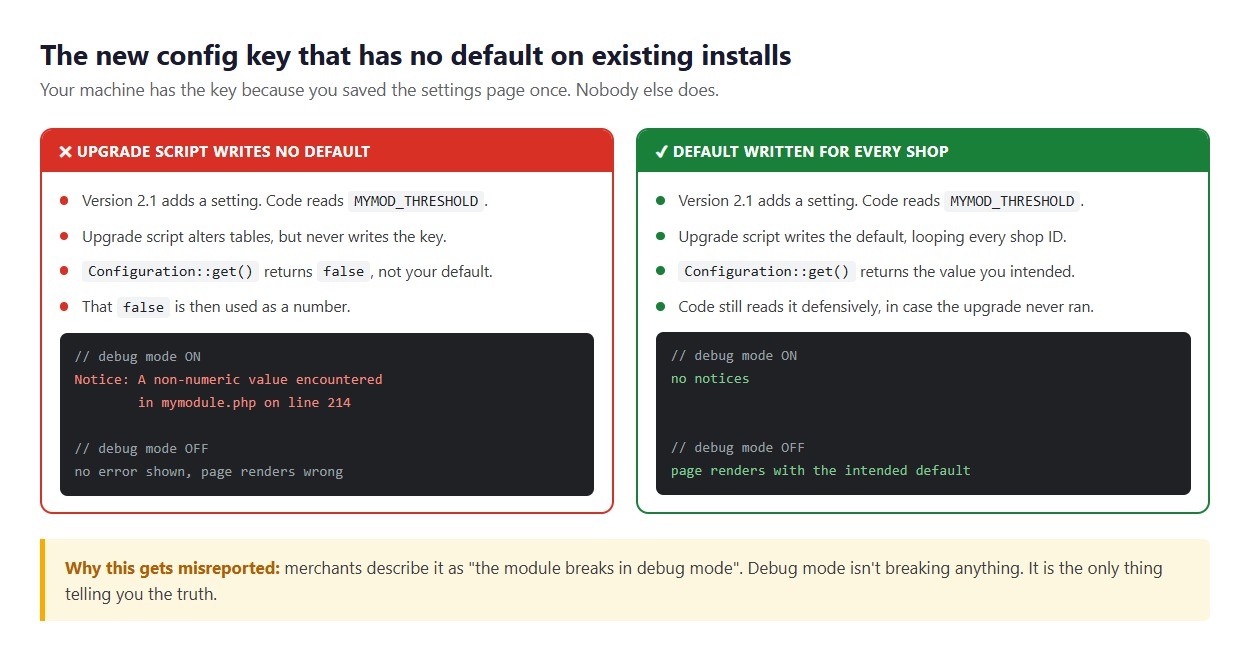
You add a setting in the new version. The admin form reads it. So does the front controller. Both were written on a machine where the settings page had been saved at least once already. So the key exists and everything looks right. Ship that, and every existing install is reading a Configuration key nobody ever wrote.

What comes back is false. Your default never appears, nor an empty string you could at least test for. From there it goes on to be used as a number, or handed to a function that wanted a string. Debug mode off, and you often get away with it: the merchant sees a page that’s slightly wrong and thinks nothing of it. Debug mode on, and it surfaces as a notice or a type error. Which is how this reaches you as “the module breaks in debug mode”, when debug mode is the only honest party involved.

The same code, with and without the default written.

The fix is dull. Every new config key gets its default written in the upgrade script, for every shop, shipping with the code that reads it. Read it defensively too, because you cannot be sure the upgrade ran.

PrestaShop module database migration versus schema change

Schema changes are the easy half. The hard half is when the meaning of existing data changes: splitting a column in two, moving a CSV field into a related table, re-encoding a status.

That is where I have seen the most damage. A botched ALTER TABLE fails loudly; a botched data transformation succeeds and writes nonsense. A PrestaShop module database migration that moves data needs a count before and after, then compared. Better found inside the upgrade script than by a merchant three weeks later.

3.0 PrestaShop module upgrade best practices I’d actually defend

The ones that have saved me:

Make every migration idempotent

Nothing should change on the second run that the first run did not already handle. Get that property and a whole category of support problem disappears, because the state of the database stops being something you need to establish first. Before writing raw SQL against core tables, PrestaShop’s database layer notes are worth an hour.

The guarded version survives a second run.

Log every failure instead of returning false silently

A bare return false is enough for PrestaShop to stop and disable the module. Not enough for you. So wrap the work. Catch whatever comes out of it, and hand that to PrestaShopLogger with the module name and version attached. Otherwise a merchant reports a failed update and you are guessing.

On PHP 7 and above, catch Error as well as Exception. Get a type error in your own migration code and it arrives as an Error, so a handler watching only for Exception lets it through.

Support every version you have ever shipped

A merchant can be on any version you have released. Somebody going 1.4 to 3.0 runs every script in between, in order, so each has to work on whatever schema the previous one left. That is why old upgrade files stay in the module. Somebody two years behind has no other route forward.

Test on staging, not on a clean local install

A fresh install of the new version proves nothing about the upgrade to it. What you want instead: install the old version, put realistic data in, then upgrade. On multistore too, if you support it.

Better still: take a copy of a real store, and put the upgrade through that instead. Your local install has clean data and four products, which is why it surfaces nothing. A real store carries half-finished imports, rows left by a module uninstalled two years ago, columns a previous developer added by hand, a catalogue big enough that ALTER TABLE takes a while.

Then timing. An upgrade wanting six minutes against real data is better learnt while booking a maintenance window than at eleven on a Friday.

Back up before schema changes, and say so

No snapshot gets taken of your tables before a module upgrade. Not by PrestaShop, not by anything. So if the merchant has no backup and your migration stops halfway through transforming data, that data has gone. Say so in the changelog rather than discovering it together.

Recovering a failed PrestaShop database update

An update failed on a live store; module disabled. Roughly this order:

Find out which version failed. That gets recorded, and if you wrote a log message it’ll be sitting there too. Between them you know which script to open and which changes landed before it stopped.

Check the actual schema, not the version number. All the module table knows is what the last successful upgrade wrote. The real tables are where the answer is, held up against whatever the failed script was trying to do.

Fix forward, not backwards. Rolling the version number back is tempting and usually wrong, because the earlier scripts have already run and re-running them against a partly changed schema turns one problem into three. Write a corrective migration from wherever the schema is to where it should be.

Then work out why the migration was not idempotent. That is the real bug.

A short checklist before you ship a module update

The list I run:

  1. Main class version, highest upgrade-*.php file: do they match?
  2. Each upgrade function named for its own file’s version?
  3. Every schema change checking first whether it already applied?
  4. Every configuration write looping over all shops?
  5. Every new config key given a default for existing installs?
  6. Run against a staging copy of a real store yet?
  7. Old version installed, data added, then upgraded?
  8. Same path on multistore?
  9. Something useful logged before each return false?
  10. Catching Error as well as Exception?
  11. Old upgrade files still in place for merchants several versions behind?
  12. Changelog telling merchants to back up?
  13. On a large table, how long is that ALTER holding a lock?

Items 6 and 7 are the ones people skip, and between them they catch most of it.

Conclusion

PrestaShop module upgrade problems are awkward for one reason: nothing announces them. The module reports its new version quite happily. The admin page loads. No logs, unless you wrote them. Meanwhile your code expects one thing, the database holds another, and that sits untouched until somebody uses the one feature caught in between.

Treat the schema as part of the release. Write migrations that survive a second run. Log what happened. Put it through staging before any merchant does. On the framework side, PrestaShop’s module development documentation is the place to start.
If you have questions or need assistance for your website performance or migration, Our experts are here to help. Contact the Knowband team at support@knowband.com today for reliable ecommerce plugins tailored to your eCommerce needs.

Using PrestaShop Hooks Effectively in Your Module Development

If you’ve spent any real time building PrestaShop modules, hooks are probably where most of your battles have been fought. They’re how your module speaks to the core — how you plug in functionality without ever cracking open a file you shouldn’t be touching. Knowing they exist is one thing. Using them without shooting yourself in the foot is another.

What a Hook Actually Is

At its simplest, a hook is a moment in PrestaShop’s execution where it pauses and checks whether anyone’s listening. If your module is registered for that hook, it gets a turn to respond.

There are two types worth distinguishing: action hooks and display hooks. Action hooks are for running logic tied to an event,  an order being placed, a product being saved, that sort of thing. Display hooks are for injecting HTML into specific spots on the storefront or back office. The distinction shapes how you write the method. Action hooks process something and usually return nothing meaningful. Display hooks return rendered HTML that PrestaShop slots into the page.

Where Developers Go Wrong with Registration

The most common early mistake is registering hooks in the wrong place or in a disorganized way. Registration belongs in your module’s install() method via $this->registerHook(). You can pass an array of hook names in one call — which is much tidier than stringing together repeated calls.

Just as important: unregister them in uninstall(). It’s easy to skip this and easy to regret. Orphaned hook registrations sitting in the database after a module’s been removed can cause genuinely confusing behavior down the line. A clean pattern looks roughly like this:

public function install()

{

    return parent::install()

        && $this->registerHook(['displayHeader',

           'actionOrderStatusUpdate',

           'displayFooterProduct']);

}


Get the Method Names Right

PrestaShop resolves hook methods by convention: hookHookName(), with the hook name in camelCase. So displayHeader maps to hookDisplayHeader(). Mess up the casing and PrestaShop silently skips your method, no error, no log entry, nothing. 

It’s one of those bugs that can eat an embarrassing amount of debugging time before you spot it.

Every hook method receives a $params array. What’s inside depends entirely on which hook triggered it. During development, dump $params once before writing any real logic. The documentation is a decent starting point but it doesn’t always reflect what actually gets passed in.


Handling Display Hooks Properly

For display hooks, the standard approach is to assign variables to Smarty and return the output of $this->display() pointing to a .tpl file. Keep your templates in views/templates/hook/ inside your module,  it’s the conventional structure and makes things easier to navigate as the module grows.

One detail worth emphasizing: always return the output, never echo it. The hook system collects return values and places them where they belong in the layout. If you echo directly, the output ends up at the top of the page regardless of where the hook actually sits.

When Built-In Hooks Aren’t Enough

PrestaShop’s native hooks cover a lot of ground, but there are situations — especially when building modules meant to be extended, where you need something more targeted. You can register a custom hook with Hook::register() and fire it using Hook::exec() from anywhere in your codebase.

Custom hooks are particularly useful in multi-module projects. Instead of modules calling each other directly, you expose a hook and let other modules respond independently. It keeps the architecture clean and makes future changes much less painful.

Don’t Ignore the Performance Side

It’s easy to underestimate how much damage a poorly optimized hook method can do. Hooks like displayHeader fire on almost every page load. If your method is hitting the database or calling an external API without any caching, page speed takes a real hit — and your clients will notice before you do.

A few habits help. Cache anything that doesn’t change between requests. Use PrestaShop’s built-in cache layer where it fits. And if your hook logic only applies under certain conditions, check those conditions at the top of the method and return early if they’re not met. Keeps the overhead low and the code readable.

When the Hook Isn’t Firing

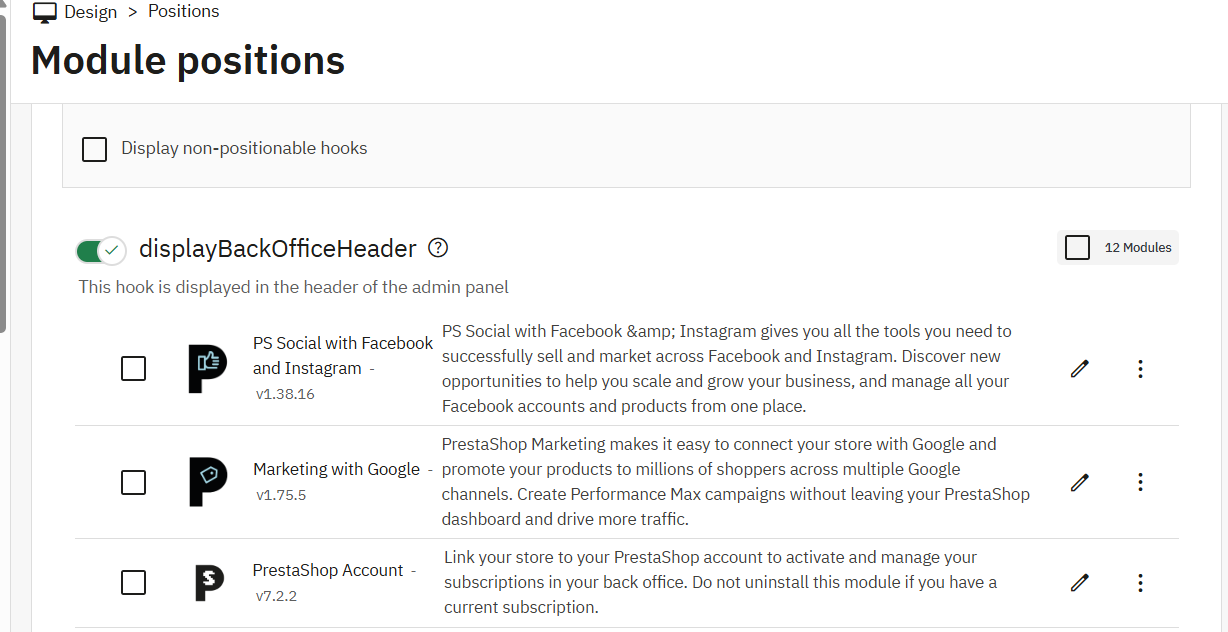
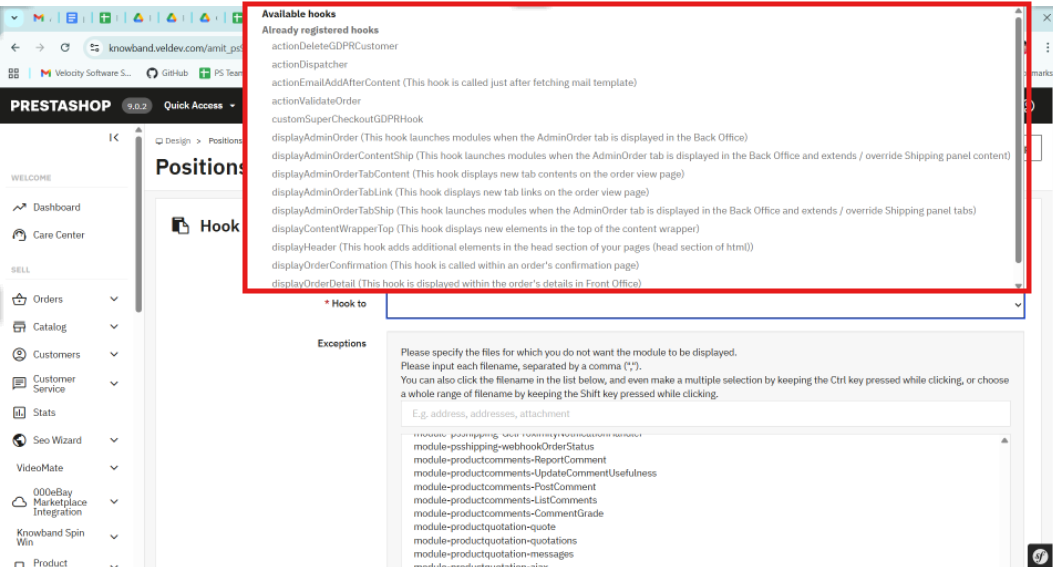
When something isn’t working as expected, the first thing to check is whether the module is actually attached to the hook. Head to Modules > Positions in the back office, or look directly at the hook table in the database. A module can be installed while a hook registration silently failed during setup.

Custom Development Services

Tailored solutions by Knowband for your eCommerce success

Looking for powerful and scalable solutions? Knowband offers expert custom development services to help you build high-performance eCommerce features with ease.

✔ Custom Module Development
✔ eCommerce Plugins
✔ API Integration
✔ Performance Optimization
✔ Third-party Integration

Also worth considering: execution order. If a module earlier in the chain throws an unhandled exception, PrestaShop can stop processing everything else on that hook. The Positions panel lets you adjust the order, and sometimes that’s all it takes to fix what looks like a mysterious disappearing hook.

The Takeaway

Hooks are what make PrestaShop modules actually modular. Used well, they let you build clean integrations that don’t step on the core or on other modules. The fundamentals aren’t complicated: register in install(), name your methods precisely, return from display hooks, cache on high-traffic hooks, and reach for custom hooks when the built-in set falls short.
Once that becomes a habit, the development process gets a lot smoother,  and your codebase stays something you’ll actually want to revisit later

At Knowband, our development team regularly works with complex PrestaShop module architectures, where efficient hook usage becomes critical for performance and scalability. If you’re looking to speed up development or implement advanced functionality, exploring professionally built modules and solutions can save significant time and effort.

One Page Super Checkout: A Simple Way to Reduce Abandonment and Increase Sales

A lot of OpenCart & Prestashop shops are losing their customers at checkout. And the reason behind it is that the general checkout process consists of an excessive number of steps and multiple fields to fill out. Research indicates that over 65% of online customers abandon the site during the checkout process when they find the process to be time-consuming or difficult to comprehend. When customers get frustrated, they stop buying, and the store loses an easy sale.

Hence, the easiest way to solve this issue is by using the OpenCart One Page Super Checkout by Knowband. This addon integrates all the checkout elements, including cart details, address, shipping, payment, and the order summary on a single page. With this, customers can make orders within seconds without switching several pages.
This smooth and fast experience reduces the number of drop-offs and increases conversions. With this addon, store owners can finally offer a checkout that customers enjoy using.
By integrating the Prestashop responsive one-step checkout addon, merchants can reduce cart abandonment and increase conversions. This powerful Prestashop fast checkout addon supports major payment gateways such as PayPal, Stripe, Authorize.Net, Braintree, Amazon Pay, Apple Pay, Google Pay, Square, Klarna, Worldpay, Mollie, Skrill, Neteller, Payoneer, and 2Checkout, providing shoppers with a variety of secure and convenient ways to pay. Offering multiple trusted payment methods helps build customer confidence and ensures more orders are completed successfully.

Benefits of the OpenCart One Page Checkout Extension

Quick Checkout, Increased Conversions.

Knowband’s OpenCart One Page Supercheckout Plugin has everything on a single page. Customers can fill in the details in a short time and complete the purchase without getting lost. Thus, once the checkout is made quicker, the conversion rate automatically increases.

Lower Cart Abandonment

Moreover, the PrestaShop Quick Checkout Module eliminates all those unnecessary steps that frustrate customers. No more loading new pages. No more long forms. This simple and clean screen keeps the customers on track and reduces the number of abandonments.

Better Mobile Shopping Experience

Most users today make purchases on mobile phones. The Responsive One Page Checkout Plugin for OpenCart is compatible with all screens, including mobiles, tablets, and desktops. Hence, customers can place their orders with ease, no matter the device they are using.

Fast Orders with Guest Checkout

Generally, when people are forced to create an account during checkout, they leave instantly. Using the Knowband Prestashop One Step Checkout Addon, customers can easily check out as guests. 

Easy Setup With No Coding

The OpenCart Simplified Checkout Plugin does not need technical skills. The extension can easily be installed by store owners, and they can configure the entire extension in just minutes.

Integrate Your PrestaShop Store with AI Chat Support

Boost engagement and conversions with instant AI replies, multilingual support, and real-time order updates.


SHOP NOW

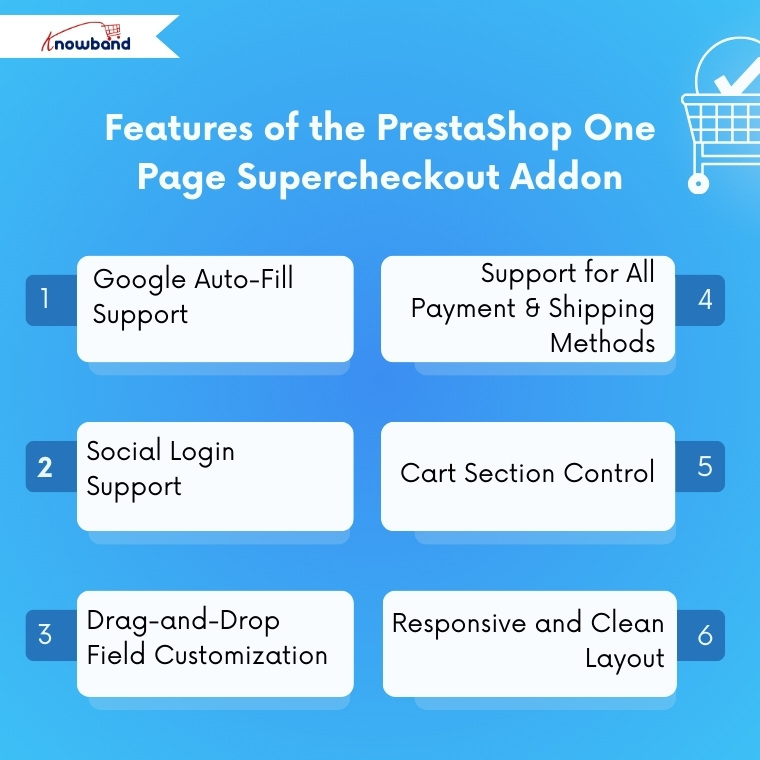
Features of the PrestaShop One Page Supercheckout Addon

Google Auto-Fill Support

The checkout form includes auto-fill to help customers enter their address faster. Thus, this reduces typing time and prevents mistakes, leading to a smoother buying process.

Social Login Support

Moreover, with the PrestaShop One Page Checkout Module by Knowband, customers can sign in using Facebook, PayPal, and Google. Thus, this saves them from creating new accounts and speeds up the purchase process.

Drag-and-Drop Field Customization

Store owners can fully customize the checkout layout. The OpenCart fast checkout extension allows adding, removing, and rearranging fields with simple drag-and-drop options. Hence, you can shape your checkout page based on your store’s needs.

Support for All Payment & Shipping Methods

The plugin works smoothly with all payment or shipping methods added to the store. In addition, admins can also customize how these methods appear by adding logos and short descriptions.

Cart Section Control

Moreover, store owners can choose what to display in the cart section on the checkout page. For example, they can show stock details or price information only to registered users while hiding them from guest users.

Responsive and Clean Layout

Last but not least, the OpenCart one-step checkout extension by Knowband provides a clean and organized layout that is easy to understand. This helps customers complete their order faster without getting confused.

Conclusion

Knowband has developed the Prestashop One Page Super Checkout Module, which is one of the strongest upgrades that any opencart & prestashop store can make in 2026. The module makes a slow, multi-step checkout process of checkout process fast and friendly for the customer. This module consists of great features such as social login, checking out as a guest, auto fill, drag and drop customization, and more.

This enhanced experience results in a reduction in the number of unfinished orders, increases successful orders, and improves customer satisfaction. Thus, Knowband’s OpenCart One Page Supercheckout Extension is the best option that you can invest in case you want to expand your opencart and prestashop store by reducing checkout friction and speeding up sales.

For more information, you can refer to the https://www.onepagesupercheckout.com/, here you can find the detailed information of  Knowband’s One Page Supercheckout, which is available for Prestashop, Opencart & Magento 2.

Must Read

Gear Up for 2026 with the Next-Gen Knowband AI Content Generator Plugin

Discover how the startup OrderFast launched its full-featured mobile app in only one week with the WooCommerce Mobile App Builder


Prestashop Advance Wishlist Addon- Get It Before 2026

This is a very common scenario that every store owner is used to. A customer will look around the store, add products to the cart, but will not make a purchase. This is usually the case in online shopping, and most of the time, it’s not because they don’t want to purchase the product. They just want to make purchases later or to compare with others and then make a choice.

Introducing the PrestaShop Save For Later Addon by Knowband, which provides customers with that very opportunity. Not only that, this interesting addon allows customers to save the products that they like and visit at any time they are willing to purchase the liked item. This minor detail has a significant impact on the store since it reduces the number of abandoned carts and makes the buyers feel that the store is closer to them.

Why the PrestaShop Advanced Wishlist Addon Is Important for Store Owners

Timing is very critical in an online business. A lot of buyers take a long time to make purchases, and when they are unable to find the products again, they usually forget them forever. That is the way potential sales are lost.

The PrestaShop Advanced Wishlist Module ensures that this is not the case. With the option to save for later, your store will always be on the mind of the customers. The customers are able to see what they have saved anytime and purchase whenever they are ready.

This module not only enhances the user experience but also boosts sales and creates long-term loyalty.

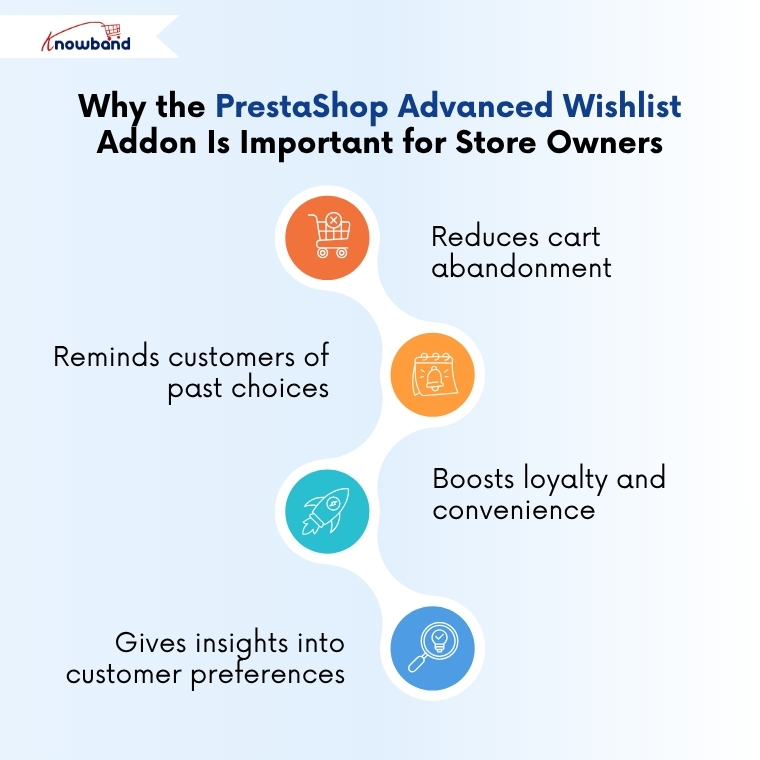
The following is how it helps the store owners:

  • It minimises cart abandonment by keeping the shoppers engaged even after leaving the site.
  • Moreover, every time a customer visits the site, the module reminds them of their choices constantly.
  • It increases loyalty as it shows that customer convenience is important to your store.
  • Moreover, it also provides admins with an analysis of customer tastes and preferences.

Therefore, the PrestaShop Wishlist Addon by Knowband is not just a nice feature, but it is a strategy that will make you get closer to your customers.

Main Features of the PrestaShop Wishlist Module

The PrestaShop Save For Later Addon is an easy-to-use solution with multiple features that facilitate shopping and the management process.

The module works smoothly on all devices, like desktop, mobile & many more. So whether your customers are on mobile or desktop, or even tablet, this wishlist feature will work the same on all devices.

This Prestashop Advanced wishlist addon provides easy-to-use configurations that a store owner can use without having any extra knowledge. Furthermore, it provides the three features, including save for later, recently viewed, and recommended products. Not only that, but store admins have the authority to change their colour or fonts and many more.

Additionally, Store admins can now easily provide the social sharing option, where customers can share their saved products with friends via WhatsApp, Facebook, or Twitter.

Lastly, store owners can get useful analytics with this module. They can analyse which product is most saved, the interests of customers, and which product eventually turned into sales. Hence, this data helps in strategising marketing campaigns and ensuring better stock management.

And the best part? PrestaShop Favourite Product List Addon by Knowband is very simple to install and needs no technical skill or coding.

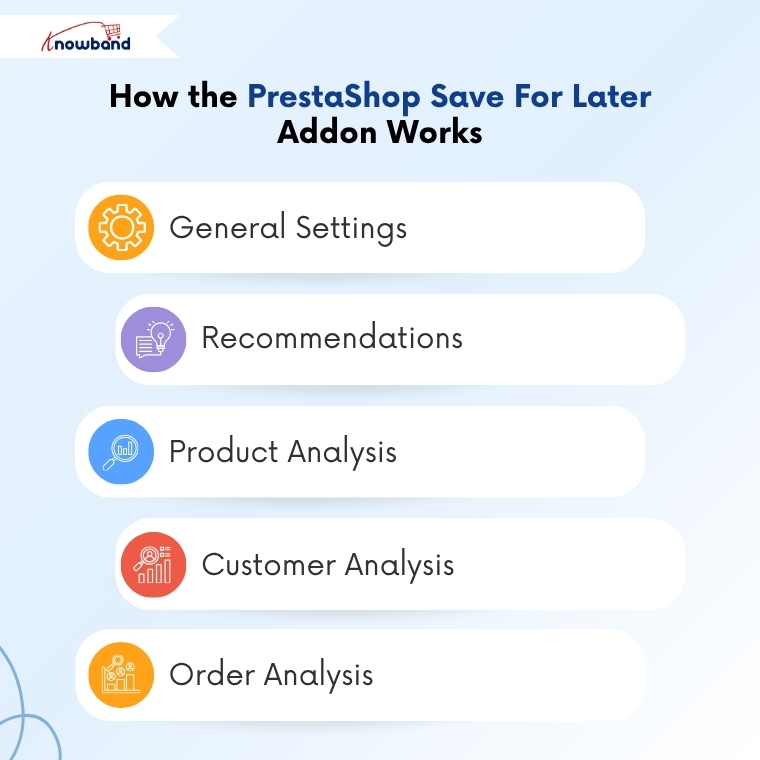
How the PrestaShop Save For Later Addon Works

General Settings

First, the admins can enable/disable the Prestashop save for later addon with one click. Then, they can enable/disable the compatibility with the PrestaShop GDPR toggle. Admins have the option to adjust the border shade, modify the buy button colour, change the bar’s background, and set the pagination limit. Moreover, admins can also customise the text and visibility of the save for later, recently viewed, and recommendations sections. Finally, in general settings, you can enable/disable social sharing for Facebook, WhatsApp, and Twitter.

Recommendations

Here, admins are able to choose what products to display in the recommendations in the frontend. The first one is that they can choose Banner, where they can add a banner, title, and a URL that will appear at the frontend. Then you can choose the Related Products to be displayed in the recommendation section.

Product Analysis

Here, admins can filter the products added to the save for later list by customers. They can check the number of products from which categories are being shortlisted in a tabular and graphical manner. Moreover, admins can download product listings in CSV format that they can easily manage and keep records.

Customer Analysis

Here, admins can examine the product data from the save for later list of customers. Admins can view the number of products that have been added by the customers, when they added them, and whether they made a purchase or not. Besides, they are also able to filter the customers and export their CSV file.

Order Analysis

Similarly, here in the order analysis section, admins can analyse the order status of the products shortlisted by the customers. Here as well, you can filter and export the CSV file of the data.

Hence, Knowband’s PrestaShop Advanced Wishlist Addon gives the store owners complete authority to know their customers better and improve their sales process.

Opencart Advance Wishlist Extension

Integrate a wishlist feature on your store

Integrate today!

Conclusion

The PrestaShop Save For Later Addon by Knowband is an easy-to-use but powerful solution that helps merchants keep customers interested even when they are not ready to purchase. It creates trust, enhances customer experience, and also provides store owners with valuable information about their customers ‘ likes and dislikes.

Every small improvement is important in the current competitive world of e-commerce. Through this module, shoppers can save items, revisit them, and make their purchases easily whenever they are ready. Hence, store owners make more conversions and enhance interactions.

Therefore, to minimise cart abandonments and ensure that your customers will visit your store again, Knowband’s PrestaShop Wishlist Addon is the right solution. It is simple, effective, and designed to expand your business smartly.

Browse more PrestaShop addons and take your store to the next level, if you need assistance, email us at support@knowband.com


Increase Your Sales This Black Friday & Thanksgiving with Product Stickers

This festive season, make your store the top-selling store in your category. Running an online store requires strategies that grab attention and boost conversions. Consequently, Knowband’s PrestaShop Product Sticker Module allows you to showcase special offers, bestsellers, and new arrivals effectively. Furthermore, its intuitive interface and versatile options make it an essential plugin for any eCommerce strategy. So, whether you are on prestashop or opencart, we have got you covered.

Why Product Stickers Are Important in Online Stores

Stickers and labels attract customers and motivate them to make a purchase. A sticker on a product signals that it’s on sale, discounted, or part of a special seasonal promotion. To help store owners increase sales this festive season, Knowband has introduced the Prestashop Product Sticker & Label Module. This module allows store owners to add different types of stickers to products, whether it’s for Black Friday, Thanksgiving, or Christmas sales.

Key Features of Knowband’s PrestaShop Product Sticker Module

You can set the product sticker module up easily, design custom stickers, automate scheduled campaigns, and be creatively in charge.

Quick & Easy Setup

No coding skills are required! After purchasing the module from Knowband, store owners can install it and configure their products in just a few minutes. Even beginners will find it easy to use.

Customizable Stickers

You can adjust stickers to perfectly suit your promotions or brand identity. Whether you want to modify colors, text, or style, the module allows full customisation of predefined stickers.

Strategic Placement

Place stickers where they get the most attention—product pages, category listings, or homepage banners. This ensures your promotional messages reach customers at the most impactful touchpoints during their shopping journey.

Scheduled Promotions

Plan ahead by scheduling stickers to appear and disappear automatically. This feature makes holiday promotions stress-free, allowing you to set up your entire campaign in advance while the module handles the rest.

Advanced Control

Modify sticker size, position, and transparency, or add custom stickers that match your brand’s visual style. Moreover, this Prestashop Product Sticker Module gives you complete creative freedom to design stickers that resonate with your target audience.

Targeted Application

Apply stickers to specific products or entire categories, ensuring relevance and preventing clutter while maintaining a professional appearance.

Benefits of Using This Powerful Module

You can get attention, increase conversions and brand consistency with the Product Sticker Module.

Boost Product Visibility

Make important products stand out with attention-grabbing labels. Featured items will receive significantly more views and engagement from potential customers.

Increase Conversions

Urgency-driven labels like “Only a Few Left” encourage faster purchasing decisions. This creates a sense of urgency that motivates customers to buy immediately rather than postponing their purchase.

Save Time

During the festive season, you can schedule stickers in advance, freeing up time to focus on other aspects of your business, such as inventory management and customer service. Automation also reduces the risk of human error when updating promotional displays.

Maintain Brand Consistency

Full control over design and placement ensures that stickers always align with your store’s look and feel, keeping your brand identity strong and recognizable across all customer touchpoints.

Maximize Impact

Display stickers on high-visibility pages to attract maximum attention. This increases exposure for your most important products and promotions while guiding customers toward high-value purchases.

Conclusion

Knowband’s PrestaShop Product Sticker Module is a smart solution for store owners who want to highlight offers, boost sales, and improve the customer experience. With its ease of use, flexible customisation, and automation features, it’s a valuable addition to any online store.

Make your products stand out and drive more sales this holiday season. Try Knowband’s Product Sticker Module for PrestaShop today and watch your conversions soar during Black Friday and Thanksgiving. Investing in this powerful plugin will help you maximise revenue during the year’s most profitable shopping period.

Upgrade Preparation Checklist for Knowband PrestaShop addons

Installing a module asks for rewriting the translations?

Problem/Motivation
While upgrading a module, the user often faces language translation issues in PrestaShop. To improve the user experience at their store and make it easy for the customers to understand the checkout instructions and flow, merchants translate the module files but on upgrading the module the changes get lost. After upgrading the module the module will show the default content only.

We receive many such queries related to language translation and translation file import problems when customers upgrade the module.

Proposed Resolution

If you have modified the default translations on your store initially for a better translation, after updating or upgrading the module, the translation changes will get lost.

Thus, to keep things as usual and minimize the efforts, you need to make a few changes before upgrading the module. Please follow the below steps for taking the backup:

  1. Download the below-mentioned file at your end:
    /modules/{module_name}/translations/{iso_code}.php
    Where, {module_name} => Name of the module folder which you want to update and {iso_code} => ISO Code of the language which you want to take backup.
  2. After taking the backup of the above file, you can update the module on your store.
  3. Then you have to replace the below-mentioned file: /modules/{module_name}/translations/{iso_code}.php with the backup file.

After taking the backup and updating the translation file, you can compare the new version with the older version to figure out the changes.

Now, you only have to add or translate the sections that are new in the upgraded version.

Extend Support Plan for the PrestaShop modules if Expiring

Are you already using KnowBand’s PrestaShop modules?

Knowband offers three month’s free module support. If your free support plan is expired, and you need any help from our technical team to configure the module then follow the steps mentioned below to extend the support period:

  1. Log in to your PrestaShop account
  2. Go to the Downloads under the My Orders tab
  3. Here you will find an option to extend the support period. Click on the desired time period for the support. You can extend the support for 3 months, 6 months, or 12 months.

Voila, you have successfully upgraded your Knowband module support plan.

KnowBand has a lot to offer- eCommerce trends and innovation

As an eCommerce owner, it is of prime importance that you keep up with changing technology trends.

After the Covid-19 outbreak, a lot has changed and there will be transitions in the upcoming days as well. Several retail businesses are now having their online stores and offering home delivery services.

Marketplaces are seeing a new uplift in the eCommerce industry, with that the small businesses are getting great opportunities by multi-channel selling.

KnowBand is helping people fulfilling their eCommerce requirements for a decade. We have eCommerce plugins for almost each and every feature that you want to add to your store, from home page decoration to an optimized checkout page and from marketplace integration to creating a marketplace on your own.

Also, we help businesses to create mobile responsive websites with PWA and AMP builders.

In addition, our mobile app builder plugin is among the best seller plugins. Here is the portfolio for reference!

Read these blogs to know more about KnowBand’s eCommerce services:

PrestaShop Website Development Services- PrestaShop Partner Agency

Create an eCommerce Website- We Develop What You Dream!

How to Copy cart into another cart in order to change the id_cart?

Objectives of the blog

After reading this blog we will be able to copy the cart into another cart in order to change the Cart Id.

Requirement

We need to modify the below file to fix the same. We will be making changes in the Core file for the same.

Root dir\classes\PaymentModule.php

Procedure

We need to modify the validate order function in the PaymentModule class file. As this function is called only once while completing the order. So we have added the code in the same to avoid multiple cart creation.


if (self::DEBUG_MODE) {
PrestaShopLogger::addLog('PaymentModule::validateOrder - Function called', 1, null, 'Cart', (int)$id_cart, true);
}
if (!isset($this->context)) {
$this->context = Context::getContext();
}
$this->context->cart = new Cart((int)$id_cart);


Below code needs to be added in the validate order function after above lines.

// changes started
// To save the secure key of current cart id and reassign the same to new cart
$old_cart_secure_key = $this->context->cart->secure_key;
// To save the customer id of current cart id and reassign the same to new cart
$old_cart_customer_id = (int)$this->context->cart->id_customer;
// To unmap the customer from old cart
$this->context->cart->id_customer = 0;
// To update the cart
$this->context->cart->save();
// To fetch the current cart products
$cart_products = $this->context->cart->getProducts();
// Creating new cart object
$this->context->cart = new Cart();
$this->context->cart->id_lang = $this->context->language->id;
$this->context->cart->id_currency = $this->context->currency->id;
// to add new cart
$this->context->cart->add();
// to update the new cart
foreach ($cart_products as $product) {
$this->context->cart->updateQty((int) $product['quantity'], (int) $product['id_product'], (int) $product['id_product_attribute']);
}
if ($this->context->cookie->id_guest) {
$guest = new Guest($this->context->cookie->id_guest);
$this->context->cart->mobile_theme = $guest->mobile_theme;
}
// to map the new cart with the customer
$this->context->cart->id_customer = $old_cart_customer_id;
// to save the new cart
$this->context->cart->save();
if ($this->context->cart->id) {
$this->context->cookie->id_cart = (int) $this->context->cart->id;
$this->context->cookie->write();
}
// to update the $id_cart with that of new cart
$id_cart = (int) $this->context->cart->id;
$this->context->cart->secure_key = $old_cart_secure_key;
// changes over


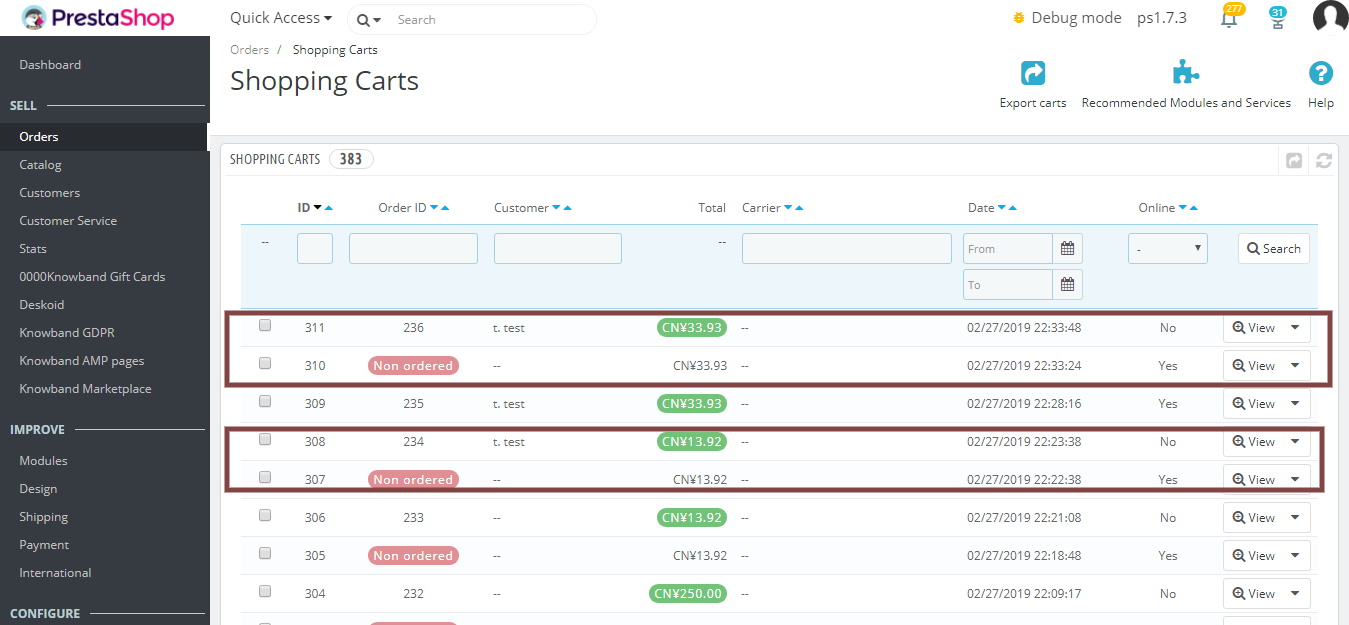
After following the above procedure, the shopping cart list will look like this i.e having a duplicate cart with the same details as of the cart with which the order is placed.

Summary

After following the above procedure, You will be able to copy the cart into another cart in order to change the id_cart.

How to Create Breadcrumb in PrestaShop 1.7?

Introduction

The Breadcrumb allows a user to maintain the location on the websites. One can easily create the Breadcrumb on the Prestashop. If you are creating a module which has a separate page on the front then you would create a front controller by extending the ModuleFrontController file and this ModuleFrontController file extends FrontController which has the following function:

protected function getBreadcrumbLinks()
{
$breadcrumb = array();

$breadcrumb['links'][] = array(
'title' => $this->getTranslator()->trans('Home', array(), 'Shop.Theme.Global'),
'url' => $this->context->link->getPageLink('index', true),
);

return $breadcrumb;
}

How to Add?

Now, To create the Breadcrumb for your page you just have to create the same function in your front controller (Which you must have created by extending the ModuleFrontController) and append your Breadcrumb title and link with the parent Breadcrumb. Please look into the following code to understand it better:

protected function getBreadcrumbLinks()
{
 $breadcrumb = parent::getBreadcrumbLinks(); /* Get the Breadcrumb array from the parent function which is situated in the FrontController.php */
 
 $breadcrumb['links'][] = array(
 'title' => $this->module->l('level1', 'Current_controller_name') , /* Title which you want to give to the location */
 'url' => $this->context->link->getModuleLink('module_name', 'Current_controller_name', array() , (bool)Configuration::get('PS_SSL_ENABLED')) , /* URL which you want to provide for a location */
 );
 
 $breadcrumb['links'][] = array(
 'title' => $this->module->l('level2', 'Current_controller_name') , /* Title which you want to give to the location */
 'url' => $this->context->link->getModuleLink('module_name', 'Current_controller_name', array() , (bool)Configuration::get('PS_SSL_ENABLED')) , /* URL which you want to provide for a location */
 );
 
 $breadcrumb['links'][] = array(
 'title' => $this->module->l('level3', 'Current_controller_name') , /* Title which you want to give to the location */
 'url' => $this->context->link->getModuleLink('module_name', 'Current_controller_name', array() , (bool)Configuration::get('PS_SSL_ENABLED')) , /* URL which you want to provide for a location */
 );
 
 return $breadcrumb;
}

How it will look like on your page?

You have to add the above-mentioned function in the front controller you created. After adding the above code in the Front Controller, the Breadcrumb will be shown on the front page like below screenshot:

Bonus Tip:

If you want to make some changes (Like remove) in the Breadcrumbs then you can do the same using the following file:
/themes/classic/templates/_partials/breadcrumb.tpl

How to Create eBay Application to Get Required API Keys and User Token?

To start selling on eBay Marketplace with any Marketplace Connector we need some mandatory eBay API keys and tokens to communicate with eBay API.  So, to get these keys and tokens we need an eBay Application. Thus, it is a prerequisite for any eBay-e-commerce connector. Moreover, we will take you over the step-by-step process for setting up an eBay application and obtaining the necessary eBay Keys and tokens in this article.

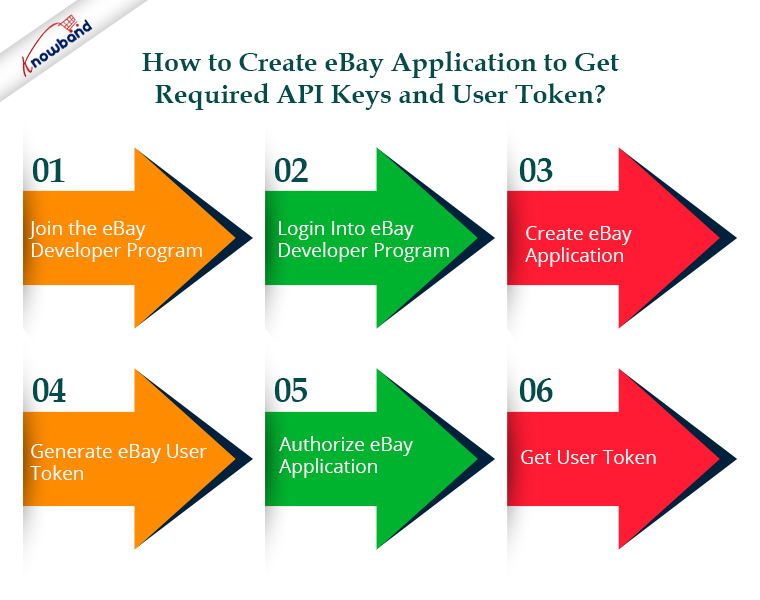
Step-By-Step Procedure to Set Up an eBay Application

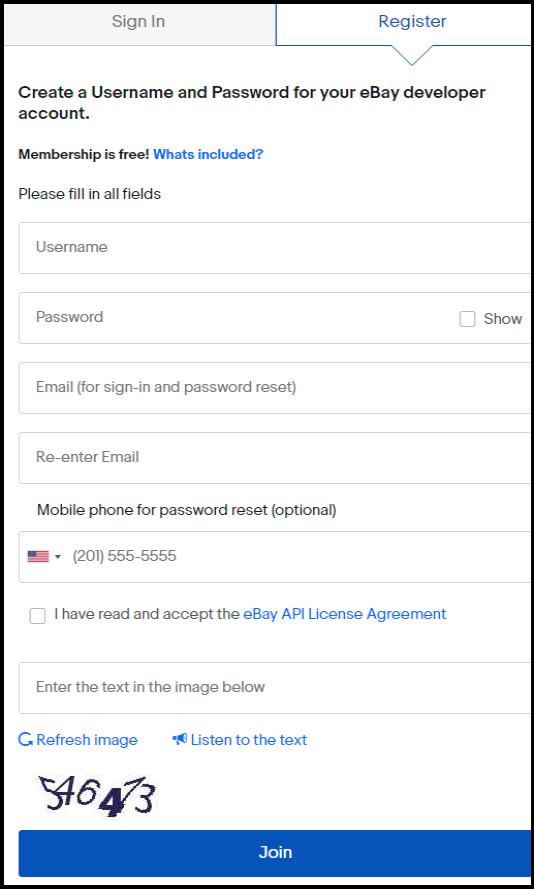
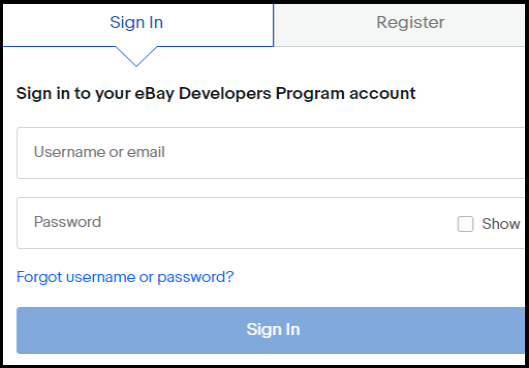
STEP 1:- Join the eBay Developer Program

To access the eBay APIs, you should first create an eBay developer account. Visits https://developer.ebay.com/signin   and fill in all required details to get register a new eBay developer account.

Skip this step and log into your eBay developer account if you already have any developer accounts.

Recommended Read: How to Launch a Marketplace like Etsy and Ebay?

STEP 2:- Login Into eBay Developer Program

Using the credentials you gave in the first step, log in to the eBay developer account after the eBay account has been created.

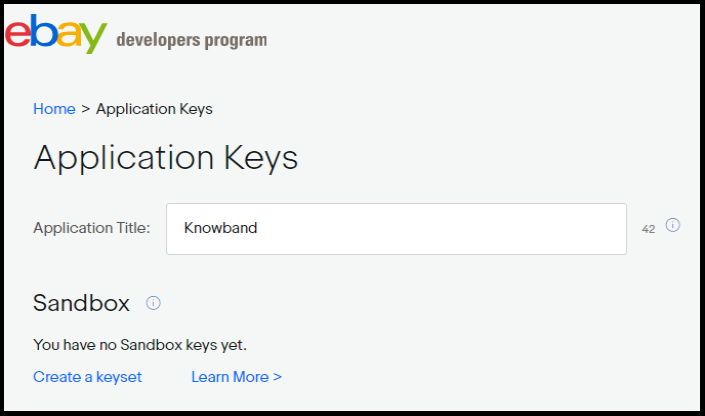
STEP 3:- Create eBay Application

Once you have logged in to the eBay developer account it will ask you to set up the eBay Application name. Next, Input a valid Application name. Here you will be presented with two options:-

  • Sandbox
  • Production

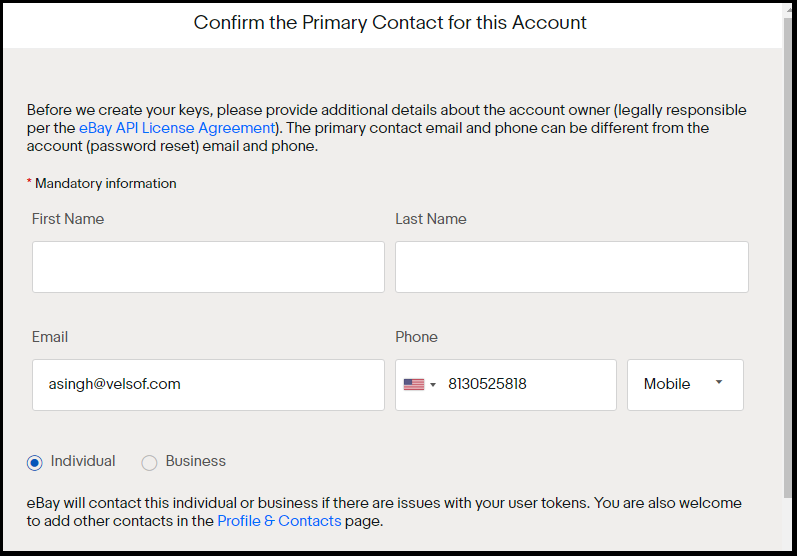
Click on ‘create a keyset’ of the mode you want to get data from. On clicking ‘create a keyset’ a new form will be opened as shown.

Recommended Read: How to Rank Higher and Get Your Listings Seen in eBay Search?

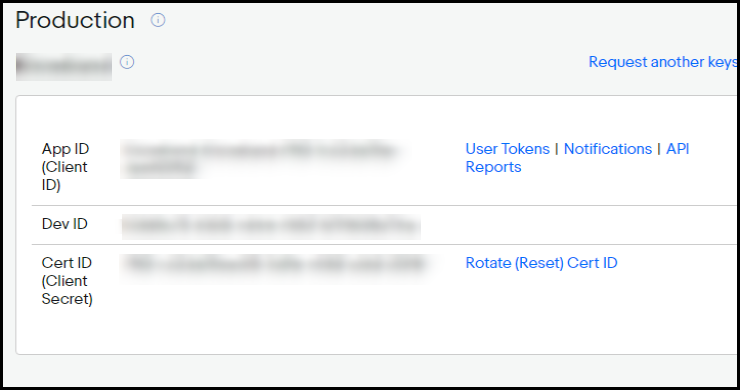
Enter the valid details and click on ‘Continue to create Keys’ to generate keys for this application and application keys will show on the next screen. Here you will get three keys:-

  • DevID- Unique identifier for the developer’s (or company’s) account.
  • AppID- Unique identifier for the application.
  • CertID- Certificate that authenticates the application when making API calls. Not to be confused with user-level authentication tokens

STEP 4:- Generate eBay User Token

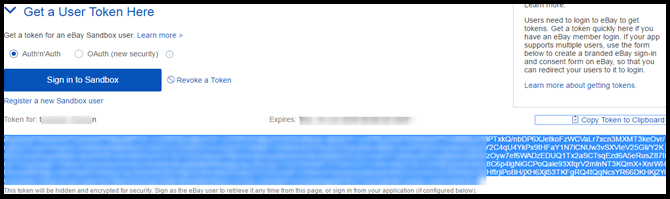
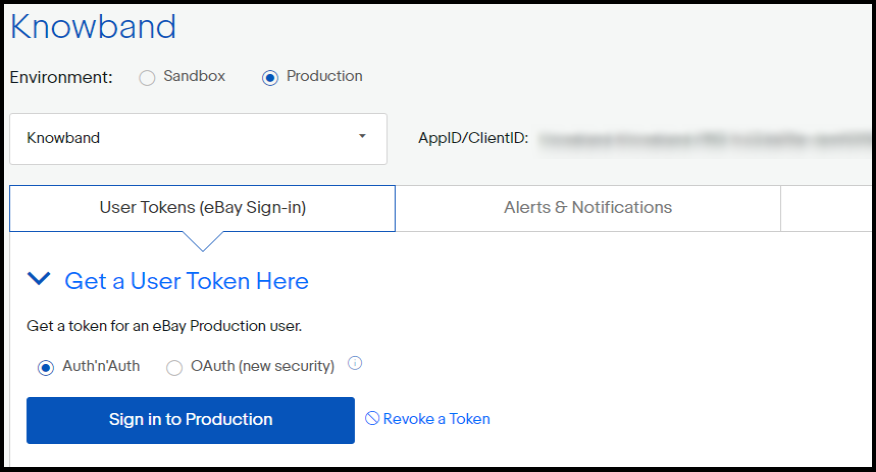
To generate an eBay user token, click on ‘User Tokens’ corresponding to the App ID key as shown in the above image. After clicking on ‘User Tokens’ you will see the below screen:-

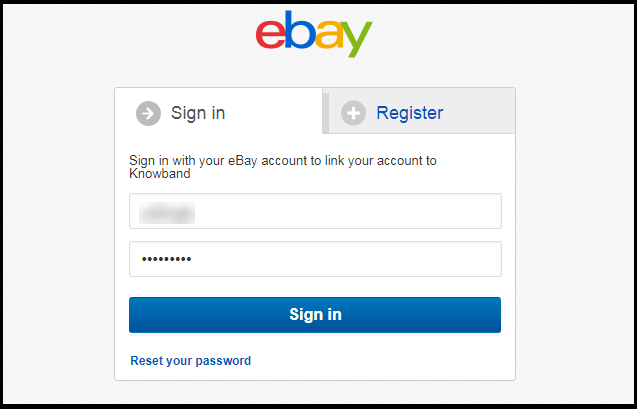
Click on the Sign in button shown in the image. It will redirect you to the respective (production/sandbox) eBay account.

Now, Sign In here with a valid eBay user credential for which you want to generate tokens.

Recommended Read: 4 Ultimate Tips To Increase Sales On eBay

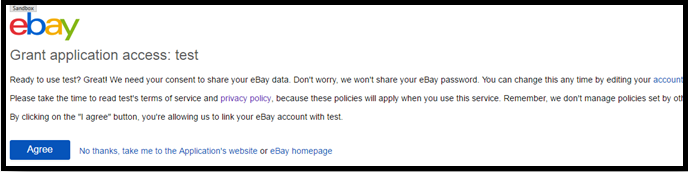
STEP 5:- Authorize eBay Application

Sign in to your eBay account and then click the “Agree” button. Additionally, it will allow any of your client applications to use the token while making HTTP connections.

STEP 6:- Get a User Token

The procedure of creating the user token is now complete. Your browser will link you to a page that lists your user token. Just copy that newly generated token and use it where required.

Please keep in mind that this token will expire after 18 months. Hence, you might need to regenerate it after that time.

Recommended Read: How to create an eBay Sandbox Account?

In the End:

Prestashop, Opencart, Magento 2 and WooComerce are all compatible with KnowBand’s eBay Marketplace integrator. This clever method enables sellers to quickly begin selling on the eBay Marketplace. Moreover, KnowBand offers three months of free service for these integration modules. However, you can select the appropriate integrator module for your store. WooCommerce eBay Marketplace Integrator,

Opencart eBay Marketplace Integrator,

Magento 2 eBay and

Prestashop eBay Marketplace Integrator.