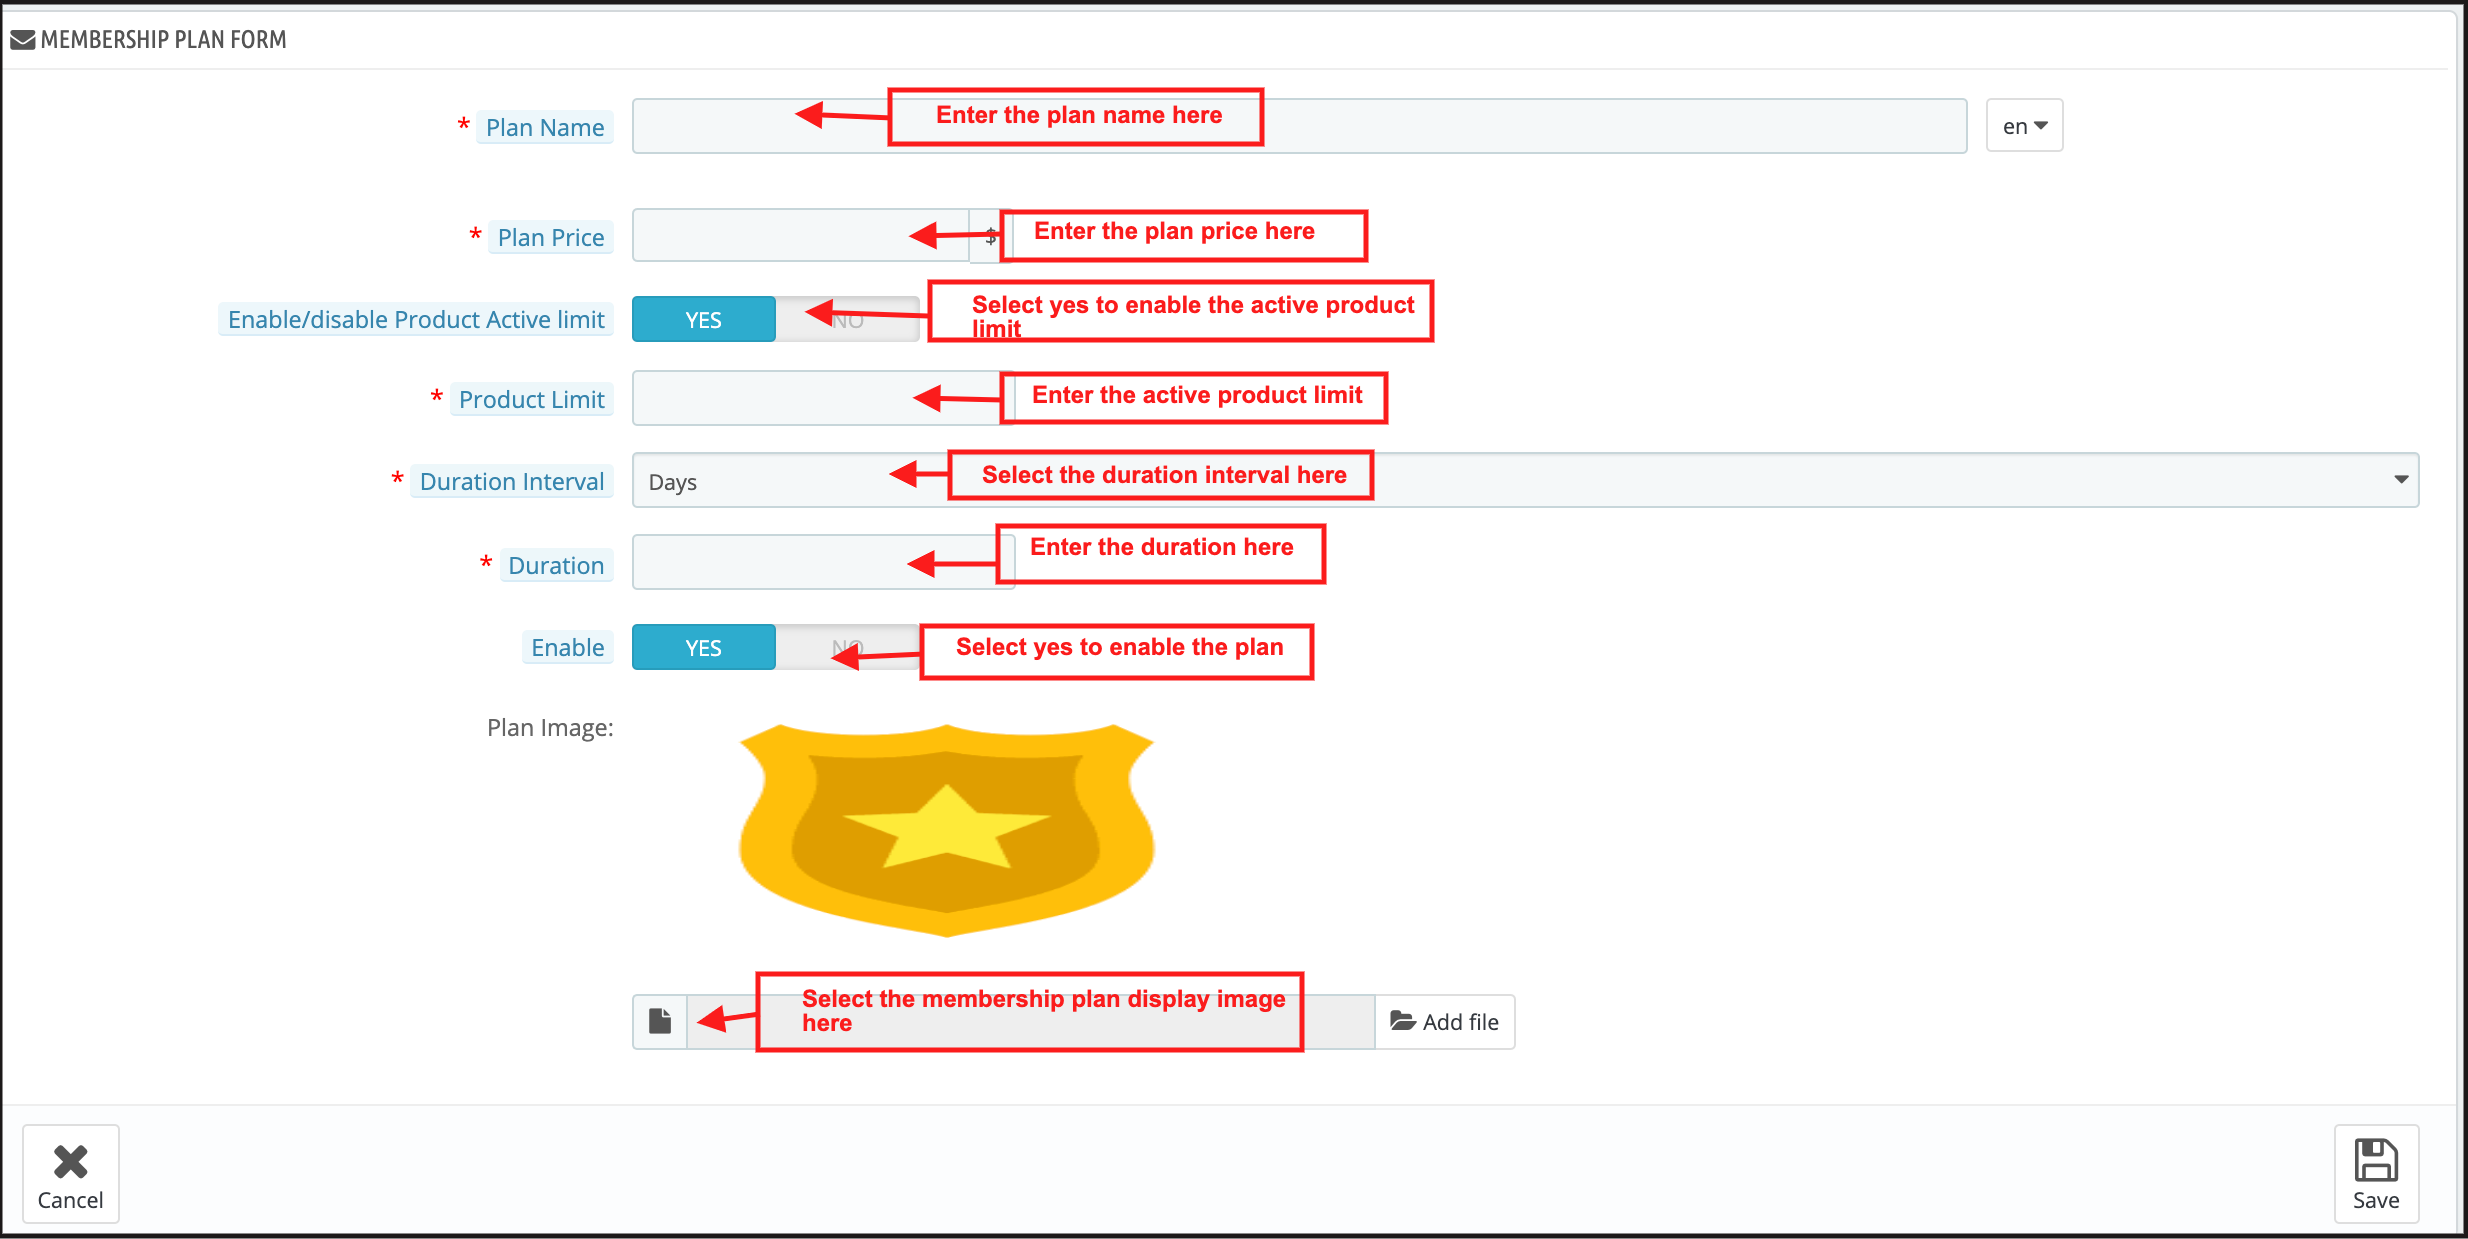
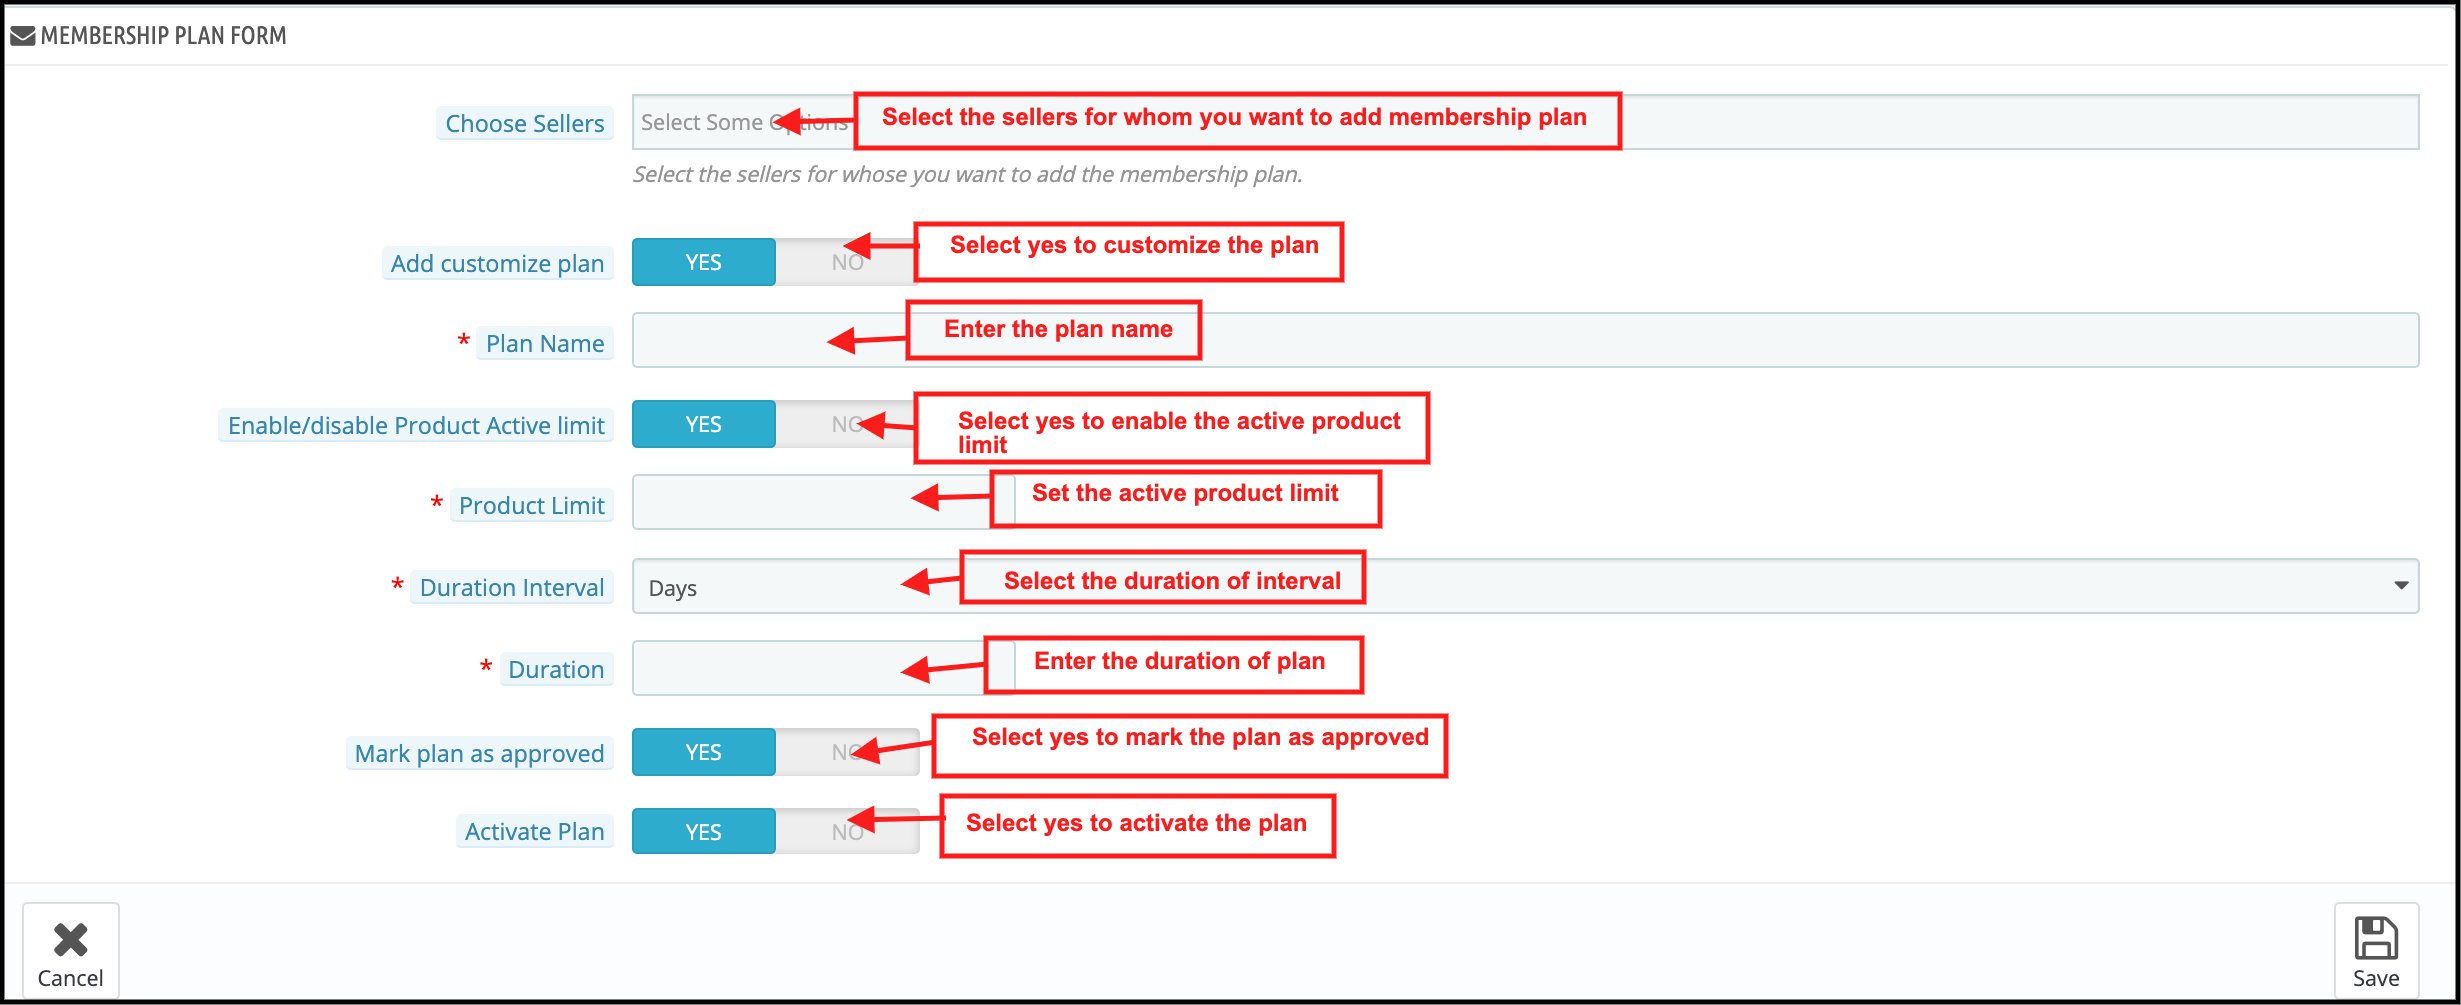
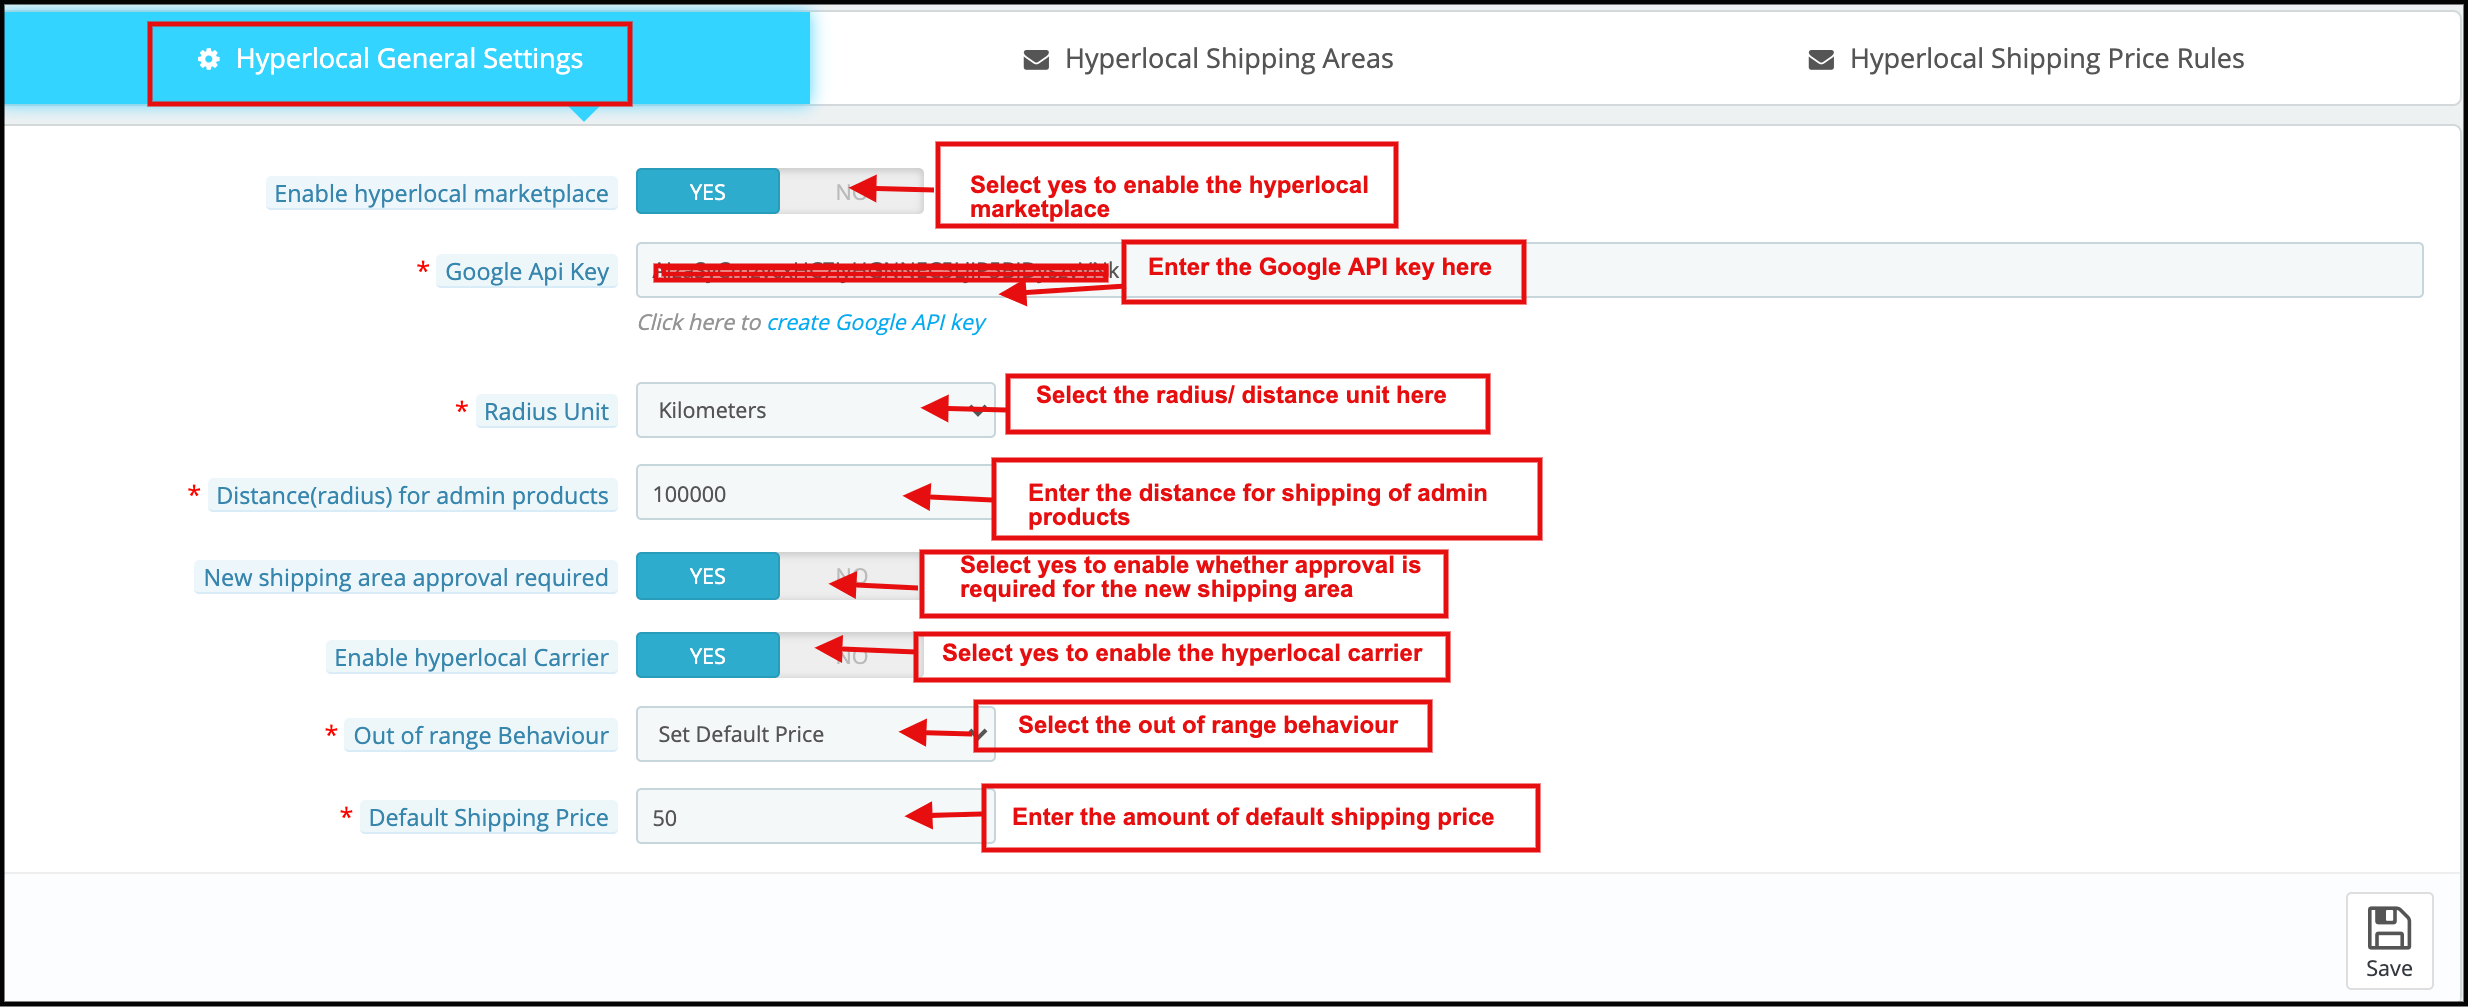
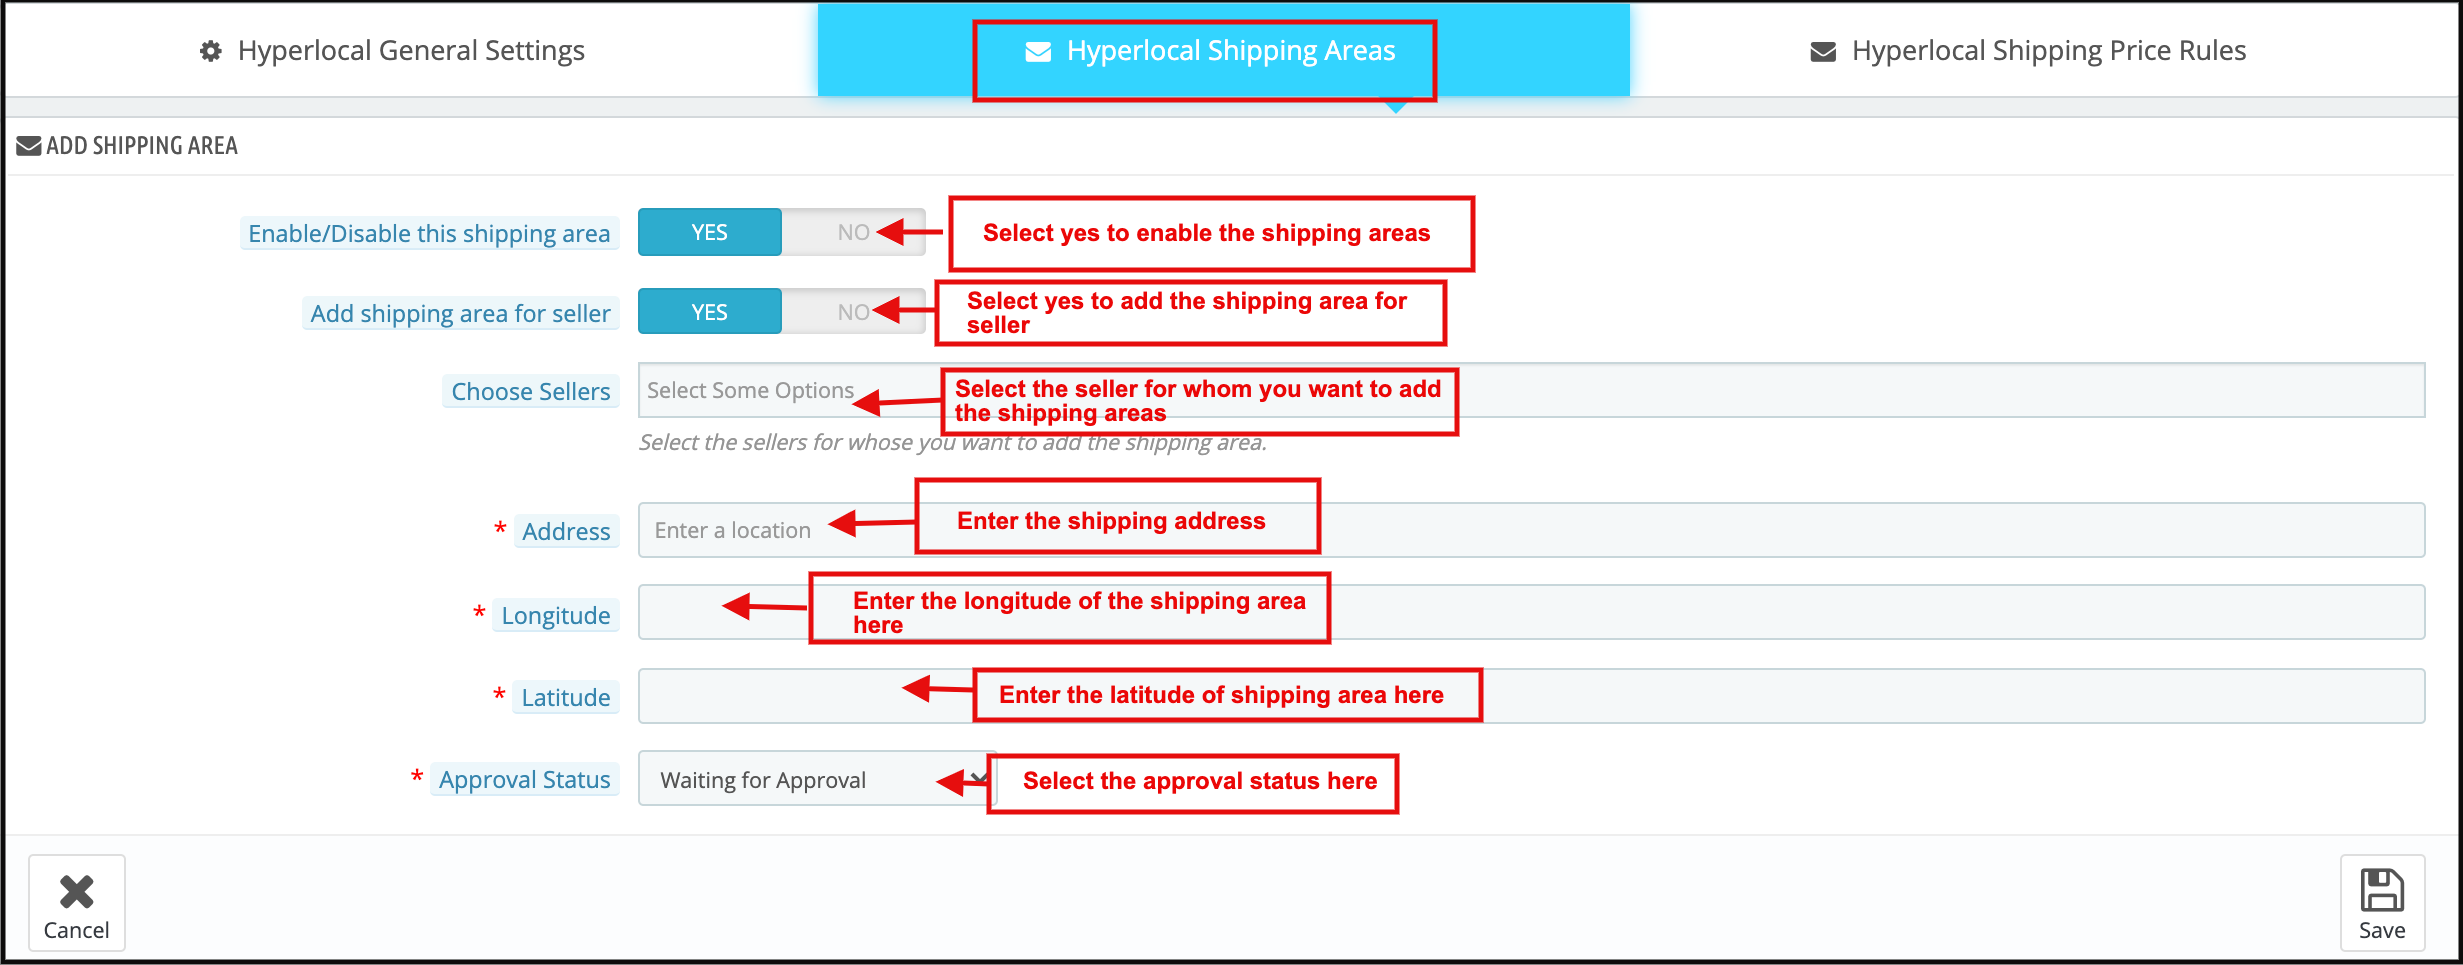
In this blog, we will undoubtedly examine the Prestashop Hyperlocal Marketplace Addon by Knowband. Marketplaces are well-known online retail platforms where a variety of merchants can register. Additionally, to evaluate and analyze the Marketplace’s bigger audience. There are a few huge, and well-known marketplaces that are highly popular.
Focusing on the Prestashop hyperlocal marketplace module, the plugin is more than just turning your store into a marketplace. In fact, it will also link customers with local sellers.
The hyperlocal multi-vendor marketplace allows vendors to display their shipping zone scope. Moreover, set the shipping fee esteems for an area that is broader than the pre-defined limit as well. Shoppers can place orders from neighboring merchants. In addition, have them delivered in a certain amount of time. Using Knowband’s Prestashop hyperlocal E-commerce business, this should be doable.
Finally, we’ve arrived at the point where we’ll start talking about Knowband’s Prestashop Hyperlocal Marketplace. Therefore, in this blog, we will keep an eye on everything that you should know about the plugin. Moreover, a layperson should know what he/she is getting into before creating a hyperlocal marketplace.
Let us go forth and check them out one by one below.
What is the definition of the Prestashop Hyperlocal Marketplace Addon?
Knowband’s Prestashop hyperlocal delivery marketplace is the quickest and smoothest way to turn your store into a hyperlocal setup. You can also start taking care of things once you acquire the module, install it in your eCommerce store, and configure it. You can start processing seller inquiries to join and sell on your platform right away. As a result, the establishment setup can be completed in three basic phases. We will look at them below.
What are the steps to set up the Prestashop hyperlocal service marketplace?
Buy the Prestashop hyperlocal delivery business model from Knowband.
Download the files and folders in the backend of the store.
Hit the install button.
Once the module installs, you can go ahead and configure it as per your choice.
What distinguishes the Prestashop Hyperlocal Delivery Business Model from others?
The very first difference is certainly the duration between placing an order and its delivery. Moreover, the Knowband marketplace has a variety of features. Some of them are available below:
Vendor commissions
The admin can choose to charge the commission percentage-wise or fixed for all sellers. Furthermore, he can charge different sellers different commissions on their orders.
Vendor request endorsement/objection settings
Once a vendor sends an enrollment request, the administrator can also pre-set the options. As a result, by clicking a button on the Prestashop hyperlocal marketplace addon, he can quickly accept or disapprove proposals.
Customers can also be sellers
Store owners can also give their customers the option of registering as a seller. The Prestashop Hyperlocal Marketplace also allows customers to register as vendors.
The panels for the administrator and the vendor are unique
Every seller has a panel where they can add or change things in the Marketplace. In fact, the vendors get a dashboard from where they can do all their activities. For instance, handle their profile, list products, and do more.
Preferences updating order status
A Prestashop hyperlocal marketplace module owner can grant dealers permission to oversee and change order status. Further, they can also handle order fulfillment and provide order records, among other things.
Designs of shipping zones
For the benefit of merchants, the store manager can add shipping zones.
The following is a list of item recommendations
Any merchant who signs up for the program is free to sell anything they want. However, the administrator must first accept the item and category synopsis. With a few clicks from the backend, stock management for delivery products becomes simple.
Payout requests
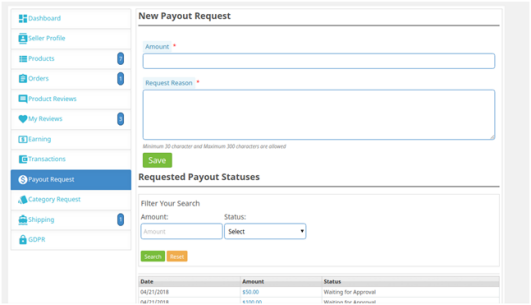
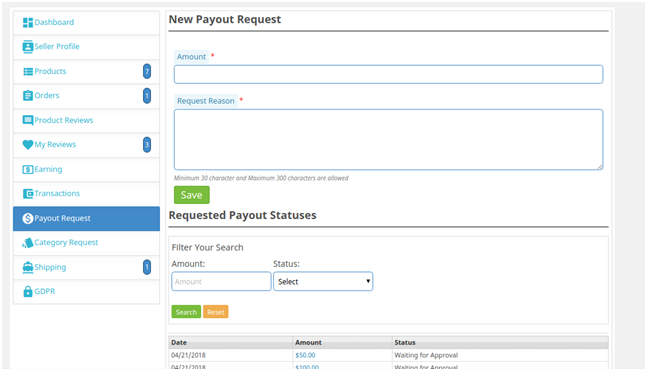
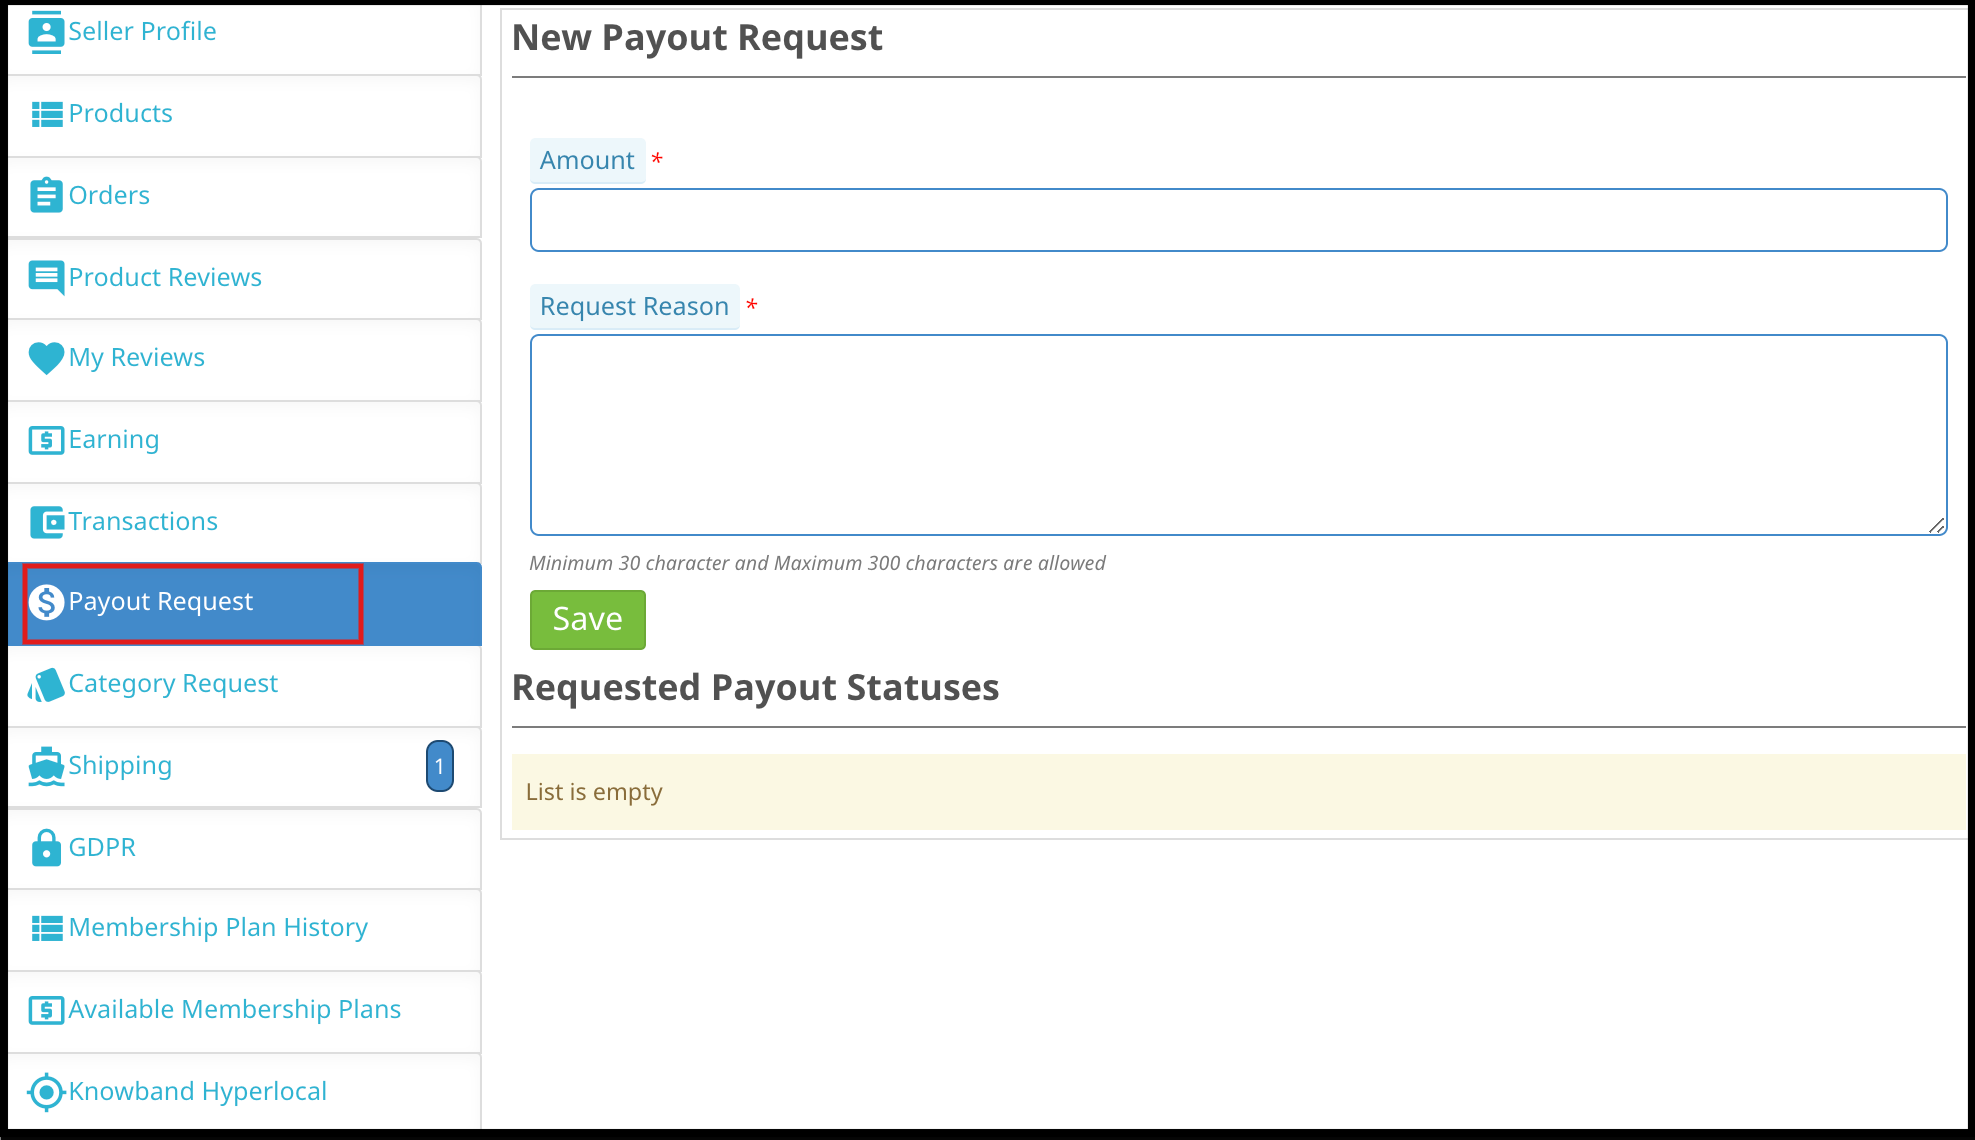
Merchants can request payment for their income via the hyperlocal multi-vendor marketplace. The shop manager can automate or manually accept the requests with a single tick. The sellers have the option of displaying the total and rationale for the payout, as well as selecting any of the payment methods available. In addition, the chairman has the authority to approve or amend the payment criteria.
Email Templates
Vendor registration, vendor account approval, item approval, research updates, payment request, and other events cover in the Prestashop addon’s email layouts.
Multiple payments and delivery alternatives are available
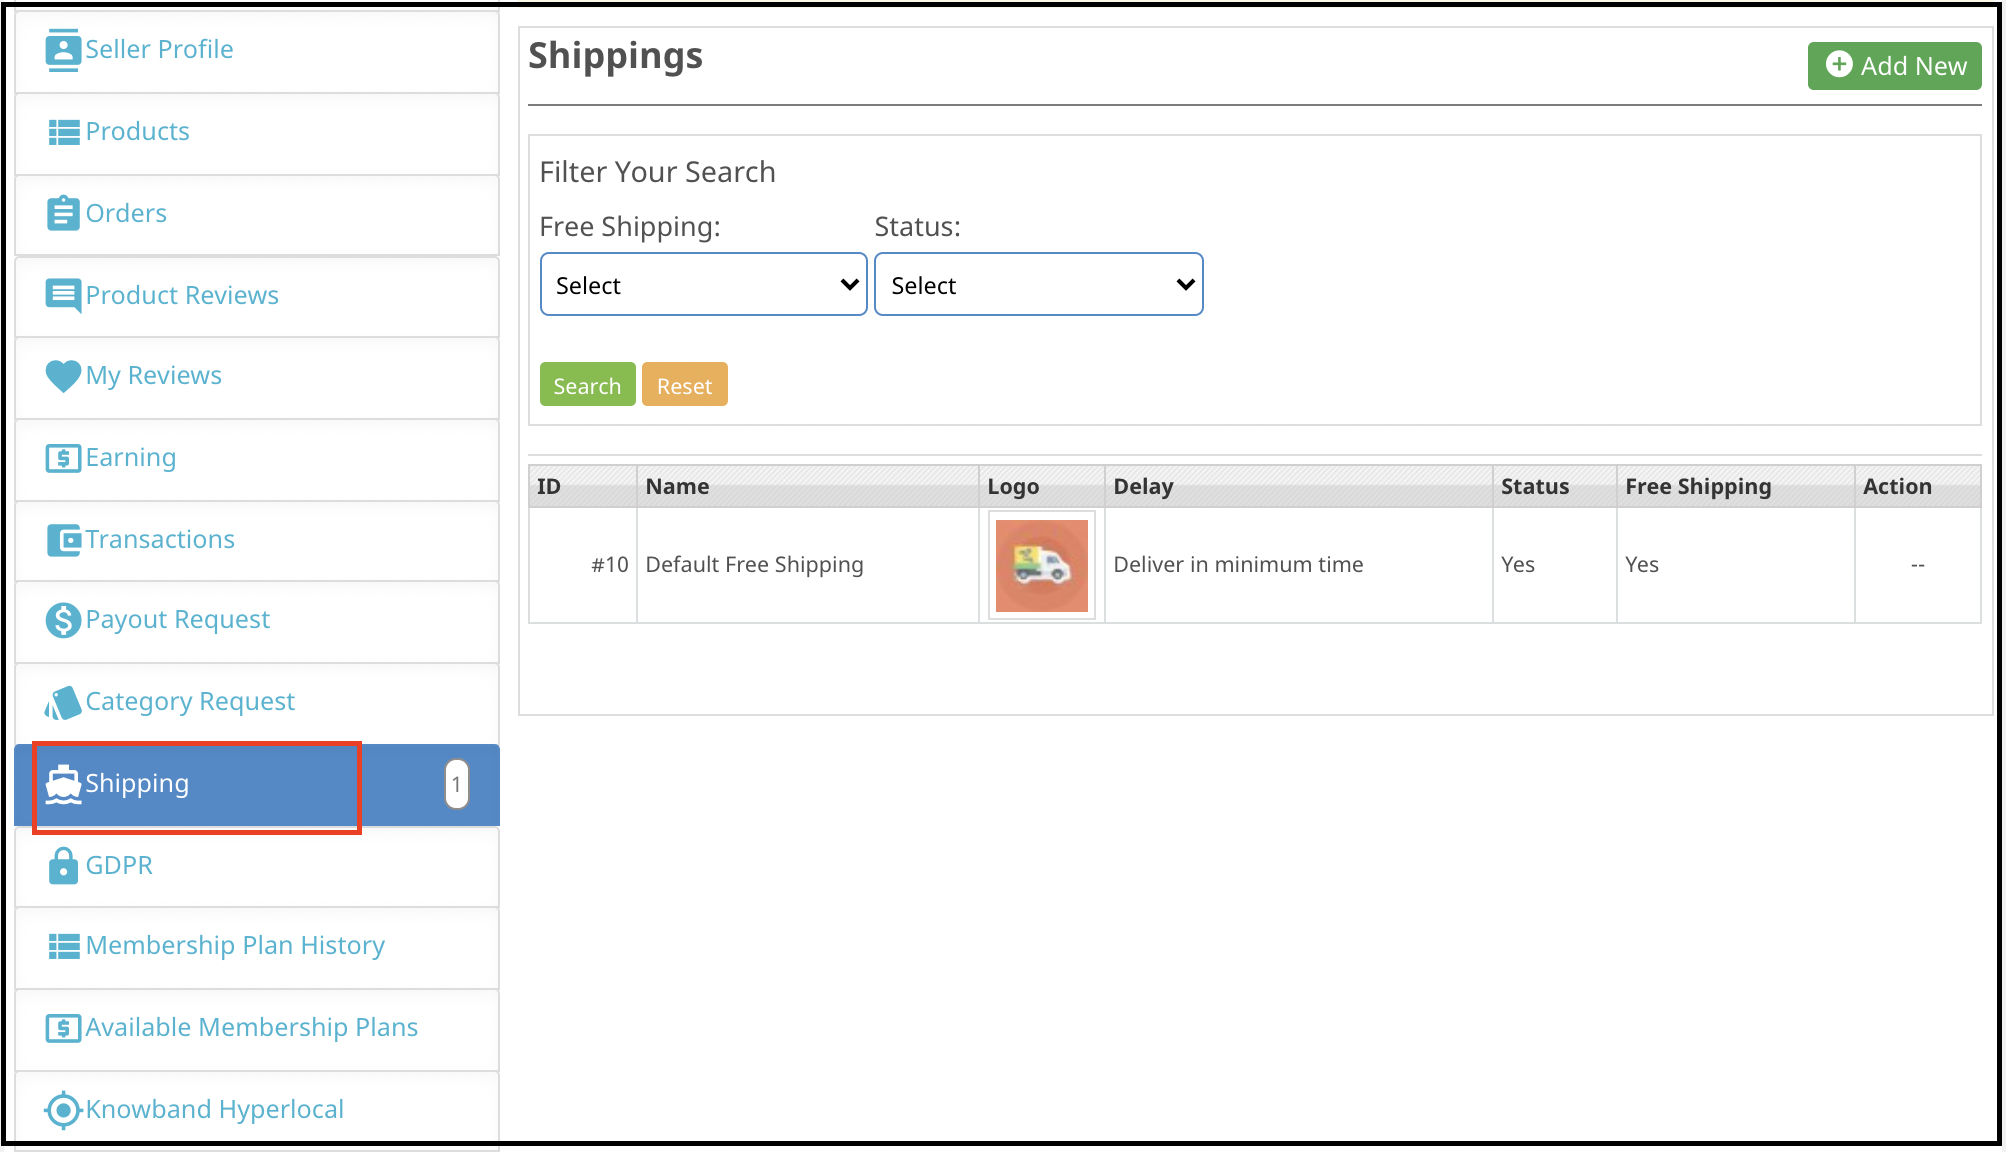
Various delivery and payment options are configurable by the administrator. On the Ship tab of the vendor’s dashboard, dealers can display their shipping plans, or the administrator’s default shipping operations will be displayed. Basic approaches for promoting the seller’s unique delivery methods should be there.
GDPR compatibility
The Prestashop hyperlocal E-commerce business guarantees GDPR compliance.
The advantages of Prestashop hyperlocal delivery marketplace
Commissions are straightforward:
The market is a source of regular income, and it may be advantageous to support local businesses. We already discussed this aspect before in the blog. The bonus can be one-of-a-kind or equivalent, according to the administrator’s discretion.
There are no requirements for archiving:
Because it allows multiple merchants to sell on one platform, the Prestashop addon is useful for inventory management. The supervisor and the vendor both can add and remove items and courses.
A lucrative business model:
The advantages of eCommerce marketplaces benefit a flexible organizational strategy. Perhaps there are fewer financial risks with an independent eCommerce store. A growing consumer check works hand in hand with developing vendors, ultimately resulting in a growing company.
Facilitates the growth of revenue:
Because they have access to a large client base, sellers go to hyperlocal marketplaces to sell. Customers are more likely to be unsatisfied with stuff they didn’t intend to acquire when browsing items on marketplaces.
As a result, the Prestashop Hyperlocal Marketplace Addon has a better chance of making a sale. Why? Because they are familiar with a wide selection of products from a variety of vendors.
What is a hyperlocal marketplace and how does it work?
Orders are placeable via a website, a mobile application, or a phone call. The hyperlocal marketplace employs an integrated program to give a seamless experience across several mediums.
The hyperlocal marketplace’s backend is reliable and trustworthy. Sellers receive client orders and ensure that purchases are complete within strict deadlines.
What is the primary difference between a traditional marketplace and a hyperlocal marketplace?
Hyperlocal businesses are companies that spread throughout a large geographic area. For instance, nearby service providers, food stores, restaurants, and so forth. They’re accessible through apps or traditional platforms, and you may start using them right now. The Prestashop hyperlocal service marketplace caters to all consumer requirements. In truth, they deal with them in the most efficient way possible.
On the other hand, eCommerce eats away on a public or global scale. In addition, it includes a gigantic procedure on a much greater scale. In addition, I made an effort to meet standards that aren’t overly strict. The ability of an online marketplace to give clients more economical options determines its success. Furthermore, who approves of staying for a short period or a longer period?
What makes Knowband’s Prestashop Hyperlocal Delivery Business Model so appealing?
The Prestashop Hyperlocal Delivery Marketplace from Knowband provides features that will help your eCommerce business. For a long time after the purchase, Knowband provides the best customer service. Moreover, for the first three months, the clients get free customer support. Further, the support team is available to assist you with any question or issue you may have with the module. For enhanced customer service beyond three months, you might have to pay a premium.
For Prestashop Hyperlocal E-commerce Business Mobile App Builder package, click here.
In the End
So, what do you think of the Prestashop hyperlocal marketplace addon by Knowband? It is a functional and beneficial option for your eCommerce business. In case you have any queries, let us know at support@knowband.com.
The marketplace has become the most visited eCommerce store in the last few years. You get products at competent prices with hundreds of choices from multiple sellers. Out of two ways of creating a marketplace, some chose to make it from scratch while others use marketplace extensions.
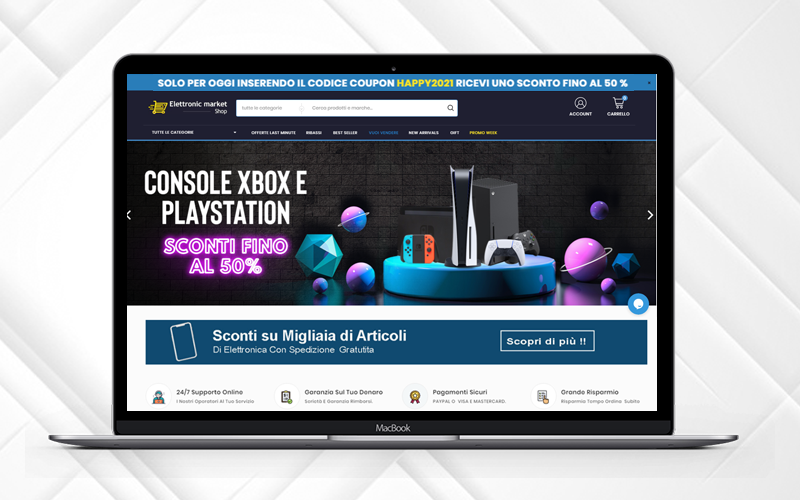
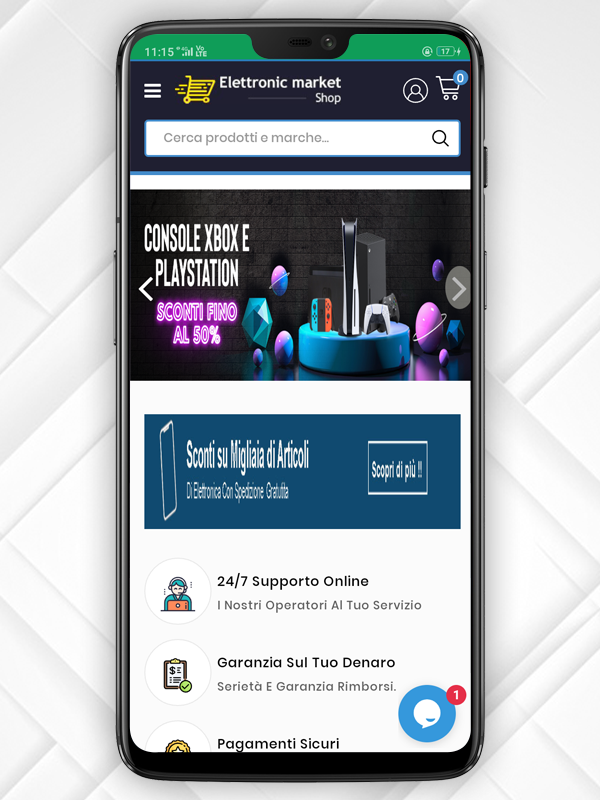
In this article, we are celebrating the success of the Elettronic Market, an Italian marketplace that trusted KnowBand’s PrestaShop Multi-vendor Marketplace Module and created a full-fledged multi-vendor store where anyone can register as a seller and expand their business.
About Elettronic Market Shop:
ELETTRONIC MARKET is a young and vibrant e-Commerce business that specializes in selling millions of goods. It sells lighting goods, DIY hardware, perfumery, clothes, beauty items, games for the little ones, personal care items, and much more thanks to a refined and unmistakable theme.
<em>"Our products are made with top quality materials and one goal: to offer design solutions with the best possible quality/price ratio."</em>

<em>-Elettronic Market</em>
Combined with attention to quality and design, the range of goods has helped their shop to become an industry leader with thousands of regular shipments throughout Italy.
The Elettronic marketplace has a functional website with a user-friendly interface. Along with that, they strive to provide an exclusive customer experience in every aspect of the shopping process. Elettronic Marketplace is actively working with big worldwide search engines such as Google, Bing, and Yahoo to guarantee all customers an exclusive and constantly changing shopping experience.
Services offered by Elettronic Market Shop:
Elettronic Market also pays close attention to all things related to logistics. Excellent logistics must enable the selling of even large goods. To always intercept the quickest route to get the goods to their destination as quickly as possible, we have agreed to focus on the best professionals in the logistics sector located in plants and warehouses in different Italian locations.
All the essentials and quality products are available at Elettronic Market Shop. It offers its customers products that are already chosen by a team of experts, bypassing the sifting of soulless products across endless websites. They examine the right products for you and this benefits the store; the customer satisfaction is more important and they watch it every day with the success of their products on the whole Italian market.
They have a 24/7 customer assistance service facility for customer communication which improves the customer experience.
Also, Elettronic Market provides the best shipping and payment options to the customers. Every transaction is secured with PayPal Gateway. The inventories are updated regularly and all the products are analyzed by the expert’s team before making them available online for the shoppers.
-> Click here to visit the Elettronic Market Shop Marketplace Website.
The Elettronic Market Shop at a glance:
The marketplace has a sleek and clear UI with a streamlined design. The Promo code bar runs at the top of the page with a discount code that can be availed by visitors. All the sidebars are separate and give a great soothing look to the front end of the website.
Features that make it to the top
The Elettronic Market Shop is created using PrestaShop Marketplace Module developed by KnowBand. The marketplace features are very well utilized and can be observed throughout the website.
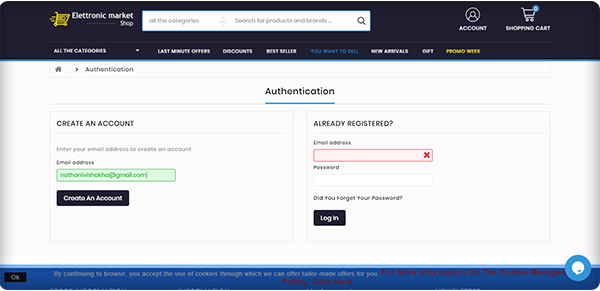
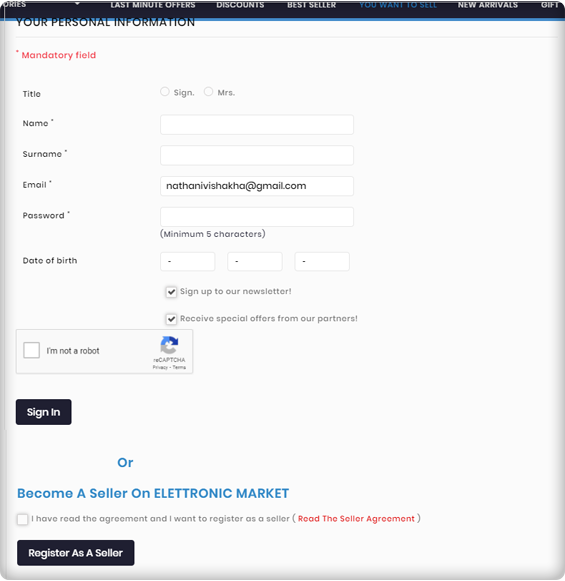
Seller Registration is easy
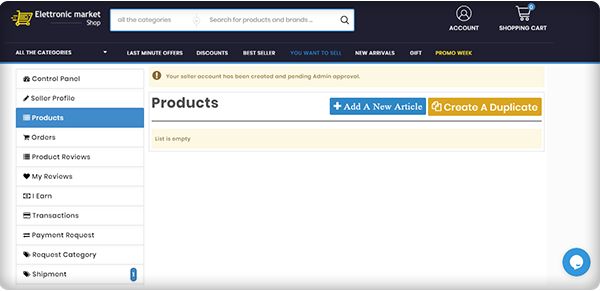
You can become a seller by simply registering yourself but it requires the admin’s approval to start selling on PrestaShop Elettronic Marketplace.
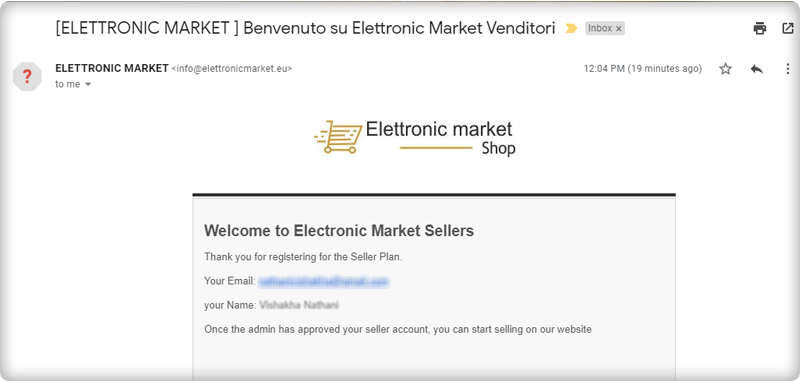
Email Templates for every event
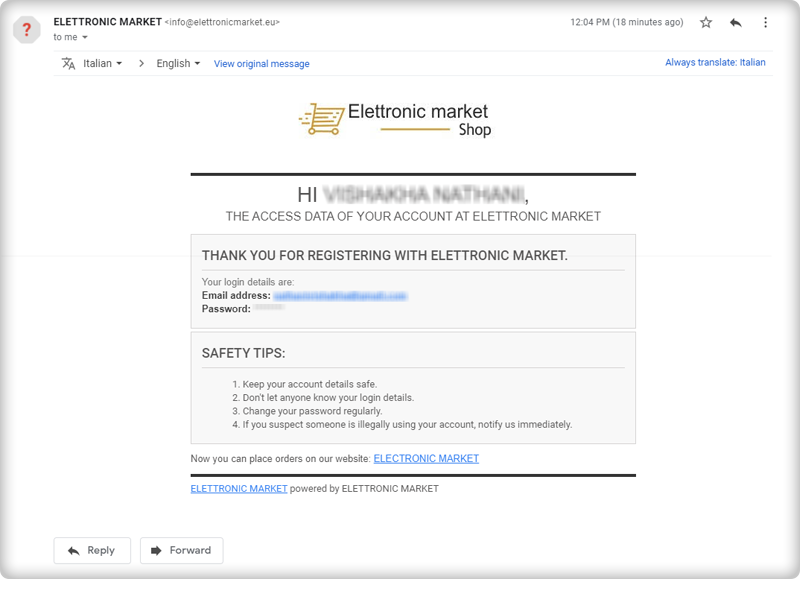
After the successful seller registration, you will receive an email with log-in credentials. Several email templates are available on the marketplace module for various events.
Seller Dashboard for every seller
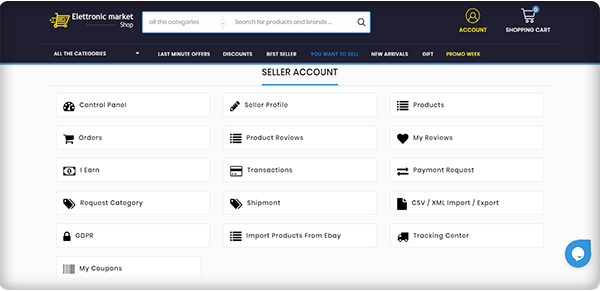
The seller dashboard is another appealing feature of the PrestaShop Elettronic Marketplace. The seller gets a lot of options for managing orders, product upload, and inventory.
Product Approval
All the products uploaded by sellers can be reviewed from the backend and requires admin’s approval, a feature offered by KnowBand’s Marketplace Module!
Elettronic Market pays special attention to all aspects of logistics
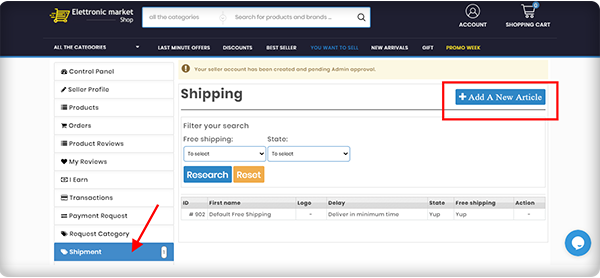
Excellent logistics must enable the selling of even large goods. Since the Elettronic Market is a well-established name in the market, their operational structure ensures the delivery of even large quantities of the products. Sellers on the Elettronic Marketplace can add custom shipping choices.
Super-Fast Delivery
With the automated efficient shipping and logistic system, In order to always intercept the quickest route to get the goods to their destination in the shortest possible period, they rely on the best professionals in the logistics sector located in plants and warehouses in different Italian locations.
In reality, thanks to this functional organization, we are always in a position to deliver our products to Italy within 24-48 working hours.
Hassle-free Inventory Management
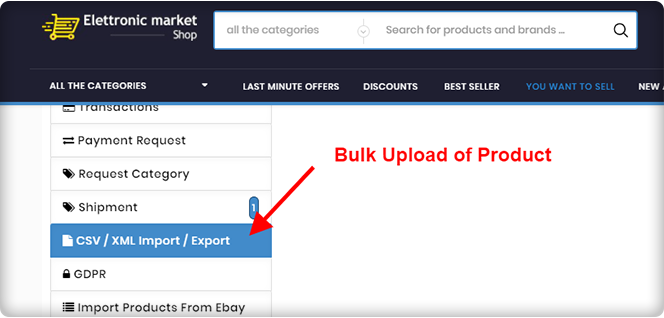
With technical systems and software developed specifically for Elettronic Market, the entire management of the products available in the warehouse takes place. They have always paid attention to the forefront of optimizing order management and processing times. Bulk upload of products from the seller’s dashboard is possible.
Ensure Packaging before Shipment
To guarantee customers impeccable service, the quality control department inspects all pre-shipment packaging and products to ensure the integrity of the goods and packages shipped. With absolute control, they handle the entire company operation.
Efficient Customer Assistance Service
They provide an effective ‘Customer Assistance’ service that assists customers of all nationalities in their mother tongue with highly skilled resources, where they are present at all levels, from the moment of selection to the delivery of the products.
Secured by PayPal Transactions
Elettronic Marketplace is certified and verified PayPal website and all online credit card transactions are carried out in maximum security environments, being attentive to online fraud and the safety of personal data.
Request Invoice Feature
Customers can send a request for the invoice and an email will be sent to the email address which is already linked to the order number.
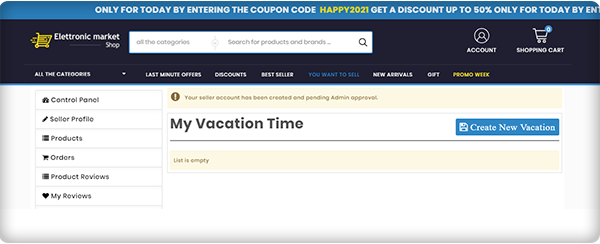
Vacation Mode
A seller can go on vacation mode when he/she is not available.
The Elettronic Market Shop makes life simpler
With a catalog the Elettronic Marketplace aims to enhance and extend on a daily basis, the list of offers includes a wide range of thousands of products.
Marketplace feature that helps in quality assurance
The greater strength of the Elettronic Marketplace has always been the richness of the bid. A team of experts continuously reviews the latest products to be included on the website and chooses only the best ones to provide customers with a superior product concerning quality, manufacturing methods, and aesthetics.
About PrestaShop Marketplace Module:
The PrestaShop Marketplace Module developed by KnowBand transforms your existing website into a multi-vendor marketplace. It is feature-rich and supports all the PrestaShop themes.
KnowBand has created several PrestaShop Modules for eCommerce websites that enhance the shopping experience and helps you bring more business to your store.
The marketplace needs a revenue model and PrestaShop Marketplace Modules supports two of the most accepted revenue models: The commission model and Membership Plans. It has a proficient admin panel with a functional seller dashboard. Customers can drop reviews for the products as well as the seller.
Every product-related activity by seller and placed orders can be monitored by the store manager from the backend. It supports multiple shipping and payment methods. The PrestaShop Marketplace module is also compatible with the mobile app builder. It supports multiple languages and currency.
Customization, email templates, seller management, inventory management, and many such features are incorporated in the Marketplace Module.
Click here to explore the Multi-Vendor Marketplace features
Click here to explore the Gold Plan of Multi-Vendor Marketplace Module
Support
For those who need a quote, specialized support is also available. In the appropriate section of the site, simply send an email at support@knowband.com and our Customer Service team will respond within a few hours.
The hyperlocal delivery business model is spreading its wings in the food and grocery market. Experts assume that in the coming future, the Grocery home delivery business will expand remarkably, and incorporating the hyperlocal delivery business model is a win-win for all the focuses involved. If you are looking for a solution to start a marketplace for grocery or food delivery business then KnowBand has exactly what you are looking for.
The modules developed for creating a hyperlocal marketplace are very well curated by the technical experts and analyzed by industry specialists to empower local businesses with the online grocery store or a food delivery marketplace. Online grocery shops have high profitability and the majority of people prefer online shopping rather than visiting the stores.
Bring your store on a digital platform and start your home delivery business with Hyperlocal Marketplace Module. For the beginners’ guide, you can refer to this article on on-demand Grocery Marketplace. To deliver grocery, food, personal care products, or any services you need to make a plan and this article will be a step-by-step guide for launching your online home delivery store or an online marketplace. The hyperlocal delivery business model gives a platform to small businesses; they can become a seller on a marketplace and start selling immediately.
Companies like Amazon, Flipkart, Alibaba, Airbnb, etc, have established their brands in the marketplace industry and it is not easy to compete with these hotshots. Still, you have an opportunity to grow as people are supporting small businesses locally.
Step-by-step guide for a hyperlocal delivery business
Finding difficulty in deciding the right industry?
Don’t worry!
We have a plan.
Step 1- Select the industry you want to work in:
To finalize the industry for your hyperlocal home delivery business, do some market research. ECommerce has a lot of potentials if you do it right. Before establishing your hyperlocal marketplace business talk to industry experts, take help from the consultants or you can conduct surveys nearby.
Make good survey forms including all the necessary questions for the sellers and customers. List the benefits you will have and the sellers can enjoy. This will help you in finalizing your domain for the home delivery business.
Step 2- Decide your niche:
Once, you have decided on the industry, now it is time to determine the niche. The specific area you want to focus on. The hyperlocal delivery model for the food industry starts when you begin to think about the product and service you will deliver. You can choose basic needs products like dairy and bakery items, packaged food from a restaurant, lunch box delivery, essential grocery, or fresh vegetable delivery in local areas.
Money comes next! Do not tempt the idea and dispose of your savings. Look into your budget and see what you have and how much you have to spend? Market research is important if you are putting your step into the hyperlocal delivery business. In my opinion, food and grocery delivery businesses are the best choices out there because this comes in the essentials and the essentials never go off the market. We already have witnessed the COVID 19 crisis scenario and boom in the hyperlocal grocery marketplace.
Step 4- Time to develop a website
Since you have to start your store online, you will need a website to enlist your products and services. You can either start a grocery, food, or personal care delivery business of your own, or you can create a marketplace web store and provide a platform to other small businesses.
A website can be created in a few simple steps:
Buy a domain and cloud hosting for your online home delivery business.
Decide the eCommerce platform on which you want to create your store.
If you want to create a marketplace then you have to choose the marketplace plugin which can be used.
Sellers are the most important part of a marketplace. If you are planning to start a food delivery marketplace similar to UberEats then you need to contact multiple restaurants and show them the benefits they can have if they sell on your marketplace. The food delivery marketplaces follow the hyperlocal delivery business model and we know how they are flourishing globally.
In a marketplace, customers and sellers are interdependent. If you succeed in attracting sellers you will automatically invite a large customer base. Grocery home delivery and food delivery from their favorite food stall is the preference of every person as this gives them convenience and save time.
You can use Social Media to attract the audience by creating pages on different platforms. Read these articles for some of the best ways to attract more customers to a hyperlocal marketplace.
Step 7- Make delivery set-up and tie-up with courier services
The success of an online grocery company depends heavily on how easily you can deliver the goods to the home/office of your client.
This makes it a vital factor in the entire start-up process to set up an effective distribution system.
Most consumers in India prefer delivery on the same day, more so for food and grocery products, and any unreasonable delay in this specific segment is generally frowned upon.
This is also not feasible, however, solely because of a shortage of human capital or the unavailability of vehicles to transport goods.
Deliveries often seem to come at a large cost-to-company, accounting for almost 30-40 % of total company costs. You can reduce shipping costs with some of the pro tips suggested in this article.
Step 8- Develop a Marketing strategy
The marketing strategies for the home delivery business can be a game-changer. You can use various social media platforms, go for email marketing, run campaigns; offer discounts, and a lot more can be done. You can attract sellers and customers by writing blogs and sharing success stories.
Although major online grocery players such as Big Basket and Amazon have the budgets on many media fronts to afford high-profile celebrity campaigns, you don’t have to follow the same path.
Instead, you can choose to market your online grocery store using local avenues that are equally successful, such as;
Putting a commercial in the local newspaper
Running a campaign on social media.
Sending SMS in bulk.
Putting up hoardings at famous places in your local area
Word of mouth is the best you can do
You can also hire food bloggers
Step 9- Allow Buy online In-store pick-up
It is a new trend to follow. Set up your Online Grocery Business with Store Pick-up Facility. This can save you from extra shipping charges and people sometimes prefer this to maintain safety and hygiene. COVID 19 outbreak expanded the market for BOPIS.
Before starting a hyperlocal delivery model for a food business you need to take care of some legal requirements and documentation work.
You need to form a legal entity
Register your firm or company for taxes
Open a business account to handle business transactions
Accomplish your licenses and permits as per your country’s policy and take the licenses according to state & local Business requirements
Since you are selling food products, follow all the food safety measures and regulations
Do vehicle’s registration and hire a licensed driver for transportation
Create a Mobile App:
Considering the numbers, the smartphone consumer base is wide and about 80% of the smartphone users did online shopping through mobile phones in the year 2020.
After the successful launch of your home delivery website, you can create a mobile app as the number of smartphone users is more than the desktop user. Built a grocery store mobile app for eCommerce and you can refer to this article to read the success story of our happy clients.
This article and the attached reads are sufficient to guide you on starting a hyperlocal home delivery business and a food delivery marketplace. The successful food delivery apps like DoorDash, UberEats, Zomato, etc. created a marketplace for small and big restaurants and increased their customer base and sales. Gear up for the new venture! You tell us what you want and let us think.
You can write to us at support@knowband.com or visit our website for further assistance. Our technical experts will guide you and help you throughout the journey.
Are you planning to start your own clothing business online? Well, thanks to the innovators and web developers. Now you can start an online merchandising business with minimal cost without any physical brick and mortar store.
Online clothing business is an opportunity if you are looking for a breakthrough idea. Strategic planning, the right approach, and excellent marketing can make you a dominator in the clothing industry.
Finding a good idea to work on is the first step to starting an online clothing business. You’re going to spend a lot of time, probably money, and effort on it, so make sure that you work on something that has real potential to earn you passive income, allow you to leave your job and do it full-time, provide value and use your skills and talents, or else.
You can sell anything like kids’ clothing, designer, vintage, or anything in between. It is now simpler than ever to set up an online clothing store, thanks to the invention of online store builders, such as OpenCart, Shopify, Wix, and PrestaShop, and the best part is you don’t even need to know how to code!
Since you have reached this far imagining about this new clothing business idea, now you require a plan which can help you start your new venture.
Before that starting a clothing business, ask yourself these questions: Are you skilled enough to start this? If you are passionate enough for starting a clothing business? Will you be able to deal with the new situations coming? Is it profitable? If your answers are in favor then you are preceding in the right direction.
1. Choose the business model
It’s time to choose a business model for your online clothing store business, now that you know your niche and have an idea of the types of items you want to sell. Online clothing and fashion stores fall into the following categories of business models:
Retail
Wholesaling
Manufacturing
After choosing a business model, one has to select the type of clothing they want to sell:
Fast Fashion
Traditional Fashion
Custom Personalised Clothing
Designer Apparels
Each business model has its pros and cons and your ultimate aim, budget, and skills should be focused on choosing between them.
2. Launch your Website:
Starting a clothing business online is a profitable business as 80% of millennials prefer shopping online.
It is important to have your website. It’s the only place you can sell clothes online and it’s where you’re going to develop your brand, get traffic, and implement all your knowledge to earn a profit. Your website will always be there, at the heart of your business, no matter how much your business expands over the years, and how many monetization methods you pursue.
A website consists of a domain name (the name of your clothing store website), a hosting provider (the company that provides the server to support online business), and a content management system such as Shopify, OpenCart, PrestaShop, Magento, etc. The online platform is the program that allows you to build an online store for selling clothes, creating content, and adding the product, email marketing, and much more.
For starting a clothing business you need an attractive name that should be easy to remember. You can hire a website development service provider to create the best to compete in this rapidly evolving world of fashion.
3. Find your Target audience:
There is a target audience for every company, so make sure to do your research before settling on a niche. The more you understand your clients and what they want, the more are your chances of delivering the goods they want.
It isn’t easy to start an online clothing business but if you know your customer and have studied their consumer behavior then you can make this difficult task an easy one.
Start blogging:
I can’t emphasize enough how important content is to your overall online clothing business strategy.
You need to build content in multiple ways to start the online clothing business flourish. Writing blog posts, comprehensive guides, videos, social media posts, podcasts, courses, etc. can support every potential lead. Repurposing content is simple as once you have published a blog post, you can easily convert it into a series of emails, a free guide for your subscribers to download, several social media posts, and what not!
Conduct Online Surveys:
To know your target audience and to understand their demands you can conduct online surveys with free available Google forms or any other means. Surveying before starting an online clothing business has added benefits. For the starter, this can help you in deciding the type of product you can sell in your store.
4. Build Your Clothing Brand
What shapes your brand is you and everything you do online. You need to make sure your brand is compatible with all the elements of your online clothing business.
It means:
Using the matching colors, photos, products, etc. on your web.
To build all types of graphics for your clothing brand, use a free tool, and capture interactive pictures of the clothes you want to sell.
Create a logo with a tagline to stand out
Writing an awesome page about telling your brand story and what you will be selling on an online clothing store;
Be on every platform of social media and get involved. That’s a way to connect, build up your followers and generate brand recognition with your audience and other business owners;
Capture professional images and add them to your website and social media pages for your product;
Ask them for reviews and display these testimonials on your website once you have some clients and email subscribers.
5. Register Your Online Business
In your country, how to start an online business? You have built the foundation of your brand when your clothing website is launched and you have started making your first cash. That’s something you’re going to need to remember.
It’s an easy procedure to register an online company, but you need to follow your country’s rules. After making the lawful registration for paying taxes you will receive all the required details like company registration number, VAT number, etc. Start your online clothing company and register it as per your country’s laws.
6. Design Your Products:
Let’s look at the things in more detail that go into creating a product.
You have to choose any available service provider companies as your fulfillment service to design a product. Assume that you have created your online shop. You all know what it takes for fashion lovers to find something pleasant to wear, so imagine what it’s like to design it. Lots of things to take into consideration:
The creator of the designs cannot just imagine but are capable of making it a reality.
The survey which you have conducted before setting up your online clothing store will now help you as you know what your target audience like.
It is needful to keep an eye on the quality of the product you are going to sell. The cut and material of the garment is something you need to take care of. The fabric you will be using, its stretch and fit, all are important factors to start selling clothes online.
For the final result, from A to Z-the fit, the color, the design, you have to be sure about everything. You have to develop a product which makes them buy it. Otherwise, selling isn’t worth it. Before going live, be sure to order a copy.
Getting your store up and running is the first step, but you will need to market your clothing store to make sure that you start (and continue) selling clothes online.
You can simply allow your customers to like your company on Facebook or follow you on Twitter with share and win schemes, which means they can keep up with all brand promotions, industry news that you can share, and any upcoming deals.
Affiliate and referral programs can help you with spreading brand awareness. It is the sneakiest way of bringing new potential customers. Another marketing tool is email marketing. You can send follow-up emails, promotional emails using apps, email marketing tools, and plugins to your customers who have visited your online clothing store before.
Your online clothing store will be making big bucks in no time at all with these easy, powerful, and inexpensive marketing methods.
It’s time to track success.
Conclusion:
When you start your online clothing store, you’ll need to find the middle ground between your quality standards, manufacturing costs, and making a profit.
Almost nobody is born with the full stack of expertise to start and run a successful business, so make the effort to learn about the pieces that you don’t know as much about, whether that’s how to connect in the fashion world, or how to build a growth-oriented business plan.
Be ambitious, understand your brand, and keep your set-up costs down! Good luck!
With the rise in marketplace demand, the Hyperlocal Marketplace PrestaShop module is a solution for all the startups that are planning on a new venture. The module is developed to provide complete assistance to the admin, seller, and customers who are willing to take the advantage of nearby delivery models.
Hyperlocal concept work on geolocation and near-me delivery which is flourishing these days. PrestaShop Hyperlocal Marketplace can convert the eCommerce website into a multi-vendor marketplace with no extra efforts. Hyperlocal Marketplace PrestaShop module is developed by Knowband which has several functionalities and benefits.
To connect customers with local sellers and shops, the Hyperlocal Marketplace PrestaShop module can be used. Using this module, owners of the PrestaShop store can turn their eCommerce website into a fully functioning marketplace and allow other sellers to sell their products.
Since location is important, sellers can add locations where their products can be delivered and customers can enter their location to verify the availability of the sellers and products. It is time to explore new business opportunities with the PrestaShop Hyperlocal Marketplace module because it is incorporated with all the necessary features required.
Features of a hyperlocal marketplace PrestaShop module
Hyperlocal Functionality
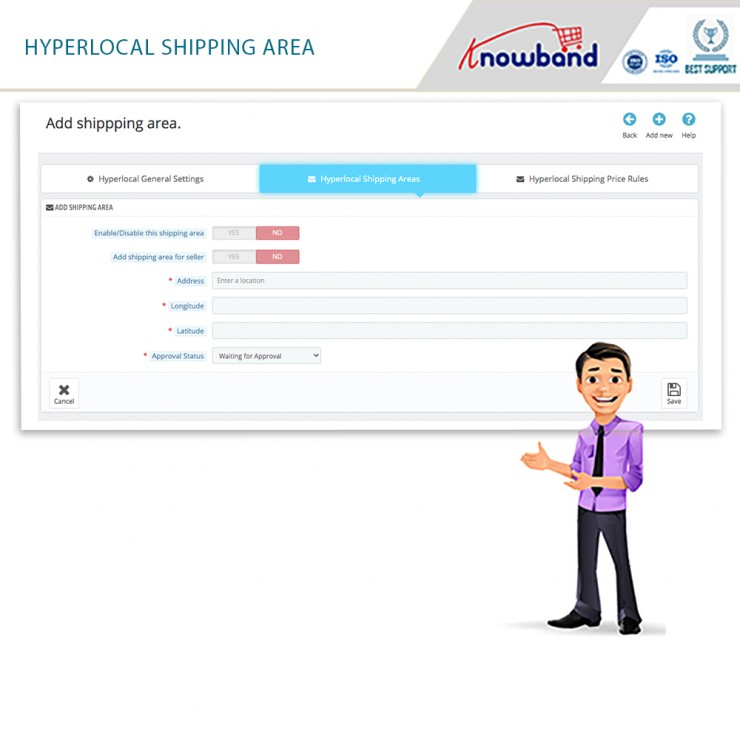
Geolocation data is incorporated and the PrestaShop Hyperlocal Marketplace module is integrated by Google Maps. Shipping areas where their food, grocery, personal care products, etc. can be delivered can be introduced using the hyperlocal feature. Admin can add various localities for sellers to register and sellers can add places where they can deliver the products.
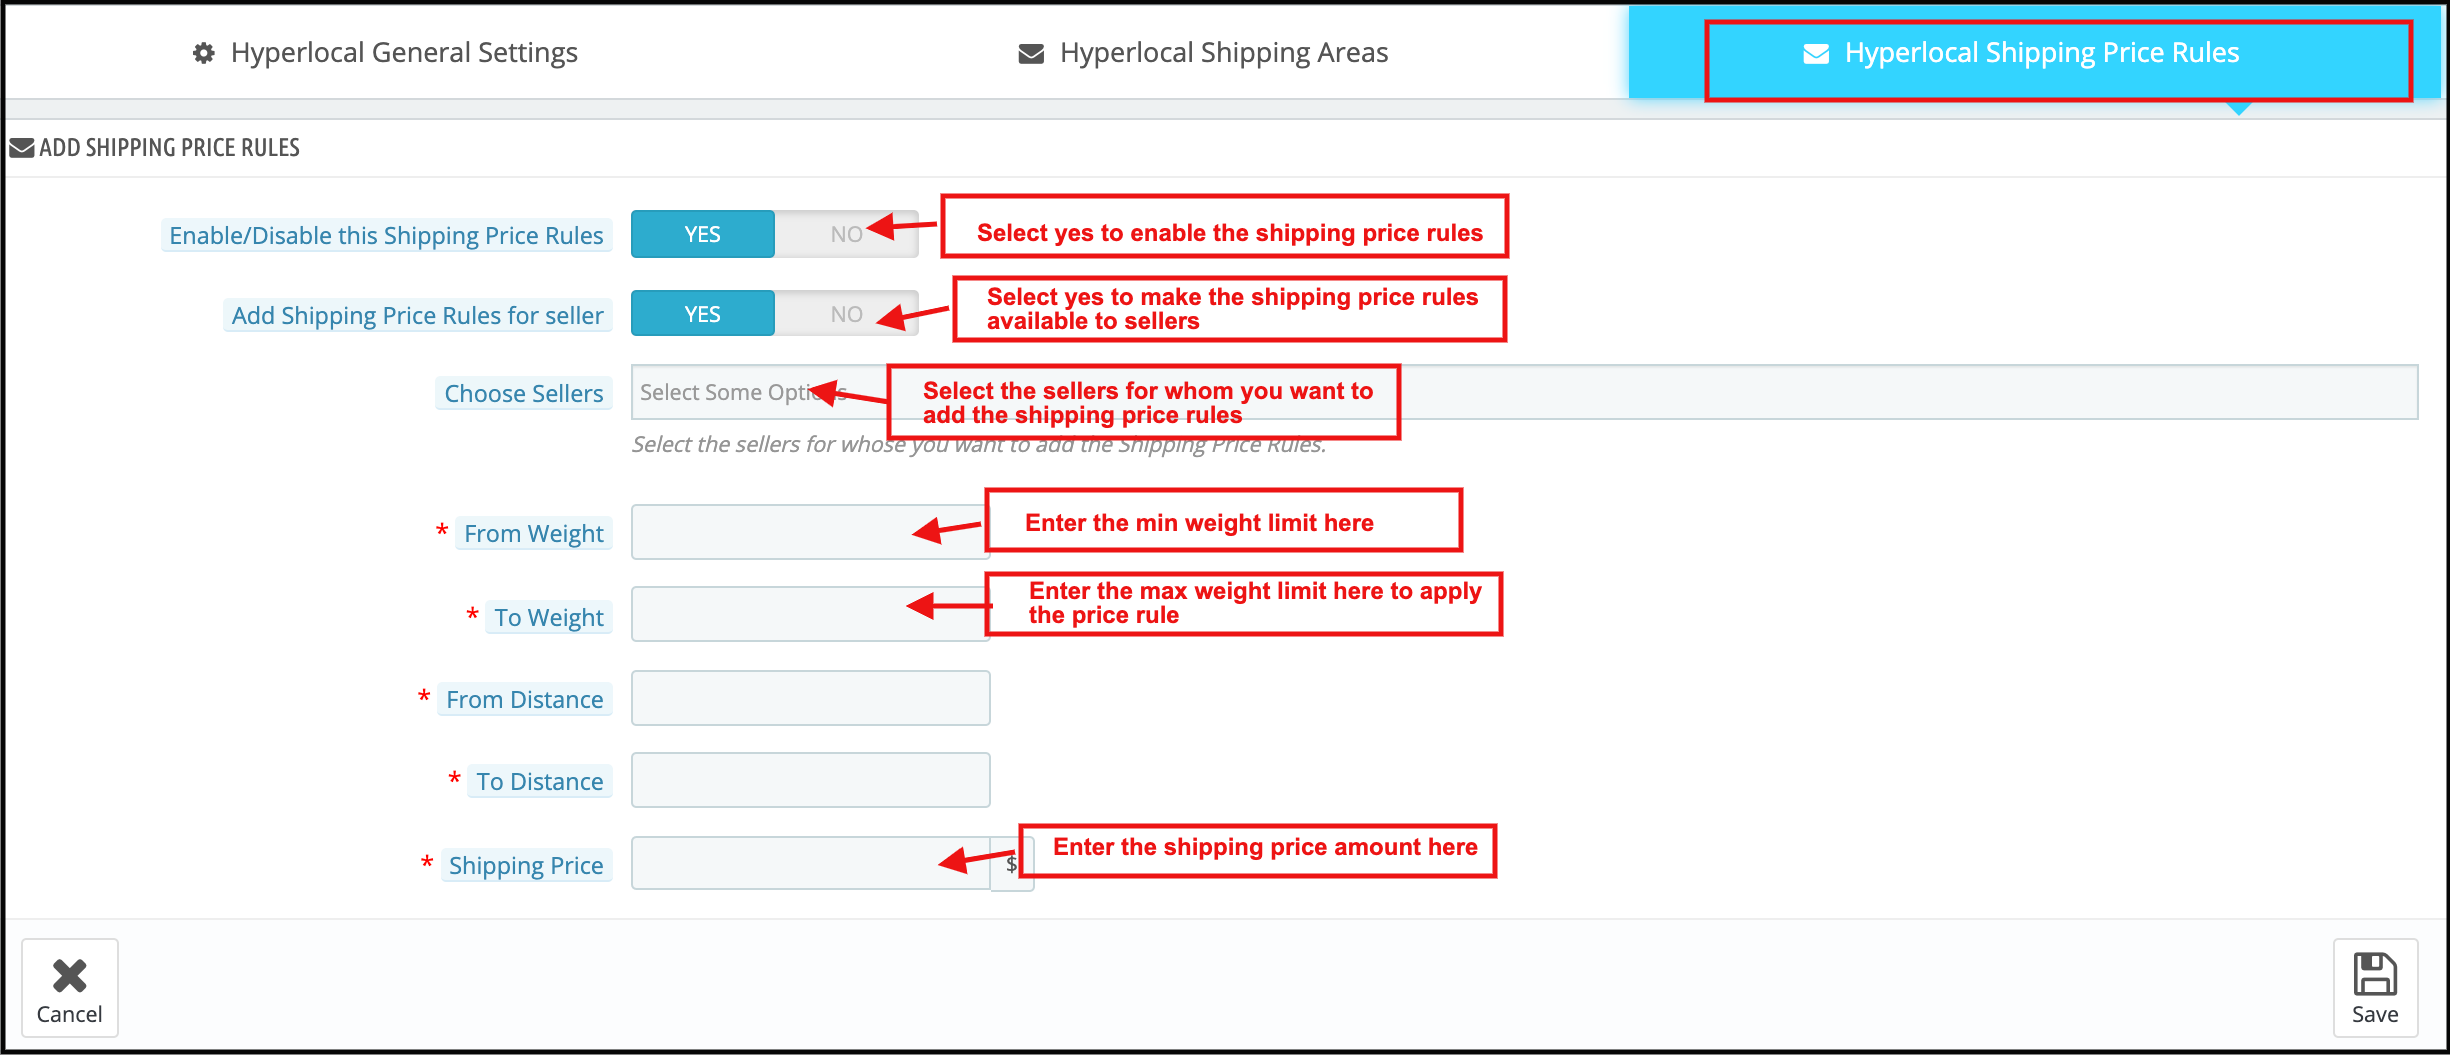
If the shipping distance is out of sight, then a default price for their shipping may also be applied by the seller. Sellers can conduct different operations using this feature, such as adding shipping prices, adding multiple shipping areas, adding bulk ship rates, etc.
Manage Sellers easily:
It is easy to approve or disapprove of the sellers from the admin panel of the Hyperlocal marketplace.
Product Approval List:
Any registered seller can sell whatever they want to but the admin can approve the list of products and categories from the seller lists. Inventory management for food delivery, grocery home delivery, and other local delivery products can be done effortlessly in a few steps.
Effortless Commission Management:
The admin can easily break the commission according to the type of the commodity. The admin may also create new categories accordingly.
By entering a default committee, the admin may set a new category. This allows managers to charge different commission rates for different types of items.
Easy Transactions
The module offers effortless transaction options for customers, sellers, and the admin.
Seller Transactions
The system does not automatically move the amount into the account of the seller, so the owner of the store must keep records for all the sellers and manually pass money to the seller and enter the transaction information later to keep a record of the same.
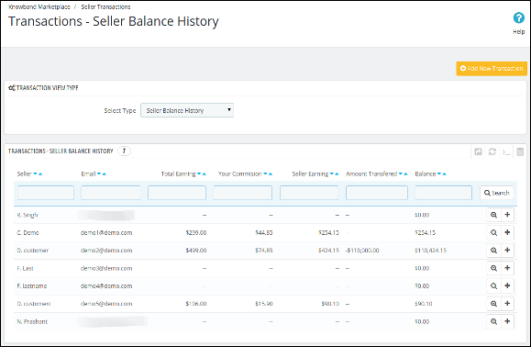
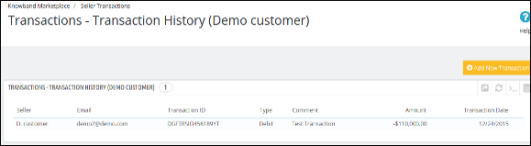
The PrestaShop Hyperlocal Marketplace module allows the administrator to view two types of sellers’ transactions, namely Seller Balance History and Transaction History.
The PrestaShop Hyperlocal Marketplace addon’s Seller Transactions page keeps track of the transactions of the seller and the remaining balance of sellers.
Payout Request
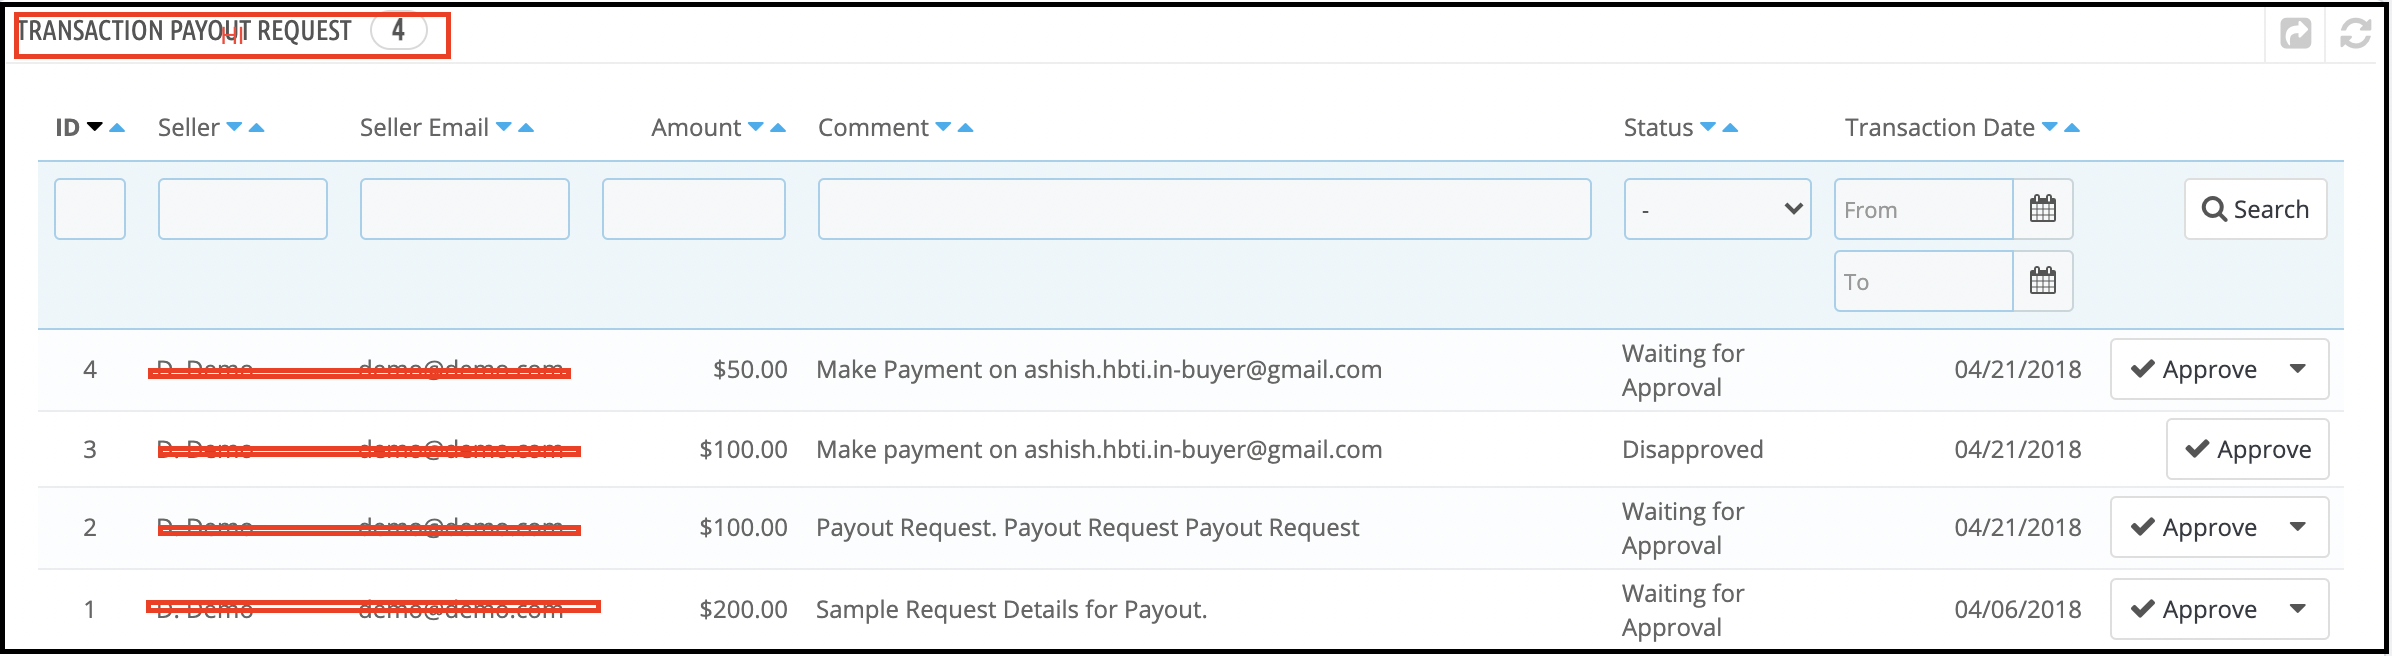
For their profits, the sellers may make a compensation offer. These payout requests can be viewed from the Hyperlocal Marketplace PrestaShop Module’s transaction payout request section.
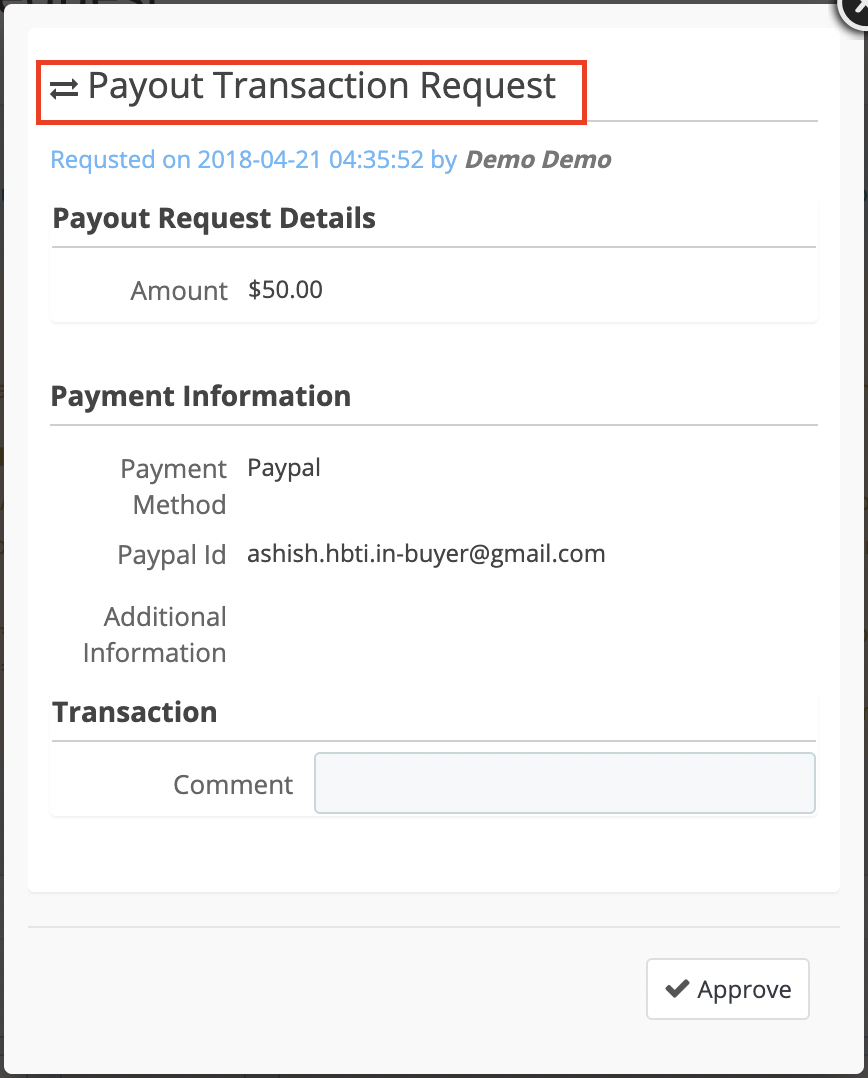
Vendors may specify the sum and purpose for the payout and may choose any of the payment methods specified. With a single mouse click, the admin may approve or disagree with the payout requests.
Email Templates for Notification
For multiple events, such as vendor registration, seller account approval, product approval, review updates, payout request warning, and many more, the PrestaShop Hyperlocal Marketplace addon offers different ready-made email templates.
The PrestaShop sellers will be updated with these email updates about different activities at the PrestaShop Hyperlocal Marketplace.
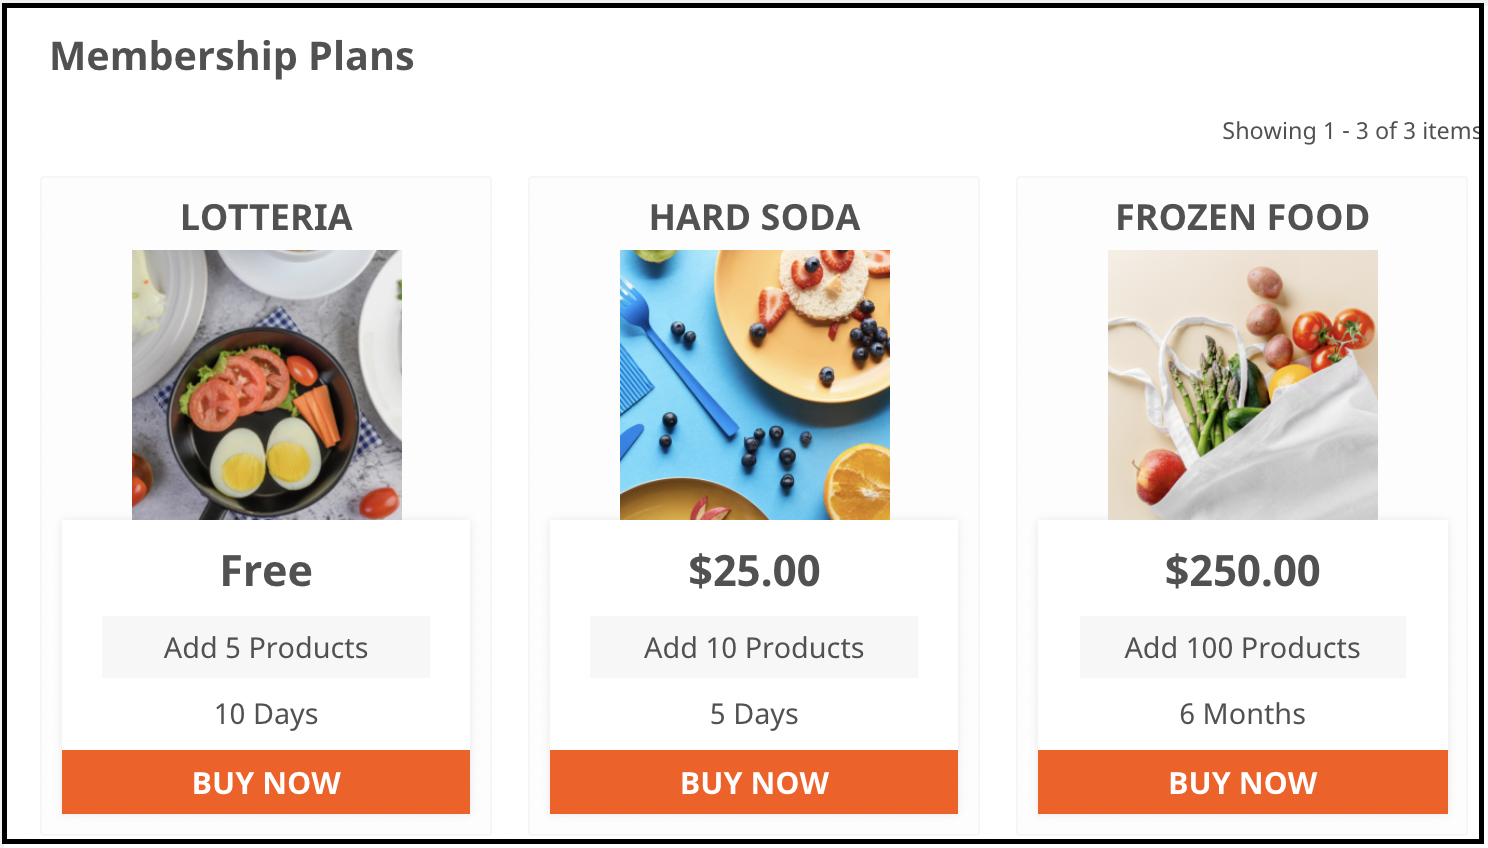
Membership plans
By adding filters, sellers can review their membership plan history. To verify the background of the membership plans, sellers have to fill in the plan name and the status of the membership plan under the philters.
Multiple payment and shipping methods:
Store admin can set multiple shipping and payment methods. Sellers can specify their methods of shipping or the default shipping methods specified by the administrator will be displayed in the Ship tab of the seller’s dashboard. To introduce his customized shipping methods, the seller has to add the required methods.
GDPR Compatibility:
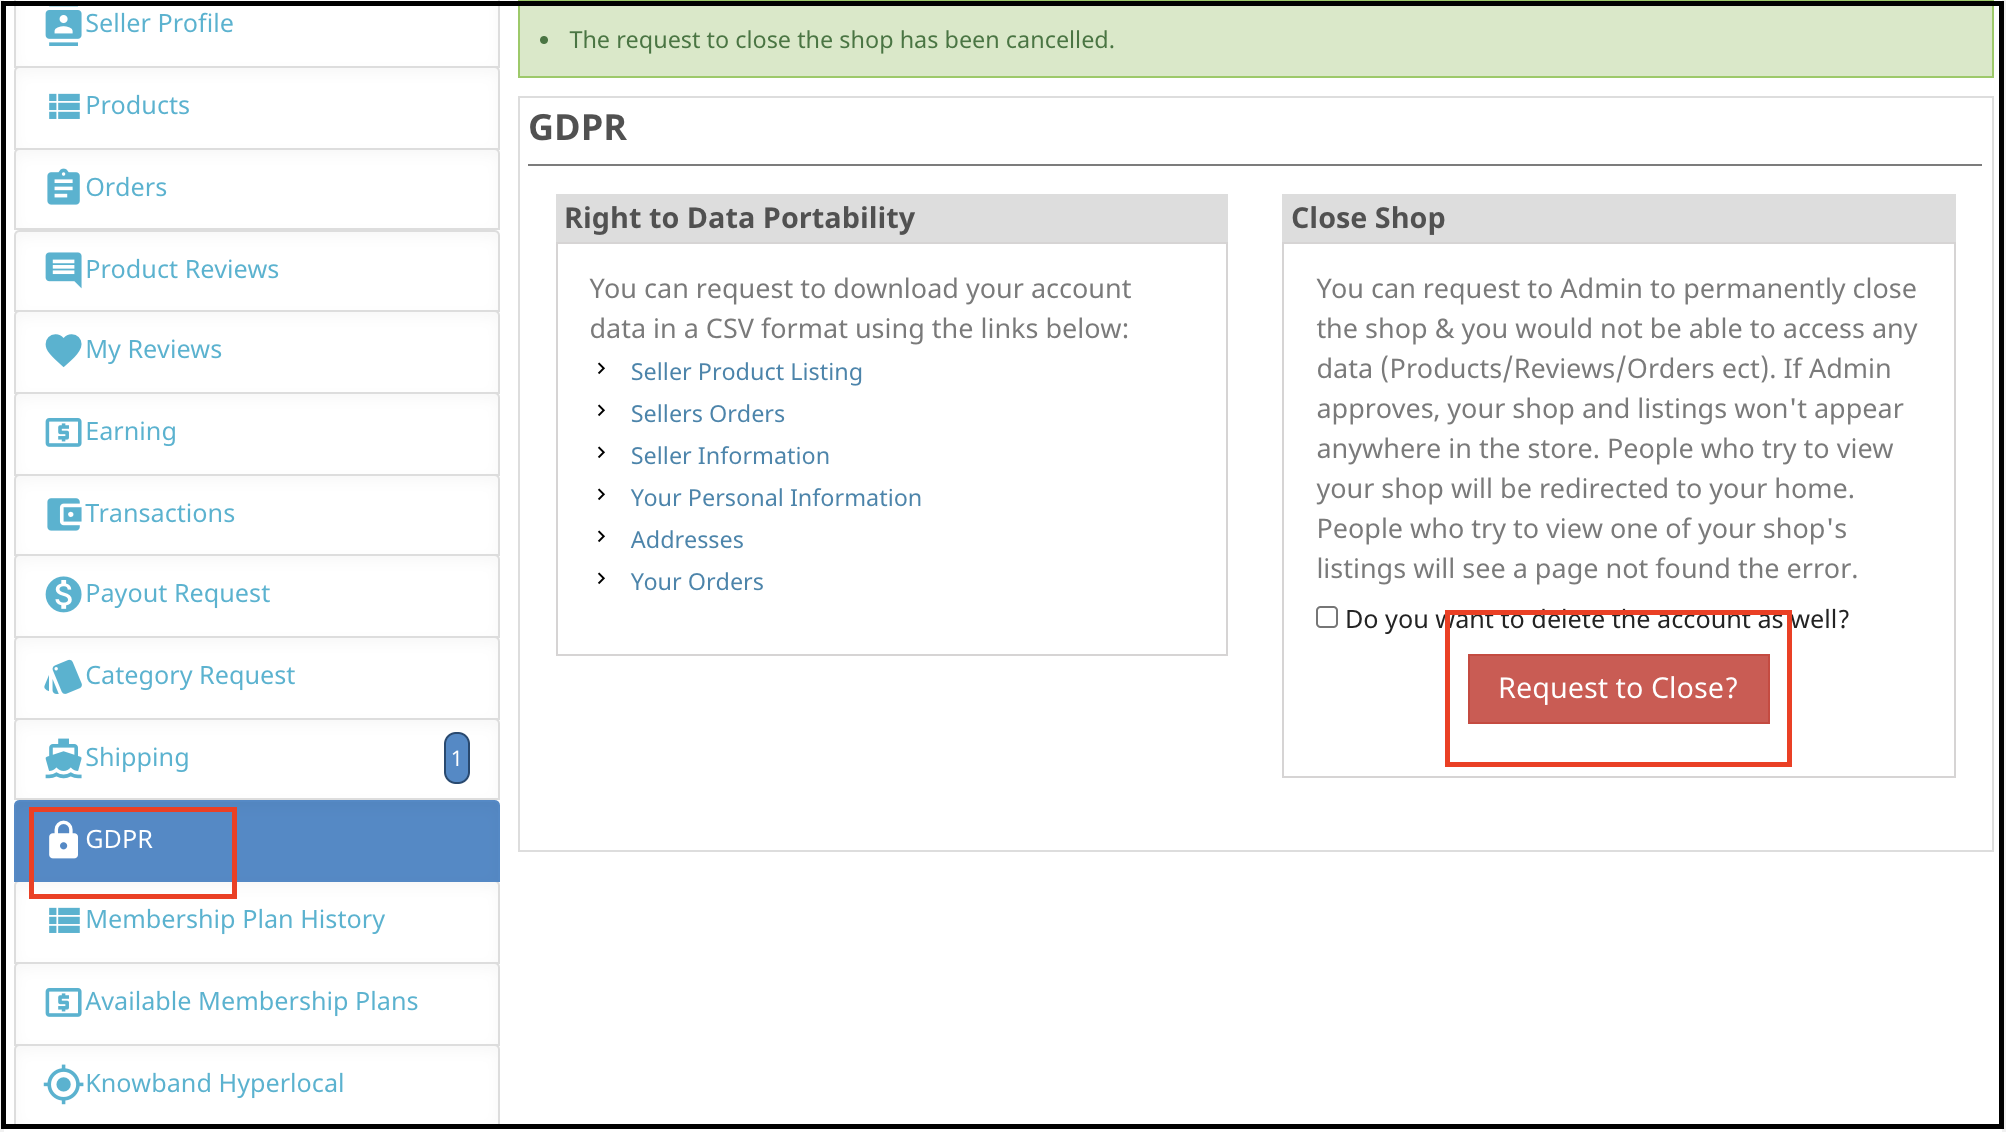
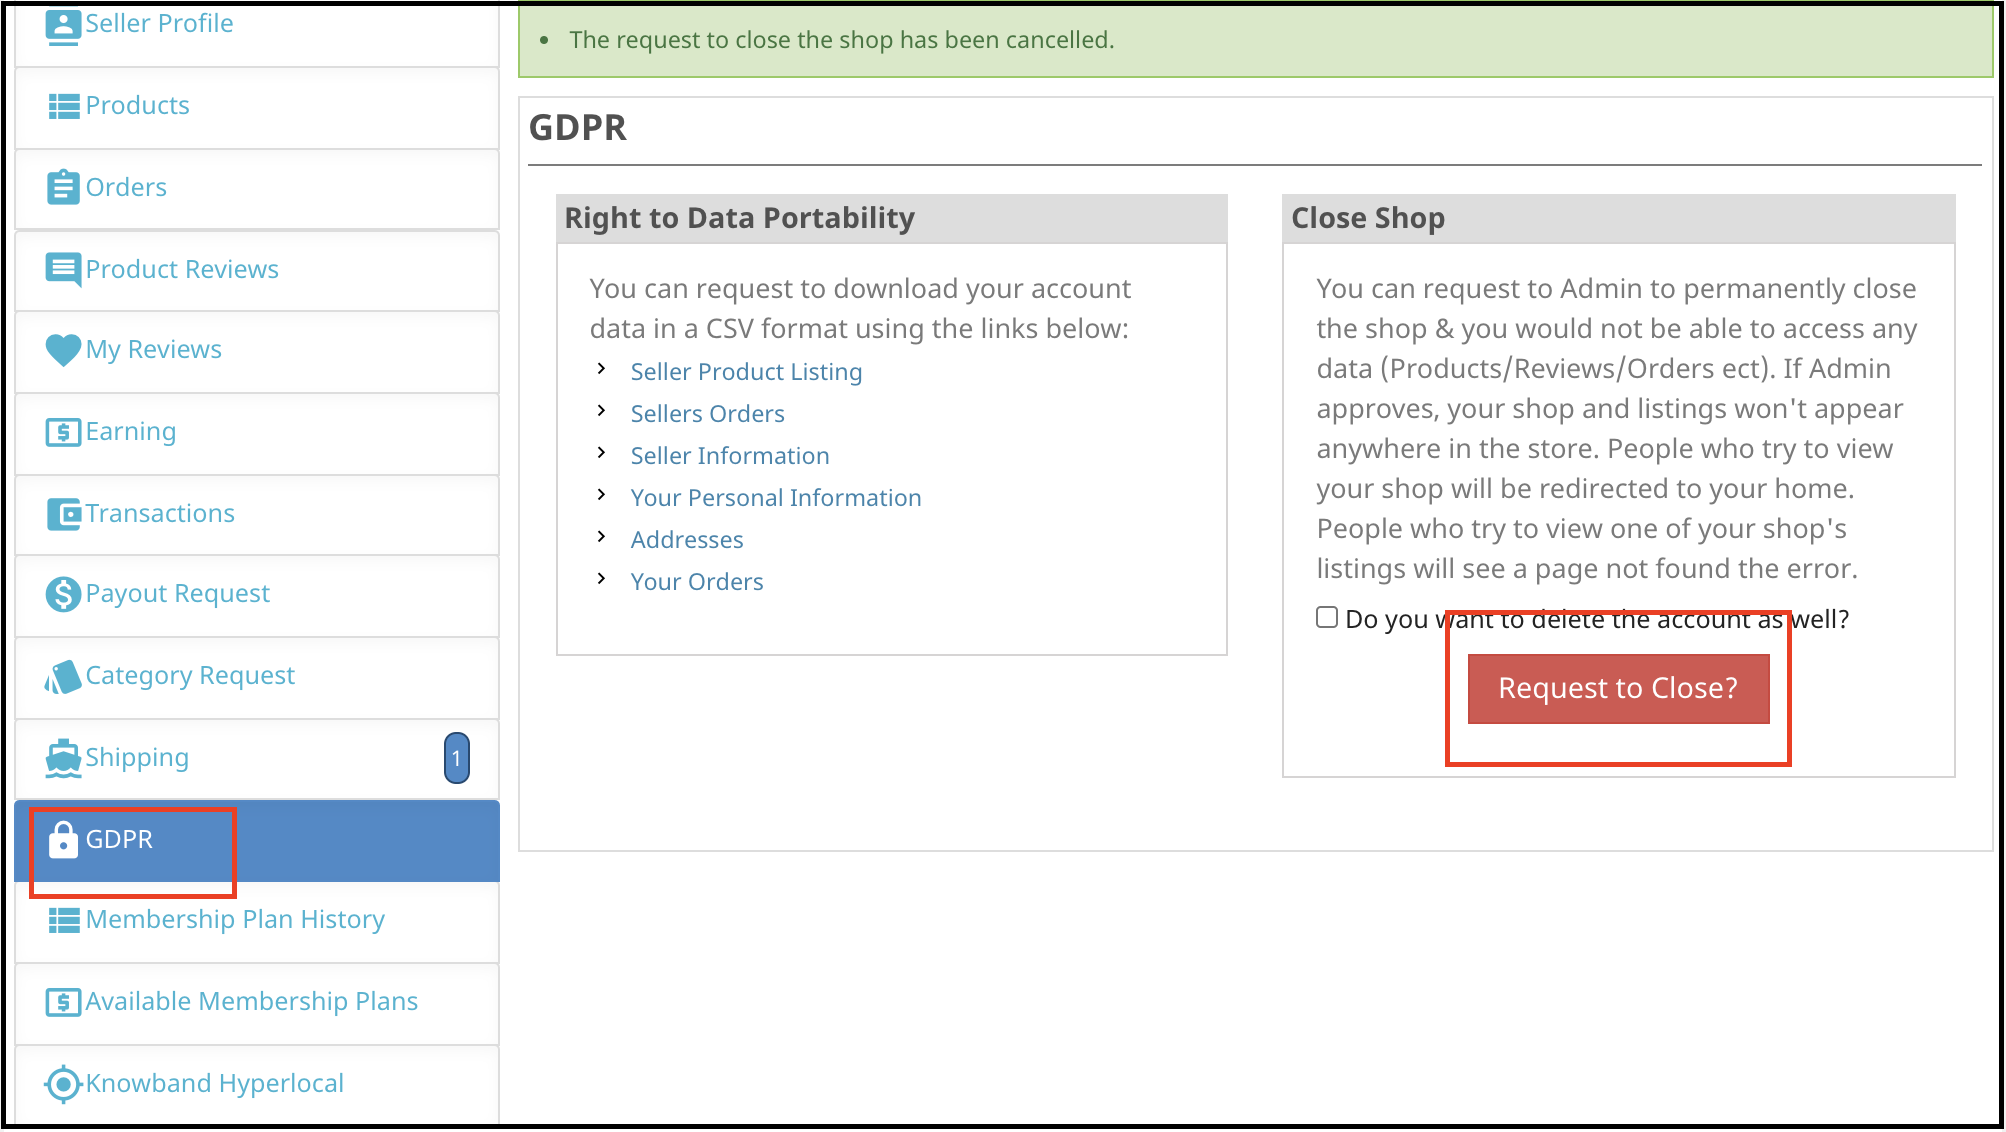
The Hyperlocal PrestaShop Marketplace is GDPR compatible. I allow customers to opt-out from the customer list. Customers can see the seller details if the admin allows the settings and sellers can close their shop whenever they want to.
Admin Benefits of Hyperlocal Marketplace PrestaShop Module:
Easy commissions:
The marketplace is a source of passive income and supporting local businesses can be advantageous. The module allows the admin to set the commission for every seller. The commission can be different or the same depending upon the admin’s choice.
No need for stocking up an inventory:
Since it allows multiple sellers and let them sell at one platform, the Hyperlocal Marketplace PrestaShop Module has the functionality to manage the inventories. Both admin and seller can add or remove products and categories.
A profitable business model:
It is a scalable business model with the benefits of eCommerce marketplaces. In contrast to a standalone eCommerce shop, it entails less financial risks. A rising customer count comes with growing suppliers, ultimately resulting in an increasingly growing business.
Helps increase revenue
Sellers come to hyperlocal marketplaces to sell because it allows them access to a large client base. The risk of consumers stumbling on goods they did not originally want to buy is higher when searching through goods on marketplaces.
Hence, this increases the chances of better sales as a wide range of goods are presented for them to choose from various vendors.
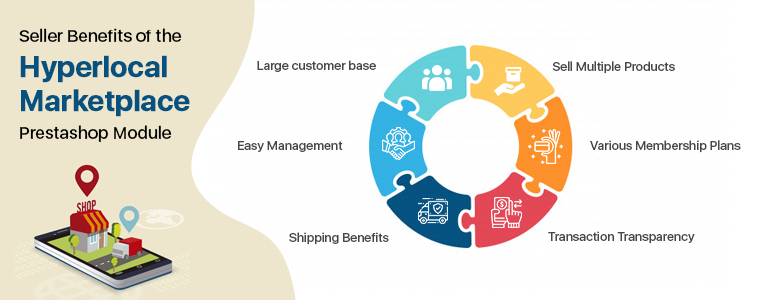
Seller Benefits of the Hyperlocal Marketplace PrestaShop Module:
Large customer base:
The Marketplace has a major advantage as it brings more new customers to the seller. A seller gets regular orders because of a larger customer base.
Easy Management:
It has a front end seller dashboard which allows the vendors to view their profile, products, and orders. The module provides a separate seller’s page which makes it easier for the vendors to promote their business.
Shipping Benefits:
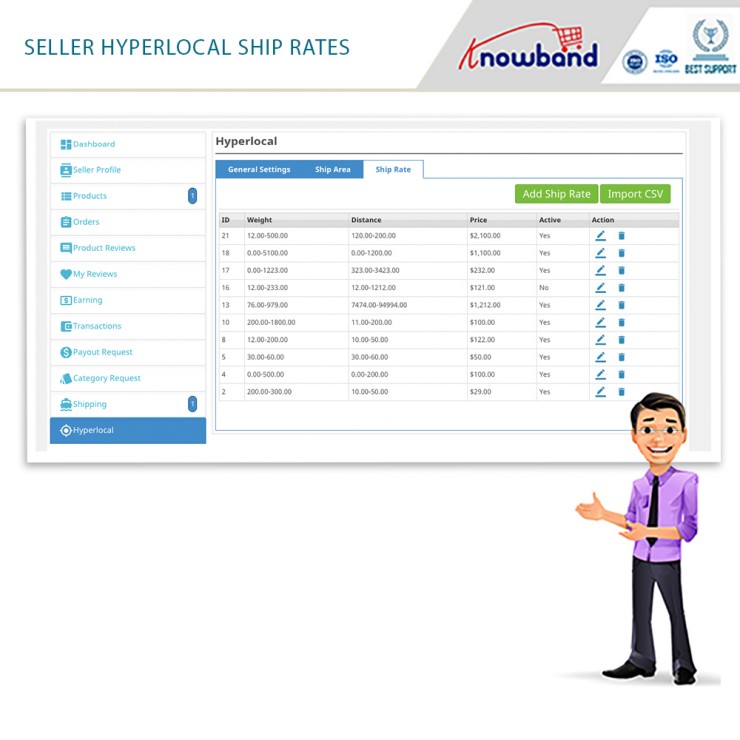
The shipping methods can help you reduce cart abandonment. As per the requirements, the vendor may add multiple ship areas. The seller will edit the areas of the ship. They can also delete areas for ships. For different areas, the seller can list multiple shipping rates. If the distance is beyond the range, the seller will set the default price for shipping.
Sell Multiple Products:
Any type of product can be introduced to the marketplace by vendors. The Hyperlocal Marketplace PrestaShop module supports all kinds of products categorized by the admin. It can be any product, virtual, or bundle products.
Various Membership Plans:
Sellers can take any membership plans as per the requirements. Hyperlocal Marketplace PrestaShop module allows the seller to choose the membership plans like a monthly plan, yearly plan, or other as needed.
Transaction Transparency:
The entire transaction is transparent as the commission charges are fixed and the seller can ask for payouts whenever needed or as per the marketplace policy.
Buyer Benefits of Hyperlocal Delivery Addon
Faster Delivery: By entering the location, buyers can check the availability of items and sellers easily. They can add Pincode and all the products which are available in their area will be displayed in the marketplace. Faster delivery can be done after buying from a nearby store.
Get a better deal: From a broader range of product choices, customers can now select the perfect items. Due to the competency factor, customers can get amazing deals on less expenditure.
Reviews can help: There is an opportunity for customers to give the seller reviews. By using Product Review Alert or Default Product Comment Addon, customers may also review the goods.
Buy from seller’s page: The hyperlocal marketplace for PrestaShop allows customers to visit the seller page and buy directly from there.
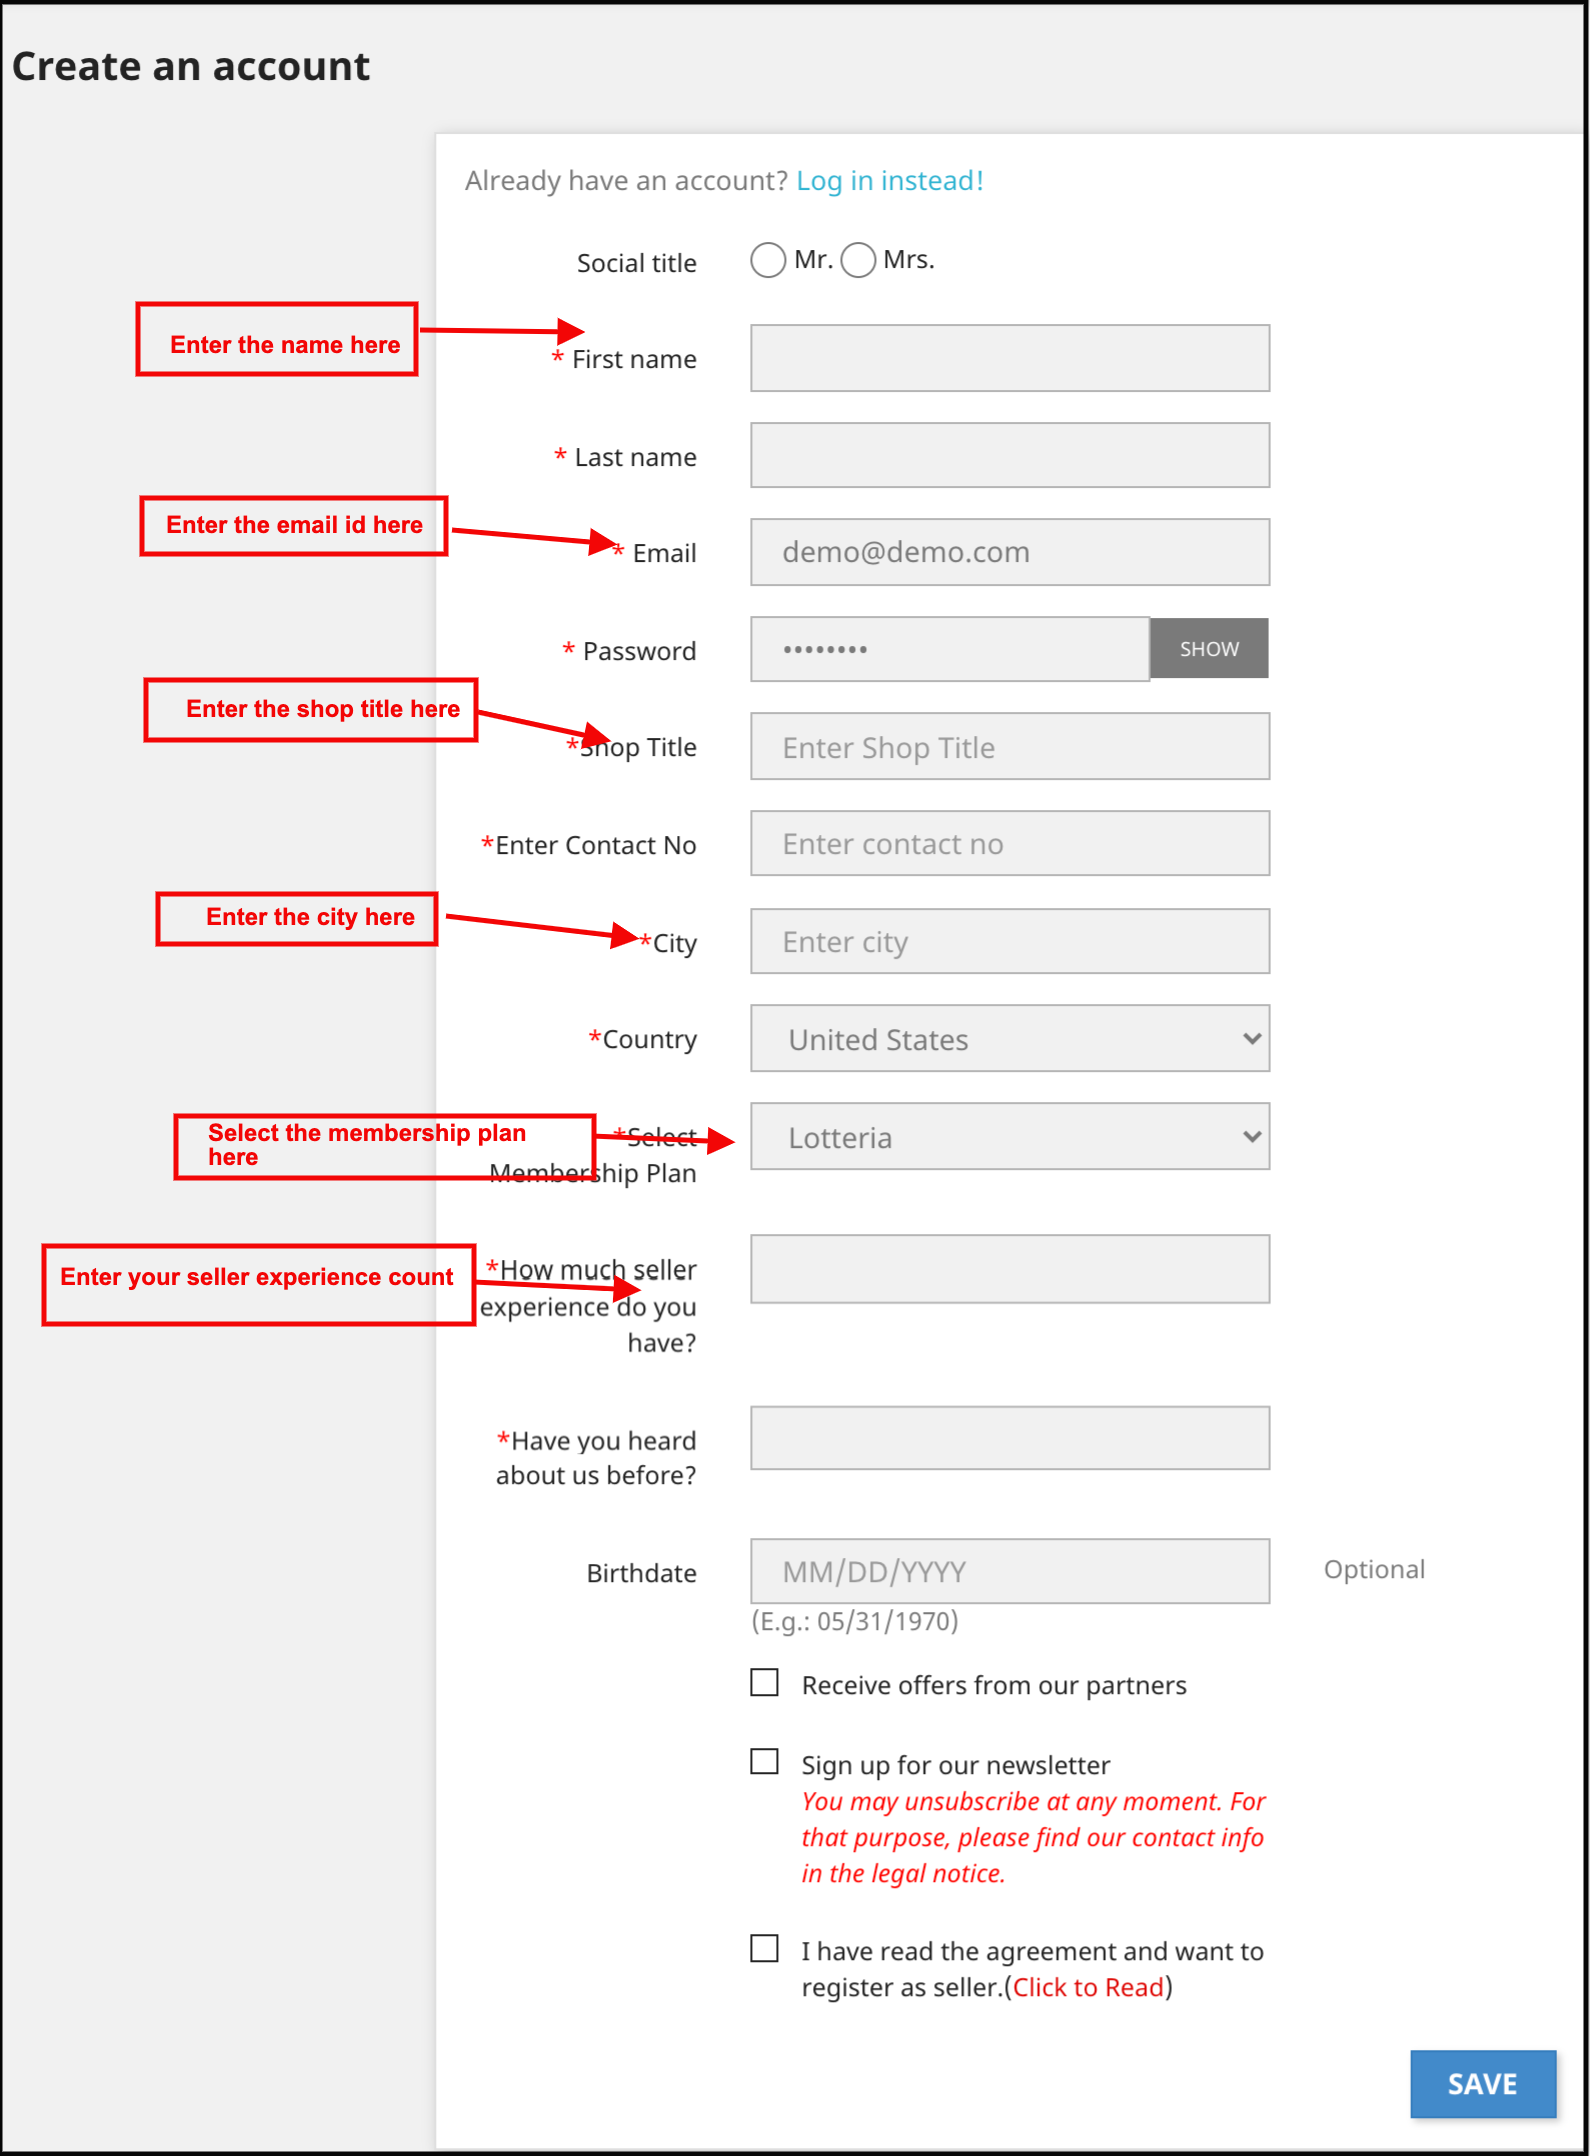
Become a seller: If you are a customer and planning to sell on a marketplace then it is super easy on a PrestaShop Multi-vendor Hyperlocal Marketplace in fewer steps.
Improved customer engagement and segmentation: Marketplace is the ultimate destination for not only consumer interaction, but also improved consumer targeting strategies and efficient study of customer segmentation. These markets provide space for a tailored consumer sales strategy and improved overall customer experiences as well.
Final words:
In the past, online hyperlocal marketplaces have shown rapid growth and capacity for the same in the future. With the tremendous opportunities it provides, marketplaces have progressively become a lucrative place for sellers from which their product scope can be extended far and wide. The path to offer excellent shopping experiences has just started for hyperlocal marketplaces. In the industry, the journey ahead is exciting and full of potential for inventive innovations.
Prestashop Hyperlocal Marketplace addon by Knowband is the easiest way to convert your PrestaShop eCommerce store into a fully working Hyperlocal online marketplace. In addition, connect customers to local stores. Further, using this module customers can connect with the local stores. The seller can easily list the location where they can deliver/ship their products. Moreover, this is the main reason why this module is beneficial for the sellers and also for their customers.
Customers can enter their location and check the available products and sellers in their locations. Furthermore, the store admin can manage a lot. For instance, the inventories, orders, products, and shipping methods at the Marketplace from the back interface of the Prestashop Hyperlocal Marketplace Add-on. Further, the Prestashop Hyperlocal Marketplace owner can charge a commission to the sellers/vendors on the products they sell. In fact, the sellers will get the chance to promote their brand. In addition, serve the audience of Marketplace in return for the commission they are paying to the admin.
1.1 Admin Benefits of Prestashop Hyperlocal multi-vendor marketplace:
The store admin can transform their eCommerce store into a marketplace with a few button clicks.
Ecommerce admin can approve/disapprove sellers ship area requests.
PrestaShop Hyperlocal Marketplace admin can edit/delete sellers’ ship areas.
Hyperlocal Delivery Marketplace admin can also add multiple locations as per their requirements.
Hyperlocal Service Marketplace admin can add the shipping area on behalf of sellers.
PrestaShop Hyperlocal Marketplace admin can also add multiple ship rates by using a CSV file.
Store admin can add a radius unit range that will be usable to search the seller from the customer’s location.
Admin can add custom fields for the seller’s profile. Further, he can add new custom fields or remove already addable fields.
Admin can also add a separate seller registration form under the general settings tab.
The admin can even disallow the seller to view the email ID of the customers. In fact, if the admin enables this, the sellers can request to close their shop from the marketplace.
The admin can fix the commission that he wants to charge to the sellers from the back-end of the Prestashop Hyperlocal E-commerce Business.
The admin gets complete access to approve/disapprove the products being sold on the marketplace. In addition, can even fix the quantity of the new products that a seller can add to the marketplace. Further, he can do it with the help of this Prestashop Hyperlocal Delivery Marketplace.
The store admin gets an option to approve/disapprove the seller’s profile at a button click.
The Prestashop Hyperlocal Marketplace add-on allows the store admin to track and manage the sellers operating in the marketplace easily.
The PrestaShop admin can add/remove the product or category as per the requirement from the admin interface of the Prestashop Hyperlocal Marketplace extension.
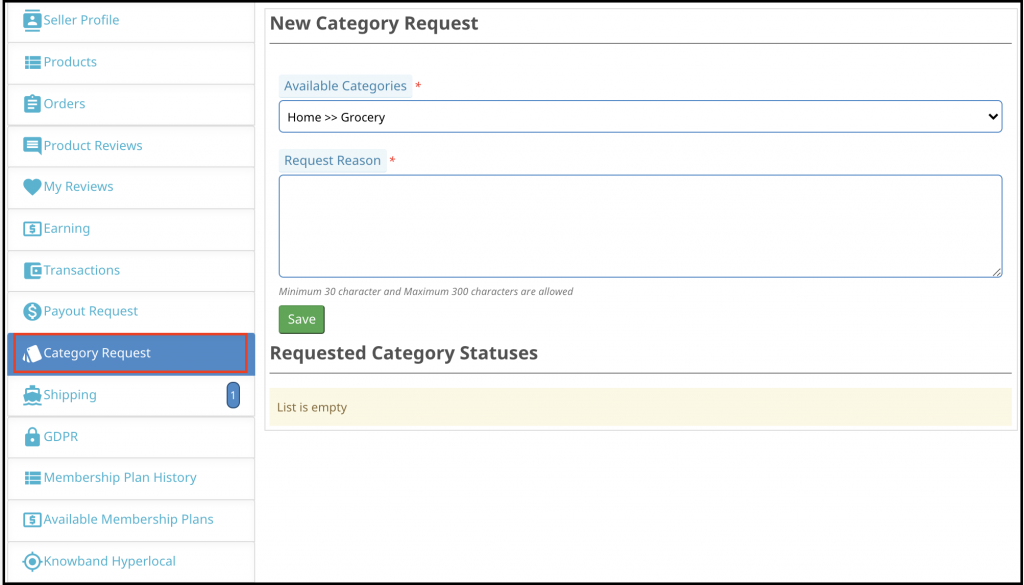
The sellers can request to add a new category to the front-end of the marketplace. Further, these requests are visible in the Prestashop Hyperlocal Service Marketplace and the admin can accept/reject them accordingly.
The seller transactions are visible from a single tab of the Prestashop Hyperlocal Delivery Business Model. Thus, the performance of the sellers is trackable.
The store admin can view the report of the commission earned from the Prestashop Hyperlocal Marketplace.
The admin can accept/reject the reviews on the products or sellers with the help of the Prestashop Hyperlocal online marketplace.
The additional features of the Prestashop Hyperlocal multi-vendor marketplace even offer an option to create custom shipping methods.
The seller can either select the default shipping method or create custom methods from their dashboard.
The PrestaShop Prestashop Hyperlocal E-commerce Business addon allows the sellers to initiate payout requests from their dashboard. In fact, the admin can approve or disapprove the payout request from the back-end of the PrestaShop addon.
Admin can create various membership plans for the sellers.
The Admin can also enable a free membership plan feature for the sellers for one-time use.
Admin can send warning emails to the sellers from upgrading their membership plans.
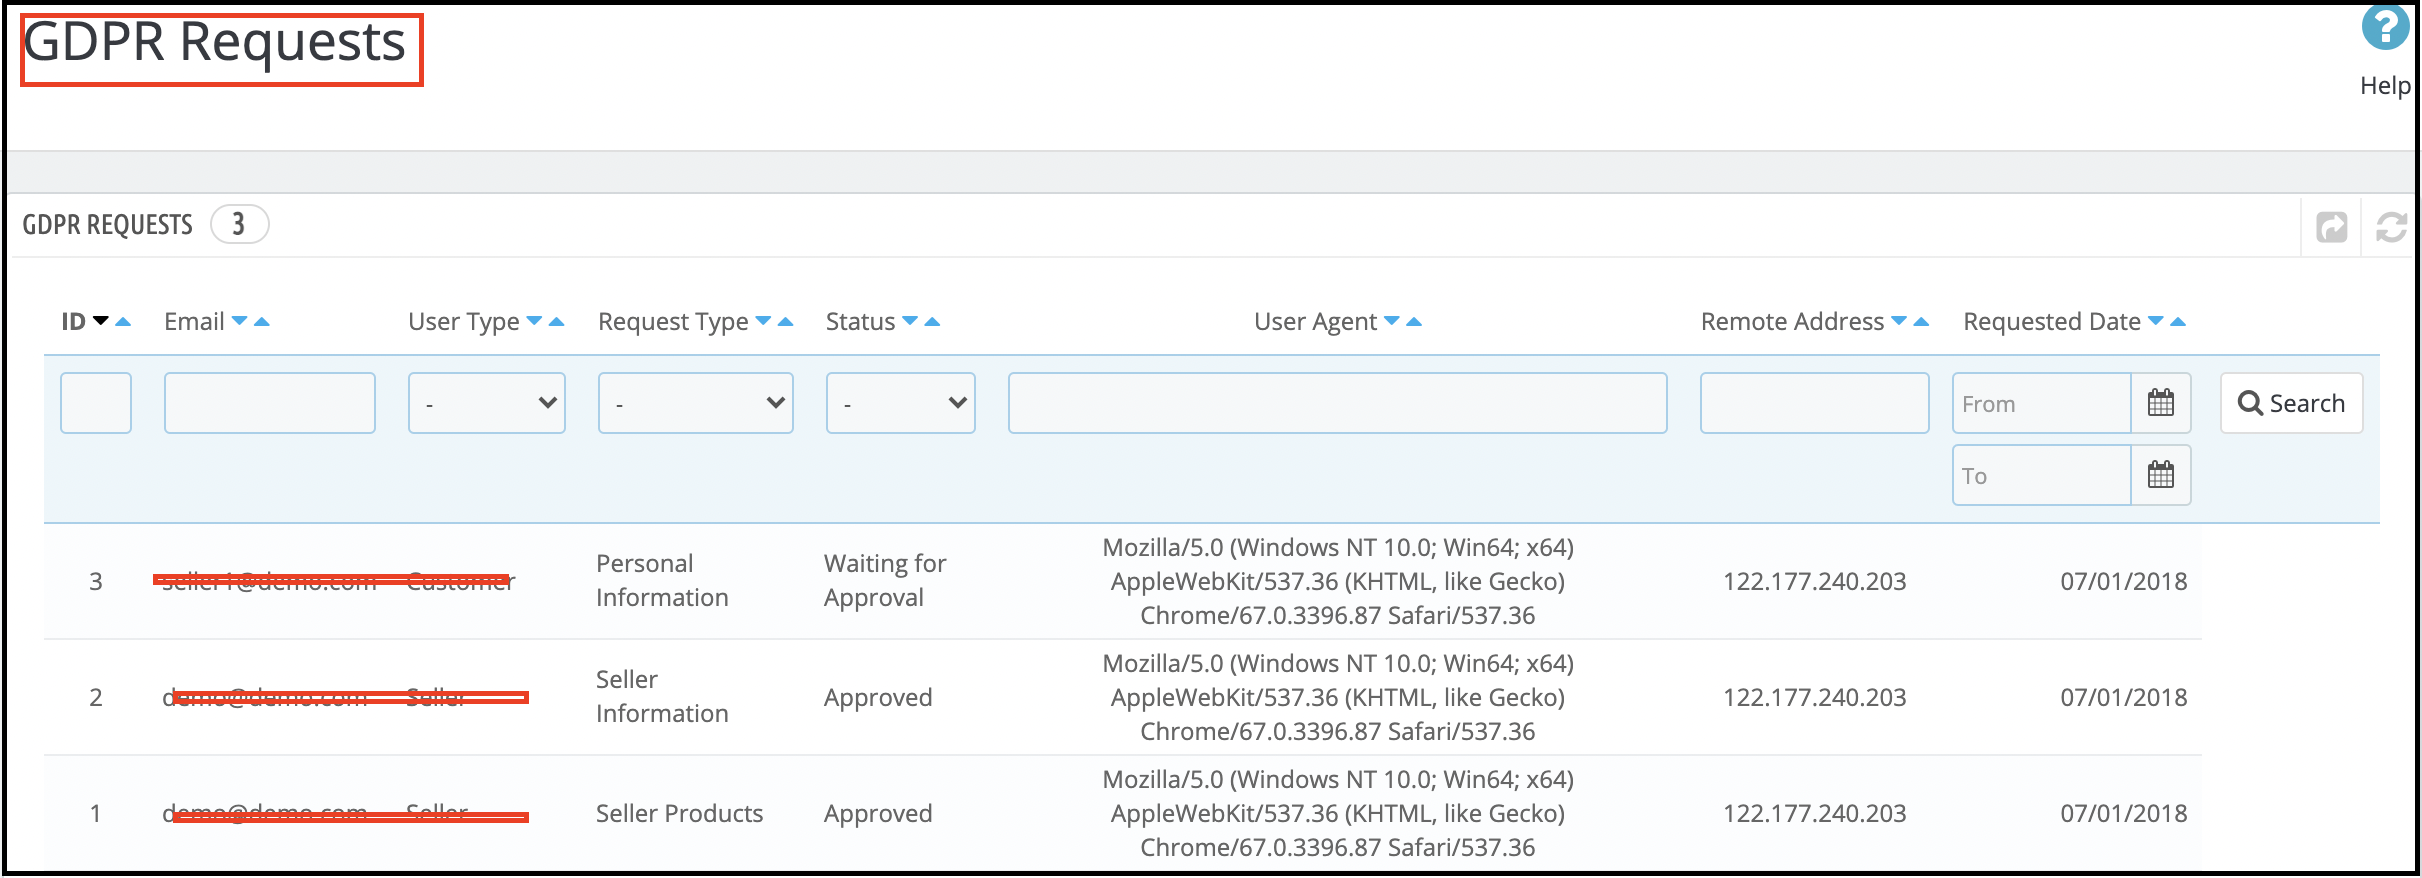
The GDPR requests raised by the sellers are visible from the back-end of the Prestashop Hyperlocal Delivery Marketplace.
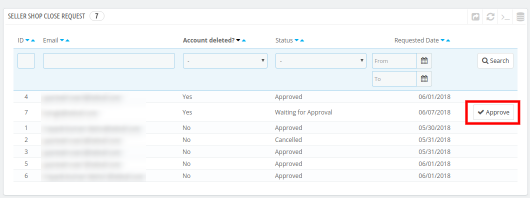
The admin approves/disapproves the shop closure request of the sellers from the admin interface of the Prestashop Hyperlocal Service Marketplace.
Admin gets an option to automate the transaction payout request process which helps the admin to automate all the payment requests of the sellers.
1.2 Seller Benefits of the Prestashop Hyperlocal Marketplace Module:
The seller can add multiple ship areas as per their requirements.
The seller can edit ship areas. They can also delete ship areas.
The seller can list multiple ship rates using a CSV file.
The seller can set a default price for the shipping if the distance is out of range.
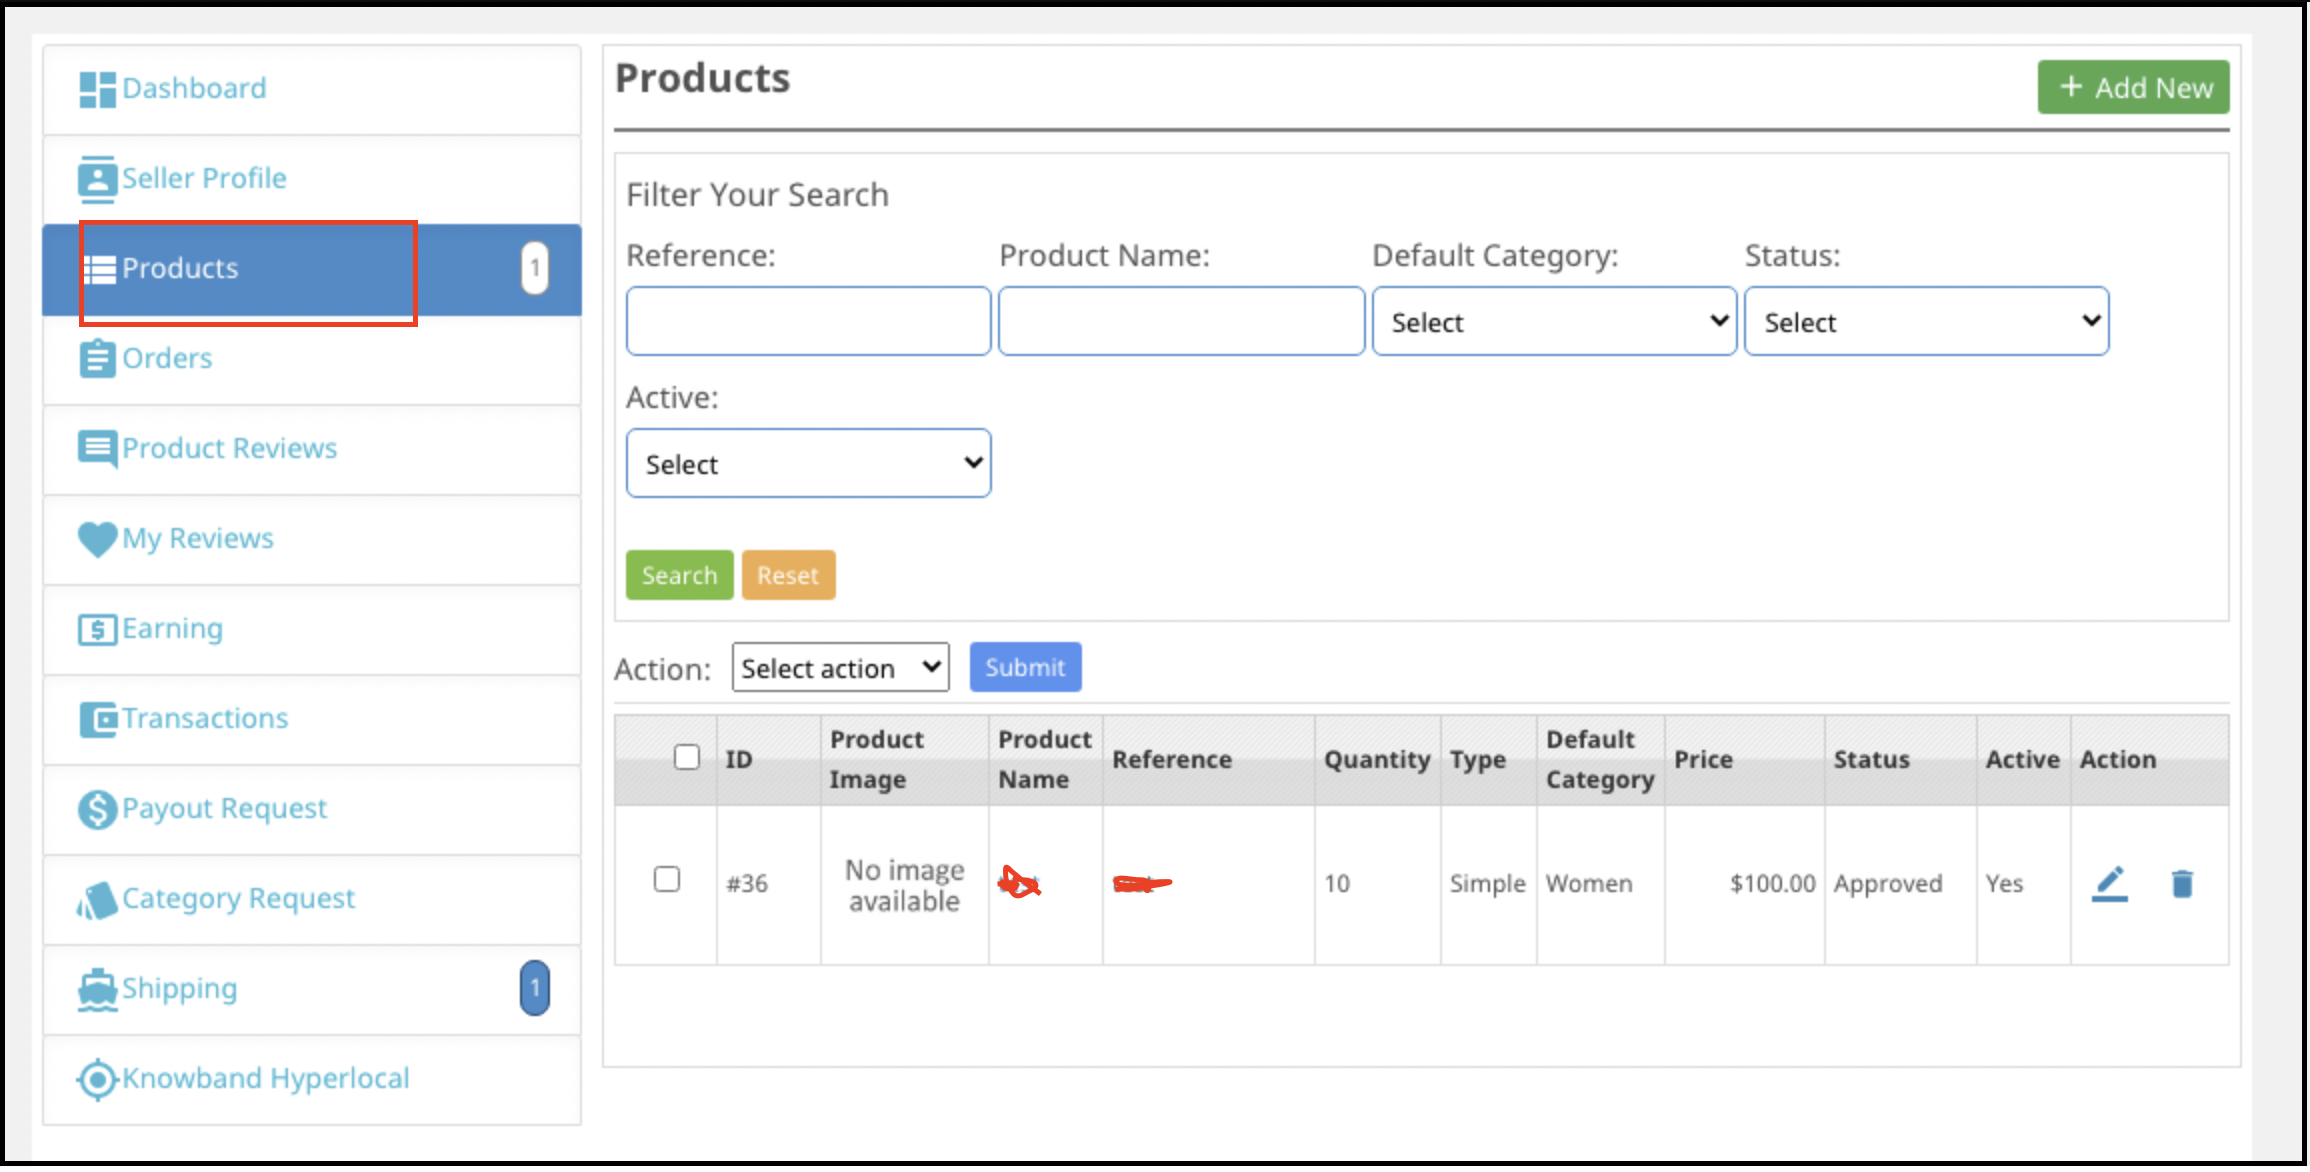
The vendors can add any type of product to the marketplace. Prestashop Hyperlocal online marketplace supports all types of products, right from the simple, configurable to the virtual and bundled products.
The sellers can even request the admin to add new categories.
The commission charges are fixed, so, the entire transaction is transparent.
The Prestashop Hyperlocal multi-vendor marketplace module makes it easier for sellers to sell their products to a larger customer base.
The dashboard allows the vendors to view their profiles, products, and orders.
A separate seller’s page makes it easier for the vendors to promote their business.
Sellers can choose from various membership plans as per the requirements.
Under the GDPR compliance, the sellers get an option to download their details in CSV format by clicking a button.
The sellers can even request the admin to remove their shop from the marketplace. This request processes from the back-end of the Prestashop Hyperlocal E-commerce Business.
1.3 Buyer Benefits
Buyers can check the availability of products and sellers easily by entering their locations.
The store visitors can now choose the ideal products from a wider range of product options.
The customers get an option to review the sellers. Customers can also review the products by using our Product Review Reminder or Default Product Comment Addon.
Online shoppers can select the product by visiting the seller’s page.
Buyers can also become a seller in Prestashop Hyperlocal Delivery Marketplace. They can also register as a seller.
2.0 Installation
Follow the following steps for installing Prestashop Hyperlocal Marketplace addon:
Once you purchase the Prestashop Hyperlocal Service Marketplace addon,
Go to the Store Admin -> Modules and Services
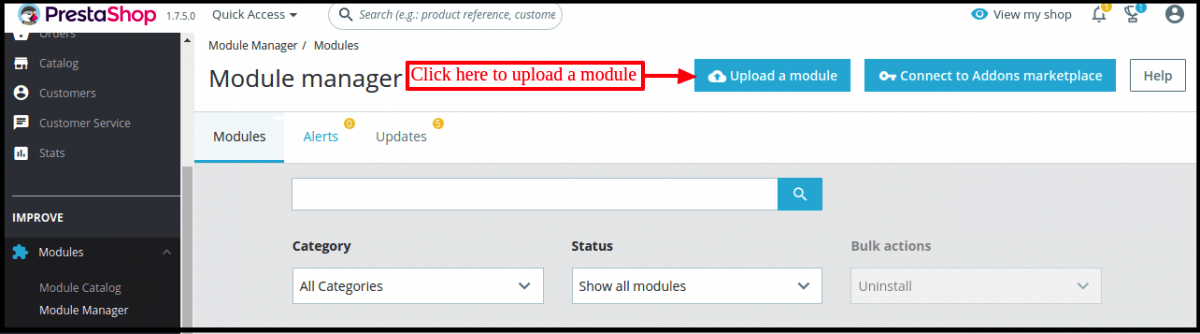
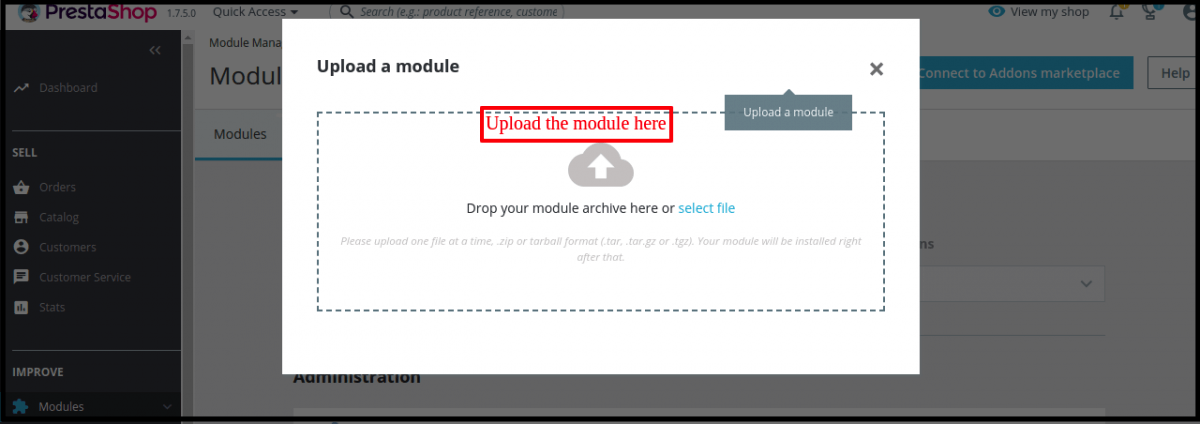
Click on “ Upload a module”. Drag or drop the file or can simply select the file from the system.
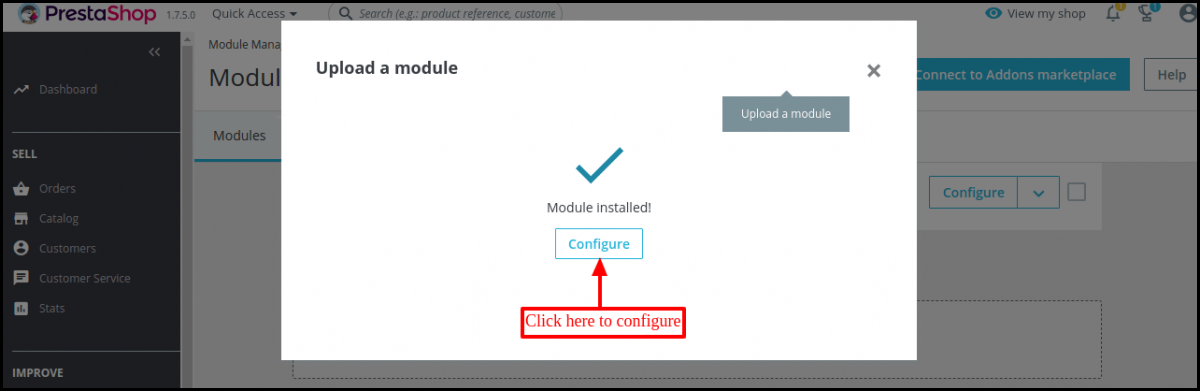
Once the file is completely uploaded, a notification of “Module(s) installed successfully” will display.
Once the Prestashop Hyperlocal Delivery Business Model installs properly the Install button will be automatically be converted to Configure.
3.0 Admin Module
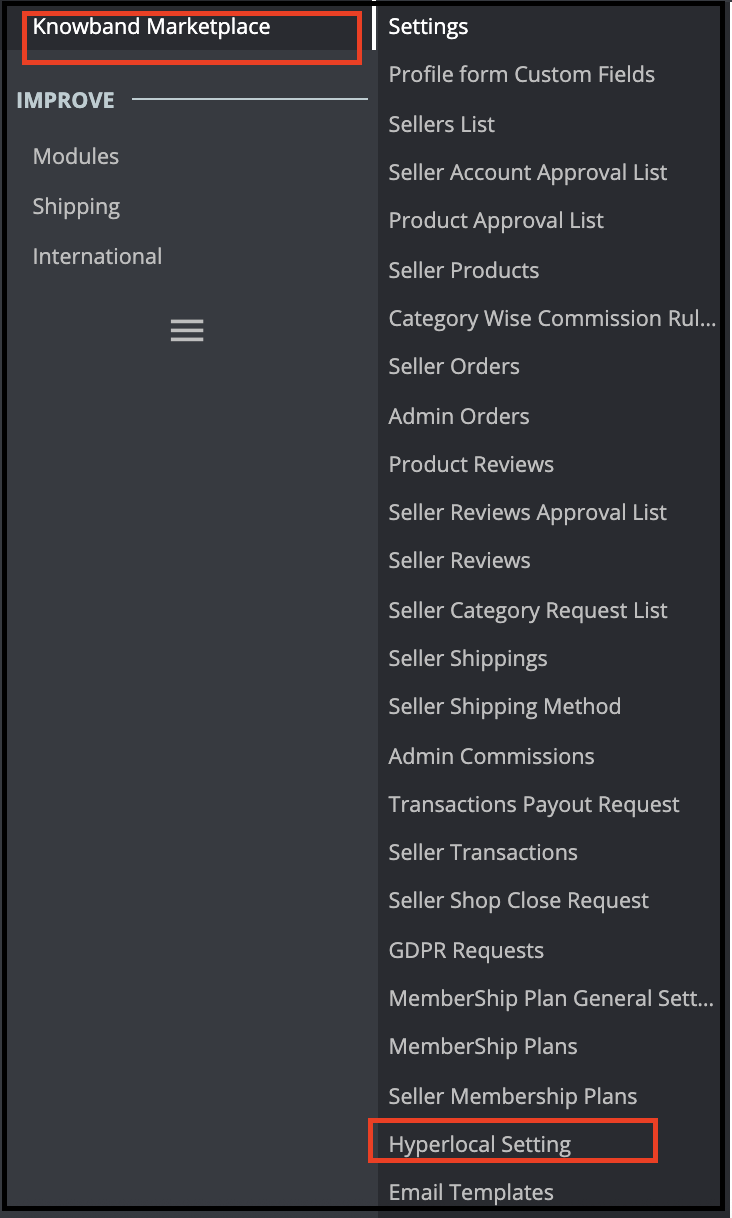
In the admin interface of the Prestashop Hyperlocal Marketplace addon, you’ll find a separate menu at the end of the menu as shown below.
The Prestashop Hyperlocal Marketplace Menu consists of several sub-menu options that direct the users to several pages in the Prestashop Hyperlocal Marketplace Addon.
3.1 Settings
The Prestashop Hyperlocal Marketplace Module’s Settings tab divides into 2 levels i.e. Seller Level Settings and Global Level Settings. This page below only controls the Global level settings for the Prestashop Hyperlocal Marketplace Module. 3.1.1 General Settings
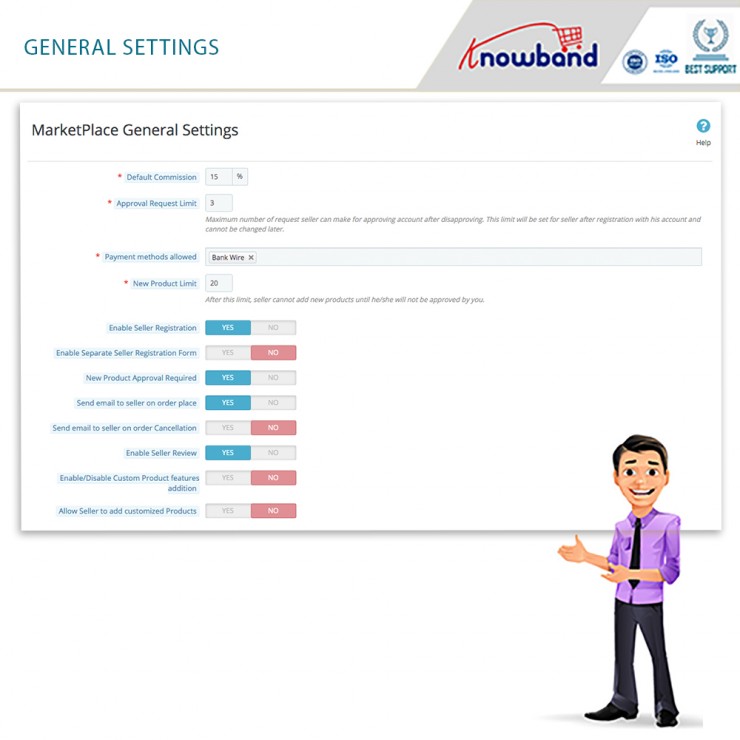
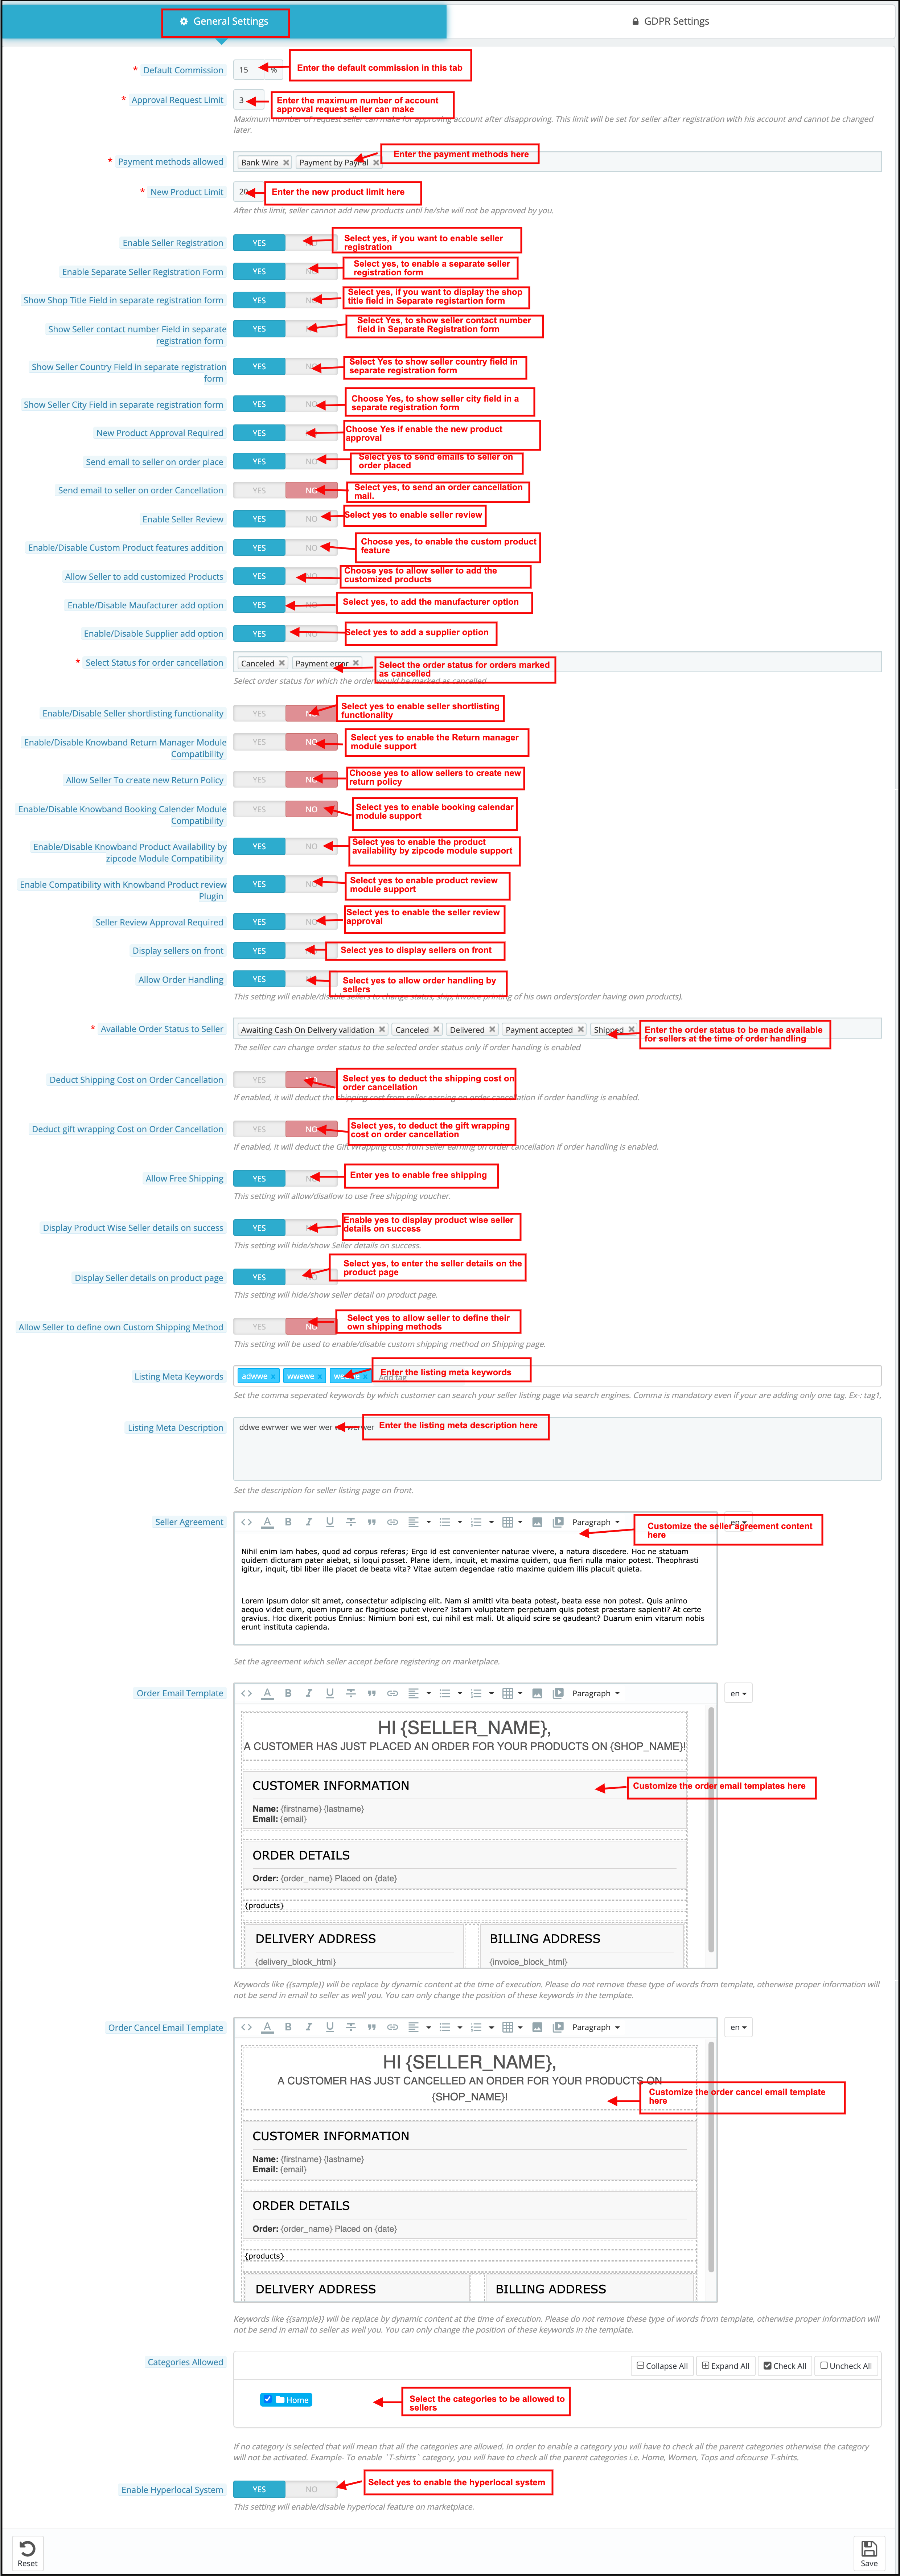
This page has all the settings that control the Prestashop Hyperlocal online marketplace and its several other features. The general settings page consists of the following fields:
Default Commission: The Prestashop Hyperlocal multi-vendor marketplace allows the sellers to fix and change the commission that is chargeable to the sellers. This section sets the default commission percentage that will charge from the sellers from the total sales made by them.
Approval Request Limit: It is the maximum number of requests that a seller can make to get a new seller account. This limit will be set for each seller after registration with his account and cannot be changed later.
Payment Methods Allowed: Select the payment methods you want to allow for transactions.
New Product Limit: Here admin can enter the maximum number of new products that a seller can add. After this limit, the seller cannot add any new product without the approval of the admin.
Enable Seller Registration: By enabling this button, the admin can allow the new or existing customer who is not a seller to register as a seller. The same ‘Register as Seller’ option is available in the Customer Tab of the PrestaShop store as well as in the front-end of the marketplace.
New Product Approval Required: Enable this field in case you want to approve a new product that a seller adds before it displays on your Prestashop Hyperlocal E-commerce Business.
Send Email to Seller on Order Place: Enable this field to send an email to the seller in case an order comes for the seller’s product(s).
Send Email to Seller on Order Cancellation: Enable this field to send an email to the seller in case an order cancels for the seller’s product(s).
Enable Seller Review: Enable this field, in case you want the customers to review the seller.
Enable/Disable Custom Product features addition: Enable this field, in case you want to add custom product features.
Allow Seller to add customizable Products: Enable this field, in case you want to allow sellers to add customizable products.
Enable/Disable Manufacturer add option: Enable this field, in case you want to add the manufacturer option.
Enable/Disable Supplier add option: Enable this field, in case you want to add the supplier option.
Order Status for cancellation: Enter the Order status to be shown at the time of cancellation.
Select order status for which the order would be marked as canceled: Select the order status to mark it when it cancels.
Enable/Disable Seller shortlisting functionality: Enable this field, in case you want to add seller shortlisting functionality.
Enable/Disable Knowband Booking Calendar Module Compatibility: Enable this field, in case you want to add Knowband Booking Calendar Module Compatibility.
Activate/Disable Knowband Return Manager Module Compatibility: Enable this field, in case you want to add Knowband Return Manager Module Compatibility.
Allow Seller To create a new Return Policy: Enable this field, in case you want to allow the seller to create a new return policy.
Enable/Disable Knowband Product Availability by zipcode Module Compatibility: Enable this field, in case you want to allow zipcode module compatibility.
Enable Compatibility with Knowband Product review Plugin: Enable this field, in case you want to allow compatibility with the product review plugin.
Seller Review Approval Required: Enable this field in case you want the seller to review for approval before it becomes visible on the storefront.
Display sellers on the front: Enable this field in case you want to show a link in the header of the Prestashop Hyperlocal Marketplace front-end about the seller’s listing page.
Allow Order Handling: This setting will enable/disable the sellers to manage and change the order status, manage the shipment of the orders and generate the invoice of their products.
Available Order Status to Seller: The seller can change order status to the selected order status. Further, only if he enables the order handling.
Deduct Shipping Cost on Order Cancellation: If the admin enables this, it will deduct the shipping cost from the seller’s earnings. Further, on order cancellation, if he enables the order handling.
Deduct gift wrapping Cost on Order Cancellation: If the admin enables this, it will deduct the Gift Wrapping cost from seller earning on order cancellation if order handling is enabled.
Allow Free Shipping: This setting will allow/disallow to use of a free shipping voucher.
Display Product Wise Seller Details on Success: If the admin enables this, the seller details will be shown on the order confirmation page.
Display Seller Details on Product Page: The seller’s detail will display on the product page if this option is enabled.
Allow Seller to define their Custom Shipping Method: Enable this functionality to allow the sellers to define their shipping methods. In case, the admin disables this feature, then, only the default shipping methods defined by the admin be shown in the Shipping tab of the seller’s dashboard.
Listing Meta Keywords: Add all the meta tags (separated by comma) by which your customers can search the Seller Listing Page via Search Engines.
Listing Meta Description: Add the description to the meta tags in the above field.
Seller Agreement: The seller agreement is customizable from this section of the Prestashop Hyperlocal Delivery Marketplace. The same agreement will display to the sellers once they register themselves in the Prestashop Hyperlocal Marketplace.
Order Email Template: The email to be sent to the sellers when an order happens for their product is customizable from here.
Order Cancel Email Template: The email to be sent to the sellers when an order cancels for their product to be customizable from here.
Categories Allowed: This option shows the categories that the admin allows for the sellers to add products. If no category is selected, all the categories that the admin allows. Moreover, if he selects some of the categories, it means that only those categories permit.
Enable Hyperlocal System: Toggling this button can enable the hyperlocal system in the marketplace.
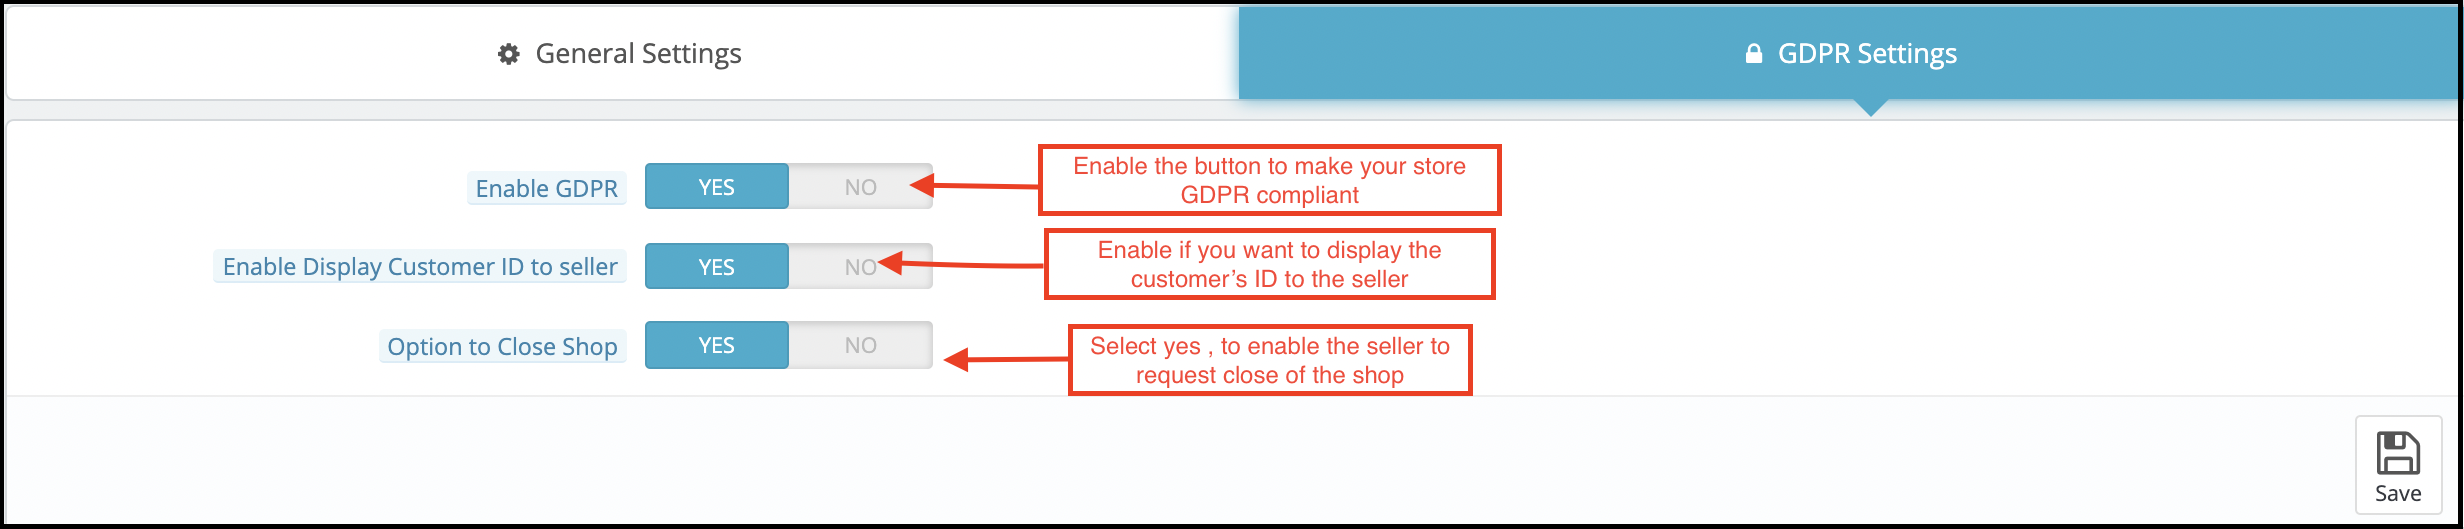
3.1.2 GDPR Settings
The store admin can enable the GDPR settings by clicking a few buttons in this section of the Prestashop Hyperlocal Marketplace addon. The various fields are below:
Enable GDPR: Toggle this button to enable GDPR compliance. Enable Display Customer ID to seller: Enable this feature if you want to display the customers’ ID to the third-party sellers. Option to close Shop: If the admin enables this feature, then, the sellers will get options to request for the shop closure. In fact, it displays a section in the tab in the dashboard of the sellers from where the request can be raised.
3.2 Profile Based Custom Fields
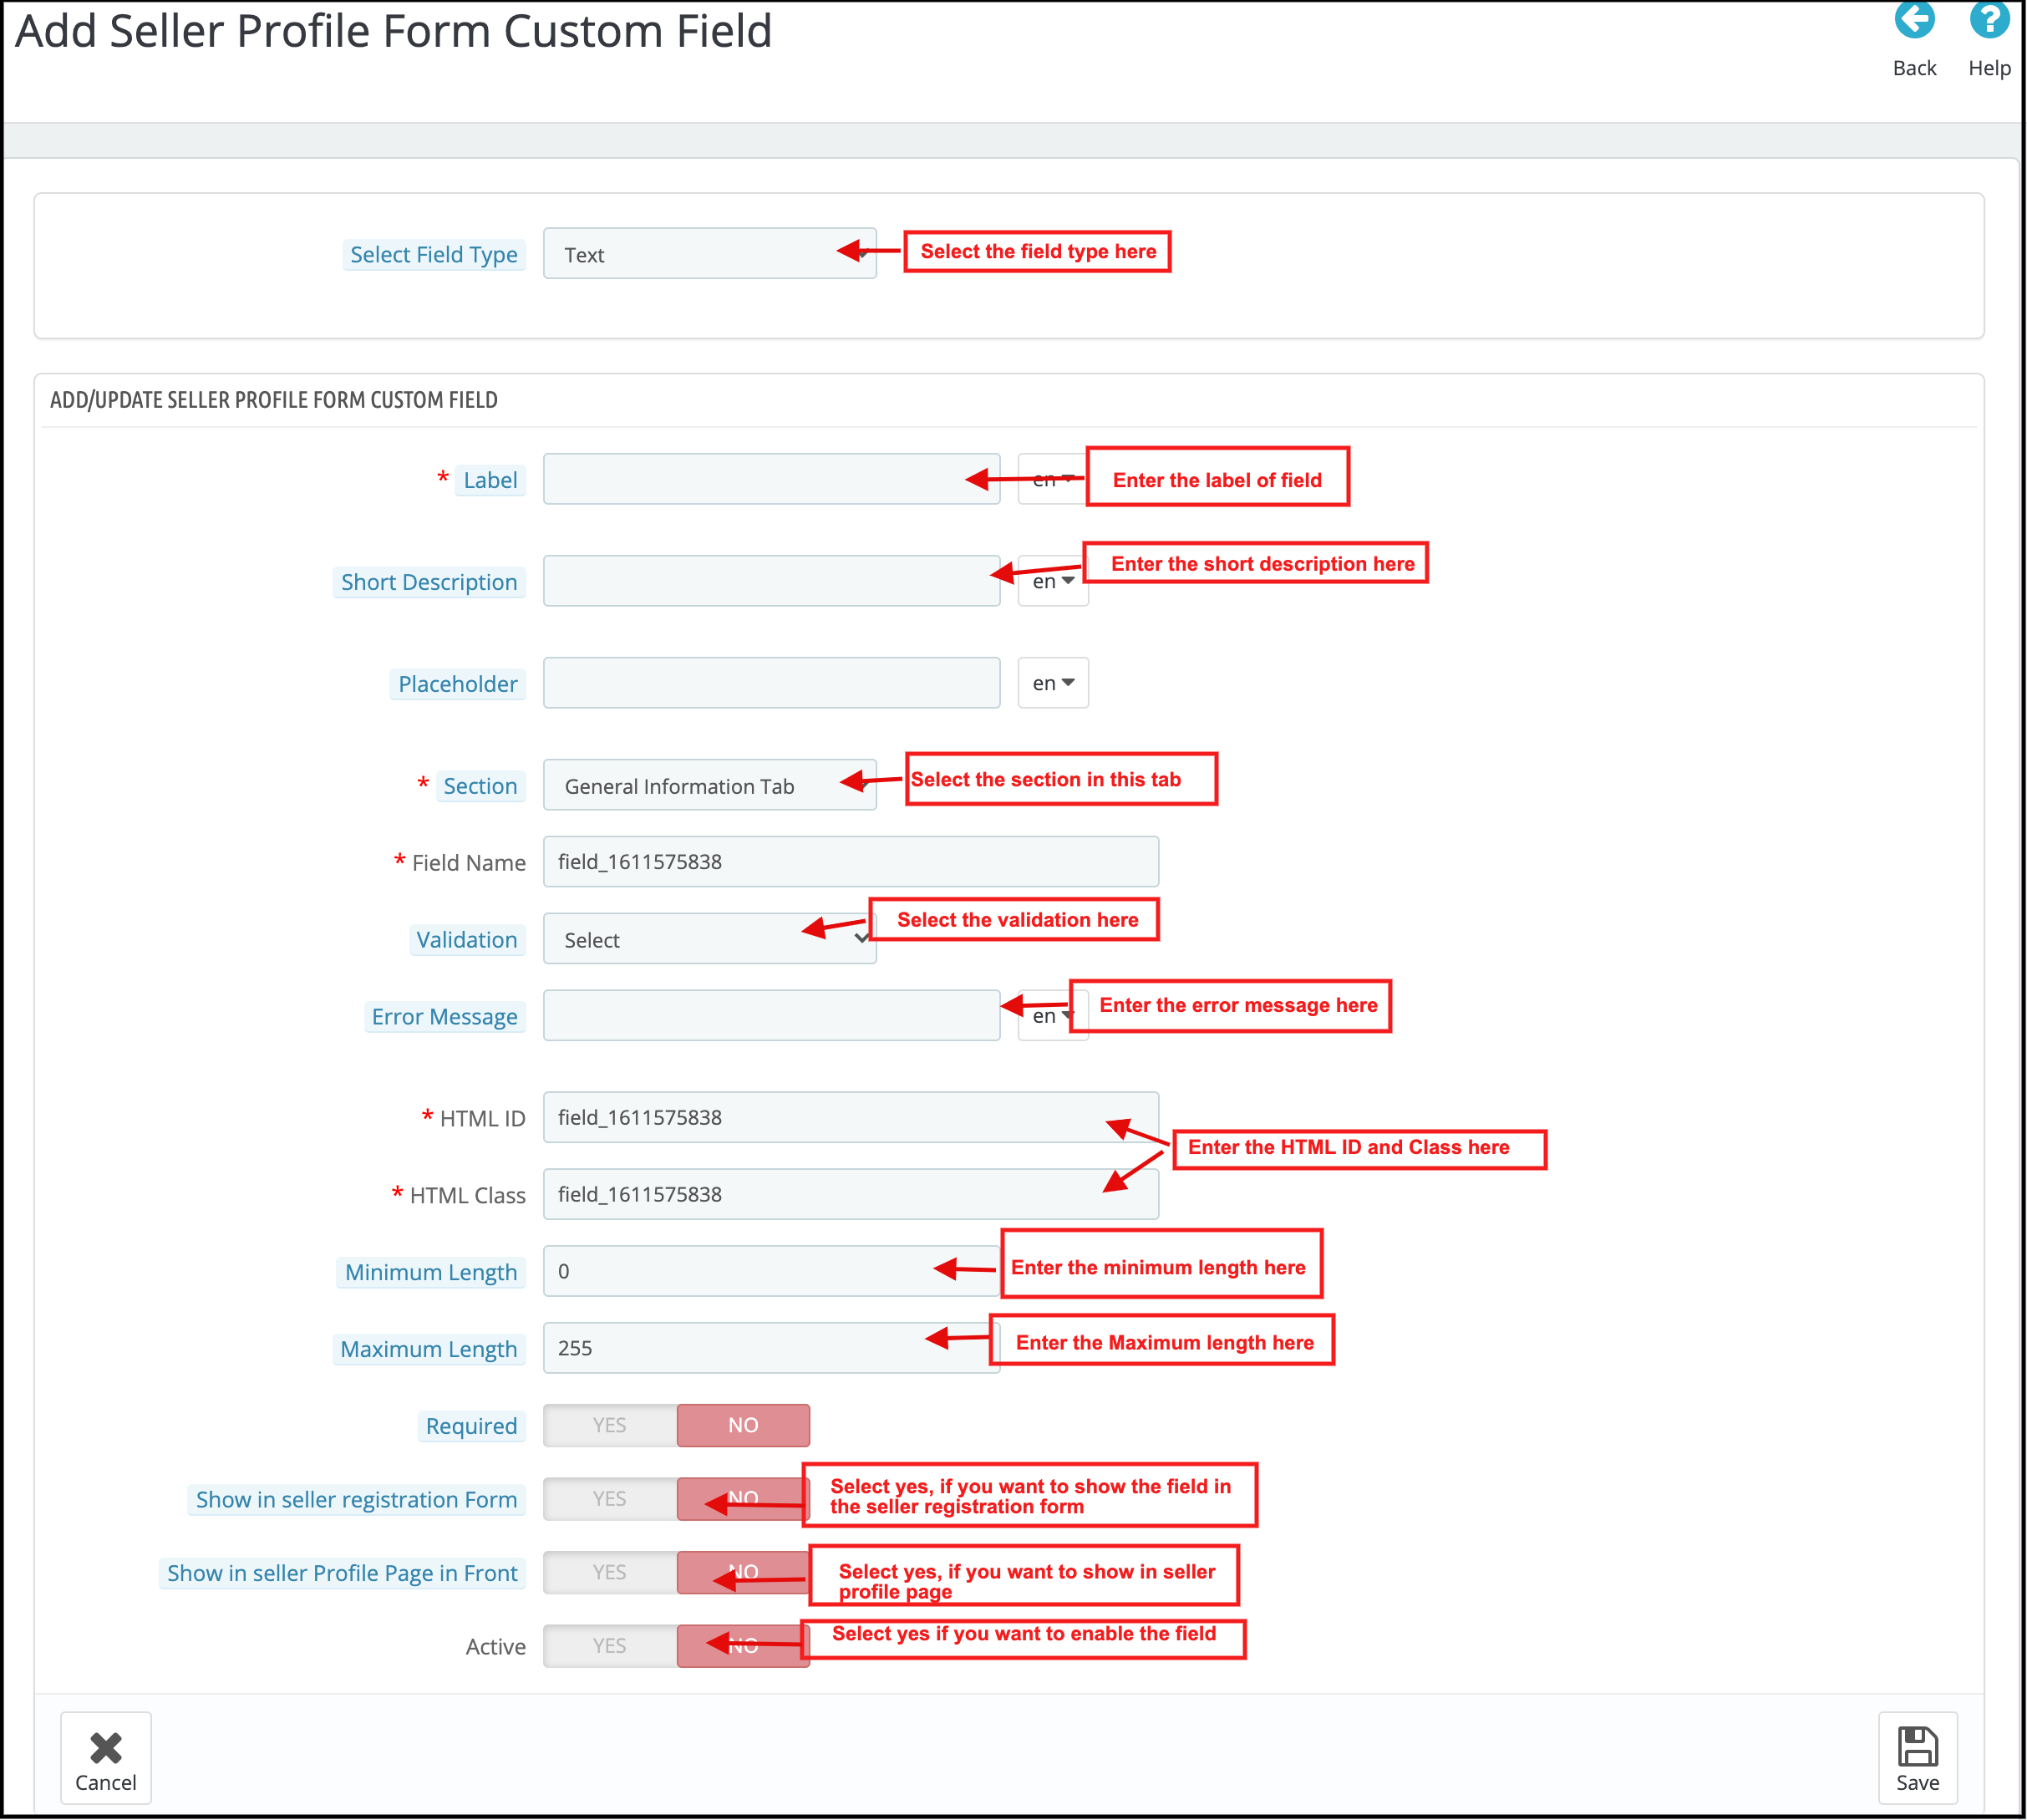
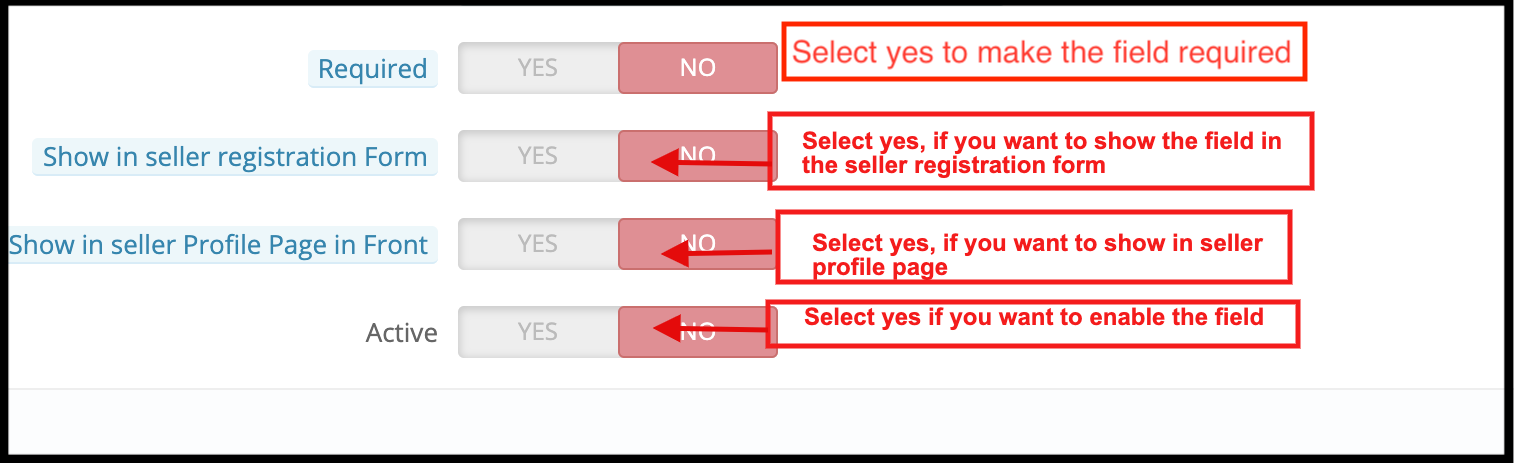
Now admin can add custom fields for the seller profile page. Moreover, even make them needful for the sellers to fill out.
Custom Fields for Seller Profile:
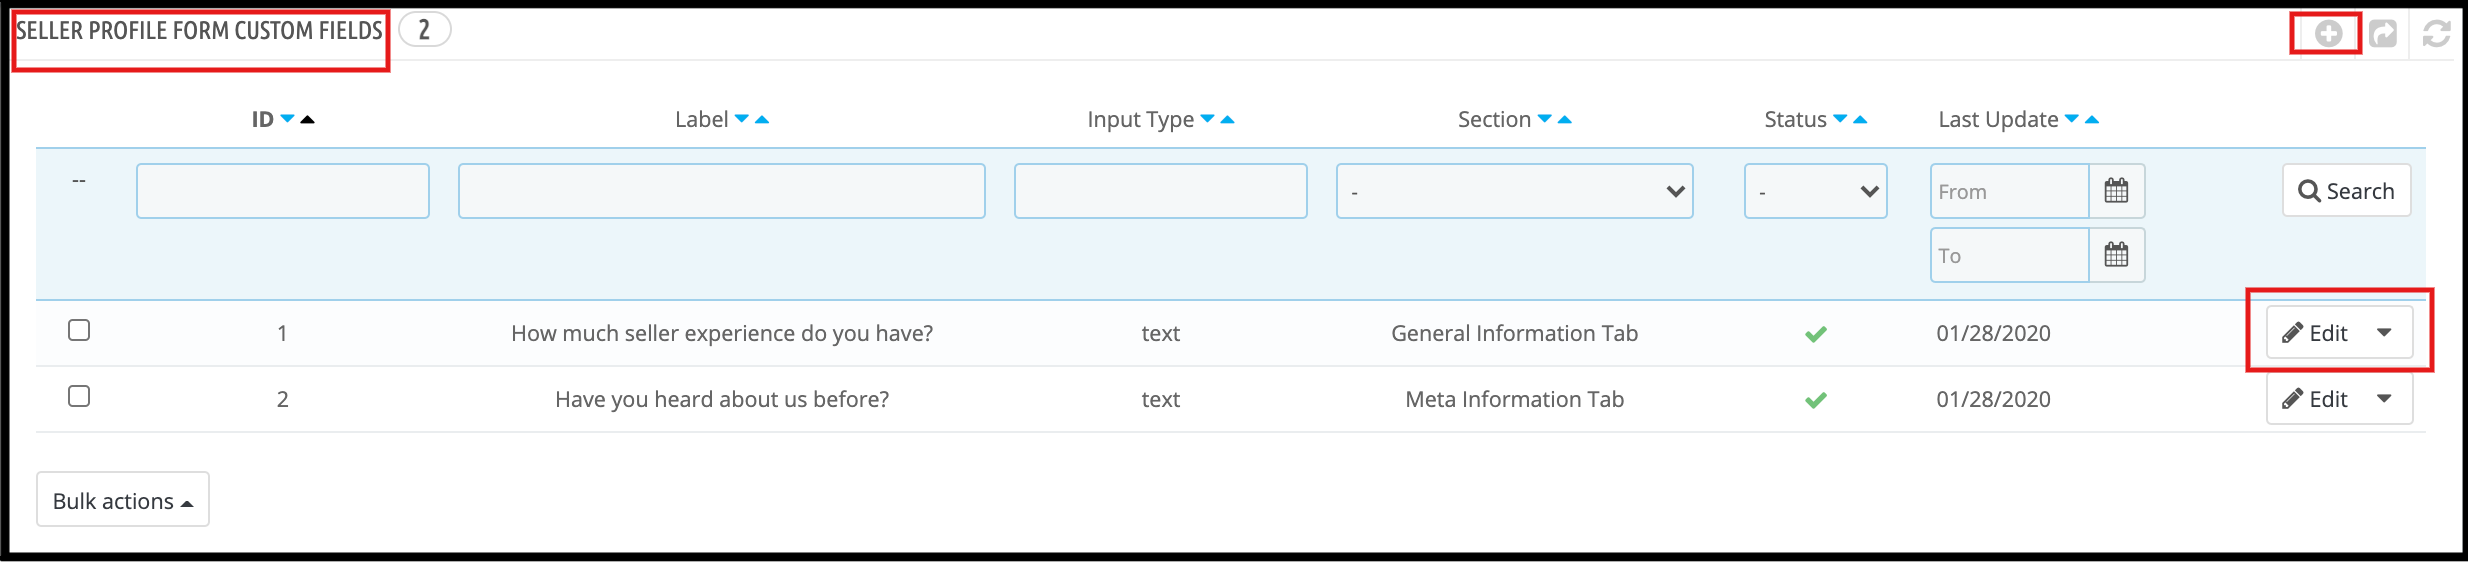
Admin can add new custom fields for the seller’s profile under the “Profile Form Custom Fields” tab. With the help of this tab, the admin can add new custom fields or delete custom fields for sellers’ profiles using Prestashop Hyperlocal Marketplace.
Show Custom Fields on Seller Front Page:
With the help of the PrestaShop Hyperlocal online marketplace, the admin can show the custom fields on the seller’s profile page. Admin can allow this functionality under the “Profile Form Custom Fields” tab.
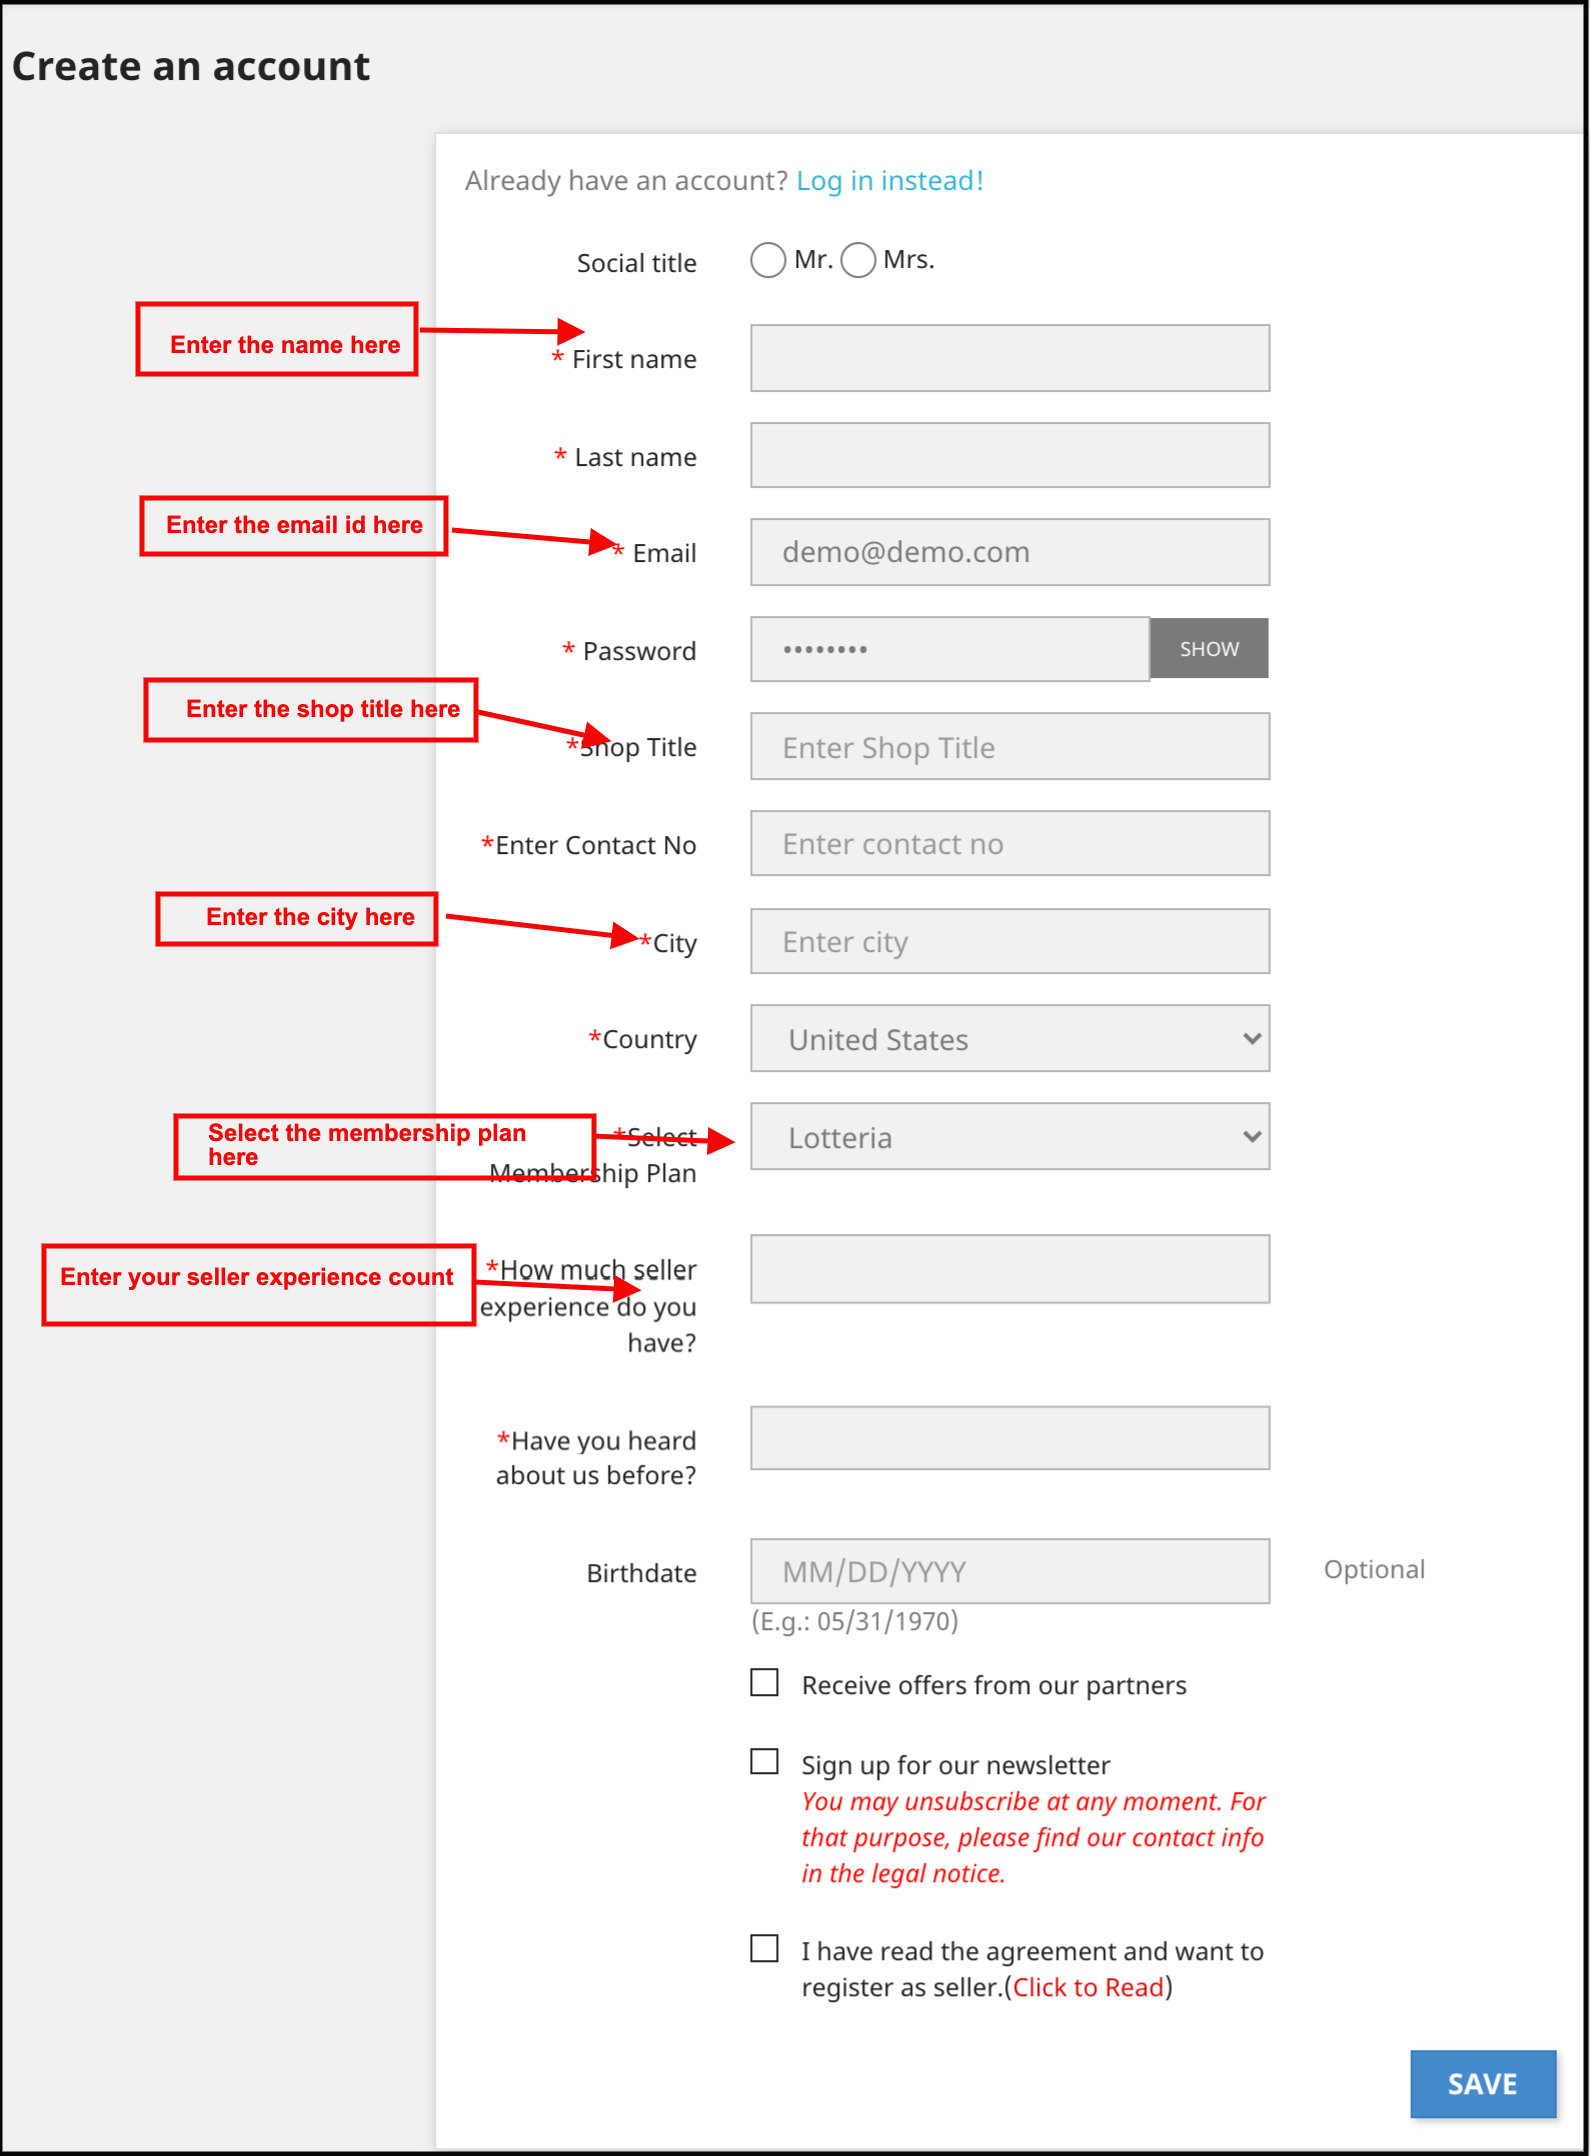
Separate Seller Registration:
Admin can add a separate seller registration form under the “General Setting” tab of the PrestaShop Hyperlocal multi-vendor marketplace. By allowing this functionality admin is also able to add more custom fields in the seller registration form like shop title, seller contact details, seller country, etc. Custom Fields Type Selection:
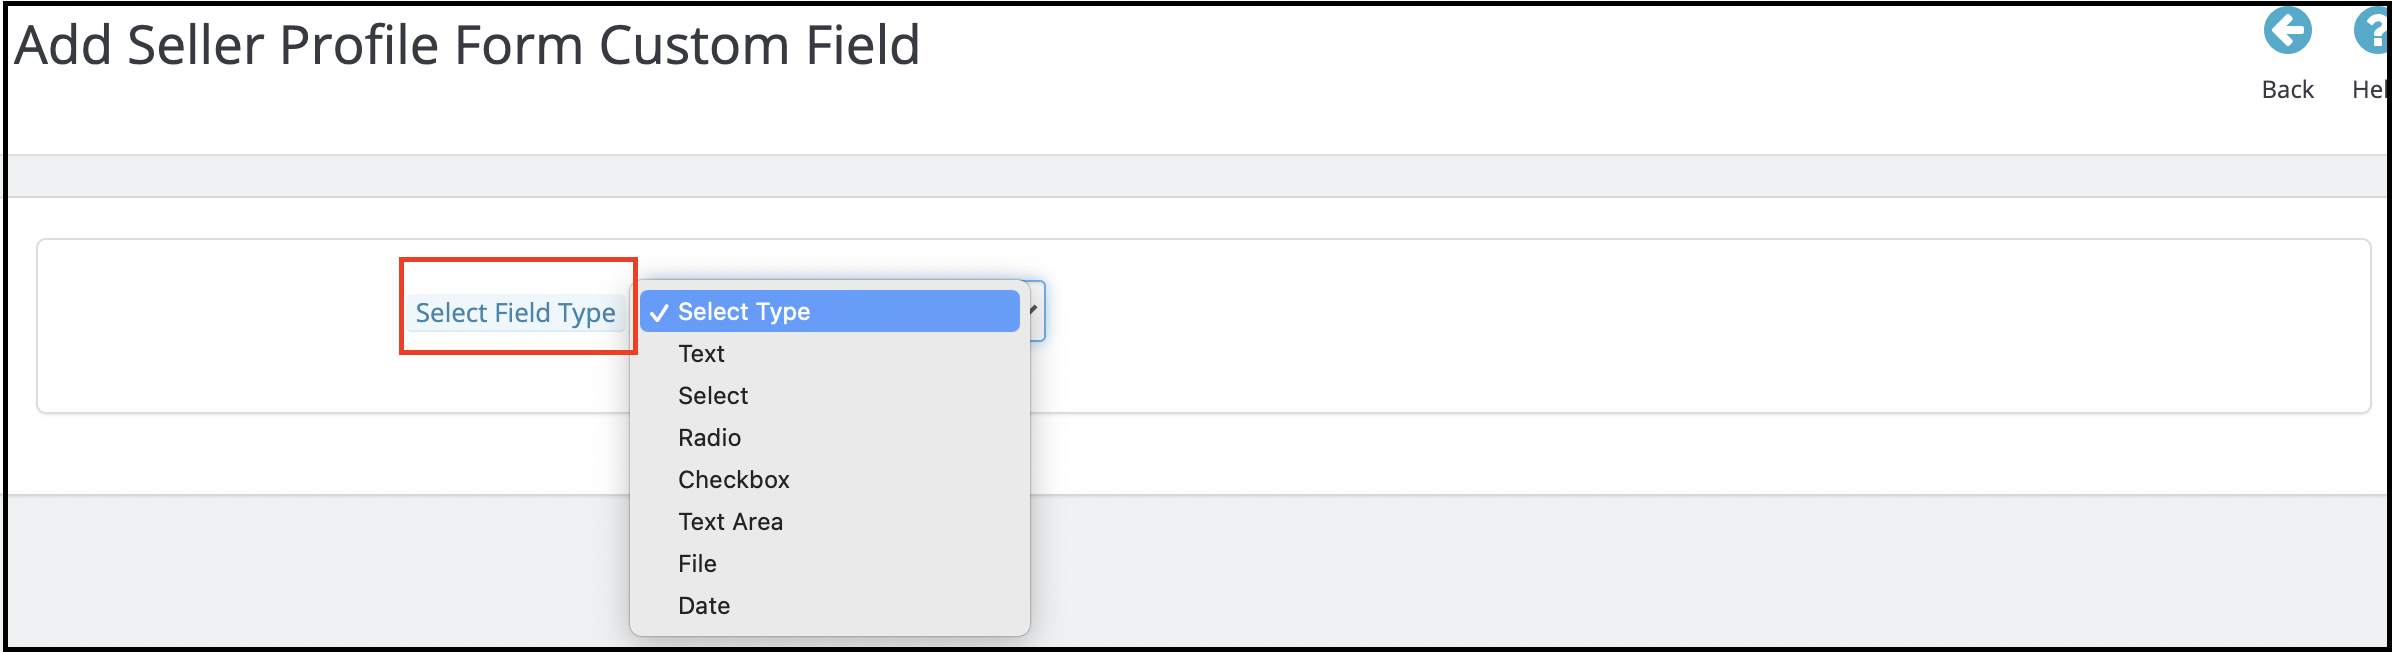
Admin can select the custom fields type which he wants to add on the seller profile page. Admin gets lots of options like checkbox, radio button, text box, etc.
Category wise Custom Fields:
Admin can map the custom fields in a particular category using the “Section” tab under Profile Form Custom Fields. With the help of this admin can map the custom fields category-wise.
Make Custom Fields Required:
Admin can make these custom fields needful using the “Required” tab.
3.3 Sellers
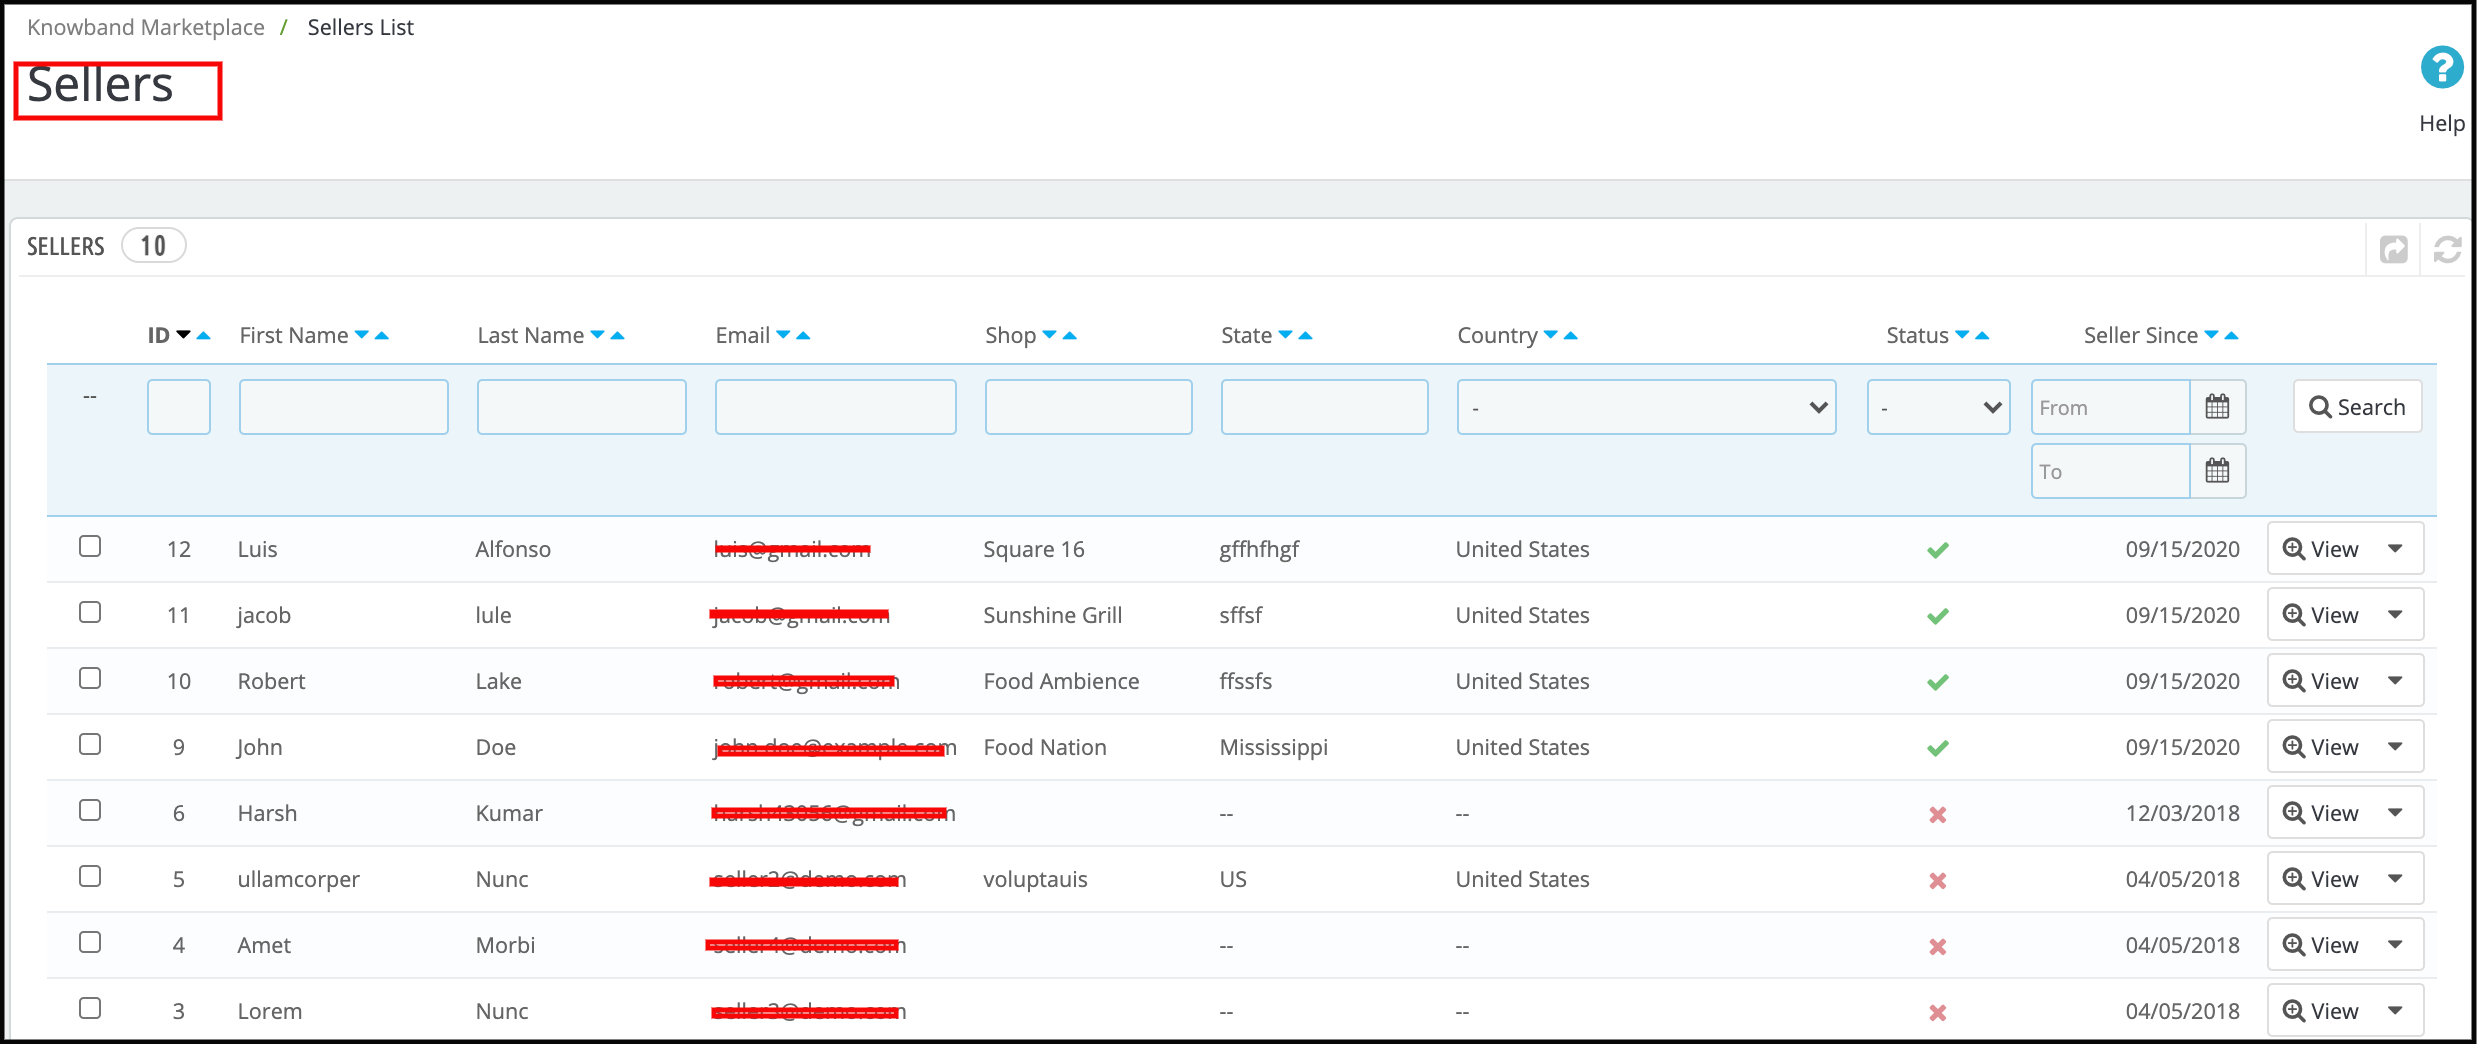
This page of the Prestashop Hyperlocal E-commerce Business extension has a list of all the sellers that the store owner approves by the store owner.
There are several filters as well to filter the list of sellers as shown in the above screenshot.
The above figure consists of a list of all the sellers that the admin approves.
The admin can also enable or disable a seller in this list using the bulk actions of the grid.
If the admin disables a seller, then, all the products of that seller are also automatically disabling. Moreover, will not be visible on the storefront.
When you click on the View button, a new page opens up consisting of the information about the seller.
3.5 Seller Account Approval Request
When a seller registers or any customer registers as a seller on the Prestashop Hyperlocal Delivery Marketplace, then, it first appears in this tab of the Prestashop Hyperlocal Service Marketplace. The store admin can approve or disapprove of the seller account request.
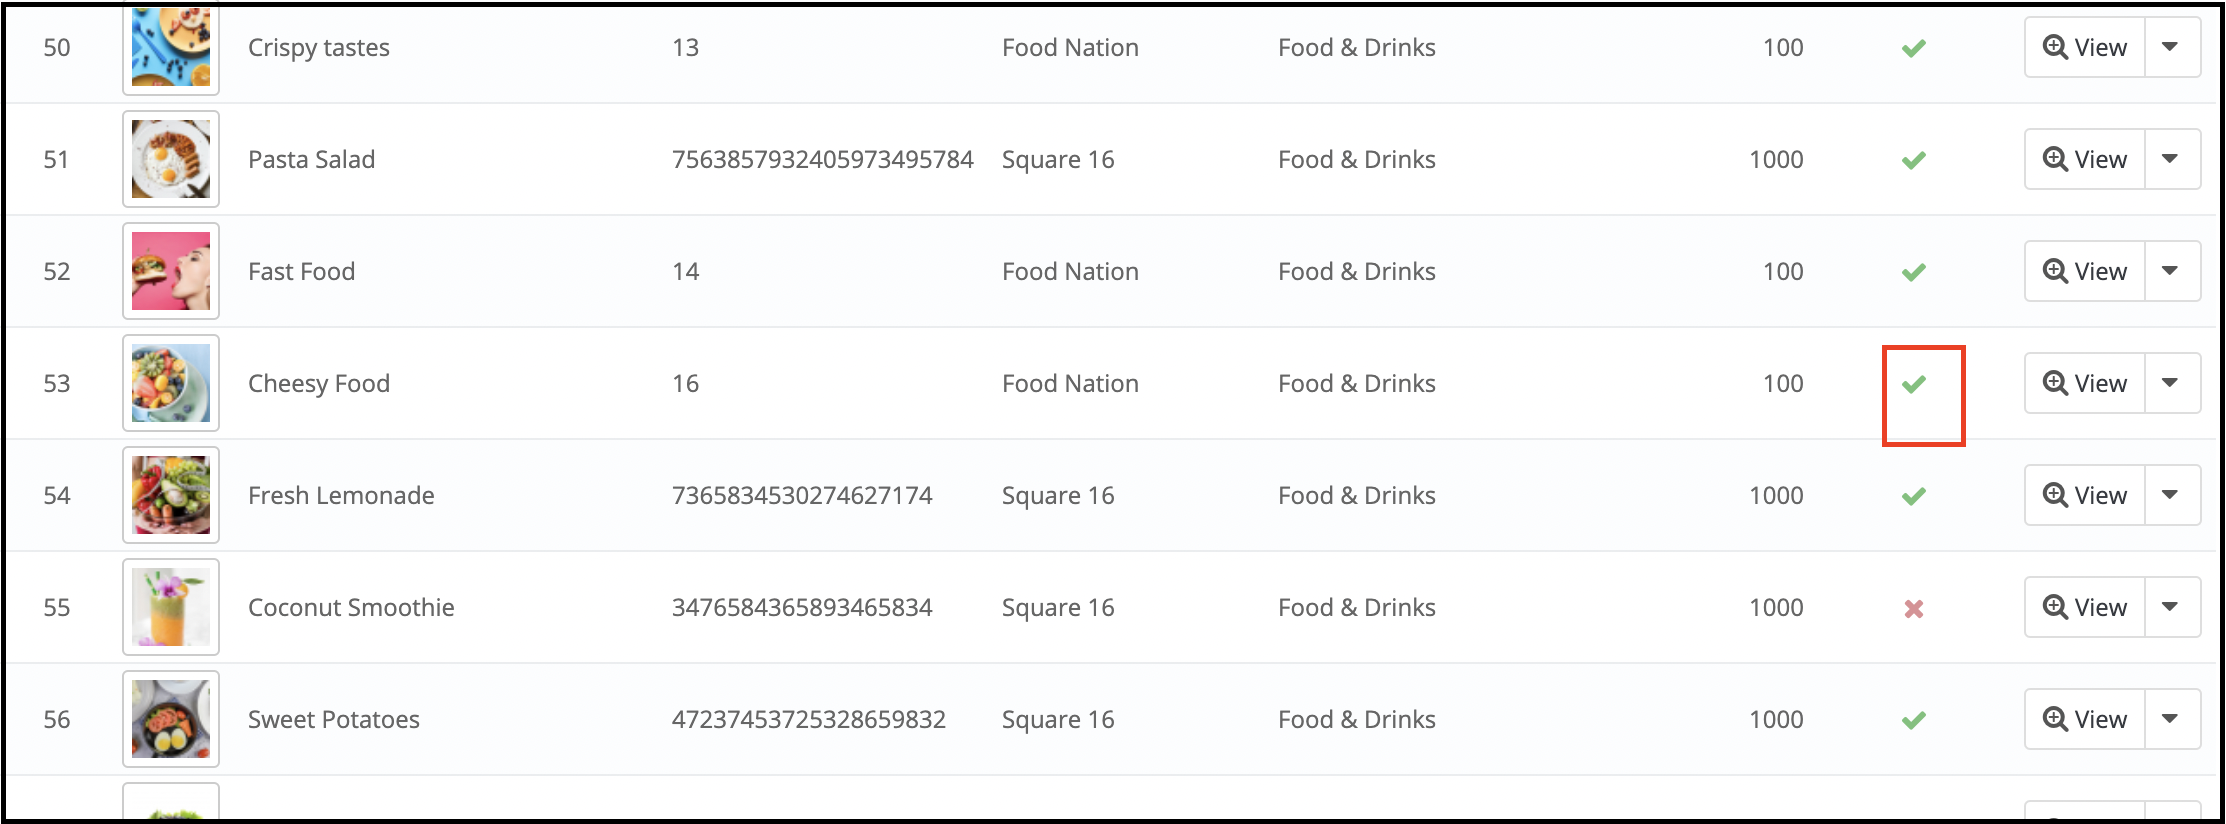
Approve Seller Account: To approve a seller’s account, you have to click on the “Cross” button corresponding to that seller on the list from the backend.
Once the Seller account approves, it directly moves to the Sellers List and all the limits to the seller account are released.
A mail will be sent to the seller to notify them about the approval of the seller account.
Note:- The Seller Accounts that the admin approves by the store owner cannot be undone. Please use this feature carefully.
Disapprove Seller Account: To disapprove of a seller account, you have to click on the “tick” button in front of that seller on the list.
A pop-up will appear asking for the reason for disapproval of the seller account. Fill the reason and then submit the form to complete the action.
A mail will be sent to the seller notifying the disapproval of the seller account. The reason provided in the pop-up will also be sent in this mail.
Note:- Once the admin disapproves a seller, then he can again apply for the seller account, and whenever a seller does this the store owner is notified through a notification email.
3.6 Product Approval List
When a seller adds a product, then, first of all, it appears in this tab of the Prestashop Hyperlocal Marketplace extension. The store owner is also notified of the same through the mail. Then, it is up to the store owner to approve or disapprove of the product.
If the admin enables the setting (i.e. New Product Approval Required), only then, a new product appears on this list. Otherwise, it directly appears in the Product List and automatically approves and displays. Disapprove Seller Product:
To disapprove of a product, you have to click on the Disapprove button corresponding to that product on the list.
A pop-up will appear asking for the reason for the disapproval of the product. Fill the reason and then submit the form to complete the action.
Once a product disapproves a mail will be sent to the seller notifying disapproval of the product with the reason provided in the above form. The disapproved products also appear on the same list. The Store admin can approve them at any point in time.
Approve Seller Product:
To approve a product, you have to click on the Approve button in front of that product in the Product Approval list.
After approval, the product is moved from the Product Approval list to the Sellers Products list.
Note:- This action cannot be undone. Please use it carefully.
3.7 Sellers Products
The Seller Products page of the Prestashop Hyperlocal online marketplace add-on consists of all the products the seller adds and the admin approves on the store.
If the admin disables the settings (i.e. New Product Approval Required) in the Setting tab of the Prestashop Hyperlocal multi-vendor marketplace, then a product approves directly when the seller adds it. In addition, it appears in this list. Otherwise, the product first appears in the Product Approval list.
Delete Product:
To delete a product, you have to click on the Delete button corresponding to each product as shown in the image below.
A pop-up will appear asking for the reason for the deletion of the product. To complete the action, fill in the reason and then click on the submit button.
A mail will be sent to the seller to notify the deletion of the product. The mail also contains the reason you have provided for the deletion of the product.
Note: The product delete action cannot be undone. Please use this feature carefully. Enable/Disable Product: To change the status of any product, you have to use the Bulk Action feature of the Grid. To enable/disable any product, select the product(s) and choose the action (i.e. Enable or Disable) to complete the action.
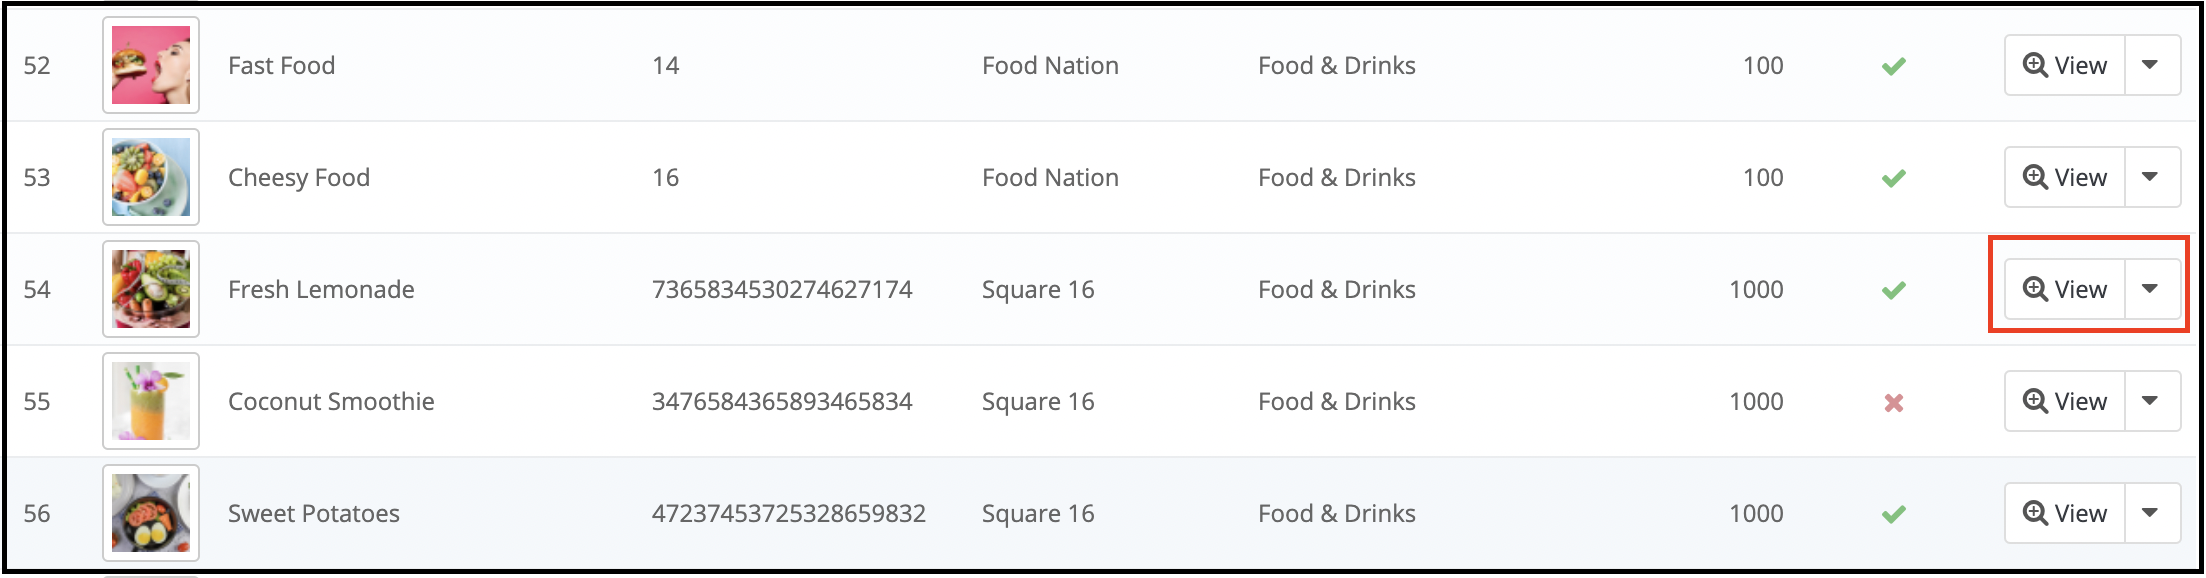
Note: Once the admin disables a product, it will not be visible at the front. To avoid disabling products and only disable a product if it is very necessary. View or Edit Product: There is also an option to view the details of any product on the list. To do that you have to click on the View button in front of that product and it will take you to the edit page of the respective product.
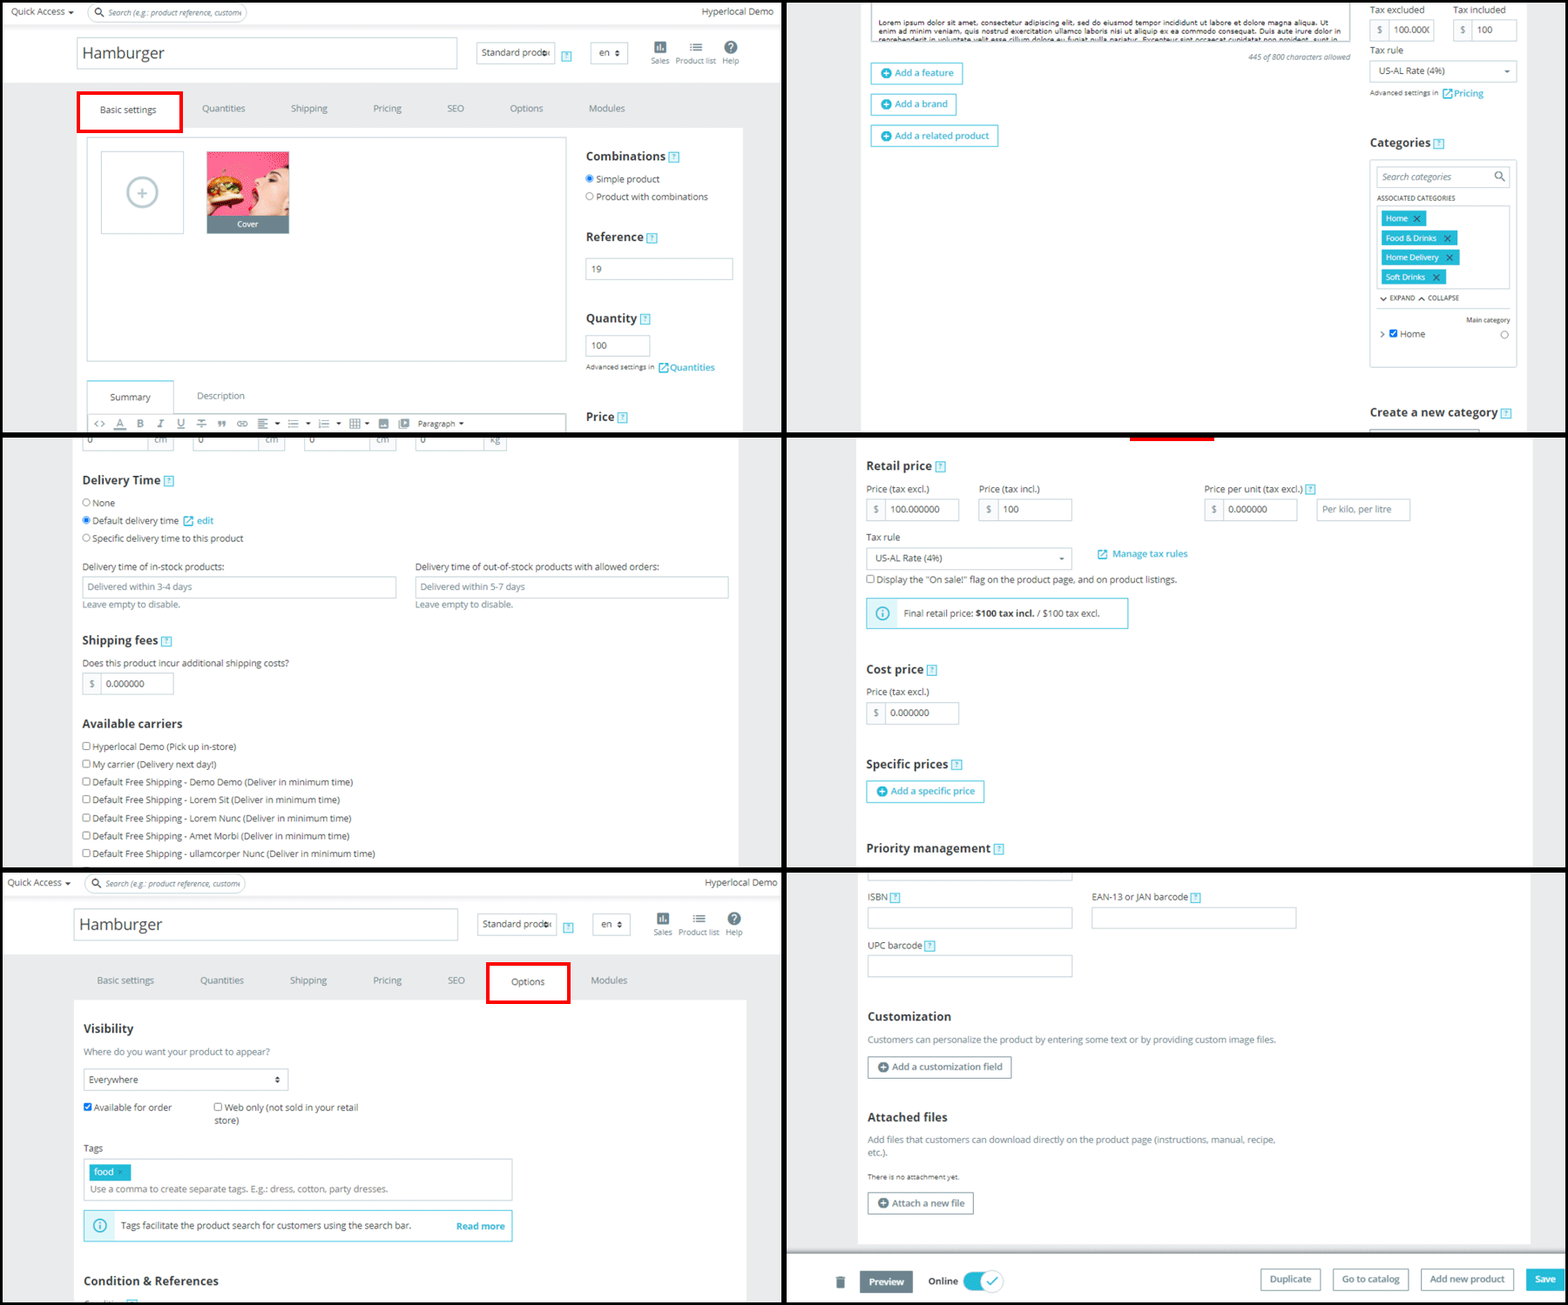
On clicking the view button, you’ll redirect to the products detail page as shown below:
The admin can make the changes as needful. Moreover, the changes will reflect in the front-end of the site.
3.8. Category Wise Commission Rules
Now, the admin can easily divide the commission according to the product category. Admin can make new categories too accordingly.
The admin can set a new category by entering a default commission. This enables the admin to charge different commission rates for different product categories.
3.9. Sellers Orders
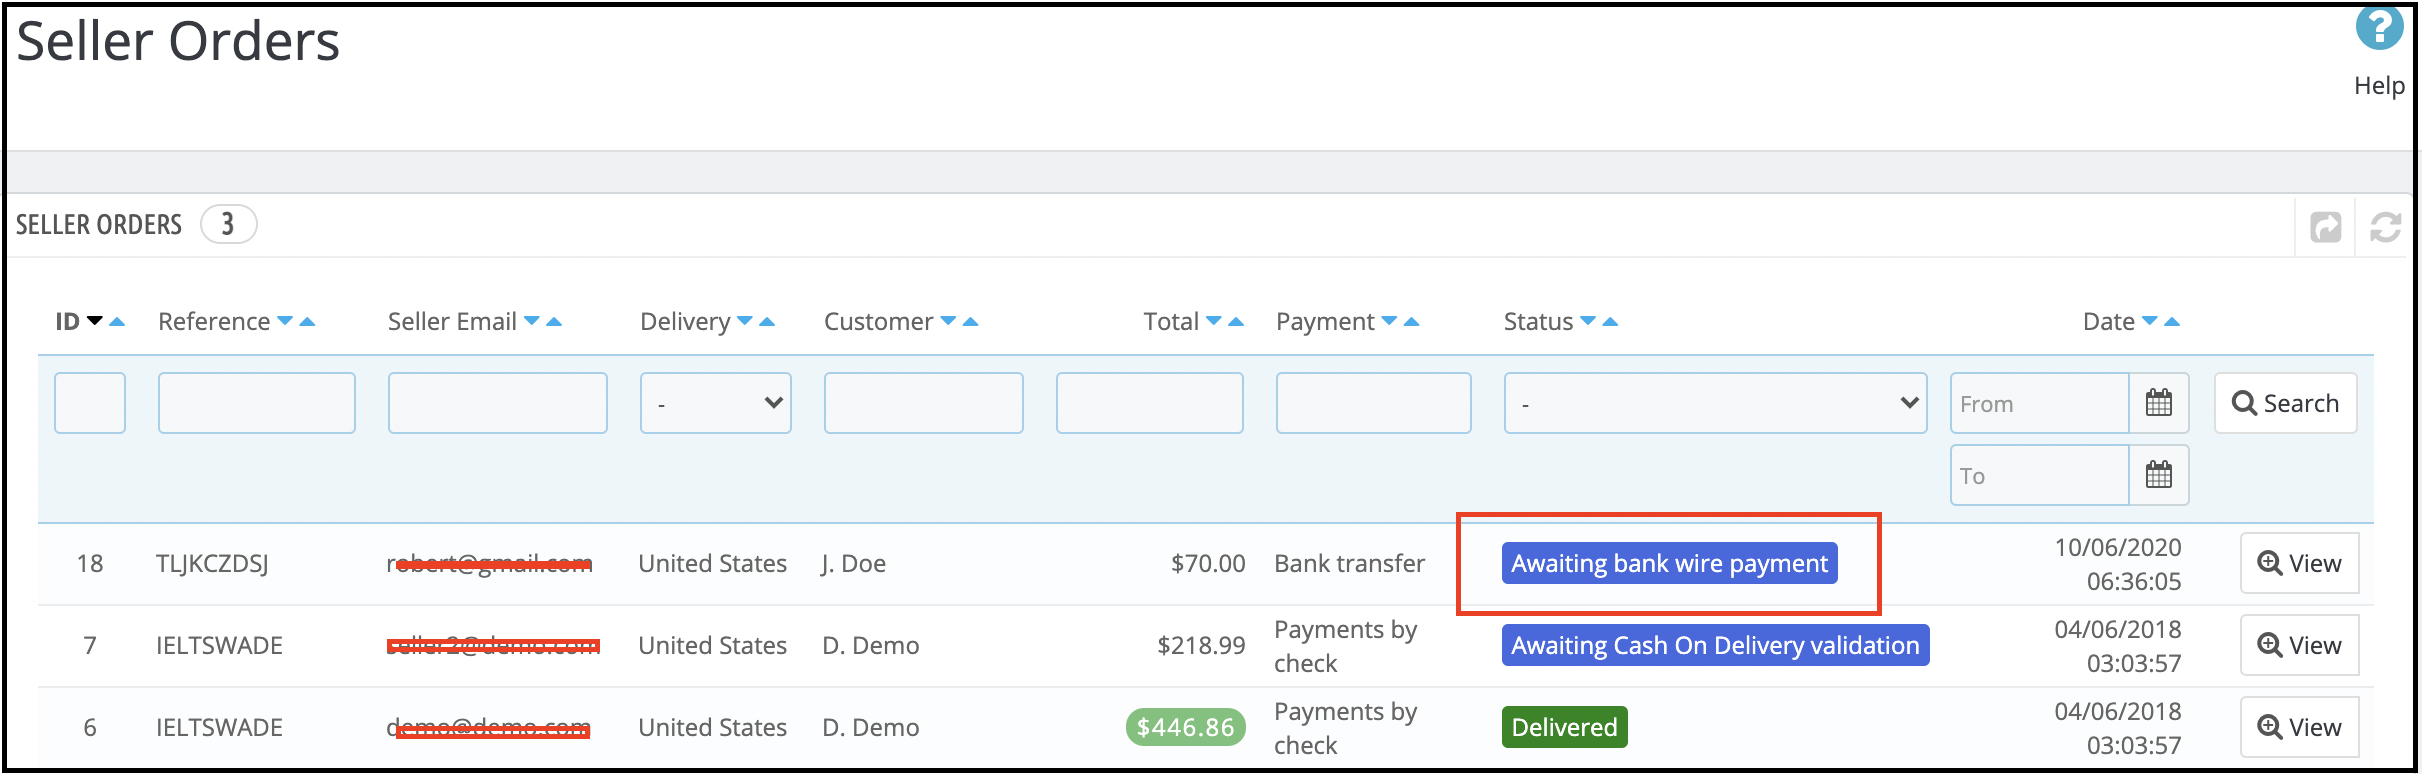
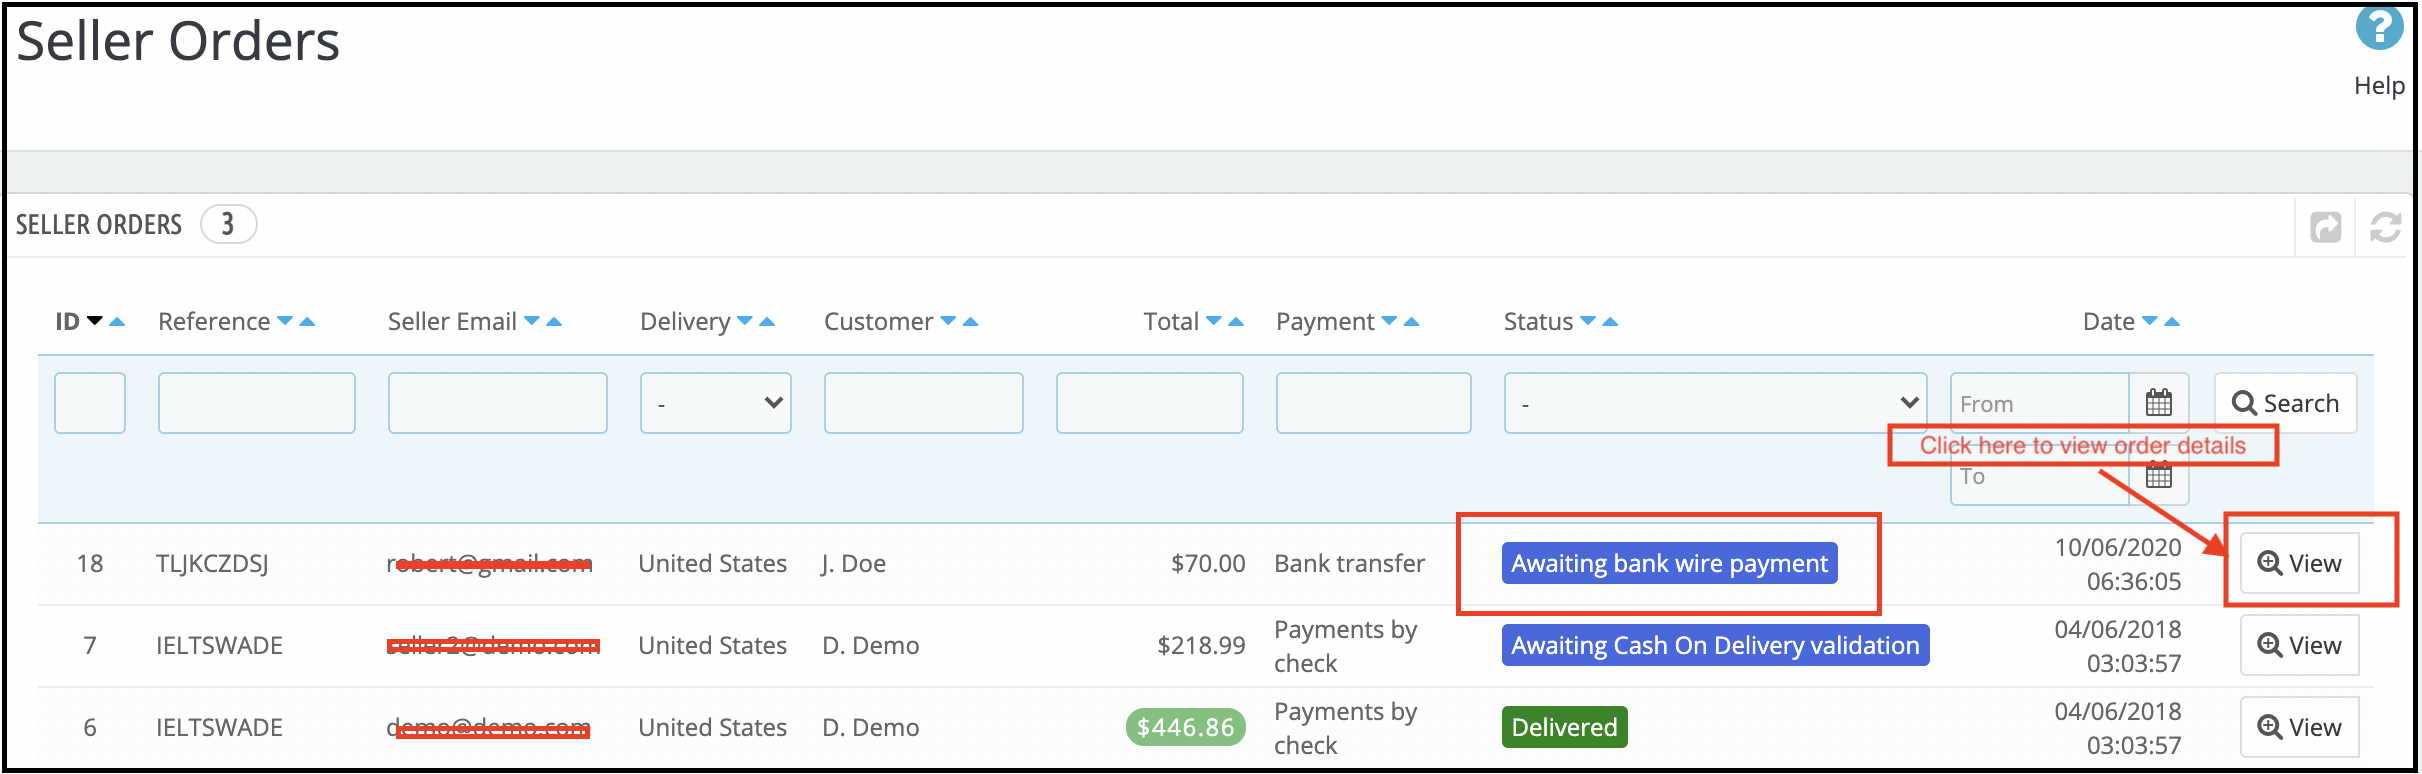
The Seller Order Tab of the Prestashop Hyperlocal Marketplace Addon consists of all the orders that the customers place for the sellers’ products. The orders shown in this list are split based on sellers which means, if there are products by different sellers in the same order then they will appear separately in this list.
View Order: There is also an option to view the details of any order on the list. To do that, you have to click on the View button in front of that order, it will take you to the order details page of the respective order. This view page is the same as when you edit any order.
3.10 Admin Order
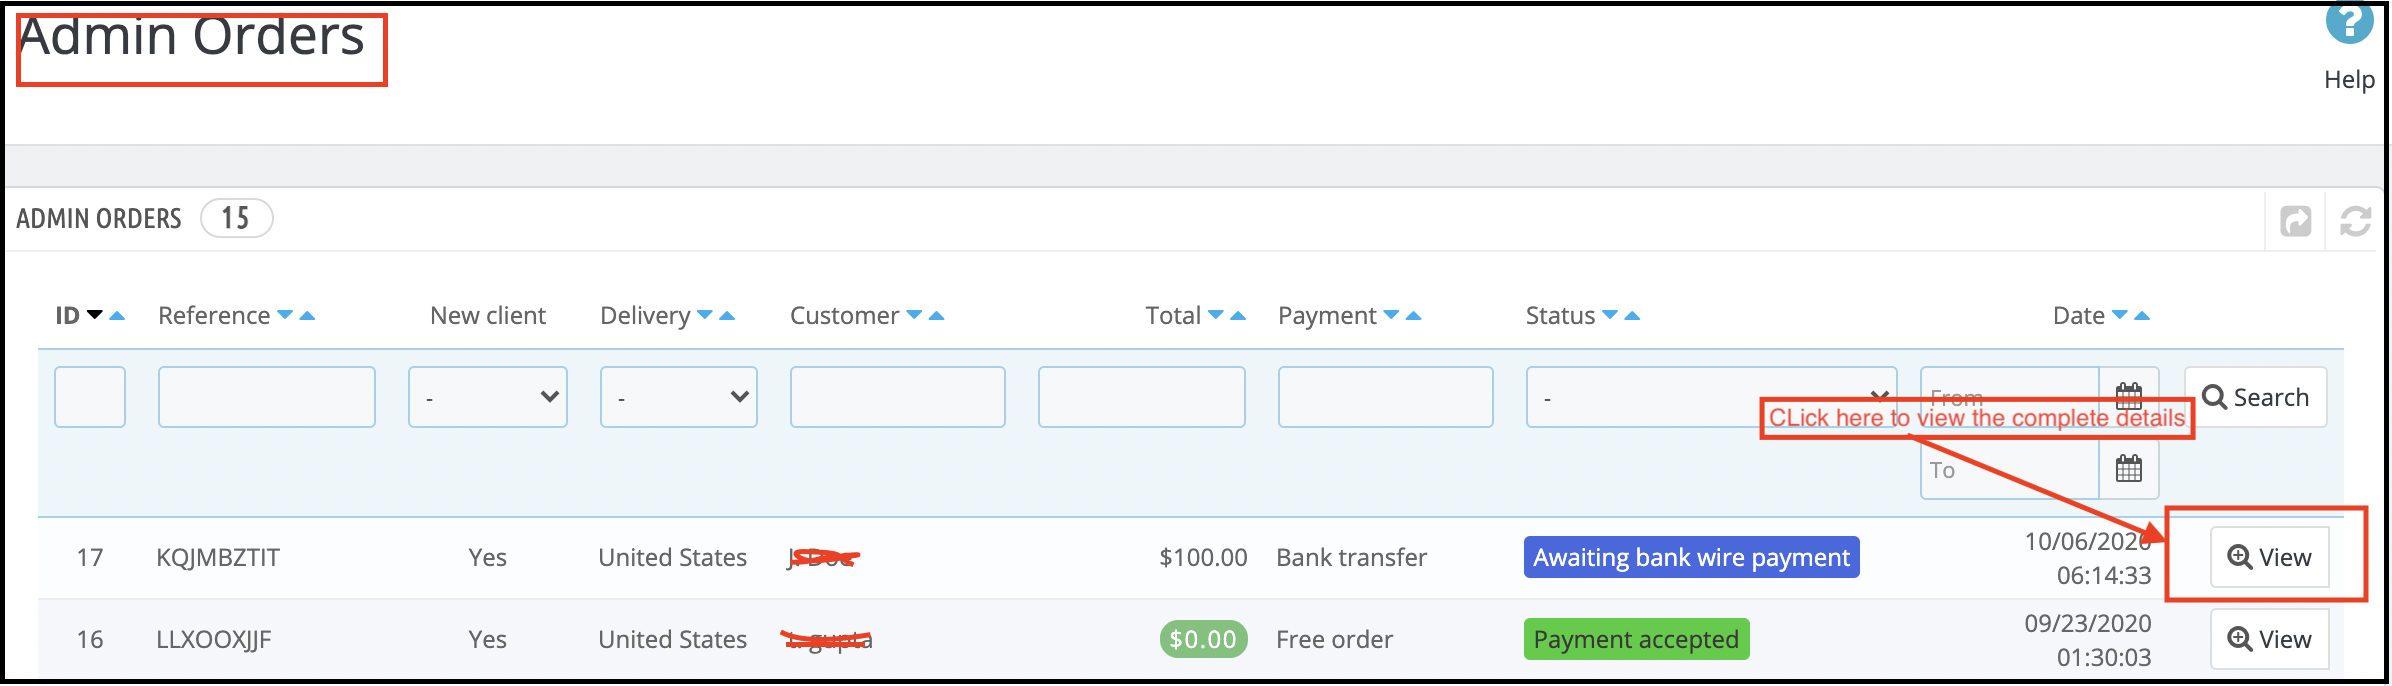
The Prestashop Hyperlocal Marketplace module allows the store admin to sell more and more products without maintaining their inventory. However, the admin can even sell their products in the marketplace. The orders received for the products of the admin are visible in the Admin Order tab of the Prestashop Hyperlocal Marketplace Marketplace addon. The orders will display as shown below:
To see the details of the order, click on the View button corresponding to each order.
3.11. Product Reviews
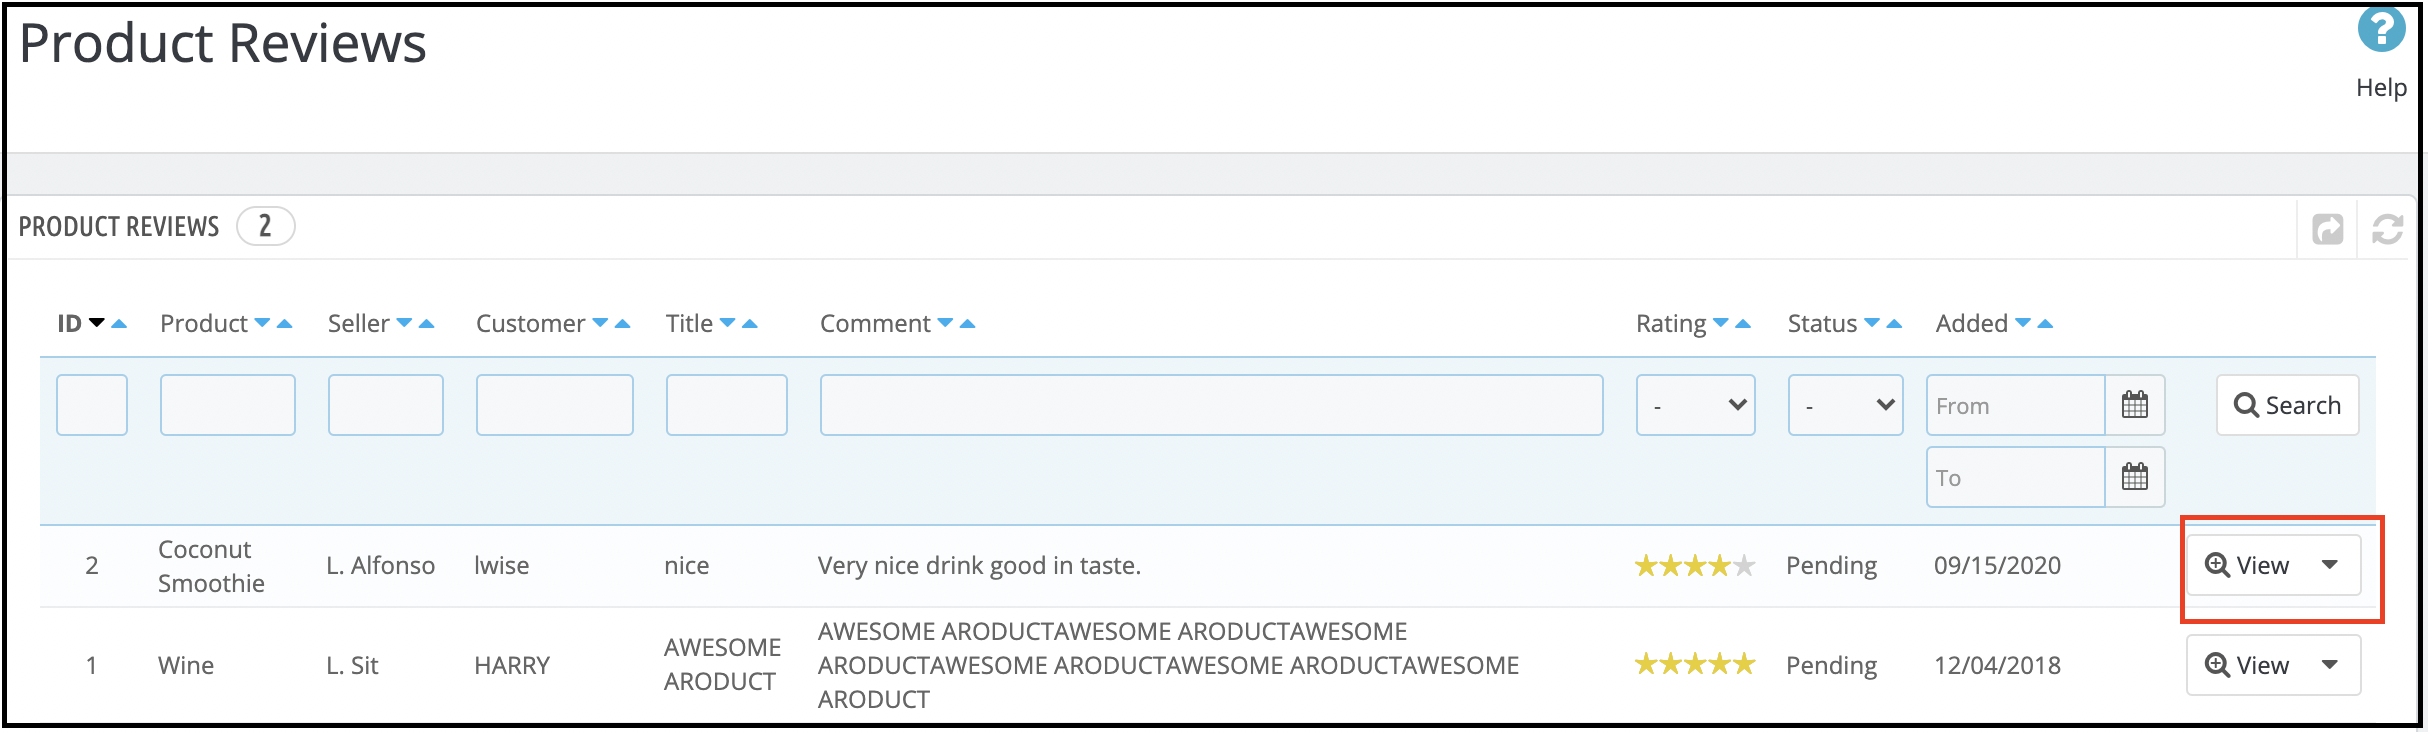
The Product Reviews page of the Prestashop Hyperlocal Marketplace plugin consists of a list of all the product reviews sent by customers on the seller’s products.
The online buyers can add a review on any of the seller’s products as shown below:
Once the customer review goes live, he’ll get a message saying that “Your comment has been added and will be available once the moderator approves it.”
These reviews then list in the Product Review tab of the Prestashop Multi seller Marketplace plugin.
View Product Review: Most of the details of the product reviews are already mentioned in the grid but some of them are not.
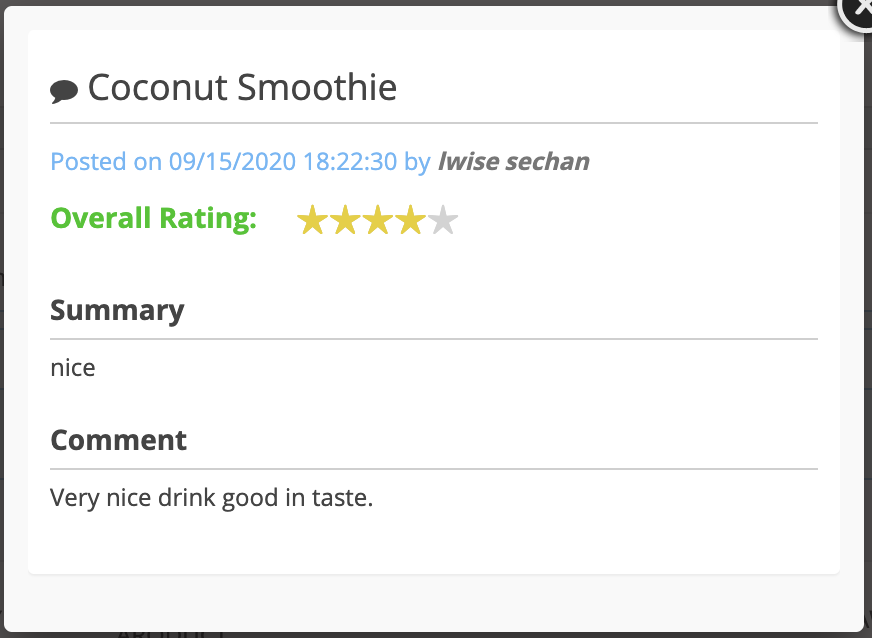
To view all the details of any Product Review, click on View Button in front of that review. A pop-up will appear having all the details of the product review.
As you click, you can see the complete review as shown in the image below:
Delete Product Review: To delete a product review, you have to click on the delete button in front of that product review on the list.
Note:- The product review deletes action cannot be undone. Please use this feature carefully. Approve Product Review: The product reviews that the customers add for the seller’s products will appear in the list here with the status Waiting for Approval and it will not be shown on the storefront to other customers until it approves. To approve it, you have to click on the Approve button in front of the product review.
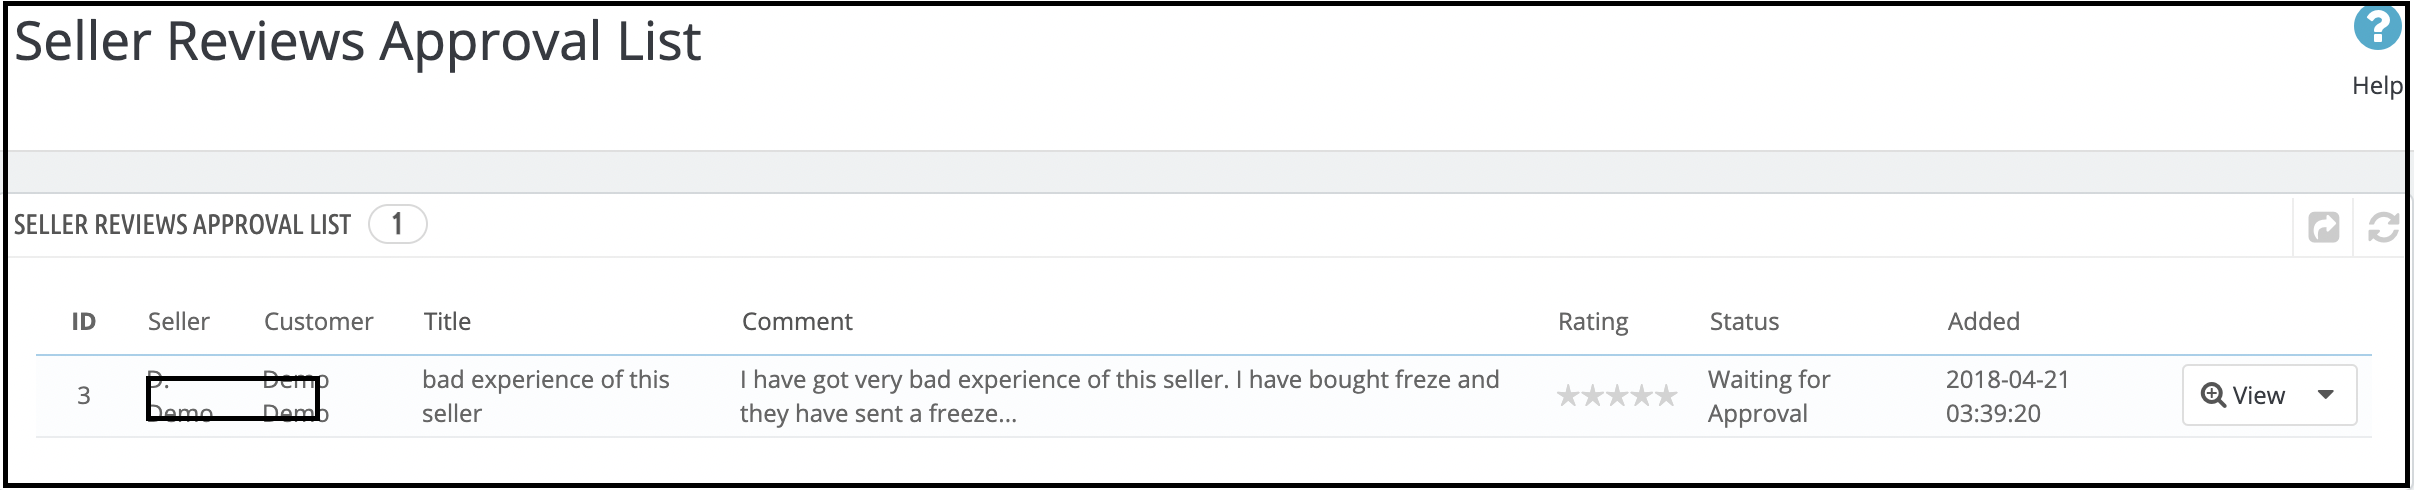
3.12. Seller Review Approval List
This tab of the Prestashop Hyperlocal Marketplace extension contains all the Seller Reviews that the customers post. In addition, no action happens against them. If the admin enables the settings (i.e. Seller Review Approval Required), then, only any seller review that the customer post appears in this list otherwise, it directly appears in the Seller Reviews list.
The reviews that are pending approval will display as shown in the image below:
View Seller Review: To view all the details of a seller review you have to click on the View button in front of that review in the list.
On clicking the View button, a Pop-up will appear having all the details of the corresponding seller review.
Approve Seller Review: To approve a seller review, you have to click on the Approve button in front of that review on the list.
Once the admin approves a seller review, it becomes visible on the front end. Moreover, is transferrable to the seller review list.
Note:- This action cannot be undone. Please use it carefully.
Disapprove Seller Review: To disapprove of a seller review, you have to click on the Disapprove button in front of that review on the list. A pop-up will appear asking for the reason for disapproval of the seller’s review. Fill the reason and then submit the form to complete the action.
Once the admin disapproves a seller review, it transfers to the seller reviews list and cannot be found anywhere else.
Note:- This action cannot be undone. Please use it carefully.
Delete Seller Review: To delete a seller review, you have to click on the Delete button in front of that review on the list.
A pop-up will appear asking for the reason for the deletion of the seller review. Fill the reason and then submit the form to complete the action.
Once a seller review deletes, it is completely removed from everywhere.
Note:- This action cannot be undone. Please use it carefully.
All this can be done at a button click with the help of the Prestashop Hyperlocal Marketplace extension.
3.13. Sellers Reviews
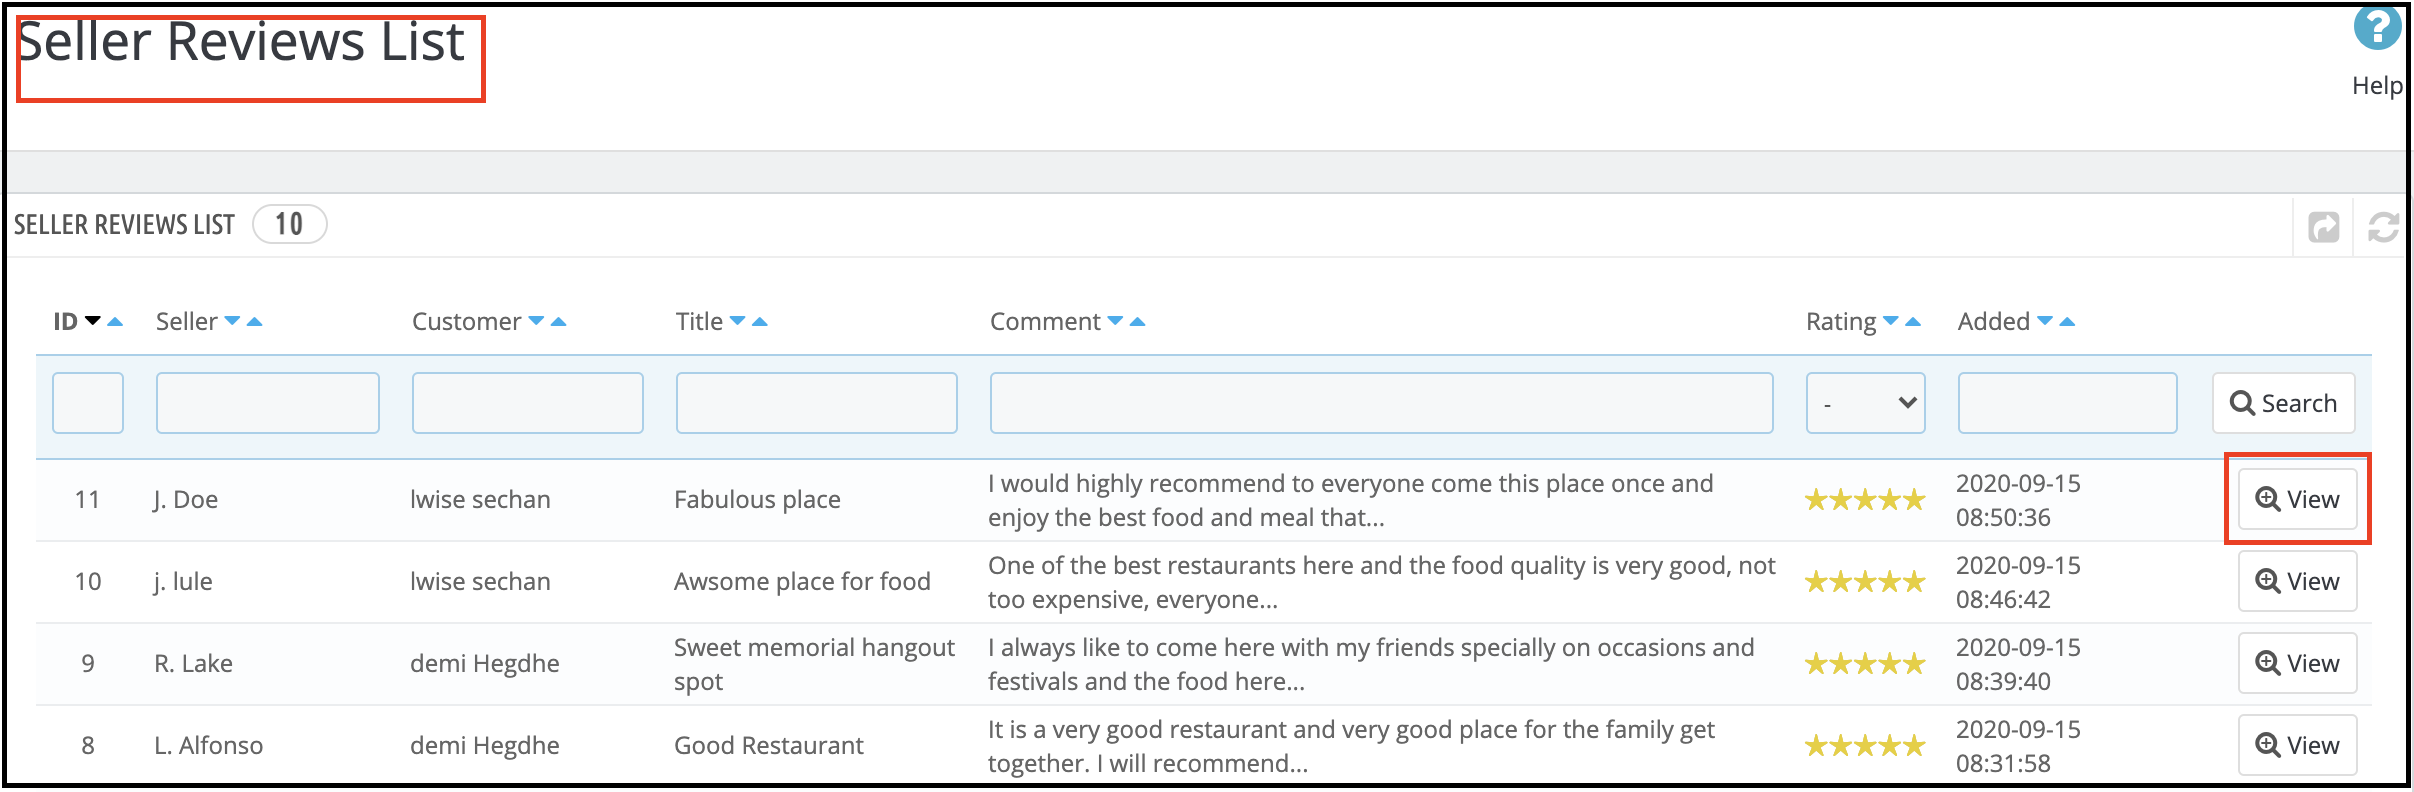
This Seller Reviews tab of the Prestashop Hyperlocal Marketplace extension contains a list of all the Sellers Reviews done by customers in the store.
If the admin disables the setting (i.e. Seller Review Approval Required), then a seller review approves directly when the customer adds it. Moreover, appears on this list. Otherwise, the review first appears in the Seller Review Approval list.
Note:- The Seller Reviews that the store owner disapproves also appear in this list.
View Seller Review: To view all the details of a seller review you have to click on the View button in front of that review in the list. On clicking the View button, a Pop-up will appear having all the details of the corresponding seller review.
3.14. Seller Category Request List
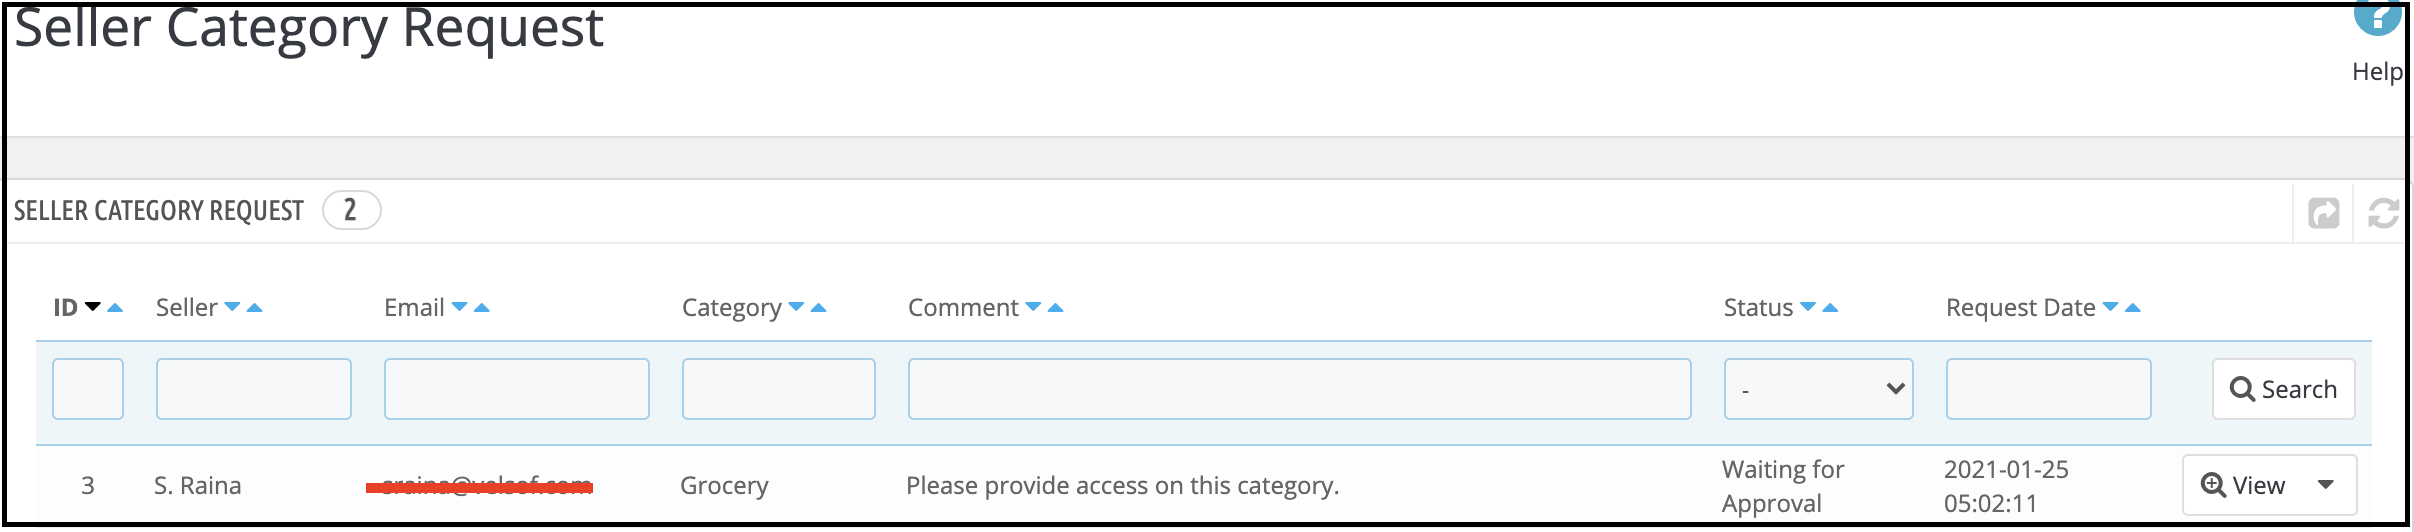
A seller can add products only to those categories that the admin allows to him/her. In case, the seller needs to add a product to a category that the admin does not allows then the seller can request for the category. All those category requests appear on this list. A mail is also sent to the store owner to notify them about the Request for Category. Then, it is up to the store owner to approve or disapprove the request.
View Category Request: To view the details of a category request, you have to click on the View button in front of that category request on the list.
On clicking the View button a Pop-up will appear having all the details of the corresponding category request. Approve Category Request: To approve a category request, you have to click on the Approve button in front of that category request on the list. Note:- This action cannot be undone. Please use it carefully. Disapprove Category Request: To disapprove of a category request, you have to click on the Disapprove button in front of that category request on the list.
A pop-up will appear asking for the reason for disapproving the category request. In fact, fill the reason and then submit the form to complete the action. Note:- This action cannot be undone. Please use it carefully.
3.15. Seller Shippings
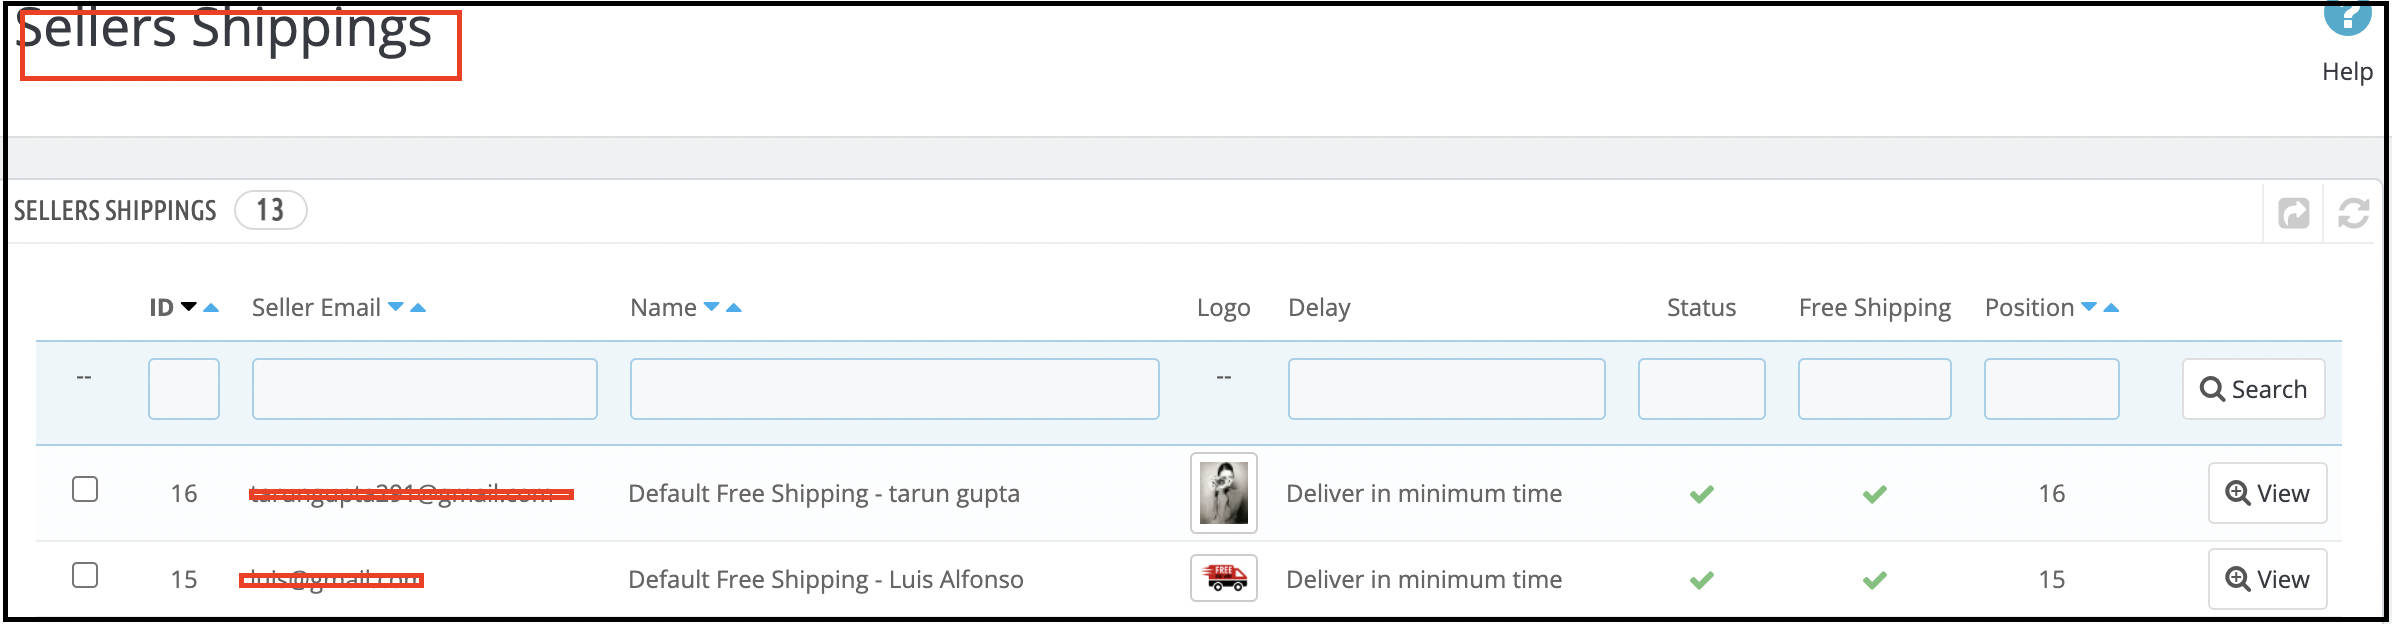
Whenever a new seller comes onboard to the system, a default shipping method addition applies to all the products by default and it is free as well. Further, the seller can add a new shipping policy and can map products to it as well. However, until then, all the products are mappable to the default shipping policy only. Furthermore, the Seller Shipping tab of the Prestashop Hyperlocal Marketplace addon page contains a list of all the shipping methods that are created for the sellers present in the system.
View Shipping: To view the details of a seller’s shipping, you have to click on the View button in front of that entry.
On clicking the button, a new page opens up having details of the respective shipping method. Note:-
The admin will not be able to delete or edit any shipping method for any seller. In fact, if tries he/she will redirect to the Carrier Listing page with the corresponding error.
By default, all the products for a seller will be mappable to the Default shipping method for the respective seller. Further, default shipping methods can identify with the name Default Free Shipping – Seller Name.
3.16. Seller Shipping Methods
Prestashop multivendor marketplace extension allows the sellers to define their shipping methods. Further, for this, the admin has to enable the ‘Allow Seller to define own Custom Shipping Method’ feature from the Setting tab of the Prestashop Hyperlocal Marketplace module. 3.16.1 How can the admin add Shipping Methods?
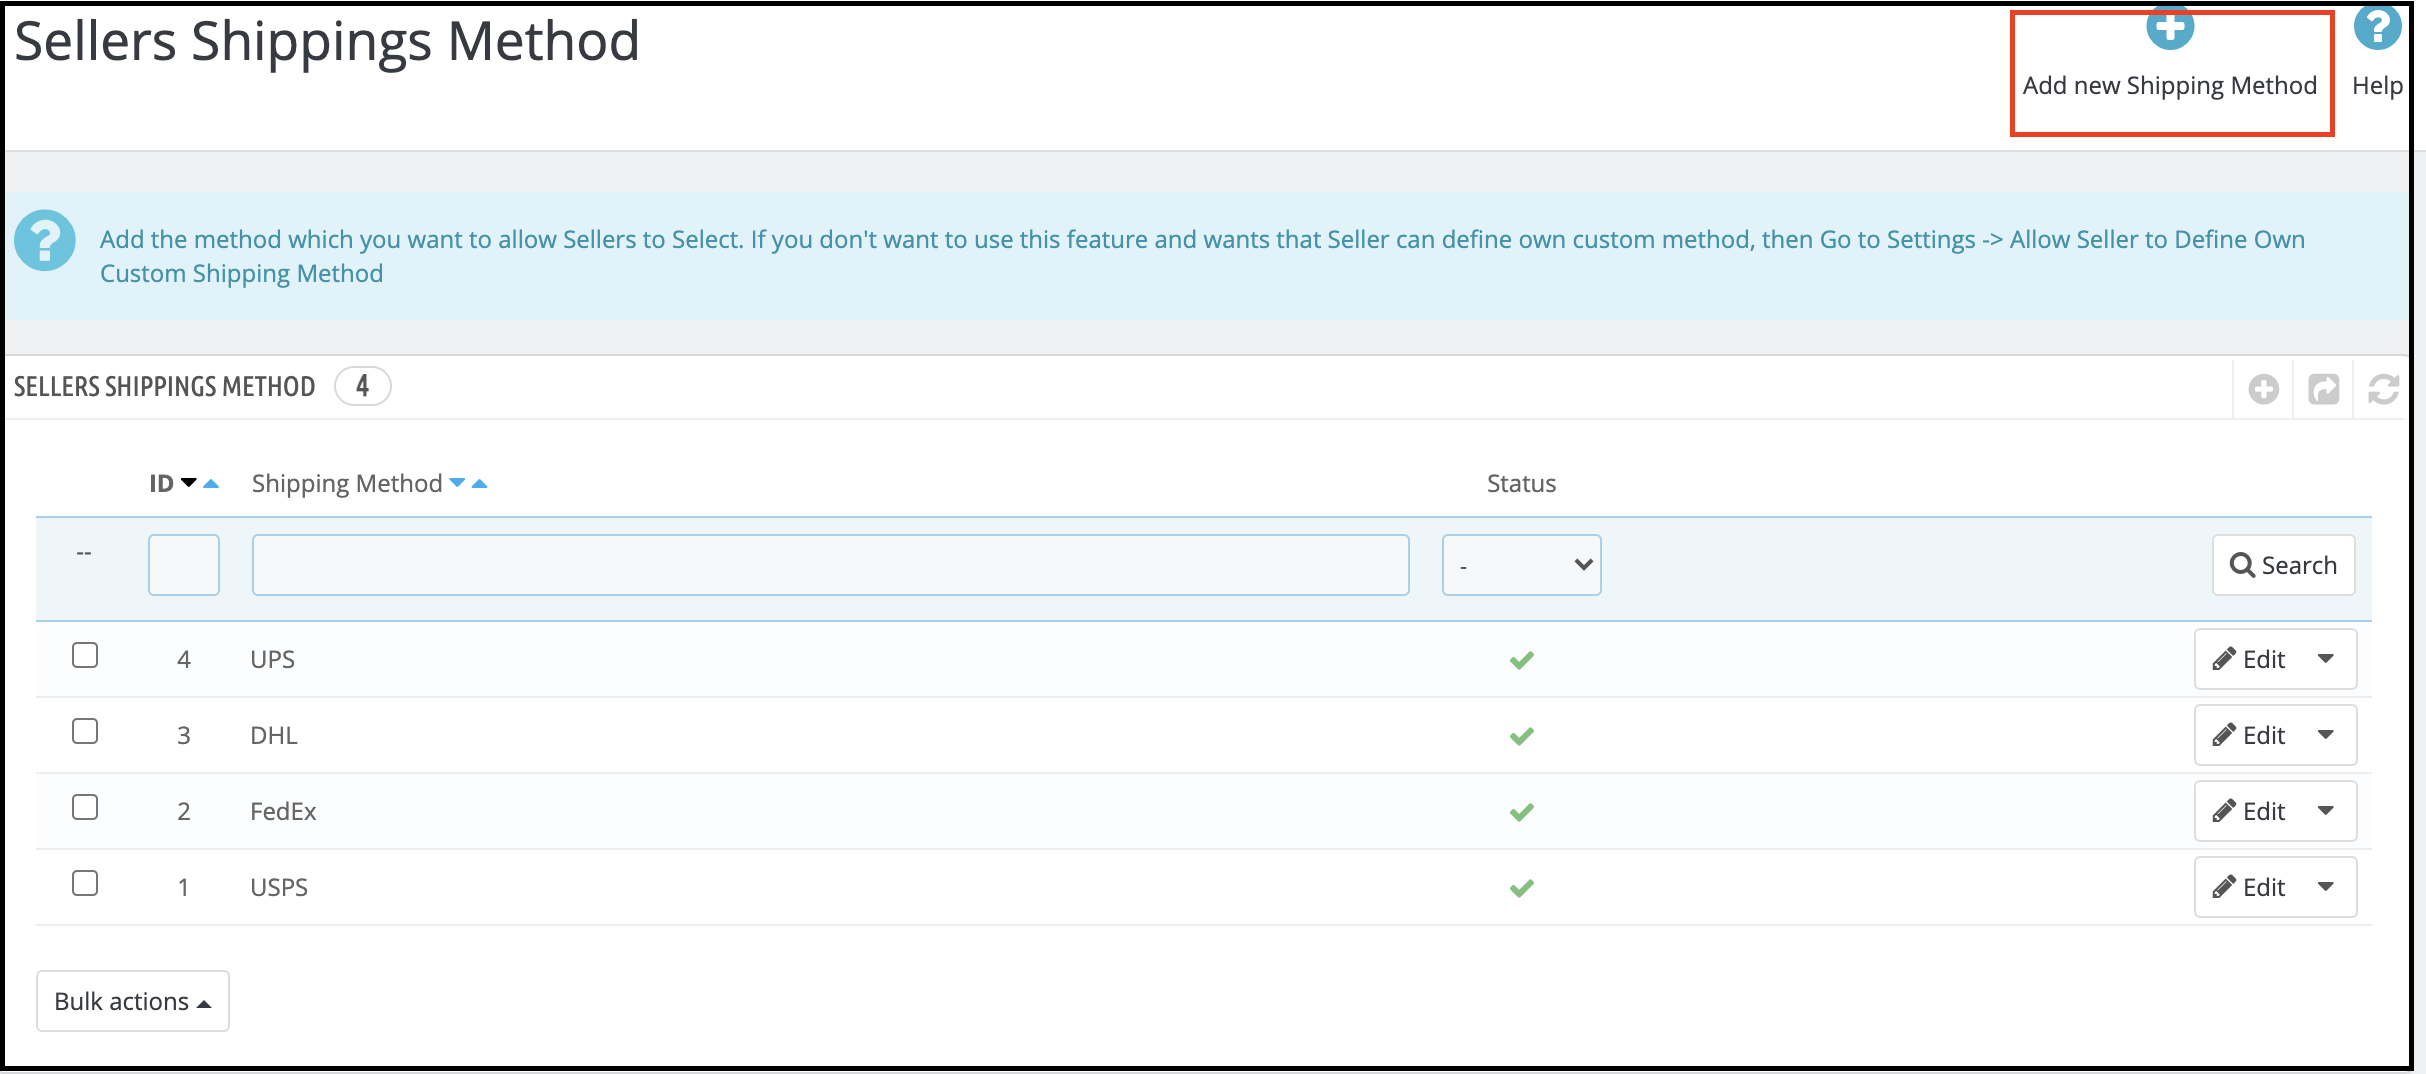
The admin can add custom shipping methods in this tab. In fact, to add custom shipping methods, click on the ‘Add New Shipping Methods’ link or the ‘+’ sign in the top-right position.
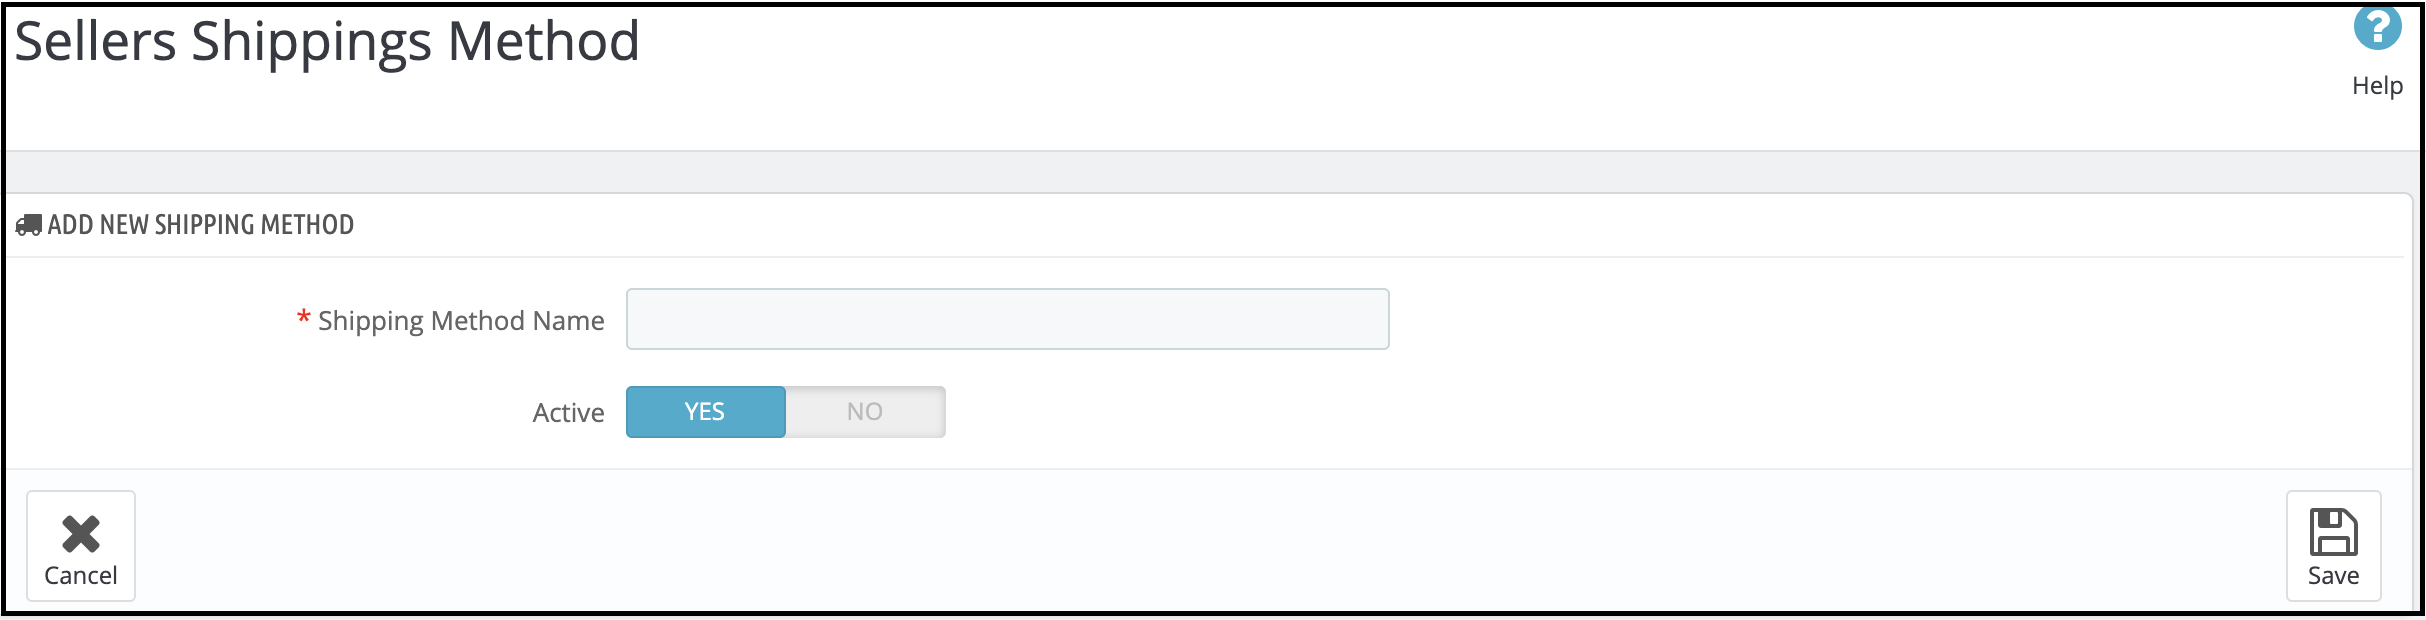
This will redirect you to the shipping methods creation page of the Prestashop Hyperlocal Marketplace addon.
Shipping Method Name: Enter the name of the shipping methods. Active: Toggle the button to activate or deactivate the shipping method.
The shipping methods will list as shown below. Further, the admin can edit or remove them by clicking on the Edit or Delete button corresponding to each shipping method. 3.16.2 How can the admin add custom Shipping Methods that they want to allow the sellers to select?
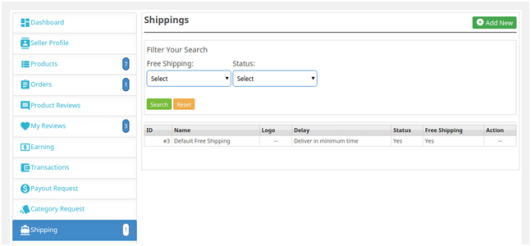
The seller can create their shipping methods from their dashboard. Go to the Dashboard -> Shipping tab.
The various shipping methods created by the sellers will list in this tab.
To add new methods, click on the ‘Add New’ link as shown in the image below:
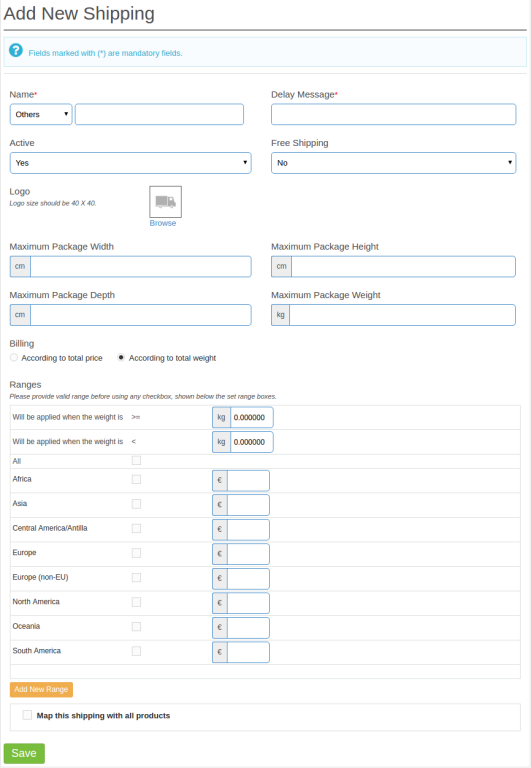
You’ll head to the shipping methods creation page. Here, you have to fill the various field as below:
The various shipping methods will list in the drop-down menu. To create a new one, select ‘Others‘. Further, enter the name of the shipping method.
The sellers can create the shipping methods by entering the fields as shown in the image below.
3.17. Admin Commissions
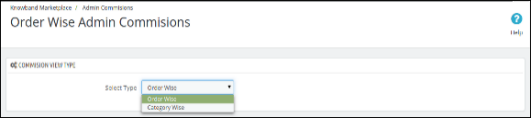
The Admin Commissions tan of the PrestaShop Hyperlocal Marketplace extension contains a filter through which the admin can filter the commissions earned in the form of Order Wise or Category Wise selection. Further, by default, the page shows Order Wise Admin Commissions. In fact, the Prestashop Hyperlocal Marketplace module makes it easier for the store admin to manage the commission structure of the marketplace.
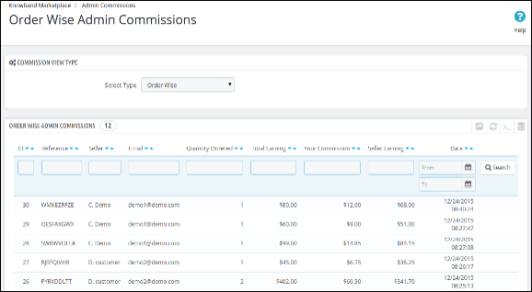
3.17.1 Order Wise Admin Commissions
This list contains all the commissions earned by the store owner on every order comes for any seller’s product. In fact, this list is split based on orders for selling products.
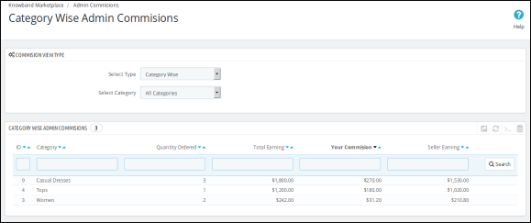
3.17.2 Category wise commissions
This list shows the total commission earned by the store owner from a seller. Furthermore, the store owner can also use filters to filter the commission reports category-wise.
It helps the store owner to identify commissions from different categories. Moreover, which category has produced how much commission.
3.18. Transaction Payout Request
With this additional feature, the sellers can request the store admin for any payout. Further, the admin was in charge of any of the payment that was to be made to the sellers. However, the sellers can now initiate a payout request from their dashboard. The admin can approve or deny the payout request of the sellers from this tab of the PrestaShop Hyperlocal marketplace addon. In fact, there are three payment methods. For instance, Bank Wire, Pay by Check, and PayPal.
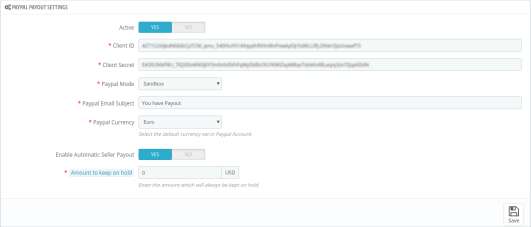
The admin can use PayPal if the seller opts for this payment method.
Click on the Configuration link of the Transaction Payout Request tab of the PrestaShop multi-seller marketplace module.
Admin can enable automatic seller payout which helps the admin to automate the payout request process. In fact, he can either use cron URLs for this setup or use the “Process Paypal Payout Status” cron directly. Furthermore, the admin can also add a particular amount which will always be kept on hold for sellers.
Enter the API details of the PayPal details as shown in the image below:
Active: Toggle the button to activate the PayPal payout settings. Client ID: Enter the Client ID of your PayPal account here. Client Secret: Enter the secret key here. PayPal Mode: Select the mode, that is, Sandbox or Live from the options drop-down menu. The PayPal Email Subject: Enter the email subject for PayPal here. PayPal Currency: Select the default currency set in your PayPal account. Enable Automatic Seller Payout: Toggle the button to activate automatic seller payout. Amount to keep on hold: Enter the amount which will always be kept on hold for sellers. 3.18.1 How can the seller create a Transaction Payout Request?
To create the payout request, the seller needs to click on the Payout Request tab of the dashboard of their account.
The seller needs to fill the various fields as below:
Amount: Enter the amount that you are requesting for the payout.
Request Reason: Specify the reason for which the payout request initiates.
As the Save button is clicked, the payout request will list as shown in the image below:
The same payout request will list in the admin interface of the Prestashop multi-seller marketplace extension. 3.18.2 How can the admin approve/disapprove the Transaction Payout Request?
The admin can approve or reject the payout request by clicking on the Approve or Disapprove button corresponding to each request.
In case, the admin approves the payout, then, a popup will display as shown in the image below:
If the payment methods are Bank wire or Pay by Check, then, the admin will have to enter the Transaction ID.
Once the admin successfully approves the request, the transaction will save in the Transaction Table.
In the case of the PayPal payment method, a request will be sent to PayPal. Moreover, based on the response, a success or error message will display. If the admin successfully approves the request, it is addable to the Transaction table.
3.19 Seller Transactions
The system does not automatically transfer the amount to the seller’s account. Hence, the store owner has to keep records of the balance for all the sellers. In addition, manually transfer money to the seller and later on, enter the details of the transaction to keep a record of the same.
The Prestashop Hyperlocal Marketplace module allows the admin to view two types of transactions of the sellers, that is, Seller Balance History and Transaction History.
The Seller Transactions page of the Prestashop Hyperlocal Marketplace plugin keeps the track of the seller transactions. In addition, the remaining balance of sellers. 3.19.1 Seller Balance History
This list of the Prestashop Hyperlocal Marketplace plugin contains all the balance variations for all the sellers in the system. Further, the list shows the total sales of the seller, seller earnings, and your commission. In fact, this list helps the store owner to identify the earnings. Moreover, categorize them seller-wise.
3.19.2 View Transactions Details
To view the details of the transactions done for a particular seller, you have to click on the View button in front of that seller.
On clicking on the View button in front of any seller, a new page will open up having a list of all the transactions done for the corresponding seller.
You can also add a new transaction for the current seller by clicking on the Add New Transaction button on the top right-hand side of the above page. 3.19.3 Create New Transaction from the back-end of the Prestashop Hyperlocal Marketplace Module
To add a new transaction detail for any seller, you have to either click on the Make New button in front of the seller. Likewise, you can also click on the Make New Transaction button on the top right-hand side of the page.
On clicking the button a new block appears (form for adding a new transaction) at the top asking for the details of the transaction. Further, fill the form. Moreover, submit it to complete the action.
Note:- This action cannot be undone. Please use it carefully. 3.19.4 Transactions History
This page contains a list of all the transactions done to date to all the sellers available in the system.
You can also add a new transaction for any seller by clicking on the Add New Transaction button on the top right-hand side of the above page.
3.20. Seller Shop Close request
If the admin enables this from the back-end of the Prestashop Hyperlocal Marketplace plugin, the sellers can request the admin to close their shop.
The request to delete the sellers’ account can initiate by just clicking a couple of buttons from the dashboard. The image of the front-end interface is shown below:
Once the request is sent, the admin can view the same from the Seller Shop Close Request tab of the Prestashop multi-seller marketplace extension.
Further, the confirmation mail is sent to the seller. In fact, once the sellers provide the confirmation, an ‘Approve’ button is available corresponding to the request. Thus, the admin can click the same and complete the request.
The entire list of the shop closure request and their status displays in this section of the Prestashop multi-seller marketplace plugin as shown in the image below:
3.21. GDPR Request
The sellers can download their data in CSV format just by clicking the links provided in the GDPR section of the dashboard.
In fact, the admin can view the GDPR requests that initiate from this section in the back-end of the Prestashop Hyperlocal Marketplace module as shown in the image below:
3.22 Membership plans general settings
This page contains all the settings which the Store admin needs to control the membership plans.
Enable membership plan functionality: By enabling this button store admin to allow all the new and existing sellers to purchase a membership plan.
Send membership plan activation email: If the admin enables this feature, an email is sent to those sellers whose membership plan is activated.
Send membership plan expiry email: If the admin enables this feature, an email is sent to those sellers whose membership plan is expired.
Show warning message: Store admin can use this feature to show a warning message to those sellers whose membership plan is about to expire.
The number of days left to upgrade the plan: The store admin can also adjust the number of days to upgrade the membership plan. Furthermore, a warning message will be shown to the sellers during this period for upgrading their plans.
Enable disable free membership plan: If the admin enables this feature, a free membership plan will add to the seller’s membership plans.
Enable disable product active limit under the free membership plan: Store admin can enable and disable the product listing limit under the free membership plan.
Product limit: Store admin can adjust the product listing limit using this tab.
Duration interval: Admin can adjust the duration interval of the free membership plan. For instance, days, months, and years.
Duration: Admin can set the duration of the free membership plan after which this plan is deactivated.
Select order state in which membership plan will be marked as paid: Admin can select the order state on which free membership plan orders will mark as paid.
Show membership plans select box during seller registration: If the admin enables this, then sellers can select the membership plan at the time of registration.
Warning plan reminder setting:
Admin can enable this functionality to send a warning email to the sellers whose plan is about to expire. In fact, the admin can set the number of days before plan expiry warning mail should be sent to the seller.
Expired plan reminder settings:
Admin can enable this functionality to send an email to those sellers whose membership plan is expired. Further, the admin can also set the number of days after the plan expiry warning email should be sent to the seller.
3.23 Membership Plans
Store admin can create a new membership plan under the membership plans tab. Further, after clicking on the add new button, a new membership plan form opens with the following fields:
Plan name: Admin can set the Plan name which displays to the sellers.
Plan price: Admin can set the plan price using this tab.
Enable/disable product active limit: Using this feature admin can enable the product listing limit for that particular membership plan.
Plan duration interval: Store admin can set the plan duration interval using this tab.
Duration: Admin can set the duration for which the plan remained active.
Enable: Using this tab admin can enable or disable the membership plan.
Plan image: Admin can choose the plan image which he wants to show to the sellers.
3.24 Seller membership plans
From this tab, the admin can check the seller’s plan details like their first name, last name, email, shop name, etc.
From the add new option, store admin can add new seller plan details by filling in the following details:
Choose sellers: Admin can choose the seller for which the admin wants to add plan details.
Add customized plan: Admin can also customize the plan details by filing the details. For instance, plan name, product active limit, duration interval, and duration details.
Mark plan as approved: If the admin enables this, then the seller plan will approve.
Activate plan: The store admin can activate the seller’s plan by enabling this button.
3.25 Hyperlocal Setting
Using hyperlocal settings, store admin can add ship areas where they can ship their products. Store admin can also ship areas on the behalf of sellers. This page contains all the settings which the admin needs to control the hyperlocal feature.
Enable Hyperlocal Marketplace: By enabling this button store admin can start hyperlocal functionality in their marketplace.
Google API key: Admin needs to enter Google API key for fetching locations.
Radius Unit: Admin can select radius type in miles or kilometers.
Distance for admin products: Admin can enter distance for the ship areas as per their requirements.
New shipping area approval required: If the admin enables this button then sellers need approval for ship areas.
Enable Hyperlocal Carrier: If the store admin can enable this button then sellers can map their products with the hyperlocal carrier.
Out of Range Behavior: If shipping distance is out of range then admin/seller can set default price.
Default Shipping Price: Admin can enter a default shipping price for out of range of products shipping.
Hyperlocal Shipping Areas:
Store admin can add multiple shipping areas using this tab.
Enable/Disable Shipping Area: Admin can enable or disable the shipping area using this button.
Add Shipping Area for Seller: If admin enables this button then store admin can assign the shipping area to other sellers as well.
Choose Sellers: Admin can select the sellers for the shipping area.
Address: Store admin need to enter a location for the shipping area.
Longitude: Enter the longitude of the area using this tab.
Latitude: Enter the latitude of the area using this tab.
Approval Status: After entering all the information admin can assign a status to the shipping area.
Hyperlocal Shipping Price Rules:
Using this tab store admin can add shipping price rules.
Enable/Disable Shipping Price Rules: Admin can toggle this button to enable or disable shipping price rules.
Add Shipping Rules for Sellers: By enabling this button store admin can add the shipping price rules for the sellers also.
Choose Sellers: Admin can choose the sellers for adding shipping price rules.
Weight: Admin can select the weight range for the shipping price rules.
Distance: Store admin can select the distance range for the shipping price rules.
Shipping Price: Using this button admin can enter the shipping price.
4.0 Seller Account
Any seller has access to several pages that are for handling the functionality of a seller account. Further, the link for all these pages is there on the My Account page of a customer who is also a seller.
Register As Seller Field (Register Page)
If a new customer is registering on the Store then simply enter your mail id according to the screenshot given below.
After clicking on “Create an Account”, you have to enter your information as given in the screenshot below.
Once the merchant becomes a seller of the marketplace, he can avail of all the functionality of the module. Moreover, boost his sales effortlessly.
The Dashboard of the sellers includes a GDPR section. Further, customers can download their data. In addition, can even delete their accounts with ease.
4.1 Seller’s Profile
The sellers can edit their profile. Moreover, personalize their shop from this tab of the dashboard.
4.2 Seller’s Product
The sellers can follow the path mentioned below to add a new product.
Go to My Account -> Dashboard -> Products
The already listed products are visible in this tab of the seller’s Dashboard.
To add a new product click on the ‘+’ sign at the top right portion.
This will redirect you to the ‘Add New Product’ page. Here, fill up the nedful details to add the product.
4.3 Order
The sellers can view their orders and related details in this tab of the Dashboard.
4.4 Product Reviews
The sellers can view the review received on their product in the Product Review Tab of their Dashboard. Furthermore, all the reviews received will list as shown in the image below:
4.5 My Reviews
The tab of the seller’s dashboard lists out the reviews received on their profile.
4.6 Earnings
Seller Earnings are visible in this tab. In fact, the vendors can filter the results as per requirement.
The total earning history will display as shown below:
4.7 Transactions
The seller can view their entire transaction history in this tab. Further, the amount debited or credited in their account is available here.
4.8 Payout Request
Sellers can view the list of payout requests sent to the admin from the Payout Request tab. In fact, for a new payout, request sellers need to fill the payout amount and reason. Moreover, send it to the admin for approval.
4.9 Category Request
The sellers can view the categories assigned to them. Additionally, they can even send a category request to the store admin. To send a category request, go to the Dashboard -> Category Request.
4.10 Shipping
The sellers can view the shipping process as in the screenshot below:
4.11 GDPR
The sellers can request to download the account details from the store owner using this tab. Further, the downloaded account details will be available in CSV format.
Sellers can also request the store owners to close their shop by clicking on the “Request to Close” button. In fact, the store admin can approve the request from the admin panel of the Prestashop Hyperlocal Delivery Business Model.
4.12 Membership plan history
Sellers can check their membership plan history by applying filters. Further, under the filters, sellers have to fill in the plan name and the status of the membership plan for checking the history of the membership plans.
4.13 Available membership plans
Using this tab sellers can buy membership plans by checking the plan details.
4.13 Knowband Hyperlocal
Using the Prestashop Hyperlocal Delivery Business Model feature sellers can add ship areas where they can ship their products. In fact, if the shipping distance is out of range then the seller can also add a default price for their shipping. Using this feature sellers can perform various operations. For instance, adding ship rates, adding multiple ship areas, adding ship rate in bulk, etc.