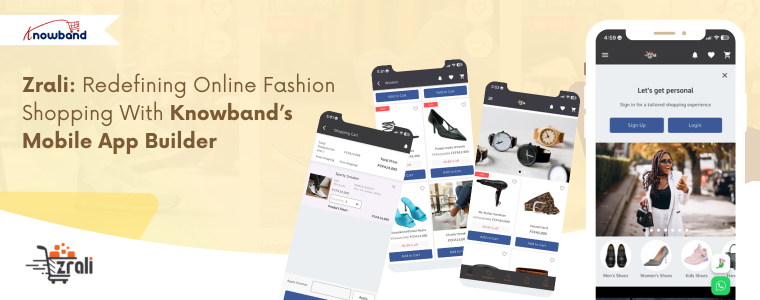
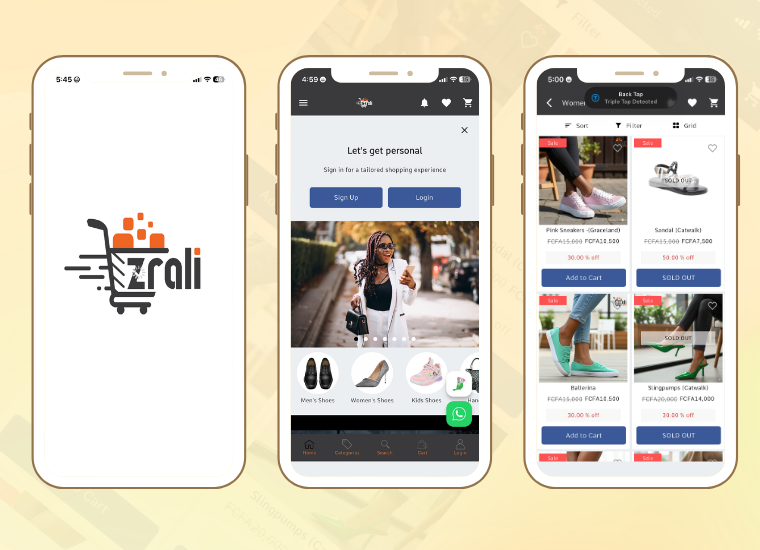
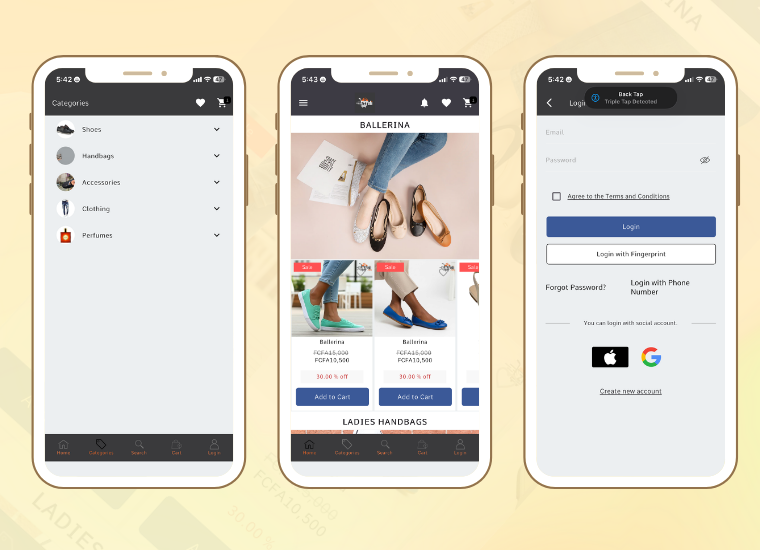
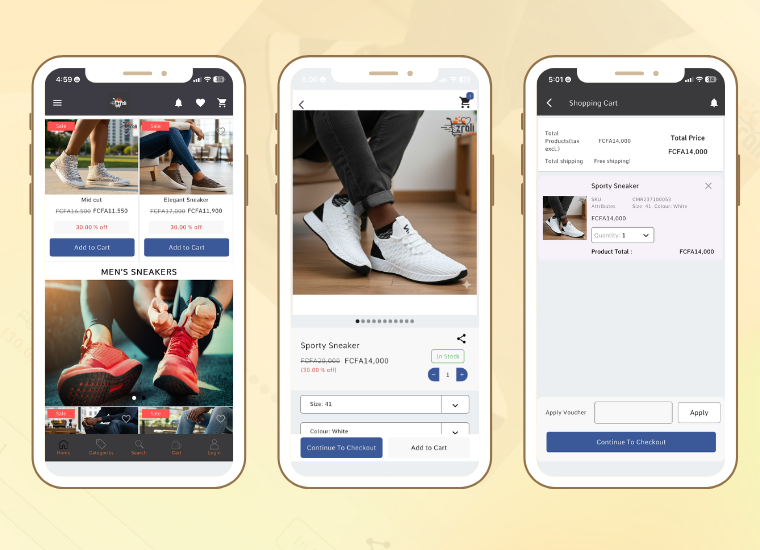
Zrali, the emerging fashion-tech brand, brings stylish and affordable global fashion to African and international shoppers. Selling shoes, handbags, clothing, and accessories, Zrali attracts thousands of online visitors each month.
Zrali was created with a simple idea in mind: fashion should be stylish, affordable, and connected with technology. Starting with fashionable shoes to fine handbags and other things people need in their day-to-day life, Zrali had a vision of introducing global-style shopping to the African customers while also expanding business worldwide.
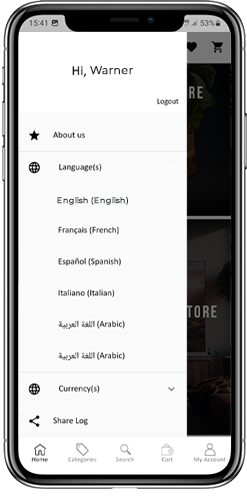
The site showcased a stunning range of products and supported multiple languages (English, French, and German) as well as various currencies (XAF, EUR, USD, GBP). However, Zrali recognised that modern customers increasingly prefer shopping through mobile applications rather than traditional websites.
Zrali wanted a mobile app that would help them reflect their store identity, connect with people instantly, and give them a user-friendly app experience without incurring high development costs.
And that’s where the PrestaShop Mobile App Builder by Knowband came in.
Why Modern Customers Need More Than a Website
Although Zrali’s website was professional and well-designed, customers increasingly sought faster, more personalised experiences. The Zrali Team identified several key challenges:
Mobile users found it hard to browse the website, especially while travelling or during short breaks.
Many users wanted a dedicated app to browse products easily on their phones.
Important features like push notifications were missing, making it harder to keep customers engaged.
To stand out in the competitive fashion market, Zrali needed a more interactive experience than a regular website.
The goal was to reduce bounce rates, increase time spent on the site, boost sales, and build customer loyalty.
A mobile app was the next step, but Zrali wanted to avoid hiring developers and spending months building it from scratch.
This ready-to-use solution allowed the team to launch the app quickly, and it is now available on the Google Play Store and App Store.
The mobile app reflects Zrali’s fashion identity, sleek, modern, and visually appealing. Importantly, it is fully synchronised with the PrestaShop website, ensuring that inventory, prices, orders, and products are updated in real time.
How the App Elevated Zrali’s Shopping Experience
Smooth Syncing: The mobile app automatically displays all the product updates, prices, and stock changes on the Zrali site.
Multi-Language and Multi-Currency: Cameroonian, European, and other shoppers can shop in their own language and own currency.
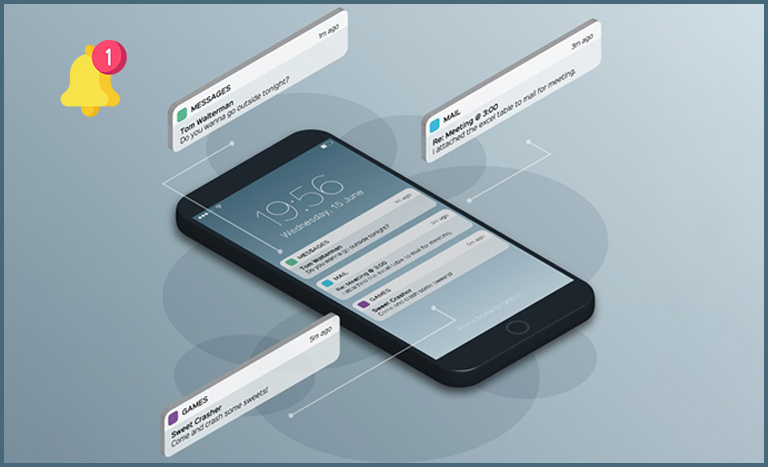
Push Notifications: Zrali can also provide customised messages to the customers, like deals, abandoned carts, etc. Hence, they re-engage the customers.
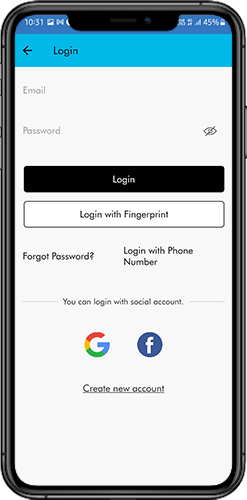
Quicker Checkout: Moreover, with the help of social login, fingerprint login, multiple shipping and payment methods, Zrali provides easy and fast checkout as well.
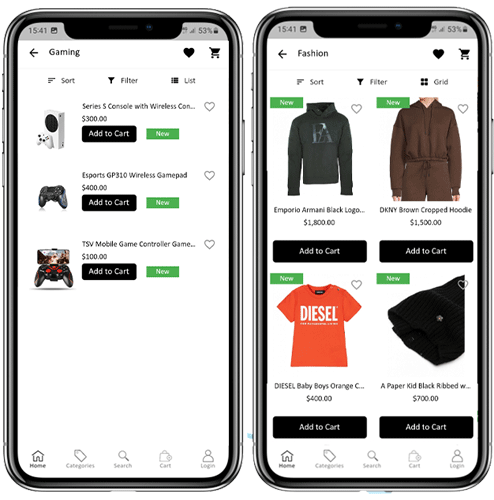
Modern UI/UX: Zrali also provides customers with trendy designs in a grid format, banners, and sliders, keeping the customers busy.
Social Login: Customers can create their accounts through Facebook and Google. Hence, they do not abandon at the last moment as they find it easy.
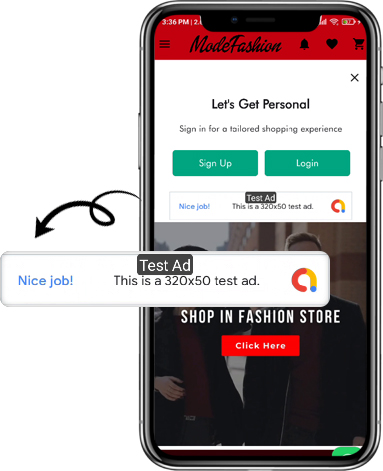
Ads Integration and GDPR Compliance: Trust and revenue are guaranteed for Zrali with GDPR compliance and AdMob integration.
Results After Launching the Mobile App
Within just a few weeks of launching the Zrali Mobile App, the impact was clear:
Browsing Time Doubled: Customers spent twice as long exploring collections because the app was faster, more interactive, and easier to use than the website.
Conversions Nearly Doubled: Faster navigation, a simplified checkout process, and increased trust led to significantly higher sales.
Higher Customer Satisfaction and Loyalty: App reviews showed increased satisfaction as users enjoyed a more personal and interactive shopping experience.
Instant Access to Exclusive Features: Shoppers could access curated collections, special offers, real-time stock updates, and enjoy multilingual and multi-currency support.
Overall, the mobile app made shopping smoother, faster, and more convenient, exactly what Zrali aimed to provide for their customers.
Celebrating Zrali: From a Website to a Mobile Fashion Brand
By partnering with Knowband, Zrali has transformed from a promising fashion website into a mobile-first brand that truly connects with its customers.
The mobile app enables Zrali to reach shoppers anytime, anywhere, offering a smooth, personalised, and convenient shopping experience. With a scalable mobile solution, the brand continues to enhance engagement, boost sales, and strengthen customer loyalty.
We also want to commend Zrali’s vision and forward-thinking approach. Their dedication to delivering the best for their customers and embracing innovative technology has made this mobile transformation possible.
Knowband’s PrestaShop Mobile App Builder helped Zrali reduce development costs, shorten time-to-market, and bring their vision to life quickly and efficiently. This collaboration demonstrates how the right technology partner can turn ideas into real-world results.
With this mobile-first approach, Zrali is not just keeping pace with modern customers; it is setting new standards in fashion-tech retail. Their commitment to quality, style, and customer satisfaction makes Zrali a true leader in the industry
Google Play has announced a comprehensive set of policies and API updates that will come into effect on August 31, 2025. Importantly, these changes are part of Google’s continuous efforts to strengthen user security, improve app quality, and ensure consistency across its ecosystem.
For developers and businesses with apps on the Play Store, these updates are not optional. Furthermore, failing to comply with the new requirements could result in apps being removed from the Play Store, preventing new users from discovering them and limiting access for existing users.
In this article, we are providing a comprehensive breakdown of the new policies, their technical implications, and how developers can prepare.
Target API Level Requirements
First and foremost, one of the most critical changes in this update revolves around target API levels.
New Apps & Updates: Starting August 31, 2025, all new apps and app updates submitted to the Play Store must target Android 15 (API level 35) or higher. Additionally, this ensures that apps leverage the latest security features and performance optimizations provided by the Android operating system.
Existing Apps: Meanwhile, apps already published on the Play Store will need to target at least Android 14 (API level 34) to remain visible to users with newer devices. Consequently, apps that fail to meet this requirement may remain installed for existing users but will no longer be available for download by new users.
Extension Option: Fortunately, Google is offering a short grace period. Developers can request an extension until November 1, 2025, through the Play Console. However, this should be treated as a backup option rather than a primary strategy.
Why this policy matters to your mobile app
Essentially, apps targeting outdated API levels miss out on the latest security patches, privacy controls, and performance improvements. Therefore, this requirement ensures that all active apps remain compatible with modern devices and meet user expectations.
Play Billing Library
In addition to API requirements, another key change relates to in-app purchases and subscriptions.
All new apps and app updates must now use Play Billing Library version 7 or newer. Notably, this is a significant update as it impacts how developers handle in-app purchases (IAPs), subscriptions, refunds, and payment flows.
Moreover, Google emphasises this requirement to improve transaction security, provide a consistent purchase experience, and reduce fraudulent activities.
Similar to the API level requirement, developers may request an extension until November 1, 2025, to migrate to the new library.
SDK & Development Tools
To ensure a smooth transition, Google strongly recommends developers use the latest Android SDK and associated development tools.
Specifically, the SDK Upgrade Assistant in Android Studio helps developers identify outdated dependencies, upgrade API levels, and resolve compatibility issues.
As a result, this reduces manual effort, minimises migration errors, and ensures that apps take advantage of new frameworks, improved APIs, and enhanced security controls.
Ultimately, staying updated with the Android SDK isn’t just about compliance; it’s about future-proofing your app. Apps built on outdated SDKs may struggle with compatibility on new devices, leading to crashes and poor reviews.
Scoped Storage & File Access
Meanwhile, Google introduced Scoped Storage in Android 11, and by 2025, it will become an enforced standard.
Moving forward, apps will no longer have broad access to external storage. Instead, they must:
Store files in app-specific directories
Use the MediaStore API for media files
Leverage the Storage Access Framework (SAF) when users need to select specific files
Impact on developers: Consequently, apps that still rely on legacy storage permissions may face rejection or functionality issues on Android 15. Therefore, migrating to Scoped Storage ensures smoother performance, stronger security, and better user trust.
Deprecated APIs
Furthermore, Google has clarified that apps relying on deprecated or outdated APIs may face rejection during Play Store review.
Essentially, deprecated APIs are those that are no longer recommended because newer, more secure alternatives exist.
As a result, continuing to use them increases the risk of crashes, security vulnerabilities, and poor performance on modern devices.
News and Magazines Apps
If your app falls under the News and Magazines category, there’s an extra requirement you can’t afford to miss.
Specifically, developers must submit a special declaration in the Play Console.
Notably, the deadline for this was August 27, 2025, slightly earlier than the general policy update.
Ultimately, this declaration ensures that apps categorised as news sources meet standards for credibility, transparency, and responsible content distribution.
How Knowband Can Help
If your store is built on PrestaShop, OpenCart, WooCommerce, or Magento 2, Knowband has you covered.
Our Mobile App Builder Module is already fully compatible with Google’s latest policy changes.
Hassle-free update process for your eCommerce app without interrupting your business operations
Guaranteed compliance with the new target API level requirement and all other Google Play policies
End-to-end support from our expert team for smooth migration, testing, and deployment
Proven track record of helping thousands of merchants successfully launch and maintain Google Play-compliant apps
With Knowband, you can focus on growing your business while we handle the technical compliance and optimisation for your mobile app.
Final Thoughts
In conclusion, the August 31, 2025, Google Play deadline is approaching fast, and for Android developers and eCommerce store owners, it’s a milestone that cannot be ignored. Unfortunately, missing these updates could result in app removal, loss of visibility, reduced downloads, and disruption of your business operations.
However, by acting early and adopting the right strategies, you can ensure your app stays compliant, secure, and optimised for the latest Android ecosystem.
With Knowband’s Mobile App Builder, you get a hassle-free, future-proof solution designed for PrestaShop, OpenCart, WooCommerce, and Magento 2 stores. From guaranteed Google Play compliance to delivering a seamless shopping experience for your customers, Knowband helps you stay ahead of deadlines and competition.
Don’t wait until the last minute, upgrade your store app with Knowband today and keep your business growing without interruptions!
Today, most people shop on their phones, so making the buying experience easy and smooth is a must. With mobile commerce on the trend, having your own app can give your brand a competitive edge.
That’s where Knowband’s Mobile App Builder comes in. Whether you’re using PrestaShop, Magento, OpenCart, or WooCommerce, Knowband makes it incredibly easy to turn your online store into a sleek mobile app with no coding required.
If you’re thinking about launching your e-commerce app, here’s a step-by-step guide to walk you through the entire process.
Step 1: Choose the Right App Builder for Your Platform
First things first, go to Knowband.com and select the Prestashop Mobile App Builder module that matches your store’s platform. Whether you’re running on PrestaShop, Magento 2, OpenCart or WooCommerce, there’s a version tailored just for you.
Once you’ve purchased the module, you will receive a downloadable ZIP file along with setup instructions.
Step 2: Install the Module on Your Website
Next up, it’s time to install the module on your site, and the good news is that it’s a pretty straightforward process.
Depending on the platform you’re using, the steps may vary slightly. If you’re using PrestaShop, you can easily upload the module right from the admin panel.
For Magento 2 users, installation is typically done using Composer or via FTP, whichever you’re more comfortable with.
If your store is built on OpenCart or WooCommerce, the installation is even easier; it just takes a few clicks within the extensions or plugin section of your admin dashboard.
Once the Opencart Mobile App Builder Extension is successfully installed using FTP, you’ll see the Mobile App Builder panel show up right in your backend.
Moreover, store owners can start set to begin customising their app’s design and functionality.
Step 3: Customise the App Design and Features
Knowband gives the full control to the store owner to customise the app based on the store’s needs.
Using the Mobile App Builder module, you can easily set up banners, sliders, featured product sections, countdown timers, and more. Furthermore, you’ll also be able to tweak the theme colours, fonts, and layout, so your app matches your brand perfectly.
Everything is highly customizable, and you don’t need to write a single line of code.
Step 4: Provide App Branding Details
Once your app layout is ready and you’re happy with the design, the next step is to provide your branding details so Knowband can begin building your mobile app. Moreover, this information helps ensure that your app looks and feels exactly like your brand, consistent, professional, and personalised.
Here’s what you’ll need to share:
App name
Logo and app icon
Splash screen image
Primary theme colour
Your store URL
Firebase keys (used for enabling push notifications)
Developer account access ( Android & iOS)
If that list feels a bit overwhelming, don’t worry, Knowband has you covered. We provide clear, step-by-step documentation and friendly support for the WooCommerce Mobile App Builder Plugin to walk you through each requirement. Whether you’re a first-time app creator or just need a little guidance, our team is always ready to help.
Step 5: App Compilation and Delivery
After you’ve submitted all the required information, our team takes over.
We compile your mobile app for both Android and iOS and typically deliver the test builds within 4-5 working days. You’ll receive APK (for Android) and IPA (for iOS) files, which you can test on real devices before going live.
Moreover, this is a good way to review the app thoroughly and ensure everything works just as expected.
Step 6: Test Your App Thoroughly
Before launching, it’s important to test your app across multiple devices and platforms. Try out the login process, navigation, product browsing, checkout, payment gateways, push notifications, and anything else that matters to your user experience.
If you notice any issues or have last-minute customisation requests, our support team is responsive and ready to assist.
Step 7: Publish to App Stores
You can upload the APK file to your Google Play Developer Account and submit the iOS version through your Apple Developer Account using App Store Connect. If you’re unsure how to do this, Knowband guide you through the process or even handles it for you.
Promote your mobile app on your website with banners or pop-ups, share download links on social media, and offer exclusive app-only deals to encourage downloads. Moreover, you can also use push notifications to keep users engaged and bring them back to your store regularly.
Don’t forget to monitor reviews, track analytics, and gather feedback so you can continuously improve the experience.
Final Thoughts
Launching a mobile app for your e-commerce store doesn’t have to be expensive or complicated. With Knowband’s Magento 2 Mobile App Builder Plugin, you can go from idea to live app in just a few days and provide your customers with the modern, mobile-first experience they expect.
Whether your store is on PrestaShop, OpenCart, Magento 2, or WooCommerce, we have the perfect solution to create your own mobile app based on your website or store theme. Visit opencartmobileshop.com to get started.
So why wait? Now is the perfect time to take your store mobile.
Get started today and let your store go mobile with KnowBand
Get fully Flutter Android & iOS apps for your PrestaShop website & start selling your products on Mobile Apps!
1.0 Introduction
This is the user guide of the advanced & readymade Flutter mobile app solution of PrestaShop Mobile App Builder. This is an eCommerce website plugin designed & crafted to build perfect & featured Android & iOS shopping apps for you.
1.1 PrestaShop Mobile App Builder: A Brief Introduction
The PrestaShop Mobile App Builder is the most advanced & automated solution to take your online website business to the mobile platform. It transforms your entire website into a featured Mobile App & allows you to sell products on mobile along with the traditional website. The functionalities & working of the app exactly match the website & work flawlessly on both Android & iPhone devices.
Our PrestaShop Mobile App Builder is the pre-configured framework designed by experts & professionals to build a pair of Flutter eCommerce apps. The apps are capable of taking all your store products to the user’s fingertips & boost sales & revenue. So, if you are a PrestaShop store merchant & looking for a full-fledged mobile app solution, this is your best chance. Read the complete article to get fully intact info on PrestaShop Mobile App Development.
Also, our PrestaShop Mobile App Builder extension is fully compatible with the Multi-vendor Marketplace plugin. You can bring the entire marketplace listing on the same Mobile Apps. We even offer a combo pack of our PrestaShop Mobile App Builder with PrestaShop Multi-Vendor Marketplace in PrestaShop Advanced Marketplace With Mobile App.
New Update: PrestashopMobile App and AI Chatbot Integration 6.0.6
The PrestaShop Mobile App Builder now supports integration with the PrestaShop AI Chatbot, helping store owners provide AI-powered assistance to mobile app users. The chatbot can help customers find products, get answers to common questions, and receive personalized product recommendations directly within the mobile shopping experience.
Moreover, the following benefits of PrestaShop Mobile App Maker would compel you to go for this Flutter app solution:
A no-code Mobile App solution.
Friendly admin panel with complete access.
3 months of free support
Fully Flutter solutions (Android & iOS)
100% synchronization between your apps & website
Highly customizable with design & functioning control.
Increases user engagement with handy marketing tools.
Increases traffic & revenue to your store.
1.2 Top-notch Features of PrestaShop Mobile App Builder:
Here is the list of some of the key features which you will get in your apps with Prestashop Mobile App Builder:
Customizable Home Screen Layout (Complete Flexibility)
Store Branding
WhatsApp Chat Support (24*7)
Google & Facebook Login
OTP & Fingerprint Login
Both Tablet & Mobile Support
Android 4.2 and so on Android VersionSupport
iOS 9 and so on iOS VersionSupport
Automatic Inventory Update
Multiple Color & Font Choices
Multi-lingual & RTL (Right To Left) Support
Multi-currency Support
All Product Type Support
Website Payment Method Supported on Apps
Website Shipping Method Supported on Apps
Unlimited Push Notifications
Product Social Sharing Options
Multiple Filtering & Sorting Options
Wishlist Functionality
Website Coupon/Vouchers Supported on Apps.
Simplified Checkout Screen
Real-time Order Tracking
Seamless Accordion Menu
Clear-cut Product & Category Screen
Show Video Banner Elements on the Home Page and Category Product Listing Pages
List/Grid Product View Options
Login/Sign-up pop-up
Enhanced Review Section
Multi-layered layout
Automated Banner Sliders
Notification Tab
Latest Version Updates in PrestaShop Mobile Apps:
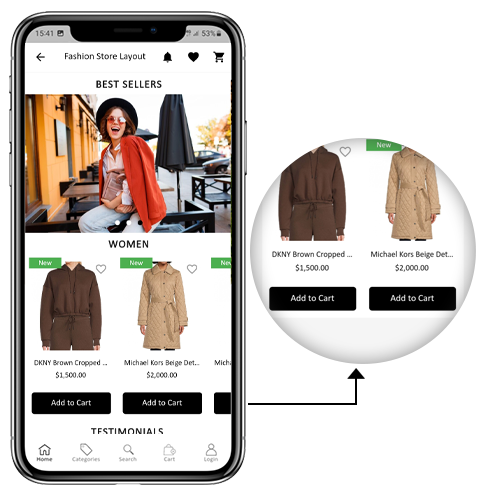
a) “Add To Cart” Button on Home & Category Screen
The PrestaShop Mobile App has been made more usable for online shoppers with an inbuilt “Add To Cart” button for products on the Home & Category screen. This allows users to quickly add products to the cart by just tapping the cart button.
The Add To Cart button is also available on the category screen of mobile apps. The users can simply scroll down to the bottom to browse the products and keep on adding products to the cart by simply tapping the Add To Cart button.
b) Product Reviews on App
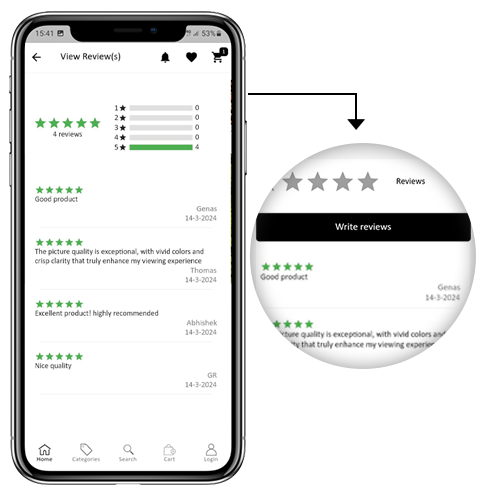
Our PrestaShop Mobile App is now compatible with the default Product Comments module of PrestaShop. Now, the user can post reviews for the products on the website and the same will appear on the app as well. Also, the user gets to view all reviews from the app and write them as well.
c) Related Products on App
The PrestaShop Mobile App Builder is now compatible with the Automatic Related Products module. The related products can be displayed on the product page of the website and mobile app. This compatibility can be used as a perfect tool to improve cross-selling for your business.
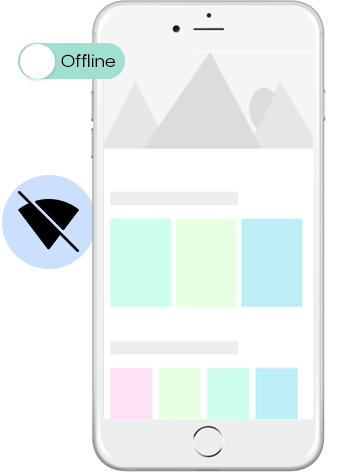
The eCommerce mobile apps with this extension will now work in offline mode as well i.e. without internet connectivity. The users get to browse the pages anytime which were loaded while active internet. Categories, products, cart screen, etc.
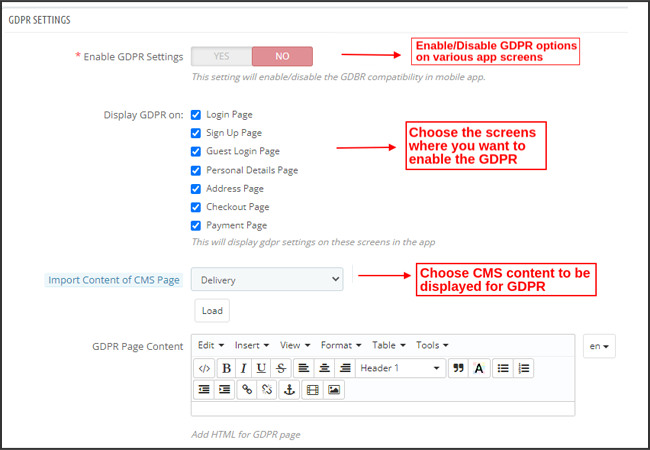
Now, the apps with PrestaShop Mobile App Builder are fully compliant as per the GDPR regulations of the EU. It will offer more control to app users over their stored personal data. The store admin can simply configure the GDPR settings to work on the application & the same will be displayed on various app screens like sign-up, login, checkout, payment, etc. Online shoppers even get the right to ask the store merchant for the removal of his/her personal information.
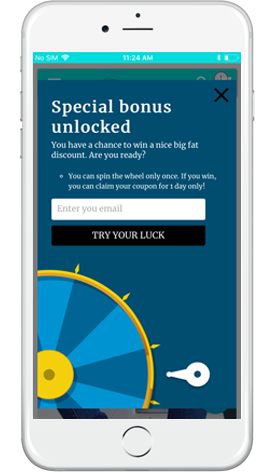
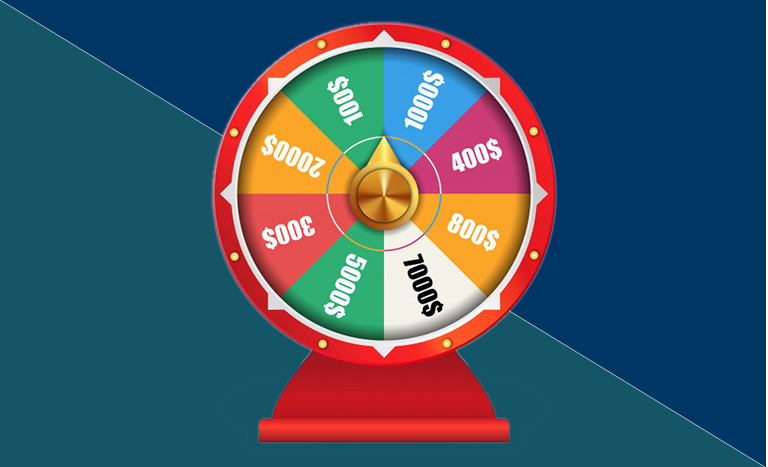
The PrestaShop Mobile App Creator is also compatible with PrestaShop Spin & Win extension. The gamified email subscription pop-up is used for offering a spin-wheel interactive pop-up that can be scheduled for entry or exit display on the web store. Now, with this integration, the same pop-up will be automatically displayed on the apps. You just need to install the extension on your website.
This list doesn’t end here. Get to know more about the features in detail from here.
g). Video Banner Elements:
The all-new Prestashop App Maker comes with video banner components available on the home page. The store admin can now showcase different videos with the option to upload/YouTube videos on the home page banner components.
h). List/Grid View:
The Android and iOS App built with Prestashop Native Mobile App Builder provides the app users with the opportunity to explore the products in list/grid view, enhancing the visuals and customer experience.
Now, the users can simply tap on the list/grid button provided on the product listing pages to switch between list and grid view for the products.
i). Video/Banner Options on the Category Product Listing Pages:
Showcase your product carousal with the all-new video/banner upload options introduced in the updated Mobile App Maker for Prestashop. The store admin can upload videos below 2 MB or can also showcase the YouTube videos directly on the category product listing pages. This feature provides better UI control to the store admin, enhancing the customer experience at the same time.
J). Automated Banner Sliders:
In the latest Mobile App Builder module, we have introduced the automated banner slider feature that allows the Prestashop store administrator to configure the automated sliding time from the module backend.
The admin can use the functionality, particularly for the “Banner Horizontal Sliders” home page layout components, and can add sliders for both videos and image banners.
K). Enhanced Review Section:
If you are using PrestaShop’s default Product Comment module, you can enjoy the enhanced review section in the app. All the approved reviews now come with enhanced UI that delivers a top-notch visual experience for your Android and iOS App users.
L). Login/Sign-up Pop-up:
Capturing the visitors’ emails is one of the biggest challenges in eCommerce. However, we have simplified this process by introducing the login/sign-up pop-up in the recent Mobile App Builder version.
The store admin can add a login pop-up that will appear for non-logged-in customers, increasing the email opt-in chances by providing simple login options to the users.
2.0 PrestaShop Mobile App Demo
KnowBand understands your concern about your uncertainty to go for the solution & to curb the same, it has offered a free demo for all eCommerce store owners. The merchants can view our demo store working on the mobile app & even their store working on our demo apps.
2.1 View Our Demo Store working on Apps
Want to see the eCommerce app features? We have integrated our demo store with the app where you can explore the fully functional app and see all its features. Just follow the below instructions:
Step 1: Download and install the Nautica PrestaShop Mobile App from either App Stores on your mobile device. Here, are the links to download demo apps:
Step 2: the Open the Nautica PrestaShop App and hit the view demo button.
That’s it! You will see our demo store running on the demo app. You can browse the same, check all functionalities, create an orders, etc.Note: To access the Admin Panel of KnowBand Mobile App Builder on our demo store, visit here.
2.2 View Your Store working on Demo Apps
Not satisfied? Want to test your store on the demo apps? Well, we got you covered with everything. You can experience your store on our demo app as well that too without any cost. Just 3 steps are all you need to follow for the same:
Step 2: Install the Demo Apps (links in the previous section) on your mobile device. Open App & enter your Store URL.
Step 3: Tap “View Your Store” and start experiencing your store on demo apps.
Step 4: Enter your store URL in the appeared box.
Example: https://www.example.com/
Note: This Free version of Mobile App Builder is just for the demo purpose & no APK/IPA files will be provided with this module. To get your own APK/IPA files, you need to purchase the paid version of the PrestaShop Mobile App Builder.
3.0 Build your PrestaShop Mobile App in 3 Simple Steps
We hope that you liked the demo of our PrestaShop Mobile Apps and found what you were looking for. So, this is the time to get a Flutter pair of apps for your store. The process to build an eCommerce mobile app is as simple as it could get. Just follow 3 simple steps & your app will be ready in 1-2 working days.
Step 1: Install-Module on your website
Download Prestashop Mobile App Builder & install the same on your store.
Once the PrestaShop Mobile App Maker is successfully installed on your website, it’s time to configure the Admin Panel of PrestaShop Mobile App Creator. Once you click on the “Configure” option on KnowBand Mobile App Builder, you will get the following tab with friendly interfaces. Let’s narrow down them one by one.
5.1 General Settings
The General Setting tab is all about the settings required to run your Mobile App on the user’s devices. This tab contains all the necessary generalized options to sync the app.
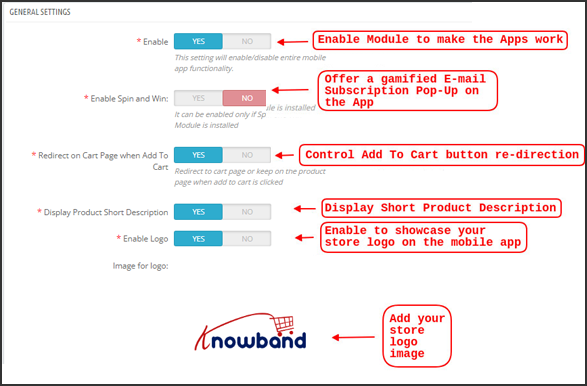
a) Enable Plugin: Enable the PrestaShop Mobile App Creator plugin to make your mobile app work on user’s devices.
b) Enable Spin and Win: Enable to display a gamified spin-wheel pop-up on the home screen whenever any user opens the app. It can be used to offer discounts/deals & capture their e-mails in return for marketing purposes. To make this functionality work, you need to install Knowband’s Spin and Win module on your website.
Note: The Spin and Win Module will only work in case you have installed the plugin in your store end.
c) Redirect on Cart Page when Add To Cart: This functionality allows you to control the navigation of the “Add To Cart” button. You can either redirect your users to the shopping cart or keep them on the product page whenever they tap Add To Cart button. This enhances the chances of additional purchases.
d) Display Short Description: Enable to display product short description on the product screen along with full description & other details.
e) Select Layout: Choose the desired Home Page Layout for your PrestaShop app. You can create multiple home screen layouts in the backend as per various festivals & themes & use them as per your store requirement.
f) App Button Color: Choose the desired button color for your PrestaShop Mobile App.
g) App Theme Color: Choose the desired theme color for your PrestaShop Mobile App.
h) Image for logo: Upload your store logo image to be displayed on the top header of the app. This promoted your brand among worldwide mobile shoppers.
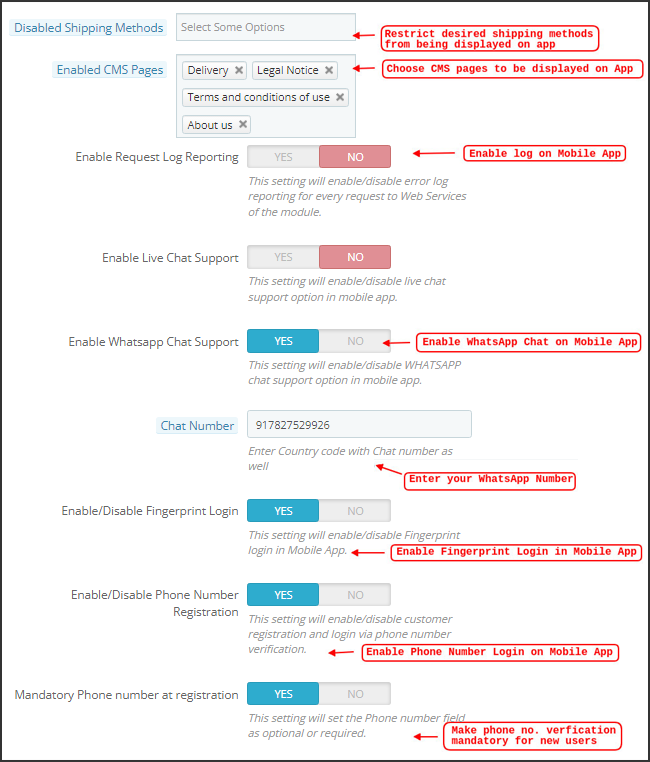
i) Disabled Shipping Methods: Choose desired shipping methods that you don’t want to be displayed on your PrestaShop Mobile App.
j) Enabled CMS Pages: Choose desired CMS pages to be displayed on the mobile apps.
k) Enable Request Log Reporting: Enable log on the mobile apps to get details of any abnormal behavior of your app.
l) Enable WhatsApp Chat Support: Enable the WhatsApp chat option on your PrestaShop Mobile Apps. The users can directly contact you at your WhatsApp number entered in the backend.
m) Enable/disable Phone Number Registration: Enable the Phone Number login option in your PrestaShop Mobile App & let your users authenticate with OTP verification.
n) Enable URL encoding of Image links: Enable this functionality to support Non-ASCII characters on the app.
o). Enable/Disable Fingerprint Login: This option enables or disables the fingerprint of Face ID login options in the Android and iOS apps.
p). Enable Notification List Feature: The admin can show/hide the notification section in the app for the customers with the help of this button.
q). Enable Sign In Login Popup: This button is designed to enable/disable the login pop-up for customers who have not completed registration on the store.
r). App Icon Theme Color: The store admin can configure the color of app icon themes, especially Wishlist, Cart, and Hamburger menu icons.
s). Enable Social Login: The following button can show/hide the social login options Google, Facebook, and Apple from the apps.
5.2 Push Notifications Settings
The PrestaShop Mobile App Creator for Android/iOS leverages the Power of Push Notification using the Google Primary Services for the Push Notification to Mobile devices. It brings this handy marketing tool to grab immediate user attention & boost sales. Highlighting your daily deals & offers is just a message away with your PrestaShop Mobile App. Both automated & custom notifications are available with PrestaShop Mobile App Maker.
a). Service Account Json: Since the traditional Firebase push messaging API is deprecated and replaced with a service Json file, this section allows the admin to configure the Json file extracted from the Firebase account.
Either you can configure the same on your own, or we will also share your service Json file at the time of app creation.
b) Enable/Disable Order Creation Notification: Enable/Disable automated Push Notification sent to the app users for successful order creation.–> Title and Message for Push Notification: Enter the title and message on the push notification setting for successful order creation.
c) Enable/Disable Order Status Changed Notification: Enable/Disable automated Push Notification sent to the app users for any update regarding their previous order delivery status.–> Title and Message for Push Notification: Enter the title and message on the push notification setting whenever there is an update the in previous order delivery status.
d) Enable/Disable Abandoned Cart Notification: Enable/Disable automated push notifications sent to the users who have abandoned cart without successful purchase.–> Title and Message for Push Notification: Enter the title & message of the push notification for abandoned cart app users.
e) Time Interval: Interval (in hours) for sending Push Notification to app users who have abandoned their cart without successful purchase.
5.3 Push Notification History
This tab contains the history of all sorts of push notifications sent to every user with concerned details. The merchant can get to know about every notification sent earlier. This tab also has the option to send a custom notification to the users crafted from the backend. You can easily make them aware of any store-related details or discounts through manually sent notifications.
Send Notification:
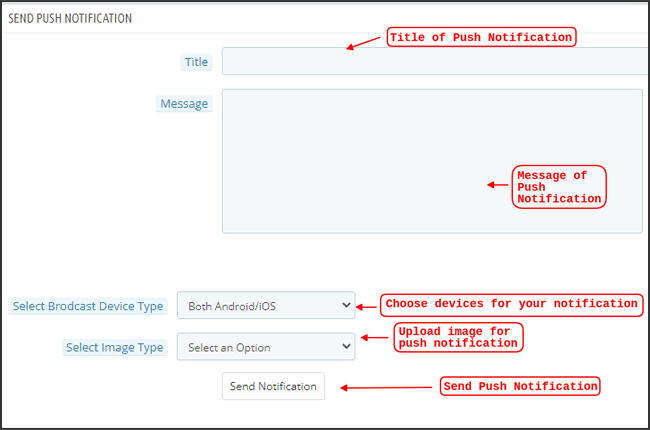
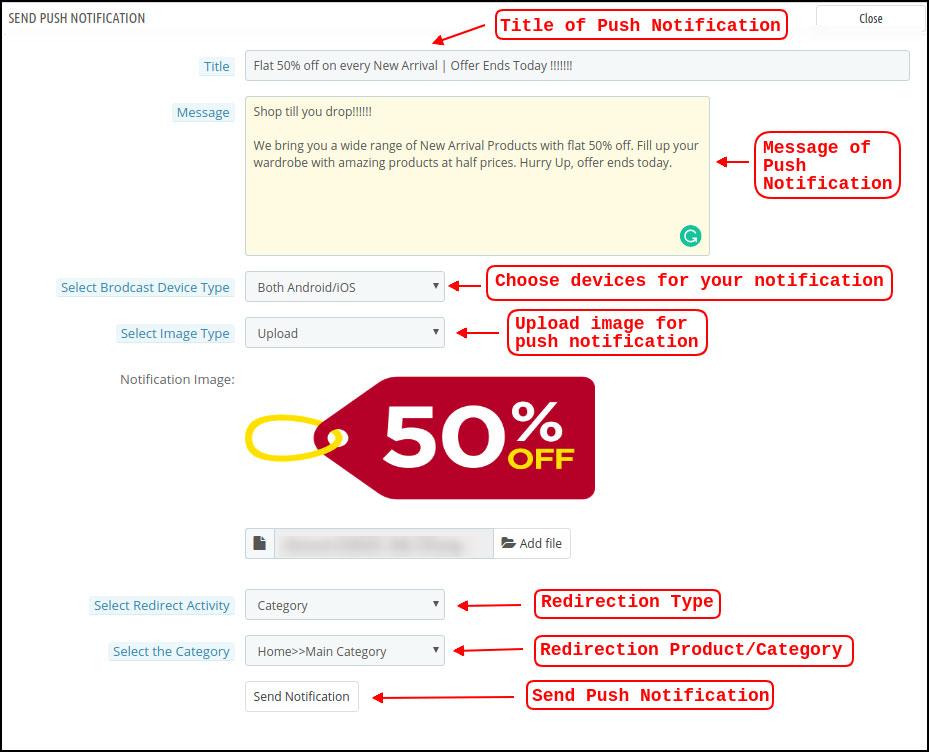
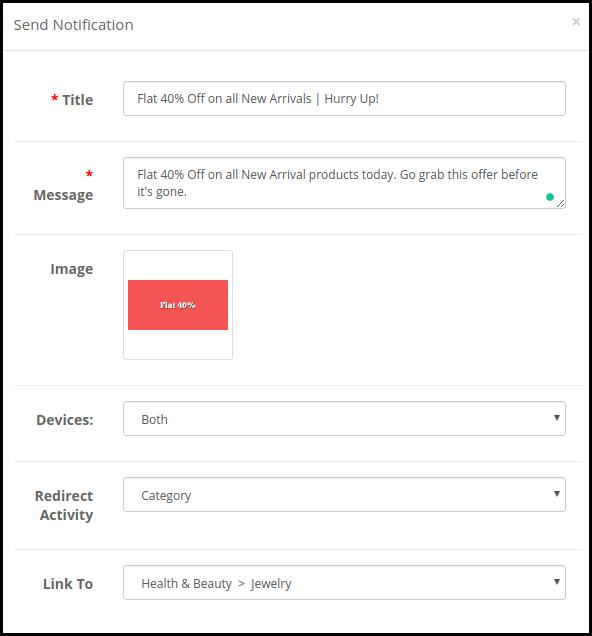
This option is there to send a manual notification to the app users as per your choice. You can configure the title, message, landing page, image, etc., and notification of your choice as shown below snapshot:
a) Title of the Push Notification: The title of your manual Push Notification that is to be sent to the app users.
b) Message of the Push Notification: The message of your manual notification which is to be sent to the app users.
c) Device Type: You can choose the users on Android/iOS or on both to whom your manual Push Notification is to be sent.
d) Image Type: You can upload the desired image/banner justifying your notification. The banner image can be uploaded or used through an existing URL.
e) Notification Image: The store admin get to preview the notification image & analyze how it will look on the user’s apps.
f) Image URL: The actual URL of the notification image which is to be sent to the app users.
g) Redirection Activity: You can choose the redirection of your notification by choosing from Home Screen/Any Category/ Any Product here. Whatever you set, your users will be redirected to the same on tapping the push notification.
h) Select the Category/Product: You can choose any relevant category/product screen for your notification.
i) Send Notification: Once you have crafted & previewed your notification, it is time to send the same on your apps.
5.4 Payment Methods
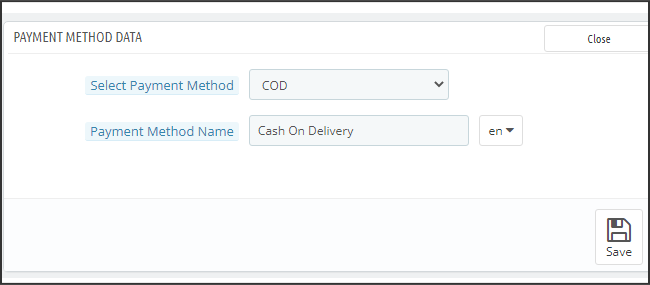
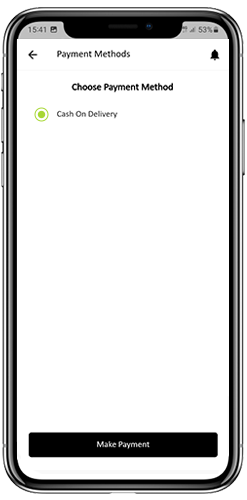
The PrestaShop Mobile App Creator for Android & iOS supports all sorts of website payment methods on the Android & iOS apps. Additionally, it brings COD payment option & the flexibility to add other Web-Viewpayment methods as well.
By-Default, there is only a Cash On Delivery Payment Method in our Mobile App. However, if you want to add the same payment methods as on your PrestaShop store, disable the COD method from the module back-end. After disabling the COD method, all the payment methods that are available on your web-end will appear fine in your Mobile Apps.
5.5 Home Page Layout
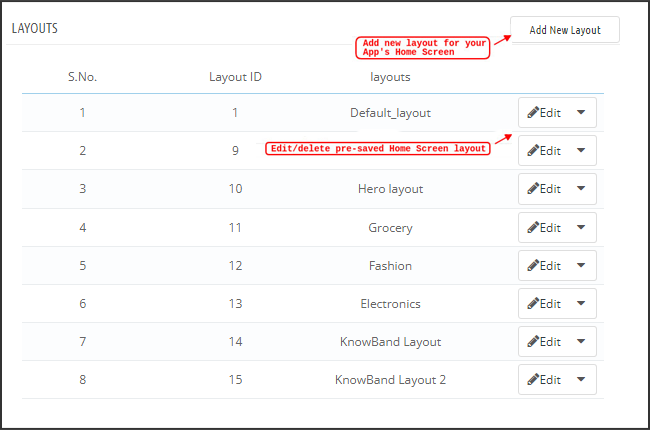
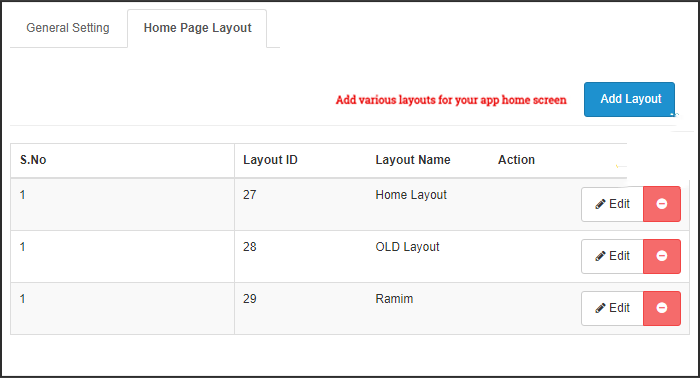
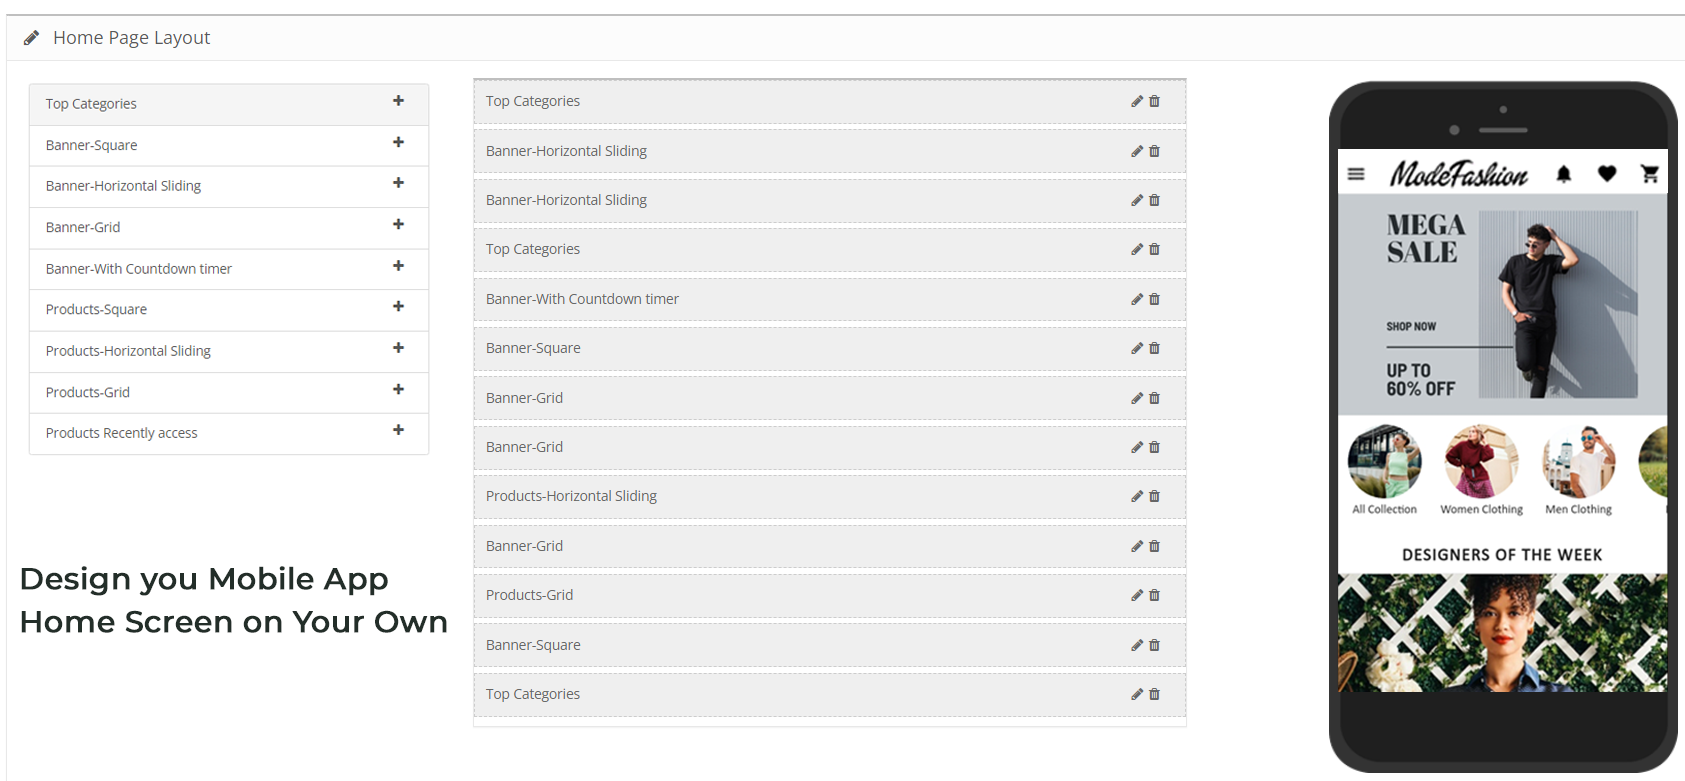
This is one of the most amazing functionalities of the PrestaShop Mobile App Builder plugin to design & craft multiple home screen layouts using various designing attributes/elements. This tab contains the list of all the home screen layouts configured earlier based on various themes & fonts as shown in the snapshot below:
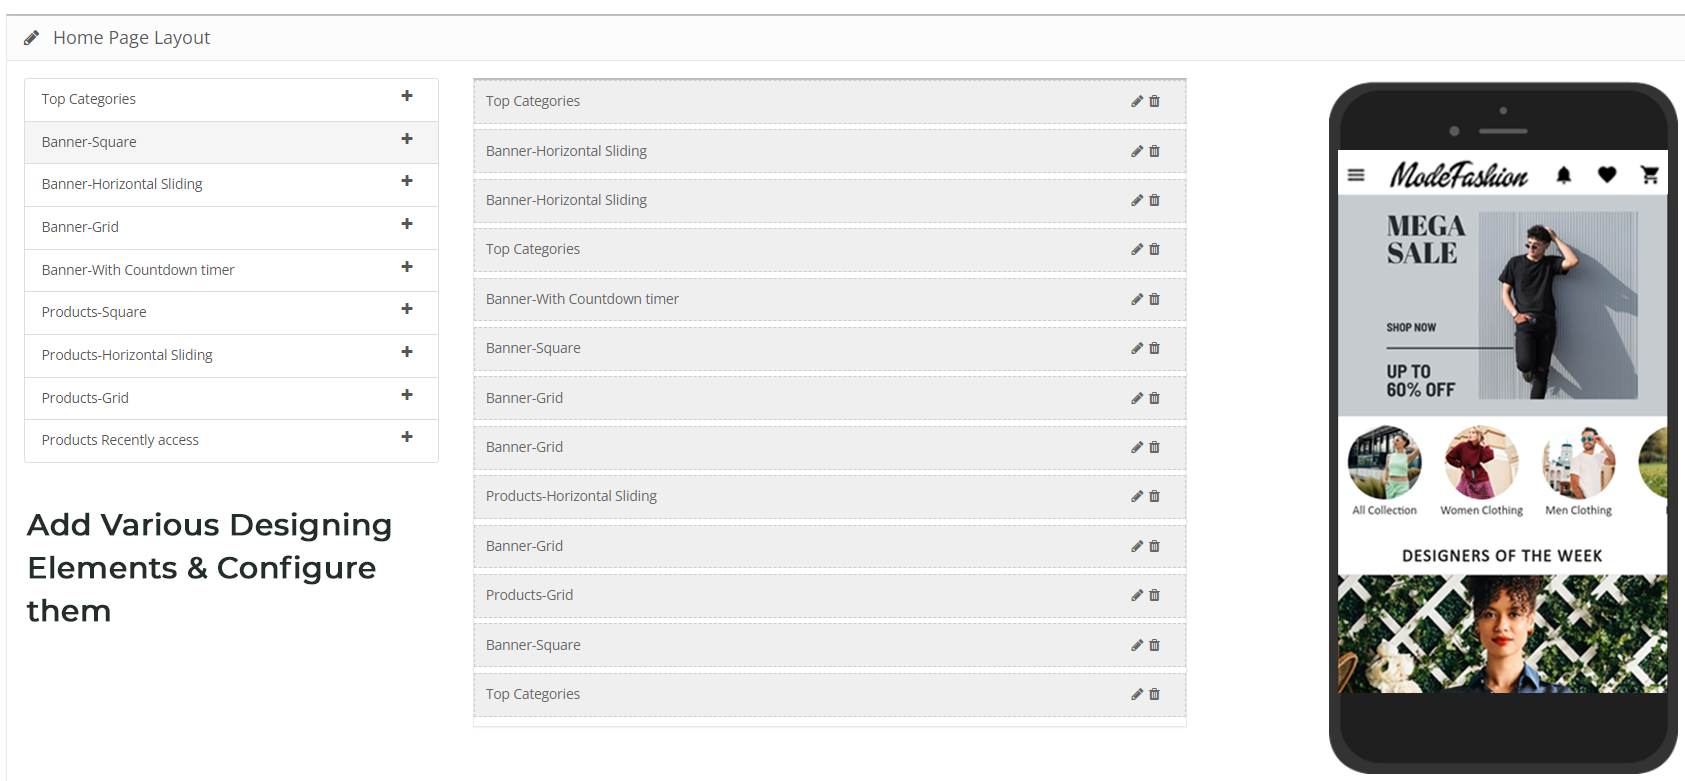
To configure the home page layouts, the following elements are available in the back-end:
Top categories
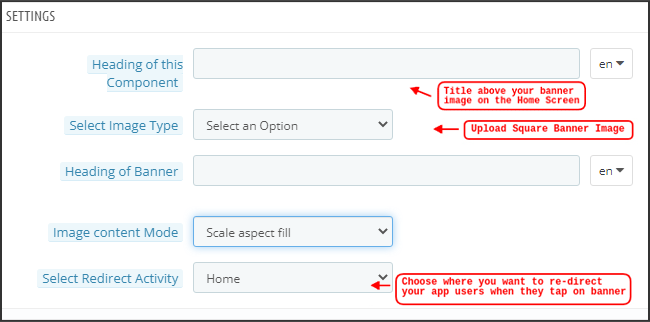
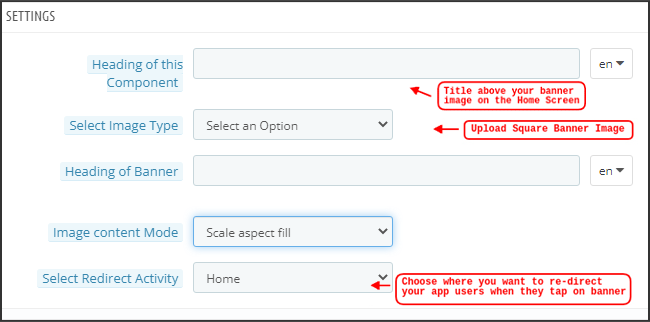
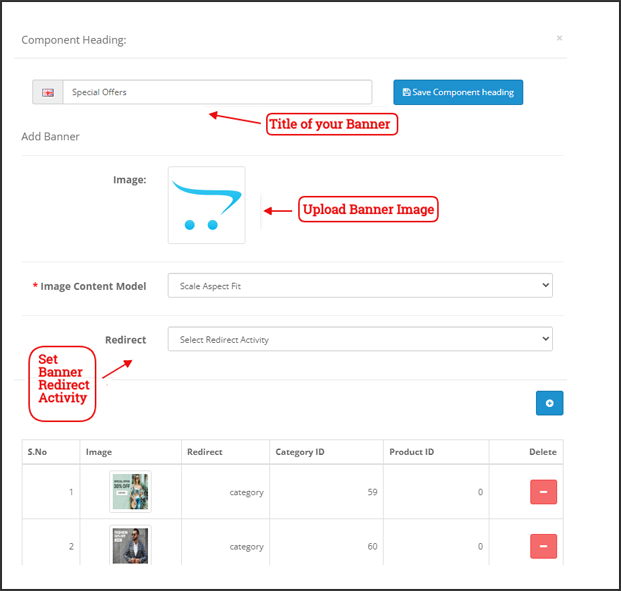
Square Banner
Horizontal Sliding Banner
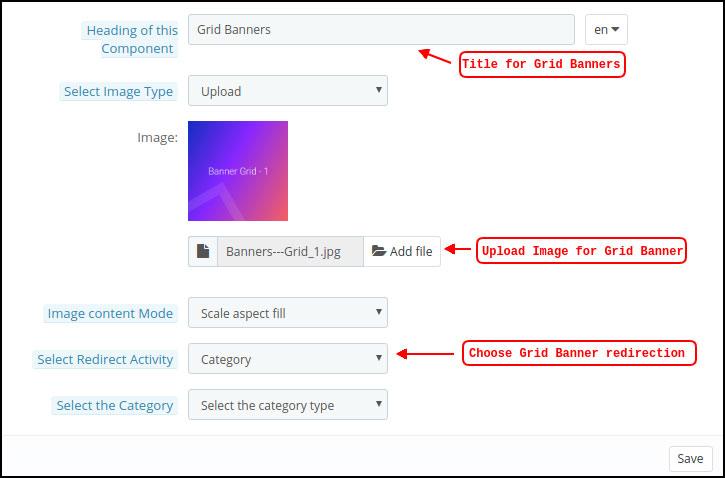
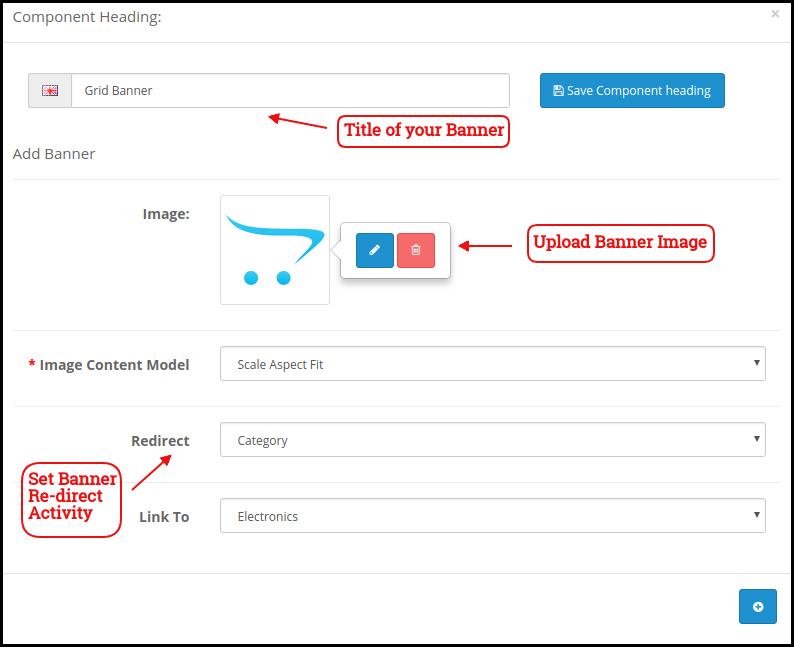
Grid Banners
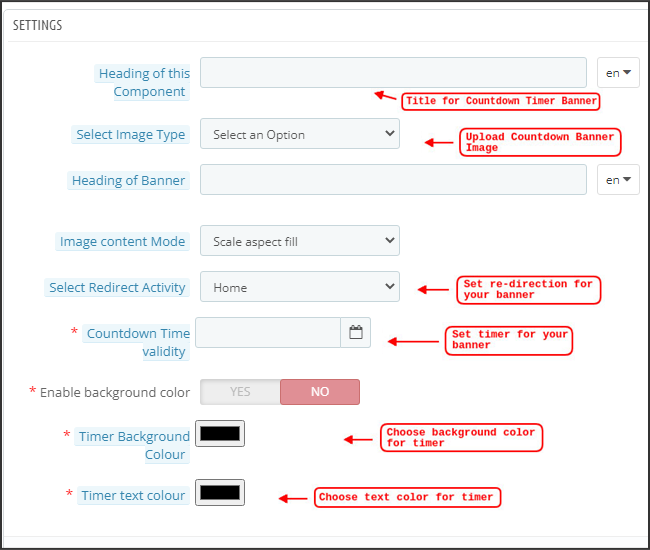
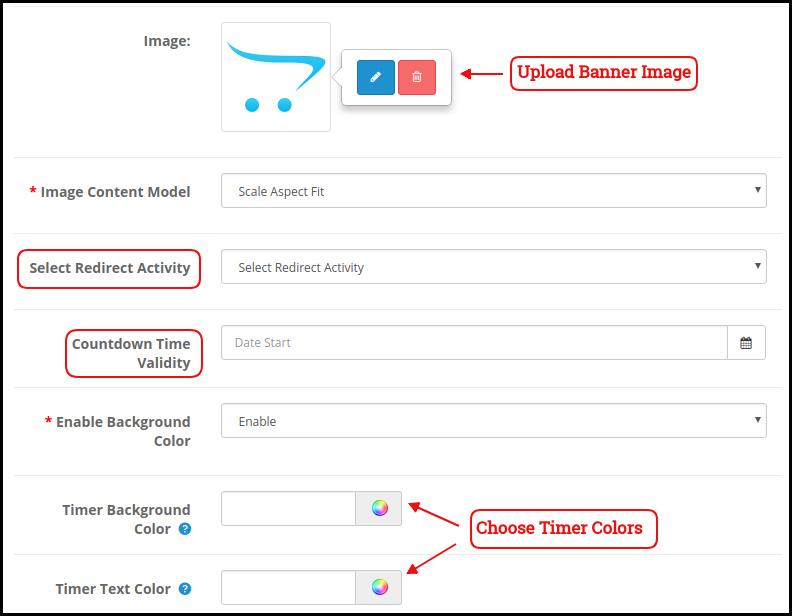
Countdown Banner
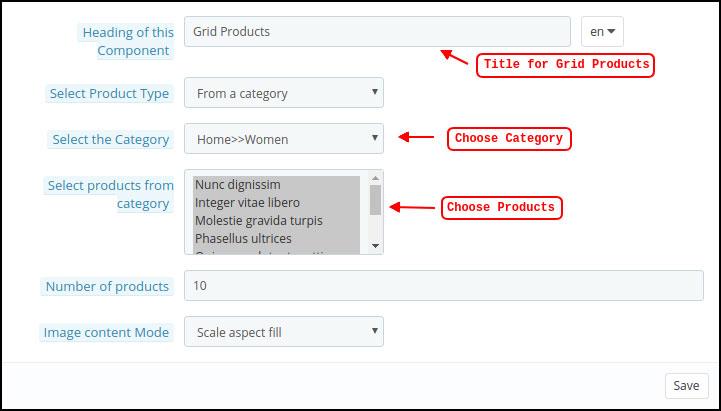
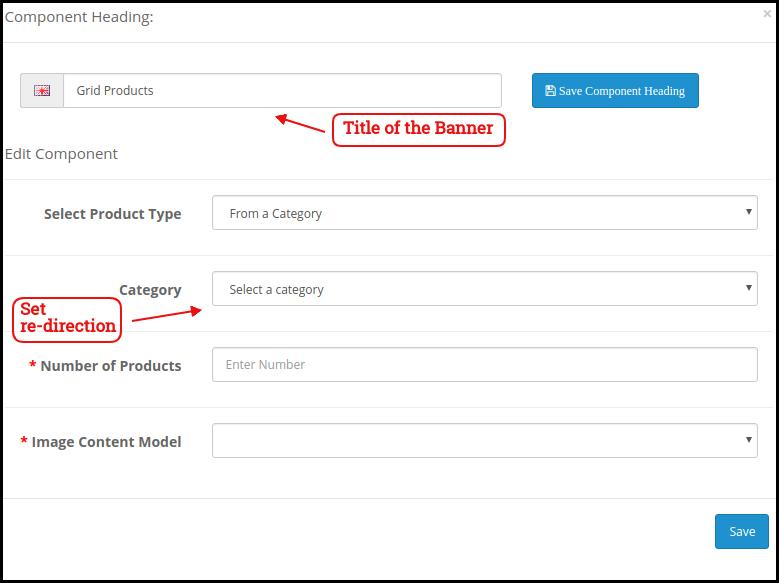
Grid Products
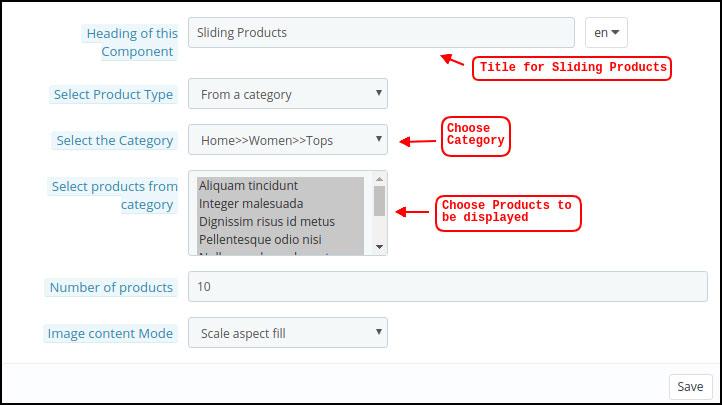
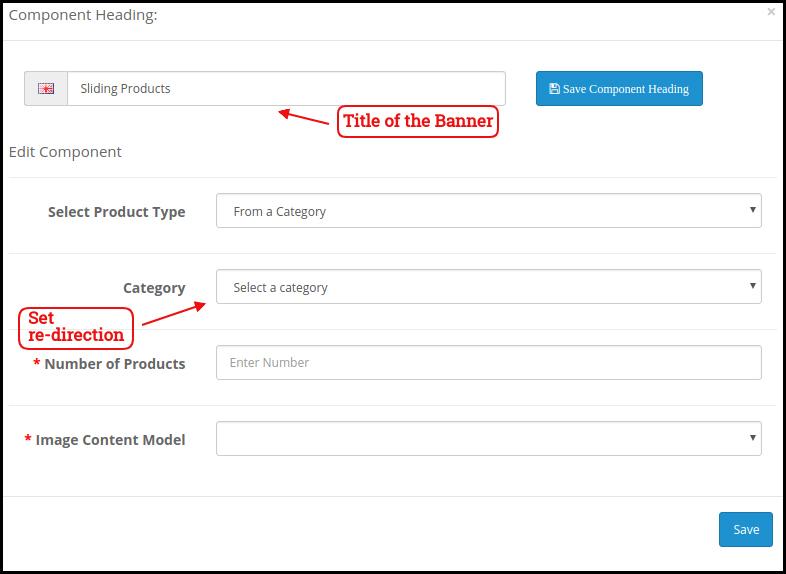
Horizontal Sliding Products
Recently Accessed Products
Login/Sign-Up Pop-Up
The store merchant can configure & use any of these attributes to craft & save multiple layouts. These layouts can be used as per the theme & requirements. Also, the positioning of various elements can be altered with just a simple drag & drop functionality.
Top Categories:
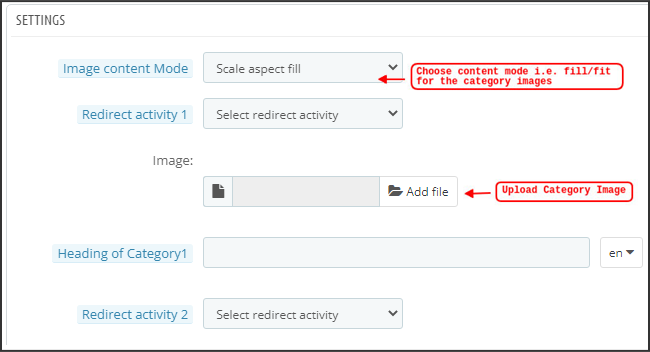
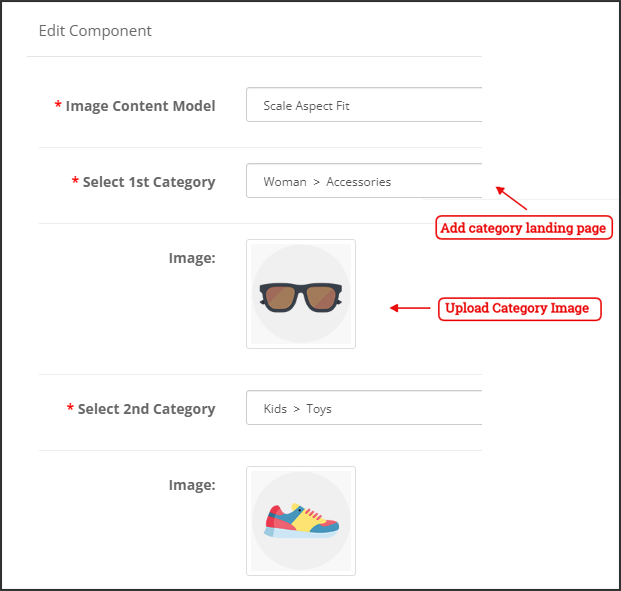
Top categories are displayed in the form of small squares on the home screen & can be configured including their image & landing categories/products. The PrestaShop Mobile App Maker offers a maximum of 8 categories in which a minimum of 4 are mandatory.
Square Banner:
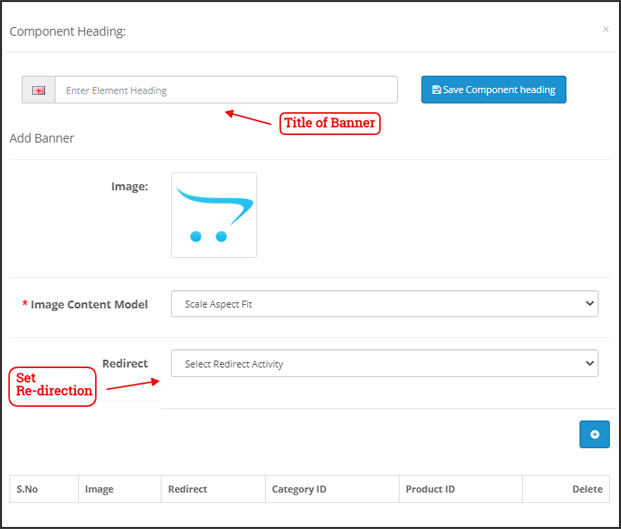
Another attribute is Square Banner listing which is used to offer a square-shaped banner on the home screen of the app. You can customize the banner by choosing the right image & landing screen for the same. In the Recent Updates, we have also added the video selection option for the banner squares. Now the admin can also choose between the options of Video Upload or YouTube Video Link for the square banners.
Horizontal Sliding Banner:
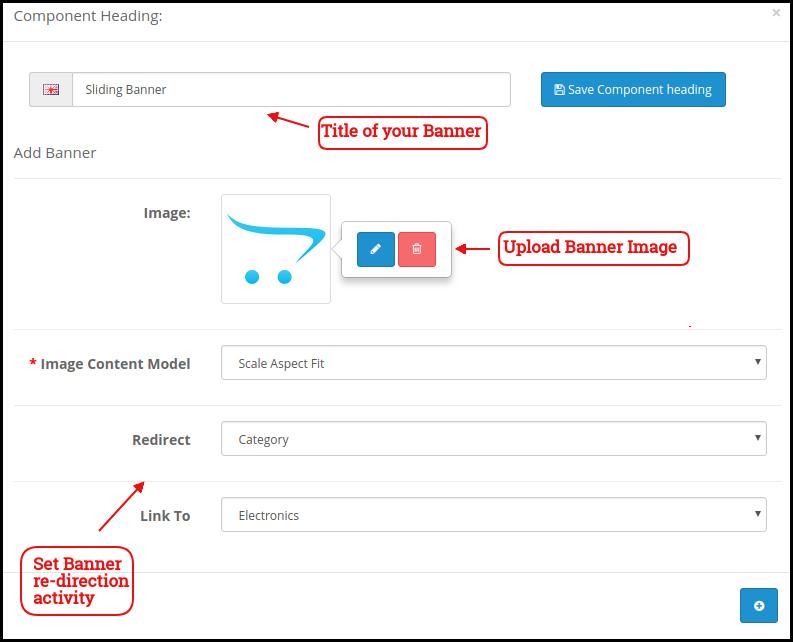
These are the rectangle-shaped available in horizontal sliding & can be fully customized from the backend. The admin can also configure the automated banner sliding time interval for the horizontal banner sliders components.
Grid Banners:
These are square-shaped banners listed on the home screen in the grid form. You can set as many banners as you want on the home screen & customize their image & landing page accordingly.
Countdown Timer Banner:
The PrestaShop Mobile App Builder offers a banner with a countdown timer. You can set the banner image & landing screen & set the timer till you want to display the banner. Once the timer is over, the banner will automatically disappear.
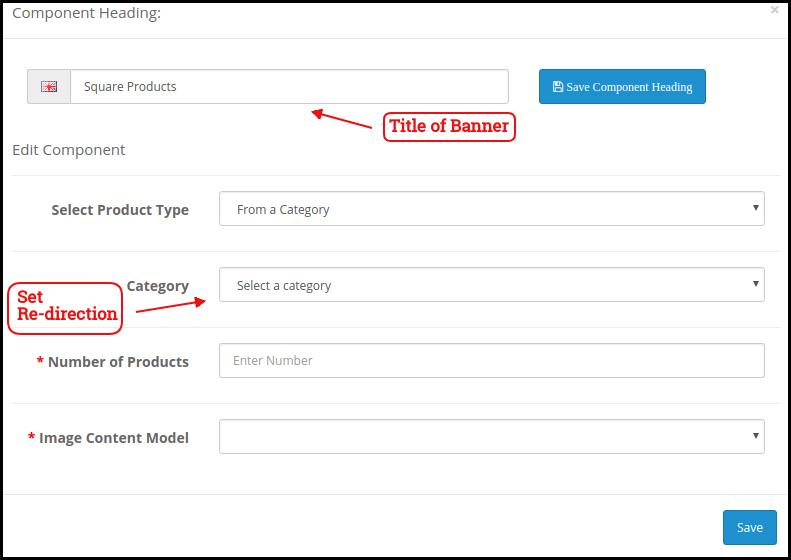
Square Products:
As for banners, the PrestaShop Mobile App Creator offers products to display on the home screen in the form of a square listings.
Horizontal Sliding Products
You can add the products in the form of horizontal sliders. The selected products could be of any specific category or other highlights as Best Sellers, Featured Products, etc.
Grid Products:
The products can also be added to the home screen in the form of grid listings. The products can be chosen from any category.
Recently Accessed Products:
The PrestaShop Mobile App Creator provides the recent tab element which displays the recent products viewed by the user. You can just add the element in your layout to display the same on the home screen.
Note: The store admin can add up to 20 elements while designing a layout in the backend panel.
Login/Sign Up Pop-Up:
We have introduced a new login pop-up that will encourage the customers to log in to their accounts with a single tap login/sing-up option provided on the home page of the apps.
5.6 GDPR Compliance
The PrestaShop Mobile App Builder offers GDPR compliance in mobile apps. The store admin can simply make a few clicks in the admin panel and apps will become GDPR compliant.
a) Enable GDPR Settings: Enable this tab to offer GDPR compatibility on various app screens.
b) Display GDPR on: Choose the app screens where you want to activate GDPR options.
c) Import Content Of CMS Page: Choose the CMS page whose content needs to be added for the GDPR option.
6.0 Mobile App Screens
6.1 Home Screen
The Home screen of your PrestaShop Mobile App will be exactly as you want it to be. The PrestaShop Mobile App Maker offers complete flexibility to design & craft a home screens into your hands. Using multiple banners(Square, Grid, Sliding), products (Square, Grid, Sliding), countdown timer banner, and recent products tab in the backend, you get to design intuitive layouts for your home screen. The following options are available on your app home screen:
Moreover, the positioning of various design elements can also be altered as per the requirement.
1. Dynamic Layouts:
Using various elements you can create & save various layouts in the backend & re-use them as per various events & festivals. You can design & craft your app home screen dynamically.
2. Brand Logo:
Your store logo is represented on the left-middle section of the top header of your PrestaShop Mobile App. The logo is fully configurable from the module backend & can be enabled/disabled including image changes.
3. Search:
The search option allows the mobile app shoppers to get easily & quickly what they desire. In your PrestaShop Mobile App, product search will be in two forms: The search option can be found on the bottom tab bar layout of PrestaShop Mobile App.
–> With Text: Your App users can search for desired products just by typing some related keywords. The PrestaShop Mobile App will show relevant results to that keyword.
4. Wishlist Bag:
The wishlist bag is displayed on the top header of your PrestaShop Mobile App containing all bookmarked products. The app users can save their desired products in a wishlist bag for future purchases.
5. Shopping Cart:
The Shopping Cart is available on the top-right corner of the app home screen. The users can get to know about the products added to their cart right from there.
6. WhatsApp
On the right-bottom of the home screen, there is a live seller-buyer chat option. The mobile app shoppers can easily & directly message you their query & you can resolve them instantly.
6.2 Accordion Menu (Navigation Bar)
The PrestaShop Mobile Apps for Android & iOS come up with proper categorization of products is available on the website. Mobile shoppers can easily browse products from multiple categories. All CMS pages are also available in Accordion Menu. It provides the following options:
1. My Account
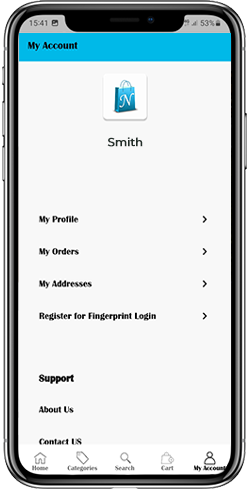
My Account screen contains all the user information like Personal Details, Shipping Address(s) & Order Details. The shoppers can view all the info related to them & can update personal details & login passwords as well.
2. Categories
These categories are the same as on your website. You can map them accordingly & offer a 3-level categorization to your app users for hassle-free browsing.
3. CMS Pages
Various CMS pages like About Us, Contact Us, Terms & Conditions, etc. Available on your website are displayed here. You can choose the desired one from the PrestaShop Mobile App Builder backend to be displayed on Mobile App.
4. Language(s)
The language option allows your users to view PrestaShop Mobile app in their Nativelanguage. All available languages are displayed under this option only.
5. Currency(s)
All available currencies on your eCommerce website are displayed on PrestaShop Mobile App as well. The shoppers can view & purchase the product price in their desired currency.
6. Login/Logout
Your users can easily log in/log out from PrestaShop Mobile App using this option.
7. Notification Settings:
The app users can control the specific push notifications they want to receive in the app. The options allow mobile app users to choose between all notifications, promotional notifications, and order status update notifications.
6.3 Category Screen:
All the sub-categories, parent categories & other associated categories are available in your PrestaShop Mobile App. The category screen is designed to deliver clutter-free experience in two basic views: Grid & List. The product image, name, price, the discount is displayed in all listings with an option to add them to the wishlist bag as well. The Mobile Apps with PrestaShop Mobile App Builder have layered navigation which makes the product search just simpler. The following options are available on the category screens:
Furthermore, now the admin can also enhance the UI of the category product listing page by adding video/images on the category page section.
1. Sort:
This option allows the shoppers to select the desired order in which the category product pricing is to be sorted. Two sorting orders are available in your apps: Price: Low to High & Price: High to Low.
2. Filter:
The option to filter products simplifies product search. The app users can filter the products in your PrestaShop Mobile App based on various attributes like size, color, compositions, Condition, Manufacturer, Price, etc. The users can search for their favorite products in minutes using these filters.
6.4 Product Screen:
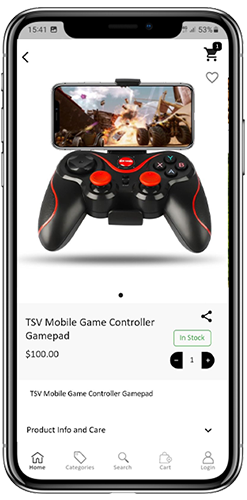
The product screen of your PrestaShop Mobile App is simple & intriguing. Multiple images of the same product are displayed along with the name & price. The product availability is also displayed as “In Stock” or “Out Of Stock” based on inventory status. It contains the following other options:
1. Product Options:
All the options related to the product like size, color, etc. are displayed on this screen. These product options are the same as available on the website.
2. Short Description
Users get to read the short description of your product to quickly make up their minds.
3. Product Info & Care
The complete product information is listed on the website is displayed here. The app users can get complete product details from here.
4. Add To Wishlist:
The Mobile App users can directly bookmark the product just by tapping “Add To Wishlist” on the left bottom of the product screen.
5. Add To Cart:
As the name “Add To Cart” button adds the product directly into the cart & the users can further go on with the purchase.
6. Product Social Sharing:
There is an option on this screen to share your product on multiple social platforms, including Bluetooth & e-mail. The app users can share the products among their friends/relatives on multiple social platforms & lure heavy users to your app.
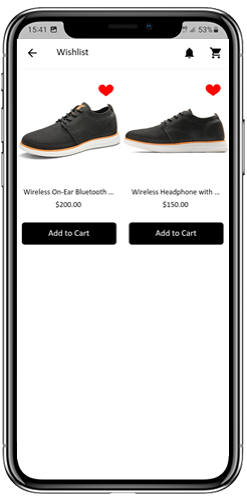
6.5 Wishlist Screen:
Your PrestaShop Mobile App Creator would have a wishlist bag allowing the users to bookmark products for future purchases. The users can view the list of all bookmarked products from here. It has two options:
1. Add To Cart:
The app users can add the bookmarked product directly into the shopping cart by choosing Add To Cart option.
2. Remove From Wishlist:
The users can even remove any wishlist product if not feel like buying that.
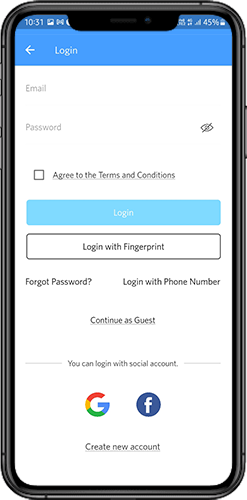
6.6 Login Screen
The PrestaShop Mobile App Creator offers various one-tap login options & makes the sign-in/registration process more seamless:
1. Login
The app users can authenticate & access apps using e-mail sign-in credentials.
2. Sign Up
All the new app users can sign-up & create their account on the store from the mobile App. The sign-up form of the PrestaShop Mobile App only asks for relevant details.
3. Login with Phone Number
Your Mobile App comes up with an easier & robust phone number login option which makes it easier for the users to verify the OTP & login app.
4. Login with a Fingerprint
Your users also get an option to log in with fingerprint authentication. This allows users to access apps in seconds.
5. Login with Facebook
The users can log in to the app using their Facebook Account Credentials.
6. Login with Google
The users can log in tothe app using their GoogleAccount Credentials.
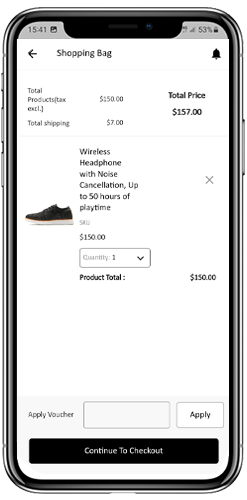
6.7 Shopping Cart Screen:
The Shopping Cart screen of your PrestaShop Mobile App will display all products to the shopping cart. The app users can view the product’s name, quantity, total price & shipping cost. This screen has the following options:
Apply Voucher
This option allows the users to get discounts & offers by entering valid coupons & vouchers running on your website.
2. Total Product Price
The users can view the complete cost of their shopping bag from here. It is automatically updated as per any update with product quantity or addition.
3. Update Product Quantity
The app users can even update the product quantity with the “Update Quantity” option.
4. Remove Product
The app users can simply remove the product from the cart by simply tapping the “Remove” option.
5. Continue To Checkout
The front-end mobile app users can proceed further to the checkout & payment screens just by tapping the “Continue To Checkout” option. It will re-direct them on the checkout screen.
6.8 Checkout Process
The Prestashop mobile app Builder consists of a simplified checkout process. The front-end mobile app users have the option to select the shipping details, billing details, order numbers, order comments, and so on in the checkout process of the mobile app.
Users of the Android and iOS apps only need to follow a few simple steps to place their orders.
1. Customers can select the desired product and add it to the shopping cart. After clicking on the shopping bag, he or she can also select the desired product quantity. Moreover, the front-end mobile app users can see the total number of products and shipping costs.
The customer also has the option to apply any voucher and coupon code at the bottom of the same page.
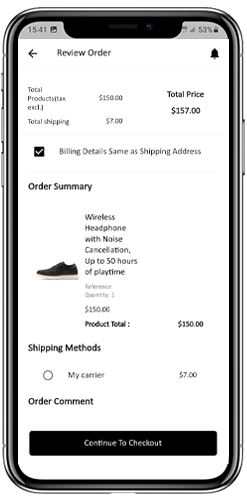
2. After clicking on the Continue to Checkout option, the user can review the order where he or she can see several details. Such as product price, shipping cost, shipping address (It can be edited on the same page), order summary (Number of the products), total price, and so on.
Additionally, the customer has the option to select their preferred mode of shipping on the same page. The user can also put his or her special request or requirement in the order comment option appearing on the bottom of the screen.
The user will be redirected to the payment method screen after clicking on the continue to checkout option.
On this screen, users have the option to select from all of the website payment options. By default, the shopping app consists of a cash-on-delivery option as a mode of payment.
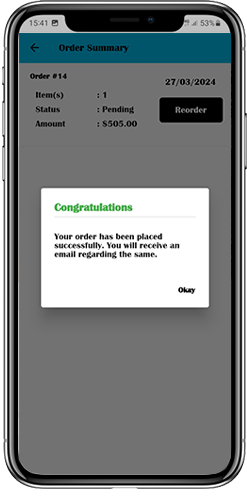
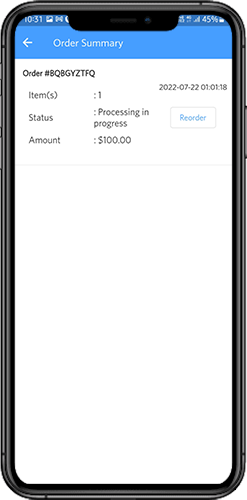
When the user performs the payment activity, then he or she will be redirected to the order summary screen. where the customer can see the order status, order number, amount, and so on. The front-end mobile app users will get the order confirmation popup message on their mobile phone screens as well.
6.8 My Account Screen
My account screen of the Android/iOS eCommerce app allows users to view the complete account details including a list of previous orders. My Account screen offers the following options:
Order History
The users get to know about complete order details being placed earlier. The order submission date, order reference, price & delivery status is displayed.
2. Update Profile
Users can also update their pre-saved profile details such as First or last name, phone number & password.
3. Shipping Address(s)
The app users can see the complete list of saved Shipping Addresses. A new Shipping address can also be added from here.
4. Order Details
The app users can get to view the complete list of the previously placed app orders.
5. Re-order feature
There is a direct re-order product directly by clicking the “Re-order” button. All the previous orders will be added to the cart by just tapping a single button.
6.10 Order Detail Screen
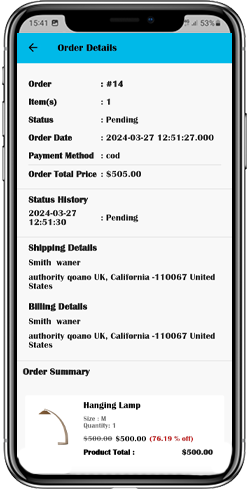
Order details screen of PrestaShop eCommerce App provides complete order detail such as shipping address, product summary, shipping and payment method, and total cost summary. The users can even track the delivery of previously placed orders directly from this screen.
7.0 Video Tutorials
8.0 Advanced PrestaShop Marketplace with Mobile App
KnowBand’s PrestaShop Marketplace converts your online website into a fully fledged marketplace. The PrestaShop Mobile App Builder is fully compatible with PrestaShop Marketplace extension. This means you can bring the entire marketplace listing on the same PrestaShop Mobile Apps. Thus, launch a pair of Marketplace-compatible Mobile Apps with KnowBand & attract a large base of sellers & customers to your store.
–> As the user clicks on the Seller option, he/she is redirected to the Seller page of the mobile store. The user can view the list of the sellers of the marketplace along with their ratings.
–> The customers can click on the name of the seller in order to see his profile and product being offered. The sellers can log in with their username and password. They are then redirected to the dashboard.
Get to know more about PrestaShop Marketplace with Mobile App from here.
Want to create apps for your PrestaShop website? We got a complete no-code App Builder for you!
There were times when PrestaShop Mobile Apps were only for big brands or flourished ones. E-commerce newbies & startups used to rely on their website only. But, time has changed now. Every PrestaShop website owner is looking forward to own mobile apps irrespective of their size. The Mobile Apps are playing a vital role in strengthening the brand & building a loyal customer base with minimal efforts. Every store owner is looking to grab this opportunity & grow their business on another level.
KnowBand, in this concern, has brought an automated solution with PrestaShop Mobile App Builder. It is a readymade framework designed to build native Android & iOS apps for your PrestaShop website without coding. The PrestaShop Mobile Apps are connected with your website in real-time. Moreover, the module provides complete backend panel control into your hands & thus you can manage the app functionalities with ease. Now let’s take a glance at some of the outstanding & sale-boosting features of PrestaShop Mobile App Builder:
1. Easy Installation:
Our PrestaShop Mobile App Builder is very easy to install & configure. All you need to do is to upload the zip file on your website & configure the backend panel from there.
2. Completely Native Mobile Apps
The performance of your PrestaShop Mobile App among worldwide mobile shoppers matters a lot as it would be a deciding factor for them to purchase or not. We all want shopping apps to be smooth & fast. The PrestaShop Mobile App Builder offers 100% native Android & iOS app which ensures hassle-free performance on all sorts of user’s devices.
Furthermore, the apps are built with the most advanced mobile app development technology Flutter, which ensures advanced compatibility and smooth user experience for the customers.
3. Customizable Home Screen Layout
The PrestaShop Mobile App Maker offers a dynamic home screen whose layout can be customized & configured from backend. The store admin can create & save multiple themes & festive based layouts in the backend. The positioning of various elements can be altered with just drag & drop feature.
4. Alluring Color & Font Options
Match your app colors & font styles with the website from backend panel of PrestaShop Mobile App Maker. Our Module allows you to choose theme color, background color, button color & button text color for your app.
5. Compatible with All Handheld Devices
Our PrestaShop Mobile App Creator provides error-prone & fully tested apps which run perfectly on all sorts of Android & iOS smartphone as well as tablets.
6. 100% Website & App Synchronization
Your PrestaShop Mobile Apps will be fully connected with your website & thus any change you make on the store will be reflected on the Mobile App in real-time.
7. Multi-lingual & RTL Support
The Mobile App Builder offers both multi-lingual & RTL writing support in the Android & iOS apps. The e-merchants can easily enhance the scope of their business worldwide.
8. Instant Login Options
The PrestaShop Mobile App Creator offers easy & quick options for user sign-in & registration. The mobile shoppers can login using Google, Facebook, Phone Number & Fingerprint verification. Moreover, the iOS App users can log in using Face ID which makes the login process hassle-free and simpler than ever.
9. Simplified Checkout
Few relevant details on a single screen of PrestaShop Mobile App Maker make the order submission easier for the users.
10. Shipping Methods Support
The PrestaShop Mobile App Supports all sorts of website shipping methods. This makes the trade between seller & buyer completely effortless.
11. All Product Type Support
The mobile apps for PrestaShop eCommerce website support all types of products on the Mobile Apps like single, bundled, grouped, configurable & virtual (downloadable) products.
12. Unlimited Push Notifications
Sending push notifications to your app users about deals/offers/discounts would definitely grab their immediate attention & close more sales for your store. The PrestaShop Mobile App Maker offers the option to send push notifications on the apps from module backend. The store admin can send following sorts of notifications on the Apps:
Automated Order Creation Notification
Automated Order Status Update Notification
Automated Abandoned Cart Notification
Custom personalized Notification
Moreover, the users can check all the previous notifications in the newly added notification tab in the app. This will make sure your customers are up-to-date concerning all the offers and informational notifications.
13. 24*7 Chat Options
Keep your users close to you with the WhatsApp chat option in your PrestaShop Mobile Apps. The users can directly contact you regarding any query/concern & get assistance 24*7.
14. Mobile Coupons & Vouchers Support
The PrestaShop Mobile App Maker offers support to all sorts of website coupons & vouchers on mobile apps as well. The amazing deals & discounted price would definitely keep the app users engaged & even compel them to re-visit app for more purchases.
15. Website Payment Experience on Mobile App
Offer the website payment experience on your PrestaShop Mobile App as well. The PrestaShop Mobile App Maker supports all sorts of website payment options on the mobile app.
16. New Payment Method Integration
The PrestaShop eCommerce Mobile App Creator comes with the flexibility to add new payment methods in the apps. All sorts of native payments can be integrated over a fair amount of fee.
17. Real-time Order Tracking
The Mobile Apps with PrestaShop Mobile App Creator offers effective real-time order tracking options. The updated status of previous order delivery gets updated in real time.
18. White Label Apps
The PrestaShop Mobile App Builder for Android & iOS allows the store owners to display the website logo on the header of the apps. This will make your app branded & popularize the same among worldwide mobile shoppers.
19. Social Sharing
The products from the app can be shared on multiple social networks by the users. It will grow the social reach of your store & lure potential leads.
20. Gamified E-Mail Subscription Pop-Up
Offer a gamified e-mail subscription pop-up on the mobile apps with an interactive spin-wheel interface. You need to install KnowBand’s PrestaShop Spin & Win module on your website.
21. Layered Navigation
The PrestaShop eCommerce Mobile App Maker makes the product search easier with multiple filters & sort options. The users wouldn’t face any issue while searching the right product.
22. Login-Sign up Pop-up:
The mobile apps encourage the customer to complete the login process in the app. The users can login via the login/sign-up pop-up available on the home screen of the app.
Furthermore, this not only ensure easy login process for the customers but also helps the E-merchants to get the customers’ emails for marketing purposes.
Develop FlutterOpenCart Mobile App for your eCommerce store with KnowBand’s OpenCart Mobile App Builder & start observing a sudden growth in your store conversions & sales.
1.0 Introduction
If you are an OpenCart website owner & currently selling products on your website, try KnowBand’s automated mobile apps solution & take your business to the mobile world. The OpenCart Mobile App Builder is the pre-configured framework designed to develop FlutterAndroid & iOS apps for your online website. This ready-to-go mobile app solution is the most advanced & smartest solution to own a pair of fully functional Android & iOS stores without any coding or technical skills.
KnowBand has made a mark in the eCommerce industry as a leading mobile app provider for almost all the major eCommerce platforms. Its OpenCart Mobile App Builder is the easiest way to build feature-packed OpenCart Mobile Apps in just 3 simple steps:
2. Share the app-related specifications & requirements.
3. Get your own FlutterOpenCart Apps in 2-3 days.
We, at KnowBand, are an exceptionally skilled and proficient pool of programmers, designers, and other involved professionals. We can deliver an OpenCart mobile app that closely matches your personal expectations and business requirements. If you are not sure about the utility of this mobile app for your OpenCart store, let us throw some light on this amazing OpenCart Mobile App Builder.
Latest Enhancements in Opencart Mobile App Builder v4.8
The OpenCart Mobile App Builder Extension now introduces two powerful new integrations with the AI-Powered Chatbot Extension and the Opencart VideoMate Extension. These latest integrations significantly improve customer engagement, automate support, and enhance product presentation within your mobile application.
The Opencart AI Chatbot Extension leverages popular and advanced AI models of 2026, such as OpenAI ChatGPT, Google Gemini, Claude, and DeepSeek, enabling intelligent, real-time customer interaction directly inside the mobile app.
The Opencart Video Manager Extension transforms the shopping experience with immersive video carousels and a floating video player, helping merchants showcase products in a more engaging and conversion-driven format.
Together, these features make the OpenCart Mobile App Builder a complete AI-powered mobile commerce solution for modern eCommerce stores.
1.1 Prominent Features of OpenCart Mobile App Builder:
The following are some of the major features you’ll get in your OpenCart Mobile Apps:
–> Customizable Home Screen Layout (Complete Flexibility)
1.2 Recent Enhancements in Opencart Mobile App Builder!
1. Dynamic Position of the Signup-Login Popup in Home Page Layout: Admins can now customize the position of the signup-login popup on the home page, offering a more flexible user experience.
2. Enhanced Review Pages:
Write Review: Simplified process for customers to leave feedback.
Read Review: Improved interface for browsing reviews.
Review on Product Page: Reviews are now more accessible directly on product pages.
3. Video in Banner Elements: We have introduced video options in the banners available for the app’s home page layout. Now, the admin can add a YouTube video or can also upload a video below 2 MB for the square, horizontal, grid, and countdown banner components.
4. Push Notification Updates: Recently Firebase has officially deprecated the older cloud messaging API. Due to that the admin configurations now support uploading Firebase key JSON files for better management.
5. CMS and Layout Redirection in Banners and Category Elements: Banners and category elements available in the home page layout now support redirection to CMS and multi-layered layouts.
6. Automatic Banner Sliding in Horizontal Banner Slider: Horizontal banner sliders now feature automatic sliding, improving user engagement. The admin can also add the time difference on which he wants to slide the banners automatically.
7. List and Grid View for Product Listing Screen: Users can toggle between list and grid views on the product listing screen for more convenient browsing. This new feature not only improves the UI but also provides more convenience to the customers while browsing the products.
8. Common Notification by Admin: Admins can now send common notifications to all users, ensuring important messages reach everyone. Furthermore, customers can check all the past notifications in the notification tab available in the app.
9. Custom Banner Element in Home Page Layout: Now, the Opencart admin can upload banners of any size, offering greater customization of the home page.
10. Redirection in Top Category Element: Top category elements now support redirection to specific layouts, improving user navigation.
11. Advertisement Setting: The enhanced OpenCart Mobile App Builder allows store admins to turn their apps into revenue-generating channels by incorporating in-app advertisements. With Google AdMob integration, admins can now display banner ads on various app pages, creating a seamless way to generate additional income while keeping users engaged.
12. Navigation Setting: With flexible customization options, the store admin can adjust the look and feel of the tab bar layout. Now, the modules allow the admin to choose the names, set redirections, choose icons, and personalize color schemes, offering a unique and branded app experience that aligns with their store’s style.
Knowband’s OpenCart Mobile App Builder
The OpenCart Mobile App Builder by Knowband helps you create a mobile app for your store without coding. Easily turn your website into a user-friendly app!
KnowBand offers a demo of OpenCart Mobile Apps before actual mobile app development. We have brought free of cost demo for all the eCommerce store owners out there.
2.1 View Our Demo Store working on Apps
Take a look at our app functionalities with our demo OpenCart Mobile Apps. We have integrated our demo store with the app in order to let you explore the app working. All you need to do is to follow these simple instructions:
Step 1: Download and install the Nautica OpenCart Mobile App on your testing device. Here, are the links to OpenCart Demo Apps:–> Apple App Store–> Google Play Store
Step 2: Open the App and tap the “View Demo” button being displayed on the splash screen. Enter some relevant details like Name, E-mail & Store URL & experience our demo store running on the demo app.
Note: To access the Admin Panel of KnowBand’s OpenCart Mobile App Builder on our demo store, visit here.
2.2 View Your Store working on Demo Apps
Want to test your own store on the demo apps. Well, we made even that possible with 3 simple steps:
Step 2: Install the Demo Apps (links in the previous section) on your mobile testing device. Open the App & enter your website URL in “View Your Store”.
Step 3: Tap “View Your Store” and start experiencing your own store on OpenCart Demo apps.
Note: This Free version of Mobile App Builder is just for the demo purpose & no APK/IPA files will be provided with this module. In order to get your own APK/IPA files, you need to purchase the paid version of the OpenCart Mobile App Builder.
3.0 Build OpenCart Mobile App in 3 Simple Steps
Once you are satisfied with the demo apps working, it’s time to build your own mobile apps. The process to develop mobile apps with OpenCart Mobile App Builder is only a matter of these 3 simple steps:
Step 1: Purchase & Install Module on your website.
If there is any issue while publishing the app on respective stores, we would get it done for you.
4.0 Admin Panel Screens
Once the OpenCart Mobile App Builder is installed on the website, let’s take a look at its backend panel configuration. First of all, go to Extensions>>Modules>>KnowBand Mobile App Creator & click on configure option. It will bring the following interfaces to you:
4.1 General Settings:
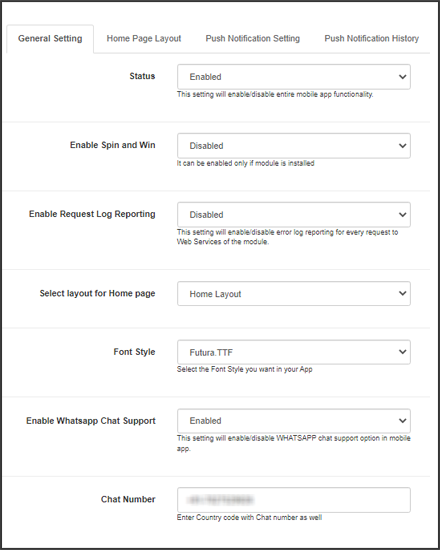
a) Status: Enable/disable the OpenCart Mobile App Builder module to make the apps work on mobile devices.
b) Enable Back in Stock: This option allows the admin to enable/disable Knowband’s back-in-stock module in the apps.
c) [New] Enable Spin & Win: This option allows the admin to enable or disable the Knowband’s Spin & Win Module in the mobile app.
d) [New] Enable AI Chatbot: You can now enable the AI Chatbot on your mobile app using the Opencart AI Chatbot Extension.
e)[New] Enable Videomate: Now, admins can easily add the instagram reels, shorts, videos in trending vidgets using the Opencart Videomate Extension
f) Font Style: This option provides multiple font styles to suit your app’s appearance.
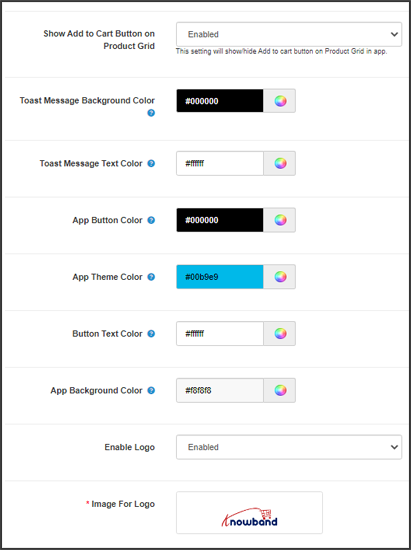
g) Show Add to Cart Button on Product Grid: If you want to show/hide the “add to cart” button from the product listing pages, you can manage the same from this button.
h) Mandatory Phone Number at Registration: Make the mobile number field optional/mandatory on the app’s sign-up page from here.
i) Redirect on Cart Page when Add to Cart: If you want users to directly redirect to the cart page upon clicking on the “add to cart” button, you can enable this option from here.
j) Enable Notification List Feature: This button allows the store admin to enable/disable the notification feature in the Android and iOS apps.
k) Enable Sing-up Pop-up: You can enable/disable the login pop-up for the non-logged-in customers in the app.
l) Enable Request Log Reporting: Enable the error log on mobile apps. This log file is used when the app shows any error or abnormal behaviour.
m) Select Layout for Home Page: Choose the desired layout for your app home screen. You can create multiple layouts under the Home Page Layout tab.
n) Enable WhatsApp Chat Support: Enable/disable the WhatsApp chat option on mobile apps.
o) App Button Color: Choose the button color for your apps.
p) App Theme Color: Choose the theme color for your apps.
q) App Button Text Color: Choose a button-text color for your apps.
r) App Background Color: Choose a background color for your apps.
p) Enable Logo: Enable the logo in your mobile apps. You can upload the logo image which will be displayed on the header of the mobile apps.
q) Fingerprint Login: Enable/disable fingerprint login in mobile apps.
r) Phone Number Login: Enable/disable phone no login in the mobile apps.
s) Disabled Shipping Methods: Disable the shipping methods that you do not want to display in the apps.
4.2 Payment Methods:
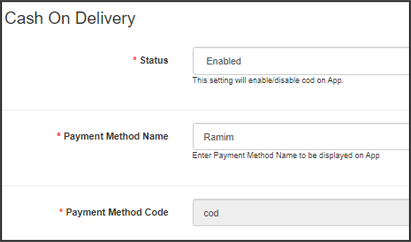
The OpenCart Mobile App Creator offers additional COD payment option to make the payments easier in the apps. The mobile apps with this extension already support web-view payment options in mobile apps.
4.3 Push Notifications:
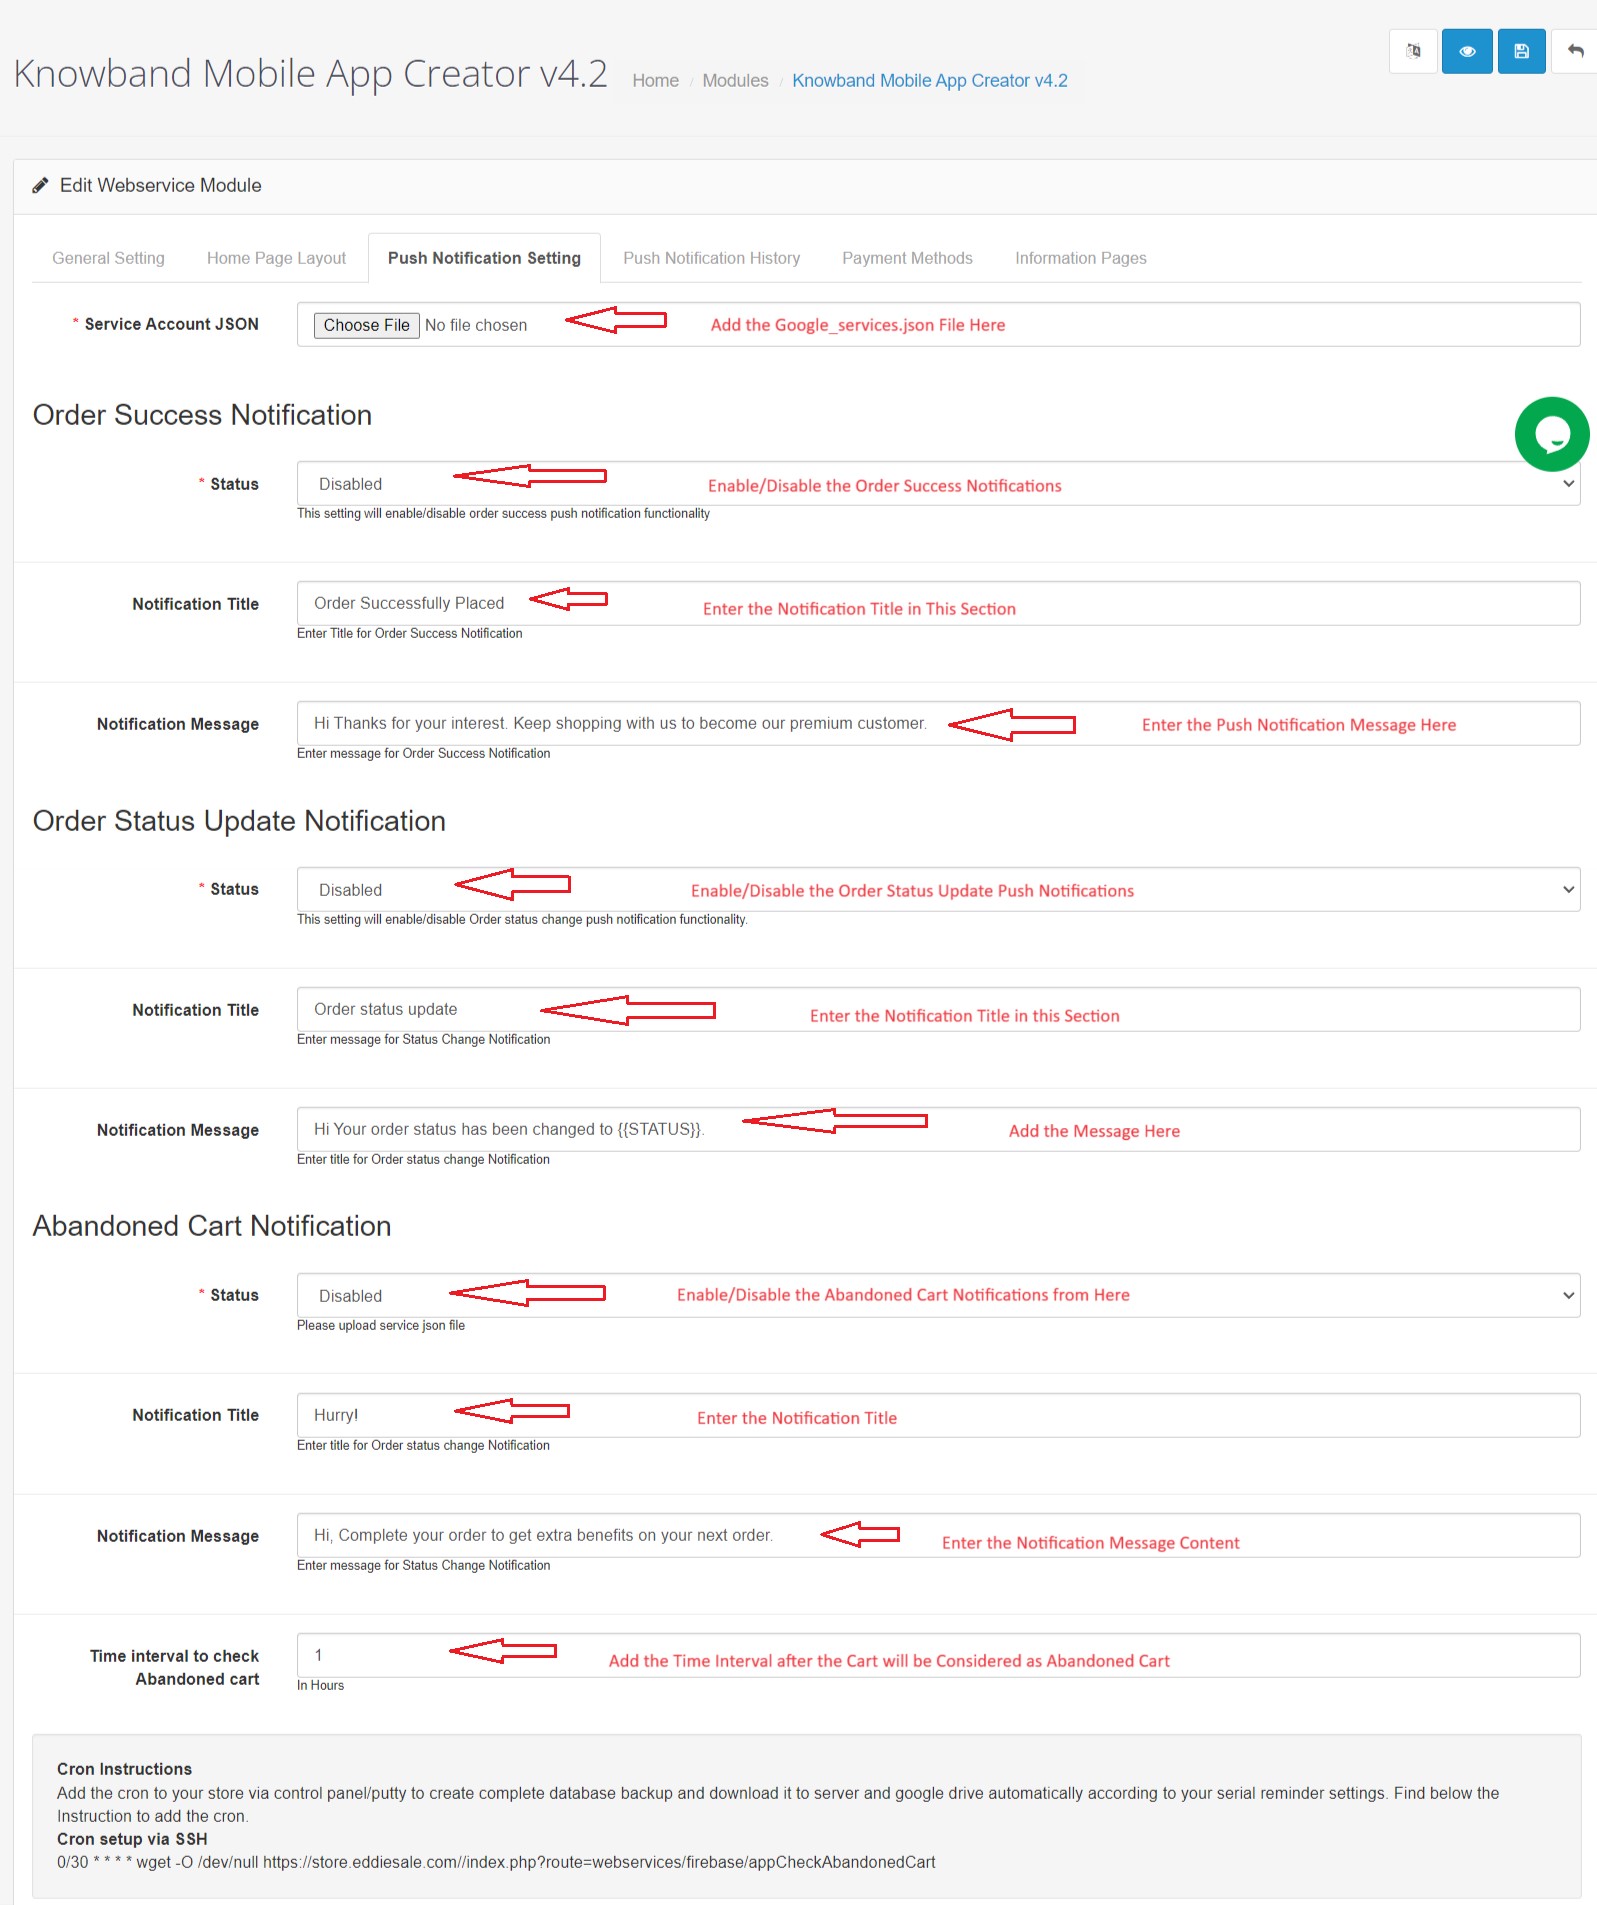
a) Service Account Json: In order to set-up the push notification in both the Android and iOS app, you will have to add the google_services.json file in this section. You can get the same in your Firebase account or can also ask the Knowband support team for the JSON file for your Firebase project.
b) Order Success Notification: Configure an automated order creation push notification which would be sent automatically on the user’s apps who successfully create an order.
c) Order Status Update Notification: Configure an order status update notification which would be sent automatically to the users whenever there is an update in order delivery status.
d) Abandoned Cart Notification: Configure automated abandoned cart notification which would be sent automatically to the users who left their products in the cart.
e) Send Notification: The store admin can even send manual notifications & highlight any deal or discount to the mobile app users.
4.4 Information Pages:
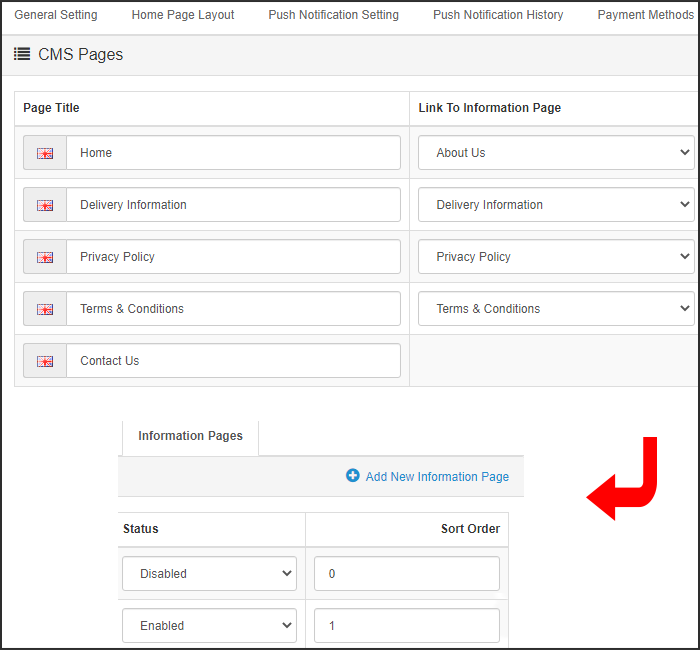
This tab of the OpenCart Mobile App Maker allows you to manage the CMS pages on the apps. You can customize the name and landing page of various CMS along with their sort order. New pages can also be added from here if there is a requirement.
4.5 Home Page Layout:
The OpenCart Mobile App Builder allows you to create & save various intuitive & appealing layouts for your mobile app home screen.
After adding the layout, click on Edit option & start adding & configuring various elements for your app home screen.
The store admin can configure the following design elements on the mobile app home screen:
Top Categories:
These are the categories displayed on the top of the home screen in the form of squares. You can configure their images & landing pages from the backend. Maximum 8 such categories are added of which 4 are mandatory.
Square Banner:
You can offer a square-shaped banner on the home screen of OpenCart Mobile App whose image & landing page link can set from the backend.
Sliding Banner:
These are the sliders for your home screen which can be configured from the module backend.
Grid Banner:
These are the banners for the app home screen displayed in the form of a grid listing & can be customized accordingly.
Countdown Banner
The OpenCart Mobile App Maker offers a count-down timer banner in your mobile apps. You can configure the banner image, landing page, and timer from the backend.
Square Products:
You can even list the products in square listing on the mobile app home screen.
Sliding Products
The products can be displayed in the slider view on the mobile app Home Screen & can be configured from backend panel.
Grid Products:
The products can be displayed in the grid view on the home screen.
Products Recently Accessed:
The OpenCart Mobile App Creator offers the recent products tab on the mobile app home screen which displays recent products viewed by the user. You can just add the element in your layout to display the same on the home screen.
Login/Sign up Pop-up:
The Opencart admin can encourage the customers to keep their account logged in in the apps by showing a dynamic login/sign-up pop-up on the home page of the app.
Advertisement Banner:
The Opencart App admin can select the position of the advertisement banner on the home page with this layout component.
Note: The store admin can add up to 20 elements while designing the layout in the backend panel.
4.6 Advertisement Setting:
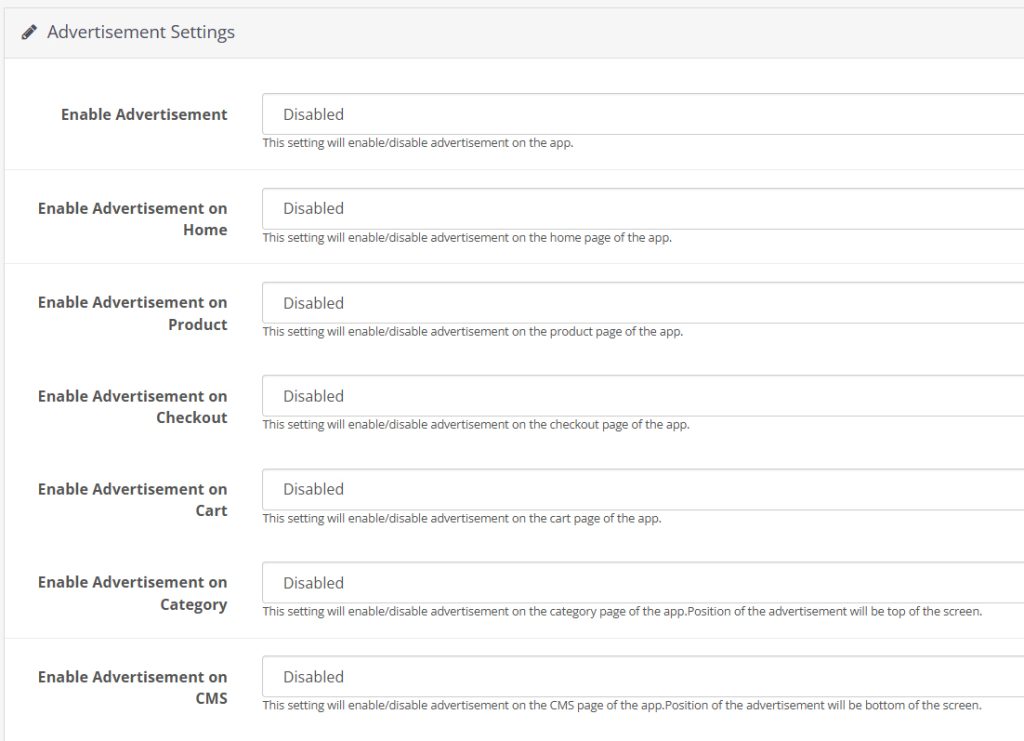
The updated Opencart App Maker allows the store admin to use their apps as an additional income channel by providing in-app advertising features in the apps. The new app comes with Google AdMob integration that allows the admin to show banner advertisements on the different pages of the app.
Enable Advertisement:
This setting will enable/disable the advertisements in the apps.
Enable Advertisement on Home:
If you want to enable/disable the advertisement feature on the home page of the app, you can use the following button.
Home Ad Unit ID:
The admin can find the Ad Unit ID on the Google AdMob console. Once done, you can enter the unit ID in the following section.
Enable Advertisement on Product:
This button will enable/disable the advertisement on the product page of the app.
Product Ad Unit ID:
Enter the Product Ad Unit ID in this section.
Select Product Position:
Using this option, the store admin can select the position of the Ad on the product page. This feature allows the admin to select from the below product image and description or above the add to cart button or related product section, providing more flexibility to the store admin.
Enable Advertisement on Checkout:
Using this button, the store admin can enable/disable the Advertisements on the checkout page.
Checkout Ad Unit ID:
Enter the Unit ID here.
Select Checkout Position:
Select the Advertisement position from here. The store admin can select from various options like top of the screen, bottom of the screen, above the products, and below the shipping methods.
Enable Advertisement on Cart:
Enable/Disable the advertisement on the cart page with this button.
Cart Ad Unit ID:
Enter the Unit ID for the banner on the cart page.
Select Cart Position:
The store admin can select the ad position from here. This option allows the admin to select from below the products or above the products option.
Enable Advertisement on Category:
This feature will enable/disable the Advertisement on the category page.
Category Ad Unit ID:
Enter the category Ad Unit ID.
Enable Advertisement on CMS:
Enable/Disable the advertisement on the CMS pages from here.
CMS Ad Unit ID:
Add the CMS Ad Unit ID.
4.7. Navigation Setting:
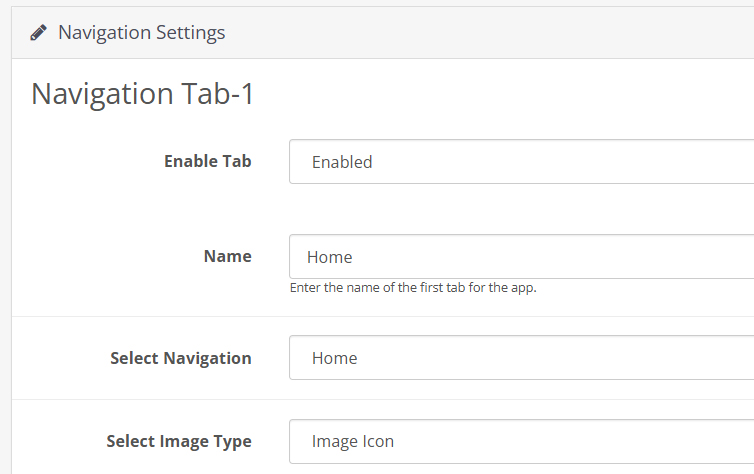
The Opencart Mobile App Builder provides the admin with the option to modify the look and feel on the bottom navigation bar of the app. Using the built-in features, the store admin can modify the name, redirection, icon, and color combinations of the tab bar layout.
Here is a detailed overview:
Enable Tab:
The store admin can enable/disable the bottom navigation icons from the following option.
Name:
Enter the navigation icon name here.
Select Navigation:
Select the redirect activity from home, cart, category, search, and profile from here.
Select Image Type:
The store admin can select if he wants to upload a custom image for the navigation bar components or the option to select built-in images is also there under the configurations.
In total, the app provides 5 different bottom navigation bar icons that can be configured with the help of the above-mentioned guide.
5.0 Mobile App Screens:
5.1 Home Screen:
The OpenCart Mobile App Builder offers a dynamic home screen in the mobile apps which can be easily designed from the backend panel. The store admin gets the complete flexibility to design & craft the home screen as per his/her choice. The OpenCart Mobile App Builder offers the following designing elements:
–> Top Categories
–> Square Banners
–> Sliding Banners
–> Grid Banners
–> Square Products
–> Sliding Products
–> Grid Products
–> Countdown Timer Banner
–> Recently Viewed Products
-> Login/sign up Pop-up.
The positioning of these attributes can also be changed as well just with simple drag & drop.
a) Dynamic Layouts: Craft alluring home screen layouts on your own which connect with the users & compel them to make the purchase.
b) Website Logo: Add your store logo in the module backend & display the same on the header of the app.
c) Search: The search option in the OpenCart Mobile App allows the users to search for products without any hassle. Keyword makes it easier for the buyers to get the right product in the least time.
d) Wishlist: Wishlist option in the OpenCart Mobile App lets you bookmark the products regarding future purchase.
e) Shopping Cart: The users can access the shopping cart from the top-right corner of the home screen.
f) WhatsAppYour OpenCart Mobile App users can directly contact you regarding any query or concern through WhatsApp chat option on the home screen.
5.2 Accordion Menu (Navigation Bar)
The OpenCart Mobile Apps for Android & iOS come up with easy to use categorization of your store products. The online shoppers get to browse all the categories in the navigation bar along with all CMS pages.
The Accordion menu categories are the same as of your store & it provides the following options:
My Account: The My Account screen of OpenCart Mobile App contains all the user information like Personal Details, Shipping Address(s) & Order Details. There is even an option for the users to register their fingerprints. The online shoppers get to view complete personal details from here & update the password as well.
Categories: All your store categories are fetched on the mobile apps as well. Offer a multi-level categorization to your app users & let them browse products with ease.
CMS Pages: All of your website CMS pages like About Us, Contact Us, Terms & Conditions, etc will be displayed here.
5.3 Category Screen:
All sorts of categorizations available on your the OpenCart stores will be displayed in the mobile apps as well. The category screen has two views: Grid & List view. The product image, name, and price is displayed for all product listings. The mobile apps with OpenCart Mobile App Maker have multiple filter & sorting options which simplify product search for the users.
Sort: Sort option in OpenCart Mobile Apps allow the users to view products in Low to High or High to Low category.
Filter: Filter down the category products with various attributes like price, cost etc. & search desired products without any efforts.
5.4 Product Screen:
The product screen of the OpenCart Mobile App is as simple & easy-to-use as it could get. Every product has multiple images displayed along with its name & price. The product availability is also displayed as “In Stock” or “Out Of Stock”. The product screen has the following other options:
Product Options: Various options related to the product like size, color, etc. are displayed on the product screen. These options are the same as available on your website.
Short Description: Users get to read the short description of your product to quickly make up their minds. The OpenCart Mobile App displays both short & full descriptions of the products.
Product Info & Care: All the information related to the specific product is displayed under this section. This is the same information as of the website.
Add To Wishlist: The users can even add the products into the wishlist bag from here. The products added in wishlist are bookmarked for the future purchase.
Add To Cart: The Add To Cart button allows you to add product in the cart which can be processed further in successful order creation.
Product Social Sharing: The OpenCart Mobile App has the option to share the products on different social platforms, Bluetooth & e-mail. The users can share the products with their friends & relatives & bring potential users to your store.
5.5 Wishlist Screen:
The OpenCart Mobile App Builder has a wishlist bag allowing the users to bookmark products for future purchases. The users can view the list of all wishlist products from this screen. It has the following options:
Add To Cart:
The app users can add the wishlist product directly into shopping cart with Add To Cart option.
5.6 Login Screen
The OpenCart Mobile App Creator offers various one-tap login options & make sign-in/registration process more seamless:
Login: The app users can authenticate & access OpenCart Mobile Apps using e-mail sign-in credentials.
Sign Up: All the new users can sign-up & create their account on the store from the mobile App. The sign-up form of the OpenCart Mobile App is fully uncluttered.
Login with Phone Number: Your OpenCart Mobile App comes up with a phone number login option as well which allows users to verify OTP & log in without any hassle.
Login with Fingerprint: Your app users also get an option to log in with a fingerprint. This biometric authentication allows the users to login apps in seconds.
Login with Facebook: The users can log in into mobile apps using their Facebook Account Credentials.
Log in with Google: The users can log in into app using their Google Account Credentials.
5.7 Shopping Cart Screen:
The Shopping Cart screen of your OpenCart Mobile App will display all products added into shopping cart.
The app user’s can view Product name, quantity, total price & shipping cost. This screen has the following options:
1. Apply Voucher:This option allows the users to get discounts & offers by entering valid coupons & voucher running on your website.
2. Total Product Price:The users can view the complete cost of their shopping bag which is automatically updated as per any addition in the cart.
3. Update Product Quantity:The users can even update the specific product quantity.
4. Remove Product:The app users can simply remove the product from the cart.
6. Continue To CheckoutThe app users can proceed further to the checkout & payment screens just by tapping the “Continue To Checkout” option. It will re-direct users on the checkout screen.
5.8 Checkout Process:
There is a simplified checkout process in the OpenCart mobile app builder. Details like shipping details, billing details, order numbers, order comments, and others are available for customers in the checkout process of the mobile app.
Orders can be placed by just following a few easy steps on the eCommerce mobile apps.
Users can choose a product and add it to their cart. After clicking on the shopping bag, the customer can select the appropriate amount of a product. In addition, mobile app users can view the total number of products and shipping prices.
At the bottom of the same page, the customer also gets the option to apply any vouchers and coupon codes.
2. The user can review the order after selecting the Continue to Checkout option and can see various details. Such as product pricing, shipping cost, shipping address (editable on the same page), order summary (number of products), and total price.
Moreover, the customer can choose their preferred shipping method on the same page. In addition, the user can specify any particular requests or requirements in the order comment field at the bottom of the screen.
3. After clicking on the continue to checkout option, the front end mobile app user will be redirected to the payment method screen. On this screen, customers can choose from all the payment alternatives available on the e-commerce website. The Android and iOS apps consist of a cash-on-delivery payment option by default.
4. Once the user has completed the online payments, he or she will be forwarded to the order summary screen. In which, the customer can view the order status, order number, and amount, along with other information. The order confirmation popup message will also appear on the screens of mobile app users.
5.9 Payment Screen:
The payment screen on OpenCart Mobile App displays both web-view & Flutterapp payment methods. The OpenCart Mobile Apps supports all sorts of website payment options along with PayPal & COD payment methods. Moreover, various other native payment options like PayU, Apple Pay, Amazon Pay, Braintree, Stripe etc. can also be added in your mobile app over a fair price.
5.10 My Account Screen
My Account screen of the OpenCart Android/iOS App allows the users to view the complete account details including a list of all previous orders by just tapping on my orders option. My Account screen has the following other options:
Order History:The users get to know about complete order details created on the app. The order creation date, reference, price & delivery status is available on this screen.
Update Profile:Users can also update their pre-saved profile details like First or last name, phone number & password.
Shipping Address(s):The app users can see the complete list of saved Shipping Addresses. New Shipping address can also be added from here.
Order Details:The app users can view the complete list of the previously placed orders from the app.
Re-order feature:There is a direct re-order functionality allowing the users to repeat the order just by clicking the “Re-order” button
5.11 Order Detail Screen
Order details screen of OpenCart Android & iOS App provides complete order detail such as shipping address, product summary, shipping and payment method, and total cost summary. This order detail is of the previous order placed by you. The users can even track the delivery of previously placed orders directly from this screen.
5.12. In-App Advertisement Samples:
The admin can set the advertisement banners on the different pages of the app. Here’s how it will look to your customers.
6.0 Advanced OpenCart Marketplace with Mobile App
KnowBand’s OpenCart Marketplace converts your online website into a fully-fledged marketplace. The OpenCart Mobile App Builder is fully compatible with OpenCart Marketplace extension. This means you can bring the entire marketplace listing on the same OpenCart Android & iOS Mobile Apps. Thus, launch a pair of Marketplace-compatible Mobile Apps with KnowBand & attract a large base of sellers & customers to your store.
–> As the user clicks on the Seller option, he/she is redirected to the Seller page of the mobile store. The user can view the list of the sellers of the marketplace along with their ratings.
–> The customers can click on the name of the seller in order to see his profile and the product being offered. The sellers can log in with their username and password. They are then redirected to the dashboard.
7.0 OpenCart Mobile App Builder for Android and iOS – Video Tutorial
This video tutorial walks you through the complete configuration of the OpenCart Mobile App Builder extension by KnowBand. Learn how to set up your app from backend to frontend with step-by-step guidance on:
General Settings
Push Notification Settings
Payment Methods
Home Page Layout
And many more essential configurations
By the end of this tutorial, you’ll be able to fully configure your OpenCart mobile app for both Android and iOS, ensuring a smooth and professional setup.