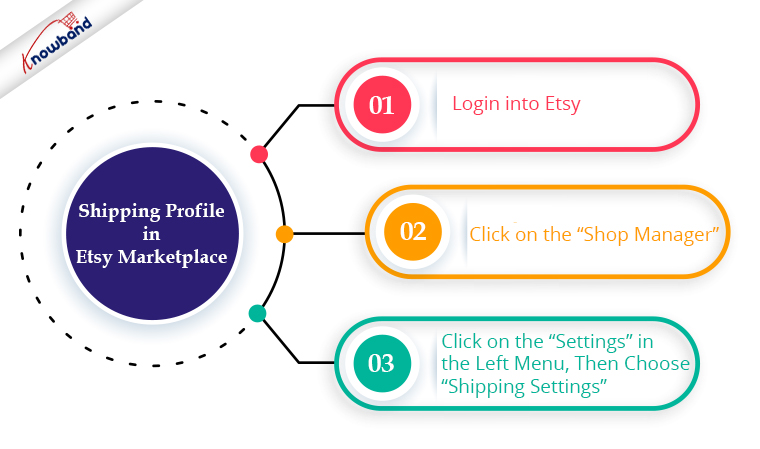
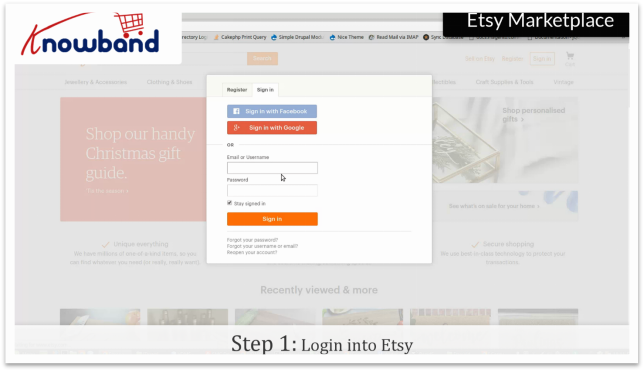
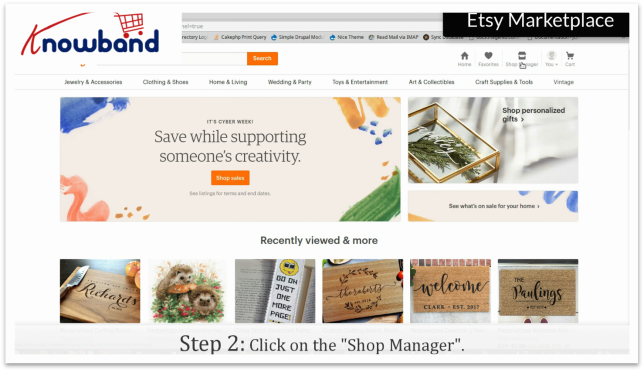
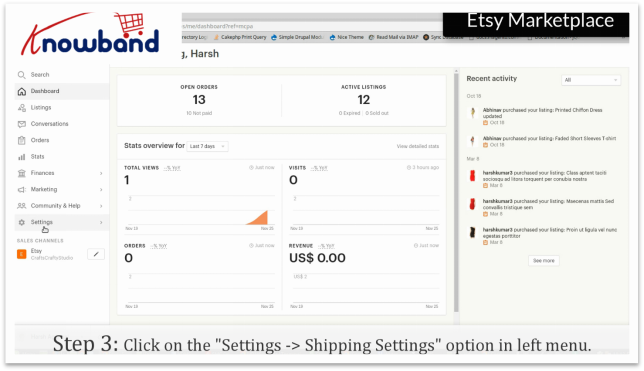
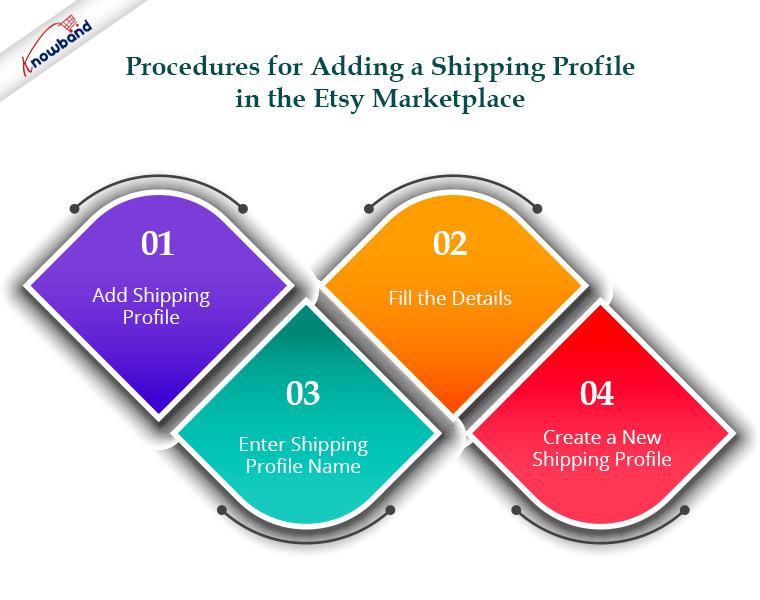
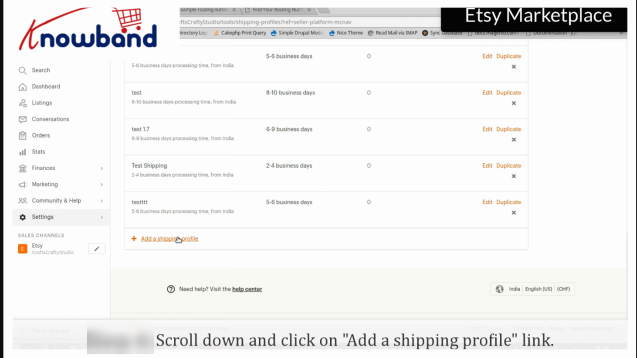
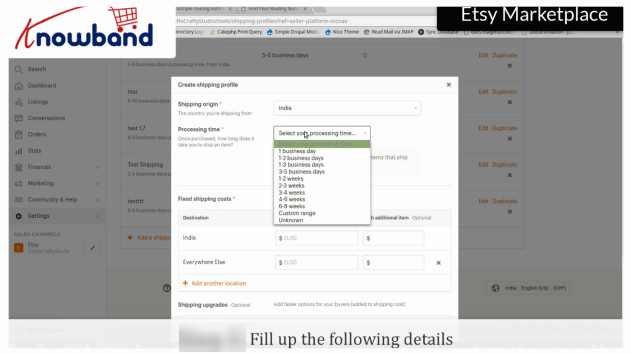
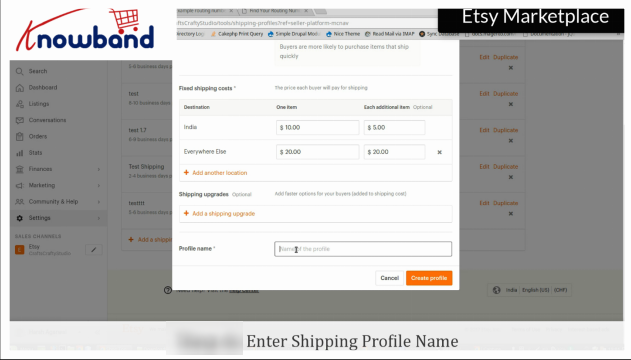
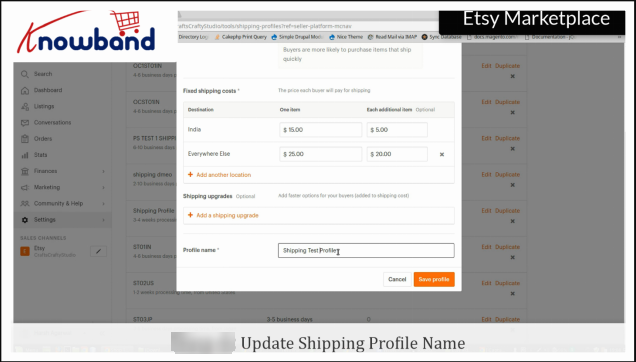
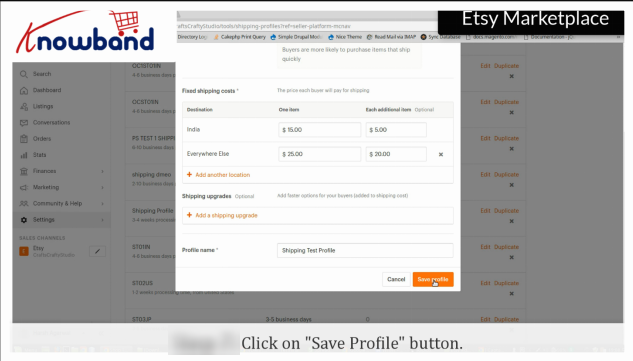
The shipping method varies from time to time, let it be cost or time duration, which is why Etsy Marketplace provides you with an option to add a new shipping profile or update the existing one free of cost. This will help your customers to have their products shipped with the most desirable and convenient method.
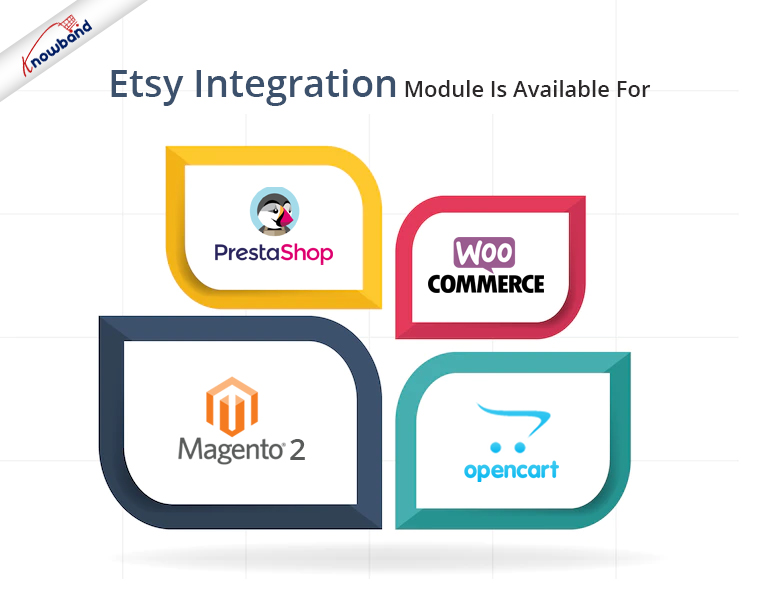
Are you looking to integrate your store with the Etsy marketplace? Knowband offers Etsy Marketplace Integrators for various CMS platforms like Prestashop, OpenCart, Magento 2 and WooCommerce. This helps in showcasing your products among the larger audiences and enhances brand awareness as well.
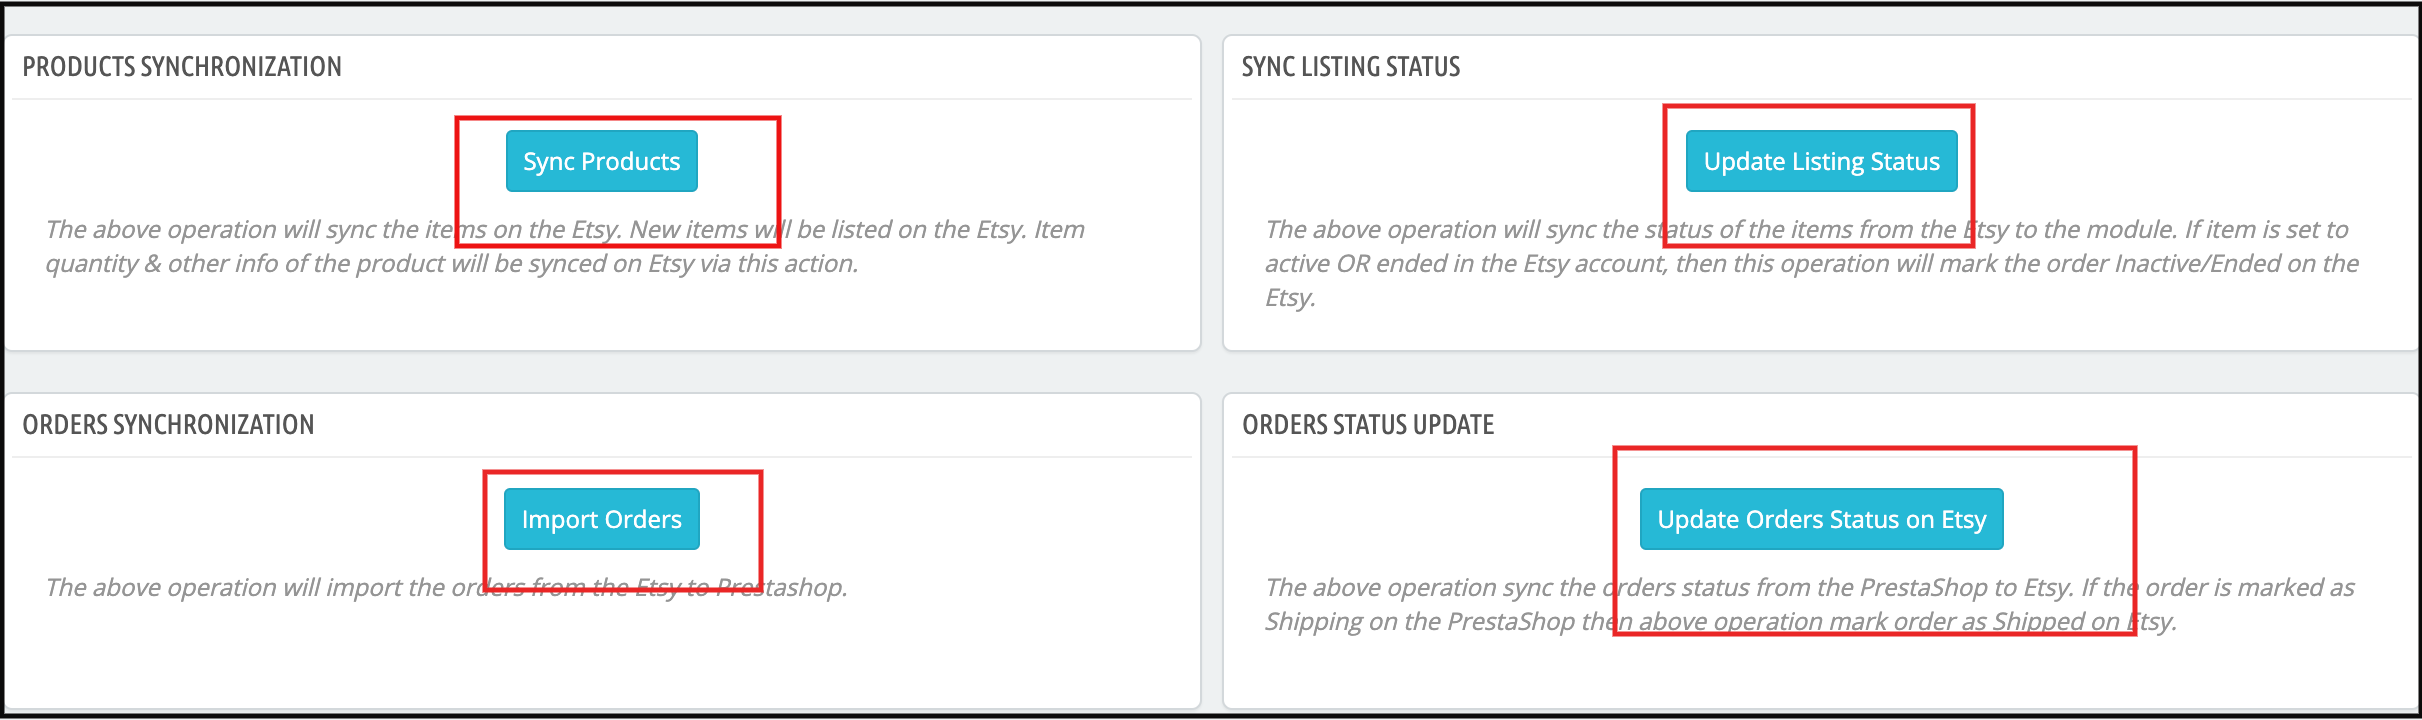
From the backend, the admin can establish shipping profiles, which can then be mapped to the various profiles generated under the Profiles Management. All of the cron settings can be automated using the synchronisation tab’s cron settings. Therefore, an online owner may quickly sync product status, order status, language sync, order status update, etc. utilising the Synchronization tab.
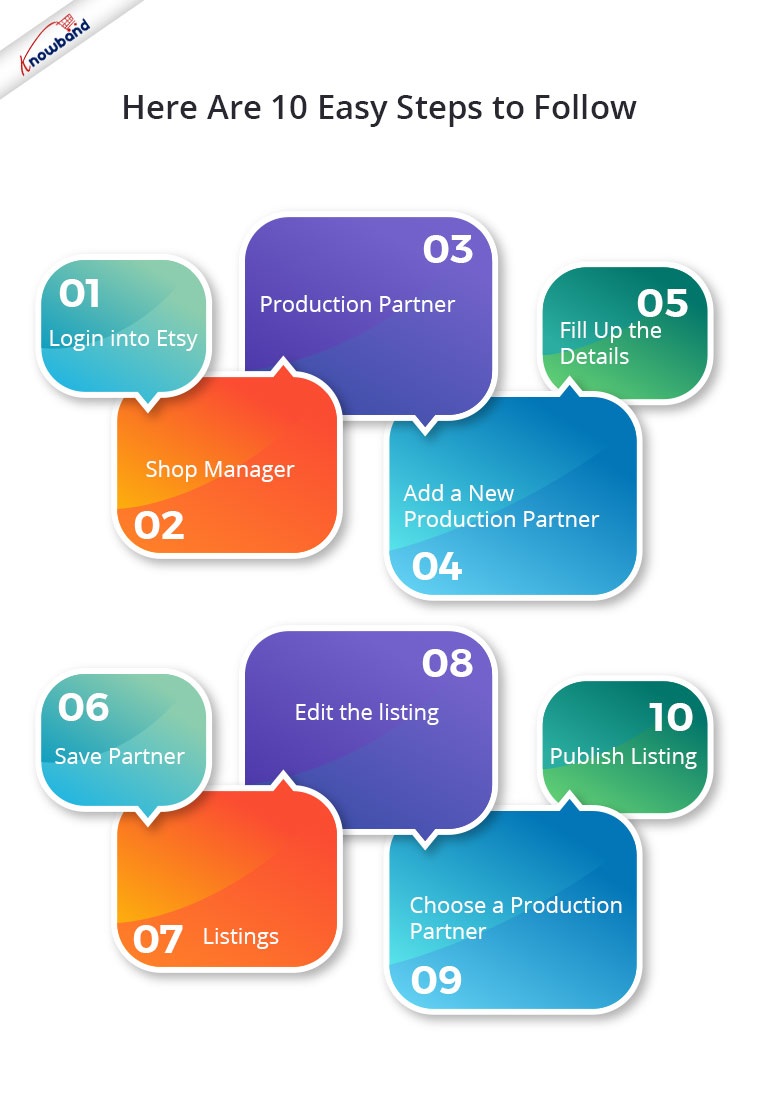
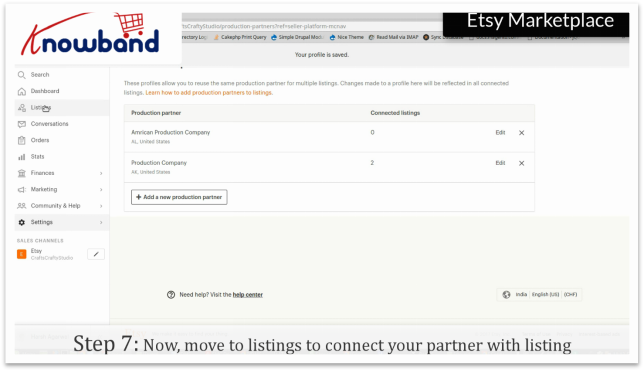
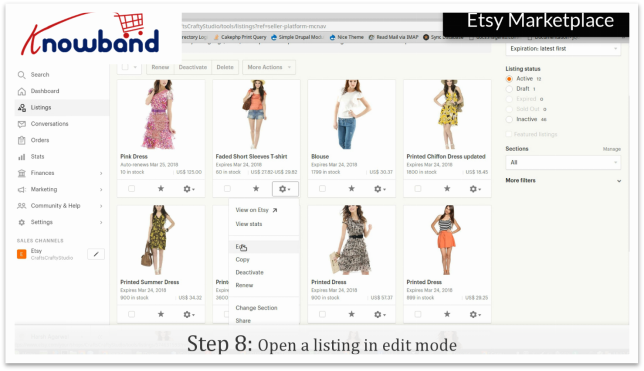
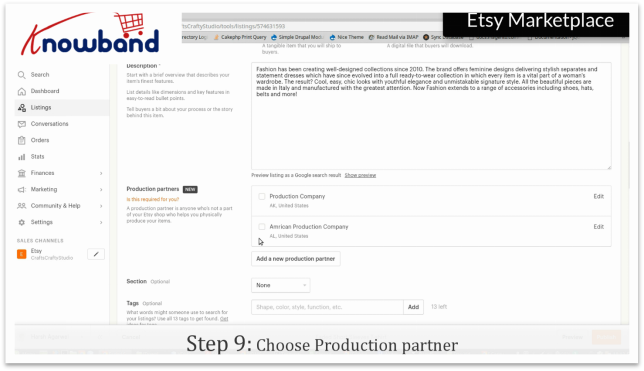
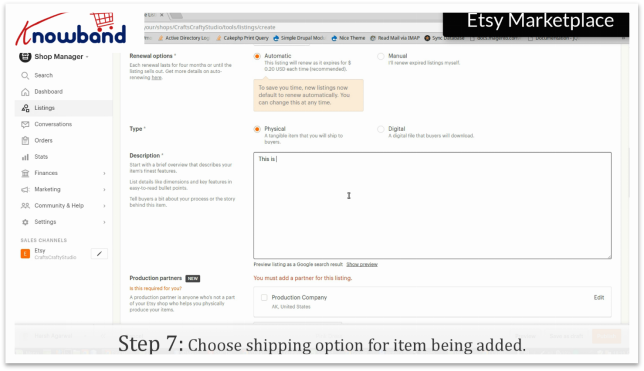
A production partner or manufacturer is someone who will assist you in producing items to be sold at the Etsy Marketplace. To maintain transparency, Etsy Marketplace has its handmade policy and the seller needs to follow those policies if he wants to sell the goods along with a production partner. Are you willing to show the same listing to multiple production partners? Etsy provides a very easy and convenient way to connect these both which eases your work.
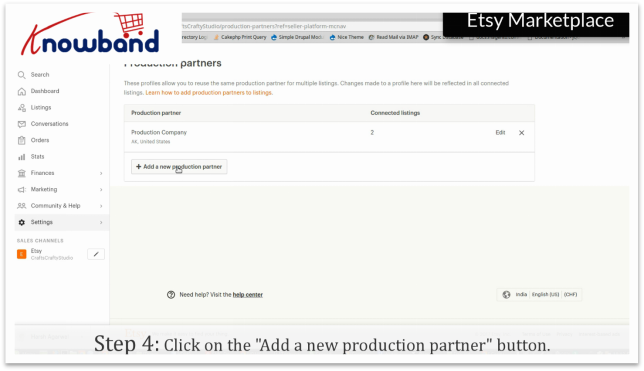
Click on the “Add a new production partner” option provided.
Step 5:Fill up the details
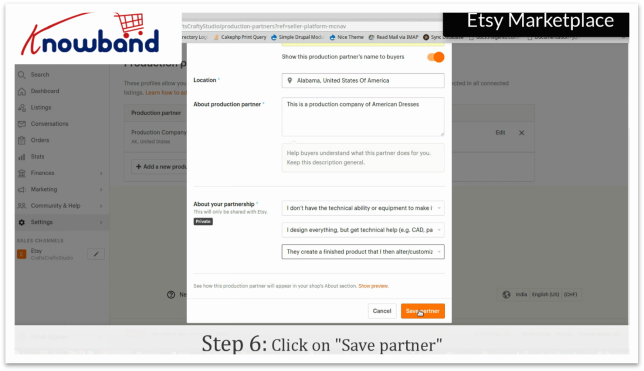
Fill up the details in the “Add a new production partner” pop-up open such as production partner, location, about production partner, about your partnership and other relevant options.
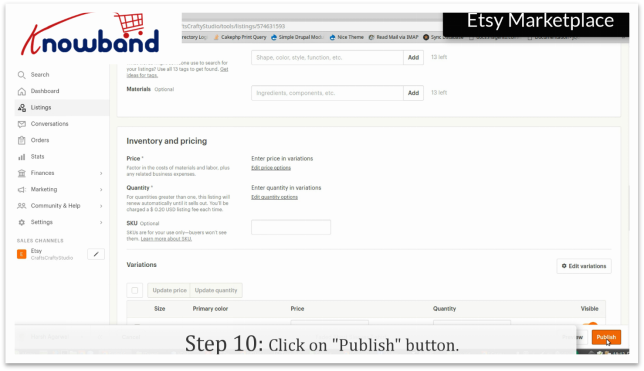
Click on the “Publish” option to save the changes you have just made.
In the End:
Are you looking to integrate your store with the Etsy marketplace? Knowband’s Etsy Marketplace Integration offers an easy interface to integrate your store into Etsy.
Etsy integrators are available for Prestashop, Magento 2 and OpenCart-based stores. Etsy offers APIs so that sellers may display their goods, easily keep track of inventory, and handle orders. Knowband provides the Etsy Integration module using these APIs, saving the online store owner from having to list each of their products on the Etsy Marketplace and PrestaShop separately.
Simply adding their products to the online store will automatically list them on the Etsy store. For any queries, please contact us at support@knowband.com.
Watch how to add Production Partner and connect with listing in Etsy Marketplace
Etsy is a professional online marketplace specifically engaged in online trading of vintage and handcrafted products. The site also regulates the buying and selling of art products such as jewelry-making tools, wire, and beads.
Etsy provides a very easy and quick way to add products in your shop. Adding products in your shop is a cakewalk, through which you can showcase your products to your customers. This article will walk you through the process of adding a product or activating/deactivating the product listing in your Etsy shop.
A) STEPS TO ADD A PRODUCT ON ETSY MARKETPLACE:
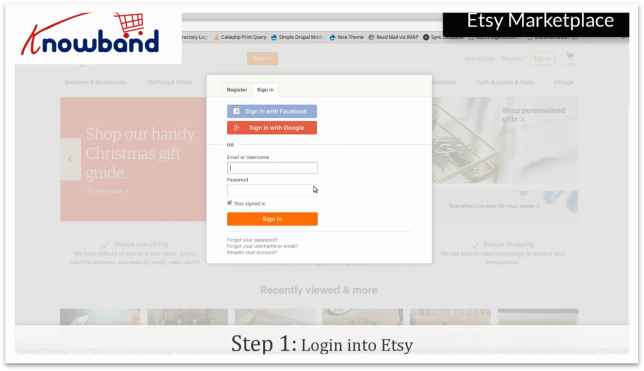
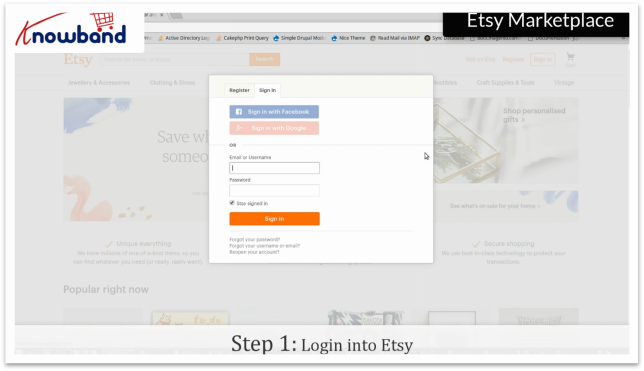
Step 1: Login into Etsy
Got to https://www.etsy.com/. Login to your Etsy account by clicking the “Sign in” option provided in the top right corner.
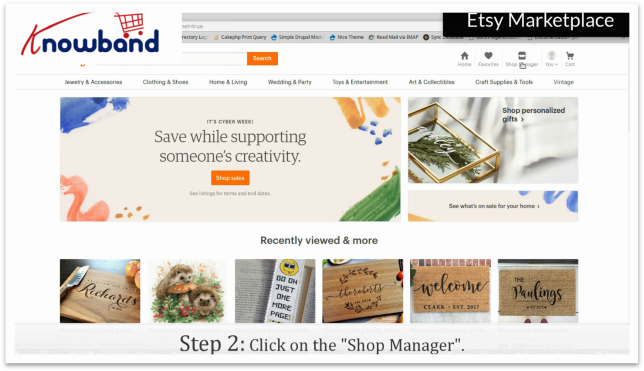
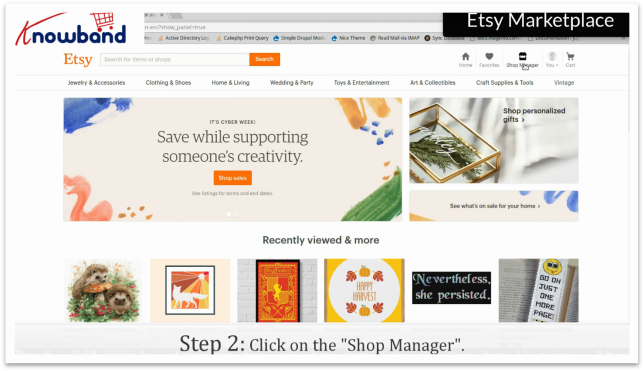
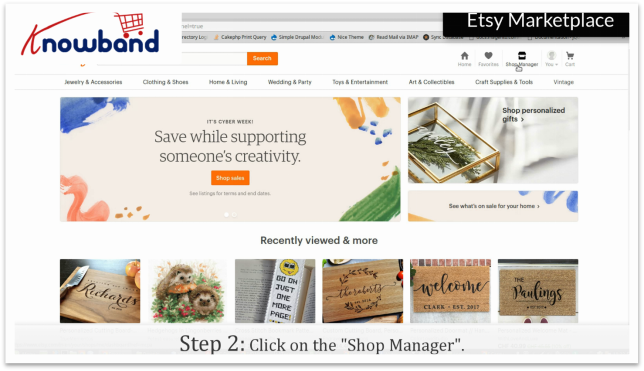
Step 2: Shop Manager
After you have successfully logged in, click on the “Shop Manager” in the top right corner.
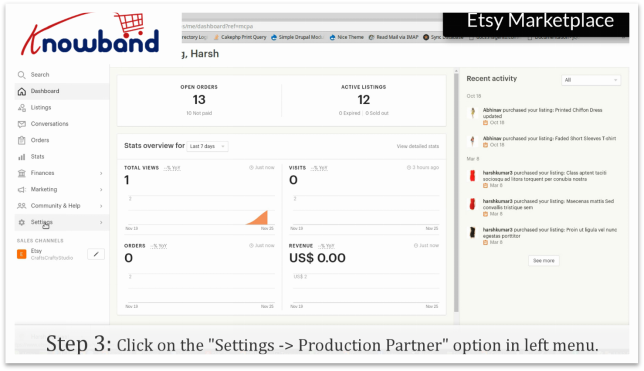
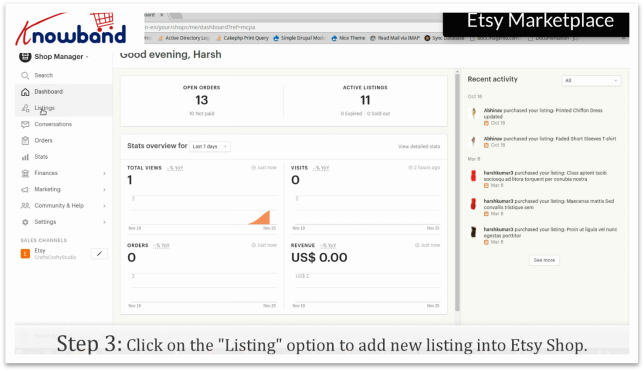
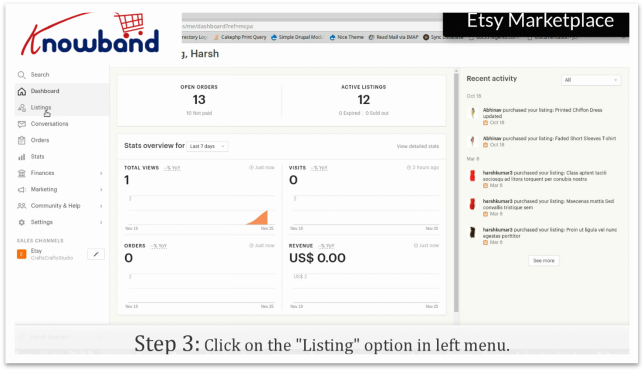
Step 3: Listing
In the “Shop Manager”, you will find an option “Listings” on the left menu. The option displays all the products you have added to your marketplace.
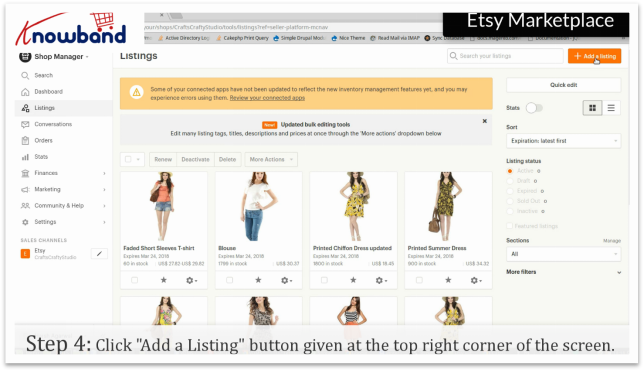
Step 4: Add a listing
Click on the “Add a listing” button in the top right corner, the option lets you add the product’s photo and other details of the product.
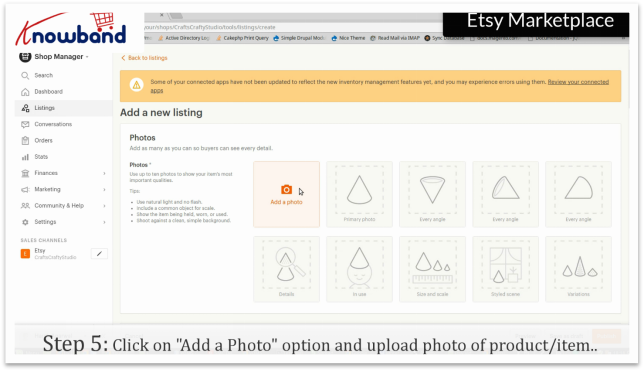
Step 5: Adding Photo
Click on the “Add Photo” option and upload a photo of the product/item. After this, you will be able to see the image of your products listed by you.
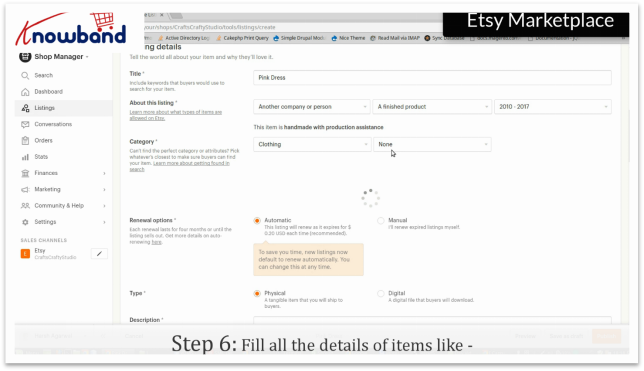
Step 6: Add details
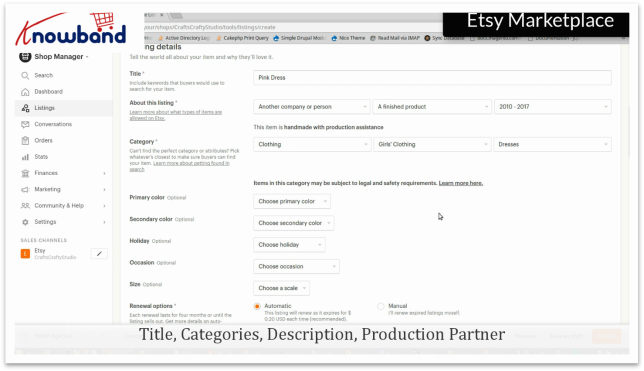
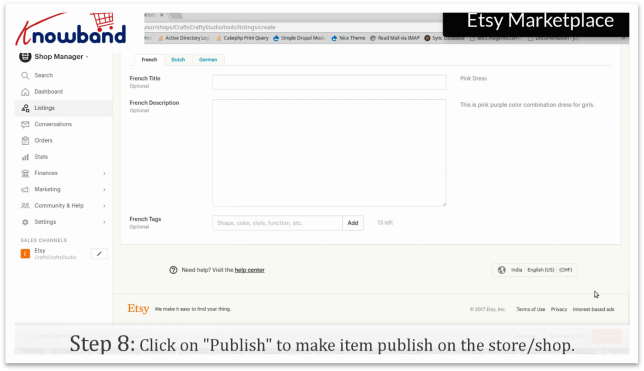
Fill all the details of the product/item like title, categories, description, production partner, a primary and secondary color, size, price & quantity of the product and other relevant details. The description of the product should be accurate and meaningful so that customers can understand the product in detail and can go for instant purchases without any inconvenience.
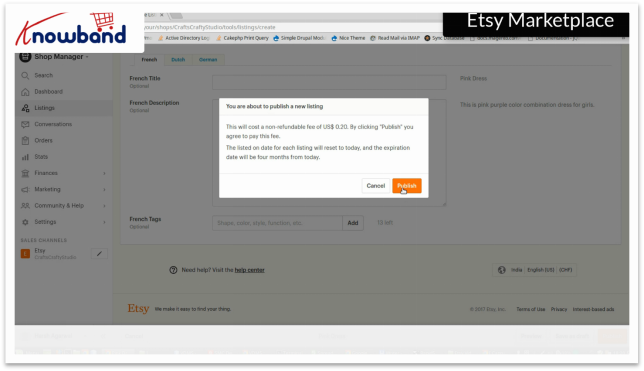
Click on the “Publish” button to make items publish in your store. Now your products are visible on the front end of Etsy Marketplace.
Once the above steps are completed, the item will be public on your store.
Video for adding a product on Etsy
B) STEPS TO ACTIVATE/DEACTIVATE THE PRODUCT LISTING ON ETSY MARKETPLACE:
Etsy also offers sellers access to renew/hide and activate/deactivate items from the Etsy Marketplace. There are times when you add product to your store and you can’t have enough supply to deliver. That is when, Etsy lets you deactivate your listings for items you can’t provide to your customers and then reactivate them later.
After logging in to Etsy. Complete the first 3 steps listed above. After that you can follow the steps as follows:
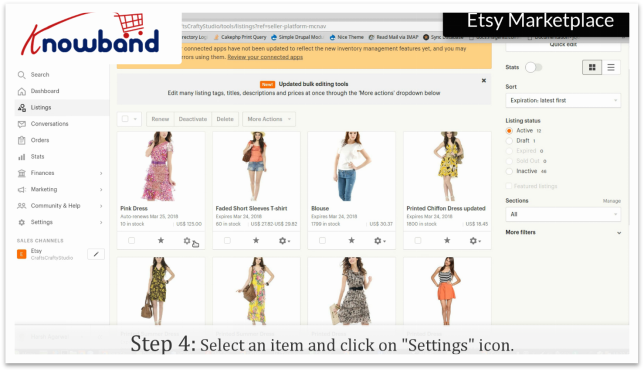
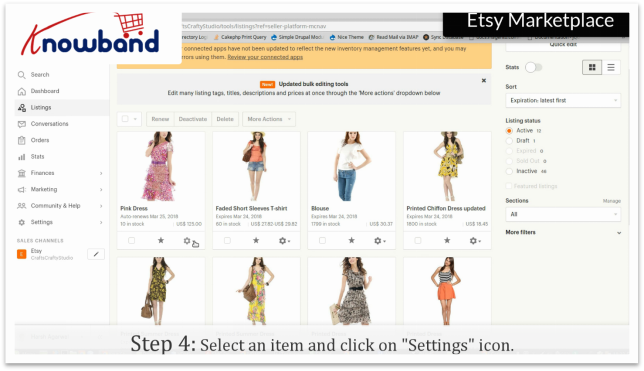
Step 4: Settings
In the listing tab, there is a “Settings” option, which will give you options to manage the product.
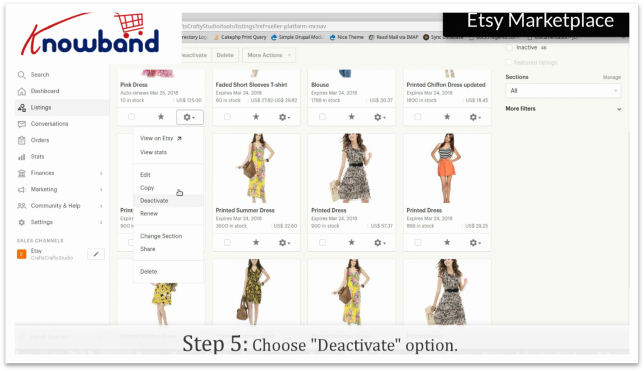
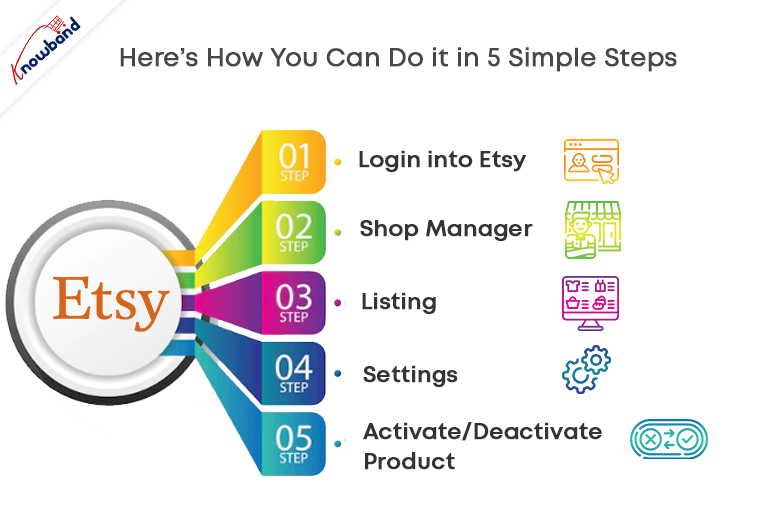
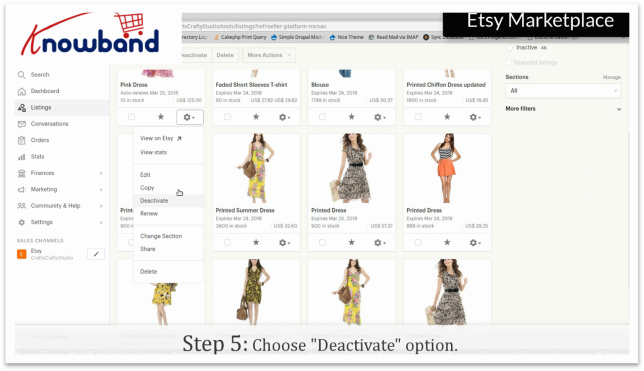
Step 5: Activate/Deactivate Product
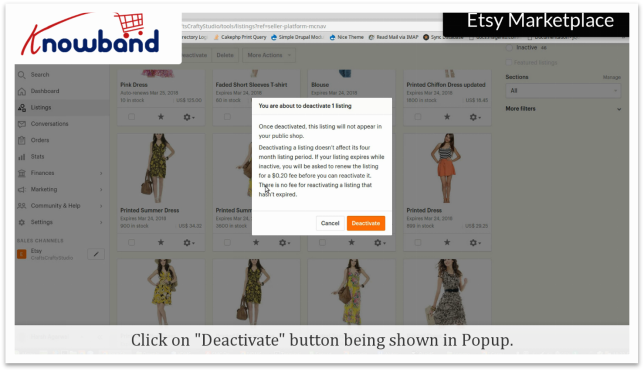
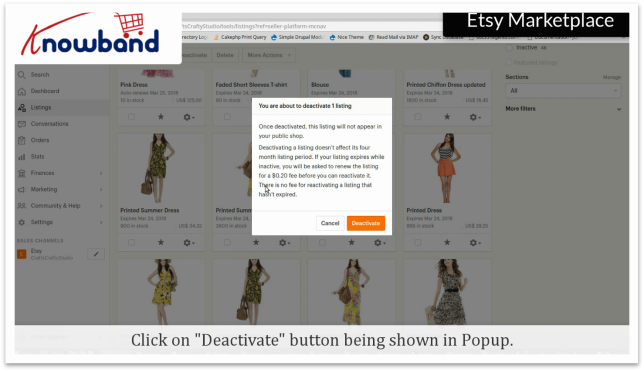
Click on the “Activate/Deactivate”. The store will ask for confirmation, on confirming the same, the store will activate/deactivate the product. Once deactivated, the listing will not appear in your public shop.
For reactivating the items, the seller needs to check the whether the listed item is expired or not. For expired items, the seller needs to pay 0.20 USD to renew the item. For inactive items who haven’t expired, reactivating is free of cost.
Video for activating/deactivating product listing on Etsy Marketplace:
Over to you:
Selling on Marketplace like Etsy could be the best decision as it provides huge audience access all over the world. This could let sellers earn a huge chunk of profits. Now the decision of selling on a Marketplace is totally up to you! The Etsy marketplace is doing everything to be the best in the industry and certainly, a good opportunity for you get on the bandwagon. Are you looking to integrate your store with the Etsy marketplace? Knowband’s offers Etsy Marketplace Integration for various CMS platforms like PrestaShop, Magento, Shopify, and OpenCart. It offers an easy interface to integrate your store into an Etsy marketplace.
Etsy offers sellers the access to renew/hide and activate/deactivate items from the Etsy Marketplace.There are times when you add product to your store and you can’t have enough supply to deliver. That is when, Etsy lets you deactivate your listings for items you can’t provide to your customers and then reactivate them later.
Login to your Etsy account by clicking the “Sign in” option provided in the top right corner.
Step 2: Shop Manager
After you have successfully logged in, click on the “Shop Manager” in the top right corner.
Step 3: Listing
In the “Shop Manager”, you will find an option “Listings” in the left menu. The option displays all the products you have added in your marketplace.
Step 4: Settings
In the listing, there is a “Settings” option, which will give you options to manage the product.
Step 5:Activate/Deactivate Product
Click on the “Activate/Deactivate”. The store will ask for confirmation, on confirming the same, the store will activate/deactivate the product. Once deactivated, the listing will not appear in your public shop.
For reactivating the items, seller needs to check the whether the listed item is expired or not.For expired items,seller needs to pay 0.20 USD to renew the item.For inactive items who has n’t expired, reactivating is free of cost.
Watch how to Activate/Deactivate listing at Etsy Marketplace?
Exciting Updates in Knowband’s PrestaShop Etsy Integrator – Version 4.0.1
We’re always looking for ways to make your Etsy integration smoother and more efficient. With the latest Version 4.0.1 of our PrestaShop Etsy Integrator, we’ve added a couple of features that we think you’ll find really useful.
[Alert]Make sure to upgrade before 18 January, as connections may be interrupted if the module isn’t updated by then.
1. Seamless OpenAPI Authentication for Etsy Etsy has updated its API authentication, and we’ve updated our Prestashop Etsy Marketplace Connector Module to match. All your API requests now include the necessary authentication headers, so you don’t have to worry about interruptions. Your PrestaShop store will continue to communicate with Etsy smoothly, exactly as before, just better.
2. Simplified Return Policy Management Handling return policies can be tricky, but we have made it easier. You can now create multiple return policies and assign them to different profiles. Not only you can you create, but you can also sync the existing policies from Etsy Marketplace by running retun policy cron.
Once a profile is linked to a product, the return policy is automatically updated on Etsy. This saves you time and ensures your listings always display the correct information for your customers.
These updates are part of our ongoing commitment to make your PrestaShop-Etsy integration as seamless and hassle-free as possible.
If you run an eCommerce store and not satisfied with your sales, you might be thinking about several ways to improve the same. Starting a shop on some popular marketplace is one such idea that might have surely come into your mind. Well! If so, this is a good decision as it will help you to leverage the traffic and customer base of an already established marketplace and generate some serious sales for your business.
The aim here is to expand the reach so as to generate desired revenue from the business. However, It might be a tough task to manage two shops on different domains at the same time. Therefore, I am going to explain how can you manage to be a seller on a popular marketplace like Etsy and manage your own eCommerce site at the same time.
PrestaShop – Etsy connection
Both your website and selling on Etsy shop are important; managing both the entities separately is not an easy task, though. You need time, effort and manpower to make sure everything goes as planned. It made us realize, if we can integrate your eCommerce site and a marketplace like Etsy, it will curtail a huge burden at once by allowing a store owner to sell on the marketplace directly from his eCommerce store.
A PrestaShop-Etsy connection is a similar approach that works by integrating an interface on the PrestaShop back-office which possess the controls and configurations for:
Synchronizing the updates and changes in the stock
Managing orders received from the Etsy store
Preparing product feed for Etsy listing
Preparing different profiles for Product listing for bulk uploading of the products or selected products of the store
Preparing product Shipping options for Etsy orders
Setting up an Etsy API configuration to establish the connection
1. The connection setup
The PrestaShop-Etsy integration process is simple and you can do it without knowing to code.
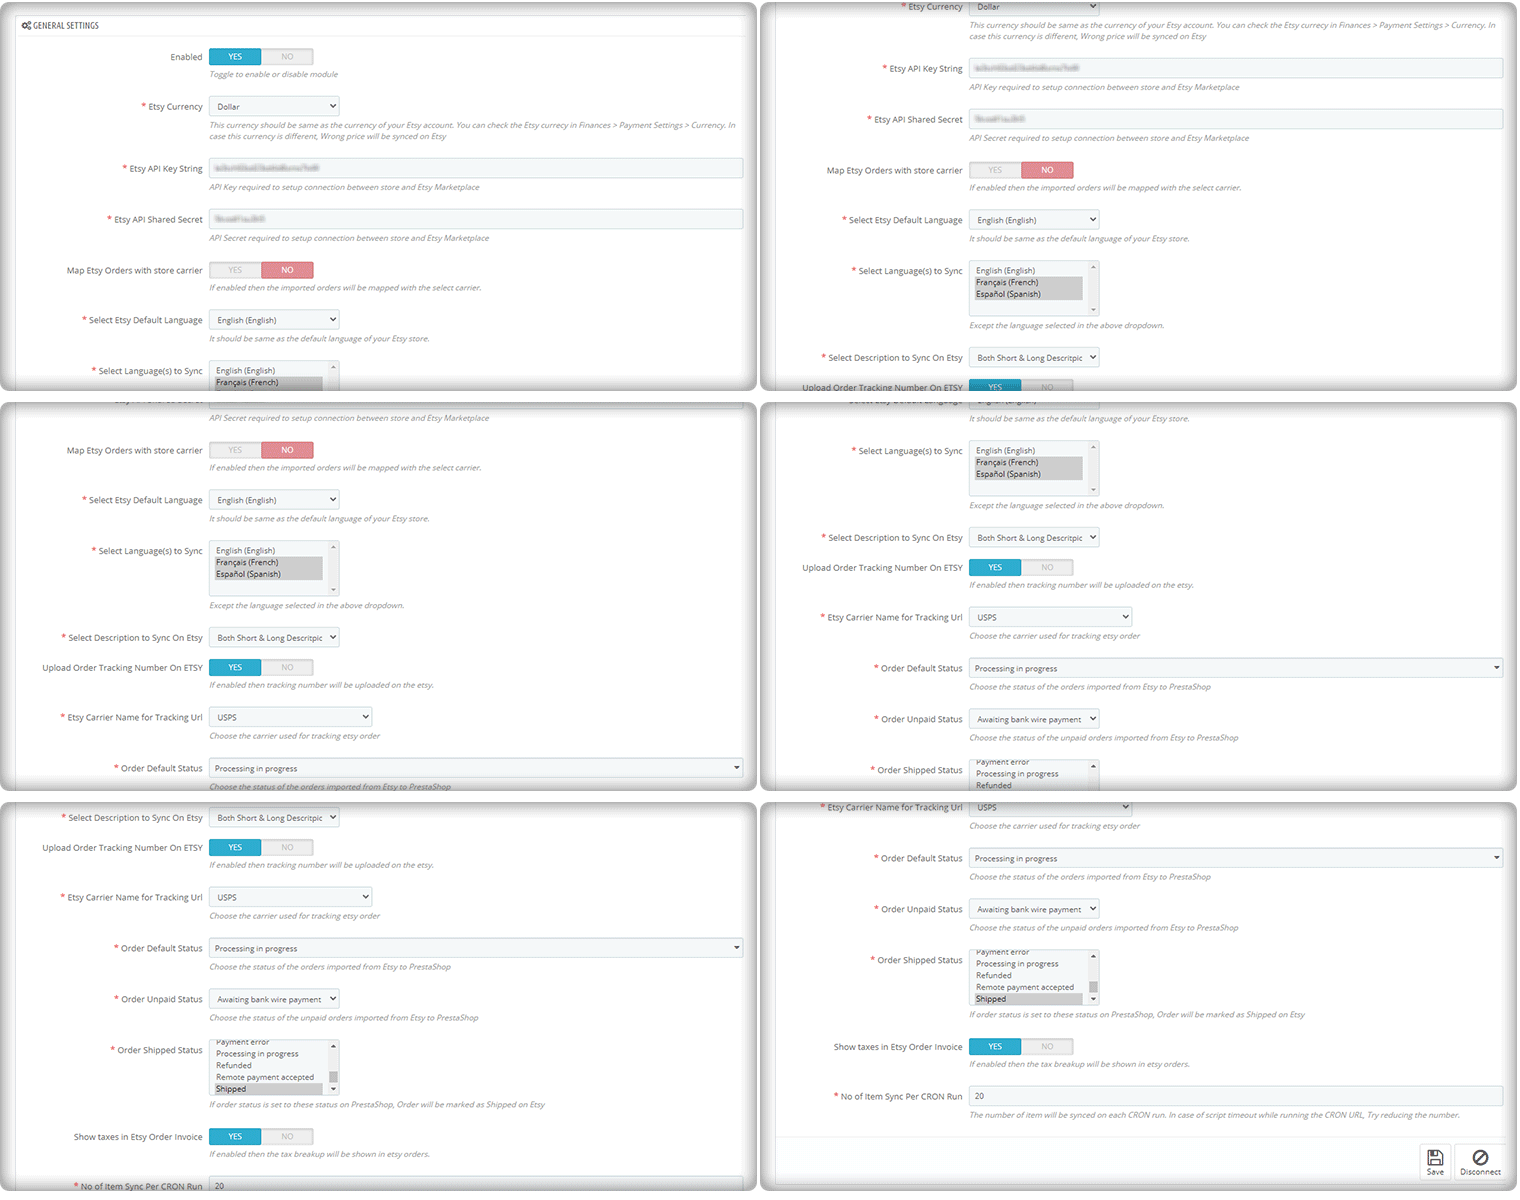
To start selling on Etsy Marketplace you will need a seller account on Etsy. Create a seller account on the Etsy marketplace before you can set up a Prestashop-Etsy connection. After seller account registration, you need to set up an App on Etsy to get the API details. The API details will be used by the PrestaShop-Etsy integration module to set up a connection between the store and the Etsy seller account. The integration allows you to select the default language and the language in which you want to sync the product details, categories, shipping methods, and other features.
The updated version of the Etsy-PrestaShop Integration module allows you to upload the order tracking number for Etsy shoppers and the order status as well. There is an invoice setting that can be enabled if you want to show taxes on the invoice.
The auto cron run feature is the most appealing one and it lets the user select the number of products that can be synced automatically.
2. Shipping management for Etsy
Next, you will need to prepare the product feeds and upload them to the Etsy product listing. However, before your PrestaShop products are visible on your Etsy seller profile, you need to make sure that you have configured the shipping options.
The customers on the marketplace would want to see what shipping options are available with the product and when it is going to be delivered to them.
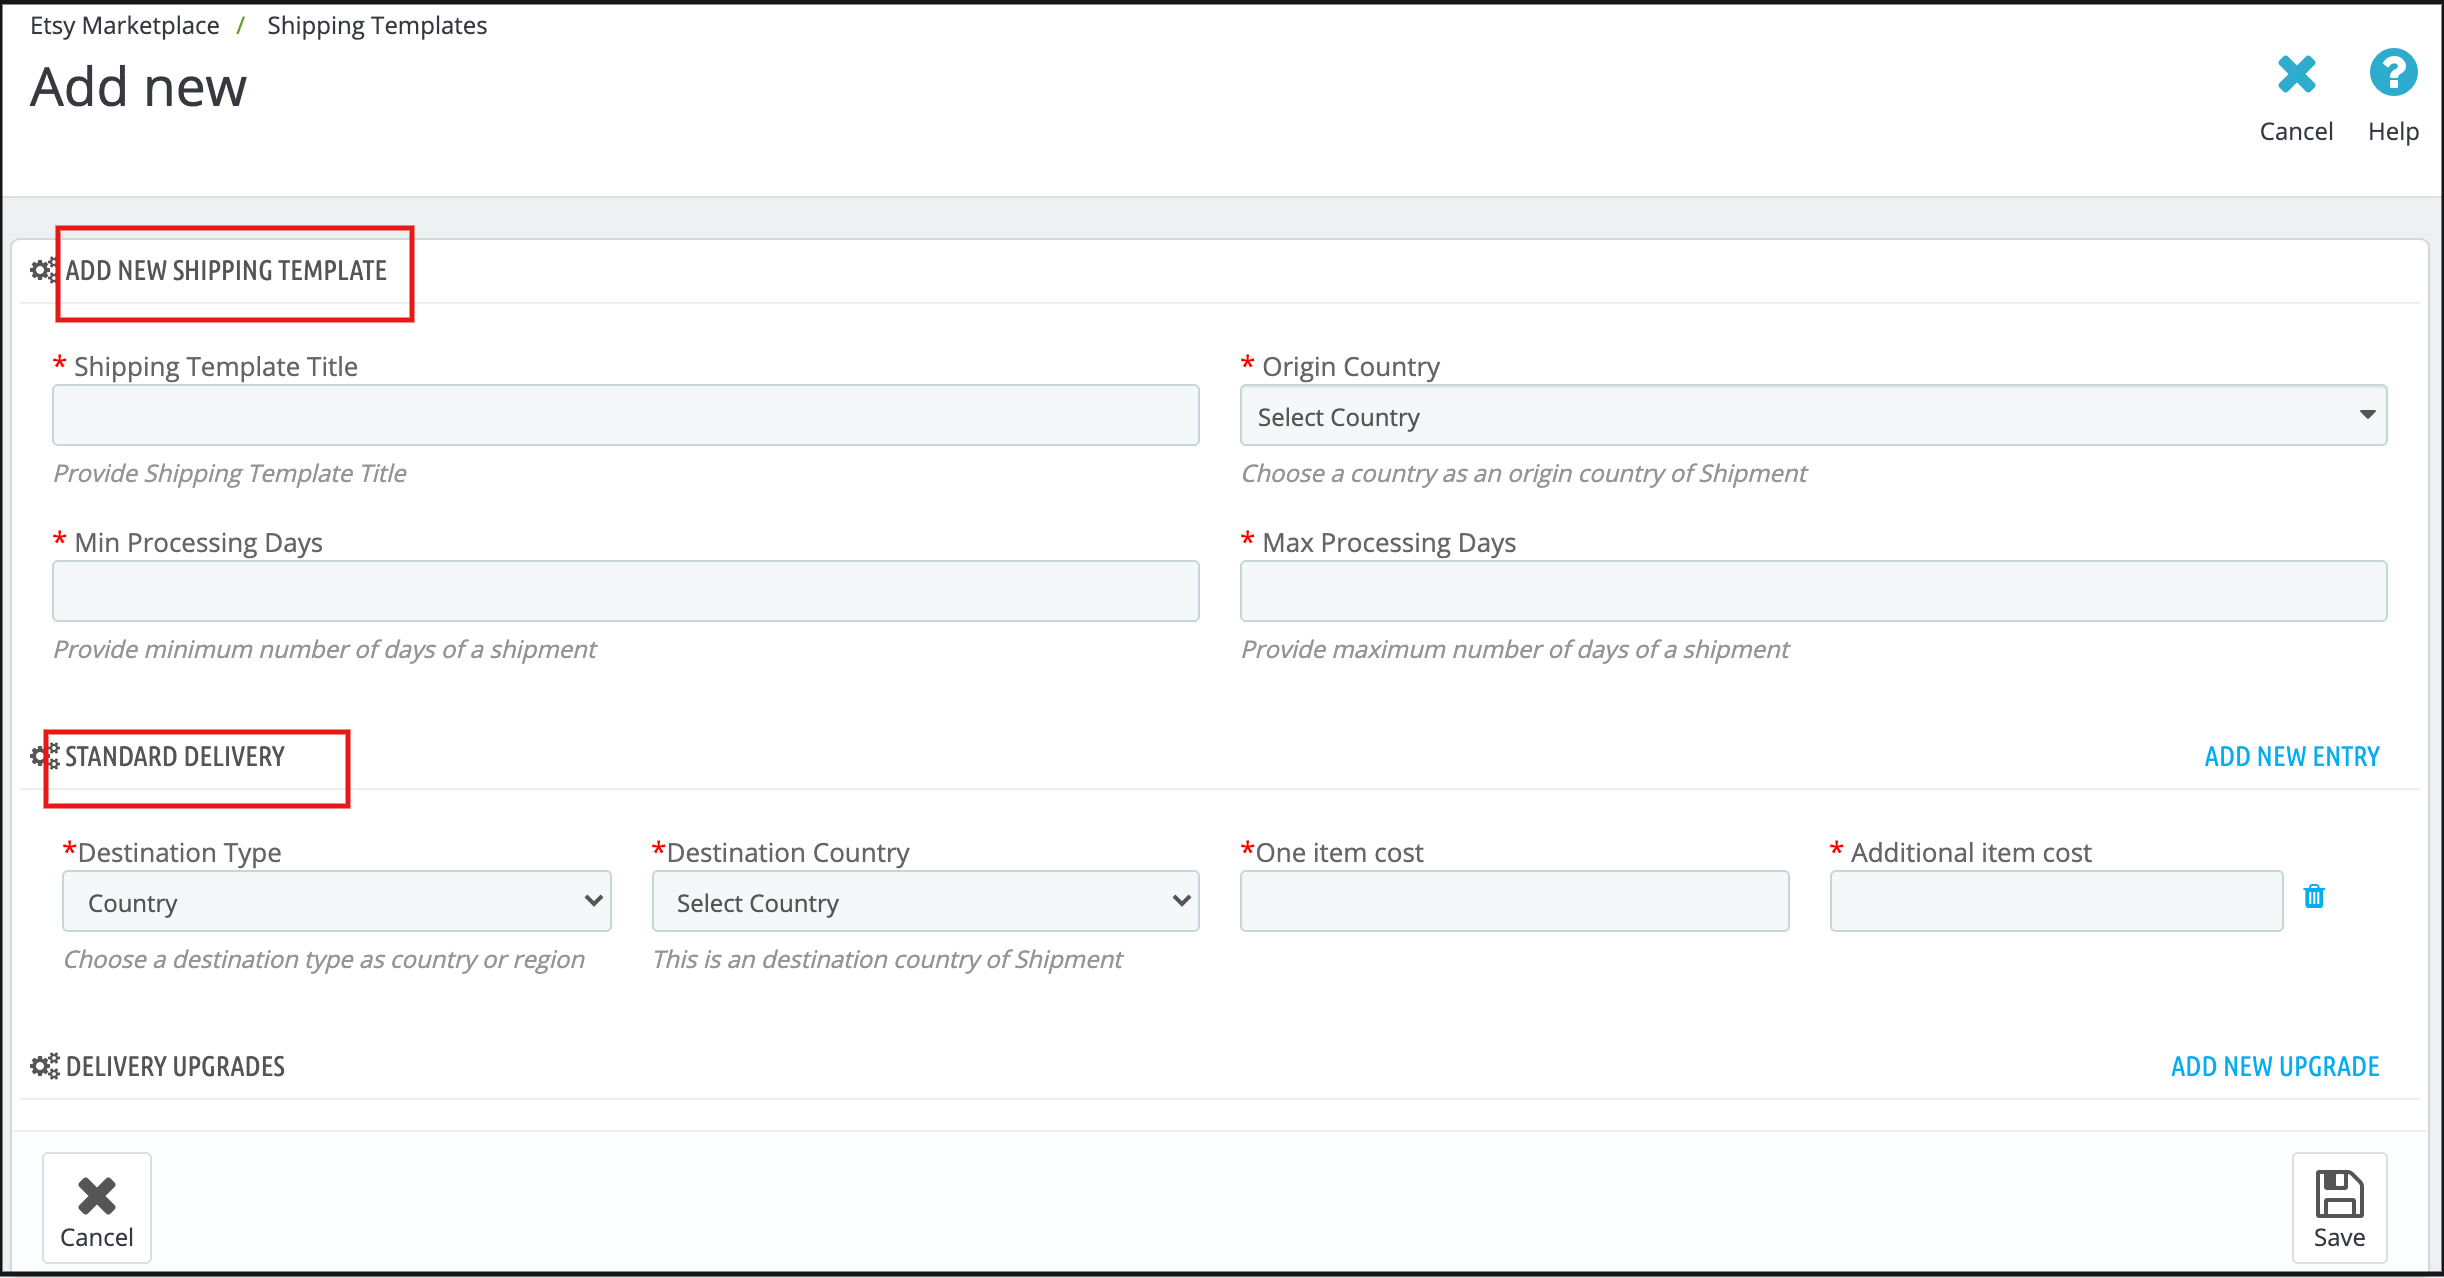
So, you must update the shipping options and let your customers on Etsy stay informed about them. You can add multiple shipping templates and improve your conversion rate because shipping is a major turn-off if a user couldn’t see the expected delivery date.
Prestashop Etsy integration module can be utilized for configuring the shipping templates by updating various information required by the Etsy marketplace. The interface of the shipping templates is the same as the Etsy Marketplace.
3. Product Listing for Etsy
To list the products on Etsy Marketplace the sellers first need to create the profiles. The seller can select the option to map the PrestaShop store category with the Etsy category or can select the products that need to be synced to the Etsy store.
The cron setup will list the goods to the Etsy Marketplace from the PrestaShop Etsy Integration module along with the variants, inventory, and definition of the product. So, this purpose helps list the goods.
4. Local Sync Option
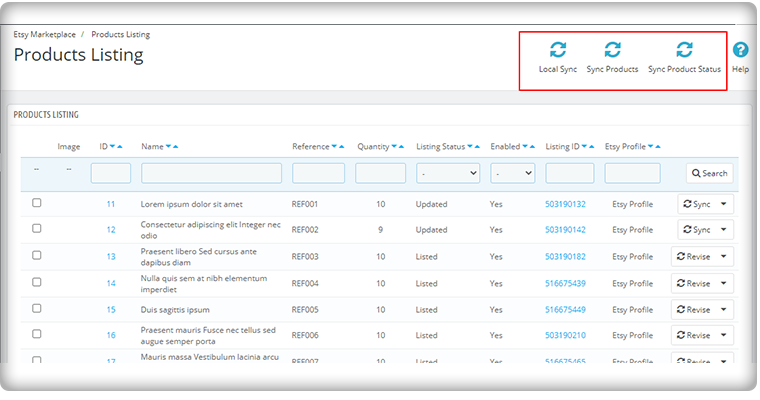
Local Sync synchronizes the product in the PrestaShop store to the Etsy Integration module. Sellers can synchronize their product from the PrestaShop store to an Etsy Integration module with the aid of local sync. This tab is available under the PrestaShop Etsy Integration extension synchronization tab. After syncing the products to the Etsy Integration module, the sellers can sync the products in bulk or sync the selected products as per their choice.
5. Synch Products individually
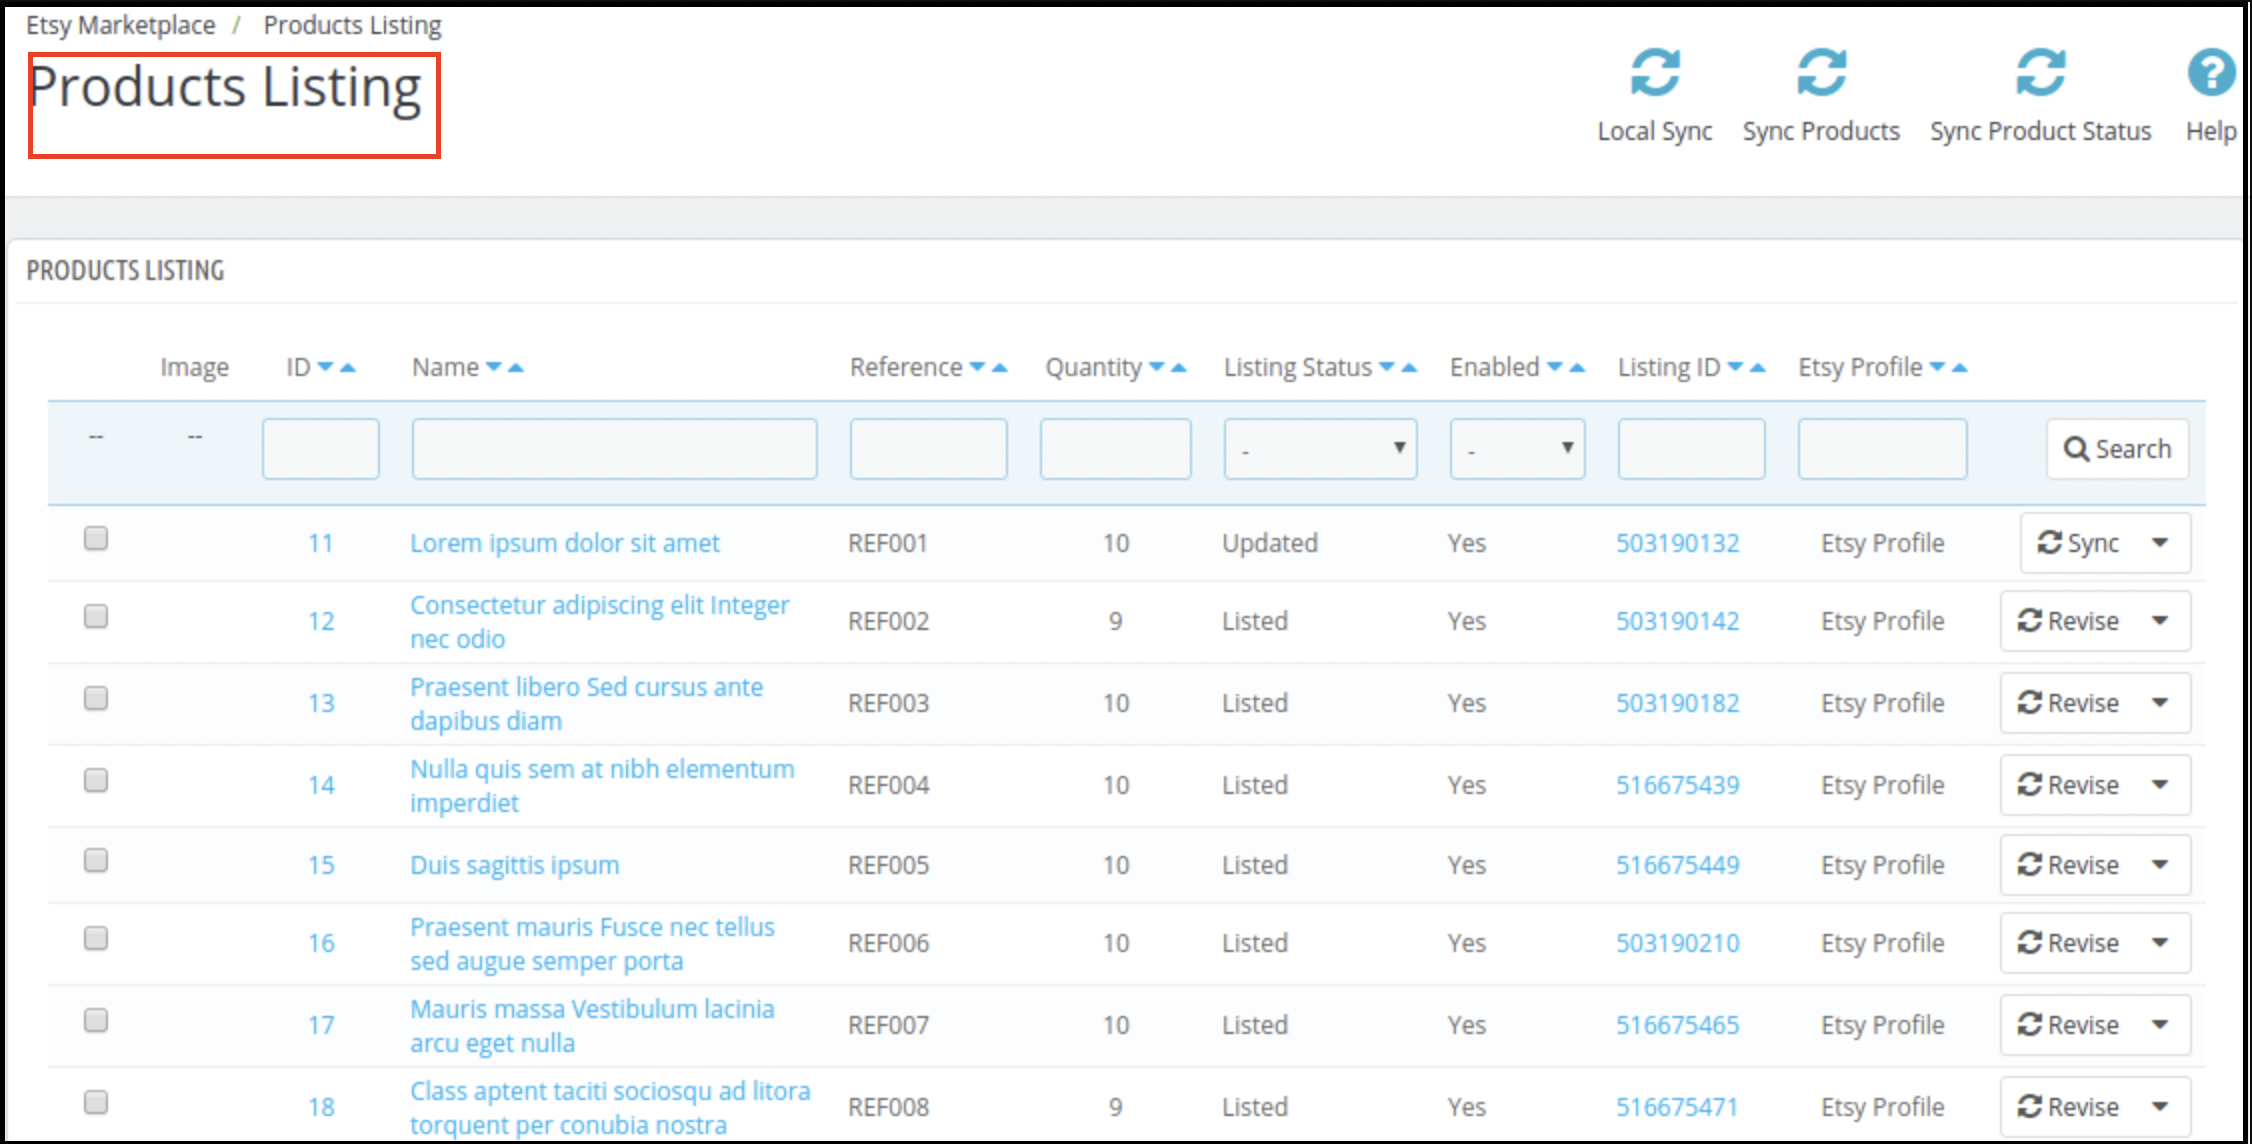
The listing status of the products is shown on the product listing tab of the integration module. The administrator may display items mapped to different profiles under this tab along with their Etsy Name, Listing Status, Etsy (Active, Ended), Activated or Disabled status, and Enable/Disable/Relist/Renew option. By running cron, the administrator may list the individual product or all the items.
Also, the seller can easily remove the product from a specific profile, and it is impossible to add the excluded items to the Etsy marketplace. All of this can be conducted once the cron is executed from the PrestaShop Etsy Integration Extension back-office.
You can update the product status for all the products manually or by running the cron.
6. Product Feed Management for Etsy
When shipping options are configured and ready for mapping with different products, you can prepare product feeds that will be shown in the Etsy marketplace. The product feeds are created based on the profiles, category mapping, and attribute mapping between the store and the marketplace.
Creating a new profile will have the options to perform category mapping and attribute mapping according to which the list of products will be shown. From this list of products, you can select those products on your store which you want to upload on the Etsy marketplace.
7. The order management
In a standard Etsy seller account, when your products become visible on the marketplace, you start receiving the order for them. A PrestaShop Etsy connection works efficiently to let you manage these product orders from the PrestaShop dashboard itself.
Now, based on the order status mapping between the PrestaShop and Etsy marketplace, you can update the order status and perform all the order management tasks from your PrestaShop back office itself.
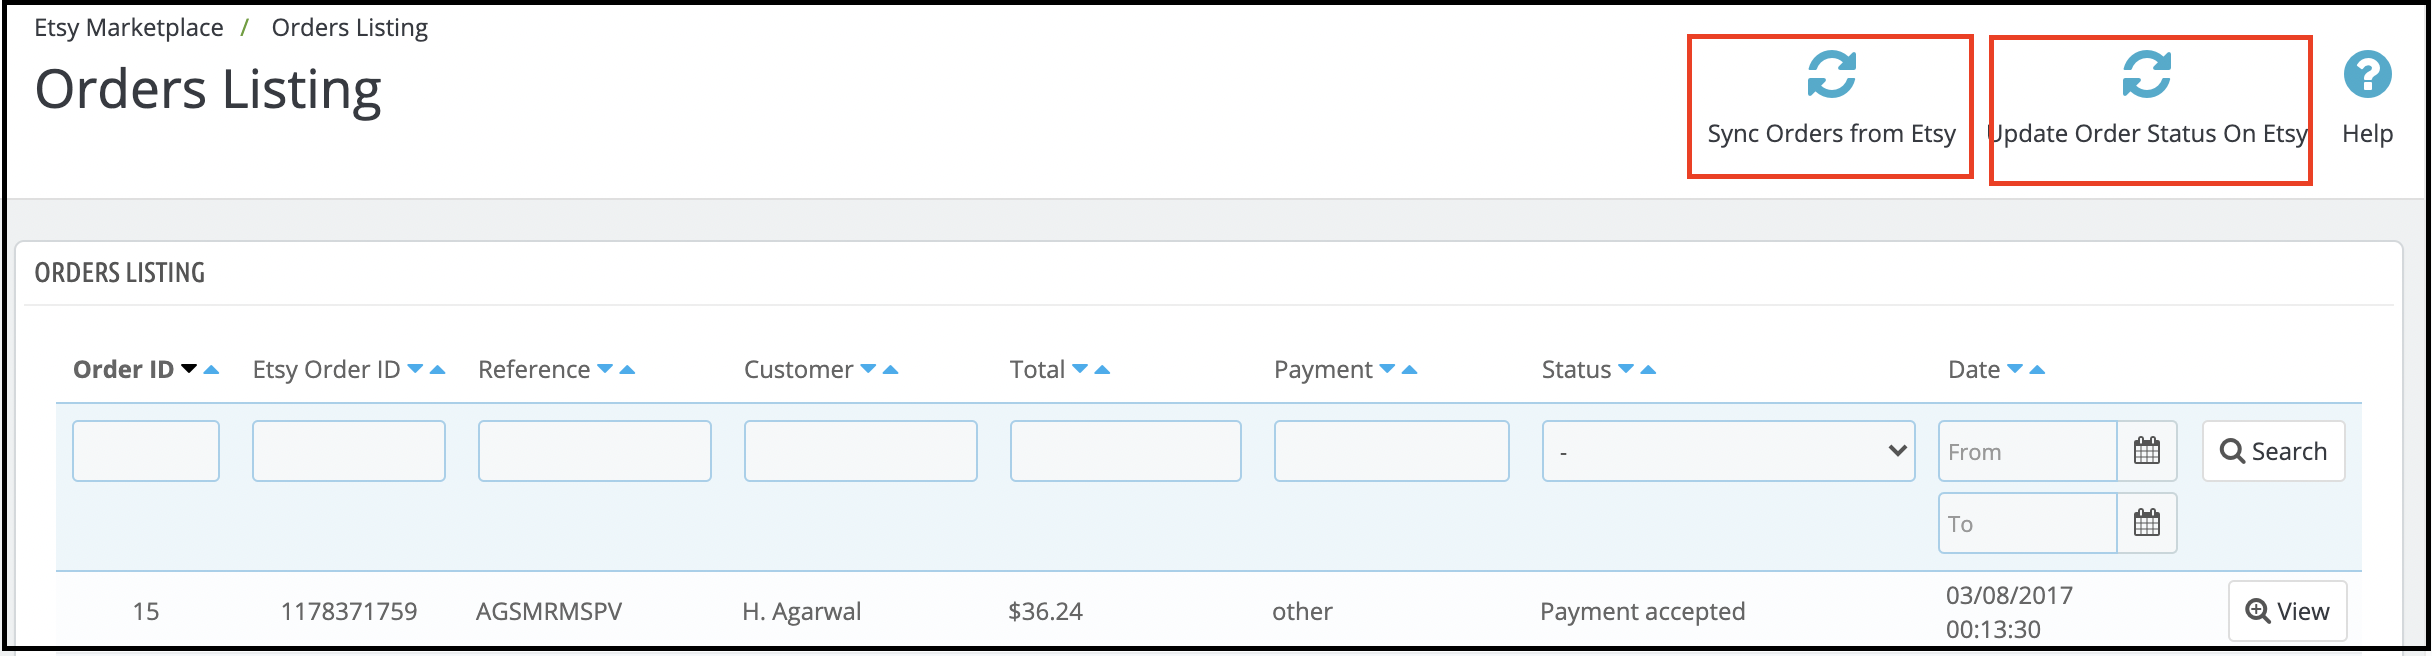
You can see the order ID, Etsy order ID, reference, customer details, total order amount, and payment status of placed orders. Etsy product orders are listed on the PrestaShop dashboard as shown in the figure below:
Other Functionalities of Etsy-PrestaShop Integration Addon that helps you connect the store
Cron set up to automate the process
The admin can set up the cron jobs so that the inventory update, order sync from Etsy to PrestaShop, and order status update from PrestaShop to Etsy will work automatically. Newly added products will also get updated accordingly.
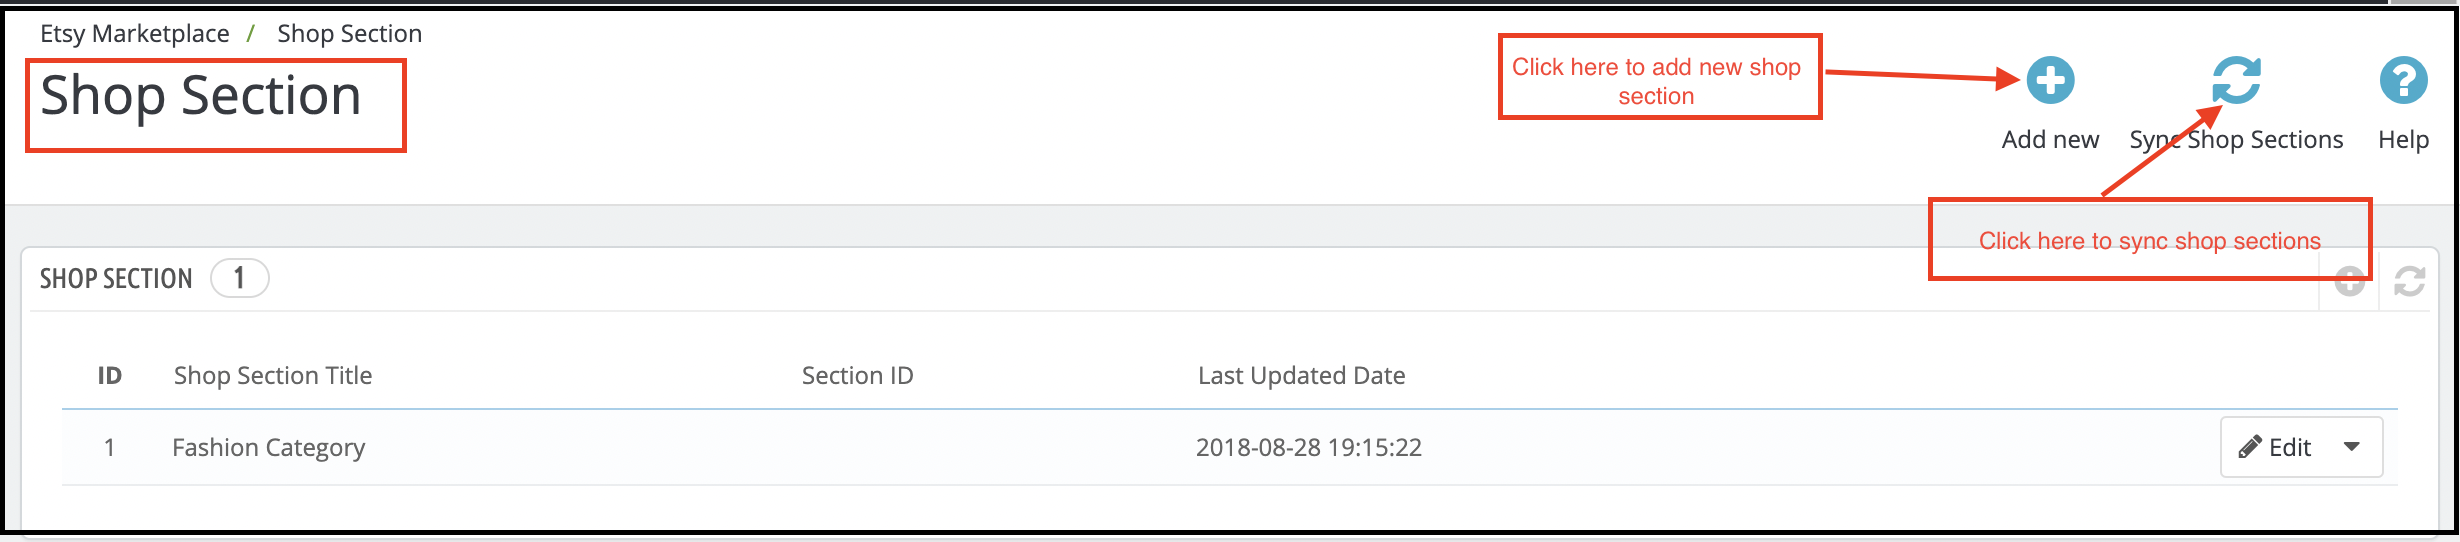
Add Shop Sections
The PrestaShop Etsy Integration add-on provides an option to create the store and the profile can be mapped to the store. Category Wise Mapping
The PrestaShop store administrator needs to map the PrestaShop store category to the most appropriate Etsy Store category to list the items on the Etsy Marketplace, so that all PrestaShop store products can be mapped to the correct Etsy category.
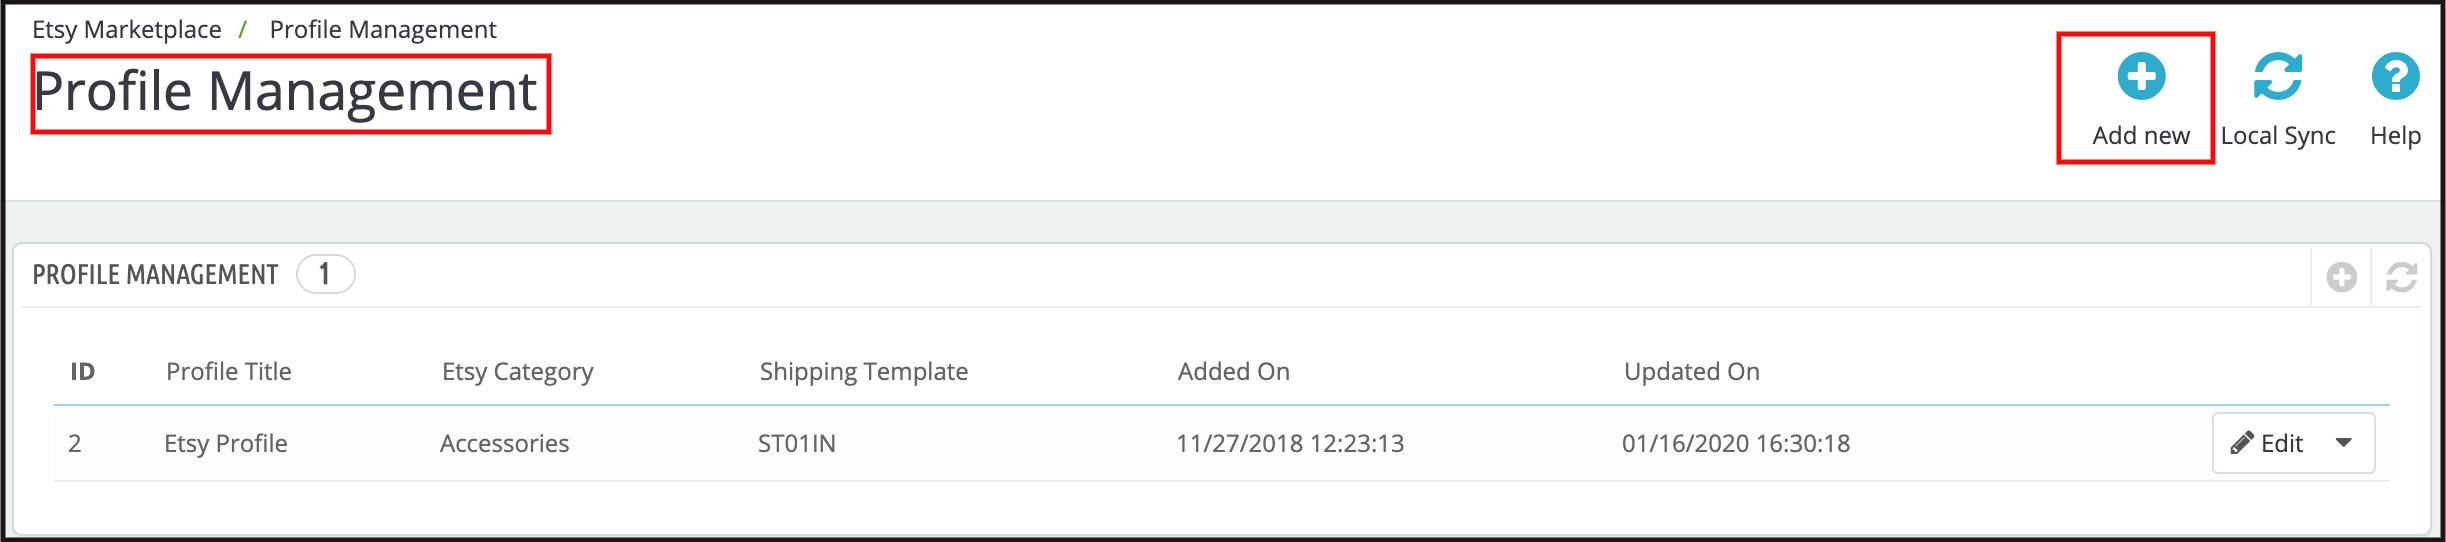
Managing Profiles with Ease
Admin can pick simple settings to list the product with the aid of profile management, such as – Etsy Shop (country-wise), Currency, Language, and Shipping Profile. Using the Size chart image function, Store Admin may add an extra image for each profile. This image will be added as an extra image to the Etsy marketplace.
You can customize the product title by inserting certain details and placeholders with the title. The place-holders like {sample} will be replaced by dynamic content at the time of execution.
The Custom Pricing for Etsy
Integration Extension enables the PrestaShop store administrator to list their goods from the PrestaShop store to the Etsy Marketplace at a price different from the price of the PrestaShop store.
Using PrestaShop Etsy Integration Extension, the admin may increase or decrease the price range at the Etsy Store. The administrator has the option to list the goods at a lower or higher price based on fixed or percentage-wise changes.
Product Image Size
Prestashop Etsy Integration module allows the admin to select the size of the product image in our module to sync the same to Etsy Marketplace.
Alter Quantity
The admin can set a maximum quantity of products that will be synced to Etsy with the products. If a product has 10 quantities on the store but Alter quantity is set as 5 then only 5 quantities will be synced to Etsy for that product.
Sales Data Analytics and Stats
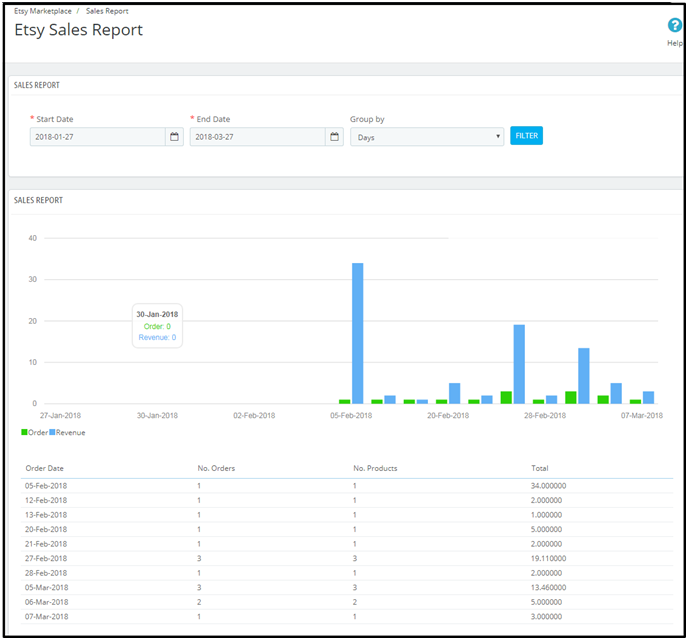
It allows the store owner to use PrestaShop Etsy Integration Extension to monitor the sales report.
The Etsy PrestaShop integration plug-in sales report tab helps the sellers to access the order and revenue report. This helps the administrator to review the sales report for orders from the Etsy store.
Also, a product sales report is displayed that allows you to see the product-wise status.
Watch how to connect Prestashop store with Etsy Marketplace
This is how a PrestaShop-Etsy integration works to allow an eCommerce site to receive orders directly from the Etsy marketplace. An effective PrestaShop-Etsy connection lets you perform all the activities of a seller account from the PrestaShop admin panel itself. Knowband’s PrestaShop Etsy integration module is one such PrestaShop module that you can leverage to generate heightened conversions on your store. It’s time you accept the importance of being a part of a popular marketplace and understand how you can leverage them to generate sales for your business.
The Prestashop Mobile Order Lookup Addon by Knowband is designed for the Prestashop eCommerce businesses and enables the customer to view order info or order status without logging into the account. The Prestashop order details module also allows the store owner to keep a track of the orders and view the customer status.
Merchant Benefits of the Prestashop Mobile Order Lookup Addon:
The Prestashop mobile order lookup module by Knowband lets the customers track their order status without logging into the account in the store.
Use of Prestashop order details addon, the store merchant can track the customer details from the back-office of the module.
Knowband’s Prestashop Order Lookup addon gives store admin the option to monitor the number of customers who viewed their order status.
The Online store merchant can customize the look and feel of the Order Lookup button text and color from the back-end of the Prestashop shipping details module.
Prestashop mobile order lookup module by Knowband allows the admin to change or add the new test which are shown above order lookup result.
This Prestashop order lookup module supports the multiple themes.
Prestashop order details addon by Knowband reduces the burden on manual support system through real-time tracking.
Knowband’s Prestashop mobile order lookup addon admin interface extremely easy to use.
2.0 Installation
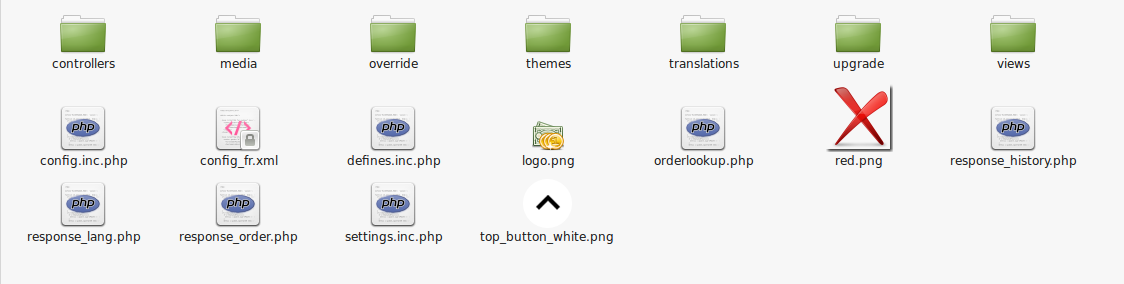
The screenshot below shows the folder structure of the Order Lookup plugin folder.
Folder structure of the Order Lookup plugin folder.
Copy the whole folder named as order lookup into your modules folder of the root directory of your PrestaShop store through FTP.
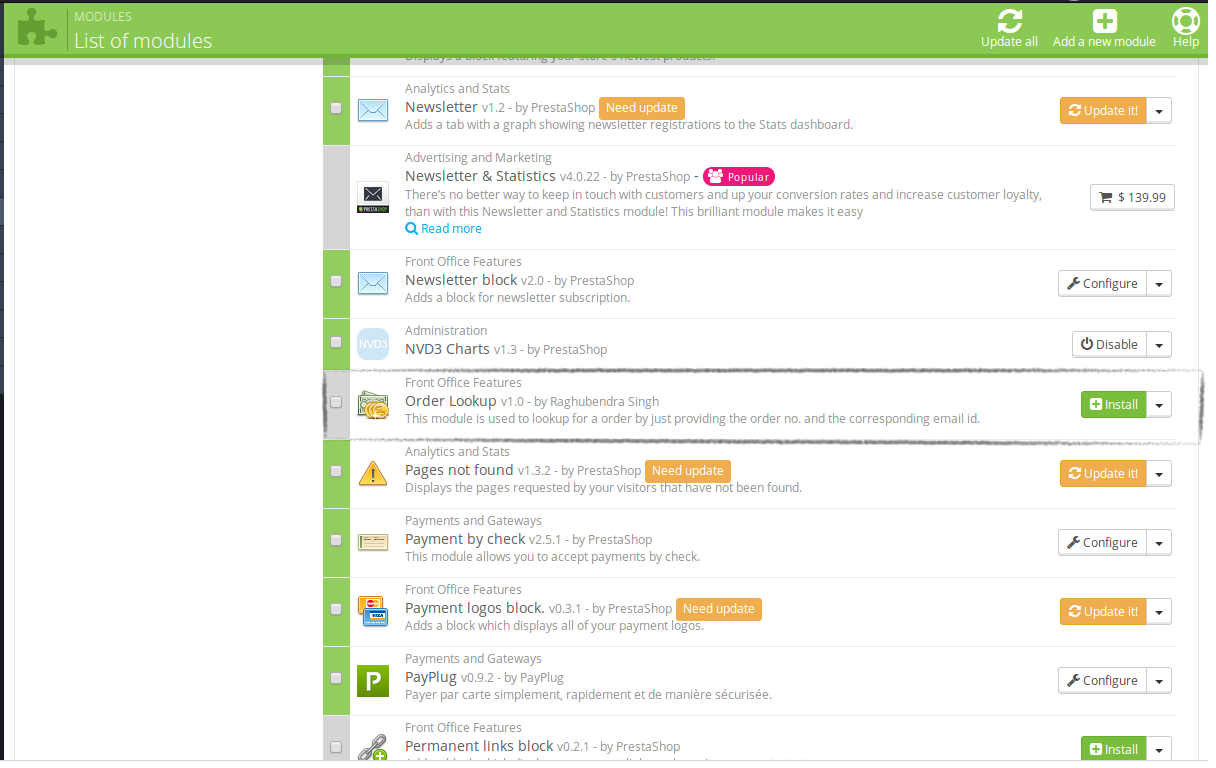
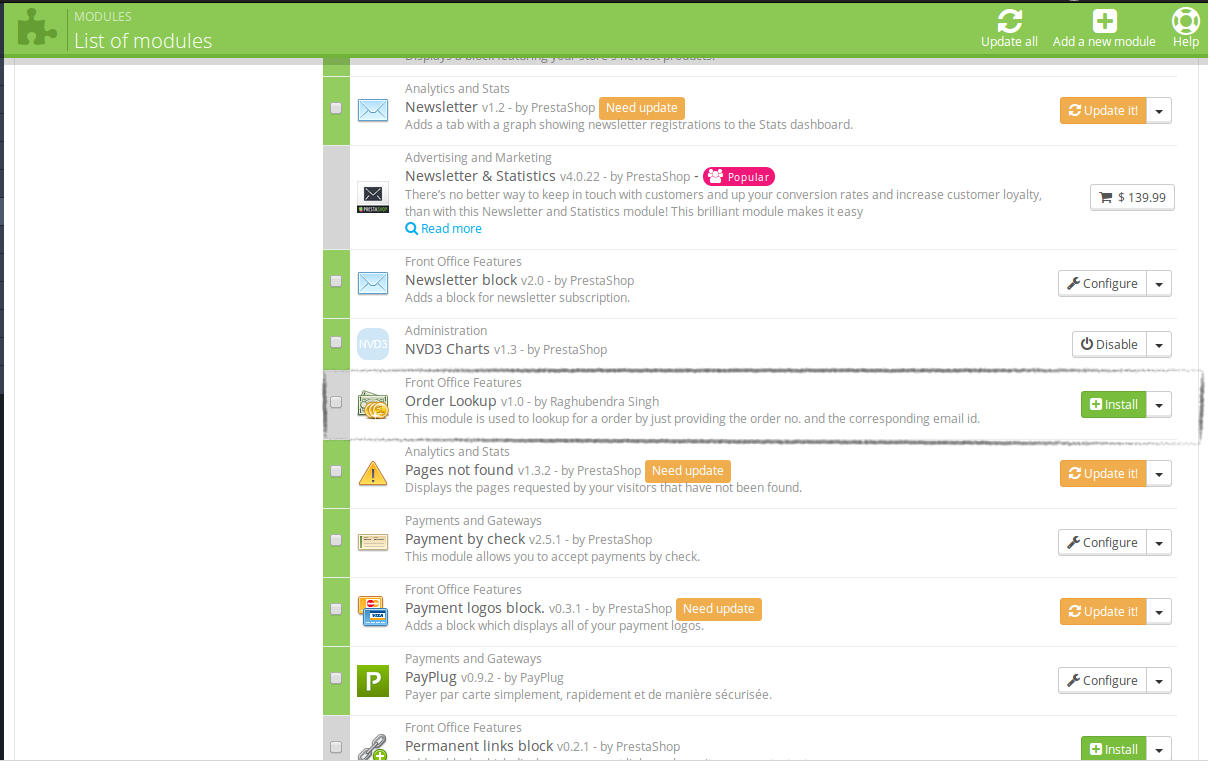
You will be able to find the Prestashop order details addon ready to be installed in the Modules in your PrestaShop store as shown below.
Click on the Install link to install the Mobile order lookup Prestashop addon.
3.0 Admin Module
Here, the Prestashop store owner can change the various settings of this plugin according to the requirements which will be reflected on front-end as well as in the admin panel.
To install this plug-in, please follow the following steps:
Add all whole plugin folder to the modules folder into the root directory of the PrestaShop Store.
After adding the plug-in files, then the system will list the plug-in on the module page.
Click on install/uninstall according to the need.
3.0.1 Admin Interface
After installing Prestashop order details module into the store, it will provide the following interface:
General Settings
Lookup Statistics
Language Translator
Get Support
Each interface is explained below.
3.0.1.1 General Settings
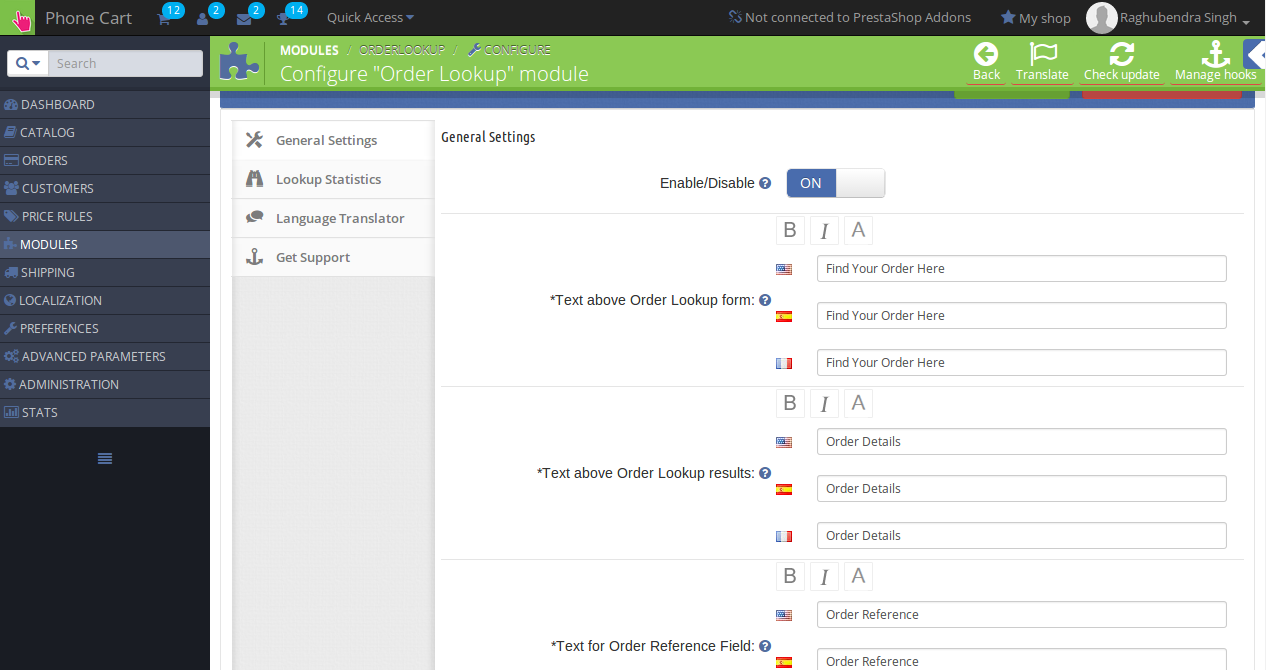
On clicking the configure link on the module listing page (configure link will automatically appear once you install the plugin), the system will open general settings tabs by default as shown in the screen below:
Initially, the fields in the above form will be already filled with their default values.
Enable/Disable: Initially, this will be OFF. The Prestashop store Admin can enable/disable plug-in by turning ON/OFF this setting.
Text control: Here, the admin can control text which would be shown on Order Lookup page and on the result page. Admin can also set different text, text layout and text color for all the languages available in the system. The type of format and text set by the admin in these controls are visible at front-end for the corresponding language selected.
Color control: Here, the admin can control colors of the buttons which would be shown on Order Lookup page and on the result page.
3.0.1.2 Lookup History
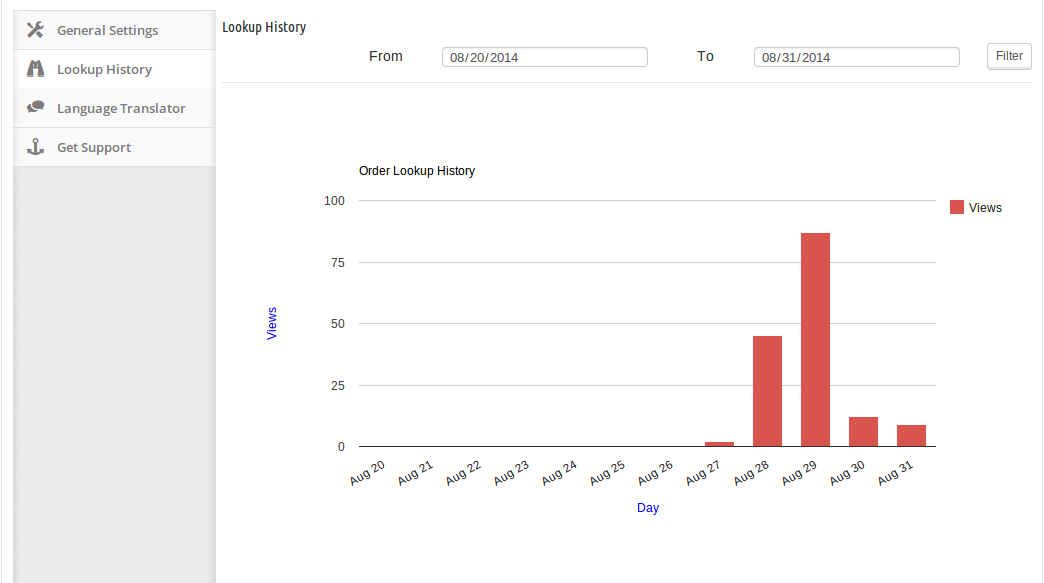
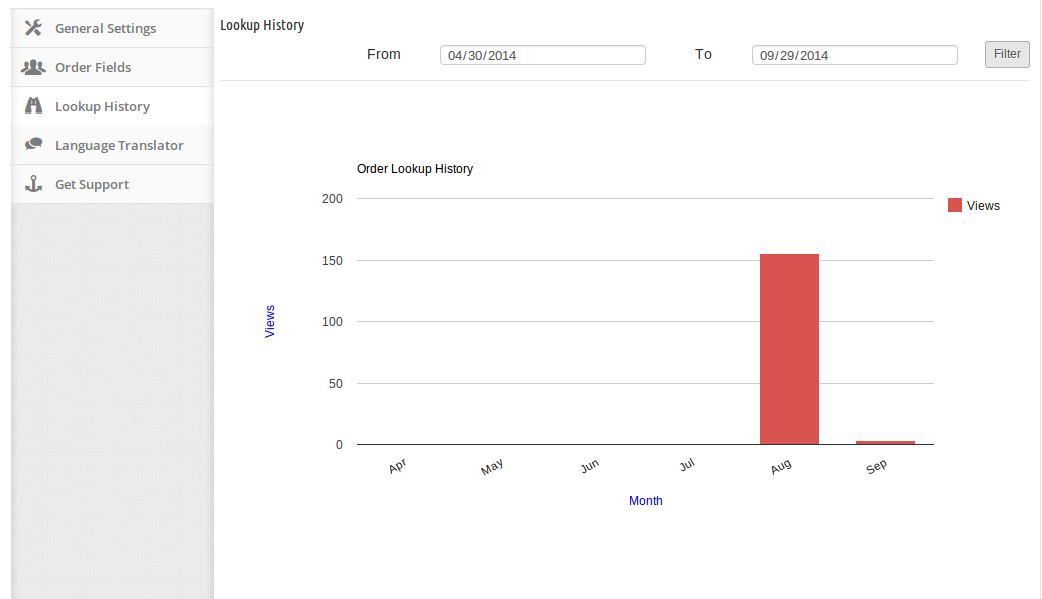
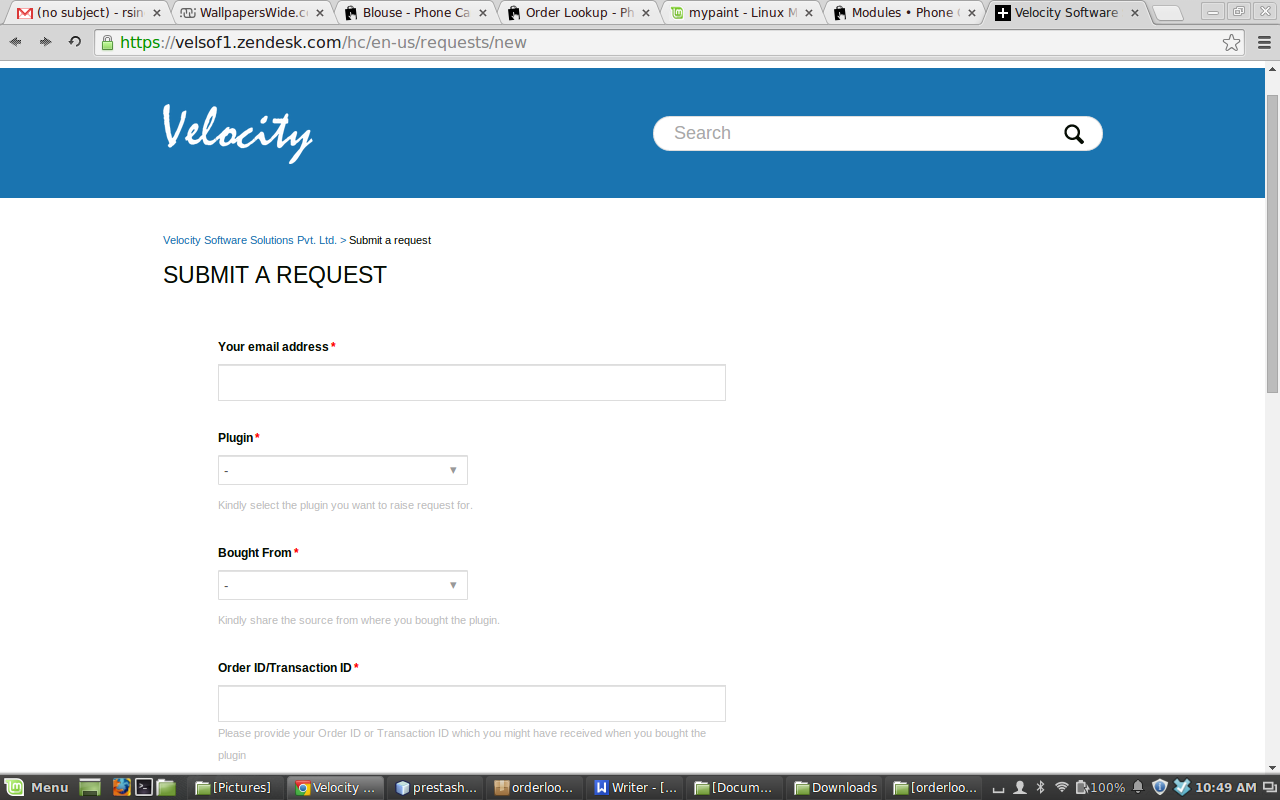
In this tab, Prestashop order status plugin will show the statistics of Lookup page view in terms of number. Reports will be displayed in the form of graphs. With the help of these statistics, the admin will be able to know at which time, Order Lookup page opened most. The store owner can enter any range and the system will show the results accordingly. By default, the graph will show the stats for the current week. The lookup stats are shown as follows:
3.0.1.3 Language Translator
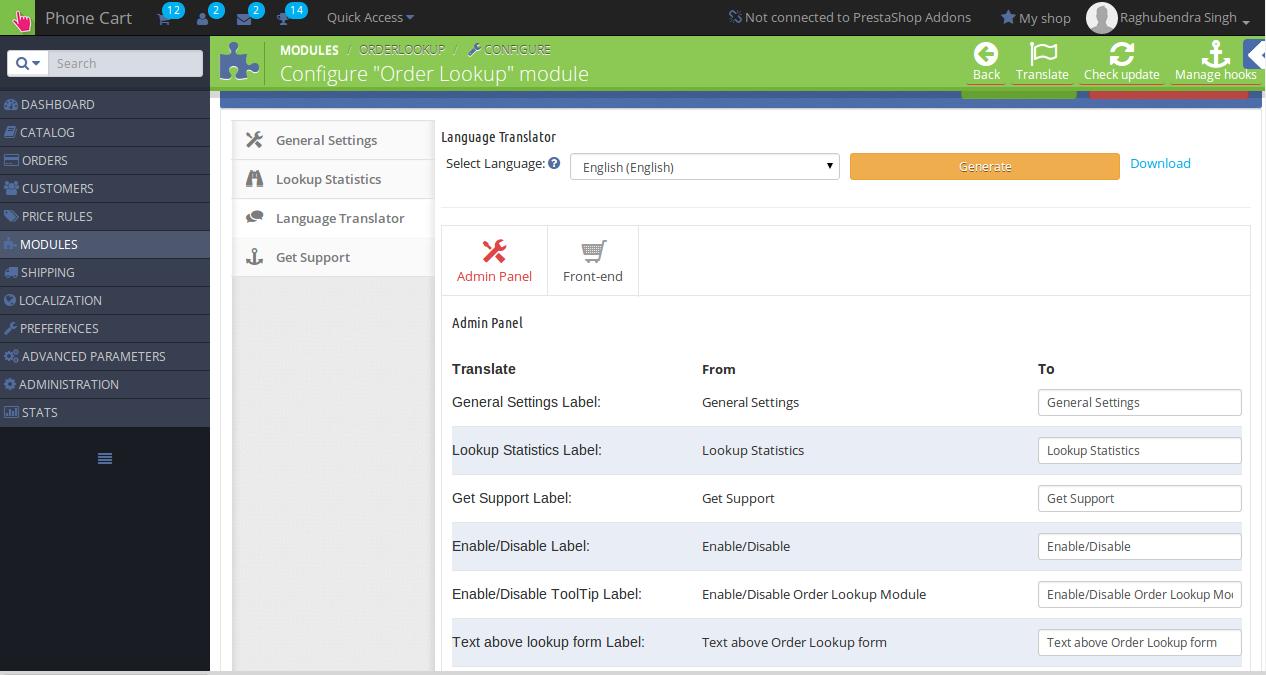
In this section, the admin can enter the text and can also change the texts that are displayed in the admin panel as well as front-end for the Mobile order lookup Prestashop addon. The interface for the language translator consists of two tabs through which the admin can enter the language texts for the admin panel and front-end. The admin can also download the language file generated. The language translator looks like the following:
3.0.1.4 Get Support
If the admin has found any issue regarding the Prestashop plugin and wants any type of support, then via this link, he/she can create a ticket for any query on our help desk support. On clicking this link, a new tab open with where the admin can generate the ticket for support.
4.0 Front End Module
At the front end, the customer will see a link on top menu which will redirect the customer to Order lookup form page.
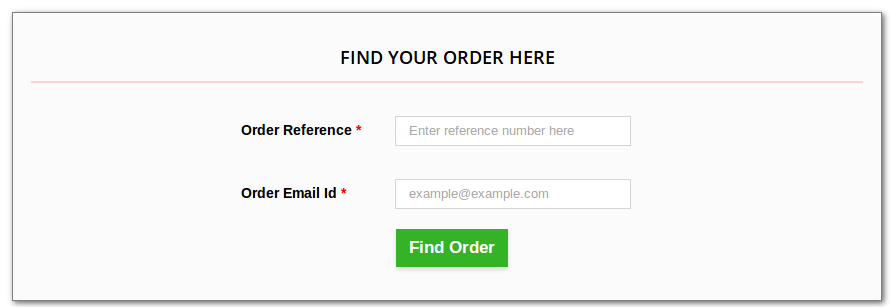
When the customer will click on the link, a new page would open which will ask for Order reference and email id.
The link to the order lookup page will appear as follows:
When the customer clicks on the link, a new page would open which will ask Order reference and email id.
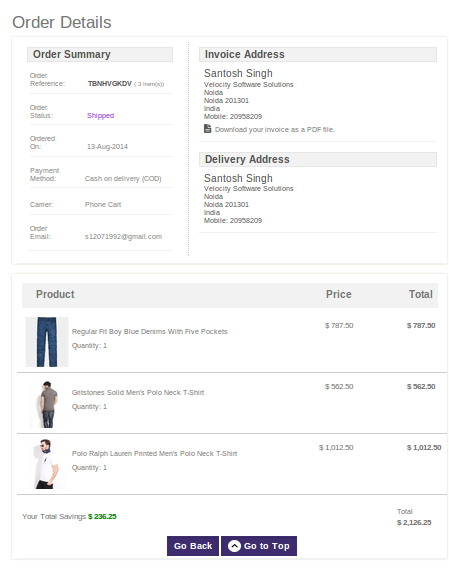
After entering correct details, the customer will be shown the corresponding Order data.
Recommendations :
Refresh home page of your store every time you enable/disable plugin. If the Prestashop extension is not working after installation then please check permissions on modules folder. The folder should be writable. Please make the folder permission to 755.
For more information about Prestashop Mobile Order Lookup: