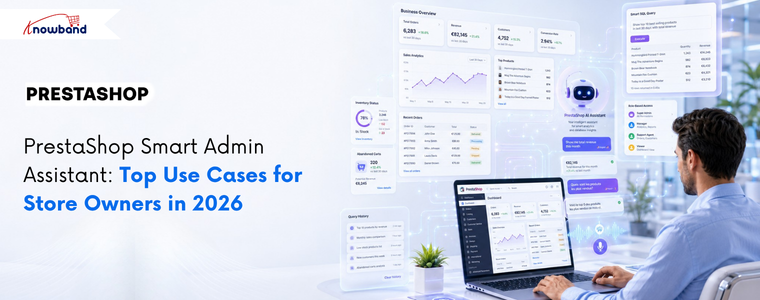
PrestaShop stores generate large volumes of operational data every day, from orders and customers to inventory, abandoned carts, revenue, and employee activity. While the data is readily available, getting to it means navigating multiple report pages, setting filters, and repeating the process for every single question. For admins checking the same figures daily, that time adds up fast. The Knowband PrestaShop Smart Admin Assistant sits inside your back office, and answers store questions in plain language, pulling results directly from your live database. No reports. No navigation. No SQL knowledge required. The module is launching soon. Here are the key use cases that show exactly how it changes day-to-day store management.
AI-Powered Natural Language Queries: No SQL Knowledge Required
Type a question in plain English, and the assistant returns the answer from your live store data within seconds. What makes this genuinely useful beyond convenience is the Show SQL Query feature. When enabled, the assistant surfaces the exact SQL it generated to produce the answer. A second setting, Allow SQL Edit and Re-run, lets the admin change that query and execute a revised version without writing SQL from scratch.
Before this, data requests involving multiple tables or custom filters sat in a developer backlog. Now, any admin can do that without any technical skills required.
Example: An admin wants to find customers who ordered at least three times but have not placed any order in the last 90 days, for a win-back campaign. They type: “Show me customers who ordered at least 3 times but have not placed any order in the last 90 days.”
The PrestaShop Smart Admin Assistant generates and runs this query:
SELECTc.id_customer, c.firstname, c.lastname, c.email,COUNT(o.id_order) AS total_orders,MAX(o.date_add) AS last_order_dateFROM ps_customer cJOIN ps_orders o ON c.id_customer = o.id_customerGROUP BY c.id_customerHAVINGCOUNT(o.id_order) >= 3AND MAX(o.date_add) < DATE_SUB(NOW(), INTERVAL 90 DAY)ORDER BY last_order_date ASC;The result is a table with customer name, email, total orders placed, and last order date. Every dormant repeat buyer in one view. The admin then adds a spend filter to focus on high-value customers first:HAVINGCOUNT(o.id_order) >= 3AND MAX(o.date_add) < DATE_SUB(NOW(), INTERVAL 90 DAY)AND SUM(o.total_paid) > 200 - admin adds this lineORDER BY last_order_date ASC;Re-run. Now, only customers who spent over 200 euros appear. Export from Query History. Win-back list ready. No developer, no phpMyAdmin, no waiting.
Database Views: Manage and Restrict AI Access to Store Data
The Database Views tab lets the admin choose which data domains the assistant is allowed to query. Available views include Orders, Customers, Products, Stock Availability, Shopping Carts, Cart Rules, Employees, Shipping Carriers, Product Combinations, and more.
Each view is a pre-built MySQL VIEW rather than a direct raw table query. This keeps things safe in two ways. The AI cannot modify any data because views are read-only. And because the joins are already built into each view, the answers come back more accurately than they would from querying raw tables directly.
Switch a view off, and the AI-powered admin assistant cannot reach that data, no matter the question. This is where PrestaShop back office analytics becomes properly controllable because the admin sets the limits, not the tool.
Example: A store owner wants the logistics team to use the PrestaShop Smart Admin Assistant for stock and order questions, but not customer personal data or employee records. Orders, Stock Availability, and Products stay on. Customers, Employees, and Customer Addresses go off. The logistics team can query what their role actually needs and nothing beyond that.
Role-Based Access Control: The Right Data for the Right Staff
The Access Control tab lets the store owner select which employee profiles can use the PrestaShop Smart Admin Assistant. Tick a profile, and it gets access. Leave all profiles unchecked, and access opens up for everyone. Tick only the ones that should have it, and the rest see nothing when they log in.
Example: A store with six admin accounts wants only the SuperAdmin and sales team to use the assistant. The store owner ticks those two profiles and leaves the rest unchecked. The translator and logistics staff log in, and the assistant is not visible to them at all. No code changes, no theme edits.
Predefined Chips: Daily Store Monitoring with One-Click
Predefined Chips are clickable question buttons that are present inside the chat widget. A predefined query runs instantly with a single click, eliminating the need for manual input.
The default set covers the most common daily checks: Orders Today, Revenue 30 Days, Abandoned Carts, Low Stock, Out of Stock, Active Customers, New Customers This Month, Cancelled Orders, Free Shipping Coupons, and No SKU Products. Every chip is editable, reorderable, and individually toggleable.
For stores running the same checks every morning, this alone saves significant time. The daily review that used to mean opening six different pages is now handled entirely through PrestaShop back office analytics in a single widget, in under a minute.
Example: A store manager checks four things every morning: today’s orders, this month’s revenue, products under five units in stock, and abandoned carts from the last 24 hours. All four are chips. The whole check is done in minutes.
Flexible AI Provider Selection: Choose OpenAI, Claude, or Gemini
The AI Provider tab gives the admin a choice between OpenAI, Anthropic Claude, and Google Gemini. Each requires the admin’s own API key and a model selection from that provider’s available tiers.
For Claude, the options are Haiku 4.5 for fast everyday queries, Sonnet 4.6 for a balance of speed and depth, and Opus 4.6 for complex multi-table work. OpenAI and Gemini follow the same tiered structure. Paying only for actual usage with no intermediary keeps running costs predictable regardless of store size. This is what makes the PrestaShop admin AI module genuinely accessible for stores that cannot commit to a fixed monthly AI subscription.
Example: Large-scale stores can use Haiku 4.5 for routine chip-based queries to maintain lower operational costs.. When the operations manager needs a detailed monthly breakdown across several joined tables, they switch to Sonnet 4.6 for that session and switch back after.
Voice Input, Widget Customisation, and Multilingual Support
Three features cover the remaining day-to-day usability of the PrestaShop Smart Store Management Addon.
Widget Layout puts every visual setting in one place: position, chatbot name, greeting message, avatar, width, height, and more. Changes reflect instantly in a live preview on the right. No CSS involved at any point.
Voice Input lets the admin ask questions out loud instead of typing. The Web Speech API built into the browser handles the transcription. For admins who move around, work on mobile, or simply find speaking faster than typing, this removes the last friction from getting a quick answer.
Chatbot Language gives the admin control over which language the PrestaShop Admin AI Module replies in. Setting it to Back-office Language ties the response to whatever language the admin panel is running in. Setting it to Custom Language lets the admin pick independently, which matters on multilingual teams where the back office language and the working language of individual staff members are different.
Example: A French-speaking operations manager works in a back office set to English for consistency across the team. Custom Language is set to French. The manager speaks a question using Voice Input and gets the answer back in French. Nothing in the back office configuration has changed.
Query History and Session Logs: A Full Audit Trail
Each question sent through the assistant lands in the Query History tab as a permanent record. The log captures the date, the employee, the question, the number of rows returned, response time in milliseconds, which AI provider ran it, the status, and the full SQL that executed.
Logs filter by date and status, and export to CSV or Excel. A retention setting purges entries older than a chosen number of days automatically, so the log table stays lean without manual cleanup. The Sessions tab keeps full conversation threads per employee for anyone who wants to review an earlier exchange or audit how the team is using the tool.
Example: A store owner gets an answer that looks off during the Monday morning check. They open Query History, pull up the exact query that ran, read the SQL, and spot that a database view was serving cached data. They hit Refresh Schema Now, rebuild the schema, and re-run with the correct result.
An AI smart admin assistant is most useful when it works from organised data Before you start asking it questions about sales or stock, it helps to know what your dashboard is already showing you. This guide to PrestaShop back office analytics explains which reports matter and how to read them without wasting time.
How the Knowband Smart Admin Assistant Improves Store Operations
Every feature covered here fills a gap that previously needed either a developer or a report that took too long to build. This PrestaShop admin AI module keeps the depth, the SQL still runs, the data is still live, and the controls are still precise, but the module removes the technical barrier between the admin and the information they need. For store owners spending more time in data analysis than on the business itself, the PrestaShop Smart Store Management Addon is the best practical fix.
The Knowband PrestaShop Smart Admin Assistant is launching next week. Stay tuned to find out more about the module and what it can do inside your back office.
Managing eCommerce manually is one of the most time-consuming parts of running an online store. Updating prices means opening products one by one. Migrating to a new store means starting from scratch. Syncing a supplier feed means downloading a file, converting it, and running an import that may or may not work cleanly.
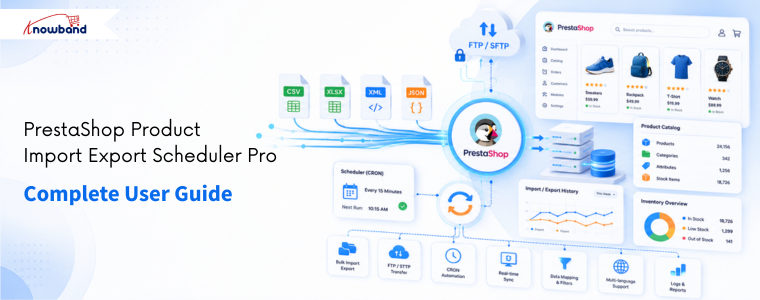
The PrestaShop Product Import Export Scheduler Pro by Knowband replaces all of that. It is a complete PrestaShop Bulk Product Import Export Module that handles every direction of catalog data transfer, products and categories, in and out, in CSV, XLSX, JSON, and XML, from inside your PrestaShop admin panel without any coding, desktop software, or developer involvement.
What makes this PrestaShop Import Export Module different from basic transfer tools is the automation layer. Transfers are saved as named profiles. Profiles run on a schedule. Scheduled runs push files to FTP or SFTP servers automatically, send completion emails, and clean up after themselves.
Compatible with PrestaShop 1.7.x through 9.x.
1.1 Who Is This Module For
The PrestaShop Catalog Manager is built for:
Store owners managing medium to large catalogs of 100 to 50,000 SKUs.
International stores running multilingual catalogs.
Businesses syncing product or pricing data from supplier feeds on a schedule.
Any merchant who has struggled with PrestaShop’s native importer and needs a reliable combination and multi-language support.
2.0 Installation Guide
2.1 System Requirements
Before installing the module, confirm your environment meets the following:
PrestaShop version 1.7.x or 8.x or 9.x.x
PHP 7.2 or higher
MySQL 5.6 or higher
2.2 Uploading and Installing the Module
Step 1 – Upload the module: From your PrestaShop admin panel, go to Modules, then Module Manager, and click “Upload a Module” in the top right. Select the ZIP file downloaded from Knowband and click Open. PrestaShop uploads and extracts the files automatically.
Step 2 – Install: Once uploaded, click Install when prompted. After installation, you are redirected to the module configuration page.
Step 3 – Locate if needed: If the module does not appear automatically, search for Bulk Data Manager in the Module Manager search bar and click Configure.
2.3 Common Installation Issues
Upload fails: Your server upload size limit is too low. Ask your hosting provider to increase upload_max_filesize and post_max_size in the PHP settings to at least 32 MB.
Module not visible after install: Clear your PrestaShop cache under Advanced Parameters, then Performance, then search for the module again in Module Manager.
The configuration page appears broken: Clear your browser cache and the PrestaShop theme cache under Design, then Theme and Logo, then Advanced Settings.
3.0 Admin Panel Overview
Once installed, the PrestaShop Product Import Export Scheduler Pro has four main tabs in the admin panel:
General Settings: Preferences, template files, limits and speed, scheduled cleanup.
Export Profile: Create and manage export profiles.
Import Profile: Create and manage import profiles.
Transfer Logs: Full history of every import and export run.
4.0 General Settings
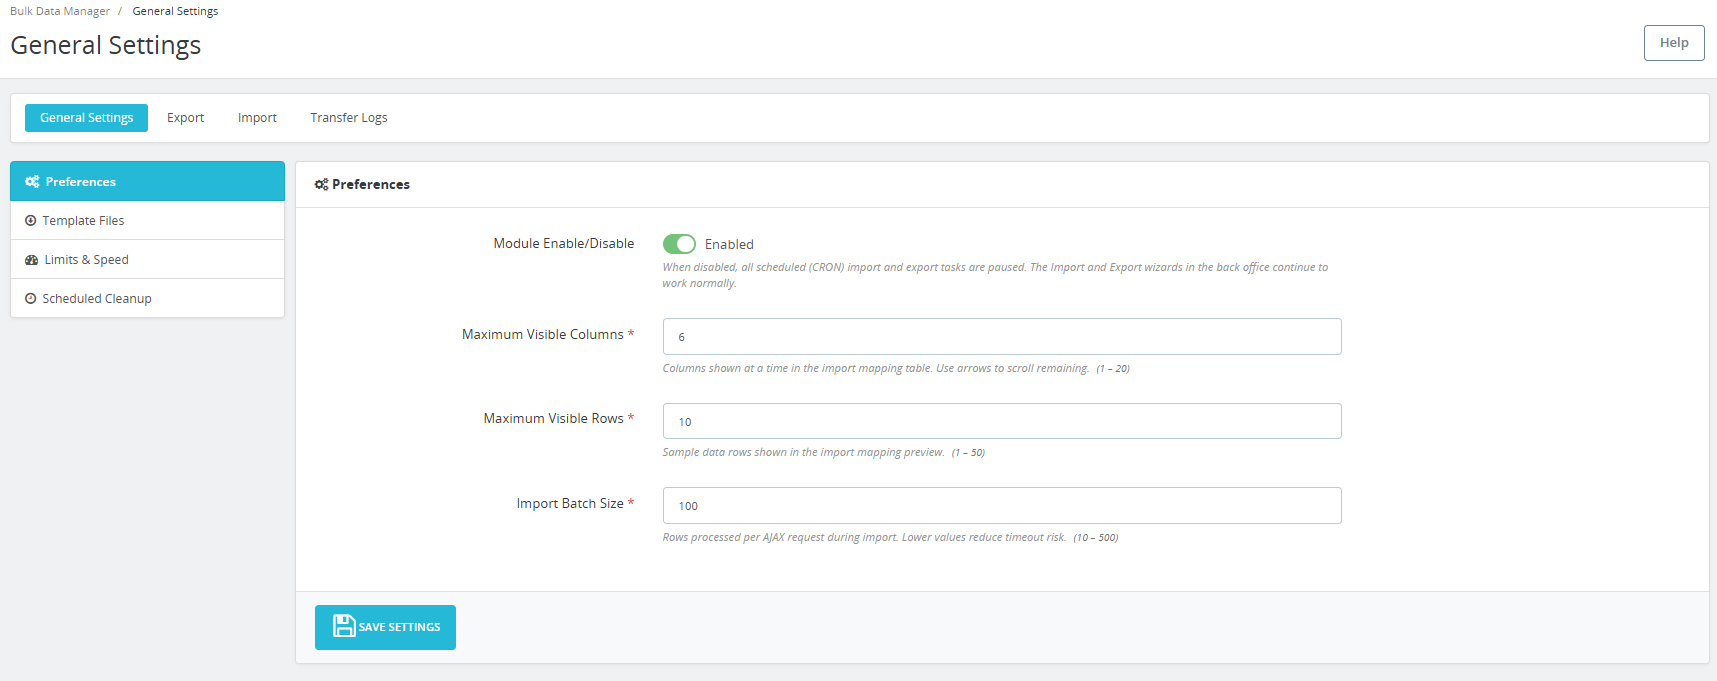
The General Settings tab has four sub-sections accessible from the left sidebar: Preferences, Template Files, Limits and Speed, and Scheduled Cleanup.
4.1 Preferences
This is the first screen you see inside the module.
Module Enable/Disable: Toggle the module on or off. When disabled, all scheduled CRON import and export tasks are paused.
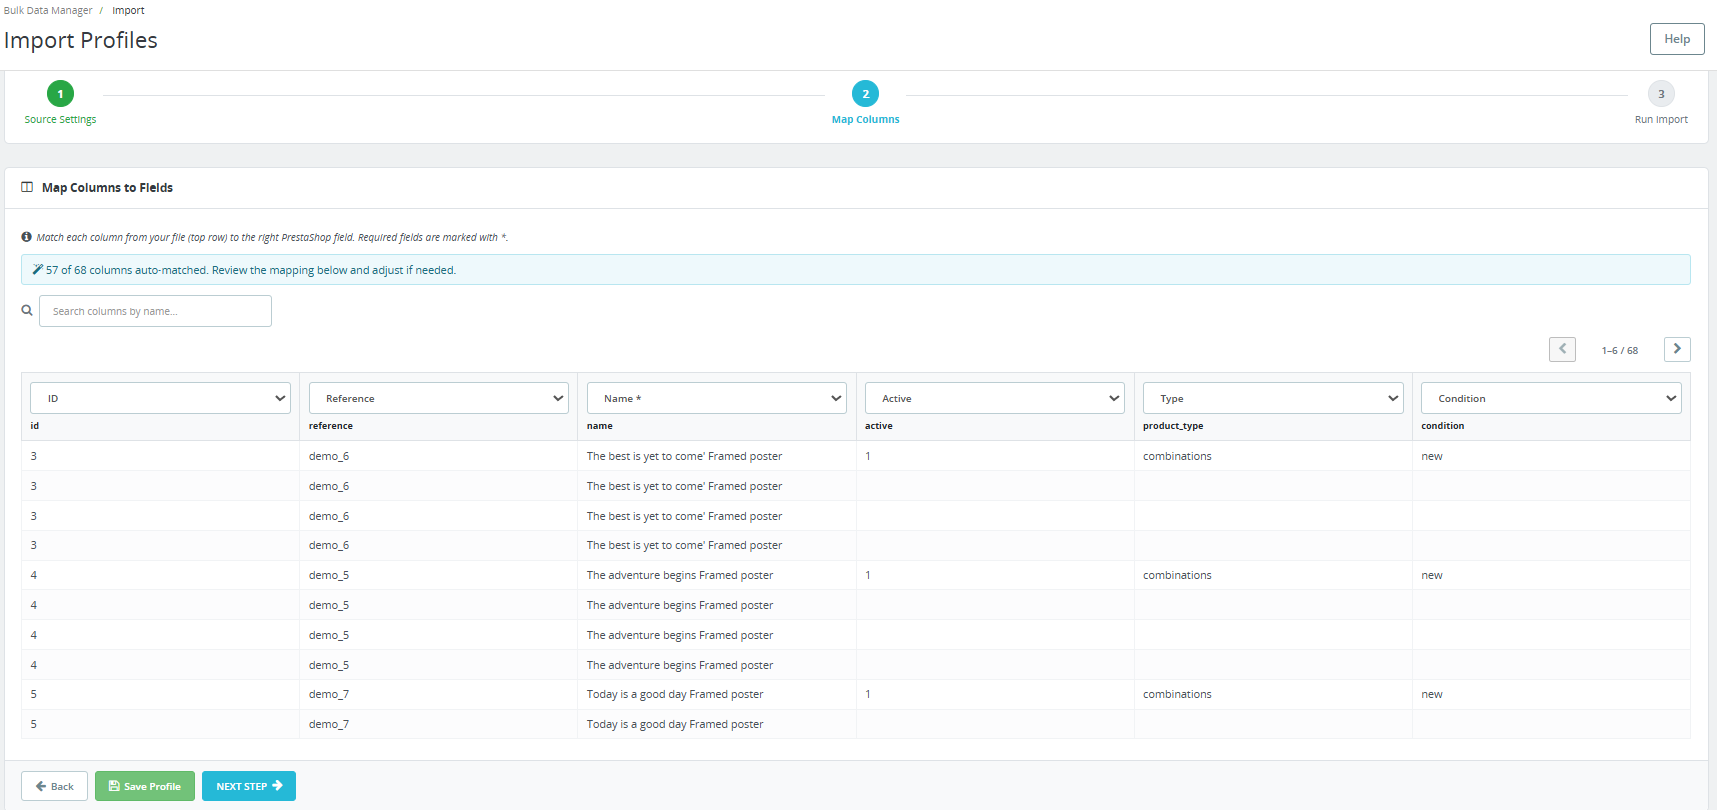
Maximum Visible Columns: Sets how many columns are displayed at once in the import mapping table. Use the arrows to scroll through the remaining columns. Accepted range is 1 to 20. Default is 6.Maximum Visible Rows: Sets how many sample data rows are shown in the import mapping preview. This is for visual verification only and does not limit how many rows are imported. Accepted range is 1 to 50. Default is 10.
Import Batch Size: Sets how many rows are processed per AJAX request during import. Lower values reduce timeout risk on shared hosting environments. The accepted range is 10 to 500. Default is 100. For VPS or dedicated servers, increase this to 300 or higher to speed up large imports.
Click Save Settings to apply changes.
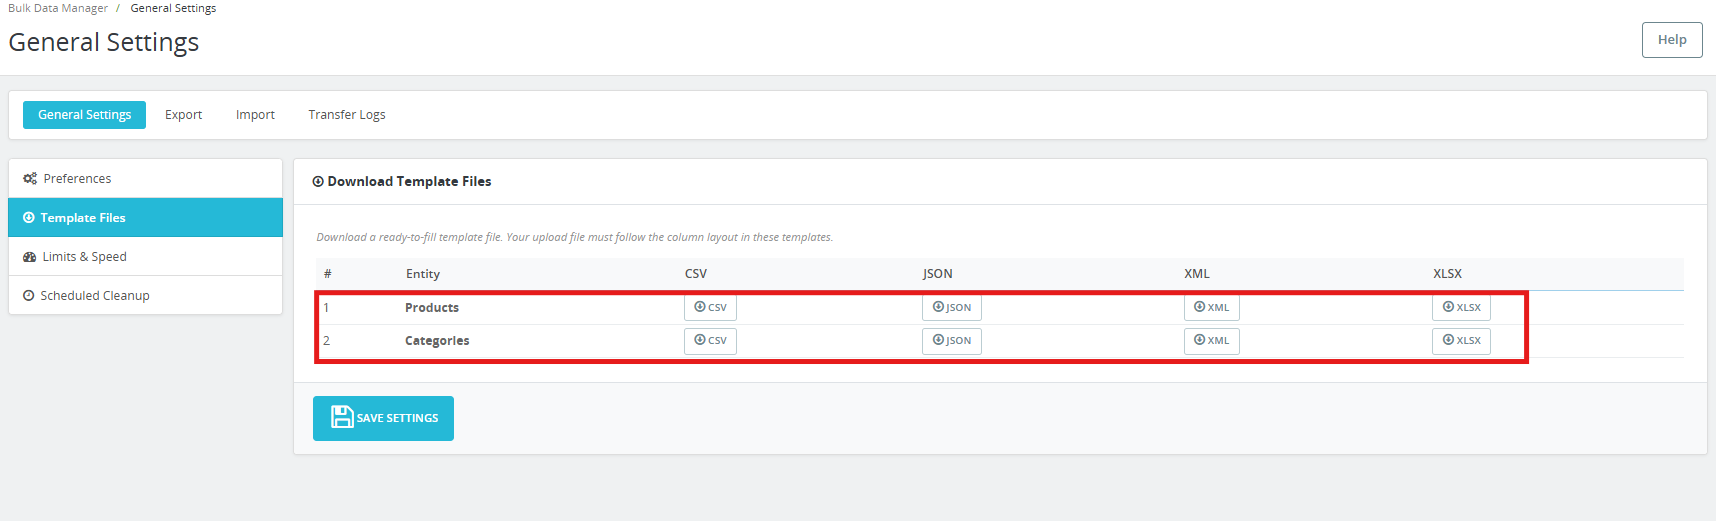
4.2 Template Files
This section provides ready-to-fill sample template files for every supported entity and format combination.
Two entities are available: Products and Categories. Each entity has four format buttons: CSV, JSON, XML, and XLSX.
Click the relevant button to download the template for that entity and format. Each template includes every column the PrestaShop Import Export Module recognises and uses safe placeholder data. Download a template, fill it in with your real product data, and import it back. Your upload file must follow the column layout shown in these templates.
4.3 Limits and Speed
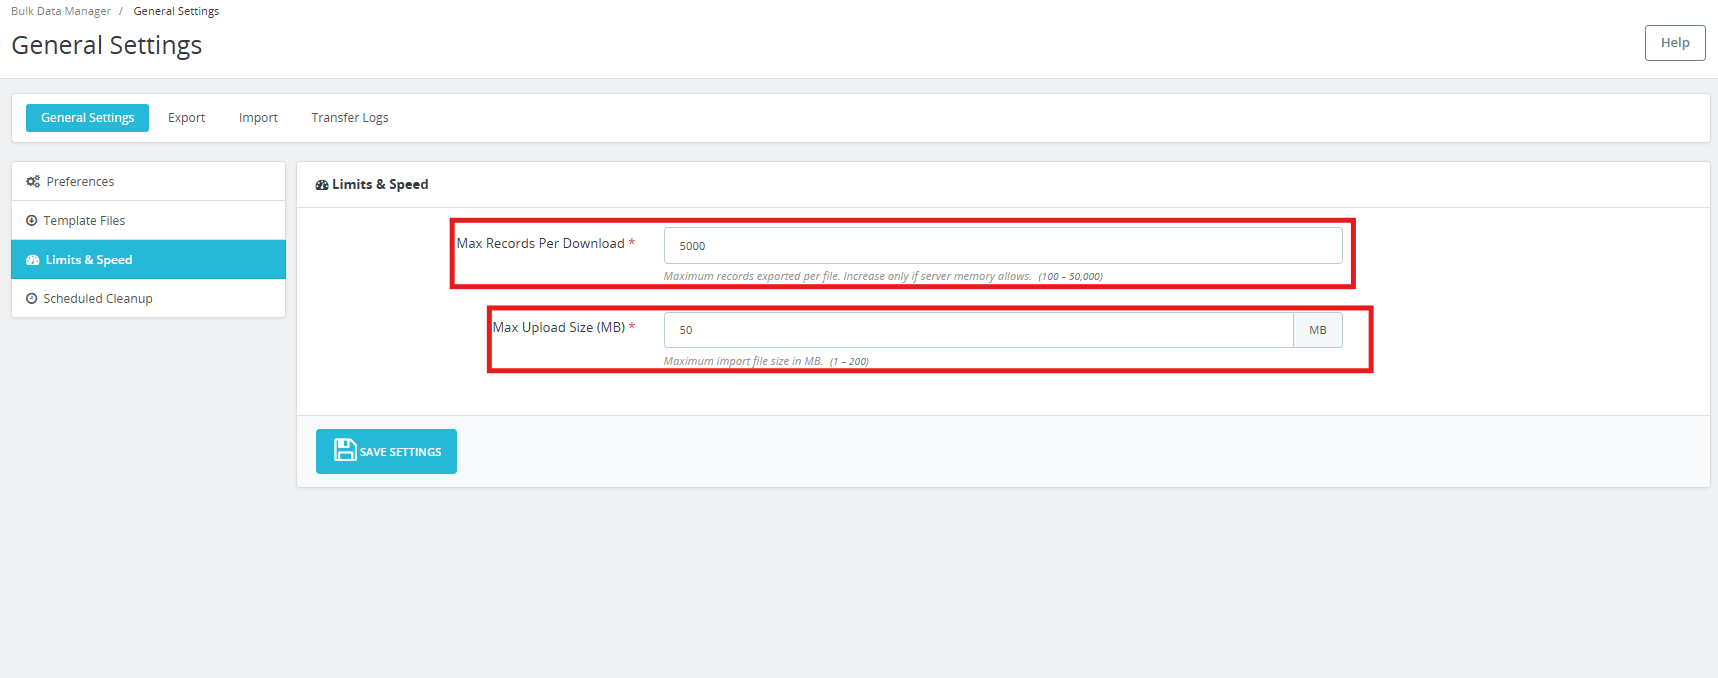
Max Records Per Download: Sets the maximum number of records exported per file. Increase only if your server memory allows. Accepted range is 100 to 50,000. Default is 5,000.
Max Upload Size (MB): Sets the maximum import file size in MB. This works alongside your server’s PHP upload limit; whichever is lower takes effect. Accepted range is 1 to 200 MB. The default is 50 MB.
Click Save Settings to apply.
4.4 Scheduled Cleanup
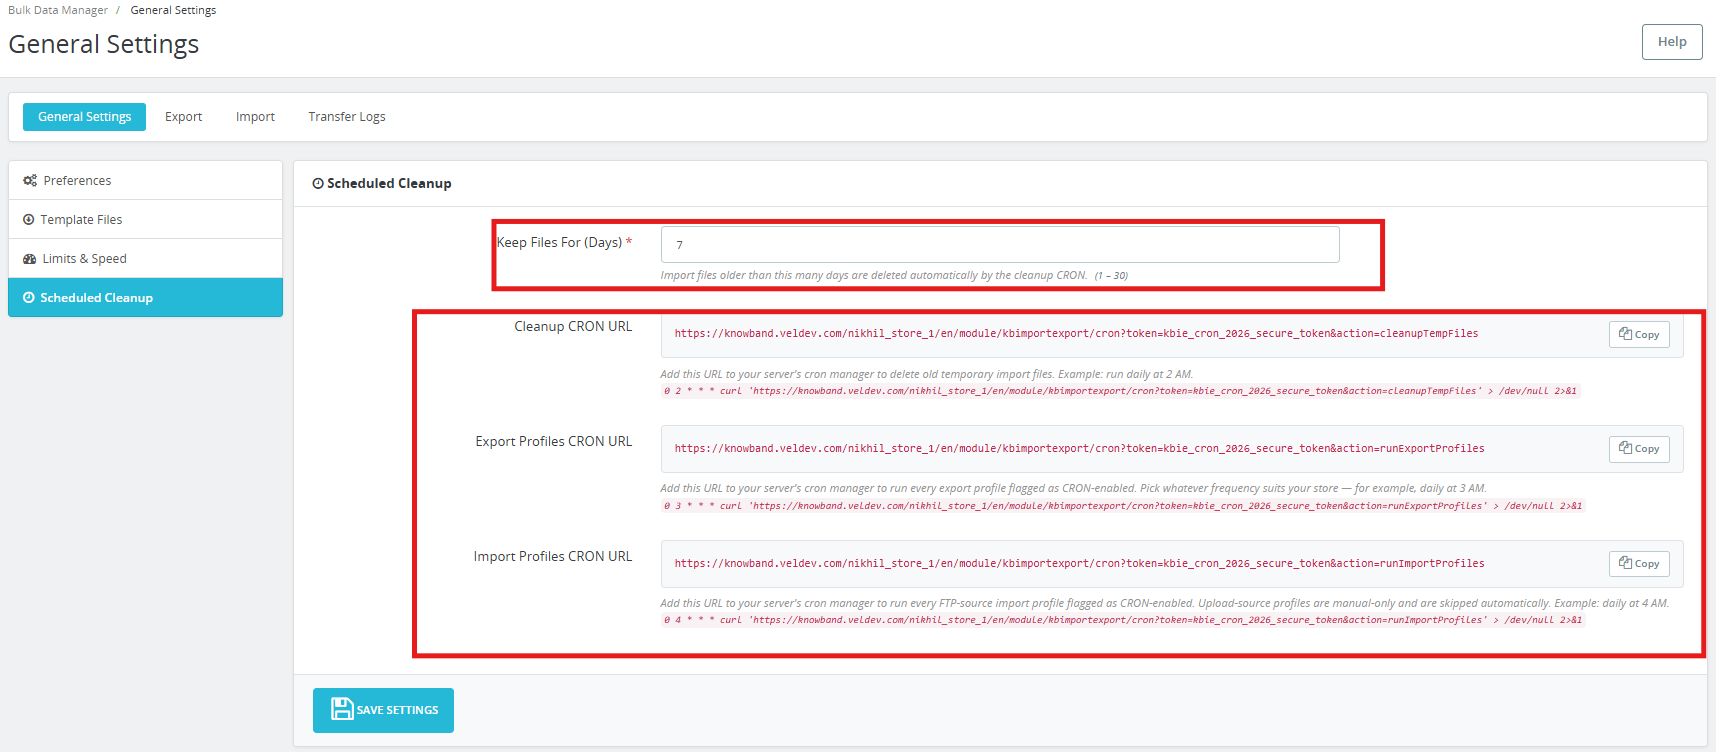
This section generates the three cron URLs used to automate transfers and manages the automatic file cleanup.
Keep Files For (Days): Import files older than this many days are deleted automatically by the cleanup CRON. Accepted range is 1 to 30. Default is 7 days.
Cleanup CRON URL: Add this URL to your server’s cron manager to delete old temporary import files automatically. Example: run daily at 2 AM.
Export Profiles CRON URL: Add this URL to your server’s cron manager to run every export profile flagged as CRON-enabled. Pick whatever frequency suits your store, for example, daily at 3 AM.
Import Profiles CRON URL: Add this URL to your server’s cron manager to run every FTP-source import profile flagged as CRON-enabled. Upload-source profiles are manual-only and are skipped automatically. Example: daily at 4 AM.
Each URL has a Copy button for one-click copying. Paste the copied URL directly into your server crontab or into PrestaShop’s built-in Scheduled Tasks module.
Click Save Settings to apply.
5.0 Export Profiles
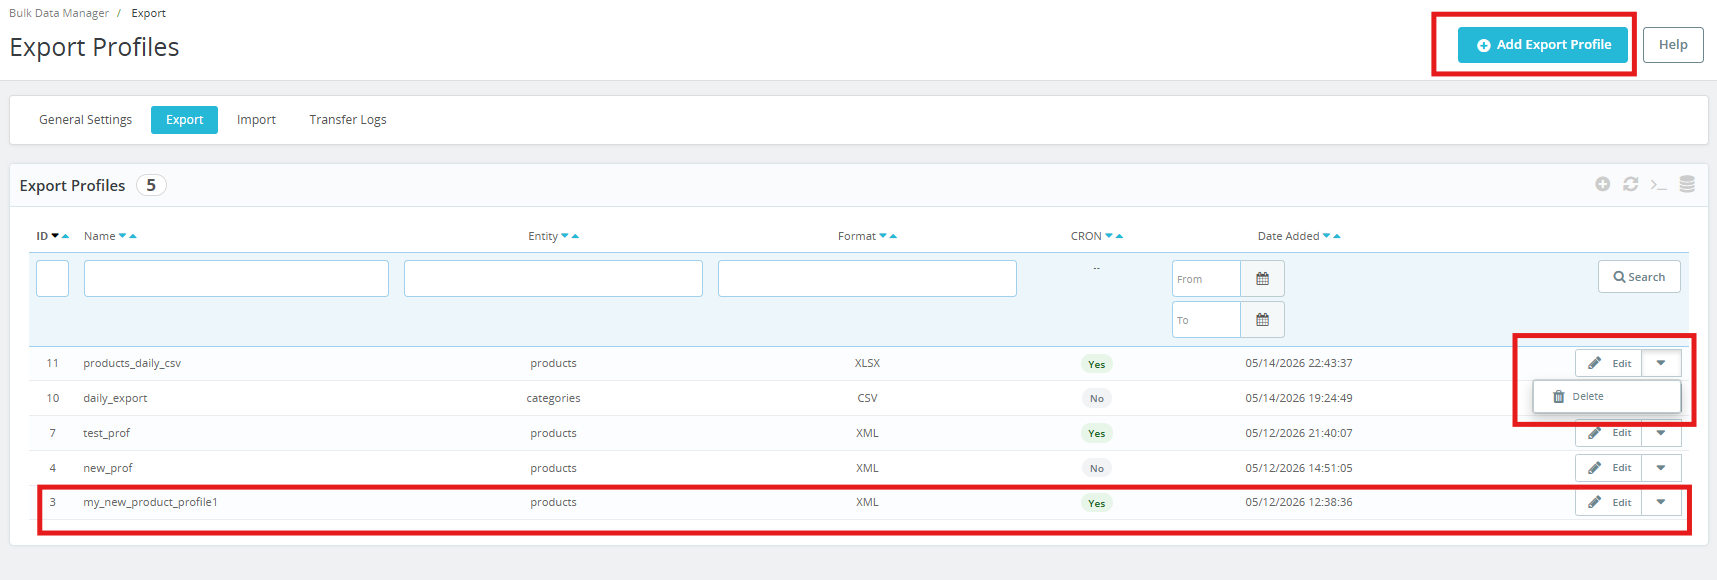
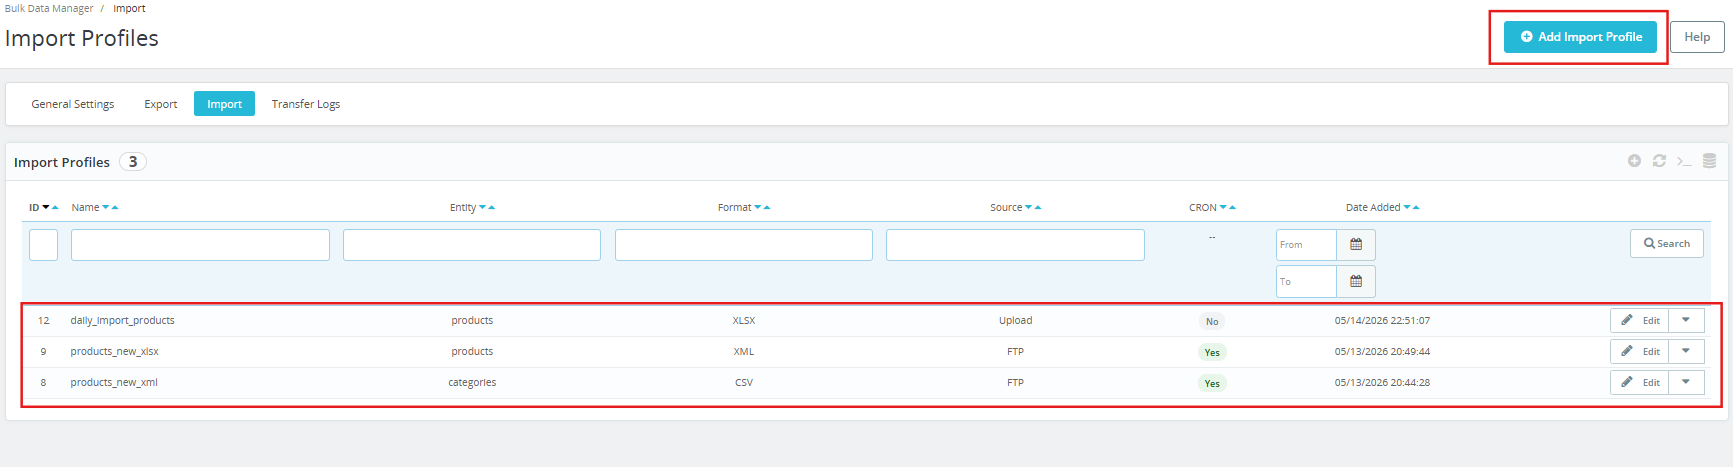
The Export tab lists all saved export profiles and allows you to create new ones. Each profile is shown with its ID, name, entity type, format, CRON status, and date added. Profiles can be edited using the Edit button on each row.
Click Add Export Profile to begin. The export wizard runs through three steps: Transfer Settings, Choose Fields, and Generate File.
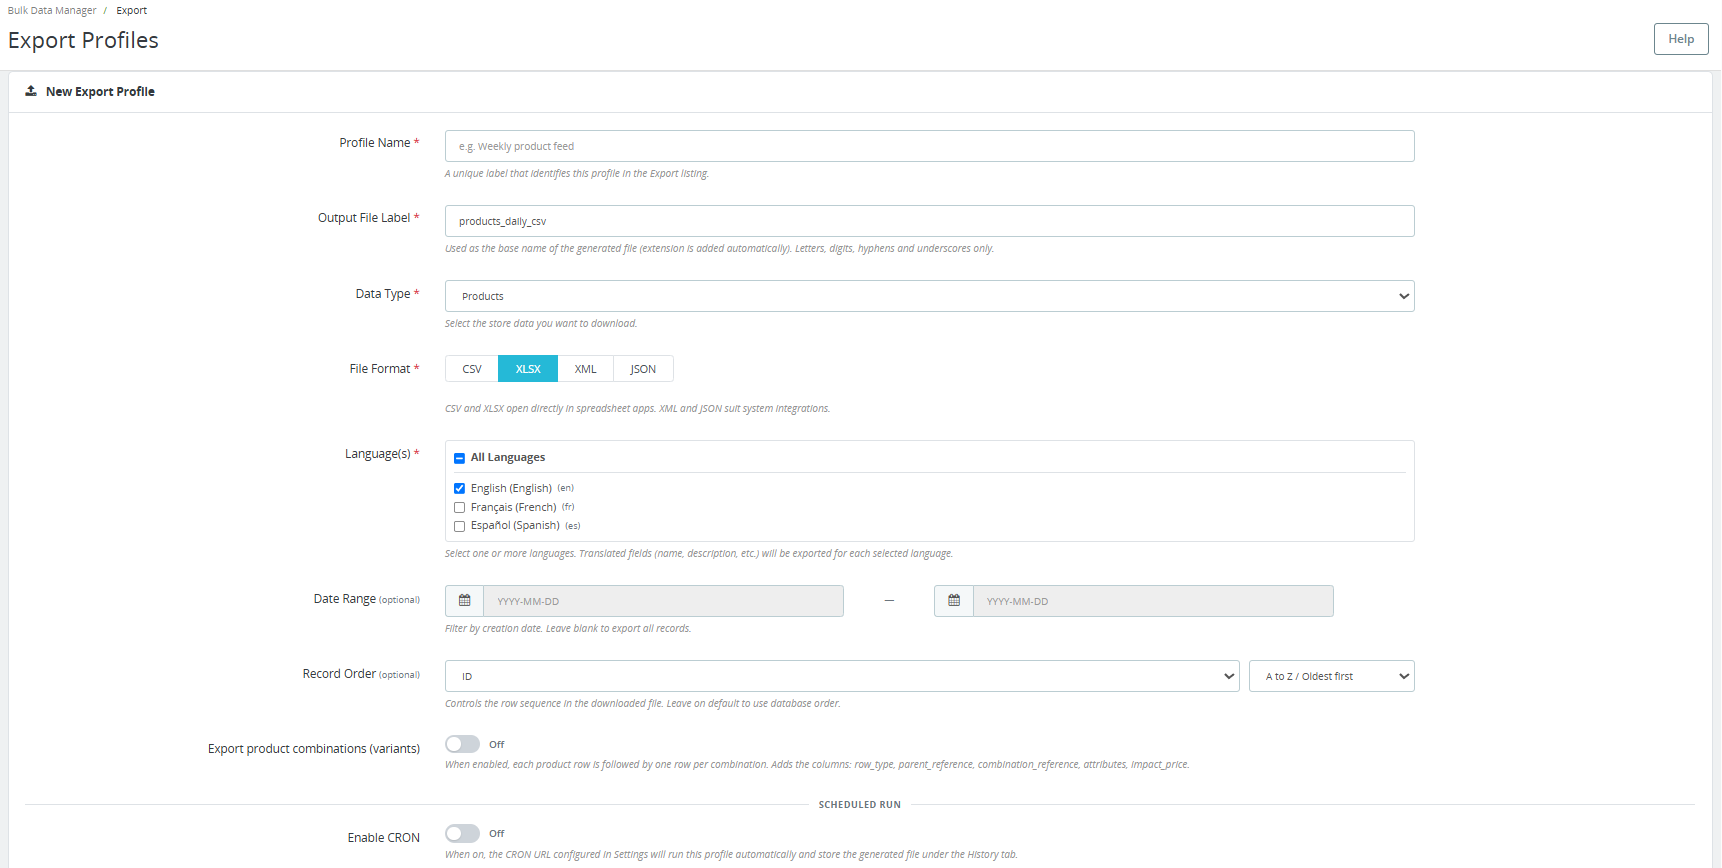
5.1 Step 1 – Transfer Settings
Profile Name: A unique label that identifies this profile in the Export listing. Example: Weekly product feed.
Output File Label: Used as the base name of the generated file. The file extension is added automatically. Use letters, digits, hyphens, and underscores only. Example: products-daily.
Data Type: Select the store data you want to download, Products or Categories.
File Format: Select CSV, XLSX, XML, or JSON. CSV and XLSX open directly in spreadsheet apps. XML and JSON suit system integrations.
Language(s): Select one or more store languages. Translated fields such as name and description will be exported for each selected language. Select All Languages to include every active language in the store.
Date Range (optional): Filter by creation date. Leave blank to export all records.
Record Order (optional): Controls the row sequence in the downloaded file. Leave on default to use database order.
Export product combinations (variants): When enabled, each product row is followed by a row for each combination. This adds the columns row_type, parent_reference, combination_reference, attributes, and impact_price. Enable this when you need a full product catalog, including all variants for re-import or migration.
Scheduled Run – Enable CRON: When on, the CRON URL configured in Settings will run this profile automatically and store the generated file under the Transfer Logs tab.
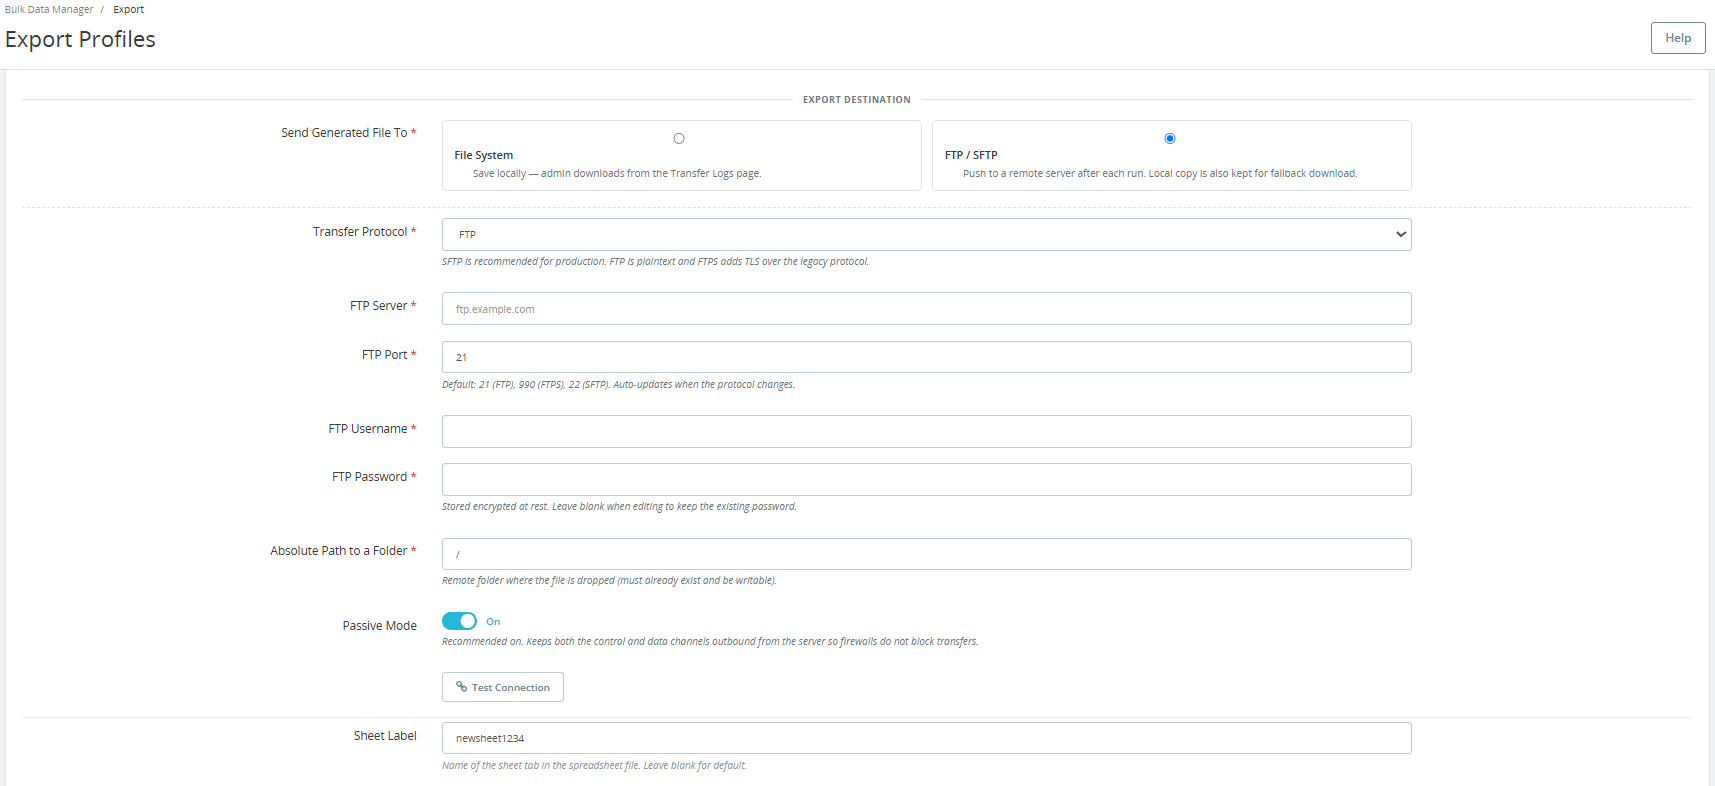
Export Destination – Send Generated File To:
File System: Saves the file locally. Admin downloads it from the Transfer Logs page.
FTP / SFTP: Pushes the file to a remote server after each run. A local copy is also kept for fallback download.
If FTP / SFTP is selected, the following fields appear:
Transfer Protocol: Choose FTP, FTPS, or SFTP. FTPS is recommended for production. FTP is plaintext. FTPS adds TLS over the legacy protocol.
FTP Server: The server address, for example, ftp.example.com.
FTP Port: Default is 21 for FTP, 990 for FTPS, and 22 for SFTP. The port auto-updates when the protocol changes.
FTP Username and FTP Password: Credentials for the remote server. The password is stored encrypted at rest.
Absolute Path to a Folder: The remote folder where the file is dropped. The folder must already exist and be writable.
Passive Mode: Recommended for FTP/FTPS so firewalls do not block transfers.
Click Test Connection to verify your credentials before saving.
Output Style: Choose the CSV delimiter, Universal comma, Windows/Excel semicolon, or Tab-separated.
List Glue: Separator used for multi-value fields such as Tags and All Category Names. Options are Pipe, Slash, or Comma.
If File System is selected, you just need to add the Sheet Lable.
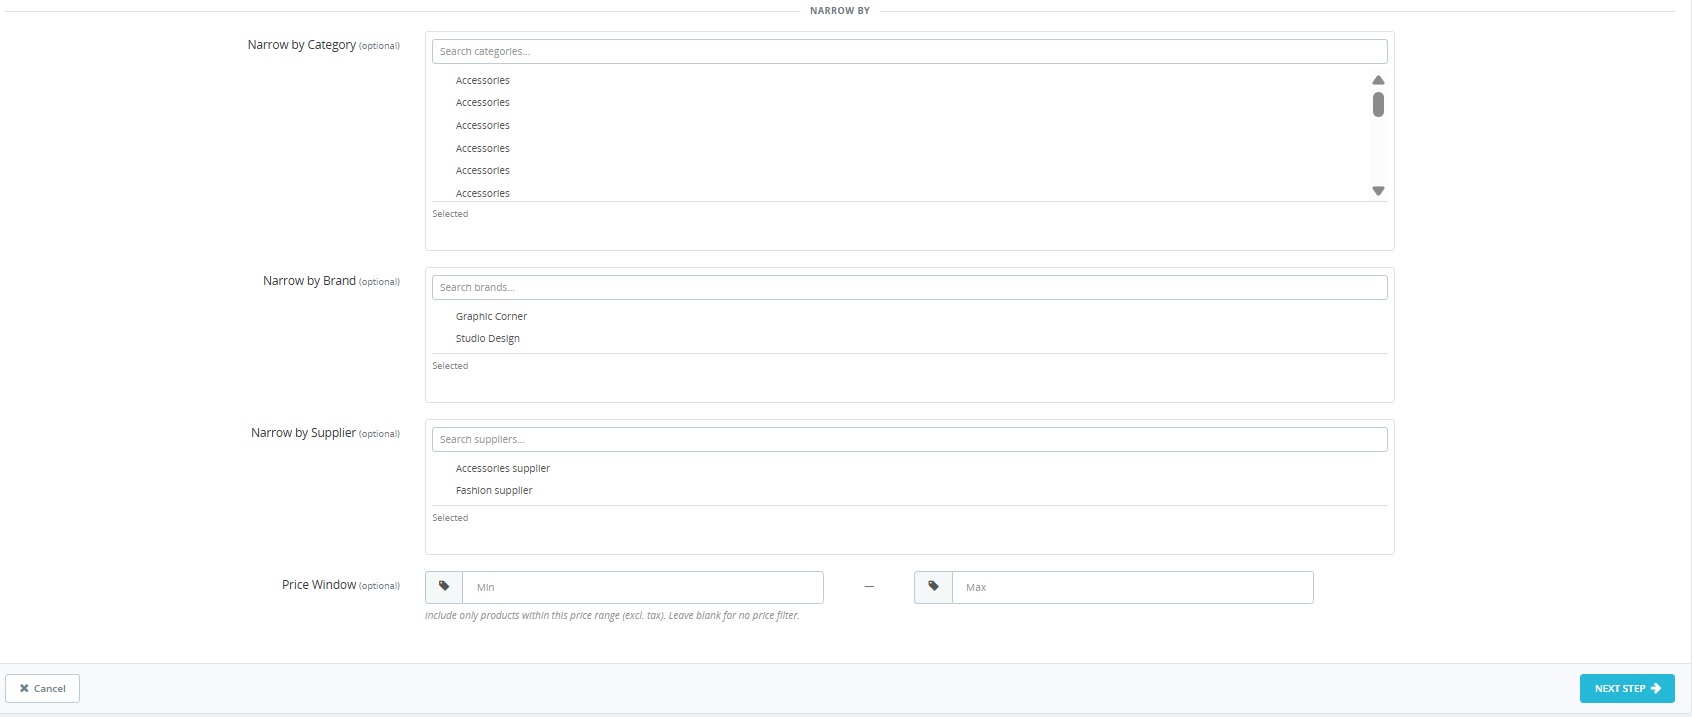
Narrow By (optional filters):
Narrow by Category: Limit the export to products in selected categories only.
Narrow by Brand: Limit the export to products from selected brands only.
Narrow by Supplier: Limit the export to products from selected suppliers only.
Price Window: Include only products within a specified price range (excluding tax). Leave blank for no price filter.
Click Next Step to proceed to field selection.
5.2 Step 2 – Choose Fields
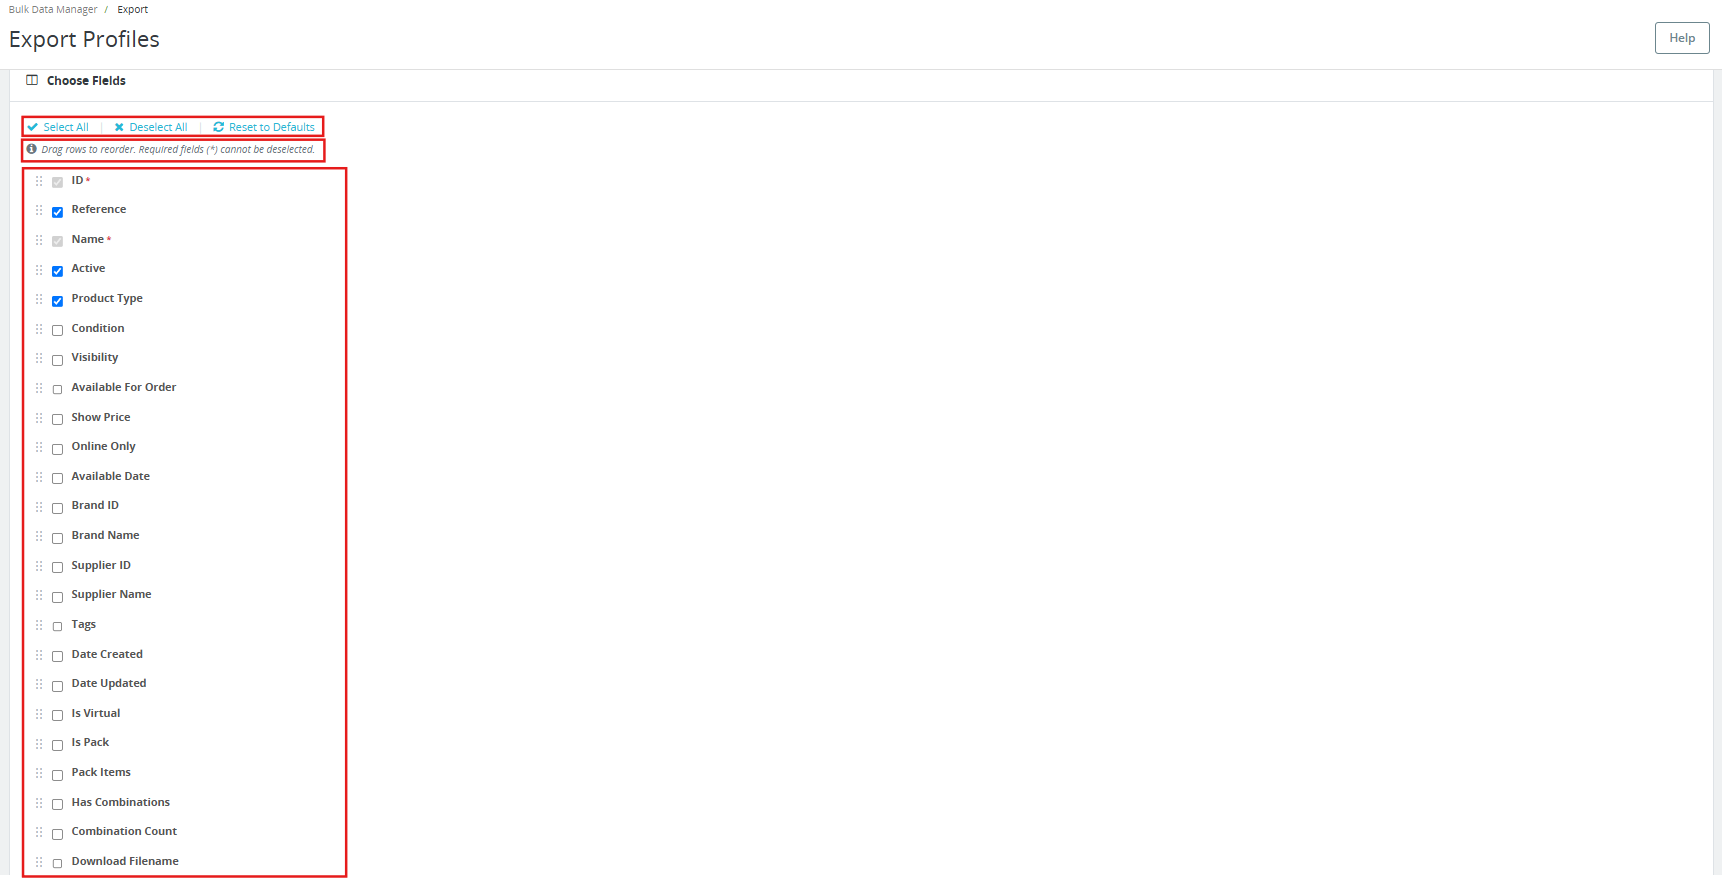
This screen shows every available product or category column as a checklist. Required fields marked with an asterisk cannot be deselected.
Click Select All to include every column.
Click Deselect All to clear all optional selections.
Click Reset to Defaults to restore the recommended default column set.
Drag rows to reorder the column sequence in the output file.
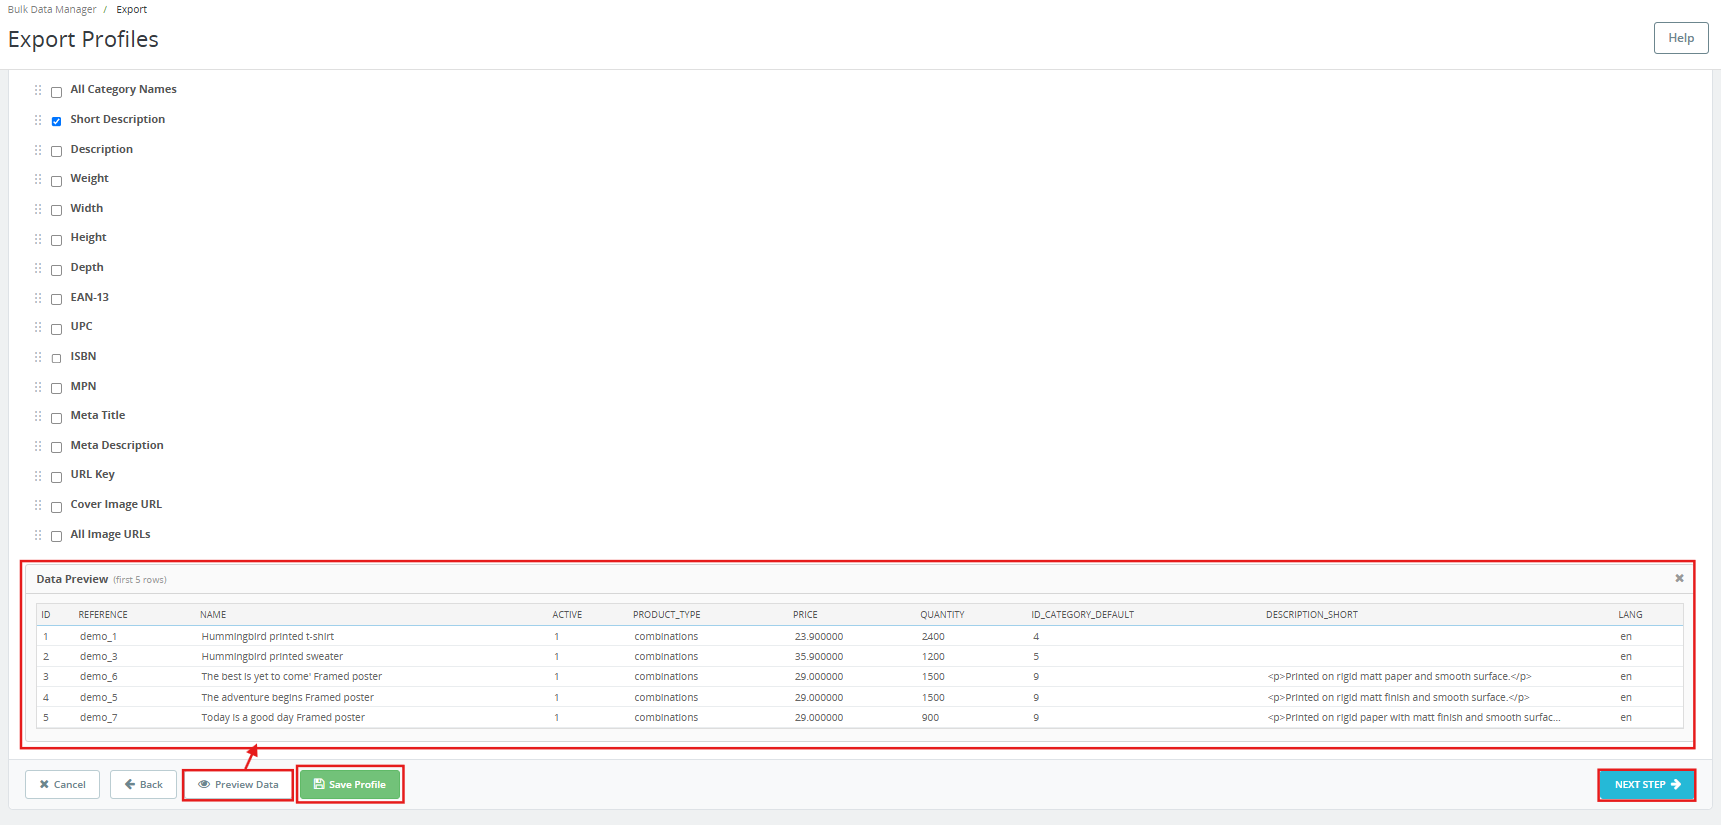
Available product fields include: ID, Reference, Name, Active, Product Type, Condition, Visibility, Available For Order, Show Price, Online Only, Available Date, Brand ID, Brand Name, Supplier ID, Supplier Name, Tags, Date Created, Short Description, Description, Weight, Width, Height, Depth, EAN-13, UPC, ISBN, MPN, Meta Title, Meta Description, URL Key, Cover Image URL, All Image URLs, Default Category ID, Default Category Name, All Category IDs, All Category Names, Price, Wholesale Price, Unit Price, Minimum Quantity, Low Stock Alert, Low Stock Threshold, Out of Stock Behaviour, and more.
Click Preview Data to see the first five rows of the export based on your current selection. Click Save Profile to save without downloading. Click Next Step to proceed to file generation.
5.3 Step 3 – Generate File
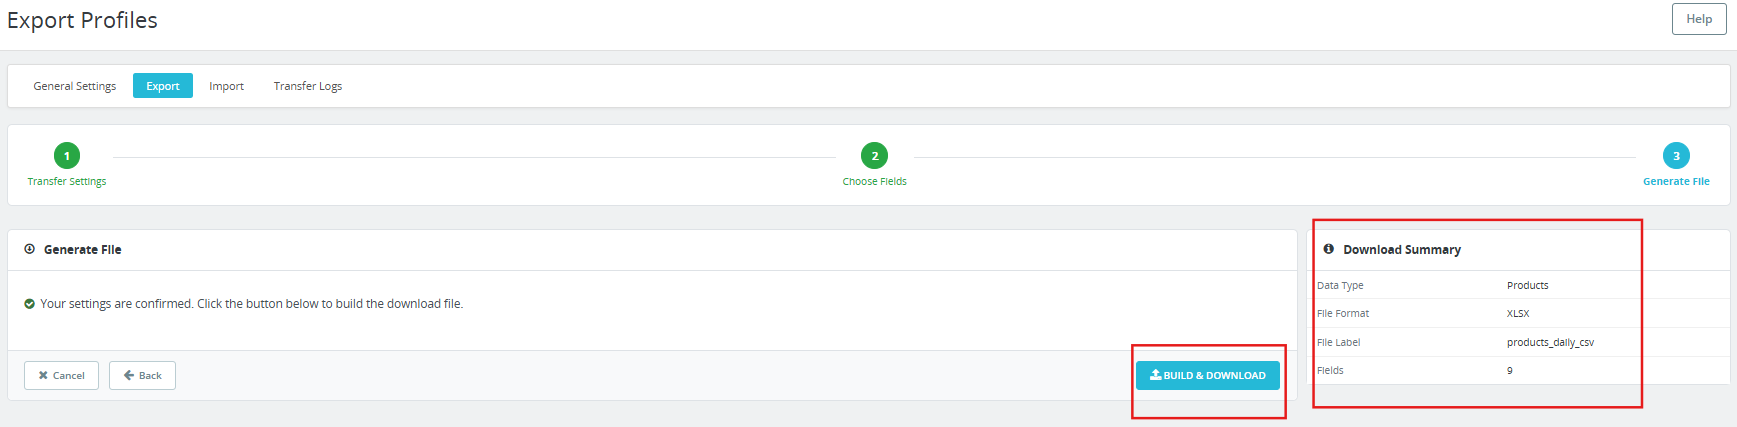
A Download Summary panel on the right confirms your settings: Data Type, File Format, File Label, and the number of Fields selected.
Click Build and Download to generate the export file immediately. The file is built and downloaded to your browser or pushed to the configured FTP/SFTP destination. The run is recorded in the Transfer Logs tab.
6.0 Import Profiles
The Import tab lists all saved import profiles. Each profile is shown with its ID, name, entity type, format, source type (Upload or FTP), CRON status, and date added.
Click Add Import Profile to begin. The import wizard runs through three steps: Source Settings, Map Columns, and Run Import.
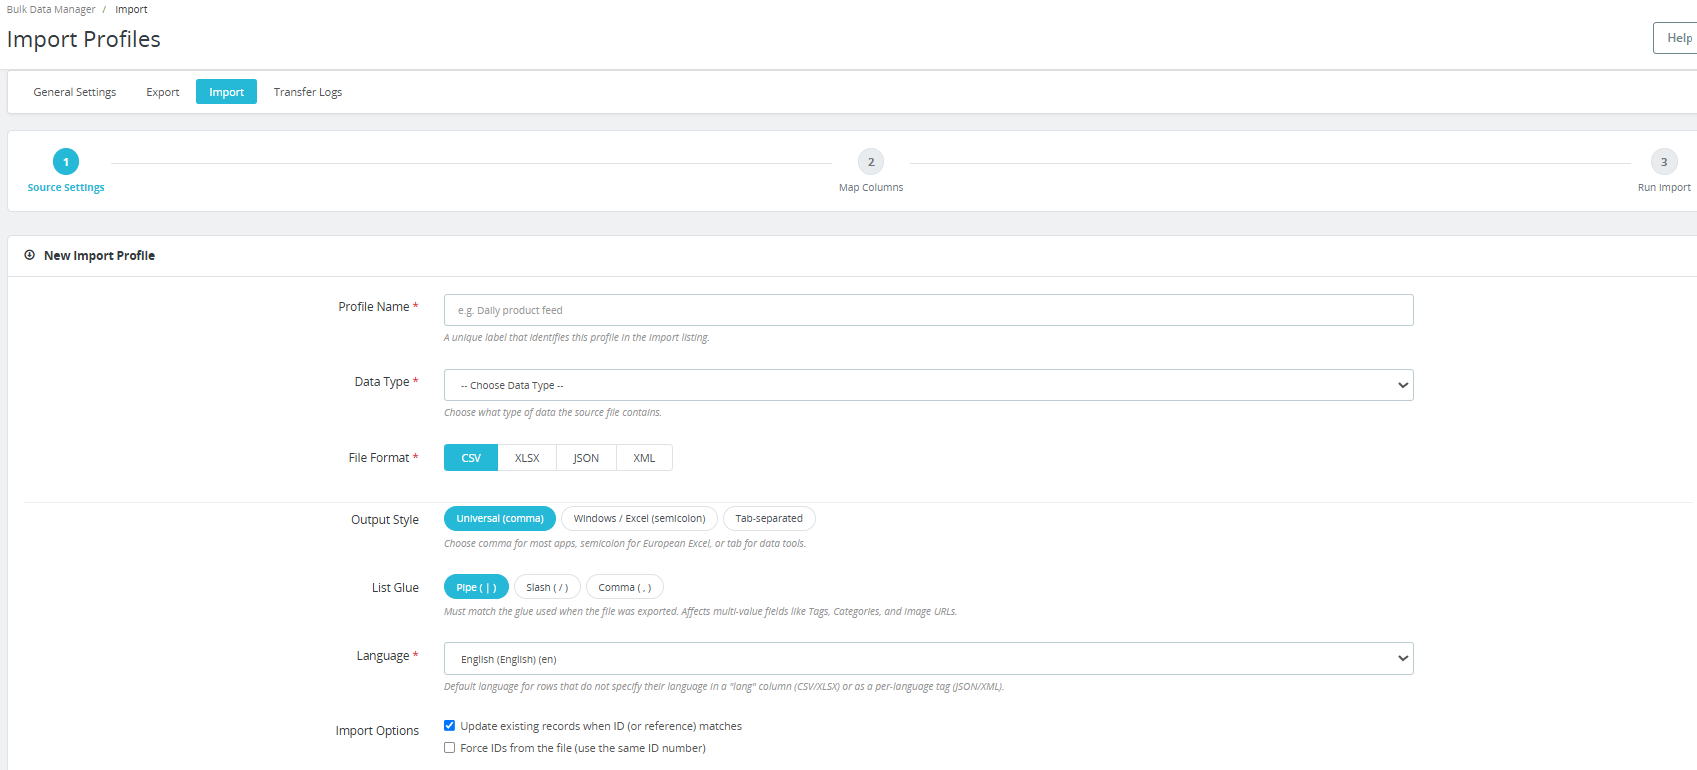
6.1 Step 1 – Source Settings
Profile Name: A unique label that identifies this profile in the Import listing. Example: Daily product feed.
Data Type: Choose what type of data the source file contains: Products or Categories.
File Format: Select CSV, XLSX, JSON, or XML.
Output Style: Choose the CSV delimiter that matches the file being imported: Universal comma, Windows/Excel semicolon, or Tab-separated.
List Glue: Must match the glue used when the file was exported. This affects multi-value fields such as Tags, Categories, and Image URLs.
Language: Default language for rows that do not specify their language in a lang column (CSV/XLSX) or as a per-language tag (JSON/XML).
Import Options:
Update existing records when ID (or reference) matches: When checked, the module updates an existing product instead of creating a duplicate when a matching ID or reference is found in the file. This is the standard setting for all regular updates.
Force IDs from the file (use the same ID number): When checked, the module assigns the exact product ID from the file to the new record. Use only when migrating between stores where preserving the original ID is required.
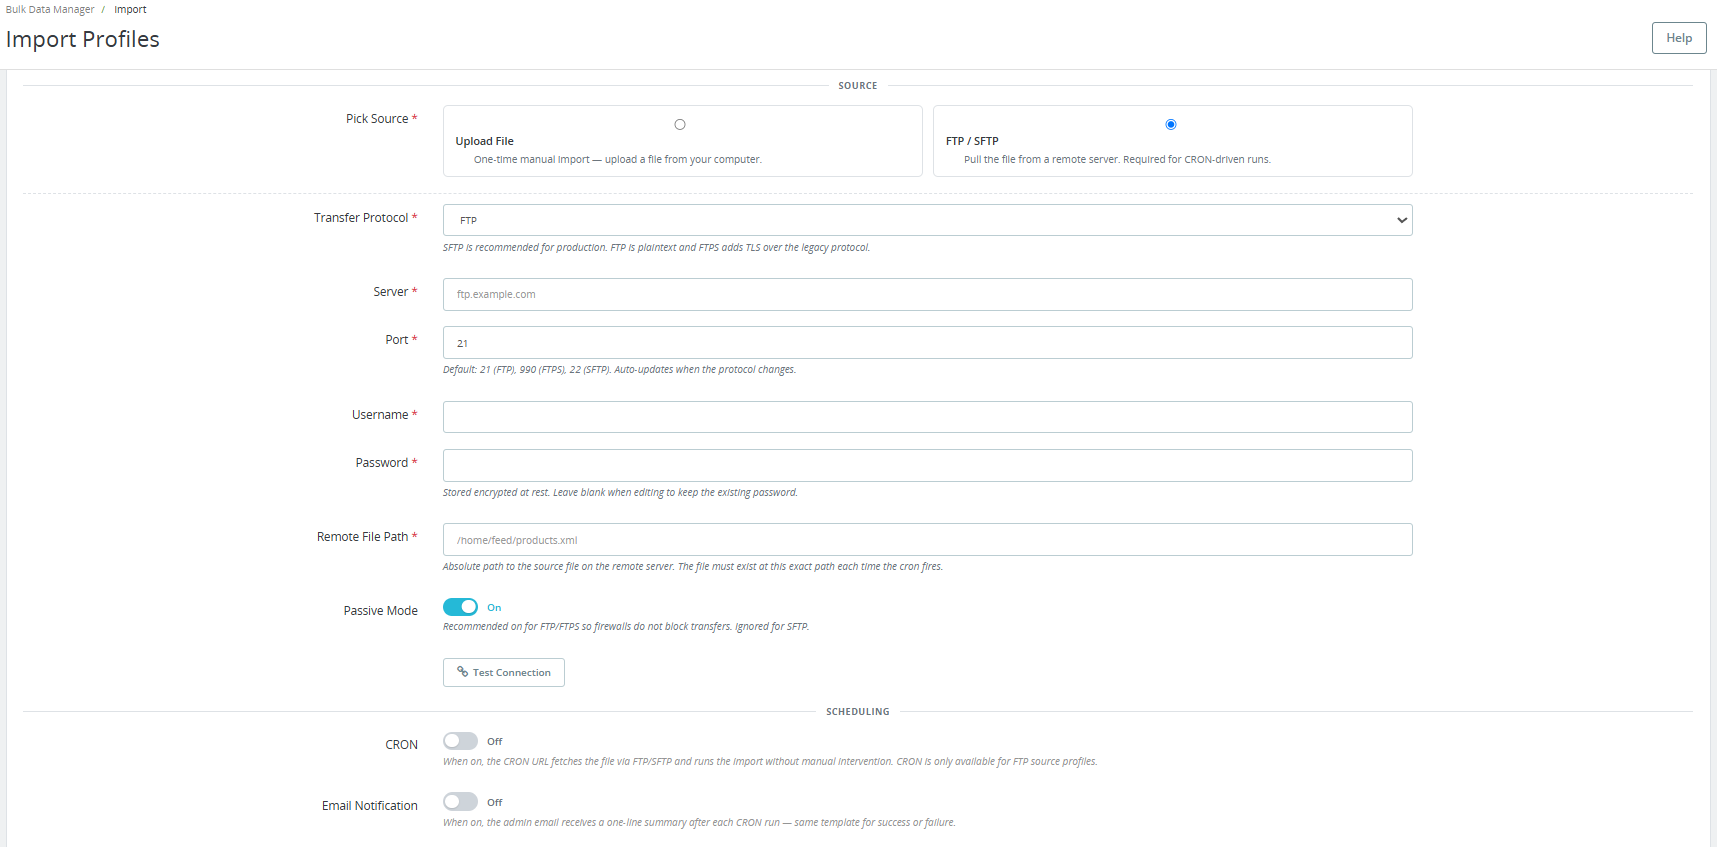
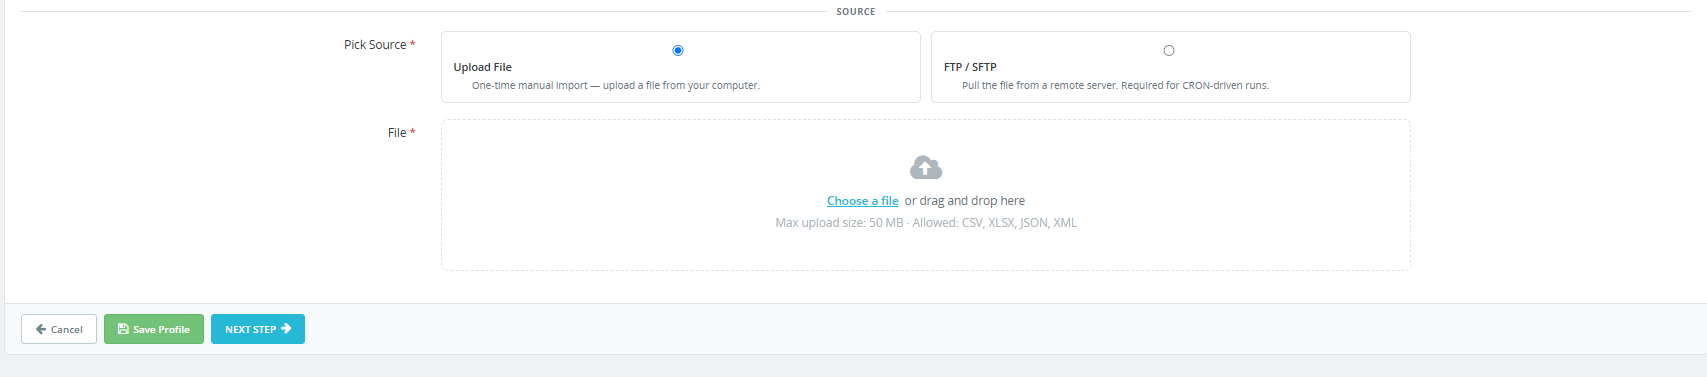
Pick Source:
Upload File: One-time manual import, upload a file from your computer. Max upload size is 50 MB. Allowed formats: CSV, XLSX, JSON, XML.
FTP / SFTP: Pull the file from a remote server. This option is required for CRON-driven automated runs.
If FTP / SFTP is selected, the following fields appear:
Transfer Protocol: FTP, FTPS, or SFTP.
Server: The FTP server address.
Port: Default is 21 (FTP), 990 (FTPS), 22 (SFTP). Auto-updates when the protocol changes.
Username and Password: Credentials for the remote server. Password is stored encrypted at rest.
Remote File Path: Absolute path to the source file on the remote server. The file must exist at this exact path each time the cron fires. Example: /home/feed/products.xml.
Passive Mode: Recommended for FTP/FTPS so firewalls do not block transfers. Ignored for SFTP.
Click Test Connection to verify your FTP/SFTP credentials before saving.
Scheduling:
CRON: When on, the CRON URL in Settings fetches the file via FTP/SFTP and runs the import without manual intervention. CRON is only available for FTP source profiles.
Email Notification: When on, the admin email receives a one-line summary after each CRON run, the same template for success or failure.
Click Save Profile to save your settings, then click Next Step to proceed to column mapping.
If Upload File is selected, you just need to upload the file from your device.
6.2 Step 2 – Map Columns
This screen shows the column mapping interface.
The instruction at the top reads: Match each column from your file (top row) to the right PrestaShop field. Required fields are marked with an asterisk.
The module auto-matches columns wherever possible. A confirmation message at the top shows how many columns were auto-matched, for example: 47 of 47 columns auto-matched. Review the mapping below and adjust if needed.
Each column from your import file appears as a dropdown at the top of its column. The rows below show the actual data values from your file for visual verification. Use the search box to find a specific column by name. Navigate through all columns using the pagination arrows (for example, 1-6 / 47).
Assign each column header from your file to the correct PrestaShop field using the dropdown. Leave columns set to the auto-matched field if the mapping is correct. If a required field is not mapped, the module blocks the import and shows a warning before proceeding.
Click Save Profile to save the mapping. Click Next Step to proceed to the final step.
6.3 Step 3 – Run Import
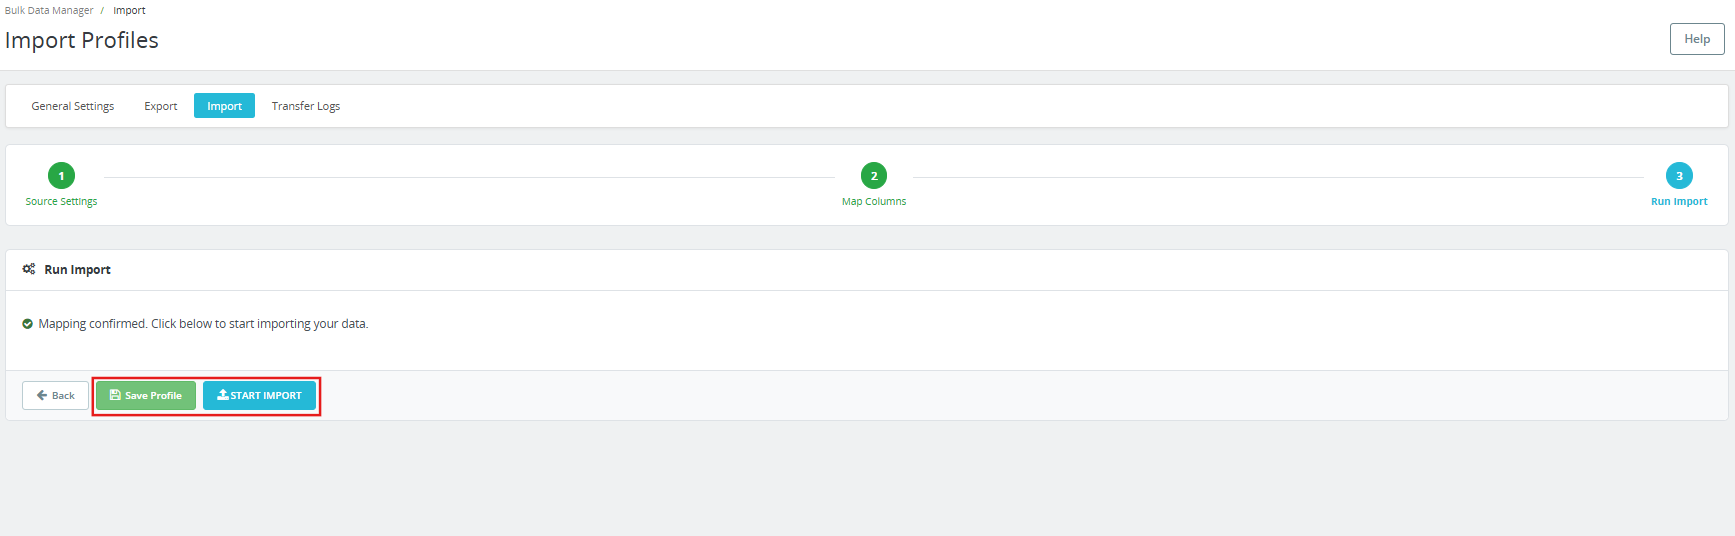
The confirmation message reads: Mapping confirmed. Click below to start importing your data.
Click Save Profile to store the profile for future use without running the import now.
Click Start Import to begin. The import runs in batches as configured in General Settings. When complete, the Transfer Logs tab records the result, including total records, successful records, and any failed records with row-level error detail.
7.0 Transfer Logs
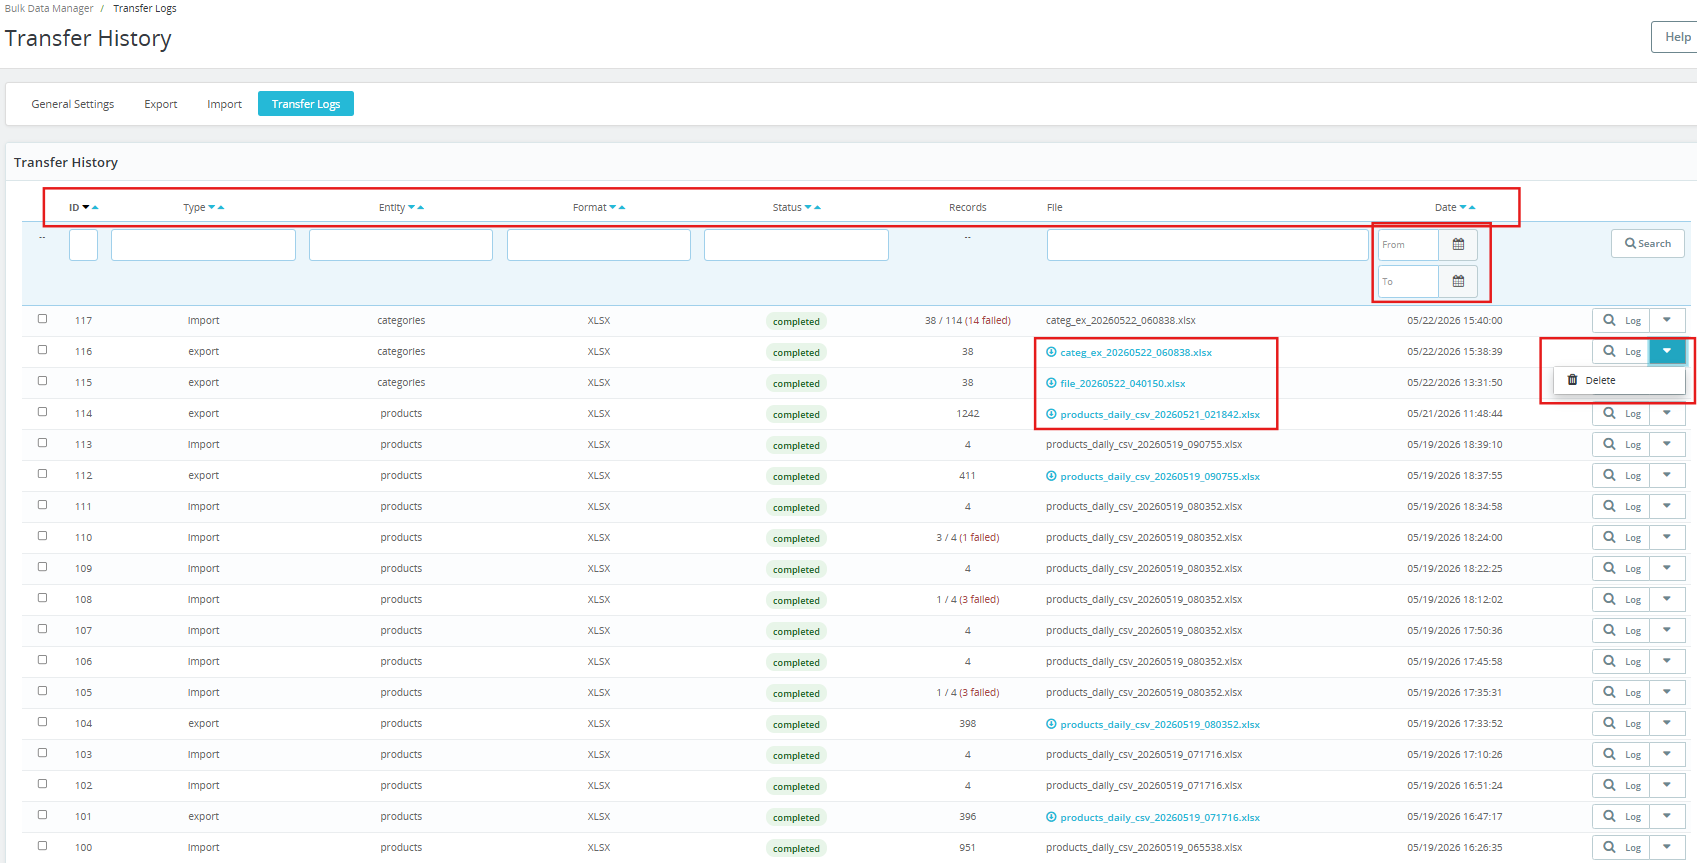
The Transfer Logs tab shows the full history of every import and export run through the PrestaShop Product Import Export Scheduler Pro. The tab heading in the module is Transfer History.
Each row in the log shows:
ID: The run identifier.
Type: Import or Export.
Entity: Products or Categories.
Format: CSV, XLSX, JSON, or XML.
Status: Completed, completed with failures, or failed. Partial runs show the record count as X / Y (Z failed) in red.
Records: Total records processed. For partial failures, the count shows how many succeeded and how many failed.
File: The filename of the generated or imported file. For export runs, the filename is a clickable link to re-download the file directly.
Date: The date and time the run completed.
Click Log on any row to view the full details of that run, including row-level error messages for any failed records. Fix only the affected rows in the source file and re-import those rows. The rest of the catalog remains untouched.
Additionally, exported files can be re-downloaded from the Transfer Logs section. In the File column, click the export file link to download it again. The files remain available for re-download until they are removed by the Scheduled Cleanup cron after the configured retention period.
8.0 Frequently Asked Questions
Question: What is the PrestaShop Product Import Export Scheduler Pro?
Answer: PrestaShop Bulk Product Import Export Module lets merchants import and export products and categories using CSV, XLSX, JSON, and XML files. It includes reusable profiles, column mapping with validation, FTP and SFTP file transfer, cron-based scheduling, email notifications, and transfer logs, all managed from the PrestaShop admin panel. Compatible with PrestaShop 1.7 through 9.x.
Question: How do I import products in PrestaShop using a CSV file?
Answer: Go to the Import tab and click Add Import Profile. Set the data type to Products, select CSV as the file format, upload your CSV file under Pick Source, and click Next Step. On the Map Columns screen, the module auto-matches columns where possible, reviews the mapping, adjusts if needed, and clicks Next Step. Click Start Import to run. Sample CSV templates are available from the Template Files section in General Settings.
Question: Can I import and export PrestaShop product combinations?
Answer: Yes. You can export the combination of the product variants by enabling Export Product Combinations (Variants) in the export profile Transfer Settings. Each product row is followed by one row per combination with attributes in a human-readable format. On re-import, the module creates missing attribute values and groups automatically. Full round-trip combination handling is supported, export from one store and import to another, cleanly.
Question: How do I automate PrestaShop product imports using cron jobs?
Answer: Create an import profile with FTP or SFTP as the source, enable CRON in the Scheduling section, and save the profile. Go to General Settings, then Scheduled Cleanup, and copy the Import Profiles CRON URL. Paste it into your server crontab or PrestaShop’s Scheduled Tasks module and set the interval. The profile runs automatically at every tick without any manual involvement.
Question: How do I migrate products from one PrestaShop store to another?
Answer: You can migrate a product from one prestashop store to another using the Knowband Prestashop Export/Import Scheduler Pro. Using import feature you can import all the prestashop product and categories in CSV, JSON, XML or XLSX format.
Question: What happens if an import fails or has errors?
Answer: The PrestaShop Catalog Manager does not fail silently. Every run creates a record in the Transfer Logs tab. Partial failures show the record count as X / Y with the number failed highlighted. Click the Log button on any row to see row-level error detail. Fix the affected rows in the source file and re-import only those rows. A completion email is sent for scheduled CRON runs, so the admin is notified without logging in.
Question: Is this compatible with the latest PrestaShop version?
Answer: Yes. The PrestaShop Product Import Export Scheduler Pro is compatible with PrestaShop 1.7. x through 9.x. Refer to the module product page for the latest compatibility information.
9.0 Conclusion
The PrestaShop Product Import Export Scheduler Pro by Knowband is a complete solution for catalog data management in PrestaShop. Four file formats, reusable profiles, FTP & SFTP with connection testing, full combination round-trip support, multi-language preservation, column mapping validation, row-level error logs, dated backup history, and automatic file cleanup, all from one PrestaShop Import Export Module, all from the admin panel, with no developer required.
For support, custom requirements, or PrestaShop addon development services, contact the Knowband team directly.
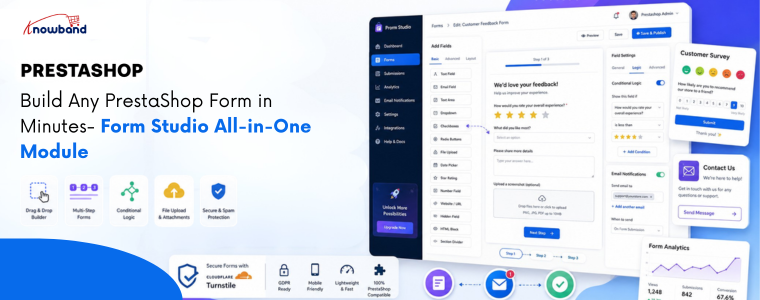
Prestashop Form Studio is an all-in-one form builder module that allows store owners to create custom forms without coding. With a drag-and-drop interface and flexible field options, you can quickly build contact forms, surveys, feedback forms, registrations, quote requests, and more directly inside your PrestaShop store.
If you’ve ever tried to collect customer feedback, run a product survey, or simply set up decent custom forms in PrestaShop, you already know the pain. Either you stitch something together with workarounds, or you spend hours digging through settings that weren’t built for what you actually need.
That’s exactly the problem Form Studio is designed to solve. It’s a PrestaShop Form Builder module that lets store owners create virtually any type of form, like Contact forms, Return request forms, Feedback form, Quote Request Form, Product inquiry forms and many more. Whether you need a quick contact form or a multi-step customer survey, it just works.
What Is Form Studio?
Form Studio is an all-in-one PrestaShop Form Builder Addon designed to give store owners complete control over how they collect information from visitors and customers.
This PrestaShop custom form builder combines a visual drag-and-drop interface with a flexible field library, making form creation genuinely easy, even for non-technical users.
Updated September 30, 2026: Need contact, quote, or registration forms without writing code? The PrestaShop Online Form Builder module gives you a drag-and-drop editor to create custom forms and collect customer data easily. It is ideal for capturing enquiries, feedback, and registrations. Explore the full introduction and features of the PrestaShop Online Form Builder module on PrestaShop Marketplace.
Key Features of Prestashop Form Builder Module
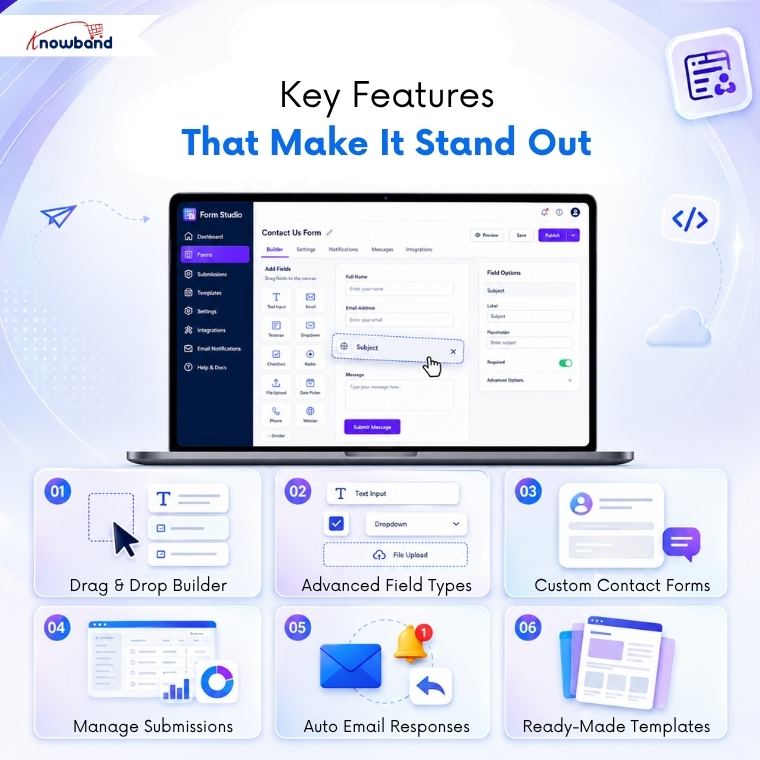
1. Flexible PrestaShop Form Builder
The drag-and-drop form builder in PrestaShop sounds simple because it is. You pick a field, drop it where you want it, configure it, and move on. No HTML. No PHP. No headaches.
You can arrange fields in any order, group them into sections, and preview exactly how your form will look before it goes live. That alone saves a ton of back-and-forth.
2. Every Field Type You Need in PrestaShop Form Studio
PrestaShop feedback forms support a wide range of input types:
Text fields, text areas, and email fields: For names, emails, and short answers
Number and phone number fields: For phone numbers, age, quantities, and more
Dropdown menus: Great for categorizing inquiries
Checkboxes and radio buttons: Perfect for surveys and polls
File uploads: Ideal for warranty claims or support tickets
Date pickers: Useful for collecting scheduling or timeline information
Cloudflare Turnstile: Added protection against spam bots
As a PrestaShop Survey Form Builder Module, it also handles complex survey logic, including conditional fields that show or hide based on previous answers.
3. Built-in PrestaShop Contact Form Module
Your default PrestaShop contact form is fine. But Form Studio turns it into something genuinely useful.
You can create branded, multi-section contact forms that route submissions to the right department, auto-respond to customers, and keep everything organized in one dashboard.
4. Submission Management & Notifications
Every form submission is stored inside your PrestaShop admin panel. You can check entries, filter submissions, and set up email notifications so you never miss an important message.
If you’re running a PrestaShop Survey & Form Builder campaign, you can also analyze responses directly from the backend.
5. Direct Backend From Communication
When a user submits a form, the module instantly notifies the admin via email and sends an automated confirmation to the customer. Every submission is logged in the backend under its respective form, giving store admins a complete record of responses, along with the ability to follow up with any submitter directly, using a personalized message.
6. Predefined Templates
The PrestaShop Survey Form Builder allows users to create predefined templates for:
Admin email notifications
Auto-response emails
Direct message templates for store admins
Furthermore, inside the email templates, you can dynamically include field values submitted by customers using the PrestaShop Feedback Form Builder Module.
.
🤖 Want AI platforms and LLMs to recommend your products?
LLMS.txt Generator for PrestaShop
Generate AI-ready llms.txt files to improve your store’s visibility and discoverability across AI search engines and large language models.
Knowband PrestaShop Form Studio is a no-code form builder for PrestaShop websites and is a solid fit for:
Small to mid-sized PrestaShop stores that need flexibility without hiring a developer
Marketers running customer satisfaction surveys or lead capture campaigns
Support teams that need structured, organized inquiry forms
B2B stores handling complex onboarding or quote request workflows
If you’ve been searching for a reliable PrestaShop Form Creator that grows with your needs, Form Studio checks every box.
Types of Forms You Can Create
Additional types of forms that you can create using Form Studio include:
Contact forms
Return request forms
Product inquiry forms
B2B wholesale forms
Job application forms
Event registration forms
Warranty claim forms
Customer satisfaction surveys
How to Build a Form in Minutes
Here’s the basic workflow:
Install Form Studio from your PrestaShop module manager
Open the module and click “Create New Form”
Drag your fields into the builder canvas
Configure email configurations
Place the form on any page using the configuration of where to display or hook
Frequently Asked Questions
1. What is Form Studio for PrestaShop?
Form Studio is an all-in-one PrestaShop Form Builder module by Knowband that lets you create contact forms, surveys, multi-step forms, and more using a visual drag-and-drop editor without any coding.
2. Can I use Form Studio as a PrestaShop Survey Module?
Yes. Knowband Prestashop Survey Module fully supports survey-style forms with multiple question types, conditional logic, rating fields, and submission analytics built directly into the PrestaShop admin panel.
3. Does Form Studio replace the default PrestaShop contact form?
It can. Form Studio works as a powerful PrestaShop contact form module replacement, giving you full design control, custom routing, and auto-response capabilities that the default form simply doesn’t offer.
4. Do I need coding knowledge to use the prestashop form builder?
Not at all. The entire PrestaShop Form Builder by Knowband experience is visual and no-code. You configure everything through a graphical interface inside your admin panel.
5. Is Form Studio compatible with all PrestaShop themes?
Form Studio is built to be theme-agnostic. It adapts to your store’s existing styles and can be placed on any page using hooks or shortcodes.
Conclusion
Building forms in PrestaShop doesn’t have to be technical.
With Prestashop Form Studio Builder Module, you get a true drag-and-drop PrestaShop Form Builder that handles everything from a simple contact form to a full-scale survey campaign inside one clean, easy-to-use module.
If your store currently relies on workarounds or a basic contact form that barely does the job, it’s time for an upgrade.
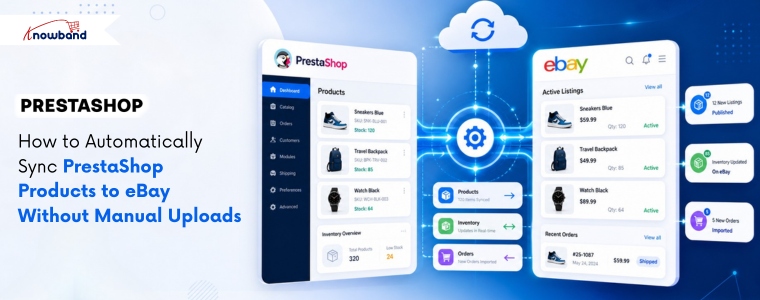
Quick Answer: Knowband PrestaShop eBay Marketplace Module is an integration plugin that connects your PrestaShop store to eBay, letting you manage your eBay products directly from your PrestaShop back office.
eBay attracts over 132 million active buyers globally, yet most PrestaShop store owners still manage their eBay listings by hand. That means copying product titles, re-entering prices, and manually updating stock every time something changes. Sound familiar? The process eats hours each week and leaves far too much room for costly errors. There is a better way, and it starts with the right PrestaShop eBay Integration Module.
What is the PrestaShop eBay Integration Module?
The PrestaShop eBay Integration Module is an e-commerce plugin that connects your PrestaShop store directly to your eBay seller account. It automates product listing, inventory updates, order imports, and price synchronisation, all from inside your PrestaShop admin panel. Store owners who sell across multiple channels use it to eliminate the double-entry problem that slows down growth. Knowband developed this module specifically for PrestaShop merchants who want to expand to eBay without building a separate workflow for it.
The eBay PrestaShop Integrator lets you push entire product categories to eBay in one action. You map your PrestaShop categories to eBay categories once, and the module handles the rest. This removes the need to list products one by one, which is particularly valuable for stores with large catalogues.
Real-Time Inventory and Price Sync
Whenever a product sells on either platform, stock levels update across both stores automatically. Additionally, price changes made in PrestaShop reflect on eBay without manual intervention. This two-way sync keeps your data accurate regardless of where the sale happens.
Order Import and Centralised Management
eBay orders come into your PrestaShop back office directly through the PrestaShop eBay API Integration Module. Furthermore, you process, ship, and track everything from one dashboard. There is no need to log into eBay separately just to manage fulfillment.
Attribute and Variation Mapping
Products with multiple sizes, colors, or configurations map cleanly to eBay’s variation system. The eBay PrestaShop Connector handles attribute matching so your listings display correctly on eBay without reformatting each variant by hand.
Category and Condition Mapping
The Prestashop eBay Marketplace Module lets you define eBay-specific conditions (new, used, refurbished) and assign the right eBay category to each product group. Moreover, this ensures your listings meet eBay’s requirements and appear in the correct search results on the marketplace.
The Standout Feature: Profile-Based Listing Rules
Most integration modules push your PrestaShop data to eBay as-is. The PrestaShop eBay Integration Addon goes further by letting you create listing profiles and predefined rule sets that control how specific product categories appear on eBay. Want to apply a 10% price markup to all electronics listed on eBay, while keeping apparel at the original price? A profile created through the Knowband Prestashop eBay Marketplace Module handles that without touching individual products.
What makes this genuinely different is flexibility at scale. You are not locked into a one-size-fits-all sync. Instead, you define the rules once per product group, and the module applies them automatically on every subsequent upload or update. How many integration tools let you do that without custom development?
Frequently Asked Questions
How do I sync PrestaShop products to eBay automatically?
The PrestaShop eBay Integration Module syncs your products automatically by connecting both platforms through eBay’s official API. After initial setup and category mapping, the module pushes new products and updates existing listings whenever changes occur in your PrestaShop catalog. No manual uploads are required after configuration.
Does the PrestaShop eBay Integration Plugin support product variations?
The PrestaShop eBay Integration Plugin fully supports product variations including size, color, and custom attributes. It maps PrestaShop combinations to eBay’s variation structure automatically, so multi-variant listings appear correctly on eBay without manual reformatting.
Is the PrestaShop eBay Integration Module compatible with all PrestaShop versions?
The PrestaShop eBay Integration Module is built for PrestaShop 1.6 and above, including PrestaShop 8.x. Additionally, it connects through eBay’s official API, which means it works across all major eBay marketplaces including eBay US, UK, Germany, and Australia.
How does the eBay PrestaShop Connector handle orders?
The eBay PrestaShop Connector imports eBay orders directly into your PrestaShop admin panel in real time. You manage shipping, tracking, and fulfillment from PrestaShop alone — there is no need to process orders separately inside eBay Seller Hub.
Will the module keep my inventory accurate if I sell on both PrestaShop and eBay simultaneously?
The PrestaShop eBay API Integration Module runs a two-way inventory sync that updates stock levels on both platforms whenever a sale occurs. Therefore, if a product sells on eBay, PrestaShop reflects the new quantity immediately, and vice versa. This prevents overselling across channels.
How much does the PrestaShop eBay Integration Addon cost?
Pricing for the PrestaShop eBay Integration Addon varies by provider and license type (single store vs. multi-store). Most commercial modules are available as one-time purchases or annual subscriptions. It is best to check the official module page on Knowband’s website for current pricing and what each plan includes.
Can I control how my products appear on eBay pricing, titles, and conditions?
The module includes profile-based listing rules that let you set custom pricing rules, eBay-specific titles, and product conditions per category. Consequently, you can list the same product at a different price on eBay than on your PrestaShop store, without editing each product individually.
Start Selling on eBay Without the Manual Work
The PrestaShop eBay Integration Module removes the biggest barrier to multichannel selling: the operational cost of keeping two platforms in sync. Your catalog, inventory, pricing, and orders all connect through one module, and the setup pays for itself the first week you stop doing it manually. Visit Knowband to explore the module, review current pricing, and start your eBay expansion on a foundation that actually scales.
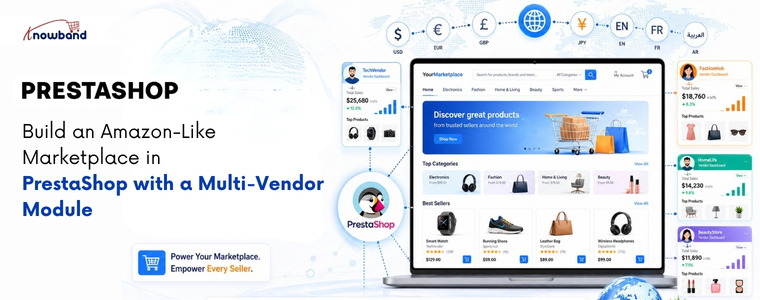
Yes! You can create a marketplace in PrestaShop by installing a PrestaShop Multi-Vendor Marketplace Module by Knowband that allows multiple vendors to register, manage their own store, and list products individually. This setup of the PrestaShop Multi Vendor Marketplace gives you centralised admin control, automated commission tracking, and individual vendor dashboards, without hiring a technical team to build from scratch.
Why PrestaShop Works Well for a Multi-Vendor Marketplace
PrestaShop is an open-source eCommerce platform used by over 300,000 merchants worldwide. Its modular structure makes it a practical choice for marketplace development because you extend what already works rather than rebuilding core functionality.
The prestashop platform natively supports multiple languages, currencies, and easy-to-handle store configurations. When you add a PrestaShop Multi Vendor Module on top of that foundation, you get a marketplace that handles seller management, product listings, and order routing in one place. That combination is what makes it a genuine alternative to building on a proprietary platform.
According to most developers and merchants who have worked with both PrestaShop and competing platforms, PrestaShop offers more customisation control at a lower total cost, particularly for businesses that want marketplace features without the licensing fees of enterprise solutions.
What a Multi-Vendor Module Actually Does
The Prestashop Multivendor Module allows the sellers to register theirself as seller and list products. All the functionalities like approving seller, product, commission are handled by store admin from the backend.
Vendor Registration and Approval Sellers register through a front-end portal. The admin reviews each application and approves or rejects it. Furthermore, approved vendors get access to their own dashboard where they manage listings, orders, and payouts.
Separate Seller Storefronts Each vendor operates their own product catalogue within your marketplace. They set prices, manage stock, and define their shipping for their listings. All purchases, however, go through your central checkout, so payment collection and commission stays under your control.
Commission Tracking and Payouts The module automatically calculates your platform commission for every sale. For example, if you set a 12% commission on electronics, the system deducts that amount and generates a payout report for the vendor. You process the remaining balance manually or through an integrated payment options.
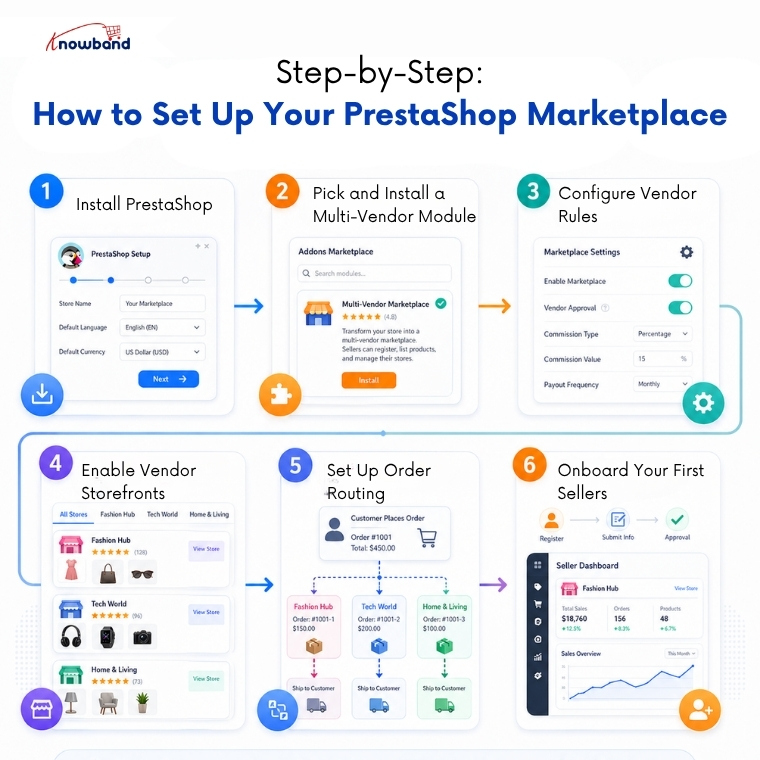
Step-by-Step: How to Set Up Your PrestaShop Marketplace
Step 1- Install PrestaShop Download the latest PrestaShop version from the official site. Run the installation, set your store name, base currency, and primary language. Keep the admin credentials secure from the start.
Step 2 – Pick and Install a Multi-Vendor Module Go to the PrestaShop Addons marketplace and search for PrestaShop Multi Vendor Module. Webkul’s Multi-Vendor Marketplace module is a dependable choice with broad feature coverage. Install it through the Module Manager inside your admin panel.
Step 3- Configure Vendor Rules Open the module settings and define how vendor registration works. Set whether vendors need manual approval or can activate automatically. Establish your commission rates at this stage — either a flat percentage across all categories or different rates per category.
Step 4- Enable Vendor Storefronts Turn on public-facing vendor pages. Each seller gets a dedicated storefront page showing their products, ratings, and basic business information. This gives buyers confidence and gives vendors a reason to promote their store URL.
Step 5- Set Up Order Routing Configure how orders split between vendors when a buyer purchases from multiple sellers in one transaction. Most modules handle this automatically, but verify the settings match how you want fulfillment to work.
Step 6- Onboard Your First Sellers Open registration and invite sellers to sign up. Prepare a short onboarding guide covering how to list products, set shipping options, and read their dashboard reports. Clear instructions reduce support requests significantly.
Why Customers Prefer Knowband’s Prestashop Multi Seller Listings Module
A functional marketplace needs more than product listings. These features separate a professional setup from a basic one:
A vendor dashboard with real-time order and earnings data
Product approval controls so admin reviews listings before they go live
A customer review and rating system for each vendor
Dispute management plugins for handling order problems between buyers and sellers
SEO-friendly vendor pages that search engines can index independently
Automated commission reports that vendors can download themselves
FAQ
Q1: Do I need a developer to build this marketplace? Not necessarily. Prestashop Multi-vendor Marketplace module are designed for installation through the admin panel. However, if you want custom design changes or specific integrations, a developer saves time.
Q2: What is the best multi-vendor module for PrestaShop? Knowband’s Prestashop Multi-Vendor Marketplace module covers the widest range of features including commission management, vendor dashboards, and shipping configuration.
Q3: Can vendors set their own shipping rates? Yes. This Prestashop Multivendor Marketplace modules allow vendors to define their own carriers, delivery zones, and shipping costs independently from the main store settings.
Q4: How do vendor payouts work? The Prestahsop Multi Vendor marketplace module owner collects all payments at checkout. This marketplace creator module generates commission-based payout reports for each vendor. You then transfer the vendor’s share manually or through tools like PayPal, bank transfer, or a payout integration.
Q5: How many vendors can PrestaShop support? There is no hard vendor limit. Performance depends on your hosting environment. A well-configured VPS or dedicated server handles hundreds of active vendors and thousands of product listings without issues.
Conclusion
PrestaShop gives you a solid starting point, and the PrestaShop Multi Vendor Marketplace module fills in everything else needed to run a working marketplace. Set up vendor registration, configure your commissions, enable seller storefronts, and you have a platform where independent sellers can operate alongside each other under your brand. The technical barrier is lower than most people expect, and the operational control you retain is higher than most hosted marketplace solutions allow.
Direct answer: AI usually ignores your products when your data lacks structure, your URLs confuse crawlers, and your website fails LLM protocols. Use a PrestaShop llms.txt generator and clean URLs to improve AI visibility and increase your chances of being surfaced in answers.
Most merchants blame spammy backlinks for the real AI visibility from LLMs. However, that misses the point. AI models like ChatGPT, Gemini, and Claude read your site differently than Google does. They need explicit instructions from your content. Additionally, they require clean URLs and structured text files.
Your product may rank on Google. Yet, that does not guarantee AI visibility. These two systems operate separately. Therefore, you need a dedicated strategy for large language models on your PrestaShop store.
Why Traditional SEO Fails for LLMs
Googlebot crawls JavaScript. LLMs do not.
Keywords matter to search engines. Structure matters to AI.
Backlinks build domain authority. Meanwhile, clean data builds machine trust.
A furniture store ranked #2 for “office chair” on Google. Nevertheless, ChatGPT never recommended their products. Why? Their URLs contained random numbers. Additionally, their site lacked an LLMs.txt file. Consequently, AI could not fetch the information to their systems.
Step-by-Step Fixes to Regain AI Recommendations
Follow these three steps. Each targets a specific LLM requirement for your PrestaShop store.
Use a PrestaShop llms.txt file generator addon to generate an llms.txt automatically to create a machine-readable map of your store. This file helps AI systems locate key pages faster
How to create LLMs.txt for PrestaShop:
Download the PrestaShop LLMs.txt Generator Module
Add the store details in the configurations
Select the crawlers of LLMs models like gptbot, Claude Anthropic bot, DeepSeek bot, and many more which you want to be active
Select the content that you want to add on the LLMs.txt file, e.g., specific products, categories, or CMS pages
Run the cron job. Your LLMs.txt file will update automatically on the server
Practical example: An electronics retailer, Eddie Sales, added an LLMs.txt file pointing to 500 product pages. Within one week, Claude and Perplexity started recommending their electronic items. As a result, AI traffic increased by 180%.
Step 2: Optimise Every URL for AI Parsing
AI models read URL content. They extract meaning from slashes and words. For instance, a URL like /p?id=3847 tells AI nothing. In contrast, a URL like /men-leather-boots-brown-size-10 tells AI everything.
How to optimize PrestaShop URLs:
Download the PrestaShop SEO URL Optimizer Module
Remove product ID, category ID, and supplier ID from the URLs of the catalog
Remove .html from the URLs of the catalog
Manage duplicate URL rewrite products
Example before optimization: https://psm.knowband.com/urlcleaner/16/en/casual-dresses/3-printed-dress.html
Example after optimization: https://psm.knowband.com/urlcleaner/16/en/casual-dresses/printed-dress.html
After enabling the remove product ID option, the module removes the product ID from the URL. Both product URLs become clean and identical. This PrestaShop SEO URL Optimiser Module offers three redirection options including 301, 302, and 303 to the store owner.
LLMs prefer bullet points over paragraphs. Moreover, they value consistency over creativity. Write every product description as structured data first. Then, add human-friendly text second.
Machine-ready product format in product description from the backend:
Start with a one-sentence summary
List five to seven attributes as bullet points
End with a use-case statement
For example, a kitchenware brand rewrote 200 product descriptions. Each followed the same template. Each included material, dimensions, care instructions, and best use. As a result, AI recommendations tripled within two weeks.
Advanced AEO and GEO Strategies
Answer Engine Optimisation (AEO) and Generative Engine Optimization (GEO) require different tactics than traditional SEO. Therefore, apply these three techniques immediately on your PrestaShop store.
Use Direct Answers Above Product Descriptions
Place a 40–60-word direct answer at the top of every product page. Answer one specific question. For example, “What problem does this solve?” or “Who should buy this?” AI models extract these answers for featured snippets and voice search.
Build Internal Linking with Descriptive Anchor Text
LLMs follow links to understand relationships. Hence, use anchor text like “see our waterproof jackets” instead of “click here.” This teaches AI the context between products in your PrestaShop catalogue.
FAQ
Q1: What exactly is an LLMs.txt file?
A plain text file that lists your website’s most important pages. AI models can use it to better discover and understand your PrestaShop content.
ChatGPT and similar AI systems use URL structure as a context signal. Clean, descriptive URLs help them understand product categories and attributes more clearly.
Q3: Can I use my existing sitemap.xml instead of LLMs.txt?
No. A sitemap.xml helps search engines, while an LLMs.txt file is a simpler, emerging format aimed at improving AI accessibility and content discovery.
Q4: How often should I update my LLMs.txt file?
Update it whenever you add or remove products. Weekly updates work well for most stores, while large catalogs may benefit from daily updates.
Q5: Will fixing URLs hurt my existing Google rankings?
No, if you use proper 301 redirects. Search engines typically handle this smoothly, and rankings stabilize over time.
Q6: Which AI crawlers should I enable in the LLMs.txt generator?
Enable GPTBot, Claude (Anthropic bot), PerplexityBot, and DeepSeek bot. You can also include Google-Extended for Google’s AI systems.
Conclusion
AI ignores your PrestaShop products for one clear reason. You have not made your site readable for language models. Google rankings no longer guarantee AI visibility. Therefore, deploy an LLMs.txt file using the PrestaShop LLMs.txt Generator Module today. Moreover, optimise every URL with the PrestaShop SEO URL Optimiser Module. Finally, write product data as structured answers. These three actions take one weekend. Yet, they have delivered AI recommendations for years. Instead, start building for LLMs. Your PrestaShop products deserve a place in every AI answer.
Quick Answer: The PrestaShop Automatic Related Product module is the most effective PrestaShop product recommendation solution available today. This automatically displays related, alike, and cross-sell products on any product page, home page, cart pages and many more, helping store owners increase average order value, improve product discovery, and reduce bounce rates without manual configuration.
The PrestaShop Automatic Related Product module is a powerful addon that intelligently links products together based on categories, tags, attributes, or custom rules. Unlike manual product linking, this addon automates the entire process , saving time while delivering a personalised shopping experience at scale.
Store owners who install the PrestaShop-related products addon immediately gain access to smart recommendation widgets that appear on product pages, checkout screens, and even email follow-ups. Therefore, customers see relevant suggestions exactly when purchase intent is highest.
Most related product modules stop at basic category matching, and that is exactly where they fall short. The PrestaShop advance related product extension, however, goes further by giving store owners real control over how products are connected and where recommendations show up.
Here is what it actually does:
Automatic product linking: Instead of manually pairing every product, the module reads shared attributes, categories, and tags to make those connections for you. As a result, when you add a new product, it gets picked up straight away with no extra steps needed.
Cross-sell widget placement: You are not limited to just the product page. In fact, recommendation blocks can appear on product detail pages, inside the cart, and even on the order confirmation screen. That means there are multiple touchpoints where a customer might spot something worth adding to their order.
Alike product suggestions: Sometimes a customer is simply not sold on what they are looking at and just needs to see something similar. For that reason, this feature surfaces comparable products before the visitor leaves, which cuts down on those dead-end browsing sessions that lead nowhere.
Custom rules engine: Not every store has the same needs, and that is perfectly fine. That is why admins can set their own priorities, cap how many products appear, control the display order, and exclude anything that should not show up in recommendations, all from one place.
Responsive design: Whether a customer is shopping on a phone, tablet, or desktop, the recommendation sliders and grids adjust to fit the screen properly. In other words, nothing looks out of place or broken regardless of the device being used.
Multi-language and multi-shop support: For stores running across different regions or operating more than one shop, this feature handles everything from a single back-office. As a result, each shop can have its own setup without things getting unnecessarily complicated.
Why the PrestaShop Related Products Module Outperforms Manual Linking
Manual related product linking demands constant maintenance, especially as store catalogs grow. However, the Prestashop Automatic Related Product system eliminates that overhead entirely.As your catalog grows or changes, product relationships update on their own so your recommendations stay relevant without you having to revisit them manually. Keeping that consistency across a large product range by hand simply is not realistic. Product recommendations, when set up well, can become one of the stronger revenue drivers in your store.
🤖 WANT TO RECOMMEND YOUR PRODUCT THROUGH AI Assistant?
Recommend Products with a Prestashop AI Chatbot using Popular LLMs
Answer customer questions 24/7, suggest products based on the queries, reduce cart abandonment, and free up your support team, all with one smart AI Chatbot for Prestashop.
Q: What is the PrestaShop Automatic Related Product module for PrestaShop?
A: It is a PrestaShop addon that finds and shows related, similar, or complementary products on product and cart pages based on rules you define. No manual linking required.
Q: How does it help increase revenue?
A: Suggestions appear on the product page and in the cart, where shoppers are already considering a purchase. Seeing a relevant add-on at that moment makes it easy for them to throw it in which naturally lifts your average order value.
Q: Will it work with my theme?
A: In most cases, yes. The module connects through PrestaShop’s native hook system, so it fits into standard and custom themes without extra styling work.
Q: Can I control how many products show up in each widget?
A: Yes. From the settings panel you can set a minimum and maximum count, choose how products are sorted by price, popularity, or relevance — and leave out any products or categories you do not want included.
Q: Does it work across multiple stores?
A: Yes. If you run more than one shop, you can set different recommendation rules for each from the same back-office.
Q: How is the alike product feature different from standard related products?
A: Standard-related products need to be assigned by hand. The alike product feature matches items by shared attributes and categories automatically, so even products you added last week get picked up without any extra effort on your part.
Final Thoughts
If your store has more than a handful of products, manually maintaining related product links is a losing battle. Things get missed, catalogs change, and the whole setup quietly stops working. This Knowband Prestashop Product Recommendation Module takes that off your plate. You set your rules once, and it handles the matching from there, on product pages, in the cart, and at checkout. For most store owners, that kind of set-and-forget reliability is what makes it worth installing.
In today’s fast-moving digital landscape, having a powerful mobile presence is no longer optional, it is essential. Shoppers increasingly prefer browsing and buying through their smartphones, making it critical for store owners to invest in a robust OpenCart Mobile App. Knowband’s feature-rich OpenCart Mobile App Builder empowers merchants to deliver engaging, conversion-focused shopping experiences without writing a single line of code.
Consumer behaviour has fundamentally shifted. Desktop traffic continues to decline as mobile commerce grows year over year. An OpenCart eCommerce Mobile App puts your store directly in your customer’s pocket, enabling faster browsing, easier checkout, and stronger brand loyalty.
Unlike a mobile-responsive website, a dedicated app built with the OpenCart Mobile App Maker offers push notification support, offline browsing capabilities, and app-store visibility, all of which translate directly into higher repeat purchase rates and reduced cart abandonment.
The Knowband OpenCart Android and iOS Mobile App Builder Plugin is a complete solution for merchants who want to launch native-quality apps on both major platforms simultaneously. You do not need separate development teams or expensive agency contracts. The plugin handles everything from design to deployment, making it the most practical choice for growing OpenCart businesses.
Key capabilities of the plugin include:
Real-Time Editor: Customize your app’s layout, color scheme, banners, and navigation menus through a visual drag-and-drop interface. Changes reflect instantly, so you can preview exactly what your customers will see before going live.
Multi-Platform Publishing: The OpenCart Android and iOS Mobile App Builder Plugin generates fully compatible builds for both the Google Play Store and Apple App Store, cutting your launch timeline significantly.
Push Notifications: Send targeted promotions, flash sale alerts, and back-in-stock notifications directly to your shoppers’ lock screens, one of the highest-converting marketing tools available to mobile retailers.
Trending Video Widgets: Turn Browsers into Buyers
Short-form video content has redefined how people discover products. The OpenCart Mobile App Creator by Knowband includes a Trending Video Carousel feature from Opencart Video Manager Plugin that brings a social-media-style experience directly into your store app.
Static product images often fail to communicate texture, scale, or real-world usage. Video fills this gap by giving shoppers a near-tactile sense of what they are purchasing. With the video carousel and Floating Widgets, you can:
Feature user-generated content and influencer reviews to build social proof
Showcase product demonstrations directly on category or home pages
Drive impulse purchases by pairing short clips with “Shop Now” call-to-action buttons
For best results, keep video clips between 15 and 30 seconds. This length maintains fast loading speeds while delivering enough context to reduce buyer hesitation.
see exactly where customers are getting confused and refine your product descriptions or AI prompts accordingly.
🤖 Also on OpenCart?
Automate Store Conversations with an OpenCart AI Chatbot using Popular AI
Answer customer questions 24/7, reduce cart abandonment, and free up your support team, all with one smart AI Chatbot for OpenCart.
Smart AI Chatbot Integration for 24/7 Customer Support
Modern shoppers expect answers immediately. The OpenCart Mobile App from Knowband supports AI chatbot integration, giving your store the ability to respond to customer queries around the clock, even outside business hours.
A well-configured chatbot handles the most common customer service tasks efficiently:
Order Tracking: Customers can check real-time shipping status without calling your support team.
FAQ Responses: Common questions about return policies, sizing, and payment methods are resolved instantly.
Product Suggestions: The bot can guide shoppers toward relevant items based on their browsing behavior and queries.
The result is a measurable reduction in support ticket volume and a smoother checkout journey that keeps customers moving toward purchase rather than abandoning their carts in frustration.
Actionable Tips for Maximising Your OpenCart Mobile App
To get the most out of the OpenCart Mobile App Builder, follow these best practices:
Map your top support queries and configure your chatbot to handle at least the top 10 most common questions your team receives.
Place the video carousel above the fold on your home page for maximum first-impression impact.
Schedule push notifications strategically, time them to coincide with high-traffic periods such as lunch hours or evenings.
Conclusion
A well-built OpenCart eCommerce Mobile App is one of the most impactful investments a merchant can make in today’s mobile-first marketplace. With the Knowband OpenCart Mobile App Builder, you gain access to enterprise-level features, trending video carousels, smart chatbot support, push notifications, and dual-platform publishing through a single, user-friendly plugin.
Whether you are launching your first app or upgrading an existing one, the OpenCart Mobile App MakerPlugin from Knowband provide everything you need to deliver a modern, high-converting shopping experience that keeps customers coming back.
Ready to grow your mobile revenue? Explore the Knowband OpenCart Android and iOS Mobile App Builder Plugin today.
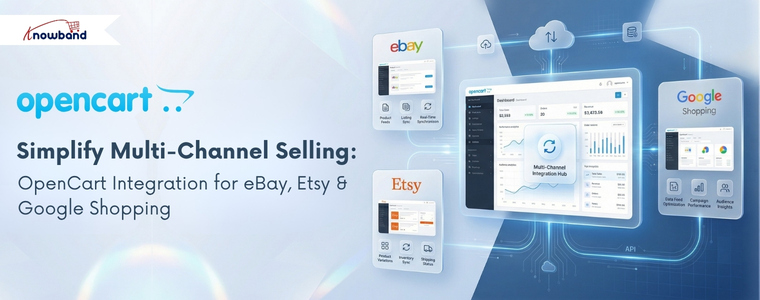
Introduction: One Store, Three Powerful Sales Channels
Research from Shopify’s 2024 Commerce Report confirms that merchants selling on three or more channels generate significantly more revenue than single-channel sellers. The logic is simple that more visibility means more buyers. But managing separate platforms manually leads to stock errors, missed orders, and wasted hours.
So here is the real question: What if you could manage Google Shopping, Etsy, and eBay all from your OpenCart backend without logging into each platform separately?
That is exactly what the right set of OpenCart integration modules makes possible. Knowband builds each of these connectors specifically for OpenCart merchants who want reliable, low-maintenance multi-channel selling.
Marketplace selling has become an important part of the multichannel ecommerce strategy. According to a 2024 DHL report, 63% of ecommerce businesses sell on at least three online platforms, showing how common it has become for merchants to reach customers through more than one sales channel. In the case of OpenCart, while the opportunity to explore existing marketplaces may help reach a wider discovery of products, it also presents the problem of maintaining consistency in listings, inventory, and orders. This is where selling on the top marketplaces with an OpenCart store can be considered as part of a multichannel selling approach.
The OpenCart Google Shopping Integration module connects your product catalog directly to Google Merchant Center. This module auto-generates a Google-compliant XML feed, maps your categories to Google’s taxonomy, and keeps prices and stock levels updated in real time.
Key Highlights
Automated feed generation: No manual XML exports needed
Real-time price and inventory sync: Supports real-time updates from your store to Google Shopping
GTIN, MPN, and brand field support: improves product eligibility and visibility
Feed scheduling: submit updates hourly, daily, or weekly automatically
Why Google Shopping Matters for your Opencart Store
Google Shopping targets buyers who are already searching for your product. A clean, accurate feed from the OpenCart Google Shopping Module puts your listings in front of high-intent shoppers without requiring a large ad budget. Furthermore, free listings alone can drive consistent, qualified traffic back to your store.
The OpenCart Etsy Marketplace Extension bridges your OpenCart catalogue with Etsy’s marketplace, which attracts over 90 million active buyers looking for unique, handmade, and vintage products. It handles Etsy’s specific listing requirements, custom variations, renewal cycles, and category tags, all managed from OpenCart.
Key Highlights
Product variation sync: Maps OpenCart options like size, color, and material to Etsy listing variants
Listing renewal management: Provides many synchronisation features like relisting, listing, and many more
Tag and category mapping: Pulls relevant keywords from OpenCart to improve Etsy search visibility
Order import: Etsy orders flow directly into your OpenCart dashboard
Why Etsy Marketplace Matters for Your Opencart Stores
Etsy’s audience actively searches for products they cannot find on mainstream platforms. If your store carries handmade, customizable, or niche items, this extension puts them in front of exactly the right buyers. Moreover, centralised order management means you never lose track of an Etsy sale again.
The OpenCart eBay Marketplace Connector, also referred to as the OpenCart eBay Marketplace Extension, links your OpenCart store to eBay’s global marketplace, one of the highest-traffic e-commerce platforms worldwide. Furthermore, automates product listing, bidirectional inventory sync, and order management between both platforms.
Key Highlights
Bulk product listing: List your entire OpenCart catalogue to eBay in one action
Bidirectional inventory sync: A sale on eBay instantly updates stock in OpenCart
Automated order import: Ebay orders appear in your OpenCart backend without manual entry
Pricing rules: Apply platform-specific markups to account for eBay fees automatically
Why eBay Matters for Your Store
eBay draws buyers who compare prices across sellers before purchasing. Getting your products listed there increases competitive visibility significantly. Furthermore, the OpenCart eBay Marketplace Extension ensures your stock numbers stay accurate across both platforms, eliminating the risk of overselling.
Why Running All Three Together Makes Sense
Each platform serves a different buyer intent. Google Shopping captures search-driven traffic. Etsy attracts niche and handmade product seekers. eBay pulls in price-conscious, high-volume shoppers. Together, they cover a wide spectrum of the buying journey.
When all three connect to a single OpenCart store, inventory updates once and syncs everywhere. Orders from all channels land in one dashboard. There is no switching between platforms, no spreadsheet reconciliation, and no overselling risk.
Conclusion
Multi-channel selling is no longer optional for growing OpenCart stores; it is the standard. The OpenCart Google Shopping Integration Extension, the OpenCart Etsy Marketplace Extension, and the OpenCart eBay Marketplace Connector each solve a specific visibility problem. Together, they turn your OpenCart store into a fully connected, automated sales hub.
Start with the channel that fits your product type best. Then expand. The infrastructure is already there
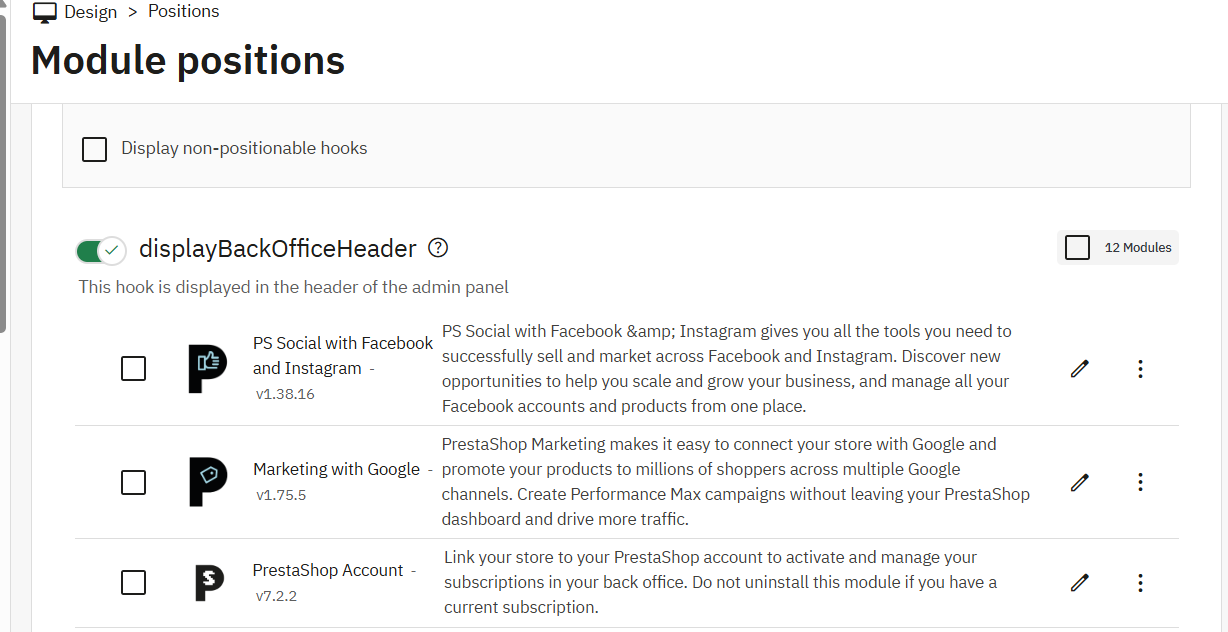
If you’ve spent any real time building PrestaShop modules, hooks are probably where most of your battles have been fought. They’re how your module speaks to the core — how you plug in functionality without ever cracking open a file you shouldn’t be touching. Knowing they exist is one thing. Using them without shooting yourself in the foot is another.
What a Hook Actually Is
At its simplest, a hook is a moment in PrestaShop’s execution where it pauses and checks whether anyone’s listening. If your module is registered for that hook, it gets a turn to respond.
There are two types worth distinguishing: action hooks and display hooks. Action hooks are for running logic tied to an event, an order being placed, a product being saved, that sort of thing. Display hooks are for injecting HTML into specific spots on the storefront or back office. The distinction shapes how you write the method. Action hooks process something and usually return nothing meaningful. Display hooks return rendered HTML that PrestaShop slots into the page.
Where Developers Go Wrong with Registration
The most common early mistake is registering hooks in the wrong place or in a disorganized way. Registration belongs in your module’s install() method via $this->registerHook(). You can pass an array of hook names in one call — which is much tidier than stringing together repeated calls.
Just as important: unregister them in uninstall(). It’s easy to skip this and easy to regret. Orphaned hook registrations sitting in the database after a module’s been removed can cause genuinely confusing behavior down the line. A clean pattern looks roughly like this:
publicfunctioninstall(){returnparent::install() && $this->registerHook(['displayHeader','actionOrderStatusUpdate','displayFooterProduct']);}
Get the Method Names Right
PrestaShop resolves hook methods by convention: hookHookName(), with the hook name in camelCase. So displayHeader maps to hookDisplayHeader(). Mess up the casing and PrestaShop silently skips your method, no error, no log entry, nothing.
It’s one of those bugs that can eat an embarrassing amount of debugging time before you spot it.
Every hook method receives a $params array. What’s inside depends entirely on which hook triggered it. During development, dump $params once before writing any real logic. The documentation is a decent starting point but it doesn’t always reflect what actually gets passed in.
Handling Display Hooks Properly
For display hooks, the standard approach is to assign variables to Smarty and return the output of $this->display() pointing to a .tpl file. Keep your templates in views/templates/hook/ inside your module, it’s the conventional structure and makes things easier to navigate as the module grows.
One detail worth emphasizing: always return the output, never echo it. The hook system collects return values and places them where they belong in the layout. If you echo directly, the output ends up at the top of the page regardless of where the hook actually sits.
When Built-In Hooks Aren’t Enough
PrestaShop’s native hooks cover a lot of ground, but there are situations — especially when building modules meant to be extended, where you need something more targeted. You can register a custom hook with Hook::register() and fire it using Hook::exec() from anywhere in your codebase.
Custom hooks are particularly useful in multi-module projects. Instead of modules calling each other directly, you expose a hook and let other modules respond independently. It keeps the architecture clean and makes future changes much less painful.
Don’t Ignore the Performance Side
It’s easy to underestimate how much damage a poorly optimized hook method can do. Hooks like displayHeader fire on almost every page load. If your method is hitting the database or calling an external API without any caching, page speed takes a real hit — and your clients will notice before you do.
A few habits help. Cache anything that doesn’t change between requests. Use PrestaShop’s built-in cache layer where it fits. And if your hook logic only applies under certain conditions, check those conditions at the top of the method and return early if they’re not met. Keeps the overhead low and the code readable.
When the Hook Isn’t Firing
When something isn’t working as expected, the first thing to check is whether the module is actually attached to the hook. Head to Modules > Positions in the back office, or look directly at the hook table in the database. A module can be installed while a hook registration silently failed during setup.
Custom Development Services
Tailored solutions by Knowband for your eCommerce success
Looking for powerful and scalable solutions? Knowband offers expert custom development services to help you build high-performance eCommerce features with ease.
Also worth considering: execution order. If a module earlier in the chain throws an unhandled exception, PrestaShop can stop processing everything else on that hook. The Positions panel lets you adjust the order, and sometimes that’s all it takes to fix what looks like a mysterious disappearing hook.
The Takeaway
Hooks are what make PrestaShop modules actually modular. Used well, they let you build clean integrations that don’t step on the core or on other modules. The fundamentals aren’t complicated: register in install(), name your methods precisely, return from display hooks, cache on high-traffic hooks, and reach for custom hooks when the built-in set falls short.
Once that becomes a habit, the development process gets a lot smoother, and your codebase stays something you’ll actually want to revisit later
At Knowband, our development team regularly works with complex PrestaShop module architectures, where efficient hook usage becomes critical for performance and scalability. If you’re looking to speed up development or implement advanced functionality, exploring professionally built modules and solutions can save significant time and effort.