

PrestaShop Product Import Export Scheduler Pro – Complete User Guide
Complete user guide for PrestaShop Product Import Export Scheduler Pro with setup, import/export profiles, cron scheduling, and transfer logs
1.0 Introduction
Managing eCommerce manually is one of the most time-consuming parts of running an online store. Updating prices means opening products one by one. Migrating to a new store means starting from scratch. Syncing a supplier feed means downloading a file, converting it, and running an import that may or may not work cleanly.
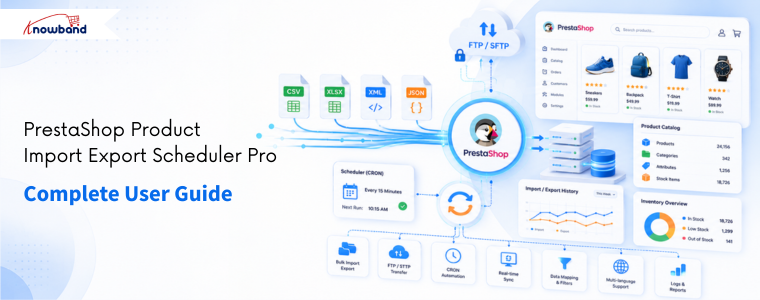
The PrestaShop Product Import Export Scheduler Pro by Knowband replaces all of that. It is a complete PrestaShop Bulk Product Import Export Module that handles every direction of catalog data transfer, products and categories, in and out, in CSV, XLSX, JSON, and XML, from inside your PrestaShop admin panel without any coding, desktop software, or developer involvement.
What makes this PrestaShop Import Export Module different from basic transfer tools is the automation layer. Transfers are saved as named profiles. Profiles run on a schedule. Scheduled runs push files to FTP or SFTP servers automatically, send completion emails, and clean up after themselves.
Compatible with PrestaShop 1.7.x through 9.x.
1.1 Who Is This Module For
The PrestaShop Catalog Manager is built for:
- Store owners managing medium to large catalogs of 100 to 50,000 SKUs.
- Agencies managing multiple client PrestaShop stores.
- International stores running multilingual catalogs.
- Businesses syncing product or pricing data from supplier feeds on a schedule.
- Any merchant who has struggled with PrestaShop’s native importer and needs a reliable combination and multi-language support.
2.0 Installation Guide
2.1 System Requirements
Before installing the module, confirm your environment meets the following:
- PrestaShop version 1.7.x or 8.x or 9.x.x
- PHP 7.2 or higher
- MySQL 5.6 or higher
2.2 Uploading and Installing the Module
Step 1 – Upload the module: From your PrestaShop admin panel, go to Modules, then Module Manager, and click “Upload a Module” in the top right. Select the ZIP file downloaded from Knowband and click Open. PrestaShop uploads and extracts the files automatically.
Step 2 – Install: Once uploaded, click Install when prompted. After installation, you are redirected to the module configuration page.
Step 3 – Locate if needed: If the module does not appear automatically, search for Bulk Data Manager in the Module Manager search bar and click Configure.
2.3 Common Installation Issues
Upload fails: Your server upload size limit is too low. Ask your hosting provider to increase upload_max_filesize and post_max_size in the PHP settings to at least 32 MB.
Module not visible after install: Clear your PrestaShop cache under Advanced Parameters, then Performance, then search for the module again in Module Manager.
The configuration page appears broken: Clear your browser cache and the PrestaShop theme cache under Design, then Theme and Logo, then Advanced Settings.
3.0 Admin Panel Overview
Once installed, the PrestaShop Product Import Export Scheduler Pro has four main tabs in the admin panel:
- General Settings: Preferences, template files, limits and speed, scheduled cleanup.
- Export Profile: Create and manage export profiles.
- Import Profile: Create and manage import profiles.
- Transfer Logs: Full history of every import and export run.
4.0 General Settings
The General Settings tab has four sub-sections accessible from the left sidebar: Preferences, Template Files, Limits and Speed, and Scheduled Cleanup.
4.1 Preferences
This is the first screen you see inside the module.
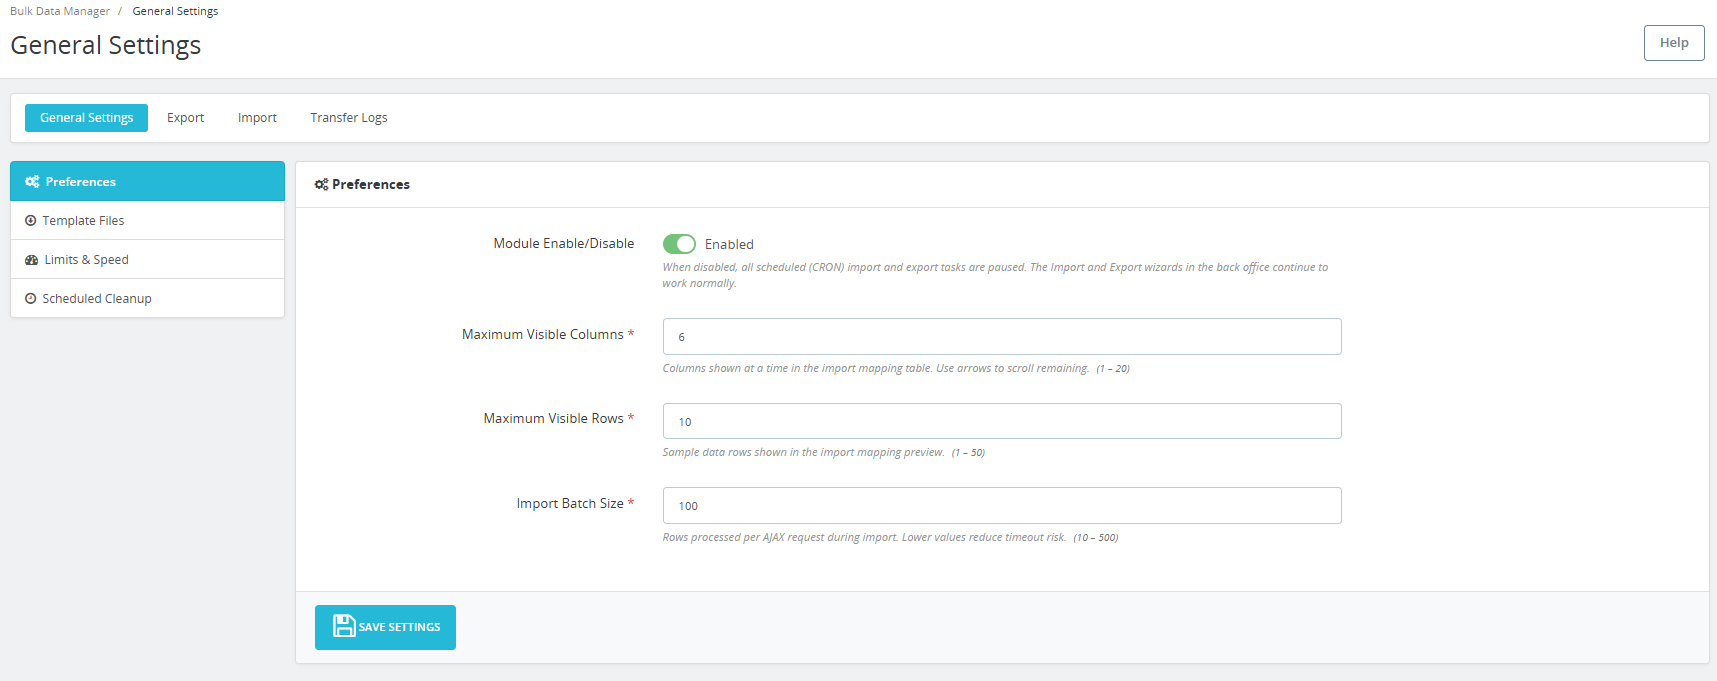
Module Enable/Disable: Toggle the module on or off. When disabled, all scheduled CRON import and export tasks are paused.
Maximum Visible Columns: Sets how many columns are displayed at once in the import mapping table. Use the arrows to scroll through the remaining columns. Accepted range is 1 to 20. Default is 6.Maximum Visible Rows: Sets how many sample data rows are shown in the import mapping preview. This is for visual verification only and does not limit how many rows are imported. Accepted range is 1 to 50. Default is 10.
Import Batch Size: Sets how many rows are processed per AJAX request during import. Lower values reduce timeout risk on shared hosting environments. The accepted range is 10 to 500. Default is 100. For VPS or dedicated servers, increase this to 300 or higher to speed up large imports.
Click Save Settings to apply changes.
4.2 Template Files
This section provides ready-to-fill sample template files for every supported entity and format combination.
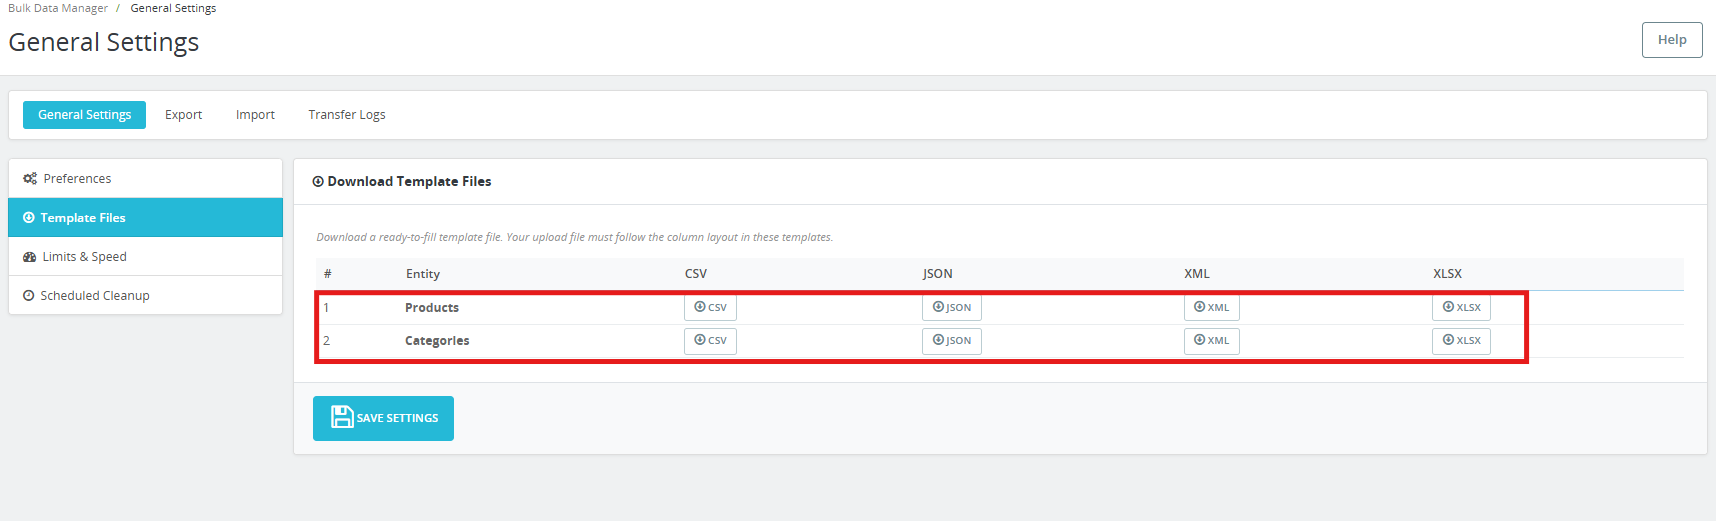
Two entities are available: Products and Categories. Each entity has four format buttons: CSV, JSON, XML, and XLSX.
Click the relevant button to download the template for that entity and format. Each template includes every column the PrestaShop Import Export Module recognises and uses safe placeholder data. Download a template, fill it in with your real product data, and import it back. Your upload file must follow the column layout shown in these templates.
4.3 Limits and Speed
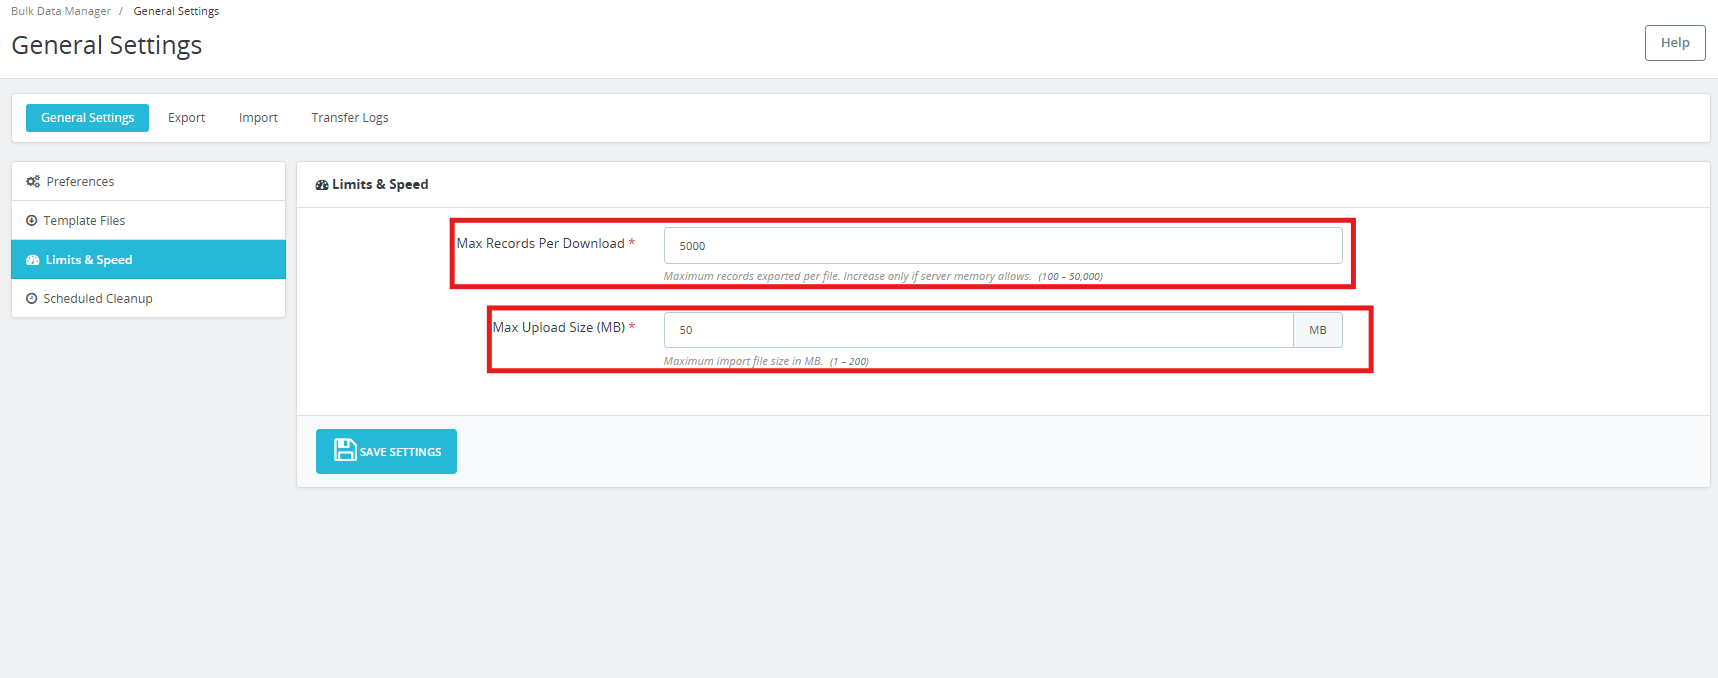
Max Records Per Download: Sets the maximum number of records exported per file. Increase only if your server memory allows. Accepted range is 100 to 50,000. Default is 5,000.
Max Upload Size (MB): Sets the maximum import file size in MB. This works alongside your server’s PHP upload limit; whichever is lower takes effect. Accepted range is 1 to 200 MB. The default is 50 MB.
Click Save Settings to apply.
4.4 Scheduled Cleanup
This section generates the three cron URLs used to automate transfers and manages the automatic file cleanup.
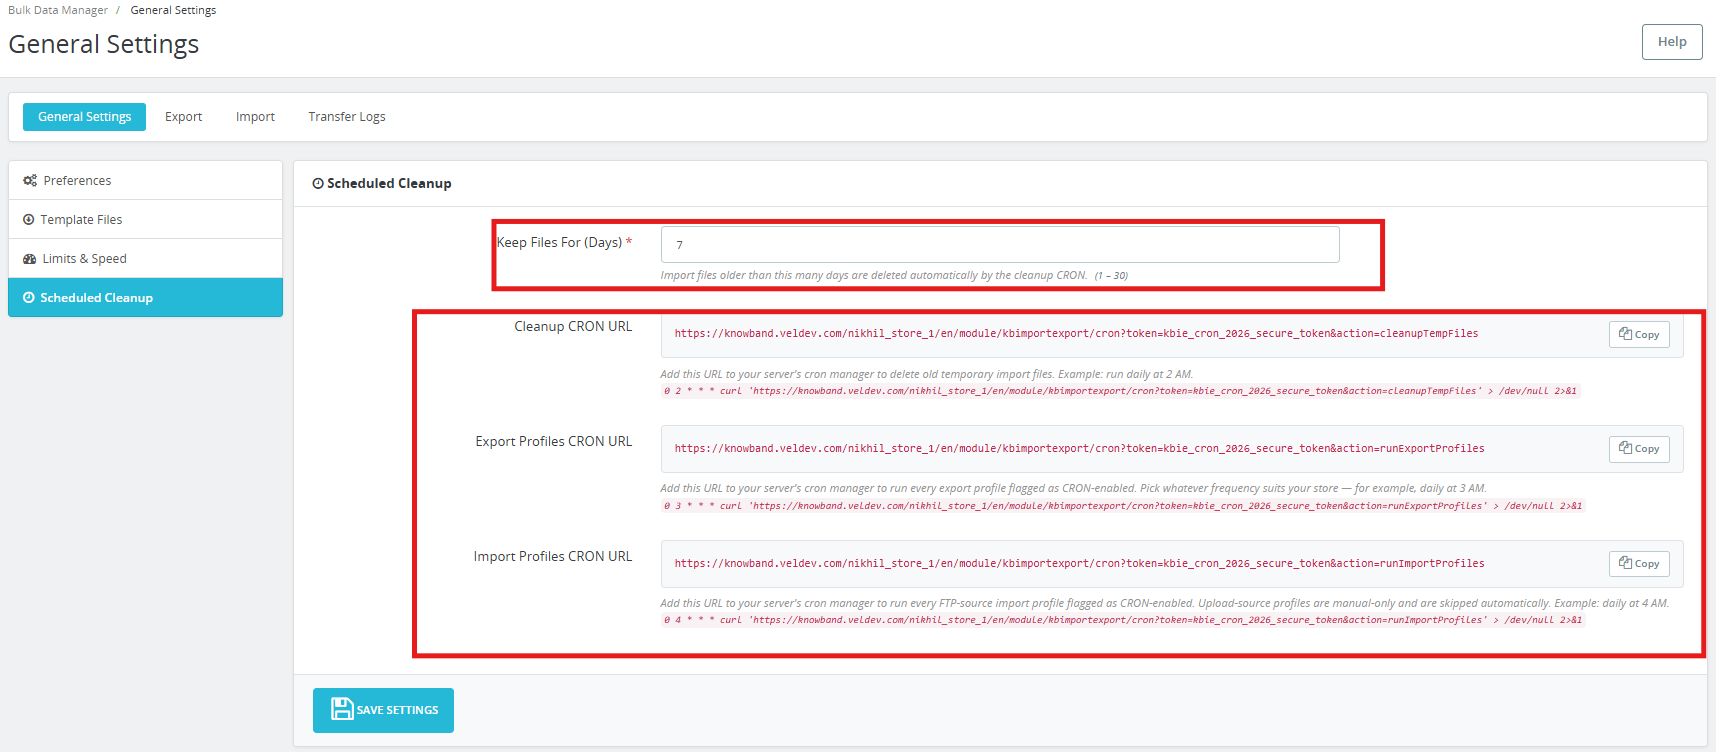
Keep Files For (Days): Import files older than this many days are deleted automatically by the cleanup CRON. Accepted range is 1 to 30. Default is 7 days.
Cleanup CRON URL: Add this URL to your server’s cron manager to delete old temporary import files automatically. Example: run daily at 2 AM.
Export Profiles CRON URL: Add this URL to your server’s cron manager to run every export profile flagged as CRON-enabled. Pick whatever frequency suits your store, for example, daily at 3 AM.
Import Profiles CRON URL: Add this URL to your server’s cron manager to run every FTP-source import profile flagged as CRON-enabled. Upload-source profiles are manual-only and are skipped automatically. Example: daily at 4 AM.
Each URL has a Copy button for one-click copying. Paste the copied URL directly into your server crontab or into PrestaShop’s built-in Scheduled Tasks module.
Click Save Settings to apply.
5.0 Export Profiles
The Export tab lists all saved export profiles and allows you to create new ones. Each profile is shown with its ID, name, entity type, format, CRON status, and date added. Profiles can be edited using the Edit button on each row.
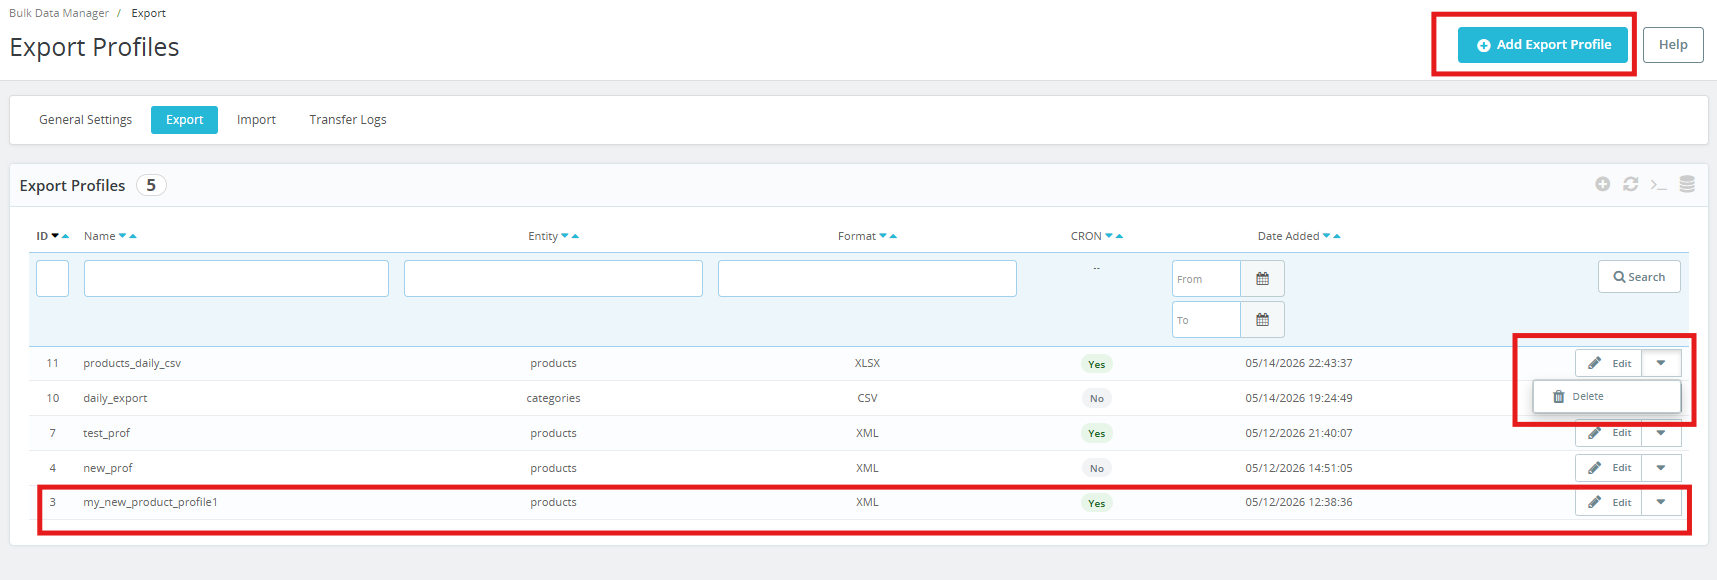
Click Add Export Profile to begin. The export wizard runs through three steps: Transfer Settings, Choose Fields, and Generate File.
5.1 Step 1 – Transfer Settings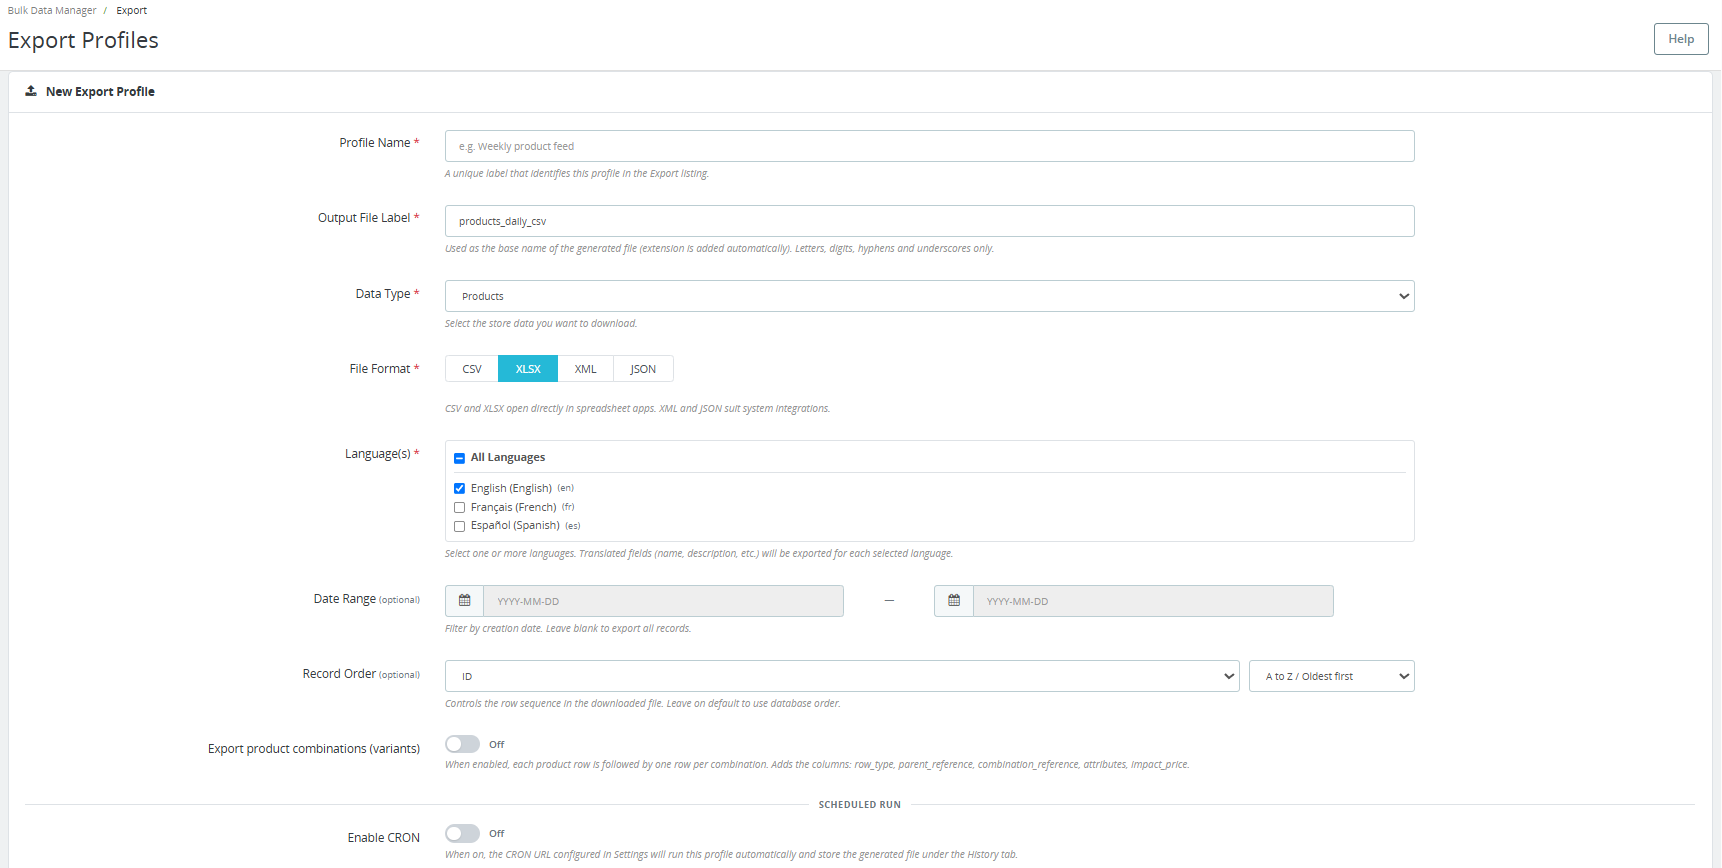

Profile Name: A unique label that identifies this profile in the Export listing. Example: Weekly product feed.
Output File Label: Used as the base name of the generated file. The file extension is added automatically. Use letters, digits, hyphens, and underscores only. Example: products-daily.
Data Type: Select the store data you want to download, Products or Categories.
File Format: Select CSV, XLSX, XML, or JSON. CSV and XLSX open directly in spreadsheet apps. XML and JSON suit system integrations.
Language(s): Select one or more store languages. Translated fields such as name and description will be exported for each selected language. Select All Languages to include every active language in the store.
Date Range (optional): Filter by creation date. Leave blank to export all records.
Record Order (optional): Controls the row sequence in the downloaded file. Leave on default to use database order.
Export product combinations (variants): When enabled, each product row is followed by a row for each combination. This adds the columns row_type, parent_reference, combination_reference, attributes, and impact_price. Enable this when you need a full product catalog, including all variants for re-import or migration.
Scheduled Run – Enable CRON: When on, the CRON URL configured in Settings will run this profile automatically and store the generated file under the Transfer Logs tab.
Export Destination – Send Generated File To:
- File System: Saves the file locally. Admin downloads it from the Transfer Logs page.
- FTP / SFTP: Pushes the file to a remote server after each run. A local copy is also kept for fallback download.
If FTP / SFTP is selected, the following fields appear:
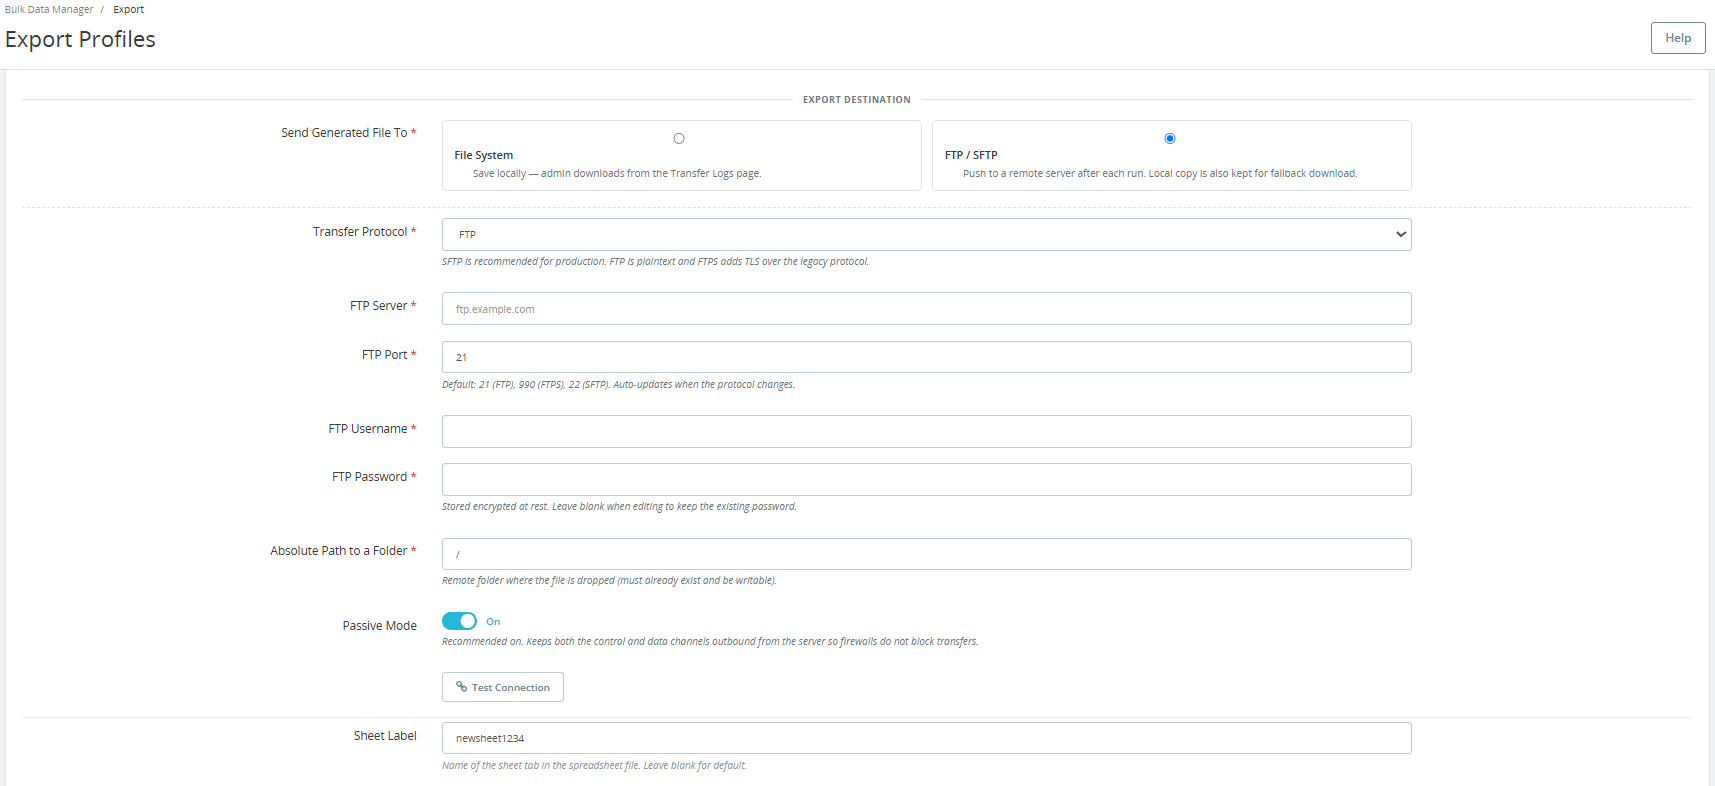
Transfer Protocol: Choose FTP, FTPS, or SFTP. FTPS is recommended for production. FTP is plaintext. FTPS adds TLS over the legacy protocol.
FTP Server: The server address, for example, ftp.example.com.
FTP Port: Default is 21 for FTP, 990 for FTPS, and 22 for SFTP. The port auto-updates when the protocol changes.
FTP Username and FTP Password: Credentials for the remote server. The password is stored encrypted at rest.
Absolute Path to a Folder: The remote folder where the file is dropped. The folder must already exist and be writable.
Passive Mode: Recommended for FTP/FTPS so firewalls do not block transfers.
Click Test Connection to verify your credentials before saving.
Output Style: Choose the CSV delimiter, Universal comma, Windows/Excel semicolon, or Tab-separated.
List Glue: Separator used for multi-value fields such as Tags and All Category Names. Options are Pipe, Slash, or Comma.
If File System is selected, you just need to add the Sheet Lable.

Narrow By (optional filters):
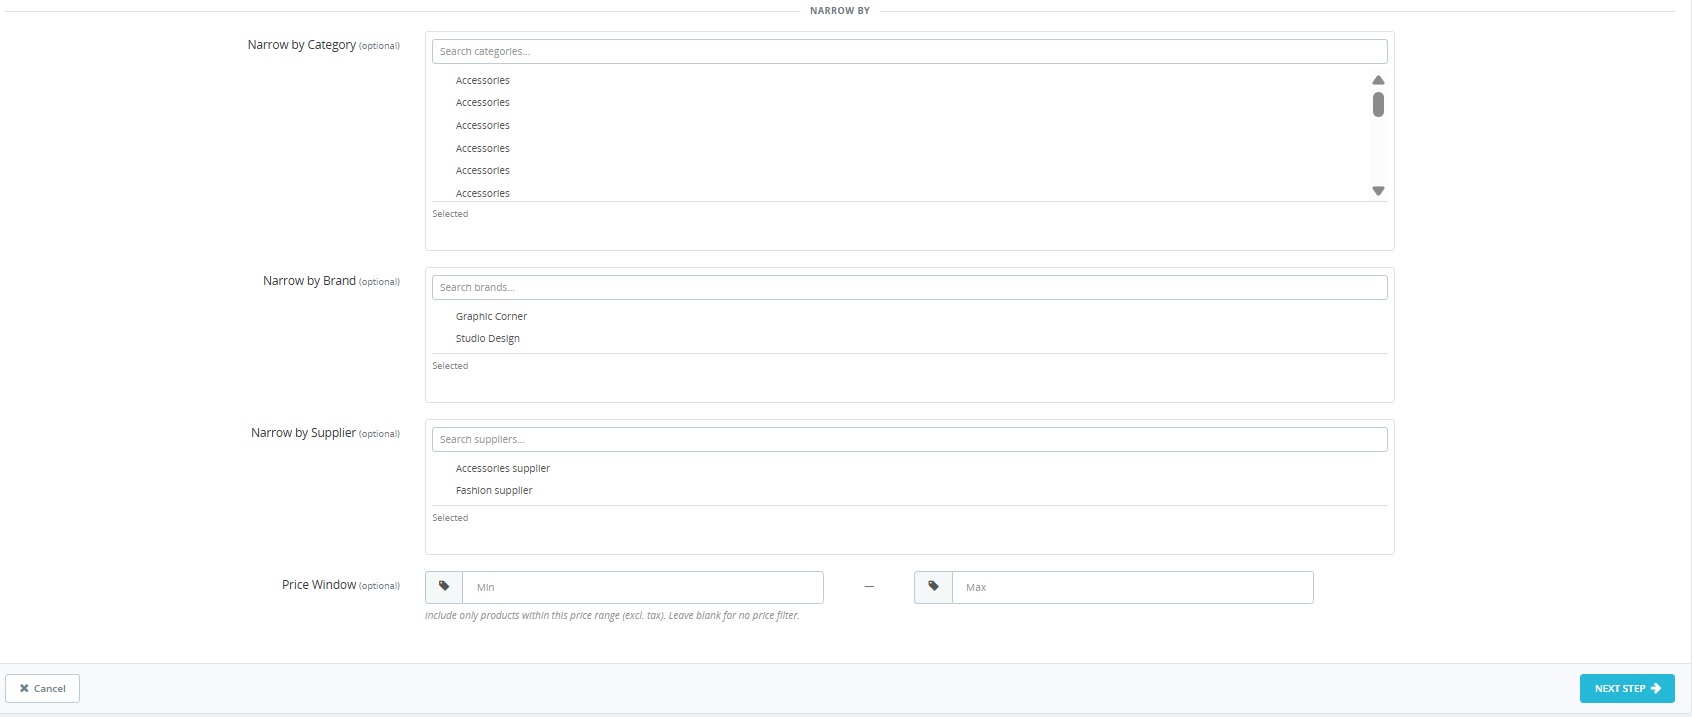
- Narrow by Category: Limit the export to products in selected categories only.
- Narrow by Brand: Limit the export to products from selected brands only.
- Narrow by Supplier: Limit the export to products from selected suppliers only.
- Price Window: Include only products within a specified price range (excluding tax). Leave blank for no price filter.
Click Next Step to proceed to field selection.
5.2 Step 2 – Choose Fields
This screen shows every available product or category column as a checklist. Required fields marked with an asterisk cannot be deselected.
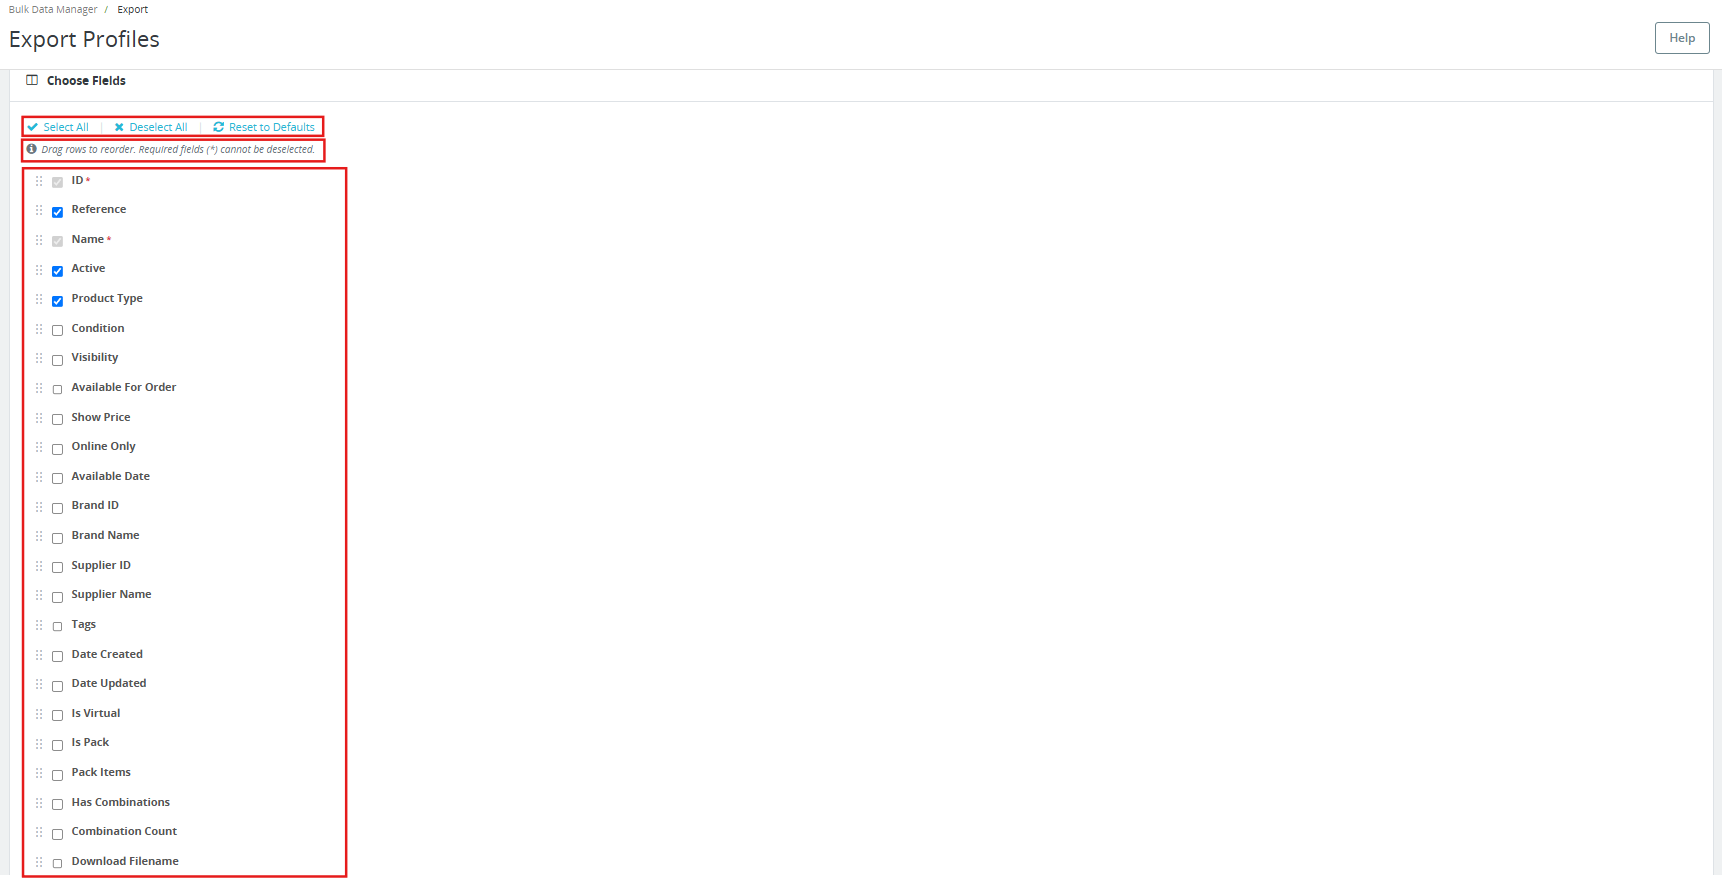
- Click Select All to include every column.
- Click Deselect All to clear all optional selections.
- Click Reset to Defaults to restore the recommended default column set.
- Drag rows to reorder the column sequence in the output file.
Available product fields include: ID, Reference, Name, Active, Product Type, Condition, Visibility, Available For Order, Show Price, Online Only, Available Date, Brand ID, Brand Name, Supplier ID, Supplier Name, Tags, Date Created, Short Description, Description, Weight, Width, Height, Depth, EAN-13, UPC, ISBN, MPN, Meta Title, Meta Description, URL Key, Cover Image URL, All Image URLs, Default Category ID, Default Category Name, All Category IDs, All Category Names, Price, Wholesale Price, Unit Price, Minimum Quantity, Low Stock Alert, Low Stock Threshold, Out of Stock Behaviour, and more.
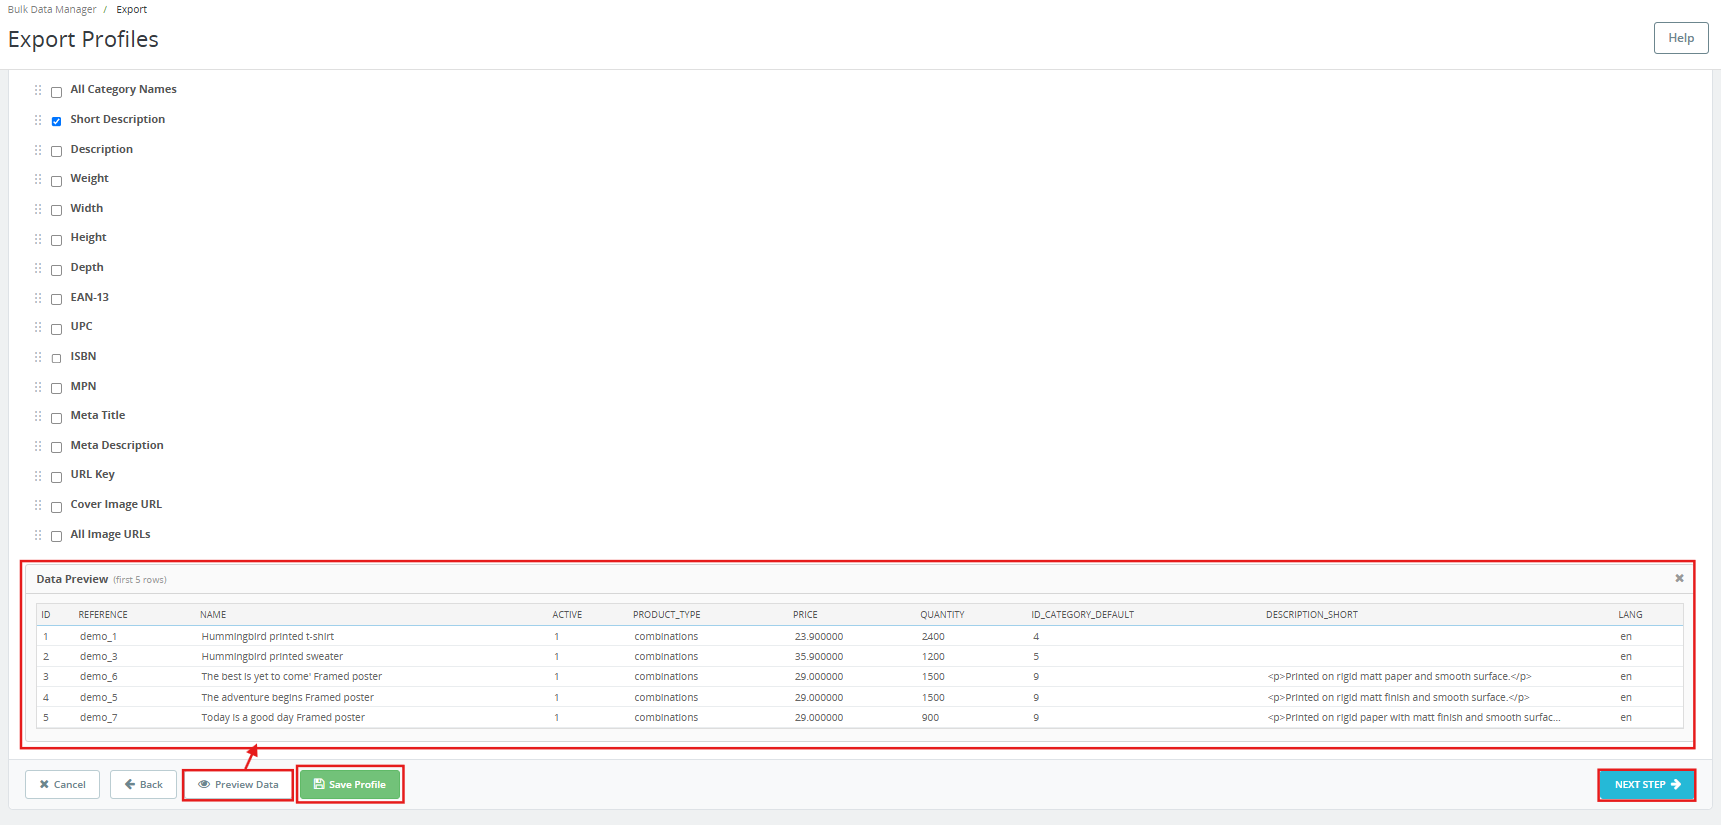
Click Preview Data to see the first five rows of the export based on your current selection. Click Save Profile to save without downloading. Click Next Step to proceed to file generation.
5.3 Step 3 – Generate File
A Download Summary panel on the right confirms your settings: Data Type, File Format, File Label, and the number of Fields selected.
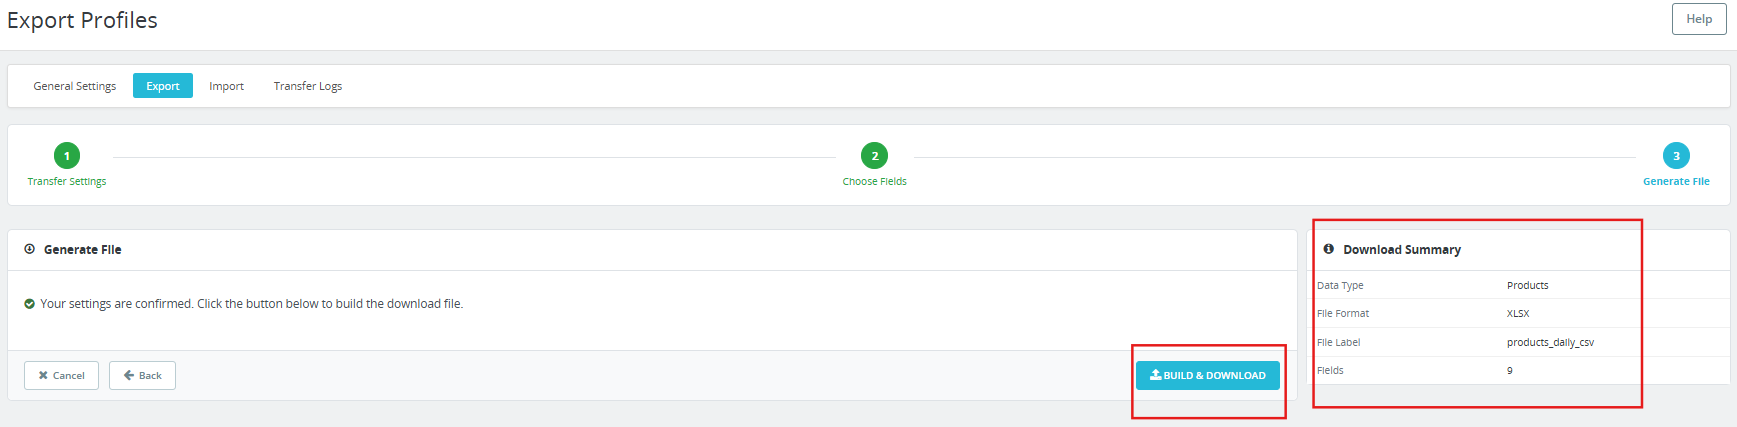
Click Build and Download to generate the export file immediately. The file is built and downloaded to your browser or pushed to the configured FTP/SFTP destination. The run is recorded in the Transfer Logs tab.
6.0 Import Profiles
The Import tab lists all saved import profiles. Each profile is shown with its ID, name, entity type, format, source type (Upload or FTP), CRON status, and date added.
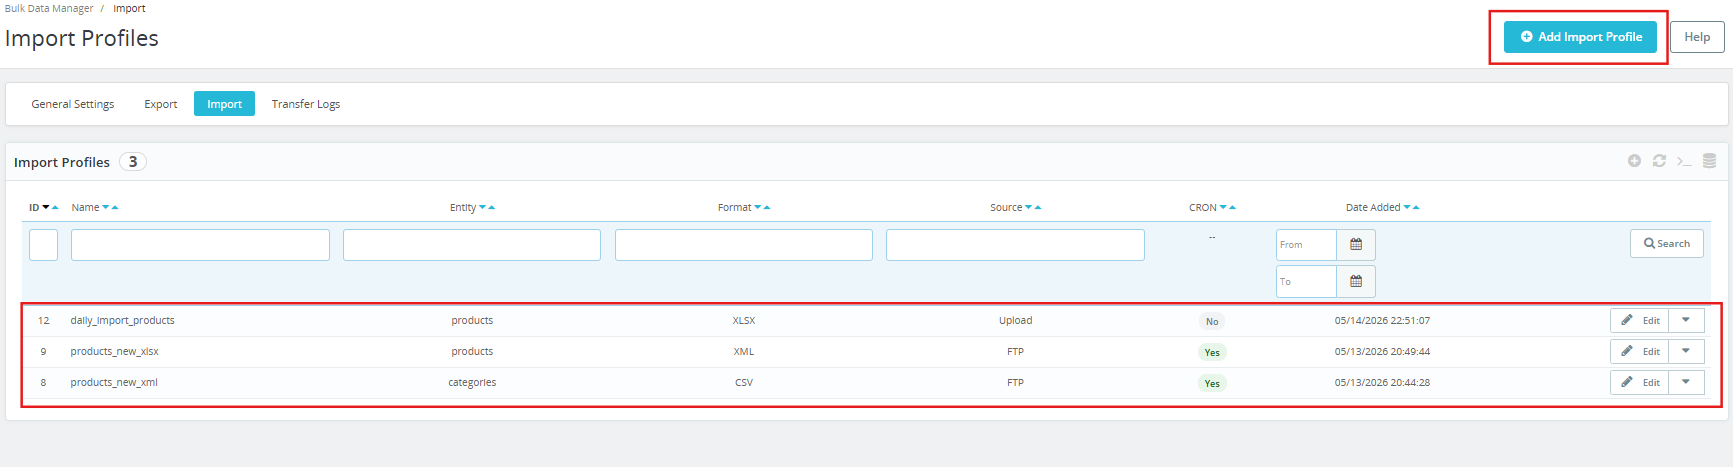
Click Add Import Profile to begin. The import wizard runs through three steps: Source Settings, Map Columns, and Run Import.
6.1 Step 1 – Source Settings
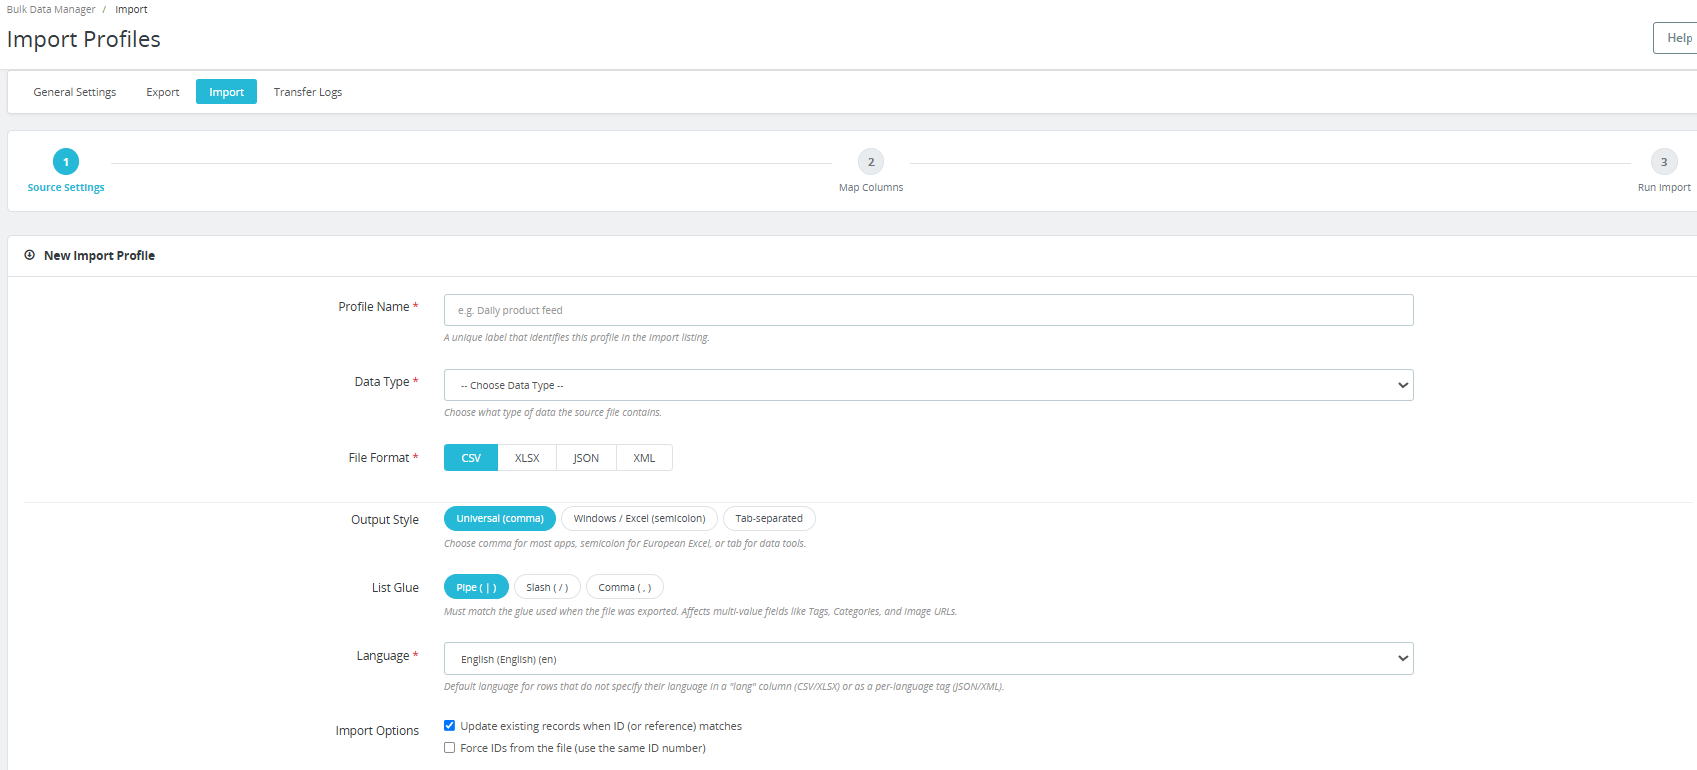
Profile Name: A unique label that identifies this profile in the Import listing. Example: Daily product feed.
Data Type: Choose what type of data the source file contains: Products or Categories.
File Format: Select CSV, XLSX, JSON, or XML.
Output Style: Choose the CSV delimiter that matches the file being imported: Universal comma, Windows/Excel semicolon, or Tab-separated.
List Glue: Must match the glue used when the file was exported. This affects multi-value fields such as Tags, Categories, and Image URLs.
Language: Default language for rows that do not specify their language in a lang column (CSV/XLSX) or as a per-language tag (JSON/XML).
Import Options:
- Update existing records when ID (or reference) matches: When checked, the module updates an existing product instead of creating a duplicate when a matching ID or reference is found in the file. This is the standard setting for all regular updates.
- Force IDs from the file (use the same ID number): When checked, the module assigns the exact product ID from the file to the new record. Use only when migrating between stores where preserving the original ID is required.
Pick Source:
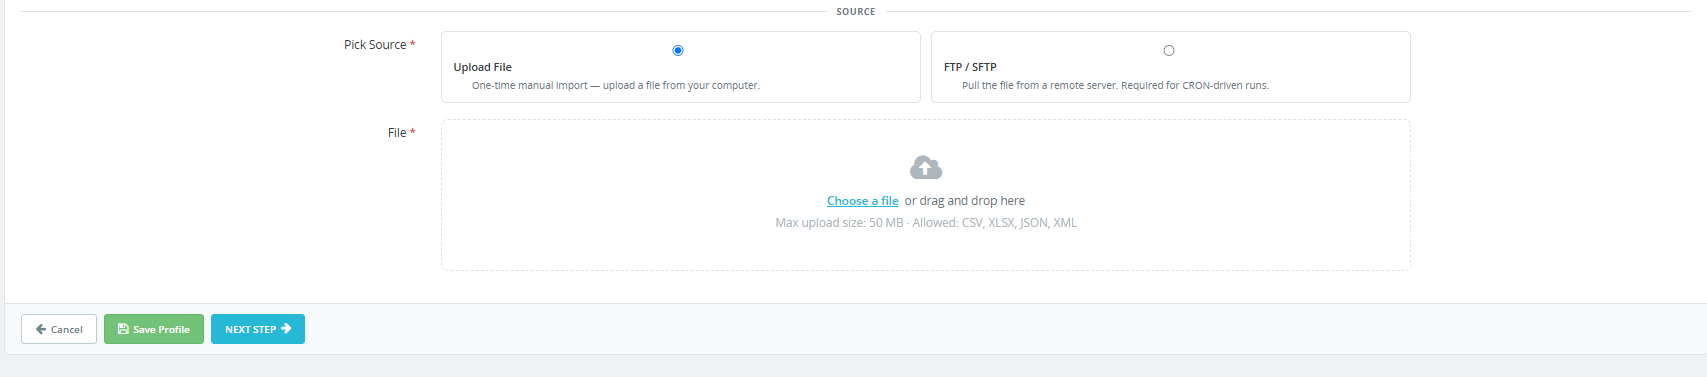
- Upload File: One-time manual import, upload a file from your computer. Max upload size is 50 MB. Allowed formats: CSV, XLSX, JSON, XML.
- FTP / SFTP: Pull the file from a remote server. This option is required for CRON-driven automated runs.
If FTP / SFTP is selected, the following fields appear:
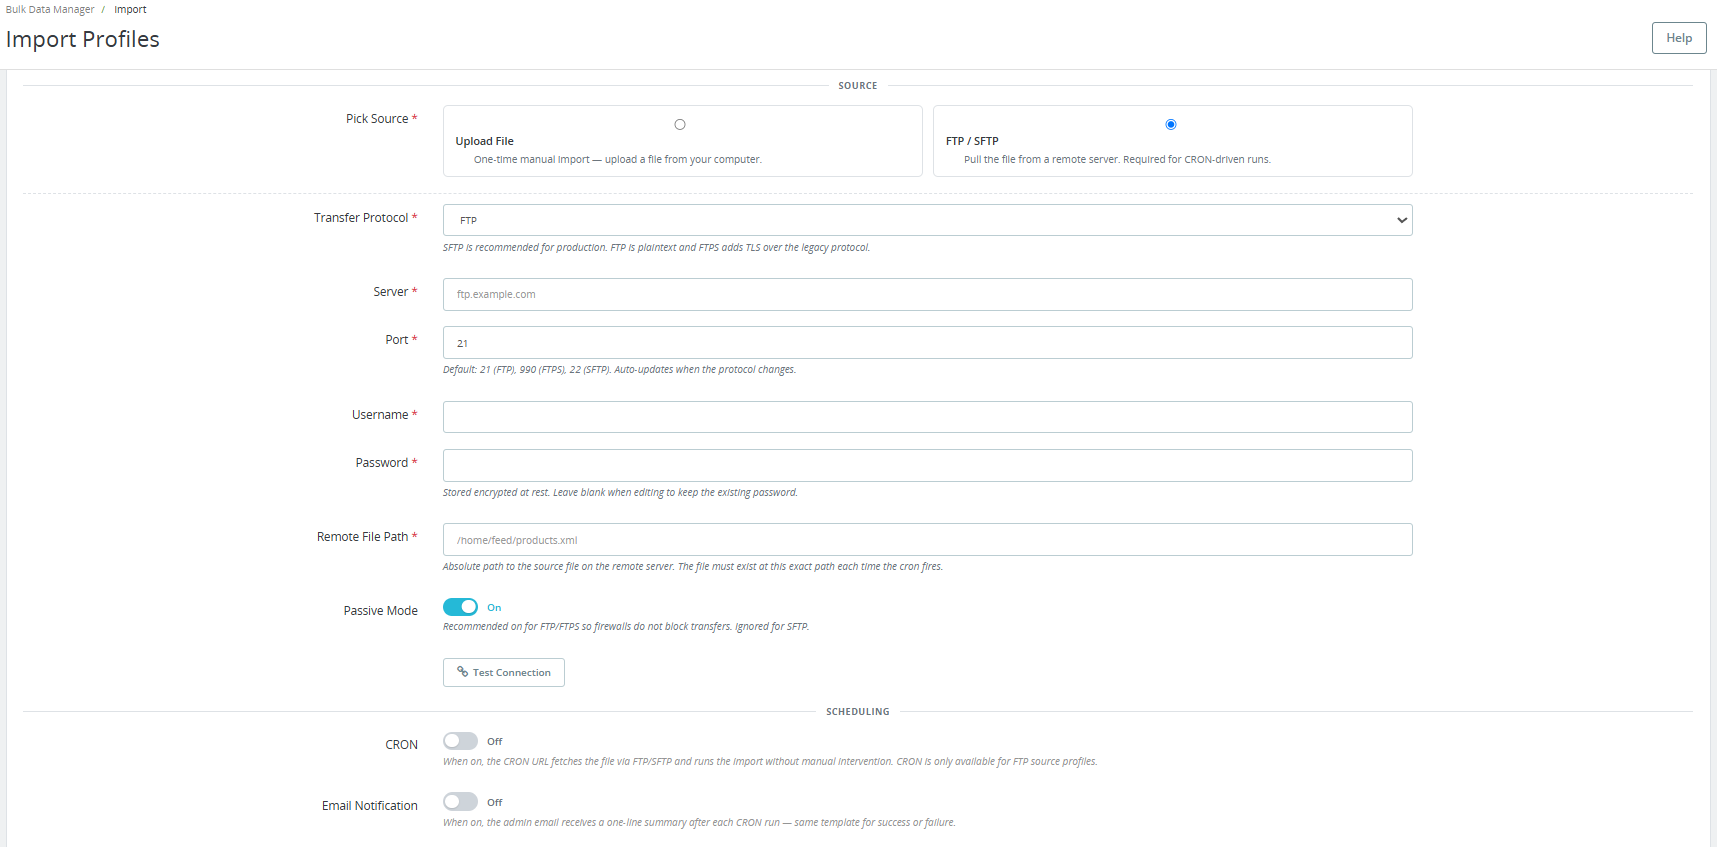
Transfer Protocol: FTP, FTPS, or SFTP.
Server: The FTP server address.
Port: Default is 21 (FTP), 990 (FTPS), 22 (SFTP). Auto-updates when the protocol changes.
Username and Password: Credentials for the remote server. Password is stored encrypted at rest.
Remote File Path: Absolute path to the source file on the remote server. The file must exist at this exact path each time the cron fires. Example: /home/feed/products.xml.
Passive Mode: Recommended for FTP/FTPS so firewalls do not block transfers. Ignored for SFTP.
Click Test Connection to verify your FTP/SFTP credentials before saving.
Scheduling:
CRON: When on, the CRON URL in Settings fetches the file via FTP/SFTP and runs the import without manual intervention. CRON is only available for FTP source profiles.
Email Notification: When on, the admin email receives a one-line summary after each CRON run, the same template for success or failure.
Click Save Profile to save your settings, then click Next Step to proceed to column mapping.
If Upload File is selected, you just need to upload the file from your device.
6.2 Step 2 – Map Columns
This screen shows the column mapping interface.
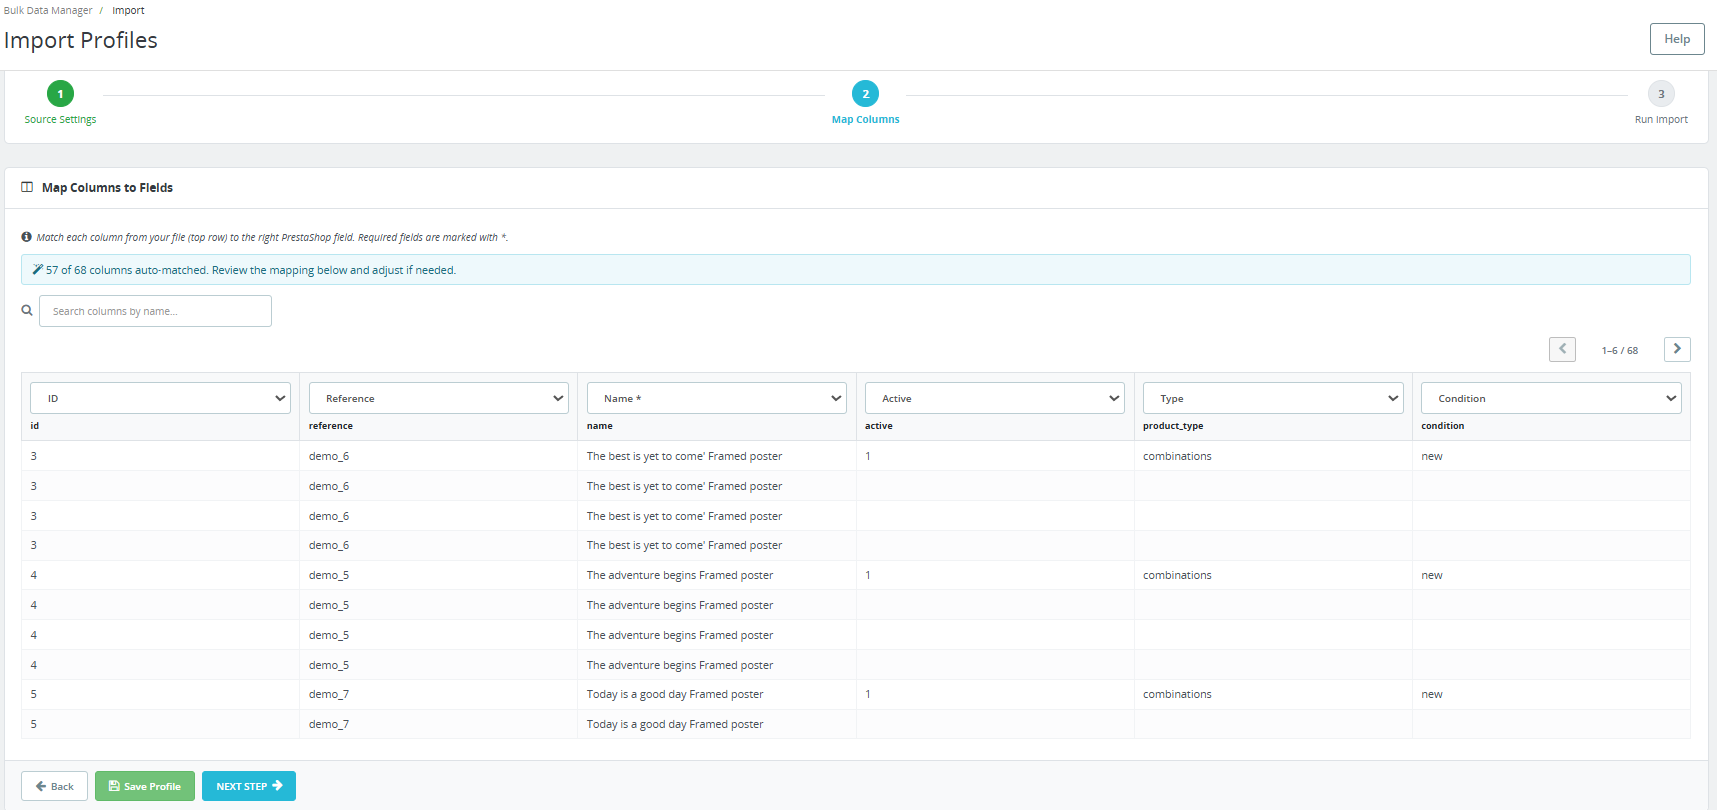
The instruction at the top reads: Match each column from your file (top row) to the right PrestaShop field. Required fields are marked with an asterisk.
The module auto-matches columns wherever possible. A confirmation message at the top shows how many columns were auto-matched, for example: 47 of 47 columns auto-matched. Review the mapping below and adjust if needed.
Each column from your import file appears as a dropdown at the top of its column. The rows below show the actual data values from your file for visual verification. Use the search box to find a specific column by name. Navigate through all columns using the pagination arrows (for example, 1-6 / 47).
Assign each column header from your file to the correct PrestaShop field using the dropdown. Leave columns set to the auto-matched field if the mapping is correct. If a required field is not mapped, the module blocks the import and shows a warning before proceeding.
Click Save Profile to save the mapping. Click Next Step to proceed to the final step.
6.3 Step 3 – Run Import
The confirmation message reads: Mapping confirmed. Click below to start importing your data.
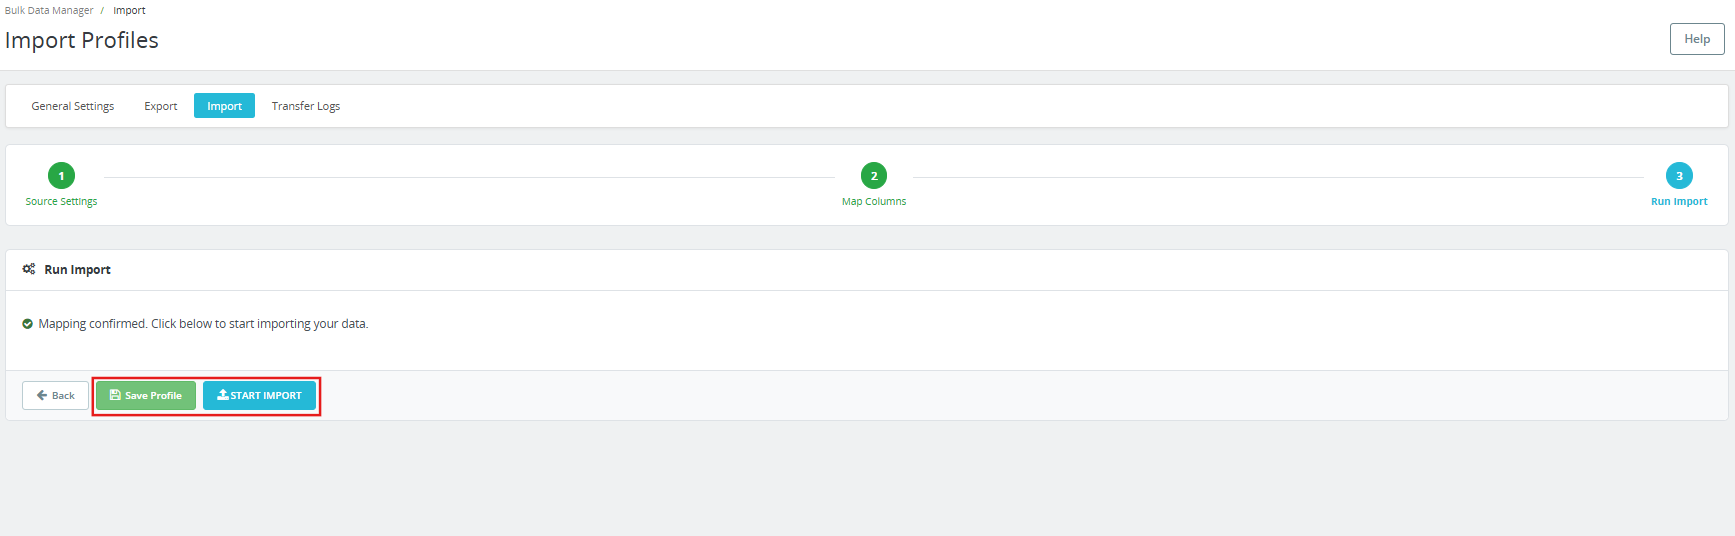
Click Save Profile to store the profile for future use without running the import now.
Click Start Import to begin. The import runs in batches as configured in General Settings. When complete, the Transfer Logs tab records the result, including total records, successful records, and any failed records with row-level error detail.
7.0 Transfer Logs
The Transfer Logs tab shows the full history of every import and export run through the PrestaShop Product Import Export Scheduler Pro. The tab heading in the module is Transfer History.
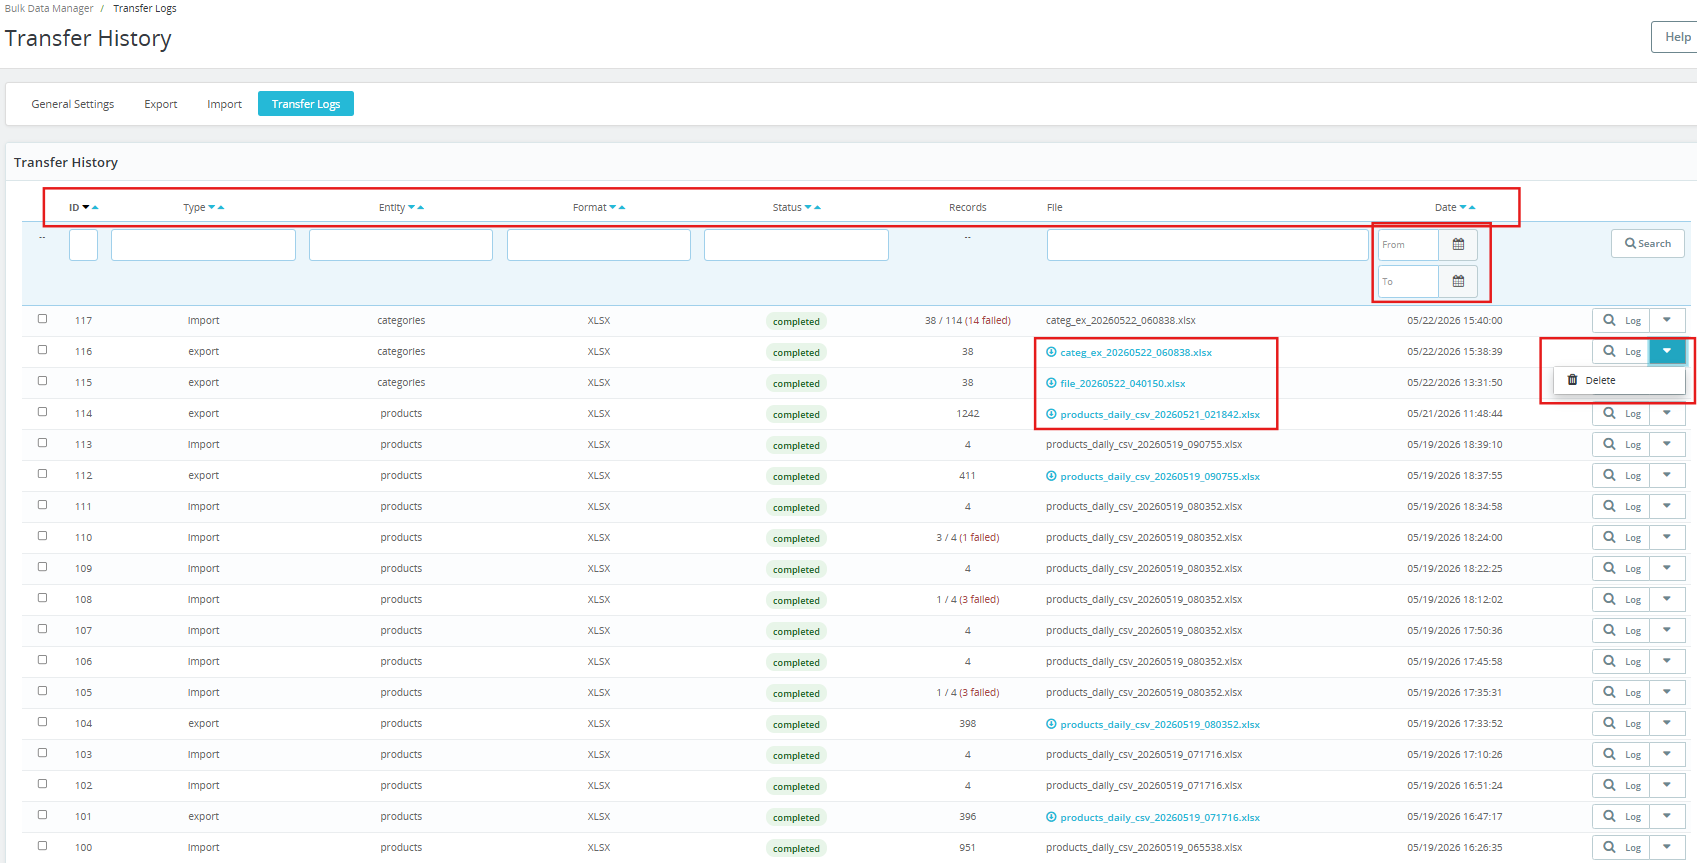
Each row in the log shows:
- ID: The run identifier.
- Type: Import or Export.
- Entity: Products or Categories.
- Format: CSV, XLSX, JSON, or XML.
- Status: Completed, completed with failures, or failed. Partial runs show the record count as X / Y (Z failed) in red.
- Records: Total records processed. For partial failures, the count shows how many succeeded and how many failed.
- File: The filename of the generated or imported file. For export runs, the filename is a clickable link to re-download the file directly.
- Date: The date and time the run completed.
Click Log on any row to view the full details of that run, including row-level error messages for any failed records. Fix only the affected rows in the source file and re-import those rows. The rest of the catalog remains untouched.
8.0 Frequently Asked Questions
Question: What is the PrestaShop Product Import Export Scheduler Pro?
Answer: PrestaShop Bulk Product Import Export Module lets merchants import and export products and categories using CSV, XLSX, JSON, and XML files. It includes reusable profiles, column mapping with validation, FTP and SFTP file transfer, cron-based scheduling, email notifications, and transfer logs, all managed from the PrestaShop admin panel. Compatible with PrestaShop 1.7 through 9.x.
Question: How do I import products in PrestaShop using a CSV file?
Answer: Go to the Import tab and click Add Import Profile. Set the data type to Products, select CSV as the file format, upload your CSV file under Pick Source, and click Next Step. On the Map Columns screen, the module auto-matches columns where possible, reviews the mapping, adjusts if needed, and clicks Next Step. Click Start Import to run. Sample CSV templates are available from the Template Files section in General Settings.
Question: Can I import and export PrestaShop product combinations?
Answer: Yes. You can export the combination of the product variants by enabling Export Product Combinations (Variants) in the export profile Transfer Settings. Each product row is followed by one row per combination with attributes in a human-readable format. On re-import, the module creates missing attribute values and groups automatically. Full round-trip combination handling is supported, export from one store and import to another, cleanly.
Question: How do I automate PrestaShop product imports using cron jobs?
Answer: Create an import profile with FTP or SFTP as the source, enable CRON in the Scheduling section, and save the profile. Go to General Settings, then Scheduled Cleanup, and copy the Import Profiles CRON URL. Paste it into your server crontab or PrestaShop’s Scheduled Tasks module and set the interval. The profile runs automatically at every tick without any manual involvement.
Question: How do I migrate products from one PrestaShop store to another?
Answer: You can migrate a product from one prestashop store to another using the Knowband Prestashop Export/Import Scheduler Pro. Using import feature you can import all the prestashop product and categories in CSV, JSON, XML or XLSX format.
Question: What happens if an import fails or has errors?
Answer: The PrestaShop Catalog Manager does not fail silently. Every run creates a record in the Transfer Logs tab. Partial failures show the record count as X / Y with the number failed highlighted. Click the Log button on any row to see row-level error detail. Fix the affected rows in the source file and re-import only those rows. A completion email is sent for scheduled CRON runs, so the admin is notified without logging in.
Question: Is this compatible with the latest PrestaShop version?
Answer: Yes. The PrestaShop Product Import Export Scheduler Pro is compatible with PrestaShop 1.7. x through 9.x. Refer to the module product page for the latest compatibility information.
9.0 Conclusion
The PrestaShop Product Import Export Scheduler Pro by Knowband is a complete solution for catalog data management in PrestaShop. Four file formats, reusable profiles, FTP & SFTP with connection testing, full combination round-trip support, multi-language preservation, column mapping validation, row-level error logs, dated backup history, and automatic file cleanup, all from one PrestaShop Import Export Module, all from the admin panel, with no developer required.
For support, custom requirements, or PrestaShop addon development services, contact the Knowband team directly.
Get the PrestaShop Product Import Export Scheduler Pro and start running automated catalog transfers from day one.