Magento Multi vendor Marketplace – User Manual

Magento multi-vendor Marketplace module by Knowband is one of the easiest ways to transform your eCommerce site into a thriving Multi vendor marketplace. A Multi vendor marketplace is an online space where different sellers and vendors can list their products, manage their inventory and sell at the same platform. The Magento Multi vendor marketplace plugin converts your online shop into a fully functional online marketplace.

1.1 Features offered to the store admin by Magento Multi-vendor Marketplace extension:

  • The admin can approve/reject the seller’s profile with the help of the Magento marketplace plugin.
  • The Magento marketplace module makes it easier to set and manage the commission charged to the sellers.
  • The admin can add/remove the products from the back-end of the Magento marketplace multi-vendor module.
  • The store admin can create and manage the product categories from the back-end of the Magento marketplace extension.
  • The Magento store owner can track the transaction and earn at the button click.
  • The Magento marketplace multivendor is compatible with the latest Magento version and supports all themes.
  • The admin can approve/reject product and seller reviews from the backend of Magento Multi seller Marketplace plugin.
  • Email templates offered by the Magento Multi-vendor Marketplace module can be used by the admin to notify the sellers.
  • Store admin has the access to approve or disapprove the seller vacation request from the backend of Magento Multi seller Marketplace module.

1.2 Features offered to the seller by Magento Multi-vendor marketplace extension:

  • The Magento Multi-vendor marketplace allows the sellers to register from the front end of the online marketplace.
  • The sellers can easily map the categories from the seller dashboard.
  • Also, the sellers can request including a new category to keep the products. The marketplace admin can approve/reject the category request with the help of the Magento multi-vendor marketplace plugin.
  • The seller’s dashboard makes it easier for them to track and manage their products, profile as well as sales.
  • Magento multi-vendor marketplace allows the sellers to add sale banners, shop logo and custom HTML content. These banners will be displayed on Seller’s Page with separate product collection.
  • Sellers can send the payout requests and Vacation request to the admin from the seller dashboard.
  • Sellers can generate coupons from the seller dashboard to lure the customers and enhances the chances of conversion.
  • Sellers can display the Upsell and Cross-Sell products at the product page and checkout page to enhances the sale.
  • To distinguish taxable and Non- taxable items, sellers can add the products in different tax classes.

1.3 Customer Benefits offered by Magento Multi-vendor Marketplace:

  • The Magento multi-vendor marketplace extension allows multiple sellers/vendors to sell their products on the same platform. Thus, customers can choose the perfect product from a wide assortment.
  • Magento marketplace extension allows the customers to shop the products at competitive prices.
  • The customers can send product reviews. These reviews can be approved/disapproved from the back-end of the Magento marketplace plugin.
  • Online shoppers can review the sellers. The seller reviews can be monitored from the back-end of the Magento multi-vendor marketplace module.
  • The Magento multi seller marketplace module even offers an option with the help of which the buyers can become a seller.
  • Customers can directly contact the sellers from the frontend of the store. A ticket will be generated every time a customer contacts the seller.

2.0 Steps For Installation of Magento Multi-Vendor Marketplace

Follow the following steps for installing Magento MarketPlace extension:

  • Download the Magento Multi-vendor Marketplace extension package.
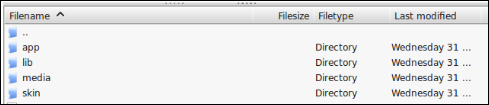
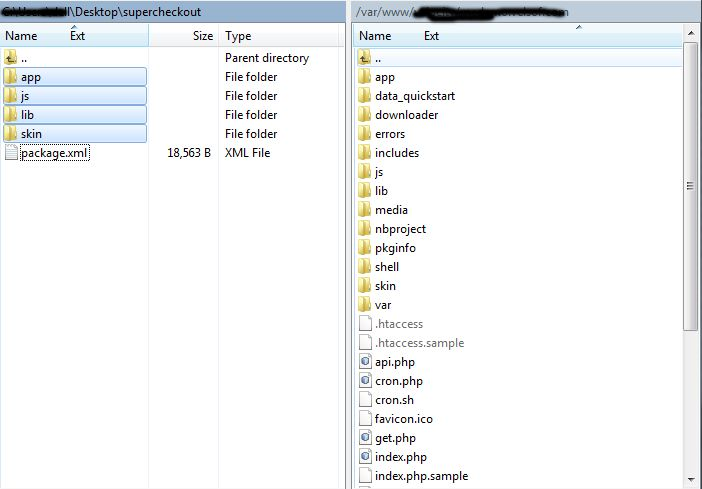
  • Unzip the package on your root folder of Magento setup via FTP manager (like Filezilla or WinSCP – download here: https://filezilla-project.org/).
  • In Admin Panel you will see a new Menu Market Place next to the System menu. In case you are not able to see the link under System, please clear Magento Cache first then check again.
  • With this, the Magento multi-vendor marketplace extension gets installed on your system.

3.0 Admin Panel

In the admin panel of Magento Multi seller, marketplace extension adds a separate menu (named MarketPlace) right next to the system menu and also adds a new tab to the customer create/edit page.

3.1 Register as Seller Option (Add New Customer Page)

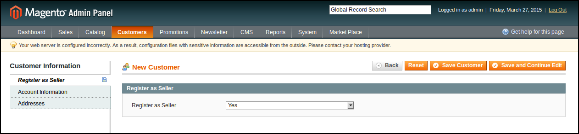
If the admin is creating a new Customer from the admin side then a new tab appears on that page asking for the Register as Seller field.

The Path to the Customer page:

Go to Customers -> Manage Customers and Click on Add New Customer on the right side of the page.

The admin can set the field to Yes to register the customer as a seller. By default, the field is set to No.
Picture2

3.2 Manage Seller Settings (Customer Edit Page)

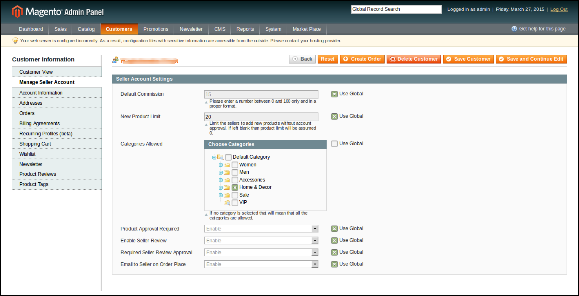
In case of editing a customer if the customer is also a seller than a new tab (named Manage Seller Account) appears to change the seller level settings for the current customer who is a seller as well.

Path to the above page:

Go to Customers -> Manage Customers and click on any customer who is also a seller.

The settings are stored when the admin submits the edit form for the customer.

When this page loads for the first time the fields are filled with the default settings pre-defined for the extension.
4.0 Marketplace Menu

The Magento marketplace extension consists of a total of 15 sub-menu options which redirect to several pages for the Magento multi-vendor marketplace Extension.
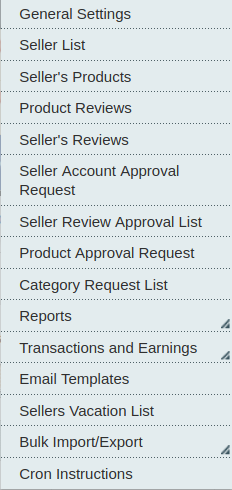

Some of the menu options of the Magento multi-vendor marketplace module have further sub-menus to navigate to some of the related pages.

All the 15 configuration options offered by the Magento multi-vendor marketplace plugin are described below in details:

4.1 General Settings

The General settings tab of the Magento multivendor marketplace module is divided into 2 main levels i.e. Seller Level Settings and Global Level Settings. This page only controls the Global level settings for the Magento Marketplace Extension.

This page has all the settings that control the Magento Marketplace plugin and its several features.
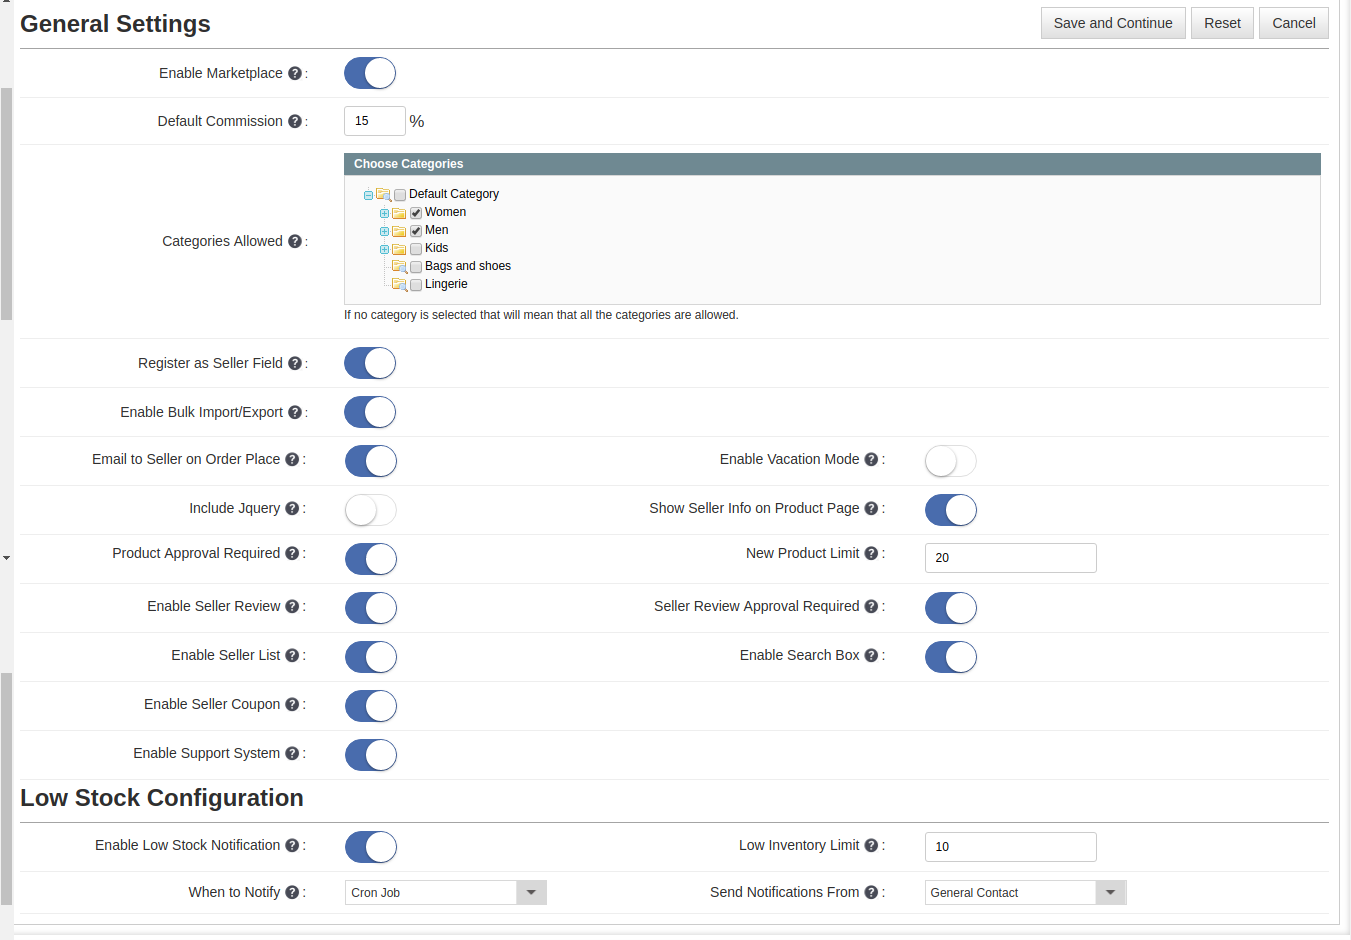

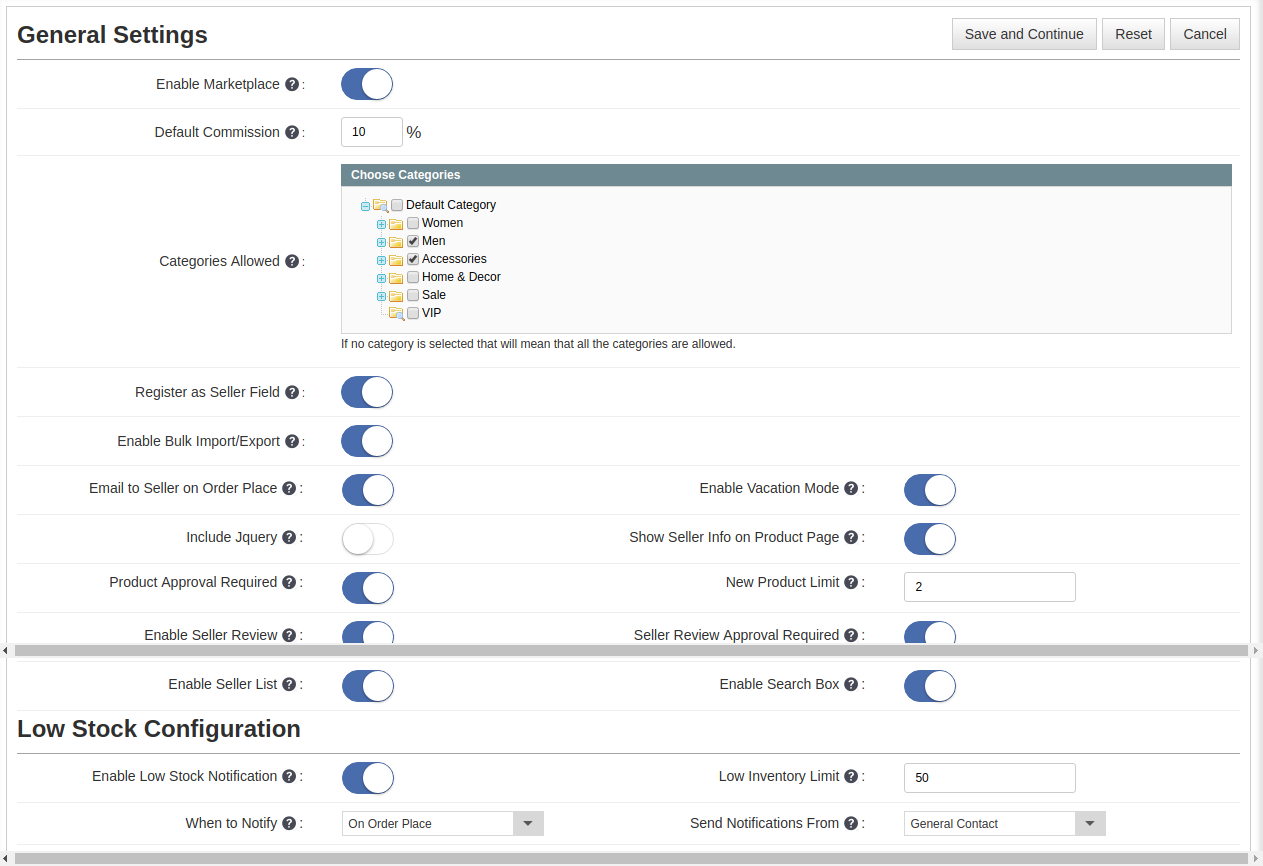
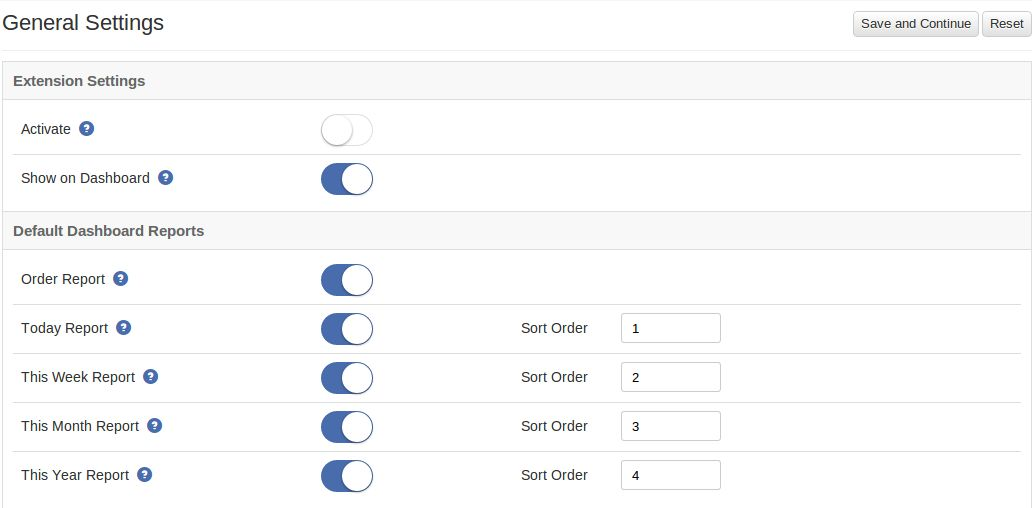
The general settings page of Magento multi-vendor marketplace plugin consists of the following fields:

1. Enable Marketplace: Enables or Disables the Magento Multi-vendor Marketplace extension on the storefront. If disabled, no page or feature of the extension is accessible on the storefront.

2. Default Commission: Sets the default commission percentage that is taken by the store owner from the total sale made by the seller.

3. Categories Allowed: The categories that are allowed for the sellers to add products. If no category is selected then all the categories are allowed and if some of the categories are selected that means that only the selected categories are allowed.

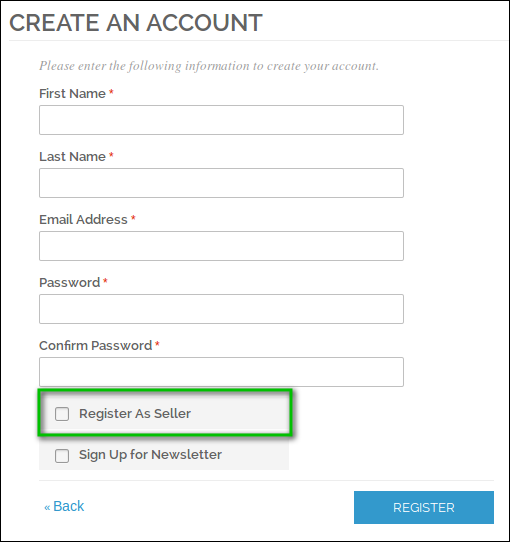
4. Register as Seller Field: Enables or Disables the Register as Seller field on the Create Account page of the storefront.
5. Enable Bulk Import/Export: Enable the button to allows the third-party vendors to use bulk import/export feature.

6. Email to Seller on Order Place: Enable this field to send an email to the seller in case an order is placed for the sellers’ product(s).

7. Include JQuery: Disable this field in case JQuery is already included in the front by another plugin or your theme.

8. Product Approval Required: Enable this field in case approval for the product added by any seller is required before it gets to your store.

9. Enable Seller Review: Enable this field in case you want the customers can review the seller.

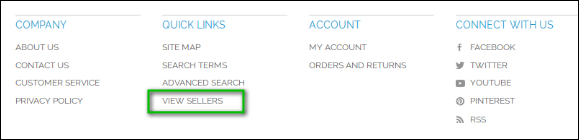
10. Enable Seller List: Enable this field in case you want to show a link in the footer of the storefront to the seller listing page. If this setting is disabled then the seller listing page cannot be accessed anyhow.
 

11. Enable Vacation Mode: Enable this button to allow the sellers to set the vacation mode for their shop for a particular period.

12. Enable seller Coupon: Enable this feature to allow the sellers to generate coupons for their products.

13. Show Seller Info Product Page: Enable the button to show the seller’s info on the product page.

14. New Product Limit: Enter the maximum number of products that a new seller can add before the seller account is approved.

15. Seller Review Approval Required: Enable this field in case you want the seller review to be approved before it becomes visible in the storefront.

16. Enable Search Box: Enable this field in case you want a search box on the seller listing page to search the sellers.

17. Enable Support System: Once this feature is enabled from the backend of the Magento Multi seller Marketplace module, the customer can directly contact the seller.

Low Stock Configuration

1. Enable Low Stock Notification: Enable the button to notify the sellers regarding the low stock notification.
2. Low Inventory Limit: Enter the stock level below which the seller will be notified regarding low stock.
3. When to Notify: Select when you will send the notification. It may be sent when the order is placed or after executing cron.
4. Send Notification From Select the email ID from which you want to send the notification.

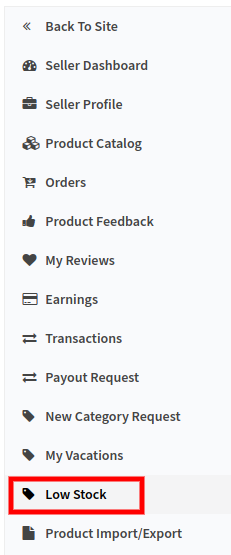
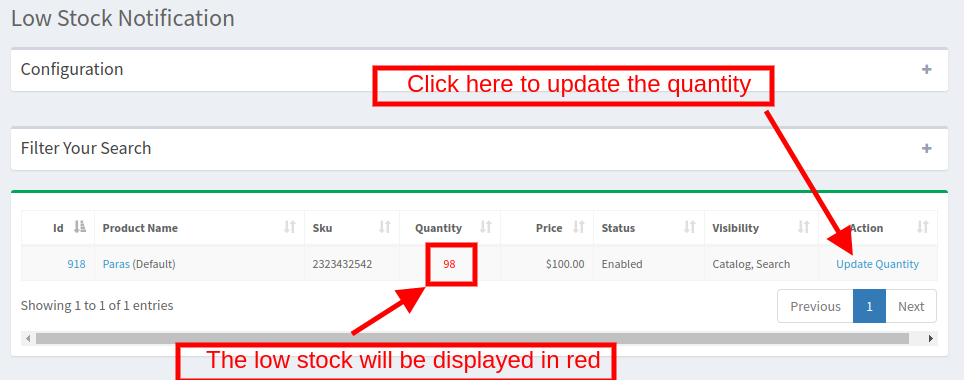
Once this functionality is enabled from the back-end of the Magento Marketplace module, the vendors can configure the low-stock setting from the Low-stock section of their dashboard.
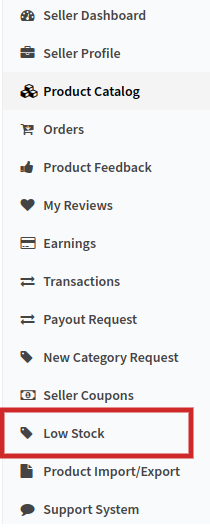
Go to the configuration section of the Low Stock tab of the dashboard.
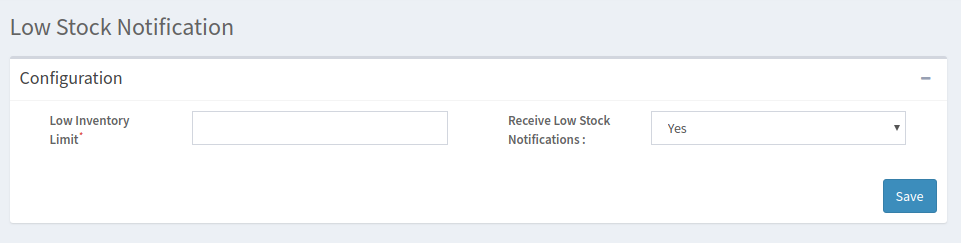
Low Inventory Limit: The sellers can enter the inventory limit below which they want to get notified.
Receive Low Stock Notification: Select whether you want to receive the low stock notification or not.
4.2 Seller List

This page of the Magento marketplace extension has a list of all the sellers that are approved by the store owner.
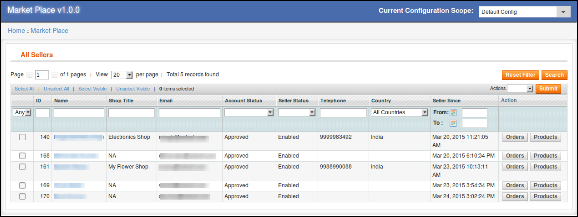
The above list contains a list of all the sellers that are approved. There are buttons to go to the seller’s products and orders in front of each seller.

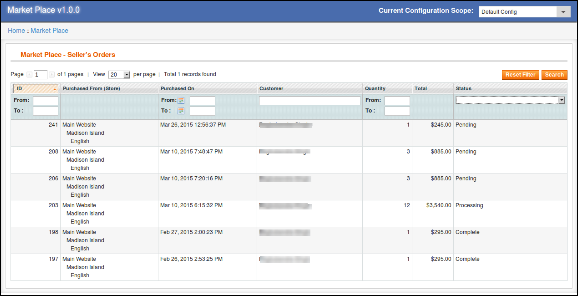
When you click on the Orders button than a new page opens consisting of the list of all the orders for that particular seller opens.
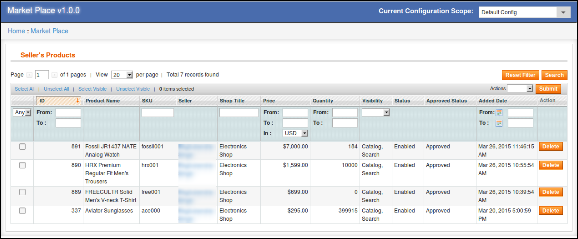
When you click on the Products button than a new page opens consisting of the list of all the products for that particular seller opens.
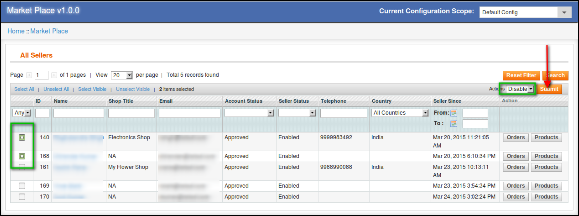
The is also a feature to enable or disable any seller using the Mass Actions feature of the Grid. To enable/disable any seller select the seller(s), choose the action (i.e. Enable or Disable) then click on the submit button to complete the action.
If a seller is disabled then all the products of that seller are also disabled and will not be visible at the storefront.

4.3 Sellers Products

This page of the Magento multi-vendor marketplace extension consists of all the approved products added by the seller(s) to the store.
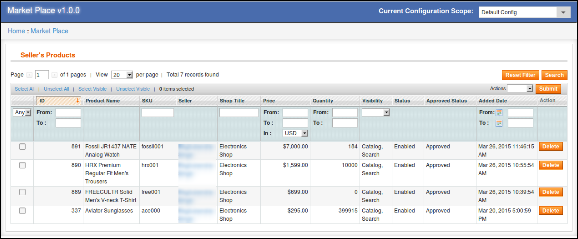
If the settings (i.e. Product Approval Required) is disabled, then, a product is approved directly when it is added by the seller and appears in this list. Otherwise, the product first appears in the Product Approval list.

Delete Product: To delete a product, you have to click on the delete button in front of that product.
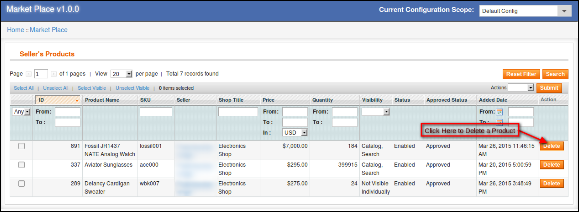
A pop-up will appear asking for the reason for the deletion of the product. To complete the action fill the reason and click submit.
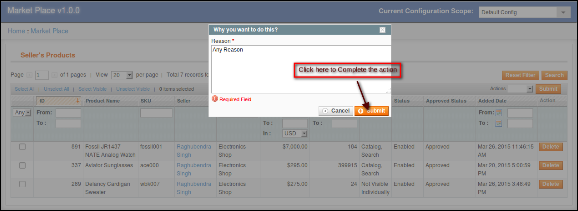
A mail will be sent to the seller to notify the deletion of the product. The mail also contains the reason you provided for the deletion of the product.

Note:- The product delete action cannot be undone. Please use this feature carefully.

Enable/Disable Product: To change the status of any product, you have to use the Mass Action feature of the Grid. To enable/disable any product select the product(s), choose the action (i.e. Enable or Disable), then, click on the submit button to complete the action.
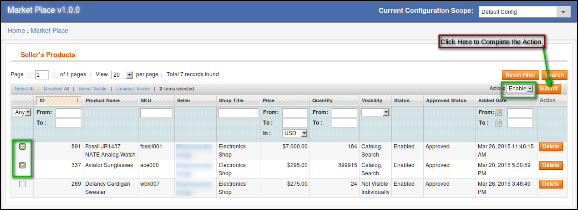
Note:- Once a product is disabled from the back-end of the Magento Multi-vendor Marketplace plugin, it will not be visible at the front. Avoid disabling products, only disable a product if it is very necessary.

4.4 Product Reviews

This page of the Magento multi seller marketplace extension contains a list of all the reviews done by customers on the seller’s products.
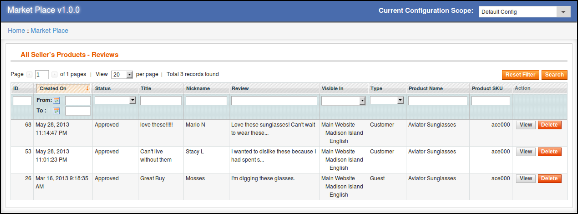
View Product Review: Most of the details of the product review are already mentioned in the grid but some of them are not. To view, all the details of any Product Review click on View Button in front of that review. A pop-up will appear in the back-end of the Magento multi-vendor marketplace plugin having all the details of the product review.
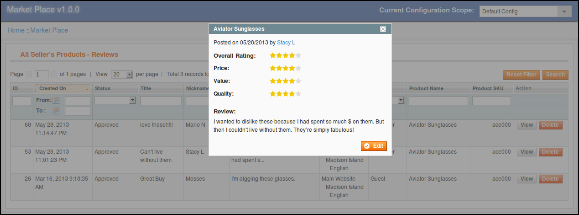
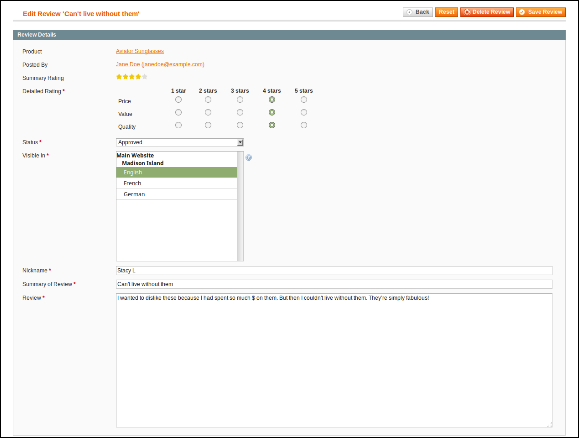
To edit the review you can click on Edit Button on the pop-up that will redirect you to the edit review page.
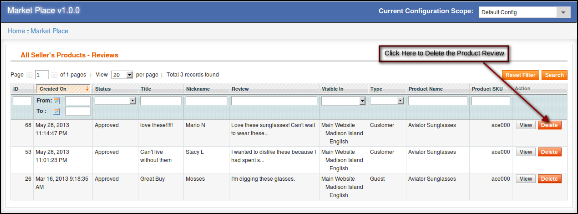
Delete Product Review: The Magento multi-vendor marketplace extension allows the store admin to delete the product reviews. To delete a product review, you have to click on the delete button in front of that product review on the list.
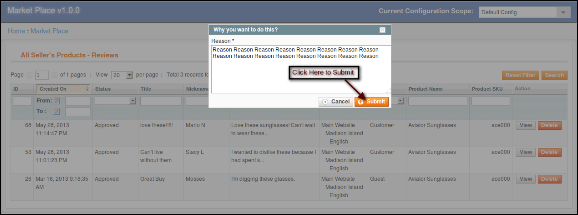
A pop-up will appear asking for the reason for the deletion of the product review. To complete the action fill the reason and click submit.
Note:- The product review delete action cannot be undone. Please use this feature carefully.

4.5 Sellers Reviews

This list contains a list of all the Sellers Reviews done by customers in the store.
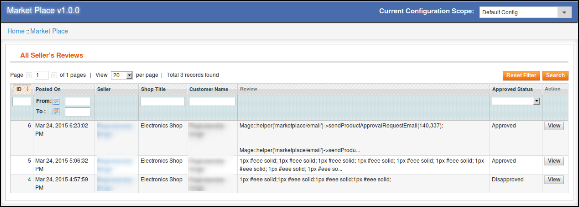
If the settings (i.e. Seller Review Approval Required) is disabled then a seller review is approved directly when it is added by the customer and appears in this list. Otherwise, the review first appears in the Seller Review Approval list.

Note:- The Seller Reviews that are disapproved by the store owner also appear in this list.

View Seller Review: To view all the details of a seller review you have to click on the View button in front of that review in the list.
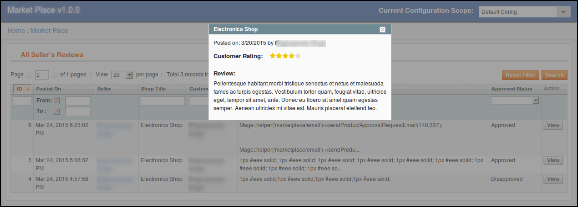
On clicking the View button a Pop-up will appear having all the details of the corresponding seller review.

4.6 Seller Account Approval Request

When a seller registers as a seller on your store than it first appears in this list of the Magento multi-vendor marketplace extension as shown in the image below. Then it is up to the store admin to approve or disapprove the seller account request.
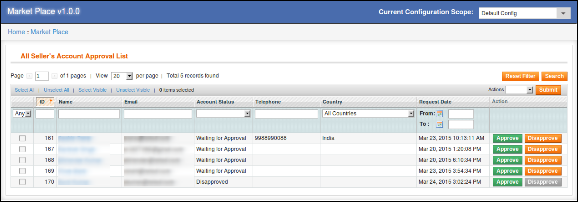
Approve Seller Account: To approve a seller account, you have to click on the Approve button in front of that seller on the list.
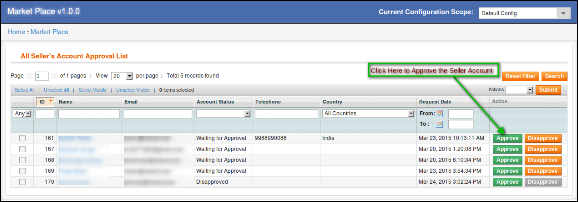
Once the Seller account is approved, it directly moves to the Sellers List and all the limits to the seller account are released.

A mail will be sent to the seller to notify the approval of the seller account.

Note:- The Seller Accounts that are approved by the store owner cannot be undone. Please use this feature carefully.

Disapprove Seller Account: To disapprove of a seller account, you have to click on the Disapprove button in front of that seller on the list.
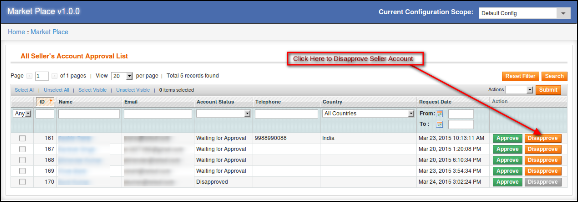
A pop-up will appear asking for the reason for the disapproval of the seller account. Fill the reason and then submit the form to complete the action.
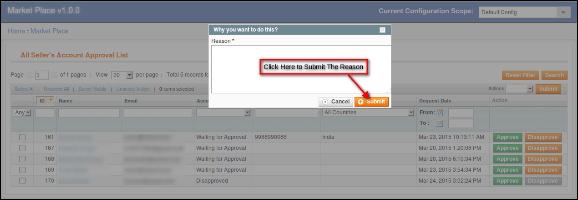
A mail will be sent to the seller notifying the disapproval of the seller account. The reason provided in the pop-up will also be sent in this mail.

Note:- Once a seller is disapproved then he can again apply for the seller account and whenever a seller do this the store owner is notified through a notification email.

4.7 Seller Review Approval List

This list of Magento multi-vendor marketplace contains all the Seller Reviews that are just posted by the customers and no action is taken on them.
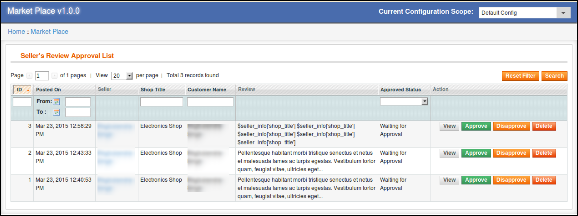
If the settings (i.e. Seller Review Approval Required) is enabled then only any seller review posted by any customer appears in this list otherwise it directly appears in the Seller Reviews list.

View Seller Review: To view all the details of a seller review you have to click on the View button in front of that review in the list.
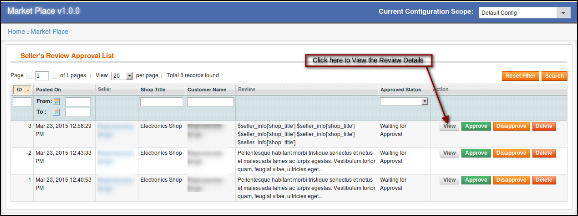
On clicking the View button a Pop-up will appear having all the details of the corresponding seller review.
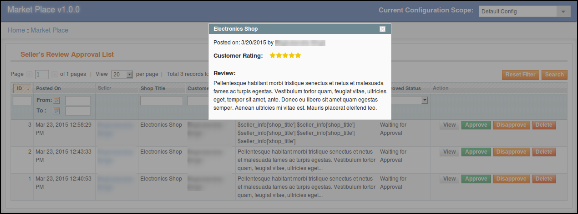
Approve Seller Review: To approve a seller review, you have to click on the Approve button in front of that review on the list.
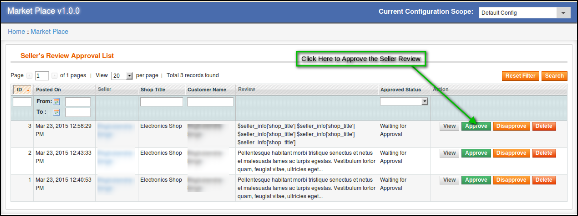
Once a seller review is approved it becomes visible in the front end and is transferred to the seller review list.

Note:- This action cannot be undone. Please use it carefully.

Disapprove Seller Review: To disapprove of a seller review, you have to click on the Disapprove button in front of that review on the list.
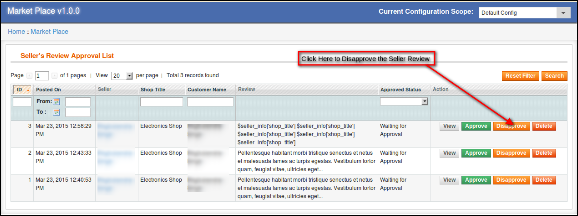
A pop-up will appear asking for the reason for the disapproval of the seller review. Fill the reason and then submit the form to complete the action.
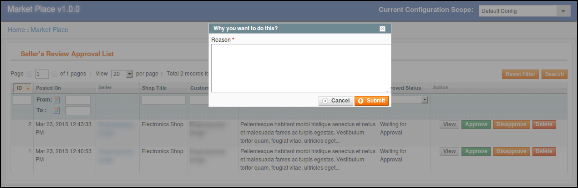
Once a seller review is disapproved it is transferred to the seller reviews list and cannot be found anywhere else.

Note:- This action cannot be undone. Please use it carefully.

Delete Seller Review: To delete a seller review, you have to click on the Delete button in front of that review on the list.
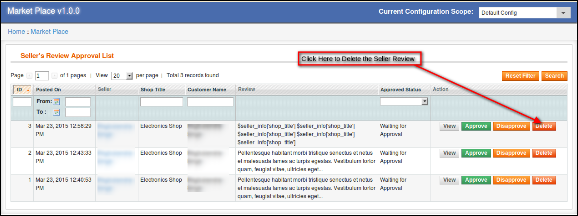
A pop-up will appear asking for the reason for the deletion of the seller review. Fill the reason and then submit the form to complete the action.
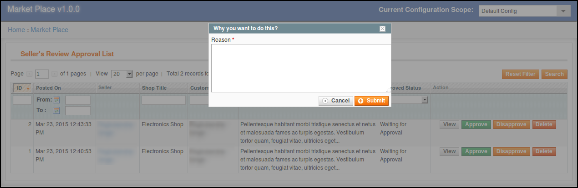
Once a seller review is deleted it is completely removed from everywhere.

Note:- This action cannot be undone. Please use it carefully.

4.8 Product Approval Request

When a seller adds a product then, first of all, it appears here and the store owner is also notified for the same through the mail. Then it is up to the store owner to approve or disapprove the product.
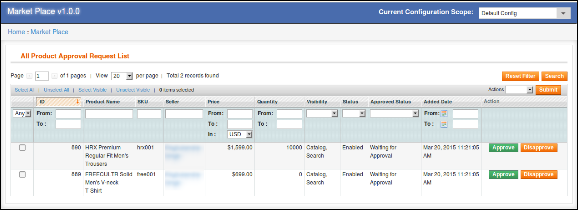
If the setting (i.e. Product Approval Required) is on then only a new product is added appears in this list otherwise it directly appears in the Product List and is automatically approved and enabled.

Disapprove Seller Product: To disapprove of a product, you have to click on the Disapprove button in front of that review on the list.
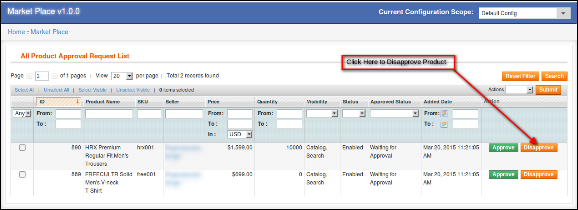
A pop-up will appear asking for the reason for the deletion of the seller review. Fill the reason and then submit the form to complete the action.
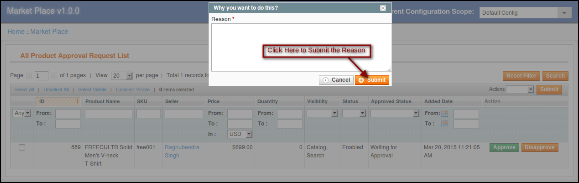
Once a product is disapproved a mail will be sent to the seller notifying the disapproval of the product. The disapproved products also appear on the same list. The Store admin can approve them anytime.

Approve Seller Product: To approve a product, you have to click on the Approve button in front of that review on the list.
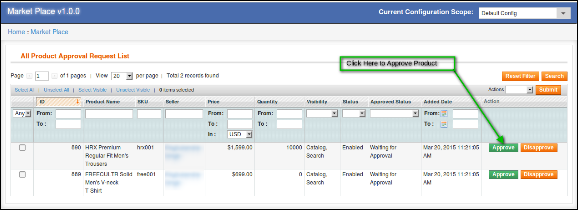
Once a product is approved it transfers from this list to the Sellers Products list.

Note:- This action cannot be undone. Please use it carefully.

4.9 Category Request List

A seller can add the product to categories that are allowed to that seller. In case, the seller needs to add a product to a category that is not allowed, then, the seller can request for the same. All those category requests appear in the Category Request by Seller list of the Magento multivendor marketplace module as shown below. A mail is also sent to the store owner to notify the Request for Category. Then it is up to the store owner to approve or disapprove the request.
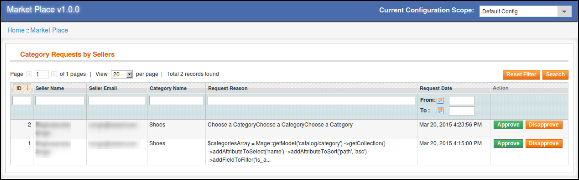
Approve Category Request: To approve a category request, you have to click on the Approve button in front of that category request on the list.
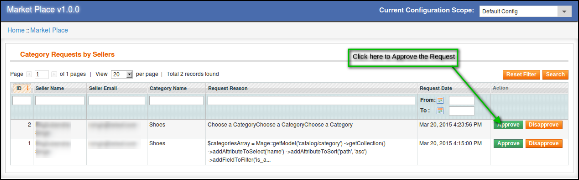
A pop-up will appear in the back-end of the Magento multi-vendor marketplace extension asking for the reason for approving the category request. Fill the reason and then submit the form to complete the action.
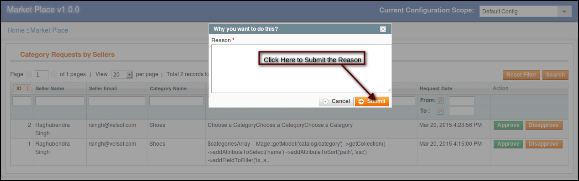
Note: This action cannot be undone. Please use it carefully.

Disapprove Category Request: To disapprove of a category request, you have to click on the Disapprove button in front of that category request on the list.
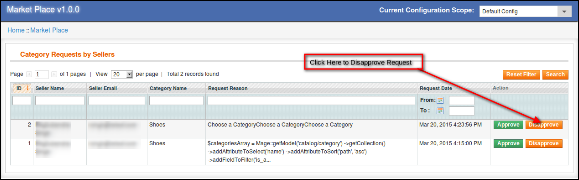
A pop-up will appear asking for the reason for disapproving the category request. Fill the reason and then submit the form to complete the action.
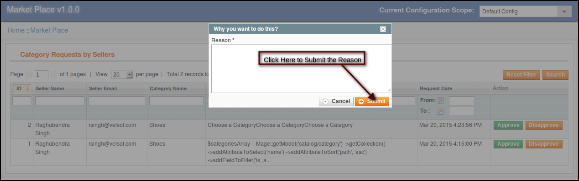
Note:- This action cannot be undone. Please use it carefully.

4.10  Reports

4.10.1 Reports -> Best Selling Products

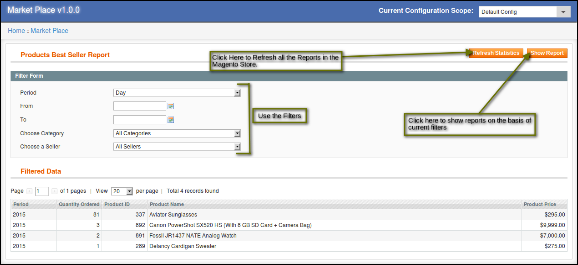
The Report tab of the Magento multi-vendor marketplace helps the store owner to identify the best selling products added by the sellers. The store owner can also use multiple filters for the best selling product reports.

The filters help the store owner identify best selling product :

  • For a date range.
  • For a specific category.
  • For a specific seller.

Note:- Sometimes you may be unable to find any data in this report. In that case, you have to refresh the report statistics and to do that you have to do the following:

Go To Reports -> Refresh Statistics -> Select The Desired Reports to Refresh -> Submit

Or

Click on the Refresh Statistics Button on the top of this page.

4.11 Transactions and Earnings

4.11.1 Transactions and Earnings -> Commissions

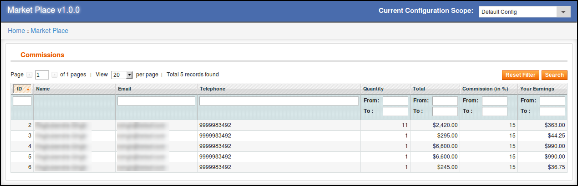
The Commission list of the Magento multi-vendor marketplace extension contains all the commissions earned by the store owner on several orders with commission percentage and total sale of the seller.
4.11.2 Transactions and Earnings -> Category wise commissions

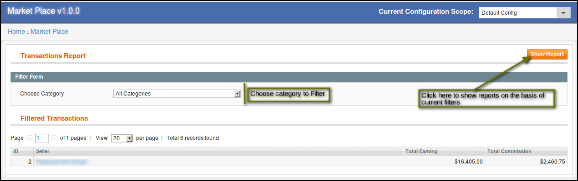
The Transactions and Earnings page of the Magento multivendor marketplace module shows the report for the commissions earned by the store owner. This report shows the total commission earned by the store owner from a seller. The store owner can also use filters to filter the commission reports category wise.

This feature offered by the Magento multi-vendor marketplace extension helps the store owner to identify commissions from different categories and which category has produced how much commission.
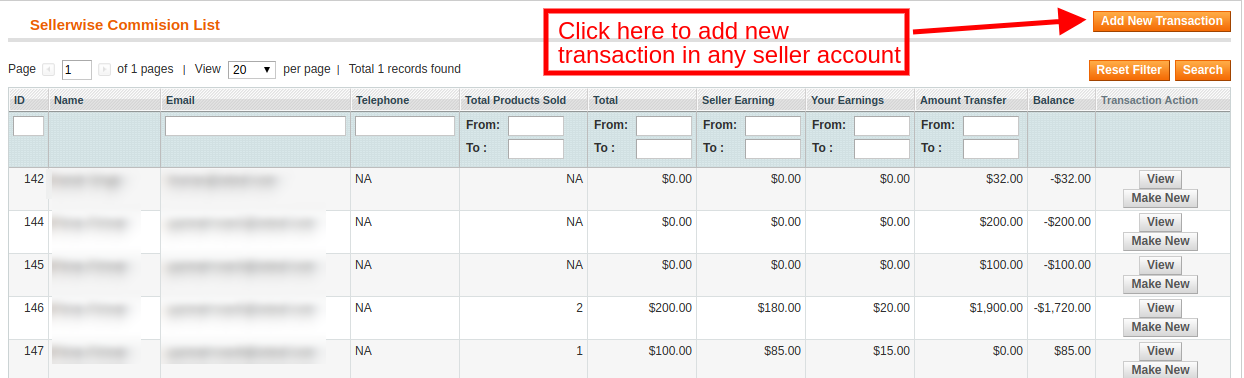
4.11.3 Transactions and Earnings -> Seller wise transaction

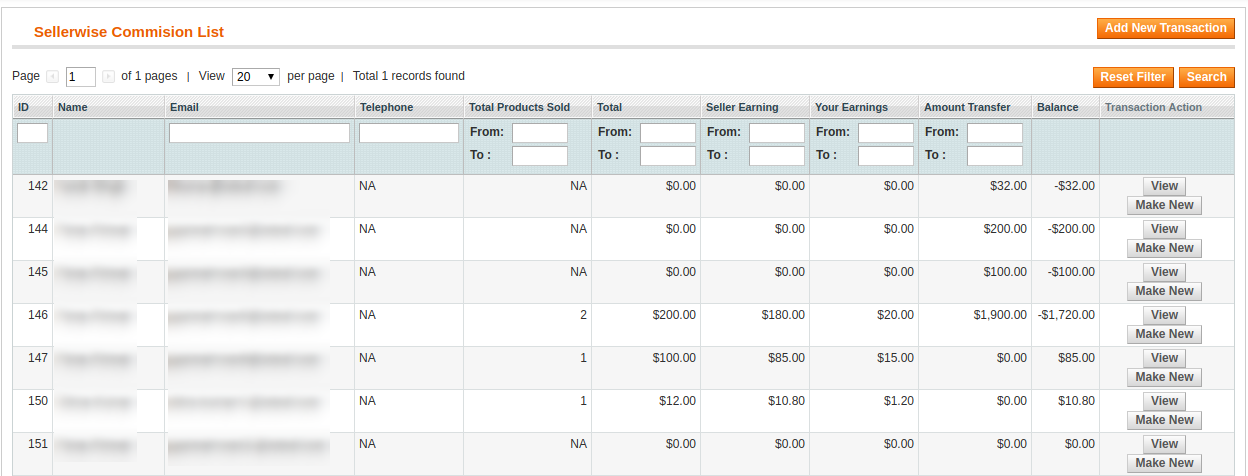
The system does not automatically transfer the amount in the seller’s account. Hence the store owner has to keep records of the balance for all the sellers and manually transfer money to the seller and then enter the details of the transaction to keep a record of the same.

This list contains all the balance variations for all the sellers in the system. The list shows total sales of the seller, seller earning, your commission. This list helps the store owner to identify the earning and categorize them seller wise.
4.11.3.1 How to View Transactions Details?

To view the details of the transactions done for a particular seller, you have to click on the View button in front of that seller.
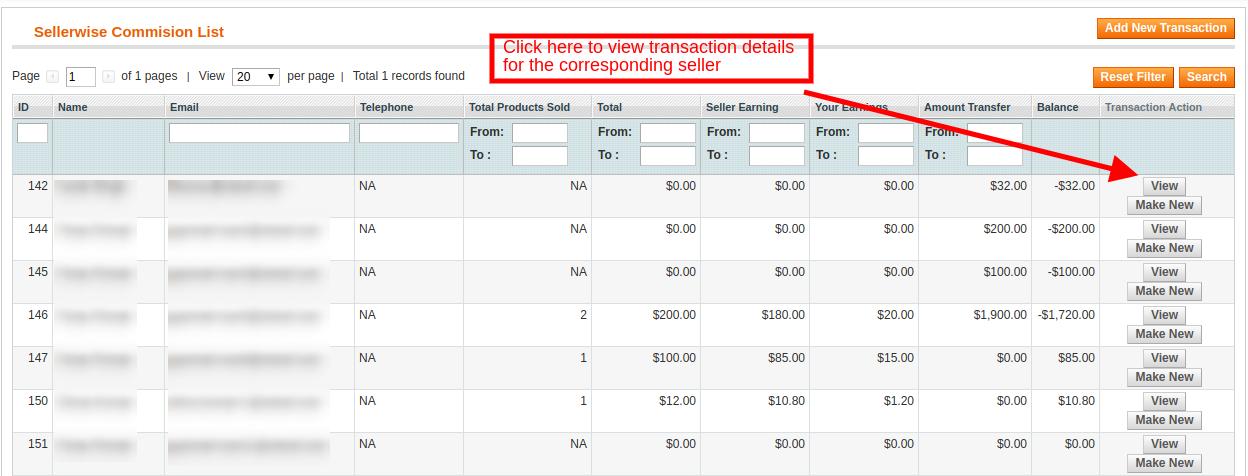
On clicking on the View button in front of any seller a new page will open having a list of all the transactions done for the corresponding seller.
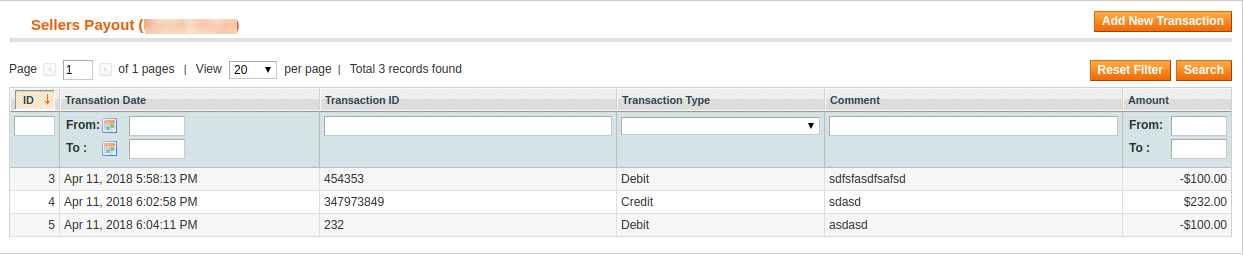
You can also add a new transaction for the current seller by clicking on the Add New Transaction button on the top right portion of the Magento multi-vendor marketplace plugin.

4.11.3.2 How to Add New Transaction in the seller’s payout details?

To add a new transaction detail for any seller, you have to either click on the Add New Transaction button corresponding to respective sellers.
On clicking the button a pop-up appears asking for the details of the transaction. Fill the form and submit the form to complete the action.
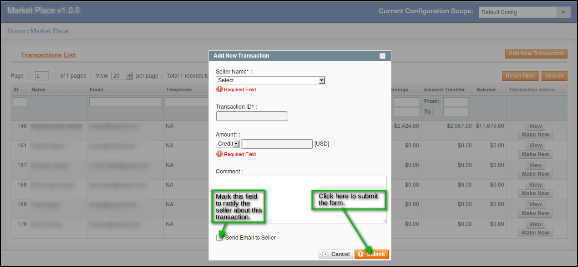
The various fields of the pop-up are discussed:

Seller Name: Select the name of the seller from the drop-down list.
Transaction ID: Enter the transaction ID here.
Amount: Select whether the amount was debited or credited and then enter the amount.
Comment: Enter a comment regarding the transaction.

Additionally, the admin can even add a new transaction in the seller’s account by clicking on the Make New button corresponding to each seller account.
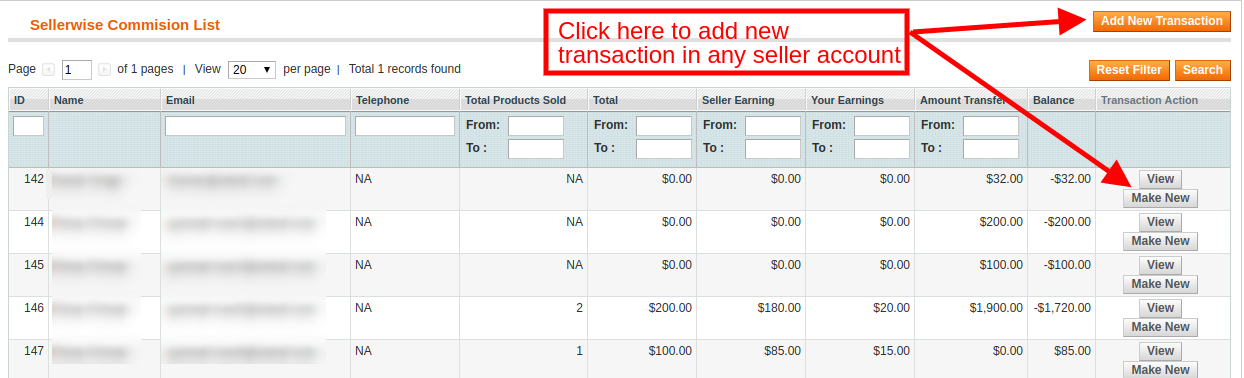
Note:- This action cannot be undone. Please use it carefully.

4.11.4 Transactions and Earnings -> Seller Payout

This page contains a list of all the transactions done to date to all the sellers available in the system.
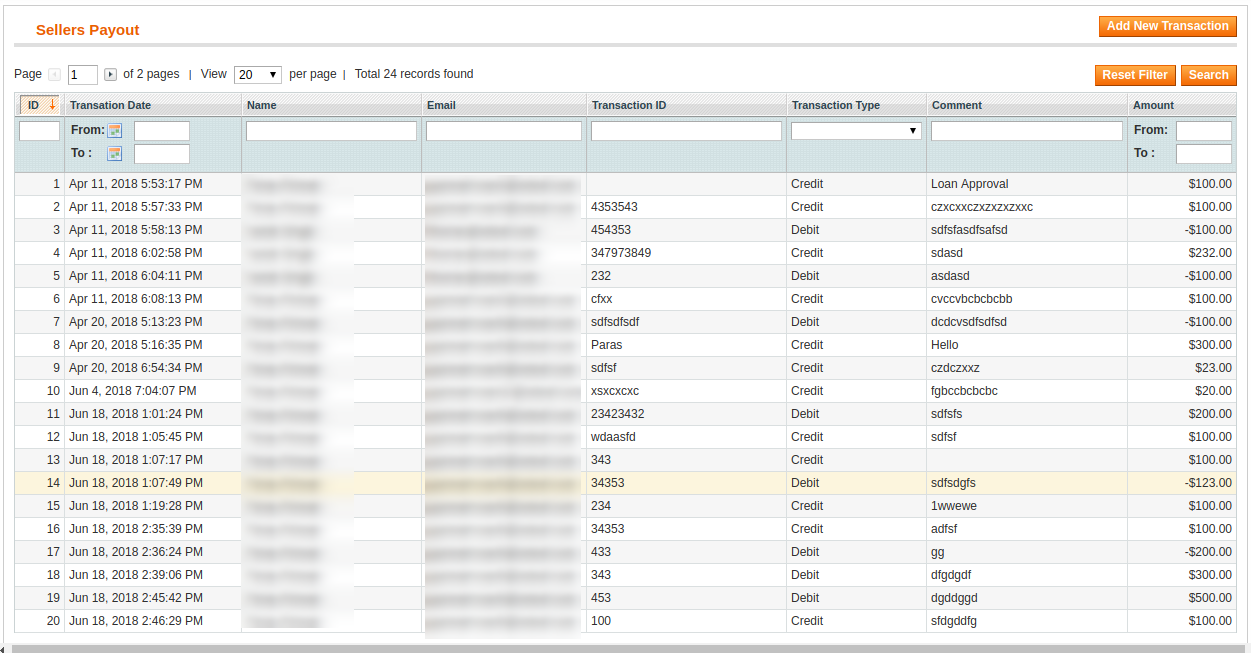
You can also add a new transaction for any seller by clicking in Add New Transaction button on the top right of the above page.

4.11.5 Transactions and Earnings -> Seller Payout Request

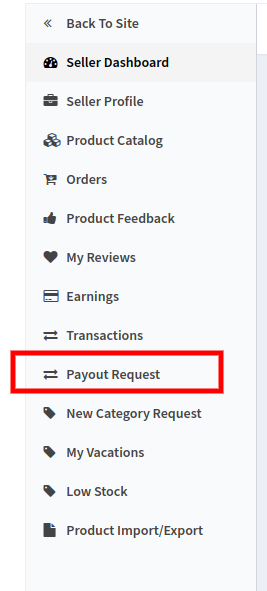
The seller can send a payout request to the store admin from their dashboard. The seller’s request is viewed by the admin from this tab of the Magento Marketplace extension. The Dashboard of the seller includes an option of Payout Request.
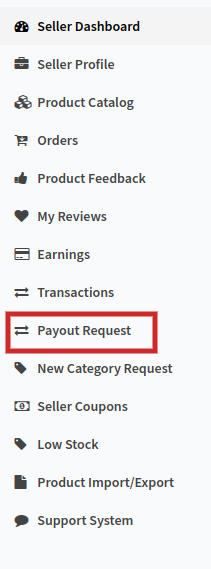
On clicking this link, the seller will be redirected on the section of the dashboard as shown in the image below:
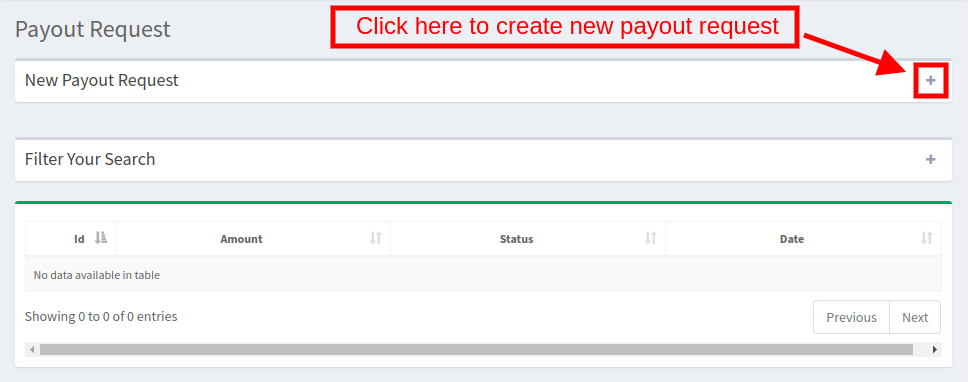
4.11.5.1 How can the sellers add a new payout request from their dashboard?

Before the seller can request for the payout, he needs to configure the payout the Profile menu of the Dashboard. The various fields required to be filled in this section are discussed below:
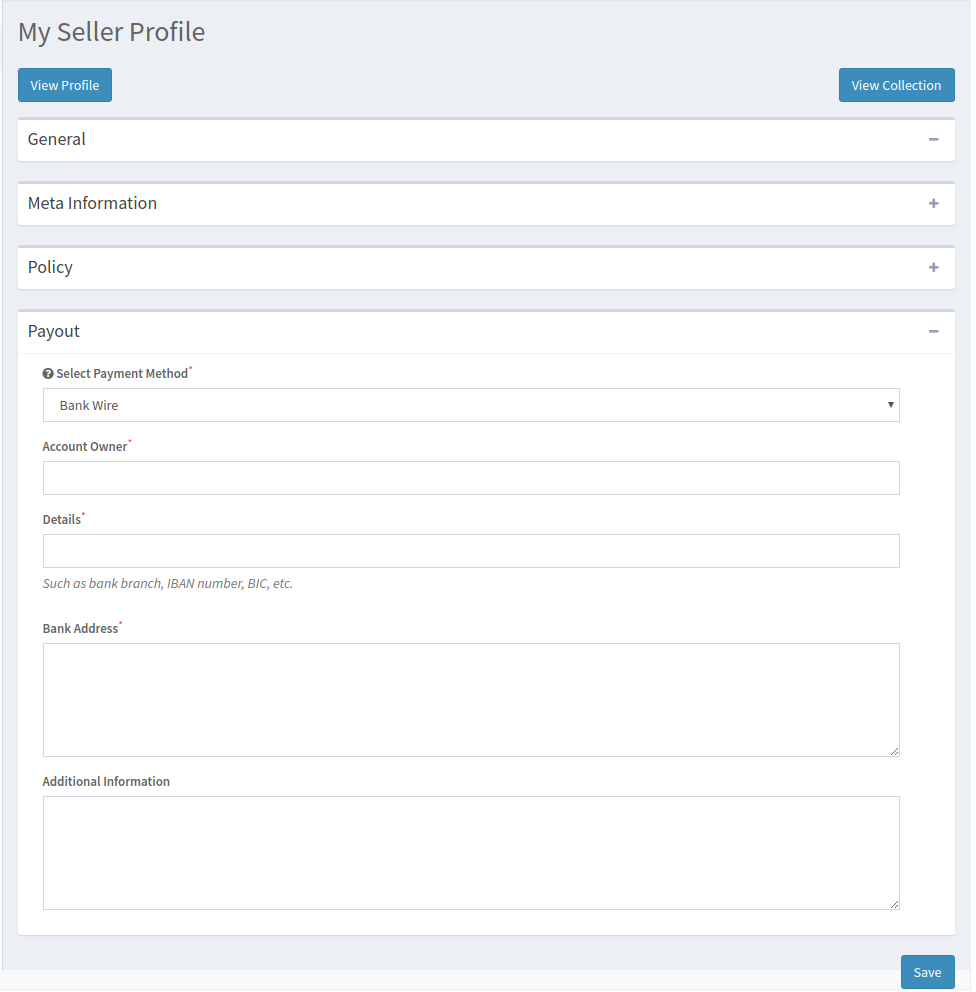
Select Payout Method: The various payout methods in the drop-down menu. Select the method that you want to use for the payout. There are three options available by default:

  • Bank Wire
  • Payment By Cheque
  • PayPal

1. Bank Wire:
On selecting, Bank Wire options, you’ll be required to provide the following information.

Account Owner: Enter the name of the owner of the account in which the amount is to be transferred.
Details: This section includes the bank details such as bank branch, IBAN, BIC, etc.
Bank Address: Enter the address of the bank.
Additional Information: Provide any information that you would like to share with the store admin.
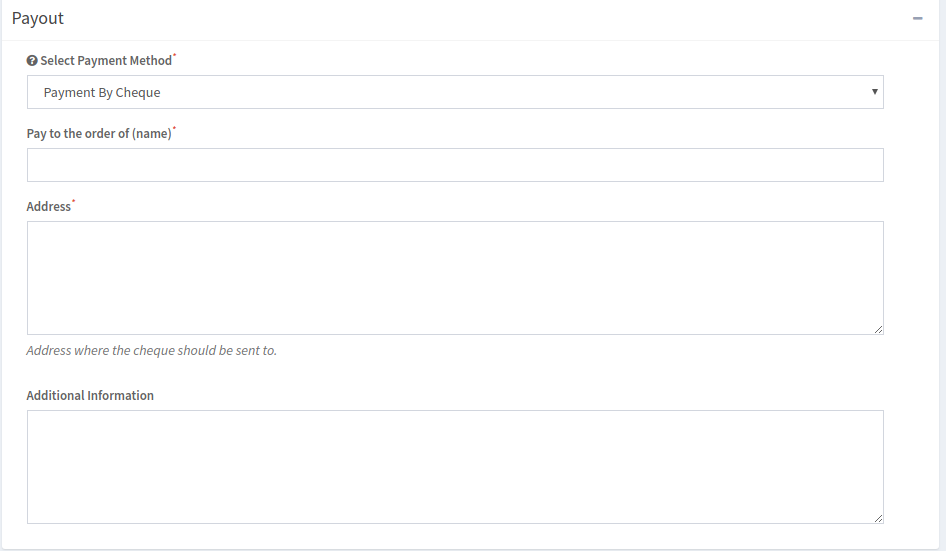
2. Payment By Cheque

Pay to the order of entering the name to which the cheque is to be issued.
Address: Provide the address for sending the cheque in this section.
Additional Information: Provide any information that you would like to share with the store admin.
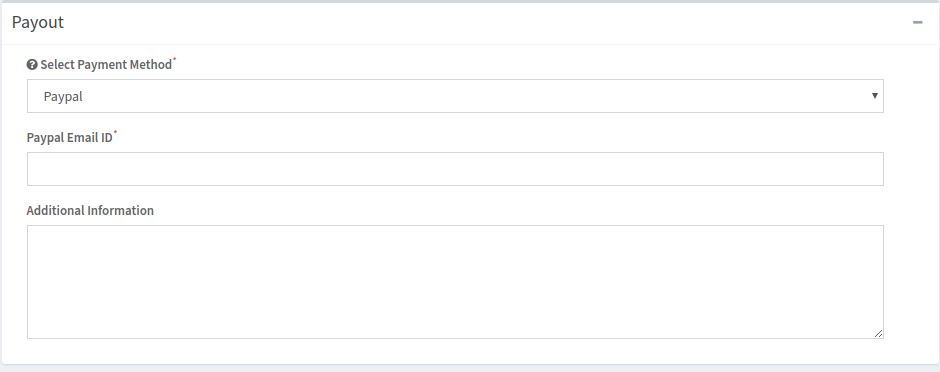
3. PayPal
In case you select, PayPal, you will be required to enter your PayPal Email ID. The additional information section allows you to provide any information that you would like to share with the store admin.
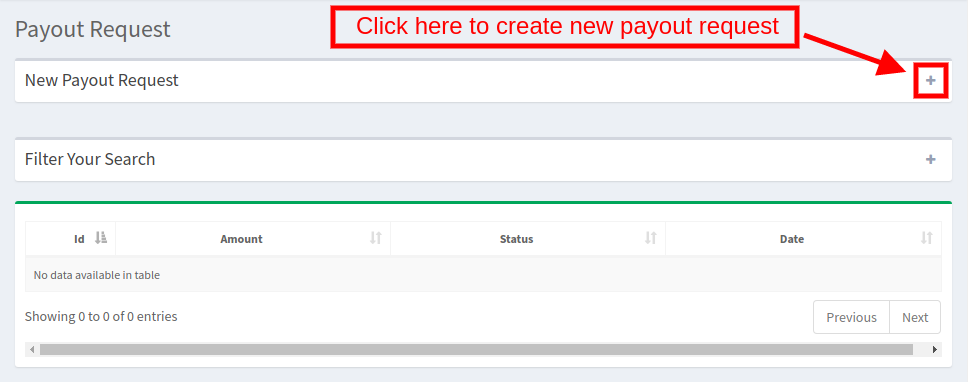
Once the payout method is configured in the seller’s profile, the vendor becomes eligible to send the payout requests.

To add new payout request click on the ‘+’ in the New Payout Request section as shown in the image below:
Fill up a small form to send the request.
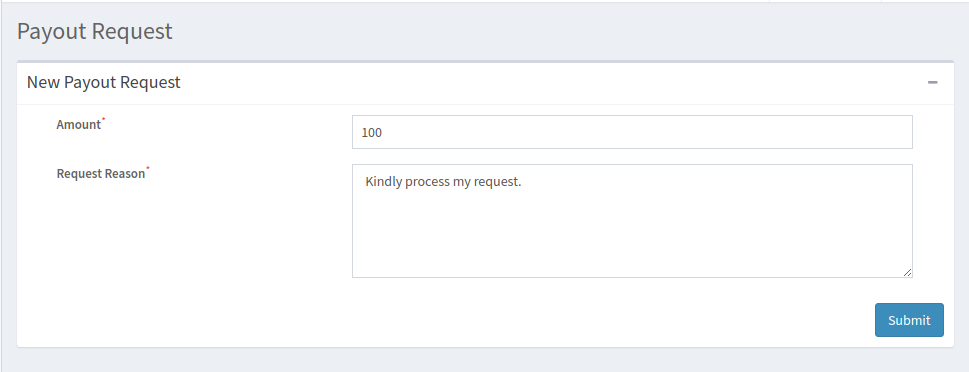
Amount: Enter the amount of the payout request.
Request Reason: Enter the reason for the payout request.

The payout request is, then, send to the admin for approval.

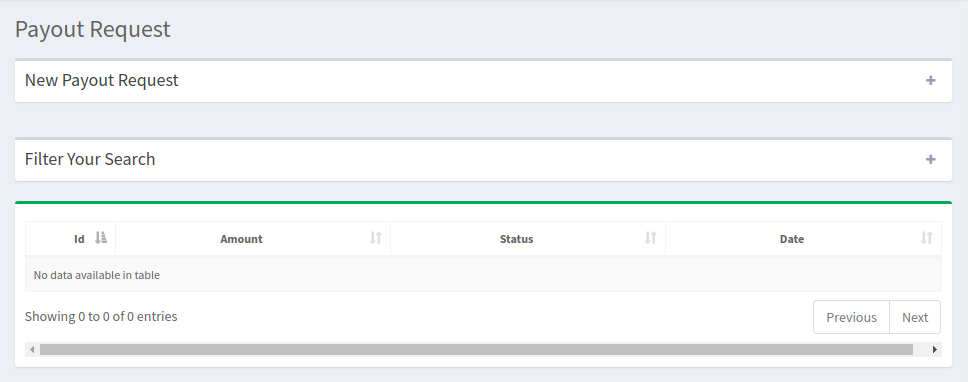
The payout requests that are approved or disapproved or waiting for approval can be viewed in the payout request section as shown below:
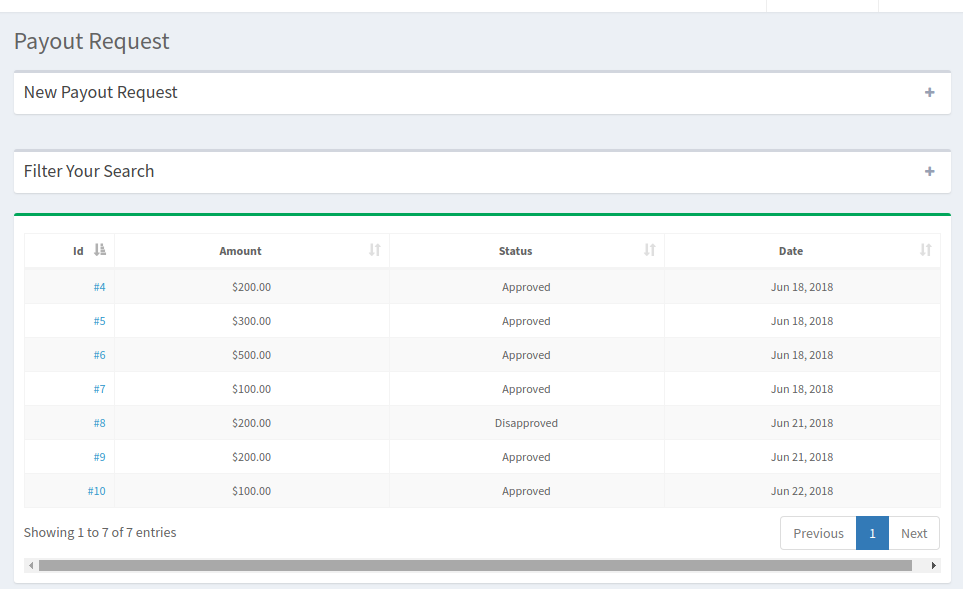
The store admin can view all the payout requests of the sellers of the marketplace in the back-end of the Magento Multi-vendor marketplace extension.
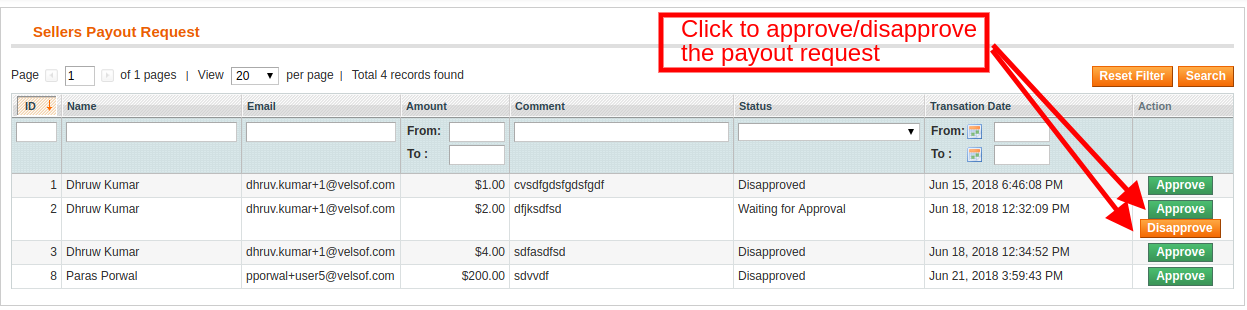
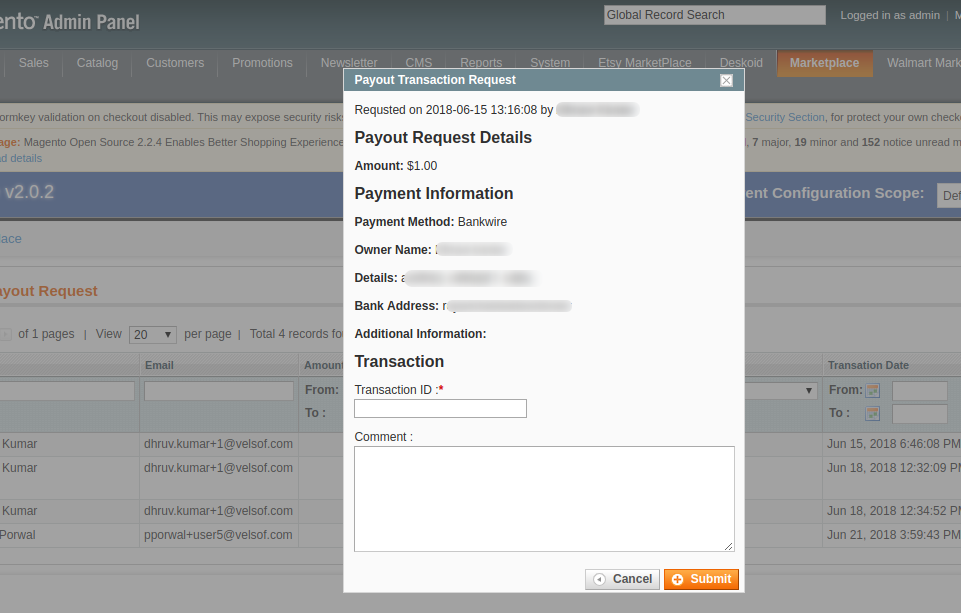
On clicking on the Approve button, a popup will be shown. Enter the transaction ID and comment to approve the request of the seller.
4.11.6 Transactions and Earnings -> PayPal Payout Settings

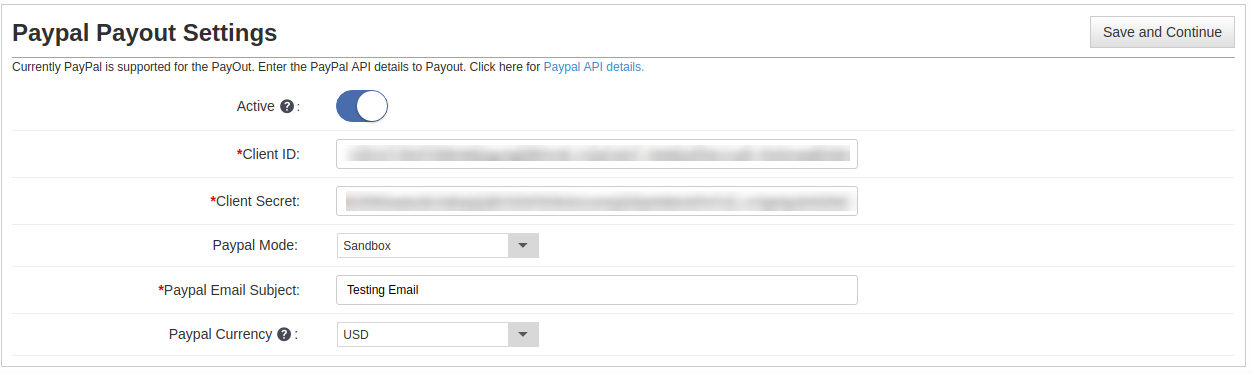
The PayPal Payout Settings of the Magento Multi seller Marketplace extension allows the store admin to enable the PayPal methods for the payout. Enter the required details as discussed below:

Active: Toggle the button to activate the PayPal payment method.
Client ID: Enter the Client ID of your PayPal account.
Client Secret: Enter the Client Secret of the PayPal account.
PayPal Mode: Select the PayPal mode from the drop-down menu.
PayPal Email ID: Enter the email ID used in your account.
PayPal currency: Select the default currency for the PayPal transaction.
4.12  Email Templates

The Email Templates tab of the Magento multi-vendor marketplace module contains a list of all the email templates that are used in the system with all the details of the email templates.
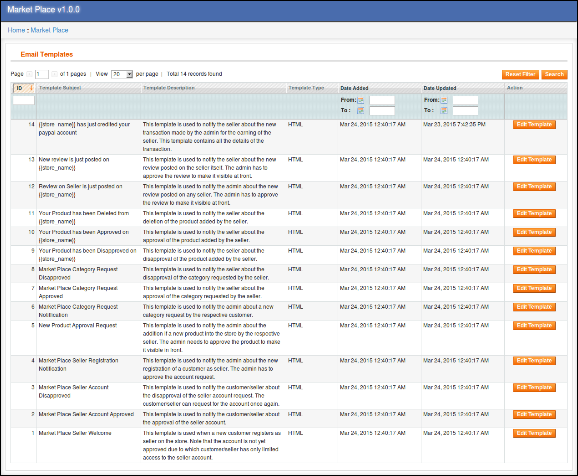
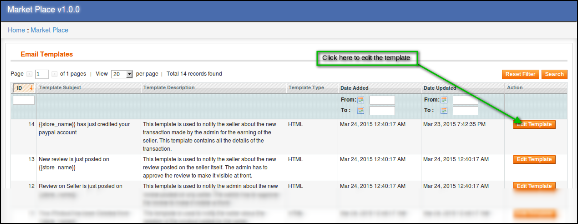
Edit Email Template: To edit an email template click on the Edit Template button in front of any email template.
On clicking on the Edit Template button a new page opens having a form for the email template. You can change the email template as desired from the admin interface of the Magento multivendor marketplace.
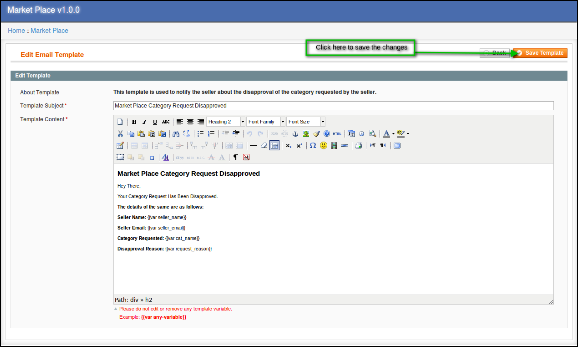
To save the changes made in the email template click on the Save Template button on the top right of the above page.

Note:- While editing the email template please keep in mind that you don’t edit any text inside the curly brackets (i.e. {{var any_var}}).

4.13. Vacation Mode

The sellers get an option to disable their shop from the marketplace for a particular period. The request of the sellers to go on vacation mode can be viewed in this section of the Magento Marketplace module.

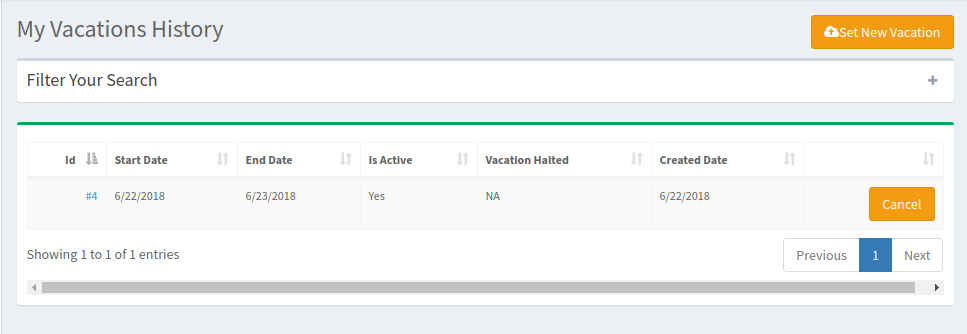
To set the vacation mode, the sellers can go to the Vacation mode tab of their dashboard.
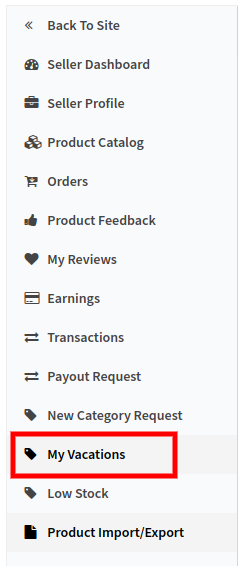
The tab shows the entire vacation history of the seller as shown in the image below:
4.13.1 How to Set the Vacation Mode?

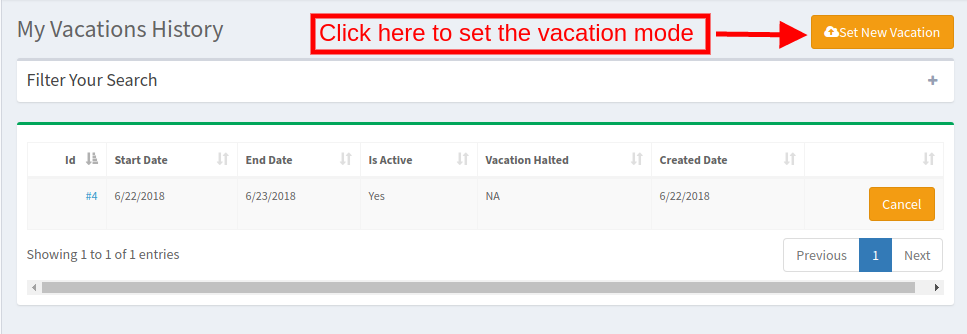
To set the vacation mode, click on the ‘Set New Vacation’ button.
On clicking the button, a popup will appear as shown in the image:
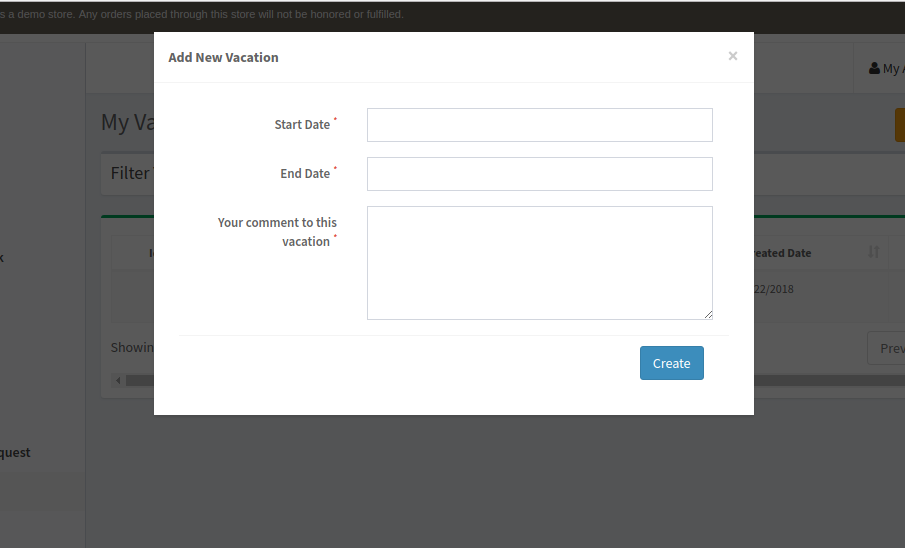
Start and End Date: Enter the start and end date of the vacation.
Your comment to this Vacation: Enter a comment for the vacation mode.
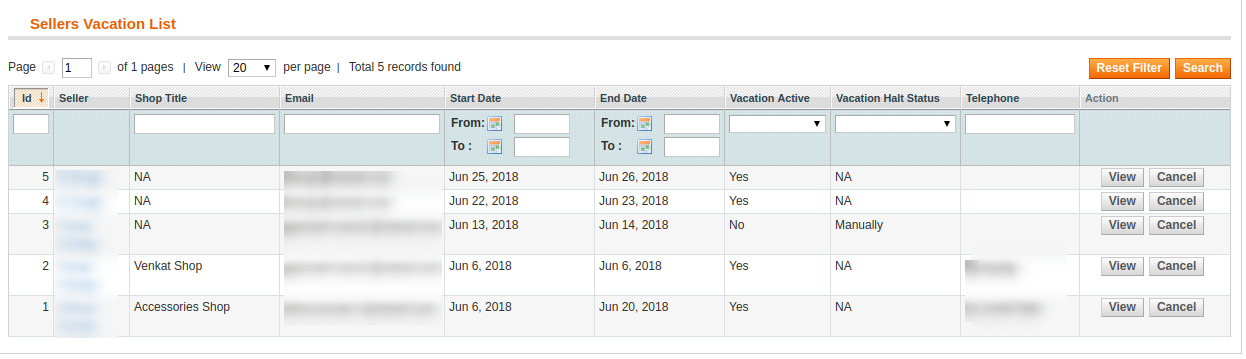
The admin can view the list of the seller who is on vacation in the Vacation tab of the Magento Marketplace plugin.

To see the details of the vacation, click on the View button.
The admin can cancel the request by clicking on the Cancel button.
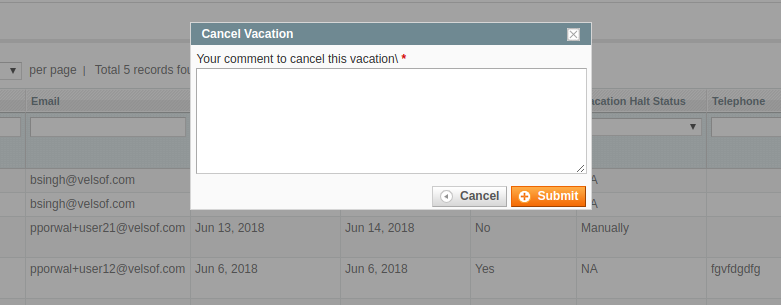
A popup will be displayed. Enter the reason for canceling the vacation mode and submit.
An email notification is sent to the seller informing them about the cancellation of the vacation.

4.14. Bulk Import/Export

The admin can offer this feature of bulk import and export to the sellers by enabling the same from the back-end.
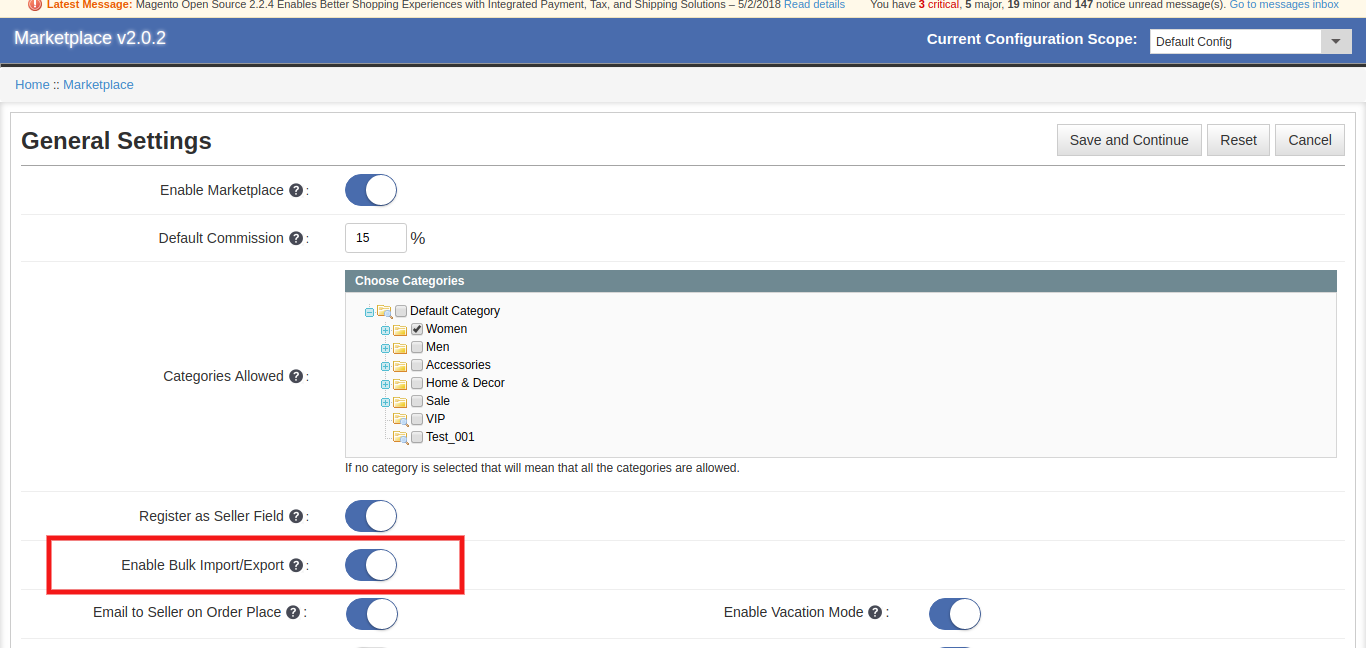
If enabled the seller can import or export of the products in bulk from their dashboard.
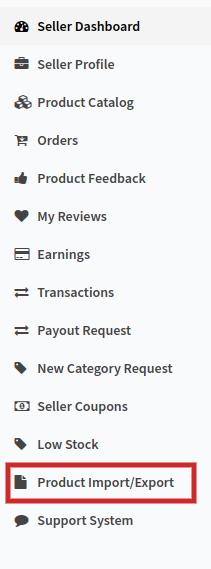
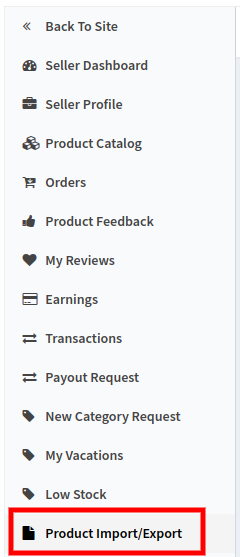
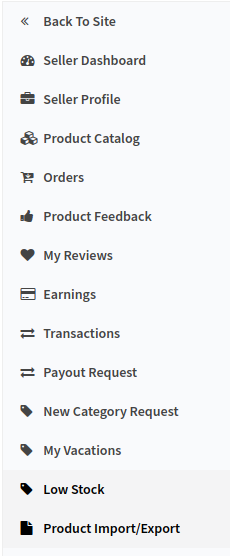
The vendors can import/export the products in bulk from the Product Import/Export tab as shown below:
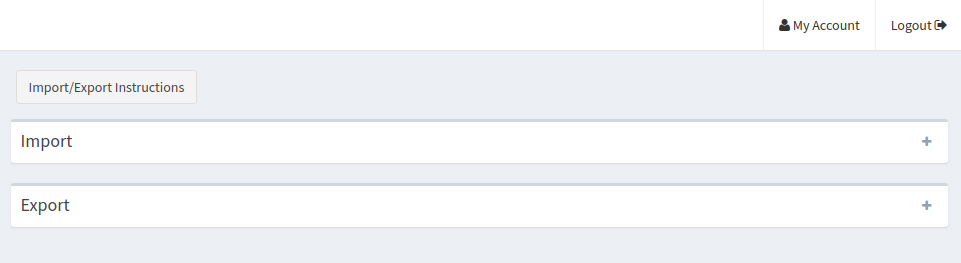
4.14.1 How to Import the products in bulk?
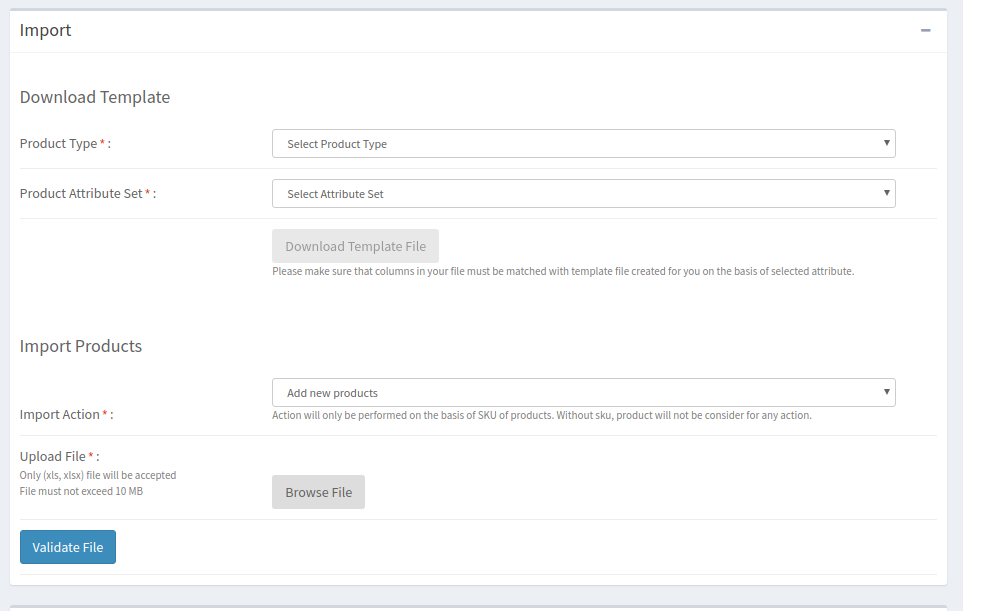
Product Type: Select the type of product that you are uploading. The Magento Multi seller Marketplace Plugin supports all type of products, that is, simple, configurable, virtual and others.

Product Attribute Set: Select the attribute set of the products from the drop-down list.

Download Template File: You can download the template file in an excel sheet for the selected attribute by clicking on this button.

Please make sure that columns in your file must be matched with the template file created for you based on the selected attribute.

Import Action: Select the import action from the drop-down list. Action will only be performed based on the SKU of products. Without SKU, the product will not be considered for any action.

Upload File: Upload the file with the product details here.

Click on the Validate File to complete the import.

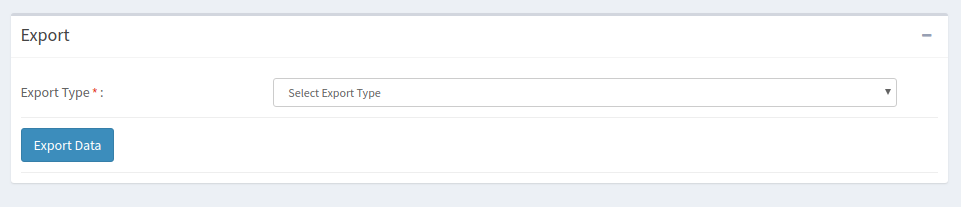
4.14.2 How to Export the Products in Bulk?

The seller can export the product details listed in the marketplace from this section. Select the Export Type from the drop-down menu and click on Export.

The details will be exported in an excel sheet.
4.15. Cron Instruction

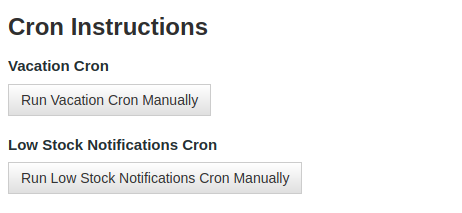
This tab offers two cron options. Execute vacation cron to implement the changes made in the Vacation tab of Magento Multi-vendor Marketplace module in the front-end of the marketplace.

Run Low Stock Notification Cron to send the low stock notifications email to the sellers.
5.0 Register As Seller Field – Register Page

If a new customer is registering in the Magento marketplace store, then, there is an additional field on the Register Page. If the customer wants to Register as Seller than the customer has to mark this field.
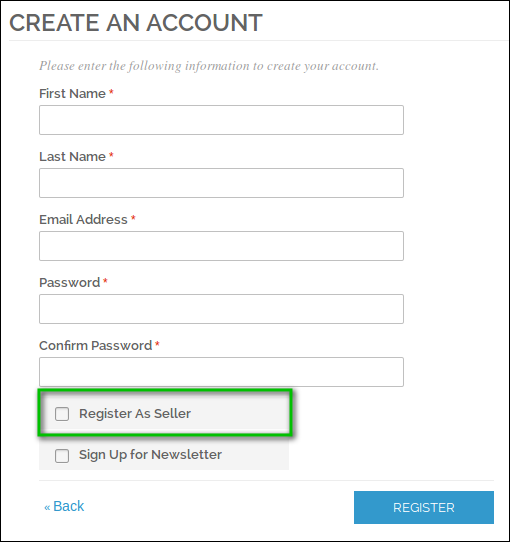
Once the account is created, the sellers get access to the dashboard.

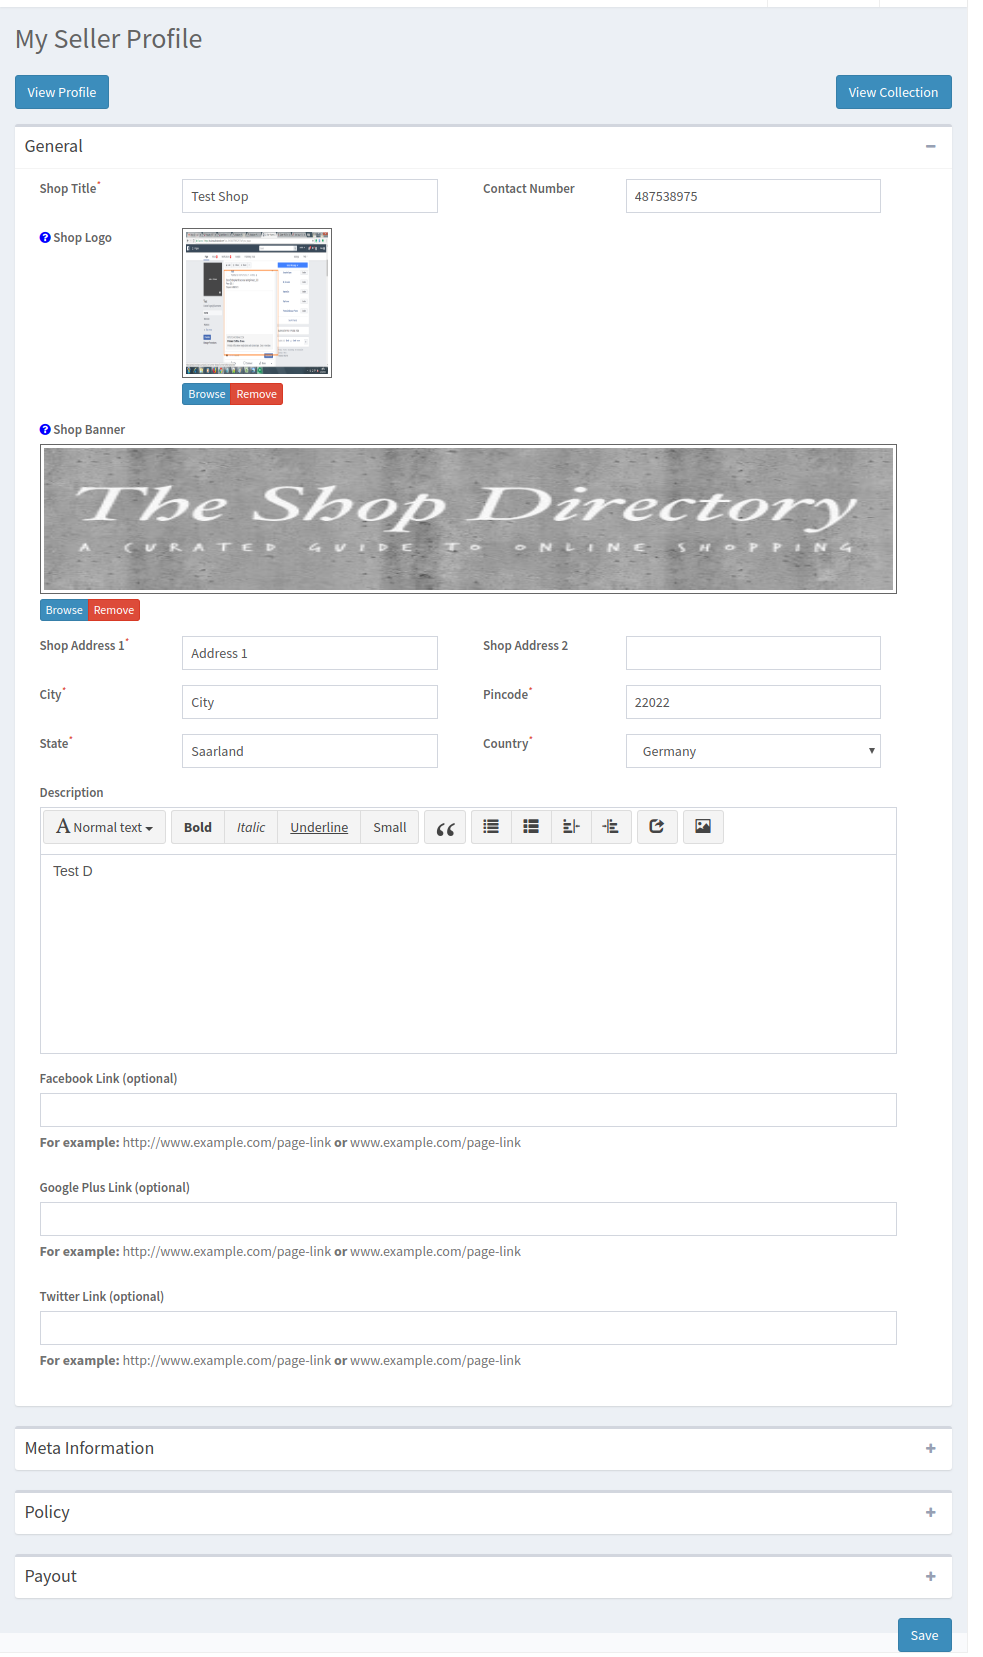
The dashboard of the seller offers several options to the sellers as shown in the image below:
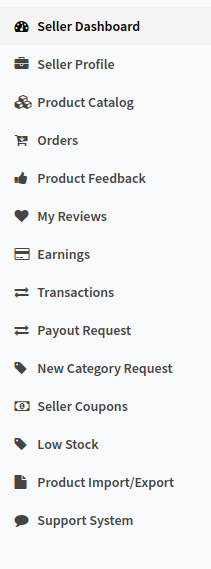
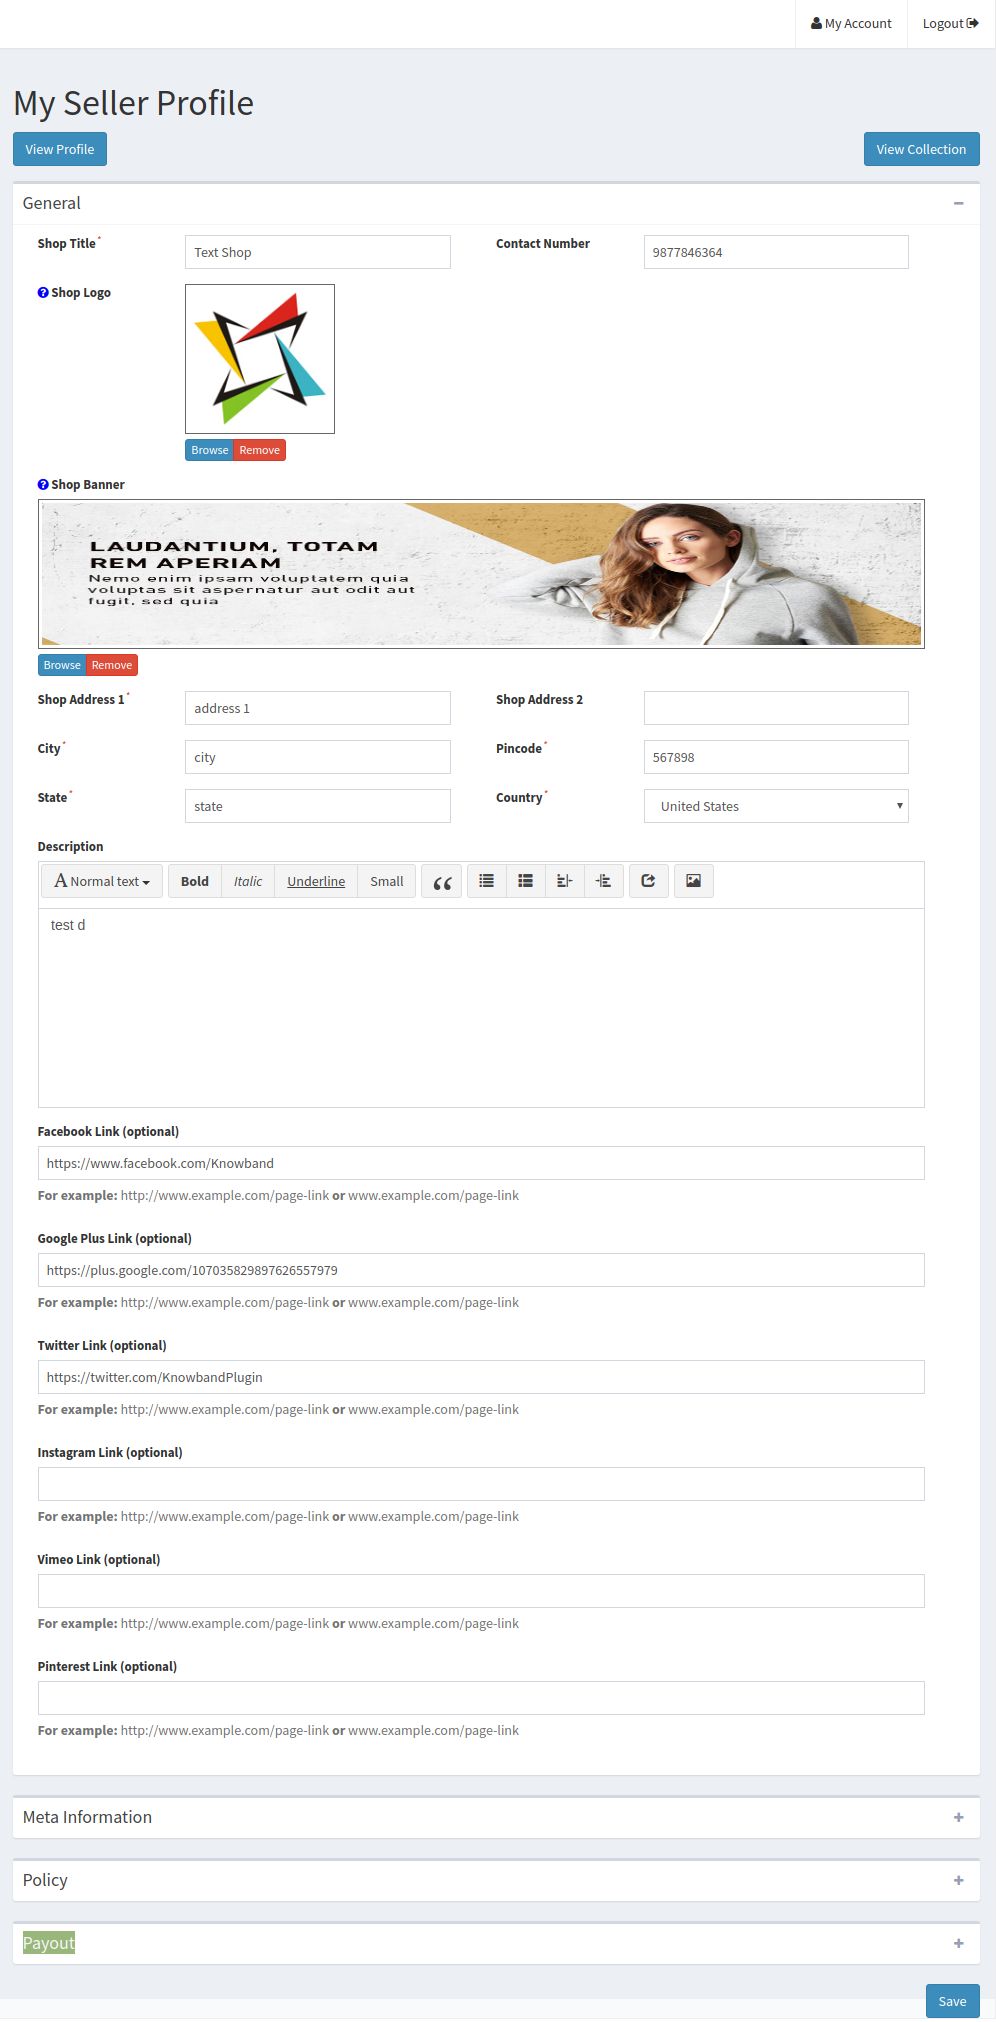
They can configure their profile by clicking on the Seller Profile tab.
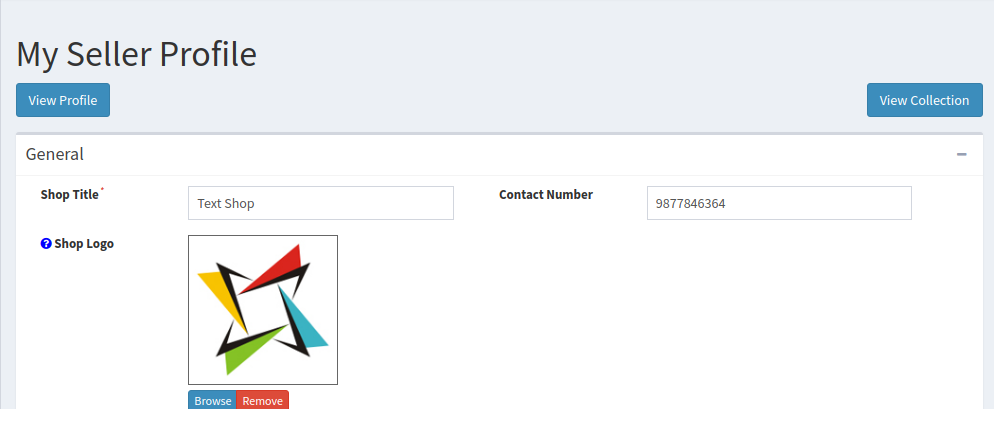
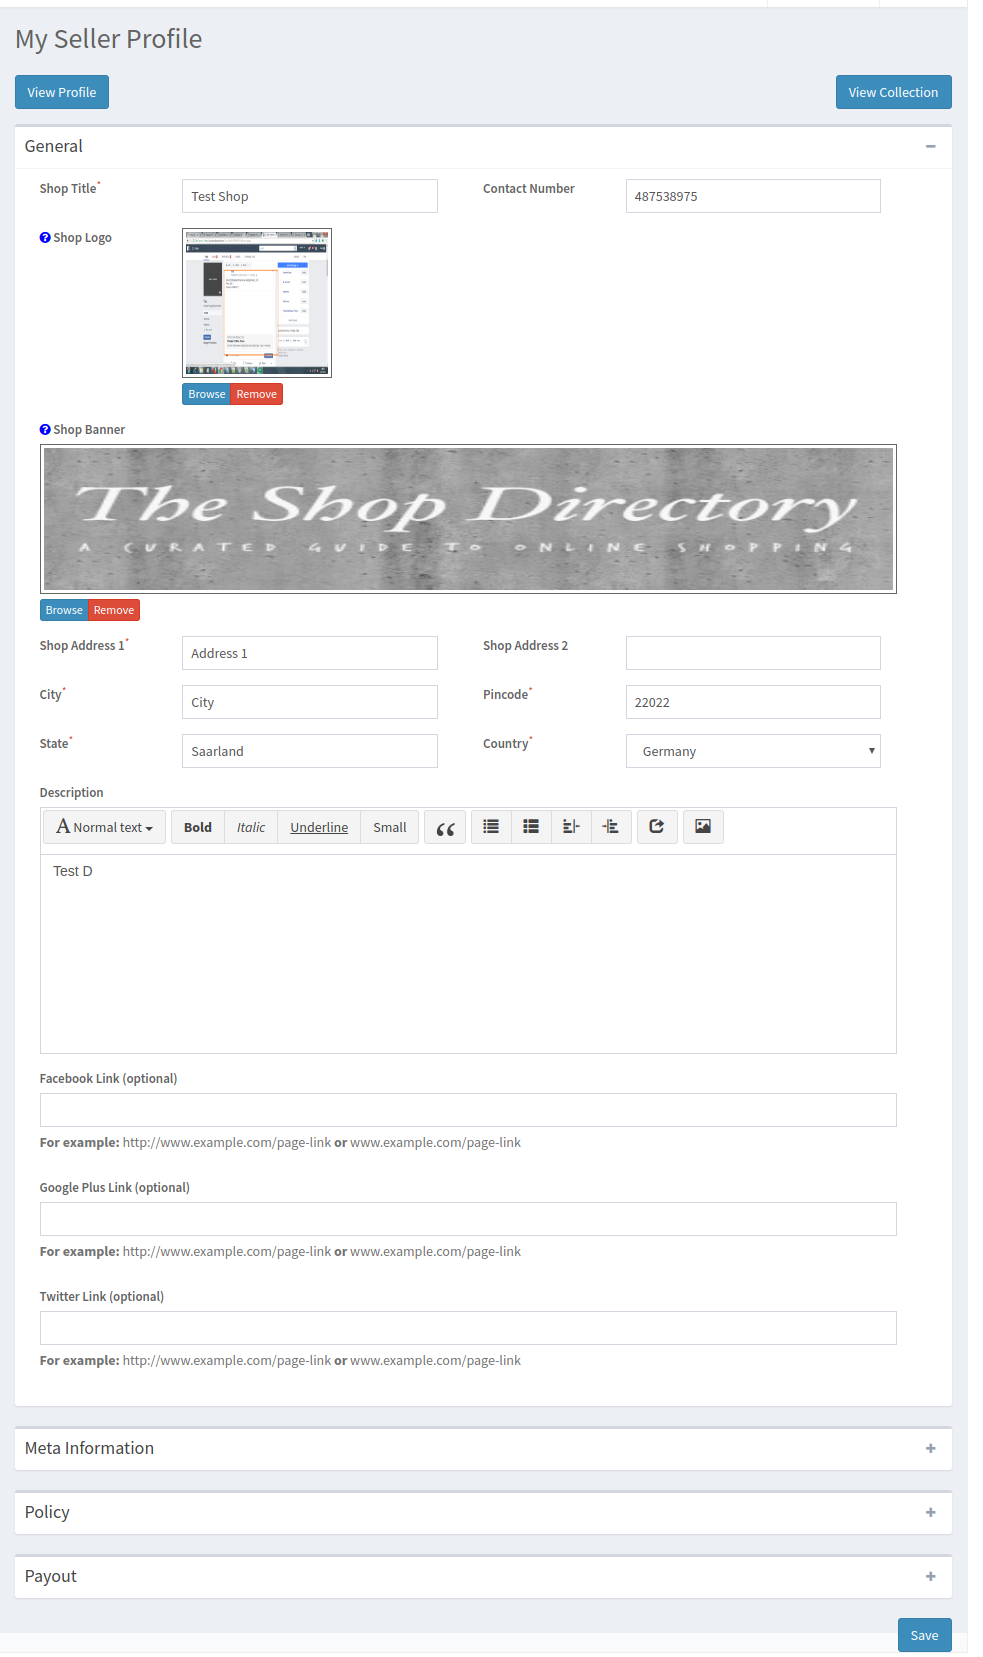
The sellers can view their profile by clicking on the ‘View Profile’ button. Additionally, they can even see their collection by clicking on the ‘View Collection’ Button.
5.1 How sellers can generate a coupon?
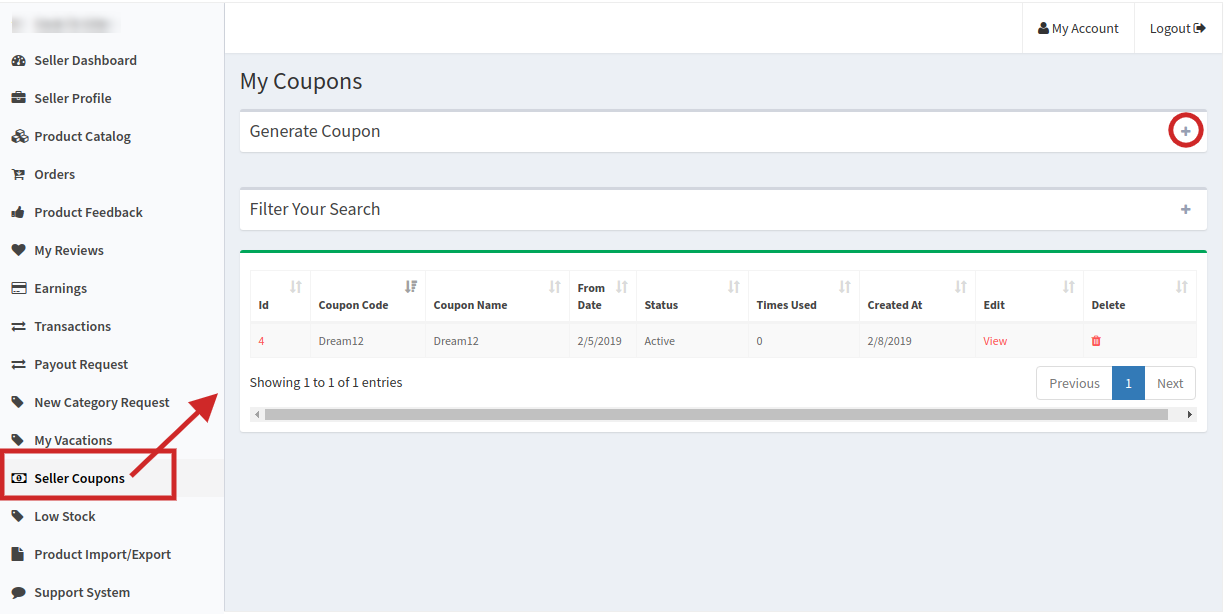
Steps to follow to generate a coupon:

  1. Click on the seller coupon tab available in the seller dashboard.
  2. Click on the “+” icon and fill the following fields in the form and following form will appear in front of you:
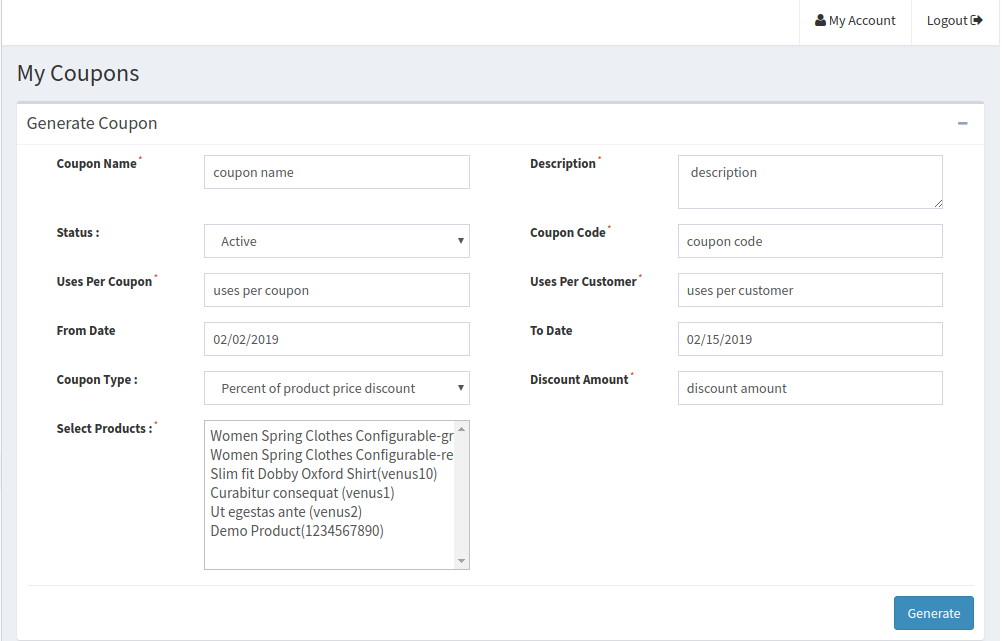
Coupon Name: Enter the name of Coupon here.

Description: Fill the Coupon description here.

Status: Select the status of coupon here.

Coupon Code: Set the coupon code here. Customers can use this coupon to avail of the discount.

Uses per Coupon: Set the number of times a coupon can be used.

Uses per Customer: Maximum number of times customers can use the coupon.

From Date to To Date: Set the time for which the coupon will be valid.

Coupon Type: Select the type of coupon here. Coupons can be fixed type and percentage type.

Discount Amount: Enter the amount value of the discount here.

Select Products: Select the products on which the seller wants to offer the discount coupon.

Click on the “Generate” button to generate a coupon.

5.2 Tax Class
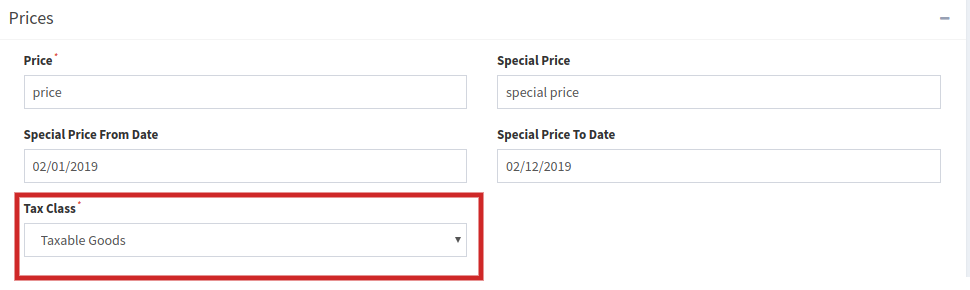
A tax class is a class assigned to a product by the sellers. Tax class helps in distinguishing between taxable goods and non-taxable goods. In the product Catalog, while filling the product details for a new product, the seller can select the tax class, in price tab of the Product Catalog, that he wants to assign to the items/services.

5.3 Customer Support System
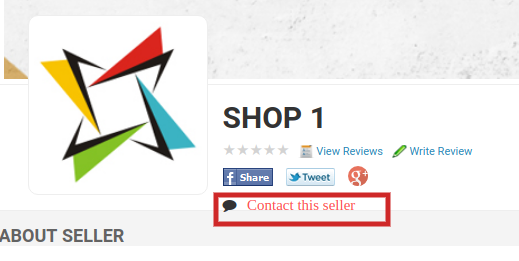
For the seller ticket system, the Marketplace admin needs to enable the seller ticket system feature in the General setting tab in the backend.
Once the feature is enabled at the backend, the customer can directly contact the sellers. Whenever a customer will contact a seller, a ticket will be generated, the seller can view the ticket in the customer support system of the seller dashboard.

5.3.1 How customer can contact a seller?

  •  Click on the seller tab at the frontend of the store.
  • A seller list will appear before you.
  • Click on the seller will take the customer to the seller profile page.
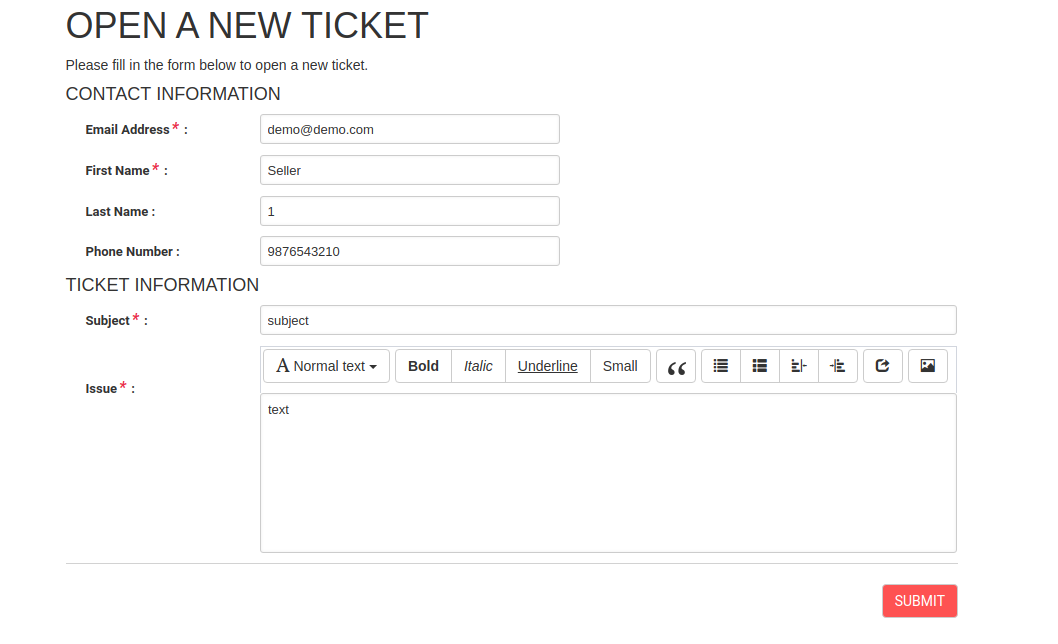
  • The customer needs to click on the contact the seller link and a form will appear before them.
  • Once the customer will submit the form, the respective seller will receive a ticket.

Watch how Magento Multi seller Marketplace module works?

For further information, refer to the following links:

Liked This? You’ll Like These Too
Magento Multi Vendor Marktplatz – Benutzerhandbuch

1.0 Einführung

Magento Multi-Vendor-Marktplatz-Modul by Knowband ist eine der einfachsten Möglichkeiten, Ihre E-Commerce-Site in einen blühenden Multi-Vendor-Marktplatz zu verwandeln. Ein Multi-Vendor-Marktplatz ist ein Online-Bereich, in dem verschiedene Verkäufer und Anbieter ihre Produkte auflisten, ihre Bestände verwalten und verkaufen. Das Magento Multi-Vendor Marketplace Plugin verwandelt Ihren Onlineshop in einen der voll funktionsfähigen Online-Marktplätze.

1.1-Funktionen, die dem Shop-Administrator von der Magento Multi-Vendor-Marktplatz-Erweiterung angeboten werden:

  • Der Shop-Administrator kann die Produktkategorien vom Back-End der Magento-Marktplatz-Erweiterung erstellen und verwalten.
  • Der Admin kann das Profil des Verkäufers mit Hilfe des Magento Marketplace Plugins genehmigen / ablehnen.
  • Das Magento Marketplace-Modul erleichtert die Festlegung und Verwaltung der den Verkäufern in Rechnung gestellten Provisionen.
  • Der Administrator kann die Produkte aus dem Backend des Magento Marktplatz-Moduls mit mehreren Anbietern hinzufügen / entfernen.
  • Der Besitzer des Magento-Geschäfts kann die Transaktion und die Einnahmen beim Klick auf die Schaltfläche verfolgen.
  • Der Magento Multi-Vendor-Marktplatz ist mit der neuesten Magento-Version kompatibel und unterstützt alle Themen.
  • Der Administrator kann Produkt- und Verkäuferbewertungen genehmigen / ablehnen.

1.2 Features, die dem Verkäufer von Magento Multi vendor Marktplatz Erweiterung angeboten werden:

  • Der Magento Multi-Vendor-Marktplatz ermöglicht es den Verkäufern / Verkäufern, sich im Online-Marktplatz zu registrieren.
  • Die Verkäufer können die Kategorien und Produkte leicht mit dem Marktplatz abbilden.
  • Darüber hinaus können die Verkäufer die Aufnahme einer neuen Kategorie beantragen. Der Marketplace-Administrator kann die Kategorie mit Hilfe des Magento Multi-Vendor Marketplace-Plugins genehmigen / ablehnen.
  • Das Dashboard des Verkäufers erleichtert es ihnen, ihre Produkte, ihr Profil und ihren Verkauf zu verfolgen und zu verwalten.
  • Magento Multi-Vendor-Marktplatz ermöglicht es den Verkäufern, Verkaufsbanner, Shop-Logo und benutzerdefinierten HTML-Inhalt hinzuzufügen. Diese Banner werden auf der Verkäuferseite mit einer separaten Produktsammlung angezeigt.

1.3 Kundenvorteile des Magento Multivendor Marktplatzes:

  • Die Magento-Multi-Vendor-Marktplatz-Erweiterung ermöglicht es mehreren Verkäufern / Verkäufern, ihr Produkt auf derselben Plattform zu verkaufen. So können die Kunden aus einem breiten Sortiment das perfekte Produkt auswählen.
  • Magento Marketplace Extension ermöglicht es den Kunden, die Produkte zu wettbewerbsfähigen Preisen zu kaufen.
  • Die Kunden können eine Produktbewertung senden. Diese Bewertungen können vom Backend des Magento Marketplace Plugins genehmigt / abgelehnt werden.
  • Die Online-Käufer können die Verkäufer überprüfen. Die Verkäuferbewertungen können über das Backend des Magento Multi Vendor Marketplace Moduls verwaltet werden.
  • Das Magento Multi Seller Marketplace Modul bietet sogar eine Option, mit deren Hilfe die Käufer zum Verkäufer werden können.

2.0 Schritte zur Installation von Magento Multi Vendor Marketplace

Befolgen Sie die folgenden Schritte für die Installation Magento MarketPlace Erweiterung:

  • Laden Sie das Erweiterungspaket Magento Multi vendor Marketplace herunter.
  • Entpacken Sie das Paket in Ihrem Stammordner von Magento Setup per FTP-Manager (wie Filezilla oder WinSCP – hier herunterladen: https://filezilla-project.org/).
  • Im Admin-Panel sehen Sie neben dem System-Menü einen neuen Menü-Marktplatz. Falls Sie den Link unter System nicht sehen können, löschen Sie zuerst Magento Cache und überprüfen Sie dann erneut.
  • Mit diesem Magento

3.0 Admin Panel

Im Admin-Panel der Magento Multi-Seller-Marktplatz-Erweiterung wird neben dem Systemmenü ein separates Menü (MarketPlace genannt) hinzugefügt und der Seite zum Erstellen / Bearbeiten eines Kunden ein neues Tab hinzugefügt.

3.1 Registrierung als Verkäufer Option (Neue Kundenseite hinzufügen)

Wenn der Administrator einen neuen Kunden auf der Administratorseite erstellt, wird auf dieser Seite eine neue Registerkarte angezeigt, in der Sie nach dem Feld "Als Verkäufer registrieren" gefragt werden.

Der Pfad zur Kundenseite:

Gehen Sie zu Kunden -> Kunden verwalten und klicken Sie auf Neuen Kunden hinzufügen auf der rechten Seite der Seite.

Der Administrator kann das Feld auf Ja setzen, um den Kunden als Verkäufer zu registrieren. Standardmäßig ist das Feld auf Nein eingestellt.

3.2 Verkäufereinstellungen verwalten (Kundenbearbeitungsseite)

Wenn ein Kunde bearbeitet wird, wenn der Kunde auch ein Verkäufer ist, erscheint ein neuer Tab ("Verkäuferkonto verwalten"), der die Verkäufereinstellungen für den aktuellen Kunden, der auch Verkäufer ist, ändert.

Pfad zur obigen Seite:

Gehen Sie zu Kunden -> Kunden verwalten und klicken Sie auf einen Kunden, der auch ein Verkäufer ist.

Die Einstellungen werden gespeichert, wenn der Administrator das Bearbeitungsformular für den Kunden sendet.

Wenn diese Seite zum ersten Mal geladen wird, werden die Felder mit den Standardeinstellungen gefüllt, die für die Erweiterung vordefiniert sind.

4.0-Marktplatzmenü

Die Magento-Marktplatz-Erweiterung besteht aus vollständigen 15-Untermenüoptionen, die auf mehrere Seiten für die Magento Multi-Vendor Marketplace Extension umleiten.


Einige der Menüoptionen des Magento Multi Vendor Marketplace-Moduls verfügen über weitere Untermenüs, um zu einigen verwandten Seiten zu navigieren.

Alle 15-Konfigurationsoptionen, die vom Magento Multi Vendor Marketplace-Plugin angeboten werden, werden nachfolgend im Detail beschrieben:

4.1 Allgemeine Einstellungen

Die Registerkarte Allgemeine Einstellungen des Magento Multivendor Marketplace-Moduls

Diese Seite enthält alle Einstellungen, die das Magento Marketplace-Plugin steuern

Die Seite Allgemeine Einstellungen des Magento Multi Vendor Marketplace Plugins besteht aus folgenden Feldern:

1. Marktplatz aktivieren: Aktiviert oder deaktiviert die Magento Multivendor Marketplace-Erweiterung im Geschäft. Wenn diese Option deaktiviert ist, ist keine Seite oder Funktion der Erweiterung auf der Vorderseite des Geschäfts verfügbar.

2. Standardauftrag: Legt den Standardprovisionsprozentsatz fest, der vom Geschäftsinhaber vom Gesamtverkaufswert des Verkäufers abgezogen wird.

3. Kategorien erlaubt: Die Kategorien, die den Verkäufern erlaubt sind, Produkte hinzuzufügen. Wenn keine Kategorie ausgewählt ist, dann alle

4. Als Verkäufer registrieren Aktiviert oder deaktiviert das Feld "Als Verkäufer registrieren" auf der Seite "Konto erstellen" des Geschäftsbereichs.

5. Massenimport / -export aktivieren: Aktivieren Sie die Schaltfläche, damit Drittanbieter die Bulk-Import / Export-Funktion verwenden können.

6. E-Mail an den Verkäufer auf Bestellplatz: Aktivieren Sie dieses Feld, um eine E-Mail an den Verkäufer zu senden, falls eine Bestellung für die Produkte des Verkäufers erfolgt.

7. JQuery einschließen: Deaktivieren Sie dieses Feld, falls JQuery bereits auf der Vorderseite von einem anderen Plugin oder Ihrem Theme enthalten ist.

8. PProduktzulassung erforderlich: Aktivieren Sie dieses Feld, wenn die Genehmigung für das von einem Verkäufer hinzugefügte Produkt erforderlich ist, bevor es in Ihr Geschäft gelangt.

9. Verkäuferbewertung aktivieren: Aktivieren Sie dieses Feld, wenn Sie möchten, dass die Kunden den Verkäufer überprüfen können.

10. Verkäuferliste aktivieren: Aktivieren Sie dieses Feld für den Fall, dass Sie einen Link in der Fußzeile des Store Front auf der Verkäuferseite anzeigen möchten. Wenn diese Einstellung deaktiviert ist, kann die Verkäuferlistenseite trotzdem nicht aufgerufen werden.


11. Urlaubsmodus aktivieren: Aktivieren Sie diese Schaltfläche, damit die Verkäufer den Urlaubsmodus für ihren Shop für einen bestimmten Zeitraum festlegen können.

12. Verkäufer Info Produktseite anzeigen: Aktivieren Sie die Schaltfläche, um die Informationen des Verkäufers auf der Produktseite anzuzeigen.
13. Neues Produktlimit:?Enter the maximum numbers of products that a new seller can add before the seller account is approved.

14. Verkäufer Überprüfung Genehmigung erforderlich:Aktivieren Sie dieses Feld, wenn Sie möchten, dass die Verkäuferbewertung genehmigt wird, bevor sie im Geschäft sichtbar wird.

15. Suchfeld aktivieren: Aktivieren Sie dieses Feld, wenn Sie ein Suchfeld auf der Verkäuferseite suchen möchten, um die Verkäufer zu suchen.

Niedrigbestandskonfiguration

1. Niedrigbestandsmitteilung aktivieren: Aktivieren Sie die Schaltfläche, um die Verkäufer über die Benachrichtigung über niedrige Bestände zu informieren.
2. Niedrige Inventargrenze: Geben Sie den Lagerbestand ein, unter dem der Verkäufer bei niedrigem Lagerbestand benachrichtigt wird.
3. Wann zu benachrichtigen: Wählen Sie, wann Sie die Benachrichtigung senden möchten. Es kann gesendet werden, wenn die Bestellung aufgegeben wird oder nachdem cron ausgeführt wurde.
4. Benachrichtigung senden Von: Wählen Sie die E-Mail-ID aus, von der Sie die Benachrichtigung senden möchten. Sobald diese Funktionalität vom Backend des Magento Marketplace-Moduls aus aktiviert wurde, können die Anbieter die Niedrigbestandseinstellung über den Bereich Niedrigbestand ihres Dashboards konfigurieren.

Go?to?the?configuration?section?of?the?Low?Stock?tab?of?the?dashboard.

Niedrige Inventargrenze: Die Verkäufer können das Inventarlimit eingeben, unter dem sie benachrichtigt werden möchten.
Erhalten Sie Benachrichtigung über niedrige Bestände: Wählen Sie aus, ob Sie die Benachrichtigung über niedrige Bestände erhalten möchten oder nicht.

4.2 Verkäuferliste

Diese Seite der Magento-Marktplatz-Erweiterung enthält eine Liste aller Verkäufer, die vom Ladenbesitzer genehmigt wurden.

Die obige Liste enthält eine Liste aller Verkäufer, die genehmigt wurden. Es gibt Schaltflächen, um zu den Produkten und Bestellungen des Verkäufers vor jedem Verkäufer zu gehen.

Wenn Sie auf die Schaltfläche "Bestellungen" klicken, wird eine neue Seite geöffnet, in der die Liste aller Bestellungen für diesen bestimmten Verkäufer angezeigt wird.

Wenn Sie auf die Schaltfläche Produkte klicken, wird eine neue Seite geöffnet, in der die Liste aller Produkte für diesen bestimmten Verkäufer angezeigt wird.

Dies ist auch eine Funktion zum Aktivieren oder Deaktivieren von Verkäufern mit der Funktion Massenaktionen des Gitters. Um einen Verkäufer zu aktivieren / deaktivieren, wählen Sie den / die Verkäufer, wählen Sie die Aktion (zB Aktivieren oder Deaktivieren) und klicken Sie dann auf Senden, um die Aktion abzuschließen.

Wenn ein Verkäufer deaktiviert ist, sind alle Produkte dieses Verkäufers ebenfalls deaktiviert und nicht im Ladengeschäft sichtbar.

4.3 Verkäufer Produkte

Diese Seite der Magento Multi Vendor Marketplace Extension besteht aus allen zugelassenen Produkten, die der Verkäufer dem Laden hinzugefügt hat.

Wenn die Einstellungen (z. B. Produktzulassung erforderlich) deaktiviert sind,

Produkt löschen: Um ein Produkt zu löschen, müssen Sie auf die Löschen-Schaltfläche vor dem Produkt klicken.

Es erscheint ein Popup-Fenster, in dem Sie nach dem Grund für die Löschung des Produkts gefragt werden. Um die Aktion abzuschließen, füllen Sie den Grund und klicken Sie auf Senden.

Eine E-Mail wird an den Verkäufer gesendet, um die Löschung des Produkts zu melden. Die E-Mail enthält auch den Grund, den Sie für die Löschung des Produkts angegeben haben.

Hinweis: – Die Löschaktion für das Produkt kann nicht rückgängig gemacht werden. Bitte verwenden Sie diese Funktion sorgfältig.

Produkt aktivieren / deaktivieren: Um den Status eines Produkts zu ändern, müssen Sie die Massenaktionsfunktion des Rasters verwenden. Um ein Produkt zu aktivieren / deaktivieren, wählen Sie die Produkte aus, wählen Sie die Aktion (z. B. Aktivieren oder Deaktivieren) und klicken Sie dann auf Senden, um die Aktion abzuschließen.

Hinweis: – Sobald ein Produkt vom Backend des Magento Multi Vendor Marketplace Plugins deaktiviert wurde, ist es nicht mehr auf der Vorderseite sichtbar. Vermeiden Sie die Deaktivierung von Produkten, deaktivieren Sie ein Produkt nur, wenn es sehr notwendig ist.

4.4 Produktbewertungen

Diese Seite der Magento-Multi-Seller-Marktplatz-Erweiterung enthält eine Liste aller Bewertungen, die von Kunden zu den Produkten des Verkäufers gemacht wurden.

Bewertungen ansehen: Die meisten Details der Produktrezension sind bereits im Raster aufgeführt, einige jedoch nicht. Um alle Details einer Produktübersicht anzuzeigen, klicken Sie auf die Schaltfläche Ansicht vor dieser Überprüfung. Ein Pop-up-Fenster erscheint im Backend des Magento Multi Vendor Marketplace Plugins mit allen Details zur Produktbewertung.

Um die Bewertung zu bearbeiten, klicken Sie im Pop-up-Fenster auf Bearbeiten-Schaltfläche, um zur Bearbeitungsseite zu gelangen.

Produktbewertung löschen:Die Magento Multi Vendor Marketplace Extension ermöglicht es dem Store-Administrator, die Produktbewertungen zu löschen. Um eine Produktbewertung zu löschen, klicken Sie auf die Löschen-Schaltfläche vor der Produktbewertung in der Liste.

Es erscheint ein Popup-Fenster, in dem Sie nach dem Grund für die Löschung der Produktbewertung gefragt werden. Um die Aktion abzuschließen, füllen Sie den Grund und klicken Sie auf Senden.

Hinweis :- Die Aktion zum Löschen der Produktprüfung kann nicht rückgängig gemacht werden. Bitte verwenden Sie diese Funktion sorgfältig.

4.5 Verkäufer Rezensionen

Diese Liste enthält eine Liste aller Verkäuferbewertungen, die von Kunden im Geschäft durchgeführt wurden.

Wenn die Einstellungen deaktiviert sind (z. B. Überprüfung der Lieferantenprüfung erforderlich), wird eine Verkäuferbewertung direkt genehmigt, wenn sie vom Kunden hinzugefügt und in dieser Liste angezeigt wird. Andernfalls wird die Überprüfung zuerst in der Genehmigungsliste für die Verkäuferüberprüfung angezeigt.

Hinweis: – Die Verkäuferbewertungen, die vom Geschäftsinhaber abgelehnt wurden, werden ebenfalls in dieser Liste angezeigt.

Verkäuferbewertung anzeigen: Um alle Details einer Verkäuferbewertung einzusehen, müssen Sie auf die Ansicht-Schaltfläche vor dieser Überprüfung in der Liste klicken.

Wenn Sie auf die Schaltfläche Anzeigen klicken, wird ein Pop-up mit allen Details der entsprechenden Verkäuferbewertung angezeigt.

4.6-Verkäuferkonto-Genehmigungsanfrage

Wenn sich ein Verkäufer in Ihrem Geschäft als Verkäufer registriert, erscheint er zunächst in dieser Liste der Magento Multi-Vendor-Marktplatz-Erweiterung, wie in der Abbildung unten gezeigt. Dann ist es Aufgabe des Store-Administrators, die Verkäufer-Account-Anfrage zu genehmigen oder abzulehnen.

Verkäuferkonto genehmigen: Um ein Verkäuferkonto zu genehmigen, müssen Sie in der Liste auf die Schaltfläche Genehmigen vor diesem Verkäufer klicken.

Sobald das Verkäuferkonto genehmigt wurde, wird es direkt in die Verkäuferliste verschoben und alle Beschränkungen für das Verkäuferkonto werden freigegeben.

Eine E-Mail wird an den Verkäufer gesendet, um die Zustimmung des Verkäufers zu bestätigen.

Hinweis :- Die Verkäufer-Accounts, die vom Store-Eigentümer genehmigt wurden, können nicht rückgängig gemacht werden. Bitte verwenden Sie diese Funktion sorgfältig.

Verkäuferkonto ablehnen: Um ein Verkäuferkonto abzulehnen, müssen Sie in der Liste auf die Schaltfläche Ablehnen vor diesem Verkäufer klicken.

Es erscheint ein Popup-Fenster, in dem Sie nach dem Grund für die Ablehnung des Verkäuferkontos gefragt werden. Füllen Sie den Grund aus und reichen Sie das Formular ein, um die Aktion abzuschließen.

Eine E-Mail wird an den Verkäufer gesendet, um die Ablehnung des Verkäufers zu melden. Der Grund, der im Pop-up angezeigt wird, wird ebenfalls in dieser Mail gesendet.

Hinweis :- Sobald ein Verkäufer abgelehnt wurde, kann er erneut das Verkäuferkonto beantragen. Wenn ein Verkäufer dies tut, wird der Ladenbesitzer durch eine Benachrichtigungs-E-Mail benachrichtigt.

4.7-Verkäuferüberprüfungs-Genehmigungsliste

Diese Liste der Magento Multi-Vendor-Marktplatz enthält alle Verkäufer Bewertungen, die nur von den Kunden gebucht werden und keine Maßnahmen auf ihnen vorgenommen werden.

Wenn die Einstellungen aktiviert sind (z. B. Genehmigung für die Genehmigung des Verkäufers), wird nur eine von einem Kunden veröffentlichte Verkäuferbewertung in dieser Liste angezeigt, andernfalls wird sie direkt in der Liste der Verkäuferrezensionen angezeigt.

Verkäuferbewertung anzeigen: Um alle Details einer Verkäuferbewertung einzusehen, müssen Sie auf die Ansicht-Schaltfläche vor dieser Überprüfung in der Liste klicken.

Wenn Sie auf die Schaltfläche Anzeigen klicken, wird ein Pop-up mit allen Details der entsprechenden Verkäuferbewertung angezeigt.

Verkäuferbewertung genehmigen: Um eine Verkäuferbewertung zu genehmigen, müssen Sie vor dieser Überprüfung in der Liste auf die Schaltfläche Genehmigen klicken.

Sobald eine Verkäuferbewertung genehmigt wurde, wird sie im Frontend sichtbar und in die Verkäuferübersicht übertragen.

Hinweis: – Diese Aktion kann nicht rückgängig gemacht werden. Bitte benutze es sorgfältig.

Verkäuferbewertung ablehnen: Um eine Verkäuferbewertung abzulehnen, müssen Sie auf die Schaltfläche Ablehnen vor dieser Überprüfung in der Liste klicken.

Es erscheint ein Popup-Fenster, in dem Sie nach dem Grund für die Ablehnung der Verkäuferbewertung gefragt werden. Füllen Sie den Grund aus und reichen Sie das Formular ein, um die Aktion abzuschließen.

Sobald eine Verkäuferbewertung abgelehnt wurde, wird sie auf die Verkäuferbewertungsliste übertragen und kann nirgendwo anders gefunden werden.

Hinweis: – Diese Aktion kann nicht rückgängig gemacht werden. Bitte benutze es sorgfältig.

Verkäuferbewertung löschen: Um eine Verkäuferbewertung zu löschen, müssen Sie auf die Schaltfläche Löschen vor dieser Überprüfung in der Liste klicken.

Es erscheint ein Popup-Fenster, in dem Sie nach dem Grund für die Löschung der Verkäuferbewertung gefragt werden. Füllen Sie den Grund aus und reichen Sie das Formular ein, um die Aktion abzuschließen.

Sobald eine Verkäuferbewertung gelöscht wurde, wird sie von jedem Ort entfernt.

Hinweis: – Diese Aktion kann nicht rückgängig gemacht werden. Bitte benutze es sorgfältig.

4.8 Produktzulassungsanfrage

Wenn ein Verkäufer ein Produkt hinzufügt, dann erscheint er zuerst hier und der Ladenbesitzer wird ebenfalls per Post benachrichtigt. Dann ist es Sache des Geschäftsinhabers, das Produkt zu genehmigen oder abzulehnen.

Wenn die Einstellung (dh Produktzulassung erforderlich) aktiviert ist, wird nur ein neues Produkt in dieser Liste hinzugefügt, andernfalls wird es direkt in der Produktliste angezeigt und automatisch genehmigt und aktiviert.

Produkt des Verkäufers ablehnen: Um ein Produkt abzulehnen, müssen Sie auf die Schaltfläche Ablehnen vor dieser Überprüfung in der Liste klicken.

Es erscheint ein Popup-Fenster, in dem Sie nach dem Grund für die Löschung der Verkäuferbewertung gefragt werden. Füllen Sie den Grund aus und reichen Sie das Formular ein, um die Aktion abzuschließen.

Sobald ein Produkt abgelehnt wurde, wird eine E-Mail an den Verkäufer gesendet, die die Ablehnung des Produkts mitteilt. Die abgelehnten Produkte werden ebenfalls in derselben Liste angezeigt. Der Store-Administrator kann sie jederzeit genehmigen.

Produkt des Verkäufers genehmigen: Um ein Produkt zu genehmigen, müssen Sie vor dieser Überprüfung in der Liste auf die Schaltfläche Genehmigen klicken.

Sobald ein Produkt genehmigt wurde, wird es von dieser Liste in die Liste der Verkäuferprodukte übertragen.

Hinweis: – Diese Aktion kann nicht rückgängig gemacht werden. Bitte benutze es sorgfältig.

4.9 Kategorie Anfrageliste

Ein Verkäufer kann das Produkt zu Kategorien hinzufügen, die für diesen Verkäufer zulässig sind. Falls der Verkäufer ein Produkt zu einer Kategorie hinzufügen muss, die nicht erlaubt ist, kann der Verkäufer dies anfordern. Alle diese Kategorieanforderungen erscheinen in der Kategorie Anfrage nach Verkäuferliste des Magento Multivendor Marketplace-Moduls wie unten gezeigt. Eine E-Mail wird auch an den Geschäftsinhaber gesendet, um die Anforderung nach Kategorie zu benachrichtigen. Dann ist es Sache des Geschäftsinhabers, die Anfrage zu genehmigen oder abzulehnen.

Kategorieanfrage genehmigen: Um eine Kategorieanfrage zu genehmigen, müssen Sie auf die Schaltfläche Genehmigen vor dieser Kategorieanfrage in der Liste klicken.

Ein Popup-Fenster erscheint im Backend der Magento Multi-Vendor-Marktplatz-Erweiterung und fragt nach dem Grund für die Genehmigung der Kategorie-Anfrage. Füllen Sie den Grund aus und reichen Sie das Formular ein, um die Aktion abzuschließen.

Hinweis:?This action cannot be undone. Please use it carefully.

Kategorieanfrage ablehnen: Um eine Kategorieanforderung abzulehnen, müssen Sie auf die Schaltfläche Ablehnen vor dieser Kategorieanforderung in der Liste klicken.

Es wird ein Popup-Fenster angezeigt, in dem Sie nach dem Grund für die Ablehnung der Kategorieanforderung gefragt werden. Füllen Sie den Grund aus und reichen Sie das Formular ein, um die Aktion abzuschließen.

Hinweis: – Diese Aktion kann nicht rückgängig gemacht werden. Bitte benutze es sorgfältig.

4.10

4.10.1 Berichte -> Meistverkaufte Produkte

Die Registerkarte Bericht des Magento Multi-Vendor-Marktplatzes

Die Filter helfen dem Ladenbesitzer, das meistverkaufte Produkt zu identifizieren:

  • Für einen Datumsbereich.
  • Für eine bestimmte Kategorie.
  • Für einen bestimmten Verkäufer.

Hinweis :- Manchmal ist es möglich, dass Sie in diesem Bericht keine Daten finden können. In diesem Fall müssen Sie die Berichtsstatistik aktualisieren und dazu müssen Sie Folgendes tun:

Gehen Sie zu Berichte -> Statistiken aktualisieren -> Wählen Sie die gewünschten Berichte zum Aktualisieren -> Senden

Or

Klicken Sie auf die Schaltfläche Statistik aktualisieren oben auf dieser Seite.

4.11 Transaktionen und Einnahmen

4.11.1 Transaktionen und Einnahmen -> Provisionen

Die Kommissionsliste der Magento Multi Vendor Marketplace Extension enthält alle Provisionen, die der Ladenbesitzer bei mehreren Bestellungen mit Provisionsprozentsatz und Gesamtverkauf des Verkäufers erzielt hat.

4.11.2 Transaktionen und Einnahmen -> Kategorieweise Provisionen

Die Seite "Transaktionen und Einnahmen" des Magento Multivendor Marketplace-Moduls zeigt den Bericht für die Provisionen, die der Geschäftsinhaber verdient hat. Dieser Bericht zeigt die Gesamtprovision an, die der Geschäftsinhaber von einem Verkäufer erhalten hat. Der Geschäftsinhaber kann auch Filter verwenden, um die Provisionsberichte kategorieweise zu filtern.

Diese Funktion, die von der Magento Multi-Vendor Marketplace Extension angeboten wird, hilft dem Ladenbesitzer Kommissionen aus verschiedenen Kategorien zu identifizieren und welche Kategorie hat wie viel Provision produziert.

4.11.3?TransaktionenSeller?wisstransAktion

Das System überträgt den Betrag auf dem Konto des Verkäufers nicht automatisch. Daher muss der Geschäftsinhaber Aufzeichnungen über den Saldo für alle Verkäufer führen und manuell Geld an den Verkäufer überweisen und dann die Einzelheiten der Transaktion eingeben, um eine Aufzeichnung über den gleichen zu führen.

Diese Liste enthält alle Saldenvariationen für alle Verkäufer im System. Die Liste zeigt den Gesamtumsatz des Verkäufers, des Verkäufers, Ihrer Provision. Diese Liste hilft dem Geschäftsinhaber, das Verdienen zu identifizieren und sie Verkäufer weise zu kategorisieren.

4.11.3.1?Wieo?Aussicht?

Um die Details der getätigten Transaktionen für einen bestimmten Verkäufer anzuzeigen, müssen Sie auf die Schaltfläche Anzeigen vor diesem Verkäufer klicken.

Wenn Sie auf die Schaltfläche "Ansicht" vor einem Verkäufer klicken, öffnet sich eine neue Seite mit einer Liste aller getätigten Transaktionen für den entsprechenden Verkäufer.

Sie können auch eine neue Transaktion für den aktuellen Verkäufer hinzufügen, indem Sie oben rechts im Magento Multi Vendor Marketplace-Plugin auf die Schaltfläche Neue Transaktion hinzufügen klicken.

4.11.3.2 Wie?to?AddNeu?imthe?seller 'saus?details?

Um für einen Verkäufer ein neues Transaktionsdetail hinzuzufügen, müssen Sie entweder auf klicken?Add New Transaction?buuton corresponding to respective sellers.

Wenn Sie auf die Schaltfläche klicken, wird ein Popup-Fenster angezeigt, in dem Sie nach den Details der Transaktion gefragt werden. Füllen Sie das Formular aus und senden Sie das Formular, um die Aktion abzuschließen.

Die verschiedenen Felder des Pop-ups werden diskutiert:

Name des Verkäufers: Wählen Sie den Namen des Verkäufers aus der Dropdown-Liste.
Transaktions-ID: Tragen Sie hier die Transaktions-ID ein.
Menge: Wählen Sie, ob der Betrag abgebucht oder gutgeschrieben wurde, und geben Sie den Betrag ein.
Kommentar: Geben Sie einen Kommentar zur Transaktion ein. Darüber hinaus kann der Administrator sogar neue Transaktionen im Verkäuferkonto hinzufügen, indem er auf die Schaltfläche Neu erstellen für jedes Verkäuferkonto klickt.

Hinweis :- Diese Aktion kann nicht rückgängig gemacht werden. Bitte benutze es sorgfältig.

4.11.4?Transaktionen und Erträge ->Verkaufener?Payaus

Diese Seite enthält eine Liste aller Transaktionen, die bisher für alle im System verfügbaren Verkäufer durchgeführt wurden.

Sie können auch eine neue Transaktion für einen Verkäufer hinzufügen, indem Sie auf klicken Neue Transaktion hinzufügen Schaltfläche oben rechts auf der obigen Seite.

4.11.5 Transaktionen und Einnahmen -> Verkäuferauszahlungsanfrage

Der Verkäufer kann eine Auszahlungsanforderung von seinem Dashboard an den Geschäftsadministrator senden. Die Anfrage des Verkäufers wird vom Administrator auf dieser Registerkarte der Erweiterung Magento Marketplace angezeigt.

Wenn Sie auf diesen Link klicken, wird der Verkäufer auf den Bereich des Dashboards umgeleitet, wie in der Abbildung unten gezeigt:

4.11.5.1 Wie können die Verkäufer eine neue Auszahlungsanforderung über ihr Dashboard hinzufügen?

Bevor der Verkäufer die Auszahlung anfordern kann, muss er die Auszahlung des Profile-Menüs des Dashboards konfigurieren. Die verschiedenen Felder, die in diesem Abschnitt ausgefüllt werden müssen, werden im Folgenden erläutert:

Wählen Sie Auszahlungsmethode: Die verschiedenen Auszahlungsmethoden im Dropdown-Menü. Wählen Sie die Methode aus, die Sie für die Auszahlung verwenden möchten. Standardmäßig sind drei Optionen verfügbar:

  • Banküberweisung
  • Zahlung per Scheck
  • PayPal

1. Banküberweisung:
Wenn Sie Bankleitzahloptionen auswählen, müssen Sie folgende Informationen angeben.

Kontoinhaber: Geben Sie den Namen des Kontoinhabers ein, in den der Betrag übertragen werden soll.
Details: Dieser Abschnitt enthält die Bankdaten wie Bankfiliale, IBAN-Nummer, BIC usw.
Bank Adresse: Geben Sie die Adresse der Bank ein.
Zusätzliche Information: Geben Sie alle Informationen an, die Sie mit dem Store-Administrator teilen möchten.

2. Zahlung per Scheck

Bezahlen Sie in der Reihenfolge: Geben Sie den Namen ein, für den der Scheck ausgestellt werden soll.
Adresse: Geben Sie die Adresse für das Senden der Überprüfung in diesem Abschnitt an.
Zusätzliche Information: Geben Sie alle Informationen an, die Sie mit dem Store-Administrator teilen möchten.

3. PayPal
Wenn Sie PayPal auswählen, müssen Sie Ihre PayPal-E-Mail-ID eingeben. Im Bereich für zusätzliche Informationen können Sie Informationen bereitstellen, die Sie mit dem Store-Administrator teilen möchten.

Sobald die Auszahlungsmethode im Profil des Verkäufers konfiguriert ist, kann der Anbieter die Auszahlungsanforderungen senden. Um eine neue Auszahlungsanforderung hinzuzufügen, klicken Sie auf das "+" im Abschnitt Neue Auszahlungsanforderung, wie im Bild unten gezeigt:

Füllen

Menge: Geben Sie den Betrag der Auszahlungsanforderung ein.
Anfrage Grund: Geben Sie den Grund für die Auszahlungsanforderung ein. Die Auszahlungsanforderung wird dann zur Genehmigung an den Administrator gesendet. Die Auszahlungsanforderungen, die genehmigt oder abgelehnt wurden oder auf Genehmigung warten, können im Auszahlungsanforderungsabschnitt wie folgt angezeigt werden:

Der Shop-Administrator kann alle Auszahlungsanfragen der Verkäufer des Marktplatzes im Backend der Magento Multi-Vendor-Marktplatz-Erweiterung einsehen.

Wenn Sie auf die Schaltfläche Genehmigen klicken, wird ein Popup angezeigt. Geben Sie die Transaktions-ID und den Kommentar ein, um die Anfrage des Verkäufers zu bestätigen.

4.11.6 Transaktionen und Einnahmen -> PayPal Auszahlungseinstellungen

Mit den PayPal-Auszahlungseinstellungen der Magento Multi seller Marketplace-Erweiterung kann der Geschäftsadministrator die PayPal-Methoden für die Auszahlung aktivieren. Geben Sie die erforderlichen Details wie unten beschrieben ein:

Aktiv: Aktivieren Sie die Schaltfläche, um die PayPal-Zahlungsmethode zu aktivieren.
Kunden ID: Geben Sie die Kunden-ID Ihres PayPal-Kontos ein.
Kundengeheimnis: Geben Sie das Kundengeheimnis des PayPal-Kontos ein.
PayPal-Modus: Wählen Sie den PayPal-Modus aus dem Dropdown-Menü.
PayPal E-Mail-ID: Geben Sie die E-Mail-ID ein, die in Ihrem Konto verwendet wird.
PayPal-Währung: Wählen Sie die Standardwährung für die PayPal-Transaktion.

4.12

Die Registerkarte "E-Mail-Vorlagen" des Magento Multi-Vendor-Marktplatz-Moduls enthält eine Liste aller E-Mail-Vorlagen, die im System mit allen Details der E-Mail-Vorlagen verwendet werden.

E-Mail-Vorlage bearbeiten: Um eine E-Mail-Vorlage zu bearbeiten, klicken Sie auf die Schaltfläche Vorlage bearbeiten vor einer E-Mail-Vorlage.

Wenn Sie auf die Schaltfläche Vorlage bearbeiten klicken, wird eine neue Seite mit einem Formular für die E-Mail-Vorlage geöffnet. Sie können die E-Mail-Vorlage wie gewünscht über die Admin-Oberfläche von Magento Multivendor Marketplace ändern.

Um die Änderungen in der E-Mail-Vorlage zu speichern, klicken Sie auf die Schaltfläche Vorlage speichern oben rechts auf der obigen Seite.

Hinweis :- Beachten Sie beim Bearbeiten der E-Mail-Vorlage, dass Sie keinen Text innerhalb der geschweiften Klammern bearbeiten (zB {{var any_var}}).

4.13. Urlaubsmodus

Die Verkäufer erhalten eine Option, ihren Shop für einen bestimmten Zeitraum vom Marktplatz zu deaktivieren. Die Anfrage der Verkäufer, in den Urlaubsmodus zu wechseln, kann in diesem Abschnitt des Magento Marketplace Moduls eingesehen werden. Um den Urlaubsmodus festzulegen, können die Verkäufer auf ihrem Dashboard auf die Registerkarte Urlaubsmodus wechseln.

Die Registerkarte zeigt die gesamte Urlaubsgeschichte des Verkäufers wie in der folgenden Abbildung dargestellt:

4.13.1 Wie stelle ich den Urlaubsmodus ein?

Um den Urlaubsmodus einzustellen, klicken Sie auf 'Legen Sie neue Ferien fest' Taste.

On?clicking?the?button,?a?popup?will?appear?as?shown?in?the?image:

Start- und Enddatum: Geben Sie das Start- und Enddatum des Urlaubs ein.
Ihr Kommentar zu diesem Urlaub: Geben Sie einen Kommentar für den Urlaubsmodus ein.

Der Administrator kann die Liste der Verkäufer, die sich im Urlaub befinden, auf der Registerkarte "Urlaub" des Magento Marketplace-Plugins anzeigen. Um die Details des Urlaubs zu sehen, klicken Sie auf Ansehen Taste. Der Administrator kann die Anfrage abbrechen, indem er auf die Schaltfläche klickt Abbrechen Taste.

Ein Popup wird angezeigt. Geben Sie den Grund für die Stornierung des Urlaubsmodus ein und senden Sie ihn. Eine E-Mail-Benachrichtigung wird an den Verkäufer gesendet, um sie über die Stornierung des Urlaubs zu informieren.

4.14. Massenimport / -export

Der Administrator kann diese Funktion des Massenimports und -exports den Verkäufern anbieten, indem er sie vom Backend aus aktiviert.

Wenn aktiviert, kann der Verkäufer die Produkte in großen Mengen von seinem Dashboard importieren oder exportieren.

Die Anbieter können die Produkte auf der Registerkarte "Produktimport / -export" wie folgt importieren / exportieren:

4.14.1?Wie?ImHafene?proKanäle?in?bUlk?

Produkttyp: Wählen Sie den Typ des Produkts, das Sie hochladen. Das Magento Multi seller Marketplace Plugin unterstützt alle Arten von Produkten, dh einfache, konfigurierbare, virtuelle und andere.

Produktattributsatz: Wählen Sie die Attributgruppe der Produkte aus der Dropdown-Liste.

Vorlage herunterladen: Sie können die Vorlagendatei im Excel-Arbeitsblatt für das ausgewählte Attribut herunterladen, indem Sie auf diese Schaltfläche klicken. Stellen Sie sicher, dass die Spalten in Ihrer Datei mit der für Sie erstellten Vorlagendatei auf der Grundlage des ausgewählten Attributs übereinstimmen müssen.

Aktion importieren: Wählen Sie die Importaktion aus der Dropdown-Liste. Die Aktion wird nur auf der Grundlage der SKU der Produkte durchgeführt. Ohne SKU wird das Produkt für keine Aktion berücksichtigt.

Datei hochladen: Laden Sie die Datei mit den Produktdetails hier hoch. Klicken Sie auf Datei validieren um den Import abzuschließen.

4.14.2 Wie können die Produkte in großen Mengen exportiert werden?

Der Verkäufer kann die auf dem Marktplatz aufgeführten Produktdetails aus diesem Abschnitt exportieren. Wählen Sie den Exporttyp aus dem Dropdown-Menü und klicken Sie auf Exportieren. Die Details werden in ein Excel-Blatt exportiert.

4.15. Cron-Anweisung

Diese Registerkarte bietet zwei Cron-Optionen. Führen Sie Vacation cron aus, um die Änderungen zu implementieren, die auf der Registerkarte "Vacation" des Magento Multi-Vendor Marketplace-Moduls im Frontend des Marktplatzes vorgenommen wurden. Führen Sie Low Stock Notification Cron aus, um die Benachrichtigung per E-Mail an die Verkäufer zu senden.

5.0 Registrieren als Verkäufer Feld – Registrieren Seite

Wenn sich ein neuer Kunde im Magento-Marktplatz registriert, gibt es auf der Registrierungsseite ein zusätzliches Feld. Wenn der Kunde sich als Verkäufer registrieren möchte, muss der Kunde dieses Feld markieren.

Sobald das Konto erstellt wurde, erhalten die Verkäufer Zugriff auf das Dashboard. Das Dashboard des Verkäufers bietet den Verkäufern eine Reihe von Optionen, wie in der folgenden Abbildung gezeigt:

Sie

DasViewProfil"AussichtCollection"


Magento Multi-Vendor Marketplace Modul Link: https://www.knowband.com/magento-multi-vendor-marketplace-plugin

Magento Multi Vendor Marketplace Benutzerhandbuch Link: https://www.knowband.com/blog/user-manual/magento-market-place/

Magento Multi Vendor Marketplace Admin Demo-Link:
https://marketplace.knowband.com/index.php/admin/dashboard/index/key/a35031d5a24beb0c5a0d4b03bce99a2b/

Magento Marktplatz Front Demo Link: https://marketplace.knowband.com/

Magento Marktplatz Video Link: https://www.youtube.com/watch?v=AiEtl88Jng4

Mochte dies? Sie werden diese auch mögen


Magento Multi vendor Marketplace – Manuale dell'utente

1.0 Introduzione

Magento multi marketplace module by Knowband è uno dei modi più semplici per trasformare il tuo sito eCommerce in un fiorente mercato multi-vendor. Un mercato multi-vendor è uno spazio online in cui venditori e venditori diversi ed elencano i loro prodotti, gestiscono il loro inventario e vendono. Il plug-in per marketplace multi-vendor Magento converte il tuo negozio online in uno di quei marketplace online pienamente funzionanti.

1.1 Funzioni offerte all'amministratore del negozio di Magento Multi estensione del marketplace:

  • L'amministratore del negozio può creare e gestire le categorie di prodotti dal back-end dell'estensione del marketplace di Magento.
  • L'amministratore può approvare / rifiutare il profilo dei venditori con l'aiuto del plugin di mercato Magento.
  • Il modulo del marketplace Magento semplifica l'impostazione e la gestione della commissione addebitata ai venditori.
  • L'amministratore può aggiungere / rimuovere i prodotti dal back-end del modulo multi-vendor del marketplace di Magento.
  • Il proprietario del negozio Magento può tracciare la transazione e guadagnare con il clic del pulsante.
  • Il multi-vendor del marketplace Magento è compatibile con l'ultima versione di Magento e supporta tutti i temi.
  • L'amministratore può approvare / rifiutare recensioni di prodotti e venditori.

1.2 Funzioni offerte al venditore dall'ampliata del marketplace di Magento Multi:

  • Il mercato multi vendor Magento consente ai venditori / venditori di registrarsi nel mercato online.
  • I venditori possono facilmente mappare le categorie e i prodotti con il mercato.
  • Inoltre, i venditori possono richiedere di includere una nuova categoria. L'amministratore del marketplace può approvare / rifiutare la categoria con l'aiuto del plugin per il marketplace multi-vendor Magento.
  • La dashboard del venditore facilita il monitoraggio e la gestione dei prodotti, del profilo e della vendita.
  • Il mercato multi-vendor di Magento consente ai venditori di aggiungere banner di vendita, logo del negozio e contenuti HTML personalizzati. Questi banner verranno visualizzati nella Pagina del venditore con una raccolta di prodotti separata.

1.3 Customer Benefits del mercato di Magento Multivendor:

  • L'estensione del marketplace multi vendor Magento consente a più venditori / venditori di vendere i loro prodotti su una stessa piattaforma. Pertanto, i clienti possono scegliere il prodotto perfetto da un vasto assortimento.
  • L'estensione del marketplace Magento consente ai clienti di acquistare i prodotti a prezzi competitivi.
  • I clienti possono inviare la recensione del prodotto. Queste recensioni possono essere approvate / disapprovate dal back-end del plugin del marketplace Magento.
  • Gli acquirenti online possono rivedere i venditori. Le recensioni dei venditori possono essere gestite dal back-end del modulo del marketplace di Multi vendor Magento.
  • Il modulo di mercato multi venditore Magento offre anche un'opzione con l'aiuto di cui gli acquirenti possono diventare venditori.

2.0 Passi per l'installazione di Magento Multi Vendor Marketplace

Seguire i seguenti passi per l'installazione Magento MarketPlace estensione:

  • Scarica il pacchetto di estensione del Marketplace di Magento Multi.
  • Decomprimere il pacchetto nella cartella principale di Magento setup tramite FTP manager (come Filezilla o WinSCP – scarica qui: https://filezilla-project.org/).
  • Nel Pannello di amministrazione vedrai un nuovo Menu Market Place accanto al menu Sistema. Nel caso in cui non si riesca a vedere il collegamento sotto Sistema, cancellare prima Magento Cache e poi ricontrollare.
  • Con questo il Magento

Pannello di amministrazione 3.0

Nel pannello di amministrazione di Magento l'estensione del marketer multi-venditore aggiunge un menu separato (denominato MarketPlace) proprio accanto al menu di sistema e aggiunge anche una nuova scheda alla pagina di creazione / modifica del cliente.

3.1 Registra come opzione venditore (Aggiungi nuova pagina cliente)

Se l'amministratore sta creando un nuovo cliente dal lato amministratore, in quella pagina viene visualizzata una nuova scheda che richiede il campo Registra come venditore.

La pagina Percorso per il cliente:

Vai a Clienti -> Gestisci clienti e clicca su Aggiungi nuovo cliente sul lato destro della pagina.

L'amministratore può impostare il campo su Sì per registrare il cliente come venditore. Per impostazione predefinita, il campo è impostato su No.

3.2 gestisce le impostazioni del venditore (pagina Modifica cliente)

In caso di modifica di un cliente se il cliente è anche un venditore di una nuova scheda (denominato Gestisci account venditore) sembra modificare le impostazioni del livello venditore per il cliente corrente che è un venditore pure.

Percorso della pagina sopra:

Vai a Clienti -> Gestisci clienti e fai clic su qualsiasi cliente che sia anche un venditore.

Le impostazioni vengono memorizzate quando l'amministratore invia il modulo di modifica per il cliente.

Quando questa pagina viene caricata per la prima volta, i campi vengono riempiti con le impostazioni predefinite predefinite per l'estensione.

Menu 4.0 Marketplace

L'estensione del marketplace Magento è composta da opzioni di sottomenu 15 totali che reindirizzano a più pagine per l'estensione del marketplace multi-vendor Magento.


Alcune delle opzioni di menu del modulo del marketplace Multi Vendor Magento hanno ulteriori sottomenu per navigare ad alcune delle pagine correlate.

Tutte le opzioni di configurazione 15 offerte dal plug-in multi-market di Magento sono descritte di seguito in dettaglio:

4.1 Impostazioni generali

La scheda Impostazioni generali del modulo del marketplace multivendor Magento

Questa pagina ha tutte le impostazioni che controllano il plugin di Magento Marketplace

La pagina delle impostazioni generali del plug-in per marketplace di Multi vendor Magento è composta dai seguenti campi:

1. Abilita il mercato: Abilita o disabilita l'estensione del Marketplace di Magento Multivendor sul fronte del negozio. Se disabilitato, nessuna pagina o funzione dell'estensione è accessibile sul fronte negozio.

2. Commissione predefinita: Imposta la percentuale di commissione predefinita che viene presa dal proprietario del negozio dalla vendita totale effettuata dal venditore.

3. Categorie consentite: Le categorie consentite per i venditori di aggiungere prodotti. Se nessuna categoria è selezionata, tutto il

4. Registrati come venditore: Abilita o disabilita il campo Registra come venditore nella pagina Crea account di fronte negozio.

5. Abilita importazione / esportazione collettiva: Abilita il pulsante per consentire ai fornitori di terze parti di utilizzare la funzione di importazione / esportazione di massa.

6. Invia per email al venditore al posto dell'ordine: Abilita questo campo per inviare una email al venditore nel caso in cui venga effettuato un ordine per i prodotti del venditore.

7. Includi JQuery: Disabilita questo campo nel caso in cui JQuery sia già incluso nella parte anteriore da un altro plugin o dal tuo tema.

8. Papprovazione del rodotto richiesta: Abilita questo campo in caso sia richiesta l'approvazione per il prodotto aggiunto da qualsiasi venditore prima che arrivi al tuo negozio.

9. Abilita recensione venditore: Abilita questo campo nel caso in cui desideri che i clienti possano recensire il venditore.

10. Abilita elenco venditori: Abilita questo campo nel caso in cui desideri mostrare un link nel piè di pagina del negozio alla pagina di elenco del venditore. Se questa impostazione è disabilitata, la pagina di elenco del venditore non è accessibile in alcun modo.


11. Abilita modalità vacanza: Abilita questo pulsante per consentire ai venditori di impostare la modalità vacanza per il proprio negozio per un determinato periodo di tempo.

12. Mostra la pagina del prodotto Info del venditore: Abilita il pulsante per mostrare le informazioni del venditore sulla pagina del prodotto.
13. Nuovo limite di prodotto:?Enter the maximum numbers of products that a new seller can add before the seller account is approved.

14. Approvazione recensione del venditore richiesta:Abilita questo campo nel caso in cui desideri che la recensione del venditore sia approvata prima che diventi visibile nella parte anteriore del negozio.

15. Abilita casella di ricerca: Abilita questo campo nel caso in cui desideri una casella di ricerca nella pagina di elenco del venditore per cercare i venditori.

Configurazione scorte limitate

1. Abilita notifica scorte basse: Abilitare il pulsante per informare i venditori in merito alla notifica di scorte basse.
2. Limite di inventario basso: Inserisci il livello delle scorte al di sotto del quale il venditore riceverà una notifica in caso di scorte basse.
3. Quando notificare: Seleziona quando invierai la notifica. Può essere inviato al momento dell'ordine o dopo l'esecuzione di cron.
4. Invia notifica Da: selezionare l'ID e-mail dal quale si desidera inviare la notifica. Una volta abilitata questa funzionalità dal back-end del modulo Magento Marketplace, i fornitori possono configurare l'impostazione low-stock dalla sezione Low-stock del loro dashboard.

Go?to?the?configuration?section?of?the?Low?Stock?tab?of?the?dashboard.

Limite di inventario basso: I venditori possono inserire il limite di inventario sotto il quale vogliono essere avvisati.
Ricevi notifica scorte basse: Selezionare se si desidera ricevere la notifica di scorte basse o no.

Elenco venditori 4.2

Questa pagina dell'estensione del marketplace Magento ha un elenco di tutti i venditori che sono approvati dal proprietario del negozio.

L'elenco sopra riportato contiene un elenco di tutti i venditori approvati. Ci sono pulsanti per andare ai prodotti e agli ordini del venditore di fronte a ciascun venditore.

Quando fai clic sul pulsante Ordini di una nuova pagina si apre, si apre l'elenco di tutti gli ordini per quel particolare venditore.

Quando fai clic sul pulsante Prodotti, si apre una nuova pagina che consiste nell'apertura dell'elenco di tutti i prodotti per quel particolare venditore.

È anche una funzione per abilitare o disabilitare qualsiasi venditore utilizzando la funzione Azioni di massa della griglia. Per abilitare / disabilitare qualsiasi venditore, selezionare il / i venditore / i, scegliere l'azione (es. Abilita o Disabilita), quindi fare clic sul pulsante Invia per completare l'azione.

Se un venditore è disabilitato, anche tutti i prodotti di quel venditore sono disabilitati e non saranno visibili in negozio.

Prodotti 4.3 per venditori

Questa pagina dell'estensione del marketplace multi vendor Magento è composta da tutti i prodotti approvati aggiunti dal / i venditore / i al negozio.

Se le impostazioni (es. Approvazione prodotto richiesta) sono disabilitate,

Elimina prodotto: Per eliminare un prodotto, devi fare clic sul pulsante Elimina di fronte a quel prodotto.

Apparirà un pop-up che chiederà il motivo della cancellazione del prodotto. Per completare l'azione, inserisci il motivo e fai clic su Invia.

Una mail sarà inviata al venditore per notificare la cancellazione del prodotto. La mail contiene anche il motivo per cui hai fornito la cancellazione del prodotto.

Nota: – L'azione di eliminazione del prodotto non può essere annullata. Si prega di utilizzare questa funzione con attenzione.

Abilita / Disabilita prodotto: Per cambiare lo stato di qualsiasi prodotto, devi usare la funzione Mass Action della Grid. Per abilitare / disabilitare qualsiasi prodotto selezionare i prodotti, scegliere l'azione (es. Abilita o Disabilita), quindi fare clic sul pulsante di invio per completare l'azione.

Nota: – Una volta che un prodotto è disabilitato dal back-end del plugin del Marketplace di Magento Multi, non sarà visibile in primo piano. Evitare di disabilitare i prodotti, disabilitare solo un prodotto se è molto necessario.

Recensioni dei prodotti 4.4

Questa pagina dell'estensione del marketplace multi venditore Magento contiene un elenco di tutte le recensioni fatte dai clienti sui prodotti del venditore.

Visualizza la recensione del prodotto: La maggior parte dei dettagli della recensione del prodotto sono già citati nella griglia, ma alcuni non lo sono. Per visualizzare tutti i dettagli di qualsiasi recensione del prodotto, fare clic sul pulsante Visualizza di fronte a tale revisione. Un pop-up apparirà nel back-end del plug-in multi-market del fornitore Magento con tutti i dettagli della recensione del prodotto.

Per modificare la recensione, puoi fare clic sul pulsante Modifica sul popup che ti reindirizzerà alla pagina di revisione della modifica.

Elimina recensione prodotto:L'estensione del marketplace multi vendor Magento consente all'amministratore del negozio di eliminare le revisioni del prodotto. Per eliminare una recensione di un prodotto devi fare clic sul pulsante Elimina di fronte alla recensione del prodotto nell'elenco.

Apparirà un pop-up che chiederà il motivo della cancellazione della recensione del prodotto. Per completare l'azione, inserisci il motivo e fai clic su Invia.

Nota :- L'azione di eliminazione della recensione del prodotto non può essere annullata. Si prega di utilizzare questa funzione con attenzione.

Recensioni dei venditori 4.5

Questo elenco contiene un elenco di tutte le recensioni dei venditori fatte dai clienti sul negozio.

Se le impostazioni (es. Approvazione recensione venditore richiesta) sono disabilitate, una recensione del venditore viene approvata direttamente quando viene aggiunta dal cliente e appare in questo elenco. In caso contrario, la recensione viene prima visualizzata nell'elenco Approvazione recensione venditore.

Nota: – Anche le recensioni dei venditori che non sono state approvate dal proprietario del negozio vengono visualizzate in questo elenco.

Visualizza la recensione del venditore: Per visualizzare tutti i dettagli di una recensione del venditore devi fare clic sul pulsante Visualizza di fronte a quella recensione nell'elenco.

Facendo clic sul pulsante Visualizza apparirà una finestra popup con tutti i dettagli della recensione del venditore corrispondente.

Richiesta di approvazione dell'account venditore 4.6

Quando un venditore si registra come venditore nel tuo negozio di quanto non appaia prima in questo elenco dell'estensione del marketplace multi-vendor Magento come mostrato nell'immagine qui sotto. Quindi spetta all'amministratore del negozio approvare o disapprovare la richiesta dell'account venditore.

Approva l'account del venditore: Per approvare un account venditore, devi fare clic sul pulsante Approva davanti a quel venditore nell'elenco.

Una volta che l'account venditore è stato approvato, passa direttamente all'elenco dei venditori e vengono rilasciati tutti i limiti all'account venditore.

Una mail verrà inviata al venditore per notificare l'approvazione dell'account venditore.

Nota :- Gli account venditore approvati dal proprietario del negozio non possono essere annullati. Si prega di utilizzare questa funzione con attenzione.

Disapprova l'account del venditore: Per disapprovare un account venditore, devi fare clic sul pulsante Disapprova davanti a quel venditore nell'elenco.

Apparirà un pop-up che chiederà il motivo della mancata approvazione dell'account venditore. Compila il motivo e quindi invia il modulo per completare l'azione.

Una mail sarà inviata al venditore notificando la disapprovazione dell'account venditore. La ragione fornita nel pop-up verrà inviata anche in questa mail.

Nota :- Una volta che un venditore non è stato approvato, può nuovamente richiedere l'account del venditore e ogni volta che un venditore lo fa, il proprietario del negozio viene avvisato tramite un'e-mail di notifica.

Elenco di approvazione per la recensione del venditore 4.7

Questo elenco del marketplace multi vendor di Magento contiene tutte le recensioni dei venditori che sono state appena pubblicate dai clienti e non viene loro intrapresa alcuna azione.

Se le impostazioni (es. Approvazione recensione venditore richiesta) sono abilitate, solo la recensione di qualsiasi venditore pubblicata da qualsiasi cliente viene visualizzata in questo elenco, altrimenti viene visualizzata direttamente nell'elenco Recensioni venditore.

Visualizza la recensione del venditore: Per visualizzare tutti i dettagli di una recensione del venditore devi fare clic sul pulsante Visualizza di fronte a quella recensione nell'elenco.

Facendo clic sul pulsante Visualizza apparirà una finestra popup con tutti i dettagli della recensione del venditore corrispondente.

Approva la recensione del venditore: Per approvare una recensione del venditore, devi fare clic sul pulsante Approva davanti a quella recensione nell'elenco.

Una volta che la recensione di un venditore viene approvata, diventa visibile nel front-end e viene trasferita all'elenco di recensioni del venditore.

Nota: – Questa azione non può essere annullata. Si prega di usare con attenzione.

Disapprova la recensione del venditore: Per disapprovare una recensione del venditore, devi fare clic sul pulsante Disapprova davanti a quella recensione nell'elenco.

Apparirà un pop-up che chiederà il motivo della mancata approvazione della recensione del venditore. Compila il motivo e quindi invia il modulo per completare l'azione.

Una volta che la recensione di un venditore non è stata approvata, viene trasferita nell'elenco di recensioni dei venditori e non può essere trovata da nessun'altra parte.

Nota: – Questa azione non può essere annullata. Si prega di usare con attenzione.

Elimina recensione del venditore: Per eliminare una recensione del venditore, devi fare clic sul pulsante Elimina di fronte a quella recensione nell'elenco.

Apparirà un pop-up che chiederà il motivo della cancellazione della recensione del venditore. Compila il motivo e quindi invia il modulo per completare l'azione.

Una volta che la recensione del venditore viene cancellata, viene completamente rimossa da ogni dove.

Nota: – Questa azione non può essere annullata. Si prega di usare con attenzione.

Richiesta di approvazione del prodotto 4.8

Quando un venditore aggiunge un prodotto, prima di tutto appare qui e anche il proprietario del negozio riceve una notifica per lo stesso tramite la posta. Quindi spetta al proprietario del negozio approvare o disapprovare il prodotto.

Se l'impostazione (vale a dire Approvazione del prodotto richiesta) è attiva, viene aggiunto solo un nuovo prodotto in questo elenco, altrimenti viene visualizzato direttamente nell'elenco dei prodotti e viene automaticamente approvato e abilitato.

Disapprova il prodotto del venditore: Per disapprovare un prodotto, devi fare clic sul pulsante Disapprova davanti a quella recensione nell'elenco.

Apparirà un pop-up che chiederà il motivo della cancellazione della recensione del venditore. Compila il motivo e quindi invia il modulo per completare l'azione.

Una volta che un prodotto non è approvato, verrà inviata una mail al venditore che notifica la disapprovazione del prodotto. I prodotti non approvati appaiono anche nella stessa lista. L'amministratore del negozio può approvarli in qualsiasi momento.

Approva il prodotto del venditore: Per approvare un prodotto, devi fare clic sul pulsante Approva davanti a quella recensione nell'elenco.

Una volta approvato, il prodotto trasferisce da questo elenco all'elenco di prodotti del venditore.

Nota: – Questa azione non può essere annullata. Si prega di usare con attenzione.

Elenco di richieste per la categoria 4.9

Un venditore può aggiungere il prodotto alle categorie consentite al venditore. Nel caso in cui il venditore debba aggiungere un prodotto a una categoria che non è consentita, il venditore può richiedere lo stesso. Tutte le richieste di queste categorie vengono visualizzate nell'elenco Richieste di categoria per venditore del modulo del marketplace multivendor Magento, come mostrato di seguito. Viene inviata anche una mail al proprietario del negozio per notificare la Richiesta di Categoria. Quindi spetta al proprietario del negozio approvare o disapprovare la richiesta.

Approva richiesta di categoria: Per approvare una richiesta di categoria devi fare clic sul pulsante Approva davanti a quella richiesta di categoria nell'elenco.

Un pop-up apparirà nel back-end dell'estensione del marketplace di Multi vendor Magento chiedendo il motivo per l'approvazione della richiesta di categoria. Compila il motivo e quindi invia il modulo per completare l'azione.

Nota:?This action cannot be undone. Please use it carefully.

Disapprova la richiesta di categoria: Per disapprovare una richiesta di categoria, devi fare clic sul pulsante Disapprova davanti a quella richiesta di categoria nell'elenco.

Apparirà un pop-up che chiederà il motivo per cui disapprova la richiesta di categoria. Compila il motivo e quindi invia il modulo per completare l'azione.

Nota: – Questa azione non può essere annullata. Si prega di usare con attenzione.

4.10

Rapporti 4.10.1 -> I prodotti più venduti

La scheda Report del marketplace multi vendor Magento

I filtri aiutano il proprietario del negozio a identificare il prodotto più venduto:

  • Per un intervallo di date.
  • Per una categoria specifica.
  • Per un venditore specifico.

Nota :- A volte è possibile che non si riesca a trovare alcun dato in questo rapporto. In tal caso è necessario aggiornare le statistiche del report e per farlo è necessario effettuare quanto segue:

Vai a Rapporti -> Aggiorna statistiche -> Seleziona i rapporti desiderati da aggiornare -> Invia

Or

Fare clic sul pulsante Aggiorna statistiche nella parte superiore di questa pagina.

Transazioni e guadagni 4.11

Transazioni e guadagni 4.11.1 -> Commissioni

L'elenco della Commissione dell'estensione del marketplace multi vendor Magento contiene tutte le commissioni guadagnate dal proprietario del negozio su più ordini con percentuale di commissione e vendita totale del venditore.

Transazioni e guadagni 4.11.2 -> commissioni per categoria

La pagina Transazioni e guadagni del modulo del marketplace multivendor Magento mostra il report per le commissioni guadagnate dal proprietario del negozio. Questo rapporto mostra la commissione totale guadagnata dal proprietario del negozio da un venditore. Il proprietario del negozio può anche utilizzare i filtri per filtrare la categoria di report delle commissioni.

Questa funzionalità offerta dall'estensione del marketplace multi-vendor di Magento aiuta il proprietario del negozio a identificare commissioni da diverse categorie e quale categoria ha prodotto la commissione.

4. 11.3?Le transazioniSeller?wisetransazione

Il sistema non trasferisce automaticamente l'importo nell'account del venditore. Quindi il proprietario del negozio deve tenere un registro del saldo per tutti i venditori e trasferire manualmente i soldi al venditore e quindi inserire i dettagli della transazione per mantenere un registro dello stesso.

Questo elenco contiene tutte le variazioni di saldo per tutti i venditori nel sistema. L'elenco mostra le vendite totali del venditore, il guadagno del venditore, la commissione. Questo elenco aiuta il proprietario del negozio a identificare il guadagno ea categorizzarlo come venditore saggio.

4. 11.3.1?Comeo?vista?

Per visualizzare i dettagli delle transazioni effettuate per un determinato venditore, è necessario fare clic sul pulsante Visualizza di fronte a quel venditore.

Facendo clic sul pulsante Visualizza di fronte a qualsiasi venditore si aprirà una nuova pagina con un elenco di tutte le transazioni effettuate per il venditore corrispondente.

Puoi anche aggiungere una nuova transazione per il venditore corrente facendo clic sul pulsante Aggiungi nuova transazione nella parte in alto a destra del plug-in del marketplace di Multi vendor Magento.

4.11.3.2 Come?to?Add?Nuovo?in?the?seller's?paysu?details?

Per aggiungere un nuovo dettaglio della transazione per qualsiasi venditore, è necessario fare clic su?Add New Transaction?buuton corresponding to respective sellers.

Facendo clic sul pulsante viene visualizzato un popup che richiede i dettagli della transazione. Compila il modulo e invia il modulo per completare l'azione.

Vengono discussi i vari campi del pop-up:

Nome del venditore: Seleziona il nome del venditore dall'elenco a discesa.
ID transazione: Inserisci qui l'ID della transazione.
Quantità: Seleziona se l'importo è stato addebitato o accreditato e inserisci l'importo.
Commento: Inserisci un commento riguardante la transazione. Inoltre, l'amministratore può anche aggiungere nuove transazioni nell'account venditori facendo clic sul pulsante Rendi nuovo corrispondente a ciascun account venditore.

Nota :- Questa azione non può essere annullata. Si prega di usare con attenzione.

4.11.4?Transazioni e guadagni ->Vendereer?Paysu

Questa pagina contiene un elenco di tutte le transazioni effettuate fino alla data a tutti i venditori disponibili nel sistema.

Puoi anche aggiungere una nuova transazione per qualsiasi venditore facendo clic su Aggiungi nuova transazione pulsante in alto a destra nella pagina sopra.

Transazioni e guadagni 4.11.5 -> Richiesta di pagamento del venditore

Il venditore può inviare la richiesta di pagamento all'amministratore del negozio dalla sua bacheca. La richiesta del venditore viene visualizzata dall'amministratore da questa scheda dell'estensione di Magento Marketplace.

Facendo clic su questo link, il venditore verrà reindirizzato nella sezione della dashboard come mostrato nell'immagine seguente:

4.11.5.1 Come possono i venditori aggiungere nuove richieste di pagamento dalla loro bacheca?

Prima che il venditore possa richiedere il pagamento, deve configurare il pagamento nel menu Profilo della Dashboard. I vari campi che devono essere compilati in questa sezione sono discussi di seguito:

Seleziona il metodo di pagamento: I vari metodi di pagamento nel menu a discesa. Seleziona il metodo che desideri utilizzare per il pagamento. Ci sono tre opzioni disponibili per impostazione predefinita:

  • Bonifico bancario
  • Pagamento tramite assegno
  • PayPal

1. Bonifico bancario:
Selezionando, Opzioni bonifico bancario, ti verrà richiesto di fornire le seguenti informazioni.

Titolare dell'account: Immettere il nome del proprietario dell'account in cui deve essere trasferito l'importo.
Dettagli: Questa sezione include i dettagli bancari come il ramo bancario, il numero IBAN, il BIC, ecc.
Indirizzo della banca: Inserire l'indirizzo della banca.
Informazioni aggiuntive: Fornisci tutte le informazioni che desideri condividere con l'amministratore del negozio.

2. Pagamento tramite assegno

Paga all'ordine di: Inserire il nome al quale deve essere emesso il controllo.
Indirizzo: Fornire l'indirizzo per l'invio del controllo in questa sezione.
Informazioni aggiuntive: Fornisci tutte le informazioni che desideri condividere con l'amministratore del negozio.

3. PayPal
Se selezioni, PayPal, ti verrà richiesto di inserire il tuo ID email PayPal. La sezione delle informazioni aggiuntive ti consente di fornire qualsiasi informazione che desideri condividere con l'amministratore del negozio.

Una volta configurato il metodo di pagamento nel profilo del venditore, il venditore diventa idoneo a inviare le richieste di pagamento. Per aggiungere una nuova richiesta di pagamento, fai clic su "+" nella sezione Nuova richiesta di pagamento, come mostrato nell'immagine seguente:

Riempire

Quantità: Inserisci l'importo della richiesta di pagamento.
Motivo della richiesta: Immettere il motivo della richiesta di pagamento. La richiesta di pagamento è, quindi, inviata all'amministratore per l'approvazione. Le richieste di pagamento che sono approvate o non approvate o in attesa di approvazione possono essere visualizzate nella sezione delle richieste di pagamento, come mostrato di seguito:

L'amministratore del negozio può visualizzare tutte le richieste di pagamento dei venditori del mercato nel back-end dell'estensione del marketplace di Magento Multi.

Facendo clic sul pulsante Approva, verrà mostrato un popup. Immettere l'ID della transazione e commentare per approvare la richiesta del venditore.

Transazioni e guadagni 4.11.6 -> Impostazioni pagamento PayPal

Le impostazioni di pagamento PayPal dell'estensione del Marketplace di Magento Multi seller consentono all'amministratore del negozio di abilitare i metodi PayPal per il pagamento. Inserisci i dettagli richiesti come descritto di seguito:

Attivo: Attiva o disattiva il pulsante per attivare il metodo di pagamento PayPal.
Identificativo cliente: Inserisci l'ID cliente del tuo account PayPal.
Client Secret: Inserisci il segreto del cliente dell'account PayPal.
Modalità PayPal: Seleziona la modalità PayPal dal menu a discesa.
Email ID PayPal: Inserisci l'ID email utilizzato nel tuo account.
Valuta PayPal: Seleziona la valuta predefinita per la transazione PayPal.

4.12

La scheda Modelli di posta elettronica del modulo del marketplace di Multi vendor Magento contiene un elenco di tutti i modelli di email che vengono utilizzati nel sistema con tutti i dettagli dei modelli di email.

Modifica modello email: Per modificare un modello di email, fai clic sul pulsante Modifica modello davanti a qualsiasi modello di email.

Facendo clic sul pulsante Modifica modello si apre una nuova pagina con un modulo per il modello di email. È possibile modificare il modello di posta elettronica desiderato dall'interfaccia di amministrazione del marketplace multivendor Magento.

Per salvare le modifiche apportate nel modello di posta elettronica, fai clic sul pulsante Salva modello in alto a destra nella pagina in alto.

Nota :- Durante la modifica del modello di email, tieni presente che non modifichi alcun testo all'interno delle parentesi graffe (es. {{Var any_var}}).

4.13. Modalità vacanza

I venditori hanno un'opzione per disabilitare il loro negozio dal mercato per un particolare periodo di tempo. La richiesta dei venditori di andare in modalità vacanza può essere visualizzata in questa sezione del modulo Magento Marketplace. Per impostare la modalità vacanza, i venditori possono accedere alla scheda Modalità vacanza della loro dashboard.

La scheda mostra l'intera cronologia delle ferie del venditore, come mostrato nell'immagine qui sotto:

4.13.1 Come impostare la modalità Vacanza?

Per impostare la modalità vacanza, fare clic su 'Imposta una nuova vacanzaPulsante '.

On?clicking?the?button,?a?popup?will?appear?as?shown?in?the?image:

Data di inizio e fine: Inserisci la data di inizio e di fine della vacanza.
Il tuo commento a questa vacanza: Inserisci un commento per la modalità vacanza.

L'amministratore può visualizzare l'elenco dei venditori in vacanza nella scheda Vacanze del plug-in Magento Marketplace. Per vedere i dettagli della vacanza, clicca su Vedere ordine pulsante. L'amministratore può annullare la richiesta facendo clic sul Annullare pulsante.

Verrà visualizzato un popup. Immettere il motivo per annullare la modalità vacanza e inviare. Una e-mail di notifica viene inviata al venditore per informarla dell'annullamento della vacanza.

4.14. Importazione / esportazione collettiva

L'amministratore può offrire questa funzionalità di importazione e esportazione di massa ai venditori abilitando la stessa dal back-end.

Se abilitato, il venditore può importare o esportare i prodotti in blocco dalla loro dashboard.

I fornitori possono importare / esportare i prodotti alla rinfusa dalla scheda Importa / Esporta prodotto come mostrato di seguito:

4.14.1?Come?Importae?procondotti?in?bULK?

Tipo di prodotto: Seleziona il tipo di prodotto che stai caricando. Il plug-in Marketplace Magento Multi seller supporta tutti i tipi di prodotti, cioè semplici, configurabili, virtuali e altri.

Set di attributi del prodotto: Seleziona il set di attributi dei prodotti dall'elenco a discesa.

Scarica il file di modello: È possibile scaricare il file modello nel foglio Excel per l'attributo selezionato facendo clic su questo pulsante. Assicurati che le colonne nel tuo file debbano essere abbinate al file modello creato per te sulla base dell'attributo selezionato.

Importa azione: Seleziona l'azione di importazione dall'elenco a discesa. L'azione verrà eseguita solo sulla base di SKU dei prodotti. Senza SKU, il prodotto non sarà considerato per alcuna azione.

Caricare un file: Carica il file con i dettagli del prodotto qui. Clicca sul Convalida file per completare l'importazione.

4.14.2 Come esportare i prodotti alla rinfusa?

Il venditore può esportare i dettagli del prodotto elencati sul mercato da questa sezione. Seleziona il tipo di esportazione dal menu a discesa e fai clic su Esporta. I dettagli saranno esportati in un foglio Excel.

4.15. Istruzione Cron

Questa scheda offre due opzioni di cron. Esegui cron vacanza per implementare le modifiche apportate nella scheda Vacanza del modulo Magento Multi vendor Marketplace nel front-end del marketplace. Esegui la notifica di scorte basse Cron per inviare l'e-mail di notifica di scarsa disponibilità ai venditori.

5.0 Registrati come venditore – Pagina di registrazione

Se un nuovo cliente si registra nel negozio di mercato di Magento, quindi, c'è un campo aggiuntivo nella pagina di registro. Se il cliente desidera registrarsi come venditore, il cliente deve contrassegnare questo campo.

Una volta creato l'account, i venditori ottengono l'accesso al dashboard. La dashboard del venditore offre una serie di opzioni per i venditori, come mostrato nell'immagine qui sotto:

Essi

IlViewProfilo‘?button.?Additionally,?they?can?even?see? their?collection?by?clicking?on?the?’vistaCollessione‘?Button.


Link al modulo del Marketplace di Magento Multi vendor: https://www.knowband.com/magento-multi-vendor-marketplace-plugin

Manuale dell'utente del Marketplace di Magento Multi fornitore Link: https://www.knowband.com/blog/user-manual/magento-market-place/

Link Demo Admin del Marketplace di Magento Multi vendor:
https://marketplace.knowband.com/index.php/admin/dashboard/index/key/a35031d5a24beb0c5a0d4b03bce99a2b/

Link dimostrativo frontale di Magento Marketplace: https://marketplace.knowband.com/

Link al video di Magento Marketplace: https://www.youtube.com/watch?v=AiEtl88Jng4

Questo mi piaceva? Ti piaceranno anche questi


Magento Multi sprzedawca Marketplace – podręcznik użytkownika

1.0 Wprowadzenie

Moduł marketplace Magento dla wielu sprzedawców by Knowband to jeden z najprostszych sposobów na przekształcenie witryny eCommerce w kwitnący rynek wielu dostawców. Rynek dla wielu dostawców to przestrzeń online, w której sprzedają się różni sprzedawcy i sprzedawcy, a także wymieniają swoje produkty, zarządzają swoimi zapasami i sprzedają. Wtyczka Magento dla wielu sprzedawców zapewnia, że ​​Twój sklep internetowy staje się jednym z tych w pełni funkcjonujących sklepów internetowych.

1.1 Funkcje oferowane administratorowi sklepu przez rozszerzenie marketera Magento Multi:

  • Administrator sklepu może tworzyć i zarządzać kategoriami produktów z zaplecza rozszerzenia rynku Magento.
  • Administrator może zatwierdzić / odrzucić profil sprzedawców za pomocą wtyczki Magento marketplace.
  • Moduł marketplace Magento ułatwia ustalanie i zarządzanie prowizją pobieraną od sprzedawców.
  • Administrator może dodawać / usuwać produkty z zaplecza modułu wielu sprzedawców Magento.
  • Właściciel sklepu Magento może śledzić transakcję i zarabiać przy kliknięciu przycisku.
  • Wieloproducent rynku Magento jest kompatybilny z najnowszą wersją Magento i obsługuje wszystkie motywy.
  • Administrator może zatwierdzać / odrzucić recenzje produktów i sprzedawców.

1.2 Funkcje oferowane sprzedawcy przez rozszerzenie marketu Magento Multi:

  • Rynek wielu dostawców Magento umożliwia sprzedawcom / sprzedawcom rejestrację na rynku online.
  • Sprzedawcy mogą łatwo zamapować kategorie i produkty na rynek.
  • Ponadto sprzedający mogą zażądać włączenia nowej kategorii. Administrator rynku może zatwierdzić / odrzucić kategorię za pomocą wtyczki marketplace Magento dla wielu sprzedawców.
  • Deska rozdzielcza sprzedawcy ułatwia im śledzenie i zarządzanie swoimi produktami, profilem i sprzedażą.
  • Rynek multi-venderów firmy Magento umożliwia sprzedawcom dodawanie banerów sprzedaży, logo sklepu i niestandardowych treści HTML. Banery te będą wyświetlane na Stronie Sprzedawcy z osobnym zbiorem produktów.

Korzyści 1.3 dla klientów rynku Magento Multivendor:

  • Rozszerzenie marketplace wielu dostawców Magento pozwala wielu sprzedawcom / sprzedawcom sprzedawać swoje produkty na tej samej platformie. Dzięki temu klienci mogą wybrać idealny produkt z szerokiego asortymentu.
  • Rozszerzenie rynku Magento pozwala klientom kupować produkty po konkurencyjnych cenach.
  • Klienci mogą przesłać recenzję produktu. Te recenzje mogą zostać zatwierdzone / odrzucone z poziomu wtyczki Magento marketplace.
  • Kupujący online mogą przeglądać sprzedawców. Przeglądy sprzedawców można zarządzać z poziomu zaplecza modułu market marketu Magento.
  • Moduł marketplace Magento dla wielu sprzedawców oferuje nawet opcję, za pomocą której kupujący mogą stać się sprzedawcami.

Kroki 2.0 dla instalacji rynku Magento Multi Vendor

Wykonaj następujące kroki, aby zainstalować Rozszerzenie Magento MarketPlace:

  • Pobierz pakiet rozszerzenia Marketplace dla sprzedawcy Magento Multi.
  • Rozpakuj pakiet w folderze głównym instalacji Magento za pomocą menedżera FTP (np. Filezilla lub WinSCP – pobierz tutaj: https://filezilla-project.org/).
  • W panelu administracyjnym zobaczysz nowe menu rynku obok menu System. Jeśli nie widzisz linku w Systemie, najpierw wyczyść pamięć podręczną Magento, a następnie sprawdź ponownie.
  • Z tym Magento

Panel administracyjny 3.0

W panelu administracyjnym Magento multi marketplace sprzedawca dodaje osobne menu (o nazwie MarketPlace) tuż obok menu systemowego, a także dodaje nową kartę do strony tworzenia / edycji klienta.

3.1 Zarejestruj się jako opcja sprzedawcy (Dodaj nową stronę klienta)

Jeśli administrator tworzy nowego klienta po stronie administratora, na tej stronie pojawia się nowa karta z pytaniem o pole Zarejestruj jako sprzedawca.

Strona Ścieżka do klienta:

Przejdź do klientów -> Zarządzaj klientami i kliknij Dodaj nowego klienta po prawej stronie.

Administrator może ustawić pole Tak, aby zarejestrować klienta jako sprzedającego. Domyślnie pole ma wartość No.

3.2 Zarządzaj ustawieniami sprzedawcy (strona edycji klienta)

W przypadku edycji klienta, jeśli klient jest również sprzedawcą, zamiast nowej zakładki (o nazwie Zarządzaj kontem sprzedawcy) wydaje się zmieniać ustawienia poziomu sprzedawcy dla bieżącego klienta, który również jest sprzedawcą.

Ścieżka do powyższej strony:

Idź do klientów -> Zarządzaj klientami i kliknij klienta, który jest również sprzedawcą.

Ustawienia są przechowywane, gdy administrator przesyła formularz edycji dla klienta.

Gdy strona ładuje się po raz pierwszy, pola są wypełniane domyślnymi ustawieniami predefiniowanymi dla tego rozszerzenia.

Menu giełdowe 4.0

Rozszerzenie rynku Magento składa się z opcji podmenu 15, które przekierowują na kilka stron dla rozszerzenia dla wielu sprzedawców Magento.


Niektóre opcje menu modułu market marketu Magento zawierają kolejne podmenu umożliwiające nawigację na niektórych powiązanych stronach.

Wszystkie opcje konfiguracji 15 oferowane przez wtyczkę marketplace multi marketera Magento są opisane poniżej w szczegółach:

Ustawienia ogólne 4.1

Zakładka ustawień ogólnych modułu marketplace Magento multivendor

Ta strona zawiera wszystkie ustawienia sterujące wtyczką Magento Marketplace

Strona ustawień ogólnych wtyczki Magento multi marketplace marketplace składa się z następujących pól:

1. Włącz rynek: Włącza lub wyłącza rozszerzenie Marketplace Magento Multivendor na froncie sklepu. Jeśli jest wyłączona, żadna strona ani funkcja rozszerzenia nie jest dostępna na froncie sklepu.

2. Domyślna Komisja: Ustawia domyślny procent prowizji pobierany przez właściciela sklepu z całkowitej sprzedaży dokonanej przez sprzedającego.

3. Kategorie dozwolone: Kategorie, które sprzedający mogą dodawać produkty. Jeśli nie wybrano żadnej kategorii, wszystkie

4. Zarejestruj się jako pole sprzedawcy: Włącza lub wyłącza pole Zarejestruj jako sprzedawca na stronie Utwórz konto sklepu.

5. Włącz zbiorczy import / eksport: Włącz przycisk, aby umożliwić zewnętrznym dostawcom korzystanie z funkcji importu / eksportu zbiorczego.

6. E-mail do sprzedawcy w sprawie zamówienia Miejsce: Włącz to pole, aby wysłać wiadomość e-mail do sprzedawcy w przypadku złożenia zamówienia na produkty sprzedającego.

7. Dołącz JQuery: Wyłącz to pole w przypadku, gdy JQuery jest już dołączony z przodu przez inną wtyczkę lub twój motyw.

8. Product Wymagana akceptacja: Włącz to pole w przypadku, gdy wymagane jest zatwierdzenie produktu dodanego przez dowolnego sprzedawcę, zanim trafi ono do Twojego sklepu.

9. Włącz weryfikację sprzedawcy: Włącz to pole, aby klienci mogli sprawdzić sprzedawcę.

10. Włącz listę sprzedawców: Włącz to pole, jeśli chcesz wyświetlić link w stopce strony sklepu na stronie z listą sprzedawców. Jeśli to ustawienie zostanie wyłączone, nie będzie można uzyskać dostępu do strony z informacjami o sprzedawcy.


11. Włącz tryb wakacji: Włącz ten przycisk, aby umożliwić sprzedawcom ustawienie trybu wakacyjnego w ich sklepie na określony czas.

12. Pokaż stronę z informacjami o sprzedawcy: Włącz przycisk, aby wyświetlić informacje sprzedawcy na stronie produktu.
13. Nowy limit produktu:?Enter the maximum numbers of products that a new seller can add before the seller account is approved.

14. Wymagana zgoda na zatwierdzanie przez sprzedawcę:Włącz to pole, jeśli chcesz, aby ocena sprzedawcy została zatwierdzona, zanim stanie się widoczna na froncie sklepu.

15. Włącz pole wyszukiwania: Włącz to pole, jeśli chcesz, aby pole wyszukiwania na stronie z listą sprzedających wyszukiwało sprzedawców.

Niska konfiguracja zapasów

1. Włącz powiadomienie o niskim stanie: Włącz przycisk, aby powiadomić sprzedawców o powiadomieniu o niskim stanie zapasów.
2. Limit niskiego zapasów: Wprowadź poziom zapasów, poniżej którego sprzedawca otrzyma powiadomienie o niskim stanie magazynowym.
3. Kiedy należy powiadomić: Wybierz, kiedy wyślesz powiadomienie. Może być wysłany, gdy zamówienie zostanie złożone lub po wykonaniu crona.
4. Wyślij powiadomienie Od: Wybierz identyfikator e-mail, z którego chcesz wysłać powiadomienie. Po włączeniu tej funkcjonalności z zaplecza modułu Magento Marketplace sprzedawcy mogą skonfigurować ustawienie niskiego poziomu zapasów z sekcji "Małe zapasy" na ich pulpicie nawigacyjnym.

Go?to?the?configuration?section?of?the?Low?Stock?tab?of?the?dashboard.

Limit niskiego zapasów: Sprzedający mogą wprowadzić limit zapasów, poniżej którego chcą otrzymywać powiadomienia.
Otrzymuj powiadomienia o niskim stanie magazynowym: Wybierz, czy chcesz otrzymywać powiadomienia o niskim stanie, czy nie.

4.2 Lista sprzedających

Ta strona rozszerzenia rynku Magento zawiera listę wszystkich sprzedawców zatwierdzonych przez właściciela sklepu.

Powyższa lista zawiera listę wszystkich zatwierdzonych sprzedawców. Istnieją przyciski, aby przejść do produktów sprzedającego i zamówień przed każdym sprzedawcą.

Po kliknięciu przycisku Zamówienia otwiera się nowa strona zawierająca listę wszystkich zamówień dla danego sprzedawcy.

Po kliknięciu przycisku Produkty otwiera się nowa strona zawierająca listę wszystkich produktów dla danego sprzedawcy.

Jest to również funkcja umożliwiająca włączanie lub wyłączanie dowolnego sprzedawcy za pomocą funkcji Masowe akcje w siatce. Aby włączyć / wyłączyć dowolnego sprzedającego, wybierz sprzedawcę (y), wybierz akcję (tj. Włącz lub wyłącz), a następnie kliknij przycisk Wyślij, aby zakończyć akcję.

Jeśli sprzedawca jest wyłączony, wszystkie produkty tego sprzedawcy również są wyłączone i nie będą widoczne w sklepie.

4.3 Sellers Produkty

Ta strona rozszerzenia market marketu Magento składa się ze wszystkich zatwierdzonych produktów dodanych przez sprzedawcę do sklepu.

Jeśli ustawienia (tj. Aprobata produktu) są wyłączone,

Usuń produkt: Aby usunąć produkt, musisz kliknąć przycisk usuwania przed tym produktem.

Pojawi się wyskakujące okienko z pytaniem o przyczynę usunięcia produktu. Aby ukończyć czynność, podaj przyczynę i kliknij Prześlij.

Poczta zostanie wysłana do sprzedawcy w celu powiadomienia o usunięciu produktu. Wiadomość zawiera również przyczynę usunięcia produktu.

Uwaga: – Działanie usuwania produktu nie może zostać cofnięte. Proszę ostrożnie korzystać z tej funkcji.

Włącz / wyłącz produkt: Aby zmienić status dowolnego produktu, musisz użyć funkcji Mass Action w Grid. Aby włączyć / wyłączyć dowolny produkt, wybierz produkt (y), wybierz akcję (tzn. Włącz lub wyłącz), a następnie kliknij przycisk Wyślij, aby zakończyć działanie.

Uwaga: – Gdy produkt zostanie wyłączony z zaplecza wtyczki Magento Multi dostawcy Marketplace, nie będzie widoczny z przodu. Unikaj wyłączania produktów, wyłączaj tylko produkt, jeśli jest to konieczne.

Recenzje produktów 4.4

Ta strona rozszerzenia marketplace Magento dla wielu sprzedawców zawiera listę wszystkich recenzji dokonanych przez klientów na produktach sprzedawcy.

Zobacz recenzję produktu: Większość szczegółów przeglądu produktu jest już wspomniana w tabeli, ale niektóre z nich nie są. Aby wyświetlić wszystkie szczegóły każdej recenzji produktu, kliknij przycisk Wyświetl przed tą recenzją. Wyskakujące okienko pojawi się na zapleczu wtyczki market marketu Magento, która ma wszystkie szczegóły dotyczące przeglądu produktu.

Aby edytować recenzję, możesz kliknąć przycisk Edytuj w wyskakującym okienku, który przekieruje Cię do strony przeglądu zmian.

Usuń recenzję produktu:Rozszerzenie marketplace multi marketu Magento pozwala administratorowi sklepu na usunięcie recenzji produktów. Aby usunąć recenzję produktu, należy kliknąć przycisk usuwania znajdujący się przed tą recenzją produktu na liście.

Pojawi się wyskakujące okienko z pytaniem o przyczynę usunięcia recenzji produktu. Aby ukończyć czynność, podaj przyczynę i kliknij Prześlij.

Uwaga :- Operacji usuwania recenzji produktu nie można cofnąć. Proszę ostrożnie korzystać z tej funkcji.

Recenzje sprzedawców 4.5

Ta lista zawiera listę wszystkich recenzji sprzedawców wykonanych przez klientów w sklepie.

Jeśli ustawienia (tj. Zatwierdzenie zatwierdzenia przez sprzedawcę) są wyłączone, weryfikacja sprzedawcy jest zatwierdzana bezpośrednio po dodaniu przez klienta i wyświetleniu na tej liście. W przeciwnym razie opinia pojawia się po raz pierwszy na liście Zatwierdzenie recenzji sprzedawcy.

Uwaga: – Recenzje sprzedawcy, które zostały odrzucone przez właściciela sklepu, pojawiają się również na tej liście.

Wyświetl recenzję sprzedawcy: Aby wyświetlić wszystkie szczegóły dotyczące oceny sprzedawcy, należy kliknąć przycisk Wyświetl przed tą recenzją na liście.

Po kliknięciu przycisku Widok pojawi się wyskakujące okno zawierające wszystkie szczegóły dotyczące przeglądu sprzedawcy.

4.6 Wniosek o zatwierdzenie konta sprzedawcy

Gdy sprzedawca zarejestruje się jako sprzedawca w swoim sklepie, niż po raz pierwszy pojawi się na tej liście rozszerzenia rynku dla wielu sprzedawców Magento, jak pokazano na poniższym obrazku. Następnie administrator sklepu musi zatwierdzić lub odrzucić żądanie konta sprzedawcy.

Zatwierdź konto sprzedawcy: Aby zatwierdzić konto sprzedawcy, musisz kliknąć przycisk Zatwierdź przed tym sprzedawcą na liście.

Po zatwierdzeniu konta sprzedawcy następuje bezpośrednie przejście do listy sprzedawców i zwolnienie wszystkich limitów konta sprzedawcy.

Poczta zostanie wysłana do sprzedawcy, aby powiadomić o zatwierdzeniu konta sprzedawcy.

Uwaga :- Konta sprzedającego zatwierdzone przez właściciela sklepu nie mogą zostać cofnięte. Proszę ostrożnie korzystać z tej funkcji.

Odrzuć konto sprzedawcy: Aby odrzucić konto sprzedawcy, musisz kliknąć przycisk Odrzuć przed tym sprzedawcą na liście.

Pojawi się wyskakujące okienko z pytaniem o powód odrzucenia konta sprzedawcy. Podaj przyczynę, a następnie prześlij formularz, aby ukończyć działanie.

Poczta zostanie wysłana do sprzedawcy z powiadomieniem o odrzuceniu konta sprzedawcy. Powód podany w wyskakującym okienku zostanie również wysłany w tej wiadomości.

Uwaga :- Gdy sprzedawca zostanie odrzucony, może ponownie złożyć wniosek o konto sprzedawcy, a gdy tylko to zrobi, właściciel sklepu otrzyma powiadomienie e-mailem z powiadomieniem.

4.7 Lista zatwierdzeń dla sprzedawcy

Ta lista marketów multi marketów firmy Magento zawiera wszystkie recenzje sprzedawców, które zostały właśnie opublikowane przez klientów i nie są one podejmowane.

Jeśli ustawienia (tj. Zatwierdzenie zatwierdzenia przez sprzedawcę) są włączone, na liście pojawia się tylko opinia sprzedawcy wysłana przez dowolnego klienta, w przeciwnym razie pojawia się bezpośrednio na liście recenzji sprzedawców.

Wyświetl recenzję sprzedawcy: Aby wyświetlić wszystkie szczegóły dotyczące oceny sprzedawcy, należy kliknąć przycisk Wyświetl przed tą recenzją na liście.

Po kliknięciu przycisku Widok pojawi się wyskakujące okno zawierające wszystkie szczegóły dotyczące przeglądu sprzedawcy.

Zatwierdź recenzję sprzedawcy: Aby zatwierdzić ocenę sprzedawcy, musisz kliknąć przycisk Zatwierdź przed tą recenzją na liście.

Po zatwierdzeniu oceny sprzedawca staje się widoczny w interfejsie użytkownika i jest przenoszony na listę recenzji sprzedawcy.

Uwaga: – Tego działania nie można cofnąć. Proszę go używać ostrożnie.

Odrzuć opinię sprzedawcy: Aby odrzucić opinię sprzedawcy, musisz kliknąć przycisk Oddal, znajdujący się przed tą recenzją na liście.

Pojawi się wyskakujące okienko z pytaniem o powód odrzucenia recenzji sprzedawcy. Podaj przyczynę, a następnie prześlij formularz, aby ukończyć działanie.

Po odrzuceniu recenzji sprzedawcy zostaje ona przeniesiona na listę recenzji sprzedawców i nie można jej znaleźć nigdzie indziej.

Uwaga: – Tego działania nie można cofnąć. Proszę go używać ostrożnie.

Usuń recenzję sprzedawcy: Aby usunąć opinię sprzedawcy, musisz kliknąć przycisk Usuń przed tą recenzją na liście.

Pojawi się wyskakujące okienko z pytaniem o przyczynę usunięcia przeglądu sprzedawcy. Podaj przyczynę, a następnie prześlij formularz, aby ukończyć działanie.

Po usunięciu recenzji sprzedawcy jest ona całkowicie usuwana z każdego miejsca.

Uwaga: – Tego działania nie można cofnąć. Proszę go używać ostrożnie.

4.8 Wniosek o zatwierdzenie produktu

Kiedy sprzedawca dodaje produkt, najpierw pojawia się tutaj, a właściciel sklepu jest również powiadamiany o tym samym poprzez pocztę. Wtedy to właściciel sklepu musi zatwierdzić lub odrzucić produkt.

Jeśli ustawienie (tj. Aprobata produktu) jest włączone, na liście pojawia się tylko nowy produkt, w przeciwnym razie pojawia się bezpośrednio na liście produktów i jest automatycznie zatwierdzany i włączany.

Odrzuć produkt sprzedawcy: Aby odrzucić produkt, musisz kliknąć przycisk Oddal, znajdujący się przed tą recenzją na liście.

Pojawi się wyskakujące okienko z pytaniem o przyczynę usunięcia przeglądu sprzedawcy. Podaj przyczynę, a następnie prześlij formularz, aby ukończyć działanie.

Gdy produkt zostanie odrzucony, poczta zostanie wysłana do sprzedawcy z informacją o odrzuceniu produktu. Odrzucone produkty pojawiają się również na tej samej liście. Administrator sklepu może je zatwierdzić w dowolnym momencie.

Zatwierdź produkt sprzedawcy: Aby zatwierdzić produkt, musisz kliknąć przycisk Zatwierdź przed tą recenzją na liście.

Po zatwierdzeniu produkt przenosi się z tej listy na listę produktów sprzedawców.

Uwaga: – Tego działania nie można cofnąć. Proszę go używać ostrożnie.

Lista żądań kategorii 4.9

Sprzedawca może dodać produkt do kategorii, które są dozwolone dla tego sprzedawcy. W przypadku, gdy sprzedawca musi dodać produkt do kategorii, która jest niedozwolona, ​​sprzedawca może zażądać tego samego. Wszystkie te żądania kategorii pojawiają się na liście popytu według kategorii sprzedawcy modułu marketplace Magento, jak pokazano poniżej. Poczta jest również wysyłana do właściciela sklepu w celu powiadomienia o wniosku o kategorię. Wtedy to właściciel sklepu musi zatwierdzić lub odrzucić prośbę.

Zatwierdź żądanie kategorii: Aby zatwierdzić żądanie kategorii, należy kliknąć przycisk Zatwierdź przed żądaniem kategorii na liście.

Wyskakujące okienko pojawi się na zapleczu rozszerzenia market marketu Magento, prosząc o powód zatwierdzenia żądania kategorii. Podaj przyczynę, a następnie prześlij formularz, aby ukończyć działanie.

Uwaga:?This action cannot be undone. Please use it carefully.

Odrzuć żądanie kategorii: Aby odrzucić żądanie kategorii, musisz kliknąć przycisk Odrzuć przed żądaniem kategorii na liście.

Pojawi się wyskakujące okienko z pytaniem o przyczynę odrzucenia prośby o kategorię. Podaj przyczynę, a następnie prześlij formularz, aby ukończyć działanie.

Uwaga: – Tego działania nie można cofnąć. Proszę go używać ostrożnie.

4.10

Raporty 4.10.1 -> Najlepiej sprzedające się produkty

Zakładka Report na rynku wielu dostawców Magento

Filtry pomagają właścicielowi sklepu zidentyfikować najlepiej sprzedający się produkt:

  • Dla zakresu dat.
  • Dla określonej kategorii.
  • Dla konkretnego sprzedawcy.

Uwaga :- Czasami jest możliwe, że nie możesz znaleźć żadnych danych w tym raporcie. W takim przypadku należy odświeżyć statystyki raportu i wykonać następujące czynności:

Przejdź do raportów -> Odśwież statystyki -> Wybierz żądane raporty do odświeżenia -> Prześlij

Or

Kliknij przycisk Odśwież statystyki na górze tej strony.

Transakcje i zarobki 4.11

Transakcje 4.11.1 i zarobki -> Prowizje

Lista Komisji rozszerzenia market marketu Magento zawiera wszystkie prowizje zarobione przez właściciela sklepu na kilka zamówień z procentem prowizji i całkowitą sprzedażą sprzedawcy.

Transakcje 4.11.2 i zarobki -> Prowizje zależne od kategorii

Strona Transakcje i zarobki modułu marketplace Magento przedstawia raport z prowizji zarobionych przez właściciela sklepu. Ten raport pokazuje całkowitą prowizję uzyskaną przez właściciela sklepu od sprzedawcy. Właściciel sklepu może również użyć filtrów do filtrowania kategorii raportów prowizji.

Ta funkcja oferowana przez rozszerzenie rynku dla wielu dostawców Magento pomaga właścicielowi sklepu w identyfikacji prowizji z różnych kategorii i kategorii, która wytworzyła wysokość prowizji.

4.10.3?TransakcjeSeller?wIsetransakcja

System nie przenosi automatycznie kwoty na konto sprzedającego. W związku z tym właściciel sklepu musi prowadzić ewidencję salda dla wszystkich sprzedawców i ręcznie przekazywać pieniądze sprzedawcy, a następnie wprowadzać szczegóły transakcji, aby zachować ich zapis.

Ta lista zawiera wszystkie odmiany równowagi dla wszystkich sprzedawców w systemie. Lista pokazuje całkowitą sprzedaż sprzedawcy, zarobki sprzedawcy, prowizję. Ta lista pomaga właścicielowi sklepu zidentyfikować zarobki i podzielić je na kategorie według sprzedawcy.

4. 11.3.1?W jaki sposóbo?Widok?

Aby wyświetlić szczegóły transakcji wykonanych dla określonego sprzedawcy, należy kliknąć przycisk Wyświetl przed tym sprzedawcą.

Po kliknięciu przycisku Widok przed jakimkolwiek sprzedawcą zostanie otwarta nowa strona zawierająca listę wszystkich transakcji wykonanych dla odpowiedniego sprzedawcy.

Możesz także dodać nową transakcję dla bieżącego sprzedającego, klikając przycisk Dodaj nową transakcję w prawej górnej części wtyczki market marketu Magento.

4.11.3.2 Jak?to?Add?Nowy?in?the?seller "s?payna zewnątrz?details?

Aby dodać nową szczegóły transakcji dla dowolnego sprzedawcy, musisz kliknąć przycisk?Add New Transaction?buuton corresponding to respective sellers.

Po kliknięciu przycisku pojawi się okienko z zapytaniem o szczegóły transakcji. Wypełnij formularz i prześlij formularz, aby ukończyć działanie.

The various fields of the pop-up are discussed:

Seller Name: Select the name of the seller from the drop-down list.
Identyfikator transakcji: Enter the transaction ID here.
Ilość: Select whether the amount was debited or credited and then enter the amount.
Komentarz: Enter a comment regarding the transaction.

Additionally, the admin can even add new transaction in the sellers account by clicking on the Make New button corresponding to each seller account.

Uwaga :- Tego działania nie można cofnąć. Proszę go używać ostrożnie.

4.11.4?Transactions and Earnings ->?Sprzedaćer?Payna zewnątrz

This page contains a list of all the transactions done till date to all the sellers available in the system.

You can also add a new transaction for any seller by clicking in Add New Transaction button on the top right of the above page.

4.11.5 Transactions and Earnings -> Seller Payout Request

The seller can send payout request to the store admin from their dashboard. The seller’s request is viewed by the admin from this tab of the Magento Marketplace extension.?The Dashboard of the seller includes an option of Payout Request.

On clicking this link, the seller will be redirected on the section of the dashboard as shown in the image below:

4.11.5.1 How can the sellers add new payout request from their dashboard?

Before the seller can request for the payout, he needs to configure the payout the Profile menu of the Dashboard. The various fields required to be filled in this section are discussed below:

Select Payout Method: The various payout methods in the drop-down menu. Select the method that you want to use for the payout. There are three options available by default:

  • Bankowy
  • Payment By Cheque
  • PayPal

1. Bank Wire:
On selecting, Bank Wire options, you’ll be required to provide following information.

Właściciel konta: Enter the name of the owner of the account in which the amount is to be transferred.
Detale: This section include the bank details such as bank branch, IBAN number, BIC, etc.
Adres banku: Enter the address of the bank.
Dodatkowe informacje: Provide any information that you would like to share with the store admin.

2. Payment By Cheque

Pay to the order of: Enter the name to which the cheque is to be issued.
Adres: Provide the address for sending the cheque in this section.
Dodatkowe informacje: Provide any information that you would like to share with the store admin.

3. PayPal
In case you select, PayPal, you will required to enter your PayPal Email ID. The additional information section allows you to provide any information that you would like to share with the store admin.

Once the payout method is configured in the seller’s profile, the vendor becomes eligible to send the payout requests.

In order to add new payout request click on the ‘+’ in the New Payout Request section as shown in the image below:

Fill?up?a?small?form?in?order?to?send?the?request.

Ilość: Enter the amount of the payout request.
Request Reason: Enter the reason for the payout request.

The payout request is, then, send to the admin for approval.

The payout requests that are approved or disapproved or waiting for approval can be viewed in the payout request section as shown below:

The store admin can view all the payout requests of the sellers of the marketplace in back-end of the Magento Multi vendor marketplace extension.

On clicking on Approve button, a popup will be shown. Enter the transaction ID and comment in order to approve the request of the seller.

4.11.6 Transactions and Earnings -> PayPal Payout Settings

The PayPal Payout Settings of the Magento Multi seller Marketplace extension allows the store admin to enable the PayPal methods for the payout. Enter the required details as discussed below:

Aktywny: Toggle the button to activate the PayPal payment method.
Identyfikator klienta: Enter the Client ID of your PayPal account.
Sekret klienta: Enter the Client Secret of the PayPal account.
Tryb PayPal: Select the PayPal mode from the drop-down menu.
PayPal Email ID: Enter the email ID used in your account.
PayPal currency: Select the default currency for PayPal transaction.

4.12? Email Templates

The Email Templates tab of the Magento multi vendor marketplace module contains a list of all the emails templates that are used in the system with all the details of the email templates.

Edit Email Template: In order to edit an email template click on the Edit Template button in front of any email template.

On clicking on the Edit Template button a new page opens having a form for the email template. You can change the email template as desired from the admin interface of Magento multivendor marketplace.

To save the changes made in the email template click on the Save Template button on the top right of the above page.

Uwaga :- While editing the email template please keep in mind that you don’t edit any text inside the curly brackets (i.e. {{var any_var}}).

4.13. Vacation Mode

The sellers get an option to disable their shop from the marketplace for a particular time period. The request of the sellers to go on vacation mode can viewed in this section of the Magento Marketplace module.

In order to set the vacation mode, the sellers can go to the Vacation mode tab of their dashboard.

The tab shows the entire vacation history of the seller as shown in the image below:

4.13.1 How to Set the Vacation Mode?

In order to set the vacation mode, click on ‘Set New Vacationprzycisk ".

On?clicking?the?button,?a?popup?will?appear?as?shown?in?the?image:

Start and End Date: Enter the start and end date of the vacation.
Your comment to this Vacation: Enter a comment for the vacation mode.

The admin can view the list of the seller who are on vacation in the Vacation tab of the Magento Marketplace plugin.

In order to see the details of the vacation, click on Widok button.
The admin can cancel the request by clicking on the Anuluj przycisk.

A popup will be displayed. Enter the reason for canceling the vacation mode and submit.
A email notification is send to the seller informing them about the cancellation of the vacation.

4.14. Bulk Import/Export

The admin can offer this feature of bulk import and export to the sellers by enabling the same from the back-end.

If enabled the seller can import or export of the products in bulk from their dashboard.

The vendors can import/export the products in bulk from the Product Import/Export tab as shown below:

4.14.1?How?to?Import?the?prokanały?in?bUlk?

Rodzaj produktu: Select the type of the product that you are uploading. The Magento Multi seller Marketplace Plugin supports all type of products, that is, simple, configurable, virtual and others.

Product Attribute Set: Select the attribute set of the products from the drop-down list.

Download Template File: You can download the template file in excel sheet for the selected attribute by clicking on this button.

Please make sure that columns in your file must be matched with template file created for you on the basis of selected attribute.

Import Action: Select the import action from the drop-down list. Action will only be performed on the basis of SKU of products. Without SKU, product will not be consider for any action.

Dodaj plik: Upload the file with the product details here.

Click on the Validate File to complete the import.

4.14.2 How to Export the Products in Bulk?

The seller can export the product details listed at the marketplace from this section. Select the Export Type from the drop-down menu and click on Export.

The details will be exported in an excel sheet.

4.15. Cron Instruction

This tab offers two cron options. Execute vacation cron to implement the changes made in the Vacation tab of Magento Multi vendor Marketplace module in the front-end of the marketplace.

Run Low Stock Notification Cron to send the low stock notifications email to the sellers.

5.0 Register As Seller Field – Register Page

If a new customer is registering in the Magento marketplace store, then, there is an additional field on the Register Page. If the customer wants to Register as Seller than the customer has to mark this field.

Once the account is created, the sellers get an access to the dashboard.

The dashboard of the seller offers a number of options to the sellers as shown in the image below:

They?can?configure?their?profile?by?clicking?on?the?Seller?Profile?tab.

The?sellers?can?view?their?own?profile?by?clicking?on?the?’View?Profil‘?button.?Additionally,?they?can?even?see? their?collection?by?clicking?on?the?’View?CollEkcja‘?Button.


Magento Multi vendor Marketplace Module Link: https://www.knowband.com/magento-multi-vendor-marketplace-plugin

Magento Multi vendor Marketplace User Manual Link: https://www.knowband.com/blog/user-manual/magento-market-place/

Magento Multi vendor Marketplace Admin Demo Link:
https://marketplace.knowband.com/index.php/admin/dashboard/index/key/a35031d5a24beb0c5a0d4b03bce99a2b/

Magento Marketplace Front Demo Link: https://marketplace.knowband.com/

Magento Marketplace Video Link: https://www.youtube.com/watch?v=AiEtl88Jng4

Lubiłem to? Spodoba ci się to


Mercado de vários fornecedores Magento – Manual do usuário

1.0 Introdução

Módulo de mercado de vários fornecedores Magento by Banda de conhecimento é uma das maneiras mais fáceis de transformar seu site de comércio eletrônico em um próspero mercado de vários fornecedores. Um mercado de vários fornecedores é um espaço on-line onde diferentes fornecedores e vendedores listam seus produtos, gerenciam seu estoque e vendem. O plug-in de mercado de vários fornecedores Magento converte sua loja on-line em um desses mercados on-line em pleno funcionamento.

Recursos do 1.1 oferecidos ao administrador da loja pela extensão do mercado de múltiplos fornecedores Magento:

  • O administrador da loja pode criar e gerenciar as categorias de produtos a partir do back-end da extensão do mercado Magento.
  • O administrador pode aprovar / rejeitar o perfil dos vendedores com a ajuda do plugin do mercado Magento.
  • O módulo do mercado Magento torna mais fácil definir e gerenciar a comissão cobrada dos vendedores.
  • O administrador pode adicionar / remover os produtos do back-end do módulo multi-vendor do mercado Magento.
  • O dono da loja Magento pode acompanhar a transação e ganhar com o clique do botão.
  • O multi-vendor do mercado Magento é compatível com a versão mais recente do Magento e suporta todos os temas.
  • O administrador pode aprovar / rejeitar análises de produtos e vendedores.

Recursos do 1.2 oferecidos ao vendedor pela extensão do mercado de múltiplos fornecedores Magento:

  • O mercado de múltiplos fornecedores Magento permite que os vendedores / fornecedores possam se registrar no mercado on-line.
  • Os vendedores podem mapear facilmente as categorias e produtos com o mercado.
  • Além disso, os vendedores podem solicitar a inclusão de uma nova categoria. O administrador do mercado pode aprovar / rejeitar a categoria com a ajuda do plug-in de mercado de vários fornecedores Magento.
  • O painel do vendedor torna mais fácil para eles rastrear e gerenciar seus produtos, perfil e venda.
  • O mercado de vários fornecedores Magento permite que os vendedores adicionem banners de venda, logotipo da loja e conteúdo HTML personalizado. Esses banners serão exibidos na Página do Vendedor com uma coleção de produtos separada.

Benefícios para o cliente 1.3 do mercado Magento Multivendor:

  • A extensão do mercado de múltiplos fornecedores Magento permite que vários vendedores / fornecedores vendam seus produtos em uma mesma plataforma. Assim, os clientes podem escolher o produto perfeito a partir de um amplo sortimento.
  • A extensão do mercado Magento permite que os clientes comprem os produtos a preços competitivos.
  • Os clientes podem enviar uma revisão do produto. Essas revisões podem ser aprovadas / reprovadas no back-end do plugin do mercado Magento.
  • Os compradores on-line podem revisar os vendedores. As avaliações do vendedor podem ser gerenciadas a partir do back-end do módulo de mercado de múltiplos fornecedores Magento.
  • O módulo de mercado multi-vendedor da Magento oferece até uma opção com a ajuda de que os compradores podem se tornar um vendedor.

Passos 2.0 para instalação do Magento Multi Vendor Marketplace

Siga os seguintes passos para instalar Extensão Magento MarketPlace:

  • Faça o download do pacote de extensão do Marketplace do Magento Multi vendor.
  • Descompacte o pacote em sua pasta raiz de configuração do Magento via gerenciador de FTP (como Filezilla ou WinSCP – baixe aqui: https://filezilla-project.org/).
  • No painel de administração, você verá um novo Market Place de menu ao lado do menu Sistema. Caso você não consiga ver o link em System, limpe primeiro o Magento Cache e depois verifique novamente.
  • Com isso o Magento

Painel Administrativo 3.0

No painel de administração da extensão do mercado de múltiplos vendedores Magento adiciona um menu separado (chamado MarketPlace) ao lado do menu do sistema e também adiciona uma nova guia para a página de criação / edição do cliente.

3.1 Registre-se como Opção de Vendedor (Adicionar Nova Página de Cliente)

Se o administrador estiver criando um novo cliente do lado do administrador, uma nova guia será exibida nessa página solicitando o campo Registrar como vendedor.

O caminho para a página do cliente:

Vá para Clientes -> Gerenciar Clientes e clique em Adicionar novo cliente no lado direito da página.

O administrador pode definir o campo como Sim para registrar o cliente como um vendedor. Por padrão, o campo é definido como Não.

3.2 Gerenciar configurações do vendedor (página de edição do cliente)

No caso de editar um cliente, se o cliente também for um vendedor, então uma nova guia (chamada Gerenciar conta do vendedor) aparecerá para alterar as configurações do nível do vendedor para o cliente atual que também é um vendedor.

Caminho para a página acima:

Vá para Clientes -> Gerenciar Clientes e clique em qualquer cliente que também seja vendedor.

As configurações são armazenadas quando o administrador envia o formulário de edição para o cliente.

Quando esta página é carregada pela primeira vez, os campos são preenchidos com as configurações padrão pré-definidas para a extensão.

Menu do Marketplace do 4.0

A extensão do mercado Magento consiste em opções de submenu 15 que redirecionam para várias páginas para a extensão de mercado de vários fornecedores Magento.


Algumas das opções de menu do módulo de mercado de vários fornecedores Magento têm mais sub-menus para navegar para algumas das páginas relacionadas.

Todas as opções de configuração do 15 oferecidas pelo plugin de mercado de vários fornecedores Magento são descritas abaixo em detalhes:

Configurações gerais do 4.1

A guia Configurações gerais do módulo de mercado do multivendor Magento

Esta página tem todas as configurações que controlam o plugin do Magento Marketplace

A página de configurações gerais do plug-in de mercado de vários fornecedores Magento consiste nos seguintes campos:

1. Ativar o Marketplace: Ativa ou desativa a extensão do Magento Multivendor Marketplace na frente da loja. Se desativado, nenhuma página ou recurso da extensão estará acessível na frente da loja.

2. Comissão Padrão: Define a porcentagem de comissão padrão que é tomada pelo proprietário da loja na venda total feita pelo vendedor.

3. Categorias permitidas: As categorias permitidas para os vendedores adicionar produtos. Se nenhuma categoria for selecionada, todos os

4. Registre-se como campo do vendedor: Ativa ou desativa o campo Registrar como vendedor na página Criar conta da frente da loja.

5. Ativar importação / exportação em massa: Ative o botão para permitir que os fornecedores terceirizados usem o recurso de importação / exportação em massa.

6. E-mail para o vendedor no lugar da ordem: Ative este campo para enviar um e-mail ao vendedor caso um pedido seja feito para o (s) produto (s) do vendedor.

7. Inclua JQuery: Desabilite este campo caso JQuery já esteja incluído na frente por outro plugin ou tema.

8. PAprovação necessária: Ative este campo caso seja necessária a aprovação do produto adicionado por qualquer vendedor antes que ele chegue à sua loja.

9. Ativar revisão do vendedor: Ative este campo caso você queira que os clientes possam analisar o vendedor.

10. Ativar lista de vendedores: Ative este campo caso você queira mostrar um link no rodapé da frente da loja para a página de listagem do vendedor. Se essa configuração estiver desativada, a página de listagem do vendedor não poderá ser acessada de qualquer maneira.


11. Ativar modo de férias: Ative este botão para permitir que os vendedores definam o modo de férias para sua loja por um determinado período de tempo.

12. Mostrar informações do vendedor Página do produto: Ative o botão para mostrar as informações do vendedor na página do produto.
13. Novo Limite de Produto:?Enter the maximum numbers of products that a new seller can add before the seller account is approved.

14. Aprovação da revisão do vendedor necessária:Ative este campo caso você queira que a revisão do vendedor seja aprovada antes de se tornar visível na frente da loja.

15. Ativar caixa de pesquisa: Ative este campo caso você queira que uma caixa de pesquisa na página de listagem de vendedores pesquise os vendedores.

Configuração baixa de estoque

1. Ativar notificação de estoque baixo: Ative o botão para notificar os vendedores sobre a baixa notificação de estoque.
2. Limite baixo de inventário: Insira o nível de estoque abaixo do qual o vendedor será notificado sobre o estoque baixo.
3. Quando notificar: Selecione quando você enviará a notificação. Pode ser enviado quando o pedido é feito ou após a execução do cron.
4. Enviar notificação De: selecione o ID de email do qual você deseja enviar a notificação. Quando essa funcionalidade é ativada no back-end do módulo do Magento Marketplace, os fornecedores podem definir a configuração de baixa disponibilidade na seção Baixa de estoque de seu painel.

Go?to?the?configuration?section?of?the?Low?Stock?tab?of?the?dashboard.

Limite baixo de inventário: Os vendedores podem inserir o limite de estoque abaixo do qual desejam ser notificados.
Receber notificação de estoque baixo: Selecione se você deseja receber a notificação de baixa ou não.

Lista de vendedores 4.2

Esta página da extensão do mercado Magento tem uma lista de todos os vendedores que são aprovados pelo dono da loja.

A lista acima contém uma lista de todos os vendedores aprovados. Existem botões para ir aos produtos e pedidos do vendedor na frente de cada vendedor.

Quando você clica no botão Pedidos, uma nova página é aberta, consistindo na lista de todos os pedidos desse vendedor em particular.

Quando você clica no botão Produtos, uma nova página é aberta, consistindo na lista de todos os produtos desse vendedor em particular.

O também é um recurso para ativar ou desativar qualquer vendedor usando o recurso Ações em massa da Grade. Para ativar / desativar qualquer vendedor, selecione o (s) vendedor (es), escolha a ação (ou seja, Ativar ou Desativar) e clique no botão Enviar para concluir a ação.

Se um vendedor for desativado, todos os produtos desse vendedor também serão desativados e não estarão visíveis na frente da loja.

Produtos para Vendedores 4.3

Esta página da extensão do mercado de múltiplos fornecedores Magento consiste em todos os produtos aprovados adicionados pelo (s) vendedor (es) à loja.

Se as configurações (isto é, Aprovação de produto necessária) estiverem desabilitadas,

Excluir Produto: Para excluir um produto, você precisa clicar no botão Excluir na frente desse produto.

Um pop-up aparecerá perguntando o motivo da exclusão do produto. Para completar a ação, preencha o motivo e clique em enviar.

Um e-mail será enviado ao vendedor para notificar a exclusão do produto. O email também contém o motivo que você forneceu para a exclusão do produto.

Nota:- A ação de exclusão do produto não pode ser desfeita. Por favor, use este recurso com cuidado.

Ativar / Desativar Produto: Para alterar o status de qualquer produto, você precisa usar o recurso Ação em massa da Grade. Para ativar / desativar qualquer produto, selecione o (s) produto (s), escolha a ação (ou seja, Ativar ou Desativar) e, em seguida, clique no botão Enviar para concluir a ação.

Nota:- Quando um produto é desativado do back-end do plug-in do Marketplace do Magento Multi vendor, ele não será visível na frente. Evite desabilitar produtos, somente desative um produto se for muito necessário.

4.4 Opiniões

Esta página da extensão do mercado de vários vendedores Magento contém uma lista de todas as revisões feitas pelos clientes nos produtos do vendedor.

Veja a análise do produto: A maioria dos detalhes da revisão do produto já é mencionada na grade, mas alguns deles não são. Para ver todos os detalhes de qualquer Revisão do Produto, clique no botão Exibir na frente dessa revisão. Um pop-up aparecerá no back-end do plugin de mercado de vários fornecedores Magento, com todos os detalhes da revisão do produto.

Para editar a revisão, você pode clicar no botão Editar no pop-up que irá redirecioná-lo para a página de revisão de edição.

Excluir análise do produto:A extensão do mercado de múltiplos fornecedores Magento permite que o administrador da loja exclua as revisões do produto. Para excluir uma revisão do produto, você deve clicar no botão Excluir na frente da revisão do produto na lista.

Um pop-up aparecerá perguntando o motivo da exclusão da revisão do produto. Para completar a ação, preencha o motivo e clique em enviar.

Nota :- A ação de exclusão da revisão do produto não pode ser desfeita. Por favor, use este recurso com cuidado.

4.5 Sellers Comentários

Esta lista contém uma lista de todas as avaliações de vendedores realizadas pelos clientes na loja.

Se as configurações (Exigência de revisão do vendedor necessárias) estiverem desabilitadas, a revisão do vendedor será aprovada diretamente quando for adicionada pelo cliente e aparecer nessa lista. Caso contrário, a revisão será exibida pela primeira vez na lista Aprovação de revisão do vendedor.

Nota:- As Revisões do vendedor reprovadas pelo proprietário da loja também aparecem nesta lista.

Ver resenha do vendedor: Para visualizar todos os detalhes de uma análise de vendedor, você deve clicar no botão Visualizar na frente dessa revisão na lista.

Ao clicar no botão Visualizar, um Pop-up aparecerá com todos os detalhes da revisão do vendedor correspondente.

Pedido de aprovação da conta de vendedor 4.6

Quando um vendedor se registra como vendedor em sua loja do que aparece pela primeira vez nesta lista da extensão de mercado de vários fornecedores do Magento, como mostrado na imagem abaixo. Então, cabe ao administrador da loja aprovar ou reprovar a solicitação da conta do vendedor.

Aprovar conta do vendedor: Para aprovar uma conta de vendedor, você precisa clicar no botão Aprovar na frente desse vendedor na lista.

Depois que a conta do vendedor é aprovada, ela é movida diretamente para a Lista de Vendedores e todos os limites da conta do vendedor são liberados.

Um e-mail será enviado ao vendedor para notificar a aprovação da conta do vendedor.

Nota :- As contas do vendedor aprovadas pelo proprietário da loja não podem ser desfeitas. Por favor, use este recurso com cuidado.

Reprovar a conta do vendedor: Para reprovar uma conta de vendedor, você precisa clicar no botão Reprovar na frente do vendedor na lista.

Um pop-up aparecerá perguntando o motivo da desaprovação da conta do vendedor. Preencha o motivo e envie o formulário para concluir a ação.

Um e-mail será enviado ao vendedor notificando a desaprovação da conta do vendedor. O motivo fornecido no pop-up também será enviado neste e-mail.

Nota :- Depois que um vendedor for reprovado, ele poderá solicitar novamente a conta do vendedor e, sempre que um vendedor fizer isso, o proprietário da loja será notificado por meio de um e-mail de notificação.

4.7 Lista de Aprovação de Revisão do Vendedor

Esta lista do mercado de múltiplos fornecedores da Magento contém todas as Revisões do Vendedor que são postadas pelos clientes e nenhuma ação é tomada sobre elas.

Se as configurações (por exemplo, Aprovação de revisão do vendedor exigida) estiverem ativadas, somente qualquer análise do vendedor publicada por qualquer cliente aparecerá nessa lista, caso contrário, ela aparecerá diretamente na lista de resenhas do vendedor.

Ver resenha do vendedor: Para visualizar todos os detalhes de uma análise de vendedor, você deve clicar no botão Visualizar na frente dessa revisão na lista.

Ao clicar no botão Visualizar, um Pop-up aparecerá com todos os detalhes da revisão do vendedor correspondente.

Aprovar revisão do vendedor: Para aprovar uma revisão do vendedor, você deve clicar no botão Aprovar na frente dessa revisão na lista.

Depois que uma revisão do vendedor é aprovada, ela fica visível no front end e é transferida para a lista de revisão do vendedor.

Nota:- Essa ação não pode ser desfeita. Por favor, use-o com cuidado.

Reprovar a análise do vendedor: Para reprovar uma resenha de vendedor, você precisa clicar no botão Desaprovar na frente da resenha na lista.

Um pop-up aparecerá perguntando o motivo da desaprovação da análise do vendedor. Preencha o motivo e envie o formulário para concluir a ação.

Depois que a resenha do vendedor é reprovada, ela é transferida para a lista de resenhas de vendedores e não pode ser encontrada em nenhum outro lugar.

Nota:- Essa ação não pode ser desfeita. Por favor, use-o com cuidado.

Excluir resenha do vendedor: Para excluir uma resenha do vendedor, você deve clicar no botão Excluir na frente dessa revisão na lista.

Um pop-up aparecerá perguntando o motivo da exclusão da análise do vendedor. Preencha o motivo e envie o formulário para concluir a ação.

Depois que uma resenha do vendedor é excluída, ela é completamente removida de todos os lugares.

Nota:- Essa ação não pode ser desfeita. Por favor, use-o com cuidado.

Solicitação de aprovação do produto 4.8

Quando um vendedor adiciona um produto, em primeiro lugar, ele aparece aqui e o proprietário da loja também é notificado sobre o mesmo pelo correio. Então, cabe ao dono da loja aprovar ou desaprovar o produto.

Se a configuração (por exemplo, Aprovação do produto necessária) estiver ativada, somente um novo produto será adicionado nessa lista. Caso contrário, ele será exibido diretamente na Lista de produtos e será aprovado e ativado automaticamente.

Desaprovar o produto do vendedor: Para reprovar um produto, você precisa clicar no botão Desaprovar na frente dessa revisão na lista.

Um pop-up aparecerá perguntando o motivo da exclusão da análise do vendedor. Preencha o motivo e envie o formulário para concluir a ação.

Depois que um produto for reprovado, um e-mail será enviado ao vendedor, notificando a reprovação do produto. Os produtos reprovados também aparecem na mesma lista. O administrador da loja pode aprová-los a qualquer momento.

Aprovar produto do vendedor: Para aprovar um produto, você precisa clicar no botão Aprovar na frente dessa revisão na lista.

Depois que um produto é aprovado, ele é transferido dessa lista para a lista de Produtos do vendedor.

Nota: – Esta ação não pode ser desfeita. Por favor, use-o com cuidado.

Lista de solicitações de categorias 4.9

Um vendedor pode adicionar o produto a categorias permitidas a esse vendedor. No caso, o vendedor precisa adicionar um produto a uma categoria que não é permitida, então, o vendedor pode solicitar o mesmo. Todas essas solicitações de categoria aparecem na lista Solicitação de categoria por vendedor do módulo do mercado de vários fornecedores Magento, conforme mostrado abaixo. Um e-mail também é enviado ao proprietário da loja para notificar a solicitação de categoria. Então, cabe ao proprietário da loja aprovar ou reprovar a solicitação.

Aprovar solicitação de categoria: Para aprovar uma solicitação de categoria, você deve clicar no botão Aprovar na frente da solicitação dessa categoria na lista.

Um pop-up aparecerá no back-end da extensão do mercado de vários fornecedores Magento perguntando o motivo da aprovação da solicitação de categoria. Preencha o motivo e envie o formulário para concluir a ação.

Nota:?This action cannot be undone. Please use it carefully.

Reprovar solicitação de categoria: Para reprovar uma solicitação de categoria, você precisa clicar no botão Reprovar na frente da solicitação dessa categoria na lista.

Um pop-up aparecerá perguntando o motivo da desaprovação da solicitação de categoria. Preencha o motivo e envie o formulário para concluir a ação.

Nota: – Esta ação não pode ser desfeita. Por favor, use-o com cuidado.

4.10

4.10.1 Reports -> Produtos mais vendidos

A guia Relatório do mercado de vários fornecedores Magento

Os filtros ajudam o proprietário da loja a identificar o produto mais vendido:

  • Para um período.
  • Para uma categoria específica.
  • Para um vendedor específico.

Nota :- Às vezes, é possível que você não consiga encontrar nenhum dado neste relatório. Nesse caso, você precisa atualizar as estatísticas do relatório e, para isso, precisa fazer o seguinte:

Vá para Relatórios -> Atualizar Estatísticas -> Selecione os Relatórios Desejados para Atualizar -> Submeter

Or

Clique no botão Atualizar Estatísticas no topo desta página.

Transações 4.11 e ganhos

Transações 4.11.1 e ganhos -> comissões

A lista da Comissão da extensão do mercado de múltiplos fornecedores Magento contém todas as comissões recebidas pelo dono da loja em várias ordens com porcentagem de comissão e venda total do vendedor.

Transações 4.11.2 e ganhos -> comissões sábias de categoria

A página Transações e ganhos do módulo de mercado de vários fornecedores Magento mostra o relatório das comissões recebidas pelo proprietário da loja. Este relatório mostra o total de comissões recebidas pelo proprietário da loja de um vendedor. O dono da loja também pode usar filtros para filtrar a categoria de relatórios de comissão.

Esse recurso oferecido pela extensão de mercado de vários fornecedores do Magento ajuda o proprietário da loja a identificar comissões de diferentes categorias e qual categoria produziu a quantidade de comissão.

4.11.3?TransaçõesSeller?wisetransaçao

O sistema não transfere automaticamente o valor na conta do vendedor. Daí o dono da loja tem que manter registros do saldo para todos os vendedores e transferir manualmente o dinheiro para o vendedor e, em seguida, insira os detalhes da transação para manter um registro do mesmo.

Esta lista contém todas as variações de saldo para todos os vendedores no sistema. A lista mostra as vendas totais do vendedor, vendedor, sua comissão. Esta lista ajuda o dono da loja a identificar os ganhos e categorizá-los de acordo com o vendedor.

4. 11.3.1?Comoo?Visão?

Para visualizar os detalhes das transações feitas para um determinado vendedor, você deve clicar no botão Exibir na frente desse vendedor.

Ao clicar no botão Visualizar na frente de qualquer vendedor, uma nova página será aberta com uma lista de todas as transações feitas para o vendedor correspondente.

Você também pode adicionar uma nova transação para o vendedor atual clicando no botão Adicionar Nova Transação na parte superior direita do plug-in do mercado de vários fornecedores Magento.

4.11.3.2 como?to?Add?Novo?in?the?seller 's?payFora?details?

Para adicionar um novo detalhe de transação a qualquer vendedor, você deve clicar no botão?Add New Transaction?buuton corresponding to respective sellers.

Ao clicar no botão, aparece um pop-up solicitando os detalhes da transação. Preencha o formulário e envie o formulário para concluir a ação.

Os vários campos do pop-up são discutidos:

Nome do Vendedor: Selecione o nome do vendedor na lista suspensa.
Transação ID: Digite o ID da transação aqui.
Valor: Selecione se o valor foi debitado ou creditado e, em seguida, insira o valor.
Comente: Digite um comentário sobre a transação. Além disso, o administrador pode até adicionar uma nova transação na conta do vendedor clicando no botão Criar novo correspondente a cada conta do vendedor.

Nota :- Essa ação não pode ser desfeita. Por favor, use-o com cuidado.

4.11.4?Transações e ganhos ->Vendaer?PayFora

Esta página contém uma lista de todas as transações realizadas até a data para todos os vendedores disponíveis no sistema.

Você também pode adicionar uma nova transação para qualquer vendedor clicando em Adicionar nova transação botão no canto superior direito da página acima.

Transações e ganhos 4.11.5 -> Solicitação de pagamento do vendedor

O vendedor pode enviar uma solicitação de pagamento ao administrador da loja no painel de controle. O pedido do vendedor é visto pelo administrador a partir desta aba da extensão do Magento Marketplace.

Ao clicar neste link, o vendedor será redirecionado na seção do painel, como mostra a imagem abaixo:

4.11.5.1 Como os vendedores podem adicionar uma nova solicitação de pagamento ao painel?

Antes que o vendedor possa solicitar o pagamento, ele precisa configurar o pagamento no menu Perfil do Painel. Os vários campos que devem ser preenchidos nesta seção são discutidos abaixo:

Selecione o método de pagamento: Os vários métodos de pagamento no menu suspenso. Selecione o método que você deseja usar para o pagamento. Existem três opções disponíveis por padrão:

  • Transferencia Bancária
  • Pagamento por cheque
  • PayPal

1. Transferência bancária:
Ao selecionar as opções de transferência bancária, você deverá fornecer as seguintes informações.

Dono da conta: Digite o nome do proprietário da conta em que o valor deve ser transferido.
detalhes: Esta seção inclui os detalhes bancários, como agência bancária, número IBAN, BIC etc.
Endereço do Banco: Digite o endereço do banco.
Informação adicional: Forneça todas as informações que você gostaria de compartilhar com o administrador da loja.

2. Pagamento por cheque

Pagar para a ordem de: Digite o nome para o qual o cheque deve ser emitido.
Morada: Forneça o endereço para enviar o cheque nesta seção.
Informação adicional: Forneça todas as informações que você gostaria de compartilhar com o administrador da loja.

3. PayPal
Caso você selecione, PayPal, você deverá inserir seu ID de e-mail do PayPal. A seção de informações adicionais permite fornecer qualquer informação que você gostaria de compartilhar com o administrador da loja.

Depois que o método de pagamento é configurado no perfil do vendedor, o fornecedor se torna elegível para enviar as solicitações de pagamento. Para adicionar uma nova solicitação de pagamento, clique em "+" na seção Nova solicitação de pagamento, conforme mostrado na imagem abaixo:

Preencher

Valor: Digite o valor da solicitação de pagamento.
Motivo da Solicitação: Digite o motivo da solicitação de pagamento. A solicitação de pagamento é, então, enviada ao administrador para aprovação. As solicitações de pagamento aprovadas, reprovadas ou aguardando aprovação podem ser visualizadas na seção de solicitação de pagamento, conforme mostrado abaixo:

O administrador da loja pode visualizar todas as solicitações de pagamento dos vendedores do mercado no back-end da extensão do mercado de fornecedores do Magento Multi.

Ao clicar no botão Aprovar, um pop-up será exibido. Insira o ID da transação e o comentário para aprovar a solicitação do vendedor.

Transações 4.11.6 e ganhos -> Configurações de pagamento do PayPal

As configurações de pagamento do PayPal da extensão do Marketplace do Magento Multi Seller permitem que o administrador da loja ative os métodos do PayPal para o pagamento. Digite os detalhes necessários, conforme discutido abaixo:

Ativo: Alterne o botão para ativar o método de pagamento do PayPal.
ID do Cliente: Digite o ID do cliente da sua conta do PayPal.
Segredo do Cliente: Digite o segredo do cliente da conta do PayPal.
Modo de PayPal: Selecione o modo PayPal no menu suspenso.
ID do email do PayPal: Digite o ID de e-mail usado em sua conta.
Moeda do PayPal: Selecione a moeda padrão para a transação do PayPal.

4.12

A guia Modelos de email do módulo de mercado de vários fornecedores Magento contém uma lista de todos os modelos de emails usados ​​no sistema com todos os detalhes dos modelos de email.

Editar modelo de email: Para editar um modelo de email, clique no botão Edit Template na frente de qualquer modelo de email.

Ao clicar no botão Editar Modelo, uma nova página é aberta com um formulário para o modelo de email. Você pode alterar o modelo de email como desejado na interface de administração do mercado de múltiplos fornecedores Magento.

Para salvar as alterações feitas no modelo de email, clique no botão Salvar modelo no canto superior direito da página acima.

Nota :- Ao editar o modelo de e-mail, lembre-se de não editar nenhum texto entre as chaves (ou seja, {{var any_var}}).

4.13. Modo de férias

Os vendedores têm a opção de desativar sua loja no mercado por um determinado período de tempo. O pedido dos vendedores para entrar no modo de férias pode ser visto nesta seção do módulo do Magento Marketplace. Para definir o modo de férias, os vendedores podem acessar a guia Modo de férias de seu painel.

A guia mostra todo o histórico de férias do vendedor, conforme mostrado na imagem abaixo:

4.13.1 Como definir o modo de férias?

Para definir o modo de férias, clique em 'Definir novas fériasbotão.

On?clicking?the?button,?a?popup?will?appear?as?shown?in?the?image:

Data de início e fim: Digite a data de início e término das férias.
Seu comentário para esta viagem: Digite um comentário para o modo de férias.

O administrador pode ver a lista do vendedor que está de férias na aba Férias do plug-in Magento Marketplace. Para ver os detalhes das férias, clique em Visão botão. O administrador pode cancelar o pedido clicando no Cancelar botão.

Um popup será exibido. Digite o motivo para cancelar o modo de férias e enviar. Uma notificação por e-mail é enviada ao vendedor informando sobre o cancelamento das férias.

4.14. Importação / Exportação em Massa

O administrador pode oferecer esse recurso de importação e exportação em massa para os vendedores, ativando o mesmo a partir do back-end.

Se ativado, o vendedor pode importar ou exportar os produtos em massa de seu painel.

Os fornecedores podem importar / exportar os produtos em massa a partir da guia Importação / Exportação do Produto, conforme mostrado abaixo:

4.14.1?Como?Importae?produtos?in?bulk?

Tipo de produto: Selecione o tipo de produto que você está enviando. O plug-in do Magento Multi Seller Marketplace suporta todos os tipos de produtos, isto é, simples, configuráveis, virtuais e outros.

Conjunto de atributos do produto: Selecione o conjunto de atributos dos produtos na lista suspensa.

Baixar arquivo de modelo: Você pode fazer o download do arquivo de modelo na planilha do Excel para o atributo selecionado clicando neste botão. Certifique-se de que as colunas no seu arquivo devem corresponder ao arquivo de modelo criado para você com base no atributo selecionado.

Ação de importação: Selecione a ação de importação na lista suspensa. A ação só será executada com base no SKU dos produtos. Sem o SKU, o produto não será considerado para nenhuma ação.

Carregar arquivo: Carregue o arquivo com os detalhes do produto aqui. Clique no Validar arquivo para concluir a importação.

4.14.2 Como exportar os produtos em massa?

O vendedor pode exportar os detalhes do produto listados no mercado nesta seção. Selecione o tipo de exportação no menu suspenso e clique em Exportar. Os detalhes serão exportados em uma planilha de excel.

4.15. Instrução Cron

Esta aba oferece duas opções de cron. Execute o cron de férias para implementar as alterações feitas na guia Férias do módulo Mercado de múltiplos fornecedores do Magento no front-end do mercado. Execute Cron de notificação de estoque baixo para enviar o e-mail de notificações de estoque baixo aos vendedores.

5.0 Registre-se como campo do vendedor – Registrar a página

Se um novo cliente está se registrando na loja do mercado Magento, então, há um campo adicional na Página de Registro. Se o cliente quiser se registrar como vendedor, o cliente deve marcar esse campo.

Depois que a conta é criada, os vendedores têm acesso ao painel. O painel do vendedor oferece várias opções aos vendedores, conforme mostrado na imagem abaixo:

Eles

oViewPerfil‘?button.?Additionally,?they?can?even?see? their?collection?by?clicking?on?the?’VisãoCollEção‘?Button.


Link para o Módulo do Mercado de múltiplos fornecedores Magento: https://www.knowband.com/magento-multi-vendor-marketplace-plugin

Manual do usuário do Magento Multi vendor Marketplace https://www.knowband.com/blog/user-manual/magento-market-place/

Magento Multi-vendor Marketplace Admin Demo Link:
https://marketplace.knowband.com/index.php/admin/dashboard/index/key/a35031d5a24beb0c5a0d4b03bce99a2b/

Link de Demonstração da Frente do Mercado Magento: https://marketplace.knowband.com/

Link de Vídeo do Mercado Magento: https://www.youtube.com/watch?v=AiEtl88Jng4

Gostou disso? Você também vai gostar disso


Magento Bird View Analytic – User Manual

Steps For Installation of Magento Bird View Analytic Extensions

1. Download the zip from Magento store & unzip into a folder.

2. After unzip, following files/folders will be extract as shown in below screen:

3. Login via FTP & Drag drop all the folders into your server root directory.

4. You will find the extension link will be displayed under System >> Bird View Analytic.

Admin Module

This module will basically work and visible in admin panel. There is no interaction of customers with this module and only admin has access of this module.

After copy this module, a link to access this module will be displayed under System >> Bird View Analytic menu as shown below screen:

After clicking on this link, module page will be open as shown in below screen:


There are following tabs are displaying on left side in above screens. Each tab has different functionality which are described below in details :

General Settings

On clicking the module link, this tab will be open by default as shown as above screen. This tab has setting of this module. Each setting is explained below:

Extension Settings

1. Activate: This setting will enable/disable the working of this module. There is switch button to ON/OFF this module. By default, it will be turn OFF.

2. Show on Dashboard: This setting will be used for display following reports on dashboard.

a) Order report

b) Today report.

c) This Week report

d) This Month report

e) This Year report

This setting will display/hide all the above reports. By default, this setting will be ON.

Default Dashboard Reports

This section has for configure settings for dashboard reports.

1. Order Report: Display/hide report on dashboard. By default, this will be ON.

2. Today Report: Display/hide report on dashboard. By default, this will be ON. Admin can also set order of this report.

3. This Week Report: Display/hide report on dashboard. By default, this will be ON. Admin can also set order of this report.

4. This Month Report: Display/hide report on dashboard. By default, this will be ON. Admin can also set order of this report.

5. This Year Report: Display/hide report on dashboard. By default, this will be ON. Admin can also set order of this report.

Report Interval Settings

Here admin can set time interval for reports for which he/she wants to display initially. There are various time interval which will be displayed in dropdown list with each report. These time interval are:

1. Last 7 Days

2. Last 15 Days

3. Current Month

4. Last Month

5. Current Year

Admin can set time interval for various below reports:

1. Dashboard Order Report

2. Sales by catalog

3. Mostly Viewed Items

4. Sales by Time

5. Sales by Customer Group

6. Sales by Country

Dashboard Statistics

This tab will display all those reports which will be displayed on dashboard. There will be no impact of dashboard report settings on this tab. On clicking this tab, following report will be displayed as shown in below screen:

1. Order Report: This is sales report which will display:

a)Total Revenue, b) Total Orders, c) Total Tax, d) Total Shipping and e) Total Product Sold. This report will be displayed in graphical form.

2. Today Report: This report will display today report. The percentage parameter will show the percentage increase/decrease in corresponding parameter after comparing with previous day.

3. This Week Report: This report will display this week report. The percentage parameter will show the percentage increase/decrease in corresponding parameter after comparing with previous week.

4. This Month Report: This report will display this month report. The percentage parameter will show the percentage increase/decrease in corresponding parameter after comparing with previous month.

5. This Year Report: This report will display this year report. The percentage parameter will show the percentage increase/decrease in corresponding parameter after comparing with previous year.

Report from point 2 to 3 will display following parameters:

1. Orders
2. Revenue
3. Product Sold
4. Discounts

On hovering any percentage value, module will display corresponding parameter values with previous value as shown in below screen:

If the previous value of any parameter is 0, then module will display N/A label instead of displaying percentage increase/decrease as shown in below screen:

Sales By Catalog

Here admin can see product sold report as well as category report according to selected report type. By default, module will display sales by product report as shown in below screen:

Admin can also filter the report by selecting following parameters in filter option:

1. Report Type: This will be a drop down list which has two options: a) Product and b) Category. With this option, module will display report accordingly. By default, product type will be selected.

2. Status: This will be a drop down list which will display all the order status.

3. Start Date: Required field. This will be a date field. Module will display report onwards of this date. Initially, module will calculate start date according to saved time interval in general setting.

4. End Date: Required field. This will also be a date field. Module will display report before of this date. Initially, module will calculate end date according to saved time interval in general setting.

5. Reset Button: This action will display corresponding report according to default values.

6. Export as CSV: Export and download report according to filter parameters in CSV format.

Graphical Report

Tabular ReportThis section will display top 20 products/category report in graphical form. The graph will display report according to sale in percentage. X-axis label will display product SKU (in case of product type) and category name (in case of category type) report. And Y-axis show sales in percentage.

Tabular Report

In this section, Product/category report will be displayed in tabular format. There are following columns will be displayed in this table :

1. Product/Category Name
2. SKU(in case of product type report)
3. Sale (in %)
4. Quantity (Number of quantity sold)
5. Total Sale (in money)

Mostly Viewed Items Report

Here admin can see mostly viewed/popular report of products as well as category according to selected report type and date interval. By default, module will display mostly viewed products report as shown in below screen:

Filter Parameters

Admin can also filter the report by selecting following parameters in filter option:

1. Report Type: This will be a drop down list which has two options: a) Product and b) Category. With this option, module will display report accordingly. By default, product type will be selected.

2. Category List: This will be a drop down list which will display all active category in the system. Here admin can select multiple categories to filter report. By default, all active categories will be listed. Required field incase of report type of category.

3. Product List: This will also be drop down list which will display all the simple type products. Here admin can select multiple products as well as search the product in drop down. On selecting category, module will refresh this product list and display only selected category products. If the report type is Category then this list will be hide. By default, module will display all simple type products and report will be display for all products. Required field in-case of report type of product.

4. Start Date: Required field. This will be a date field. Module will display report onwards of this date. Initially, module will calculate start date according to saved time interval in general setting.

5. End Date: Required field. This will also be a date field. Module will display report before of this date. Initially, module will calculate end date according to saved time interval in general setting.

6. Reset Button: This action will display corresponding report according to default values.

7. Export as CSV: Export and download report according to filter parameters in CSV format.

Graphical Report

This section will display top 20 products/category report in graphical form. The graph will display report according to number of views. X-axis label will display product SKU (in case of product type) and category name (in case of category type) report. And Y-axis show number of views.

Tabular Report

In this section, Product/category report will be displayed in tabular format. There are following columns will be displayed in this tab:

1. Product/Category Id
2. Product/Category Name
3. Product type (in case of product type report):
4. SKU(in case of product type report)
5. Views (in %)
6. Number of views

Sales By Time

In this tab, admin can see sales report according to time. This tab will display 3 types of report as per time. Here time have been divided into following category:

1. Days of Week (Display report for only days of week i.e Monday to Sunday)

2. Months of Year (Display report for only months of year i.e January to December)

3. By Years (Display year report)

By default, module will display days of week report as shown in below screen:

Filter Parameters

Admin can also filter the report by selecting following parameters in filter option:

1. Start Date: Required field. This will be a date field. Module will display report onwards of this date. Initially, module will calculate start date according to saved time interval in general setting.

2. End Date: Required field. This will also be a date field. Module will display report before of this date. Initially, module will calculate end date according to saved time interval in general setting.

3. Type: This will be a drop down list, which will display following options: a) Days of Week, b) Months of Year and c) By Years. By default, Days of Week will be selected.

4. Reset button: This action will display corresponding report according to default values.

5. Export as CSV: Export and download report according to filter parameters in CSV format.

Graphical Report

This section will display report according selected type in graphical form. The graph will display report according to sale(in money). X-axis label will display day name (in case of days of week type), month name (in case of Months of Year type) and year (in case of By Year type) report. And Y-axis show sales (in money).

Tabular Report

In this section, sales report will be displayed in tabular format. There are following columns will be displayed in this tables:

1. Label:

a) Day name(Monday – Sunday) in case of Days of Week report.
b) Month Name(January – December) in case of Months of Year report.
c) Year (2014, 2015 etc) in case of By Years report.

2. Sale (in %)

3. Total Orders

4. Quantity (Product Sold)

5. Total Sale (in money)

Sales By Customer Group

In this tab, admin can see sales report for each customer group. By default, module will display report according to saved time interval as shown in below screen:

Filter Parameters

Admin can also filter the report by selecting following parameters in filter option:

1. Start Date: Required field. This will be a date field. Module will display report onwards of this date. Initially, module will calculate start date according to saved time interval in general setting.

2. End Date: Required field. This will also be a date field. Module will display report before of this date. Initially, module will calculate end date according to saved time interval in general setting.

3. Reset button: This action will display corresponding report according to default values.

4. Export as CSV: Export and download report according to filter parameters in CSV format.

Graphical Report

This section will display report according selected type in pie chart. In pie chart, each section will highlight the corresponding sales data in percentage as shown in above screen.

Tabular Report

In this section, sales report will be displayed in tabular format. There are following columns will be displayed in this tables:

1. Group name
2. Tax class name (currently applicable)
3. Sale (in %)
4. Total Orders
5. Quantity (Product Sold)
6. Total Sale (in money)

Sales By Country

In this tab, admin can see sales report for each country. By default, module will display report according to saved time interval as shown in below screen:

Filter Parameters

Admin can also filter the report by selecting following parameters in filter option:

1. Start Date: Required field. This will be a date field. Module will display report onwards of this date. Initially, module will calculate start date according to saved time interval in general setting.

2. End Date: Required field. This will also be a date field. Module will display report before of this date. Initially, module will calculate end date according to saved time interval in general setting.

3. Reset button: This action will display corresponding report according to default values.

4. Export as CSV: Export and download report according to filter parameters in CSV format.

Graphical Report

This section will display report in world graph map. Each country will be highlighted with different color as per sale range. On hovering country, module display country name and sale(in money) from that country.

Sale Range

Sale is divided into 4 range as follow:

1. 1 Range: This range will indicate sale range above 60%.

2. 2 Range: Indiacate range between 35% to 60%.

3. 3 Range: Indicate range between 15% to 35%.

4. 4 Range: Indicate range less than 15%

5. The last one is not range. It will indicate only not found country.

Tabular Report

In this section, sales report will be displayed in tabular format. There are following columns will be displayed in this tables:

1. Country Code
2. Country Name
3. Sale (in %)
4. Total Orders
5. Quantity (Product Sold)
6. Total Sale (in money)

Dashboard Item

If any report is enabled to display on dashboard from general settings, then module will display them on dashboard. The report which will be displayed on dashboard is identical to report displaying in Dashboard Statistic Tab. For example, if all dashboard items are enabled then module will display reports on dashboard as shown in below screen:

Front End

There is no interaction of this module with users on front end. Only one functionality will work internally on front end which does not affect any other part of system.

Magento Ajax Popup Loginizer – User Manual

Steps For Installation of Magento Ajax Popup Loginizer Extension

Required Materials:

  • All files used by the extension.
  • FTP access to your website.

The connect manager is a useful tool for installing extensions, but prefer hands-on method when it comes to installations. It feels more comfortable when you are personally in control of the process. Do you see an app-code directory there, what about app-etc-modules? If you don’t see these directory paths and files contained within them, chances are that the extension download was faulty. Take a look at the package.xml file, this is the blueprint used by Magento Connect to arrange the files in the proper places. You may need to use this to ensure that everything is as it should be. Once you have reviewed the extension files you are ready to perform the last step. Using your FTP client, drag all of the files onto the store root of the magento instance.

Depending on the number of files in the extension, this may take a few moments. Now go to the admin console and click Flush Cache Storage. This is the requirement for any extension that adds pages to the admin console. Logging out and back in is also required to ensure that everything loads properly. If you cannot clear the cache via the admin console for any reason, you will need to clear the cache manually via your FTP client (see the first FAQ question for assistance). That is the final step. Congratulations on a successful installation.

Troubleshooting and FAQs

I loaded all files onto my Magento store, and now get a white screen for some or all of the admin console.

This is a fairly common problem, and 99% of the time it is cache related. If you can get to it, go to System->Cache Management and click Flush Cache Storage. This will ensure that everything cached by Magento is deleted and will to be regenerated. Log out and back in to complete the process.

If you are completely cut off from the admin console, navigate to the var-cache directory of your website. You should see a series of directories named mage*. Delete all of these directories (DO NOT DELETE var-cache). This is the equivalent of flushing the cache storage from the admin console.

I am receiving a Magento error when accessing certain pages. How can I debug this?

This question really deserves a blog post all to itself, but a good start would be to go into the errors directory of your store. Locate the local.xml.sample file and rename it local.xml. The next time you see the error detailed information will be provided explaining where the error took place. Dont forget to change this back when you are finished troubleshooting!

I have a critical error with my webstore and need to turn off an extension I cannot access the admin console. What do I do?

Go to the app-etc-modules directory and open the file that goes with your extension. The naming convention is generally DeveloperName_ExtensionName.xml. In this case it would be Vss_PopupLoginizer.xml.

Look for the active tags in the file, change the value from true to false and save your changes. This tells Magento that the extension is disabled and not to run any code associated to it. Deleting the Magento cache is recommended (and most likely required) for this change to take effect.

User Guide

1. To access the Ajax Popup Loginizer Module . Click on System menu and then click Popup Loginizer as seen below.

2. After clicking the module settings will display like shown below.

In modules top navigation bar, there are following controls:

  • Current Configuration Scope : This option is used to change the store configuration scope.
  • Save : This option is used to save the module settings.
  • Cancel : This option will cancel the current changes in settings.

General Settings

On clicking the module link, this tab will be open by default as shown as above screen. This tab has following options :

  • Activate Popup: This option is used to enable or disable the module.
  • Include Addon: This option is used to add Forgot form and Registration form with in popup. When there are included then user get the forgot password form and registration form within popup as shown in above Introduction section. Otherwise when user will click on forgot password or sign up link, he will be redirect to forgot password page or registration page respectively.
  • Text for Popup link: Enter the text you want to display as a link next to default login link i.e. in top links.
  • Include jQuery: jQuery i.e. a javascript framework is required for this plugin to work. Sometimes themes used in Magento already includes it but sometime they do not. If jquery is already included in your theme then deactivate else activate to include it.

We hope that we have covered all the concerns regarding the installation and product guide of this Magento Extension. You should also check our blog on Registration Related issues of Magento Ajax Popup Login.

Liked This? You’ll Like These Too
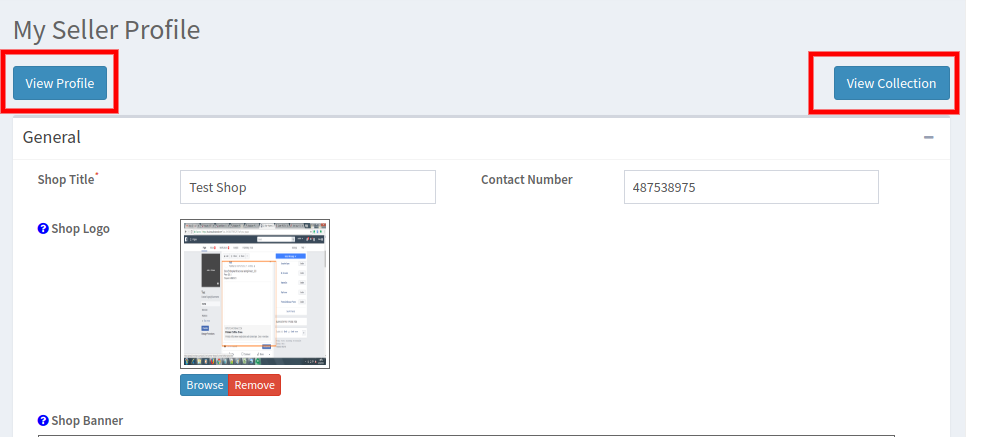
Knowband OpenCart Filter Pro Extension – User Manual
Introduction:

Knowband offers OpenCart Filter Pro extension which simplifies the product searching for your store customers. With the help of this improve filter module the e-merchant can showcase various filtering options on the website store. Thus customers can easily find the required product just by selecting the appropriate filter options.

Features:

  • The Opencart product filter module is very easy to install and configure.
  • The store admin can activate/deactivate the search filter plugin anytime.
  • The Opencart filter by price module offers a simple and hassle-free implementation.
  • You don’t need to change codes for implementation.
  • No technical help required for applying this functionality.
  • The store owner can allow the users to minimize/maximize the filter options.
  • AJAX-based navigation makes product searching faster.
  • You can show/hide the available products count.
  • Provide filtering based upon many options like attribute, brands, categories, discount etc.
  • The Opencart filter extensions allow the store owner to select the suitable location for showing filter options.
  • OpenCart custom filter extension allows setting sort order for filter options.
  • OpenCart attribute filter plugin Doesn’t conflict with any other module.
  • Checkbox layered navigation module offers free installation support.
  • Free support and future updates.

How to install OpenCart Filter Pro plugin on your server

1. Download the zip from OpenCart & unzip into a folder.

2. Open the upload directory & you will see following folder structure.

3. Login via FTP & Drag drop all the folders into your server root directory. You dont have to changet he default theme folder name to your theme folder name.

4. You will find the plug-in ready to be installed in the Modules of your OpenCart.

You must have VQMOD installed for this plug-in to work. If VQMOD is not installed please download and install from the URL below:
https://code.google.com/p/vqmod/

5. Click on Install link to install the plug-in.

6. Delete the vqcache files from the vqmod/vqcache folder.

7. To access settings of Filter Pro plug-in, click on the edit button for filter Pro in the list of modules as shown below.

8. Store admin will have various settings options categorized in the left column as shown:

1. General Settings tab

Admin can play with various settings to customize the module according to him/her. Settings provided under this tab are applicable to the entire module be it on any layout. Following settings options are available for it:

1. Enable/Disable: This is the global enable/disable switch for module. Enabling/Disabling this switch will enable/disable the entire module wherever applied.

2. Minimize/Maximize: Enabling this will give user the option to minimize and maximize each filter onstore front.

Clicking on the + icon will maximize the filter data and the +icon will change to a – icon.

3. Enable/Disable Ajax: If you switch it on, filtering would be done via Ajax otherwise on page refresh.

4. Show/Hide Product count: If you switch on this button, store front users will be able to see the products count with each filter.

If you switch this button off, you will not be able to see any product count with any filter.

2. Filter Options tab

Under this setting option, admin can choose which filters should be enabled for all layouts. Also, sort order for each filter can be put in here. Options are described as following:

1. Status for each category: Each filter namely category, Brands, Price, Discount and Product Attributes have option to be either enabled or disabled globally. If any of these filters are disabled,they will not appear on any module whether they are enabled on a layout or not.

2. Sort Order for each category: Each filter has a text box for entering a sort order. This sort order decides which filter may appear above another filter in the module.
Filter with smallest sort order will appear at the top of the module, largest at the bottom-most part of the module.

3. Filter Layout tab

Under this setting option, admin can choose to show specific filters for specific layouts on left or right positions.

In the filter option table, each filter has corresponding options for each layout.

1. Enable: To enable a filter, you must check enable the checkbox for that layout corresponding to the filter you want to enable. For example, if you want to enable Product attributes for the category layout, you will have to check enable checkbox under category layout corresponding to Product Attributes.

2. Position: You can choose to show an enabled filter on either left-hand side or right-hand side of the layout by selecting the position from the drop down in front of each filter.

Store Front

On the front- end, users will be able to view all enabled filters on the respective layouts on the respective positions (left, right).

  • On checking any of the check-boxes, product listing will happen according to the options chosen,also the chosen options will be displayed on top.

  • Clicking on close icon (as highlighted below) of any of these will remove that filter immediately and make a new product listing.

Each filter also has the option for clearing all the chosen options within a filter, clicking on the link
Clear will remove all filtering options, uncheck all the options for that filter and create a new product listing.

For more details please visit: 

Module Link: https://www.knowband.com/opencart-filter-pro

Admin Demo Link:

https://ocdemo.knowband.com/1.5/admin/index.php?route=module/filterPro&token=c4f245743f23ccbf154ba1ec9a69e002

Front Demo:  https://ocdemo.knowband.com/1.5/index.php?route=product/category

Please contact us at support@knowband.com for any query or custom change request as per your business requirement.

Magento Supercheckout Lite Version – User Manual

Steps for Installation of Magento One Page checkout Lite Extension

Required Materials:

  • All files used by the extension.
  • FTP access to your website.

The connect manager is a useful tool for installing extensions, but prefer hands-on method when it comes to installations. It feels more comfortable when you are personally in control of the process.

Do you see an app-code directory there, what about app-etc-modules? If you dont see these directory paths and files contained within them chances are that the extension download was faulty. Take a look at the package.xml file, this is the blueprint used by Magento Connect to arrange the files in the proper places. You may need to use this to ensure that everything is as it should be. Once you have reviewed the extension files you are ready to perform the last step. Using your ftp client, drag all of the files onto the store root of the Magento instance. Depending on the number of files in the extension, this may take a few moments.

Now go to the admin console and click Flush Cache Storage. This is the requirement for any extension that adds pages to the admin console. Logging out and back in is also required to ensure that everything loads properly. If you cannot clear the cache via the admin console for any reason, you will need to clear the cache manually via your FTP client (see the first FAQ question for assistance). That is the final step. Congratulations on a successful installation.

Troubleshooting and FAQs

I loaded all files onto my Magento store, and now get a white screen for some or all of the admin console.

This is a fairly common problem, and 99% of the time it is cache related. If you can get to it, go to System->Cache Management and click Flush Cache Storage. This will ensure that everything cached by Magento is deleted and will to be regenerated. Log out and back in to complete the process.

If you are completely cut off from the admin console, navigate to the var-cache directory of your website. You should see a series of directories named mage*. Delete all of these directories (DO NOT DELETE var-cache). This is the equivalent of flushing the cache storage from the admin console.

I am receiving a Magento error when accessing certain pages. How can I debug this?

This question really deserves a blog post all to itself, but a good start would be to go into the errors directory of your store. Locate the local.xml.sample file and rename it local.xml. The next time you see the error detailed information will be provided explaining where the error took place. Dont forget to change this back when you are finished troubleshooting!

I have a critical error with my webstore and need to turn off an extension I cannot access the admin console. What do I do?

Go to the app-etc-modules directory and open the file that goes with your extension. The naming convention is generally DeveloperName_ExtensionName.xml. In this case it would be Velsof_Supercheckout.xml.

Look for the active tags in the file, change the value from true to false and save your changes. This tells Magento that the extension is disabled and not to run any code associated to it. Deleting the Magento cache is recommended (and most likely required) for this change to take effect.

General Settings

1. To excess Magento Checkout Extension, Click on supercheckout option appearing as a sub menu in navigation menu under System main menu as shown below.

2. On clicking sub menu Free Supercheckout the module for plugin will open. It contains navigational bar at the top, menu at the left and main content in the center as shown below.

3. To enable the plugin, switch the enable button from OFF to ON which is just to the right of Enable/Disable label.

4. To enable guest registration, switch the button from OFF to ON which is just to the right of Register Guest Automatically label. Enabling this would result in registering the guest to your store and an automatically generated password would be mailed to that user.

5. To enable registration, switch the button from OFF to ON which is just to the right of Register Guest With Password label. On enabling this password and confirm password fields will appear so that customer can register from the checkout page itself.

6. To change the default option from Guest, Login or Register in Login section of checkout page, select an option from given radio button. The selected option will be set as chosen option by default.

7. To enable or disable guest checkout by the user check/uncheck the checkbox which is just to the right of Display Guest label.

Login Tab( Not in Free Version )

1. This tab basically contains setting to enable /disable Facebook and Google registration & login as shown below.

2. To enable Facebook Registration & Login switch the button from OFF to ON which is just to the right of Enable Facebook Login label. But before you do that do get Facebook APP ID and APP SECRET from https://developers.facebook.com.

3. Enter the APP ID and APP SECRET in their respective fields and save. You will find Facebook login button on your checkout page.

4. To enable Google Registration & Login switch the button from OFF to ON which is just to the right of Enable Google Login label. But before you do that do get Google APP ID, CLIENT ID and APP SECRET from https://code.google.com/apis/console. For detailed instructions to get the
APP ID, download the Facebook & Google Setup guide from oepncart accout.

5. Enter the APP ID, CLIENT ID and APP SECRET in their respective fields and save. You will find Google login button on your checkout page.

Payment Address Tab

1. This tab contains setting for the fields which is to be shown in Payment or Billing Address section in checkout page as shown below.

2. It consists of two sections. The one in the left is for Guest Customers and the right one for registered customers.

3. To make a field display/hide in the checkout page check the checkbox just to the left of Show label.

4. To make a field as mandatory (required field) check the checkbox just to the left of Require Label.

NOTE: The rearrangement of fields is not available in free version.

5. The fields can also be rearranged according to the requirement. To rearrange just move the cursor to the drag icon and drag & drop the field wherever it is required as shown below.

6. On saving, the fields will be rearranged as per the changes.

Shipping Address Tab

1. This tab contains setting for the fields which is to be shown in Shipping Address section in checkout page as shown below.

2. It consists of two sections. The one in the left if for Guest Customers and the right one for registered customers.

3. To make a field display/hide in the checkout page check the checkbox just to the left of Show label.

4. To make a field as mandatory (required field) check the checkbox just to the left of Require Label.

NOTE: The rearrangement of fields is not available in free version.

5. The fields can also be rearranged according to the requirement. To rearrange just move the cursor to the drag icon and drag & drop the field wherever it is required which is same as payment
address.

Shipping Method Tab (Not available in free version)

1. This tab contains settings for shipping method which is shown in checkout page. It basically contains settings for enabling/disabling and setting the default shipping method as shown below:


2. To Enable/Disable the shipping methods from the checkout page switch the button from ON to OFF or vice-versa. This will disable the shipping method block from checkout page. But you should select a default shipping method (if any installed) to apply shipping charges to the order.

3. To get a default shipping method selected in the checkout page select the default shipping method from the dropdown. If the selected shipping method is not installed it will automatically select from installed shipping method.

Payment Method Tab (Not available in free version)

1. This tab contains settings for payment methods shown in checkout page like enabling/disabling or selecting a default method.

2. To Enable/Disable the payment methods from the checkout page switch the button from ON to OFF or vice-versa. This will disable the payment method block from checkout page. But you should select default payment method (if any installed) to get a payment method in the checkout page.

Confirm Tab and Cart

1. This tab contains setting for the cart and confirming the order as shown below:

2. Its divide in two section

a. Cart
b. Confirm

Cart

NOTE: These configuration is not available in free version.

1. This tab is again divided into two sections, the left one is for Guest Customers and Right one for Registered or Logged in customers.

2. To Display/Hide cart from the checkout page check uncheck the checkbox present in front of Display Cart label.

3. To enable/ disable any column in the cart check/uncheck the checkbox in front of that respective column.

4. To enable/disable the popup images for the product check/uncheck the checkbox in front of that respective column.

5. To change the size of popup for images Enter the width and height of the popup in textbox in front of Pop Image Size label.

6. Coupon and Voucher options can also be disabled or enable by checking/unchecking the checkbox in front of that respective field.

Confirm

1. This tab is again divided into two sections, the left one is for Guest Customers and Right one for Registered or Logged in customers.

2. To enable the comment box for the order by customer check the checkbox in front of that Leave a comment for the order label & to disable uncheck the same checkbox.

3. To enable agree to the term or any other information saved in the admin for the store check/uncheck the checkbox in front of I agree to the conditions label.

Design Tab (Not available in free version)

1. This tab contains the settings for the design of checkout page in the catalog.

2. To change the width of any column adjust the slider present at the top as shown below :

3. Block of different steps can also be rearranged from one column to the other or in the same column as shown below:

4. On saving, the block will be rearranged in the checkout page as per the changes.

Cart Popup Tab (Not available in free version)

1. This tab contains the settings for pop up cart that appear on adding any product to the cart.

2. To enable the popup cart, switch the enable button from OFF to ON which is just to the right of Enable/Disable label as shown below:

3.Cart popup is divide in two section as shown below, left section shows the cart details while right section can be used for promotion.

Screen Shot

This is supercheckout page which will be shown to customer.

Hope that we have covered all the concerned regarding the installation of Magento Extension. If you have some worries about the Magento One Page Checkout check our blog HERE.

Related Stories:

Opencart Birds View – User Manual

How to install OpenCart Birds View Plugin on your server

1. Folder structure of BirdView plugin.

2. Open the upload folder and you will find the following folder structure:

You must have VQMOD installed for this plug-in to work. IfVQMOD is not installed please download and install from the URL below:
https://code.google.com/p/vqmod/

3. Select all the folder and drag and drop them to the root directory of your OpenCart storet hrough FTP.

4. You will be able find the plug-in ready to be installed in the Modules (Extensions -> Modules)in your OpenCart store as shown below.

5. Click on the Install link to install the plugin.

6. To enable the plugin, Go to Extension -> Module & edit the Birdview plugin.

7. Click on edit button in module section as shown below:

8. On clicking edit button, A module page will be displayed.

Features

1. Select enable for status field to enable the plugin.

2. Enable the chart to display the chart on admin.

3. Select enable for Today, Yesterday, Last Week, Last Month, Last Year option to enable to boxes
in the Admin Dashboard. If you want to disable any of the boxes, then select disabled option for
the particular boxes.

4. Each box i.e. Today, Yesterday, Last Week, Last Month, Last Years having type of data i.e.Order, Product, Discount, Revenue, Missing order.

  • Order: No of orders received
  • Product: No of products sold
  • Discount: Coupon/Voucher discount on sold product
  • Revenue: Total amount of sold products
  • Missing Order: Received missing orders.

5. Disable any columns to remove the data from boxes.

Screen shots