You don’t need to scratch your head thinking about the possible ways to bring back your abandoned customers nor do you need to expect for a miracle for getting back those lost customers as you can now avail the wonderful services of our OpenCart Abandoned Cart extension to limit the extent of damage incurred due to abandoned shopping carts. This extension has encouraged numerous people to complete their pending shopping carts and has surged the conversion rates to a great height making it as one of the top OpenCart modules among its other competitors. Here are some of its salient features that has placed it as one of the most favored choice for various e- commerce organizations for reclaiming their abandoned shopping carts.
Provides freedom to site admin for checking the performance of module
One of the important feature of this OpenCart extension is that it provides an easy mechanism to the site admin to analyze the performance of this module regarding conversion of the abandoned shopping carts. It provides a clear idea about how many shopping carts have actually been converted through the completion of the payment process of the pending shopping carts by abandoned customers.
Allow store owners flexibility to create their own customized email templates
With the help of top end features of this module, store owners now enjoy the flexibility to create customized email templates for their abandoned customers so as to persuade them to complete their pending shopping carts through regular time interval email messages. But, with this customized email templates, store owners can target their customers in a more effective manner using customer name, product information, eligible discount and shopping offers so that these abandoned customers can be tempted again to complete their pending shopping orders. Moreover, it has been observed that personalized messages do have a stronger impact on the minds of the customers and can make them complete their pending shopping orders by realizing them that they are an important part of your overall business activity.
Automatic handling of the email notifications
This OpenCart extension has an effective inbuilt email notification system that alerts abandoned customers about their pending shopping carts so that they can complete their pending orders at a suitable time later on. However, what is more amazing is the automatic email notification handling of this extension which stops sending email notifications to the targeted customers as soon as the customer completes a pending shopping order.
Helps in tackling the issue of abandoned carts in order to improve your conversion rates
With the help of the numerous wonderful features of this e- commerce module, business organization can reduce their abandoned shopping carts drastically by targeting their abandoned customers in a more focused manner. Due to its effectiveness against abandoned shopping cart retention, this OpenCart Abandoned Cart extension has carved out a niche place for itself among several e- commerce modules.
Provide added advantage to store owners by providing information about guest shoppers
This extension is not only effective against regular customers but can play a key role in the case of guest customers also. Now, store owners can get complete information about the abandoned shopping carts by the guest customers which allow them to target these guest customers through email notifications and can persuade them to complete their pending shopping orders thereby improving their overall conversion rates.
So, you don’t have to worry about those abandoned shopping carts as you can now have an effective second chance to tempt your abandoned customers for completing their earlier pending shopping orders. Don’t ignore those increasing abandoned shopping carts and take an effective action against them by purchasing this Opencart Abandoned Cart extension from our e- commerce site, www.knowband.com and set your sales counter ringing again.
There is no such hard and fast rule to achieve cent percent relief from the shopping cart abandonments on your e- commerce site but you can certainly tone down those huge numbers of shopping cart abandonments so as to improve your business fortunes. Shopping cart abandonments if left untackled can be a severe blow to your conversion rates and product sales. Further, it can also affect the online reputation and image of your e- commerce organization to a great extent. In order to persuade your customers to complete their pending shopping carts, you can avail the brilliant services and features of this OpenCart e- commerce extension known as OpenCart Abandoned Cart. Some of the features that can explain the benefits of having this OpenCart module on your e- commerce site are as follows:
Easy recovery of the abandoned shopping cart
There is a higher probability that your abandoned customers will return to your e- commerce site for completing their pending orders if they can easily recover their abandoned shopping carts. Thanks to this module, this complex task has become simplified with the help of a single click shopping cart recovery which is sent through the email notification. Due to this quick recovery, abandoned customers are more than willing to complete their pending shopping cart orders.
Allows easy maintenance of the shopping cart items
With the help of this OpenCart module, customers can get direct access to the product page of their e- commerce site so as to make faster and quicker changes in their abandoned shopping carts. Customers can easily add/remove any product, increase/decrease the quantity of each shopping cart or other such desired changes in their abandoned shopping carts through this plugin before proceeding finally towards the checkout process.
Provides store admin information about the abandoned orders and order number
Having information before hand about the abandoned orders and order number can help your e- commerce organization to target those abandoned customers more effectively so as to increase your conversion rates and product sales. Now, this module has made this crucial task much easier by providing store admin the complete information about abandoned orders and order number so that those customers can be retargeted and persuaded by your business organization again to complete their pending shopping orders.
Helps in the customization of the email templates
Customized email messages referring to a particular customer is seen to be most effective in driving back that abandoned customers towards your e- commerce store. This OpenCart extension provides facility to store admin to customize their email messages according to their business and customer requirements. They can easily make desired changes in the customer name, product information, discount and shopping offers of their reminder emails so as to be sent to their abandoned customers. Further, you can also create other email templates that can be sent to your targeted customers on a regular time interval.
Provide power to admin to decide the abandon time of the shopping cart along with the delay time of the reminder emails
It is important to set a time deadline upto which a shopping cart can be recovered by the customers so as to prevent the long term hold of the pending shopping carts. With this plugin, store admin can now easily set the specified time after which the shopping carts will be declared as abandoned and customers will not be able to recover them back. Similarly, they can also set the dealy time for their reminder emails so that their emails regarding the information of abandoned carts reach to their customers after a period of time so as not to frustrate the customers with continuous reminder email messages.
It can be understood that shopping cart abandonment is a serious issue which needs to be tackled with sincere efforts so as to avoid the long term damage to the social reputation and image of your e- commerce organization. Now, deal with this menace strongly by availing the services of our wonderful OpenCart plugin through our e- commerce store, www.knowband.com and make new additions into your existing customer base.
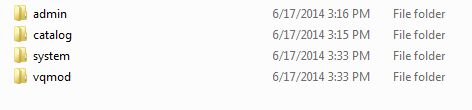
1. Download the zip from OpenCart & unzip into a folder. After unzip folder structure of Price alert plugin will be similar to shown in below screen.
2. Open the upload directory and you will see following folder structure.
3. Login via FTP & Drag drop all the folders into your server root directory. You don’t have the change the default theme folder name to your theme folder name.
You must have VQMOD installed for this plug-in to work. IfVQMOD is not installed please download and install from the URL below:
https://code.google.com/p/vqmod/
4. You will find the plugin ready to be installed in the Modules of your OpenCart.
5. Click on Install link to install the plugin.
6. Delete the vqcache files from the vqmod/vqcache folder.
7. To access Price Alert, Click on Pricealert link which is just to the right of Report Menuas shown below.
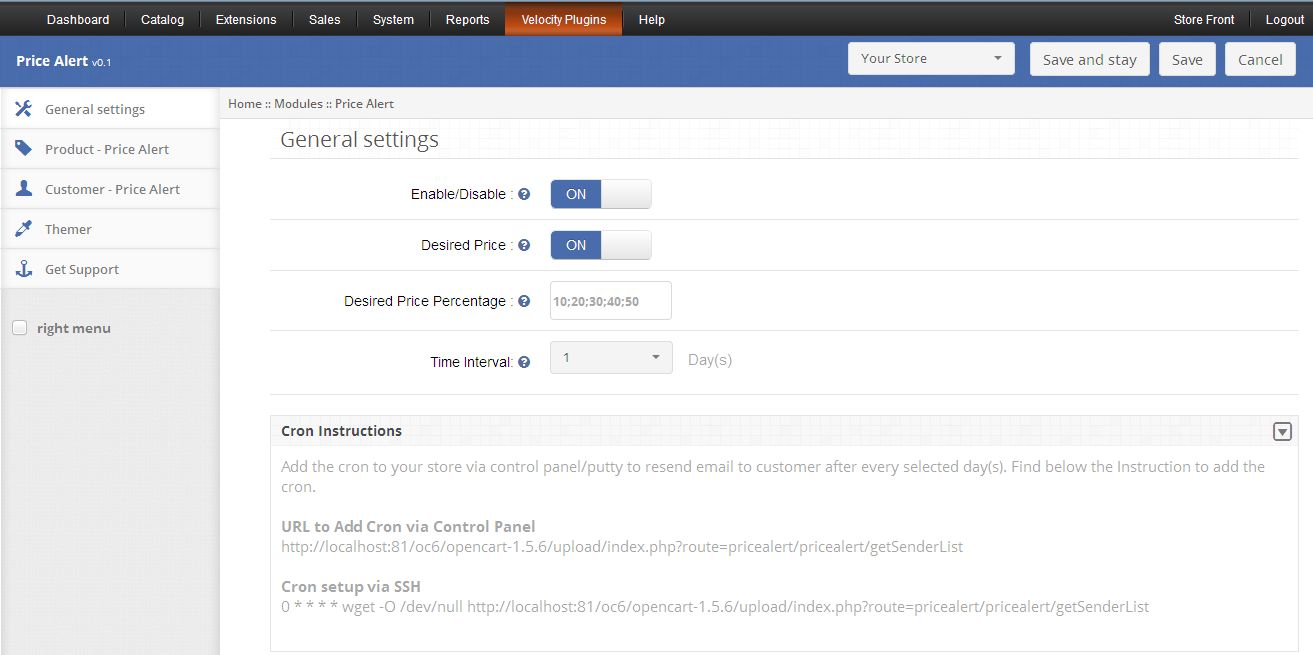
8. On clicking Price alert link the module for plug in will open. It contains navigational bar at the top, menu at the left and main content in the center as shown below.
1. General Settings
1. To enable the plug in, switch the enable button from OFF to ON which is just to the right of Enable/Disable label.
2. To enable Desired Price display on customer side, switch the button from OFF to ON which is just to the right of Desired Price label.
3. If you enable Desired Price then you must fill Desired Price Percentage field else error will come. You can give up to five percentage values here which will be shown to customers and these percentage must be separated by semicolon (;) as shown below:
4.E-mail Resend Days option enable admin to set number of days after which Price Alert will be send again to the customer. If its value is none then Price Alert will be sent only once, but if you set it to 4 days, then Price Alert will be sent repeatedly after every 4 days.
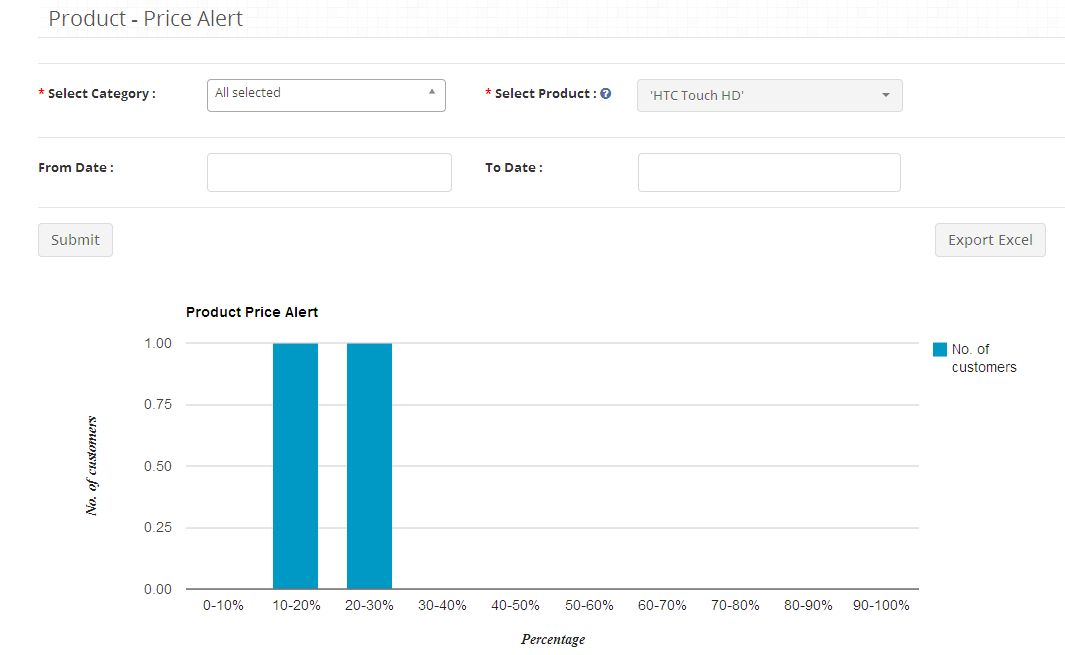
2. Product Price Alert Report
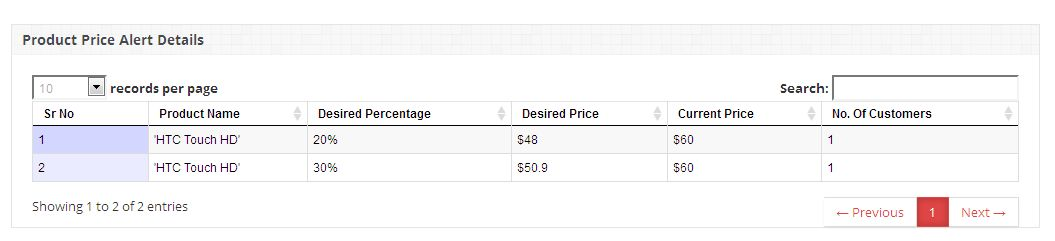
1. This tab shows admin, the Product Price Alert Report in tabular and chart form. Admin can set filter to fetch report for specific period of time or for a particular product.
2. You can also export the tabular report data in Excel format by clicking on export button.
3. Customer Price Alert Report
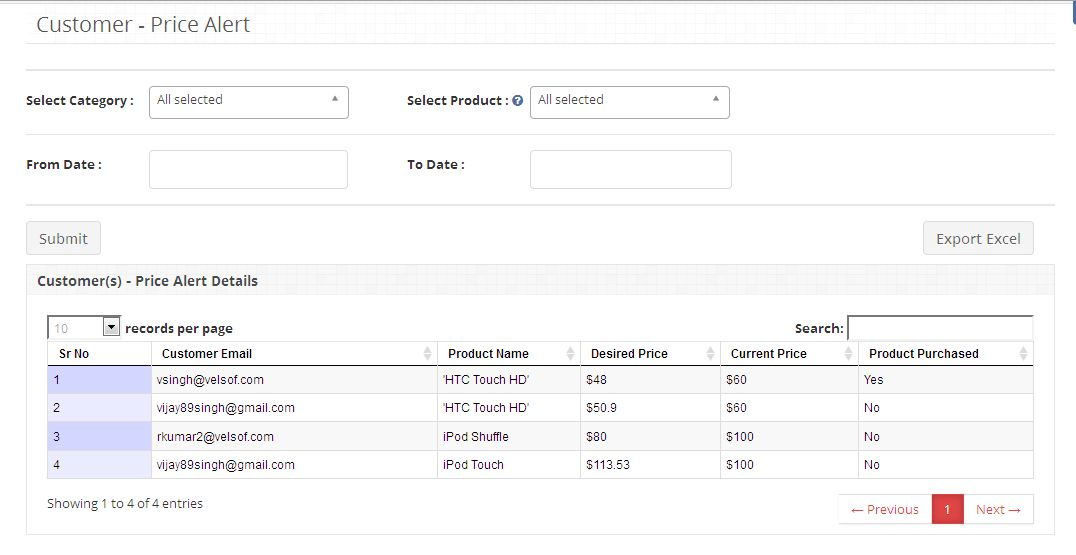
1. This tab shows admin, the Customer Price Alert Report in tabular form. Admin can set filter to fetch report for specific period of time or for a particular product.
2. You can also export the tabular report data in Excel format by clicking on export button.
4. Reports tab
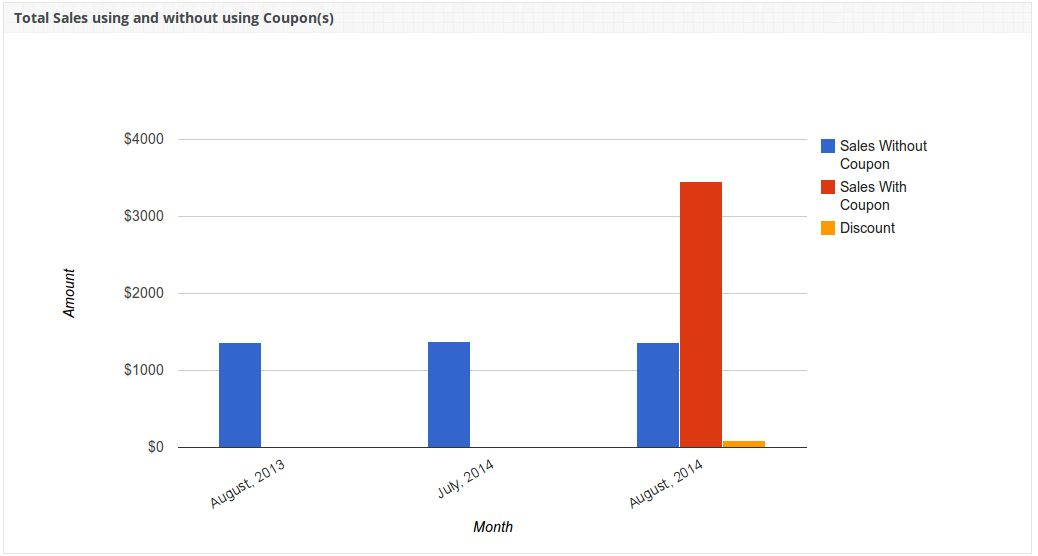
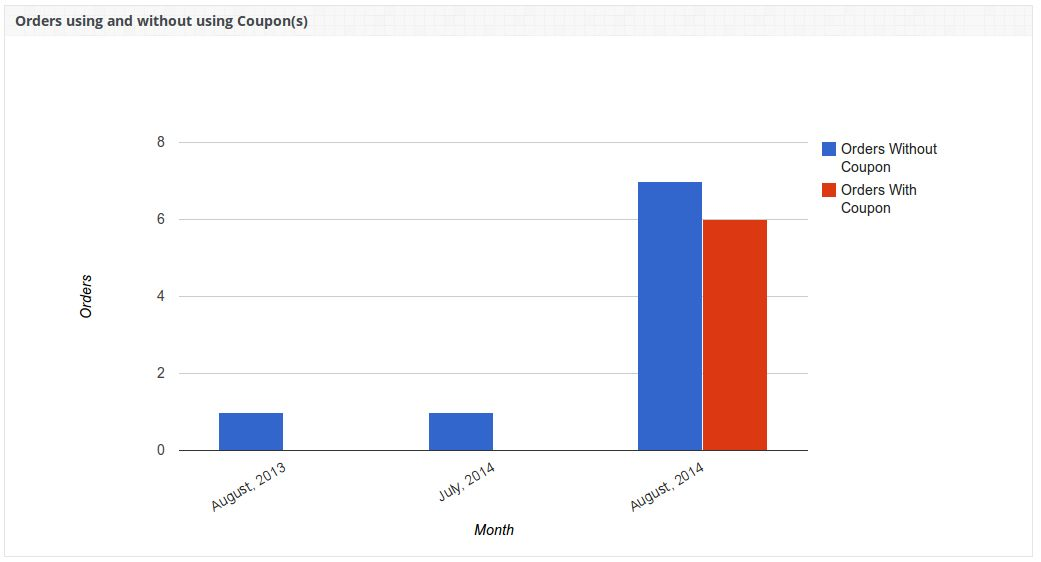
The Reports tab shows the following column graphs:
1.Total Sales using and without using coupons and total discount given.
2.Total Orders using and without using coupons.
CRON Setup (Email Setting)
For sending Price Alert via Email to all customers who have set Price Alerts, you must configure OpenCart and CRON as follow:
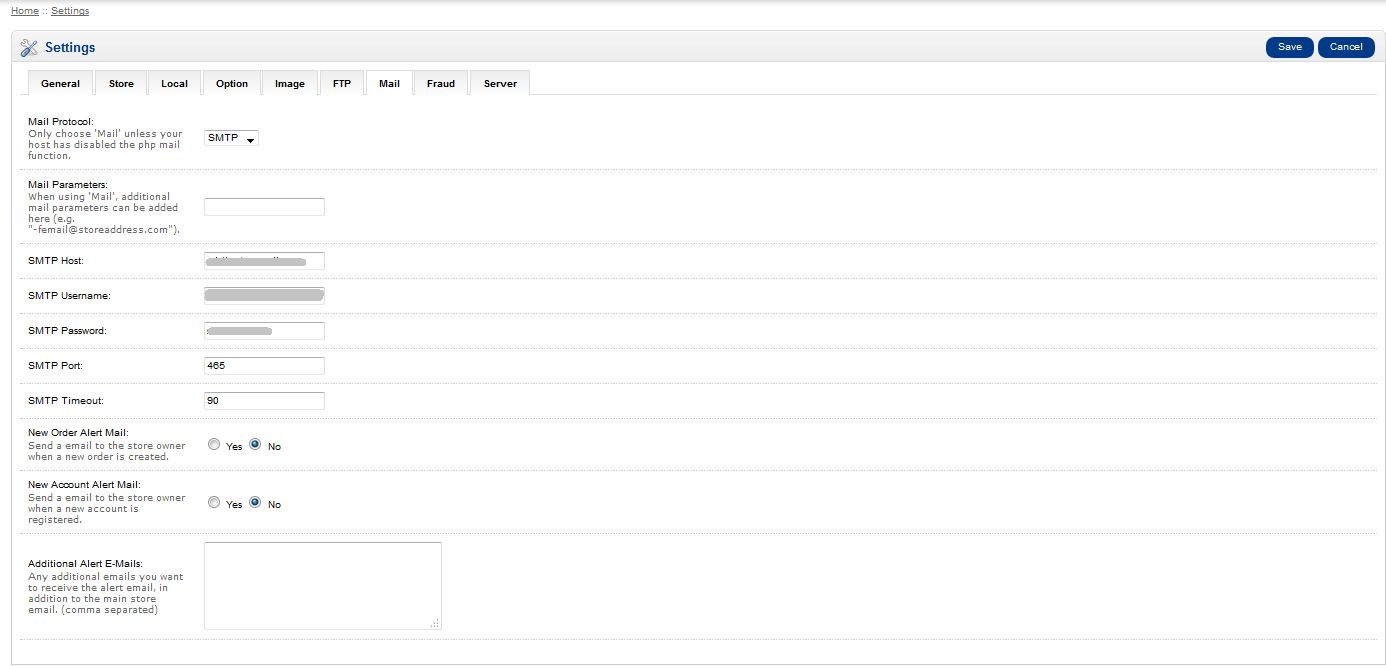
1.For setting up email on OpenCart open the Admin Panel and click on System->Settings.
2.After that click on Edit button against your store and then under mail setting, fill all required details and save.
3. You also need to set a CRON job for the following URL. We recommend you to run this CRON only once a day.
https:///index.php?route=pricealert/pricealert/getSenderList/
Customer Panel
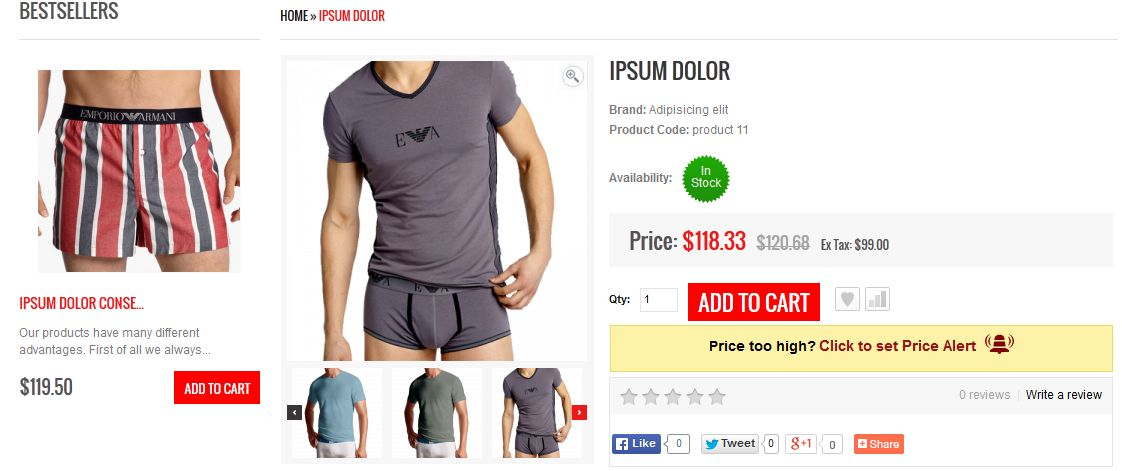
Customer will be able to create Price Alert for any product by clicking on Click to set Price Alert which will be there on every product page.
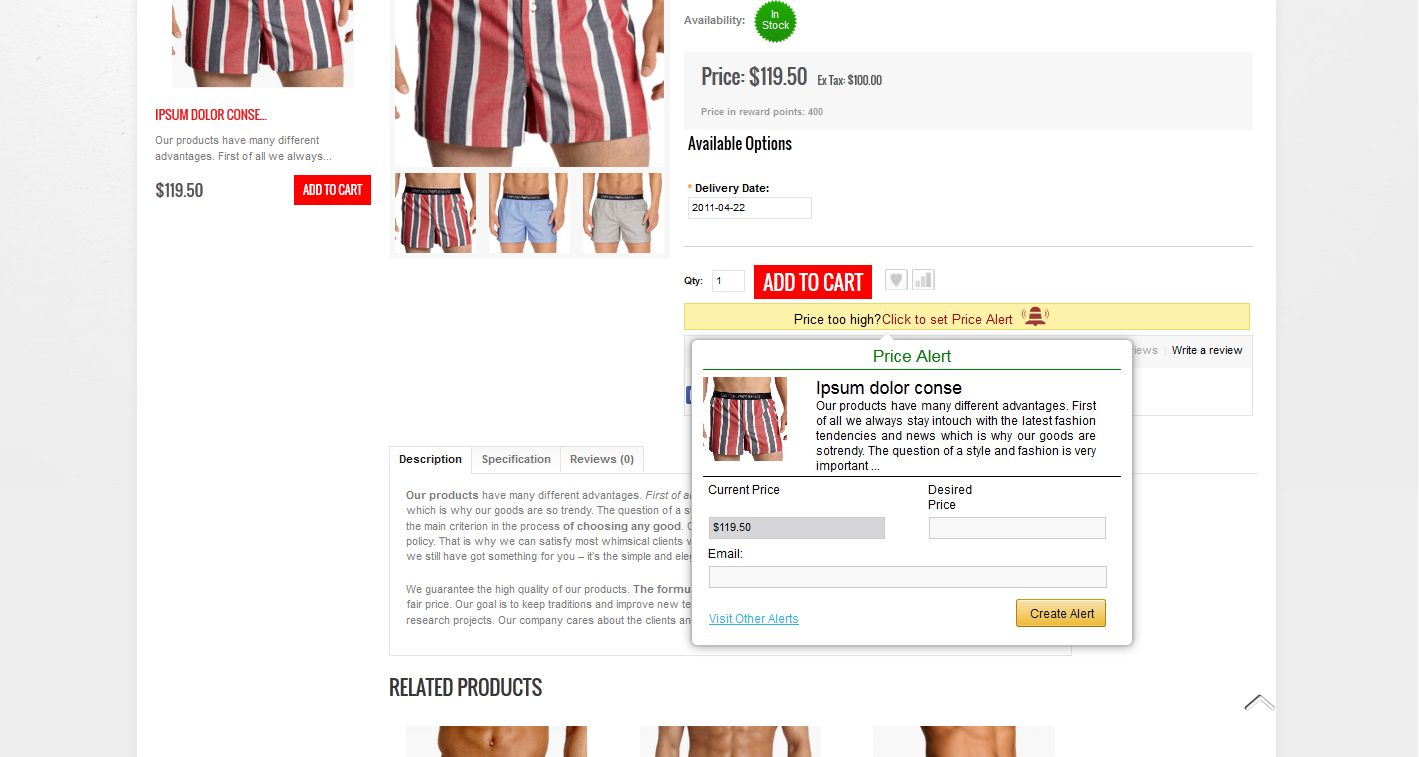
1. When customer will click on Click to set Price Alert a popup will be shown to him where he has to enter his email-id and desired price to set Price Alert.
2. On this popup when customer enters Desired Price text field then some predefined desired price values will be suggested to him. These values are predefined by Admin. Customer cannot enter his own desired price. He has to select any one from these suggestions. Admin can disable desired price field in that case, customer will only need to enter Email-id to create Price Alert.
3. Once customer clicks on Create Alert button after entering required fields, Price Alert will be created in his account for that product and a notification message will be shown to him. Now whenever admin will change price for that product then a Price Alert will be sent to that customer via Email only if his entered desired price is greater than or equal to new price. And in case admin has disabled desired price field then price alert will be sent to that customer, every time when there is any change in the price of that product.
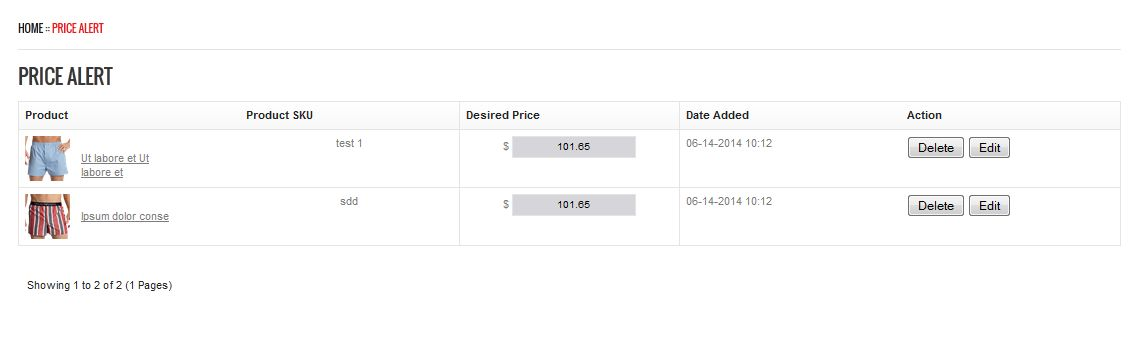
4. If customer is logged in then he can see all Price Alert created by him for different products by clicking on Visit Other Alerts link.
5. Customer can update or delete any Price Alerts.
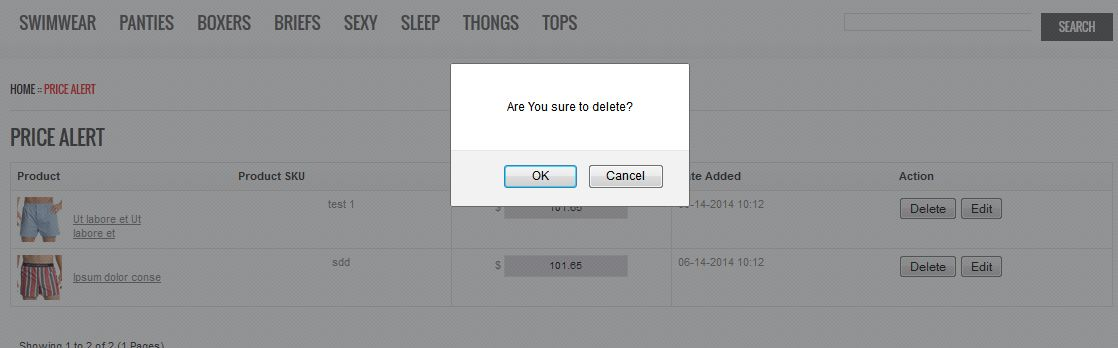
6. Customer can delete any Price Alert using Delete button against respective Price Alert.
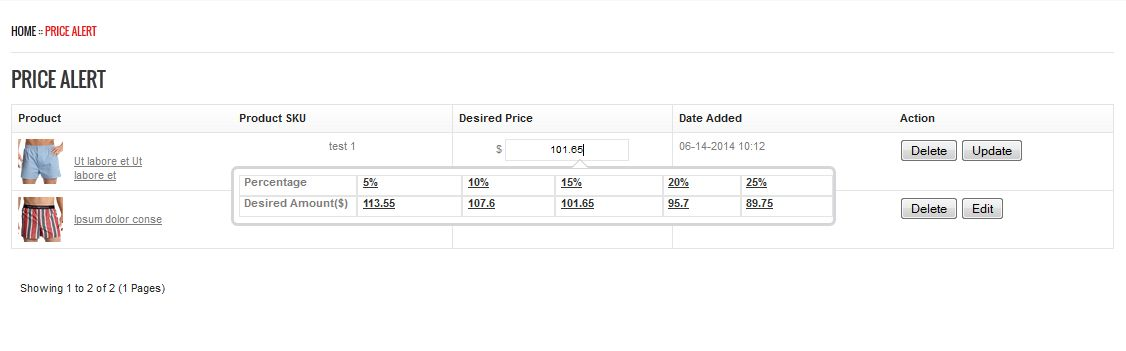
7. Customer can edit any Price Alert by clicking on Edit button, this will enable the Desired Price text field. Using this field he can change his Desired Price value. His changed price will be updated once he clicks on Update button as shown below.
Running a PrestaShop store means juggling orders, inventory, promotions, and customers every single day, and in the middle of that routine, backing up the database is the task most owners postpone until it is too late. The Knowband Backup and Restore module is developed to close that gap. Rather than treating data protection as the task that you think that you will do later, it turns automatic store backup into a scheduled, hands-off routine that runs quietly in the background while you focus on running the business.
This PrestaShop backup and restore module combines a PrestaShop database backup module, a full PrestaShop store backup module, and a standalone restore script into a single, unified dashboard. Consequently, whether you need a quick database snapshot before an update, a complete files-and-database archive before a migration, or a scheduled cloud backup for PrestaShop that ships copies off-server automatically, the same interface handles all three, without switching between separate tools.
In addition, because disaster recovery for eCommerce depends on being able to restore quickly and not just back up reliably, the module ships with a restore engine, a restore-history log, and a password-gated standalone restore.php file so that you can restore your shop even if the back office itself becomes unreachable. The sections below walk through every tab, field, and setting so that you can configure the module correctly the first time, and troubleshoot it confidently if something does not go as planned.
In this section, you are going to learn about each tab in the Backup module so that you can configure it on your prestashop backend. We will first start with the Dashboard Functionality of the module.
1. Dashboard
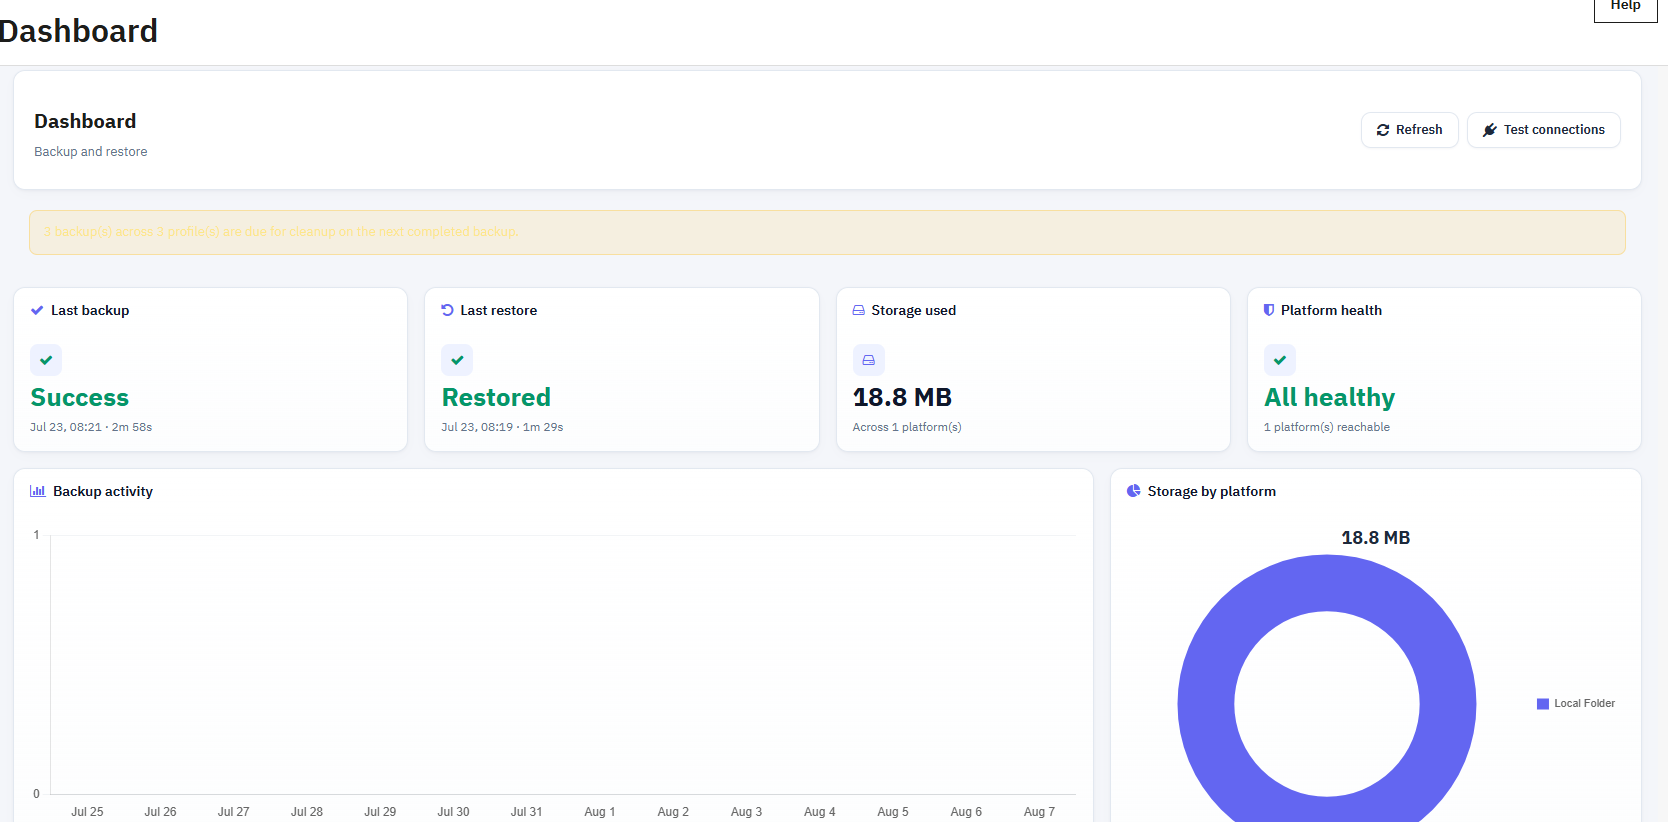
The Dashboard is the first screen you visit when you click on the Configure tab, and it is designed to answer one question at a glance: is my data currently protected? Rather than digging through logs, you get a summary of the last backup, the last restore, the storage consumed, and the health of every connected platform, all on a single dashboard page.
1.1 Status of Backup and Restore
Last backup: Shows the outcome (Success, Failed, or Running) of the most recent backup job, along with the date, time, and how long the job took to complete.
Last restore: Displays the same information for the most recent restore operation, so you can confirm a restore actually finished before relying on it.
Storage used: The total disk space occupied by stored backup archives, broken down by how many platforms currently hold copies.
Platform health: A quick reachability check across every configured storage platform (local, FTP/SFTP, S3-compatible, or OAuth cloud), flagged as healthy or unreachable.
Backup Activity The backup activity shows the no, of backups that run over time, like per day. This feature also shows the failed activity that happened using the Prestashop File Backup Module.
Storage by Platform Storage by platform shows the total space each connected storage platform is currently using, so you can see the data contained in each storage platform.
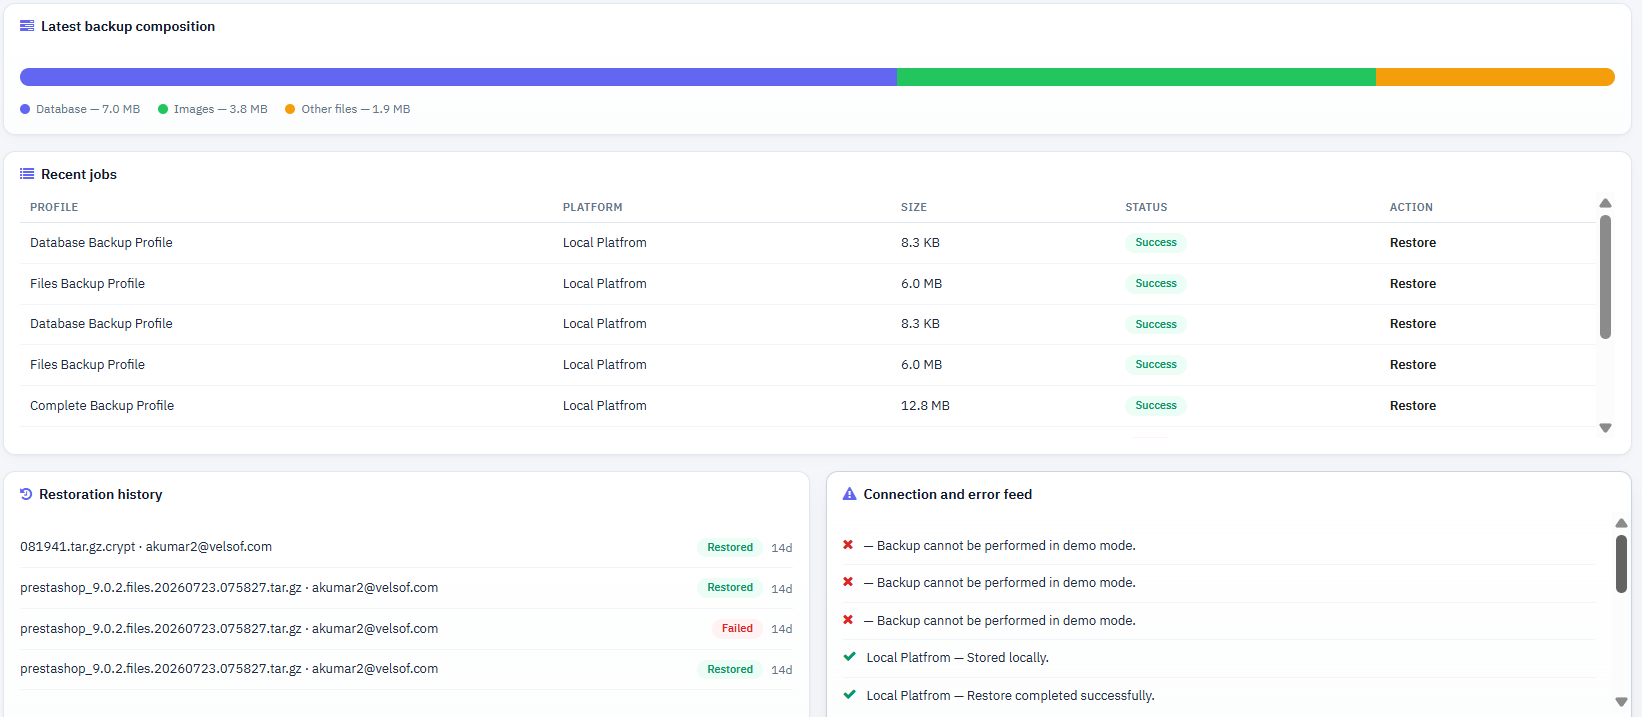
Latest backup composition This latest backup composition breaks the newest storage data into database, images, and other files, showing the size of the data or media.
Recent Jobs The latest backup runs with a direct Restore or Retry action, so you can act on a failure right from the dashboard.
Restoration History Here you can see the recent restore attempts with result, status and timing, allowing you to confirm a restore genuinely finished before relying on it.
Connection and Error Feed You can see the live error and status messages as they happen, giving you the exact cause of a failure without needing to check the Logs tab separately.
3. General Settings
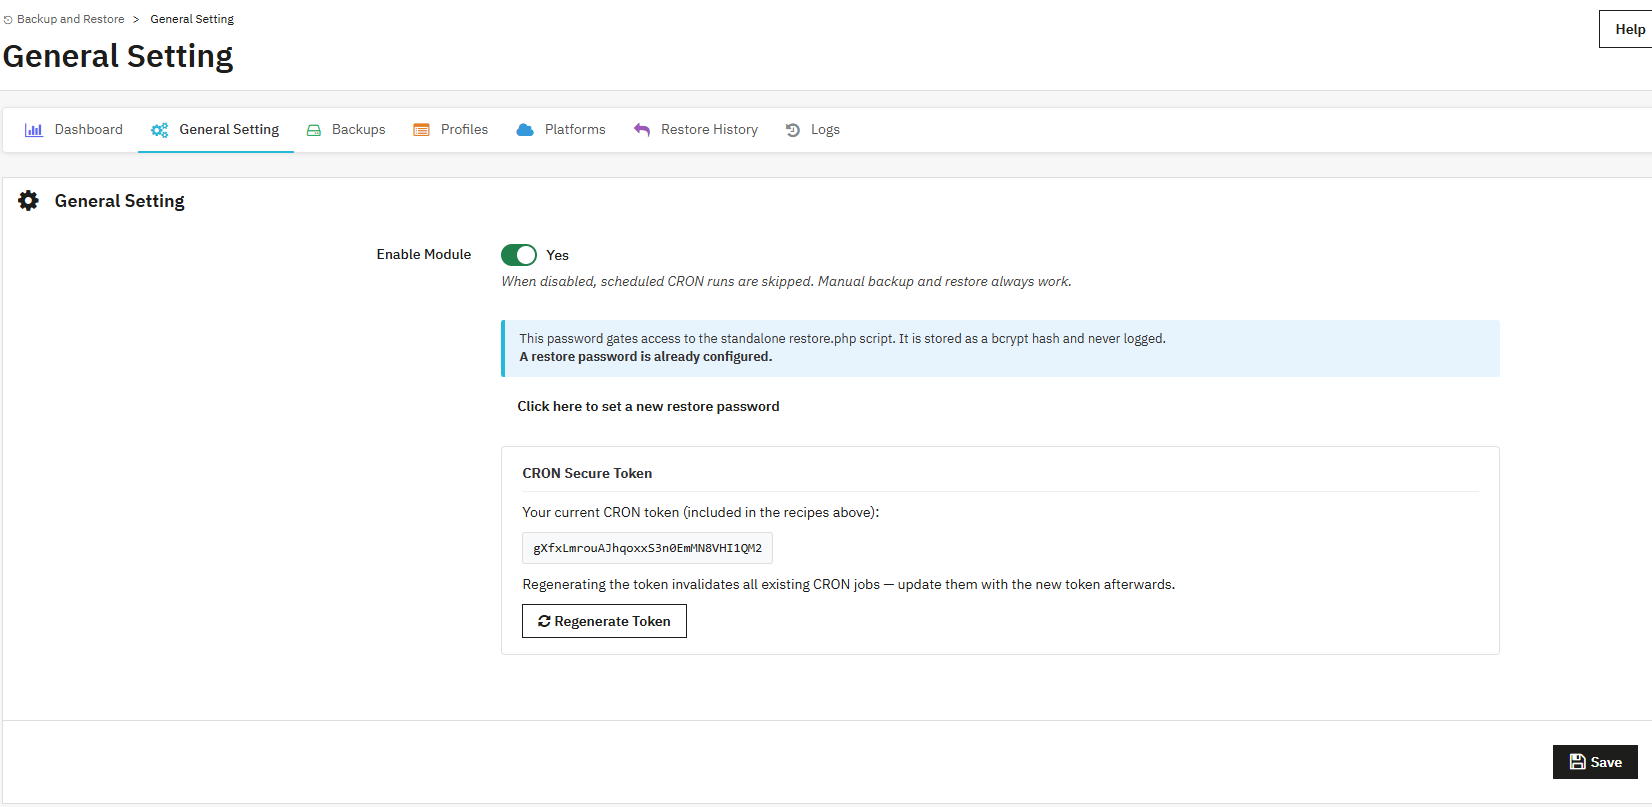
General Settings is where the module’s core behaviour is configured: whether it runs at all, how the standalone restore script is protected, and the exact CRON that your server, or a third-party scheduler,r should call. We will explore each feature one by one.
Enable Module: You can enable or disable the module just like other modules. When disabled, scheduled CRON runs are skipped entirely, though manual backup and restore from the back office continue to work normally.
Restore Password: A password protecting the standalone restore.php script, stored as a bcrypt hash and never logged in string text. Required any time you restore outside the module interface.
CRON Secure Token: A unique token embedded in every scheduled-backup URL and CLI command. Regenerating it invalidates all existing CRON jobs, so update every scheduler entry immediately afterwards.
Standalone Restore Script: The direct URL (and server file path) for restore.php, which allows you to restore a backup even if the PrestaShop back office itself is inaccessible, provided you know the restore password.
Scheduled Backup (CRON): Ready-to-copy Web URL, PHP CLI, and shell commands that trigger every enabled profile in one hit. Paste one of these into your hosting panel’s CRON manager or an external scheduler.
3. Backups
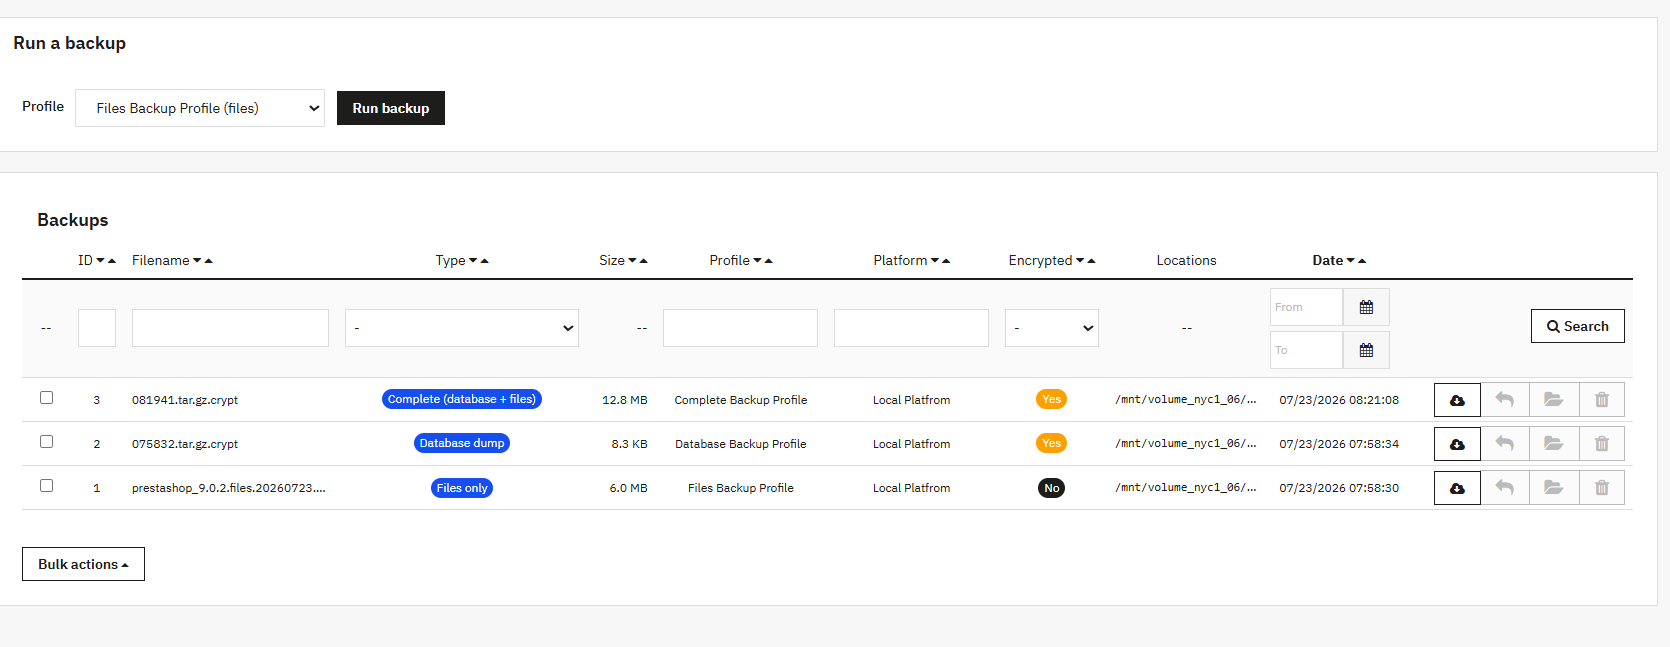
The Backups tab in Prestashop Database Backup Module is where you trigger a one-off job outside the regular schedule and review every archive the module has produced so far. Select a profile from the dropdown, click Run, and the module streams progress in place rather than forcing a page reload.
4.1 Backups Table
ID: Identifier for the backup record, used internally when linking a restore action to its source archive.
Filename: The archive’s actual filename on disk, typically timestamped (and suffixed .crypt when encryption is enabled) so successive backups never collide.
Type: Database dump, Files only, or Complete (database + files), matching the Backup Type chosen on the profile.
Size: Compressed size of the finished archive.
Profile / Platform: Which backup profile generated the archive, and which storage platform is currently holding the copy.
Encrypted: Yes/No flag indicating whether AES-256 encryption was applied before storage.
Locations: The From/To file paths, useful when confirming a copy actually reached a remote destination and not just the local staging folder.
Date: Timestamp the backup completed, used for sorting and for the retention rules configured on the platform.
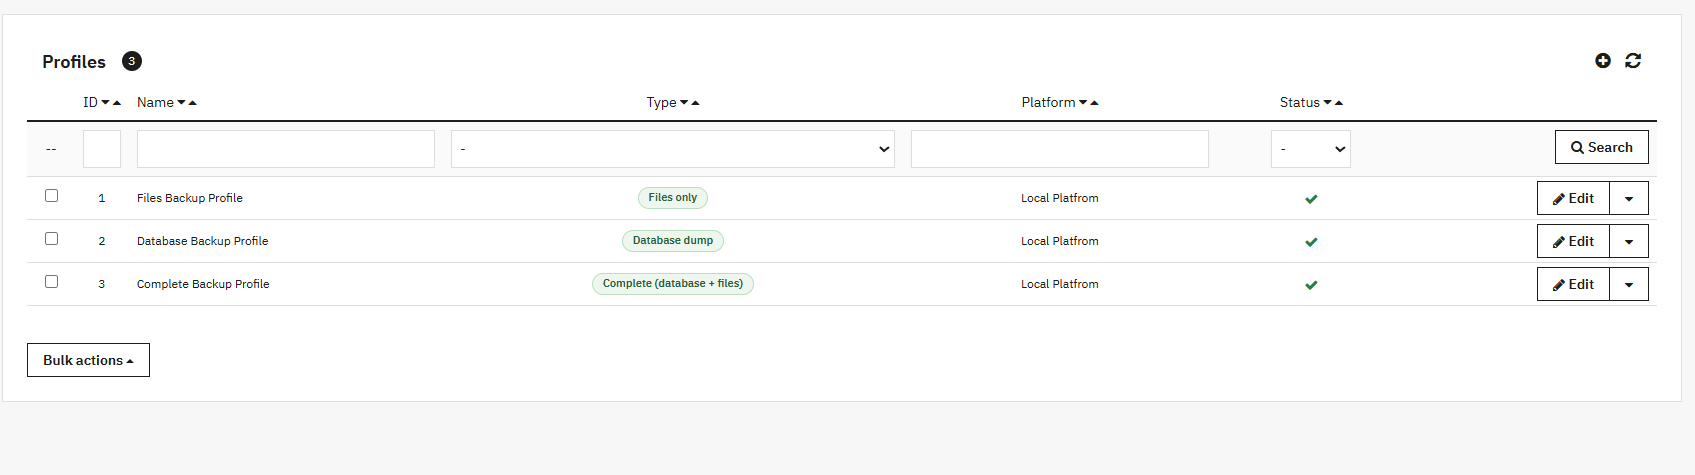
5. Profiles
A profile is a saved backup configuration that you can reuse anytime. It stores your backup settings, including what to back up, where to store it, and who should receive backup notifications. You can create as many backup profiles as needed.
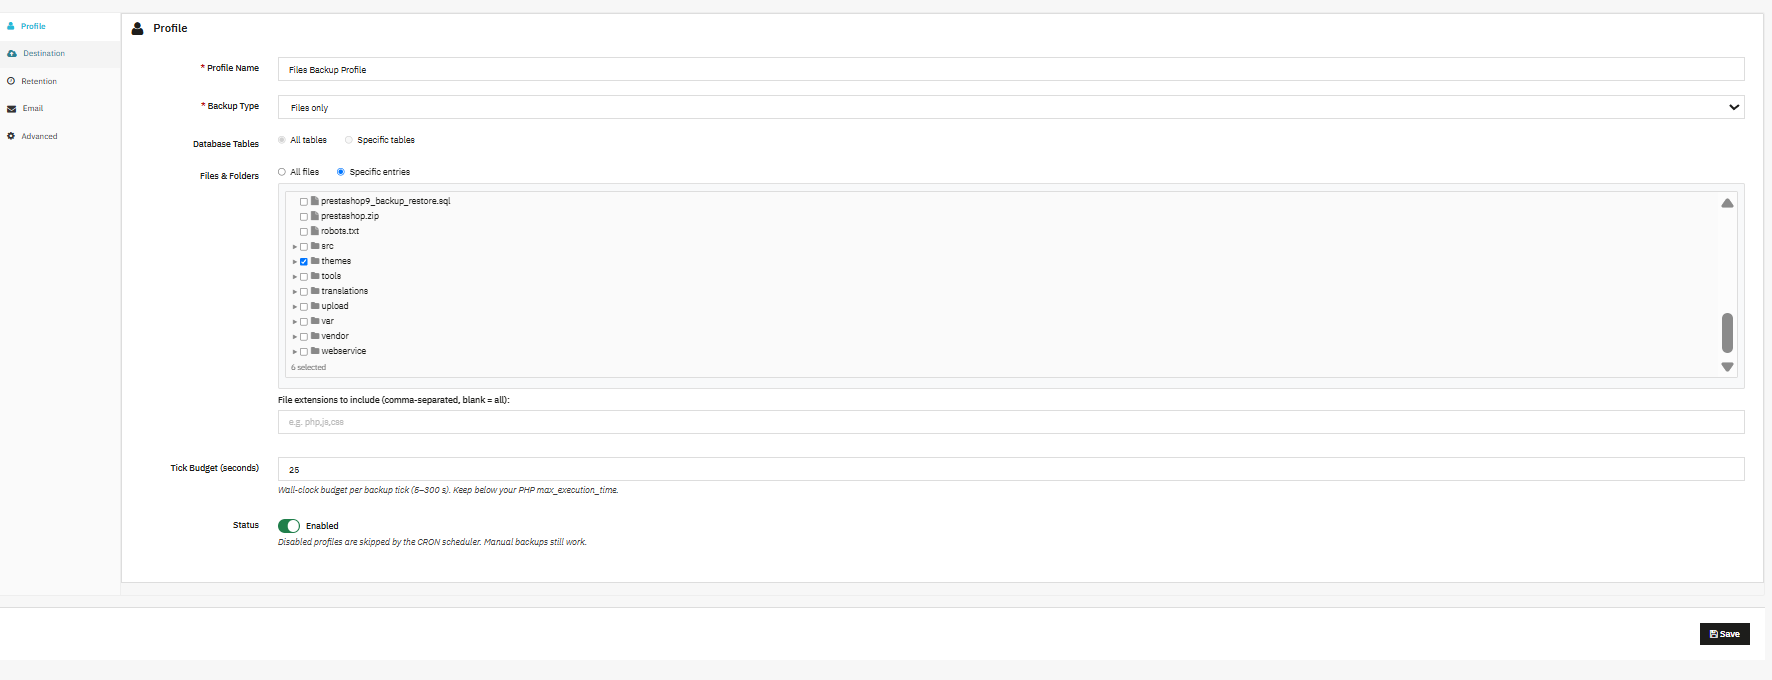
Profile Name: A name that you can choose so you can easily recognise this profile later in the dashboard, backup list, and restore history.
Backup Type: Store owners can choose what this profile backs up, like database and files both, Database tables only or just your store’s data. Store owners can also choose files/folders only, just your website files, no data.
Database Tables: Choose All tables to back up everything in the database, or pick Specific tables if you only need certain data, for example, orders and customers, but not logs.
Files & Folders: Choose All files to back up your entire site, or Specific entries to only back up selected folders. You can also use the exclude list below to skip folders like cache or temp files that just take up space.
Exclude these files or folders: Store owners can list any folders or files you want to skip, one per line, for example var/cache/ or img/tmp/. These will be skipped even if you selected “All files.”
File extensions to include: If you only want certain file types backed up, list them here (like php, js,css). Leave this blank to include every file type.
Tick Budget (second: Large backups can take a while, so the process runs in short batches called “ticks.” This setting controls how long each batch runs, between 5 and 300 seconds.
Status: You can enable the status of the profile so that it will not be skipped during the cron job. If you disable it so that it won’t run automatically, you can still start it manually anytime.
5.2 Destination
From the destination, you can select a Storage Platform. First, you have to create the destination or storage platform from the Platforms tab; those that are created will be reflected in the destination option in the profile.
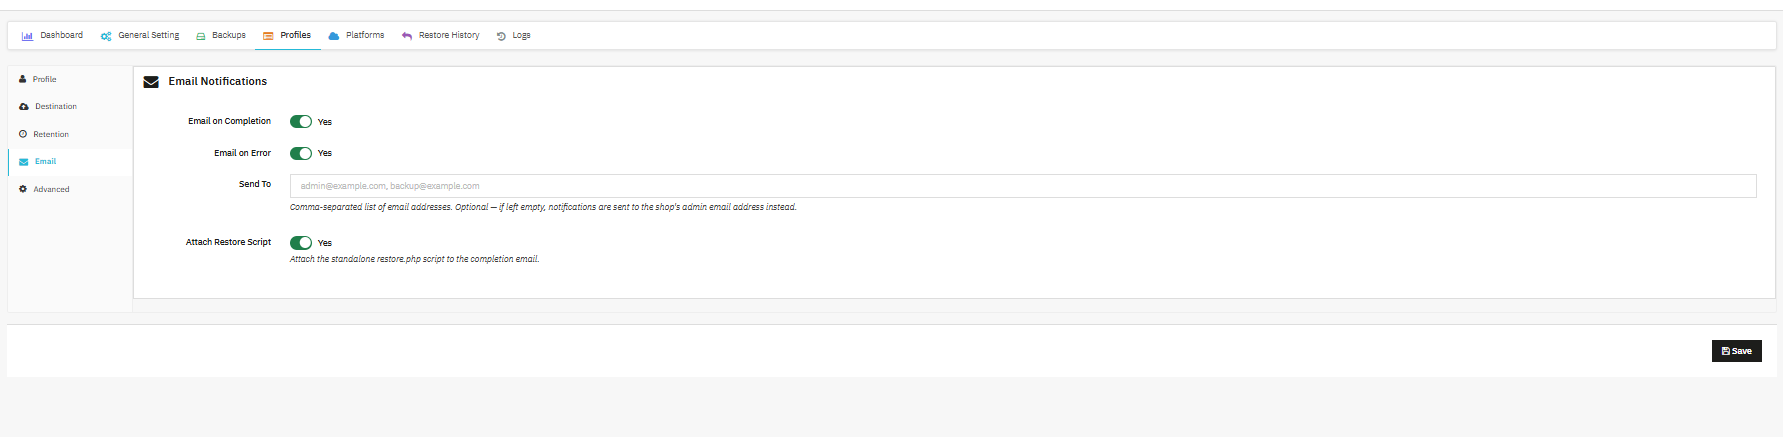
5.3 Email Notifications
Email on Completion / Email on Error: You can independently manage whether a notification is sent for successful jobs, failed jobs, or both.
Send To: Comma-separated recipient list. You can leave blank to fall back to the shop’s admin email address automatically using the Prestashop Database backup and restore module.
Attach Restore Script: When enabled, you can attach the standalone restore.php script to the completion email, so a copy is always on hand even if the server is later lost.
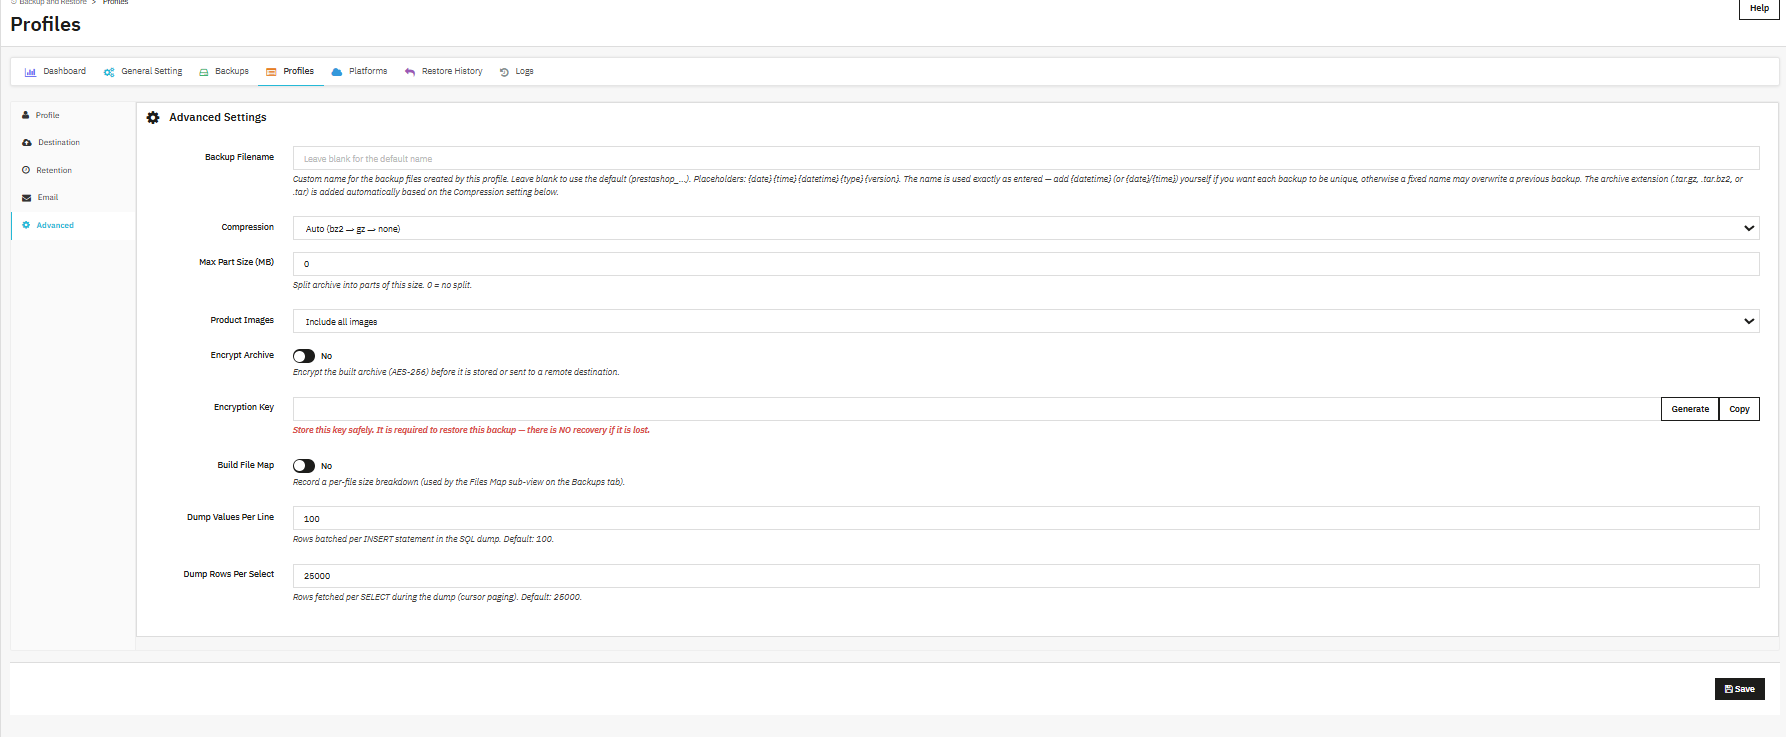
5.4 Advanced Settings
Backup Filename: You can add custom naming using placeholders such as {date}, {time}, {datetime}, {type}, {version} for the data that you are backing up. Store owners can leave it blank for the default prestashop_… name, and remember that a fixed name without {datetime} will overwrite the previous backup rather than creating a new one.
Compression: You can select the type of compression that you want in files like Auto (bz2 to gz to none)(it will automatically add the type), or a fixed format; it determines the archive extension (.tar.gz, .tar.bz2, or .tar) applied automatically.
Max Part Size (MB): You can split the archive into parts of the given size; 0 disables splitting.
Product Images: Store owners can choose to select products as well as source images, or can also choose to exclude the same.
Encrypt Archive: This Backup and Restore module also applies AES-256 encryption to the backed up archive file before it is stored locally or shipped to a storage platform.
Encryption Key: The key required to decrypt and restore this specific backup file as AES-256 is being applied on these files. There is no recovery mechanism if it is lost, so store it securely and separately from the server itself.
Build File Map: Store owners can record a per-file size breakdown, which powers the Files Map sub-view for auditing exactly what a given archive contains.
Dump Values Per Line: Admins can choose to add the rows batched per INSERT statement when writing the SQL dump.
Dump Rows Per Select: Admins can choose the max. no. of rows fetched per SELECT during the dump via cursor paging (default 25000); lower this on memory-constrained servers with very large tables.
6. Platforms
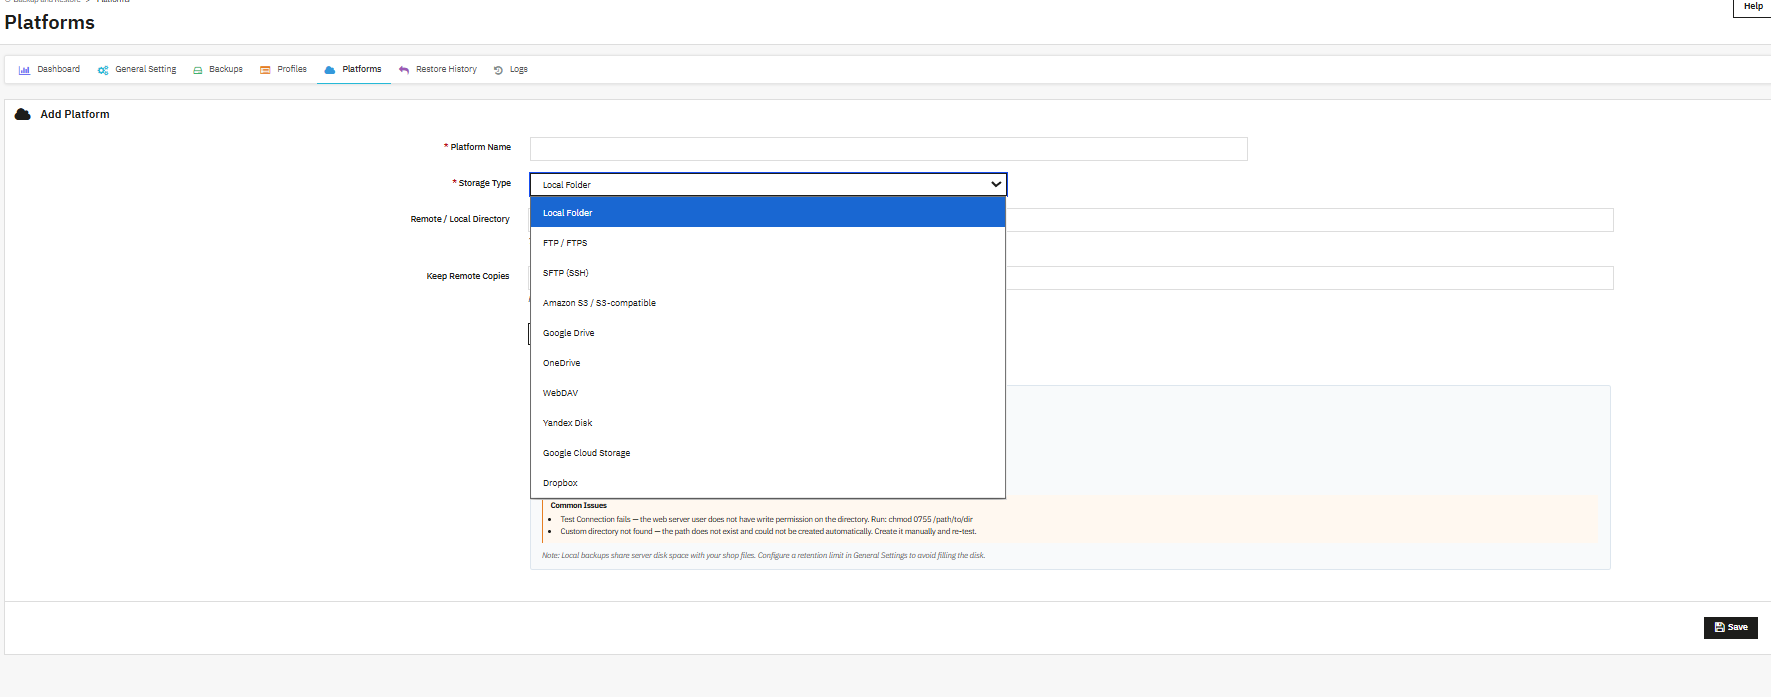
Platforms define where finished backups end up. Local storage is the simplest option, but the module’s real strength as a cloud backup module for PrestaShop shows once you connect FTP/SFTP, Amazon S3 and S3-compatible services (MinIO, Wasabi, Backblaze, Scaleway), Google Cloud Storage, or an OAuth-based cloud such as Google Drive, Dropbox, OneDrive, or Yandex. Storing a copy away from the origin server is, in practice, the single change that turns a backup routine into genuine disaster recovery for eCommerce.
Platform Name: A friendly label used everywhere the platform is referenced: profiles, the backups table, and the dashboard’s health card.
Storage Type: Local folder, FTP/SFTP, an S3-compatible service, Google Cloud Storage, or an OAuth cloud provider.
Remote / Local Directory: Destination path for stored archives; defaults to modules/kbbackuprestore/backup/ when left blank. This field is locked once the platform is created, so set up a new platform if you need a different path later.
Keep Remote Copies: Maximum number of archives retained on this platform; 0 keeps every copy indefinitely, which is convenient but worth monitoring against available storage.
7. Restore History
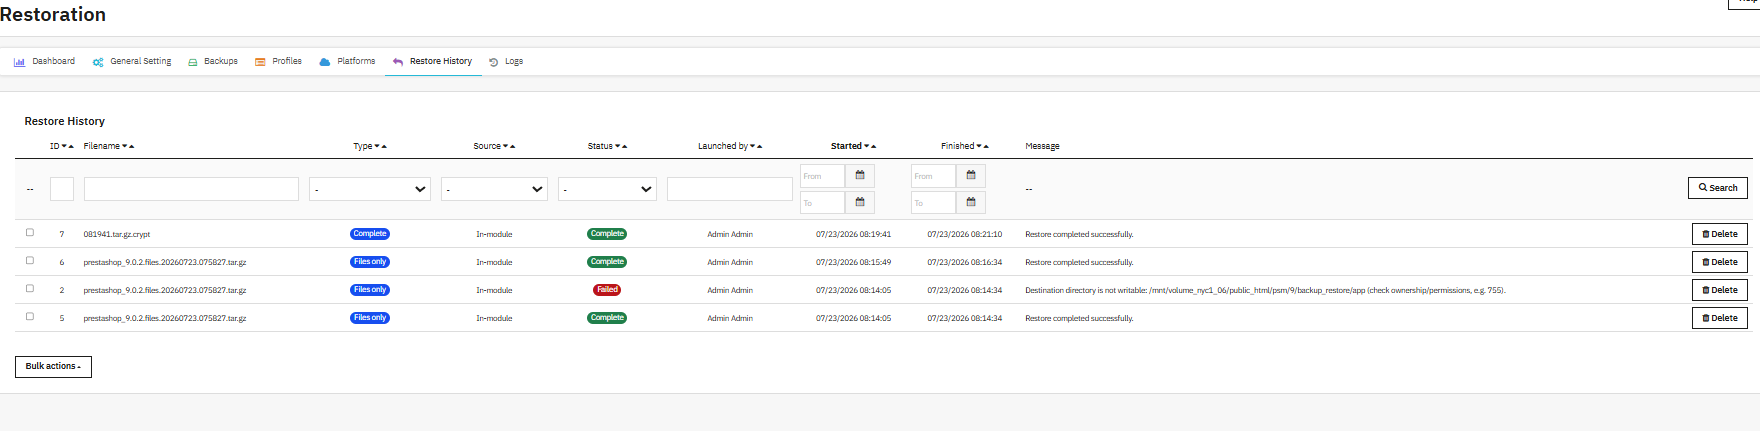
Every restore attempt, successful or not, is logged here, which matters most in the moment you actually need to restore your shop under pressure. Rather than trusting that a restore “probably worked,” you can confirm it against a timestamped, per-file record.
ID / Filename / Type: Identifies the restore record and the exact archive that was restored, along with its backup type (Complete, Database, or Files only).
Source: Where the restore was initiated from, typically in-module, though the standalone restore.php script logs here as well.
Status: Complete or Failed, reflecting the outcome of the operation.
Launched by: The admin user who triggered the restore, useful for accountability on stores with multiple back-office users.
Started / Finished: Timestamps bounding the operation, from which the total duration can be derived.
Message: The exact system message for the attempt, for example a permissions error on a specific path when a restore fails, or a plain confirmation when it succeeds.
8. Logs
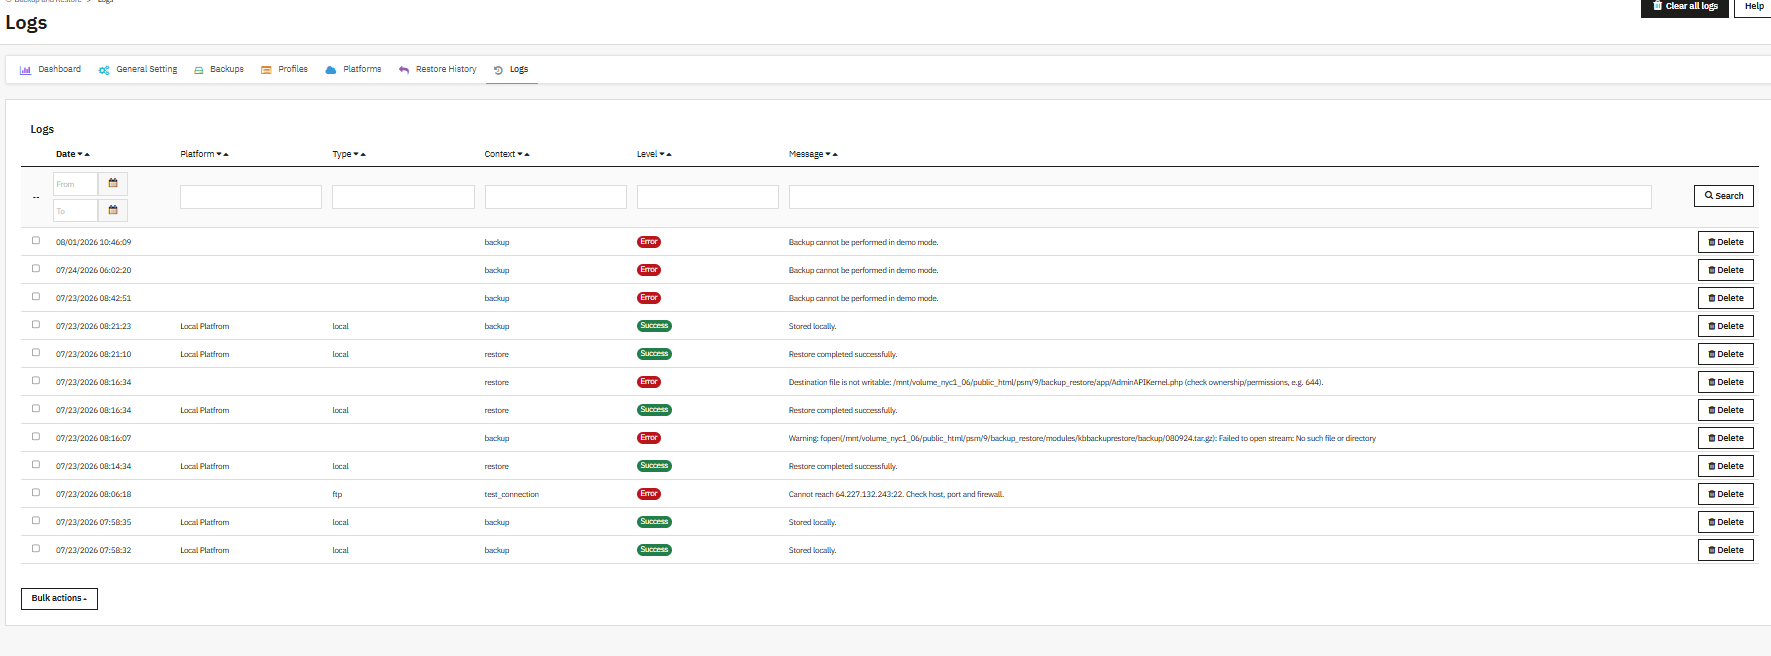
Logs in the Prestashop backup and Restore module are the tab that helps in checking first whenever the Dashboard’s Connection and Error Feed does not give you enough detail on its own. Every backup, restore, and connection test writes a row here, filterable by date, platform, type, and severity level.
Date: Exact timestamp of the logged event.
Platform: Which storage platform the entry relates to, when applicable; blank for events that occur before a platform is involved, such as a demo-mode restriction.
Type: The underlying operation category, such as local, ftp, or another connector type.
Context: The action being performed: backup, restore, or test_connection.
Level: Success or Error, letting you filter noise out quickly when scanning for problems.
Message: The full, unabridged system message, including file paths, permission codes, or network errors, which is typically enough to diagnose the issue without escalating further.
9. Conclusion
This user manual by Knowband covers every tab associated with the Knowband Backup and Restore module for PrestaShop, from the Dashboard through to the Logs tab, and it is worth bookmarking as a reference the next time you configure a new profile or platform.
If you run into a scenario this manual does not cover, an unusual storage provider, a permissions setup specific to your host, or a restore that behaves unexpectedly, the Knowband support team can assist directly, and reviewing the Logs tab before reaching out will generally speed up the diagnosis considerably.
In short, treat scheduled database backup and off-server copies as routine housekeeping rather than an emergency measure, and PrestaShop data protection becomes something you rarely have to think about, which, ultimately, is the point of the module.
1. Folder structure of the Slideup Promotion plugin folder.
2. Open the upload folder and you will find the following folder structure:
You must have VQMOD installed for this plug-in to work. If VQMOD is not installed please download and install from the URL below:
https://code.google.com/p/vqmod/
3. Select all the folder and drag and drop them to the root directory of your OpenCart store throughFTP.
4. You will be able find the plug-in ready to be installed in the Modules in your OpenCart storeas shown below.
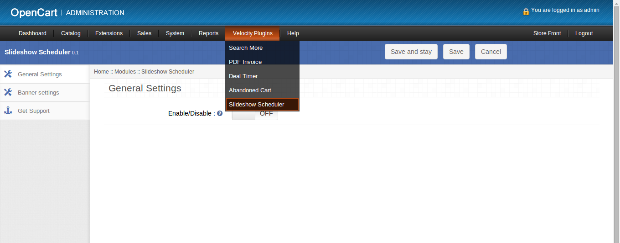
5. Click on the Install link to install the plug-in. This will also add a dropdown option in your menu bar which will list all plug-ins by Velocity installed on your store for fast navigation. Thisdropdown also has a message box, using which we can inform you about new launched plug-in ornew update.
6. Delete the Vqcache files from the vqmod/vqcache folder.
7. To access Slideup Promotion plug-in click on edit button in module section as shown below:
8. On clicking edit button the module for plug-in will open. It contains navigational bar at top, menu at left and main content at center as shown below.
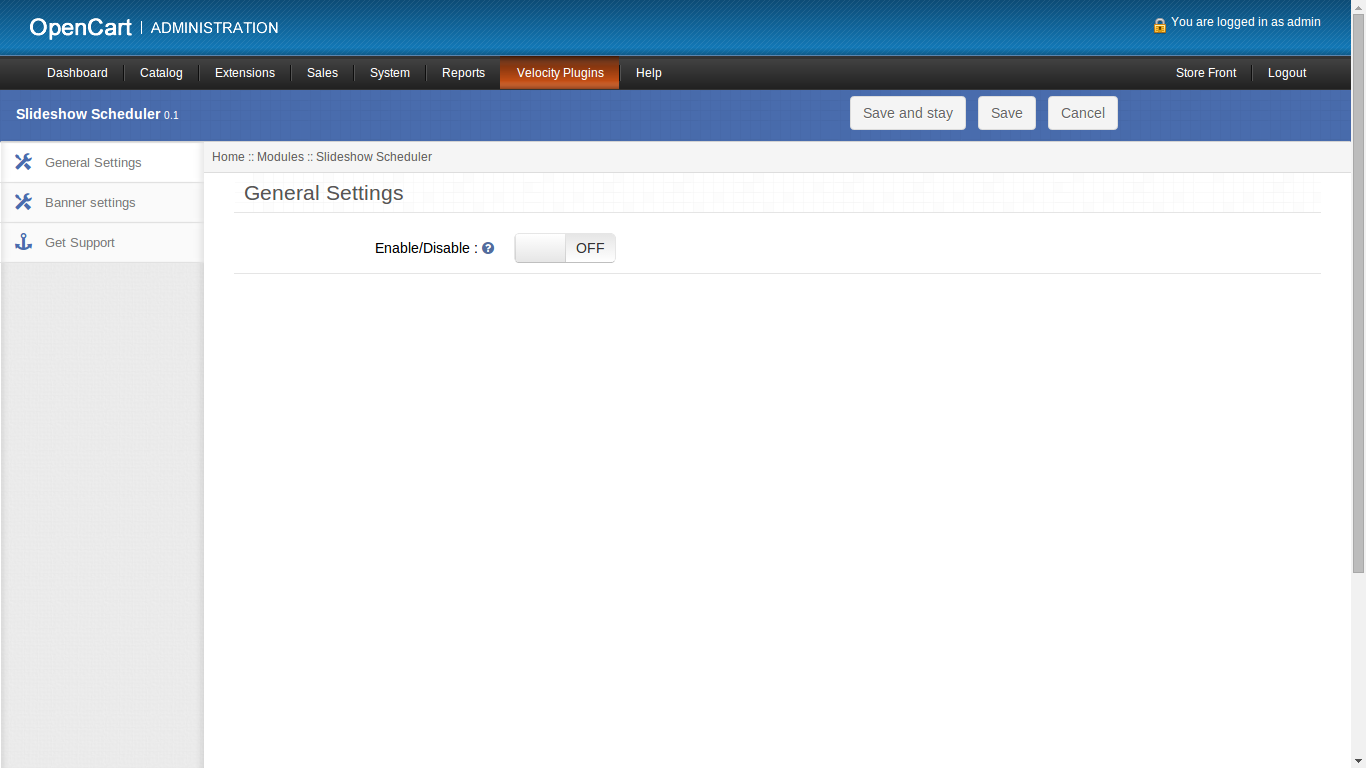
1. General Settings tab
General Settings tab has the option to enable/ disable this plugin.
Enabling this button means that the banners shall be displayed based on their date ranges provided. Disabling this button would render all the banners added through this module or default slideshow module irrespective of the date ranges chosen for displaying.
2. Banner Settings tab
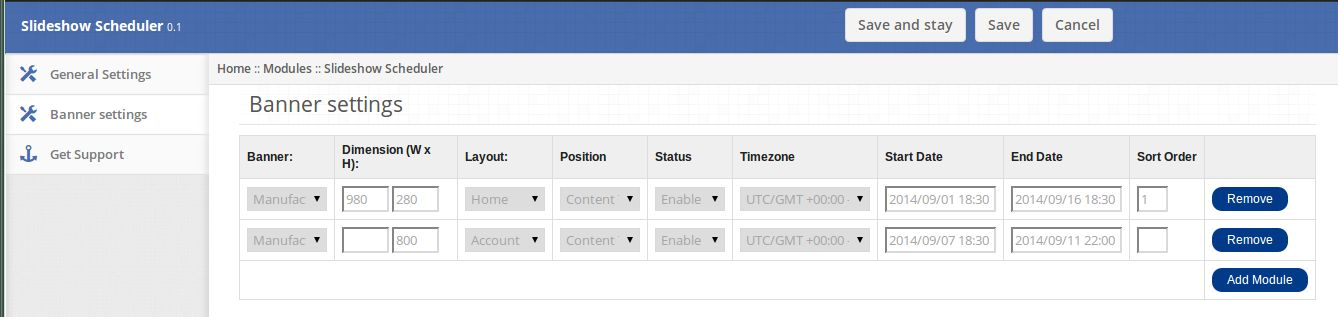
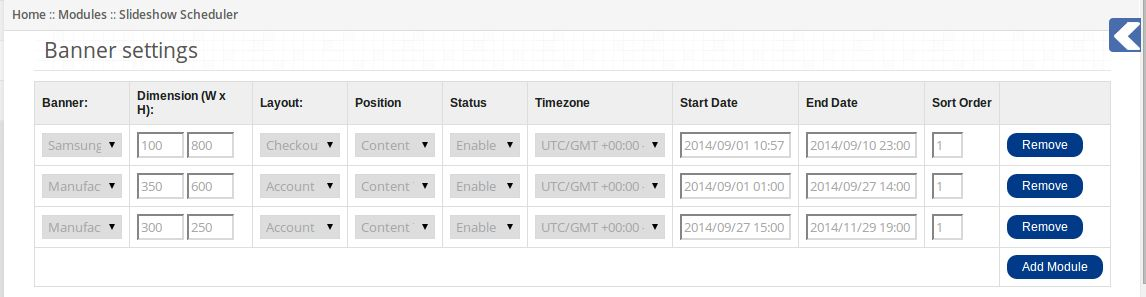
Banner Settings tab has following options to configure:
1. Banner: This will be a dropdown box containing a list of all the banners added in the system.
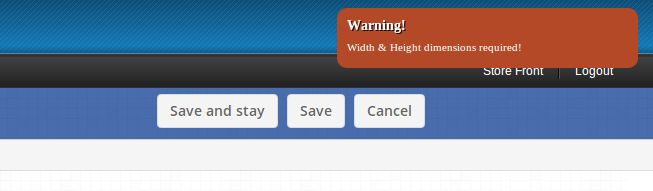
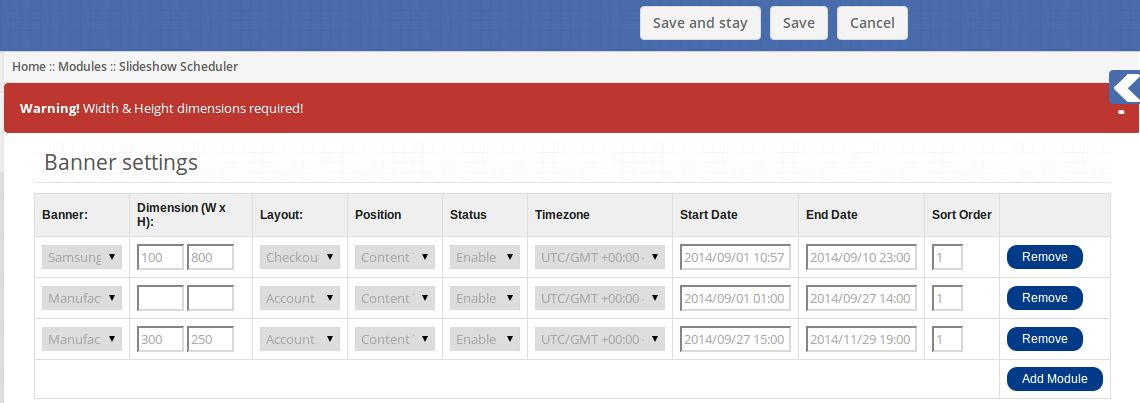
2. Dimensions: Specify width and height here. This is a required field, ignoring which will throw a warning message on top right corner when you try to click save and stay.
Clicking on save button without entering dimensions will restrict you to save changes and will display an error message like in figure below:
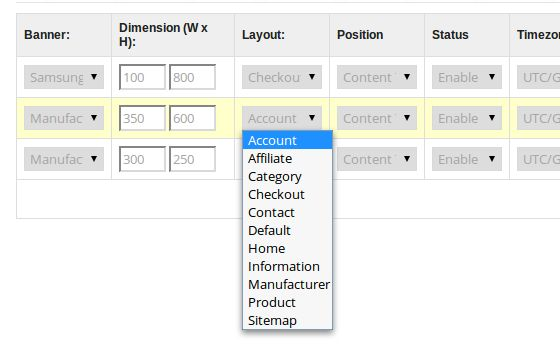
3. Layout: Choose from a number of layouts on which you can place this slideshow.
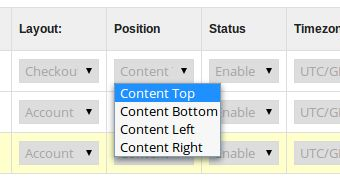
4. Position: Choose from the positions on layout where you can place your slideshow.
5. Status: Choose whether to enable/ disable this banner.
6. TimeZone: Choose from the list of time-zones from dropdownbox for which you want to provide time
range.
7. Start Date: Choose a start date for each banner after which its slideshow should start appearing on the specified layout. If no date is chosen, youll be prompted to do so on saving data via warning message.
8. End Date: Choose an end date for each banner until which its slideshow should keep appearing on
the specified layout.
Note that, you must choose end date greater than the start date. Also, make sure that start date and end dates for any two banners do not overlap in case they are same banners and are being added on same layout and positions, else you wont be able to stop the warning messages from restricting you to proceed.
9. Sort Order: Type a sort order for slideshow to appear.
10. Remove : To delete a banner or a row, click on this button.
11. Add Module: Click on this button to add another row or a banner and then enter required details.
Note: Any changes such as adding, removing a module in this plugin or making changes to any of the
fields mentioned before will be reflected in the default slideshow plugin for opencart. And, similarly, all the changes made in the default slideshow module will be reflected in this plugin. This way, both modules will stay in sync with each other.
3. Get Support
By clicking on Get Support tab, you will be redirected to our support website, where you can contact our support for help. Use this tab in case you have any query/issue or found some bug.
Store Front
On the front end, visitors on the site will only see those slideshows for which the local current date
(according to timezone) lies between the date range as set by the admin.
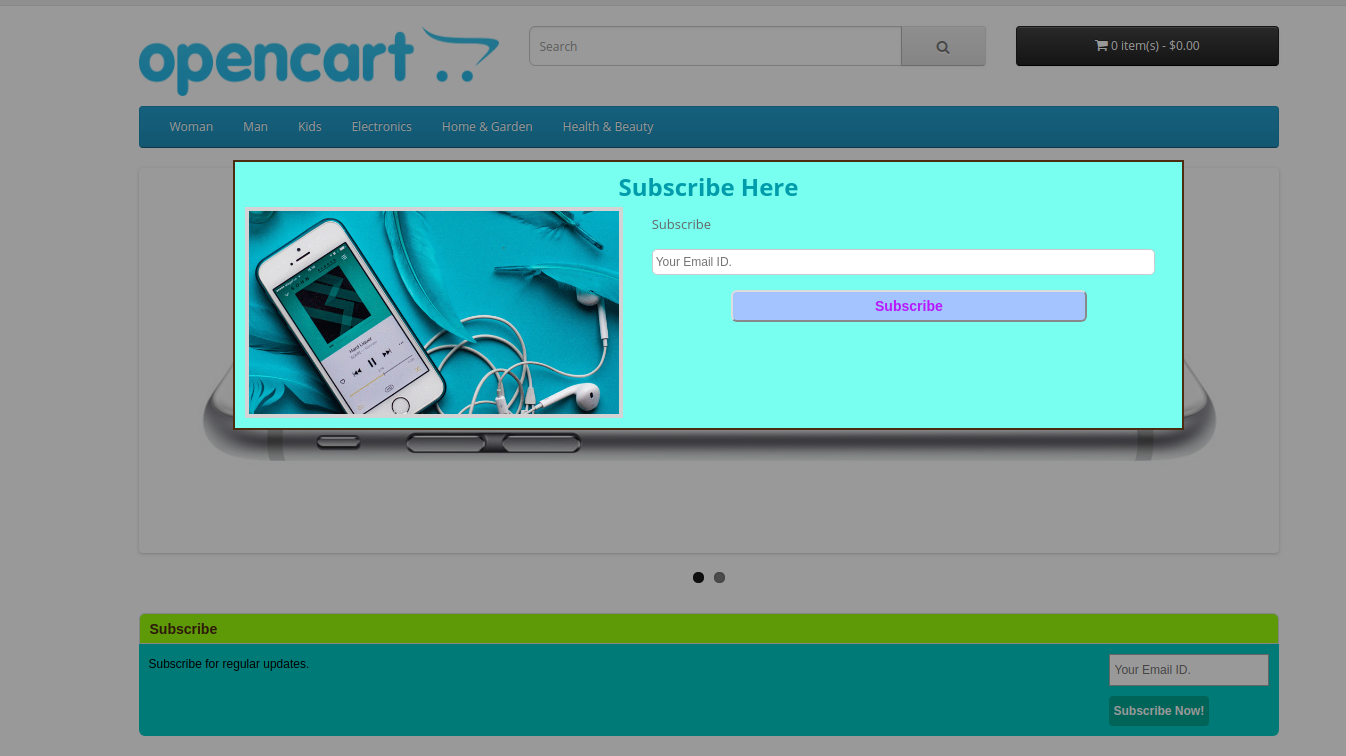
Now the Opencart store merchant can easily get new subscribers for sending newsletters. Opencart Auto Subscribe extension allows the Opencart store admin to add a “subscription form” on the home page of the eCommerce store. This OpenCart Auto Subscribe extension helps the store merchant to design an attractive subscription form, so that, the visitors coming to the website get registered by submitting the required information on it. With a pop-up window, OpenCart email subscription popup allows the Opencart eCommerce store owner to collect the email address of website visitors. The Newsletter Subscribe Extension for OpenCart can automatically subscribe the online store visitors on registration or checkout. This way, the online merchant can get more email id details for sending the newsletter.
The online merchant can show subscription box on website pages and display attractive subscription popup on the website homepage. The online store visitors can enter their email id details and easily subscribe to the website. The Newsletter Subscribe Extension for OpenCart forwards email id details to admin’s MailChimp and Constant Contact account at the same time when users enter their details. The Email Subscriber module for OpenCart is mobile responsive, multi-lingual compatible and offers smooth functioning.
1.1 Features Offered by OpenCart email newsletter addon
The online merchant can subscribe online users automatically while registration, checkout or normally by showing subscription form.
The OpenCart product subscription module allows admin to show subscription box on website pages and subscription popup on the homepage.
The eCommerce store merchant can set the look and feel of subscription box/popup by setting its heading, description and color.
The OpenCart email newsletter addon allows setting the position for showing subscription box and show multiple subscription boxes on the same page by setting sort order.
The OpenCart product subscription module allows the store merchant to set gap for showing subscription popup next time to the same user.
The online store merchant can show a success message after subscription and admin can set the size of subscription popup.
Email Subscriber module for OpenCart allows sending a mail to the subscribers after subscription.
The store merchant can configure MailChimp and Constant Contact settings from the admin interface of the Newsletter Subscription Module.
The OpenCart email newsletter addon is multi-lingual compatible and mobile responsive.
There is no need to change even a single line of codes from the admin interface while using MailChimp Newsletter Subscription module.
Auto Subscribe integration extension helps store admin to gain email subscribers.
Opencart eCommerce store owner can collect mail id from users without any difficulty.
The online customers can get regularly updated the information of the store.
2.0 Auto Subscribe integration Installation Steps
Purchase OpenCart Auto Subscribe extension from the Knowband website.
First, you will get a source code file of the open cart Auto Subscribe extension in zipped file format.
User Manual of this OpenCart Auto Subscribe extension.
Follow below-mentioned steps in order to install OpenCart Auto Subscribe extension:
1. Unzip the received zip file. You will get the folders as shown in the following image:
2. Copy all the folders of the zip file in the Root Directory of OpenCart setup via FTP manager.
So, OpenCart OpenCart Auto Subscribe module is now successfully installed and ready to use at your store.
Now go to the admin menu and click on the extensions and thereby click on configure button next to OpenCart Twitter Login extension.
3.0 Admin Interface
After successful installation, you can configure the OpenCart product subscription module as described in this user manual. There are multiple Configuration tabs as shown below:
Subscriber Box Settings
Popup Setting
Email Setting
Mail Chimp
Constant Contact
Auto Subscribe Events
3.1 Subscriber Box Settings
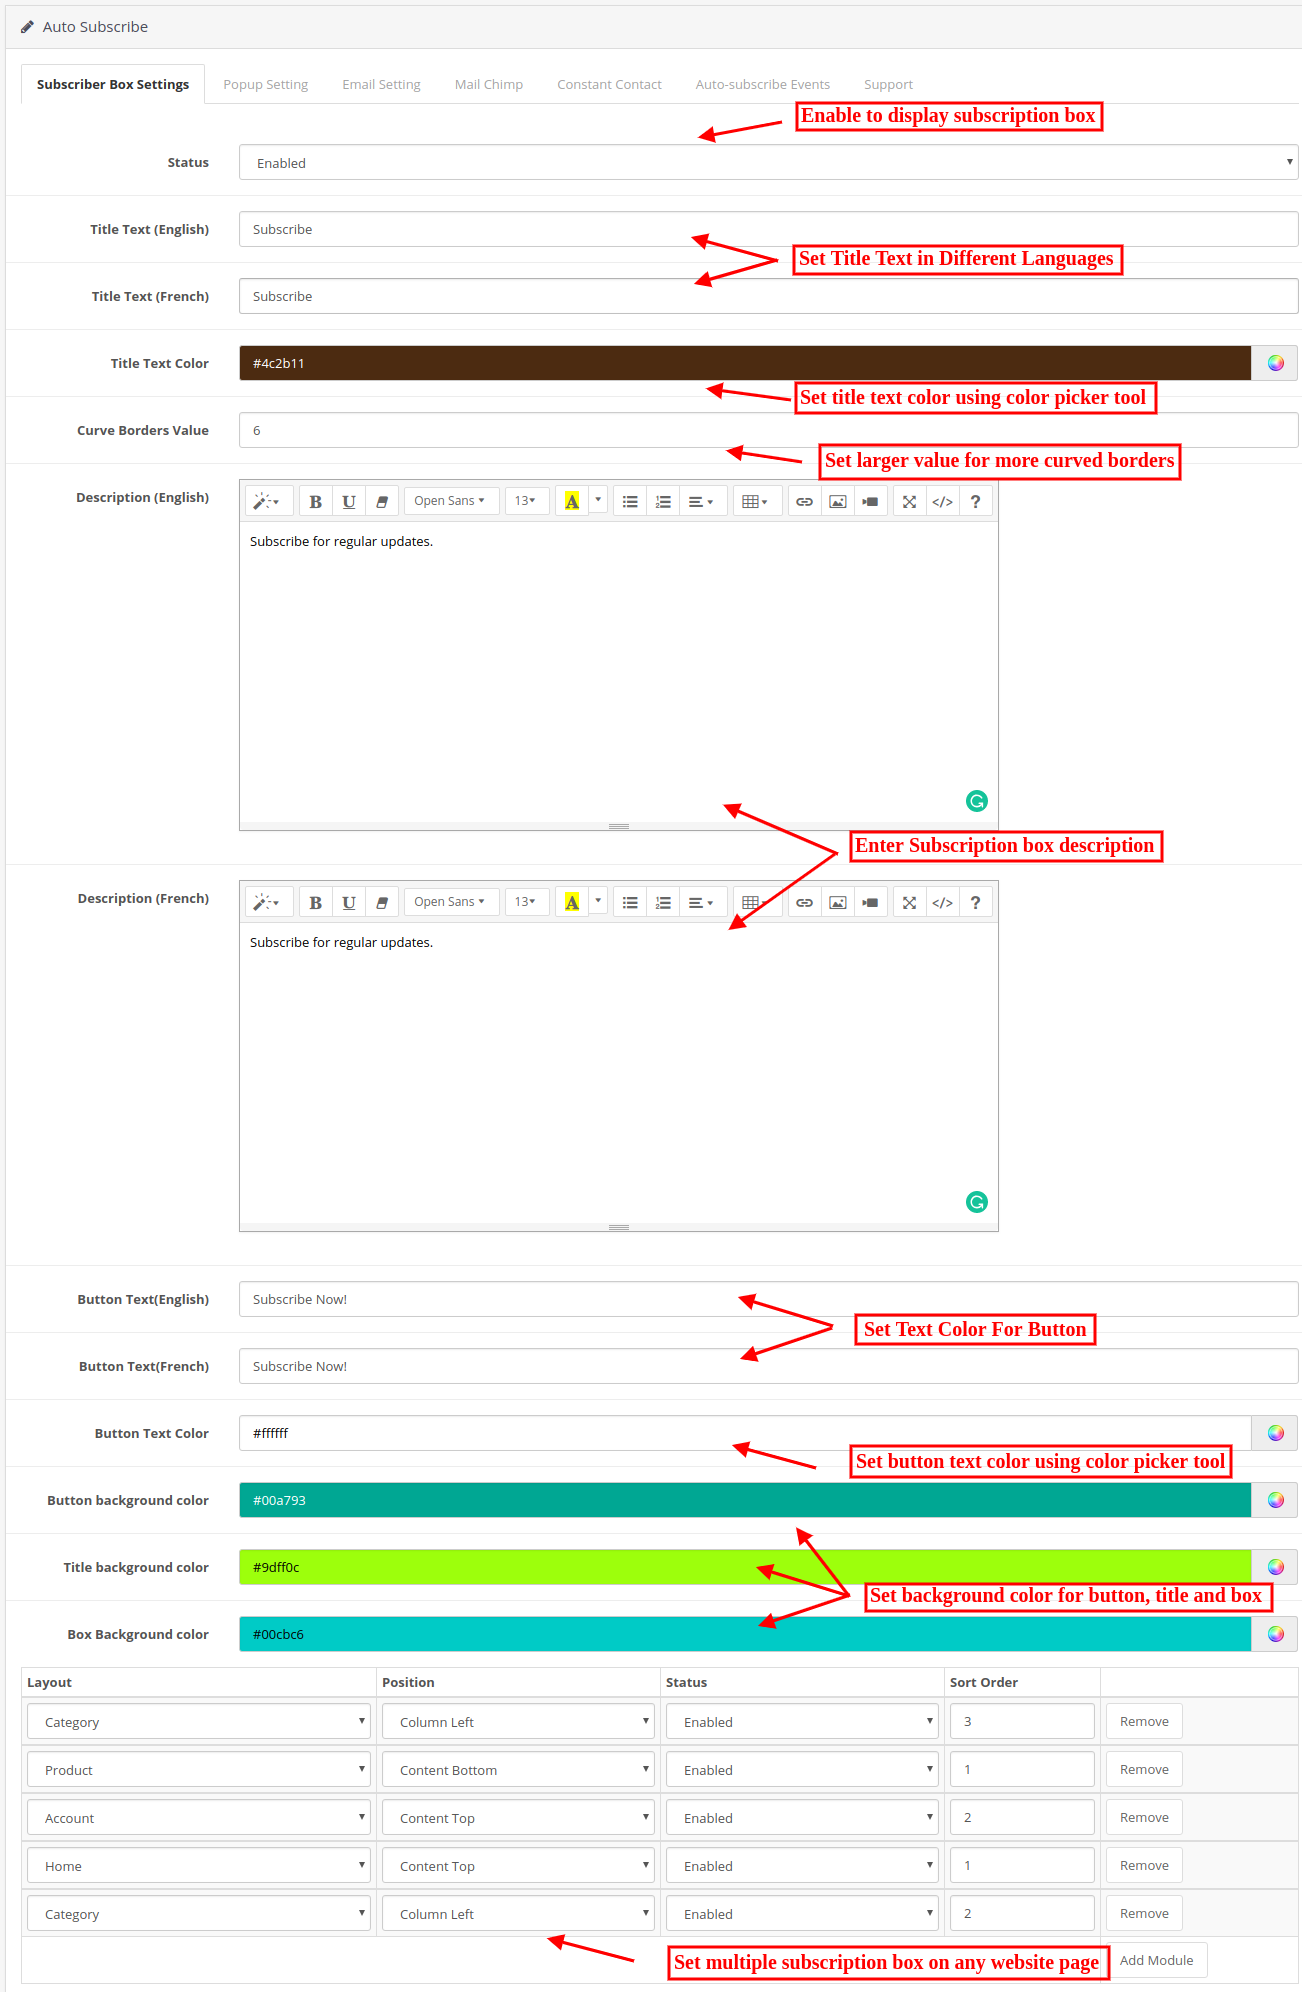
Opencart admin can customize the subscription box to be displayed in the Opencart eCommerce store front by using the following settings option available.
Status: Enable the functionality for showing subscription box on wbesite pages.
Title Text: Enter the title of the subscription box in different languages.
Title Text Color: Select the title text color using color picker tool.
Curve Borders Value: The Opencart store admin can enter the radius of curve borders. This value will be applied to the four corners of the subscription box on front. Higher the value will result more curves.
Description: Enter the text for describing to visitors, the advantages of subscribing to your store. Admin can enter description in different languages.
Button text: Enter the button text here in different languages.
Button text color: Choose button background color using color picker tool.
Button Background Color: Select a color for the background of the button on subscription box.
Title Background Color: Set title background color here.
Box Background color: Choose a background color for the subscription box.
Add Module: Admin can select different pages and set the position of showing subscription box on it. Admin can disable any module if he wants to disable it. Admin can also show multiple subscription boxes on the same website page by selecting its sort order. Any module can be removed from the admin interface of OpenCart MailChimp extension anytime as per the requirement.
3.2 Pop up Settings tab
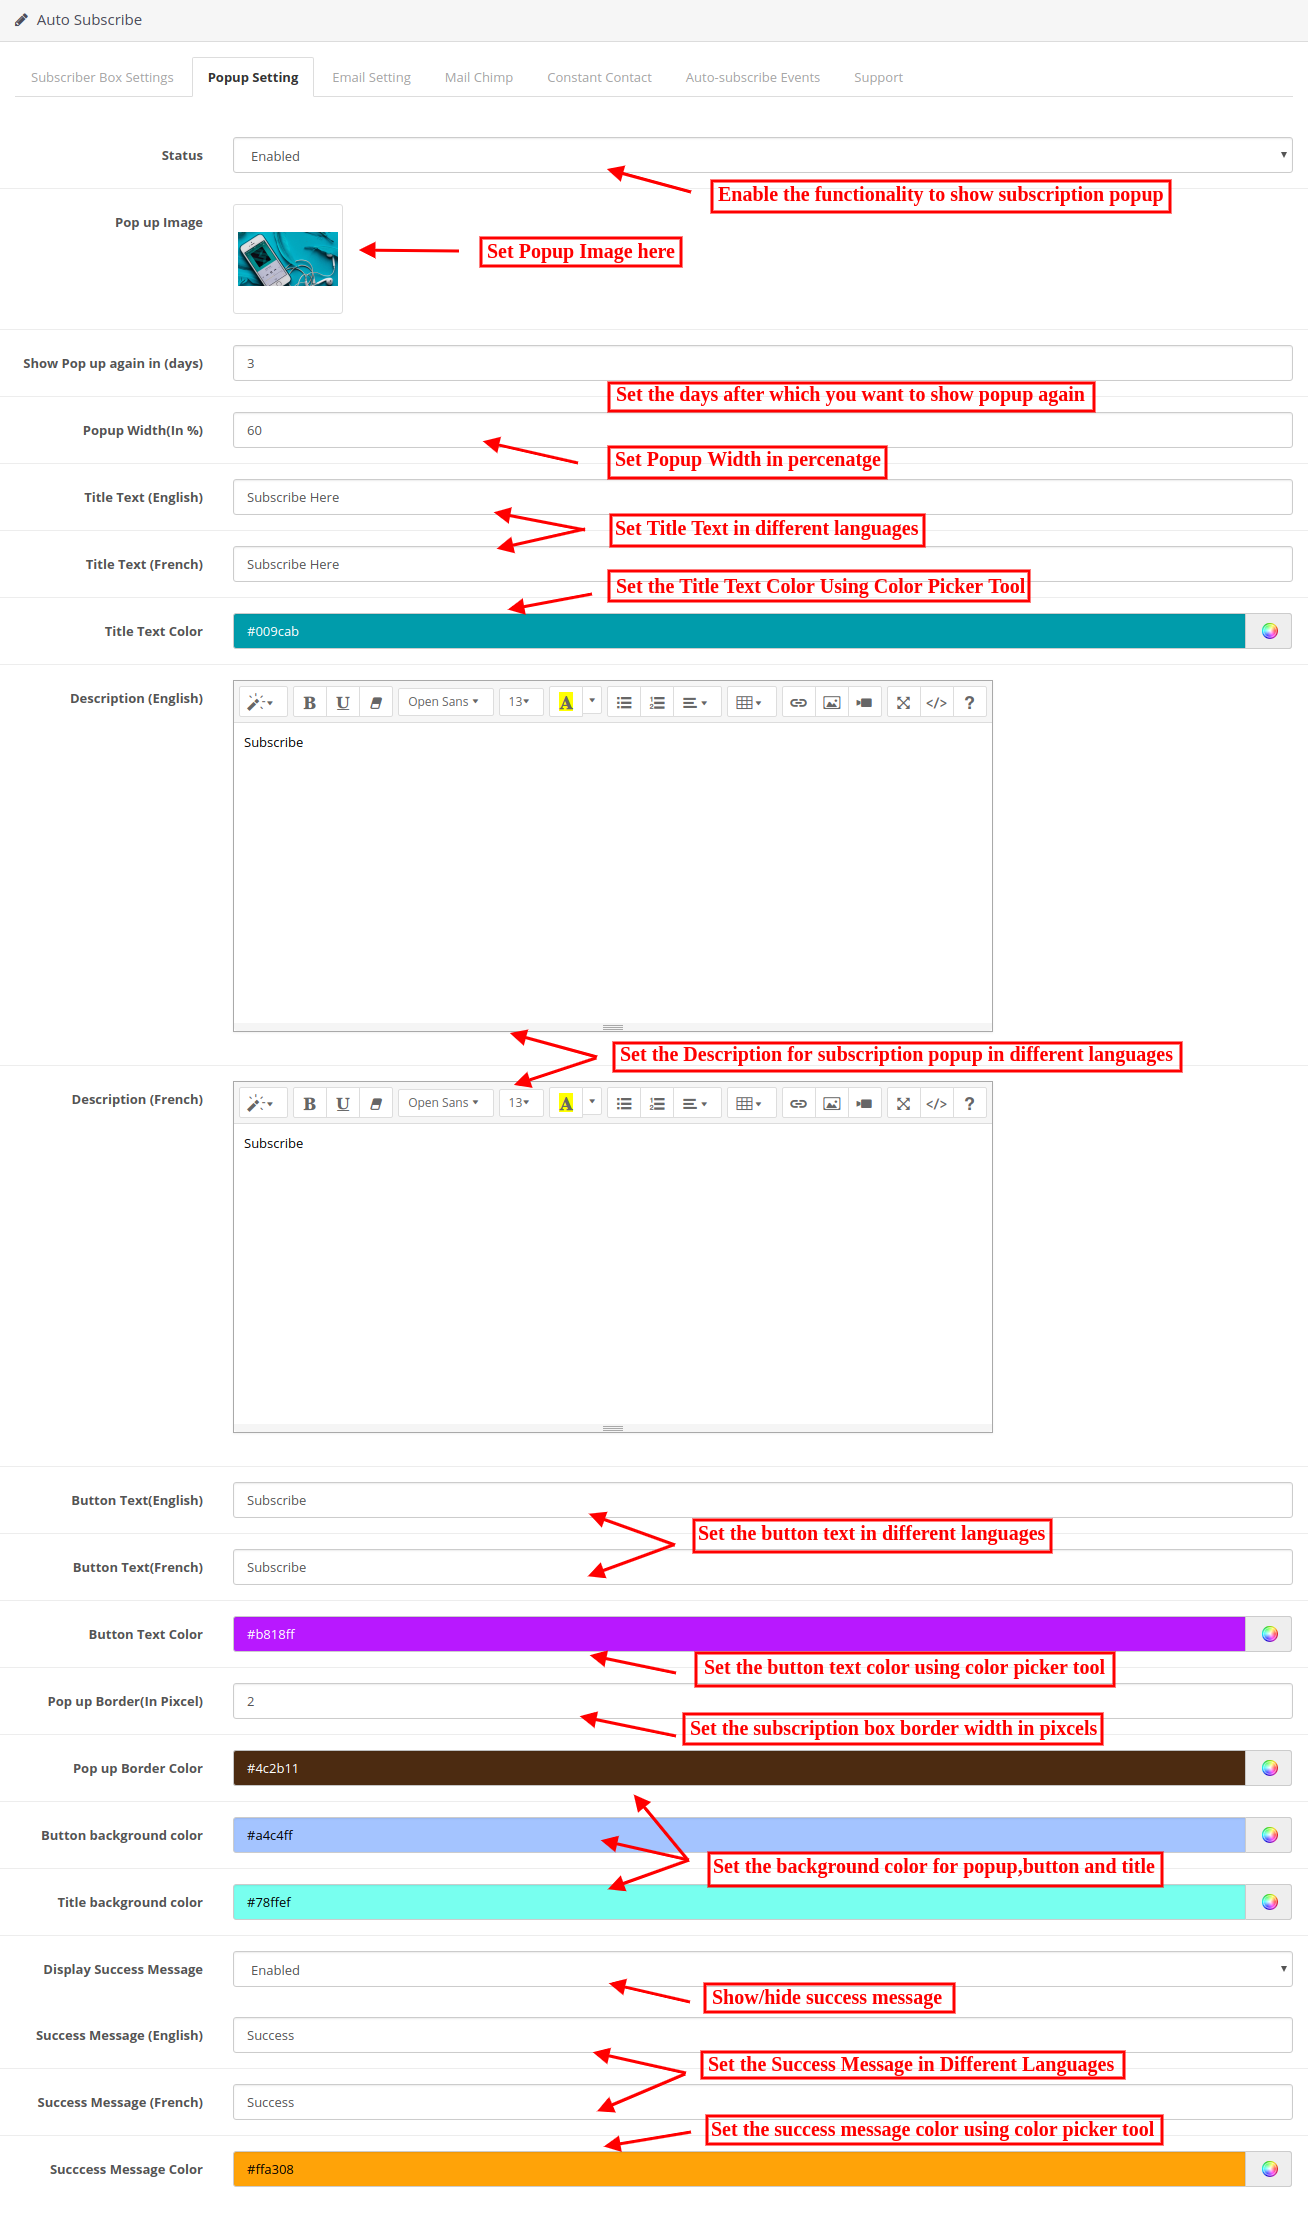
The OpenCart MailChimp Integration allows store admin to customize the pop-up box for showing on website homepage using the following setting option available.
Status: Enable or disable the pop-up display on the homepage. One cannot view subscription pop up on the front until this is enabled.
Pop up Image: Select the image for showing with subscription popup.
Show pop up again in (days): You can choose the duration (in days) for which the subscription popup will appear in the front-end. If you want the pop-up to appear only once in a lifetime, type in a number, say 999. If you want it to appear every time a user lands on the home page, type the value 0.
Pop-Up Width: Enter the value in percentage for setting popup width. Higher value will show larger width.
Title Text: Enter the popup title text in different languages.
Title Text Color: Select the title text color using color picker tool.
Description: Enter popup description in multiple languages for describing the store visitors the need of subscribing the store.
Button Text: Enter the button text in multiple languages.
Popup Text color: Set the popup text color using color picker tool.
Pop Up Border: Set the width of pop up border from the admin interface of OpenCart MailChimp Integration module.
Popup Border Color: Set the color of this border using color picker tool.
Button background color: Change the background color of your button as per the website theme.
Title background color: MailChimp Newsletter Subscription module allows setting the background color of the pop-up title.
Display Success Message: Enable to show success message after successful subscription.
Success Message: Set the message which you want to dispaly on website after successful subscription. You can enter success message in multiple languages.
Success Message Color: Choose the desired color for the success message using color picker tool.
3.3 Email Settings
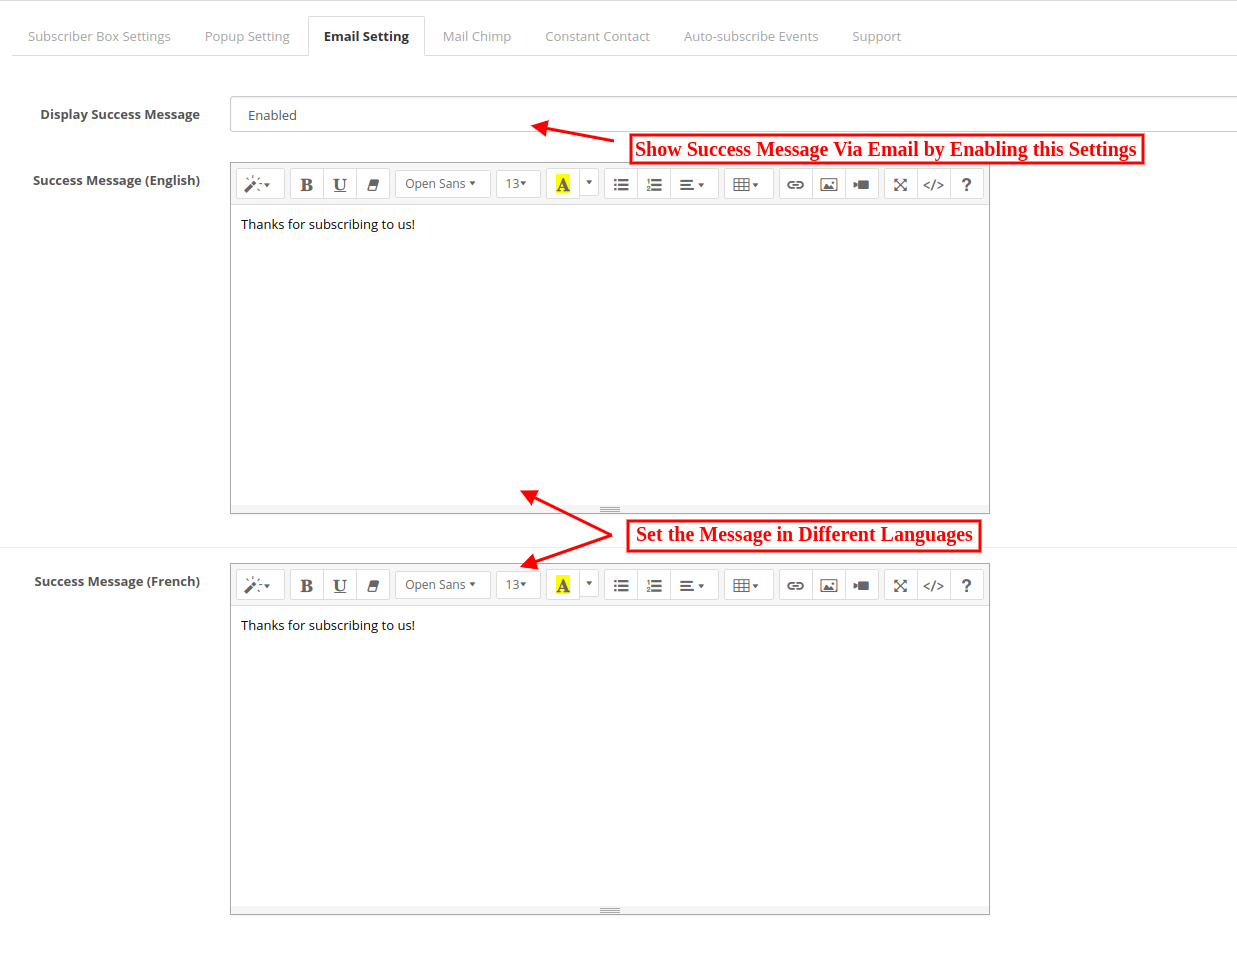
Admin can show an email to the subscribers.
Display Success Message: Admin can Enable/Disable mail sending after subscription.
Success Message: Opencart store admin can set the mail content. This mail will be sent on subscription. In case of no content, the default mail will be sent to the customer.
3.4 MailChimp Tab
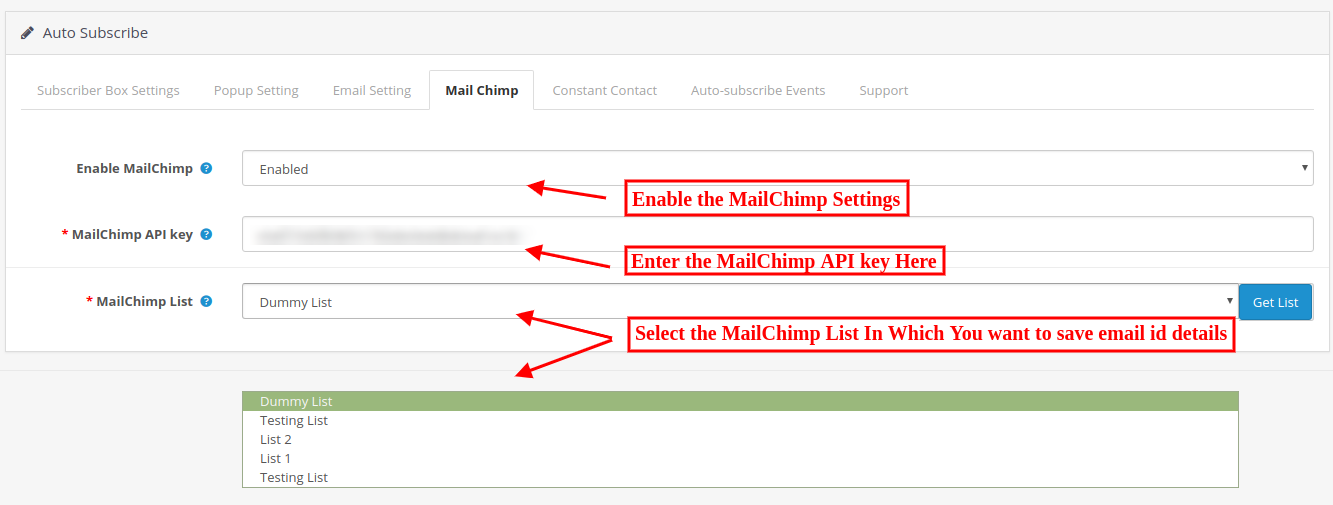
In this tab, OpenCart store admin can choose from the lists in his/her MailChimp account where emails should be added.
Initially, a message will be displayed like No list exists for this API key!
Enable MailChimp: Enable or Disable MailChimp from the admin interface of OpenCart product subscription module.
MailChimp API key: Enter the API key to fetch lists from your account.
MailChimp List: Choose from the lists displayed here. On the selected list, the email id details will be transferred.
3.4.1 Steps to generate Mailchimp API key
Step 1: Click on https://www.mailchimp.com and first of all create a user account in MailChimp, if you don’t have a MailChimp account. Once you create an account, log in to it.
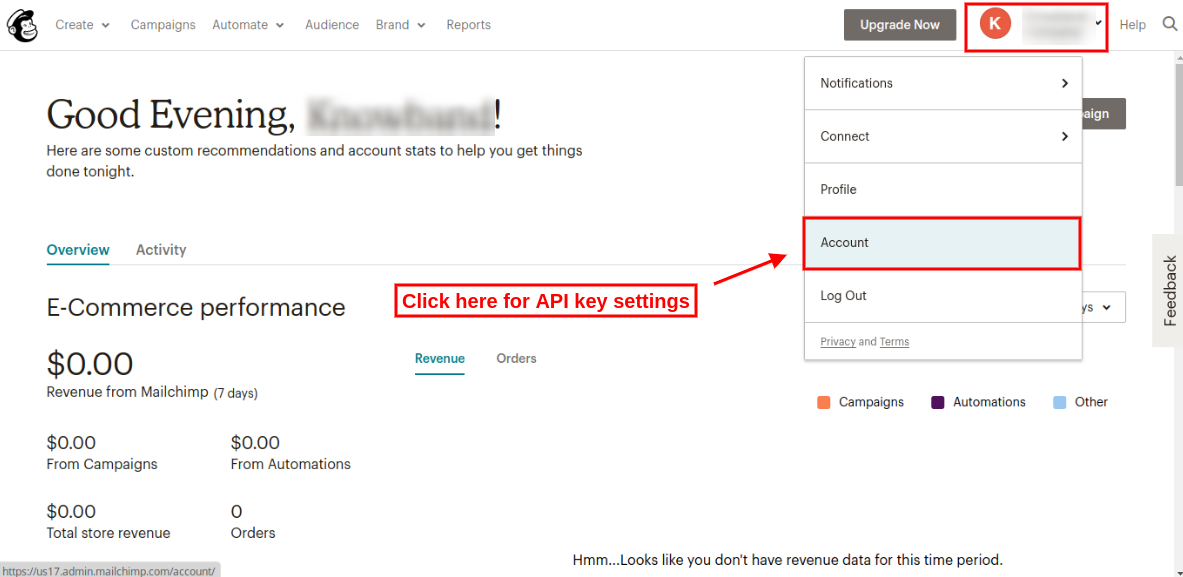
Step 2: On the upper right corner of the dashboard, there will be a drop-down. Select the “Account” option from the list and click on that option.
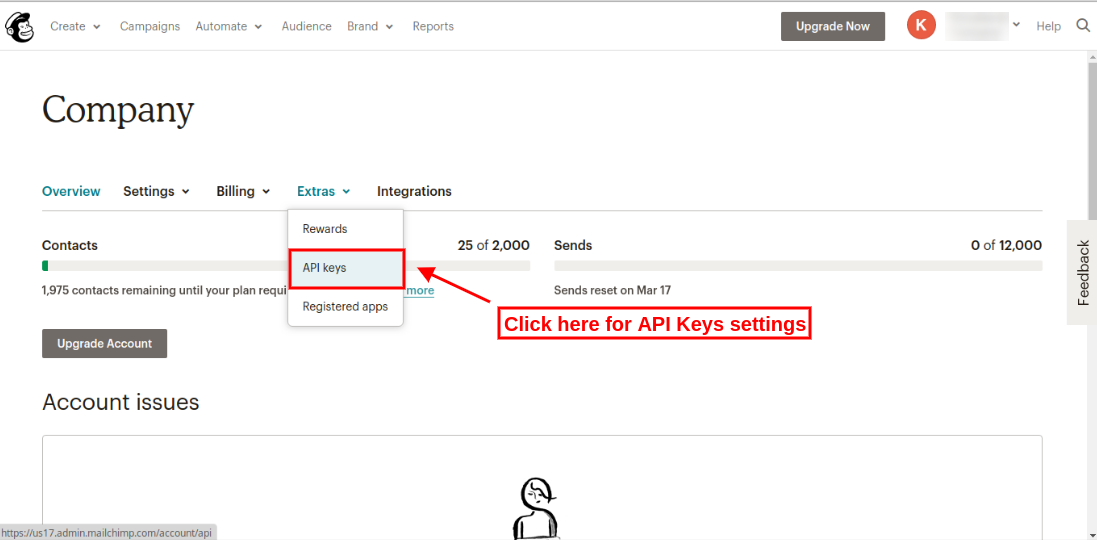
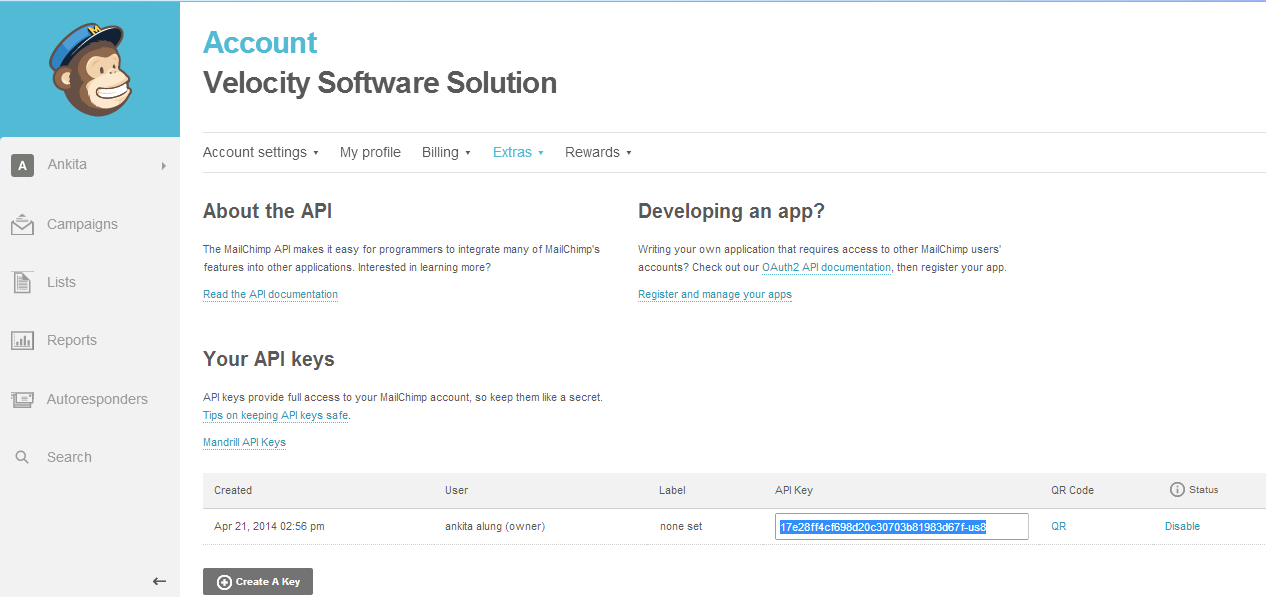
Step 3: After clicking on the “Account” section, there will be some sub-menus. Select the “Extras” submenu. There will be some options, select “API keys” from these options as shown below:
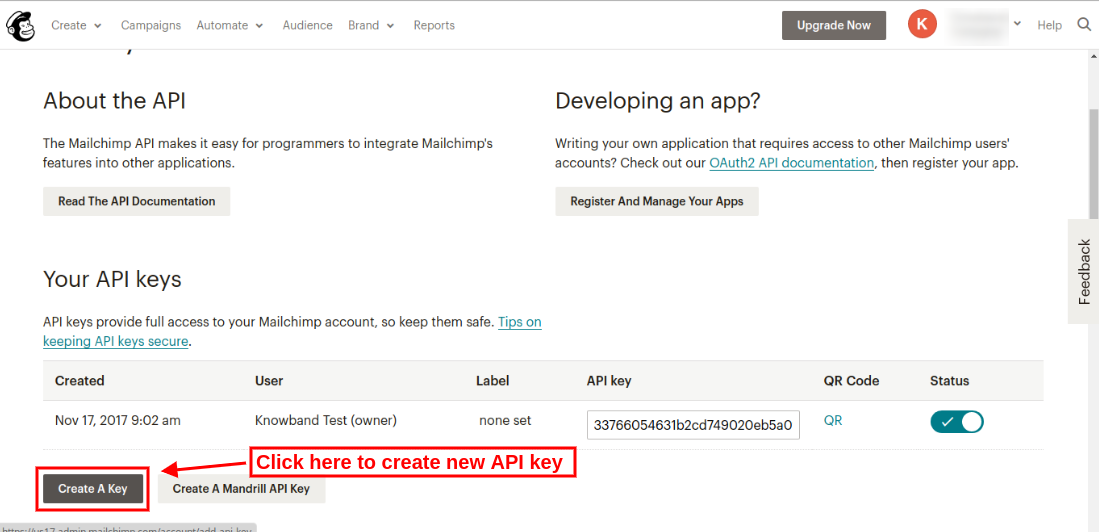
Step 4: On API keys page, click “Create a key” and generate a new API key.
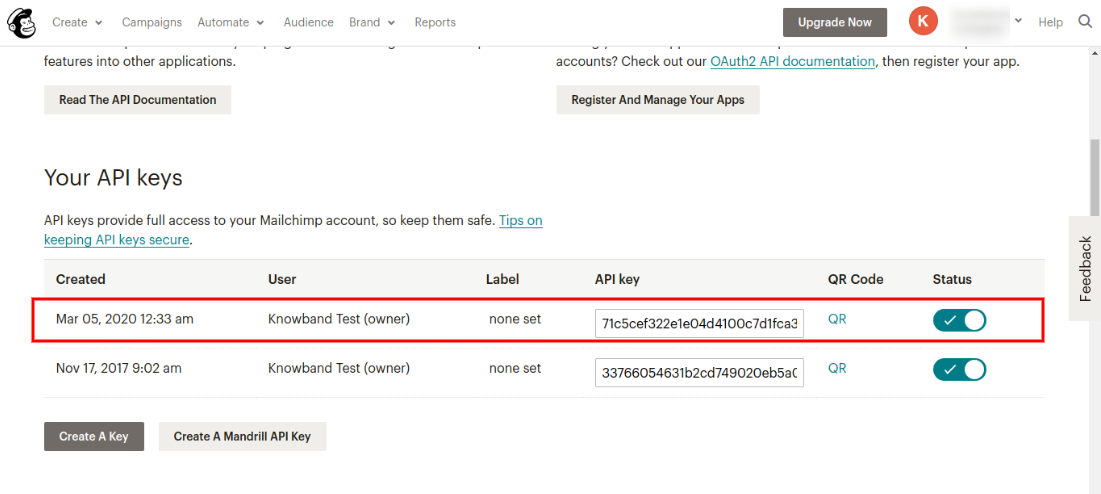
After clicking on Create a Key button, the user can view the newly created API key as shown below:
To create MailChimp Audience
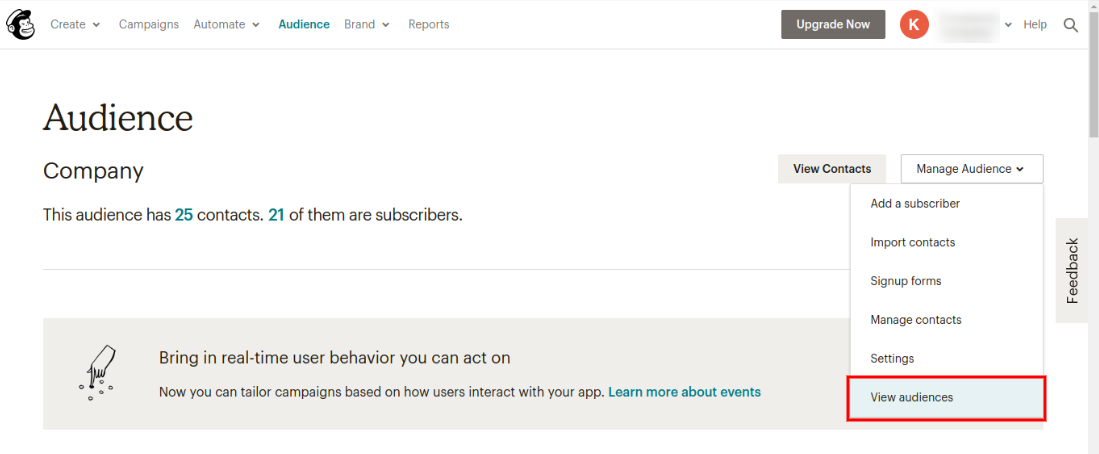
Step 5: Click on the “Audience” tab in the upper menu for rreating new audience. Admin will be redirected to a new page where he/she can view previously created audiences and also create a new audience. The screen is given below:
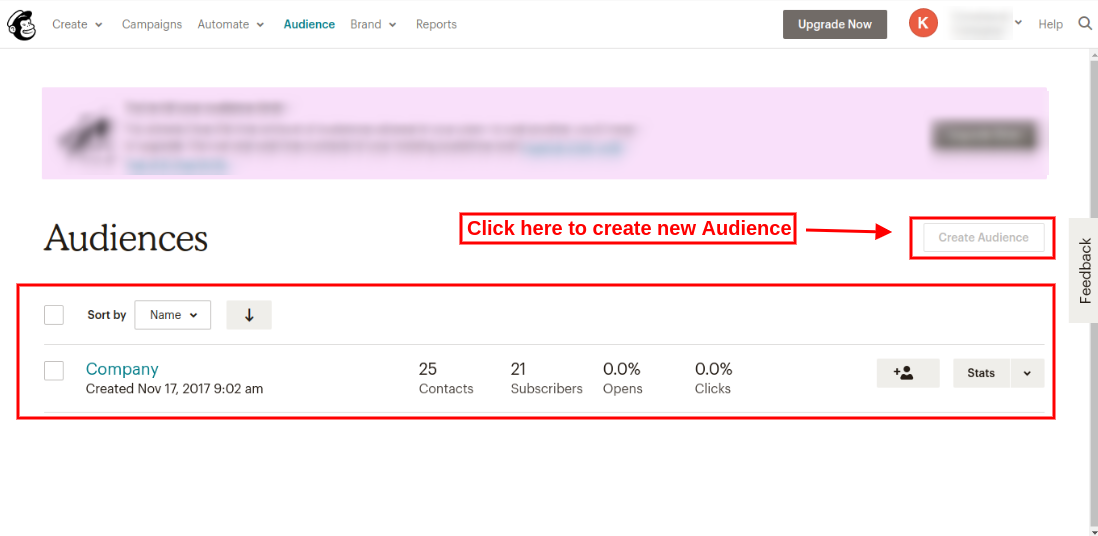
Step 6: On clicking “view audiences” option, admin can view previously created audiences as shown below:
Admin needs to upgrade his/her account for adding more audiences. In the free account, admin can create a single audience only. Admin can upgrade account and then click on “Create Audience” option as shown below:
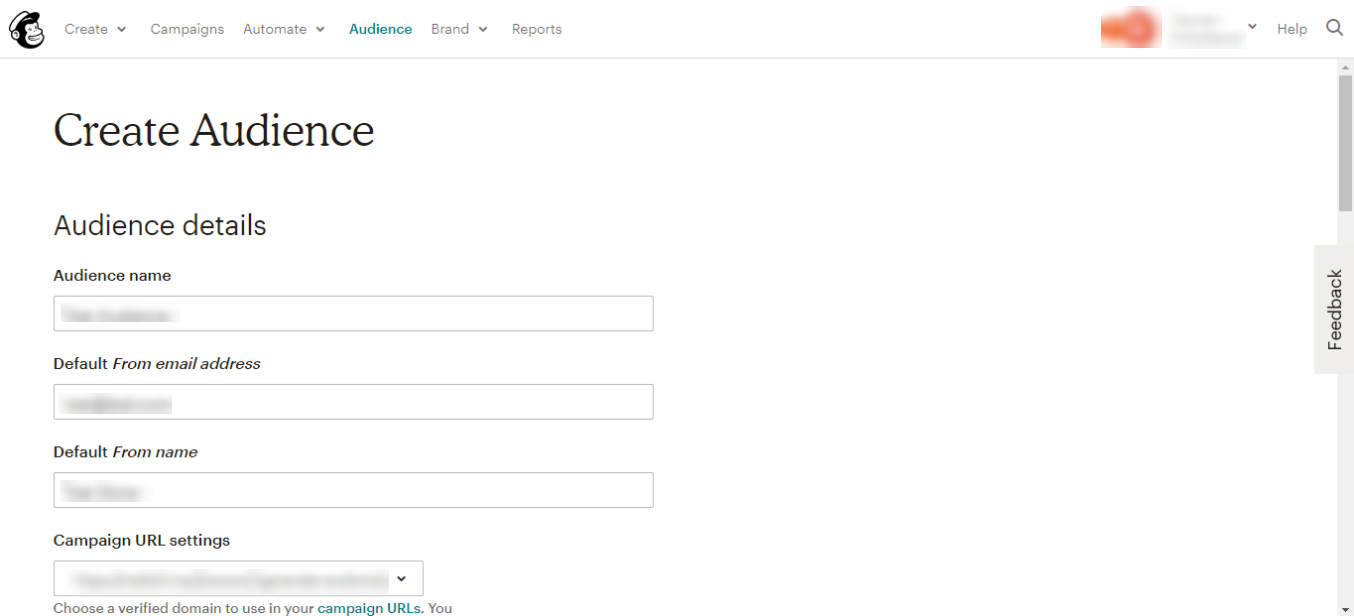
After clicking on “Create audience” option, admin needs to fill the required information:
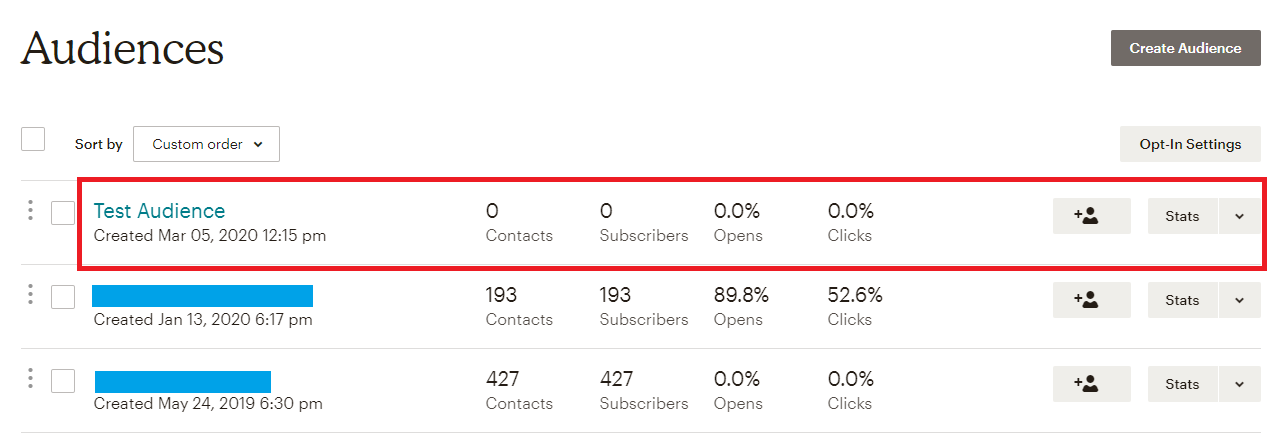
After saving all the details, the admin needs to save it. This way, admin can create new audience ash shown below:
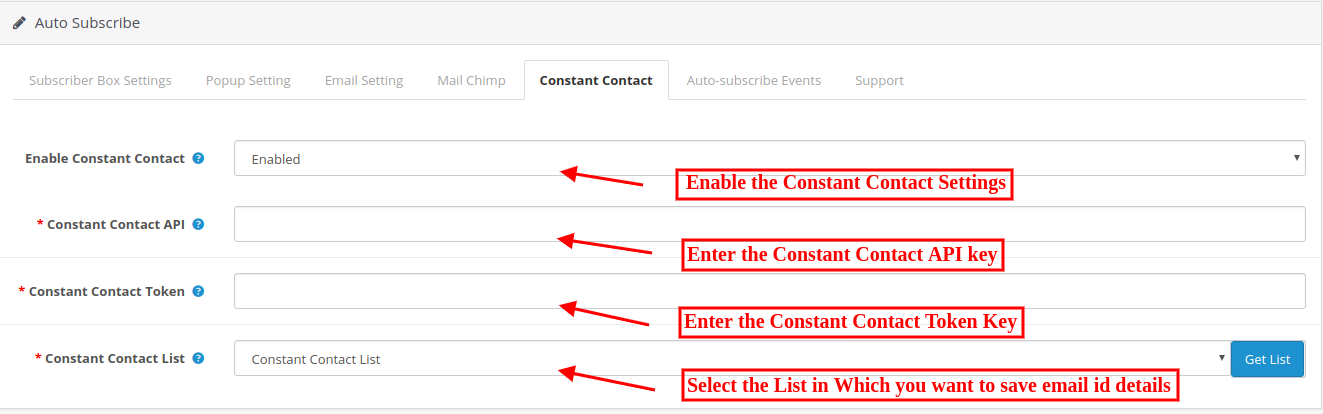
3.5 Constant Contact Tab
In this tab, admin can choose from the lists in his/her Constant Contact account where email id details should be added. Initially, a message will be displayed like No list exists for the combination of Key and Token provided above!
Enable Constant Contact: Enable if you want to save email id details in constant contact account.
Constant Contact API key: The Opencart store admin needs to enter API key. As soon as admin enters the key and clicks on the text box, the request is sent and lists (if any) are fetched and displayed in a drop-down box.
Constant Contact Access Token: The Opencart store admin needs to enter access token along with API Key. As soon as admin enters the token and clicks outside the text box, the request is sent and lists (if any) are fetched and displayed in a drop-down box.
Constant Contact List: Choose from the lists displayed here.
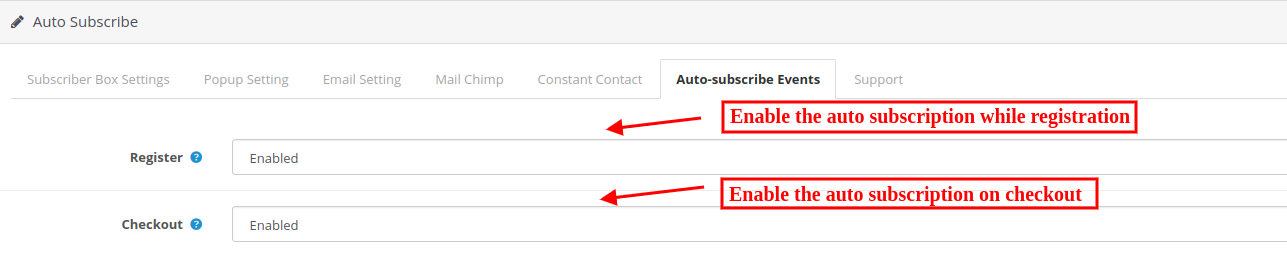
3.6 Auto Subscribe Events
Auto-subscribe events are the events on which the users can be subscribed to the configured lists in admin automatically. On such events, the user will not be notified of being added to the subscription lists you have chosen in admin but they will receive the email for the same if you have turned on the option to send emails (in subscriber box settings tab) on subscription.
Register: Turn on Register, if you want a user to be automatically added to your list on successful registration.
Checkout: Turn on Checkout, if you want a user to be automatically added to your list on successful checkout.
4.0 Requirements
1. Php version 5.3 or greater
To access the API of constant contact, one must use the PHP version equal or higher than 5.3. Unless your server is running the required PHP version, you will not be able to successfully install this plugin.
2. MailChimp
Before using this module, you must have a valid account with MailChimp and one or more lists created in it. Note that, you must also have the access right to alter your email subscribers list. You will need to provide these for this module to work.
API Key: You can obtain your API key from your MailChimp dashboard, or you can create one if you don’t have one already.
3. Constant Contact
You need to have a valid account with constant contact and one or more lists created into it. Note that, you must also have the access right to alter your email subscribers list. You will need to provide these for this module to work.
API Key: You get an API key from constant contact via email as soon as you register your application.
Access Token: In addition to API key, you also needed an access token to grant permission to access API.
Note that, this plug-in works for constant contact API version 2 since version 1 is deprecated and will soon be discontinued.
5.0 Website Front-end Interface
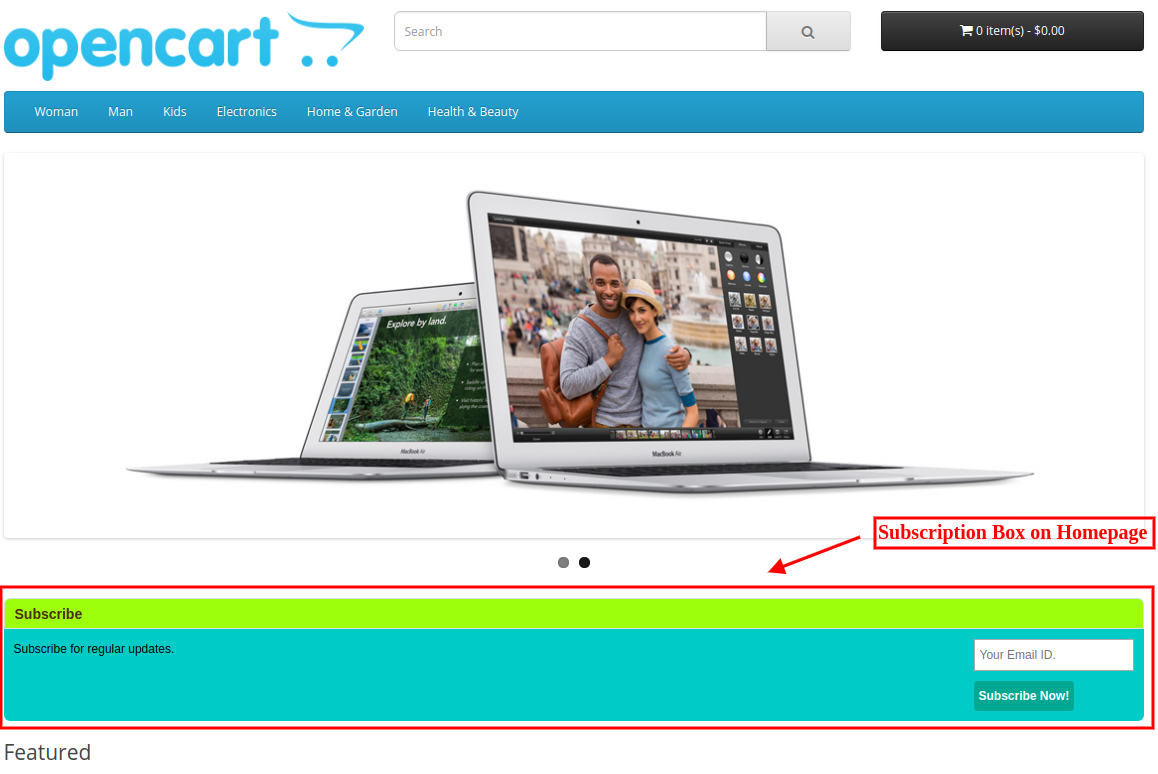
The online store visitors can view the subscription box on the website pages. On the front end, users will have the option to subscribe themselves by clicking on subscribe button. The module will look like the following screen. The visitor can type in email id and click on subscribe button to add itself to the lists configured. A success or an error message will be displayed to notify the user.
On the user’s end, pop up will appear something like this screen below, depending upon your chosen display settings.
If one chooses an image to be displayed on pop up from admin settings, a pop up like shown above will appear. Admin can also choose to show a pop up without any image, by not choosing any image in the admin panel.
After Successful subscription, the online users can view the success message.
Most of the visitors leave the checkout for the desired product just because they find the process complex and lengthy to complete. This ultimately leads to more and more number of abandoned carts. To control the exit and cart abandonment rates, Knowband has offered OpenCart One Page Checkout Pro plugin for OpenCart stores. Further, by implementing One Page Checkout for your eCommerce site, you can improve the conversion rates as it replaces the multi-step checkout page with a single page checkout.
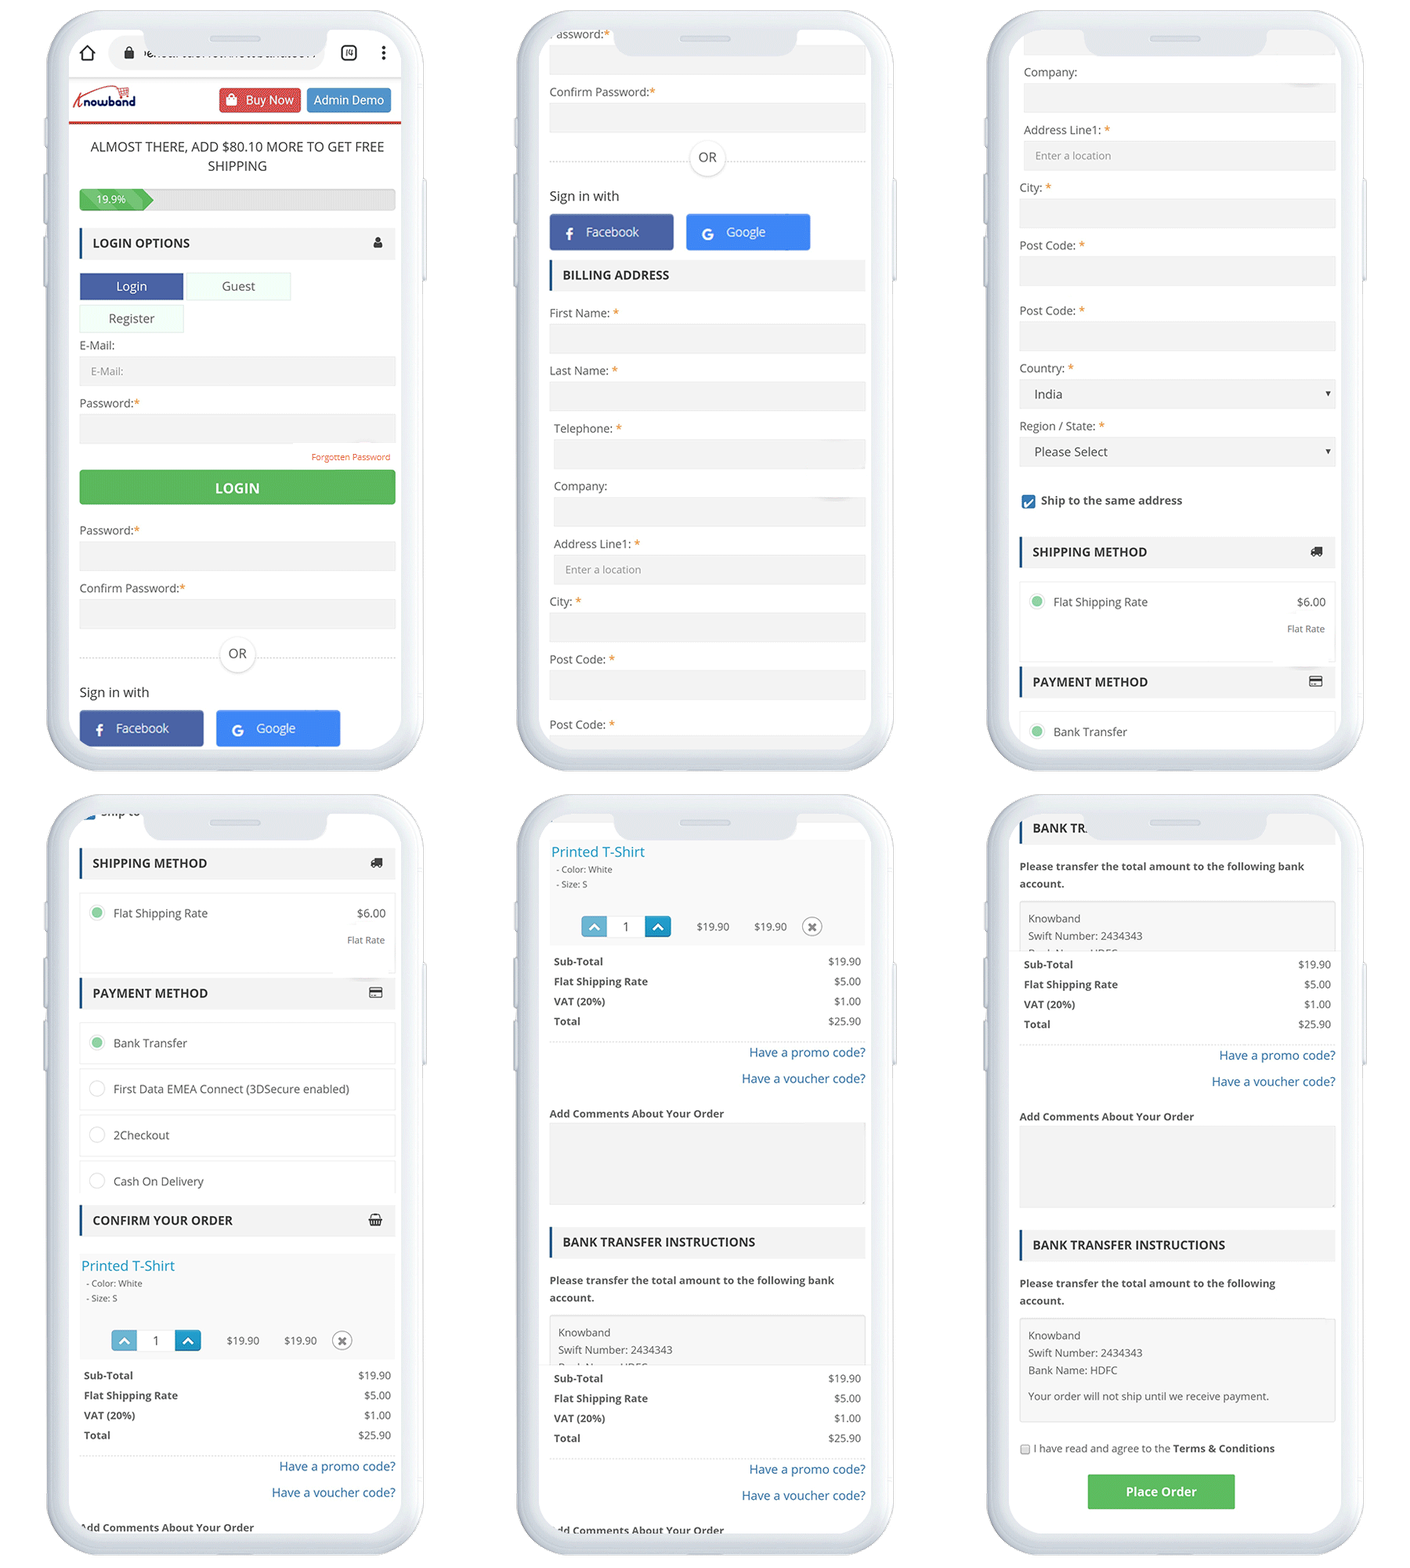
Mobile View:
Salient Features of the OpenCart One Page Checkout extension:
The extension offers Guest checkout functionality by which the users can easily and quickly complete their orders as guest customers without creating a new account on the online store.
The OpenCart Fast Checkout extension allows the customers to quickly log in to the website using their Google, Facebook, and Paypal accounts.
The fields on the checkout page can be easily customized by the admin from the back-end of the OpenCart One Page Checkout Pro extension. The store admin can show or hide any of the fields from the checkout page or can make them optional or mandatory for the users to fill. The admin can also re-arrange the position fields with drag and drop functionality.
The store owner can easily customize the look and feel of the checkout page including changing the color of the buttons, background button color, text color, etc.
The OpenCart One Page Supercheckout offers multi-store and multi-lingual compatibility.
The OpenCart One Step Checkout extension supports nearly all the major shipping and payment methods that boost the confidence of the customers to choose their desired method from the checkout page.
The e-merchant can apply any of the design layouts from 3 different checkout layouts I.e., 1-column, 2-column, or 3-column. The fields can be easily rearranged by dragging and dropping.
The OpenCart Quick Checkout module offers integration with MailChimp, Klaviyo, and SendinBlue that allows you to sync your users’ database automatically with these accounts of yours without any manual efforts.
The e-merchant can also customize the look and feel of the extension through custom CSS and JS.
The OpenCart Responsive One Step Checkout module offers the Testing mode feature by which the store owner can check and view the customizations done before making the customizations live on the website.
The OpenCart Simplified Checkout module offers the Ship2Pay feature by which the store owner can map particular payment methods with selected delivery methods. It hides all the other payment methods on selecting a particular delivery method and shows only those payment methods that are mapped to the selected delivery method to the user.
2.0 Installation Guide of OpenCart One Page Checkout extension
Before starting the installation process, you have to buy the OpenCart One Page Checkout extension from the Knowband store. Once purchased, you will receive the following files in your registered email.
Source code of OpenCart One Page Checkout Extension in zipped file format.
User Manual of OpenCart One Page Checkout extension.
Now to install this OpenCart Single Page Checkout on your online shop, follow the given steps:
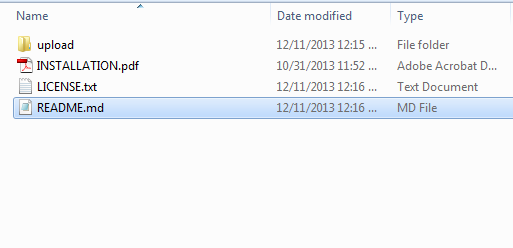
1. Unzip the zip file. You will get the folders as shown in the image below
2. Copy all the folders of the zip file in the Root Directory of OpenCart setup via FTP manager.
Steps to install the OCMOD file
After unzipping the folder, you will find a file supercheckout_pro.ocmod.xml as shown below:
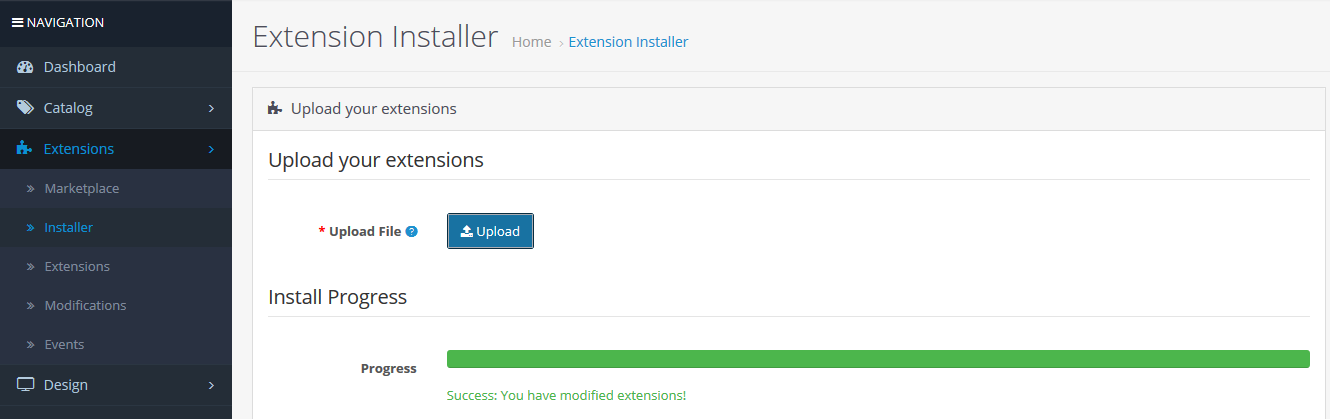
Now in the admin panel, click on Extensions in the left side menu. Then click on Extension Installer ( Home->extension).
Now, Upload the supercheckout_pro.ocmod.xml. A success message is shown once the file is uploaded.
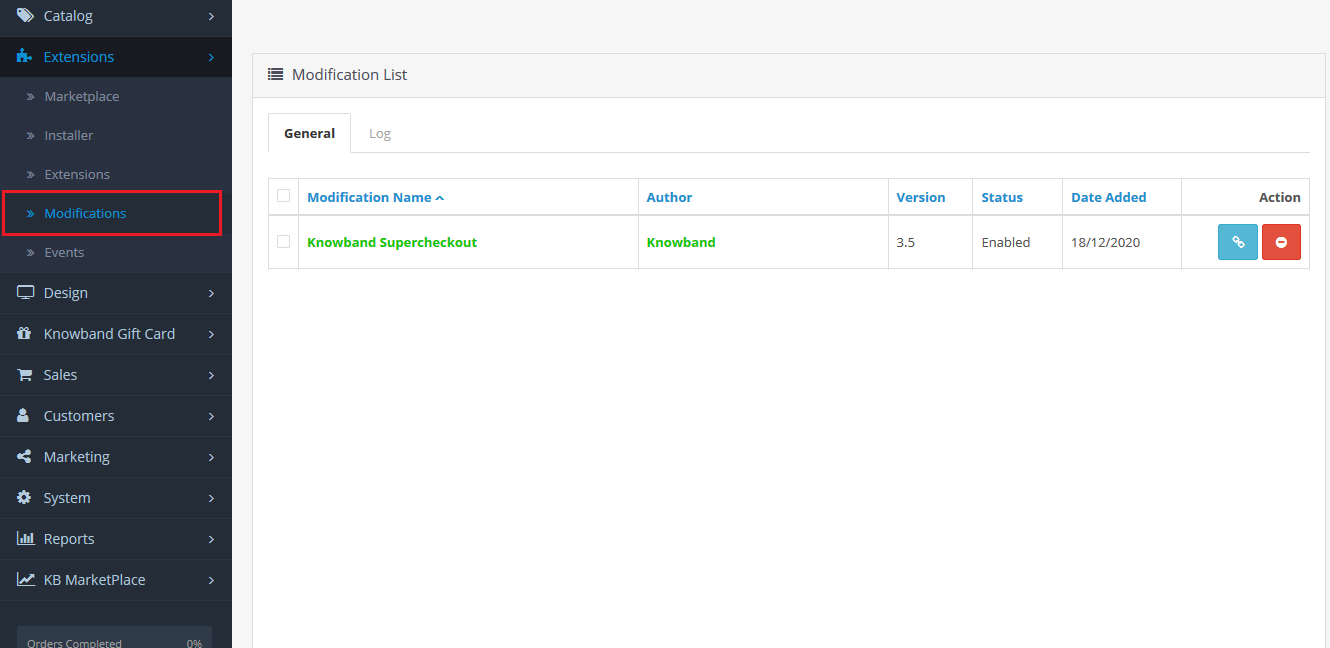
After the file is uploaded go to Home->Modification
You will find a file with the name Supercheckout Pro v2.8 (this means your ocmod has been installed successfully). Click on the corresponding “+” icon to enable it. The green icon turns into the red as shown below.
Finally, click on the refresh button (This is mandatory).
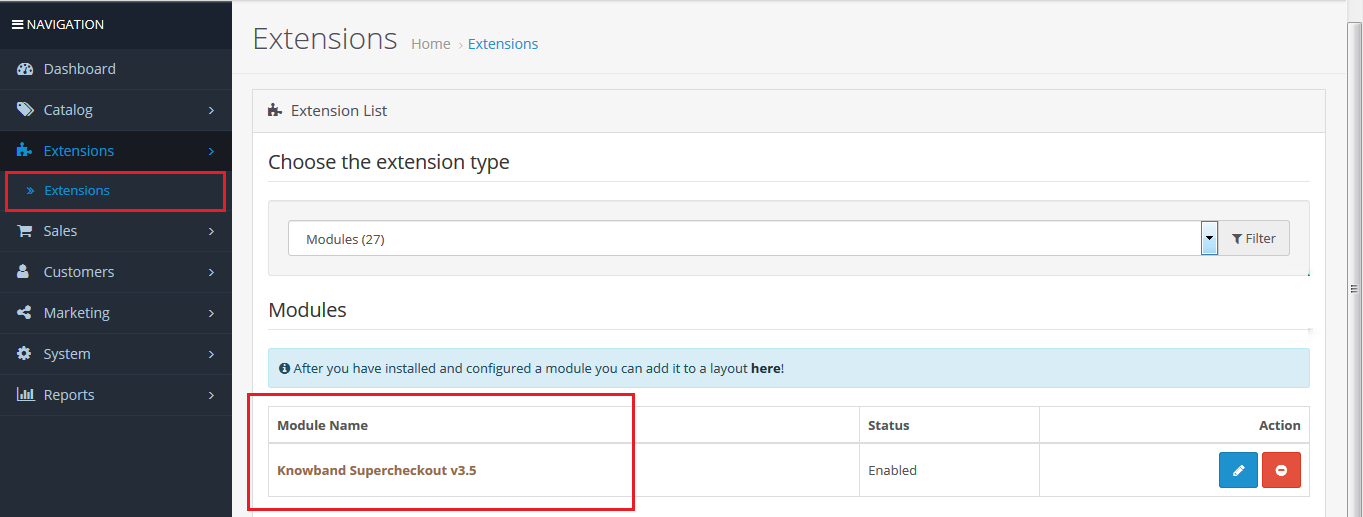
So, OpenCart One Page Checkout Pro is now successfully installed and is ready to use at your store. Go to the admin menu and click on the Extensions and then on Modules. Click the configure button next to Knowband Supercheckout.
3.0 Admin Interface of OpenCart responsive one step checkout module
Just after the successful installation of the One Page Checkout for OpenCart website, you can configure the checkout form fields as per your requirements. You have to navigate the settings in the given order: Admin Panel > Extensions > Modules > Knowband Supercheckout
The easy to understand admin interface of OpenCart One Page Checkout Pro is divided into ten sections namely:
1. General Settings
2. Customizer
3. Login Settings
4. Payment Address
5. Shipping Address
6. Shipping Method
7. Ship2Pay
8. Payment Method
9. Cart
10. Design
11. Newsletter
Each of these sections has been discussed below:
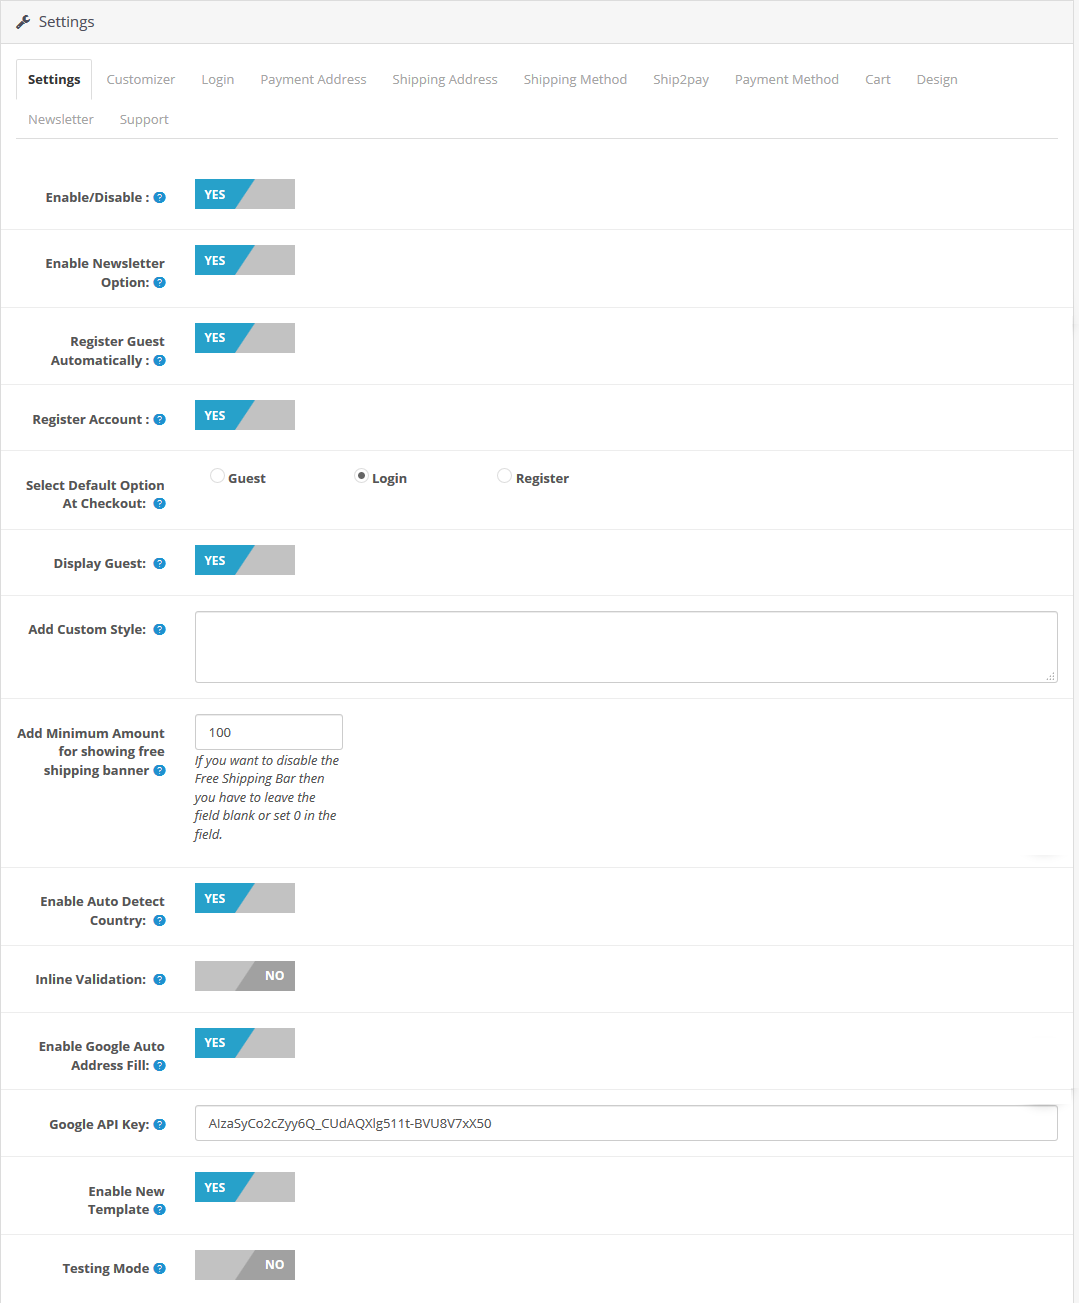
3.1 General Settings
Enable/Disable: Using this option, you can enable or disable the complete functionality of the OpenCart One Page Checkout Pro plugin from OFF to ON.
Enable Newsletter Option: You can enable or disable the Newsletter option on the Supercheckout page. Once you have enabled this button, the following will be the cases:
a.) Newsletter option will be visible to Guest checkout customers, only if you have enabled Register Guest Automatically option.
b.) Newsletter option will always be visible to customers if they are creating a new account.
c.) Newsletter option will never be visible to logged-in customers.
Register Guest Automatically: You can enable this option to automatically register the guest customers at your store. By enabling this option, you can register your customers to the store and send them a generated password on their email.
Register Account: By enabling this field, you can show a password field on the supercheckout page so that the new users can easily set the desired password for their account.
Select Default Option at Checkout: With this option, you can set a default option in the login section of your OpenCart One Page Supercheckout page out from the options as Guest, Login, and Register.
Disable Guest: You can enable or disable the guest functionality for the users in the login section of One Page Checkout.
Add Custom Style: With this option, you can add or include custom style to the Supercheckout page. To apply some custom CSS on the Supercheckout page, you can write that CSS in the text box which is just to the right of the Add Custom Style label. For eg: You can change the color of the buttons on the Supercheckout page.
Add Minimum Amount for showing free shipping banner: From this tab, the admin can add a minimum amount which is required after which the customers will be eligible to get free shipping of their order.
Enable Auto-detect Country: After enabling this feature, the extension will detect and fill the country of the user automatically in the country section.
Inline Validation: With this feature, the extension displays an error every time the user misses filling a mandatory field on the checkout page.
Enable Google Auto-address to fill: As soon as the user starts typing his address, the extension suggests his address if this feature is enabled.
Enable or Disable New Template: With the OpenCart One Page Checkout extension, the store owner can either apply the new or old checkout template as per his desire from the General settings.
Testing Mode: This option helps you to enable or disable the test mode functionality of this OpenCart One Page Checkout extension.
Testing URL: Once you enable the testing mode, you can set a supercheckout URL where you can test the functionality of one page checkout.
Customizer
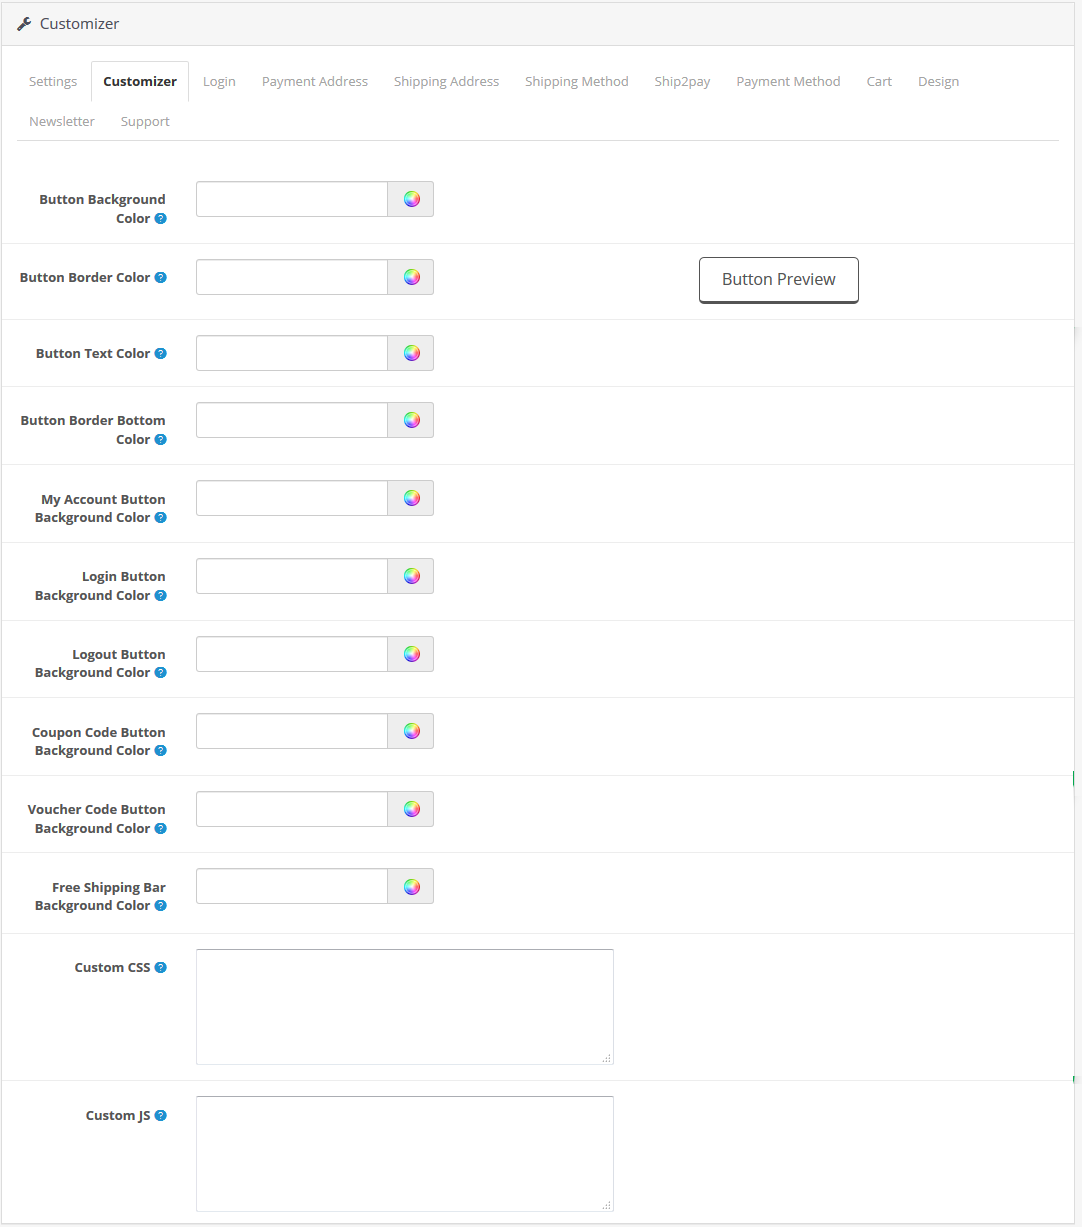
From the Customizer tab, you can customize the Button Background Color, Button Border Color
Button Preview, Button Text Color, Button Border Bottom Color, My Account Button Background Color, Login Button Background Color, Login Button Background Color, Logout Button Background Color, Coupon Code Button Background Color, Voucher Code Button Background Color, etc.
Free Shipping Bar Background color: This section allows you to change the background color of the Free Shipping Bar on the checkout page.
Custom CSS and JS: This section allows you to customize the look and feel of the checkout page with custom CSS and JS.
3.2 Login
Under this tab, you will find options to configure Facebook, Google, and Paypal login options as shown below.
Enable Facebook Login: With this option, you can enable/disable the Facebook Login option on One Page Checkout.
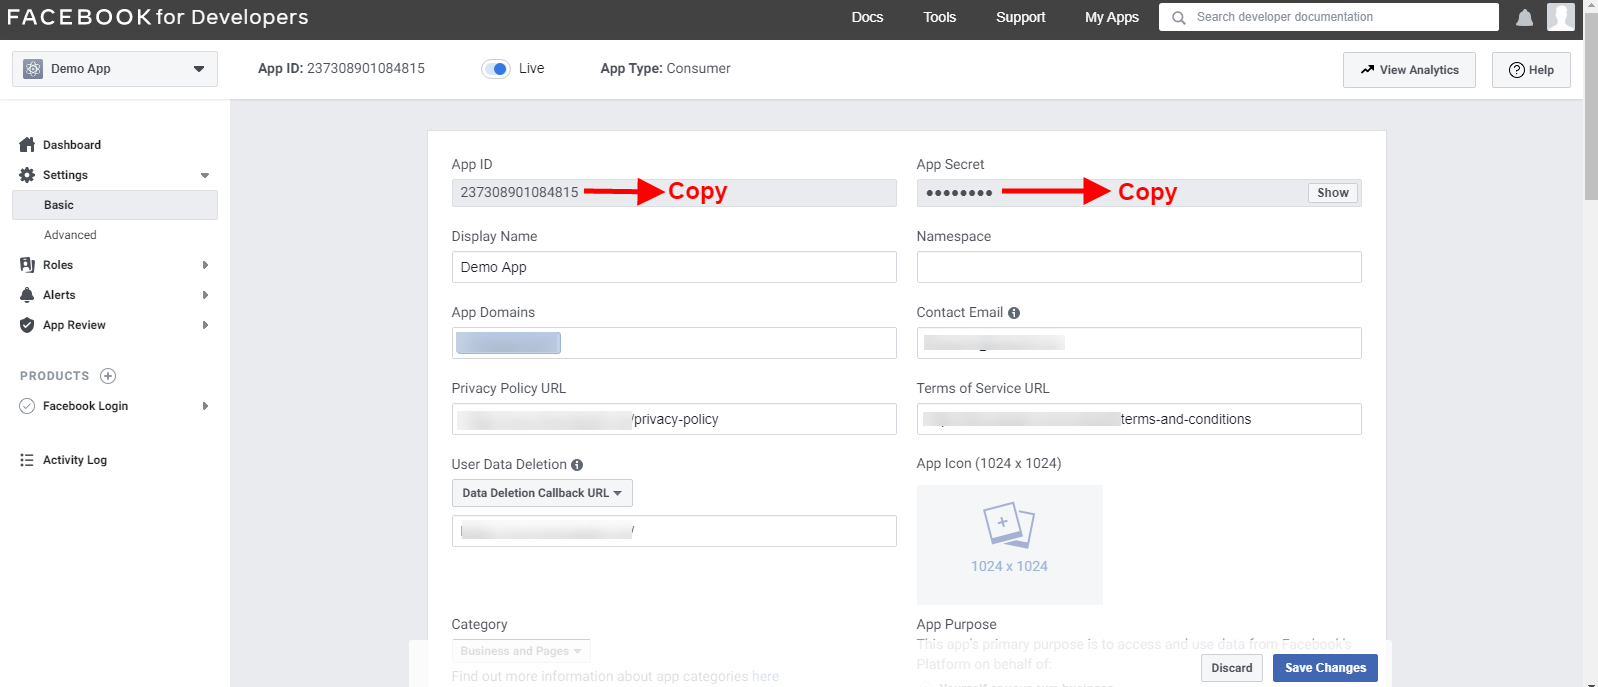
Facebook App ID: This option lets you set the Facebook App ID which can be generated using Facebook Developer’s account.
Facebook App Secret: Using this option, set the secret key generated using Facebook Developer’s account.
Enable Google Login: With this option, you can enable/disable the Google Login option on One Page Checkout.
Google App ID: This option lets you set the GoogleApp ID.
The Google Client ID: This field lets you set the Google client ID created from the Google console.
Google App Secret: Using this option, you can set the App secret key generated using Google console.
Enable Paypal Login: With this option, you can let your customers log in through their Paypal accounts.
Paypal Client ID: This option lets you add your Paypal Client ID.
Paypal Client Secret: This option lets you add your Paypal Client Secret ID.
For detailed instructions to generate App ID, App Secret Key, and Client ID, jump to the next section.
3.2.1 How to Set up Facebook Login?
Facebook App can be created by below-mentioned steps:-
1: Go to the given URL: https://developers.facebook.com/apps/
2: Click on the “Create App” button.
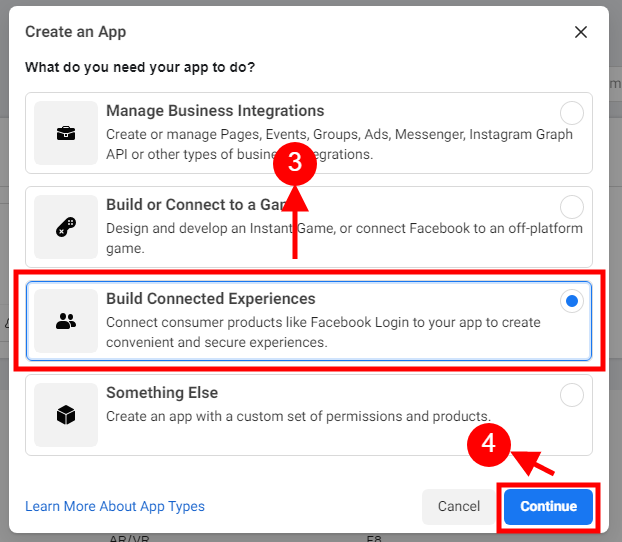
3&4: Select the “Build Connected Experiences” option and click on the ‘Continue’ button.
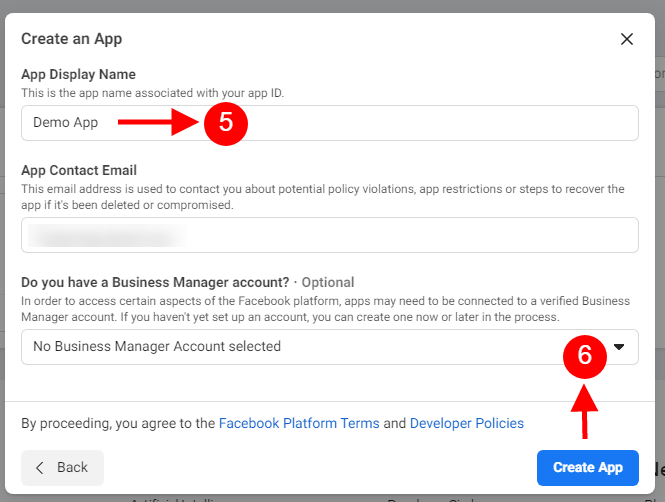
5&6: Add “App Display Name”, “App Contact Email”, and choose from the “Do you have a Business Manager Account?” and then click on the “Create App” button.
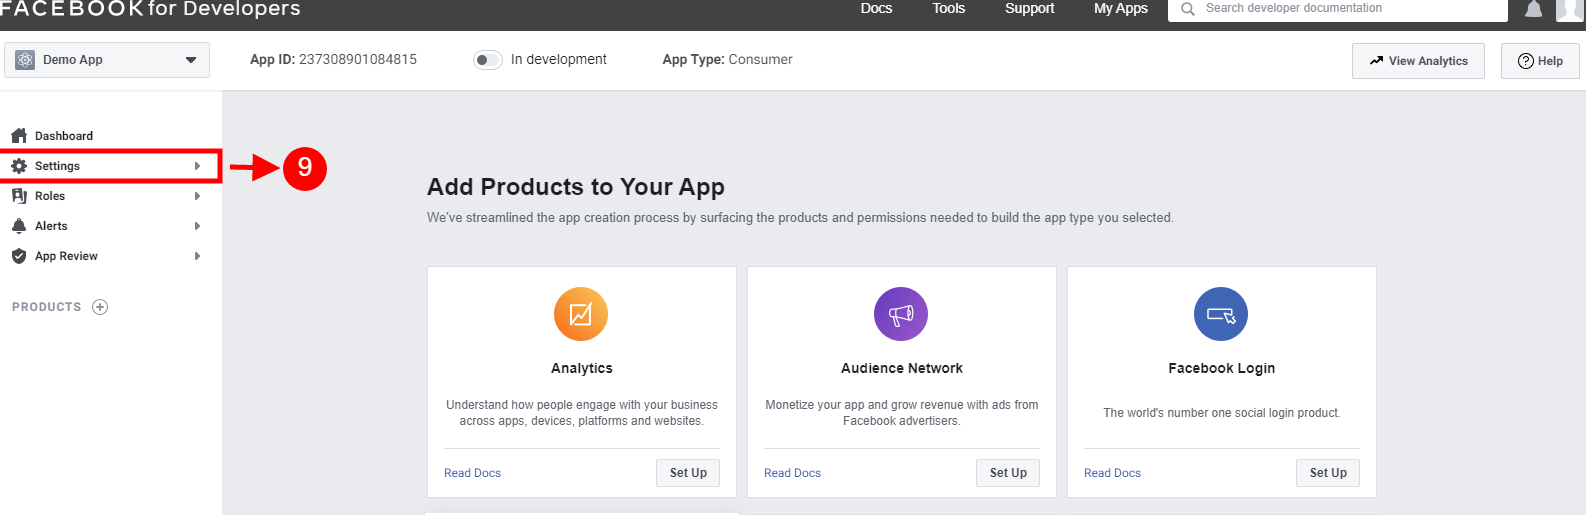
7&8: After clicking on Create App ID you will have to go through a security check as shown:
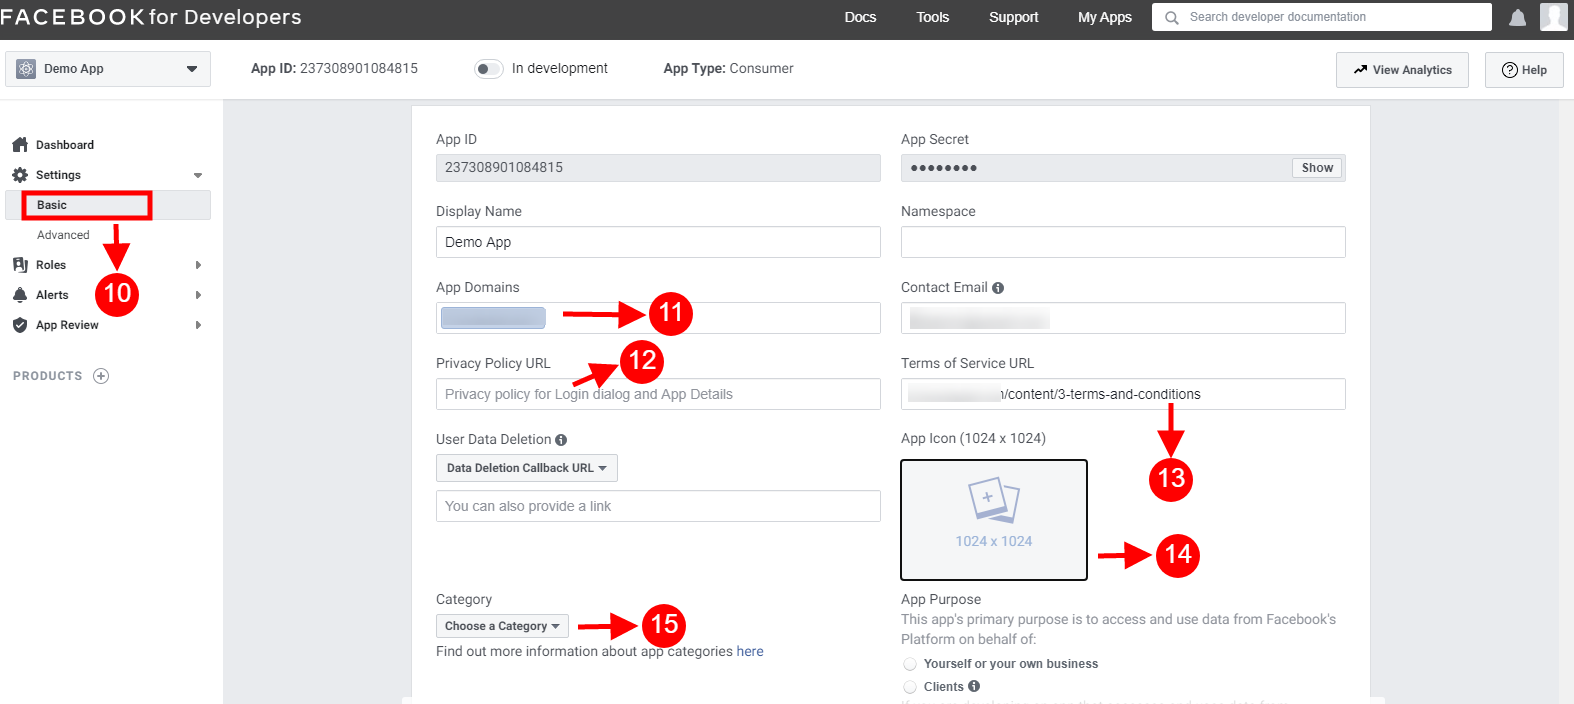
10-15: Two options will be available in the dropdown, Basic and Advanced, click on “Basic”. And then enter your “App Domain”, ”Privacy URL”, ”Terms of Service URL”, ”Add Icon”, ”Select Category” and click on the “Save Changes” button.
App Domains:
yourdomain.com is correct
yourdomain.com/store is incorrect
www.domain.com is incorrect
16: Now click on “+Add Platform”.
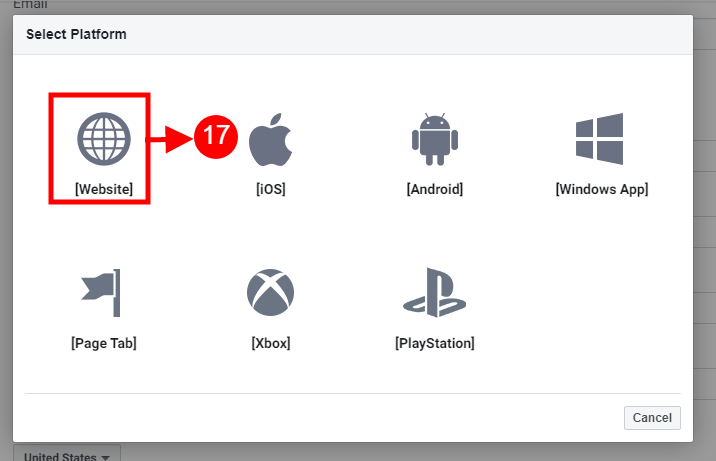
17: And select Website as Platform.
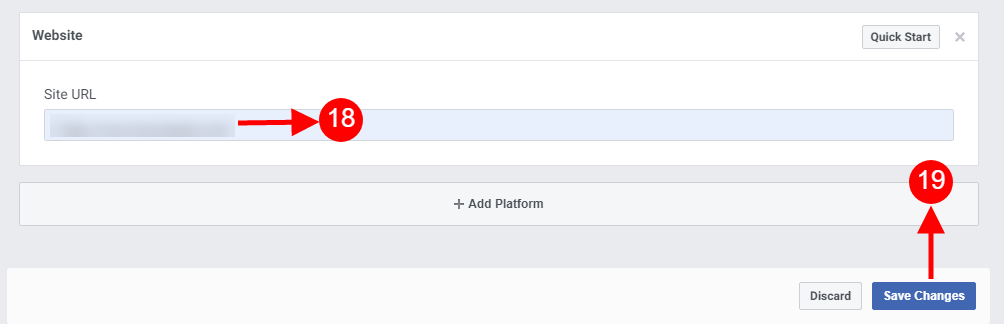
18&19: Now Enter your site URL.
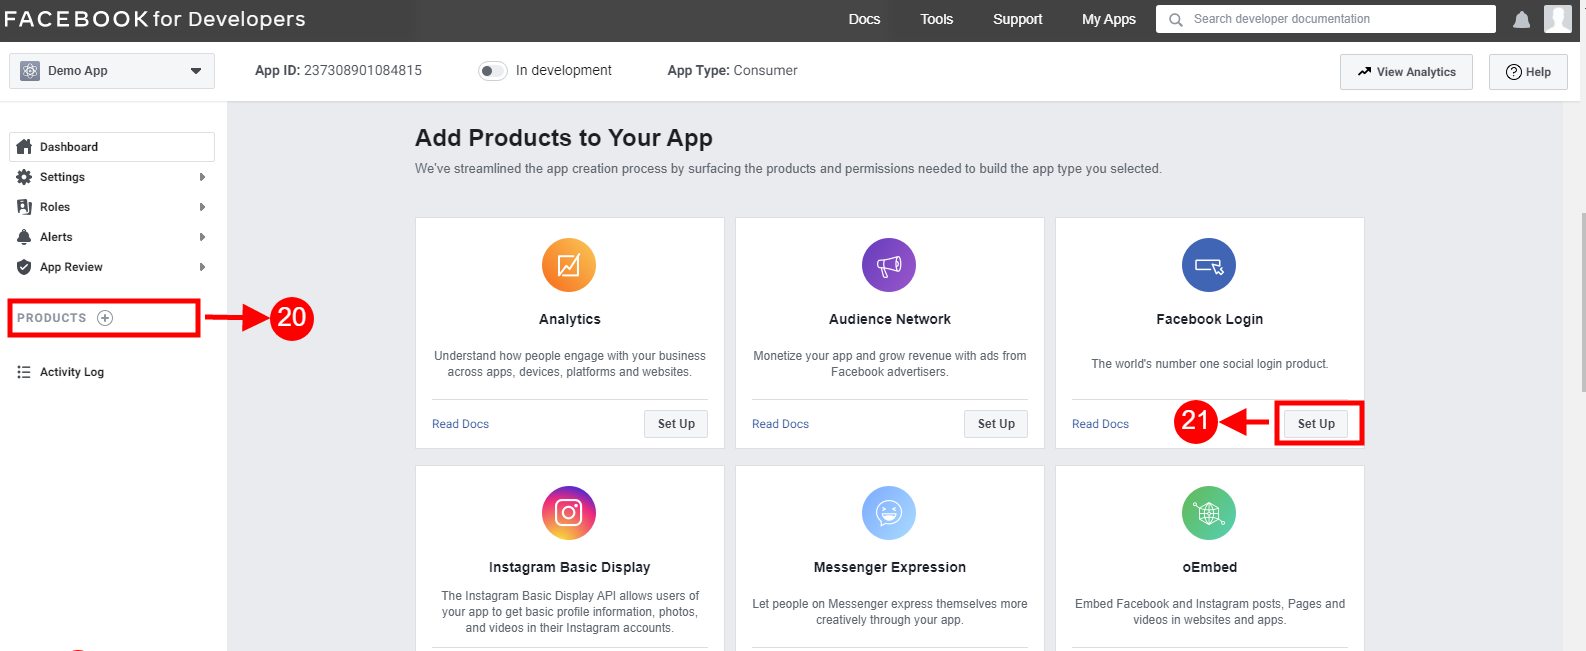
20&21: Click on “Products+” and click on the Setup button from the Facebook login tab.
22: Select the web as the platform for the app.
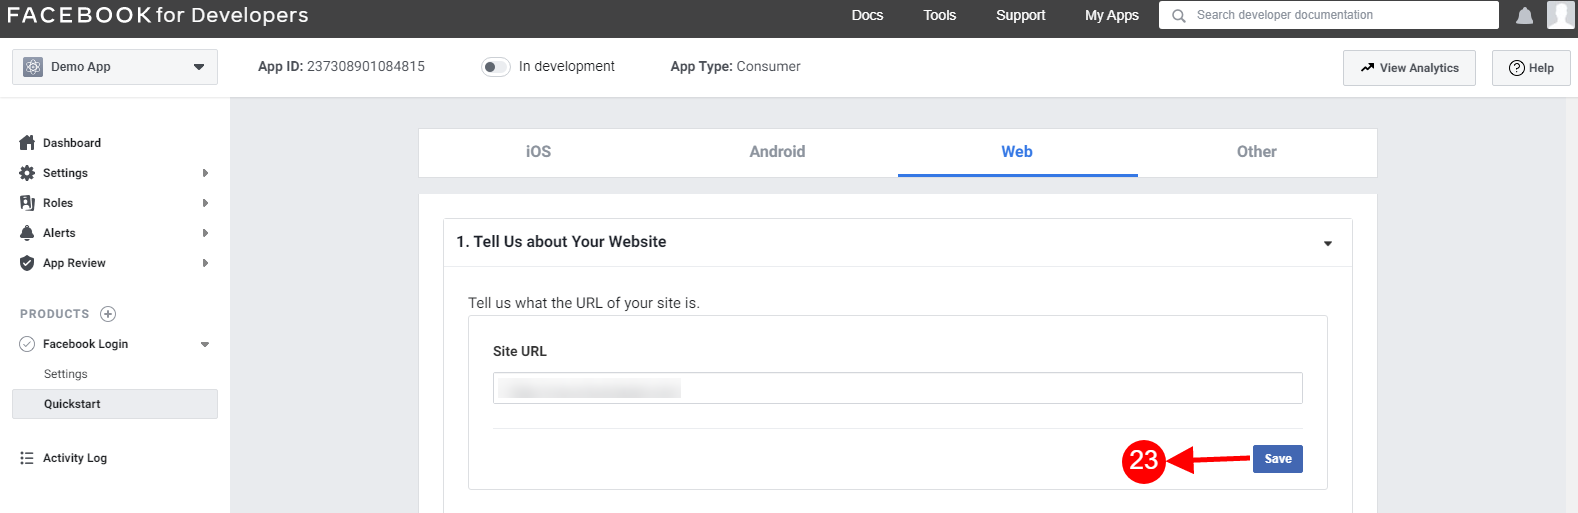
23: Add Site URL and click on save.
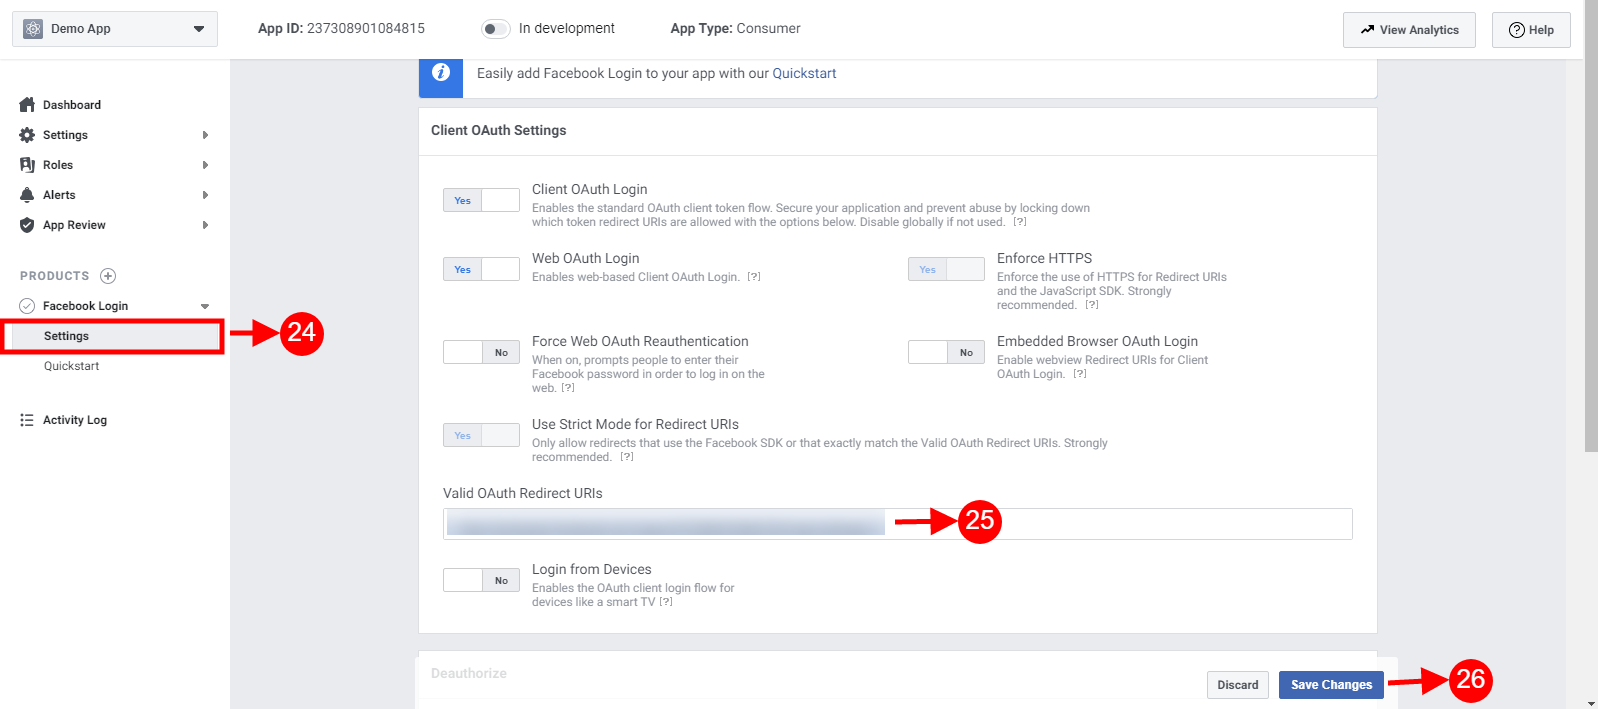
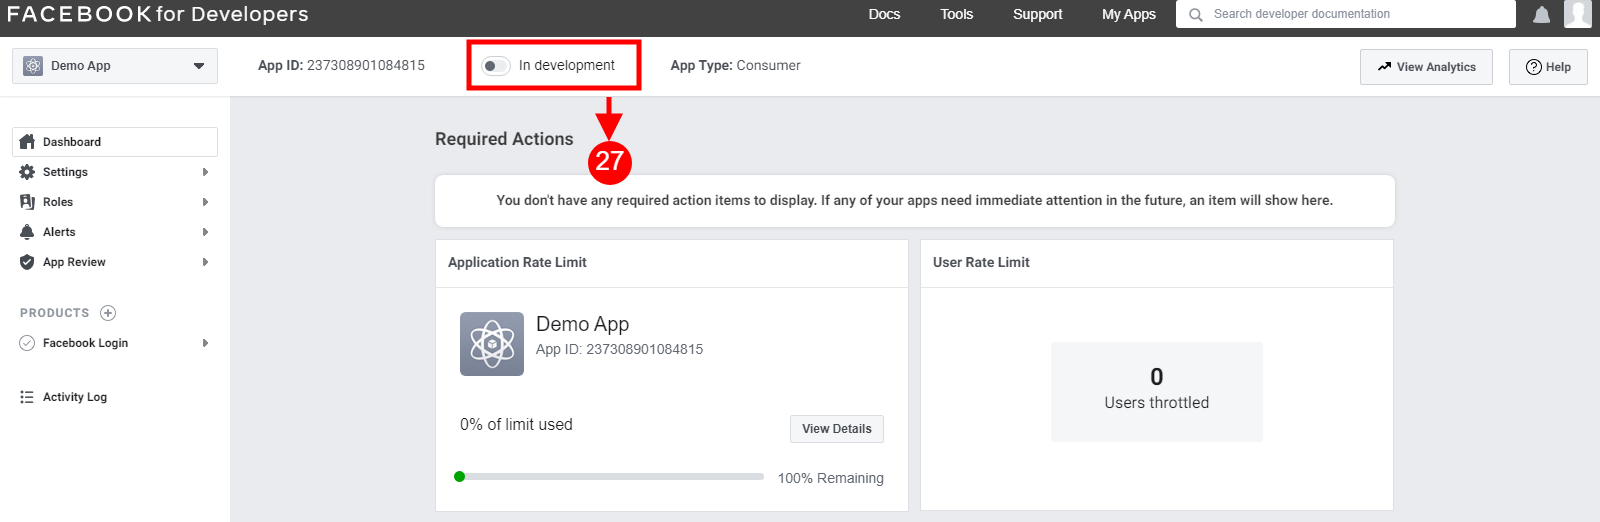
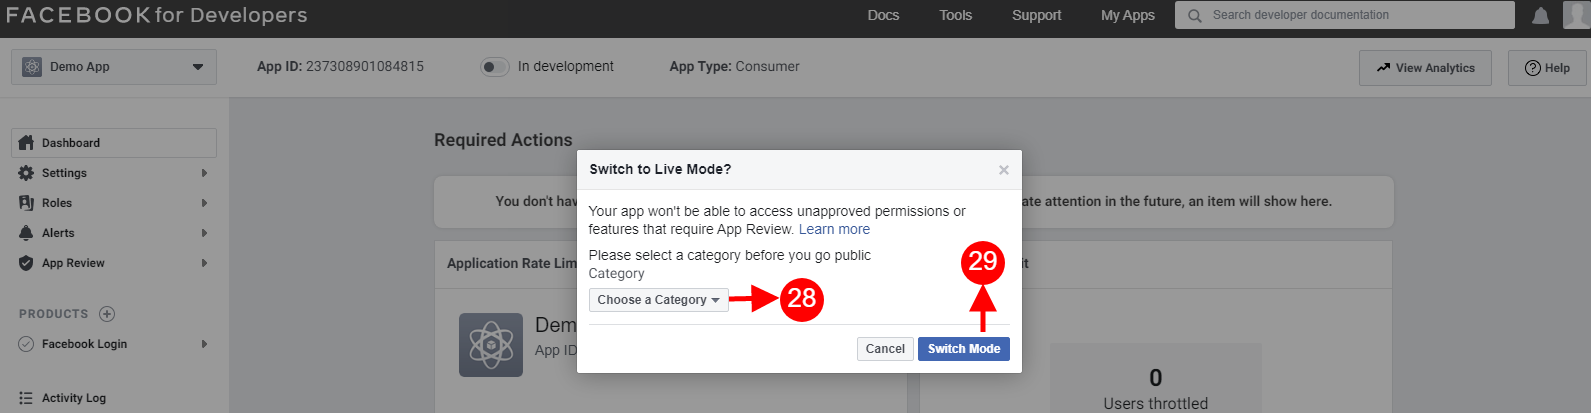
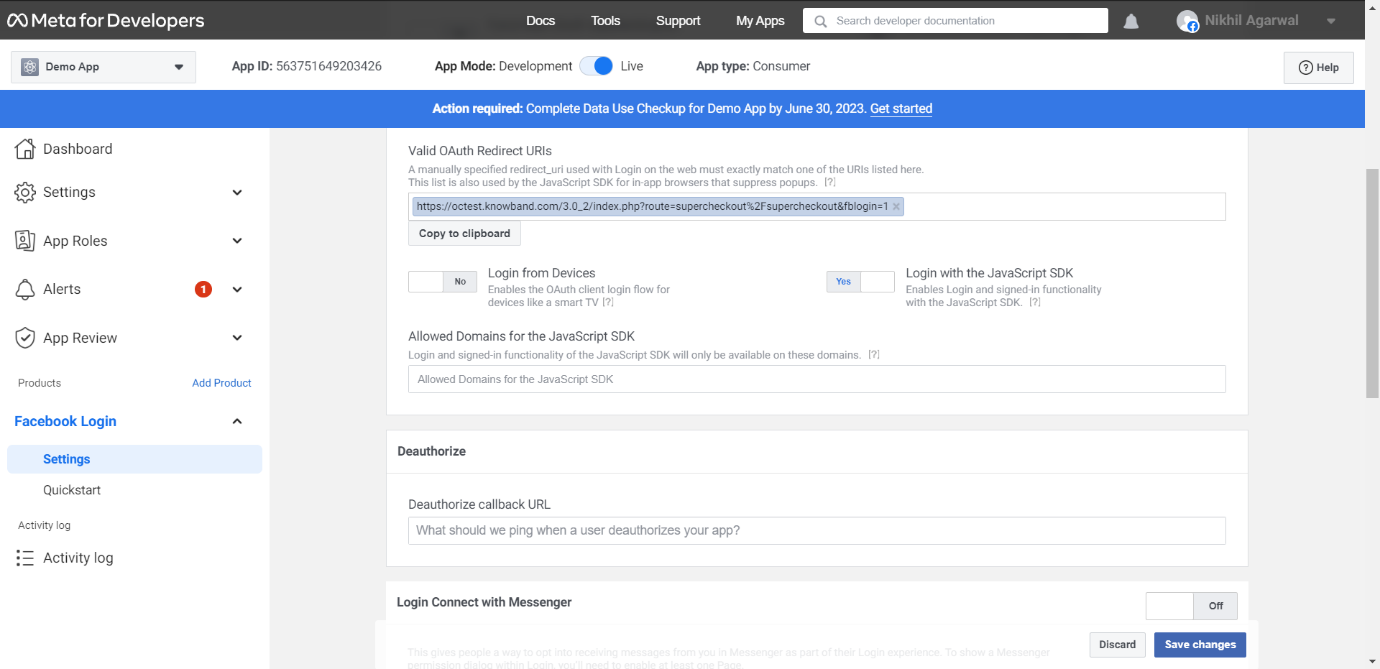
24-26: Click on Settings and add a Valid OAuth Redirect URIs.
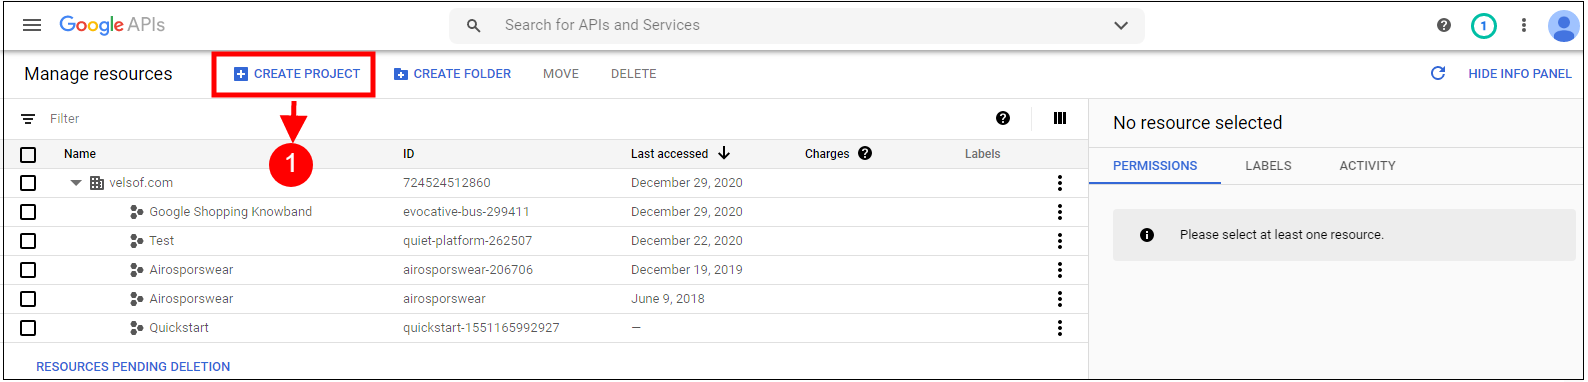
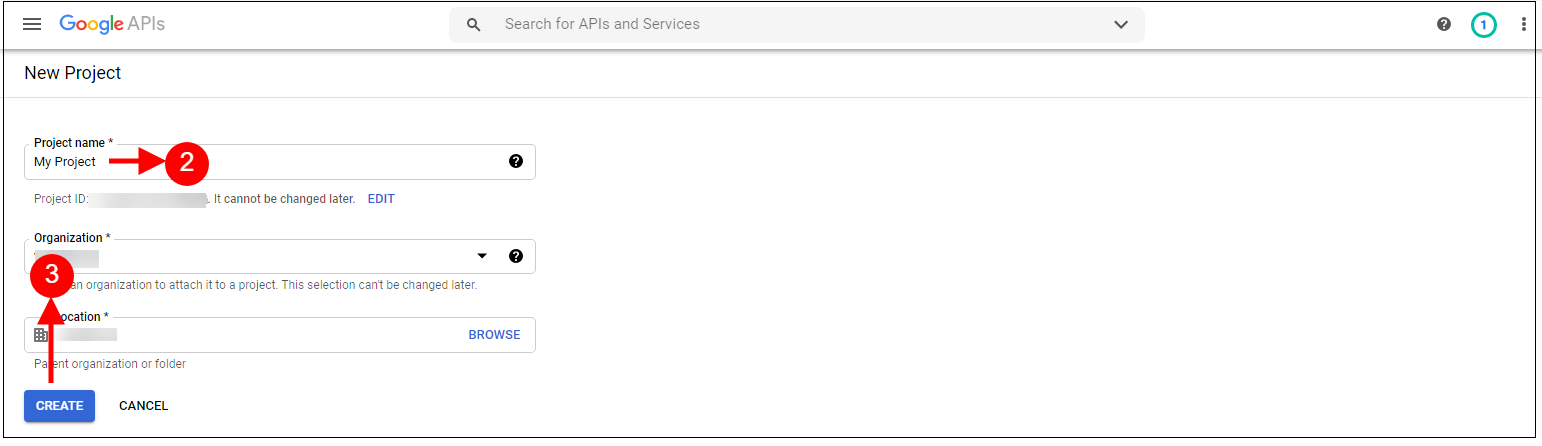
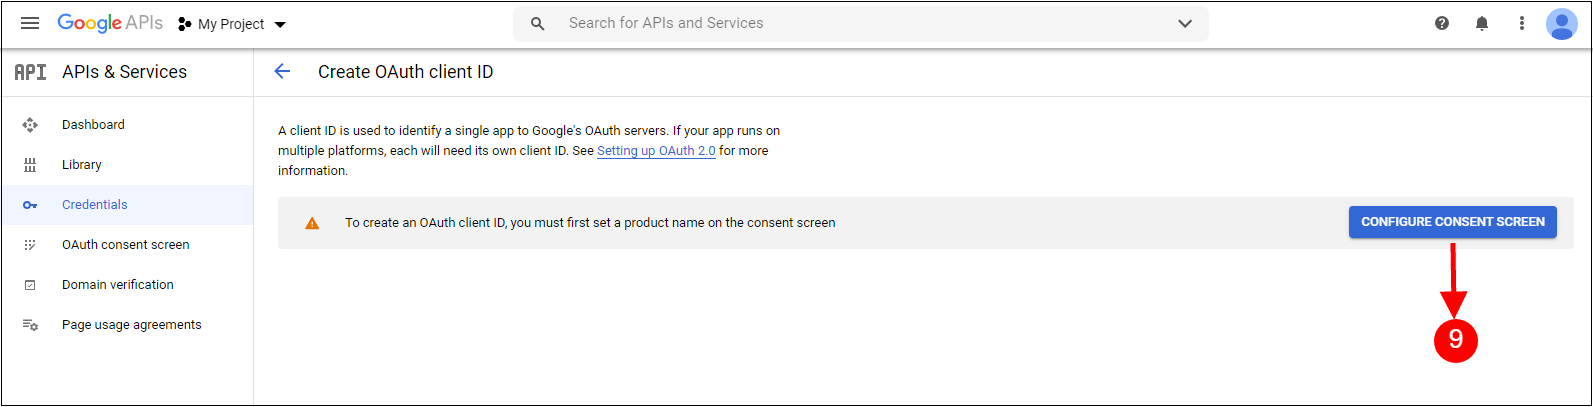
9. Click on Add Domain and add Authorised Domain and then click on Save and Continue.
10. Click on Save and Continue button.
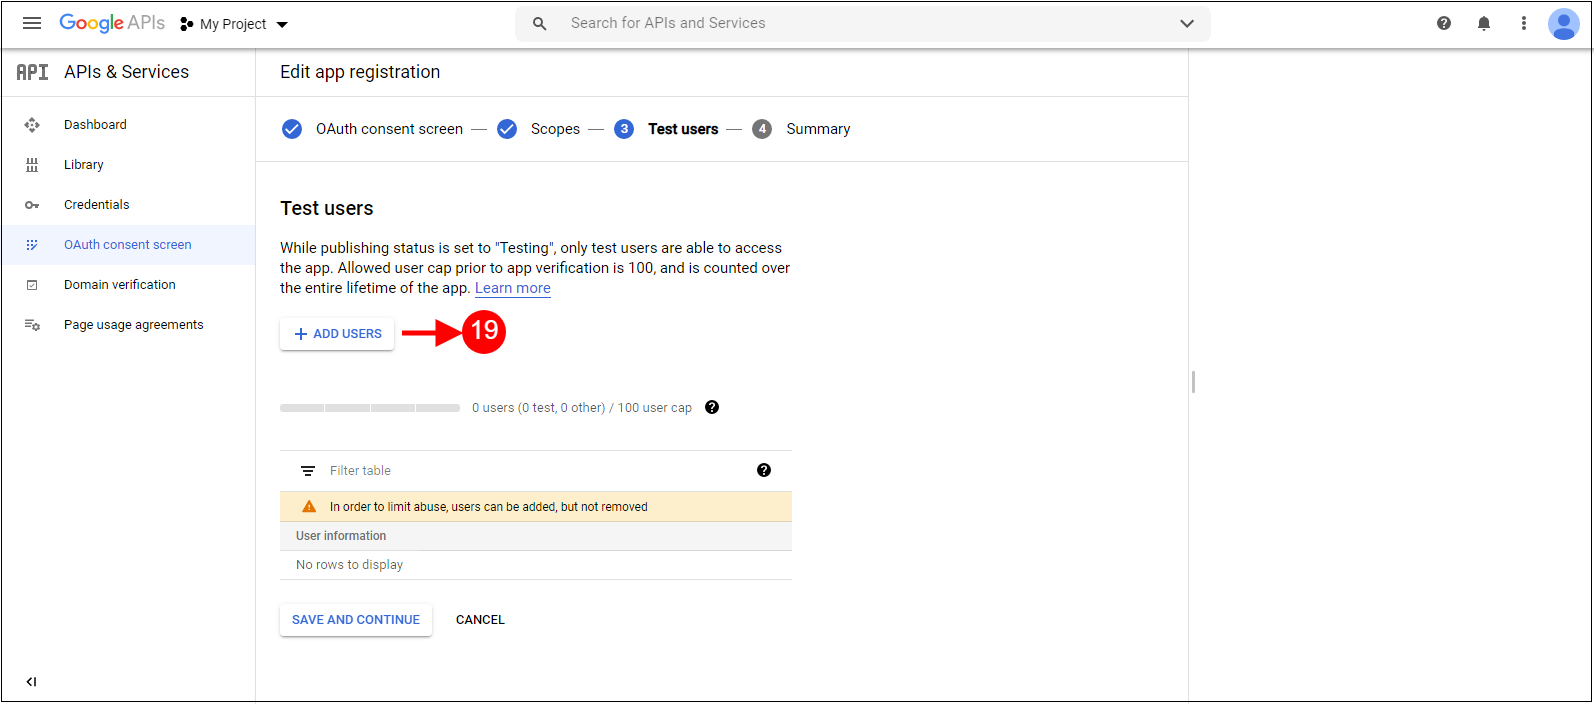
Click on +Add Users.
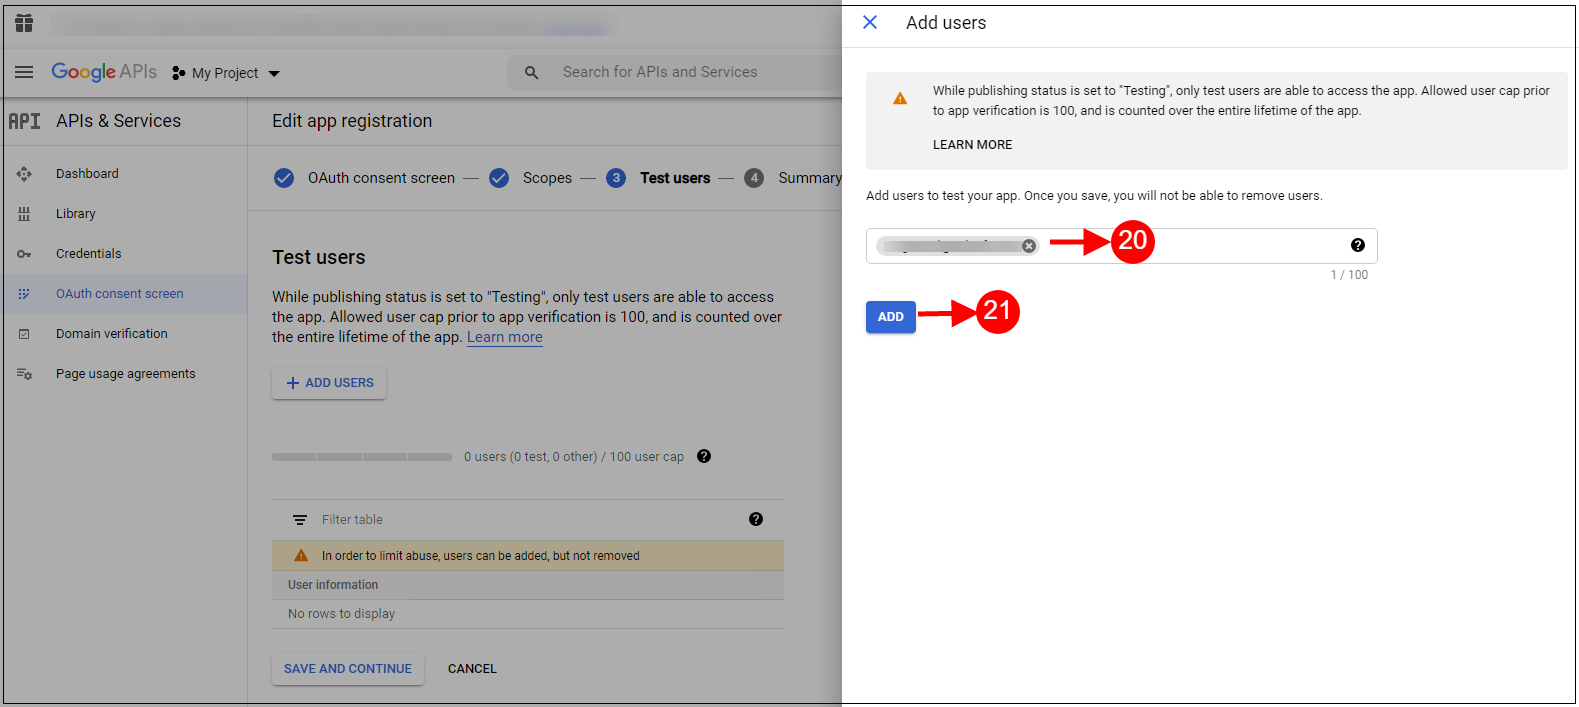
11. Add a user name and click on Add button.
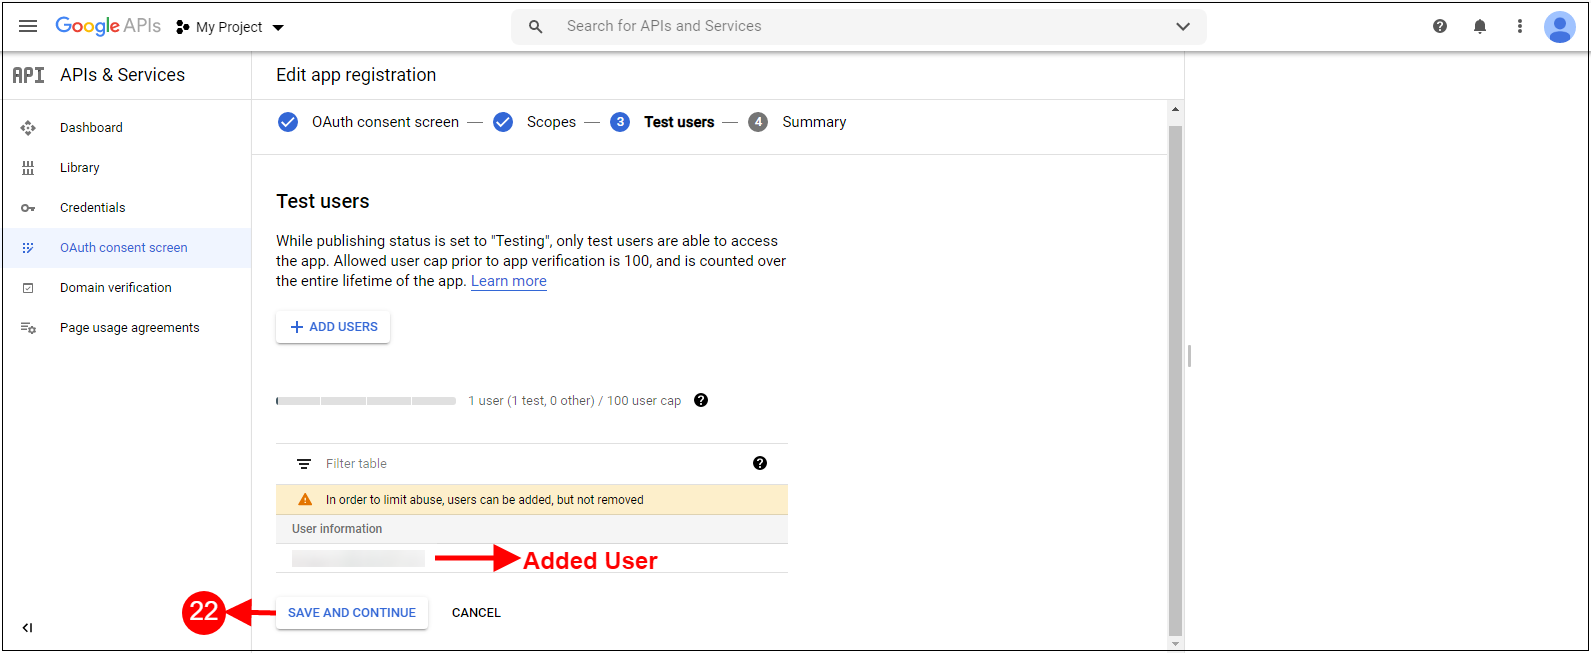
12. The Added user will be visible and then click on Save and continue button.
13. Click on the Oath content screen and then click on Publish Add button.
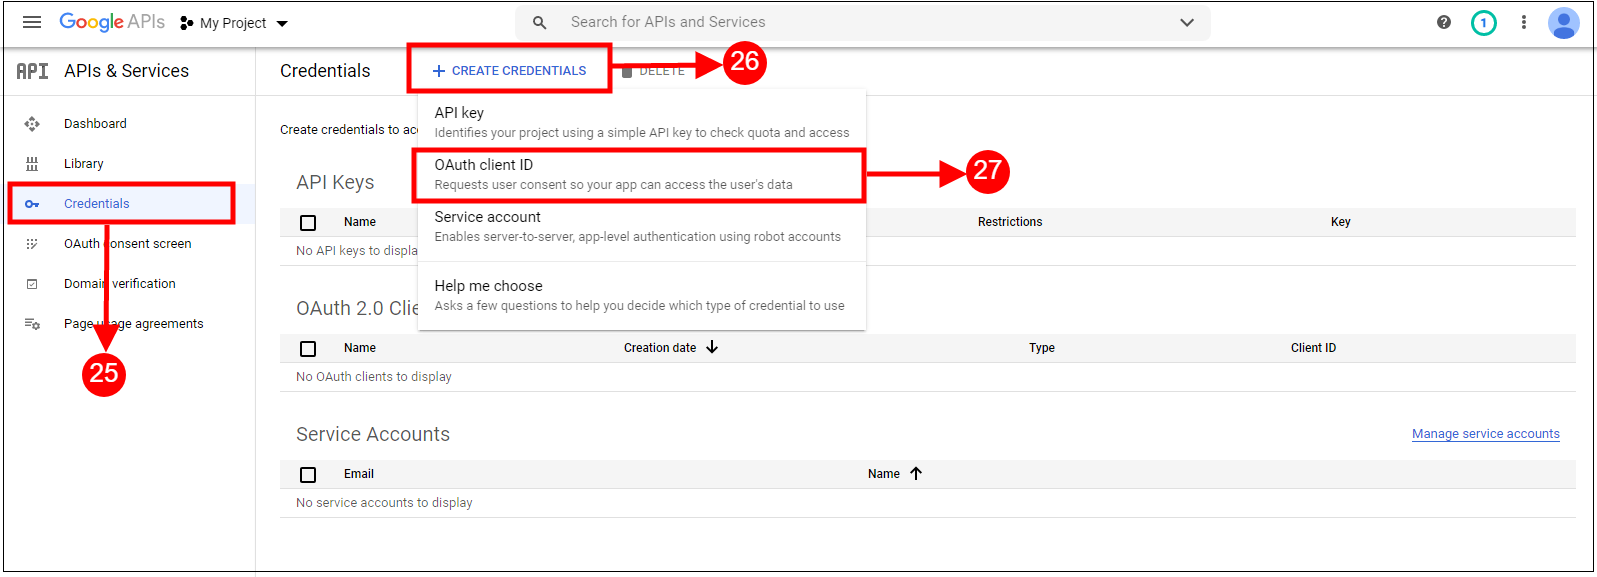
14. Click on Credentials and then +Create Credentials button and then select Oath Client ID.
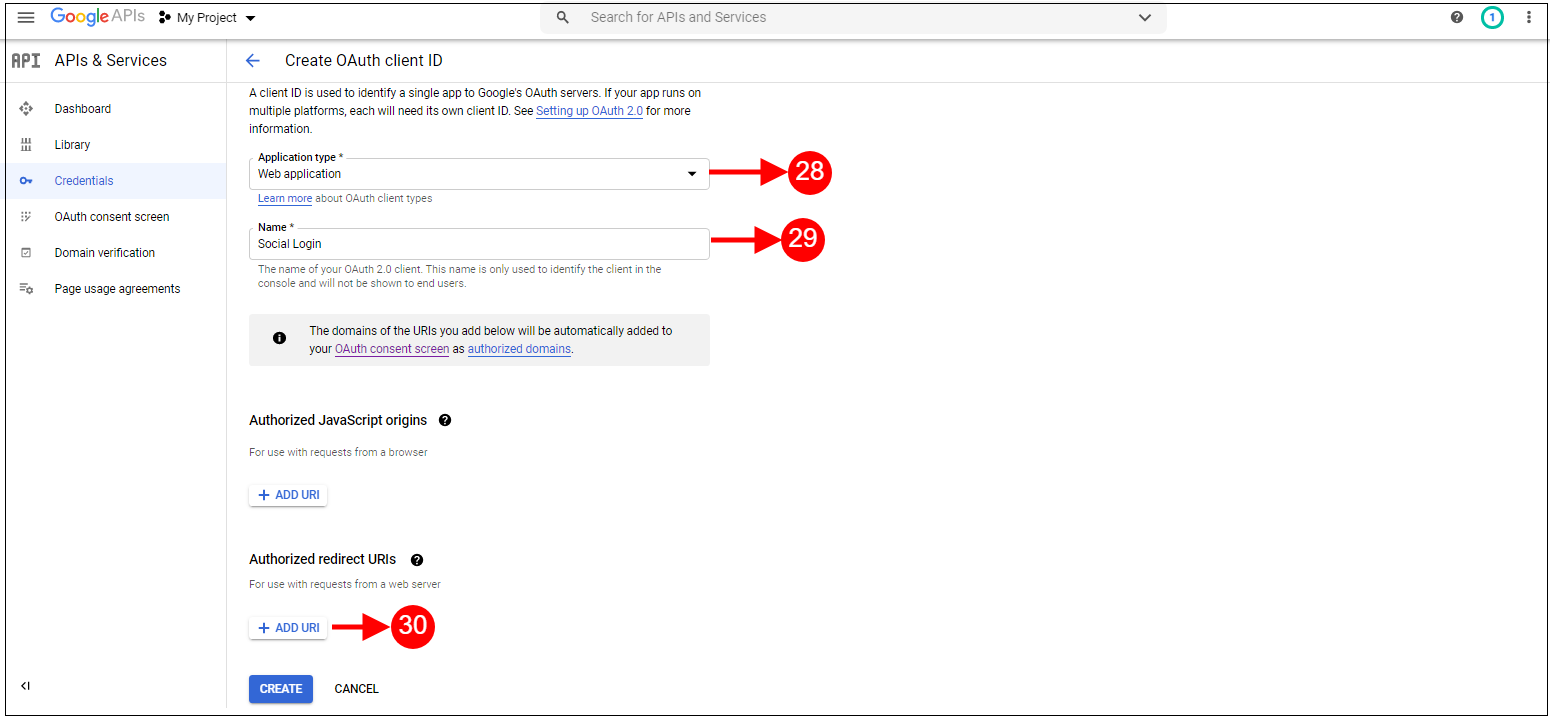
15. Add Application type and Name and then click on Add button.
16. Add the URLs and then click on Create button.
17. Copy and paste Client ID and Client Secret in the Text Field shown below in the Prestashop one page checkout module’s
How to Generate the Google API key:
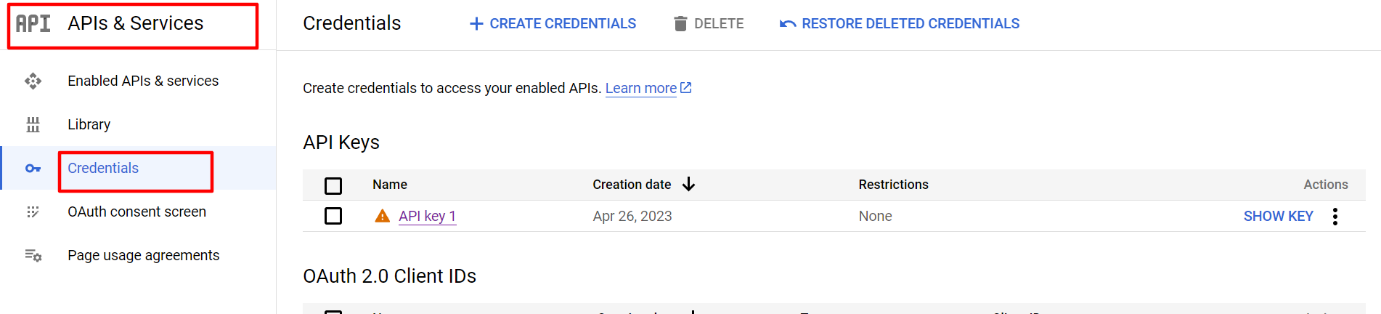
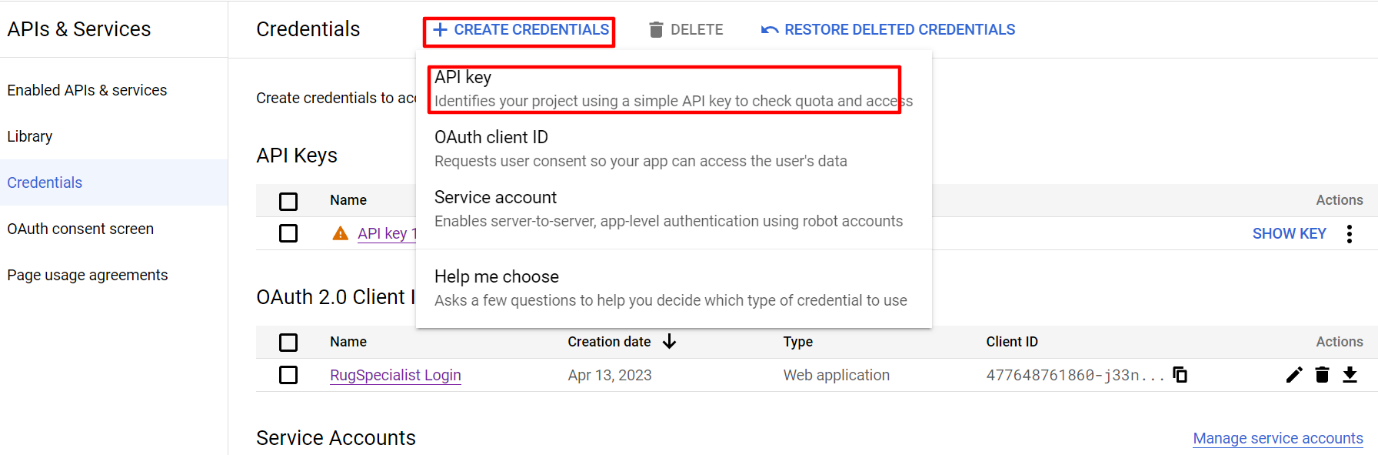
1) Go to API Manager, click on the left menu, click on API & Services, and then click on Credentials.
2) Click on Create Credentials & then select the API key.
3)Copy the API key and enter the same into the Google App Id field of the admin end module’s login page.
3.3 Payment Address
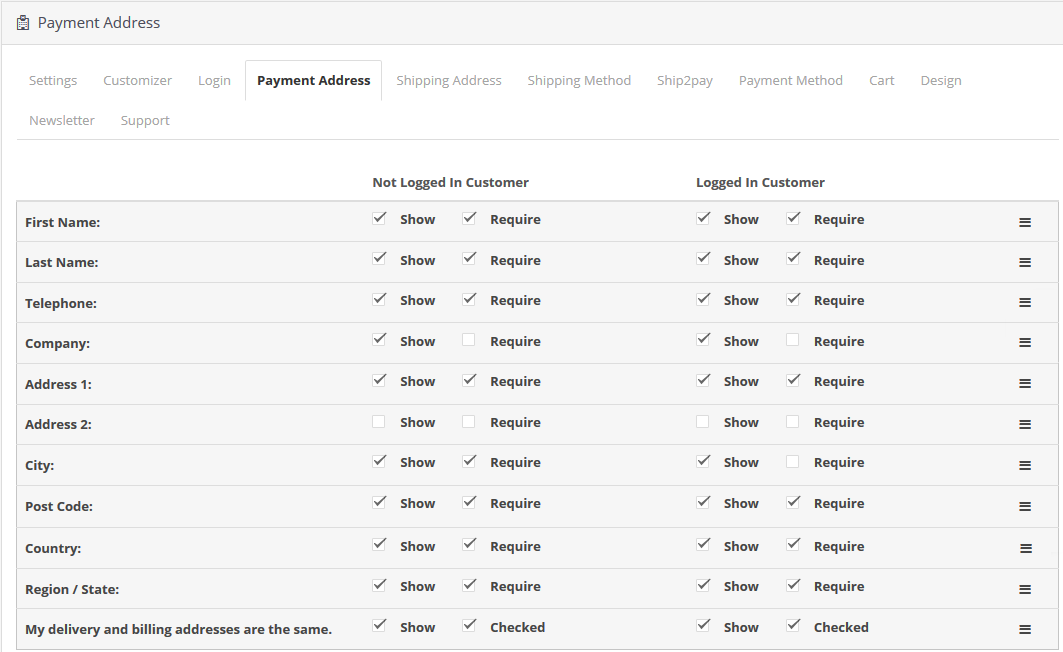
This tab contains settings for the fields which are to be shown in the Payment or Billing Address section on the checkout page as shown below.
It consists of two sections. The one on the left is for Guest Customers and the right one for logged-in customers.
To make a field display/hide in the checkout page check the checkbox just to the left of the Show label.
To make a field mandatory (required field) check the checkbox just to the left of Require Label.
The fields can also be rearranged according to the requirement. To rearrange just move the cursor to the drag icon and drag & drop the field wherever it is required as shown below.
On saving, the fields will be rearranged as per the changes.
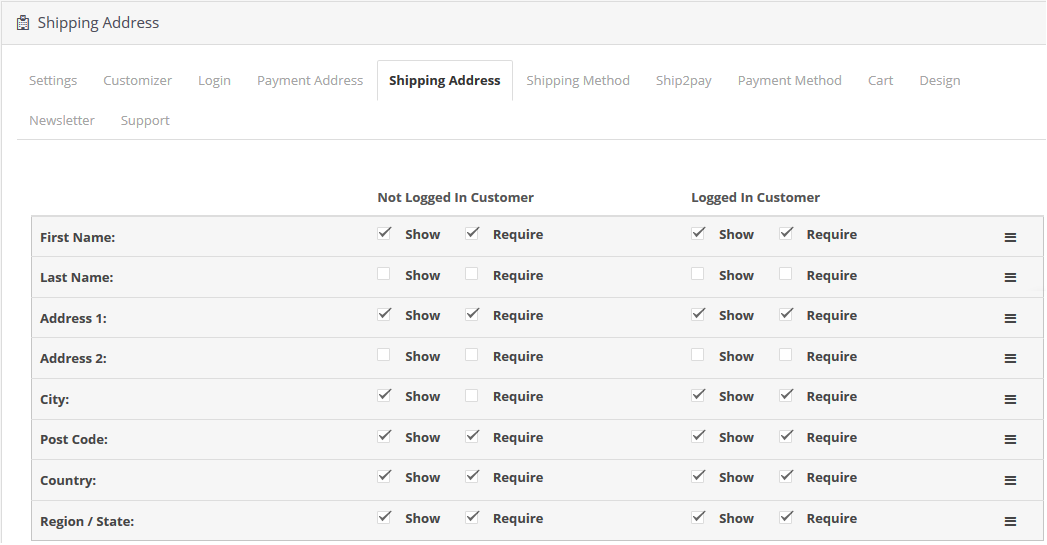
3.4 Shipping Address
This tab contains settings for the fields which are to be shown in the Shipping Address section on the checkout page as shown below.
It consists of two sections. The one on the left is for Guest Customers and the right one for registered customers.
To make a field display/hide in the checkout page check the checkbox just to the left of the Show label.
To make a field mandatory (required field) check the checkbox just to the left of Require Label.
The fields can also be rearranged according to the requirement. To rearrange just move the cursor to the drag icon and drag & drop the field wherever it is required as shown below.
On saving, the fields will be rearranged as per the changes.
3.5 Shipping Method
This tab contains settings for the shipping method which is shown on the checkout page. It contains settings for enabling/disabling and setting the default shipping method as shown below:
Display Shipping Methods: By this option, you can show/hide the shipping methods on the checkout page. For this, you have to switch the button from ON to OFF or vice-versa.
Display Style: This option allows you to select the display style for the shipping methods you have added to your website. You can choose any style out of three options as Text Only, Image Only, or Text with Images.
Display Shipping Method Title: With this option, you can enable or disable the title for the shipping methods displayed on the checkout page.
Select a Default Shipping Method: This option helps you to select any method as the default shipping method for your store.
Title: With this option, you can set titles corresponding to each of the shipping methods added and configured for your store. You can set the title in English or French language.
Logo: This option allows you to set the desired logo corresponding to each of the shipping methods configured for your store.
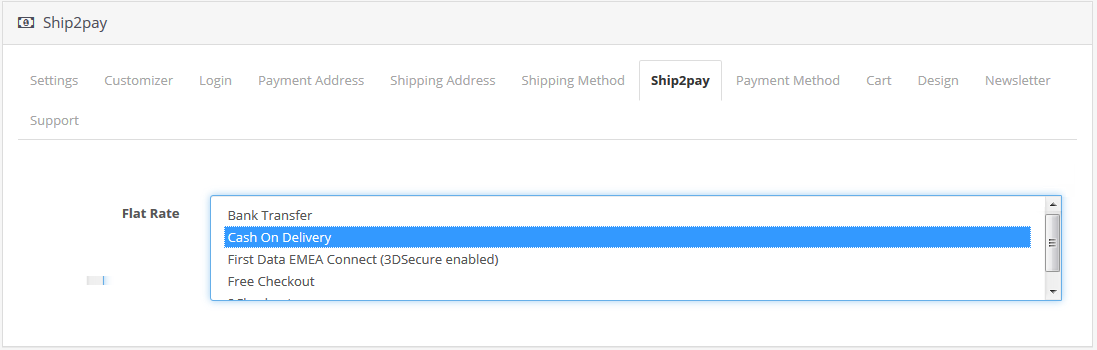
3.6 Ship2Pay
The ship2pay feature offered by the OpenCart Supercheckout module automatically disables the payment methods based on the shipping method selected by the customer. That is, the admin can map some particular payment options with some particular Shipping options on the store.
3.7 Payment Method
This tab contains settings for payment methods shown on the checkout page like enabling/disabling or selecting a default method.
Display Payment Methods: By this option, you can show/hide the payment methods on the checkout page. For this, you have to switch the button from ON to OFF or vice-versa.
Display Style: This option allows you to select the display style for the payment methods you have added to your website. You can choose any style out of three options as Text Only, Image Only, or Text with Images.
Select a Default Payment Method: This option helps you to select any method as the default payment method for your store.
Title: With this option, you can set titles corresponding to each of the payment methods added and configured for your store. You can set the title in English or French language.
Logo: This option allows you to set the desired logo corresponding to each of the payment methods configured for your store.
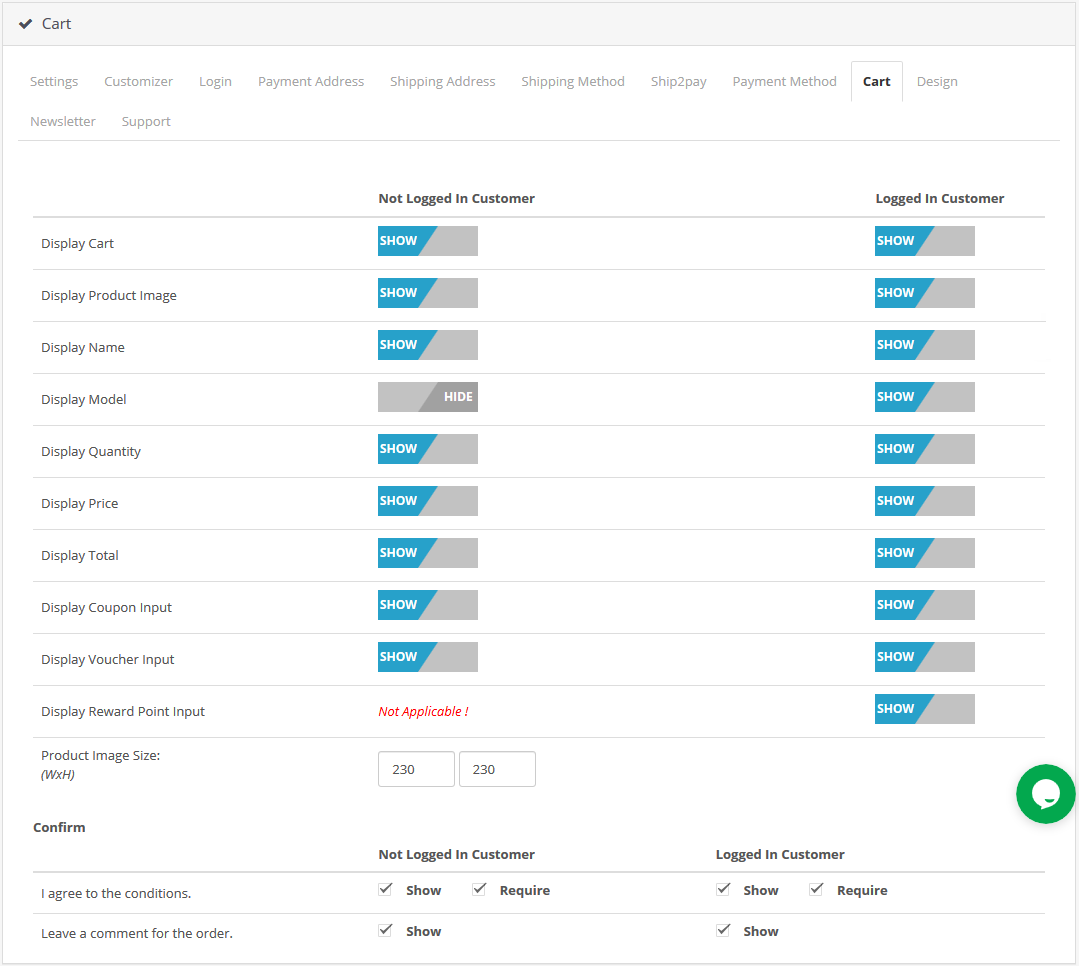
3.8 Cart
Under this section, you will find the cart fields divided into two sections, the left one is for Guest Customers, and the Right one is for Registered or Logged in customers.
To Display/Hide the cart from the checkout page check uncheck the checkbox present in front of the Display Cart label.
In order to enable/ disable any column in the cart check/uncheck the checkbox in front of that respective column.
To enable/disable the popup images for the product check/uncheck the checkbox in front of that respective column.
To change the size of image popup, enter the width and height of the popup in textbox in front of Product Image Size label.
Coupon , Reward Points and Voucher options can also be disabled or enable by checking/unchecking the checkbox in front of that respective field. Kindly note that rewards point text box will only be visible on Supercheckout page once following three conditions are fulfilled.
a.) Customer must be logged in.
b.) He must have atleast 1 reward point in his account.
c.) He must have a product in the cart which can be purchased with reward points.
Confirm:
This tab is again divided into two sections, the left one is for Guest Customers and Right one for Registered or Logged in customers.
To enable the comment box for the order by customer check the checkbox in front of that Leave a comment for the order label & to disable uncheck the same checkbox.
To enable agree to the term or any other information saved in the admin for the store check/uncheck the checkbox in front of I agree to the conditions label.
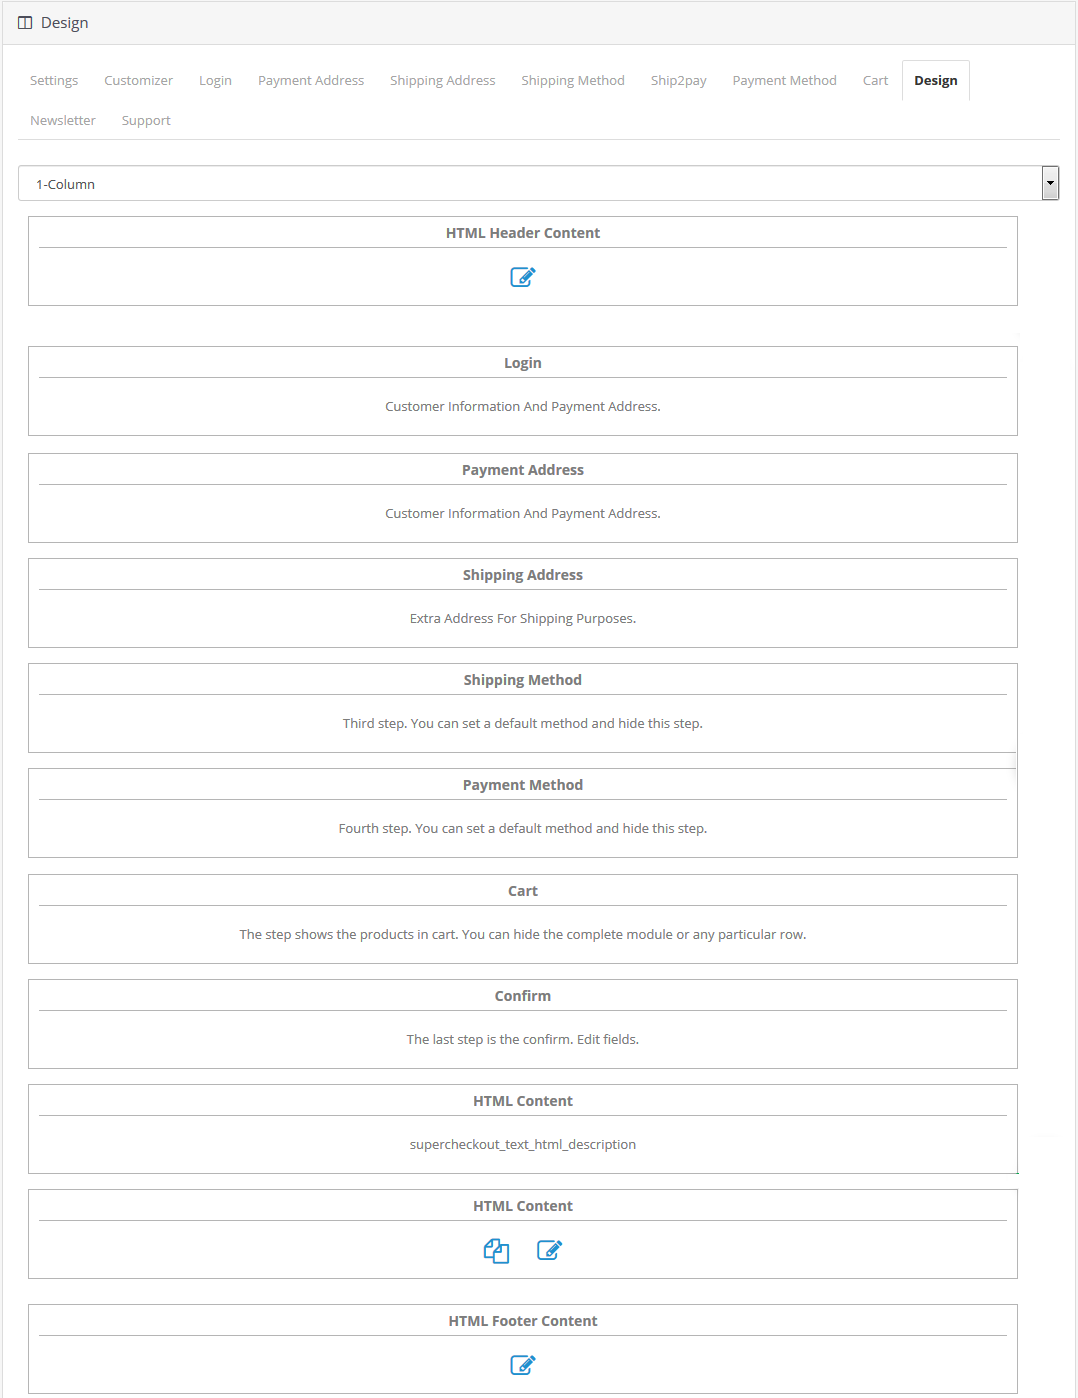
3.9 Design Tab
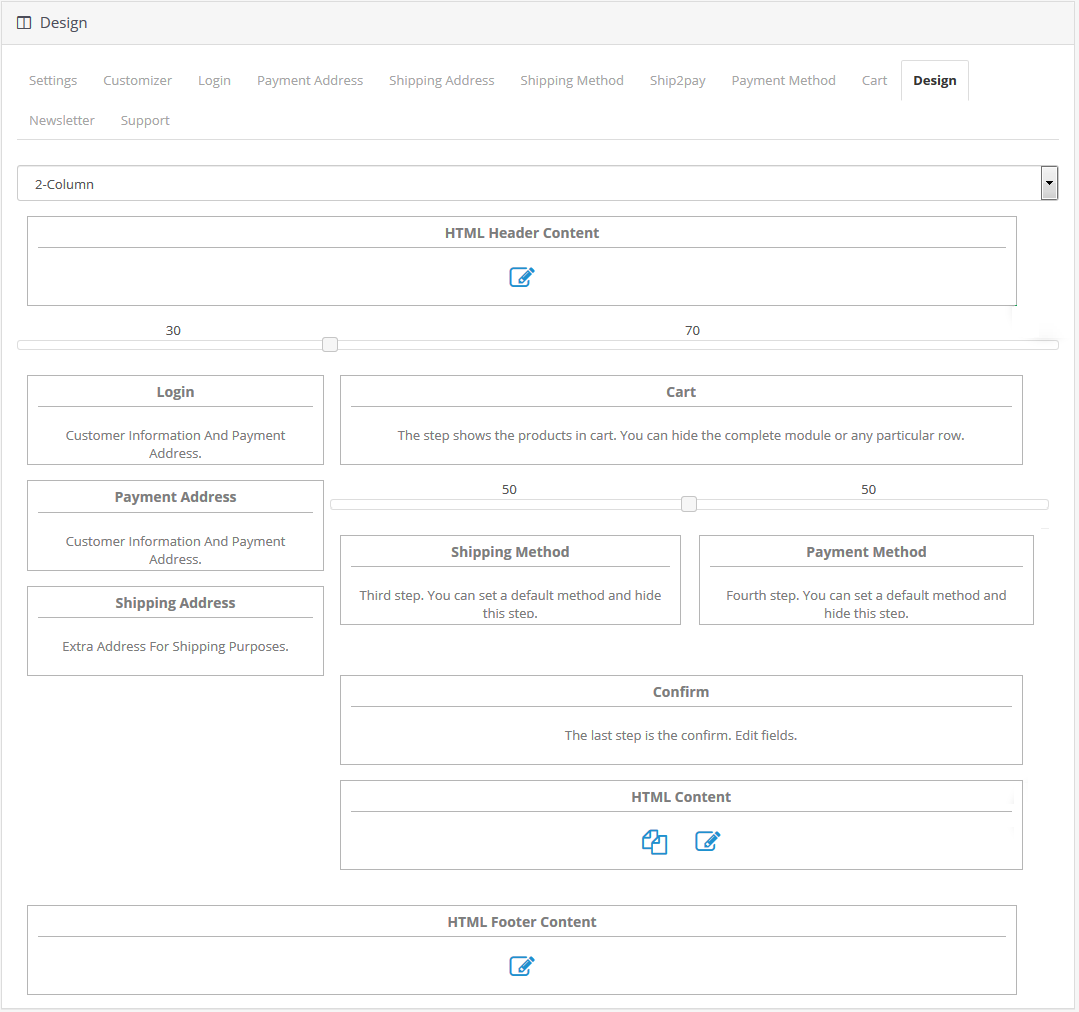
This tab contains the settings for the design of OpenCart One Page Checkout Pro as shown below:
1-Column
2-Column
3-Column
You can easily change the width of any column adjust the slider present at the top as shown below.
Also, you can reposition different blocks of checkout page using simple drag and drop action. On saving, the block will be rearranged in the checkout page as per the changes.
3.10 Newsletter
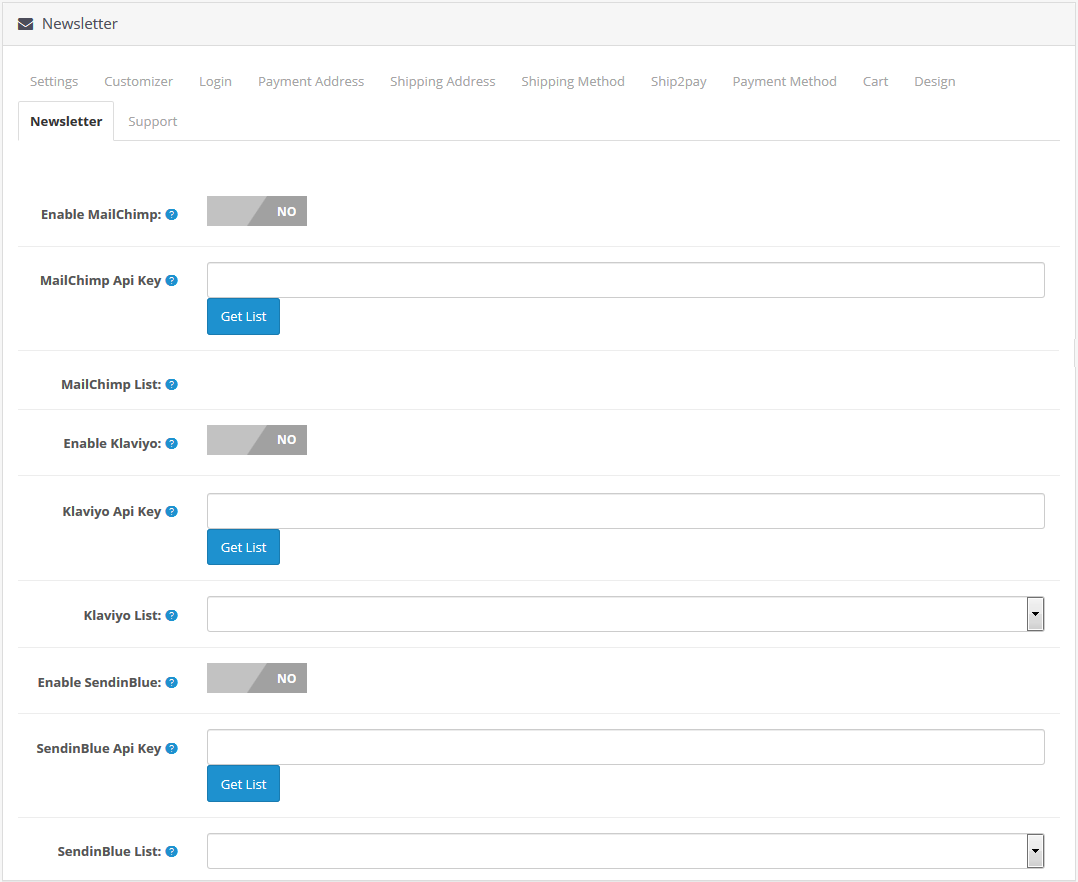
By clicking on the Newsletter tab of the OpenCart responsive one-step checkout module, you can configure the MailChimp, SendinBlue, and Klaviyo Integrator settings as shown below:
Enable MailChimp: You can enable or disable the MailChimp Integrator functionality for your store. You can enable this option if you want to boost newsletter subscriptions for your store.
MailChimp API Key: This option helps you to set the Mailchimp API key for capturing customer’s emails.
MailChimp List: Once the key is configured with this OpenCart fast checkout extension, you can fetch and select the MailChimp List.
The same can be done for SendinBlue and Klaviyo.
4.0 Front Interface of OpenCart One Step Checkout Extension
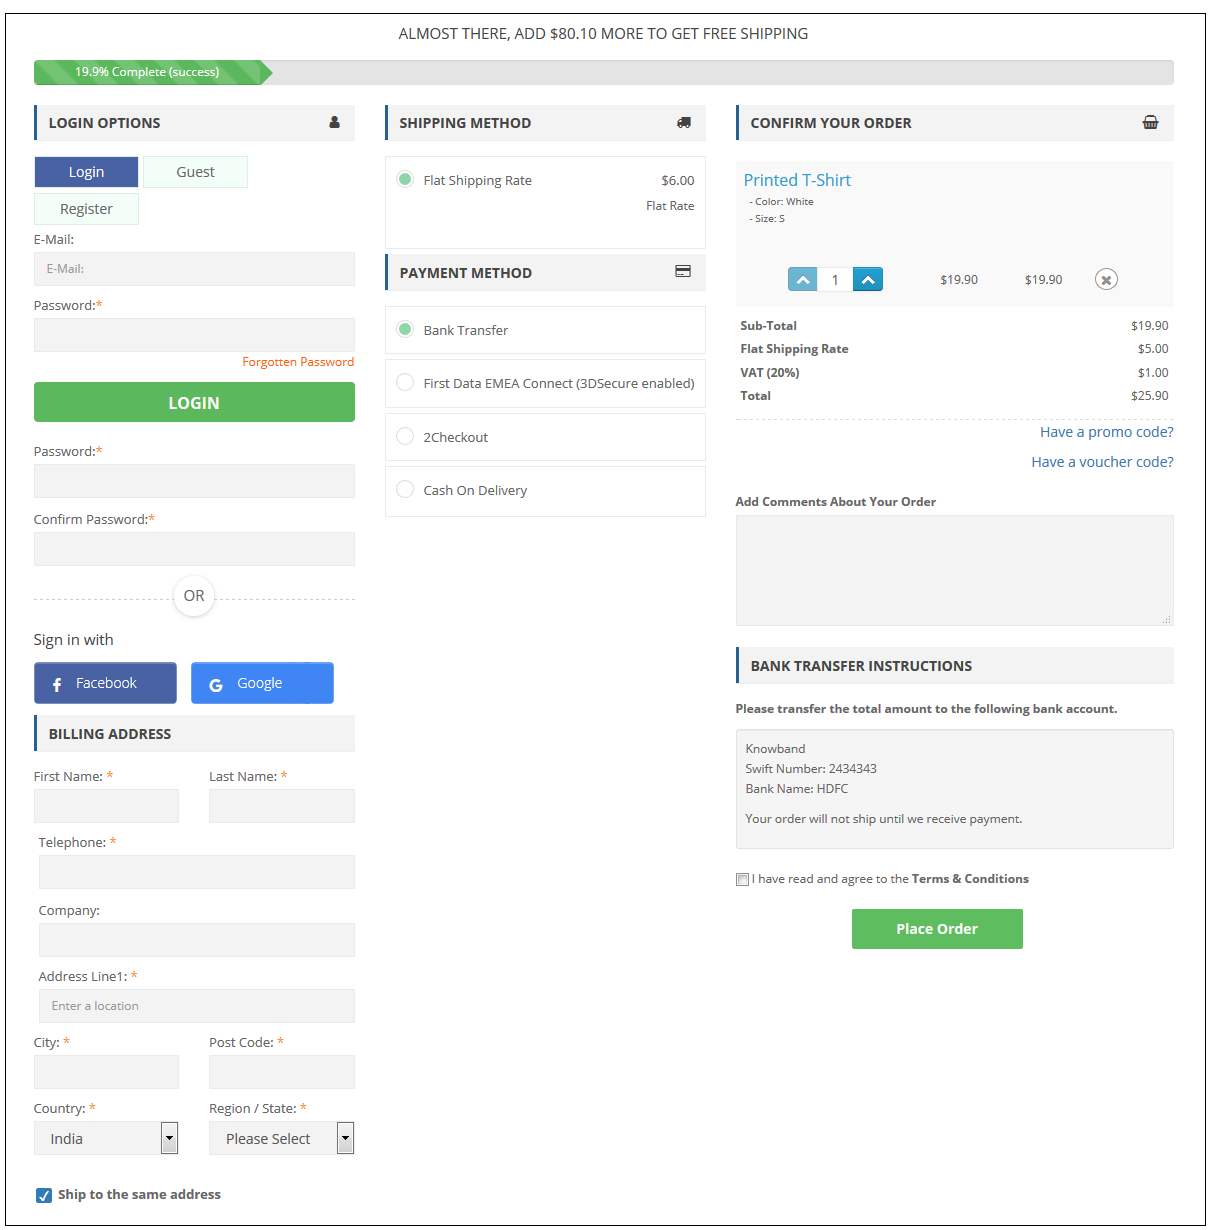
When the user clicks on “Add to Cart” button corresponding to a product and performs its checkout, they will see the following supercheckout on their screen.
5.0 Tutorial of Opencart One Page Checkout Pro by Knowband
To make the installation, setup, and configuration process completely hassle-free, we have created a detailed and easy-to-understand tutorial for OpenCart One Page Checkout Pro by Knowband. This step-by-step guide walks you through everything, from downloading and installing the module to configuring all its powerful features for a faster, smoother, and more user-friendly checkout experience.
Whether you are new to OpenCart or an experienced user, the tutorial ensures you can effortlessly customise fields, manage social login options, enable guest checkout, configure payment and shipping methods, and optimise the overall design without any confusion.
Watch the full tutorial here to ensure a seamless installation and smooth operation of the One Page Checkout Pro Extension.
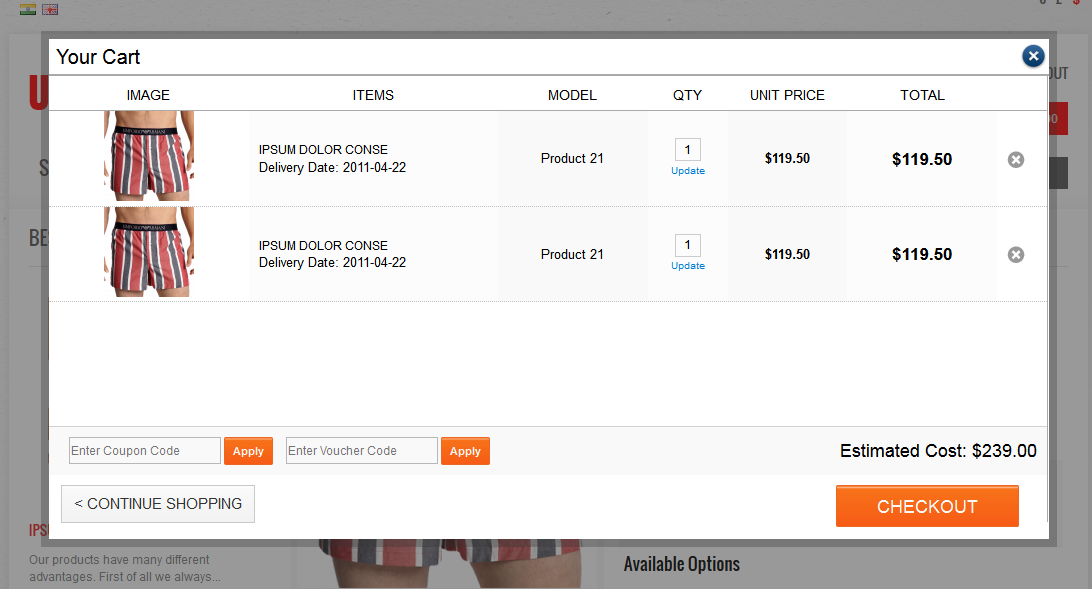
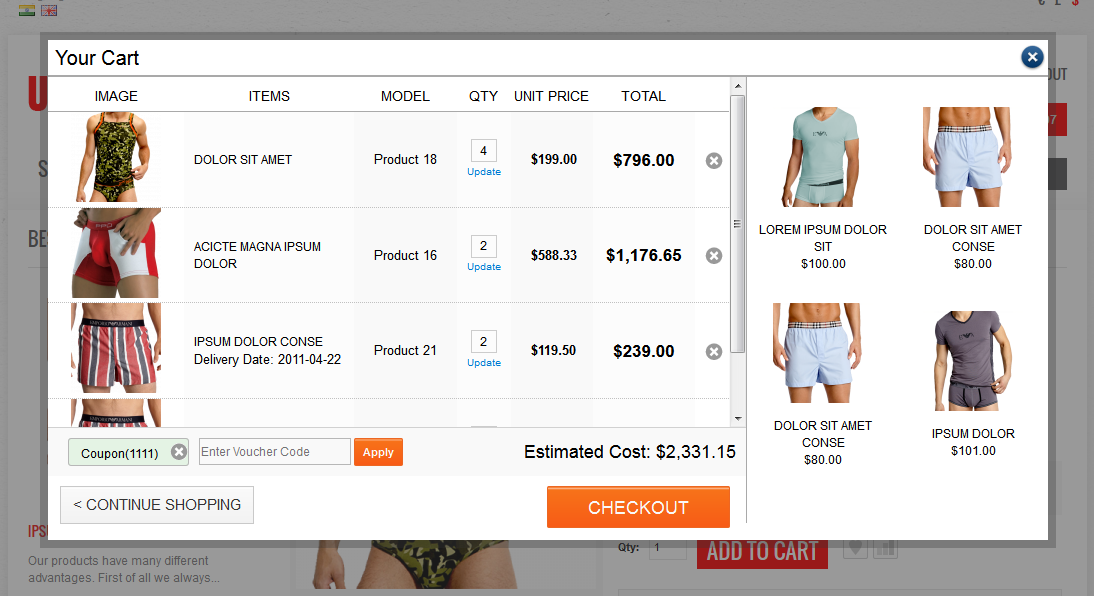
The Opencart Ajax Cart Plus Extension by Knowband displays an interactive popup as user clicks on ‘Add To Cart’ option. On which, the users can easily view the estimated cost of the cart, remove the cart products, update the quantity, apply the coupon/voucher, contact the support team etc. This Opencart extension helps the admin in increasing the up-sell of the website too.
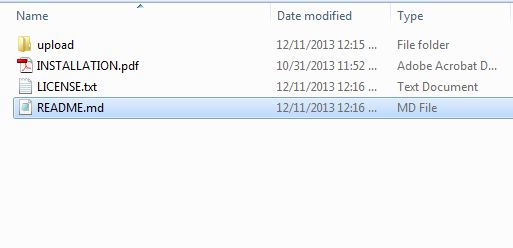
2. Open the upload folder and you will find the following folder structure:
You must have VQMOD installed for this plug-in to work. If VQMOD is not installed please download and install from the URL below: https://code.google.com/p/vqmod/
3. Select all the folder and drag and drop them to the root directory of your OpenCart store
through FTP.
4. You will be able find the Opencart plugin ready to be installed in the Modules in your OpenCart store as shown below.
5. Click on the Install link to install the plugin.
Vqmod xml directory should be writable. Refresh homepage of your store every time after installation/uninstallation of plugin.
6. To access Ajax Cart+ plugin click on edit button in module section as shown below:
7. On clicking edit button the module for plug-in will open. It contains navigational bar at top, menu at
left and main content at center as shown below.
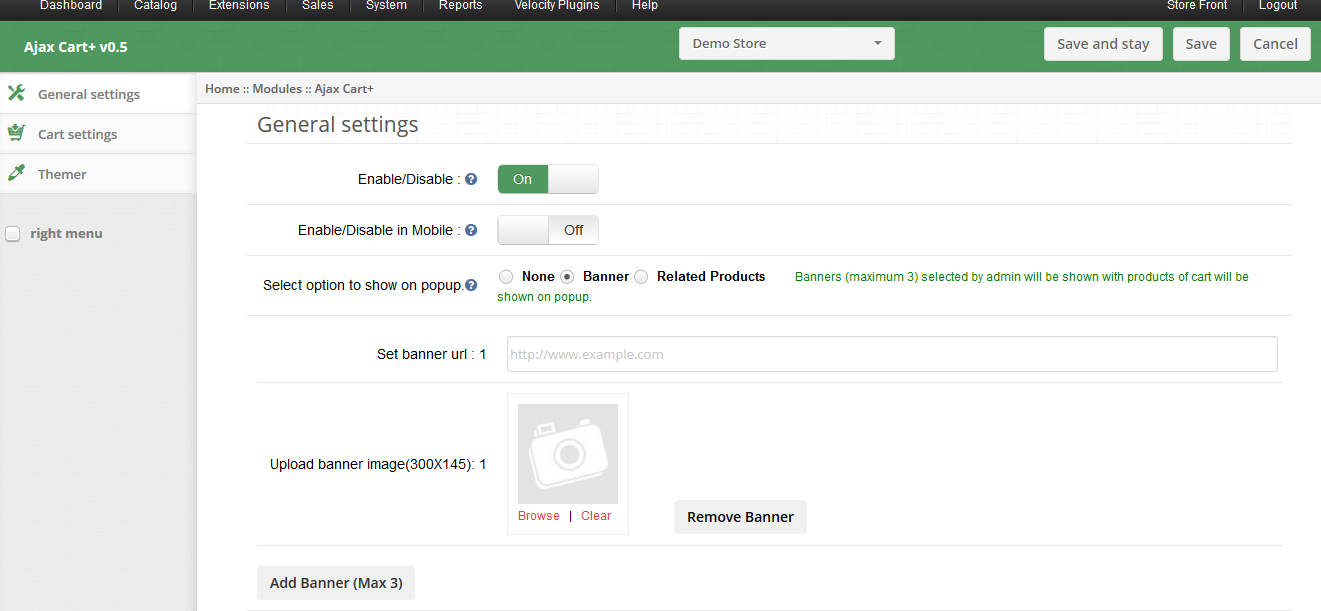
General Settings of the Opencart ajax cart extension:
1. Enable/Disable: To enable/disable the opencart ajax cart, Switch the enable button OFF to ON / ON to OFF this is just to the right of Enable/Disable label. Refresh home page of your store every time you change enable/disable setting. 2. Enable/Disable in mobile: The Opencart popup cart extension allows the admin to enable or disable this Opencart plugin in mobile device. 3. Select option to show on Popup: This field of opencart pop-up cart extension allows the admin to select the option that would be displayed at the front end, i.e. None, Banners or Related Products.
>>When you select banner radio button, a button Add Banner (Max 3) will appear on screen. >>Click Add Banner button to add a banner, on clicking this button you will be asked to enter banner URL and select banner image.
>> Write the complete URL of your webpage where you wish to redirect user on clicking the banner.
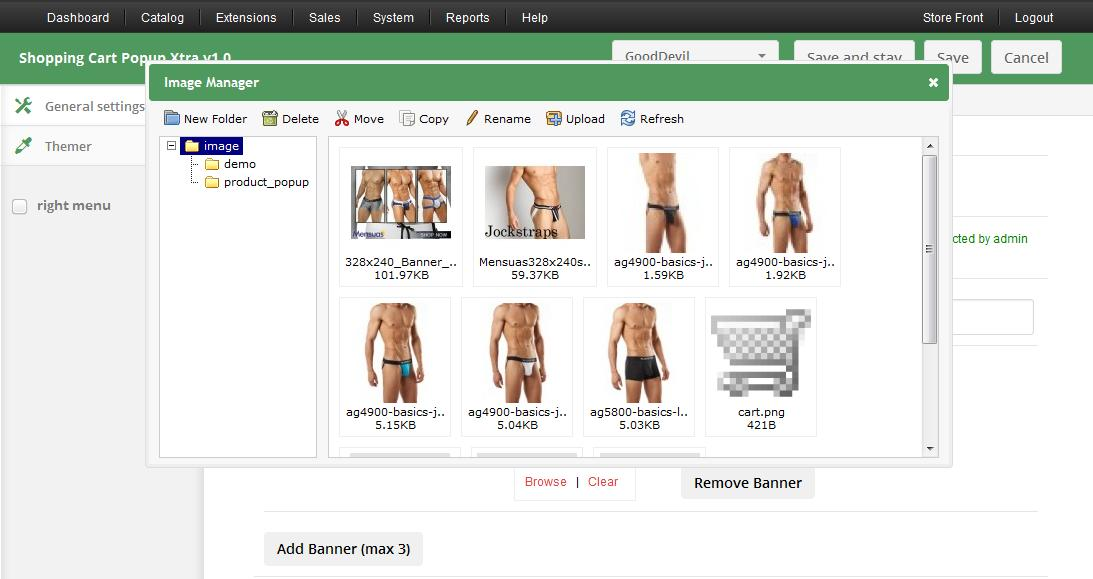
>> Select an image for banner to be shown on pop-up dialog from Image Manager as shown below. Click Browse to open Image Manager.
>> You can remove a banner by clicking Remove Banner button.
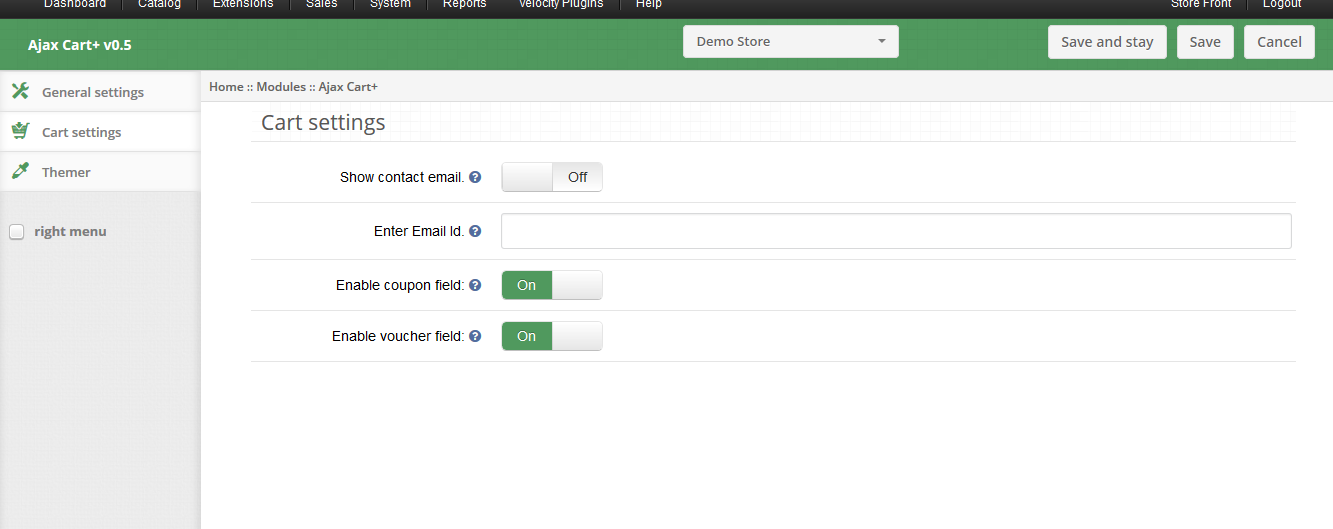
Cart Settings of the Opencart Ajax Cart Plugin:
1. Show Contact Email: This field of the opencart ajax cart extension is provided to the admin to display contact email on the popup by enabling the Show Contact Email option. Email in the field Enter Email Id will be required. 2. Enable Coupon Field: You can enable OR disable the Voucher & Gift Coupon functionality from the ajax cart popup by enabling& disabling the respective field.
Front End of the Opencart Ajax Cart Extension:
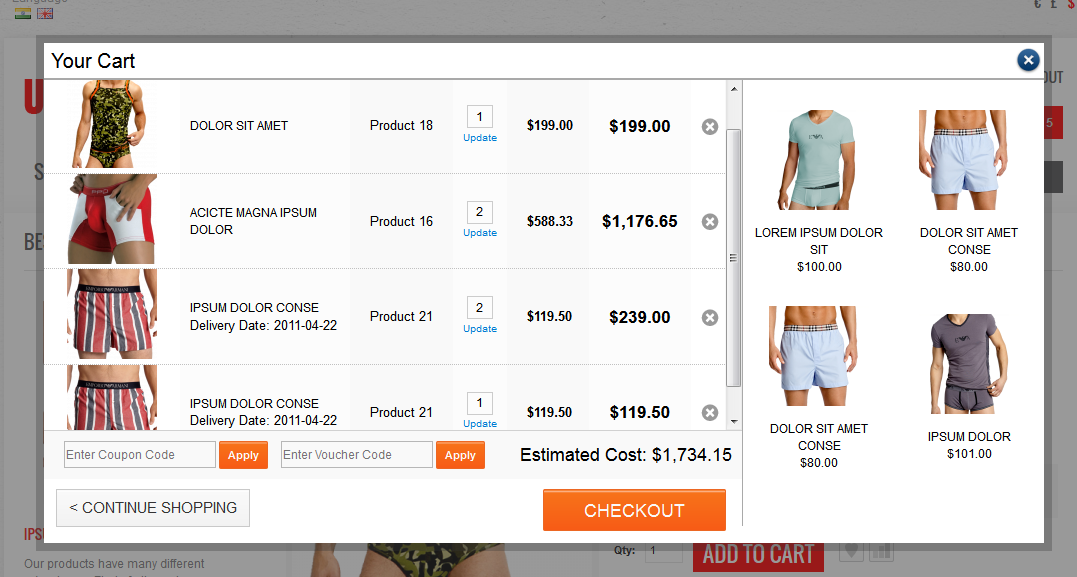
Cart with Related Products:
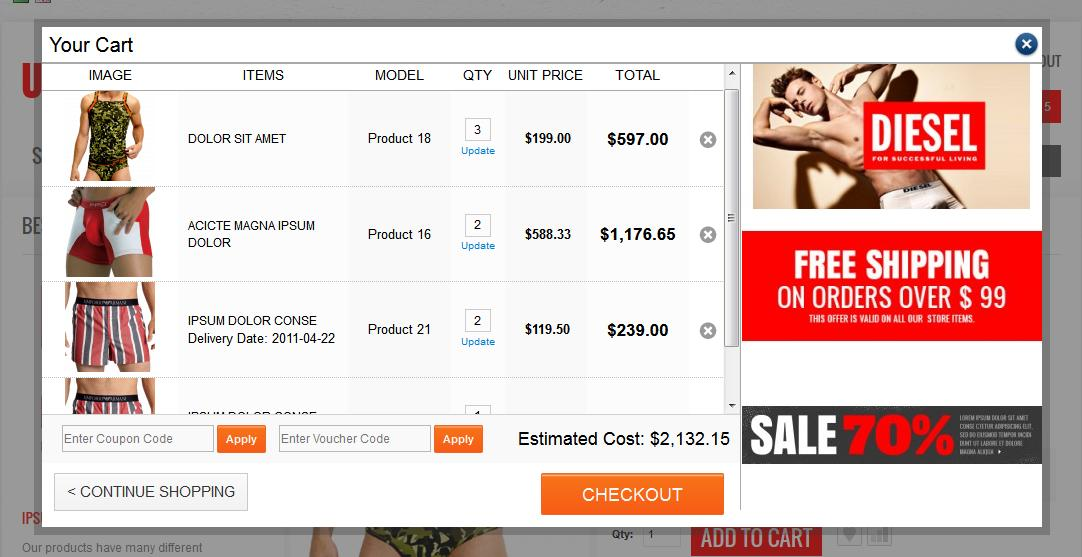
Cart with Banners
Cart without Banners and Related Products
Cart when coupon applied
Recommendations
1. Refresh home page of your store every time you enable/ disable plugin.
2. If plugin is not working after installation then please check permissions on vqmod folder.
mods.cache file, xml, vqcache folder should be writable. Please make the folder permission to 755 and also check if apache process has access to this folder.
3. Popup will enable on the product page by default if theme is implemented as per OpenCart standards.
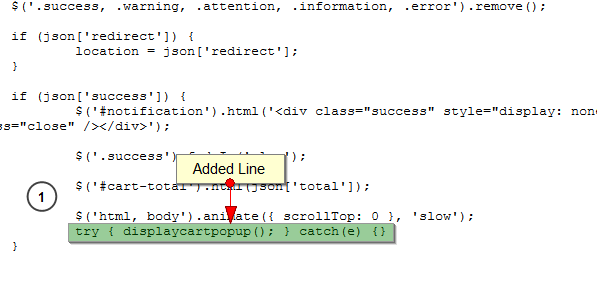
4. To enable the popup on Home Page & Category Page, Manual code has to be entered. Please follow the instruction below the display the popup on Home, Category page.
*Theme should be using the default open cart function to add products into cart.
In the present time, the Online shoppers are always looking for exciting shopping offers and deals that can give them ample reasons to indulge in online shopping. If you have this Knowband Opencart Scratch Coupon extension that displays a scratch coupon on the front-end where the store visitors can scratch the coupon with their mouse and win alluring discounts.
The Opencart Extensions enable the store owner to allow the system to give discount coupons to endpoint customers and analyze the customer’s need by tracking discount coupons. As we know that customers attract to any shopping sites on the base of attractive offers and various type discounts. So, with keep in mind these points, this Opencart coupon email extension will generate discount coupon on the front end to all visited customers, based on defined discount criteria by the Opencart store owner.
1.1 Benefits for the store owner
1. The Opencart coupon email plugin can be installed and customized without any hassle.
2. The Opencart scratch coupon module allows the online merchant to enable/disable it with a by toggling the button.
3. The mouse cursor is used to scratch the coupon on the front end.
4. The Opencart scratch card enables the Opencart store admin can send a personalized email with the coupon code.
5. The Admin can add the own rules and he/she can be customized as per requirement. For example, the shipping cost to be added or not.
6. The Store admin can track the use of the coupon codes and more with the help of Opencart Scratch Coupon pop up module.
7. The Opencart coupon generator module by Knowband allows the eCommerce merchant to set the discount amount, the eligible time period to avail coupon code and much more.
8. The Opencart scratch card pop up by Knowband allows the e-merchant to customize the messages on the scratch card, button text and input field from the back-end of the Opencart plugin.
9. The Admin has an option to customize the look, feel, and text of the front block from back-end itself.
10. The Opencart Scratch Coupon module provides free technical support and assistance.
11. The Opencart scratch coupon extension by Knowband is compatible with various types of online stores and themes.
12. The Opencart Scratch Coupon pop up module offers free technical support service and updates.
13. The Opencart scratch card can be installed and configured in a seamless manner.
1.2 Benefits for the Customer:
1- This Opencart scratch coupon extension by Knowband give the attractive offer to the customer.
2- This Opencart scratch coupon pop up module is mobile responsive and enables the customers to scratch the coupon on their mobile phones and desktop.
2.0 Installation
After purchasing the Knowband Opencart scratch coupon pop up plugin you will get following files as listed below:
1. Compressed File in ZIP format (contains source code of the module)
2. User Manual
How to install OpenCart Scratch Coupon plugin on your server
1. Folder structure of the Opencart scratch coupon module folder.
2. Open the upload folder and you will find the following folder structure:
You must have VQMOD installed for this plug-in to work. IfVQMOD is not installed please download and install from the URL below:
https://code.google.com/p/vqmod/
3. Select all the folder and drag and drop them to the root directory of your OpenCart store through FTP.
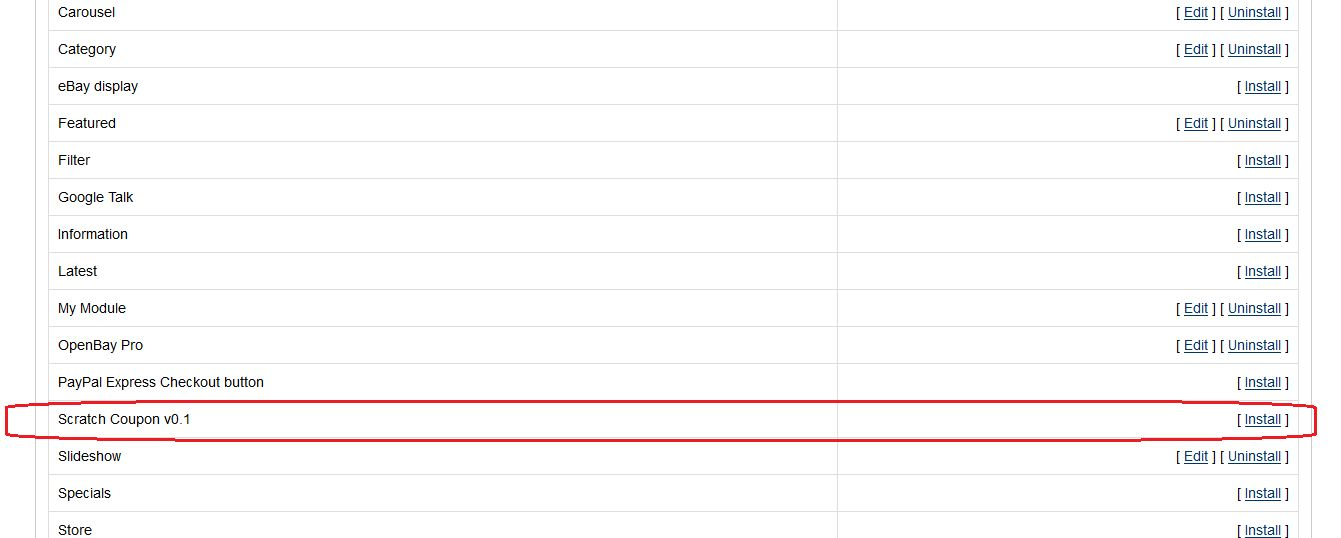
4. You will be able find the Opencart coupon email extension plug-in ready to be installed in the Modules in your OpenCart store as shown below.
5. Click on the Install link to install the Opencart scratch coupon pop up module. This will also add a dropdown option in your menu bar which will list all plug-ins by Velocity installed on your store for fast navigation. This dropdown also has a message box, using which we can inform you about new launched plug-in or new update.
6. Delete the Vqcache files from the vqmod/vqcache folder.
7. To access Smart Sort Order Opencart extension click on edit button in module section.
8. On clicking edit button the Opencart coupon generator extension for Opencart plug-in will open. It contains navigational bar at top, menu at left and main content at center as shown below.
3.0 Admin Module
After installing Opencart scratch coupon extension into store, the Opencart extension will provide following interface:
1.General Settings
2.Report Analysis
3.Get Support
Each interface is explained below:
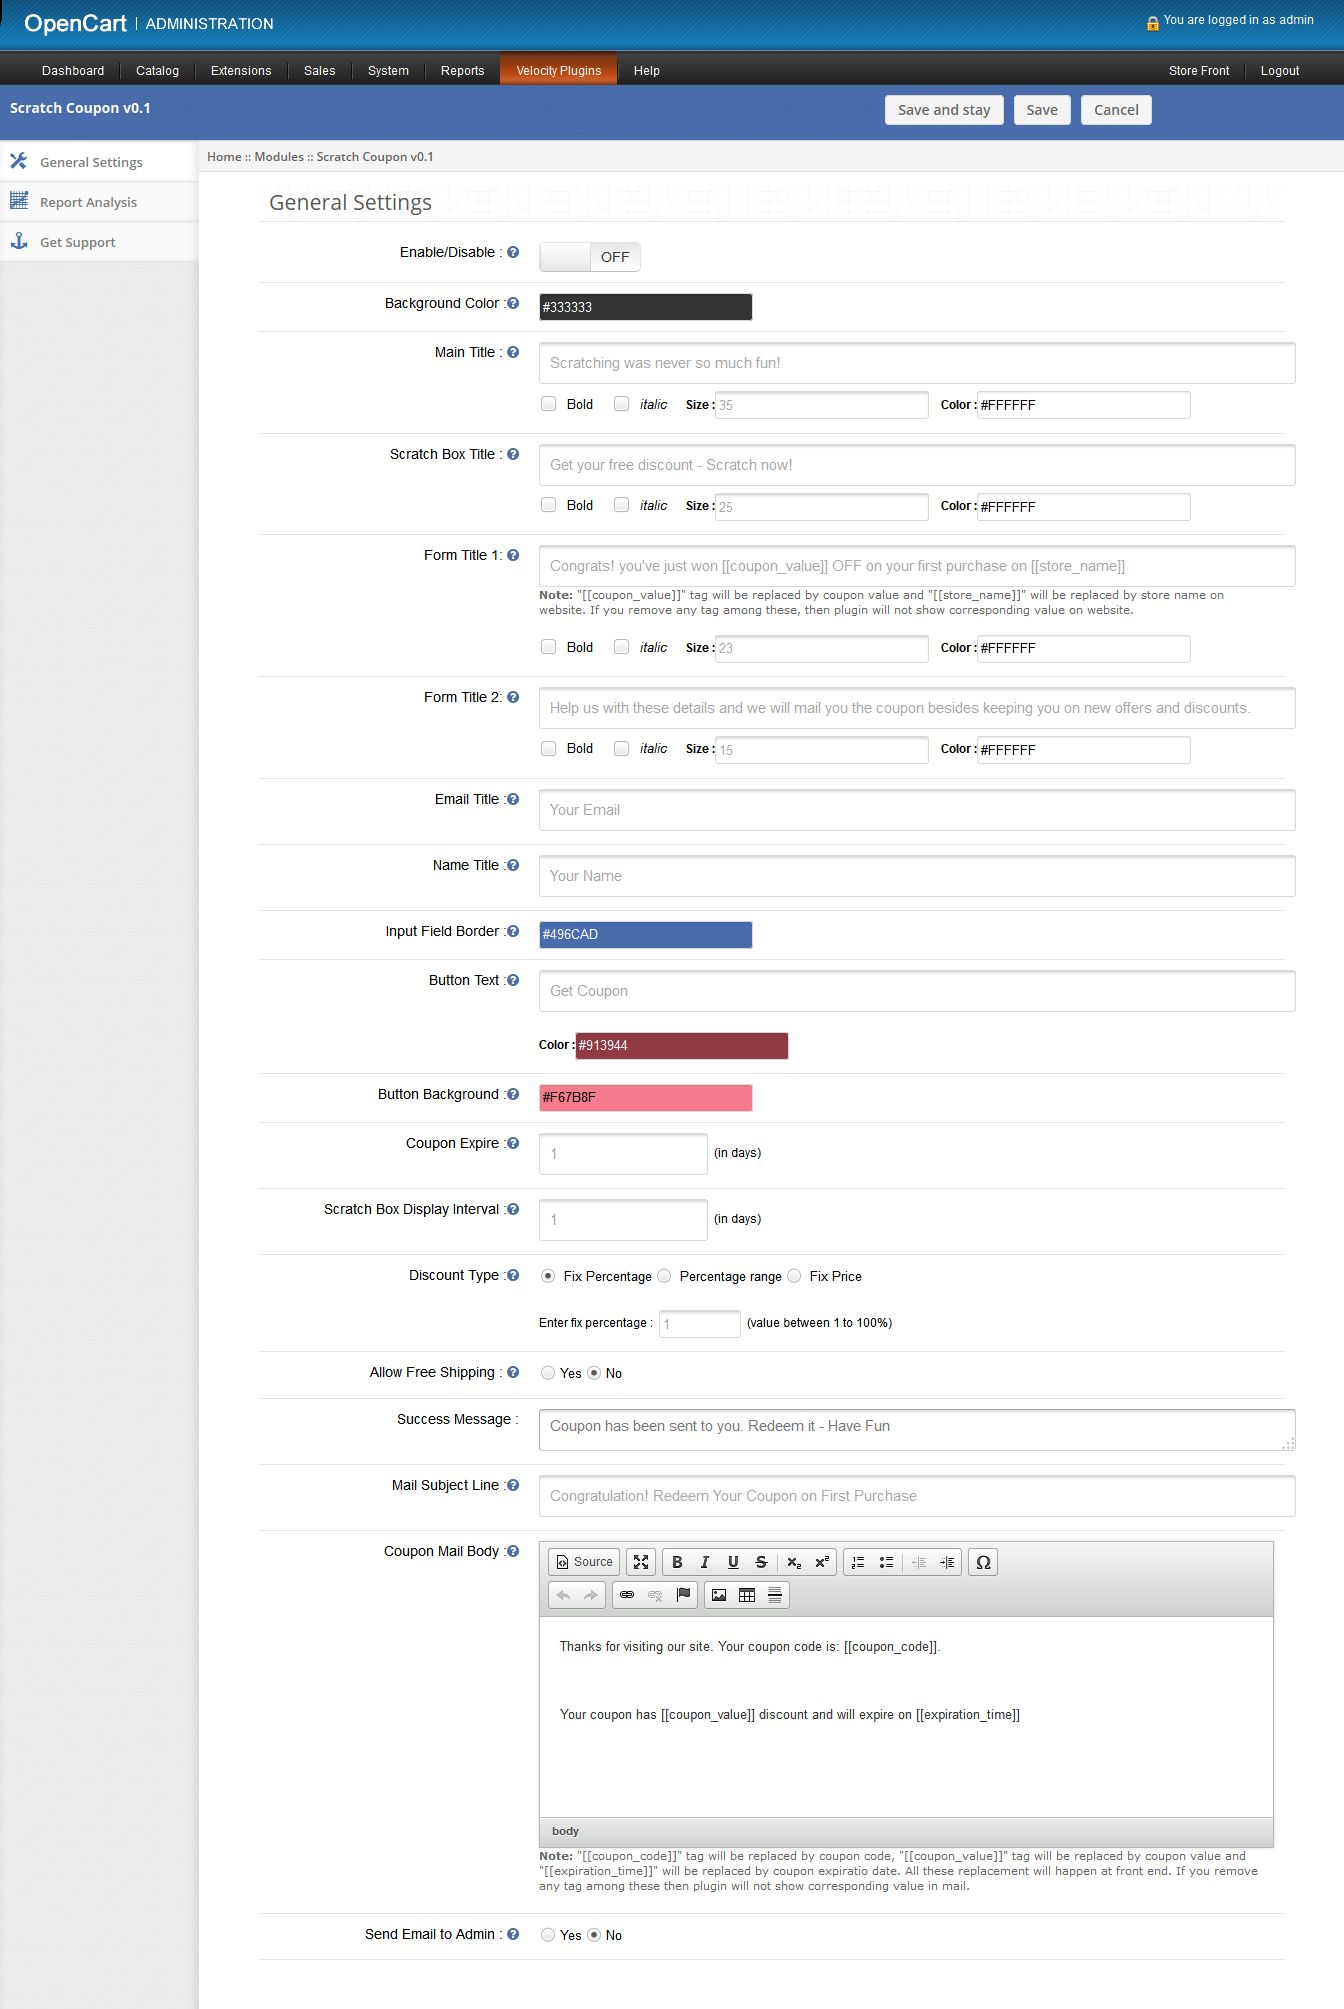
On clicking on edit link on module listing page, the system will open general settings tabs by default as shown in the screen below:
3.1 General Settings
On clicking on edit link on Opencart module listing page, system will open general settings tabs by default as shown in screen below:
1. Enable/Disable: Initially, this will be “OFF”. User can enable/disable Opencart scratch coupon extension functionality by turning ON/OFF this setting.
2. Background Color: This field will be used to define background color of scratch coupon box on front end. On clicking this input, a color picker will pop up from where user can change the color of background color. There is no option to blank this field.
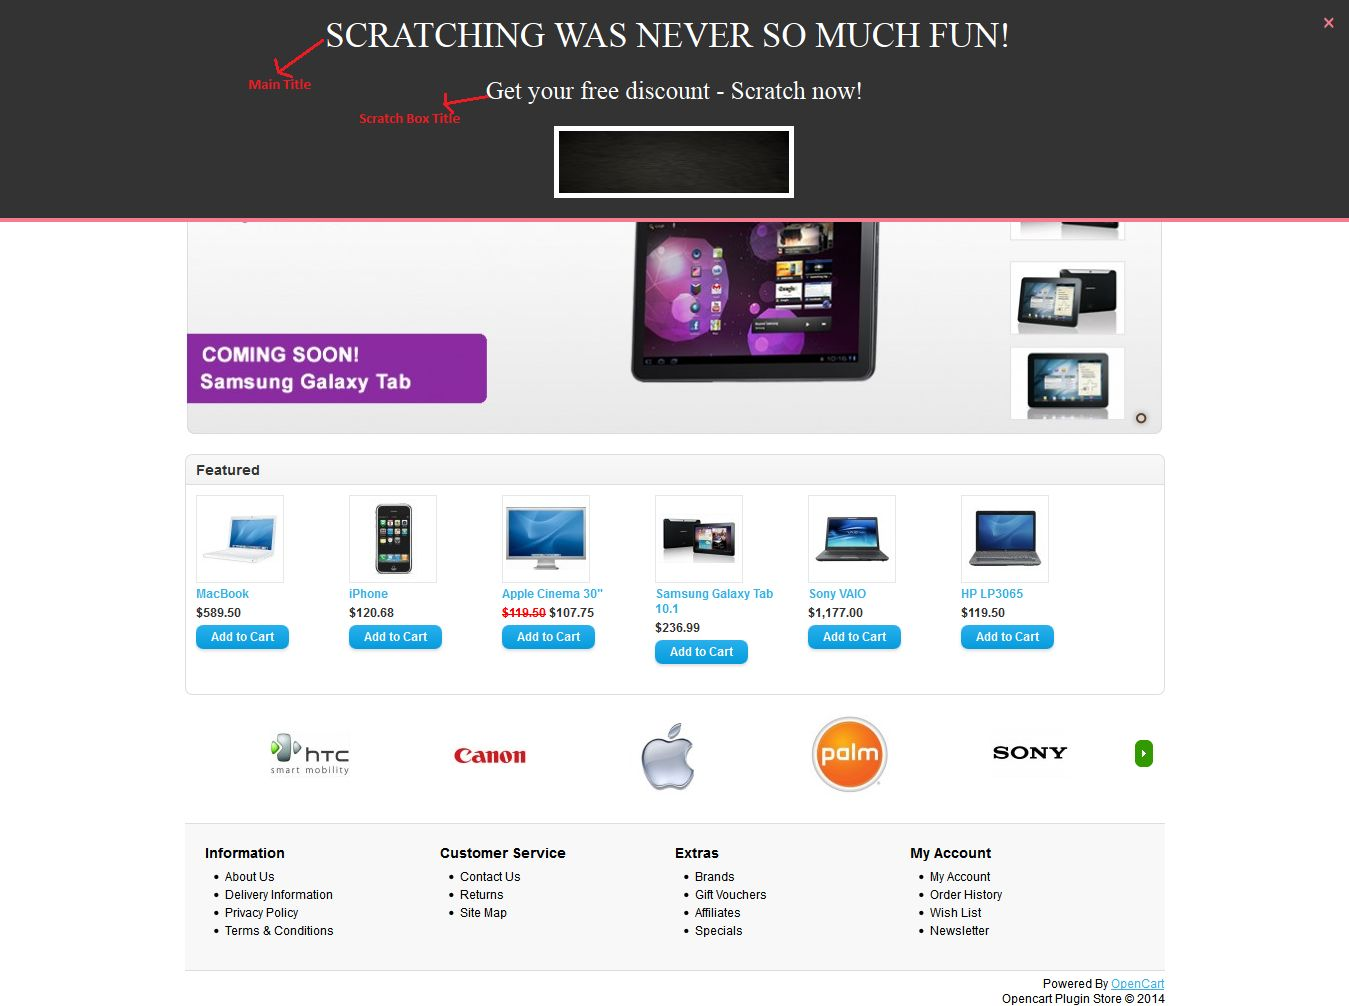
3. Main Title: Mandatory. This is the title showing on the top of the coupon box on front. User can make this title stylish as setting following options:
Bold: To darken the title.
Italic: to italic the title
Size: to increase/decrease the size of the title.
Color: To set the color of the title.
4. Scratch Box Title: Mandatory. This title will be show just above the scratch area on front end.User can also make stylish this title with style options.
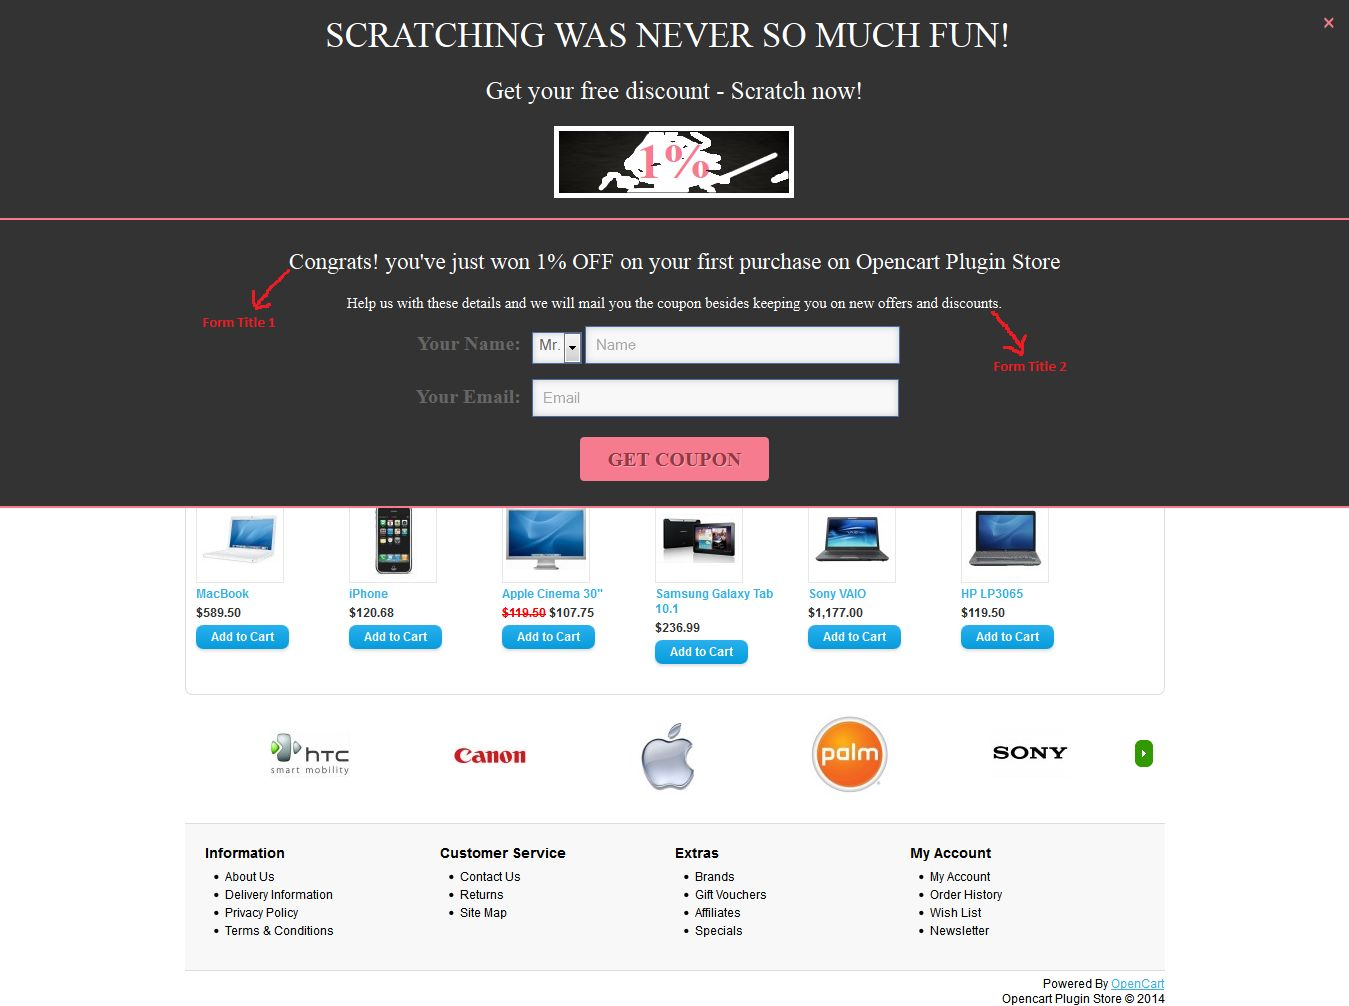
5. Form Title 1: Mandatory. After little scratching of discount, Opencart scratch card module will open a form to submit name and email id to get coupon. This title will be shown on top of this opened box.
6. Form Title 2: Mandatory. This title will be displayed just above the email input form and below the After Scratch Title on front end. User can also stylish this title with various style options.
7. Email Title: Mandatory. In this field user can set name of the email input field, showing with “email input” on front.
8. Name Title: Mandatory. In this field user can set the name of name input field, showing with “name input” on front.
9. Input Border Field: Use to style the border of input fields on front end. We recommend that use opposite color of background color to clearly show the input fields on front end.
10. Button Text: Mandatory. Here user can set the title of button. User can also change the color of button text by setting the color into corresponding color field.
11. Button Background Color: Mandatory. Here user can set the background color of button. This color will also be used for setting the color of separator between scratch coupon box and input form box. Also use for setting color of close(X) button, which will be used for close the coupon box on front end.
12. Coupon Expire: Mandatory and must be number greater than 0. This field will be used for defining the expiration date of coupons. In this field, user can set after how many days coupon will be expired. The expiration date will be set at the time of coupon generation.
13. Scratch Box Display Interval: Mandatory and must be number greater than 0. This field will be used to, after how many days; scratch box will be displayed again on the same system.
14. Discount Type: Mandatory. Here user can set the type of discount to customers. There are three options to set the discount type. They are as follow:
a. Fix Percentage: By default, this option will be selected. Here user can set the fix percentage discount. Fix percentage value will lie between 1 and 100. On front end,each coupon will have fix discount percentage.
b. Percentage Range: On selecting this option. Two inputs will be shown as shown in screen below:
Here user can set the range of percentage. By setting this option, plug-in will randomly generate discount within percentage range on front end.
c. Fix Price: If user set fix amount discount instead of percentage. Then this option will fulfill this need. Here user can set fix amount in USD.
15. Allow Free Shipping: By default No will be selected. On selecting Yes. Free shipping will be allowed on the generated coupons.
16. Success Message: Mandatory. This message will be shown after sending coupon to corresponding customer.
17. Mail Subject Line: Mandatory. Use to set the subject line of coupon mail send to customers.
18. Mail Body: Mandatory. Mail body of coupon.
19. Send Email to Admin: By default “No” will be selected. This option will enable Opencart scratch coupon extension to send same email to admin or not.
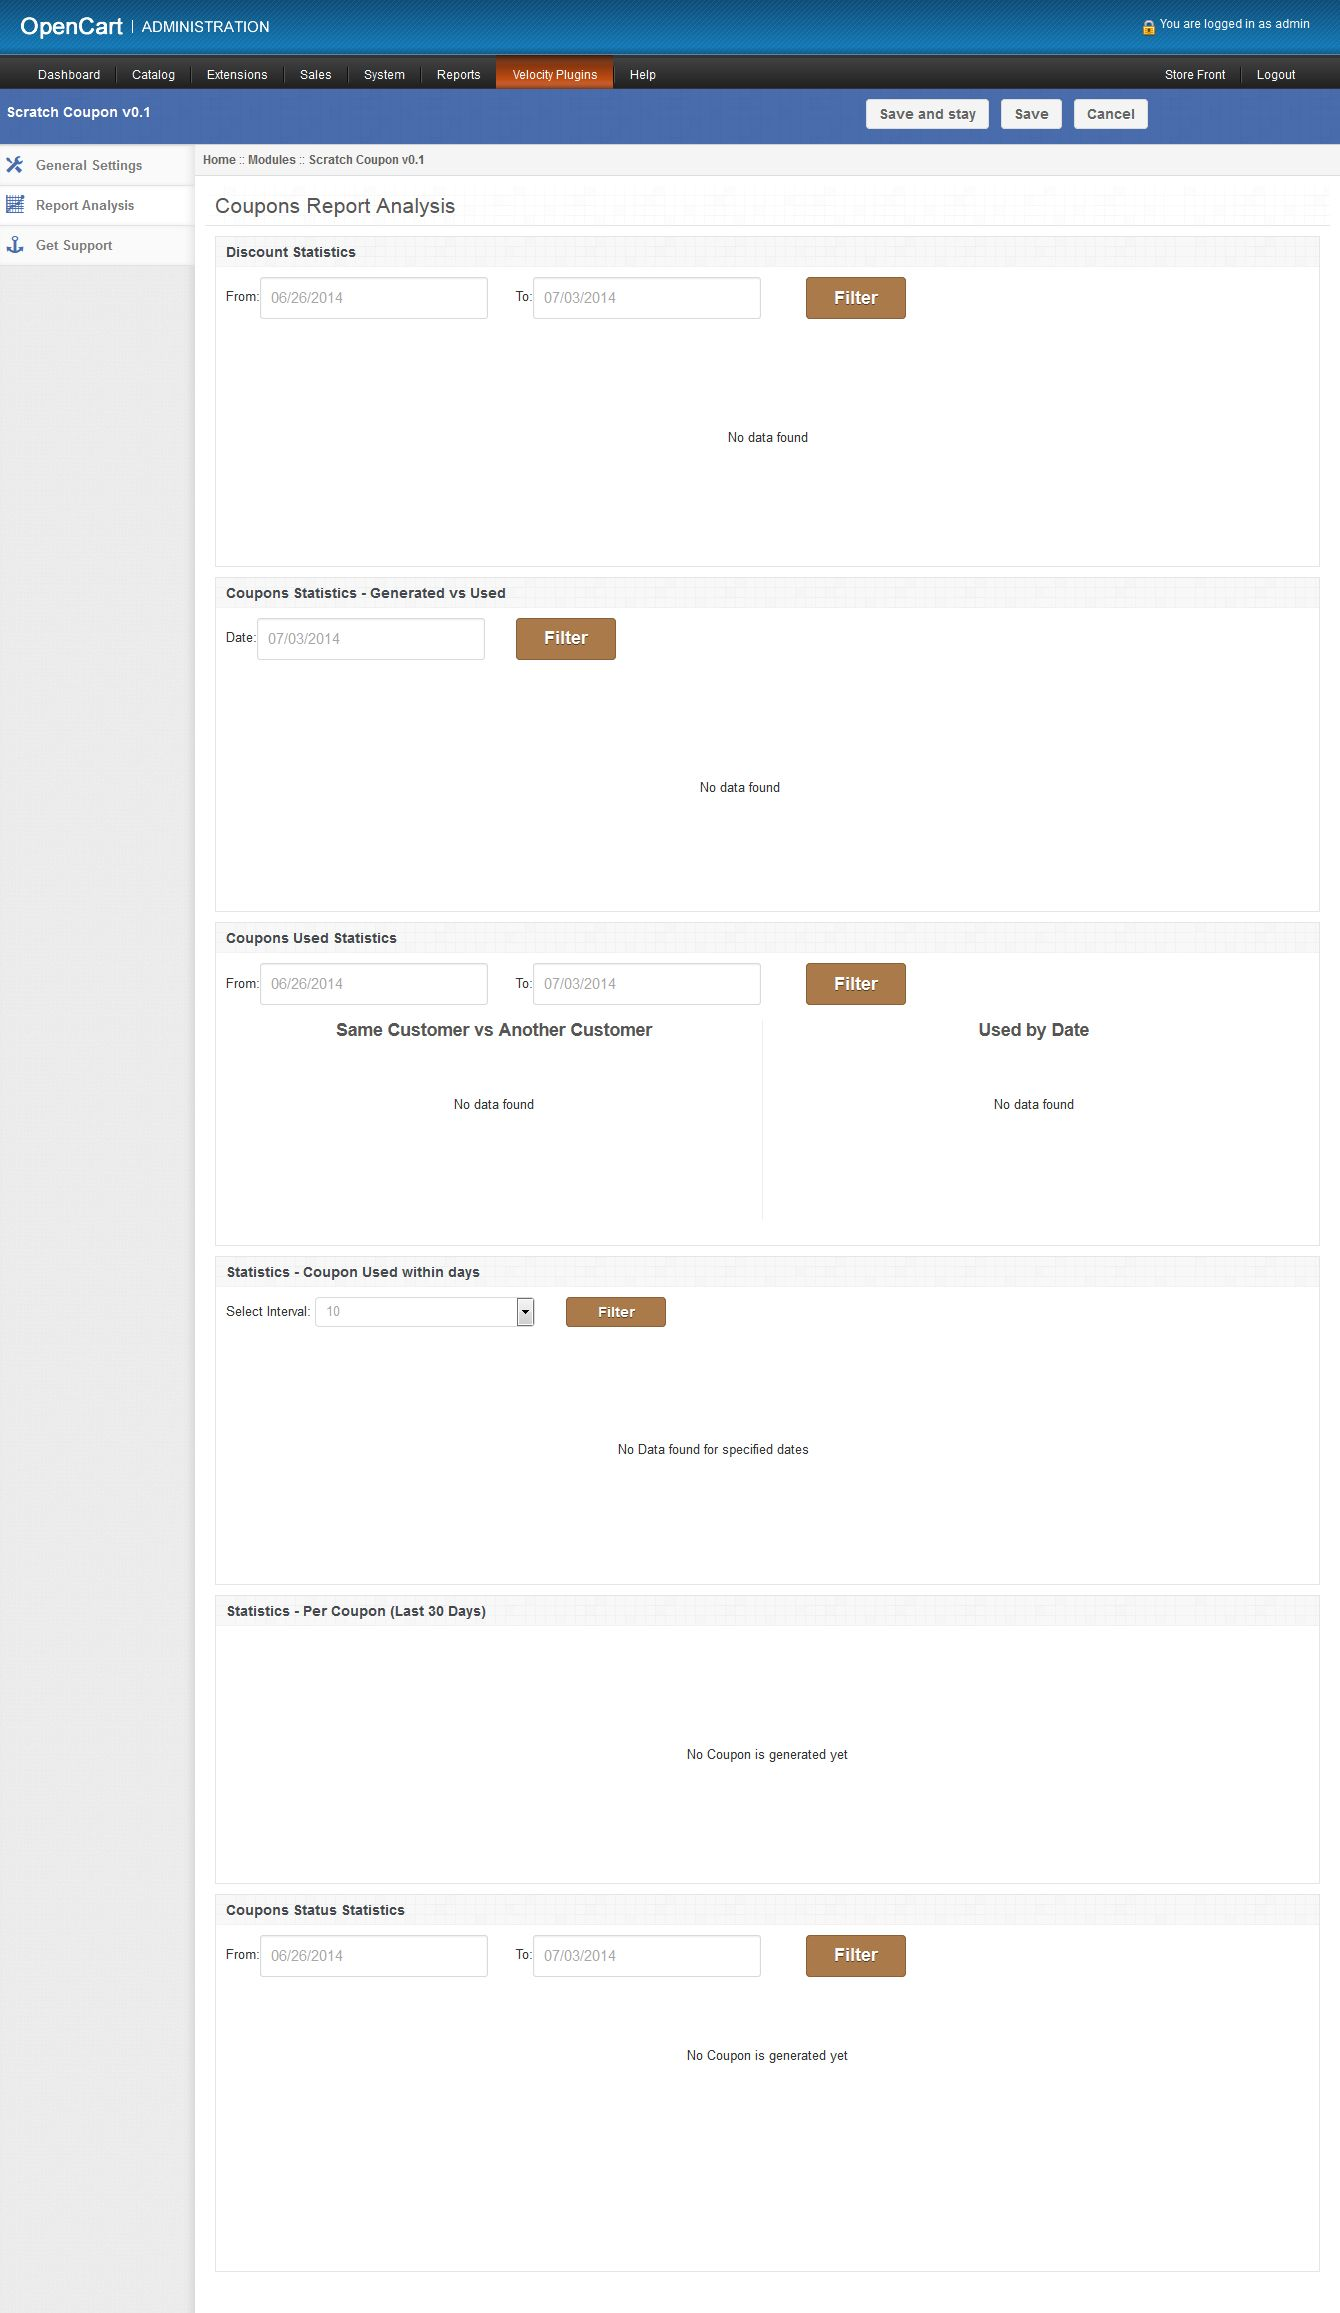
3.2 Report Analysis tab
In this tab, Opencart generate coupon extension will show the coupons and discount statistics in graphical form. With the help of these statistics, user will able to analysis customers need in form of discounts and time as shown in screen below:
There are following graphs will be shown into this tab:
1. Discount Statistics: In this, Opencart scratch coupon pop up plugin will show, how many number of customers applied for which discount range and how many times coupon is scratched for which discount range. As there are two types of discount: percentage and fixed amount; in a system. The opencart extension will show a separate graph for both discount types as follows:
a. Percentage discount statistics: This will be a bar graph, in which discount interval will be of 20% upto 100%. Below is the sample screen of this statistics:
b. Fixed Amount discount statistics: This will also be a bar graph, in which discount interval will be of $20 and 6 intervals will be shown. Below is the sample screen of this statistics:
With the help of these above two graphs, the user can track the customer’s needs in terms of discounts. Information gathers in these statistics will be helpful in attracting more customers by offering preferred discounts and increase store sales. The user can also filter these graph by selecting dates.
2. Coupon Statistics Generated Vs Used: This will be bar graph and will show the coupons generated and same coupons used within last 7 days. This graph will be helpful to analyze the customers that the customers used the coupons on the same day or on another day. The user can also filter graph by selecting a date. Following is the sample screenshot of statistics:
3. Coupon Used Statistics: In this, Opencart scratch coupon extension will show that how many coupons used in term of percentage on the date and how many coupons in terms of percentage will be used by same customer and another customer. Data will be shown in the form of the pie chart. By default, Opencart module will show last 7 days statistics. The following screen is shown below as a sample:
4. Coupon Used within days: This bar graph will help the user to analyze that, in how many days coupon is used after assigning to the customer. By default, Opencart coupon email extension will show coupons within the interval of 10 days. The user can increase days interval by selecting interval from drop-down menu. Below is the sample screenshot of this statistics:
5. Statistics-Per Coupon (Last 30 Days): Here Opencart scratch card will show each coupon statistics in a tabular format.Opencart plugin will show only last 30 days data. This tabular format will show following data:
Coupon: Coupon code
Assignee Name: Name of the customer to which coupon is assigned.
Assignee Email: Email id of the customer on which coupon sent.
Gender: Show gender (M/F) of customers.
Assigned date: On which date coupon was assigned to the corresponding customer.
Expire Date: On which date coupon will expire.
Used By: Email id of the customers who will use this coupon. If the coupon is not used yet, then this will show NA.
Used Date: Date on which coupon was used. If not used, then this will show NA.
Status: Status of the coupon.
6. Coupon Status Statistics: Here Opencart scratch coupon module will show status of coupons generated within last 7 days in form of a pie graph. Coupon statuses are: Used, Unused and Expired. If coupon of any status not find, then Opencart extension will not show it in pie graph. Following is the sample screenshot of this statistics:
3.3 Get Support tab
If user have found any issue regarding and wants any type of support, then via this link, the user can create the ticket for any query on our helpdesk support.
Scratch Coupon description
On front, the Knowband Opencart scratch coupon extension will only be displayed on home page after enabling it from admin panel. This scratch coupon box will show on top of the homepage. Following is the screen of scratch coupon box with default values:
After scratching coupon area above 30%, an input form will be open just below the coupon box as shown in screen below:
After providing name and email into form, Opencart scratch coupon module will send the coupon with discount showing in above screen to the corresponding customer. After sending email to the customer, a success message will be displayed as shown in below screen:
The above message will disappear after 5 seconds and next discount will be shown on the same system after defined (set through admin panel ) days
Tracking Information
On the front end, this Opencart coupon email extension by Knowband will track following information to create analysis reports in the form of graphs:
1. Discount Scratch Tracking: Whenever customer scratches discount upto 10% of the scratchable area, then Opencart coupon generator extension will track that event and save into DB, after that disable the tracking process until the browser will not reopen again on the same system.
2. Coupon Tracking: To get a coupon of scratched discount, the customer must have to provide his name and email. After providing it, Opencart scratch card pop up will generate a coupon randomly and send it to the corresponding customer. After sending, Opencart extension will save coupon data and to which customer this coupon is assigned into the database.
3. Send Email to Admin: If store owner allows email to admin, then Opencart scratch coupon pop up extension will also send the same email to admin.
4. Enable discount coupon again: After sending coupon to customer, Opencart Scratch Coupon plug-in will not re-generate discount on the same system till days defined by the store owner in the admin panel.
You can try Knowband’s Opencart scratch coupon extension for on your Opencart store. Opencart generate coupon module helps you increase customer engagement to your store and give the better user experience to your eCommerce customer.
Installation Steps of Magento Advanced Wish List Extension
1.0 Introduction
Most of the time eCommerce store visitors have to plan their shopping in advance – they may need certain products regularly (e.g. consumer goods or food, clothes); for special occasions, to make sure they will have all they need, etc. For this purpose making the easy, they save the favorite product to their wishlist. The Magento Advanced wishlist extension makes this process much more comfortable – with it customers can save the favorite products, they are planning to buy in the future, etc.
This Magento advanced order list extension motivates the customer to come back to your website as well as attract the new shoppers and they place more orders. This Magento extension shows the popup of the wishlist product at the bottom of the webpage with the help of this, they can transform wishlist products into checkout with just a click of a button.
1.1 Benefits of the merchant:
The Magento advanced wishlist extension allows the customer to maintain the private wishlist of the product that can help for future reference.
The Magento extension provides an option to the store admin can view the complete list of products saved by the customer on their wishlist.
The Magento Advance order list extension allows the e-merchant to change the look and feel of the wishlist and add to cart button and they can also allow the default. color settings as per requirement.
The Magento advance purchase list has an option to include the jQuery file if required.
The online retailers can set the expiry of the saved product in days.
With the help of this Magento advanced wishlist extension, the store admin can view the which product is most popular and high demanded.
The store admin can analysis the sales report.
The Admin can Re-Price the products to increase sale.
This Magento saves for later extension compatible with all themes.
Mobile responsive.
Easy installation and use.
2.0 Installation Guide
1. Folder structure of the Magento Return Manager module.
2. Copy all the above folders into Magento root directory and clear the cache (if enabled).
3. Now, login to the admin panel of your Magento store. You will be able find the “Save for Later” option inside the “System > Knowband Extensions > Save for Later” menu.
2. On clicking menu Save For Later the module for plugin will open. It contains navigational bar at the top, Tab menu at the left and in main content the first general setting tab will display.
4. You can now configure the Magento Save for Later Extension as per your requirements and check its working in the front end at following URL:
https://pstest2.knowband.com/mage1932
3.0 Admin Module
After installing the Magento advanced wishlist plugin into magento store, the module will provide following options inside “Save For Later” menu:
Above 4 points are actually one section comes under “Settings” but described here as separate entity for more clarity.
Each interface is in form of a tab and each tab contains some specific settings/functionalities that can be changed according to the need. Each tab is explained below.
3.1 General Settings
1. Active: Initially, this will be “OFF”. The e-merchant can enable the module, select enable present under the label Activate.
2. Remove Wishlist : Check this option to remove the default wishlist from the website.
3. Use Default Color Setting: This option will allow the store admin to reset your color setting to default. The default color values will display by default. Remember if you wish to change the color setting then this option must be disabled.
4. View All Button Color: To Select a color for the view all button color in the saved product list. See below image:
5. View All Button Text Color: Select the color value for text over the view all button color.
6. Add To Cart Button Color: Select the color for add to cart button visible on the page open on the click of view all button.
7. Add To Cart Button Text Color: Select the color for the text over the add to cart button.
8. Days to Store guest Product: For guest users the product will be saved in the cookies. Using this option you can set the expiry days for cookies.By Default cookies will stored for 10 days.
9. Jquery File: jQuery i.e. a javascript framework is required for this plugin to work. Sometimes themes used in magento already includes it but sometime they do not. If jquery is already included in your theme select no else select yes to include it.
3.2 Category Analysis
This Magento advanced wishlist extension allows the admin to make an analysis on the Categories. Here the store merchant can view the graph for the categories using the dropdown menu and date filters. When the admin opens the tab, by default last week report will display. If there is no product saved in last week then no record found message will display instead of the graph.
Below the graph a grid is provided. This grid will display the categories of the product saved.
On the top of the grid there is an export button , that will export the grid data into csv file. You can find particular record for category by using its id and search button available on top left of the grid.
In the Grid you can see an action column, on click of it a new grid will open in another browser tab displaying the products saved under that category.
NOTE: The No. of Product will be display according to configuration scope.
3.3 Product Analysis
This Magento advance purchase list allows the admin to make an analysis on the Products. The Product analysis tab the online retailers can view the graph for the product using the dropdown menu and date filters. When the admin opens the tab, by default last week report will display. If there is no product saved in last week then no record found message will display instead of the graph. Below the graph a grid is provided. This grid will display the categories of the product saved.
On the top of the grid there is an export button , that will export the grid data into CSV file. You can find particular record for category by using its id and search button available on top left of the grid.
NOTE: The No. of Product will be display according to configuration scope,
3.4 Customer Analysis
This Magento advance order list allows the Magento store owners to make an analysis on the the online customer. The Online store owner can view the use count of the SAVE FOR LATER option for each user in the grid.
Also, there is a column view saved products, on click a new grid will open in new tab displaying the products saved by that customer.
NOTE: The no. of use count and no of product can be different. When you click on view saved product , only those product will be displayed which are saved in customers list that time.
Hope that we have covered all the concerned regarding the installation of Magento Extension. If you are new on Magento then you can also check our blog of Top Magento themes of 2015.
4.0 Front End Module
After enabling the Magento save for later module, customers will be able to see a bottom bar on every page of the store containing the “Your Saved Item block” enabled through configuration panel of the magnto extension.
The bottom bar at the front-end appears as shown below:
The highlighted “Shortlist” button will allow customers to shortlist corresponding products into a separate bucket. This bucket is displayed at the bottom of the page as highlighted in above screen.
When the customer clicks on “Shortlist” button, a product gets added to bucket and button text will get changed from “Shortlist” to “Added”.
You can try Knowband’s Magento Advanced Wishlist extension for on your Magento store. Magento advance order module helps you increase customer engagement to your store & you can
Provide the option to the online shoppers to save the favorite product to their wishlist.