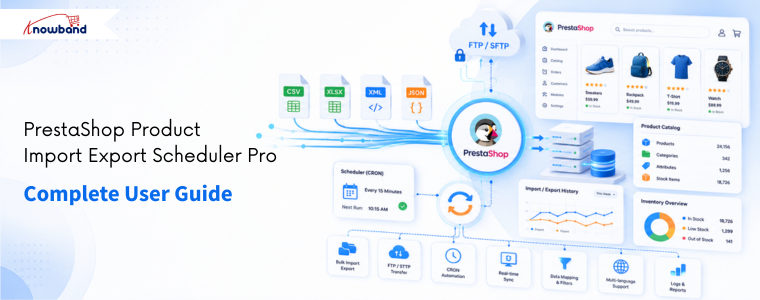
PrestaShop Product Import Export Scheduler Pro – Complete User Guide

1.0 Introduction

Managing eCommerce manually is one of the most time-consuming parts of running an online store. Updating prices means opening products one by one. Migrating to a new store means starting from scratch. Syncing a supplier feed means downloading a file, converting it, and running an import that may or may not work cleanly.

The PrestaShop Product Import Export Scheduler Pro by Knowband replaces all of that. It is a complete PrestaShop Bulk Product Import Export Module that handles every direction of catalog data transfer, products and categories, in and out, in CSV, XLSX, JSON, and XML, from inside your PrestaShop admin panel without any coding, desktop software, or developer involvement.

What makes this PrestaShop Import Export Module different from basic transfer tools is the automation layer. Transfers are saved as named profiles. Profiles run on a schedule. Scheduled runs push files to FTP or SFTP servers automatically, send completion emails, and clean up after themselves.

Compatible with PrestaShop 1.7.x through 9.x.

1.1 Who Is This Module For

The PrestaShop Catalog Manager is built for:

  • Store owners managing medium to large catalogs of 100 to 50,000 SKUs.
  • Agencies managing multiple client PrestaShop stores.
  • International stores running multilingual catalogs.
  • Businesses syncing product or pricing data from supplier feeds on a schedule.
  • Any merchant who has struggled with PrestaShop’s native importer and needs a reliable combination and multi-language support.

2.0 Installation Guide

2.1 System Requirements

Before installing the module, confirm your environment meets the following:

  • PrestaShop version 1.7.x or 8.x or 9.x.x
  • PHP 7.2 or higher
  • MySQL 5.6 or higher

2.2 Uploading and Installing the Module

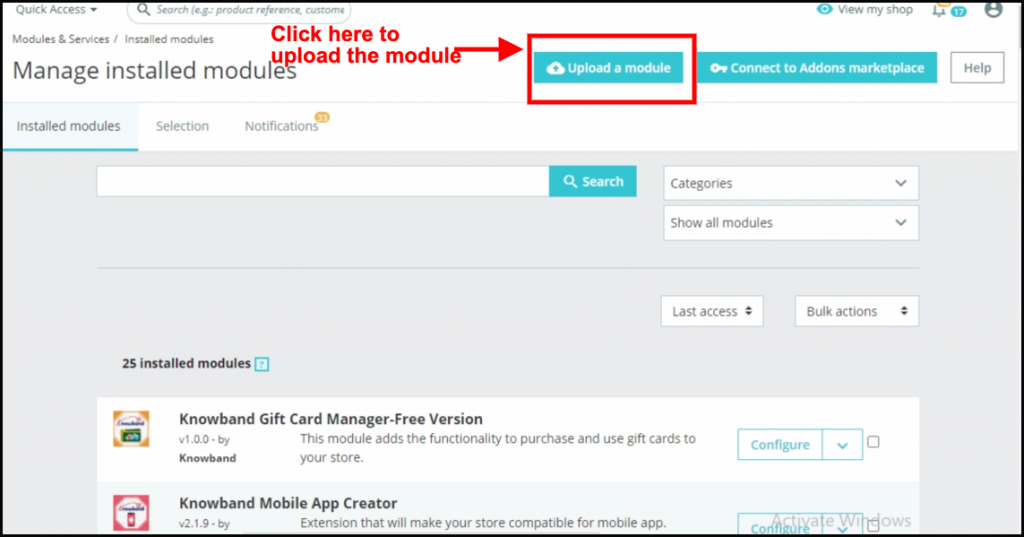
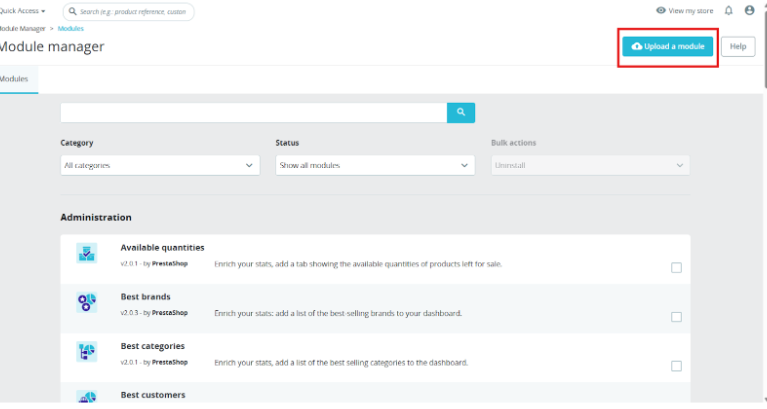
Step 1 – Upload the module: From your PrestaShop admin panel, go to Modules, then Module Manager, and click “Upload a Module” in the top right. Select the ZIP file downloaded from Knowband and click Open. PrestaShop uploads and extracts the files automatically.

Step 2 – Install: Once uploaded, click Install when prompted. After installation, you are redirected to the module configuration page.

Step 3 – Locate if needed: If the module does not appear automatically, search for Bulk Data Manager in the Module Manager search bar and click Configure.

2.3 Common Installation Issues

Upload fails: Your server upload size limit is too low. Ask your hosting provider to increase upload_max_filesize and post_max_size in the PHP settings to at least 32 MB.

Module not visible after install: Clear your PrestaShop cache under Advanced Parameters, then Performance, then search for the module again in Module Manager.

The configuration page appears broken: Clear your browser cache and the PrestaShop theme cache under Design, then Theme and Logo, then Advanced Settings.

3.0 Admin Panel Overview

Once installed, the PrestaShop Product Import Export Scheduler Pro has four main tabs in the admin panel:

  • General Settings: Preferences, template files, limits and speed, scheduled cleanup.
  • Export Profile: Create and manage export profiles.
  • Import Profile: Create and manage import profiles.
  • Transfer Logs: Full history of every import and export run.

4.0 General Settings

The General Settings tab has four sub-sections accessible from the left sidebar: Preferences, Template Files, Limits and Speed, and Scheduled Cleanup.

4.1 Preferences

This is the first screen you see inside the module.
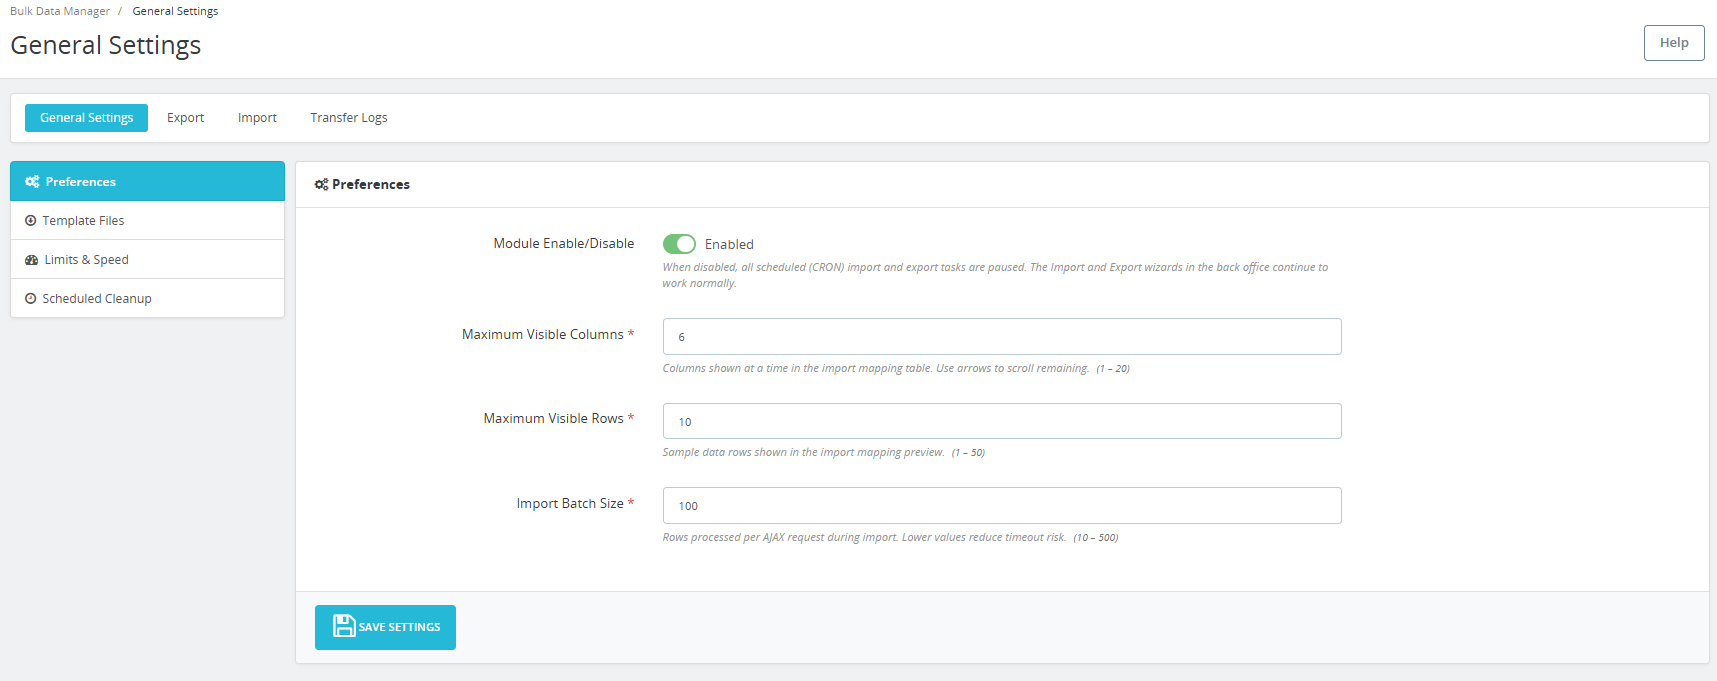
Module Enable/Disable: Toggle the module on or off. When disabled, all scheduled CRON import and export tasks are paused.

Maximum Visible Columns: Sets how many columns are displayed at once in the import mapping table. Use the arrows to scroll through the remaining columns. Accepted range is 1 to 20. Default is 6.Maximum Visible Rows: Sets how many sample data rows are shown in the import mapping preview. This is for visual verification only and does not limit how many rows are imported. Accepted range is 1 to 50. Default is 10.

Import Batch Size: Sets how many rows are processed per AJAX request during import. Lower values reduce timeout risk on shared hosting environments. The accepted range is 10 to 500. Default is 100. For VPS or dedicated servers, increase this to 300 or higher to speed up large imports.

Click Save Settings to apply changes.

4.2 Template Files

This section provides ready-to-fill sample template files for every supported entity and format combination.
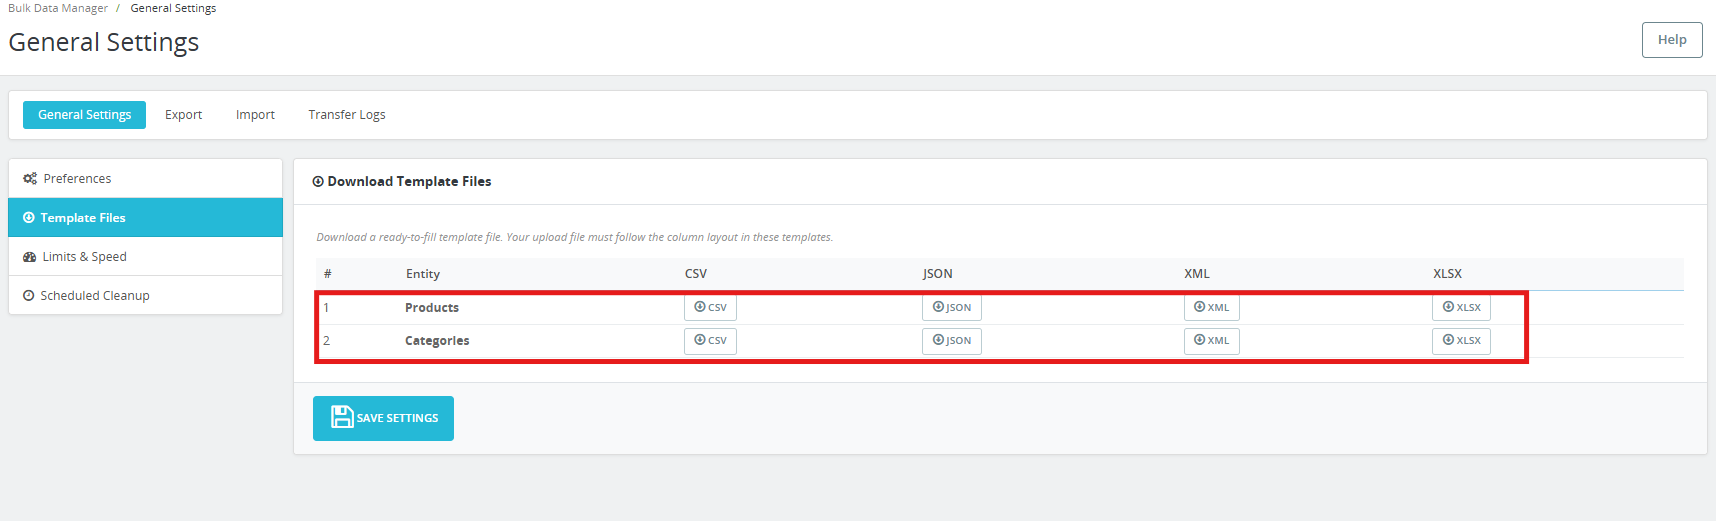
Two entities are available: Products and Categories. Each entity has four format buttons: CSV, JSON, XML, and XLSX.

Click the relevant button to download the template for that entity and format. Each template includes every column the PrestaShop Import Export Module recognises and uses safe placeholder data. Download a template, fill it in with your real product data, and import it back. Your upload file must follow the column layout shown in these templates.

4.3 Limits and Speed
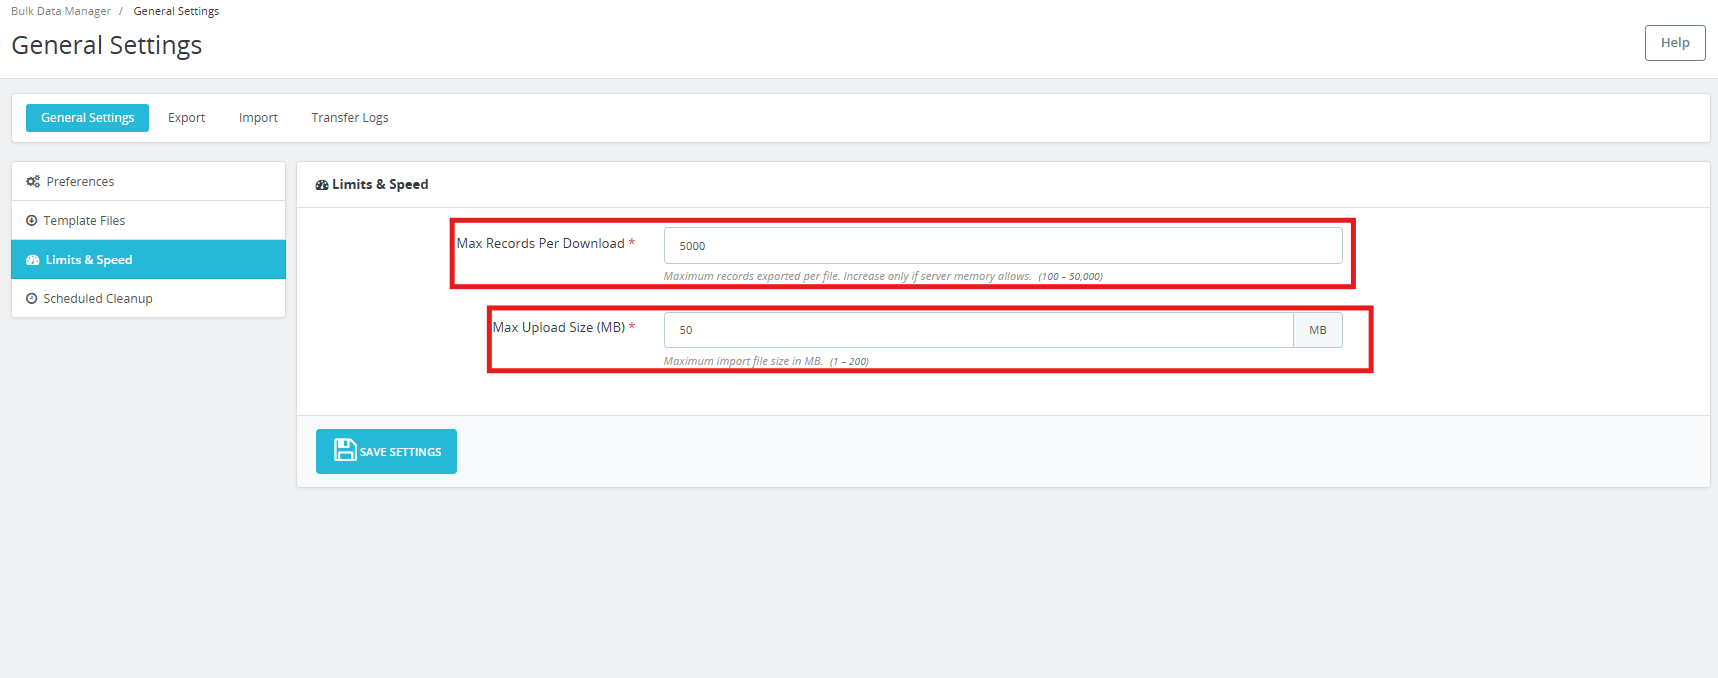
Max Records Per Download: Sets the maximum number of records exported per file. Increase only if your server memory allows. Accepted range is 100 to 50,000. Default is 5,000.

Max Upload Size (MB): Sets the maximum import file size in MB. This works alongside your server’s PHP upload limit; whichever is lower takes effect. Accepted range is 1 to 200 MB. The default is 50 MB.

Click Save Settings to apply.

4.4 Scheduled Cleanup

This section generates the three cron URLs used to automate transfers and manages the automatic file cleanup.
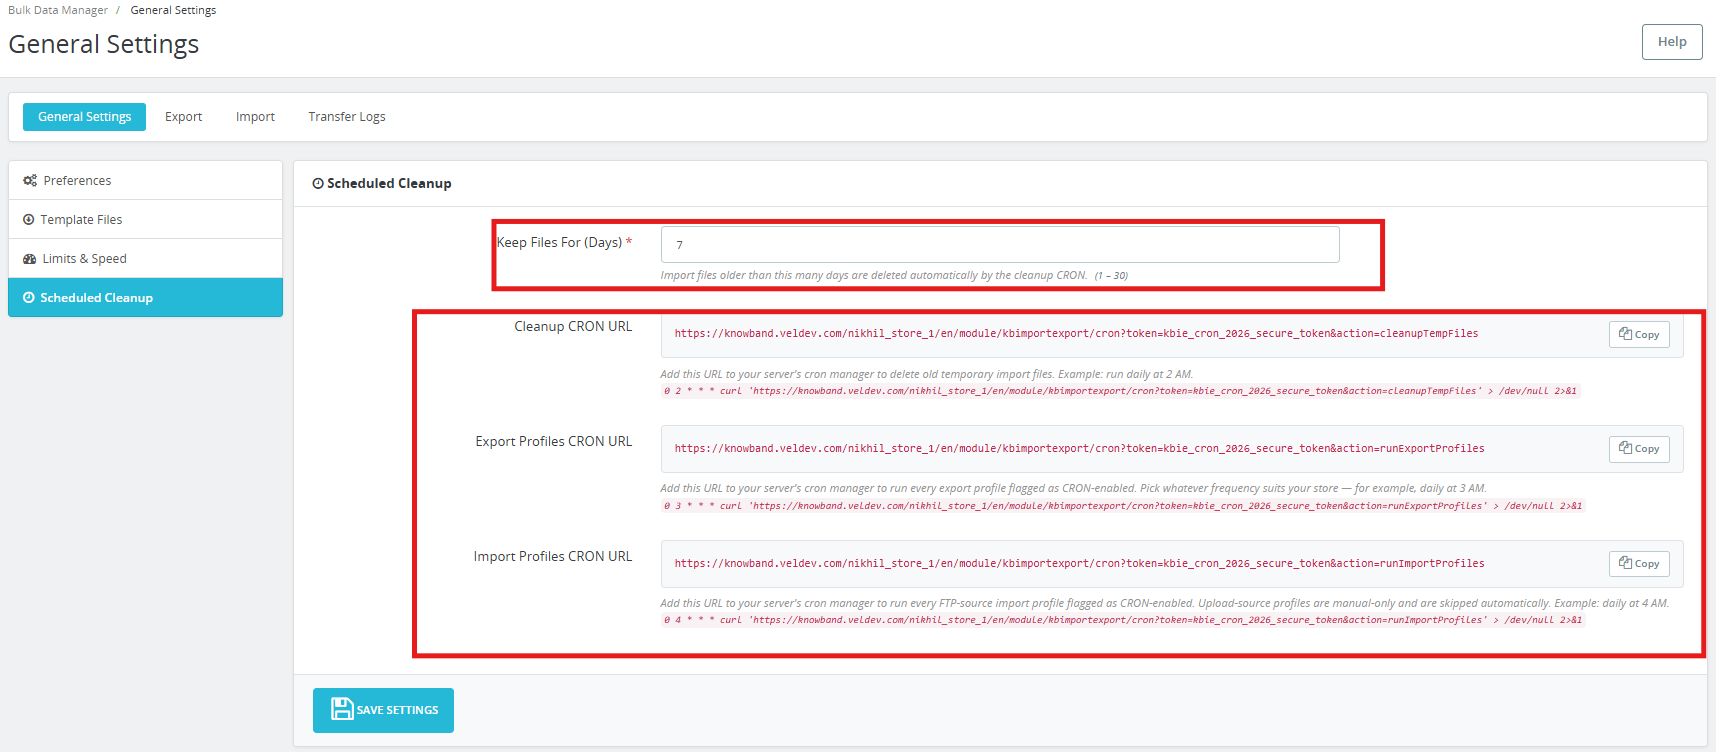
Keep Files For (Days): Import files older than this many days are deleted automatically by the cleanup CRON. Accepted range is 1 to 30. Default is 7 days.

Cleanup CRON URL: Add this URL to your server’s cron manager to delete old temporary import files automatically. Example: run daily at 2 AM.

Export Profiles CRON URL: Add this URL to your server’s cron manager to run every export profile flagged as CRON-enabled. Pick whatever frequency suits your store, for example, daily at 3 AM.

Import Profiles CRON URL: Add this URL to your server’s cron manager to run every FTP-source import profile flagged as CRON-enabled. Upload-source profiles are manual-only and are skipped automatically. Example: daily at 4 AM.

Each URL has a Copy button for one-click copying. Paste the copied URL directly into your server crontab or into PrestaShop’s built-in Scheduled Tasks module.

Click Save Settings to apply.

5.0 Export Profiles

The Export tab lists all saved export profiles and allows you to create new ones. Each profile is shown with its ID, name, entity type, format, CRON status, and date added. Profiles can be edited using the Edit button on each row.
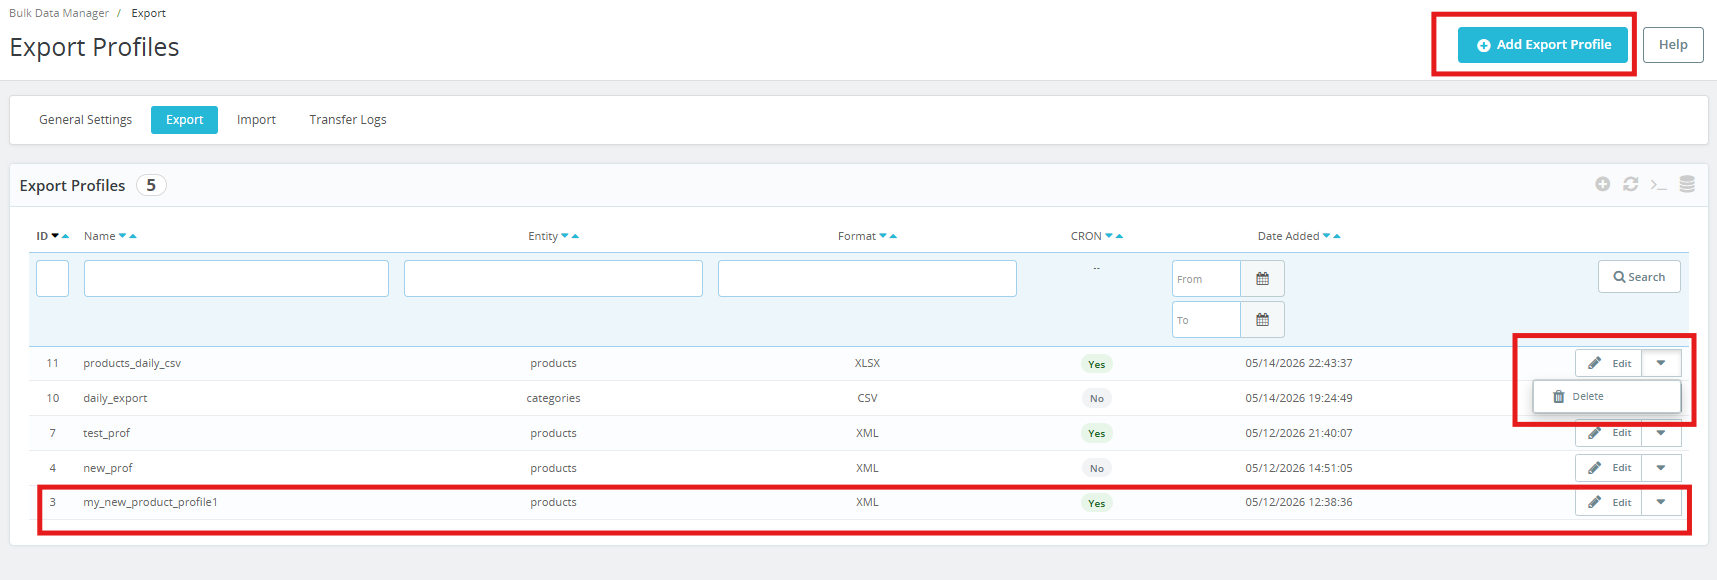
Click Add Export Profile to begin. The export wizard runs through three steps: Transfer Settings, Choose Fields, and Generate File.

5.1 Step 1 – Transfer Settings
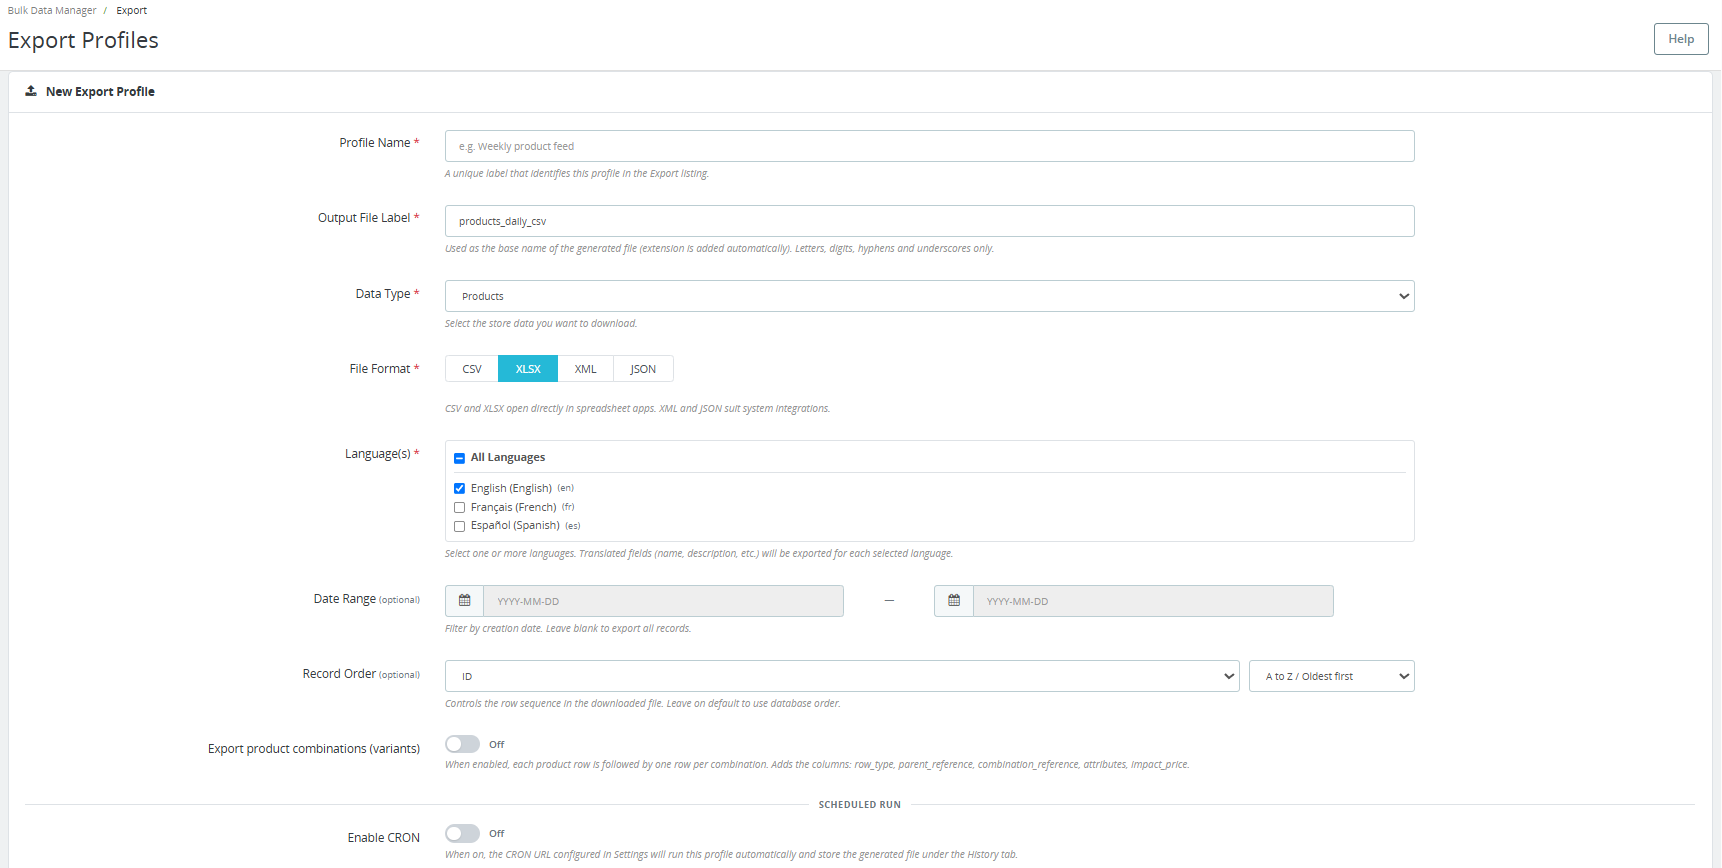
Profile Name: A unique label that identifies this profile in the Export listing. Example: Weekly product feed.

Output File Label: Used as the base name of the generated file. The file extension is added automatically. Use letters, digits, hyphens, and underscores only. Example: products-daily.

Data Type: Select the store data you want to download, Products or Categories.

File Format: Select CSV, XLSX, XML, or JSON. CSV and XLSX open directly in spreadsheet apps. XML and JSON suit system integrations.

Language(s): Select one or more store languages. Translated fields such as name and description will be exported for each selected language. Select All Languages to include every active language in the store.

Date Range (optional): Filter by creation date. Leave blank to export all records.

Record Order (optional): Controls the row sequence in the downloaded file. Leave on default to use database order.

Export product combinations (variants): When enabled, each product row is followed by a row for each combination. This adds the columns row_type, parent_reference, combination_reference, attributes, and impact_price. Enable this when you need a full product catalog, including all variants for re-import or migration.

Scheduled Run – Enable CRON: When on, the CRON URL configured in Settings will run this profile automatically and store the generated file under the Transfer Logs tab.

Export Destination – Send Generated File To:

  • File System: Saves the file locally. Admin downloads it from the Transfer Logs page.
  • FTP / SFTP: Pushes the file to a remote server after each run. A local copy is also kept for fallback download.

If FTP / SFTP is selected, the following fields appear:
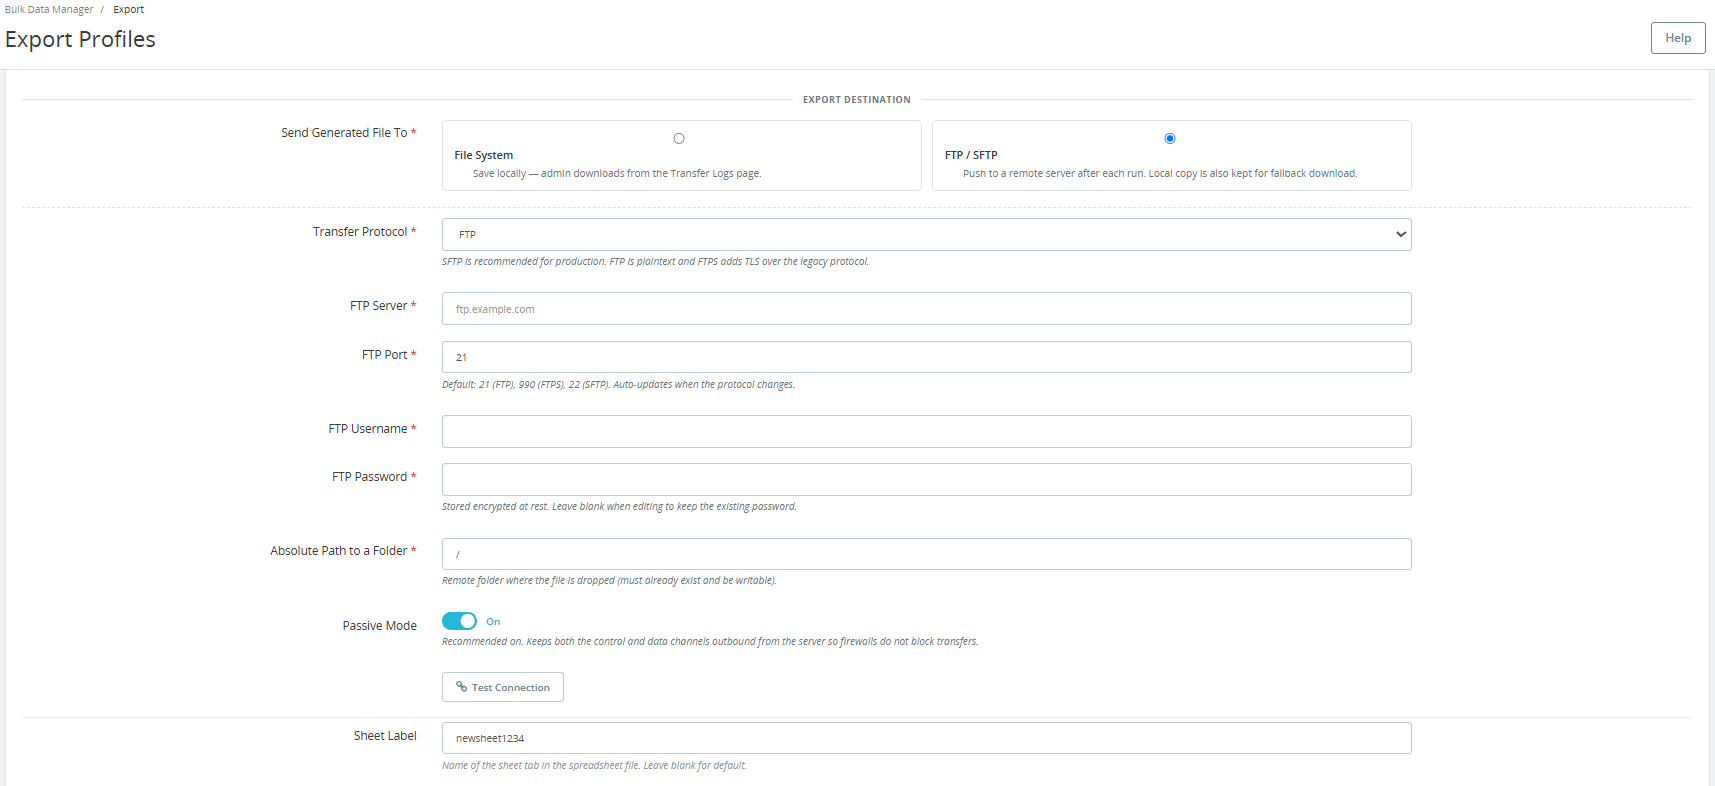
Transfer Protocol: Choose FTP, FTPS, or SFTP. FTPS is recommended for production. FTP is plaintext. FTPS adds TLS over the legacy protocol.

FTP Server: The server address, for example, ftp.example.com.

FTP Port: Default is 21 for FTP, 990 for FTPS, and 22 for SFTP. The port auto-updates when the protocol changes.

FTP Username and FTP Password: Credentials for the remote server. The password is stored encrypted at rest.

Absolute Path to a Folder: The remote folder where the file is dropped. The folder must already exist and be writable.

Passive Mode: Recommended for FTP/FTPS so firewalls do not block transfers.

Click Test Connection to verify your credentials before saving.

Output Style: Choose the CSV delimiter, Universal comma, Windows/Excel semicolon, or Tab-separated.

List Glue: Separator used for multi-value fields such as Tags and All Category Names. Options are Pipe, Slash, or Comma.

If File System is selected, you just need to add the Sheet Lable.

Narrow By (optional filters):
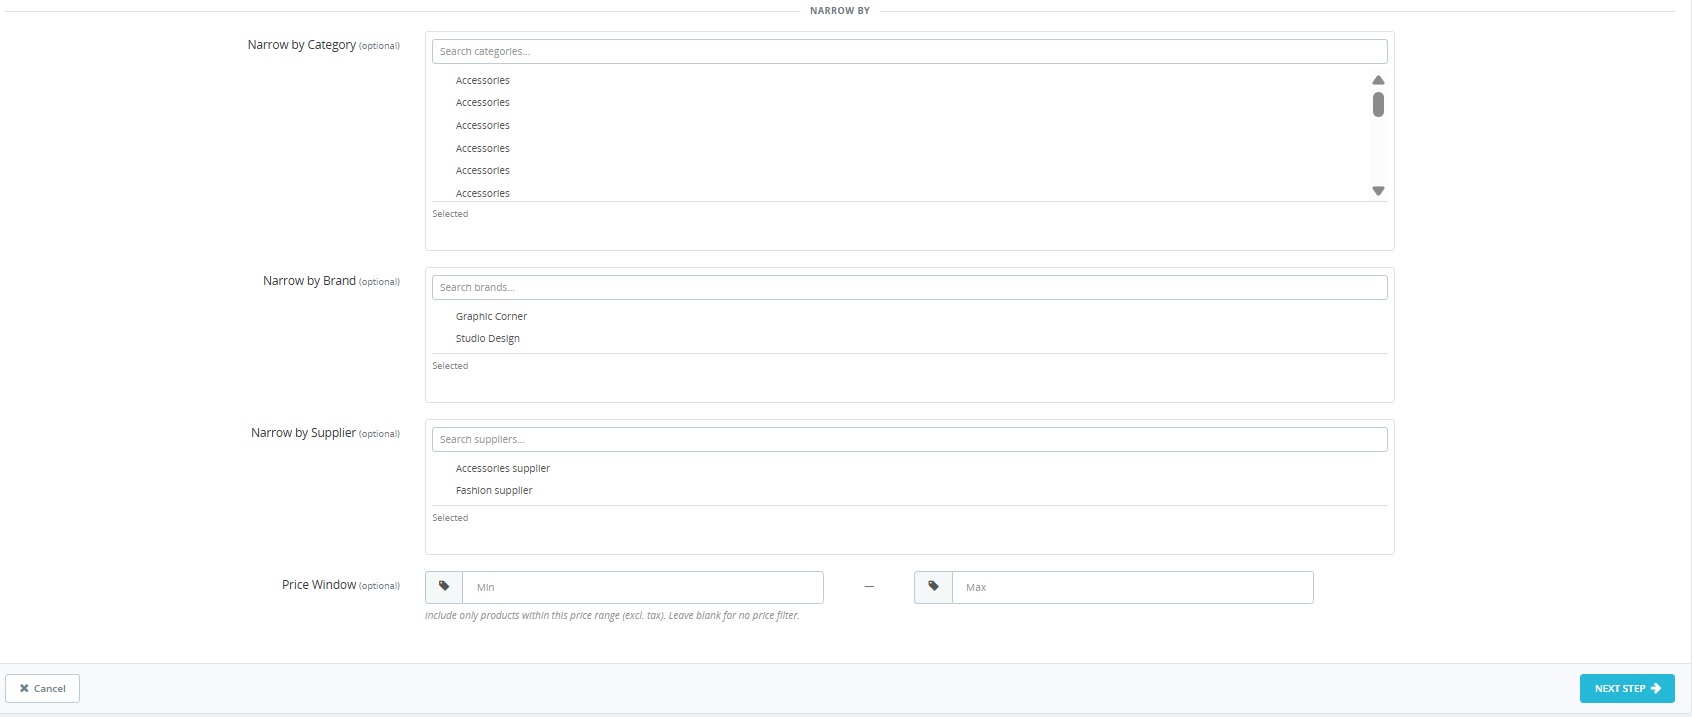
  • Narrow by Category: Limit the export to products in selected categories only.
  • Narrow by Brand: Limit the export to products from selected brands only.
  • Narrow by Supplier: Limit the export to products from selected suppliers only.
  • Price Window: Include only products within a specified price range (excluding tax). Leave blank for no price filter.

Click Next Step to proceed to field selection.

5.2 Step 2 – Choose Fields

This screen shows every available product or category column as a checklist. Required fields marked with an asterisk cannot be deselected.
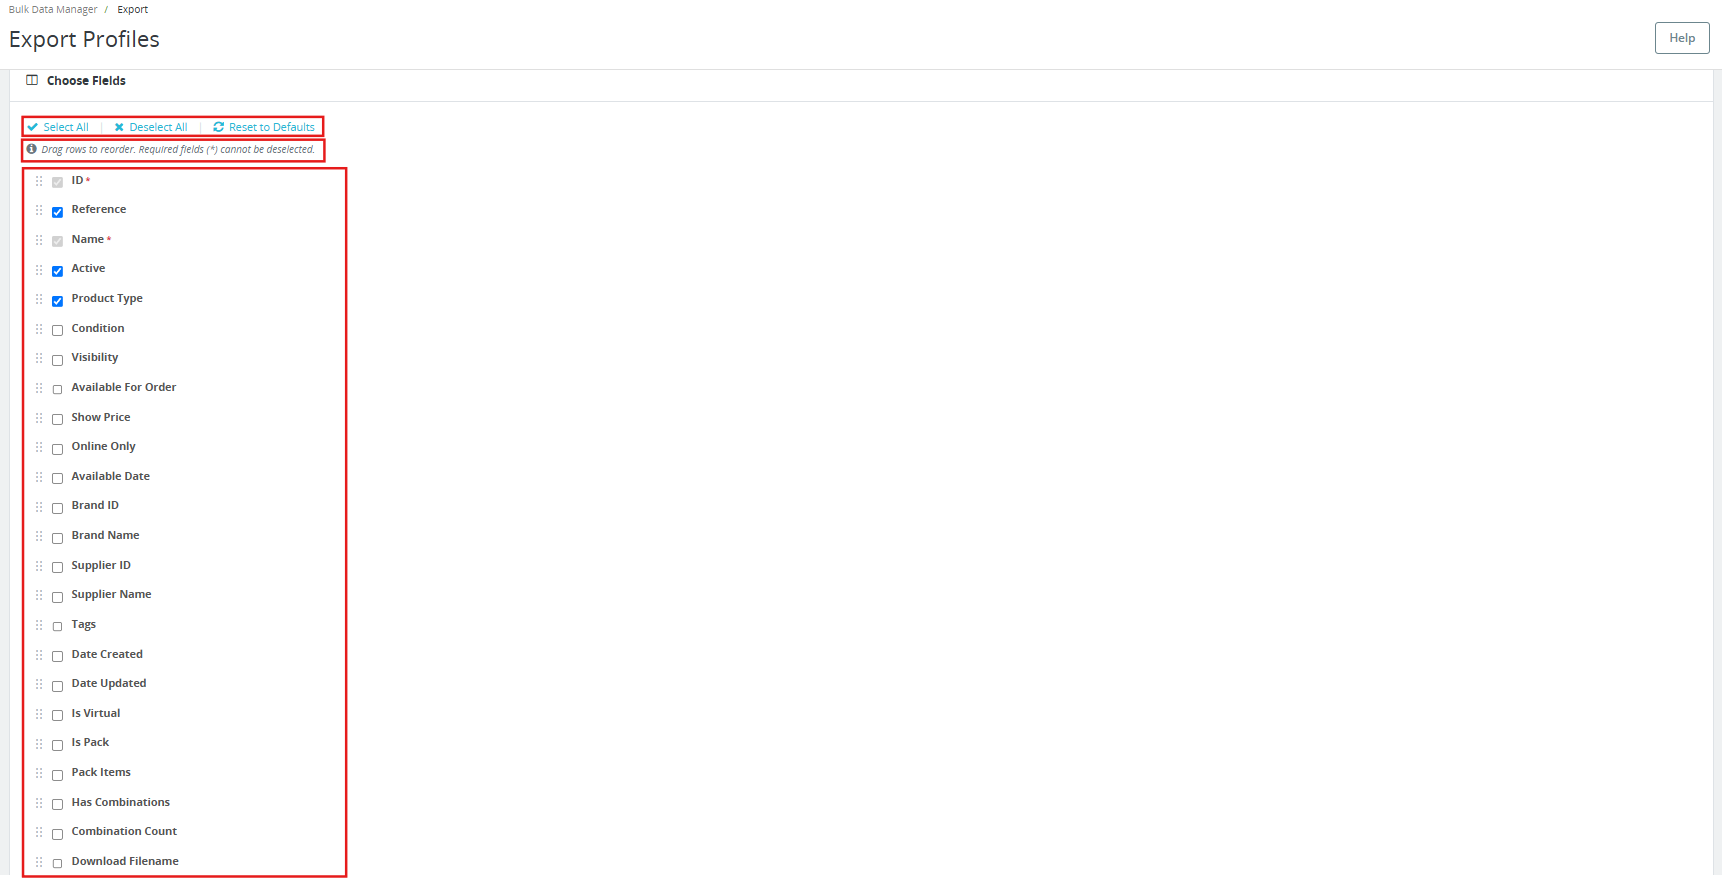
  • Click Select All to include every column.
  • Click Deselect All to clear all optional selections.
  • Click Reset to Defaults to restore the recommended default column set.
  • Drag rows to reorder the column sequence in the output file.

Available product fields include: ID, Reference, Name, Active, Product Type, Condition, Visibility, Available For Order, Show Price, Online Only, Available Date, Brand ID, Brand Name, Supplier ID, Supplier Name, Tags, Date Created, Short Description, Description, Weight, Width, Height, Depth, EAN-13, UPC, ISBN, MPN, Meta Title, Meta Description, URL Key, Cover Image URL, All Image URLs, Default Category ID, Default Category Name, All Category IDs, All Category Names, Price, Wholesale Price, Unit Price, Minimum Quantity, Low Stock Alert, Low Stock Threshold, Out of Stock Behaviour, and more.
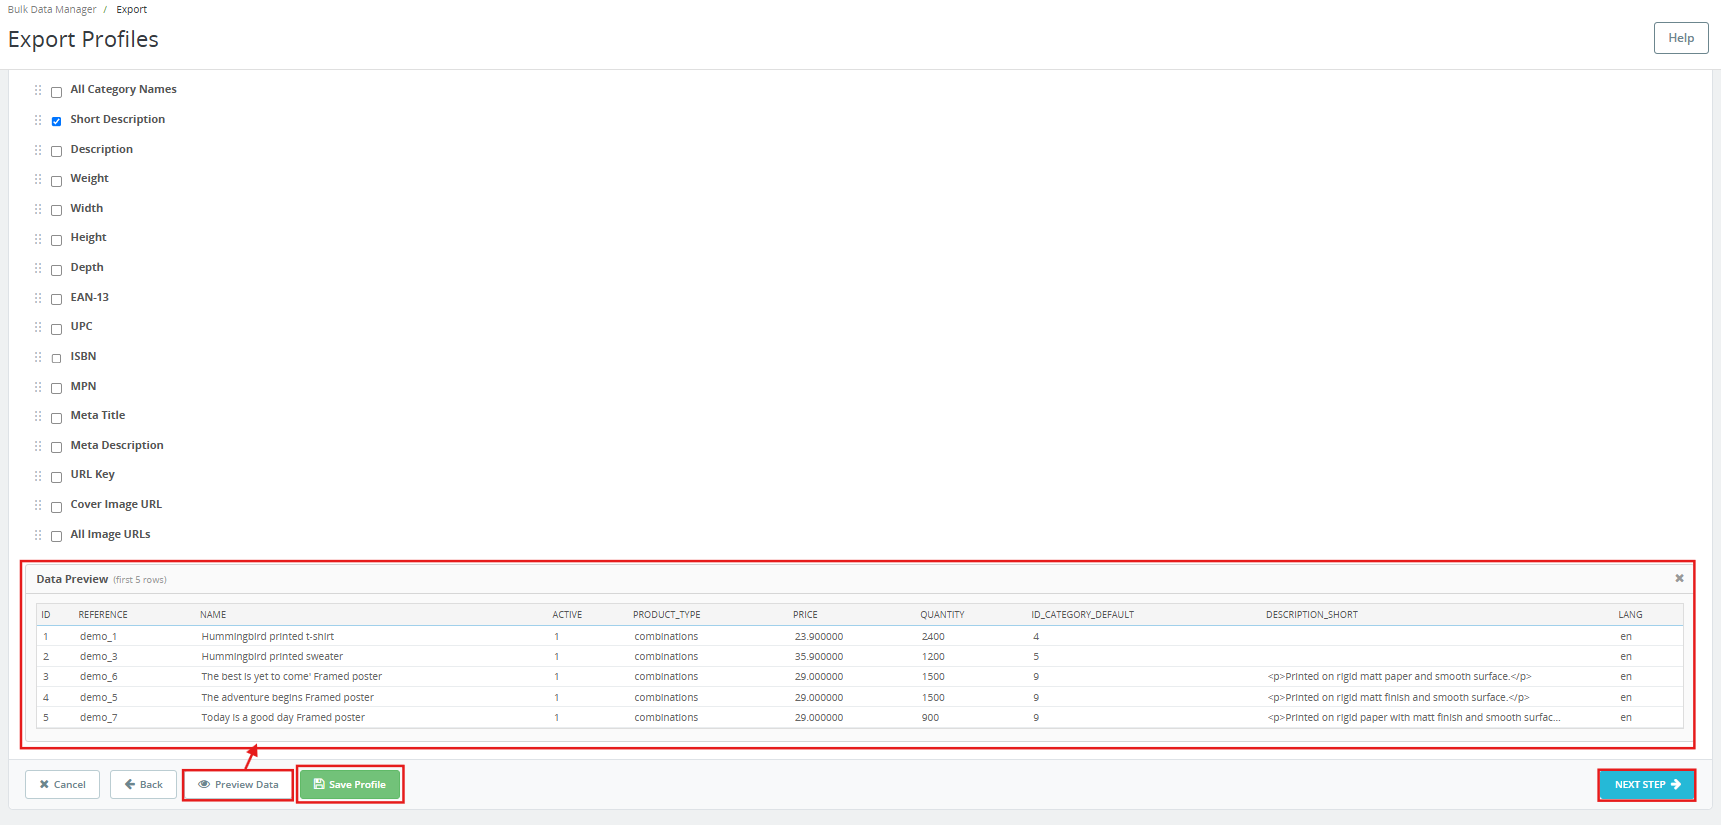
Click Preview Data to see the first five rows of the export based on your current selection. Click Save Profile to save without downloading. Click Next Step to proceed to file generation.

5.3 Step 3 – Generate File

A Download Summary panel on the right confirms your settings: Data Type, File Format, File Label, and the number of Fields selected.
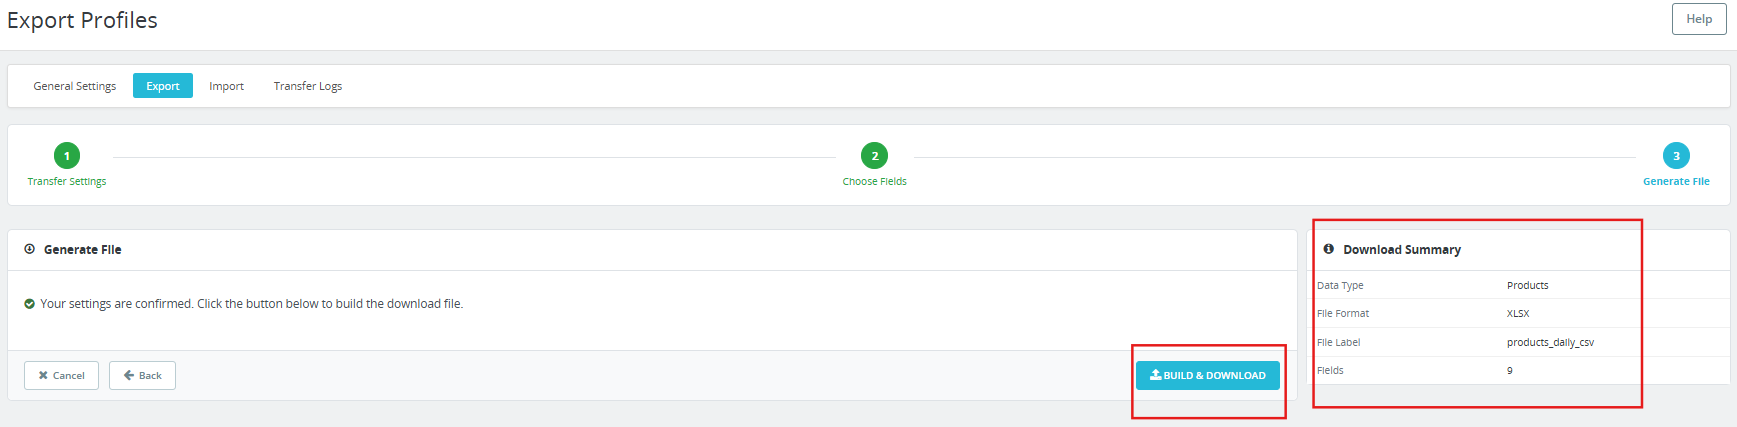
Click Build and Download to generate the export file immediately. The file is built and downloaded to your browser or pushed to the configured FTP/SFTP destination. The run is recorded in the Transfer Logs tab.

6.0 Import Profiles

The Import tab lists all saved import profiles. Each profile is shown with its ID, name, entity type, format, source type (Upload or FTP), CRON status, and date added.
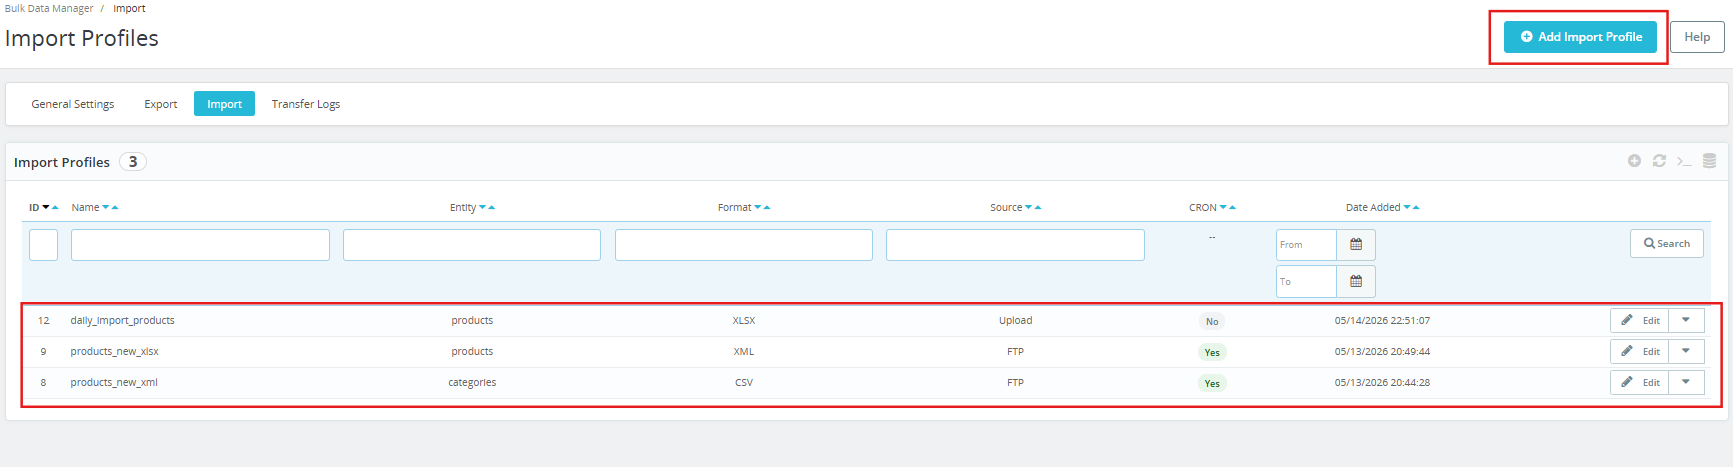
Click Add Import Profile to begin. The import wizard runs through three steps: Source Settings, Map Columns, and Run Import.

6.1 Step 1 – Source Settings
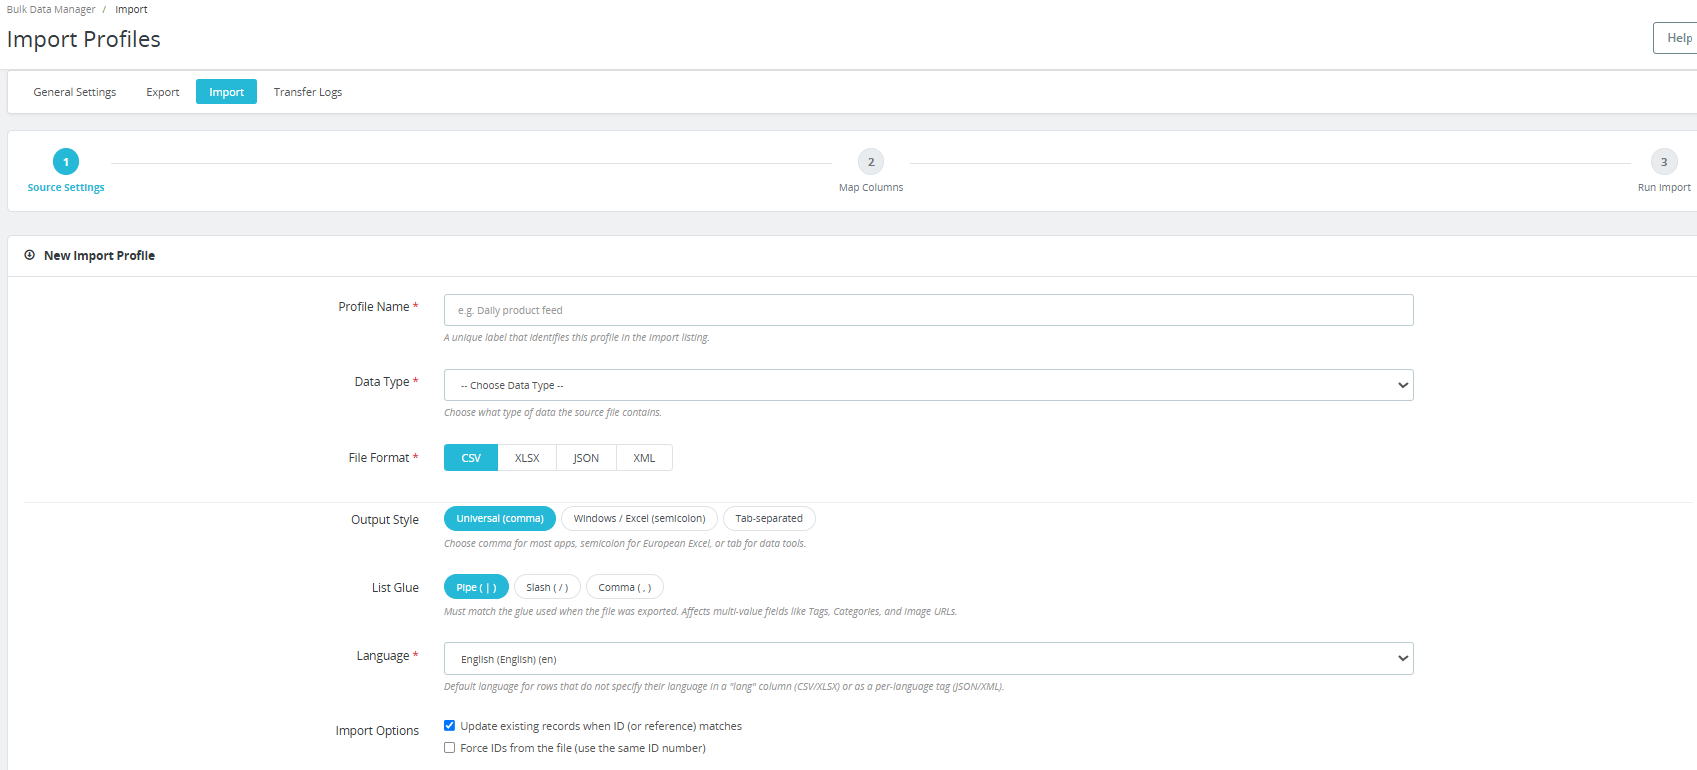
Profile Name: A unique label that identifies this profile in the Import listing. Example: Daily product feed.

Data Type: Choose what type of data the source file contains: Products or Categories.

File Format: Select CSV, XLSX, JSON, or XML.

Output Style: Choose the CSV delimiter that matches the file being imported: Universal comma, Windows/Excel semicolon, or Tab-separated.

List Glue: Must match the glue used when the file was exported. This affects multi-value fields such as Tags, Categories, and Image URLs.

Language: Default language for rows that do not specify their language in a lang column (CSV/XLSX) or as a per-language tag (JSON/XML).

Import Options:

  • Update existing records when ID (or reference) matches: When checked, the module updates an existing product instead of creating a duplicate when a matching ID or reference is found in the file. This is the standard setting for all regular updates.
  • Force IDs from the file (use the same ID number): When checked, the module assigns the exact product ID from the file to the new record. Use only when migrating between stores where preserving the original ID is required.

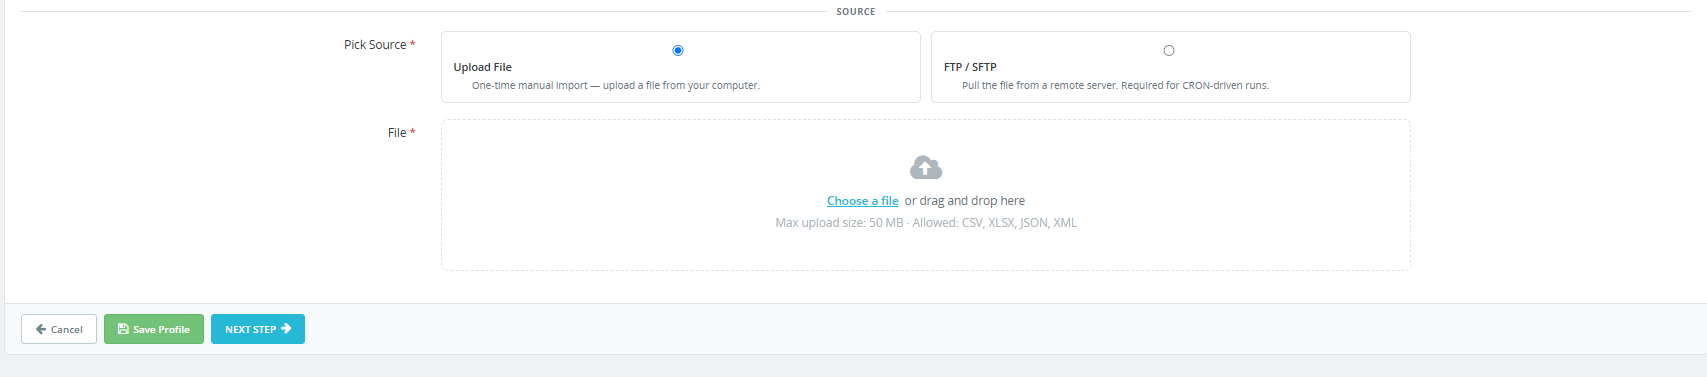
Pick Source:

  • Upload File: One-time manual import, upload a file from your computer. Max upload size is 50 MB. Allowed formats: CSV, XLSX, JSON, XML.
  • FTP / SFTP: Pull the file from a remote server. This option is required for CRON-driven automated runs.

If FTP / SFTP is selected, the following fields appear:
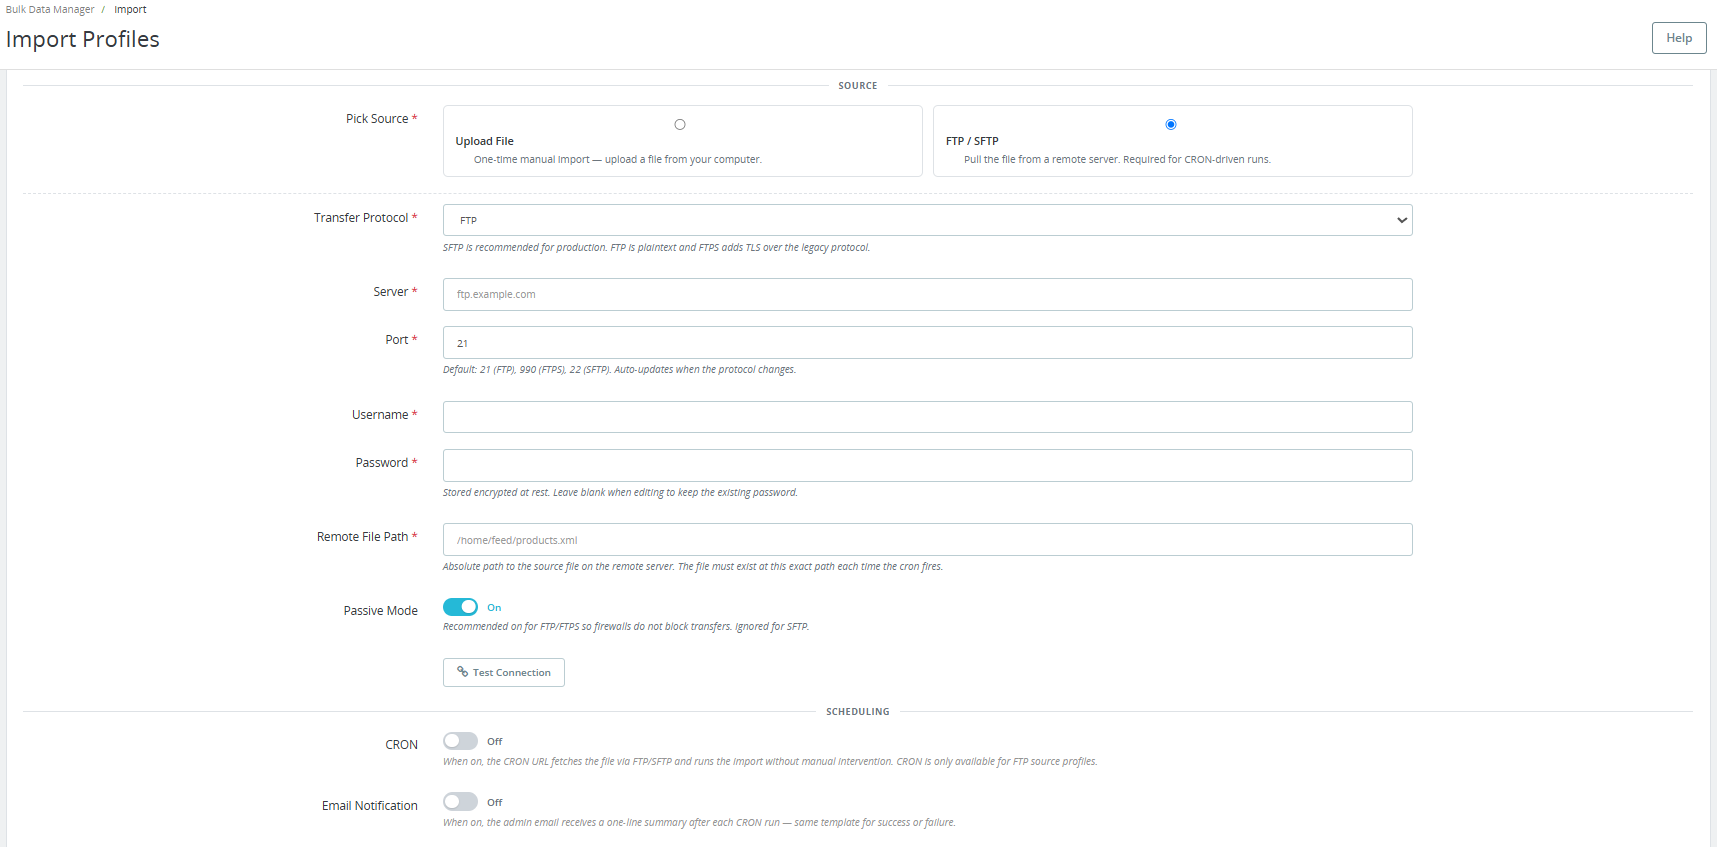
Transfer Protocol: FTP, FTPS, or SFTP.

Server: The FTP server address.

Port: Default is 21 (FTP), 990 (FTPS), 22 (SFTP). Auto-updates when the protocol changes.

Username and Password: Credentials for the remote server. Password is stored encrypted at rest.

Remote File Path: Absolute path to the source file on the remote server. The file must exist at this exact path each time the cron fires. Example: /home/feed/products.xml.

Passive Mode: Recommended for FTP/FTPS so firewalls do not block transfers. Ignored for SFTP.

Click Test Connection to verify your FTP/SFTP credentials before saving.

Scheduling:

CRON: When on, the CRON URL in Settings fetches the file via FTP/SFTP and runs the import without manual intervention. CRON is only available for FTP source profiles.

Email Notification: When on, the admin email receives a one-line summary after each CRON run, the same template for success or failure.

Click Save Profile to save your settings, then click Next Step to proceed to column mapping.

If Upload File is selected, you just need to upload the file from your device.
6.2 Step 2 – Map Columns

This screen shows the column mapping interface.
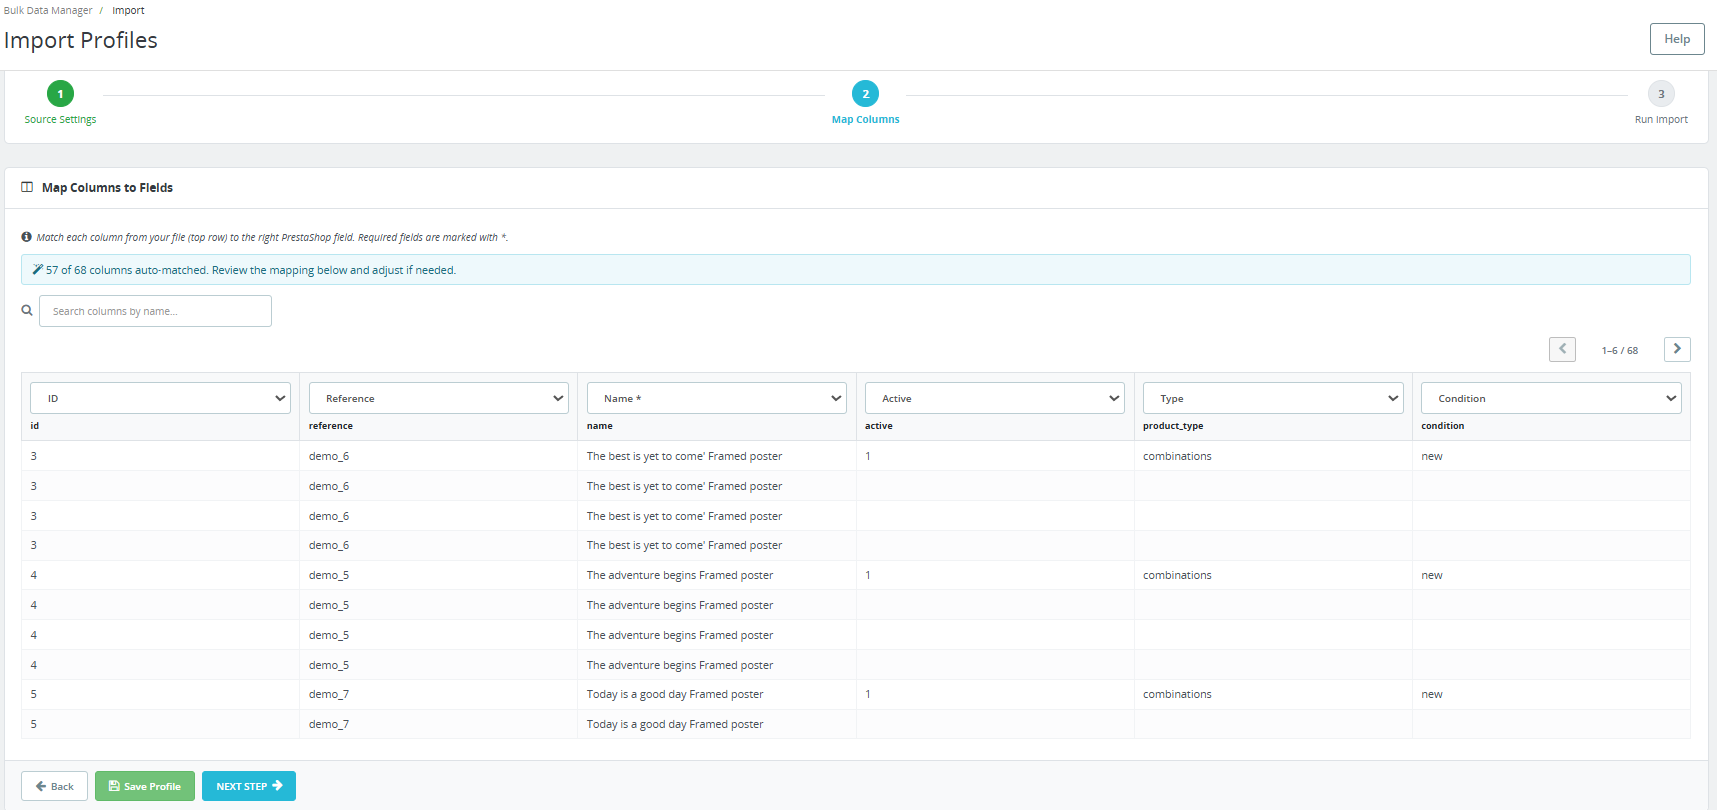
The instruction at the top reads: Match each column from your file (top row) to the right PrestaShop field. Required fields are marked with an asterisk.

The module auto-matches columns wherever possible. A confirmation message at the top shows how many columns were auto-matched, for example: 47 of 47 columns auto-matched. Review the mapping below and adjust if needed.

Each column from your import file appears as a dropdown at the top of its column. The rows below show the actual data values from your file for visual verification. Use the search box to find a specific column by name. Navigate through all columns using the pagination arrows (for example, 1-6 / 47).

Assign each column header from your file to the correct PrestaShop field using the dropdown. Leave columns set to the auto-matched field if the mapping is correct. If a required field is not mapped, the module blocks the import and shows a warning before proceeding.

Click Save Profile to save the mapping. Click Next Step to proceed to the final step.

6.3 Step 3 – Run Import

The confirmation message reads: Mapping confirmed. Click below to start importing your data.
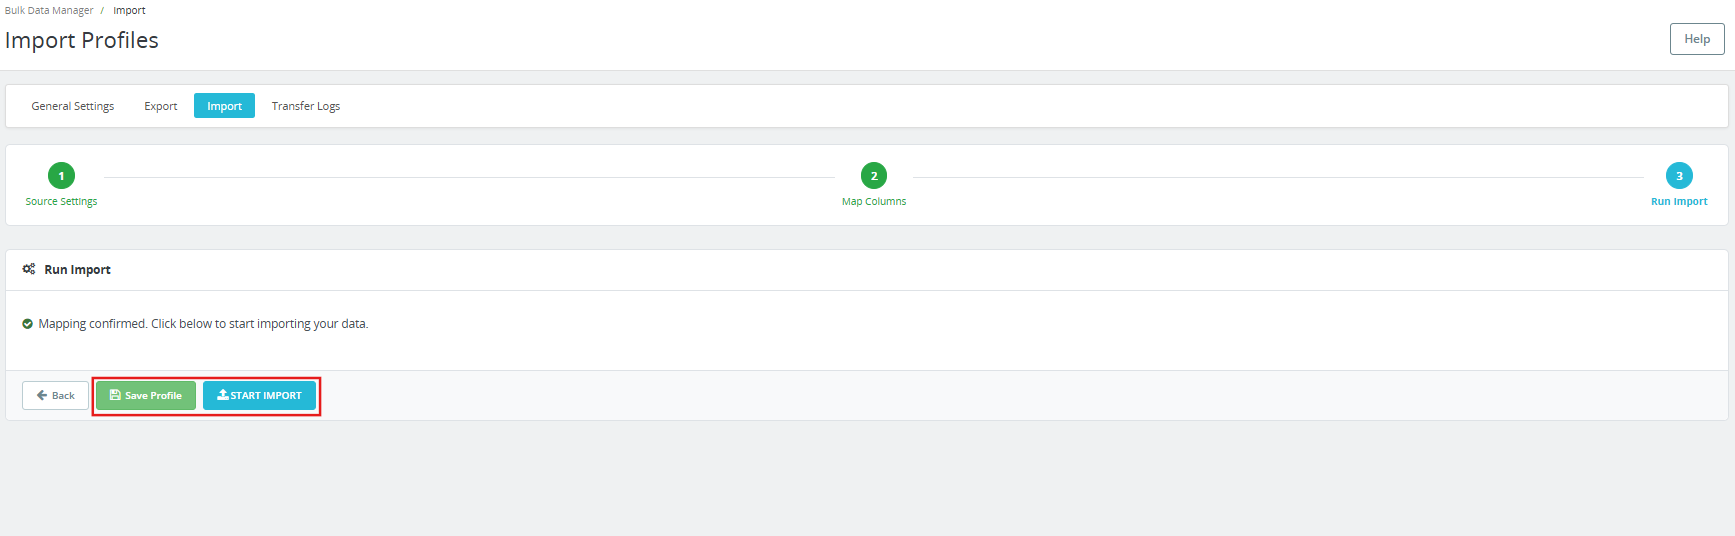
Click Save Profile to store the profile for future use without running the import now.

Click Start Import to begin. The import runs in batches as configured in General Settings. When complete, the Transfer Logs tab records the result, including total records, successful records, and any failed records with row-level error detail.

7.0 Transfer Logs

The Transfer Logs tab shows the full history of every import and export run through the PrestaShop Product Import Export Scheduler Pro. The tab heading in the module is Transfer History.
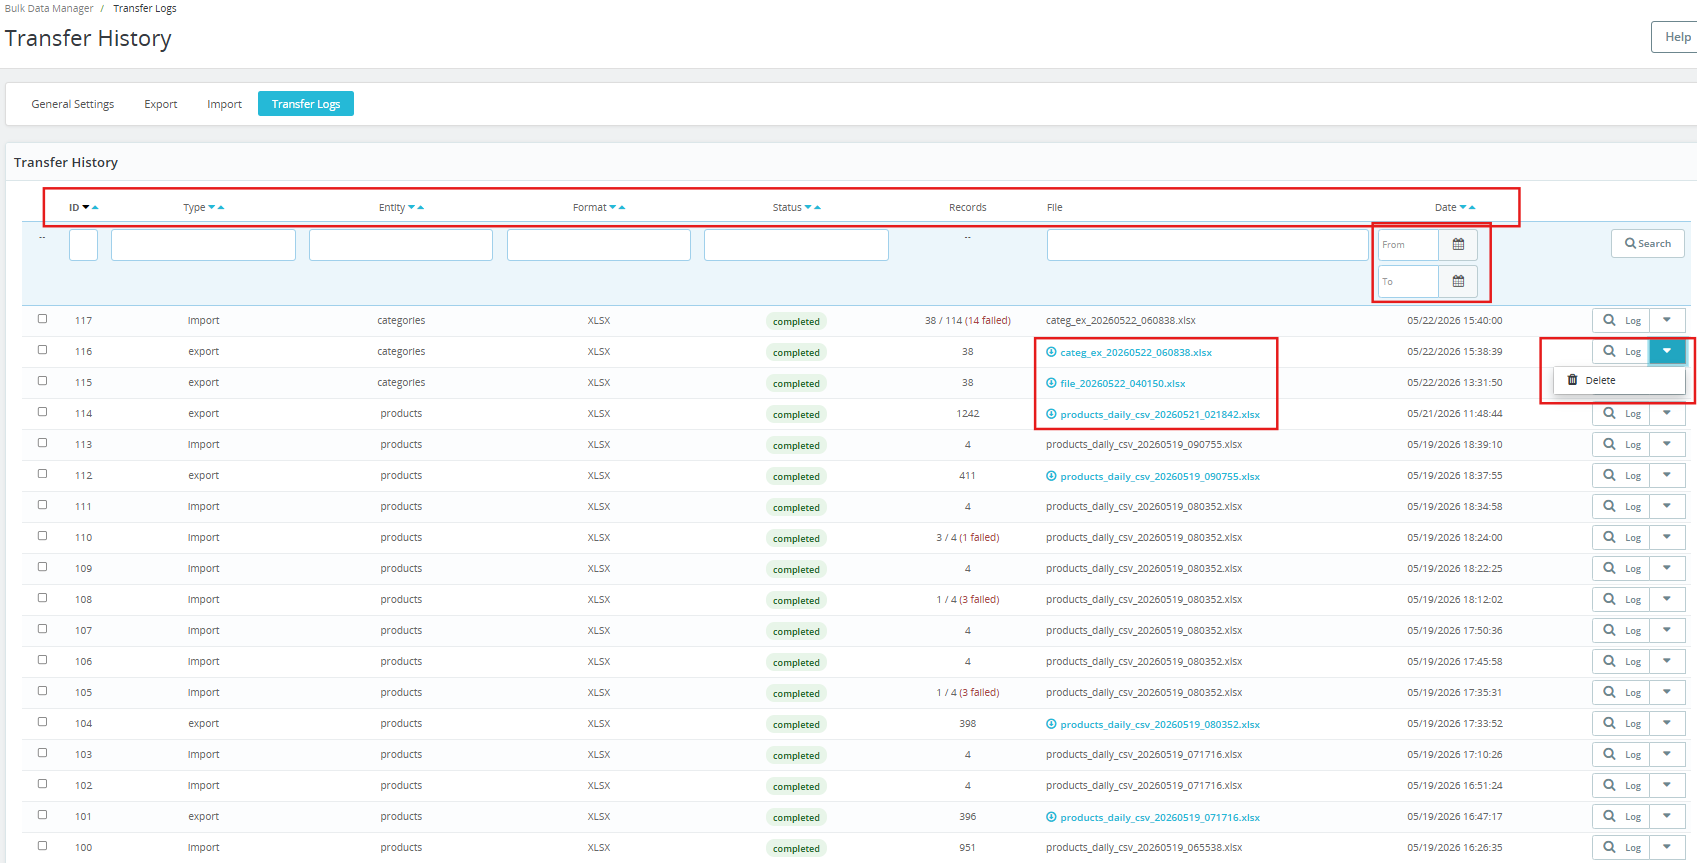
Each row in the log shows:

  • ID: The run identifier.
  • Type: Import or Export.
  • Entity: Products or Categories.
  • Format: CSV, XLSX, JSON, or XML.
  • Status: Completed, completed with failures, or failed. Partial runs show the record count as X / Y (Z failed) in red.
  • Records: Total records processed. For partial failures, the count shows how many succeeded and how many failed.
  • File: The filename of the generated or imported file. For export runs, the filename is a clickable link to re-download the file directly.
  • Date: The date and time the run completed.

Click Log on any row to view the full details of that run, including row-level error messages for any failed records. Fix only the affected rows in the source file and re-import those rows. The rest of the catalog remains untouched.

Additionally, exported files can be re-downloaded from the Transfer Logs section. In the File column, click the export file link to download it again. The files remain available for re-download until they are removed by the Scheduled Cleanup cron after the configured retention period.

8.0 Frequently Asked Questions

Question: What is the PrestaShop Product Import Export Scheduler Pro?

Answer: PrestaShop Bulk Product Import Export Module lets merchants import and export products and categories using CSV, XLSX, JSON, and XML files. It includes reusable profiles, column mapping with validation, FTP and SFTP file transfer, cron-based scheduling, email notifications, and transfer logs, all managed from the PrestaShop admin panel. Compatible with PrestaShop 1.7 through 9.x.

Question: How do I import products in PrestaShop using a CSV file?

Answer: Go to the Import tab and click Add Import Profile. Set the data type to Products, select CSV as the file format, upload your CSV file under Pick Source, and click Next Step. On the Map Columns screen, the module auto-matches columns where possible, reviews the mapping, adjusts if needed, and clicks Next Step. Click Start Import to run. Sample CSV templates are available from the Template Files section in General Settings.

Question: Can I import and export PrestaShop product combinations?

Answer: Yes. You can export the combination of the product variants by enabling Export Product Combinations (Variants) in the export profile Transfer Settings. Each product row is followed by one row per combination with attributes in a human-readable format. On re-import, the module creates missing attribute values and groups automatically. Full round-trip combination handling is supported, export from one store and import to another, cleanly.

Question: How do I automate PrestaShop product imports using cron jobs?

Answer: Create an import profile with FTP or SFTP as the source, enable CRON in the Scheduling section, and save the profile. Go to General Settings, then Scheduled Cleanup, and copy the Import Profiles CRON URL. Paste it into your server crontab or PrestaShop’s Scheduled Tasks module and set the interval. The profile runs automatically at every tick without any manual involvement.

Question: How do I migrate products from one PrestaShop store to another?

Answer: You can migrate a product from one prestashop store to another using the Knowband Prestashop Export/Import Scheduler Pro. Using import feature you can import all the prestashop product and categories in CSV, JSON, XML or XLSX format.

Question: What happens if an import fails or has errors?

Answer: The PrestaShop Catalog Manager does not fail silently. Every run creates a record in the Transfer Logs tab. Partial failures show the record count as X / Y with the number failed highlighted. Click the Log button on any row to see row-level error detail. Fix the affected rows in the source file and re-import only those rows. A completion email is sent for scheduled CRON runs, so the admin is notified without logging in.

Question: Is this compatible with the latest PrestaShop version?

Answer: Yes. The PrestaShop Product Import Export Scheduler Pro is compatible with PrestaShop 1.7. x through 9.x. Refer to the module product page for the latest compatibility information.

9.0 Conclusion

The PrestaShop Product Import Export Scheduler Pro by Knowband is a complete solution for catalog data management in PrestaShop. Four file formats, reusable profiles, FTP & SFTP with connection testing, full combination round-trip support, multi-language preservation, column mapping validation, row-level error logs, dated backup history, and automatic file cleanup, all from one PrestaShop Import Export Module, all from the admin panel, with no developer required.

For support, custom requirements, or PrestaShop addon development services, contact the Knowband team directly.


Get the PrestaShop Product Import Export Scheduler Pro and start running automated catalog transfers from day one.
PrestaShop LLMs TXT Generator Addon: User Manual

The PrestaShop LLMs TXT Generator is a must-have plugin designed to generate the llms.txt file for your store. This file contains structured information related to the store catalogue, including products, categories, and CMS pages.

Nowadays, you see customers first ask the query on AI platforms like ChatGPT, Gemini, and many more. People have become dependent on the AI even for the smallest things. So what if ChatGPT starts recommending your products to customers? Is it amazing, right? Therefore, Knowband has designed this Prestashop LLMs TXT Generator, which helps the AI platforms to recommend your products.

The generated llms.txt file from the Knowband Prestashop llms.txt generators helps AI crawlers and AI answer engines to access store content in an organised manner. By placing this llms.txt file on the server, the store expands with modern AI search and product recommendation AI Models such as ChatGPT, DeepSeek, Gemini, Perplexity, and Claude.

Using this AI product recommendation module for PrestaShop helps improve AI product discovery, supports accurate AI-generated responses, and ensures that store content can be correctly identified and referenced when users search for product- or store-related information on AI-driven search platforms.

1.0.0 Highlighted Key Features of Prestashop LLMs TXT Generator Addon

Support for Advanced AI Model Bots

This PrestaShop module supports access for multiple advanced AI crawler bots used by modern AI answer engines and generative AI search platforms. 

These supported bots include:

  • DeepSeekBot
  • GPTBot
  • Anthropic AI
  • PerplexityBot
  • Google-Extended

Supporting these AI bots helps ensure compatibility with AI product discovery and ChatGPT product recommendations to customers.

AI Crawler Access Control

The Knowband PrestaShop LLMs TXT Generator module allows administrators to manage which AI crawlers can access store content through the llms.txt file.

Customisation of llms.TXT files

The PrestaShop LLMs TXT file generator by Knowband allows admins to add additional content to the llms.txt file.

Customisation options are available in PrestaShop LLMs TXT file generator Addon for store descriptions, products llms.txt files, category product llms.txt files, CMS llms.txt files and many more.

Access Control for Content Pages

This Knowband PrestaShop LLMs TXT Generator for AI search engines allows admins to select which content pages should be included in the llms.txt file, such as product pages, category pages and CMS pages.

This feature in LLMs TXT Generator for prestashop ensures that AI engines answer accurately and do not disclose any other content except the selected one. 

Product Recommendations Compatibility

The PrestaShop LLMs TXT Generator  Addon is designed to develop evolving AI search and AI product recommendations of the ecommerce stores. By creating a structured llms.txt file with additional content and instructions, your content remains synchronised with next-generation AI answer engines like ChatGPT and recommendation platforms.

Content Filtering

The Knowband PrestaShop LLMs TXT File Generator for products allows store admins to filter and select specific products, categories, and CMS pages in the llms.txt file.

This content filtering feature provides full control over which data you can allow to access for Prestashop AI product discovery, AI crawler indexing, and generative AI search by ChatGPT.

2.0.0 Installation Guide for Knowband PrestaShop LLMs TXT Generator Module

Step 1: Purchase and download the Knowband Prestashop LLMs TXT Generator Module.

After the completion of the purchase, you’ll receive the  kbllmstxtgenerator.zip file. 

Step 2: Click on Module on your prestashop back office left menu, go to module manager, then you will see the click option. Click on the Upload.

Step 3: Upload and Install the Module. After the complete installation, you have to click on the configuration, and then you will be directed to the configuration page.

Step 4: Now you are ready to configure the LLMs.TXT module.

3.0.0 Backend/Admin Panel of Prestashop Product Recommendation by ChatGPT Module

3.1 General Settings

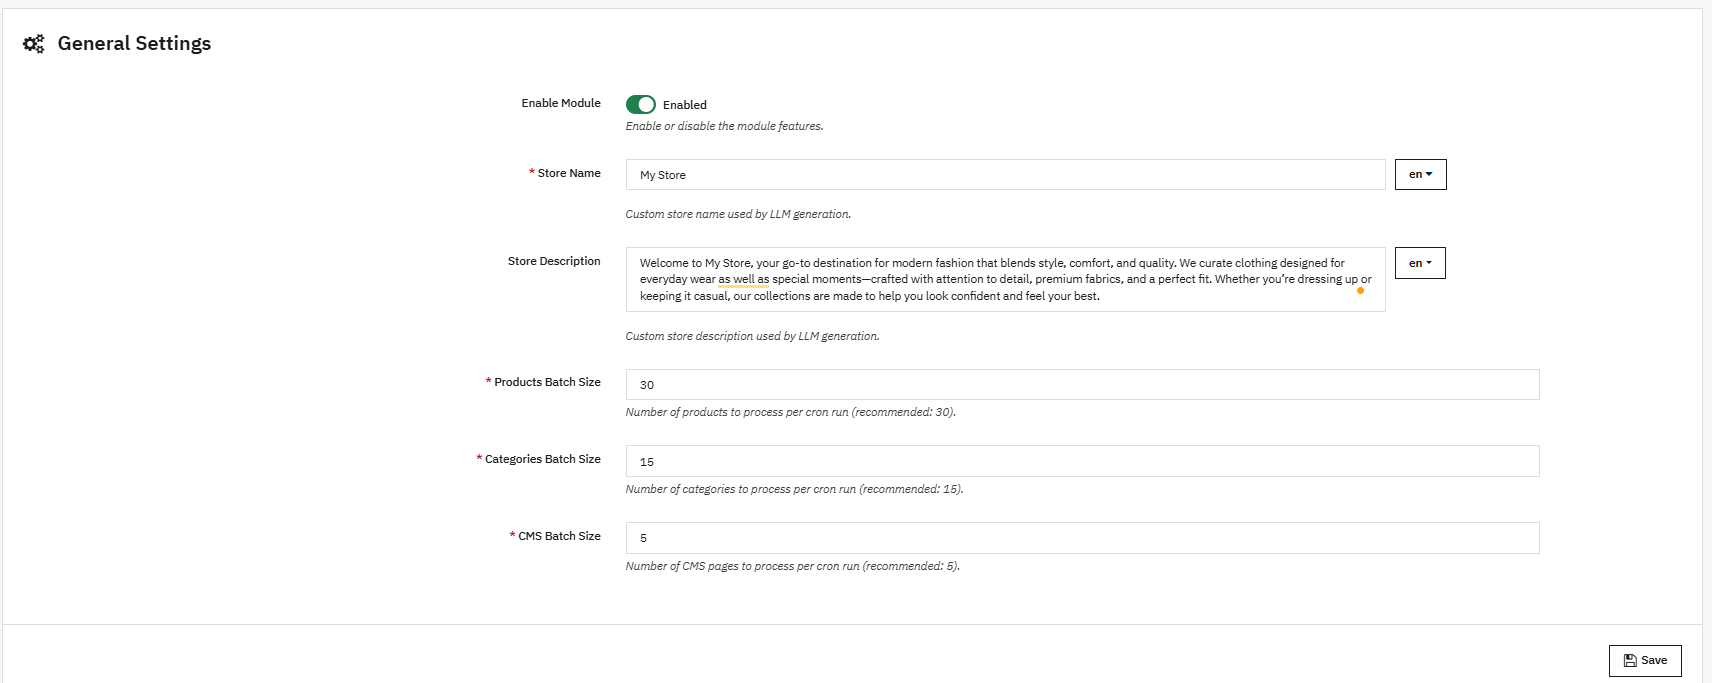
  1. Enable/Disable Module:
    This option in the llms.txt file generator for AI is used to enable or disable the functionality of the PrestaShop LLMs.txt Generator module.
  2. Store Name:
    Store admins enter their store name in this field. This Prestashop LLMs.TXT Generator module also supports the languages that are added in the store.
  3. Store Description:
    This field is used to add the store description to the llms.txt file generated by the module. Furthermore, it helps to describe the store and its catalogue based on the provided content.
  4. Product Batch Size:
    This field in the Prestashop LLMs txt File Generator Addon allows you to define how many products are processed per batch during cron execution. By default, 30 products are processed in one batch.
  5. Category Batch Size:
    This field of category batch size allows the cron to process a specified number of categories per batch.
  6. CMS Batch Size:
    This field allows the cron to process CMS pages per batch. By default, 5 CMS pages are processed in one batch during cron execution in the module.
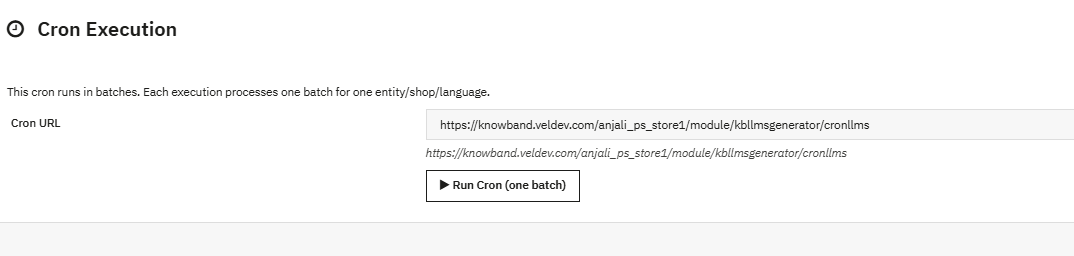
  7. Cron Execution (Batch Processing): This cron job in Prestashop LLMs TXT generator runs in batches. Each execution processes one batch only, for products, categories and CMS pages. After updating settings like general settings, content filtering and customisation of files, running the cron is necessary to reflect any changes.

3.2 Crawlers Setting

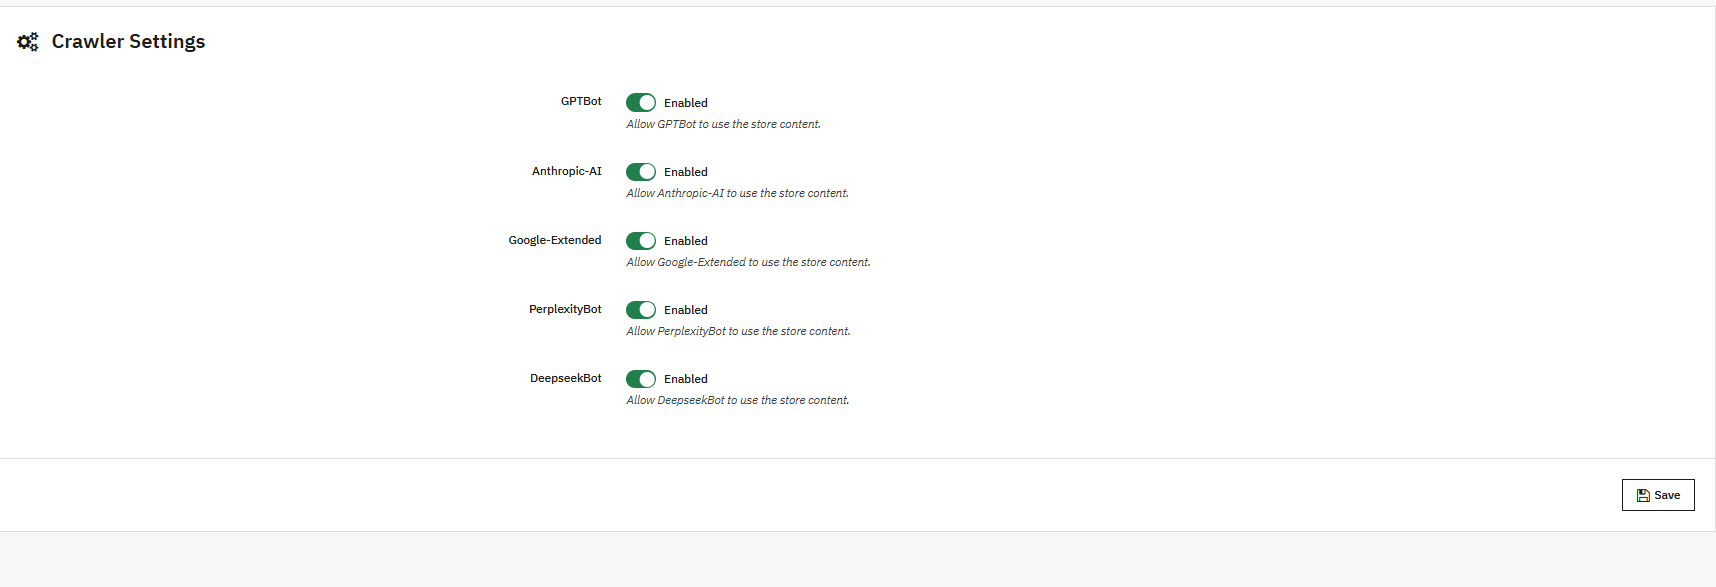
This crawler setting in Prestashop LLMS TXT Generator allows the store owners to manage the AI model’s bots like GPTbot, Google Extended Gemini Bot, DeepSeek and many more

GPTBot: AI Crawler of OpenAI ChatGPT, collects the data to train the ChatGPT AI Models. You can allow or disallow this using the 

DeepseekBot: AI crawler bot of deepseek which gathers public web data of the store to train and refine DeepSeek’s large language models

Google-Extended: This Google’s AI-specific crawler (separate from Googlebot) allows the collection of content specifically for training Google’s AI models (like Gemini),

PerplexityBot: This web crawler of perplexity AI is used to fetch up-to-date web content to generate cited answers and summaries

Anthropic-AI: Lastly, this web crawler of Anthropic is used to collect public web data to train and improve Claude AI models. You can enable or disallow all the AI Crawler bots. 

3.3 Content Filtering in Prestashop LLMs.txt Generator for AI Tools

The Content Filtering feature allows store admins to control which store content is included in the generated llms.txt file. Furthermore, this helps ensure that only relevant and intended information is processed and shared, while unnecessary or sensitive content can not be exposed.

1. Shop Context

This option in the Prestashop LLM.txt Generator allows you to select the specific shop when you have multiple stores.

If your prestashop store includes multiple shops, you can generate the llms.txt file for a single shop or apply the settings individually to each shop. LLMs TXT files will be generated for each store separately.

2. Product Details

The Product Details content filtering option allows you to control which products are included.

Moreover, store owners can select all products or select specific products for the llms.txt files for the product.

If you want to limit the llms.txt file to featured products, active products, or selected products, while excluding extra items

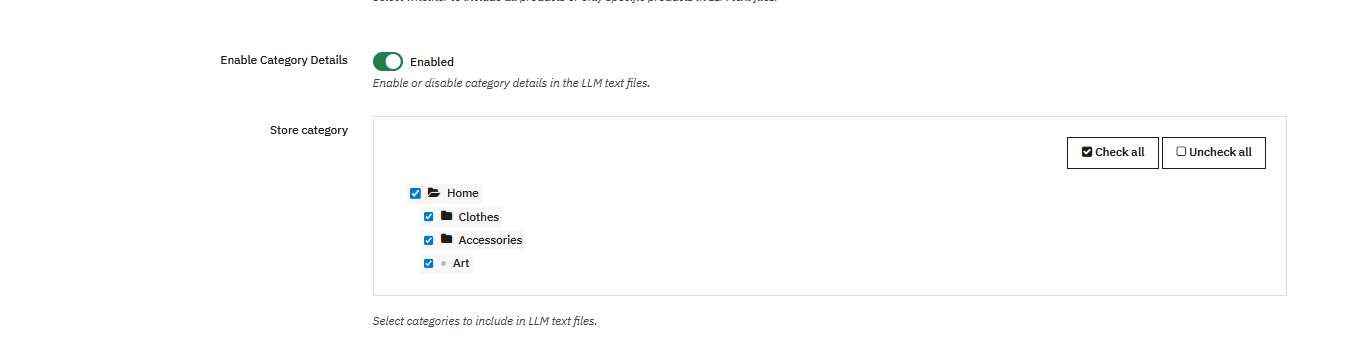
3. Category Details

The Category content filtering options allow you to manage category-level items.

This furthermore helps maintain a clean and organised structure by including only relevant categories and excluding the inactive ones.

4. CMS Pages

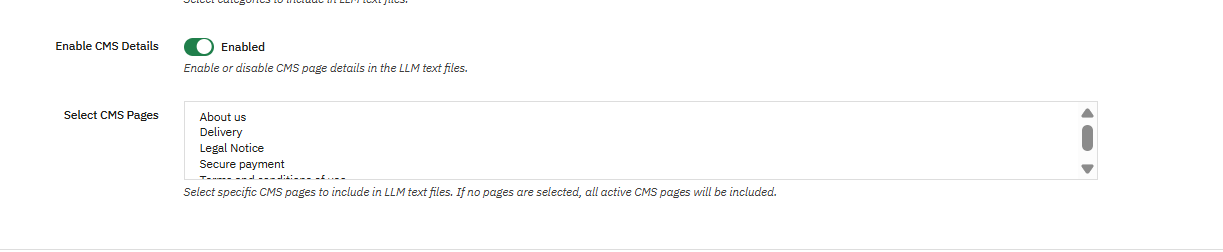
The CMS Pages option allows you to control which CMS content should be included in cms llms.txt file. Furthermore, you can select the pages depending on your needs to avoid the exposure of other CMS pages.

Hence, this feature of Prestashop LLMs.TXT Generator is useful for excluding internal or temporary CMS pages of your store while keeping essential store information available.

4.0 Customisation of Prestashop llms.txt Generator Addon

Customization

The customisation options in the PrestaShop LLMs TXT Generator allow you to add additional content in the llms.txt files. These options help the store add category, product, and CMS data with internal notes or information so it can be clearly understood by crawler bots.

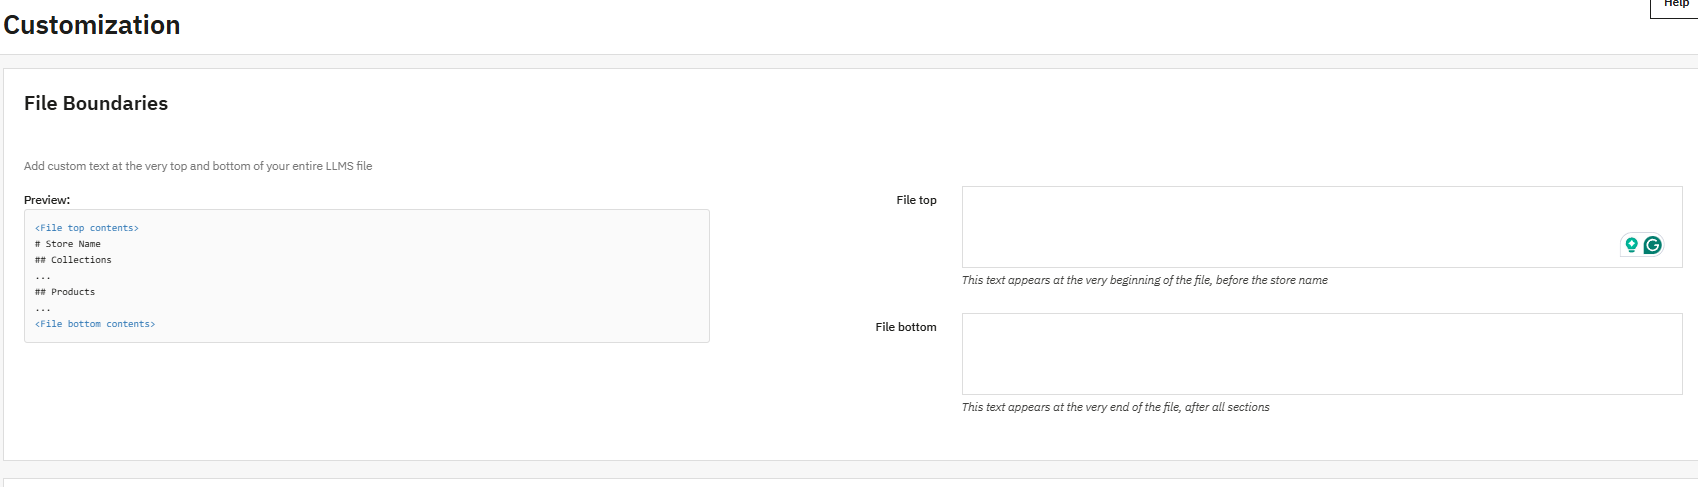
4.0.1 File Boundaries Customisations

The File Boundaries feature allows you to add custom text at specific locations, like top and bottom, in the llms.txt file. Moreover, this makes it possible to include additional notes or instructions without modifying core store data. This gives a clear idea to the bots to understand the structure of the file.

These fields are commonly used to add general instructions or notes that should be read first or last by crawlers and answer engines.

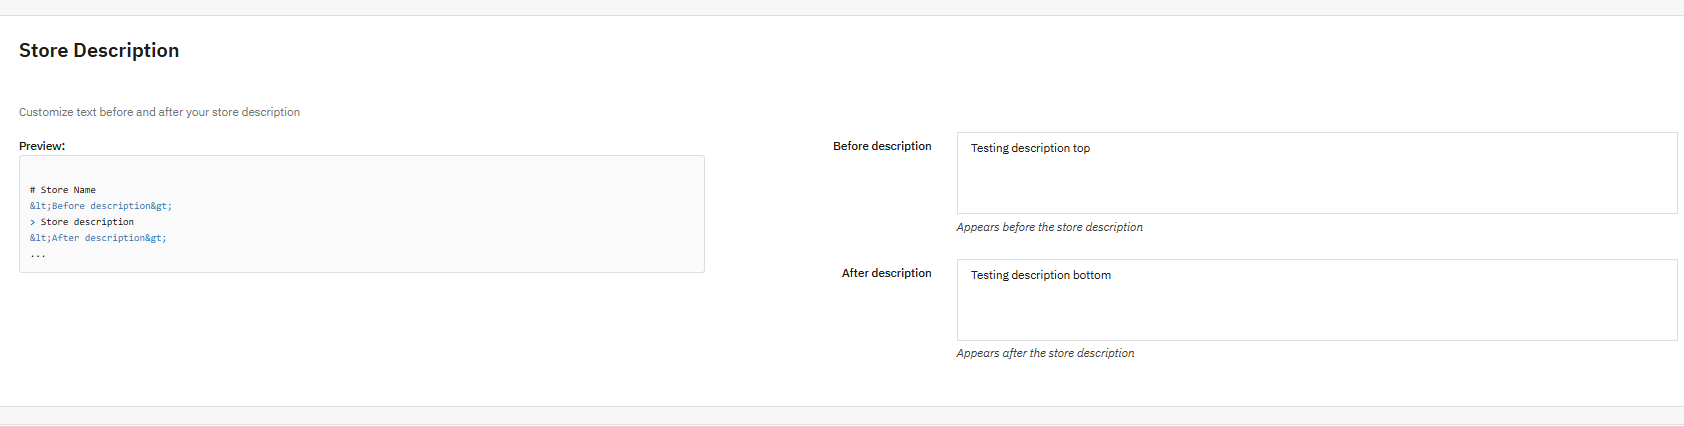
4.0.2 Store Description

Short description customisation in LLMs TXT Generator for PrestaShop allows you to customise text that shows before and after the store description in the llms.txt file.

By adding contextual information around the store description, merchants can clearly define the store’s descriptions, main catalogue, or special instructions. Furthermore, this helps generative search platforms and search engines to better understand the store when generating responses for customers.

4.0.3 Category Section Customisation

Additionally, store owners can add extra content or text before and after the categories section of the llms.txt file.

Furthermore, this is useful for explaining category structure, naming conventions, or relationships between categories. Also, clear category context improves product discovery and helps crawlers correctly interpret category-level data when indexing your PrestaShop store.

4.0.4 Product Section Customisation

The product section customisation of files allows you to insert text before and after the product details sections.

Furthermore, this can be used to add product-related content or guidelines without changing the actual product information. These additional notes allow the AI models to understand the content easily and improve the recommendations.

4.0.5 CMS Pages Section Customisation

CMS Pages section customization the store owners to add additional notes before and after the CMS Pages section in the llms.txt file.

CMS pages often contain important information such as store policies, shipping details, and FAQs. Furthermore, adding contextual text around this section helps crawlers and answer engines better understand non-product content and supports overall search engine optimisation.

Finally, as AI is evolving, your store should too. Install it on your store, and let AI models recommend to you.

Pro Tip: Keep the SEO of your product pages, category pages, and CMS pages strong to maximise visibility and performance across AI-driven search platforms.


5.0.0 Complete Tutorial of PrestaShop LLMs.txt Generator by Knowband

This complete tutorial of the PrestaShop LLMs.txt Generator module by Knowband covers all major functionalities, including general settings, cron setup, LLMs.txt file generation for catalog pages, content filtering, and file customisation. If you face any issue, kindly contact at support@knowband.com or via knowband tickets.

Prestashop AI Powered Chatbot Addon – Complete User Guide

In today’s fast-moving world of e-commerce, customers expect quick answers and smooth experiences from the store. Even for the smallest and simplest questions, people rely on intelligent systems that respond instantly and accurately. We wanted to develop something that incorporates advanced technologies, but you can use it without needing any Prior Knowledge. So, the PrestaShop AI-Powered ChatBot Module gives your store exactly that: a smart, always-available virtual AI assistant that can guide your customers at any time of the day.

Powered by advanced OpenAI technology, this chatbot delivers natural, human-like responses in real time. Moreover, PrestaShop Chatbot Using OpenAI ChatGPT helps customers find products, understand prices, check stock,  and even get updates on their orders, all without needing human support. 

With easy setup and powerful features, this PrestaShop AI Module is designed to improve the overall shopping journey and increase your store’s conversion rate.

This module brings the future of customer service directly into your Prestashop store, helping you serve visitors, customers faster, smarter, and more efficiently.

2. Key Features of Prestashop AI ChatBot Module

[New] Vector Search Integration 

The integration of vector search with Qdrant enhances the PrestaShop chat plugin by enabling context-aware searches that go beyond exact keyword matching. By interpreting the intent behind user queries, the system delivers more accurate search results and personalised product suggestions, helping customers quickly find what they are truly looking for.

[New] Integration with Gemini, Claude, and Deepseek

The platform now supports seamless integration with Gemini, Claude, and Deepseek, expanding its AI capabilities and data retrieval options. This allows users to leverage advanced AI models for smarter search, improved recommendations, and more insightful interactions, ensuring a richer and more personalized experience across the system.

[New] Chat Logs for AI Chatbot Using Prestashop Live AI Chatbot Module

The Prestashop AI Chatbot Module by Knowband now maintains detailed chat logs of all user interactions. These logs help store owners analyze customer conversations, track behavior, and identify common queries. Access to chat history also improves AI response quality and overall customer support.

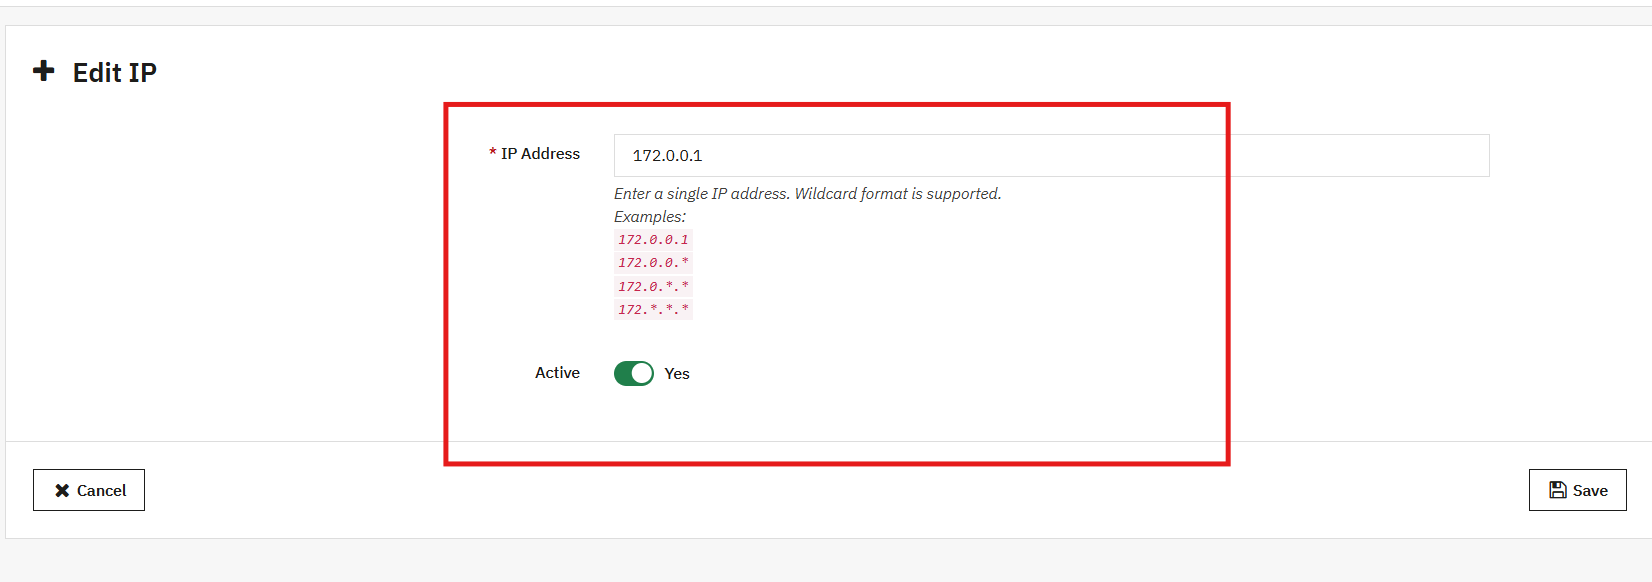
[New] IP-Based User Blocking

The AI Chatbot Addon allows IP-based user blocking to restrict access for specific users or IP addresses. This enhances security and prevents misuse of the Prestashop AI chatbot. It ensures a safe and controlled chat environment for genuine customers.

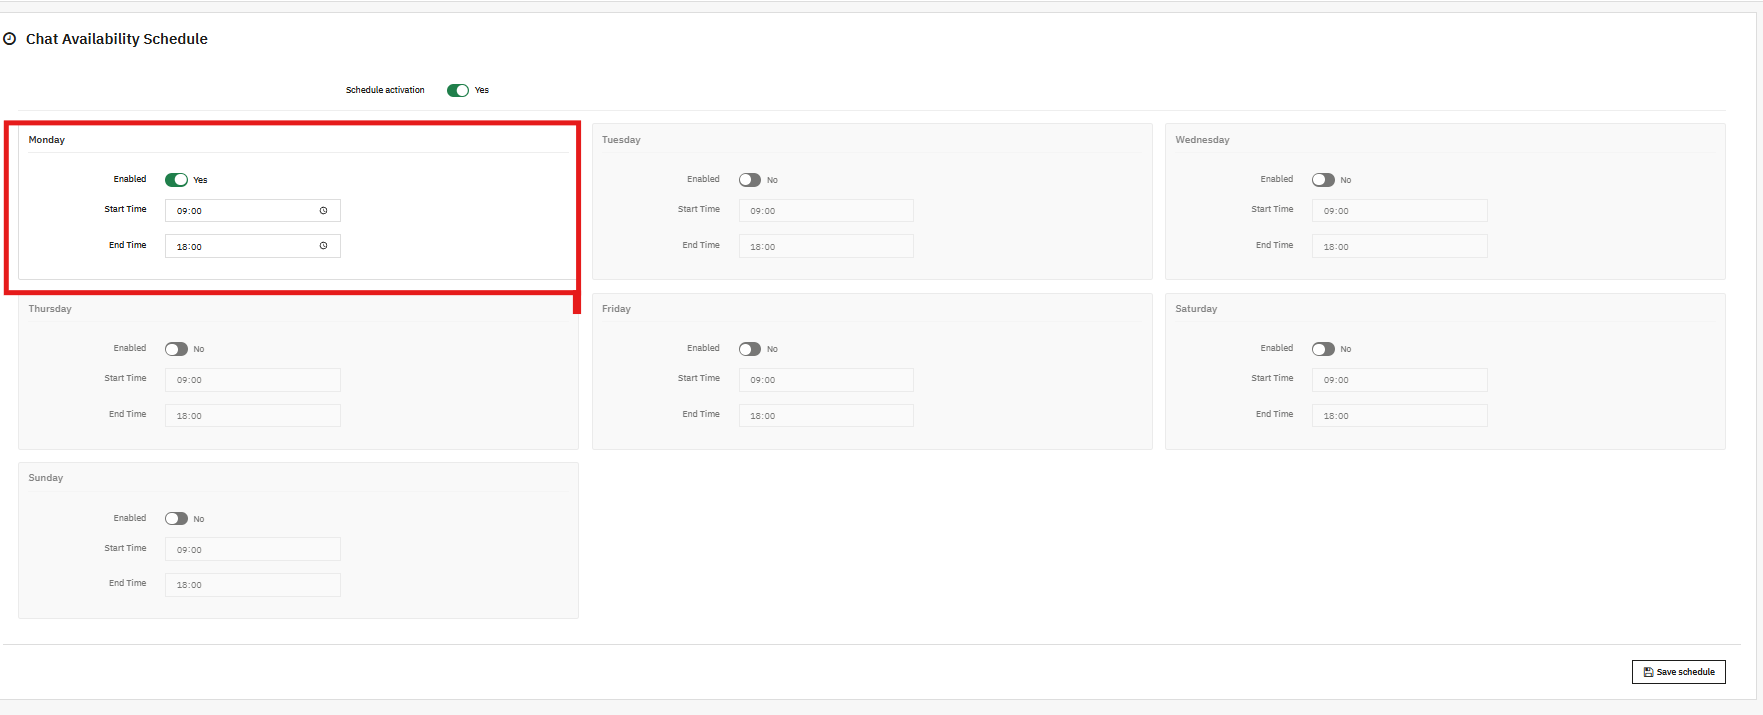
[New] Chat Availability Scheduling

Now, store owners can manage chat availability by setting specific days and hours for the AI chatbot. This helps in providing timely support and ensures the chatbot is accessible only during designated support hours.

1. Real-Time, Intelligent AI Responses

The chatbot instantly answers queries about product prices, stock availability, categories, product comparison using AI and more, pulling live data directly from your store.

2. Multi-Language and Multi-Currency Support

The Pretasop multilingual AI chatbot Addon automatically detects the language of your shop, no matter which languages & currencies you have added and responds in the same language and currency. Thus, this makes it ideal for stores selling internationally.

3. Powered by ChatGPT Technology

Using the latest GPT models from OpenAI, the chatbot delivers accurate, natural, and context-aware responses that feel like chatting with a human and are helpful.  Additionally, the module also offers the option to choose the different ai engines within the ChatGPT Modules

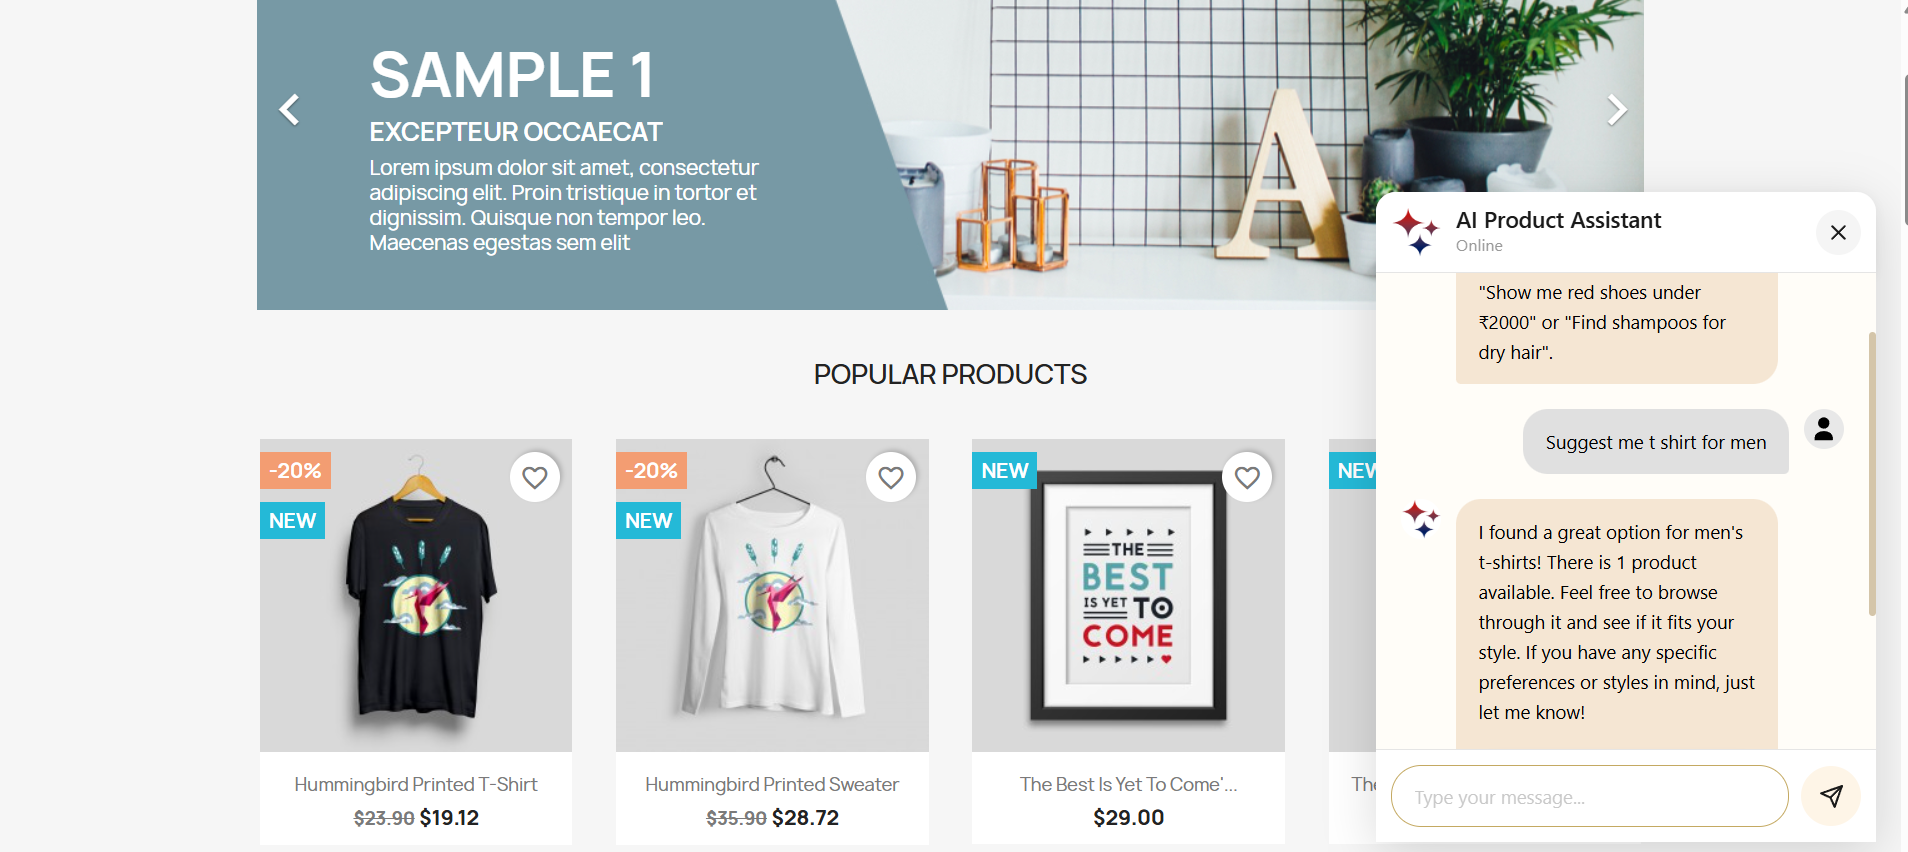
4. Smart Product Search

Customers can easily search and explore products directly through the chatbot. This AI Chatbot for PrestaShop helps them browse categories, view options, and compare items efficiently.

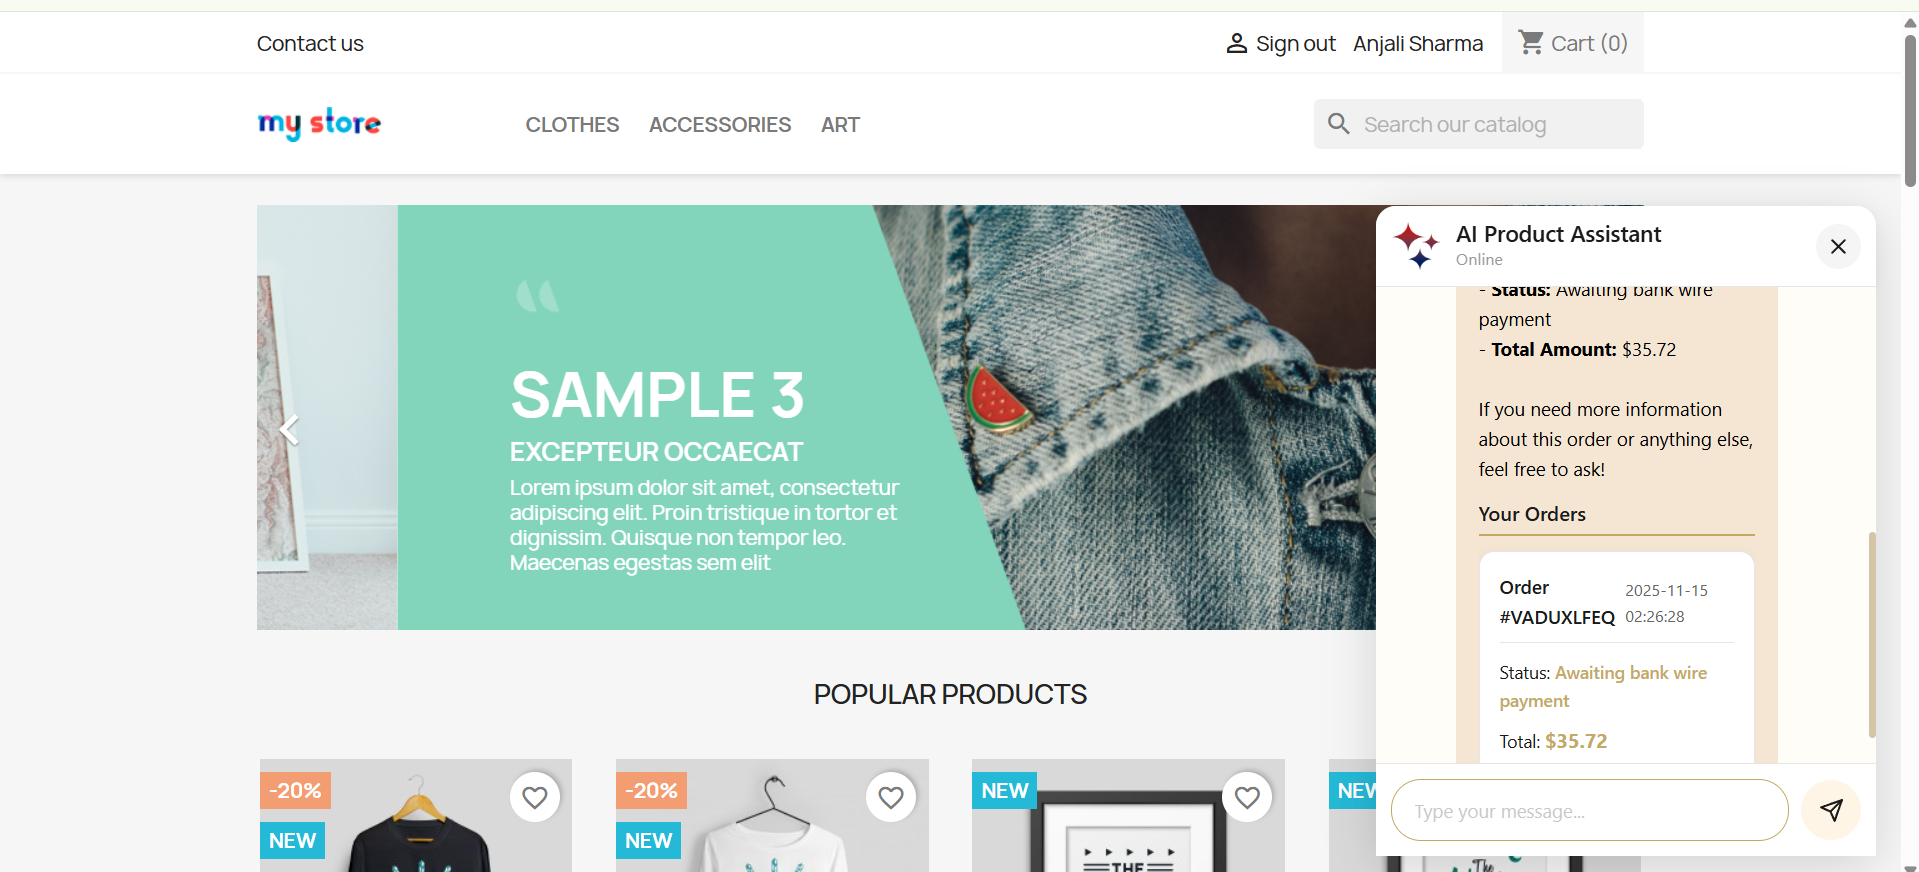
5. Automatic Order Information Retrieval

The Prestashop AI ChatGPT ChatBot instantly fetches and displays recent customer orders, including order ID, products, prices, status, and more, making order management effortless.

6. Real-Time Order Status & Tracking

With the Prestashop AI-Powered ChatBot Module, customers can check their order status or track shipments directly via the chatbot using their order ID quickly, easily, and conveniently

7. Fully Customizable UI

The chatbot interface is fully customizable, allowing store owners to adjust the background color, chatbot box color, customer chat color, icons, and button styles. This ensures the PrestaShop ChatBot Module matches any store design while delivering a modern, visually appealing, and user-friendly front-end experience.

8. Vector Search Integration

The integration of vector search with Qdrant enhances the PrestaShop chat plugin by enabling context-aware searches that go beyond exact keyword matching. By interpreting the intent behind user queries, the system delivers more accurate search results and personalised product suggestions, helping customers quickly find what they are truly looking for.

3.0.0 Installation Guide for PrestaShop AI-Powered ChatBot Addon

Step 1: Purchase and download the Knowband Prestashop OpenAI ChatBot Module.

After the completion of the purchase, you’ll receive the chatbotsearch.zip file. 

Step 2: Click on Module on your prestashop back office left menu, go to module manager, then you will see the click option. Click on the Upload.

Step 3: Upload and Install the ChatBot Module. After the complete installation, you have to click on the configuration, and then you will be directed to the configuration page.

Step 4: Now you are ready to configure the chatbot module.

4.0.0 Admin Interface of Prestashop Live AI ChatBot Assistant

The PrestaShop AI-Powered Chat Assistance Module is designed with simplicity and ease of use in mind. The module includes the configuration pages, like configuration and customisation.

4.0.1 General Configuration

Each option directly affects how the AI interacts with customers, processes queries, and displays results inside your PrestaShop store.

Let’s take a walkthrough of these fields for better hands-on understanding

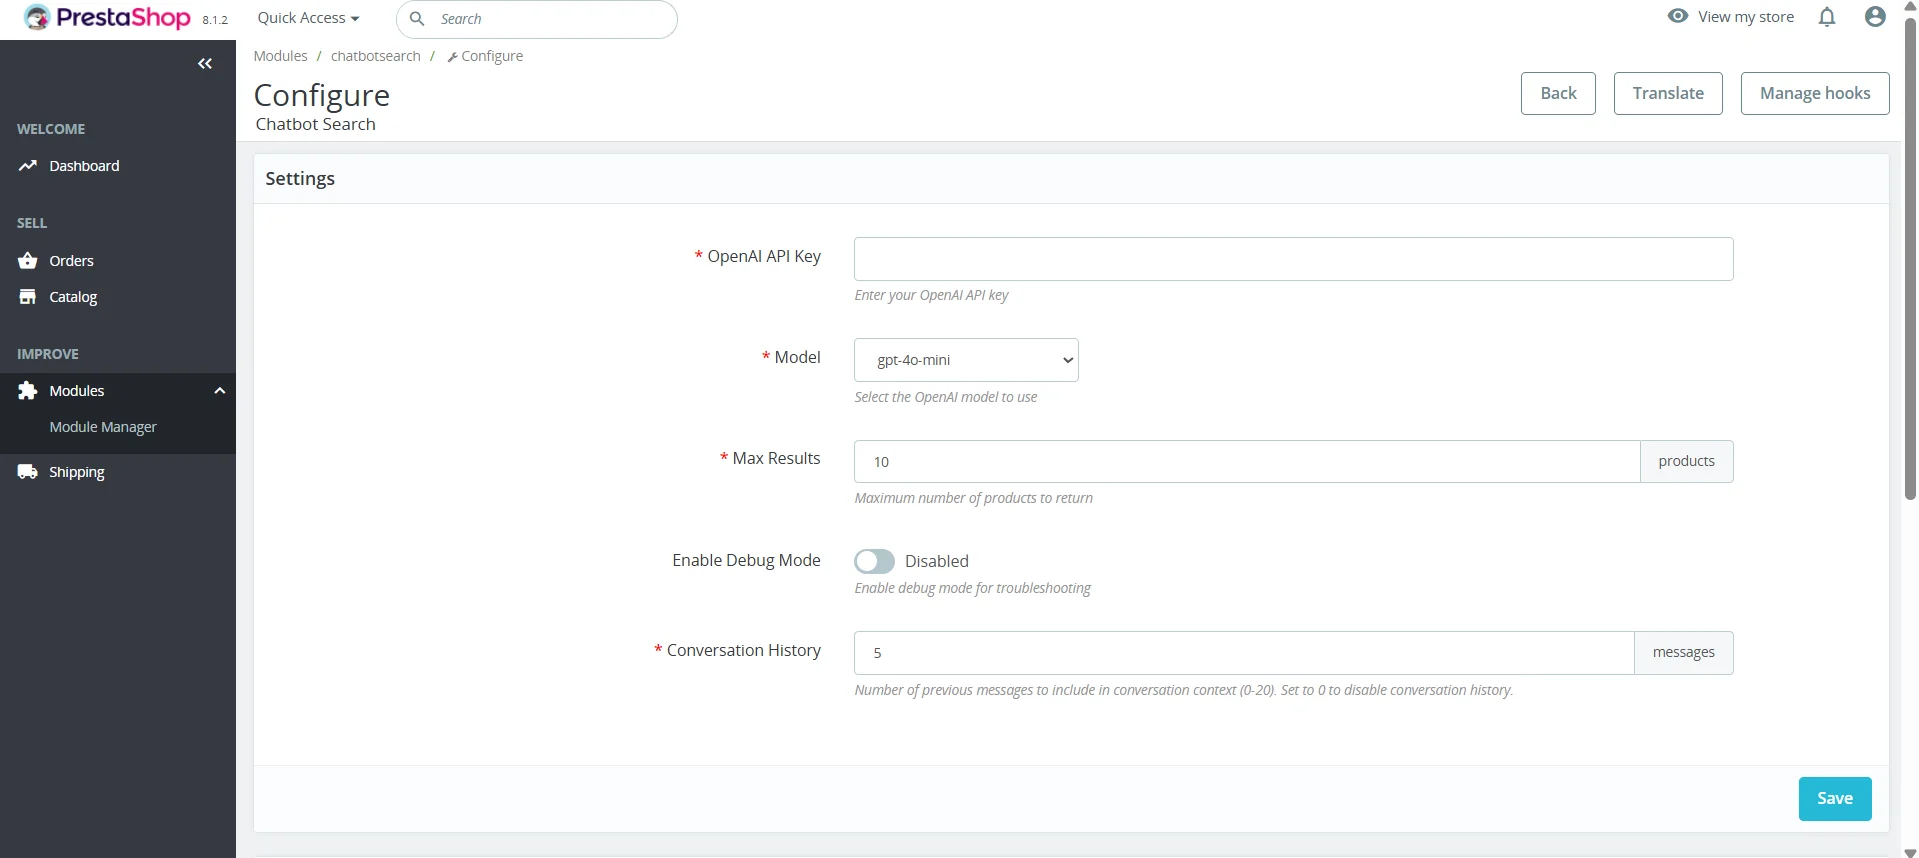
1. OpenAI API Key: This field allows you to enter your OpenAI API Key, which is required for the PrestaShop AI Chat Integration to connect to the OpenAI platform. Without this key, the chatbot cannot generate responses as the API Key is required for its functioning.

  • OpenAI API Key authorises your store to use GPT models.
  • Ensures secure communication between your PrestaShop store and OpenAI servers.
  • Kindly make sure to keep your API Key secure and not share publicly.

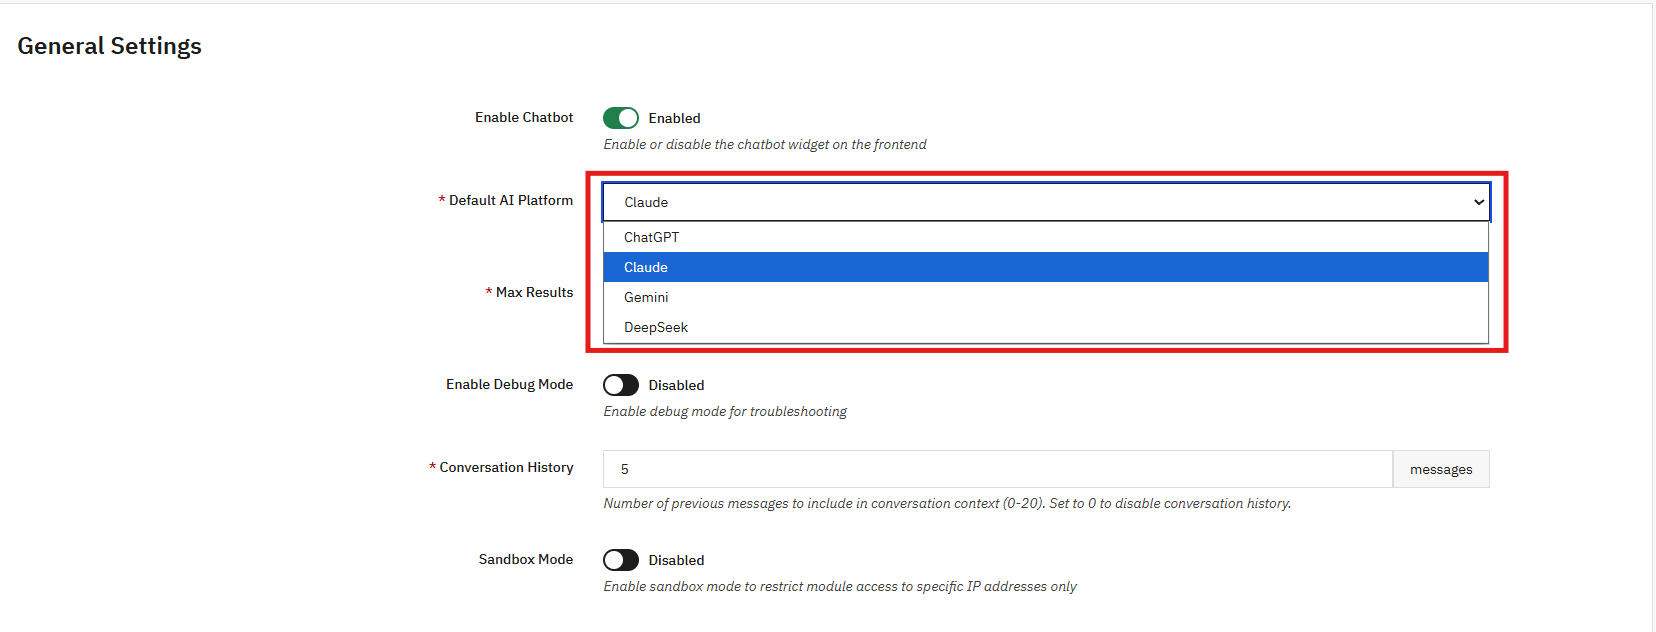
2.  Model Selections:

The PrestaShop AI Engine Module enables the store administrator to select the specific AI model that the chatbot will use. Each model offers varying capabilities in terms of speed, intelligence, and accuracy, allowing the admin to choose the most suitable option for their store.

Currently, the Prestashop AI Chatbot Addon by Knowbandsupports the following four AI models:

  • ChatGPT: A conversational AI model designed for natural language understanding and customer interactions. Ideal for answering questions, assisting with purchases, and providing guidance.
    Submodels: GPT-5 (latest high-performance model), GPT-5 Mini (lightweight, fast), GPT-4 Mini (compact, efficient), GPT-4o (enhanced reasoning), GPT-4 Turbo (optimized for speed), GPT-3.5 Turbo (classic high-speed conversational AI)
  • DeepSeek: Focused on advanced search and recommendation tasks. It is optimised for retrieving relevant products and content quickly.
    Submodels: DeepSeek Pro (accurate and feature-rich), DeepSeek Reasoner (advanced logic and reasoning capabilities)
  • Claude: A model specialised in summarisation, reasoning, and contextual understanding. Useful for generating product descriptions, summaries, and conversational insights.
    Submodels: Opus (balanced reasoning and language capabilities), Haiku (optimized for concise responses and summarization), Sonnet (advanced multi-turn conversation and contextual understanding)
  • Gemini: Focused on multimodal AI tasks, including text and image understanding. Ideal for product recommendations, visual searches, and content generation.
    Submodels: Gemini 2.5 Pro (high-performance, advanced capabilities), Gemini Flash (fast, lightweight), Gemini 2.0 (balanced, reliable performance)

3. Max Results: This option controls how many results the Knowband’s PrestaShop AI Chat Addon will show when a customer asks product-related queries.

For example, if a customer asks:” show jeans under 30$ ”, the chatbot will display up to the number of results you set here.

These options help in controlling the readability inside the chat window in the ChatGPT PrestaShopChatBot  Module, as well as prevent overwhelming customers with too many results.

4. Enable Debug Mode: This Knowband’s Best AI Assistant For PrestaShop allows the store admin to enable debug Mode, which helps you troubleshoot issues by showing internal logs and technical details while the chatbot operates. When the debug mode is enabled:

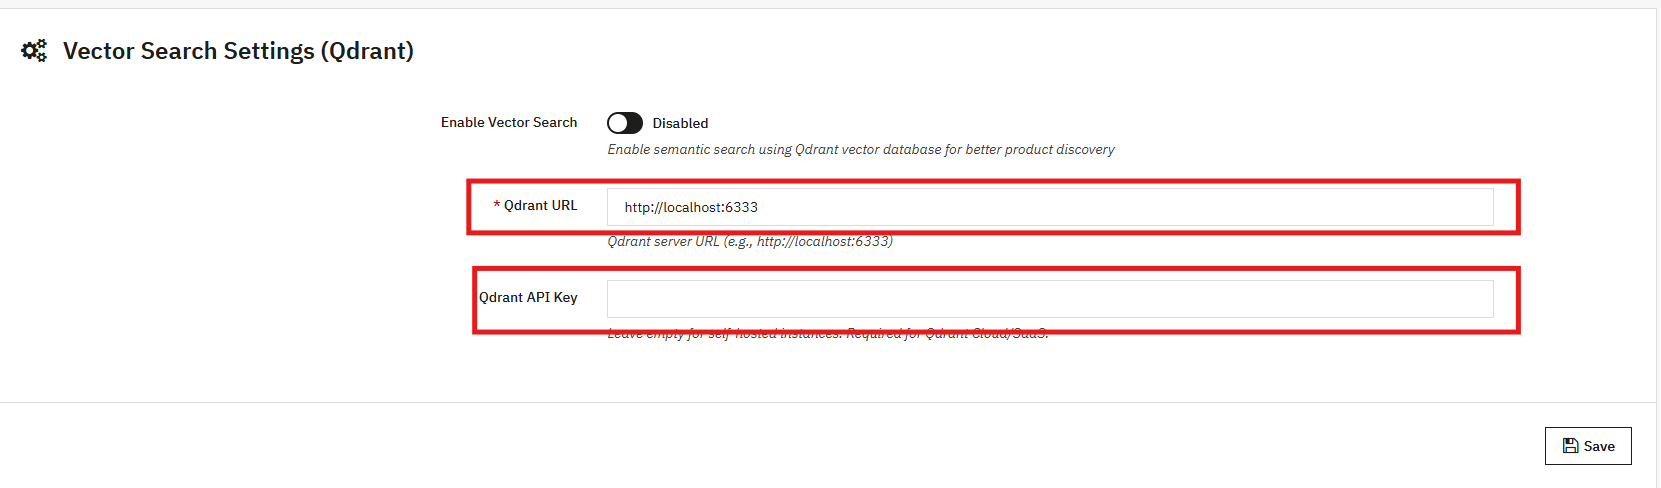
5. Enable Vector Search: Turn on semantic search to let the PrestaShop AI Chatbot better understand user intent and provide more relevant answers, going beyond simple keyword matching.

6. Qdrant URL: Enter the endpoint URL of your Qdrant vector database server. Furthermore, this database stores and fetches vector data used for semantic search. We have provided the steps in the user manual section 5.0.5

7. Qdrant API Key: Provide the API key to authenticate access to your Qdrant server. This ensures secure communication between the chatbot and the vector database.

4.0.2 Customisation Tab of Prestashop AI ChatBot Module

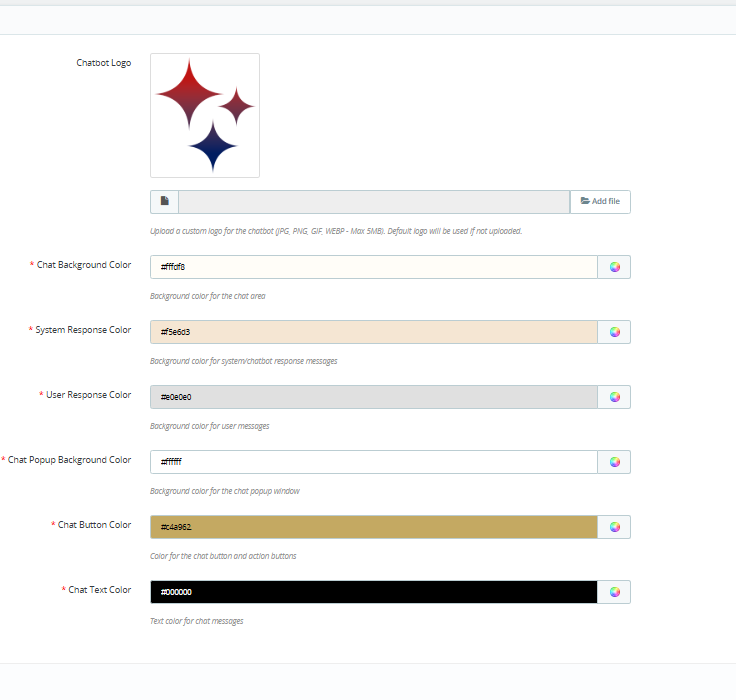
The PrestaShop AI ChatBot Module allows full customisation of the chatbot interface to match your store’s design and provide a seamless user experience.

Below is a guide for each customizable field:

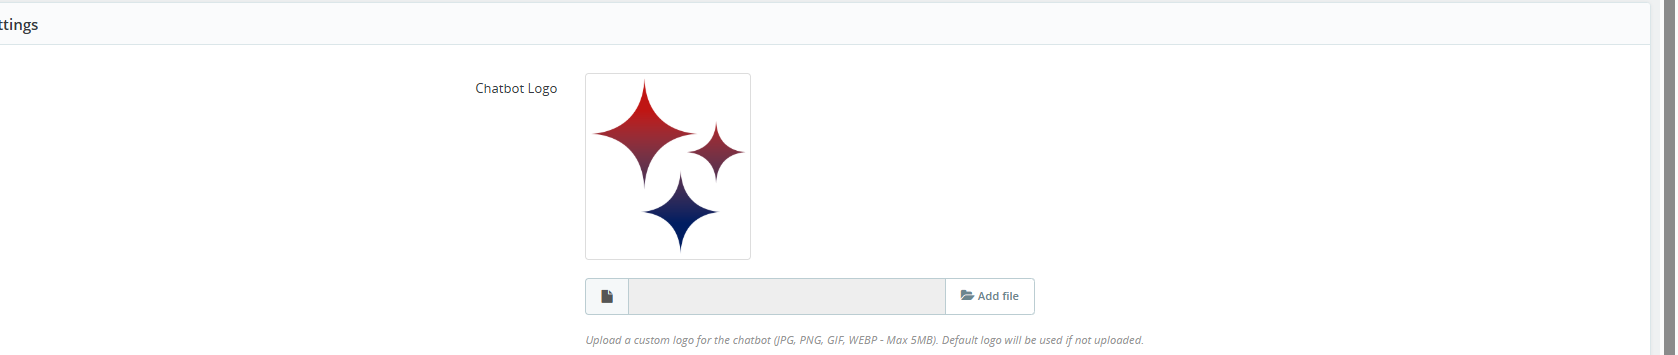
1. Chatbot Logo: Upload a custom logo for your chatbot to represent your brand. Moreover, it supports logo formats including JPG, PNG, GIF, and WEBP, with a maximum file size of 5MB.
If no logo is uploaded, the default PrestaShop logo will be displayed. Ensure your logo is clear and visually compatible with the chat interface.

2. Chat Background Colour: Store admins can set the background colour of the chat area to match your store theme. Knowband recommends using a colour that provides good contrast with chat messages for readability.

3. System Response Colour: Furthermore, you can customise the background colour of the chatbot messages. Choose a colour that differentiates the chatbot responses from user messages for better visual clarity.

4. User Response Color: Additionally, store admin can set the background color for user messages in the chat window. This helps distinguish customer messages from the AI responses.

5. Chat Popup Background Colour: Change the background color of the chat popup window to complement your store’s. Ensure the pop-up remains visually appealing and integrates smoothly with your website.

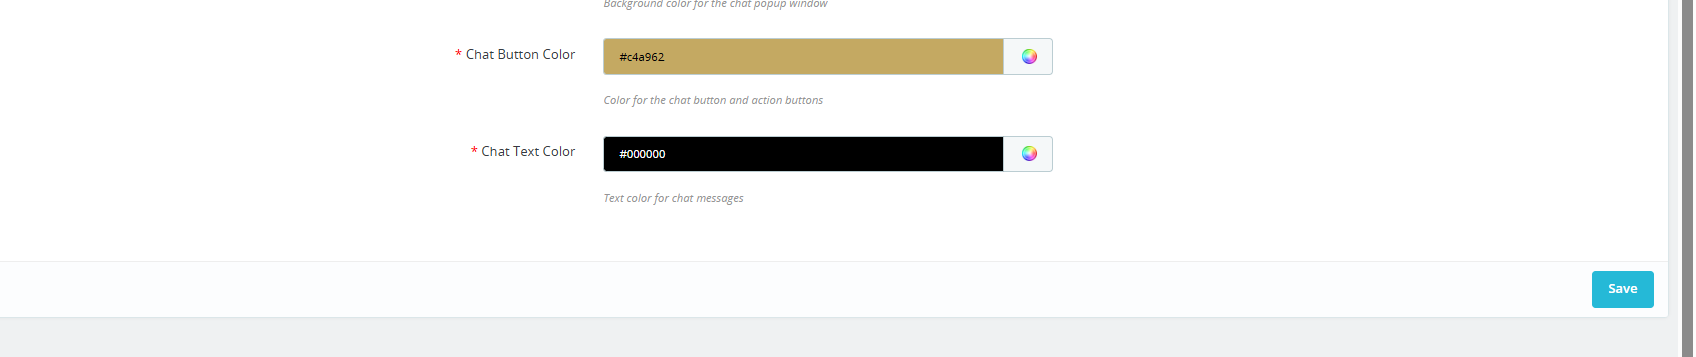
6. Chat Button Colour: Store owner can easily customise the colour of the chat button and action buttons to match their store’s theme. A clear, contrasting button color can improve click rates and engagement.

7. Chat Text Color: Set the text color for all chat messages, including both system and user messages. Ensure the text colour provides good readability against the background colors selected.

4.0.3 Chat Logs for AI Chatbot

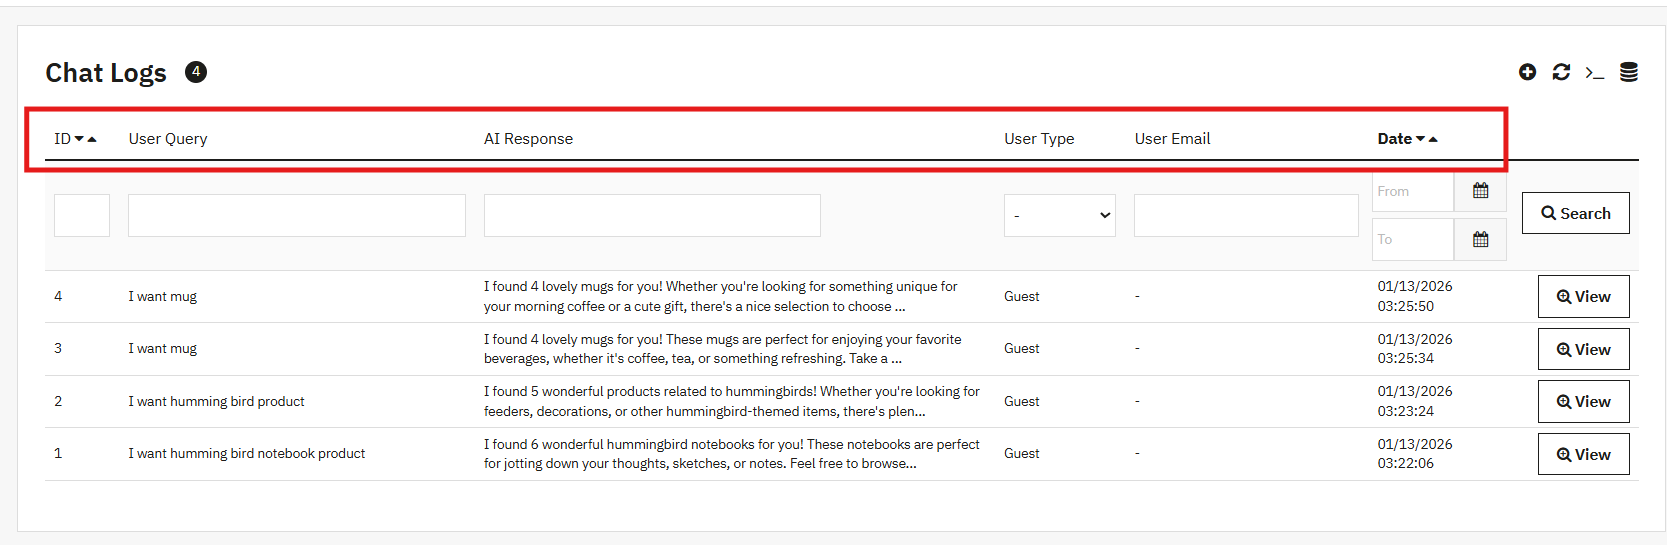
The Prestashop AI Chatbot Module by Knowband now maintains comprehensive chat logs of all user interactions. These logs allow store owners to review conversations, track customer behavior, and identify frequently asked questions. Access to this history also helps improve AI responses and enhances overall customer support.

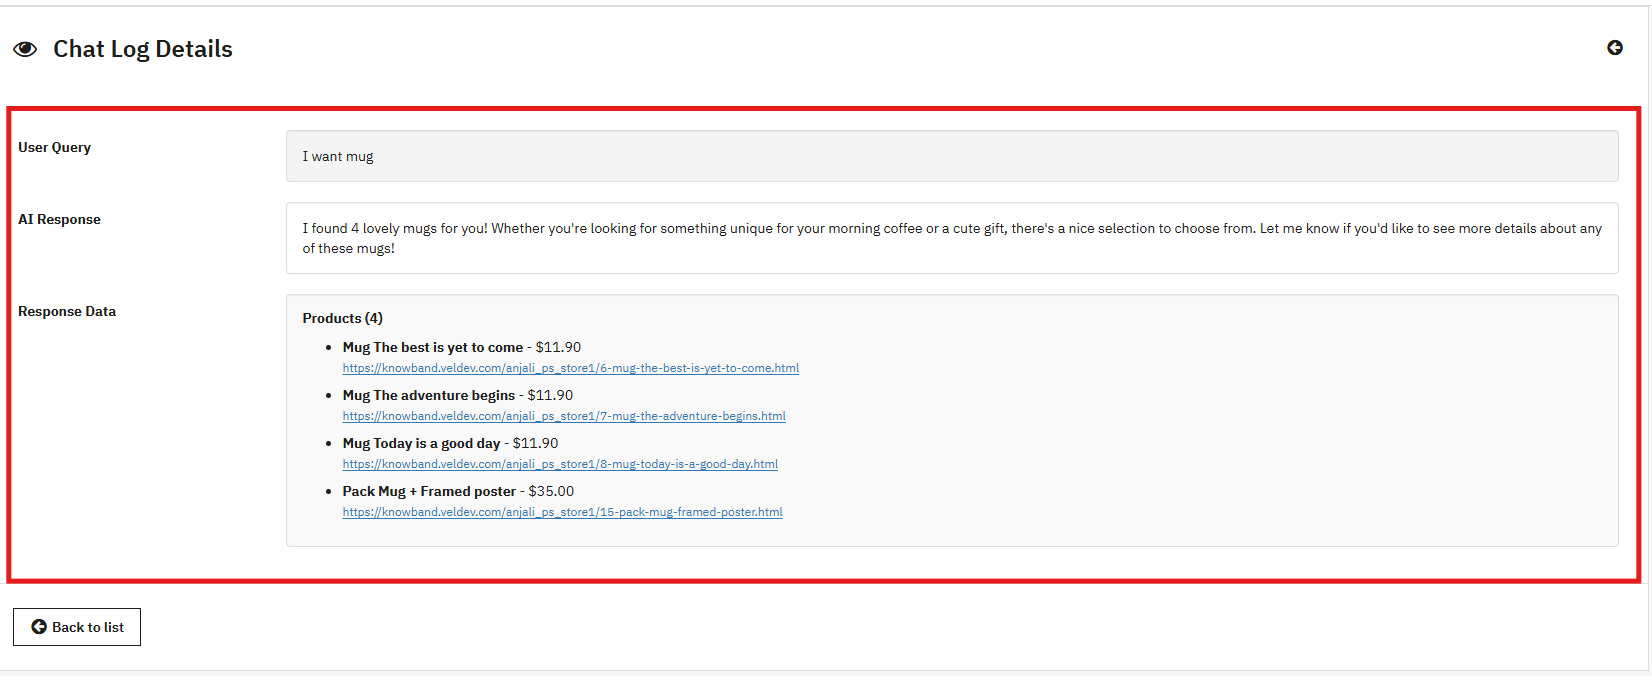
With this feature, you can view details such as the user query, email, customer type (guest or registered), AI responses,  response data ( the products that chatbot showed) and the date of interaction, providing full visibility into chatbot interactions.

4.0.4 IP-Based User Blocking

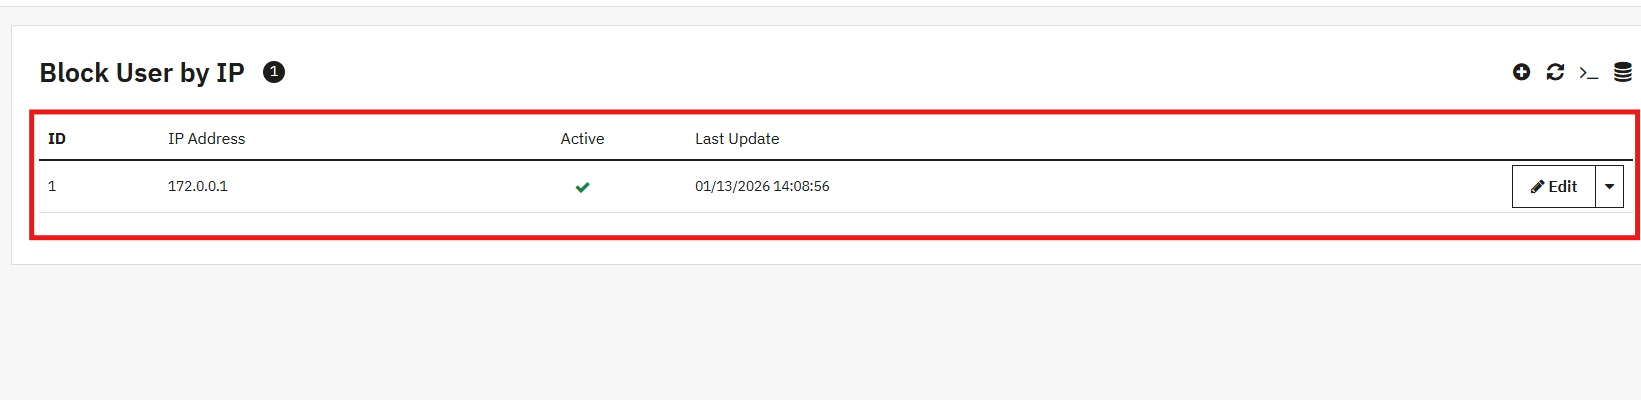
The AI Chatbot Addon now includes IP-based user blocking, allowing store owners to restrict access for specific users or IP addresses. This feature improves security, prevents misuse, and ensures a safe, controlled environment for genuine customers.

To use this feature, you can add IP addresses in the format ( X.X.X.X) separated by commas, and set the status for each IP as Enable or Disable.

4.0.5 Chat Availability Scheduling

Store owners can manage chat availability by specifying the days and times when the AI chatbot is active. This ensures that customers receive timely support and that the chatbot is accessible only during scheduled support hours, improving service efficiency.

You can select any day of the week (e.g., Monday) and define the start and end time for chatbot availability to align with your business hours.

5.0.0 Frontend View

The KnowBand PrestaShop AI ChatBot Module appears on your store as a smart, interactive chat widget that provides instant, AI-powered support to customers. It offers a seamless shopping experience by helping users search products, check stock, track orders, and get quick answers to common queries.

ChatBot Frontend Feature Implementation- Short Overview

Product Search

The chatbot allows customers to quickly search for products, browse categories, and compare items directly from the storefront

Order Details

Customers can view their order details, including order ID, products, prices, and order status, directly through the chatbot in real time.

In addition to product search and order details, the chatbot also provides:

      • Shipment Details: Track shipments and view delivery status instantly.

      • Order Information: Access complete order history and details.

      • Product Information: Get product descriptions, prices, availability, and other details quickly.

Go mobile with the PrestaShop Mobile App Builder

Convert your PrestaShop website into a fully functional mobile app to increase sales, improve user experience, and grow mobile conversions.


GET PRESTASHOP MOBILE APP BUILDER NOW!

6.0.0 Tips for Store Owners

The following tips will help you optimise your chatbot for better performance and ensure it aligns with your store’s branding and business needs:

      • Customise the chatbot to match your store’s branding, including colors, logo, and chat button style.

      • Keep FAQs and automated responses updated to ensure accurate answers.

      • Test the chatbot regularly to make sure it responds correctly and provides a smooth user experience.

      • Monitor chatbot interactions to identify common questions and improve automated responses.

      • Highlight promotions or new products within the chatbot responses to boost engagement.

      • Ensure the OpenAI API key is active and working to maintain real-time AI responses.

      • Keep the chatbot interface clean and uncluttered for better readability and customer satisfaction.

7.0.0 Steps to Generate API Keys for Prestashop AI Chatbot Module

7.0.1 OpenAI API Key

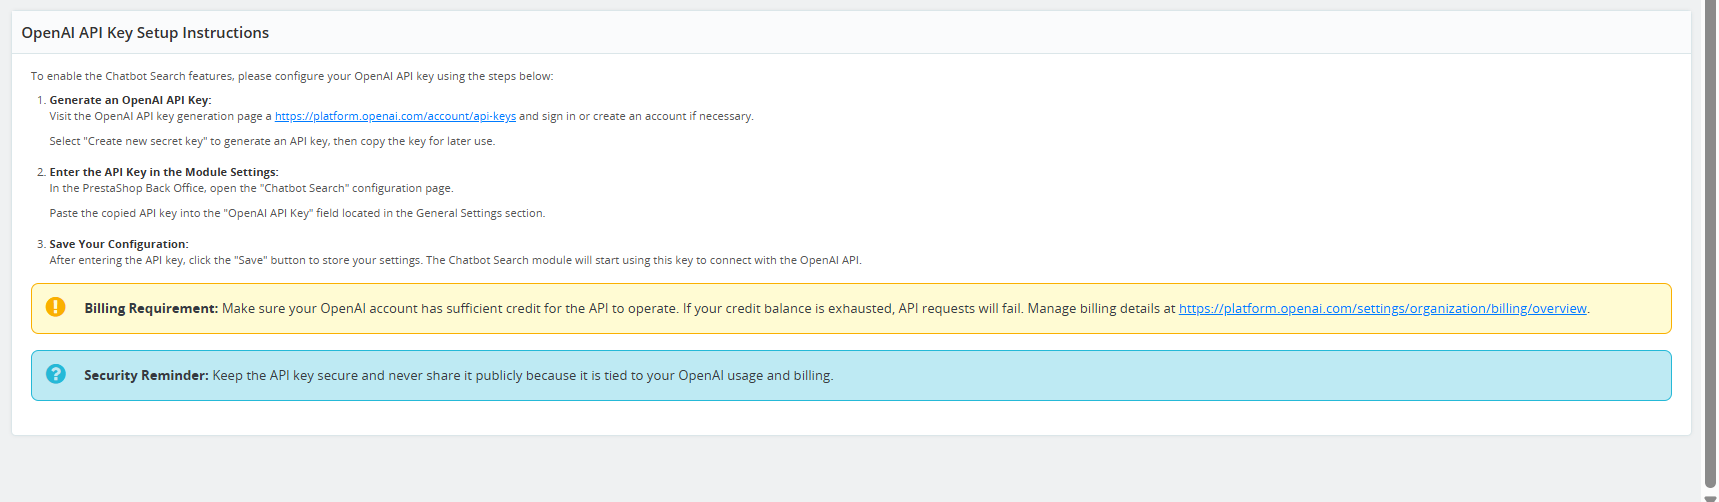
Knowband’s Prestashop ChatBot AI Addon also provide the instructions in the module to generate the OpenAI API Key below the General Settings Page.

Follow these steps to generate the OpenAPI Key to enable the functionality of the Prestashop AI-Powered ChatBot Module

      1. Obtain an OpenAI API key and configure it within the module settings.
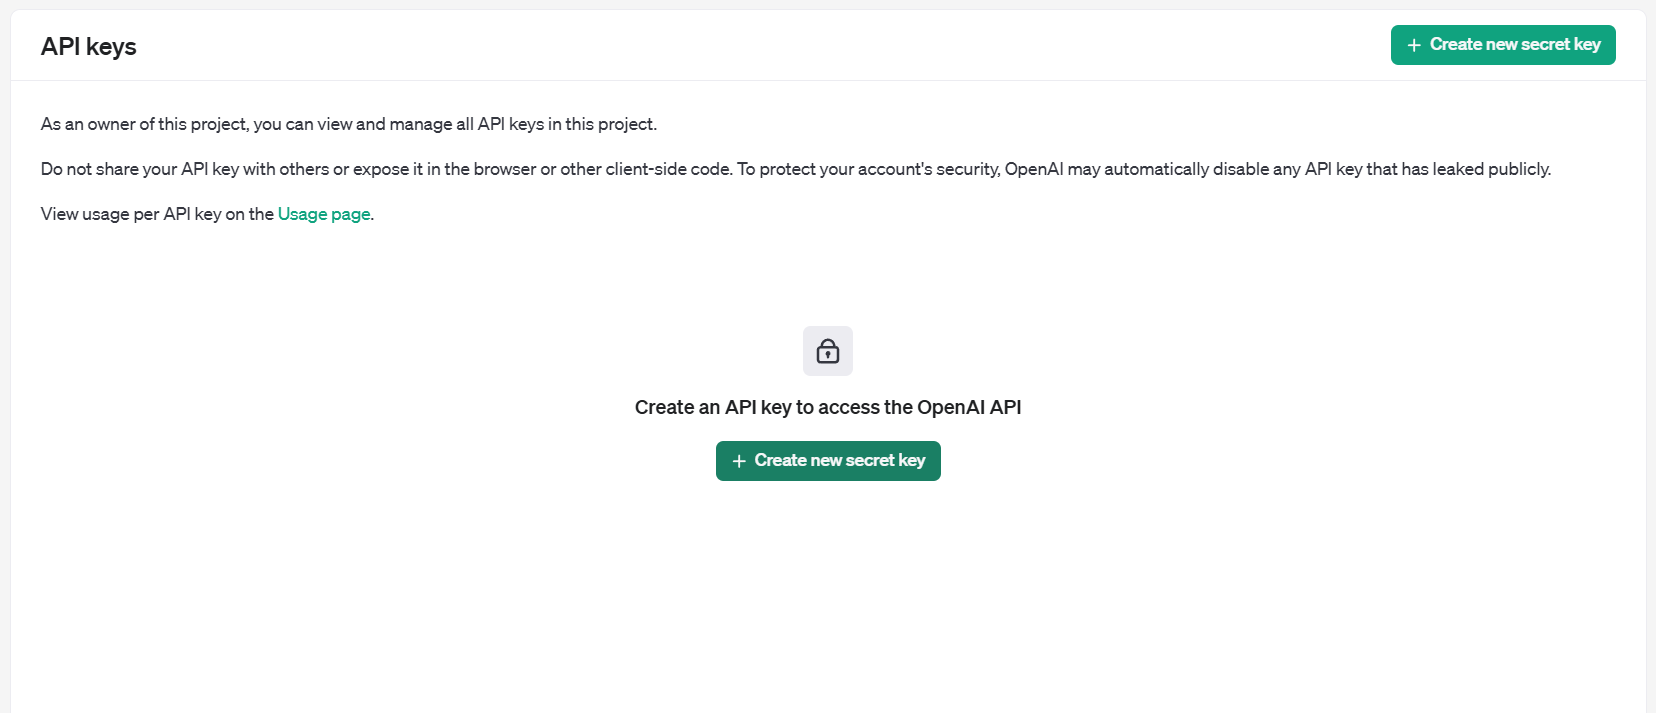
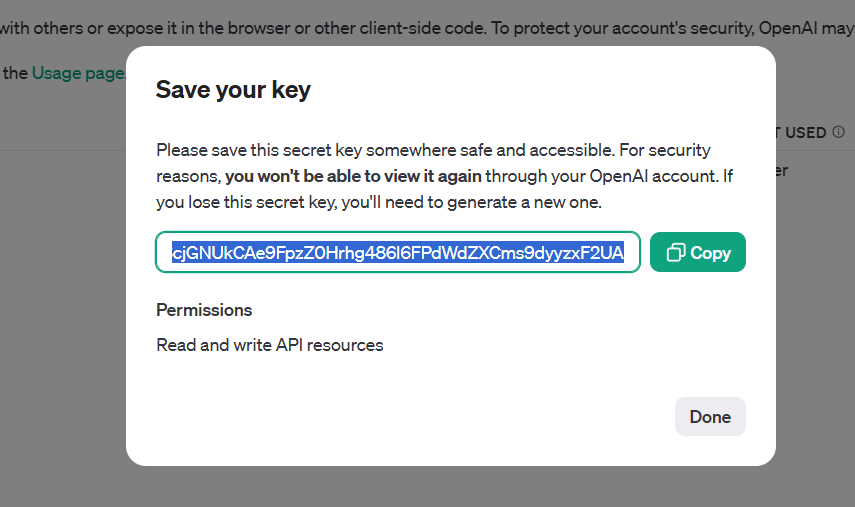
      2. Click on your profile (top-right) → “View API keys” → “Create a new secret key”.
      3. Copy the key immediately and store it safely. 

7.0.2 For Claude API: 

  1. Visit Anthropic’s website, and click “Start Building”.
  2. Create an account, access your Dashboard, generate an API key, and save it securely.

7.0.3 For Gemini API:

  1. To access the API,  visit the Google AI Studio website.
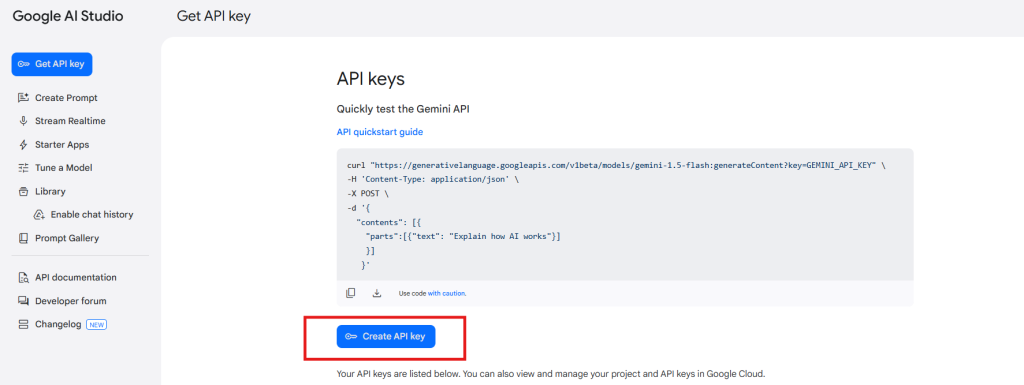
  2.  Click “Get API key,” accept the terms of service, create your key, and paste it into the module’s configuration settings.

7.0.4 Steps to Generate DeepSeek API 

  1. Access the Deepseek platform via this URL: https://platform.deepseek.com/api_keys to generate the API Key. Log in or sign up to generatean  API Key
  2. Click on Create API Key after adding the key name.
  3. Copy or store the key to enable functioning of Prestashop DeepSeek AI Content Chatbot Module

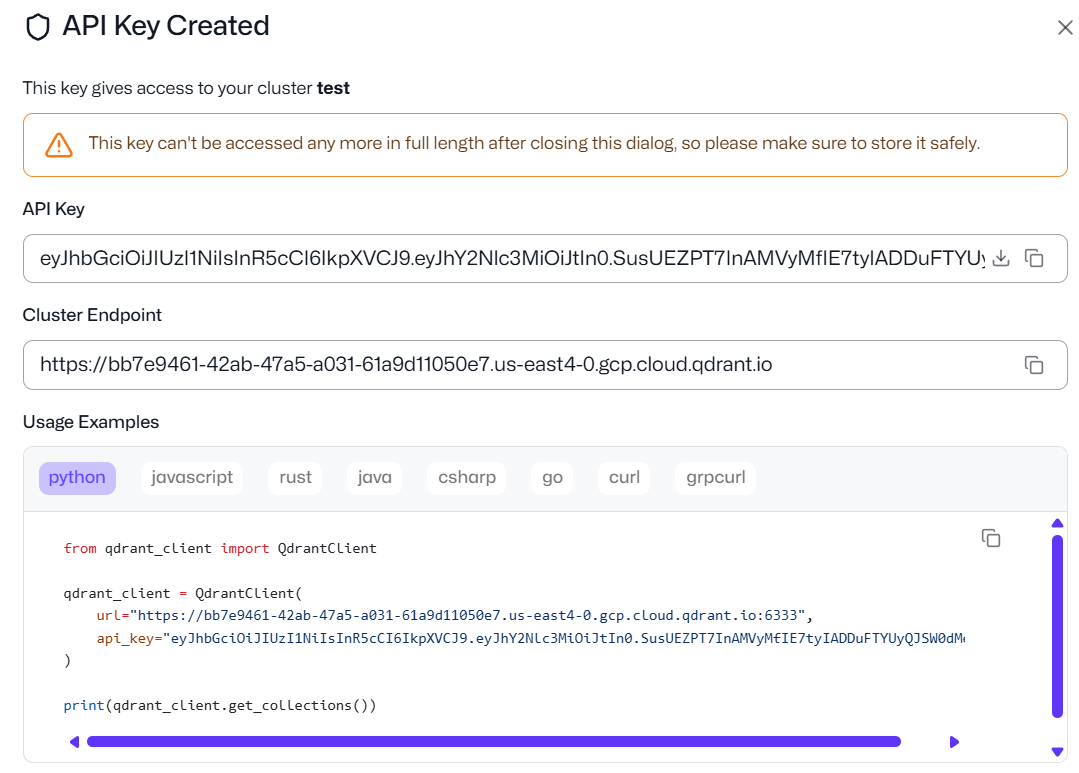
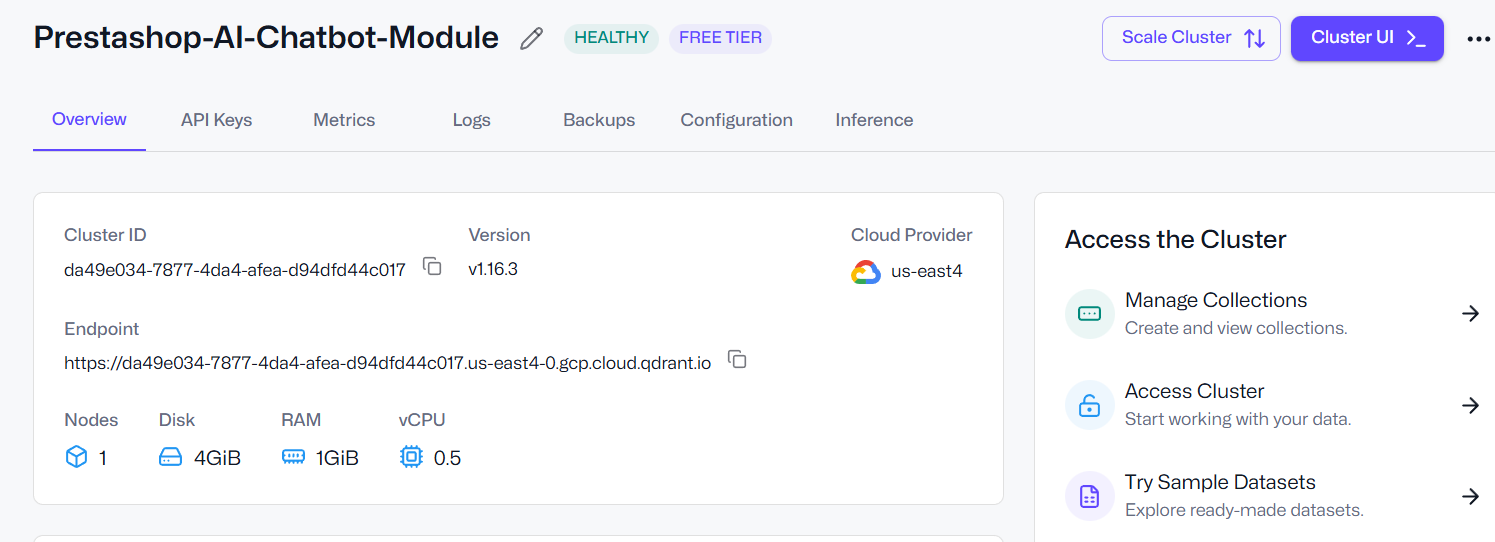
7.0.5 How to Generate Qdrant API Key and Endpoint URL for PrestaShop AI Chatbot

If you plan to use vector search with Qdrant for semantic queries in the PrestaShop AI Chatbot, follow these steps:

Step 1: Log in to Qdrant
Access your Qdrant account, whether using the cloud service or a self-hosted instance.

Step 2: Create a Cluster and API Key
Navigate to your clusters section, create a new cluster if needed, and generate an API Key for your chatbot integration.

Step 3: Copy the API Key and Endpoint URL
The Endpoint URL points to your Qdrant server, while the API Key provides secure access to the vector database. Copy both values carefully.

Step 4: Enter the Details in PrestaShop
In your PrestaShop admin panel, go to General Configuration → Qdrant URL and paste the Endpoint URL. Then, enter the API Key in the Qdrant

8.0.0 Benefits of Prestashop AI-Powered ChatBot Module

Increase Conversions Automatically: Customers receive quick answers to their queries without waiting, helping them make purchasing decisions faster and reducing hesitation at checkout.

Improve User Experience With Friendly Interactions: The PrestaShop Live AI Chat Module

can guide customers through products, store policies, order information, and more, making browsing easier and more enjoyable.

Increase Session Activity and Dwell Time: This PrestaShop AI Assistant Module keeps visitors and customers engaged with your store, increasing the session activity and dwell time.

Reduce Cart Abandonment: Instant support helps resolve common doubts that cause customers to leave before completing a purchase.

Strengthen Trust and Brand Image: The PrestaShop Chat Assistant Module really looks like it has a 24/7 intelligent assistant or real-time AI chat support on your site, enhancing your store’s professionalism and reliability, helping customers feel confident and supported.

Save Time and Boost Store Efficiency: The PrestaShop ChatGPT Bot handles repetitive questions, FAQs, product inquiries, and general support, allowing your team to focus on more important tasks.

Summary

To conclude,  the PrestaShop Chat Module Free is a powerful AI ChatBot that transforms the way your store interacts with customers. By providing instant, intelligent, and personalised responses, Prestashop AI ChatBot Module enhances the shopping experience, improves engagement, and increases conversions. With features like real-time product information, multi-language and multi-currency support, and feedback collection, this module ensures your store delivers professional and reliable service 24/7.

Overall, implementing the AI ChatBot not only saves time and resources by automating repetitive tasks but also strengthens customer trust and boosts your store’s efficiency.

This AI Chatbot for PrestaShop can be the best chatbot for your store that can stay ahead in the competitive e-commerce market while delighting customers with faster, smarter, and more personalised interactions.

Try the PrestaShop AI Chatbot Free Demo
Explore the chatbot by asking product-related queries.

Watch the Tutorial:
Learn how to use the PrestaShop ChatBot powered by ChatGPT with our step-by-step module guide.

VideoMate for PrestaShop: User Manual & Setup Guide

VideoMate is a comprehensive PrestaShop video addon designed to transform your online store with engaging video content. As a powerful PrestaShop product video module, VideoMate allows you to easily integrate MP4 videos into your store, creating dynamic and interactive experiences that help showcase your products, promotions, and brand story more effectively.

Furthermore, this versatile PrestaShop VideoMate Addon supports multiple widget types, including responsive video carousels, floating video players, and single video displays, giving you full control over how videos appear across your site. Whether you want to highlight your best sellers, or new products, or simply add captivating videos on the homepage or category pages, VideoMate offers flexible video mapping and display options tailored to your needs.

Additionally, with features like video library management, status toggling, and client-side validation, managing your video assets is effortless and secure. Meanwhile, the floating video module allows you to add stylish, movable video players that users can minimize or close, while the carousel module displays multiple videos with autoplay and navigation controls, ensuring a smooth and modern user experience.

Moreover, designed for seamless integration, Knowband’s PrestaShop product video addon enhances product pages with rich media content that increases user engagement and boosts conversion rates. Ultimately, whether you are looking for a PrestaShop category video module, a homepage video solution, or a full-featured video marketing module, VideoMate offers an all-in-one video widget module for PrestaShop that is responsive, customizable, and easy to manage.

[New] Latest Updates of PrestaShop Video Manager Module v1.0.4

PrestaShop VideoMate Manager v1.0.4 has been released with the following changes:

Dashboard and Reports: Now you can track impressions, plays, product clicks, and add to cart with charts, tables, date filters, and CSV export.
Shoppable Video: Attach products to a video, with a product card and Add to cart on the storefront.
YouTube and Vimeo: Add videos by link, with cover images fetched automatically or uploaded by you.
Widget Controls: Schedule widgets, set delay or scroll triggers, target pages and devices, and choose landscape, portrait, or square video.

[New] Latest Updates of Prestashop Video Manager Module v1.0.3

This major update brings the new enhancement that now you can generate videos using AI Platforms.The Prestashop Video Manager Module now supports AI-powered video generation using Gemini and ChatGPT. Create product and promotional videos automatically with advanced AI technology. 

[New] Latest Updates of Prestashop Video Manager Module v1.0.2

The new version of the PrestaShopVideomate module now includes new enhancements that give store owners greater control over video content and how customers interact with the videos.

1. Video Upload Type Options

Now, store owners can choose between two methods of video type for their store:

Direct Upload: They can select and upload video files stored locally on their computer

External URL: Store owners can also add URLs to videos hosted on supported platforms using their URLs, which are publicly accessible.

These options give you flexibility in managing your video content based on your preferred hosting method.

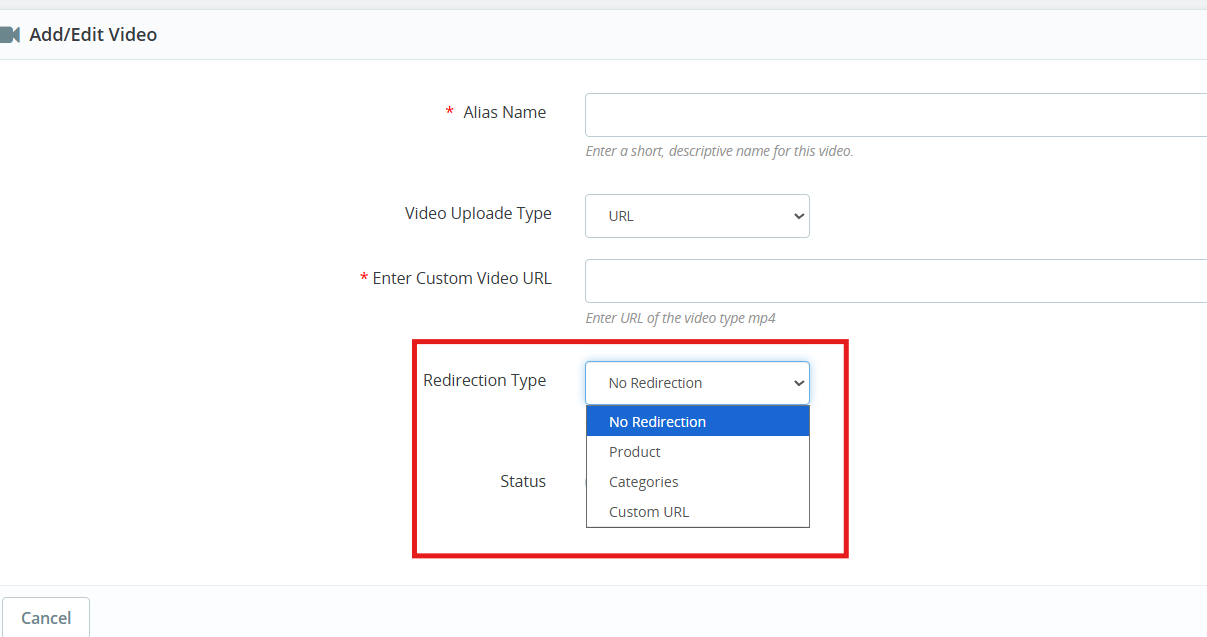
2. Configurable Redirection Settings

The Prestashop Video Manager module introduces redirection controls that determine where customers land after clicking on a video. 

You can direct them to redirection URLs of products and categories as well as any custom URL.

3. Video Integration on Product Pages

Videos now appear within the product image gallery on individual product pages. When you add a video, it displays alongside your product photos in the same viewing area.

These key features specially helps in

  1. Demonstrate how products work in real
  2. Keep potential buyers engaged longer on your product pages
  3. Deliver more detailed product information without cluttering the page layout


1.0 Key Features of Prestashop VideoMate Addon

Video Library Management First and foremost, with the VideoMate PrestaShop Addon, upload MP4 videos (up to 50MB) and manage them easily using alias names, status toggle, and in-admin previews.

Video Mapping Management Additionally, this PrestaShop product video addon lets you map videos to products, categories, home pages, Best Sellers, or New Product pages with flexible widget types.

Frontend Video Display. Furthermore, use a carousel, single, or floating widget to display videos beautifully across your store. A responsive video module for PrestaShop ensures smooth playback on all devices.

Broad Widget Placement Moreover, this PrestaShop video carousel module supports placement on product pages, category pages, home pages, and special listings, maximizing visibility and customer engagement.

Custom Widget Configuration In addition, configure widget settings like autoplay, video count, position, and custom headings—making it a PrestaShop custom video display module with high flexibility.

Centralized Admin Panel Subsequently, manage all configurations from a clean admin panel with global enable/disable controls—ideal for store-wide video campaign control.

Optimized Performance & Compatibility Meanwhile, this lightweight PrestaShop MP4 video integration works seamlessly with prestashop versions 1.7 to 8. x.x.

Effective Video Marketing Strategies As a result, a true PrestaShop video marketing module, VideoMate enhances your store’s product pages with engaging video content that boosts conversions and customer trust.

Fully Responsive & Mobile-Friendly Consequently, VideoMate is a responsive video module built specifically for PrestaShop that automatically optimizes video display across all devices, delivering seamless playback on desktop, tablet, and mobile screens.

Knowband’s PrestaShop Addon to Show Product Videos Ultimately, VideoMate serves as your comprehensive video display solution for PrestaShop, offering versatile functionality as a homepage video module, category video module, or floating video module to meet all your site’s video integration needs.

2.0.0 Installation Guide for PrestaShop VideoMate Addon

Step 1: Purchase and download the Knowband’s Prestashop VideoMate Addon After your purchase is complete, you’ll receive the videomate.zip file. VideoMate is your complete PrestaShop video marketing module, designed to transform and enhance your storefront with professional video integration.

Step 2: Access Module Manager Once logged in, go to Modules > Module Manager > Upload a Module to begin the installation of your PrestaShop MP4 video integration solution.

Step 3: Upload and Install the Module Then, drag and drop the videomate.zip file or manually upload it. PrestaShop will automatically install this feature-rich video widget module for PrestaShop.

Step 4: Configure the Addon Finally, click Configure to start managing your video library, mapping videos to products, categories, or special pages like Best Seller and New Product – all with one of the best PrestaShop addons to show product videos.

3.0. Admin Panel Configuration

3.0.1 General Settings

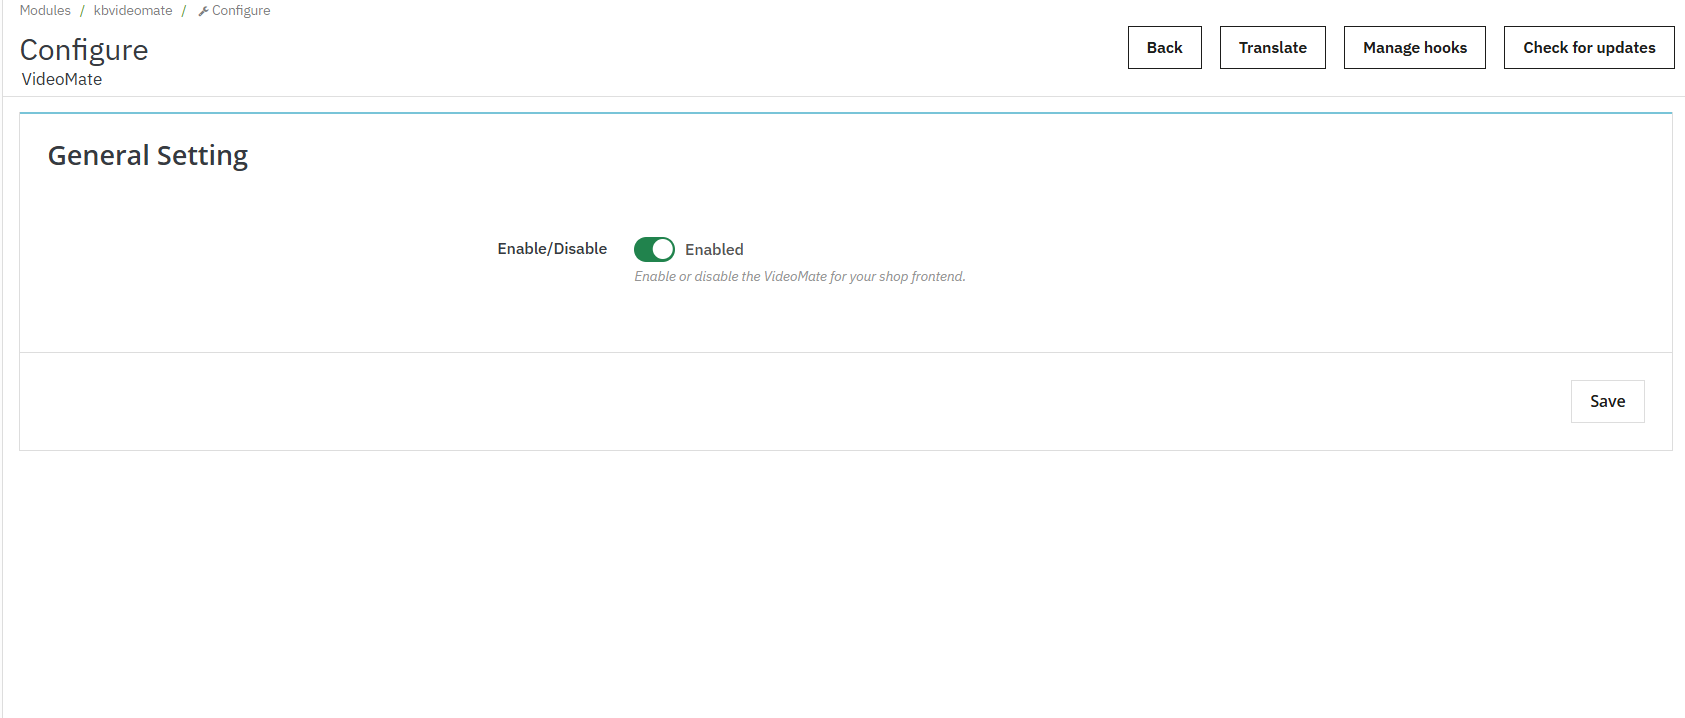
Enable or disable the entire video widget functionality across your store with a single toggle. Additionally, this is useful for temporary deactivation without losing configurations.

3.0.2 Video Library Management

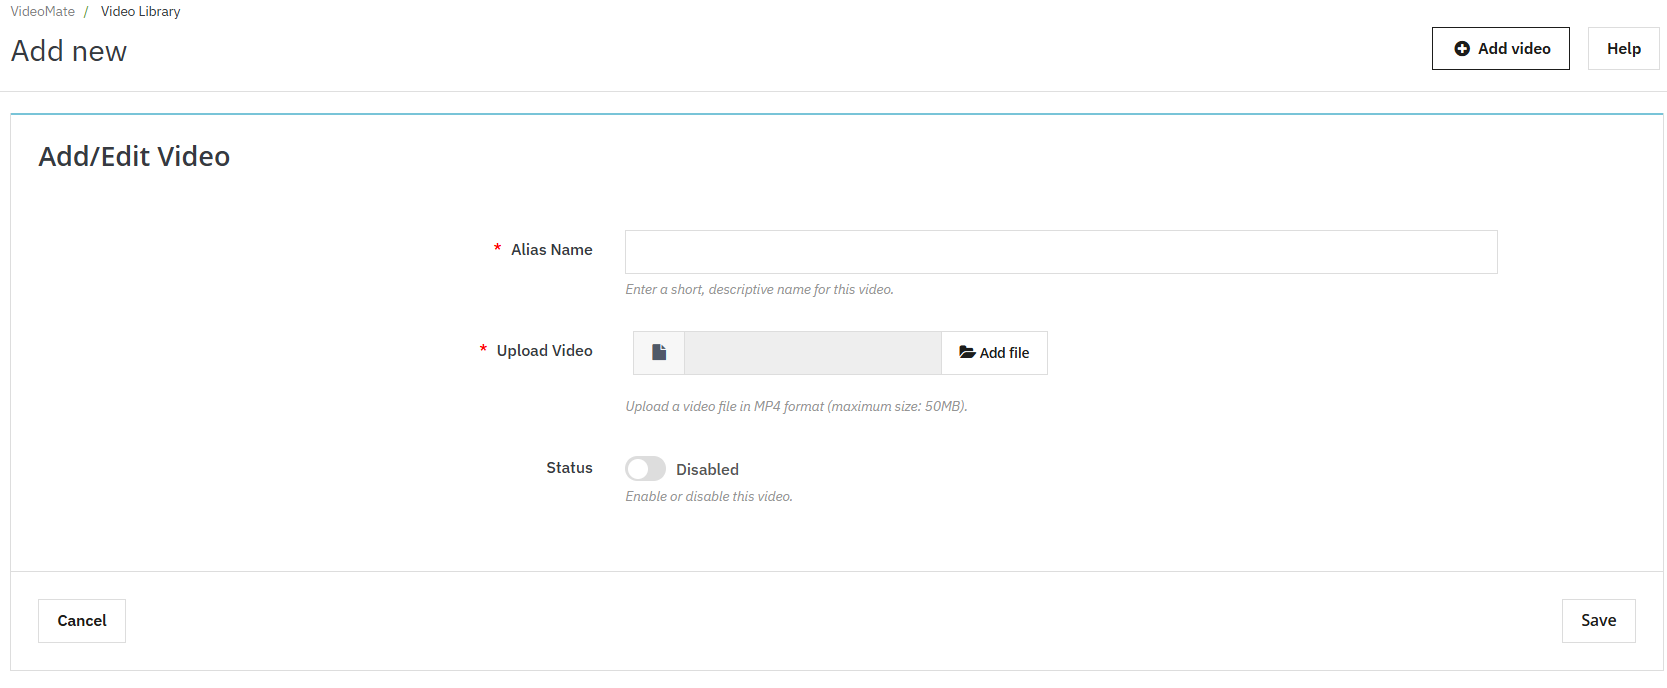
  • Add New Video: Click “Add New” to upload MP4 videos (up to 50MB) to the library. This feature enables PrestaShop MP4 video integration.
  • Alias Name: Assign a unique name to each video for easy identification and mapping.
  • Upload Video: The Videomate allows the store owners to browse and upload mobile-friendly video files in MP4 format.
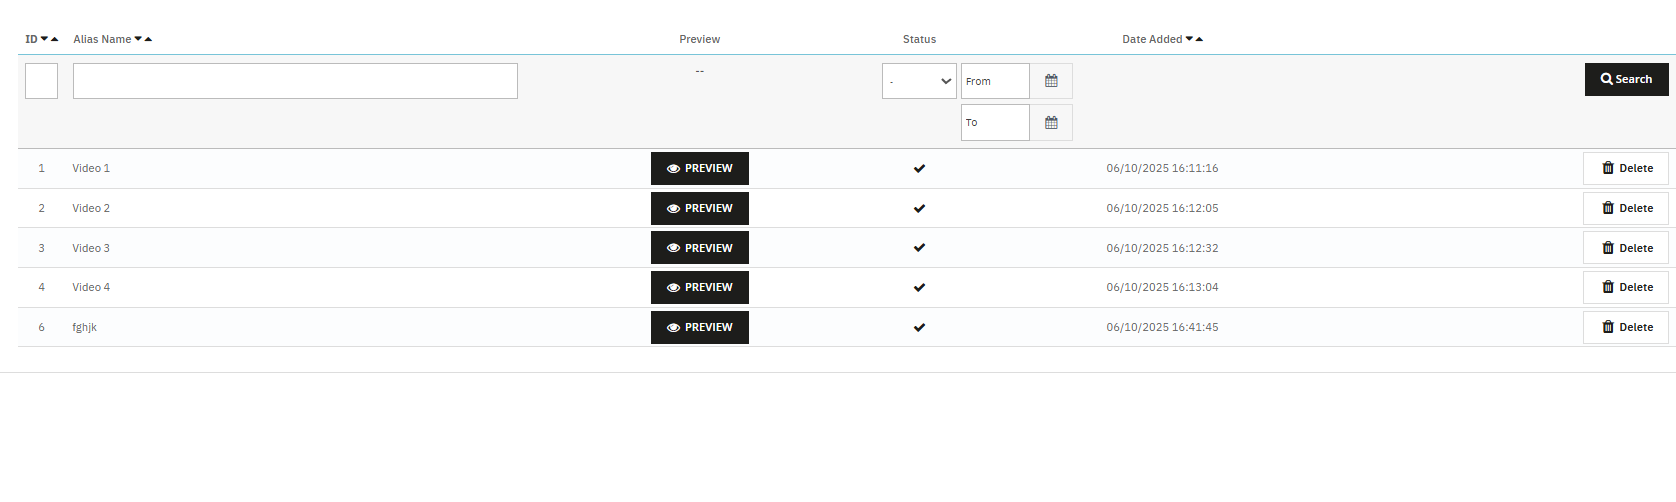
  • Preview Option: Knowband’s VideoMate Prestashop Module allows store owners to preview before being mapped or published.
  • Redirection URL: The store owners can now link their videos to product pages, category pages and custom page URLs using the Prestashop Video Manager Module


3.0.3 AI Video Generation in Prestashop Video Manager Module

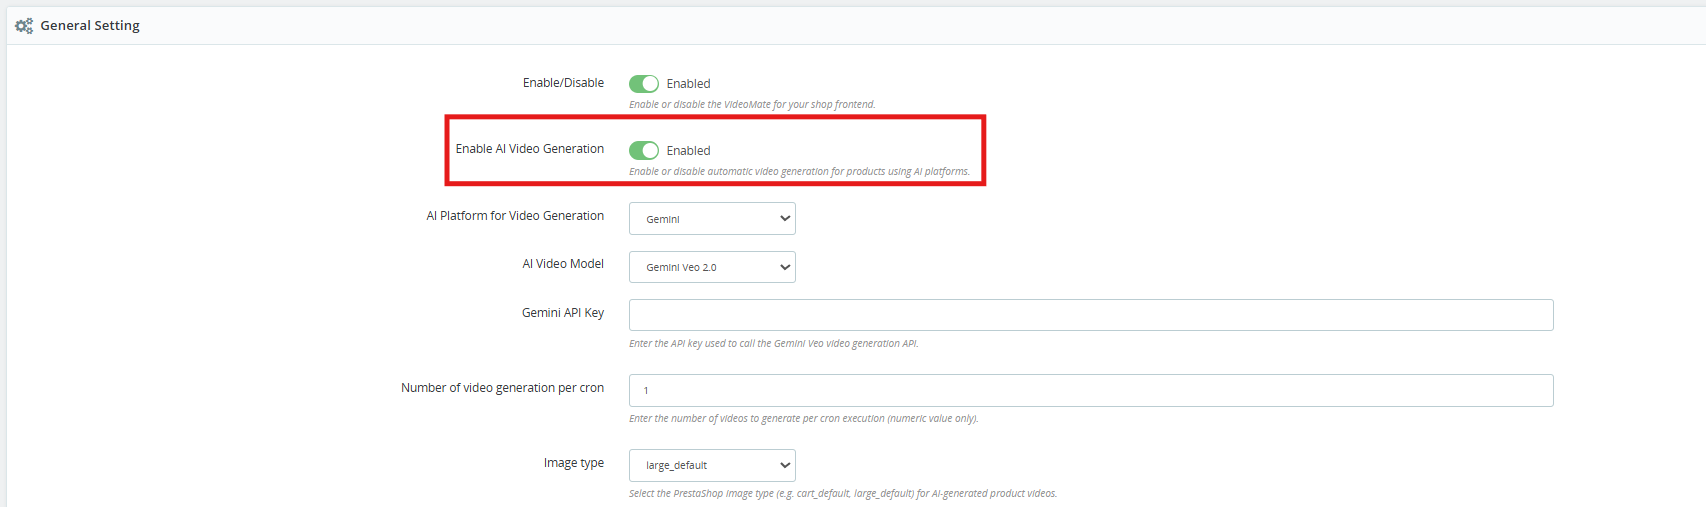
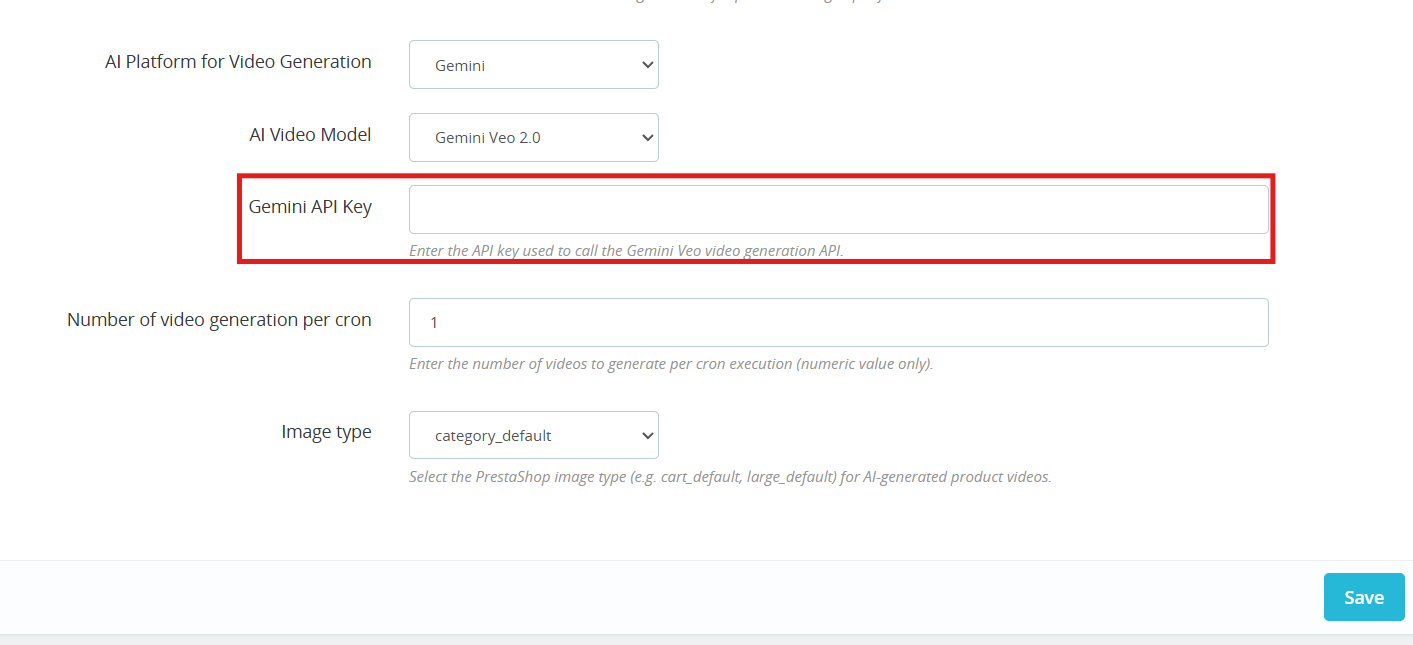
[New] Enable AI Video Generation: Enable this option to start the AI-powered video generation functionality.


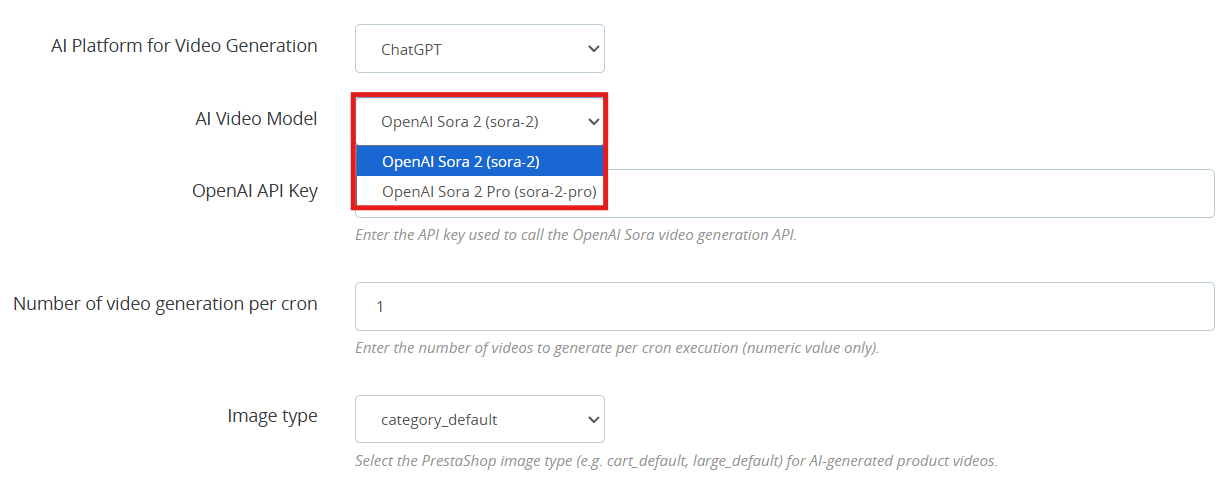
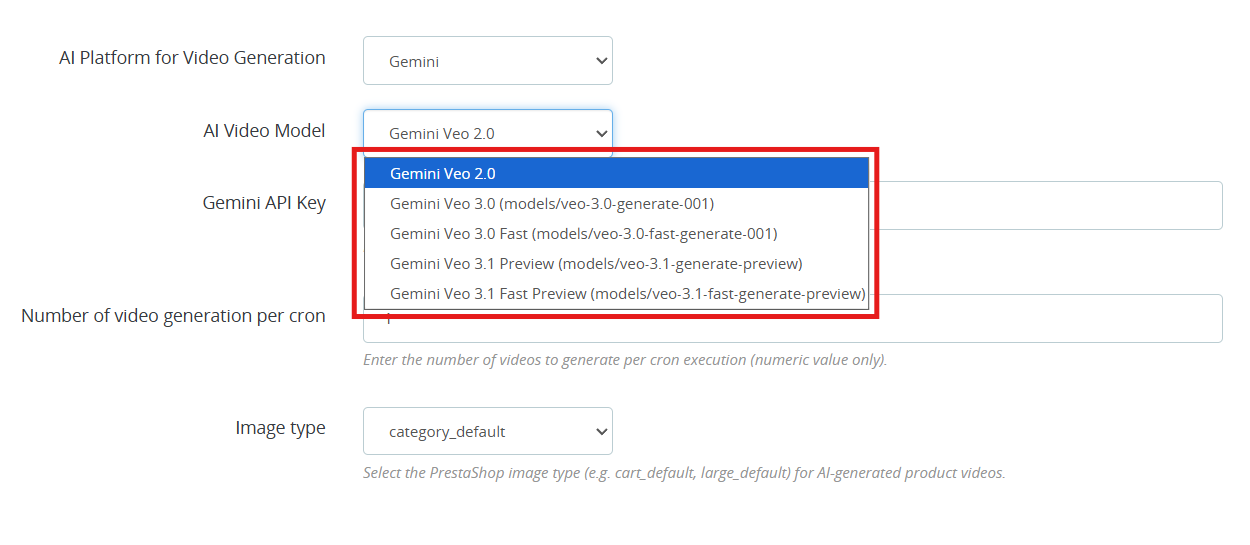
[New] AI Platform for Video Generation: Select either ChatGPT or Gemini as your generation platform. Both AI platforms work well and it really comes down to which fits your requirement and what you are willing to spend.

[New] AI Video Generation Models: VideoMate is one of the popular Prestashop AI Video Generation Module which is available right now. Whether you are going with the ChatGPT video generator or the Gemini video generation, you have clear options to work with.

ChatGPT Models (OpenAI)

  • OpenAI Sora 2: This model turns text prompts into sharp, visually strong videos. A good all-around pick for PrestaShop AI product video generation.
  • OpenAI Sora 2 Pro: this OpenAI ChatGPT model steps it up with finer detail, support for longer clips, and cleaner results on more complicated scenes. Worth it if your store needs polished, high-end AI-generated product videos.

Gemini Models (Google)

  • Gemini Veo 2.0 Output in Veo 2.0 is consistent and predictable, which makes it a natural fit for PrestaShop Gemini video generation tasks.
  • Gemini Veo 3.0 (models/veo-3.0-generate-001) Noticeably better motion handling and prompt accuracy over  Veo 2.0. You can go here for PrestaShop marketing video generation or any product showcase.
  • Gemini Veo 3.0 Fast (models/veo-3.0-fast-generate-001) is designed for throughput. If you are running bulk AI video generation in PrestaShop through cron jobs, this is the one to use.
  • Gemini Veo 3.1 Preview (models/veo-3.1-generate-preview) handles more nuanced prompts better than previous versions.
  • Gemini Veo 3.1 Fast Preview (models/veo-3.1-fast-generate-preview) Same generation quality as 3.1 Preview but tuned for speed. It is practical for high-volume PrestaShop product video automation where you cannot afford long wait times.

  • OpenAI API Key: Paste your OpenAI key here to get PrestaShop ChatGPT video generation running. Steps are in section 3.4.
  • Gemini API Key Add your Gemini key to switch on PrestaShop Gemini AI video generation. Steps are in section 3.5.
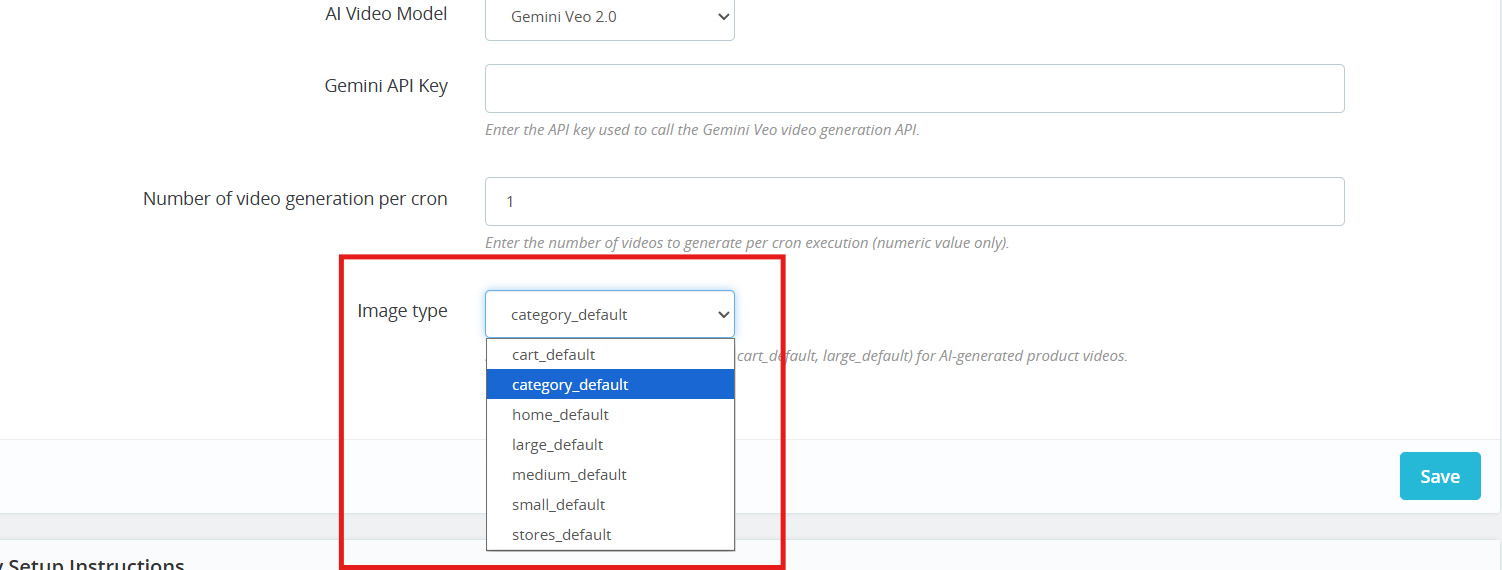
  • Number of Videos per Cron Controls how many videos the PrestaShop AI Video Generation module queues up each time the cron runs.
  • Image Type: Choose which image size gets passed to the AI during PrestaShop AI video generation: cart, large, small, medium, stores, or category.

Cron URL: Run the cron URL provided in the General Configuration section to automatically generate videos using AI.

3.0.4 AI Video Library

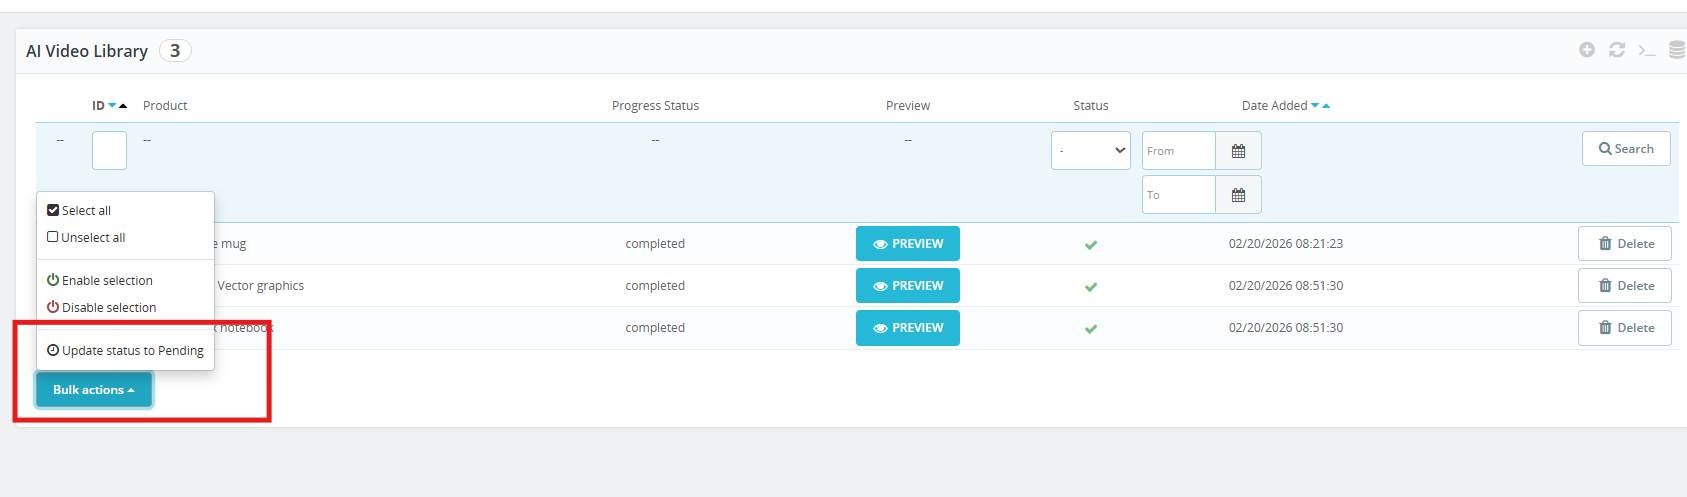
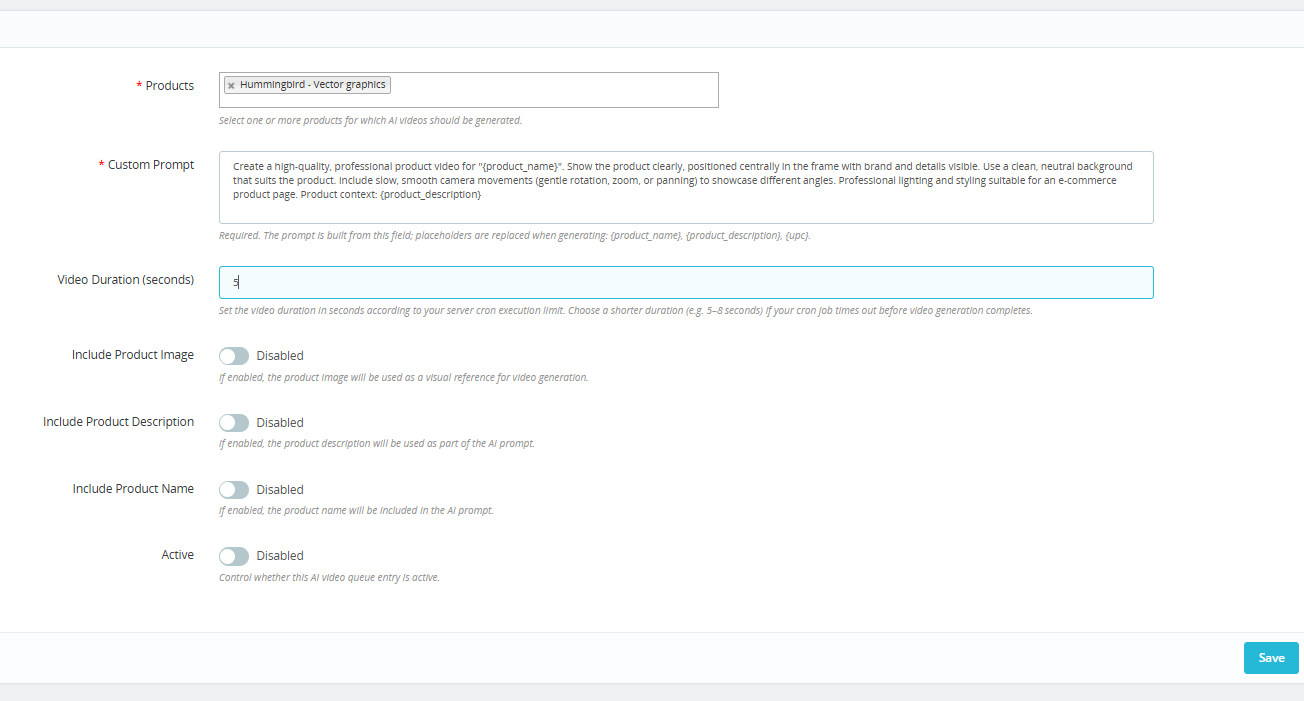
This is where all your PrestaShop AI Video Library entries live, queued, paused, or active. Click + to set up a new one.

  • Products: Choose the products you want to cover. The PrestaShop AI Video Generation module handles the rest, generating a video for each one through ChatGPT or Gemini.
  • Custom Prompt: Type out what you want the AI to do. Add in {product_name}, {product_description}, or {upc} where needed. The module add these variable with live product data each time a video runs, which keeps your PrestaShop AI product video prompts scalable without extra manual work.
  • Video Duration (seconds) Staying in the 5 to 8 second range helps you avoid cutoffs during automated PrestaShop video generation.
  • Include Product Image: Allow the AI model to take your product photo as a reference so the output stays visually close to the real item. Helps the PrestaShop AI video generator stay on brand.
  • Include Product Description Gives the AI more to work with. More context generally means more relevant AI-generated product videos in PrestaShop.
  • Include Product Name Keeps the prompt tied to the right product so there is no mismatch in the final PrestaShop AI video output.
  • Active: You can enable or disable the AI Generation settings for the product. If this is disabled, then products will not be added to the queue for video generation.

Generated AI Video Demonstration:

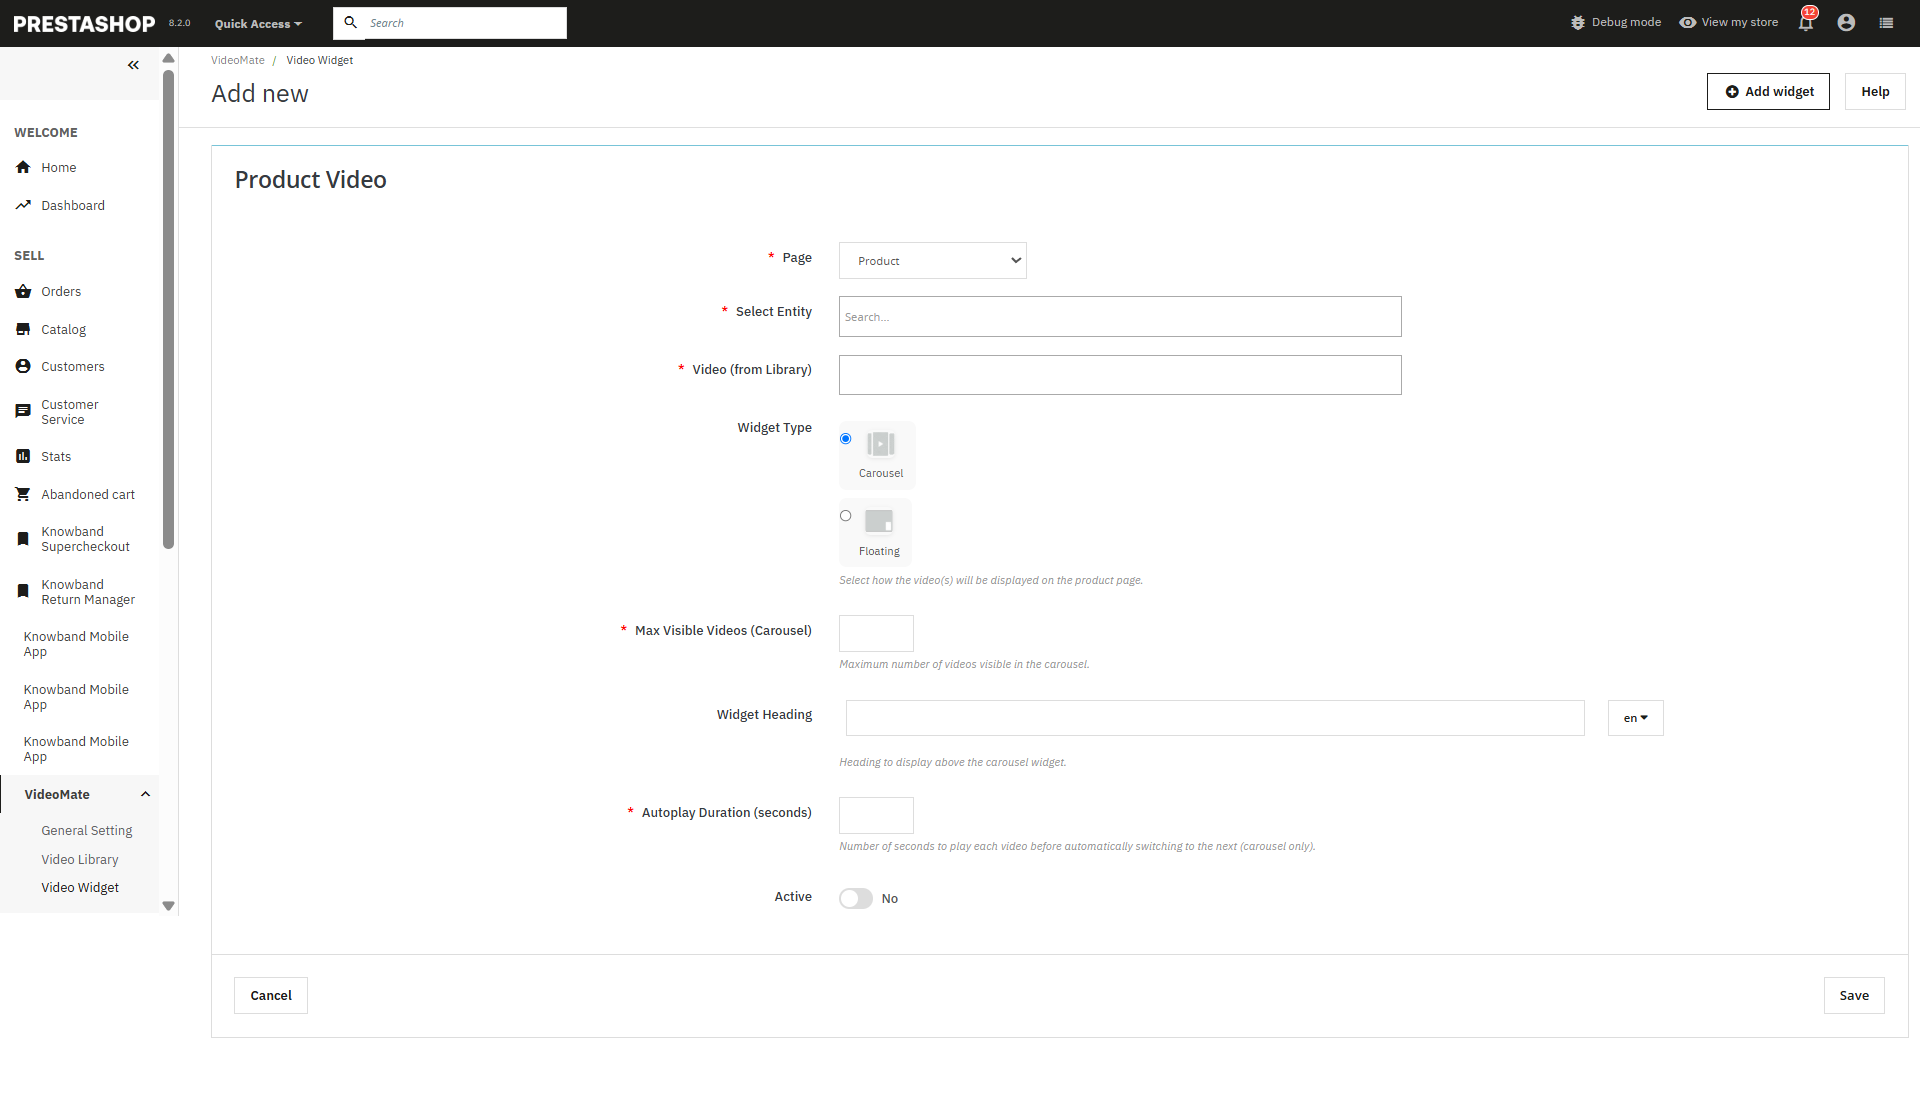
3.0.5 Video Widgets Configuration

The VideoMate PrestaShop Module exhibit the feature to place the dynamic video widgets across multiple pages.

  • Add New Widget: Click to create a new video widget for YouTube or MP4 videos.
  • Page Selection: Choose where to display videos — Homepage, Product Page, Category Page, Best Seller, or New Product.
  • Select Entity: Dynamically assign videos to specific products or categories.
  • Video Selection: Select from videos already available in your media library.
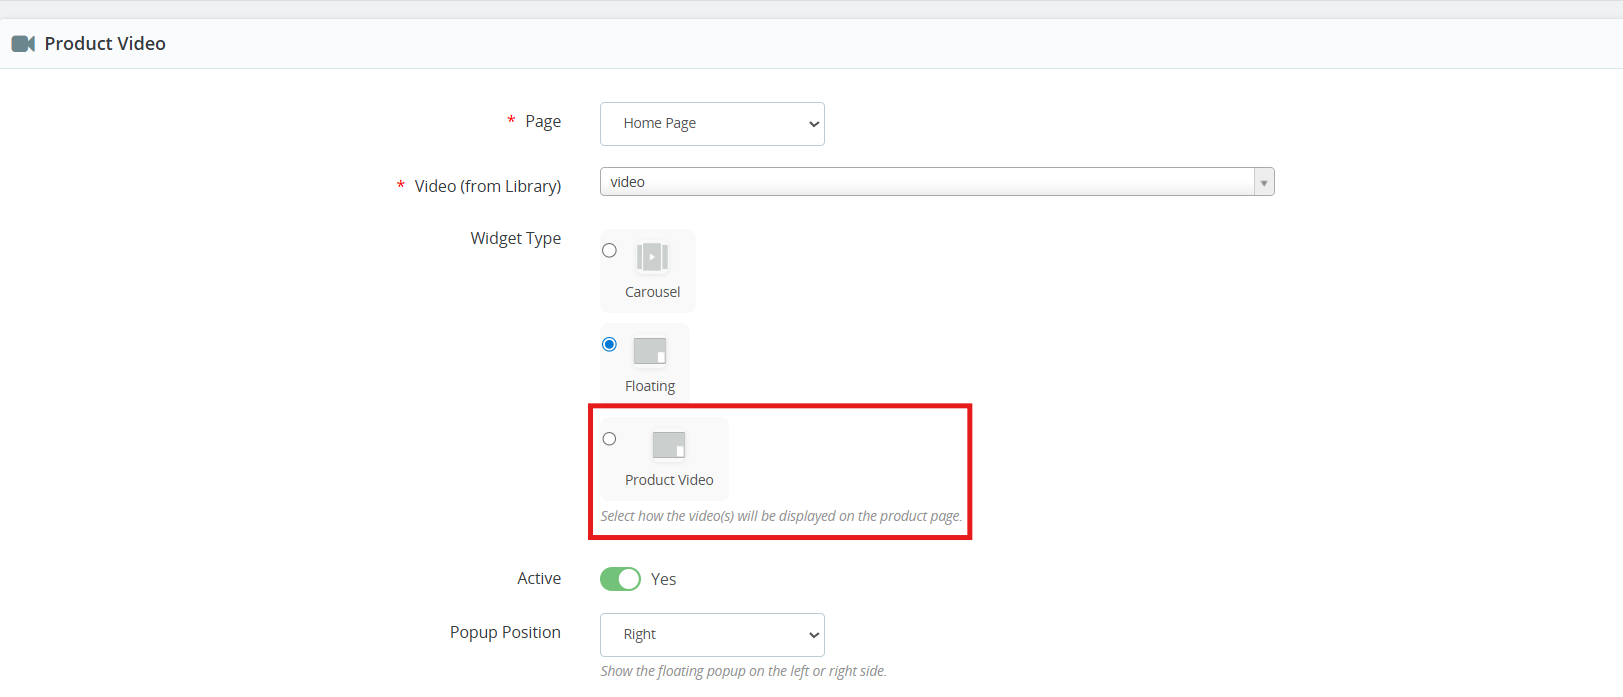
  • Widget Type: Select between:
    • Carousel – For multiple videos in a slider format.
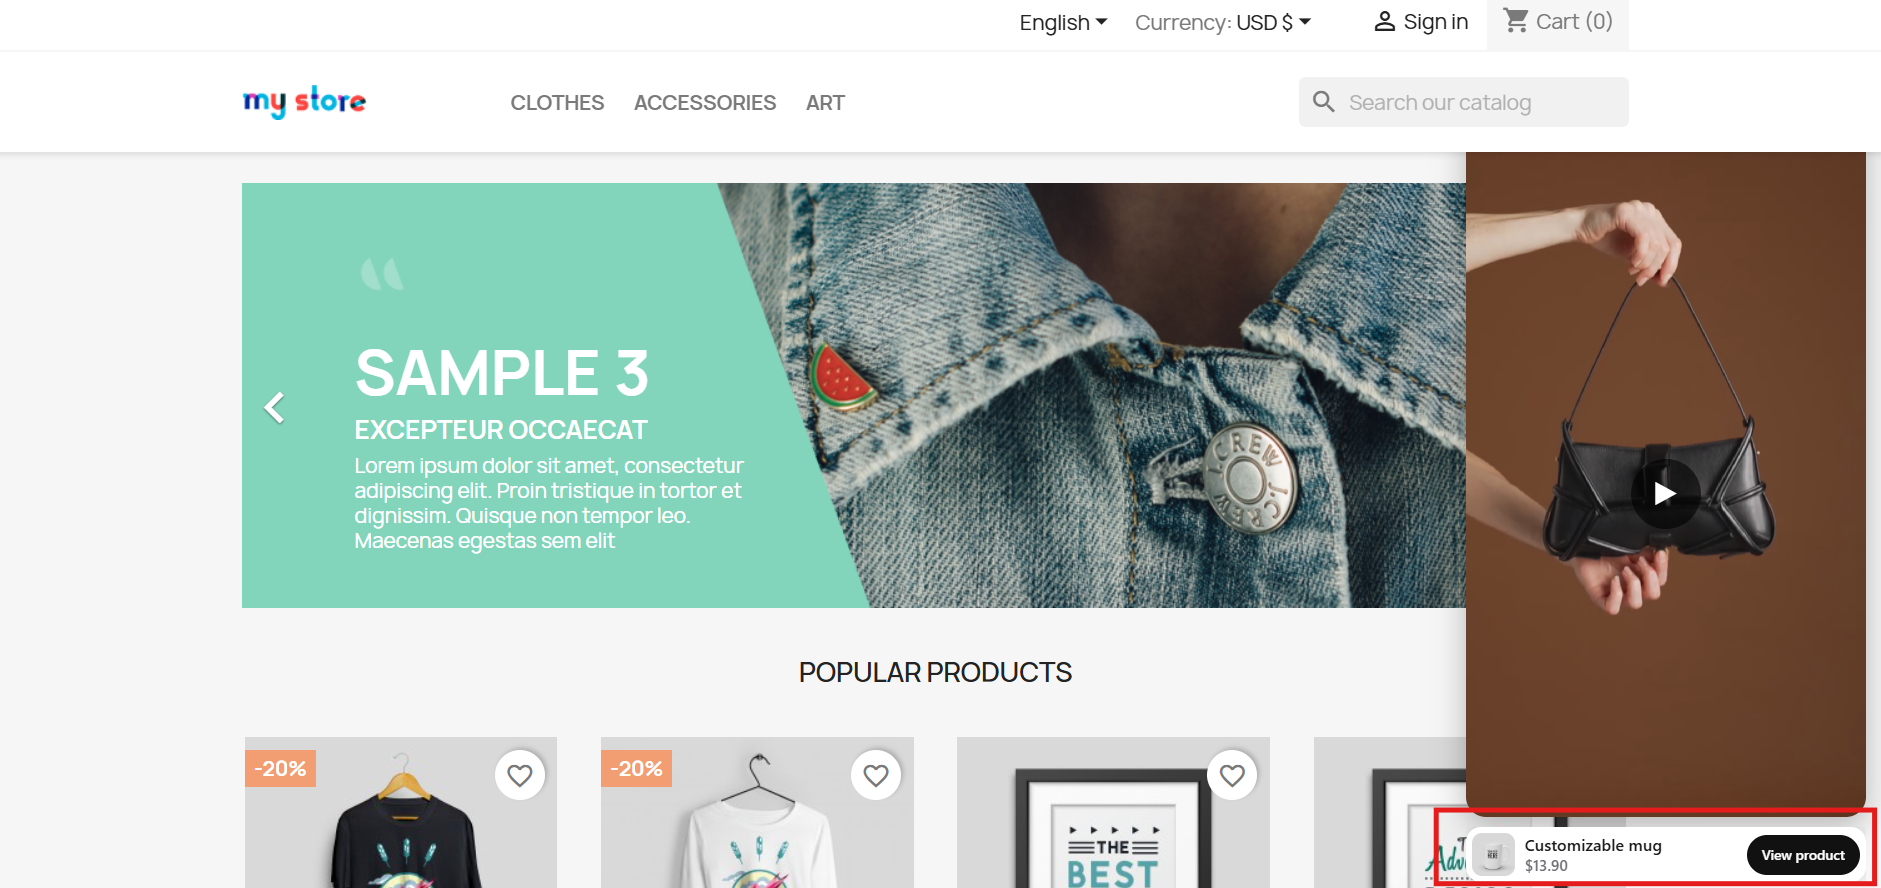
    • Floating – Provides a movable video player positioned at the bottom-left or bottom-right of the screen.
    • [New] Product Video: Store owners can now add videos to product pages using the new Product Video widget of the PrestaShop Video Manager. The added product videos will be displayed alongside product images on the product image section, allowing merchants to showcase product visuals more effectively.
  • Maximum Visible Videos: Prestashop video marketing module allows the store owners to define how many videos should be shown in a carousel (shows 5 in case of 5 maximum videos).
  • Widget Heading: The Responsive video module for PrestaShop allows the module to optionally set a title above the widget to engage users.
  • Autoplay Video: The Prestashop VideoMate Module allows the e-merchant to set the autoplay time in seconds for videos to begin automatically.
  • Status (Active/Inactive): This feature of the PrestaShop floating video module enables or disables the status of the widget without deleting it.

Store owners can disable the widgets added in the video Widgets.

  • Save: Click to save your configurations and apply the widget to your selected pages.

3.0.6 PrestaShop Video Dashboard

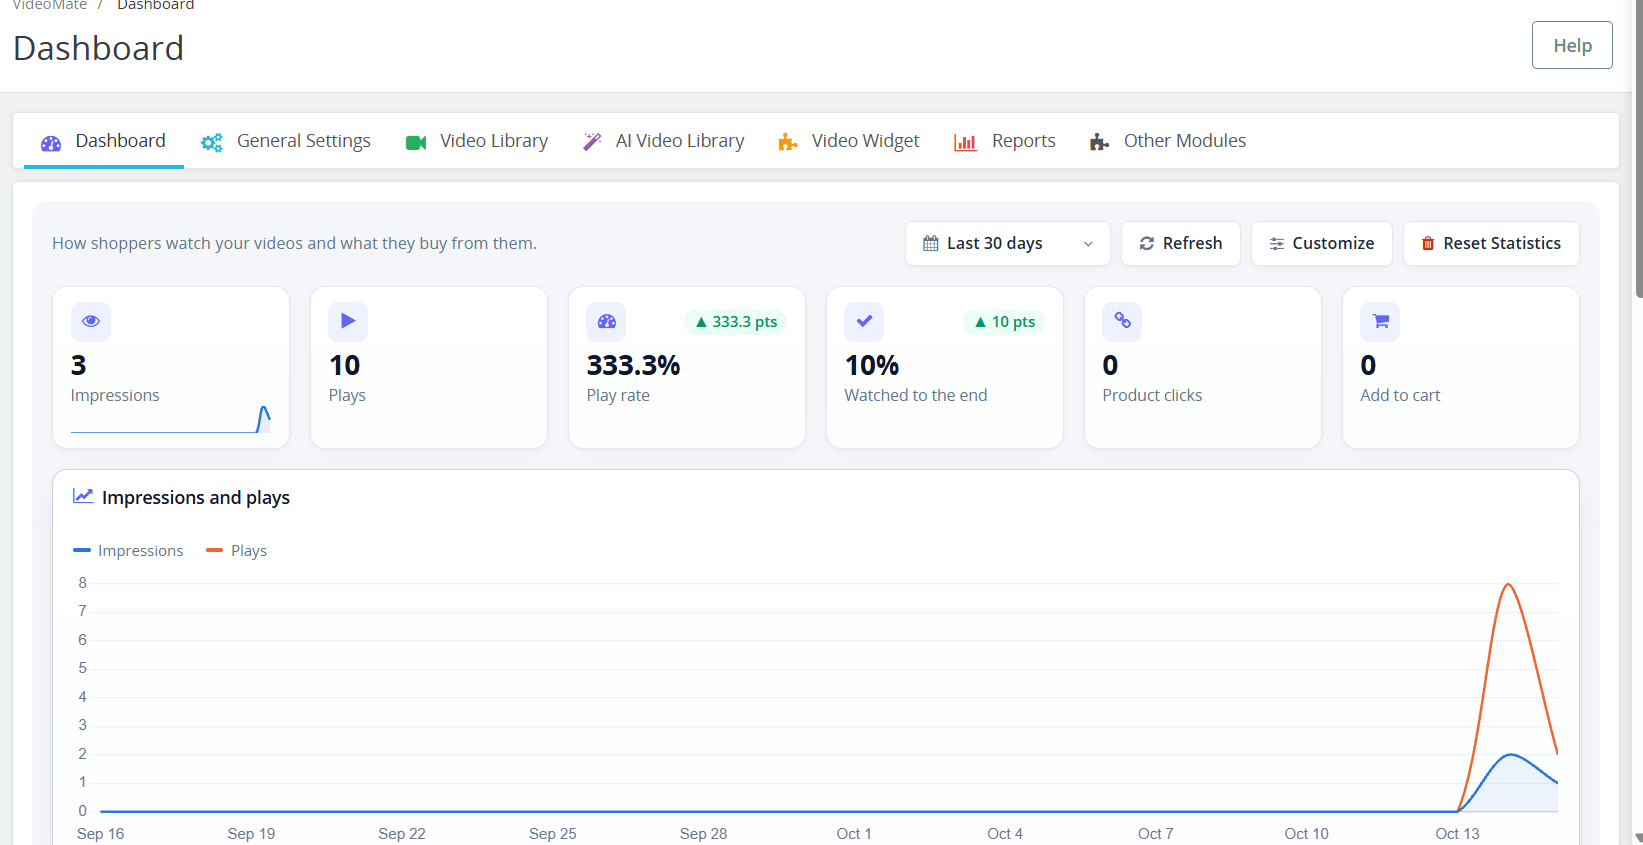
The Dashboard tab within the PrestaShop VideoMate plugin allows for tracking the way the customers watch your videos and which products they purchase through your videos. All your PrestaShop video statistics will be available to you in one place!


Period: choose the time period for all charts.
Refresh: refreshes the statistics.
Customize: Add, remove, and rearrange dashboard elements. Changes to the layout will be saved only to your admin profile.
Clear Statistics:
permanently removes the collected statistics.
Cards: Impressions, Plays, Play rate, Watched to the end, Product clicks, and Add to cart.

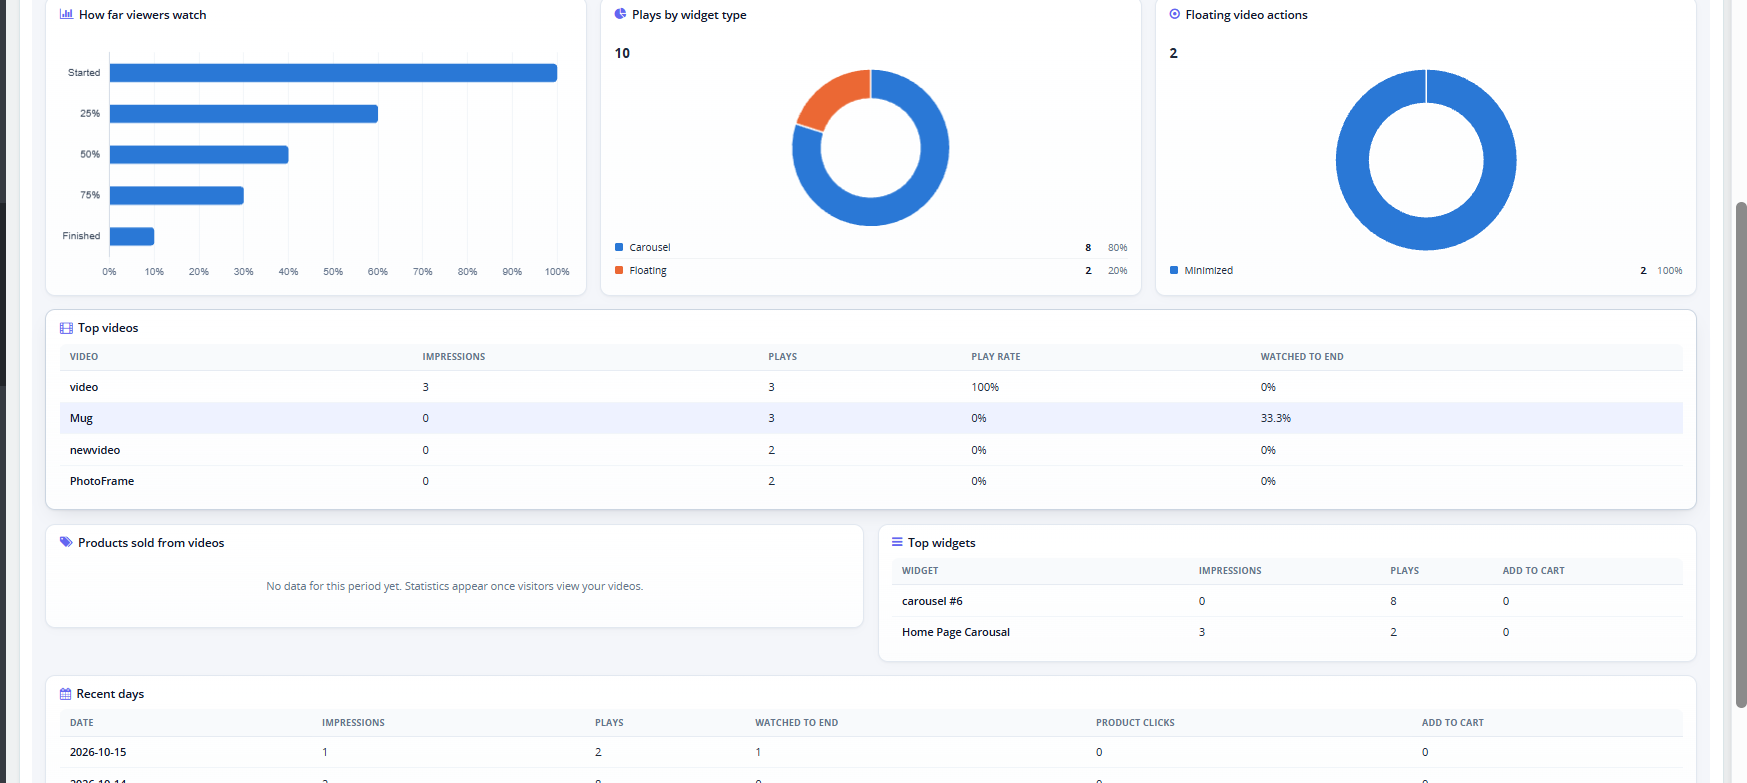
Charts: Impressions and plays over time, how far viewers watch (Started, 25%, 50%, 75%, Finished), plays by widget type, and floating video actions.

Tables: Top videos, Products sold from videos, Top widgets, and Recent days.

3.0.7 YouTube and Vimeo Videos in PrestaShop

This YouTube Vimeo PrestaShop module lets you add videos by link. In Video Library, the Video Source field now includes YouTube and Vimeo. Select one, paste the video link, and the module builds the embed automatically.

3.0.8 PrestaShop Video Cover Image (Poster)

The Poster Upload field sets the PrestaShop video cover image shown before the video plays. It accepts JPG, PNG, or WebP files up to 3 MB, at least 16×16 px. For YouTube and Vimeo videos the cover is fetched automatically, and you can upload your own to replace it.

3.0.9PrestaShop Shoppable Video

You can turn any video into a PrestaShop shoppable video by attaching products to it.

  • Shoppable Products: start typing a product name and select it from the list. You can attach up to 100 products to one video.
  • Bulk Add Products: paste product IDs or references, separated by commas or new lines, to add up to 1000 at once.

On the storefront, each attached product appears as a card with the image, name, price, and an Add to cart button. This PrestaShop video add to cart option lets customers buy without leaving the video. After a product is added, a View cart button appears. If a product has options, the card links to its product page instead.

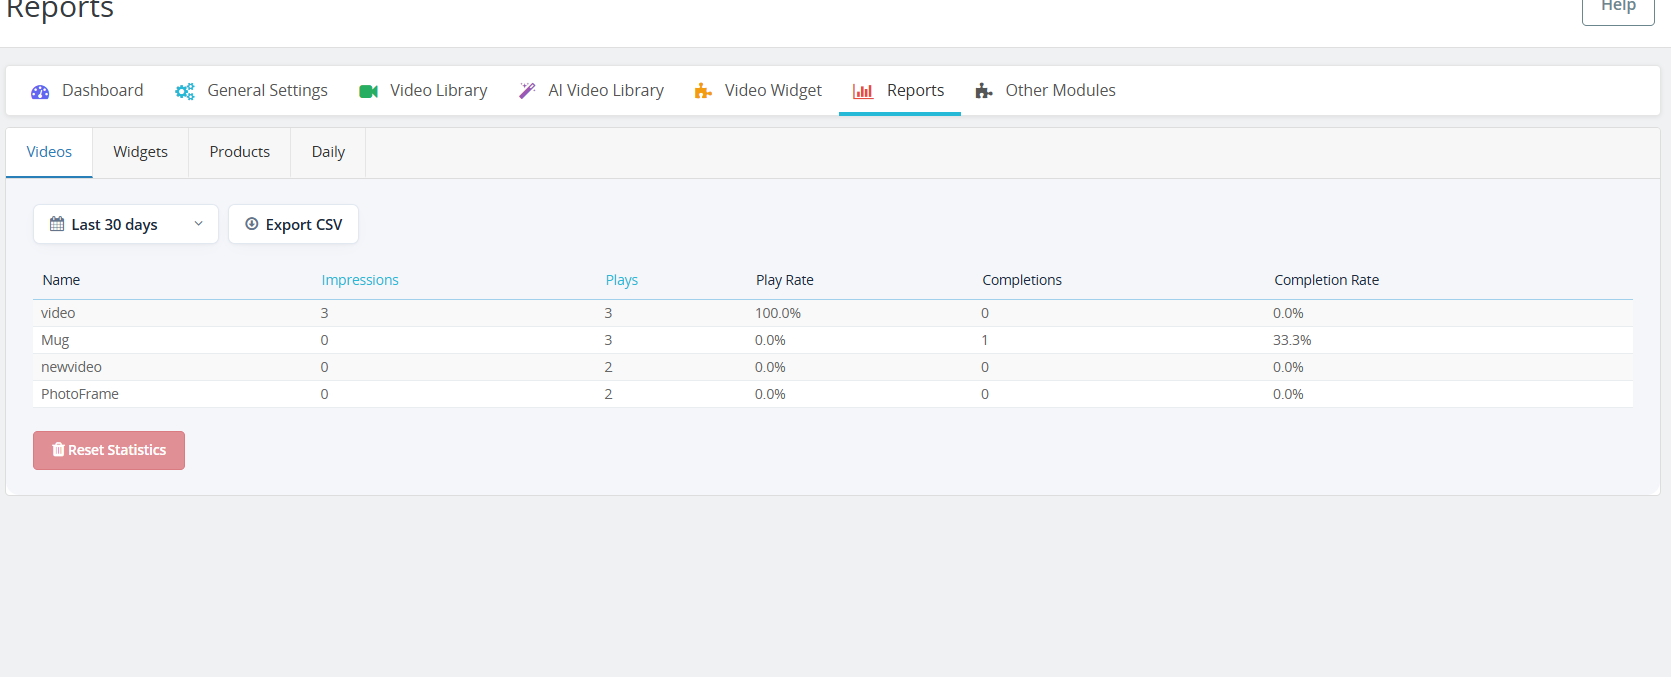
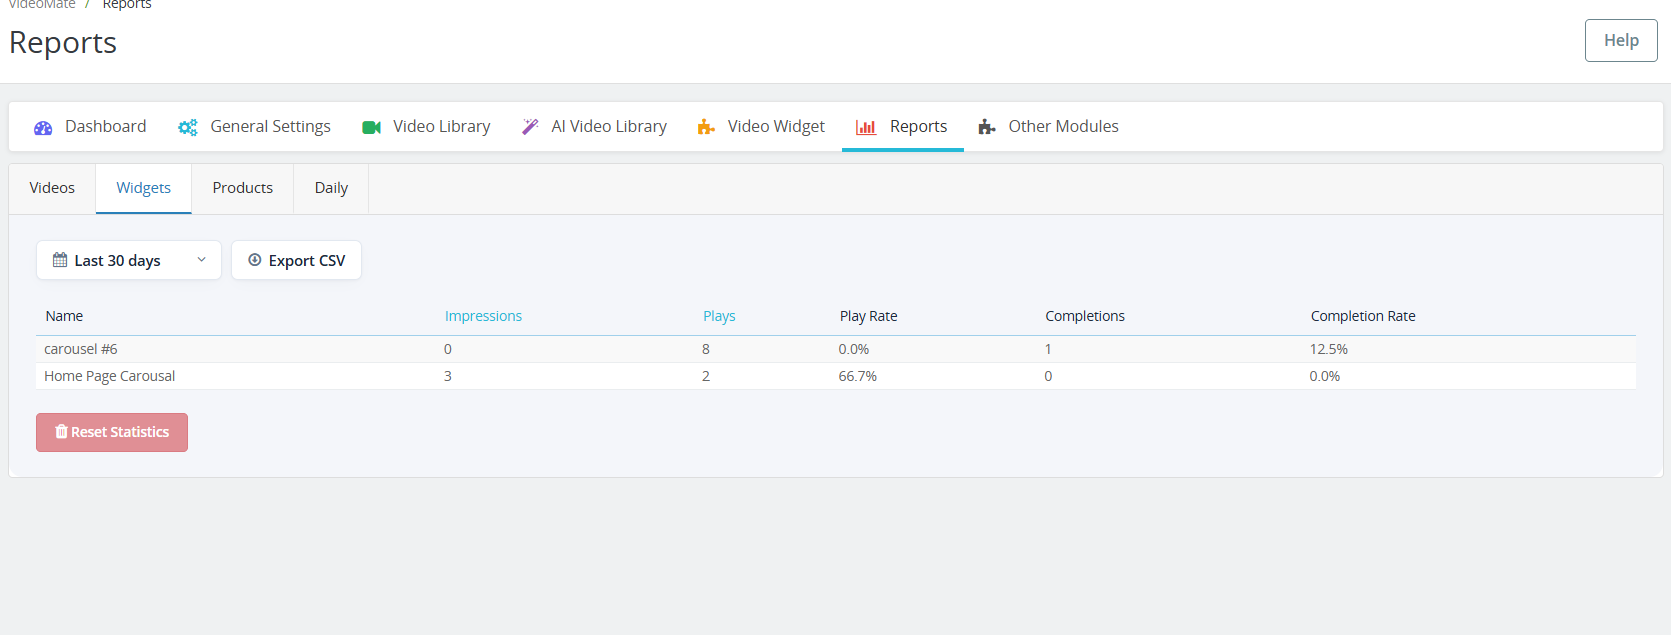
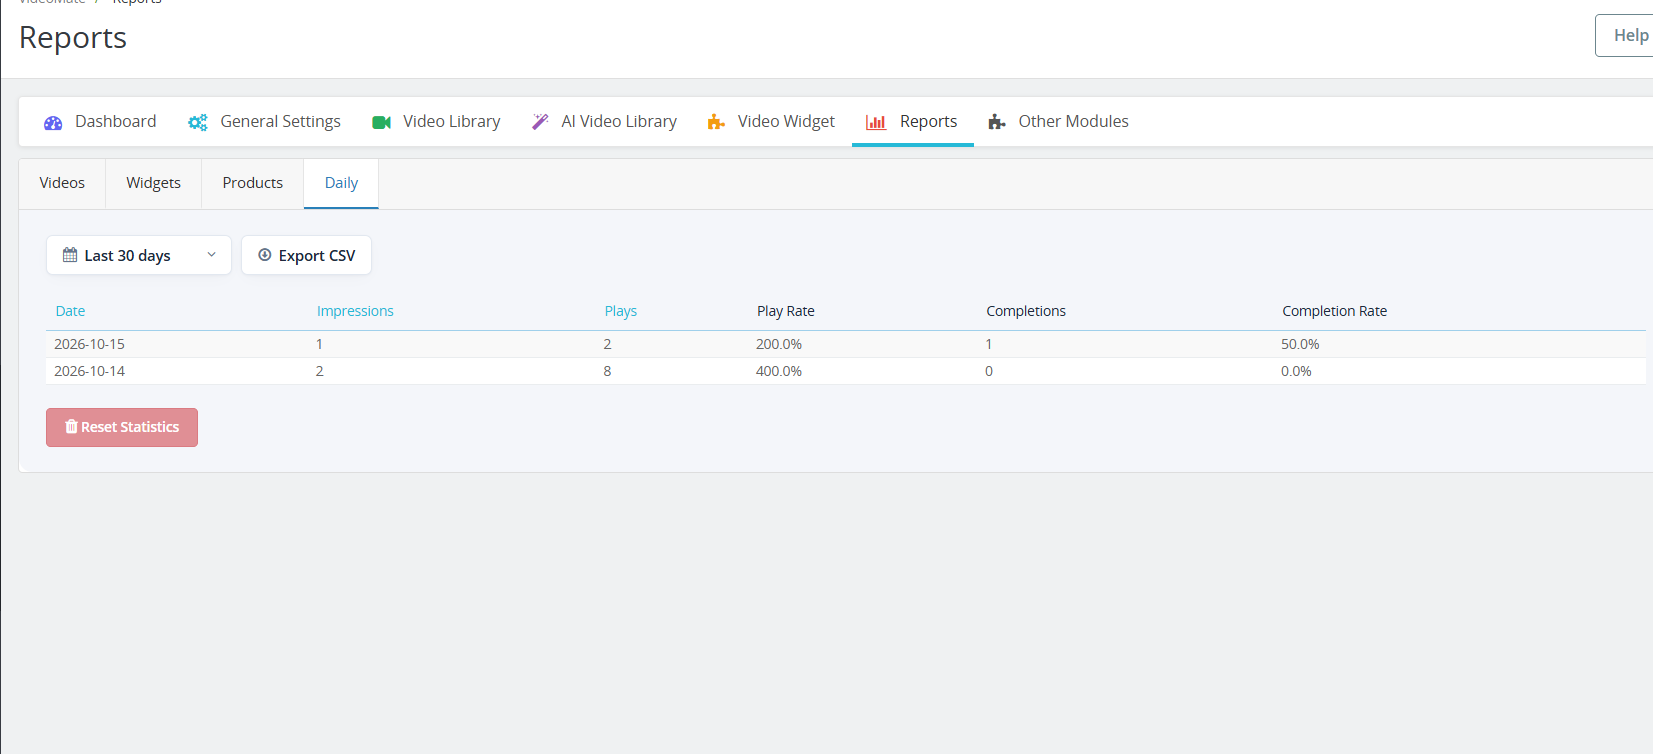
3.1.0 PrestaShop Video Reports

The new Reports tab has four sub-tabs: Videos, Widgets, Products, and Daily. Each one shows impressions, plays, play rate, completions, and completion rate.

  • Choose a period to filter the data.
  • Click Impressions or Plays to sort the table.
  • Click Export CSV to download the table. PrestaShop video reports can then be opened in Excel or Google Sheets.
  • Click Reset Statistics to clear the recorded data.

4.0 Benefits of PrestaShop VideoMate Module 

Boosts Product Engagement

Videos provide a richer shopping experience, helping customers understand product features better and reducing purchase hesitation.

Improves Conversion Rates

Significantly, customers are more likely to convert when they see video demos or tutorials, making VideoMate a powerful PrestaShop product video module for increasing sales.

Flexible Video Placement

Add videos across product pages, category pages, homepage, Best Seller, and New Product pages – ensuring visibility where it matters most.

Multiple Display Options

Choose from the carousel, floating, or single video widgets for a dynamic and responsive presentation tailored to your design.

Supports A & YouTube Links

Furthermore, seamlessly upload MP4 videos (up to 50MB) or trending social media videos, enabling full PrestaShop video integration.

Mobile-Responsive Design

All video widgets are fully responsive, ensuring smooth performance across desktop, tablet, and mobile devices.

Tutorial: Watch the Video Guide

To help you set up and use the PrestaShop VideoMate Module, we have created a comprehensive YouTube tutorial. This step-by-step video guide walks you through the installation process, configuration options, and how to effectively add and manage video content on your store.

 If you experience any difficulties during installation or when using the Prestashop VideoMate Extension, our support team is ready to assist you. Reach out to us through email at support@knowband.com or by submitting a ticket at knowband.com/helpdesk for prompt assistance with any technical issues or questions you may have.

Prestashop Gemini/ChatGPT/Claude/DeepSeek Content Generator & Translator Addon – User Manual

The Knowband AI Content Generator and Translator for PrestaShop is a cutting-edge module designed to create and translate content for PrestaShop store owners. By leveraging the advanced capabilities of Claude AI, ChatGPT AI, DeepSeek AI and Gemini AI, the module enables store owners to generate exceptionally high-quality content. Notably, the PrestaShop SEO-Optimized module provides SEO-friendly product content, including product descriptions, product titles, category descriptions, meta titles, and meta descriptions, all while maintaining content integrity and authenticity.

Moreover, the PrestaShop AI-powered Translator Addon seamlessly integrates with Claude AI, ChatGPT, DeepSeek AI and Gemini AI, thereby providing accurate and efficient translations for product content.

In addition, store owners can generate content effortlessly and in no time thanks to the powerful PrestaShop AI module. As a result, Knowband’s PrestaShop AI Content Generator enhances creativity in product descriptions while ensuring that all generated and translated content follows SEO best practices.

Furthermore, the Claude AI Content Generator for Prestashop integrates smoothly with “Claude AI API,” “Gemini AI API,” “DeepSeek API”, and “ChatGPT API,” which guarantees a hassle-free experience for both content generation and translation. Equally important, the built-in SEO optimisation features significantly improve search rankings while preserving content integrity.

What’s New in Prestashop AI Content Generator & Translator Module v1.0.2

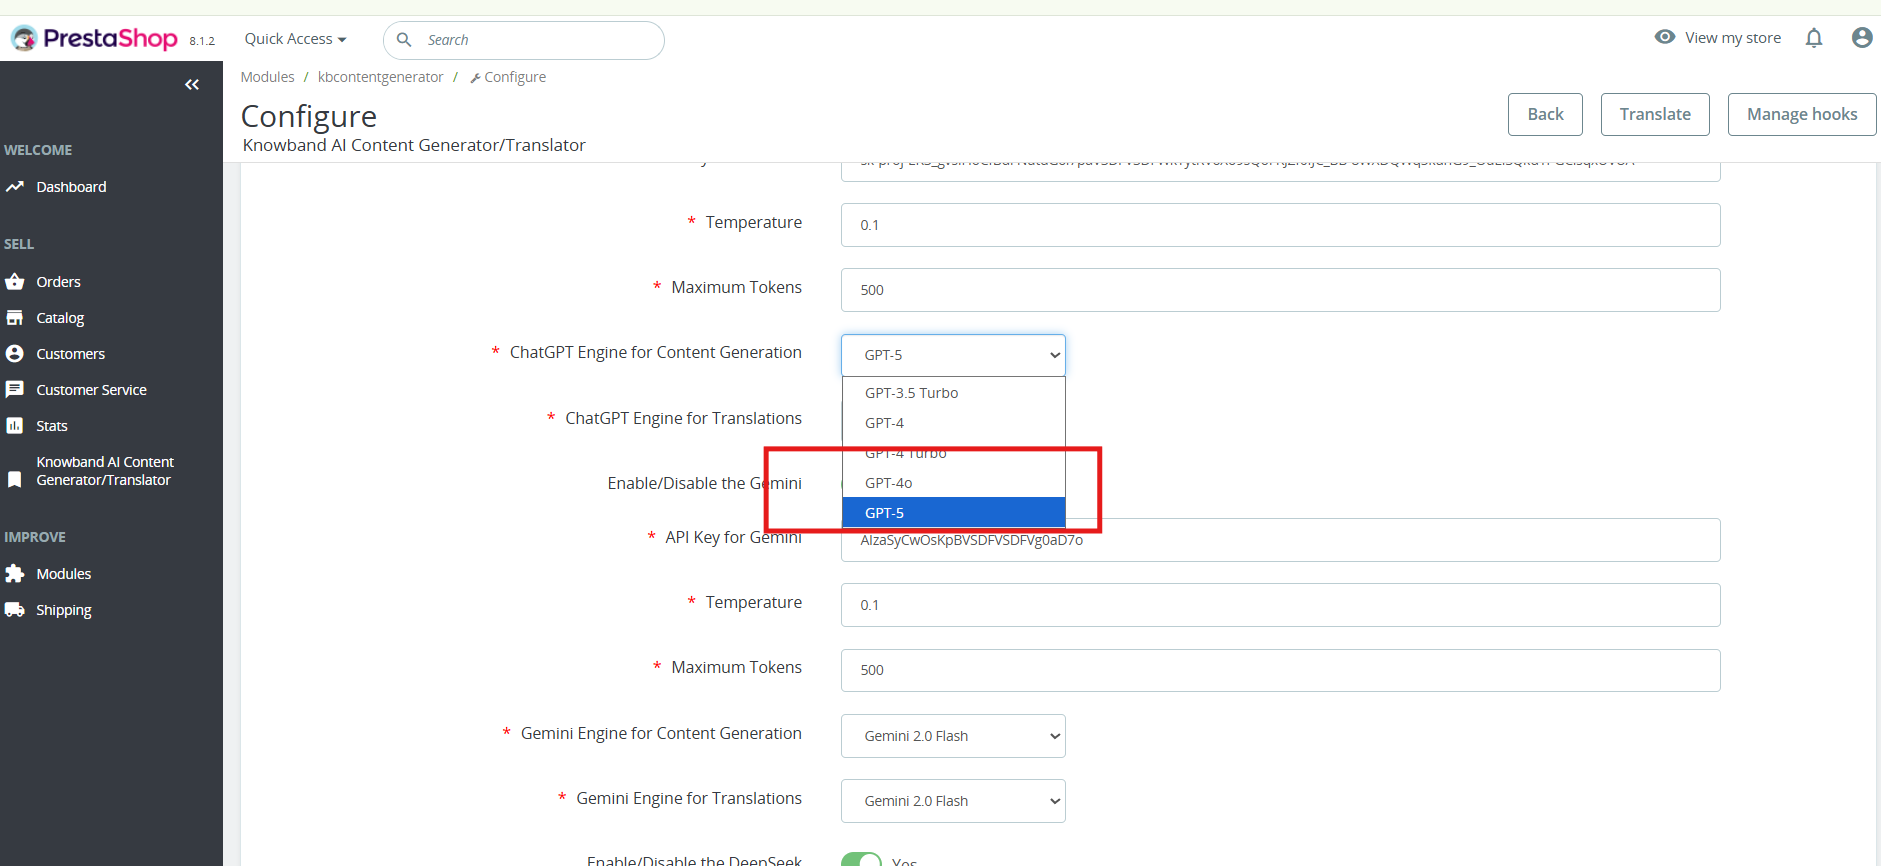
ChatGPT -5 for Smarter Content: The Prestashop AI Content Generator Addon now supports GPT-5, along with GPT-3.5, GPT-4 Turbo, and GPT-4.5. It enables faster, more accurate, and creative generation of product titles, descriptions, and meta content.

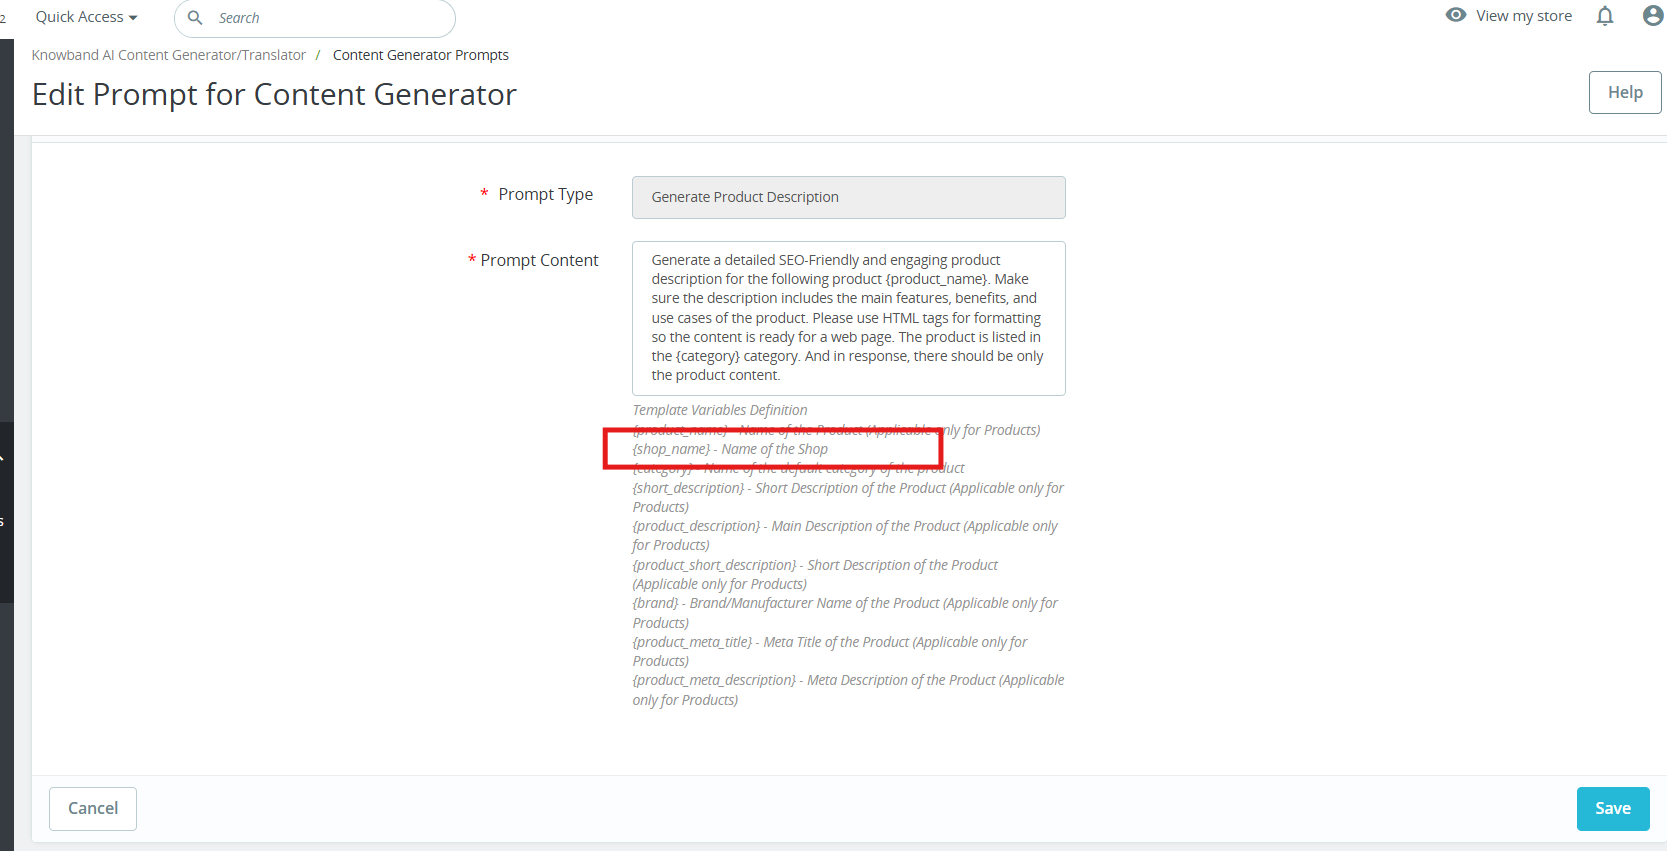
Brand-Specific Content with Manufacturer Variable: A new Manufacturer Variable allows you to include your shop or brand name directly in prompts. This feature in Prestashop AI Content Generator ensures personalised and consistent content across your store, easily editable to fit your needs.

1.0.0 Key Features Of the Prestashop Gemini/ChatGPT/Claude Content Generator/Translator Module

Effortless Content Generation
The Prestashop AI Content Module automatically creates high-quality product and category descriptions, meta titles, and meta descriptions by leveraging advanced AI technology. As a result, store owners can generate engaging and well-structured content without manual effort.

Customizable AI Models
Moreover, the PrestaShop AI Content Generator Addon offers a wide range of AI models for content creation and translation. Store owners can choose from ChatGPT models like GPT-3.5 and GPT-4.0, DeepSeek models including Chat & Reasoner, Claude models including Haiku 3, Haiku 3.5, Sonnet 3.5 (Old), and Sonnet 3.5 (New), as well as Gemini models such as Gemini 1.5 Pro, 1.5 Flash, 1.5 Flash-8b, 2.0 Flash, and 2.0 Flash – Lite Preview. With these options, merchants can tailor content generation based on their specific needs.

Seamless Multilingual Translation
In addition, the Prestashop AI Bulk Content Generator Module allows store owners to translate their content into multiple languages while simultaneously maintaining accuracy and cultural relevance. This means that businesses can expand their reach effortlessly and attract global customers.

Enhanced SEO Performance
Furthermore, the Prestashop AI Content Generator and Translator Addon optimize all content for search engines, thereby improving search rankings and increasing store visibility. By ensuring SEO best practices, this module helps businesses not only drive organic traffic but also enhance conversion rates.

User-Friendly Interface
Notably, no technical expertise is required to run the module. The PrestaShop Gemini/ChatGPT/Claude Content Generator Addon integrates seamlessly with your PrestaShop store, providing an intuitive interface that simplifies content generation. Additionally, even non-technical store owners can generate professional content with just a few clicks. This makes it easier than ever to manage high-quality store content without external assistance.

Bulk Processing Capabilities
For larger stores, the PrestaShop AI Content Generator module is an ideal solution. Moreover, the Prestashop Content Translator Addon enables store owners to generate content for multiple products simultaneously. As a result, businesses can save time and streamline their workflow effectively.

Comprehensive Activity Tracking
Lastly, the Prestashop AI Content Translator module records every action taken, including changes made within the module. It also logs timestamps and provides a summary of modifications, allowing store owners to track content evolution effortlessly. This ensures that all content updates remain transparent, structured, and easily manageable.

2.0. Installation Guide for PrestaShop AI Content Creator Addon

After purchasing the Prestashop AI Content Generator add-on, follow these steps to install it:

  1. Navigate to Store Admin → Modules
  1. Click on “Upload a module”. You can either drag and drop the file or manually select the file from your system.

3.0 Steps to Generate the API Key for Prestashop AI Content Generator and Translator Module Configurations?

For Claude API: 

  1. Visit Anthropic’s website, and click “Start Building”.
  2. Create an account, access your Dashboard, generate an API key, and save it securely.

For Gemini API:

  1. To access the API,  visit the Google AI Studio website.
  2.  Click “Get API key,” accept the terms of service, create your key, and paste it into the module’s configuration settings.

For ChatGPT API: 

  1. Obtain an OpenAI API key and configure it within the module settings.
  2. Click on your profile (top-right) → “View API keys” → “Create a new secret key”.
  3. Copy the key immediately and store it safely. 

Steps to Generate DeepSeek API 

  1. Access the Deepseek platform via this URL: https://platform.deepseek.com/api_keys to generate the API Key. Log in or sign up to generatean  API Key
  2. Click on Create API Key after adding the key name.
  3. Copy or store the key to enable functioning of DeepSeek AI Content Generator Plugin

4.0.0 Admin Interface

4.0.1 General Settings:

The Prestashop AI Content Generator and Translator Addon by Knowband allows the admin to configure AI settings and manage bulk content operations efficiently using Claude, ChatGPT, DeepSeek AI and Gemini AI engines.

[New]Enhanced Content Creation with GPT-5: The Prestashop AI Content Generator Addon now includes support for GPT-5, the latest and most advanced model from OpenAI.

Alongside GPT-3.5, GPT-4 Turbo, and GPT-4.5, GPT-5 enables smarter, faster, and more creative content generation. You can create high-quality product descriptions, titles, and meta content that are accurate, engaging, and SEO-friendly. Users can select the desired GPT model within the addon, giving full flexibility depending on the type of content needed.


  • Enable/Disable: Enable or disable the module
  • Enable/Disable the Claude: Click to enable Claude AI Engine
  • API Key for Claude: Enter the API Key for Claude Engine.
  • Select Claude Model for Generation: Choose from Claude Haiku 3, Haiku 3.5, Sonnet 3.5 (Old), or Sonnet 3.5 (New).
  • Select Claude Model for Translation: Select Claude Engine Models for translation Claude Haiku 3, Haiku 3.5, Sonnet 3.5 (Old), or Sonnet 3.5 (New).
  • Enable/Disable the ChatGPT: Click to enable ChatGPT.
  • API Key for ChatGPT: Enter the API Key for ChatGPT Engine to enable the functionality.
  • Select ChatGPT Model for Generation: Choose between ChatGPT 3.5 or ChatGPT 4.0 for content generation.
  • Select ChatGPT Model for Translation: Select between ChatGPT 3.5 or ChatGPT 4.0 for content translation.
  • Enable/Disable the Gemini AI: Click to enable the Gemini AI Engine
  • API Key for Gemini: Enter the API Key for Gemini AI Engine.
  • Select Gemini Model for Generation: Choose from Gemini 1.5 Pro, 1.5 Flash, 1.5 Flash-8b, 2.0 Flash, or 2.0 Flash – Lite Preview and save the settings.
  • Select Gemini Model for Translation: Pick from Gemini 1.5 Pro, 1.5 Flash, 1.5 Flash-8b, 2.0 Flash, or 2.0 Flash – Lite Preview and save the settings.
  • Enable/Disable the DeepSeek: Turn DeepSeek AI Engine on or off to use this  AI mode.l
  • [New Feature]API Key for DeepSeek- Enter the DeepSeek API key to activate content generation and translation.
  • [New Feature]Select DeepSeek Model for Generation- Choose between Deepseek Chat or DeepSeek Reasoner for generating the content for the products, CMS and categories
  • Model Selection: Choose from available models of each AI engine for content generation and translations.
  • Temperature Control: Adjust creativity by adding values to the temperature(0.0 to 1.0), the higher values generate more creative content, while lower values ensure consistency.
  • Token Limit: Set a maximum token limit for each engine, Gemini, Claude, and ChatGPT
  • Primary Language: Define the default language for content generation and translations.
  • Target Languages: Choose multiple languages for content translation.

4.0.2 Prestashop AI Content Generator and Translator Module Prompts

The Prestashop AI Content Module includes 14 pre-configured AI prompts designed to create and translate e-commerce content efficiently.

Knowband Prestashop Gemini AI Content Generator Prompts:

[New] Personalised Branding with Manufacturer Variable: The new Manufacturer Variable allows you to insert your shop or brand name directly into content. This makes all product descriptions, titles, and promotional texts feel personalised and aligned with your brand. You can edit or replace the variable within prompts to suit your specific needs, ensuring consistent branding across products and suppliers in Prestashop AI Content Generator.

Content Generation Prompts:

  • Generate Product Description – Create SEO-friendly, well-structured product descriptions with key features and benefits.
  • Generate Product Meta Title – Produce optimized meta titles under 60 characters with relevant keywords.
  • Generate Product Meta Description – Generate compelling meta descriptions within 140 characters.
  • Generate Category Description – Create category descriptions with proper HTML formatting.
  • Generate Category Meta Title – Generate keyword-rich category meta titles under 60 characters.
  • Generate Category Meta Description – Create concise and engaging category meta descriptions within 140 characters.
  • [New] Generate CMS Content – Generate high-quality CMS page content using AI, ideal for pages like About Us, Return Policy, etc.
  • [New] Generate CMS Meta Title – Create SEO-friendly meta titles for CMS pages using AI.
  • [New] Generate CMS Meta Description – Generate engaging and optimized meta descriptions for CMS pages.

Translation Prompts:

  • Translate Product Title – Translate product titles into multiple languages.
  • Translate Product Description – Translate product descriptions while preserving HTML formatting.
  • Translate Product Meta Title – Convert product meta titles into different languages.
  • Translate Product Meta Description – Translate product meta descriptions while maintaining readability.
  • Translate Category Title – Translate category titles into multiple languages.
  • Translate Category Description – Ensure accurate translations of category descriptions with HTML formatting.
  • Translate Category Meta Title – Convert category meta titles to different languages.
  • Translate Category Meta Description – Translate category meta descriptions into multiple languages
  • [New] Translate CMS Title – Translate CMS page titles into multiple languages.
  • [New] Translate CMS Content – Translate full CMS page content while preserving structure and formatting.
  • [New] Translate CMS Meta Title – Convert CMS meta titles into different languages for better SEO reach.
  • [New] Translate CMS Meta Description – Translate CMS meta descriptions into multiple languages while maintaining clarity and impact.

4.0.3 [New] Bulk Product Content Generation By Uploading CSV:

The PrestaShop AI Content Generator & Translator now supports bulk content generation via CSV upload.


You can upload a CSV file containing Product IDs along with specific fields corresponding to various content prompts (e.g., title, description, meta fields).

Each field uses binary values to control execution:

  • A value of 1 indicates that the prompt should be executed for that product.
  • A value of 0 means the prompt will be skipped.

This feature allows for flexible and efficient bulk processing of content across multiple products


4.0.3 Prestashop Claude content translator Addon Task Log:

The Knowband PrestaShop AI Content Generator Task Log maintains a detailed record of all AI-generated and translated content, including prompt type, language, product, categories, timestamp, status, previous content, or newly generated content concerning date.

5.0 How to Execute Prestashop AI Content Generator/ Translator Module Prompts?

To execute bulk content operations via the PrestaShop Backend Store follow the steps:


  1. Navigate to Products or Categories in the admin panel.
  2. Select the items you want to generate or translate.
  3. Click on the Bulk Actions menu.
  4. Choose the desired AI-generated prompt (Product Description, Meta Title, Translation, etc.).
  5. Select the AI engine (Claude, ChatGPT, DeepSeek or Gemini) to perform the task.
  6. Click on the prompt that you want to execute.

6.0.0[New] Individual Key Pages Content Generation

The PrestaShop AI Content Generator & Translator Module by Knowband has now been enhanced to support individual content generation for specific key pages across your store. Whether it’s a Product Page, Category Page, or a CMS Page, you can now generate high-quality, AI-driven content tailored to each item individually, giving you full control over tone, style, and structure.

Steps to execute the prompt on individual key pages.

1. Navigate to the Desired Section:
For Products, go to: Catalogue → Products

For Categories, go to: Catalogue → Categories

For CMS Pages, go to: Design → Pages

2. Edit the Specific Page:
Click Edit next to the specific product, category, or CMS page you want to update.

3. Access the AI Content Generator Panel:
Within the edit screen, you’ll now find an AI Content Generation prompt section, where you will find the prompts listed

This section is integrated into each edit page and allows you to generate or translation content for that specific page only.

4. Configure the Content Generation:
Select a predefined prompt (Generate Product description, Translate Meta description, Generate CMS Page description etc).

Choose your preferred AI engine (ChatGPT, Claude, Gemini, or DeepSeek) depending on your content goals, speed, and budget.

Optionally, add an additional prompt or specific instructions to guide the AI (e.g., use a formal tone, target specific keywords, mention product benefits, etc.).

5. Page-Type Specific Capabilities:

Product Pages: Generate or translate product descriptions, meta titles, & meta descriptions.

Category Pages:
With the PrestaShop AI Content Generator & Translator, you can now generate or translate content for individual categories right from their respective edit pages.

CMS Pages:


Generate content for informational pages such as About Us, Return Policy, Shipping Info, FAQs, and more.

Translate existing content into multiple languages to support global audiences.

Final Step: Execute the Prompt

Once you have written the additional prompt or chosen AI models, simply click “Execute”.

The content generation task request will be sent to the pending task. Now you can execute the pending tasks.

You can monitor progress and manage any pending tasks directly from the Task Log section of the module.

This new enhancement ensures that you’re not limited to bulk operations and gives you the power to optimise individual pages as per your business needs, making it easier than ever to deliver high-quality, engaging, and multilingual content across your store.

7.0.0 [New] Steps to Generate & Translate CMS Pages Content

The Knowband PrestaShop AI Content Generator & Translator Module enables store owners to effortlessly create and translate content for CMS pages such as About Us, Return Policy, Terms & Conditions, and more.

Steps to Generate or Translate CMS Page Content:
1. Navigate to:
Design → Pages

2. Select Pages:
Choose individual pages, or select all if you want to generate or translate content in bulk.

3. Choose Bulk Action:
From the bulk action menu, select the desired AI operation.

4. Select AI Engine:
Choose from supported AI models (e.g., ChatGPT, Gemini, Claude, DeepSeek) based on your content needs.

5. Add Custom Prompt (Optional):
You can include additional instructions or prompts after selecting the AI engine to tailor the content output.

6. Submit Task:
The request will be added to the Task Log for processing.

7. Execute Task:
Run any pending tasks, and your CMS content will be generated or translated accordingly

8.0.0 Benefits of the PrestaShop AI Content Generator Module

Saves Time and Effort

The Prestashop AI Content Generator Module automates content creation; as a result, it significantly reduces manual work. Consequently, store owners can focus on business growth instead of writing product descriptions.

Improves SEO Rankings

The Prestashop ChatGPT SEO Content Generator optimizes product descriptions and meta tags. Therefore, it enhances search rankings and drives more organic traffic.

Expands Global Reach

The Prestashop AI translator addon translates product content into multiple languages. Thus, businesses can effortlessly connect with international customers.

Enhances Content Quality

AI-generated content is engaging and accurate. In addition, it ensures product descriptions are clear, detailed, and informative, which ultimately leads to better conversions.

Reduces Costs of Content Creation

The Claude addon for Prestashop eliminates the need for professional copywriters and translators. As a result, businesses save money while still maintaining high-quality content.

Supports Multiple AI Models

Merchants can choose from various AI models, including Prestashop ChatGpt content generator, Gemini AI content generator Prestashop, and Claude AI. Moreover, this flexibility allows tailored content creation.

Speeds Up Bulk Content Generation

The Prestashop Gemini Content Generator Addon enables bulk content creation. Consequently, merchants can generate descriptions for multiple products in minutes.

Provides an Easy-to-Use Interface

The PrestaShop AI Content Generator / Translator Module is beginner-friendly. Additionally, it allows store owners to create professional content without any technical expertise.

Ensures Content Accuracy and Authenticity

The Prestashop Claude Translator/Generator Module maintains the originality of product information. Thus, customers always receive precise and reliable details.

Tracks All Content Changes

The Prestashop Claude Translator Module records all AI-generated and translated content. As a result, merchants can monitor changes and refine their content strategy over time.

Prestashop Claude AI Content Generator/Translator Addon – User Manual

The PrestaShop Claude AI Content Generator Addon is a powerful Plugin that simplifies content creation for PrestaShop store owners. Using advanced AI, the  Prestashop Claude AI Content Generator/Translator Addon helps store owners quickly generate high-quality product descriptions, catchy product titles, and SEO-friendly content. As a result, the store can effortlessly attract more visitors and boost sales.

Moreover, the AI Content Generator for PrestaShop integrates smoothly with Claude AI, ensuring a hassle-free experience. The Prestashop Claude AI Content Generator-Translator Addon also includes an SEO Content Generator feature, which guarantees that all content is original, engaging, and optimized for search engines. Additionally, Knowband’s PrestaShop Claude AI Content Translator module allows e-merchant to expand its business internationally with accurate and natural-sounding translations.

Whether you want to manage multilingual content or improve your content strategy, the Claude add-on for Prestashop simplifies the entire process. Moreover, with the PrestaShop Claude AI Content Translator Module, store owners can save time while enhancing the store with high-quality, multilingual content—effortlessly!

1.0. Key Features of Prestashop Claude AI Content Generator/Translator Addon

1. AI-Powered Content Generation: The Prestashop Claude SEO Content Generator by Knowband enables store owners to generate high-quality product descriptions, meta titles, and descriptions. Therefore, by using the advanced AI model Claude, it ensures that the content is engaging, informative, and optimized for search engines.

2. Advanced AI Technology : The AI-powered translation addon for Prestashop leverages Anthropic’s powerful Claude AI models, including Claude 3.5 Sonnet, Claude 3 Opus, and Claude 3 Haiku. Furthermore, with AI engines, you can generate creative content and produce accurate translations depending on your store’s specific needs. 

3. AI-Powered Translation : The AI Translation Addon for Prestashop ensures accurate and context-aware translations with minimal effort. Therefore, e-merchants don’t need to manually translate the content of the products.

4. Easy Installation and Configuration – The Prestashop Claude content generator Addon is Designed with an easy-to-use interface. Likewise, the AI content generation Prestashop is simple to install and run, even for store admins who don’t have coding experience.

5. Efficient Bulk Content Creation – Perfect for merchants with extensive product catalogs, the Prestashop Claude content generator excels at generating content in bulk. 

6. Multi-Language Compatibility – The module supports all languages, including right-to-left (RTL) scripts, ensuring flexibility for global businesses. Additionally, it is compatible with multiple Prestashop versions, making it a reliable solution for a wide range of stores.

2.0 How to Generate the Claude API Key for Module Configurations?

To enable Claude AI functionality in your PrestaShop module, you must get an API Key.

To use the features of the module, you need to have an API Key. Please follow these steps:

Step 1: Obtain an API Key:

Step 2: Enter the API Key in Your PrestaShop Store:

  • In your PrestaShop Store’s Backend, go to the “Knowband Prestashop Claude AI Generator/Translator” General Settings page.
  • Paste the API Key into the provided “API Key for Claude” field.

Step 3: Save the Settings:

  • After adding the API Key in General Settings, click “Save” to store settings. Now, the Claude AI module will use this key to interact with the Claude API.

3.0 Installation Guide for Prestashop Claude AI Content Generator Module

Knowband’s Prestashop Claude AI Generator Installation Steps

  1. Access the Store Admin -> Modules and Services.
  2. Click on “Upload” in the module section. You can simply upload the downloaded zipped file from the system.


4.0 Admin Interface Overview:

4.0.1 General Setting:

The Prestashop Claude Content Translator Module by Knowband allows the admin to configure settings and manage bulk content operations efficiently.

Here is a Brief Overview of the features of the Module

Enable/Disable: You can enable or disable the Prestashop Claude Content Generator.

API Key for Claude: Enter your Anthropic API Key in the designated field.

Claude Model Selection: Choose from Anthropic’s suite of models, including Claude 3.5 Sonnet(new), Claude 3.5 Sonnet(old), Claude 3 Opus, and Claude 3 Haiku, to generate high-quality content tailored to your store needs.

Temperature: Adjust the creativity level – higher values produce more creative content,t while lower values deliver more consistent results.

Maximum Tokens: Set your token limit (default: 2000). Tokens represent text fragments used by the AI model.

Claude Engine for Translations: Select which Claude model to use specifically for translation tasks.

Primary Language: Choose your default language for content generation and translation.

Target Languages: Select which languages you want your content translated into.

4.0.2. Claude Prompts:


The module features 14 pre-configured prompts designed for various e-commerce content needs:

Knowband Prestashop Claude Content Translator AI Prompts

Generate Product Description: Creates SEO-friendly, formatted product descriptions with features, benefits, and use cases.

Generate Product Meta Title: Creates optimized meta titles under 60 characters, incorporating keywords and product categories.

Generate Product Meta Description: Produces compelling meta descriptions limited to 140 characters.

Translate Product Title: Translate product titles to multiple different languages.

Translate Product Description: Translates descriptions while preserving HTML formatting.

Translate Product Meta Title: Translate meta titles to multiple different languages.

Translate Product Meta Description: Translates meta descriptions to multiple different languages.

Generate Category Description: Creates SEO-optimized category descriptions with proper HTML formatting.

Generate Category Meta Title: Produces category meta titles under 60 characters with relevant keywords.

Generate Category Meta Description: Creates category meta descriptions within 140 characters.

Translate Category Title: Translates category titles to multiple different languages.

Translate Category Description: Translates category descriptions while maintaining HTML structure.

Translate Category Meta Title: Converts category meta titles to multiple different languages.

Translate Category Meta Description: Translates category meta descriptions to multiple different languages.

4.0.3. Claude Prompts Task Log

Maintains a comprehensive record of all executed prompts with details like Prompt Type, Product, Category, Language, Previous Content, New Content, and timestamp for easy tracking.

Maintains a comprehensive record of all executed prompts with details like Prompt Type, Product, Category, Language, Previous Content, New Content, and timestamp for easy tracking.

5.0. How to Execute Claude Prompts?


Knowband’s Prestashop Claude Prompt Execution Steps

Select your desired products and access the Bulk Actions menu to choose from various content generation and translation options:

Generate Product Description: Create descriptions for multiple products simultaneously.

Generate Product Meta Title: Bulk create SEO-optimized titles.

Generate Product Meta Description: Generate meta descriptions for multiple different products.

Translate Product Title: Convert product titles to multiple languages.

Translate Product Description: Create multilingual product descriptions for the product.s

Translate Product Meta Title: Convert meta titles to multiple different languages for the products.

Translate Product Meta Description: Translate meta descriptions for bulk products simultaneously.

Prestashop Gemini AI Content Generator/Translator Addon – User Manual

The Prestashop Gemini Content Generator/Translator Addon is a cutting-edge tool designed to transform content management for Prestashop store owners. This advanced module harnesses the power of AI to simplify content creation and translation, making it a must-have for modern eCommerce businesses. Moreover, with the Prestashop Gemini Content Generator Module, you can quickly generate engaging product descriptions, attention-grabbing product titles, and SEO-friendly content. As a result, your store’s online presence improves, attracting more visitors and enhancing the overall customer experience.

In addition to content generation, the AI Content Generator for Prestashop seamlessly integrates with Prestashop Gemini, ensuring smooth and efficient operation. Furthermore, its SEO Content Generator feature guarantees that all content is not only original but also fully optimized for search engines. On top of that, the module comes with the Prestashop Gemini Content Translator, an AI-driven translation addon that enables store owners to expand their business into international markets with precise and context-aware translations.

Whether you’re handling multilingual content or aiming to enhance the efficiency of your content strategy, the Prestashop Gemini Content Generator Addon simplifies the entire process. Additionally, the Prestashop Gemini Content Translator Module combines state-of-the-art AI with user-friendly features, allowing merchants to save time while enhancing their stores with high-quality, multilingual content.

1.0. Key Features of Prestashop Google AI Gemini Content Generator/Translator Addon:

Seamless Content Creation – Easily generate high-quality product titles, detailed descriptions, and well-optimized meta tags with the Prestashop Gemini Content Generator Module. This saves time while ensuring uniform and engaging content across your store.

Advanced AI Engines – The Prestashop Gemini Content Generator and Translator addon is powered by multiple AI models, including Gemini 1.5 Flash, Gemini 1.5 Pro, Gemini 1.5 Flash -8b, Gemini 2.0 Flash, and Gemini 2.0 Flash – Lite Preview. Therefore, with these cutting-edge AI engines, you can create highly creative content and translate it with precision to meet diverse store requirements.

Optimized for SEO – Improve your store’s search rankings effortlessly with Knowband’s AI Content Generator. The Gemini content translator for Prestashop helps generate SEO-friendly content that drives more traffic to your website.

Effortless AI-Powered Translation – Expand your business globally by translating your store’s content into multiple languages with ease. The AI Translation Addon for Prestashop ensures accurate and context-aware translations with minimal effort.

Easy to Set Up and Use – Designed with a user-friendly interface, the Prestashop AI Content Creator is simple to install and operate, even for store admins without technical expertise. Furthermore, this ensures a smooth and hassle-free onboarding experience.

Category and Meta Tag Automation – Quickly generate and translate category names and meta descriptions with precision. This feature ensures professional and consistent content throughout your store with just a few clicks.

Bulk Content Generation – Ideal for stores with large product catalogs, the module supports batch content creation. Thus, this allows you to process multiple items simultaneously, significantly increasing efficiency.

Improved Store Management – Streamline content management tasks, making product updates quicker and boosting overall operational efficiency. This feature benefits both small and large-scale businesses.

Multi-Language Compatibility – The module supports all languages, including right-to-left (RTL) scripts, ensuring flexibility for global businesses. Additionally, it is compatible with multiple Prestashop versions, making it a reliable solution for a wide range of stores.

2.0 How to Generate the Gemini Key for Module Configurations?

To enable Gemini functionality in your PrestaShop module, you must configure an API Key.

To use Gemini features, you need to set up an API Key. Please follow these steps:

Step 1: Obtain an API Key:

  • Go to the Gemini API Key generation page at https://aistudio.google.com/app/apikey and log in or create an account if you haven’t already.
  • Click on “Create new secret key”. Copy this key for the next step.

Step 2: Enter the API Key in Your PrestaShop Module:

Step 3: Save the Settings:

After entering the API Key, click “Save” to store your settings. The Gemini module will now use this key to interact with the Gemini API.

Important:

Billing Requirement: Ensure that you have a sufficient credit balance in your Gemini account for the API to function. If your credit balance is depleted, the API requests will not work. You can check your balance and add funds by visiting the billing overview page at https://aistudio.google.com/app/apikey.

Keep your API Key secure and do not share it publicly, as it is linked to your Gemini account usage and billing.

3.0 Installation Guide for Prestashop AI Content Creator Addon:

Once you purchase the addon, follow the below steps:

  • Go to the Store Admin -> Modules and Services.

  • Click on “Upload a module”. You can drag or drop the file or can simply select the file from the system.

4.0 Admin Interface Overview:

4.0.1 General Setting:

The Google AI Content Generator for Prestashop allows the admin to configure the module and handle bulk content operations within just a few clicks.

Here is a Brief Overview:

Enable/Disable: Enable/Disable the Prestashop Gemini Content Generator.

API Key for Gemini: Paste the API Key into the provided “API Key for Gemini” field.

Gemini Engine for Content Generation: This module utilizes a range of advanced AI models, including Gemini 1.5 Flash, Gemini 1.5 Pro, Gemini 1.5 Flash -8b, Gemini 2.0 Flash, and Gemini 2.0 Flash – Lite Preview. With these state-of-the-art AI engines, you can effortlessly generate compelling content and translate it accurately to meet the unique needs of your store.

Temperature: Enter the temperature here. A higher temperature value leads to a more creative content tone. Whereas, a lower temperature shares more focused and relevant content.

Maximum Tokens: Enter the number of maximum tokens here. The term “tokens” stand for the chunks of words of characters. Keep the default value as 500.

Gemini Engine for Translations: Select the Google Gemini AI engine for your content translation.

Primary Language for Translation/Content Generation: Select the default language to be used for generating and translating content.

Languages to Translate Content: Select the different multiple languages for content translation.

4.0.2. Gemini Prompts:

The module includes 14 built-in Gemini prompts, designed to assist with a variety of tasks. Below is a list of these prompts along with their functionalities:

Generate Product Description: Generate a detailed SEO-Friendly and engaging product description for the following product {product_name}. Make sure the description includes the main features, benefits, and use cases of the product. Please use HTML tags for formatting so the content is ready for a web page. The product is listed in the {category} category

Generate Product Meta Title: Generate a concise and catchy meta title for a product named “{product_name}” in the “{category}” category. Keep the title under 60 characters. Avoid using double quotes. The title should include the main keyword and attract potential customers.

Generate Product Meta Description: Generate a compelling meta description for the product named {product_name} which lies in the category {category}. Limit the description to about 140 characters.

Translate Product Title: Translate the following product title and make sure to give translated content only

Translate Product Description: Translate the following product description and preserve the HTML structure and tags, and only translate the visible text content and make sure to give translated content only.

Translate Product Meta Title: Translate the following product Meta Title and make sure to give translated content only.

Translate Product Meta Description: Translate the following product Meta Description and make sure to give translated content only.

Generate Category Description: Generate the SEO-Friendly Category Description for the {category} Generate a detailed, SEO-friendly category description for the “{category}” category. Please use HTML tags for formatting so the content is ready for a web page.

Generate Category Meta Title: Generate a concise and catchy meta title for a “{category}” category. Keep the title under 60 characters. The title should include the main keyword, attract potential customers, and avoid using double quotes.

Generate Category Meta Description: Generate a compelling meta description for the category {category}. Limit the description to about 140 characters and avoid using double quotes.

Translate Category Title: Translate the following category title and make sure to give translated content only.

Translate Category Description: Translate the following Category description and preserve the HTML structure and tags, and only translate the visible text content and make sure to give translated content only

Translate Category Meta Title: Translate the following Category Meta Title and make sure to give translated content only.

Translate Category Meta Description: Translate the following category meta description and make sure to give translated content only.

4.0.3. Gemini Prompts Task Log:

This tab displays comprehensive information about all executed prompts. It includes key details such as Prompt Type, Product, Category, Language, Previous Content, New Content, and Date, allowing for easy tracking and management.

 5.0. How to Execute Gemini Prompts?

The Prestashop store retailer can generate and translate the content within a few taps from the Prestashop Backend>>Products tab.

Choose the desired products and navigate to the Bulk Actions tab, as shown in the screenshot above. From there, you can select various prompts to perform different actions efficiently with the help of Prestashop AI Content Generator and Translator Module.

  • Generate Product Description: Select multiple products and click on the “generate product description” button.
  • Generate Product Meta Title: Generate the meta titles of products from here.
  • Generate Product Meta Description: Select the products and click on the “generate product meta description” prompt shown under the bulk actions section.
  • Translate Product Title: Translate the product titles from here.
  • Translate Product Description: This prompt helps the store admin translate the product description into multiple different languages.
  • Translate Product Meta Title: Translate the product meta title from here.
  • Translate Product Meta Description: Select multiple products and hit the following prompt for product meta description translations in bulk.

Prestashop Google Tag Manager (gtag, GA4, GTM Events) Addon – User Manual

The Knowband Prestashop Google Tag Manager Addon is the ultimate solution for integrating Google Tag Manager (GTM) with your Prestashop store. This user-friendly module allows store owners to easily integrate and manage various Google tags without needing any technical skills. The add-on empowers you to track key events, such as Add to Cart, Product Views, Checkout Begins, Order Confirmation, and much more, providing deep insights into customer behavior.

With seamless integration, you can also capture UTM parameters, enabling you to track the effectiveness of your marketing campaigns. Furthermore, the Prestashop Google Marketing Integration Module helps you understand which campaigns are driving traffic and conversions, so you can optimize your ad spend and improve your ROI.

The Prestashop GTM Addon is perfect for those who want to enhance their tracking capabilities, optimize conversion rates, and improve the user experience. Whether you’re using Google Analytics, GA4, or other Google marketing tools, this addon streamlines the process, giving you more time to focus on growing your business.

1.0. Key Features Offered by Prestashop GTM Addon:

Seamless Google Tag Integration: Easily integrate Google tags like Google Analytics, Google Ads, and GA4 into your Prestashop store without the need for coding.

Real-Time Event Tracking: Track real-time user actions such as Add to Cart, Product Views, and Checkout Initiation to understand customer behavior instantly.

UTM Parameter Tracking: Capture UTM Parameters to track the effectiveness of your marketing campaigns and identify the best-performing channels.

Enhanced eCommerce Tracking: Track advanced eCommerce events such as Product Detail Views, Add to Cart, and Order Confirmations for in-depth sales performance analysis.

Easy Setup and Configuration: No technical expertise required! The module’s user-friendly interface allows quick and easy setup, making tag management hassle-free.

User-Friendly Dashboard: Manage and monitor all your tags and events directly from the Prestashop admin panel with an intuitive and easy-to-use dashboard.

Multi-Lingual Support: The Prestashop GTM addon comes with multi-lingual language support, allowing store admin to use the module for multiple different languages.

1.1. How to Get Your Google Tag Manager Container ID

Step 1: Go to your Google Tag Manager account.

Step 2: Create a new container or select an existing one.

Step 3: The Container ID will look like GTM-XXXXXX and is visible in the top-right corner of the Tag Manager interface.

Step 4: Copy the Container ID and paste it into the GTM Container ID field in this module’s configuration.

1.2. How to Get Your Google Analytics Measurement ID?

Step 1: Go to your Google Analytics account.

Step 2: Select the property for which you want to retrieve the Measurement ID.

Step 3: Navigate to Admin > Data Streams and choose your web data stream.

Step 4: The Measurement ID will look like G-XXXXXXXXXX.

Step 5: Copy the Measurement ID and paste it into the Google Analytics Measurement ID field in this module’s configuration.

1.3. How to Configure Events in Google Tag Manager?

Step 1: Download GTM Events: You can find a direct download link under module configurations>>Instructions tab.

Step 2: Go to your Google Tag Manager account.

Step 3: In Google Tag Manager, navigate to Admin > Import Container.

Step 4: Select the downloaded JSON file from your system.

Step 5: Choose the workspace where you want to import the events and select the “Merge” or “Overwrite” options as required.

Step 6: Click Confirm to complete the import process.

Step 7: Save and publish your container to activate the events in your Google Tag Manager.

By following the above steps, you can successfully configure the module. However, if you face any issues, please feel free to contact us at support@knowband.com.

2.0. Installation Guide for Prestashop GTM Addon:

Once you purchase the addon, follow the below steps:

  • Go to the Store Admin -> Modules and Services.

  • Click on “Upload a module”. You can drag or drop the file or can simply select the file from the system.

3.0. Admin Panel Overview:

The Google Tag Manager for Prestashop provides an easy and intuitive admin dashboard to Prestashop retailers. The store admin can configure and manage all the tags from the Prestashop admin dashboard itself. Here is a brief overview:

3.0.1. Configurations:

Enable/Disable: The store admin can enable/disable the module with this option.

GTM Container ID: Insert the GTM Container ID in this text field. The admin can get the container ID by following the steps mentioned in section 1.1.

Google Analytics Measurement ID: Enter the Google Analytics Measurement ID here.

Page View: Enable/Disable “Page View Google Event”.

View Category: Manage the “View Category” tag from here.

View Product Detail Page: Enable the “View Product Details Page” tag from here.

Remove from the cart: Enable/Disable the “Remove from Cart” Google tag.

Add to cart: Enable/Disable the “Add to Cart” Google Tag.

Checkout Begins: Enable the tag for checkout initiatiation tracking.

Checkout Page: Enable/Disable the event for “Checkout Page”.

Add/Select address on checkout: Enable/Disable the tag for the “Add/Select Address on Checkout” page.

Shipping Method Selected: Enable the tag for “Shipping Method Selection”.

Order Confirmation:Manage the “Order Confirmation” tag from here.

Apply Discount Code: Enable/Disable the “Apply Discount Code” tag.

Remove Discount Code: Enable/Disable the “Remove Discount Code” Google event.

View Cart: Manage the “View Cart” Google tag with this enable/disable switch.

Customer Login: Enable/Disable the “Customer Login” Google Tag from here.

Customer Registration: Enable/Disable the “Customer Registration” tag.

Add to Wishlist: Manage the “Add to Wishlist” tag from here.

Remove from Wishlist: Enable/Disable the “Remove from Wishlist” tag from here.

Search Product: Manage the tags for “Searched Products”.

Capture UTM Parameters: The store admin can enable capturing UTM parameters with the help of this switch button.

3.0.2. Configuration Instructions:

The Prestashop no-code Google tag manager integration comes with straightforward instructions that eliminate the need for any technical expertise for the module connections. The store admin can simply visit the Google consoles and get the required credentials by following the simple steps mentioned below:

These instructions are going to help the store admin in the module configurations, however, if you face any issue with any connect step or module, you can also drop us a mail at support@knowband.com or raise a ticket on knowband.com/helpdesk.

Prestashop ChatGPT Content Generator/Translator Addon – User Manual

The Prestashop ChatGPT Content Generator/Translator Addon is an innovative solution designed to revolutionize content management for your Prestashop store. This powerful module leverages advanced AI to streamline content creation and translation tasks, making it an indispensable tool for modern eCommerce businesses. Furthermore, with the Prestashop ChatGPT Content Generator Module, you can effortlessly create engaging product descriptions, product titles, and SEO-optimized content, enhancing your store’s visibility and customer experience.

The AI Content Generator for Prestashop goes beyond simple text creation by offering seamless integration with Prestashop ChatGPT Furthermore, the SEO Content Generator capabilities, ensure your content is not only unique but also search engine friendly. Additionally, the module includes a Prestashop ChatGPT Content Translator, which serves as an AI-powered translation addon for Prestashop, enabling store owners to expand their reach into new markets with accurate, context-aware translations.

Whether you’re managing content in multiple languages or aiming to improve the quality and efficiency of your content strategy, the Prestashop ChatGPT Content Generator Addon simplifies the process. Furthermore, the Prestashop ChatGPT Content Translator Module combines cutting-edge AI with user-friendly features, empowering merchants to save time and elevate their online store with high-quality, multilingual content.

1.0. Key Features Offered by Knowband’s Prestashop ChatGPT Content Generator/Translator Addon!

Effortless Content Creation: Generate high-quality product titles, detailed descriptions, and optimized meta tags effortlessly with the Prestashop ChatGPT Content Generator Module, saving time and ensuring consistency across your store.

Dual AI Engines: Powered by the latest ChatGPT 3.5 and 4.0 models, the Prestashop AI Content Generator module provides advanced options for generating creative content and translating it accurately to meet diverse store needs.

SEO-Friendly Content: Easily create SEO-optimized content for your Prestashop store using Knowband’s AI Content Generator, helping improve search engine rankings and driving more traffic to your store.

AI Translation Made Simple: Translate your store’s content into multiple languages seamlessly with the AI-Powered Translation Addon for Prestashop, enabling you to expand your business globally with minimal effort.

User-Friendly Setup: The Prestashop AI Content Creator offers a straightforward setup process, making it easy to use for all store admins, even those without technical expertise, ensuring a smooth onboarding experience.

Category and Meta Tags: Quickly generate and translate category names and meta descriptions with precision, ensuring consistency and professionalism in just a few clicks using this addon.

Bulk Content Generation: Ideal for stores with extensive catalogs, the module supports batch content generation, allowing you to process multiple items in one go and significantly boost efficiency.

Enhanced Store Management: Streamline your store’s content management tasks, enabling quicker product updates and improving operational efficiency for both small and large-scale businesses.

Multi-Language Support: With support for all languages, including right-to-left (RTL) scripts, and compatibility with various Prestashop versions, the module ensures flexibility and usability for global businesses.

2.0 How to Generate the ChatGPT Key for Module Configurations?

To enable ChatGPT functionality in your PrestaShop module, you must configure an API Key. Follow the steps below for a seamless setup process.

Step 1: Obtain an API Key

  • Visit the OpenAI API Key Generation Page.
  • Log in to your OpenAI account. If you don’t have one, create a new account to proceed.Once logged in, click the “Create new secret key” button.

  • A unique API Key will be generated. Copy this key as you will need it in the subsequent steps.

Important: This is the only time the key will be displayed, so save it securely. The ChatGPT module will now be ready to interact with the OpenAI API, enabling its features within your PrestaShop store.

Important: Verify Billing Requirements!

To ensure uninterrupted functionality, confirm that your OpenAI account has an adequate credit balance:

  • Check your current balance and add funds if necessary.
  • Note: If your account balance is depleted, API requests from the ChatGPT module will fail.

3.0 Installation Guide for Prestashop AI Content Creator Addon:

Once you purchase the addon, follow the below steps:

  • Go to the Store Admin -> Modules and Services.

  • Click on “Upload a module”. You can drag or drop the file or can simply select the file from the system.

4.0 Admin Interface Overview:

4.0.1 General Setting:

The module comes with an easy to manage admin dashboard that allows the admin to manage the module efficiently even without any technical skills.

Here is a Brief Overview:

Enable/Disable the Module: The store admin can enable/disable the module with the help of this button.

API Key for ChatGPT: Here, you need to enter the ChatGPT API key that will be responsible for the smooth operations. Please follow the steps mentioned above to generate the API key in just a few clicks.

ChatGPT Engine for Content Generation: The Prestashop AI Content Generator Addon comes with 2 powerful ChatGPT engines 3.5 and 4.0. Where the GPT-3.5-turbo is a cost-effective, suitable solution for general tasks, on the other hand, the GPT-4-turbo is an Advanced model with improved accuracy and context handling.

Choose the suitable module from the dropdown.

ChatGPT Engine for Translations: Select the ChatGPT engine for content translation.

Default Language for Translation/Content Generation: Choose the default language for content generation.

Languages to Translate Content: Choose the additional languages you would like to generate the content for.

4.0.2. ChatGPT Prompts:

The module comes with 14 in-built ChatGPT Prompts that are useful for handling various tasks. Here is a list of the Prompts and what they do:

Generate Product Description: Generate a detailed SEO-Friendly and engaging product description for the following product {product_name}. Make sure the description includes the main features, benefits, and use cases of the product. Please use HTML tags for formatting so the content is ready for a web page. The product is listed in the {category} category

Generate Product Meta Title: Generate a concise and catchy meta title for a product named “{product_name}” in the “{category}” category. Keep the title under 60 characters. Avoid using double quotes. The title should include the main keyword and attract potential customers.

Generate Product Meta Description: Generate a compelling meta description for the product named {product_name} which lies in the category {category}. Limit the description to about 140 characters.

Translate Product Title: Translate the following product title and make sure to give translated content only

Translate Product Description: Translate the following product description and preserve the HTML structure and tags, and only translate the visible text content and make sure to give translated content only.

Translate Product Meta Title: Translate the following product Meta Title and make sure to give translated content only.

Translate Product Meta Description: Translate the following product Meta Description and make sure to give translated content only.

Generate Category Description: Generate the SEO-Friendly Category Description for the {category} Generate a detailed, SEO-friendly category description for the “{category}” category. Please use HTML tags for formatting so the content is ready for a web page.

Generate Category Meta Title: Generate a concise and catchy meta title for a “{category}” category. Keep the title under 60 characters. The title should include the main keyword, attract potential customers, and avoid using double quotes.

Generate Category Meta Description: Generate a compelling meta description for the category {category}. Limit the description to about 140 characters and avoid using double quotes.

Translate Category Title: Translate the following category title and make sure to give translated content only.

Translate Category Description: Translate the following Category description and preserve the HTML structure and tags, and only translate the visible text content and make sure to give translated content only

Translate Category Meta Title: Translate the following Category Meta Title and make sure to give translated content only.

Translate Category Meta Description: Translate the following category meta description and make sure to give translated content only.

4.0.3. ChatGPT Prompts Task Log:

This tab provides the details of all the prompts that are executed. Here, you can find all the details such as Prompt Type, Product, Category, Language, Previous Content, New Content, and Date.

 5.0. How to Execute ChatGPT Prompts?

To execute the ChatGPT prompts, the store admin can find the options under Catalog>>Products.

Select the products and click on the bulk actions tab as shown in the above screenshot. Here you can select different prompts for various actions.


PrestaShop Mobile App Builder – User Manual

Get fully Flutter Android & iOS apps for your PrestaShop website & start selling your products on Mobile Apps!

1.0 Introduction

This is the user guide of the advanced & readymade Flutter mobile app solution of PrestaShop Mobile App Builder. This is an eCommerce website plugin designed & crafted to build perfect & featured Android & iOS shopping apps for you.

1.1 PrestaShop Mobile App Builder: A Brief Introduction

The PrestaShop Mobile App Builder is the most advanced & automated solution to take your online website business to the mobile platform. It transforms your entire website into a featured Mobile App & allows you to sell products on mobile along with the traditional website. The functionalities & working of the app exactly match the website & work flawlessly on both Android & iPhone devices.

Our PrestaShop Mobile App Builder is the pre-configured framework designed by experts & professionals to build a pair of Flutter eCommerce apps. The apps are capable of taking all your store products to the user’s fingertips & boost sales & revenue. So, if you are a PrestaShop store merchant & looking for a full-fledged mobile app solution, this is your best chance. Read the complete article to get fully intact info on PrestaShop Mobile App Development.

Also, our PrestaShop Mobile App Builder extension is fully compatible with the Multi-vendor Marketplace plugin. You can bring the entire marketplace listing on the same Mobile Apps. We even offer a combo pack of our PrestaShop Mobile App Builder with PrestaShop Multi-Vendor Marketplace in PrestaShop Advanced Marketplace With Mobile App.

New Update: PrestashopMobile App and AI Chatbot Integration 6.0.6

The PrestaShop Mobile App Builder now supports integration with the PrestaShop AI Chatbot, helping store owners provide AI-powered assistance to mobile app users. The chatbot can help customers find products, get answers to common questions, and receive personalized product recommendations directly within the mobile shopping experience.

Moreover, the following benefits of PrestaShop Mobile App Maker would compel you to go for this Flutter app solution:

  • A no-code Mobile App solution.
  • Friendly admin panel with complete access.
  • 3 months of free support
  • Fully Flutter solutions (Android & iOS)
  • 100% synchronization between your apps & website
  • Highly customizable with design & functioning control.
  • Increases user engagement with handy marketing tools.
  • Increases traffic & revenue to your store.

1.2 Top-notch Features of PrestaShop Mobile App Builder:

Here is the list of some of the key features which you will get in your apps with Prestashop Mobile App Builder:

  • Customizable Home Screen Layout (Complete Flexibility)
  • Store Branding
  • WhatsApp Chat Support (24*7)
  • Google & Facebook Login
  • OTP & Fingerprint Login
  • Both Tablet & Mobile Support
  • Android 4.2 and so on Android VersionSupport
  • iOS 9 and so on iOS VersionSupport
  • Automatic Inventory Update
  • Multiple Color & Font Choices
  • Multi-lingual & RTL (Right To Left) Support
  • Multi-currency Support
  • All Product Type Support
  • Website Payment Method Supported on Apps
  • Website Shipping Method Supported on Apps
  • Unlimited Push Notifications
  • Product Social Sharing Options
  • Multiple Filtering & Sorting Options
  • Wishlist Functionality
  • Website Coupon/Vouchers Supported on Apps.
  • Simplified Checkout Screen
  • Real-time Order Tracking
  • Seamless Accordion Menu
  • Clear-cut Product & Category Screen
  • Show Video Banner Elements on the Home Page and Category Product Listing Pages
  • List/Grid Product View Options
  • Login/Sign-up pop-up
  • Enhanced Review Section
  • Multi-layered layout
  • Automated Banner Sliders
  • Notification Tab

Latest Version Updates in PrestaShop Mobile Apps:


a) “Add To Cart” Button on Home & Category Screen

The PrestaShop Mobile App has been made more usable for online shoppers with an inbuilt “Add To Cart” button for products on the Home & Category screen. This allows users to quickly add products to the cart by just tapping the cart button.

The Add To Cart button is also available on the category screen of mobile apps. The users can simply scroll down to the bottom to browse the products and keep on adding products to the cart by simply tapping the Add To Cart button.

b) Product Reviews on App

Our PrestaShop Mobile App is now compatible with the default Product Comments module of PrestaShop. Now, the user can post reviews for the products on the website and the same will appear on the app as well. Also, the user gets to view all reviews from the app and write them as well.

c) Related Products on App

The PrestaShop Mobile App Builder is now compatible with the Automatic Related Products module. The related products can be displayed on the product page of the website and mobile app. This compatibility can be used as a perfect tool to improve cross-selling for your business.

–> Explore PrestaShop Related Products

d) Offline Mode Accessibility:

The eCommerce mobile apps with this extension will now work in offline mode as well i.e. without internet connectivity. The users get to browse the pages anytime which were loaded while active internet. Categories, products, cart screen, etc.

–> Explore PrestaShop Image Search

e) GDPR Compliance:

Now, the apps with PrestaShop Mobile App  Builder are fully compliant as per the GDPR regulations of the EU. It will offer more control to app users over their stored personal data. The store admin can simply configure the GDPR settings to work on the application & the same will be displayed on various app screens like sign-up, login, checkout, payment, etc. Online shoppers even get the right to ask the store merchant for the removal of his/her personal information.

–> Explore PrestaShop GDPR Module

f) Spin & Win (Gamified Email Subscription) Compatibility:

The PrestaShop Mobile App Creator is also compatible with PrestaShop Spin & Win extension. The gamified email subscription pop-up is used for offering a spin-wheel interactive pop-up that can be scheduled for entry or exit display on the web store. Now, with this integration, the same pop-up will be automatically displayed on the apps. You just need to install the extension on your website.

–> Explore PrestaShop Spin Win Module

This list doesn’t end here. Get to know more about the features in detail from here.

g). Video Banner Elements:

The all-new Prestashop App Maker comes with video banner components available on the home page. The store admin can now showcase different videos with the option to upload/YouTube videos on the home page banner components.

h). List/Grid View:

The Android and iOS App built with Prestashop Native Mobile App Builder provides the app users with the opportunity to explore the products in list/grid view, enhancing the visuals and customer experience. 

Now, the users can simply tap on the list/grid button provided on the product listing pages to switch between list and grid view for the products.

i). Video/Banner Options on the Category Product Listing Pages:

Showcase your product carousal with the all-new video/banner upload options introduced in the updated Mobile App Maker for Prestashop. The store admin can upload videos below 2 MB or can also showcase the YouTube videos directly on the category product listing pages. This feature provides better UI control to the store admin, enhancing the customer experience at the same time. 

J). Automated Banner Sliders:

In the latest Mobile App Builder module, we have introduced the automated banner slider feature that allows the Prestashop store administrator to configure the automated sliding time from the module backend. 

The admin can use the functionality, particularly for the “Banner Horizontal Sliders” home page layout components, and can add sliders for both videos and image banners. 

K). Enhanced Review Section:

If you are using PrestaShop’s default Product Comment module, you can enjoy the enhanced review section in the app. All the approved reviews now come with enhanced UI that delivers a top-notch visual experience for your Android and iOS App users. 

L). Login/Sign-up Pop-up:

Capturing the visitors’ emails is one of the biggest challenges in eCommerce. However, we have simplified this process by introducing the login/sign-up pop-up in the recent Mobile App Builder version. 

The store admin can add a login pop-up that will appear for non-logged-in customers, increasing the email opt-in chances by providing simple login options to the users. 

2.0 PrestaShop Mobile App Demo

KnowBand understands your concern about your uncertainty to go for the solution & to curb the same, it has offered a free demo for all eCommerce store owners. The merchants can view our demo store working on the mobile app & even their store working on our demo apps.

2.1 View Our Demo Store working on Apps

Want to see the eCommerce app features? We have integrated our demo store with the app where you can explore the fully functional app and see all its features. Just follow the below instructions:

Step 1: Download and install the Nautica PrestaShop Mobile App from either App Stores on your mobile device. Here, are the links to download demo apps:

Apple App Store  – https://testflight.apple.com/join/PAcL7EEE

Google Play Store– https://play.google.com/store/apps/details?id=com.velsof.prestashopgenericapp&pli=1

Step 2: the Open the Nautica PrestaShop App and hit the view demo button.

That’s it! You will see our demo store running on the demo app. You can browse the same, check all functionalities, create an orders, etc.Note: To access the Admin Panel of KnowBand Mobile App Builder on our demo store, visit here.

2.2 View Your Store working on Demo Apps

Not satisfied? Want to test your store on the demo apps? Well, we got you covered with everything. You can experience your store on our demo app as well that too without any cost. Just 3 steps are all you need to follow for the same:

Step 1: Download & install FREE PrestaShop Mobile App Builder plugin & install it on your store.

Step 2: Install the Demo Apps (links in the previous section) on your mobile device. Open App & enter your Store URL.

Step 3: Tap “View Your Store” and start experiencing your store on demo apps.

Step 4: Enter your store URL in the appeared box.

Example: https://www.example.com/

Note: This Free version of Mobile App Builder is just for the demo purpose & no APK/IPA files will be provided with this module. To get your own APK/IPA files, you need to purchase the paid version of the PrestaShop Mobile App Builder.

3.0 Build your PrestaShop Mobile App in 3 Simple Steps

We hope that you liked the demo of our PrestaShop Mobile Apps and found what you were looking for. So, this is the time to get a Flutter pair of apps for your store. The process to build an eCommerce mobile app is as simple as it could get. Just follow 3 simple steps & your app will be ready in 1-2 working days.

Step 1: Install-Module on your website

Download Prestashop Mobile App Builder & install the same on your store.

Step 2: Share your App Specifications

Share your App details/requirements in our pre-requisites form.

Step 3: Get Your Apps in 1-2 days

Our skilled & professional developers build your apps matching exactly the shared details. We would get back to you with APK/IPA files in 1-2 days.

Note: You can publish these APK/IPA files on respective app stores. Refer following links for the same:

How to publish an app on Google Play Store?

How to publish an app on the Apple App Store?

Still an issue? Tell us, we would publish the apps for you. Moreover, for any queries and suggestions, please reach us at support@knowband.com.

4.0 Module Installation

Once you have purchased the PrestaShop Mobile App Builder module, you will get the following files as listed below:

1. Compressed File in ZIP format (contains the source code of the addon)2. User Manual

Now, you can go on with the further installation process in the following two ways:

Module Installation using FTP Details

Module Installation using Admin Details

5.0 Admin Panel Screens

Once the PrestaShop Mobile App Maker is successfully installed on your website, it’s time to configure the Admin Panel of PrestaShop Mobile App Creator. Once you click on the “Configure” option on KnowBand Mobile App Builder, you will get the following tab with friendly interfaces. Let’s narrow down them one by one.
5.1 General Settings

The General Setting tab is all about the settings required to run your Mobile App on the user’s devices. This tab contains all the necessary generalized options to sync the app.

a) Enable Plugin: Enable the PrestaShop Mobile App Creator plugin to make your mobile app work on user’s devices.

b) Enable Spin and Win: Enable to display a gamified spin-wheel pop-up on the home screen whenever any user opens the app. It can be used to offer discounts/deals & capture their e-mails in return for marketing purposes. To make this functionality work, you need to install Knowband’s Spin and Win module on your website.

Note: The Spin and Win Module will only work in case you have installed the plugin in your store end.

c) Redirect on Cart Page when Add To Cart: This functionality allows you to control the navigation of the “Add To Cart” button. You can either redirect your users to the shopping cart or keep them on the product page whenever they tap Add To Cart button. This enhances the chances of additional purchases.

d) Display Short Description: Enable to display product short description on the product screen along with full description & other details.

e) Select Layout: Choose the desired Home Page Layout for your PrestaShop app. You can create multiple home screen layouts in the backend as per various festivals & themes & use them as per your store requirement.

f) App Button Color: Choose the desired button color for your PrestaShop Mobile App.

g) App Theme Color: Choose the desired theme color for your PrestaShop Mobile App.

h) Image for logo: Upload your store logo image to be displayed on the top header of the app. This promoted your brand among worldwide mobile shoppers.

i) Disabled Shipping Methods: Choose desired shipping methods that you don’t want to be displayed on your PrestaShop Mobile App.

j) Enabled CMS Pages: Choose desired CMS pages to be displayed on the mobile apps.

k) Enable Request Log Reporting: Enable log on the mobile apps to get details of any abnormal behavior of your app.

l) Enable WhatsApp Chat Support: Enable the WhatsApp chat option on your PrestaShop Mobile Apps. The users can directly contact you at your WhatsApp number entered in the backend.

m) Enable/disable Phone Number Registration: Enable the Phone Number login option in your PrestaShop Mobile App & let your users authenticate with OTP verification.

n) Enable URL encoding of Image links: Enable this functionality to support Non-ASCII characters on the app.

o). Enable/Disable Fingerprint Login: This option enables or disables the fingerprint of Face ID login options in the Android and iOS apps. 

p). Enable Notification List Feature: The admin can show/hide the notification section in the app for the customers with the help of this button. 

q). Enable Sign In Login Popup: This button is designed to enable/disable the login pop-up for customers who have not completed registration on the store. 
r). App Icon Theme Color: The store admin can configure the color of app icon themes, especially Wishlist, Cart, and Hamburger menu icons. 

s). Enable Social Login: The following button can show/hide the social login options Google, Facebook, and Apple from the apps.

5.2 Push Notifications Settings

The PrestaShop Mobile App Creator for Android/iOS leverages the Power of Push Notification using the Google Primary Services for the Push Notification to Mobile devices. It brings this handy marketing tool to grab immediate user attention & boost sales. Highlighting your daily deals & offers is just a message away with your PrestaShop Mobile App. Both automated & custom notifications are available with PrestaShop Mobile App Maker.

a). Service Account Json: Since the traditional Firebase push messaging API is deprecated and replaced with a service Json file, this section allows the admin to configure the Json file extracted from the Firebase account. 

Either you can configure the same on your own, or we will also share your service Json file at the time of app creation.

b) Enable/Disable Order Creation Notification: Enable/Disable automated Push Notification sent to the app users for successful order creation.–> Title and Message for Push Notification: Enter the title and message on the push notification setting for successful order creation.

c) Enable/Disable Order Status Changed Notification: Enable/Disable automated Push Notification sent to the app users for any update regarding their previous order delivery status.–> Title and Message for Push Notification: Enter the title and message on the push notification setting whenever there is an update the in previous order delivery status.

d) Enable/Disable Abandoned Cart Notification: Enable/Disable automated push notifications sent to the users who have abandoned cart without successful purchase.–> Title and Message for Push Notification: Enter the title & message of the push notification for abandoned cart app users.

e) Time Interval: Interval (in hours) for sending Push Notification to app users who have abandoned their cart without successful purchase.

5.3 Push Notification History

This tab contains the history of all sorts of push notifications sent to every user with concerned details. The merchant can get to know about every notification sent earlier. This tab also has the option to send a custom notification to the users crafted from the backend. You can easily make them aware of any store-related details or discounts through manually sent notifications.

Send Notification:

This option is there to send a manual notification to the app users as per your choice. You can configure the title, message, landing page, image, etc., and notification of your choice as shown below snapshot:

a) Title of the Push Notification: The title of your manual Push Notification that is to be sent to the app users.

b) Message of the Push Notification: The message of your manual notification which is to be sent to the app users.

c) Device Type: You can choose the users on Android/iOS or on both to whom your manual Push Notification is to be sent.

d) Image Type: You can upload the desired image/banner justifying your notification. The banner image can be uploaded or used through an existing URL.

e) Notification Image: The store admin get to preview the notification image & analyze how it will look on the user’s apps.

f) Image URL: The actual URL of the notification image which is to be sent to the app users.

g) Redirection Activity: You can choose the redirection of your notification by choosing from Home Screen/Any Category/ Any Product here. Whatever you set, your users will be redirected to the same on tapping the push notification.

h) Select the Category/Product: You can choose any relevant category/product screen for your notification.

i) Send Notification: Once you have crafted & previewed your notification, it is time to send the same on your apps.

5.4 Payment Methods

The PrestaShop Mobile App Creator for Android & iOS supports all sorts of website payment methods on the Android & iOS apps. Additionally, it brings COD payment option & the flexibility to add other Web-Viewpayment methods as well.

By-Default, there is only a Cash On Delivery Payment Method in our Mobile App. However, if you want to add the same payment methods as on your PrestaShop store, disable the COD method from the module back-end. After disabling the COD method, all the payment methods that are available on your web-end will appear fine in your Mobile Apps.

5.5 Home Page Layout

This is one of the most amazing functionalities of the PrestaShop Mobile App Builder plugin to design & craft multiple home screen layouts using various designing attributes/elements. This tab contains the list of all the home screen layouts configured earlier based on various themes & fonts as shown in the snapshot below:

To configure the home page layouts, the following elements are available in the back-end:

  • Top categories
  • Square Banner
  • Horizontal Sliding Banner
  • Grid Banners
  • Countdown Banner
  • Grid Products
  • Horizontal Sliding Products
  • Recently Accessed Products
  • Login/Sign-Up Pop-Up

The store merchant can configure & use any of these attributes to craft & save multiple layouts. These layouts can be used as per the theme & requirements. Also, the positioning of various elements can be altered with just a simple drag & drop functionality.

Top Categories:

Top categories are displayed in the form of small squares on the home screen & can be configured including their image & landing categories/products. The PrestaShop Mobile App Maker offers a maximum of 8 categories in which a minimum of 4 are mandatory.

Square Banner:

Another attribute is Square Banner listing which is used to offer a square-shaped banner on the home screen of the app. You can customize the banner by choosing the right image & landing screen for the same. In the Recent Updates, we have also added the video selection option for the banner squares. Now the admin can also choose between the options of Video Upload or YouTube Video Link for the square banners.

Horizontal Sliding Banner:

These are the rectangle-shaped available in horizontal sliding & can be fully customized from the backend. The admin can also configure the automated banner sliding time interval for the horizontal banner sliders components.

Grid Banners:

These are square-shaped banners listed on the home screen in the grid form. You can set as many banners as you want on the home screen & customize their image & landing page accordingly.

Countdown Timer Banner:

The PrestaShop Mobile App Builder offers a banner with a countdown timer. You can set the banner image & landing screen & set the timer till you want to display the banner. Once the timer is over, the banner will automatically disappear.

Square Products:

As for banners, the PrestaShop Mobile App Creator offers products to display on the home screen in the form of a square listings.

Horizontal Sliding Products

You can add the products in the form of horizontal sliders. The selected products could be of any specific category or other highlights as Best Sellers, Featured Products, etc.

Grid Products:

The products can also be added to the home screen in the form of grid listings. The products can be chosen from any category.

Recently Accessed Products:

The PrestaShop Mobile App Creator provides the recent tab element which displays the recent products viewed by the user. You can just add the element in your layout to display the same on the home screen.

Note: The store admin can add up to 20 elements while designing a layout in the backend panel. 

Login/Sign Up Pop-Up:

We have introduced a new login pop-up that will encourage the customers to log in to their accounts with a single tap login/sing-up option provided on the home page of the apps.

5.6 GDPR Compliance

The PrestaShop Mobile App Builder offers GDPR compliance in mobile apps. The store admin can simply make a few clicks in the admin panel and apps will become GDPR compliant.

a) Enable GDPR Settings: Enable this tab to offer GDPR compatibility on various app screens.

b) Display GDPR on: Choose the app screens where you want to activate GDPR options.

c) Import Content Of CMS Page: Choose the CMS page whose content needs to be added for the GDPR option.

6.0 Mobile App Screens

6.1 Home Screen

The Home screen of your PrestaShop Mobile App will be exactly as you want it to be. The PrestaShop Mobile App Maker offers complete flexibility to design & craft a home screens into your hands. Using multiple banners(Square, Grid, Sliding), products (Square, Grid, Sliding), countdown timer banner, and recent products tab in the backend, you get to design intuitive layouts for your home screen. The following options are available on your app home screen:

Moreover, the positioning of various design elements can also be altered as per the requirement.

1. Dynamic Layouts:

Using various elements you can create & save various layouts in the backend & re-use them as per various events & festivals. You can design & craft your app home screen dynamically.

2. Brand Logo:

Your store logo is represented on the left-middle section of the top header of your PrestaShop Mobile App. The logo is fully configurable from the module backend & can be enabled/disabled including image changes.

3. Search:

The search option allows the mobile app shoppers to get easily & quickly what they desire. In your PrestaShop Mobile App, product search will be in two forms: The search option can be found on the bottom tab bar layout of PrestaShop Mobile App.

–> With Text: Your App users can search for desired products just by typing some related keywords. The PrestaShop Mobile App will show relevant results to that keyword.

4. Wishlist Bag:

The wishlist bag is displayed on the top header of your PrestaShop Mobile App containing all bookmarked products. The app users can save their desired products in a wishlist bag for future purchases.

5. Shopping Cart:

The Shopping Cart is available on the top-right corner of the app home screen. The users can get to know about the products added to their cart right from there.

6. WhatsApp

On the right-bottom of the home screen, there is a live seller-buyer chat option. The mobile app shoppers can easily & directly message you their query & you can resolve them instantly.

6.2 Accordion Menu (Navigation Bar)

The PrestaShop Mobile Apps for Android & iOS come up with proper categorization of products is available on the website. Mobile shoppers can easily browse products from multiple categories. All CMS pages are also available in Accordion Menu. It provides the following options:

1. My Account

My Account screen contains all the user information like Personal Details, Shipping Address(s) & Order Details. The shoppers can view all the info related to them & can update personal details & login passwords as well.

2. Categories

These categories are the same as on your website. You can map them accordingly & offer a 3-level categorization to your app users for hassle-free browsing.

3. CMS Pages

Various CMS pages like About Us, Contact Us, Terms & Conditions, etc. Available on your website are displayed here. You can choose the desired one from the PrestaShop Mobile App Builder backend to be displayed on Mobile App.

4. Language(s)

The language option allows your users to view PrestaShop Mobile app in their Nativelanguage. All available languages are displayed under this option only.

5. Currency(s)

All available currencies on your eCommerce website are displayed on PrestaShop Mobile App as well. The shoppers can view & purchase the product price in their desired currency.

6. Login/Logout

Your users can easily log in/log out from PrestaShop Mobile App using this option.

7. Notification Settings:

The app users can control the specific push notifications they want to receive in the app. The options allow mobile app users to choose between all notifications, promotional notifications, and order status update notifications.

6.3 Category Screen:

All the sub-categories, parent categories & other associated categories are available in your PrestaShop Mobile App. The category screen is designed to deliver clutter-free experience in two basic views: Grid & List. The product image, name, price, the discount is displayed in all listings with an option to add them to the wishlist bag as well. The Mobile Apps with PrestaShop Mobile App Builder have layered navigation which makes the product search just simpler. The following options are available on the category screens:

Furthermore, now the admin can also enhance the UI of the category product listing page by adding video/images on the category page section.


1. Sort:

This option allows the shoppers to select the desired order in which the category product pricing is to be sorted. Two sorting orders are available in your apps: Price: Low to High & Price: High to Low.

2. Filter:

The option to filter products simplifies product search. The app users can filter the products in your PrestaShop Mobile App based on various attributes like size, color, compositions, Condition, Manufacturer, Price, etc. The users can search for their favorite products in minutes using these filters.

6.4 Product Screen:

The product screen of your PrestaShop Mobile App is simple & intriguing. Multiple images of the same product are displayed along with the name & price. The product availability is also displayed as “In Stock” or “Out Of Stock” based on inventory status. It contains the following other options:

1. Product Options:

All the options related to the product like size, color, etc. are displayed on this screen. These product options are the same as available on the website.

2. Short Description

Users get to read the short description of your product to quickly make up their minds.

3. Product Info & Care

The complete product information is listed on the website is displayed here. The app users can get complete product details from here.

4. Add To Wishlist:

The Mobile App users can directly bookmark the product just by tapping “Add To Wishlist” on the left bottom of the product screen.

5. Add To Cart:

As the name “Add To Cart” button adds the product directly into the cart & the users can further go on with the purchase.

6. Product Social Sharing:

There is an option on this screen to share your product on multiple social platforms, including Bluetooth & e-mail. The app users can share the products among their friends/relatives on multiple social platforms & lure heavy users to your app.

6.5 Wishlist Screen:


Your PrestaShop Mobile App Creator would have a wishlist bag allowing the users to bookmark products for future purchases. The users can view the list of all bookmarked products from here. It has two options:

1. Add To Cart:

The app users can add the bookmarked product directly into the shopping cart by choosing Add To Cart option.

2. Remove From Wishlist:

The users can even remove any wishlist product if not feel like buying that.

6.6 Login Screen

The PrestaShop Mobile App Creator offers various one-tap login options & makes the sign-in/registration process more seamless:

1. Login

The app users can authenticate & access apps using e-mail sign-in credentials.

2. Sign Up

All the new app users can sign-up & create their account on the store from the mobile App. The sign-up form of the PrestaShop Mobile App only asks for relevant details.

3. Login with Phone Number

Your Mobile App comes up with an easier & robust phone number login option which makes it easier for the users to verify the OTP & login app.

4. Login with a Fingerprint

Your users also get an option to log in with fingerprint authentication. This allows users to access apps in seconds.

5. Login with Facebook

The users can log in to the app using their Facebook Account Credentials.

6. Login with Google

The users can log in tothe app using their GoogleAccount Credentials.

6.7 Shopping Cart Screen:

The Shopping Cart screen of your PrestaShop Mobile App will display all products to the shopping cart. The app users can view the product’s name, quantity, total price & shipping cost. This screen has the following options:

  1. Apply Voucher

This option allows the users to get discounts & offers by entering valid coupons & vouchers running on your website.

2. Total Product Price

The users can view the complete cost of their shopping bag from here. It is automatically updated as per any update with product quantity or addition.

3. Update Product Quantity

The app users can even update the product quantity with the “Update Quantity” option.

4. Remove Product

The app users can simply remove the product from the cart by simply tapping the “Remove” option.

5. Continue To Checkout

The front-end mobile app users can proceed further to the checkout & payment screens just by tapping the “Continue To Checkout” option. It will re-direct them on the checkout screen.

6.8 Checkout Process

The Prestashop mobile app Builder consists of a simplified checkout process. The front-end mobile app users have the option to select the shipping details, billing details, order numbers, order comments, and so on in the checkout process of the mobile app.

Users of the Android and iOS apps only need to follow a few simple steps to place their orders.

1. Customers can select the desired product and add it to the shopping cart. After clicking on the shopping bag, he or she can also select the desired product quantity. Moreover, the front-end mobile app users can see the total number of products and shipping costs.

The customer also has the option to apply any voucher and coupon code at the bottom of the same page.

2. After clicking on the Continue to Checkout option, the user can review the order where he or she can see several details. Such as product price, shipping cost, shipping address (It can be edited on the same page), order summary (Number of the products), total price, and so on.

Additionally, the customer has the option to select their preferred mode of shipping on the same page. The user can also put his or her special request or requirement in the order comment option appearing on the bottom of the screen.

  1. The user will be redirected to the payment method screen after clicking on the continue to checkout option.

On this screen, users have the option to select from all of the website payment options. By default, the shopping app consists of a cash-on-delivery option as a mode of payment.

  1. When the user performs the payment activity, then he or she will be redirected to the order summary screen. where the customer can see the order status, order number, amount, and so on. The front-end mobile app users will get the order confirmation popup message on their mobile phone screens as well.

6.8 My Account Screen

My account screen of the Android/iOS eCommerce app allows users to view the complete account details including a list of previous orders. My Account screen offers the following options:

  1. Order History

The users get to know about complete order details being placed earlier. The order submission date, order reference, price & delivery status is displayed.

2. Update Profile

Users can also update their pre-saved profile details such as First or last name, phone number & password.

3. Shipping Address(s)

The app users can see the complete list of saved Shipping Addresses. A new Shipping address can also be added from here.

4. Order Details

The app users can get to view the complete list of the previously placed app orders.

5. Re-order feature

There is a direct re-order product directly by clicking the “Re-order” button. All the previous orders will be added to the cart by just tapping a single button.

6.10 Order Detail Screen

Order details screen of PrestaShop eCommerce App provides complete order detail such as shipping address, product summary, shipping and payment method, and total cost summary. The users can even track the delivery of previously placed orders directly from this screen.

7.0 Video Tutorials

8.0 Advanced PrestaShop Marketplace with Mobile App

KnowBand’s PrestaShop Marketplace converts your online website into a fully fledged marketplace. The PrestaShop Mobile App Builder is fully compatible with PrestaShop Marketplace extension. This means you can bring the entire marketplace listing on the same PrestaShop Mobile Apps. Thus, launch a pair of Marketplace-compatible Mobile Apps with KnowBand & attract a large base of sellers & customers to your store.

–> As the user clicks on the Seller option, he/she is redirected to the Seller page of the mobile store. The user can view the list of the sellers of the marketplace along with their ratings.

–> The customers can click on the name of the seller in order to see his profile and product being offered. The sellers can log in with their username and password. They are then redirected to the dashboard.

Get to know more about PrestaShop Marketplace with Mobile App from here.

Android & iOS Mobile App Builder for PrestaShop is also available at the Offical PrestaShop Addon Store