Earlier in Marketplace if the admin has to transfer sellers cut which the seller has earned from selling his products then he has to do that manually using his account, but using this module the admin can transfer money to the seller or can also take the refund from the seller when needed, but for this both the admin and the seller must use their PayPal account.
Steps for Installation
To install this ad-don, please follow the following steps:
1. Add ad-don folder under modules folder of your system.
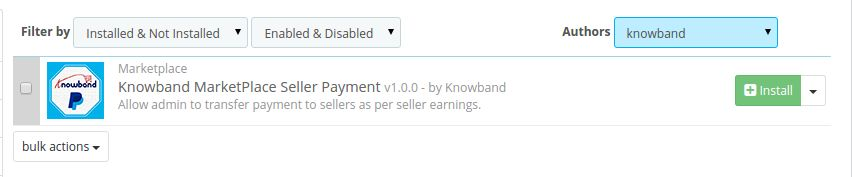
2. After adding this ad-don folder, system will list the ad-don on module page under front office feature category as given below:
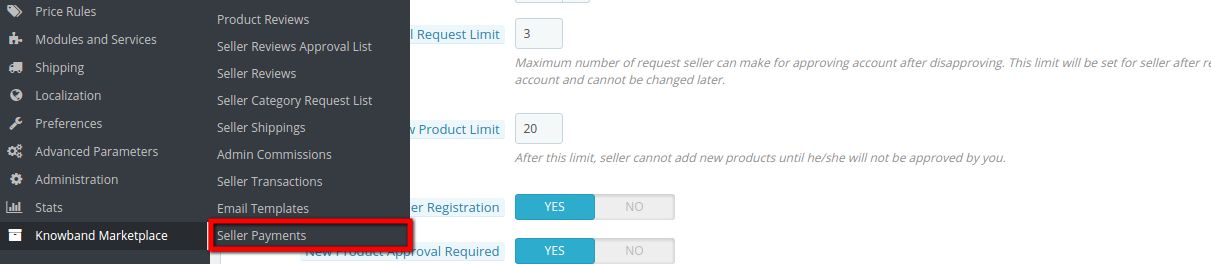
After installation, a sub menu will be added in the Knowband Marketplace menu and will be named as SELLER PAYMENT.
On clicking the highlighted link, system will be redirected to the Seller Balance Payment Page where all the listing of the seller with PayPal accounts will be listed and the admin can make the payment to the seller and also take the refund from the seller.
Seller Payment Configuration
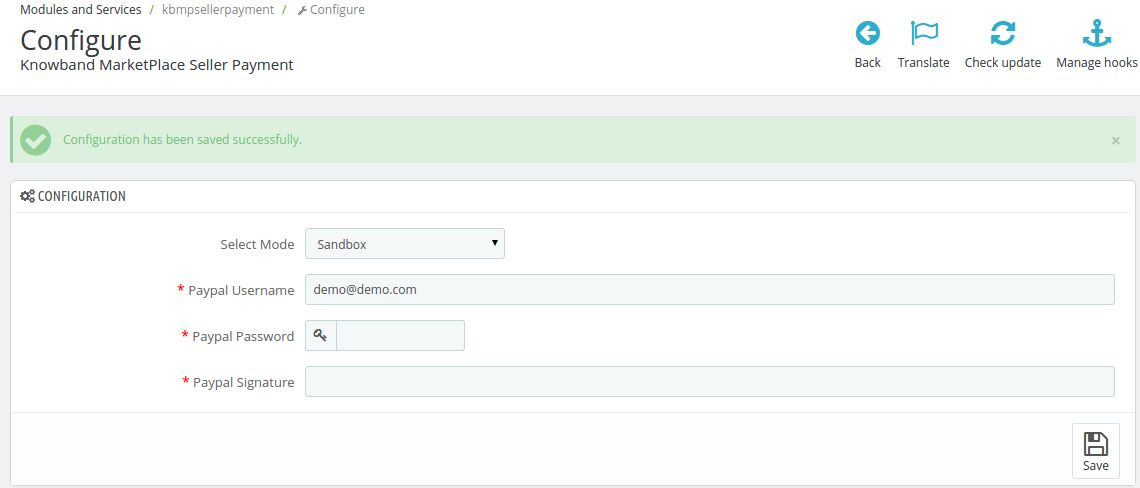
Here is the configuration Page for the admin in the admin account.
Settings Description
1. Select Mode: This field has two options 1. Sandbox 2. Live. When the module is on sandbox mode then the module is on the testing mode and can be tested by the admin till he gets sure and if the module is set for the live mode then it is live working on the store.
2. PayPal User name: In this field the admin has to enter his user name of the PayPal account to which the admin will make the payment or request for the refund.
3. PayPal Password : Here the admin has to enter the PayPal account password.
4. PayPal Signature: Enter the PayPal signature associated with your account.
Seller Balance Payment
Here the seller can make payment or request for the refund from the seller.
Settings Description For Transfer Payment to Seller
1. Seller: This field will contain the seller shop title.
2. Email: This contains the seller email id.
3. PayPal Email: Here the PayPal Email of the seller is provided.
4. Total Earning: Displays the total earning done by the seller from t
5. Your Commission: This field shows the admin what commission does he deserves from the seller total earning.
6. Seller Earning: Here the seller earning is shown after the admin commission is removed from it.
7. Amount Transferred: This shows the admin that how much amount the admin has transferred to the seller.
8. Balance: This is the balance between the seller and the admin that the admin should transfer to the seller.
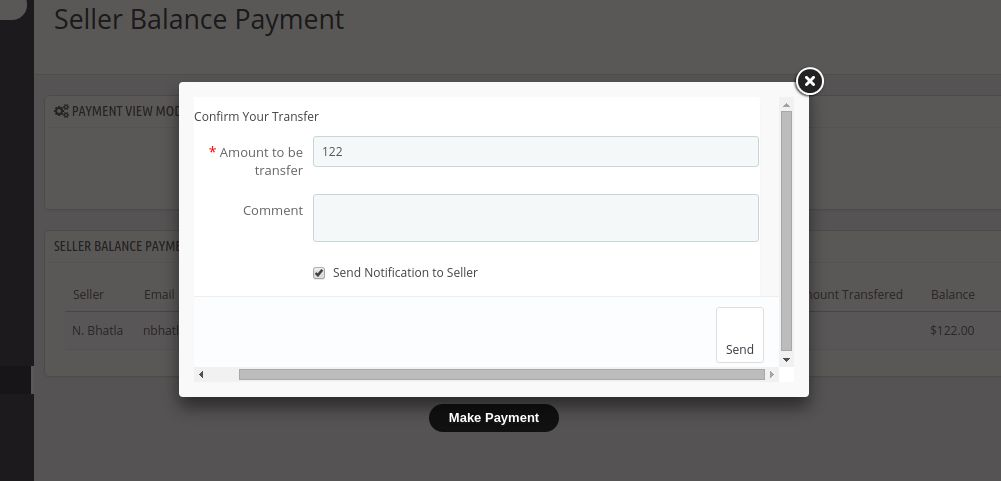
9. Make Payment: When the admin clicks on Make Payment then a pop up appears as shown in the below screen shot from where the admin can transfer the amount to the particular seller.
A. Amount to be transferred: Here the admin has to enter the amount which he wants to transfer to the seller PayPal account.
B. Comment: The admin can also enter any comment which he wants to add to the transfer of payment which he is doing.
C. Send notification to seller: If this filed is checked by the admin the an email is send to the seller whenever the admin transfers any payment to the seller.
Settings Description For Refund Payment from Seller
1. Seller: This field will contain the seller shop title.
2. Email: This contains the seller email id.
3. PayPal Email: Here the PayPal Email of the seller is provided.
4. Amount: This is the amount which the admin has transferred to the seller earlier and can be refunded by using this transaction.
5. Transaction Id: This is the transaction id which was generated to the transaction which the admin has done to the seller earlier.
6. Account ID: This is the account ID of the seller to which he account has been transferred.
7. Transaction Pay Key: This is the key which is generated for the transaction which is done.
8. Refund Back: When the admin will click on this button then the account which has been transferred by the admin using this transaction will be refunded back to the admin account.
Module Location
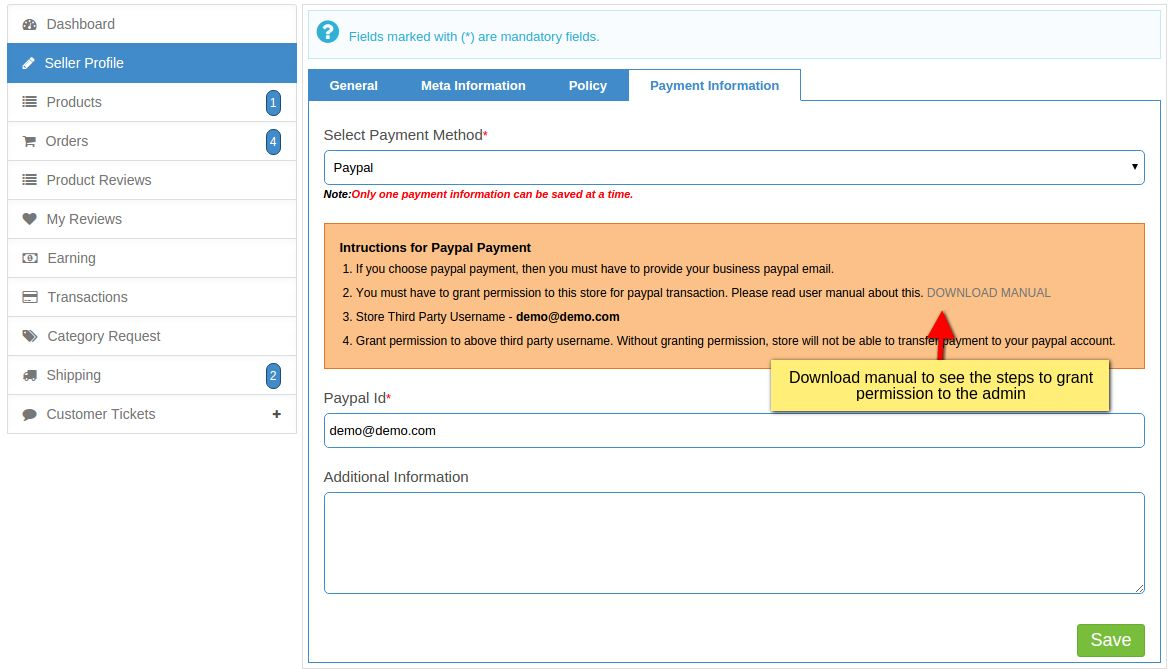
The module will appear when the seller will select PayPal as their payment option. Here the seller will see all the instruction which he/she has to follow to make the PayPal payment.
The instruction are given in the screen shot below.
Seller can also download a manual to see the steps of STEPS TO GRANT PERMISSION TO THE ADMIN for refund request.
NOTE: Please test the module in the sandbox test mode and check the permissions which the admin has to be granted to complete the refund transaction.
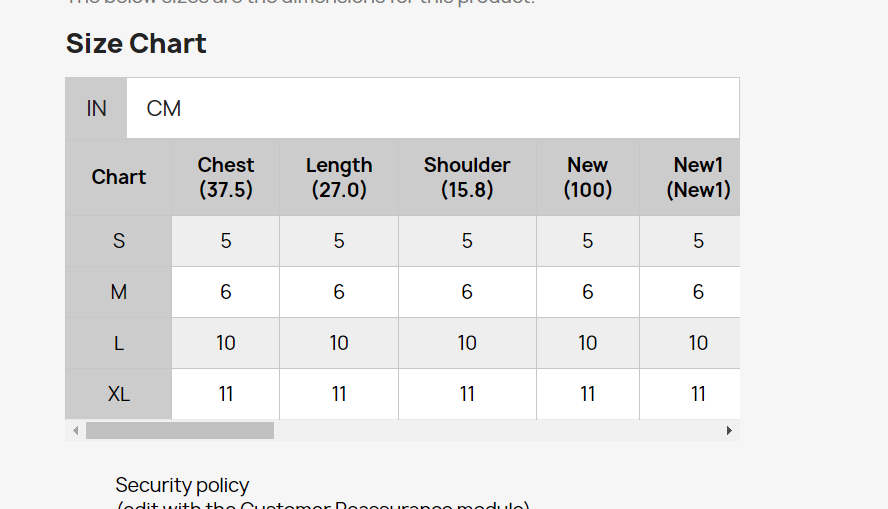
The Prestashop Product Size chart addon is a Size Chart creating module for Prestashop. Using this extension, the merchant can show the different types of size charts for each category, product, and manufacturers available on his/her store.
The eCommerce store admin can assign a single chart in ‘n’ number of the category in a single configuration. Products under the default category will show the size chart on the product landing page. The eCommerce store admin can assign the created size chart on any product or any category or any manufacturer. And, a product can have a unique size chart which means, any merchant can assign a pre-configured chart to any product.
The eCommerce store admin can assign the chart to a particular product or products of a particular category or products of a particular manufacturer. Thus with the help of this Prestashop Product Size chart module the eCommerce store owner can easily resolve the size-related issues of the store customers. The user-friendly interface of this Prestashop size catalog extension makes it more useful.
Features –
The Prestashop Product Size chart module allows the eCommerce admin to display the size chart on the product pages of the eCommerce store.
It’s very easy to install and configure this Prestashop size guide addon.
The store admin can enable/disable this Prestashop size catalog extension without any hassle.
The Prestashop Size Chart Popup addon is fully customizable.
The Prestashop Size Chart link module offers a simple and hassle-free implementation.
No technical knowledge is required for the configuration of this size chart popup addon.
The Prestashop size catalog extension provides an option to add images, guidelines or any HTML content to the size chart.
The Prestashop size guide for a category of products, a single product, or a manufacturer.
An unlimited number of rows and columns on the size charts can be added as per requirement.
The Prestashop Product Size chart extension provides the preview option.
Helps in making the purchase decision.
The Prestashop Size Catalog plugin is multi-lingual Compatible.
What’s New in 1.0.7 Update:
Customizable Size Chart:
You can now customize the size chart according to your needs and preferences, providing a more personalized experience for your customers.
UNIT Feature Update:
With this feature, Admin has the ability to specify the unit of measurement for the size charts
Custom CSS and JS:
You can now load your own custom CSS and JS files, allowing you to further customize and enhance the look and feel.
Improved Popup:
The all-updated 1.0.7 Size Chart Module allows for popups to be displayed over the other popups or directly on the product page under the “Add to Cart” button, providing a more seamless and user-friendly experience to both users and Presta admins.
New Rule Options:
Now, the Prestashop store admins can find two new rule options based on product reference and attribute, giving administrators more flexibility and control over how they map charts with products.
Multistore Compatibility:
The all-new Prestashop Size Chart module is now compatible with multistore. The PrestaShop store admins can now manage and customize their e-commerce platform with greater ease and efficiency.
Benefits offered by Prestashop Product Size Chart:
With the help of this Prestashop size guide addon the store admin can create appropriate size charts just by entering values.
The Prestashop size catalog extension allows e-merchant to set the size chart on a particular category, product or manufacturer.
This size chart will be available on every product page for a better store experience.
The admin can add n number of rows and columns in the size chart.
A preview option is available on the back-end.
This size related information reduces product return based on size issues.
With the help of Prestashop size catalog extension, the customers can view the size chart before purchasing the product.
The Prestashop product size table allows adding text and images in the size chart for better understanding.
The customers can easily understand the guidelines given with the size chart.
The Size Chart module offers admins to use the module for their Multi-Store Prestashop stores.
Along with all the pre-tailored options, the admins can now also add custom CSS and JS to improve the look and feel of their Product Size chart.
To install the Prestashop product size table addon, please follow the following steps:
1. Add the addon folder to the modules folder of your system.
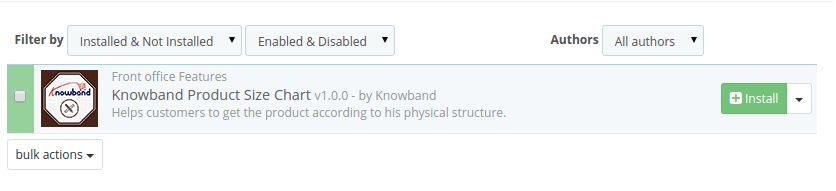
2. After adding this addon folder, system will list the addon on module page under front office feature category as given below:
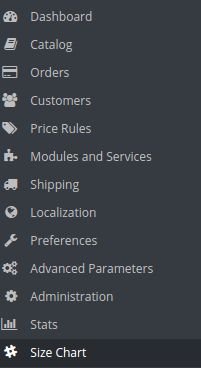
After the module is installed a new entry in the menu bar of the shop starts appearing in the back end with the name ‘Size Chart’. This menu will contain a sub-menu which further will be containing the following options.
1. Attributes Set
2. Chart
3. Category/Manufacturer Chart
4. Category Chart
5. Product Chart
Each section is described in detail below.
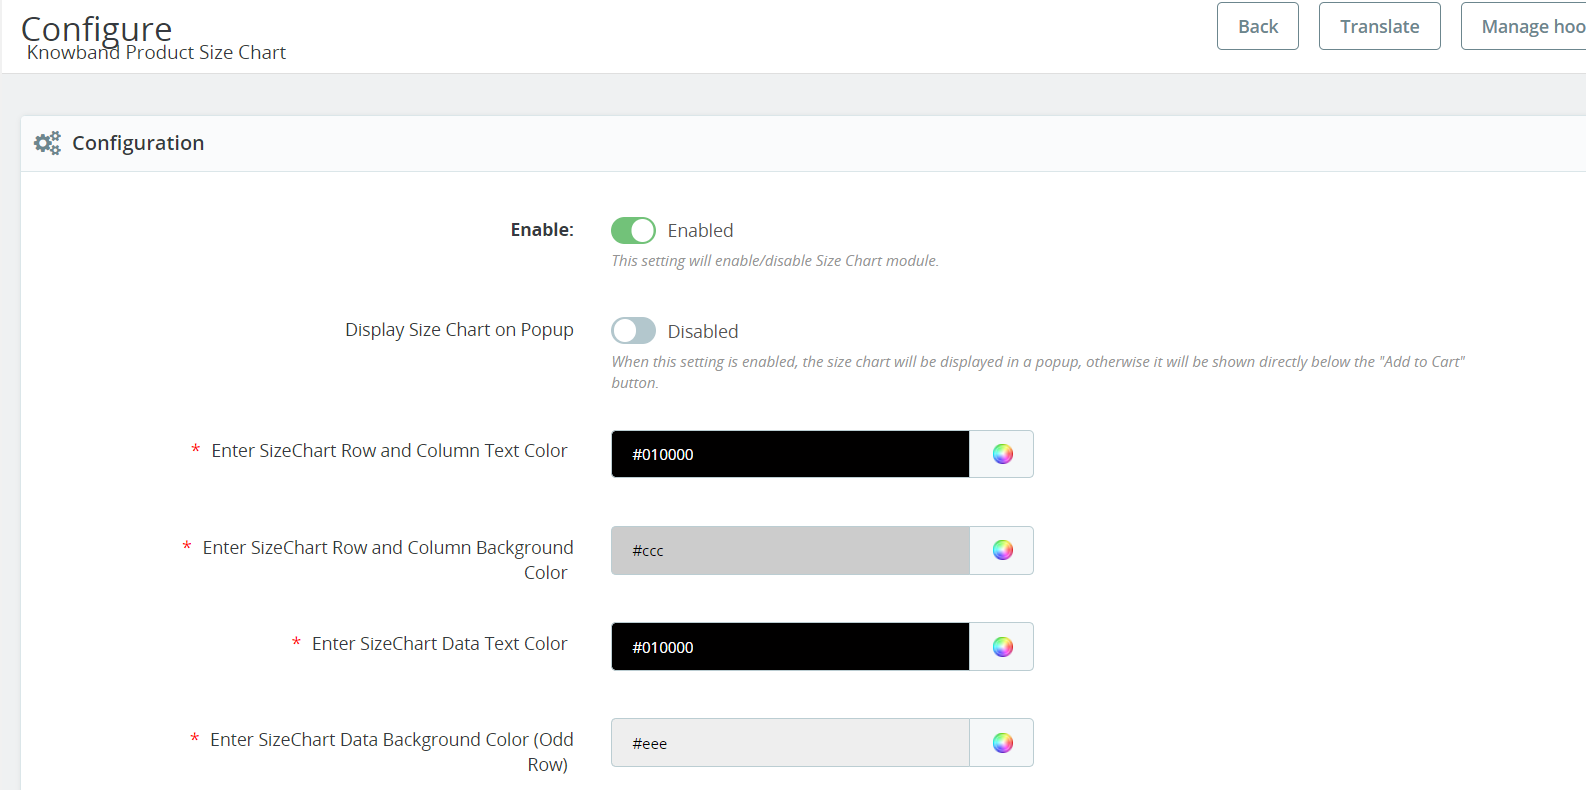
Configuration Setting:
In the following tab, the store admins can configure their Prestashop Size chart module and choose all the major size chart attributes such as component colours, CSS, JS, etc.
Enable/Disable:
The store admins can enable/disable the module with the help of this particular button.
Display Size Chart on Popup:
When this setting is enabled, the size chart will be displayed in a popup, otherwise, it will be shown directly below the “Add to Cart” button.
Enter SizeChart Row and Column Text Color:
This particular option will manage the row and column text color of the size chart.
Enter SizeChart Row and Column Background Color:
Like text color, the Prestashop store admins can manage the background color of size chart rows and columns.
Enter Size Chart Data Text Color:
With the help of this button, the store admins can manage the text color of size chart data.
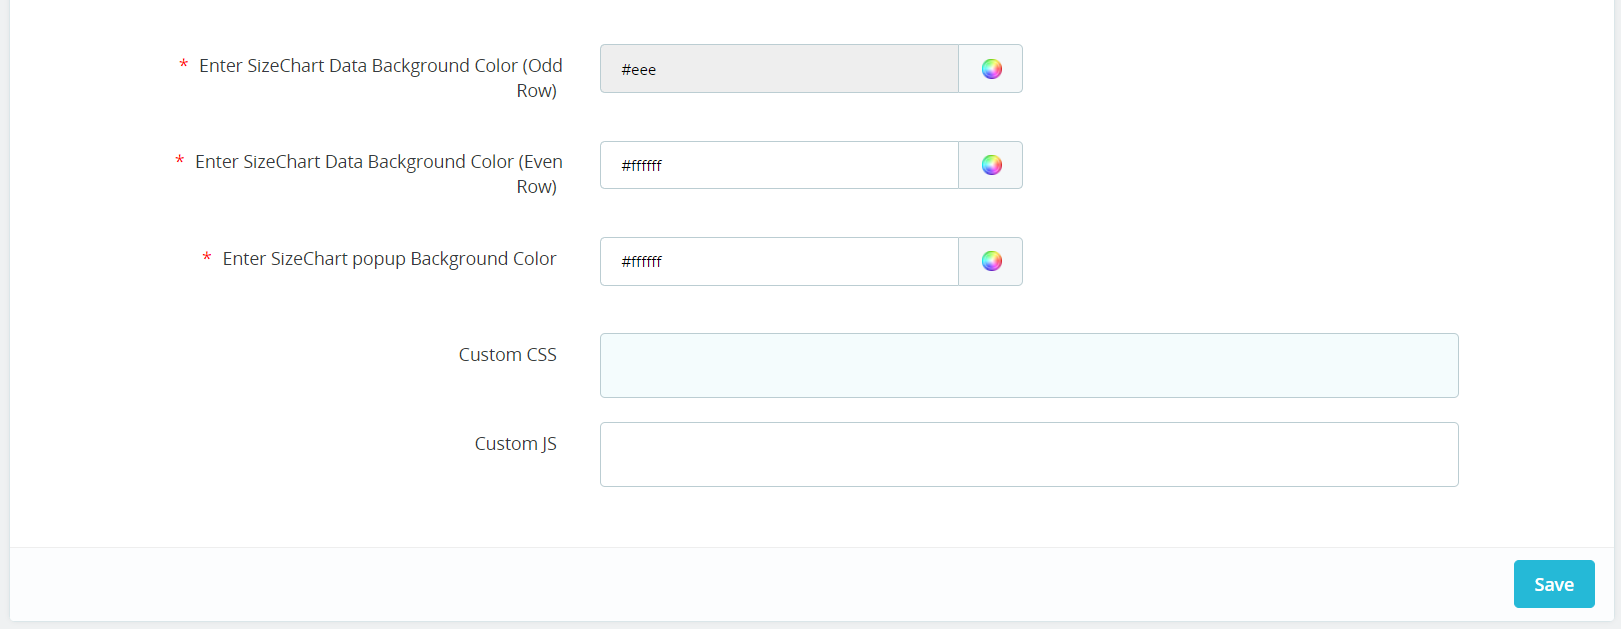
Enter SizeChart Data Background Color (Odd Row):
You can choose the color of the background of the size chart data from here. This option will manage the background color for the odd row only.
Enter SizeChart Data Background Color (Even row):
Like odd rows background color, the Prestashop store retailers can manage the the data background color for the even rows from this option.
Enter SizeChart Popup Background Color:
This option will allow the store admins to manage the SizeChart popup background color.
Custom CSS:
In the following text field, the admins can enter customized CSS to make their size chart sounding.
Custom JS:
Likewise, this particular field can be used for adding customized JS for the size chart.
Attributes Set
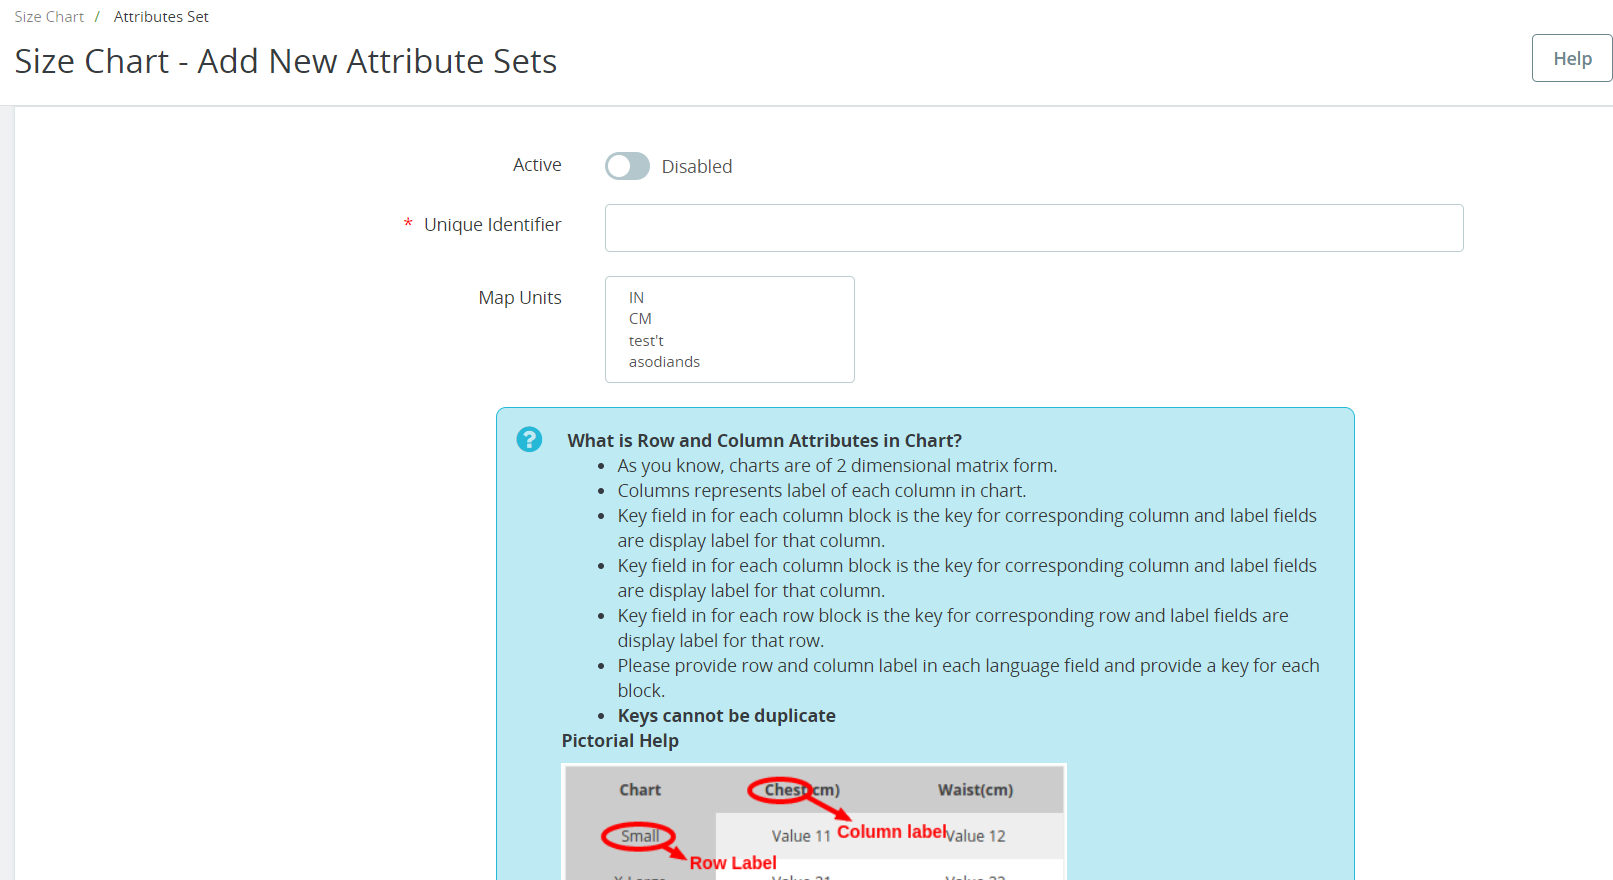
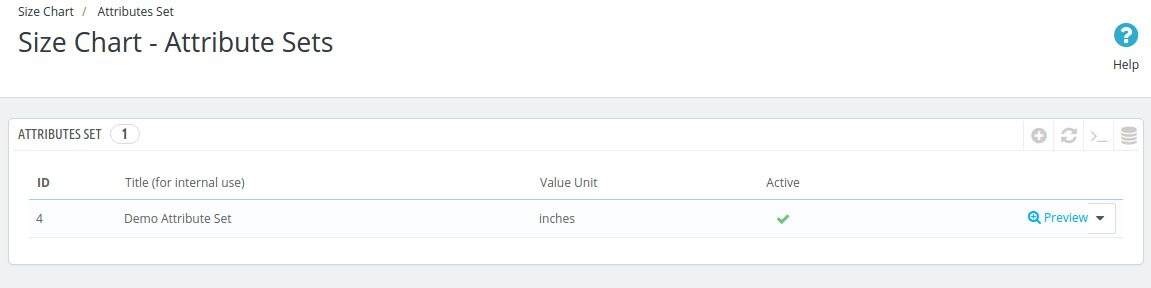
Once the admin will click on this option, a table appears which will contain the details of all the attributes of the chart which has been created to date. The admin can also create new attributes set by clicking on the add icon above the table. After the admin will click on the add icon, a new form appears containing the following fields.
1. Active: This field indicates whether the particular attribute set is enabled or not. The attribute set will only work if it is enabled.
2. Unique Identifier: In this field, the admin has to enter the unique name of the attribute set from which the attribute is going to be identified in the back end of the shop to create full-size chart.
3. Map Units: This feature allows you to choose the units that you wish to associate with the size charts. By visiting the size chart unit page, you can create Units for the size chart of your choice and then map them to your preferred charts using this option.
4. Value Unit: This is the field where the admin will choose the unit of the attributes set may be in inches, cms, kms, grams.
5. Chart Column Labels: In this field, the Prestashop eCommerce store admin has to choose the chart column labels and their name in the different store languages. The admin can add ‘n’ number of column labels.
6. Chart Row Labels: In this field, the eCommerce store admin has to choose the chart row labels and their names in different store languages. The admin can add ‘n’ number of column labels.
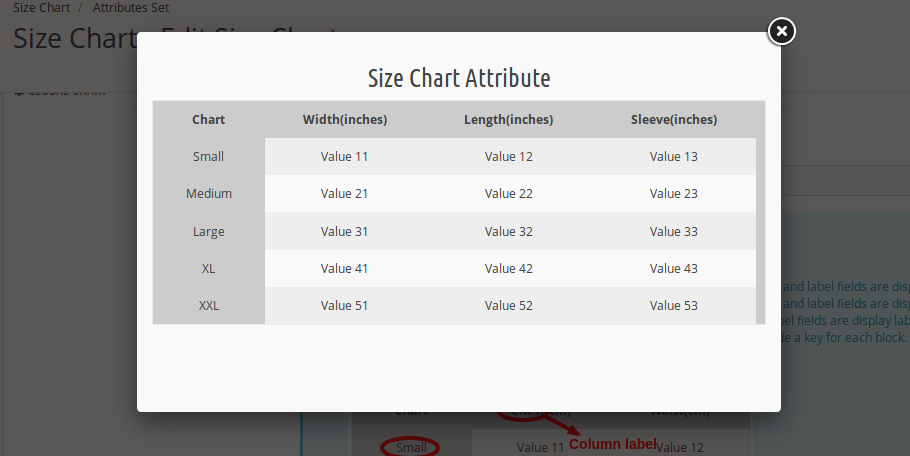
7. Preview: By clicking on this link the Prestashop store admin can view the preview of the attributes set which will be created by the values that are filled above.
8. Actions: Actions like edit and delete are also available to edit the entries which are already done by the admin.
Charts
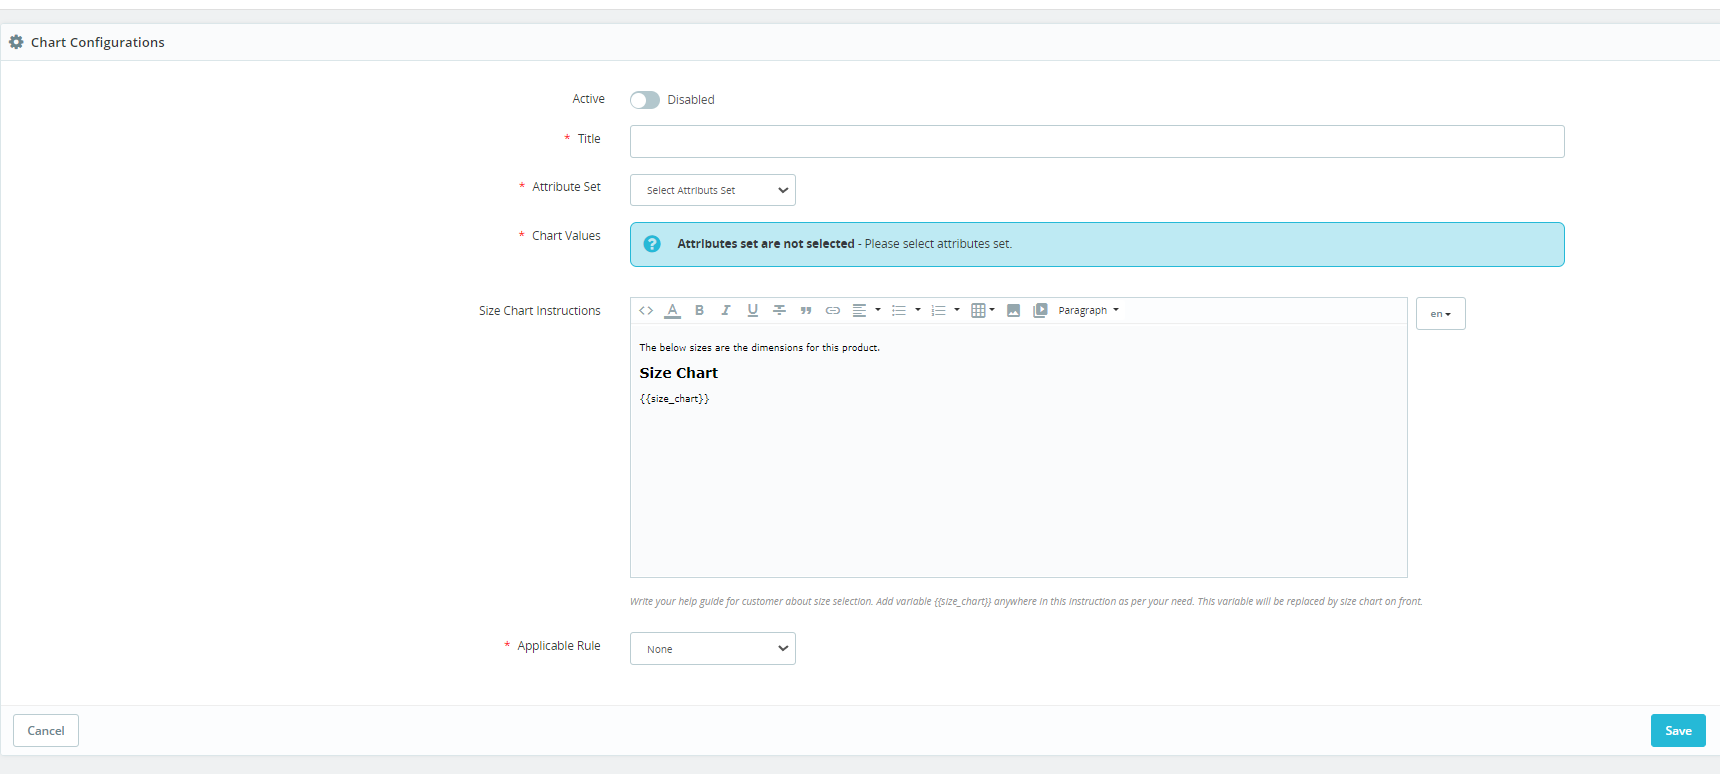
Here, the admin will create the full chart using the attribute sets which were created in the previous tab. To create a chart, the eCommerce store admin has to click on the add button on the right side of the chart. As soon as the eCommerce store admin clicks on that add button, a new form appears with the following options.
1. Active: From here, the Prestashop store admin can set the chart enabled or disabled. The chart will be displayed only if it is enabled.
2. Title: This is the title of the chart which is for internal use only to uniquely identify the chart when assigning them to the product, category or manufacturer.
3. Attributes Set: This field will contain all the data attribute sets which were created earlier and are enabled. The admin can choose any of the attributes set in this field.
4. Chart Values: After the admin selects the attributes set, then he/she has to fill in the values which will be reflected where this chart will be used.
5. Size Chart Instructions: Here, the admin can add up the instructions which he/she feels are important for the customers to understand the above attribute set chart.
6. Actions: Actions like edit and delete are also available to edit the entries which are already done by the admin.
7. Applicable Rule: From here, the admins can select the rule for which the product chart is going the display on the product page. Instance, we have provided 2 options here. Using the first one, the store admins can add the conditions for a chart based on product features such as color, conditions, and more. Apart from it using the other option (reference), the admins can add the product reference in the text field and the chart will be automatically applicable for all the products that are having mentioned references.
Manufacturer Chart
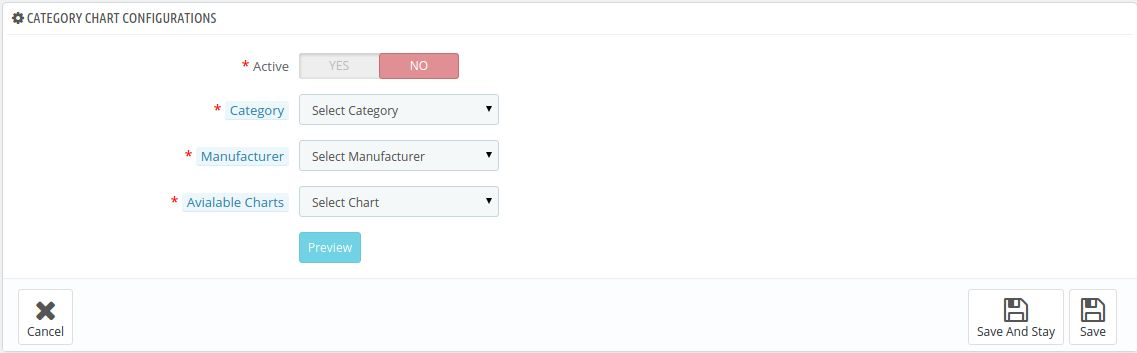
A table appears in this tab. This table shows which charts are mapped to which manufacturer. To add a new entry, the admin can click on the add icon appearing on the right side of the table. The following form appears after clicking on the add icon button –
1. Active: This is the field that decides whether the chart should be enabled or disabled. The chart only works if it is enabled from this end.
2. Category: Here the admin may select the category of the products where this chart should appear.
3. Manufacturer: In this field, the admin has to select the manufacturer to which this particular chart is to be mapped.
4. Available Chart: In this field, all the charts which are created till now are listed. The admin can select any of the charts from this field and then save the settings.
5. Preview: Admin can also view the preview of the chart by clicking on the preview button below.
6. Actions: Actions like edit and delete are also available to edit the entries which are already done by the admin.
Category Chart
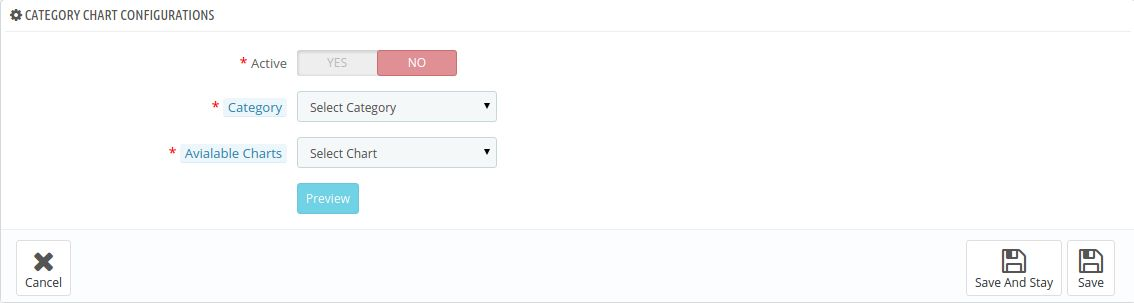
In this tab, a table appears. This table shows that which charts are mapped to which category. The following form appears after clicking on the add icon button –
1. Active: This is the field that decides whether the chart should be enabled or disabled. The chart only works if it is enabled from this end.
2. Category: Here, the Prestashop store admin may select the category of the products where this chart should appear.
3. Available Chart: In this field, all the charts which are created till now are listed. The admin can select any of the charts from this field and then save the settings.
4. Preview: The eCommerce store admin can also view the preview of the chart by clicking on the preview button below.
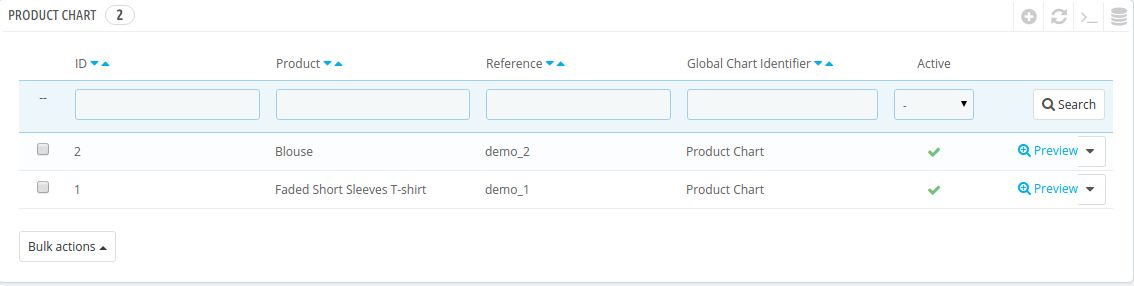
Product Chart
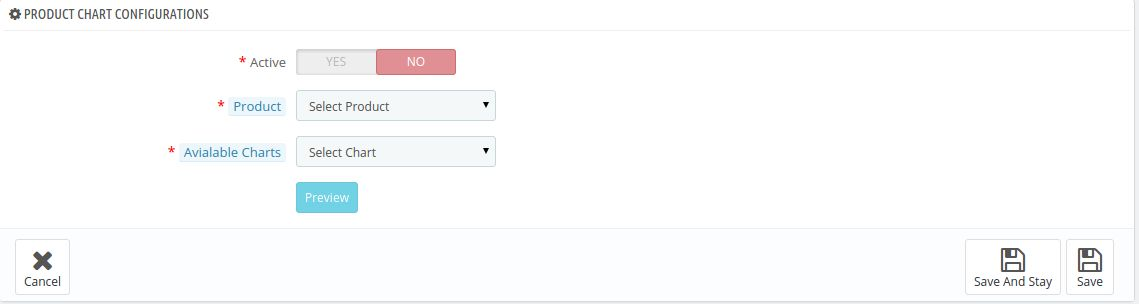
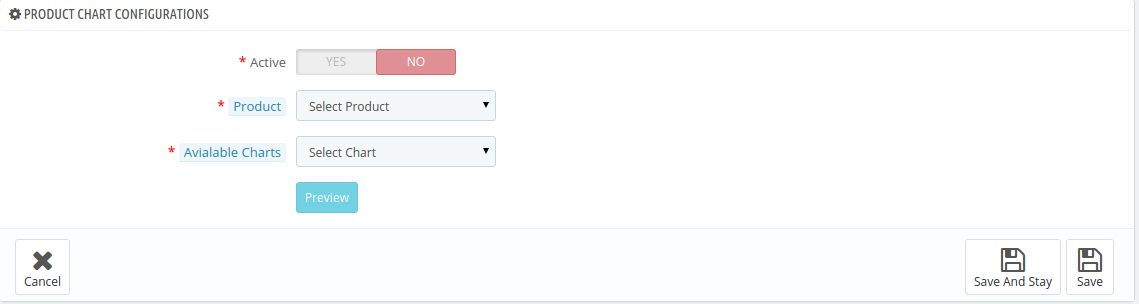
A table appears in this tab. This table shows that which charts are mapped to which product. The following form appears after clicking on the add icon button –
1. Active: This is the field that decides whether the chart is enabled or disabled. The chart only works if it is enabled from this end.
2. Select Product: In this field, all the products which are available in this particular store appear and the admin can choose any one of those products and get that product mapped with that particular chart.
3. Available Chart: In this field, all the charts which are created till now are listed. The admin can select any of the charts from this field and then save the setting.
4. Preview: Admin can also view the preview of the chart by clicking on the preview button below.
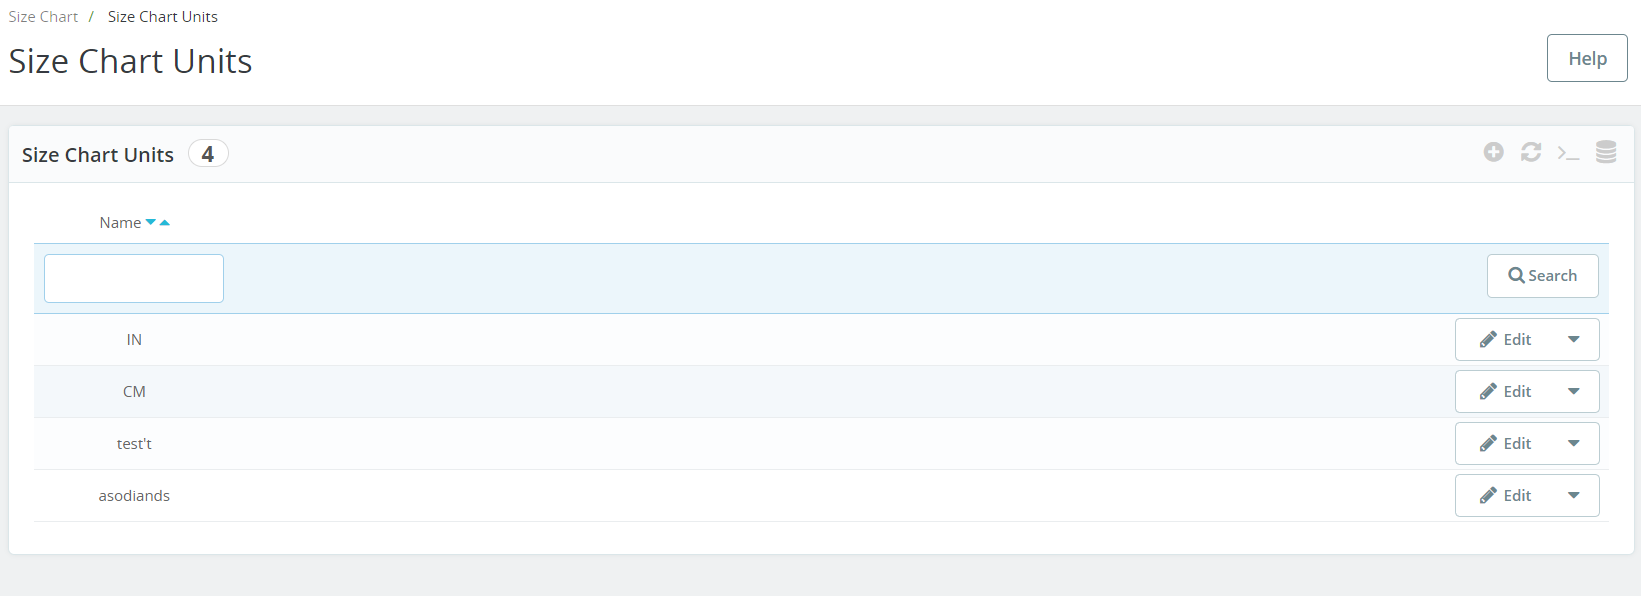
Size Chart Units:
In the following tab offered by the Prestashop size chart addon, the admin can manage all the size chart units. Not only the admin can modify the added units but also can add as many units as he wants for the size charts.
Front End Module
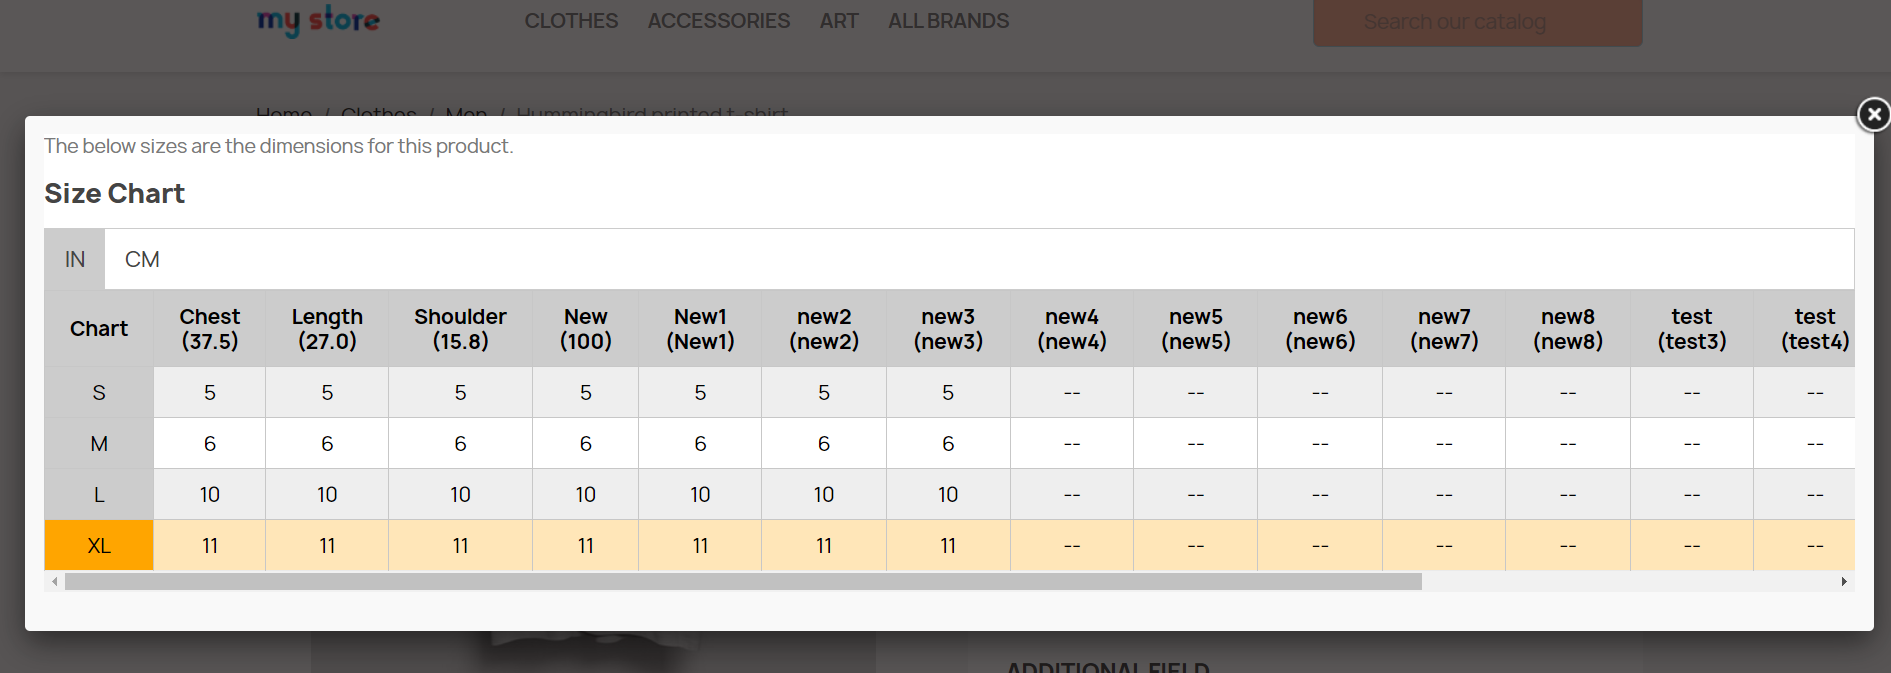
When this extension is enabled from the back end with all the entries done, then a link named ‘VIEW SIZE CHART’ appears on the right side of the page just like the screenshot below.
Also, if “Display size chart on popup” is enabled then the “View Size Chart” button is available otherwise, the chart is displayed directly under the Add to Cart button.
It may be a case when a product has a chart mapped to itself and it also has a chart mapped to its category and it also has a chart mapped to its manufacturer. In this case, the priority of the chart has been decided. So, the priority of a product chart is higher than the priority of the category chart and the priority of the category chart is higher than the priority of the manufacturer chart.
So, the chart on the product page is shown according to the priority basis which has been explained above.
When the customer will click on the link, a pop-up will appear with all the data of size for that product.
Thus this Prestashop product size chart addon makes shopping easy for the online customers. The admin can reduce the complexity of choosing the perfect size. By using this Prestashop product size table plugin the admin can display size charts on the product page. The customers can buy the products easily after viewing the size chart.
Prestashop Size Chart Addon: Video Tutorial
For a more visual and hands-on understanding of how to install, configure, and use the Knowband Prestashop Size Chart Addon, we have created a step-by-step video tutorial.
This video covers:
Module installation
Creating and customising size charts
Assigning size charts to products
Front-end display and functionality
Watch the full tutorial below to get started quickly and make the most out of this addon.
For more information about this Prestashop Size Chart Popup Addon please visit Knowband.
Introduction of PrestaShop Product Quantity Update Addon:
This PrestaShop Product Quantity Update by Scanner module is basically developed for the Prestashop eCommerce site owners to let them update their product quantity on the site without any hassle. It provides an option to update the product quantities without going to the product listings on the back end. A separate interface is provided at the back end which allows the product quantity update based on the:
UPC Number
Reference Number
EAN Number
Steps for Installation:
To install this Prestashop product quantity addon by Knowband, please follow the following steps:
1. Add add-on folder to the modules folder on your system.
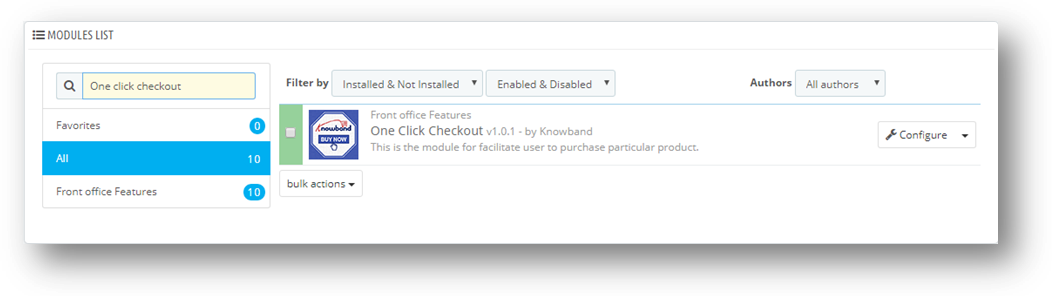
2. After adding this Prestashop addon folder, the system will list the add-on on module page under front office feature category as given below:
These interfaces will be accessible only by the admin in his modules section.
Menu Location:
An Admin can access the interface of this Prestashop module by navigating to the following address:
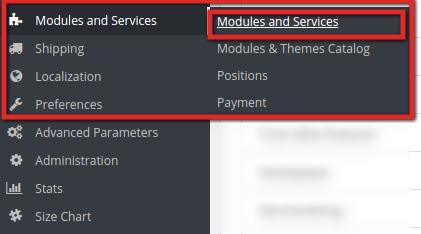
1. Navigate to Modules and Services >> Modules and Services
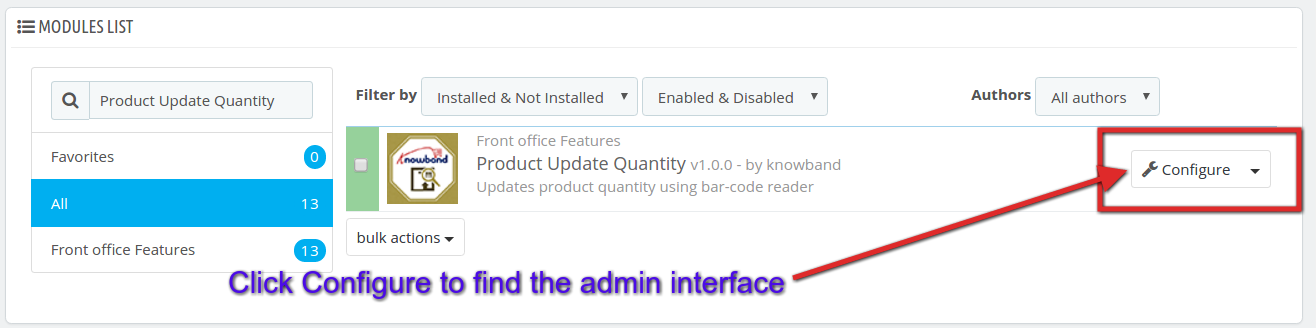
2. The list of Prestashop modules installed on your site will open. Now search for Product Update Quantity in the search box, you will find the following interface. In the following interface click on the Configure button:
Admin Configuration Panel:
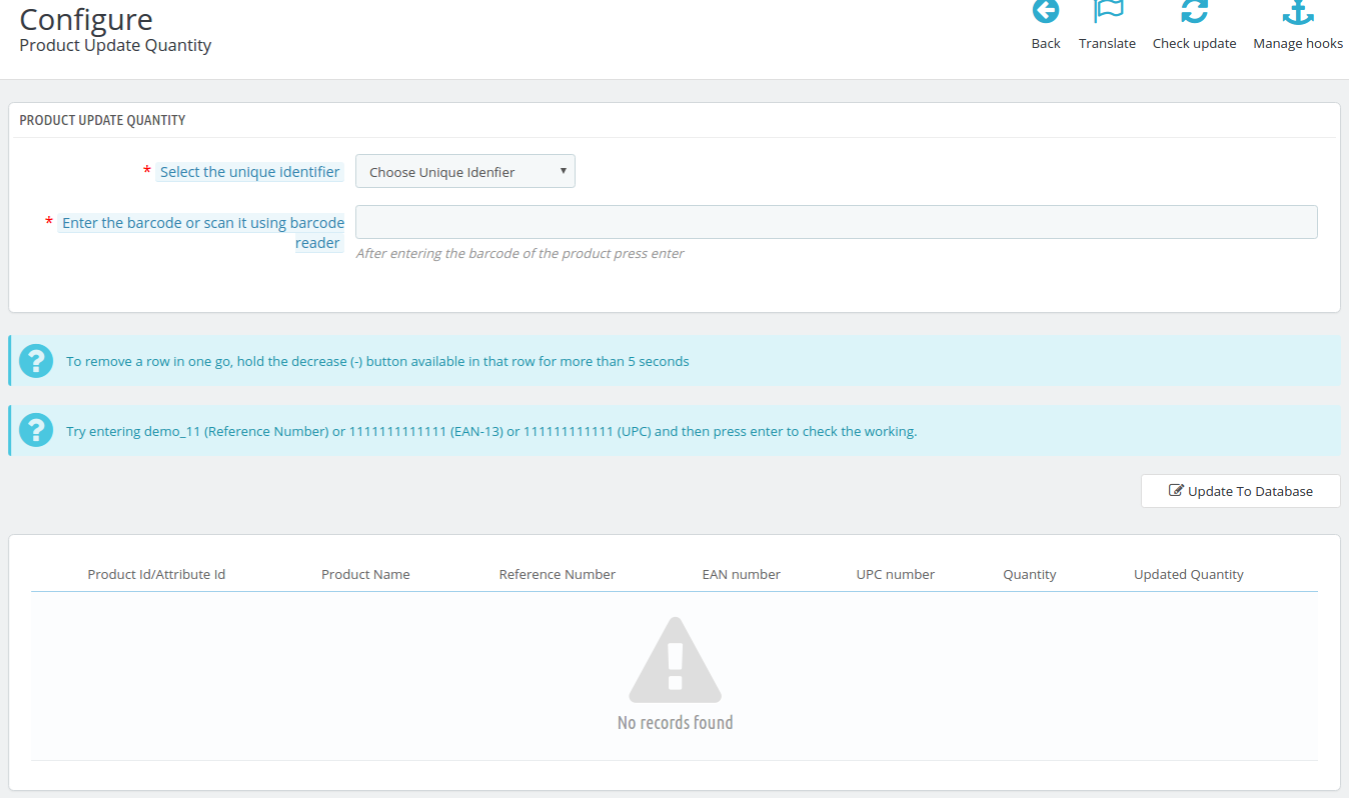
The Admin configuration interface of this Prestashop Quantity update addon by Knowband looks like this:
Update the Product Quantity based on UPC Number:
To update the product quantity based on UPC Number, follow the following steps:
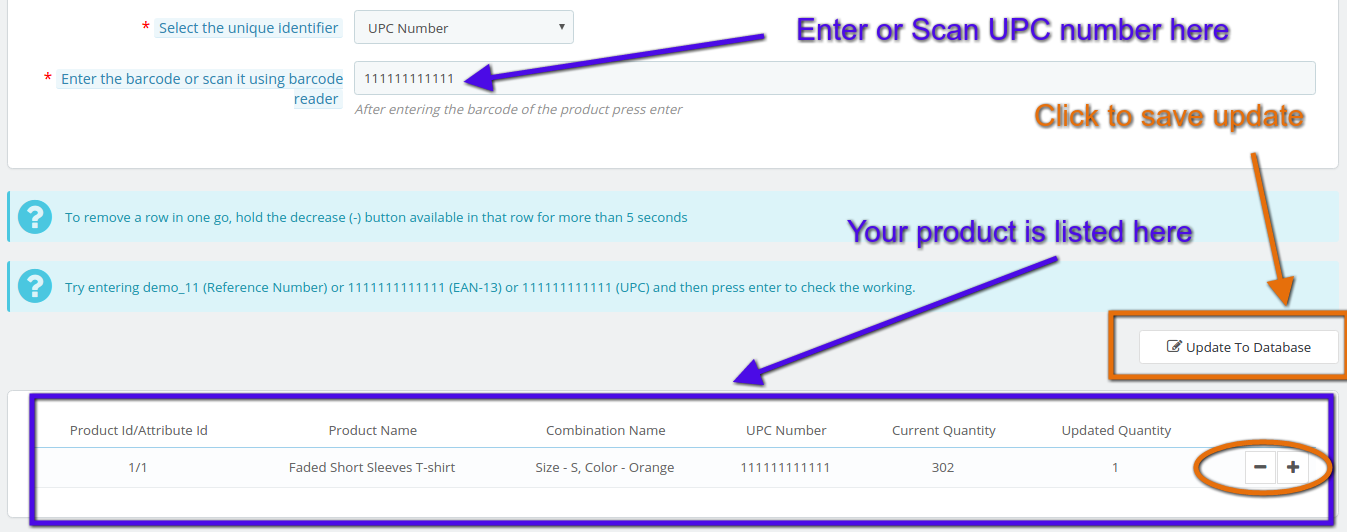
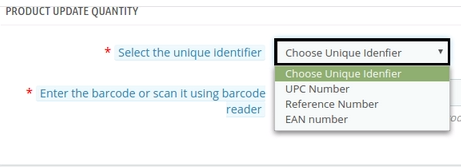
1. Select UPC Number from the drop-down list in ‘Select Unique Identifier’ menu option.
2. Scan the UPC number of the product ( you can even enter the UPC number manually in the text filed to entering the bar-code or scan it using the bar-code reader).
3. Your product will be listed below in the interface as shown in this screen shot:
4. You can re-scan the UPC number of the other products in the list to add a quantity or you can also increase or decrease the quantity by clicking + or – as shown in the screen shot above.
5. After you update the desired quantity of the products it will shown in Updated Quantity that how many new products you have added in the list for this particular UPC number. Click on ‘Update To Database’ to save your product quantity update for the particular UPC number.
6. Similarly, you can perform the Product Quantity update based on EAN number or Reference Number too. Just don’t forget to select the items from the drop-down list according to your need.
Introduction to One Click (Single click) Checkout Addon:
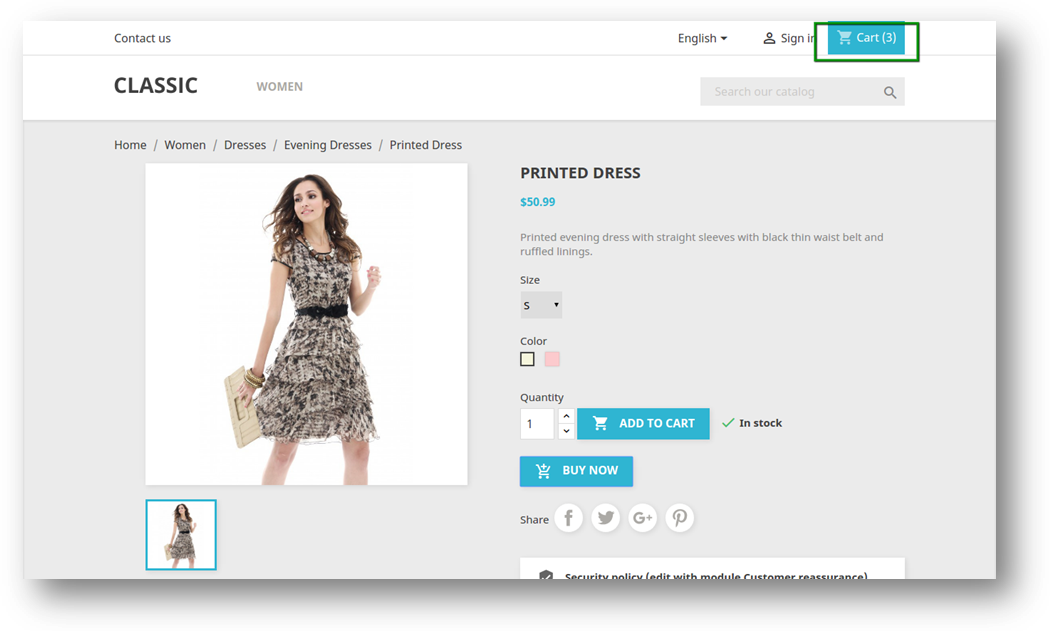
Prestashop One click checkout addon adds a functionality in the PrestaShop’s front end (on Product Page) through which the customer can buy any product instantly, keeping the current cart on hold.
If a customer has some items in their cart already, and come across another product to purchase and likes it so much that the customer wants to buy that product first, The module provides a ‘Buy Now’ button on the product page for this functionality, so that user can buy only a particular product and the current cart products are not included in the order and after completion of order the previous cart items are restored automatically.
Features of Prestashop One Click or Single click Checkout Addon:
1. Prestashop One click (single click) checkout adds a Buy Now button on every product page in the store.
2. Prestashop One click (single click) checkout extension offer the customers a fast and hassle-free direct checkout option.
3. The Quick checkout addon simplifies the checkout process for the online shoppers.
4. Customize the One click checkout(Buy Now) button and match it with your Prestashop theme.
5. Single click checkout way ensures high impact on direct sales.
6. One Click Checkout Addon holds the current cart and checks out the current product only.
7. If the order is not completed through fast cart checkout, then automatically the product is added to the current cart.
8. The Fast checkout addon has a potential to turn your visitors into potential buyers and improves the conversion rates by offering a faster way to checkout.
9. Extremely easy to use backend interface of Prestashop Instant Checkout addon.
10. Prestashop Direct Checkout module is Multi-lingual compatibilty.
11. Prestashop Single Click Checkout addon is Multi-store compatible
12. The Quick checkout addon is compatible with all Prestashop themes and do not conflict with other modules
13. Prestashop Single button checkout addon offers Desktop, Mobile and Tablet responsive design.
14. Prestashop Fast checkout addon is compatible with our One-page checkout module is compatible with our One page checkout module
How Merchant will benefit from Prestashop One Click or Single click Checkout Addon:
1. Prestashop One click(Quick) checkout addon adds a new button to your store, there providing a new feature to your store.
2. Prestashop Fast Cart Checkout Addon increases the conversion rates and increases the rate of returning customers.
3. With the integration of Prestashop Fast Cart Checkout Addon, customer are likely to purchase products in a single click rather than going through multiple checkout steps.
4. Customize the One click checkout (Buy Now) button and match it with your Prestashop theme.
How Customer will benefit from Prestashop One Click or Single click Checkout Addon:
1. Customer will get a Quick and Hassle free way to direct Checkout.
2. Customer can checkout in a single click
Installation Steps for Prestashop Fast Cart Checkout Addon
After purchasing Prestashop One click(Single click) checkout addon, you will get following files as listed below:
1. Compressed File in ZIP format (contains source code of the Prestashop Fast Cart Checkout module)
2. User Manual
Follow the steps to install Prestashop One click checkout addon:
Unzip the compressed file. It would contain files and folders as shown below
Copy all the files and folders of unzipped folder into your store “modules” directory on the path – Root Directory/modules/.
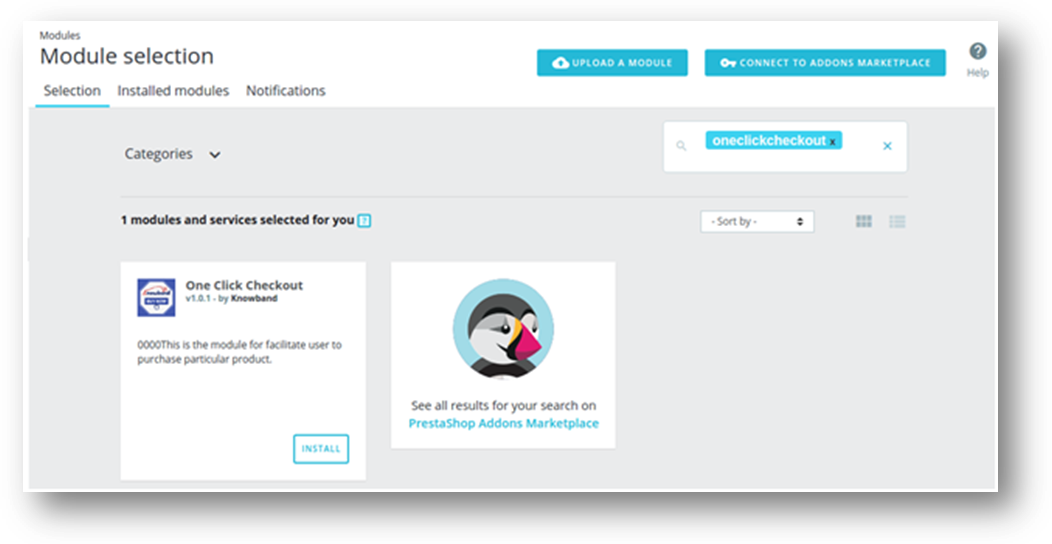
Now the addon is ready to be installed on your Prestashop store and you can find that in Store Admin -> Modules and Services. It is shown below:
PrestaShop 1.6
PrestaShop 1.7
Click on “Install” button to install the addon. It would show a pop-up for your confirmation. Click on “Proceed with the installation” option. This step will install the module and show notification – “Module(s) installed successfully”.
How to configure Prestashop One Click Checkout or single click checkout addon?
Admin Interface
Following interface is provided to Prestashop store admin :
General Settings
The single page interface of Prestashop Instant Checkout addon has been explained below:
General Settings
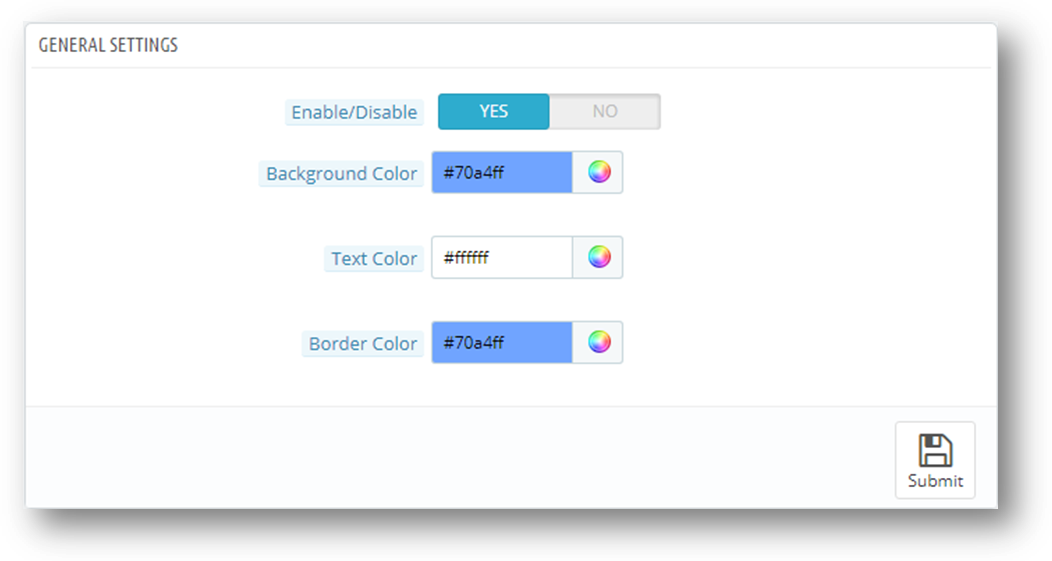
After clicking on configure link of Prestashop One Click(Direct) Checkout module on modules listing page, system will open General Settings tabs by default as shown in screen below:
The configurations will be having respective default values on page load.
Enable/Disable: Initially, this setting will be “OFF”. User can enable/disable the module’s functionality by turning this “ON/OFF”.
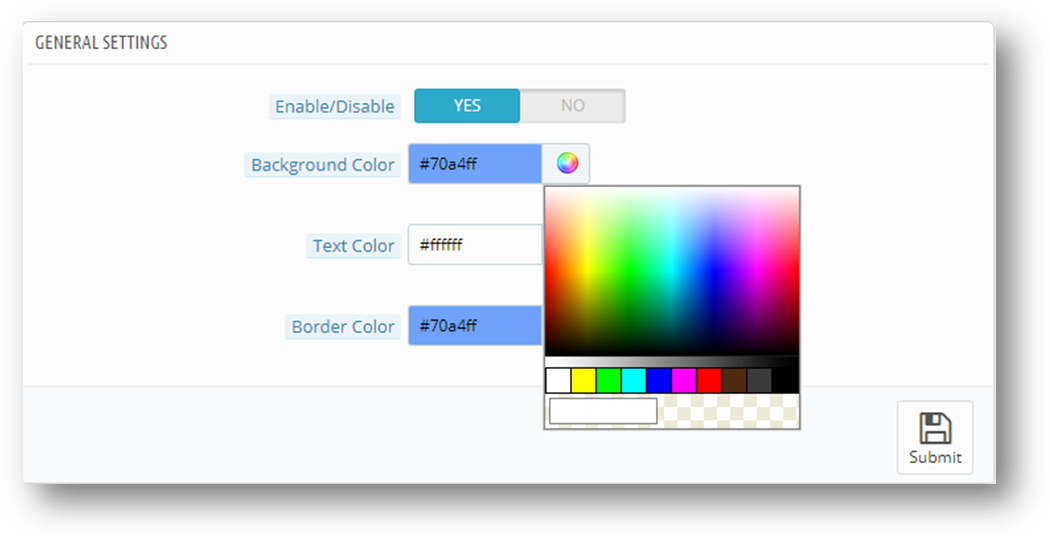
Background Color: Background color for the Buy Now button at the front product page can be changed by picking a color from color picker of this field.
Text Color: Text color for the Buy Now button on product page at the front can be changed from here.
Border Color: Border color of the Buy Now button at the front product page can be selected from here.
Front End of Prestashop One click checkout Addon
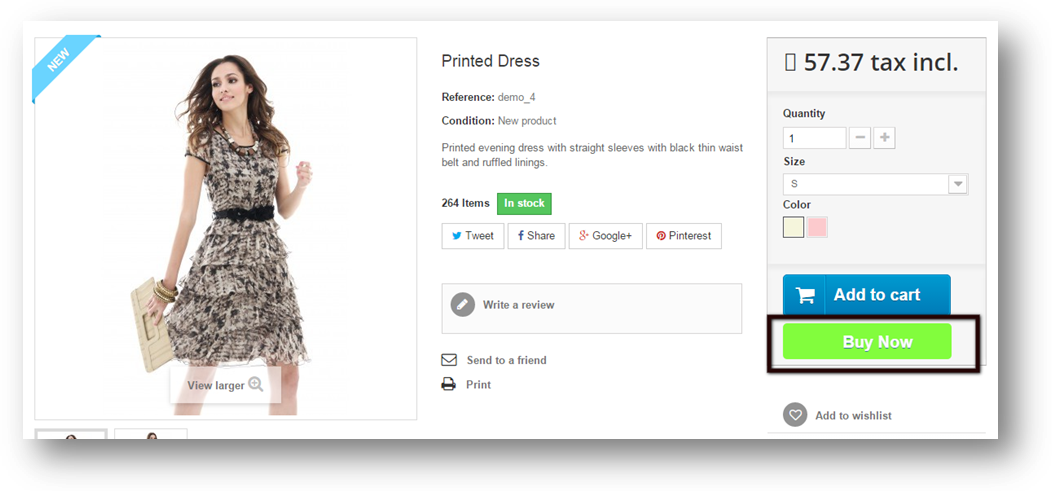
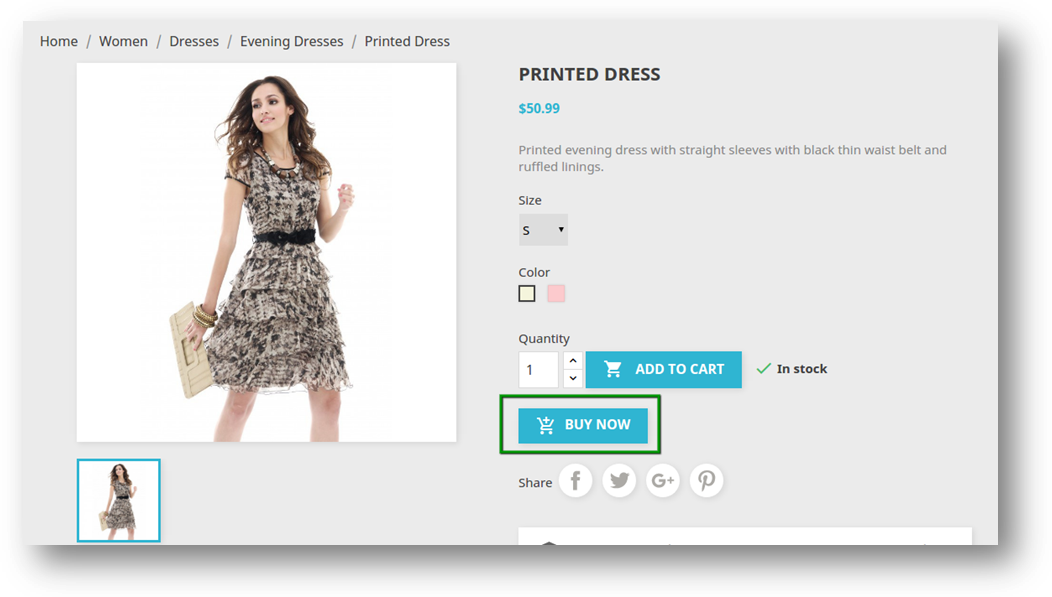
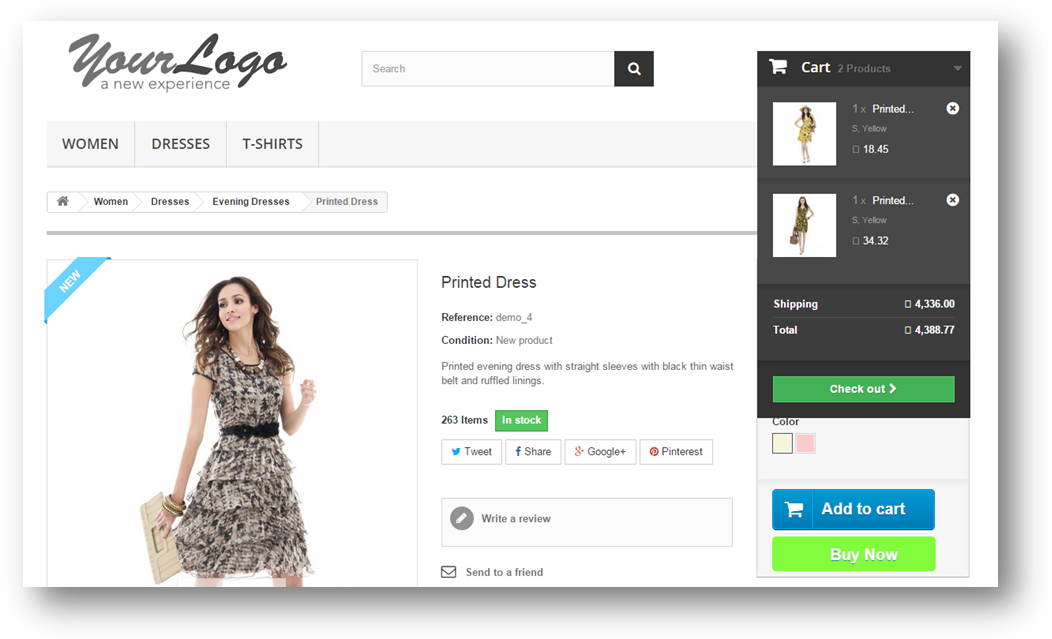
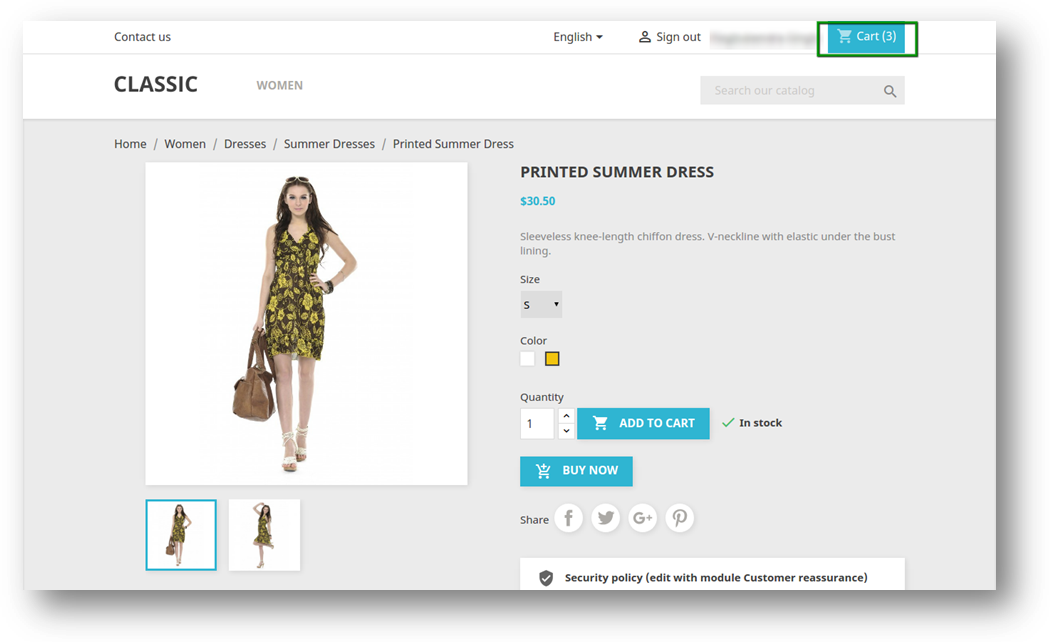
After enabling Prestashop Fast checkout addon the front-end user will see a button (i.e. Buy Now) on the product pages.
The ‘Buy Now’ button at the front-end appears as follows:
PrestaShop 1.6
PrestaShop 1.7
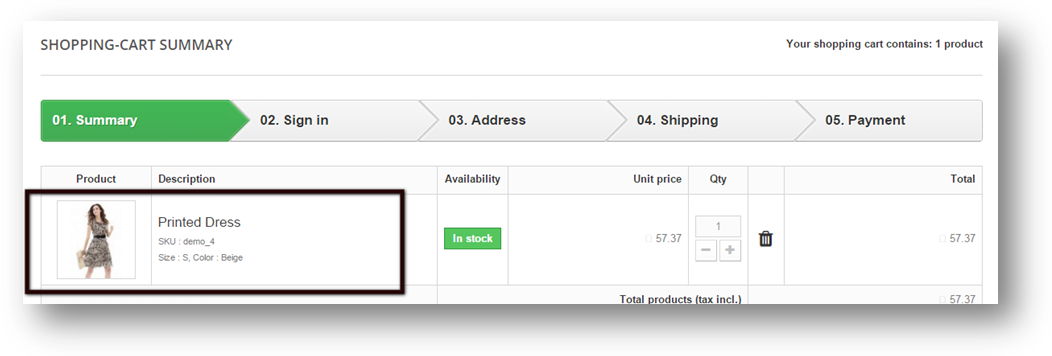
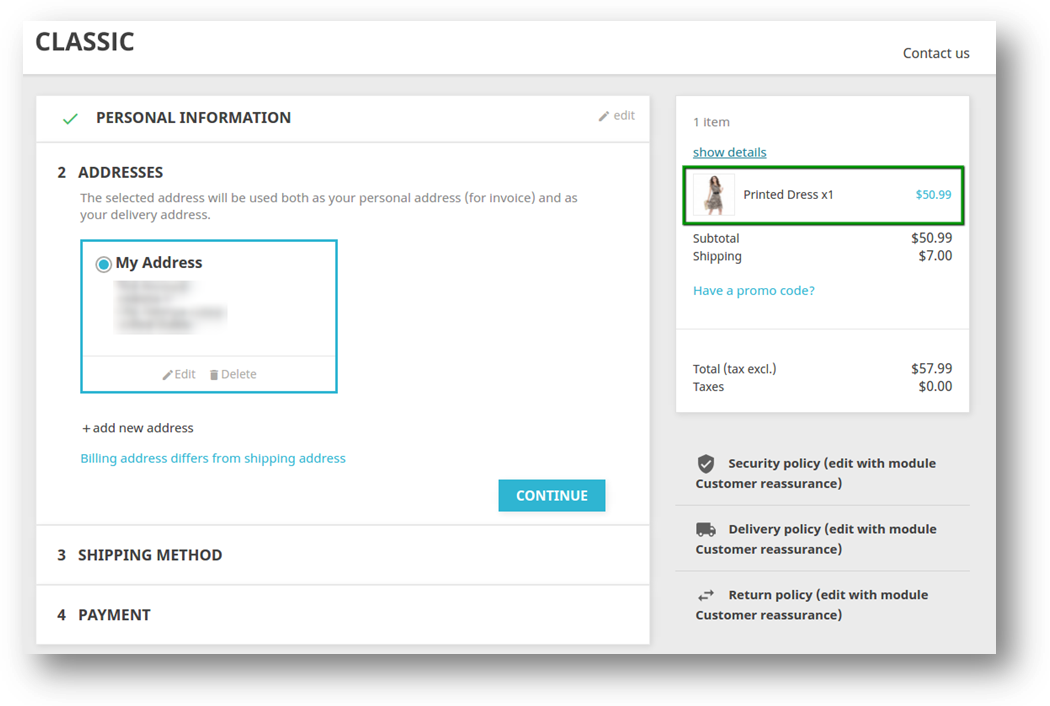
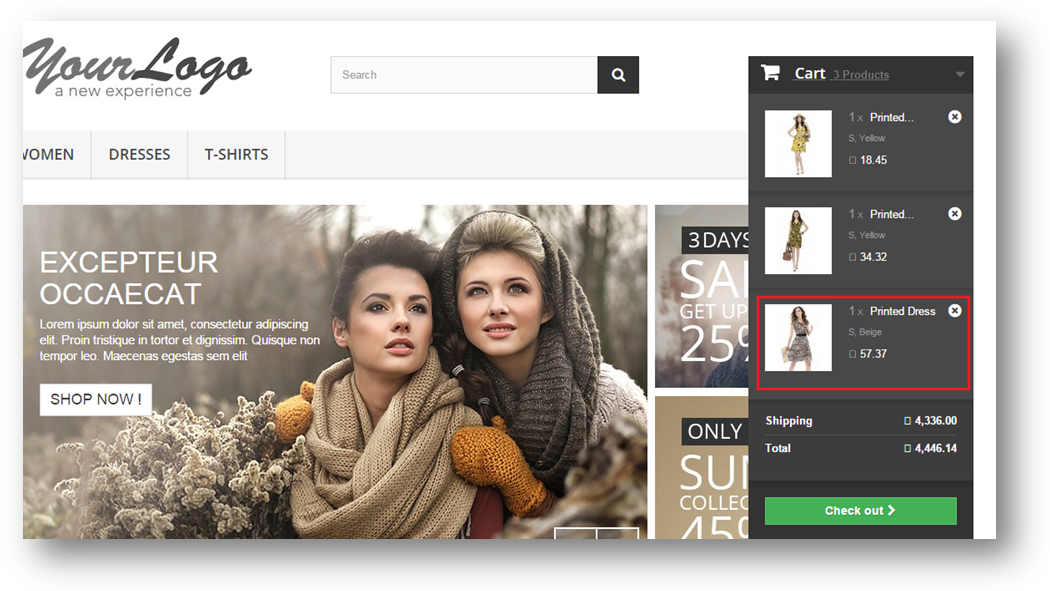
After Clicking on Buy Now button user can directly purchase a product excluding the current cart products. The user will be redirected to order page for that particular product. When clicked on the ‘Buy Now’ button following are the possible cases:
Proceed to the checkout process and confirm order
Did not Proceed to the checkout process and add the item to the cart with other products
Proceed to the checkout process and confirm order
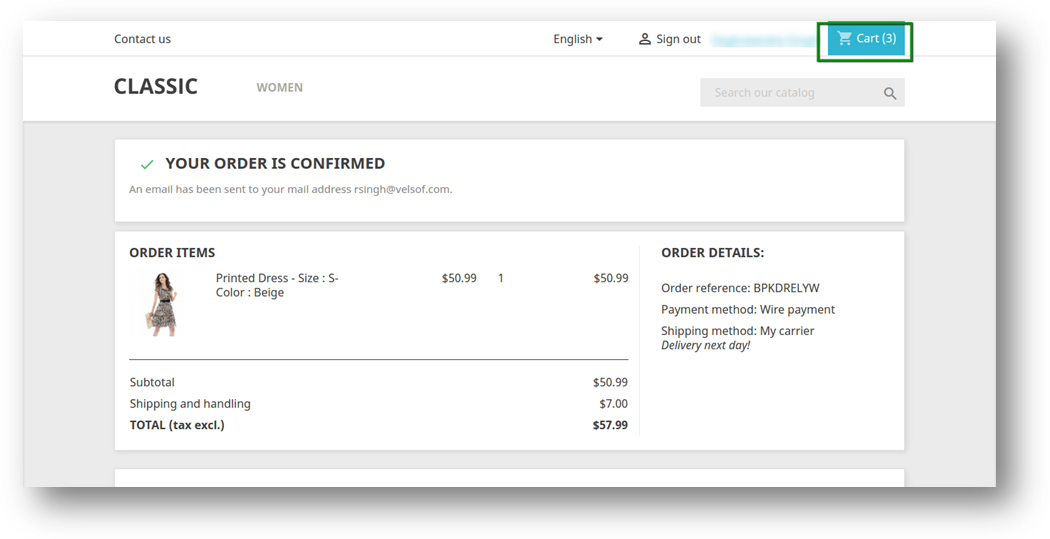
If user shopping cart already has some products and a user clicks on buy now button then the user will be redirected to the order page for that particular product and the user completes the checkout process and confirms the order for that particular product. After confirming the order previous cart of the user will be restored.
PrestaShop 1.6
PrestaShop 1.7
Did not proceed to the checkout process:
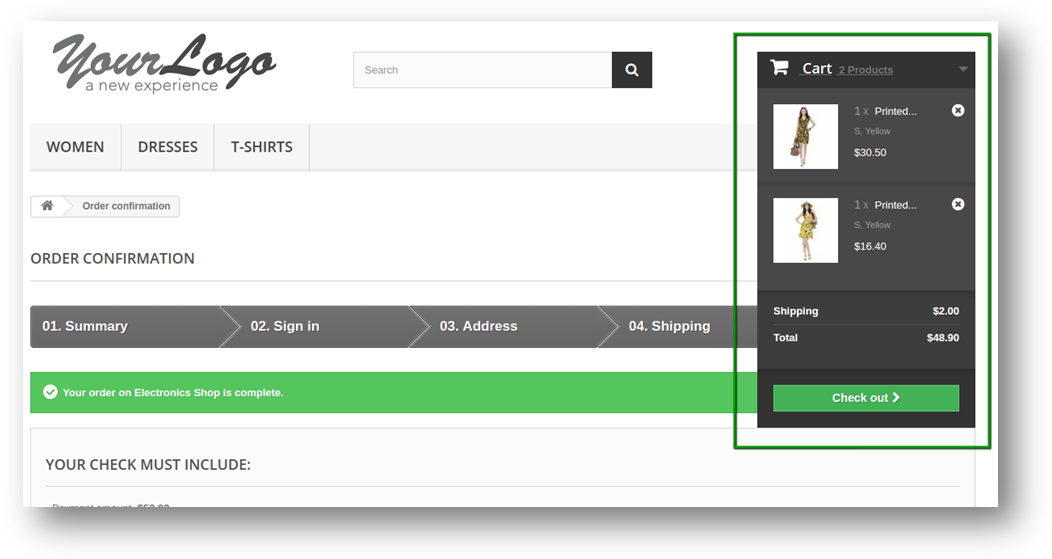
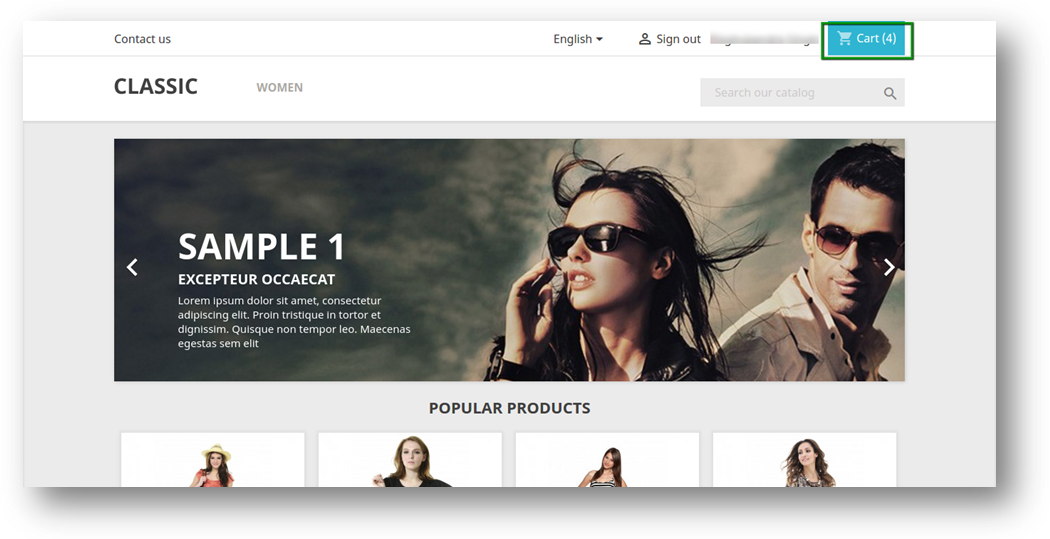
If Prestashop user clicks on Buy Now button and user have some products already in the cart then user will be redirected to the order page but at that time user don’t want to proceed the checkout and user navigates to some other page (e.g. home page), in that condition the particular product is added to the previous cart of the user and the previous cart is restored.
PrestaShop 1.6
PrestaShop 1.7
Recommendations
1. Refresh home page of your store every time you enable/disable the One click(single click) checkout addon. If Fast checkout addon is not working after installation then please check permissions on modules folder. The folder should be writable. Please make the folder permission to 755.
Find more information Prestashop One Click Checkout module
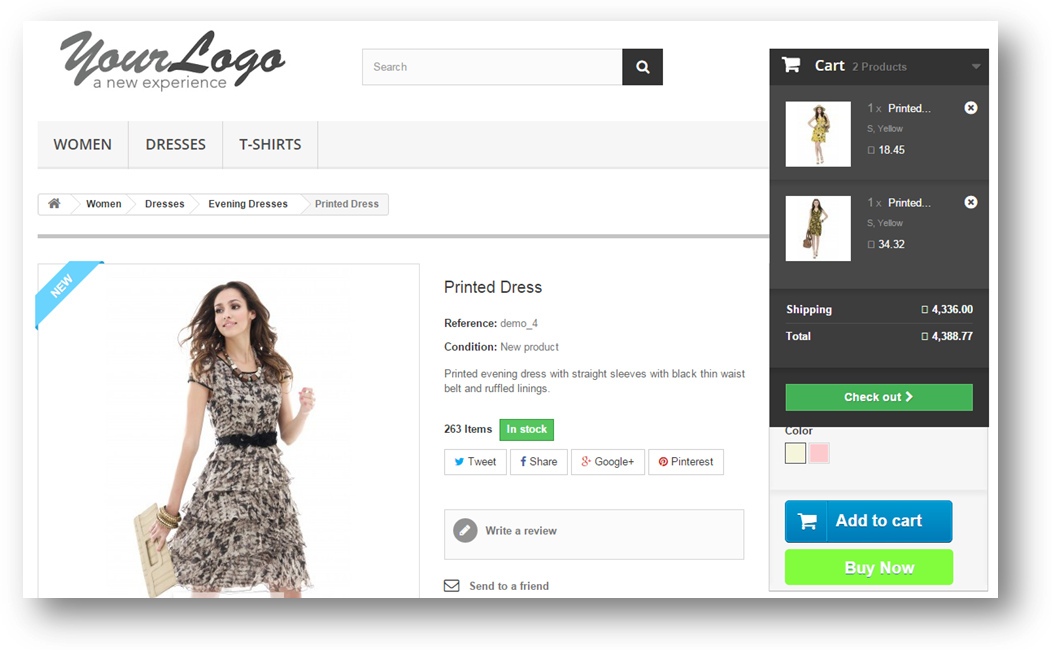
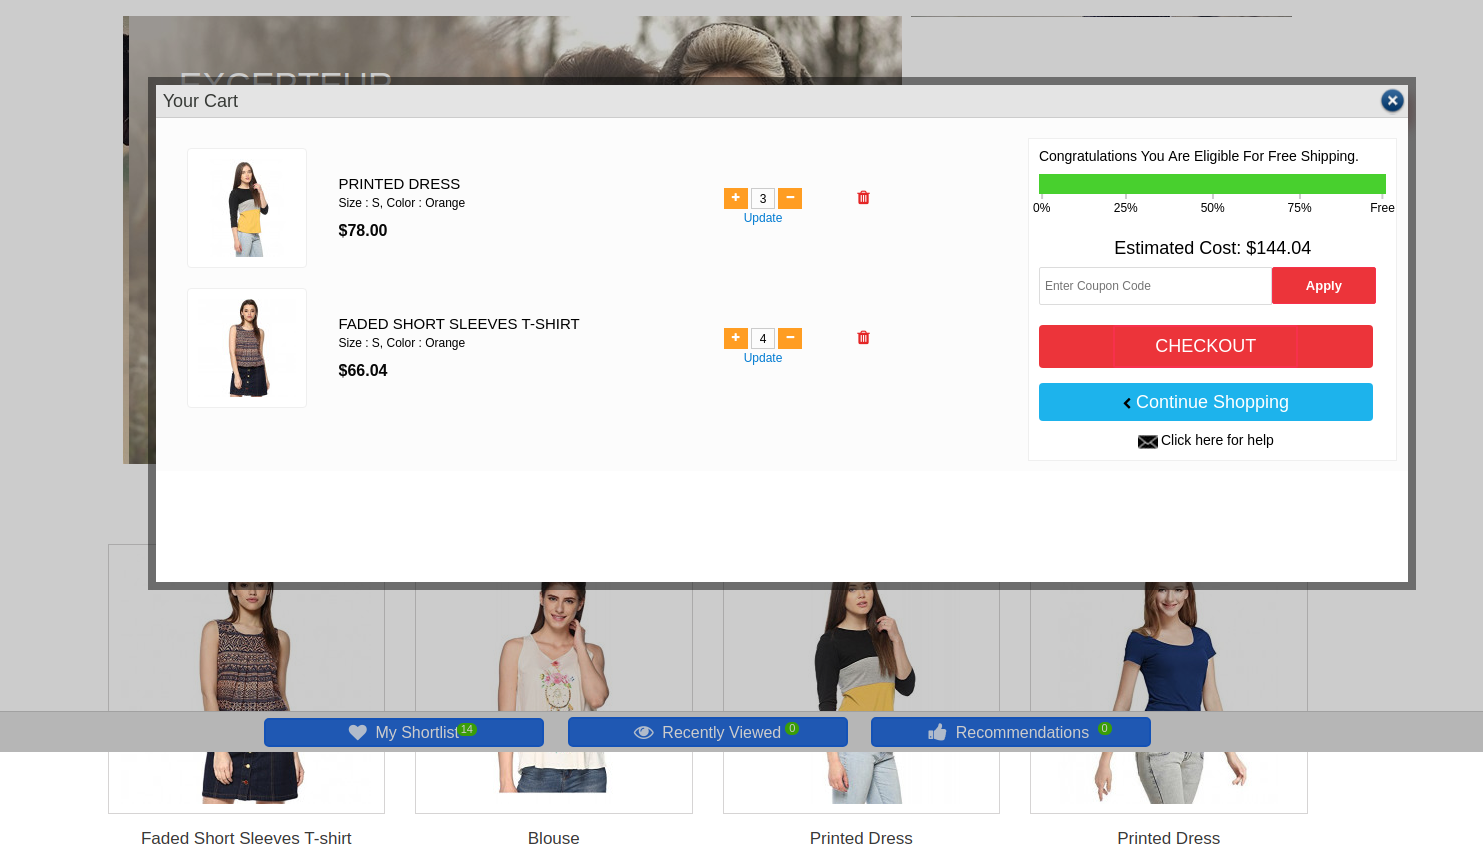
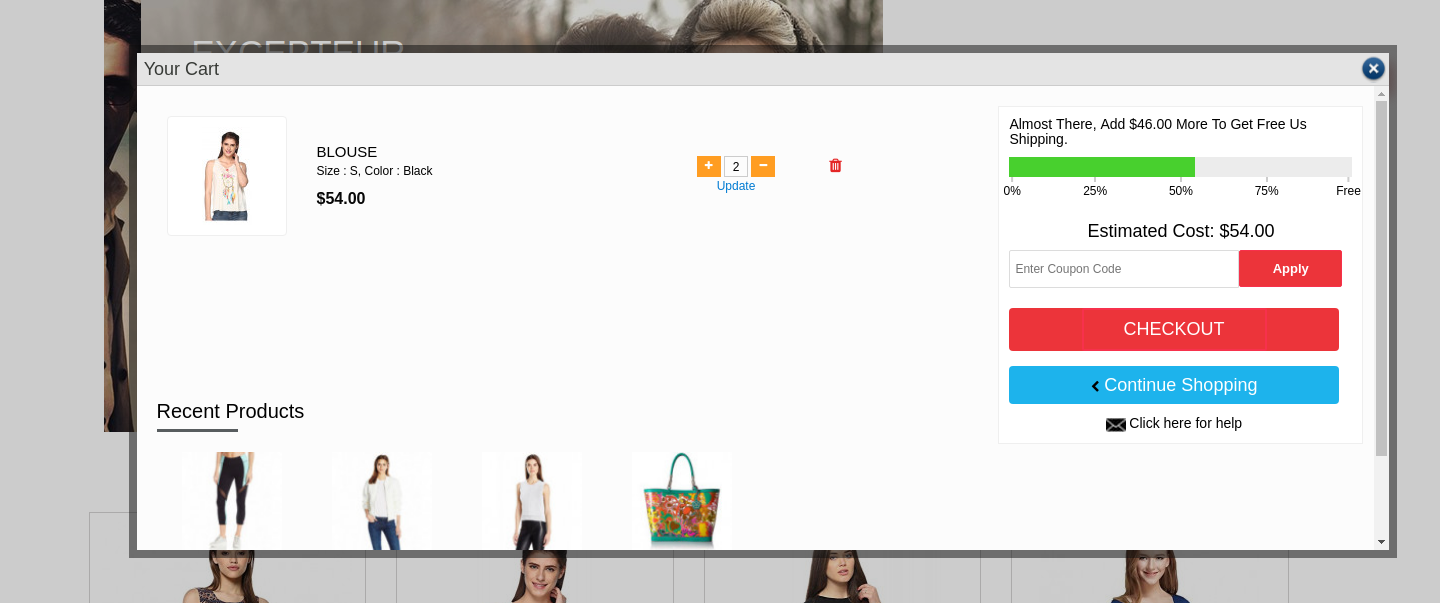
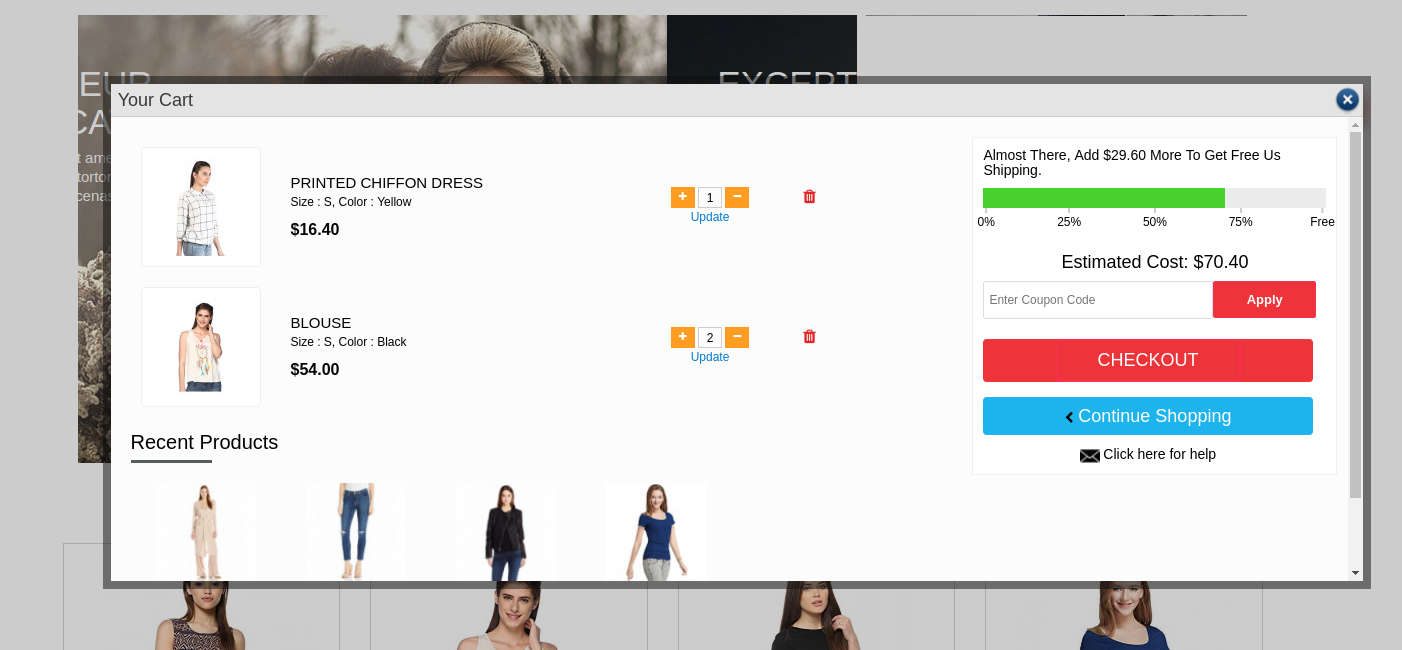
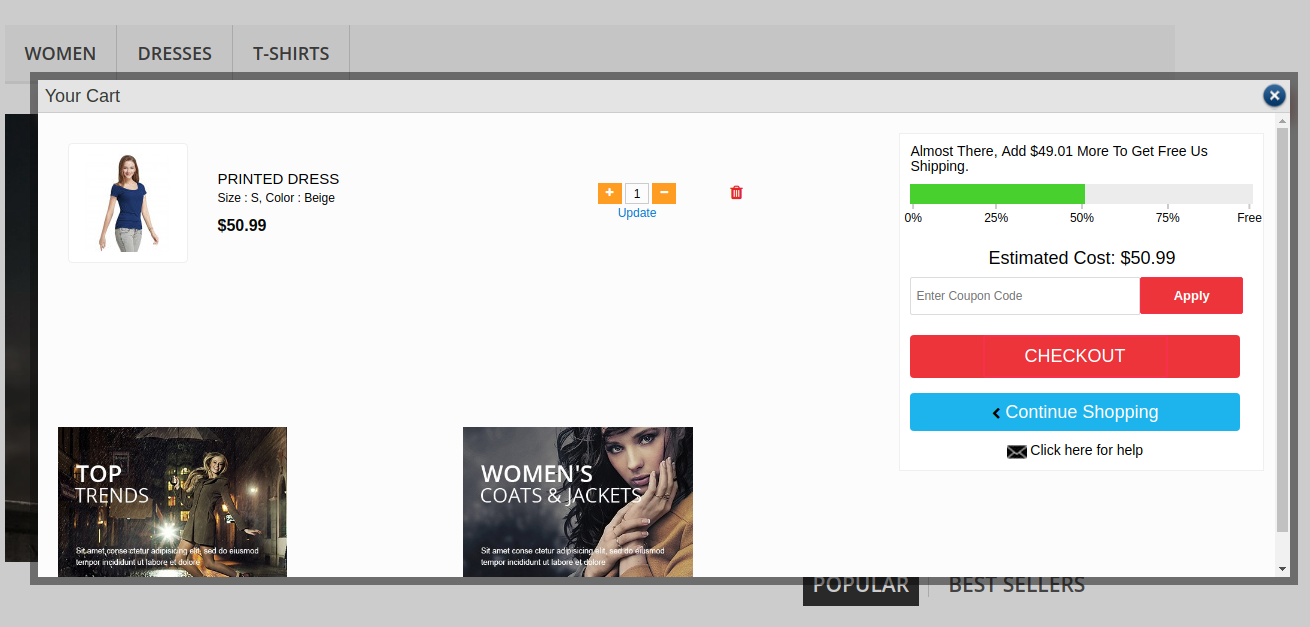
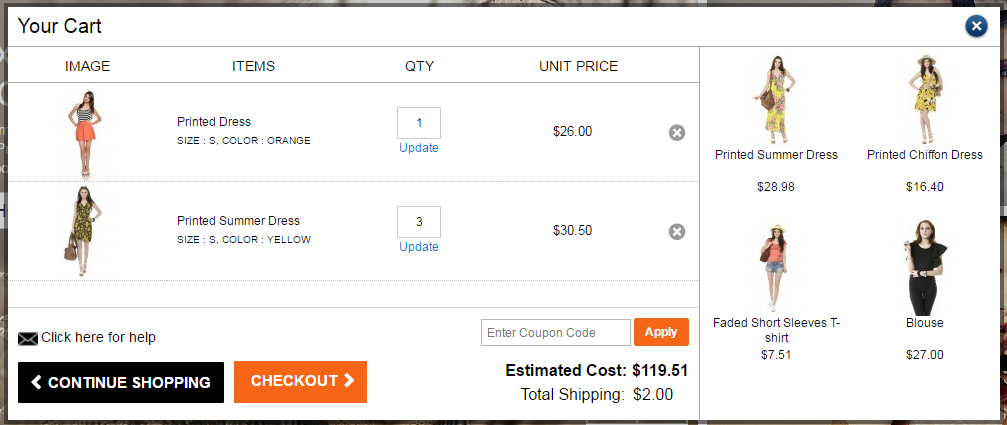
Prestashop Ajax Cart Plus Addon provides an interactive and useful interface/pop-up for Shopping Cart where users will be able to view shopping cart items.along with Related items, New Arrivals, Best Sellers or Promotional banners. Pop-up will also provide the option to apply coupon/gift voucher to check the estimate of the cart. Pop-up will appear when user adds the products into cart from Home Page/Product Page/Category Page etc
Prestashop Ajax cart pop up is fully customizable, the addon offers multiple customization options like look and feel and Custom CSS for advance admin to customize the pop up.
This interactive and informative Ajax cart pop up is a good way to influence the buying impulse of the customers and often leads to conversions.
1.1 Features of Prestashop Ajax Cart+ Addon
Prestashop add to cart popup addon adds a well-organized & optimized Ajax based shopping cart popup on your store.
Very easy to use and intuitive backend: No technical knowledge required
Option to show Related Items, New Arrivals, Best sellers and Promotional banners on the pop up itself
Option for the admin to show the contact information on the Responsive pop up
Prestashop pop up cart Addon provides options for customizing the look and feel of pop up from back-end itself.
Customize the Ajax cart pop up using Custom CSS
Ready Made Ajax Cart Pop up Templates. The admin can select from two templates and set AJAX cart layout.
Option to Enable/Disable the Ajax cart pop up on Mobile Devices.
Option to disable the popup only for mobile devices.
Does not conflict with any other PrestaShop module.
View Cart products, Update cart quantity, Delete cart products, Apply coupon without going to cart page.
Button to visit checkout page directly from the popup.
Ajax enabled cart for effortless interaction.
Prestashop add to cart popup addon provides Multiple Lingual Support.
Prestashop pop up cart Addon is Multi-Store Compatible.
Mobile, Tablet and Desktop responsive design. It adapts to most of the screen sizes and devices.
Prestashop Ajax Cart Addon works with all the PrestaShop themes: do not conflict with any other Prestashop addons
1.2 Benefits of Prestashop Ajax Cart Addon to Merchants
The interactive Ajax based pop up ensures high impact on direct sales.
Fully customizable Ajax cart pop up.
Promote Offers & Banners on Shopping Cart
Show Related Products & Increase Conversion & Average order Size
Increase Customer Trust: Offers them smooth navigation to the checkout page.
Simple & Elegant Admin Panel
1.3 Customer Benefits
View cart products, Update cart quantity, Delete cart products, Apply coupon without going to cart page
View Cart estimated cost and shipping cost before going to the checkout page.
Prestashop Ajax Cart Addon Offers smooth flow to the checkout page
Single Button Click to visit checkout page directly from the popup.
Ajax enabled cart for effortless interaction.
Mobile responsiveness of Prestashop pop up cart Addon makes it usable on mobile devices too.
2.0 Installation Guide for Prestashop add to cart popup addon
After purchasing Prestashop Ajax Cart+ addon, you will get following files as listed below:
1. Compressed File in ZIP format (contains source code of the addon)
2. User Manual
Follow the following steps to install the extension:
Unzip the compressed file. It would contain files and folders as shown below –
Copy all the files and folders of unzipped folder into your store “modules” directory on the path – Root Directory/modules/.
Now this Prestashop add to cart popup addon is ready to be installed on your store and you can find that in Store Admin -> Modules and Services. It would be shown as below –
4. Click on “Install” button to install the addon. It would show a pop-up for your confirmation. Click on “Proceed with the installation” option. This step will install the addon and show notification – “Module(s) installed successfully”.
3.0 How to configure Prestashop Ajax Cart Addon?
This Prestashop pop up cart Addon is configurable and Store Owner or Admin can setup or configure this addon through Admin Panel of store. There are following sections available to configure this addon –
General Settings
Customizer
FAQs
Suggestions
Other Plugins
Each section is explained below.
3.1 General Settings
You have to follow steps given below to update general settings of this Prestashop add to cart popup module –
Go to the Addon and Services -> Addon and Services
It would list all the addons of store. Find ‘Ajax Cart+’ in addons list.
Now click on ‘Configure’ button given corresponding to the ‘Ajax Cart+’ addon.
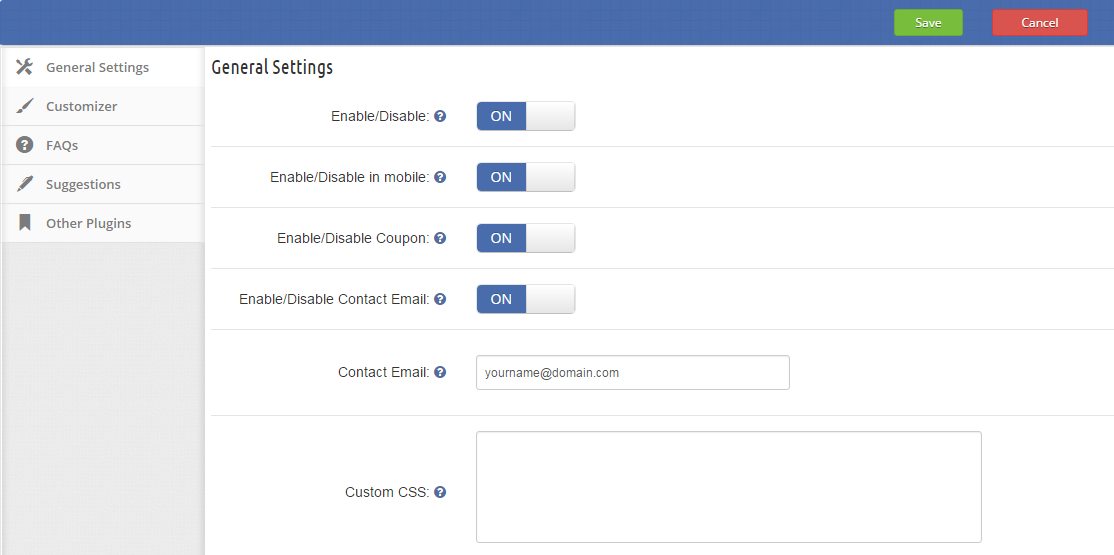
It would redirect Store Owner or Admin to a new page as shown below –
Update the values of given fields corresponding to ‘General Settings’ as per need.
Now click on ‘Save’ and it would validate and save the provided values.
That’s it.
This form contains following input fields which Store Owner or Admin can update –
Enable/Disable – Initially, this will be “OFF”. Admin can enable/disable addon by turning it ON/OFF
Enable/Disable in mobile – Initially, this will be “OFF”. Admin can enable/disable the addon in mobiles by turning it ON/OFF.
Enable/Disable Coupon – Coupon input box will be shown on front Ajax Cart pop-up if this is set to ‘ON’.
Enable/Disable Contact Email – Contact Email will be shown on Ajax Cart pop-up if this is set to ‘ON’.
Contact Email – Input box to provide contact email.
Custom CSS – Text area field to add CSS in popup.
3.2 Customizer
You have to follow steps given below to customize Ajax Cart Pop-up appearance on store front –
Goto the Addon and Services -> Addon and Services
It would list all the addons of store. Find ‘Ajax Cart+’ in addons list.
Now click on ‘Configure’ button given corresponding to the ‘Ajax Cart+’ addon.
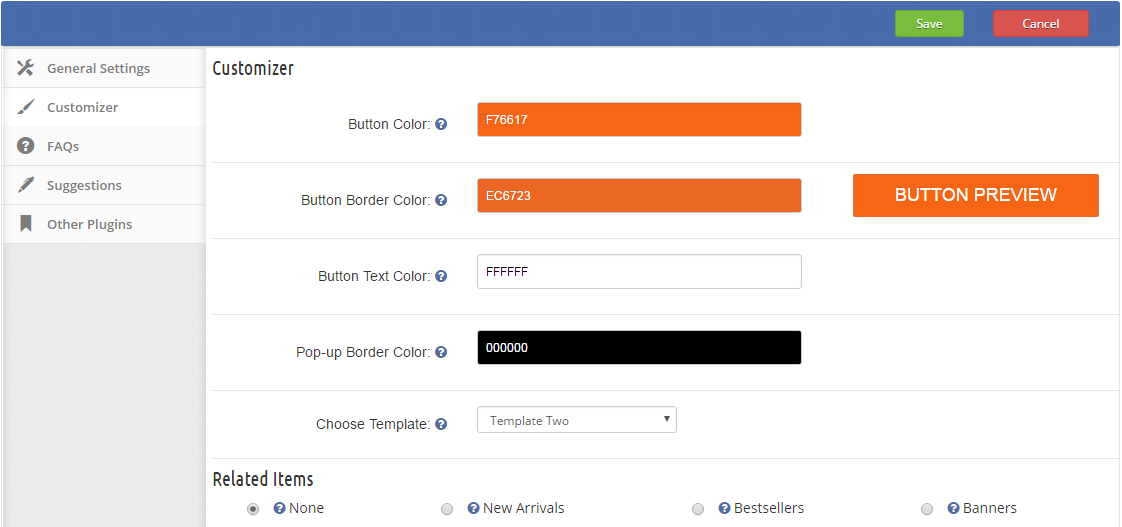
It would redirect Store Owner or Admin to a new page as shown below –
Update the values of given fields corresponding to ‘Customizer’ section as per need.
Now click on ‘Save’ and it would validate and save the provided values.
That’s it.
This form contains following input fields which Store Owner or Admin can update –
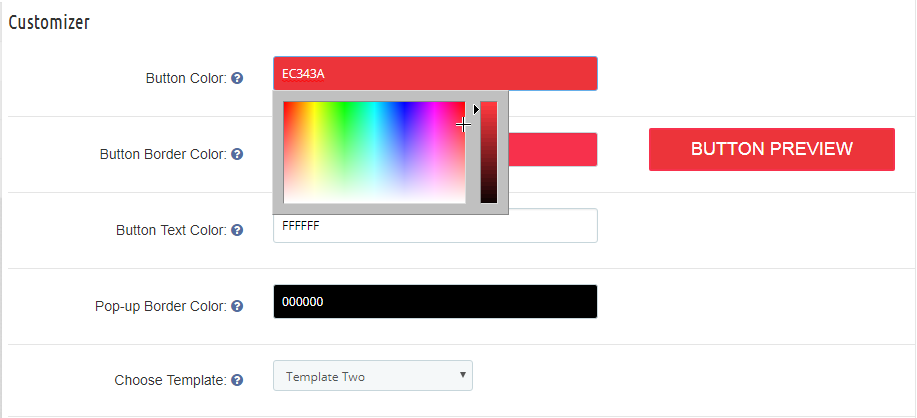
Button Color – Input box to set the pop-up button color. Clicking on the input box will open a color pallet to choose the button color.
Button Border Color – Input box to set the button border color. Clicking on the input box will open a color pallet(shown below) to choose the button border color.
Button Text Color – Input box to set the pop-up button text color. Clicking on the input box will open a color pallet to choose the button text color.
Pop-up Border Color – Input box to set the pop-up border color. Clicking on the input box will open a color pallet to choose the pop-up border color.
Choose Template – There are two templates of the pop up, admin can any one of them.
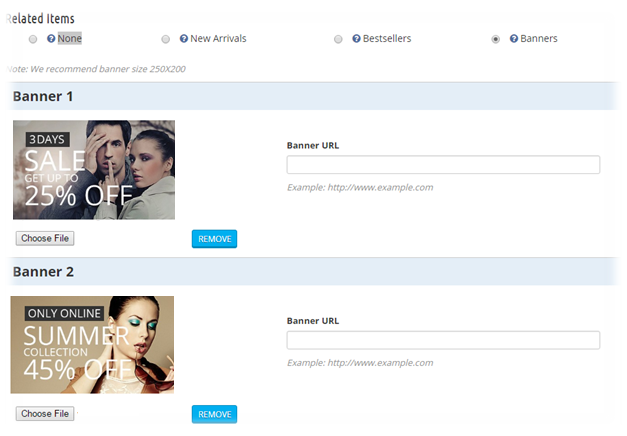
Related Items – Admin can select the option which he wants to display in pop-up with cart like Recent Items, New Items OR banners. Addon is having option to display up to two banners.
To add the banner, choose the Banners option. Select the banner which you want to display & provide the URL of the web page where you wish to redirect the user.
4.0 Website Front-end Interface
Template One Without any Suggestion
Template one with New Arrival Suggestions
Template One with Best Seller Items
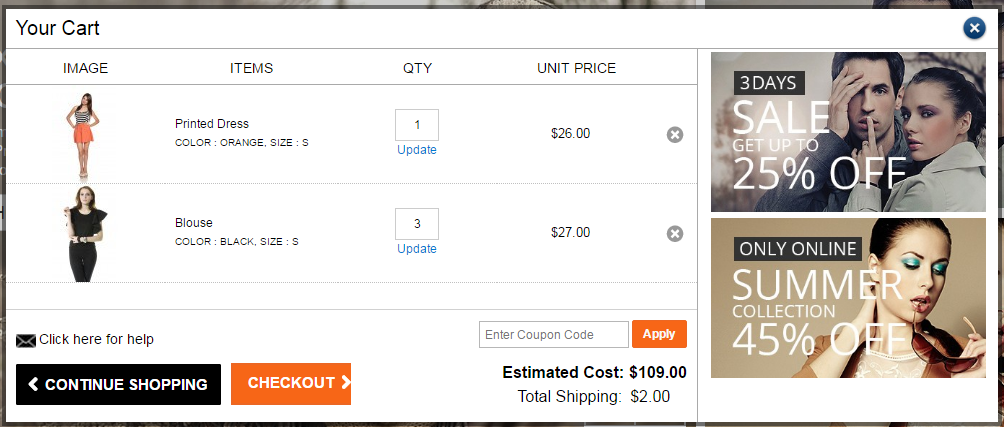
Template One with banners
Cart with New Products
Cart with Banners
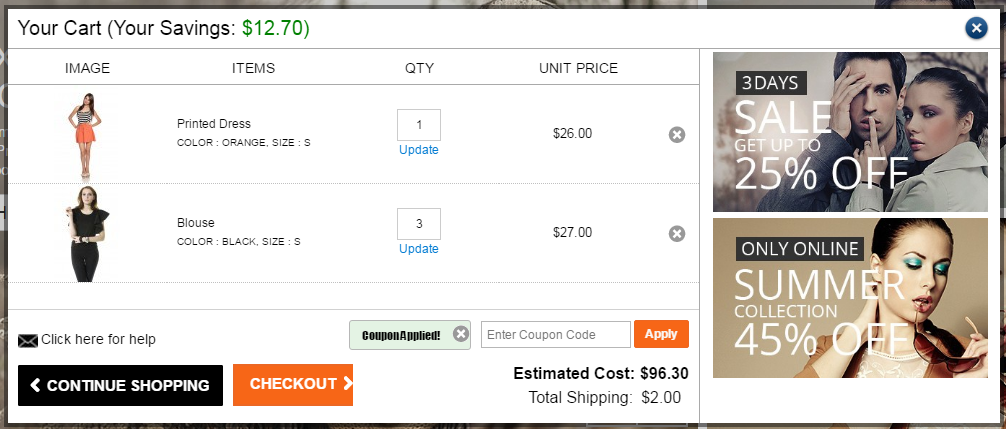
Cart when coupon applied
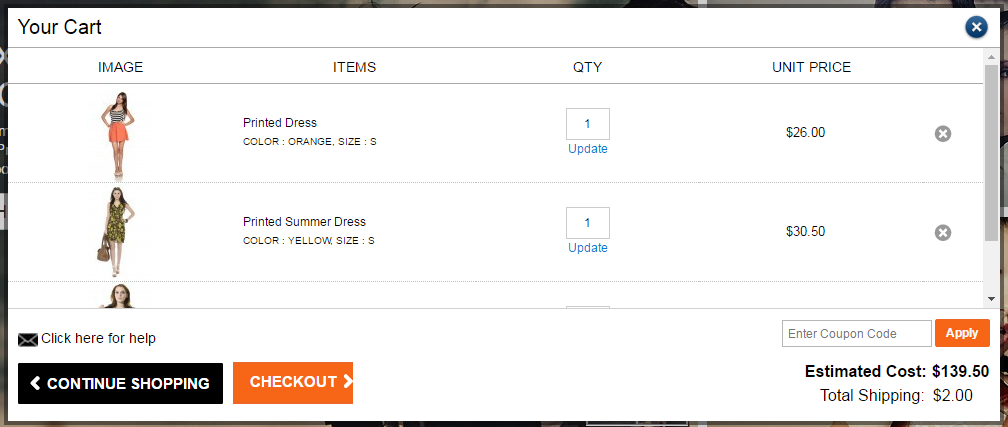
Cart without Banners & Related Products
For giving an optimized and user-friendly interface to your customers, the store owners can easily implement this Prestashop Ajax Cart to their eCommerce store. With this addon, you can easily trigger the purchase decisions of your customers and hence increase the direct sales of your store. The addon features a direct button to the checkout page from the ajax cart popup which allows the customers to complete their transactions easily and effortlessly. No need to wait anymore, buy this Prestashop Ajax Cart module on the Addon Store
Now the Prestashop eCommerce store admin can offer tax-free products to the selected customers with the help of Prestashop remove tax addon offered by Knowband. The Tax Manager Prestashop Addon allows the e-merchant to remove the tax from some products for selective customer groups or customers. This Tax store manager is highly customizable and easy to implement. The store admin can easily implement the functionality.
Features
Easy to install and configure.
Highly customizable.
No need to change the code on the back-end for implementation.
You can apply the functionality even without any technical information.
Offers a hassle-free and effortless implementation.
The Prestashop tax manager extension is fully customizable.
You can remove the tax from product page for selective customers depending on their customer group.
One product can be selected for which this rule will not apply. That product will show the included tax.
You can select categories for the customers, visitors, and guest users. These customers don’t need to pay tax on selected products.
The Prestashop remove tax addon is compatible with all checkout modules.
1. The folder structure of the tax manager plugin folder.
2. Copy the whole folder named as tax manager into your modules folder of the root directory of your PrestaShop store through FTP.
3. You can also upload zip folder of the module by clicking on Add New Module button, which should appear just in the top right corner of module listing page.
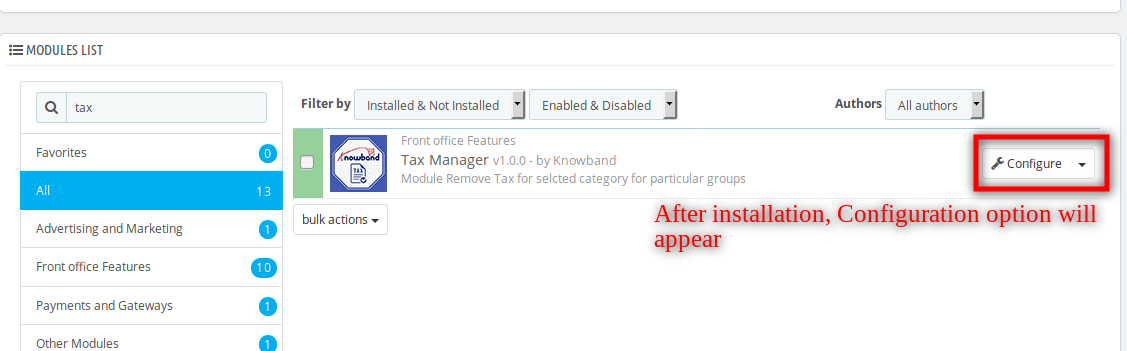
4. After that, you will be able to find the plug-in ready to be installed in the Modules in your PrestaShop store as shown below.
Here store owner can change the various settings of this plugin according to the requirements.
After installing the plug-in into the store, the plug-in will provide General Settings tabs in the interface.
General Settings
On clicking on configure link on module listing page (configure link will automatically appear once you install the plugin).
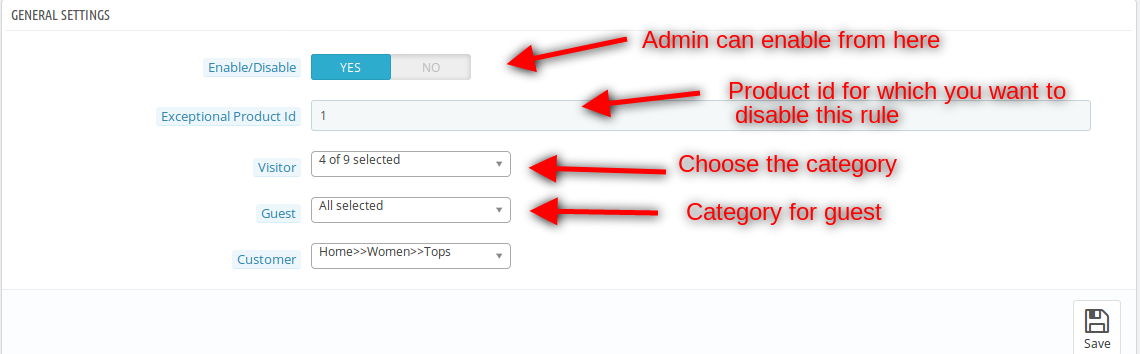
The tab consist following options:
1. Enable/ Disable: To enable the plugin, switch the enable button from OFF to ON. The default value will be OFF.
2. Exceptional Product Id: Enter the product id for which tax manager is not working. Tax manager is also not working on all products if the provided product id is available in the cart.
3. Visitors: The store admin can select the category for visitors.
4. Guest: Here, The store owner can choose the category for guest.
5. Customer: The store admin can select the category for the regular customers for removing the tax.
Front Module
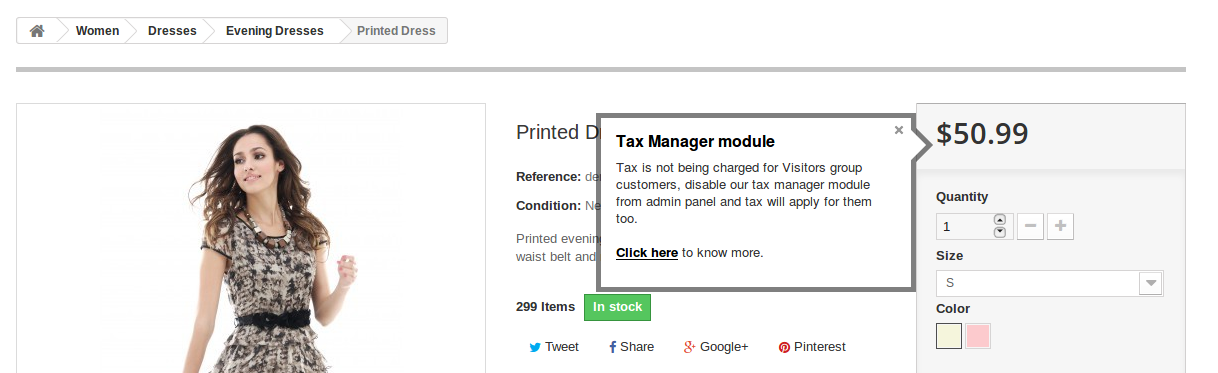
When the admin enables this plugin the products under the selected categories mapped for a particular group are shown without tax and if the provided exceptional product is in the cart or added into the cart the tax manager rule is not available for all the products.
Recommendations
* Always delete the Product.php and Cart.php from rootdirectory/override/classes/ before installing the plugin.
We hope that we have covered all the concerns regarding the installation and product guide of this Prestashop Addon. You should also check more Prestashop traffic and visibility addons that will help you to increase customer engagement on the website.
Do you want to improve user retention rate of your website? Here is a perfect opportunity for you to grab! Prestashop Product Jackpot addon, a loyalty reward program by Knowband lets the eCommerce store owners engage their audience by offering different free jackpot products. Jackpot modules are highly profitable for strengthening the customer base for your website. Most of the users actually don’t care what all exciting deals and products you bring for them. But finding a jackpot fun, they are encouraged to play and win from your store.
This Prestashop Jackpot Addon by Knowband will help the merchants to attract the customers to their stores by giving them opportunities to get the certain jackpot on whatever page they open first on the shop.
Whenever the customer will win any of the jackpot, a coupon code will be generated as the user enters his name and email id. The generated coupon code with all related information will then be sent to the entered email id. The customer will have to enter the coupon code on the checkout page to get the free gift product which he has won in the jackpot game earlier.
Installation of Prestashop Product Jackpot Addon
To install this Prestashop addon, please follow the following steps:
1. Add addon folder under modules folder of your system.
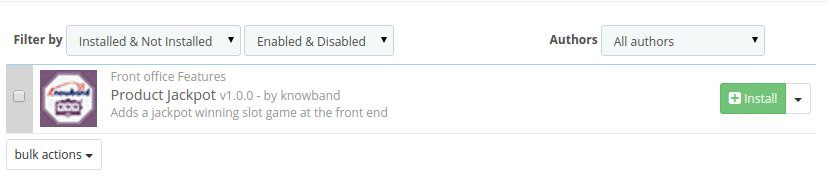
2. After adding this addon folder, the system will list the Prestashop addon on module page under front office feature category as given below:
3. Click ‘install’ to install this Prestashop plugin.
Administration Module
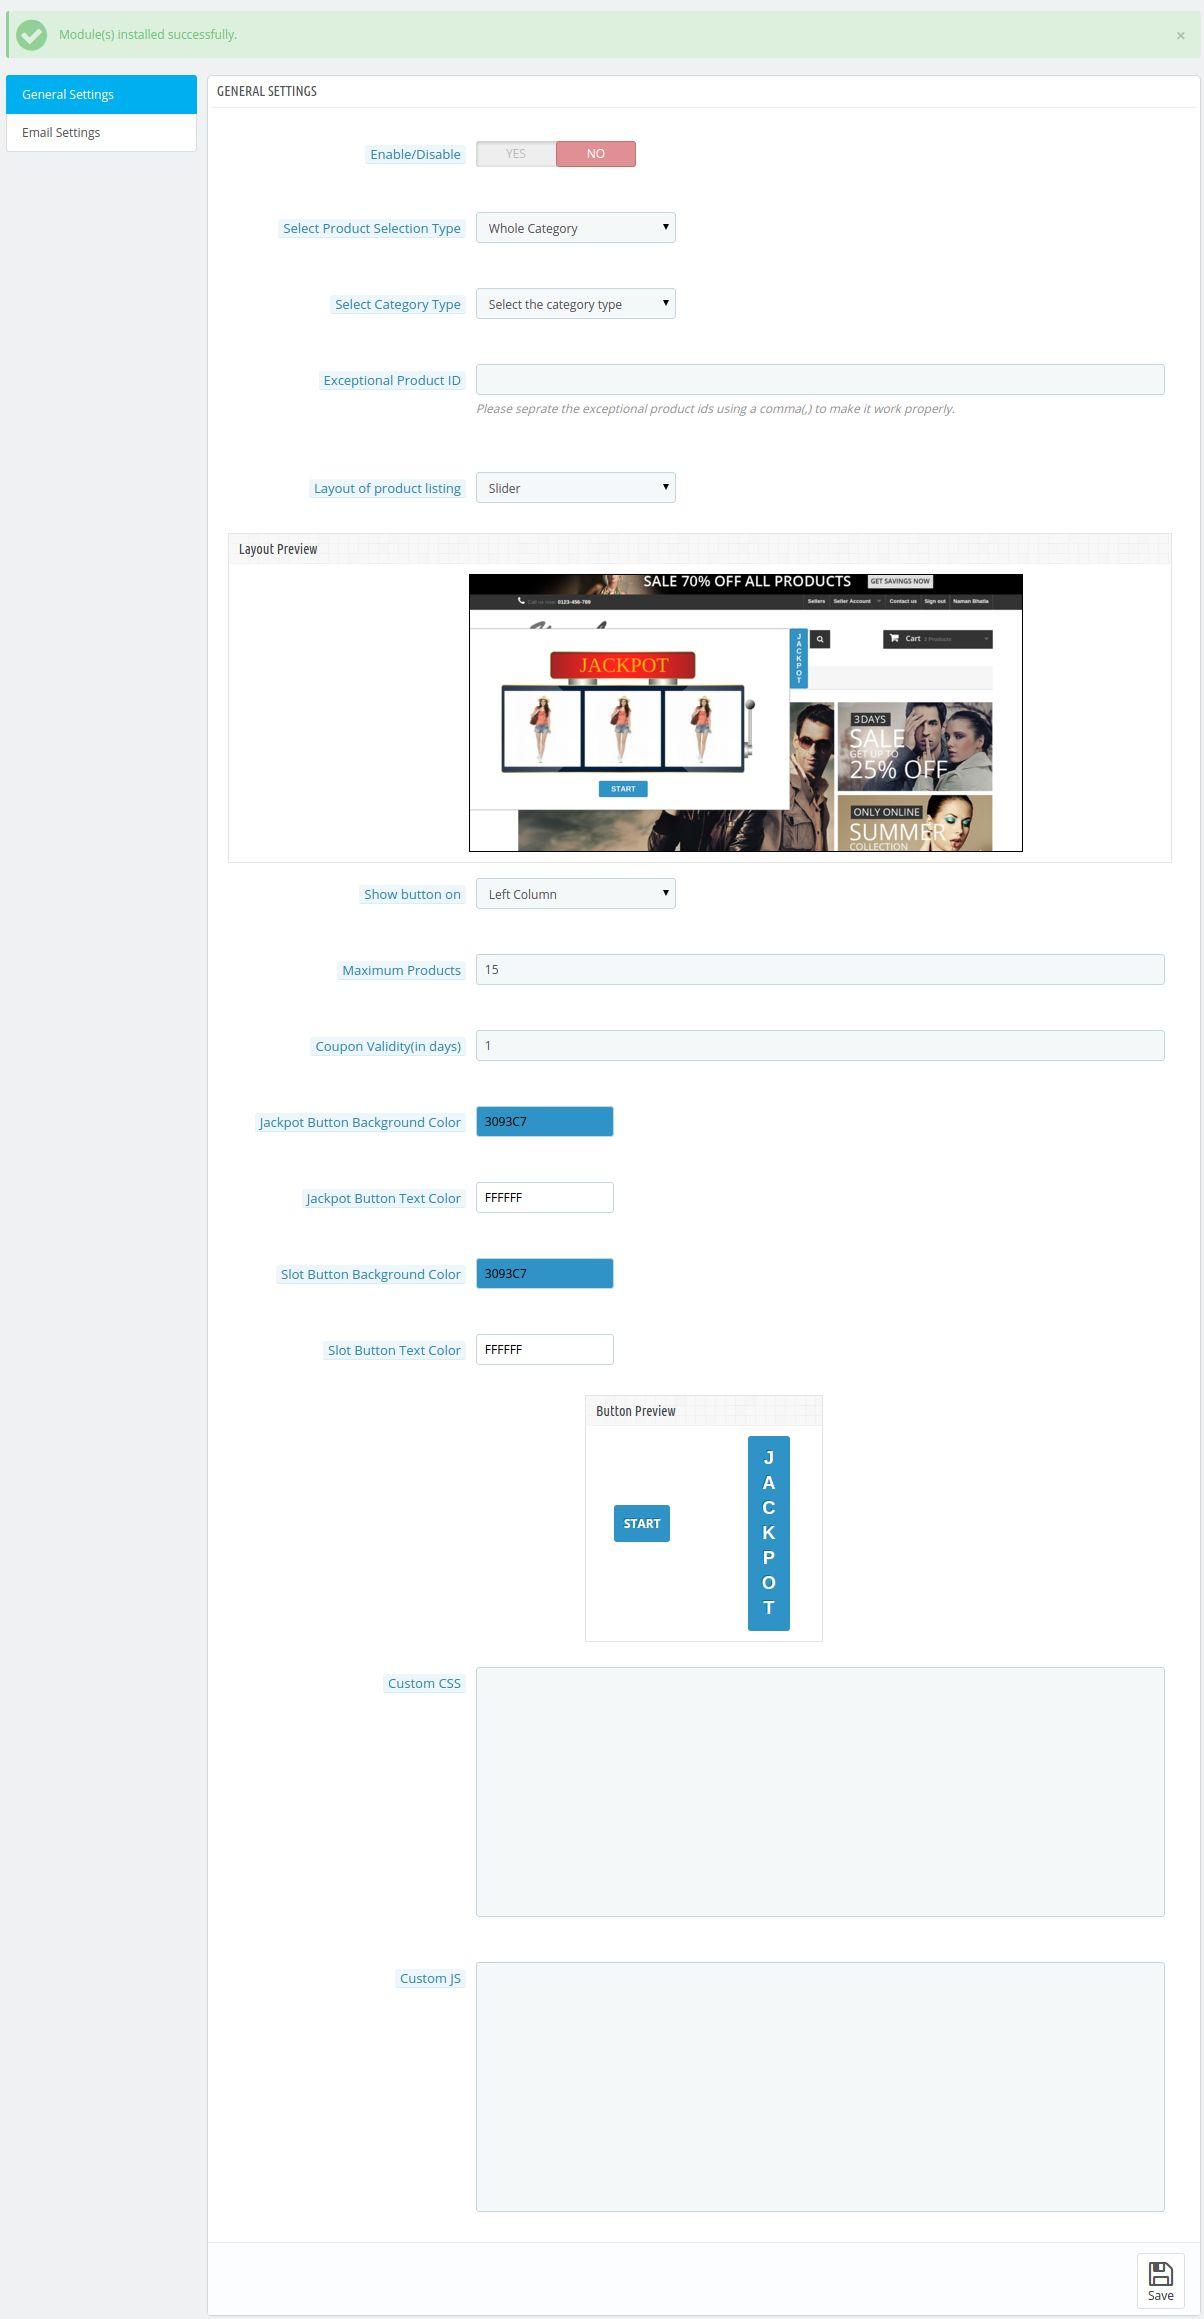
In admin module, there will be following options to configure this Prestashop free gift module. The freebie addon includes 2 tabs and they are as follows.
1. General Settings.
2. Email Settings.
Each section is described in details below.
General Settings of Prestashop Customer Jackpot Addon:
This section will be having the following options to configure the Prestashop jackpot addon:
Enable/Disable: This option of the free product module will be having a toggle button with two specific values ON and OFF. This Prestashop module will only work if this is set to ON. If this is set to OFF then none of the features will be working and not even impact any other section of the website. By default, this option will be OFF.
Product Selection Type: In this field of the Prestashop gift module, the admin will select that how he is going to define the products which will be appearing in the jackpot game in the front. It will be of two types category and product.
IF ‘CATEGORY’ IS SELECTED-
Select Multiple Category: This field of Prestashop freebie addon only appears when the admin selects category as the product selection type. Here, the admin can select any type of categories whose product will be appearing in the front. This field will be multiple selection types.
Exceptional product Id: This field of Prestashop free gift addon also appears when the category is selected as product selection type. Here, the admin can enter those products id’s separated by the commas which he does not wants to appear in the front.
IF ‘SPECIFIC PRODUCT’ IS SELECTED-
Jackpot Product ID: In this field of the Prestashop customer jackpot addon, the admin has to enter all the products ids which he wants to display on the front. This field will only appear if the admin will select ‘Specific Product’ as product selection type.
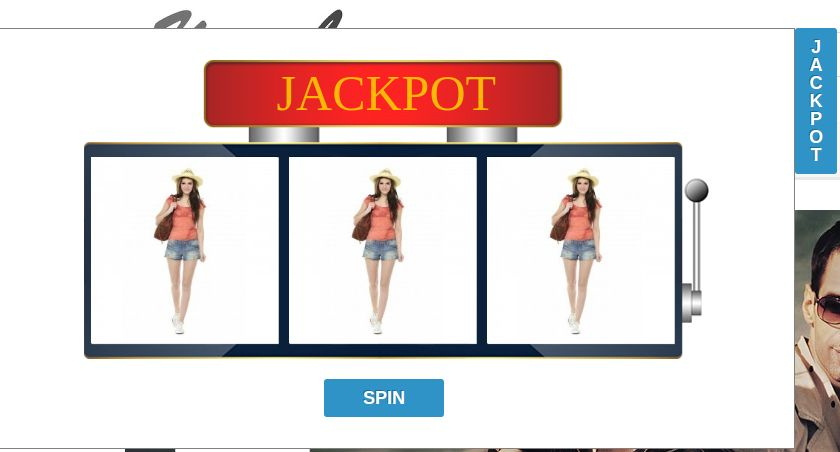
Select Layout Type: There will be two layout types which will be available in this Prestashop jackpot addon. One layout will be a popup type layout in front and another layout will be a slider layout.
Custom CSS and JS: These fields of Prestashop gift module have been provided to let the admin change the look and feel of the front end of this Prestashop module.
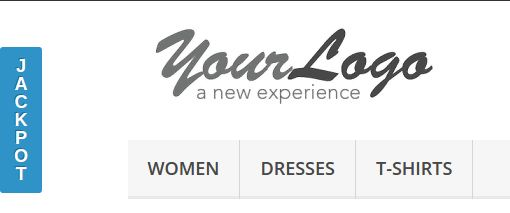
Show Button On: This field has two option left or right. Here, the admin can select that on which side the admin wants to put the jackpot button.
Coupon Validity: Here, the admin can enter the time up to which the coupon code generated by this Prestashop jackpot addon given to the customer will be considered as active.
Button Customization Options: The Prestashop freebie addon also has button customization option to change the background color and text color of the buttons which are used in the module in front. These buttons are the jackpot button (Only for slider layout) and Slot game button. The admin can change the background as well as text color above mentioned both buttons just by selecting the desired color from the color picker.
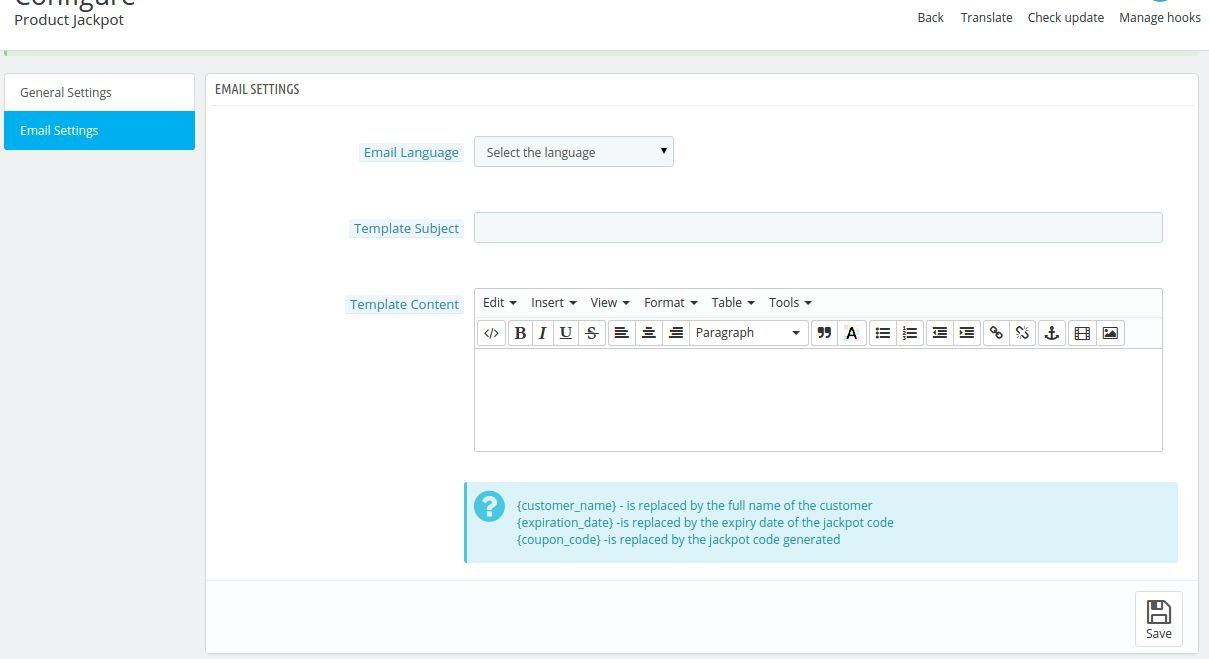
Email Settings of the Prestashop Jackpot Addon:
In this field of Prestashop gift module, the admin will have the following options:
Select Email Language: Here, the admin will select the email language using which he will send the email to the customers who have won the jackpot.
Template Subject: This field of Prestashop freebie addon allows the admin to enter the email subject. Whatever subject the admin will enter in this email field, it will be used as the subject of the email sent to the customer whenever they will win any jackpot in the front.
Template Content: Here, the admin can enter the email content which will be sent to the customers who will win the jackpot in the front.
There are certain constants which have to be used by the admin to let the customers know the discount code and discount validity of the respective code, that will be {{discount_validity}} and {{discount_code}}.
Front End Module of the Prestashop Freebie Addon:
When the Prestashop jackpot addon is enabled from the admin panel then it will appear in the front on the first page where the customer will visit the store. As the settings are given in back end, the module will be having two layouts and when the module will appear in front then it will be according to the layout selected by the admin in the back end.
This module is basically for the sellers to let them know about the decreasing stock of their products. In this module the seller can set a specific quantity of the products and if any of his products got below this mark then the seller will receive an alert mail regarding the lowering of the product.
The admin can also set a cron which will send a mail to the seller as soon as the stock of any of the products is down or as soon as an order is placed making the stock of that product less from the given low stock quantity.
Steps for Installation
To install this ad-don, please follow the following steps:
1. Add ad-don folder under modules folder of your system.
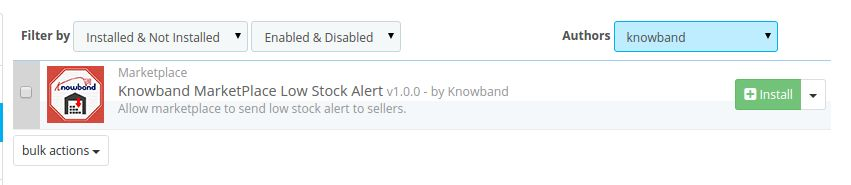
2. After adding this ad-don folder, system will list the ad-don on module page under front office feature category as given below:
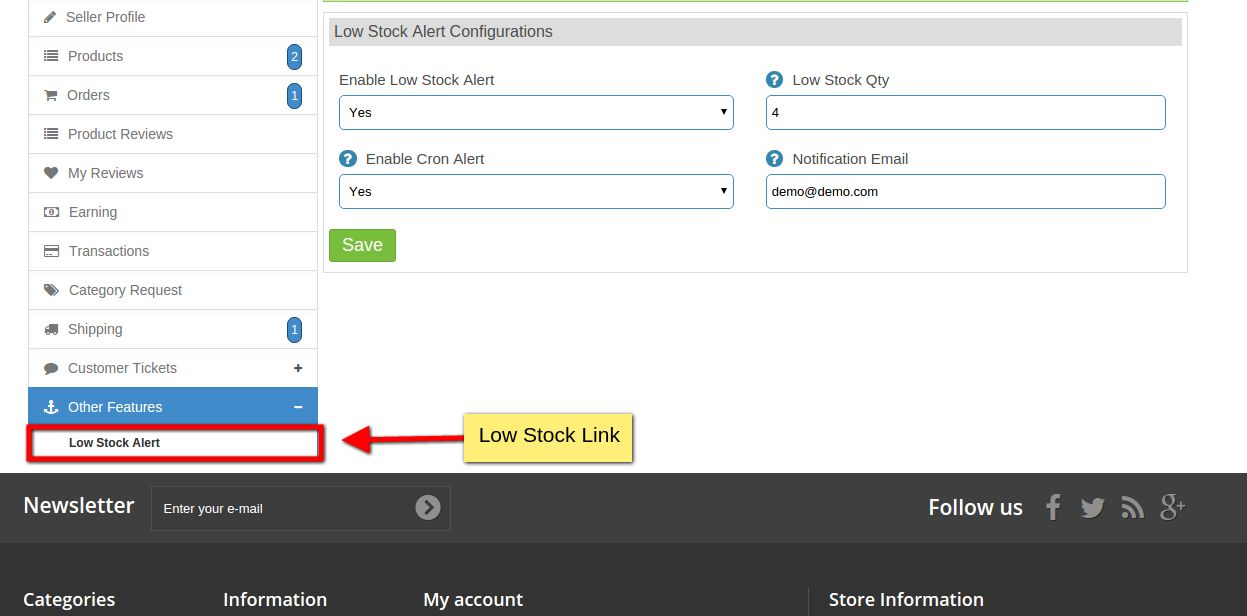
After installation, a menu will be displayed to the seller as shown in below screen:
On clicking the highlighted link, system will redirect seller to his low stock alert configurations page.
Low Stock Alert Configuration
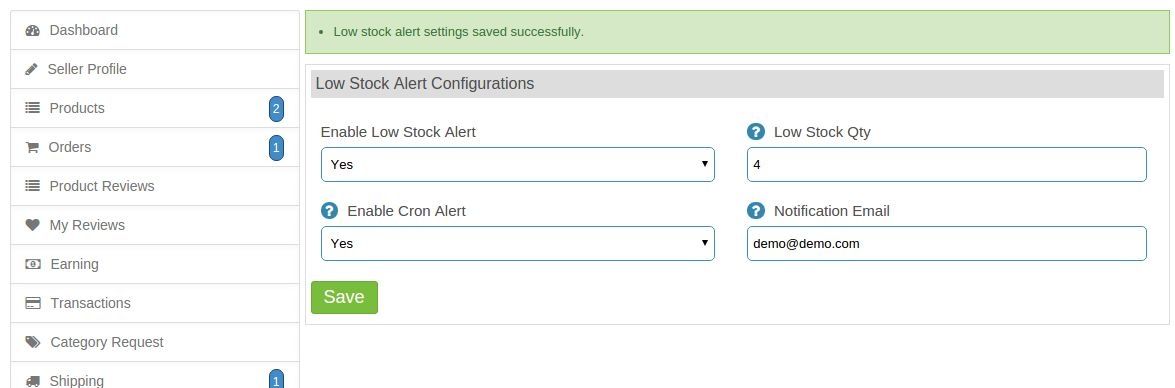
Here all the settings of the modules are mentioned. These are explained below:
Settings Description
1. Enable Low Stock Alert: The module will only work if this field is set to enabled. If this module is disabled then the module does not work.
2. Low Stock Qty: In this field the seller will set the low stock quantity. If the quantity of any of the products of the seller goes below this value then the seller will receive an email after the order is placed or when the cron works.
3. Enable Cron Alert : If this field is enabled then the cron set up by the admin works and if this field is disabled then the seller will not receive any of the emails generated by the cron.
4. Notification Email: This is the email of the seller in which the seller will receive the low stock alert mails.
Module Work Flow
When the seller will enable the module and set the low stock quantity then after every order is placed for the products of the seller, The seller will receive an alert email if the quantity of the product is now lower then the low stock quantity set by the seller.
The seller may also receive email according to the cron set up by the admin on his server but if the seller has disabled the cron settings from his interface then he wont receive any of the emails which will be generated from the cron.
The Prestashop Maintenance Page Customizer by Knowband is designed to customize the “Under-Maintenance” page of the Prestashop store. The addon lets the store admin make the changes in the font color, background color, text size and more from the back-end. The store owner can also have a Cron setup to automatically enable Maintenance mode on your store.
2.0 Steps for Installation
The user manual guides you to the easy installation and configuration of the Prestashop Maintenance page customizer by Knowband.
You can follow the steps mentioned below to install the Prestashop addon on your store.
Copy custom maintenance page module folder under your root_directory/modules/of your store via FTP or use Prestashop interface to upload the plugin.
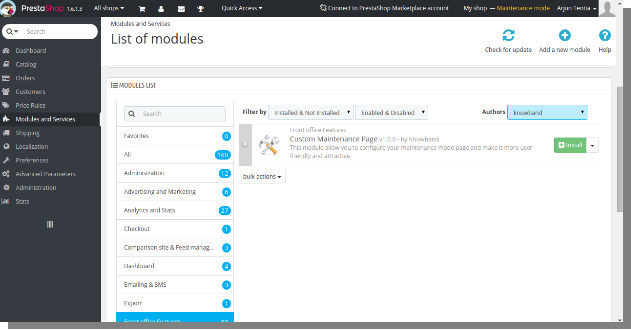
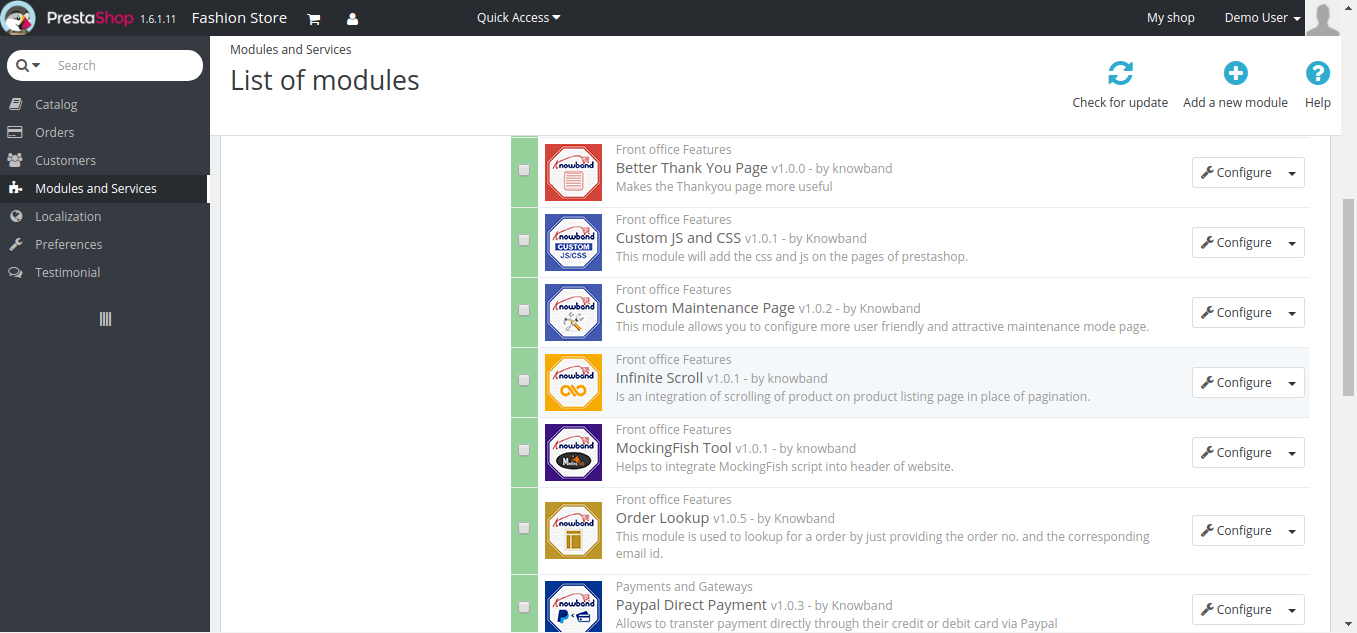
After copying, the Prestashop module will be listed on module listing page in admin panel as shown given below screen.
If Prestashop maintenance page module is not displaying on your module listing page, search it by filtering module with following details:
When you will click on install button, a pop-up box will appear which will display warning messages. You can ignore these messages and move ahead. There will be no negative impact of this warning message on your store.
After installing Prestashop modification page customizer module, a configure button will be in front of this plugin on module listing page as shown in the screen below:
3.0 Admin Module
3.0.1 Configuration Settings
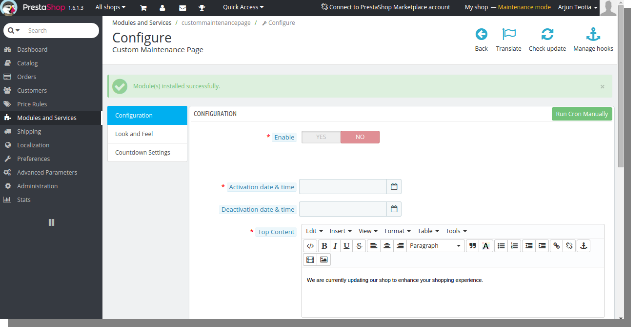
To access this Prestashop error page modification module, Click on configure button of custom maintenance page module. On clicking, module interface will be open and following screen will be displayed as given below:
Enable/Disable: To enable the plugin, switch the enable button from OFF to ON. The default value will be OFF.
Activation date and time: This is the activation date and time when your module will go into maintenance mode. The default value will be Null
Deactivation date and time: This is the deactivation date and time when you want your shop to go live and turn off maintenance mode. The default value will be Null.
Top Content: This is the main message that will display on your maintenance page after maintenance mode is enabled. We have added a The default text in this field. The default data will be We are currently updating our shop to enhance your shopping experience.
Bottom Content: This is another text message that will display on your maintenance page below top content after maintenance mode is enabled.We have added a The default text in this field. The default data will be We apologize for the inconvenience and thank you for your patience.
3.0.2 Look and Feel Tab
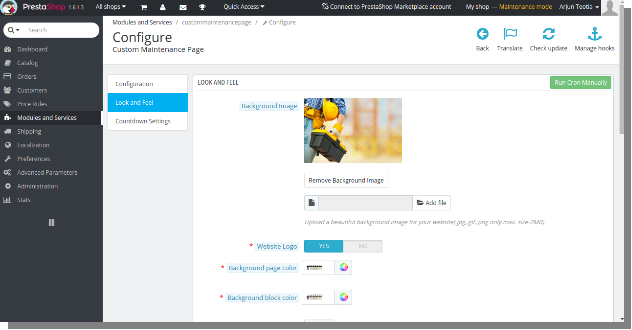
This tab basically contains look and feel of maintenance page. These settings are for our user interface on maintenance page.
Background Image: You can change the background image for your maintenance page here. There is a given The default image for maintenance page background. You can easily upload a beautiful image for your background on maintenance page’s front-end.
Website Logo: You can also have an option to show your website logo on maintenance page. The default value of this field will be YES.
Background Page Color: This is the background color of maintenance page. The default background color will be white #ffffff.
Background Block Color: This is the background color of the rectangular content block on which your message is printed on maintenance page. The default color will be white #ffffff.
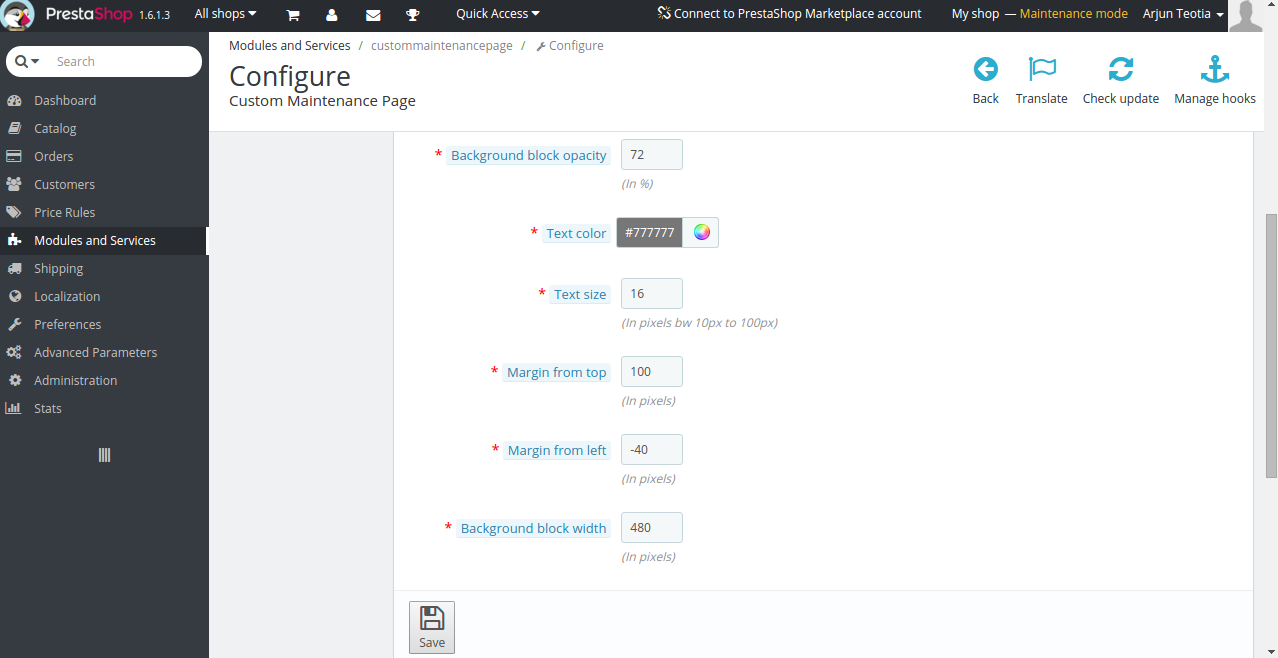
Background block opacity: This is the opacity in the percentage of the rectangular content block on your maintenance page. The default value will be 72.
Text Color: This is the color of the text message on maintenance page. The default color will be #777777.
Text Size: This is the font size of the text message on maintenance page. The default size will be 16pixels.
Margin From Top: This is the margin between your content block and top of the window. This helps to move downward or upward your content block on the maintenance page. The default margin will be 100pixels tested well on Prestashop v1.6.1.3.
Margin From Left: This is the margin between your content block and left of the window. This helps to move left or right your content block on maintenance page. The default margin will be -40pixels suitable for Prestashop v1.6.1.3. For the different version of Prestashop, you will need to change this setting according to your shop.
Background Block width: This is the width of the content block on maintenance page. You can stretch your background block accordingly with ease. The default value will be 480pixels.
3.0.3 Countdown Settings
This tab of the Prestashop error page modification addon is for the configuration setting of the countdown timer on maintenance page. You can change the background color of your timer with the content block and you can even move left, right on the content block. You can also select from 4 different sizes of countdown timer according to your need.
Timer Size: You can change the size of your countdown timer which is shown on maintenance page. There are 4 different sizes of countdown timer available Middle size, Small size, Extra small size and Large size. The default value will be Middle Size.
Countdown Background Color: This is the background color of the countdown timer. The default data will be white color #ffffff.
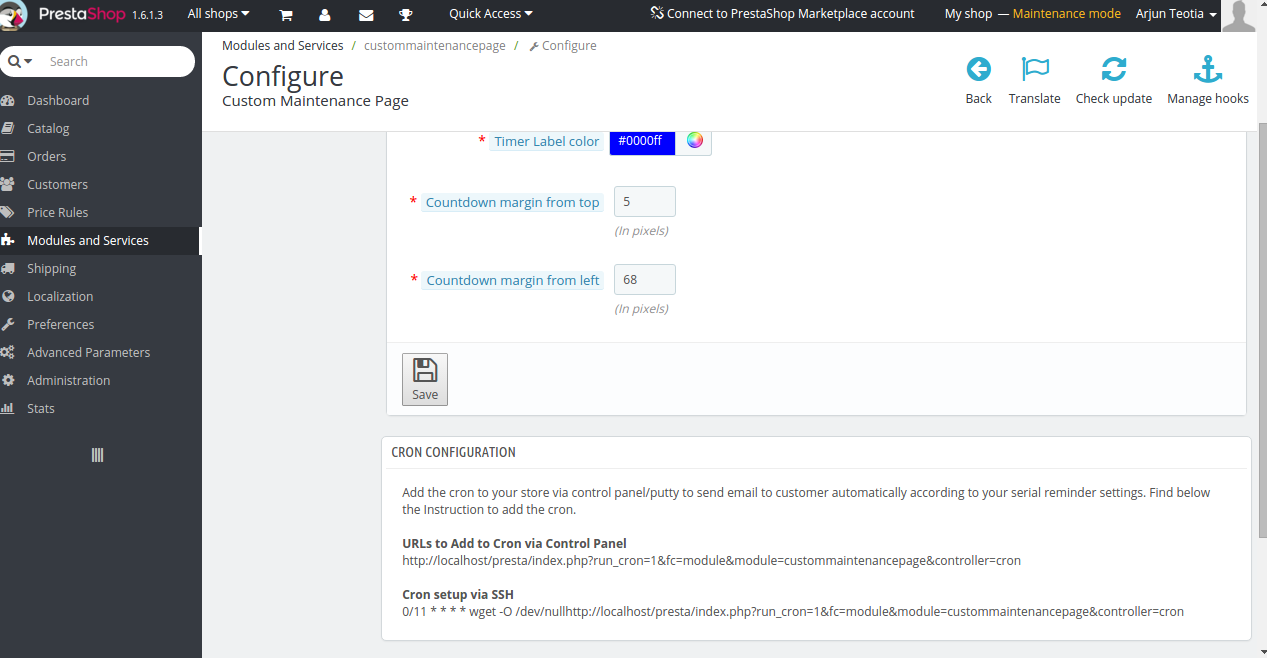
Timer Label Color: This is the font color of labels for hours, minutes, seconds. The default color will be blue #0000ff.
Countdown margin from top: This is the margin of the countdown timer from the top of your text message on the content block on maintenance page. The default value will be 5pixels.
Countdown margin from left: This is the margin of the countdown timer from the left of your content block on maintenance page. The default value will be 68pixels.
3.0.3.1 Cron Instructions
This is instruction on how to run your cron function of maintenance tab. There is a button to run cron manually on the left side of module page. You can either click this button to run cron or set an automatic cron on your server following the instructs. The cron URL and how to setup via SSH is given on the below of tabs as shown in the below image –
3.0.3.1.1 The functionality of Cron Function-
These are the requirements when cron function will activate maintenance mode and disable your shop.
The module must be installed properly and enabled.
The current timestamp must be either greater or equal to Activation time stamp means the current date is same as activation date or ahead of activation date.
Deactivation timestamp must be greater than current time stamp means deactivation date must be ahead of the current date.
After all above conditions are true. The following message will print on running the cron – Maintenance mode has been enabled successfully.
These are the requirements when Cron function will deactivate maintenance mode and re-enable your shop.
The module must be installed properly and enabled.
All other conditions above must not be true.
The current timestamp must be greater than deactivation time stamp means current date must be ahead of deactivation date.
After all above conditions are true. The following message will print on running the cron – Maintenance mode has been disabled successfully.
In case both these options are incorrect, you will be shown the following message-
The module is not enabled or Activation/Deactivation date for maintenance has not passed yet.
4.0 Front Office Interface
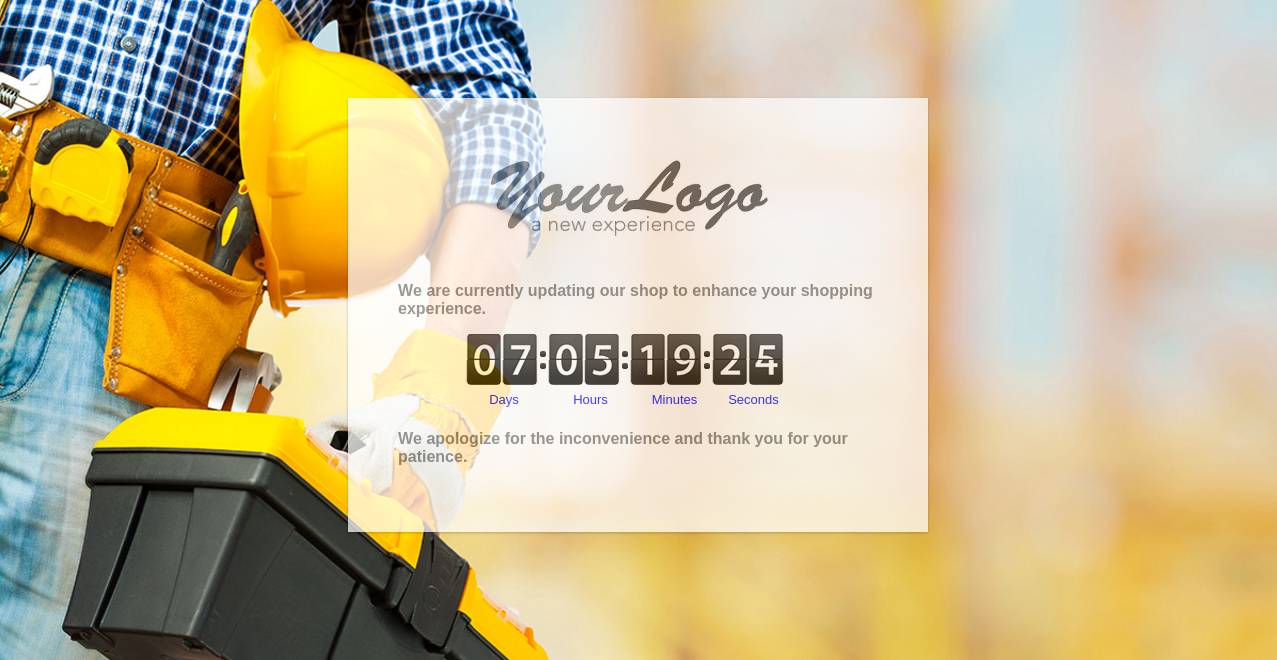
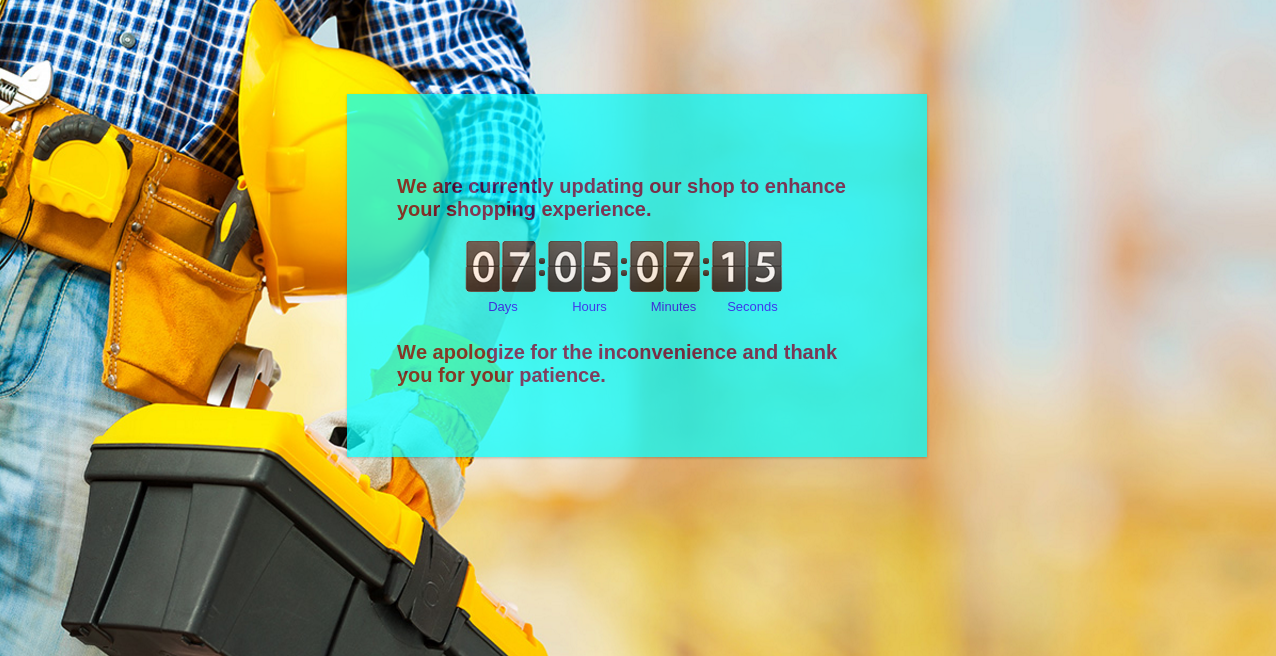
1. Default Settings Interface
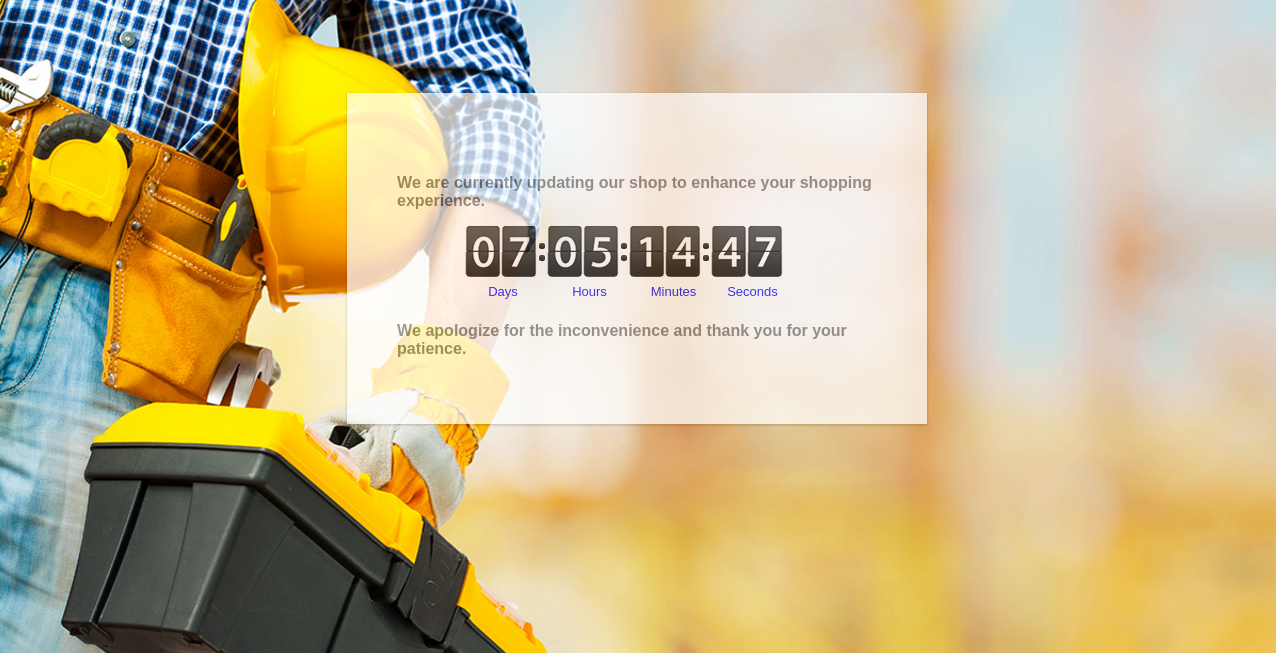
2. Without Website Logo
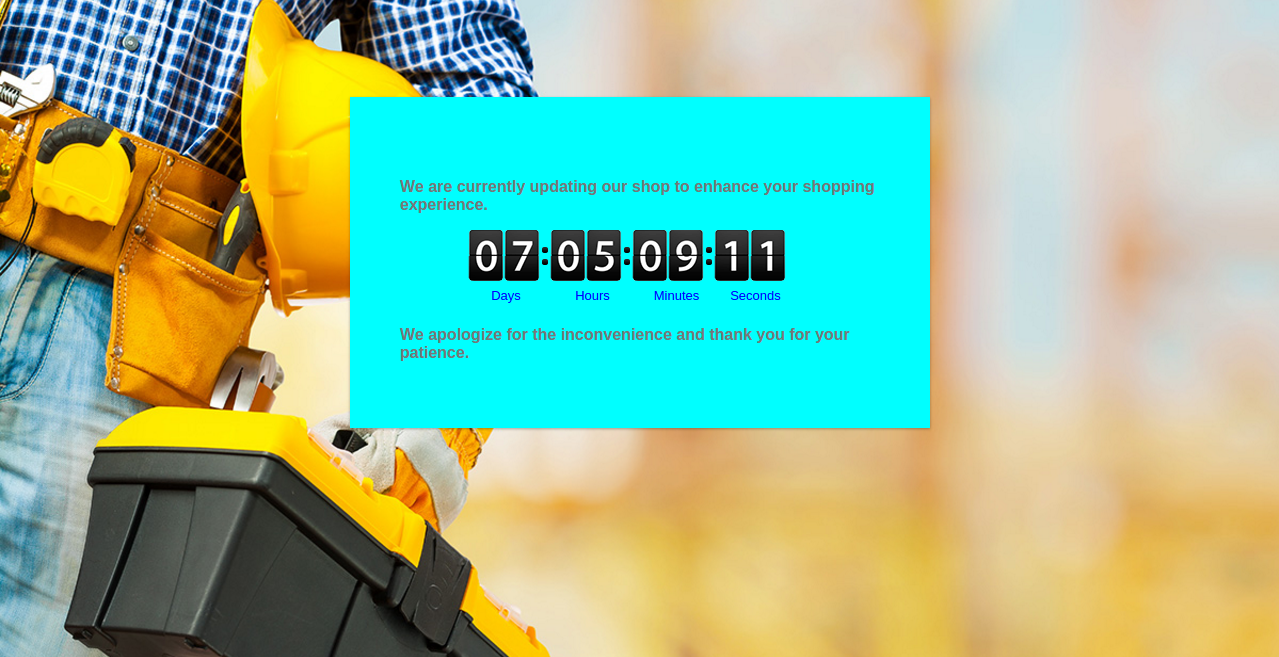
3. The changed Background Color of the content block and countdown timer
4. The maximum opacity of the content block
5. Changed font size and color
6. Changed position of the content block
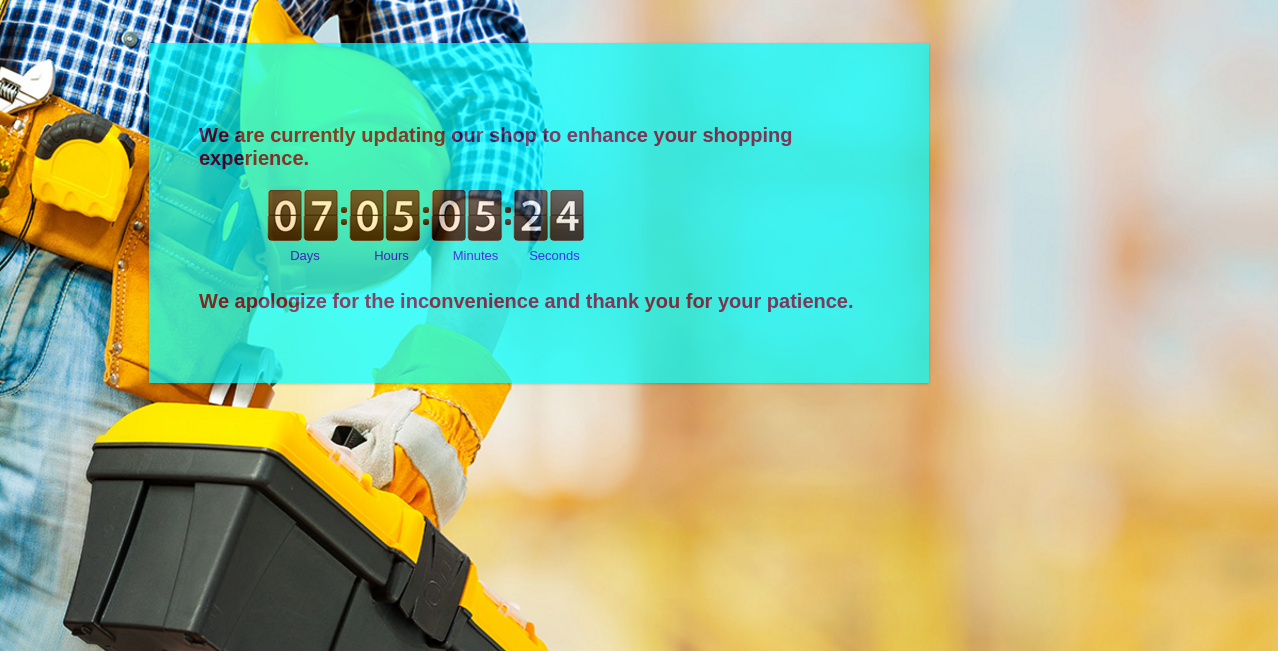
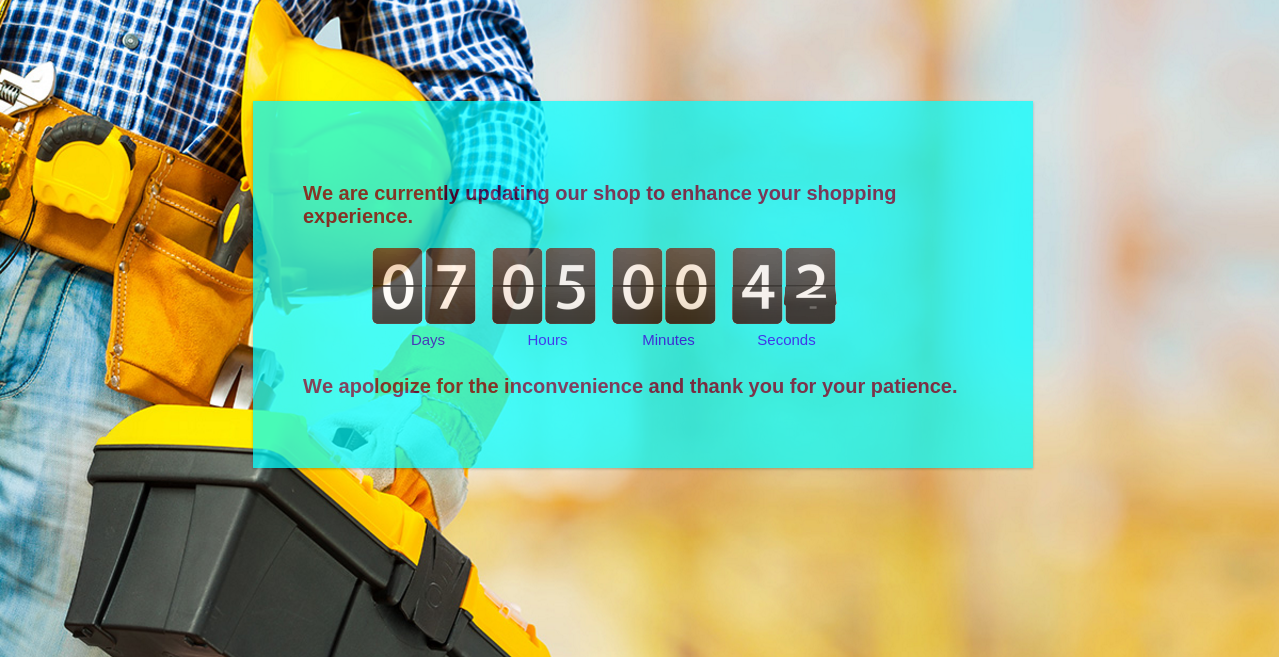
7. Large Countdown
8. Smaller Countdown
From all of the above images, you can easily make your maintenance page beautiful without making any extra efforts with the help of this module. You can fully customize maintenance page with the Prestashop Maintenance page customizer. So, attract your customers even when your actual shop is disabled.
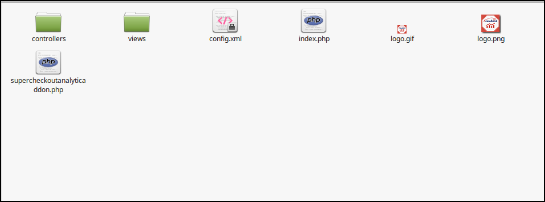
The folder structure of the Prestashop checkout page analytics by Knowband analytics addon folder.
Copy the whole folder named as checkout analytic addon by Knowband into your modules folder of the root directory of your PrestaShop store through FTP.
You can also upload zip folder of the module by clicking on Add New Module button, which should appear just in the top right corner of module listing page.
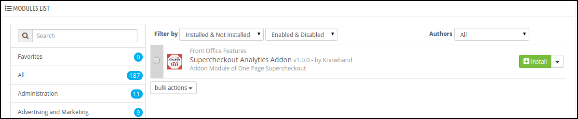
After that, you will be able to find the Google Analytics Prestashop addon ready to be installed in the Modules in your PrestaShop store as shown below.
Click on the Install link to install the Prestashop checkout page analytics module.
2.0 Admin Module
Here, the Prestashop store owner can enable/disable the Prestashop addon and see the analytics summary.
After installing the Prestashop checkout analytics addon into the store, the module will provide the following tabs:
General Settings
Analytics Details
Other Plugins
2.0.1 General Settings
On clicking on the configure link on the module listing page, configure link will automatically appear once you install the plugin.
The tab consists the following details:
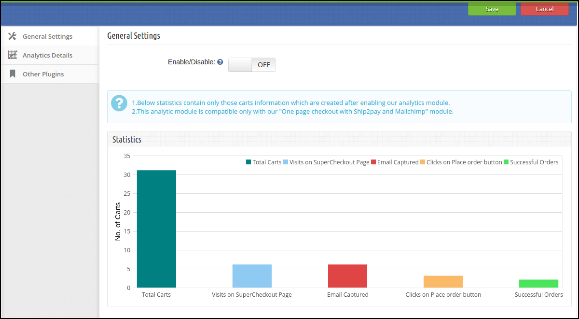
Enable/Disable: To enable the Prestashop google analytics, switch the enable button from OFF to ON. The default value will be OFF.
Statistics Graph: Graph shows the statistics of only those carts which are created after enabling the Prestashop module.
2.0.2 Analytics Details
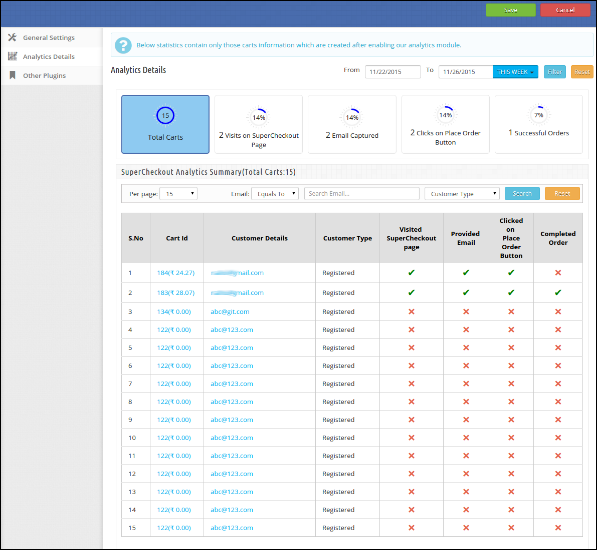
This tab shows the details of following actions:
Total Carts: Shows the total number of carts created after enabling Google Analytics Prestashop addon.
Visits on Checkout Page: Total number of Customers which visit checkout page.
Email Captured: Total number of customers who have provided their email addresses.
Clicks on place order button: Total number of customers who click on the place order button.
Successful Orders: Total customers which completed their orders.
Table Consist the following columns:
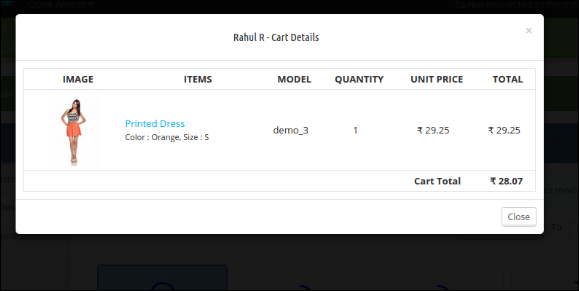
Cart Id: This column shows the cart id of the product along with its cart total. The Prestashop store admin can also see the cart details by clicking on the cart id.
Customer Details: This column will consist the customer email addresses. The Prestashop store admin can also see the details by clicking on the email address.
Customer Type: This column shows the type of customers. Whether the customers are Registered, Guest, Visitor or Visitor by email.
Visited Checkout Page: This column will show tick if the visitor/customer visits our checkout page otherwise, a cross is displayed.
Provided Email: This column will show tick if the visitor/customer enters an email address in the email field of checkout page otherwise, shows a cross.
Clicked on place order button: This column will show tick if the visitor/customer clicks on ‘place order button” on checkout page otherwise, show cross.
Completed Order: This column will show tick if the customer completed his/her order on the checkout page.
Recommendations
Install One-page checkout with Ship2pay and Mailchimp module before installing this Prestashop checkout page analytics module.
Always remember that the Statistics contain only those cart information which is created by enabling Prestashop checkout page analytics addon.