
1.0 Steps for Installation
Following are the steps to install the Prestashop Checkout Analytic Addon
- The folder structure of the Prestashop checkout page analytics by Knowband analytics addon folder.

- Copy the whole folder named as checkout analytic addon by Knowband into your modules folder of the root directory of your PrestaShop store through FTP.
- You can also upload zip folder of the module by clicking on Add New Module button, which should appear just in the top right corner of module listing page.
- After that, you will be able to find the Google Analytics Prestashop addon ready to be installed in the Modules in your PrestaShop store as shown below.
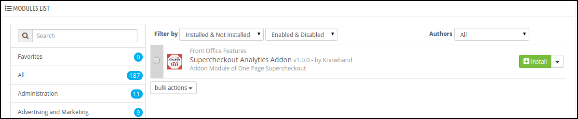
- Click on the Install link to install the Prestashop checkout page analytics module.
2.0 Admin Module
Here, the Prestashop store owner can enable/disable the Prestashop addon and see the analytics summary.
After installing the Prestashop checkout analytics addon into the store, the module will provide the following tabs:
- General Settings
- Analytics Details
- Other Plugins
2.0.1 General Settings
On clicking on the configure link on the module listing page, configure link will automatically appear once you install the plugin.
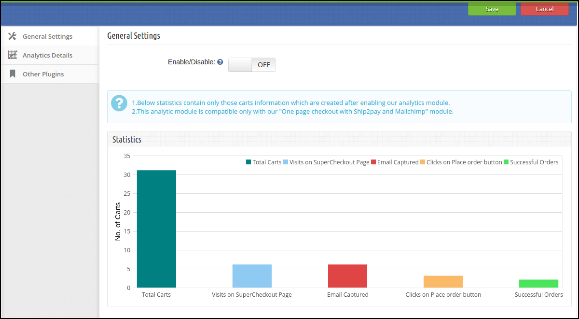
The tab consists the following details:
- Enable/Disable: To enable the Prestashop google analytics, switch the enable button from OFF to ON. The default value will be OFF.
- Statistics Graph: Graph shows the statistics of only those carts which are created after enabling the Prestashop module.
2.0.2 Analytics Details
This tab shows the details of following actions:
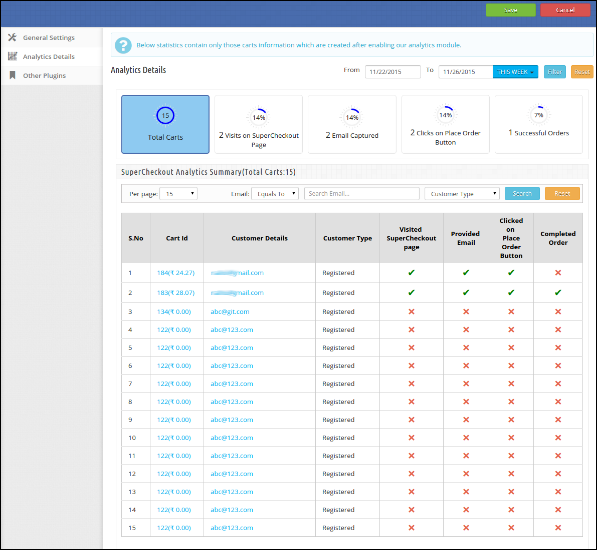
- Total Carts: Shows the total number of carts created after enabling Google Analytics Prestashop addon.
- Visits on Checkout Page: Total number of Customers which visit checkout page.
- Email Captured: Total number of customers who have provided their email addresses.
- Clicks on place order button: Total number of customers who click on the place order button.
- Successful Orders: Total customers which completed their orders.
Table Consist the following columns:
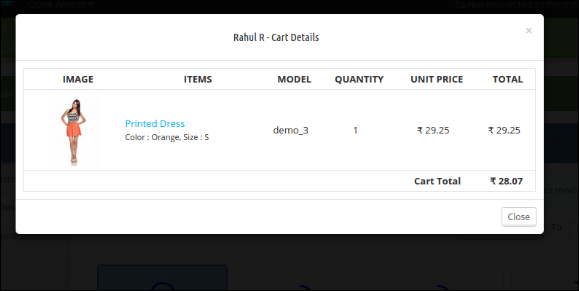
- Cart Id: This column shows the cart id of the product along with its cart total. The Prestashop store admin can also see the cart details by clicking on the cart id.
- Customer Details: This column will consist the customer email addresses. The Prestashop store admin can also see the details by clicking on the email address.
- Customer Type: This column shows the type of customers. Whether the customers are Registered, Guest, Visitor or Visitor by email.
- Visited Checkout Page: This column will show tick if the visitor/customer visits our checkout page otherwise, a cross is displayed.
- Provided Email: This column will show tick if the visitor/customer enters an email address in the email field of checkout page otherwise, shows a cross.
- Clicked on place order button: This column will show tick if the visitor/customer clicks on ‘place order button” on checkout page otherwise, show cross.
- Completed Order: This column will show tick if the customer completed his/her order on the checkout page.
Recommendations
- Install One-page checkout with Ship2pay and Mailchimp module before installing this Prestashop checkout page analytics module.
- Always remember that the Statistics contain only those cart information which is created by enabling Prestashop checkout page analytics addon.
We hope that we have covered all the concerns regarding the installation and product guide of this Prestashop Addon. Check out the Prestashop Features that can improve eCommerce Business.
This Would Also Interest You:
