In the ever-evolving world of e-commerce, businesses must adapt to changing market trends and customer expectations to remain competitive. One crucial decision that online store owners may face is whether to migrate from their current platform to a new one. In recent years, PrestaShop to Shopify migration has gained popularity due to Shopify’s user-friendly interface and robust features. However, before making the leap, there are several essential factors to consider.
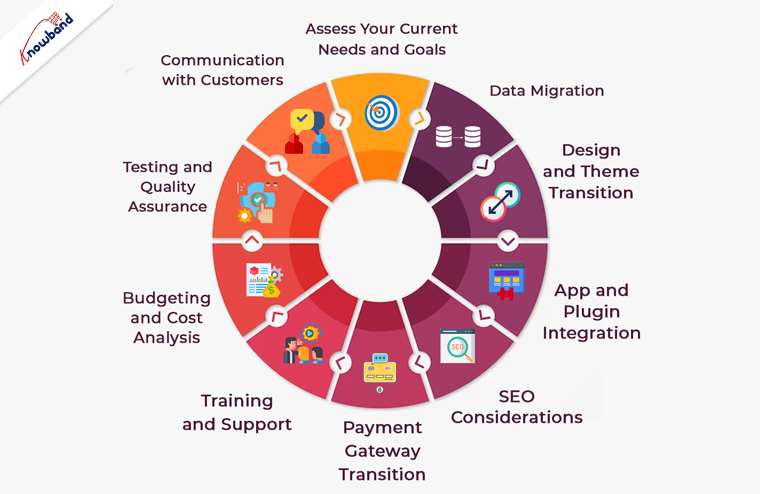
1. Assess Your Current Needs and Goals:
Before initiating a migration, it’s vital to understand your current e-commerce needs and long-term goals. Moreover, you should take a close look at your PrestaShop store and identify any shortcomings or limitations.
You can consider factors like scalability, customization options, and the ability to implement future changes. Furthermore, Shopify offers a wide range of features, but it’s essential to ensure they align with your specific business requirements.
2. Data Migration:
One of the most critical aspects of migrating from PrestaShop to Shopify is data transfer. This encompasses product listings, client details, past order records, and additional data. Therefore, ensure that your data is organized and cleaned before the migration process begins. Moreover, Shopify provides several tools and services to facilitate data migration, but a meticulous approach is necessary to avoid data loss or inaccuracies during the transition.
3. SEO Considerations:
Maintaining your website’s SEO ranking is crucial during a platform migration. Be prepared to update and redirect your URLs to prevent any loss in search engine visibility. Make a list of all your PrestaShop URLs and set up 301 redirects in your new Shopify store. Additionally, create an XML sitemap and submit it to search engines to help them index your new site quickly.
4. Design and Theme Transition:
The look and feel of your online store play a significant role in customer engagement. If you have a custom PrestaShop theme, you’ll need to recreate or find a similar one for Shopify.Shopify provides a diverse selection of themes, which include both free and premium choices.Thus, you can ensure that the selected theme aligns with your brand identity and provides an excellent user experience.
5. App and Plugin Integration:
Both PrestaShop and Shopify have their ecosystems of apps and plugins to extend functionality. Therefore, as an eCommerce shop admin you should always identify the essential Prestashop addons and integrations your business relies on and check if they are available on the Shopify platform. While Shopify has an extensive app store, some specific apps may not be available, which could impact your business operations.
6. Payment Gateway Transition:
The processing of payments is a vital element of every e-commerce establishment.Shopify supports various payment gateways, but the ones you were using on PrestaShop may not be the same. Research the available payment options on Shopify and ensure they meet your business needs. Additionally, plan for a seamless transition to minimize any disruption in your revenue stream.
7. Training and Support:
Shopify is known for its user-friendly interface, but it’s essential to invest time in learning the platform thoroughly. Take advantage of Shopify’s extensive documentation and support resources to familiarize yourself with its features and capabilities. Consider providing training to your staff if necessary to ensure a smooth transition.
8. Budgeting and Cost Analysis:
Migrating from PrestaShop to Shopify involves various costs, including subscription fees, theme purchases, app subscriptions, and potential design and development expenses. Thus, create a detailed budget to account for these costs and assess whether the benefits of moving to Shopify justify the investment.
9. Testing and Quality Assurance:
Before making your Shopify store live, thoroughly test all aspects of the website, including functionality, design, and data accuracy. Test the checkout process, navigation, and user accounts to ensure a seamless customer experience. Address any issues or glitches promptly to avoid customer dissatisfaction.
10. Communication with Customers:
Keep your customers informed throughout the migration process. Notify them in advance of any planned downtime or temporary disruptions to your online store’s services. Provide clear instructions on how they can access your new Shopify-based website. Effective communication can help maintain customer trust and loyalty during the transition.
In the End!
In conclusion, migrating from PrestaShop to Shopify can be a beneficial move for your e-commerce business if done thoughtfully and strategically. Furthermore, careful planning, attention to detail, and thorough testing are essential to ensure a successful transition. By considering these key factors, you can make the migration process as smooth as possible and position your online store for growth and success in the competitive e-commerce landscape. At Knowband with 13+ years of technical expertise in Web and App development, we also offer custom development and platform migration services. In case you have any queries, you can also find us at our official email address support@knowband.com.
Shopify Walmart Integration app by KnowBand connects your Shopify Store with Walmart marketplace. This Shopify Walmart API Integration app creates a channel facilitating the synchronization of product inventory, product details and helps the store admin to manage the product inventory, shipping and orders from the Shopify store itself. This Walmart Shopify Integration app uses the Walmart API – Consumer ID, Private Key and Consumer channel type to integrate the Shopify store with Walmart marketplace.
1.1 Admin Features of Shopify Walmart Integration
The Shopify Walmart Marketplace integration app automates the entire marketplace and store integration.
With the help of Walmart Shopify integration, the store admin can list the products in bulk in the marketplace.
Once the products are ready for listing, the admin can even change their details from the back-end of the Shopify Walmart integrator.
The Walmart Shopify integrator makes attribute mapping easier for the e-merchants.
The admin gets an option to create the unlimited profile from the admin interface of Shopify Walmart connector.
Any changes required in the product attribute or variation can be done with the help of these profiles.
The Walmart Shopify connector allows the admin to manage the inventory at a few button clicks. The change in the pricing and other related details can be synced with the marketplace by executing cron from the back-end.
The sellers can add shipping methods as per their requirement with the help of Shopify Walmart Synchronization app.
The admin even gets an option to sync the lag time, that is the number of days between when an item is ordered and when it is shipped, of the products from the back-end of the Walmart Shopify Synchronization app.
The admin can view the buybox report and can reprice the products with great ease with the help of Shopify Walmart Integration app.
Admin even gets an option to manage the promotional price of their products from the back-end of the Shopify Walmart Integration app.
Shopify Walmart Integration app allows the sellers to provide the tax code with least hassle.
2.0 Installation of Shopify Walmart Integration
For installing Walmart Shopify Integration app, visit knowband-walmart-integration & click GET option. Allow all the required access to the app.
After that, click Install Shopify Walmart Integration App option.
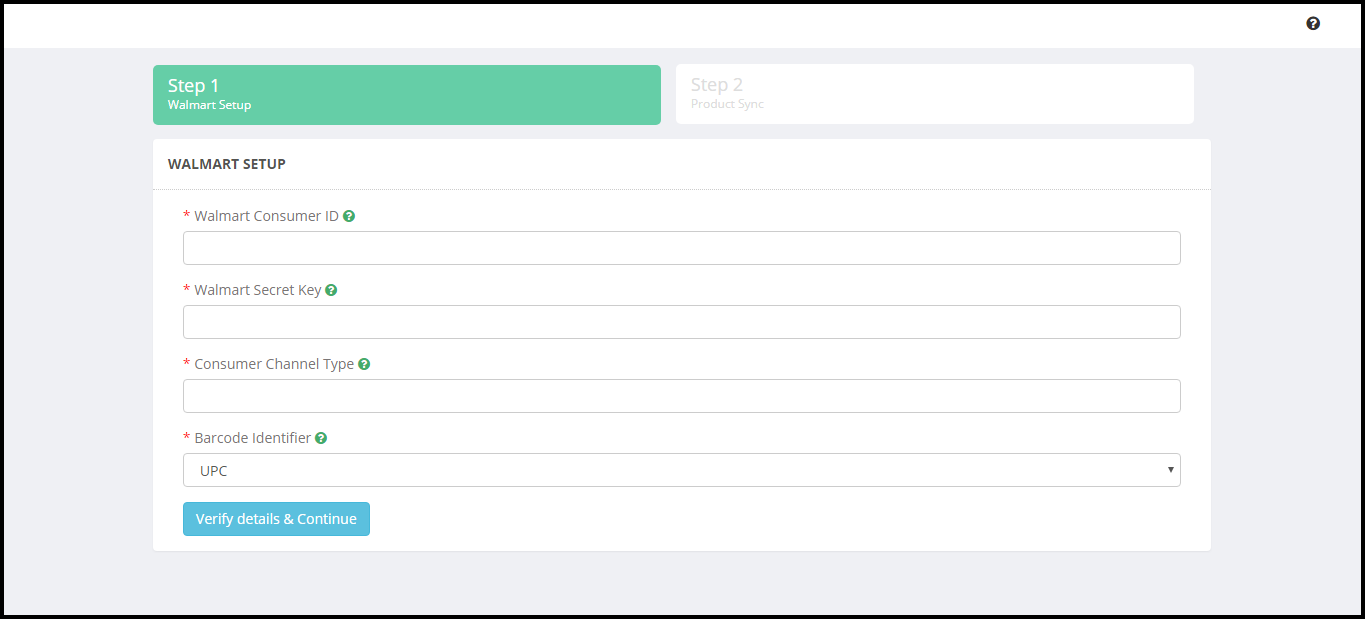
In order to synchronize the Shopify store with the Walmart marketplace store, the admin needs to configure the Walmart API details.
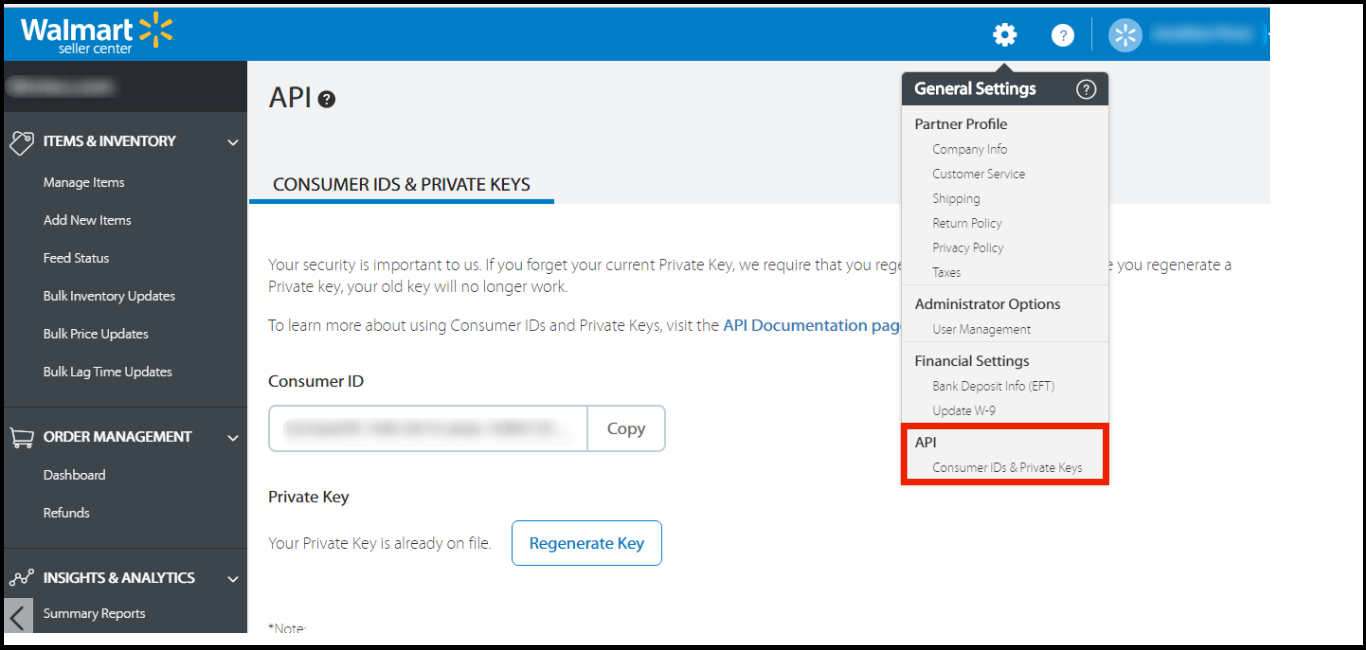
2.1 Steps to get Walmart API credentials-
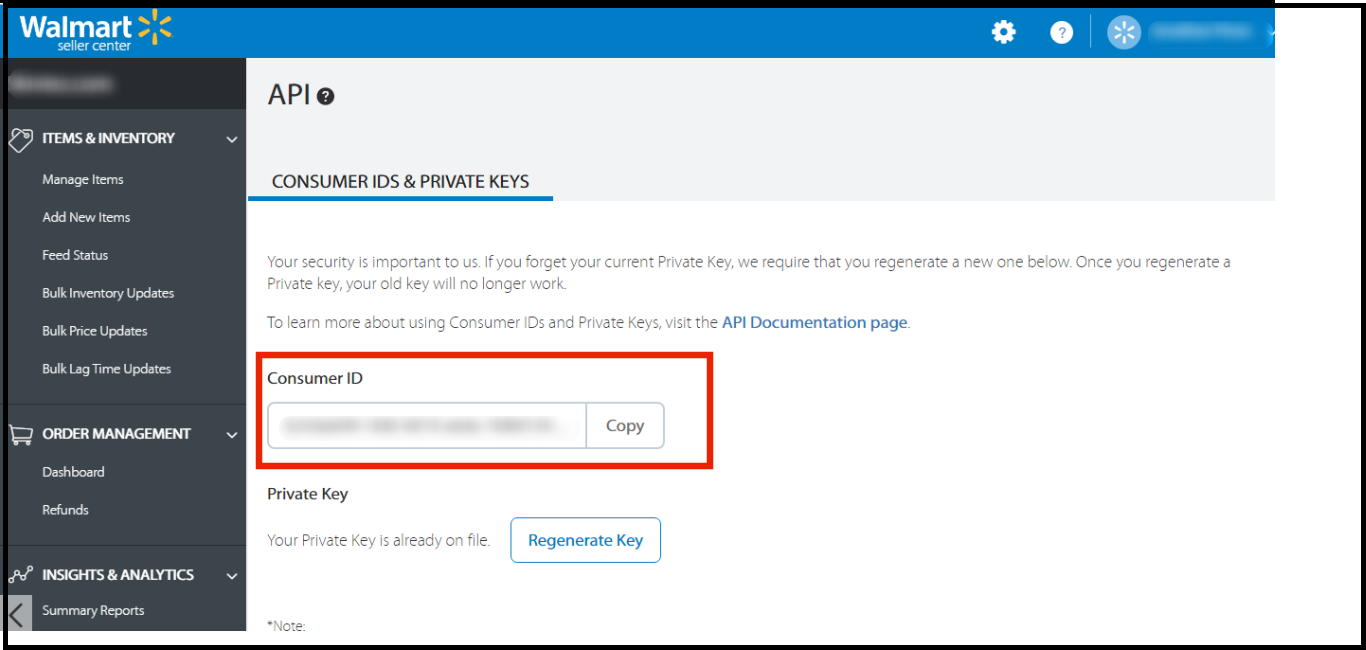
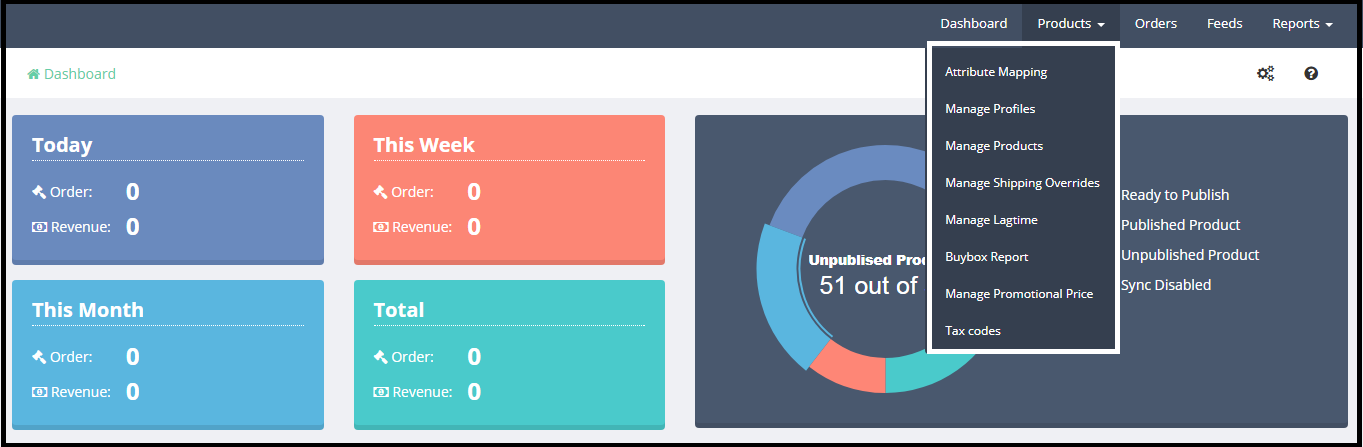
Click on the gear icon in the top-right to open the General Settings menu. Now click on the API.
You will get the Consumer ID once this option is clicked. Copy the Customer ID.
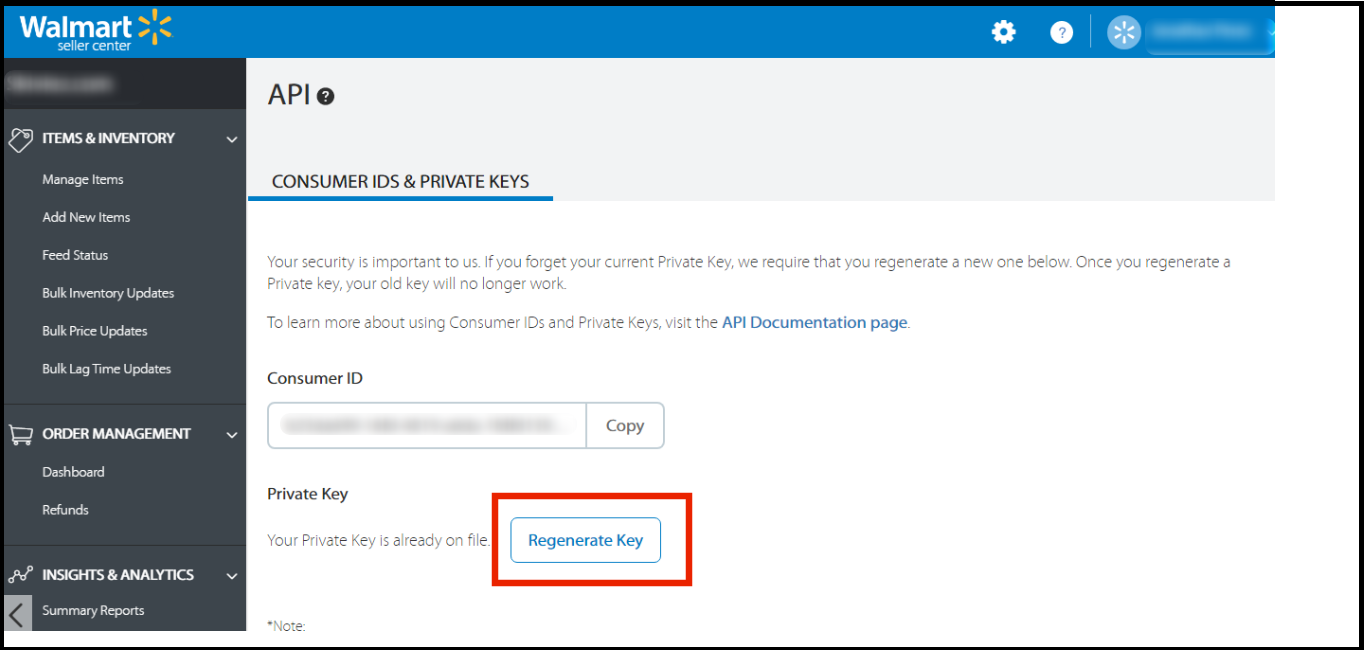
Click on the “Regenerate Key” button to regenerate the Private Key.
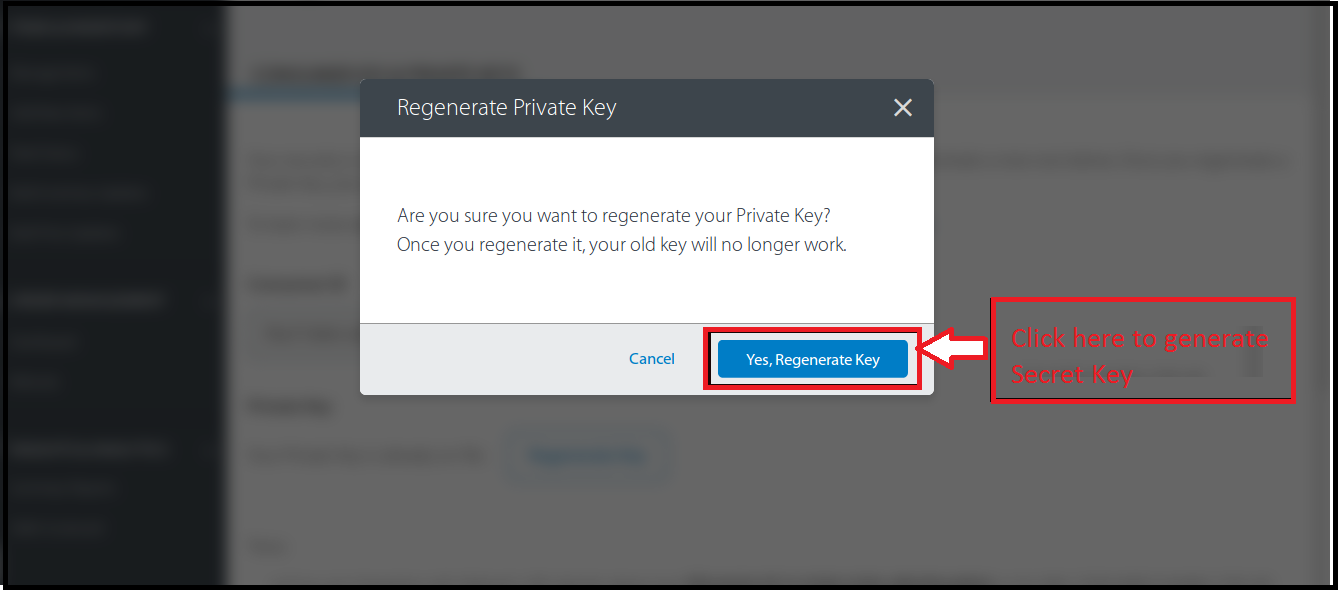
When you click on the “Regenerate Key” button, a pop-up appears.
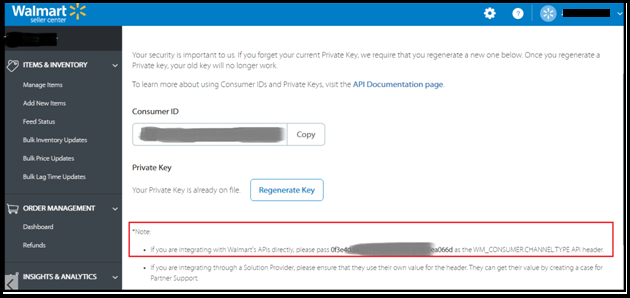
Copy the Consumer Channel Type from the API page of Walmart account. Please refer to the below screenshot:
2.2 Barcode Identifier
A barcode is a code composed of numbers, along with a specific pattern of stripes that represents a particular product. Select the Barcode identifier from the drop-down list – UPC, GTIN, ISBN, and EAN.
After entering all the details in the setup, click on the Verify details & Continue button.
2.3 Sync Products
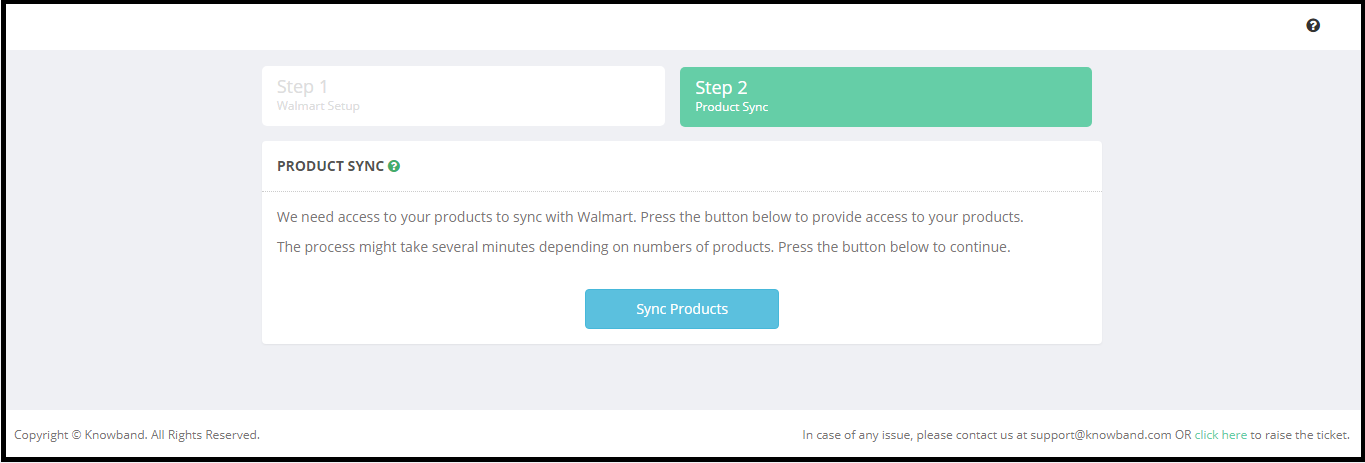
Now, your Shopify store has been integrated with the Walmart marketplace. Next step is to import the products into the Walmart Integration app. To complete the product import click on the Sync Products.
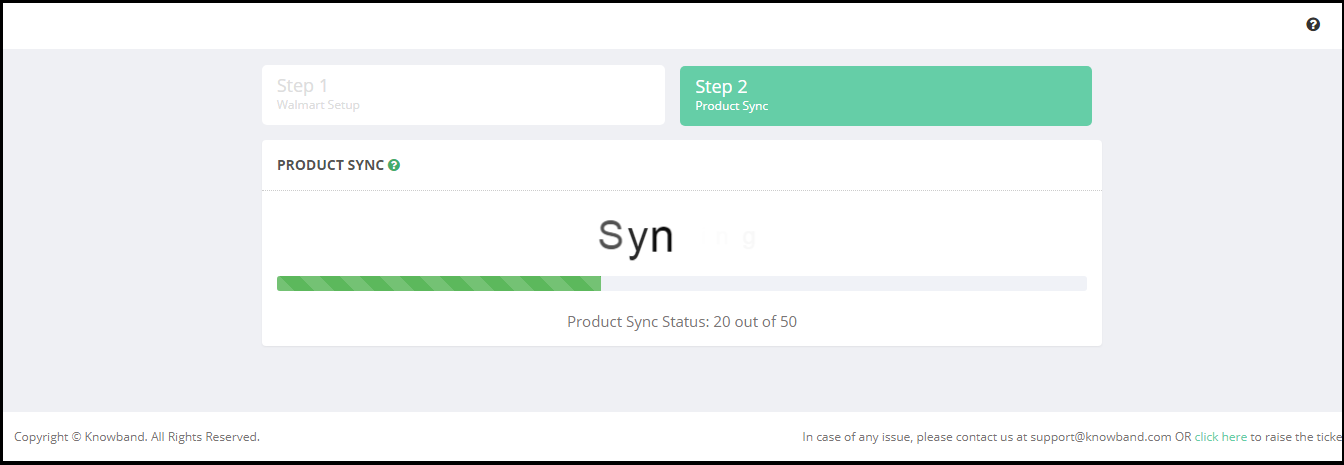
Clicking on the Sync Products will start importing the products to the Walmart integration app.
2.3.1 Import Summary-
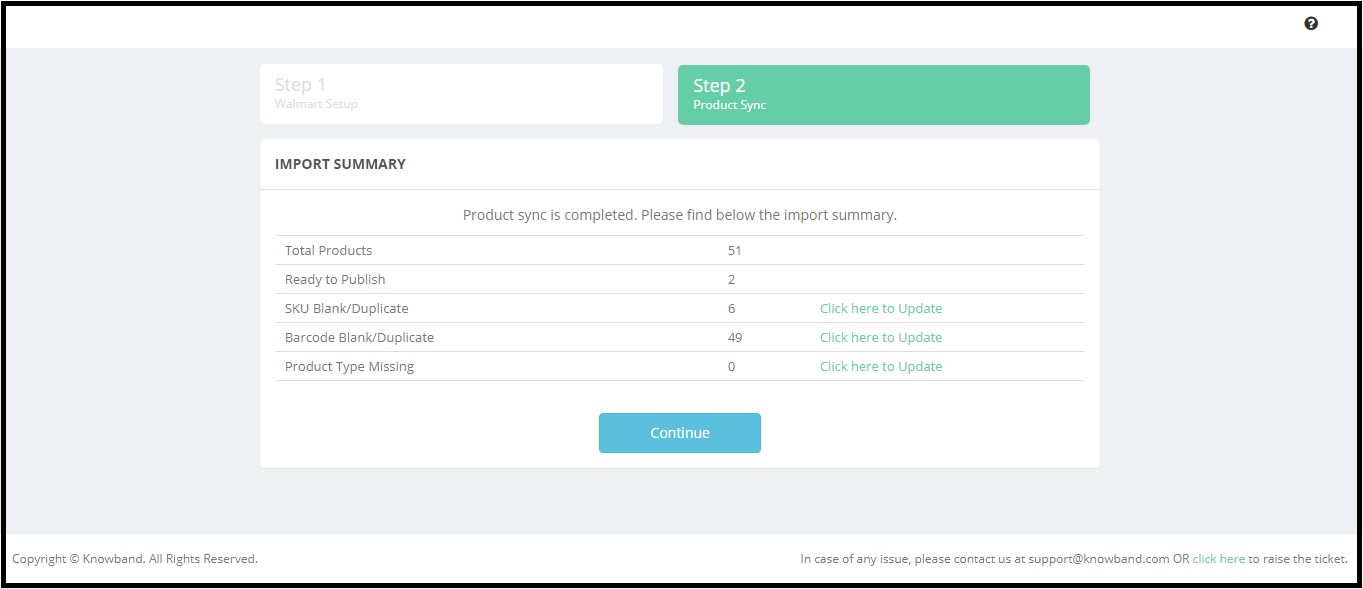
After completing the product syncing, the import summary will be displayed.
This section of the Walmart Shopify Integration app shows the following options:
1) Total Products – Number of products imported from the Shopify store. 2) Ready to publish – Number of products which have the mandatory details to list the products on the Walmart marketplace. 3) SKU Blank/Duplicate – Number of the products which do not have the SKU or has a duplicate SKU. 4) Barcode Blank/Duplicate – Number of the products which do not have the SKU or has a duplicate SKU. 5) Product Type Missing – Shopify allows the store admin to add the Product Type for each product. This helps to upload the products in bulk.
After verifying the import summary admin need to click on the Continue button to complete the product import.
Note:
1) SKU is mandatory to upload the products to the Walmart marketplace. Products without SKU or Duplicate SKU will not be listed to the Walmart. Admin can check and update the SKU of the products by clicking the Click here to Update.
2) Barcode is mandatory to upload the products to the Walmart marketplace. Product without Barcode or Duplicate Barcode will not be listed to the Walmart. Admin can check and update the Barcode of the products by clicking the Click here to Update.
3) Click here to update will redirect the admin to the page where all the products with the missing SKU and barcode will be listed. Admin can update the SKU and Barcode of the products from here, so that these products can be listed to the Walmart.
After completing the Product Import, the admin will be redirected to the Dashboard tab of the Shopify Walmart API integration app.
3.0 Dashboard
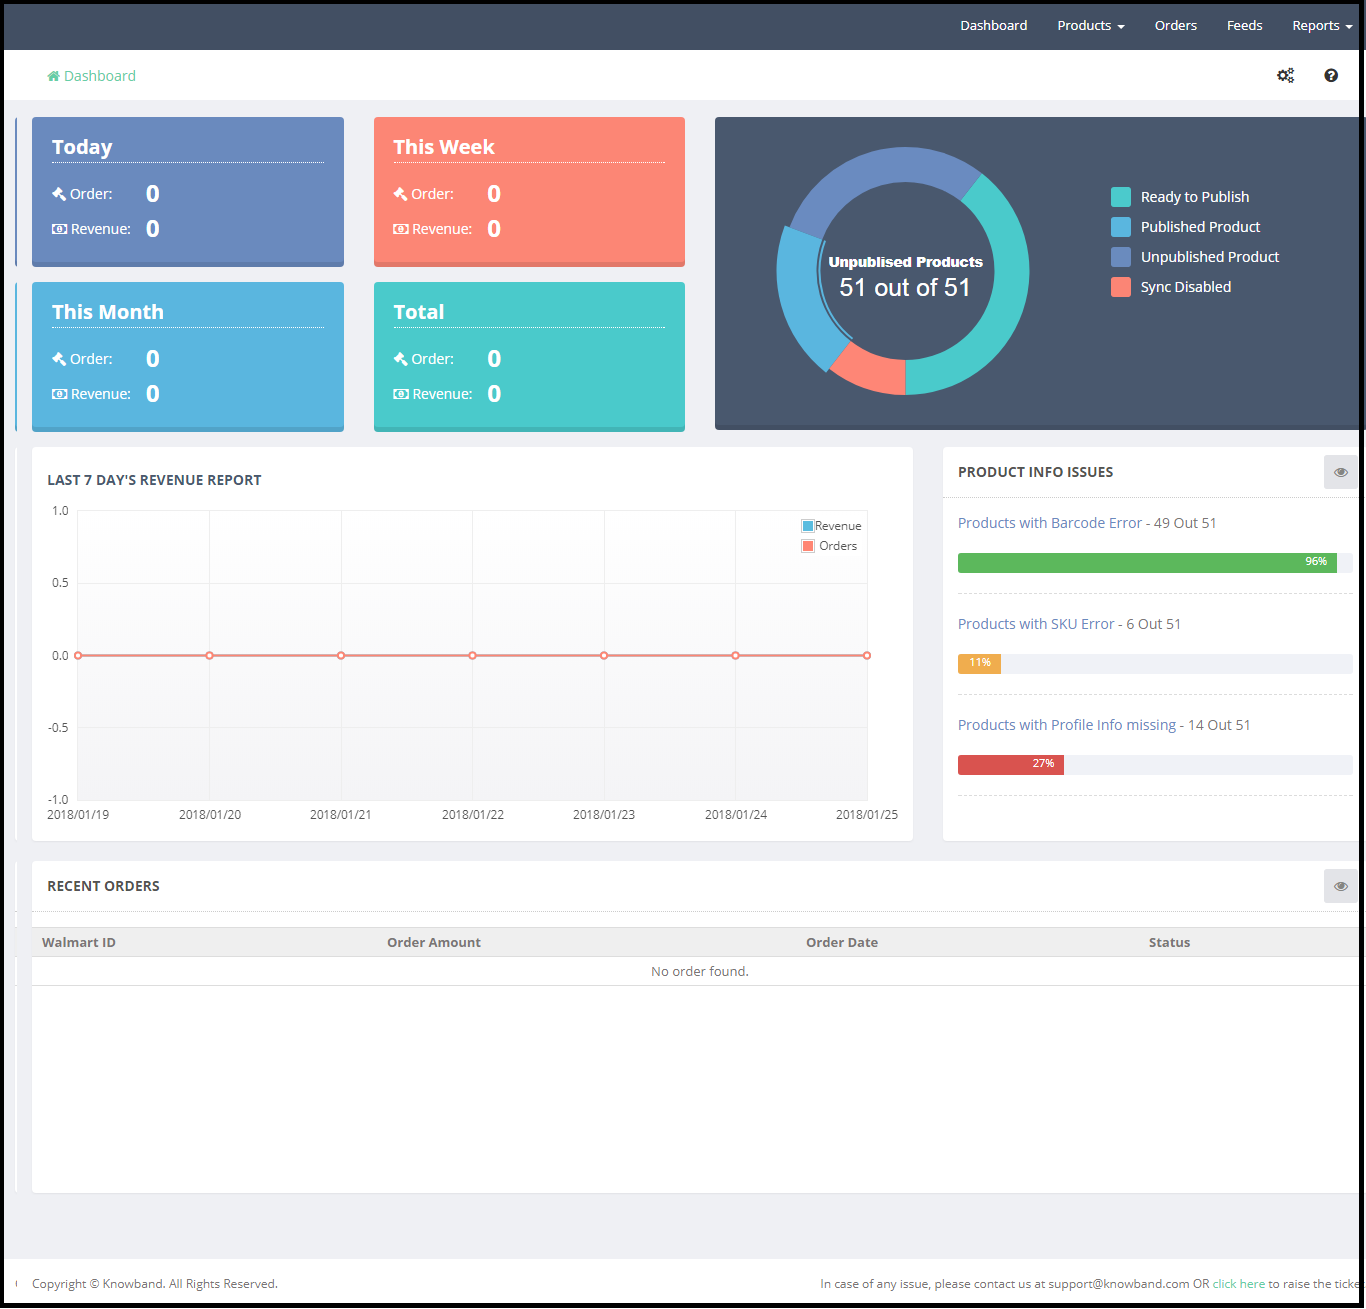
The Dashboard of the Shopify Walmart Integration app shows the status of the listed products and orders. From the Dashboard section admin can check the status of the following:
3.1 Orders
Orders section of the Walmart Shopify Integration app displays the status of the orders placed on Today, This Week, This Month and Total orders placed on Walmart.
Revenue report graph of the last 7 days.
Recent orders.
Product Status
Admin can check the status of the products like – Ready to Publish, Published Products, Published Products and Sync Disabled.
From the Dashboard section of the Walmart Shopify API integration app, the admin can also check the products with Barcode Errors, SKU Errors and Profile Info missing.
3.2 Products
Products tab allows the admin to select the products which would be listed to the Walmart marketplace. Products tab of the Shopify Walmart integration app has the following options-
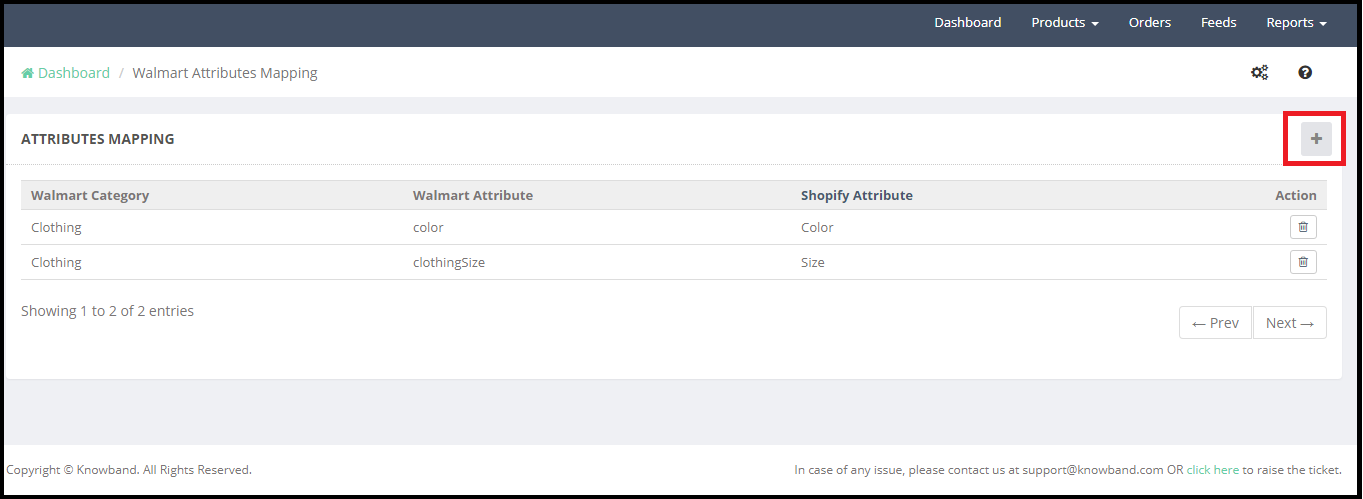
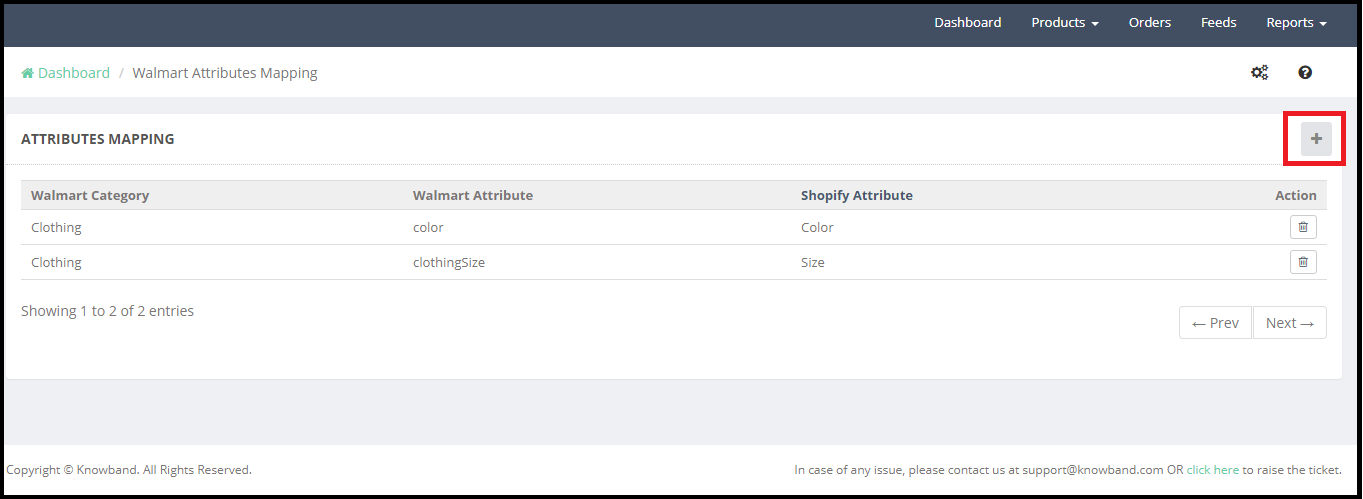
Attribute mapping tab of the Shopify Walmart Integration app helps to list the variation products. Choose Walmart category and attributes that you want to map with your product variant options. Click on the + icon to map the attributes.
How to map a new attribute?
The attribute mapping can be done from this section of the Walmart Shopify integration app. The + icon will open a new window with the fields – Select Walmart Category, Select Walmart Attribute and Select Shopify Attribute.
Walmart Category –
Select the Walmart category for which you would like to map the Walmart attributes with the Shopify attribute. For example, Clothing category attributes Color and Clothing Size of the Walmart marketplace has been mapped with the Color and Size attributes of Shopify store. So the Shopify products with the Size and Color variation will be listed as the variation products on the Walmart.
Walmart Attributes –
As per the selected Walmart category, the seller can select the Walmart Attributes. For example, in the above screenshot, Walmart Clothing Category attribute Color and ClothingSize has been selected from the drop-down list.
Shopify Attributes:
Select the Shopify store attributes which you would like to map with the Walmart attributes. For example, in the above screenshot, the Shopify store attributes Color and Size has been mapped with the Color and ClothingSize attributes of the Walmart.
3.2.2. Manage Profiles
in order to upload the products on the Walmart marketplace, the admin is required to create the profile in the back-end of the Shopify Walmart Integration app. Creating Profile helps store admin to upload the products in bulk. Admin can map the products to a profile on the basis of Shopify Product Type. For example, if the admin selects the Shopify Product Type “Clothing” to map to the Clothing category of Walmart, then all the Shopify store products with the Product type “Clothing” will be mapped to the Clothing category of the Walmart.
3.2.2.1 How to add a new profile?
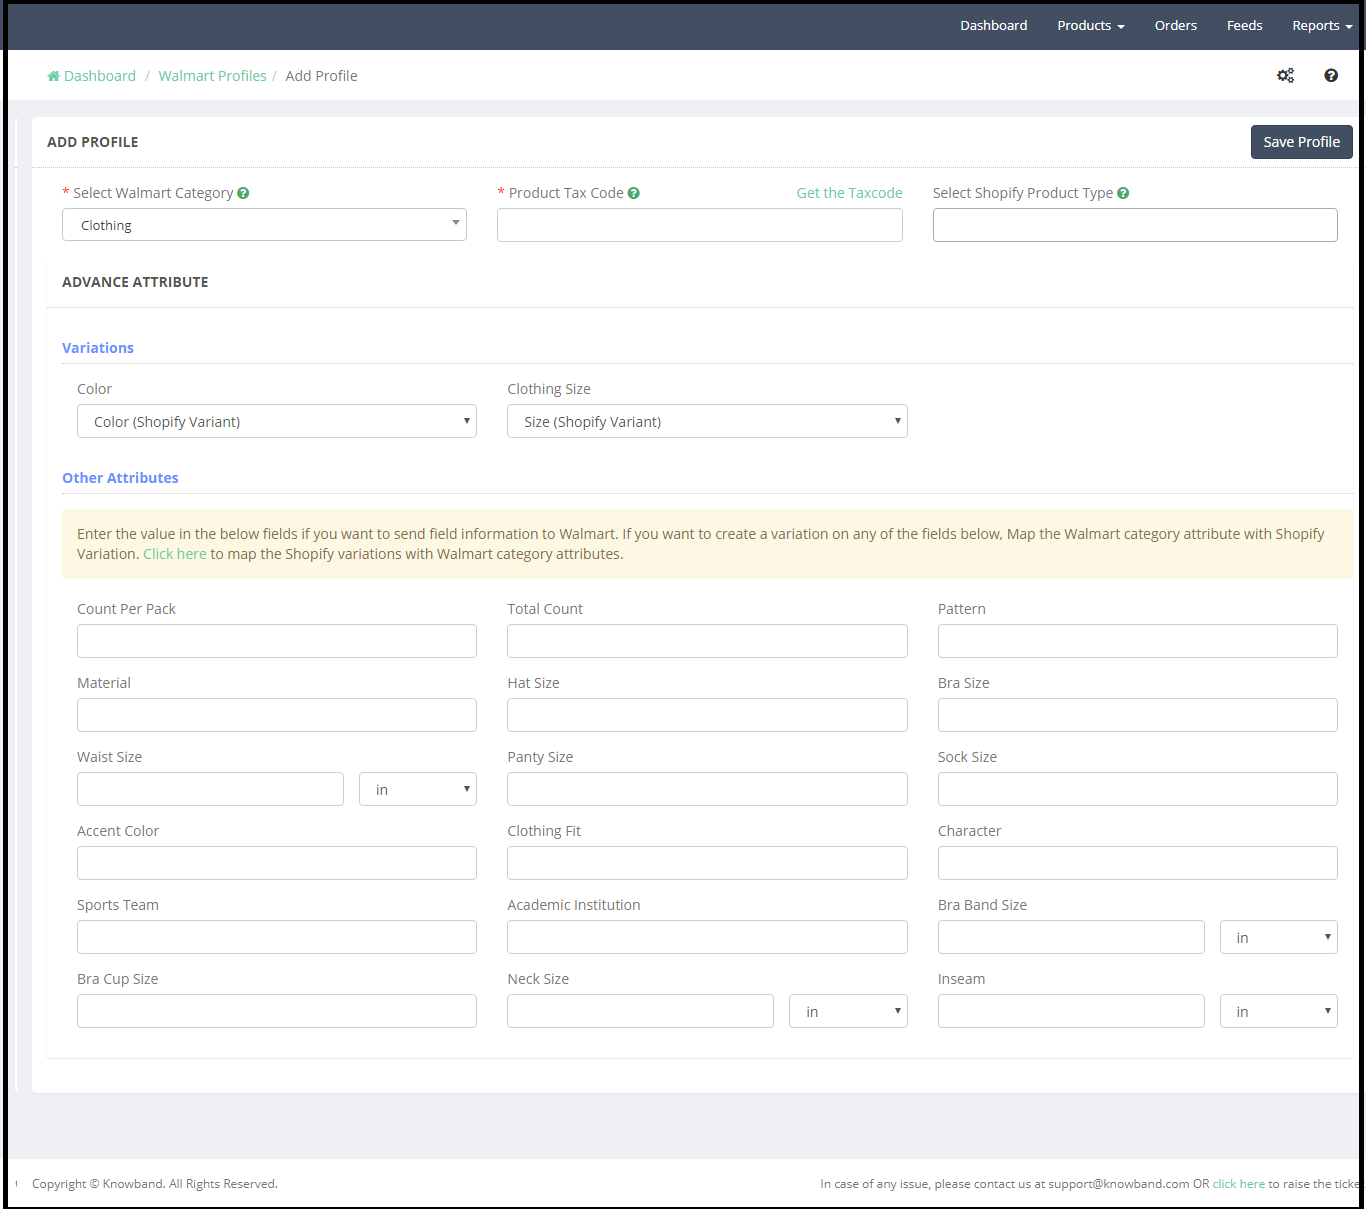
Click on the + icon to create a new profile (as highlighted in the above screenshot). It will redirect to a new page, here are the following options to complete the profile-
1) Select Walmart Category
2) Product Tax Code
3) Select Shopify Product Type
4) Advance Attributes
5) Other Attributes
Select Walmart Category –
Select the Walmart Category from the drop-down list. As per the selected Walmart category, Advance Attribute option will appear on the page. For the better exposure of the products to the audience with most relevant attributes, it is essential for the sellers to select the right category. Click here to know more about Walmart Category.
Product Tax Code:
It is mandatory for the sellers to provide the Tax code for the products at the time of product listing. The current sales tax codes spreadsheet can be found in the Seller Center. This spreadsheet contains all of the sales tax codes that you need for items. To download the spreadsheet:
1. Click on the gear icon at the top right, and under Partner Profile select Taxes.
2. Scroll down to the Download section and click on the US Tax Codes 2017 button.
Admin can also check the product tax code by clicking the Get the Tax Code.
Select Shopify Product Type – At the time of adding the products to the Shopify, the store admin can define the product type. This helps to upload the products in bulk, otherwise, the admin is required to select the products one by one. For example, admin can map all the Shirts – like the Printed shirt, formal shirt, Full length etc to the “Shirts” product type.
Variations – As per the attributes mapped with the specific Walmart category in the Attribute Mapping tab, variation option will be displayed under the Variations field. For example, we have mapped the Clothing category attributes Color and ClothingSize of the Walmart with the Shopify store attributes Color and Size, so both the attributes are listed under the Variations (refer to the above screenshot).
Other Attributes- In the other attributes section, admin can map other attributes related to the category. It is good to map all the relevant attributes related to the products.
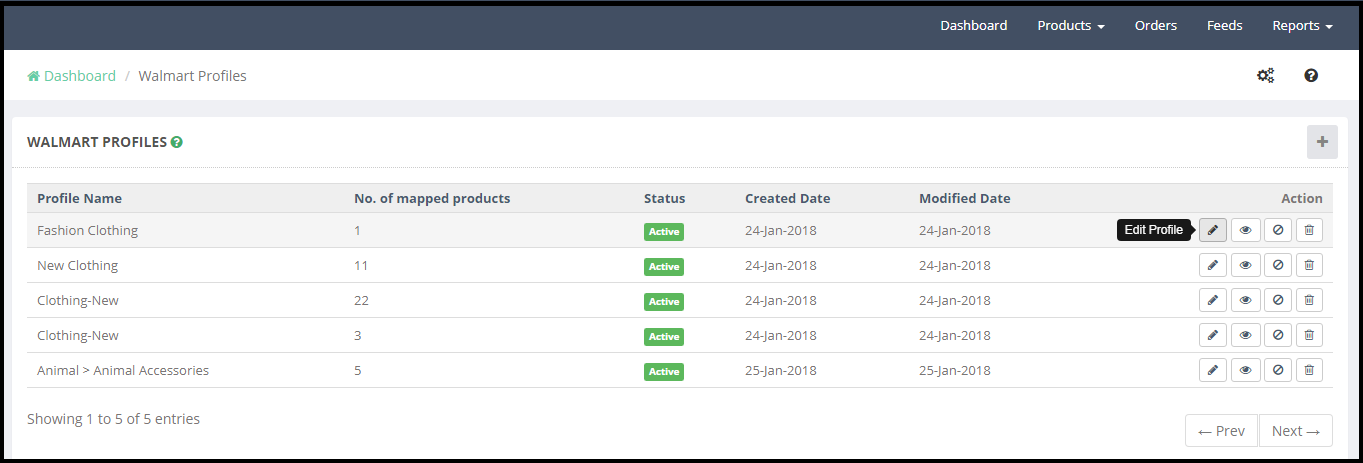
3.2.2.2How to Edit Profile?
To edit a profile created in the admin interface of the Walmart Shopify Integration app, click on the Edit option next the profile (refer to the below screenshot).
The Edit profile option will redirect the admin to the Add Profile page. The admin can update the profile data as per the requirement. After making required changes click on the Save Profile button to save the changes.
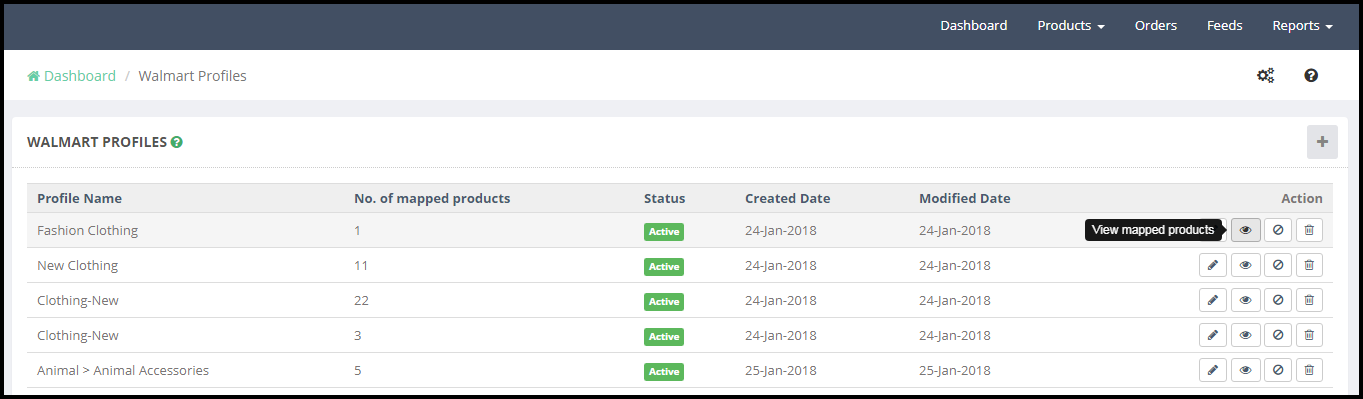
3.2.2.3How to View Mapped Products?
Admin can check the products mapped with a profile by clicking the “View Mapped Products” option (refer to the below screenshot) –
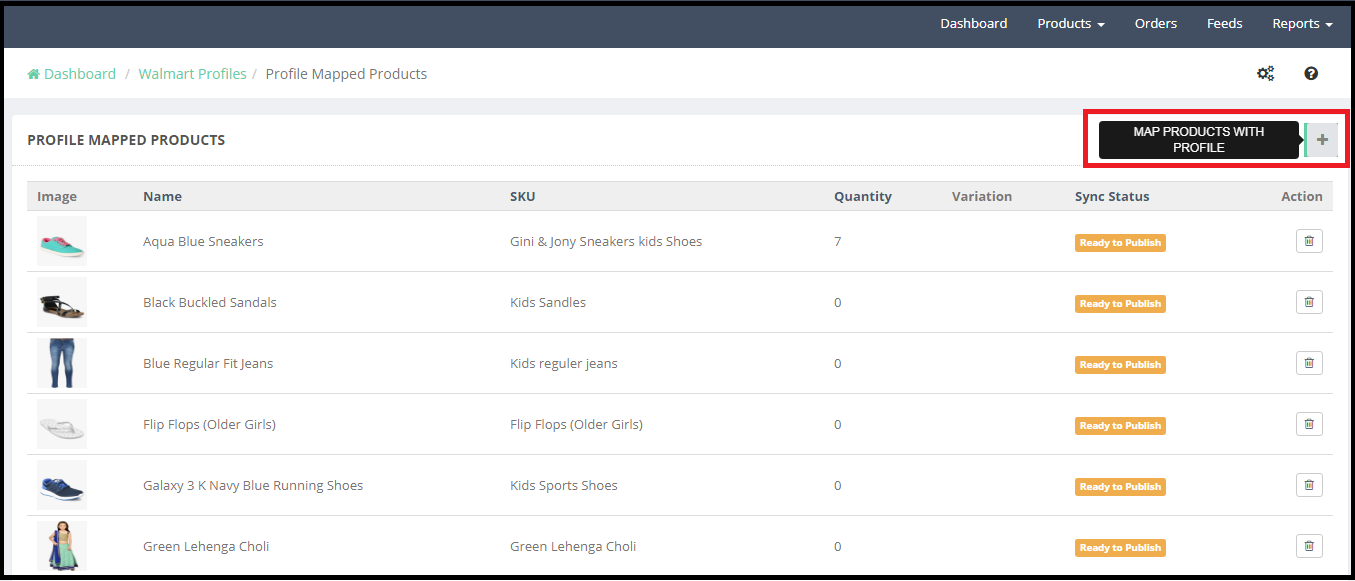
This option will redirect to the new page where all the products mapped to the particular profile will be listed. Here admin have 2 options-
1) Add products with Profile- By clicking the + icon on the top of the page, admin can select the products which he would like to map to the profile.
2) Delete Products from Profile- By clicking the Delete option given next to each product details, the admin can delete the products.
3.2.2.4 How toDisable and Delete Profile?
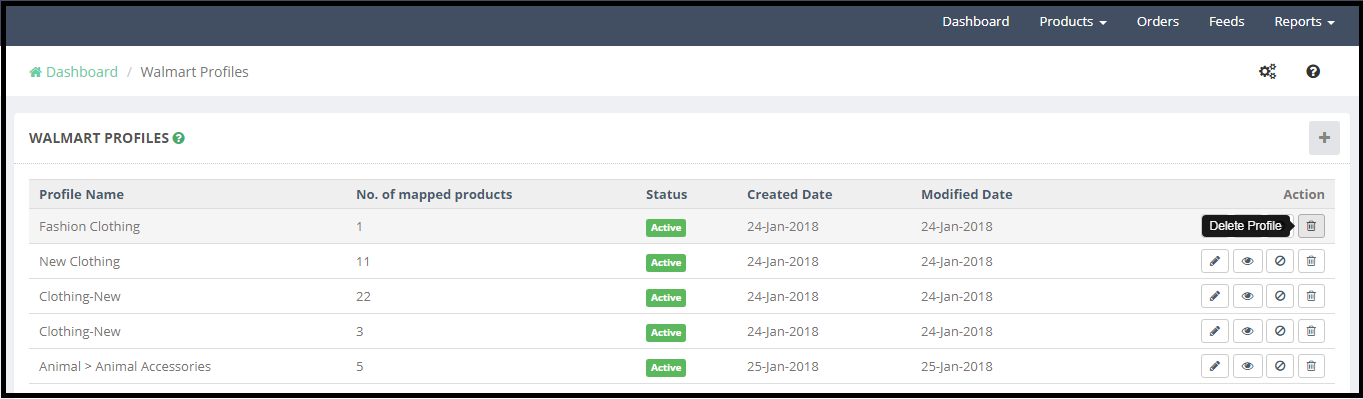
Admin can disable or delete a profile from the back-end of the Shopify Walmart Integration app. Before deleting or disabling a profile it is mandatory to remove all the mapped products from the profile.
To delete a profile click on the Delete option (refer to the below screenshot):
Remove the mapping of the products from the profile. Now click on the Delete option a confirmation pop-up will appear, click on the Confirm to delete the profile.
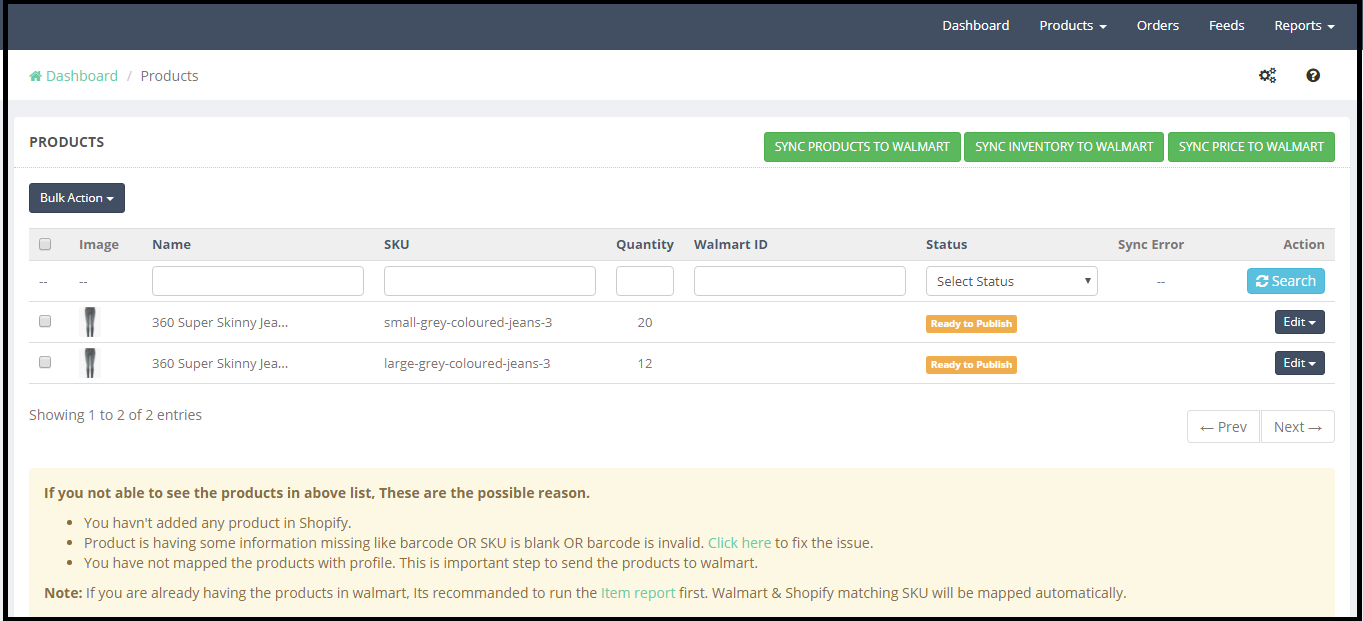
3.2.3. Manage Products-
Manage Products tab of the Walmart Shopify integration app display the products which have the following details-
1)No missing SKU
2)No missing Barcode
3)Mapped to a profile
4)Inventory
Manage products tab of the Shopify Walmart API Integration app allows the store admin to sync the product to the Walmart marketplace.
Sync Products to Walmart
All the products synced to the Shopify Walmart integration app with all the mandatory details like SKU, Barcode and mapped with a profile will be listed to the Walmart on clicking the “Sync Products to Walmart” button.
Sync Inventory to Walmart:
To sync the inventory of the listed products, the admin needs to click on the Sync Inventory to Walmart button, so that product inventory can get updated on the Walmart.
Sync Price to Walmart:
To update the price of the Walmart store products admin need to click on the “Sync Price to Walmart”.
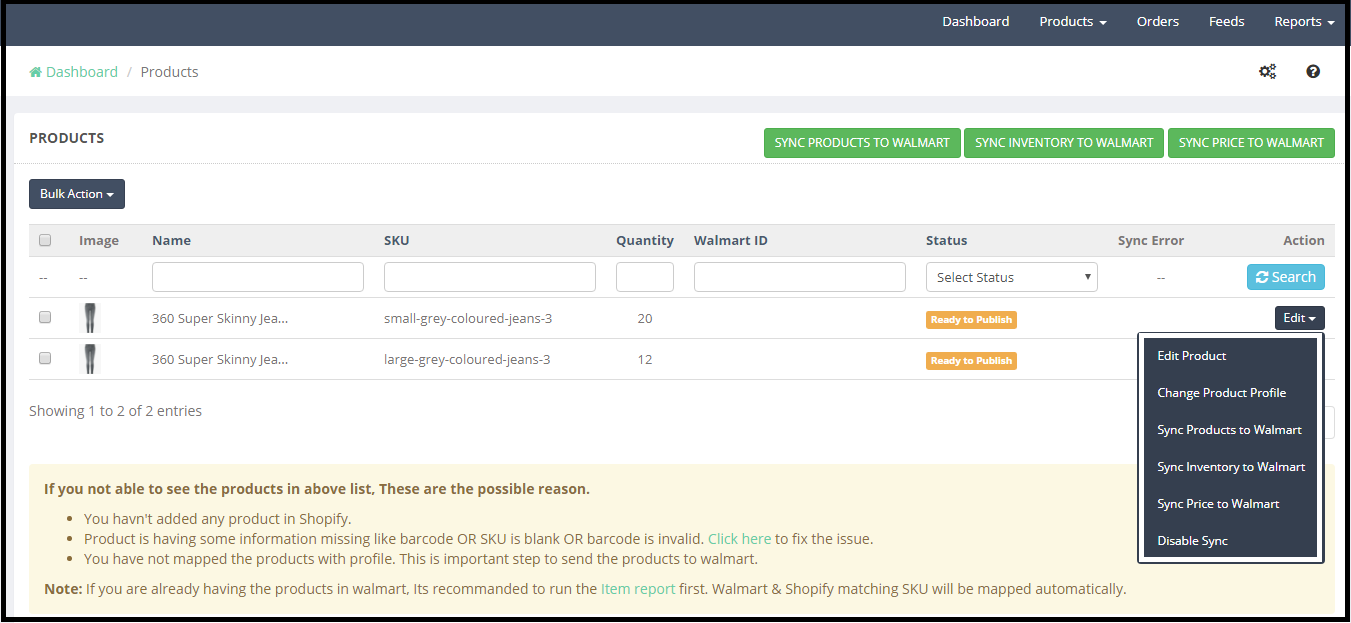
Edit Option:
Admin can modify the data for individual products. Edit option allows following actions:
1)Edit Product Price
2)Change Product Profile
3)Sync Products to Walmart
4)Sync Inventory to Walmart
5)Sync Price to Walmart
6)Disable Sync
Note:
a)Admin can update the profile of the individual or selected products. To complete the action admin first need to select the product(s) for which he would like to update the profile and then select the “Change Product Profile” option from the Bulk action menu.
b)Admin can select the product(s) which he would like to sync to the Walmart. To complete the action, admin first needs to select the product(s) for which he would like to sync to the Walmart and then select the “Sync Products to the Walmart” option from the Bulk action menu.
c)Admin can select the product(s) for which he would like to update the inventory on Walmart. To complete the action, admin first needs to select the product(s) for which he would like to update the inventory and then select the “Sync Inventory to the Walmart” option from the Bulk action menu.
d)Admin can select the product(s) for which he would like to update the price on Walmart. To complete the action admin first needs to select the product(s) for which he would like to update the price and then select the “Sync price to the Walmart” option from the Bulk action menu.
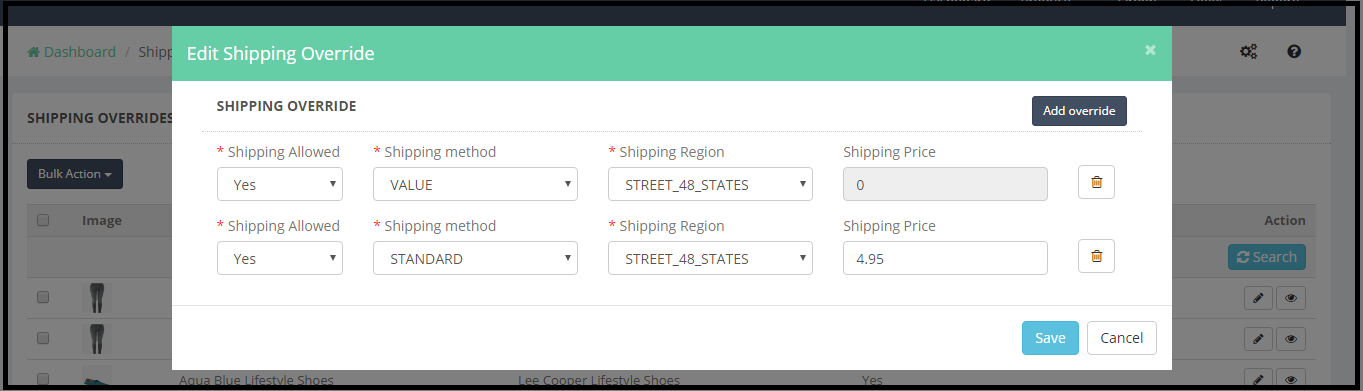
3.2.4. Manage Shipping Overrides:
Admin can define the shipping methods for individual products from this section of the Shopify Walmart Integration app. To edit the shipping options, the admin needs to click on the Edit Shipping Overrides.
Edit Shipping Override will open a pop-up with the option to add shipping methods. To add the new shipping method for a product admin need to click on the Add Override. Please refer to the below screenshot:
Admin can update the shipping methods for the multiple products by using the Bulk Action.
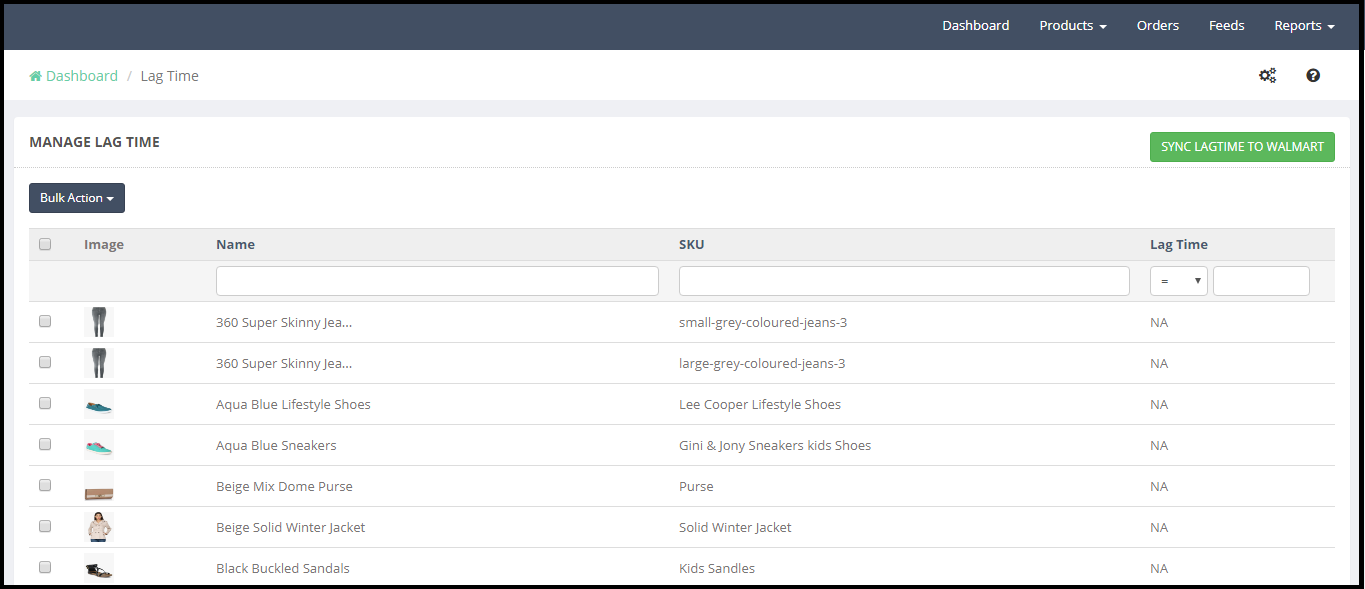
3.2.5. Manage Lag Time-
Lag Time is the number of days between when an item is ordered and when it is shipped. Lag time of 2 days or more requires approval at the item setup category level. Please refer to the Request Lag Time Exceptions article for more details on this process.
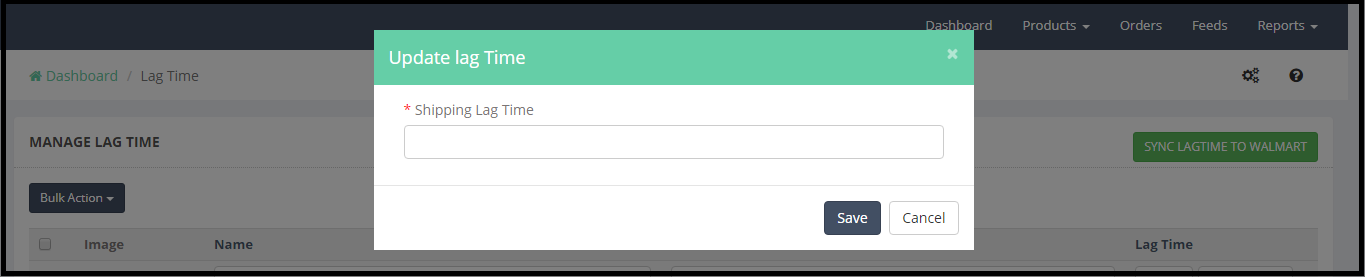
To update the Lag Time for the products admin need to select the products then click to the Bulk Action, a pop-up window with the option to define Lag Time duration (in Days) will appear. Please refer to the screenshot below:
Click on the SAVE button and the success message will appear on the top of the page.
After updating the Lag Time, click on the SYNC LAGTIME TO WALMART.
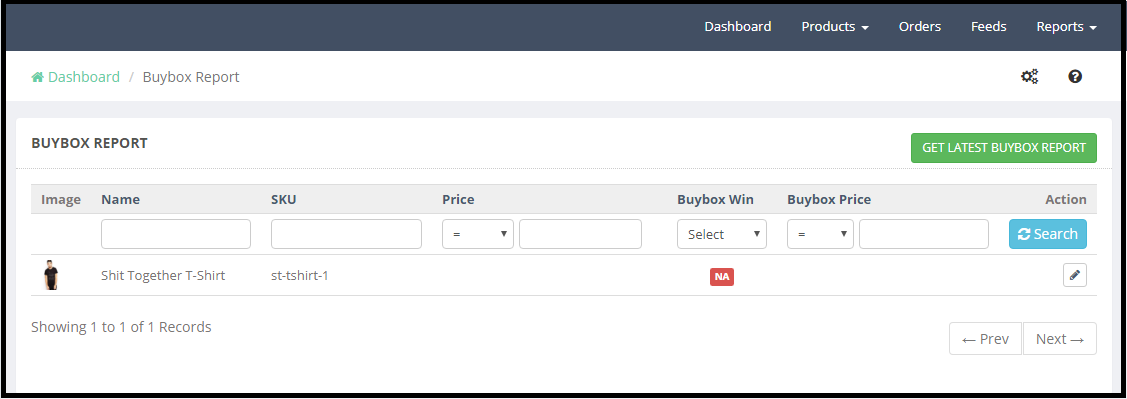
3.2.6. Buybox Report-
If an item is sold by multiple Sellers, Walmart.com presents the item listings together on a single Item Page. The page of Walmart Shopify API integration app displays competing for (pricing) listings to the customer, leaving the final choice of the Seller to the customer. One listing always wins the Buy Box. Winning the Buy Box is important because customers are usually drawn to the first option. Making sure your items remain in stock and offering competitive pricing will improve your chances of winning the Buy Box. To know more about the Buybox click here.
Admin can check the status of the Buybox products from this section.
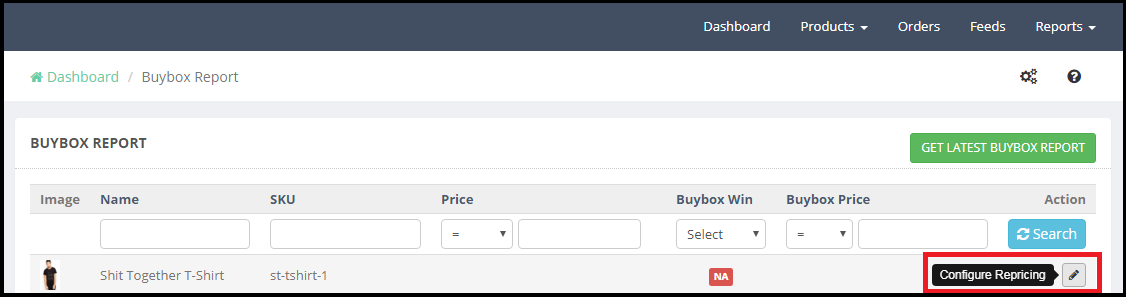
Admin can enable the Re-pricing feature for the Buybox product. To enable Re-pricing click on the Configure Repricing section of Shopify Walmart Integration, as shown in the screenshot below:
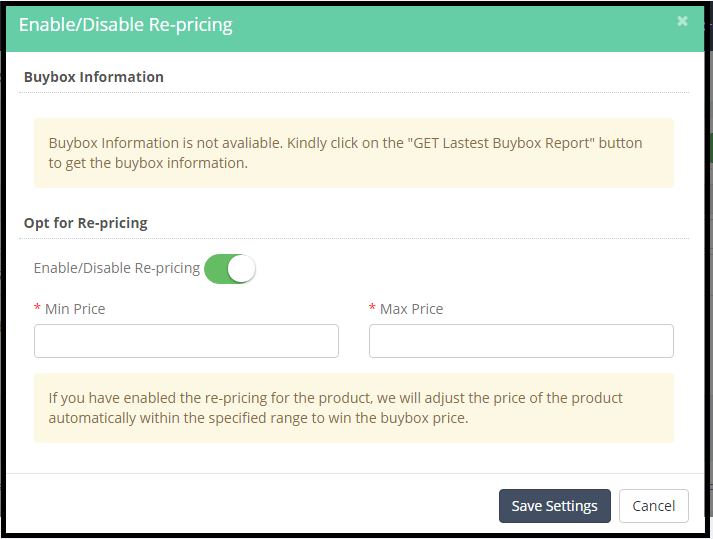
Re-pricing feature allows the admin to set a minimum and maximum price for the products and as per the Buybox price the price of the product will be auto adjusted so that the product can win the Buybox in the specified price range. Please refer to the attached screenshot below:
3.2.7. Manage Promotional Price
Sellers can set regular or promotional prices for their items. Setting the Promotional prices is an option to create unique pricing for events such as clearance sales or to call out a comparison price. The seller can add promotional prices from this tab of the Shopify Walmart Integration app.
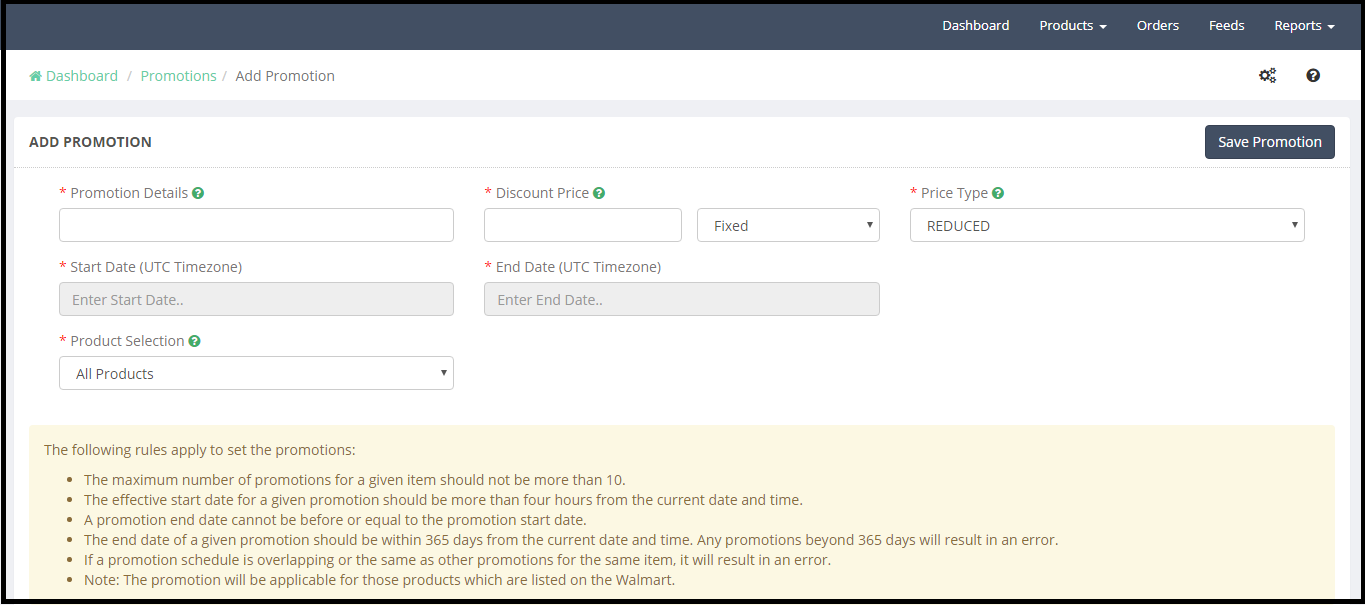
Click on the ADD NEW PROMOTION button to add a promotion. It will open a new page with the option to add promotion based on the discount or fixed value. Please refer to the below screenshot:
Here admin needs to enter following details:
1)Promotion Details
2)Discount Price
3)Fixed/Percentage
4)Price Type
5)Start Date
6)End Date
7)Product Selection
Promotion Details: Admin can define the promotion name like “Father’s Day sale” for the reference.
Discount Price: Admin can select the discount on the basis of Fixed and percentage bases. For example, if admin enters the Discount Price
10 and selects the fixed option then the product cost will be reduced by the $10. If admin selects the discount with Percentage, then the product cost will be reduced by the 10%.
Start Date: Select the Promotion Start Date. The effective start date for a given promotion should be more than four hours from the current date and time.
End Date: Select the Promotion End Date.
Product Selection: Promotional price can be applied to the selected products or all the products. As per the choice store, admin can select the products on which the special price will be applied.
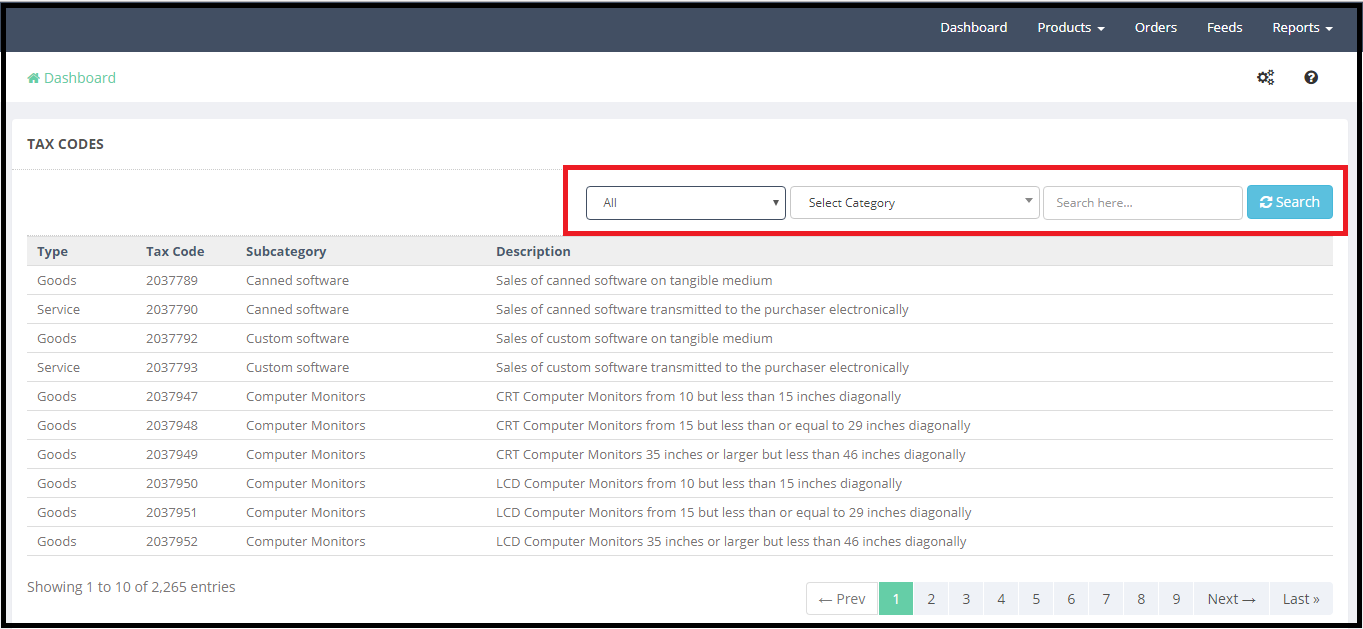
3.2.8. Tax Codes
It is mandatory for the sellers to provide the Tax code for the products at the time of product listing. Admin can check the Tax codes for the products under the Tax Codes tab of Shopify Walmart Integration
3.3 Orders
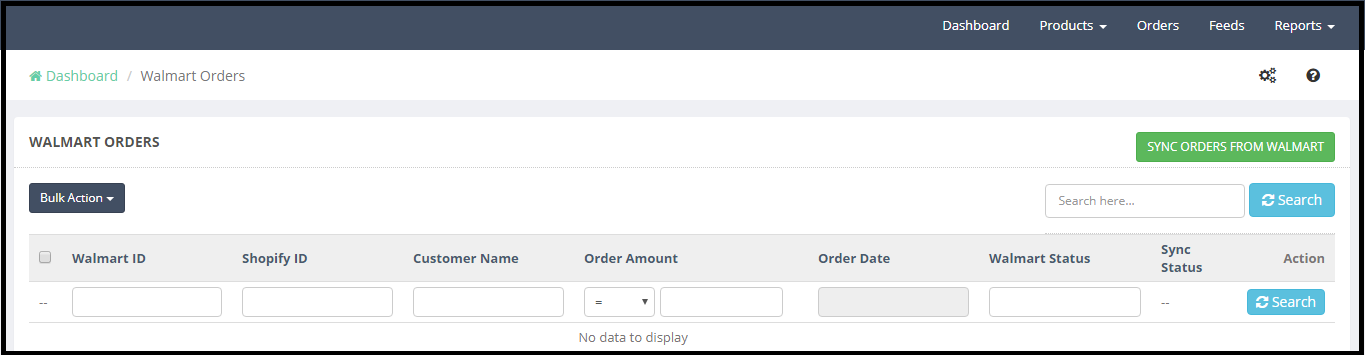
Orders tab of the Shopify Walmart Integration app shows the Walmart marketplace orders. To download the products to the Walmart Integration app admin first need to PULL ORDERS FROM WALMART. This syncing will download all the Walmart orders to the Shopify store with the help of Shopify Walmart Integration app.
Now all the Walmart orders can be processed and shipped from the Shopify store.
3.4 Feeds
The data is sent to Walmart.com in the form of feed, so we need to update the feed status. Select the feed by checking boxes and select the “Update Feed Status” in this tab of the Shopify Walmart Integration.
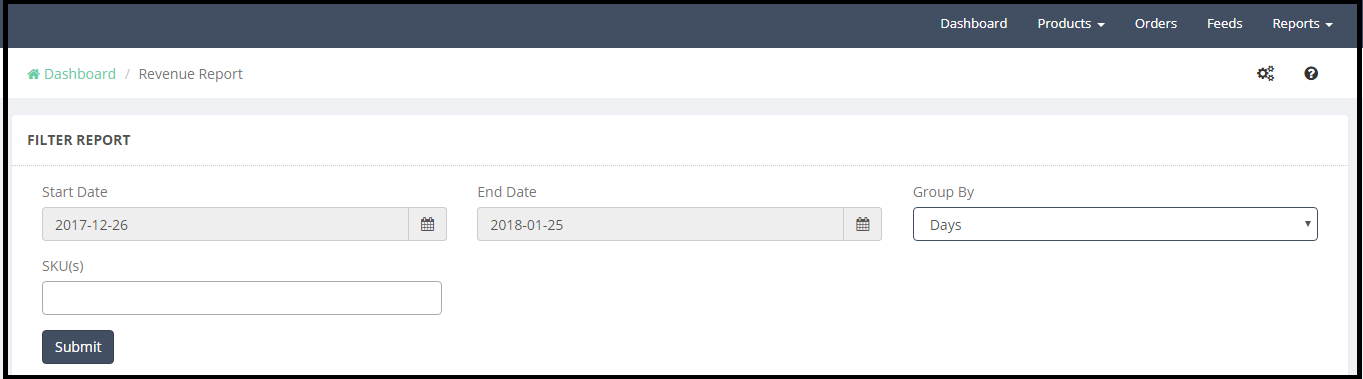
3.5 Reports
Admin can generate the Revenue Report from the Report section of the Shopify Walmart Integration app. Admin can check the details for the Revenue, orders and best selling SKUs.
The visitor’s behavior when it comes to shopping online is quite unpredictable. The customer may wish to stay in the web store as long as they are able to connect with various aspects of the website. Once they lose touch of the contents provided offered by the store, they may not be interested in staying any longer. At this point, it becomes important for the eCommerce owners to keep the customers stay put in the web store. To do this they need to use various approaches and methods.
The exit rate of the customers in a website is one of the biggest concerns for the eCommerce companies. According to a study, about 65% of the customers exit the website after browsing a few pages. These figures are quite scary for a website owner as they are losing a major portion of their sales with these customers and the effective number of conversions of the website is also going down. Thus, an immediate need to control these exit rate from the website needs to be made by the web store owners.
There is no particular reason for the exit rates of the website, but a decent efforts can be made by them to control those numbers and try to get the customers back to the store. It is never an easy task to lure back a customer back to the store after they have decided to exit. The website must try to provide them with some strong motive, so that, they may feel like taking another look to the website or try other features. With some decent efforts and better approach the owner may be able to get back a decent number of customers back to the stores who had decided to exit.
The below discussed are some ways in which the exit rate of a website can be controlled.
Optimizing the website content
One of the important point that strikes the website owner’s mind after seeing a large number of exit rates in the website is the optimization of website. Yes, the main problem may be the website contents. The customers will only entertain themselves with the website as long as they understand the contents and are in the same page as the website but as soon as the communication gap rises the customer starts to move apart, eventually leaving the website. Therefore, a better option would be to optimize the website for better engagement. The number of CTA, their positioning, images, ALT images all these features play a great role in engaging the customer hence optimizing the website may help in lowering the exit rates.
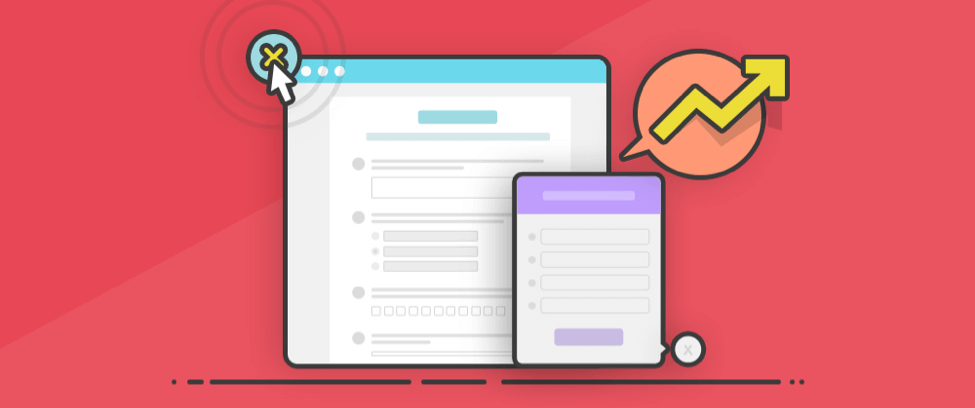
Exit surveys
Exit surveys are also of great importance and helps the store owners to know the exact reasons of the cause of the customers exit. The website may use attractive pop ups in order to get customer’s reasons of leaving. Exit surveys provide essential information about the level of satisfaction with your company’s products, prices or the website’s UX, loading speed and many more things. The websites may use the survey results to reduce the exit rates by making use of branching logic. This process requires to engage the customers and convince them to convert by throwing lights on the positive aspects of the website. The exit surveys are found to serve the purpose of knowing the reason of customer’s dissatisfaction with the website, so that the services can be improved and the exit rate may be controlled in the near future. Therefore, the classic surveys won’t help you to improve the exit rates of your pages unless you won’t use scenarios with branching logic.
Website performance
There is almost a drop in 7% of the conversion rates of the website due to 1 sec delay in page load. This shows the urgency to improve the website performance. In the era of online marketing the options are multiple, the customers need not to wait for any longer in order to make a purchase. If the websites can’t provide them with efficient and fast results than they are likely to move out. This makes it one of the possible reason of the high exit rates. Thus, the websites needs to be timely checked for the performance and their seed. If the response rate is being delayed somehow than the web store needs to check it out.
Exit pop ups
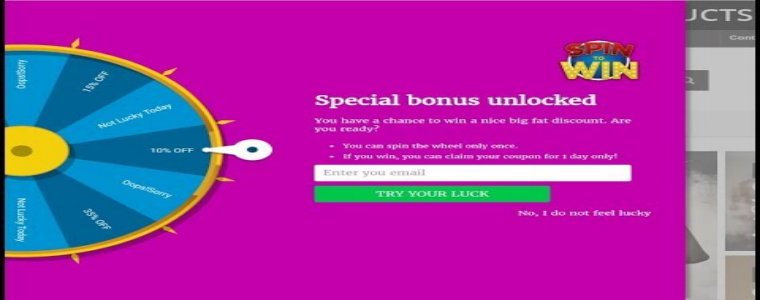
One of the efficient way to control the exit rates is by using the interactive exit intent pop up. The exit pop ups are designed in such a way that when the customers tend to exit the store, these pops up in their screen. The exit pop ups are filled with attractive offers and discounts for the customer, which the customers can utilize and avail. Shopify spin and win is one such example for attractive exit pop-ups for the Shopify stores. Such gamified pop-ups are even available for other platforms such as Prestashop, Magento and others. The wheelio curbs the exit-intent of the customers by offering various alluring giveaways. This is definitely one of the surefire ways to make the customers reconsider their exit and motivate them to place the order instead.
A/B testing
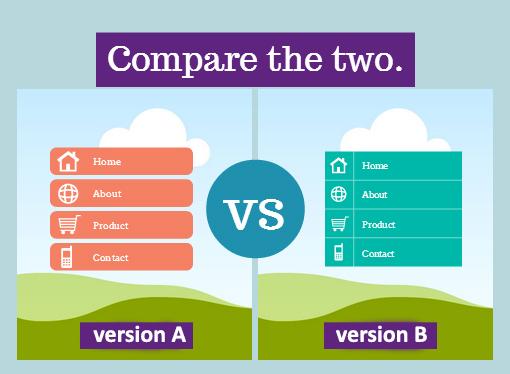
A/B testing is one of the important solution to all the conversion related problems today. The website owner needs to know the specific reasons where the website is not performing. In this efforts, the website owner can make use of A/B testing approach. Usually, it’s better to start testing the pages from the bottom part of the funnel as you’ll see changes in revenue more clearly. If it’s a successful change you’ll get more sales and a bonus. On the other hand, if the test fails, you won’t lose too much, because it’s just a test and you included only a sample of traffic.
The success of any web store depends upon many factors. Some of them may be small and some of them may be very large in determining so but if a web store wants to be a complete success then the importance of all the factors is merged and then the final tally is made. So, the eCommerce store owners needs to be sure that they are working on all the directions in order to improve their web store functionality. A flawless functioning of the web store has a better chance of producing great results in terms of sales.
One of the most important factor of website performance is it’s presentation. It is not just the service or the name that determines the web store popularity, but the mode of presentation of the products. Most of the customers won’t even give a good second look to the product if they don’t find the presentation enticing. The first impression of the product determines the involvement of the customers in making a purchase directly to a very large extent. Hence, better options and approaches are needed to be discovered by the web store in order to come out as the better among the other web stores.
Social media is one of the best suited approach to present the products in a better way to the customers and Facebook is one of the best suited platform to do so. The concept of Facebook marketing is not new and sellers are using every aspect of Facebook to contribute to the growth of their web store. Thus, one of the additive use of Facebook in order to gain better visibility of the web store is by using Shopify Facebook album module. It helps the stores to publish the better and well known presentations of their products. The user base of Facebook is very large, hence it ensures the seller about the positive results.
Let us discuss some of the advantages of using Shopify Facebook album to improve the customer base.
1. More Traffic
No doubt the users on Facebook would be more than your customer base on the web store. Thus, the encouragement of product promotion using the product album will surely help the seller to get better exposure. Most of the time, apart from the regular customers the first time visitors of the web store get a glimpse of the products provided by the web store. It leaves a positive impact on the visitors and if they like the presentation, then, they are much likely to enter the web store and take a god look on the other products.
2. Better Insight
The basic idea of launching a series of photos of the product is to provide a better glimpse of the product to the customer. Not just this, the user engagement on this platform will provide you an idea of how popular the products are. The Facebook album ensures the seller that the customers can check the product from different angles and make sure about making the purchase. The customers would agree on the product description if they are provided with some graphical evidence. Hence, Facebook album serves the purse of doing so for the web store. The more likes and comments you get on the photo album, the more word-of-mouth will be spread.
3. Social sharing
What could be a better option for the seller that the products on hos store are getting promoted without him actually involved in the process? The feature of social sharing has made it all possible for the sellers to gain more popularity from the social media platform. The visitors who may like the product may suggest the products to their known ones. Hence, it starts a series of web promotion from the customers itself. Thus, with the product reaching out to more people better are the chances of it making a sale.
4. Enhanced interaction
The customer’s get to know about the product in detail without visiting the web store. It imparts a feeling of being just to the customers and meanwhile the customers like to get notified about the products detail before making a purchase. It improves the interaction of the customers with the web store and as well as the products to a very large extent. The better interaction strengthens the bond between the seller and the buyer and is the key to better trade. Hence, Facebook album prove to be an efficient tool in doing so.
5. Response
The response of the customers to the representation of the products can be noticed via feedbacks and reviews. It gives a better idea about the product future sales and prospects to the seller. The web store my like to improve certain features in the products or replace it, if the reviews of the customers are not good enough.
The increasing popularity of the social media platforms among the online shoppers have make it one of the most inevitable part of marketing. If we take a look at the statistics, you’ll find that there have an abrupt rise in the total number of users on the social media. Therefore, it is one of the best platforms for the eCommerce stores to promote their product. These platform provides better opportunities to the seller in term of the reaching out to greater number of customers and enhancing the store’s visibility. The foremost concept of marketing includes targeting the right audience and catering them with sufficient information about your products and product count. The Facebook wall posts that showcases your offerings and store information can helps in engaging more customers on the social media platform and at the same time making effective conversions.
1. Easier way to update FB wall
Knowband has come up with Shopify FB Wall Post module. The module enables all the Shopify site owners to connect to their customers on Facebook with attractive and informative wall posts. It is one of the better way to reach to the potential buyers and improve the chances of conversions. The wall post has a higher chances of reaching the required customers as it is easy to access and less time consuming. Keeping the customers informed about your store activity through Facebook is a better than motivating them to visit the store all the time.
2. Contest based marketing
According to a survey by bufferapp, “About 35% online users engage themselves in the product purchase when they get proper information about it”. Therefore web store owners may use this as an opportunity to boost their sales and increase the rate of conversions. If acted properly, it can help in the tremendous increase in the product sales. You can post your content on Facebook. The images and contents can intrigue the visitors to post their comments. Thus, you can increase the engagement even more. Hence, it won’t be wrong to state that this is a less time-consuming to indulge into content marketing.
3. Organize giveaways
Giveaways are one of the best approach to engage the customers. More customers are likely to register themselves to your web store for free giveaways. The seller can use this to promote his products in the future or inform the customer about the ongoing offers or current discounts.
4. Set up a FB Store
If you run an eCommerce store than setting a FB store might boost the sales up for you. Facebook is most popular social media platform. Thus, providing your customers to use your services without actually visiting the store will surely help you grow. Shopping through FB store is the new concept and your customers will surely love to use your FB store to avail your services. It saves them time and will make their experience better with you.
5. Keep the customers informed through FB page
The eCommerce store owners may use a FB page to promote their products. Just create a page and keep your customers updated about your products, deals and discounts offered by you. With the help of this page, you can allow your customers to learn more about your products. This feature helps in increasing the customer data and using it for future references. The customers will be happy to hear about your products, without having to spend their time.
6. Invite the feedback and reviews
One of the most important factor, which is often neglected by the eCommerce store owners. Try to be invite more reviews and feedback about your products and services. It helps you in getting a better understanding of the customer’s priorities and queries. At the same time, customers can easily connect with you. This process also promotes the idea of social sharing and enhances the rate of sales up to a great extent by spreading word-of-mouth.
One of the biggest problem with the eCommerce store owners is to retain their customers. Most of the time, if a customer doesn’t find better products or deals, they tend to leave the website. In such cases, the seller must come with a better idea to keep the customers engaged to the website. Thus, the idea of exit popup proves to be a better option, in order to lure back the customer to the web store.
Therefore, Knowband has come up with Shopify Exit popup module. The module allows the Shopify site owners to generate an exit popup when the customer is about to exit the web store. The exit popup offers the discounts to the customer just when they intend to leave the site. The exit popup encourages the customer to check the web store once again and avail the offer received.
The Shopify exit popup module is one of the better approach to redirect the attention of the customers to the website. So, if you are a Shopify site owner, who wishes to improve traffic to their website, then Shopify exit popup might be the tool you are seeking for.
The Exit popup benefits the eCommerce stores in following ways:-
Increase Web Traffic
Well, the exit popup redirects the customers to the web store again. Hence, exit popup provides them with an opportunity to make a purchase on products with the discounts they received through exit popup. The customers can browse through the web store again for the products to avail the discounts with the exit popup. The exit popup increases the customer’s activity on the web store and increases the web traffic considerably. There are playful exit popups that not just retains the existing customers, but even helps acquiring new ones. Spin and win is one such example of the exit popups which makes shopping a more fun experience for the customers and at the same time generate better revenues for the web stores.
Boost the Sales
The customers are tempt to avail the offers, they received through exit popups. Thus, they re-enter the web store in order to use the discount code or the avail the offer received. The exit popup turns out to be a win-win situation for the sellers as well as the customers. Curbing the exit intend of the customers, the exit popups help in enhancing the customer engagement to a greater extend. However, at the same time, the exit popups are considered to be annoying by some of the customers. In order to make it fun and engaging at the same time for the customers, you can use gamified exit popup. Shopify Spin and Win module is one such way to convert the visitors into leads without annoying them. The interactive exit popup of wheelio is not a playful way to offer giveaways to the customers and curtail their exit intend. Thus, by enhancing the engagement, the exit popup not just increases the traffic of the site, but even boost the sales at the same time.
Better UI and UX
The whole idea of providing discount offers to the customer upon their exit is to stop them from exiting the store. It provides the customers with a better interface to connect with the seller. The idea of providing offers to the customers via discounts coupons enhances the customer’s experiences. The discounts received while they intend to the exit from the store imparts a feeling of trust on the web store. The exit popup bends the customer to make purchase from your web store in the near future. While just asking the customers to enter their email ids and offering 10% discount is tedious, the exit popups can make the entire thing exiting and fun for the customers. The gamified and attractive exit popups introduced in the recent past makes the interface of your website alluring. Thus, by enhancing the UI as well as UX, the exit popup is one way to staying in the good books of the customer.
Email Integrator
The exit popup allows the user to avail discount after they have entered their email id. Therefore, now the store owner is provided with personal details of the customers. Hence, the seller can now use the information of the customers for the future sales promotion with the exit popup. The exit popup helps in increasing the product visibility. Some of the exit popup plugins including the Wheelio module is an email integrator that integrates the email ids in the MailChimp, Klaviyo and other account of seller. Thus, exit popup is one of the ways to make email marketing a cinch and lure the customers back to the store.
Reduced Abandoned Carts
The exit popup is one of the best method to deal with the problem of abandoned carts. According to a survey by Baymard, “There is about 70% average documented online shopping cart abandonment rate”. Therefore, it becomes a challenging problem for the eCommerce store owners to get better conversions. The exit popup lures the customers to use the discount code and complete their purchase, which otherwise they would have left without going to the checkout page. The web store can provide the customers with various offers and discounts, so that they may get back to the web store and re consider exiting the store. Exit popup has a very high success rate in reducing the number o abandoned cart rate.
Better marketing options
Once the attention of customer is redirected back to the web store then it becomes quite easy for the web store to market them more products. The sellers get a chance to showcase some of their more products which the customers may find suitable to make a purchase on. Thus, the web store is able to make sales out using these exit popups. Therefore, the idea of using exit popup to get back to the leaving customers may help the web store to makes sales on more products.
Conclusion
The idea of marketing is tough and if you are not in sync with the what’s happening in the eCommerce market. One of the biggest hack to reduce exit rate and abandoned cart is by cutting short of the mistakes of the checkout page that may be killing your conversions. The exit popup is an effective way to boost up your sales and make effective conversions. So, find a solution for your site and take your business to the next level.