Why Product Reviews are Important in eCommerce?

Product reviews are arguably the most useful way to eliminate shoppers’ concerns regarding a product. A majority of the people are influenced by product reviews in their purchase.

No matter whether you are a popular brand or just started out, product reviews do play a crucial role in your eCommerce business as far as credibility is concerned. Credibility is one of the key elements that decide the success of your brand in the long run.

Merchants often overlook the importance of product reviews. The major focus remains on designing the site look and optimizing the checkout page but nothing really matters if you are not getting good reviews on your products.

The importance of product reviews can be understood by the fact that 90% of the consumers read online reviews before making a purchase and 88% of the consumers will be prompted to take an action after reading positive reviews. (Stats collected from Invesp)

What is Product Review?

Product reviews are the opinions or feedbacks of customers for a particular product. Many online businesses put up a review section on their website to allow customers to rate and review the product they purchased.

A product review helps other users get a clear idea of the product before purchasing it. They can read the reviews and make their mind clear, and decide whether the product is worth purchasing or not.

If you have not added a product review section on your eCommerce website, only because of fearing negative reviews, you are losing out on a huge number of potential customers.

Importance of Product Reviews
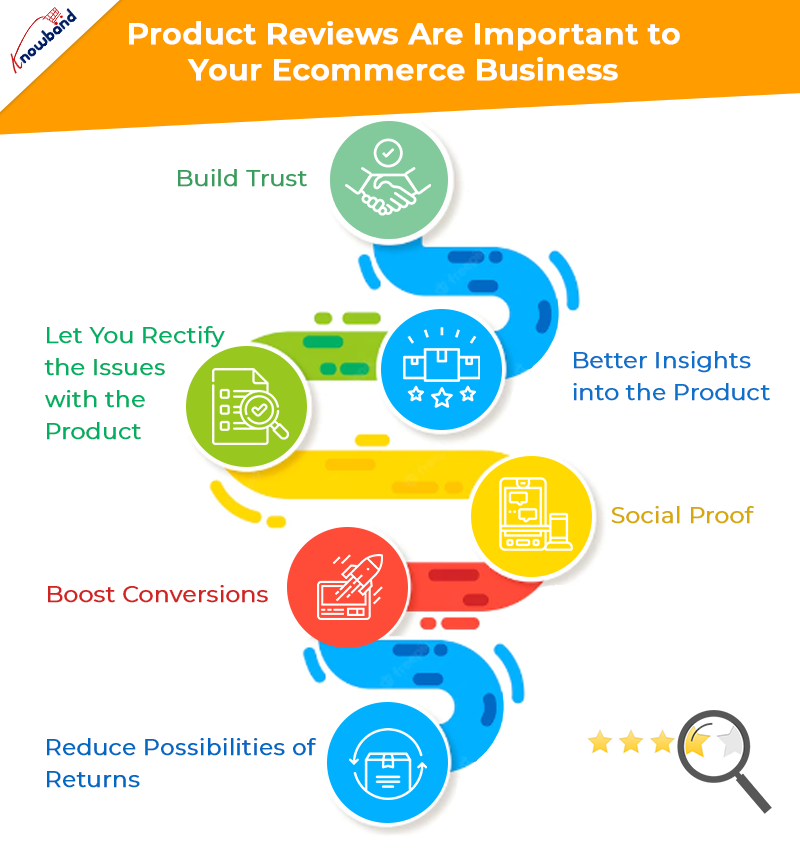
In this write-up, I have provided 6 reasons why product reviews are important to your eCommerce business. Let’s have a look.

1. Product Reviews build Trust

When a user lands on your website with the intention of making a purchase, the first thing that they look for is reviews.

A product having good reviews would surely be able to help the prospect in his/her buying decision. They would likely put their trust in your products as well as your Brand.

Amazon displays average ratings for products based on customers’ feedbacks, right on the top of the product page, and at the bottom are the customer’s reviews. Whenever a prospect visits the product page, they are straight away displayed the product ratings along with the number of people who rated that product.

Related: 8 Ways to Build Customer Trust and Loyalty

2. Product Reviews provide better insights into the product

Hearing from people’s past purchase experience helps the prospects identify whether the product has earlier matched customer’s expectations or not.

I mean, Brands will obviously try to highlight every feature of the product in the best way possible, but it is the customers who will give honest feedback on the product.

When a customer leaves a review for the product, he is helping others understand what they can expect from the product, how is it performing, what are its flaws, what are its pros and much more.

3. Product Reviews let you rectify the issues with the product

If a majority of customers are pointing out the same problem in the product, it is for you to take the onus of rectifying the defect so that the issue gets resolved. Yes, there are possibilities of a damaged or defective item reaching the customer but it happens with a few customers only.

If the problem is major, you need to look into it and get it fixed as soon as possible. Put simply, customer reviews help you find the loopholes in the product and provide you with an opportunity to improvise on those areas.

4. Product Reviews work as Social proof

One of the major benefits of product reviews is they can do wonders to your Brand. You would have often seen brands highlighting what their customers have to say about their products or services. These are what we call as testimonials and they make a significant impact on a prospect’s purchase.
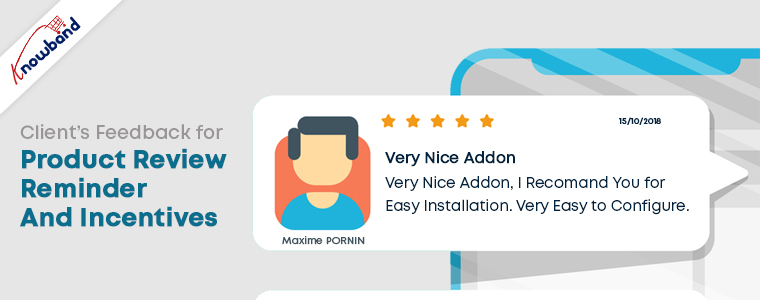
Display testimonials through your social media pages and on the home page of your website. It is one of the best ways to promote your brand that can attract a large number of potential customers to your website and also leave an excellent impression when a visitor lands on your website.

5. Product Reviews boost Conversions

If you delivering up to your customer’s expectations, product reviews are going to play a huge role in your conversions. People would openly do the marketing for you by leaving positive reviews. And even a single positive review can lead to an increase in the conversion rate.

Yes, there will be a few negative reviews as well but till the time they have a low count, you do not need to worry much. Each and every customer cannot be satisfied. If the product has the quality and people have given positive remarks to it, more and more people will be encouraged to buy that product.

6. Product Reviews reduce possibilities of Returns

If you do not display product reviews, how are online shoppers going to decide the product quality? They would not be confident enough to make a purchase. Moreover, they will have doubts regarding product quality.

Let’s understand it this way. You have a product but provide no customer reviews. Now users can only hope that the product does not turn out to be defective or has a low-quality. It is very much possible that they receive a genuine product but if in case they don’t, they will be left with no choice except placing a return request.

Now let’s figure out how this could have been sorted with product reviews. A product having good ratings and reviews would likely face fewer returns, simply because most of the customers are satisfied with it, whereas on the other hand, if negative reviews are dominating positing ones, it simply means that most people have faced some kind of issue with it. And hence people would not even go for the purchase, in the first place.

Related: 8 Simple Tips to Reduce Product Returns eCommerce

The Bottom Line

Customer is the king. They are the ones who can either take your business to new heights or bring it down drastically. Their feedback is highly important as it will only be their experience that will decide how good your product is.

And there is no shame in having negative reviews. They are people’s honest opinions which you give a reality check. And it also shows that you welcome whatever a user has to say with open arms.

Since there is not any technology yet that could let users examine a product online, the importance of product reviews becomes supreme.

Make reviews more fun with Review Reminder and Incentives module.

With the Review Reminder and Incentives module, you can offer your customers rewards for every successful review posted. You can set the timing for the review reminders to be sent over email, customize those emails, set the incentive value and much more.

Every review posted will be first submitted for approval. Only after you approve, the end customer receives the rewards. Sounds exciting, doesn’t it?
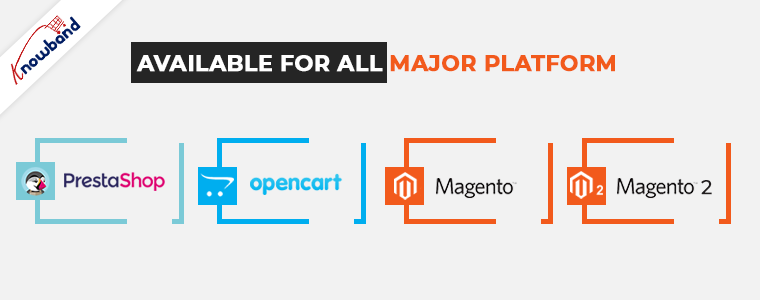
The Product Review Reminder and Incentives module is available for PrestaShop, OpenCart, Magento, and Magento 2 eCommerce platform!

If you would like to add something to this content, feel free to leave a comment below.  Or if you need any assistance, you can contact us at support@knowband.com


OpenCart Image Search Extension – User Manual

1.0 Introduction

Knowband offers OpenCart Image Search Extension which implements image search functionality on the website. The online users just need to upload an image from the website front-end interface and as a result, they can view the matched products. Admin can set a higher threshold value from the admin interface for offering accurate results. The online merchant can show an image search option near the search box and on product pages as the “Search Visually same product” button.

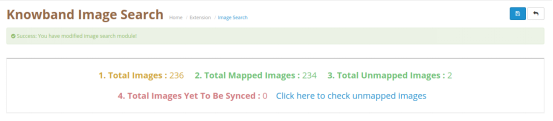
The eCommerce store merchant can check total images, mapped images, unmapped images and total images yet to be synced. There is a specific link for viewing the reasons behind the unmapping of the images. This way, the online store merchant can implement an email search on the website and offer a better store experience to the customers.

1.1 Features of OpenCart Image Search Extension

  1. Online merchants can implement image search functionality on the website using the OpenCart Image Search Extension.
  2. This OpenCart Image Search Extension recognizes the uploaded image and provides matching products in the search result.
  3. The online users just need to upload images for searching the desired products.
  4. There is an option to display the image search option near the search bar. Admin just needs to enable this option from the admin interface of this Search by Image module for OpenCart.
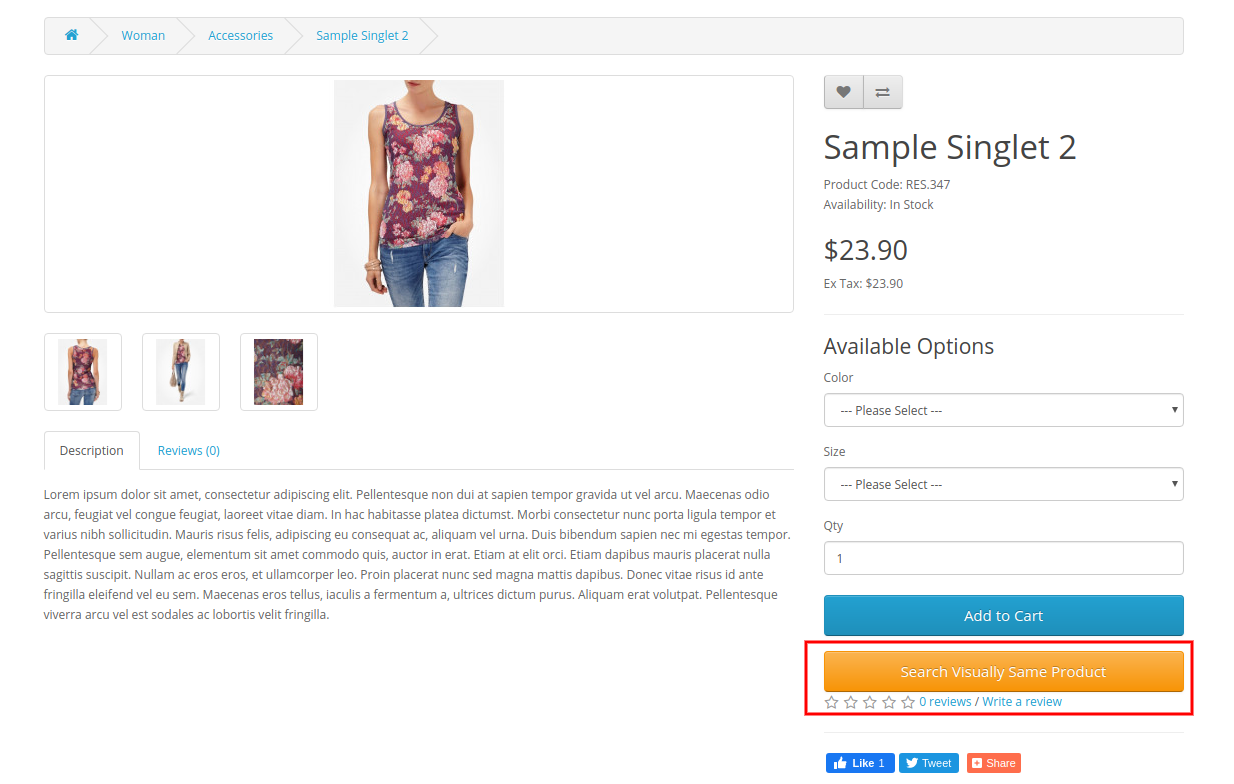
  5. The eCommerce store merchant can also enable us to show the “Search visually same Products” button on the website’s product pages.
  6. The Search by Image module for OpenCart has the functionality to sync the newly added product images automatically.
  7. There is an option to set threshold percentage according to which, admin can show more accurate results of image search. The range can vary from 50 to 100 where 95 is the recommended value for accuracy of results.
  8. OpenCart Image Search plugin provides steps for generating an API key from the clarified portal.
  9. The OpenCart store admin can view total available images and mapped images details in the OpenCart Image Recognition System admin interface.
  10. The online store admin can also view the number of unmapped images along with un-mapping reasons.
  11. The online sellers can also view the number of images that needs to be synced.
  12. With this Search by Image plugin for OpenCart, admin can offer a better user experience to the customers.
  13. OpenCart Image Recognition System has a Machine Learning feature that recognizes the uploaded images and shows matching product images in the image search result.

2.0 Installation

Buy OpenCart Image Search Extension from the store. You will receive these files:

  • First, you will get a source code file of the OpenCart Image Search Extension in a zipped file format.
  • User Manual of this OpenCart Image Search module.

Follow below-mentioned steps to install OpenCart Image Search Extension:

1. Unzip the received zip file. You will get the folders.

2. Copy all the folders of the zip file in the Root Directory of OpenCart setup via FTP manager.

3. There will be a file named kbimage_search.ocmod.xml (In case of Openvar v3.0.x file name would be kbimage_search.ocmod.zip). Upload the same file from the page “Admin -> Extension -> Extension Installer -> upload”.

So, OpenCart Image Search Extension is now successfully installed and ready to use at your store.

Now go to the admin menu and click on the extensions and thereby click on the configure button next to the OpenCart Image Search module.

3.0 Admin Interface

After the successful installation of OpenCart Image Search Extension, the online store merchant can easily implement the conditions and show the image search option on the website front-end interface.

There are two configuration sections:

  • General Settings
  • Unmapped images    

3.1 General Settings

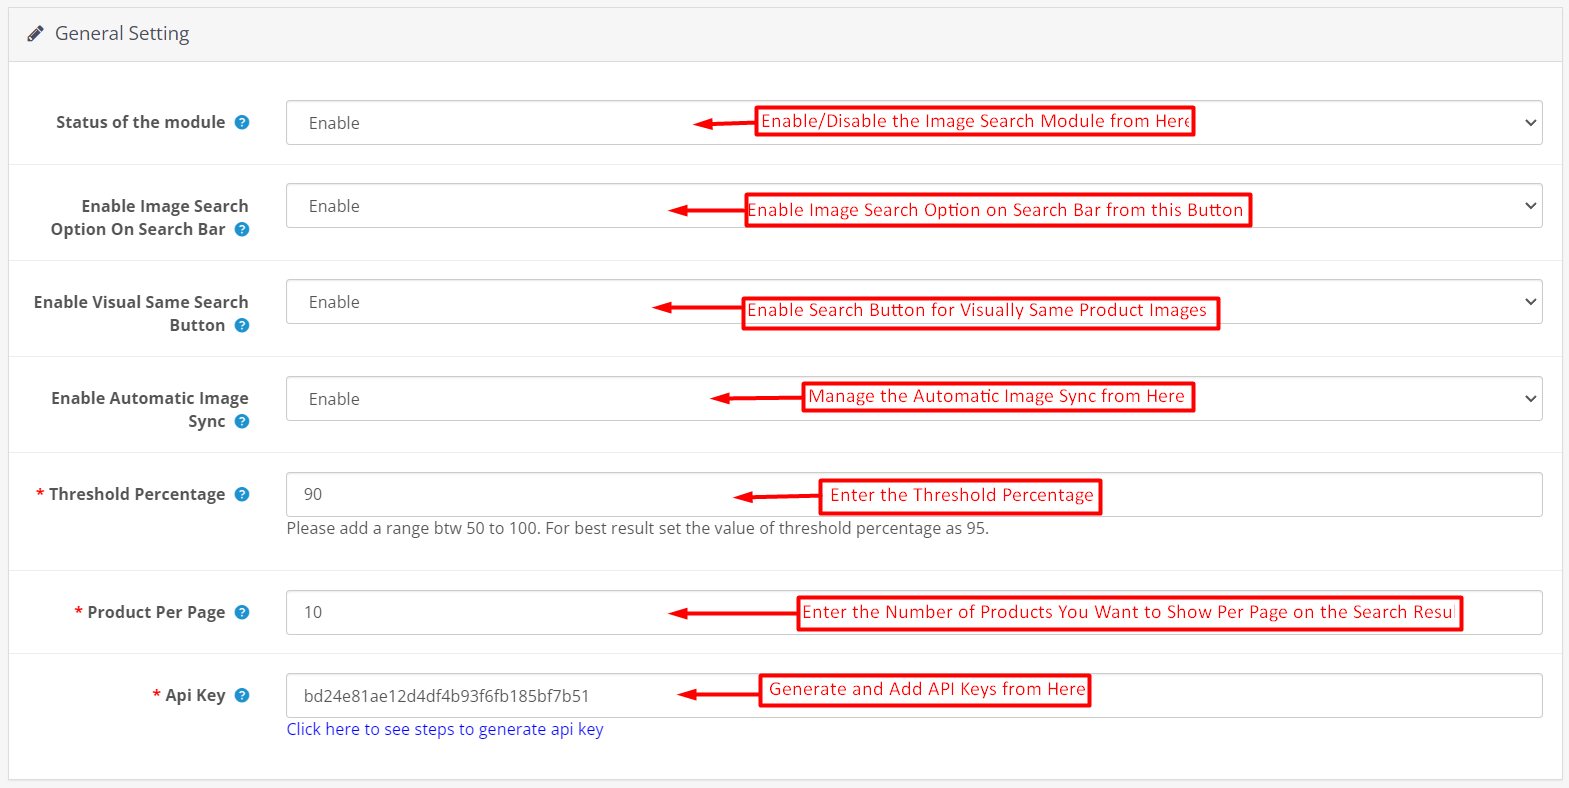
In the General settings section, the online store merchant can apply the basic settings for image search. The OpenCart Image Search module is highly customizable and offers smooth functioning to the users.

These are the configuration options:

  • Status of the module: Activate or deactivate this OpenCart Image Search Extension functionality by enabling or disabling this option.
  • Enable Image Search Option On search bar: The online merchant can show or hide the image search button from the search bar.
  • Enable Visual same search button: Admin can show or hide a button on the product page to search visually the same images. Customers just need to click on this button to view similar product images.
  • Enable Automatic image Sync: The online store merchant can activate this configuration option for automatically syncing the newly added product images.
  • Threshold percentage: Admin needs to add a range between 50 to 100 as a threshold percentage.
  • Product Per Page: The store admin can add the number of products he wants to show for the image search results.
  • API key: Admin can check the steps to generate an API key in the provided link and set it from the admin interface.

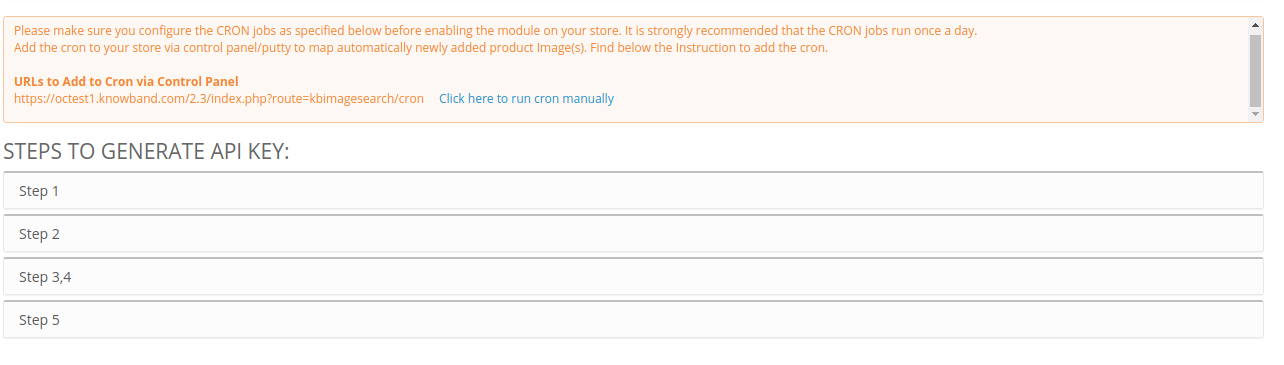
Apart from these settings, the admin needs to configure CRON setup and admin can run cron manually for image mapping. Steps for API key generation are given and admin can easily follow the steps to generate an API key.


Admin can also check the number of total images, mapped images and number of images that needs to be synced. Apart from that, admin can also check the data of unmapped images and he can click on the link for getting the reason behind unmapping.

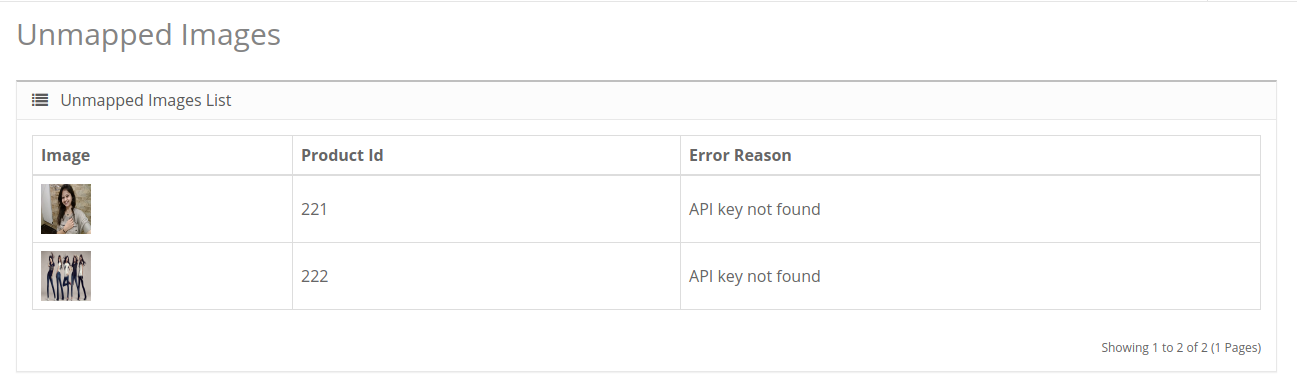
3.2 Unmapped Image Log

Admin can click on the provided URL for checking the details of the unmapped image. Here admin can view the product id and reason behind the unmapping of the image.

4.0 Front-end Interface

The online users can view the image search options on the website’s front-end interface and use it for their convenience.

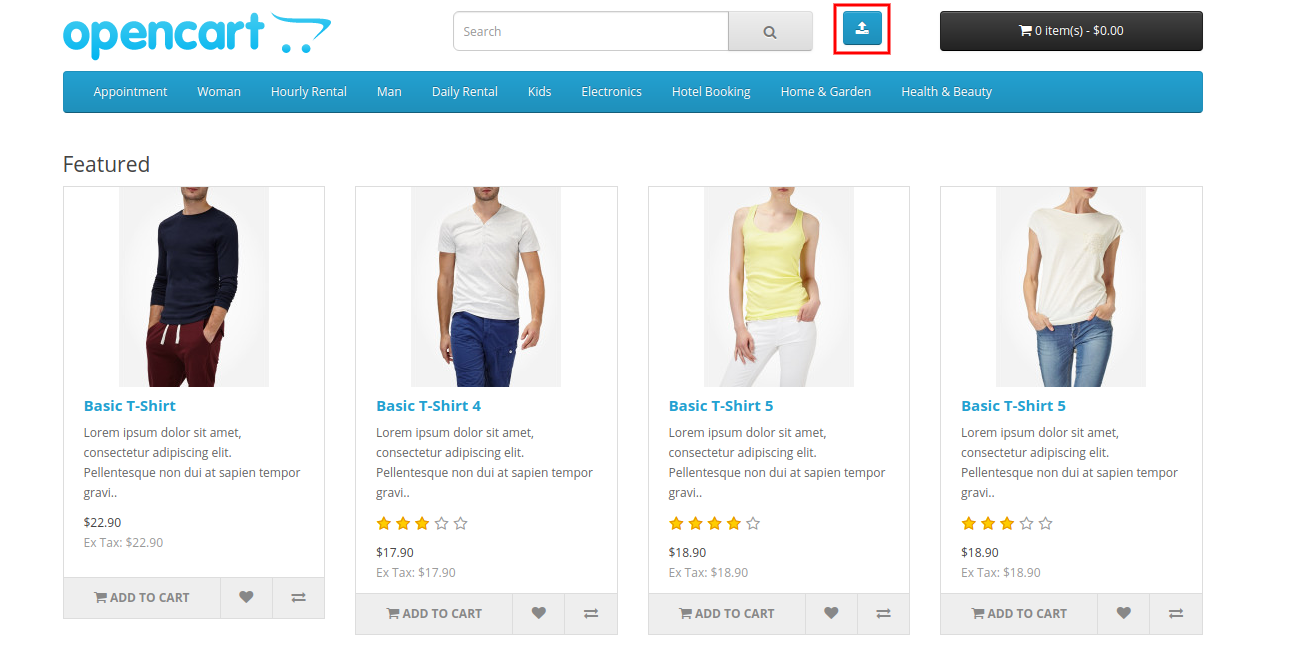
The online users can view the image search option on the search bar as shown below:


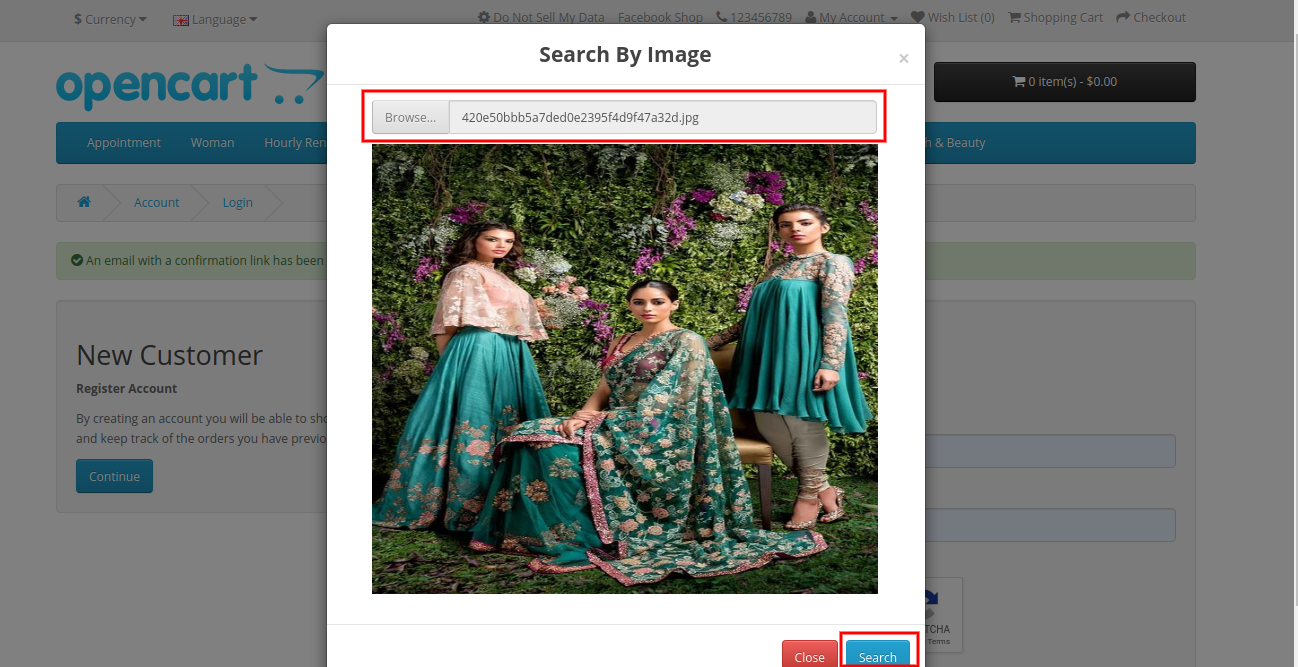
Online users just need to upload an image and click on the search button for the proceeding image search option. Check the below-mentioned image:

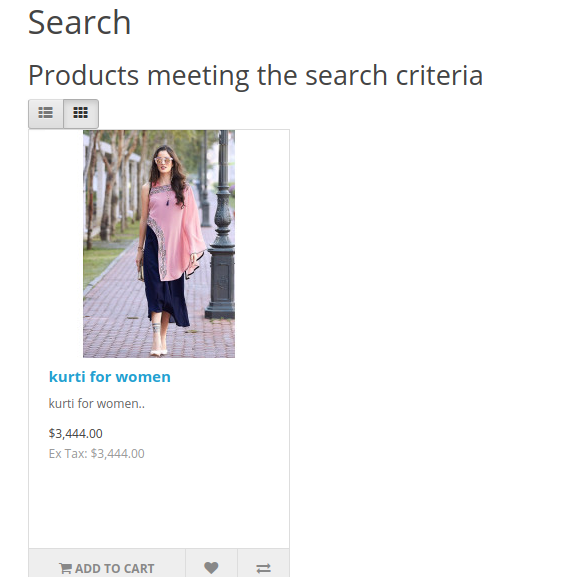
In search results, online users can view the products which meet the search criteria and they can easily find the desired products without any hassle or time taking process.

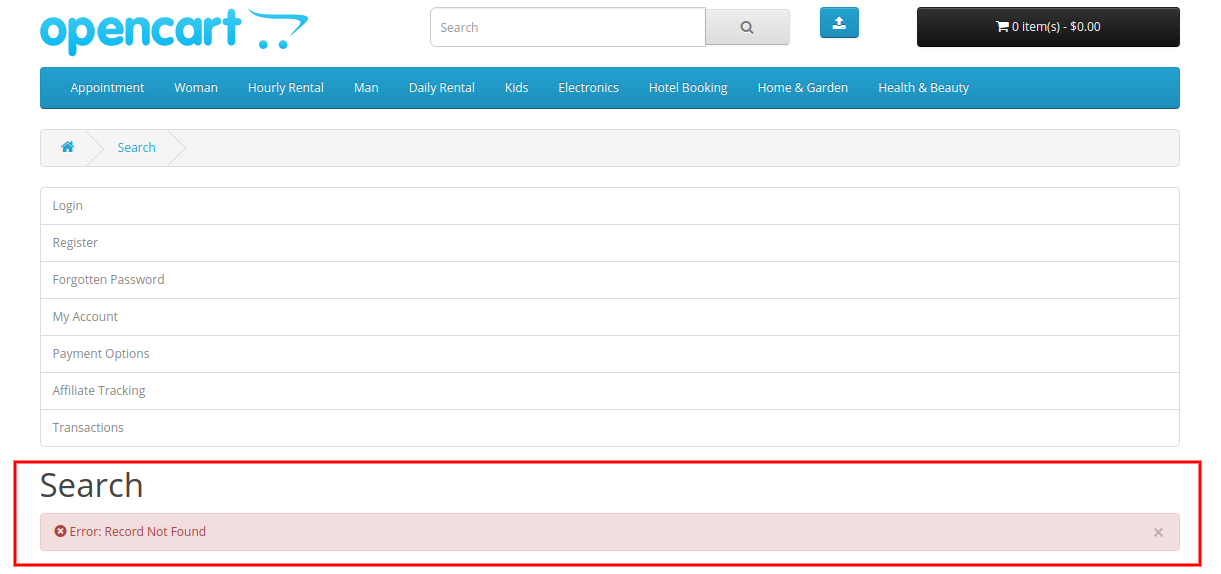
The search result will show an error in case of the unavailability of matching images.

The OpenCart Image Search plugin also provides an option to show “visually similar product”. The online users can click on this button and check the visually same products.


This way, the online users can easily get the desired products without wasting much time and efforts. The eCommerce store merchant can easily configure the Search by Image module for OpenCart and implement image search functionality.

How to setup Encryption and Decryption between Android and ASP.Net Web Application?

In this encryption, we are going to use a secret key for encrypting the string. The algorithm used will be AES with CBC (Cipher Block Chaining) mode.

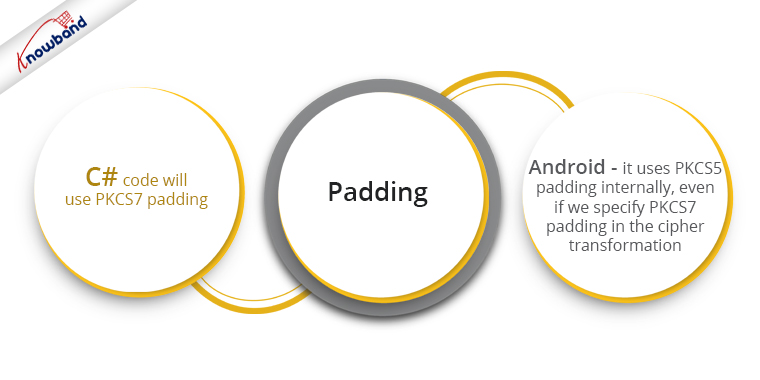
The C# code will use PKCS7 padding, as PKCS5 is not available there. In Android, it uses PKCS5 padding internally, even if we specify PKCS7 padding in the cipher transformation. So, we’re also specifying the PKCS5 padding mode. When tested, they both produce the same correct results.

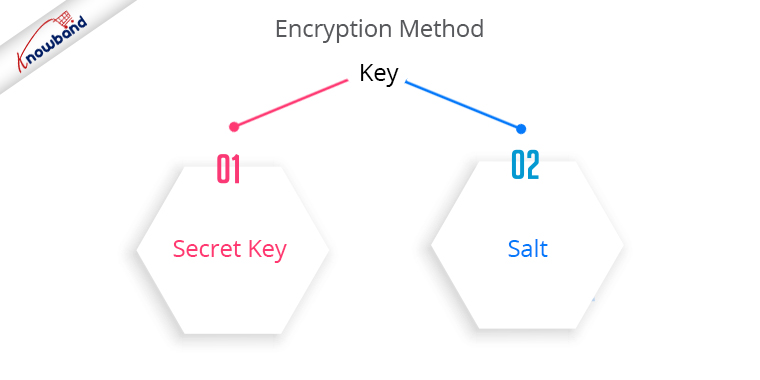
In this encryption method, a single key is used for both the secret key and the salt.

When using different keys for the secret key and salt, there was some difference between the Base64 encoded versions of the salt (or Initialization Vector). The Base64 encoded versions were created by Android and C# codes, and they were different from one another.

To overcome this, we’ve used a single key that will serve as both the secret key and the salt.

The code for the Android part is as follows:

public class EncryptionUtils {

   private final String characterEncoding = "UTF-8";
   private final String cipherTransformation = "AES/CBC/PKCS5Padding";
   private final String aesEncryptionAlgorithm = "AES";

   public String encrypt(String plainText, String key) throws UnsupportedEncodingException, InvalidKeyException, NoSuchAlgorithmException, NoSuchPaddingException, InvalidAlgorithmParameterException, IllegalBlockSizeException, BadPaddingException {
       byte [] plainTextbytes = plainText.getBytes(characterEncoding);
       byte [] keyBytes = getKeyBytes(key);
//        return Base64.encodeToString(encrypt(plainTextbytes,keyBytes, keyBytes), Base64.DEFAULT);
       return Base64.encodeToString(encrypt(plainTextbytes,keyBytes, keyBytes), Base64.NO_WRAP);
   }

   public String decrypt(String encryptedText, String key) throws KeyException, GeneralSecurityException, GeneralSecurityException, InvalidAlgorithmParameterException, IllegalBlockSizeException, BadPaddingException, IOException {
       byte [] cipheredBytes = Base64.decode(encryptedText, Base64.DEFAULT);
       byte[] keyBytes = getKeyBytes(key);
       return new String (decrypt(cipheredBytes, keyBytes, keyBytes), characterEncoding);
   }

   public  byte [] decrypt( byte[] cipherText, byte[] key, byte [] initialVector) throws NoSuchAlgorithmException, NoSuchPaddingException, InvalidKeyException, InvalidAlgorithmParameterException, IllegalBlockSizeException, BadPaddingException
   {
       Cipher cipher = Cipher.getInstance(cipherTransformation);
       SecretKeySpec secretKeySpecy = new SecretKeySpec(key, aesEncryptionAlgorithm);
       IvParameterSpec ivParameterSpec = new IvParameterSpec(initialVector);
       cipher.init(Cipher.DECRYPT_MODE, secretKeySpecy, ivParameterSpec);
       cipherText = cipher.doFinal(cipherText);
       return cipherText;
   }

   public byte[] encrypt(byte[] plainText, byte[] key, byte [] initialVector) throws NoSuchAlgorithmException, NoSuchPaddingException, InvalidKeyException, InvalidAlgorithmParameterException, IllegalBlockSizeException, BadPaddingException
   {
       Cipher cipher = Cipher.getInstance(cipherTransformation);
       SecretKeySpec secretKeySpec = new SecretKeySpec(key, aesEncryptionAlgorithm);
       IvParameterSpec ivParameterSpec = new IvParameterSpec(initialVector);
       cipher.init(Cipher.ENCRYPT_MODE, secretKeySpec, ivParameterSpec);
       plainText = cipher.doFinal(plainText);
       return plainText;
   }

   private byte[] getKeyBytes(String key) throws UnsupportedEncodingException{
       byte [] keyBytes= new byte[16];
       byte [] parameterKeyBytes= key.getBytes(characterEncoding);
       System .arraycopy(parameterKeyBytes, 0 , keyBytes, 0, Math.min(parameterKeyBytes.length, keyBytes.length));
       return keyBytes;
   }
}

<strong>Recommended Read: </strong><a href="https://www.knowband.com/blog/tips/copy-clipboard-javascript/">Copy to clipboard in JavaScript</a>

The code for the C# part is as follows:

// Encrypts plaintext using AES 128bit key and a Chain Block Cipher and returns a base64 encoded string
       public string Encrypt(String plainText, String key)
       {
           var plainBytes = Encoding.UTF8.GetBytes(plainText);
           return Convert.ToBase64String(Encrypt(plainBytes, GetRijndaelManaged(key)));
       }
    
       public string Decrypt(String encryptedText, String key)
       {
           var encryptedBytes = Convert.FromBase64String(encryptedText);
           return Encoding.UTF8.GetString(Decrypt(encryptedBytes, GetRijndaelManaged(key)));
       }
    
       public byte[] Encrypt(byte[] plainBytes, RijndaelManaged rijndaelManaged)
       {
           return rijndaelManaged.CreateEncryptor()
               .TransformFinalBlock(plainBytes, 0, plainBytes.Length);
       }
    
       public byte[] Decrypt(byte[] encryptedData, RijndaelManaged rijndaelManaged)
       {
           return rijndaelManaged.CreateDecryptor()
               .TransformFinalBlock(encryptedData, 0, encryptedData.Length);
       }
    
       public RijndaelManaged GetRijndaelManaged(String secretKey)
       {
           var keyBytes = new byte[16];
           var secretKeyBytes = Encoding.UTF8.GetBytes(secretKey);
           Array.Copy(secretKeyBytes, keyBytes, Math.Min(keyBytes.Length, secretKeyBytes.Length));
           return new RijndaelManaged
           {
               Mode = CipherMode.CBC,
               Padding = PaddingMode.PKCS7,
               KeySize = 128,
               BlockSize = 128,
               Key = keyBytes,
               IV = keyBytes
           };
       }

With the help of the above code, one can encrypt a string on one platform, and then decrypt it on the other platform, and vice-versa.

Recommended Read: How to see the code of ‘.ctp’ file as colourful as the ‘.php’ file in NetBeans

6 Effective Ways to Build and Grow your Email List

An email list is of paramount importance for any online business. It contains useful data or customer information that businesses use to market their brand, products and services, or provide some kind of valuable information to their subscribed audience.

Having an email list helps brands reach out to their subscribers and persuade them to take some action. It could be about making them download an ebook or read a blog post, or it could be an announcement of the upcoming sale.

The more people you have in your email list, the more profitable it is for your business. Brands use various tactics to capture the email address of the users. In this article, I have presented 5 ways to build and grow your email list.

But before I begin, let’s try to understand why you require building an email list.

Over the years, emails have proved to be one of the best marketing mediums. Though the impact has slightly diminished with the introduction of social media, email marketing still holds high significance among marketers.

Moreover, it is a globally used marketing strategy and is still a powerful communication channel that can bring you high conversions.

According to some stats collected by Hubspot, 93% of the B2B marketers leverage emails to deliver content and more than 59% of the marketers say email is their biggest ROI source.

Considering the benefits that email bring to your eCommerce business, let’s now shift our focus on how to grow an email list.

1. Use Lead Magnets

A lead magnet is an incentive that businesses offer to prospects in exchange for their contact information such as name and email address. It comes in the form of an email popup and makes it one of the best techniques to grow your email list.

Lead magnets usually contain irresistible offers, and consist of compelling elements to make users drop their email address and grab those offers.

For a lead magnet to deliver the best results, make sure it is adding value or providing some kind of benefits to your visitors. No visitor will turn into your subscriber if they are not getting benefited from it.

2. Grow your Email list using Engaging Popups

Email Popups have more or less been an annoyance for netizens. They disturb the user flow and hinder the user experience.

But popups like Spin and Win have been widely used by online businesses. In fact, the very famous Digital Marketer Neil Patel also used to have the Spin and Win popup on his website.

The reason why this kind of popup is helpful in building your email list is that it adds fun to your approach to collecting email addresses.

You can incorporate this on the home page of your website and ask users to spin the wheel to earn some amazing deals and offers. It not only helps you grow your email list but also increases user engagement.

You can check out the Spin and Win module from our Knowband store. It is available for various eCommerce platforms like PrestaShop, OpenCart, Magento, etc.

Apart from this, you can make use of Exit Popups. They have been effective in capturing the email address of the visitors as they tend to appear only when the user is trying to exit.

Knowband also offers Scratch Coupon module, a strategy to capture email leads, which you can use to draw visitors’ attention and develop curiosity inside them.

3. Include Intriguing CTAs on your Blog Posts

Another efficacious way to grow email list is by adding intriguing CTAs to your blog posts.

For whatever purpose the CTA is designed for, whether is a PDF download link or a link to the lead magnet, make sure it is relevant to the content.

For example, if I have prepared a guide to reduce cart abandonment and I am showing the CTA related to it on a blog post that discusses social media, it would not make any sense.

However, if that CTA is attached to a blog related to cart abandonment, it would show effective results as it matches with the content. CTAs work well if they go with the content flow. That way, you do not interrupt the reader’s flow.

Some other useful tips for a performing CTA would be to make it short and catchy. It should evoke interest in the users immediately, and drive them to make an extra push.

4, Ask Visitors to Subscribe to your Newsletters

Newsletter subscription is still considered helpful in building your email list.

At the end of your blog posts, you can ask readers to subscribe to your newsletters and get updates on the latest contents, offers or any important information.

You can also ask for it via a popup but it should not appear instantly. Give some time to the readers to go through your content and then ask for their permission.

A successful mantra to collecting email addresses for newsletters is to write quality and evergreen content. It is the only thing that decides the interest of the users towards receiving newsletters.

The more quality you have in your content, the more people will be inclined towards your business.

5. Build Email List through Social Media

You simply cannot overlook social media if you want to build your email list. It is a platform that can increase your email subscriber’s list rapidly.

To acquire more email leads, choose the platform that suits your niche. For example, Facebook and Instagram can be ideal for B2C businesses whereas B2B businesses would pay more focus on LinkedIn and Twitter.

So what would be the ideal way to collect email addresses?

Add the sign-up button on your Facebook Business page, host contests and giveaways, provide freebies that require users to enter their email address and promote the same lead magnet on your social media pages.

Most of your future subscribers are waiting there to be a part of your email list. If you are not using it, you are missing out on a huge opportunity to multiply your subscribers count.

Related: 6 Must-Have Social Media Addons for Your PrestaShop store

6. Ask for Feedback

It is important to know what people think about your Brand. Their opinions could make an impact in your business’ success.

When visitors are about to leave your website, introduce a popup that asks them for their feedback. Ask them if they have any suggestion, complaint or any comment that they want to make so that you could improve.

Make them feel that their opinion matters a lot to you and you would be obliged to receive their remark. The feedback form should have the option of name, email address and comment, that’s it.

The Bottom Line

There are tons of other ways to build and grow your email list apart from these 6 major techniques, some of which are-

Adding testimonials to your website- This builds a visitor’s trust on your brand and they are more likely to get connected to you.

Using Gated content- This restricts the full content view and displays only a small chunk. Users need to enter their email address to get full access.

You can also try using lightbox and sidebar popups, add a floating bar or place an offer strip on the header or footer.

Look out for these strategies to build your email list and see your subscribers count climb up. Just a piece of advice- once you add them to your list, make sure that you do not spam them. You do not want them to hit the unsubscribe button, right?

How helpful did you find this information?

OpenCart CCPA (California Consumer Privacy Act) Extension – User Manual

1.0 Introduction

CCPA stands for California Consumer Privacy Act which is the most detailed privacy law. It targets companies that collect and/or sell personal information. This way, the CCPA provides full control to the Californians over their data. The law’s current compliance deadline is January 1, 2020.

There is a major difference between GDPR and CCPA that the GDPR focuses on all data related to the EU consumers whereas the CCPA considers both the consumer and household as identifiable entities and, in some cases, only considers data provided by the consumer as opposed to data sourced or purchased from third parties.

Knowband offers OpenCart CCPA Extension which helps the OpenCart store merchant to meet all the CCPA requirements. This OpenCart CCPA Compliance extension covers all the rights of the consumers and also provides an easy interface to the customers for accessing their privacy rights.

With this CCPA Opencart compliance module, the online users will get these rights:

  • Right to Access Personal Data
  • Right to Data Portability
  • Right to be Forgotten
  • Right to Data Rectification
  • Right to User Consent

They can send requests and get their rights over their data.

1.1 Features Offered by OpenCart CCPA Module

  1. CCPA Compliance: The OpenCart CCPA Compliance extension ensures CCPA compliance to the store admin and makes it easy to make the website CCPA compatible.
  2. Cookie usages and setting: The online store merchant can display a Cookie consent bar on the front-end of the website for notifying the customers regarding the use of the cookies in the store.
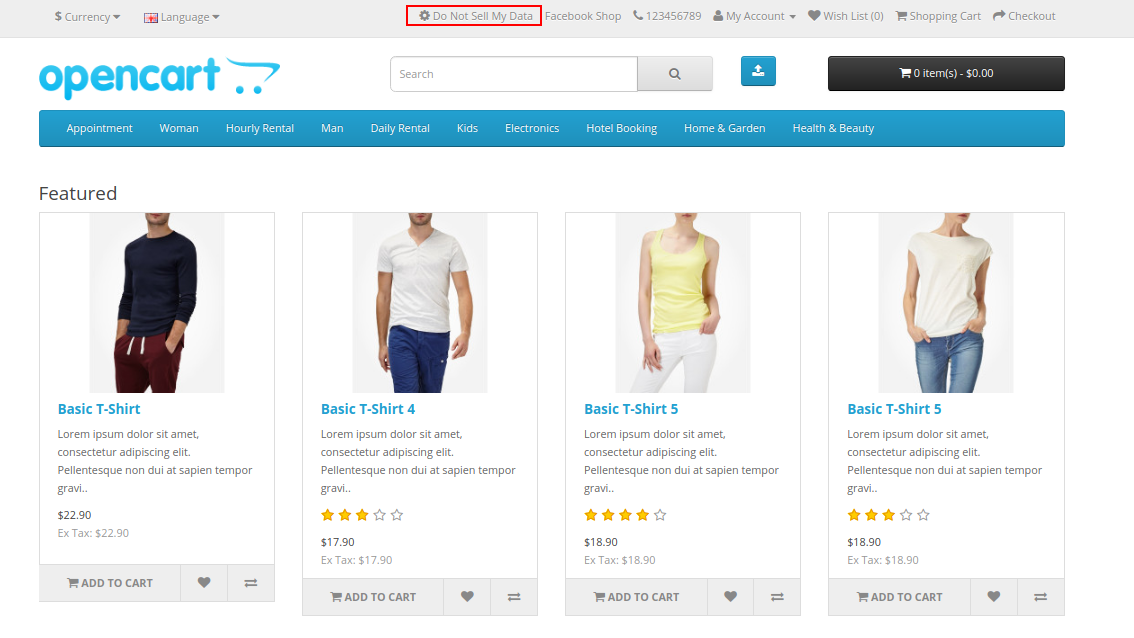
  3. Right to opt-out: The online users have the right to opt-out of the sale of personal data. Admin can show the “Do Not Sell My Personal Information” link on the website header. The online customers can click on this link to view the CCPA rights.
  4. Right to delete: This OpenCart CCPA Compliance module allows the California customers to request for the data deletion of the last 12 months which was collected by the business.
  5. Right to access & data portability: The online users of California can access and download their personal information, address and order details.
  6. Right to Data Rectification: The online store admin can rectify their details, address and also update their password.
  7. Right to User Consent: The online users of California can also change user consent data if they wish to do so.

2.0 Installation

Purchase OpenCart CCPA Extension from our store. You will receive these files after purchasing the OpenCart CCPA Extension:

  • First, you will get a source code file of the OpenCart CCPA Extension in a zipped file format.
  • User Manual of this OpenCart CCPA Extension.

Follow below-mentioned steps to install OpenCart CCPA Extension:

1. Unzip the received zip file. You will get the folders.

2. Copy all the folders of the zip file in the Root Directory of OpenCart setup via FTP manager.

3. There will be a file named kbccpa.ocmod.xml (In case of Openvar v3.0.x file name would be kbccpa.ocmod.zip). Upload the same file from the page “Admin -> Extension -> Extension Installer -> upload”.

So, OpenCart CCPA Extension is now successfully installed and ready to use at your store.

Now go to the admin menu and click on the extensions and thereby click on the configure button next to OpenCart CCPA Extension.

3.0 Admin Settings

After installation, the online merchant can configure CCPA and implement the functionality.

These configuration options are available as shown below:

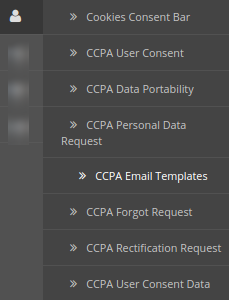
  • CCPA Module Basic Settings
  • Cookie Consent Bar
  • CCPA User Consent
  • CCPA Data Portability
  • CCPA Personal Data Request
  • CCPA Email Template
  • CCPA Forgot Request
  • CCPA Rectification Request
  • CCPA User Consent Data

3.1 CCPA Module Basic Settings

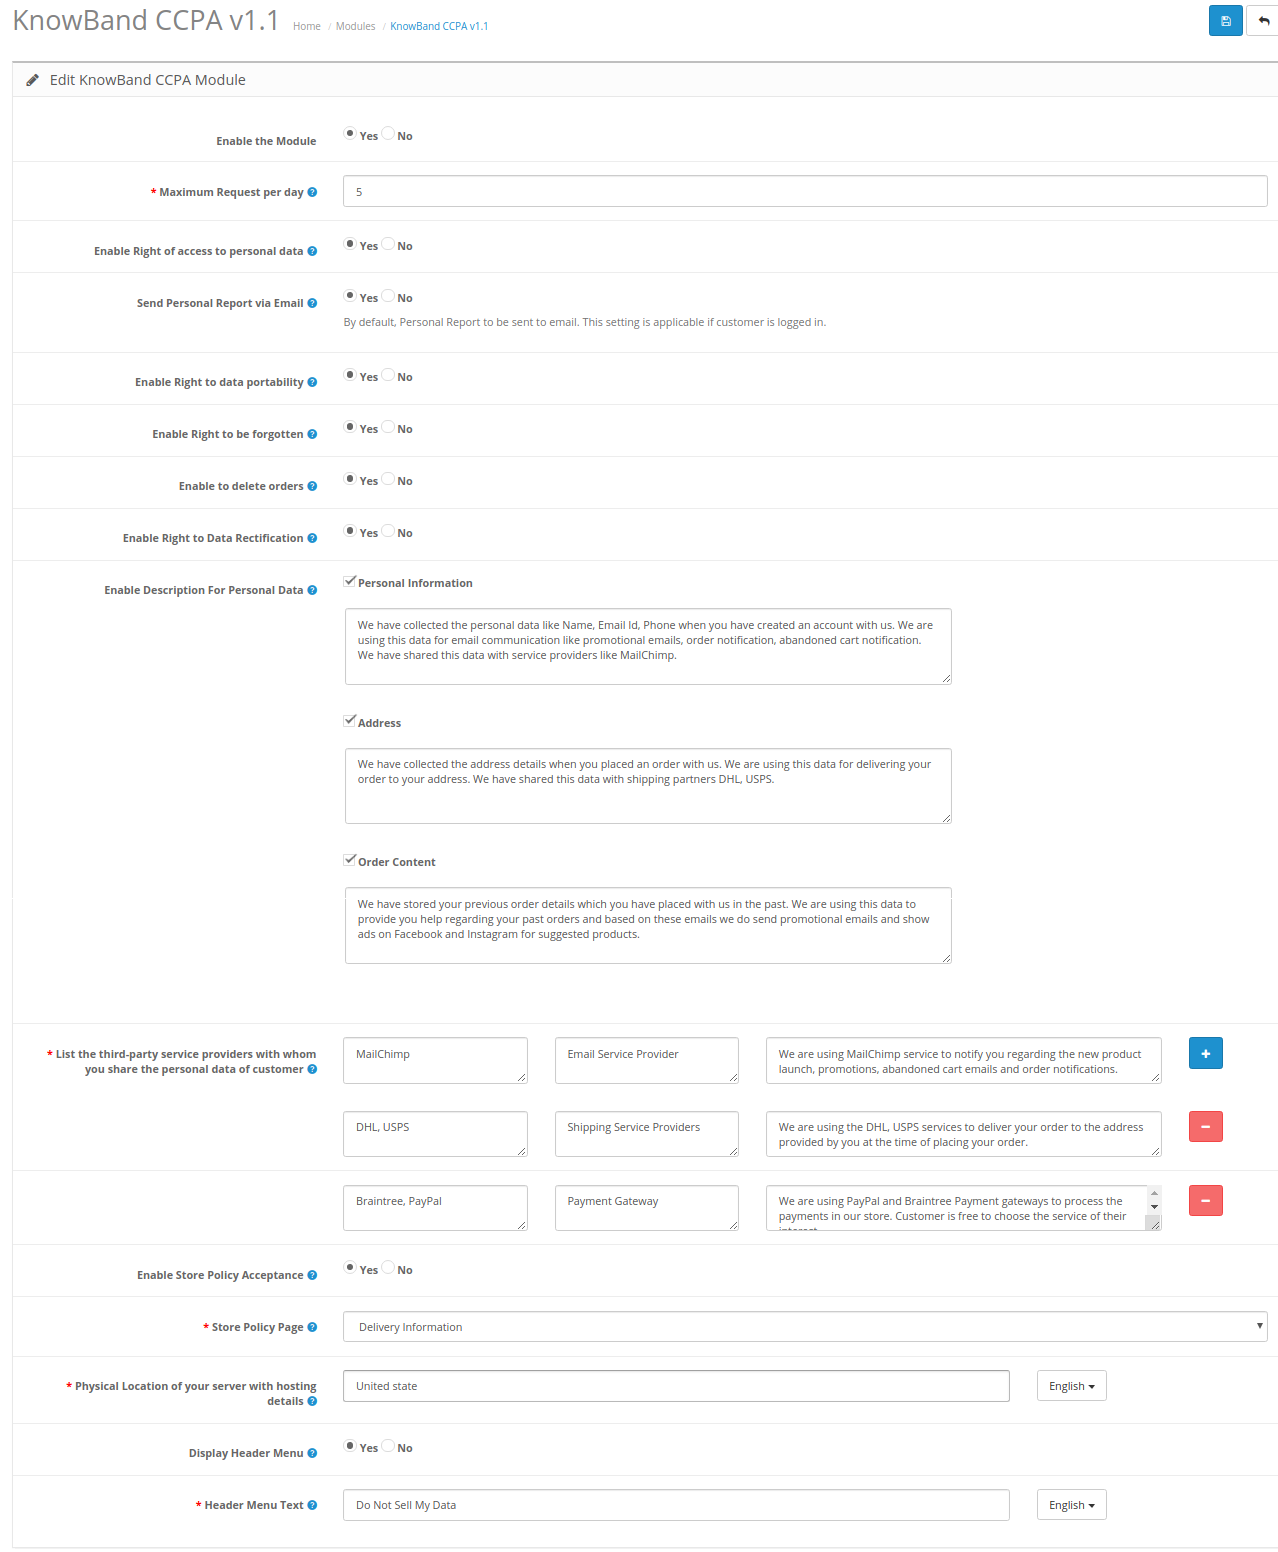
Here, in this section, the online store merchant can apply the basic settings of the CCPA module. These are the available configuration options:


  • Enable The Module: Click on yes or no for activating/deactivating the OpenCart CCPA Extension functionality.
  • Maximum Request per Day: Set the number of requests which will be accepted from the customer per day. This is for minimizing the load on the webserver and for preventing spam requests.
  • Enable Right of access to personal data: Select yes or no for allowing customers to send personal data access requests.
  • Send Personal Report via Email: The store merchant can send personal data details via email.
  • Enable Right to data portability: Select yes or no for activating/deactivating the Right to data portability option.
  • Enable Right to be forgotten: The store merchant can enable or disable the right to be forgotten option by selecting yes or no.
  • Enable to delete orders: Activate or deactivate the order deletion option from the admin interface of this OpenCart CCPA Module.
  • Enable Right to Data Rectification: Admin can enable this option for showing the data rectification option.
  • Enable Description For Personal Data: The OpenCart CCPA Compliance module allows the store merchant to activate this option for showing a description for personal data details. Admin needs to set the description for personal information, address and order content.
  • List the third-party service providers with whom you share the personal data of customer: Admin needs to enter third-party service providers name with whom store admin shares customer data. Admin needs to enter the service provider name, service type and description.
  • Enable Store Policy Acceptance: Admin needs to select yes for restricting customers to accept store policy before requesting CCPA.
  • Store Policy Page: Select the store policy page which you want to show on the store policy page.
  • Physical Location of your server with hosting details: List the server location and hosting details. Admin can enter the country name where the server is located.
  • Display Header Menu: Admin can select yes to show the header menu.
  • Header menu Text: Admin can Enter the text in various languages for showing on the header menu.

3.2 Cookie Consent Bar

The OpenCart CCPA Compliance extension provides an option to display the Cookie Consent Bar at the website front end. The online users can accept the cookie or discard this message. Admin can also customize the appearance settings and cookie bar messages from the admin interface of this OpenCart CCPA plugin.

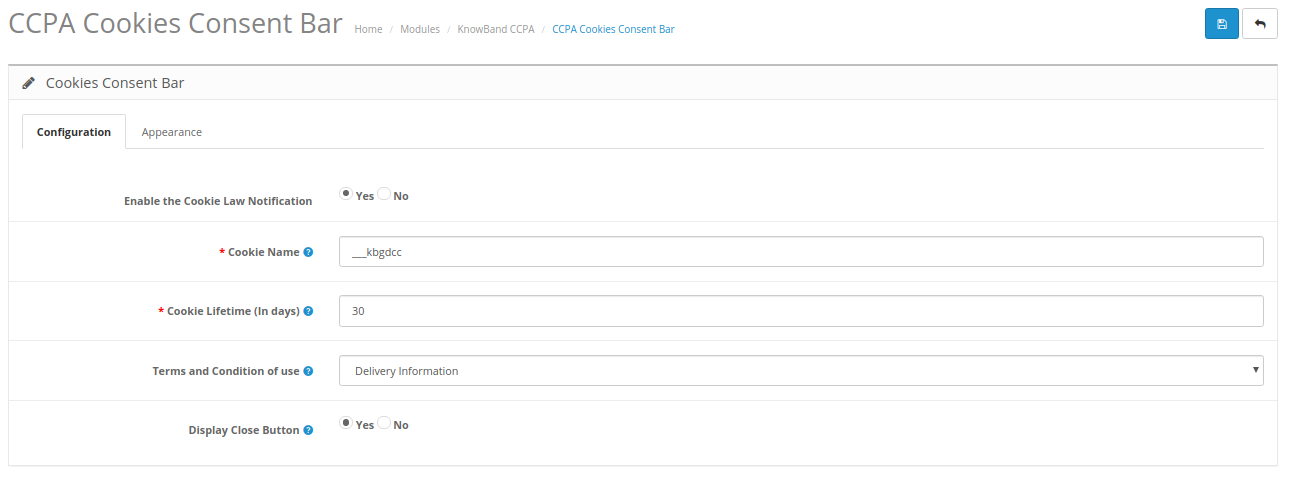
1.Cookie Consent Bar

  • Enable the Cookie Law Notification: Select yes for enabling the cookie message on the website.
  • Cookie Name: Define the cookie name to get the user consent. Please do not use the space for the cookie name.
  • Cookie Lifetime: Cookie Lifetime allows the store admin to set up the cookie duration that how long the cookie will be stored on the user’s device.
  • Terms and Condition of use: The admin can list the details of the cookies on a Cookie Policy page and add the link to the page on the message displayed to the user.
  • Display Close Button: The store merchant can also remove the Close button from the Cookie Consent Bar.

2. Appearance Settings

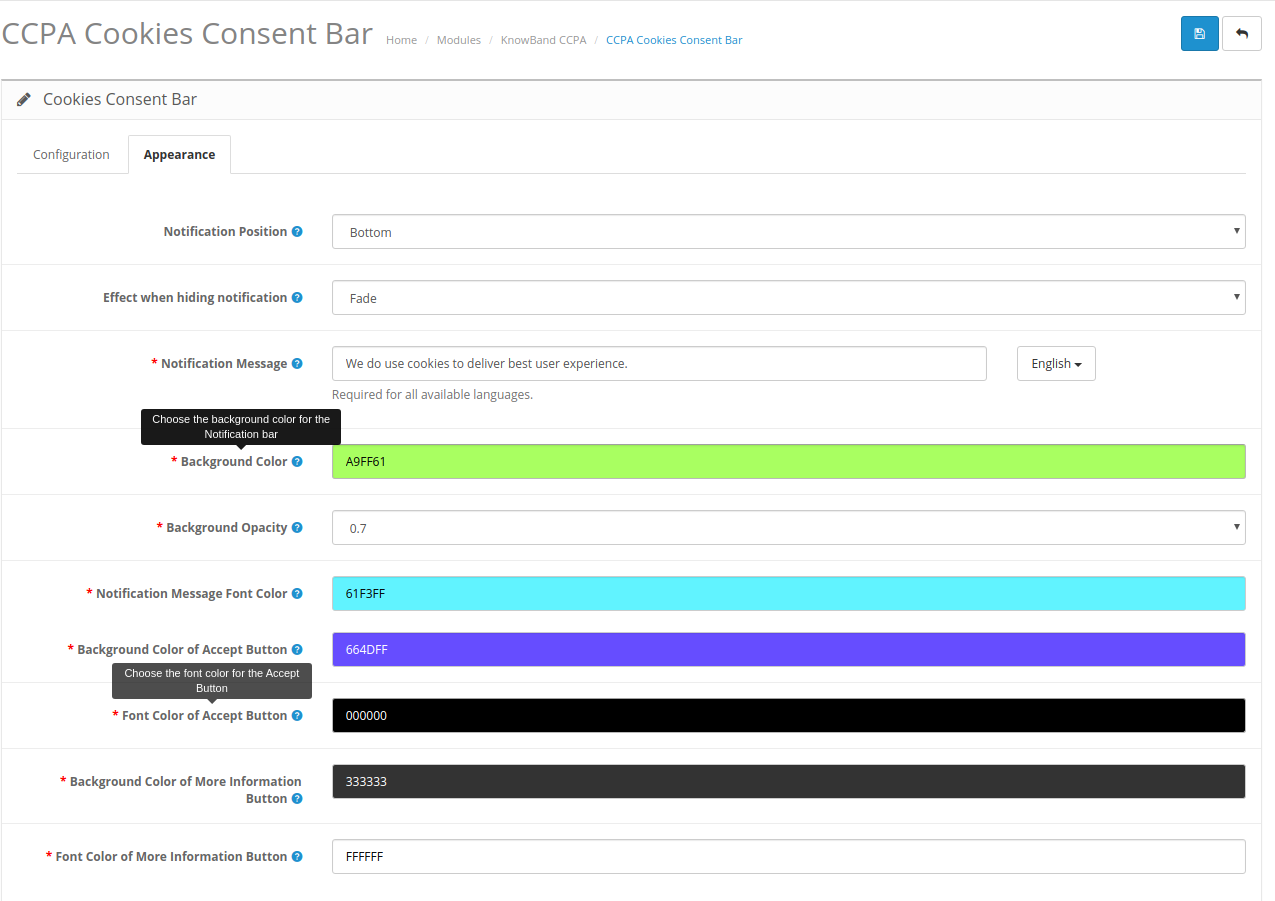
Admin can easily control the following options for the Cookie Consent Bar.

  • Notification Position: Choose the position of the Cookie Notice on the bottom or top.
  • Effect when hiding the notification: Admin can select the options like Fade, Hide or Slide from the drop-down list.
  • Notification Message: Set the notification message in various languages as per the requirement.
  • Background Color: Set-Cookie bar background color from the color picker tool.
  • Background Opacity: Set the background opacity.
  • Notification Message Font Color: Set the font color of the notification message.
  • Background Color of Accept Button: Set the accept button background color from the available color options.
  • Font Color of Accept Button: Choose the font color of the accept button.
  • Background Color of More Information Button: Set BG color of more info button.
  • Font Color of More Information Button: Set font color of more information color.

3.3 CCPA User Consent

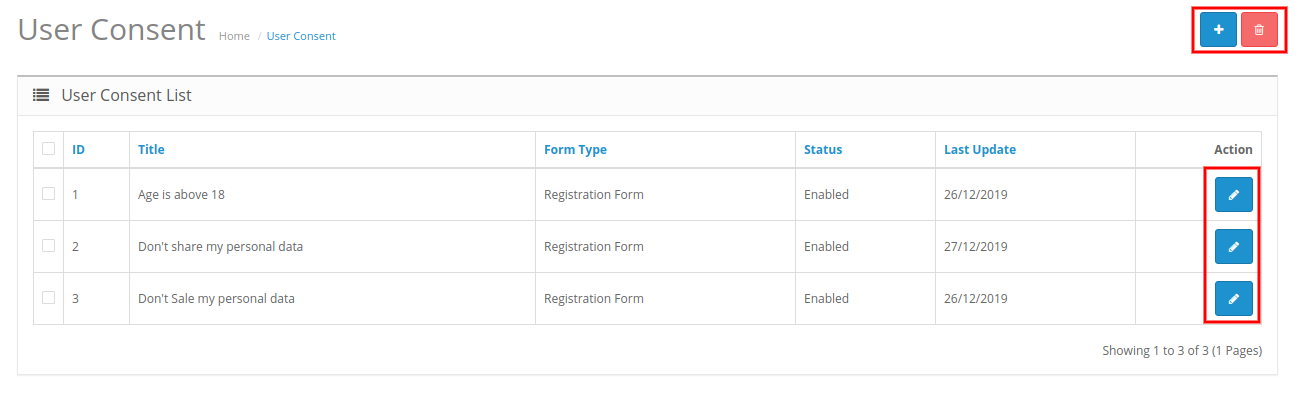
The store merchant can view a user consent list here:

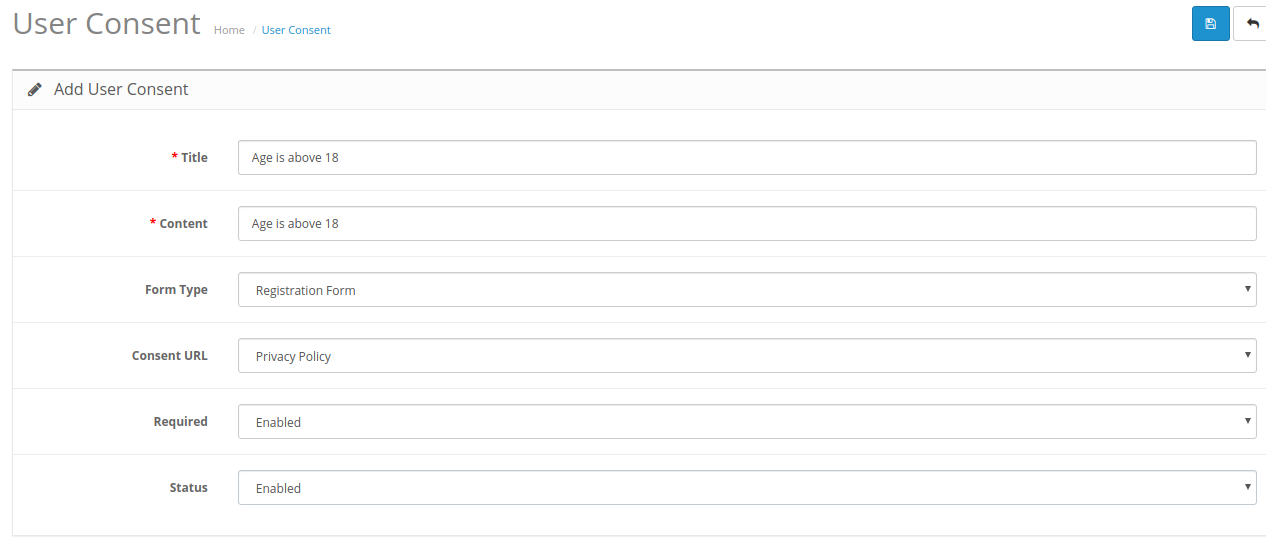
Admin can add, delete and modify the user consents. Admin needs to click on the “+” button for adding new user consent. These are the configuration options:

  • Title: Set the title for user consent.
  • Content: The online merchant can enter content for user consent.
  • Form type: Select form type as registration form or Contact form.
  • Consent URL: Select the page URL where you want to redirect customers.
  • Required: Enable this option to make this field a required field.
  • Status: Enable or disable the user’s consent status.

3.4 CCPA Data Portability

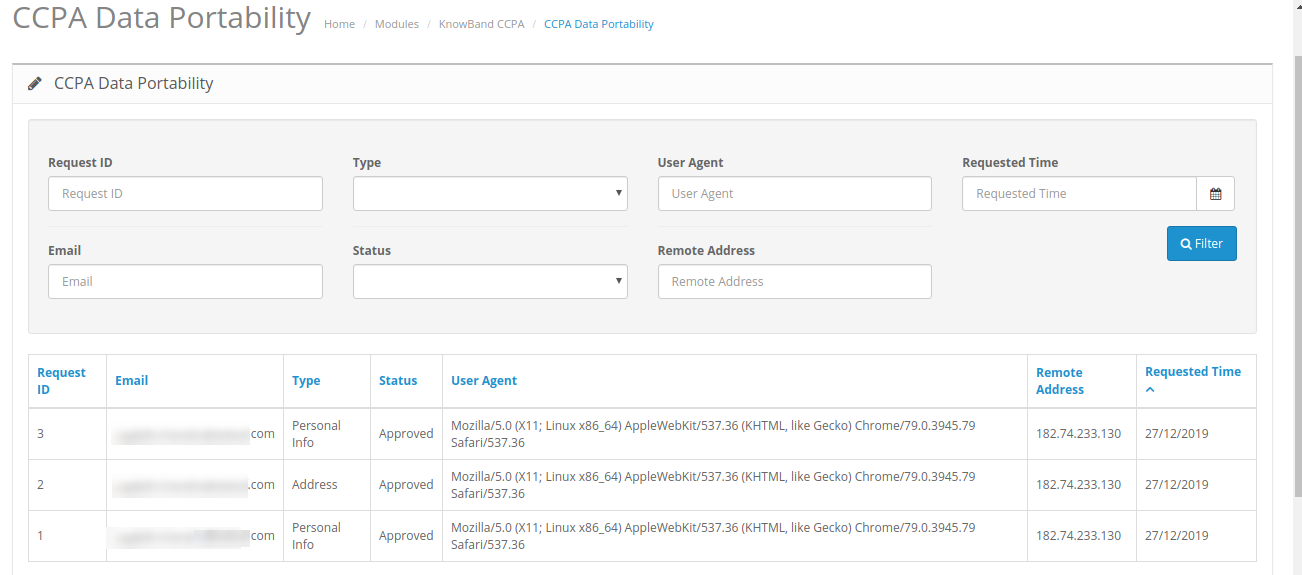
In the OpenCart CCPA Module’s data portability section, the online store merchant can check the log of the data portability requests from the back-end.

The store merchant can also apply filters for data rectification.

3.5 CCPA Personal Data Request

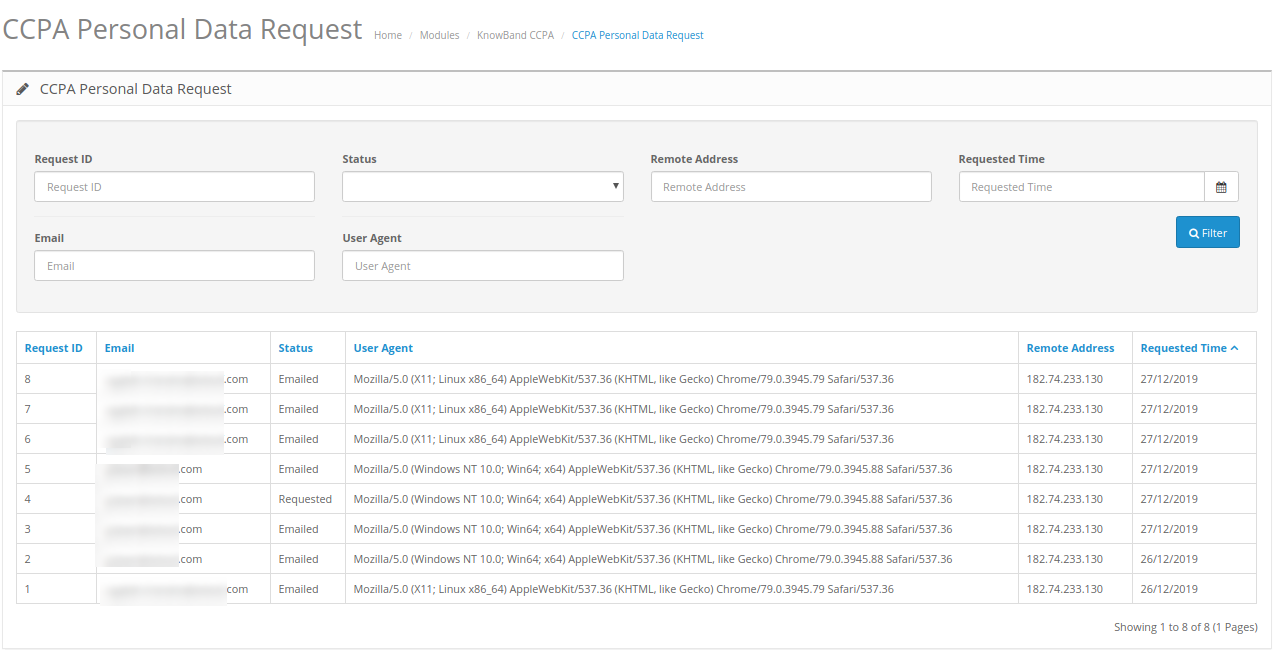
CCPA module for OpenCart keeps the log of all the personal data requests.


The store merchant can view the personal data request details from the admin interface of this CCPA Opencart compliance module.

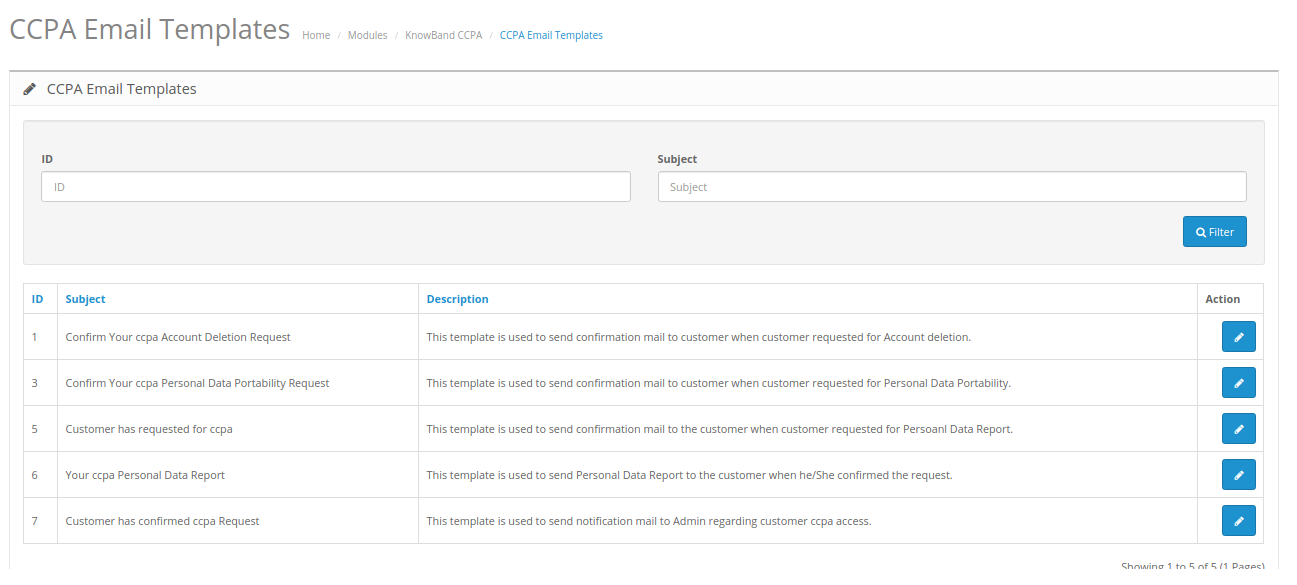
3.6 CCPA Email Template

CCPA Opencart compliance module has customizable email templates for sending emails to the customers on various requests.

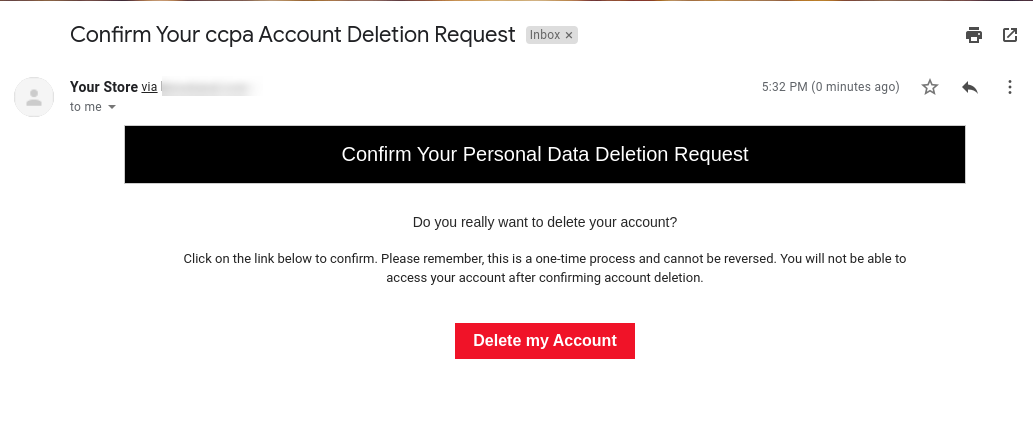
  • Confirm Your CCPA Account Deletion Request: This template is used to send the confirmation mail to the customer when the customer requested for Account deletion.
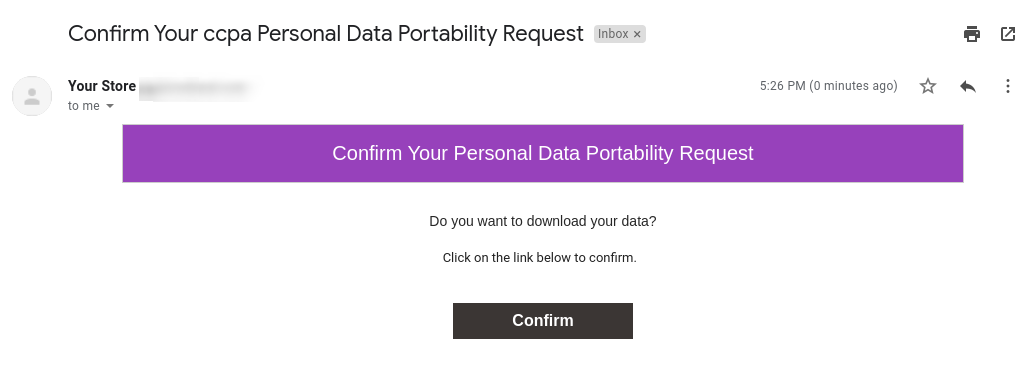
  • Confirm Your CCPA Personal Data Portability Request: This template is used to send the confirmation mail to the customer when the customer requested for Personal Data Portability.
  • The customer has requested for CCPA: This template is used to send the confirmation mail to the customer when the customer requested for Personal Data Report.
  • Your CCPA Personal Data Report: This template is used to send Personal Data Report to the customer when he/She confirmed the request.
  • The customer has confirmed CCPA Request: This template is used to send a notification mail to Admin regarding customer CCPA access.

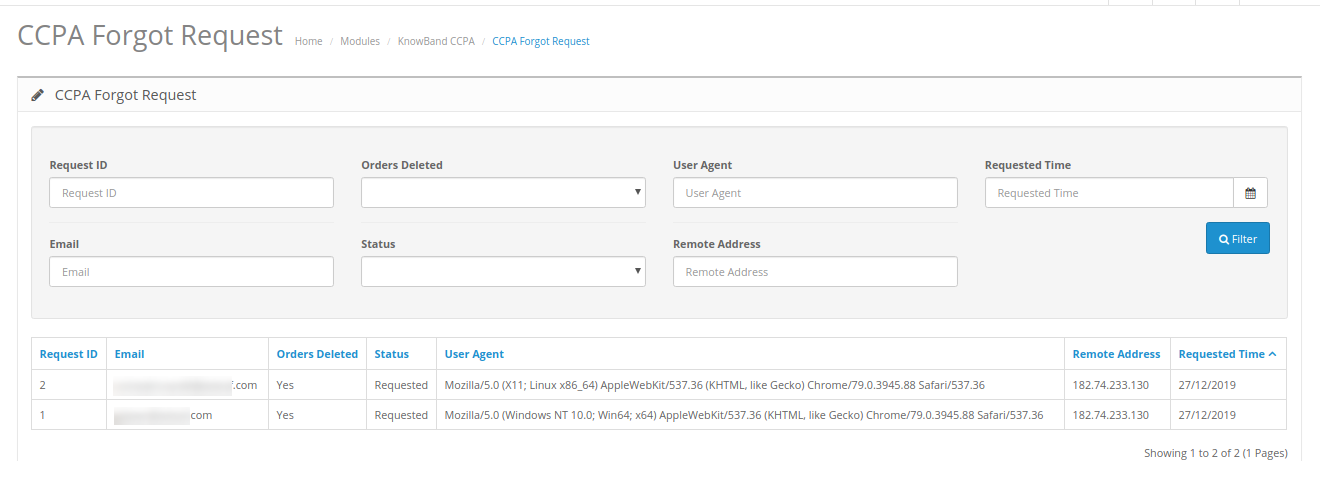
3.7 CCPA Forgot Request

OpenCart CCPA Extension keeps the log of the forgot requests. Admin can use this information to delete customer’s accounts.

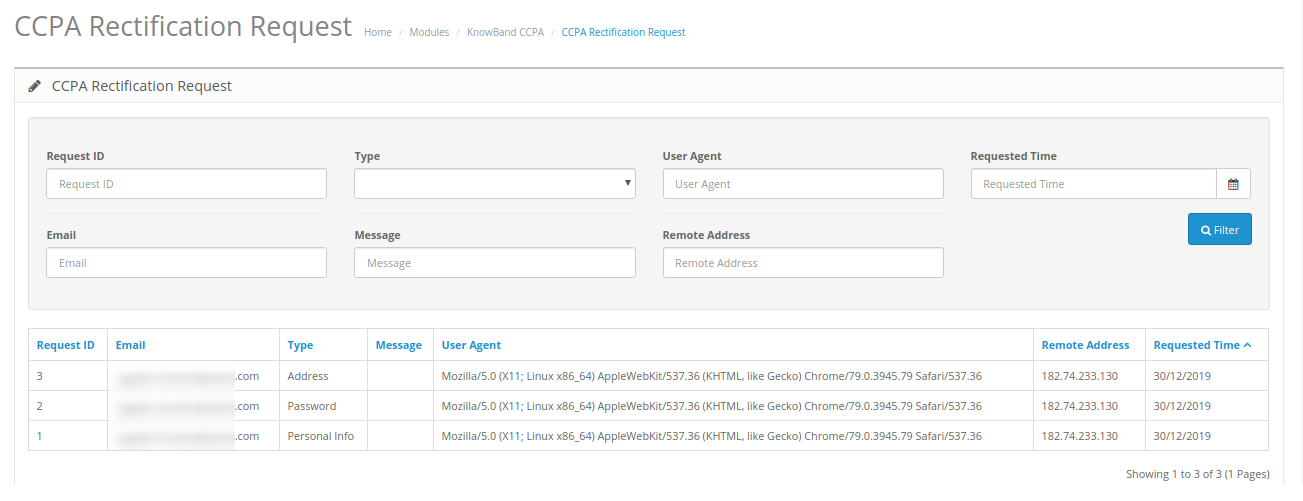
3.8 CCPA Rectification Request

OpenCart CCPA Compliance module keeps the log of the data rectification requests. Admin can use this information to modify the customer data on the third party services.

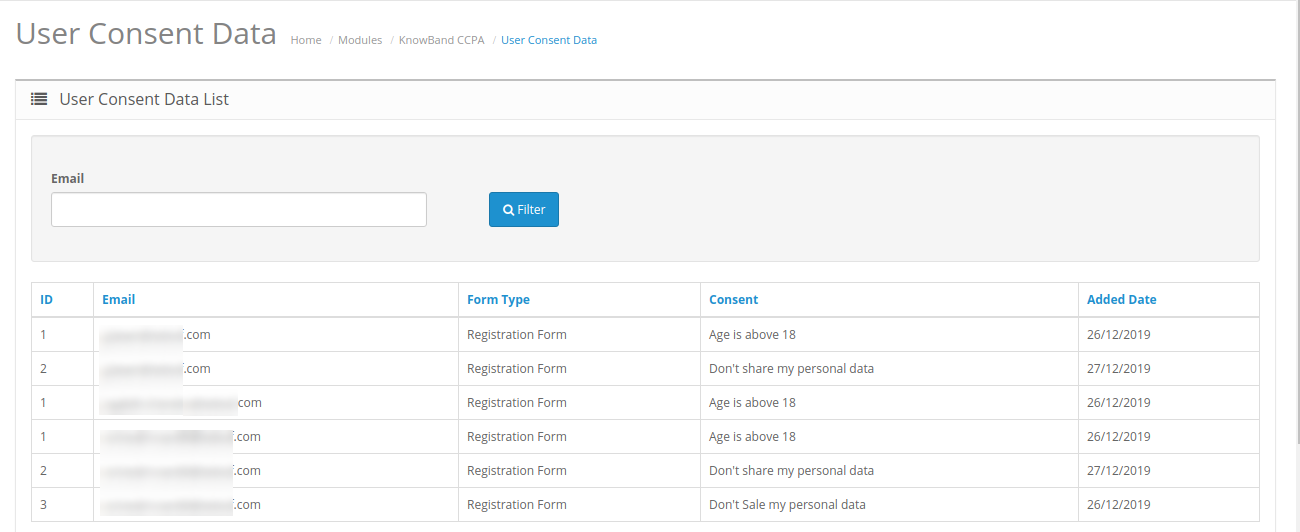
3.9 CCPA User Consent Data

In user consent data details, the store admin can view the user consent data list in which he can check the consents accepted by customers.

4.0 Front-end Interface

The online consumers can click on “Do not Sell my Data” header link as shown below:

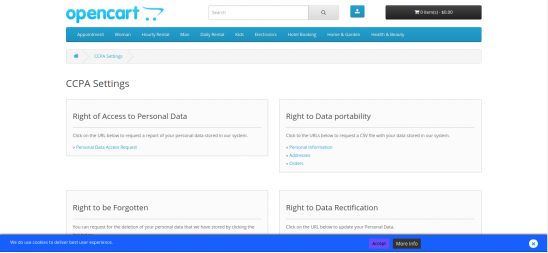
The online users will view a cookie consent bar as shown below:

Online users can accept the click on accept for better user experience. the users can also click on more info page.

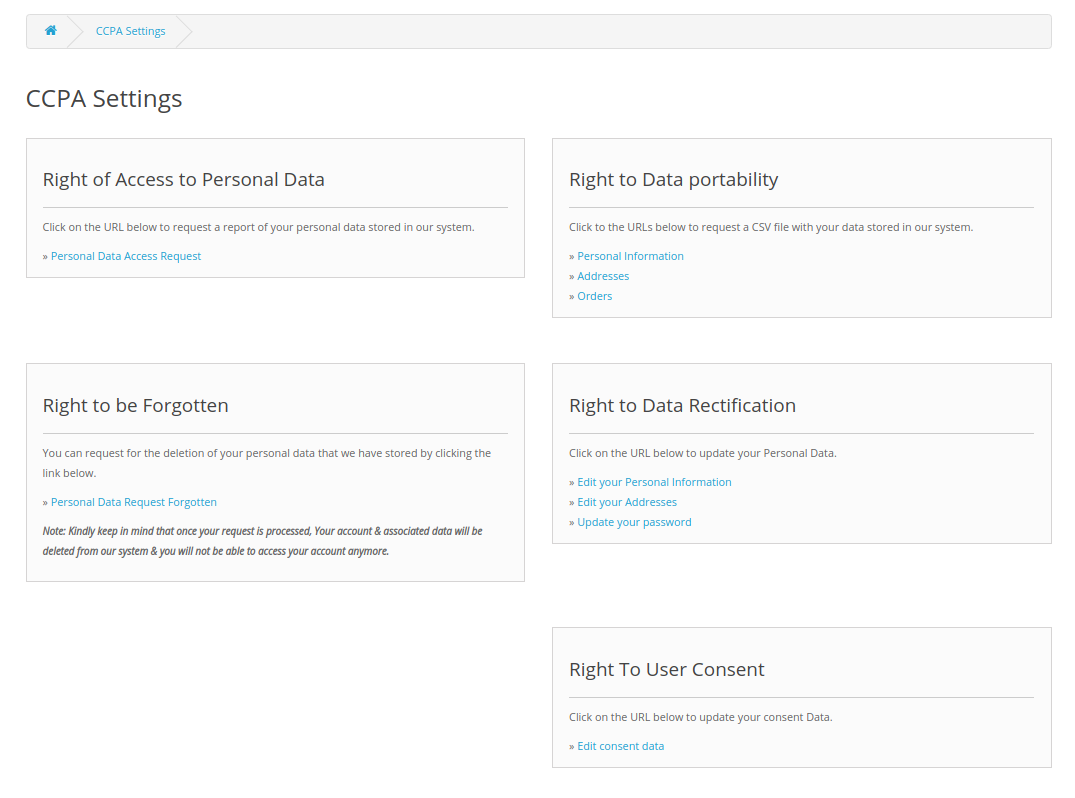
After clicking on this link, online users will get these options:

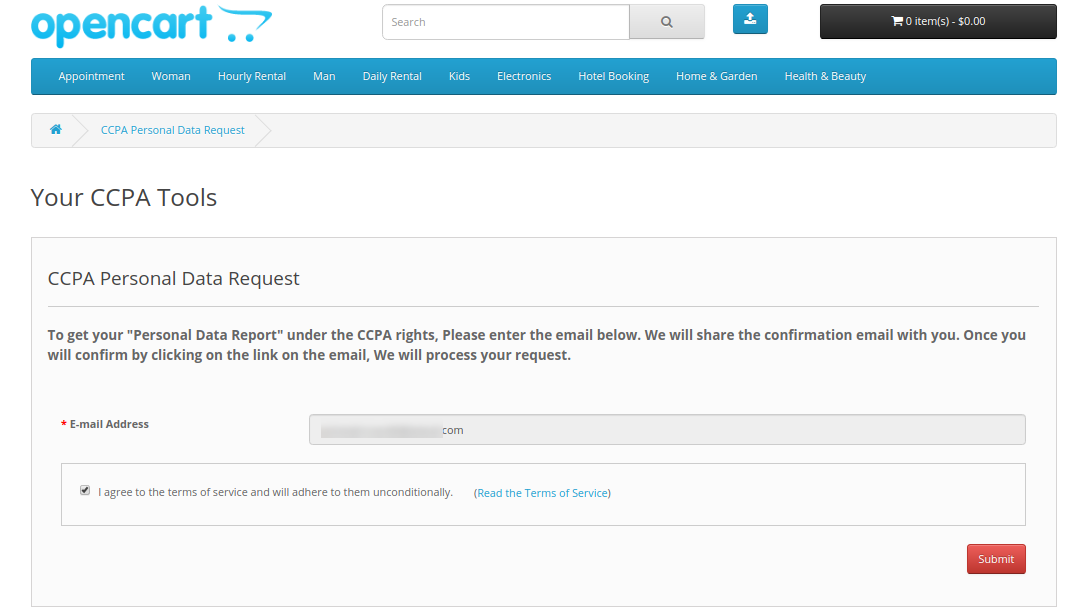
1. Right to Access Personal Data: Online users can click on “Personal Data Access Request” for getting personal data reports.

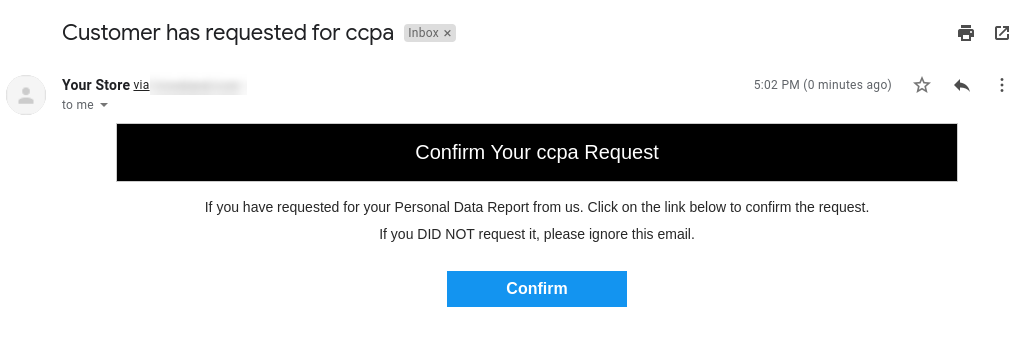
After submitting the request, the customers will get a confirmation request as shown below:


After confirmation, the online users can get an email along with the account details, address information, order details, Third-party service provider details and CCPA Requests details.

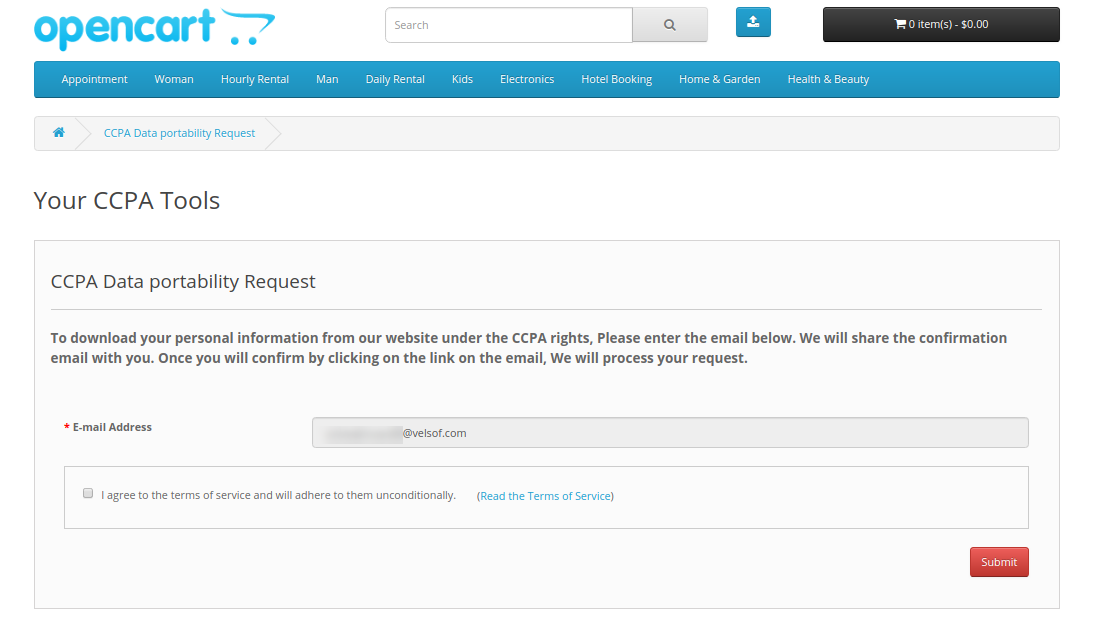
2. Right to Data Portability: Customers can request for data portability from the admin interface of this OpenCart California Consumer Privacy Act Module. The online users can request for downloading personal information, address and orders.

After clicking on the submit button, users will get a confirmation email as shown below:

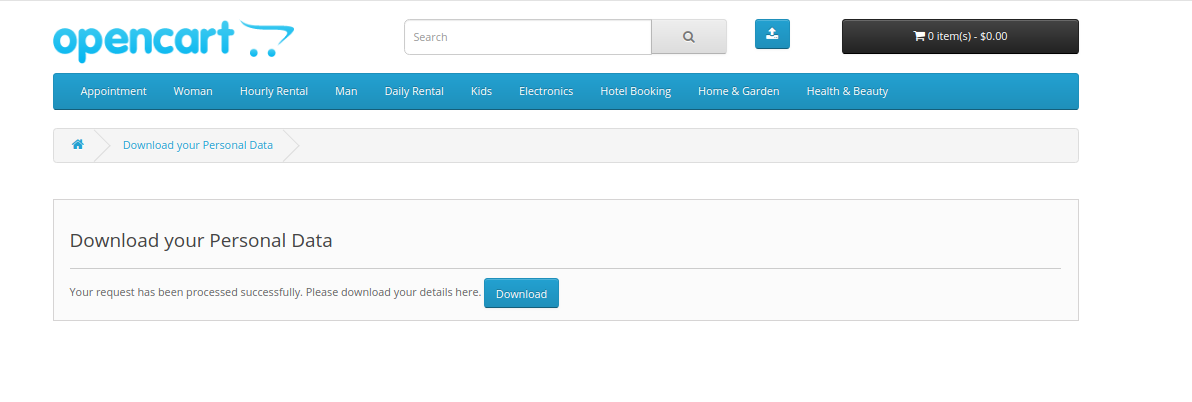
They can confirm and get a download link as shown below:

They can get a CSV file which includes their personal information.

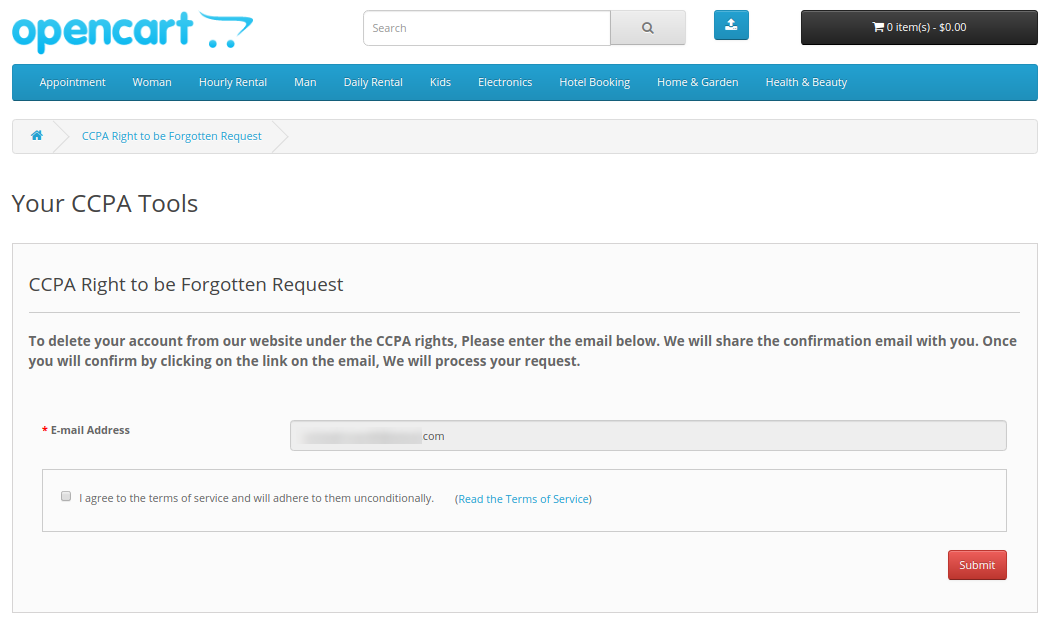
3. Right to be Forgotten: The online users can request for using their right to be forgotten. In this option, they need to click on the “Personal Data Request Forgotten” link and provide email details.


After submitting the details, the users will get a confirmation email. The users can delete their account by clicking on the provided link.

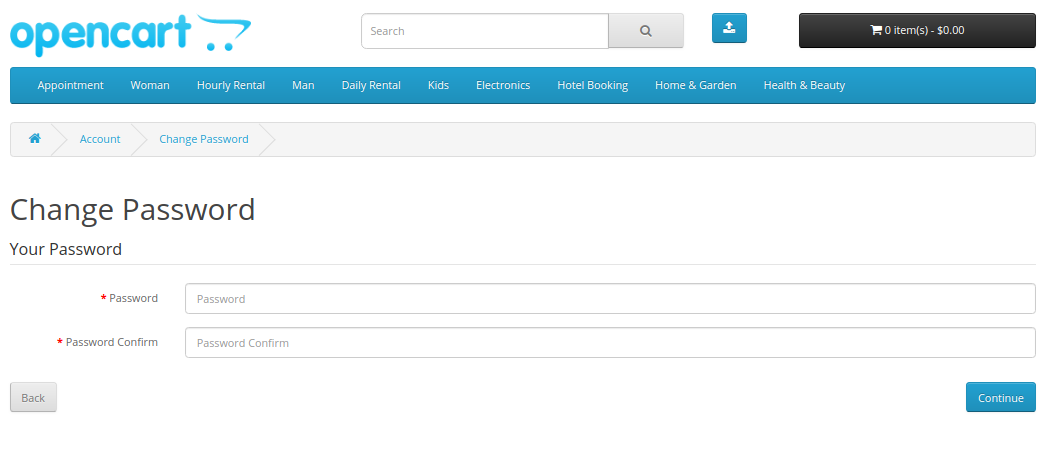
4. Right to Data Rectification: The online users can click on provided links and update their Personal Data, Address and password:


After clicking on the confirm button, the users can successfully update their account password.

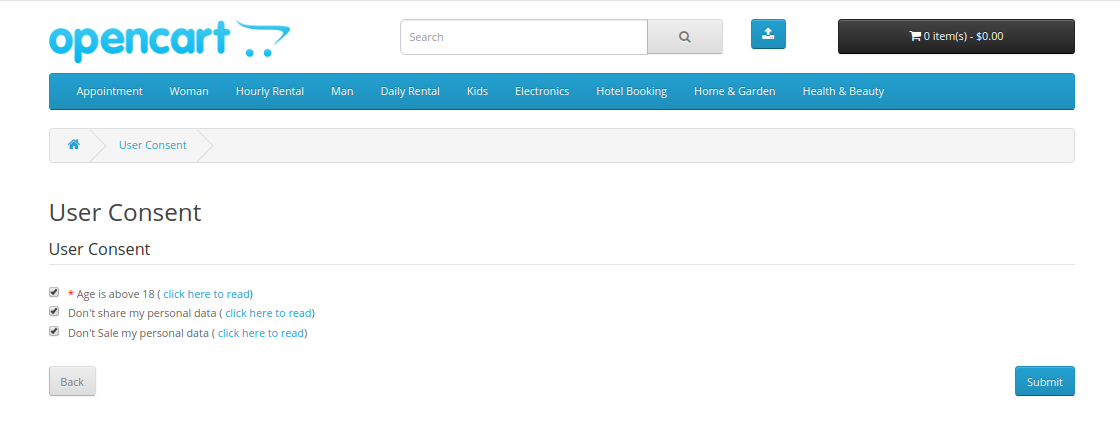
5. Right to User Consent: The online users can also update user consent data by clicking on “Edit Consent data” link:

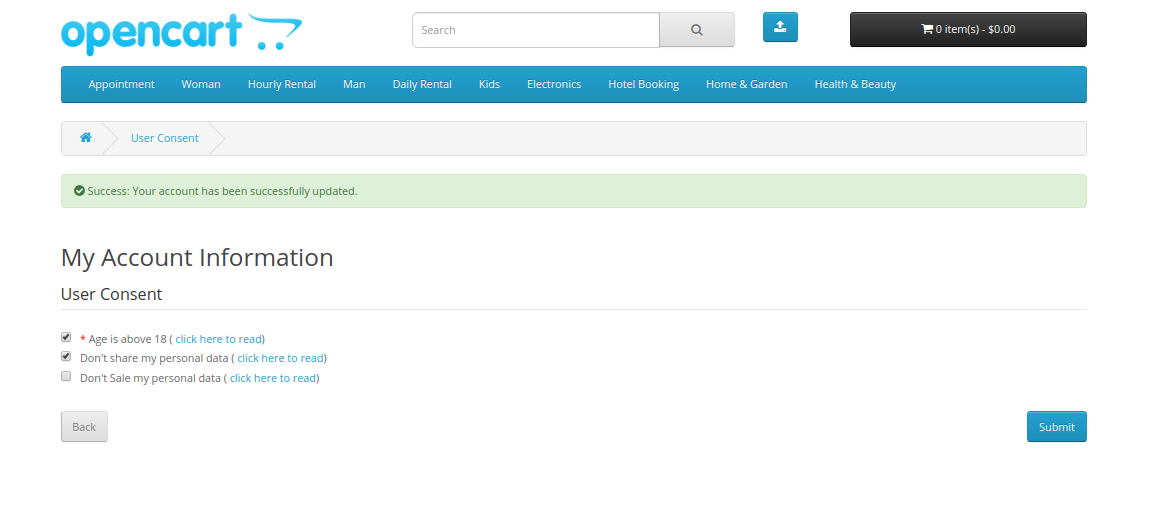
After clicking on the submit button, the online users can successfully update their consent data. A success message will display on the same page for notification.

This way, the online store admin can use OpenCart CCPA Extension for CCPA compliance.


OpenCart CCPA Extension- California Consumer Privacy Act

“OpenCart CCPA Extension helps California businesses comply with the CCPA law without following any arduous approach. The extension makes it easy to set up the California Consumer Privacy Act conditions on the front end of your website.”

What is CCPA?

CCPA stands for California Consumer Privacy Act. Passed on June 2018, by the California State Legislature, the law will be effective for businesses from January 1, 2020.

The businesses falling under this law would be those who have gross annual revenue of more than $25 million, have personal data of more than 50,000 consumers and earn half of the total annual revenue by selling consumer’s personal information.

It is implemented to give consumers better control over their data and to avoid breaching of personal information.

The law gives consumers

Right to Access- Have a check on the information that the company has collected about them.

Right to Deletion- Ask companies to delete their personal information.

Right to Equality- Not to be discriminated against consumers for denying any product or services to the consumers or charging a different price.

Right to be Informed- know what kind of data is getting shared and why is it getting shared and to whom.

Right to Opt-out- Deny companies to share the personal data to any third party.

OpenCart CCPA Extension

Understanding the urge of businesses to comply with the CCPA law and avoid any penalty, OpenCart has introduced the CCPA Extension. OpenCart CCPA extension simply adds a “Do not sell my data” tab at the front end header.

The tab consists of the following 5 options-

1. Right of Access to Personal Data

2. Right to Data Portability

3. Right to be forgotten

4. Right to Data Rectification

5. Right to User Consent

Let us have an in-depth analysis of each-

1. Right of Access to Personal Data

Through this option, consumers can ask a business to share the personal details that they have collected over time.

All a consumer needs to do is provide his/her email address and submit a request. Once submitted, a confirmation email will be sent to the consumer. Upon confirmation, they will receive their personal data over their email address.

It will display the entire information the business has captured about the consumer.

2. Right to Data Portability

This option allows consumers to download their personal data in a CSV format. They can download their personal information, address details and order details.

They just need to submit a request to the merchant.

3. Right to be forgotten

This right allows consumers to permanently delete their entire information from the website. A consumer just needs to request for his/her account deletion by providing his email address.

Upon confirmation, all the associated data of the consumer will be removed from the system and they will no longer be able to access their account, however, they can create a new account using the same email address.

4. Right to Data Rectification

This option allows consumers to rectify their existing information on the website. It includes updating personal information, address and password.

Put simply, a consumer can modify their personal information easily.

5. Right to User Consent

The last option that we have is “Right to User Consent.” Under this option, you can ask for the consumers’ consent regarding sharing of their personal data with the third-party websites or selling it for the monetization purpose.

As per the CCPA law, consumer aged between 13 to 16 has the right to opt-in for allowing sharing of their personal data and consumers below 13 need a guardian authority.

Get the OpenCart CCPA Extension today. If you need any assistance regarding this extension, you can raise a ticket at support@knowband.com

Check out the admin demo and front demo of the OpenCart CCPA module.

Understanding CCPA: California Consumer Privacy Act

The 1st day of the year 2020 will mark the arrival of new privacy law for the people and online businesses of California. The law is named as California Consumer Privacy Act, or CCPA, also denoted as CaCPA, sometimes.

The CCPA bill was passed by the California State Legislature on June 18, 2018, and will turn into an Act following January 1, 2020.

What is CCPA?

The California Consumer Privacy Act deals with the privacy of the people residing in the California state of the United States. The CCPA compliance will enforce businesses to allow consumers to get insights into their personal information being captured by them.

Companies would be required to share what data they have collected of a consumer, and modify or delete it on a consumer’s request.

It’s a great initiative to keep consumers’ privacy within a boundary and maintaining transparency. This will also have a positive effect on the brand-customer relationship since consumers will have more control over their personal data.

Today, there is a heavy breach of data all over the world. Data is getting stolen and sold to companies that even have no relevance with that audience.

California legislators realizing the importance of respecting consumer’s privacy and keeping it confidential introduced CCPA which was the demand of the hour.

CCPA Consumer Rights

Let’s take a look at the consumer rights that fall under the CCPA law-

1. Right to Access Personal Data

Consumers will be able to track what information do the businesses have about them. They can request the business to disclose the information they have collected.

2. Right to Deletion of Data

Consumers will have the option to approach a business and ask them to eradicate their entire details from their business panel. This will lead to the permanent removal of the customer data.

3. Right to be Informed about the Data collection

This gives consumers the right to ask what kind of information is being collected by the businesses, whom it is getting shared with or why it is getting shared.

4. Right to Opt-out

Consumers have the right to say no to the distribution of their personal data to any third party company.

There is also the right to opt-in for the minors, which says that any consumer aged between 13 to 16 can permit businesses to sell their information. Consumer below the age of 13 will require authority through a guardian.

5. Right to Non-discrimination

CCPA highly forbids businesses from discriminating against the consumers. It prohibits-

Discrimination denying goods or services to the consumer

Discrimination for charging a different price than the original price of the goods and services

Discrimination on the level of quality

In short, consumers have the right to equality or say equal prices and services.

Who does CCPA apply to?

CCPA applies to businesses that have-

An annual turnover of more than $25 million

Data of more than 50,000 consumers

Earn more than half of the annual revenue selling consumer’s personal information

To comply with the law, businesses need to add the options on their website that matches with the above-mentioned consumer rights. Feeling the necessity, KnowBand has come up with the CCPA module to help businesses go in accordance with the CCPA law.

CCPA Module by Knowband

The CCPA module by Knowband adds a CCPA tab on the front end of your website. Customers can visit that section and raise a request regarding any information falling under the rights in the CCPA law.

This module is currently available for PrestaShop and OpenCart merchants. Check out-

PrestaShop CCPA addon

OpenCart CCPA extension

It’s high time to re-structure your privacy policy. Companies failing to comply with the CCPA law can be charged with a heavy penalty of up to $7500 depending on the level of breach.

For any query or assistance, reach out to us at support@knowband.com
Everything you need to know about PrestaShop GDPR Addon

“PrestaShop GDPR addon helps EU business comply with the GDPR law and avoid any kind of troubles in the future. It adds a GDPR tab on the front end of your website and allows your customers to raise a request regarding data access, modification or deletion, any time.”

GDPR stands for General Data Protection Regulation. It is a law implemented for European countries on 25th May 2018 to enhance the data privacy of the people.

Every online business was enforced to comply with this law and it gave EU citizens better control over their private information. Any business failing to follow the GDPR law would be charged a heavy penalty.

With this law, people would be able to check what information does a website have about them and they would be able to modify the details they want to share with a business.

Realizing the extreme importance of GDPR in the EU countries, Knowband comes up with the GDPR- Rights of the Individual addon.

What does PrestaShop GDPR addon offers?

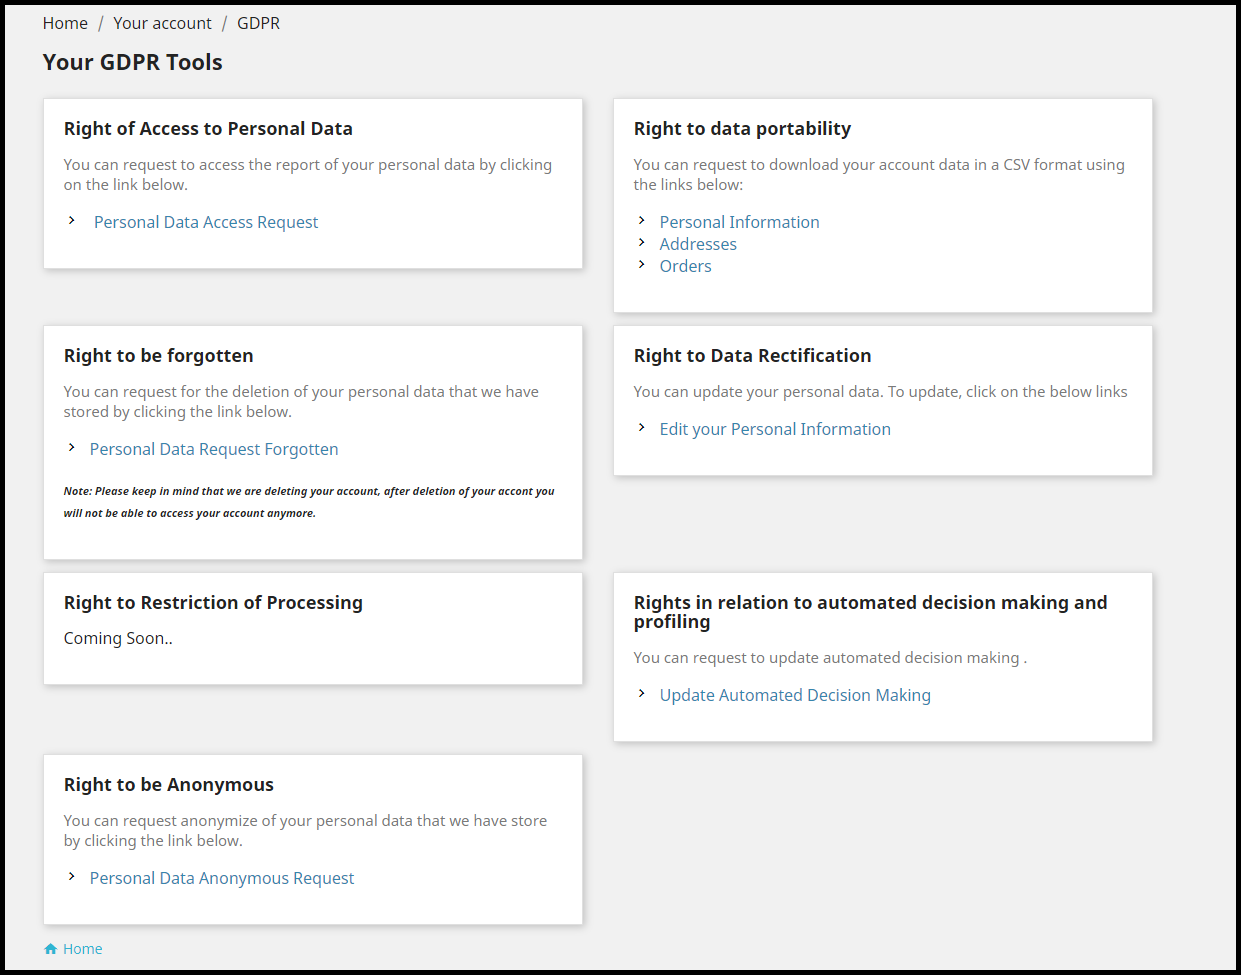
Once installed, the PrestaShop GDPR module places a GDPR tab on the header that has the following options:

1. Right of Access to Personal Data

2. Right to Data Portability

3. Right to be forgotten

4. Right to Data Rectification

5. Rights in relation to automated decision making and profiling

6. Right to be Anonymous

7. Right to Restriction of Processing (Coming soon)

Let’s try to get insights into each option-

1. Right of Access to Personal Data

Through this option, the customer can raise a request to the merchant to get access to their personal data, by submitting their email address.

The user receives the confirmation email. Once confirmed, the report is sent to the user.

From the backend of the module, you can check the requests of the users who have raised the data access request, under the GDPR Personal Data Request tab.
2. Right to Data Portability

Through this option, the customer can download his/her data in a CV format. This tab consists of three options named as-

Personal Information

Addresses

Orders

The customer needs to head over to the desired option and they will get the option to download your data, after confirming the email address.

The requests can be seen under the GDPR Data Portability tab in the backend of the module.

3. Right to be forgotten

This option allows customers to permanently delete their account details from the website.
Once performed, the user details would be removed from the store and they would be required to create a new account if they wish to come back to the store.

The account deletion requests can be seen under Data Forgot Request tab.

4. Right to Data Rectification

This option allows customers to rectify their existing information captured by the brand. It allows editing personal information, address and the option to update the password.

The merchant can check the rectification requests under GDPR Rectification Request.

5. Rights in relation to automated decision making and profiling

Through this option, consumers can check which services have they been automatically subscribed to. Upon request, the consumers have the option to choose only those automation services which they would want to receive.

6. Right to be Anonymous

If a customer does not want to share his original email address with the brand and want to remain anonymous, they can opt for this option.

Upon submitting this request, the existing email address of the user will be replaced by a system-generated email address. These requests can be looked under the GDPR Anonymous Request tab.

7. The Right to Restriction of Processing

This option is not available to use as of now but would soon be reflected in the module.

Let’s now come to some general settings of the PrestaShop GDPR addon.

General settings

1. Specify the number of requests a customer can raise in a single day.

2. You can mention the time after which the user account will be deleted permanently.

3. You can customize the cookies consent bar.

4. You can enable or disable any option at any time.

5. Customize the user consent option as per your requirements from the User Consent tab.

6. Restrict GDPR to some specific countries or specific IPs only.

7. You can customize the email templates and adjust the cron functionality.

There are many more options available in this module. Check out the PrestaShop GDPR addon to know its complete features and benefits.

For any assistance regarding this addon, kindly contact us at support@knowband.com