OpenCart CCPA (California Consumer Privacy Act) Extension – User Manual

1.0 Introduction

CCPA stands for California Consumer Privacy Act which is the most detailed privacy law. It targets companies that collect and/or sell personal information. This way, the CCPA provides full control to the Californians over their data. The law’s current compliance deadline is January 1, 2020.

There is a major difference between GDPR and CCPA that the GDPR focuses on all data related to the EU consumers whereas the CCPA considers both the consumer and household as identifiable entities and, in some cases, only considers data provided by the consumer as opposed to data sourced or purchased from third parties.

Knowband offers OpenCart CCPA Extension which helps the OpenCart store merchant to meet all the CCPA requirements. This OpenCart CCPA Compliance extension covers all the rights of the consumers and also provides an easy interface to the customers for accessing their privacy rights.

With this CCPA Opencart compliance module, the online users will get these rights:

  • Right to Access Personal Data
  • Right to Data Portability
  • Right to be Forgotten
  • Right to Data Rectification
  • Right to User Consent

They can send requests and get their rights over their data.

1.1 Features Offered by OpenCart CCPA Module

  1. CCPA Compliance: The OpenCart CCPA Compliance extension ensures CCPA compliance to the store admin and makes it easy to make the website CCPA compatible.
  2. Cookie usages and setting: The online store merchant can display a Cookie consent bar on the front-end of the website for notifying the customers regarding the use of the cookies in the store.
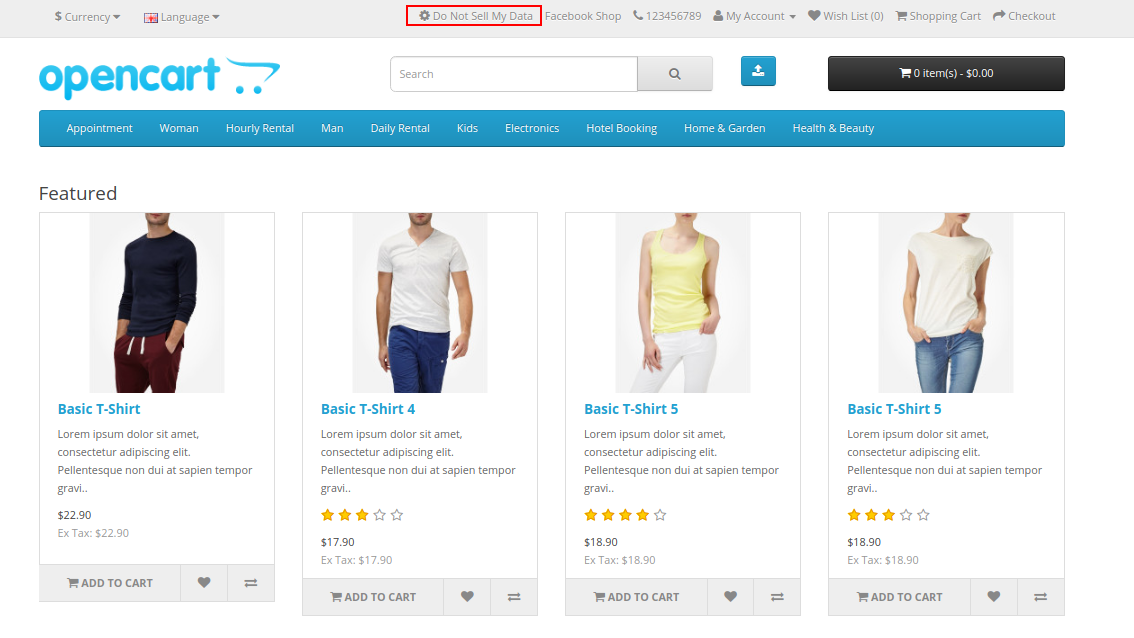
  3. Right to opt-out: The online users have the right to opt-out of the sale of personal data. Admin can show the “Do Not Sell My Personal Information” link on the website header. The online customers can click on this link to view the CCPA rights.
  4. Right to delete: This OpenCart CCPA Compliance module allows the California customers to request for the data deletion of the last 12 months which was collected by the business.
  5. Right to access & data portability: The online users of California can access and download their personal information, address and order details.
  6. Right to Data Rectification: The online store admin can rectify their details, address and also update their password.
  7. Right to User Consent: The online users of California can also change user consent data if they wish to do so.

2.0 Installation

Purchase OpenCart CCPA Extension from our store. You will receive these files after purchasing the OpenCart CCPA Extension:

  • First, you will get a source code file of the OpenCart CCPA Extension in a zipped file format.
  • User Manual of this OpenCart CCPA Extension.

Follow below-mentioned steps to install OpenCart CCPA Extension:

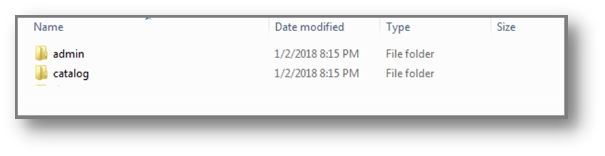
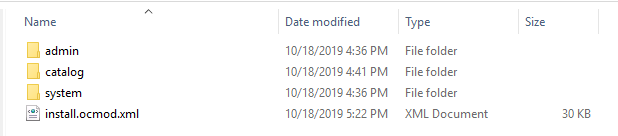
1. Unzip the received zip file. You will get the folders.

2. Copy all the folders of the zip file in the Root Directory of OpenCart setup via FTP manager.

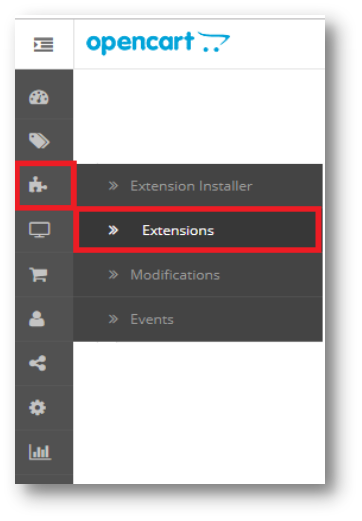
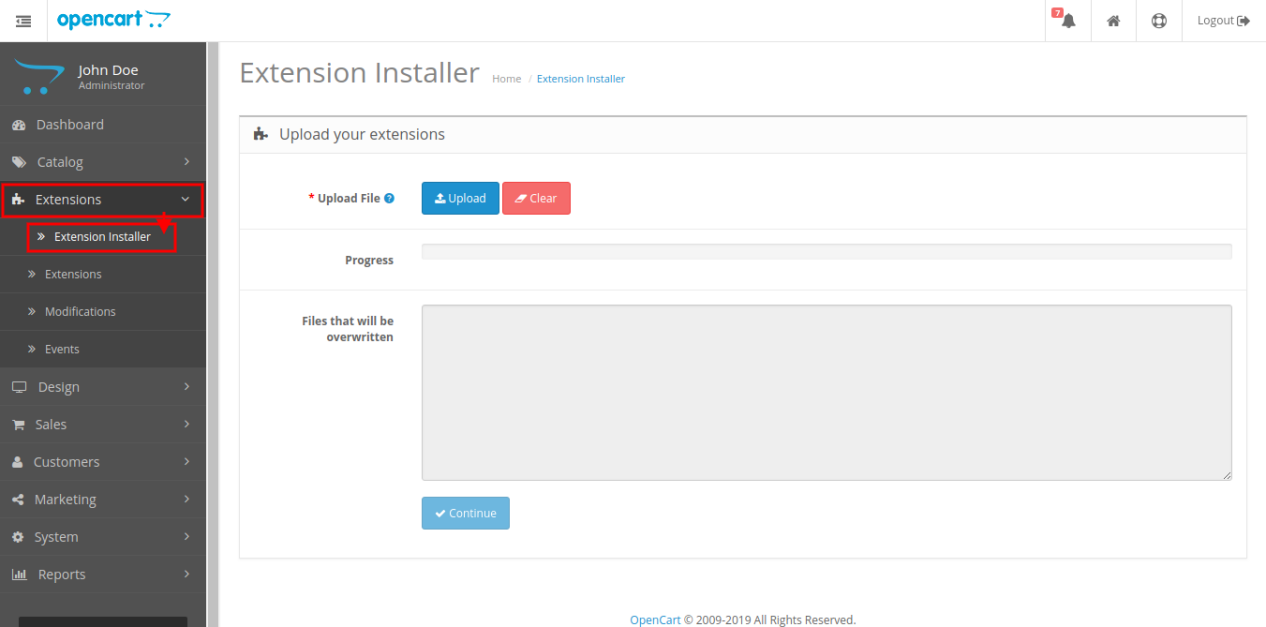
3. There will be a file named kbccpa.ocmod.xml (In case of Openvar v3.0.x file name would be kbccpa.ocmod.zip). Upload the same file from the page “Admin -> Extension -> Extension Installer -> upload”.

So, OpenCart CCPA Extension is now successfully installed and ready to use at your store.

Now go to the admin menu and click on the extensions and thereby click on the configure button next to OpenCart CCPA Extension.

3.0 Admin Settings

After installation, the online merchant can configure CCPA and implement the functionality.

These configuration options are available as shown below:
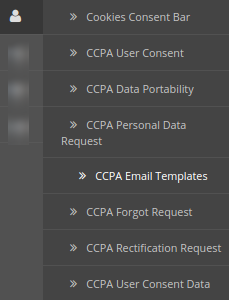
CCPA-configuration-options

  • CCPA Module Basic Settings
  • Cookie Consent Bar
  • CCPA User Consent
  • CCPA Data Portability
  • CCPA Personal Data Request
  • CCPA Email Template
  • CCPA Forgot Request
  • CCPA Rectification Request
  • CCPA User Consent Data

3.1 CCPA Module Basic Settings

Here, in this section, the online store merchant can apply the basic settings of the CCPA module. These are the available configuration options:
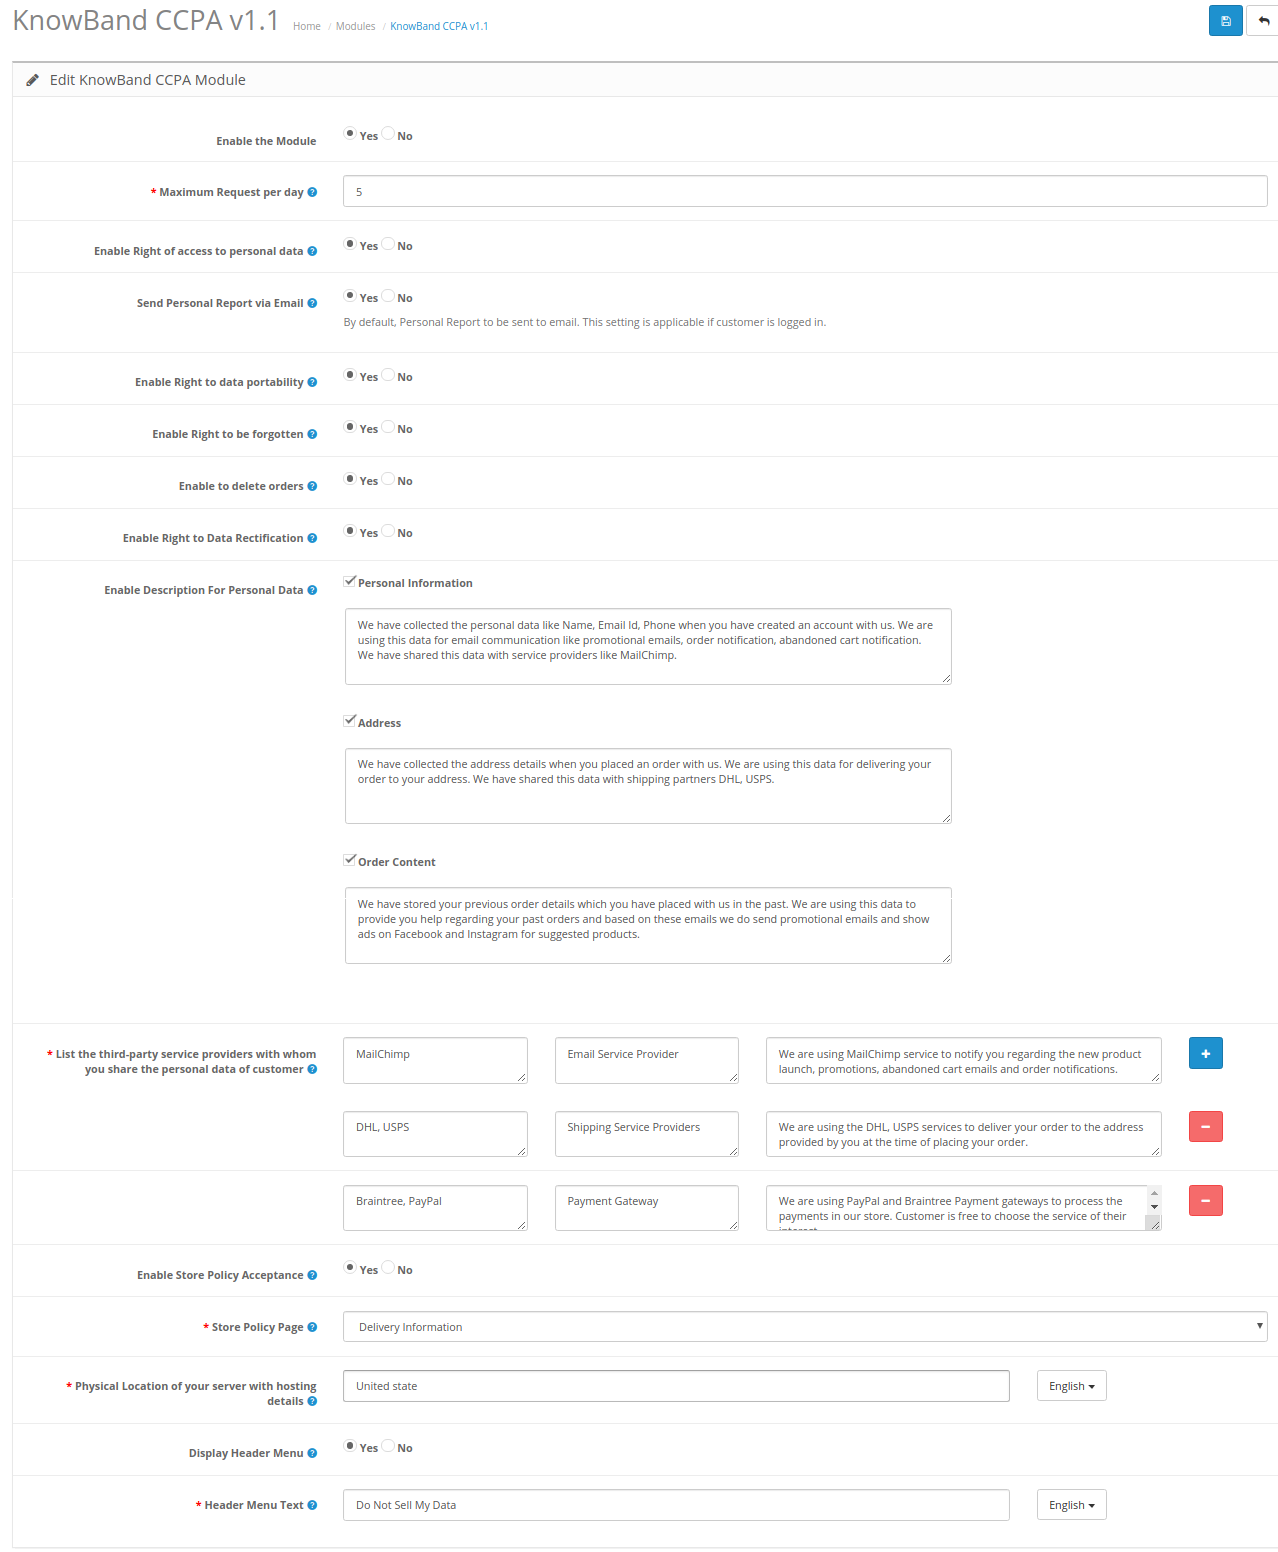
    

  • Enable The Module: Click on yes or no for activating/deactivating the OpenCart CCPA Extension functionality.
  • Maximum Request per Day: Set the number of requests which will be accepted from the customer per day. This is for minimizing the load on the webserver and for preventing spam requests.
  • Enable Right of access to personal data: Select yes or no for allowing customers to send personal data access requests.
  • Send Personal Report via Email: The store merchant can send personal data details via email.
  • Enable Right to data portability: Select yes or no for activating/deactivating the Right to data portability option.
  • Enable Right to be forgotten: The store merchant can enable or disable the right to be forgotten option by selecting yes or no.
  • Enable to delete orders: Activate or deactivate the order deletion option from the admin interface of this OpenCart CCPA Module.
  • Enable Right to Data Rectification: Admin can enable this option for showing the data rectification option.
  • Enable Description For Personal Data: The OpenCart CCPA Compliance module allows the store merchant to activate this option for showing a description for personal data details. Admin needs to set the description for personal information, address and order content.
  • List the third-party service providers with whom you share the personal data of customer: Admin needs to enter third-party service providers name with whom store admin shares customer data. Admin needs to enter the service provider name, service type and description.
  • Enable Store Policy Acceptance: Admin needs to select yes for restricting customers to accept store policy before requesting CCPA.
  • Store Policy Page: Select the store policy page which you want to show on the store policy page.
  • Physical Location of your server with hosting details: List the server location and hosting details. Admin can enter the country name where the server is located.
  • Display Header Menu: Admin can select yes to show the header menu.
  • Header menu Text: Admin can Enter the text in various languages for showing on the header menu.

3.2 Cookie Consent Bar

The OpenCart CCPA Compliance extension provides an option to display the Cookie Consent Bar at the website front end. The online users can accept the cookie or discard this message. Admin can also customize the appearance settings and cookie bar messages from the admin interface of this OpenCart CCPA plugin.

1.Cookie Consent Bar
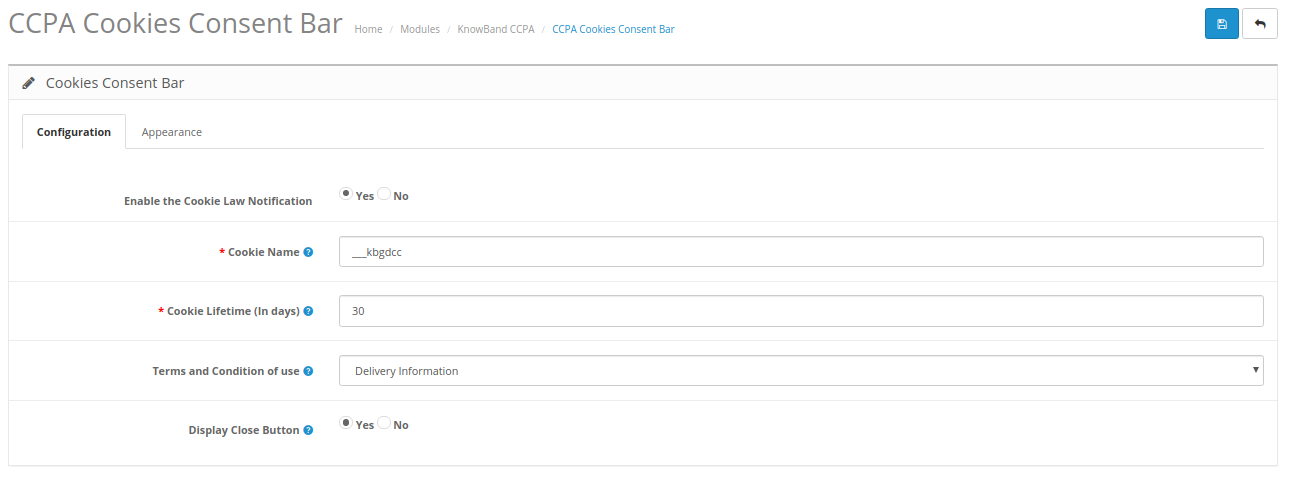
  • Enable the Cookie Law Notification: Select yes for enabling the cookie message on the website.
  • Cookie Name: Define the cookie name to get the user consent. Please do not use the space for the cookie name.
  • Cookie Lifetime: Cookie Lifetime allows the store admin to set up the cookie duration that how long the cookie will be stored on the user’s device.
  • Terms and Condition of use: The admin can list the details of the cookies on a Cookie Policy page and add the link to the page on the message displayed to the user.
  • Display Close Button: The store merchant can also remove the Close button from the Cookie Consent Bar.

2. Appearance Settings

Admin can easily control the following options for the Cookie Consent Bar.
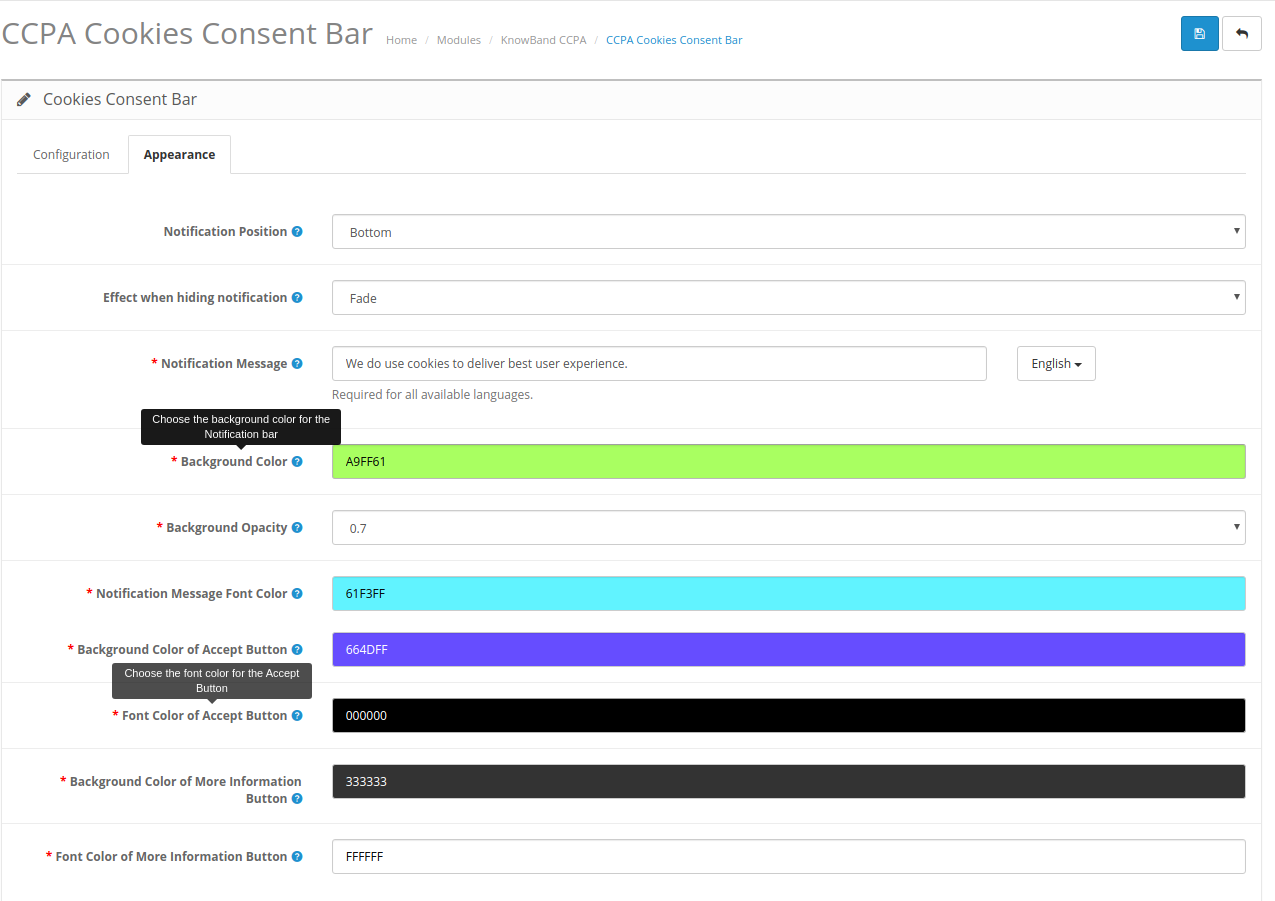
  • Notification Position: Choose the position of the Cookie Notice on the bottom or top.
  • Effect when hiding the notification: Admin can select the options like Fade, Hide or Slide from the drop-down list.
  • Notification Message: Set the notification message in various languages as per the requirement.
  • Background Color: Set-Cookie bar background color from the color picker tool.
  • Background Opacity: Set the background opacity.
  • Notification Message Font Color: Set the font color of the notification message.
  • Background Color of Accept Button: Set the accept button background color from the available color options.
  • Font Color of Accept Button: Choose the font color of the accept button.
  • Background Color of More Information Button: Set BG color of more info button.
  • Font Color of More Information Button: Set font color of more information color.

3.3 CCPA User Consent

The store merchant can view a user consent list here:
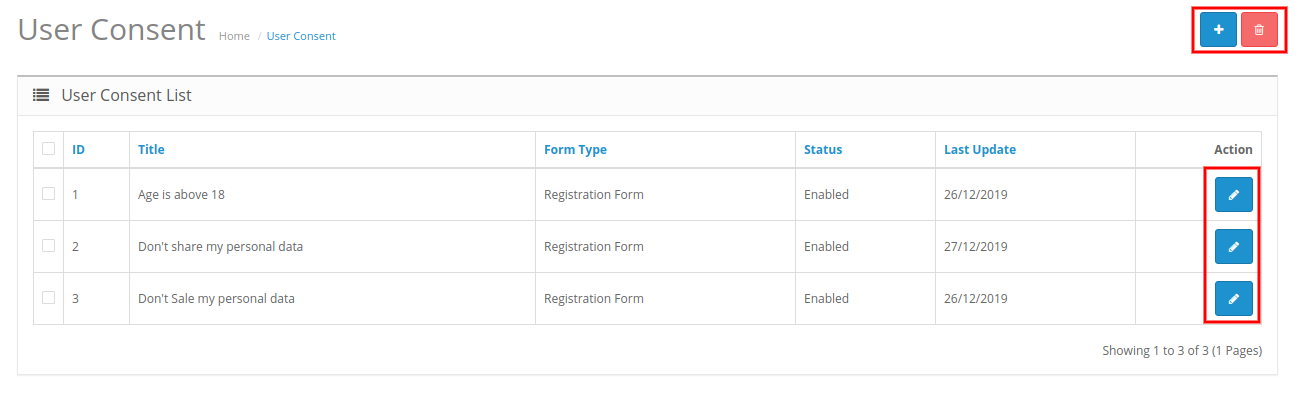
Admin can add, delete and modify the user consents. Admin needs to click on the “+” button for adding new user consent. These are the configuration options:
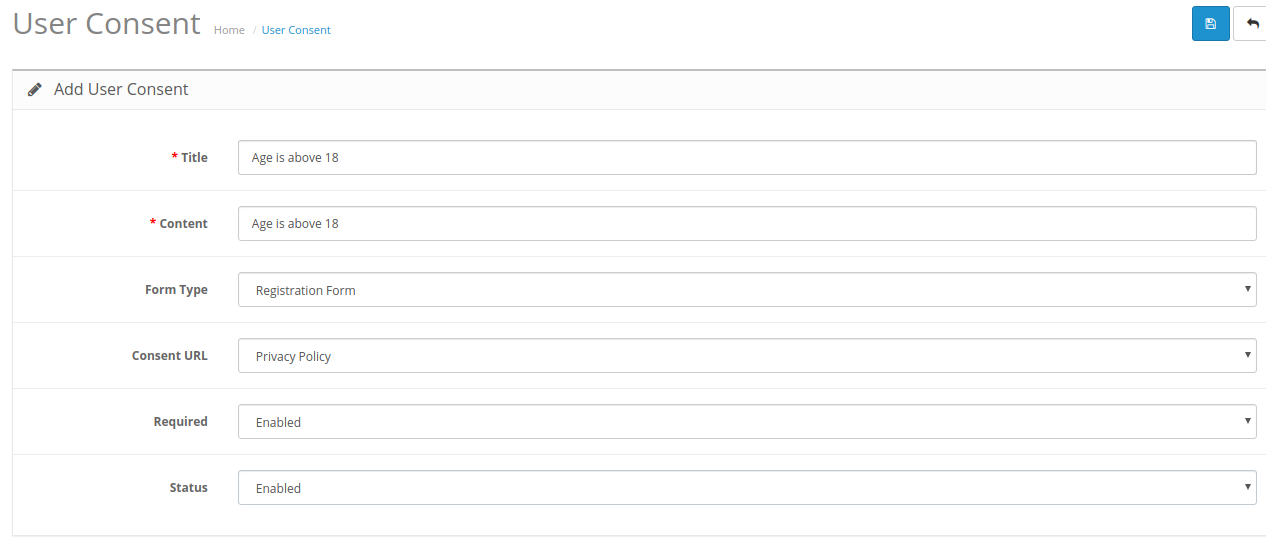
  • Title: Set the title for user consent.
  • Content: The online merchant can enter content for user consent.
  • Form type: Select form type as registration form or Contact form.
  • Consent URL: Select the page URL where you want to redirect customers.
  • Required: Enable this option to make this field a required field.
  • Status: Enable or disable the user’s consent status.

3.4 CCPA Data Portability

In the OpenCart CCPA Module’s data portability section, the online store merchant can check the log of the data portability requests from the back-end.
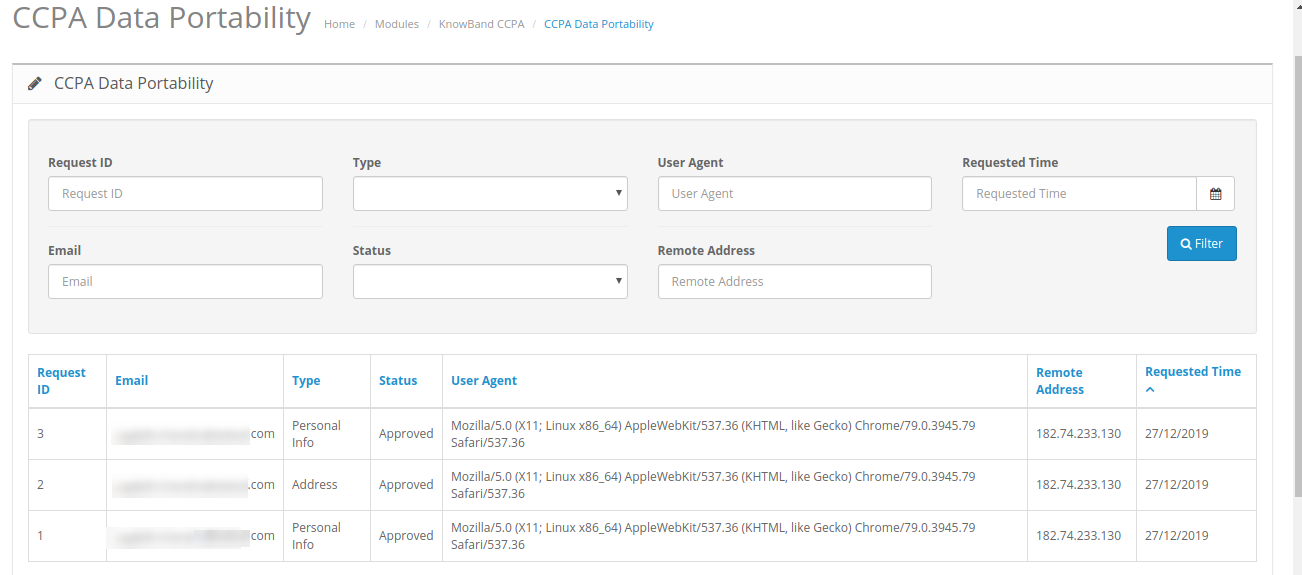
The store merchant can also apply filters for data rectification.

3.5 CCPA Personal Data Request

CCPA module for OpenCart keeps the log of all the personal data requests.
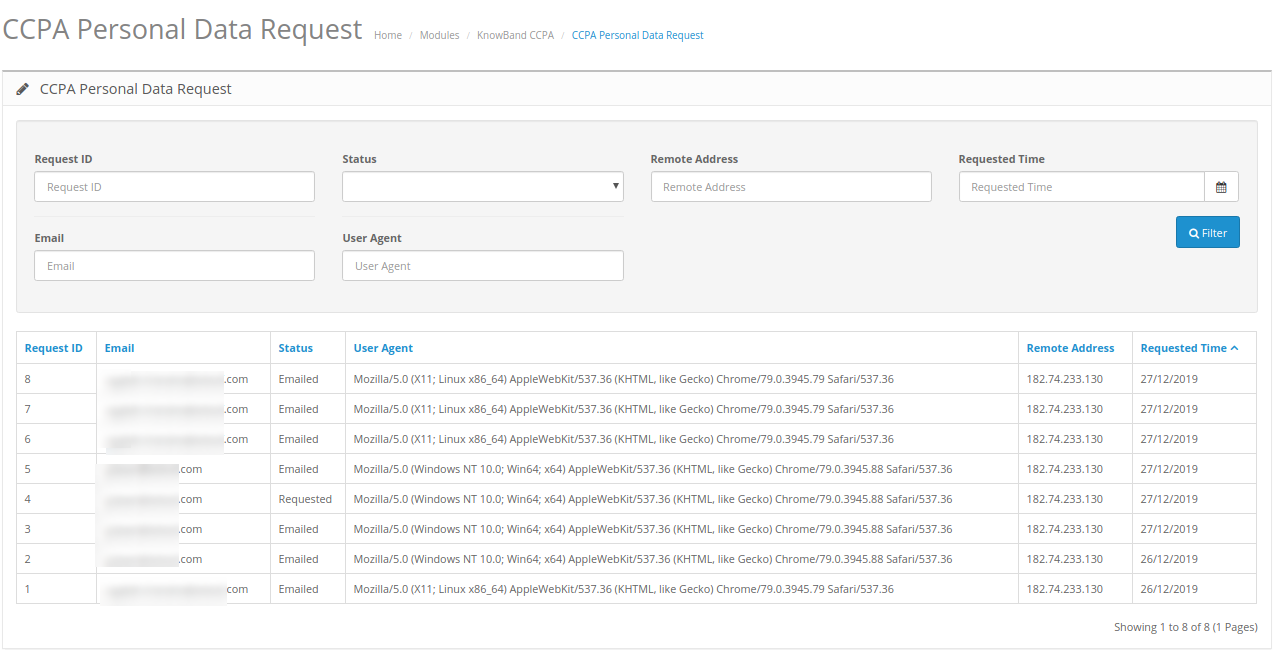
  

The store merchant can view the personal data request details from the admin interface of this CCPA Opencart compliance module.

3.6 CCPA Email Template

CCPA Opencart compliance module has customizable email templates for sending emails to the customers on various requests.
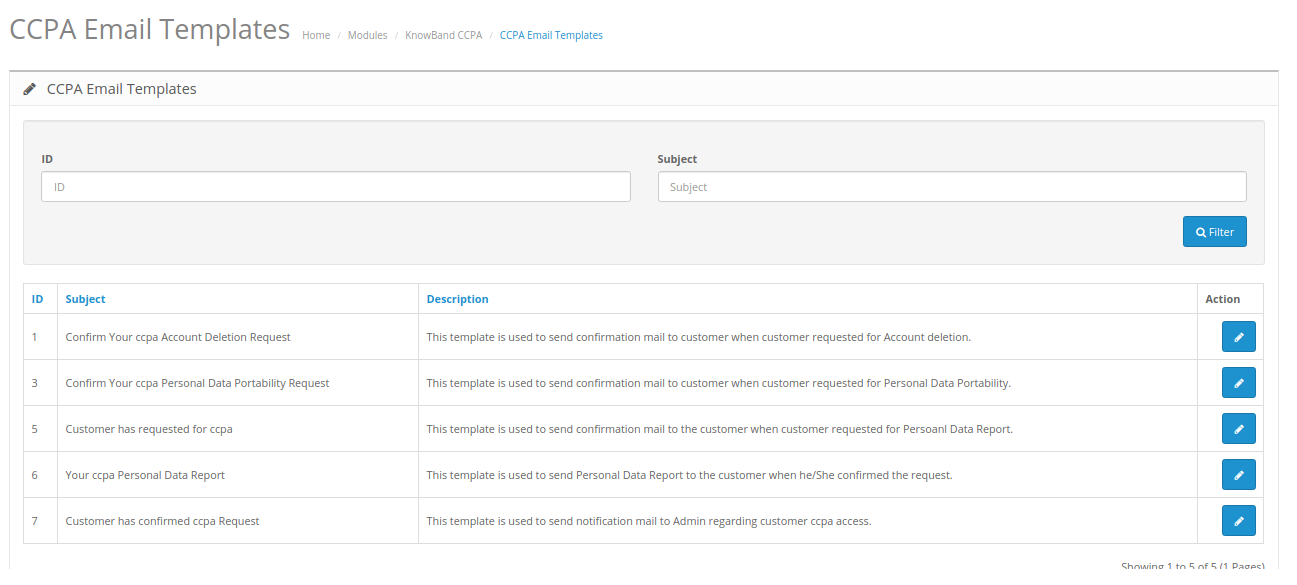
  • Confirm Your CCPA Account Deletion Request: This template is used to send the confirmation mail to the customer when the customer requested for Account deletion.
  • Confirm Your CCPA Personal Data Portability Request: This template is used to send the confirmation mail to the customer when the customer requested for Personal Data Portability.
  • The customer has requested for CCPA: This template is used to send the confirmation mail to the customer when the customer requested for Personal Data Report.
  • Your CCPA Personal Data Report: This template is used to send Personal Data Report to the customer when he/She confirmed the request.
  • The customer has confirmed CCPA Request: This template is used to send a notification mail to Admin regarding customer CCPA access.

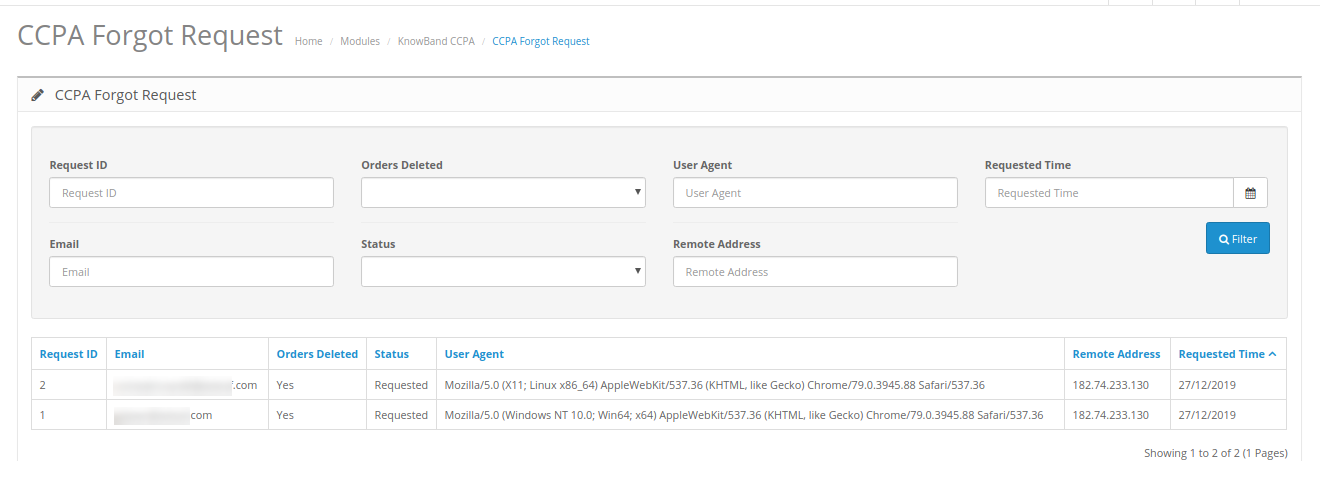
3.7 CCPA Forgot Request

OpenCart CCPA Extension keeps the log of the forgot requests. Admin can use this information to delete customer’s accounts.
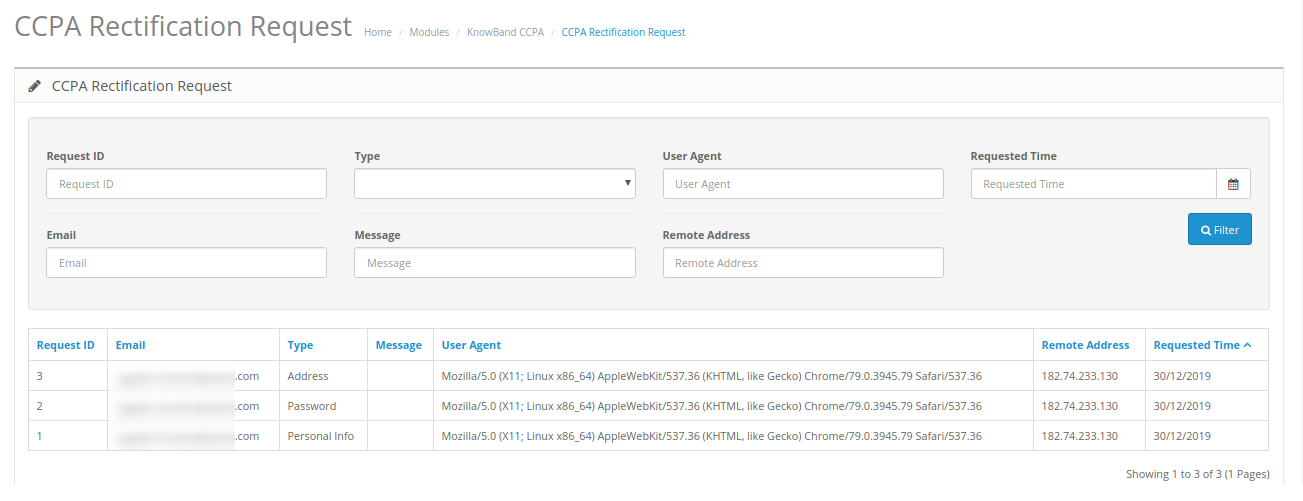
3.8 CCPA Rectification Request

OpenCart CCPA Compliance module keeps the log of the data rectification requests. Admin can use this information to modify the customer data on the third party services.
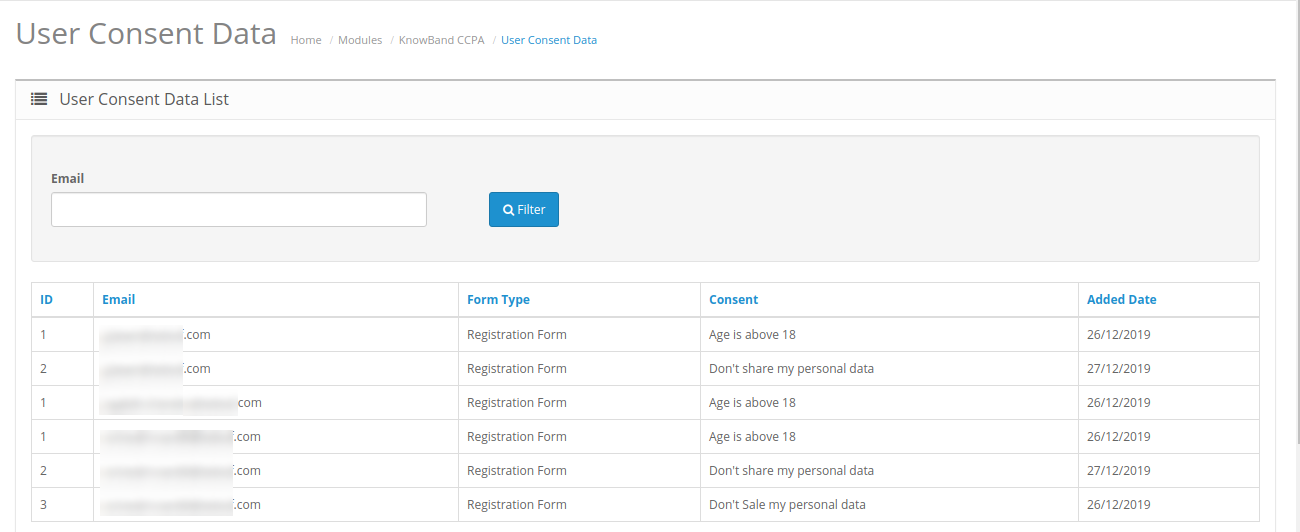
3.9 CCPA User Consent Data

In user consent data details, the store admin can view the user consent data list in which he can check the consents accepted by customers.
4.0 Front-end Interface

The online consumers can click on “Do not Sell my Data” header link as shown below:
The online users will view a cookie consent bar as shown below:
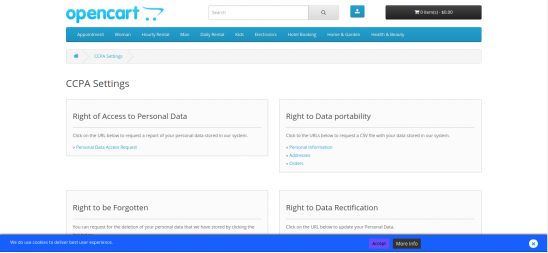
Online users can accept the click on accept for better user experience. the users can also click on more info page.

After clicking on this link, online users will get these options:
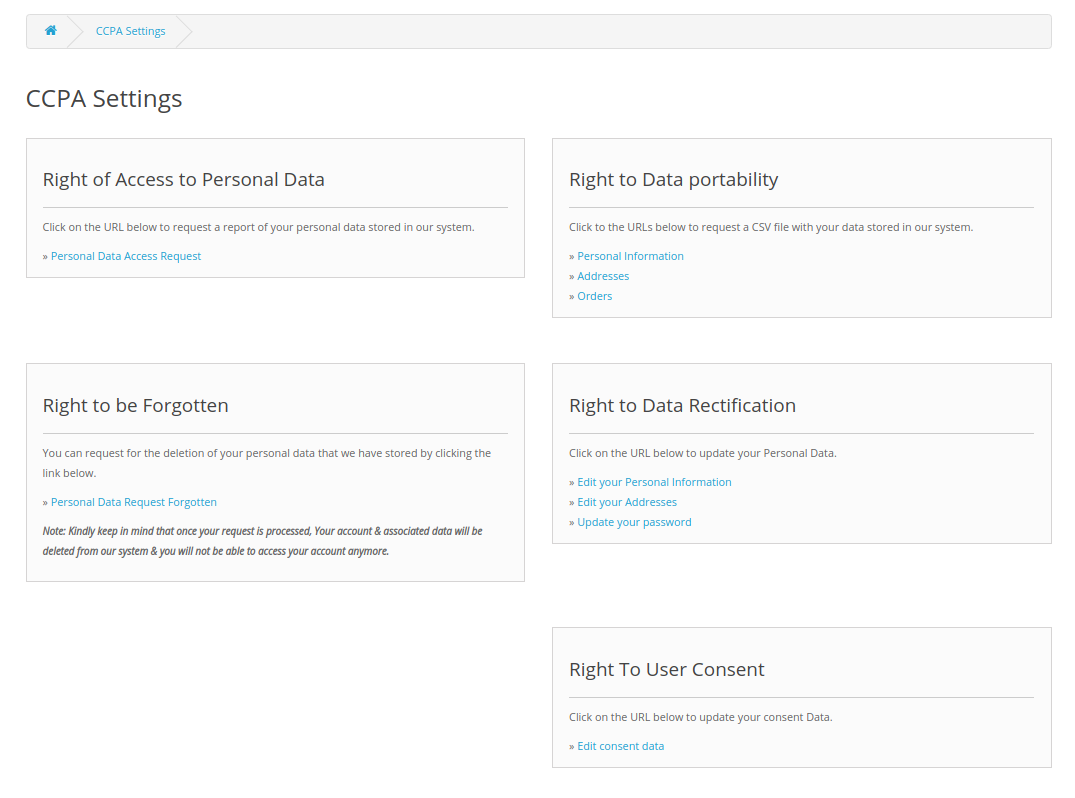
1. Right to Access Personal Data: Online users can click on “Personal Data Access Request” for getting personal data reports.
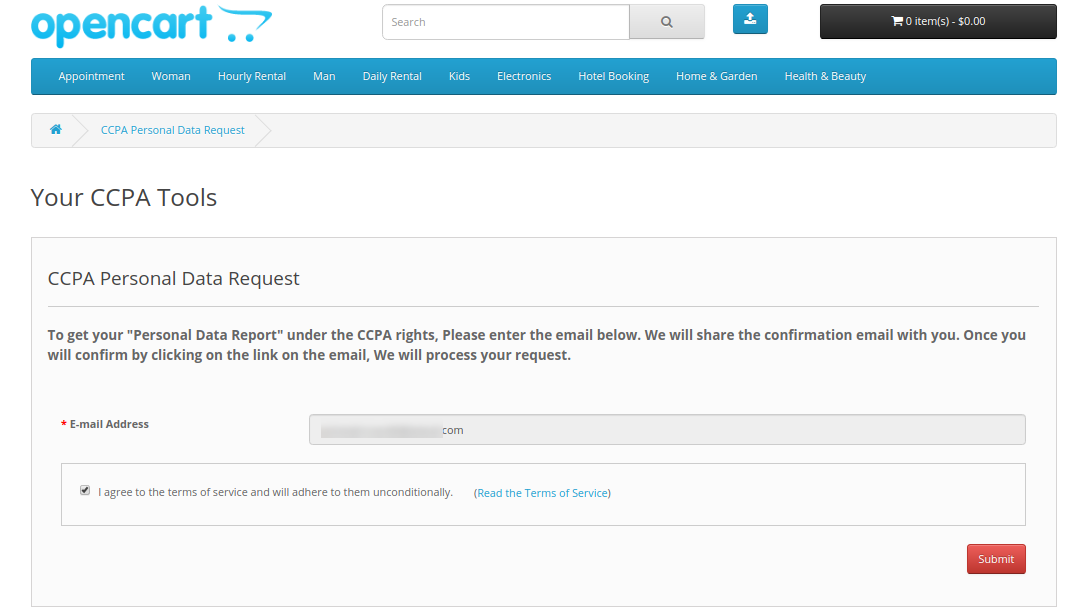
After submitting the request, the customers will get a confirmation request as shown below:
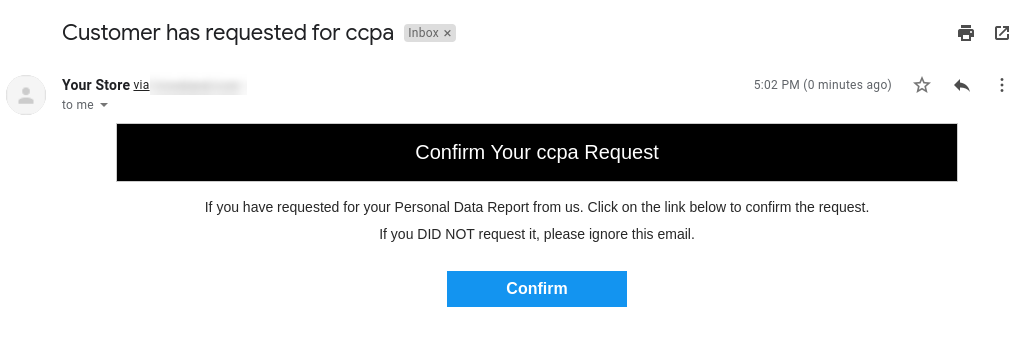
 

After confirmation, the online users can get an email along with the account details, address information, order details, Third-party service provider details and CCPA Requests details.

2. Right to Data Portability: Customers can request for data portability from the admin interface of this OpenCart California Consumer Privacy Act Module. The online users can request for downloading personal information, address and orders.
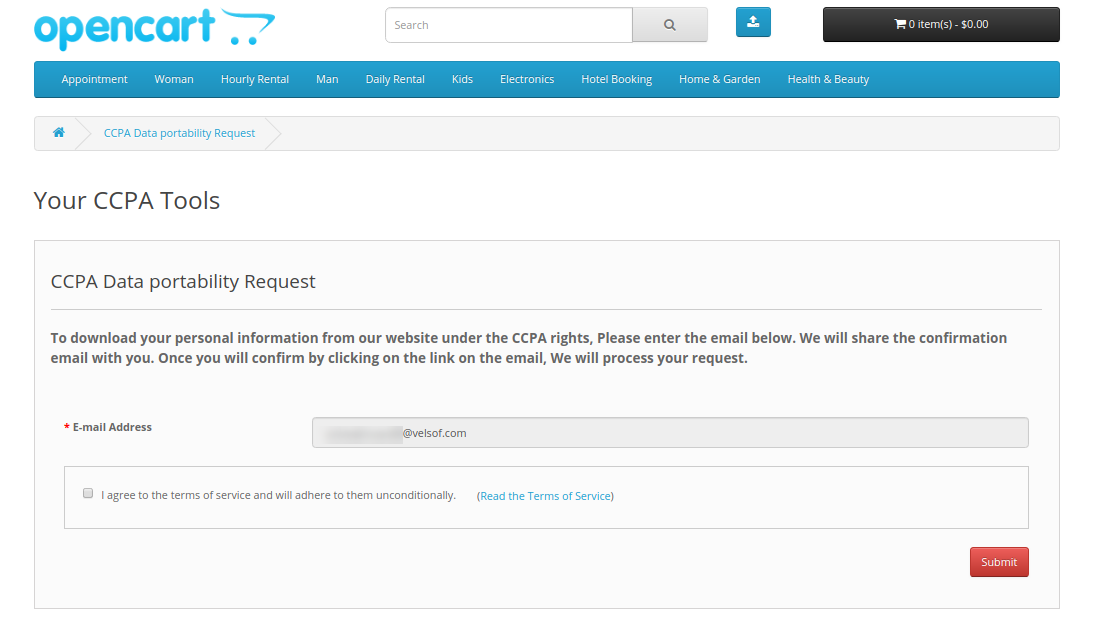
After clicking on the submit button, users will get a confirmation email as shown below:
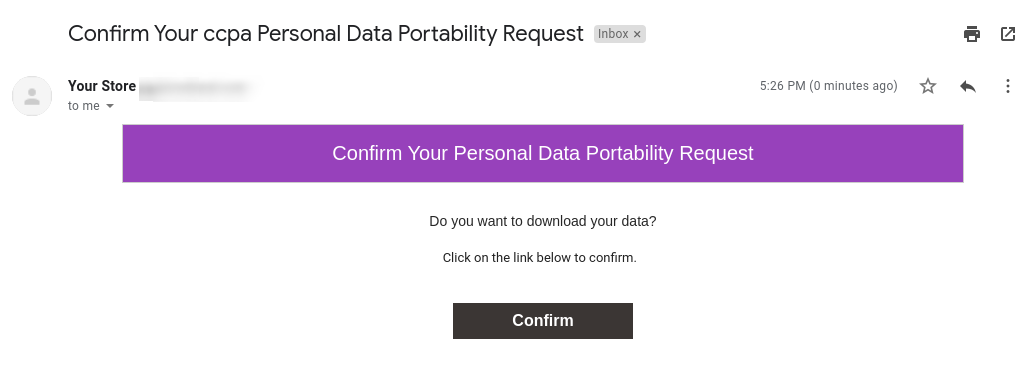
They can confirm and get a download link as shown below:
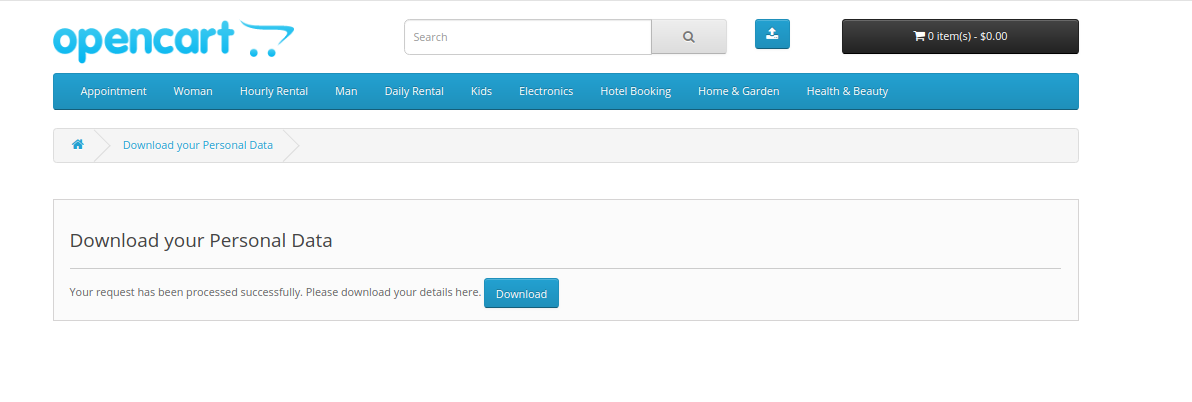
They can get a CSV file which includes their personal information.

3. Right to be Forgotten: The online users can request for using their right to be forgotten. In this option, they need to click on the “Personal Data Request Forgotten” link and provide email details.
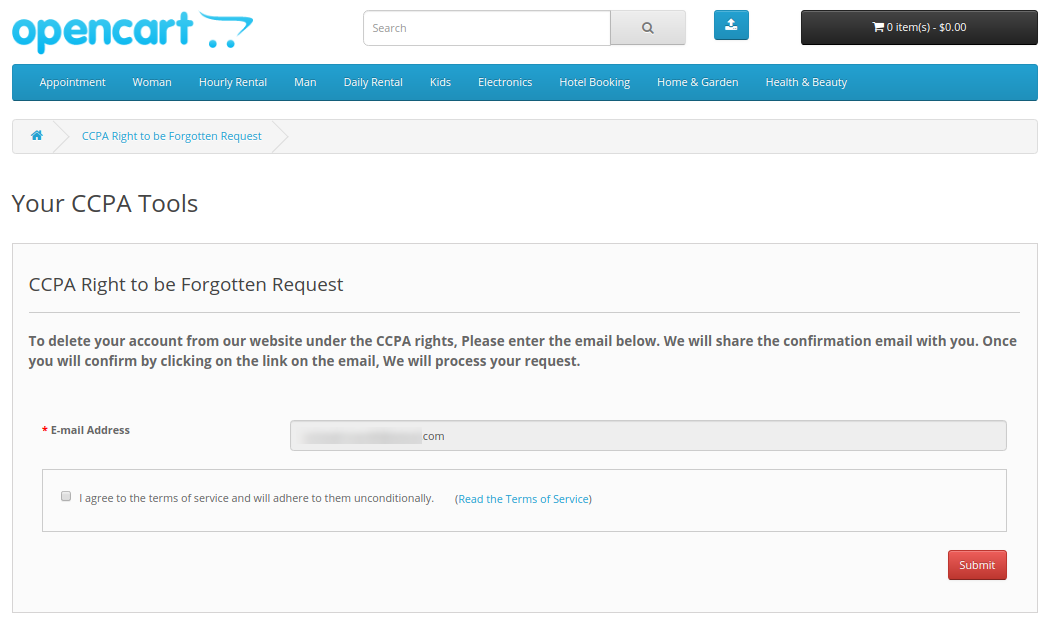
 

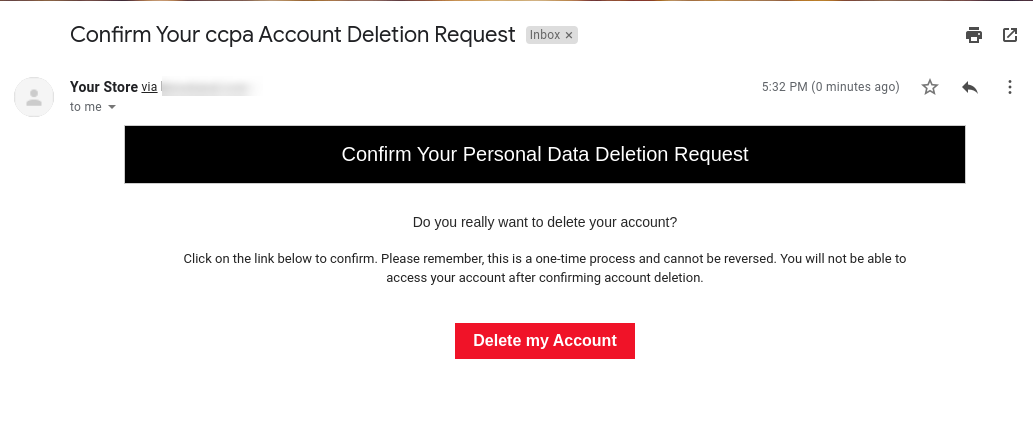
After submitting the details, the users will get a confirmation email. The users can delete their account by clicking on the provided link.
4. Right to Data Rectification: The online users can click on provided links and update their Personal Data, Address and password:
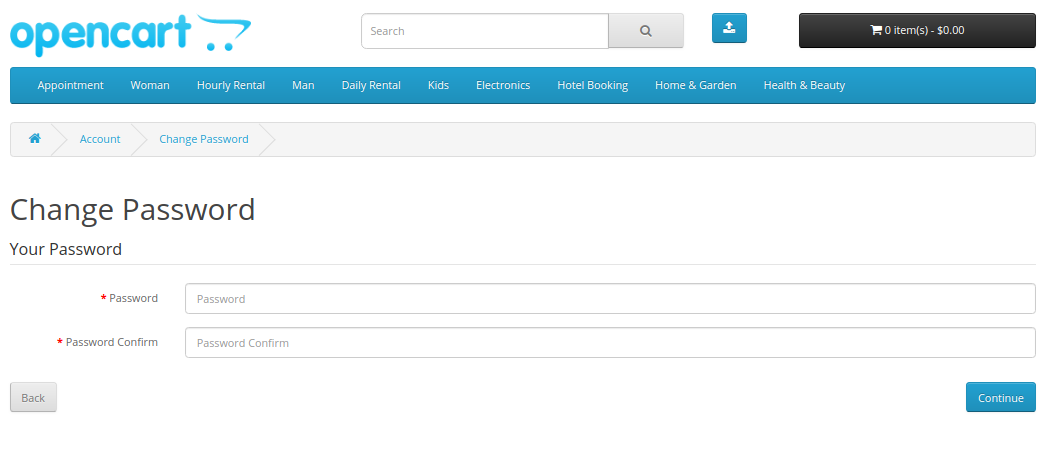
 

After clicking on the confirm button, the users can successfully update their account password.

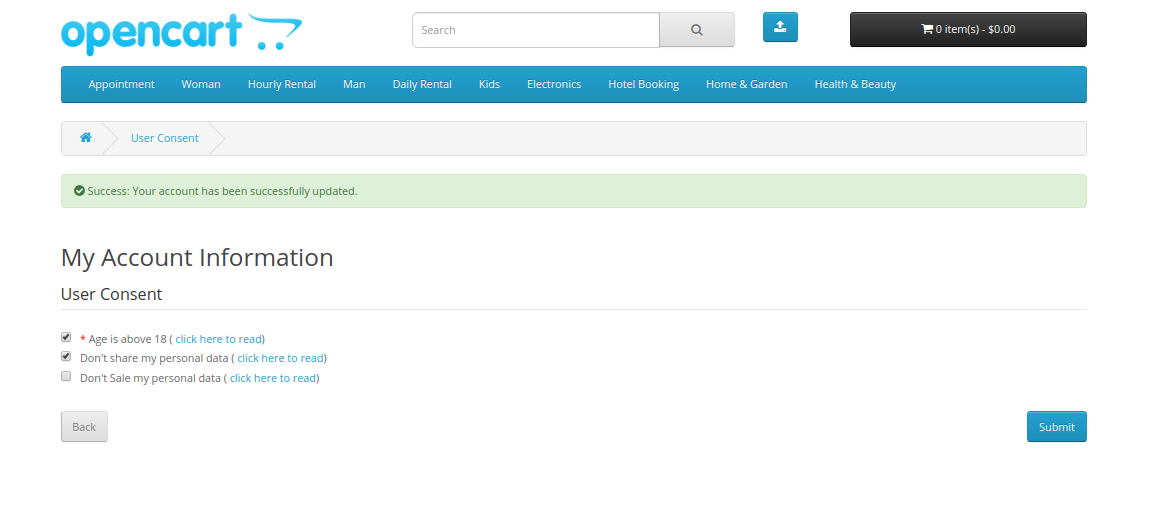
5. Right to User Consent: The online users can also update user consent data by clicking on “Edit Consent data” link:
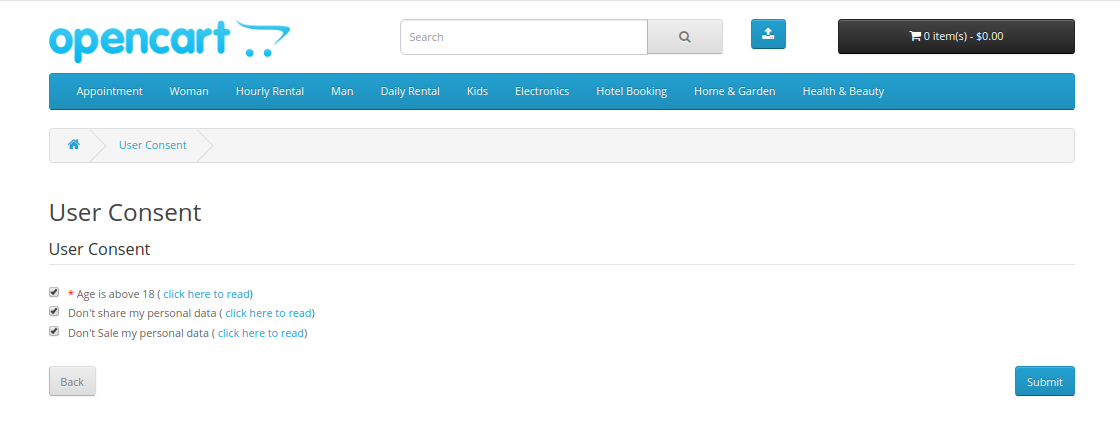
After clicking on the submit button, the online users can successfully update their consent data. A success message will display on the same page for notification.
This way, the online store admin can use OpenCart CCPA Extension for CCPA compliance.
 

OpenCart SEO Redirect Extension | User Manual

1.0 Introduction

It is always desired to keep better quality content and human-readable keywords in order to target high traffic to your website. So, the very first thing you need to make sure that your website shop is more SEO Friendly by rewriting the incorrect website URLs and making your website pages more searchable, using Knowband’s OpenCart SEO Redirect module. This module also provides redirect URL features for your website shop and you can implement any redirection like 301, 302 and 303 type. Redirect feature informs the customer’s browser that the page is moved and it will automatically switch to a new page of your choice.
1.1 Striking Features of OpenCart SEO Friendly URL Extension

  • OpenCart SEO Friendly URL extension helps to convert default URLs into SEO friendly URL.
  • OpenCart URL Redirect module automatically fetches all the duplicate URLs at your store which can modified or removed as per business needs.
  • With the OpenCart Rewrite URL module, you can redirect the old URLs into new URLs using 3 redirection choices as 301, 302 and 303 redirect type.
  • OpenCart SEO Redirect module helps to restructure your store by reforming incorrect store links of product pages and categories.
  • OpenCart URL Redirect module helps in improving website SEO in Google search results.
  • OpenCart Friendly URL Module is multi-store and multi-lingual compatible.
  • OpenCart SEO Optimizer offers an easy to use backend which requires no coding skills for configuring module settings.
  • OpenCart URL Redirect module allows changing all the known SEO URLs into SEO URLs.
  • OpenCart 301/302/303 Redirect Module allows you to redirect the non HTTPS URL to the HTTPS URL.
  • You can enable or disable the complete functionality of the OpenCart URL Redirect module on a single button click at the backend.
  • OpenCart 301/302/303 Redirect Module allows you to create N number of redirects for your store corresponding to different redirection type.

2.0 Installation Guide of OpenCart SEO Redirect Module

Before starting the installation process, you have to buy the OpenCart SEO Redirect module from the Knowband store. Once purchased, you will receive the following files on your registered email.

  • Source code of OpenCart SEO Redirect in zipped file format
  • User Manual of OpenCart SEO Redirects extension.

Now in order to install this SEO Redirect on your website, follow the given steps:

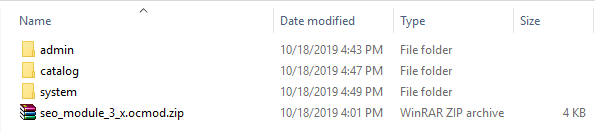
1. Unzip the zip file. You will get the folders as shown in the image below:

2. Copy all the folders of the zip file in the Root Directory of OpenCart setup via FTP manager.

Steps to install Ocmod file using Extension Installer (for v2.3)
1. Open the Extension Installer window from the admin panel.

2. Click on Upload button to browse and upload the install.ocmod.xml file.
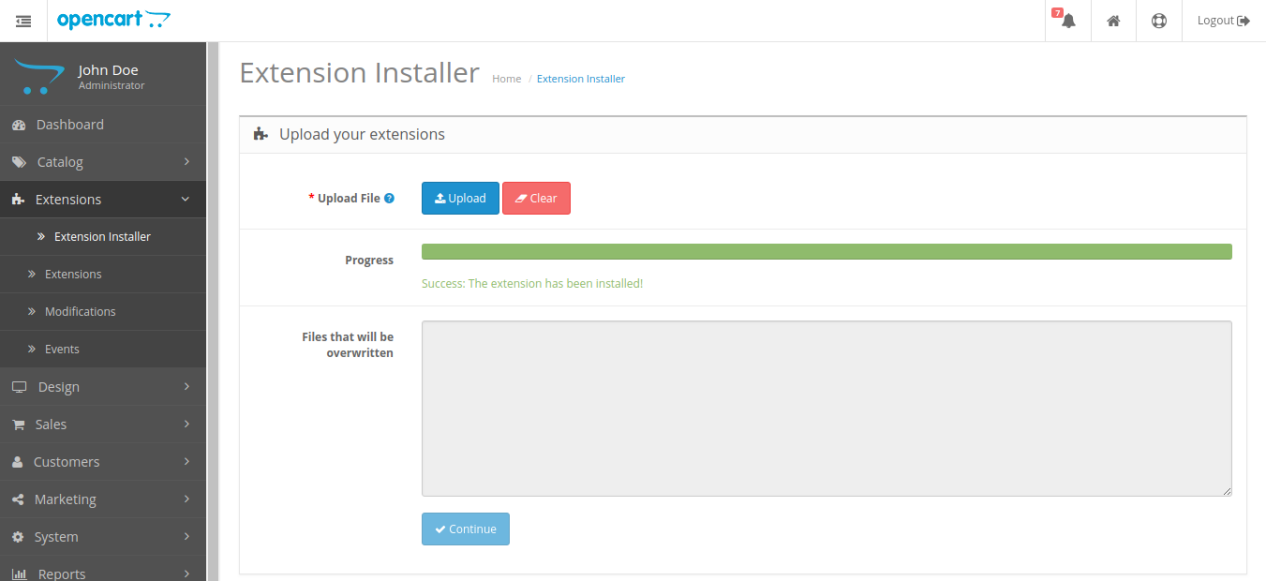
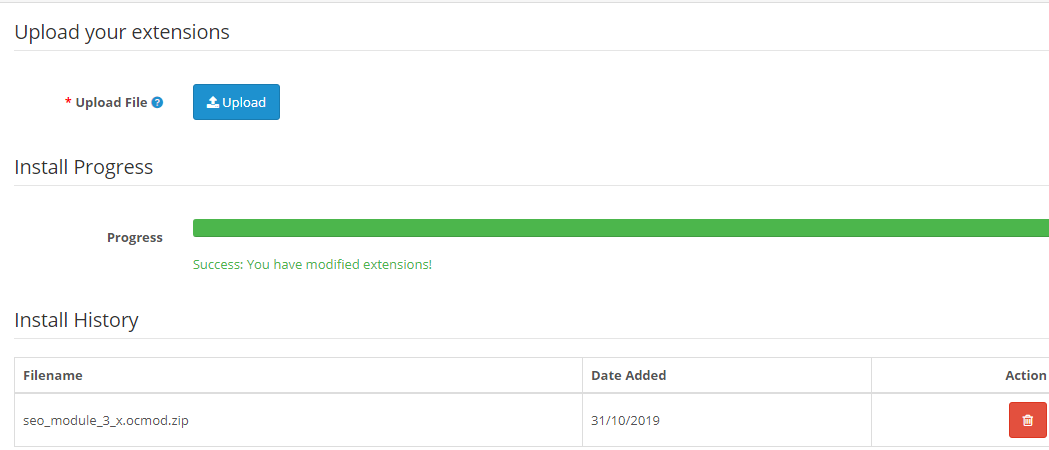
3. Once uploaded, you will see a success message on your screen as shown below.

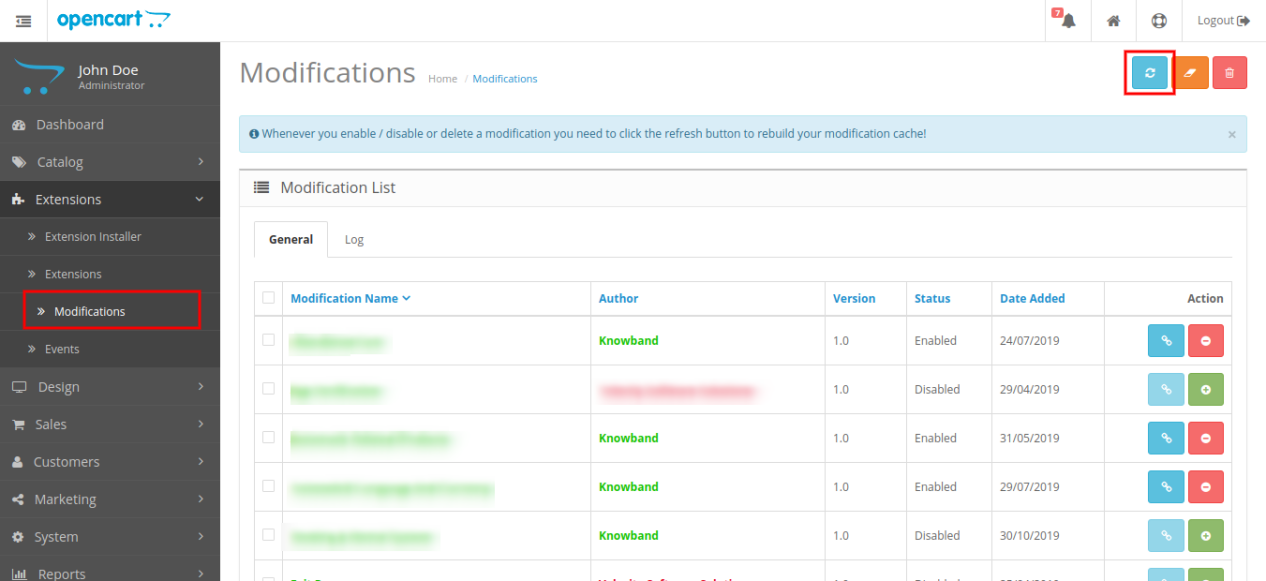
4. Next, go to Modifications tab and click on the Refresh button at the top right side of screen.

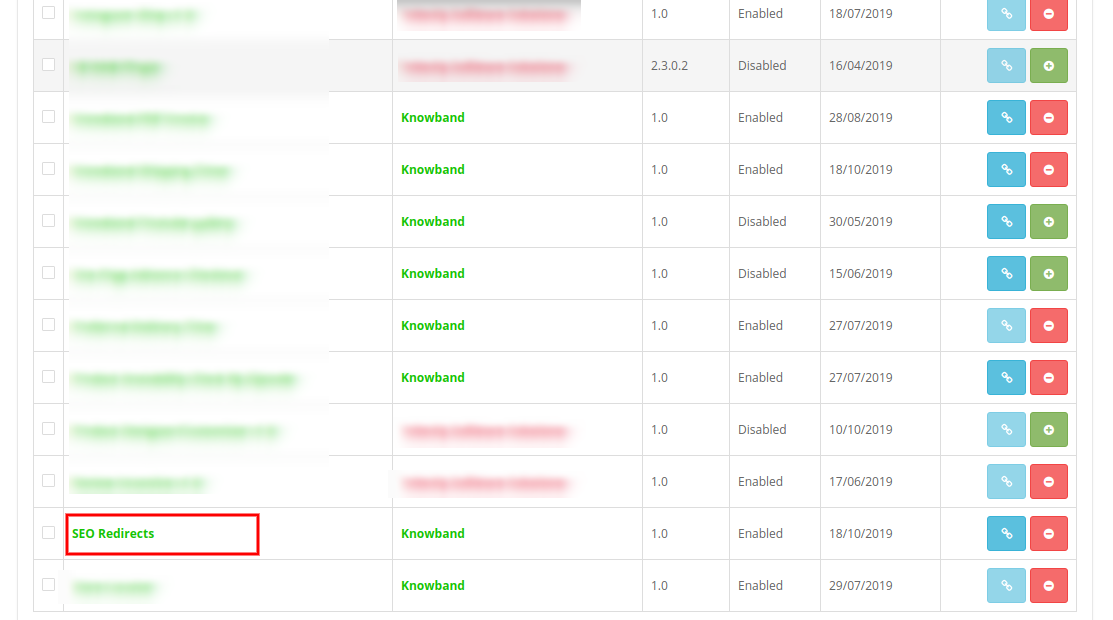
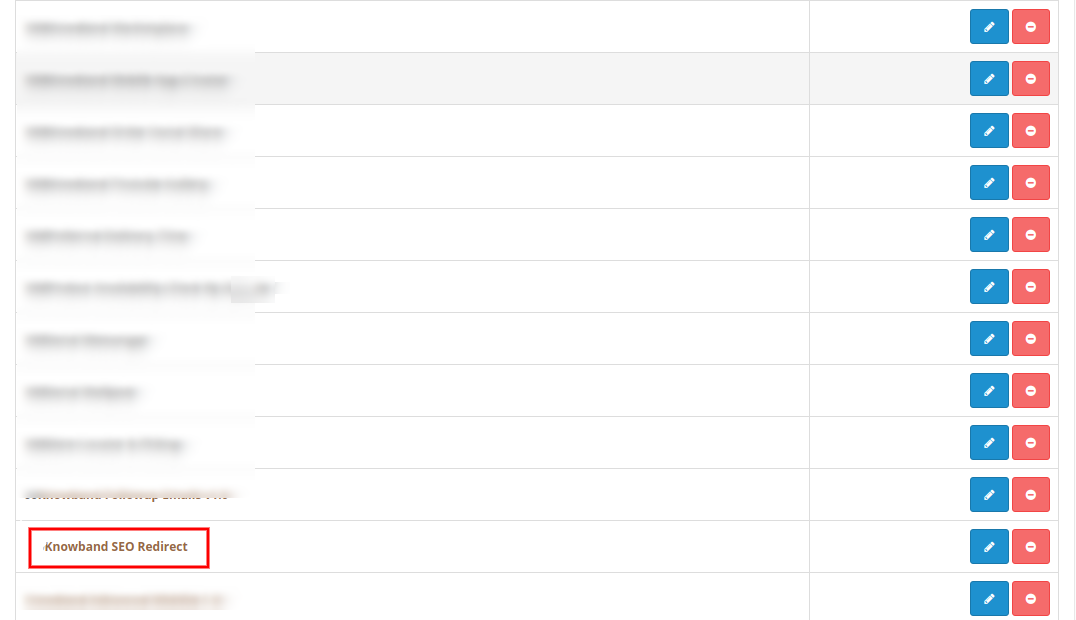
5. Now, scroll down the screen and you will find the SEO redirect module is installed as shown below.


Note:
1. Allow read-write permission to the “kbseoredirection” folder located on the following path: system\storage\download\kbseoredirection
2. For v3.x, you will find an installation file and folder structure as shown below:

While installing the seo_module_3_x.ocmod.zip file, you will see the following image:


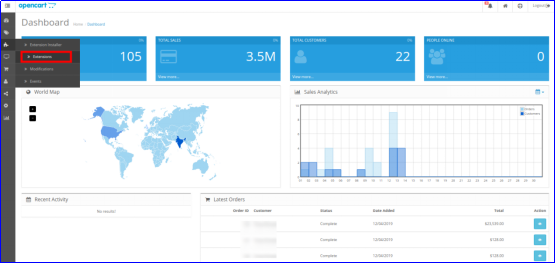
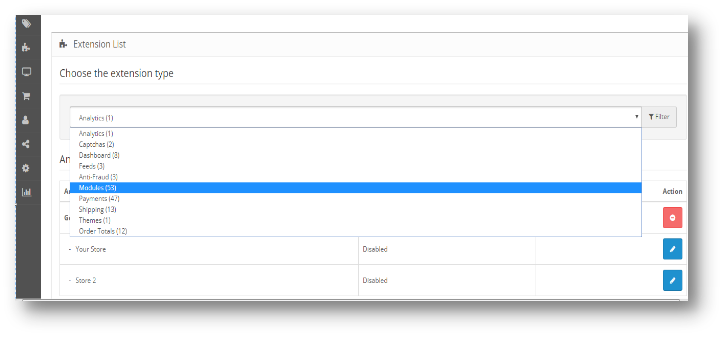
So, OpenCart SEO Optimizer is now installed and is ready to use at your store. Go to the admin menu and click on the extensions. Then, click on Modules and thereby click on Edit button next to Knowband SEO Redirect.

3.0 Admin Interface of OpenCart URL Redirect module

After the successful installation of OpenCart URL Redirect module for your website, you can create as many 404 redirection for your store including 301, 302 and 303. Additionally, OpenCart 404 Redirect plugin eases you in converting the default URL structure at your store into a clean and SEO friendly URLs.
Simply, navigate the settings in the given order: Admin Panel > Extensions > Modules > Knowband SEO Redirect.


The simple to understand admin interface of OpenCart SEO Friendly URL extension is divided into three sections as:

1. General Settings
2. Duplicate URLs
3. 404 Redirects
4. URL Redirects
5. Non SEO URLs

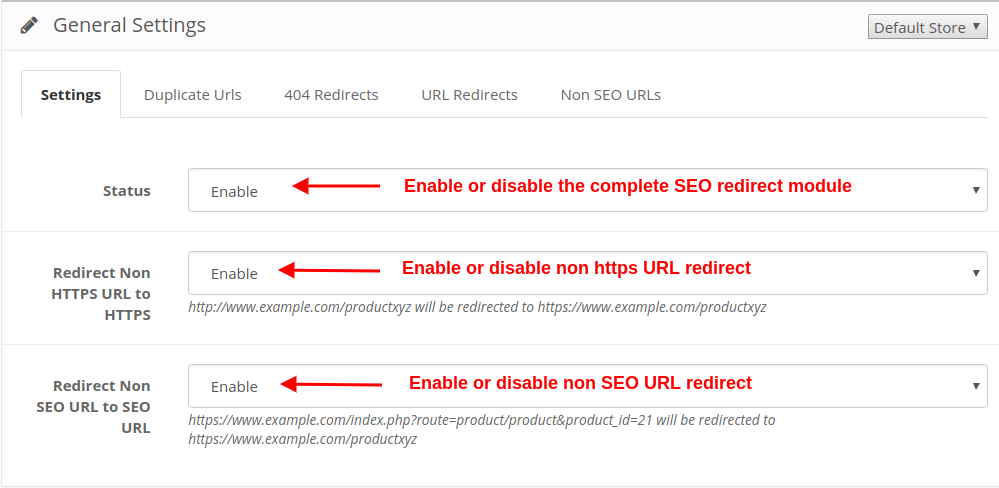
3.1 General Settings

  • Status: This option will enable or disable the complete functionality of URL Redirect for OpenCart store.
  • Redirect Non HTTPS URL to HTTPS: By enabling this option, the non https URL will be automatically redirected to https URL. But if this setting is disabled, the non https URL will remain unsecured.
  • Redirect Non SEO URL to SEO URL: By enabling this option, the non SEO URL can be converted to SEO URL.

3.2 Duplicate URLs

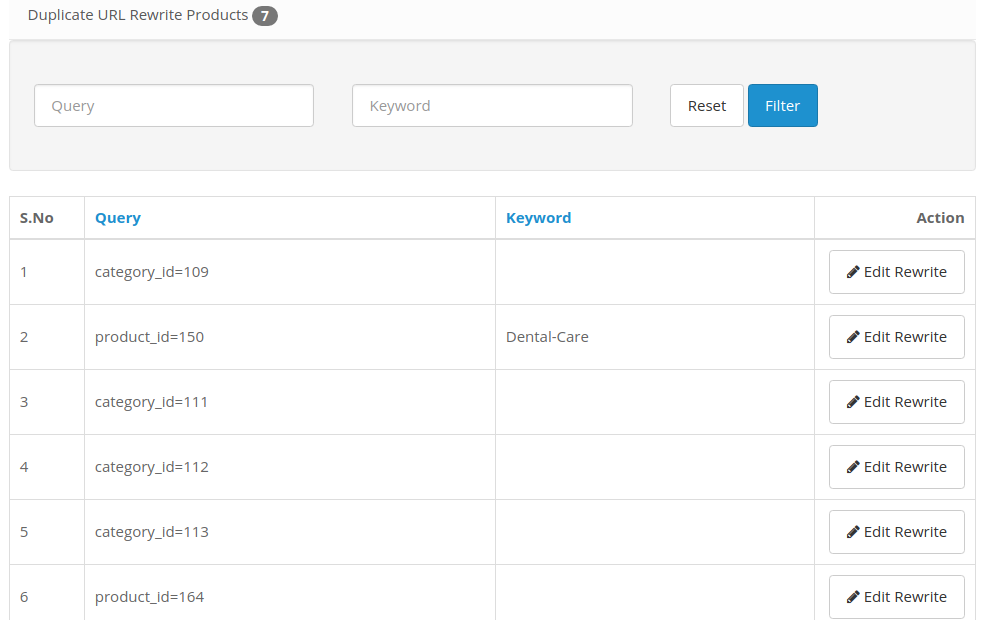
OpenCart URL Redirect module fetches all the duplicate URLs at your store and lists them under this Duplicate URL section. Here, you can simply rewrite any duplicate URL and change it into a new SEO friendly URL by adding an appropriate keyword.
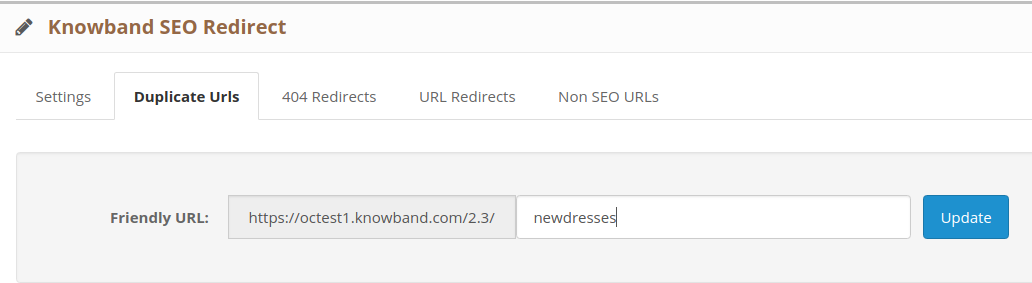
Click on “Edit Rewrite” button corresponding to a URL and you can update the URL as shown below:

The duplicate URL you rewrite and update is automatically removed from the list. This way, you can change all the duplicate URLs into a unique or SEO friendly URL.

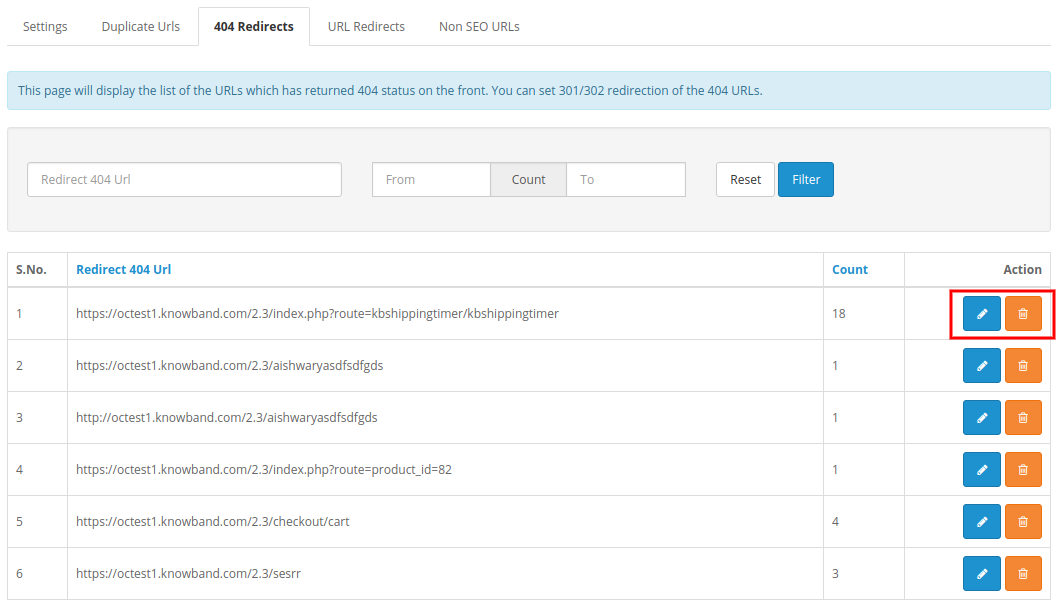
3.3 404 Redirects

From this section of OpenCart 301/302/303 Redirect Module, you can check the list of 404 redirects. You can find all the redirect 404 URL along with an option to “Edit Redirect” or “Delete Redirect”. Also, you can check the hit count corresponding to a specific wrong URL.
You can edit any wrong redirect with the options given below:

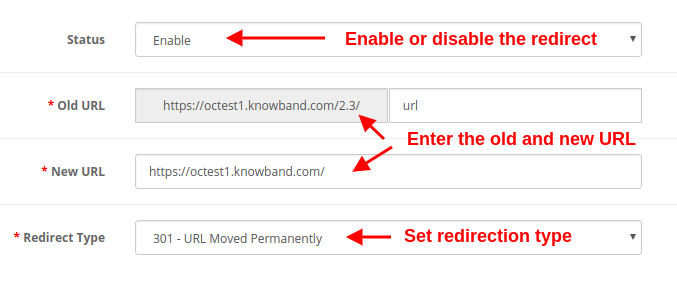
  • Status: This option enables or disables the specific 404 redirect.
  • Old URL: This field specifies the incorrect or wrong URL redirecting to 404 page.
  • New URL: With this field, you can specify the new URL to which you want to redirect the old URL.
  • Redirect Type: This option allows you to set the redirection type as 301, 302, and 303.

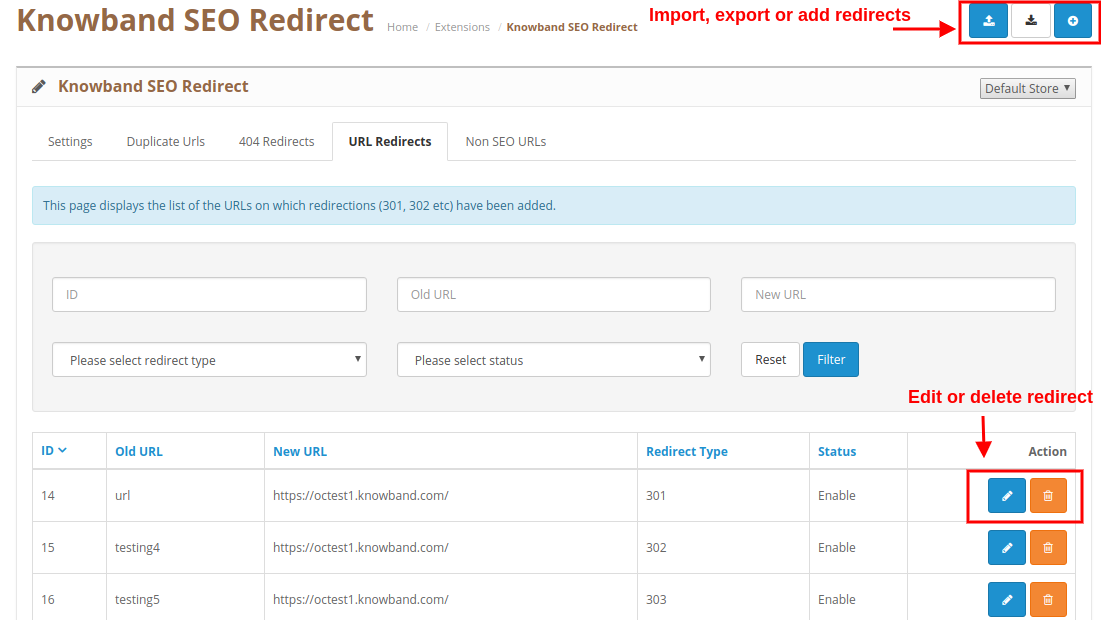
3.4 URL Redirects

From this section, you can view and manage all the SEO redirects at your store. These redirects can be edited or deleted by clicking on the “Edit” or “Delete” button.

You can add a new redirect or you can modify the existing redirection using the “Edit” or “Delete” button.
Editing an existing Redirect

Bulk Upload

3.5 Non SEO URLs

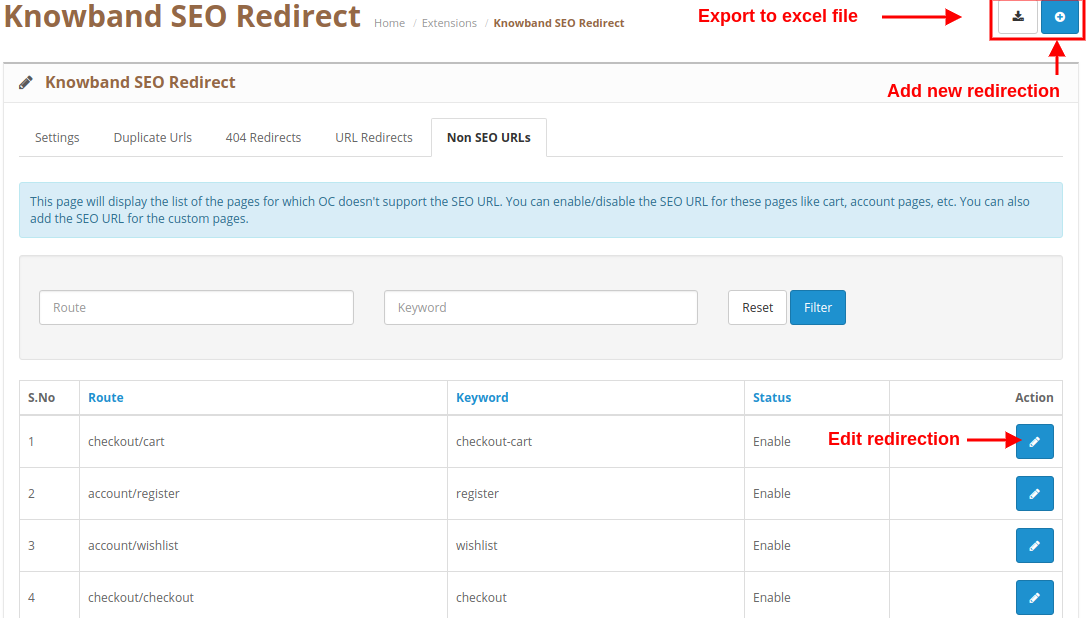
OpenCart SEO Redirect module provides a detailed interface to check the non SEO URLs at your store. You can easily edit the existing redirection or can add a new redirection for your store.

For more details about this OpenCart 301/302/303 Redirect Module, visit here:

OpenCart 404 Redirect module page link

OpenCart Clean URL module Admin Demo Link

OpenCart Fixed Duplicate URL extension Front-Demo Link

OpenCart Friendly URL Module Marketplace Link

OpenCart Booking and Rental System Extension- User Manual

1.0 Introduction

The online store merchant can now allow the online users to rent products, fix appointments and book hotels from the website. Knowband offers OpenCart Booking and Rental System Extension which is highly customizable and allows the online merchant to show hourly rental products, daily rental products, hotels for booking and appointment options. The online merchant can create a dynamic booking system easily without any hassle. This OpenCart Reservation And Booking Module allow the online merchant to set pricing, time slots, date availability, number of maximum available appointments/bookings/quantity from the admin interface.
The online users can fix appointments, book hotels, book hourly rental based products, book daily rental based products easily as per their requirements. The online merchant can also apply price rules for offering a reduced price on specific dates. The Online Booking module for OpenCart shows location using Google Map on the product pages for helping the users. The Hotel booking module for OpenCart is multi-lingual compatible and offers smooth functioning.

1.1 Features of this OpenCart Booking Calendar Extension

  1. The online merchant allows the online users to fix appointments, book hotel rooms and rent any product daily or hourly basis.
  2. The OpenCart Booking and Rental System Extension allows showing Locations using Google maps on the booking/rental product pages.
  3. Admin can create price rules for offering a discount on specific days. Admin can show/hide price rules on the booking/rental product pages.
  4. The OpenCart Reservation And Booking Module allows selecting appointment(Date/Date-time), daily rental(Date/Date-time), hotel booking and hourly rental type products from the admin interface.
  5. The Hotel booking module for OpenCart allows selecting service type ie. branch and home service for Appointment type products. In-home service, the users can get doorstep service and in-branch service type the users need to visit the service provider.
  6. Admin can select the initial price of service, show Google map location, image and availability date/time. Admin can also select the days on which he doesn’t want to offer a particular service.
  7. In hotel booking settings, admin can set the minimum-maximum days of booking, set the hotel rating, Facilities and add rooms of different types.
  8. For a specific room, admin can set the additional price of that room, the number of available rooms, check in-checkout time. Admin can also upload a room image and its facilities.
  9. Admin can create unlimited room categories and activate or deactivate it anytime.
  10. The Booking System Extension for OpenCart allows admin to create multiple room types(ie Deluxe, super-deluxe, semi-deluxe) and set the maximum allowed child/adult count. The store merchant can enable or disable the room types easily as per the requirement.
  11. The Online Booking module for OpenCart allows adding booking facilities and maps it with the product. Admin can add facilities like wifi availability, bathtub, free lunch and map it with hotel rooms. Admin can add images or font awesome for showing booking facilities.
  12. The online merchant can create and apply price rules from the admin interface for offering a discount on particular dates/duration.
  13. Admin can select the product, date type(specific/date range), reduction type(fixed/percentage-based) and reduction amount for applying price rule.
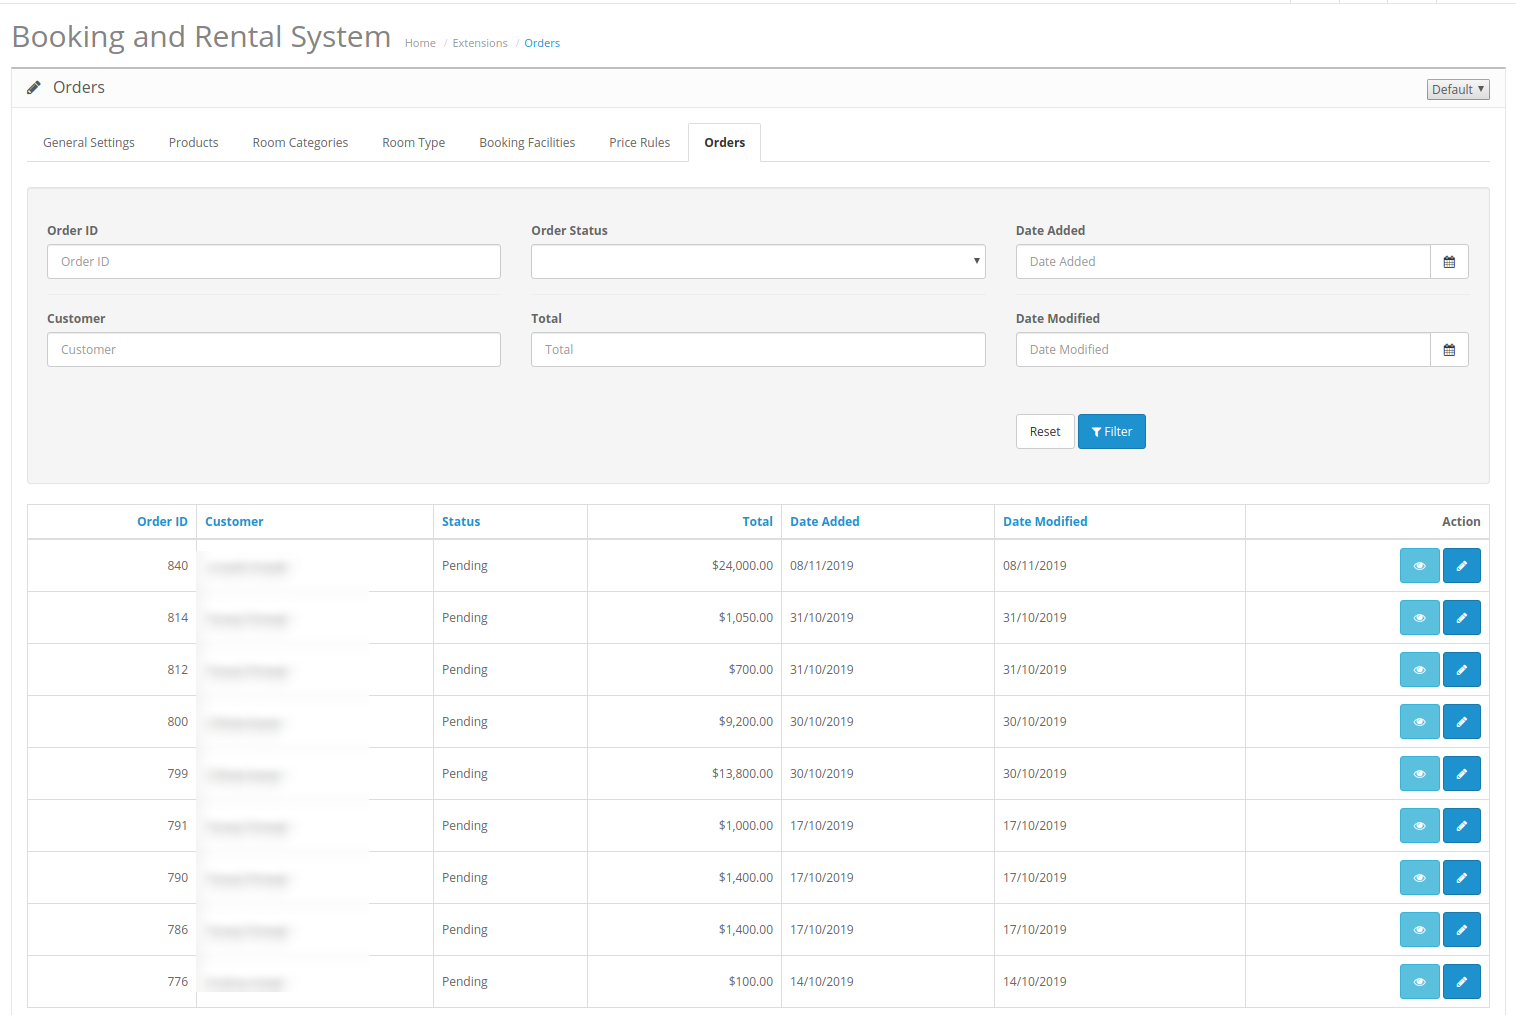
  14. Admin can view a list of all the ordered based on booking and rental. The OpenCart Event Booking plugin allows admin to view and edit the orders from the admin interface.
  15. The Online Booking module for OpenCart is multi-lingual compatible.

2.0 Installation Steps for Booking and Rental System

Purchase OpenCart Booking and Rental System Extension from our store. You will receive these files after purchasing the OpenCart Booking and Rental System Extension:

  • First, you will get a source code file of the OpenCart Booking and Rental System Extension in a zipped file format.
  • User Manual of this OpenCart Booking and Rental System module.

Follow below-mentioned steps to install OpenCart Booking and Rental System Extension:

1.Unzip the received zip file. You will get the folders.

2. Copy all the folders of the zip file in the Root Directory of OpenCart setup via FTP manager.

3. There will be a file named kbbooking_system.ocmod.xml (In case of Openvar v3.0.x file name would be kbbooking_system.ocmod.zip). Upload the same file from the page “Admin -> Extension -> Extension Installer -> upload”.

So, OpenCart Booking and Rental System Extension is now successfully installed and ready to use at your store.

Now go to the admin menu and click on the extensions and thereby click on the configure button next to Booking and Rental System.

3.0 Admin Settings

After installation, the online merchant can apply the settings to implement booking and rental functionality on the website.

There are seven configuration sections as shown below:

  1. General Settings
  2. Products
  3. Room Categories
  4. Room Type
  5. Booking Facilities
  6. Price Rules
  7. Orders

3.1 General Settings

In general settings, the online merchant can apply basic settings related to the rental system.

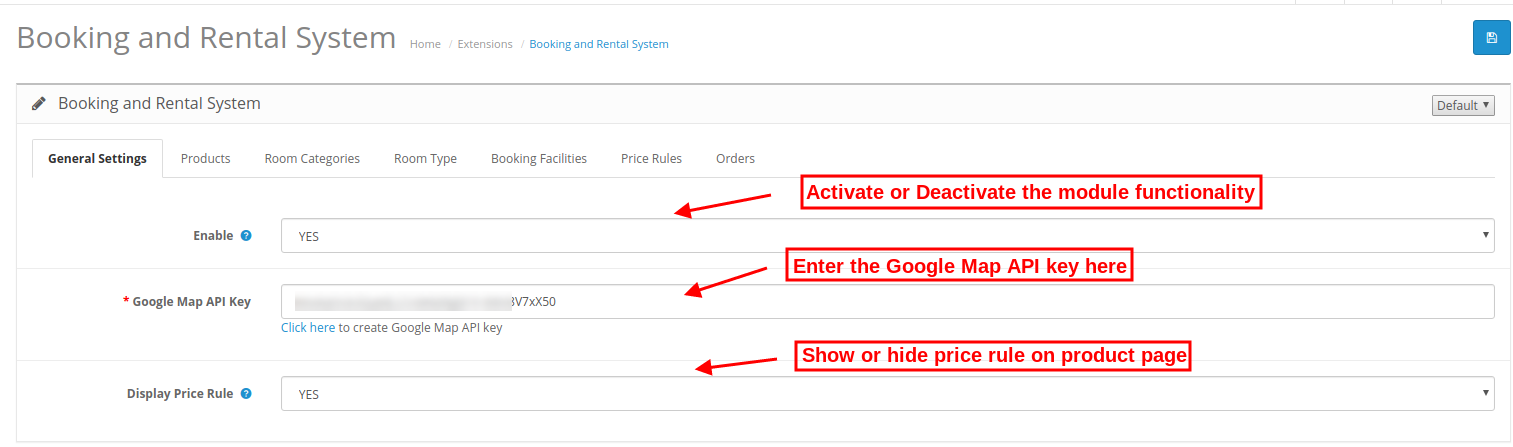
  • Enable: Enable or disable the functionality by selecting yes or no option.
  • Google Map API Key: Enter the Google map API key for Google map integration. The store admin can also get the steps to generate a Google map API key.
  • Display Price Rule: Enable this option to show price rule on the product page.

3.1.1 How to generate the Google Map API key

For generating Google map API key, admin can follow these steps:

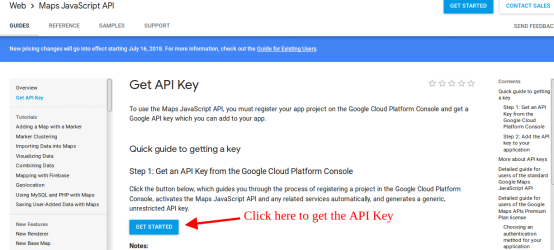
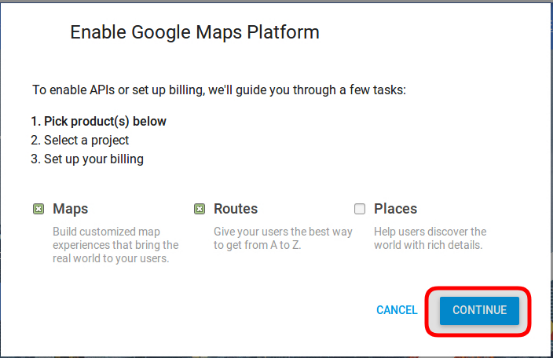
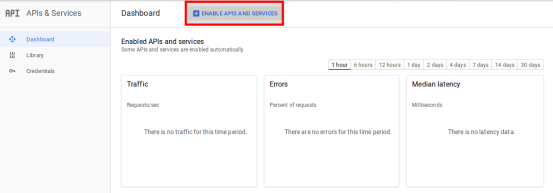
  • Click on the “Get Started” button: First of all click on this button to get Google map API key.

  • Pickup the products: On clicking the “Get Started” button, an admin will view this pop-up.

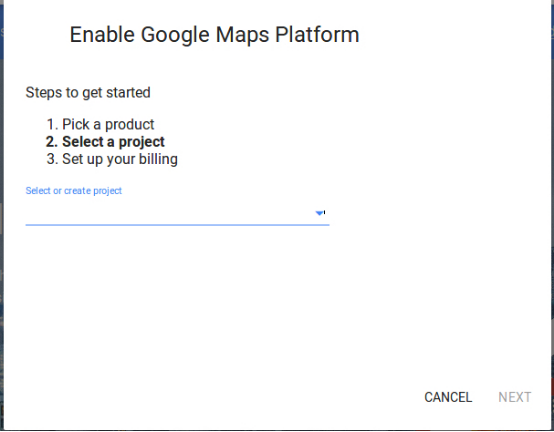
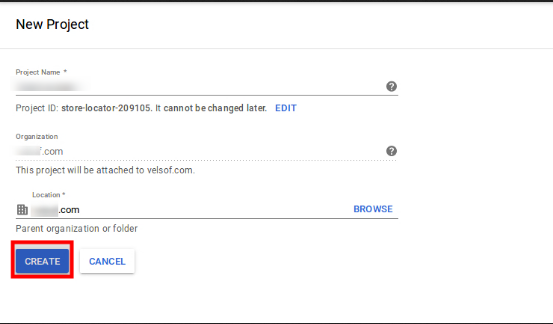
  • Project selection: Now, admin can create or select any project.

1. Select a project:

2. Create a new project:

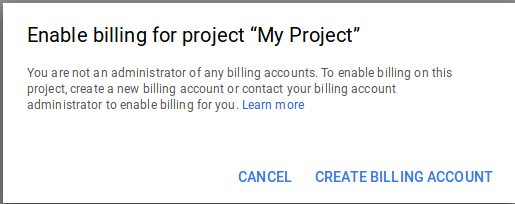
  • Setup the billing: After creating a new project set up the billing.
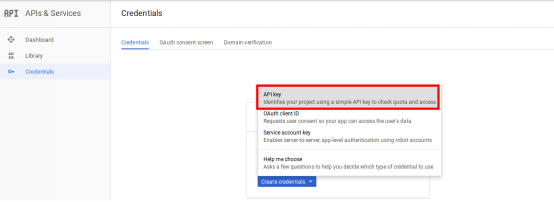
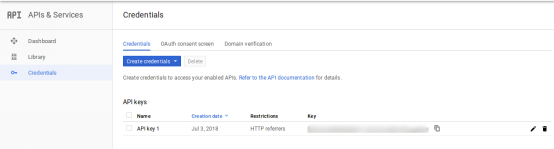
  • After billing the online merchant can get the Google map API key.  On the Credentials page, get an API key:

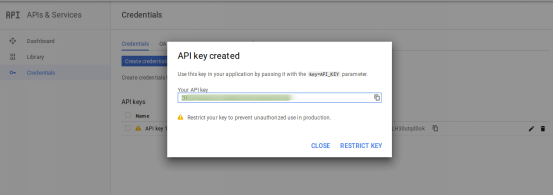
  • The store admin can select the API key option:

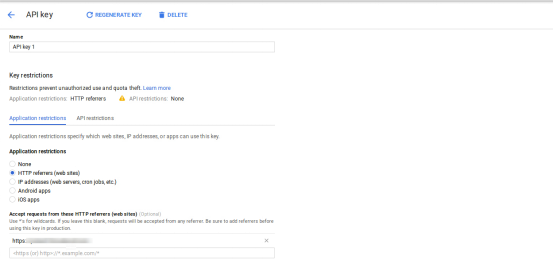
The admin can select the restrict key option from the dialog box to set a browser restriction on the API key.

In the Key restriction section, the store admin can select HTTP referrers (web sites), then follow the on-screen instructions to set referrers.

This way the admin can set the Google map API key.

3.2 Product

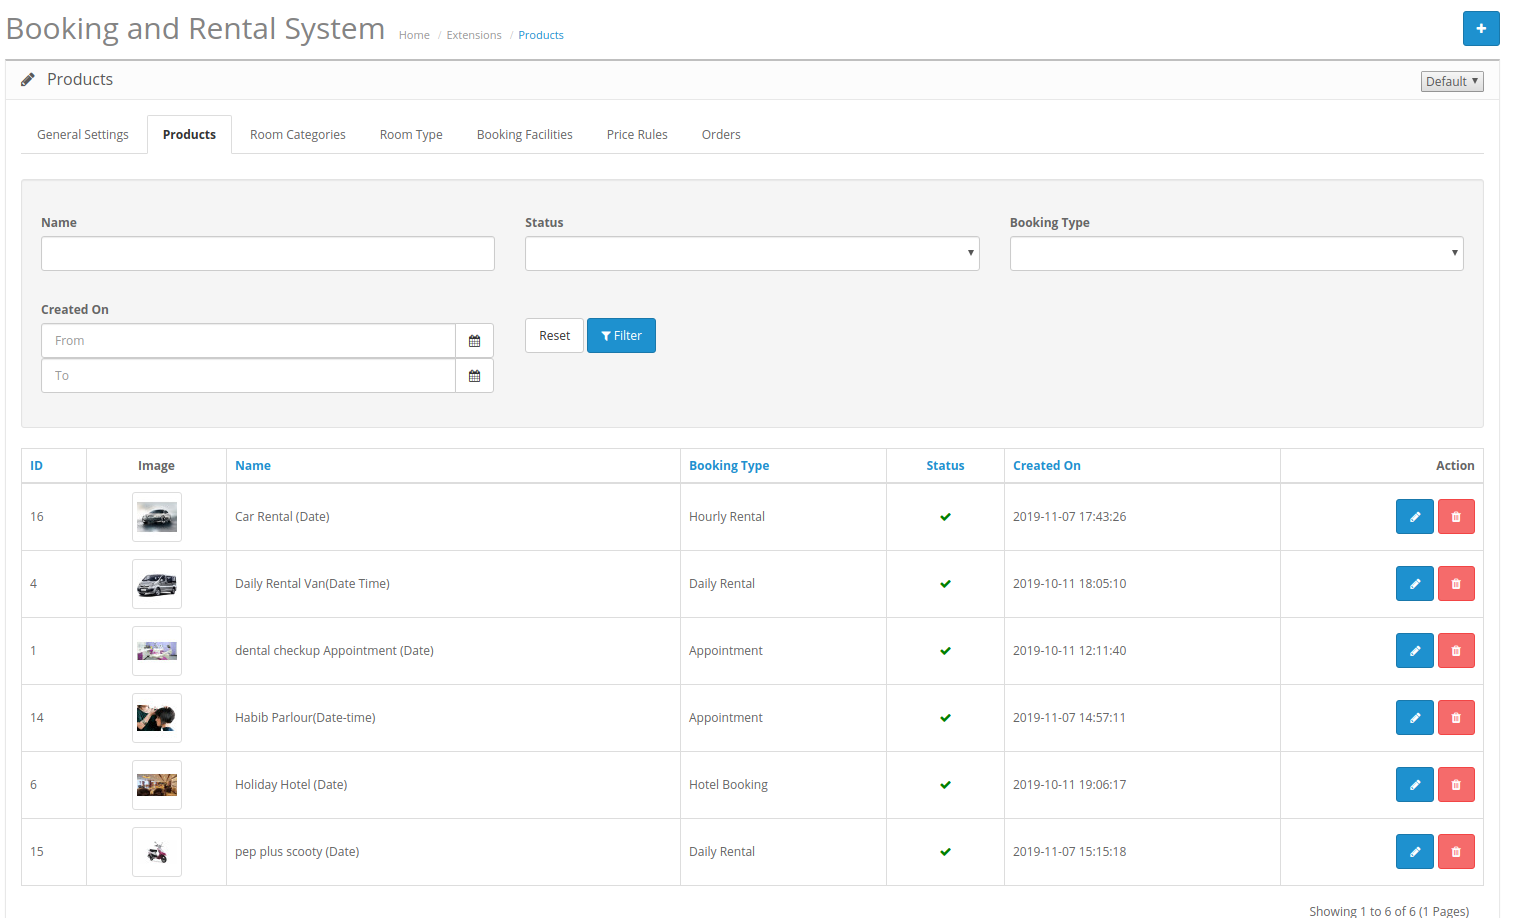
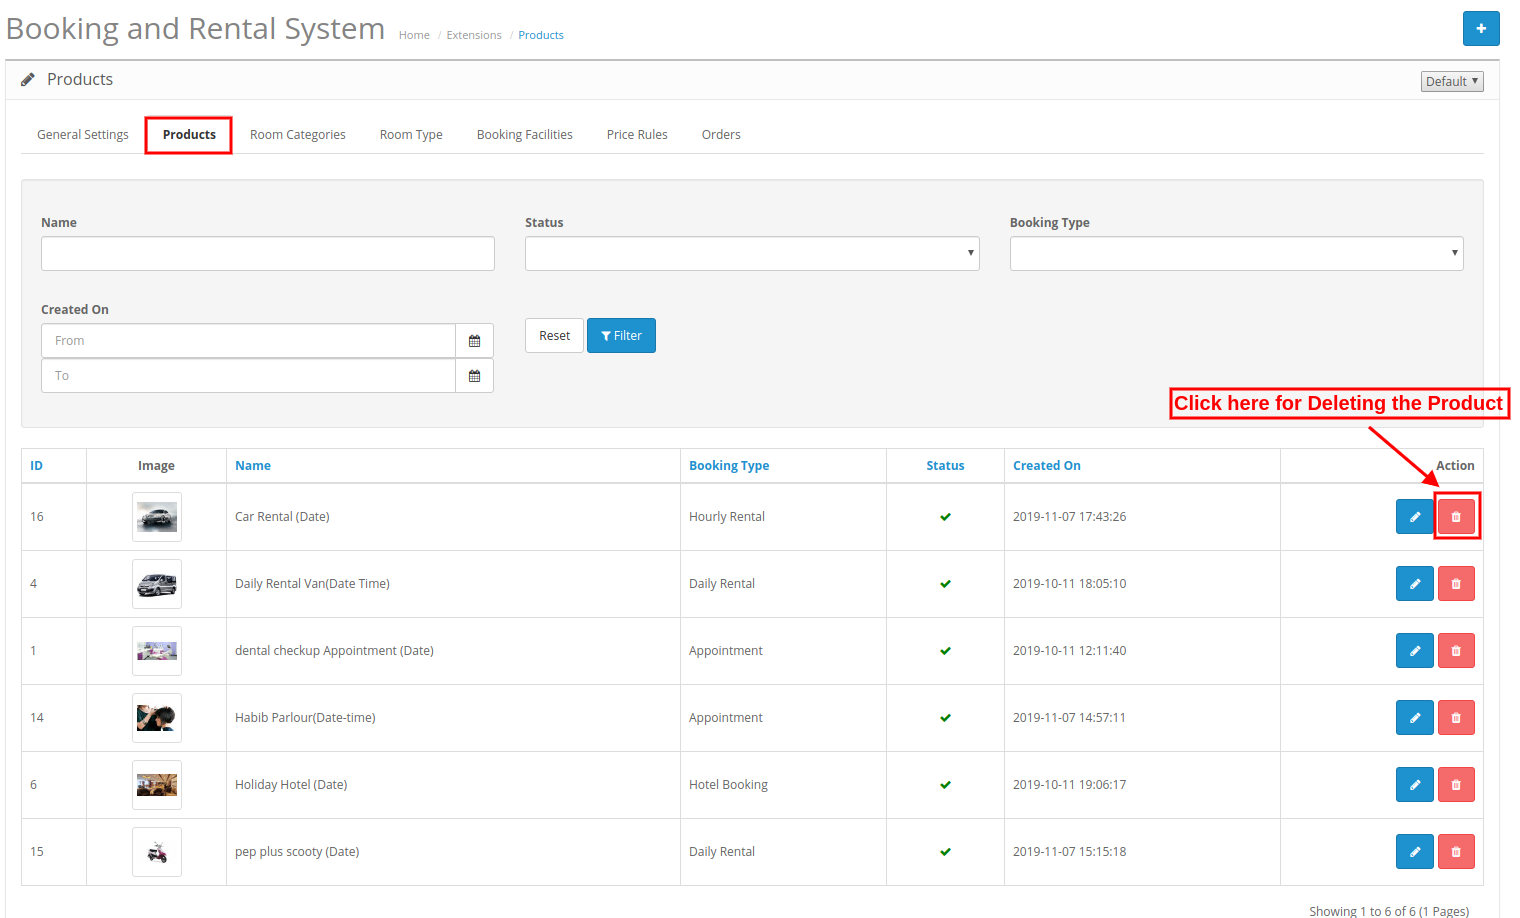
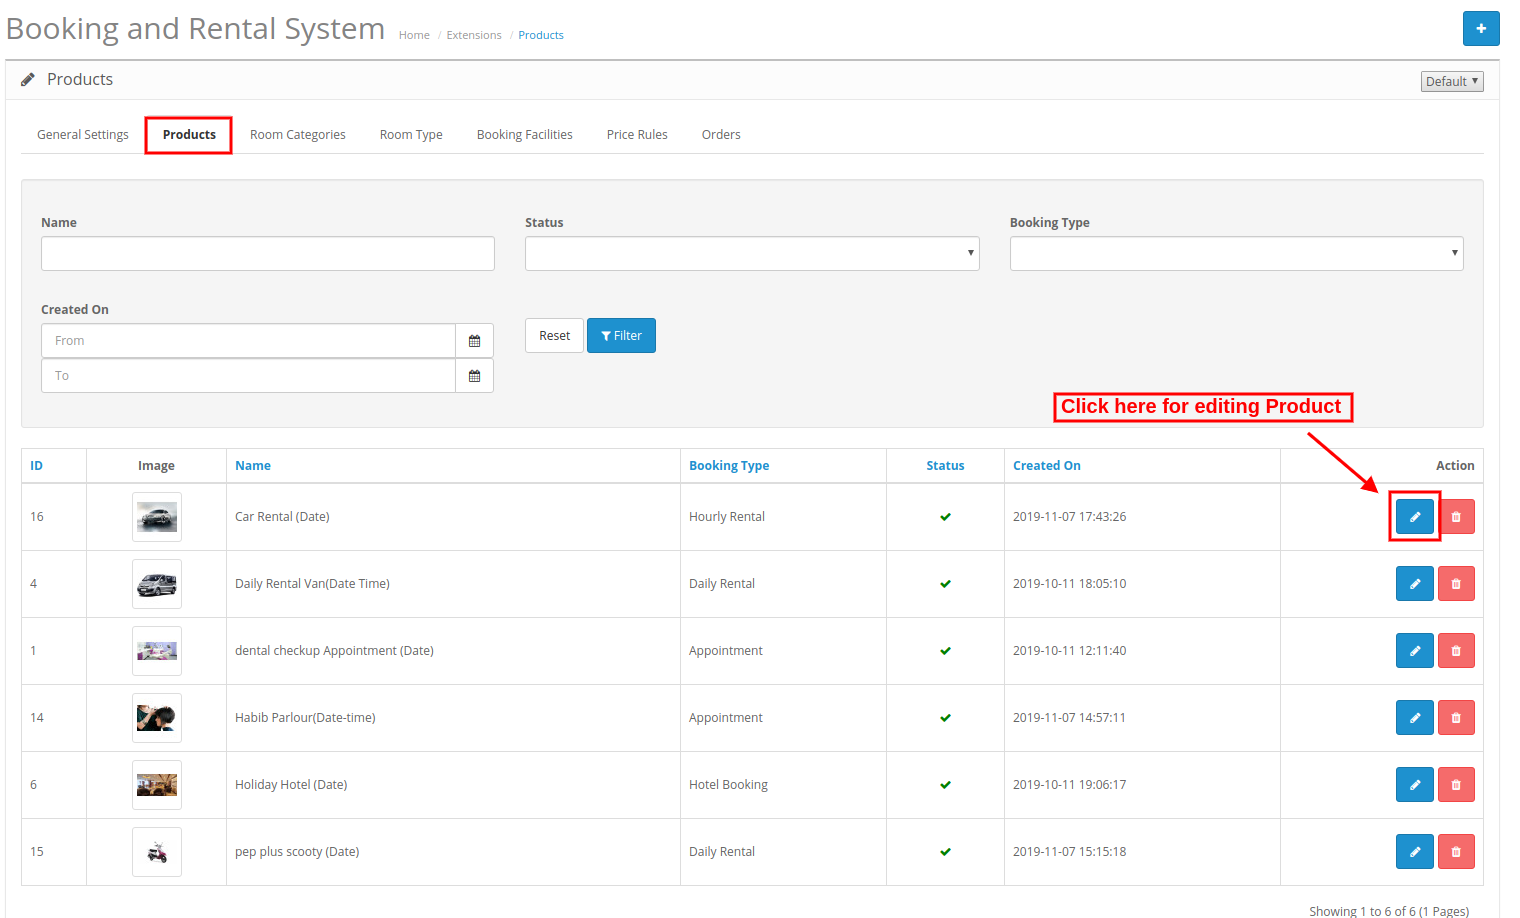
In the products tab, online users can view the list of added products. The store merchant can add, edit and delete any product easily without any hassle.


3.2.1 Add new Product

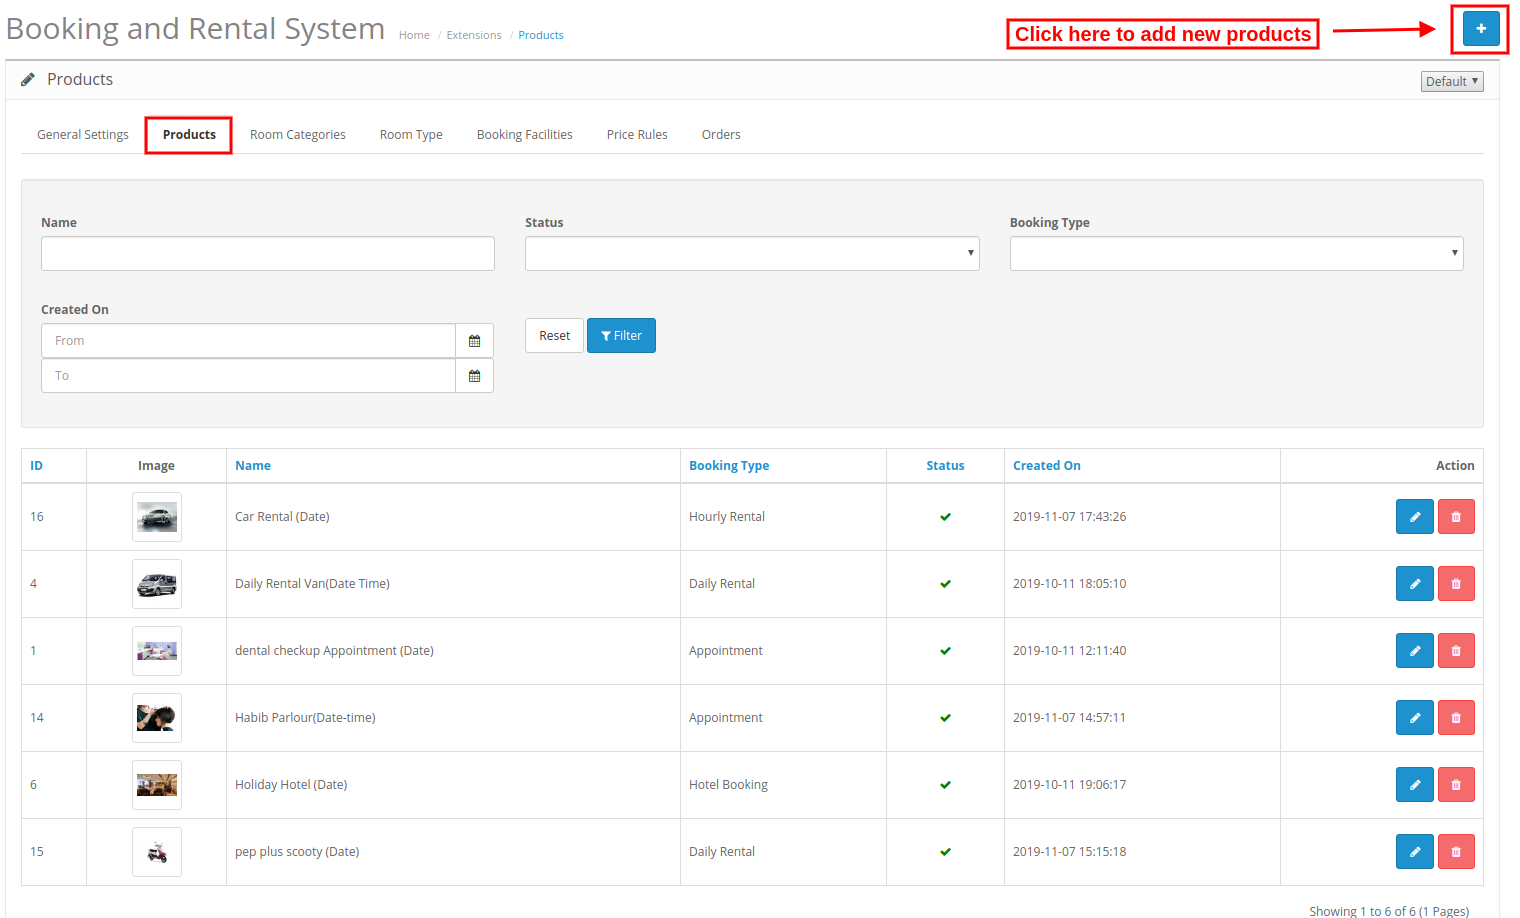
For adding a new product, the admin needs to click on the “+” button first.


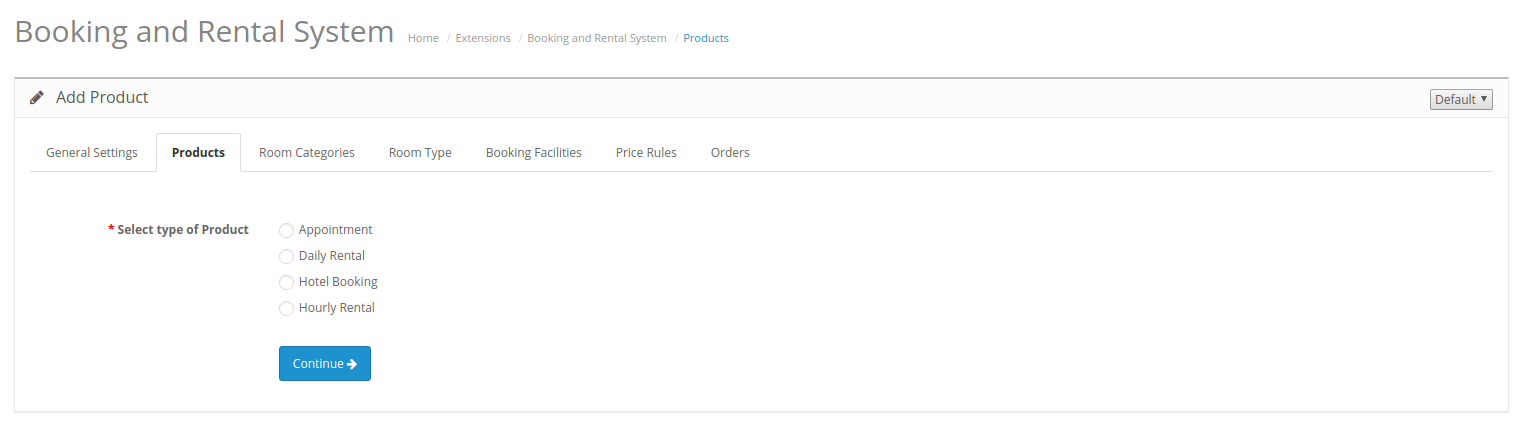
After clicking on the “+” button, an admin will get several options as shown below:

Select Type of Product: Admin needs to select the type of product which he wants to add.

Admin can select from these product types:

  • Appointment
  • Daily Rental
  • Hotel Booking
  • Hourly Rental

There are a total of 6 cases:

Admin can add Appointment(Date and Date-type), Daily Rental(Date and Date-type), Hotel Booking(Date) and Hourly Rental(Date) type of products.

3.2.1.1 Appointment Type

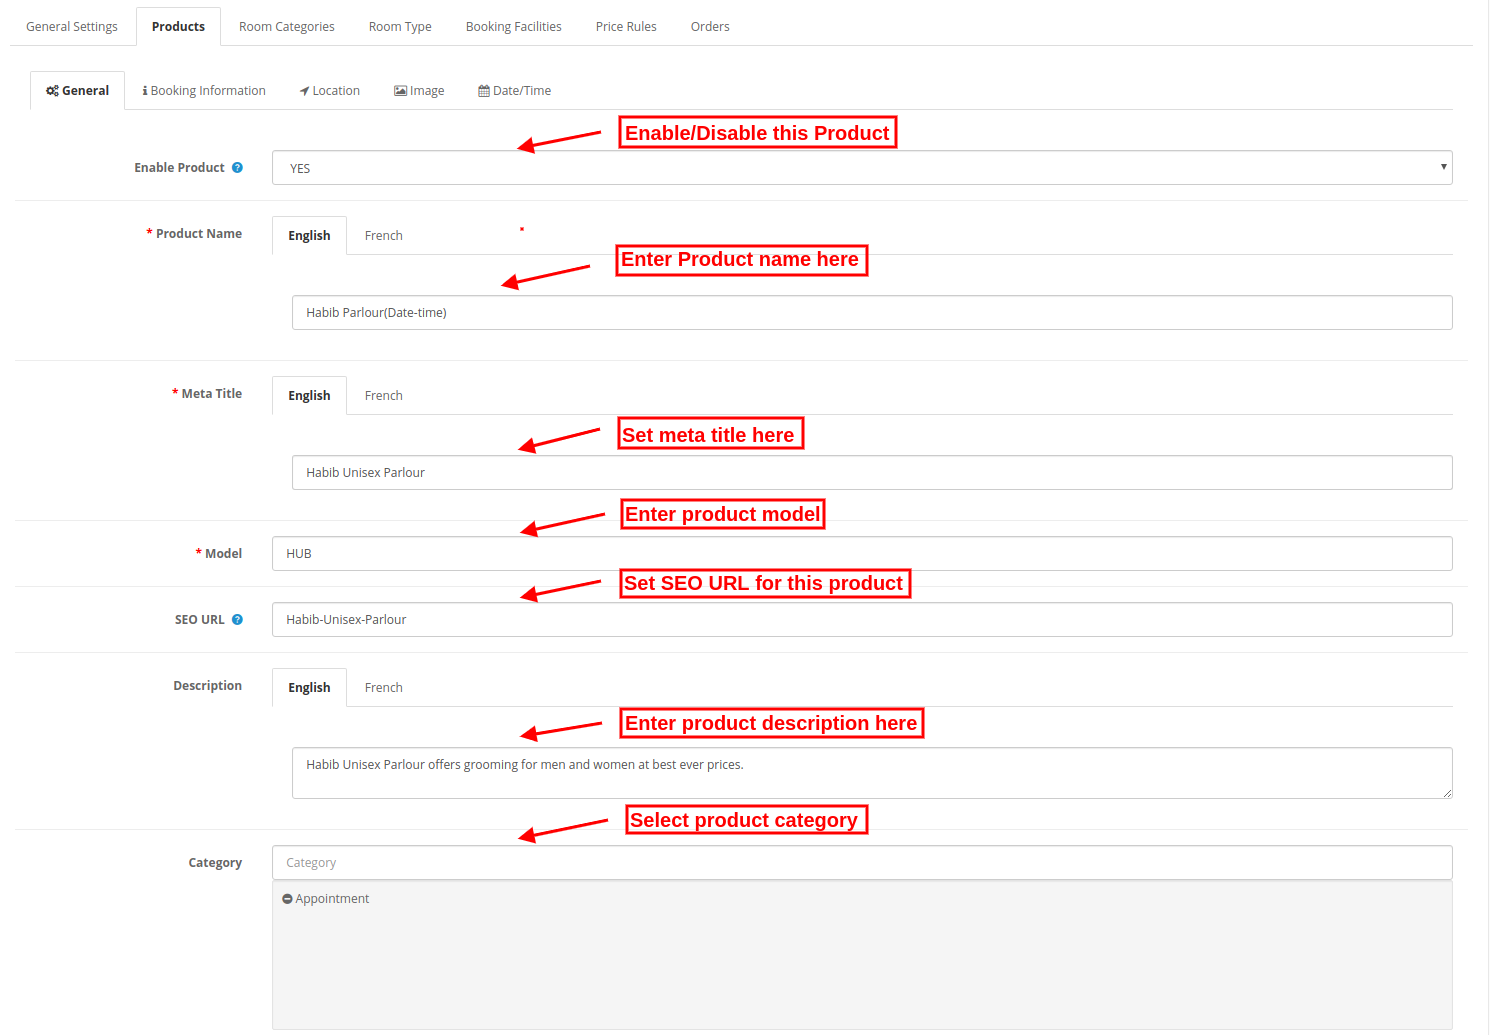
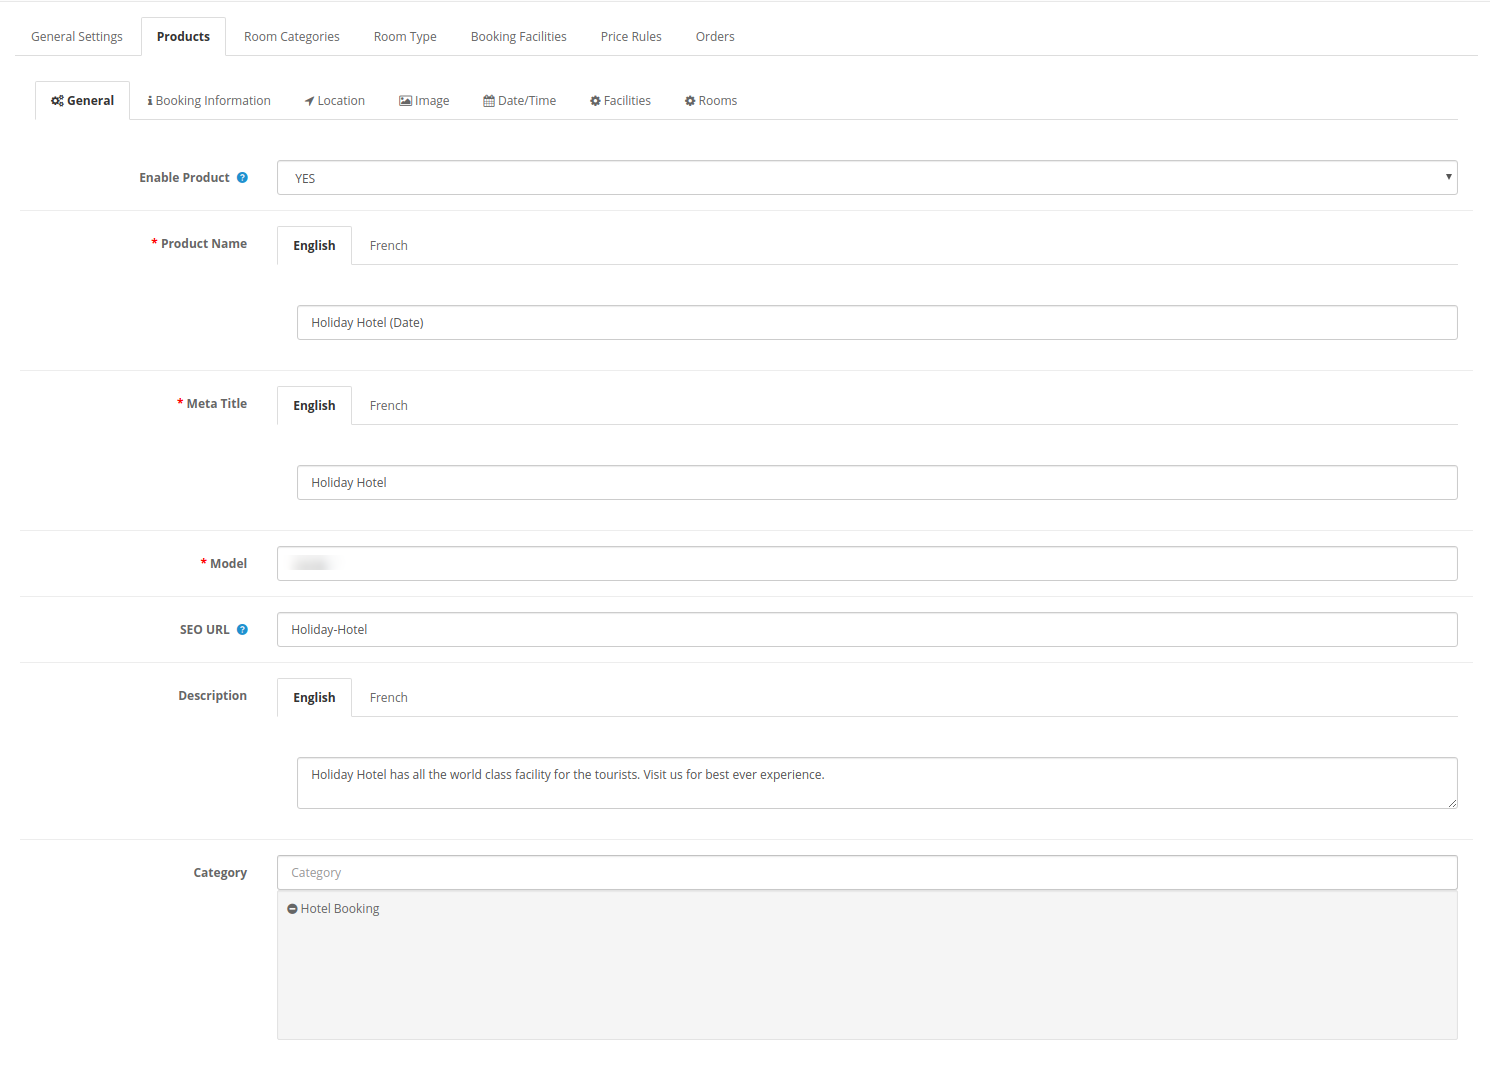
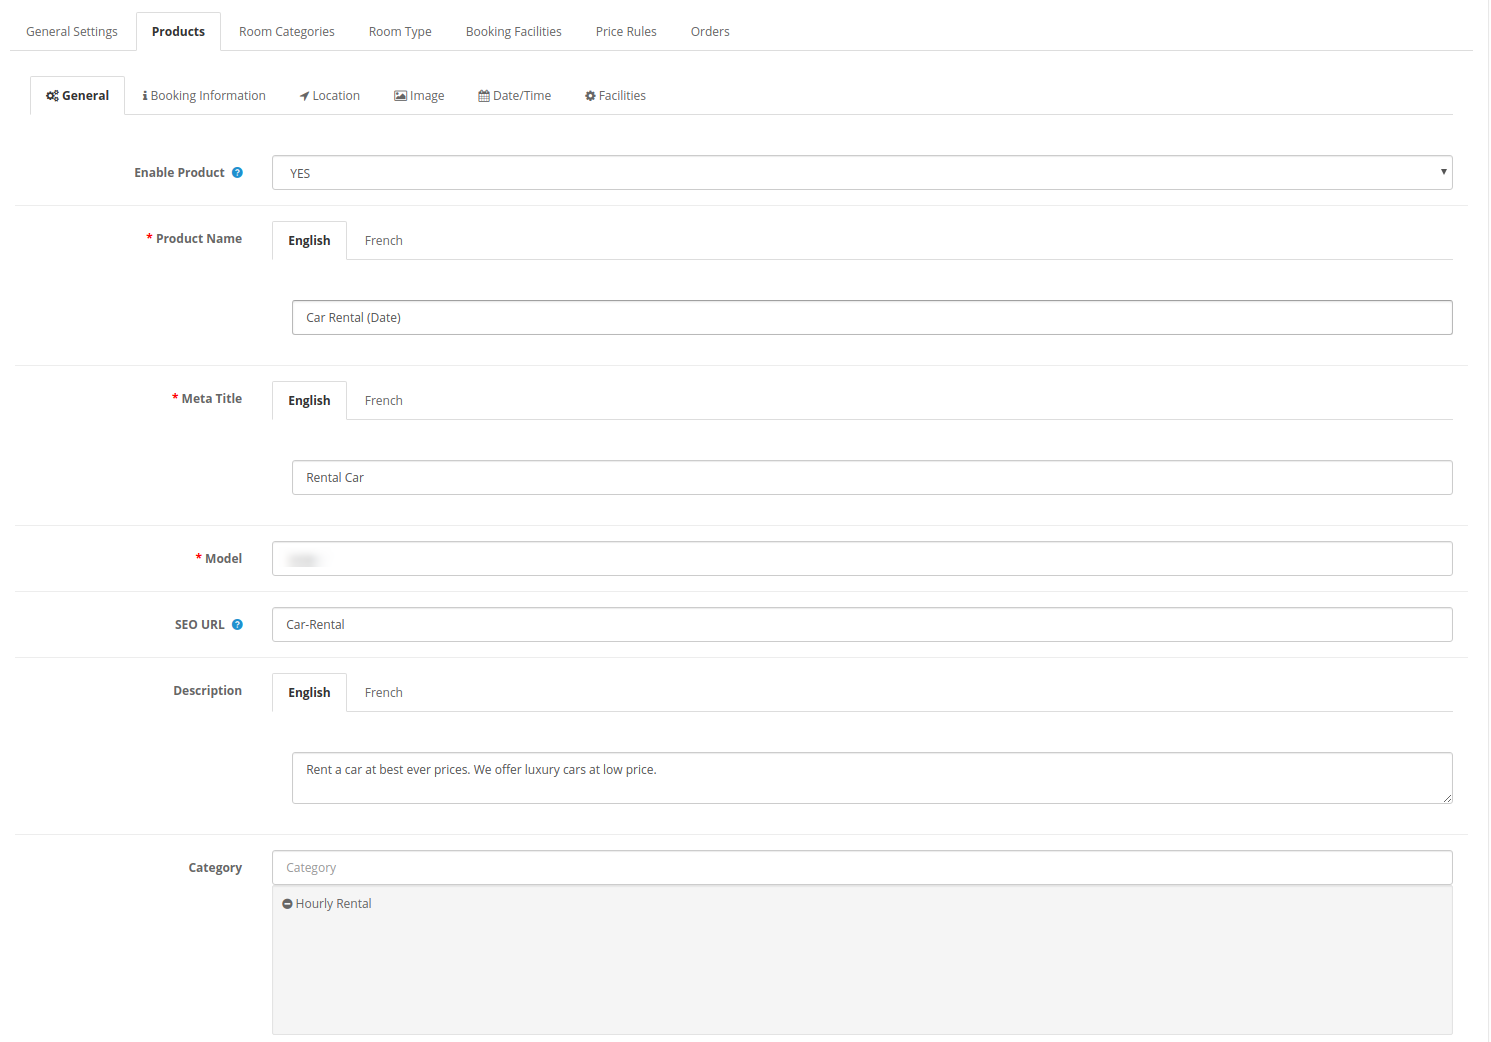
1. General:

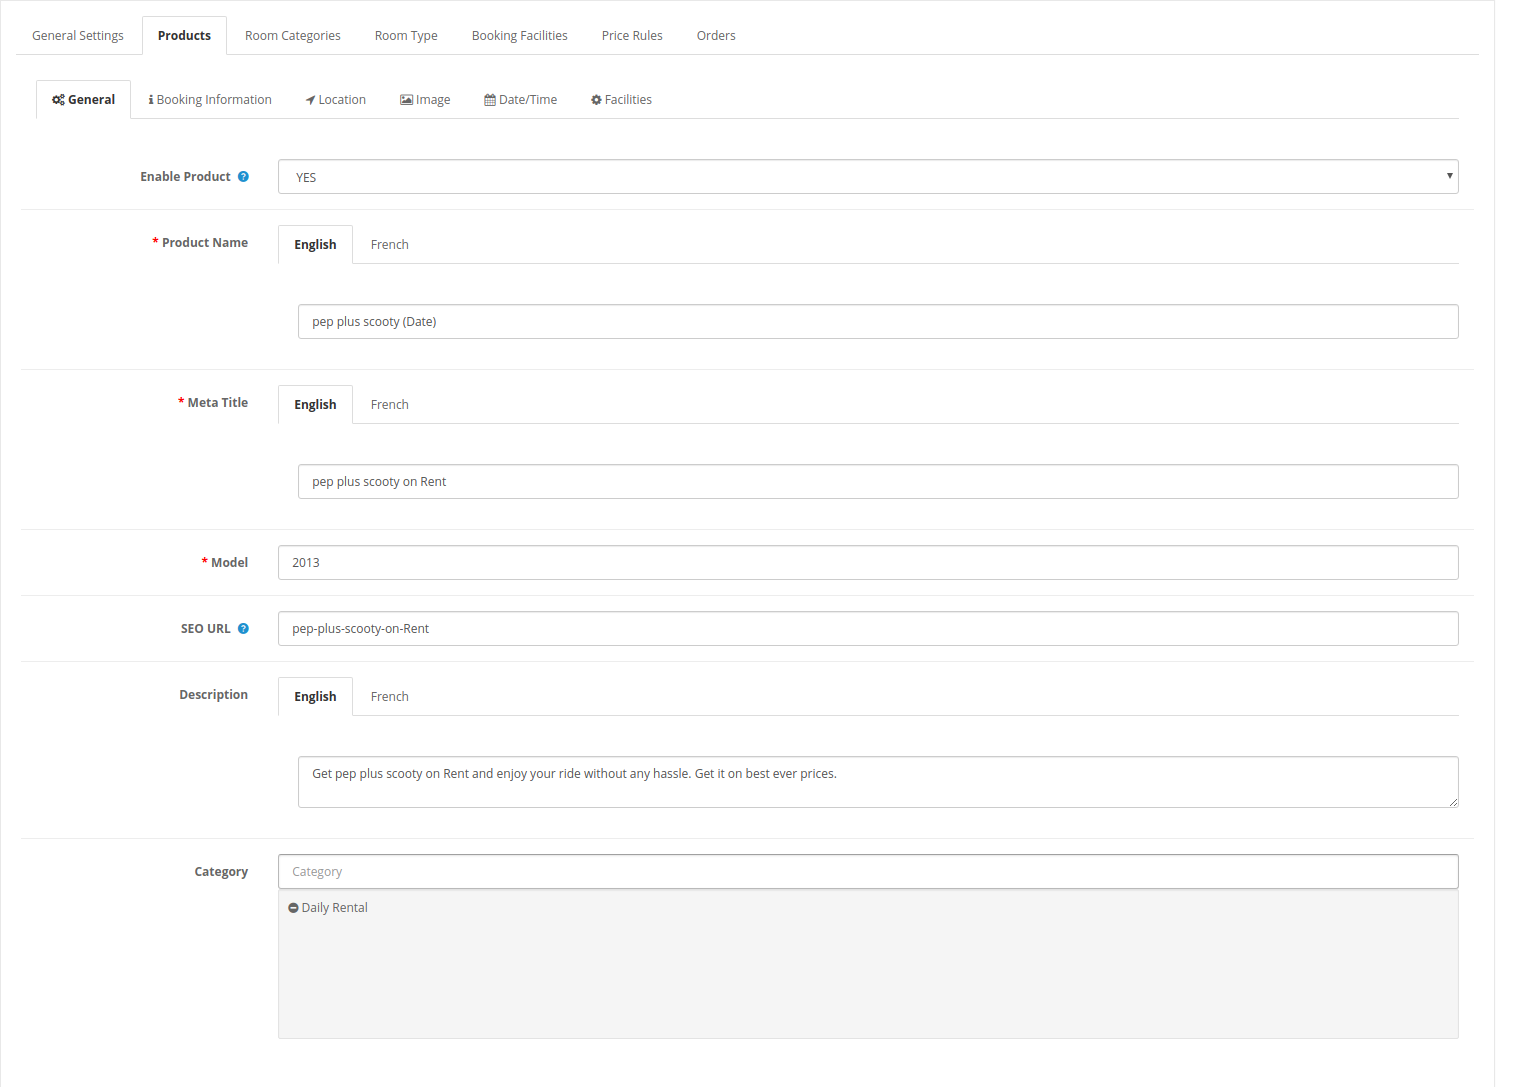
The store merchant can apply basic settings for products.

  • Enable Product: Select Yes or No to activate or deactivate the product.
  • Product Name: Enter the name of the product in multiple languages.
  • Meta Title: Set the meta title in multiple languages.
  • Model: Enter the model details here
  • SEO URL: Set SEO URL for this product. Do not use any space in the SEO URL.
  • Description: Enter the product description in various languages.
  • Category: Select the category for the product.

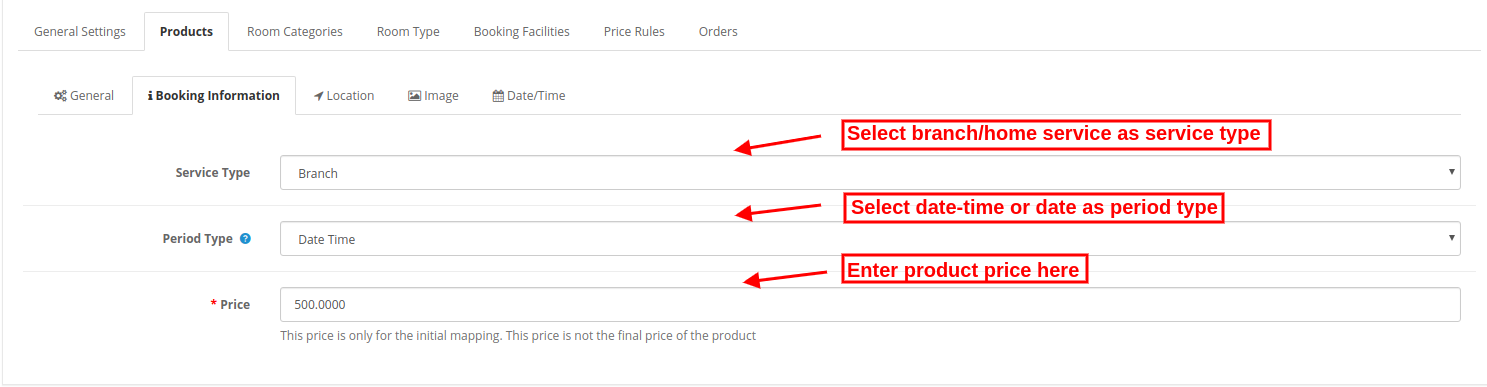
2. Booking Information:

In booking information tab, admin can set the booking related settings as shown below:

  • Service Type: Select the Service type as Branch if you want the user to visit at your place. Select service type as Home service if you want to offer the home facility.
  • Period Type: There are two-period types one is date and the other is date-time. Admin can select any of the period types as per the requirements. According to the selected option, the fields will change in the Date/Time tab.
  • Price: Set the price of the product for initial mapping. It will not be considered as a final price.

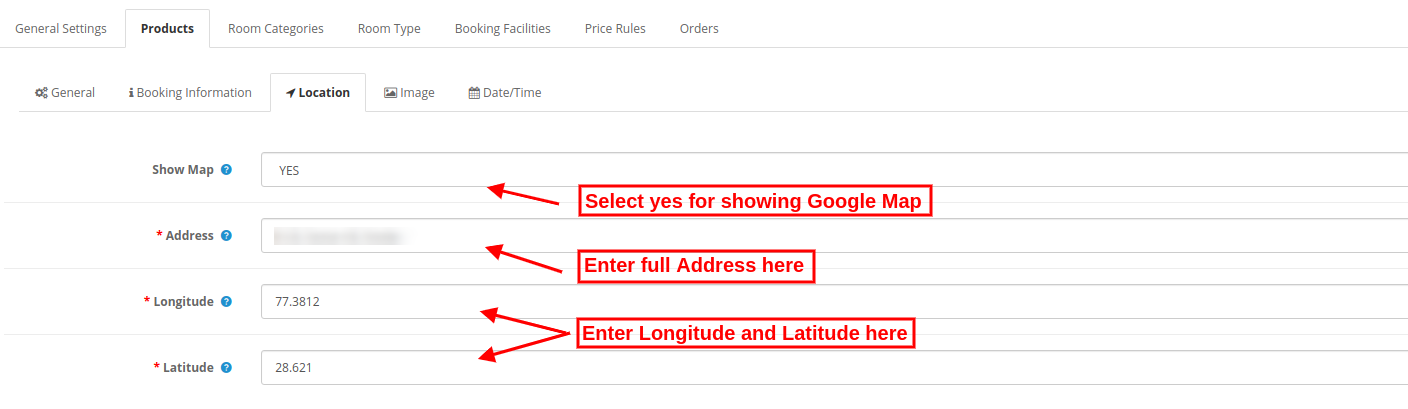
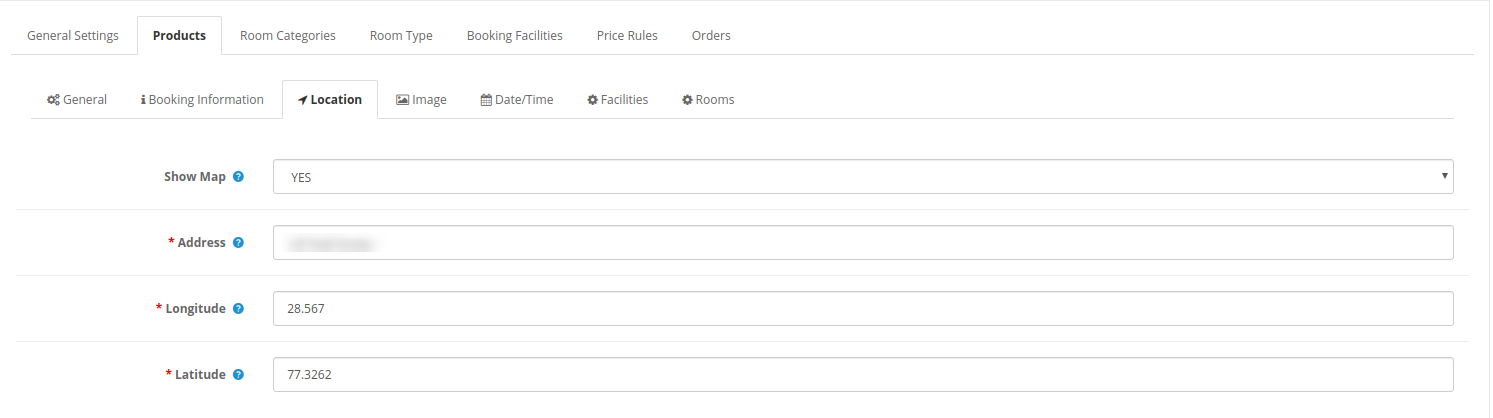
3. Location:

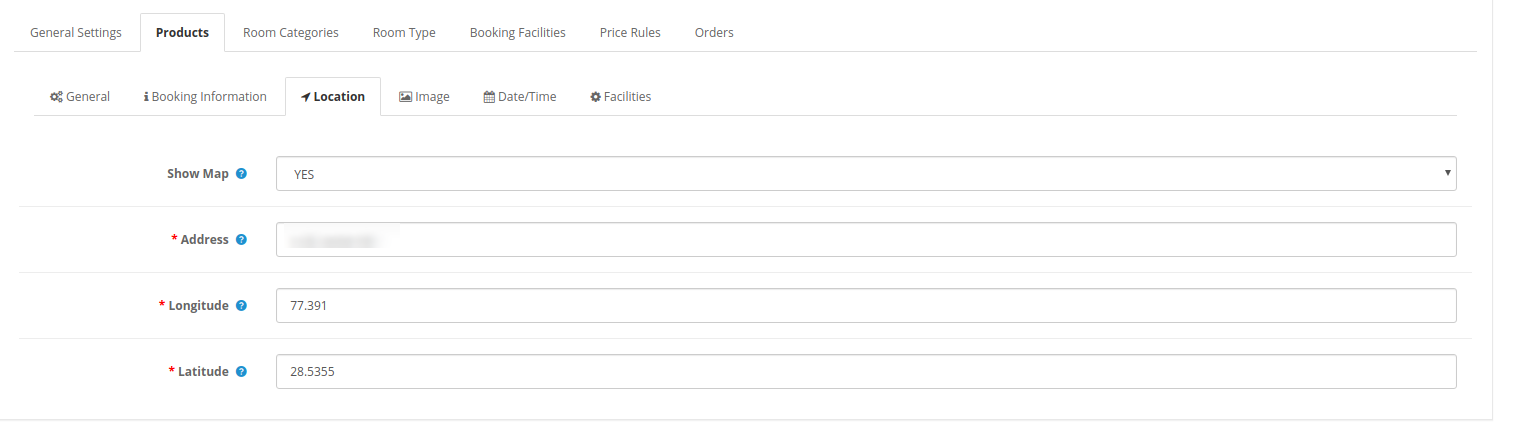
The online merchant can also show the service location at Google map by applying these location settings:

  • Show Map: Select yes for including a map and no if you don’t want to show map.
  • Address: Enter the full address here.
  • Longitude: Set the Longitude.
  • Latitude: Set the Latitude.

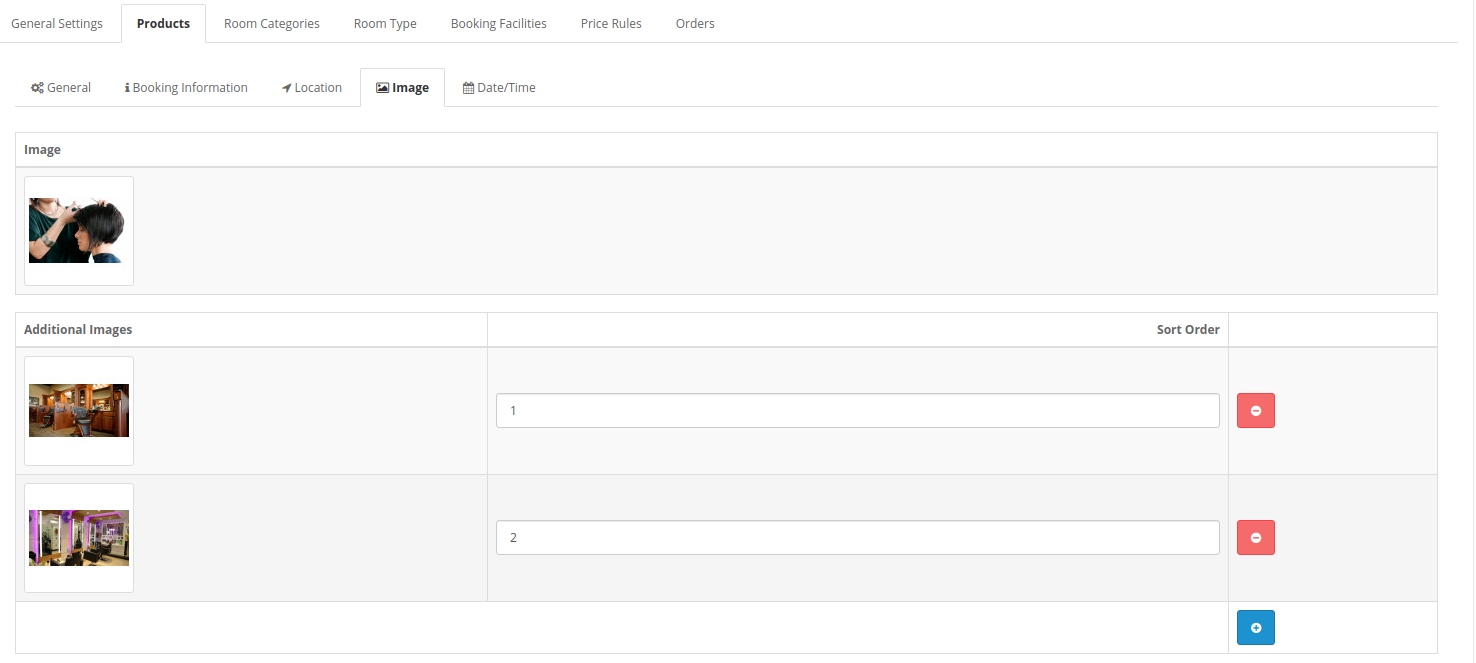
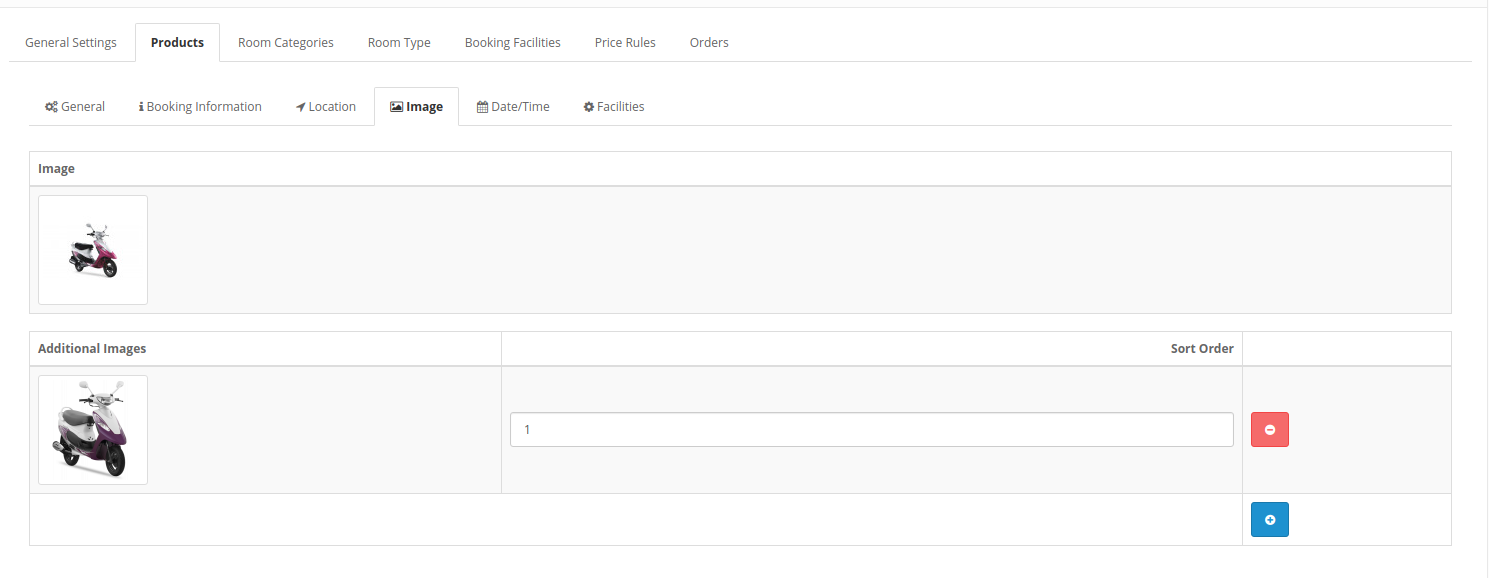
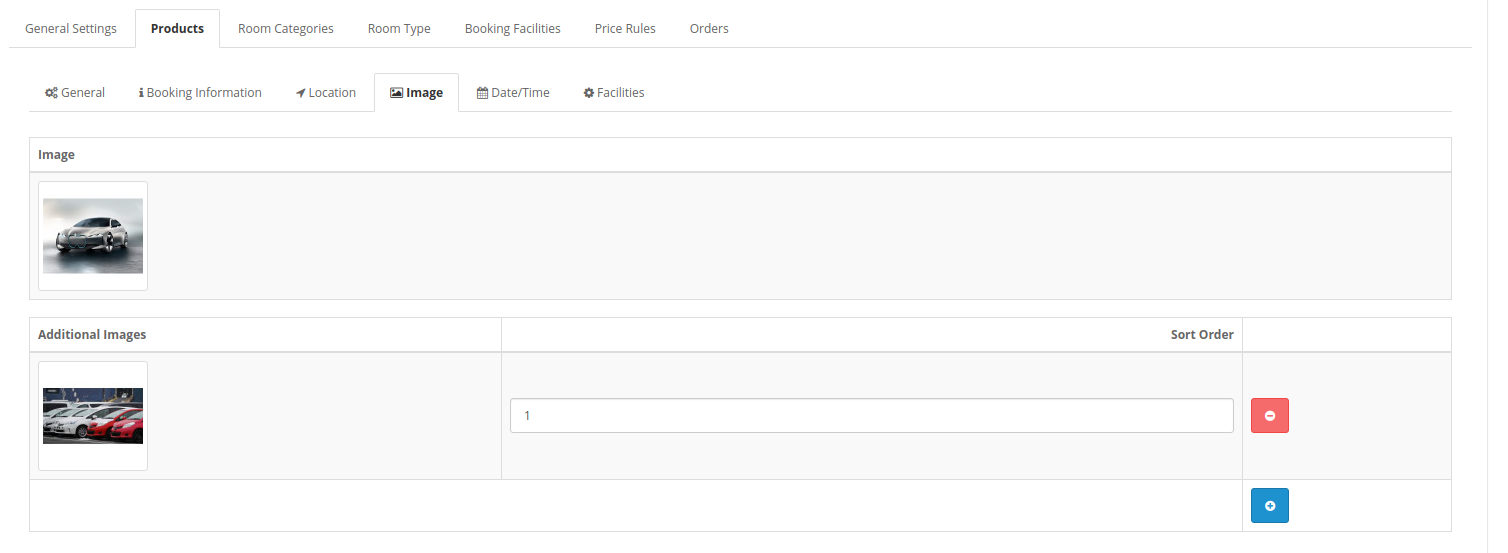
4. Image: Select the product image. Admin can select multiple images and set the sort order for setting the position.

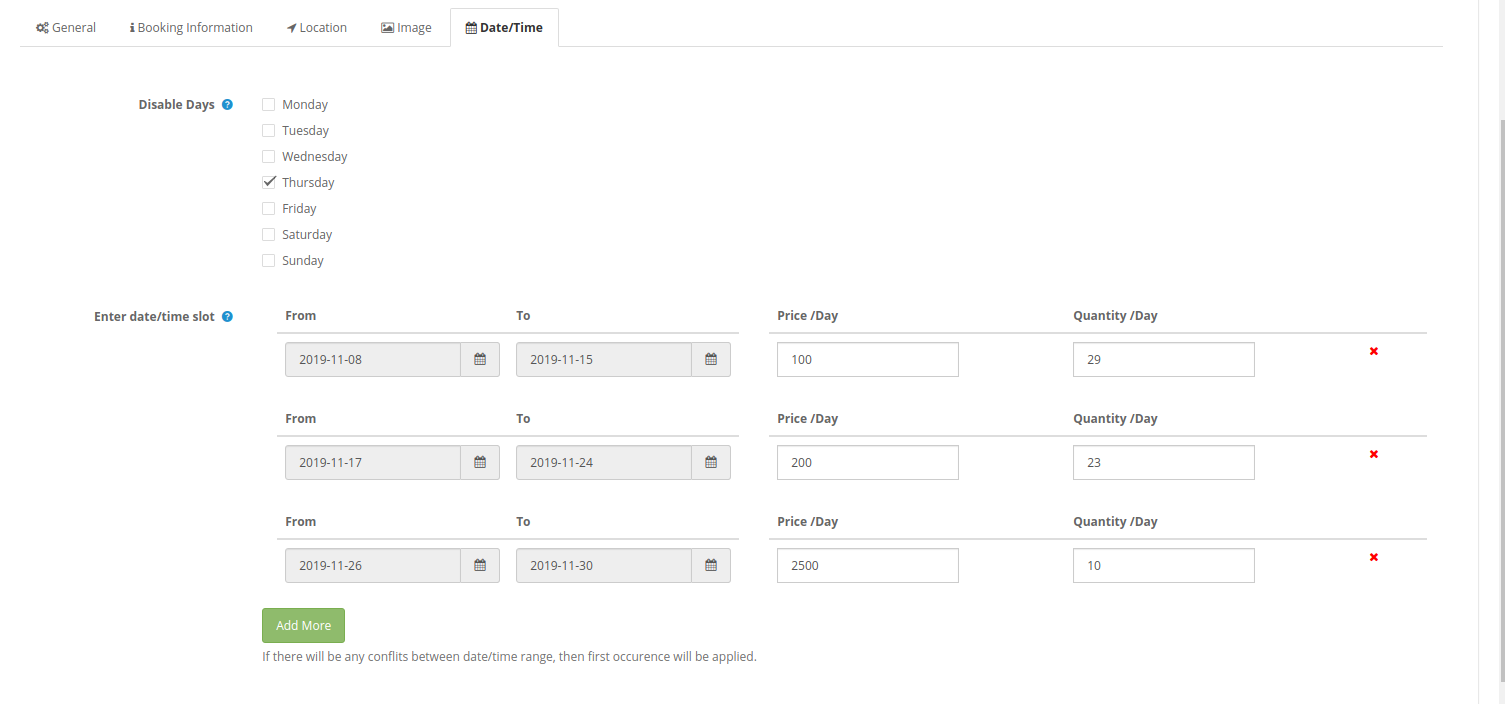
 5. Date/Time:

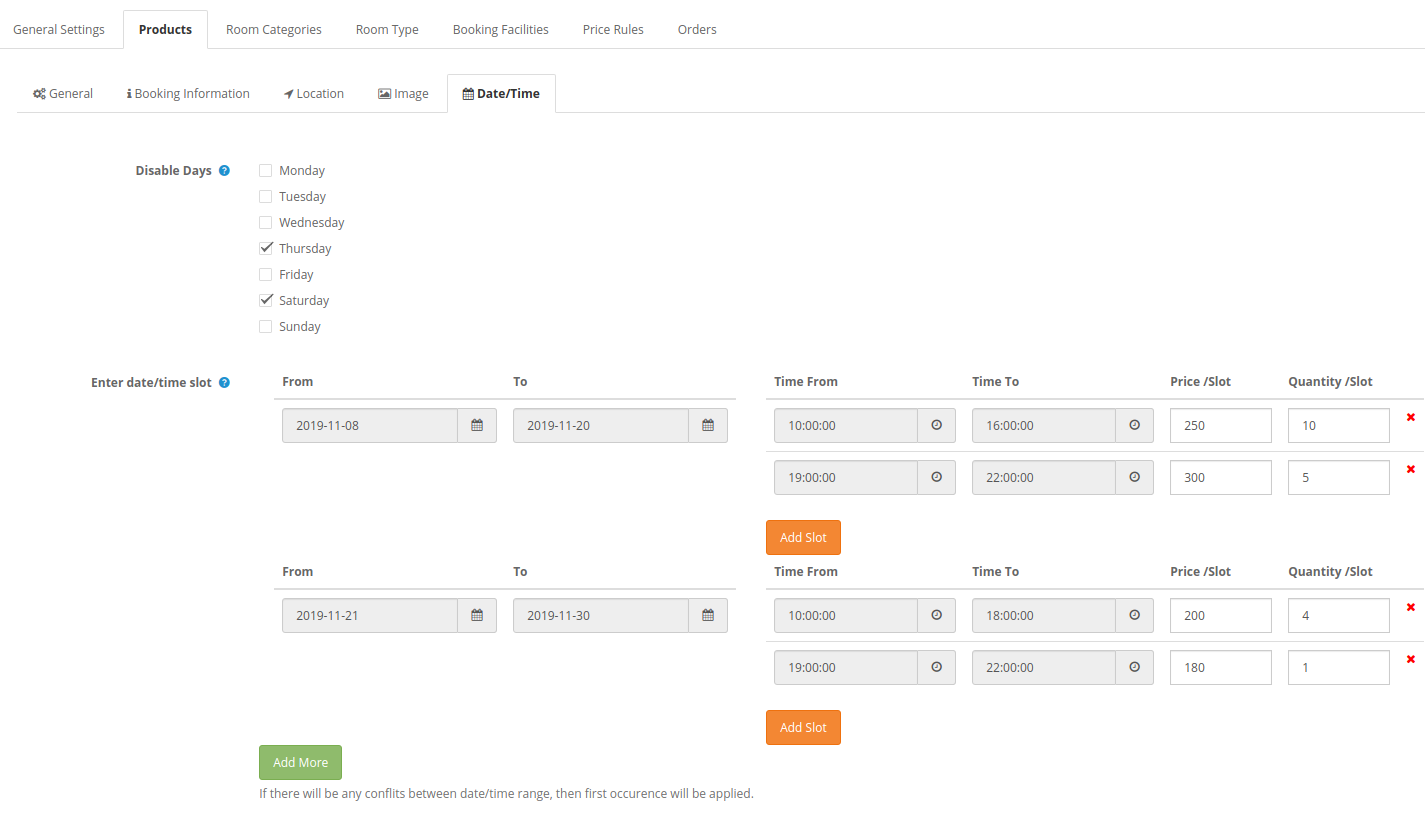
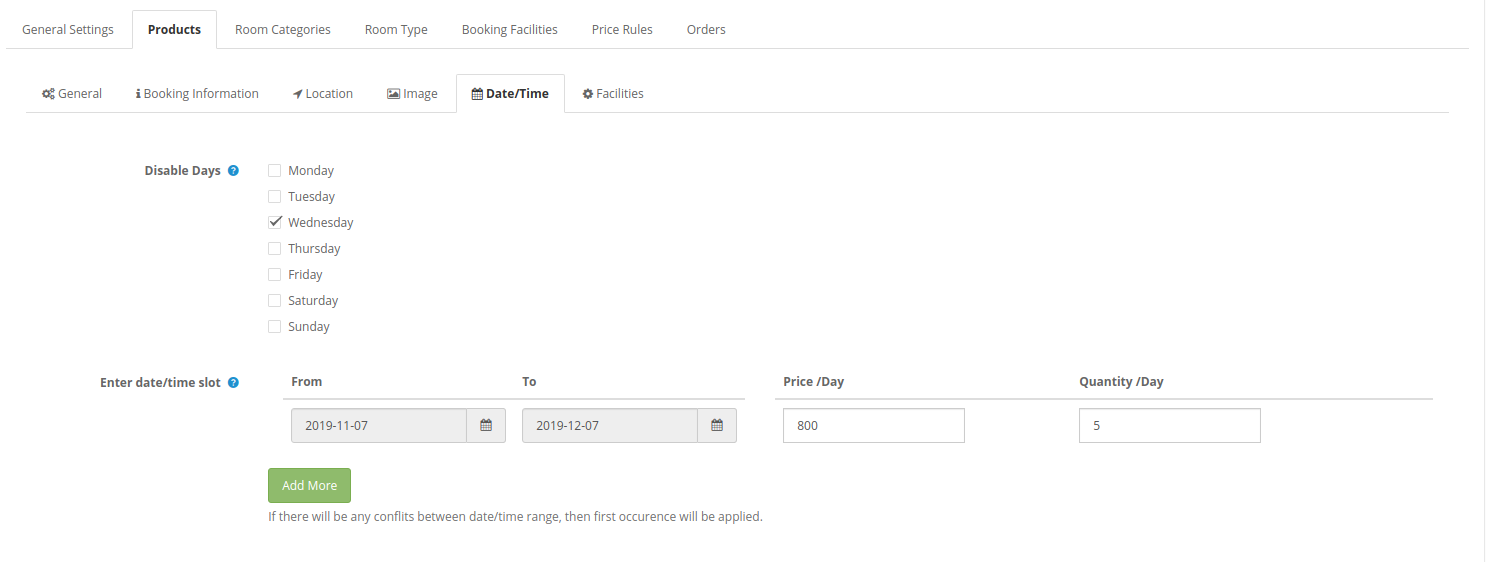
The online merchant can set date and time setting as shown below:

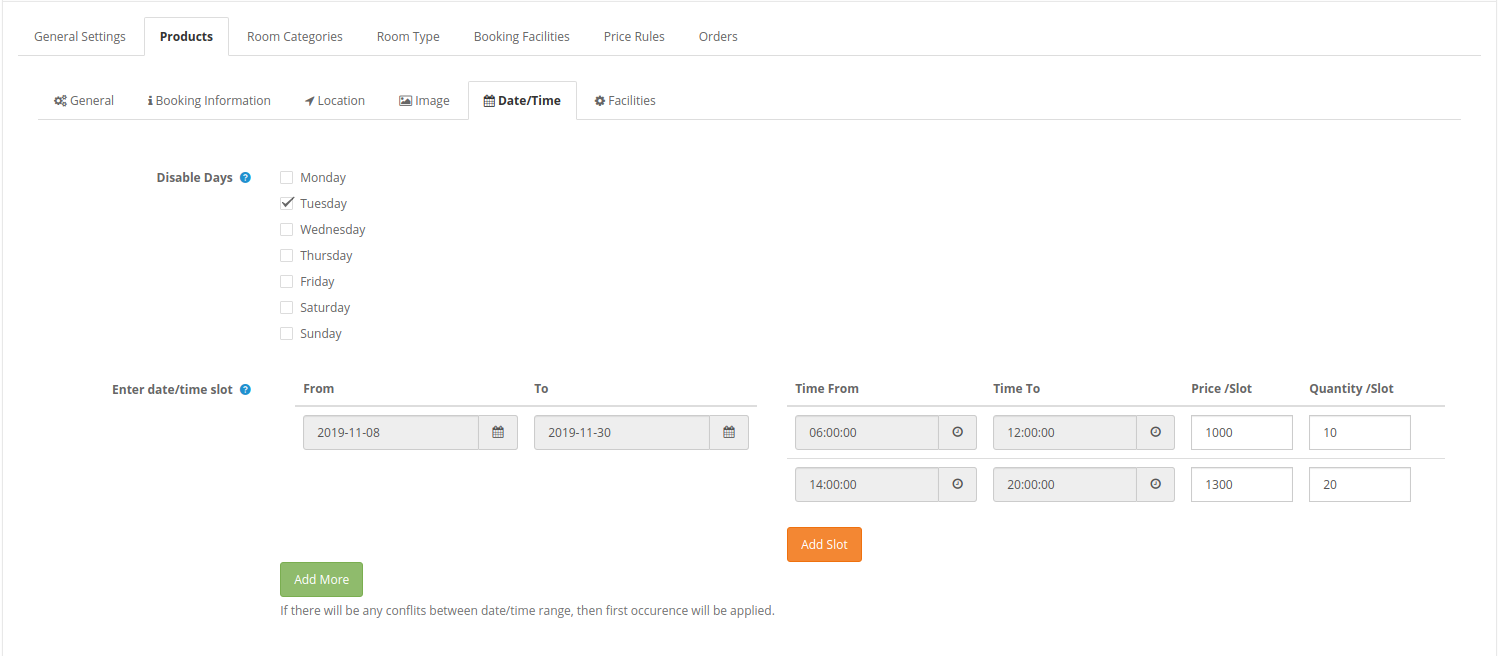
Date-time slots settings will display as below-mentioned image:

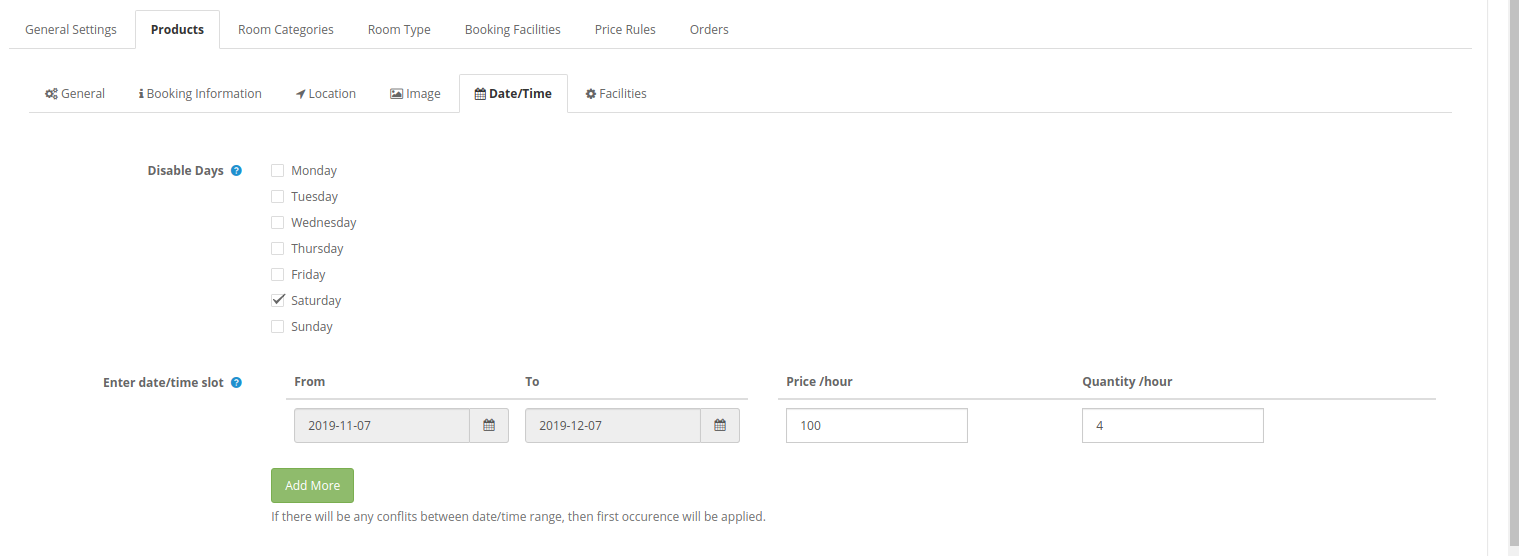
  • Disable days: A checkbox is available for every day, admin can click on the day which he wants to disable. There will be no service/product available on disable days.
  • Enter date/time slot: Admin can create multiple days/time slots by setting the dates/time duration, the price per slot and quantity per slot. The OpenCart Reservation And Booking Module shows an error if the admin overlaps any date/time.

Date Slot settings will show as below-mentioned image:

3.2.1.2 Daily Rental

Admin can select the product type as Daily rental and add products in this category.


1. General: General Settings will be the same as “Appointment” product type settings. Admin can enable/disable the settings, enter product name, meta title, model, description, SEO URL and also select the product category.

2. Booking Information: 

  • Period Type: Admin can select the booking period type as date and date-time. While selecting period type as date, there will be two more settings for minimum and maximum days. According to the selected option the fields will change in the Date/Time tab.
  • Price: Set the product price for initial mapping.
  • Min Days: Set Minimum booking days.
  • Max Days: Set Maximum booking days.

3. Location:

Location Settings will be the same as “Appointment” location settings. Admin can show/hide the map, set address and enter longitude-latitude.


4. Image:

Select the product image. Admin can select multiple images and set the sort order for setting the position.

5. Date/Time:

Date/time Settings will be the same as “Appointment” Date/time settings. Admin can click on the checkbox for disabling days and enter date/time slots also.

Date slots:


Date-time Slots:

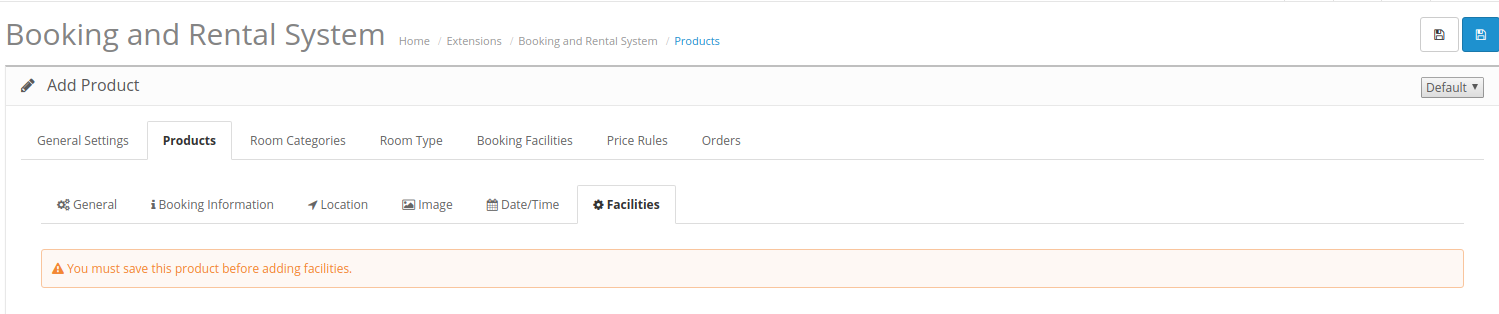
6. Facilities:

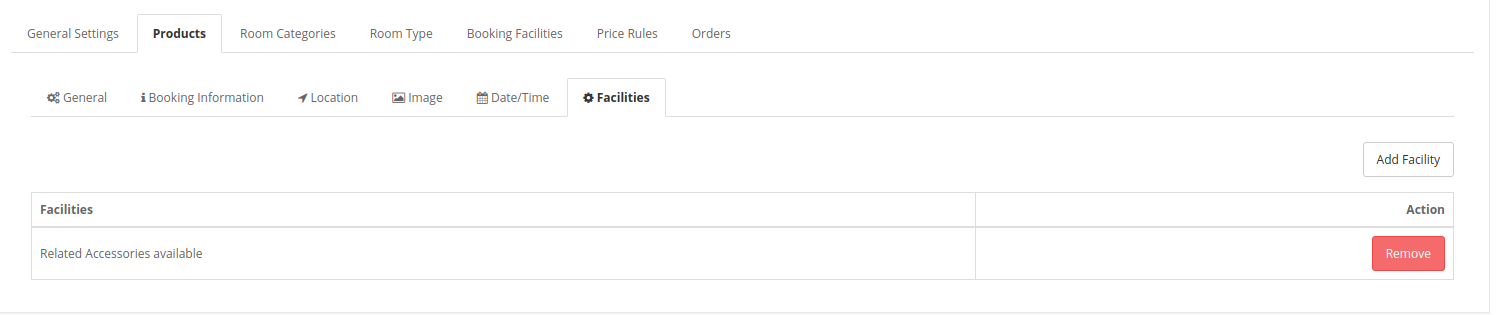
Admin can add facilities once he saves this settings. Only the “Rent” type of facilities will be listed here to add them.

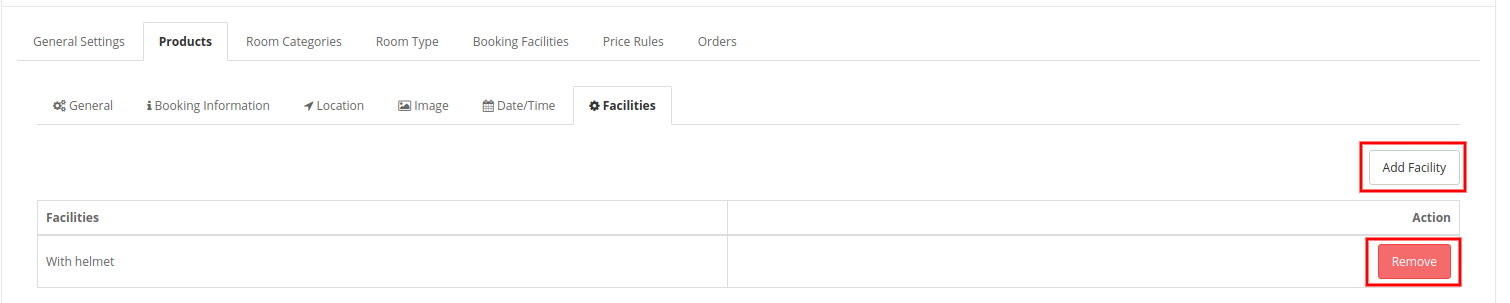
After saving the products and applying booking facility settings, admin can add facilities easily by clicking on the add facility button.

Admin can also remove any facility by clicking on the remove button.

3.2.1.3 Hotel Booking

Admin can select hotel booking product types and add multiple hotels easily.

1. General:

General Settings will be similar to previous settings.

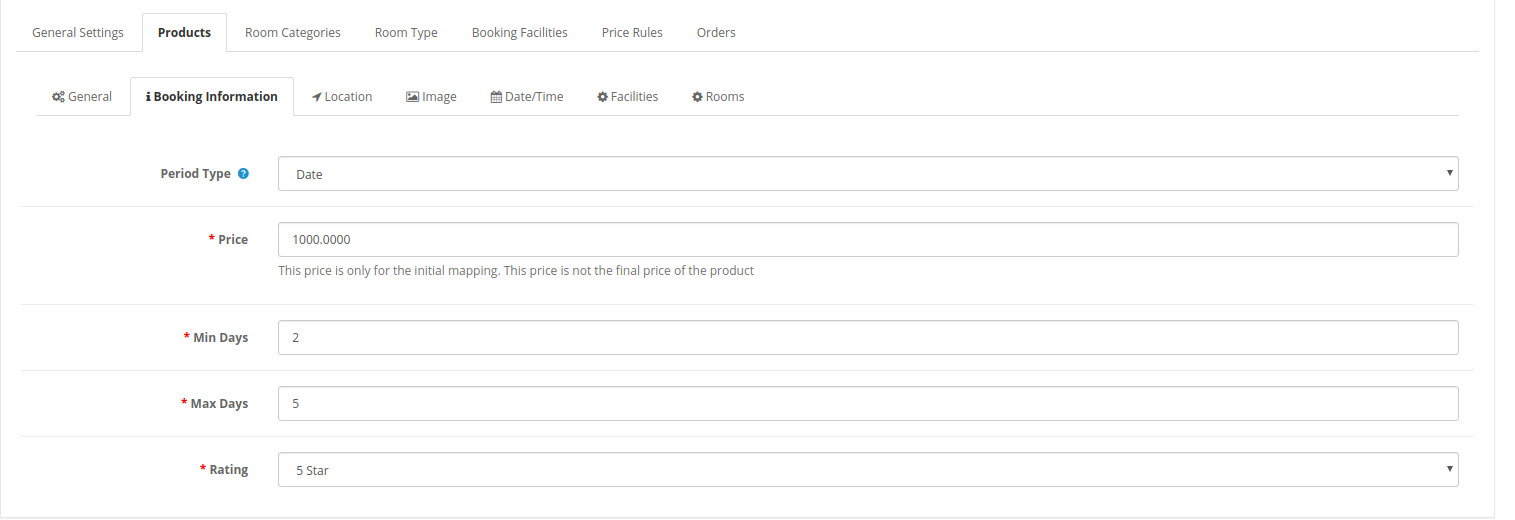
2. Booking Information:

  • Period Type: Period type will be as date.
  • Price: Set the product price for initial mapping.
  • Min Days: Set minimum booking days for this hotel.
  • Max Days: Set maximum booking days for this hotel.
  • Rating: Set hotel Rating. The maximum rating will be 5 stars.  

3. Location 

Location settings will be the same as in previous settings.

4. Image:

Select the product image. Admin can select multiple images and set the sort order for setting the position.

5. Date/Time Set:

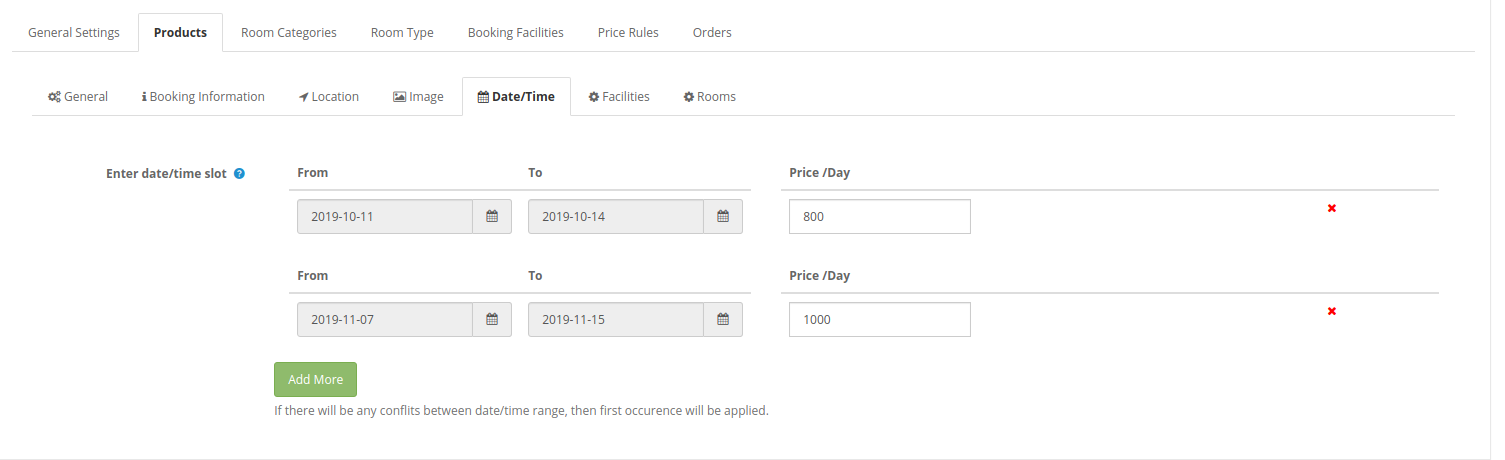
  • Enter Date/time Slot: Admin can create date slots and set hotel prices per day.

6. Facilities:

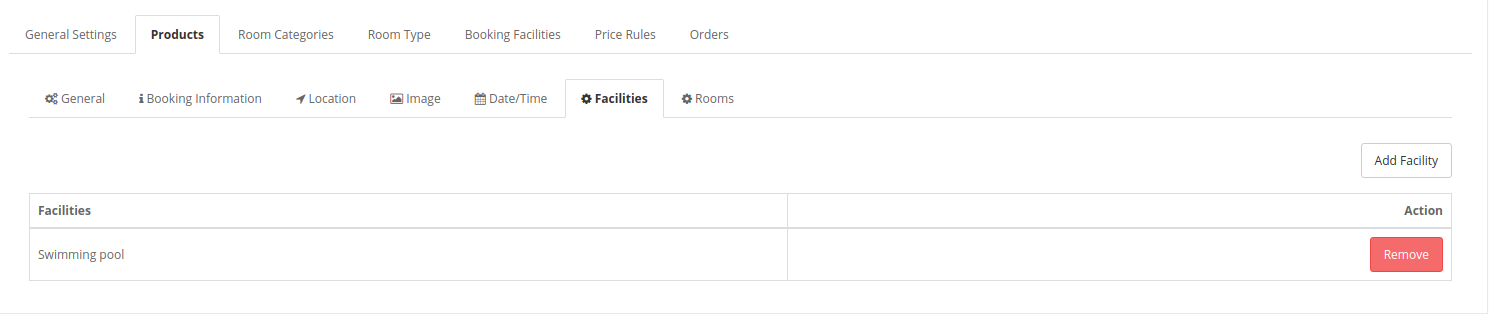
Admin can add facilities once he saves these settings. Admin just needs to click on “Add Facility” for adding facilities. Only hotel type of facilities will be listed to add them.

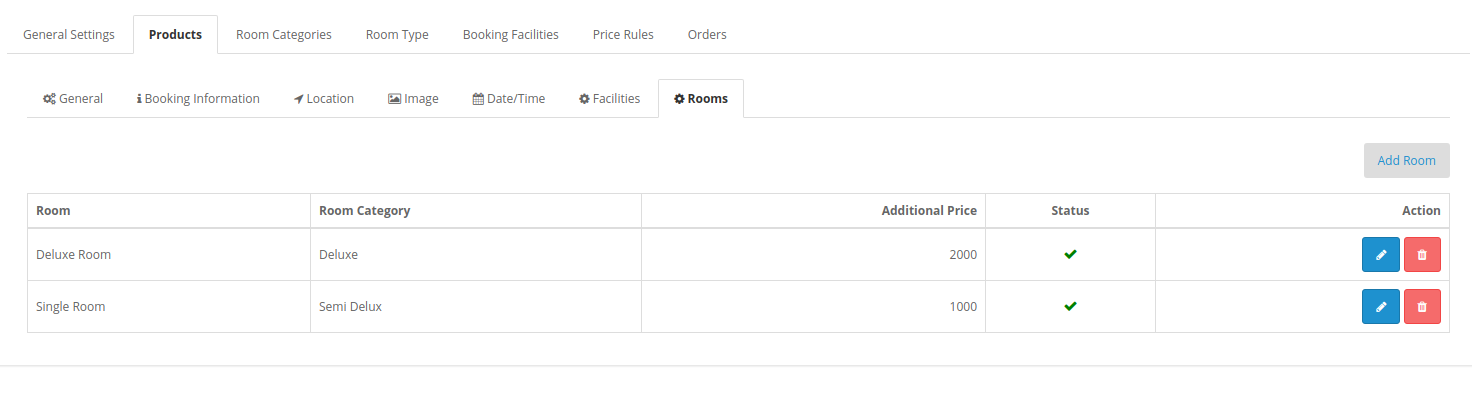
7. Rooms: 

Admin can first save the settings and then add the details of the room. Rooms can be added only after applying room category settings, room type settings and booking functionality settings.

For adding any new room, follow these steps:

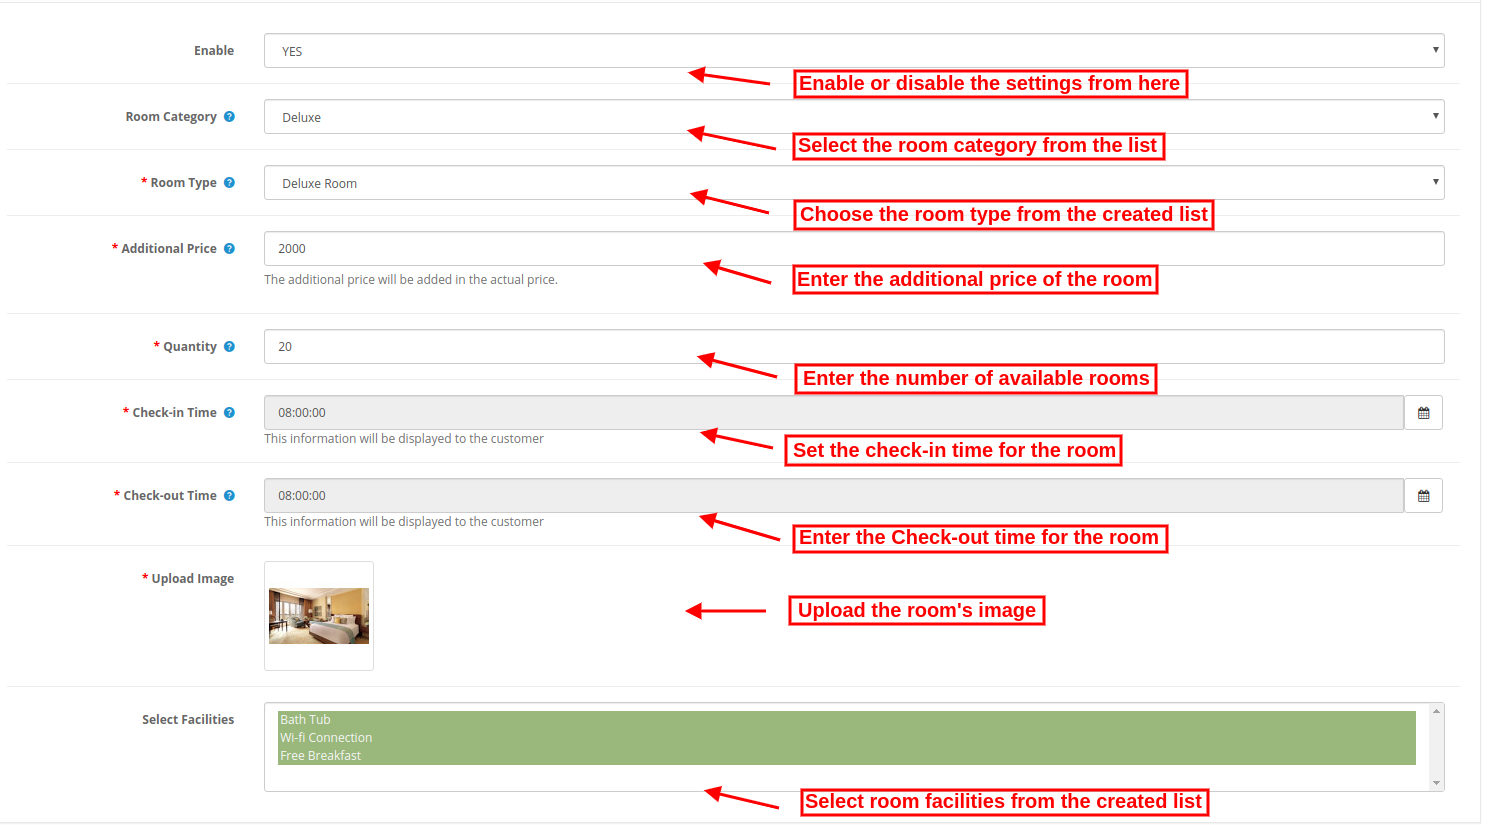
For adding a new room, admin just needs to click on “Add new” and apply these settings:

  • Enable: Select yes if you want to show this room at the front-end interface.
  • Room Category: Select from available room categories.
  • Room Type: Select the room type from the available room types.
  • Additional price: Set the room price which will be added in the hotel’s mapped amount.
  • Quantity: Enter the number of available rooms of similar type.
  • Check-in-time: Enter Check-in time in available format.
  • Checkout time: Enter Check-out time in available format.
  • Upload Image: Select the room image and upload it.
  • Select Facilities: Select facilities of room ie wifi, bathtub. Only the “Room” type of facilities will be listed here to select.

Admin can delete and edit room details from the rooms list page. He just needs to click on delete and edit icons.

3.2.1.4 hourly rental

Admin can select the hourly rental product types and add multiple products on the bases of hourly rent.

1. General:

General Settings are same as previous settings.

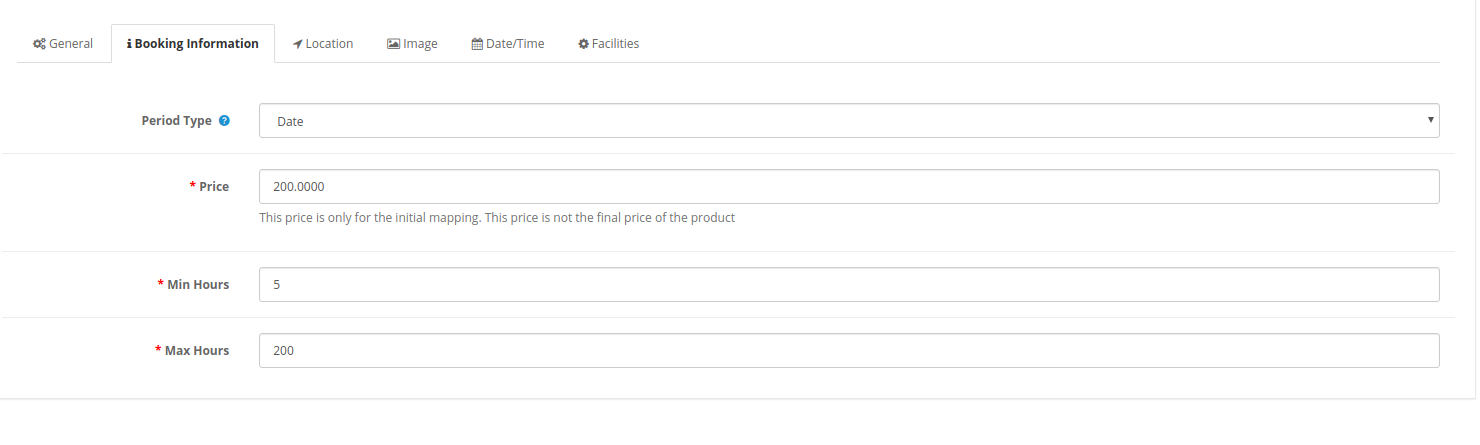
2. Booking Information: 

Booking Information is the same as in previous settings. Admin can set date as period type, set initial mapping price, min-max hours.
3. Location 

Location settings will be the same as in previous settings.

4. Image:

Select the product image. Admin can select multiple images and set the sort order for setting the position.

5. Date/Time Set:

  • Disable Days: Admin can click on check-box for disabling days and enter date/time slots also.
  • Enter Date/time Slot: Admin can create date slots and set hourly rental prices per hour and quantity per hour.

6. Facilities:

Admin can add facilities once he saves this setting. Only the “Rent” type of facilities will be listed here to add them.

3.2.2 Delete Products

Admin can click on the delete button for deleting the products.

3.2.3 Edit Products

The online store merchant can also modify the product details easily from the admin interface of this Hotel booking module for OpenCart.

Admin just needs to click on the edit button and save after applying the changes.

3.3 Room Categories

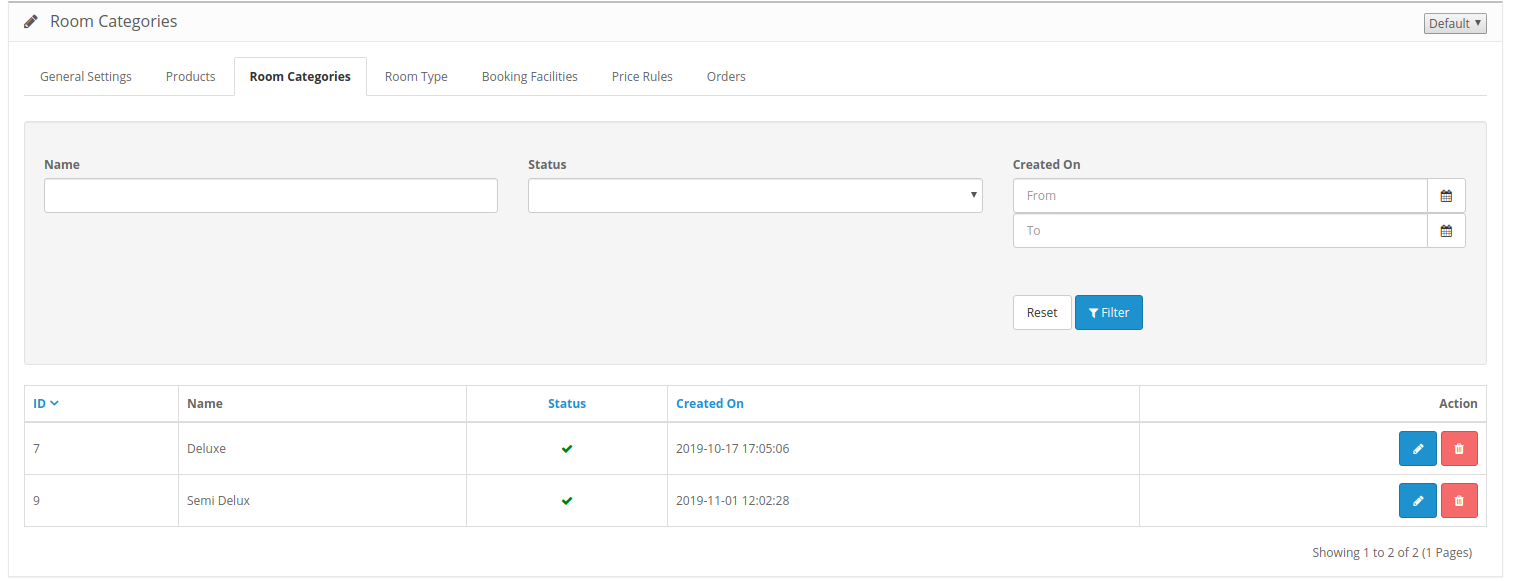
Here, in this tab, the online store admin can add various kinds of rooms and they can also delete and modify the room details. The store merchant can apply filters.

3.3.1 How to Add a room Category

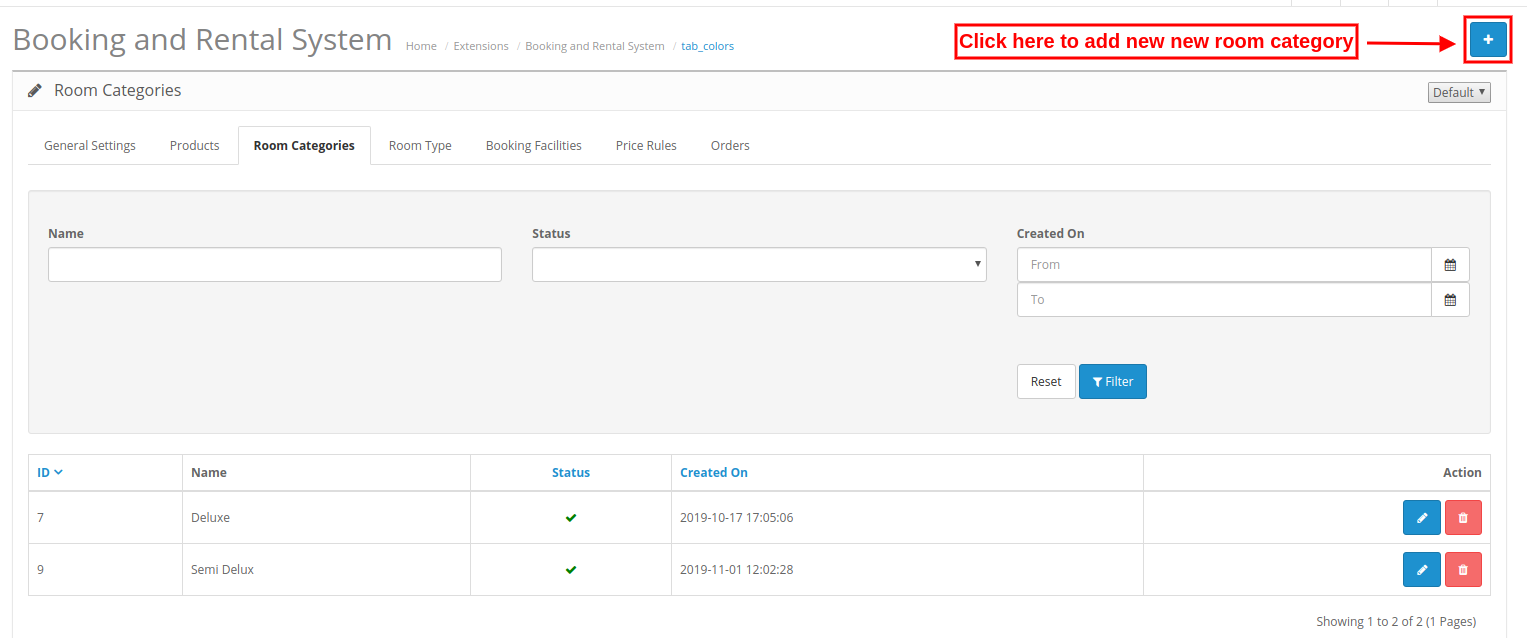
For adding any new room category, click on the “+” button and apply these settings:

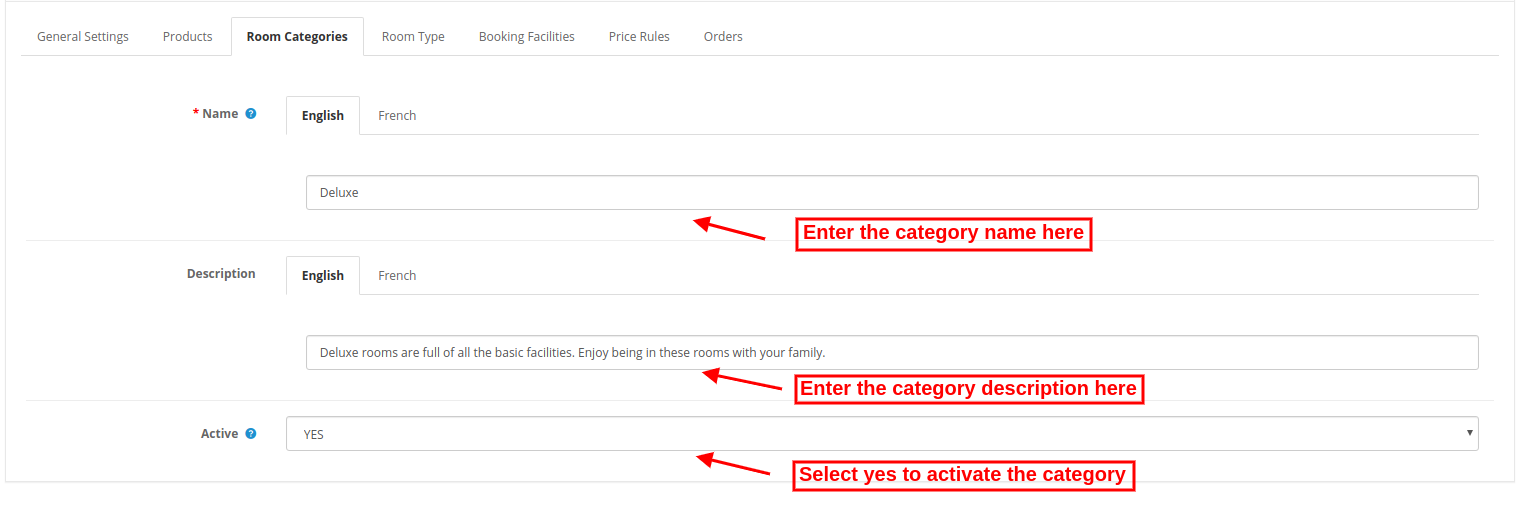
After clicking on the add button, the admin needs to apply these settings:

  • Name: Enter the Room category name in various languages.
  • Description: Enter the description of this room category in various languages.
  • Active: Select yes or no for activating/deactivating this room category.

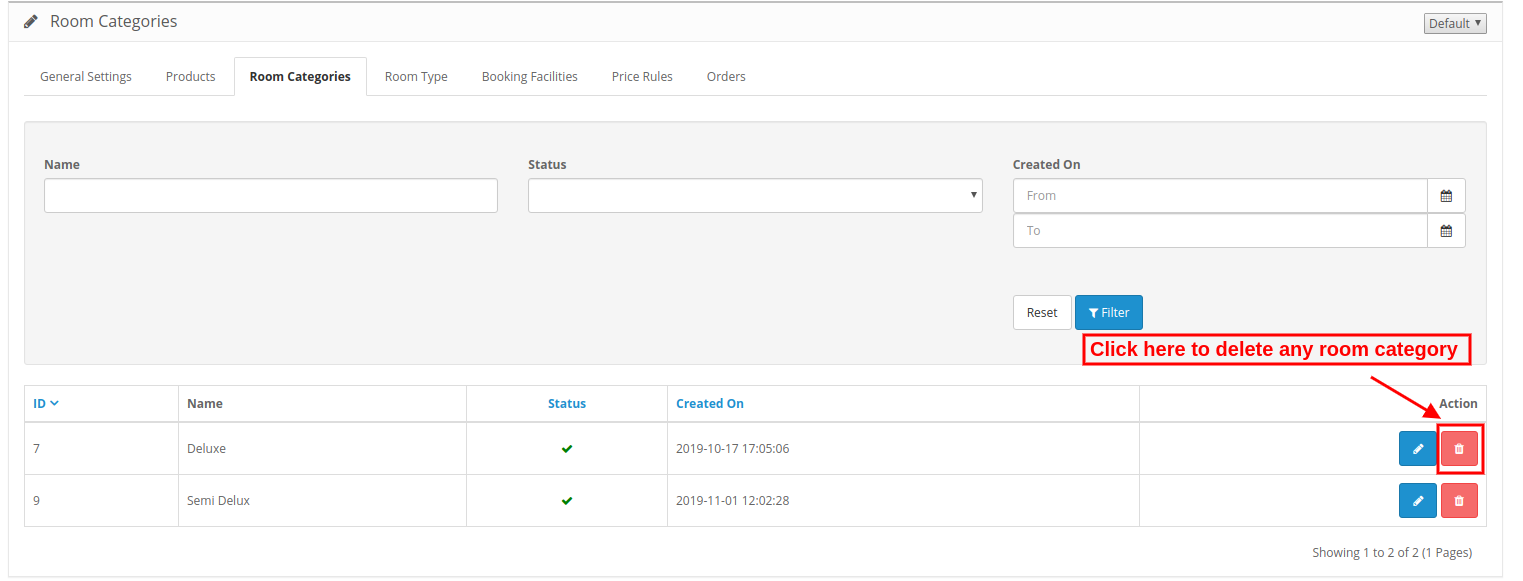
3.3.2 How to delete any room category

Click on the delete icon and delete any room category easily. You cannot delete or disable any such category which is mapped with any product.

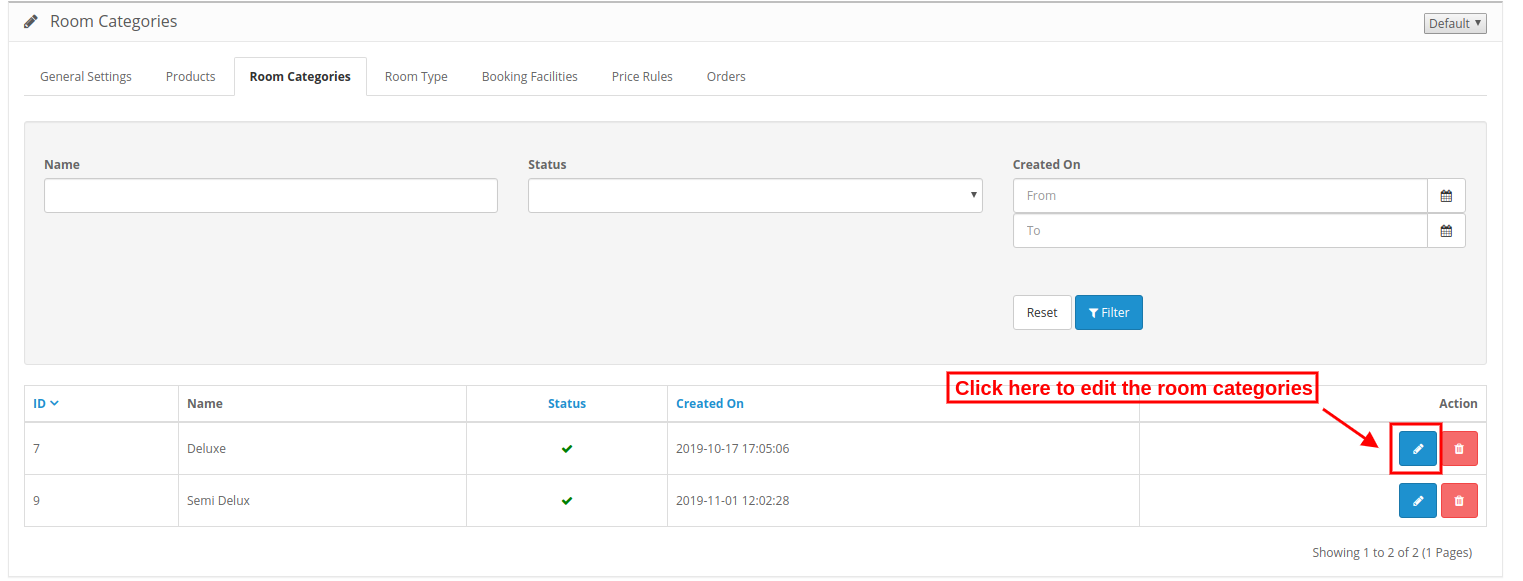
3.3.3 How to Edit any room category

Click on the edit icon for applying any changes in room categories.

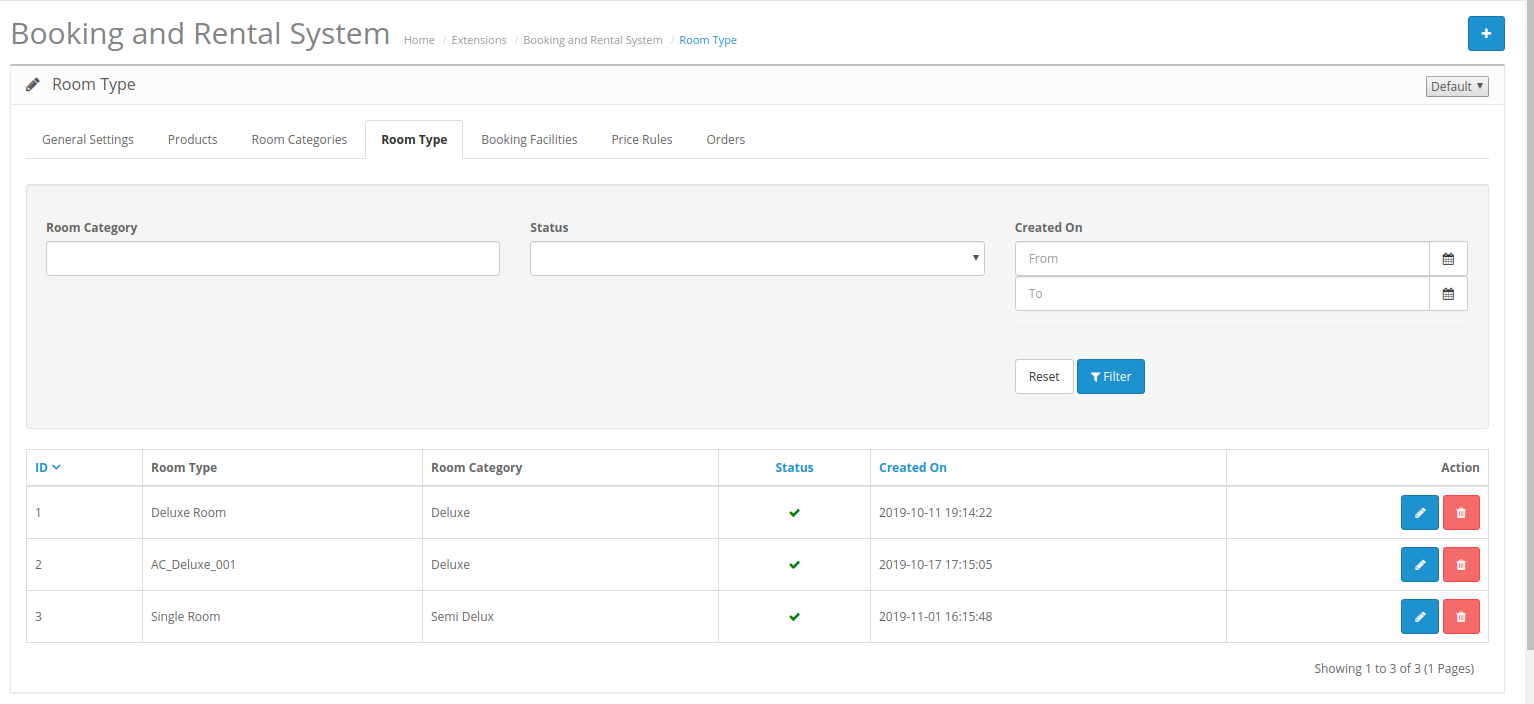
3.4 Room type

In this tab, the online merchant can set the room type from here. The admin is allowed to add, delete and edit the room type from the admin interface of this Online Booking module for OpenCart.

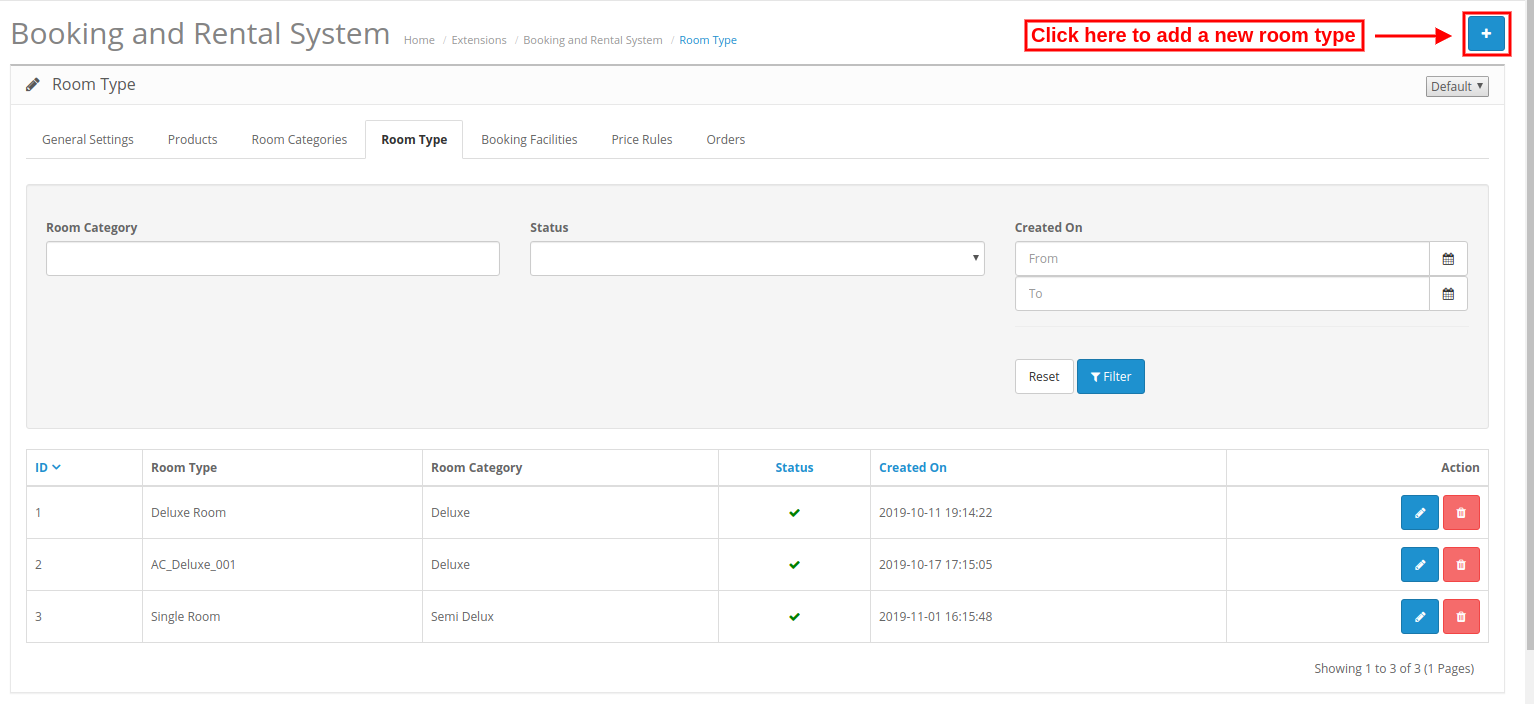
3.4.1 How to Add a new Room Type

For adding a new room type, click on the “+” sign and enter these details:


After clicking on the “Add” button, the admin needs to apply these settings:

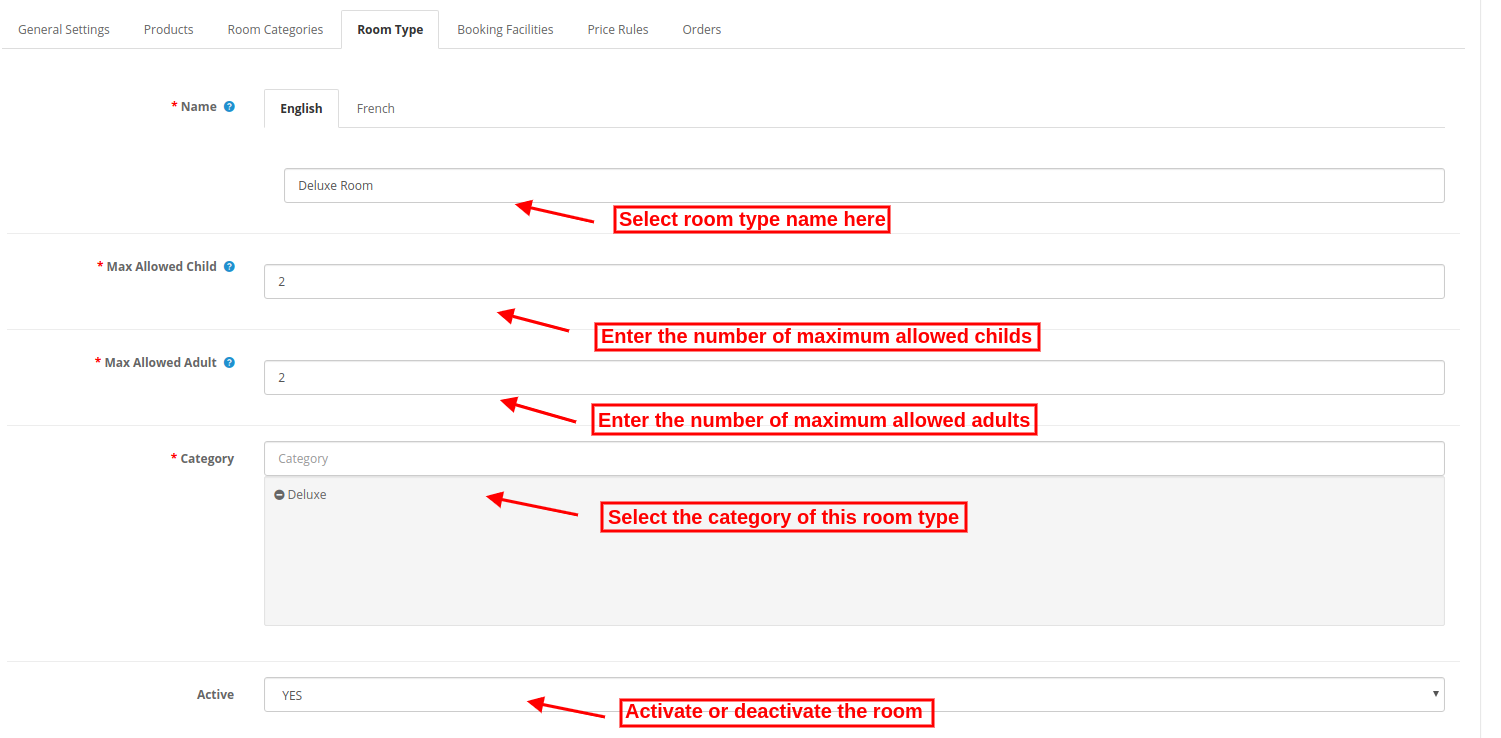
  •  Name: Enter the room type name in multiple languages.
  • Max Allowed Child: Enter the number of children who are allowed.
  • Max Allowed Adult: Enter the number of adults who are allowed.
  • Category: Select the room category from here.
  • Active: Select yes or no for activating/deactivating this room type.

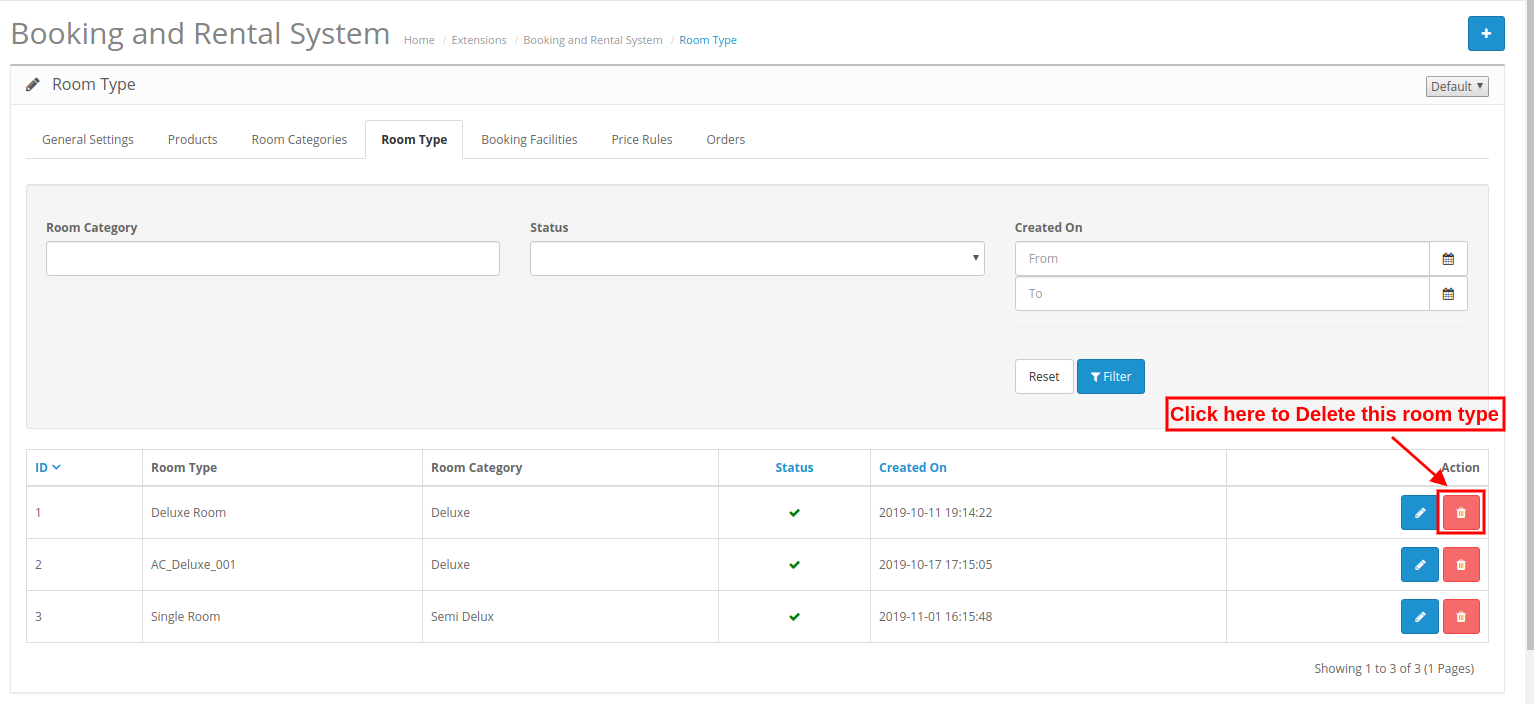
3.4.2 How to Delete a Room Type

Admin just needs to click on the delete icon for deleting any room type.

3.4.3 How to Edit a Room Type

Admin just needs to click on the edit icon for editing any room type.

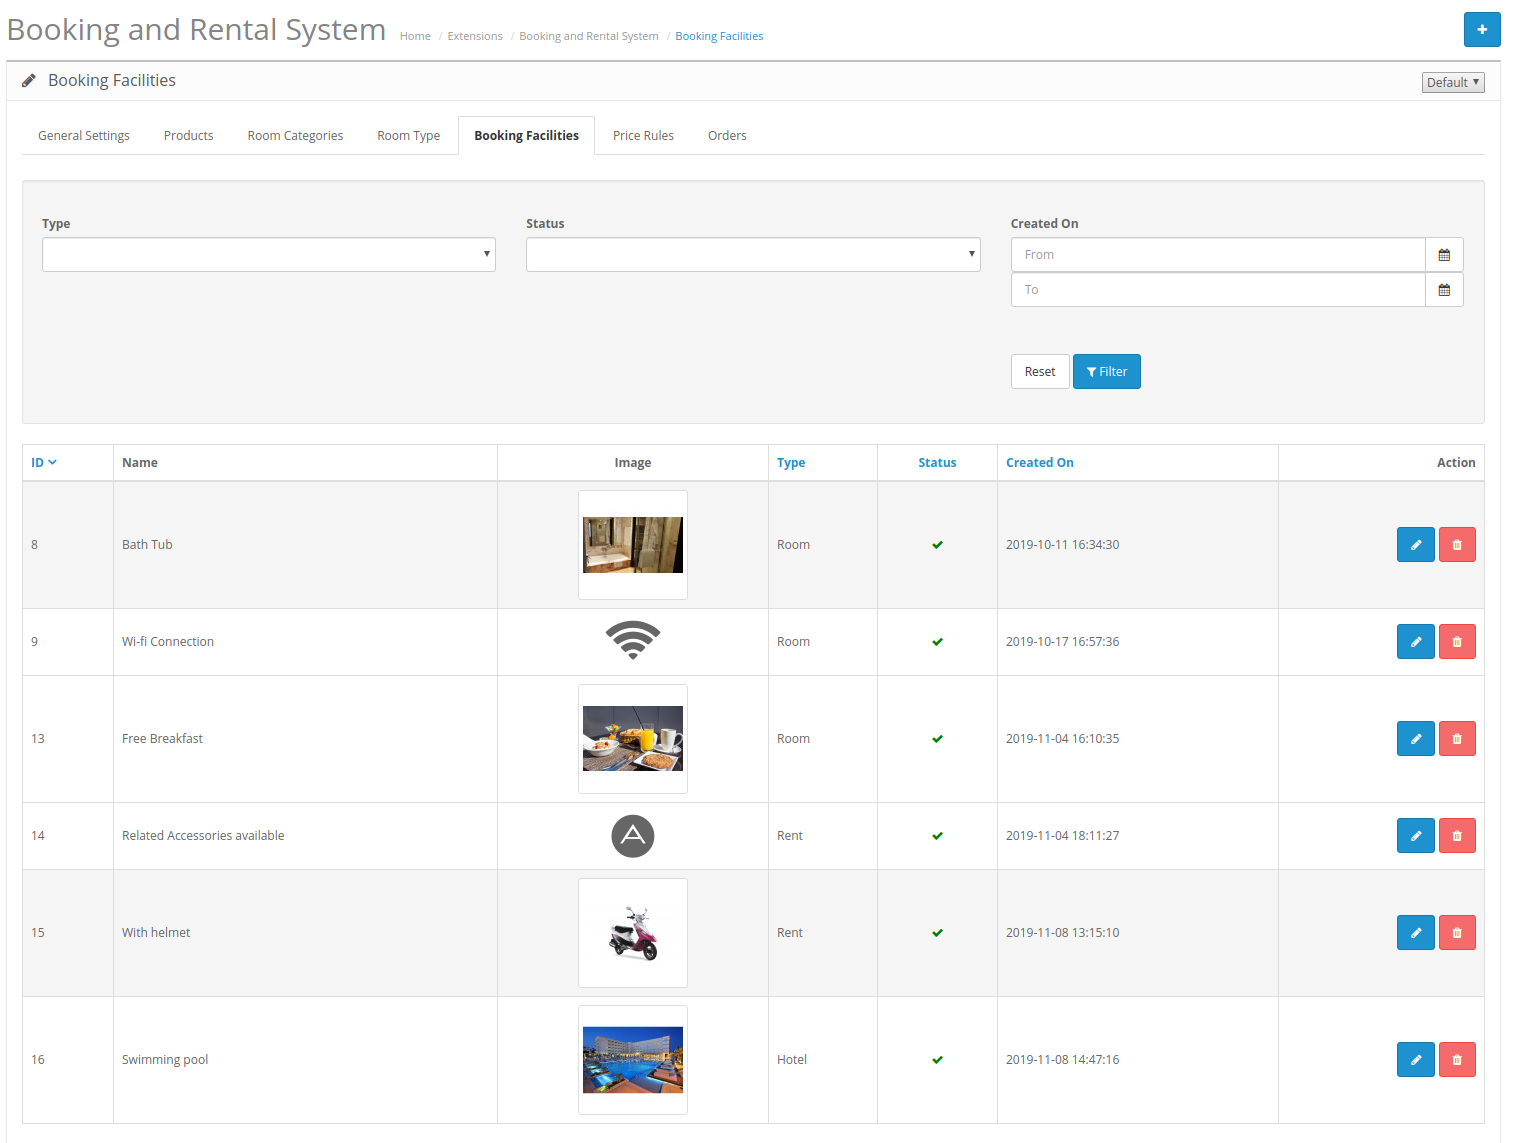
3.5 Booking Facility

The store merchant can add, delete and update the booking facilities from this tab.

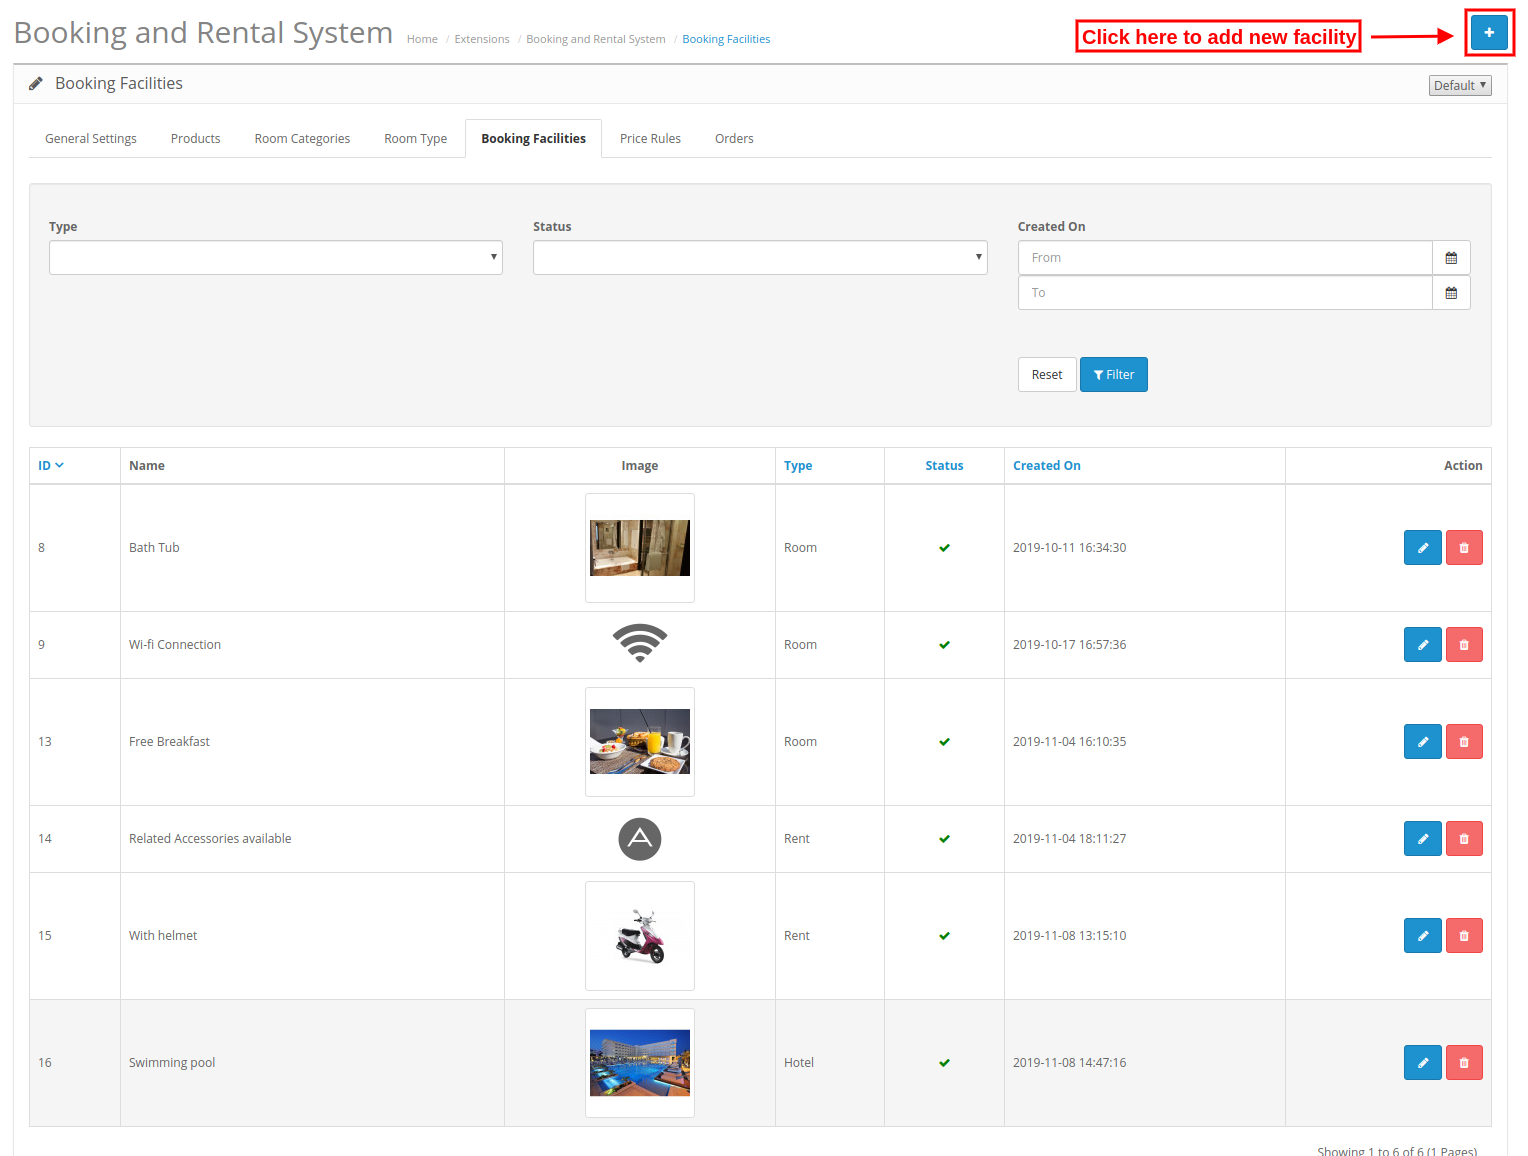
3.5.1 How to Add new booking facility

For adding a new booking facility, click on the “+” button as shown below:

After clicking this button admin needs to apply the following settings:

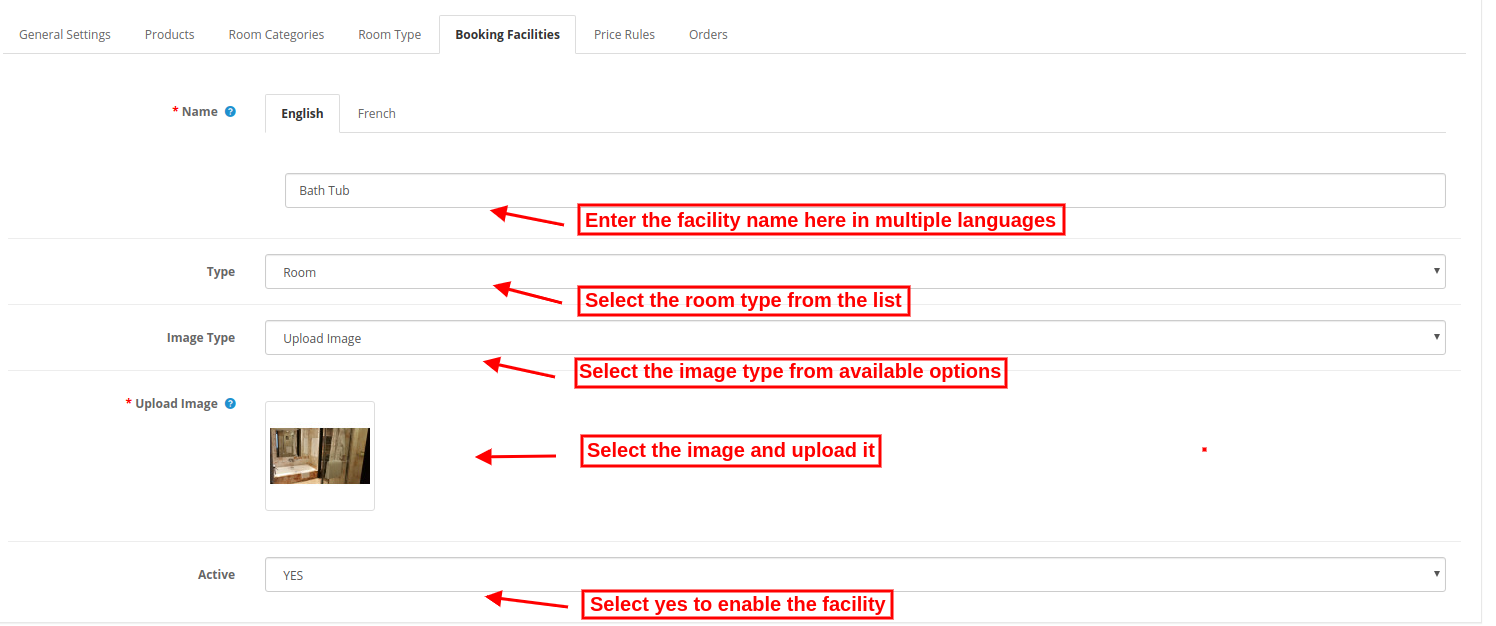
  • Name: Enter the facility name in various languages.
  • Type: Select from the available types ie room, rent or hotel. The facilities would be available to map with the product according to there type i.e. A hotel type of category can be mapped with only hotel type of products.
  • Image Type: Select the image type ie upload image or a font awesome.

1. Upload Image: Select the image which you want to upload

2. Font Awesome: Enter the font awesome icon.

  • Active: Select yes or no for activating or deactivating this booking facility.

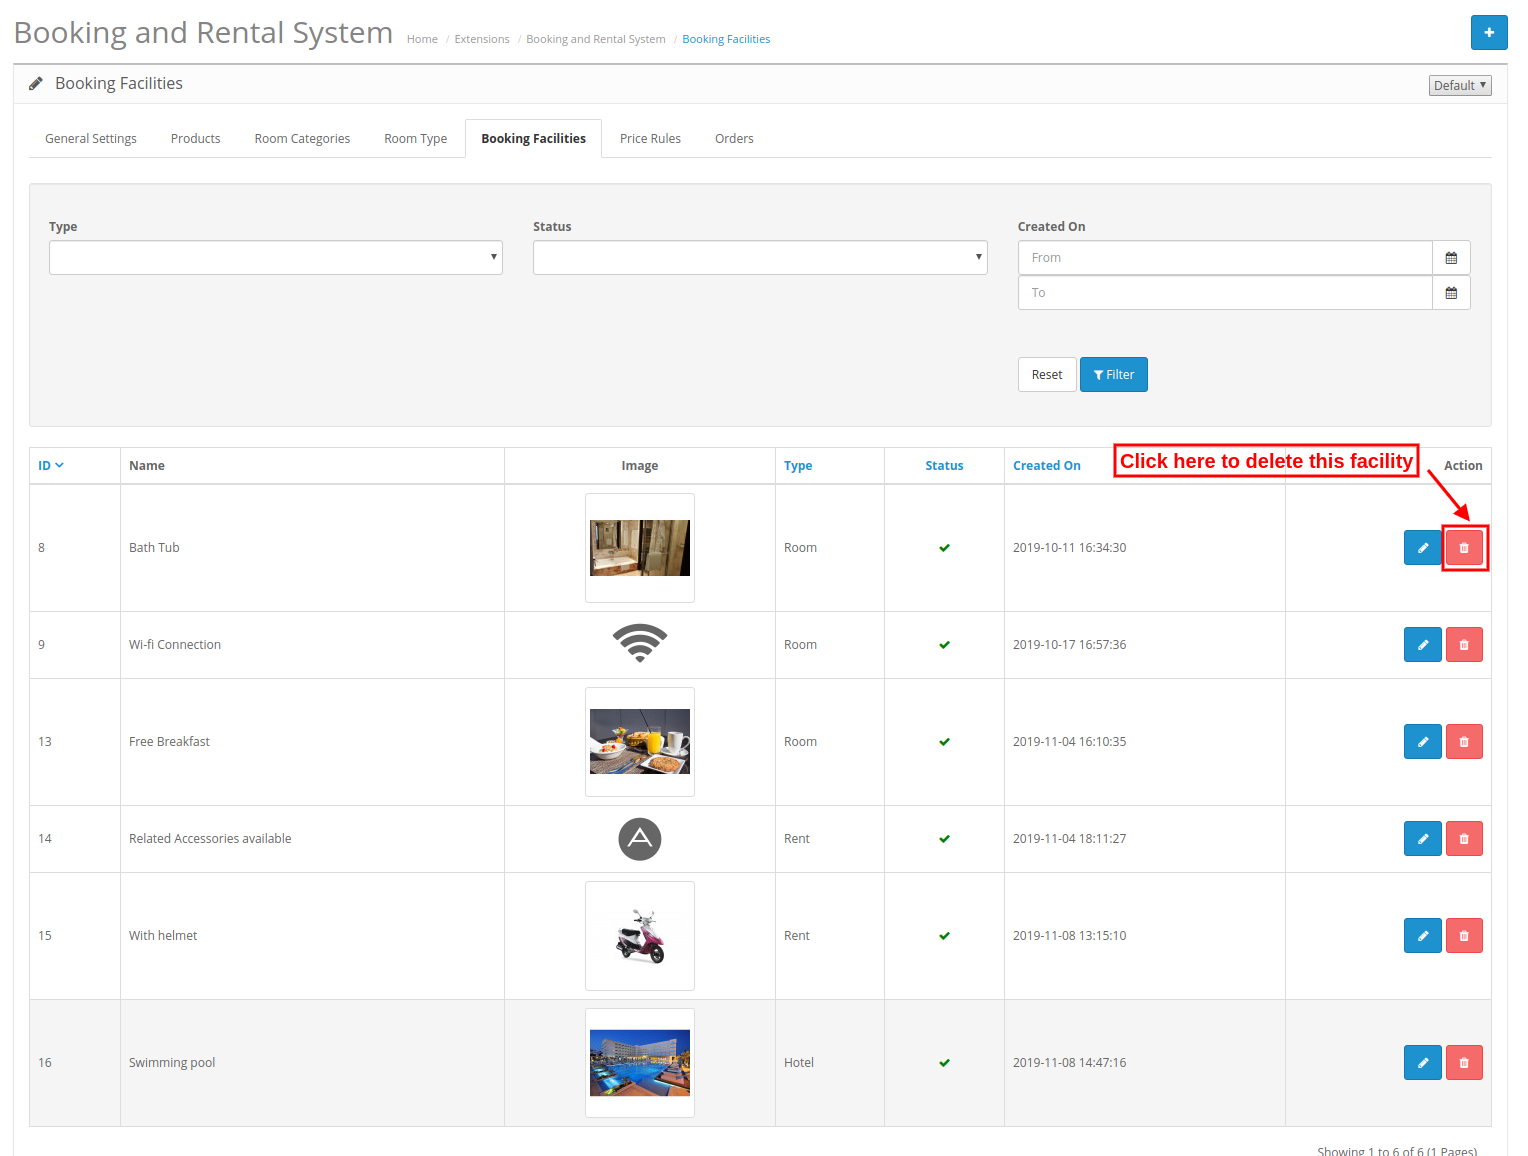
3.5.2 How to Delete booking facility

The online merchant just needs to click on the delete icon for deleting any booking facility.

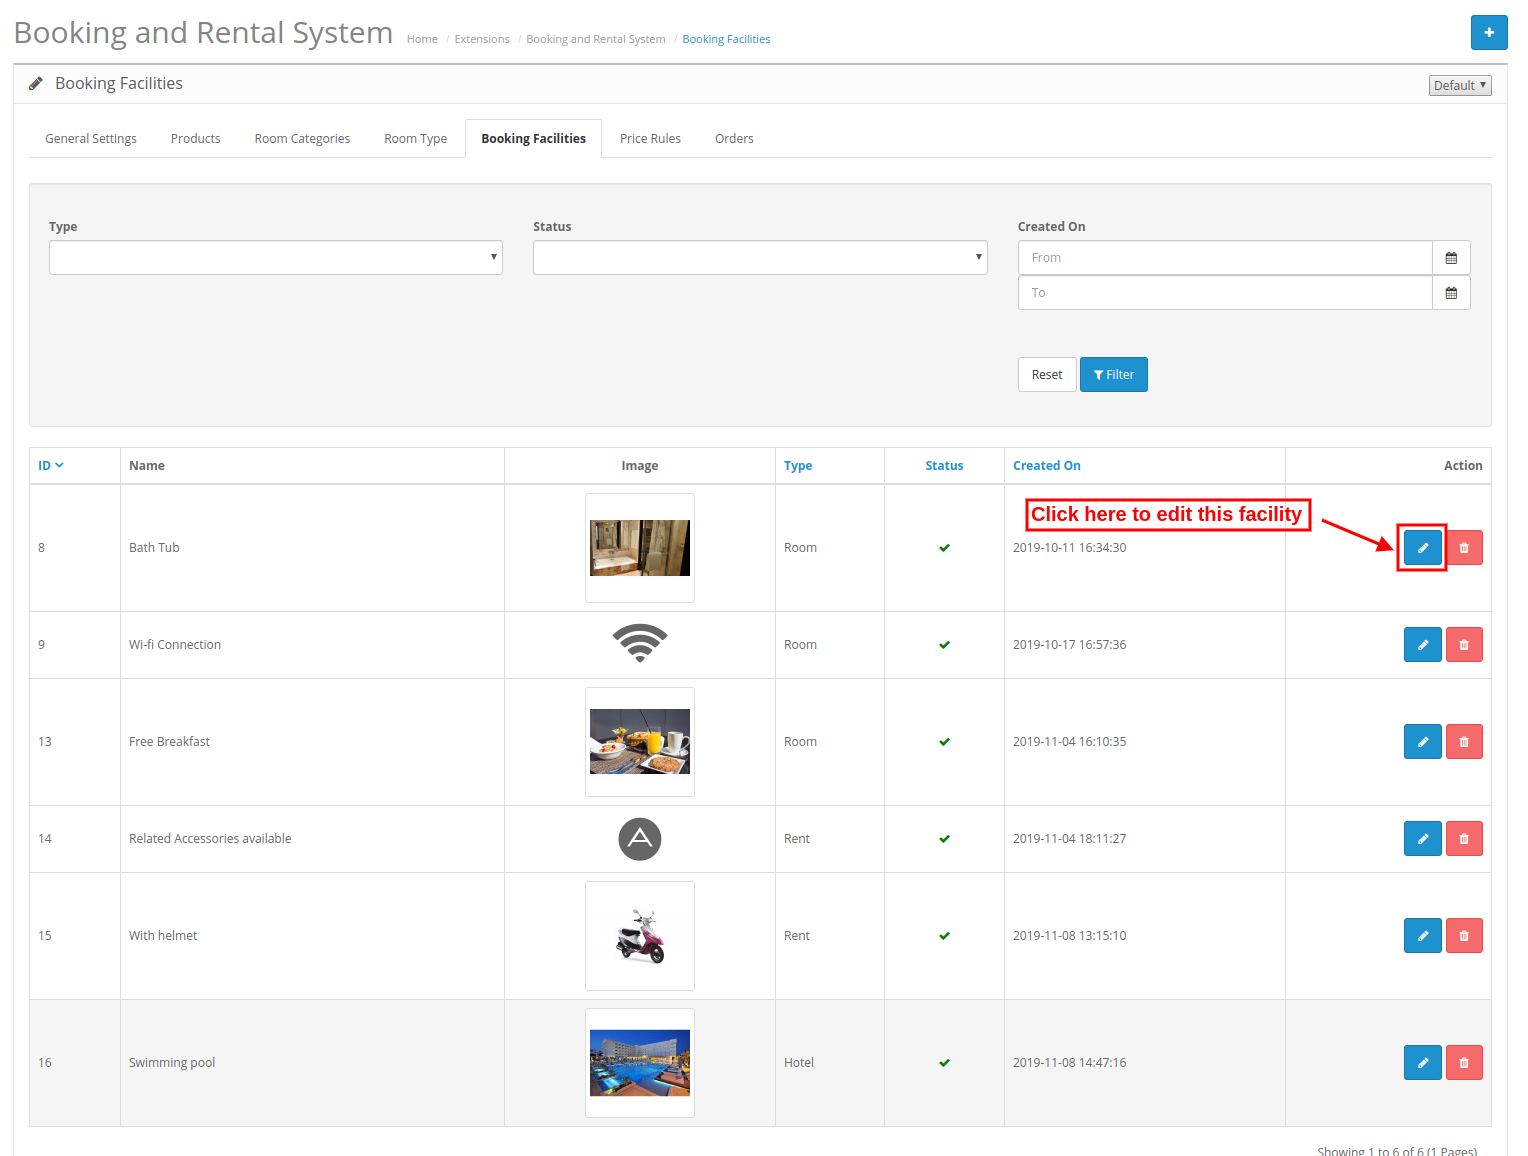
3.5.3 How to Edit booking facility

The online merchant just needs to click on the edit icon for editing any booking facility.

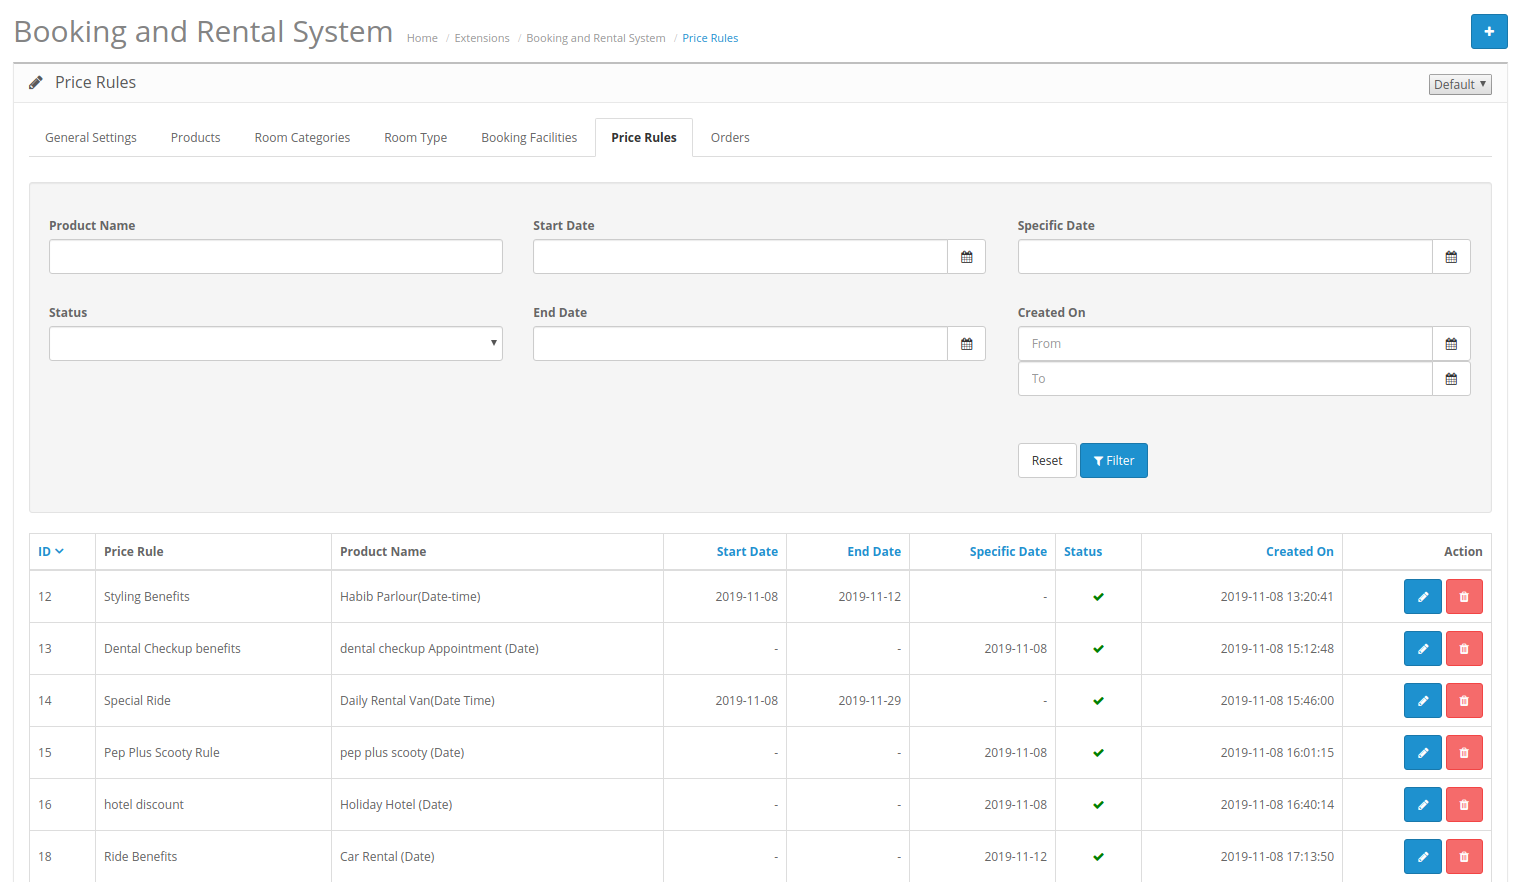
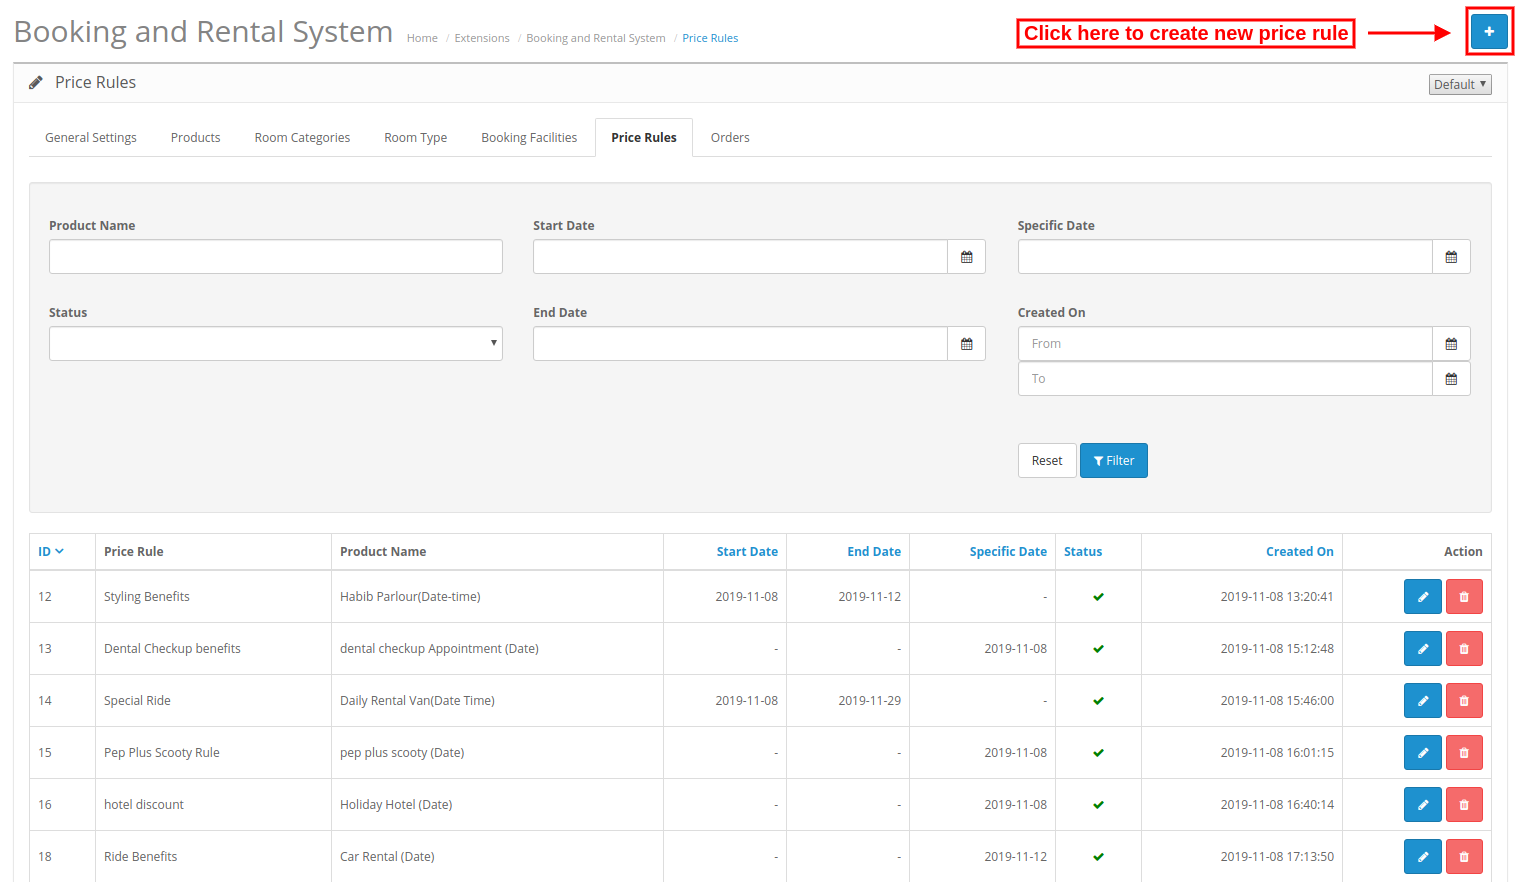
3.6 Price Rule

Here, admin can create, delete and update price rules easily by following the described steps.

3.6.1 How to Add new Price Rule

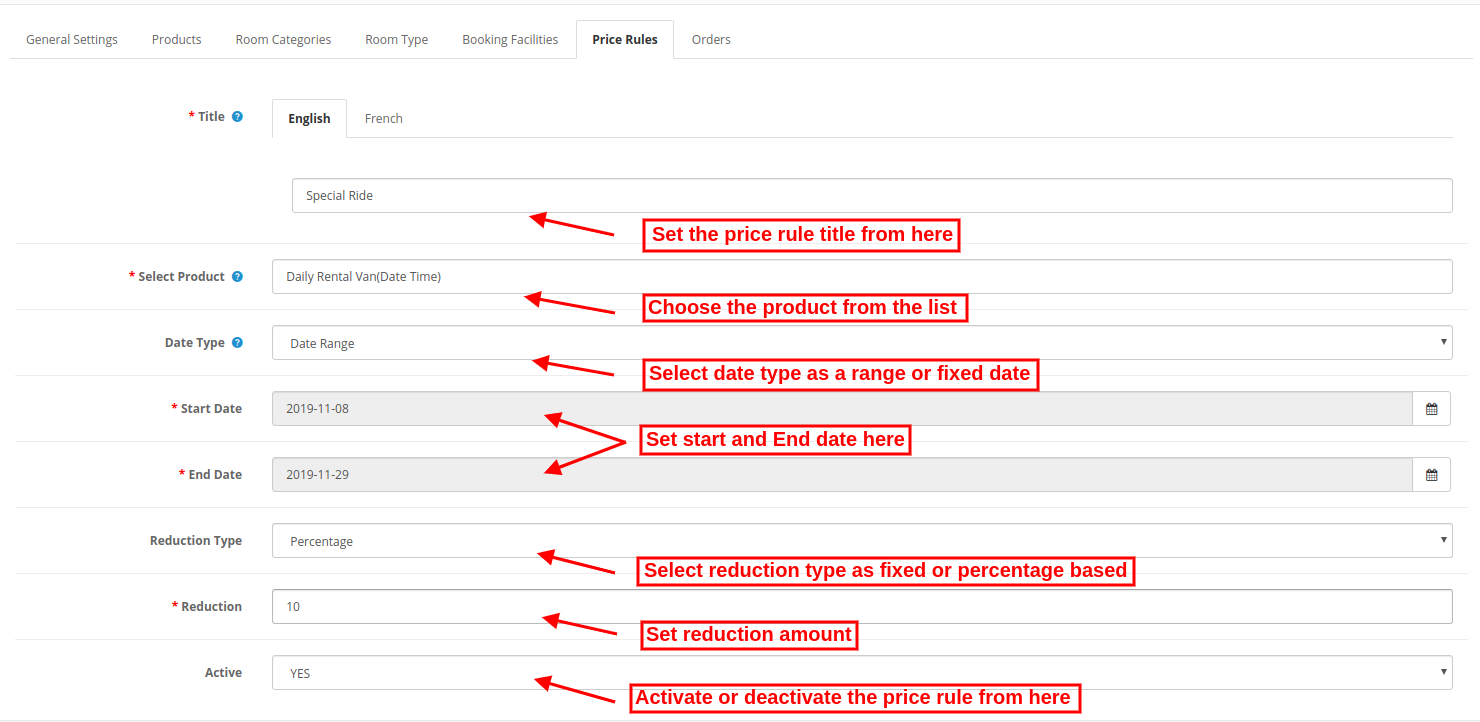
After clicking on Add new button, the admin needs to apply these settings:

  • Title: Enter the Price Rule Title in various languages.
  • Select Product: Select the product for mapping this price rule.
  • Data Type: Select the date type as a date range or a specific date.

While selecting date type as date range, you will get these customization options:

1. Start Date: Enter the starting date here.

2. End date: Enter the ending date.

While selecting a specific date, the admin needs to enter a specific date only.

  • Reduction Type: Select a fixed or percentage-based reduction type.

  • Reduction: enter the fixed/percentage based amount which you want to reduce.
  • Active: Select Yes or no for activating/deactivating this price rule.

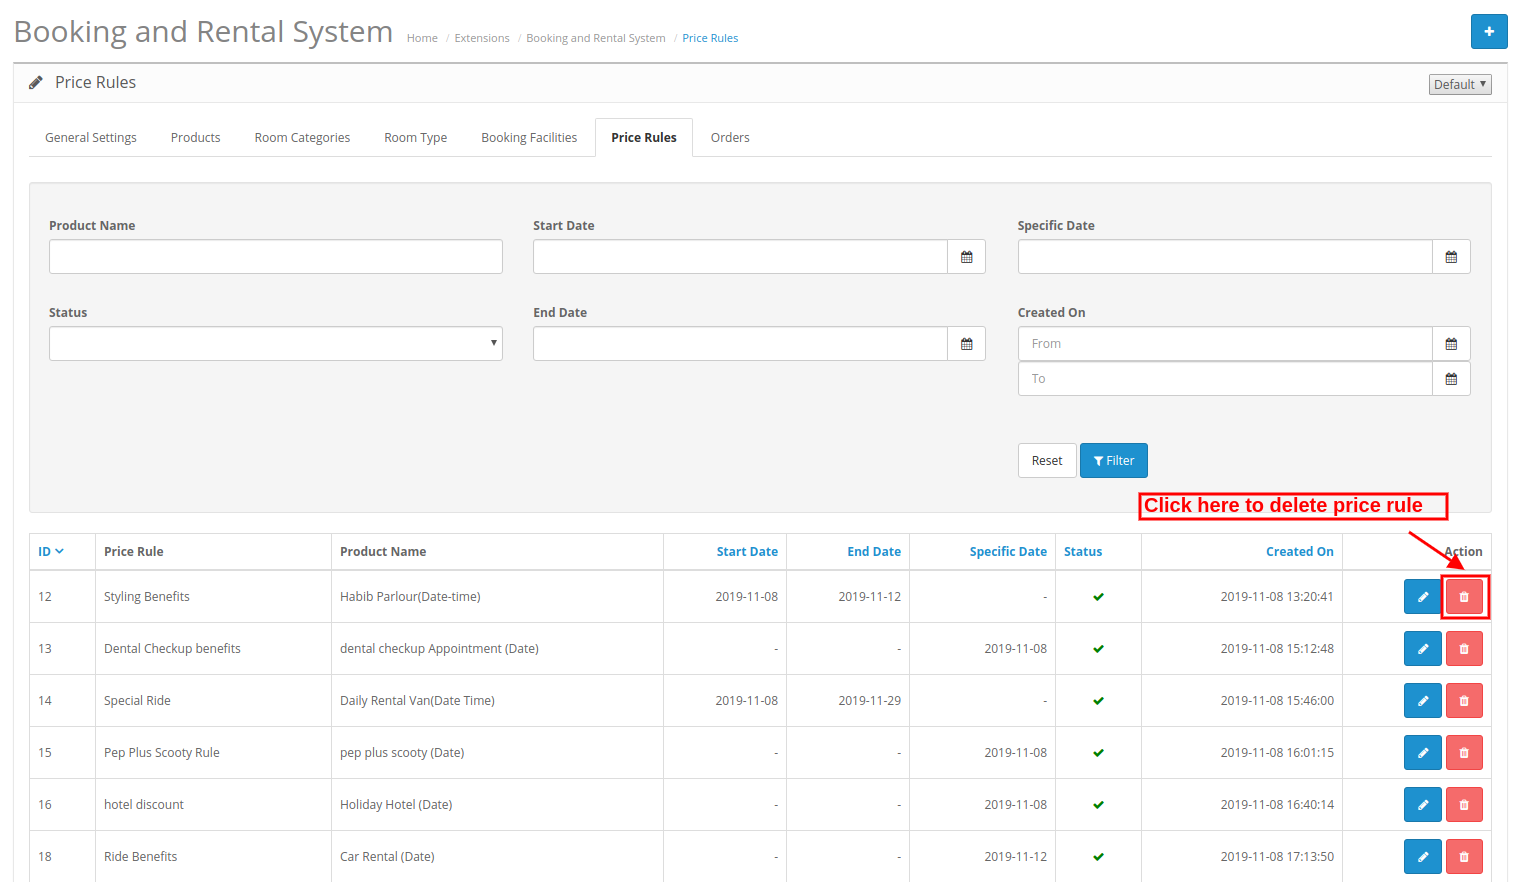
3.6.2 How to Delete Price Rule

The online merchant just needs to click on the delete icon for deleting any Price Rule.

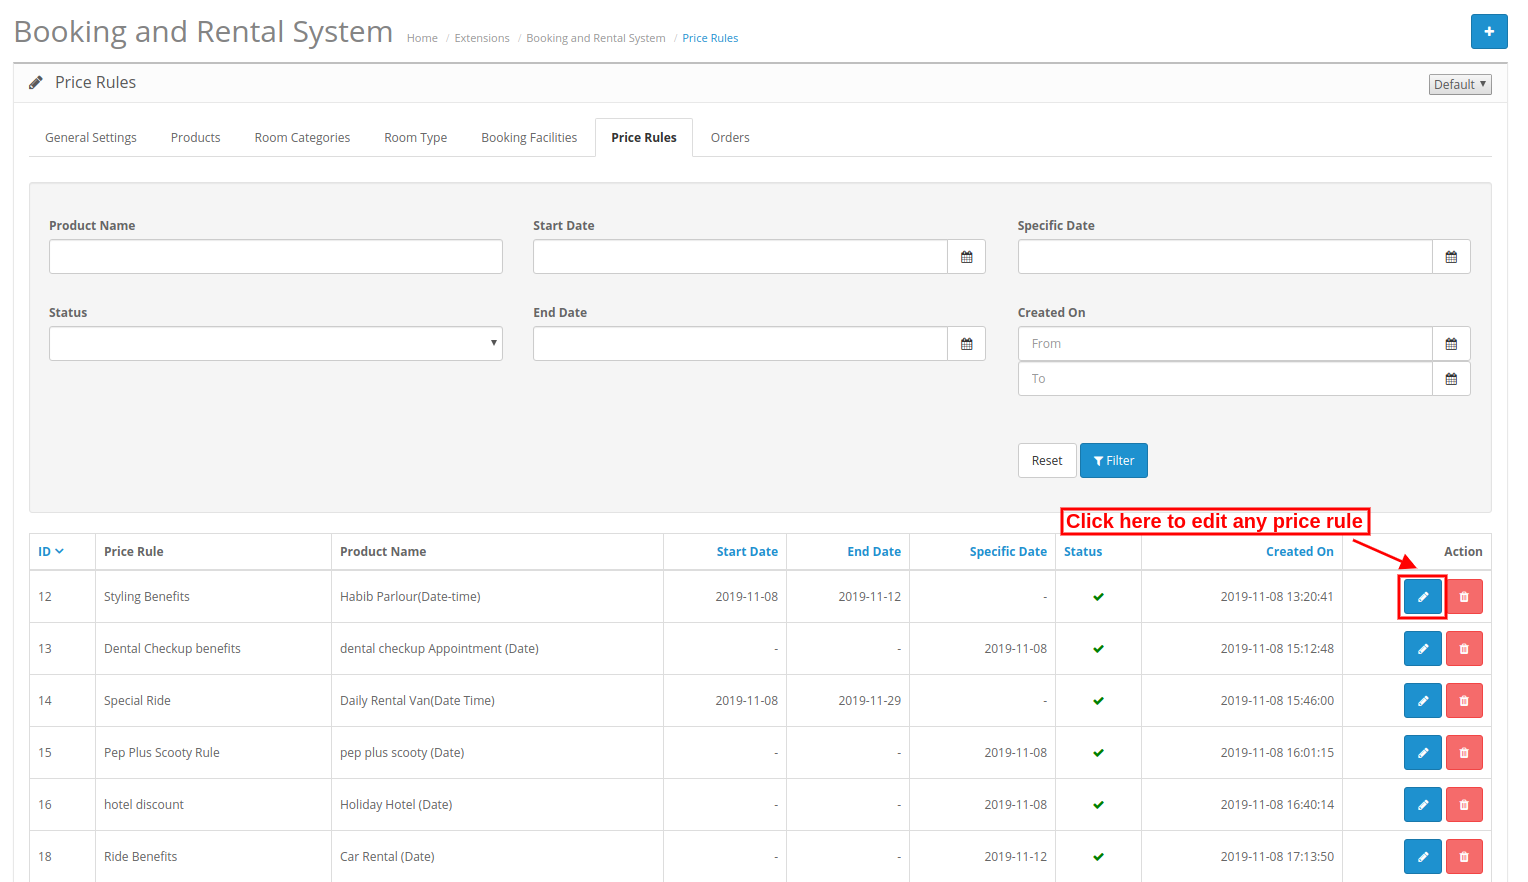
3.6.3 How to Edit Price Rule

The online merchant just needs to click on the edit icon for editing any Price Rule.

3.7 Orders

Admin can view all the booking and rental system based orders. Admin can view and edit order details.

4.0 Front-end Interface

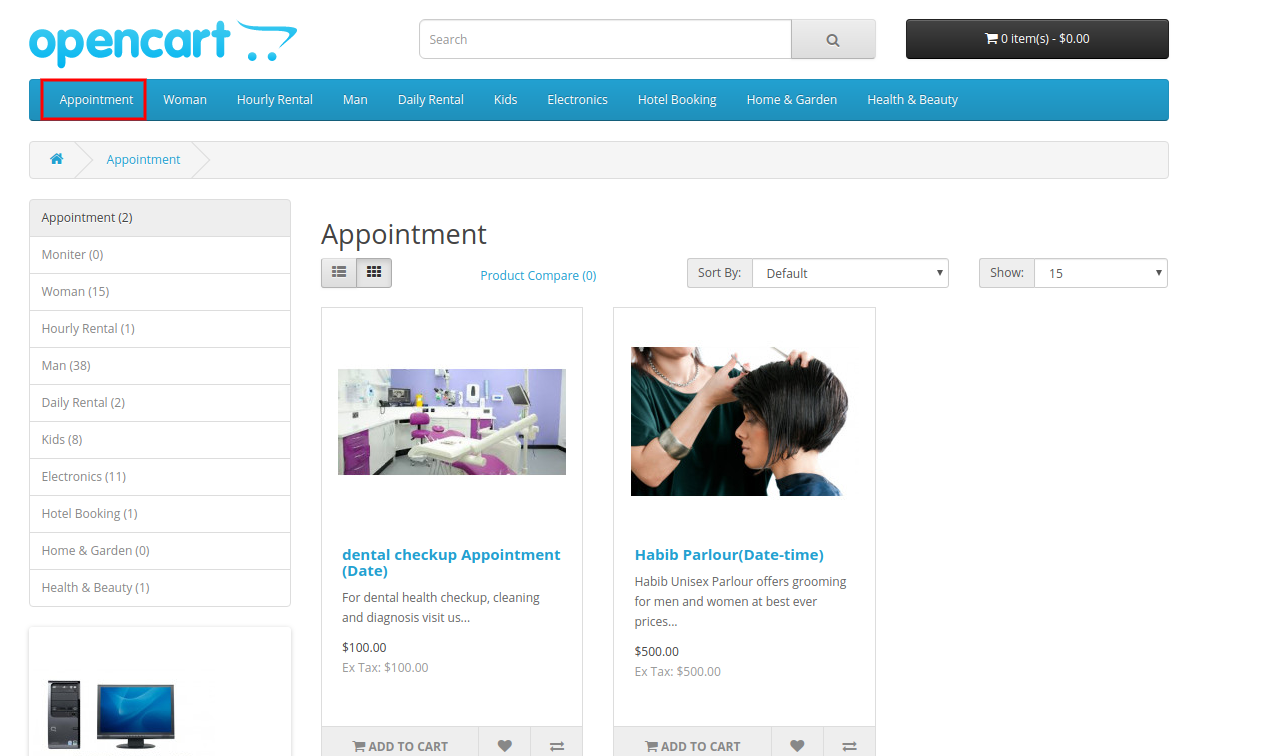
1. Appointment:

In the appointment category, the online users can view appointment type products as shown below:

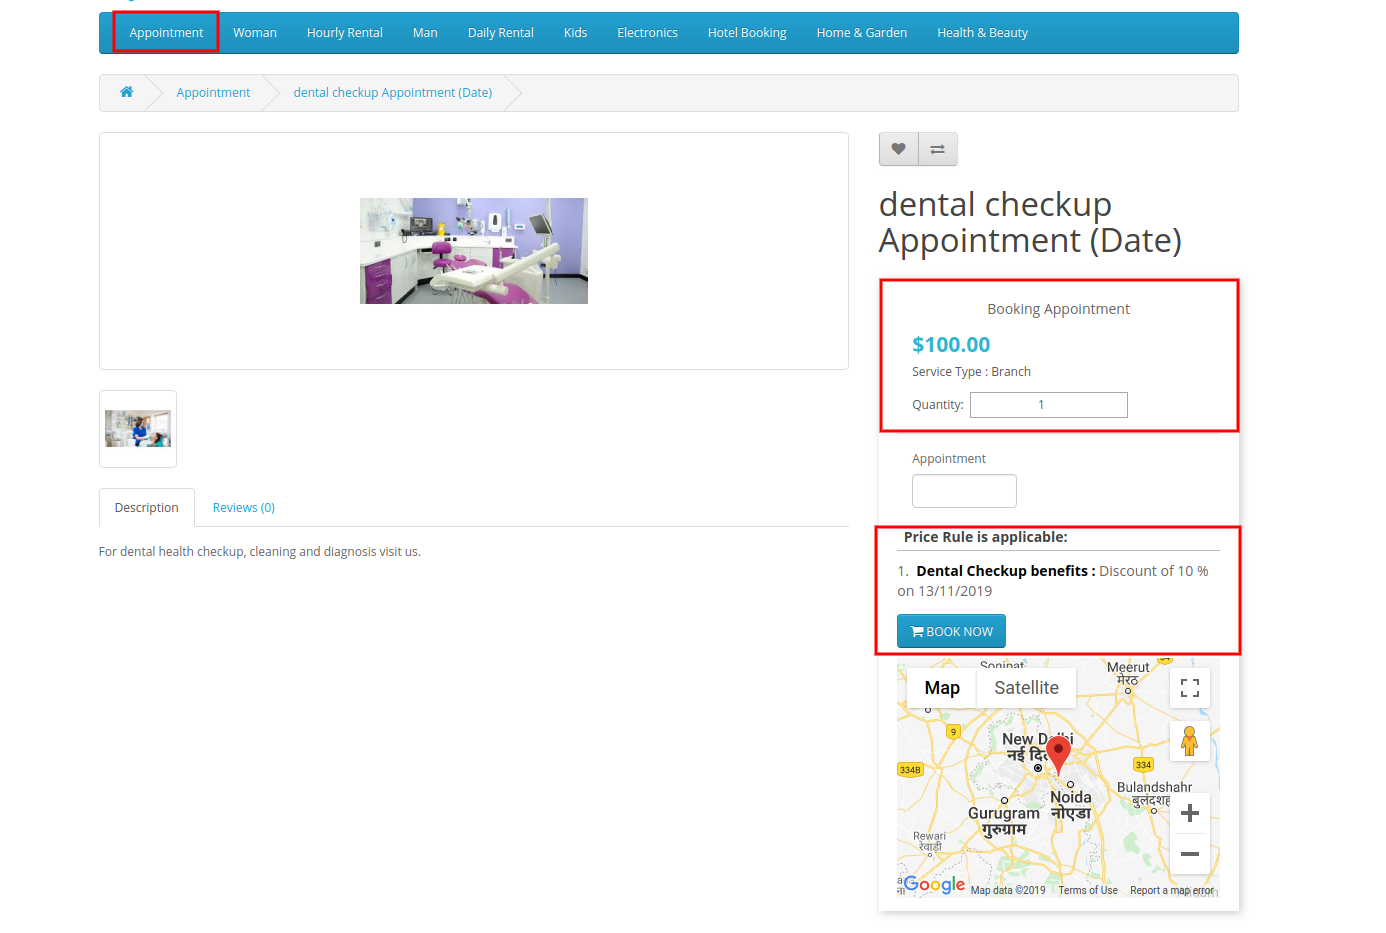
Appointment Date Type:

The online users can view the initial price of the appointment and view the price rule. The online users can also view the location on the map as shown below:

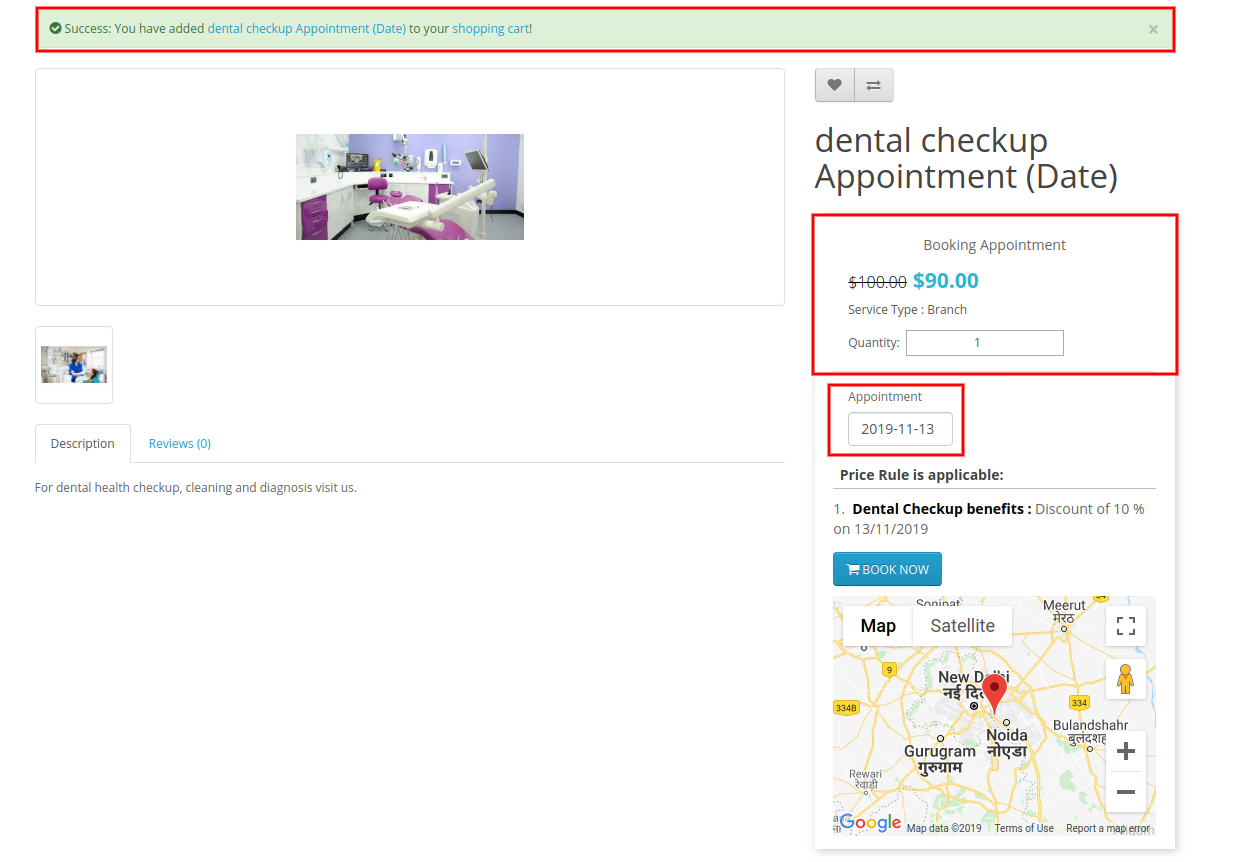
After selecting the appointment date, online users can view the location from the Google map. The online users can view the discounted amount at the same time when they select the appointment date.

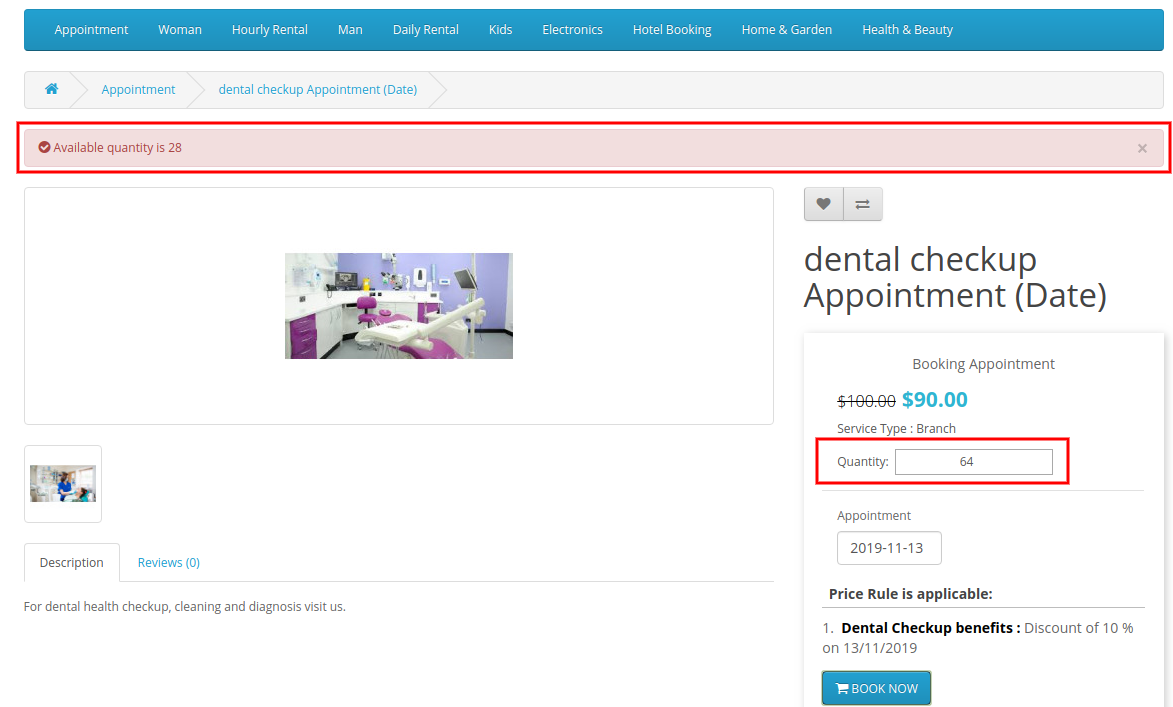
There will be an error if customers select more quantity than the available number of appointments.

Appointment Date-time Type:

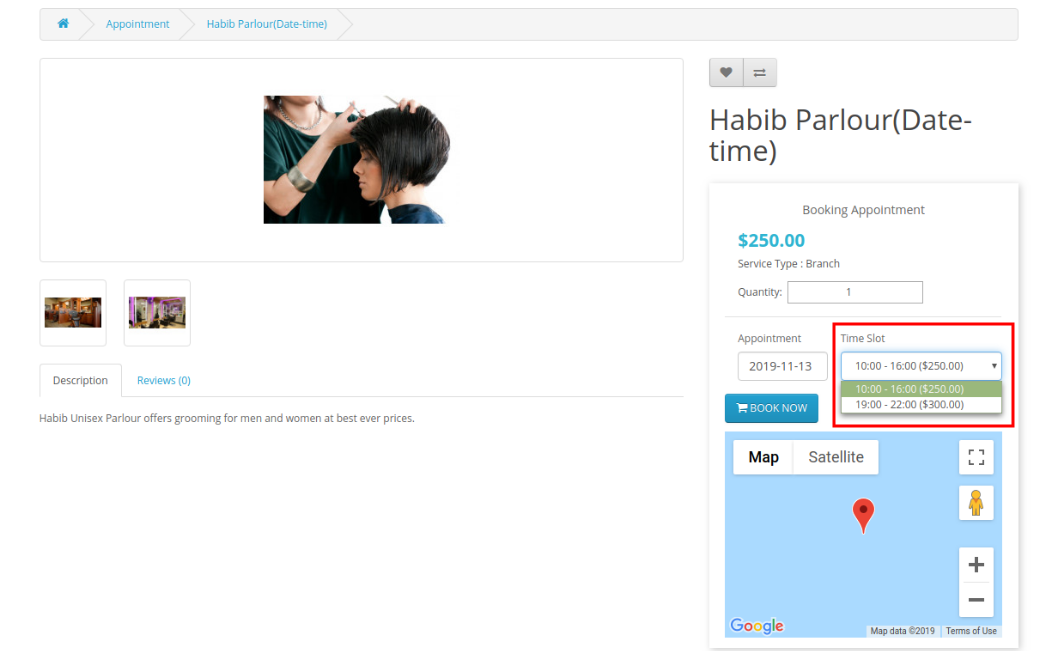
In Date-time based appointments, customers need to select time along with the date. They can view the charges of different time slots.

2. Daily Rental:

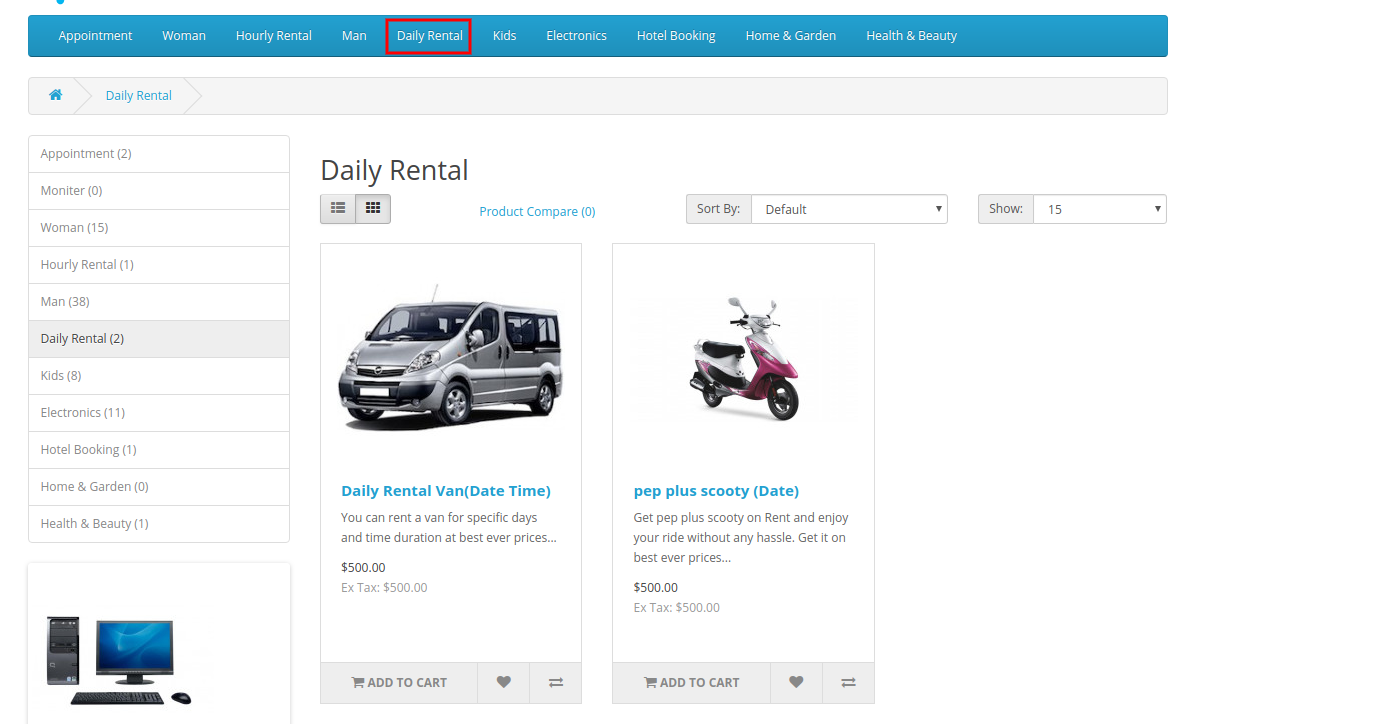
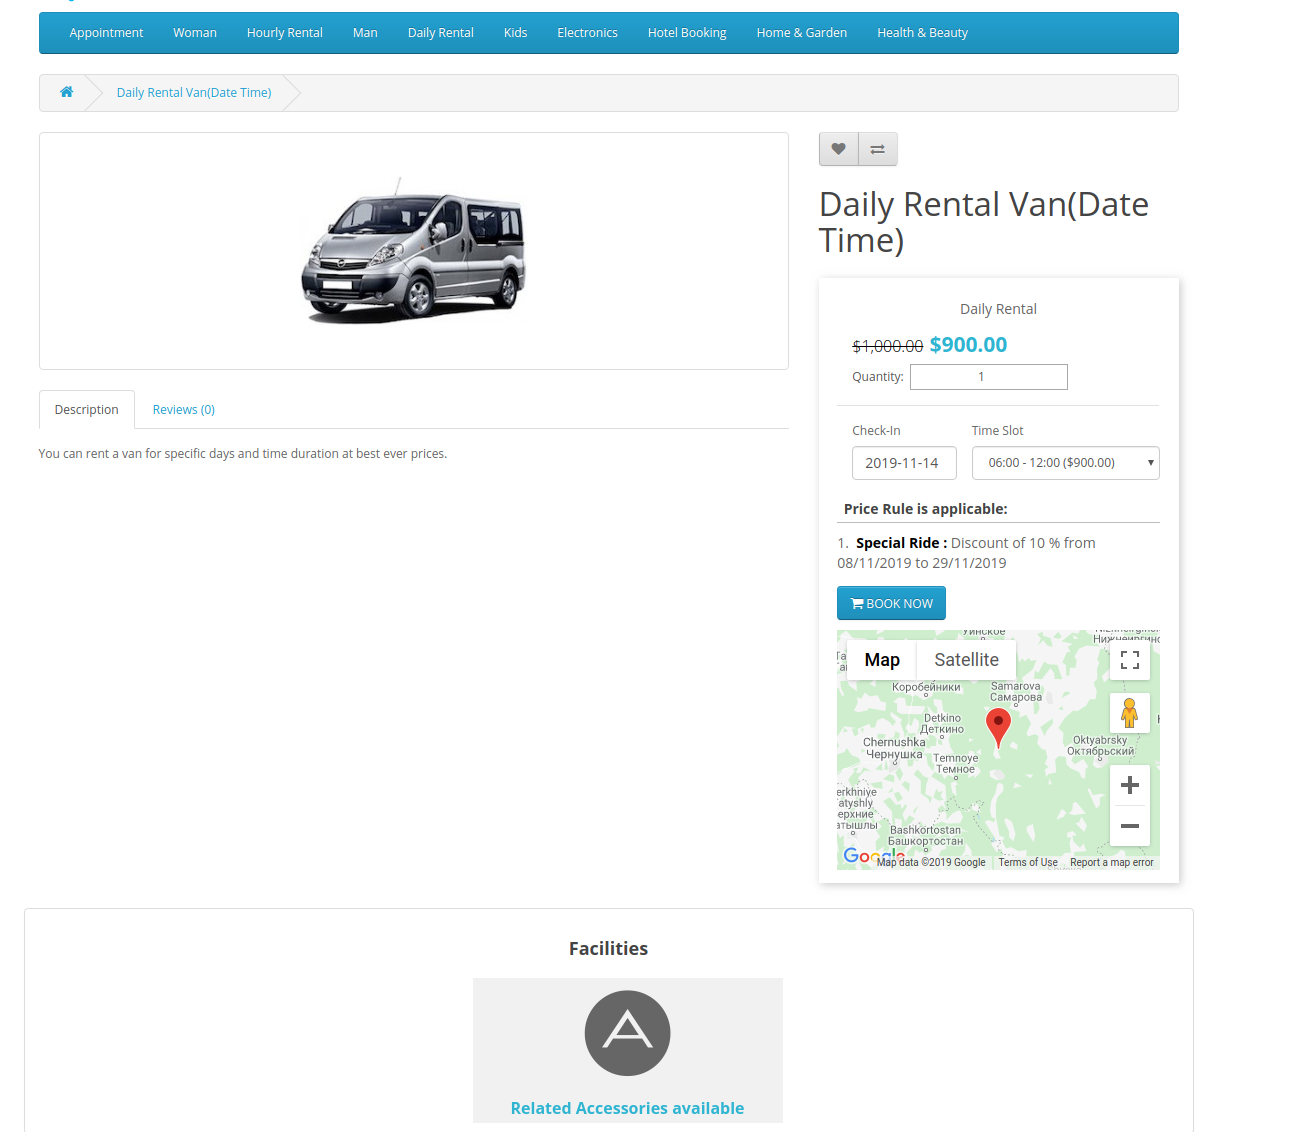
In the Daily rental category, online users can view all the activated daily rental products.

Daily Rental Date Type:

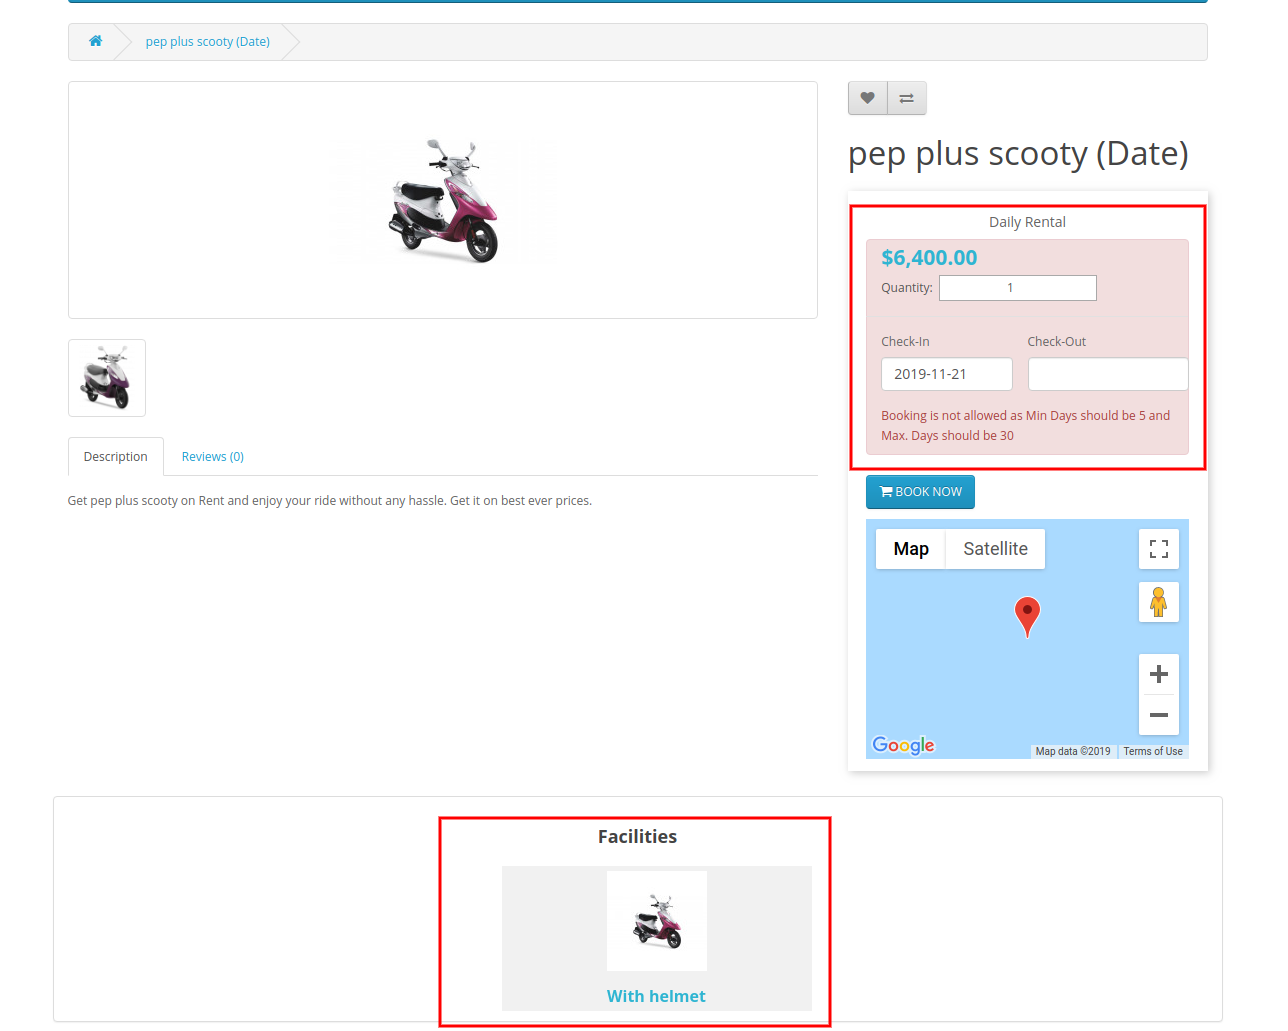
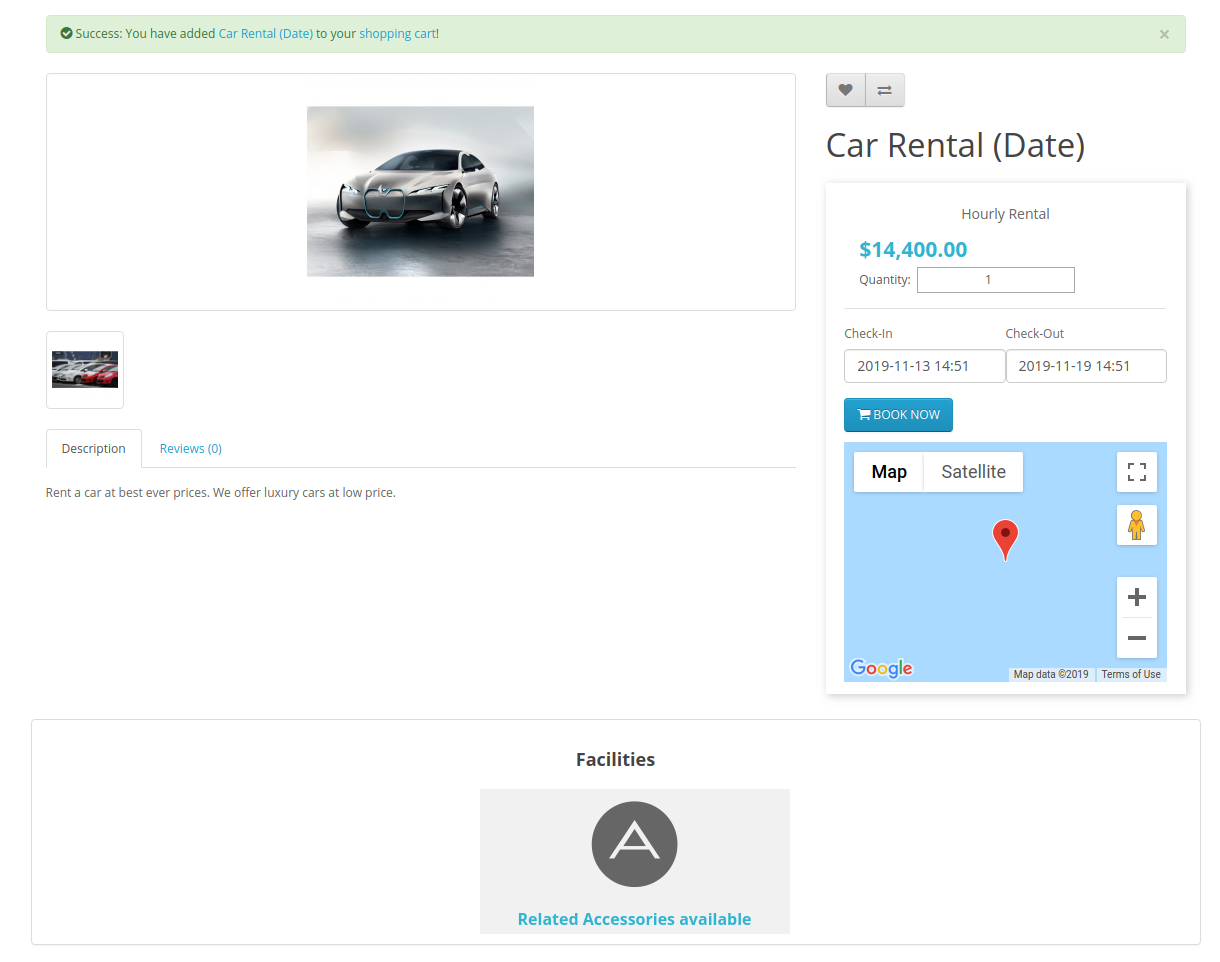
The online users can view the booking instructions and facilities on the product page.

Daily Rental Date-time type:

The online users can select the date and time slots. After that users can book daily rental based bookings.

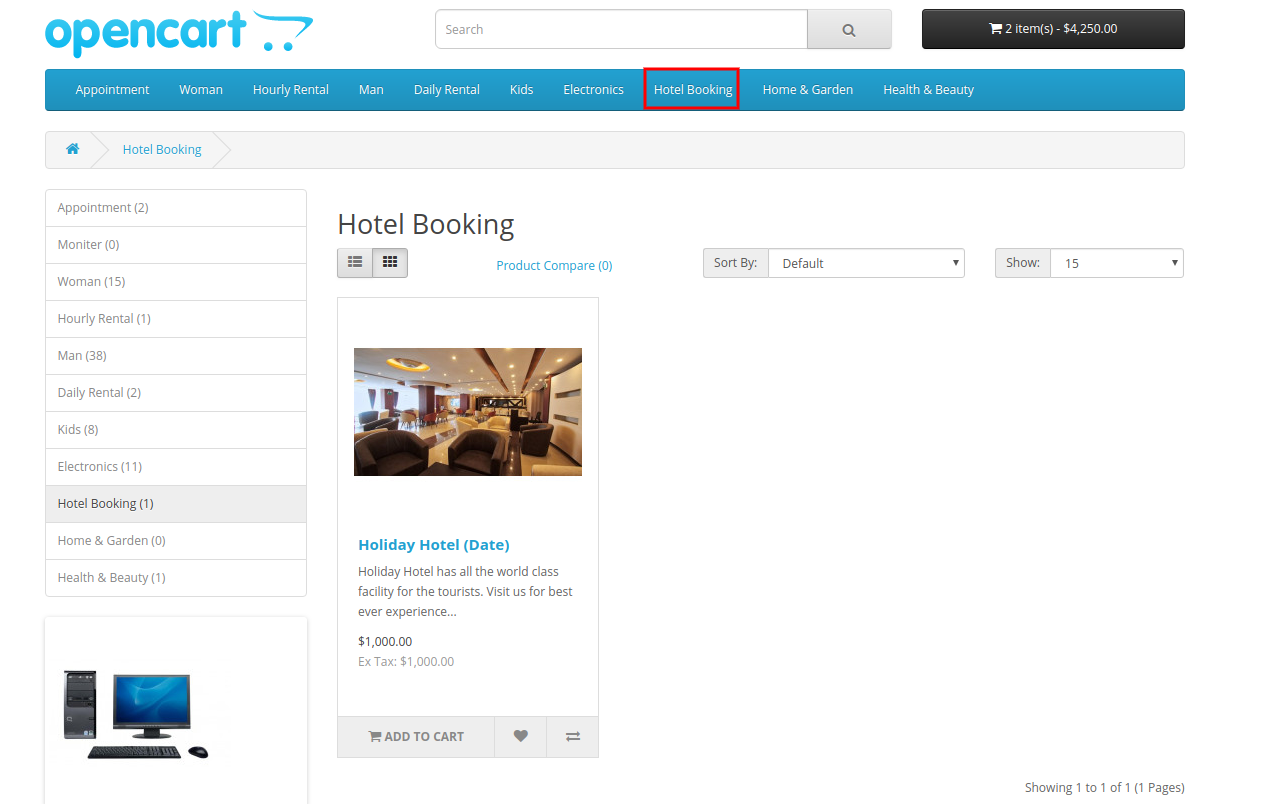
3. Hotel Booking:

The online users can view all the available hotels in hotel booking category as shown below:

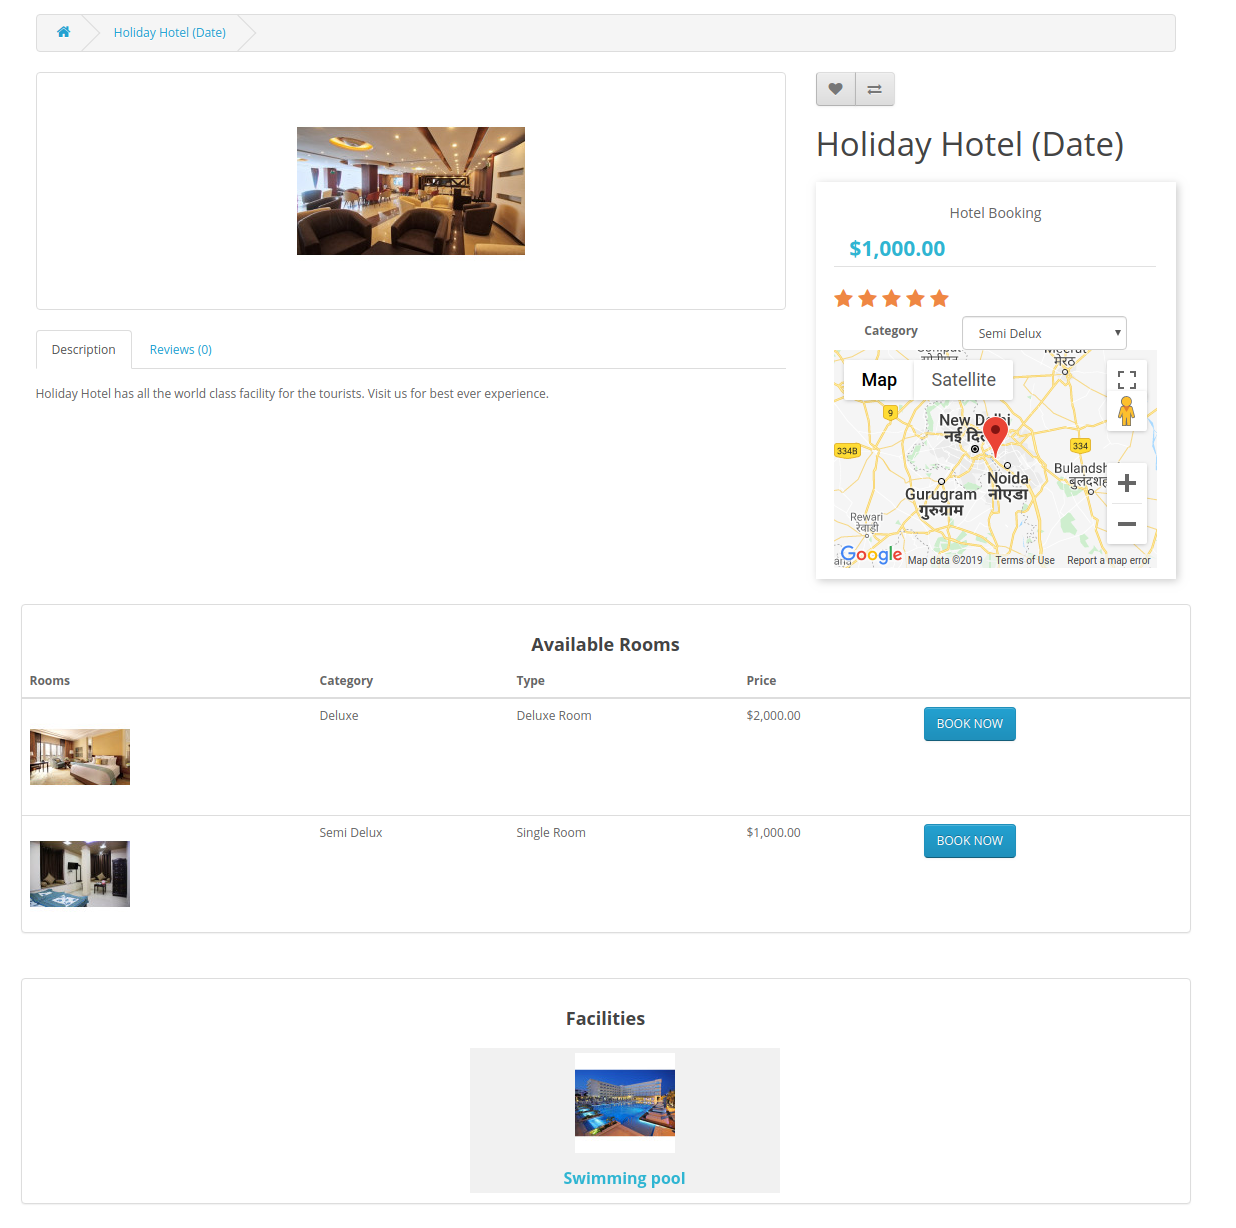
Initially, admin can view all room types and facilities as shown below:

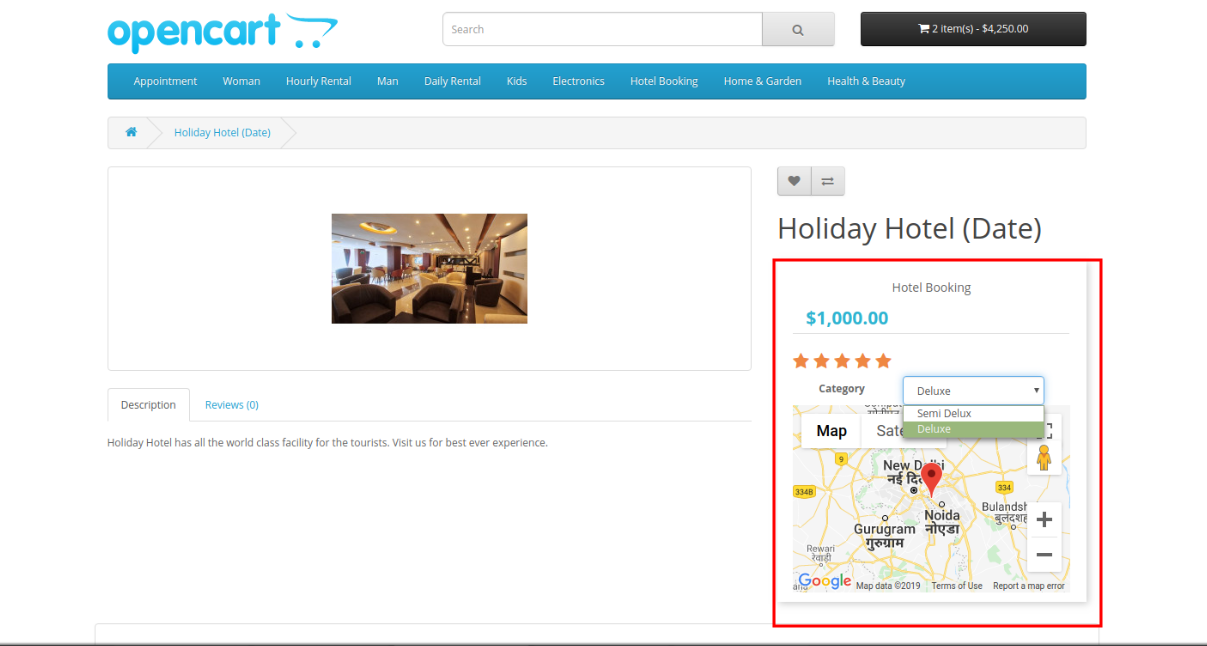
Admin can select from available room categories.

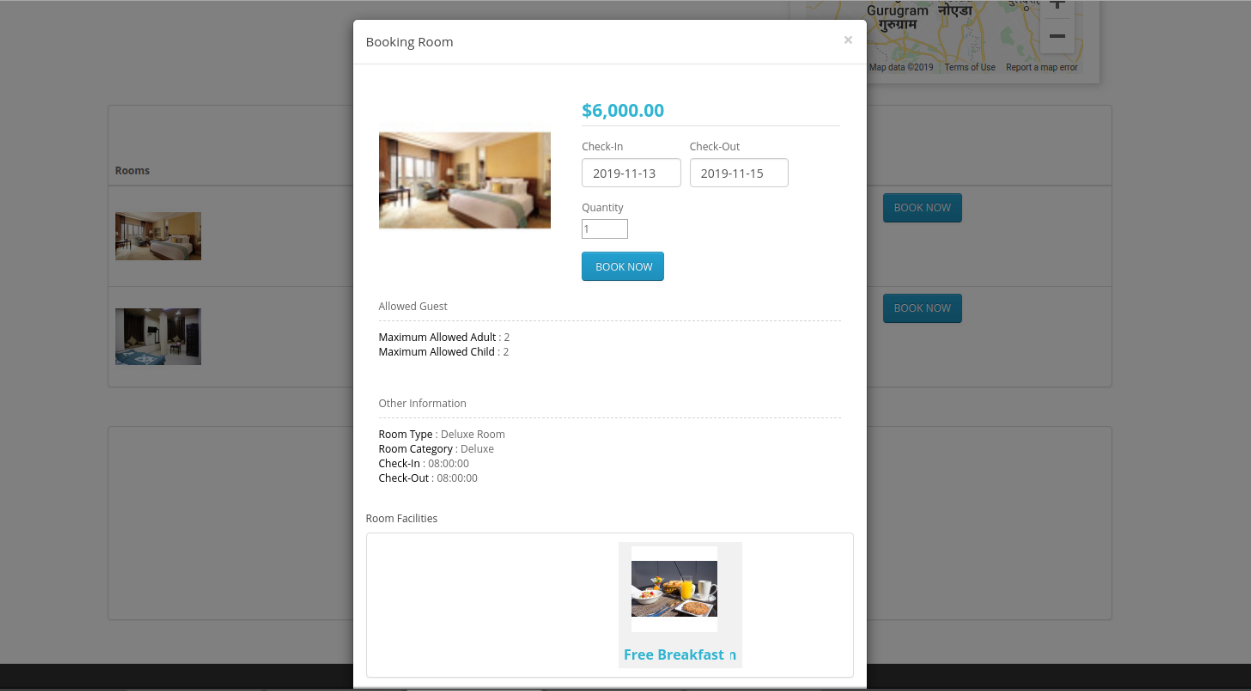
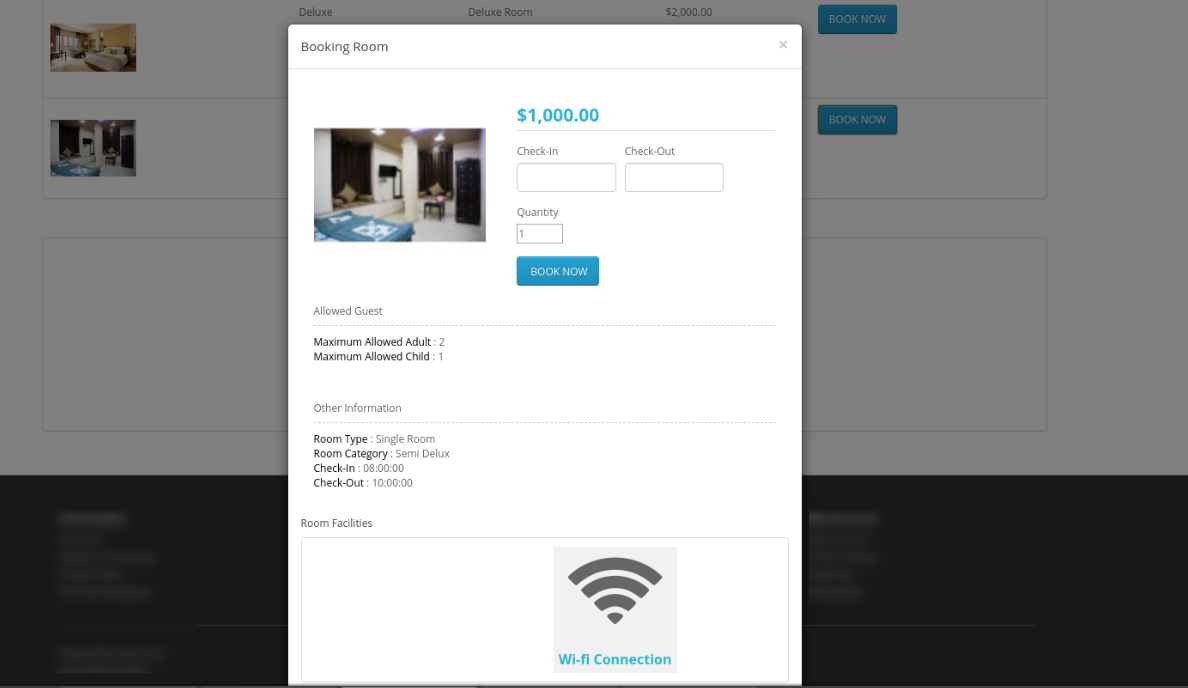
Online users can book the deluxe room as shown below:

Online users can also check conditions and facilities before booking any room.

4. Hourly Rental:

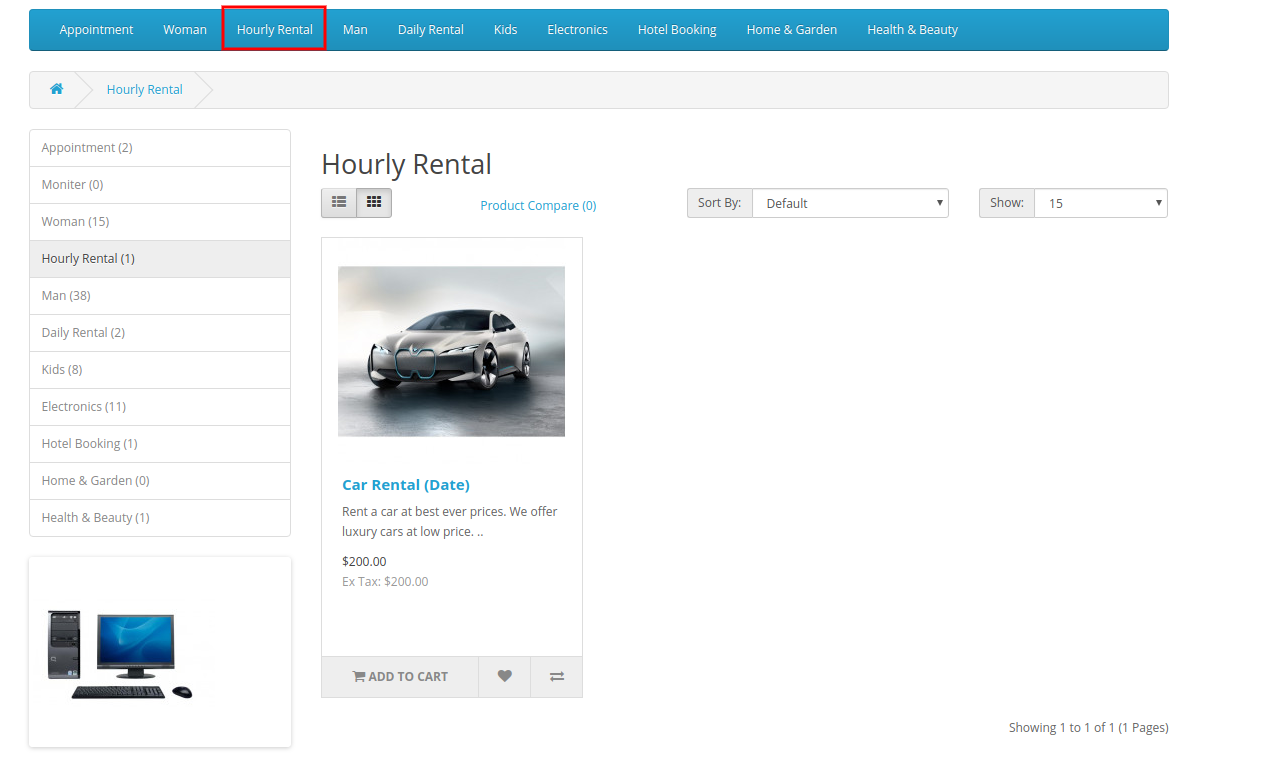
In the hourly rental category, online users can use products based on hourly rent.

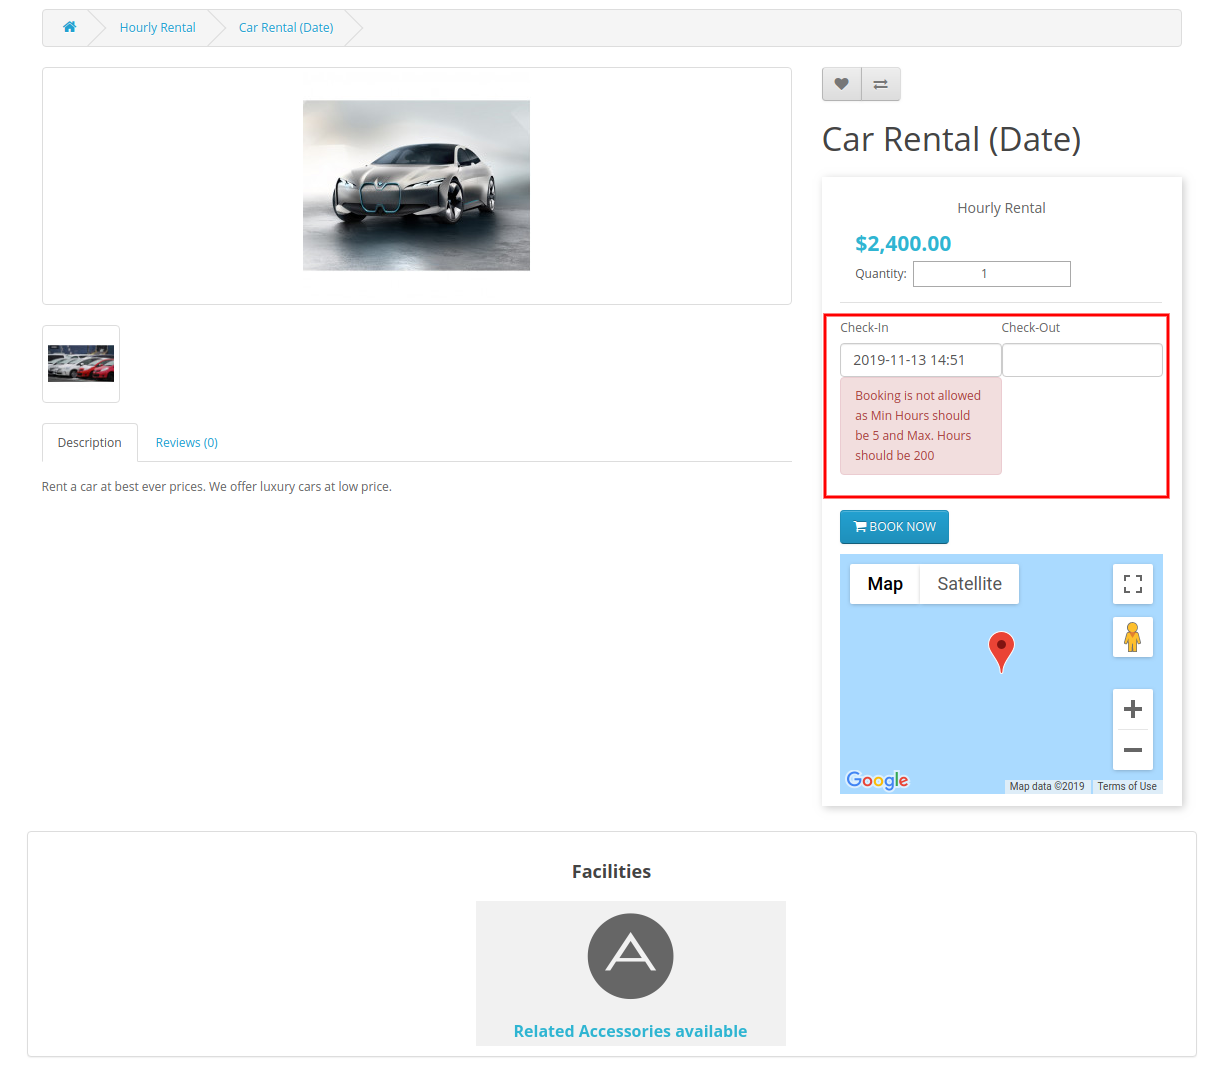
The online users can view the hourly rental conditions after selecting the check-in date as shown below:

Online users can select the quantity and duration for booking any hourly rental based product.

This way, the online store merchant can implement the functionality of booking and reservation with this Booking System Extension for OpenCart.

OpenCart Followup Emails Extension- User Manual

1.0 Introduction

The online store admin can now send followup emails to the customers with the help of OpenCart Followup Emails Extension offered by Knowband. This feature-rich OpenCart module allows the store merchant to create multiple rules and email templates for sending followup emails in several conditions.

Admin has an option to send followup emails to the customers after a certain time. Admin can create multiple rules and assign various templates for different events. Admin has an option to keep a followup email log. The OpenCart Follow Up Emails Extension allows offering a discount coupon code to the customers along with the followup emails. The OpenCart Follow Up Emails Module is multi-lingual compatible and offers smooth functioning.

1.1 Features of this OpenCart Followup Emails Module

  • With the help of OpenCart Followup Emails Extension, the store admin can send follow up emails to the customers.
  • Admin can also offer fixed or percentage-based discount coupons along with the followup email.
  • Ready-made email templates are available for follow-up which can be further customizable.
  • As an online store admin, you can set the number of days after which you want to send follow up emails.
  • Admin can review all the followup emails by enabling test mode from the admin interface of this OpenCart Follow Up Emails Extension.
  • The OpenCart Follow Up Emails Extension is compatible with multiple languages.
  • Admin can keep a follow up email log to view followup related details.
  • The OpenCart Followup Emails Extension allows the online store admin to select products, customers group on which he wants to apply to follow up rules.
  • Ready-made email templates are available for sending followup emails without any hassle.
  • There is no need to change even a single line of codes while using OpenCart Followup Emails Extension.

2.0 Installation Steps of OpenCart Followup Emails Module

Purchase Order Followup plugin for OpenCart from our store. You will receive these files after purchasing the OpenCart extension:

  • First, you will get a source code file of the OpenCart Followup Emails Module in zipped file format.
  • User Manual of this OpenCart Follow Up Emails Extension.

Follow below-mentioned steps to install OpenCart Followup Emails Module

1. Unzip the received zip file. You will get the folders as shown in the following image:

2. Copy all the folders of the zip file in the Root Directory of OpenCart setup via FTP manager.

So, Followup emails for order plugin is now successfully installed and ready to use at your store.

Now go to the admin menu and click on the extensions and thereby click on the configure button next to Followup Emails plugin for OpenCart.

2.0 Admin Interface

The online store admin can apply the settings for sending followup emails. OpenCart Followup Emails Extension has three customization tabs as shown below:

  • General Settings
  • Email Templates
  • Sent Log

3.1 General Settings

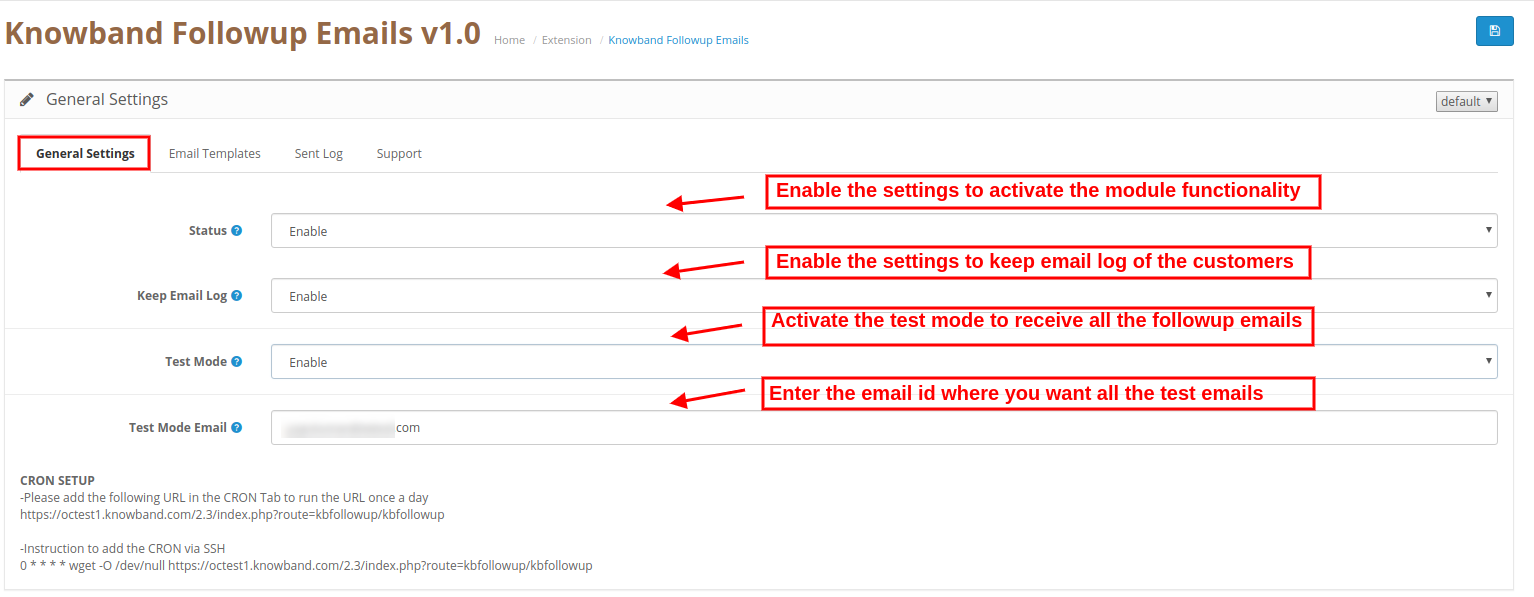
In general settings sections, the online store admin can apply these settings:

  • Status: Activate or deactivate the OpenCart Follow Up Emails Extension functionality.
  • Keep Email Log: Enable the settings for keeping a log of all the sent emails.
  • Test Mode: Enable test mode to receive all sent emails on the followup email
  • Test mode Email: Here the store admin can set the email id on which u want to receive all sent followup emails.

Note: Admin can setup CRON by following the CRON setup Instructions. In General settings there are Instruction to add the CRON via SSH.

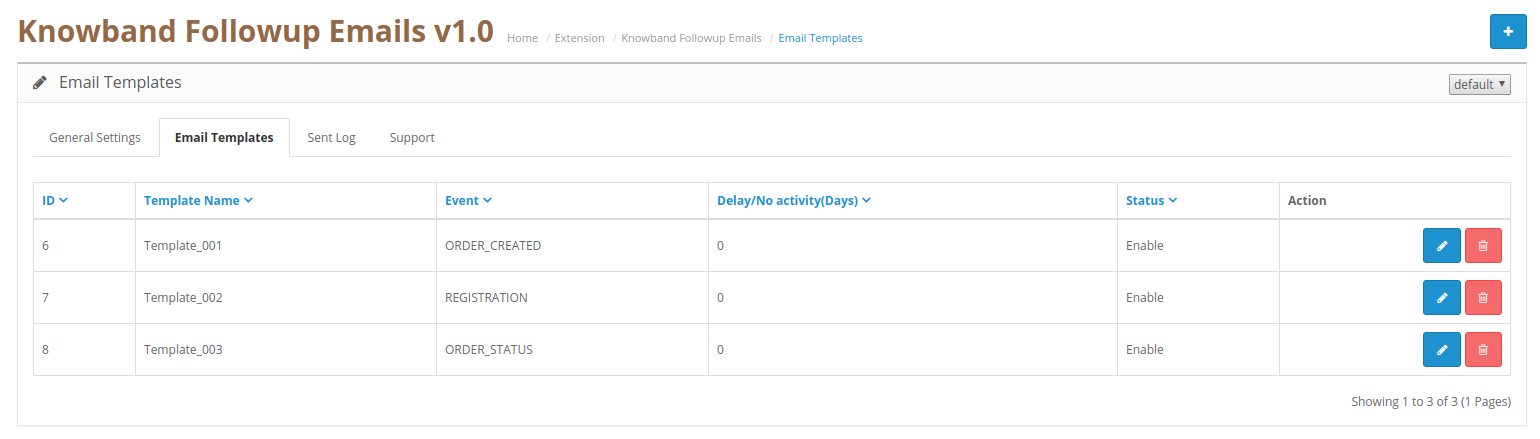
3.2 Email Templates

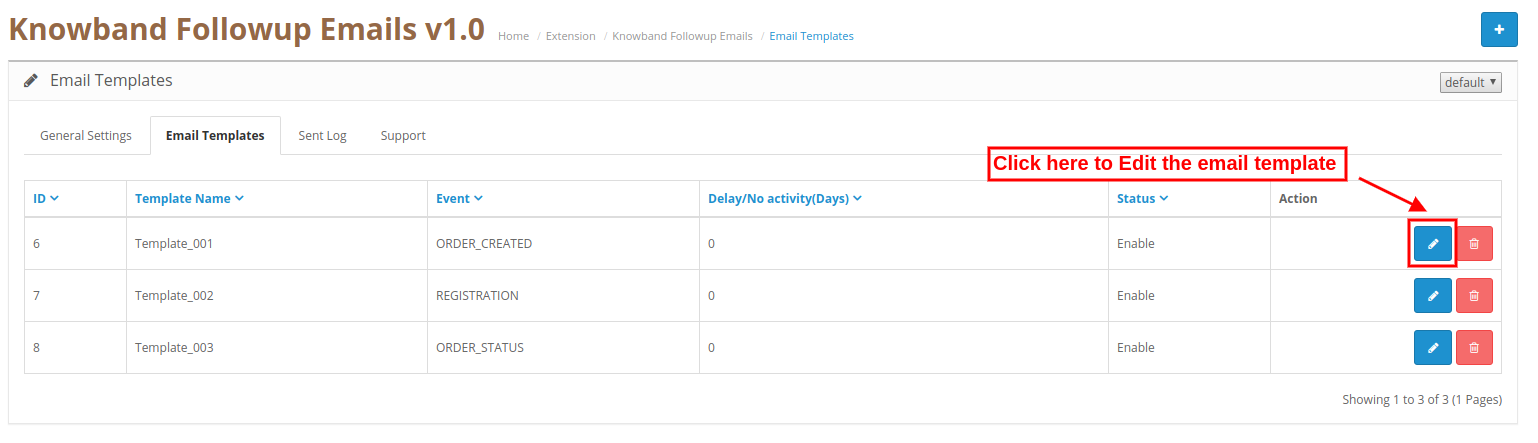
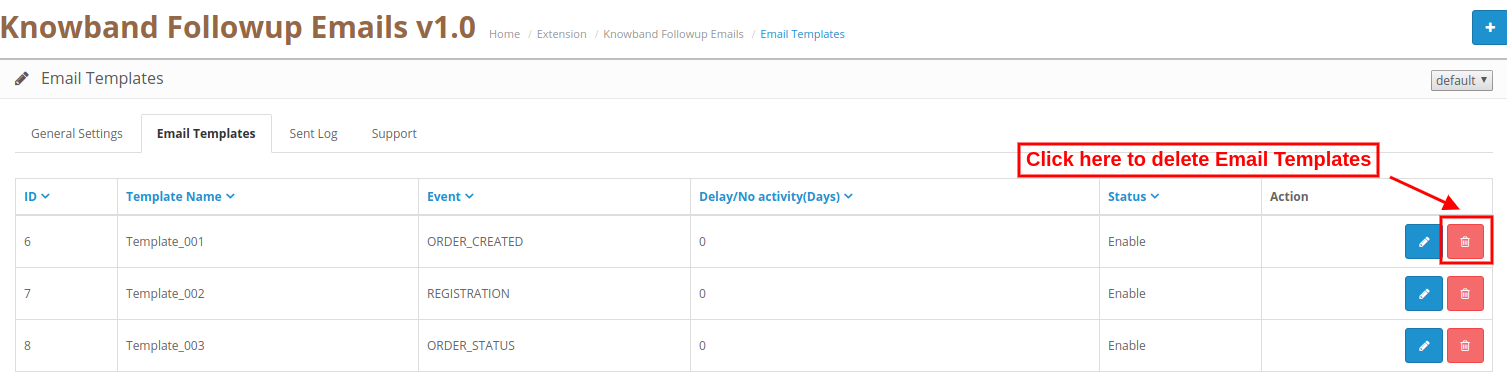
The OpenCart Followup Emails Extension allows the store admin to set rules and customize email templates for sending followup emails. Admin can add new email templates, modify the templates and delete the previously creates email templates.

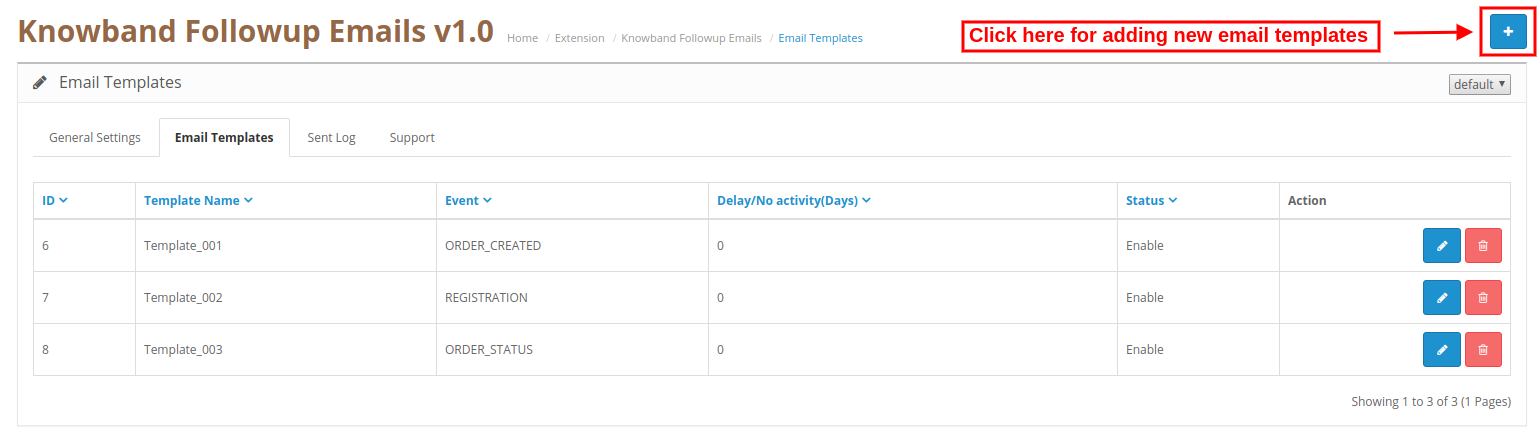
Steps to add new email template

Admin just needs to click on the “+” sign for adding a new email template.

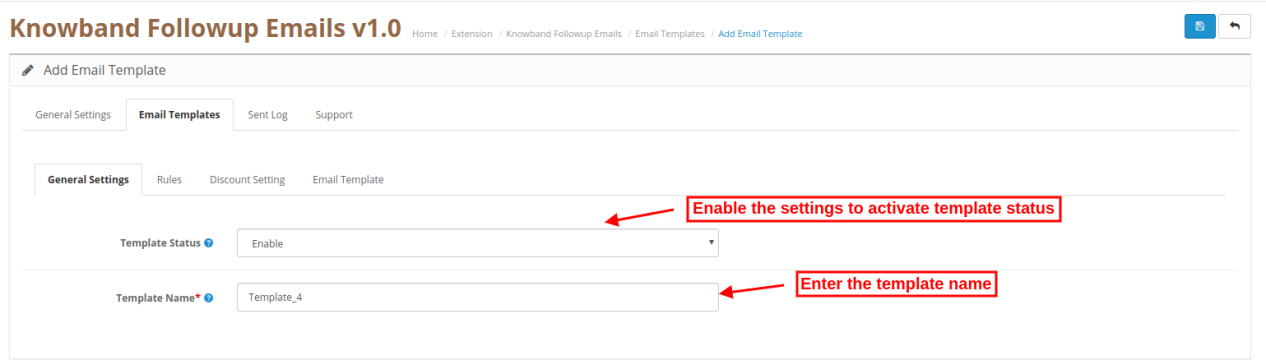
3.2.1 General Settings

  • Template Status: Activate or deactivate the template status.
  • Template Name: Set the template name from here.

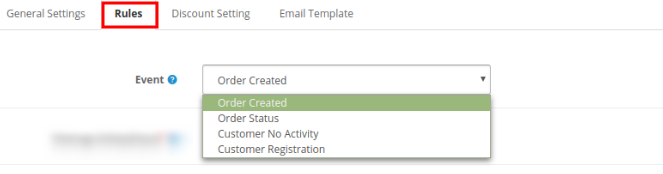
3.2.2 Rules

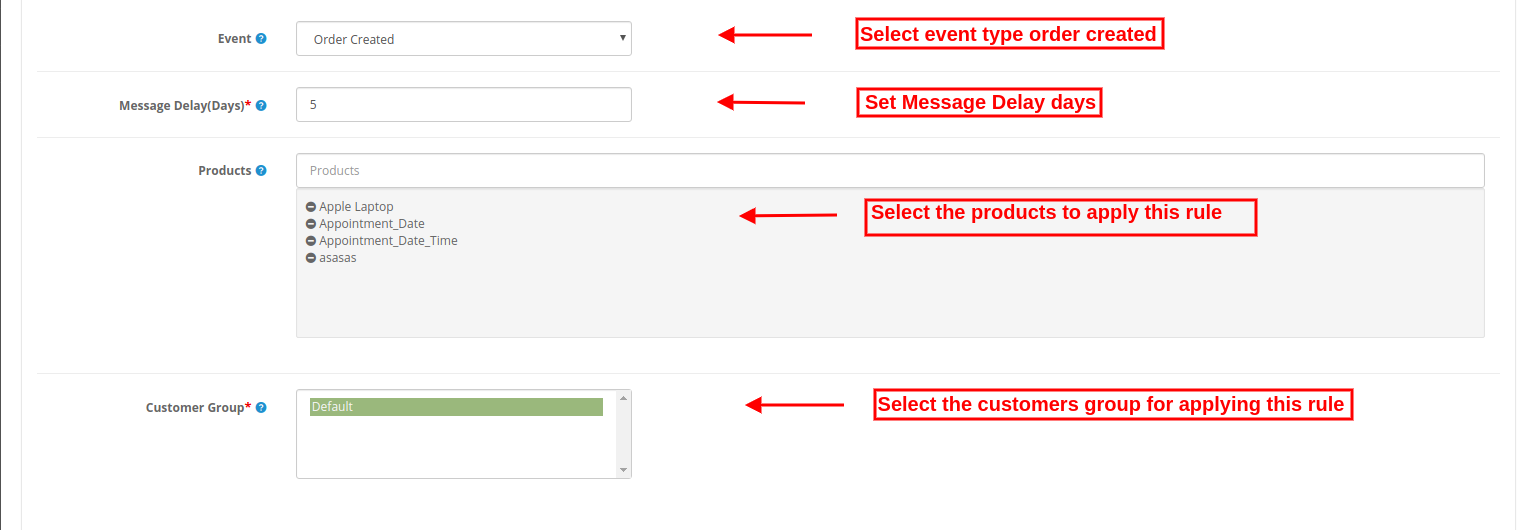
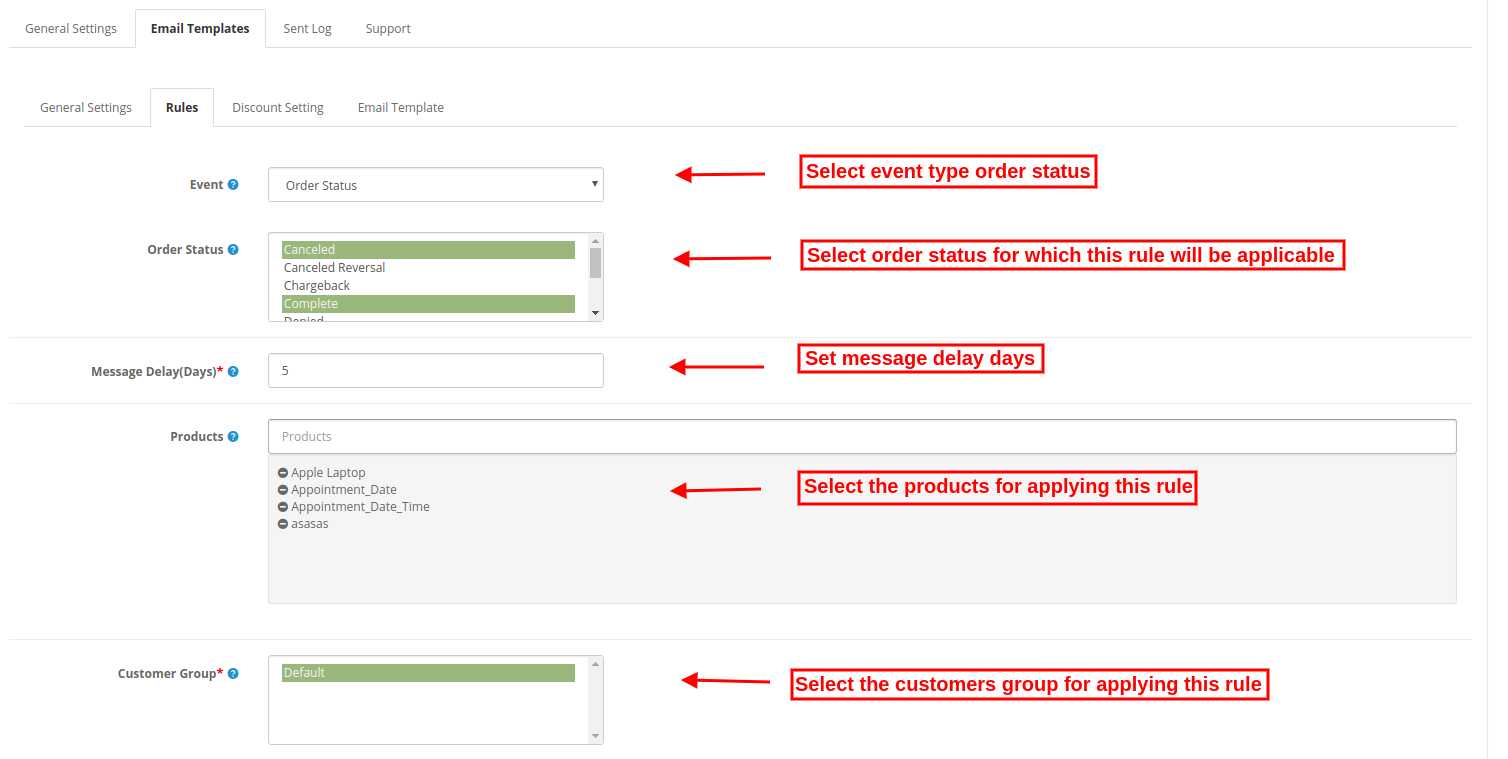
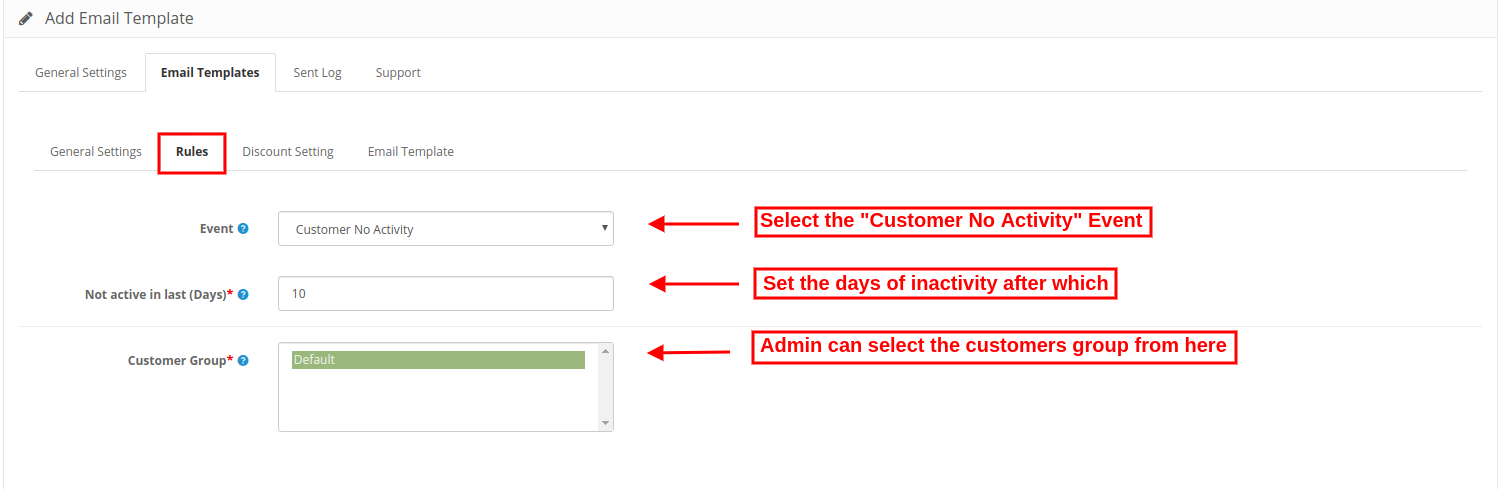
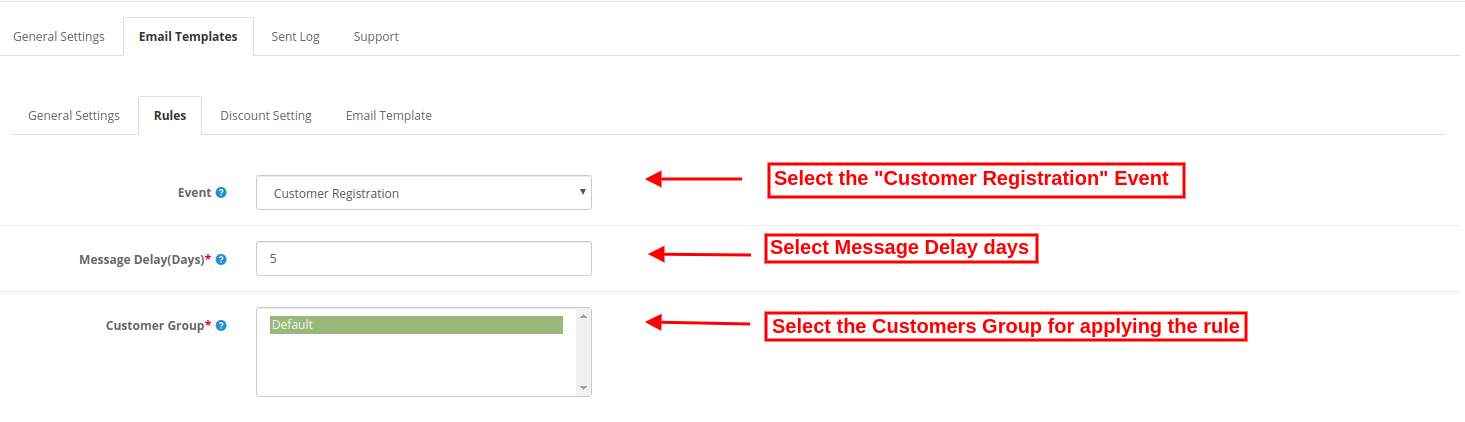
  • Event: The store admin can select the event type. There are four event types from which admin can select.

Order Created
Order Status
Customer No Activity
Customer Registration

Rule 1: Order Created

  • Message Delay(Days): Admin can set the number of days after which he wants to send follow-up emails.
  • Products: Select the product names for which this rule will be applicable. This rule will apply on all the products if admin doesn’t select any product.
  • Customers group: Select the customer’s group on which, you want to apply this rule.

Rule 2: Order Status

  • Order Status: Select the order status on which you want to sent follow-up emails.
  • Message Delay(Days): Set the days after which you want to send follow-up emails.
  • Products: Select the products to which you want to apply this rule. You can leave it blank if you want to apply this rule on all the products.
  • Customer Group: Select the customer’s group on which you want to apply this rule.

Rule 3: Customer No Activity

  • Not Active in last(Days): Set the days of inactivity after which you want to send reminder emails.
  • Customer Group: Select the customer’s group on which this rule will be applied.

Rule 4: Customer Registration

  • Message Delay: The online merchant can set the number of days after which he wants to send followup emails.
  • Customer Group: Admin can select customers group for which this rule will be applicable.

3.2.3 Discount Settings

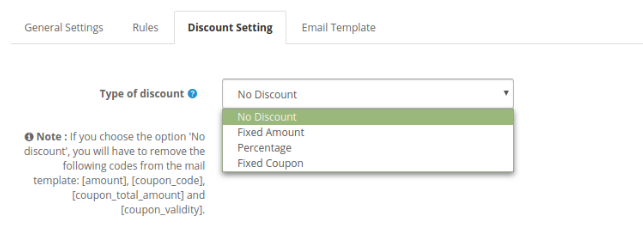
  • Type of discount: The store admin can select the discount type.

  • No Discount: If you don’t want to offer any discount, then select this discount type.
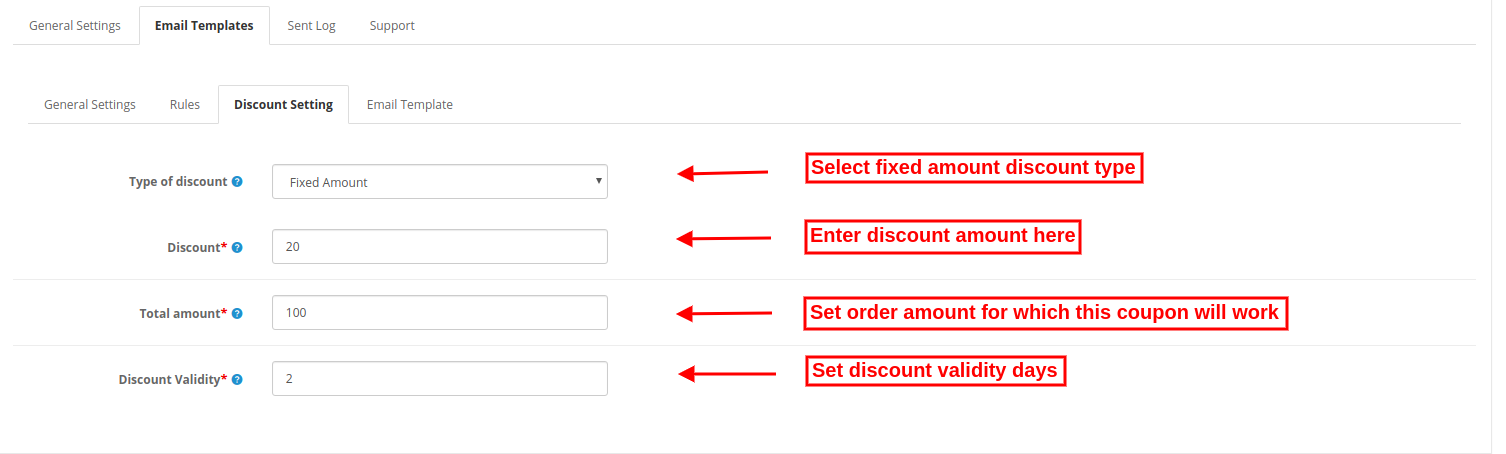
  • Fixed Amount: The store merchant can set the discount type as a fixed amount.

Discount: Admin can set the discount amount per order.

Total amount: Admin can set the total order amount for which coupon will be valid.

Discount Validity: Admin can set the validity days for the discount coupon.

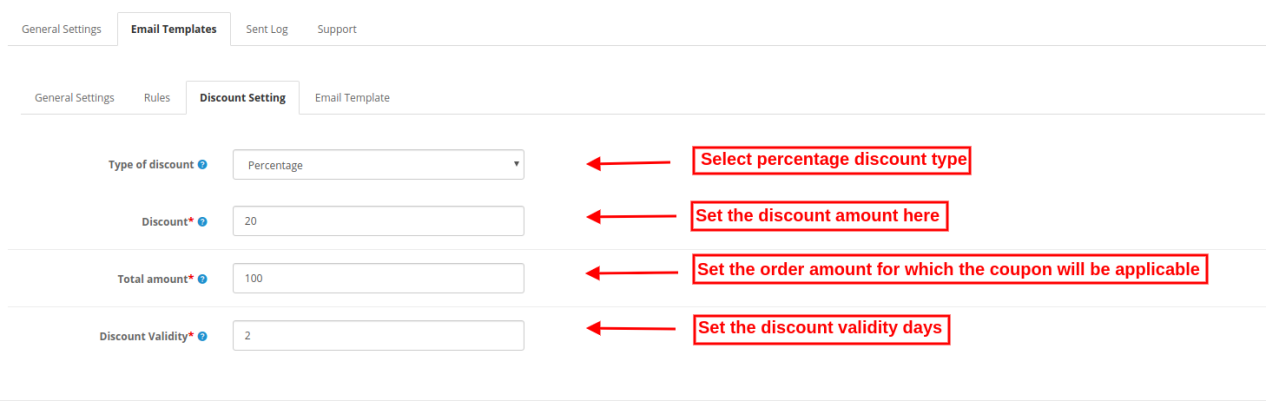
  • Percentage: The store merchant can set the discount type as a percentage-based amount

Discount: Admin can set the discount amount per order in percentage.

Total amount: Admin can set the total order amount for which coupon will be valid.

Discount Validity: Admin can set the validity days for the discount coupon.

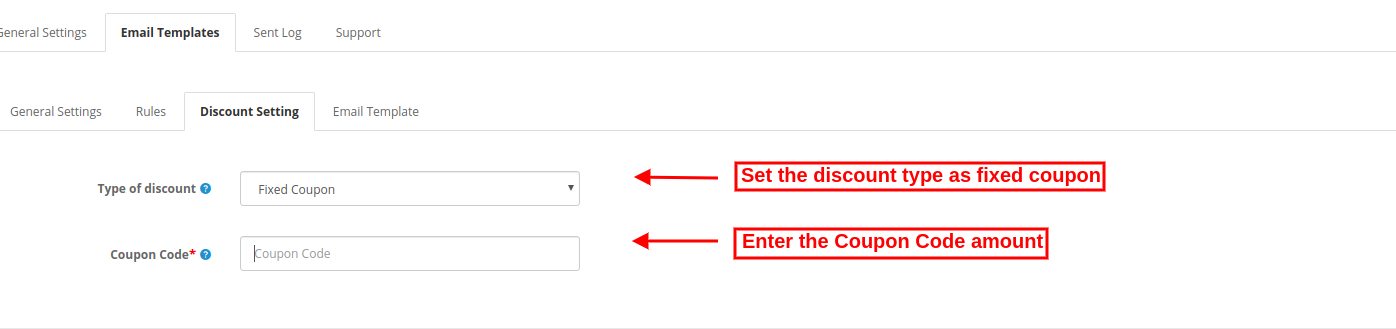
  • Fixed Coupon: Admin can also select the fixed coupon option for sharing coupons directly.

  • Coupon Code: Enter the coupon code.

3.2.4 Email Template

The Followup emails for order plugin has ready-made email templates for sending a follow-up emails.

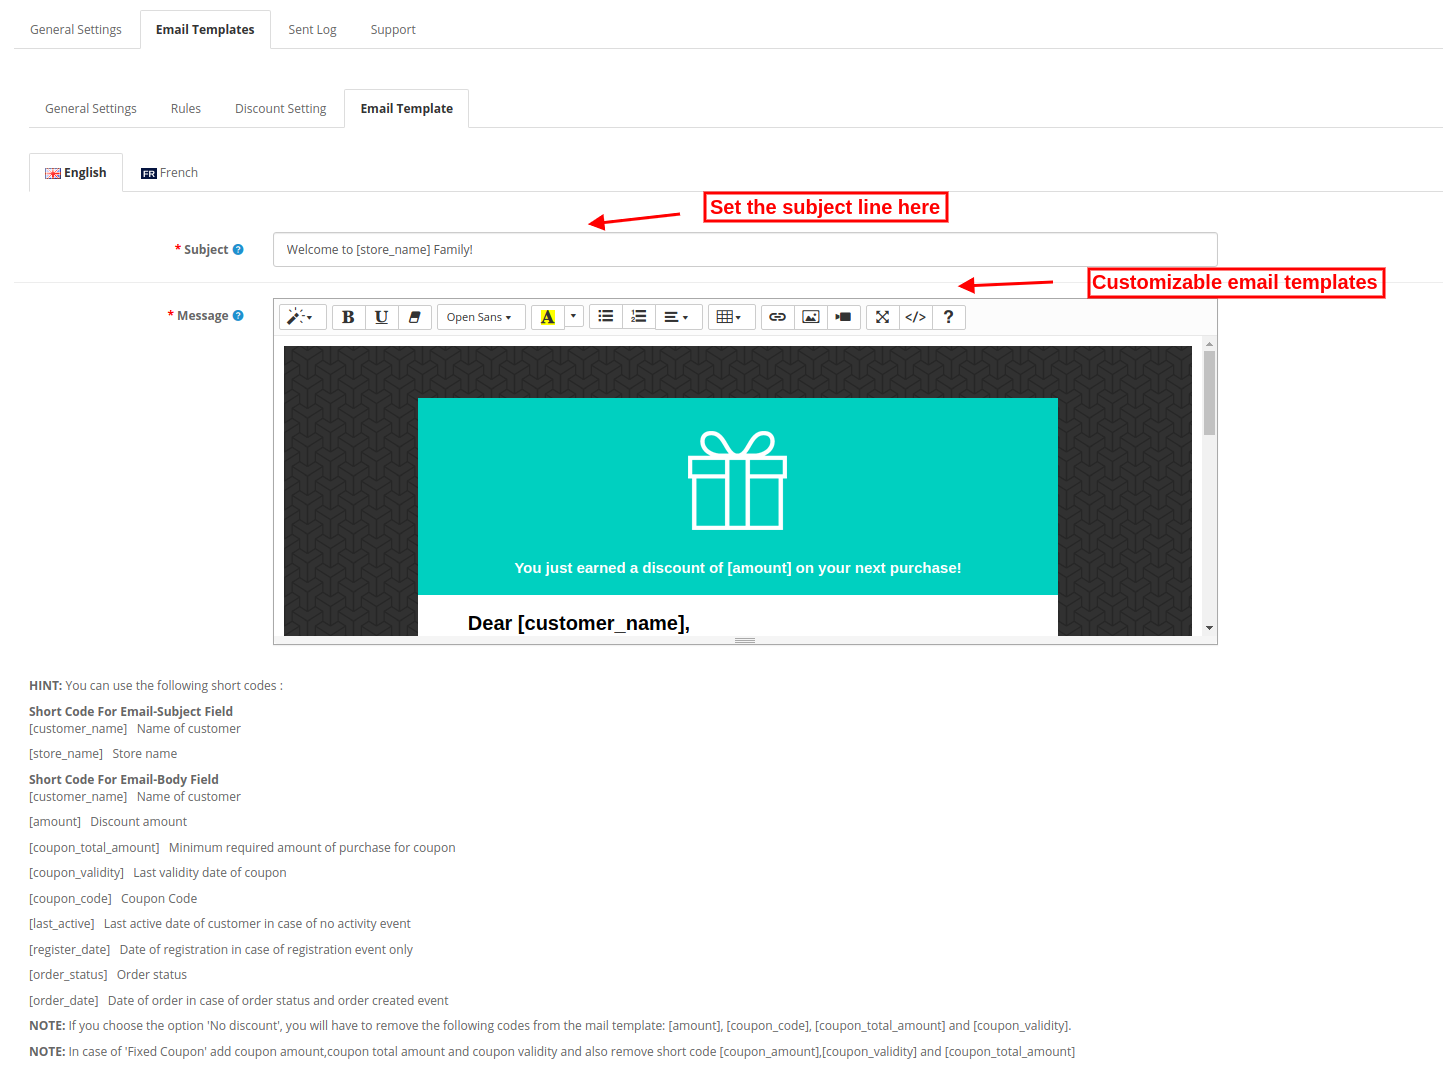
  • Subject: Admin can enter the email subject line in multiple languages.
  • Message: Admin can customize the email template for sending follow-up email.

Note: The online users can get order details link along with the followup email for viewing their order in case of order status and order created event type.

Steps to Edit Email Template

The online store admin can easily modify email templates from the admin interface.

Steps to Delete any email template

The online store admin can delete any email templates from the admin interface easily.

3.3 Sent Log

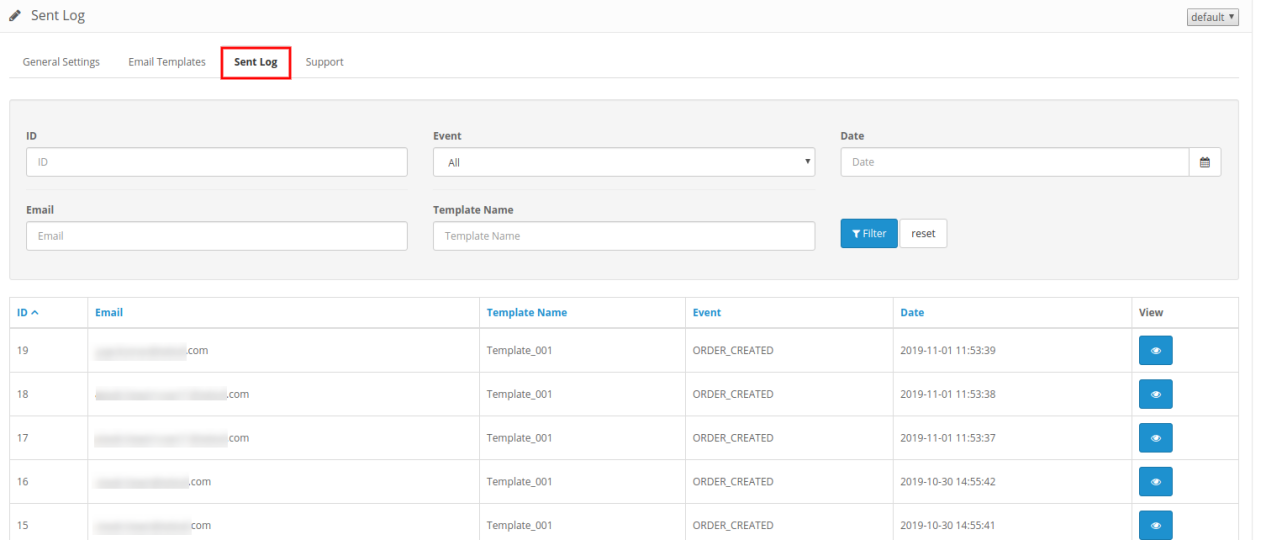
Admin can view the list of all the followup emails along with the other details like customer’s email id, template type, event and date.

Admin can also apply a filter for shortlisting the email log.

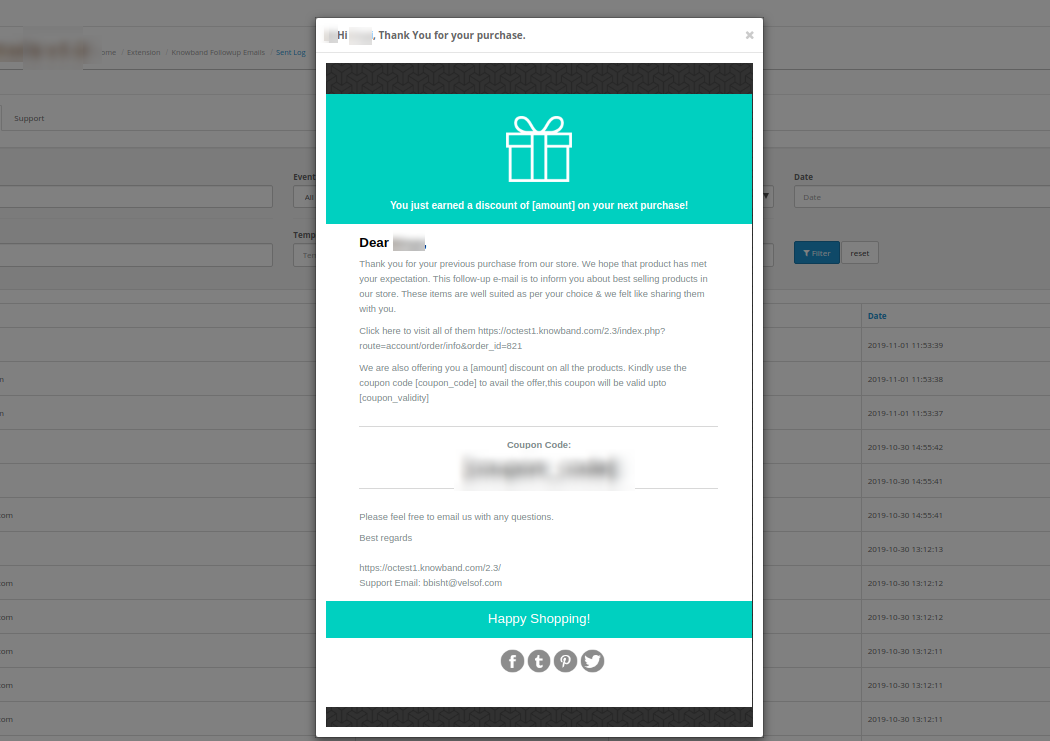
The online store admin can view the followup email structure.

4.0 Front-end Interface

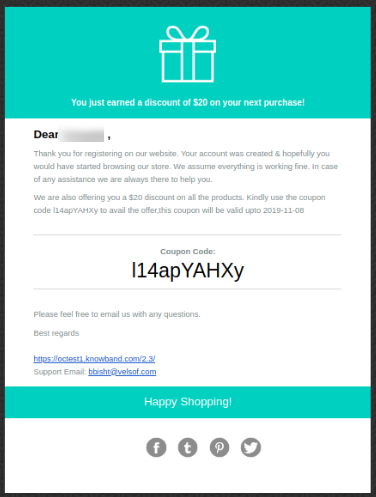
The online store admin can send followup emails to the customers in different conditions. Customers can get followup emails while order creation, different order conditions, customers no activity, new customers registration.

Prestashop Image Search Addon – User Manual

1.0 Introduction

Improve the search experience of your customers on your store. Incorporate Knowband’s Prestashop Image Search Addon and help your customers to search for a product using product image. This saves the time of your customers and improves their shopping experience as well. Through machine learning, the Image Search addon recognizes the image uploaded by a customer and displays relevant results.

1.1 Striking Features of Prestashop Image Search Addon

Prestashop Image Search Addon is highly customizable plugin with no technical changes involved. You can upload or add as many images for your eCommerce store and map them corresponding to products. Lets quickly check different features offered by this Prestashop Image Recognition System.

1. Prestashop Image Search module allows your customers to search products at your store using an image.

2. You can provide “Search Products by Image” option on search bar of website.

3. With Prestashop Image Search module, you can enable or disable Visual Same Search Button on the product pages.

4. You can enable or disable the automatic image sync feature to map images corresponding to products.

5. You can run the cron file to manually map the images to products. Once mapped, they will appear in image search results.

6. Prestashop Image Search Addon supports multi-lingual and multi-store compatibility.

7. You have an option to set threshold percentage ranging between 50 to 100. Based on this value, the matched search results are shown.

8. You can set the number of products which will be displayed on the search result page.

9. Prestashop Image Recognition System is simple to enable or disable from back-office interface.

10. The total details like Total Images, Total Mapped Images, Total Unmapped Images, Total Images yet to be Synced are shown at back-office of module.

1.2 Technology for Development

Language: PHP
Frame Work: Prestashop

2.0 Installation Guide for Prestashop Image Search Addon

You can follow these simple steps for installing the Prestashop Image Search module on your eCommerce store:

1. Firstly, download the addon package from the Knowband store.

2. You will get a zipped file containing the source code and user manual. Unzip the complete package in the root directory of your Prestashop store through FTP manager (like Filezilla or WinSCP – download here: https://filezilla-project.org/). You’ll find the files and folders as shown in the image below:

3. The Prestashop Image Search module is all set to be installed at your store. Go to the Store Admin and then to ‘Modules and Services’.

4. Click on the “Install” button just next to your module. It would show a pop-up for your confirmation. Click on “Proceed with the installation” option. This step will install the module and show notification – “Module(s) installed successfully”.

3.0 Admin Interface of Prestashop Image Recognition System

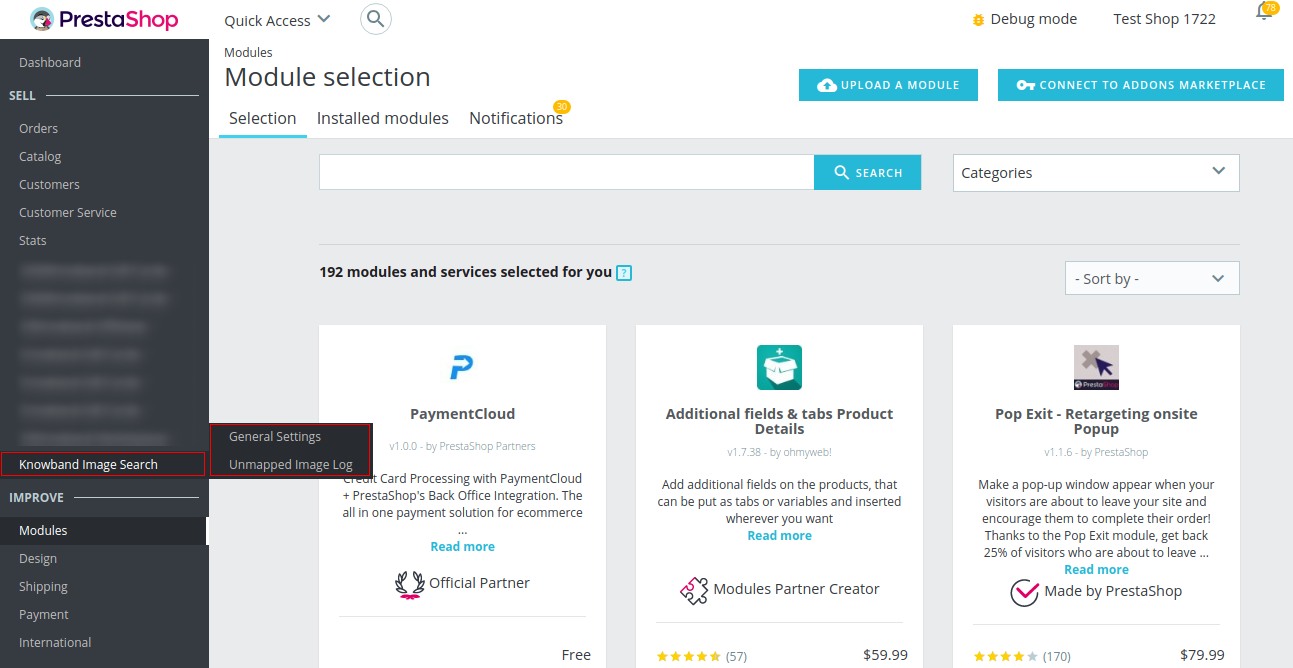
Once you have successfully installed Prestashop Image Search Addon on your store, you can configure the Image Search settings from the admin backend. The module settings are categorized under two tabs as shown below:

Here in this interface of Prestashop Image Search Addon, you will find two tabs as listed below.

1.General Settings
2.Unmapped Image Log

Each section of this Prestashop Image Search module has been discussed below.

3.1 General Settings

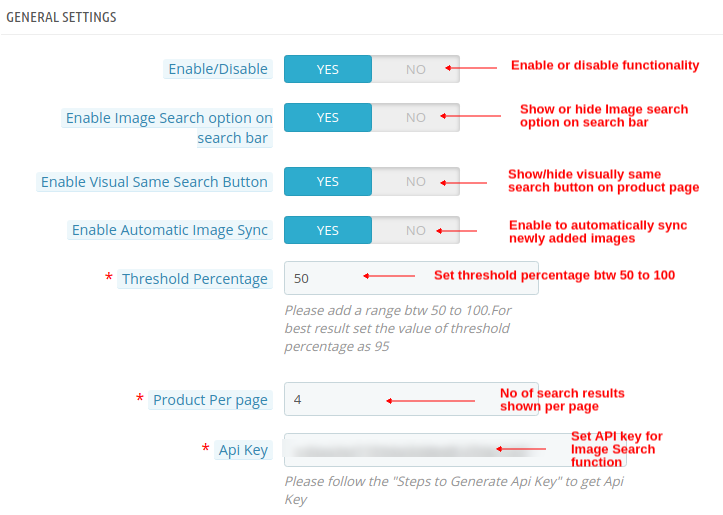
  • Enable/Disable: Using this option, you can enable or disable the functionality of Prestashop Image Search module for your store.
  • Enable Image Search Option on Search Bar: This option shows or hide the Image Search option on the Search Bar.
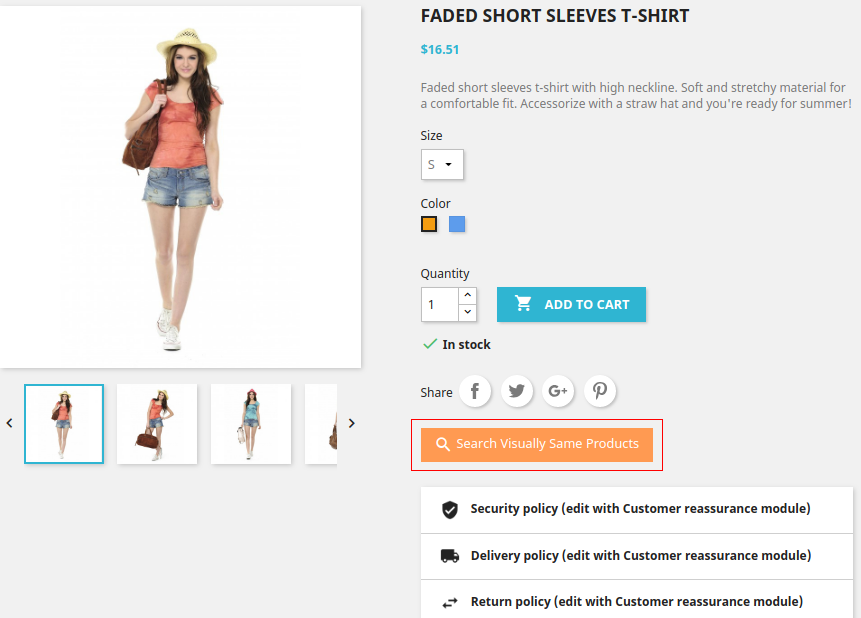
  • Enable Visual Same Search Button: This option enables or disables the “Search Visually Same Products” button on the product page.
  • Enable Automatic Image Sync: If this option is enabled, then it will automatically map all the newly added unmapped images. If this is disabled, you have to hit and run cron file manually in order to map the unmapped images.
  • Threshold Percentage: Using this option, you can set a threshold percentage match value ranging between 50 to 100. Based on this value, module shows the image search results on the frontend. For best results, set the threshold value as 95.
  • Product Per Page: With this option, you can set the number of products or search results which will be shown per page.
  • API Key: This option will set the API key for Clarifai account. The steps to generate API key are provided at the back-office.

A) Total Images: This count is incremented as you will add new images to any product.
B) Total Mapped Images: This count indicates total mapped images either automatically or manually by running cron.
C) Total UnMapped Images: This count indicates total unmapped images due to some error like API not found or wrong API key.
D) Total Images Yet To Be Synced: The value indicates the images which were not mapped automatically or using cron file. Once you hit the cron file or enable the “Enable Automatic Image Sync” option, the count becomes zero.

3.2 Unmapped Image Log

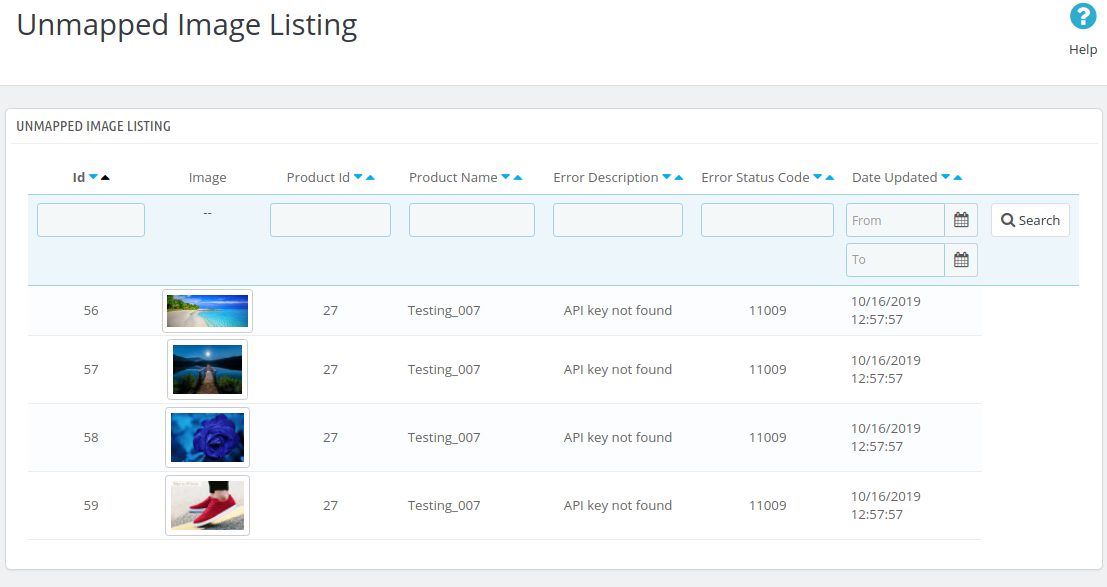
Under this tab of Prestashop Image Search module, you will find details of unmapped images. All the images that are unmapped because of wrong API key are listed along with details like Product ID, Product Name, Error Description, Error Status Code and Upload Date.

4.0 Front Interface of Prestashop Image Recognition System

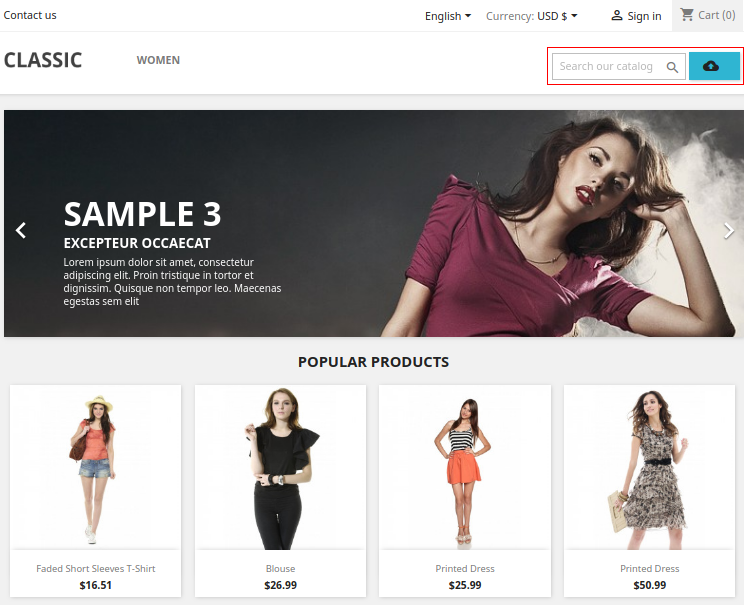
A) Image Search Option at Front

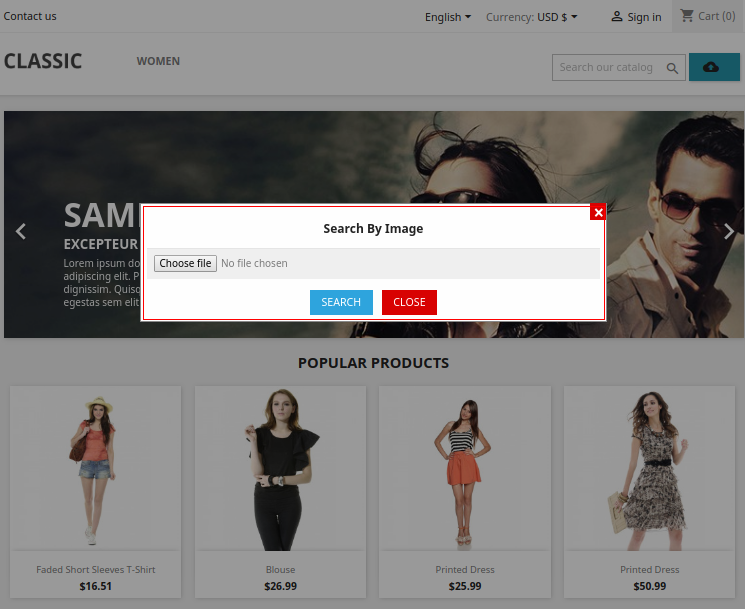
B) Choose file for “Search by Image” option

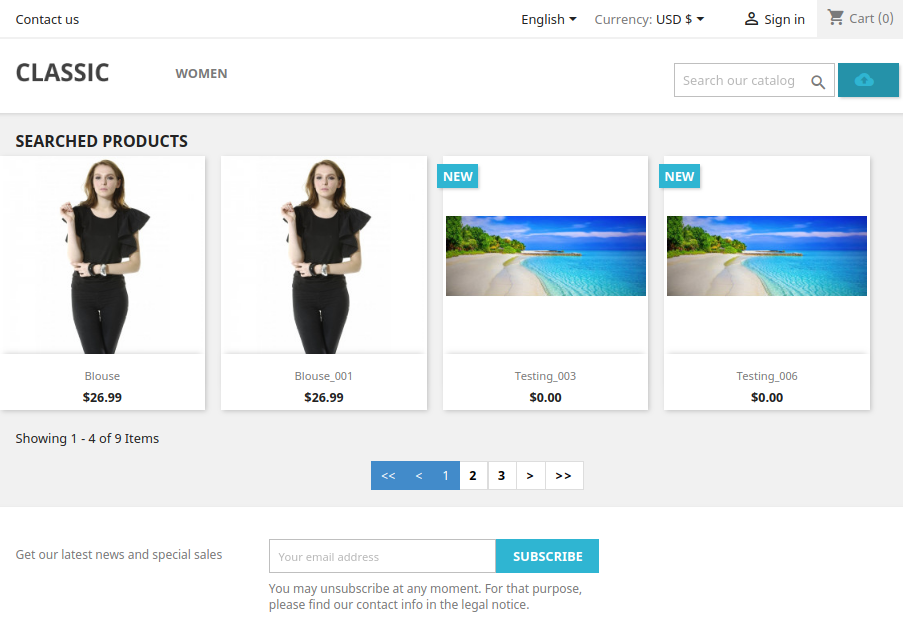
C) When relevant search results are found for the uploaded image.

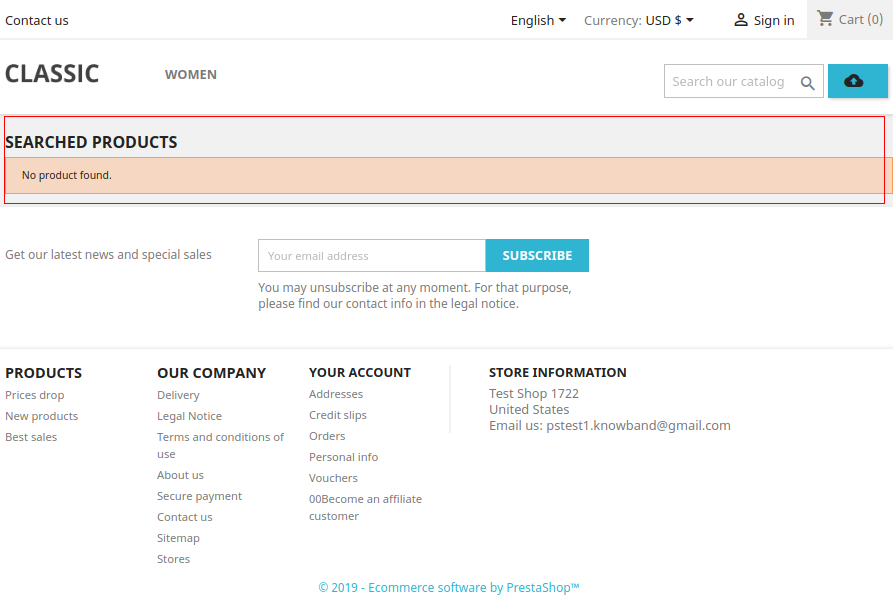
D) When no results are found for the uploaded image.

E) Image Search option on product page

OpenCart Shipping Timer Extension – User Manual

1.0 Introduction

OpenCart Shipping Timer extension by Knowband offers a configurable shipping timer which you can display on product pages at your store. This shipping timer is a countdown that compels the visitors at your store for grabbing benefits of same day shipping or one day shipping. This OpenCart Shipping module basically adds a single day or multiple day timer to your store for selected products, categories and manufactures. You can attain your customer’s attention with this shipping timer and show custom banners to them.
If the customer orders a product before the countdown time ends, their product will be delivered on the same day or one day of ordering.

1.1 Striking Features of Product Shipment Timer for OpenCart

OpenCart Shipping Timer extension comes with customizable features which can be modified as per business requirements. No coding is required and you can display a same day shipping timer or one day delivery timer at your store without any coding efforts. Let us explore them one by one.

  • Shows a shipping timer on every product page of your store compelling users to buy product before same day or one day delivery offer ends.
  • OpenCart Shipping module is easy to install and configure.
  • You can enable or disable OpenCart Shipping Timer extension on a single click.
  • OpenCart Countdown Timer offers multi-lingual and multi-lingual compatibility.
  • With OpenCart Shipment Timer extension, you can create a single day timer or multiple day timer for your store.
  • OpenCart Shipping module provides you multiple choices for selection that is categories, products and manufacturers.
  • You can set the starting and ending date for the shipping timer.
  • You can choose the days for which you want to show the countdown timer.
  • OpenCart Shipping Timer extension also gives you option to set the vacation dates to restrict the functionality.
  • In order to give an appealing look and feel, you can add desired banners along with countdown.
  • You can easily view and manage the total orders by customers using this OpenCart Countdown Timer.
  • OpenCart Shipment Timer extension is useful in increasing conversion levels as the shipping countdown compels the customer in making their decision quick.

2.0 Installation Guide of OpenCart Shipment Timer Extension

Before starting the installation process, you have to buy the OpenCart Shipping module from the Knowband store. Once purchased, you will receive the following files on your registered email.

  1. Source code of Shipping Timer extension in zipped file format
  2. User Manual of OpenCart Shipping Timer extension

Now in order to install this Shipping Timer on your website, follow the given steps:

1. Unzip the zip file. You will get the folders as shown in the image below


2. Copy all the folders of the zip file in the Root Directory of OpenCart setup via FTP manager.

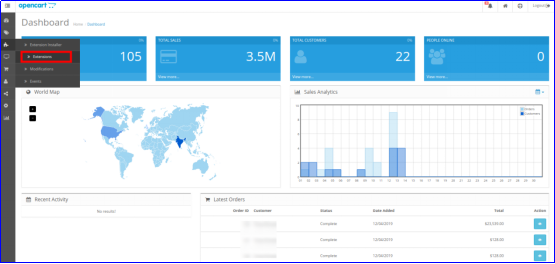
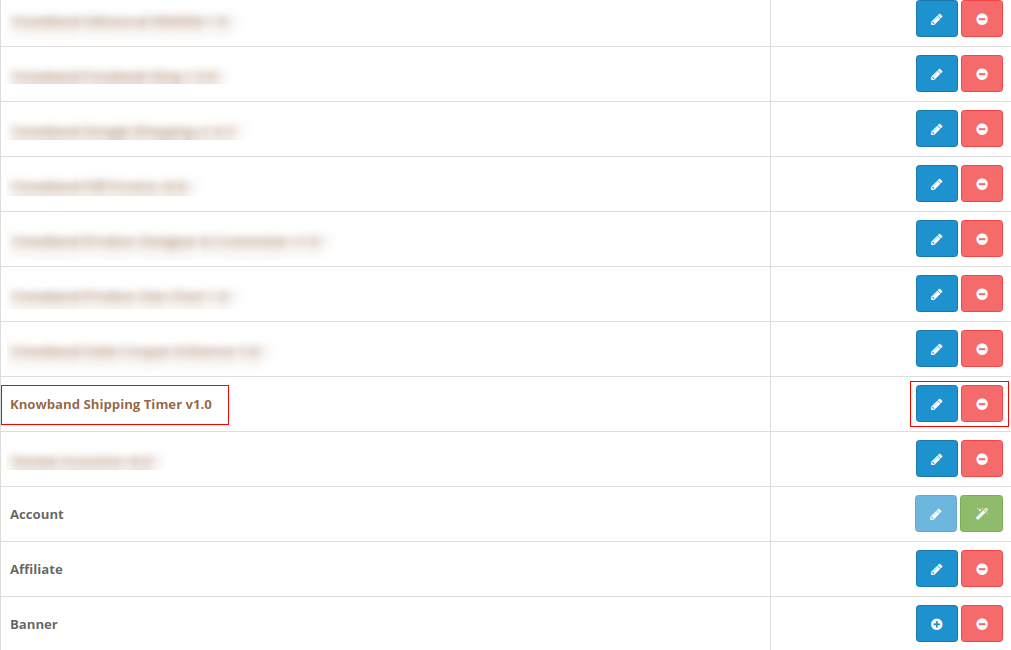
So, OpenCart Shipping Timer extension is now successfully installed and is ready to use at your store. Go to the admin menu and click on the extensions. Then, click on Modules and thereby click on configure button next to Knowband Shipping Timer.

3.0 Admin Interface of OpenCart Shipping module

Just after successful installation of Shipping module for OpenCart website, you can create and configure the countdown timers as per your business requirements. Navigate the settings in the given order: Admin Panel > Extensions > Modules > Knowband Shipping Timer.

The simple to understand admin interface of OpenCart Shipping Timer extension is divided into six broad sections as:

1. General Settings
2. Manufacturers
3. Categories
4. Products
5. Orders
6. Support

These sections are discussed in detail below. While the “General Settings” section is also divided into three sections as:
1. Enable Settings
2. Countdown Settings
3. Banner Settings

3.1 General Settings

The complete General Settings are categorized under these following three sections:

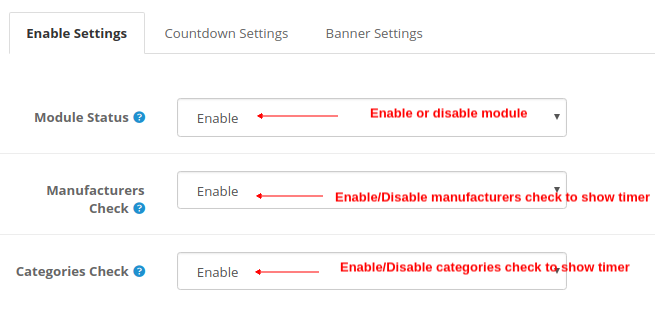
3.1.1 Enable Settings

  • Module Status: This setting simply enables or disables the shipping module functionality.
  • Manufacturers Check: By enabling this option, the timer will be shown for the selected Manufactures list. To add new manufacturer into the list, go to section 3.2.
  • Categories Check: By enabling this option, the timer will be shown for the selected Categories list. To add new categories into the list, go to section 3.3.

3.1.2 Countdown Settings

You can setup two kinds of countdown timer here:

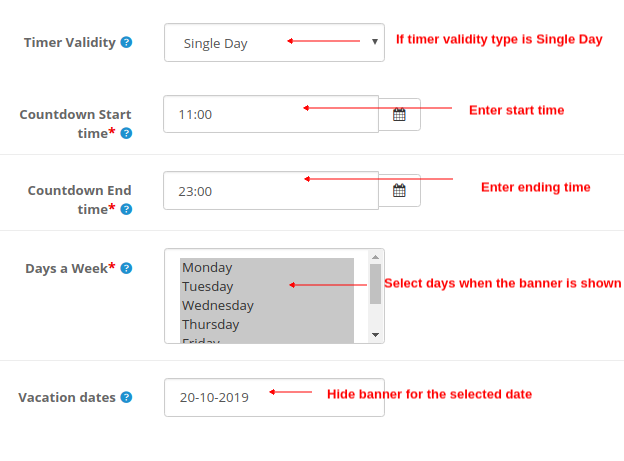
A) Single Day

  • Timer Validity: This option can be set to single day or multiple day. Considering that it is set to Single Day.
  • Countdown Start Time: This option allows you to set the start time for the countdown timer.
  • Countdown End Time: This option allows you to set the end time for the countdown timer.
  • Days a Week: With this option, you can pick up or select the days when the banner will be shown.
  • Vacation Dates: Using this option, you can exclude the particular date when you want to hide the banner. You can select multiple dates separated by (,)

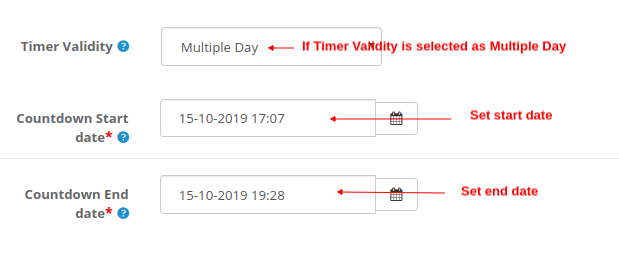
B) Multiple Day

  • Timer Validity: This option can be set to single day or multiple day. Considering that it is set to Multiple Day.
  • Countdown Start Date: This option allows you to set the start date and time for the countdown timer.
  • Countdown End Date: This option allows you to set the ending date and time for the countdown timer.

3.1.3 Banner Settings

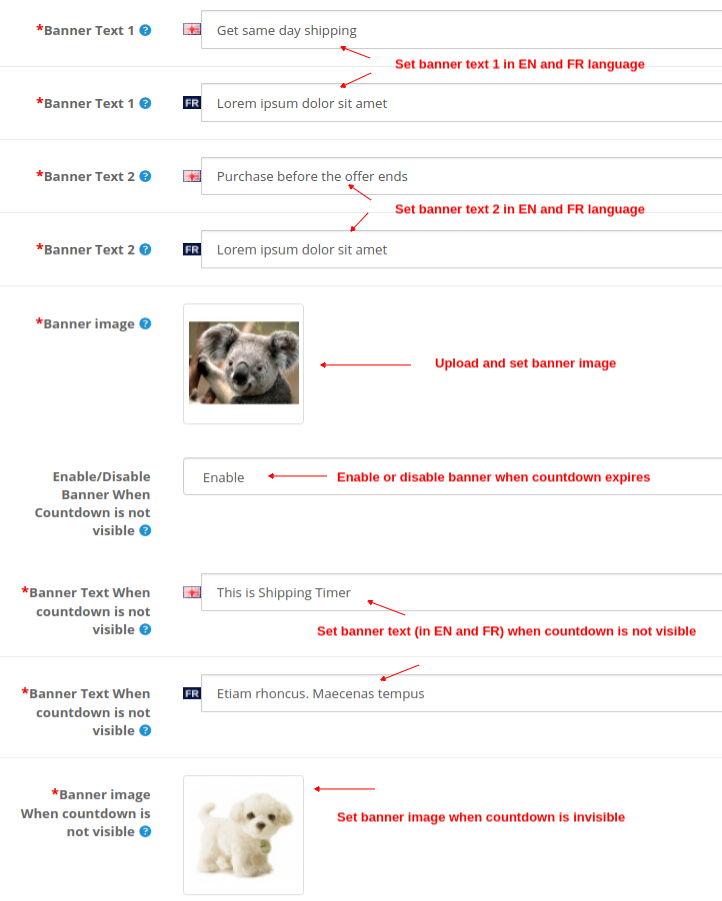
  • Banner Text 1: Set a desired text (in english and french) which is displayed above the timer.
  • Banner Text 2: Set a desired text (in english and french) which is displayed below the timer.
  • Banner Image: With this option, you can set the banner image you want to show along with countdown timer.
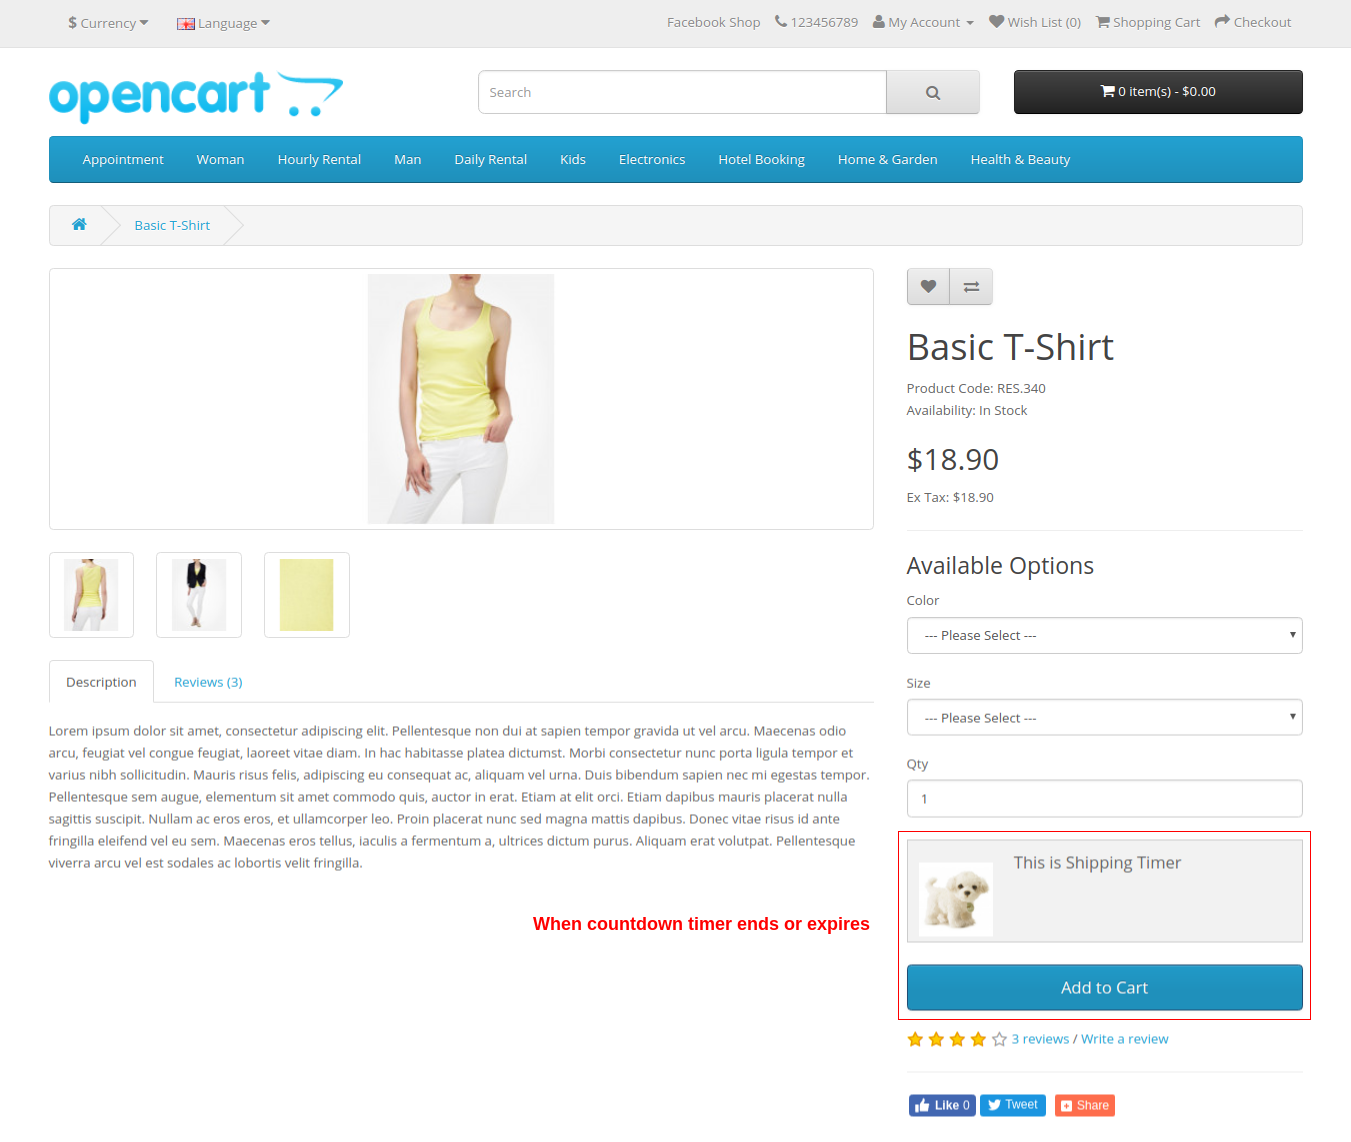
  • Enable/Disable Banner when countdown is not visible: You can enable or disable the banner when countdown is not visible or it expires.
  • Banner Text when countdown is not visible: You can set a desired banner text (in english and french) which is shown when countdown is not visible.
  • Banner Image when countdown is not visible: You can set a desired banner image which is shown when countdown is not visible.

3.2 Manufacturers

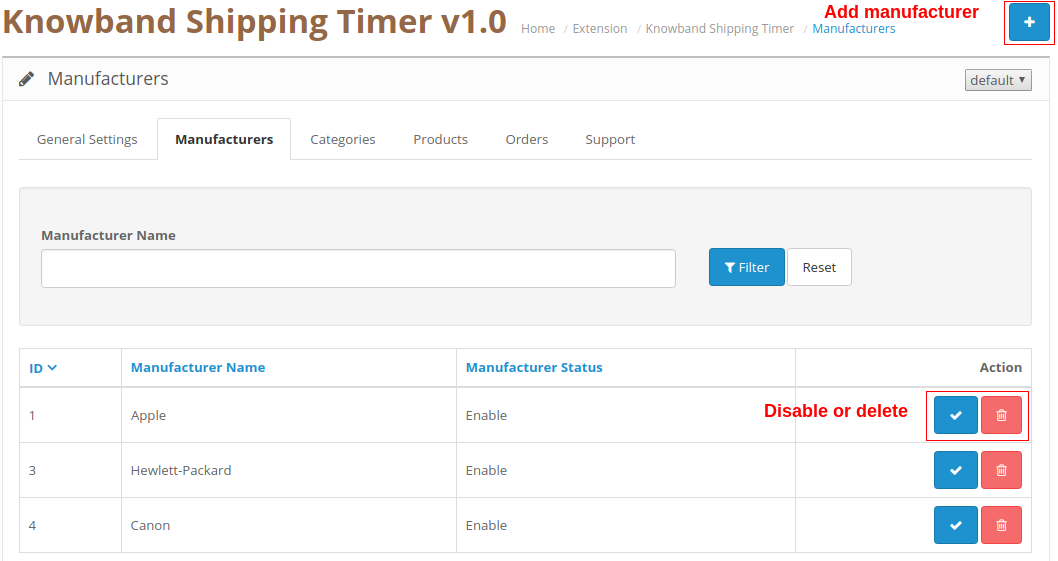
From this section of OpenCart Shipping module, you can add manufacturers by clicking on the “+” button. To disable or delete the existing manufacturer, you can click on corresponding “Disable” or “Delete” button.
The shipping timer is displayed for the products which are offered by these manufacturers.

3.3 Categories

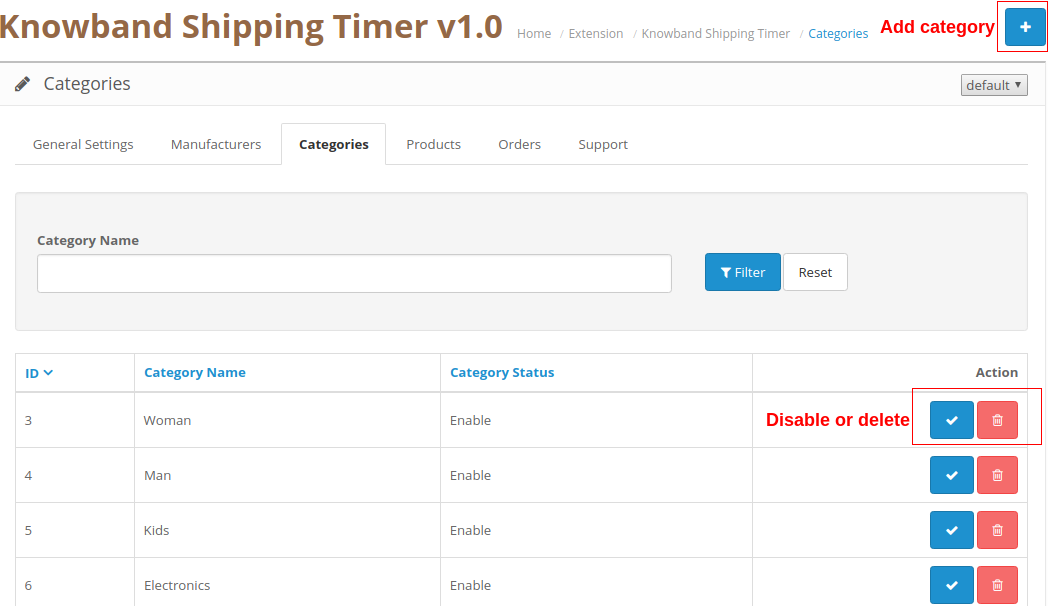
From this section of OpenCart Shipping module, you can add categories by clicking on the “+” button. To disable or delete the existing category, you can click on corresponding “Disable” or “Delete” button.
The shipping timer is displayed for the all the products belonging to these categories.

3.4 Products

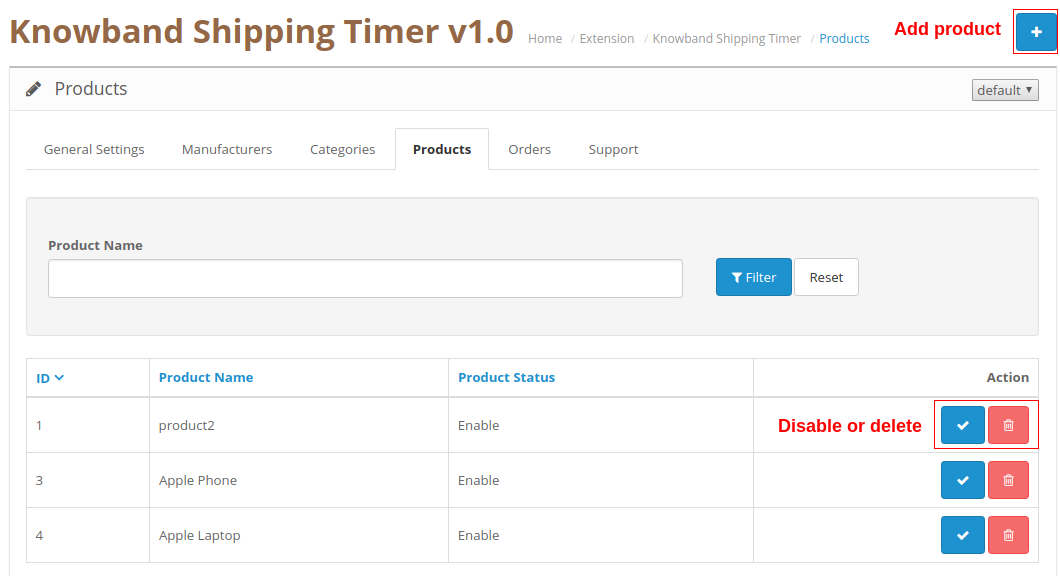
From this section of OpenCart Shipping module, you can add products by clicking on the “+” button. To disable or delete the existing product, you can click on corresponding “Disable” or “Delete” button.
The shipping timer is displayed for all these products.

3.5 Orders

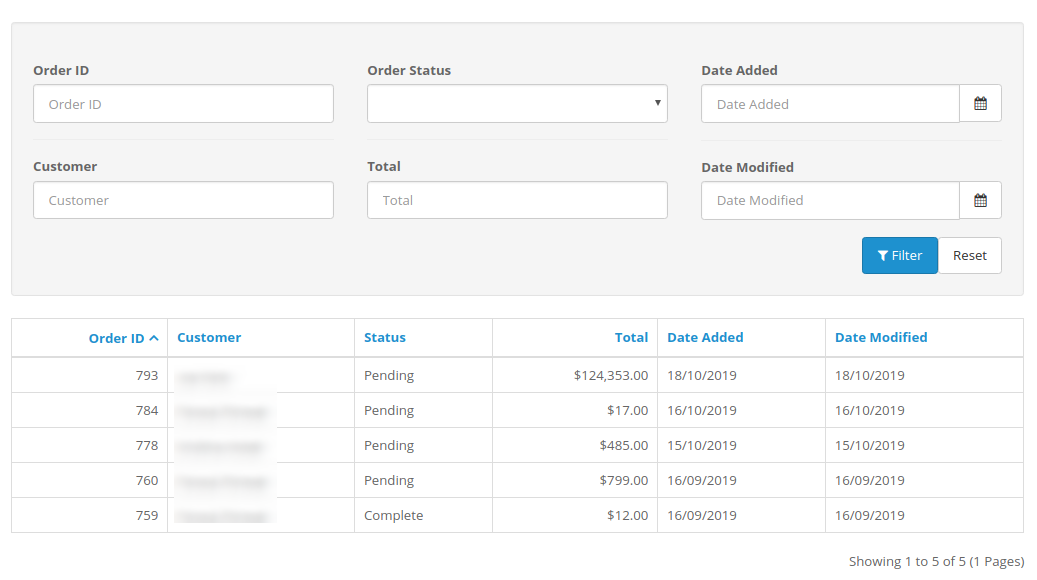
OpenCart Shipping Timer extension allows you to view and track the complete details of the orders received. The purchase orders of the products with the one-day or same day shipping features can be easily viewed in this ‘Order’ tab of the admin interface.
You can even apply various filters to fetch the entire list of the orders received along with details of any particular customer as per the need.

3.6 Support

For any issues or concerns, you can simply raise a ticket from this Support section.

4.0 Front Interface of OpenCart Shipping Timer Extension

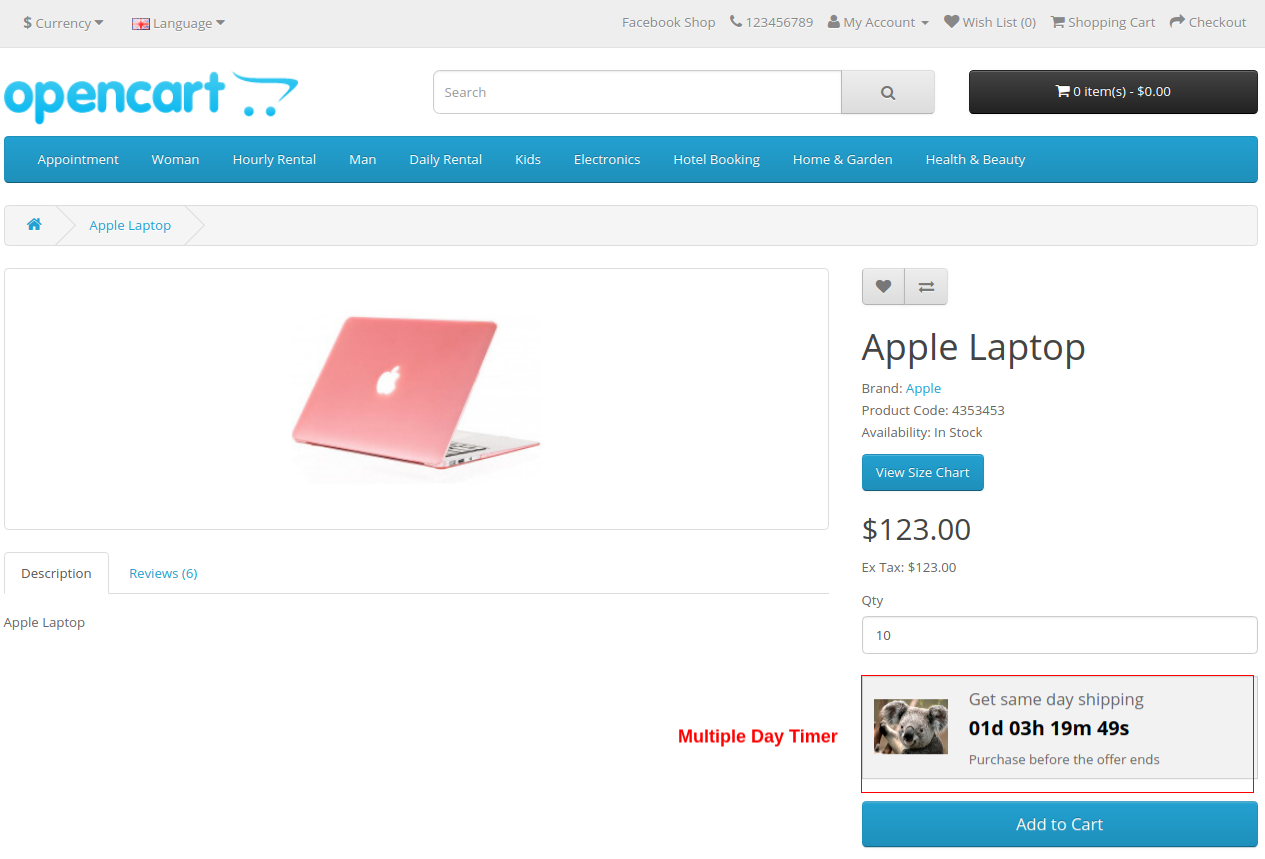
A) Multiple Days Timer


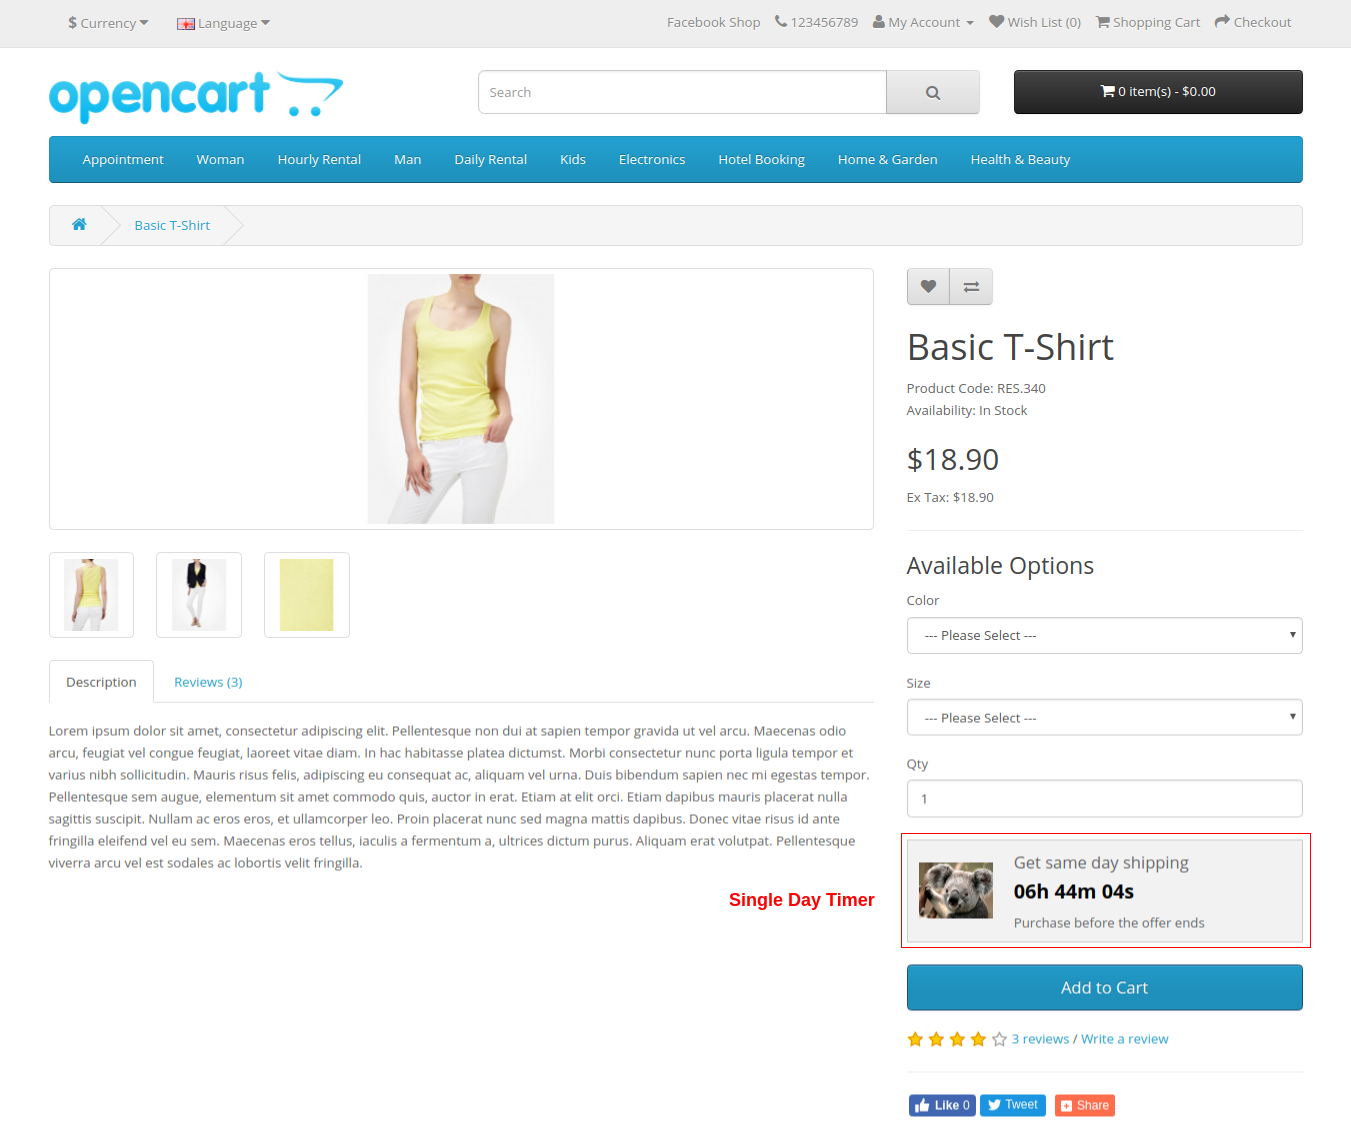
B) Single Day Timer


C) Banner and Text shown when the countdown timer is not visible

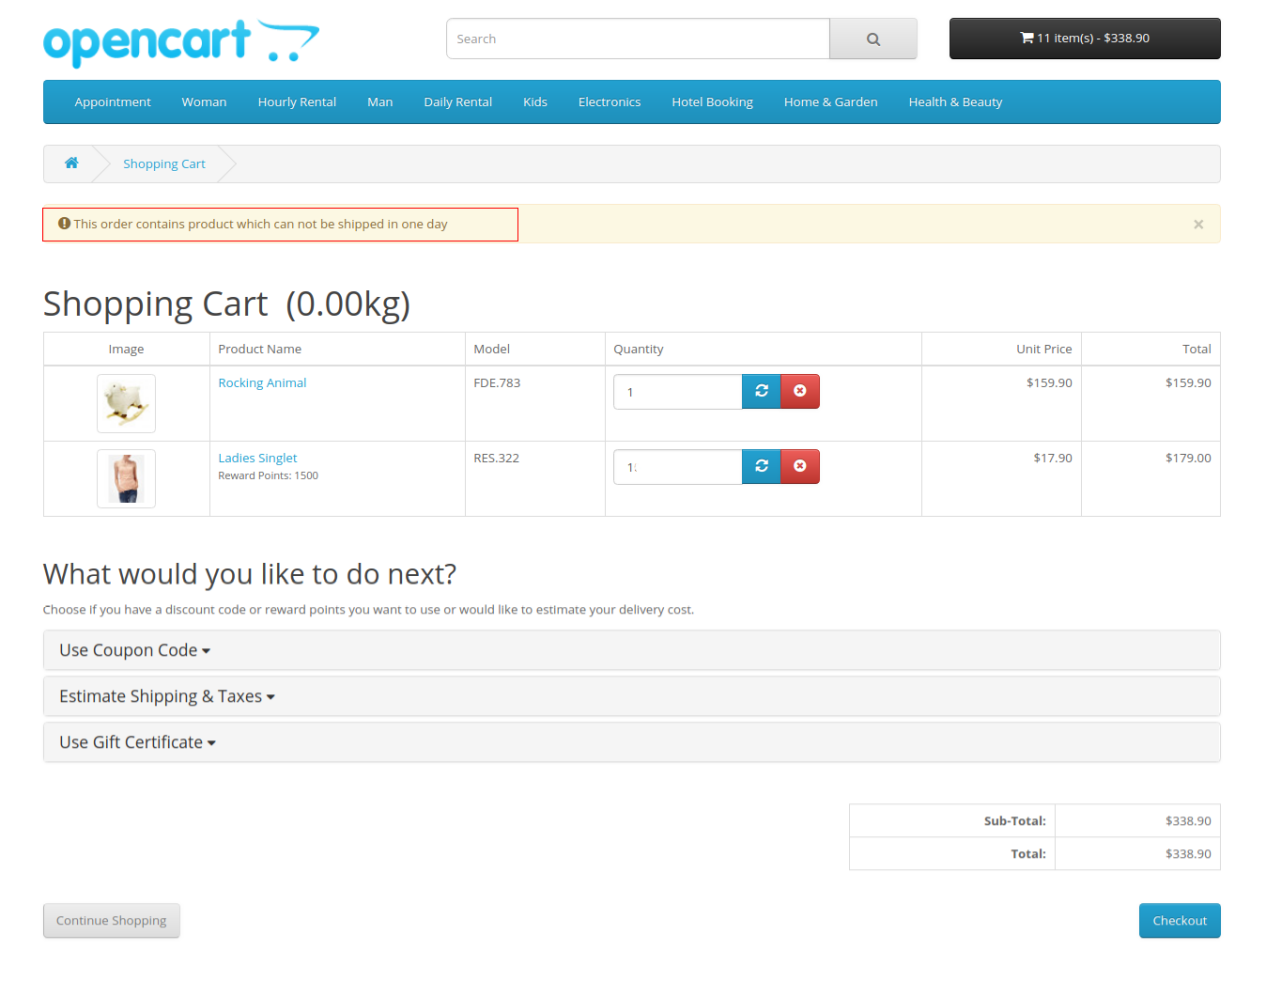
D) Text message when a product in your cart is not eligible for one day or same day delivery.

Note: If cart contains more than one product and none of them are selected by admin for one day delivery,  then there is no message on cart page for the user.

Opencart Product Designer/Customizer Extension – User Manual

1.0 Introduction

Everybody loves a personal touch. This is especially true in today’s online shopping universe, which allows you to order the product of your choice from the comfort of your own sofa. Furthermore, the spectacular rise in the number of online stores has given customers a wide array of buying options. And this is where product customization comes into play. Companies that implement product customization, design, alter and market their items to the customer’s needs or desires. Opencart Product Designer/Customizer offers many benefits and generally leads to higher conversion rates.

Until a few years ago, personalized products were pretty much limited to a small circle of brands and items. It mainly comprised of gifting items, showcase products, or marketing merchandise. Figuratively speaking, you could count the amount of personalized items on the fingers of one hand. Luckily, a lot has changed. For the good. Sellers of pretty much everything, from dresses and shirts to handbags and even consumer packaged goods, are discovering the benefits and value of product customization. More and more brands are finding out that the personalization of items and services is a great way to enhance customer loyalty and engagement.

OpenCart Product Designer/Customizer is an easy way to let your customers customize any product according to their desire and place an Order with you. It gives your customer’s flexibility to get the Product they want and the way they want and hence increasing your sales. Customers can easily add rich colored texts with effects, upload their images with filters and add a QR code to make it suitable for their needs.

Why should you give Product Customization option to your customers?

If you are wondering why Product Customization? Then here is why it would make your Web store better.


2.0 Installation Guide

Before starting the installation process, you have to buy the Opencart Product Designer/Customizer by the Knowband store. Once purchased, you will receive the following files on your registered email.

1. Source code of Opencart product customization module in zipped file format.
2. User Manual of Opencart custom product designer extension.

Now in order to install this Opencart custom product designer extension on your online shop, follow the given steps:

Step 1: Unzip the zip file. You will get the folders as shown in the image below


Step 2: Copy all the folders of the zip file in the Root Directory of OpenCart setup via FTP manager.

So, Opencart Custom Product Design module is now successfully installed and is ready to use at your store. Go to the admin menu and click on the extensions. Choose the Extension Type as Modules. You will find a list of modules. Select the Opencart Product Designer/Customizer.

3.0 Admin Interface of Opencart Product Designer Customizer

To configure the Product Designer/Customizer extension for OpenCart, Navigate the settings in the following order:
Admin Panel > Extensions >Modules> Product Designer/Customizer

The Admin Interface of OpenCart Product Designer/Customizer extension includes following main settings:

  • Configure
  • Colors
  • Font
  • Image Group

How to Customize a Product?

To customize a Product, Follow the following path:
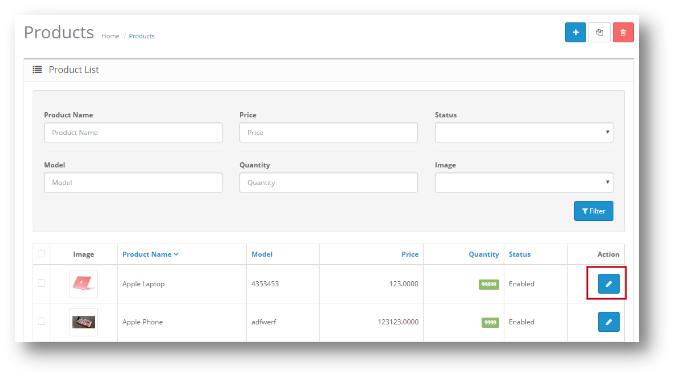
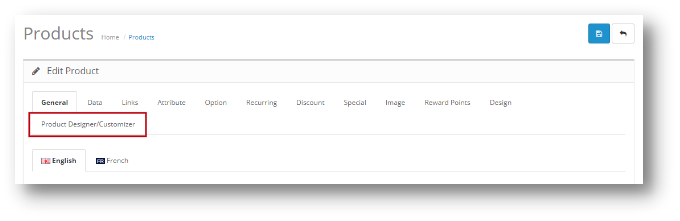
Catalog>> Products>> Select a Product>> Edit>> Product Designer/Customizer


Once the User clicks on the Product Designer/Customizer, the User will have the following options in Opencart Extended Product Customization module:

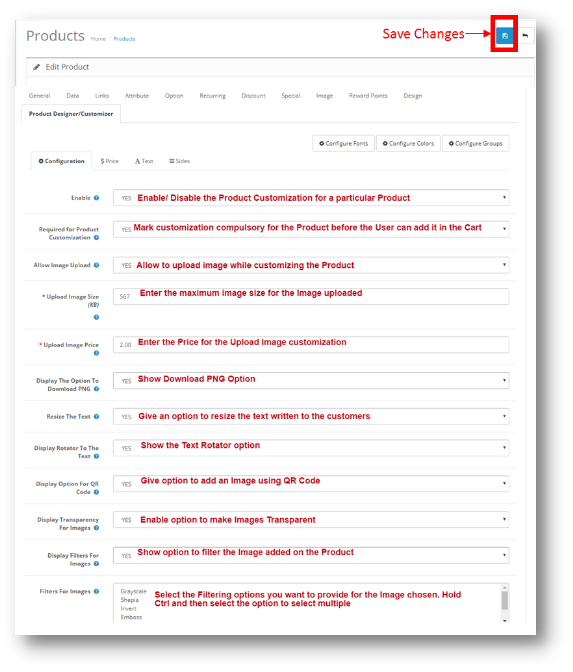
3.0.1 Configuration

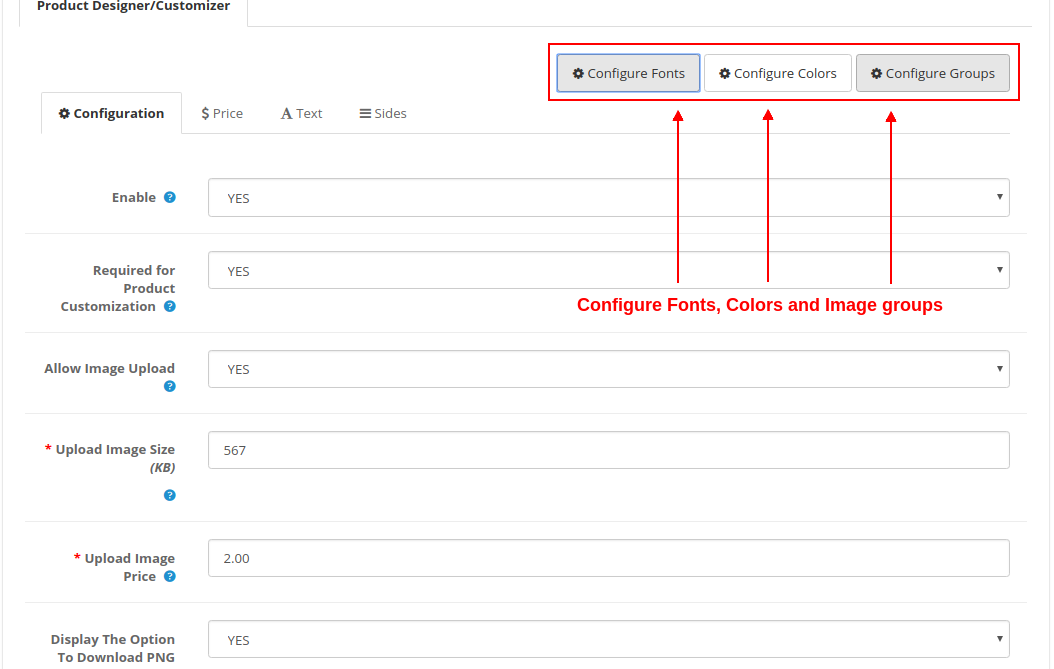
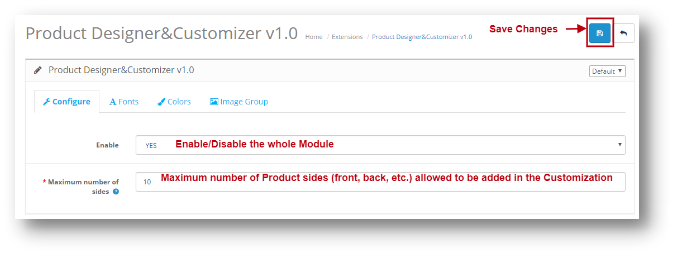
Through this setting of Opencart Custom Product Design module, the User can enable/disable the whole Module and make changes in the Customization of the Product.

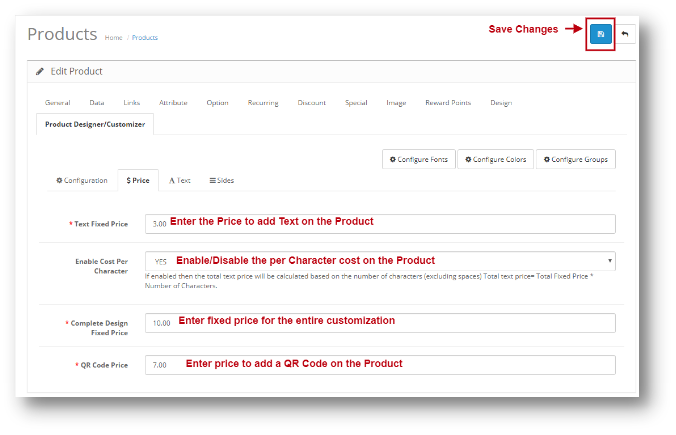
3.0.2 Price

This setting of Opencart Extended Product Customization module lets Admin decide the fixed price for each customization that has to be added in the Product. The screen for the same will look as shown below:


3.0.3 Text

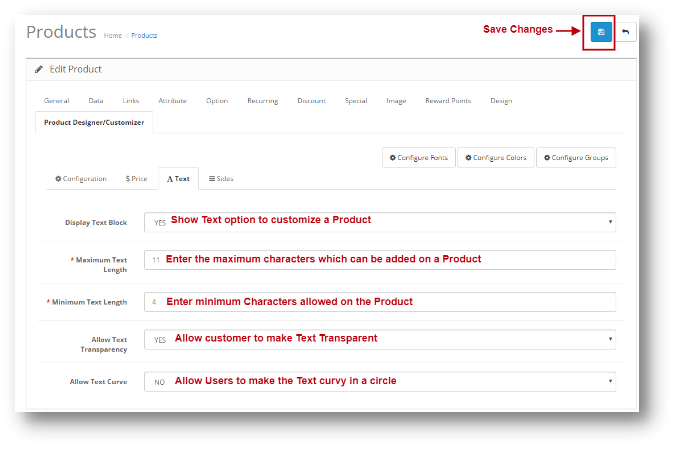
Through this setting of Opencart Custom Product Design module, Admin can control the Text option in the Customization. The Screen for this option will look as shown below:

3.0.4 Sides

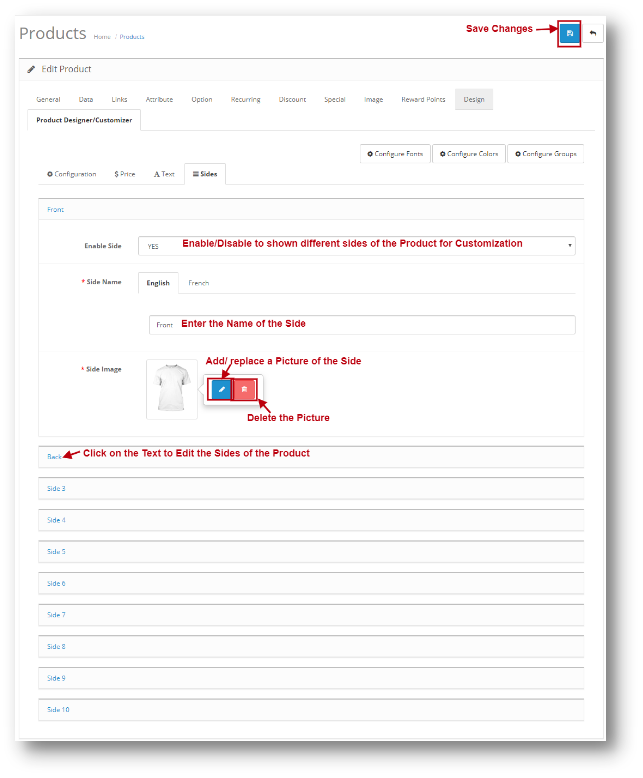
Sides Setting of Opencart custom product designer extension module lets Admin Add an Image of Different sides of the Product so that the User can customize the Product from any of the side they want. Admin can also name the Sides added.
The screen will look like as shown:

How to Configure Fonts, Colors, and Image Groups?

While you are changing the customization settings for a product, you will find the options to select different Fonts, Colors, Image Groups at the top right side of screen. You will find three options as:

1. Configure Fonts

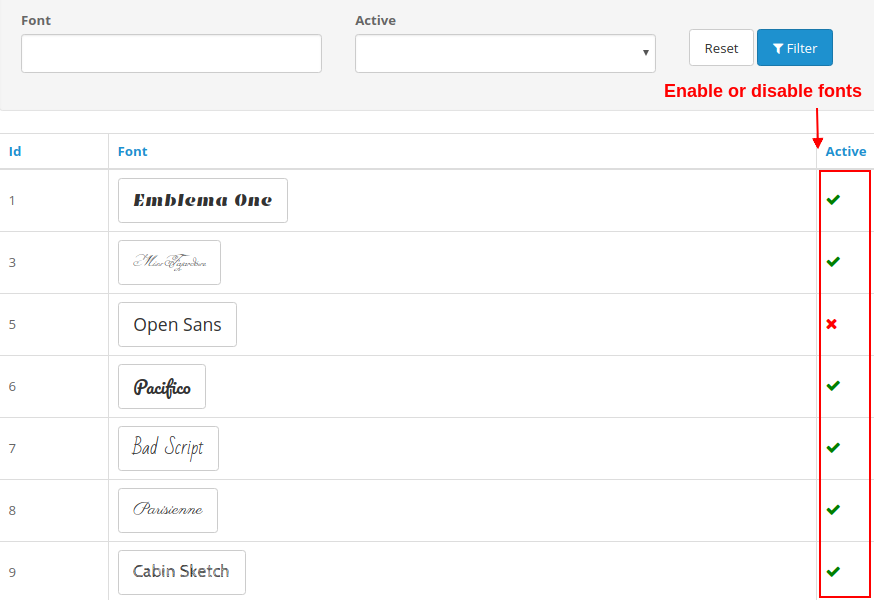
All the fonts that have been added from the module are listed here in this interface. You can directly enable or disable any font.


2. Configure Colors

All the colors that have been added using the module are listed here in this interface. You can directly enable or disable any color.

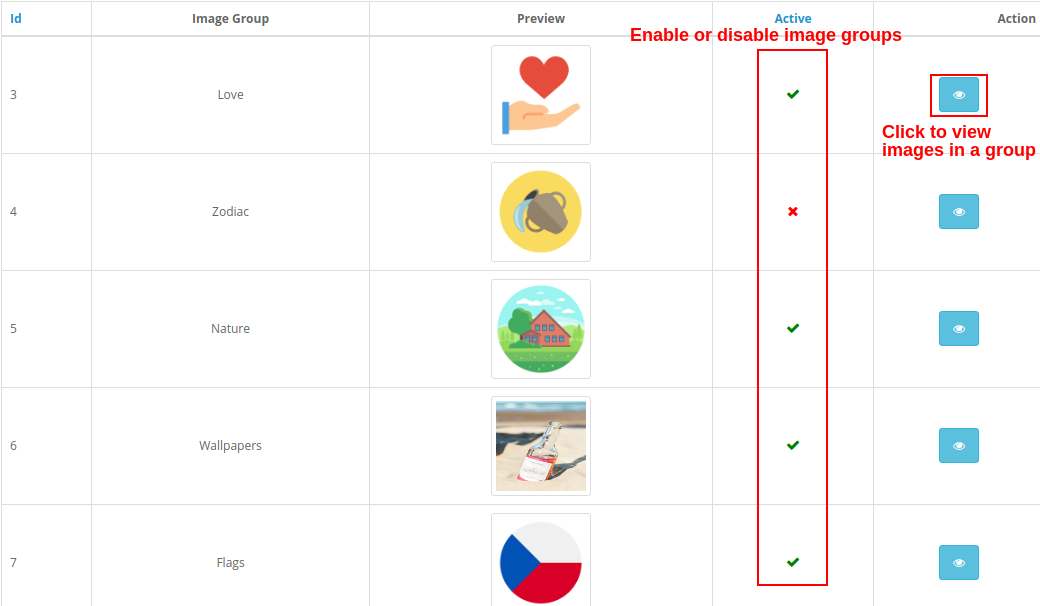
3. Configure Image Groups


All the image groups that have been added are listed here in this interface. You can directly enable or disable any image group.

On clicking the “View Images” button, you will see the following screen.

3.0.5 Configure

This option is given in the Admin Panel of the OpenCart custom product designer extension, Admin can Enable/Disable the whole module from this setting. The screen will look as shown below:


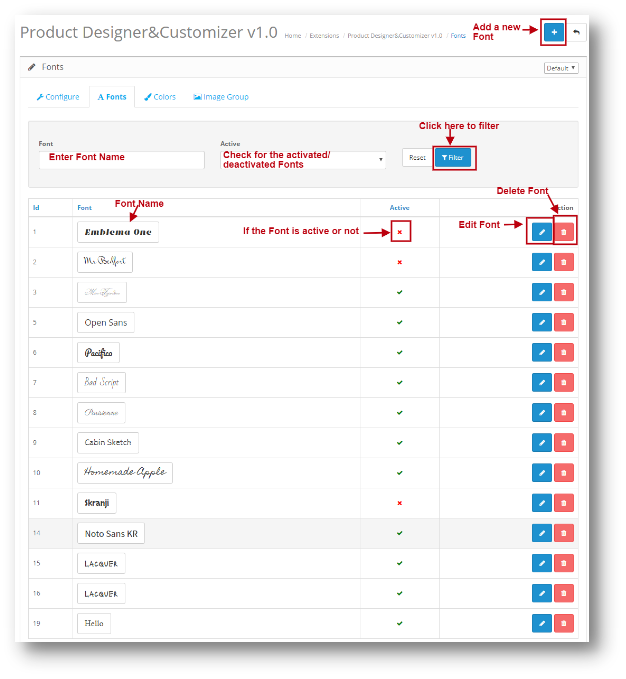
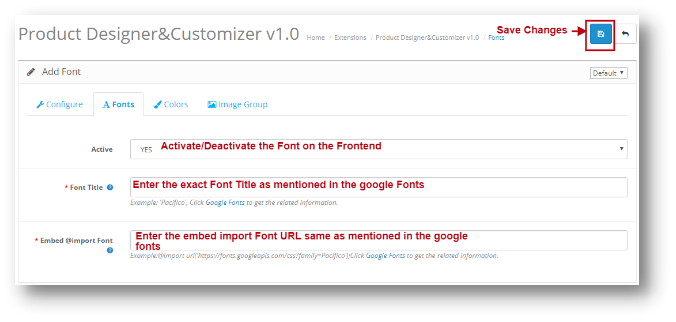
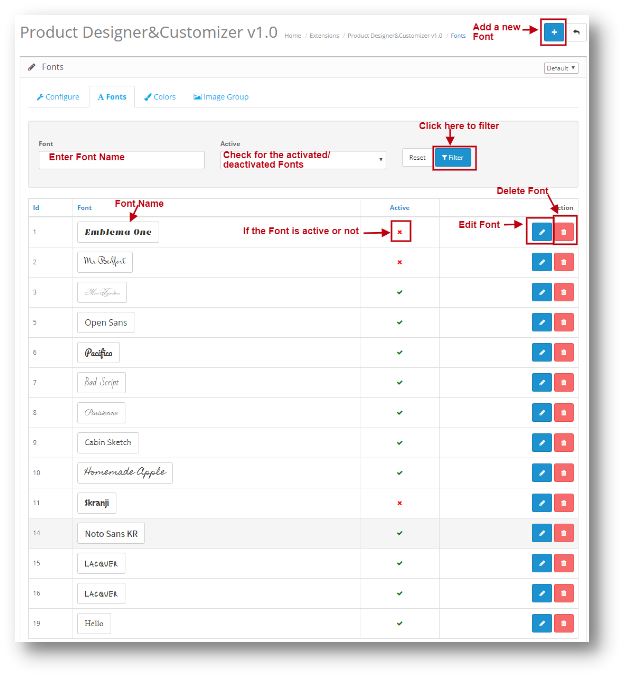
3.0.6 Fonts

Through this setting of OpenCart Extended Product Customization module, Admin can add a new font in the system and also edit the existing one. The screen will look as shown below:

Edit Font: You can Edit an existing Font set using the Edit option. The screens for Editing Font will be same as Adding an Font. The only difference will be that Edit will have the fields already filled.

Delete Font: You can delete a Font by clicking on the ‘Trash’ Icon. A pop up will show up asking for the Confirmation. You can click yes and the Font will be deleted.

Add Font: You can add a Font in OpenCart Extended Product Customization module by clicking on the ‘+’ icon given at the top of the page. The screen will look as shown below:


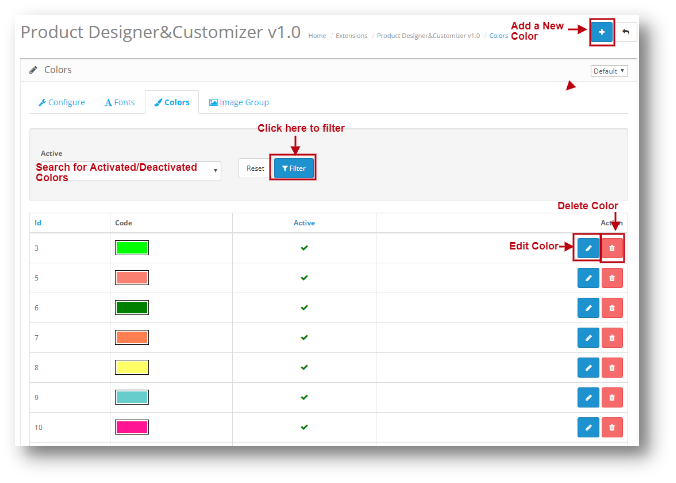
3.0.7 Colors

Through this setting of OpenCart Extended Product Customization module, Admin can add a new Color in the system and also edit the existing one. The screen will look as shown below:


Edit Color: You can Edit an existing Color set using the Edit option. The screens for Editing Color will be same as Adding a Color. The only difference will be that Edit will have the fields already filled.

Delete Color: You can delete a Color by clicking on the ‘Trash’ Icon. A pop up will show up asking for the Confirmation. You can click yes and the Font will be deleted.

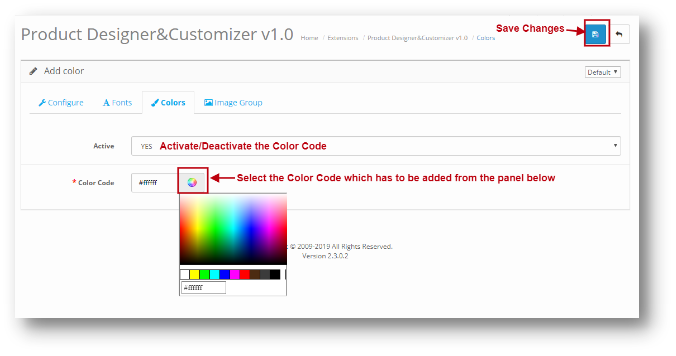
Add Color: You can add a Color in OpenCart Extended Product Customization module by clicking on the ‘+’ icon given at the top of the page. The screen will look as shown below:


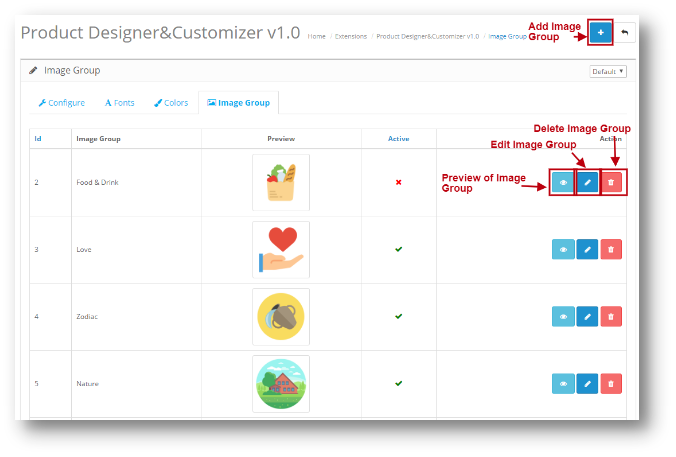
3.0.8 Image Group

Image Group settings of OpenCart Extended Product Customization module lets Admin add a Group of Images to offer their customers for Product Customization. The screen will look as shown below:

Edit Image Group: You can Edit an existing Image Group set using the Edit option. The screens for Editing Image Group will be same as Adding a Color. The only difference will be that Edit will have the fields already filled.

Delete Image Group: You can delete an Image Group by clicking on the ‘Trash’ Icon. A pop up will show up asking for the Confirmation. You can click yes and the Font will be deleted.

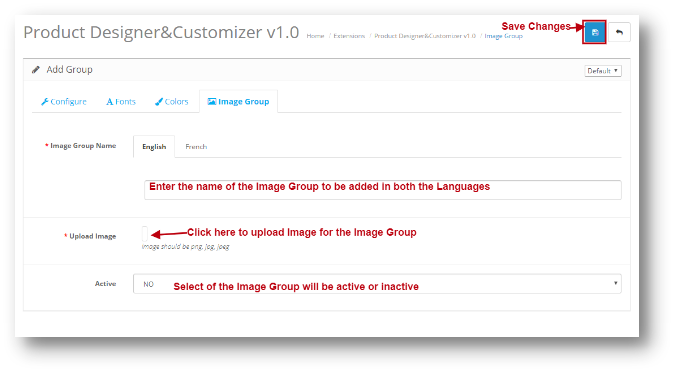
Add Image Group: You can add an Image Group in OpenCart Extended Product Customization module by clicking on the ‘+’ icon given at the top of the page. The screen will look as shown below:

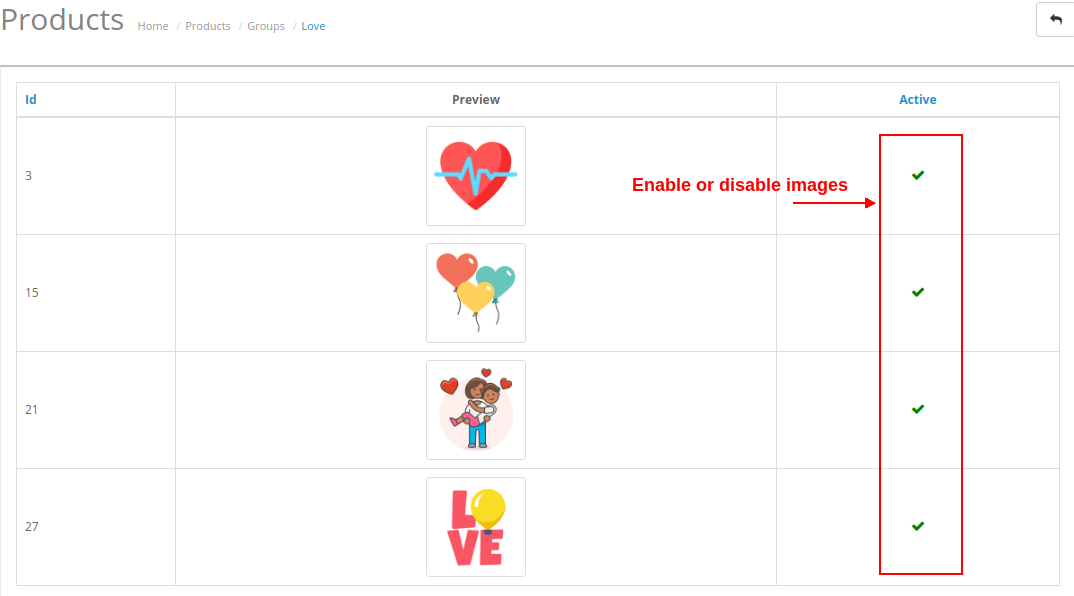
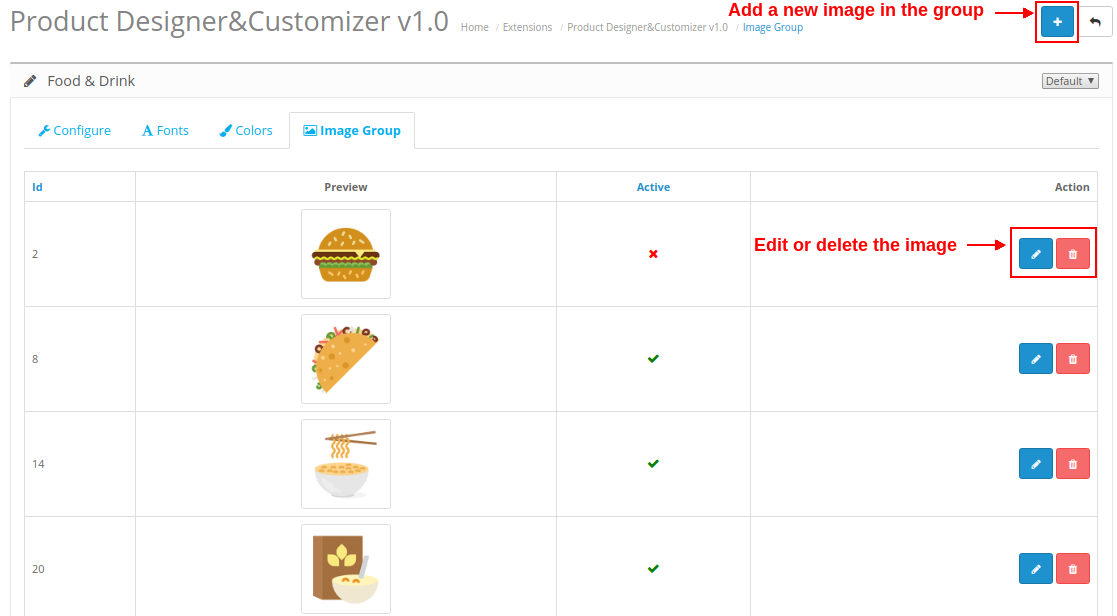
Preview of Image Group: You can view all the images within a group by clicking on the “Eye” icon corresponding to a particular group. It will show the below screen:


Here, you can add a new image into the group, edit/delete the existing image.

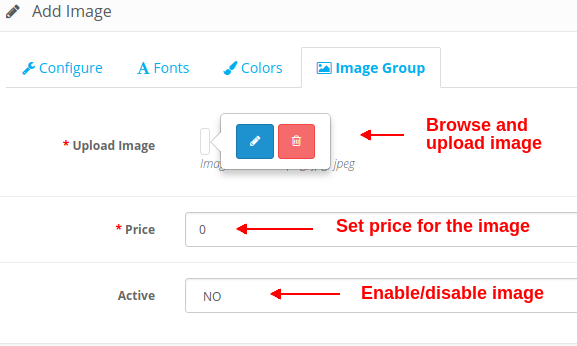
On clicking the Add button, you will see the following options as shown below:

Upload Image: This option will allow you to browse a desired image from your local computer space and upload that here.

Price: This option sets the price for the selected image.

Active: This option enables or disables the image for the selected group. Set it to YES or NO.

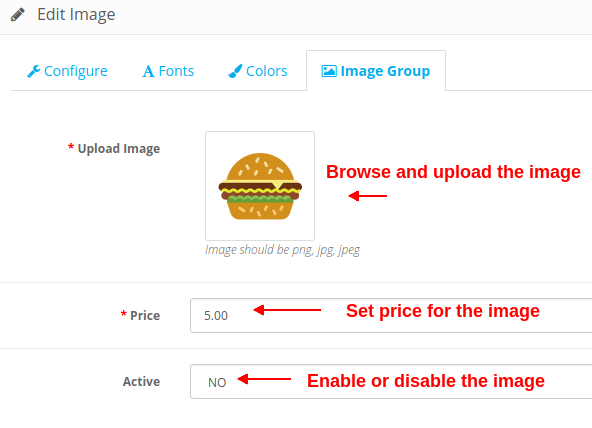
Similarly, you can click on the Edit button corresponding to the image. The options will be same, the only difference is that the fields will be filled as shown in the image below.


Deleting an image is simple. Just click on the “Trash” icon corresponding to the image.

4.0 Front Interface of Opencart Product Designer Customizer Module

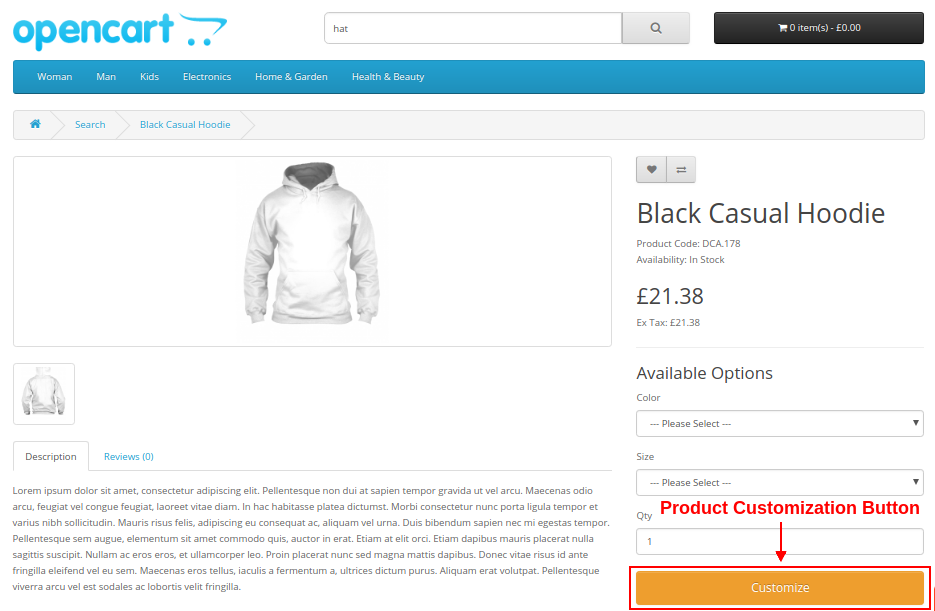
If the Opencart Product Designer/Customizer module is enabled, it will show a “Customize” button on the product page as shown below.

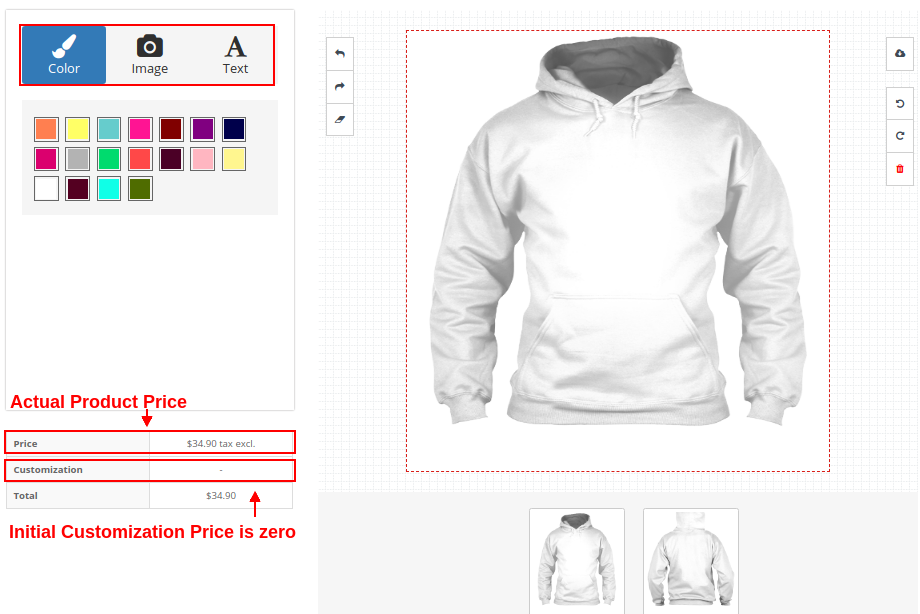
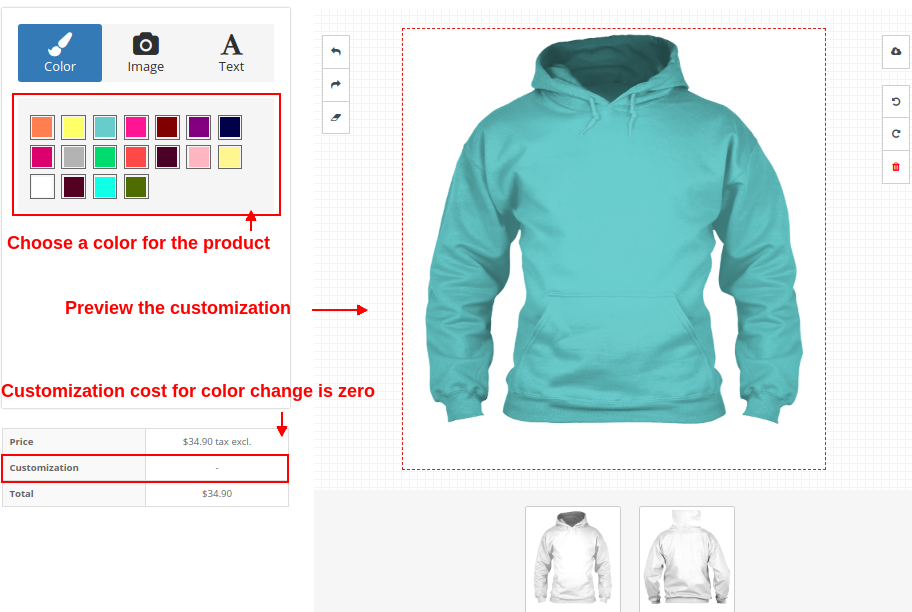
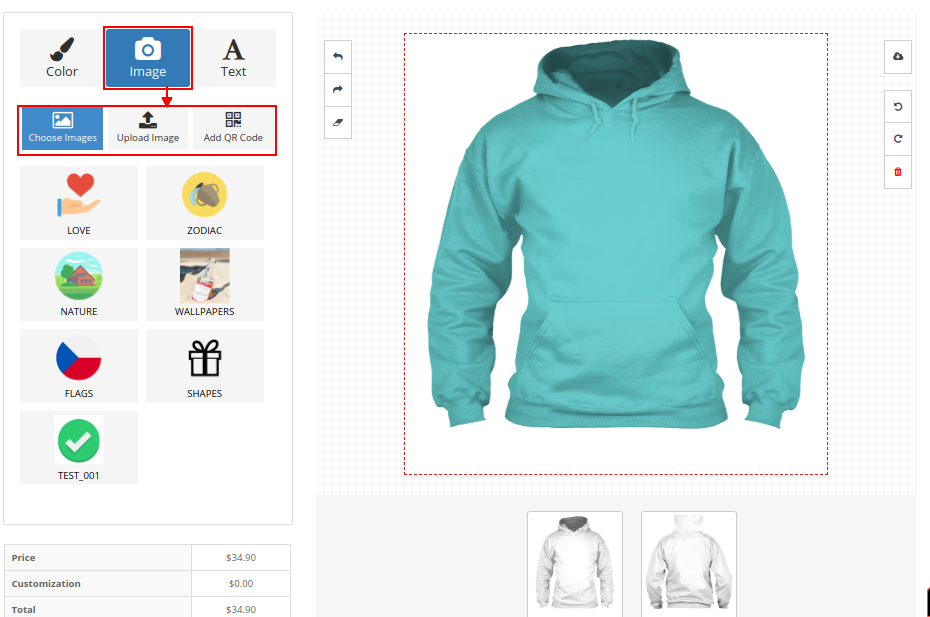
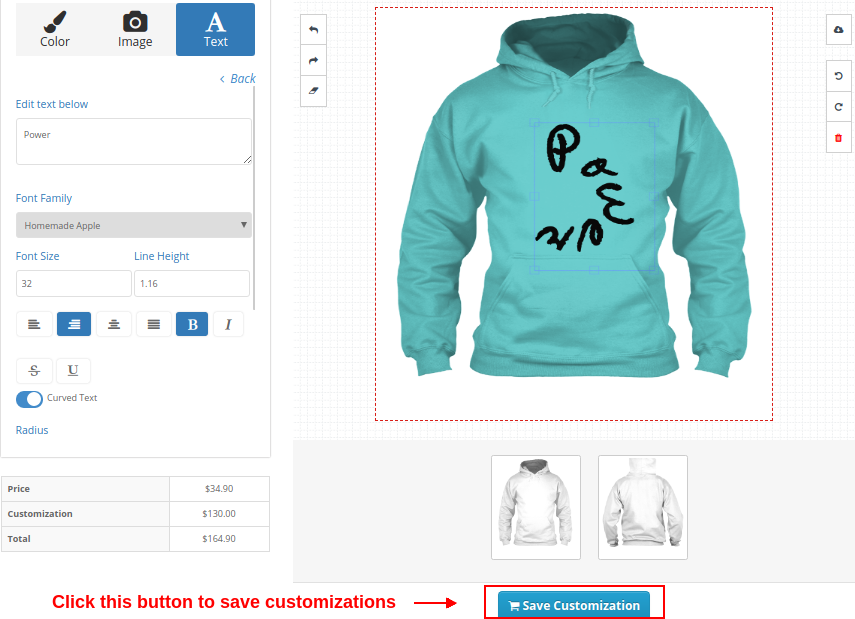
On clicking the Customize button, the customer will be shown a screen pop-up which will consists of various product design and customization settings. Customers can add any color, custom text, custom image or QR code for a product as per their shopping requirements.

Customers can perform various kinds of customizations like:

1. Color


2. Image

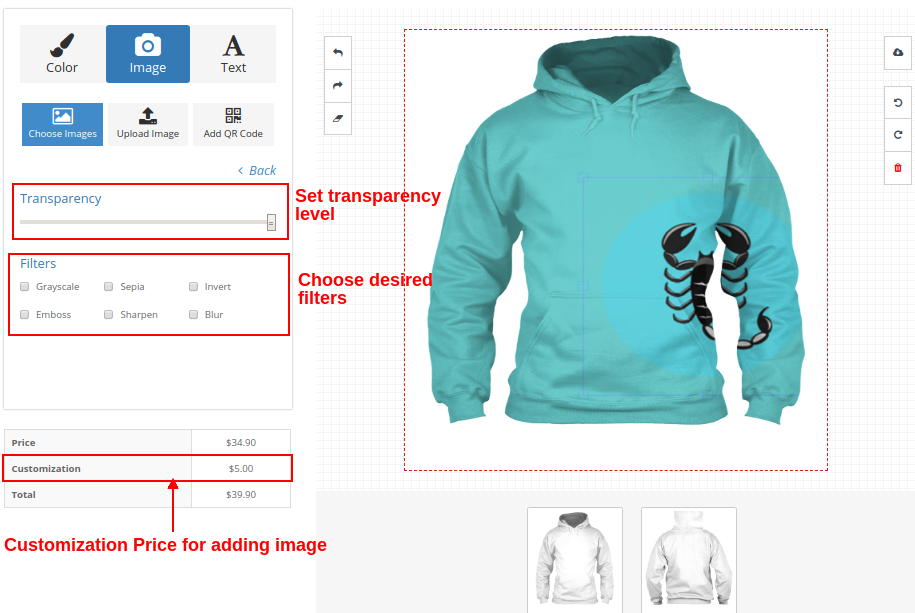
Customers can select an image of their choice from the provided image group options.

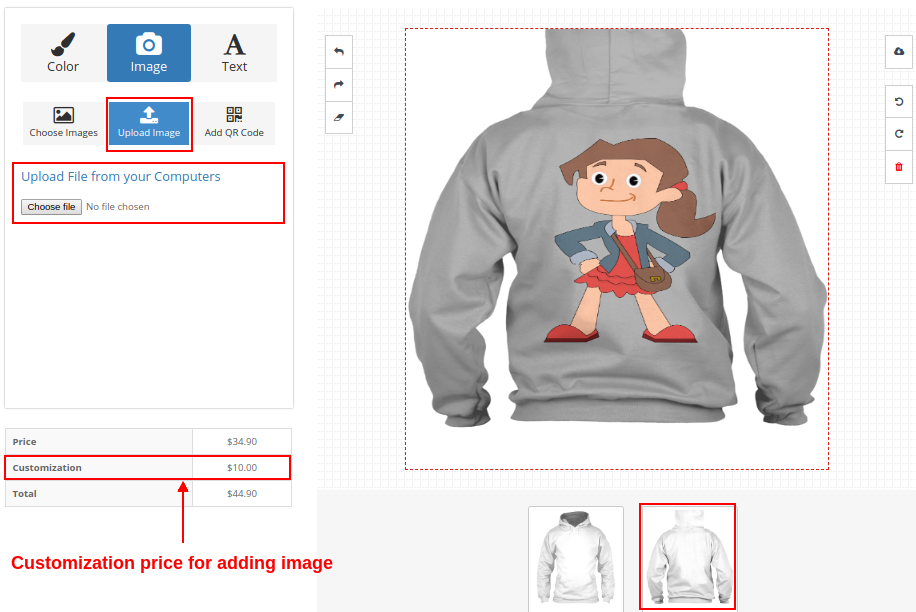
They can upload and print any other image of their choice from the local space.

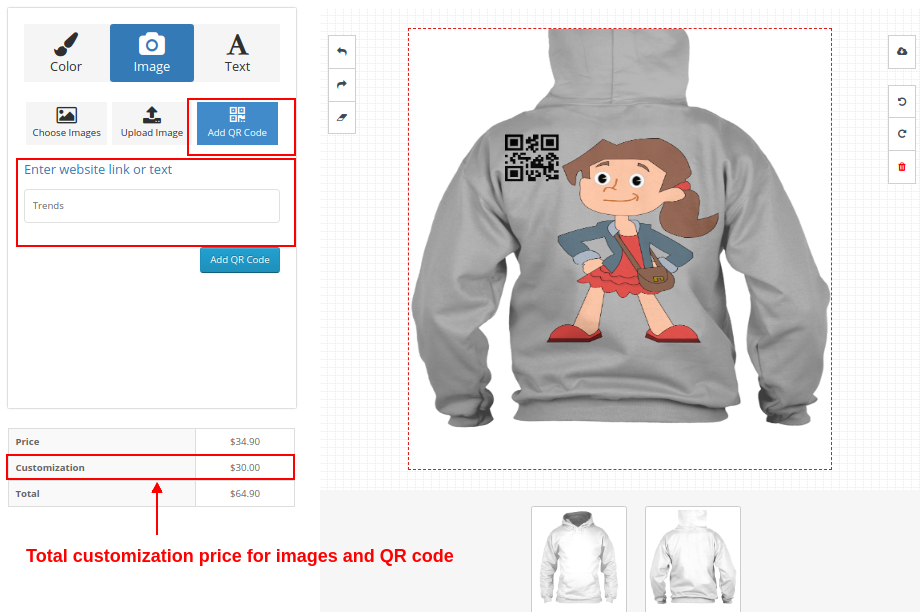
They can even print QR code for some hidden text or website link.


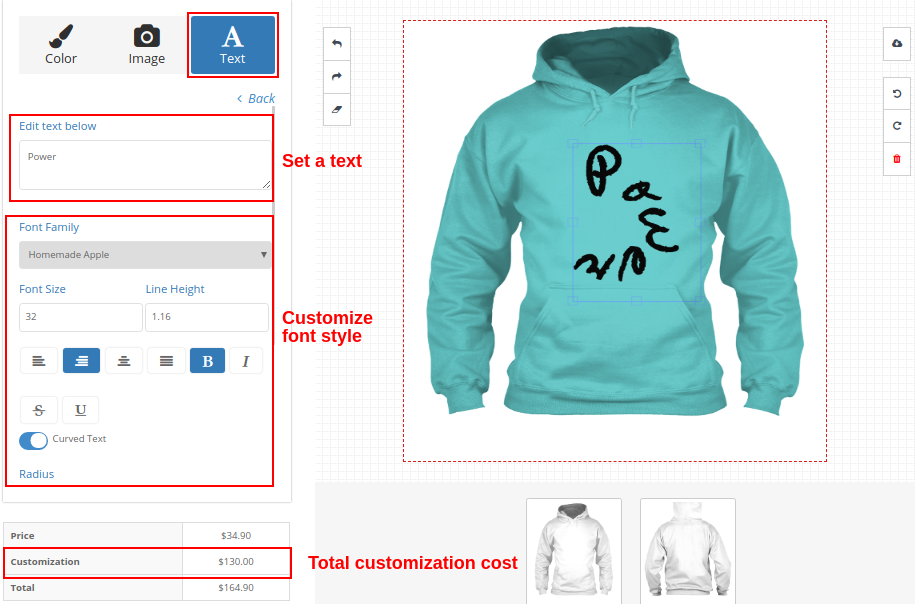
3. Text


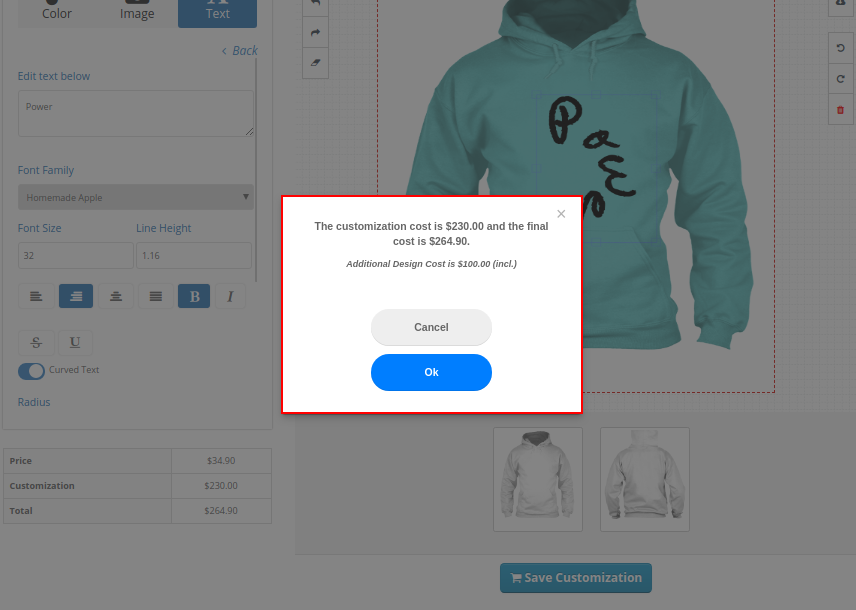
Customer can save all the customizations to their product by clicking on the Save button as shown below.

It will show the cost check box on the screen. Click OK to confirm.


Similarly, these customizations are applicable to other products of the store like mug and phone cases.

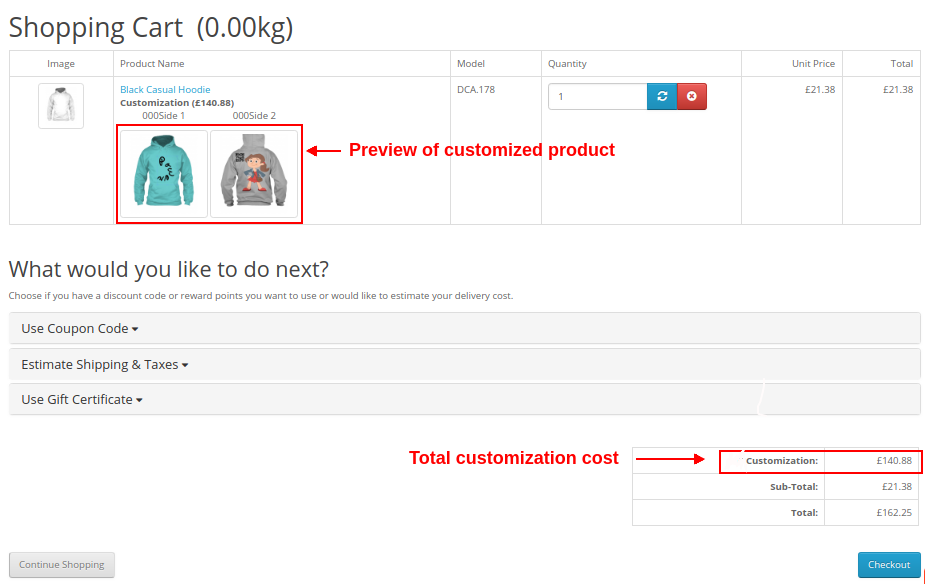
Shopping Cart Summary Page for Customized Product

The below frontend image shows how the custom product displays on the cart page with different options to the customers after clicking on “Save Customization” button.


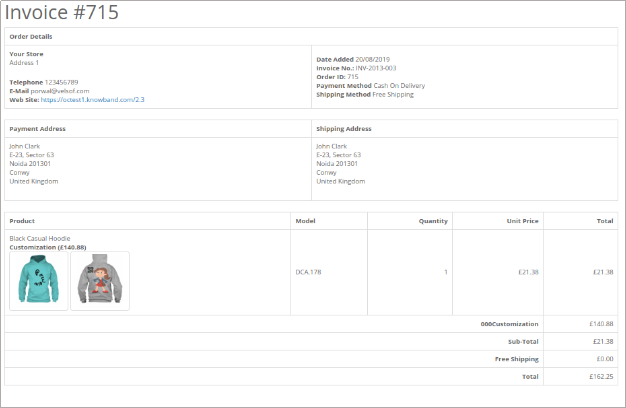
Customer can view the Invoice of this customized product as shown below.


Order View from Admin Panel

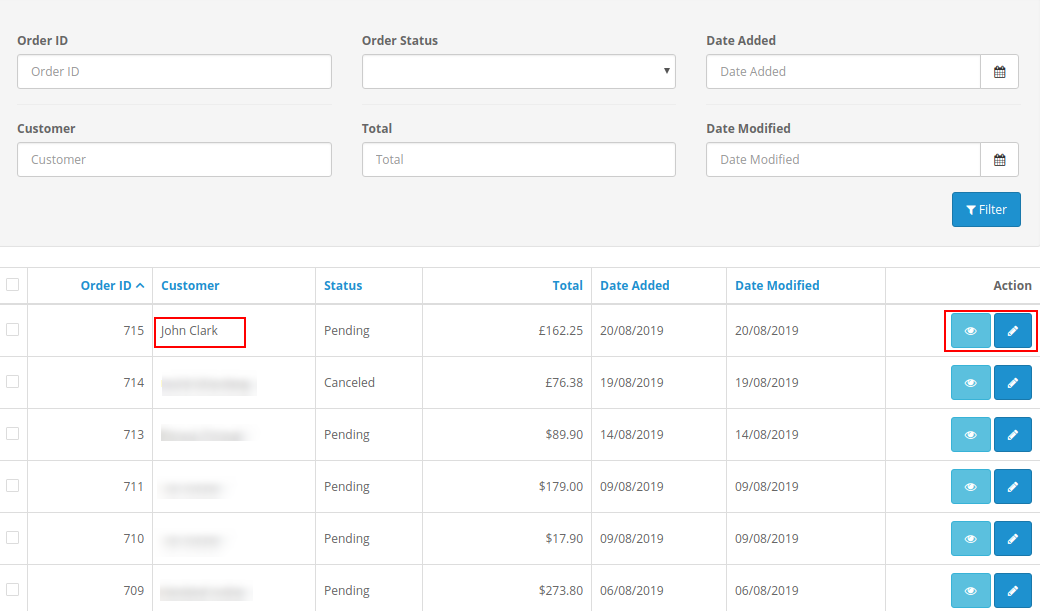
Admin can view the order invoice and all the configuration regarding the product customization from back-office. The details of an order can be viewed under the Orders section of Admin Panel.


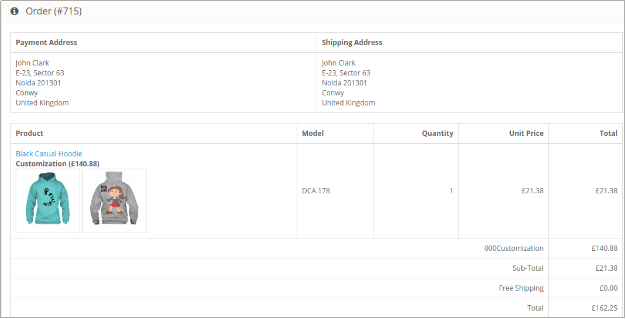
On clicking the View button corresponding to a product, admin can check the complete order details of the custom product.

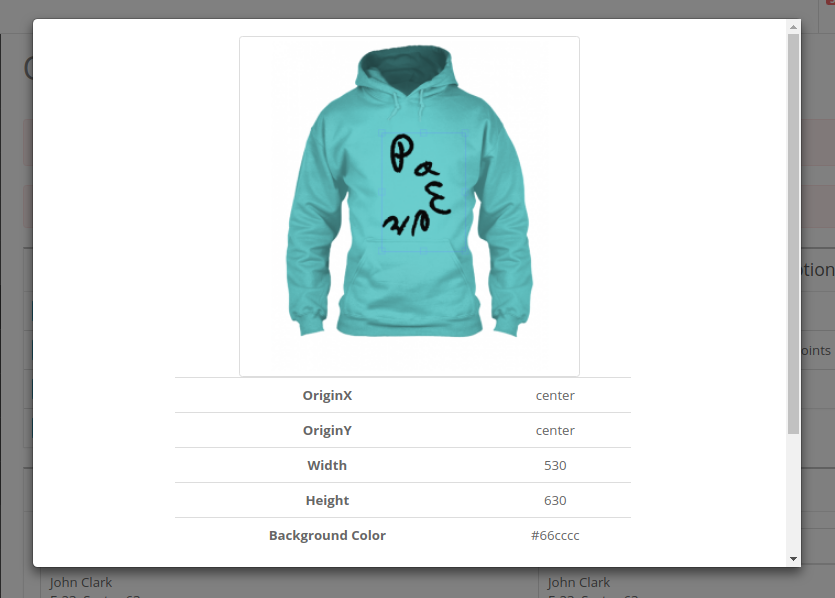
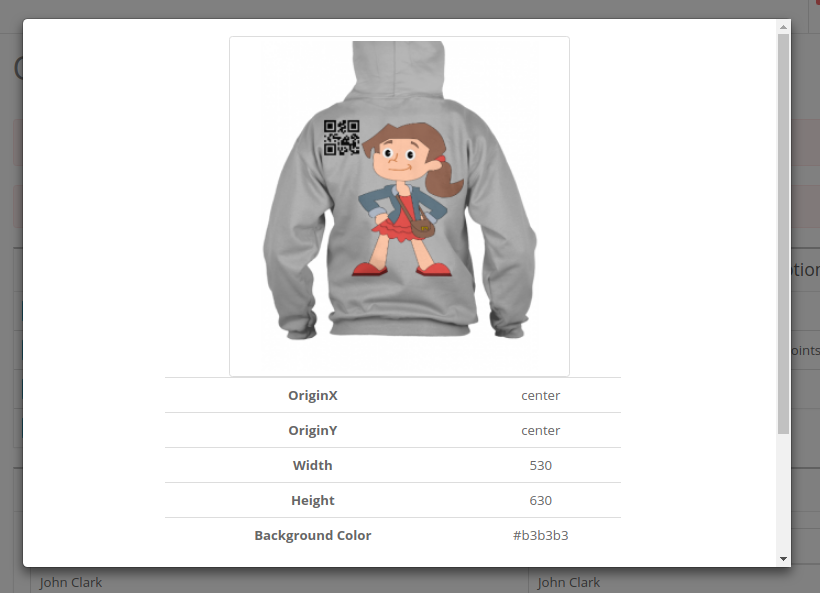
On clicking the product images, admin will see the complete details of personalized product in the form of a popup screen as shown below.

Magento Loyalty Points Extension- User Manual

1.0 Introduction

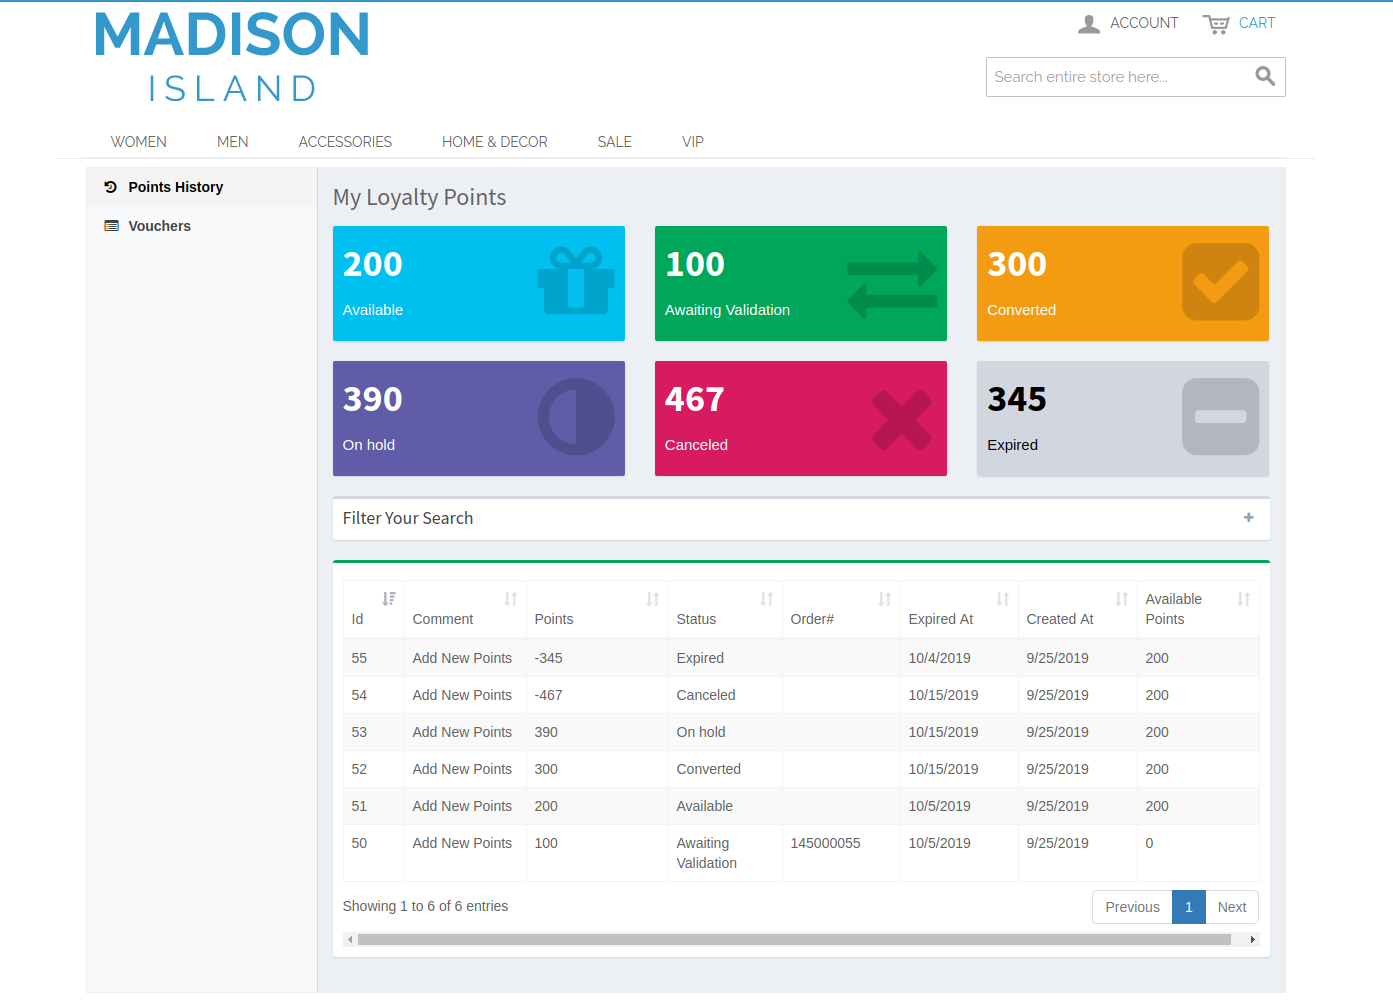
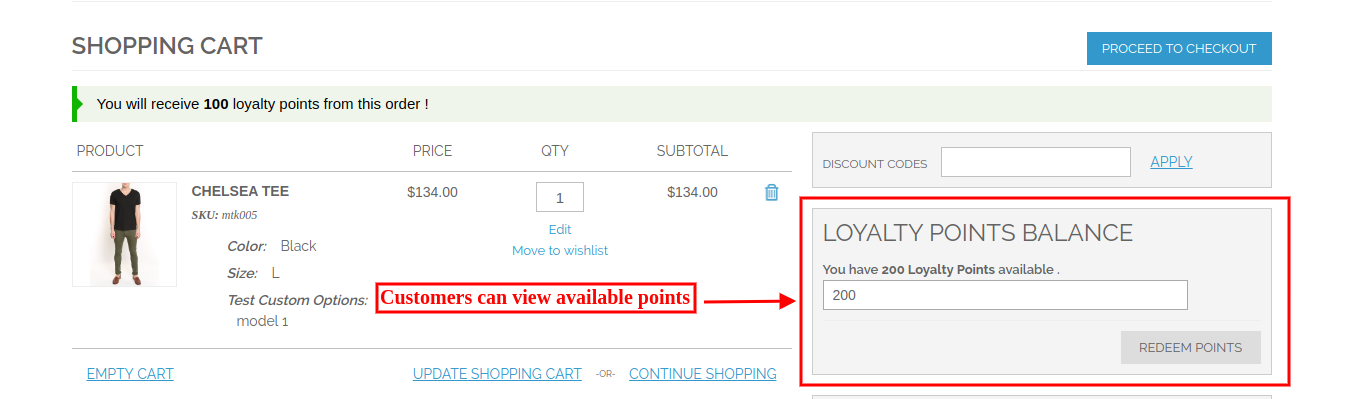
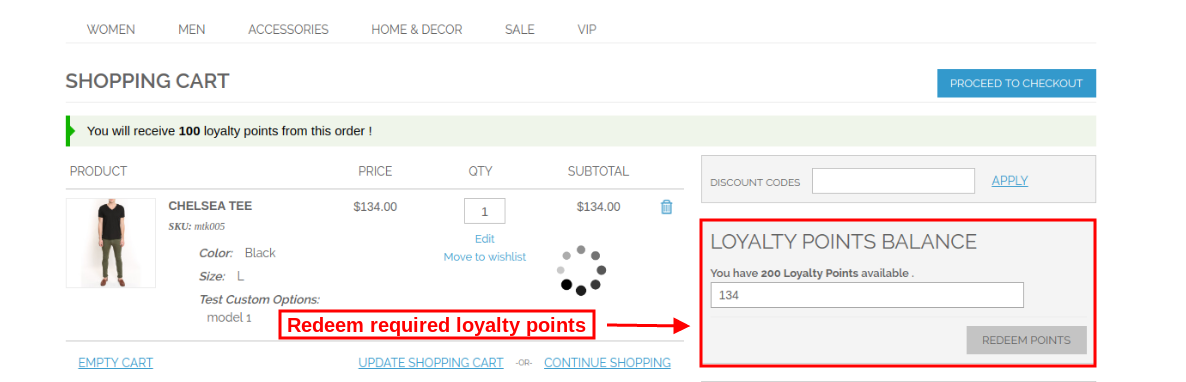
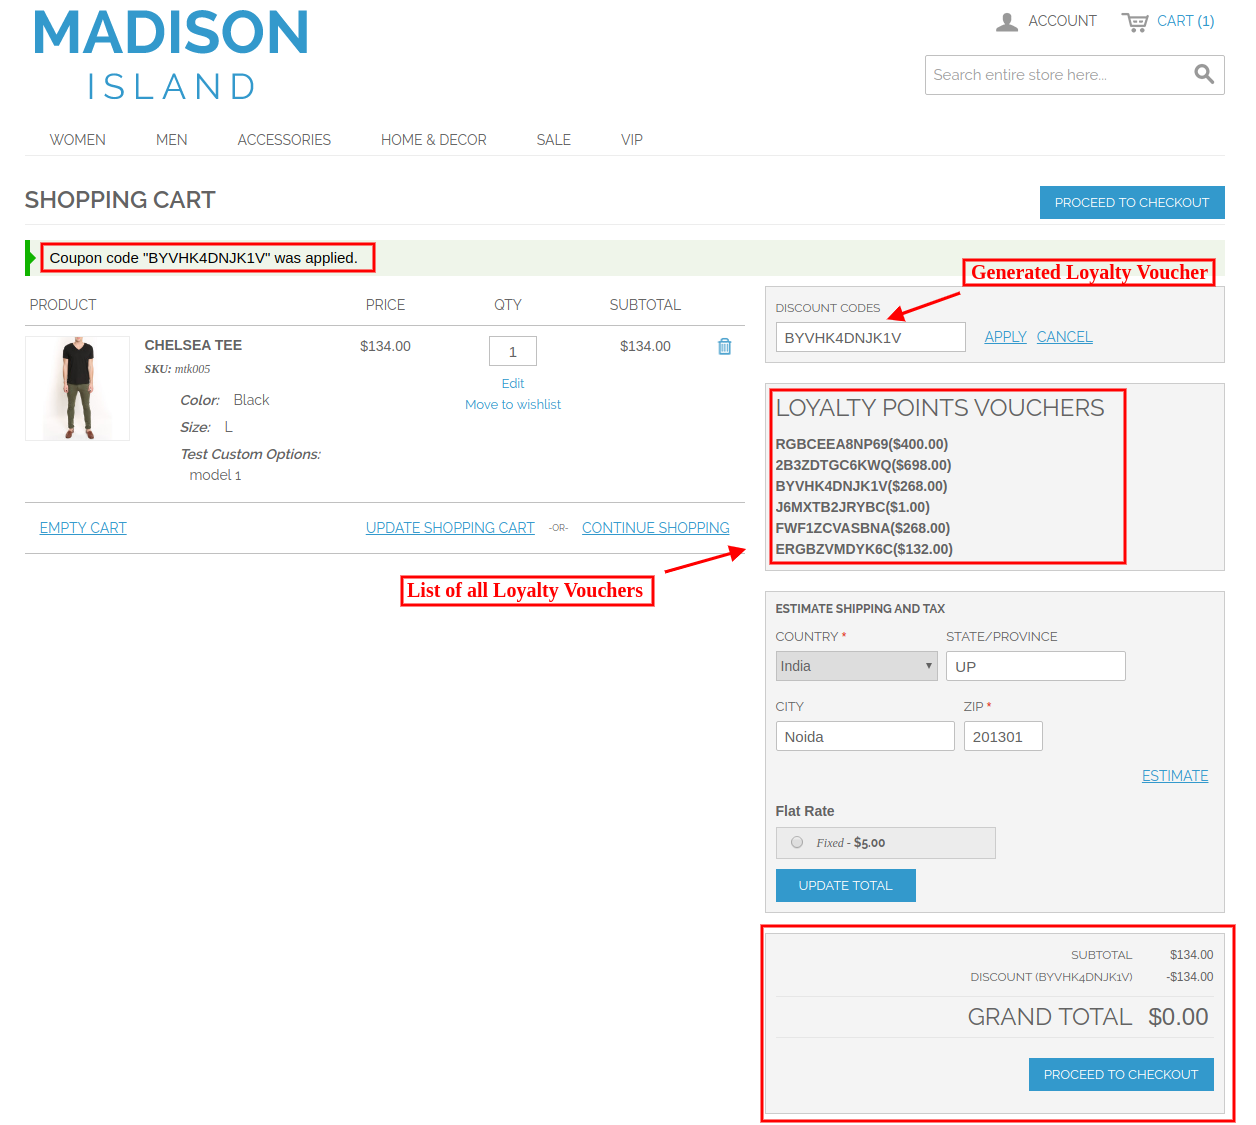
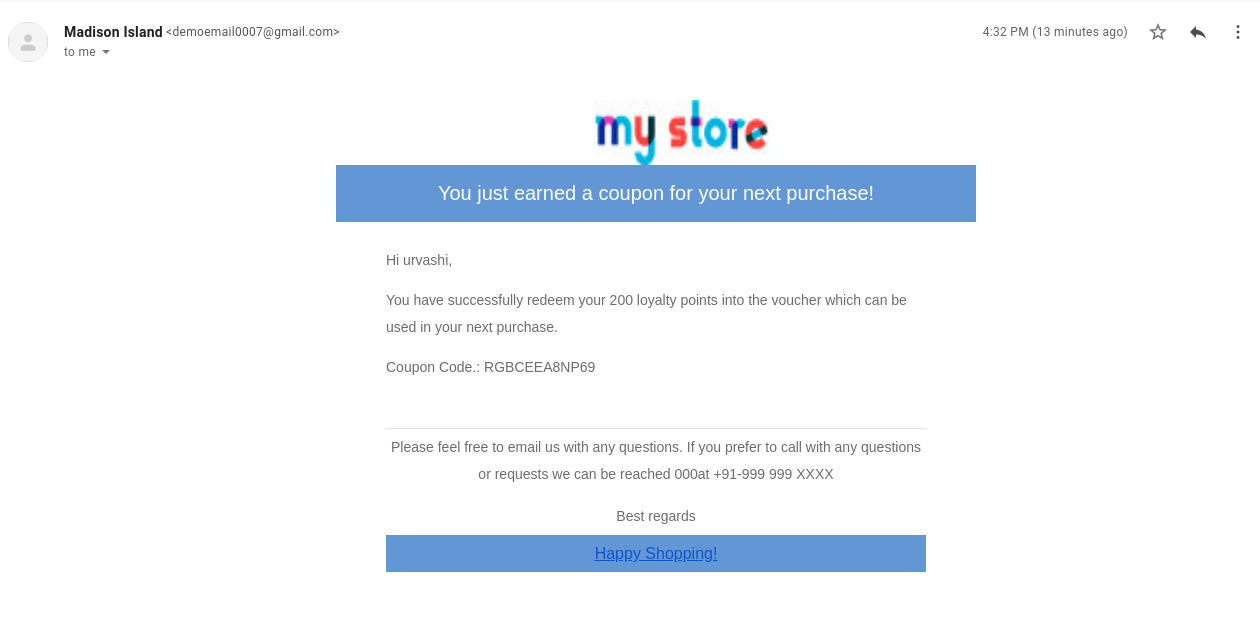
Magento Loyalty Points Extension by Knowband allows the online merchant to give loyalty points to the online users on new registration, first order, any specific order placed by the customers and other events. The online customers can generate a coupon of these loyalty points and use it on their next purchase from the store. The online store admin can this way increase the conversion rate of the website by offering loyalty points to the customers using this Magento Loyalty Points Extension.

Loyalty points make the online users come back and order again and again from the store. The online merchant can set the conditions according to which, customers will get loyalty points. The Magento Loyalty Points module allows the online merchant to offer loyalty points on the customer’s birthday. This Magento Loyalty points system extension is mobile responsive, customizable and offers smooth functioning.

1.1 Basic Features of this Magento Loyalty Points Extension

  1. The Magento Loyalty reward points plugin helps the store admin to offer loyalty points to the customers.
  2. By offering loyalty points, the online merchant can ensure customer retention and customer acquisition.
  3. The online merchant can set terms and conditions for providing loyalty points. The Magento Loyalty Points module allows applying Cart, Product Rule and Behavior rule from the admin interface.
  4. The Magento Loyalty points system extension provides an option to set the price amount for a single loyalty point.
  5. The online store admin can also set the order status on which the online users can get loyalty point.
  6. The online merchant can set the loyalty point expiry date and also send alert notification to the customers before set days of expiry date.
  7. The online admin can also offer loyalty points on customer’s birthday and also restrict this functionality to the specific customers by by selecting customers group.
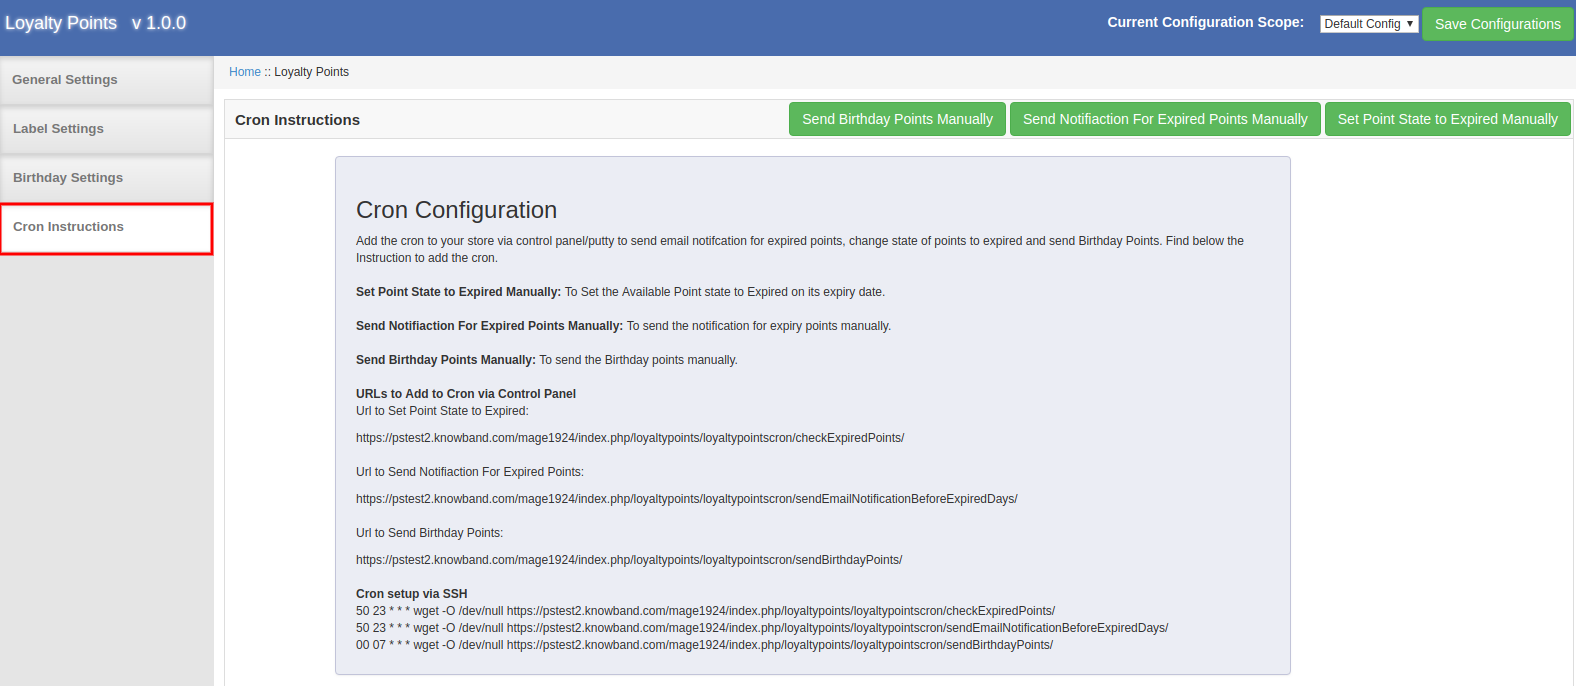
  8. The Magento Customer reward points plugin provides instructions to setup cron. Admin can get the URLs to Add to Cron via Control Panel and also get instructions of Cron setup via SSH.
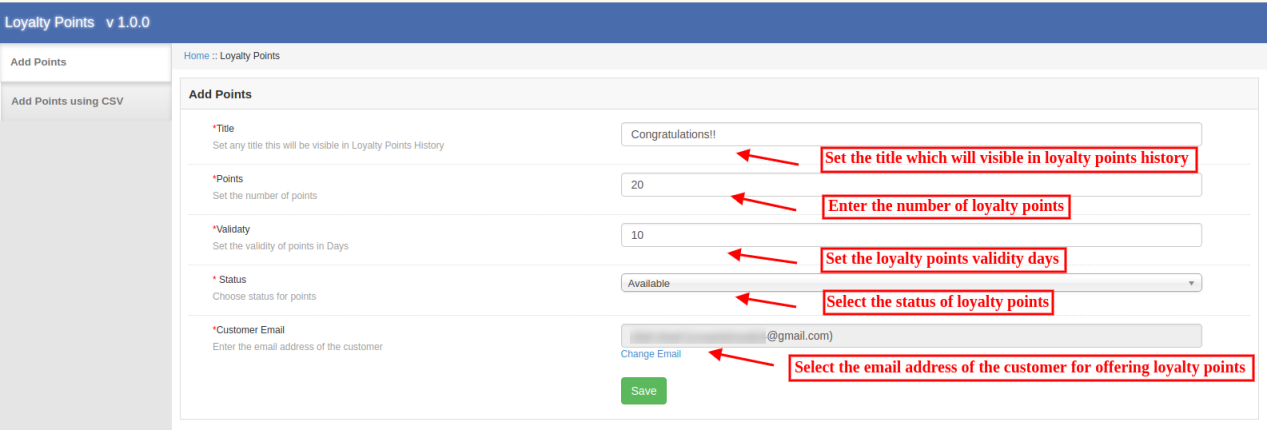
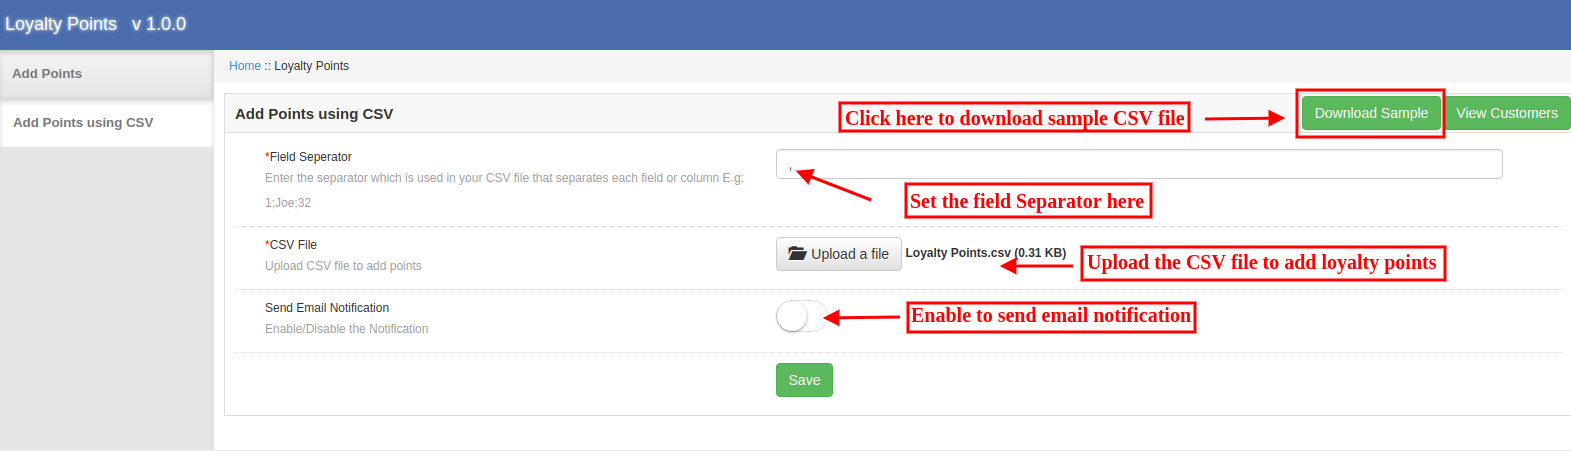
  9. The Magento Loyalty points system extension also provides an option to offer loyalty points to any specific customer by setting the loyalty points, validity, status and email id for sending loyalty points. The store merchant can also upload CSV file for adding points.
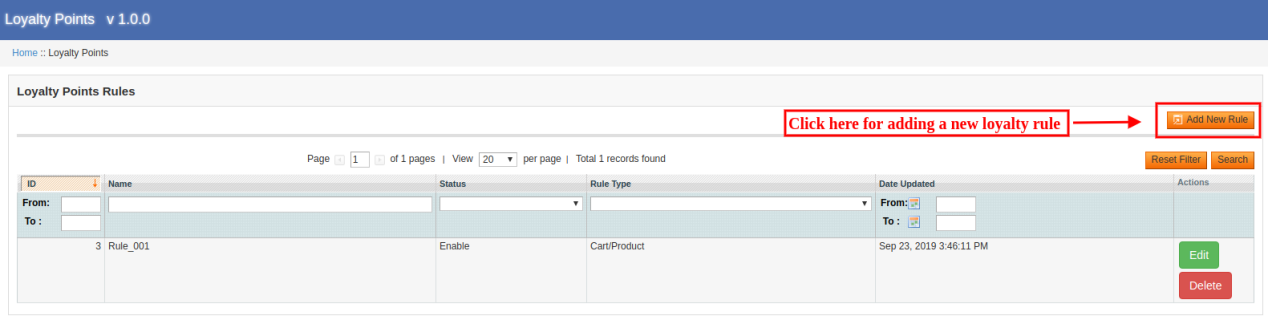
  10. The eCommerce store merchant can create various rules and apply them for offering loyalty points. The online users can get loyalty points when he meets the conditions.
  11. The Magento Loyalty reward points plugin provides an option to send an email informing them regarding loyalty points.
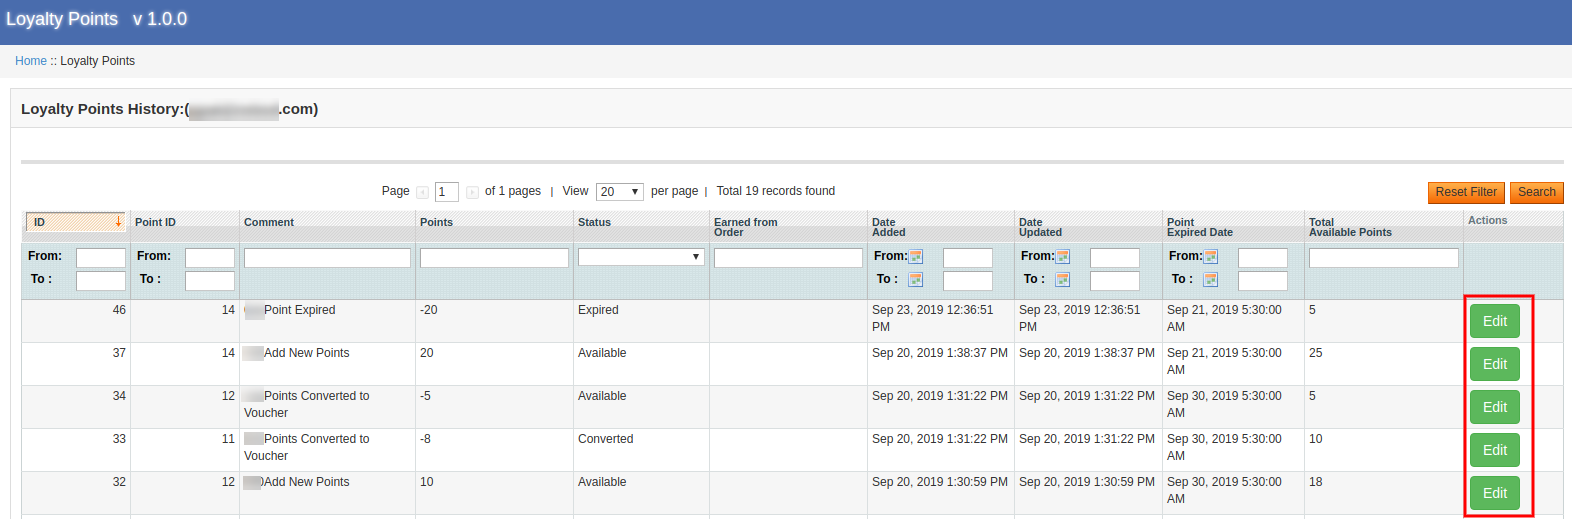
  12. The Loyalty points extension for Magento allows the online store admin to view the loyalty point balance of all customers from the admin interface.
  13. The Loyalty points extension for Magento provides an option to change the status, validity and number of loyalty points.
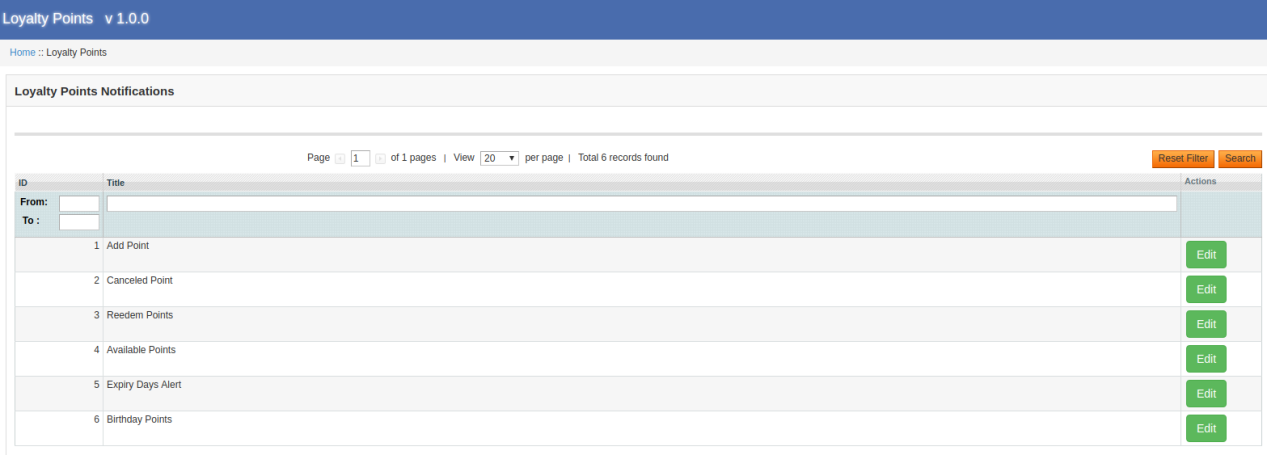
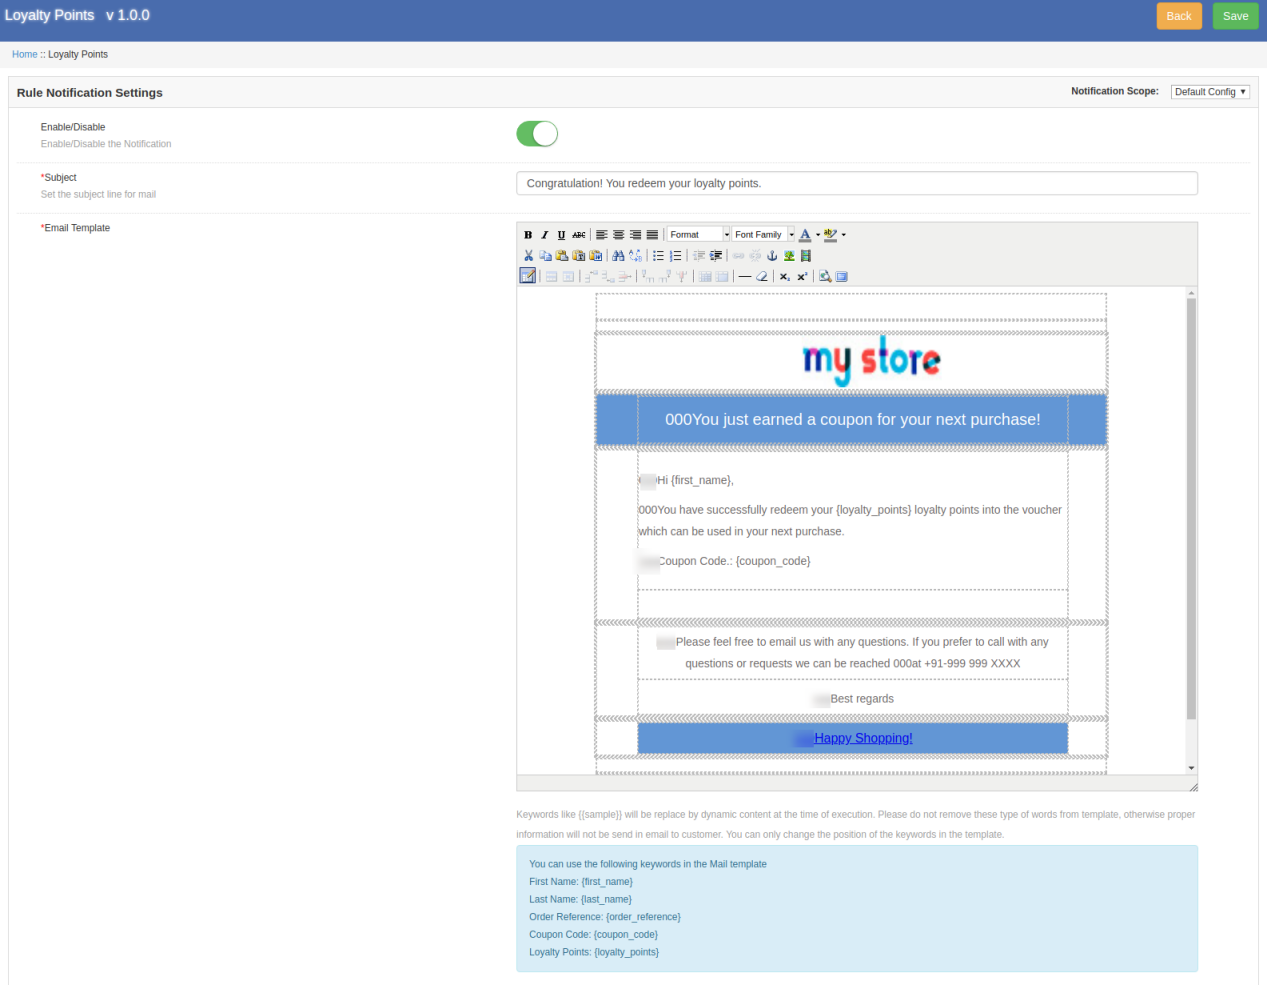
  14. The loyalty points module provides ready-made email templates that can be further customized. The online merchant can enable the settings for sending email while offering loyalty points.

2.0 Installation of Magento Loyalty Points Module

The online store merchant can install the Magento Loyalty Points Extension easily by following these steps:

1. Download the extension package from the Knowband store.

2. After downloading the extension package, you will get a zipped file. Unzip the package on the root folder of Magento setup via FTP manager (like Filezilla or WinSCP – download here: https://filezilla-project.org/). The store admin will find the files and folders as shown in the image below:

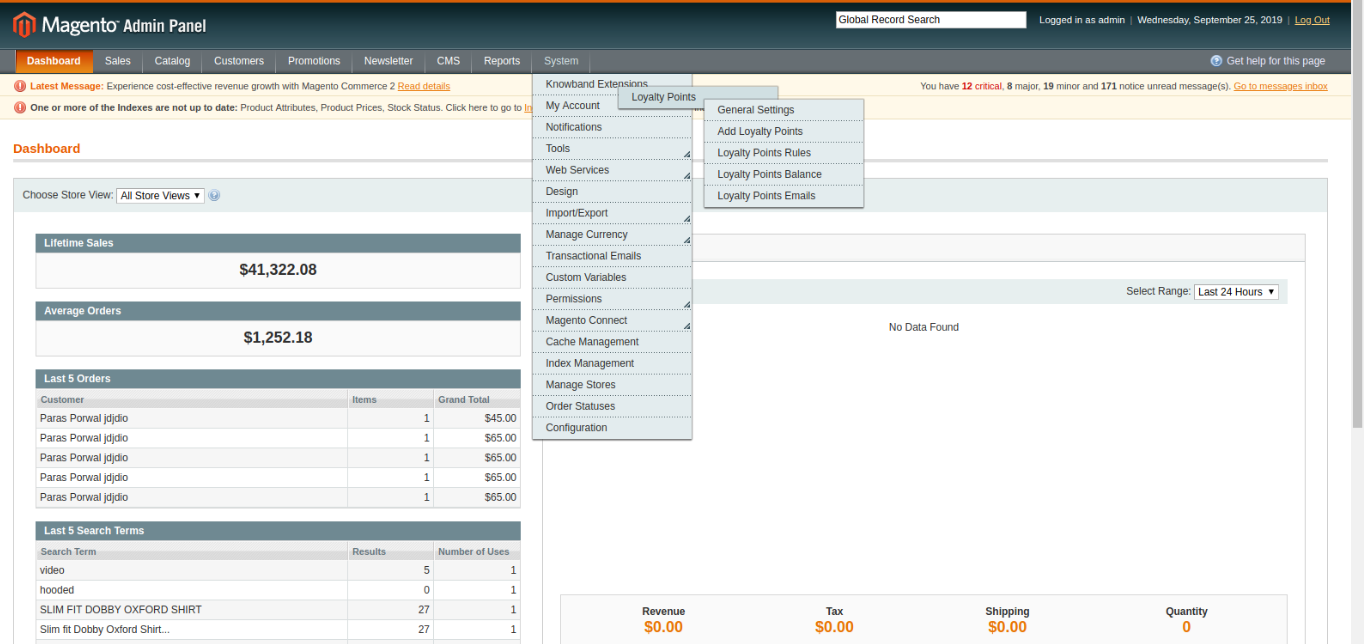
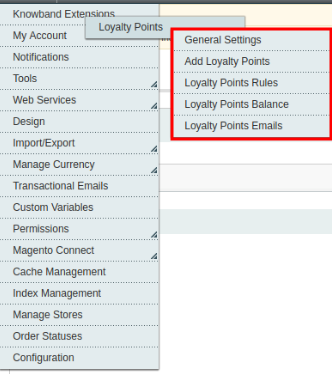
3. The extension is now installed and ready for use. In the Admin Panel, go to “System > Knowband Extensions >Magento Loyalty Points Extension”.

Now, the store admin can use and configure the Magento Loyalty Points module.

3.0 Admin Interface

After successful installation, the eCommerce store merchant can easily configure the Magento Loyalty points system extension. There are multiple configuration options as shown below:

  • General Settings
  • Add Loyalty Points
  • Loyalty Points Rules
  • Loyalty points balance  
  • Loyalty points Emails

Admin can easily apply settings and configure them easily.

3.1 Loyalty Points – General Settings

The store admin can apply loyalty points related settings and also offer loyalty points on birthdays.

3.1.1 General Settings

In General Settings, the store admin can configure basic settings related to loyalty points. The online merchant can apply these settings from the admin interface of this Magento Loyalty reward points plugin:

  • Enable/Disable: click on the button for activating or deactivating loyalty points functionality.
  • Price for 1 loyalty point: Here, set the price which will be applicable for 1 loyalty point.
  • Minimum Points Range: Set the least loyalty points which can be used by the customers.
  • Order Status for Points Awarded: Set the order default status on which customers will get loyalty points.
  • Order Status for Points canceled: You can also set the order status on which loyalty points will be canceled from the customer’s account.
  • Voucher Expiry days: Set the number of days after which voucher will get expired.
  • Disable Earning Of Loyalty Points: Enable this option if you don’t want to offer loyalty points to the customers if a loyalty voucher is applied in cart.
  • Enable/Disable Points Expiry Alert: Enable the option if you want to send an email to alert the customers about the expiry of loyalty points.
  • Alert Before Expiry Days: Set the number of days from which you want to send an alert email.

3.1.2 Label Settings

Here, the online store admin can set the label for loyalty points. The Magento Loyalty reward points plugin allows setting label for Awaiting Validation, Converted, On Hold, Available, Canceled and Expired loyalty points.

3.1.3 Birthday Settings

The Magento Loyalty points system extension allows the store admin to apply settings for offering birthday loyalty points. There will be customizable options as shown below:

  • Enable/Disable: The online store merchant can enable or disable the settings from the Magento Loyalty points system extension admin interface in order to offer loyalty points on birthdays.
  • Customer Groups: Select the customer group to whom you want to offer loyalty points on their birthday.
  • Number of points: Set the number of loyalty points which you want to offer on customers birthday.
  • Validity of Points: Set the number of days for which loyalty points will be valid.

3.1.4 Cron Instructions

The Magento Loyalty Points Extension provides instructions to setup cron. It provides URL to add to cron via Control Panel. The Store admin can also view the instructions to setup cron via SSH.

Admin can configure cron and manage the overall process of offering loyalty points. This way, admin can send birthday points manually, send a notification for expired points and set loyalty point state to expired manually.

3.2 Add Loyalty Points

Here, the store admin can apply settings related to loyalty points. View the detailed description of all the configuration options.

3.2.1 Add Points

The online merchant can offer loyalty points for the customers by selecting their email id from the Magento Loyalty points system extension admin interface. Check the customization options below:

  • Title: Set the loyalty points title which will be shown in loyalty points history.
  • Points: Set the number of loyalty points.
  • Validity: Set the points validity days.
  • Status: Select the status for points.
  • Customer Email: Enter the customer’s email id here.

3.2.2 Add Points Using CSV

Admin can download the sample CSV file and then add loyalty points with other details. Then the admin can upload the updated CSV files for offering loyalty points.

  • Field Separator: Set the field separator for every column.
  • CSV File: Upload CSV File to add loyalty points .
  • Send Email Notification: Enable or Disable email notification option from the admin interface of Magento Loyalty points and discount module.

3.3 Loyalty Points Rules

Admin can create multiple rules for loyalty points. The Magento Reward points module allows for adding various rules without any limitations. Admin can edit or delete any rule anytime from the Magento Reward points module admin interface.

3.3.1 Add new Loyalty Rule

Admin can apply the settings and add new rules easily from the Loyalty points extension admin interface.

  • Enable/Disable: Enable or Disable The rule for the website.
  • Title: Set title for the rule.
  • Description: Set the rule description.
  • Rule Type: Choose the type of Rules for points.
  • Loyalty Points: Set the number of loyalty points.
  • Validity: Set the validity of loyalty points in days.
  • Start Date: Set the start date of the rule. Admin can leave it blank if he doesn’t want to put any restriction.
  • End Date: Here, set the end date for the rule. An online merchant can leave it blank for no restriction.
  • Customer Groups: Select the customer’s group for which this loyalty rule is applicable.

There are several rule types which are based on product cart and behavioral rule.

A. Product Cart Rule

1. Offer loyalty points based on the cart subtotal

The online merchant can apply conditions on cart subtotal amount. There may be several conditions and customers can get loyalty points when the condition meet properly.

The customers can get discount when the subtotal is any specific amount, is not a specific amount when cart total amount is equal to or greater than selected amount when cart amount is equal or less than the selected amount, greater than the selected amount, less than the amount as per the module settings.

2. Offer loyalty points based on the item quantity

Admin can provide loyalty points to the customers when they shop for specific product quantity. Similar conditions as “cart subtotal” can be included in item quantity.

3. Offer loyalty points based on the total weight

Define what should be the total weight of the cart to earn loyalty points.

4. Offer loyalty points based on the Payment method

The Loyalty points extension for Magento allows the store admin to provide loyalty points when any customer makes a payment through the specified payment method.

5. Offer loyalty points based on the shipping method

The store admin can provide loyalty points when a customer opts for the defined shipping service.

6. Offer loyalty points based on the product

The Magento Loyalty points system extension allows the online store admin to offer loyalty points when cart products match with all/any selected product or no product matches.

7. Offer loyalty points based on the Product

The online merchant can offer loyalty points when customers purchase from a certain category(all or any matches)/do not purchase from the specific category.

8. Offer loyalty points based on the price

The Loyalty points extension for Magento allows the store admin to offer loyalty points when the cart price meets conditions as per the Loyalty points extension settings. Similar conditions as “cart subtotal” can be included in Price Settings.

9. Offer loyalty points based on the attribute set

The online store admin can set the conditions related to attribute sets. The customers can get reward points if added products from/not from a specific attribute set. (As per the conditions)

Note: In the conditions section, the online merchant can select “AND” or “OR” condition conjunction. All conditions should match for offering loyalty points while using “AND” conjunction and any of the condition should math while applying “OR” conjunction.

B. Behavior rule

1. Offer loyalty points on registration

Online users can get loyalty points on successful registration.

2. Offer loyalty points on first order

The online users can get loyalty points on their first order if the admin selects this event.

3.3.2 Edit Loyalty Rule

The online store admin can edit the rule settings from the admin interface of this Magento Loyalty reward points plugin.

  • Email Notification: The online merchant can send an email with the loyalty point details will be sent to the customers if they get any loyalty point. The online merchant can enable or disable the settings for sending an email notification. The online merchant can also customize the email template easily.

3.3.3 Delete Loyalty Rule

The Magento Loyalty reward points module allows deleting the loyalty rules from the Magento Customer reward points plugin admin interface.

3.4 Loyalty points balance

The online store admin can view the list in which he can check loyalty points balance of the customers.


Admin can apply filters and also reset it. The store admin just needs to click on the “view” button for checking the details. Admin can also edit the details.

  • Title: Admin can change the title for showing on loyalty points history.
  • Points: Set the number of loyalty points from the admin interface of this Magento Customer reward points plugin.
  • Validity: Set the validity of loyalty points in days.
  • Status: Change the status of loyalty points.
  • Customer Email: Admin can also change the customer’s email.

3.5 Loyalty Points Emails

Admin can view a list of default emails and edit the emails as per the requirements.

The online store admin can customize the ready-made email templates.

  • Enable/Disable: Admin can activate or deactivate email notification.
  • Subject: The online store merchant can set the email subject line.
  • Email Template: The online merchant can configure the email by adding images, HTML text and description.

4.0 User Interface

The online users can get loyalty point on registration, first-order events and they can also get loyalty points on any specific order and cart state.

They can view the loyalty points from the “My Account” section.

They can view the loyalty points details on the loyalty points history and they can convert the loyalty points into the discount coupon.

In any case when two or more situations get common then the customers will get the highest loyalty point from any of the applied condition.

The online users can view the total available loyalty points.

The online users can enter the amount which they want to redeem.

Customers need to apply loyalty voucher for availing discount.

The online users can also get email notifications when they get loyalty points.

This way, the online merchant can place order and get loyalty points.

For more details, please visit here:

Magento Loyalty Points Extension Admin Demo Link

Magento Loyalty Points module Front-Demo Link

Magento Google Shopping Integrator Extension – User Manual

1.0 Introduction

Magento Google Shopping Integration addon by Knowband offers a hassle-free way to upload the products of the Magento store on Google Shopping. Displaying the product ads on the search result is one of the ways to get thousands of visitors on your site.

Google Shopping allows the e-merchants to display its product on Google’s search result page. Powered by AdWords and Google Merchant Center, this is one of the ways to allows the users to search for the products on online shopping websites and compare prices between different vendors. The Magento Google Shopping Integration makes it easier for the store owners to display their products on Google’s SERP.

The Magento Google Shopping Integration module automatically syncs feed from the Magento store to the Google Merchant Center Account. Also, the store admin can sync the product status back to the store’s database by executing cron in the back-end of the Google Shopping Magento Feed Synchronization plugin.

1.1 Features offered by Knowband’s Magento Google Shopping integrator

  • The Magento Google Shopping Integration addon automates the entire process of listing the products on Google Shopping from the eCommerce site.
  • The store admin can automatically update the product inventory between the two stores from the back-end of the Google Shopping Magento Integration extension.
  • The Magento Google Shopping API integration offers real-time synchronization of products, inventory and between the Google Shopping API and Magento store is an easy means to excel the online businesses.
  • The store admin gets an option to create N number of profiles in the back-end of the Magento Google Shopping Integration extension.
  • The profile-based upload allows the admin to list the products in bulk. Moreover, any changes required in the product details can be done by making changes in the profile created in the back-end of the Google Shopping Magento API integration addon.
  • The store admin gets an easy option to keep a track of the products listed in the Google merchant center in the ‘Product Listing’ tab of the Magento Google Shopping connector.
  • Magento Google Shopping Feed synchronization plugin even allows the admin to delete the products or view the errors that occurred while product listing.
  • The real-time synchronization offered by the Magento Google Shopping Integration module makes tracking and feed management easier for the store admin.
  • The status of the actions performed can be viewed in the audit log section of the Google Shopping Magento Integrator.

2.0 Installation

  • Download the extension package of the Magento Google Shopping integration plugin from Knowband.
  • Unzip the package in your root folder of Magento setup via FTP manager (like Filezilla or WinSCP – download here: https://filezilla-project.org/).
  • In Admin Panel go to Google Shopping Marketplace in the main menu.
  • The Magento Google Shopping integrator is now ready for use.

This User Manual will guide the users through the Magento Google Shopping synchronization extension configuration and settings.

3.0 Admin Interface

Once the Magento Google Shopping Integration extension add-on is installed, it will display 5 tabs in the main menu of the admin interface. Each tab is explained one-by-one in the next section.

3.1 General Settings

  • Enable the Extension: Toggle to Enable or Disable the module.
  • Exclude Out of Stock Products: Toggle to Exclude out of stock products.
  • Exclude Products with Price less than: Enter value to exclude products whose price is less than this value.
  • Sync Type: Select the Sync Type.
  • utm_campaign Parameter: Enter the utm_campaign parameter.
  • utm_source Parameter: Enter the utm_source parameter.
  • utm_medium Parameter: Enter the utm_medium parameter.

3.2 Profile Management

The admin can create, edit or delete profiles from this tab of the Magento Google Shopping Integration extension.

3.2.1 How to Create a New Profile?

Click on the ‘Add New’ button sign to create a new profile.
You’ll be redirected to the profile creation page of the Google Shopping Magento Integrator as given below.

Select the Country from the drop-down list.

After this, you will get a full list of settings as the screenshot below:

  • Country: Select the country to create a profile.
  • Select Language: Select language to create a profile.
  • Select Currency: Select currency to create a profile.
  • Profile Title: The profile name you enter here is for identification purposes only.
  • Google Shopping Category: Choose Google Shopping Category.
  • Store Categories: Select store Categories.
  • GTIN: Select attribute for GTIN.
  • Brand: Select attribute for Brand.
  • Material: Select attribute for Material.
  • Pattern: Select attribute for Pattern.
  • Gender: Select Gender.
  • Age Group: Select Age Group.
  • Adult Content: Toggle for adult content.
  • Color: Select Color.
  • Size: Select Size.
  • Size Type: Select Size Type.
  • Size System: Select Size System.
  • Product Shipping: Choose a Shipping Template to avail of shipping options for customers. In case, if Shipping Templates are not being displayed, Run Synchronization -> Sync Shipping Templates.

Google Adsense

  • Custom Label 0: Enter Custom Label 0
  • Custom Label 1: Enter Custom Label 1
  • Custom Label 2: Enter Custom Label 2
  • Custom Label 3: Enter Custom Label 3
  • Custom Label 4: Enter Custom Label 4

3.2.2 How to Edit or Delete the Existing Profile?

The created profile in the Magento Google Shopping Synchronization addon can be viewed in the admin interface. Click on ‘Edit’ to edit the profile or click on ‘Delete’ to delete the existing profile. The edit option opens the page filled with all the details shown in the above screenshot. You can edit and save it accordingly.

3.3 Products Listing

The listed products can be viewed in this section of the Google Shopping Magento Connector as shown in the image below.

  • The admin can remove the product by clicking on ‘Delete’.
  • The admin can view the Error occurred while uploading the product.

3.4 Synchronization

The Synchronization tab of the Magento Google Shopping Integration extension offers easy integration with the help of cron jobs. The Magento Google Shopping Feed synchronization allows the admin to sync the feeds to Google merchant and syncs the product status back to the store.

  • Product Synchronization: This cron will synchronize the products on Google Shopping.
  • Product Status Synchronization: This cron will synchronize the product status on Google Shopping.

3.5 Audit Log

The admin can view all the jobs running and the errors occurred in the same. The status of the jobs can be viewed in this tab of the Magento Google Shopping Integration plugin.

For more values, please follow the below URL and read the documentation:

https://support.google.com/merchants/answer/7052112?hl=en

Magento Google Shopping Integrator Extension Module Link

Magento Google Shopping Integrator Extension Admin Demo Link

PrestaShop Instagram Shop Gallery Addon- User Manual

1.0 Introduction

The online store merchant can use one of the most popular social media platforms .ie Instagram for increasing website conversion rate and sales by showing already tagged Instagram images on the website pages. Knowband offers Prestashop Instagram Shop Gallery module implements functionality to showcase Instagram photos on the website pages. Admin can also show a specific top navigation link on the website. The online users can click on the link and view all the Instagram images in Insta Gallery. The online merchant has an option to show related products on the Instagram photo popup. The online users can buy the products by clicking on the “Shop Now” link.

1.1 Salient Features of Instagram Integration Extension

  1. With the help of this PrestaShop Instagram Shop Gallery addon, the online store admin can show already tagged Instagram photos on the eCommerce website.
  2. It is very easy to install, configure and customize the Prestashop Instagram Shop Gallery module. The admin can enable or disable the overall functionality anytime from the admin interface of the Shoppable Instagram plugin for PrestaShop.
  3. The online merchant can show the top navigation link on the website. Online visitors can view all the enable Instagram photos just by clicking on this link.
  4. Admin can map products with the Instagram images and allow online users to buy it just by clicking on the “Shop Now” button.
  5. Admin can also create and improve business profiles using this Prestashop Instagram Shop Gallery module.
  6. The online merchant can display all the Instagram photos, approved photos, photos having related products and approved photos having related products as per his preferences.
  7. With multiple image select feature, admin can also select multiple images or photos simultaneously which he wants to show on the website.
  8. Admin can set the URL key for the Instagram galley page from the admin interface of this Shoppable Instagram plugin for PrestaShop.
  9. The PrestaShop Instagram extension allows the eCommerce store admin to create new Instagram galleries and update it easily.
  10. The eCommerce store merchant can set title, image visibility and limitations. The store merchant can also show it on the main Insta Gallery page.
  11. The online merchant can set the position of Instagram photos for almost every website page.
  12. Prestashop store admin can show multiple photos on the Instagram gallery from the admin interface of the PrestaShop Instagram Shop Gallery addon.
  13. Admin can fetch the Instagram photo using the hashtag. This Shoppable Instagram module allows selecting Instagram tagged photos or saved photos.
  14. Admin can enable or disable any photo, approve/disapprove it and also show related products by mapping it.
  15. The PrestaShop Instagram product tag feed module is multi-lingual compatible.
  16. This PrestaShop Instagram Shop Gallery addon has a mobile responsive layout.
  17. This Instagram Integration Extension automatically shows likes, comments and date of posting of every Instagram photo.

1.2 Benefits of this PrestaShop Instagram extension

  1. The online merchant can use this PrestaShop Instagram Shop Gallery addon for showing Instagram photos on the website without changing even a single line of codes.
  2. The online merchant can offer a better store experience and attract store visitors by showing eye-catchy photos on almost every website page.
  3. PrestaShop Instagram extension is highly customizable and offers smooth functioning.
  4. There is no need to change even a single line of codes while using Instagram Integration Extension.
  5. The mobile responsive layout of this PrestaShop Instagram gallery shop module allows store visitors to view the functionality on their mobile devices.
  6. Customers can view attractive Instagram images on the website pages and click on any image to view it.
  7. There is no need to authenticate the account for viewing the images.

2.0 Steps to Install this PrestaShop Instagram Extension

You will get these files after purchasing this PrestaShop Instagram Shop Gallery addon:

1. A zipped file consists of the source code of this Prestashop Instagram Shop Gallery module.

2. User Manual

Follow these steps to install the PrestaShop Instagram gallery shop module:

  • Unzip the zipped file. This file includes some files and folders.
  • Now copy the overall content of the folder and paste it into the “Modules” folder of the store’s directory. The admin can follow the path – Root Directory/modules/.

3. As a store admin, you can install the PrestaShop Instagram product tag feed module. You can find that in Store Admin -> Modules and Services.

Now, you just need to click on the “Install” button to install this Instagram Integration Extension. A confirmation pop-up will be shown. Click on “Proceed with the installation” option. This step will install the Instagram Integration Extension and show notification – “Module(s) installed successfully”.

3.0 Admin Interface

After successful installation, the online store admin can easily configure the Prestashop Instagram Shop Gallery module for showing Instagram gallery on the website.

A. Configuration Page

Admin can apply General Settings from this section. There are two basic settings as shown below:

  • Enable/Disable: Activate or Deactivate this option for enabling/disabling module functionality.
  • Enable/Disable Like/Comment: Enable this option if you want to show likes and comments of Instagram photos.

Apart from general settings, these are the configuration options for showing Insta gallery on the website:

Check the configuration method which is described below mentioned sections.

3.1 Instagram Page

Here, you can apply settings for showing the Instagram page on the website. These are the configuration options, the admin needs to know:

  • Enable Instagram Page: Enable or Disable the PrestaShop Instagram Shop Gallery addon functionality.
  • Top Navigation Link: Enable to show navigation links on the top of the website.
  • Page Title: Enter the title which you want to show as the page title. You can set the title in multiple languages. This PrestaShop Instagram Shop Gallery addon is multi-lingual compatible.
  • Image Visibility: You can control the image visibility from here. You can showcase all the photos, only approved photos, photos having related products or those approved photos which also have related products.
  • Image Limit: You can set an image limit for showing a particular number of photos. If you don’t want to apply any limit on the number of photos then set image limit 0.
  • Page URL key: Here, you can enter the key for showing on the Instagram page URL.

3.2 Instagram Gallery Listing

In the Instagram gallery list, you can view a list of all Instagram galleries. You can also add a new Instagram gallery, update the previously created galleries or delete it. In this list, you can view the title of the Instagram gallery, activate/deactivate it, view the image limit and activate/deactivate the Instagram page. As an eCommerce store admin, you can also add pictures in any Instagram gallery from the admin interface of Shop on your Instagram gallery addon.

3.2.1 Add new Instagram Gallery

You can click on the “+” sign for adding a new Instagram gallery. Please follow these steps for customization:

  • Active: Enable or disable new Instagram gallery.
  • Instagram Gallery Title: Set the gallery title in different languages.
  • Image Visibility: You can control the image visibility by showing all photos, approved images, images having related products and approved images with related products.
  • Image Limit: Enter the maximum number of images which you want to show from this gallery.
  • Include in Main Page: Enable the settings if you want to show this Instagram gallery on the Instagram page.
  • Select Hooks: You can select the position where you want to show Instagram gallery. This Prestashop Instagram Shop Gallery module allows displaying the gallery at header, footer, left column or right column. You can select multiple options if you wish to do so.
  • Select Pages: As a store merchant you can select product page, category page, the home page, CSM page and manufacturer page also.

3.2.2 Update Instagram Gallery

Click on the “Edit” button and apply the required changes easily.

3.2.3 Delete Instagram Gallery

On clicking the “Delete” button, you will see a popup warning. Click yes and the module will delete the particular gallery.

3.3 How to Add Photos in Instagram gallery

Here, you can view the list of previously added images. As a store merchant, you can also modify and delete image anytime. You can view the image status, image, hashtag, sort order of the image and check if the image is approved or not. For adding a new image, you just need to click on “Add New Image” button.

  • Instagram Hashtag: Enter the Instagram hashtag for searching images according to it. You can search for images from Instagram or show from saved images. After clicking on the “Fetch” button, you will get multiple images based on a searched hashtag. You can select the image for showing in the gallery.


  • Image: Here, you will view the selected image.

>> MULTIPLE IMAGE SELECT 

  • Status: Enable or disable the image status.
  • Approve: You can approve or disapprove this image.
  • Choose Products: You can select some products for mapping with the Instagram image.

On Front-end Interface, the image will look as below:

Admin can also delete and edit any image from the admin interface of this Instagram shop module. Admin can view the list of all the images and edit or update any image from the admin interface.

After clicking on Edit button, you just need to apply the required changes and save it.

Admin can also delete any image by clicking on “Delete” button from the admin interface.

4.0 Front-end Interface

After full configuration, the online merchant can implement an Instagram gallery on the website.

A.Instagram Shop Page:

The online users can view a header link for visiting the gallery page. They can view all the activate images on the Gallery page as shown below:

B. Likes and Comments:

Online buyers can view image likes and comments easily as shown below:

The online merchant can show Insta photos on different website pages like homepage, product pages, category pages, CMS pages and manufacturer pages in different positions.

1. Homepage View:

Admin can show Insta photos on different positions like below:

Header:

Footer:

2.Category Page View:

Similarly, an online merchant can show Insta photos on category page in different positions.

Sidebar bottom view:

3.Product page View:

The online users can also show Insta photos on the product page at header and footer

Online users can click on the photo and view the Instagram image popup. In Instagram image popup, customers can view likes, comments and date of posting.

Online users can also click on the Follow button for following the profile. Online users can also buy mapped related products by clicking on Shop now.

Online users will be redirected on clicking the Follow button from the Instagram image popup. Here, they can follow the particular profile from which the image has been posted.

This way, the online store merchant can use this Shoppable Instagram plugin for PrestaShop and showcase already tagged Instagram images on the website. The Shoppable Instagram plugin for PrestaShop provides an option to show unlimited attractive images on different website pages. The online users can view Instagram images and also check the related products with the Insta photos. The online store admin can this way promote the products indirectly and increase sales on the website. It is very easy to implement the PrestaShop Instagram extension and use it. The Instagram Integration Extension is mobile responsive and offers smooth functioning also.

For more details about Shoppable Instagram plugin for PrestaShop, Please Visit here:

Shoppable Instagram plugin for PrestaShop Module Page

PrestaShop Instagram extension Admin Demo Link

Prestashop Insta Shoppable Gallery addon Front Demo Link