The Knowband’s OpenCart Gift The Product extension gives benefits to the customer and the consumer as well. This extension allows the admin to encourage the customer to increase their value in order to get the free gift product on their purchase. This extension also helps in increasing user engagement and generating more sales.
1.1 Salient Features of Gift The Product Extension
The visitors get attracted by the free exciting gift on their every purchase.
This will increase the number of visitors to the store and also affects the sale of the store in a positive aspect.
Admin has the ability to provide a different variety of products to their customers as per their cart price.
The cart price will decide the range of the Gift Products and the Admin have the ability to increase the cart price for the particular order.
The admin can manage what products to be displayed on the front end either from a particular category or any specific products.
This extension allows the admin to encourage the customer to increase the cart value which will result in more sales.
1.2 What’s New in the Recent Enhancements?
The enhanced Knowband’s Opencart Gift the Product extension now allows store admins to configure specific product rules, choosing particular items eligible as gifts. Additionally, admins can select specific gift products for different items, offering greater flexibility and personalization in gifting options.
Knowband’s Opencart Gift the Product Extension
Let customers easily send gifts from your store with the OpenCart Gift the Product Extension by Knowband.
With the help of this Knowband’s OpenCart Gift The Product extension, the store owners can get the following things:
Helps to improve the visitor’s engagement.
Assists in reducing cart abandonment.
Helps to increase sales and customer engagement in the store.
It encourages the visitors to buy more items.
User will be rewarded with the free products as Gifts.
This Knowband’s OpenCart Gift The Product Extension will be one of the best options for the merchant to drive visitors to their store and make them shop.
3.0 Installation
Before starting the installation process, you have to buy the OpenCart Gift The Product extension either from the Knowband store or from the OpenCart Marketplace. Once purchased, you will receive the mail notification containing the following files on your registered email.
Source code of OpenCart Gift The Product Extension in zipped file format.
User Manual of OpenCart Gift The Product Extension.
Now in order to install this OpenCart Gift The Product on your online shop, follow the below steps:
Unzip the zip file. You will get the following folders as shown in the image below:
Copy all the folders of the zip file in the Root Directory of OpenCart setup via FTP manager.
3.1 Steps to install the OCMOD file:
After unzipping the folder, you will find a file named kbgiftproduct.ocmod.zip(for OC3.0.x) and kbgiftproduct.ocmod.xml(for OC2.3.x) as shown below:
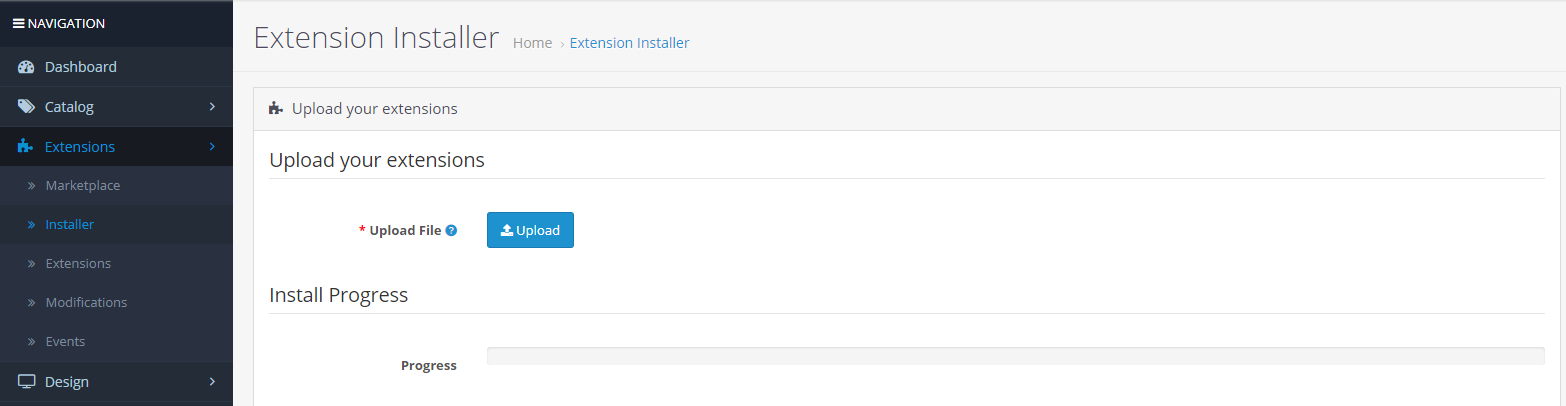
Now in the admin panel, click on Extensions in the left side menu. Then click on Installer (Home->extension).
Now, Upload the kbgiftproduct.ocmod.zip. A success message is displayed once the file is uploaded.
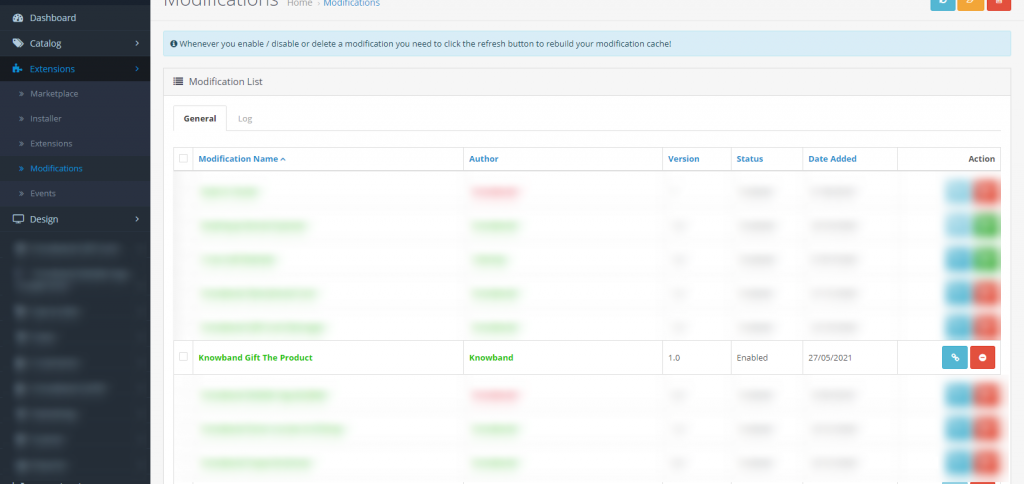
After the file is uploaded go to Home->Modification
Here you will find a file with the name Knowband Gift The Product (that means the OCMOD has been installed successfully). Here click on the corresponding “+” icon to enable the installed file. The green plus icon turns into a red minus icon as shown below.
Finally, click on the refresh button on the top right corner of the page (This is mandatory).
So, OpenCart Gift The Product extension is now successfully installed and is ready to use at your store. Go to the admin menu and click on the Extensions and then on Modules. Click the pencil icon next to Knowband Gift The Product to configure the module settings.
4.0 Administration Module:
On the admin side of the extension, you’ll find the following options to configure this OpenCart Gift The Product extension:
General Setting
Listing Rules
Both the sections are described in details as follows:
4.1 General Setting:
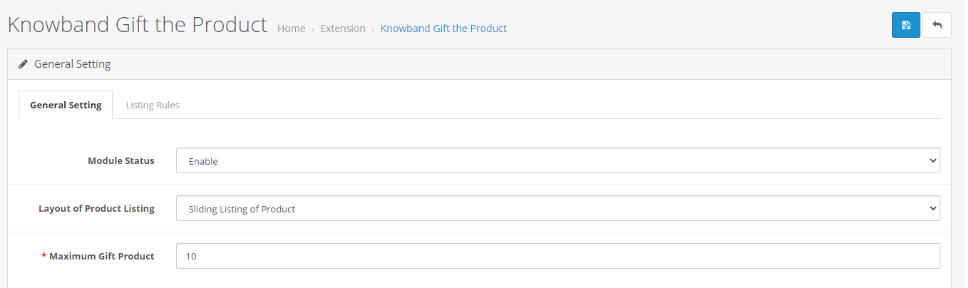
Through this setting of OpenCart Gift The Product Extension, you can Enable/Disable the whole module with just one click. The options under this tab will look like as shown below:
This section of OpenCart gift the product extension will have the following options to configure the module:
Enable/Disable
This option has a dropdown list with two specific values, i.e. Enable and Disable. This OpenCart Gift The Product extension will only work if this is set to Enable. If you select Disable, then none of the features will work. By default, this option is set to Disable. You’ll need to select Enable.
The layout of Product Listing
This option of Knowband’s OpenCart Gift The Product extension allows the admin to select how to display the Gift Products on the front end of the store. There are two layouts available:
Normal Listing of Products
Sliding Listing of Product
Maximum Gift Products
This field of OpenCart Gift The Product extension specifies the total maximum number of products that will be displayed in the Gift The Product Box at the front end.
4.2 Listing Rules:
Through this setting of OpenCart Gift The Product extension, you can make the rules for Gift Products on the basis of a range of cart amount and range of the amount of the products that will appear in the Gift Products list. The options under this tab will look like as shown below:
Edit a Rule
You can edit an existing rule using the Edit option. The screens for Editing Rule will be the same as Adding a Rule. The only difference will be that Edit will have the fields already filled.
Delete a Rule:
You can delete an existing rule by clicking on the ‘Trash’ Icon. A pop up will show up asking for the Confirmation for deletion. You can click yes and the Rule will be deleted.
Add a Rule
You can add a Rule by Clicking on the option provided on the Top Right Corner of the Page. The following screen will show up:
While adding the new rule or editing an existing rule in an OpenCart Gift The Product extension, the admin will have to complete the form by filling the following fields that will decide the item displayed as the Gift Products at the frond-end.
Price Rule Name: This field needs to be filled uniquely and it consists of the name of the price rule.
Minimum Cart Amount: In this, the admin will have to set the minimum cart amount to decide that if the Cart is eligible for the Gift Products.
Least Cart Amount: In this, the admin will have to set the maximum cart amount to limit the cart price for being eligible for the Gift Products.
Minimum Gift Product Amount: In this, the field of OpenCart Gift The Product extension by Knowband, the admin will have to enter the minimum product amount that is eligible for the gift products.
Maximum Gift Product Amount: In this field of OpenCart Gift The Product extension by Knowband, the admin will have to enter the maximum product amount that is eligible for the gift products.
The Gift products which will be in between the entered price range will be shown to the customer in the front end as the Gift Product.
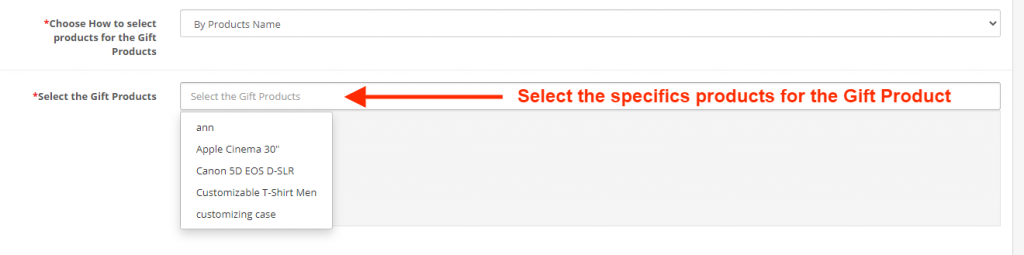
Choose How to select products for the Gift Products: In this field, the admin can select how to choose the products which will be available as the Gift Products in the front end.
There are two options in this field:
By-Products Name
By Category Name
Status: In this field of OpenCart Gift The Product extension by Knowband, the admin can Enable/Disable the particular Rule.
4.3 Product Rule:
The Opencart Gift the product extension also comes with an option to configure the product rule. The store admin can choose particular products that are applicable to the gift items.
Further, we have also provided an option to choose specific gifting products for different products.
Rule Type: This section allows the admin to choose between price rules or product rules.
Price Rule Name: Enter the price rule name in this section.
Choose Products: You can add the products that are applicable for the free gift items in the following text field.
Choose Specific Gift Products: This section allows the store admin to select the items that will be provided as a gift while adding the specific products to the cart.
Status: Enable/Disable the gifting rule from this option.
5.0 Front End Module
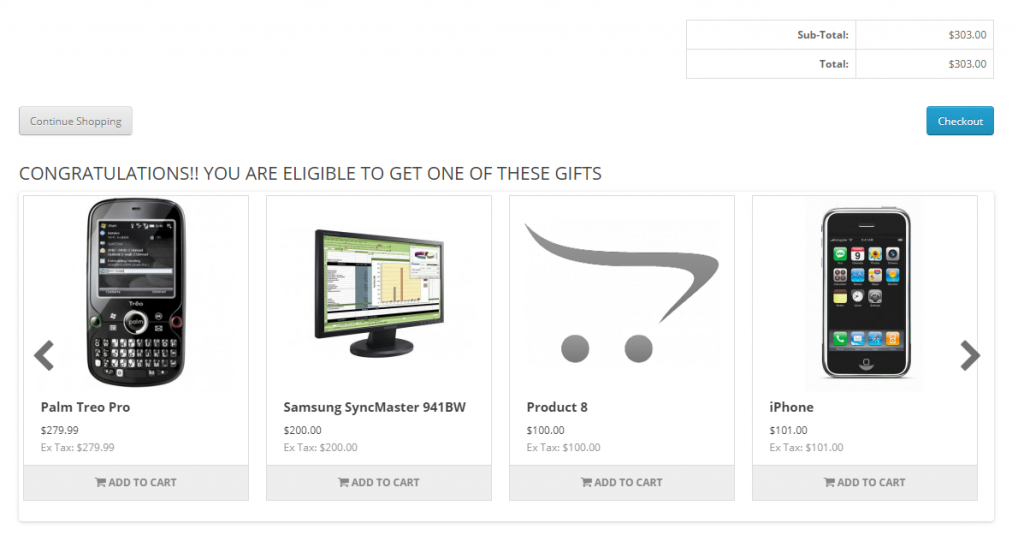
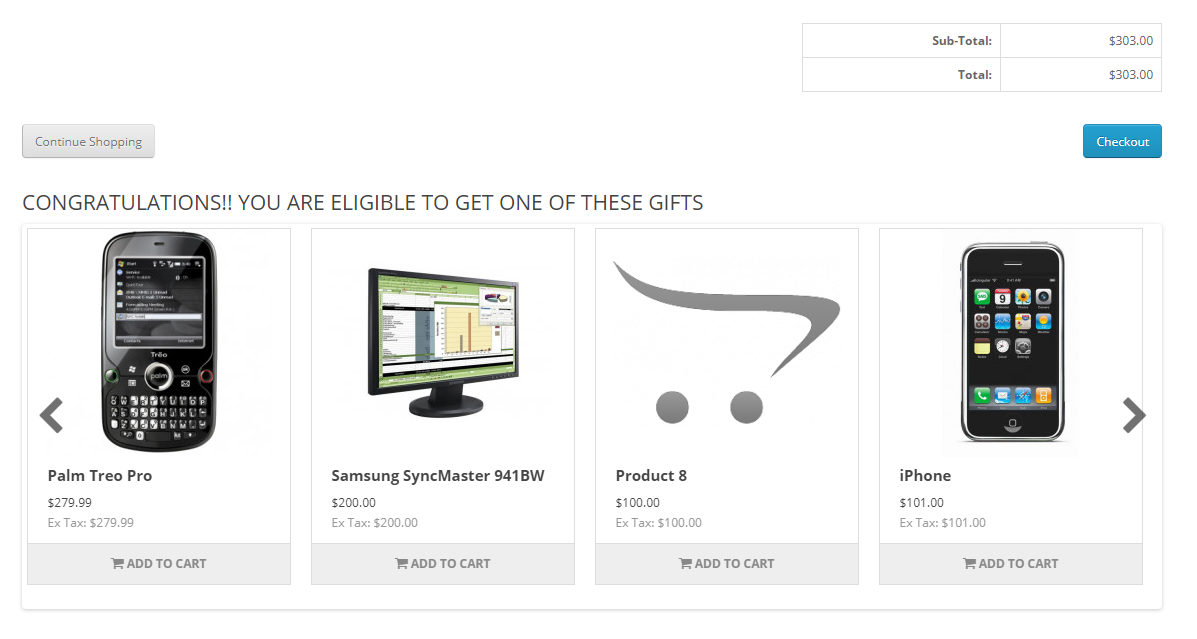
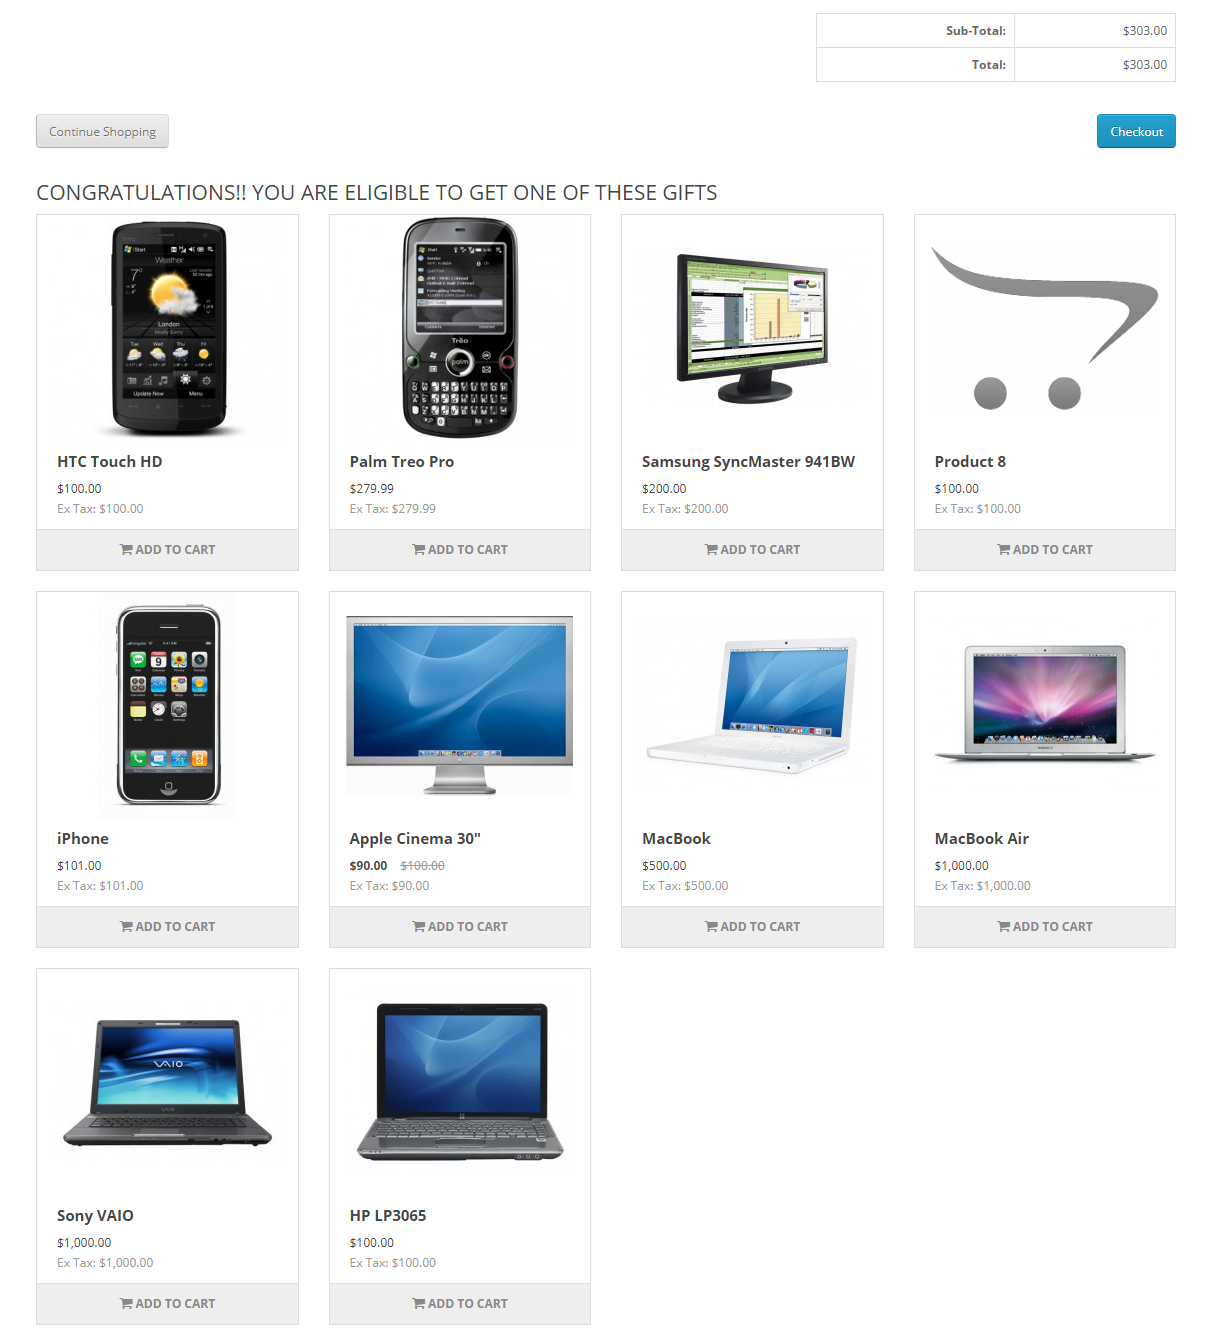
Once the Knowband’s OpenCart Gift The Product extension is enabled, a block will appear just below the cart summary on the front end displaying the message “CONGRATULATIONS!! YOU ARE ELIGIBLE TO GET ONE OF THESE GIFTS”. This block will display all the gifts product as per the listing rules set by the admin in the backend of the Gift the Product extension.
Layout: Below is the types of the defined layout that can be used to display the gift product on the front end.
Sliding Listing of Products: In this layout of Knowband’s OpenCart Gift The Product extension, the customer will have to click on the desired product. By doing so, the customer is redirected to the product page of the particular product and then the user can add that product in their cart from there itself.
Normal Listing of Products:
We hope that we have covered all the concerns regarding the installation and product guide of Knowband’s OpenCart Gift The Product extension.
As a shopper, you must have seen many of the online stores now don’t allow you to browse through the website or do any purchases unless you create an account with them. This is the way to make your website secure and safe from anonymous users. So, there are several tools out there to provide login security but most of them are like they only apply the login security to the complete site. But with the Knowband OpenCart Private Shop Extension, you can even customize the way you want to secure the website. You can either secure the complete store or you can select from the list of Categories, Products, Pages, and IPs to secure separately instead of securing the complete storefront.
2.0 Salient Features of OpenCart Private Shop Module
Using this module admin can force the users to login to visit the webstore.
Admin can update the login/Signup page element changes as per requirement, he/she can add title and show hide the store logo.
The admin can set if he wants to enable the signup process from the secured page or not..
OpenCart admin can set if the newly registered customer can view the store directly or he/she must be approved first.
Store admin can change the content of the thank you page which will be only visible if the verify new customers option is enabled.
Admin can set the position of the forms on the secure pages, like, left, right, or center.
Store owner can add custom CSS and JS to add on the secure pages.
Private Shop Admin can either secure the complete web store or he/she can set the categories, products, and pages on which he wants to add security.
OpenCart shop admin can add IP to allow them to view everything on the web store with logging in.
Private shop admin can change the opacity of the forms on the secure pages.
Admin can change the background of the forms as per his/her requirement, he/she can choose from the plain color background, image background, or video background.
What’s New in the Recent Enhancements!
Customer Listing:
With Knowband’s Opencart Private Shop Extension, store admins can enable a private login pop-up for specific sections, restricting access to products, categories, and CMS pages for general customers. This new enhancement lists customers who are registered through the private shop login pop-up in a separate tab, providing admins with control to approve, disapprove, or delete private customer accounts as needed.
Email Templates:
The email template section in Knowband’s Opencart Private Shop Extension allows admins to customize private account registration emails. Admins can set the subject line in the template subject text field and modify email content with text or HTML. This ensures personalized and professional communication with registered customers.
Opencart Private Shop Extension
Transform your OpenCart store into an exclusive Private Shop with restricted access for select customers. Customize visibility and create a VIP shopping experience effortlessly!
Before starting the installation process, you have to buy the Private Shop by the Knowband store. Once purchased, you will receive the following files in your registered email.
Source code of OpenCart Private Shop extension in zipped file format.
User Manual of OpenCart Private Shop extension.
Now in order to install this on your online shop, follow the given steps:
Step 1:
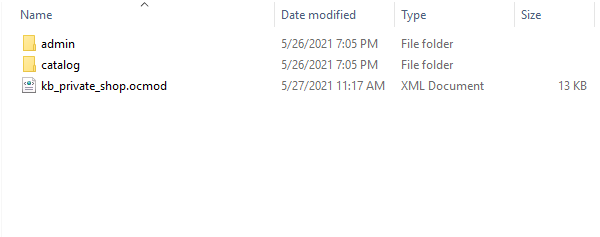
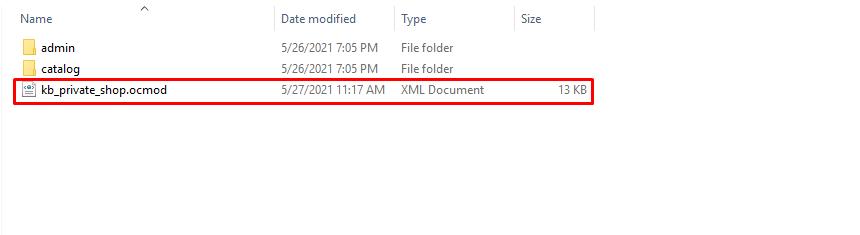
Unzip the zip file. You will get the folders as shown in the image below
Step 2:
Copy the content of one of the folders as per your OpenCart version as shown in the below image
Step 3:
You can copy these folders to the root folder of your website.
Step 4:
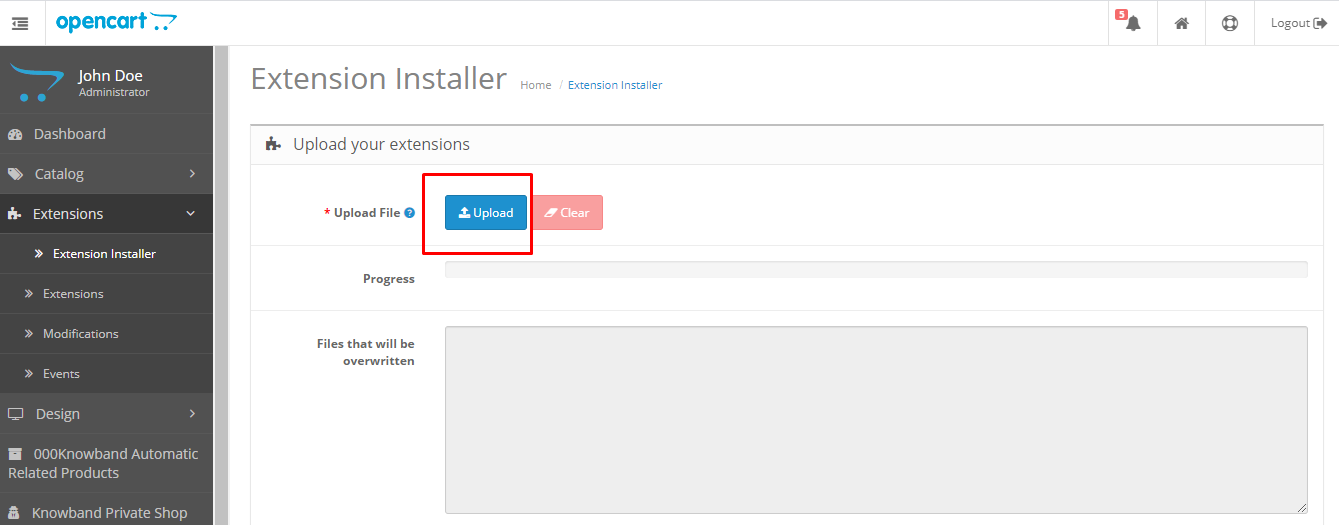
After copying this go to your admin panel and install the module with the modification file.
Step 5:
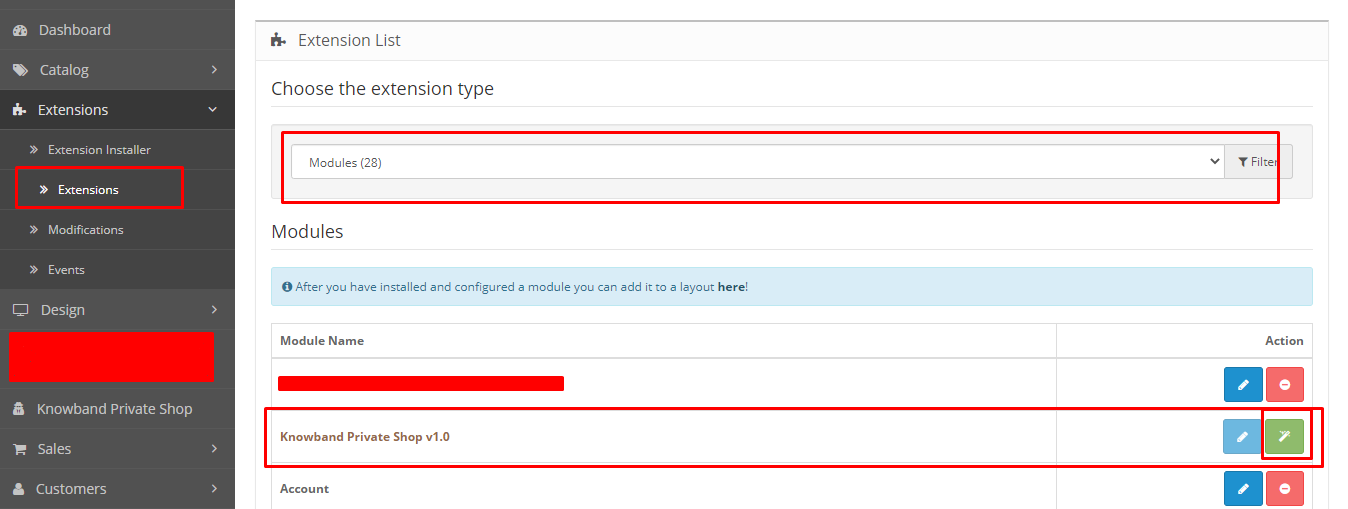
After uploading the OCMOD file your module will be ready to use. You can go to the extensions and install and configure the module as per your need.
4.0 Admin Interface of OpenCart Private Shop Extension
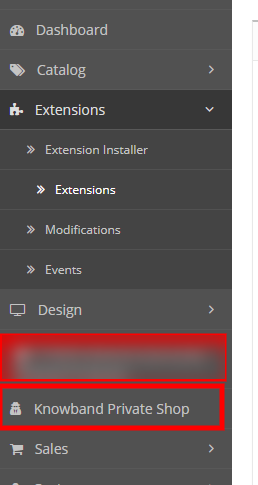
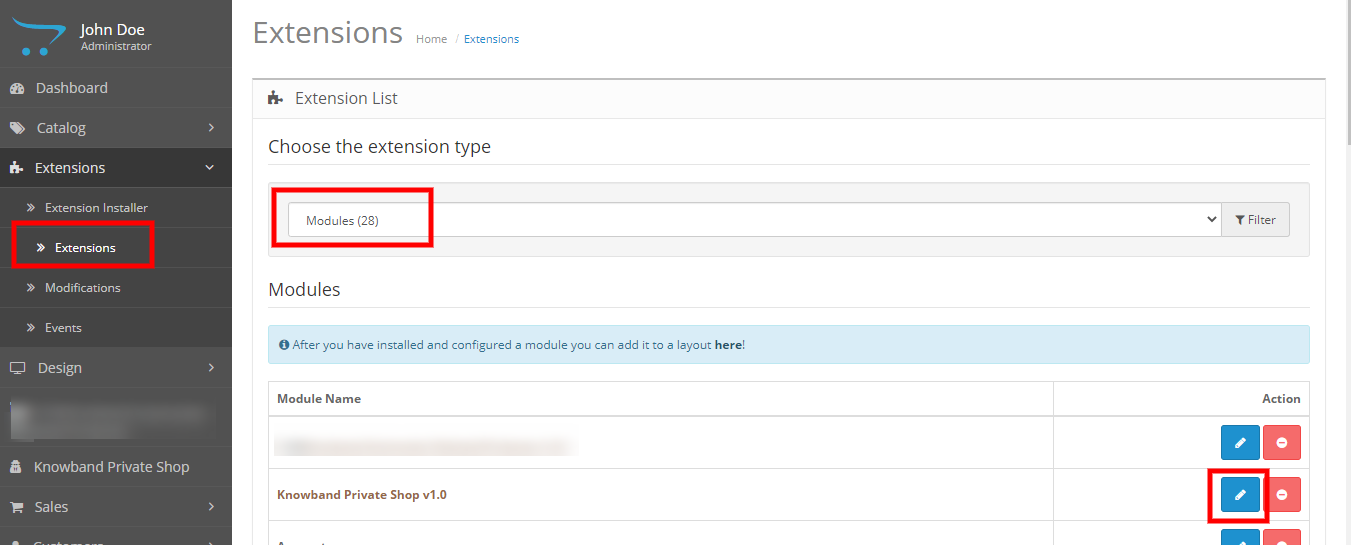
To configure the OpenCart Private Shop extension you can navigate to the module configuration page either by clicking on the Knowband Private Shop link in the side menu.
Or you can go to the Extensions > Modules > Knowband Private Shop.
In the admin you will see the following main settings tabs those are:
General Settings
Access Settings
4.1 General Settings
These are the basic settings that you can apply on the front-end forms and views. Here you have the option to enable or disable the module and much more:
Status: Enable/Disable this module.
Login/Signup Forms Position: Select the position where you want to display the login/signup form on the front-end store.
Login/Signup Forms Theme: Select the theme which you want to apply on the login/signup form. The default theme will use your store theme.
Login/Signup Form Opacity: Enter the form opacity value for login/signup form. Values should be between 0 and 1 For example 0.5 or 0.75
Enable Signup: Enable this to allow the customer to register a new account.
Login Page Title Text: Input login page title text which will be displayed on the frontend login page. Only work if the theme is selected as modern.
Signup Page Title Text: Input signup page title text which will be displayed on the frontend signup page. Only work if the theme is selected as modern.
Display Logo on Login/Signup page: Enable this setting if you want to display the logo on the Login/Signup page. Only work if a theme is selected as modern.
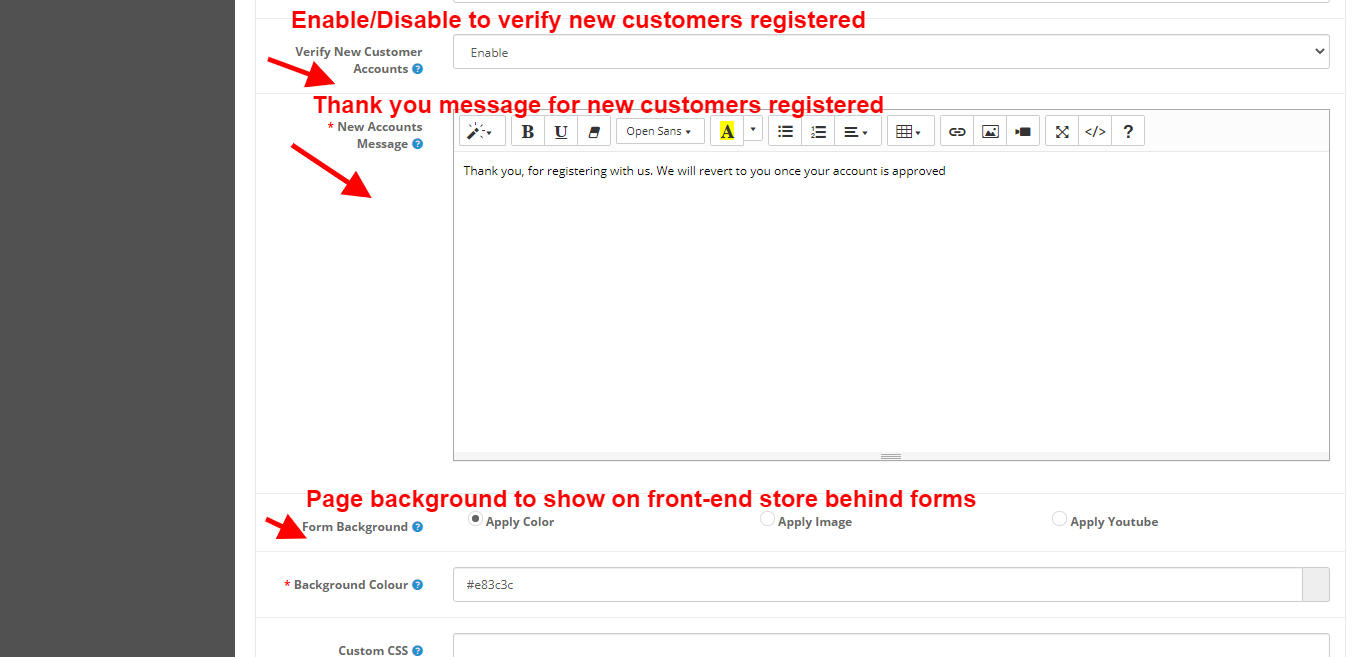
Verify new customer accounts: Enable this setting if you want to validate new accounts.
New Accounts Message: This message will be displayed after the registration of restricted customers. Only visible if the verify new customer accounts is enabled, if disabled default functionality of OpenCart will get triggered.
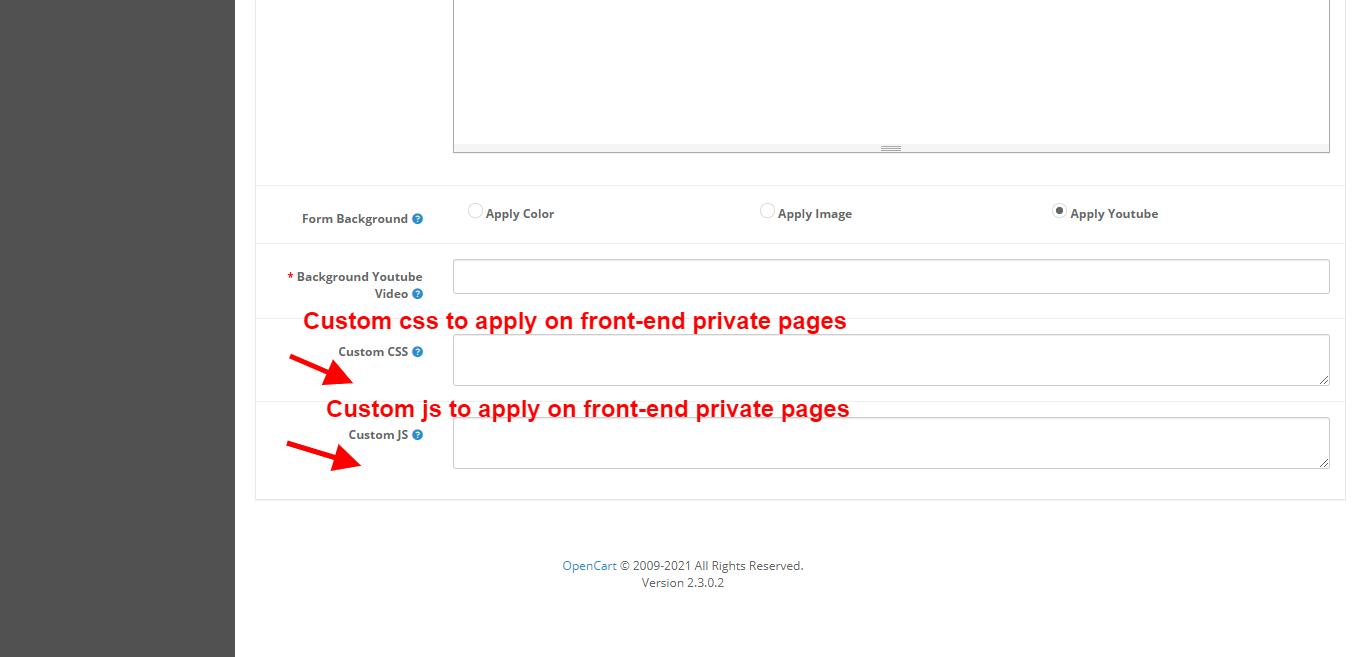
Custom CSS: You can add custom CSS to render it on the front end. Further, from the forms that are visible on the secure pages of the front-end.
Custom JS: You can add custom JS to render it on the front end. Furthermore, from the forms that are visible on the secure pages of the front-end. Do not add script tags.
Form Background: Select the background type which you want to apply on the Login/Signup form. In this you the option of three types.
Solid color: Choose a color to display on the front end.
Image: This image will display as the background image of the Login/Signup page. Only .png or .jpg file format accepted.
YouTube video: Copy and paste the YouTube video URL here Which you want to display on the front end. Note: YouTube video link needs to be changed to embedded.
4.2 Access Settings
These are the access settings that the admin can use to secure the front-end store. Further, to save it from unauthorized users.
Privatize Shop Type: Admin can select the type of privatization, either the admin wants to secure the complete webstore or the admin wants to secure the selected part of the webstore.
Allow IP Addresses: Admin can add the public IP’s of the users to whom the user wants to give access to the front-end store without creating an account.
Allow Google to Crawl Your Store: Admin can enable or disable the google crawling option to apply settings on google crawling.
Choose Private Products: Admin can select the products individually by searching for their name and add them to the list of private products which will add security to those products on the front-end store. This only works when the admin selects the “Only Selected” option in privatize type.
Select Private Categories: Admin can select the categories individually by searching for their name and add them to the list of private categories which will add security to those categories on front-end store.This only works when the admin selects the “Only Selected” option in privatize type.
Choose Private Pages: Admin can select the pages individually by searching for their name and add them to the list of private pages which will add security to those pages on the front-end store.This only works when the admin selects the “Only Selected” option in privatize type.
4.3 Private Customers:
With the help of Knowband’s Opencart Private Shop Extension, the store admin can enable the private login pop-up on particular sections of the shop. For example, you can restrict products, categories, and CMS pages from the general customers.
In this section, the module shows the list of customers who have registered via the private shop login pop-up. Furthermore, the module provides complete control to the admin by providing approve/disapprove or deleting the private customers’ accounts in this section.
4.4 Email Templates:
The email template section allows the admin to customize the private account registration email.
Template Subject: You can add the email subject for the customer registration email in the template subject text field.
Email Template: The email template section allows the store admin to modify the email content by providing the option to add text/HTML content to the emails.
5.0 Front End Interface for the OpenCart Private Shop Module
On the front end, you will see the design changes and content on the basis of options selected in the admin basic settings configurations.
If the admin applies the Default theme, the background image is visible without the logo and login from the title.
When form position set as left.
If the admin applies the Default theme, the background image is visible without the logo and login from the title.
The admin can enable new customer signup. Furthermore, the opacity of the form sets to 1 from the admin panel.
A thank you message screen appears after the verification of the new customer account.
6.0 Check out our Tutorial Guides for the OpenCart Private Shop Extension
Learn how to restrict store access, manage customer groups, configure private shop settings, set custom login and registration rules, control product visibility, and provide a seamless private shopping experience for your customers.
The Delivery Boy App for PrestaShop allows online store owners to offer seamless delivery management. The store owner can easily add a delivery boy app, assign orders, track them simply via the module. The delivery boy app for PrestaShop allows the delivery boys to simply log in and use the app to deliver orders.
The PrestaShop Delivery Management App can be published on Google Play Store and Apple App store for public download. Once the delivery boy is approved from the admin panel, he can log in to the app and start accepting orders.
1.2 Delivery Boy App Compatible with Mobile App Builder
Our PrestaShop Delivery Boy App is compatible with Mobile App Builder and as result, the users can get live order tracking. In simple words, if a user is using PrestaShop Mobile App can get live tracking of their order in the app itself. The condition is that the PrestaShop Delivery Boy App module is being used in the same store.
Upon the installation of the PrestaShop Delivery Boy App module on a PrestaShop eCommerce website, it’s now time for the store admin to manage their Delivery Boy App. They can do so from the admin panel of this module. Below is the detailed explanation:
2.1 General Settings:
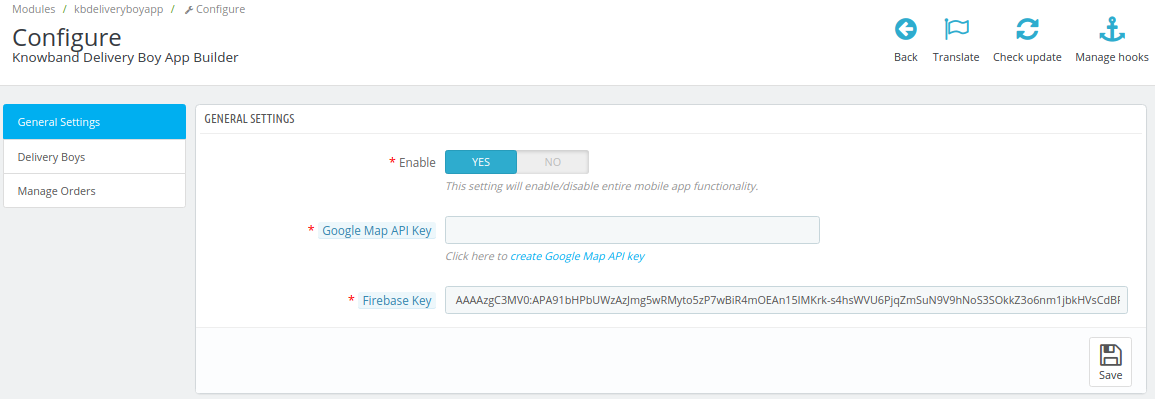
A) Enable: This toggle switch enables the delivery boy app to either be on or off, i.e. enabled/ disabled.
B) Google Map API Key: Such an API key handles the location mapping, also helps with navigation.
C) Order Status: Options available in this allows the admin to set default statuses for the orders such as for-
Disabled Open Orders
Status Once Order is assigned
Status once order is picked up
Status once order is delivered
Payment to be collected
2.2 Delivery Boy Settings:
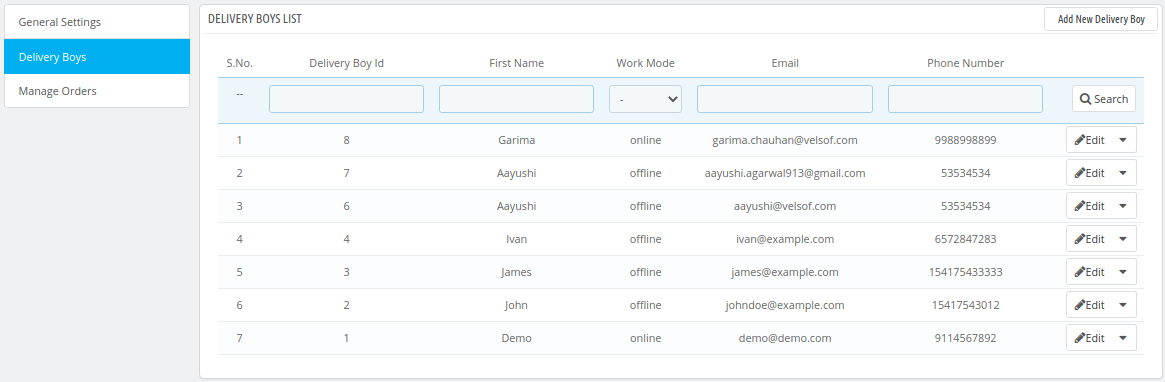
This settings tab contains information about all the delivery agents that are using the ‘Delivery Boy App’. From this settings tab, the store admin can also add new delivery agents.
2.3 Add Delivery App:
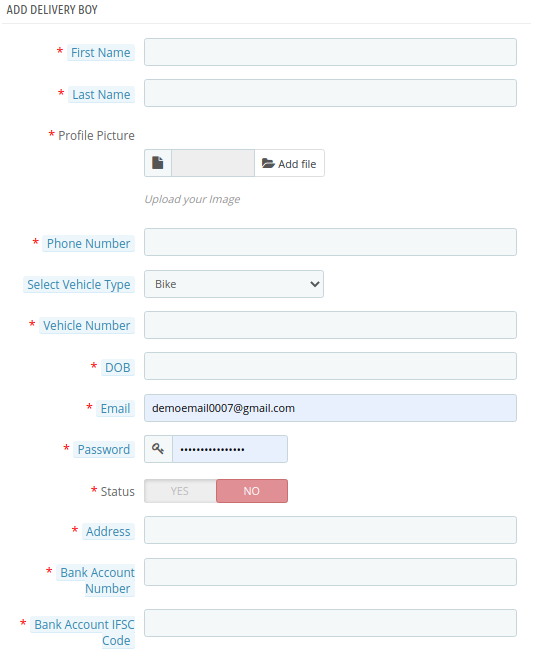
The store admin can enter various parameters such as name, profile picture, phone number, DOB, email, password, address, etc. Also, the vehicle information including vehicle type (car/bike/others), vehicle number. Bank account details are also included here so that agents can receive their payments in their accounts.
The store owner also gets to edit the information of existing delivery agents on the above-mentioned parameters.
2.4 Manage Orders:
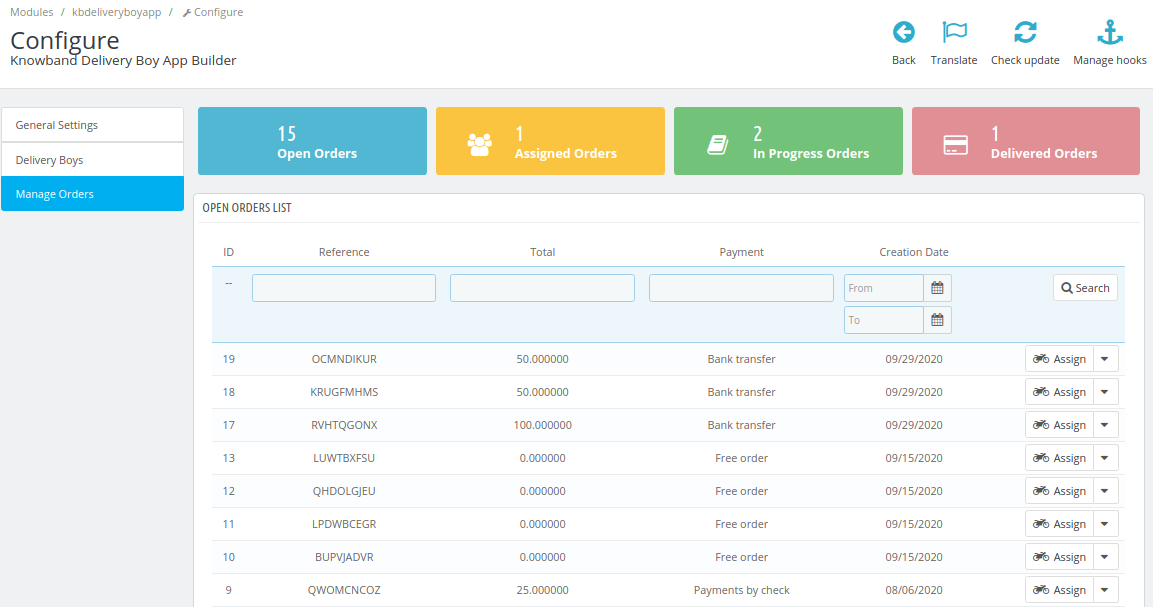
For store admin to manage their orders on the Delivery Boy App, a simple categorization is done for convenient management. They are-
Open Orders
Assigned Orders
In-Progress Orders
Delivered Orders
In all these lists, a very systematic arrangement is made in a tabular format for easy management. Admins can also manually assign any order to a particular delivery agent. Upon clicking on a delivery boy to view his/her information, the following screen is shown to the admin to manage that delivery boy.
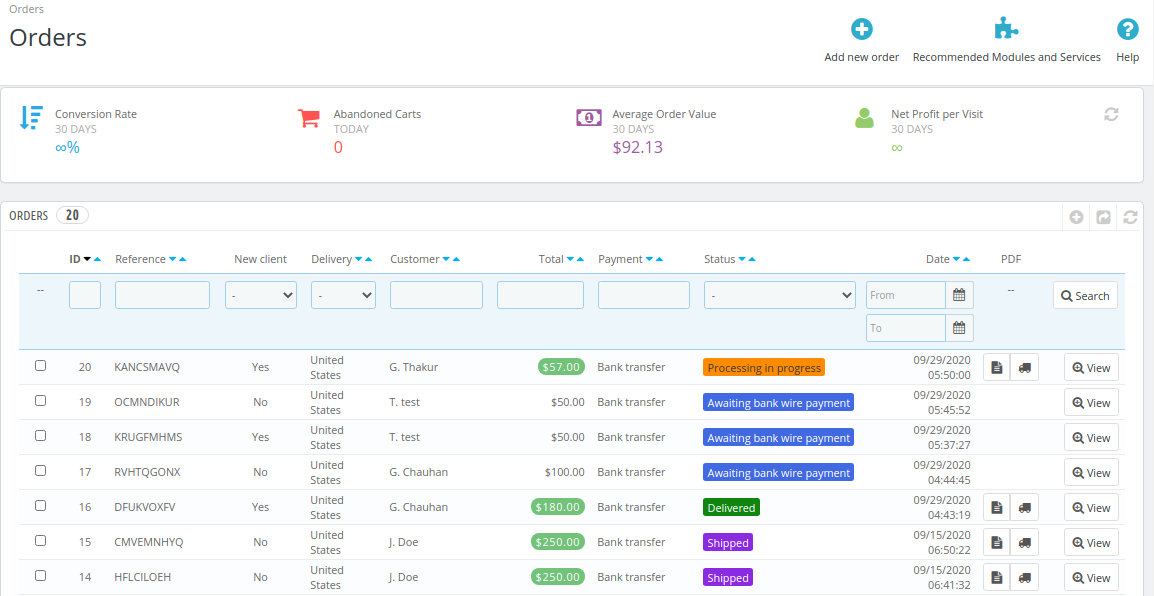
The two icons of a ‘file’ & ‘delivery truck’ are meant for invoices. The icon ‘magnifying glass’ is meant for viewing all the details about a particular delivery assigned to that delivery boy. This is how its screenshots look like.
3.0 Front End Screens
3.1 Splash Screen:
The PrestaShop Delivery Boy App takes care of all the management & processing for the delivery agents. The welcome screen or the splash screen of the app (on the front end) can be designed at the time of development with your brand logo and name.
3.2 Delivery Boy login screen:
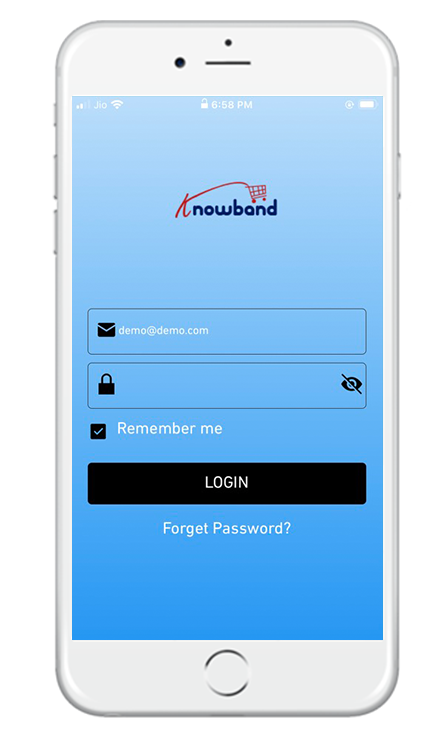
All of the delivery boys (that are approved by the admins) can log in to their ‘delivery boy app’ using the login screen as shown in the frontend screenshot. Upon setting up a new password (such as when someone forgets his/her password), the delivery boys get the options to change their password on their registered email id/ phone number.
3.3 Dashboard Screen:
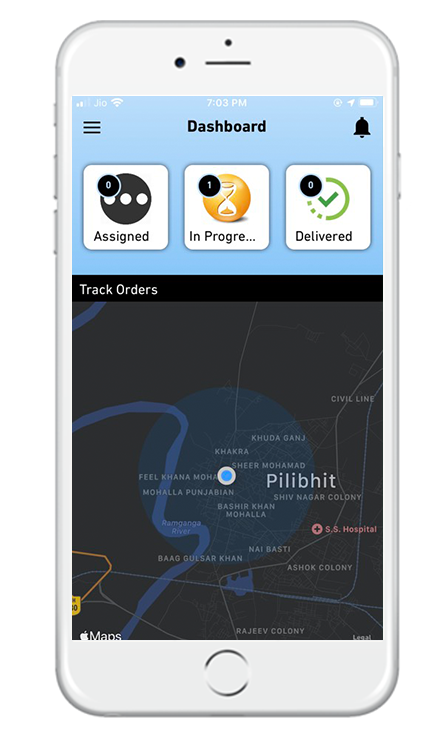
The main dashboard of the PrestaShop Delivery Boy App displays all the necessary information all gathered at this one screen. From the dashboard, a delivery boy can navigate anywhere on the app to access various other things such as order delivery records, assigned orders, delivered orders, my-info & many other screens. By default, the map (as shown in the screenshot) shows the exact location of the delivery boy & the tracking of the order.
3.4 OTP Login for Delivery:
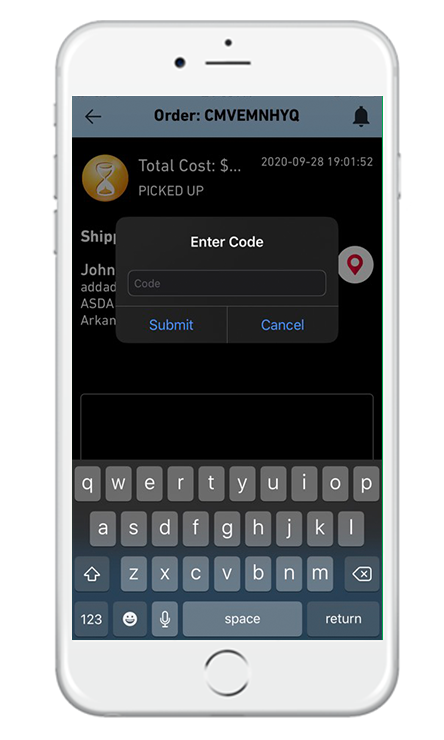
For the complete security of the orders, an OTP is sent to the customer (who placed the order). While delivering the order to the customer, delivery boys need to ask the customer for that OTP and enter in his/her delivery boy app. Only then the order is successfully delivered (if it’s the right OTP i.e. the right customer).
3.5 Delivery Boy Information:
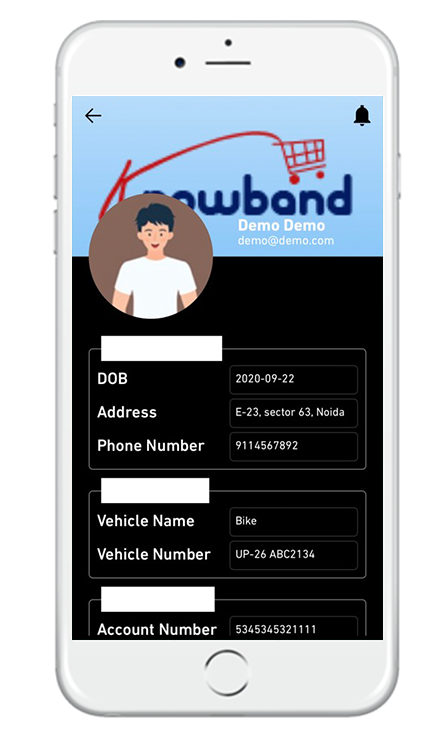
This screen contains all the information of the delivery boy. It’s like a my-info or my-account screen for the delivery boy. Information such as name, profile picture, phone number, DOB, email, password, address, vehicle details & bank account details is available on this screen.
3.6 Navigation Menu:
The Navigation menu/ Toggle menu is what allows the delivery boy to navigate anywhere on the app. As shown in the screenshot, assigned orders, in-progress orders, delivered orders can be accessed by the delivery boys. The status of the delivery boy, i.e. whether he is online/offline can also be seen here.
3.7 Order Accept/Reject:
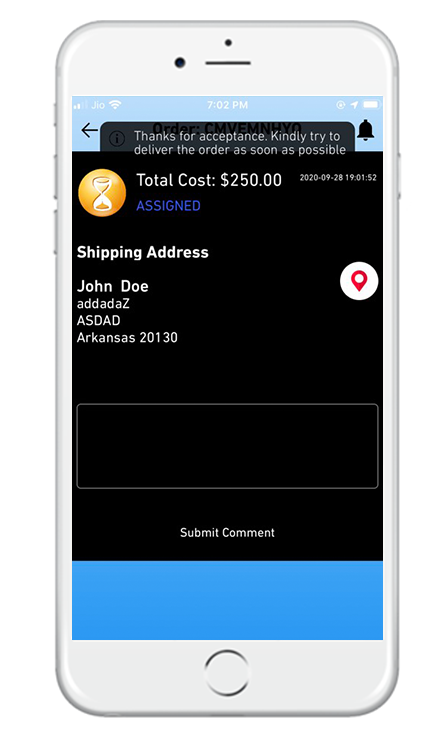
Whenever an order is assigned to a delivery boy, he gets to accept/reject the order. Upon accepting the order, the assigned order shows up on the ‘assigned order’ page as shown on the screen-shot.
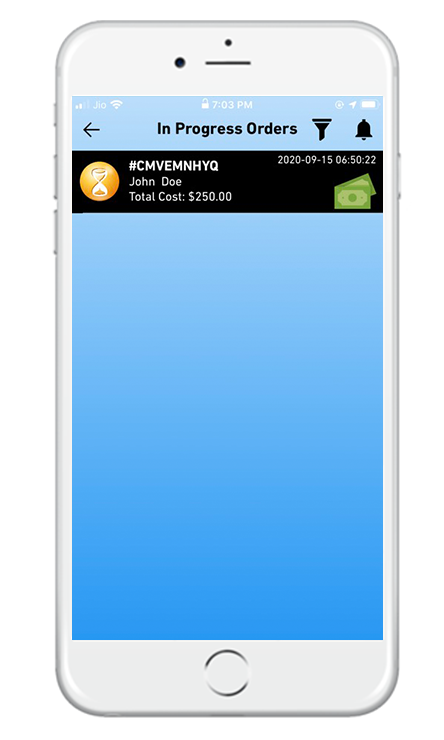
3.8 In-progress Orders:
All the orders that are in-progress are displayed on the ‘in-progress’ tab. Delivery boys can access these orders to process them.
3.9 Order Details:
This is what the screen looks like the delivery boy right when he accepts to deliver an order. The cost of the order & the delivery address is shown here as well. The delivery boy can even submit a comment he needs.
eBay Marketplace Integrator for Magento 2 offers the quickest means to the Magento 2 store owners to integrate their store with the very popular eBay marketplace. The eBay integration allows the merchants to manage the inventory and orders from a single interface.
Headquartered in San Jose, California, eBay is a multinational eCommerce corporation that popular as an online auction and shopping site. It facilitates consumer-to-consumer and business-to-consumer sales and offers an easy and customizable interface for sellers across the globe to list and sell their products effortlessly. eBay operates in over 30 nations. The product listing of eBay combines 800+ million product listings that are not just unique but are even coupled with great deals.
eBay Marketplace connector module for Magento 2 offers a smart solution to the e-merchants to integrate their store with the eBay Marketplace. The store admin can list products to the marketplace and sync the orders from the marketplace to their Magento 2 store.
1.1 Merchant benefits of eBay Integrator for Magento 2:
The Magento 2 eCommerce sites can easily expand their reach by integrating their store with the popular marketplace with the help of this eBay integrator for Magento 2.
The eBay API integrator for Magento 2 allows the store admin to sell their products to a larger audience base.
eBay integration for Magento 2 allows the sellers to sync their site with any of the eBay sites.
The eBay connector module for Magento 2 offers multi-currency and multi-lingual support that helps you offer the services according to the target customer.
The eBay integration plugin for Magento 2 is easy-to-understand and the admin can start selling in the marketplace in a few simple steps.
The user-friendly interface of the eBay connector extension for Magento 2 makes it easier for the store admin to manage their merchandise from a single platform.
The merchants can add/remove the product, manage the details and inventory from the admin panel of the eBay integration plugin for Magento 2.
The admin can manage the shipping methods for the eBay store from the admin panel of the eBay Marketplace connector extension for Magento 2.
Profile-based product listing of the eBay API integration module for Magento 2 makes it easier for the merchants to list the products in bulk.
Even the order processing becomes easier with the robust eBay API integrator for Magento 2.
The seller can check the reason for the error product rejection and rectify accordingly from the back-end of the eBay integrator for Magento 2.
The eBay API integration plugin for Magento 2 comes with free support for 3 months.
The eBay connector extension for Magento 2 is easy-to-use. Further, the admin can configure it with the least effort.
2.0 Installation
Follow the following steps for installing the eBay Magento Marketplace integration extension:
1. Download the Magento 2 eBay connector extension package.
2. Unzip the package in your root folder of Magento setup via FTP manager (like Filezilla or WinSCP – download here: https://filezilla-project.org/).
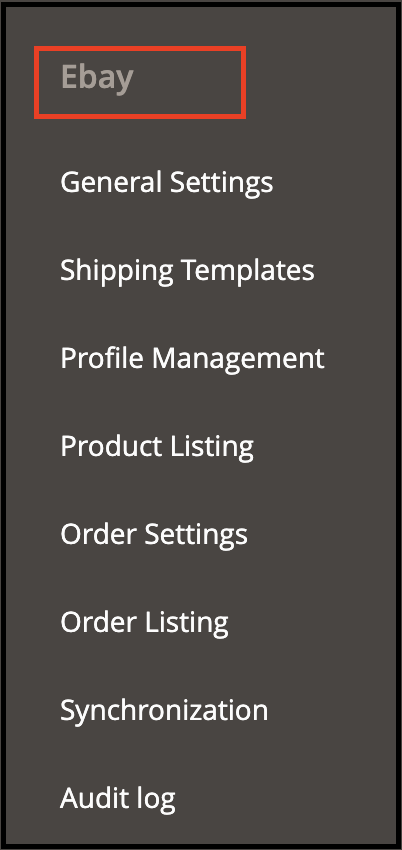
3. In the admin panel, go to eBay Marketplace in the main menu.
4. The Magento 2 eBay Marketplace connector module is now ready for use.
This User Manual will guide the users through the Magento 2 eBay integration extension configuration and settings.
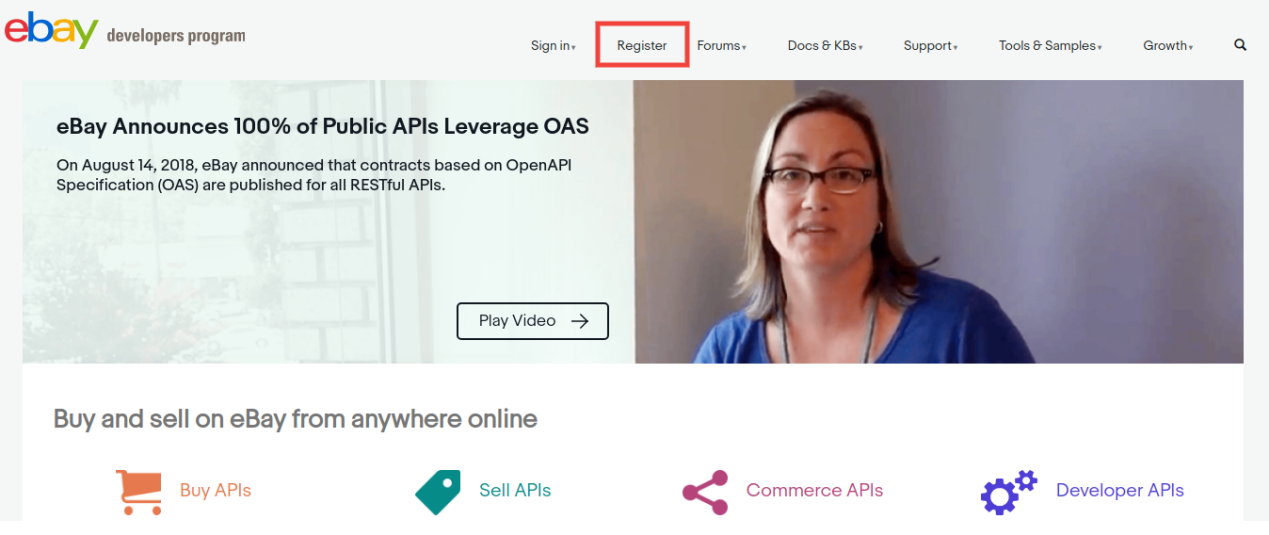
To start selling on eBay Marketplace you need to have a seller account on eBay. In this section, we are listing all the steps to create a seller account on eBay. Please find them below –
After filling-in valid data click on join and you will head to the application creation page.
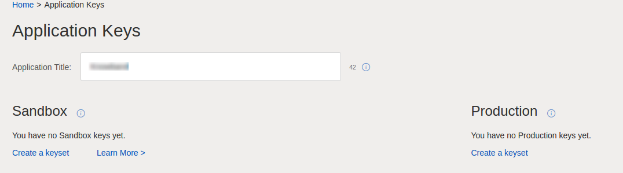
Enter the application name and click on ‘Create a keyset’ under the Production section, a new form will be opened.
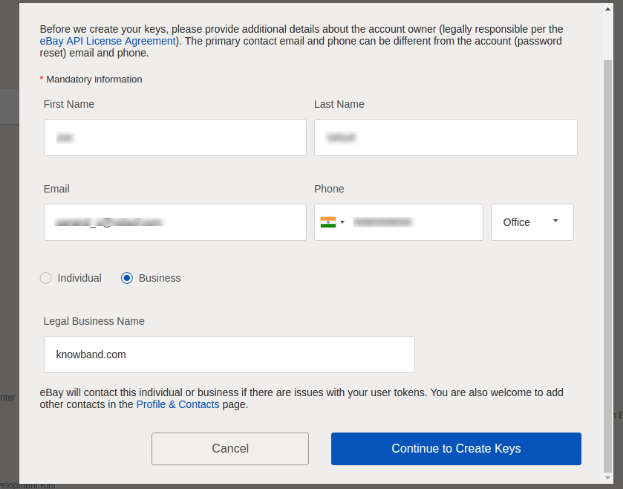
Enter the details and click on Continue to create Keys.
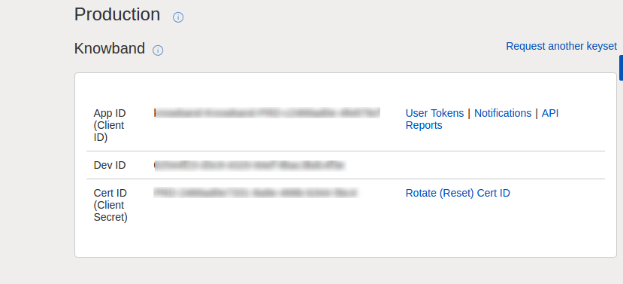
The application keys will be shown.
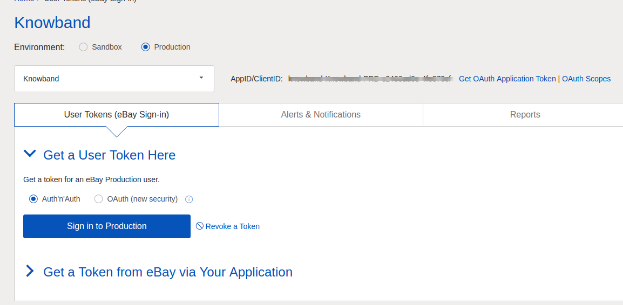
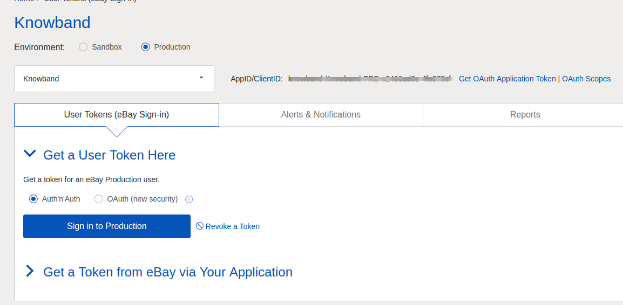
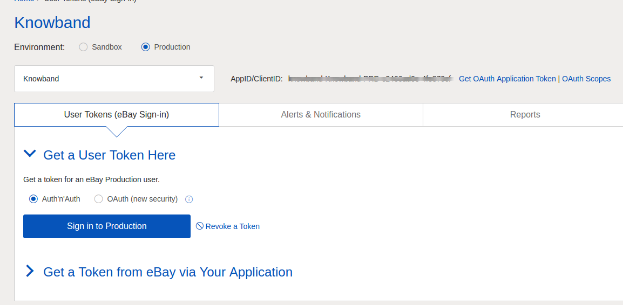
To create a user token, click on the User Tokens link in the above image.
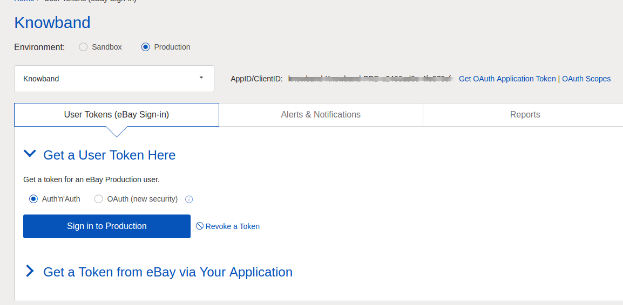
Click on ‘Sign in to Production’ to get a token.
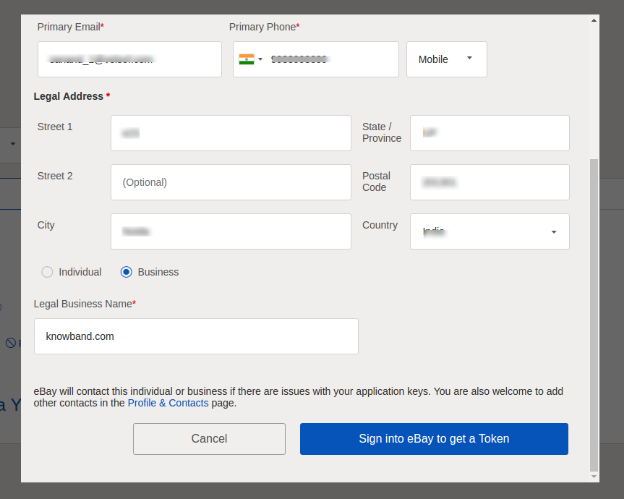
Fill in the details and click on “Sign in to eBay to get a Token”.
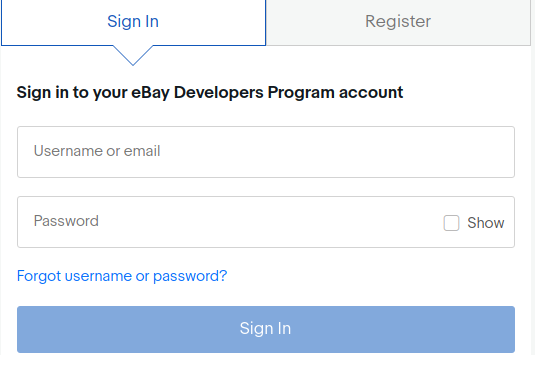
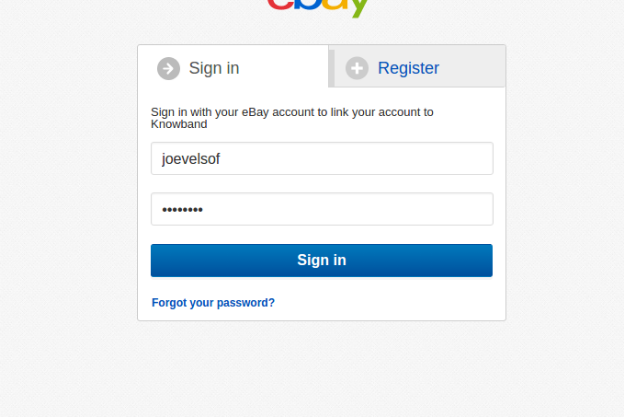
Sign into an already created eBay Seller account or register as shown below:
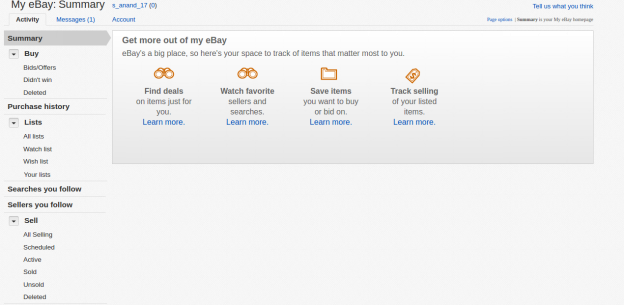
11. On clicking register and filling in details you will head to your Seller eBay account.
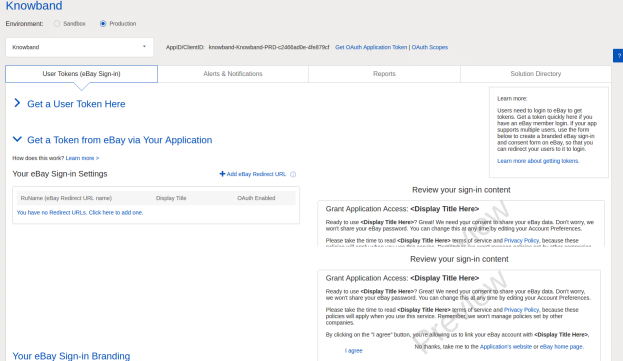
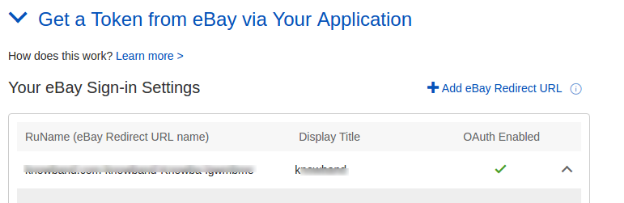
2.2 To Get a token from eBay via your application
To create a user token, click on the User Tokens link in the below image.
Steps to reach this screen:-
A. Login into your developer’s eBay account.
B. On successful login, you will see the below-added screen.
Click on “Get a Token from eBay Via Your Application.”
Steps to reach this screen:-
A. Click on “User Tokens” from the above screen.
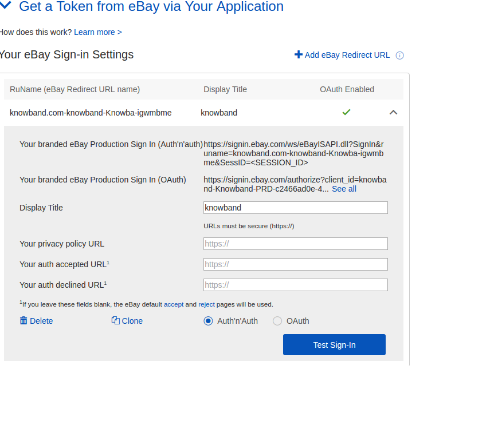
Click on add eBay redirect URL and fill the form and save.
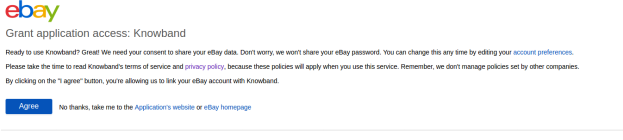
On clicking I agree from the right side form, you will head to the authentication page.
3.0 Admin Interface of eBay Integrator for Magento 2:
The Admin Panel of the eBay API Integration extension for Magento 2 offers 8 configuration options.
General Settings
2. Shipping Templates
3. Profile Management
4. Product Listing
5. Order Setting
6. Order Listing
7. Synchronization
8. Audit Log
3.1 General Settings
Once you have created a seller’s account, you need to fill-up the form to validate the synchronization of the store with the marketplace. Navigate to Admin Interface>eBay Marketplace>General Settings.
Fill out the form shown in the General settings section. Each field for the configuration panel of the eBay connector plugin for Magento 2 is explained below:-
1. Enable/Disable
Enable/disable the eBay API integrator for Magento 2 by toggling this button.
2. Account Type
The admin can either choose the Sandbox account or the Production eBay account. The sandbox account is for testing purposes. While the Production account is for the final store integration.
3. Dev Id
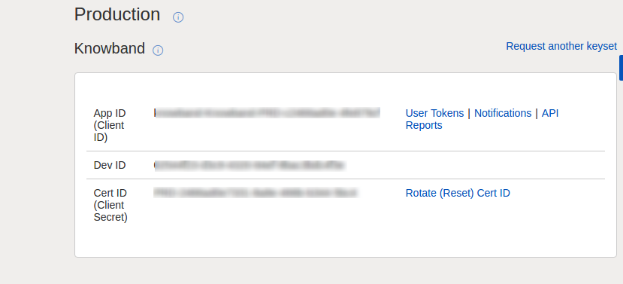
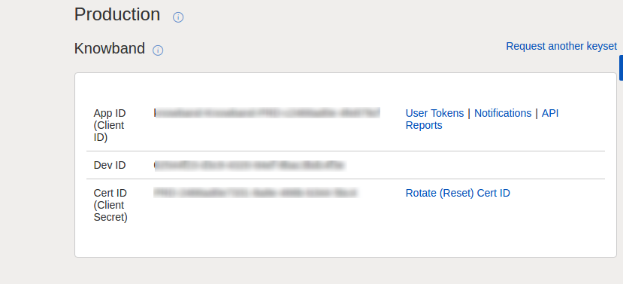
Enter the Dev ID of your eBay account in this section. To find your Dev ID, sign in to the eBay developer account. In the application key section, you’ll find App ID, Dev ID, and Cert ID as shown in the image below.
4. App Id
Copy the App ID from your eBay account and copy the same in this field.
5. Cert Id
Enter the Cert Id of the eBay account in this section. You can find the Cert Id as shown in the above image.
6. RU Name
Enter the RU Name of the eBay account. To obtain your RU name, go to the ‘Get a Token from eBay via Your Application’ tab after adding a redirect URL.
7. Paypal Email
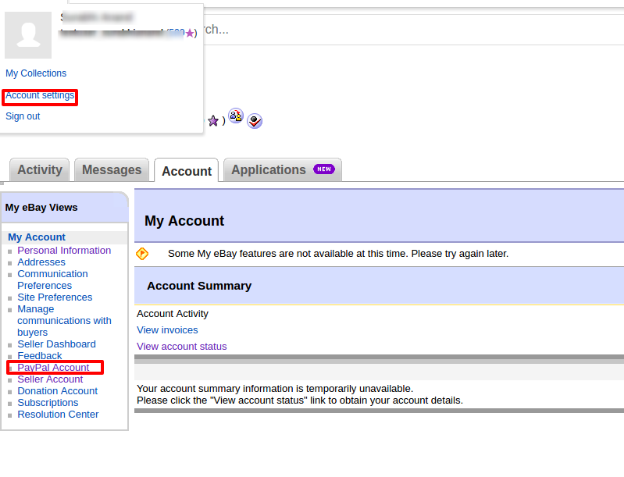
Enter a valid PayPal ID connected to your eBay account. Follow the steps mentioned below:
Log in to your eBay seller account.
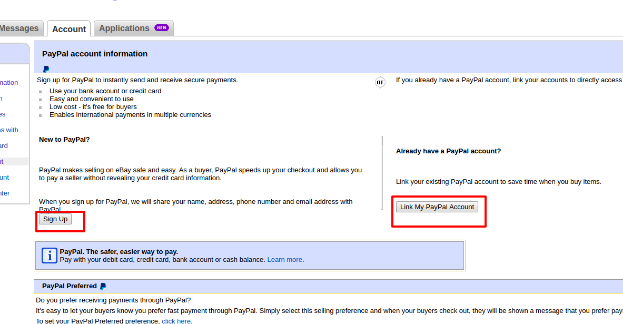
Click on account settings from the top-left dropdown and click on Paypal account.
Now Sign up or link your already created PayPal account with the eBay seller account.
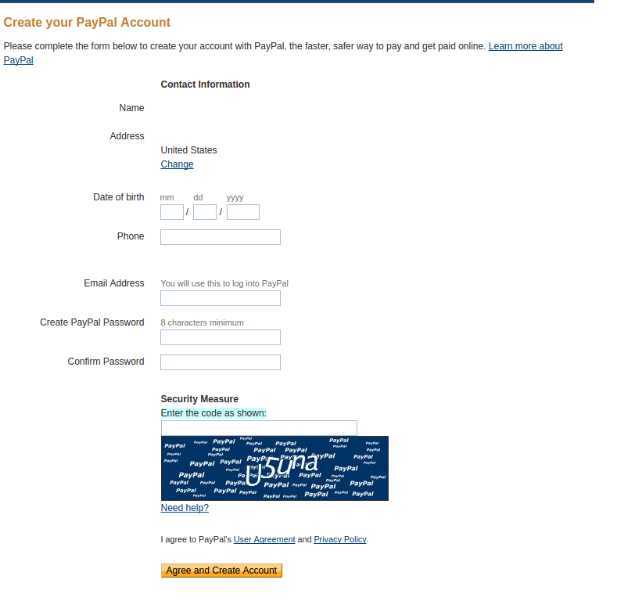
On clicking Sign Up, you will move to the PayPal account creation page. Just create a profile by filling in the details and linking it to your seller’s account.
8. Token Listing Link
Click on this link to add the tokens for eBay countries. To get the access token, you need to click on Sign in to Production as shown in the below image.
Sign in to the account from the form below:-
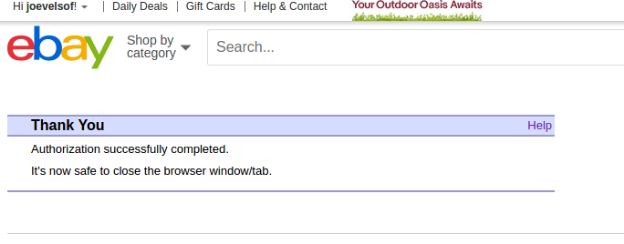
Click on I agree and get access tokens.
3.2 Shipping Templates
The Magento 2 store admin gets to create an N number of shipping templates from the back-end of the eBay Integration extension for Magento 2.
3.2.1 How to create New Shipping Templates?
To create new shipping templates, click on the ‘Add New’ button.
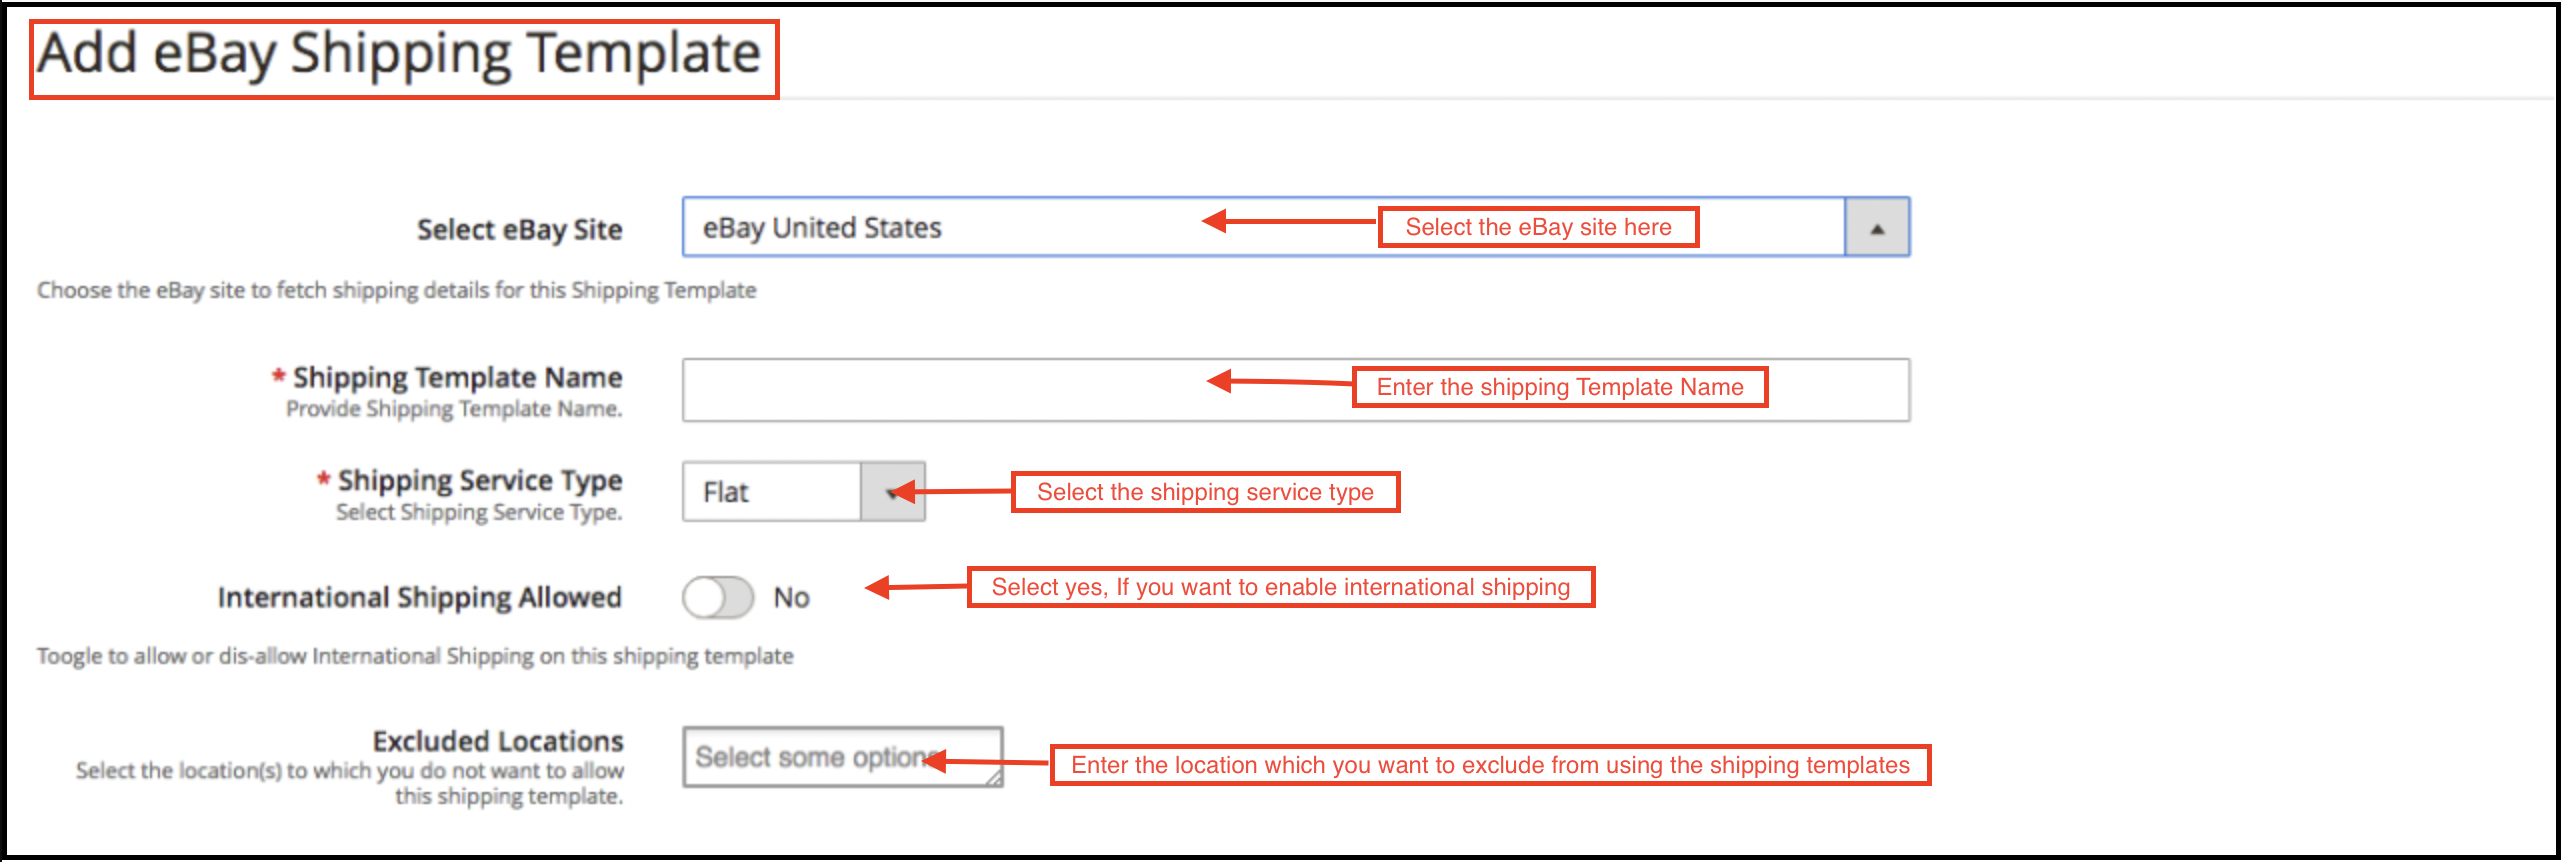
You’ll move to the shipping template creation page.
Select eBay Site: First, select the eBay site for which you are creating the shipping template.
Shipping Template Name: Enter a name for the shipping template.
Shipping Service Type: Select the shipping service type.
International Shipping Allowed: Switch on the button if you want to allow international shipping.
Excluded Location: Select the locations (if any) that you want to exclude from this shipping method.
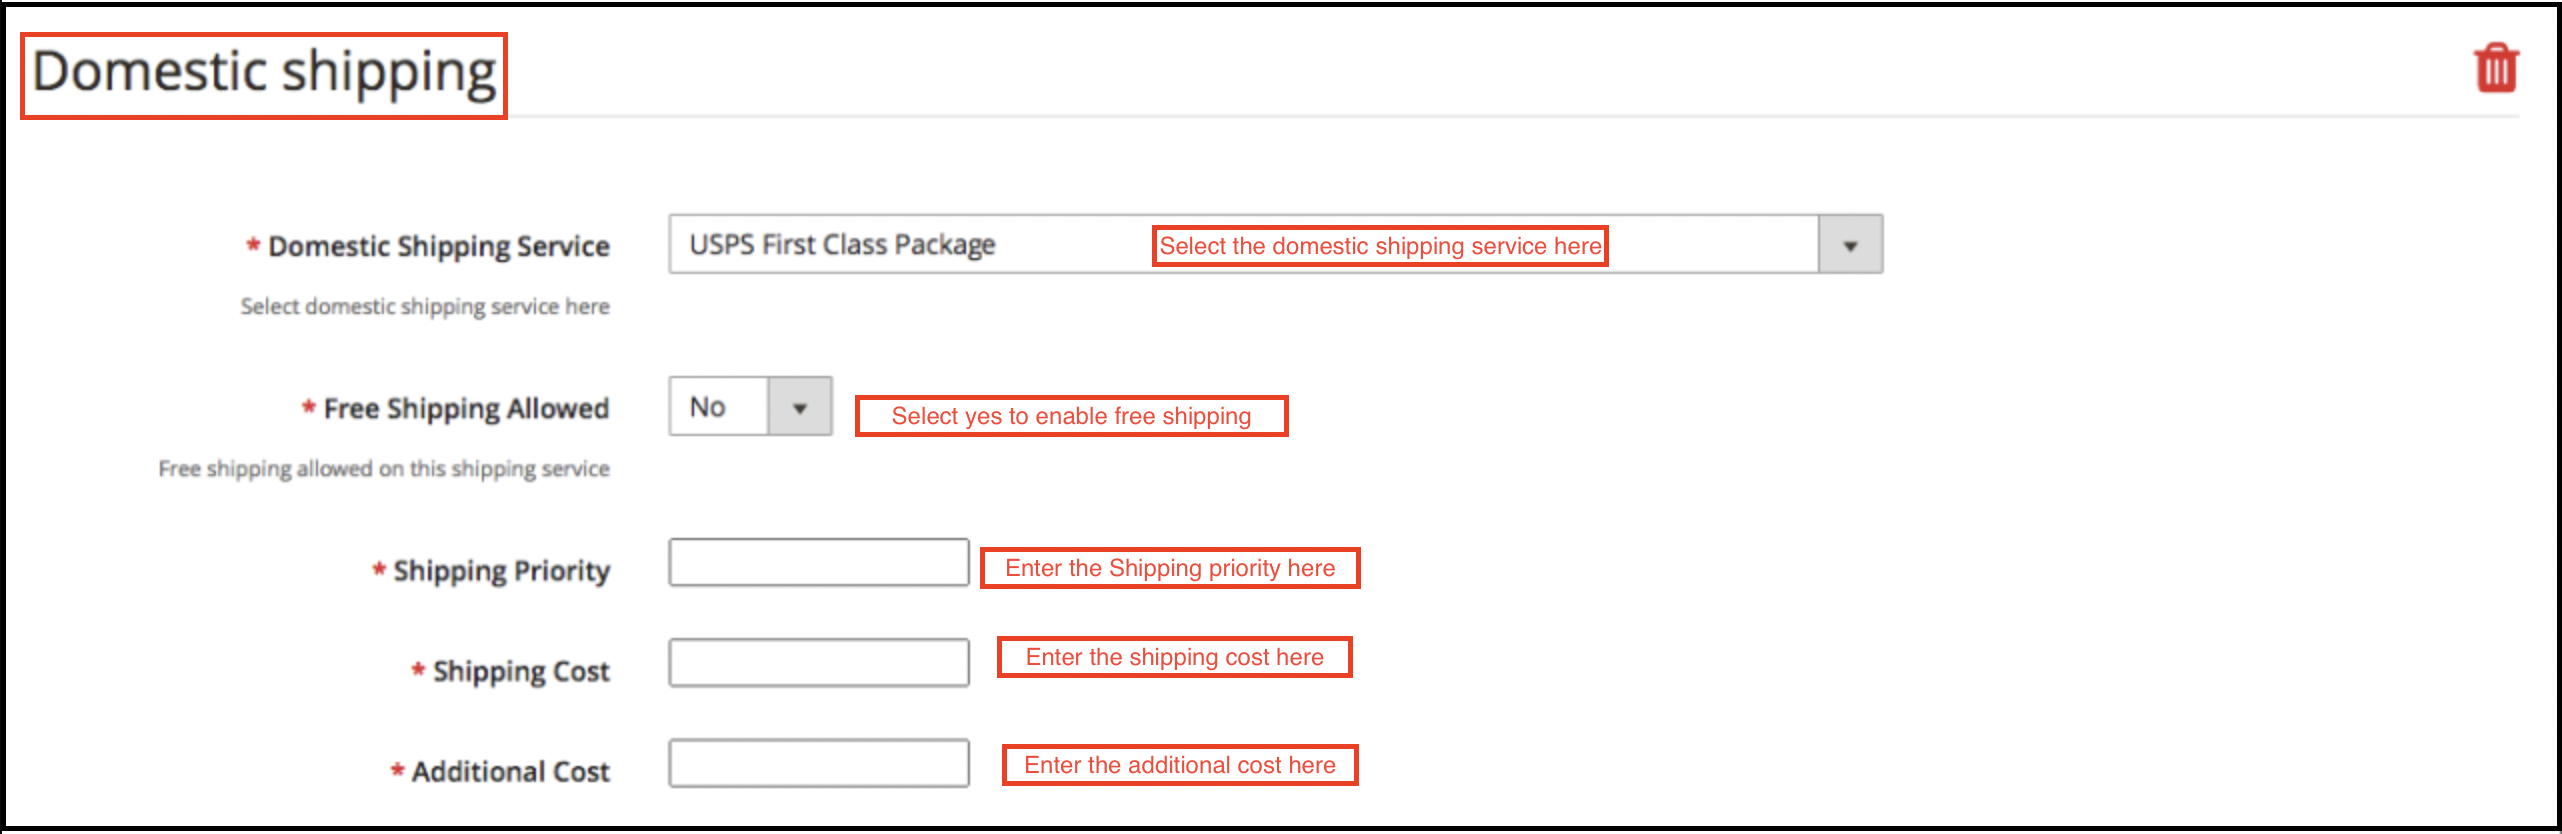
Fill the below-mentioned fields for domestic shipping:
Domestic Shipping Service: Select the domestic shipping service from here.
Free Shipping Allowed: Select ‘Yes’ if you want to allow free shipping services.
Shipping Priority: Set the priority for the shipping methods. The options will display in the front-end as per the priority set.
Shipping Cost: Enter the Shipping Cost that is chargeable.
Additional Cost: Specify the additional cost that is chargeable.
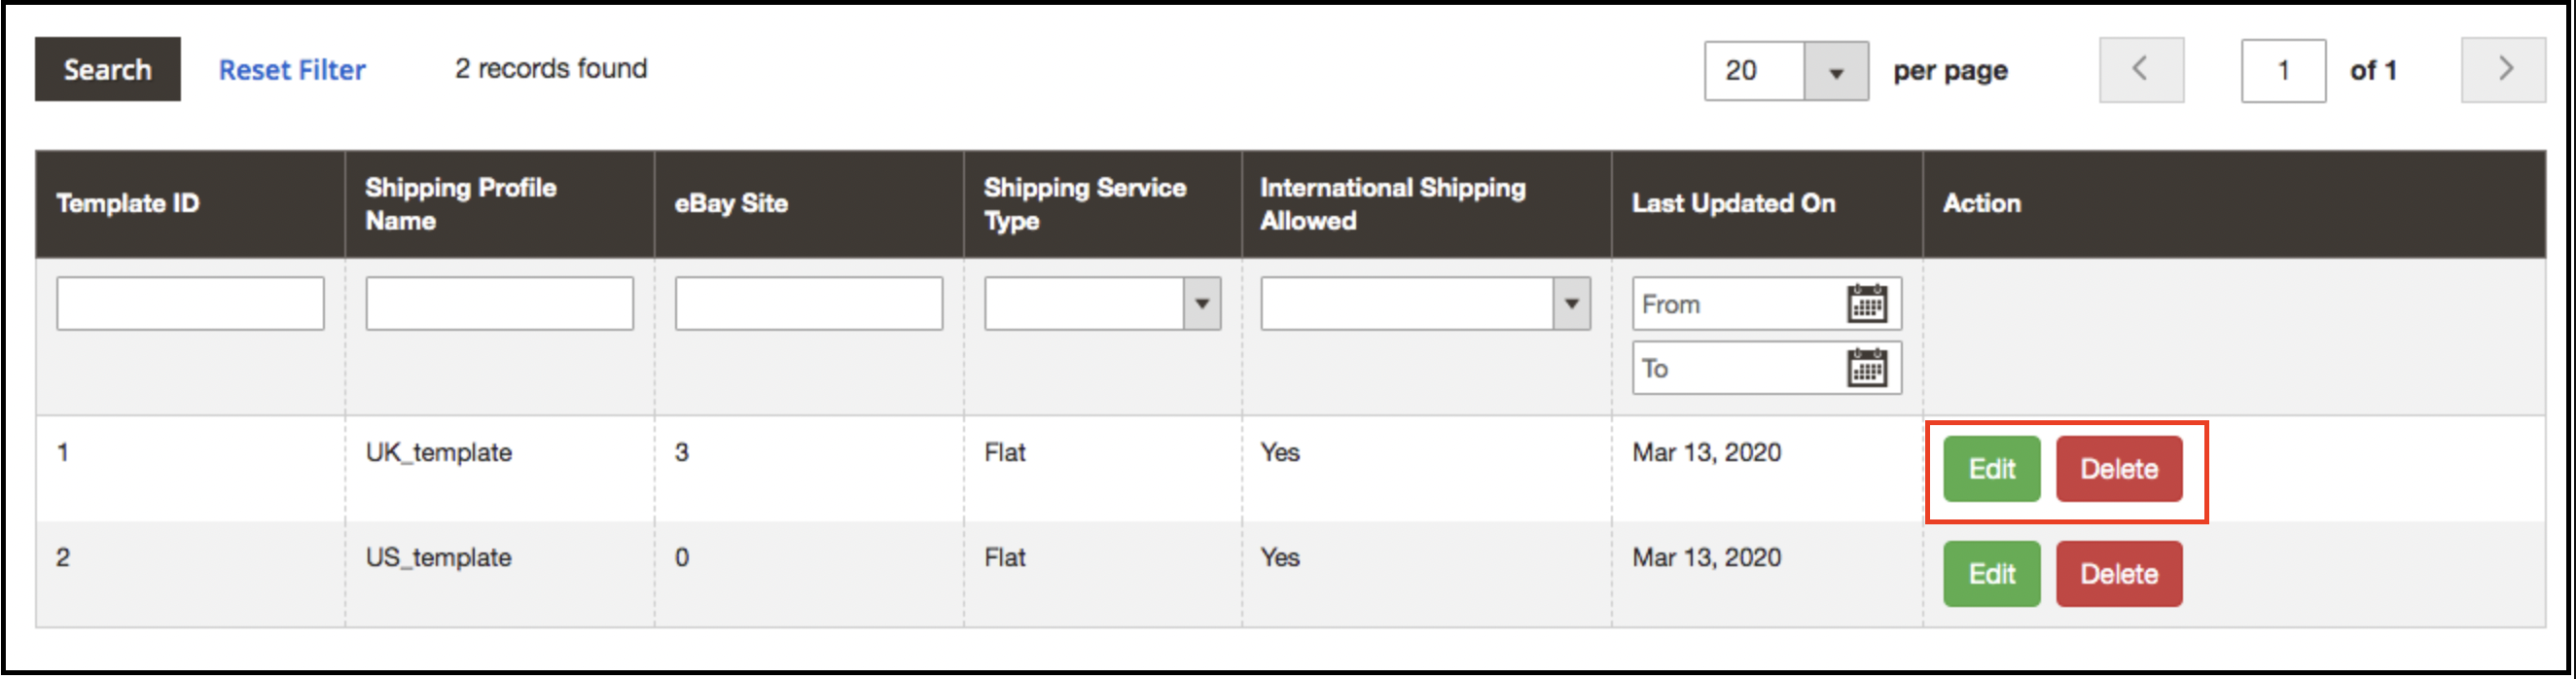
3.2.2 How to Edit/Delete Shipping Templates?
The admin can edit/delete the shipping template by entering the Edit or Delete button as highlighted in the image below:
3.3 Profiles Management
The eBay Marketplace Integrator plugin for Magento 2 offers an option of the profile-based product listing. The profiles created in the admin interface of the eBay connector plugin for Magento 2 can be viewed in this tab. The admin can create a new profile and edit or delete the already created profiles.
3.3.1 How to Add New Profiles?
Follow the steps, to create new profiles, Go to the Admin Panel>eBay Marketplace>Profile Management.
Click on the ‘Add New’ button as shown below:
The profile creation tab of the eBay Integration plugin for Magento 2 is categorized into three tabs. They are:
General Setting
Profile Return
Profile Specifics
3.3.1.1 General Settings
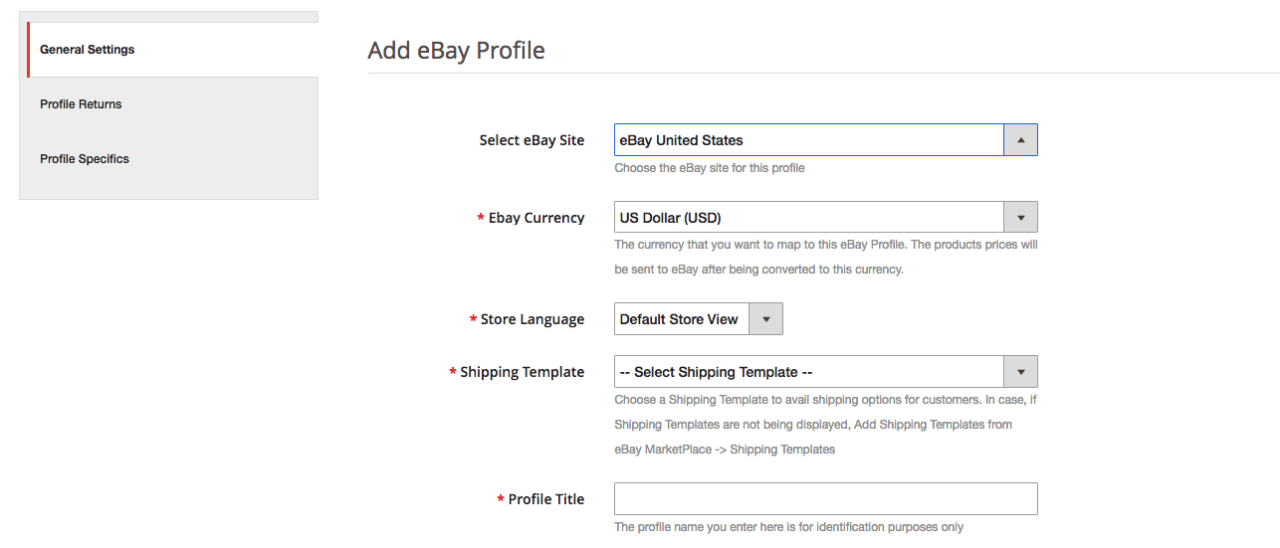
Once the admin selects the eBay site, he has to enter the following information.
eBay Currency: The currency will be automatically selected as per the eBay site selected by the admin. The store admin can even change the currency if required.
Store Language: The store admin needs to select the language as per the selected eBay site.
Shipping Template: The shipping options created in the Shipping Template Tab will be listed here. Select the shipping option that you want to display to the marketplace customer.
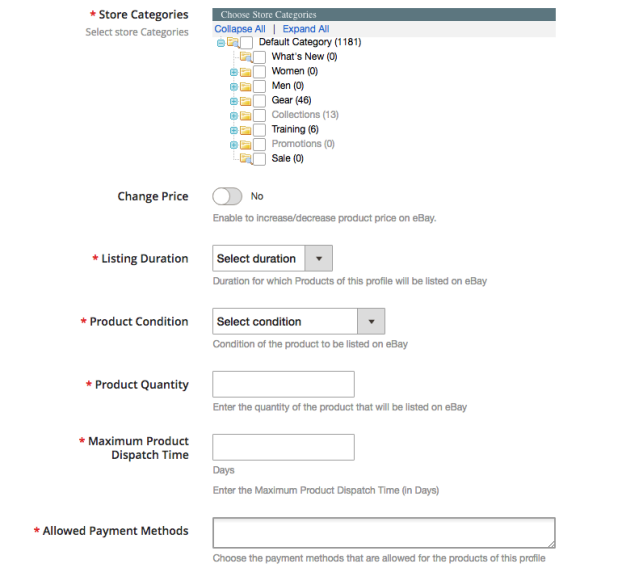
eBay Category: Select the eBay category from the dropdown menu in which you want to map the categories of the store.
Store Categories: Check the categories that you want to map in the selected category of eBay. The eBay integrator for Magento 2 allows the admin to map multiple categories of the Magento 2 store with a single category of eBay. To list multiple eBay categories, you are supposed to create multiple profiles.
Listing Duration: Select the duration for which the products of the profile are to be listed in the marketplace.
Product Condition: The default conditions are listed in the drop-down menu. Select the condition of your product.
Product Quantity: Enter the quantity of the product here.
Maximum Product Dispatch Time: Enter the maximum expected product dispatch time.
Allowed Payment Methods: Select the payment methods that you want to allow for this particular profile.
3.3.1.2 Profile Returns
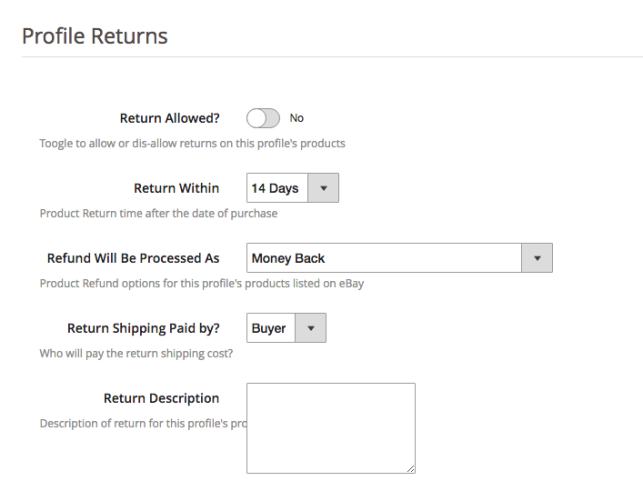
The store admin can manage the return requests of the marketplace from the back-end of the eBay API integrator for Magento 2. Here are some of the customization options offered in this tab.
Return Allowed: Enable the button if you want to allow the return option in this profile.
Return Within: Enter the maximum number of days within which the return request should be initiated.
Refund will Process: As selected how the refund will be offered to the customer.
Return Shipping Paid by?: Select who will pay for the shipping cost of the returned product.
Return Description: Enter a short description for the return option here.
3.3.1.3 Profile Specifics
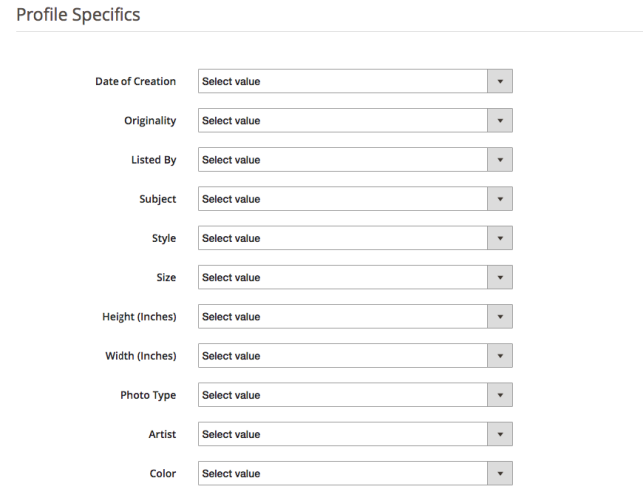
Profile specifics will appear as per the category of eBay selected in the General Setting tab of the Profile Management. This tab includes fields like Type, Brand, Model, Color, Features, and others. Fill up the fields as per the category selected and the product mapping will be done accordingly. The specifics marked by * are mandatory. Other specifics can be left blank.
3.3.2 How to Edit/Delete the existing Profile?
Click on the ‘Edit or Delete’ button to edit/delete the profile as shown in the image:
The admin can enable/disable the Profiles by selecting the option in the ‘Active’ tab.
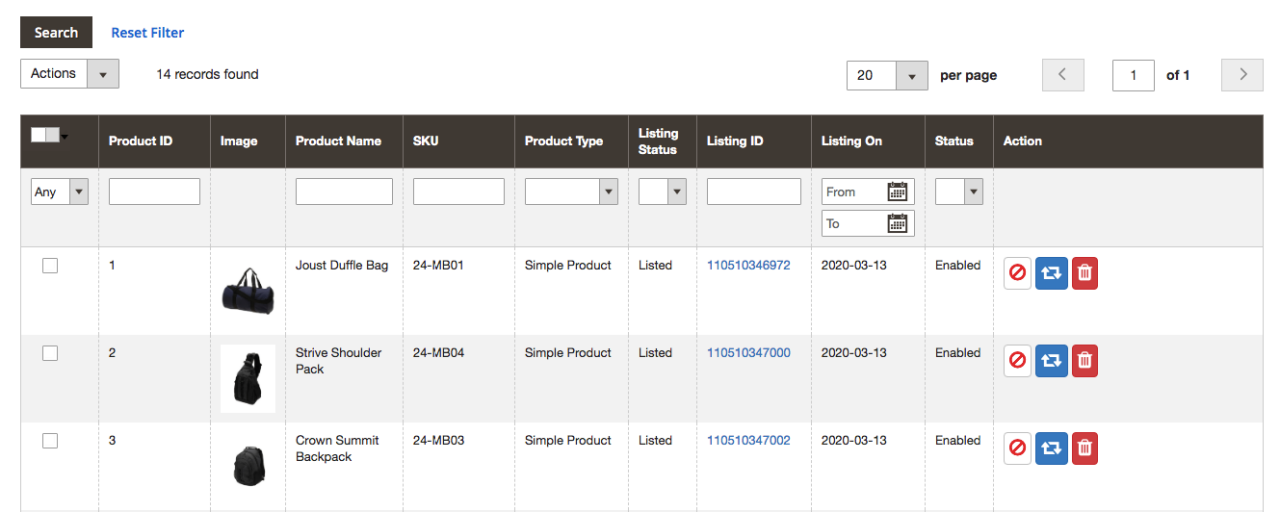
3.4 Product Listing
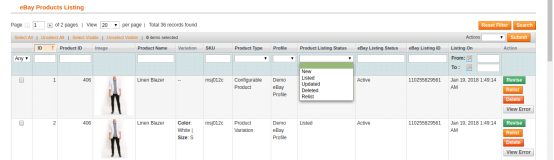
The store admin can view all the products listed in the marketplace from the Product Listing tab of the eBay Integration extension for Magento 2.
Here are some of the listing options offered in this tab of the eBay connector plugin for Magento 2.
Revise
The store admin can click on the ‘Revise’ button to update any change in the product detail. Whether you make a change in the product description, pricing, or quantity of the products, all the changes will be updated in the marketplace by this button.
Delete
This option allows the admin to delete the product from eBay Marketplace. Click on the “Delete” action corresponding to each product listing if you want to remove it from eBay.com.
Disable Products
The admin can disable the products that are listed For this, click on the ‘Disable Product’ action.
Adding products from the product listings tab
If you want to add a product to the product listing tab, the admin has to create a profile of the product in the Profile section of the module. There you will get a step-by-step procedure of creating a profile and adding the product in the products listing tab.
Different statues in the filter of the product listing
Here are some different statuses in the filter of the product listing.
New: After applying this filter, the admin can view the new products listed on the Marketplace.
Listed: After applying this filter, the admin can view the listed products listed on the Marketplace.
Updated: After applying this filter, the admin can view the updated products listed on the Marketplace.
Deleted: After applying this filter, the admin can view the list of disabled products.
Relist: After applying this filter, the admin can view the relist products listed on the Marketplace.
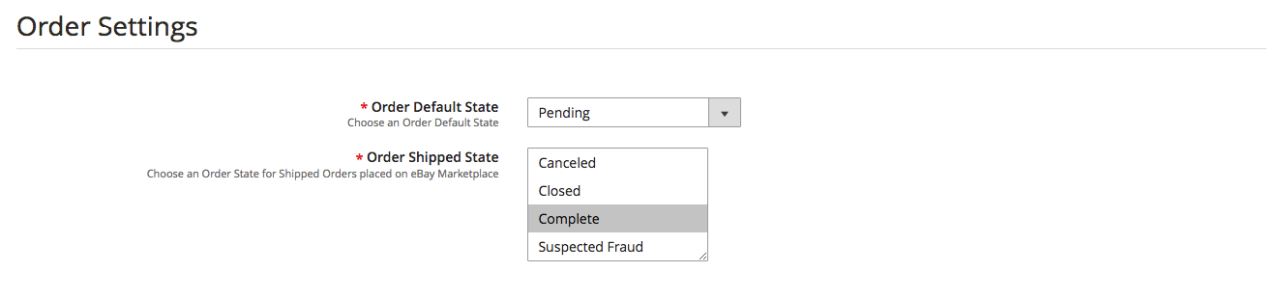
3.5 Orders Settings
The eBay connector for Magento 2 offers two-way integration. The admin can mark which status will display when an order syncs.
It includes three options:
Order Default State: Select the default status of the orders that will display in the marketplace.
Order Shipped State: Select the status for shipped orders.
Note –
The default status is the first status of the order when it is placed in the store.
Shipped status means that ordered items have been shipped.
To update the change in the order status by executing cron in the Synchronization tab of the eBay Marketplace connector plugin for Magento 2.
3.6 Orders Listing
The orders available from the marketplace will sync to the Magento 2 store. Furthermore, when the cron executes in the Synchronization tab.
The orders are listed as shown in the image below. To view the details and process the same click on the ‘View’ button corresponding to each order.
The store admin can now see the following details of each order.
It offers basic information like order date, status, billing and shipping address, payment information, gift options, item ordered, comments history.
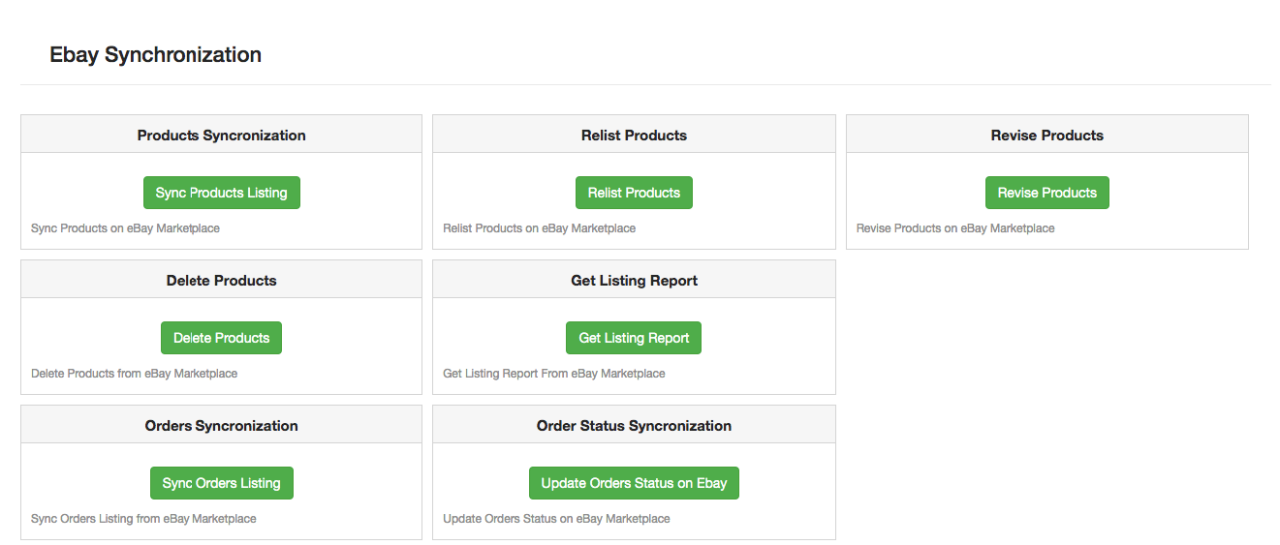
3.7 Synchronization
The eBay integration for Magento 2 allows easy synchronization between both stores. All the synchronization jobs can be performed from this tab.
The synchronization tab of the eBay connector module for Magento 2 offers two synchronization options. That is Product and Order synchronization.
3.7.1 How to sync the products on eBay Marketplace?
Click on the “Sync Product Listing” button as shown below.
It will add products in the marketplace with the respective product details.
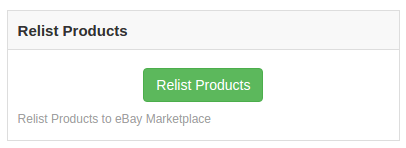
3.7.2 How to Relist the product on the eBay Marketplace?
Click on the “Relist Products” button as shown below.
This will relist the expired products in the marketplace. It will update the listing of the products whose relisting was initiated in the Product Listing tab.
3.7.3 How to Revise the product on the eBay Marketplace?
Click on the ‘Revise Product’ as shown below to revise the products on the marketplace. Any change in the product details, image, pricing, etc can sync by executing this cron offered by eBay Integrator for Magento 2.
3.7.4 How to Remove a product on the eBay Marketplace?
Click on the ‘Delete Products’ as shown below to remove products from the marketplace. The admin has to click on the ‘Delete’ button in the products listing tab before executing this cron eBay Integrator for Magento 2.
3.7.5 How to Import the listing report from the eBay Marketplace?
By executing ‘Get Products Listing Report’, the admin can import the report of the product listing from the marketplace. The eBay status column will fill up when this action executes by eBay Integrator for Magento 2.
3.7.6 How to sync Orders from the eBay Marketplace?
Click on the “Sync Orders Listing” button as shown below.
It would perform the following actions:
The plugin will sync the Orders and related details from eBay Marketplace to the Magento 2 store.
It creates the orders in the Magento 2 store as per the details of the order received from the Marketplace.
3.7.7 How to sync Order Status to the eBay Marketplace?
Click on the “Update Order Status on eBay” button as shown below.
It would perform the following actions
The cron checks if there is any status update recorded by the eBay integrator for any order.
The updates are then synchronized accordingly.
It updates the Status of Orders as per the configuration settings modification in the “Order Settings” tab of the admin interface of the eBay Integration module for Magento 2.
3.8 Audit Log
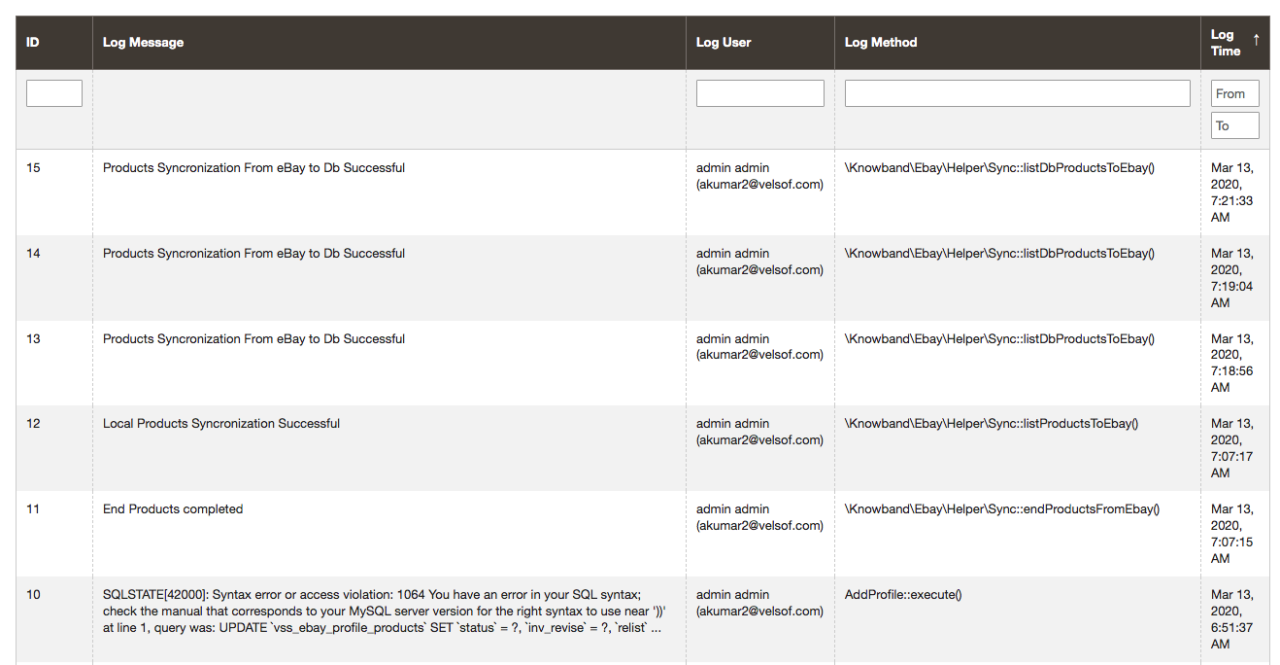
This tab offers an overview of all the tasks being performed in the back-end of the eBay Integrator extension for Magento 2.
The PrestaShop Hyperlocal Marketplace Mobile App Builder is for converting online hyperlocal multi-vendor marketplace into native Android and iOS shopping app without any coding/programming knowledge. The readymade plugin is a pre-designed framework for all PrestaShop store owners out there who are somewhere willing to launch mobile apps.
1.1 What is a Hyperlocal Multi-vendor Marketplace?
A Hyperlocal Marketplace Module is a simple way to turn a regular PrestaShop marketplace into a multi-vendor marketplace with an inbuilt hyperlocal system. Hyperlocal functionality allows the store owner to allow himself or sellers on the marketplace to sell in a specific location. On a PrestaShop Hyperlocal Marketplace store, the owner can define the radius value (to be evaluated on the map) and set the location for product availability. Once customers onboard the e-store website or mobile applications, they will be asked to choose the location and browse products as per the availability. Based on the entered location of each individual user, they are presented with the products and sellers that are available nearby to them (as per the radius circle specified in the admin panel).
Hence, in simple words, a hyperlocal marketplace is a local ecosystem allowing peoples of a specific zone to shop or order products. These kinds of online shopping medium are great for ‘same-day delivery’ or ‘one-hour delivery’ kinds of models. Examples of some of such online marketplaces are online grocery stores, food delivery stores, medicine stores, gift shops, malls, etc.
1.2 What is a Hyperlocal Marketplace Mobile App?
The majority of the online shopping audience is on mobile. Considering the same, we have created a complete Hyperlocal Marketplace and Mobile shopping apps package for the PrestaShop e-store owners. Android and iOS shopping apps will be in sync with the PrestaShop hyperlocal marketplace. Both Admin and seller products will be available on the PrestaShop Hyperlocal Mobile App for customer browsing and purchasing products. Offering a localized PrestaShop Marketplace Mobile App in your native language will attract a wide range of users from the local market.
The users just need to choose a current location with inbuilt GPS in the app and view products and sellers available in that location.
Here are some of the snapshots for a better idea:
2.0 Hyperlocal Marketplace Admin Panel
Refer below link for PrestaShop Hyperlocal Module admin panel configurations:
The below snapshots with a detailed explanation will make the module configurations and settings more clear. Check the step by step settings tab with details. After installing the PrestaShop Mobile App Builder module on the store, click on the “Configure ” option. You will get the following tab with simple-to-use interfaces.
3.1 General Settings
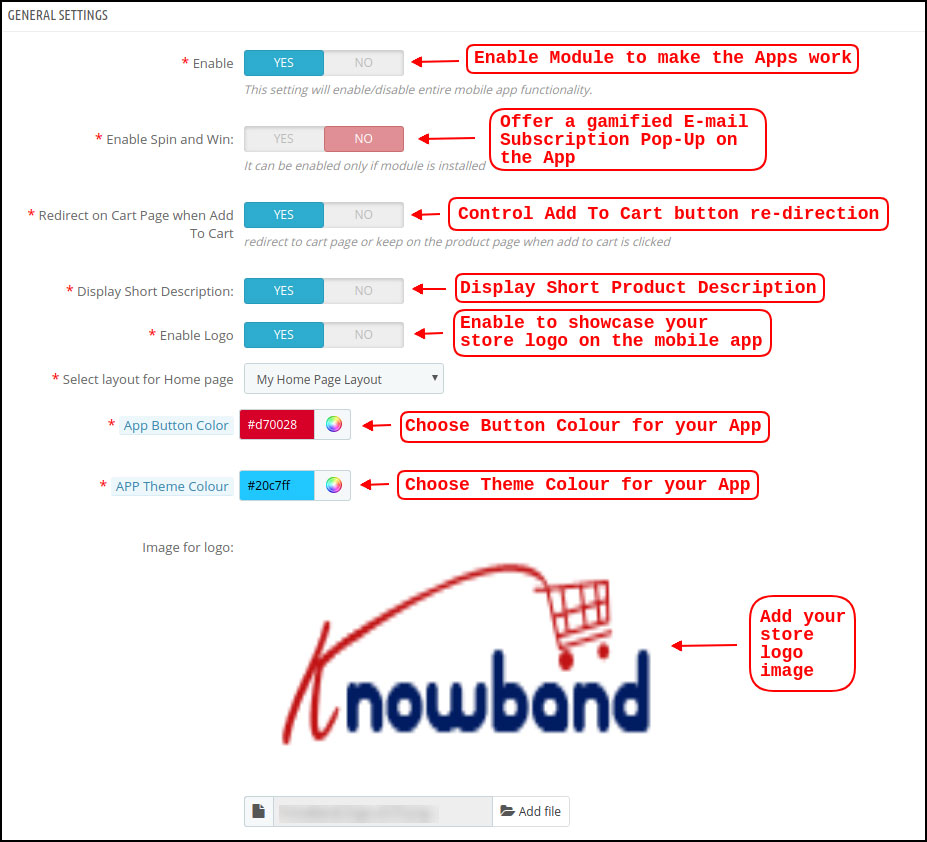
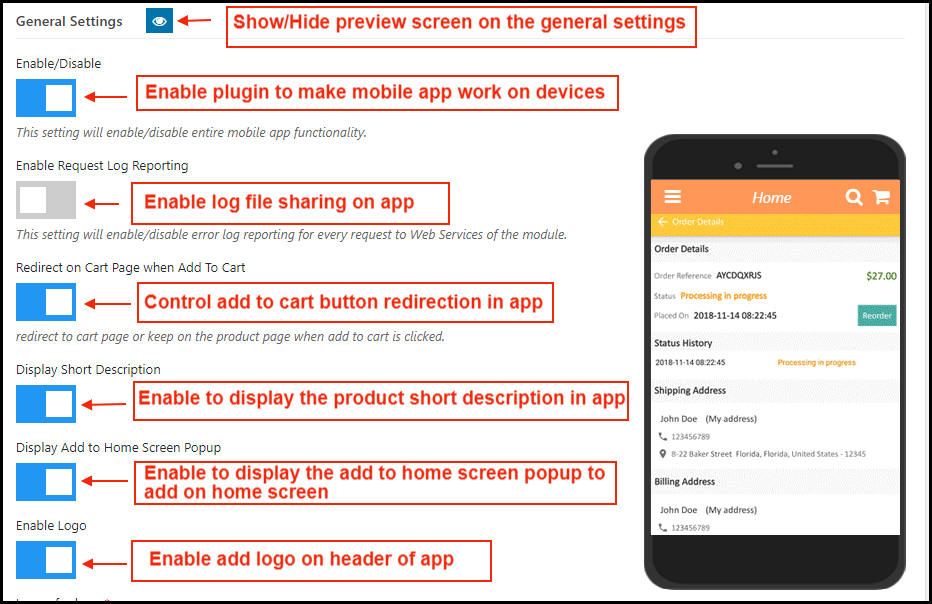
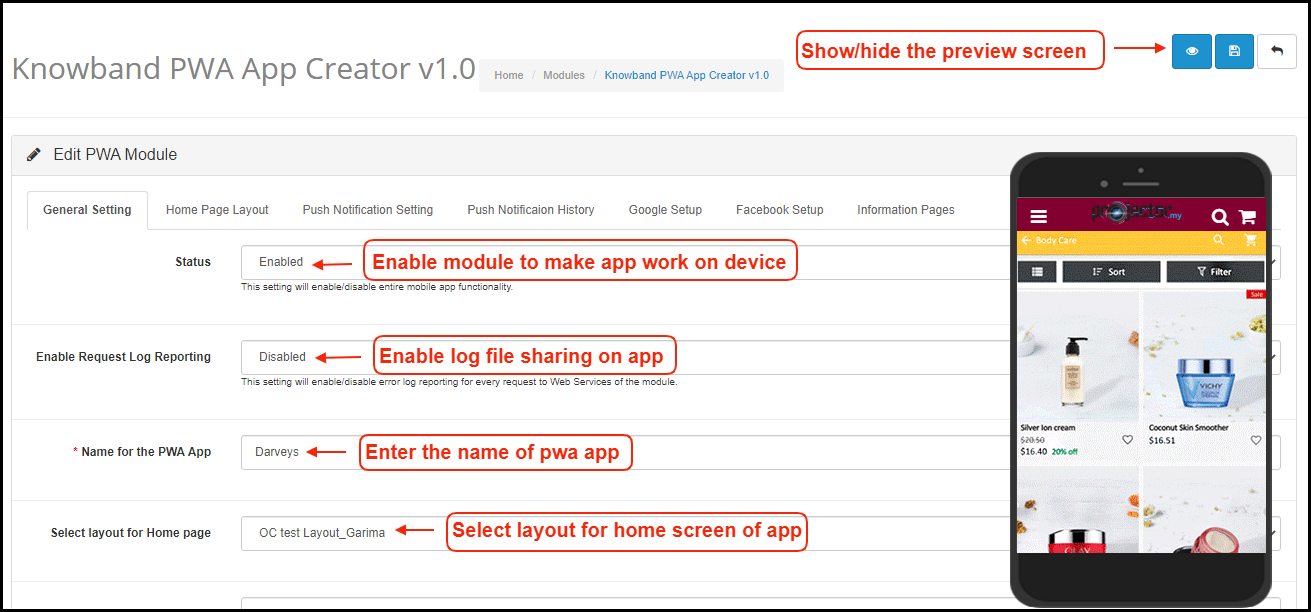
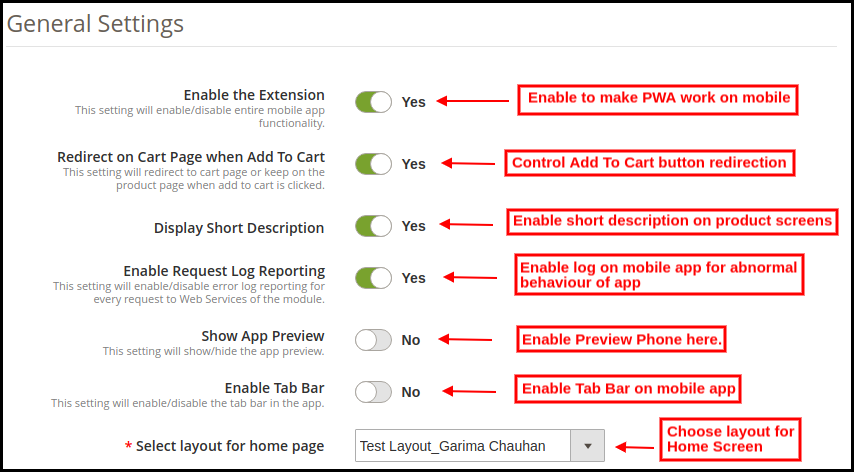
a) Enable/Disable Plugin: Enable PrestaShop Hyperlocal Marketplace Mobile App Builder to make mobile apps work on mobile devices. In case, you ever need to stop the app working, just disable this option.
b) Enable Spin and Win: This option is to display a gamified spin-win email subscription on the home screen of the PrestaShop Nearby Shopping App. The spinning wheel pop-up interface will be displayed on the home screen once the user opens the app. The store admin can set the discounts and other settings in spin-win extension and capture user emails for remarketing purposes and promotional strategies.
Note: To use the spin win functionality, you need to add the KnowBand Spin win extension on the Prestashop store.
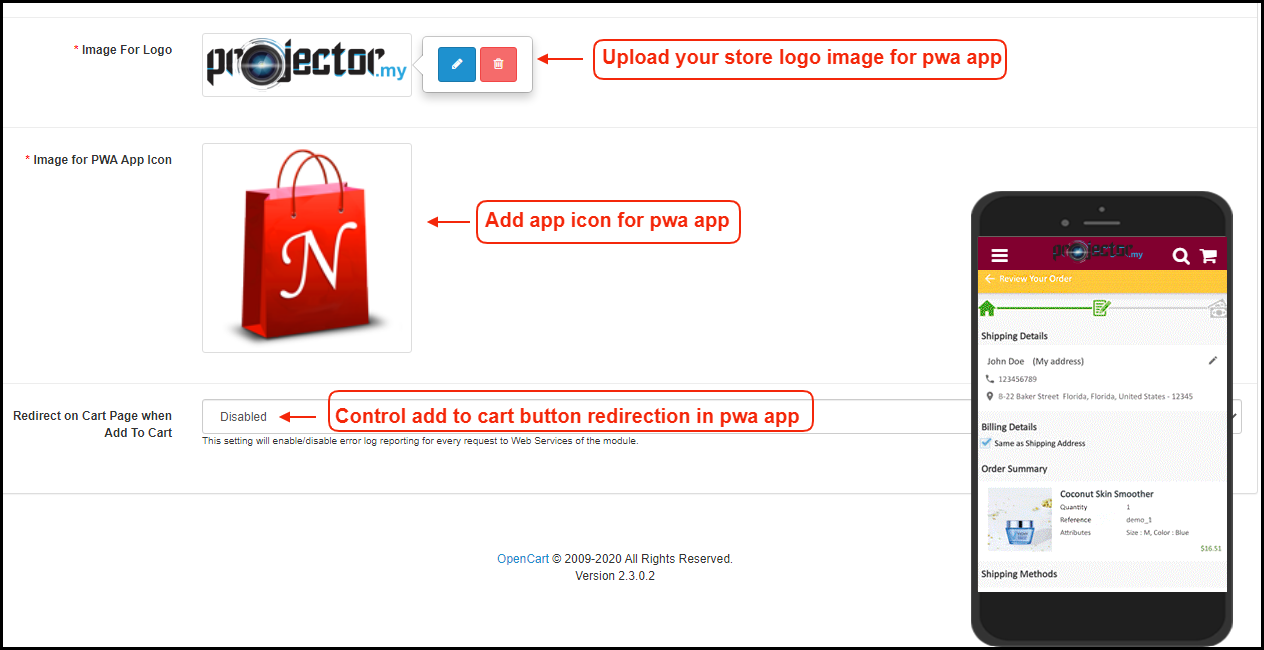
c) Redirect on Cart Page when Add To Cart: This tab lets the store admin control the “Add To Cart” functionality in PrestaShop Hyperlocal Marketplace Mobile App. The users can be redirected directly to the cart screen or can stay on the product page for more shopping.
d) Display Short Description: Enable to display the short description on the product screen along with full description & other details. The short description will only be displayed if the same is added to the website inventory.
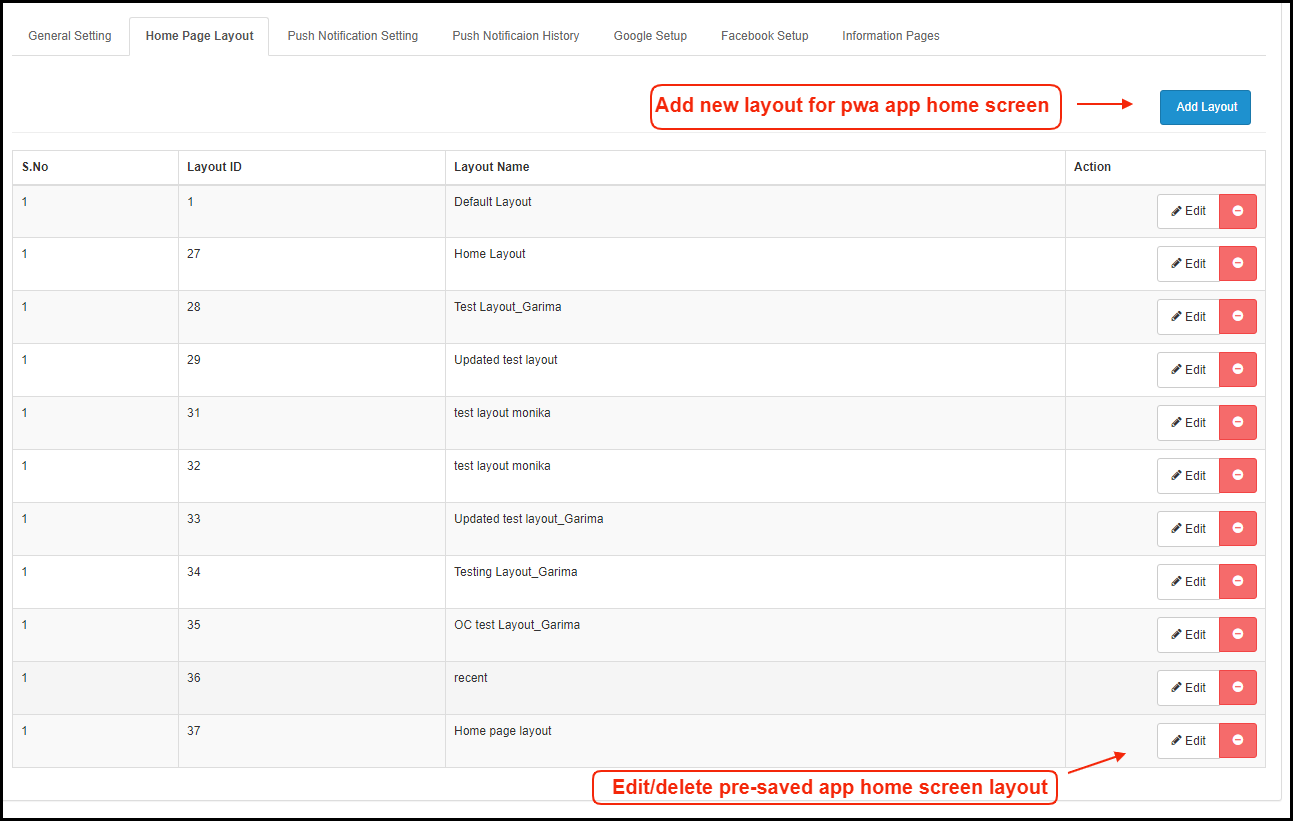
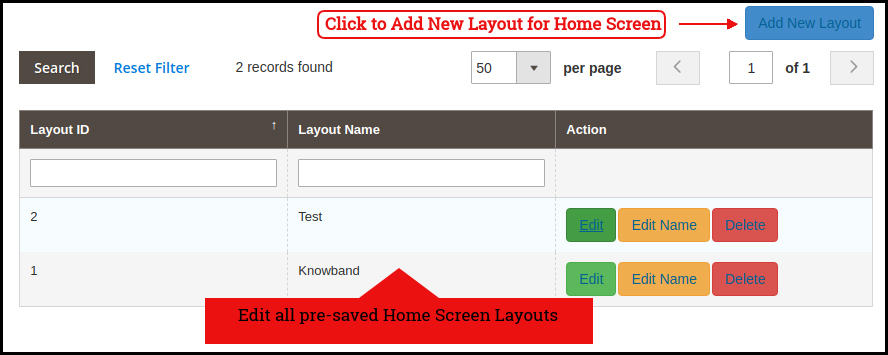
e) Select Layout for Home Page: Create a home screen look & design of the PrestaShop Hyperlocal Marketplace Mobile App as per your choice. (Same can be added from the Home Page Layout section). In this option, there will be all layouts available in the dropdown and chosen as per the requirement. Multiple app home screen layouts can be pre-designed and saved as per various festivals, sales, offers, deals, etc.
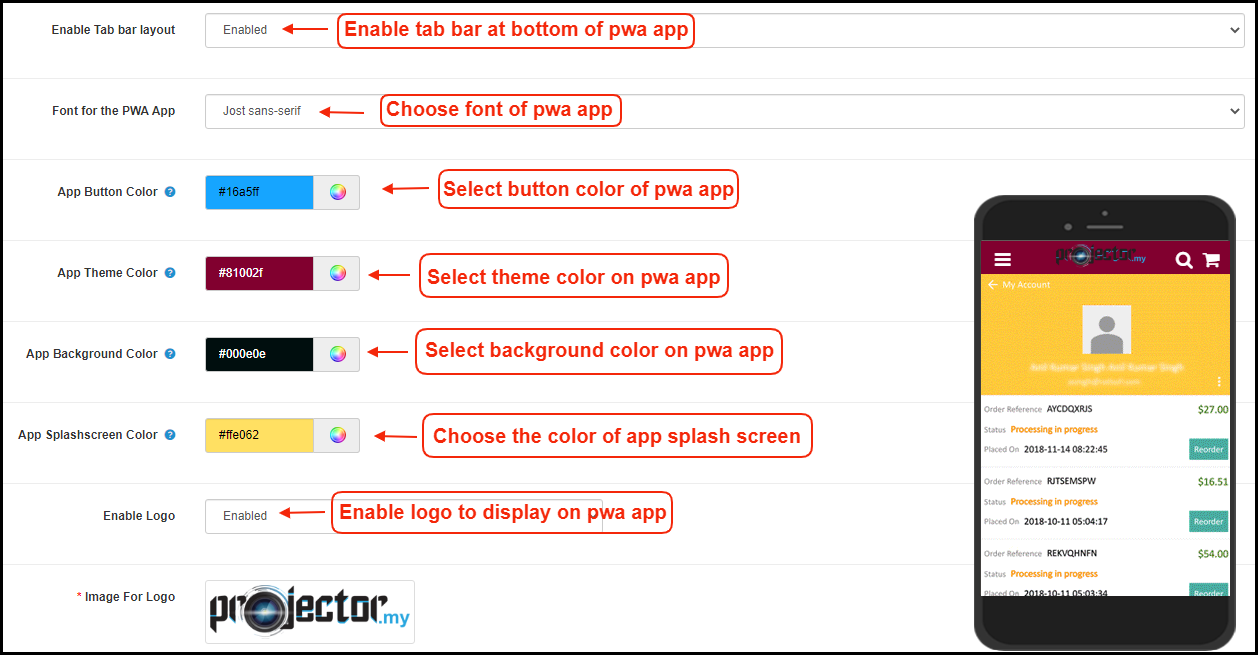
f) App Button Color: Choose the desired button color for PrestaShop Hyperlocal Marketplace Mobile App. This color will be for all the buttons available on the Android and iOS apps.
g) App Theme Color: Choose the desired theme/header color for PrestaShop Hyperlocal Marketplace Mobile App.
h) Image for logo: Upload your website/marketplace logo image to be displayed on the top header of hyperlocal shopping apps. This will be a simple way to offer apps branded to your business only. Our PrestaShop Hyperlocal Marketplace Mobile App Maker is a complete white label solution.
i) Disabled Shipping Methods: This option allows you to disable the shipping methods from PrestaShop Hyperlocal Marketplace Mobile App. (In case any shipping methods needs to be disabled from the app)
j) Enabled CMS Pages: Add desired CMS pages like About Us, Terms & Conditions, Privacy Policy, etc. (available on the website) on PrestaShop Hyperlocal Marketplace Mobile App.
k) Enable Request Log Reporting: Add an option on the PrestaShop Mobile App to enable error log. The log file can be used to identify and rectify any abnormal behavior of your app.
l) Enable Live Chat Support: Enable/disable Zopim (Zendesk) chat option on PrestaShop Hyperlocal Marketplace Mobile Apps. The chat API key will be provided with the final app that can be used to activate the live chat on mobile apps.
m) Enable WhatsApp Chat Support: Enable/disable WhatsApp chat option on your PrestaShop Nearby Shopping Mobile Apps. This option simply allows the users to connect with the store admin via Whatsapp chat option.
Note: Either Zopim chat or Whatsapp chat can be enabled from the admin panel.
n) Enable Fingerprint Login: Enable/disable Fingerprint login option in PrestaShop Hyperlocal Mobile App.
o) Enable/disable Phone Number Registration: Enable phone number login option (OTP) in PrestaShop Hyperlocal Marketplace Mobile App & allow users to authenticate using OTP verification.
3.2 Push Notifications Settings
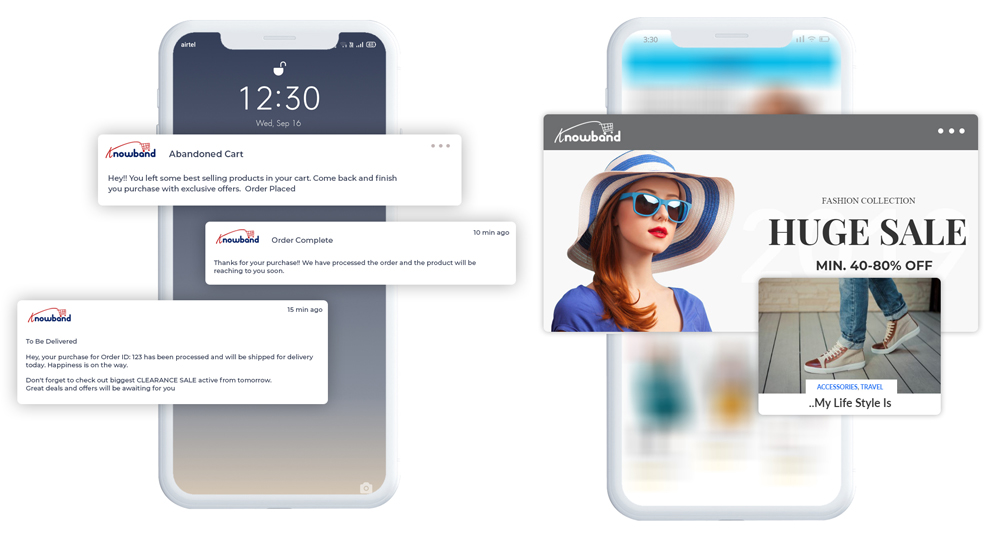
The Hyperlocal Marketplace Mobile App Creator offers unlimited push notifications to be sent from the admin panel of extension. The store admin can configure the push notifications template (Use own text, image, redirection link) and send it to Android and iOS app users. This can be an effective tool to market or promote the store deals, offers, and boost sales in the store.
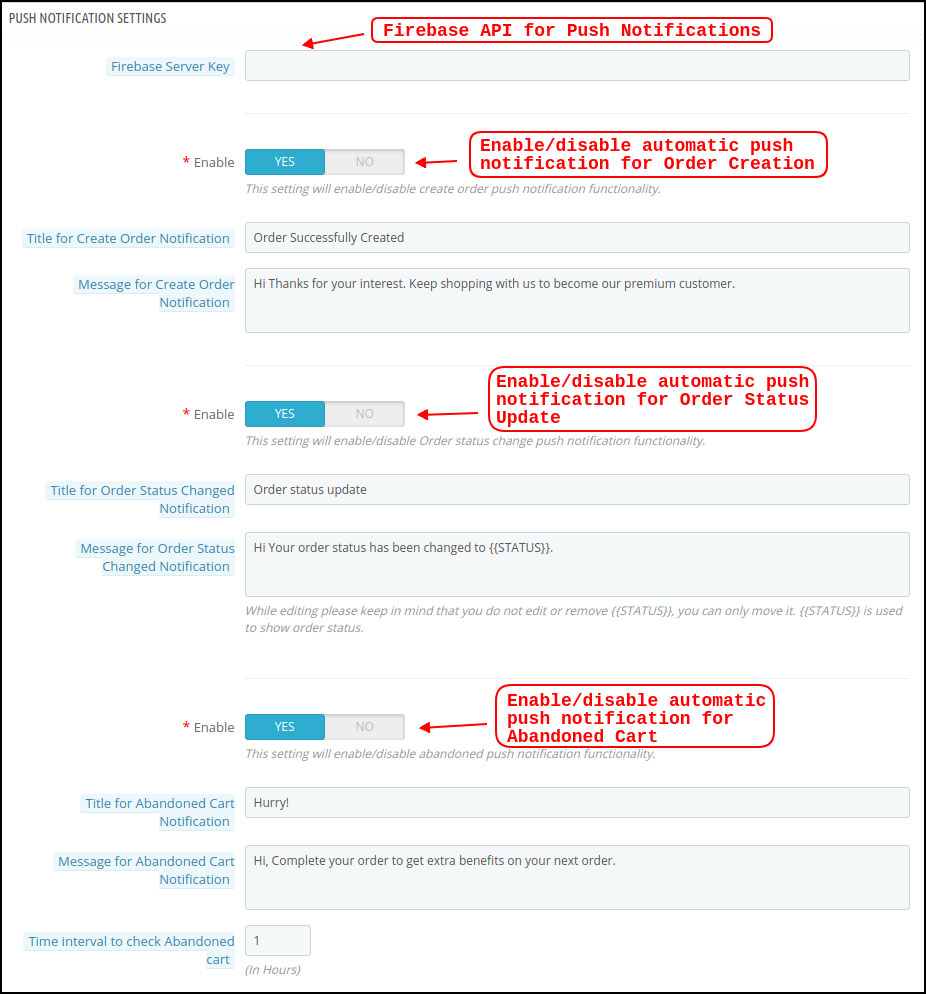
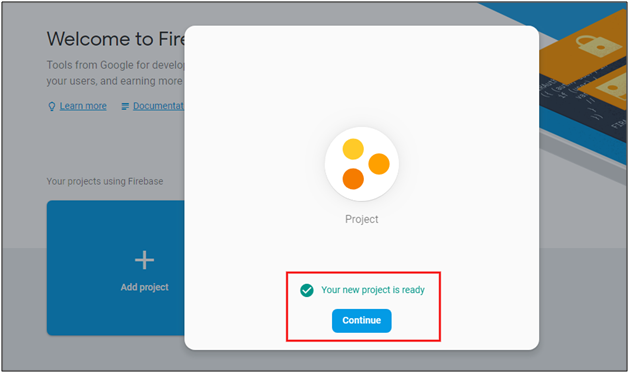
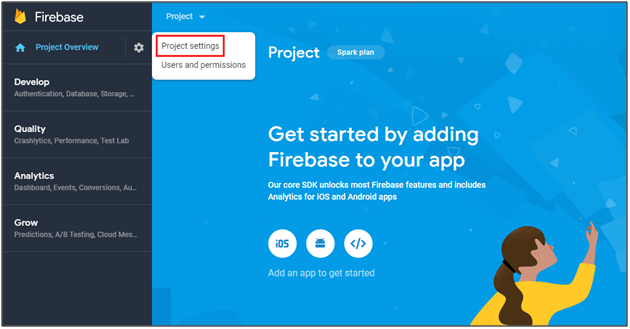
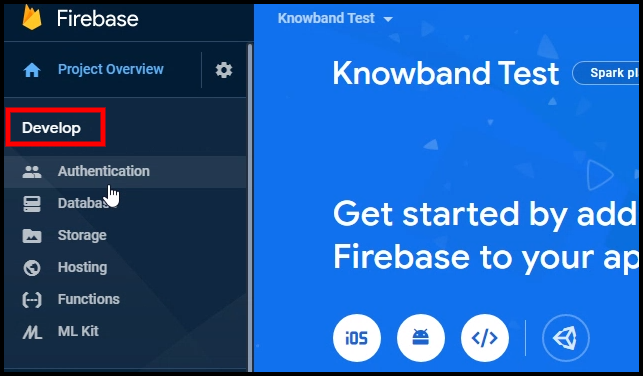
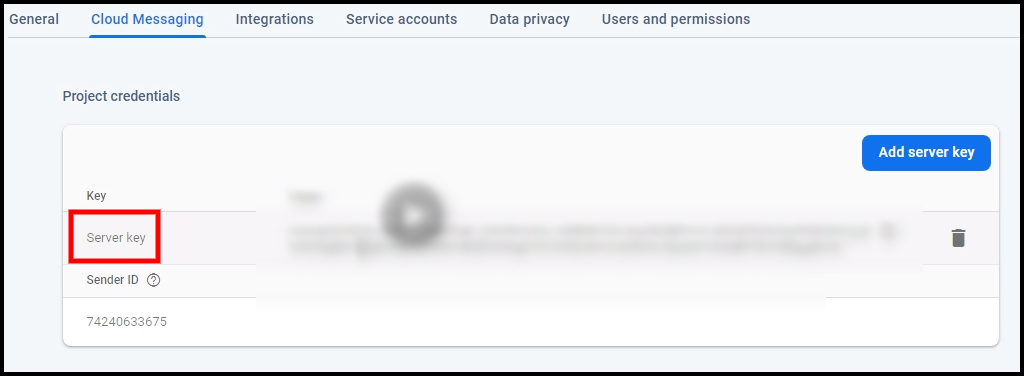
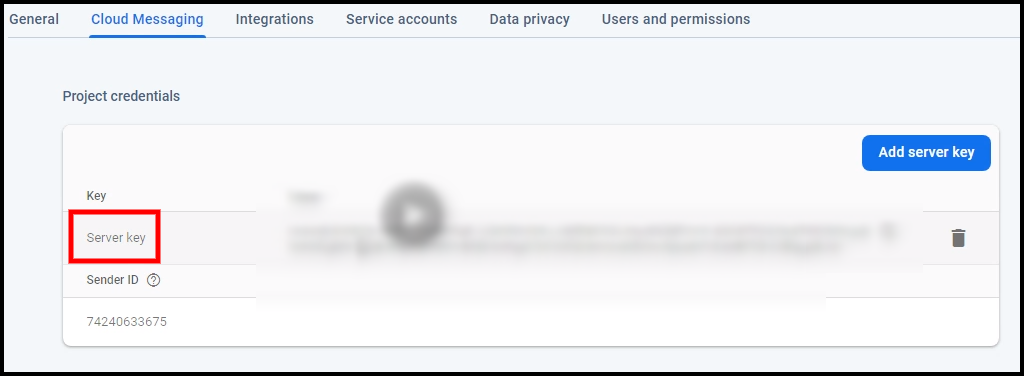
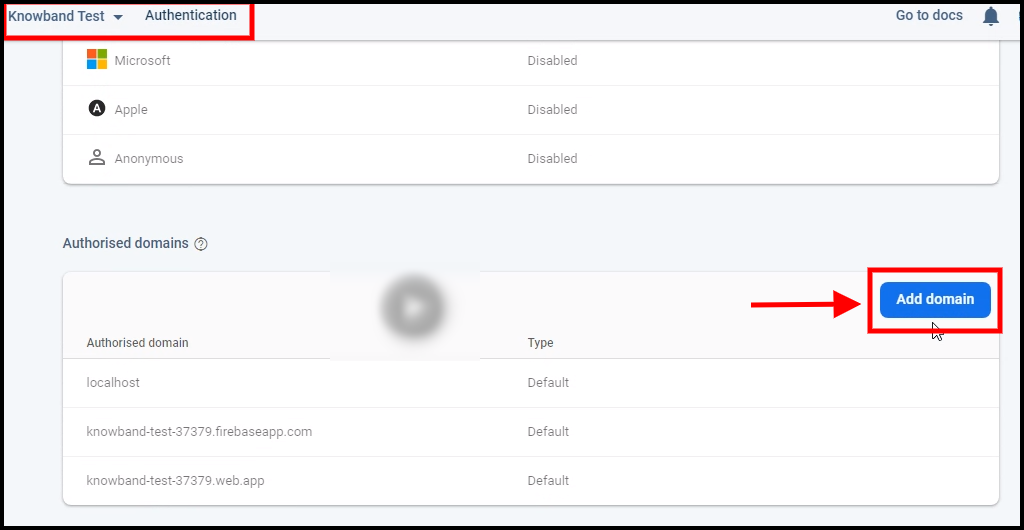
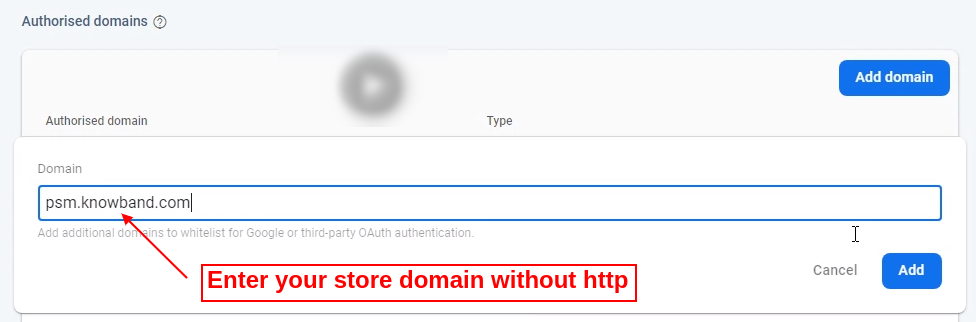
a) Firebase Server Key: This key can be used to send the push notifications on PrestaShop Hyperlocal Mobile App. The firebase project will be created while marketplace mobile app development. Once entered, it makes sure that the push notifications will be received to all mobile app users.
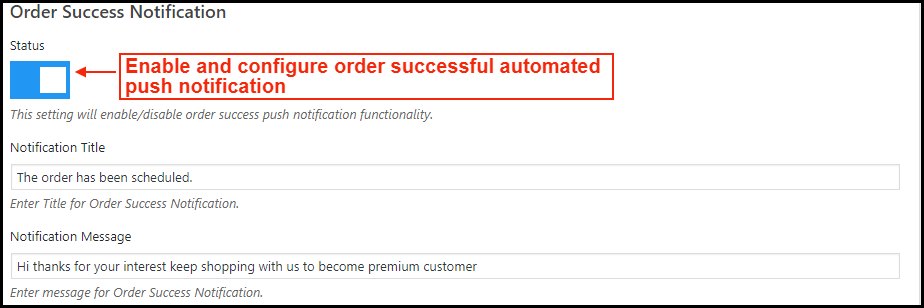
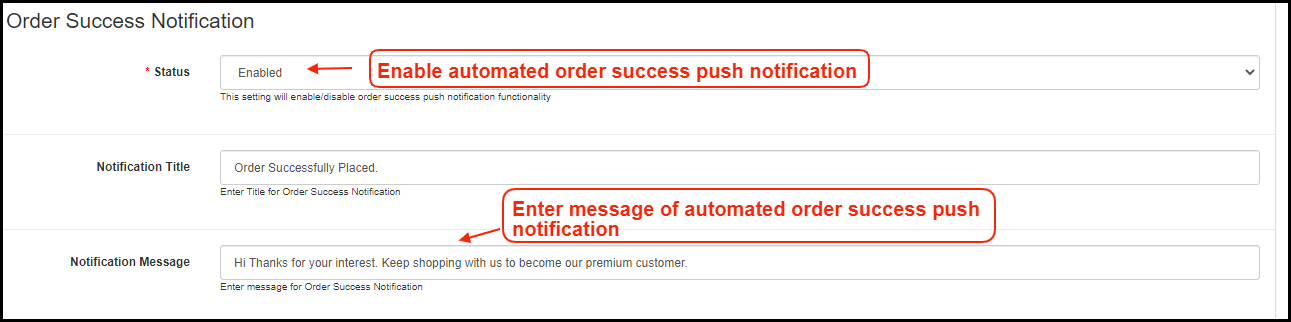
b) Create Order Notification: Enable/Disable automated successful order push notification sent to the app users. The template for the notification is fully editable like title, message, image, etc.
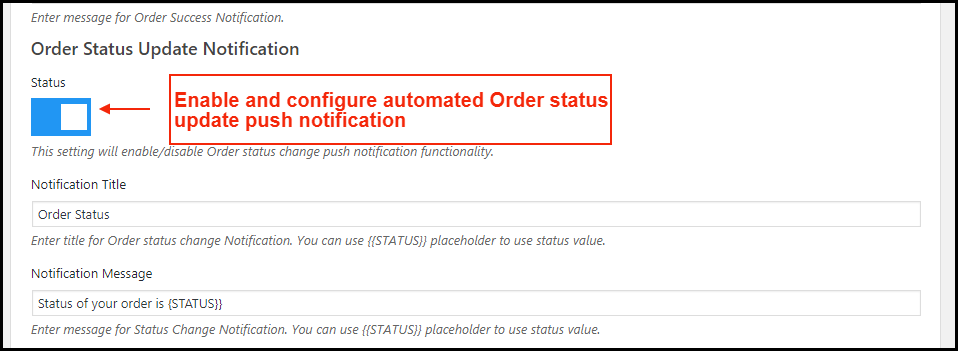
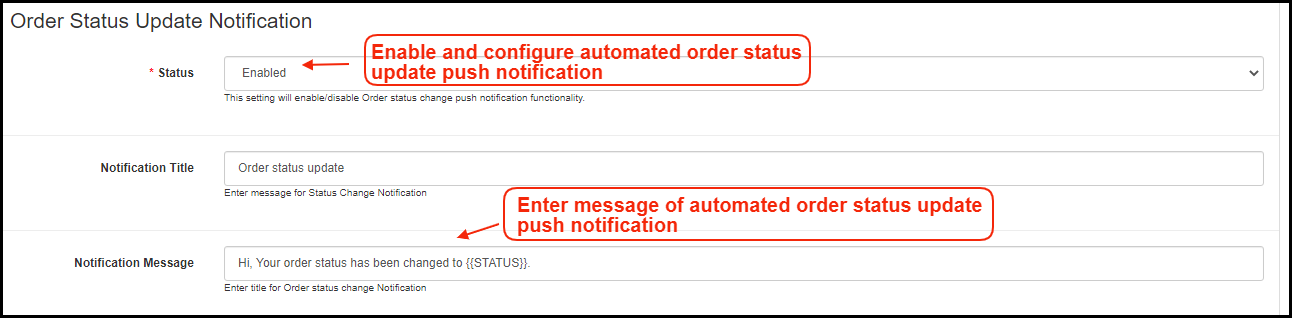
c) Order Status Change Notification: Enable/Disable automated order status change push notification sent to the app users. The template of the notification can be edited like title, message, image, etc.
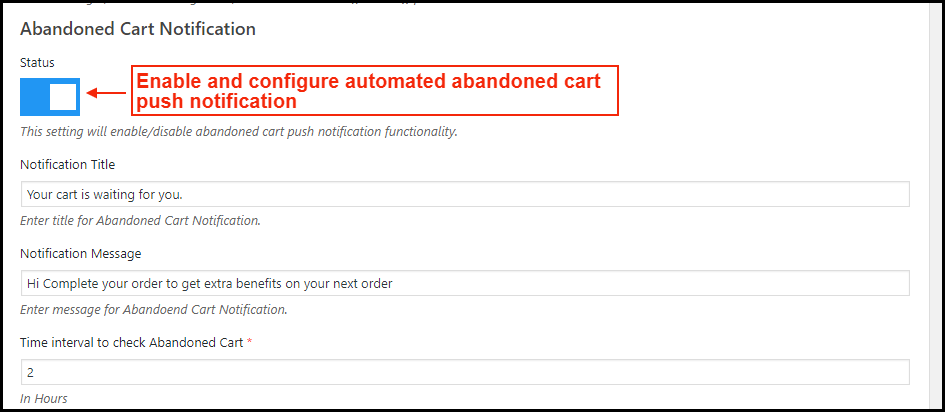
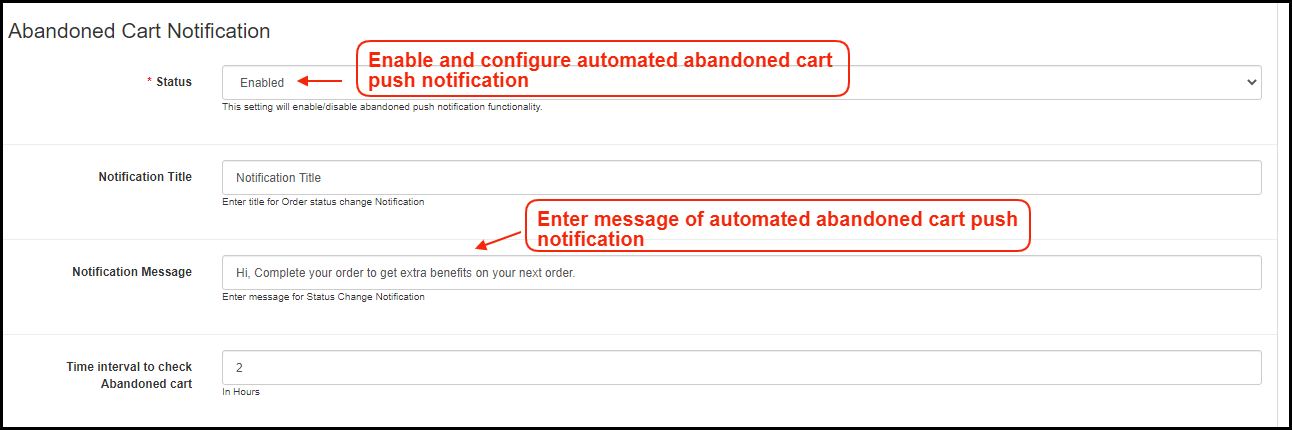
d) Abandoned Cart Notification: Enable/Disable automated abandoned cart push notification sent to the users who have left products in the cart without successful purchase. Enter the title & message of the push notification. For Abandoned cart notification, enter the time interval (in hours) after which push notifications will be sent.
3.3 Push Notification History
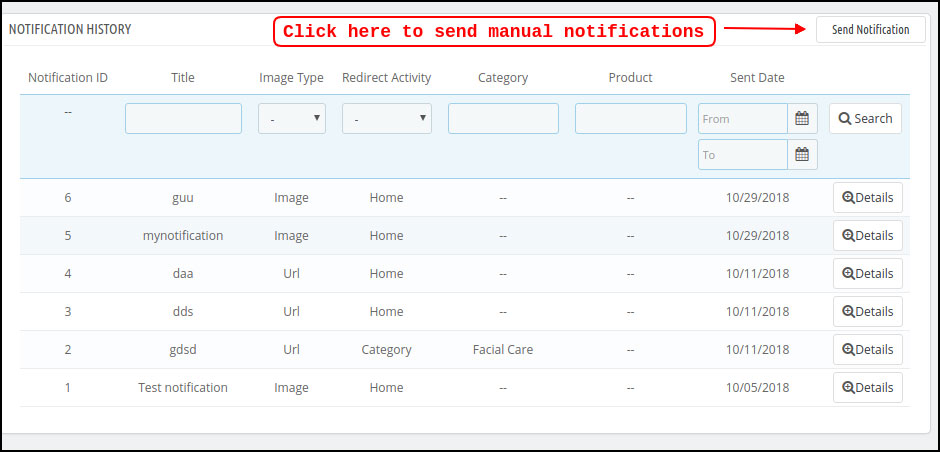
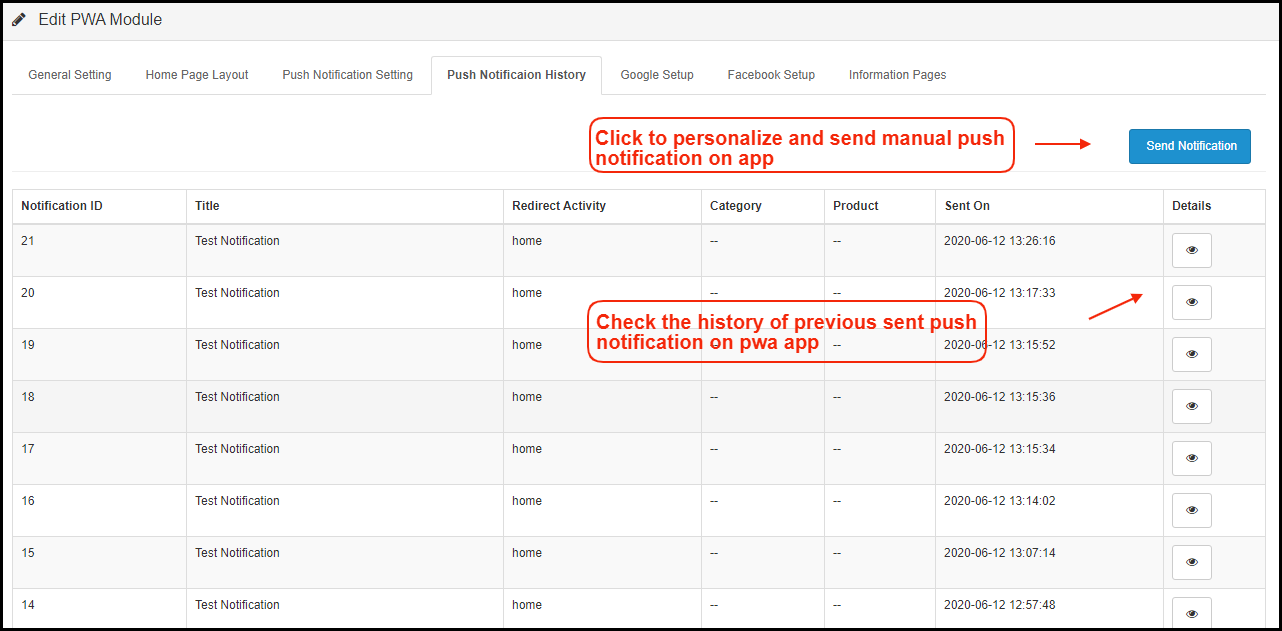
This settings tab contains the history of all push notifications sent to the PrestaShop Hyperlocal Marketplace Mobile App. The store admin can view the details of every sent notification.
Send Manual Notification:
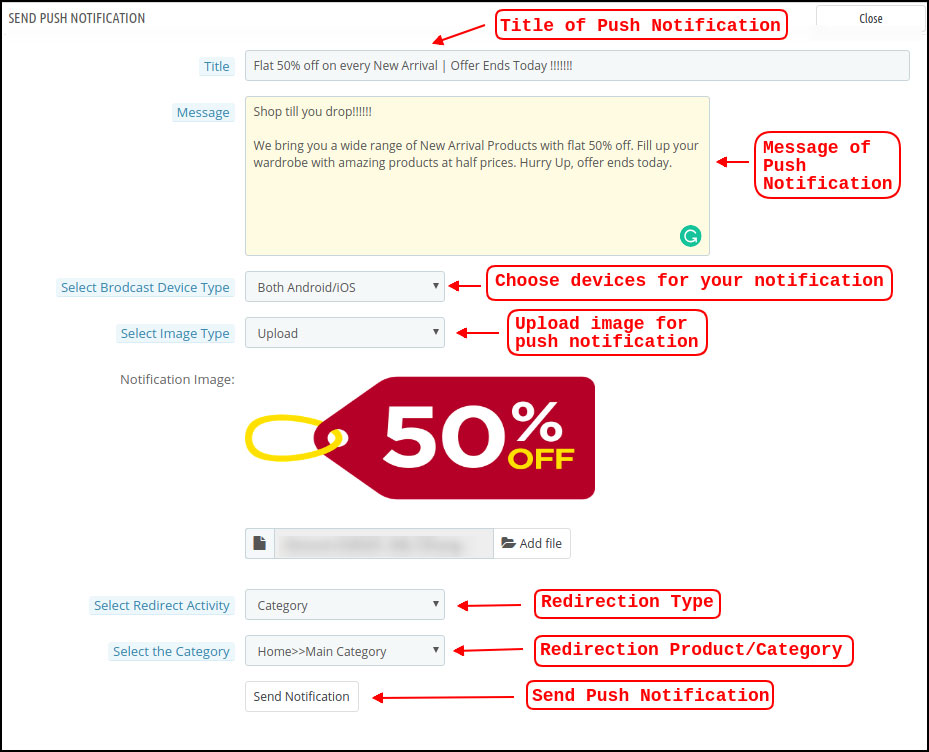
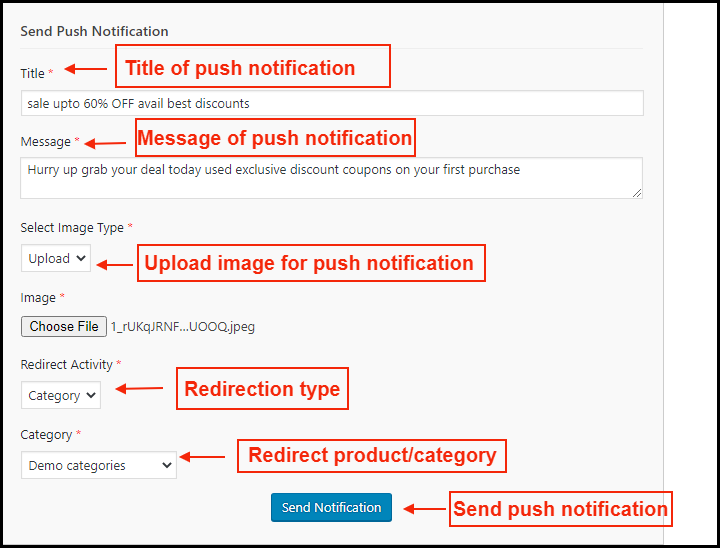
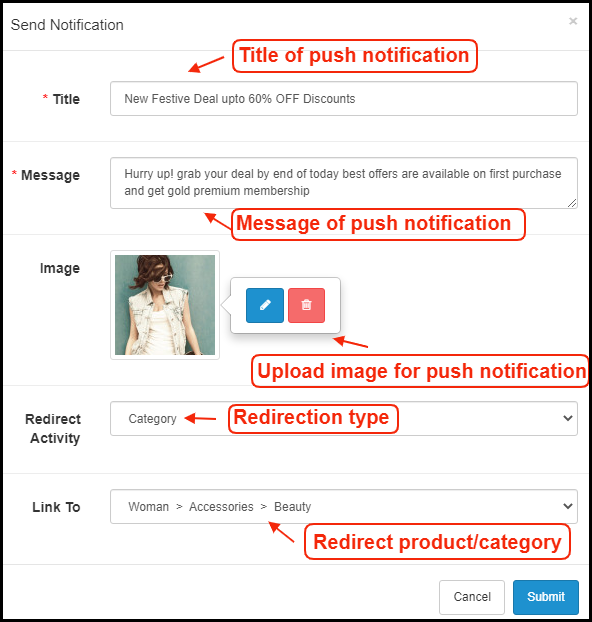
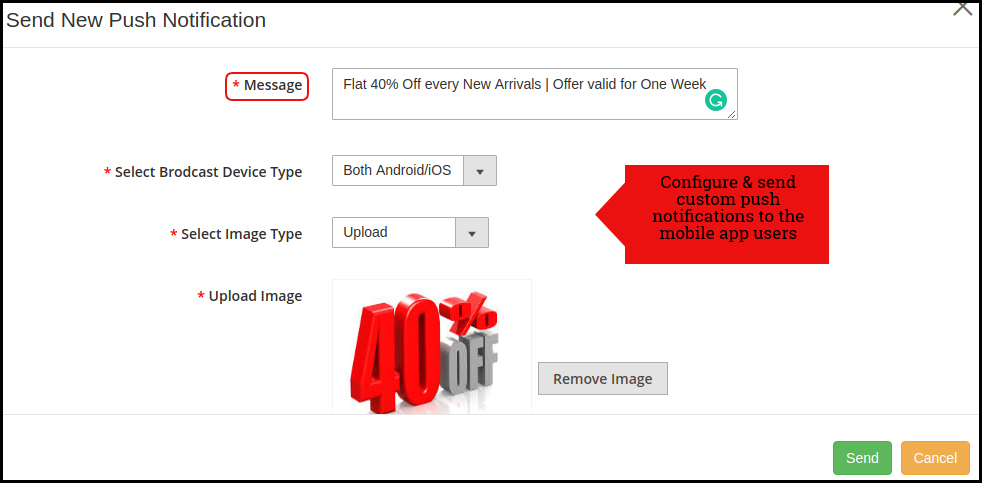
The store owner can craft and design push notification and sent it manually to app users. Configure the title, message, redirection link, image, etc. and send a push notification of choice:
a) Title: Enter the title of Push Notification that is to be manually sent to the app users.
b) Message: Enter the message of manual notification to be sent to the app users.
c) Select Device Type: Choose an Android or iOS device on which push notification is to be sent.
d) Image Type: Upload the push notification image as per the requirement. Image URLs can also be used instead of uploading images.
e) Select Redirect Activity: Set redirection of push notification on the app by choosing Home/Category/Product. Whatever redirection is set from the admin panel, app users will be redirected to the same screen.
f) Send Notification: Once configured, tap this button and send the push notification.
3.4 Payment Methods
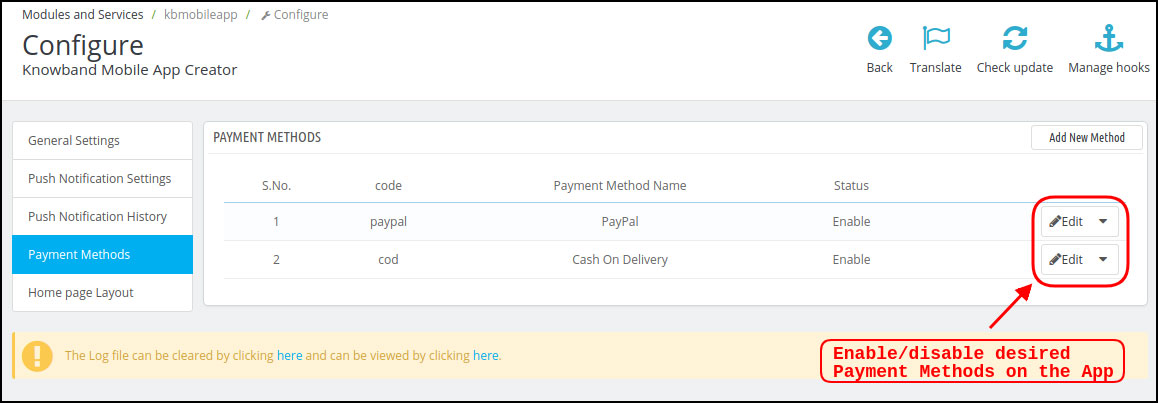
The PrestaShop Hyperlocal Marketplace Mobile App Creator supports all sorts of website payment methods. If you disable payment options (COD & PayPal) from the module, all website payments will be enabled on the Android and iOS apps.
3.5 Home Page Layout
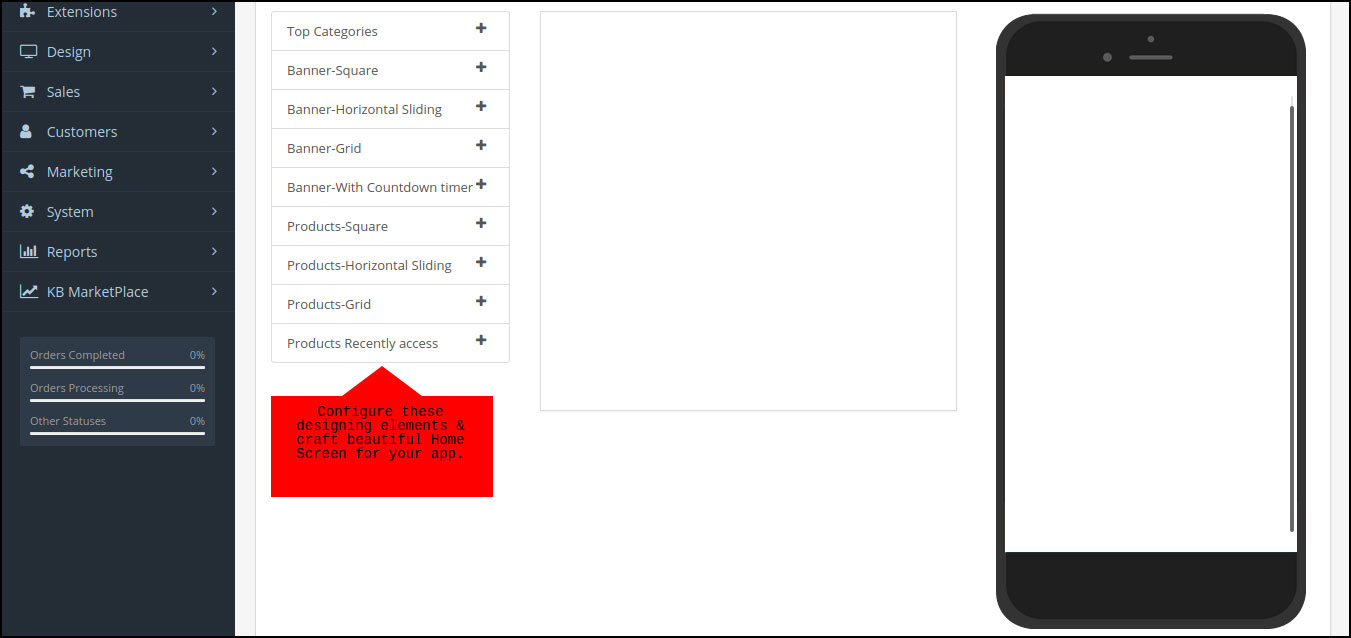
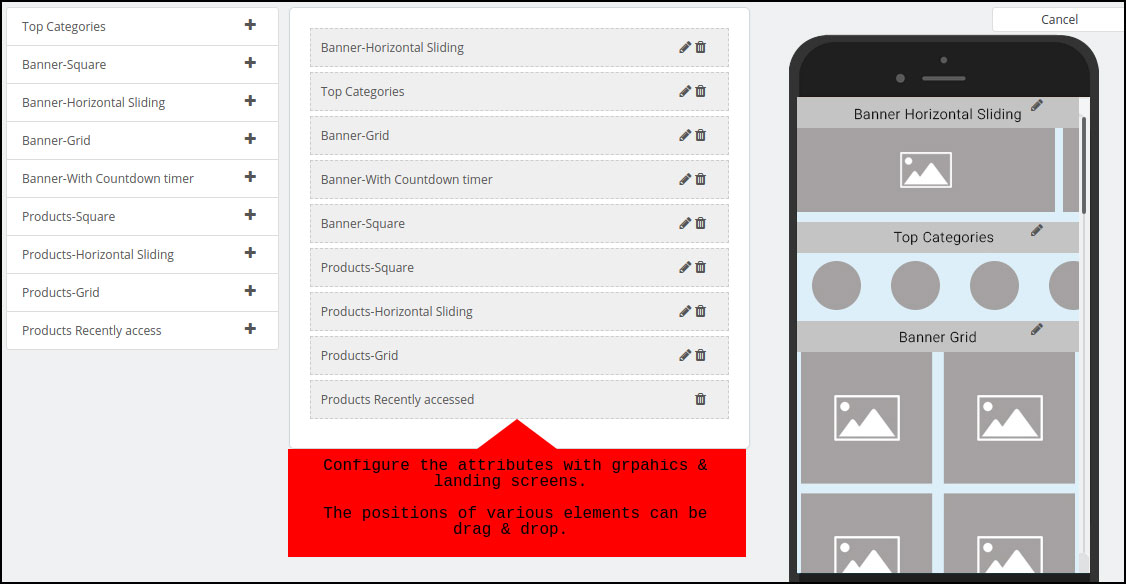
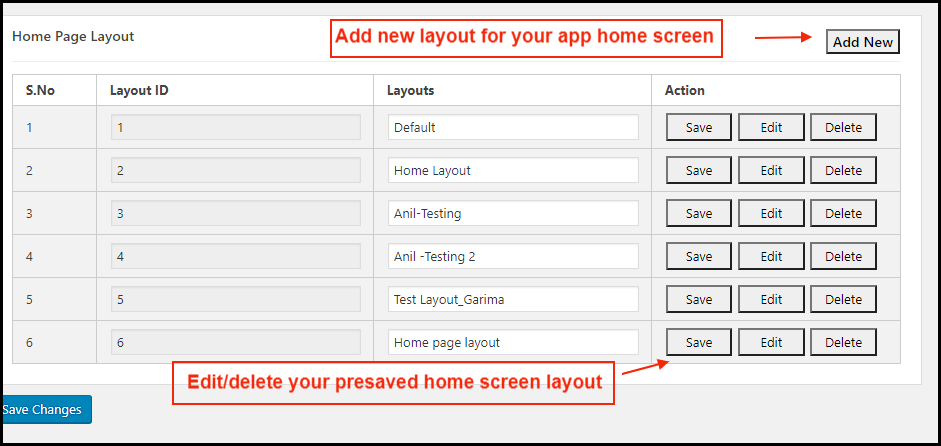
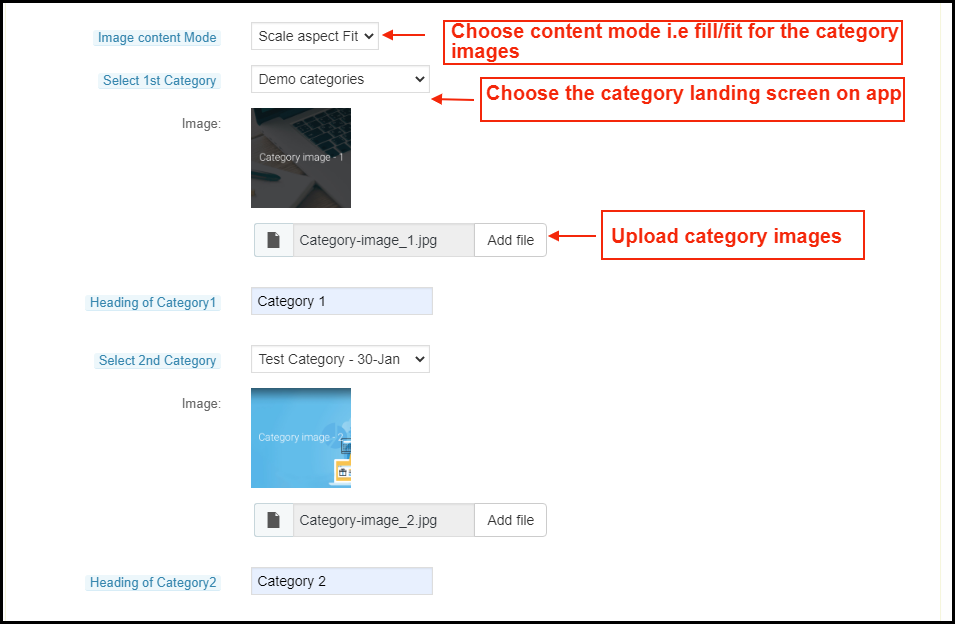
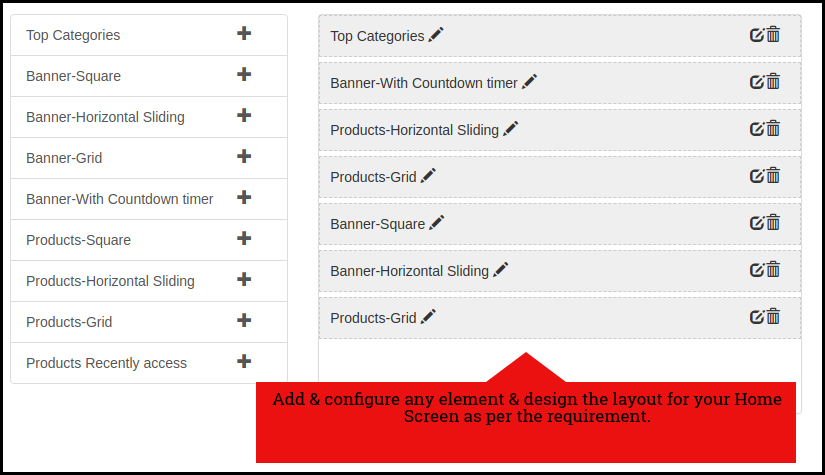
The PrestaShop Hyperlocal Marketplace Mobile App comes with a flexible home screen layout allowing store admin to use predefined elements and configure the look of the home screen. Multiple festivals, sale, promotional, etc. layouts can be created and saved in the admin panel and also used on the app as per the requirement. Here is the step by step process to create their own layout:
Top categories
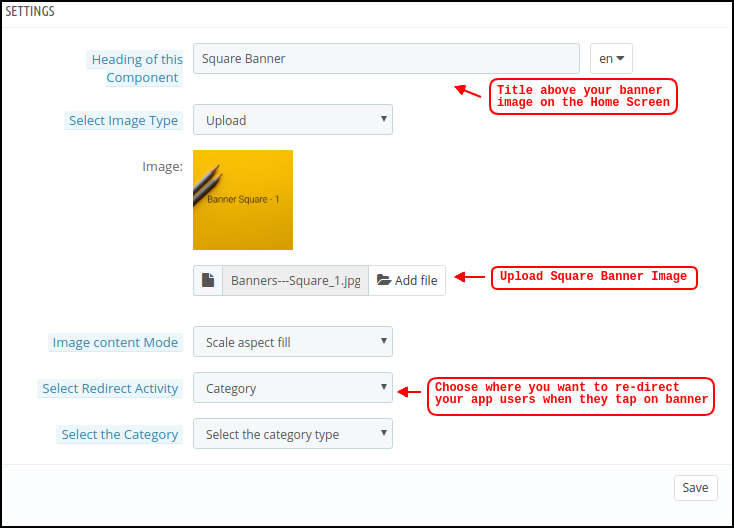
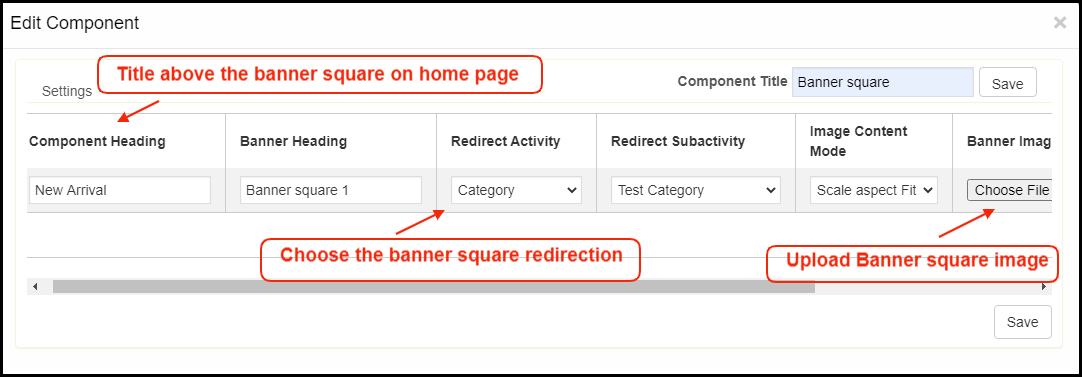
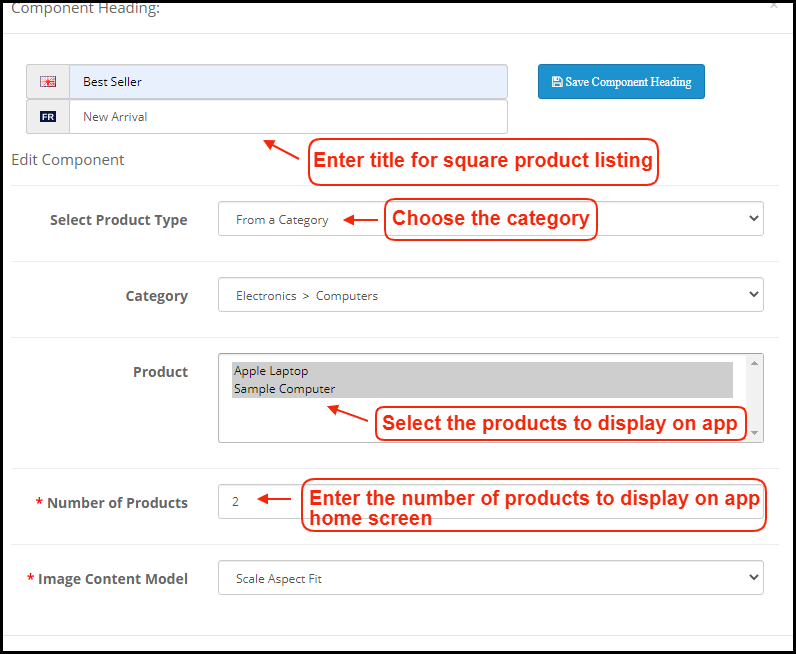
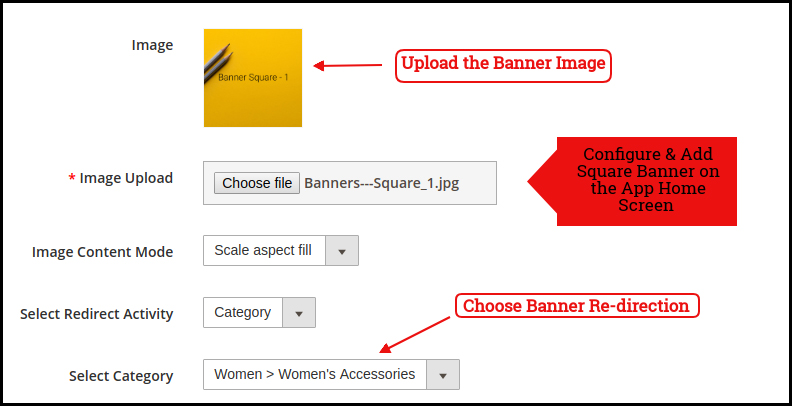
Square Banner
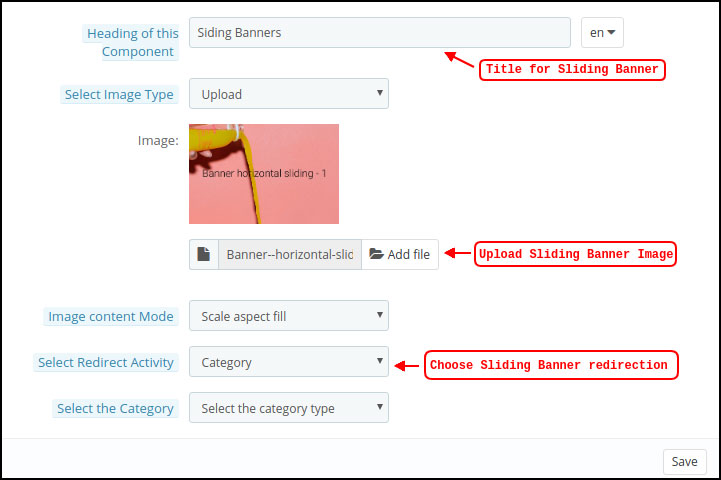
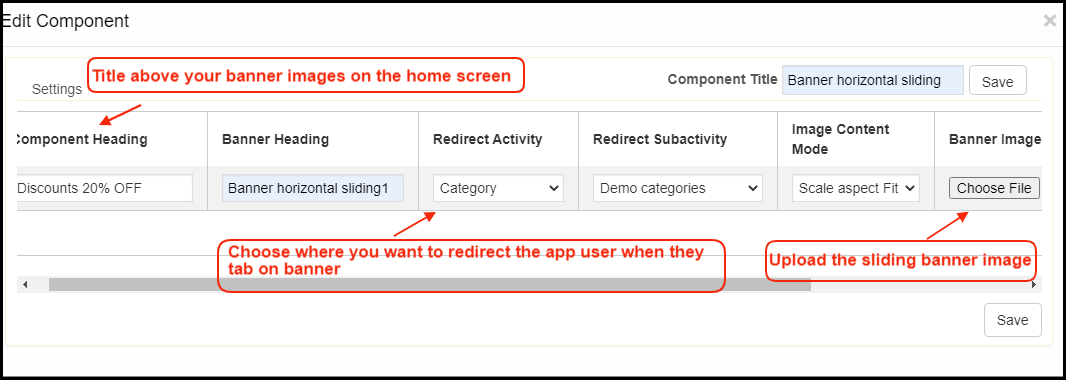
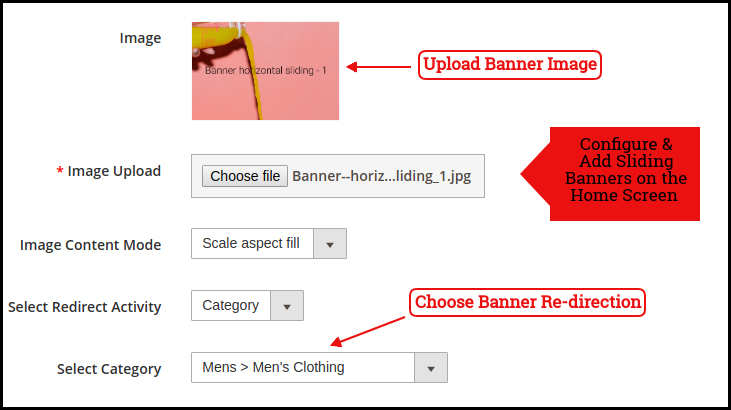
Horizontal Sliding Banner
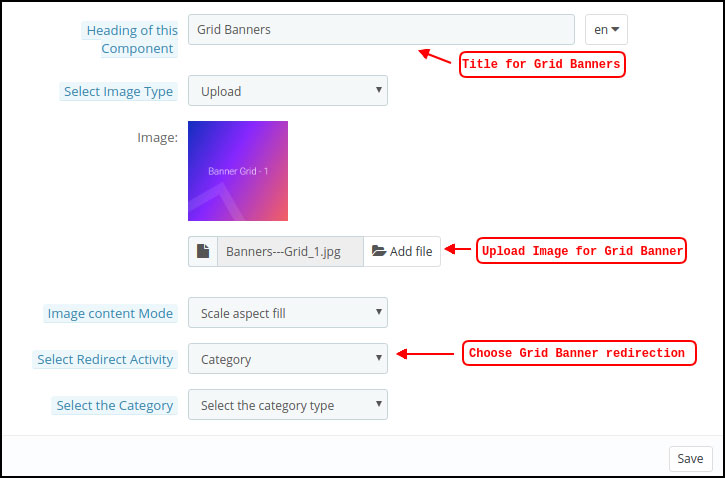
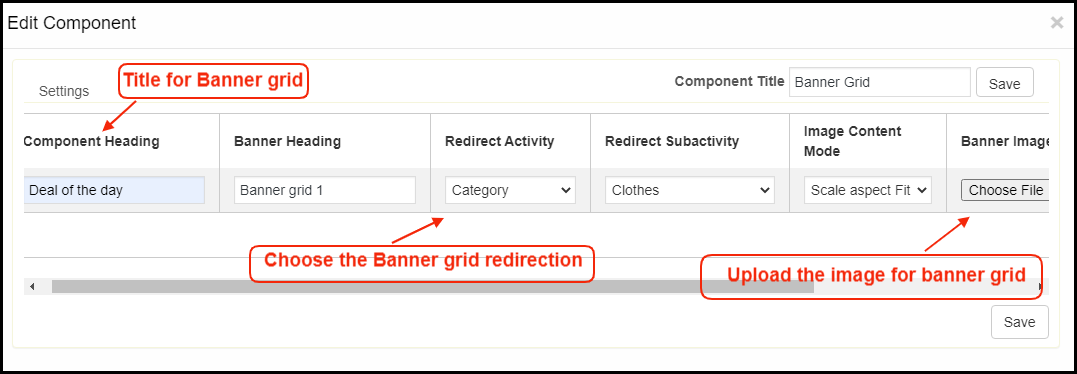
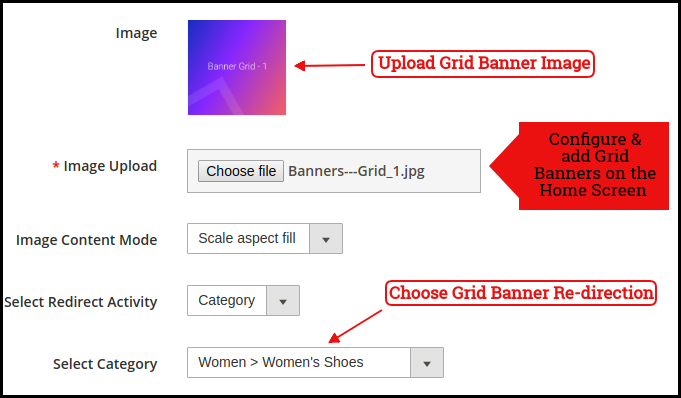
Grid Banners
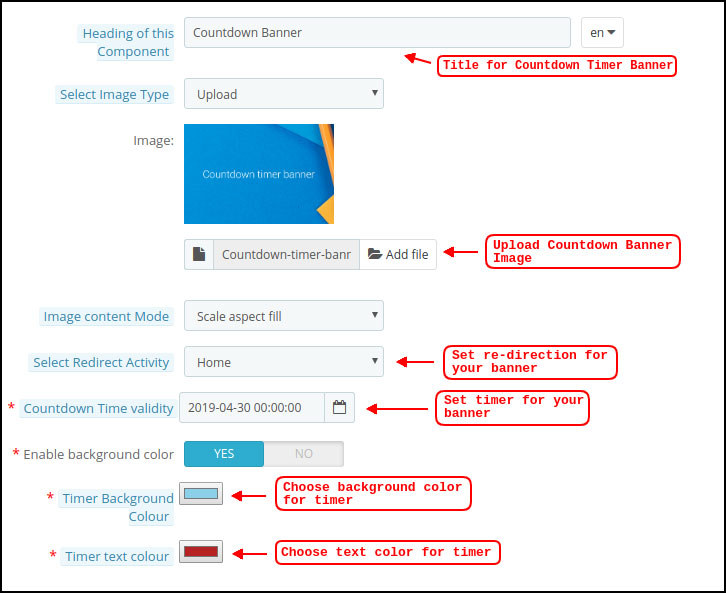
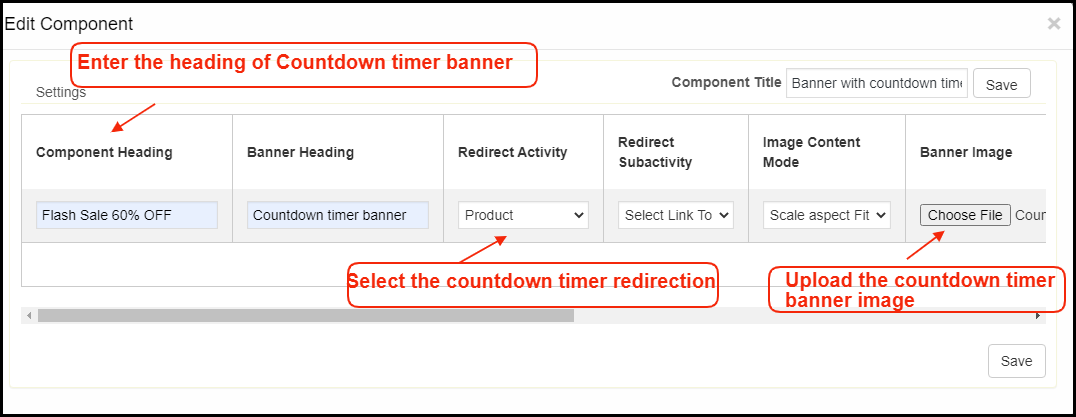
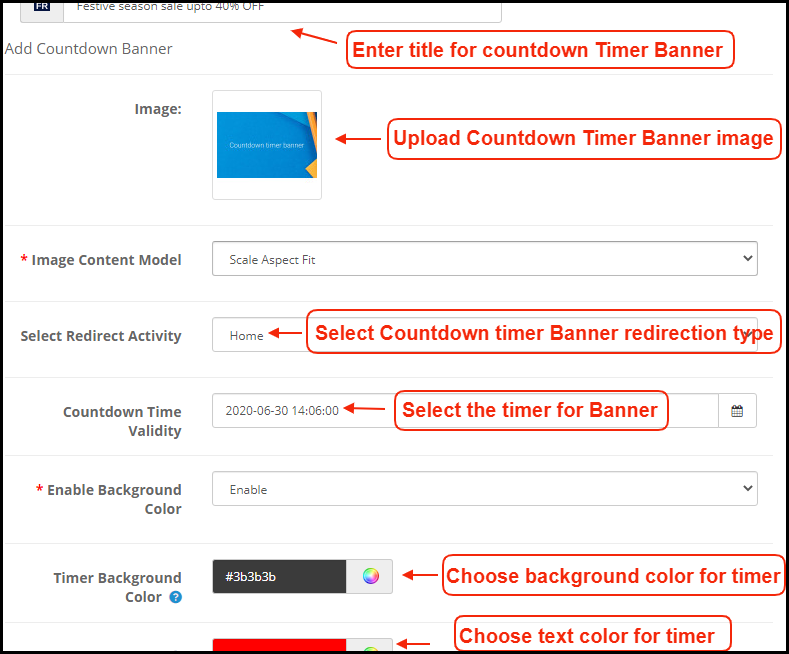
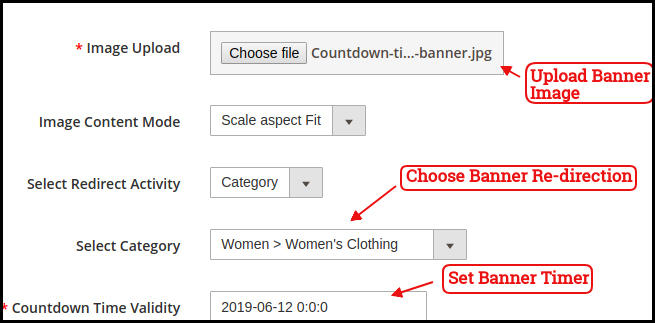
Countdown Banner
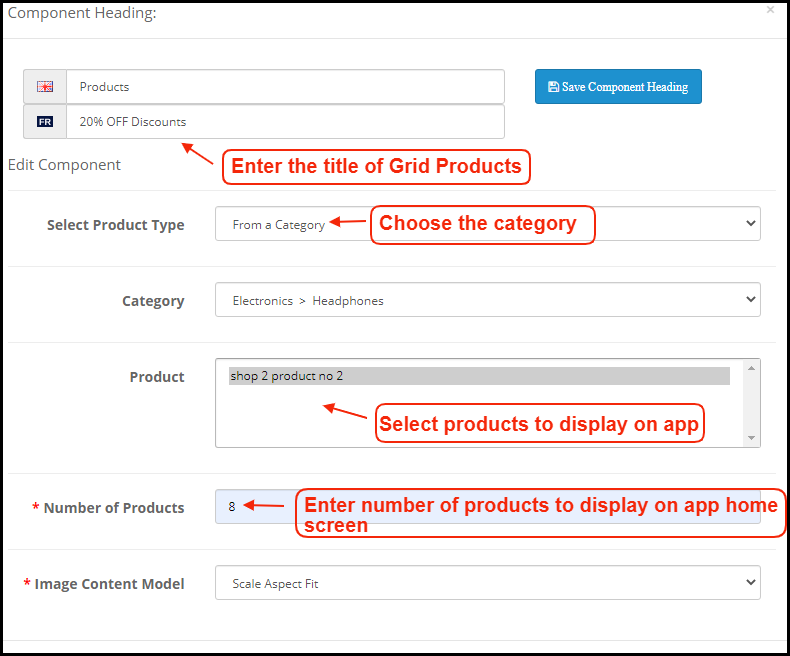
Grid Products
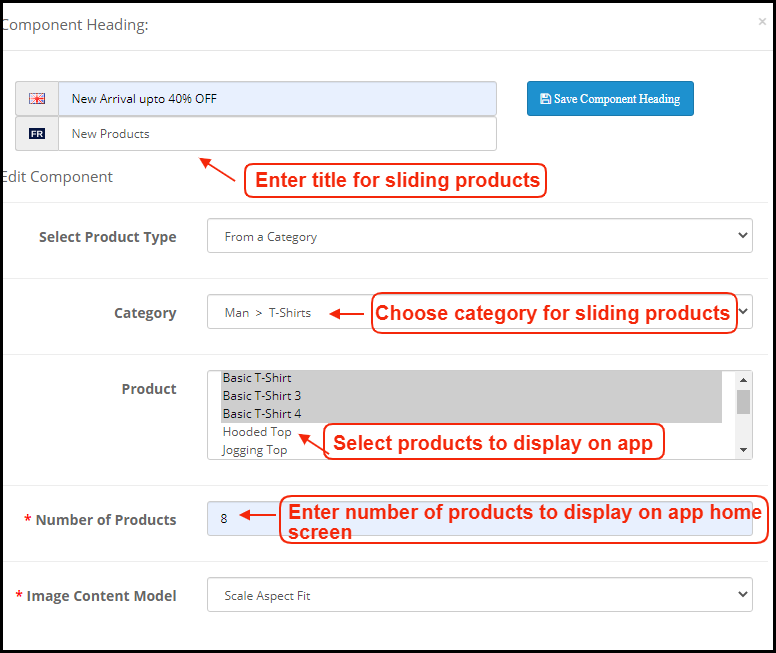
Horizontal Sliding Products
Recently Accessed Products
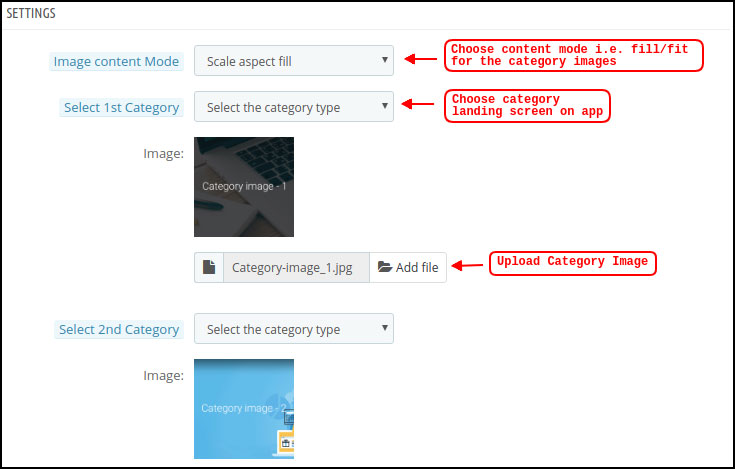
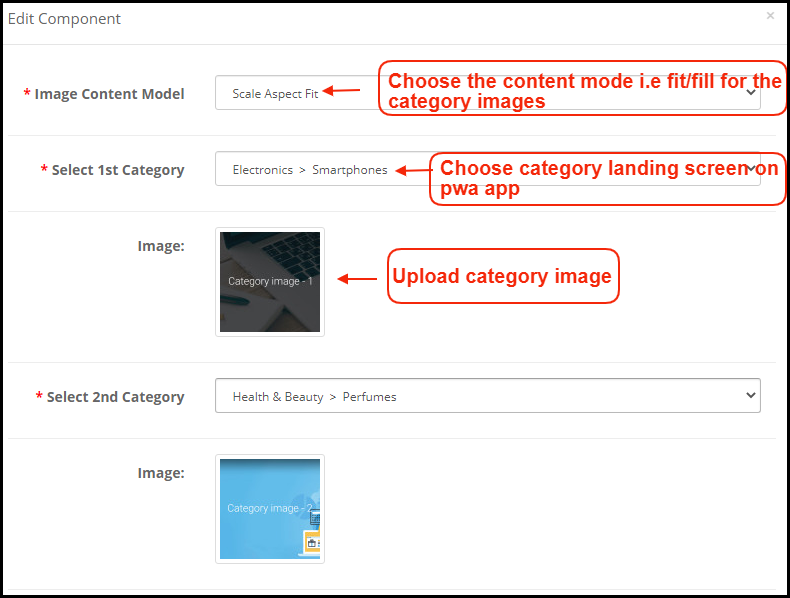
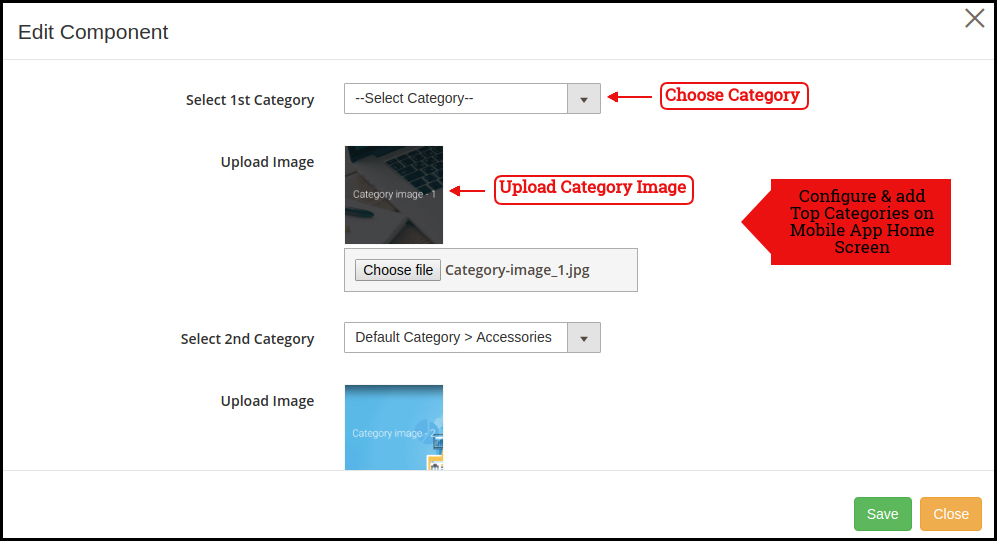
Top Categories:
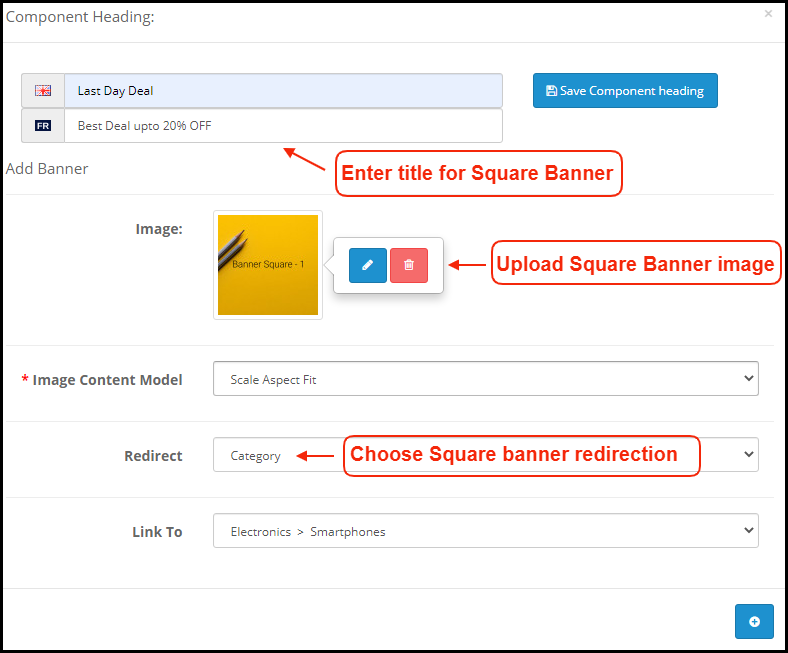
Square Banner:
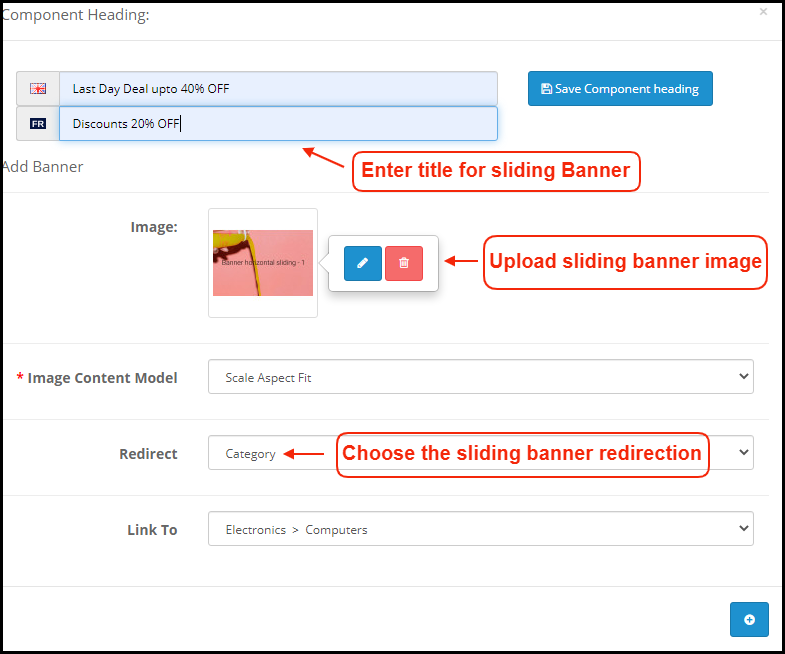
Horizontal Sliding Banner:
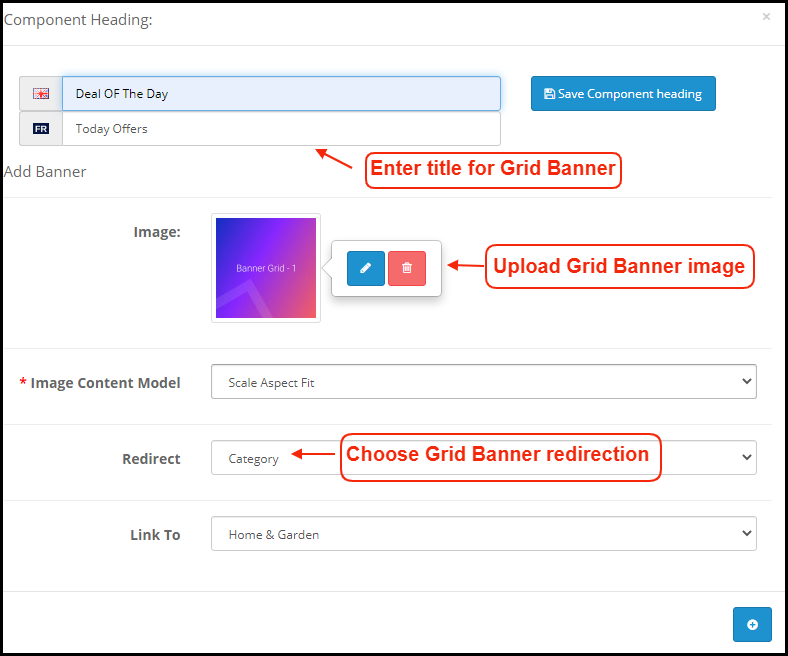
Grid Banners:
Countdown Timer Banner:
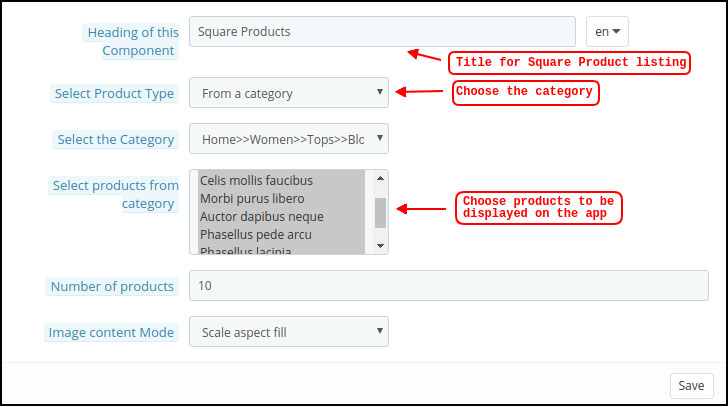
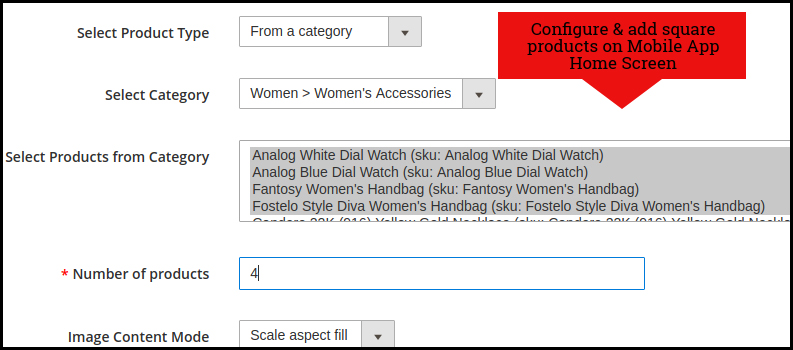
Square Products:
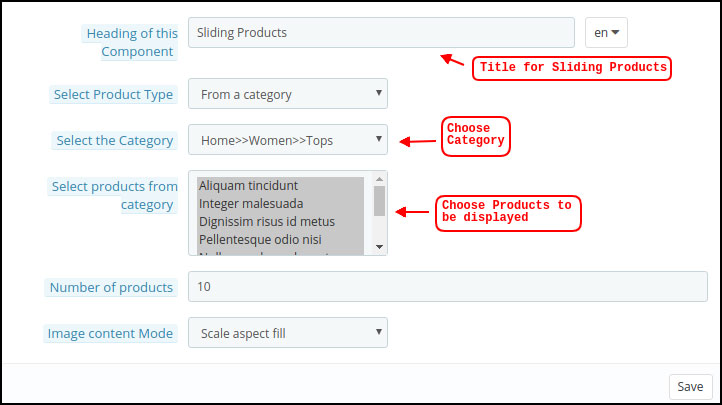
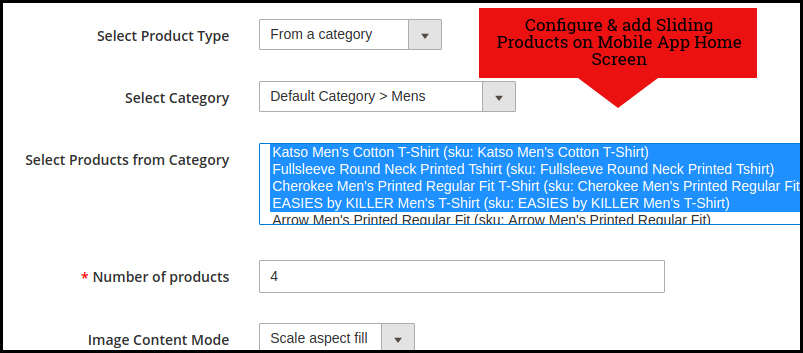
Horizontal Sliding Products
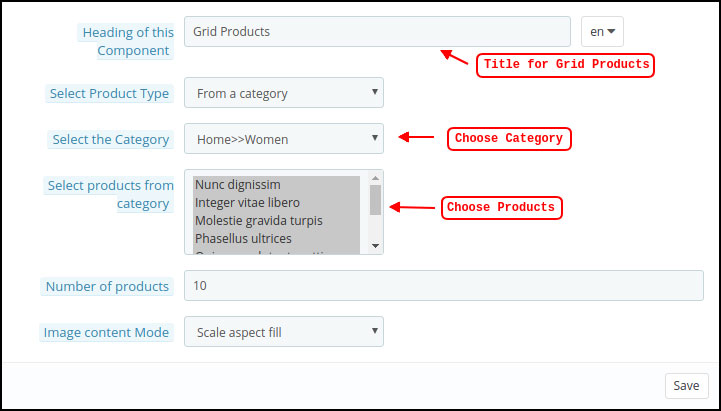
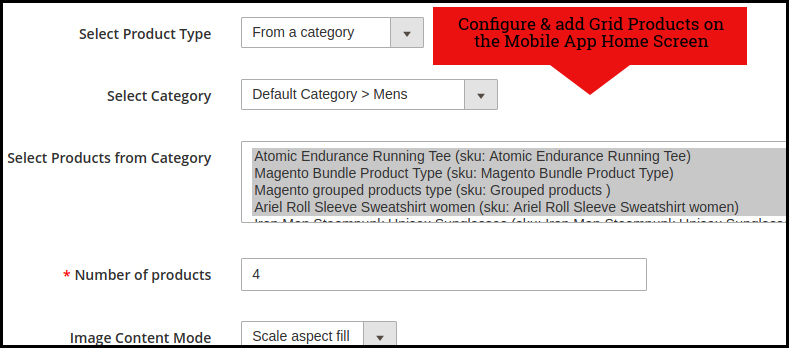
Grid Products:
3.6 Tab Bar Layout
Customize & showcase the bottom Tab Bar on Hyperlocal Mobile App (Android & iOS). This tab has the following options:
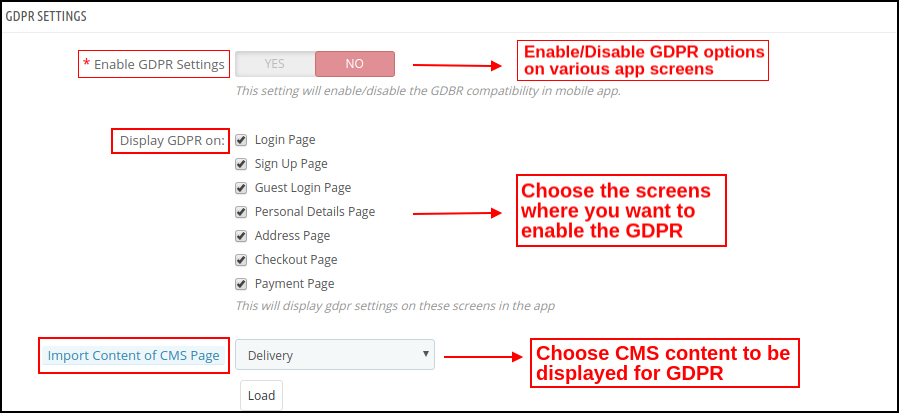
3.7 GDPR Compliance
The PrestaShop Hyperlocal Multivendor Mobile App comes with inbuilt GDPR compliance. The store admin can even GDPR settings to stop GDPR functionalities in mobile apps.
4.0 Hyperlocal Marketplace Mobile App Screens
4.1 Home Screen
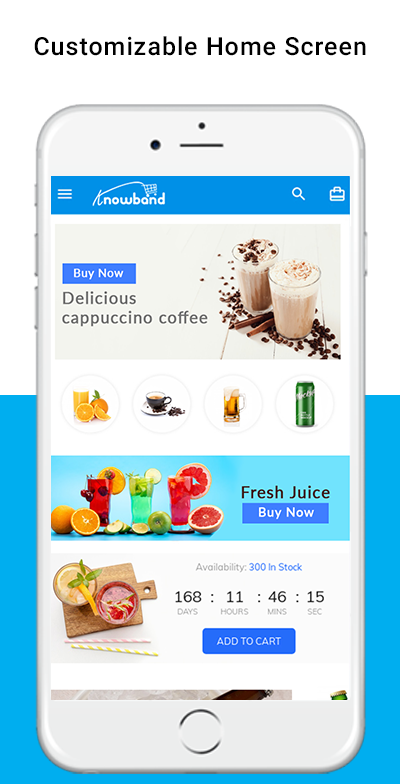
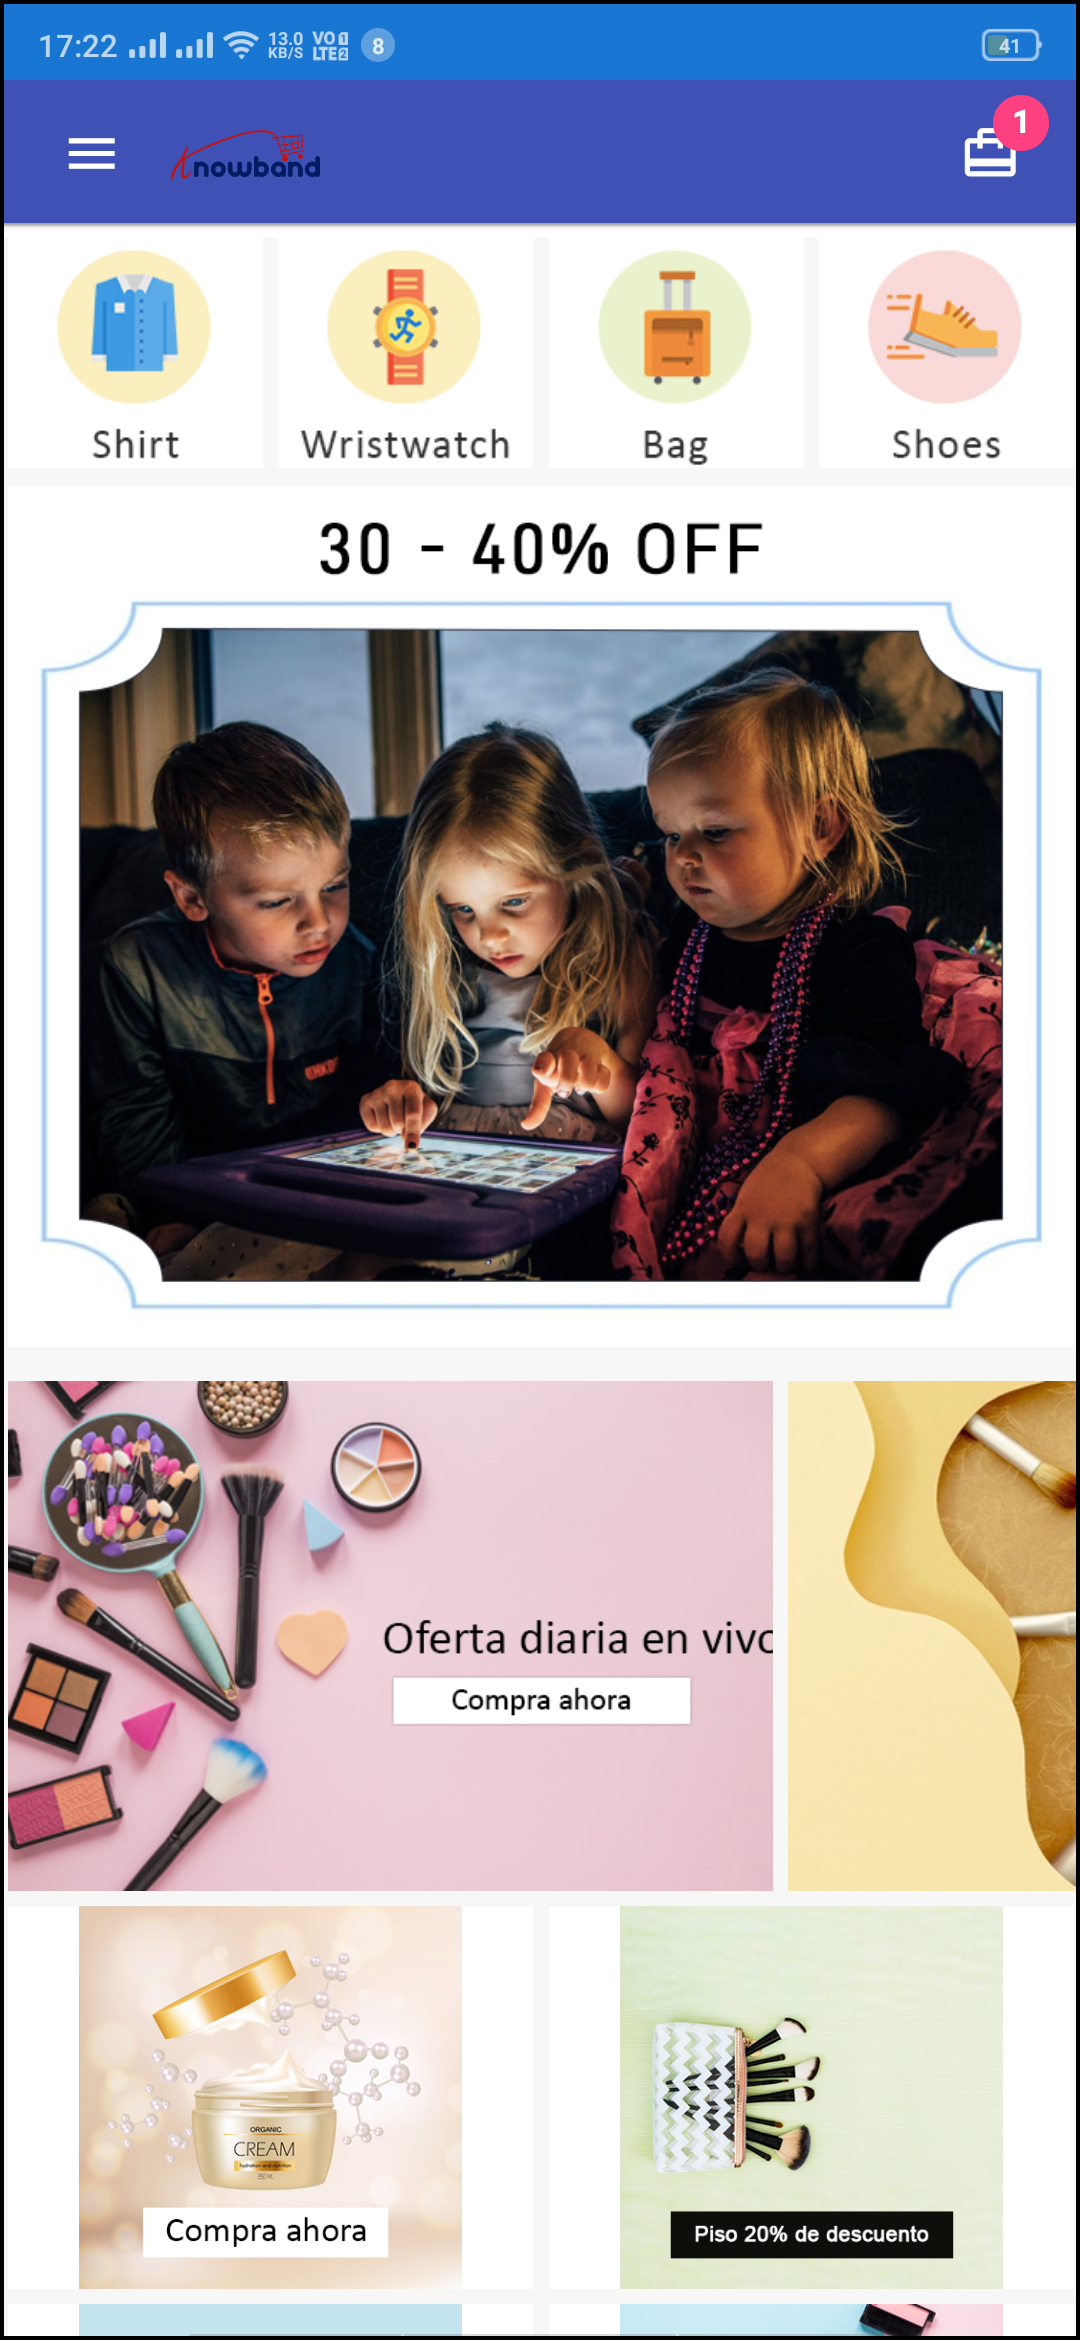
The PrestaShop Hyperlocal Marketplace Mobile App home screen consists of editable banners, images, blocks, colors, fonts, etc. With DIY editor in the admin panel, the entire home screen design can be changed anytime even after the apps are live.
The colors can be chosen from the admin panel. The store logo can be added to the header of the app. The following elements can be used for designing the home screen:
Top Categories
Square Banners
Grid Banners
Horizontal Sliding Banners
Square Products
Grid Products
Horizontal Sliding Products
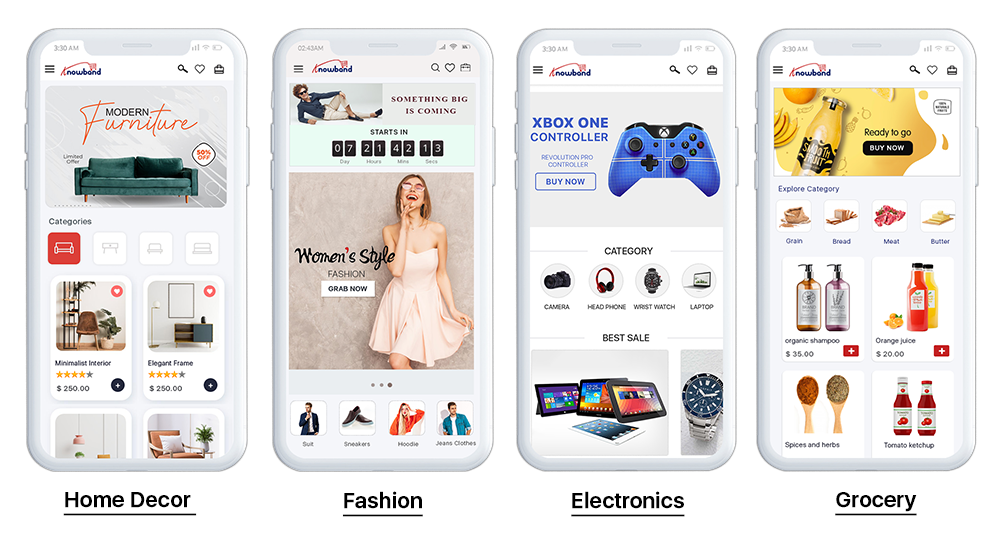
The customizable home screen of the PrestaShop Nearby Marketplace Mobile App can be transformed into general stores, food delivery, grocery delivery, medicines, or any local level marketplace business. No matter what you sell, the app can fit perfectly for all sorts of business domains.
4.2 Choose Location
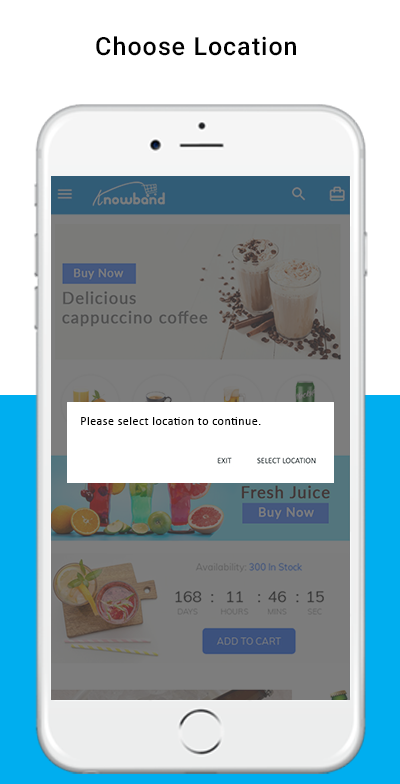
The Hyperlocal Mobile App for PrestaShop comes with the option to choose the location in the front end. The mobile app users can simply set the current location or enter the same manually.
Select Current Location
Enter Manual Location
Once the location is selected, the users can browse the products available in that location and place orders. Also, they can access nearby products at one screen from the navigation menu.
The mobile app user taps the Select location button, another screen opens with Google map and pointer. In case of choosing the current location, the pointer automatically selects the location and asks for confirmation.
Once the location is confirmed by the user of the PrestaShop Hyperlocal Marketplace Mobile App, the app will be redirected to the home screen. All the products under that location will be available for browsing and purchase.
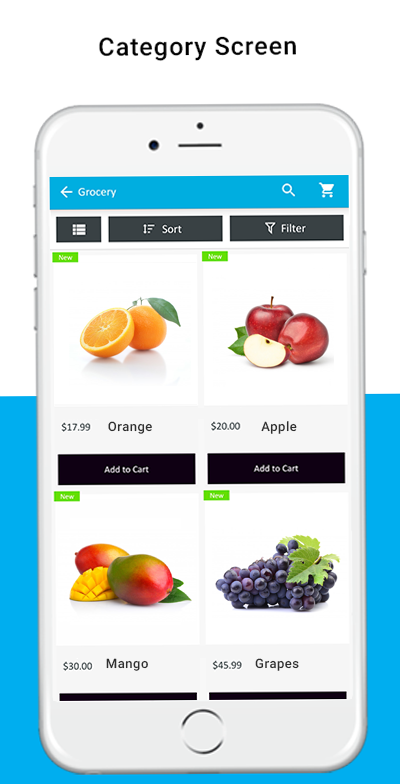
4.3 Category Screen
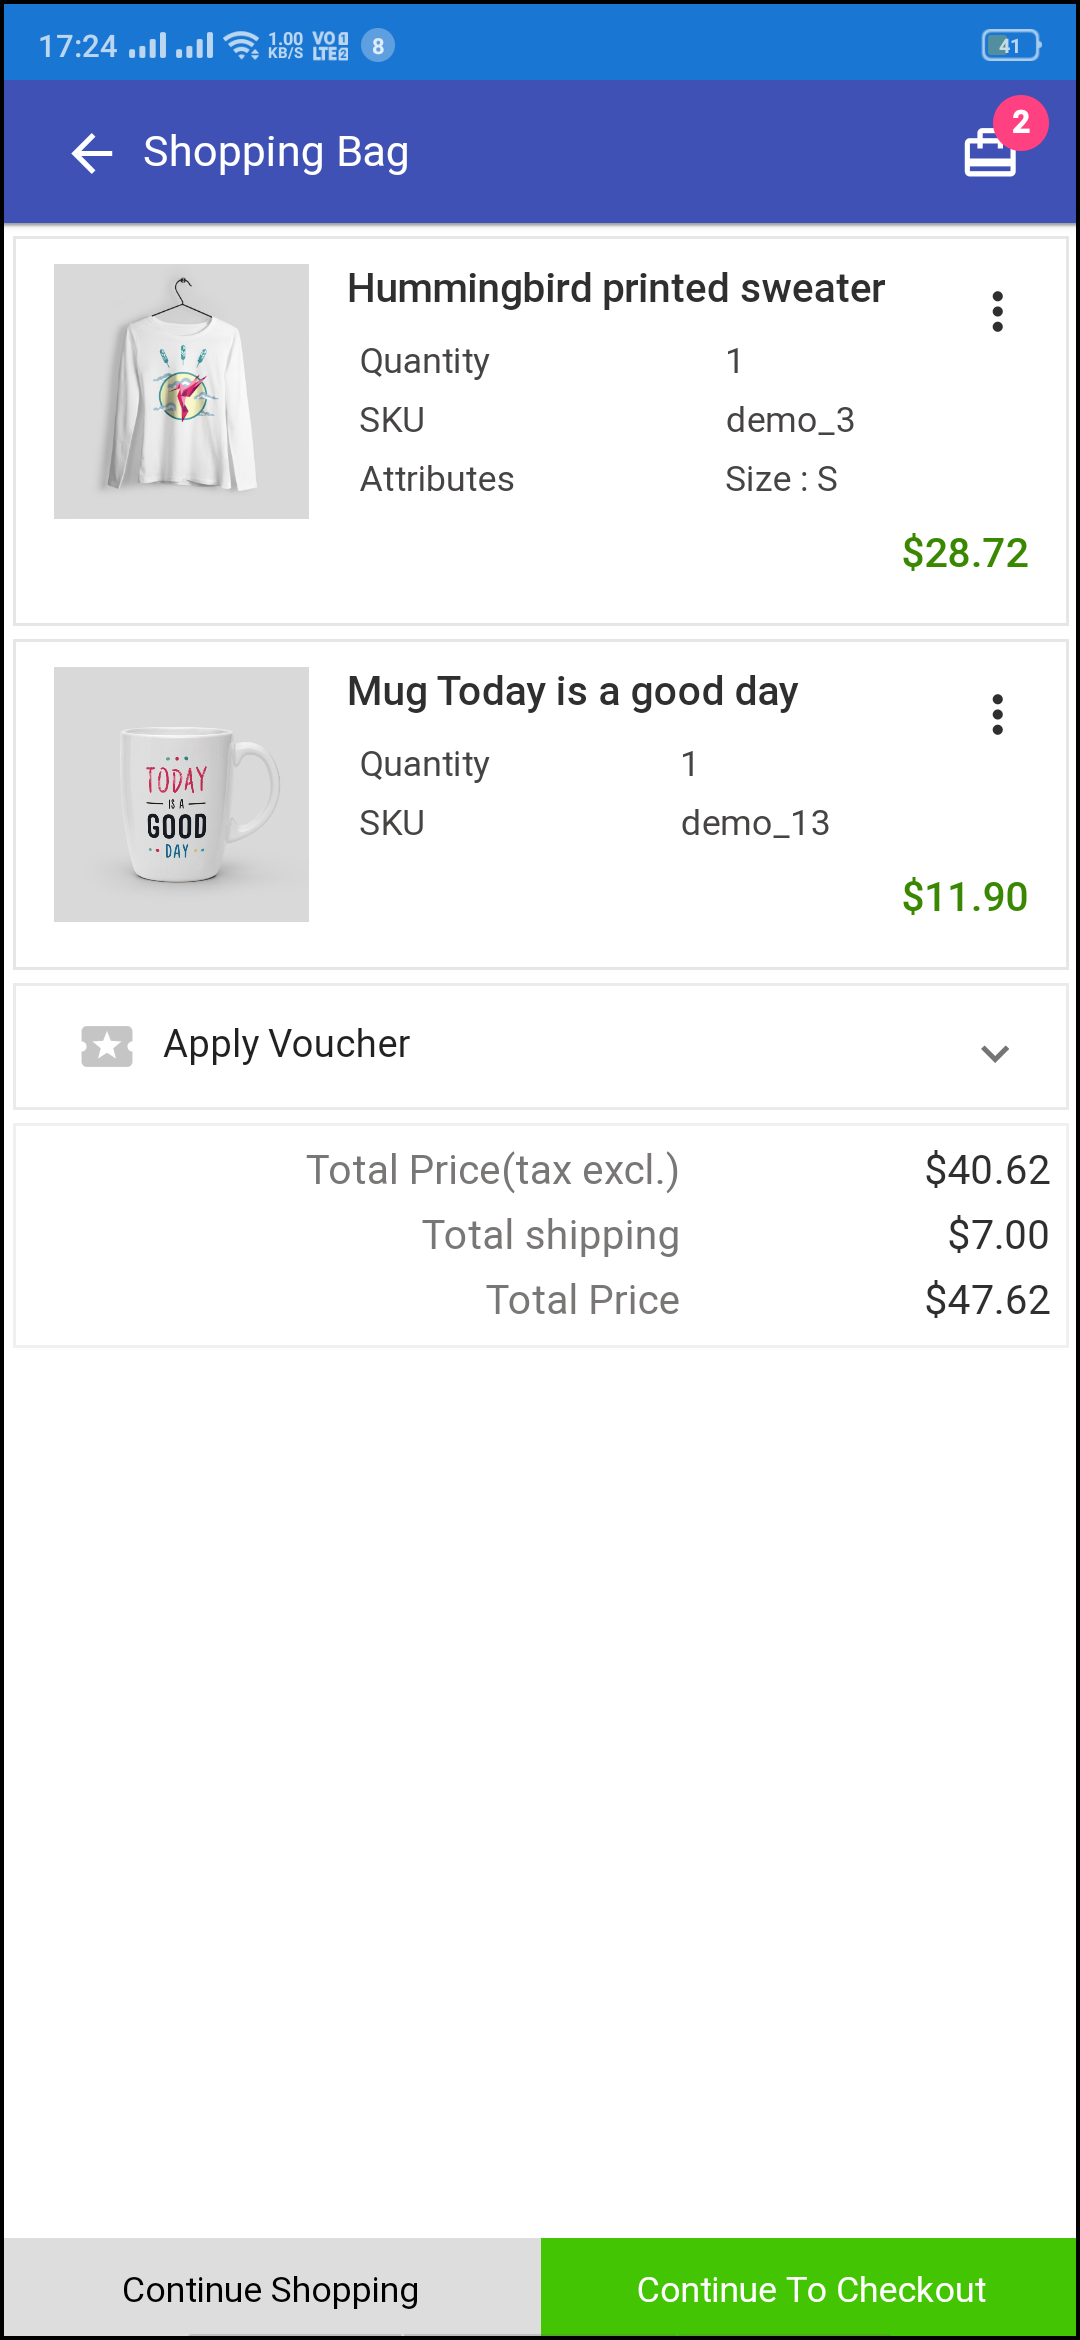
The Hyperlocal Multi-vendor Mobile App comes with an impressive design with “Add To Cart” and “+/- Quantity Stepper” for all product blocks. The users can simply browse the products with infinite scrolling functionality. No need to hassle between pages with regular pagination. Browse simply by navigating from top to bottom and products will be loaded gradually.
List/Grid View
Sort Option
Filter Option
With the sort option, the users get to narrow down the products based or available sorting options like – High to Low, Low to High, etc.
With the inbuilt filter option, the user gets to filter down the products based on the category, brand, price, etc. This layered navigation in PrestaShop Hyperlocal Marketplace Mobile App can be much fruitful in finding the right product for purchase.
A green color “New” badge will be stuck on the product blocks for all new products added in website inventory.
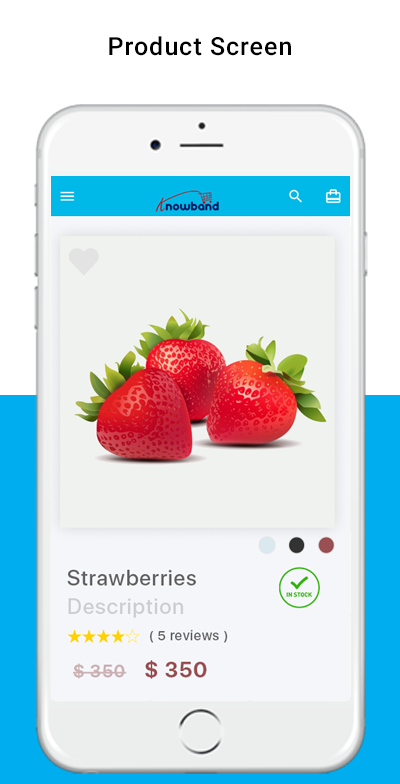
4.4 Product Screen
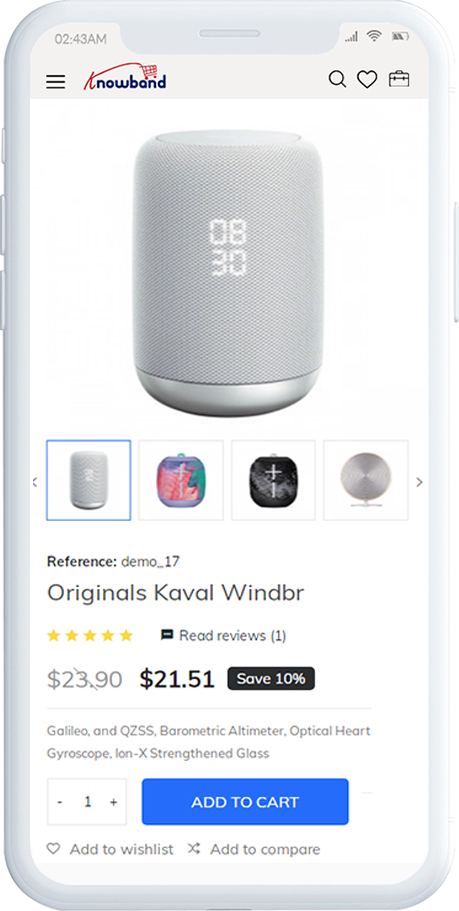
The product screen of the PrestaShop Hyperlocal Marketplace App is simple yet very appealing. Right from showcasing multiple product images to name and both short as well as the long description. The availability of the product is displayed with the “In Stock” and “Out Of Stock” label. This label will be automatically set on the Android and iOS apps based on inventory status.
Product Options
Wishlist Functionality
Short Description
Long Description
Quantity Stepper
Continue Shopping
Add To Cart button
Social Sharing of Products
The users can simply go to the product screen, choose the option, select quantity, and tap the Add To Cart button to add the product in the shopping bag. There is also an option to share products on various social media channels like Whatsapp, Facebook, Email, etc.
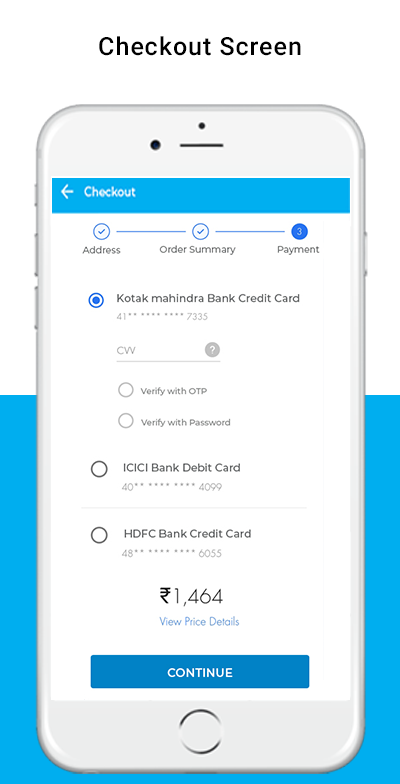
4.5 Checkout Screen
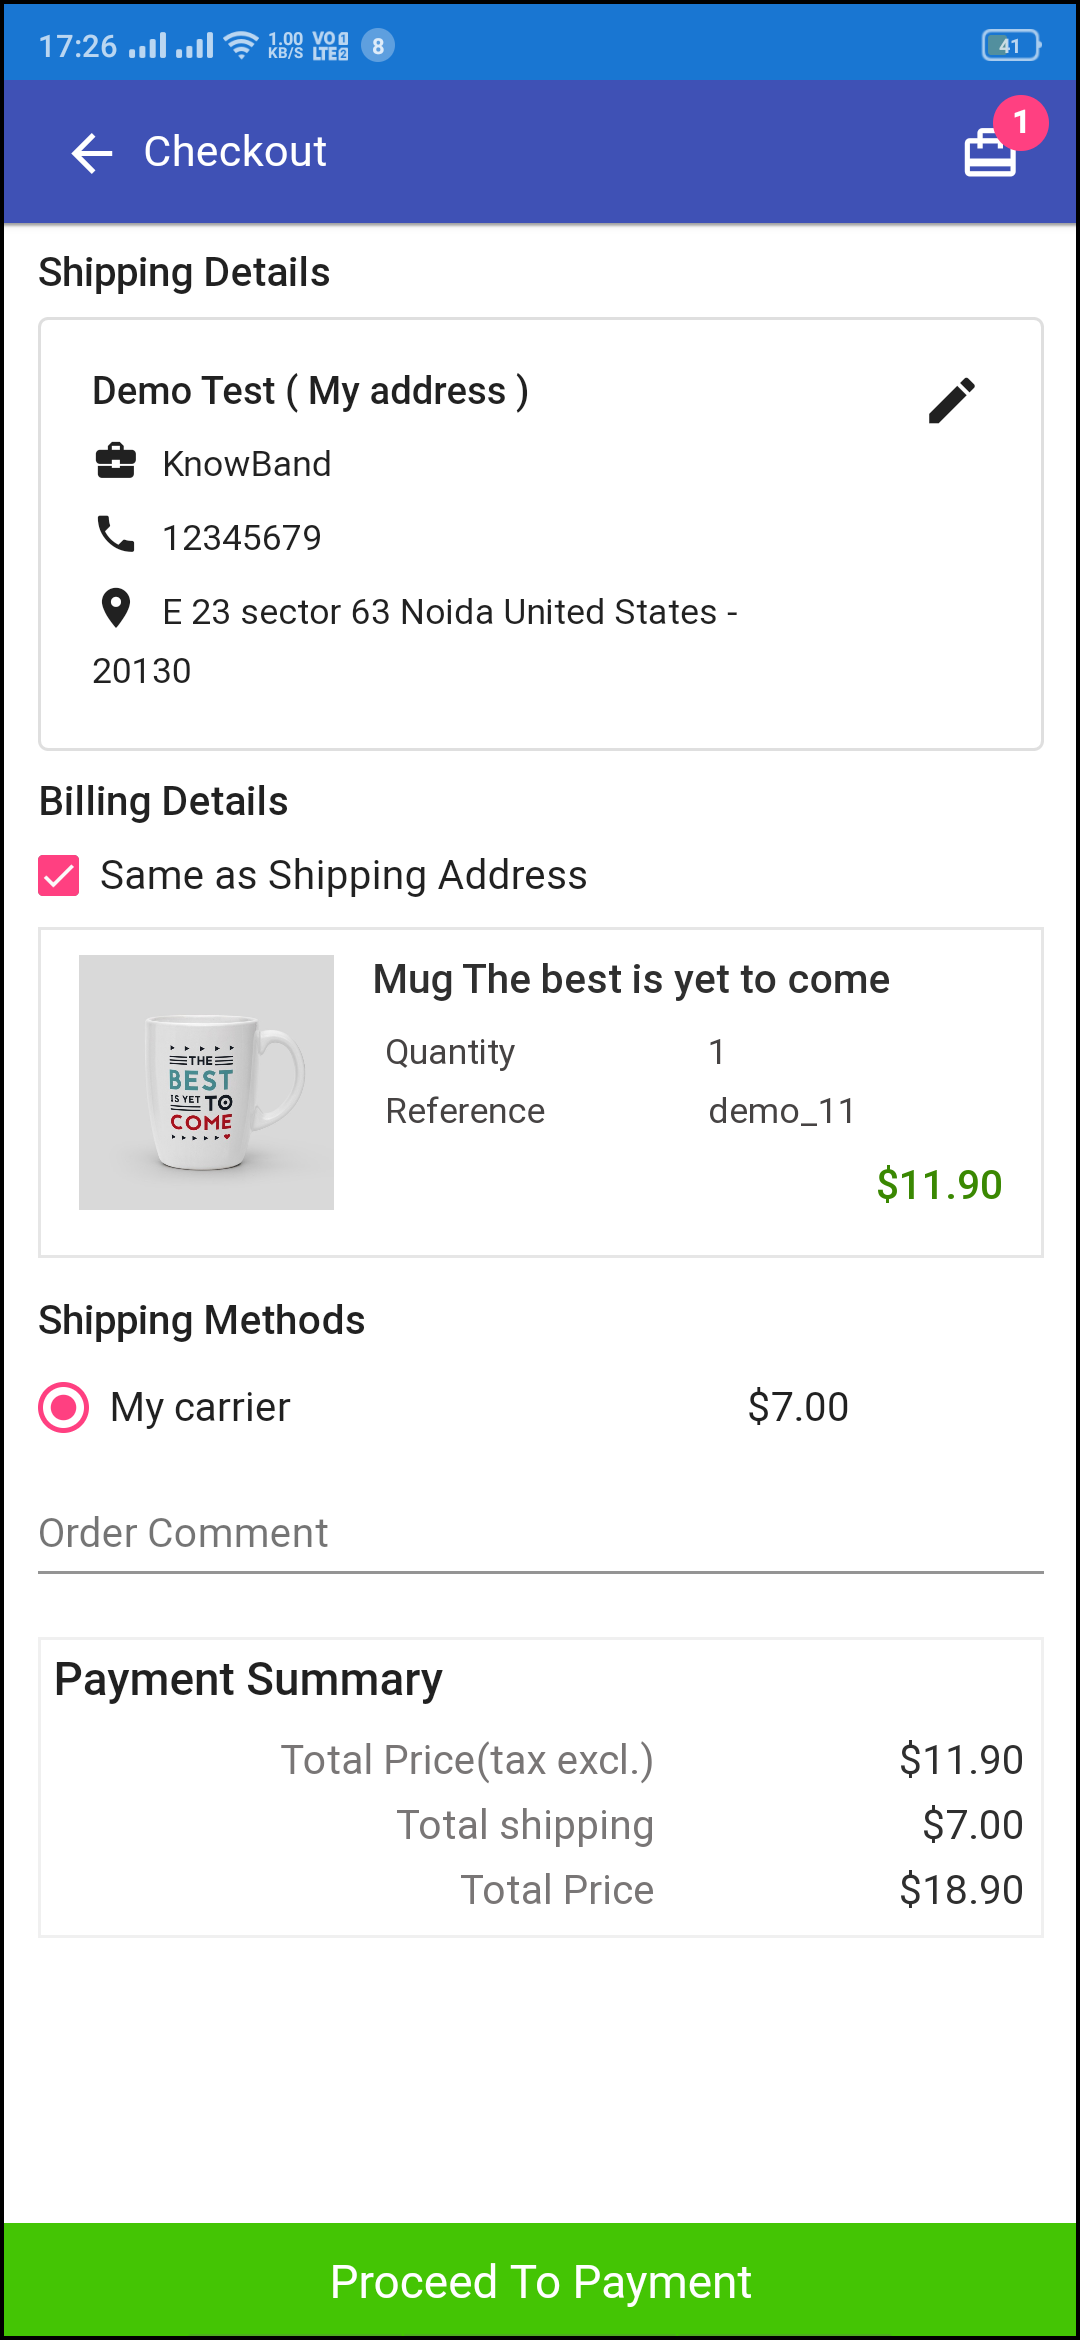
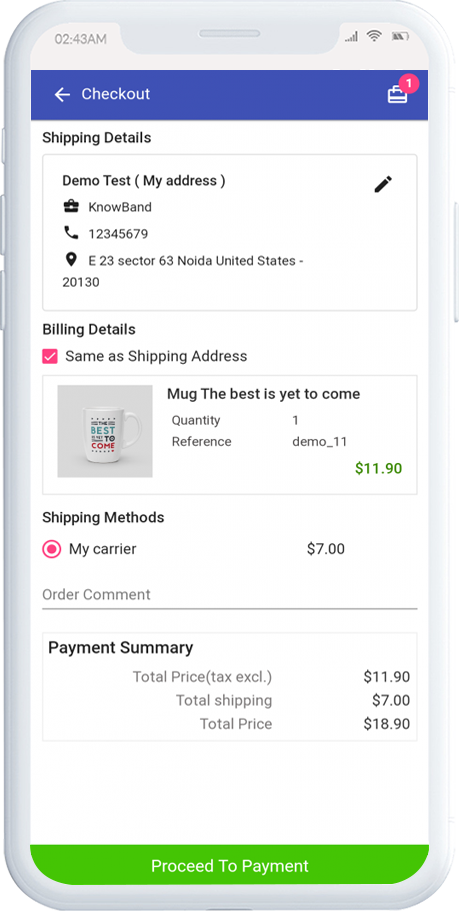
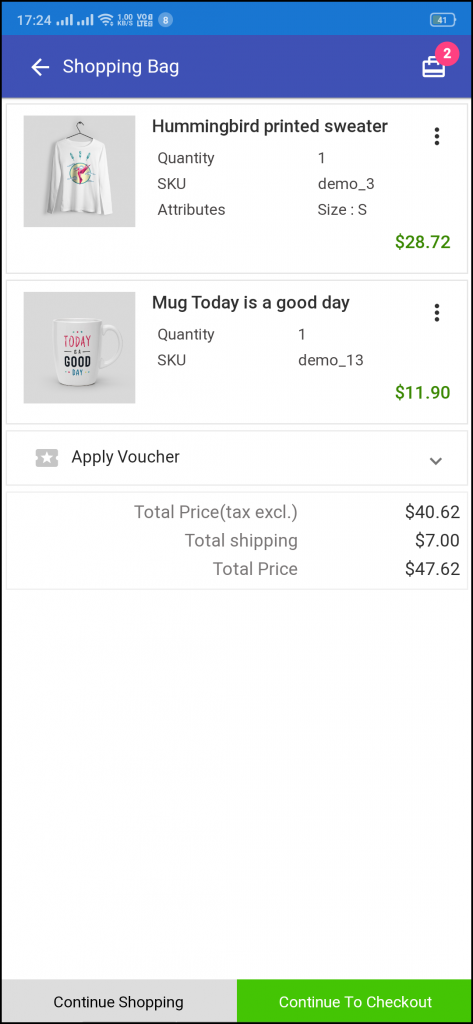
The Hyperlocal Multivendor Mobile Apps for PrestaShop comes with a one-page simplified checkout screen with all requiring information. The mobile shopper can view the complete order and product-related details on a single screen like –
Shipping Details
Billing Details
Order Summary
Shipping Methods
Order Comment
Payment Summary
This screen shows the selected shipping & billing details for the purchase. The user gets to edit the addresses if required and even add a new one. The total cost of the chosen product will be shown as per the shipping methods.
The app users get to view purchased product details in this section before making the final purchase. All available shipping methods are displayed under this section of the checkout screen. The users can choose the desired one from here.
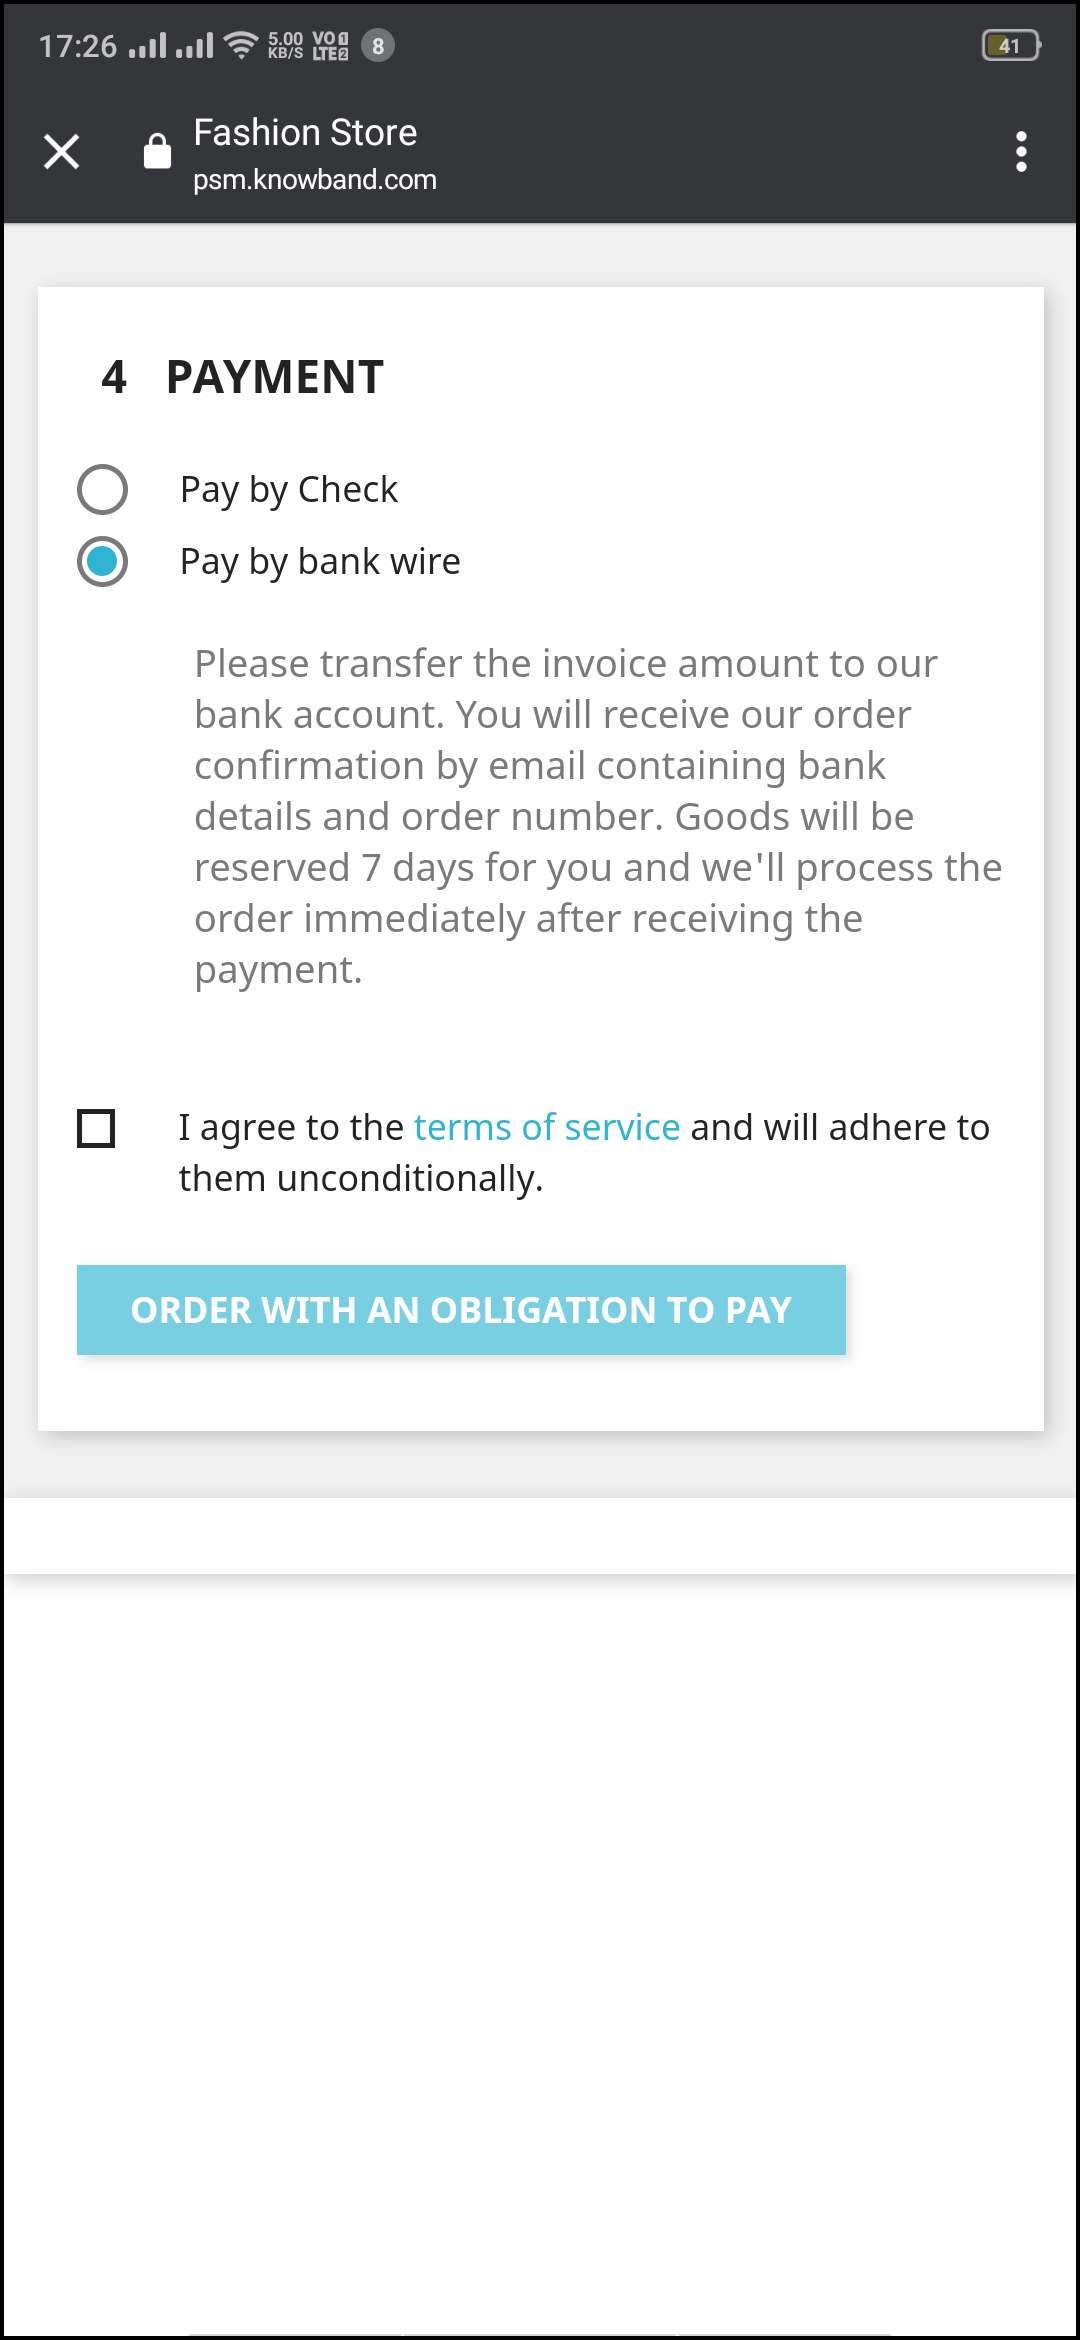
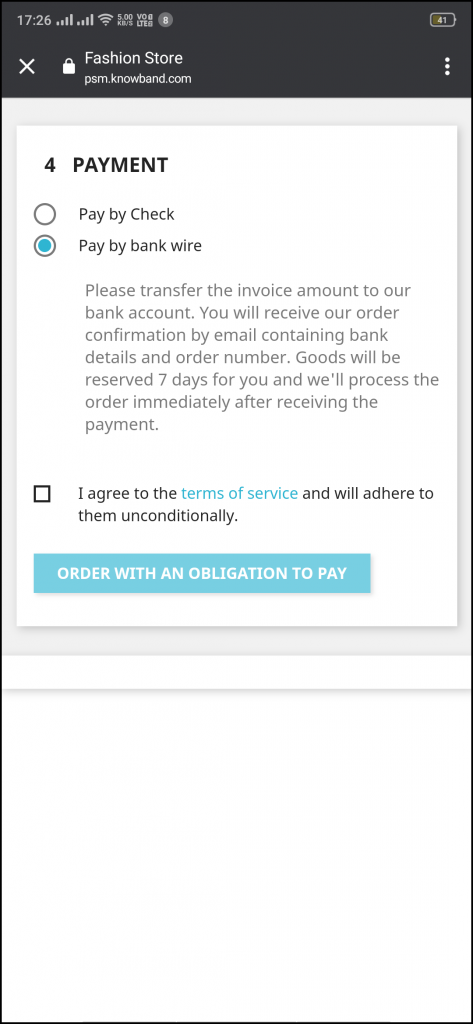
This section displays the complete breakdown of the total payment details. The app users will be re-directed to the Payment screen after tapping the “Proceed To Payment” button.
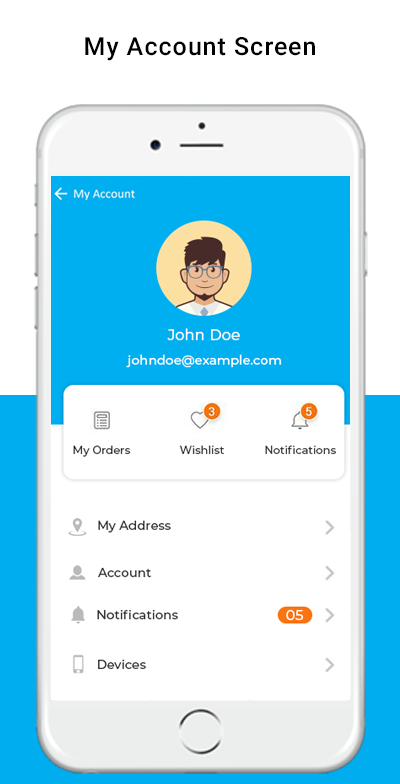
4.6 My Account Screen
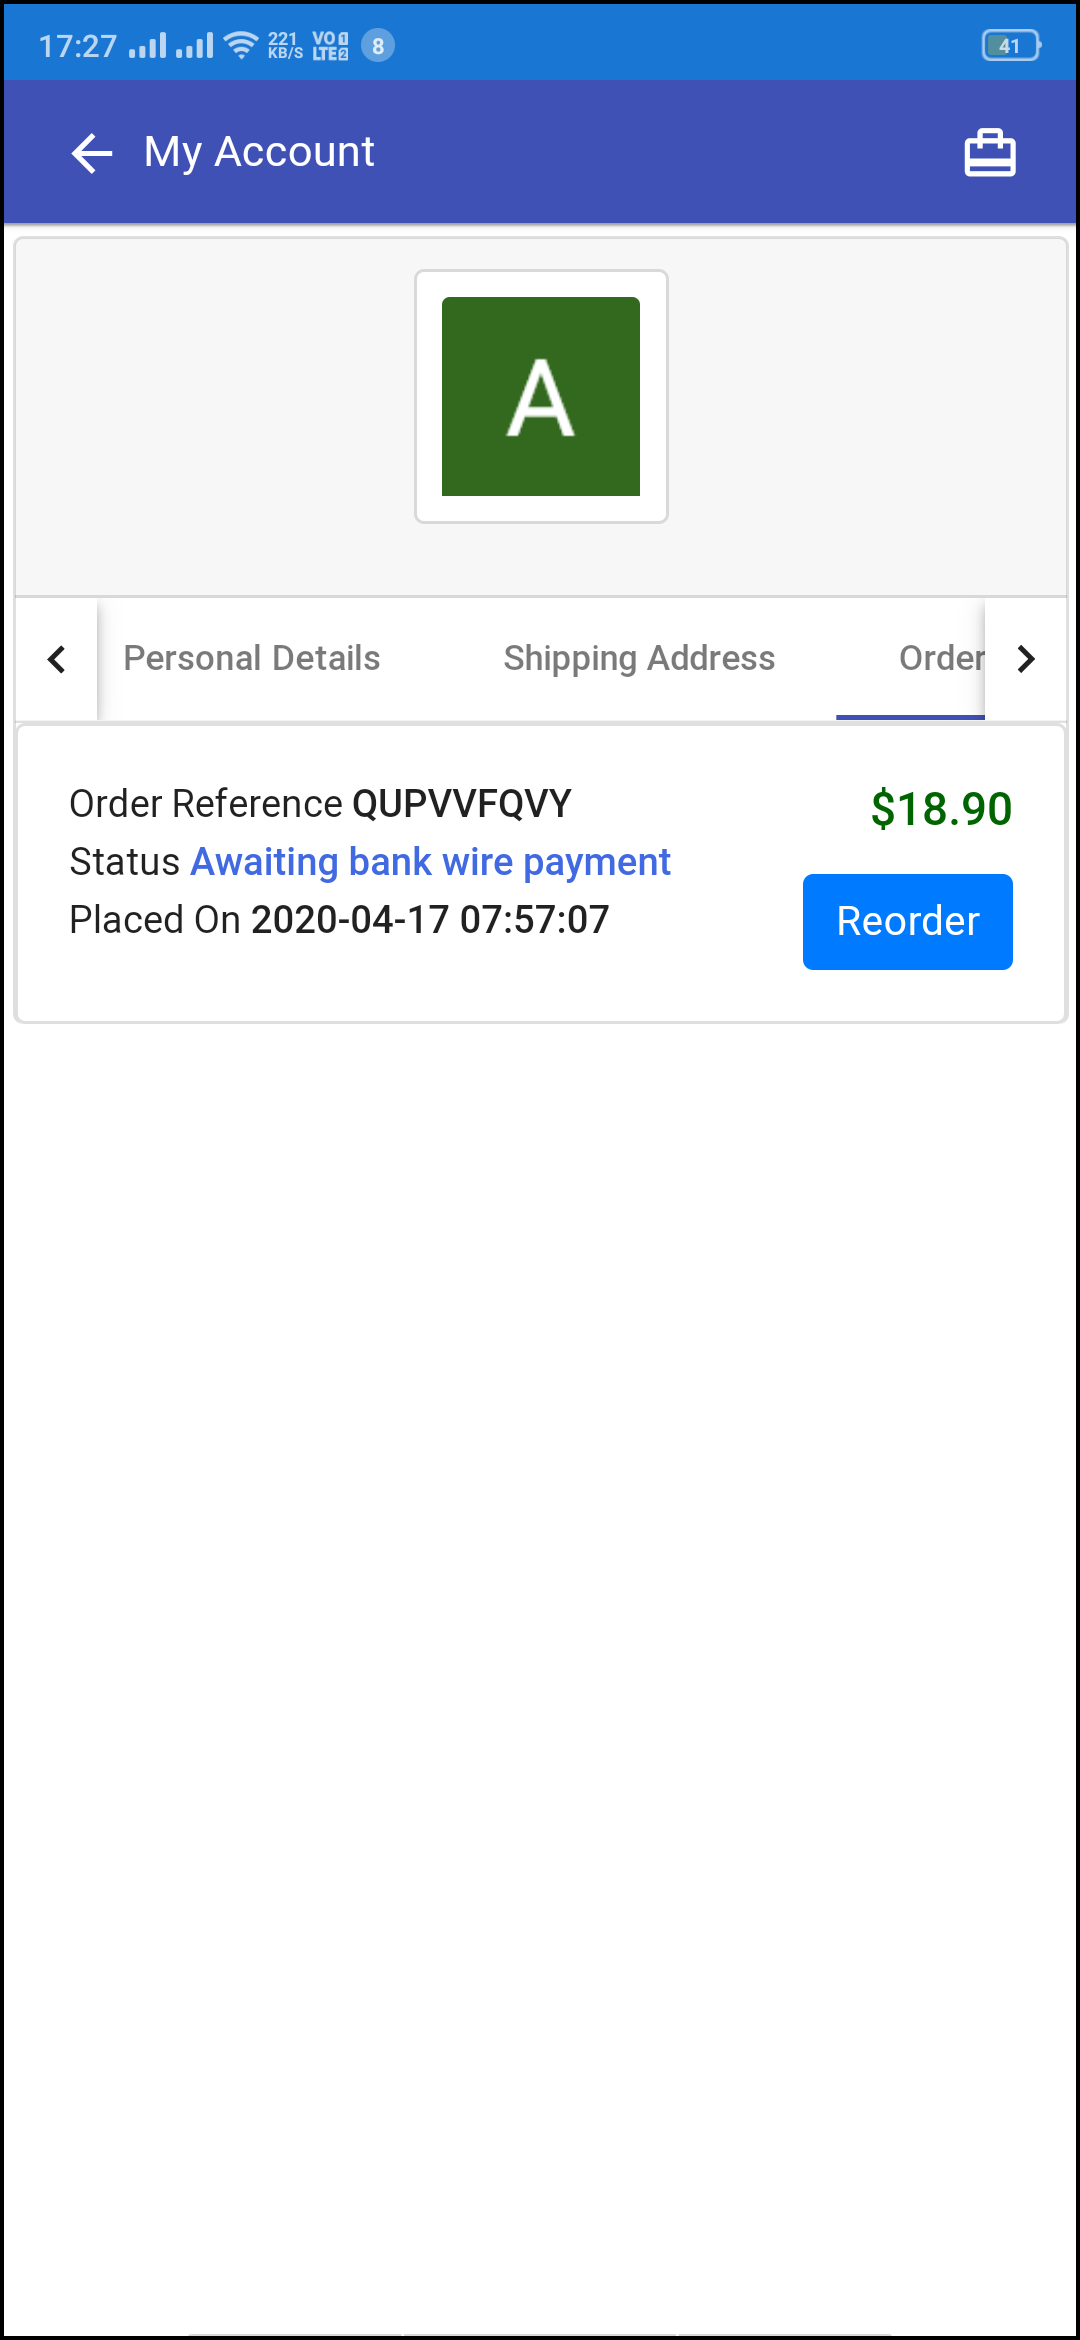
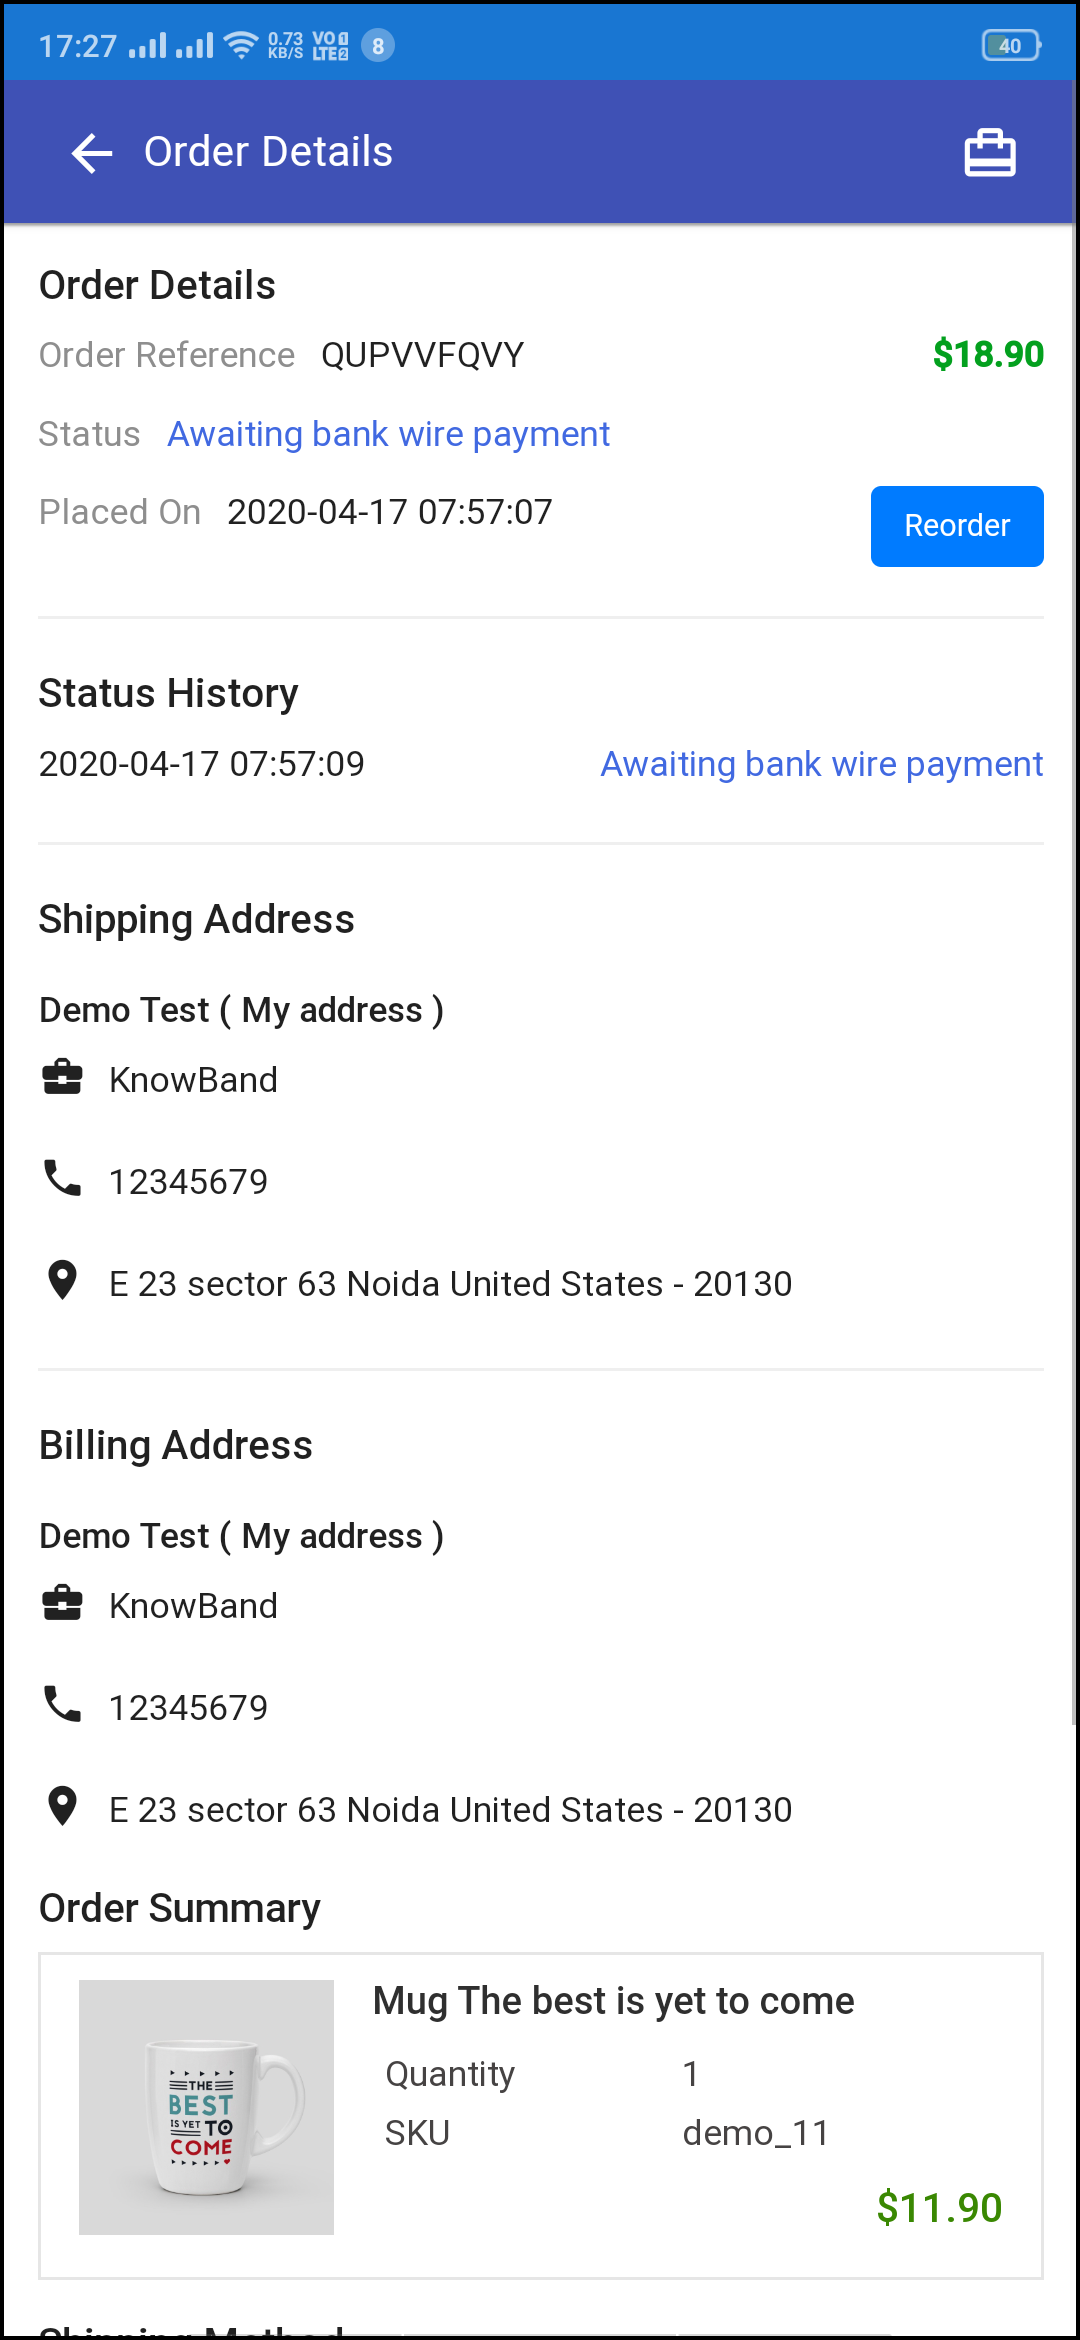
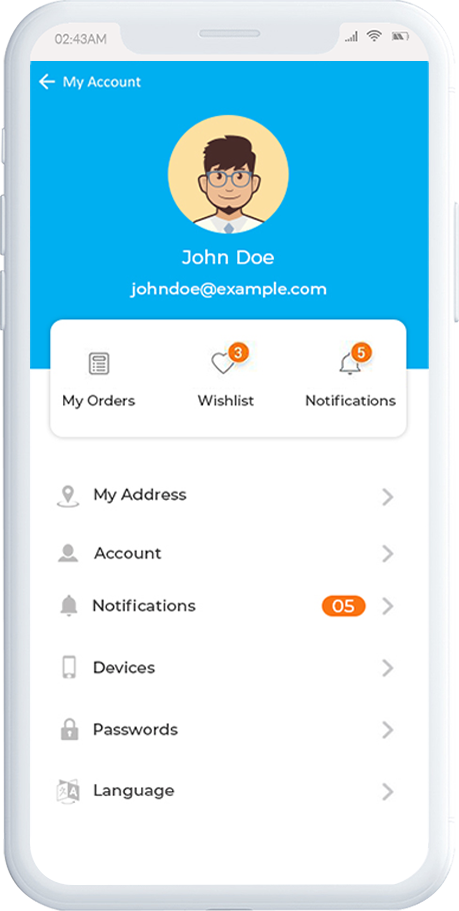
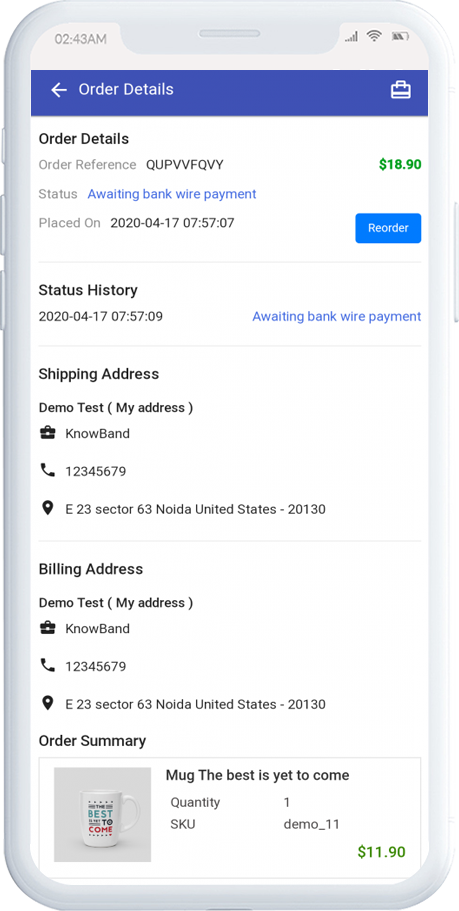
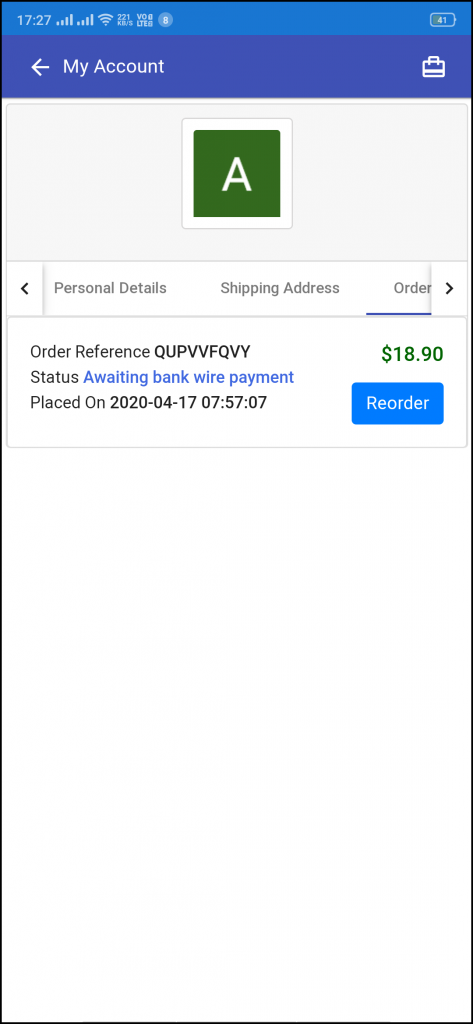
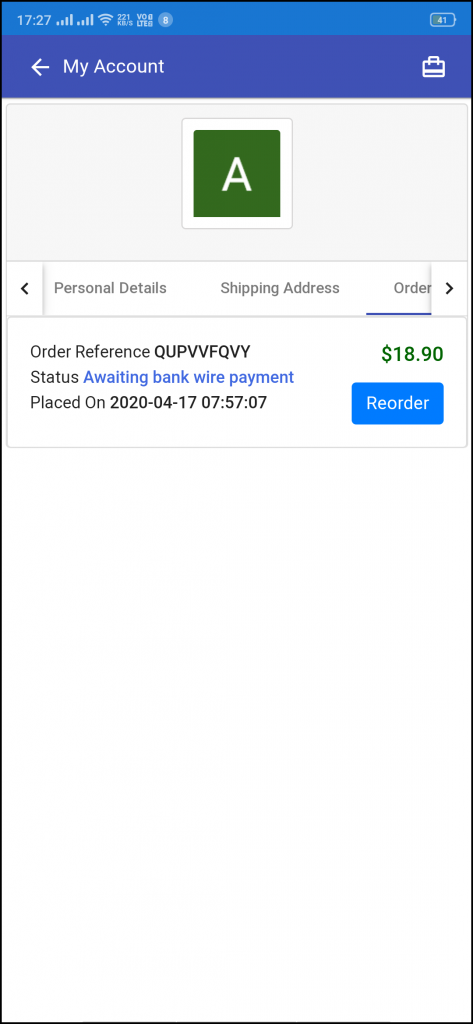
My account screen of the PrestaShop Hyperlocal Marketplace Mobile App allows app users to view the complete account details including a list of previous orders. My Account screen offers the following options:
Order Details
Personal Information
Shipping Addresses
Order Details
Reorder
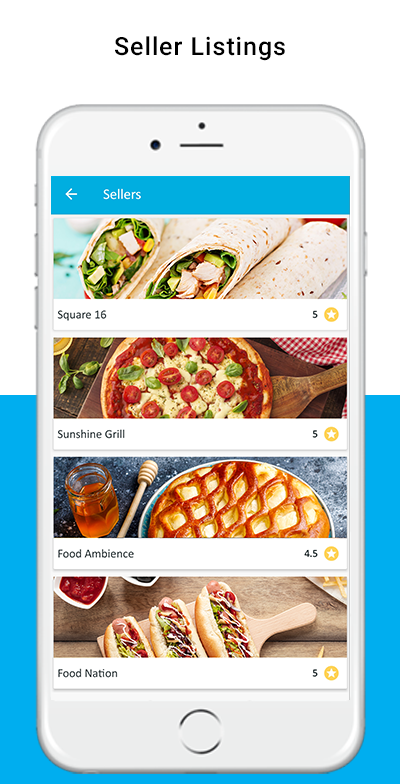
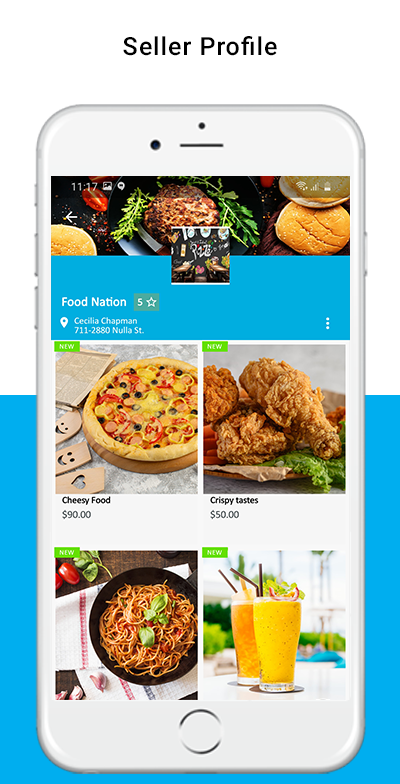
4.7 Seller Screens
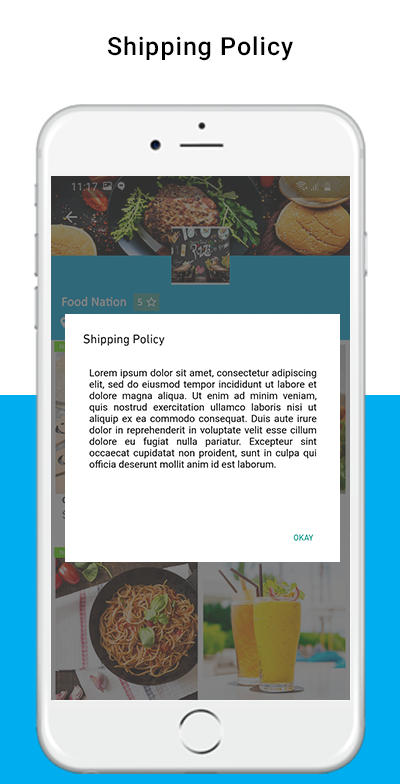
The seller panel on PrestaShop Hyperlocal Mobile App allows the users to access all available sellers on the marketplace. The listing shows all sellers on the single screen and users can simply make the choice. Once the seller is accessed, the user is redirected to the seller profile where all products under the seller are displayed. Even seller reviews, shipping policy, return policy is displayed for sellers on the app.
Prestashop Hyperlocal Marketplace addon by Knowband is the easiest way to convert your PrestaShop eCommerce store into a fully working Hyperlocal online marketplace. In addition, connect customers to local stores. Further, using this module customers can connect with the local stores. The seller can easily list the location where they can deliver/ship their products. Moreover, this is the main reason why this module is beneficial for the sellers and also for their customers.
Customers can enter their location and check the available products and sellers in their locations. Furthermore, the store admin can manage a lot. For instance, the inventories, orders, products, and shipping methods at the Marketplace from the back interface of the Prestashop Hyperlocal Marketplace Add-on. Further, the Prestashop Hyperlocal Marketplace owner can charge a commission to the sellers/vendors on the products they sell. In fact, the sellers will get the chance to promote their brand. In addition, serve the audience of Marketplace in return for the commission they are paying to the admin.
1.1 Admin Benefits of Prestashop Hyperlocal multi-vendor marketplace:
The store admin can transform their eCommerce store into a marketplace with a few button clicks.
Ecommerce admin can approve/disapprove sellers ship area requests.
PrestaShop Hyperlocal Marketplace admin can edit/delete sellers’ ship areas.
Hyperlocal Delivery Marketplace admin can also add multiple locations as per their requirements.
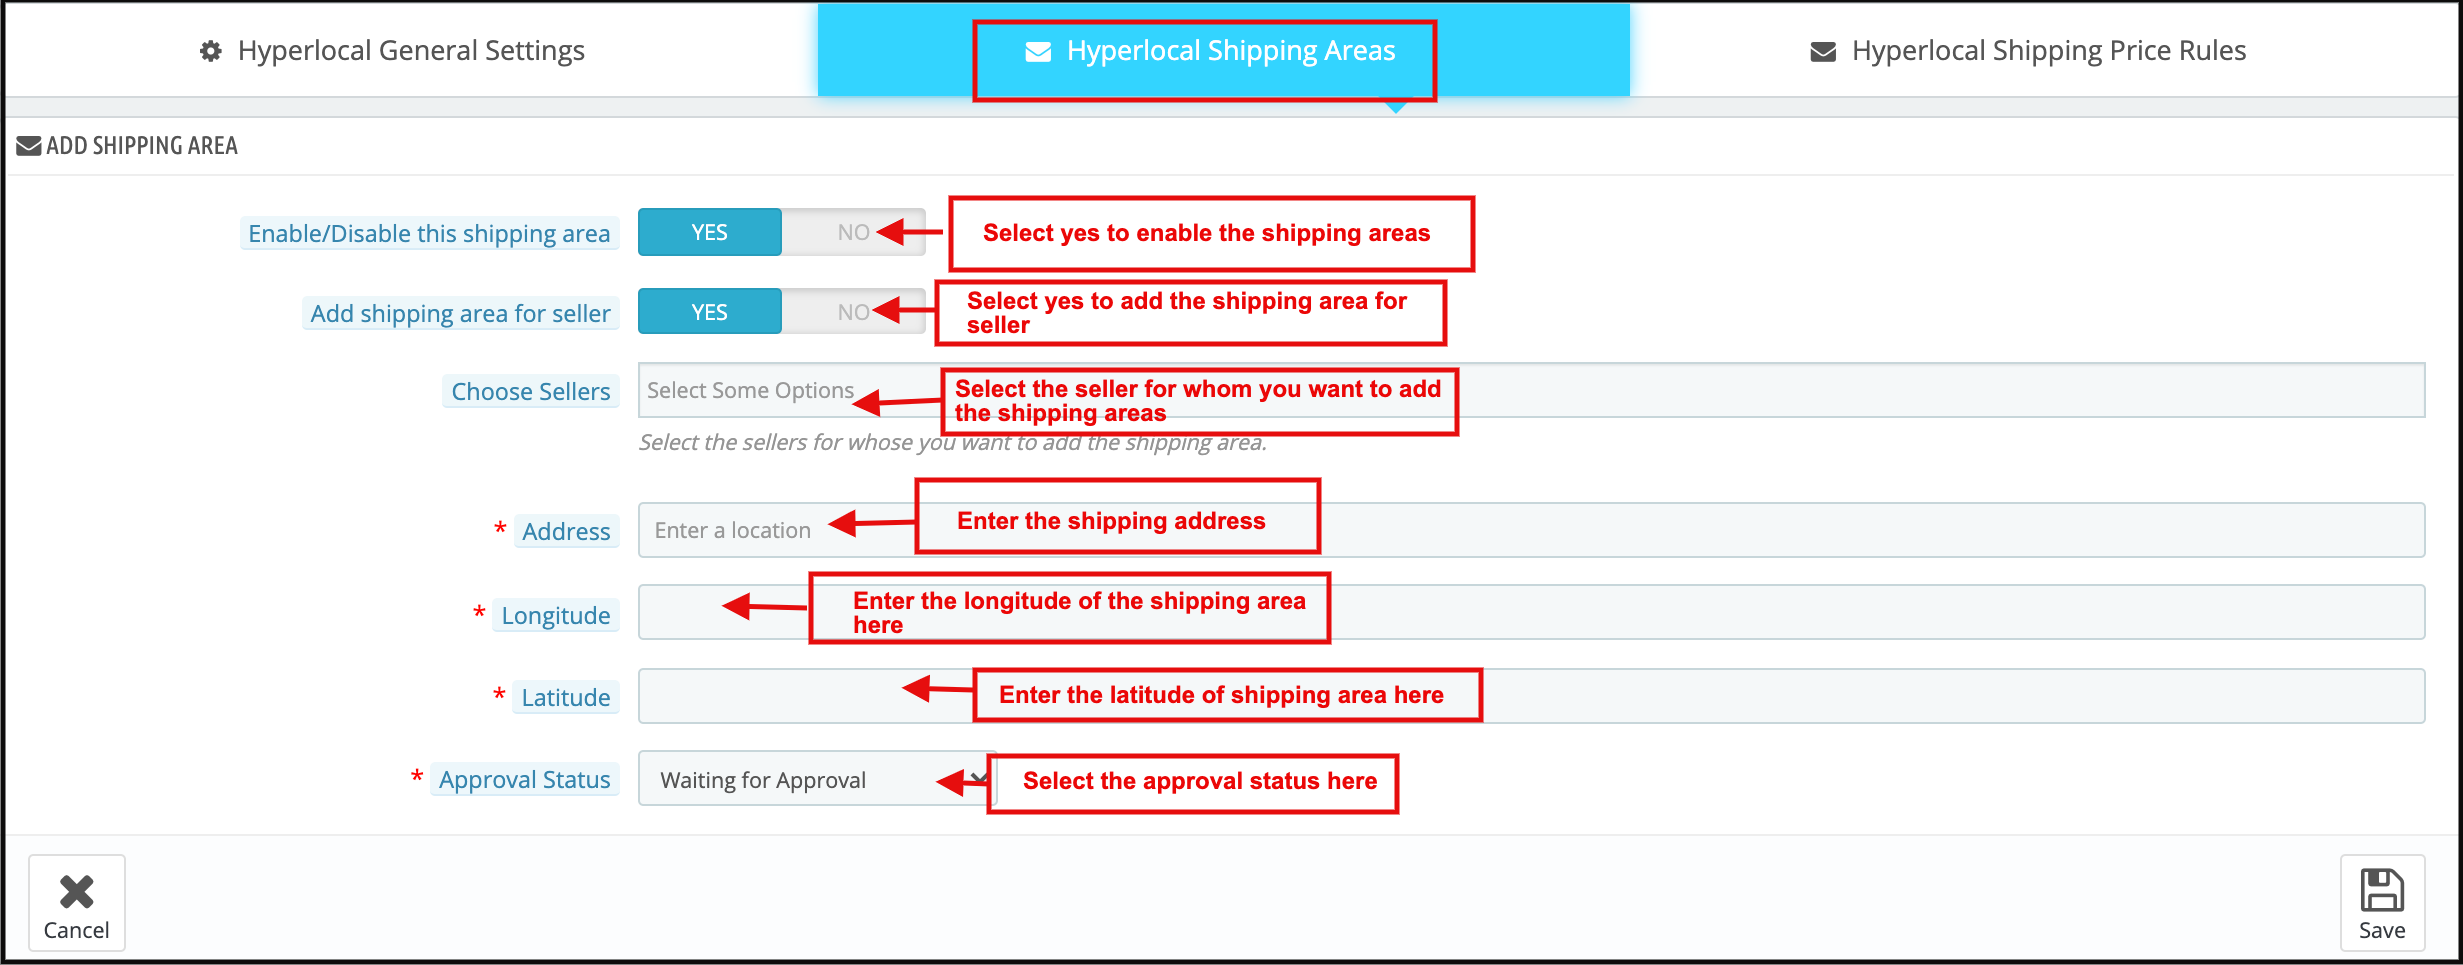
Hyperlocal Service Marketplace admin can add the shipping area on behalf of sellers.
PrestaShop Hyperlocal Marketplace admin can also add multiple ship rates by using a CSV file.
Store admin can add a radius unit range that will be usable to search the seller from the customer’s location.
Admin can add custom fields for the seller’s profile. Further, he can add new custom fields or remove already addable fields.
Admin can also add a separate seller registration form under the general settings tab.
The admin can even disallow the seller to view the email ID of the customers. In fact, if the admin enables this, the sellers can request to close their shop from the marketplace.
The admin can fix the commission that he wants to charge to the sellers from the back-end of the Prestashop Hyperlocal E-commerce Business.
The admin gets complete access to approve/disapprove the products being sold on the marketplace. In addition, can even fix the quantity of the new products that a seller can add to the marketplace. Further, he can do it with the help of this Prestashop Hyperlocal Delivery Marketplace.
The store admin gets an option to approve/disapprove the seller’s profile at a button click.
The Prestashop Hyperlocal Marketplace add-on allows the store admin to track and manage the sellers operating in the marketplace easily.
The PrestaShop admin can add/remove the product or category as per the requirement from the admin interface of the Prestashop Hyperlocal Marketplace extension.
The sellers can request to add a new category to the front-end of the marketplace. Further, these requests are visible in the Prestashop Hyperlocal Service Marketplace and the admin can accept/reject them accordingly.
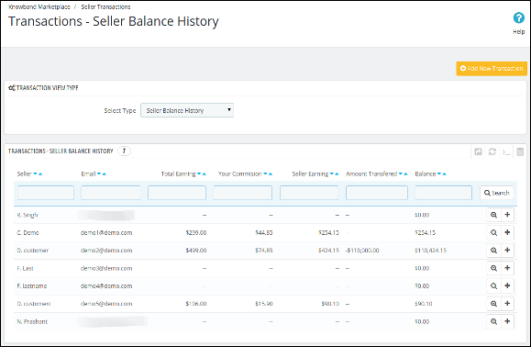
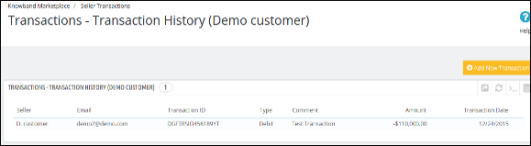
The seller transactions are visible from a single tab of the Prestashop Hyperlocal Delivery Business Model. Thus, the performance of the sellers is trackable.
The store admin can view the report of the commission earned from the Prestashop Hyperlocal Marketplace.
The admin can accept/reject the reviews on the products or sellers with the help of the Prestashop Hyperlocal online marketplace.
The additional features of the Prestashop Hyperlocal multi-vendor marketplace even offer an option to create custom shipping methods.
The seller can either select the default shipping method or create custom methods from their dashboard.
The PrestaShop Prestashop Hyperlocal E-commerce Business addon allows the sellers to initiate payout requests from their dashboard. In fact, the admin can approve or disapprove the payout request from the back-end of the PrestaShop addon.
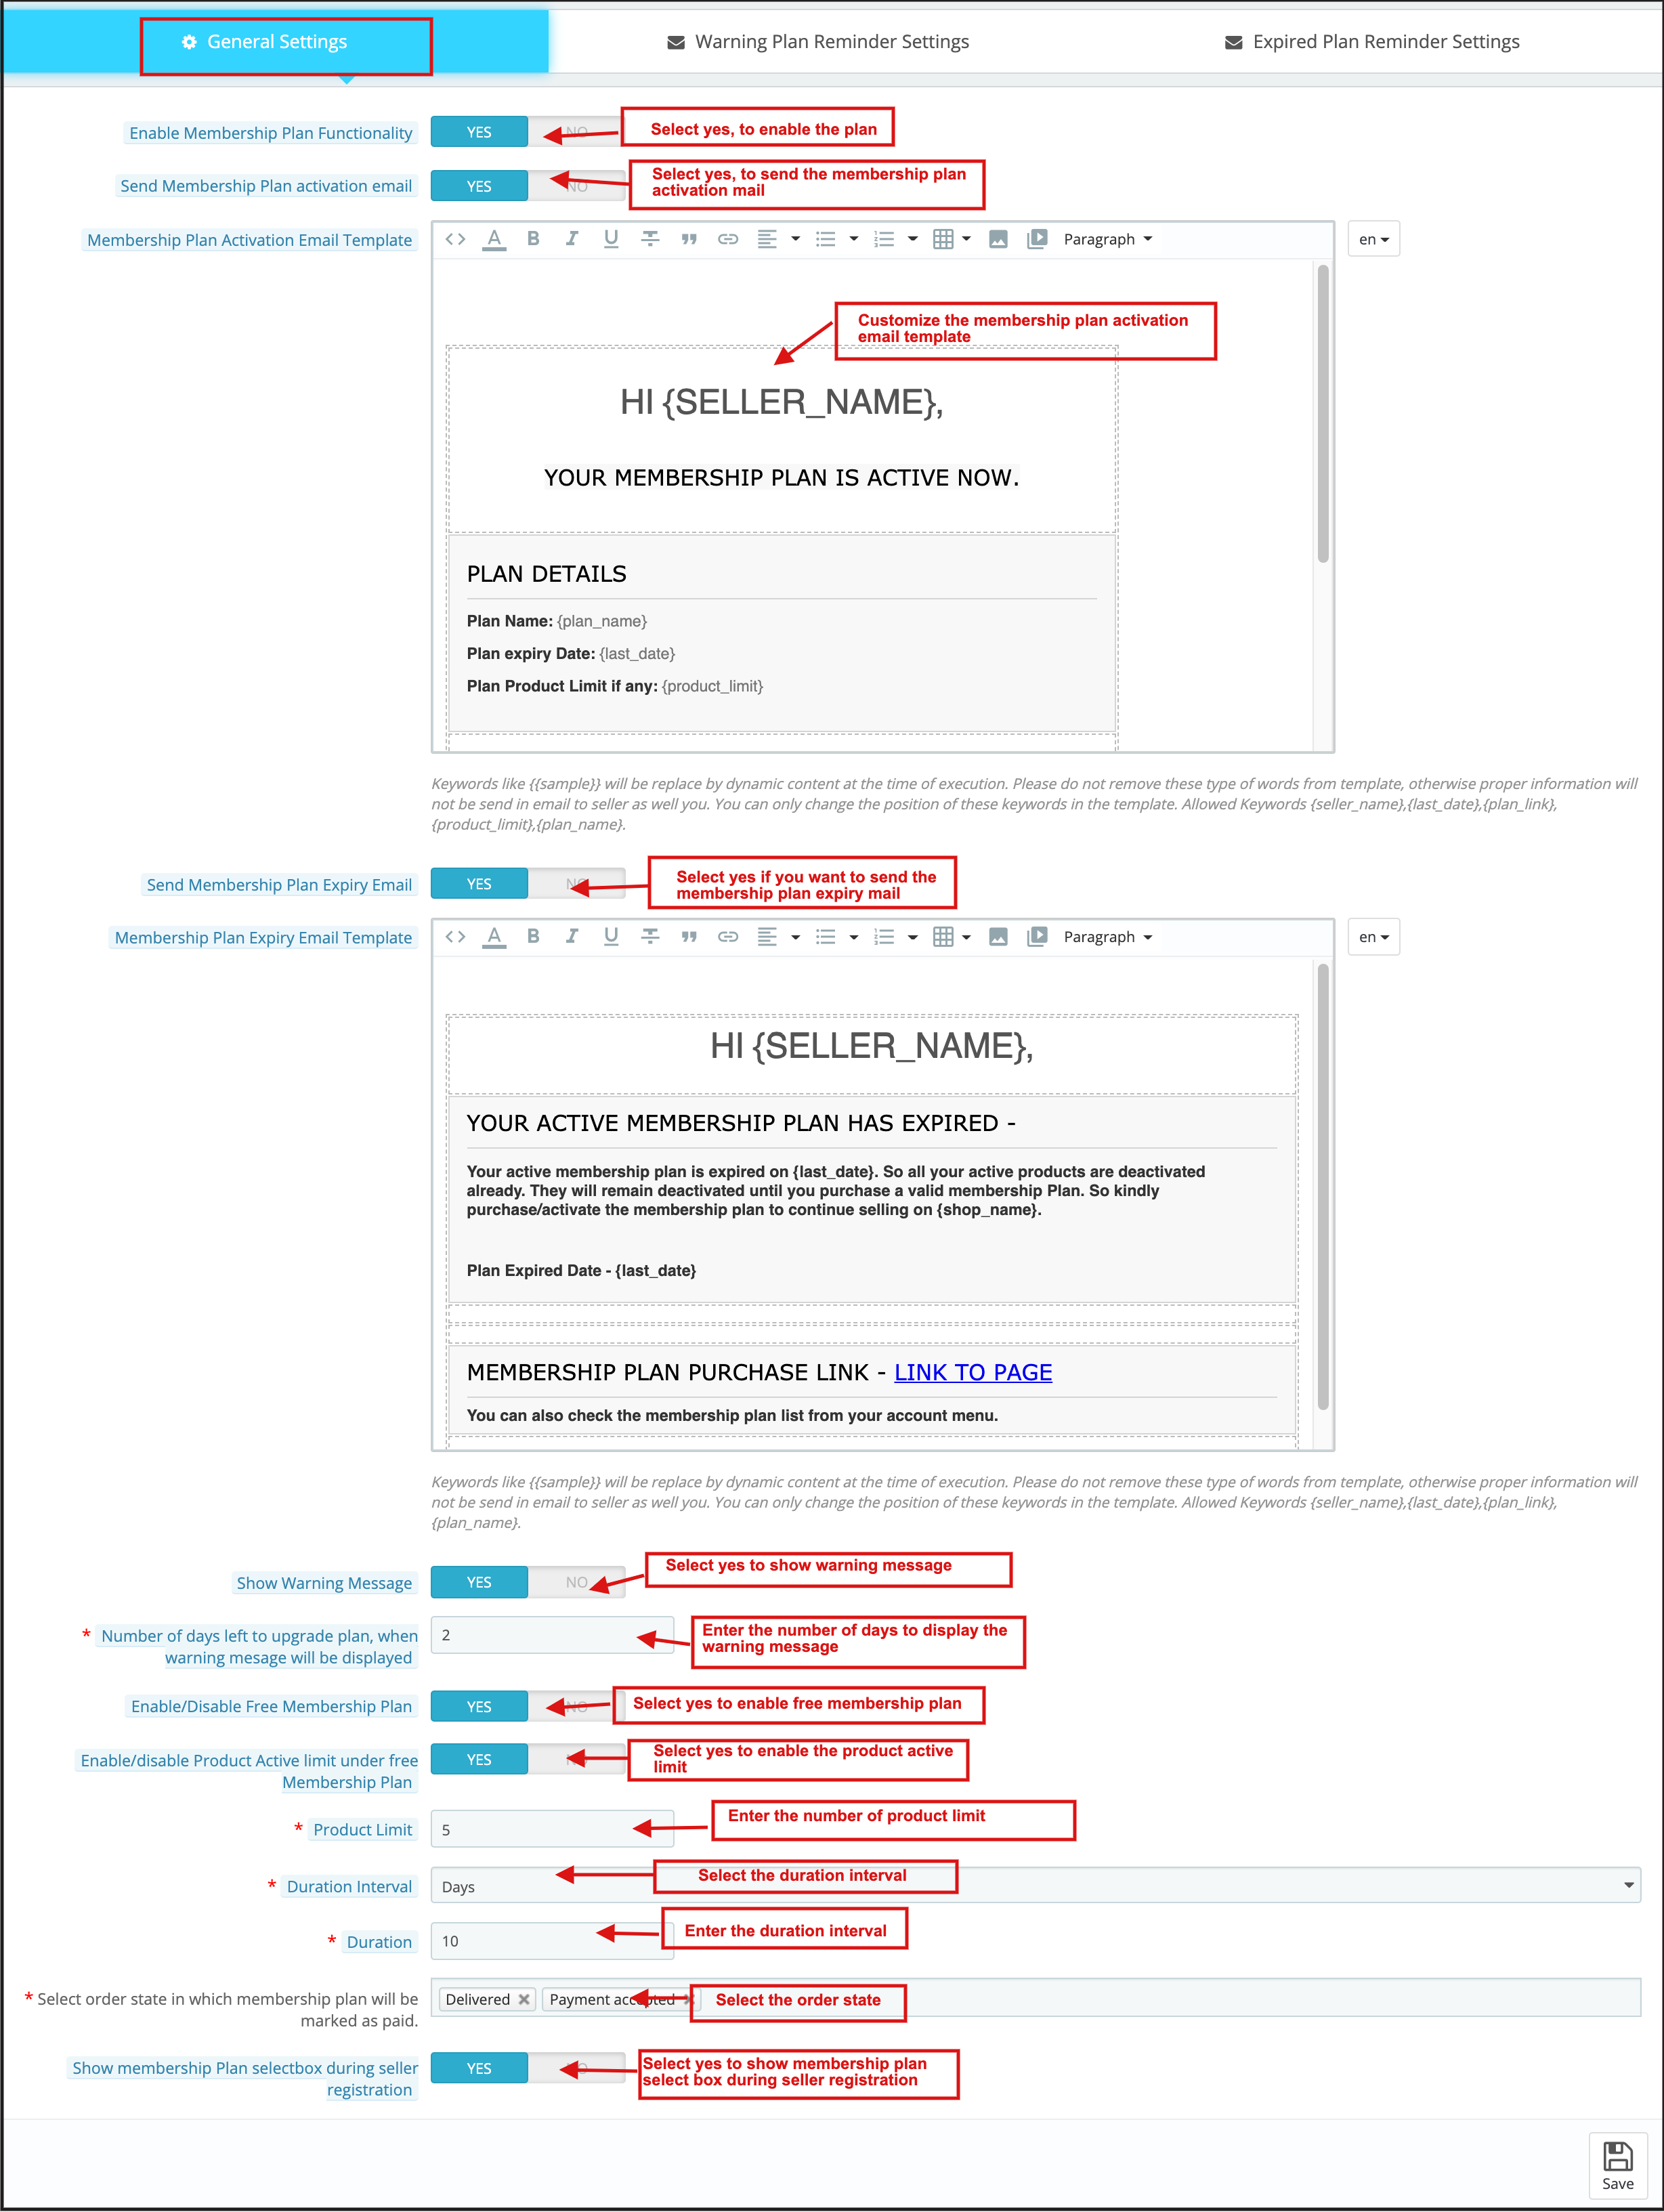
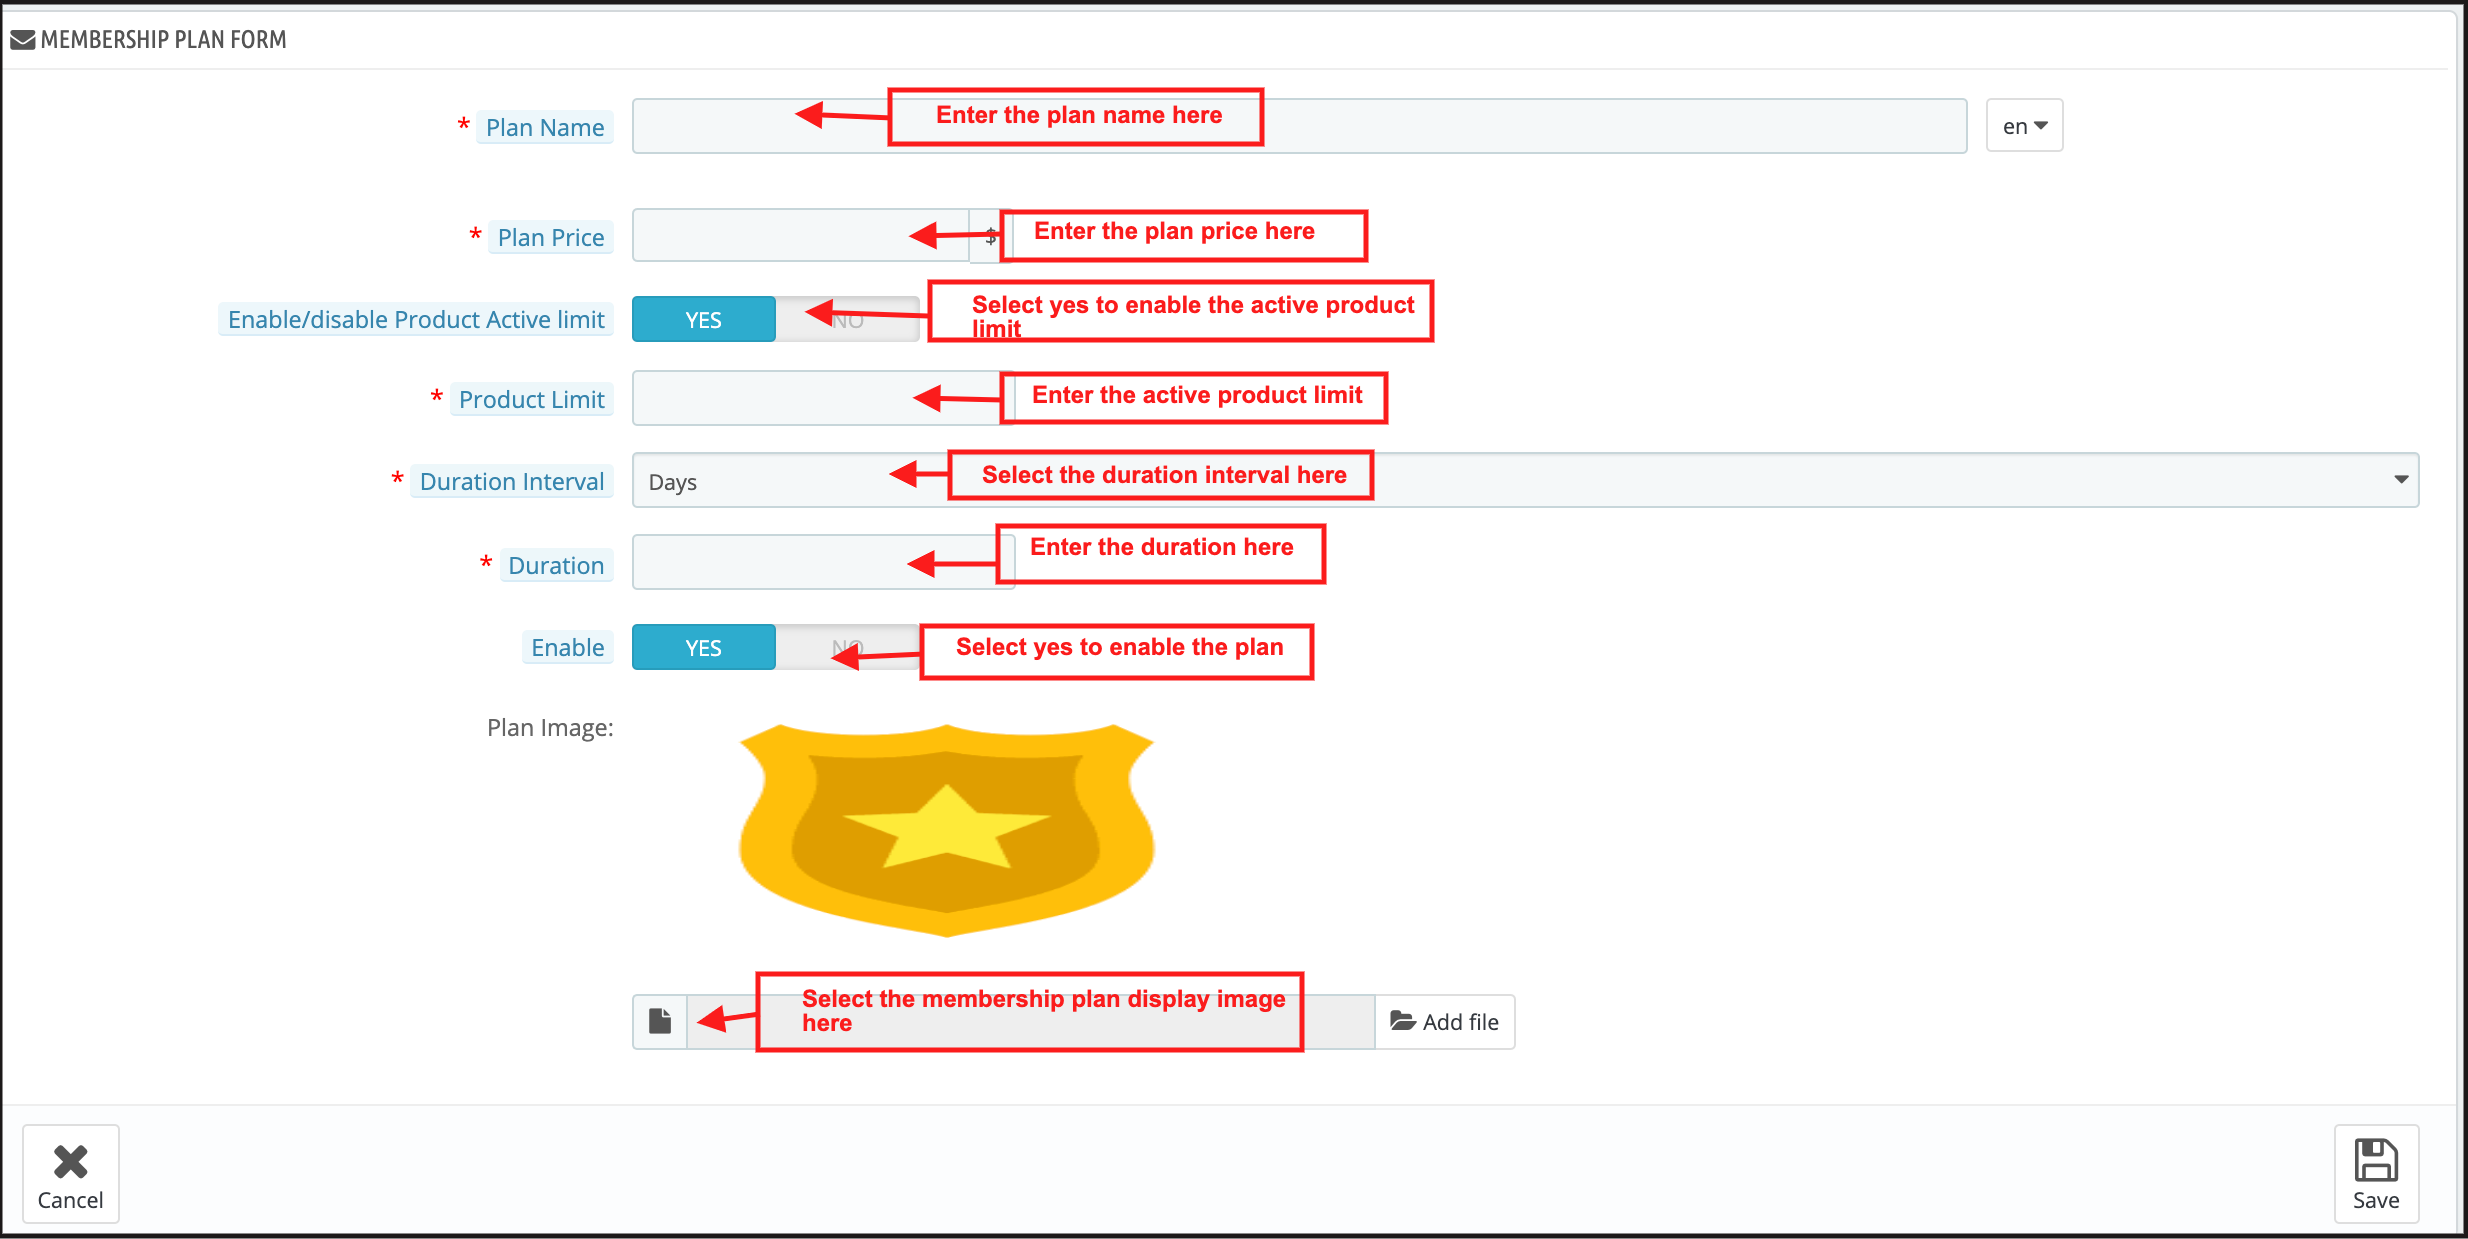
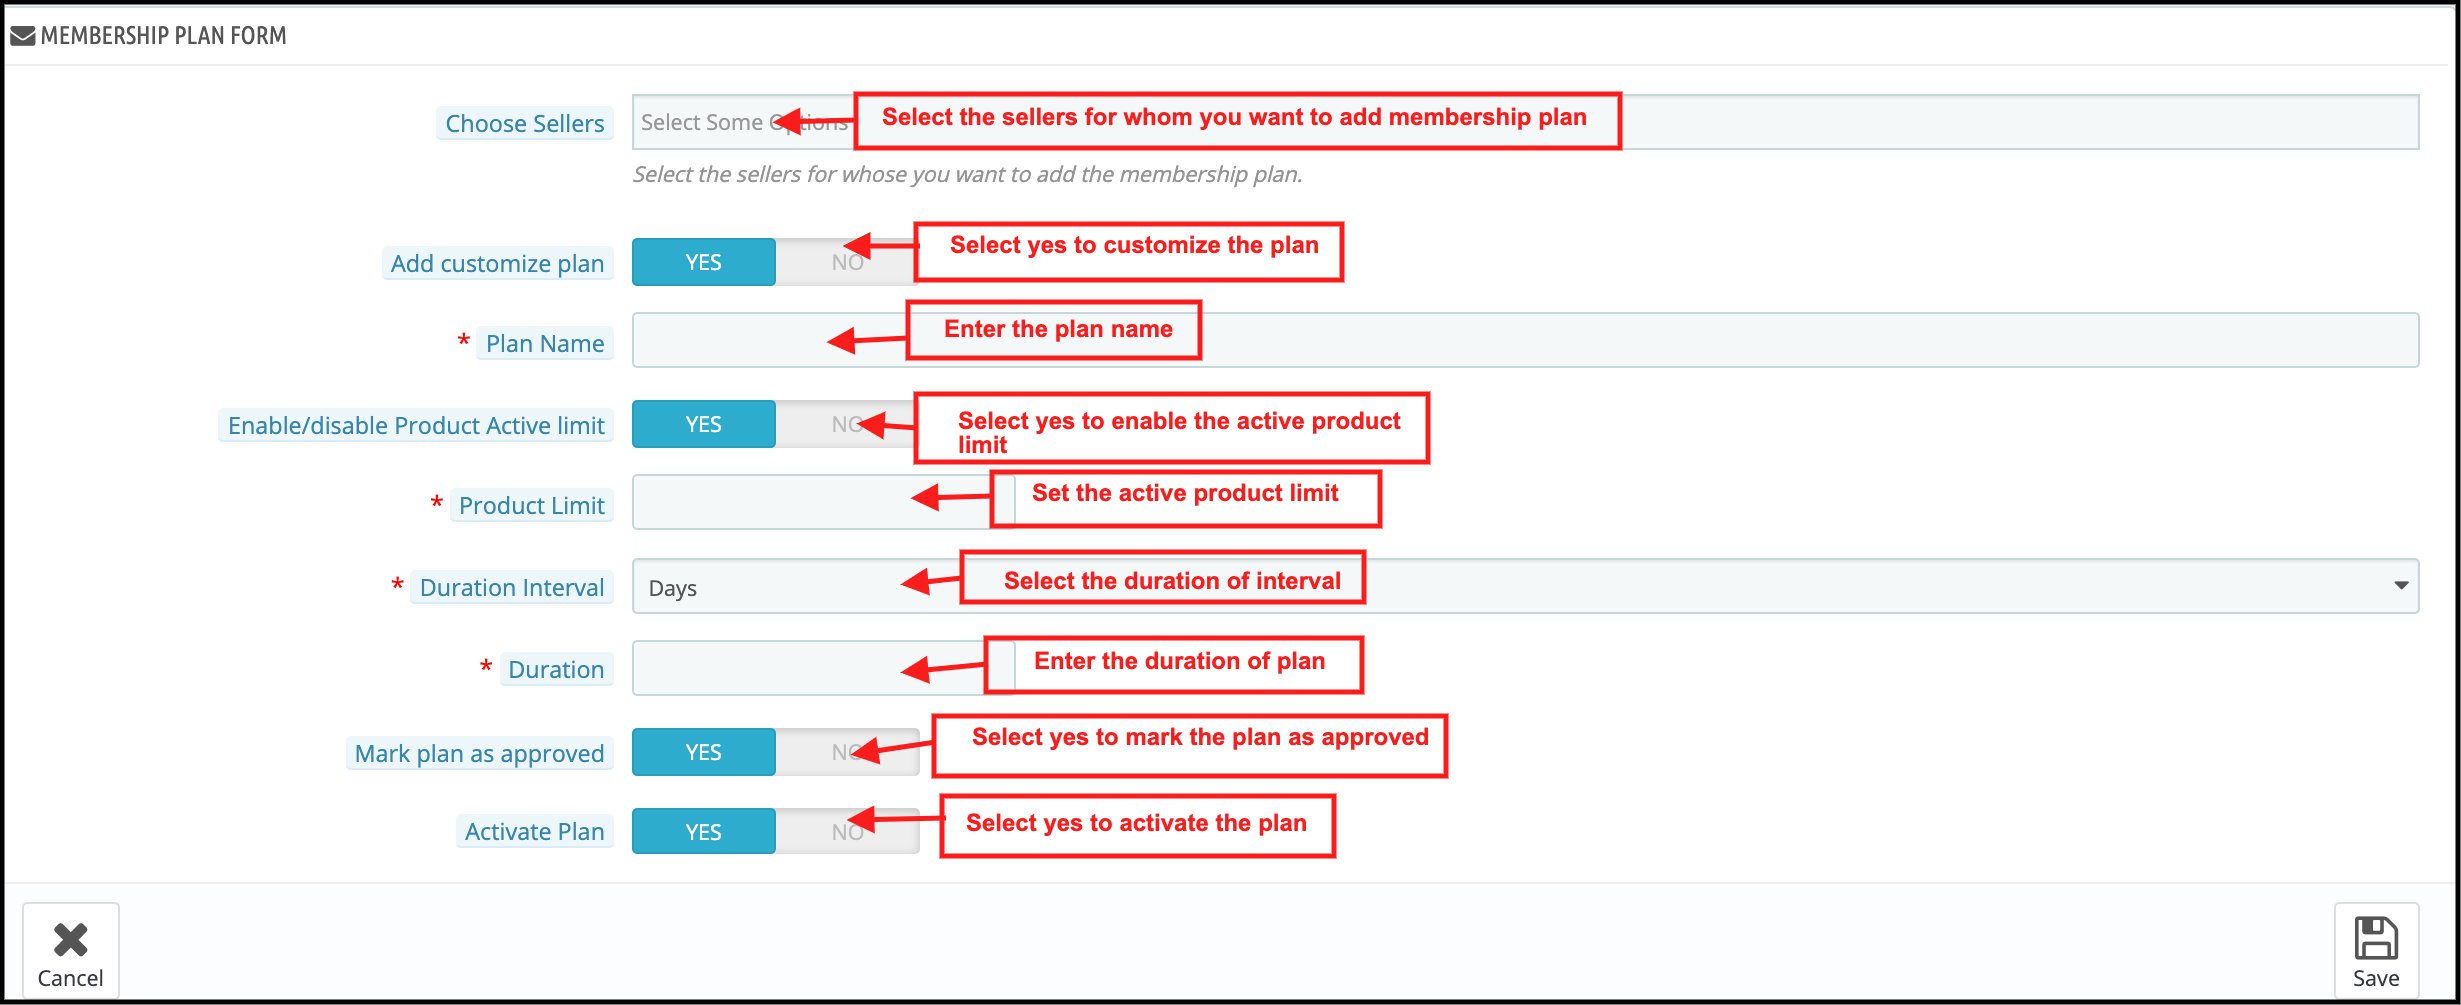
Admin can create various membership plans for the sellers.
The Admin can also enable a free membership plan feature for the sellers for one-time use.
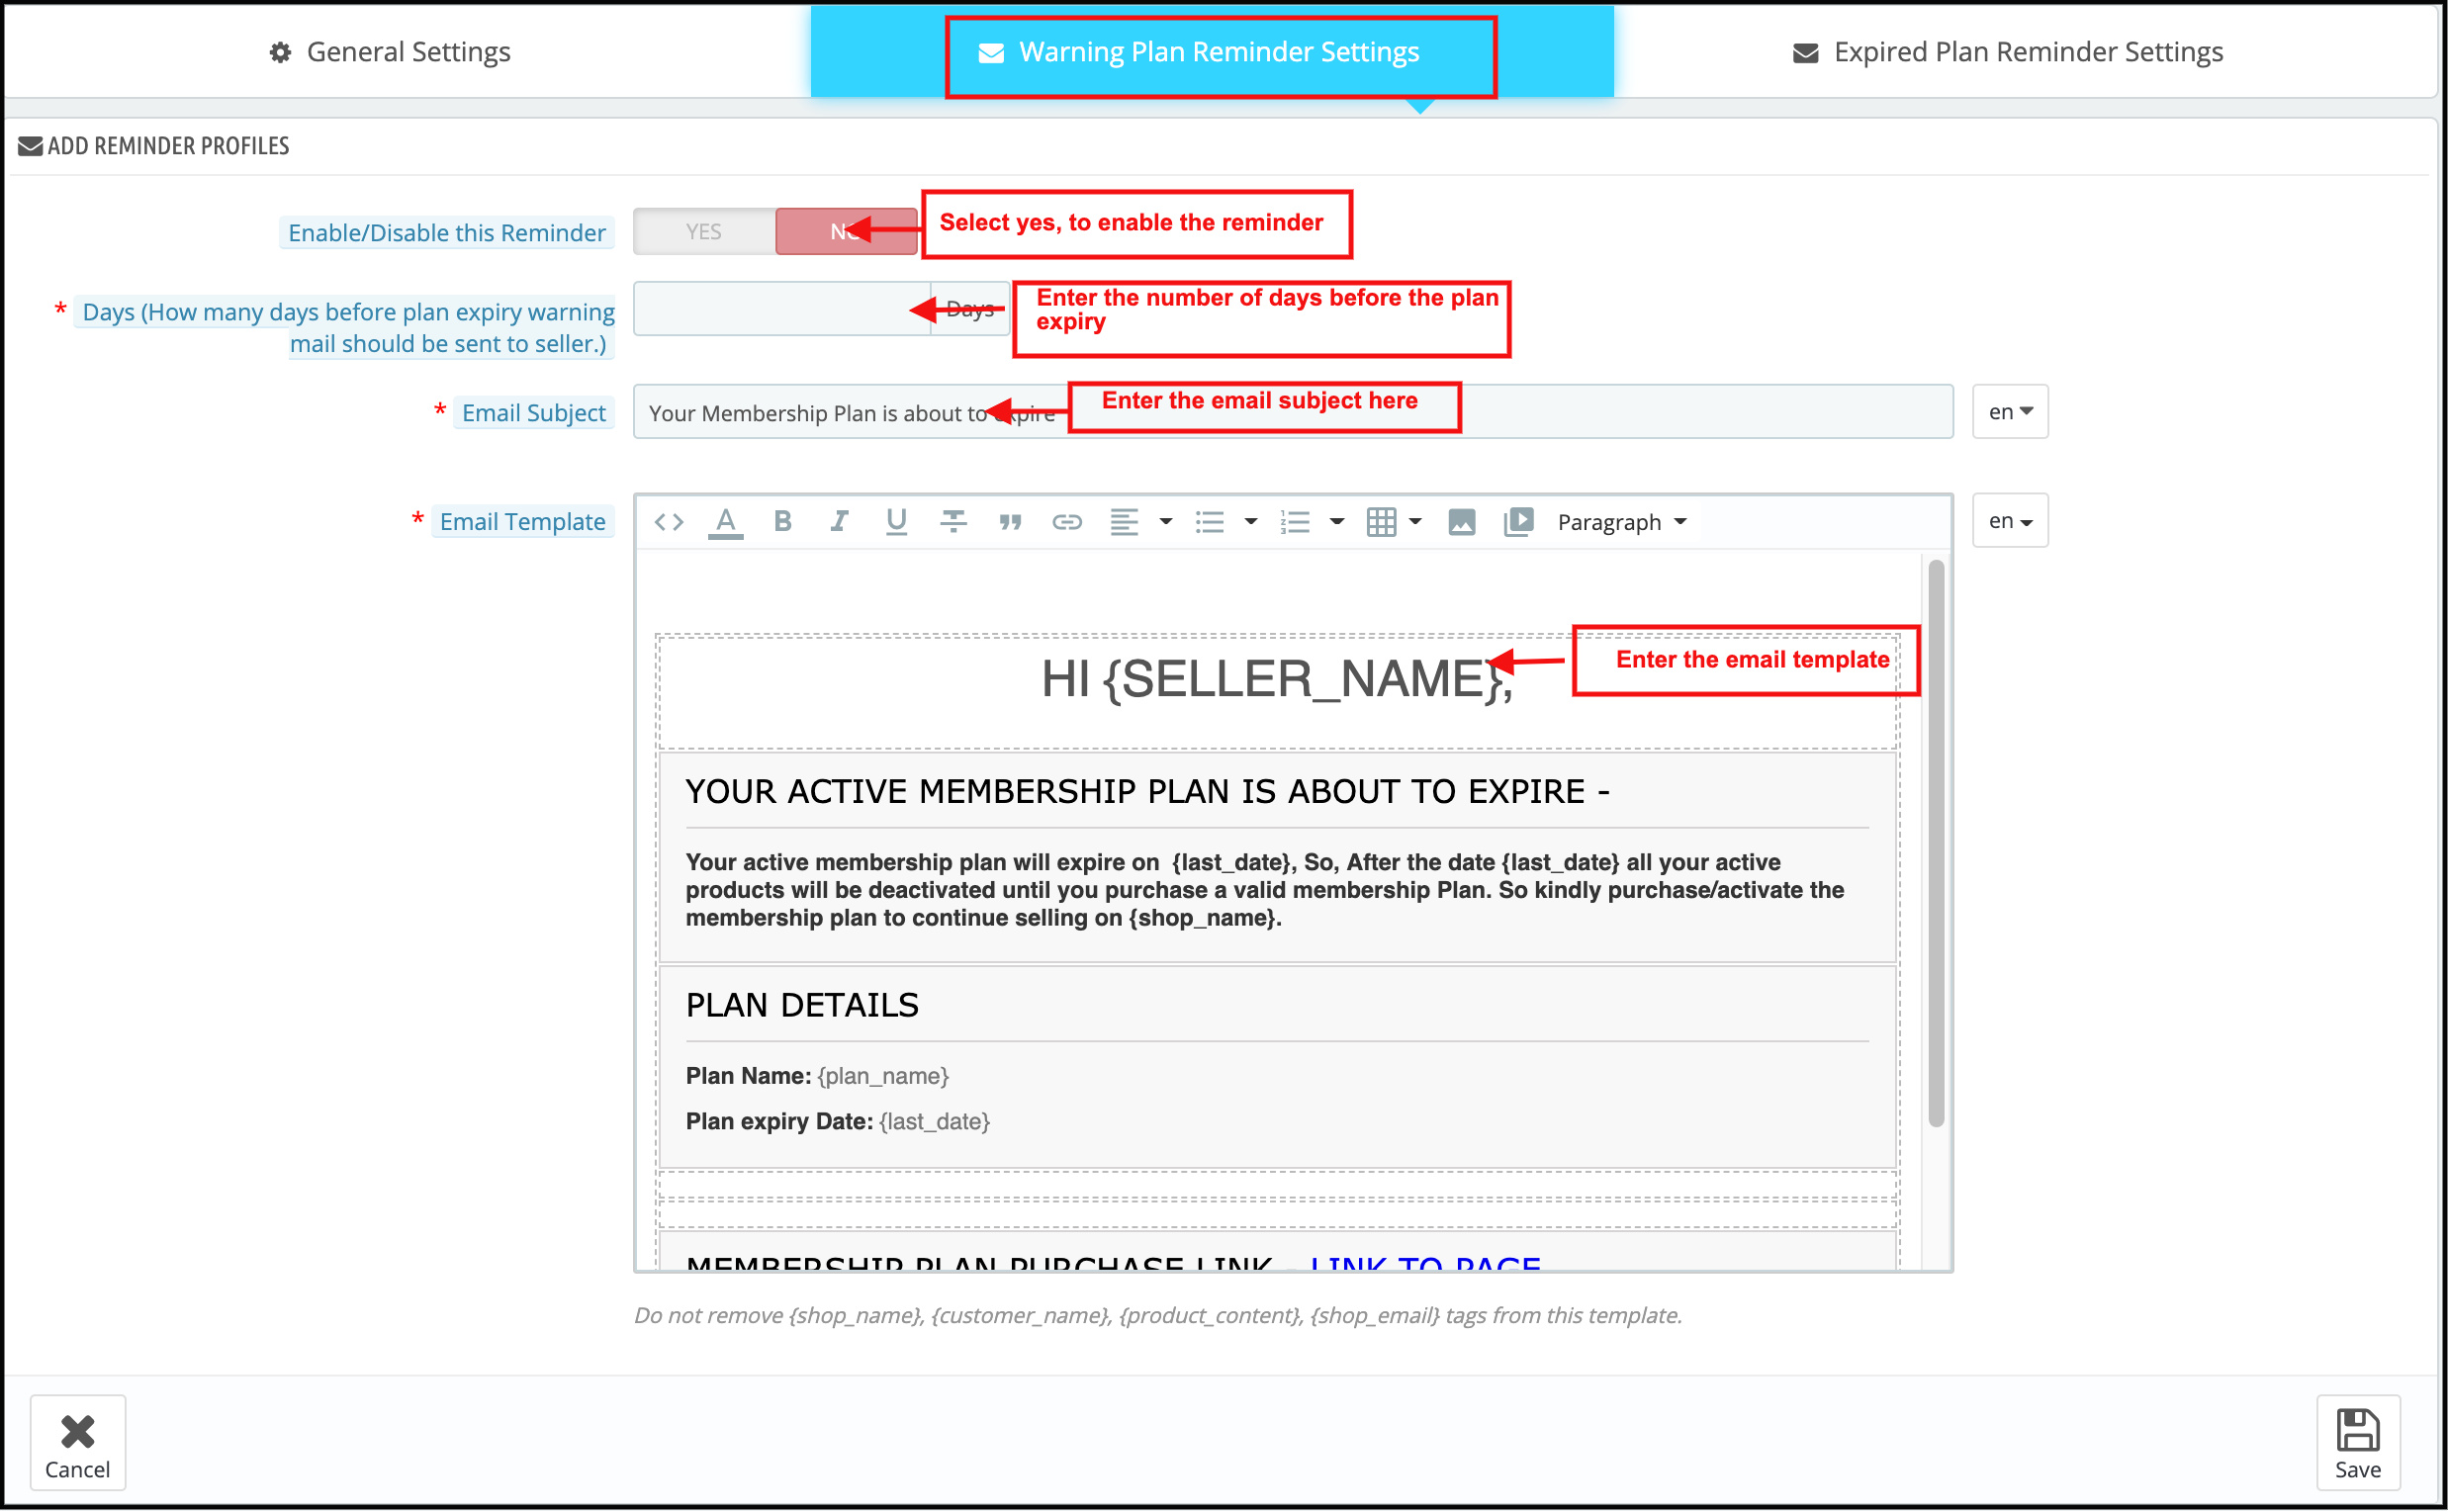
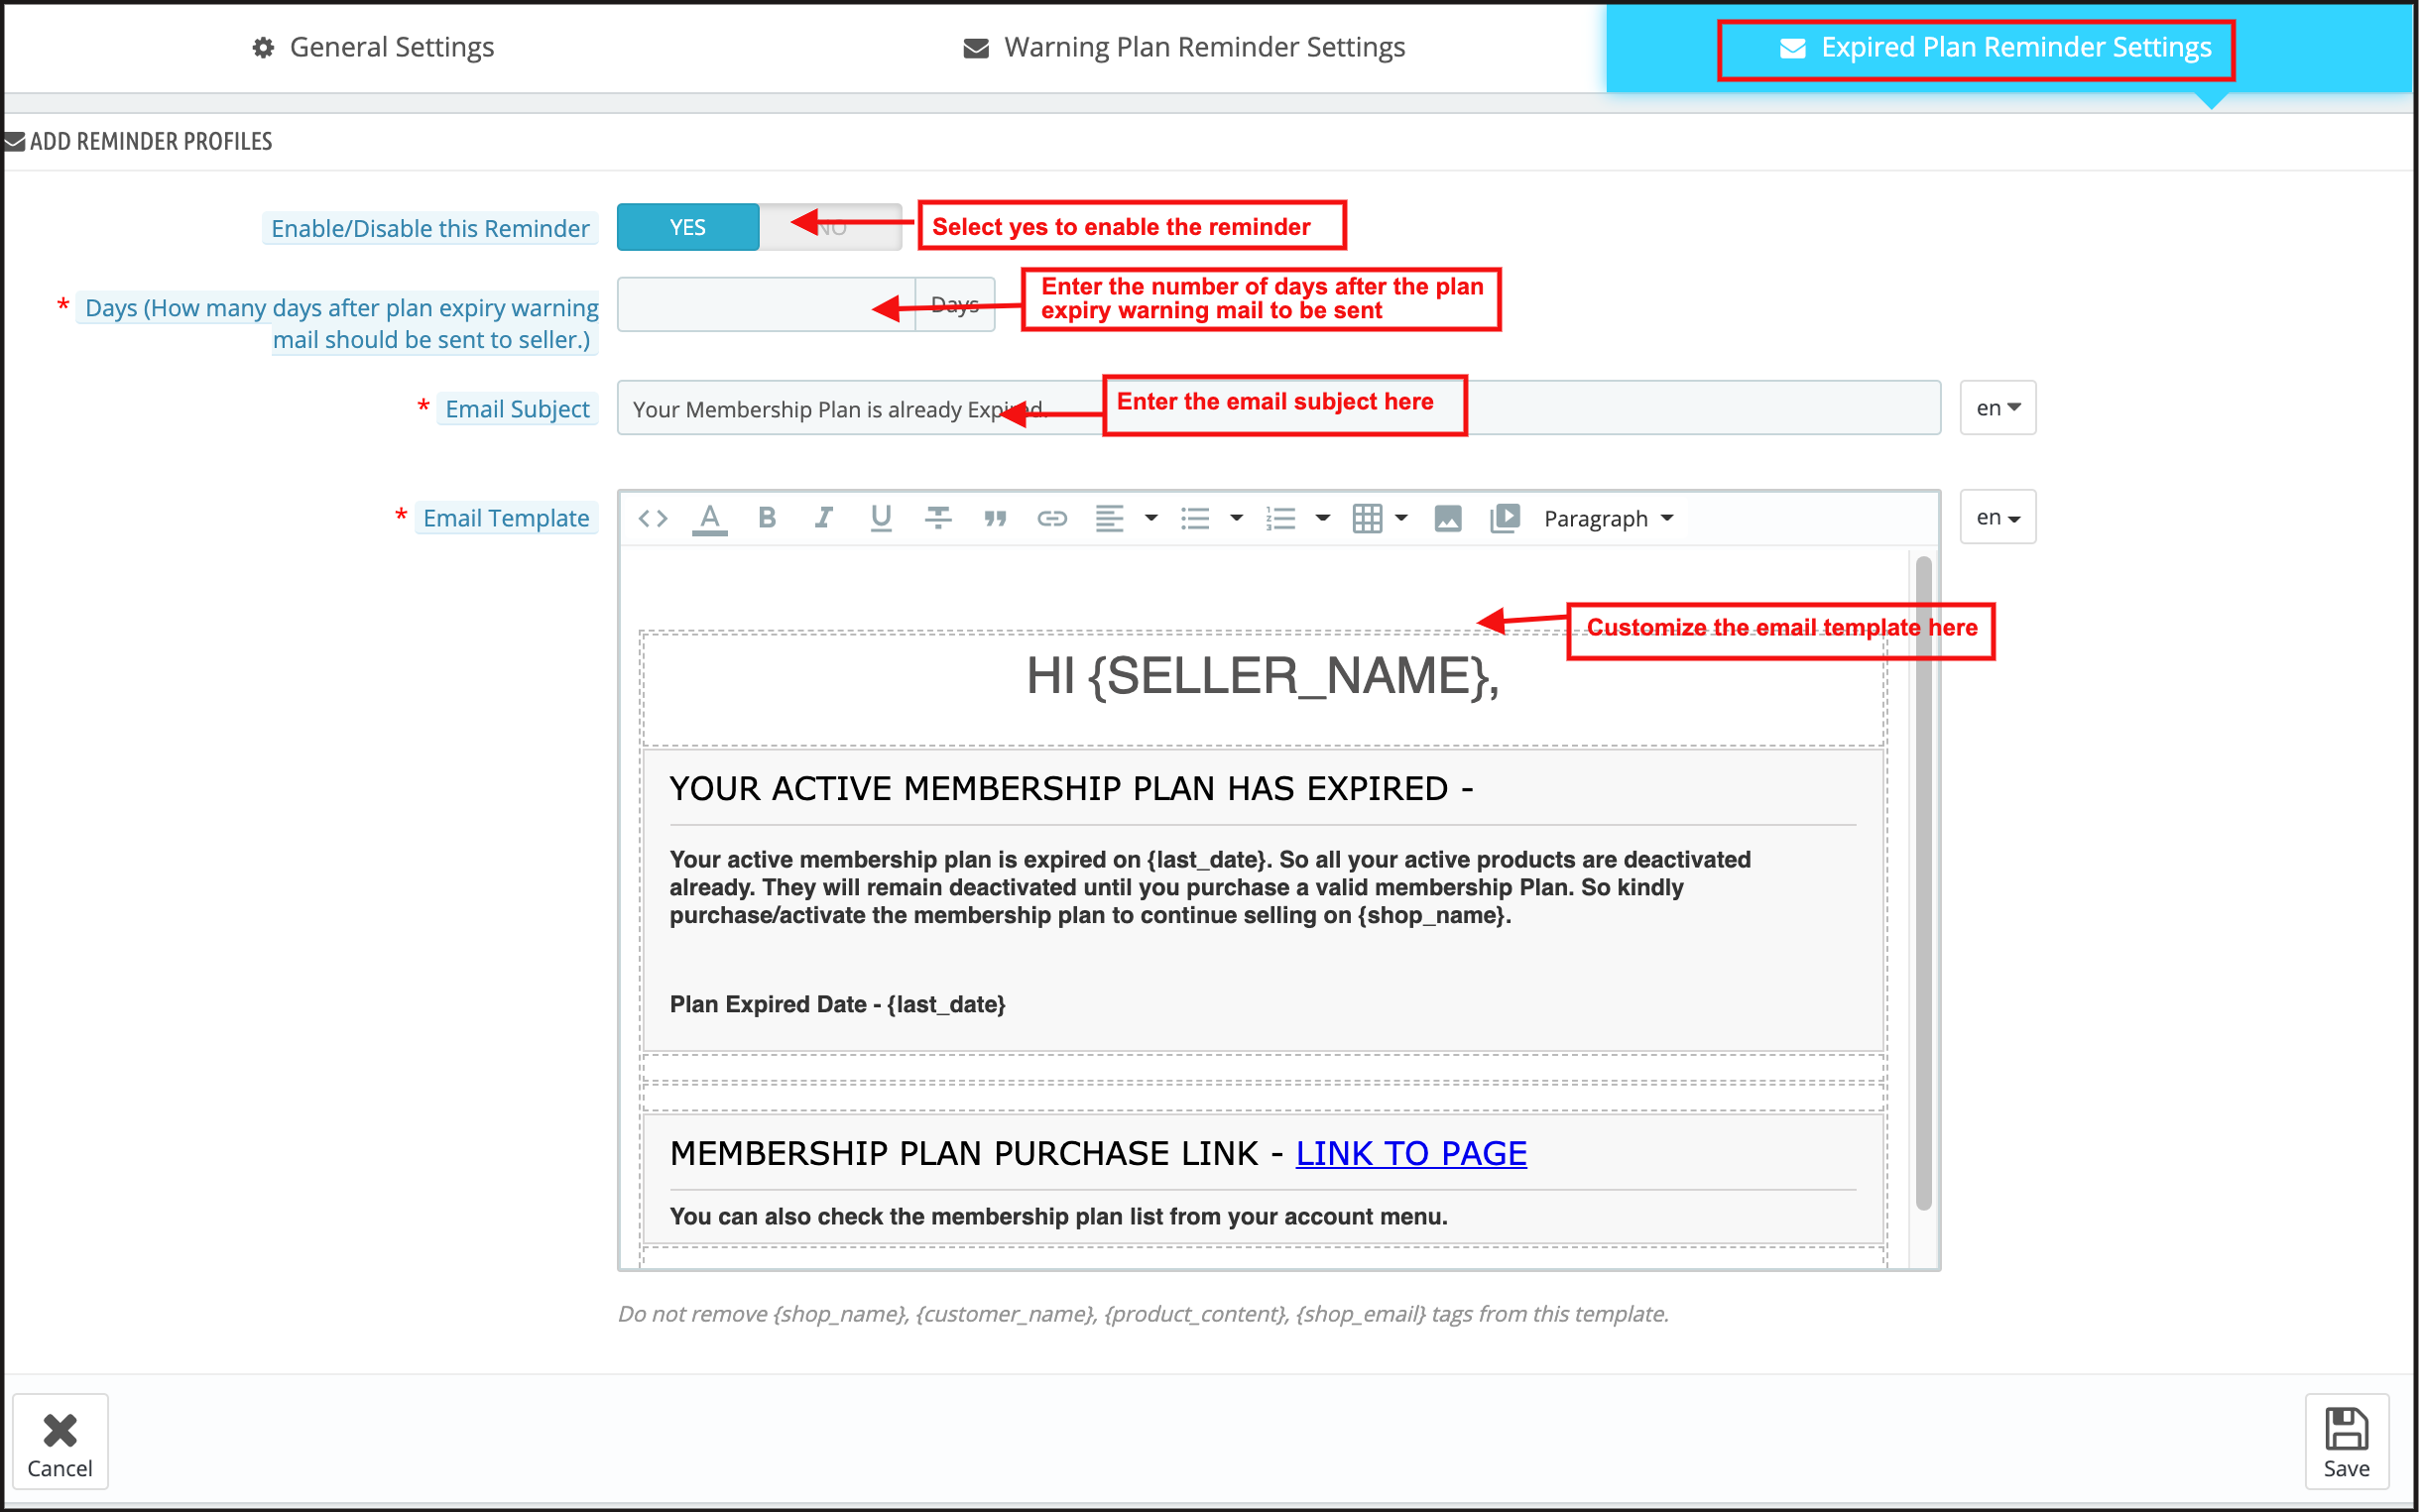
Admin can send warning emails to the sellers from upgrading their membership plans.
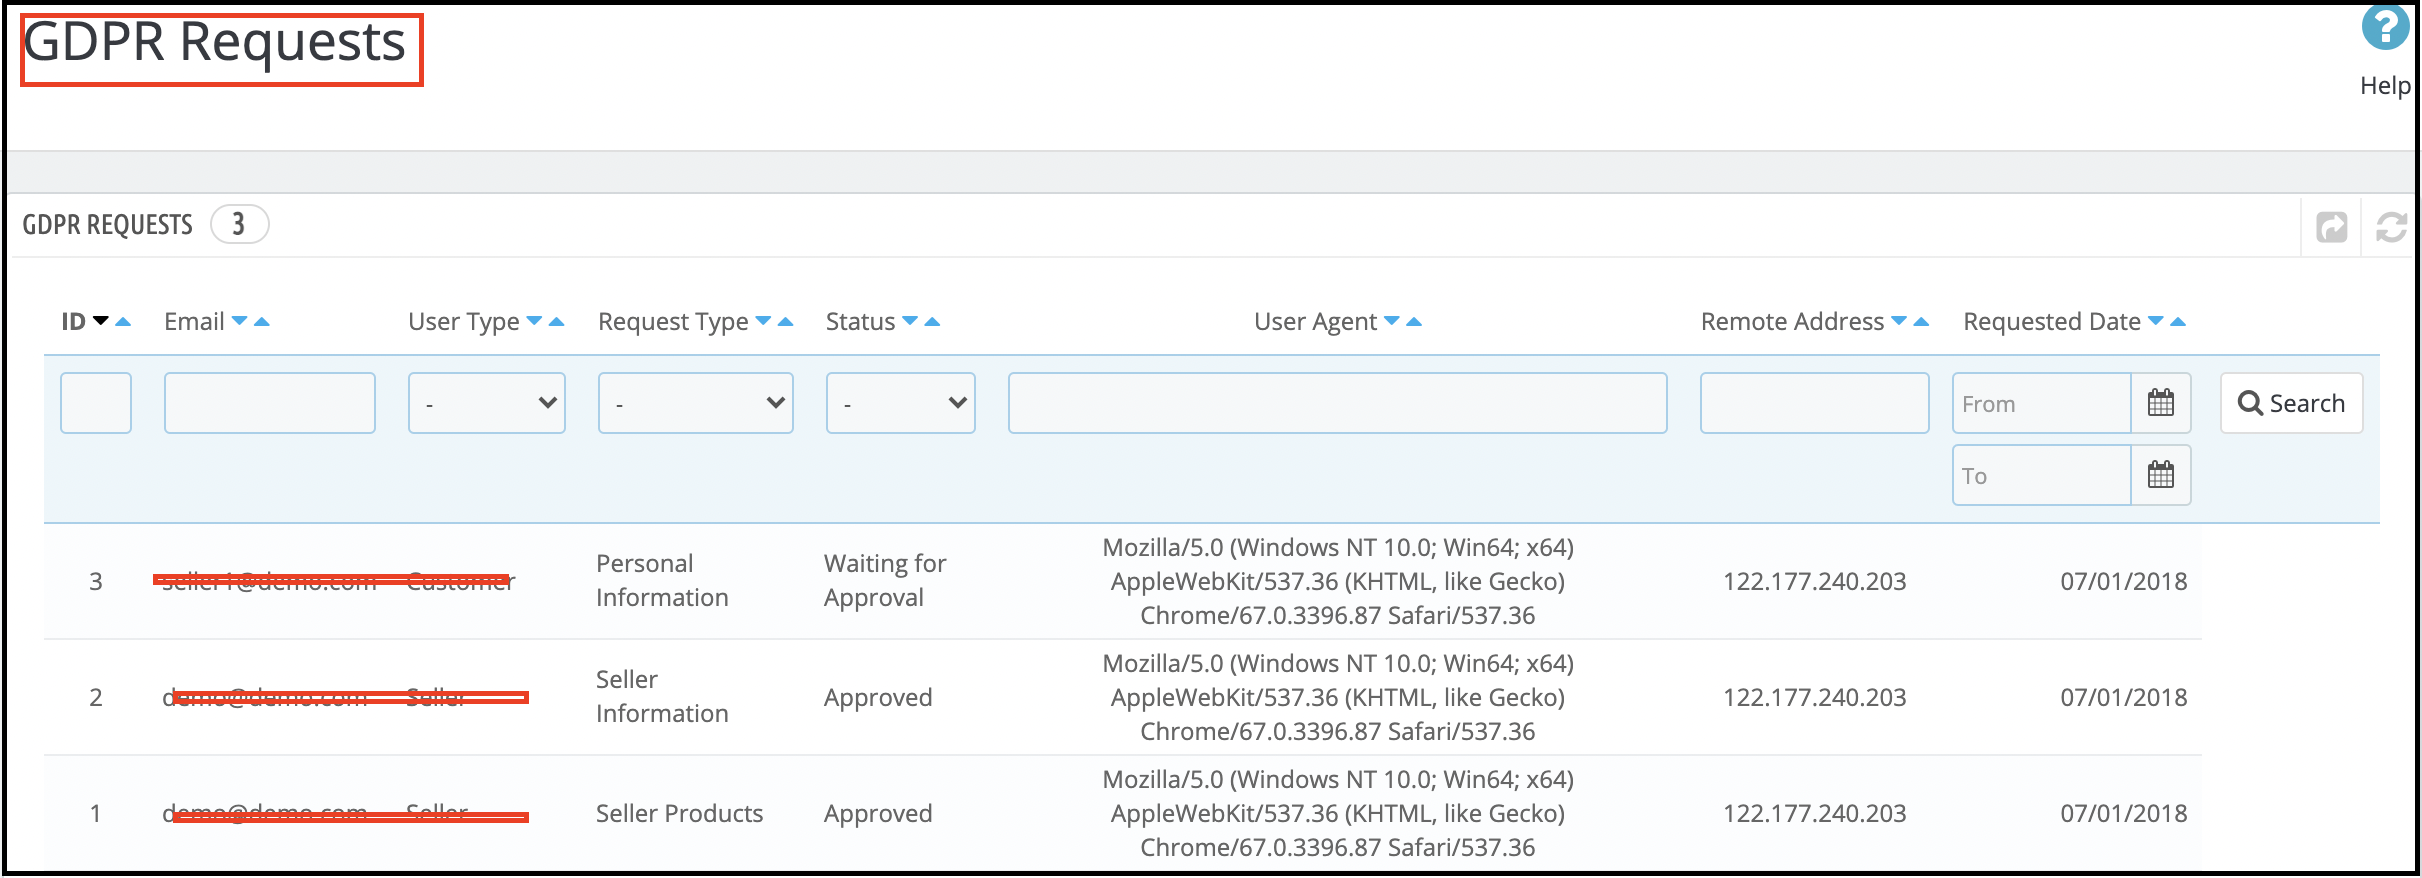
The GDPR requests raised by the sellers are visible from the back-end of the Prestashop Hyperlocal Delivery Marketplace.
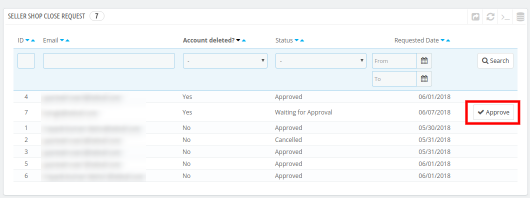
The admin approves/disapproves the shop closure request of the sellers from the admin interface of the Prestashop Hyperlocal Service Marketplace.
Admin gets an option to automate the transaction payout request process which helps the admin to automate all the payment requests of the sellers.
1.2 Seller Benefits of the Prestashop Hyperlocal Marketplace Module:
The seller can add multiple ship areas as per their requirements.
The seller can edit ship areas. They can also delete ship areas.
The seller can list multiple ship rates using a CSV file.
The seller can set a default price for the shipping if the distance is out of range.
The vendors can add any type of product to the marketplace. Prestashop Hyperlocal online marketplace supports all types of products, right from the simple, configurable to the virtual and bundled products.
The sellers can even request the admin to add new categories.
The commission charges are fixed, so, the entire transaction is transparent.
The Prestashop Hyperlocal multi-vendor marketplace module makes it easier for sellers to sell their products to a larger customer base.
The dashboard allows the vendors to view their profiles, products, and orders.
A separate seller’s page makes it easier for the vendors to promote their business.
Sellers can choose from various membership plans as per the requirements.
Under the GDPR compliance, the sellers get an option to download their details in CSV format by clicking a button.
The sellers can even request the admin to remove their shop from the marketplace. This request processes from the back-end of the Prestashop Hyperlocal E-commerce Business.
1.3 Buyer Benefits
Buyers can check the availability of products and sellers easily by entering their locations.
The store visitors can now choose the ideal products from a wider range of product options.
The customers get an option to review the sellers. Customers can also review the products by using our Product Review Reminder or Default Product Comment Addon.
Online shoppers can select the product by visiting the seller’s page.
Buyers can also become a seller in Prestashop Hyperlocal Delivery Marketplace. They can also register as a seller.
2.0 Installation
Follow the following steps for installing Prestashop Hyperlocal Marketplace addon:
Once you purchase the Prestashop Hyperlocal Service Marketplace addon,
Go to the Store Admin -> Modules and Services
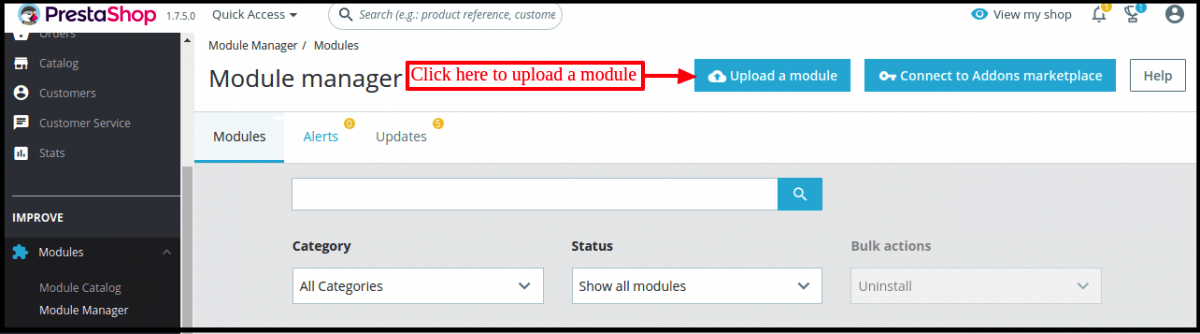
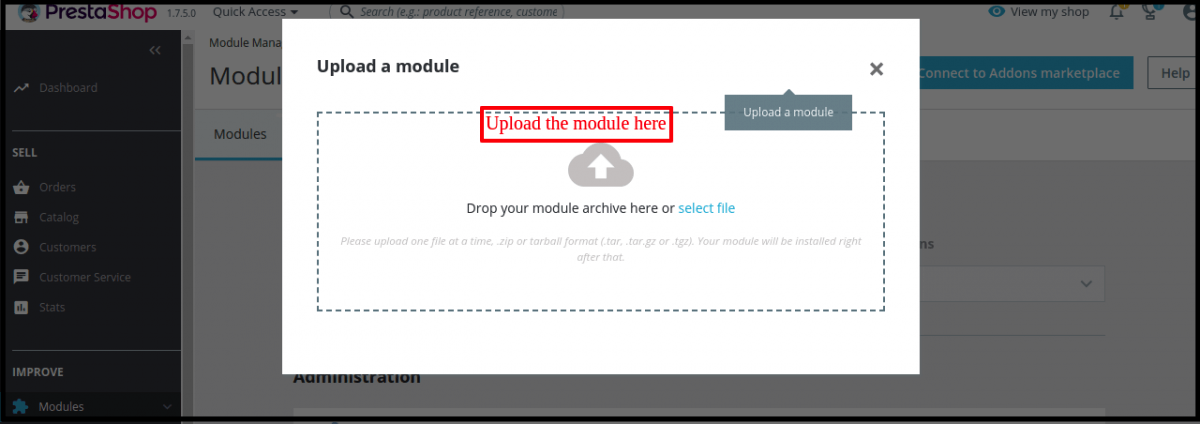
Click on “ Upload a module”. Drag or drop the file or can simply select the file from the system.
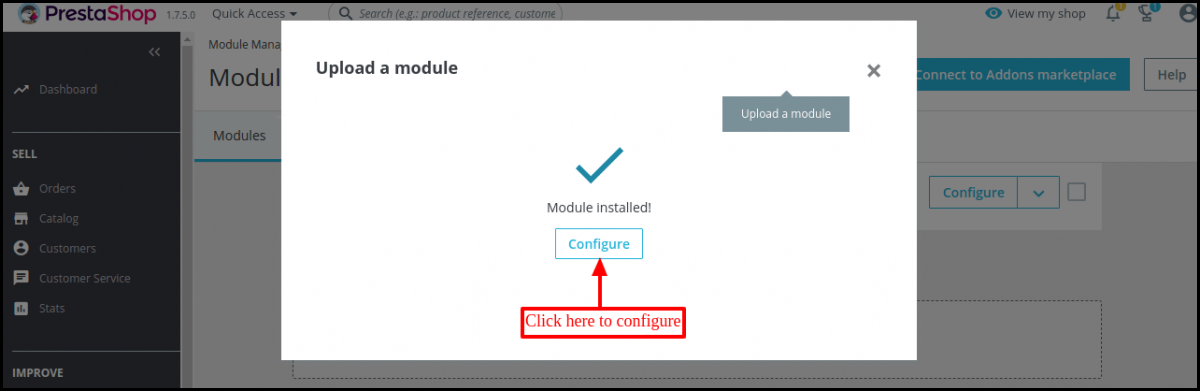
Once the file is completely uploaded, a notification of “Module(s) installed successfully” will display.
Once the Prestashop Hyperlocal Delivery Business Model installs properly the Install button will be automatically be converted to Configure.
3.0 Admin Module
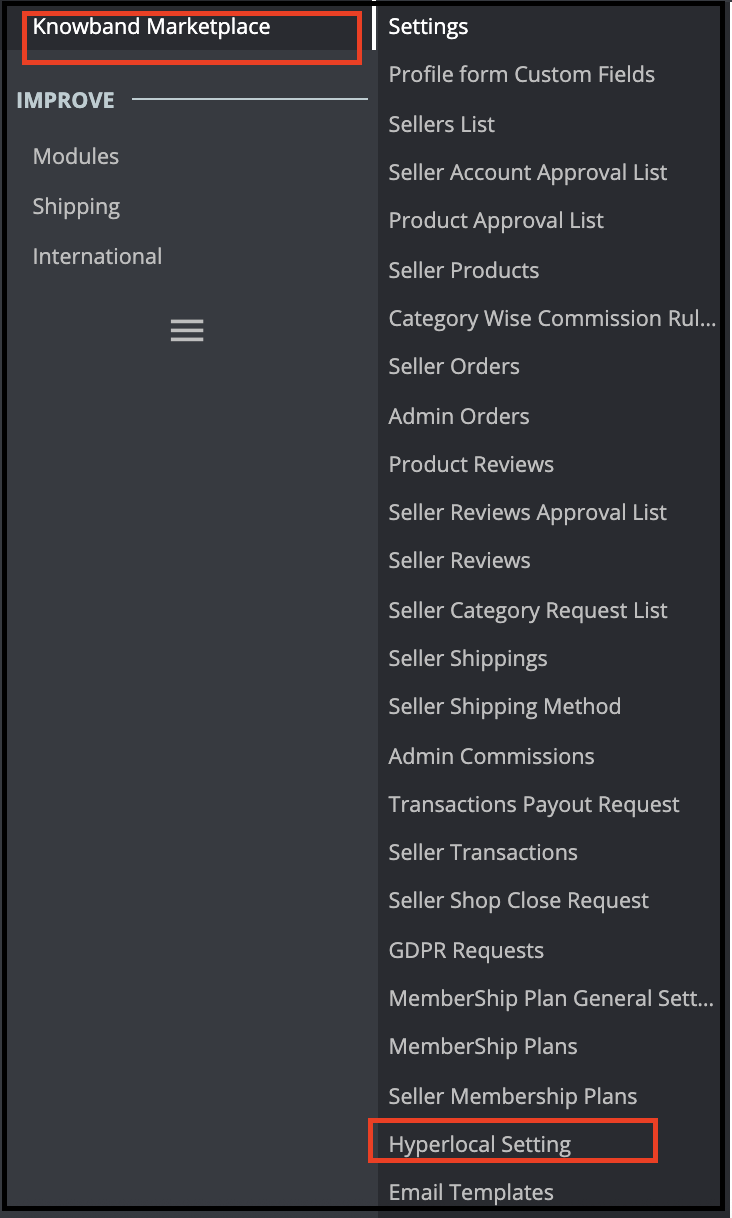
In the admin interface of the Prestashop Hyperlocal Marketplace addon, you’ll find a separate menu at the end of the menu as shown below.
The Prestashop Hyperlocal Marketplace Menu consists of several sub-menu options that direct the users to several pages in the Prestashop Hyperlocal Marketplace Addon.
3.1 Settings
The Prestashop Hyperlocal Marketplace Module’s Settings tab divides into 2 levels i.e. Seller Level Settings and Global Level Settings. This page below only controls the Global level settings for the Prestashop Hyperlocal Marketplace Module. 3.1.1 General Settings
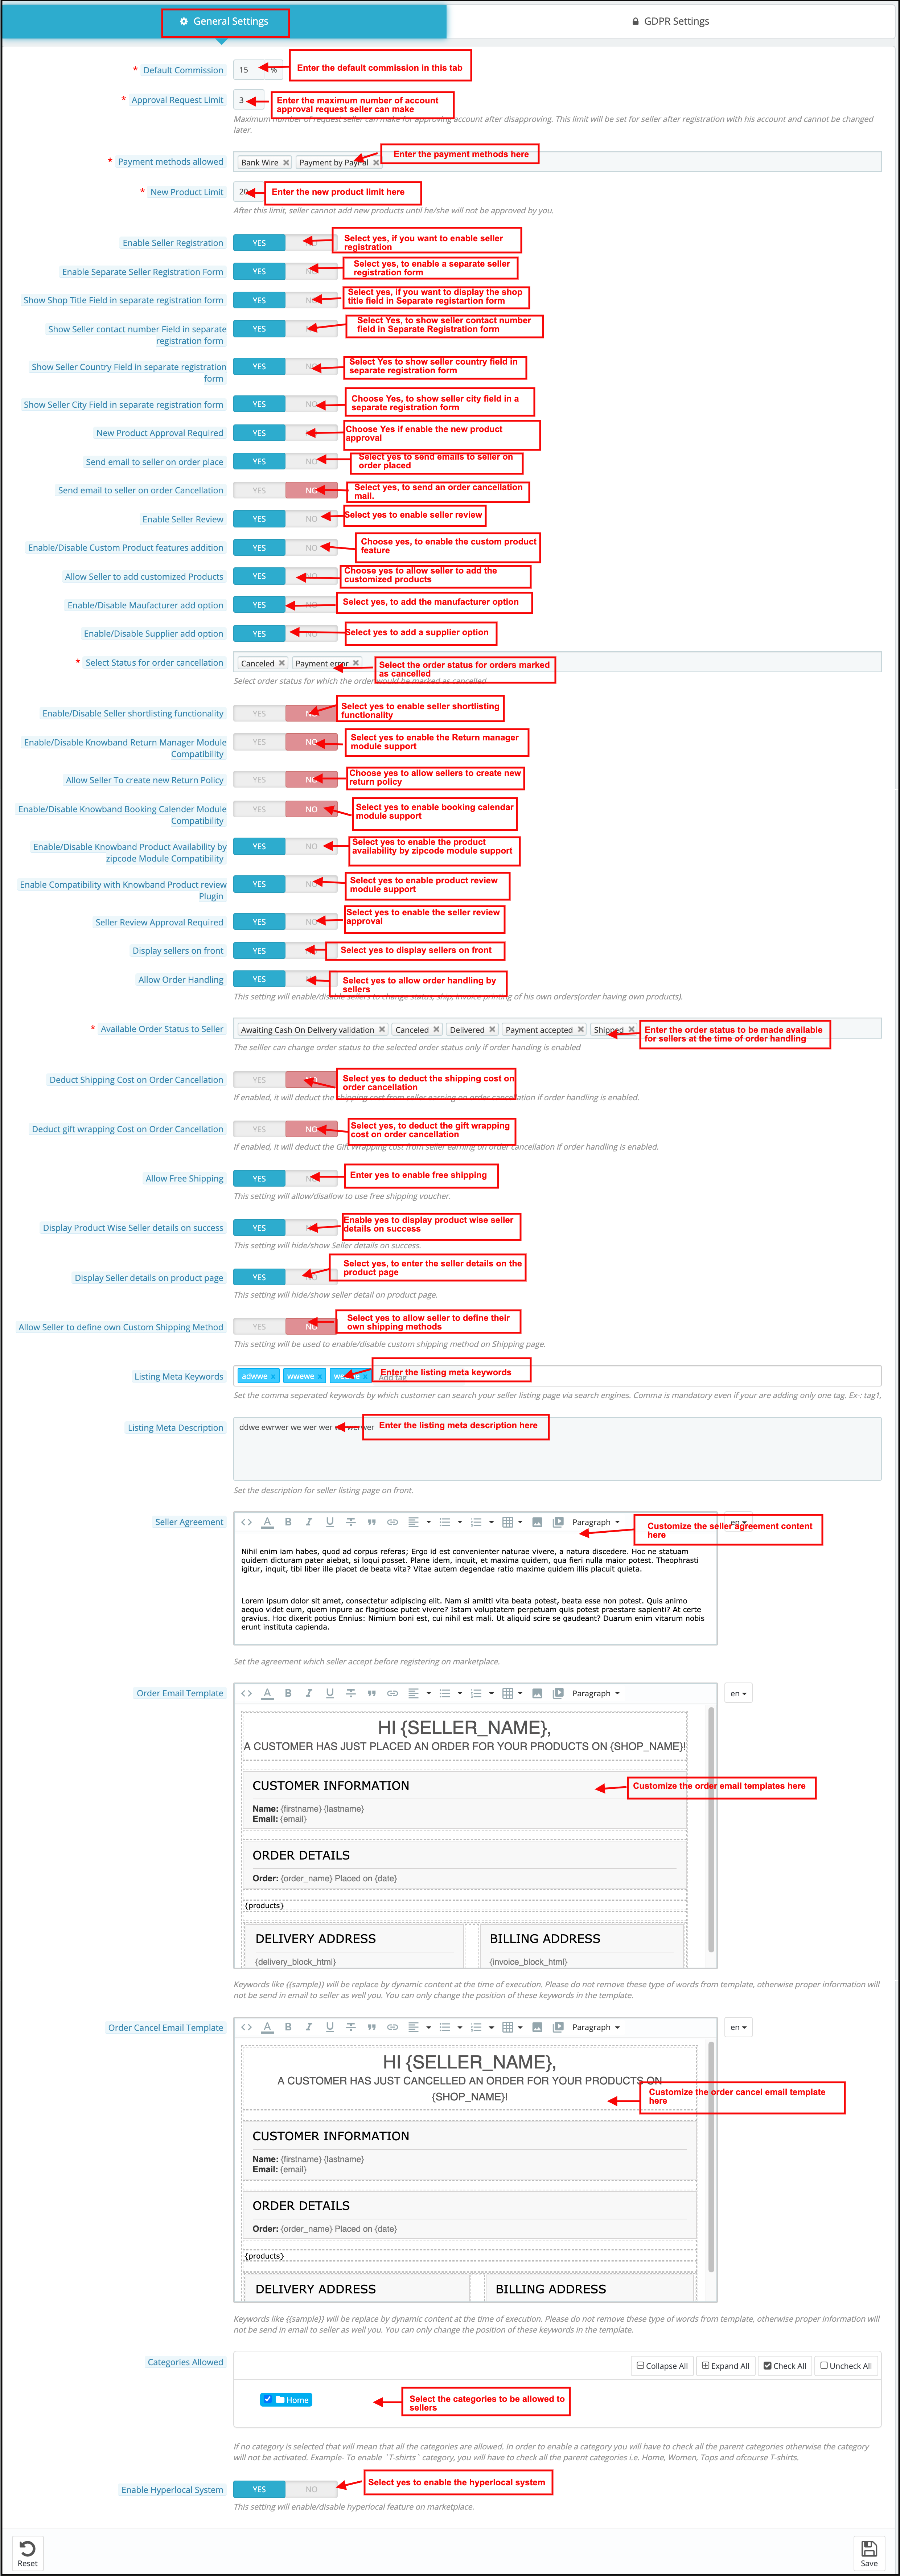
This page has all the settings that control the Prestashop Hyperlocal online marketplace and its several other features. The general settings page consists of the following fields:
Default Commission: The Prestashop Hyperlocal multi-vendor marketplace allows the sellers to fix and change the commission that is chargeable to the sellers. This section sets the default commission percentage that will charge from the sellers from the total sales made by them.
Approval Request Limit: It is the maximum number of requests that a seller can make to get a new seller account. This limit will be set for each seller after registration with his account and cannot be changed later.
Payment Methods Allowed: Select the payment methods you want to allow for transactions.
New Product Limit: Here admin can enter the maximum number of new products that a seller can add. After this limit, the seller cannot add any new product without the approval of the admin.
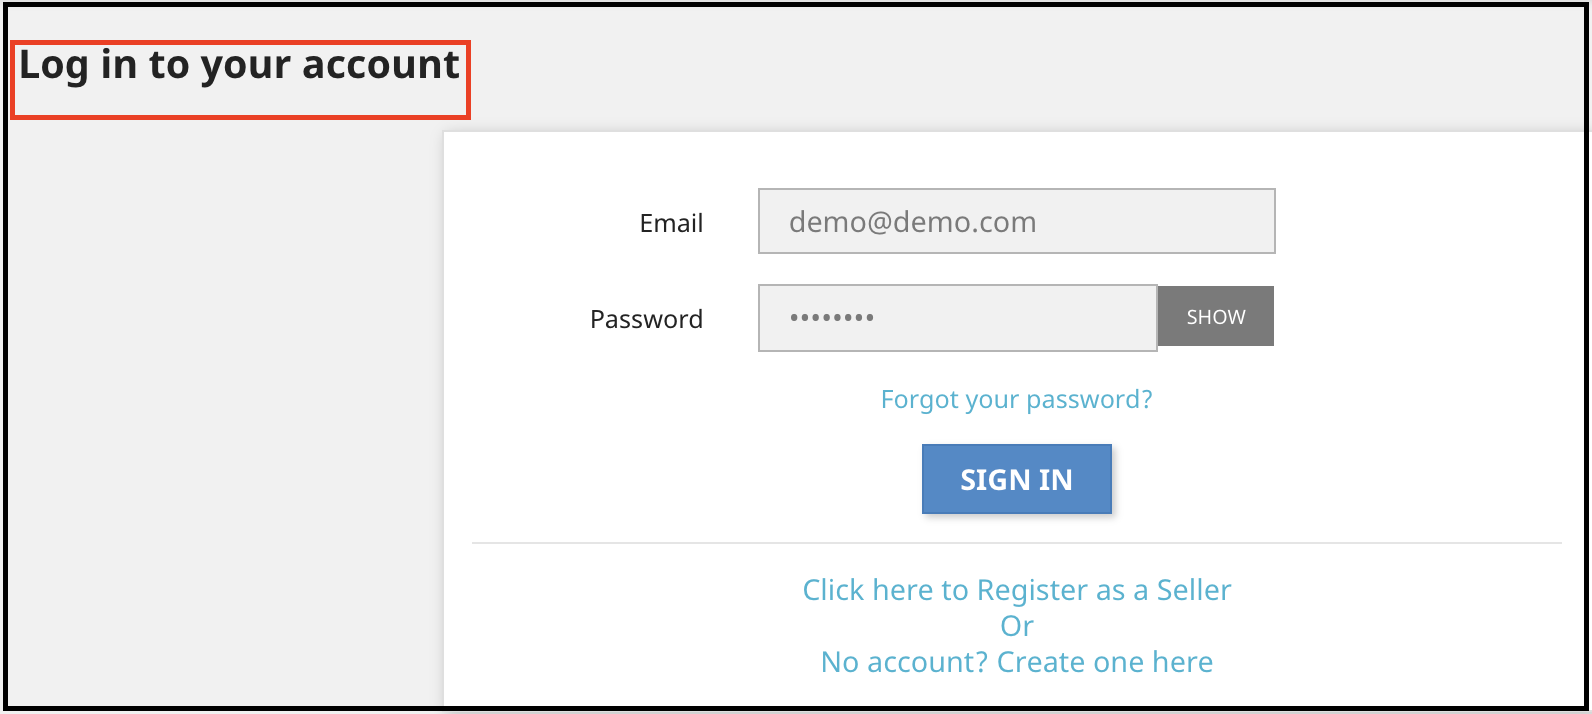
Enable Seller Registration: By enabling this button, the admin can allow the new or existing customer who is not a seller to register as a seller. The same ‘Register as Seller’ option is available in the Customer Tab of the PrestaShop store as well as in the front-end of the marketplace.
New Product Approval Required: Enable this field in case you want to approve a new product that a seller adds before it displays on your Prestashop Hyperlocal E-commerce Business.
Send Email to Seller on Order Place: Enable this field to send an email to the seller in case an order comes for the seller’s product(s).
Send Email to Seller on Order Cancellation: Enable this field to send an email to the seller in case an order cancels for the seller’s product(s).
Enable Seller Review: Enable this field, in case you want the customers to review the seller.
Enable/Disable Custom Product features addition: Enable this field, in case you want to add custom product features.
Allow Seller to add customizable Products: Enable this field, in case you want to allow sellers to add customizable products.
Enable/Disable Manufacturer add option: Enable this field, in case you want to add the manufacturer option.
Enable/Disable Supplier add option: Enable this field, in case you want to add the supplier option.
Order Status for cancellation: Enter the Order status to be shown at the time of cancellation.
Select order status for which the order would be marked as canceled: Select the order status to mark it when it cancels.
Enable/Disable Seller shortlisting functionality: Enable this field, in case you want to add seller shortlisting functionality.
Enable/Disable Knowband Booking Calendar Module Compatibility: Enable this field, in case you want to add Knowband Booking Calendar Module Compatibility.
Activate/Disable Knowband Return Manager Module Compatibility: Enable this field, in case you want to add Knowband Return Manager Module Compatibility.
Allow Seller To create a new Return Policy: Enable this field, in case you want to allow the seller to create a new return policy.
Enable/Disable Knowband Product Availability by zipcode Module Compatibility: Enable this field, in case you want to allow zipcode module compatibility.
Enable Compatibility with Knowband Product review Plugin: Enable this field, in case you want to allow compatibility with the product review plugin.
Seller Review Approval Required: Enable this field in case you want the seller to review for approval before it becomes visible on the storefront.
Display sellers on the front: Enable this field in case you want to show a link in the header of the Prestashop Hyperlocal Marketplace front-end about the seller’s listing page.
Allow Order Handling: This setting will enable/disable the sellers to manage and change the order status, manage the shipment of the orders and generate the invoice of their products.
Available Order Status to Seller: The seller can change order status to the selected order status. Further, only if he enables the order handling.
Deduct Shipping Cost on Order Cancellation: If the admin enables this, it will deduct the shipping cost from the seller’s earnings. Further, on order cancellation, if he enables the order handling.
Deduct gift wrapping Cost on Order Cancellation: If the admin enables this, it will deduct the Gift Wrapping cost from seller earning on order cancellation if order handling is enabled.
Allow Free Shipping: This setting will allow/disallow to use of a free shipping voucher.
Display Product Wise Seller Details on Success: If the admin enables this, the seller details will be shown on the order confirmation page.
Display Seller Details on Product Page: The seller’s detail will display on the product page if this option is enabled.
Allow Seller to define their Custom Shipping Method: Enable this functionality to allow the sellers to define their shipping methods. In case, the admin disables this feature, then, only the default shipping methods defined by the admin be shown in the Shipping tab of the seller’s dashboard.
Listing Meta Keywords: Add all the meta tags (separated by comma) by which your customers can search the Seller Listing Page via Search Engines.
Listing Meta Description: Add the description to the meta tags in the above field.
Seller Agreement: The seller agreement is customizable from this section of the Prestashop Hyperlocal Delivery Marketplace. The same agreement will display to the sellers once they register themselves in the Prestashop Hyperlocal Marketplace.
Order Email Template: The email to be sent to the sellers when an order happens for their product is customizable from here.
Order Cancel Email Template: The email to be sent to the sellers when an order cancels for their product to be customizable from here.
Categories Allowed: This option shows the categories that the admin allows for the sellers to add products. If no category is selected, all the categories that the admin allows. Moreover, if he selects some of the categories, it means that only those categories permit.
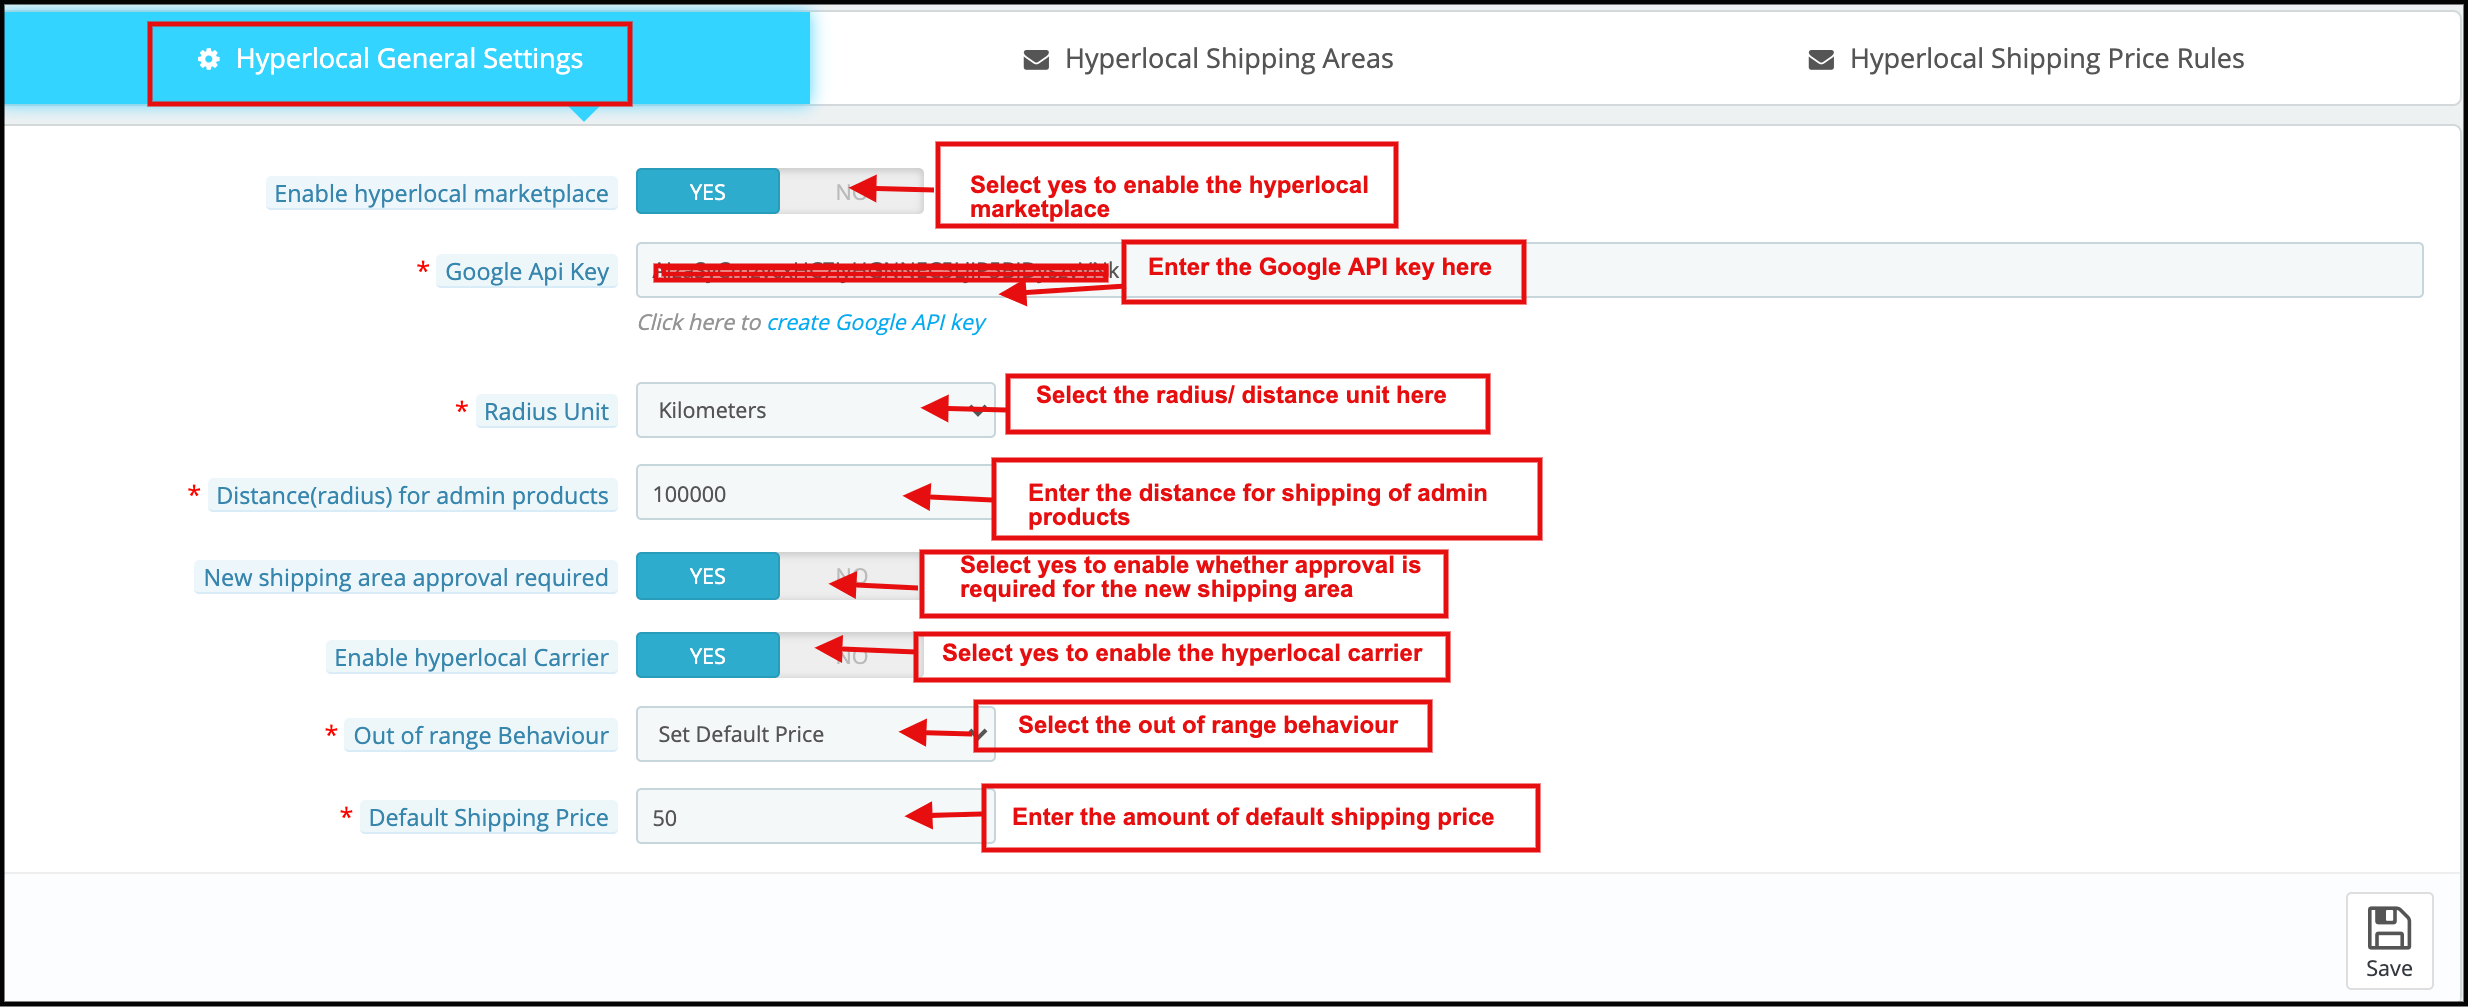
Enable Hyperlocal System: Toggling this button can enable the hyperlocal system in the marketplace.
3.1.2 GDPR Settings
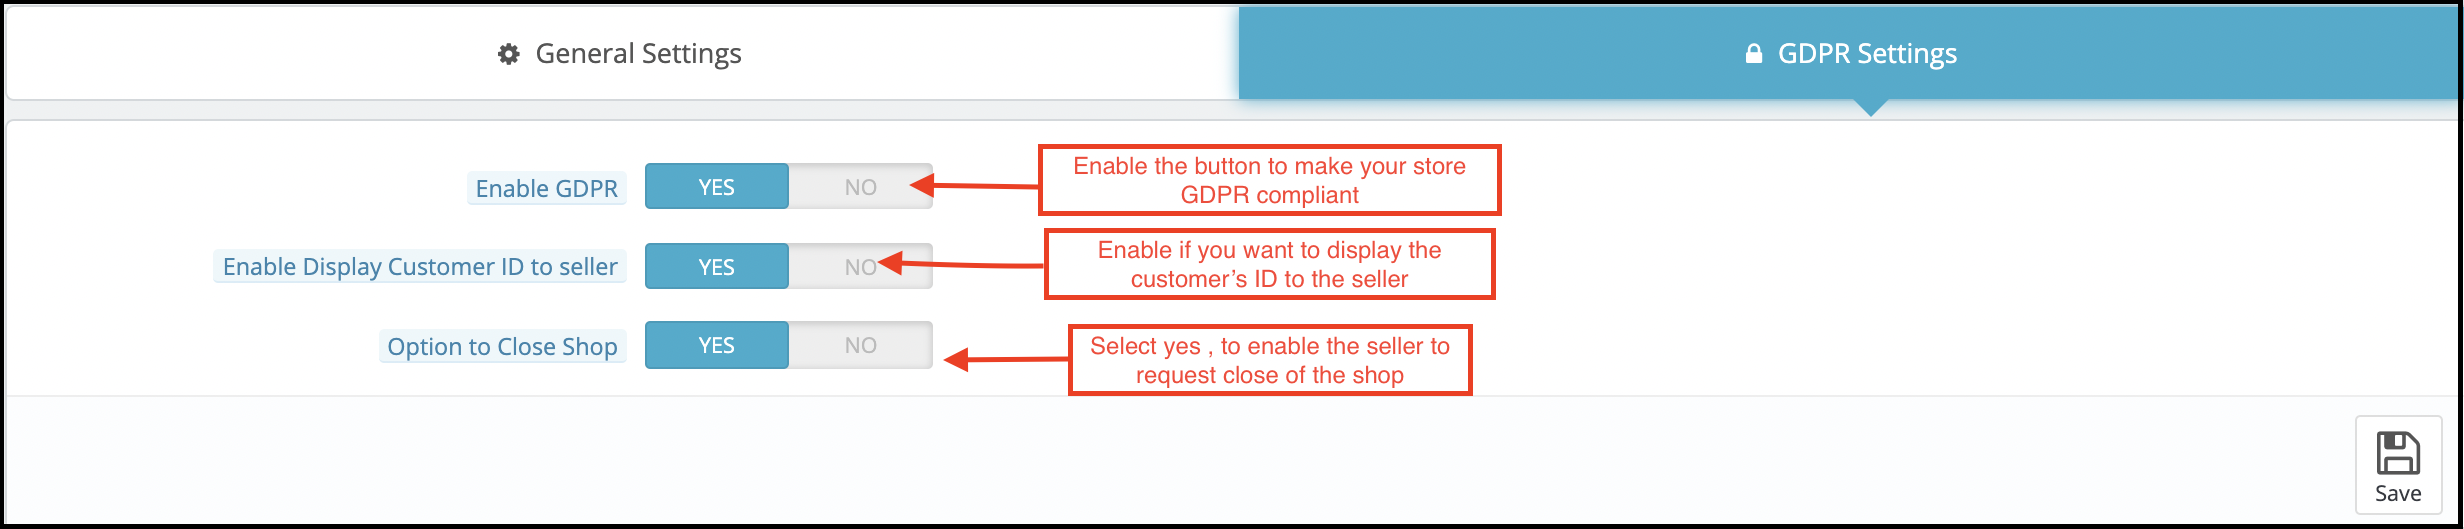
The store admin can enable the GDPR settings by clicking a few buttons in this section of the Prestashop Hyperlocal Marketplace addon. The various fields are below:
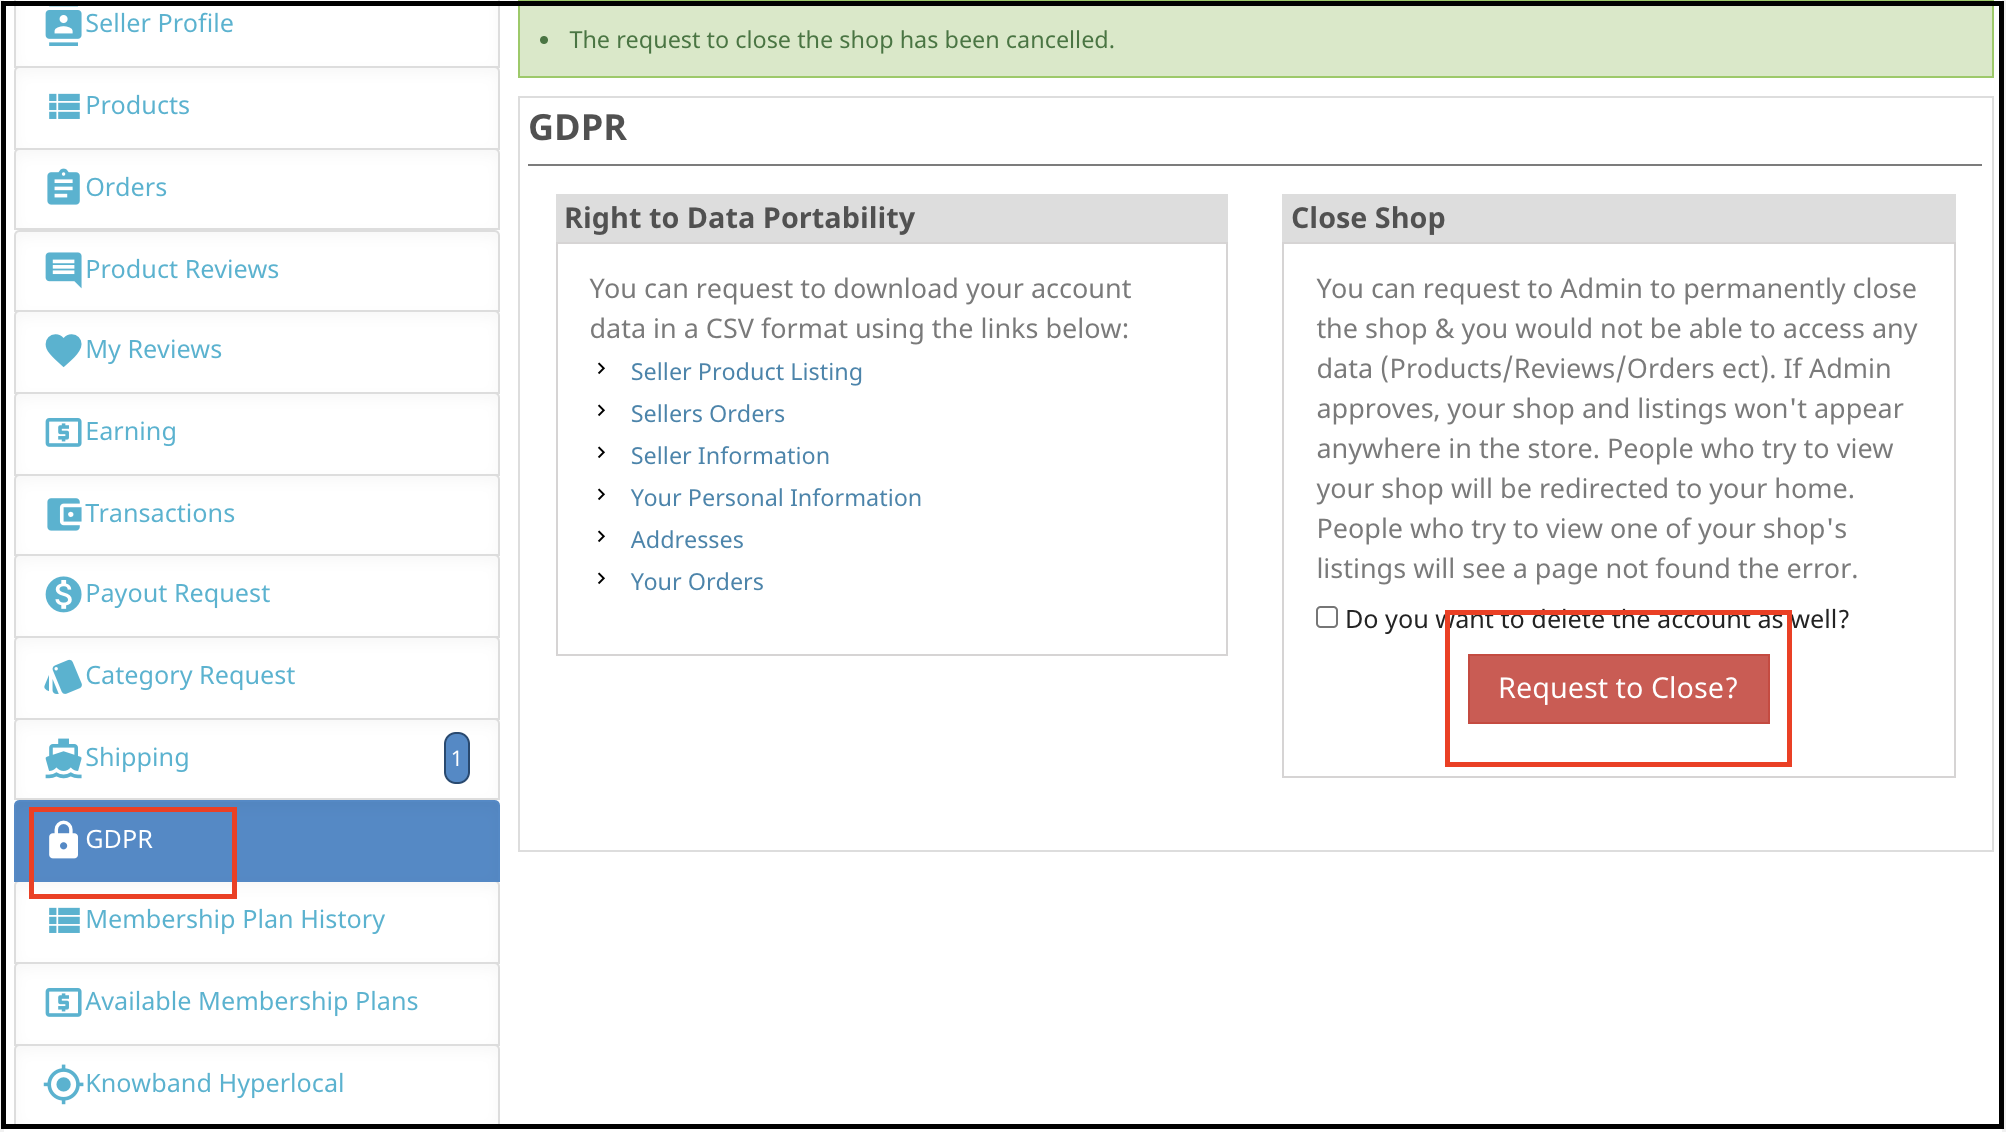
Enable GDPR: Toggle this button to enable GDPR compliance. Enable Display Customer ID to seller: Enable this feature if you want to display the customers’ ID to the third-party sellers. Option to close Shop: If the admin enables this feature, then, the sellers will get options to request for the shop closure. In fact, it displays a section in the tab in the dashboard of the sellers from where the request can be raised.
3.2 Profile Based Custom Fields
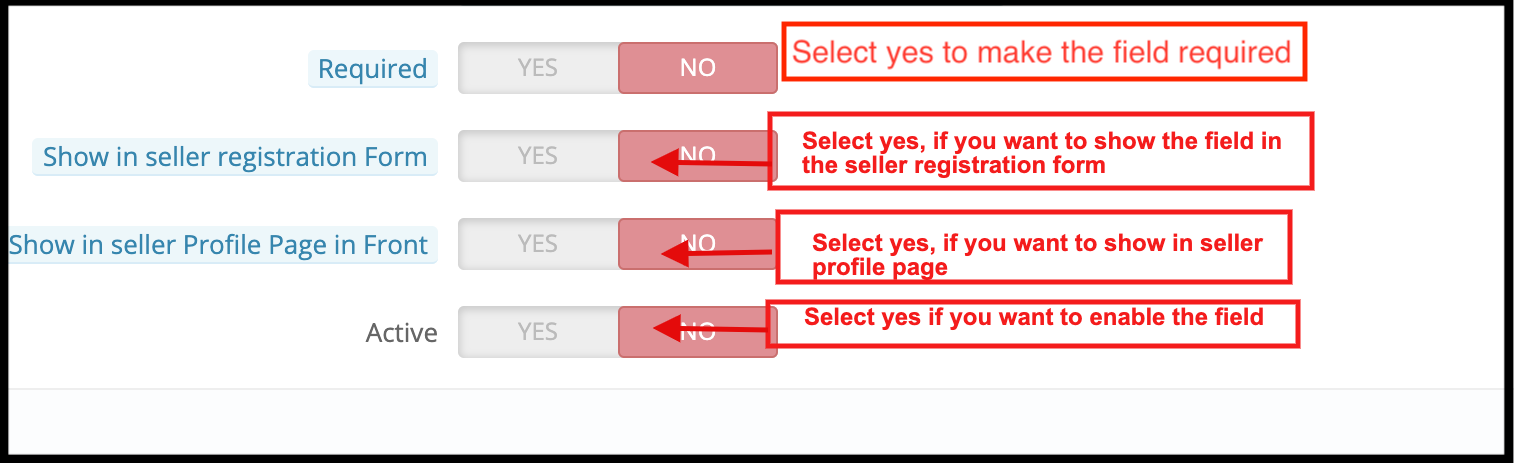
Now admin can add custom fields for the seller profile page. Moreover, even make them needful for the sellers to fill out.
Custom Fields for Seller Profile:
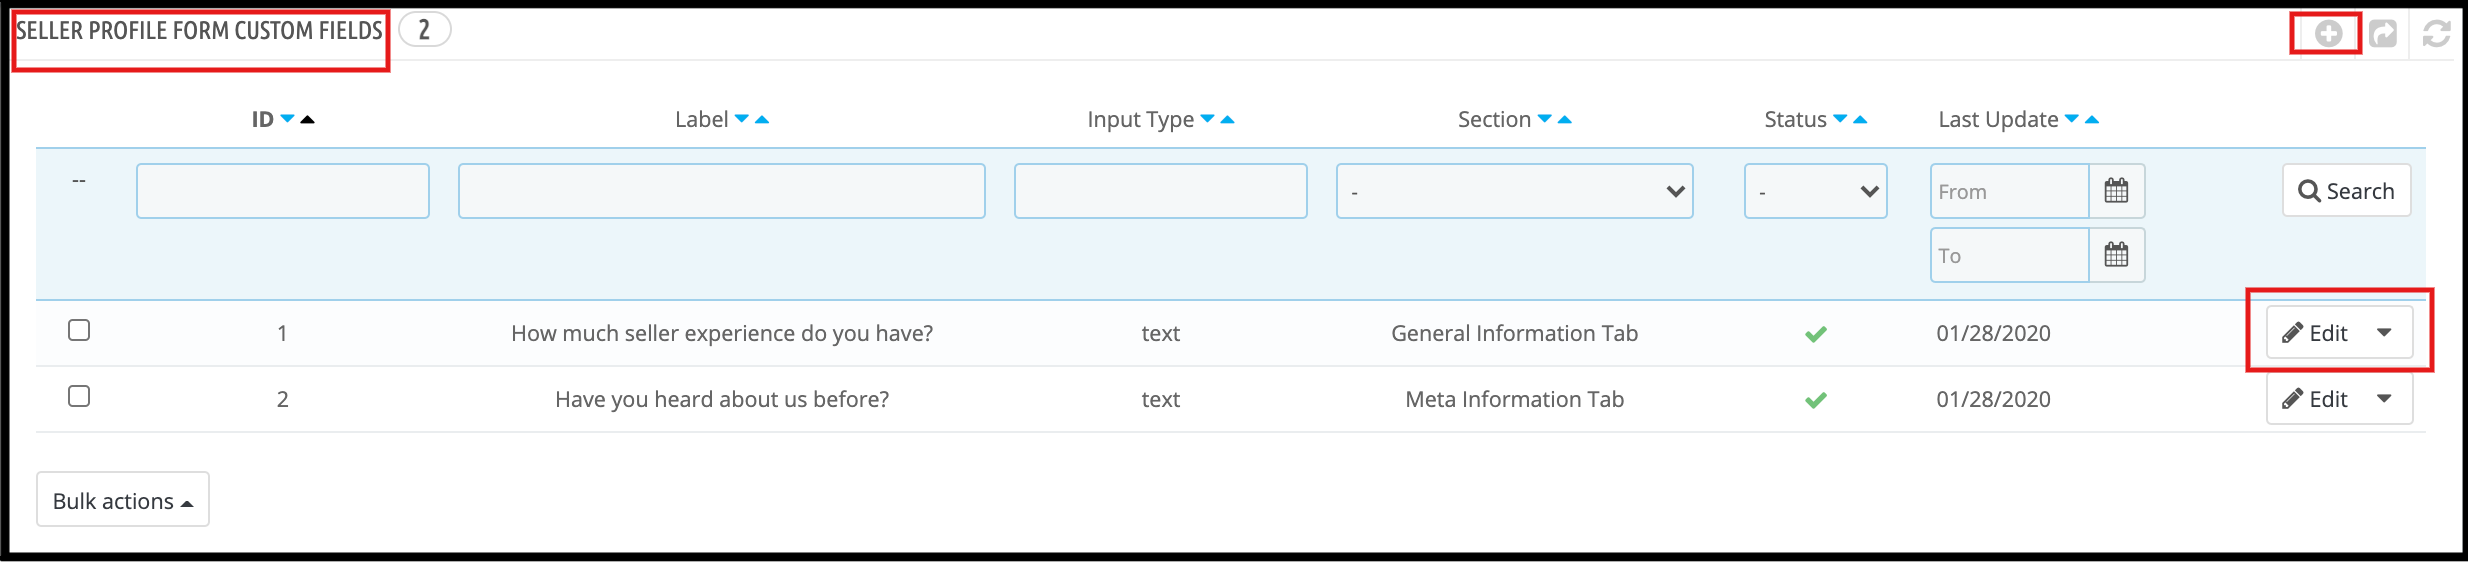
Admin can add new custom fields for the seller’s profile under the “Profile Form Custom Fields” tab. With the help of this tab, the admin can add new custom fields or delete custom fields for sellers’ profiles using Prestashop Hyperlocal Marketplace.
Show Custom Fields on Seller Front Page:
With the help of the PrestaShop Hyperlocal online marketplace, the admin can show the custom fields on the seller’s profile page. Admin can allow this functionality under the “Profile Form Custom Fields” tab.
Separate Seller Registration:
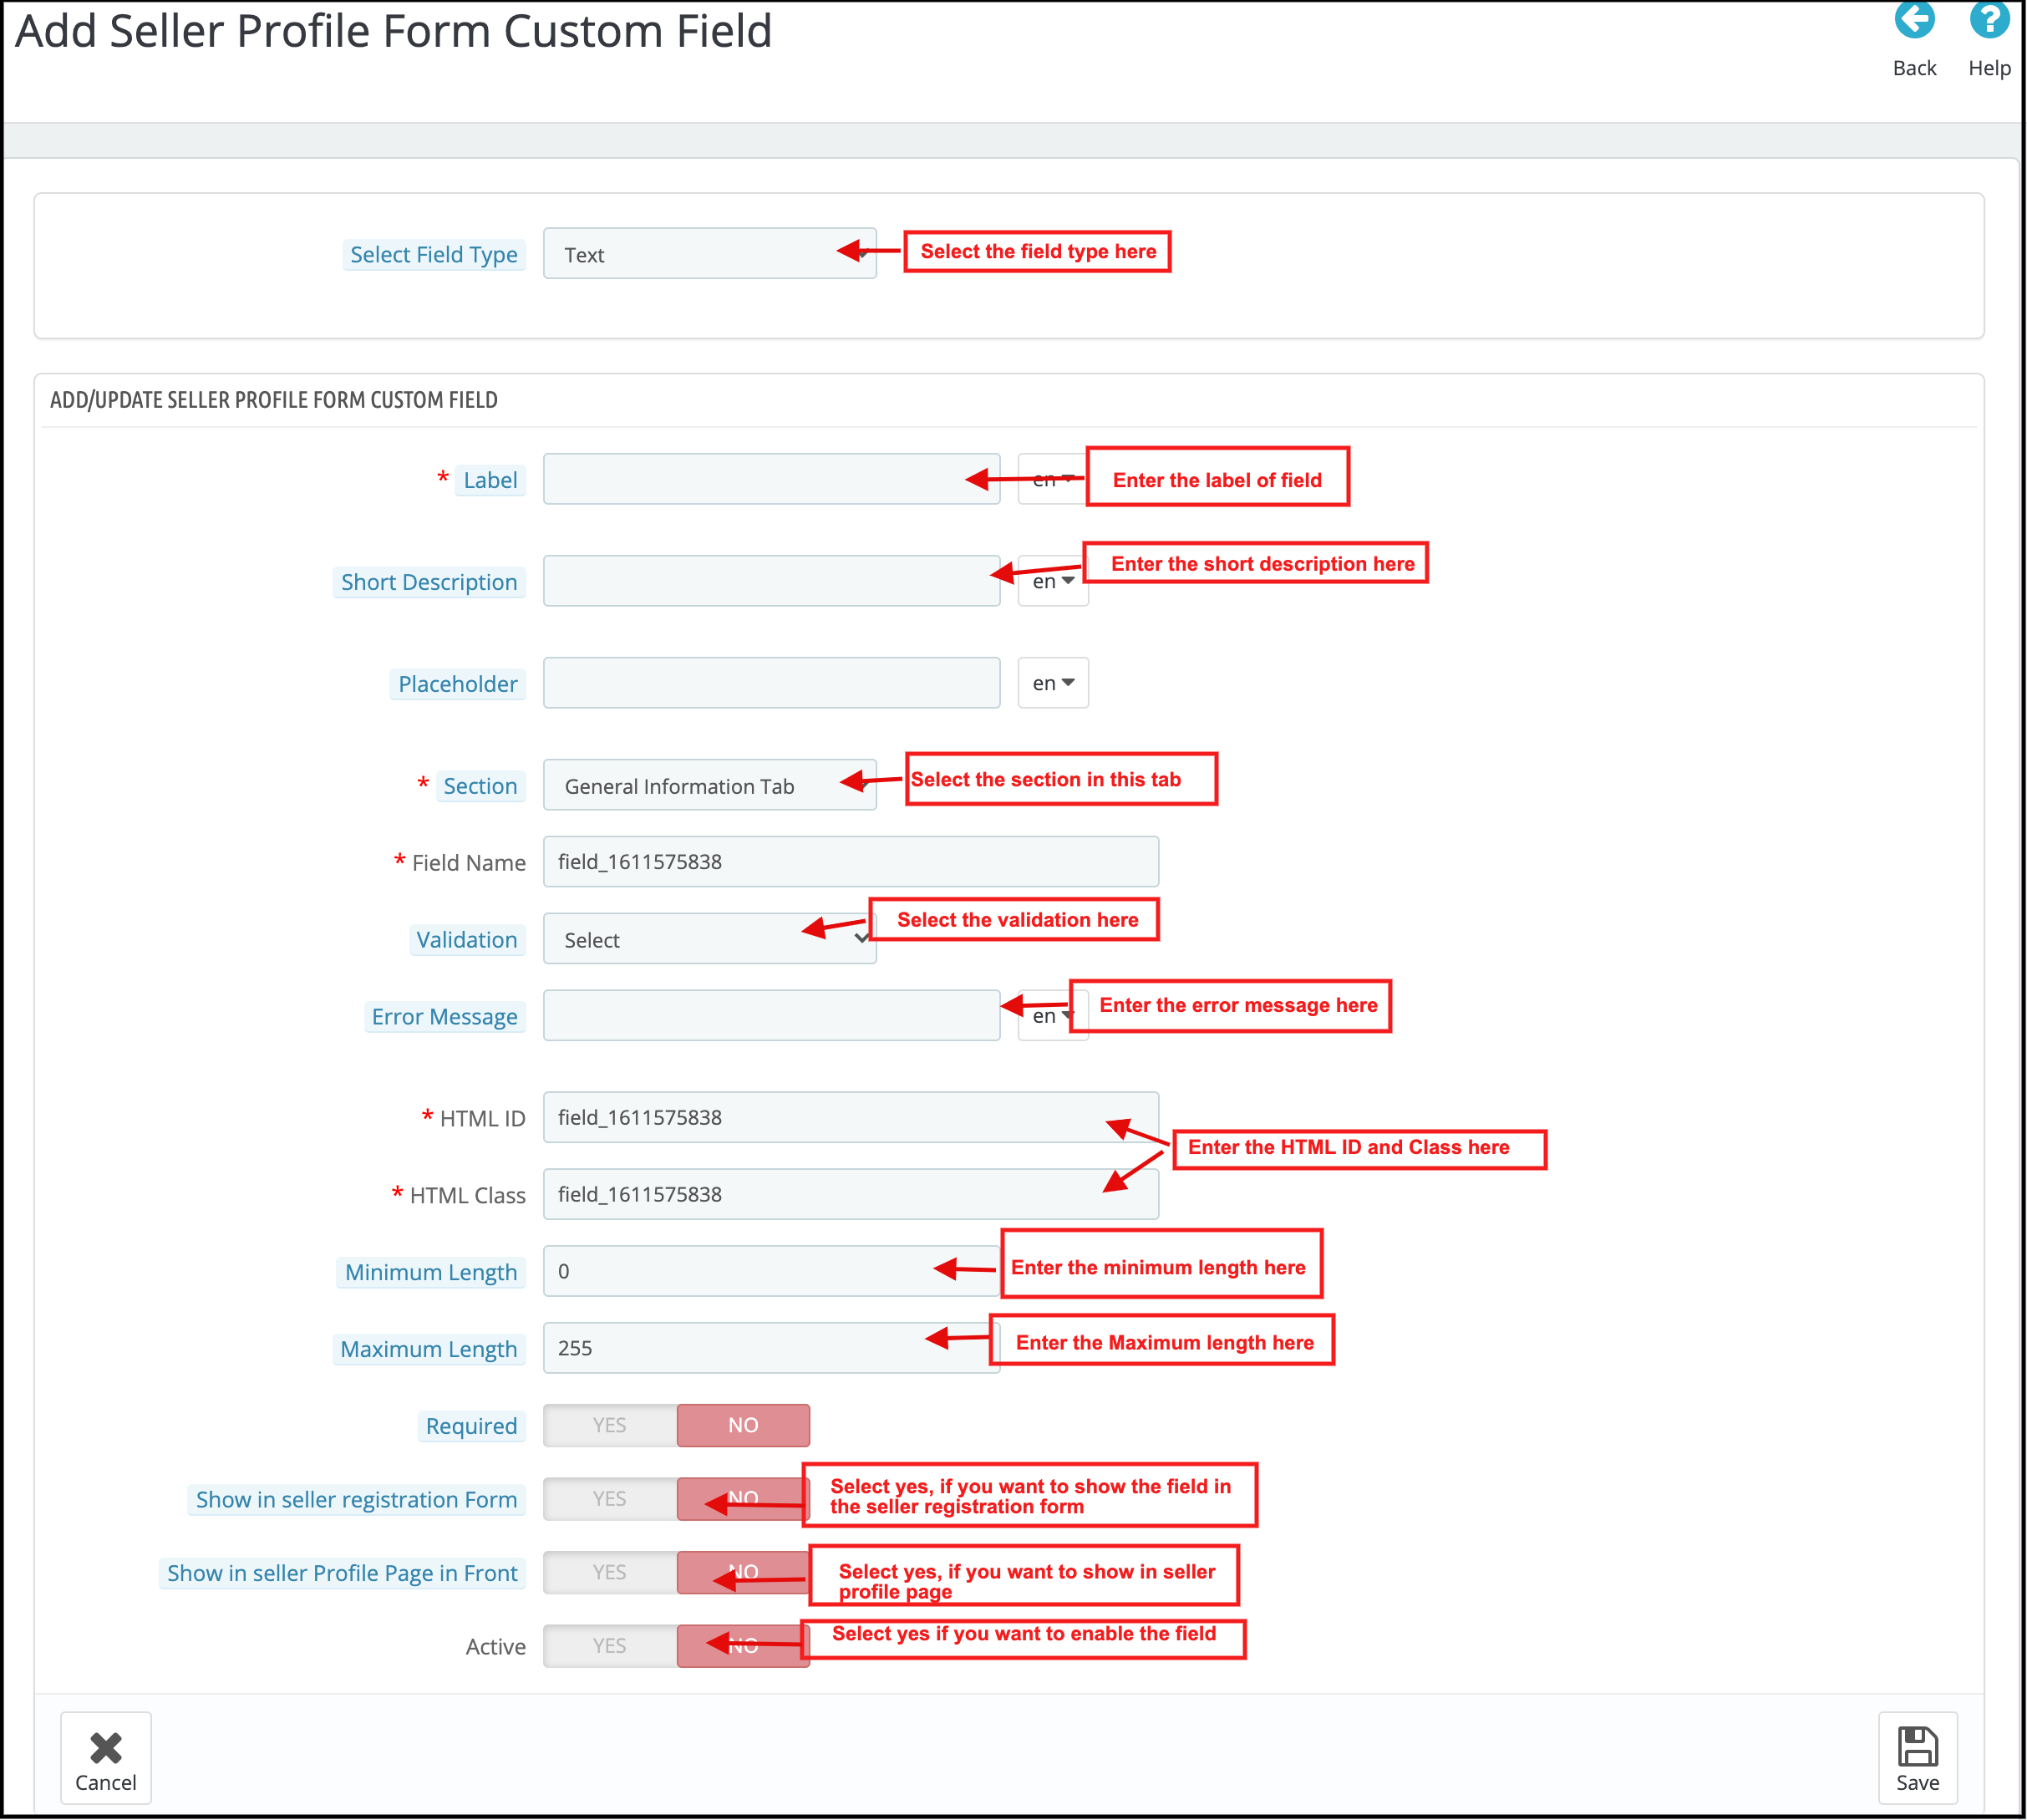
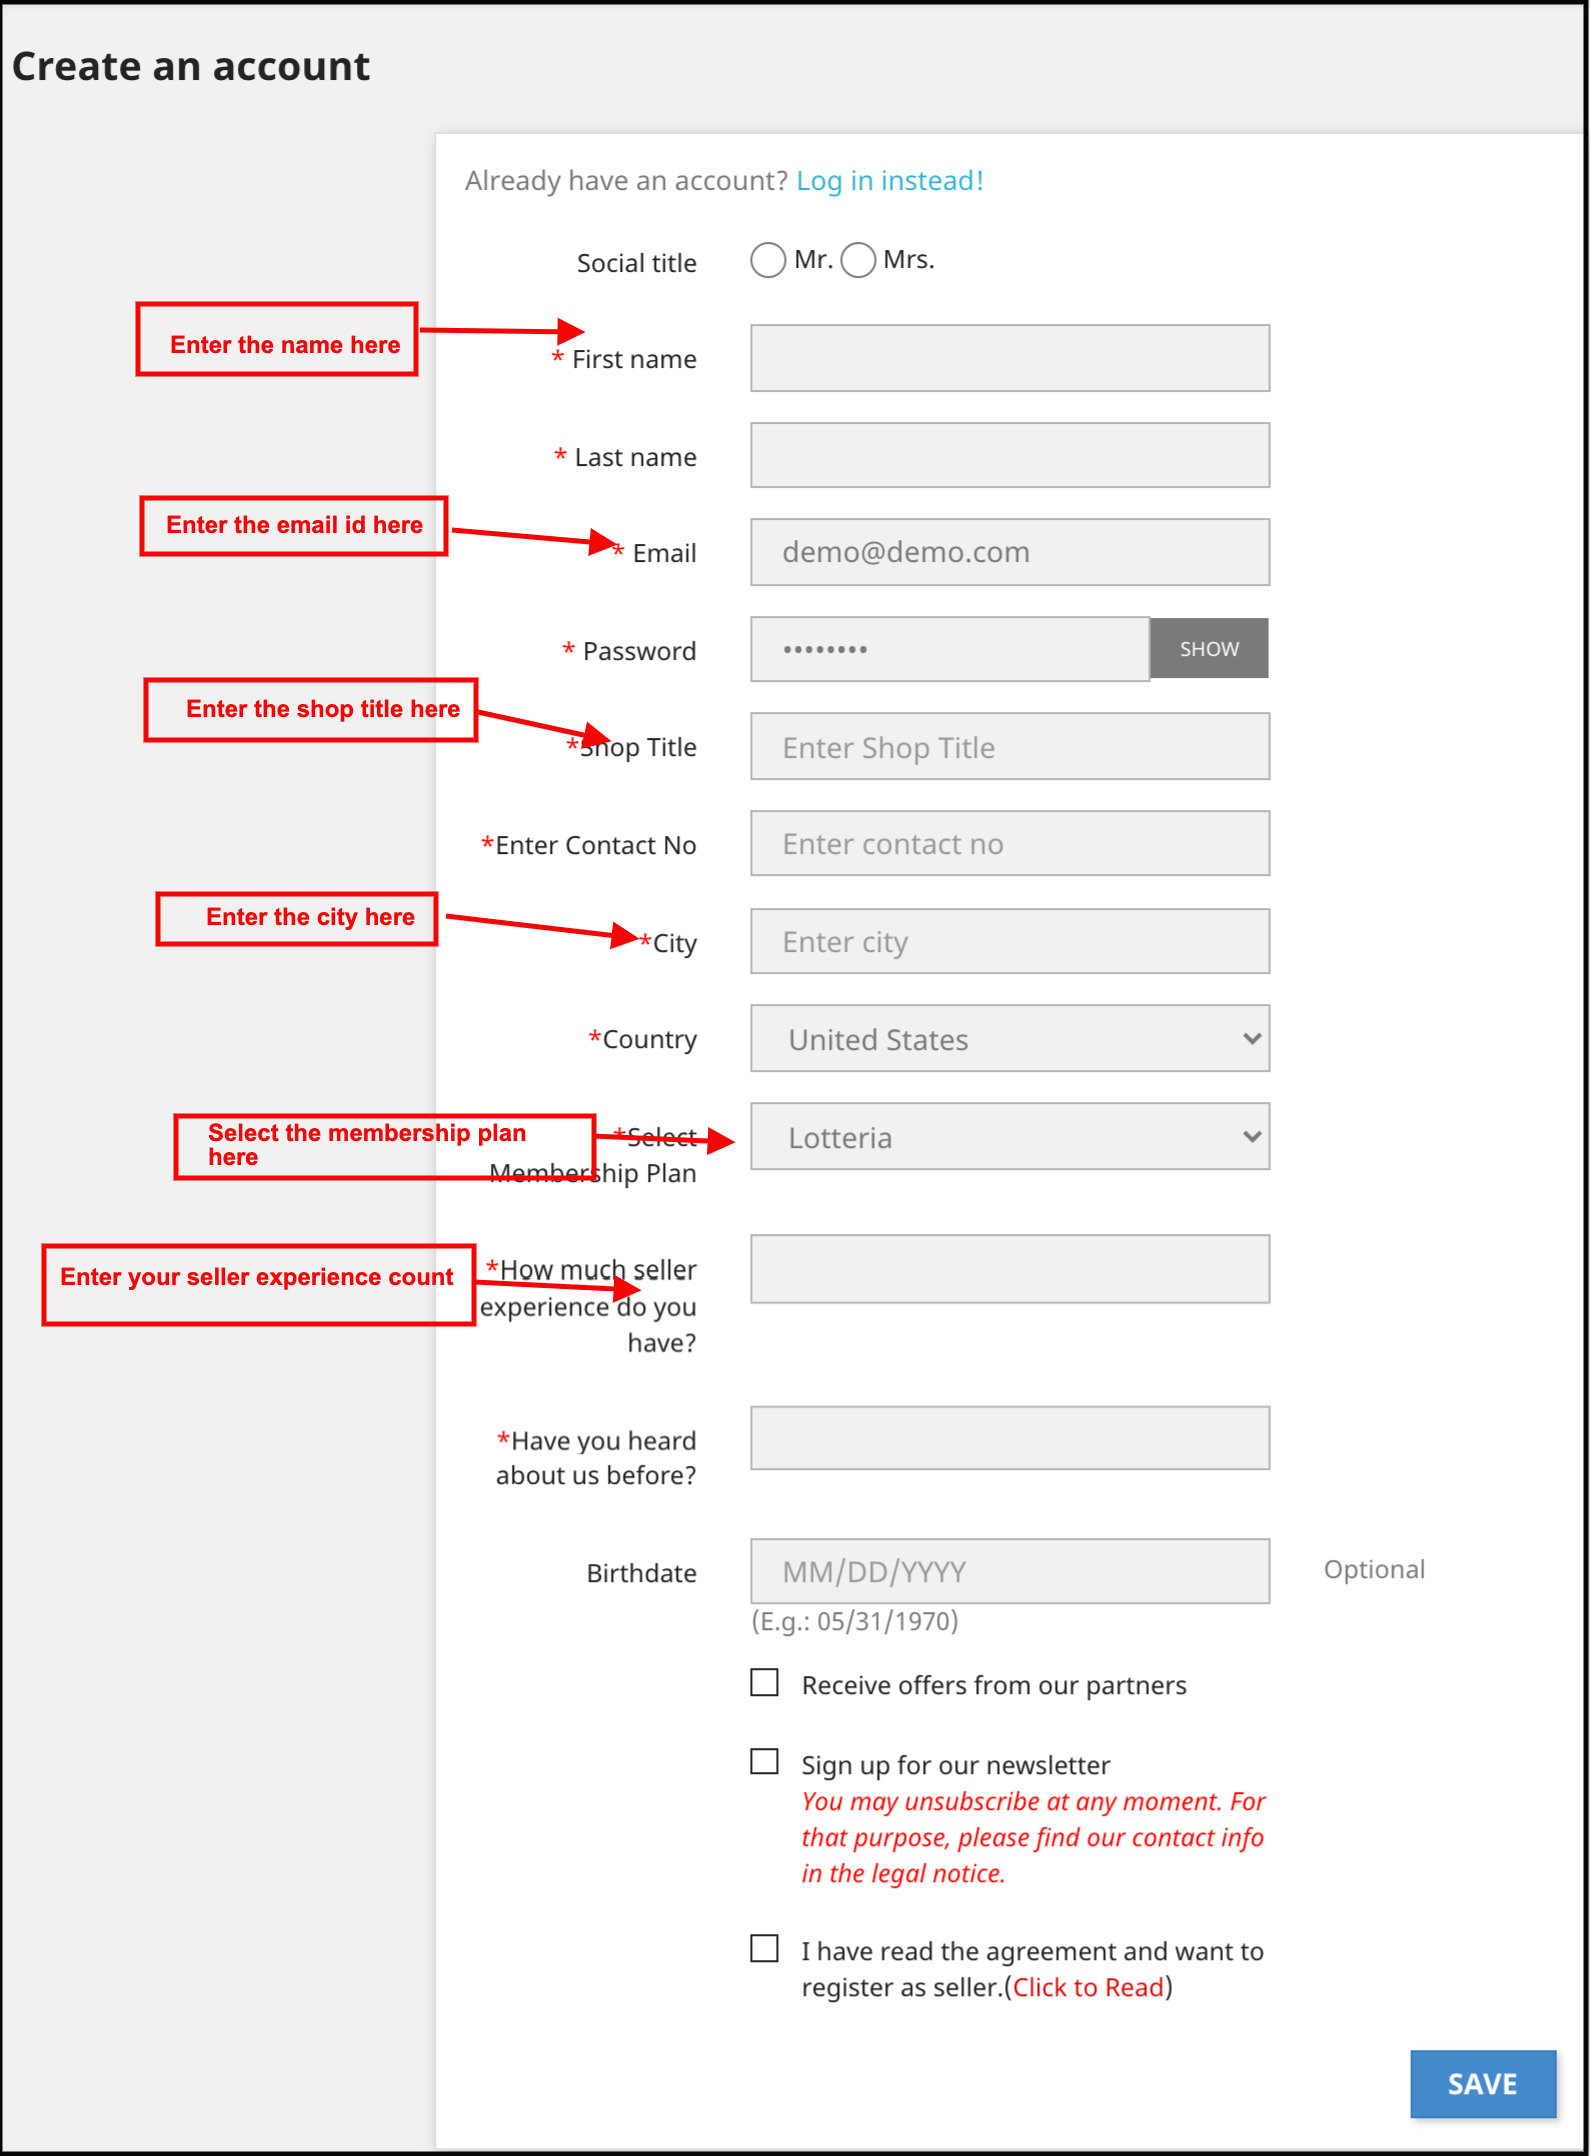
Admin can add a separate seller registration form under the “General Setting” tab of the PrestaShop Hyperlocal multi-vendor marketplace. By allowing this functionality admin is also able to add more custom fields in the seller registration form like shop title, seller contact details, seller country, etc. Custom Fields Type Selection:
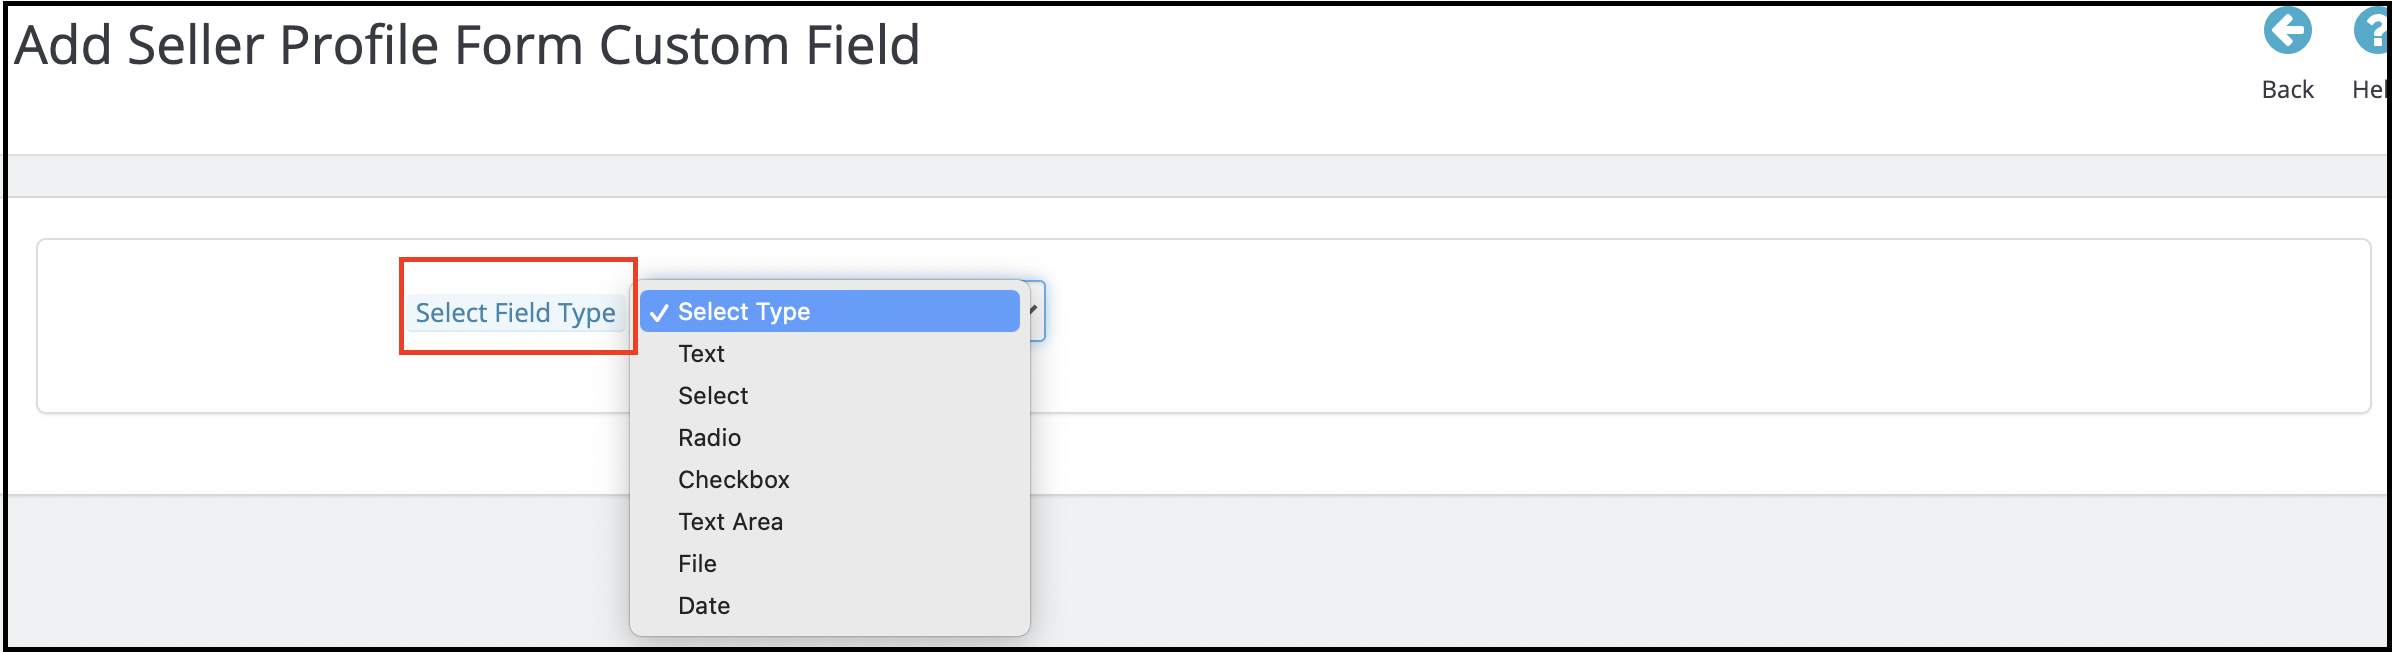
Admin can select the custom fields type which he wants to add on the seller profile page. Admin gets lots of options like checkbox, radio button, text box, etc.
Category wise Custom Fields:
Admin can map the custom fields in a particular category using the “Section” tab under Profile Form Custom Fields. With the help of this admin can map the custom fields category-wise.
Make Custom Fields Required:
Admin can make these custom fields needful using the “Required” tab.
3.3 Sellers
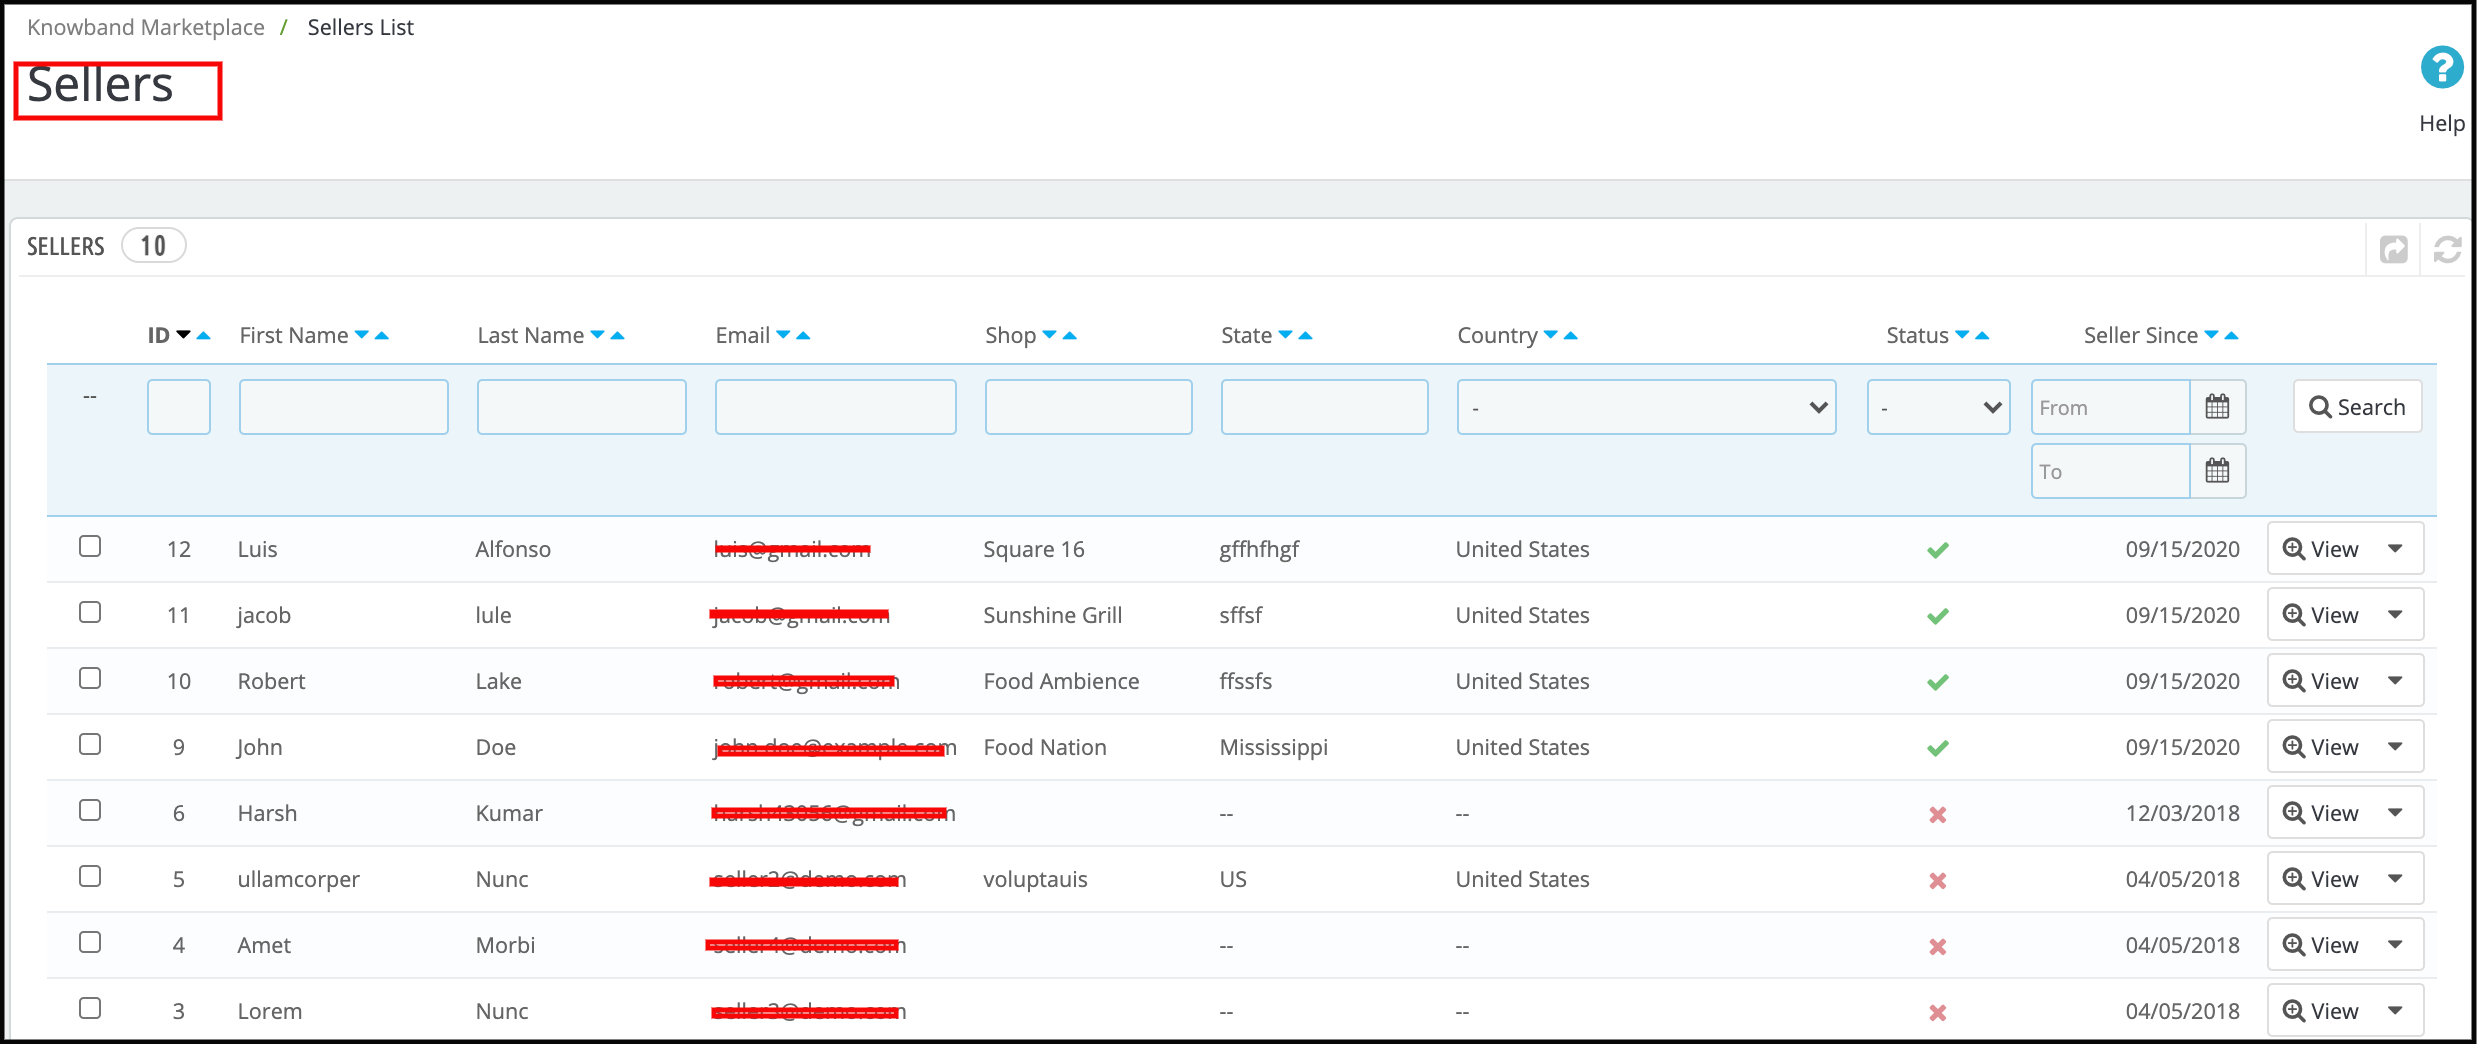
This page of the Prestashop Hyperlocal E-commerce Business extension has a list of all the sellers that the store owner approves by the store owner.
There are several filters as well to filter the list of sellers as shown in the above screenshot.
The above figure consists of a list of all the sellers that the admin approves.
The admin can also enable or disable a seller in this list using the bulk actions of the grid.
If the admin disables a seller, then, all the products of that seller are also automatically disabling. Moreover, will not be visible on the storefront.
When you click on the View button, a new page opens up consisting of the information about the seller.
3.5 Seller Account Approval Request
When a seller registers or any customer registers as a seller on the Prestashop Hyperlocal Delivery Marketplace, then, it first appears in this tab of the Prestashop Hyperlocal Service Marketplace. The store admin can approve or disapprove of the seller account request.
Approve Seller Account: To approve a seller’s account, you have to click on the “Cross” button corresponding to that seller on the list from the backend.
Once the Seller account approves, it directly moves to the Sellers List and all the limits to the seller account are released.
A mail will be sent to the seller to notify them about the approval of the seller account.
Note:- The Seller Accounts that the admin approves by the store owner cannot be undone. Please use this feature carefully.
Disapprove Seller Account: To disapprove of a seller account, you have to click on the “tick” button in front of that seller on the list.
A pop-up will appear asking for the reason for disapproval of the seller account. Fill the reason and then submit the form to complete the action.
A mail will be sent to the seller notifying the disapproval of the seller account. The reason provided in the pop-up will also be sent in this mail.
Note:- Once the admin disapproves a seller, then he can again apply for the seller account, and whenever a seller does this the store owner is notified through a notification email.
3.6 Product Approval List
When a seller adds a product, then, first of all, it appears in this tab of the Prestashop Hyperlocal Marketplace extension. The store owner is also notified of the same through the mail. Then, it is up to the store owner to approve or disapprove of the product.
If the admin enables the setting (i.e. New Product Approval Required), only then, a new product appears on this list. Otherwise, it directly appears in the Product List and automatically approves and displays. Disapprove Seller Product:
To disapprove of a product, you have to click on the Disapprove button corresponding to that product on the list.
A pop-up will appear asking for the reason for the disapproval of the product. Fill the reason and then submit the form to complete the action.
Once a product disapproves a mail will be sent to the seller notifying disapproval of the product with the reason provided in the above form. The disapproved products also appear on the same list. The Store admin can approve them at any point in time.
Approve Seller Product:
To approve a product, you have to click on the Approve button in front of that product in the Product Approval list.
After approval, the product is moved from the Product Approval list to the Sellers Products list.
Note:- This action cannot be undone. Please use it carefully.
3.7 Sellers Products
The Seller Products page of the Prestashop Hyperlocal online marketplace add-on consists of all the products the seller adds and the admin approves on the store.
If the admin disables the settings (i.e. New Product Approval Required) in the Setting tab of the Prestashop Hyperlocal multi-vendor marketplace, then a product approves directly when the seller adds it. In addition, it appears in this list. Otherwise, the product first appears in the Product Approval list.
Delete Product:
To delete a product, you have to click on the Delete button corresponding to each product as shown in the image below.
A pop-up will appear asking for the reason for the deletion of the product. To complete the action, fill in the reason and then click on the submit button.
A mail will be sent to the seller to notify the deletion of the product. The mail also contains the reason you have provided for the deletion of the product.
Note: The product delete action cannot be undone. Please use this feature carefully. Enable/Disable Product: To change the status of any product, you have to use the Bulk Action feature of the Grid. To enable/disable any product, select the product(s) and choose the action (i.e. Enable or Disable) to complete the action.
Note: Once the admin disables a product, it will not be visible at the front. To avoid disabling products and only disable a product if it is very necessary. View or Edit Product: There is also an option to view the details of any product on the list. To do that you have to click on the View button in front of that product and it will take you to the edit page of the respective product.
On clicking the view button, you’ll redirect to the products detail page as shown below:
The admin can make the changes as needful. Moreover, the changes will reflect in the front-end of the site.
3.8. Category Wise Commission Rules
Now, the admin can easily divide the commission according to the product category. Admin can make new categories too accordingly.
The admin can set a new category by entering a default commission. This enables the admin to charge different commission rates for different product categories.
3.9. Sellers Orders
The Seller Order Tab of the Prestashop Hyperlocal Marketplace Addon consists of all the orders that the customers place for the sellers’ products. The orders shown in this list are split based on sellers which means, if there are products by different sellers in the same order then they will appear separately in this list.
View Order: There is also an option to view the details of any order on the list. To do that, you have to click on the View button in front of that order, it will take you to the order details page of the respective order. This view page is the same as when you edit any order.
3.10 Admin Order
The Prestashop Hyperlocal Marketplace module allows the store admin to sell more and more products without maintaining their inventory. However, the admin can even sell their products in the marketplace. The orders received for the products of the admin are visible in the Admin Order tab of the Prestashop Hyperlocal Marketplace Marketplace addon. The orders will display as shown below:
To see the details of the order, click on the View button corresponding to each order.
3.11. Product Reviews
The Product Reviews page of the Prestashop Hyperlocal Marketplace plugin consists of a list of all the product reviews sent by customers on the seller’s products.
The online buyers can add a review on any of the seller’s products as shown below:
Once the customer review goes live, he’ll get a message saying that “Your comment has been added and will be available once the moderator approves it.”
These reviews then list in the Product Review tab of the Prestashop Multi seller Marketplace plugin.
View Product Review: Most of the details of the product reviews are already mentioned in the grid but some of them are not.
To view all the details of any Product Review, click on View Button in front of that review. A pop-up will appear having all the details of the product review.
As you click, you can see the complete review as shown in the image below:
Delete Product Review: To delete a product review, you have to click on the delete button in front of that product review on the list.
Note:- The product review deletes action cannot be undone. Please use this feature carefully. Approve Product Review: The product reviews that the customers add for the seller’s products will appear in the list here with the status Waiting for Approval and it will not be shown on the storefront to other customers until it approves. To approve it, you have to click on the Approve button in front of the product review.
3.12. Seller Review Approval List
This tab of the Prestashop Hyperlocal Marketplace extension contains all the Seller Reviews that the customers post. In addition, no action happens against them. If the admin enables the settings (i.e. Seller Review Approval Required), then, only any seller review that the customer post appears in this list otherwise, it directly appears in the Seller Reviews list.
The reviews that are pending approval will display as shown in the image below:
View Seller Review: To view all the details of a seller review you have to click on the View button in front of that review in the list.
On clicking the View button, a Pop-up will appear having all the details of the corresponding seller review.
Approve Seller Review: To approve a seller review, you have to click on the Approve button in front of that review on the list.
Once the admin approves a seller review, it becomes visible on the front end. Moreover, is transferrable to the seller review list.
Note:- This action cannot be undone. Please use it carefully.
Disapprove Seller Review: To disapprove of a seller review, you have to click on the Disapprove button in front of that review on the list. A pop-up will appear asking for the reason for disapproval of the seller’s review. Fill the reason and then submit the form to complete the action.
Once the admin disapproves a seller review, it transfers to the seller reviews list and cannot be found anywhere else.
Note:- This action cannot be undone. Please use it carefully.
Delete Seller Review: To delete a seller review, you have to click on the Delete button in front of that review on the list.
A pop-up will appear asking for the reason for the deletion of the seller review. Fill the reason and then submit the form to complete the action.
Once a seller review deletes, it is completely removed from everywhere.
Note:- This action cannot be undone. Please use it carefully.
All this can be done at a button click with the help of the Prestashop Hyperlocal Marketplace extension.
3.13. Sellers Reviews
This Seller Reviews tab of the Prestashop Hyperlocal Marketplace extension contains a list of all the Sellers Reviews done by customers in the store.
If the admin disables the setting (i.e. Seller Review Approval Required), then a seller review approves directly when the customer adds it. Moreover, appears on this list. Otherwise, the review first appears in the Seller Review Approval list.
Note:- The Seller Reviews that the store owner disapproves also appear in this list.
View Seller Review: To view all the details of a seller review you have to click on the View button in front of that review in the list. On clicking the View button, a Pop-up will appear having all the details of the corresponding seller review.
3.14. Seller Category Request List
A seller can add products only to those categories that the admin allows to him/her. In case, the seller needs to add a product to a category that the admin does not allows then the seller can request for the category. All those category requests appear on this list. A mail is also sent to the store owner to notify them about the Request for Category. Then, it is up to the store owner to approve or disapprove the request.
View Category Request: To view the details of a category request, you have to click on the View button in front of that category request on the list.
On clicking the View button a Pop-up will appear having all the details of the corresponding category request. Approve Category Request: To approve a category request, you have to click on the Approve button in front of that category request on the list. Note:- This action cannot be undone. Please use it carefully. Disapprove Category Request: To disapprove of a category request, you have to click on the Disapprove button in front of that category request on the list.
A pop-up will appear asking for the reason for disapproving the category request. In fact, fill the reason and then submit the form to complete the action. Note:- This action cannot be undone. Please use it carefully.
3.15. Seller Shippings
Whenever a new seller comes onboard to the system, a default shipping method addition applies to all the products by default and it is free as well. Further, the seller can add a new shipping policy and can map products to it as well. However, until then, all the products are mappable to the default shipping policy only. Furthermore, the Seller Shipping tab of the Prestashop Hyperlocal Marketplace addon page contains a list of all the shipping methods that are created for the sellers present in the system.
View Shipping: To view the details of a seller’s shipping, you have to click on the View button in front of that entry.
On clicking the button, a new page opens up having details of the respective shipping method. Note:-
The admin will not be able to delete or edit any shipping method for any seller. In fact, if tries he/she will redirect to the Carrier Listing page with the corresponding error.
By default, all the products for a seller will be mappable to the Default shipping method for the respective seller. Further, default shipping methods can identify with the name Default Free Shipping – Seller Name.
3.16. Seller Shipping Methods
Prestashop multivendor marketplace extension allows the sellers to define their shipping methods. Further, for this, the admin has to enable the ‘Allow Seller to define own Custom Shipping Method’ feature from the Setting tab of the Prestashop Hyperlocal Marketplace module. 3.16.1 How can the admin add Shipping Methods?
The admin can add custom shipping methods in this tab. In fact, to add custom shipping methods, click on the ‘Add New Shipping Methods’ link or the ‘+’ sign in the top-right position.
This will redirect you to the shipping methods creation page of the Prestashop Hyperlocal Marketplace addon.
Shipping Method Name: Enter the name of the shipping methods. Active: Toggle the button to activate or deactivate the shipping method.
The shipping methods will list as shown below. Further, the admin can edit or remove them by clicking on the Edit or Delete button corresponding to each shipping method. 3.16.2 How can the admin add custom Shipping Methods that they want to allow the sellers to select?
The seller can create their shipping methods from their dashboard. Go to the Dashboard -> Shipping tab.
The various shipping methods created by the sellers will list in this tab.
To add new methods, click on the ‘Add New’ link as shown in the image below:
You’ll head to the shipping methods creation page. Here, you have to fill the various field as below:
The various shipping methods will list in the drop-down menu. To create a new one, select ‘Others‘. Further, enter the name of the shipping method.
The sellers can create the shipping methods by entering the fields as shown in the image below.
3.17. Admin Commissions
The Admin Commissions tan of the PrestaShop Hyperlocal Marketplace extension contains a filter through which the admin can filter the commissions earned in the form of Order Wise or Category Wise selection. Further, by default, the page shows Order Wise Admin Commissions. In fact, the Prestashop Hyperlocal Marketplace module makes it easier for the store admin to manage the commission structure of the marketplace.
3.17.1 Order Wise Admin Commissions
This list contains all the commissions earned by the store owner on every order comes for any seller’s product. In fact, this list is split based on orders for selling products.
3.17.2 Category wise commissions
This list shows the total commission earned by the store owner from a seller. Furthermore, the store owner can also use filters to filter the commission reports category-wise.
It helps the store owner to identify commissions from different categories. Moreover, which category has produced how much commission.
3.18. Transaction Payout Request
With this additional feature, the sellers can request the store admin for any payout. Further, the admin was in charge of any of the payment that was to be made to the sellers. However, the sellers can now initiate a payout request from their dashboard. The admin can approve or deny the payout request of the sellers from this tab of the PrestaShop Hyperlocal marketplace addon. In fact, there are three payment methods. For instance, Bank Wire, Pay by Check, and PayPal.
The admin can use PayPal if the seller opts for this payment method.
Click on the Configuration link of the Transaction Payout Request tab of the PrestaShop multi-seller marketplace module.
Admin can enable automatic seller payout which helps the admin to automate the payout request process. In fact, he can either use cron URLs for this setup or use the “Process Paypal Payout Status” cron directly. Furthermore, the admin can also add a particular amount which will always be kept on hold for sellers.
Enter the API details of the PayPal details as shown in the image below:
Active: Toggle the button to activate the PayPal payout settings. Client ID: Enter the Client ID of your PayPal account here. Client Secret: Enter the secret key here. PayPal Mode: Select the mode, that is, Sandbox or Live from the options drop-down menu. The PayPal Email Subject: Enter the email subject for PayPal here. PayPal Currency: Select the default currency set in your PayPal account. Enable Automatic Seller Payout: Toggle the button to activate automatic seller payout. Amount to keep on hold: Enter the amount which will always be kept on hold for sellers. 3.18.1 How can the seller create a Transaction Payout Request?
To create the payout request, the seller needs to click on the Payout Request tab of the dashboard of their account.
The seller needs to fill the various fields as below:
Amount: Enter the amount that you are requesting for the payout.
Request Reason: Specify the reason for which the payout request initiates.
As the Save button is clicked, the payout request will list as shown in the image below:
The same payout request will list in the admin interface of the Prestashop multi-seller marketplace extension. 3.18.2 How can the admin approve/disapprove the Transaction Payout Request?
The admin can approve or reject the payout request by clicking on the Approve or Disapprove button corresponding to each request.
In case, the admin approves the payout, then, a popup will display as shown in the image below:
If the payment methods are Bank wire or Pay by Check, then, the admin will have to enter the Transaction ID.
Once the admin successfully approves the request, the transaction will save in the Transaction Table.
In the case of the PayPal payment method, a request will be sent to PayPal. Moreover, based on the response, a success or error message will display. If the admin successfully approves the request, it is addable to the Transaction table.
3.19 Seller Transactions
The system does not automatically transfer the amount to the seller’s account. Hence, the store owner has to keep records of the balance for all the sellers. In addition, manually transfer money to the seller and later on, enter the details of the transaction to keep a record of the same.
The Prestashop Hyperlocal Marketplace module allows the admin to view two types of transactions of the sellers, that is, Seller Balance History and Transaction History.
The Seller Transactions page of the Prestashop Hyperlocal Marketplace plugin keeps the track of the seller transactions. In addition, the remaining balance of sellers. 3.19.1 Seller Balance History
This list of the Prestashop Hyperlocal Marketplace plugin contains all the balance variations for all the sellers in the system. Further, the list shows the total sales of the seller, seller earnings, and your commission. In fact, this list helps the store owner to identify the earnings. Moreover, categorize them seller-wise.
3.19.2 View Transactions Details
To view the details of the transactions done for a particular seller, you have to click on the View button in front of that seller.
On clicking on the View button in front of any seller, a new page will open up having a list of all the transactions done for the corresponding seller.
You can also add a new transaction for the current seller by clicking on the Add New Transaction button on the top right-hand side of the above page. 3.19.3 Create New Transaction from the back-end of the Prestashop Hyperlocal Marketplace Module
To add a new transaction detail for any seller, you have to either click on the Make New button in front of the seller. Likewise, you can also click on the Make New Transaction button on the top right-hand side of the page.
On clicking the button a new block appears (form for adding a new transaction) at the top asking for the details of the transaction. Further, fill the form. Moreover, submit it to complete the action.
Note:- This action cannot be undone. Please use it carefully. 3.19.4 Transactions History
This page contains a list of all the transactions done to date to all the sellers available in the system.
You can also add a new transaction for any seller by clicking on the Add New Transaction button on the top right-hand side of the above page.
3.20. Seller Shop Close request
If the admin enables this from the back-end of the Prestashop Hyperlocal Marketplace plugin, the sellers can request the admin to close their shop.
The request to delete the sellers’ account can initiate by just clicking a couple of buttons from the dashboard. The image of the front-end interface is shown below:
Once the request is sent, the admin can view the same from the Seller Shop Close Request tab of the Prestashop multi-seller marketplace extension.
Further, the confirmation mail is sent to the seller. In fact, once the sellers provide the confirmation, an ‘Approve’ button is available corresponding to the request. Thus, the admin can click the same and complete the request.
The entire list of the shop closure request and their status displays in this section of the Prestashop multi-seller marketplace plugin as shown in the image below:
3.21. GDPR Request
The sellers can download their data in CSV format just by clicking the links provided in the GDPR section of the dashboard.
In fact, the admin can view the GDPR requests that initiate from this section in the back-end of the Prestashop Hyperlocal Marketplace module as shown in the image below:
3.22 Membership plans general settings
This page contains all the settings which the Store admin needs to control the membership plans.
Enable membership plan functionality: By enabling this button store admin to allow all the new and existing sellers to purchase a membership plan.
Send membership plan activation email: If the admin enables this feature, an email is sent to those sellers whose membership plan is activated.
Send membership plan expiry email: If the admin enables this feature, an email is sent to those sellers whose membership plan is expired.
Show warning message: Store admin can use this feature to show a warning message to those sellers whose membership plan is about to expire.
The number of days left to upgrade the plan: The store admin can also adjust the number of days to upgrade the membership plan. Furthermore, a warning message will be shown to the sellers during this period for upgrading their plans.
Enable disable free membership plan: If the admin enables this feature, a free membership plan will add to the seller’s membership plans.
Enable disable product active limit under the free membership plan: Store admin can enable and disable the product listing limit under the free membership plan.
Product limit: Store admin can adjust the product listing limit using this tab.
Duration interval: Admin can adjust the duration interval of the free membership plan. For instance, days, months, and years.
Duration: Admin can set the duration of the free membership plan after which this plan is deactivated.
Select order state in which membership plan will be marked as paid: Admin can select the order state on which free membership plan orders will mark as paid.
Show membership plans select box during seller registration: If the admin enables this, then sellers can select the membership plan at the time of registration.
Warning plan reminder setting:
Admin can enable this functionality to send a warning email to the sellers whose plan is about to expire. In fact, the admin can set the number of days before plan expiry warning mail should be sent to the seller.
Expired plan reminder settings:
Admin can enable this functionality to send an email to those sellers whose membership plan is expired. Further, the admin can also set the number of days after the plan expiry warning email should be sent to the seller.
3.23 Membership Plans
Store admin can create a new membership plan under the membership plans tab. Further, after clicking on the add new button, a new membership plan form opens with the following fields:
Plan name: Admin can set the Plan name which displays to the sellers.
Plan price: Admin can set the plan price using this tab.
Enable/disable product active limit: Using this feature admin can enable the product listing limit for that particular membership plan.
Plan duration interval: Store admin can set the plan duration interval using this tab.
Duration: Admin can set the duration for which the plan remained active.
Enable: Using this tab admin can enable or disable the membership plan.
Plan image: Admin can choose the plan image which he wants to show to the sellers.
3.24 Seller membership plans
From this tab, the admin can check the seller’s plan details like their first name, last name, email, shop name, etc.
From the add new option, store admin can add new seller plan details by filling in the following details:
Choose sellers: Admin can choose the seller for which the admin wants to add plan details.
Add customized plan: Admin can also customize the plan details by filing the details. For instance, plan name, product active limit, duration interval, and duration details.
Mark plan as approved: If the admin enables this, then the seller plan will approve.
Activate plan: The store admin can activate the seller’s plan by enabling this button.
3.25 Hyperlocal Setting
Using hyperlocal settings, store admin can add ship areas where they can ship their products. Store admin can also ship areas on the behalf of sellers. This page contains all the settings which the admin needs to control the hyperlocal feature.
Enable Hyperlocal Marketplace: By enabling this button store admin can start hyperlocal functionality in their marketplace.
Google API key: Admin needs to enter Google API key for fetching locations.
Radius Unit: Admin can select radius type in miles or kilometers.
Distance for admin products: Admin can enter distance for the ship areas as per their requirements.
New shipping area approval required: If the admin enables this button then sellers need approval for ship areas.
Enable Hyperlocal Carrier: If the store admin can enable this button then sellers can map their products with the hyperlocal carrier.
Out of Range Behavior: If shipping distance is out of range then admin/seller can set default price.
Default Shipping Price: Admin can enter a default shipping price for out of range of products shipping.
Hyperlocal Shipping Areas:
Store admin can add multiple shipping areas using this tab.
Enable/Disable Shipping Area: Admin can enable or disable the shipping area using this button.
Add Shipping Area for Seller: If admin enables this button then store admin can assign the shipping area to other sellers as well.
Choose Sellers: Admin can select the sellers for the shipping area.
Address: Store admin need to enter a location for the shipping area.
Longitude: Enter the longitude of the area using this tab.
Latitude: Enter the latitude of the area using this tab.
Approval Status: After entering all the information admin can assign a status to the shipping area.
Hyperlocal Shipping Price Rules:
Using this tab store admin can add shipping price rules.
Enable/Disable Shipping Price Rules: Admin can toggle this button to enable or disable shipping price rules.
Add Shipping Rules for Sellers: By enabling this button store admin can add the shipping price rules for the sellers also.
Choose Sellers: Admin can choose the sellers for adding shipping price rules.
Weight: Admin can select the weight range for the shipping price rules.
Distance: Store admin can select the distance range for the shipping price rules.
Shipping Price: Using this button admin can enter the shipping price.
4.0 Seller Account
Any seller has access to several pages that are for handling the functionality of a seller account. Further, the link for all these pages is there on the My Account page of a customer who is also a seller.
Register As Seller Field (Register Page)
If a new customer is registering on the Store then simply enter your mail id according to the screenshot given below.
After clicking on “Create an Account”, you have to enter your information as given in the screenshot below.
Once the merchant becomes a seller of the marketplace, he can avail of all the functionality of the module. Moreover, boost his sales effortlessly.
The Dashboard of the sellers includes a GDPR section. Further, customers can download their data. In addition, can even delete their accounts with ease.
4.1 Seller’s Profile
The sellers can edit their profile. Moreover, personalize their shop from this tab of the dashboard.
4.2 Seller’s Product
The sellers can follow the path mentioned below to add a new product.
Go to My Account -> Dashboard -> Products
The already listed products are visible in this tab of the seller’s Dashboard.
To add a new product click on the ‘+’ sign at the top right portion.
This will redirect you to the ‘Add New Product’ page. Here, fill up the nedful details to add the product.
4.3 Order
The sellers can view their orders and related details in this tab of the Dashboard.
4.4 Product Reviews
The sellers can view the review received on their product in the Product Review Tab of their Dashboard. Furthermore, all the reviews received will list as shown in the image below:
4.5 My Reviews
The tab of the seller’s dashboard lists out the reviews received on their profile.
4.6 Earnings
Seller Earnings are visible in this tab. In fact, the vendors can filter the results as per requirement.
The total earning history will display as shown below:
4.7 Transactions
The seller can view their entire transaction history in this tab. Further, the amount debited or credited in their account is available here.
4.8 Payout Request
Sellers can view the list of payout requests sent to the admin from the Payout Request tab. In fact, for a new payout, request sellers need to fill the payout amount and reason. Moreover, send it to the admin for approval.
4.9 Category Request
The sellers can view the categories assigned to them. Additionally, they can even send a category request to the store admin. To send a category request, go to the Dashboard -> Category Request.
4.10 Shipping
The sellers can view the shipping process as in the screenshot below:
4.11 GDPR
The sellers can request to download the account details from the store owner using this tab. Further, the downloaded account details will be available in CSV format.
Sellers can also request the store owners to close their shop by clicking on the “Request to Close” button. In fact, the store admin can approve the request from the admin panel of the Prestashop Hyperlocal Delivery Business Model.
4.12 Membership plan history
Sellers can check their membership plan history by applying filters. Further, under the filters, sellers have to fill in the plan name and the status of the membership plan for checking the history of the membership plans.
4.13 Available membership plans
Using this tab sellers can buy membership plans by checking the plan details.
4.13 Knowband Hyperlocal
Using the Prestashop Hyperlocal Delivery Business Model feature sellers can add ship areas where they can ship their products. In fact, if the shipping distance is out of range then the seller can also add a default price for their shipping. Using this feature sellers can perform various operations. For instance, adding ship rates, adding multiple ship areas, adding ship rate in bulk, etc.
The checkout page is one of the most important pages on an eCommerce website as the customers decide whether they are finally going to purchase the product or not. If your checkout page is simple and optimized, then there are very fewer chances for cart abandonment. With Magento 2 Quick checkout extension, you can replace the default checkout page with a fast and responsive One Page Checkout. The extension eliminates the unnecessary steps from the multi-page checkout and simplifies the checkout process.
Magento 2 One Step Checkout offers advanced features like Guest Checkout and Social Login that ease the checkout process and help the customers to place their orders quickly. The interactive and clean UI of the Supercheckout provides your customers with a better shopping experience. Magento 2 Single Page Checkout extension helps to reduce the cart abandonment rate by making the checkout process easier and smoother and helps in improving the conversion rate of the business.
1.1 Salient Features of Magento 2 Simplified Checkout extension:
The extension offers a Guest checkout feature which allows the customers to checkout without creating a separate account. The store admin can also enable register guests with a password feature.
The extension allows the customers to login with social accounts including Google and Facebook that save the customers to remember many login credentials.
The Quick Checkout Extension Magento 2 allows the store admin to choose from 2 different customizable layouts. The admin can choose a 2-column checkout layout or 3-column checkout layout from the back end.
Magento 2 One Page Checkout extension allows the store admin to hide/show the address fields on the checkout page. The admin can also make the fields optional or mandatory to fill from the back end.
With the extension, the store owner can rearrange the checkout fields with drag and drop features.
Magento 2 Fast Checkout extension supports multiple payments and delivery methods that give the customers a variety of options to choose from.
The addon is completely mobile responsive.
The Magento 2 Single Page Checkout extension allows the store admin to customize the cart section of the checkout page. The admin has the option to display/hide or rearrange the fields as per the needs. The e-merchant can do it for logged-in customers as well as guest customers.
The extension can be enabled or disabled from the General Settings in the back office.
2.0 Installation Guide:
After purchasing the Magento 2 One Page Supercheckout from the Knowband store, you will receive the following files on your registered email address:
Source code of the Magento 2 Single Page Checkout addon in zipped file format.
User Manual of the extension
Unzip the package of the extension.
Create a folder {Magentoroot}/app/code/Knowband/Supercheckout
Upload the extracted content in this folder through FTP manager (like Filezilla or WinSCP: you can download from here: https://filezilla-project.org/).
Now run the following commands to install the extension:
php bin/magento setup:upgrade
php bin/magento setup:di:compile
php bin/magento setup:static-content:deploy
Now, the Magento 2 One Page Checkout extension is installed on your store and ready to use and configure.
3.0 Admin Interface of the Magento 2 Quick Checkout extension:
After successfully installing the extension, you can configure the checkout fields as per your needs from the back end. To configure the extension, go to Admin panel > Knowband > Supercheckout >Configuration
The Admin Interface of the Magento 2 Simplified Checkout extension contains the following 8 sections:
General Settings
Login Settings
Payment Address
Shipping Address
Payment Method
Shipping Method
Cart & Confirm
Design
Each of the sections is discussed below:
3.1 General Settings:
The General Settings section contains the following configurable options:
Enable Supercheckout: From this option, the store admin can enable or disable the Quick Checkout Extension Magento 2 on the online store.
Enable Supercheckout Test mode: This option allows the admin to test the Supercheckout before making it live on the online store.
Guest Registration: This option enables registration of the guest accounts.
Guest Registration with Password: If this feature is enabled then the extension will register the guest accounts with their passwords.
Select the default option at checkout: From this option, the admin can choose the default option which will be displayed first when the customer will open the Supercheckout page. The admin can choose from 3 options i.e., Guest, Register, log in from the back end of the Magento 2 Fast Checkout extension.
Enable Guest Checkout: This option enables the Guest checkout feature at the Supercheckout page.
3.2 Login Settings:
Enable Facebook Login: This option allows the admin to add Login with the Facebook feature on the checkout page. In order to make this feature functional, the admin needs to add Facebook App ID and Facebook App Secret in the Login Settings tab.
Enable Google Login: This option allows the store admin to add Login with Google feature. To make this feature functional, the admin needs to add Google App ID, Google Client ID, Google App Secret.
3.3 Payment Address:
From the Payment Address tab of the back end of the One Page Checkout for Magento 2, the store admin can customize the Payment Address fields. The admin can show/hide any address field or make any field optional or mandatory to fill for the customers. The store admin can re-arrange the address fields also by simply dragging and dropping them.
The admin can do these customizations for both logged-in customers as well as for guest customers.
3.4 Shipping Address:
From this tab, you can customize the Shipping Address fields. Like Payment Address fields, you can show/hide or make any field optional or mandatory to fill. Magento 2 One Page Supercheckout allows these customizations for both guest customers as well as logged-in customers.
3.5 Payment Methods:
This tab contains settings for enabling or disabling the Payment methods. You can show or hide the payment methods from the checkout page. From this section, you can also select a default payment method for your online store.
3.6 Shipping Methods:
This Shipping Methods tab allows you to enable or disable the Shipping methods from the checkout page. From this section, you can also select the default shipping method for your online shop.
3.7 Cart and Confirm:
From this tab, you can customize the cart summary/cart block displayed on the checkout page. Magento 2 Single Page Checkout addon allows you to display or hide the cart fields for both logged-in as well as guest customers. You can show or hide cart, product name, image, quantity, price, total value, and voucher input. You can also specify the size of the Popup image from this tab.
3.8 Design:
The Design section allows you to select from 2 different checkout page layouts. You can choose from a 2-column or 3 column layout for the checkout page. From this section, you can do various customizations including adding re-arranging the checkout blocks with drag and drop feature, adding HTML content blocks, etc.
You can also change the width of any column from the back end of the Magento 2 One Page Supercheckout.
2-Column Layout:
3-Column Layout:
4.0 Front-End Interface:
When the customers add a product to the cart and proceed to checkout, then they will see the following One Page SuperCheckout on their screens:
This readymade plugin is designed & developed by KnowBand to convert your running WooCommerce store into a feature-rich Progressive Web Application. Once the eCommerce store is transformed into PWA Application, whenever any user opens the store URL in the mobile browser, the concerned person will be asked to “Add PWA To Home Screen”. Once the WooCommerce PWA Mobile App is added to the home screen of the mobile device, the user can browse the store on the app like any other application.
The WooCommerce PWA Mobile App is a web application that actually doesn’t rely on app publish on Google Play and Apple App Store. The users can simply add the Progressive Web App to the mobile device and use like any other application.
1.1 Compelling Features to Choose WooCommerce PWA:
– Faster loading & quick performance
– Fully customizable home screen with the DIY editor
– All website shipping & payment methods support
– Engaging user-friendly interface
– No dependency on App stores
– Fully branded to your store
– Email & Social Login (Google & Facebook)
– Multi-lingual & RTL support
– Offline mode working
– Live synchronization b/w website & app
– Both android and iOS compatible
– One page checkout
– Lightweight application
– CMS pages management
1.2 View WooCommerce PWA Demo
Explore module and PWA app features from the below demo links:
–> iOS devices do not offer any inbuilt “Add To Home Screen” prompt, so users need to manually add the PWA Mobile App to the home screen of iPhone or iPad.
–> iOS does not support web push notifications. Hence the push notifications won’t be received on the PWA installed on the iPhone or iPad.
[NEW UPDATE] WooCommerce PWA supports RTL Language Scripts:
The WooCommerce Progressive Web App Creator now supports all worldwide languages including RTL (Right To Left) ones like Arabic, Hebrew, Persian, etc. The store admin can now even add RTL languages on WooCommerce PWA Mobile App.
2.0 Admin Panel Screens:
Explore all settings under Admin Panel of WooCommerce PWA Mobile App and check how they work with the help below detailed screenshots:
2.1 General Settings:
a) Show/hide Preview: Tap on the eye button to display/hide preview phone in the admin panel. b) Enable/Disable: Enable the module to PWA work on mobile devices. c) Enable Request Log Reporting: Enable error log on mobile. d) Redirect on Cart Page when Add To Cart: Control redirection of Add To Cart button whenever any user taps Add To Cart button. e) Display Short Description: Enable and display a short description for the product (if added on the website product page). f) Display Add To Home Screen Pop Up: Offer pop-up message “Add To Home Screen” and allow users to add the PWA app on the mobile devices. g) Enable Logo: Add your brand logo on the header of the WooCommerce PWA Mobile App.
h) Splash Screen Background Color: Choose and set the color for the splash screen of the WooCommerce Progressive Web App. i) Name for PWA App: Enter the desired name for WooCommerce PWA App. It will be displayed once the user add app on the mobile devices. j) Image for App Icon: Add app icon image in the admin panel. k) Select Font of the App: Choose the font for your WooCommerce PWA Mobile App. l) Select Layout for Home Page: Choose from pre-added home screen layout for the WooCommerce PWA App.
m) App Button Color: Choose button color for PWA Mobile App. n) App Theme Color: Choose theme color for PWA App. o) App Background Color: Choose the background color for the PWA App. p) Enable Tab Bar: Enable tab bar on the bottom of the PWA App for quick and easier navigation. q) Custom CSS: Enter CSS code to improve look and feel of web-view pages of PWA App like web-view payment, CMS pages, etc.
2.2 Push Notifications Settings
Push notifications are the best marketing tool for the PWA app for WooCommerce. The store admin can simply promote the store products and deals to app users and bring more sales and revenue. Enter all details in push notification settings by creating a Firebase project:
How to set up a Firebase Account?
Step 1: Login Google Firebase
Step 2: Create a New Project
As you click on Add Project, the following dialog box will pop up:
It will take a few seconds to create the project. Once the project is ready, click continue.
Step 3: Manage Project Settings
Once the project is created, click on Project Settings.
Step 4: Go to Authentication options:
Step 5: Find Firebase Keys
In the project settings, click on Cloud messaging settings. From here, you can directly get the server key.
Step 6: Add your Web-App to Firebase
Step 7: Get other firebase related details and paste the same in PWA module admin panel.
Step 8: Get firebase server key from cloud messaging tab in Settings:
Step 9: Add your domain in authentication>>sign-in.
A) Successful Order Push Notification:
Enable/Disable automated Push Notification to be sent to app users whenever they place successful order from the WooCommerce PWA app.
B) Order Status Update Push Notification:
Enable/Disable automated Push Notification sent whenever order status from the app gets updated. The WooCommerce PWA mobile app users can keep an eye on the details of previous orders.
C) Abandoned Cart Push Notification:
Enable/Disable automated push notification sent to users abandoning products in cart without successful purchase. This push notification will be sent to users automatically after the entered time interval.
2.3 Push Notifications History
Complete push notification history of successfully sent push notifications will be seen here. The store admin can keep a track of previously sent push notifications from here.
A) Send Notification:
Personalize and send push notification manually to PWA app users as per the need. The store admin can configure these notifications on their own & send them to WooCommerce PWA app users.
2.4 Home Page Layout:
The WooCommerce PWA Mobile App offers a customizable Home Screen whose layout can be designed from the admin panel with a few mouse clicks and drag-drop. The attractive layout as per running festival, sale, occasion etc. can surely help in improving sales through WooCommerce PWA Mobile Apps.
Add a new layout from this tab or edit the previously added ones. The home page configuration settings offers the following elements:
a) Top Categories:
b) Square Banner:
c) Horizontal Sliding Banner:
d) Grid Banners:
e) Countdown Timer Banner:
f) Square Products:
g) Sliding Products:
h) Grid Products:
2.5 Information Pages:
Add CMS pages on the app and offer informative content to WooCommerce PWA Mobile App users.
How to get Facebook App details?
Facebook App can be created by following below-mentioned steps:-
Step 1: Go to given URL: https://developers.facebook.com/apps/
Step 2: Click on the “Add a New App” button.
Step 3&4: Enter your App name and email id, then click on “Create App ID” button.
Step 5&6: After clicking on Create App ID you will have to go through a security check as shown:
Step 7: Click on “Setting” tab.
Step 8-13: Two option will be available in the dropdown, Basic and Advanced, click on “Basic”. And then enter your “App Domain”, “Contact Email”, ”Privacy URL”, ”Terms and Conditions URL”, ”Add Logo”, ”Select Category” and click on “Save Changes” button.
App Domains:
yourdomain.com is correct
yourdomain.com/store is incorrect
www.domain.com is incorrect
Step 14: Now click on “+Add Platform”.
Step 15: And select Website as Platform.
Step 16: Now Enter your site URL.
Step 17&18: Click on “Products+” and select Facebook login.
Step 19: Select web as the platform for the app.
Step 20: Now click on save.
Step 21&22: Click on Settings and add a Valid OAuth Redirect URIs.
Valid OAuth Redirect URIs:
https://example.com/pwa-app/login
Step 23&24: Click on “App review”. And mark “Make ‘your app name’ Public” to Yes.
Final Step: Copy the App ID and App Secret and paste it into the fields provided in the module.
How to get Google App details?
Go to Google Developers Console
(https://console.developers.google.com/project) or click on link given top right of the respective tab in module configuration page.
Now click on Create Project on the left of the page.
Enter a name for your project and proceed to the next step.
Now click on APIs and auth-> Credentials from the left menu as shown below.
Click Create New Client ID button from the right panel of the screen.
You may have to fill the form for Consent Screen before proceeding. To do so, that you have to click on Consent Screen in the left menu as shown in the image above.
Fill the pop-up form with below details:
Application Type: Web Application. Authorized JavaScript Origins: Your store domain name (https://www.yourstore.com). Authorized redirect URI or URI of Loginizer redirect page:
https://example.com/pwa-app/login
Now click Create Client ID button to get your Client ID and Client Secret Key.
Now you can use the client secret and client ID to let your customers login to your store using their Google account.
3.0 Front End PWA Screens:
3.1 Home Screen:
The home screen of the WooCommerce PWA Mobile App is fully customizable with the DIY editor as explained above in Admin Panel screens. Change app home screen look & feel anytime and offer more user-friendly & sale driven appearance.
1. Custom Layout:
Using various banner, slider, product elements, the store admin can create dynamic layout as per the need.
2. Brand Logo:
Use your store logo on the top header of the WooCommerce PWA app.
3. Shopping Cart Bag:
The shopping cart icon on the top-right corner of the home screen allows users to access cart screen and check added products.
4. Left Navigation Menu:
Browse the categories displayed in the PWA app with left navigation menu browsing.
3.2 Accordion Menu (Navigation Bar):
The WooCommerce PWA Mobile Apps comes with seamless and proper categorization available. The users can find relevant categories from the left navigation menu and browse products. Various CMS pages can also be added in the menu offering relevant content on App.
1. My Account
My Account option contains all the users’ personal information including shipping and order. The WooCommerce Progressive Web App shoppers can view and update the saved information.
2. Categories
Categories displayed in the left navigation menu of the WooCommerce Progressive Web App are the same as available on the eCommerce store.
3. CMS Pages
Various CMS pages like About Us, Contact Us, Terms & Conditions, etc. can be accessed from here. These information pages can be added from the admin panel of the extension.
4. Language(s)
The language option allows PWA app users to view the web-app in their desired language.
5. Currency(s)
All available currencies on your website are displayed here on the WooCommerce PWA app.
6. Login/Logout
Users can easily sign-in/sign-out from the WooCommerce PWA app via this option.
3.3 Category Screen:
Clutter-free category screens with the list and grid view allow the users to choose what’s best for them from a specific category. The entire store inventory will remain in-sync with WooCommerce PWA Mobile App and new additions and changes even get updated in real-time.
1. List & Grid View:
The categories on the PWA app for WooCommerce can be browsed in both list and grid view.
2. Product Sorting:
The sorting option allows online shoppers to narrow down the products in the desired sort order and find the right one.
3. Product Filter:
The WooCommerce PWA Mobile App offers the option to filter products simplifying the product search. Online shoppers can find the desired products under categories using filters for various attributes like size, color, price, etc.
3.4 Product Screen:
The product screen of the WooCommerce Progressive Web App is as simple & intriguing as it could get. With all the necessary options and information about the product, it becomes a matter of minutes for users to be sure about the product which he/she is about to purchase. Multi-images are available for the product with In stock and Out of stock options.
1. Product Info & Care:
The complete product information as available in the inventory will be displayed here.
2. Short Description:
Users get to read the short description of your product to quickly make up their minds about the purchase.
3. Product Options:
All the options related to the product like size, color, etc. are displayed here.
5. Add To Cart:
This button allows users to add products into the cart. The users can further process the cart for purchase.
6. Product Social Sharing:
The sharing option for the product allows users to share products on multiple social channels.
3.5 Login Screen
The WooCommerce PWA Mobile App offers one-tap social login options & make the sign-in/registration process more seamless. The WooCommerce Progressive Web App offers Google and Facebook login.
1. Login:
The app users can easily authenticate & login to PWA apps using their previous email login credentials.
2. Sign Up:
All the new app users can sign-up & create their account on the store from the WooCommerce PWA App. The sign-up form asks for only the necessary details to create an account.
3. Login with Facebook:
The users can log in to the PWA app using their Facebook Account Credentials.
4. Login with Google:
The users can log in to the PWA app using their Google Account Credentials.
3.6 Shopping Cart Screen:
The Shopping Cart screen of the WooCommerce PWA Mobile App will display all products added into the shopping cart. The app users can view Product name, quantity, total price & shipping cost. This screen has the following options:
1. Apply Voucher:
This option allows users to use website coupons and grab discount offers.
2. Total Product Price:
The users get to view the complete cost of their shopping bag before proceeding further. It is automatically updated according to any update with product quantity or new addition.
3. Update Product Quantity:
The PWA app users can even update the product quantity with the “Update Quantity” option.
4. Remove Product:
The app users can simply remove the product from the cart by simply tapping the “Remove” option.
5. Continue Shopping:
The app users can leave the cart to browse more products on your app.
6. Continue To Checkout:
The PWA app users can proceed further to the checkout & payment screens just by tapping the “Continue To Checkout” option.
3.7 Checkout Screen
The Progressive Web App for WooCommerce has a simplified single-screen checkout with only relevant information. The app users can view complete checkout details like shipping details, billing details, order summary, order comment, payment summary.
1. Shipping & Billing Details:
This screen provides details of the shipping & billing addresses saved by the user. The user can also edit/save the new shipping address if needed.
2. Order Summary:
The app users get to view product details before making payment.
3. Shipping Methods:
All available shipping methods are displayed here. Users can choose the one suiting their needs.
4. Order Comment:
Users can also add any comment related to their order which will be visible to store admin on the order web-page in the backend.
5. Payment Summary:
This section displays the complete breakdown payment details involved with the purchase.
6. Proceed To Payment:
The PWA app users will be re-directed to the Payment screen after tapping the “Proceed To Payment” button.
3.8 Payment Screen:
The payment screen of the WooCommerce PWA App has all web-view payments available on the store. Online shoppers can find similar payment experiences on both websites and apps.
3.9 My Account Screen
My account screen of the WooCommerce PWA Mobile App allows online shoppers to view their complete details saved on the Progressive Web App. This screen also displays a list of previous app orders as well.
1. Personal Details:
Users get to view & update their pre-saved personal details on PWA Mobile App.
2. Shipping Address(s):
The app users can see the complete list of pre-saved shipping addresses in the PWA app.
3. Order Details:
The app users can get to view the complete list of the previously placed orders from the PWA app and their details.
4. Re-order feature:
There is a direct re-order button on the My Account screen of the PWA app. All the previous products under this order will be added into the cart with just a single button.
3.91 Order Detail Screen
The order details screen of the WooCommerce Progressive Web App provides complete details of specific orders from the PWA app. Users can easily view shipping address, product summary, shipping and payment method, and total cost summary, etc. It even offers the option to keep a track of status of order and delivery.
This automated OpenCart extension is built with the motive to provide ease for online store owners to transform their store into a Progressive Web Application. The eCommerce store into PWA is one of the major advanced technologies that every eCommerce business should look for. The OpenCart PWA Mobile App is actually a web application that doesn’t rely on the third-party App stores (Google Play and Apple App Store). Online shoppers can easily “Add PWA App To Home Screen” and shop products on the go like any other application.
1.1 How OpenCart Progressive Web App (PWA) Works?
Once the eCommerce store is converted to OpenCart PWA Mobile App, whenever any user opens the store URL in the mobile browser, users will be asked to “Add PWA To Home Screen”. It’s that simple to install and use OpenCart Progressive Web App.
–> iOS devices (iPhone, iPad, etc.) do not offer any inbuilt “Add To Home Screen” prompt. Hence, the PWA Mobile App users need to manually add OpenCart PWA Mobile App to the home screen of iPhone or iPad.
–> iOS does not support web push notifications. Hence, the store admin can only send the push notifications to the Android device, not on iOS.
[NEW UPDATE] OpenCart PWA supports RTL Languages (Arabic, Hebrew, etc.):
The OpenCart PWA Mobile App Creator now supports multiple languages including RTL (Right To Left) scripts like Arabic, Hebrew, Persian, etc. All languages of the OpenCart store will be on the Progressive Web App and other required languages can also be added. The users can choose the language on the Progressive web app and the entire app content will be translated accordingly.
Fully Compatible With KnowBand Multi-vendor Marketplace:
Our OpenCart PWA Mobile App is compatible with OpenCart Multi-vendor Marketplace. Convert your OpenCart eCommerce store into a full-fledged marketplace and launch PWA mobile app for the same. The marketplace sellers will be available on your Progressive Web App and users can simply browse them as well.
Note: OpenCart PWA Mobile Apps are only customer-centric i.e. the users can visit the browse PWA app along with sellers. There won’t be any seller dashboard or management via OpenCart Progressive Web App. The admin can manage the sellers from marketplace web and same will be updated automatically on the PWA Mobile App.
1.3 View OpenCart PWA Demo:
Explore module and PWA app features from the below demo links:
(Copy-paste URL in the mobile browser and “Add To Home Screen”)
2.0 Admin Panel Screens:
Explore all settings of Admin panel of OpenCart PWA Mobile App extension along with functionality and work with the below-shared snapshots :
2.1 General Settings:
a) Show/hide Preview: Tap on the eye button to display/hide preview phone in the admin panel. b) Status: Enable the module to PWA work on mobile devices. c) Enable Request Log Reporting: Enable error log on mobile. d) Name for PWA App: Enter name for OpenCart PWA App. e) Select Layout for Home Page: Choose from pre-added home screen layout for OpenCart Progressive Web App.
f) Enable Tab Bar: Enable tab bar on the bottom of the OpenCart PWA App for seamless navigation. g) Font for PWA App: Choose a font for OpenCart Progressive Web App(PWA). h) App Button Color: Choose button color for PWA Mobile App. i) App Theme Color: Choose theme color for PWA App. j) App Background Color: Choose the background color for the PWA App. k) App Splash Screen Color: Choose a splash screen for PWA Mobile App. l) Enable Logo: Add your brand logo on the header of the OpenCart PWA Mobile App.
m) Image for App Icon: Add app icon image in the admin panel of OpenCart PWA extension. n) Redirect on Cart Page when Add To Cart: Control redirection of Add To Cart button whenever any user taps Add To Cart button.
2.2 Push Notifications Settings
Push notifications are the best marketing tool for the Progressive Web App(PWA) for OpenCart. The store admin can simply promote the store products and deals to app users and bring more sales and revenue. Enter all details in push notification settings by creating a Firebase project:
How to set up a Firebase Account?
Step 1: Login Google Firebase
Step 2: Create a New Project
As you click on Add Project, the following dialog box will pop up:
It will take a few seconds to create the project. Once the project is ready, click continue.
Step 3: Manage Project Settings
Once the project is created, click on Project Settings.
Step 4: Go to Authentication options:
Step 5: Find Firebase Keys
In the project settings, click on Cloud messaging settings. From here, you can directly get the server key.
Step 6: Add your Web-App to Firebase
Step 7: Get other firebase related details and paste the same in PWA module admin panel.
Step 8: Get firebase server key from cloud messaging tab in Settings:
Step 9: Add your domain in authentication>>sign-in.
A) Successful Order Push Notification:
Enable/Disable automated Push Notification to be sent to app users whenever they place successful order from the OpenCart Progressive Web App (PWA).
B) Order Status Update Push Notification:
Enable/Disable automated Push Notification sent whenever order status from the app gets updated. The OpenCart PWA mobile app users can keep an eye on the details of previous orders.
C) Abandoned Cart Push Notification:
Enable/Disable automated push notification sent to users abandoning products in cart without successful purchase. This push notification will be sent to users automatically after the entered time interval.
2.3 Push Notifications History
Complete push notification history of successfully sent push notifications will be seen here. The store admin can keep a track of previously sent push notifications from here.
A) Send Notification:
Personalize and send push notification manually to OpenCart Progressive Web App(PWA) users as per the need. The store admin can configure these notifications on their own & send it to OpenCart Progressive Web App (PWA) users.
2.4 Home Page Layout:
Design and save multiple layouts designs (sale, festivals etc.) and just choose right one from admin panel to update on OpenCart Progressive Web App.
The OpenCart Progressive Web App(PWA) offers a customizable Home Screen whose layout can be designed from the admin panel with a few mouse clicks and drag-drop. The attractive layout as per running festival, sale, occasion, etc. can surely help in improving sales through OpenCart PWA Mobile Apps.
Add a new layout from this tab or edit the previously added ones. The home page configuration settings offer the following elements:
Top Categories:
Square Banner:
Horizontal Sliding Banner:
Grid Banner:
Countdown Timer Banner:
Square Products:
Sliding Products:
Grid Products:
How to get Facebook App details?
Facebook App can be created by following below-mentioned steps:-
Step 1: Go to given URL: https://developers.facebook.com/apps/
Step 2: Click on the “Add a New App” button.
Step 3&4: Enter your App name and email id, then click on “Create App ID” button.
Step 5&6: After clicking on Create App ID you will have to go through a security check as shown:
Step 7: Click on “Setting” tab.
Step 8-13: Two option will be available in the dropdown, Basic and Advanced, click on “Basic”. And then enter your “App Domain”, “Contact Email”, ”Privacy URL”, ”Terms and Conditions URL”, ”Add Logo”, ”Select Category” and click on “Save Changes” button.
App Domains:
yourdomain.com is correct
yourdomain.com/store is incorrect
www.domain.com is incorrect
Step 14: Now click on “+Add Platform”.
Step 15: And select Website as Platform.
Step 16: Now Enter your site URL.
Step 17&18: Click on “Products+” and select Facebook login.
Step 19: Select web as the platform for the app.
Step 20: Now click on save.
Step 21&22: Click on Settings and add a Valid OAuth Redirect URIs.
Valid OAuth Redirect URIs:
https://example.com/pwa-app/login
Step 23&24: Click on “App review”. And mark “Make ‘your app name’ Public” to Yes.
Final Step: Copy the App ID and App Secret and paste it into the fields provided in the module.
How to get Google App details?
Go to Google Developers Console
(https://console.developers.google.com/project) or click on link given top right of the respective tab in module configuration page.
Now click on Create Project on the left of the page.
Enter a name for your project and proceed to the next step.
Now click on APIs and auth-> Credentials from the left menu as shown below.
Click Create New Client ID button from the right panel of the screen.
You may have to fill the form for Consent Screen before proceeding. To do so, that you have to click on Consent Screen in the left menu as shown in the image above.
Fill the pop-up form with below details:
Application Type: Web Application. Authorized JavaScript Origins: Your store domain name (https://www.yourstore.com). Authorized redirect URI or URI of Loginizer redirect page:
https://example.com/pwa-app/login
Now click Create Client ID button to get your Client ID and Client Secret Key.
Now you can use the client secret and client ID to let your customers login to your store using their Google account.
2.7 Information Pages:
Add CMS pages on the app and offer informative content to OpenCart PWA Mobile App users.
3.0 Front End PWA App Screens:
3.1 Home Screen:
The home screen of the OpenCart Progressive Web App (PWA) is fully customizable with a DIY editor as explained above in Admin Panel screens. Change app home screen look & feel anytime and offer more user-friendly & sale driven appearance.
1. Custom Layout:
Using various banner, slider, product elements, the store admin can create a dynamic layout as per the need.
2. Brand Logo:
Use your store logo on the top header of the OpenCart Progressive Web App(PWA).
3. Shopping Cart Bag:
The shopping cart icon on the top-right corner of the home screen allows users to access cart screen and check added products.
4. Left Navigation Menu:
Browse the categories displayed in the PWA app with left navigation menu browsing.
3.2 Accordion Menu (Navigation Bar)
The OpenCart PWA Mobile Apps comes with seamless and proper categorization available. The users can find relevant categories from the left navigation menu and browse products. Various CMS pages can also be added to the menu offering relevant content on the App.
1. My Account:
My Account option contains all the users’ personal information including shipping and order. The OpenCart Progressive Web App shoppers can view and update the saved information.
2. Categories:
Categories displayed in the left navigation menu of the OpenCart Progressive Web App are the same as available on the eCommerce store.
3. CMS Pages:
Various CMS pages like About Us, Contact Us, Terms & Conditions, etc. can be accessed from here. These information pages can be added from the admin panel of the extension.
4. Language(s):
The language option allows PWA app users to view the web-app in their desired language.
5. Currency(s):
All available currencies on your website are displayed here on the OpenCart Progressive Web App (PWA) app.
6. Login/Logout:
Users can easily sign-in/sign-out form the OpenCart PWA app via this option.
3.3 Category Screen:
Clutter-free category screens with the list and grid view allow the users to choose what’s best for them from a specific category. The entire store inventory will remain in-sync with OpenC Progressive Web App(PWA) Mobile App and new additions and changes even get updated in real-time.
1. List & Grid View:
The categories on the PWA app for OpenCart can be browsed in both list and grid view.
2. Product Sorting:
The sorting option allows online shoppers to narrow down the products in the desired sort order and find the right one.
3. Product Filter:
The OpenCart PWA Mobile App offers the option to filter products simplifying the product search. Online shoppers can find the desired products under categories using filters for various attributes like size, color, price, etc.
3.4 Product Screen:
The product screen of the OpenCart Progressive Web App is as simple & intriguing as it could get. With all the necessary options and information about the product, it becomes a matter of minutes for users to be sure about the product which he/she is about to purchase. Multi-images are available for the product with In stock and Out of stock options.
1. Product Info & Care:
The complete product information as available in the inventory will be displayed here.
2. Short Description:
Users get to read the short description of your product to quickly make up their minds about the purchase.
3. Product Options:
All the options related to the product like size, color, etc. are displayed here.
4. Add To Cart:
This button allows users to add products into the cart. The users can further process the cart for purchase.
5. Product Social Sharing:
The sharing option for the product allows users to share products on multiple social channels.
3.5 Login Screen
The OpenCart PWA Mobile App offers one-tap social login options & make the sign-in/registration process more seamless. The OpenCart Progressive Web App offers Google and Facebook login.
1. Login:
The app users can easily authenticate & login to PWA apps using their previous email login credentials.
2. Sign Up:
All the new app users can sign-up & create their account on the store from the OpenCart PWA App. The sign-up form asks for only the necessary details to create an account.
3. Login with Facebook:
The users can log in to the PWA app using their Facebook Account Credentials.
4. Login with Google:
The users can log in to the PWA app using their Google Account Credentials.
3.6 Shopping Cart Screen:
The Shopping Cart screen of the OpenCart PWA Mobile App will display all products added into the shopping cart. The app users can view Product name, quantity, total price & shipping cost. This screen has the following options:
1. Apply Voucher:
This option allows users to use website coupons and grab discount offers.
2. Total Product Price:
The users get to view the complete cost of their shopping bag before proceeding further. It is automatically updated according to any update with product quantity or new addition.
3. Update Product Quantity:
The PWA app users can even update the product quantity with the “Update Quantity” option.
4. Remove Product:
The app users can simply remove the product from the cart by simply tapping the “Remove” option.
5. Continue Shopping:
The app users can leave the cart to browse more products on your app.
6. Continue To Checkout:
The PWA app users can proceed further to the checkout & payment screens just by tapping the “Continue To Checkout” option.
3.7 Checkout Screen
The Progressive Web App for OpenCart has a simplified single-screen checkout with only relevant information. The app users can view complete checkout details like shipping details, billing details, order summary, order comment, payment summary.
1. Shipping & Billing Details:
This screen provides details of the shipping & billing addresses saved by the user. The user can also edit/save the new shipping address if needed.
2. Order Summary:
The app users get to view product details before making payment.
3. Shipping Methods:
All available shipping methods are displayed here. Users can choose the one suiting their needs.
4. Order Comment:
Users can also add any comment related to their order which will be visible to store admin on the order web-page in the backend.
6. Payment Summary:
This section displays the complete breakdown payment details involved with the purchase.
7. Proceed To Payment:
The PWA app users will be re-directed to the Payment screen after tapping the “Proceed To Payment” button.
3.8 Payment Screen:
The payment screen of the OpenCart PWA App has all web-view payments available on the store. Online shoppers can find similar payment experiences on both websites and apps.
3.9 My Account Screen
My account screen of the OpenCart PWA Mobile App allows online shoppers to view their complete details saved on the Progressive Web App. This screen also displays a list of previous app orders as well.
1. Personal Details:
Users get to view & update their pre-saved personal details on PWA Mobile App.
2. Shipping Address(s):
The app users can see the complete list of pre-saved shipping addresses in the PWA app.
3. Order Details:
The app users can get to view the complete list of the previously placed orders from the PWA app and their details.
4. Re-order feature:
There is a direct re-order button on the My Account screen of the OpenCart Progressive Web App (PWA). All the previous products under this order will be added into the cart with just a single button.
3.91 Order Detail Screen
The order details screen of the OpenCart Progressive Web App provides complete details of specific orders from the PWA app. Users can easily view shipping address, product summary, shipping and payment method, and total cost summary, etc. It even offers the option to keep a track of status of order and delivery.
Being in the retail eCommerce industry, you must have come across the word PWA (Progressive Web App). If yes, you must be also aware of the capability they carry as a shopping application. In case not, you’ve landed in the right place. With the constant growth in the usage of shopping apps (both native & PWA), online stores are shifting to PWA Mobile App development for their businesses. Launching a Progressive Web App is quite a simpler and affordable task these days.
KnowBand has launched Magento 2 PWA Mobile App, a complete no-code and automated tool to launch a Progressive Web App. In simple words, whenever any user opens your store URL on the mobile browser, he will get a prompted message of “Add To Home Screen”. The Magento 2 Progressive Web App will be added in the user’s device like any other app and online purchasing can be done on the go.
1.1 View Demo App:
Explore Progressive Web App demo for Magento 2 and take a glance at how your final apps will look and work:
–> iOS devices do not offer any inbuilt “Add To Home Screen” prompt. Users need to manually add the Magento 2 PWA Mobile App to the home screen of iPhone or iPad.
–> iOS does not support web push notifications. The push notifications can only be sent to the Android device from the admin panel of Magento 2 PWA Mobile App Builder.
The Magento 2 PWA Mobile App Creator now supports all worldwide languages including RTL (Right To Left). The PWA Mobile App for Magento 2 can have languages like Arabic, Hebrew, Persian, etc. The store owner can offer all website languages on the Progressive Web App and can even add new ones.
2.0 Admin Panel Screens:
With the friendly admin panel backend, the store admin can configure and customize the look, feel, and working of the PWA Mobile Application. It’s just a matter of a few clicks and mouse toggles to make changes in the Magento 2 Progressive Web Apps. Let’s take a detailed overview of the Admin panel screens:
2.1 General Settings:
a) Enable the Extension: Enable Magento 2 PWA module to make web app work on the users’ smartphones.
b) Redirect on Cart Page when Add To Cart: Enable to re-direct users to shopping cart or disable to keep them on the product screen.
c) Display Short Description: Enable to add & display a short description on the product screen of Progressive Web App.
d) Enable Request Log Reporting: Enable this tab to activate the log file on the PWA Mobile App. This log file can be used to rectify any abnormal behavior of Progressive Web Application.
e) Show App Preview: Enable to add a preview phone in the admin panel. All color, font, home screen changes will be displayed in real-time preview phone.
f) Enable Tab Bar: Add a bottom tab bar on the Magento 2 PWA Mobile App.
g) Select Layout for Home Page: Choose desired layouts from the added ones and improve look and feel of app.
h) Image for App Icon: Upload Magento 2 PWA app icon on your own and change the same as well if required.
i) Name For PWA App: Enter the name of the Magento 2 Progressive Web App.
j) Select Font For PWA App: Choose the font of your PWA app for Magento 2.
k) App Button Color: Choose button color for your PWA Mobile App.
l) App Button Text Color: Choose the button text color for your Magento 2 Progressive Web App.
m) App Theme Color: Choose the theme color (header) of your web application.
n) App Background Color: Choose the background color of the Progressive Web Application.
o) Splash Screen Background Color: Choose the right color option for the background of the PWA app splash screen.
p) Disabled Shipping Methods: Choose shipping methods to be restricted from working in Magento 2 PWA mobile app.
q) Enable & Upload Logo: Add the logo image of your store to be displayed on the header of the PWA Mobile app.
2.2 Push Notifications Settings:
The Magento 2 Progressive Web App offers unlimited push notifications to market and promotes store deals and products. The store admin will get push notifications for a lifetime with no additional charges.
The various fields under this setting tab require a Firebase Account set up. Here’s how you may set one:
How to set up a Firebase Account?
Step 1: Login Google Firebase
Step 2: Create a New Project
As you click on Add Project, the following dialog box will pop up:
It will take a few seconds to create the project. Once the project is ready, click continue.
Step 3: Manage Project Settings
Once the project is created, click on Project Settings.
Step 4: Go to Authentication options:
Step 5: Find Firebase Keys
In the project settings, click on Cloud messaging settings. From here, you can directly get the server key.
Step 6: Add your Web-App to Firebase
Step 7: Get other firebase related details and paste the same in PWA module admin panel.
Step 8: Get firebase server key from cloud messaging tab in Settings:
Step 9: Add your domain in authentication>>sign-in.
2.21 Automated Push Notifications:
The store admin gets to schedule automated notification sending for the following cases:
a) New Order Settings: Whenever any new order is placed from the Magento 2 PWA Mobile App.
b) Order Status Change Settings: Whenever the delivery status of any order gets changed/updated.
c) Abandoned Cart Settings: Whenever any user leaves product in cart and abandon Progressive Web App.
2.22 Manual Push Notification:
As shown in the above snapshot, the store admin can personalize and send manual push notifications to PWA Mobile App users. The message, image, discount offered, redirection link can be added/edited to improve the efficiency of notification and bring more sales.
2.3 Home Page Layout:
The Magento 2 PWA Mobile App Builder offers a fully customizable DIY editor panel to customize and configure the look and feel of Progressive Web Application. Various new layouts can be added to the admin panel based on upcoming festivals and occasions.
2.31 Top Categories:
2.32 Square Banner:
2.33 Sliding Banner:
2.34 Grid Banner:
2.35 Countdown Timer Banner
2.36 Square Products:
2.37 Sliding Products:
2.38 Grid Products:
How to get Facebook App details?
Facebook App can be created by following below-mentioned steps:-
Step 1: Go to given URL: https://developers.facebook.com/apps/
Step 2: Click on the “Add a New App” button.
Step 3&4: Enter your App name and email id, then click on “Create App ID” button.
Step 5&6: After clicking on Create App ID you will have to go through a security check as shown:
Step 7: Click on “Setting” tab.
Step 8-13: Two option will be available in the dropdown, Basic and Advanced, click on “Basic”. And then enter your “App Domain”, “Contact Email”, ”Privacy URL”, ”Terms and Conditions URL”, ”Add Logo”, ”Select Category” and click on “Save Changes” button.
App Domains:
yourdomain.com is correct
yourdomain.com/store is incorrect
www.domain.com is incorrect
Step 14: Now click on “+Add Platform”.
Step 15: And select Website as Platform.
Step 16: Now Enter your site URL.
Step 17&18: Click on “Products+” and select Facebook login.
Step 19: Select web as the platform for the app.
Step 20: Now click on save.
Step 21&22: Click on Settings and add a Valid OAuth Redirect URIs.
Valid OAuth Redirect URIs:
https://example.com/pwa-app/login
Step 23&24: Click on “App review”. And mark “Make ‘your app name’ Public” to Yes.
Final Step: Copy the App ID and App Secret and paste it into the fields provided in the module.
How to get Google App details?
Go to Google Developers Console
(https://console.developers.google.com/project) or click on link given top right of the respective tab in module configuration page.
Now click on Create Project on the left of the page.
Enter a name for your project and proceed to the next step.
Now click on APIs and auth-> Credentials from the left menu as shown below.
Click Create New Client ID button from the right panel of the screen.
You may have to fill the form for Consent Screen before proceeding. To do so, that you have to click on Consent Screen in the left menu as shown in the image above.
Fill the pop-up form with below details:
Application Type: Web Application. Authorized JavaScript Origins: Your store domain name (https://www.yourstore.com). Authorized redirect URI or URI of Loginizer redirect page:
https://example.com/pwa-app/login
Now click Create Client ID button to get your Client ID and Client Secret Key.
Now you can use the client secret and client ID to let your customers login to your store using their Google account.
3.0 Front End PWA App Screens:
Take a quick glance on seamlessly designed screens of Progressive Web App for Magento 2:
3.1 Home Screen:
The home screen of the Magento 2 Progressive Web App is fully customizable from the admin panel of the module. You can design the layout of app screens the way you want. Custom layouts can be designed in the admin panel based on events, festivals, occasions, etc. and used whenever required.
1. Dynamic Layout:
Using various designing elements (banners, sliders, categories, etc), the store admin can create dynamic layout as per the need.
2. Store Logo:
Add store logo on the header of the PWA app.
3. Shopping Cart:
The shopping cart icon on the top-right corner of the home screen allows users to switch on cart screen.
4. Navigation Menu:
Browse the categories in the apps with left navigation menu on the home screen.
3.2 Left Navigation Menu:
The Magento 2 PWA Mobile Apps come up with seamless categorization of products. The categories on the PWA Mobile App will be the same as available on the website. Online shoppers can easily browse products from multiple categories without any hassle. Various CMS pages can also be added to the left navigation menu using the admin panel.
1. My Account:
My Account option contains all the user personal, shipping, order information. The PWA app shoppers get to view all the stored data related to them & can update the same as well.
2. Categories
Categories displayed in left navigation menu of PWA app are the same as of your website.
3. CMS Pages:
Various CMS pages like About Us, Contact Us, Terms & Conditions, etc. Can be accessed from here.
4. Language(s)
The language option allows PWA app users to view the web-app in their desired language. All available languages are displayed under this option only.
5. Currency(s)
All available currencies on your website are displayed here on Magento 2 PWA app.
6. Login/Logout
Users can easily sign-in/sign-out from Magento 2 PWA app via this option.
3.3 Category Screen:
1. Multiple Views:
The categories on PWA app for Magento 2 can be viewed in both list and grid view.
2. Sorting:
This option allows the online shoppers to choose the sort order in order to narrow down the search and get desired product with ease.
3. Filter:
Option to filter products simplifies product search. Users can filter all products under categories using various attributes like size, color, price etc.
3.4 Product Screen:
The product screen of the Magento 2 Progressive Web App contains all necessary product information the same as of your store. From multiple product images to short and long description helps in making user’s mind for purchase. The product availability is signaled as “In Stock” or “Out Of Stock” based on inventory status.
1. Product Info & Care
The complete product information as available in the inventory will be displayed here.
2. Short Description
Users get to read the short description of your product to quickly make up their minds about the purchase.
3. Product Options:
All the options related to the product like size, color, etc. are displayed here.
5. Add To Cart:
This button allows users to add products into the cart. The users can further process the cart for purchase.
6. Product Social Sharing:
The sharing option for the product allows users to share products on multiple social channels.
3.5 Login Screen
The Magento 2 Progressive Web App offers quick one-tap login options & make sign-in/registration process more seamless:
– Email Login
– Google Login
– Facebook Login
1. Login
The app users can easily authenticate & login to PWA apps using their previous email login credentials.
2. Sign Up
All the new app users can sign-up & create their account on the store from the Magento 2 PWA App. The sign-up form asks for only the necessary details to create an account.
3. Login with Facebook
The users can log in into the PWA app using their Facebook Account Credentials.
4. Login with Google+
The users can log in into the PWA app using their Google Account Credentials.
3.6 Shopping Cart Screen:
The shopping bag of Magento 2 PWA apps will display all added products along with their quantity and price to pay. The app users can view product details as well to be sure before purchasing one.
1. Apply Voucher:
This option allows users to use website coupons and grab discount offers.
2. Total Product Price:
The users get to view the complete cost of their shopping bag before proceeding further. It is automatically updated according to any update with product quantity or new addition.
3. Update Product Quantity:
The PWA app users can even update the product quantity with the “Update Quantity” option.
4. Remove Product:
The app users can simply remove the product from the cart by simply tapping the “Remove” option.
5. Continue Shopping:
The app users can leave the cart to browse more products on your app.
6. Continue To Checkout:
The PWA app users can proceed further to the checkout & payment screens just by tapping the “Continue To Checkout” option.
3.7 Checkout Screen:
The PWA Mobile apps for Magento 2 comes with a single screen clutter-free checkout with only relevant & necessary fields required. App users get a complete overview of the order before actually making the payment like shipping details, billing details, order summary, order comment, payment summary.
1. Shipping & Billing Details
This screen provides details of the shipping & billing addresses saved by the user. The user can also edit/save the new shipping address if needed.
2. Order Summary
The app users get to view product details before making payment.
3. Shipping Methods
All available shipping methods are displayed here. Users can choose the one suiting their need.
4. Order Comment
Users can also add any comment related to their order which will be visible to store admin on the order web-page in the backend.
6. Payment Summary
This section displays the complete breakdown payment details involved with the purchase.
7. Proceed To Payment
The PWA app users will be re-directed to the Payment screen after tapping the “Proceed To Payment” button.
3.8 Payment Screen:
Magento 2 PWA App brings all web-view (website) payments on the app. The app users will find same payment options here as available on the applications. The payment screen of Magento 2 Progressive Web App is fully optimized for app view.
3.9 My Account Screen:
My account screen of the Magento 2 PWA app offers all users details available on the Progressive Web App. The online shoppers get to view the personal details, shipping address, order details, etc.
1. Personal Details
Users can also view & update their pre-saved profile details.
2. Shipping Address(s)
The app users can see the complete list of pre-saved shipping addresses in the PWA app.
3. Order Details
The app users can get to view the complete list of the previously placed orders from the PWA app and their details.
4. Re-order feature
There is a direct re-order button on the My Account screen of the PWA app. All the previous products under this order will be added into the cart with just a single button.
3.10 Order Detail Screen
The Magento 2 Progressive Web App displays complete order details of previous app orders. This screen contains Order Details, Status History, Shipping & Billing Addresses, etc. for every order placed through the Magento 2 PWA app. The app users can quickly view the entire order summary and get to keep track of delivery status as well.