OpenCart Product Availability Check by Zipcode Extension – User Manual

1.0 Introduction

Is there a way to reduce cart abandonment and improve user experience on the website? Knowband’s OpenCart Product Availability Check by Zipcode Extension allows the customer to check product availability on their specific location via zip code search. Customers who are there to shop at your online store generally don’t have any idea about product availability in their region. Consequently, they go through a bad shopping experience at the time of checkout process when they get to know that the product is unavailable on their location. This way they are compelled to drop their cart contributing abandonment rates.
OpenCart Product Postal Code Validator Module incorporates a simple Product zipcode validator on the product page so that the customers can find whether the product can be shipped to their location or not. Moreover, if the product delivery is available on their postal code, OpenCart Product Availability module will show the delivery days and date in advance to the user. This overall functionality improves both the user experience and interface of the online shop.

1.1 Striking Features of Availability check by zipcode module for OpenCart

OpenCart Product Availability Check by Zipcode module offers different customizable features which can be set as per business requirements. No coding is required and the store owner can display product availability check by zipcode result on the frontend over the product pages. Let us quickly take a tour of its features.

1.OpenCart Product Availability Check by Zipcode Extension helps to control cart abandonment rates just by allowing customers to enter their zip code and checking the product availability at their location.

2. This OpenCart extension displays a Product zipcode validator block on the product page letting customer check product availability without going to the checkout page.

3. With OpenCart Product Postal Code Validator extension, admin can add unlimited global zones and multiple zip codes inside those zones.

4.OpenCart product zipcode validator gives an effortless way to add and map as many zip codes in various zones by directly uploading CSV file for bulk number of zip codes.

5.OpenCart Product Availability module lets admin map bulk number of products in different global zones or they can upload CSV file directly for bulk upload.

6. With OpenCart product zipcode validator, admin can exclude all those products for which the product shipping or delivery is unavailable. Customers can directly perform checkout for such products.

7.OpenCart zipcode validator module displays the advanced delivery days and date on frontend only when the product delivery is available for the specific zip code.

8.OpenCart product zipcode validator enables and shows the Add to Cart button on frontend only in case if the product delivery is applicable on that specific zip code.

9. Store admin can enable the zipcode validator module for specific products only using this OpenCart extension. For other products, the standard checkout is shown on the frontend.

10.OpenCart zipcode extension can be quickly enabled or disabled from the back-office.

11.No technicalities are involved in the install and configuration of OpenCart Availability check by zip code module.

12. The existing global zones, zip codes, product zone mappings can be enabled, disabled or deleted as per requirements.

13.OpenCart Product Postal Code Validator extension allows admin to edit and modify Product-Zone Mapping from the back-office.

14.OpenCart Product Availability Check by Zipcode Extension provides compatibility with multiple stores.

What’s New in the Recent Enhancement:

The latest update to Knowband’s Opencart Product Availability Check by Zipcode module introduces a new feature that allows store admins to enable or disable the zipcode verification pop-up on the front-end. This flexible option enhances user experience by offering seamless control over the visibility of the zipcode verification process.

2.0 Installation Guide of OpenCart Product Postal Code Validator Extension

Before starting the installation process, you have to buy the OpenCart Product Availability Check by Zipcode module from the Knowband store. Once purchased, you will receive the following files on your registered email.

  • The source code of OpenCart Product Availability Check by Zipcode module in zipped file format.
  • User Manual of OpenCart Product Availability Check by Zipcode extension.

Now in order to install this OpenCart zipcode validator for your online store, follow the given steps:

1. Unzip the zip file. You will get the folders as shown in the image below

OpenCart Product Availability Check by Zipcode Extension

2. Copy all the folders of the zip file in the Root Directory of OpenCart setup via FTP manager.

So, the OpenCart Product Availability module is now successfully installed and is ready to use at your store.

OpenCart Product Availability Check by Zipcode Extension

Check products are available in your area by entering your zip code with the OpenCart Product Availability Check by Zipcode module from Knowband.

SHOP NOW

3.0 Admin Interface of OpenCart Product Availability Check by Zipcode module

Just after the successful installation of the product availability check module for your OpenCart website, you can create as many product zipcode mappings and configure them as per your business requirements. Navigate the settings in the given order: Admin Panel > Extensions > Modules > Product Availability Check By Zipcode.
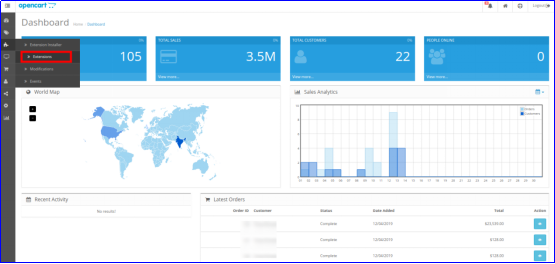
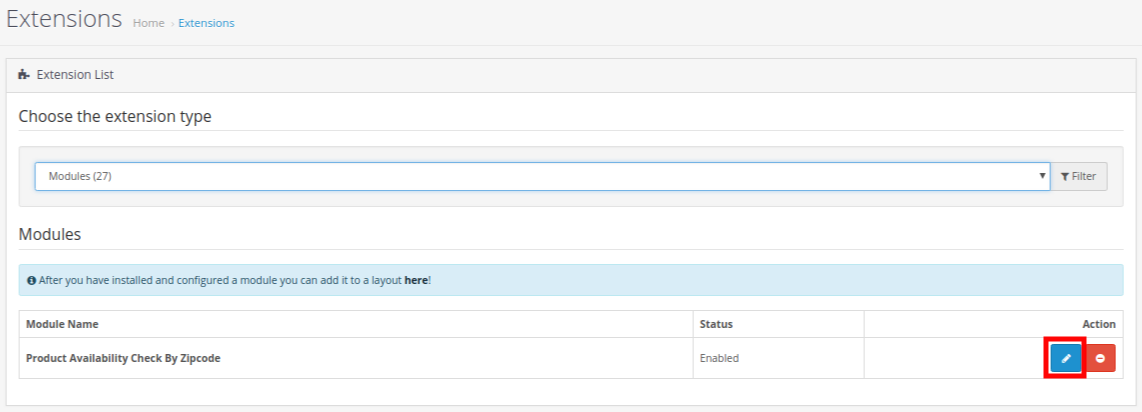
The simple to understand admin interface of OpenCart Product Postal Code Validator extension is divided into three broad sections namely:

1.Module Configuration Settings
2.Global Zones
3.Product Zone Mapping

Each of these sections has been discussed in detail below.

3.1 Module Configuration Settings

Under the Module Configuration Settings of OpenCart Product Postal Code Validator module, you will find the basic settings of global zones and product zone mapping which looks as shown below:

  • Enable/Disable module: This option will enable or disable the complete functionality of OpenCart product zipcode validator.
  • Display Delivery Date: You can show or hide the delivery days and delivery date under the product availability check result in advance. The delivery estimation is only applicable when the product is available on that particular postal code.
  • Display Zipcode Popup: The Opencart admin can enable/disable the zipcode pop-up on the storefront with this option.
  • Check Cart: If this option is enabled, then Add to Cart button is shown only when the product is available on that specific postal code. If the product is unavailable on this location, the Add to cart button will not be shown to the user.
  • Module Only For Mapped Product: You can enable or disable the module for mapped products. If this module is enabled for the mapped products, then the customer can perform checkout for all other products as well.
  • Disabled Products: Using this option of Product zip code validator module, you can restrict the product availability check for specific products of their store.
  • Custom CSS: In the following text field, the store admins can add custom CSS to modify the look and feel at their convenience.
  • Custom JS: We have provided this particular text filed  for allowing the admin to add custom JS.

3.2 Global Zones

Under this section of OpenCart Product Availability Check by Zipcode module, admin can create multiple global zones for their store. Under those global zones, they can add and map as many zip codes or postal codes where they will deliver their product or services. The interface looks like:
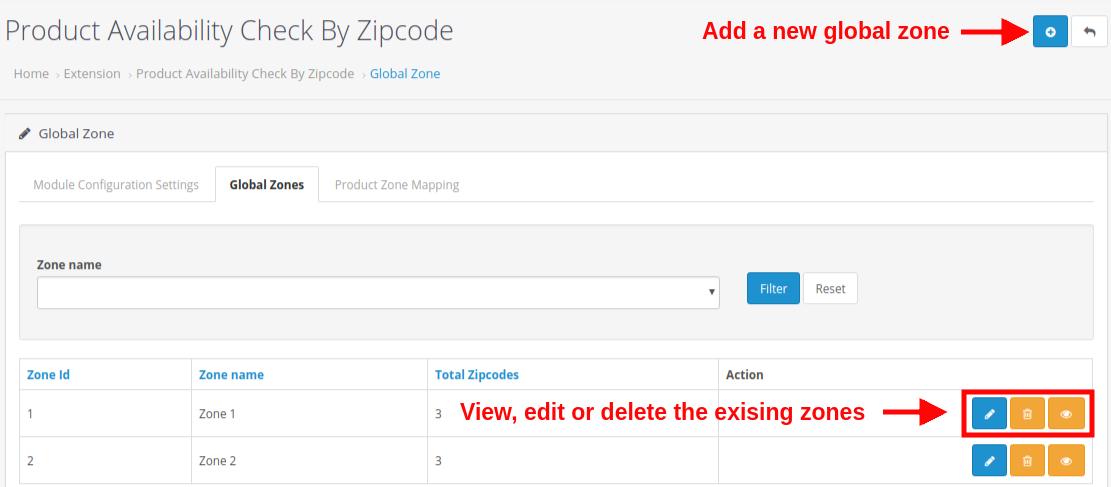
You can create as many global zones for your store by clicking on the “+” button. Moreover, you also have the flexibility to edit or delete the existing zones using the Edit or Delete button respectively. To check all the zip codes mapped in a zone, click on the View button.
Additionally, you can check the total number of zip codes that have been mapped in a particular zone.

Each of these actions has been discussed in detail below:

3.2.1 Add a New Zone

The above image shows the interface to add/create a new zone for your store. This is the manual way to add a global zone, where you have to manually list all the zip codes, and mark enable/disable status corresponding to those zones. To add a new global zone, fill the following fields:
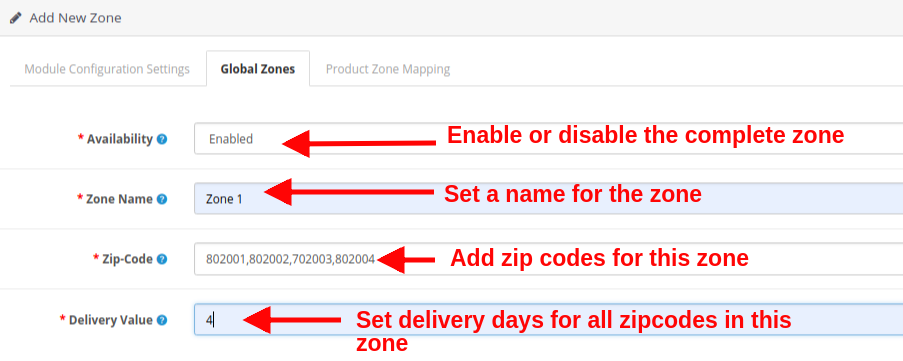
  • Availability: This option will enable or disable the complete zone. All the zip codes mapped in this zone will be all enabled or disabled.
  • Zone Name: This option will help you to set a name for the zone.
  • Zip-Code: Using this option, you can map as may zip codes in this zone. For adding multiple pin codes, separate them using a comma ‘,’ like 802001,802002,702003,802004
  • Delivery Value: This option will set the delivery days for all the zip codes under this zone.

3.2.2 Edit the Zone Name

If you want to change the name of the global zone, set using this option:
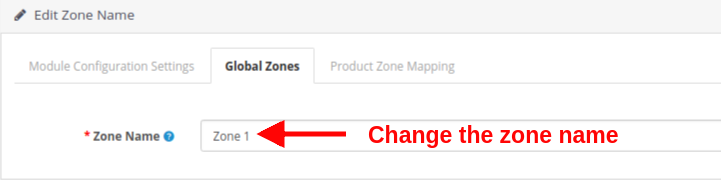
  • Zone Name: This option lets you specify the desired zone name.

3.2.3 View the Global Zone

A list of existing zones is displayed on this interface. You can view, or delete the existing zipcodes under a zone. Also, you can directly add new zip codes from this section of the admin interface. Each of these options has been discussed in the next sections.

3.2.3.1 Add New Zip Code

There are two ways to add new zip codes:

1. Manual Filling
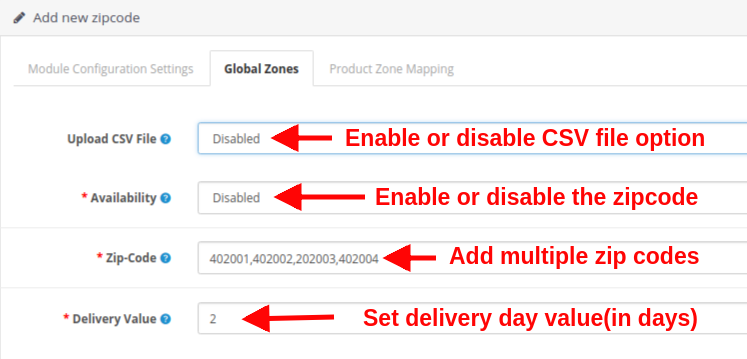
When you choose to manually add the zip codes in a particular zone, you have to set the following fields:

  • Upload CSV File: Enable or disable the upload CSV file option as per your business requirements. If disabled, you will be shown the below interface.
  • Availability: With this option, you can set the availability status of the product for the configured Zip-Code.
  • Zip-Code: This option will allow you to add multiple zip codes using a comma. Eg. 402001,402002,202003,402004
  • Delivery Value: Set a positive integer value as the delivery days for the configured zip codes.
2. Bulk Upload(using CSV file)
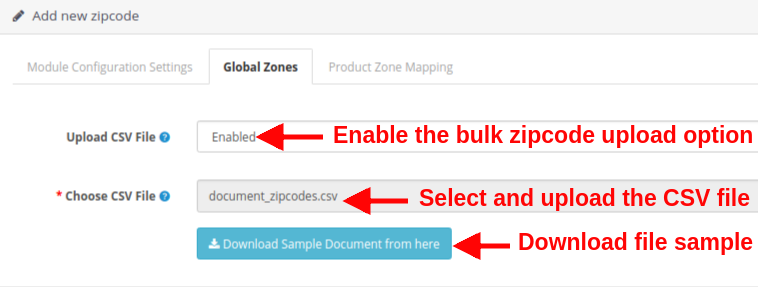
This option is useful when you have a large number of zip-codes to add for product delivery at your store. You have to configure the following options:

  • Upload CSV File: To use bulk zip code upload option, enable this option. This option allows you to upload CSV file for adding a large number of zip-codes for your store.
  • Choose CSV File: With this option, you can select and upload the CSV file from the local computer.
  • Download Sample Document: This option is provided as the CSV file reference. You can download a sample file from here and see the format to list the zip code details.
3.2.3.2 Edit Existing Zipcode
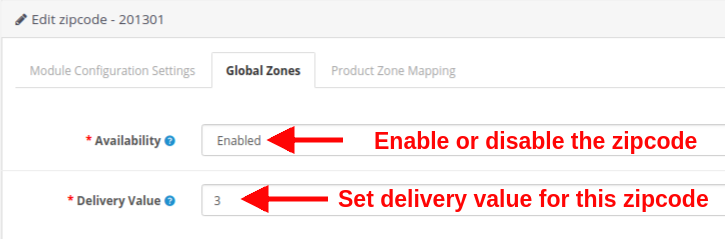
To edit a particular zip code, you have to set the following fields:

  • Availability: With this option, you can set the availability status of the product for the configured Zip-Code.
  • Delivery Value: Set a positive integer value as the delivery days for the configured zip codes.

3.3 Product Zone Mapping

Under this tab of OpenCart Product Availability module, you can add or create as many product zone mapping for your store. You can map the products to all specific zones where you want to allow delivery of those products.
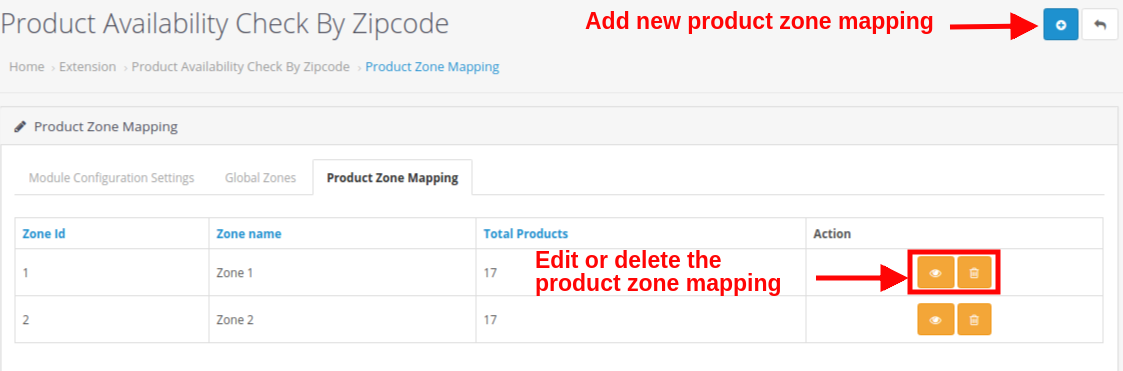
Here you can add new product zone mappings for your store. Also, the ‘Edit’ and ‘Delete’ button allows you to edit and delete the existing product zone mappings. Each of these actions has been discussed in detail, below.

3.3.1 Add New Product Zone Mapping

There are two ways to add new product zone mappings:

1. Manual Filling

When you choose to manually add the product zone mappings, you have to set the following fields:
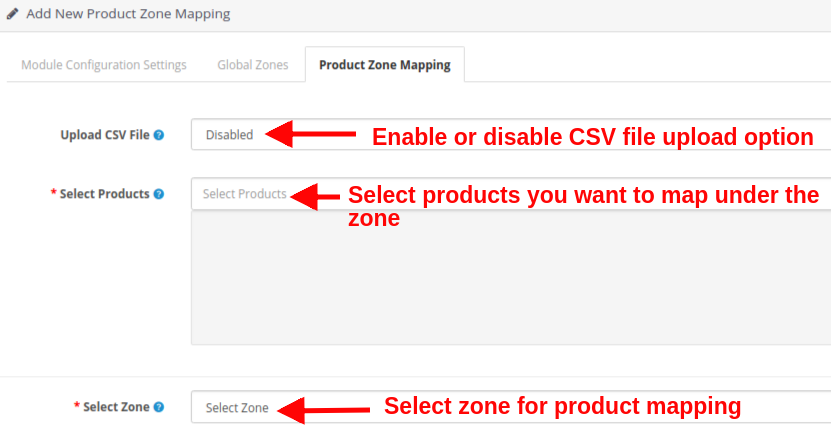
  • Upload CSV File: Enable or disable the upload CSV file option as per your business requirements. When you are manually adding the product mappings, set this option as disabled.
  • Select Products: This option allows you to select all the products which you want to map in a specific zone.
  • Select Zones: This option allows you to set the zone for which you are mapping the products.

2. Bulk Upload(using CSV file)
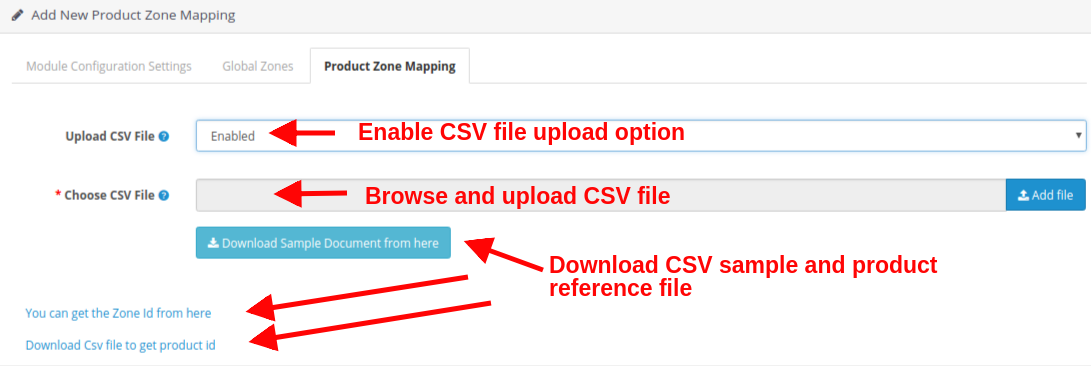
  • Upload CSV File: Enable or disable the upload CSV file option as per your business requirements. When you are manually adding the product mappings, set this option as disabled.
  • Choose CSV file: Browse and select the CSV file to add a large number of product zone mappings in bulk.
  • Download Sample Document: This option is provided as the CSV file reference. You can download a sample file from here and see the format to list the product zone mapping details.
  • Get the Zone Id: By clicking this link, you will see the list of zones with their name and ID.
  • Download CSV file for product Id: By clicking this link, you can download the CSV file to get the product ID.

3.3.2 View Existing Product Zone Mapping
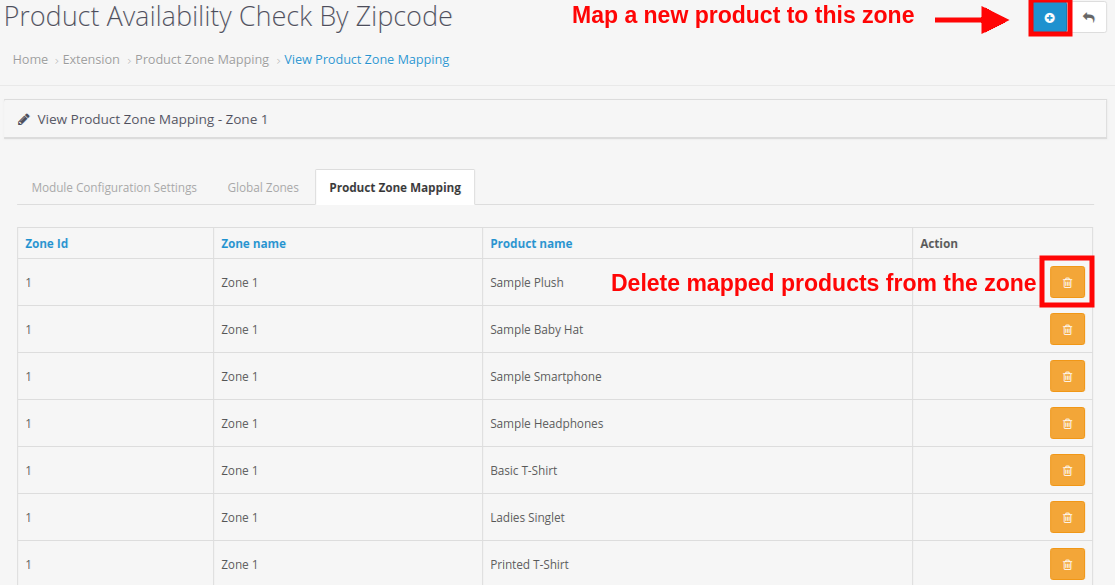
The above-provided interface shows you the complete list of product zone mappings. You can delete any product mapping for the selected zone and you can even add a new product mapping in this zone by clicking the ‘+’ button at the top right corner of the screen. As you will click the Add Product Mapping button, you will see the below interface:
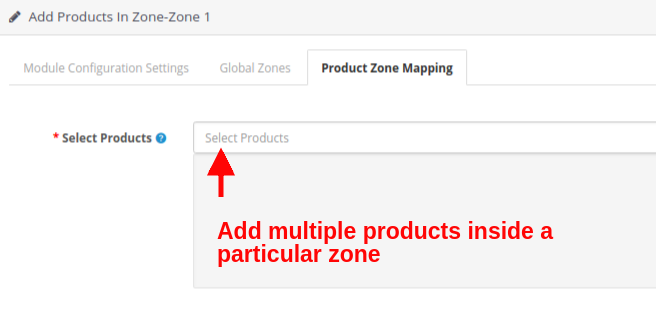
Select Products: Using this option, select the products that you want to map in this zone.
Note: Remember to click on the “Save” button shown at the top right corner of the admin panel to save the configured settings.

3.4.0 ZipCode Request:
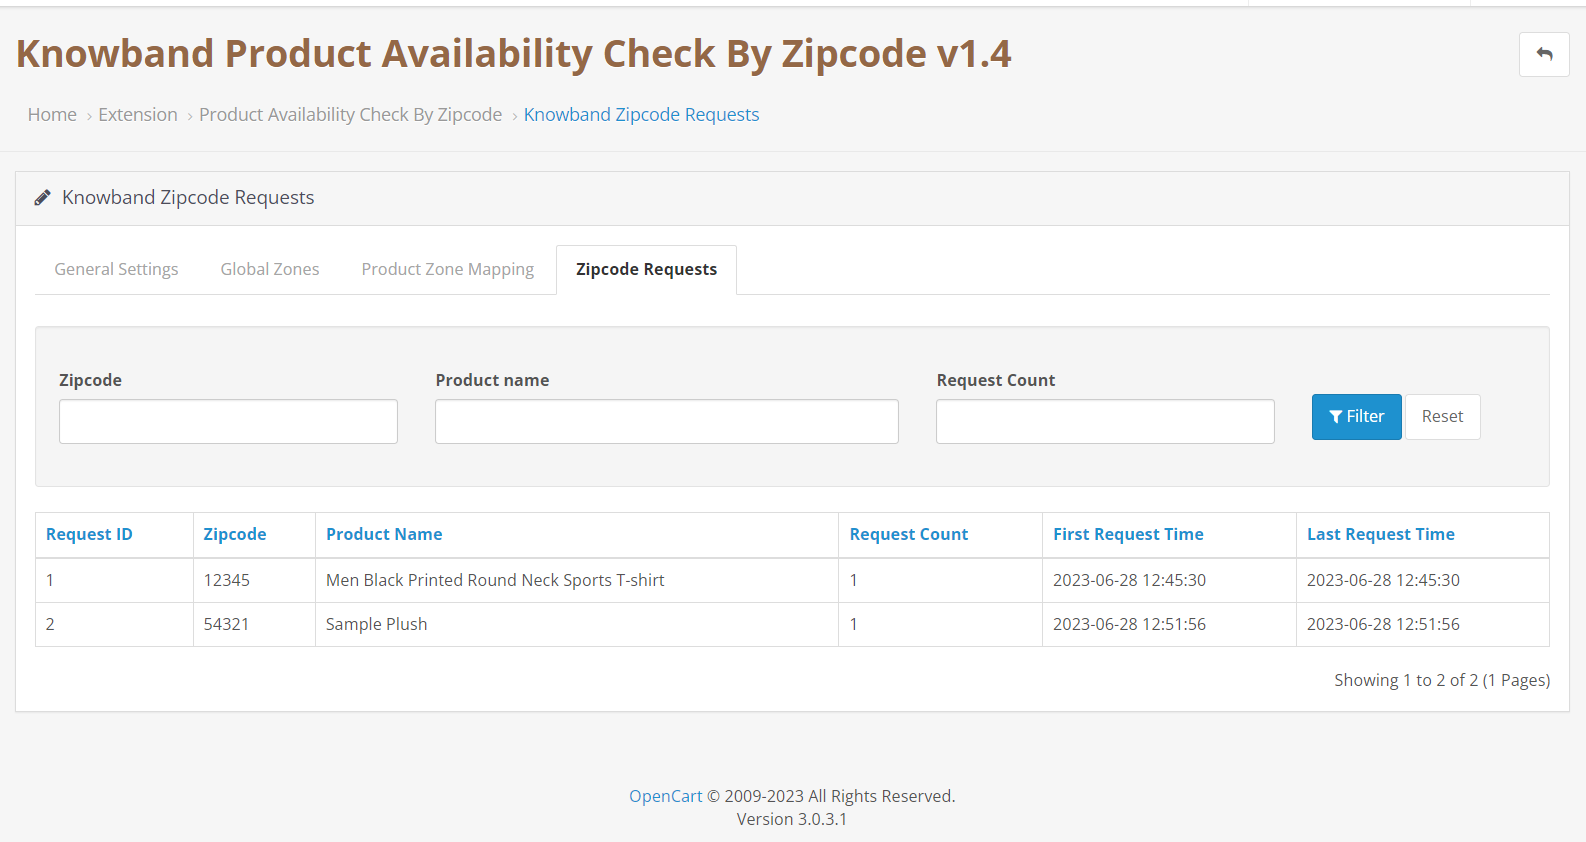
In case the customer will check the product availability by Zipcode and the product is not deliverable to that particular area, the zipcodes along with product name, request count (will depend on how many customers has checked the product for that particular location), and first & last request time will be automatically listed here.

4.0 Front Interface of OpenCart Product Availability Check by Zipcode Extension

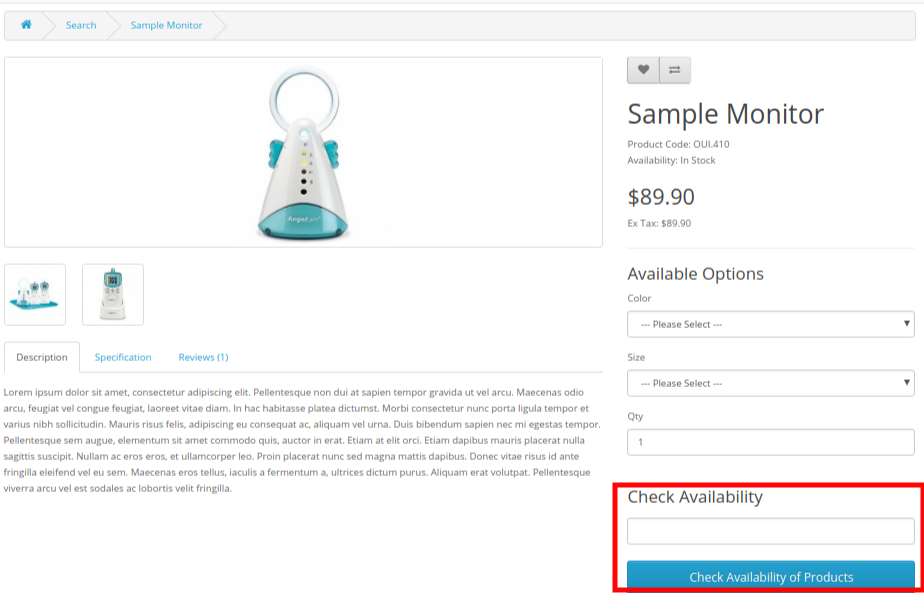
After you have successfully configured the settings of OpenCart Product Postal Code Validator Module and have mapped the products to global zones, you will see a product availability check block on the product pages of the site. For products, the Product zipcode validator is enabled, you will find this availability check block on the frontend.

  • The customers have to simply enter their zip code or postal code where they want the product to deliver. This ensures whether the product shipping is available on their specific location or not.
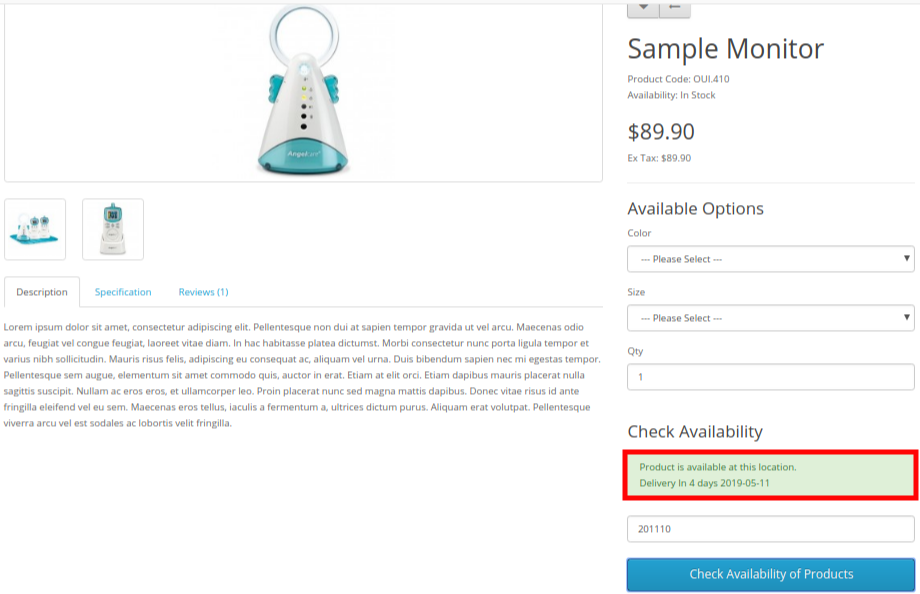
  • If the product is available on their provided zipcode, it will show a success message along with the delivery days and date information.
  • In case the product is unavailable on their zip code, they will see a message like “Product is Unavailable” as shown in the image below.
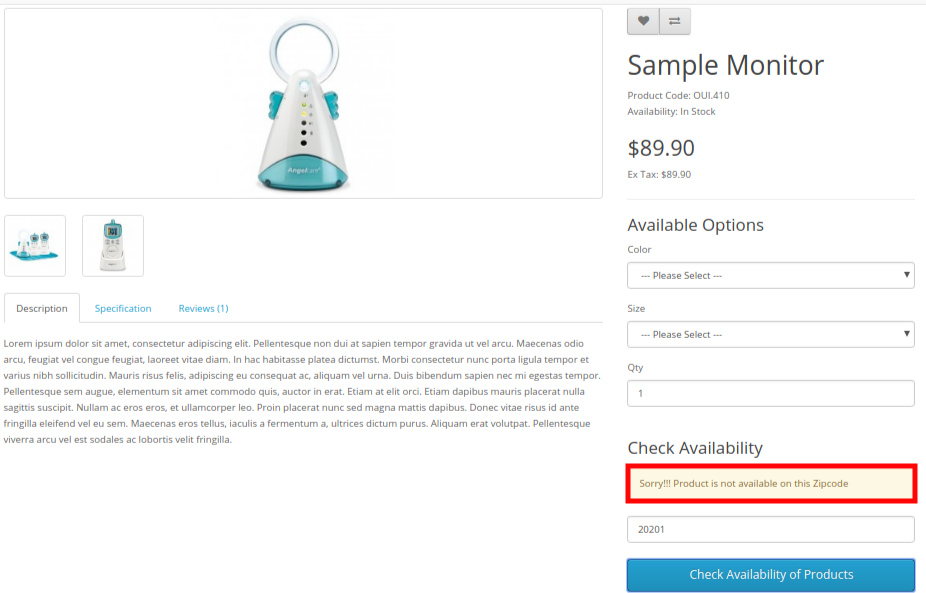
Important: The “Add to Cart” button on product pages will be only shown in two cases:

  1. Product Delivery is available for the entered zip code.
  2. The product has been restricted from the OpenCart product zipcode validator

Also, you can check our OpenCart Preferred delivery date and time extension which provides a facility for preferred delivery to online buyers.

OpenCart Preferred Delivery Date and Time Extension

Allow customers to choose their preferred delivery time slots easily with the OpenCart Preferred Delivery Time Slot module by Knowband.

SHOP NOW

5.0 Tutorial of OpenCart Product Zip Code Availability

To help you easily understand the installation, configuration, and working of the OpenCart Product Availability by Zip Code Extension, Knowband provides a detailed step-by-step tutorial along with a video guide.

Watch the Tutorial Video

We recommend watching the complete tutorial video to quickly learn how the module works on both the admin panel and frontend. The video demonstrates module installation, configuration of zip codes and zones, product mapping, and live product availability checks on the storefront.

Watch this complete tutorial video on our YouTube channel to get a clear and visual walkthrough of all features and settings.

6.0 Recommendations

Recommended OpenCart Modules

To enhance your OpenCart store and streamline content creation and management, we recommend the following Knowband modules:

1. VideoMate – Video Manager Extension Opencart

VideoMate is a powerful OpenCart module designed to integrate video content seamlessly into your store. It allows you to:

  • Add tutorial, Instagram reels, youtube shorts or demo videos to product pages, home page & category pages.
  • Engage customers with step-by-step video instructions.
  • Increase conversion rates by providing clear, visual product guidance.
  • This extension is perfect for merchants who want to create rich, interactive shopping experiences directly on their product pages.

2. AI Content Generator & Translator for OpenCart

AI Content Generator is an OpenCart module that helps store owners automatically generate product descriptions, blog posts, and other website content. Key features include:

  • AI-generated, SEO-friendly product descriptions & meta details.
  • Automatic content updates for large product catalogues.
  • Customizable tone and style for marketing or instructional content.

This module is ideal for saving time, maintaining content consistency, and improving your store’s search engine visibility.

7.0 Knowband Support

Knowband is committed to providing reliable and timely support to ensure smooth module usage and performance.

If you face any issues during installation, configuration, or usage of Knowband’s OpenCart Product Availability by Zip Code Extension, or if you have custom requirements, feel free to contact our support team. Our experts are always ready to assist you.

Email: support@knowband.com
Magento 2 Instagram Shop Gallery Extension – User Manual

1.0 Introduction

Embed Instagram image galleries anywhere on your eCommerce store and showcase a list of mapped site products with those images using Knowband’s Magento 2 Instagram Shop Gallery Extension. This is one best way to increase conversion rates directly by integrating Instagram tagged images. Instagram Shop module adds a well-known interface for the visitors which compels them to buy the related products immediately.

1.1 Striking Features of Magento 2 Instagram Shop Gallery Extension

The Magento 2 Instagram Shop Gallery Extension offers you multiple customizable features which are easy to implement for your eCommerce website. Admin can implement and configure any feature for their store without using any coding knowledge. Let us quickly take an overview of striking features by this Magento 2 Instagram product tag feed module.

1. Magento 2 Instagram Shop Gallery Extension helps e-merchants to embed Instagram gallery to their website front.

2. Magento 2 Instagram Shop Extension fetches and displays Instagram photos based on the tags specified by the admin at the backend.

3. Magento 2 Instagram Integration Extension lets admin integrate Instagram Shop gallery page to the website showing all the fetched Instagram images under different Instagram galleries.

4. Admin can enable or disable the complete working of Magento 2 Shoppable Instagram Module for their store.

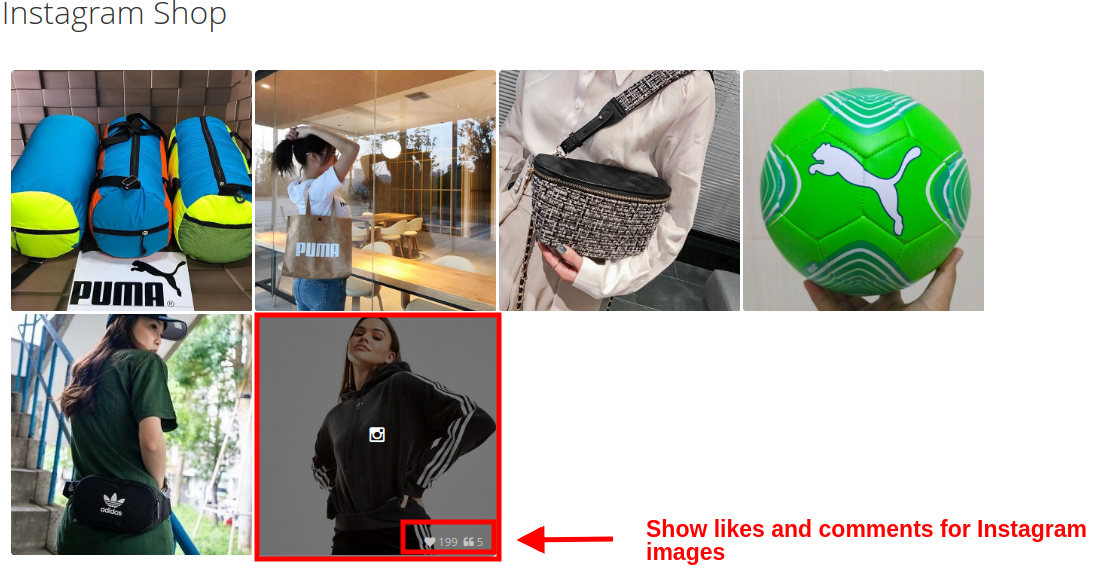
5. With Magento 2 Instagram Shop Gallery Extension, admin can show the likes and comments for the fetched Instagram image.

6. The main Instagram page can be enabled or disabled from the backend of this Magento 2 extension.

7. Using Magento 2 Instagram Shop Gallery Extension, Admin can show or hide the Instagram Page link in the top menu navigation bar of the website.

8. Insta Shoppable Gallery Module for Magento 2 allows admin to set the title for the Instagram Shop Gallery Page.

9. Using Magento 2 Shoppable Instagram Module, admin can show the images of the selected type on the main Instagram page. They can show all the photos, approved ones, having related images or having both approved and related images.

10. Magento 2 Instagram Shop Extension allows admin to set a limit on the maximum number of images that can be shown on this Instagram Shop page.

11. Admin can set a URL page key for this Instagram Shop page.

12. Magento 2 Instagram product tag feed module gives the flexibility to create as many Instagram gallery for the website which can be edited or deleted as per needs. They can be separately enabled or disabled if required.

13. Magento 2 Instagram Shop Extension allows admin to select the store view in which they want to include this gallery.

14. With Magento 2 Instagram Shop Gallery Extension, the store merchant can set the gallery title, image limit and image visibility for the particular gallery.

15. Admin gets an option to show or hide the selected image gallery on the main Instagram Shop page.

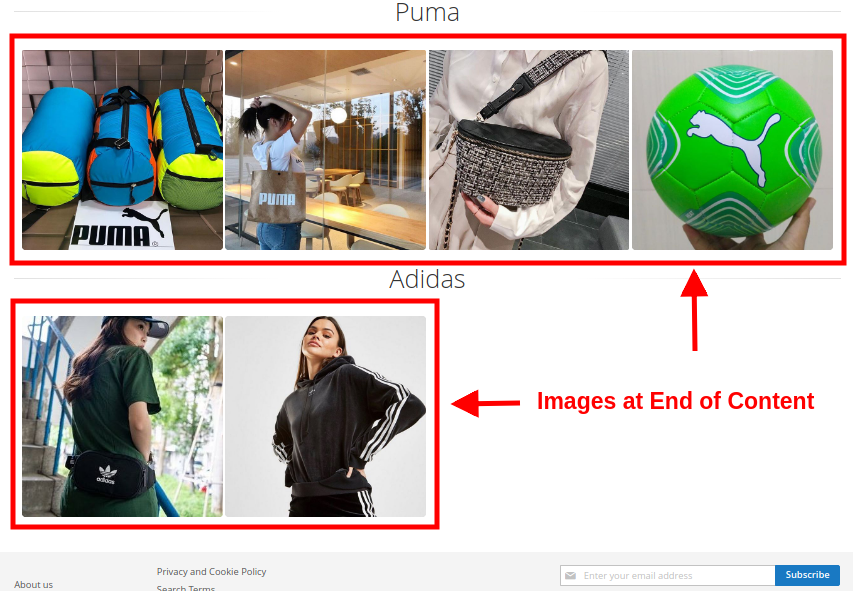
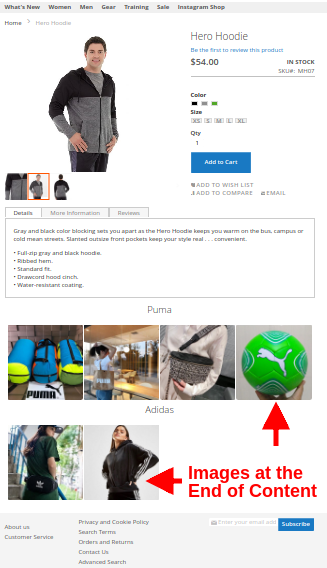
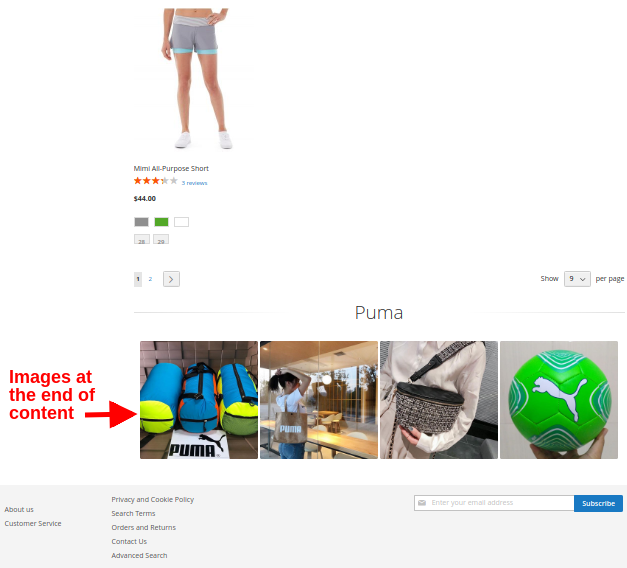
16. Using Magento 2 Instagram product tag feed module, admin can set the gallery visibility on different pages of the website at different positions.

17. The eCommerce store admin can add as many images for a particular gallery which can be edited or deleted anytime.

18. Admin has to specify Instagram Hashtag in order to fetch a new image. They can select any of the images out from the fetched images whose preview is available on the same interface.

19. Admin can use the toggle button to enable or disable a particular image.

20. Insta Shoppable Gallery Module for Magento 2 also allows admin to set a sort order for the images in a category.

21. Magento 2 Shoppable Instagram Module gives an option to map desired products for the Instagram image.

2.0 Installation Guide of Magento 2 Shoppable Instagram Module

1. Once after purchasing Magento 2 Instagram Shop Gallery Extension from the Knowband store, you will get the following files on your registered email:

  • Source code file of Magento 2 Instagram Shop Extension in zipped file format.
  • User Manual of Instagram Shop Gallery Extension

2. Unzip the extension package.

3. Create folder{Magentoroot}/app/code/Knowband/Instagramshopgallery

4. Upload the extracted content in the above folder via FTP manager (like Filezilla or WinSCP – download here: https://filezilla-project.org/).

5. Now run below commands to install the plugin:

php -f bin/magento module:enable –clear-static-content Knowband_Instagramshopgallery
php -f bin/magento setup:upgrade
php -f bin/magento setup:di:compile
php bin/magento setup:static-content:deploy

The Magento 2 Instagram Shop Gallery Extension is now installed and ready to use.

3.0 Admin Interface of Insta Shoppable Gallery Module for Magento 2

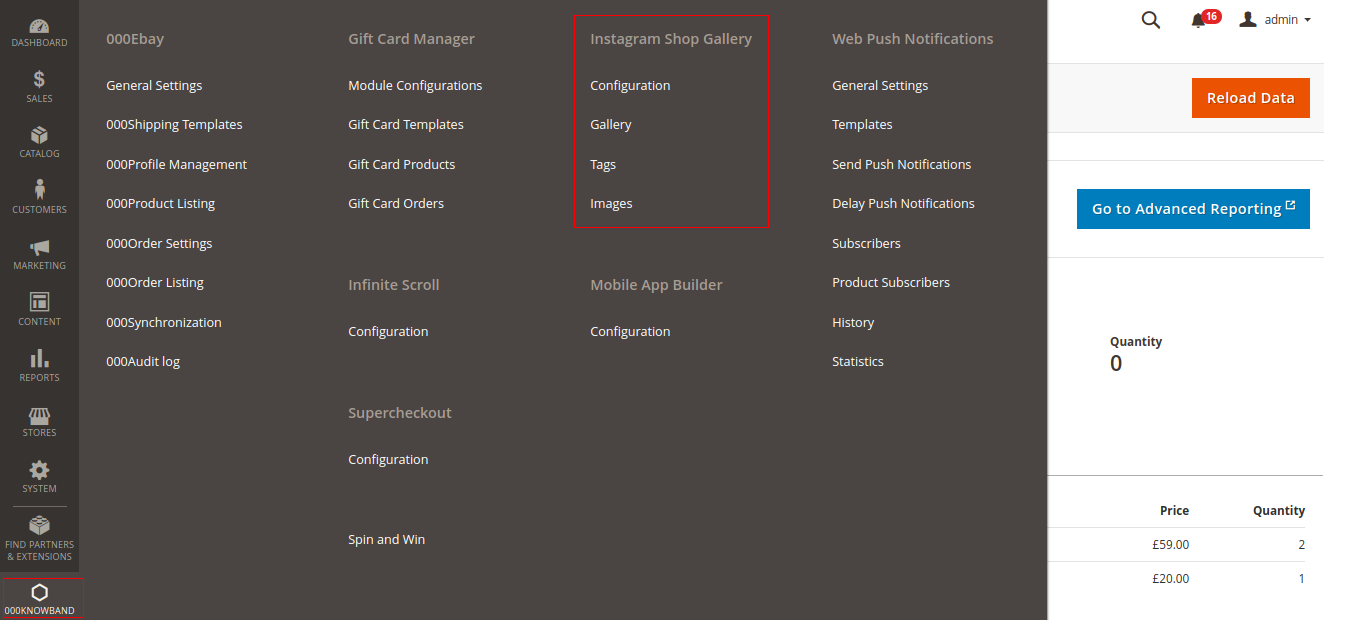
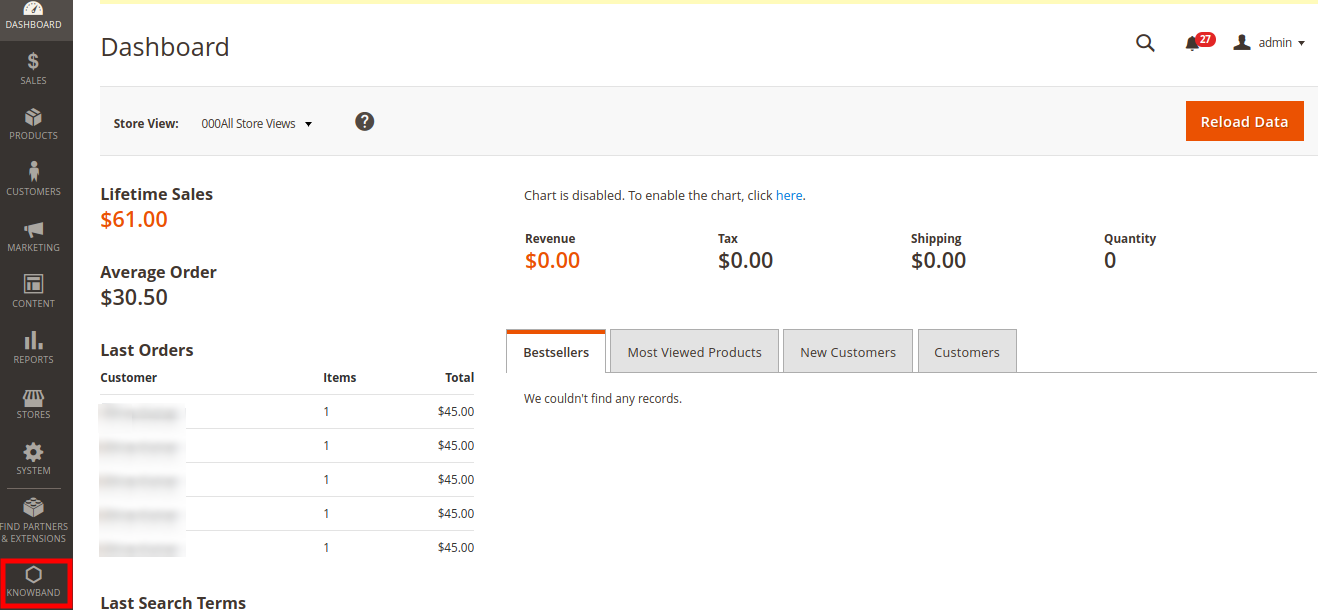
Just after successful installation of Magento 2 Shoppable Instagram Module on your website, you can display as many Instagram feeds on different pages of your store as per business requirements. In order to configure this Magento 2 Instagram module, navigate the settings in the given order: Admin Panel > Knowband > Instagram Shop Gallery

The simple to understand admin interface of Magento 2 Instagram product tag feed plugin has been divided into two broad sections:

1. Configuration

2. Gallery

3. Tags

4. Images

Each of these sections of Magento 2 Instagram Shop Gallery Extension has been discussed in detail below.

3.1 Configuration Settings

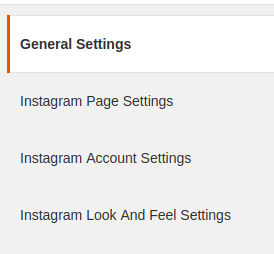
The configuration settings of Magento 2 Instagram Shop Extension is further divided into two sections as:

1. General Settings

2. Instagram Page Settings

3. Instagram Account Settings

4. Instagram Look and Feel Settings

Each of these settings has been discussed in the next section.

3.1.1 General Settings

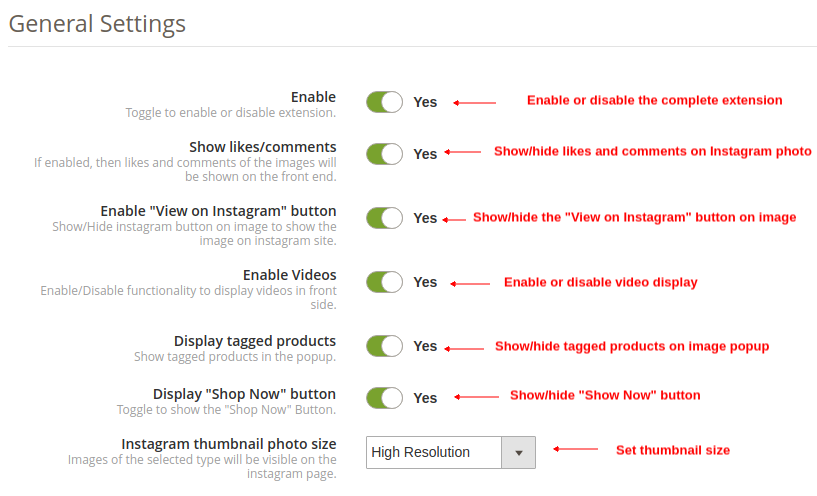
Under the general settings of Instagram Shop Gallery for Magento 2, you have the following configuration options:

  • Enable: On toggling this button, you can enable or disable the complete functionality of this Magento 2 Shoppable Instagram Module for your store.
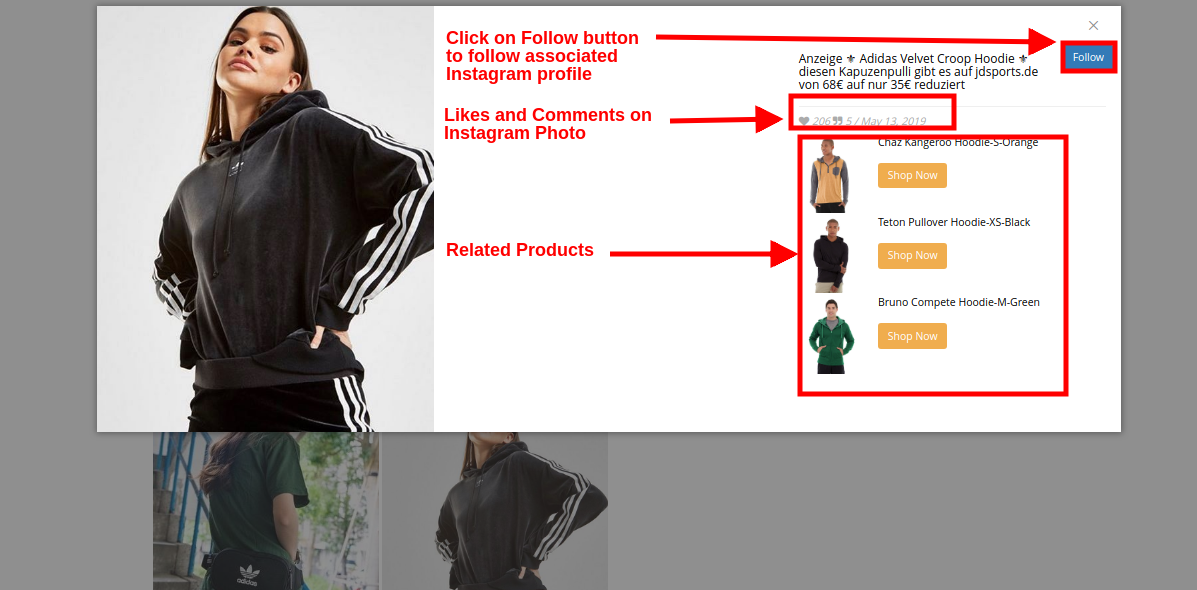
  • Show Likes/Comments: Enable or disable this option to show likes and comments on the Instagram feed. If enabled, the likes and comments for the particular post will be shown on the frontend to the customers.
  • Enable View on the Instagram button: With the help of this option, you can enable or disable the “View on Instagram” button on the Instagram image popup.
  • Enable Videos: This option allows you to enable or disable Instagram videos on the frontend.
  • Display Tagged Products: With this option, you can show/hide the tagged products alongside Instagram photo.
  • Display Shop Now Button: By enabling this option, you can display the Shop Now button with every Instagram photo.
  • Instagram Thumbnail Photo Size: Using this option, you can set the size or resolution for Instagram photos.

3.1.2 Instagram Page Settings

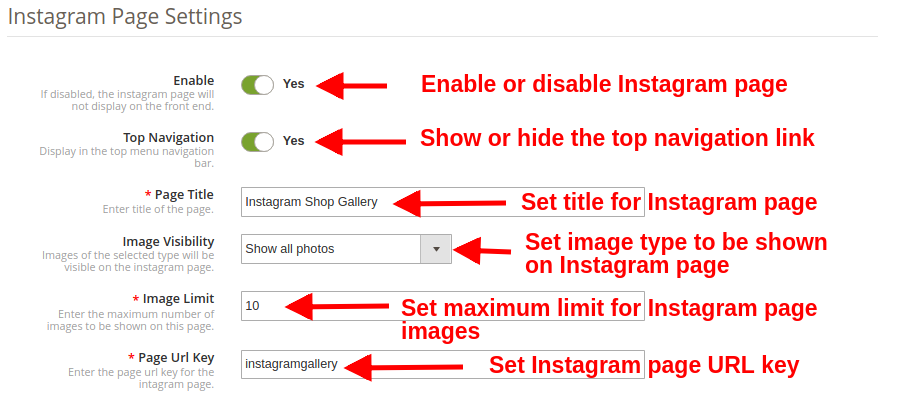
Under this section of Magento 2 Instagram Integration Extension, you can make various settings for the Instagram Page.

  • Enable: This option allows you to enable or disable the complete Instagram feed page whose link is shown on the menu bar of the website.
  • Top Navigation: You can show or hide the Instagram page link in the top navigation menu of the website. If enabled, the Insta shoppable gallery link is shown at the menu navigation bar.
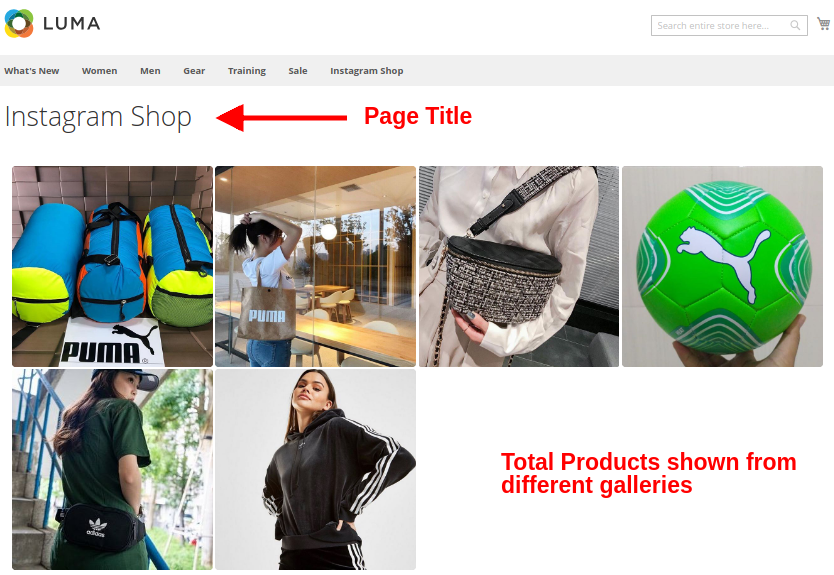
  • Page Title: This option lets you set a custom title for the Instagram Shop Gallery Page.
  • Image Visibility: This option decides which category of images will be shown on the Instagram page. You can set any image type out of these four options:
    a. Show all photos
    b. Only approved
    c. Have related product
    d. Approved and related product
    Note: The total images can be managed from the “Gallery Settings” discussed in the next section 3.2
  • Image Limit: This option will set the maximum number of images to be shown on this Instagram Gallery page.
  • Page Url Key: Using this option, you can set a desired URL key for the Instagram Shop Gallery Page.

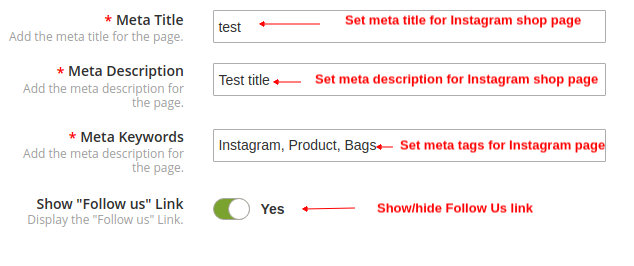
  • Meta Title: This option allows you to set your own meta title for Instagram shop page.
  • Meta Description: This option allows you to set the desired meta description for Instagram shop page.
  • Meta Keywords: This option allows you to set your meta keywords for Instagram shop page.
  • Show Follow Us Link: Using this option, you can show/hide a Follow Us link on the image popup.

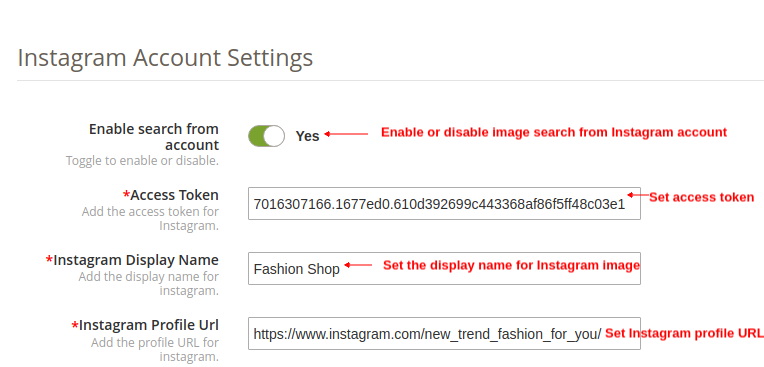
3.1.3 Instagram Account Settings

  • Enable Search from Account: This option will enable or disable the Instagram image search using the account.
  • Access Token: Set the generated access token using this option.
  • Instagram Display Name: With this option, you can set the display name for the Instagram page.
  • Instagram Profile URL: With this option, you can set the desired Instagram profile URL.

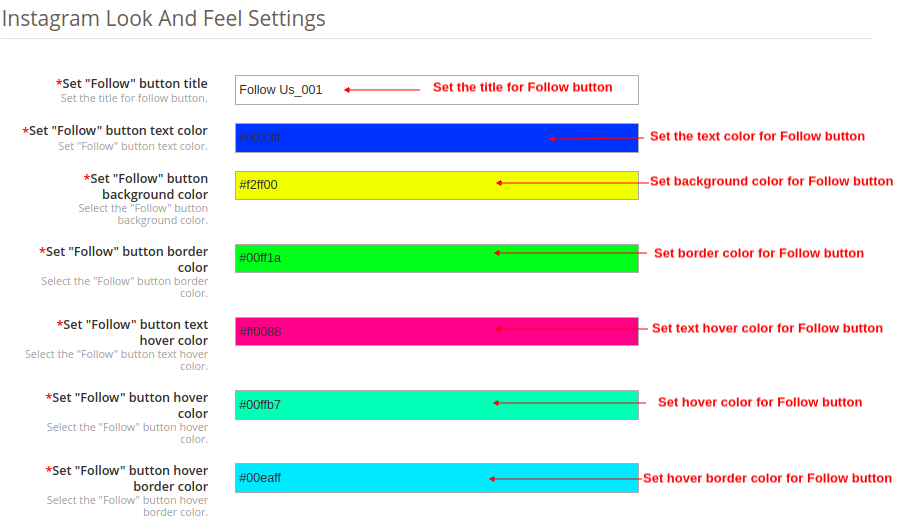
3.1.4 Instagram Look and Feel Settings

  • Set “Follow” button title: This option helps you to set the title for the Follow button.
  • Set “Follow” button text color: This option sets the font color for the Follow button.
  • Set “Follow” button background color: This option sets the background color for the Follow button.
  • Set “Follow” button border color: This option sets the border color for the Follow button.
  • Set “Follow” button text hover color: This option sets the text hover color for the Follow button.
  • Set “Follow” button hover color: This option sets the hover color for the Follow button.
  • Set “Follow” button hover border color: Using this option, you can set the hover border color of Follow button.

3.2 Gallery Settings

The Instagram images that will be fetched and shown on the website can be configured under this section of back-office. You can create multiple Instagram Shop galleries for your website and can even edit the settings of the existing gallery. You can show as many images in each of the Instagram gallery using relevant hashtags and show related products for those images.
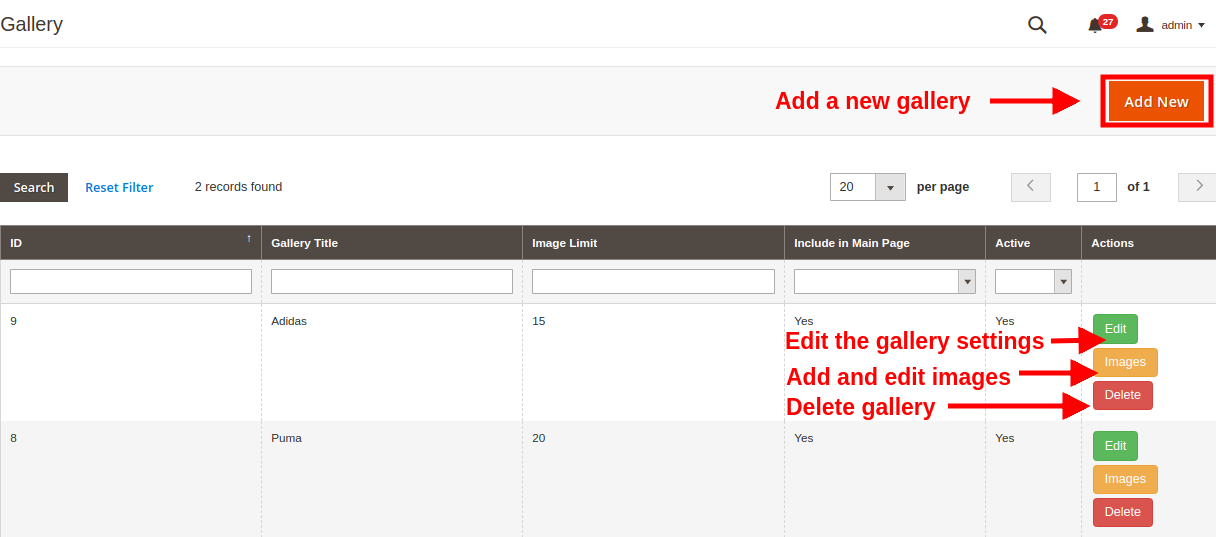
The below interface shows a list of existing Instagram Gallery which can be edited or deleted. You can edit the existing images or you can add new images to the Instagram gallery.

From this interface, you can perform the following sequence of actions:

3.2.1 Add a New Gallery

To add a new gallery, click on “Add New” button at the top right corner of the screen.

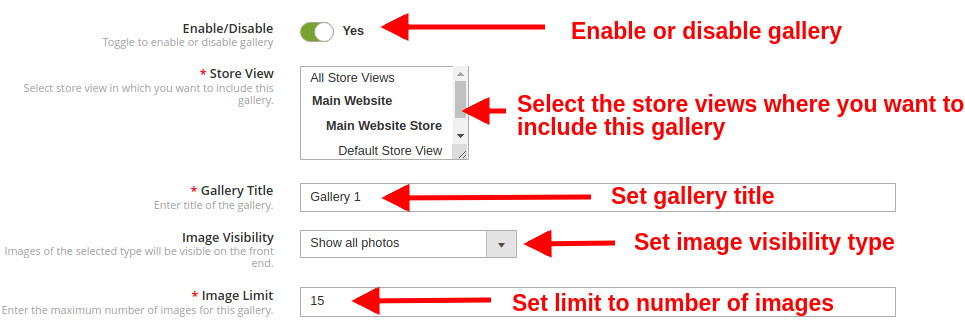
  • Enable/Disable: Toggle this button to enable or disable the Instagram gallery.
  • Store View: With this option, select the store views where you want to include this gallery.
  • Gallery Title: This option allows you to set a title for the gallery.
  • Image Visibility: With this option, the images of the selected type will be shown on the frontend.
  • Image Limit: Using this option, set the maximum number of images for this gallery.

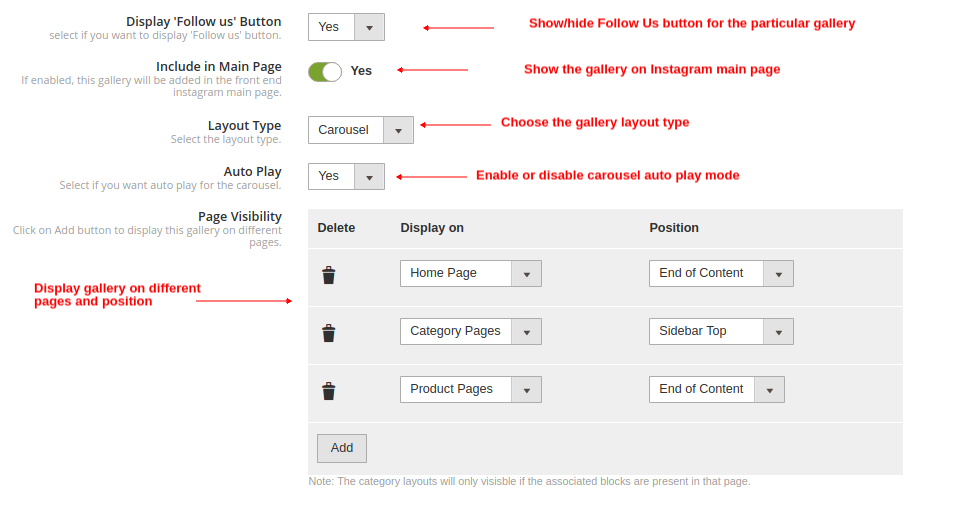
  • Display Follow Us button: This option allows you to show Follow Us button for the selected gallery.
  • Include in Main Page: You can enable this toggle field if you want this gallery to be added on the Instagram main page at the front.
  • Layout Type: With this option, you can set the gallery layout type as a carousel or grid view type.
  • Auto Play: Enable this option if you want auto play for the carousel.
  • Page Visibility: With this option, you can set visibility of Instagram gallery on various pages. Simply Click on Add button to display this gallery on different pages.

3.2.2 Edit the Existing Gallery Settings

You can easily edit the existing settings of the gallery by clicking on the “Edit” button corresponding to the gallery you want to configure.

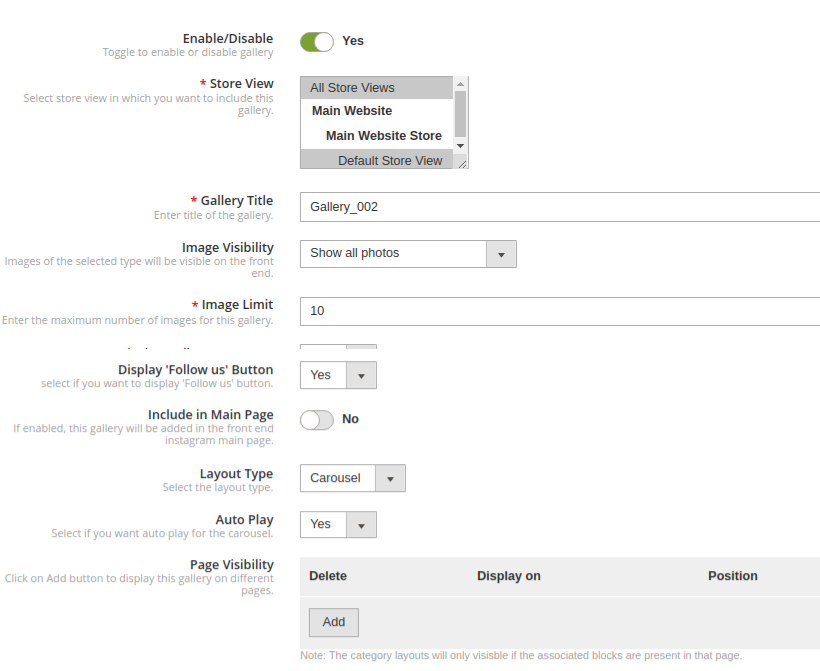
  • Enable/Disable: Toggle this button to enable or disable the Instagram gallery.
  • Store View: With this option, select the store views where you want to include this gallery.
  • Gallery Title: This option allows you to set a title for the gallery.
  • Image Visibility: With this option, the images of the selected type will be shown on the frontend.
  • Image Limit: Using this option, set the maximum number of images for this gallery.
  • Include in Main Page: You can enable this toggle field if you want this gallery to be added on the Instagram main page at the front.
  • Page Visibility: With this option, you can set visibility of Instagram gallery on various pages. Simply Click on Add button to display this gallery on different pages.

3.2.3 Add and Edit Images

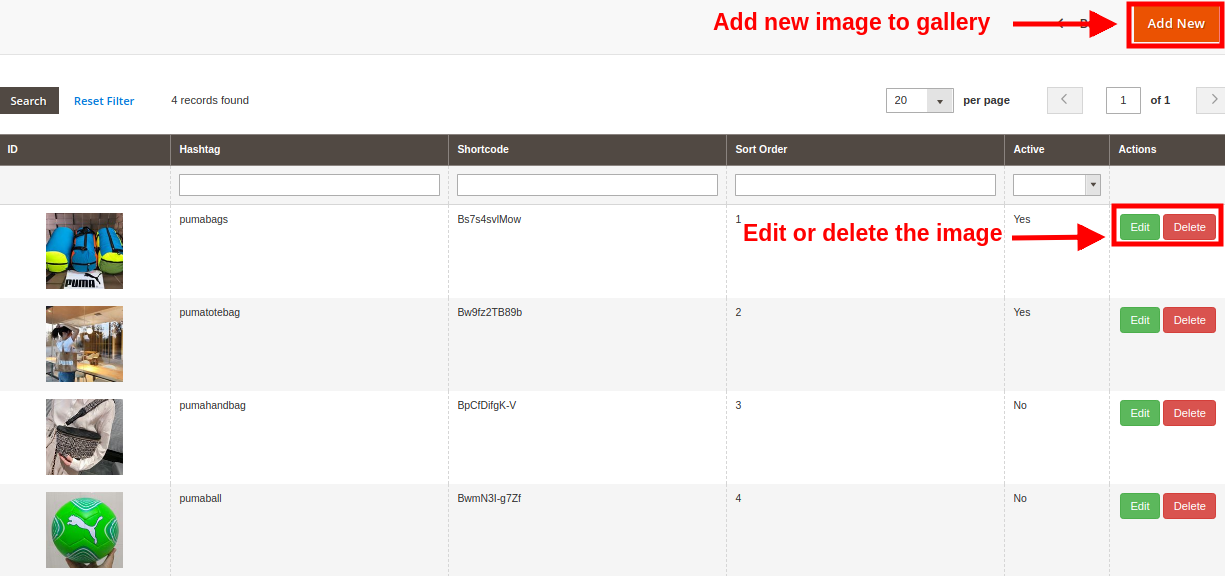
Now once you have created a gallery, you can add multiple images to it by clicking on the “Images” button corresponding to the gallery.

The above screen shows you a list of existing Instagram gallery. You can add new images, modify or delete the existing images.
Note: Deleting an image is easy, you just have to click the “Delete” button corresponding to the image.

3.2.3.1 Add New Image

In order to fetch and add images to a particular Instagram gallery, there are three ways you can prefer. 

  1. Enter the relevant tag of your choice and search those tagged photos from the whole of Instagram. Select “Instagram” and click on “Fetch” button.
  2. The other option is that you can select “Saved Photos” option. This will fetch all the images that have been already added to any Instagram Gallery.
  3. The option “From Account” fetches images and videos from a particular Instagram profile or account which you have set from backend.
3.2.3.2 Edit an existing image

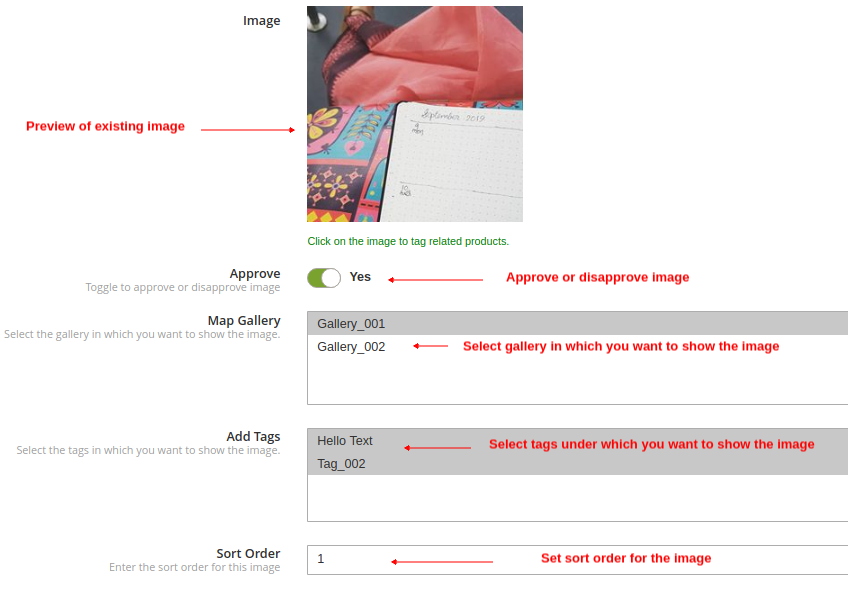
  • Image: This option lets you check the preview for the fetched Instagram image.
  • Approve: With this option, you can approve or disapprove the image.
  • Map Gallery: This option allows you to select the gallery in which you want to show that particular image.
  • Add Tags: Using this option, you can select the tag or category under which the image will be shown.
  • Sort Order: This option lets you set the sort order of image.
  • Related Products: This option allows you to select the related products that you want to show for that image. For this, you have to click on “Click on the image to tag related products” text shown in green color. This will allow you to pin unlimited site products to that image.

3.2.4 Delete the Existing Gallery

Deleting a gallery is simple, you just have to click the “Delete” button corresponding to the desired Instagram gallery.

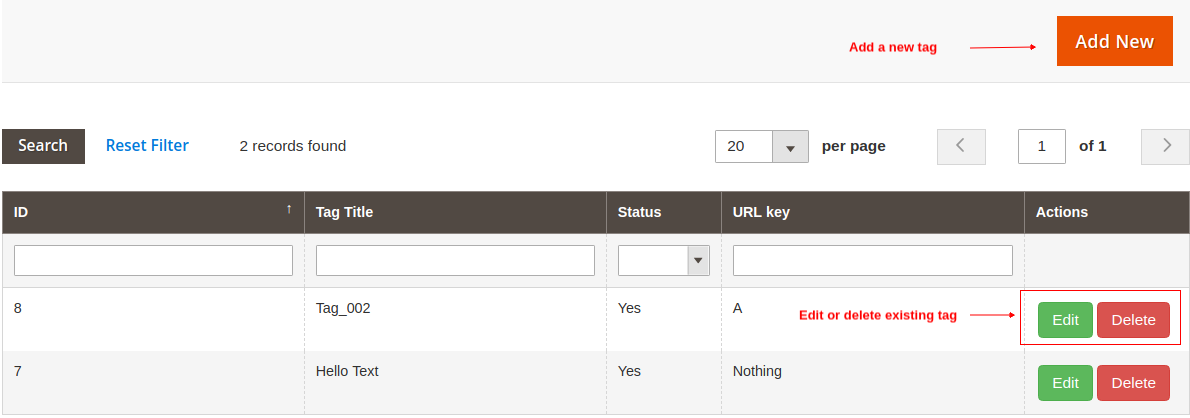
3.3 Tags Settings

From this interface, you can perform 3 actions as:

  1. Add a new tag

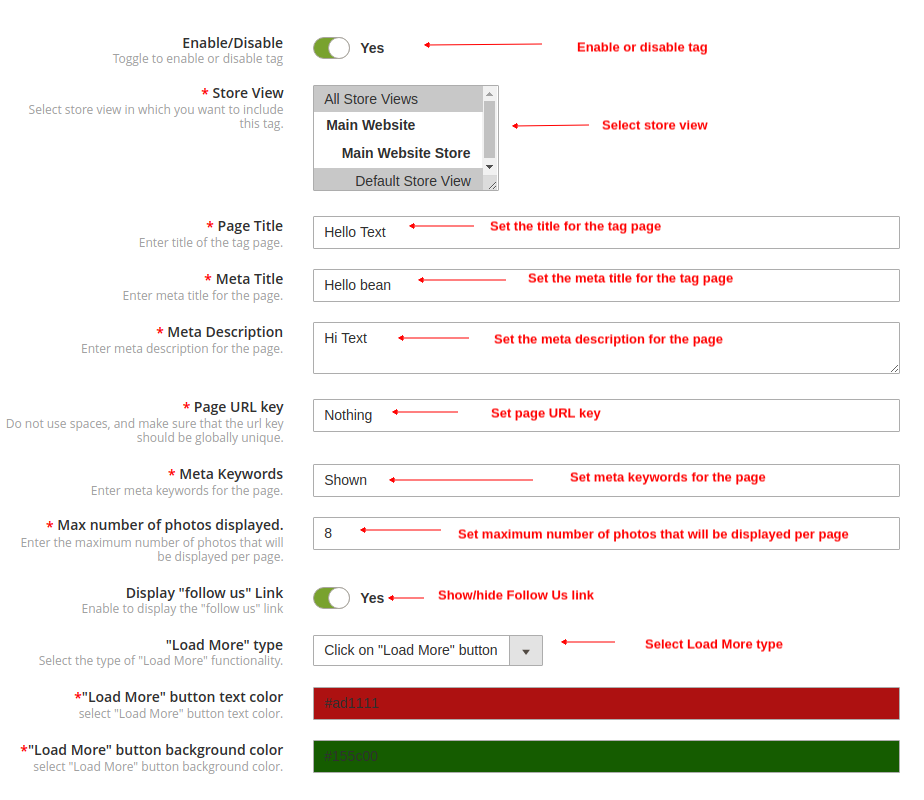
  • Enable/Disable: This option allows you to enable or disable the selected tag.
  • Store View: Using this option, select the store view in which you want to include the tag.
  • Page Title: This option allows you to set the title for the tag page.
  • Meta Title: This option allows you to set the meta title for the tag page.
  • Meta Description: This option allows you to set the meta description for the tag page.
  • Page URL Key: This option sets a unique page URL.
  • Meta Keywords: With this option, you can set the meta keywords for the tag page.
  • Max Number of Photos Displayed: This option sets the maximum photo limit for a particular tag.
  • Display Follow Us Link: This option allows you to show/hide Follow Us link on tag page.
  • Load More Type: Using this option, select the Load More type as:
    • Click on Load More button
    • Auto (when scroll down)
  • Load More Button Text Color: This option lets you set the text color for the Load More button.
  • Load More Button Background Color:  This option lets you set the background color for the Load More button.

2. Edit existing tag

You will see the same configuration options when you edit the existing tag.

3. Delete existing tag

You can simply click on the Delete button corresponding to a particular tag.

3.4 Images Settings

From this interface, you can easily manage the total images fetched and added for various Instagram Gallery. You can add a new image, edit the existing one or delete them.

4.0 Front Interface of Insta Shoppable Gallery Module for Magento 2

A) Instagram Shop Page

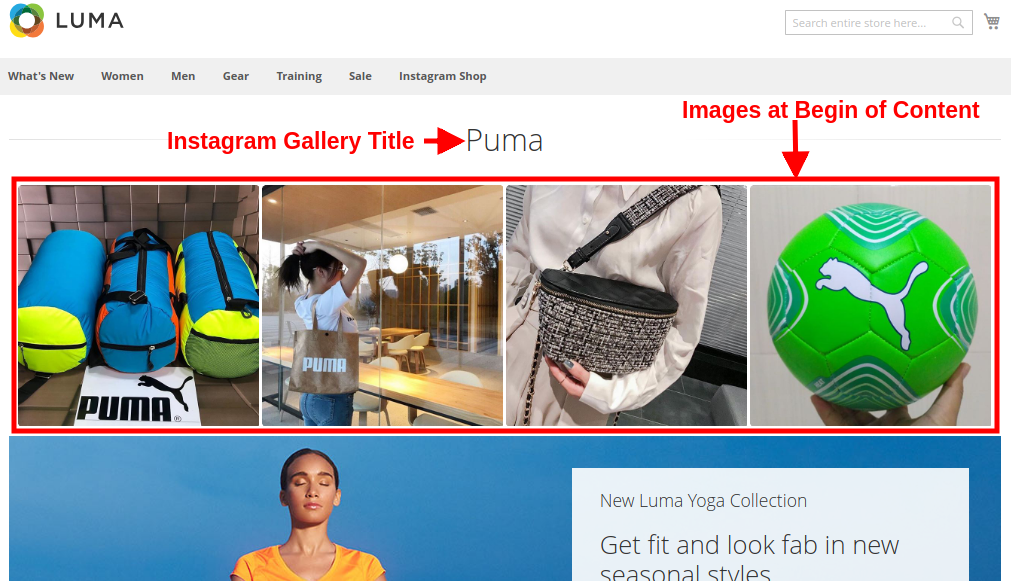
Customers will see this Instagram Gallery option on the top menu bar.

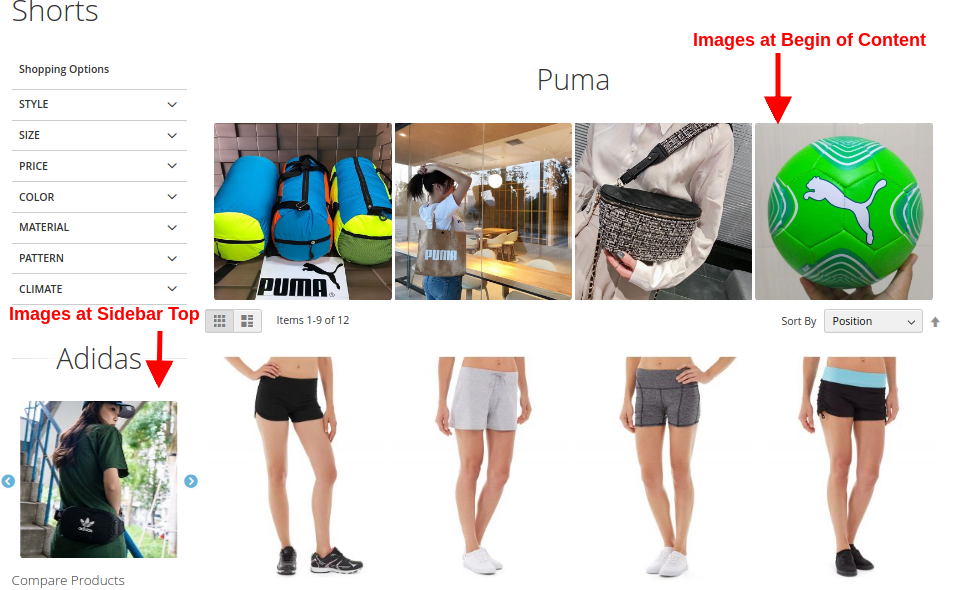
Upon clicking the tab, they will be redirected to the Instagram Shop Page with URL key as “https://ma2testing.knowband.com/ma215/instagramgallery/”. This URL can be defined as per your own site needs. The Instagram Shop Gallery looks like in the image below:

B) Likes and Comments for Instagram Image


C) Show Instagram Gallery on Homepage


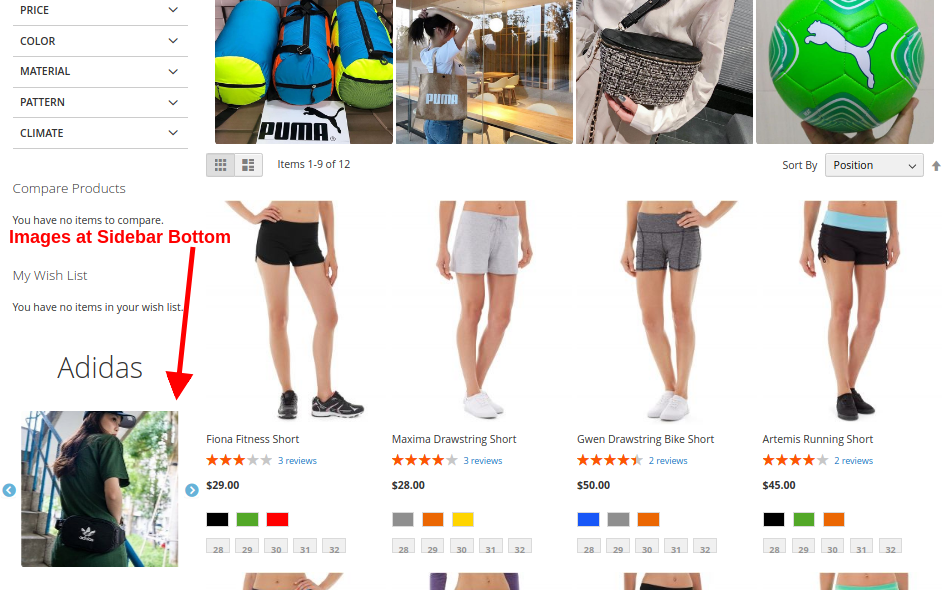
D) Show Instagram Gallery on Product Pages


E) Show Instagram Gallery on Category Pages

On clicking any of the images, customers will see the following image popup.

OpenCart Age Verification Extension- User Manual

1.0 Introduction

There are so many sites in which the store admin offers products, services, and content related to adults. For these sites, the admin needs to validate customers age and restrict the immature audience. In order to protect underage visitors and keep the products, content, and services only for the adults, OpenCart Age Verification extension is the best extension for your eCommerce store.

Knowband offers OpenCart Age Verification popup which allows the store admin to show age verification popup on the website front-end interface to allow only the visitors above a certain age and restrict the immature visitors to access the website. The store admin can set the eye-catchy themes on the age verification popup with the Age Verify OpenCart module.

By using this Age Verification OpenCart extension, the store admin can add a filter on the basis of customers age. Admin doesn’t need to change even a single line of code in the core files of the website for showing the OpenCart Age Verification popup.

1.1 Basic Features of this OpenCart Age Verification extension

  1. By using OpenCart Age Verification module, the online store admin can validate the age of store visitors to ensure that the services and products are delivering to the right group of people.
  2. OpenCart 18+ Verification plugin shows a drop-down list for selecting the date of birth.
  3. Admin can show a small note to the customers for validating their date of birth from the back office of OpenCart Verification popup.
  4. The store admin can set the logo for showing on the Popup 18+ OpenCart.
  5. Admin can enter the URL for redirecting the customers when the user closes the OpenCart Age Verification popup.
  6. Age Verify OpenCart module provides an option to enter terms and conditions for age validation.
  7. The online users can also view the age verification terms and conditions from the admin interface.
  8. Age Verification OpenCart extension is multi-lingual compatible.
  9. The store admin can set the title and description of the OpenCart Age Verification popup.
  10. Admin can also set the geo location where he wants to show the age verification popup from the admin panel Age Verify OpenCart module.

2.0 Installation of OpenCart Age Verification extension

First of all, buy the Age Verification OpenCart extension from the website(Knowband.com).

After purchasing the module, you will receive these files on your registered email.

  • Source code file of OpenCart Age Verification module in zipped file format.
  • User Manual of this module.

For installing this OpenCart 18+ Verification plugin, you have to follow the below mentioned steps:

1. Unzip the received zip file. You will get the folders as shown in the following image:

2. Copy all the folders of the zip file in the Root Directory of OpenCart setup via the FTP manager.

So, OpenCart Verification popup is now successfully installed and ready to use at your store.

Now go to the admin menu and click on the extensions and thereby click on the configure button next to Popup 18+ OpenCart.

3.0 User Manual of OpenCart Age Verification extension

The User Manual will guide the store admin to apply the back-end settings of this OpenCart Age Verification extension. The admin can manage the look and feel and maintain the general settings after reading this user manual.

4.0 Admin Interface of OpenCart Age Verification extension

There are “General Settings tab” and “Look and Feel Settings tab”. The store admin can apply the settings and showcase the OpenCart Age Verification popup on the website front-end interface.

4.1 General Setting Tab

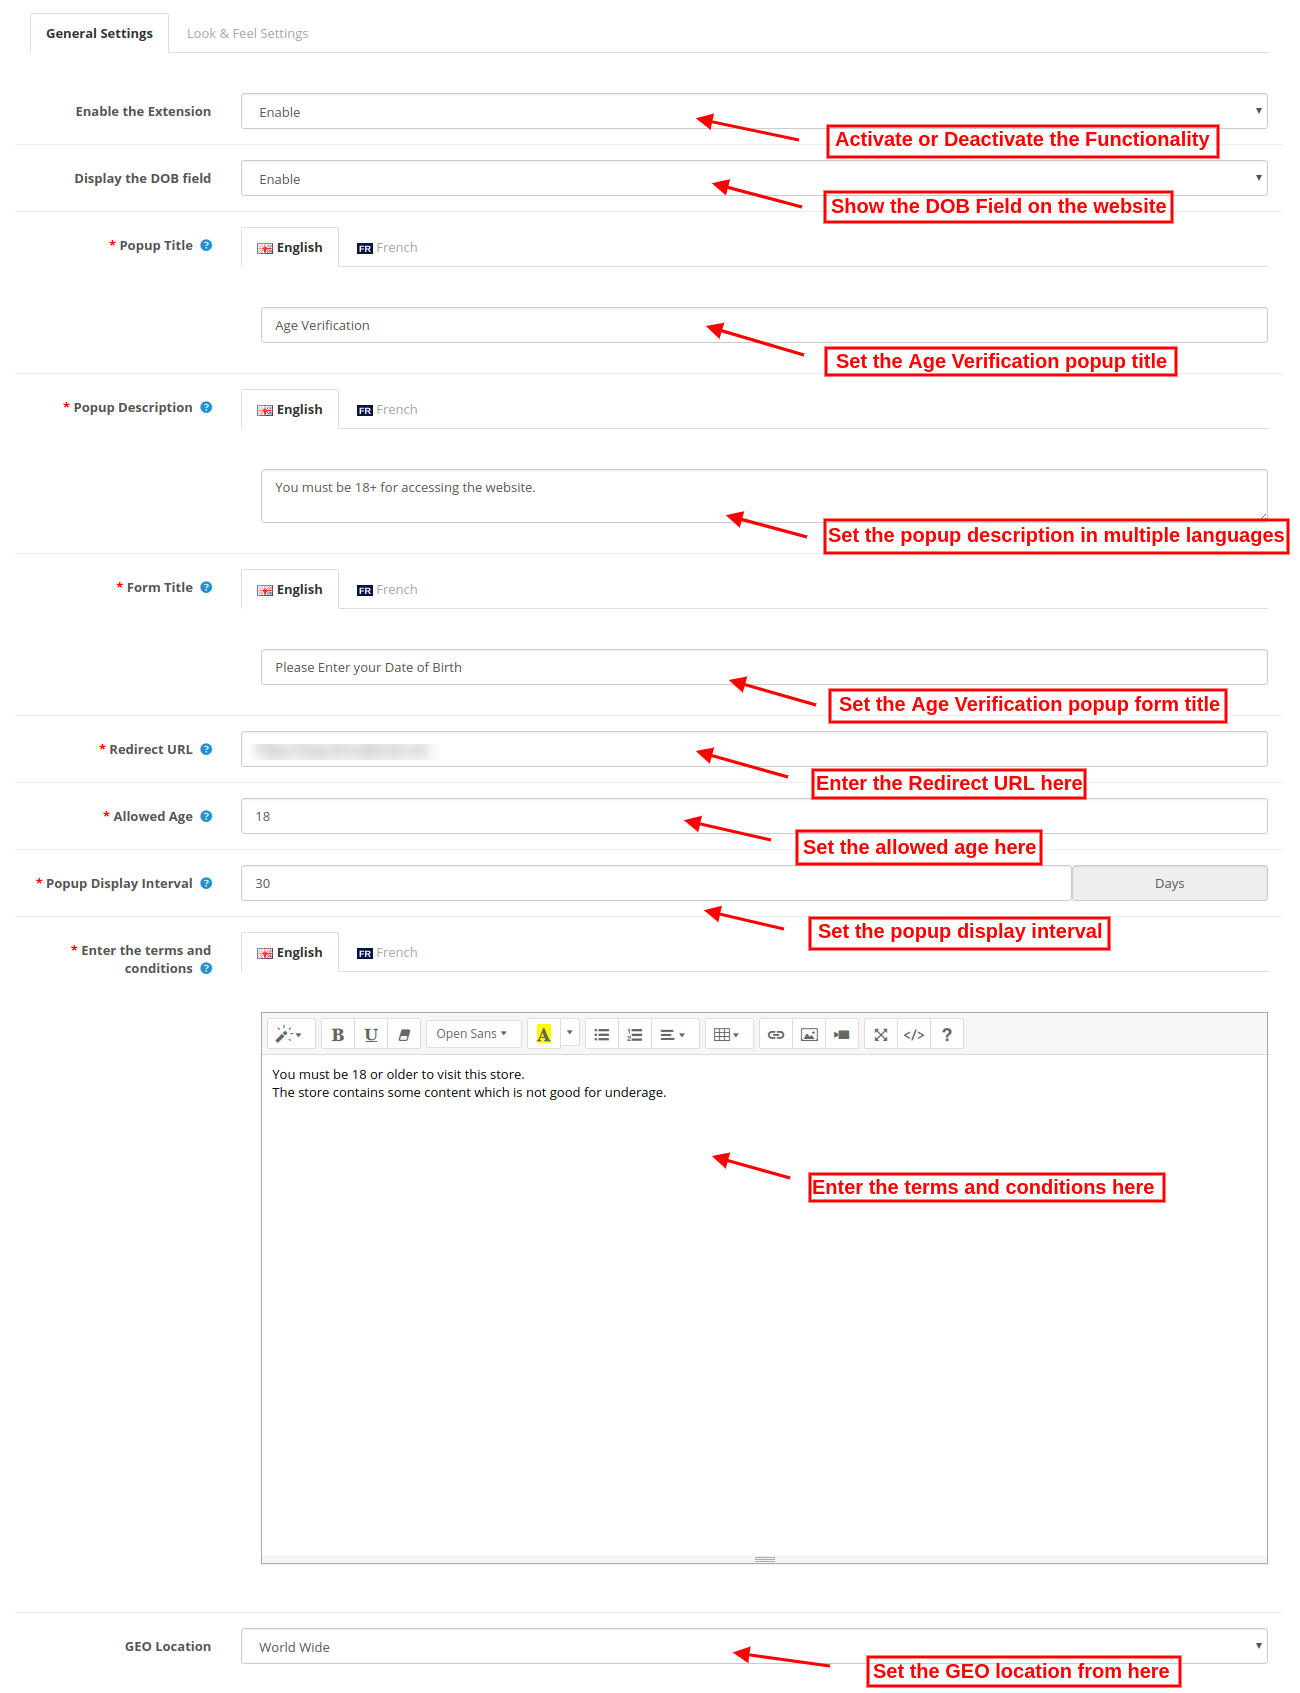
In the general Setting tab of Age Verify OpenCart module, the store admin can apply the age verification settings. Here, the store owner can set the OpenCart Age Verification popup related settings.

1. Enable the Age Verify OpenCart module: Select Enable or Disable option in order to activate or deactivate the settings. The Age Verification OpenCart extension can be activated or deactivated easily without any complications.

2. Display the DOB Field: Enable the option to show the Date of birth field on the website front-end interface. The OpenCart Age Verification module allows showing age verification popup even without the DOB field.

3. Pop-up Title: Set the title of the OpenCart Age Verification popup. Admin can set the title in multiple languages like English and French. The OpenCart 18+ Verification plugin is multi-lingual compatible.

4. Popup Description: Here, the store owner can set the OpenCart Verification popup in multiple languages.

5. Form Title: Admin can fix the form title here. This text will be shown on the top of the date of the birth popup.

6. Redirect URL: Admin can enter the URL where he/she wants from the back office of Popup 18+ OpenCart to redirect the customers when the user closes the age verification popup.

7. Allowed Age: Admin can set the minimum age to access the website. This way, the admin can restrict the user below this age group with OpenCart Age Verification extension.

8. Popup Display Interval: Admin can set the displayed interval of the OpenCart Age Verification popup to be shown to the same person from the admin interface of Age Verify OpenCart module.

9. Enter the terms and conditions: The store admin can enter the terms and conditions from the admin interface of Age Verification OpenCart extension. The customer can view the terms and conditions by clicking on it.

10. GEO Location: Admin can also select the geolocation for showing the age verification popup via Age Verification OpenCart extension.


11. World Wide: Admin can show the OpenCart Age Verification popup for all the customers in every location.

12. Display on Selected Areas Only: You can also select the countries in which you want to show the OpenCart Age Verification popup.


13. Do Not Display on Selected Areas: Admin can also select the countries in which he doesn’t want to show the OpenCart Age Verification popup.

4.2 Look and Feel Setting Tab of OpenCart Age Verification extension

In this tab, the online merchant can apply the settings to manage the look and feel of the OpenCart Age Verification extension.

 These are the customization options for OpenCart 18+ Verification plugin:  

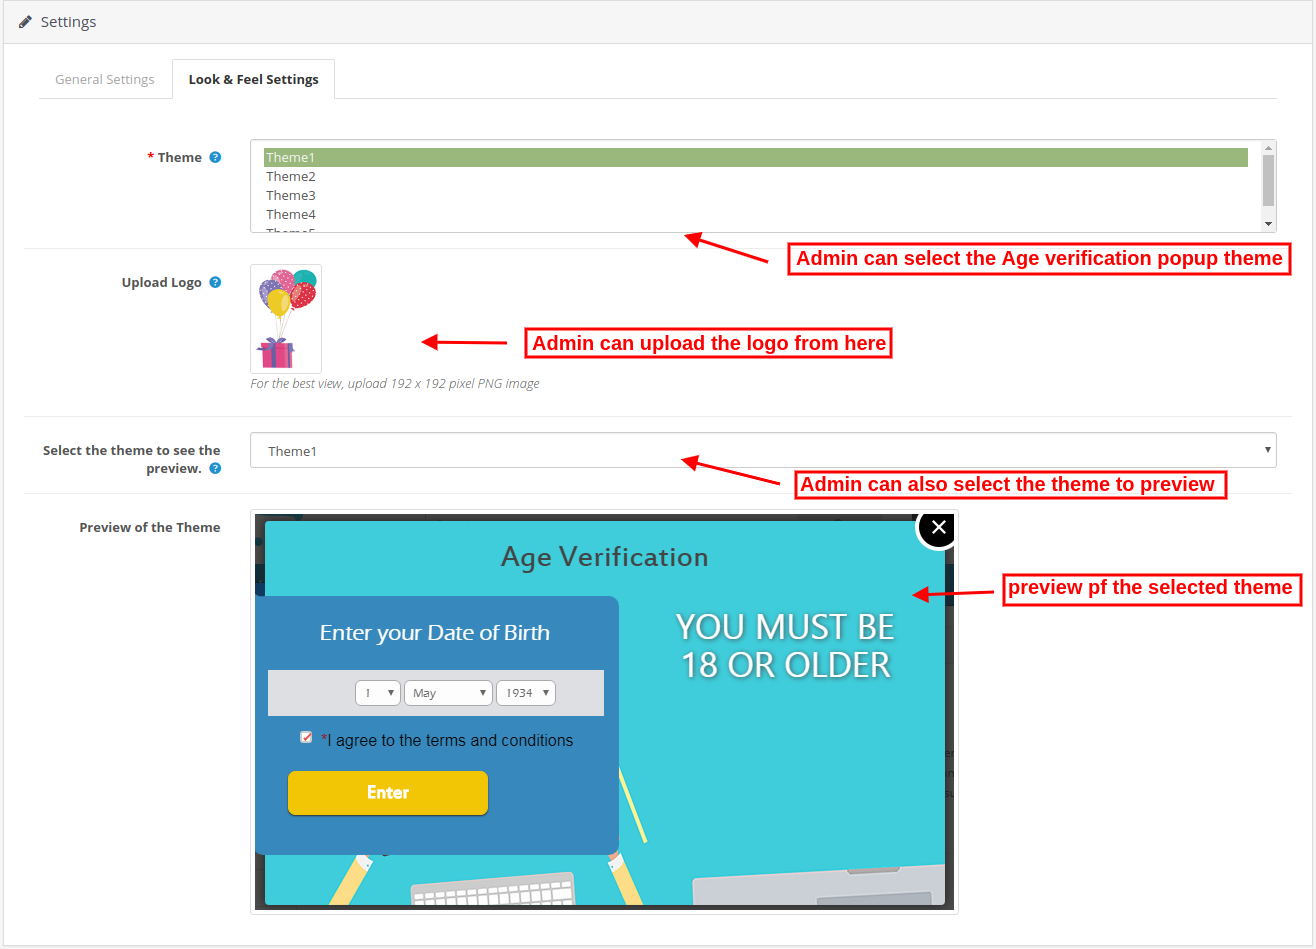
1. Theme: The store admin can select the theme from the available list. There are five themes available for OpenCart Age Verification popup.

2. Upload Logo: The store admin can upload a logo from the admin interface of OpenCart 18+ Verification plugin.

3. Select the theme to See the preview: The store admin can also preview the selected theme from the admin interface of Age Verify OpenCart module.

4. Preview of the theme: The online store merchant can view the theme from the admin interface of Age Verification OpenCart extension.

5.0 Front-end Interface of OpenCart Age Verification extension

After applying all the settings from the admin interface of this OpenCart Age Verification module, the online store admin can show the age verification popup on the website front-end.

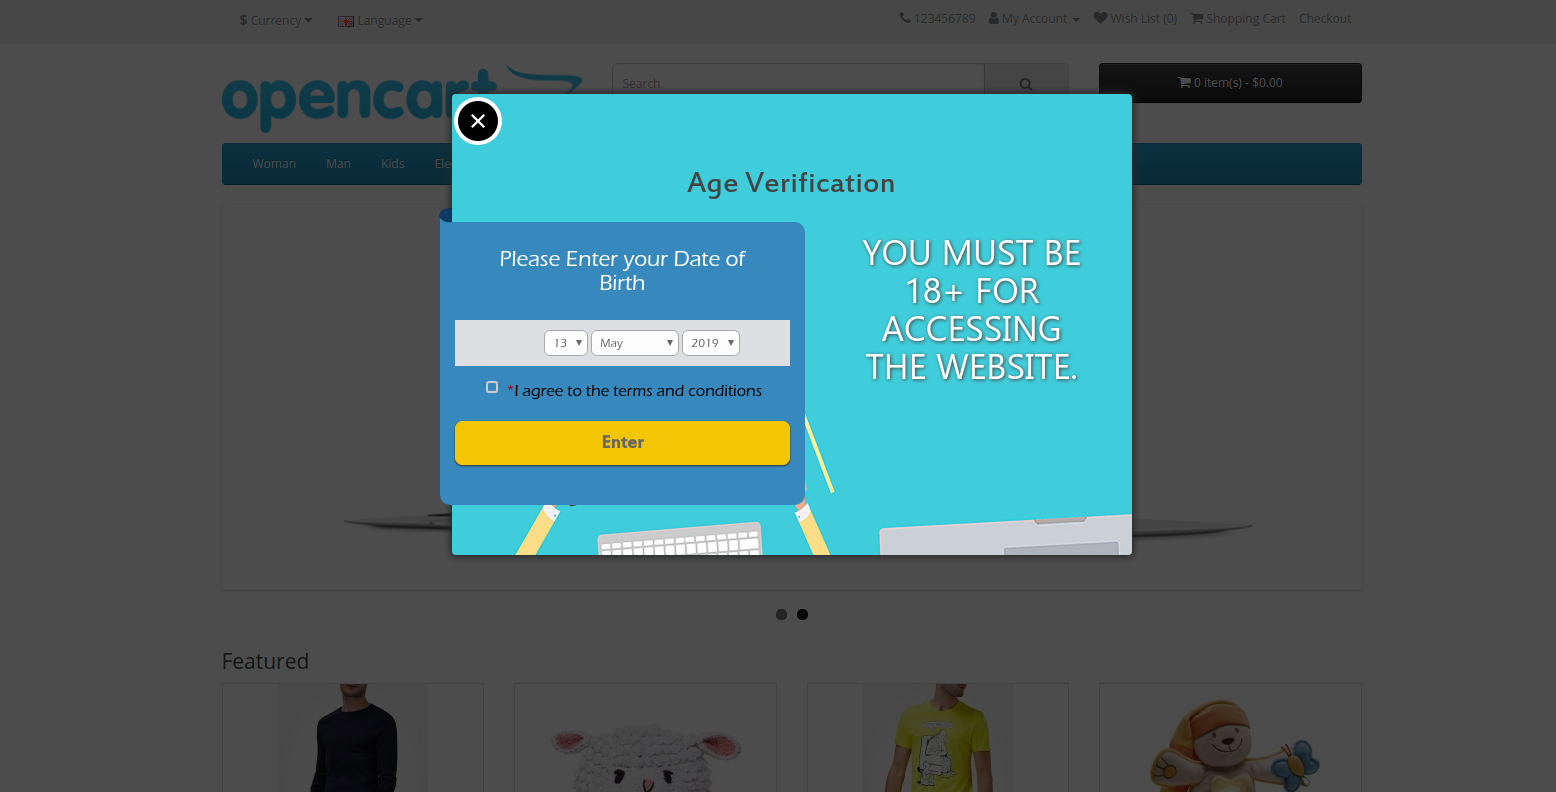
The online users are restricted to enter their date of birth for age verification by OpenCart 18+ Verification plugin. The age verification popup looks like the below-mentioned image:


The customers can view the terms and conditions for OpenCart Age Verification popup by clicking on the terms and conditions link. Customers can select the date of birth by selecting from the drop-down list.

If the customers close the popup, they will redirect to the URL specified by the store admin in Popup 18+ OpenCart back-end.

This way the customers can access the website after sharing the date of birth details.

Admin can also disable the date of the birth field from the OpenCart Age Verification extension admin interface.

This way, by using Age Verify OpenCart module, the online store merchant can validate the user’s age and allow access to the eligible website visitors. The Age Verification OpenCart extension makes the implementation much easier for the store admin. The admin doesn’t need any technical help for showing OpenCart Age Verification popup on the website.

Here is the Product Video:

Click Here for the Admin Demo.

Click Here for the Front End Demo.

For more information in detail, you can contact us via email at support@knowband.com.

OpenCart Accelerated Mobile Pages Extension | User Manual

1.0 Introduction

A smooth and mobile-friendly user interface is the core of successful eCommerce websites. To create a fully mobile responsive layout system for the mobile and tablet users, Google Accelerated Mobile Pages(AMP) plugin has taken place into the market. The Google AMP pages are lite and optimized version of your site pages providing a quick responsive UI to the device users. OpenCart Accelerated Mobile Pages Extension by Knowband is one such tool to add Google AMP functionality to your online shop to capture mobile users through smartphones and tablets. Opencart AMP pages improve the web browsing experience by decreasing page load times. Faster mobile browsing is the only way where new customers will dive in and get motivated to purchase order.

More than 60% of your customers are mobile-based so it becomes important to create the AMP pages of store home page, category pages, product pages and CMS pages with the help of OpenCart Accelerated Mobile Pages Module. OpenCart AMP focuses on light content that increases the overall page speed and reduces the bounce rates. The reduced page load time contributes to the growth of traffic and SEO ranking.

1.1 Striking Features

OpenCart Accelerated Mobile Pages plugin offers additional features to the OpenCart site owners. Let us explore one by one.

1. OpenCart Accelerated Mobile Pages Extension adds optimized AMP pages to your website which are instantly loaded on mobile and tablet devices.

2. With the help of the Google Accelerated Mobile Pages(AMP) plugin, you can add Accelerated Mobile Page functionality to the home page, category pages, product pages, and CMS pages.

3. Knowband’s Accelerated Mobile Pages Extension for OpenCart provides an option to customize the home page, category pages, product pages, and CMS pages settings form the back-office.

4. You can upload a desired business logo for the AMP pages. Moreover, you can set the width and height of the site logo.

5. OpenCart AMP extension gives an option to display the bestsellers, new arrivals, and featured products on the home page. The e-merchant can set the number of featured products to be shown in a particular section and can be displayed in random order.

6. OpenCart Accelerated Mobile Pages Module provides an option to add social media sharing on the AMP mobile pages. The store admin can add extra icons apart from the ones provided with the Accelerated Mobile Pages Extension for OpenCart.

7. By using the Google Accelerated Mobile Pages Module, the OpenCart admin can automatically generate AMP sitemap with the help of a CRON job. They just have to click the Update Sitemap button.

8. Knowband’s OpenCart Accelerated Mobile Pages Addon supports Google Analytics allowing admin to enter the Analytics client Id for tracking the AMP performance.

9. Google Accelerated Mobile Pages Module for OpenCart supports multiple languages.

10. With the help of OpenCart Accelerated Mobile Pages Extension, the admin can set color and background color for AMP website and other different blocks of AMP.

11. To add more information to the AMP, admin can display YouTube, Vimeo and DailyMotion videos on the homepage of mobile pages.

12. Google Accelerated Mobile Pages(AMP) module allows lets you feature Instagram and Twitter feeds on the homepage.

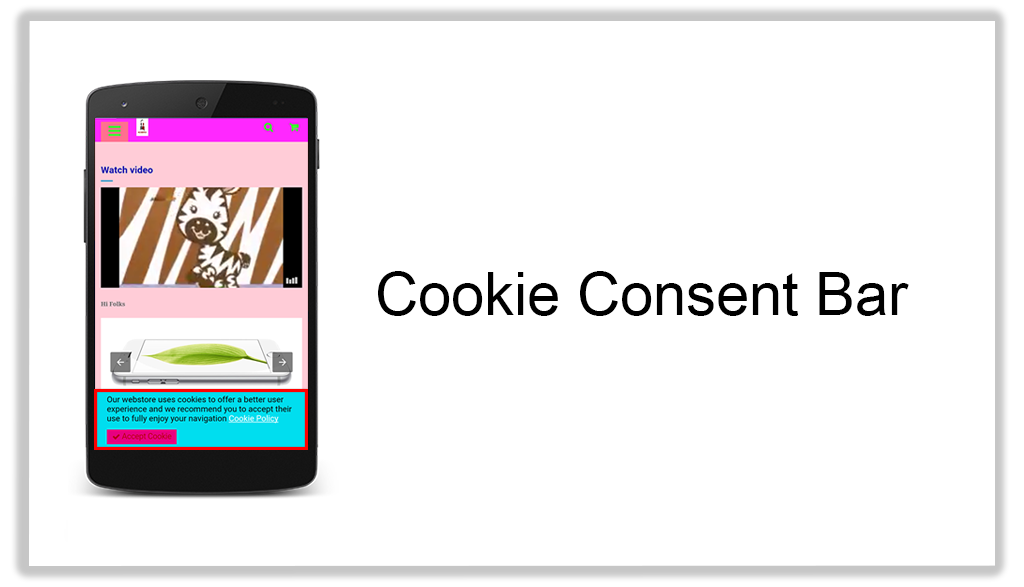
13. The look and feel of cookie consent bar can also be changed from the back-office of Accelerated Mobile Pages Extension for OpenCart.

14. Store merchants can display advertisement on all the Mobile Pages by including Google Adsense from the admin interface of this OpenCart extension.

15. Store merchants can also implement Facebook pixel functionality on the mobile pages which helps you track the AMP website visitors.

16. OpenCart AMP module allows you to update AMP SEO URL on a single click.

2.0 Installation Guide

Before starting the installation process, you have to buy the OpenCart Accelerated Mobile Pages Extension from the Knowband store. Once purchased, you will receive the following files on your registered email.

  • Source code file of OpenCart AMP Module in zipped file format.
  • User Manual of OpenCart AMP Module.
    Now in order to install this OpenCart AMP extension for your website, follow the given steps:

1. Unzip the zip file. You will get the folders as shown in the image below
2. Copy all the folders of the zip file in the Root Directory of OpenCart setup via FTP manager.

So, OpenCart Accelerated Mobile Pages plugin is now successfully installed and is ready to use at your store. Go to the admin menu and click on the extensions and thereby click on configure button next to Knowband AMP Pages.

3.0 Admin Interface

Just after successful installation of Google Accelerated Mobile Pages(AMP) plugin on your website, you can configure the AMP settings as per your requirements. Navigate the settings in the given order: Admin Panel > Extensions > Knowband AMP Pages.

The simple to understand admin interface of OpenCart Accelerated Mobile Pages Module is divided into nine sections namely:

1.General Settings
2.Home Page Settings
3.Category Page Settings
4.Product Page Settings
5. Look & Feel Settings
6.Social Media
7.Extra Icon
8.Tracking
9.Sitemap

Each of these sections has been discussed in detail below.

3.1 General Settings

The general settings of Google Accelerated Mobile Pages(AMP) plugin consist of the following configuration options:

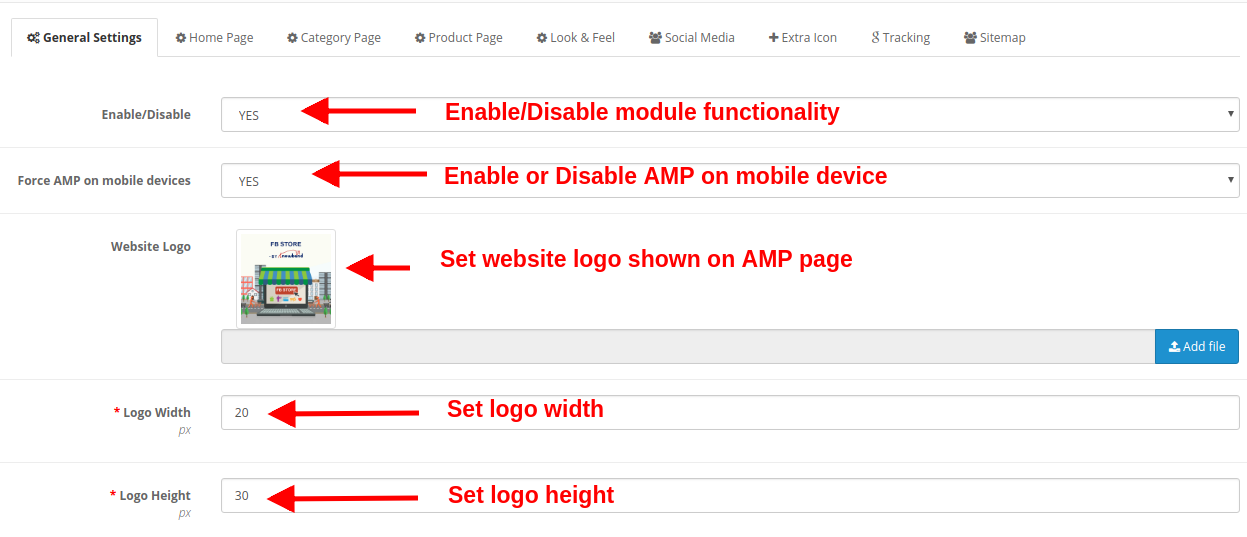
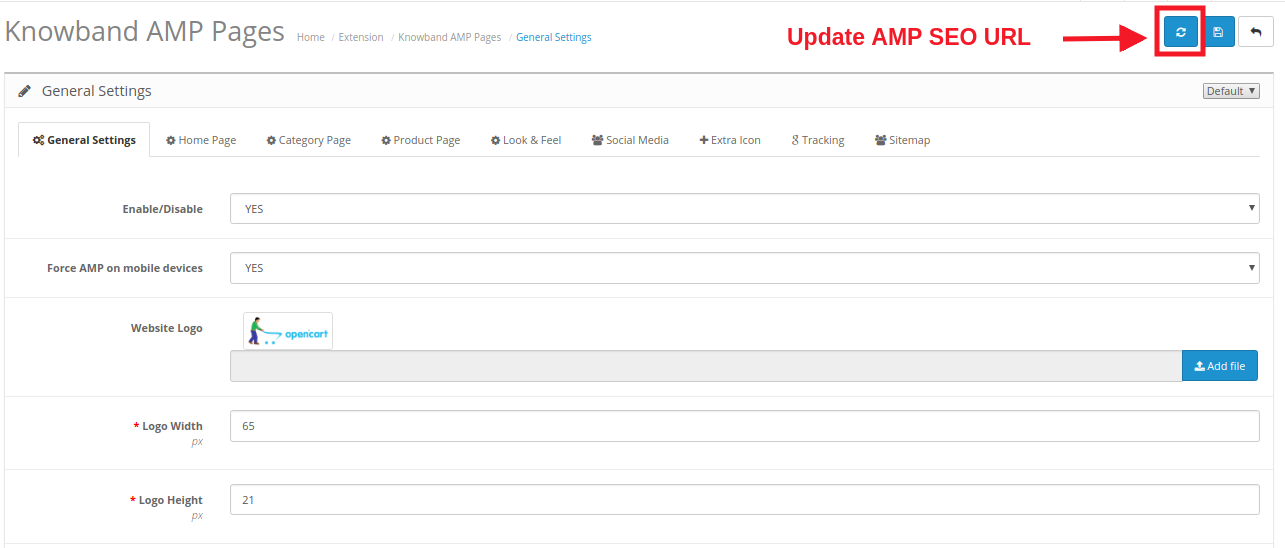
  • Enable/Disable: The whole functionality of OpenCart Accelerated Mobile Pages Module can be enabled or disabled just by selecting Yes or No.
  • Force AMP on Mobile Devices: This option enables or disables Google AMP functionality for mobile devices only.
  • Website Logo: The website logo shown on the AMP mobile pages can be changed by uploading a new image file.
  • Logo Width: This option sets the width for the logo image in pixels.
  • Logo Height: This option sets the height for the logo image in pixels.
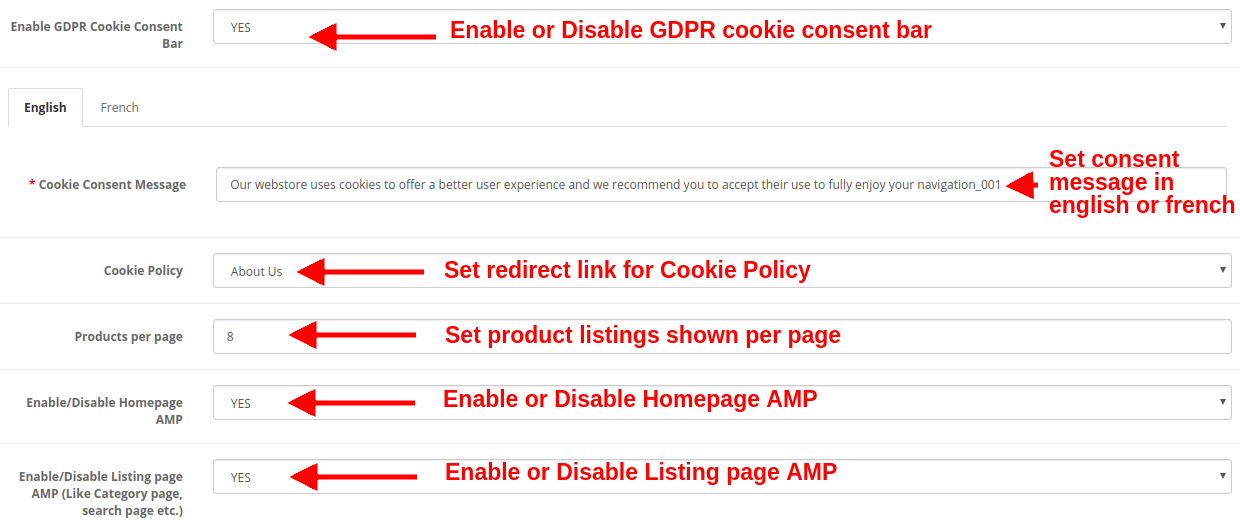
  • Enable GDPR Cookie Consent Bar: This option enables or disables GDPR cookie consent bar for all the AMP mobile pages of the website.
  • Cookie Consent Message: This option allows you to set a cookie consent message shown on the consent bar. You can set this text in both English and French language.
  • Cookie Policy: This option lets you set the URL for Coolie policy. When the user clicks the cookie policy text they are redirected to this specified page automatically.
  • Products per Page: This option specifies the count of product listings on the category pages of the site.
  • Enable/Disable Homepage AMP: This option enables or disables Google AMP on the Homepage of the website.
  • Enable/Disable Listing Page AMP: This option enables or disables Google AMP on listing pages like category page, search page, etc.

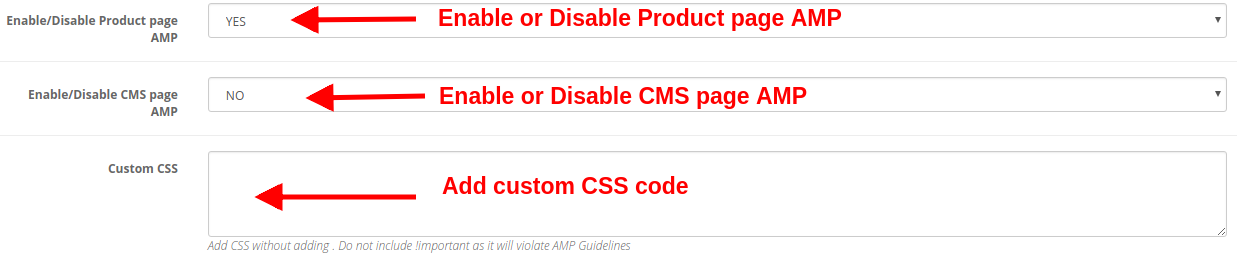
  • Enable/Disable Product Page AMP: This option enables or disables Google AMP on product pages of the website.
  • Enable/Disable CMS Page AMP: This option enables or disables Google AMP on different CMS pages of the site.
  • Custom CSS: You can include custom CSS code to improve the front-end functionality of AMP mobile pages.

By clicking on the “Refresh” button shown in the General Settings of Knowband AMP module, the default URL is automatically updated to AMP SEO URL.

3.2 Home Page Settings

You can configure the AMP settings for the site’s Homepage. These settings are not applied to the other pages like category page, product page, etc. The various settings include:

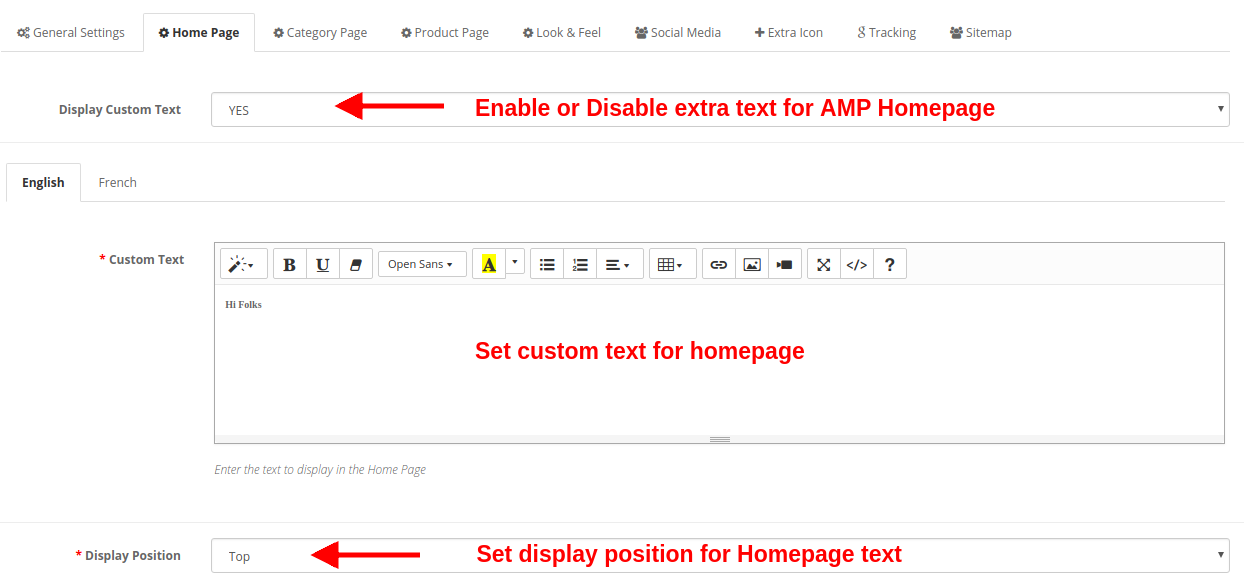
  • Display Custom text: Using this option, you can set a desired text on the product page. This extra text can be enabled or disabled as per needs.
  • Custom Text: You can specify the desired text you want to show on the Homepage. This custom text can be set in both English and French language.
  • Display Position: You can set a specific location where you want to show this custom text. You can show at the top or bottom of the page.

a) Featured Products Settings

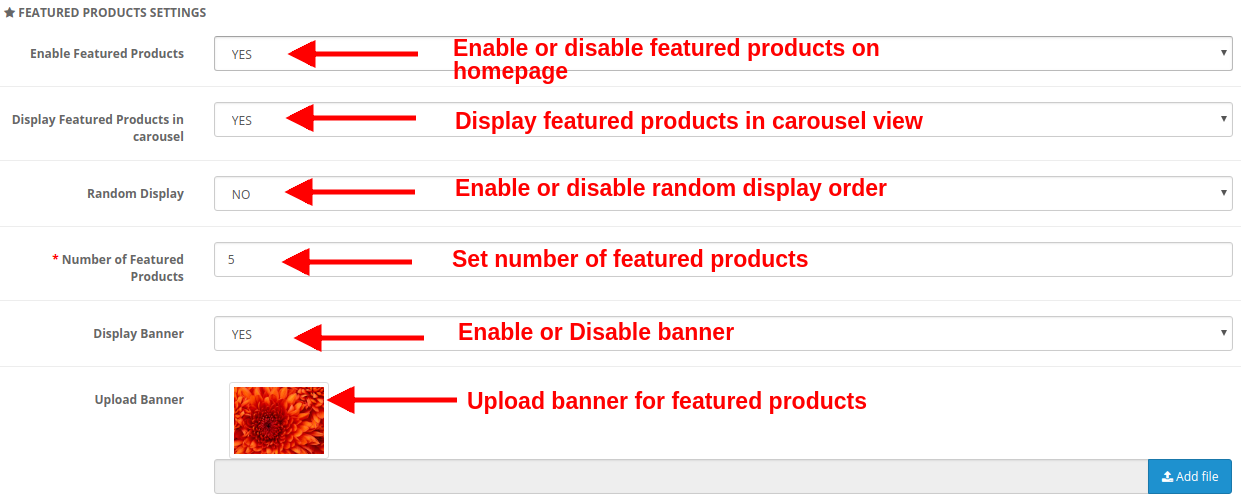
  • Enable Featured Products: This option lets you to enable or disable the featured products shown on the product page.
  • Display Featured Products in Carousel: You can enable this option to display the featured products in carousel view. If disabled, the products will be shown in the standard format.
  • Random Display: This option if enabled shows random featured products. Every time the customer will see random products in the featured category. If this option is disabled, the products will be the same every time.
  • Number of Featured Products: You can fix the number of products shown in the featured products section of the Homepage.
  • Display Banner: Enable or disable the banner shown on the featured products section of the homepage.
  • Upload Banner: This option lets you upload or select the image file you want to show as a banner for featured products.

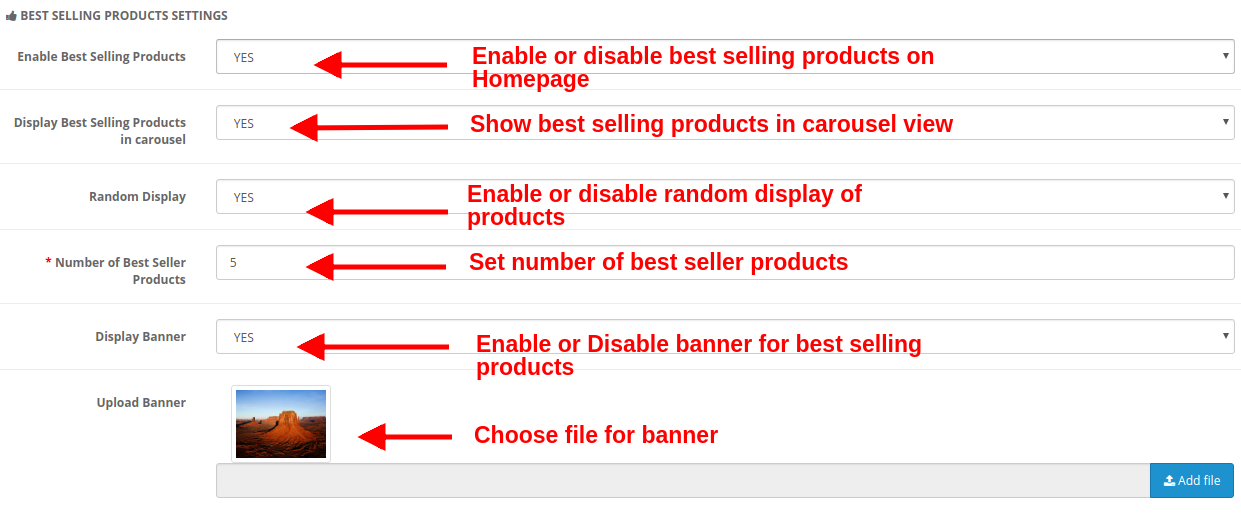
b) Best Selling Products Settings

  • Enable Best Selling Products: This option lets you enable or disable the best selling products shown on the product page.
  • Display Best Selling Products in Carousel: You can enable this option to display the best selling products in carousel view. If disabled, the products will be shown in the standard format.
  • Random Display: This option is enabled shows random best selling products. Every time the customer will see random products in the best selling category. If this option is disabled, the products will be the same every time.
  • Number of Best Seller Products: You can fix the number of products shown in the best selling products section of the Homepage.
  • Display Banner: Enable or disable the banner shown in the best selling products section of the homepage.
  • Upload Banner: This option lets you upload or select the image file you want to show as a banner for best selling products.

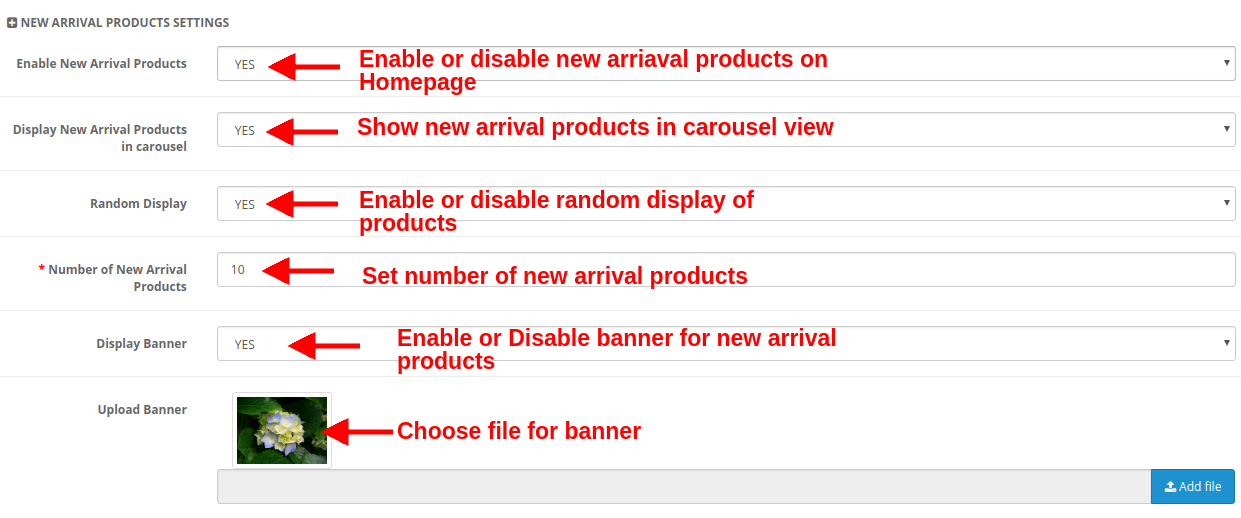
c) New Arrival Products Settings

  • Enable New Arrival Products: This option lets you enable or disable the new arrival products shown on the product page.
  • Display New Arrival Products in Carousel: You can enable this option to display the new arrival products in carousel view. If disabled, the products will be shown in the standard format.
  • Random Display: This option if enabled shows random new arrival products. Every time the customer will see random products in the new arrival category. If this option is disabled, the products will be the same every time.
  • Number of Best Seller Products: You can fix the number of products shown in the new arrival section of the Homepage.
  • Display Banner: Enable or disable the banner shown in the new arrival products section of the homepage.
  • Upload Banner: This option lets you upload or select the image file you want to show as a banner for new arrival products.

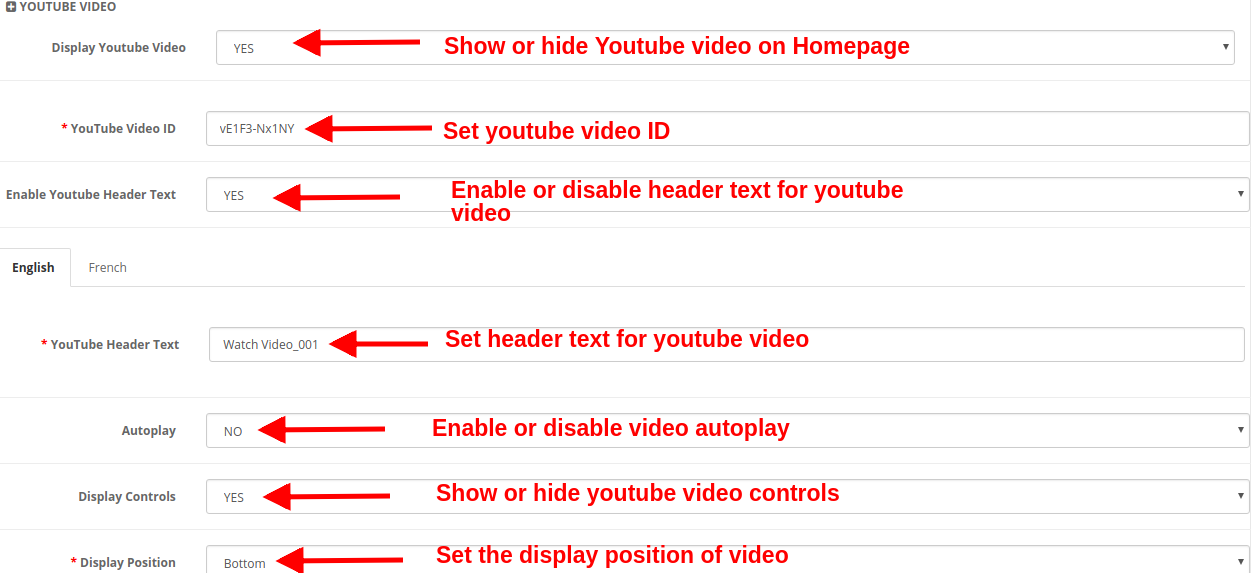
d) YouTube Video

  • Display Youtube Video: This option lets you show or hide the Youtube video on the Homepage.
  • Youtube Video ID: With this option, you can set the Youtube video ID corresponding to the specific youtube video.
  • Enable Youtube Header Text: You can show or hide the header text for the youtube video.
  • YouTube Header Text: The youtube header text can be changed using this option. You can specify a custom text you want to show as header text for a video. This text can be set for English or French language.
  • Autoplay: If this option is enabled, the video will automatically play as the homepage loads. But if this option is disabled, the user has to click the play button in order to view the youtube video.
  • Display Controls: If this option is enabled, the youtube control bar is shown for the youtube video. Else if disabled, the youtube controls are not displayed.
  • Display Position: You can set the position for the youtube video. This position can be either set to top or bottom.

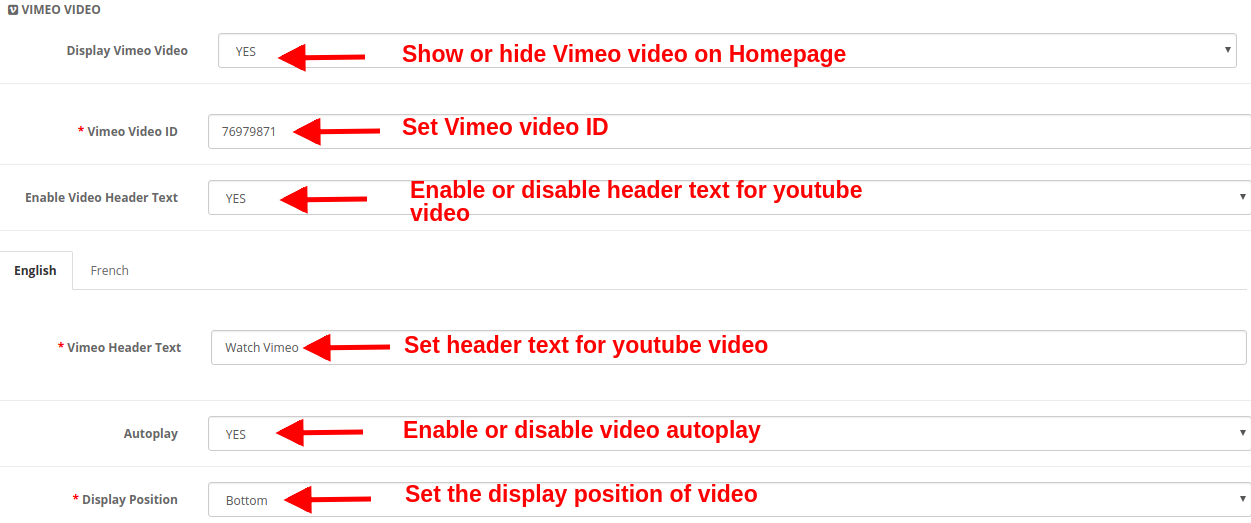
e) Vimeo Video

  • Display Vimeo Video: This option lets you show or hide the Vimeo video on the Homepage.
  • Vimeo Video ID: With this option, you can set the Vimeo video ID corresponding to the specific Vimeo video.
  • Enable Video Header Text: You can show or hide the header text for the Vimeo video.
  • Vimeo Header Text: The Vimeo header text can be changed using this option. You can specify a custom text you want to show as header text for a video. This text can be set for English or French language.
  • Autoplay: If this option is enabled, the video will automatically play as the homepage loads. But if this option is disabled, the user has to click the play button in order to view the Vimeo video.
  • Display Position: You can set the position for the Vimeo video. This position can be either set to top or bottom.

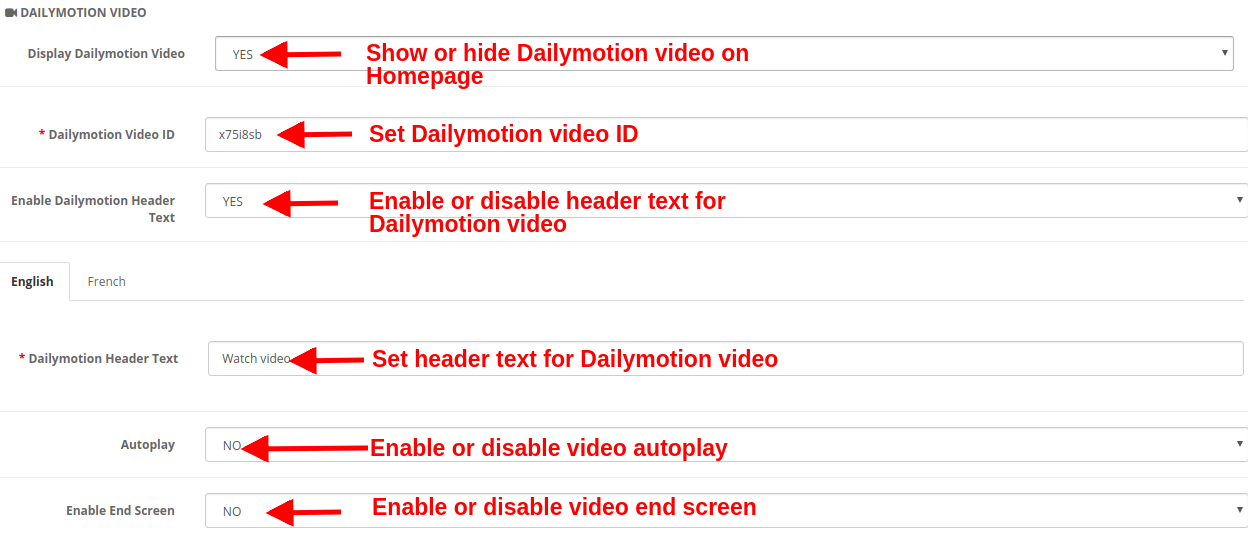
f) Dailymotion Video

  • Display Dailymotion Video: This option lets you show or hide the Dailymotion video on the Homepage.
  • Dailymotion Video ID: With this option, you can set the Dailymotion video ID corresponding to the specific Dailymotion video.
  • Enable Dailymotion Header Text: You can show or hide the header text for the Dailymotion video.
  • Dailymotion Header Text: The Dailymotion header text can be changed using this option. You can specify a custom text you want to show as header text for the video. This text can be set for English or French language.
  • Autoplay: If this option is enabled, the video will automatically play as the homepage loads. But if this option is disabled, the user has to click the play button in order to view the Dailymotion video.
  • Enable End Screen: Show or hide the end screen at the end of the video. If enabled, it will show other recommended videos on the video end.
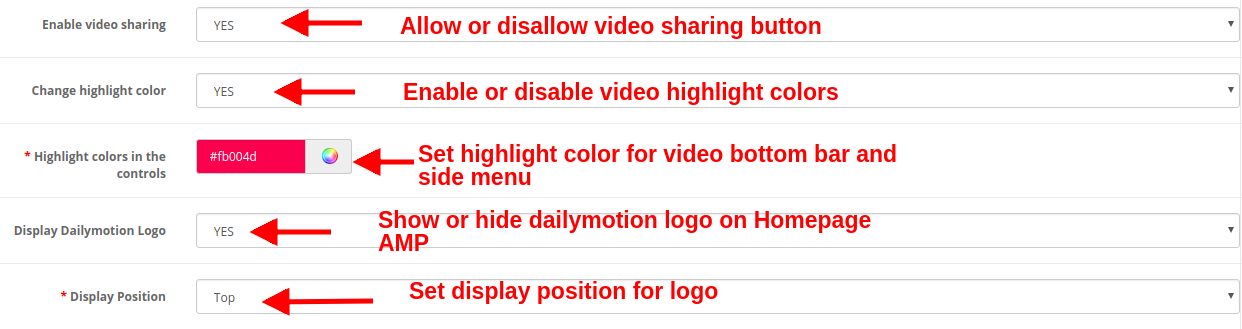
  • Enable Video Sharing: Show or hide the share option for the Dailymotion video.
  • Change Highlight Color: Enable or disable video highlight colors.
  • Highlight Colors in the Control: Pick up the desired color which will be shown on the video bottom bar and side menu bar panel.
  • Display Dailymotion Logo: You can show or hide the Dailymotion logo on the video.
  • Display Position: You can set the position for the Dailymotion video. This position can be either set to top or bottom.

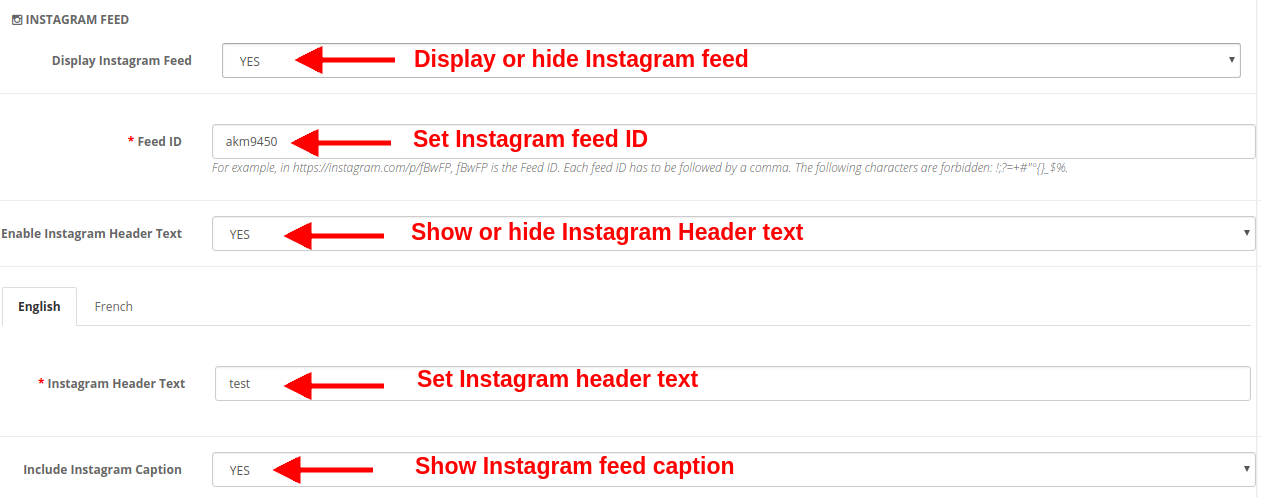
g) Instagram Feed

  • Display Instagram Feed: You can show or hide the Instagram feed on the homepage of the website.
  • Feed ID: This option allows you to set the Instagram feed ID which will be shown on the Homepage of the website. To set multiple feed IDs, separate each feed ID followed by a comma.
  • Enable Instagram Header Text: You can enable or disable the header text shown for the Instagram feed.
  • Instagram Header Text: This option lets you specify the header text for the Instagram post or feed.
  • Include Instagram Caption: This option shows/hide the Instagram caption for the specific photo or video.

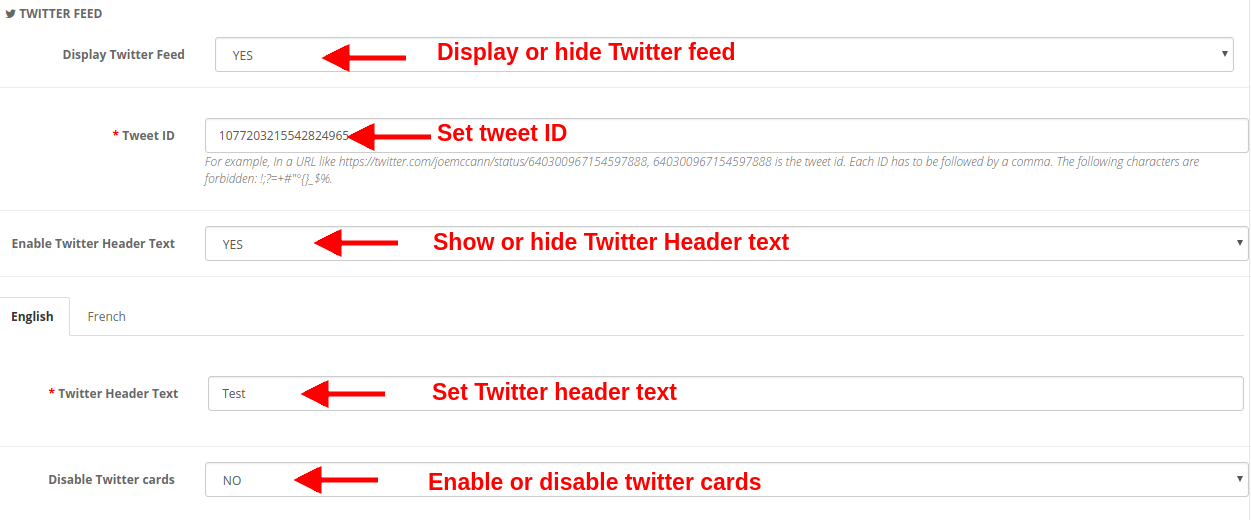
h) Twitter Feed

  • Display Twitter Feed: You can show or hide the twitter feed on the Homepage of the website.
  • Tweet ID: This option sets the Tweet ID which has to be displayed on the Homepage.
  • Enable Twitter Header Text: You can enable or disable the Twitter Header Text shown over the tweet.
  • Twitter Header Text: You can specify the header text for Twitter feeds.
  • Disable Twitter Cards: If you set Yes for this option, the content is displayed in a compact form. Else if you set this option to No, the detailed twitter feed is displayed on the Homepage.

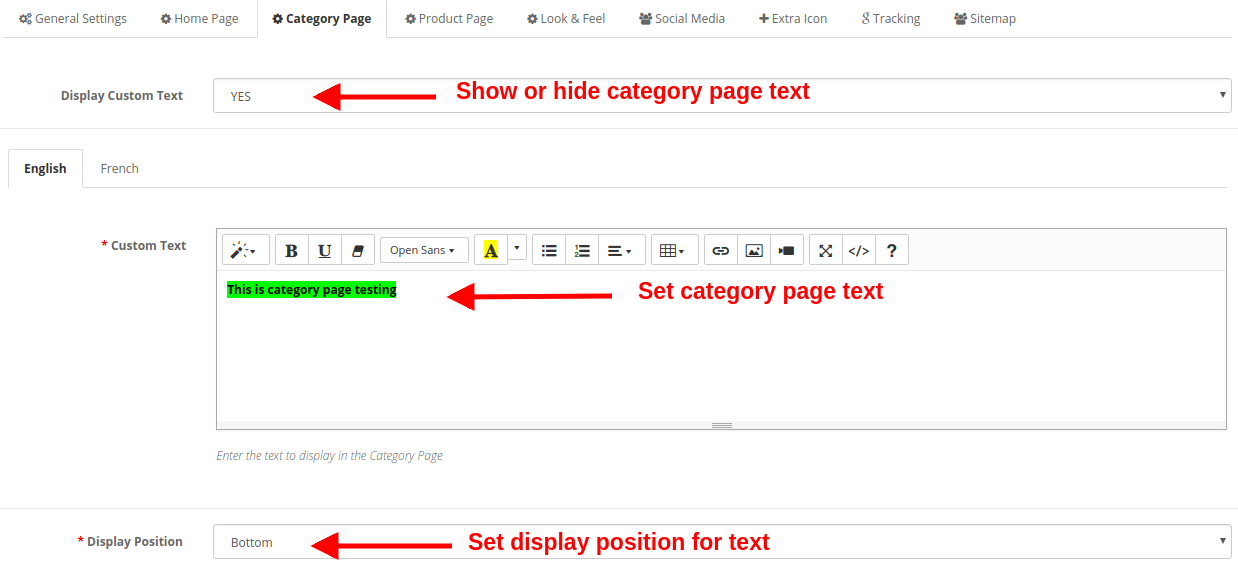
3.3 Category Page Settings

Under this section of Google Accelerated Mobile Pages(AMP) plugin, you can perform AMP settings for the category pages of the site. The various settings include:

  • Display Custom Text: You can enable or disable this text shown on the category pages of the website.
  • Custom Text: Using this option, you can set a desired text for the category pages. This text can be specified in English or French language.
  • Display Position: You can set the position for this custom text on the category page. The text position can be set to Top or Bottom of page.

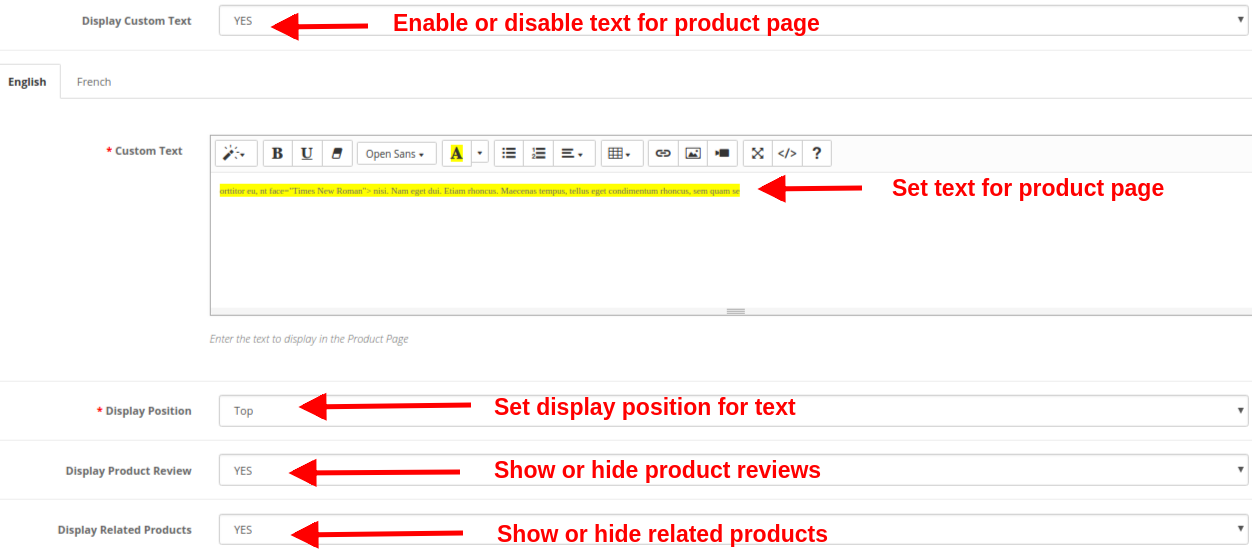
3.4 Product Page Settings

Under this section of OpenCart Accelerated Mobile Pages Module, you can perform AMP settings for the product pages of the site. The various settings include:

  • Display Custom Text: You can enable or disable this text shown on the product pages of the website.
  • Custom Text: Using this option, you can set a desired text for the product pages. This text can be specified in English or French language.
  • Display Position: You can set the position for this custom text on the product page. The text position can be set to Top or Bottom of page.
  • Display Product Review: You can show or hide product reviews on the AMP product pages.
  • Display Related Products: You can enable or disable related products on the AMP product pages.

3.5 Look and Feel Settings

You can modify the look and feel settings for the AMP pages of your site. The settings can be done for each of the page element. You can make general settings, settings for product page, product listings, category page, and cookie consent bar.

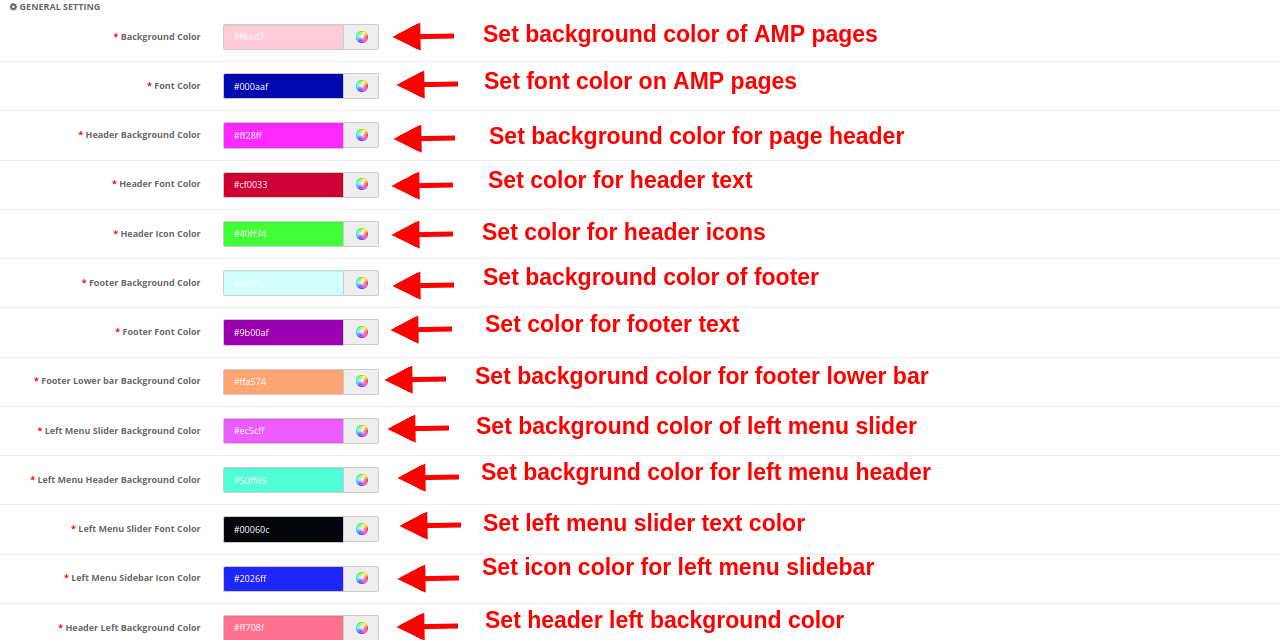
a) General Setting

  • Background Color: This option sets the background color for all the AMP pages.
  • Font Color: This option sets the font color for the text shown on AMP pages.
  • Header Background Color: This option sets the background color for the site header.
  • Header Font Color: This option sets the font color for the text shown in the header section.
  • Header Icon Color: This option sets the icon color for the icons shown in the header section of the site.
  • Footer Background Color: This option sets the background color of the footer section of the AMP website.
  • Footer Font Color: This option sets the font color for the text shown in the footer section.
  • Footer Lower Bar Background Color: This sets the background color for the lower footer bar.
  • Left Menu Slider Background Color: This option sets the background color for the left menu slider.
  • Left Menu Header Background Color: This option sets the background color for the left menu header part.
  • Left Menu Slider Font Color: This option sets the font color for the text shown in the left menu slider.
  • Left Menu Sidebar Icon Color: This option sets the color for the icons shown in left menu sidebar.
  • Header Left Background Color: This option sets the background color for the left header section.

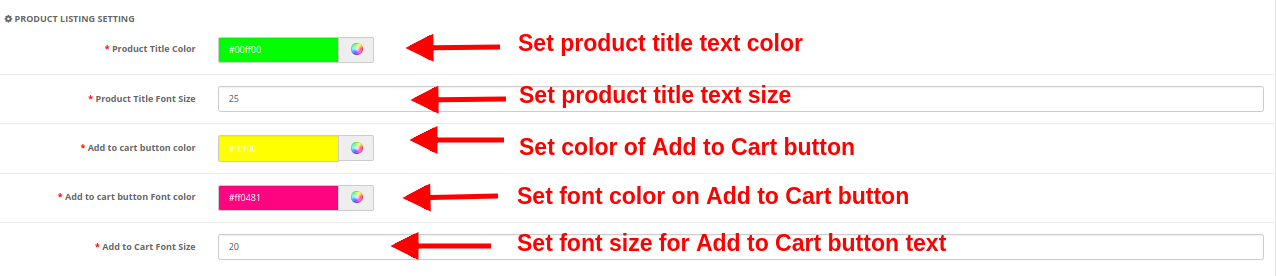
b) Product Listing Setting

  • Product Title Color: This option sets the color for the product title text.
  • Product Title Font Size: This option sets the font size of the product title.
  • Add to cart button color: This color specifies the background color of the Add to Cart button.
  • Add to cart button Font color: This sets the font color for the text shown on Add to Cart button.
  • Add to Cart Font Size: This option sets the size for the text shown on Add to Cart button.

c) Category Setting

  • Category Heading Font Color: This option sets the color for the text shown as a category heading.
  • Category Heading Font Size: This option sets the font size for the text shown as a category heading.

d) Product Setting

  • Product Title Font Color: This option sets the color for the product title text.
  • Product Title Font Size: This option sets the font size for the product title text.
  • Add to cart button color: This option specifies the background color of the Add to Cart button.
  • Add to cart button Font color: This option shows the font color for the text shown on Add to cart button.
  • Add to cart button Font size: This option shows the font color for the text shown on Add to cart button.

e) Cookie Consent Bar

  • Cookie Consent Background Color: This option sets the background color for the cookie consent bar.
  • Consent Message Font Color: This option sets the font color for the text shown as consent message.
  • Background Color of Accept Button: This option specifies the background color for the Accept Button shown on cookie consent bar.
  • Font Color of Accept Button: This sets the font color for the text shown on Accept Button.

3.6 Social Media

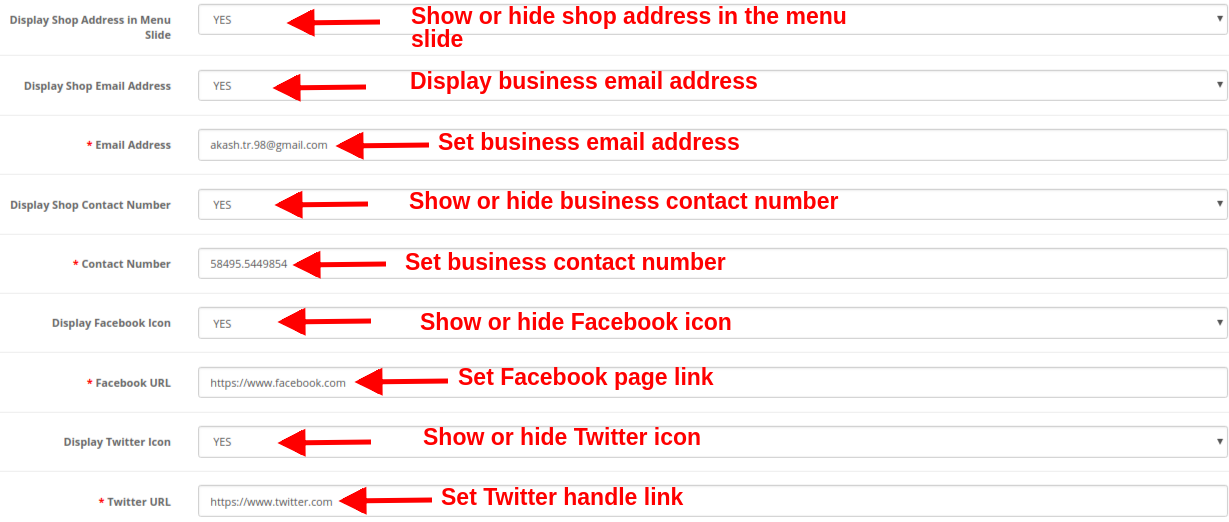
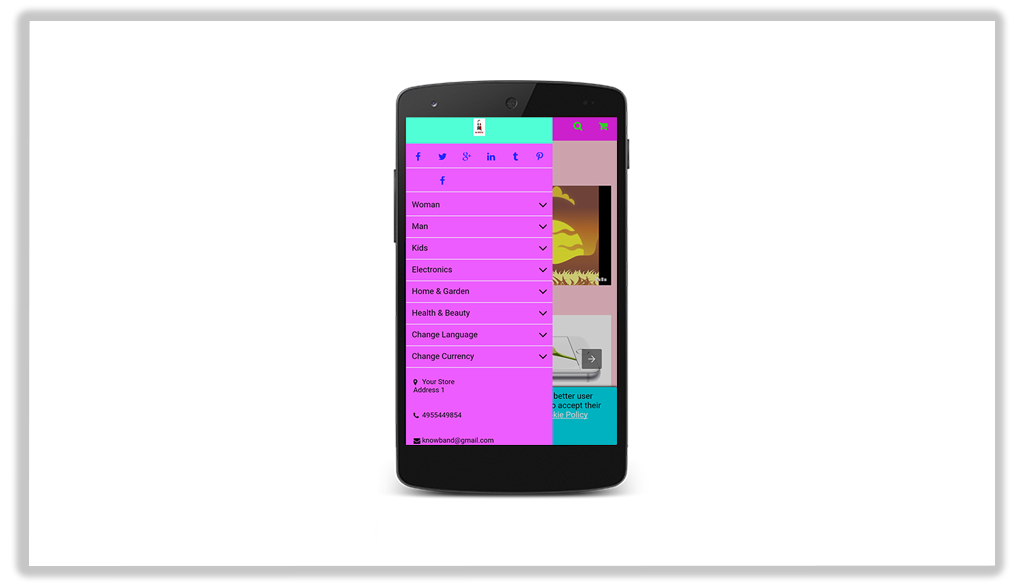
Under the social media settings of Google AMP module, you have an option to add business contact information like address, email ID and contact number. You can also add social channels links to your AMP mobile pages so that customers can direct follow up with their queries or doubts on social media like Facebook, Twitter, LinkedIn, Pinterest, etc. Social channels are one way to keep your users updated about your online business. Admin can perform the following configurations:

  • Display Shop Address in Menu Slide: Show or hide business address in the left slider menu section.
  • Display Shop Email Address: Show or hide the email address of your business in the left slider menu section.
  • Email Address: Set the email address of your business using this option.
  • Display Shop Contact Number: Show or hide the contact number for your business or shop.
  • Contact Number: Set the contact number for your online shop.
  • Display Facebook Icon: Show or hide the Facebook icon in the left menu slider of the website.
  • Facebook URL: Set Facebook page URL using this option.
  • Display Twitter Icon: Show or hide the Twitter icon in the left menu slider of the website.
  • Twitter URL: Set Twitter page URL using this option.
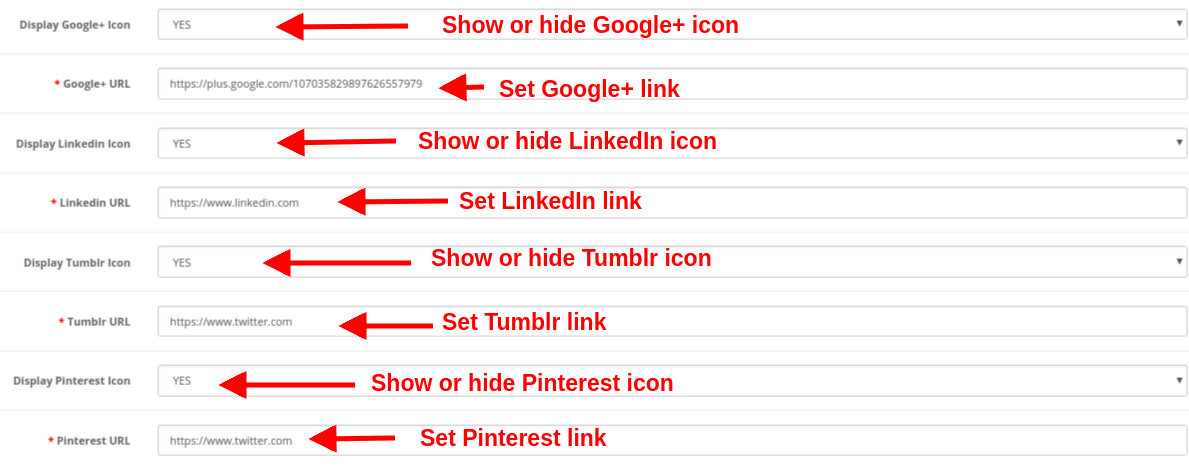
  • Display Google+ Icon: Show or hide the Google+ icon in the left menu slider of the website.
  • Google+ URL: Set Google+ page URL using this option.
  • Display Linkedin Icon: Show or hide the LinkedIn icon in the left menu slider of the website.
  • Linkedin URL: Set the LinkedIn page URL using this option.
  • Display Tumblr Icon: Show or hide the Tumblr icon in the left menu slider of the website.
  • Tumblr URL: Set Tumblr page URL using this option.
  • Display Pinterest Icon: Show or hide the Pinterest icon in the left menu slider of the website.
  • Pinterest URL: Set Pinterest page URL using this option.

3.7 Extra Icon

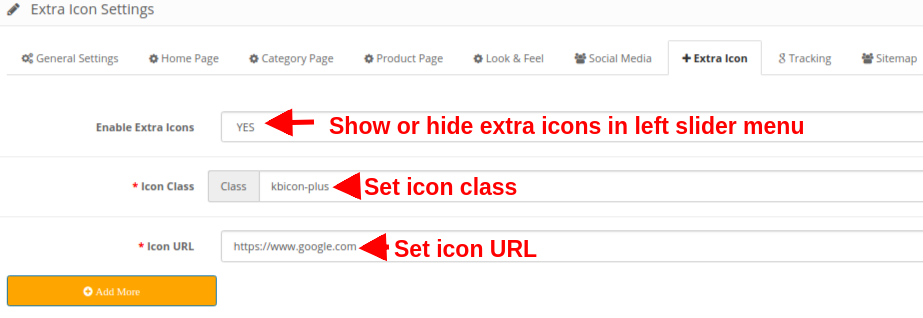
If they want to add more social media icon then they can add here with ease.

  • Enable Extra Icons: Enable or Disable extra icons in the left slider menu.
  • Icon Class: Set the icon class using this option.
  • Icon URL: This option sets a URL corresponding to the icon.

An option to “Add More or Remove” is also provided so that you easily add new icons or delete the existing icons.

3.8 Tracking

The various tracking services offered by this OpenCart Accelerated Mobile Pages Extension allows you to track the performance of AMP pages. The three track services provided are:

Enable Google Analytics: If you want to track the performance of the accelerated mobile pages of your site, this feature allows you to enable or disable Google Analytics functionality.
Analytics Client Id: You can enter your Google analytics client ID to configure.

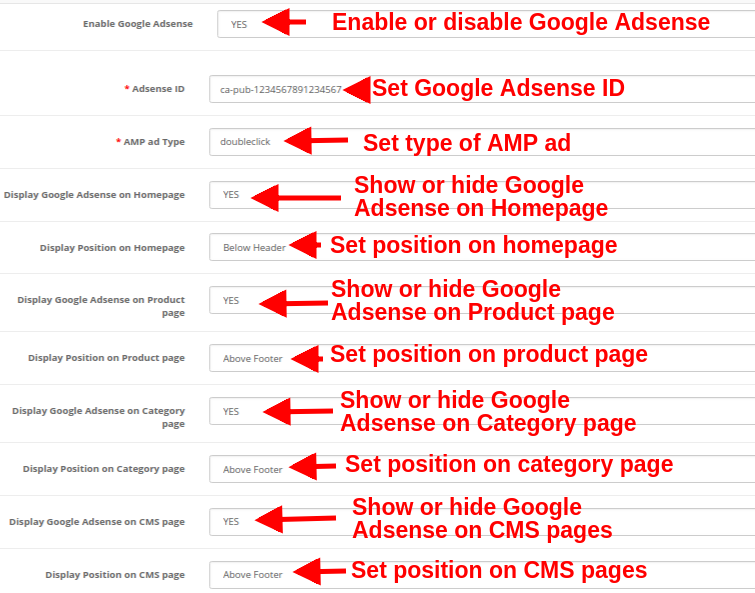
Enable Google Adsense: Activate or Deactivate the Google Adsense functionality from here.
Adsense ID: Enter the Adsense ID here.
AMP ad type: Enter the supported AMP ad type. This way the admin can specify an identifier for the ad network. The type attribute selects the template to use for the ad tag.
Display Google Adsense on Homepage: Enable the option in order to display Google adsense on the Homepage.
Display Position on Homepage: Select the position for showing Google adsense on the homepage.
Display Google Adsense on the Product page: Enable the option to show Adsense on the Product page.
Display Position on the Product page: Select the position for displaying Google adsense on the product page.
Display Google Adsense on Category page: Enable the option to show Adsense on a category page.
Display Position on Category page: Select the position for showing Google adsense on category.
Display Google Adsense on CMS page: Enable the option to show Adsense on the CMS page.
Display Position on CMS page: Select the position for showing Google adsense on CMS.
Enable Facebook Pixel: Enable or disable the option from here for implementing Facebook pixel tool to track site visitors.
Facebook Pixel ID: Enter the Facebook Pixel ID here.

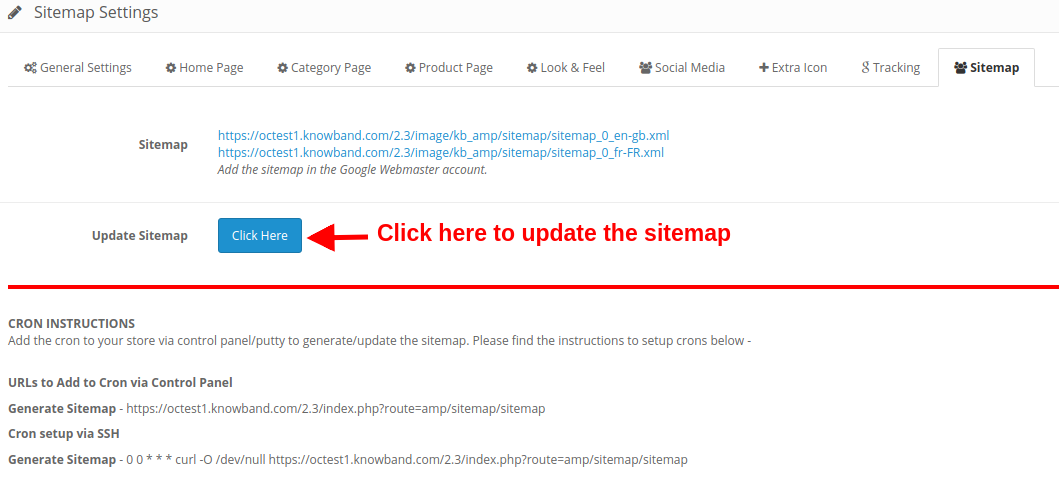
3.9 Sitemap

In this section, the store admin can generate the AMP Sitemap by clicking the button.
As you will hit an enter or click on the “Click Here” button, the sitemap will be automatically updated and will display a “Success” message on the screen.

CRON INSTRUCTIONS

Add the corn to your store via control panel/putty to generate/update the sitemap. Please find the instructions to setup crons below:

  • URLs to Add to Cron via Control Panel
  • Generate Sitemap – https://octest1.knowband.com/2.3/index.php?route=amp/sitemap/sitemap
  • Cron setup via SSH
  • Generate Sitemap – 0 0 * * * curl -O /dev/null https://octest1.knowband.com/2.3/index.php?route=amp/sitemap/sitemap

4.0 Front Interface

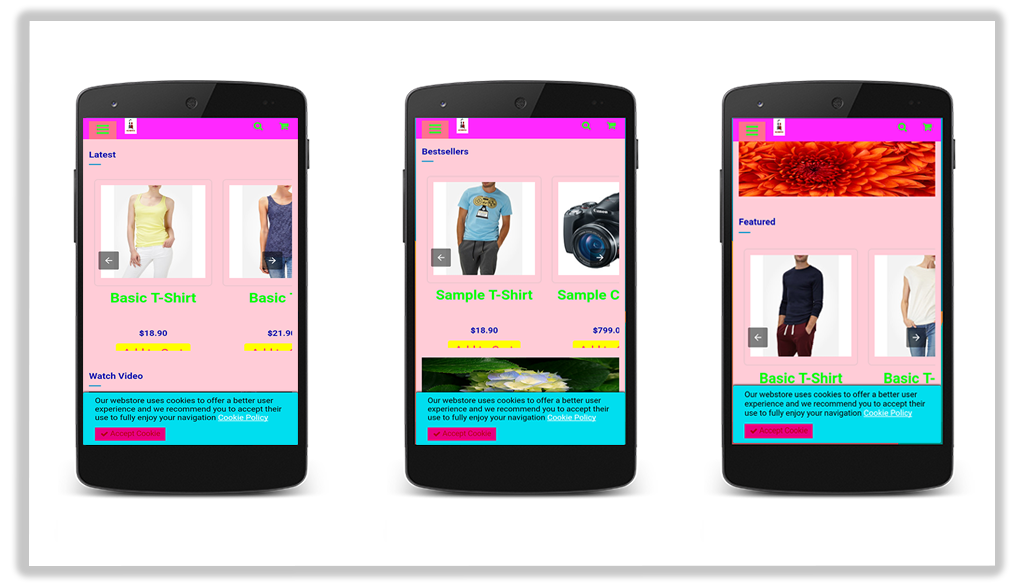
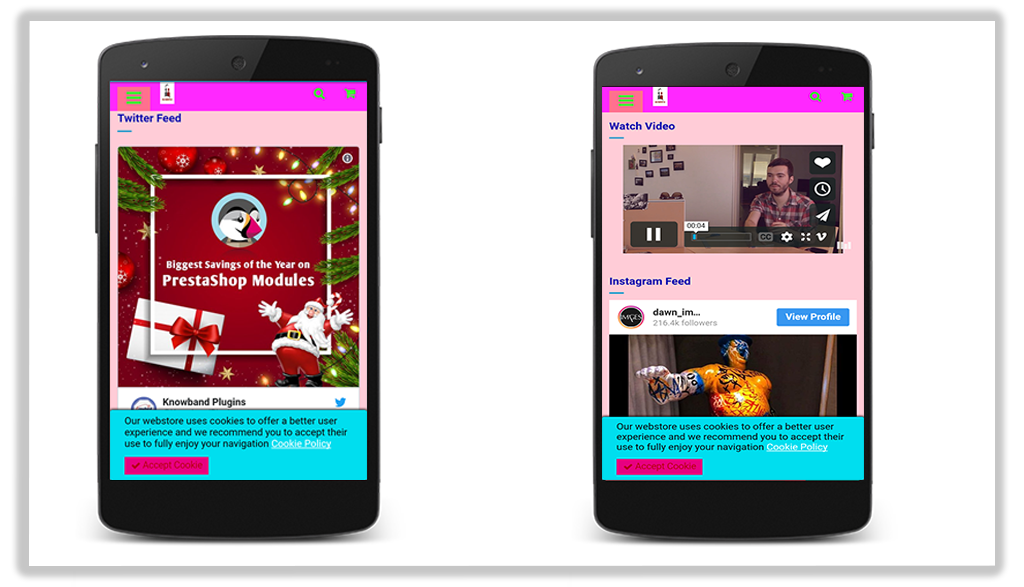
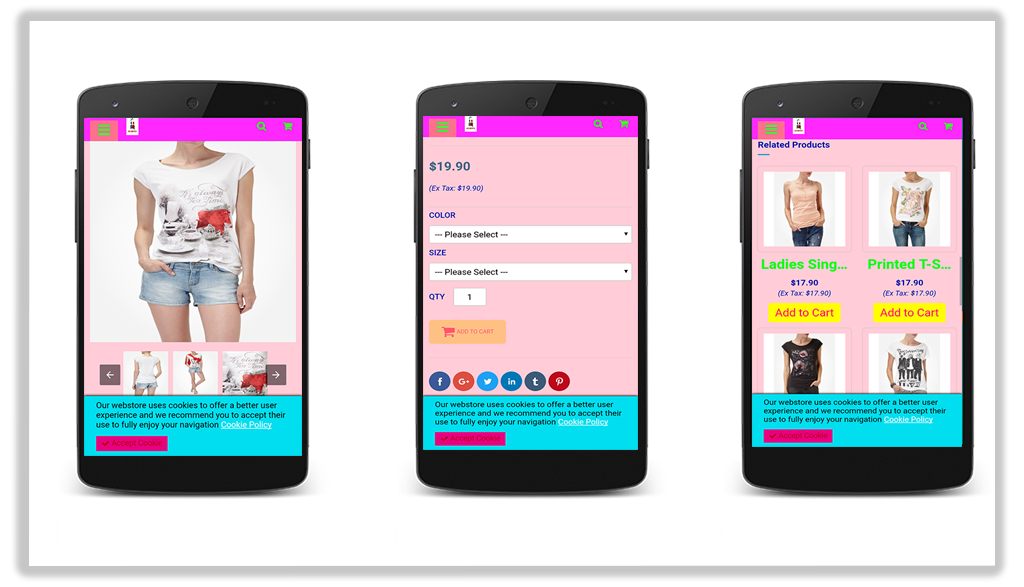
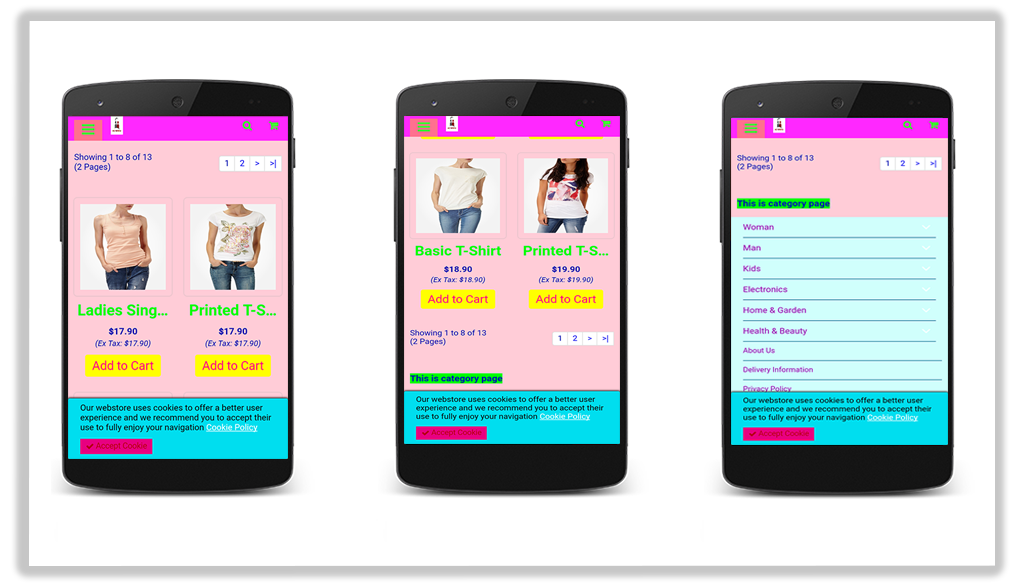
After enabling the OpenCart Accelerated Mobile Pages(AMP) Module by Knowband the store admin can enable the settings for the home page, category pages, product pages, and CMS pages. As per the settings enabled by the admin, AMP will look as shown below:

Home Page

Various featured products, new arrivals products, and best seller products can be shown on the Homepage of the website.

You can display YouTube video, Dailymotion video, Vimeo video, Instagram feed, and Twitter feed on the Homepage.


Product Page


Category Page

Cookie Consent Bar

Left Menu Slider

This way the OpenCart Accelerated Mobile Pages Extension converts the general website pages into accelerated mobile pages without any complicated process. The online merchant can implement the OpenCart Accelerated Mobile Pages module easily without any hassle and improve page load time easily without any hassle. The OpenCart Accelerated Mobile Pages Module provides separate settings for the homepage, product pages, category pages and CMS pages which makes configuration easy for the store admin. Admin can take a step ahead to reduce the bounce rate of the website by offering mobile responsive website pages.

For more OpenCart modules please visit Knowband.

OpenCart Accelerated Mobile Pages Extension Link

OpenCart Accelerated Mobile Pages Module Admin Demo Link

OpenCart AMP Module Front-end demo link

Google Accelerated Mobile Pages(AMP) plugin Marketplace Link

For more support and information, feel free to contact us via email at support@knowband.com anytime.
OpenCart Gift Card Manager Extension | User Manual

1.0 Introduction

Gift Cards or eCards have been always special and appealing to everyone as they suit every customer’s needs. Be it a Birthday, Wedding Anniversary, New Year or some other special occasion finding a gift for their loved ones is a big task for online customers. Your customers are unknown about the likes and dislikes of their loved ones. Moreover, giving a cash amount seems to be unreal and emotionless. Gift Cards are one smart and convenient way to make your customers feel happy and special.

So, what’s the best way to offer personalized gift cards to your store customers? OpenCart Gift Card Manager Extension by Knowband allows admin to sell gift cards in their online shop. With OpenCart send gift card extension, they can create and sell multiple gift cards based on different occasions in their store. The store customers can buy these gift cards and gift them to their relatives or friends. Moreover, lower return rates of the gift cards are another benefit for the store admin.

Open Cart Gift Card Manager helps you provide your customers with several occasion-based gift cards. Knowband OpenCart Gift Card Manager can set up a gift card section on the OpenCart website to promote digital gifting. The store owner can create several Gift Cards with gift card managers for special occasions such as Birthdays, Weddings, Valentine’s Day, Friendship Day, Father’s Day, etc. so that consumers should pick gift cards for their loved ones as desired. The customers can select the options like printing the gift card or sending it via email.

The Digital Gift Card plugin makes gifting simpler and more enjoyable. Finalizing a gift was time-consuming earlier, but now with a gift card manager, it can happen in minutes.

Benefits of Opencart Gift Card Manager for the eCommerce store owner:

  1. Brings a new customer to your store
  2. Lower return rates and increased retention
  3. Generate revenue in advance of sales
  4. More convenient with simplified predefined email templates
  5. Fully Mobile Responsive

Benefits for Customer:

  1. The customer who finds selecting a product difficult doesn’t have to spend extra time finalizing the gift. The OpenCart Gift card extension saves extra effort and time.
  2. With the Knowband OpenCart gift card manager, they can get a gift card for every occasion.

The Knowband Gift Card manager comes with an easy admin panel and Sets the luring design and texts for Gift Card.

1.1 What’s New In this Updated Version of Gift Card Manager v1.3

The latest version of the Gift Card Manager Extension for OpenCart offers new enhanced features that will help the store admin to create the Gift Cards with ease. This new version of the OpenCart gift card plugin comes with some attractive features which increase the user experience. Let’s check out what’s new in the updated version:

  • With this OpenCart Gift card manager plugin, the eCommerce store owner can easily incorporate the gift card functionality into their online store.
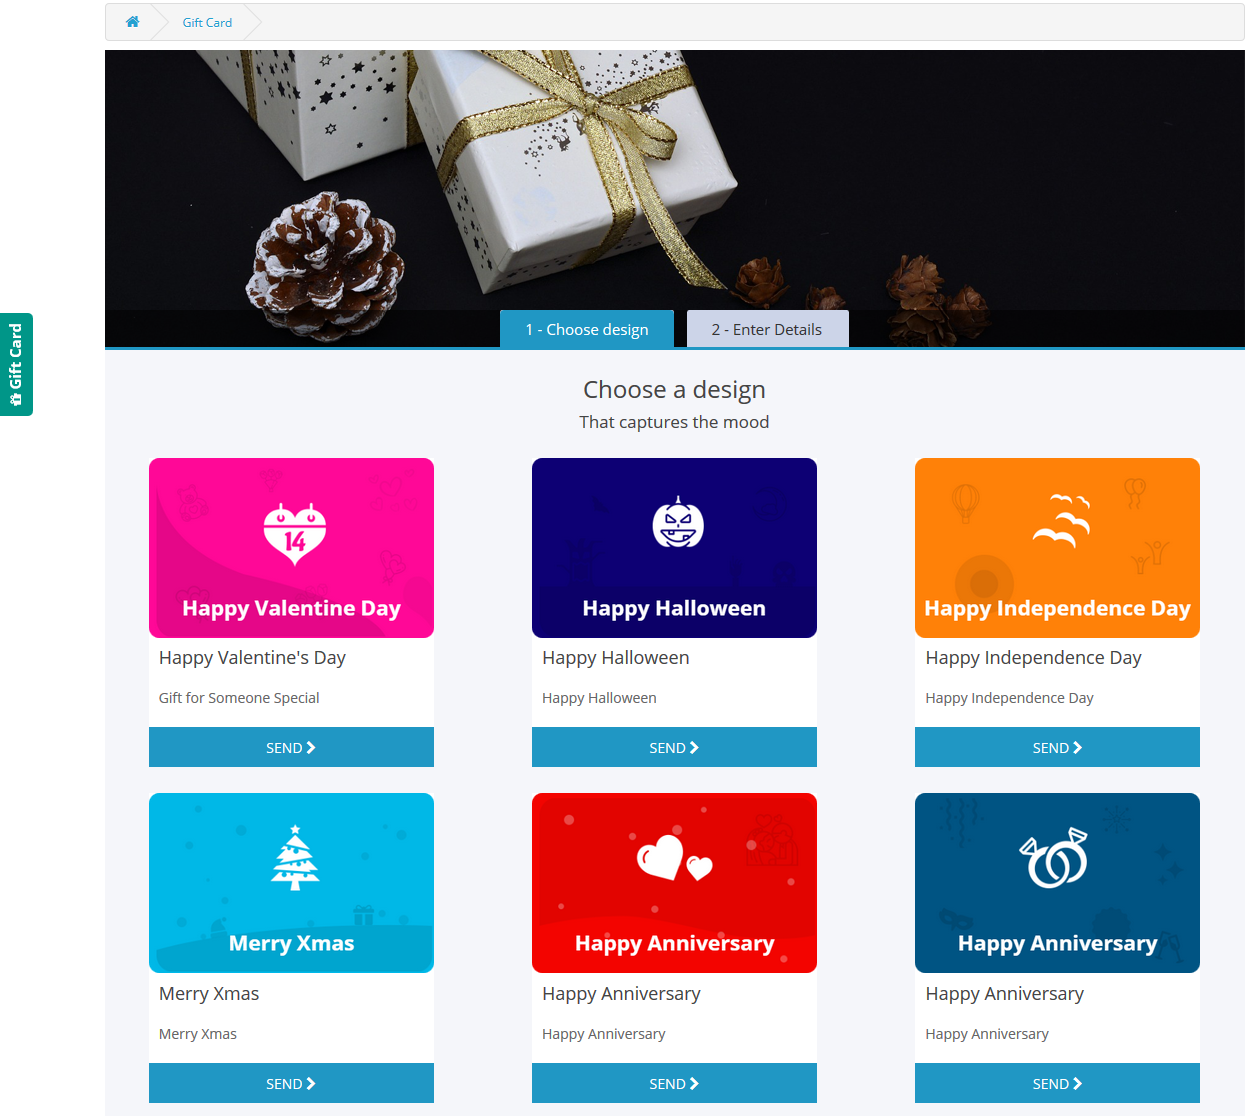
  • Improved UI of the front end will enhance the customer experience. The gift card manager extension lets the admin show the Gift Card as products on the category page for both desktop and mobile.
  • OpenCart Gift card manager has the functionality of uploading personalized images from the front end to send the same in the gift card. The plugin allows the customer to create a custom gift card by uploading the desired image
  • With this new version, the functionality of uploading customizes catchy images from the backend to create gift cards. Further, this feature of the Gift card manager extension will help the store admin to create gift cards for local events. In addition, these images are usable as the background for Gift Card.
  • Opencart Gift card manager plugin has Interesting and descriptive email templates. Templates cannot only reduce the workload but make you feel less stressed. With the Open cart gift card manager installed an email notification will be sent to the recipient, sender, and customer when the gift card order comes in.
  • A Gift Card template will be sent to the customer through email if the customer has not uploaded a personalized image from the front end else personalized image will be sent through email.
  • Customers can choose the day and time for the delivery of physical gift cards as well as the virtual gift card via mail. The new version of the OpenCart Gift Card Manager allows the store admin to run the Cron manually.  
  • A button corresponding to each order for resending the Gift Card is available.
  • With this new version of the Opencart Gift Card Manager Extension, the admin can add title and description to the Gift Card template. This title and description along with the image will be visible to the customer.
  • The new version is mobile responsive.
  • Opencart Gift card manager is easy to use and install.

1.2 Distinct features of OpenCart Gift Card Manager Extension:

OpenCard Gift Card Manager Plugin comes with some striking features which give better UX and handy customizable options to the store admin.

  • Customers can purchase or send gift card vouchers from the store.
  • OpenCart Send Gift Card extension gives the flexibility to create unlimited gift cards for the store based on various occasions like Birthdays, anniversaries, New Year, Christmas, or any other special event.
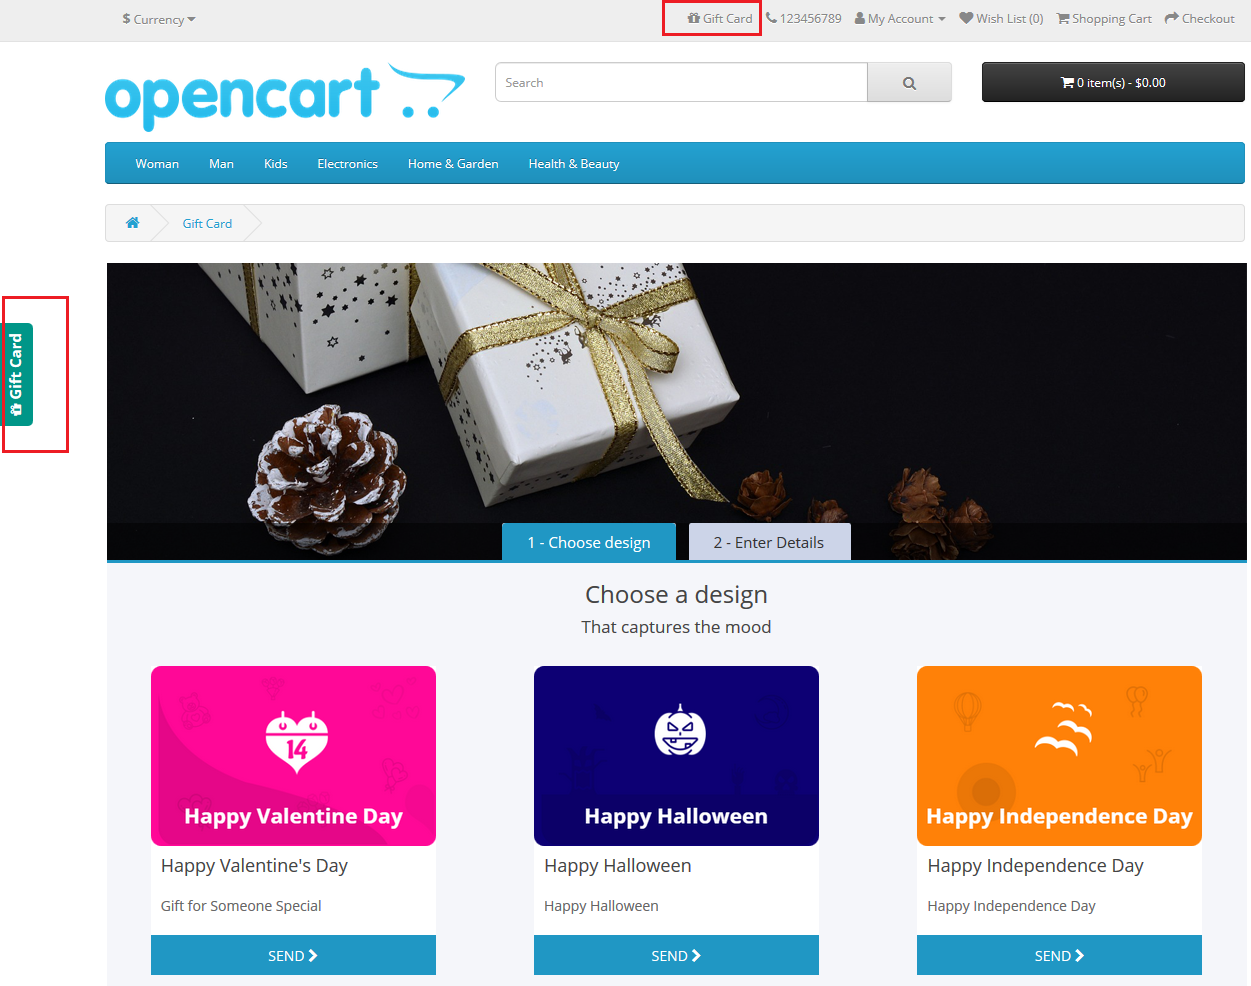
  • The admin can promote the Gift Cards by showing the Gift Card in the header section, footer section, or the left side of the webpage.
  • OpenCart Gift Card system gives an option to set the Gift Card delivery gap in several days.
  • OpenCart Gift Card Manager Plugin allows online store merchants to add a unique prefix code to the gift voucher.
  • Using Gift Card extension the admin can set the appropriate order status for the Gift Card orders. The Gift Card will deliver to the specified recipient only after the order status changes to the defined status.
  • OpenCart Gift Card Extension supports multi-lingual and multi-store compatibility.
  • OpenCart gift card Manager helps store admin monitor all gift card purchases. In particular, the admin can see the order information corresponding to the orders.
  • Buyers must specify the value of the gift card, the name of the sender, the name of the recipient, and the email address of the recipient for the delivery of the gift card.
  • The OpenCart gift card templates can be mapped to any category by defining or adding relevant keywords to them.
  • The eCommerce store owner can send an email notification to customers who have opted for the “Print by Yourself” option. A separate email template is available to submit an email update. That way, an online store admin will send an email update to a gift card sender.
  • The online store merchant can show a fixed amount of gift cards for the customers. Admin can make multiple fixed amount gift cards with OpenCart gift card manager and separate them using a comma.
  • OpenCart Gift Card Manager Extension allows online merchants to fix minimum and maximum gift card value from the admin interface of the gift card manager plugin. The online users need to purchase a gift card of more than a minimum and less than the maximum value

2.0 How to Install Gift Card extension?

This module comes with an easy installation process. Before starting the installation process, you have to buy the Gift Card Module for the OpenCart store from the Knowband store. Once purchased, you will receive the following files on your registered email.

  • Source code file of OpenCart Gift Card Extension in zipped file format.
  • User Manual of OpenCart Gift Card module.

Now in order to install the OpenCart Gift Card vouchers on your website, follow the given steps:

Unzip the zip file. You will get the folders as shown in the image below


Copy all the folders of the zip file in the Root Directory of OpenCart setup via FTP manager.

So, the OpenCart Gift Cards manager is now successfully installed and is ready to use at your online store.

3.0 Admin Interface of OpenCart Gift Card Manager Extension

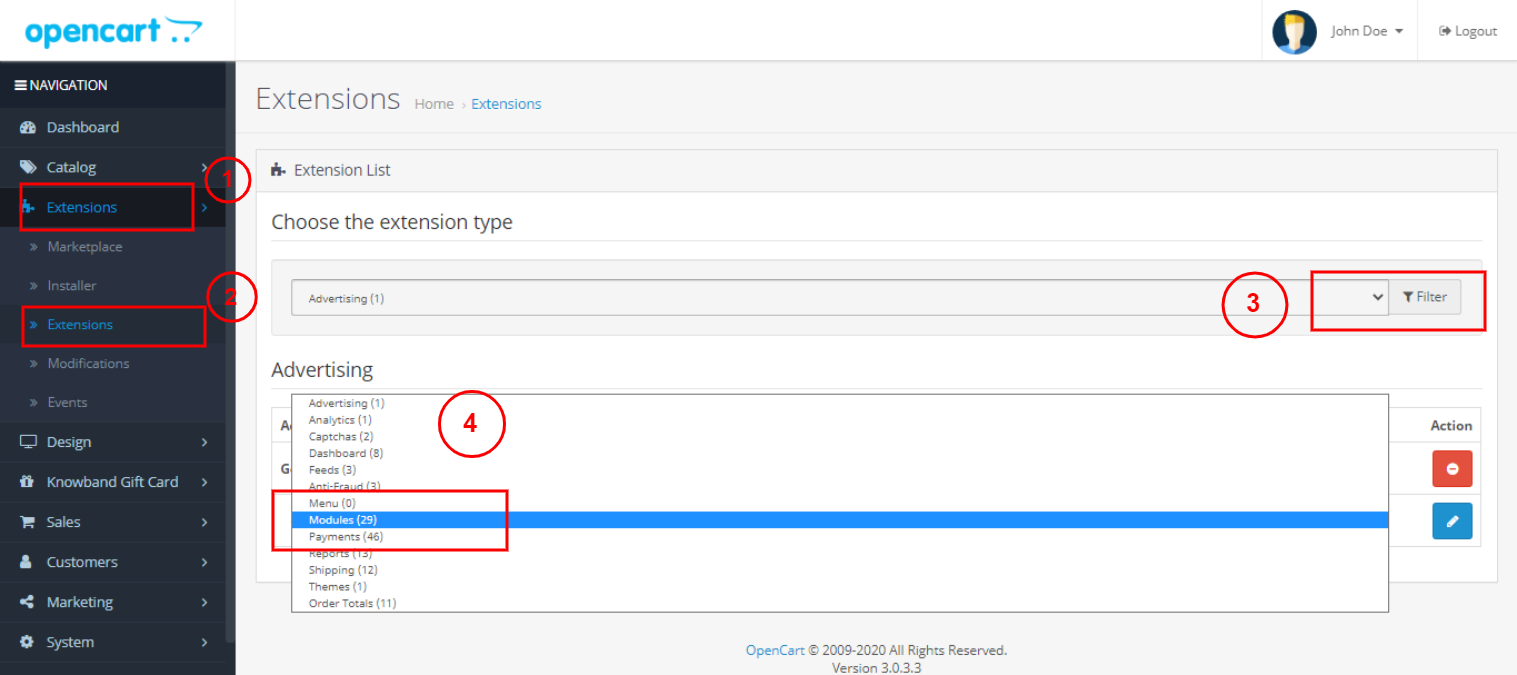
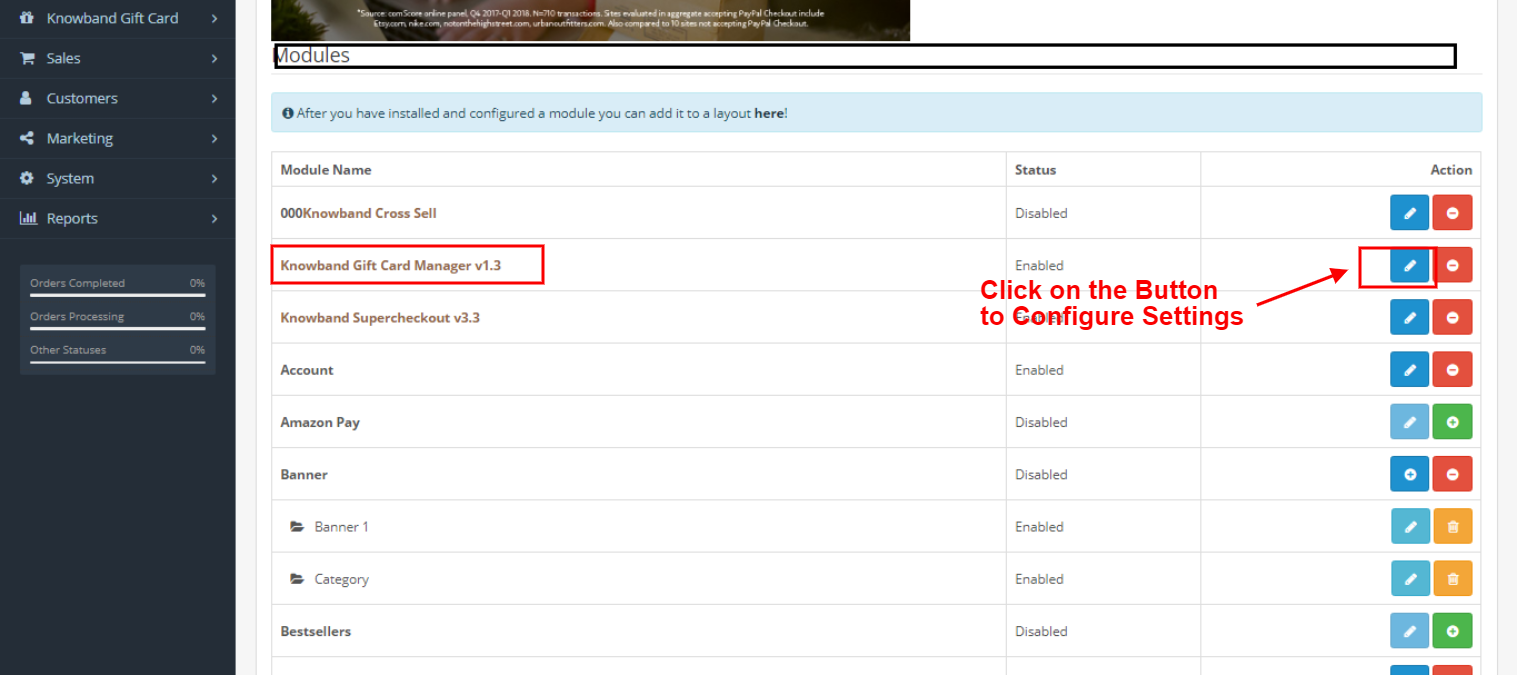
After installing OpenCart Gift Card Manager v1.3 in the OpenCart store, the store owner can make the changes without any hassles. Navigate the settings in the given order: Admin Panel > Extensions >Modules > Gift Card Manager.

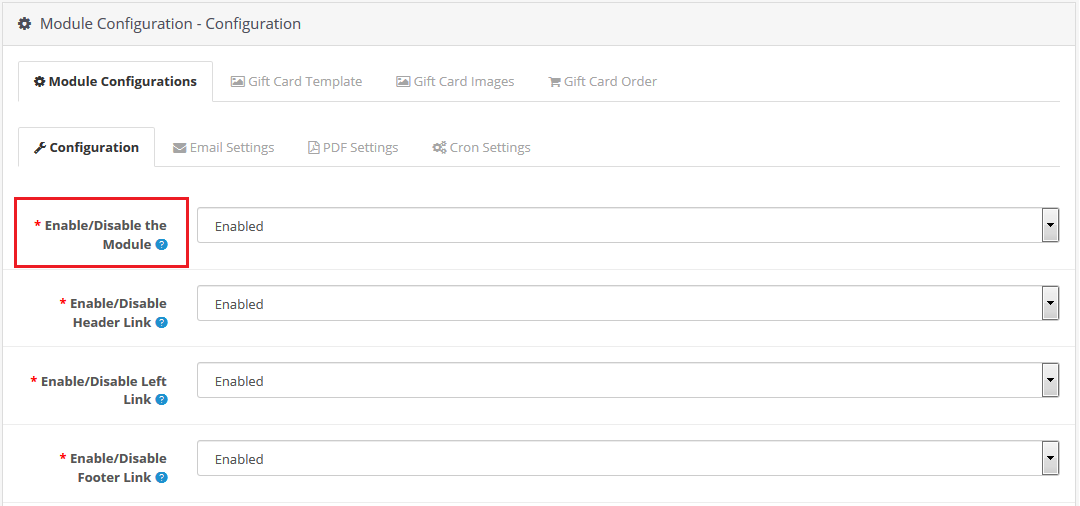
The knowband gift card manager module configuration page will display the following tabs to configure the module as desired.

  1. Module Configuration
  2. Gift Card Template
  3. The Gift Card Images
  4. Gift Card Orders

Each interface is in the form of a tab, and each tab contains some basic settings that changes as required. Each tab will be discussed below.

3.1 Module Configuration

How to configure Gift Card Manager for open Cart? OpenCart Gift Card Manager Module Configuration settings consist of the following four parts, as discussed below:

3.1.1 Configuration 

Enable/Disable Module: Enable or disable the gift card feature of your shop.

Enable/Disable Header Link: Show or hide the gift card link in the header section of the website. By showing the Gift Card link in the header, you can bring it to the attention of the store visitors.

Enable/Disable Left Link: Enable or Disable gift card link in the left section of the website. A direct call to the Gift Card Action button will be shown on the storefront. It will help you encourage the selling of gift cards.

Enable/Disable Footer Link: This allows the admin to show or hide the gift card link in the footer section of the site.

Enable/Disable My Account Link: With this button, the admin can show or hide the gift card link in the My Account section of the site. This will help store owners to show the gift card options to the visitors.

Enable/Disable Personalised photo: This option allows the admin to hide or show the functionality of uploading personalized images from the front end to send the same in the gift card.

Gift Card Prefix: This option helps the admin to set the gift card voucher code prefix. The admin enters the code in a ‘Store_Name- * * *’ format. Admin can use this as a branding suffix. The store owner will advertise the store by using its business name as a prefix.

Gift Card Code Order Status: This button sets the status of the store orders when the gift card delivers to the respective customer. If the order status is set as ‘Complete’, the gift card will be sent to the customer once the purchase of the gift card has been completed on-site.

Minimum Gift Card Delivery Gap: Using this tab, the store administrator can determine the minimum duration of time on which the order comes in. Moreover, the day on which the gift card delivers. Thus, this value is only applicable to the option Send by Email.

Fixed Amount Status: The online store merchant can activate or deactivate this option if he or she wants to display a fixed amount drop-down list. The admin can allow the customers to send the gift cards of their desired amount. Store Admin can set the minimum and maximum amount for the Gift Card.

Fixed amount: The admin can add multiple values and separate the same by a comma.

Max amount: The online merchant can set the maximum amount which is acceptable for a gift card by the OpenCart gift card manager. This function will work only if fixed amount status functionality will disable.

Min Amount: The store admin can set a minimum amount for the card purchase. The customer cannot buy a gift card lesser than that amount.

3.1.2 Email Settings

With OpenCard Gift Card Manager a gift card can be sent to the recipient via email. You can customize this email template. When the gift voucher email is sent another email will be sent to receive, and the sender will receive an acknowledgment email. All the email templates are customizable.

Recipient email Subject: The subject line of the gift voucher code email sent to the receiver are customizable.

Recipient Email Content: OpenCart Gift Card Manager allows eCommerce store owners to customize the contents of the gift voucher email code which will be sent to the recipient. 

Sender email Subject: An acknowledgment email is received at the end of the sender upon the successful delivery of the gift voucher code. The subject line of the sender’s acknowledgment email is changeable by the admin.

Sender email Content: The content for the sender acknowledgment email customizable by the store admin.

Customer email Subject: Admin can alter the subject line of the email and modify the email template.

Customer email Content: The online store administrator will send an email notification to online shoppers who have chosen the “Print by yourself” option.

3.1.3 PDF Settings

The purchaser of the gift voucher will print the OpenCart gift voucher in PDF format. The administrator will modify the contents of the PDF file. 

Gift Card PDF Prefix: This option allows you to set the PDF gift card prefix code attached to the document.

PDF HTML Content: You can modify or customize the contents of the PDF file as per business requirements. This template is in HTML format so you can easily add text, photos, or links to it. This PDF material can also publish in English, French, and other languages.

3.1.4 Cron Setting

The OpenCart Gift Card manager Module supports cron features. Admin can run cron manually or automatically after a specified period of time. A button is available for this functionality. 

URLs to Add to Cron via Control Panel

https://octest1.knowband.com/2.3/index.php?route=kbgiftcard/kbgiftcard/cron

Cron setup via SSH

0 1 * * * wget -O /dev/null https://octest1.knowband.com/2.3/index.php?route=kbgiftcard/kbgiftcard/cron

Add the cron to your store via the Control Panel to send gift cards automatically.

3.2 The Gift Card Template

To build new gift card templates using the OpenCart gift card module, go to the Gift Card design tab of the admin panel. Click the ‘Add New Template’ button or the ‘+’ sign on the top right of the OpenCart gift card screen. You can see the following settings to create a new gift card template for your store.

Add New Templates or Edit/Delete the Templates:

Add New Gift Card Template:

 Template Title: This is a new feature in this latest version of OpenCart Gift Card Manager which allows admin to add the template title.

Template Description: Now admin can add the description for the Gift Card which he or she wants to display on the front end.

Name of the template: This option allows the admin to set a unique name for the gift card template that defines a particular template.

Image: This option of the OpenCart Gift Card Plugin allows the admin to pick a gift card picture or model that will display at the front end of the shop. When selecting an image, only the images produced will display in the drop-down list.

Template Keywords: This choice lets you map the gift card design to a specific category. It can be achieved by choosing the appropriate tags/keywords for the gift card template. If you want to place the gift card template in a new category, you can first add the keyword and map the template to it. Just press the “Add new keyword template” button.

Physical Gift Card Allow: This option allows the OpenCart admin to activate or deactivate the physical gift card for this template.

Virtual Gift Card Allow: You can activate or disable e-cards for both the recipient and yourself. This means that when you activate the virtual card option, customers will see three options on their front page, namely “Print Yourself”, “Send by Email”, and “Physical Card”.

 Enable Template: This option easily activates or deactivates the template from OpenCart Store.

Select Language: The admin will pick the language of the template from the drop-down list.

3.3 The Gift Card Images

Pictures for various occasions are pre-uploaded at the back end of the OpenCart gift card manager.  The admin can select an occasion-based image when building a gift card template. In addition, the store owner needs to set the following configuration settings to attach a new gift card to the store. 

View Gift Card Image:

Add Gift Card Images:

Select the add product button available in the upper right corner. You will head to a new page where you can add new Gift card Images.

Gift Card Type: The store admin can upload a personalized gift card image to make the gift card more attractive.

Image Name: This feature is to add a name to the Image. This name is for recognition purposes of the admin and this won’t display on the front end.

Enable/Disable Image: With this button, the store owner can show or hide the particular Image from the front end.

Gift Card Image section of OpenCart Gift card Manager has two more options

  1. Upload Personalised Gift Card Image:

  1. Create Using Background Image:

Save the settings before moving to the next setting section.

3.4 The Gift Voucher Orders

For the admin interface Gift Card Order section is very important. Here admin can track the details of the orders of Gift Cards.

Under the Gift Card Order tab of the Gift Card Manager, the administrator can monitor the entire list of orders received for gift cards. It displays the e-mail address of the recipient, the date of the shipment, and the status of the gift cards.

In this section, you will find all the details about the order. Go to the ‘Display’ button in the right section of the ‘Gift Card Order’ page.

View the Gift voucher Orders:

4.0 Front Interface

4.1 Different positions of gift card link

a)  The gift card link is shown at the left and header sections.

b) The gift card link is shown in the footer section.

4.2 How to Purchase a Gift card?

Click on the Gift Card Button from any of the above-mentioned tabs. Customer will head to Gift card Page


  1. Choose Design: Select a design for your card according to the occasion from the options available.
  2. Choose an option for the Gift Card Delivery Mode

4.2.1 Print Your self


From(Name): Enter the name of the sender

To(Name): Enter the name of the receiver

Upload Personalize Pic (Choose File): With the OpenCart Gift card manager, the Customer can choose a personalized Image that will be shown on the card.

Personalize message: A personalized message can be written by the customer.


How much would you like to gift?

Gift Card Amount: Customer can put an amount which needs to be gifted.

4.2.2 Send By Email

Provide Gift Car Delivery Details

Email Address: Enter the email address of the receiver

Sending Date:  Add sending date of the Gift Card Notification email


From(Name): Enter the name of the sender

To(Name): Enter the name of the receiver

Upload Personalize Pic (Choose File): With the OpenCart Gift card manager, the Customer can choose a personalized Image that will be shown on the card.

Personalize message: A personalized message can be written by the customer.

How much would you like to gift?

Gift Card Amount: Customer can put an amount which needs to be gifted.

Now you can add the Gift card to your Cart.

4.2.3 Physical card

From(Name): Enter the name of the sender

To(Name): Enter the name of the receiver

Upload Personalize Pic (Choose File): With the OpenCart Gift card manager, the Customer can choose a personalized Image that will be shown on the card.

Personalize message: A personalized message can be written by the customer.

How much would you like to gift?

Gift Card Amount: Customer can put an amount which needs to be gifted.

4.3 Add gift card to shopping cart

4.4 Steps before Checkout


By clicking on the Place order button, the customer can place the order.


Customers will receive an email after the successful Order Placement.

This way the online store admin can easily allow the customers to share gift cards with their friends and family person. There are so many templates for different occasions, that online users can select the gift card and send it. The OpenCart gift card manager extension provides smooth functioning and multi-lingual compatibility. The Gift Card Module for OpenCart shows the gift card link in multiple sections for the customer’s ease. The online merchant can increase profit by offering a gift card to the customers.

Check Tutorial Guides for the OpenCart Gift Card Manager

These videos walk you through:

  • Installing the OpenCart Gift Card Manager Extension

  • Setting up basic gift card settings

  • Creating gift card products in your store

  • Managing gift card designs, amounts, and delivery options

  • Tracking gift card orders and usage

These tutorials are perfect for beginners who want a clear, step-by-step guide without any technical jargon.

For more details about this OpenCart gift card vouchers plugin, please visit here:

OpenCart gift card extension module link

OpenCart send gift card extension Admin demo link

Gift Card Module for OpenCart Youtube Video link

OpenCart gift card system Front demo link

OpenCart gift card vouchers plugin marketplace Link

Follow us on Facebook

OpenCart Store Locator Extension User Manual

1. Introduction

OpenCart Store Locator and Pickup extension by Knowband allows the store admin to show physical stores locations on the website front-end using Google map. With the OpenCart in-store pickup module, the store visitors can find the closest store that has the products of their choice. The admin can display a store locator on the website with some additional details like distance, contact number, name, and timing. They can check the nearest store and select the one from where they want to pick up the product.

This OpenCart store locator and pickup plugin offer a user-friendly interface and the admin can easily configure it without any help. The admin can select multiple stores that are to be shown in the store locator. The OpenCart store locator and pickup plugin allow the admin to set the minimum and the maximum number of days within which the product pickup will be initiated. The customers can easily check the nearest store and view the details also. They can pick up the product if they wish to. Thus they can get the product with greater and minimal time.

1.1 Striking Features of Store Locator Extension for OpenCart:

The OpenCart Store Locator Extension provides you with multiple features which are fully customizable and easy to configure from the back-end interface without requiring any coding knowledge. The various striking features of the OpenCart Store Locator Extension have been listed below:

  • The store owner can activate the store locator and pickup functionality just by a button toggle.
  • The e-merchant can set an image as a Google map marker and the zoom level of the map.
  • The OpenCart plugin allows the store admin to show contact numbers also.
  • The Customer can search the store by providing the distance in km or miles.
  • Customers can also search the store by entering their locations.
  • The store admin can add multiple stores and show them on the Google map. The admin can also select the default store.
  • OpenCart in-store pickup plugin allows the e-merchant to set the maximum pickup days.
  • The Opencart store locator and pickup module allow the store admin to show the store locator in the header menu.
  • The online store owner can set the date and time format.
  • The e-merchant can enable the settings to display the pick-up time slot.
  • The admin can set the minimum hours for which the customer has to wait for the pickup of the ordered product.
  • Store admin can enable e-mail notification settings. Enabling this setting will automatically send an e-mail to the store owner about the received order.
  • The OpenCart store locator and pickup module have a ready-made email template for sending an email notification to the pick-up stores about the order.
  • The OpenCart Google Maps Store Locator plugin allows the admin to upload store details in bulk using a CSV file. Store admin can also download a sample CSV file.
  • The store admin can also set store working days and hours at the time of listing.
  • The OpenCart store locator and pickup module are Multi-lingual compatible.
  • It is very easy to install, configure and activate this OpenCart store locator and pickup plugin.
  • The product will be delivered to the selected store. The customer can pick up the product from the store.
  • The address of delivery will be the selected store’s address.

1.2 Technology for Development

Language: PHP
Framework: OpenCart (2.0.x. to 3.0.x)

2.0 Installation Guide

To install this OpenCart Store Locator Module, please follow the following steps:

Purchase the OpenCart Store Locator Extension from the Knowband store. You’ll get the following files:

  • Zipped File containing the source code of the OpenCart Store Locator module.
  • User Manual of OpenCart Store Locator plugin.

Follow the steps below to install the OpenCart Store Locator Extension in the OpenCart store:

1. Unzip the zipped. You’ll get the folders as shown in the image below:

2. Upload all the files and folders of the zip file in the Root Directory of OpenCart setup via FTP manager.

3. Install the OCMOD file from the Opencart Admin Side.


4. Refresh the OCMOD cache from the Extensions -> Modification.
5. Login via FTP OR Control panel & make the folder i.e. image/kbstore_locator writable. Once done, Go to Extensions ->Extensions ->Modules & Install the module.

6. The OpenCart Store Locator module is now installed and is ready to use as shown in the image below:

3.0 Admin Interface of OpenCart Store Locator Extension

OpenCart Store Locator extension offers an easy customization option to the store admin. The various configuration options are discussed in detail below:

3.1 General Settings:

This General Settings page offer various configuration options as shown below:

  • Enable/Disable: The eCommerce store admin can activate or deactivate the store locator and pick-up plugin anytime just by toggling this button.
  • Enable/Disable Store Locator: The OpenCart Store Locator extension allows the admin to enable or disable the store locator in the front-end. By default, it will be enabled.
  • Enable/Disable the Pickup at Store: The admin can activate the pickup from the store just by toggling this button.
  • Google Map API Key: Enter the Google map API key in this section. A link is provided for generating an API key.

3.1.1 How to generate the Google Map API Key? General Settings:

The eCommerce store admin can generate the Google API key by following these steps:

  • Click on the “Get Started” button: The admin can click on this button to get the Google map API key.

  • Pickup the products: When the admin will click the “Get Started” button this pop-up will be displayed.

  • Project selection: The eCommerce store admin can select or create a project.

1. Select a project:

2. Create a new project:

Setup the billing: The eCommerce store admin can now set up the billing.

After billing the store admin can get their Google map API key.

On the Credentials page, get an API key, store admin can select the API key option:

The admin can select the restrict key option from the dialog box to set a browser restriction on the API key.

In the Key restriction section, the store admin can select HTTP referrers (web sites), then follow the on-screen instructions to set referrers.

This way the admin can set the Google map API key.

Enable Libraries:

To use Google map API, You need to enable the following libraries in the Google Developer Project.

1. Maps Javascript API
2. Place API
3. Geolocation API

Steps to enable the libraries:
1. Click on the “Enable API & Services” button as shown in the image below:

2. After clicking on the “Enable API & Services” the following screen will appear:

3. Search “Maps Javascript API” & Click on the “Maps Javascript API” from the suggested list.

4. Click on the “Enable” button as shown in the below image:

5. Repeat the same process to enable the Places API & Geo Location API.

Continued General Settings…

  • Google Map Marker: The OpenCart Google Map Store Locator plugin allows the admin to set an image as a Google map marker.
  • Map Zoom Level: The eCommerce store admin can set the zoom level of the map.
  • Distance Unit: The OpenCart Google Maps Store Locator plugin allows the admin to set the unit of distance measure as kilometers and miles.
  • Display header menu: The store admin can display the store locator in the header menu of the site.
  • Header Menu Text: The store admin can set the header menu text.

3.2 Pickup Time Settings

The various fields of this interface are discussed below:

  • Maximum pickup days: In this option, the admin can set the Maximum days within which customer has to pick up their package from the store.
  • Allow Pickup Time Slot: Enable to display the pick-up time slot.
  • Pickup Hours Gap: The admin can set the minimum hours for wait after placing the order. This time will be the last time for which the customers need to wait after placing their order. After the provided time they can pick up their package.

3.3 Email Notification Settings:

The store admin can send an email to notify the pickup store of the orders. Ready to send email templates to make this easy for the store admin to inform the pickup stores about the order.

  • Enable Email Notification: The eCommerce store admin can enable this option for sending e-mail notifications to notify the pick-up store about the order. The admin can set the subject line both in English and French language. Customizable email templates are available for sending the email to the stores. The ready-made email template automates the process.
  • Subject: The store admin can set the subject line of the email.
  • Email template: The store admin can also modify the email template if required.

3.4 Store Settings

Under this tab, you will see the list of stores added by the admin. You can enable or disable existing stores.

The store admin can easily add a store from the admin panel. After clicking on the “add” button, a screen will be shown like below:

  • The store admin can easily add store name, full address of the store, and contact details also. The OpenCart pick-up module allows the admin to set the picture, status, and timing also.
  • The admin can easily insert the working days and hours of the store.

3.4.1 Import Store’s Contact:

By clicking on the “Import” button the store admin can upload store details in bulk. The store owner can download the sample file and insert all the details in this file. The admin can upload this file to import the store details.

4.0 Front End of the website:

The customers can easily view the nearest store and pick up the product. They can view the contact details, name, distance, and timings also. The customers can get the product faster and without paying the shipping charges

1. They can select the Pickup option:

After clicking the Pickup at store option the customers can view the store locator.

The customers can place their pickup orders easily. The customers can select the date and time to pick up the ordered product.

2. See the timings of the store for product pickup.

2. Order History of customers.

3. An email would be sent to the store owner stating the details of online purchase, date, and timings of the product pickup at the store by the customer.

This way, the online store admin can show multiple physical stores on the website using Google Maps. The Opencart Google Maps Store Locator extension makes the overall process very simple for the store admin. The Opencart store locator module is highly customizable and allows sharing maximum store details with the customers. Opencart Google Maps Store Locator extension also provides an option to set the pickup time, date, and delay from the admin interface. The online merchant can also send an email to the physical store end for notifying them about the in-store pickup order. Online users can easily pick up the ordered product from the selected stores.

Online users can easily place in-store pickup-based orders and grab the benefits of online deals and store discounts. Apart from that, they can place in-store pickup-based orders by which they can save delivery charges also. The Opencart store locator extension is highly effective and makes the overall process much easier.

Knowband is one of the most reputed names in the field of plugin development. We provide the best plugins for platforms like – Magento, Prestashop, OpenCart, and   Shopify.

Knowband Opencart store locator extension Module Link

The Knowband’s OpenCart store pick up extension Admin Demo link

Knowband Opencart Google Maps Store Locator plugin Front Demo link.

Opencart Store Locator Extension Youtube Video Link

Opencart store locator module marketplace link

For more support and information, feel free to contact us via email at support@knowband.com anytime.
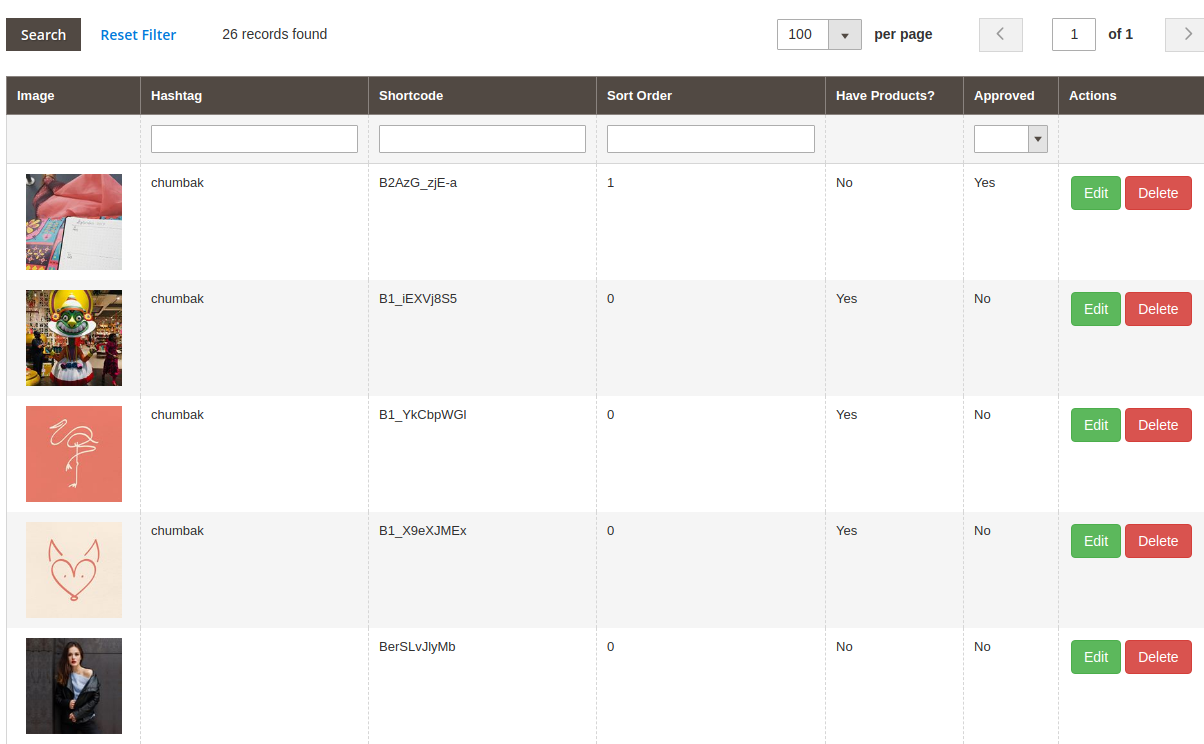
Prestashop Booking and Rental System Addon – User Manual

1.0 Introduction

Buying and renting services has now become a common scenario of online markets. People commonly prefer rental products and therefore shop owners have found their way in the rental business. So, which module to try for offering 24*7 booking and rental services to your customers. Prestashop Booking and Rental System addon by Knowband helps e-merchants in adding a wonder functionality to their online shop which is referred to as booking system. Yes, Prestashop Booking System is one great module to create a dynamic booking system for your online shop giving an option to set your pricing, maintain a calendar, appointment orders very effectively from the back-office. Using eCommerce booking system, online users can easily make time-date based bookings and appointments for various products.

Prestashop Reservation And Booking Module help you to add rental products and services to your Prestashop site. Prestashop Booking Calendar addon integrates flexible booking options and a user-friendly interface to the site. Customers can check real-time availability and relatively opt for rental or booking services from the online shop. So if you are planning to offer a rental, appointment or bookable services, this is the right one for you.

1.1 Striking Features of Prestashop Booking and Rental System Addon

To provide rental services that fit your customers need, Prestashop Reservation system module has offered multiple configuration settings so that you can effectively make your online business booking ready for the customers. The simple to use backend of Prestashop Booking Calendar addon is extremely easy to use without any technical operations or coding hassles.

The various key features provided by Prestashop Rental Booking System has been listed below.

1. Prestashop Booking and Rental System addon help store owners to convert their store into an online reservation and booking store that provides many kinds of rental, appointments and room booking services to the online users.

2. Creating and listing an appointment, daily rental product, booking room, hourly rental services is a time-saving approach with the help of Prestashop Booking Calendar addon.

3. Prestashop Booking System gives an intuitive interface to add the details for bookable product/services or appointment.

4. Admin can add suitable date ranges and time slots on the product page of booking product or appointments when their business services are available to the online users.

5. The total bookable orders with their status and associated customer details can be viewed from the back-office of this Prestashop Event Booking addon.

6. Prestashop admin can provide exciting deals and discount to their customers by flashing special price rules on the product pages. This will engage and add more traffic to the site which will impact the sales system as well.

7. Prestashop Booking Calendar addon builds a rental service schedule or appointment based on the features selected by the customers.

8. Admin can show the location with every bookable product/service using the Google Place Integration feature of Prestashop Reservation system module.

9. Prestashop Service Booking module offers flexibility to add, edit and delete unlimited bookable products to their eCommerce shop.

10. Prestashop Booking and Rental System addon allow you to add two kinds of bookable services for the users which include branch and home service.

11. Prestashop Booking System flawlessly supports multi-lingual and multi-store compatibility.

12. With Prestashop Reservation And Booking Module, admin can set the initial price for the rental services or appointments at their store.

13. They can disable booking and appointments for selective days or timing using this Prestashop Booking and Rental System addon.

14. The Prestashop admin can show multiple dates and time slots available for each bookable product or service.

15. Prestashop Booking Calendar addon provides an option to show custom rental service charges corresponding to the date-time slot selected by the customer.

16. Prestashop Event Booking addon allows admin to specify the different type, category and offered facilities with the rental room or hotel services.

1.2 Technology for Development

Language: PHP
Frame Work: Prestashop

2.0 Installation Guide for Prestashop Booking Calendar Addon

The store admin can follow these simple steps for installing the Prestashop Booking and Rental System addon on their eCommerce store:

1. First of all download the addon package from the Knowband store.

2. You will get a zipped file containing the source code and user manual. Unzip the complete package in the root directory of your Prestashop store through FTP manager (like Filezilla or WinSCP – download here: https://filezilla-project.org/). You’ll find the files and folders as shown in the image below:

The Prestashop Booking System is now installed and ready for use. Now the admin can configure the various configuration settings in accordance with their Prestashop site.

3.0 Admin Interface of Prestashop Rental Booking System

Just after successful installation of Prestashop Booking and Rental System addon at your website, you can configure the booking service setting as per your needs. In the admin panel or dashboard, you will find the Knowband Booking/Reservation module along with its sub-sections listed below.

This Knowband Booking/Reservation System comprises of seven sections which have been discussed further.

1.General Settings
2.Products
3.Booking Room Category
4.Booking Room Type
5.Booking Facilities
6.Booking Price Rules
7.Orders

Each Tab of the Prestashop Booking System has been discussed below:

3.1 General Settings

The General Settings of Prestashop Rental Booking System includes the basic configuration settings as:

1.Enable/Disable: This option enables or disables the complete functionality of the Prestashop Booking and Rental System at your store.

2.Google Map API Key: This option helps you to set the Google Map API Key. Once this unique API key is set from the backend, you can mark and display the location corresponding to every bookable product or service.

3.Display Price Rule: This option lets you show or hide the custom price rules over the product page of bookable product and rental service. To create a new price rule for different bookable products or edit the existing price rule, jump to the “Booking Price Rule” section of the dashboard.

3.1.1 How to generate the Google Map API key

The eCommerce store admin can generate the Google API key by following these steps:

  • Click on the “Get Started” button: The admin can click on this button to get Google map API key.

  • Pickup the products: When the admin will click the “Get Started” button this pop-up will be displayed.

  • Project selection: The eCommerce store admin can select or create a project.

1. Select a project:

2. Create a new project:

  • Setup the billing: The eCommerce store admin can now set up the billing.

  • After billing the store admin can get their Google map API key.
    On the Credentials page, get an API key:

  • The store admin can select the API key option:

  • The admin can select the restrict key option from the dialog box to set a browser restriction on the API key.

  • In the Key restriction section, the store admin can select HTTP referrers (web sites), then follow the on-screen instructions to set referrers.

  • This way the admin can set the Google map API key.

3.2 Products

Here, you can view the complete list of daily/hourly rental products, appointments and hotel booking services added at your eCommerce store. To edit the existing details for any type of booking product/service, click on the edit option corresponding to a product listing. If you want to delete a particular listing, click on Delete option shown in the drop-down option corresponding to the product. If you don’t want to delete, simply enable or disable the product manually.

To add a new rental product or booking room service or appointments at your store, click on the Add new Booking Product option at the top right corner of the admin panel of this Prestashop Booking and Rental System addon.

1. Click on the “+” button at the top right side of the admin interface.
2. Now select the type of product you want to add to your site. The four offered options include:

  • Appointment
  • Daily Rental
  • Hotel Booking
  • Hourly Rental

3.2.1 Add an Appointment Type Product

The Appointment type product contains the following information. In Appointment type of product, admin can show date/time slots. Admin has to set the appointment price on per day basis.

3.2.1.1 General Information

  • Enable or Disable Product: This option helps to enable or disable the current product.
  • Product Name: You can set the desired name for the product which is a mandatory field.
  • Product Reference: Set a unique reference code for the product which is a mandatory field.
  • Short Description: You can add a short one-line description for your product which displays under the product name.
  • Description: Give detailed information about the product in this field box.

  • Condition: Set the condition of the product stating whether it is new, refurbished or used.
  • Category: Select a particular category where you want to add and show this appointment service.
  • Default Category: You can choose a default category for the product using this field.
3.2.1.2 Booking Information

  • Service Type: This option lets you select the service type as a branch or home service.
  • Period Type: This option sets the period or schedule type that you want to display on the product page for the users. If the date is selected, then date schedules will be shown only. If the date/time option is selected then both date and time slots are shown to the customers.
  • Quantity: You can set the available quantity of bookable product or service for a day.
  • Price: You can set an initial price of the product per appointment that is shown to the user before they have done any service customization. After they have selected their product preferences, mainly date, and time schedules, the initial price is changed to the final custom price that they have to actually pay for getting service benefits.
3.2.1.3 Location

  • Show Map: You can turn Google Map ON or OFF visible at the frontend over the product page.
  • Address: This field specifies the exact location or address of that particular bookable product.
  • Longitude: This field sets the longitude coordinate of the specific location.
  • Latitude: This field sets the latitude coordinate of the specific location.
3.2.1.4 Image

  • Add new image to this product: You can add multiple images to describe your product. You can set the display order of these images. Also, you can set any of these images as a cover image for the rental service or booking service.
  • Caption: You can give a desired caption for the product images.
3.2.1.5 Date/Time

  • Disable Days: You can select all the days when the services are unavailable by the respective businesses.
  • Enter Date/Time Slot: You can create and display multiple dates and time slots on the product page. If the period type is selected as Date, then only date schedules will be shown at the backend. If the date/time is selected as period type, then you can add multiple time slots corresponding to every date range. This way you can map multiple time slots to a single date slot.
  • Final Price: You have to specify the final price corresponding to each date/time schedule added for the appointment. This final price is calculated during checkout based on customization done by the customer.
    Finally, save your created product.

3.2.2 Add a Daily Rental Product

The complete configuration settings for a rental product are the same as appointment type product.
Admin can show date/time slots for a daily rental product and can also fix a price corresponding to that schedule on per day basis.
The only difference occurs in the following listed settings:

  • Price: The initial price for the rental product is on a daily basis. Remember this is not the final price of the rental product.
  • Facilities: This option allows you to add multiple facilities that you are offering with the daily rental product. These rent type facilities have to be first created from the “Booking Facilities” section of the admin panel. Once created, you can map them here for the particular daily rental service.

3.2.3 Add a Hotel Booking Service

The Hotel Booking service or Room Booking service contains the following information. In this room booking service, the customer has to select the check-in and check-out dates so that the room availability can be checked.

3.2.3.1 General Information

  • Enable or Disable Product: This option helps to enable or disable the Hotel room booking service.
  • Product Name: You can set the desired name for the booking service which is a mandatory field.
  • Product Reference: Set a unique reference code for the booking service which is a mandatory field.
  • Short Description: You can add a short one-line description for your room booking service which displays under the product name.
  • Description: Give detailed information about the hotel service in this field box.

  • Condition: Set the condition of service stating whether it is new, refurbished or used.
  • Category: Select a particular category where you want to add and show this booking service.
  • Default Category: You can choose a default category for the booking service using this field.
3.2.3.2 Booking Information

  • Period Type: This option sets the period type as Date allowing you to add multiple date slots for your hotel service.
  • Price: You can set an initial price of the booking service on a daily basis that is shown to the user before they have done any service customization. After they have selected their product preferences, mainly date slot, this initial price is added with the final custom price that they have to actually pay for getting service benefits.
  • Min days: Set the minimum days for hotel booking service.
  • Max Days: Set the maximum days for hotel booking service.
  • Star Rating: Select and display the star rating of hotel room service.
3.2.3.3 Location

  • Show Map: You can turn Google Map ON or OFF visible at the frontend over the product page.
  • Address: This field specifies the exact location or address of that particular Hotel service.
  • Longitude: This field sets the longitude coordinate of the specific location.
  • Latitude: This field sets the latitude coordinate of the specific location.
3.2.3.4 Image

  • Add a new image to this product: You can add multiple images to describe your Hotel booking service. You can set the display order of these images. Also, you can set any of these images as a cover image for the room booking service.
    Caption: You can give a desired caption for the product images.
3.2.3.5 Date/Time

  • Enter Date/Time Slot: You can create and display multiple date schedules on the product page when your hotel services are available for the users. If there will be any conflict between the date/time range, the first occurrence will be applied.
  • Final Price: You have to specify the final price corresponding to each date slot schedule. This price is on a nightly basis. This final price is calculated during checkout based on the check-in and check-out time selected by the customer.
3.2.3.6 Rooms

This interface will list you all the existing rooms within the particular hotel booking service. You can edit the details/specifications for any available room or you can delete them if required.
You can create a new room under this hotel service with different room type, category, and offered facilities. For this, you have to simply click on the Add Room option present at the top right corner of the interface.

  • Enable: Enable or disable the room service.
  • Room Category: Select a particular category for room service. For this, you have to first create various categories from the “Booking Room Category” section of the admin interface. Then you have to map this room under the desired room category.
  • Room Type: Select a particular type for the room service. For this, you have to first create various room types from the “Booking Room Type” section of the admin interface. Then you have to map this room under the desired room type.
  • Additional Price: Set the additional price which is added to the initial price.
  • Quantity: Set the available quantity of rooms per day.
  • Check-in Time: Specify the check-in time for this room.
  • Check-out Time: Specify the check-out time for this room.
  • Upload Images: You can add multiple images describing the hotel room.
  • Select Facilities: Select multiple facilities that are offered with the room service. These facilities have to be first created from the “Booking Facilities” section of the admin interface. Then, you can easily map various facilities for this selected room.
3.2.3.7 Facilities

Under this section, you can map all the facilities that are being provided for the particular hotel service. These hotel facilities are also created from the “Booking Facilities” section of the admin interface.
Finally, save your created hotel/room service.

3.2.4 Add an Hourly Rental Product

The complete configuration settings for an hourly rental product are same as of daily rental type product. The customer has to pick a check-in and check-out date-time which specifies the duration for which they want the product.
The only difference occurs in the following listed settings:

  • Period Type: This option sets the period type as Date Type for the hourly rental product.
  • Quantity: You can specify the total quantity of that hourly rental product.
  • Price: This option sets the price of the product on per hour basis.
  • Min Hours: Set minimum hours for booking.
  • Max Hours: Set maximum hours for booking.

  • Disable days: Check the days on which the hourly rental product is unavailable for customer use.
  • Enter Date/Time slot: Create multiple date slots along with their final custom price on per hour basis.
  • Facilities: This option allows you to add multiple facilities that you are offering with the hourly rental product. These rent type facilities have to be first created from the “Booking Facilities” section of the admin panel. Once created, you can map them here for the particular hourly rental service.

3.3 Booking Room Category

You can view and manage the list of booking room category through this interface. You can even edit or delete an existing category. For adding a new booking room category, click on the “+” button at the top right place of the admin panel.

Fill the following details while creating a new booking room category:

  • Name: Set name of booking room category.
  • Description: Set a short description for the booking room category.
  • Active: Enable or disable the room category.

3.4 Booking Room Type

You can view and manage the list of booking room type through this interface. You can even edit or delete an existing room type. For adding a new booking room type, click on the “+” button at the top right place of the admin panel.

  • Name: Enter the name of room type.
  • Maximum Allowed Child: Set the maximum limit of allowed children.
  • Maximum Allowed Adults: Set the maximum limit of allowed adults.
  • Select Room Category: Select multiple room categories for this room type.
  • Active: Enable or disable the booking room type.

3.5 Booking Facilities

There are three kinds of booking facilities that can be created using this Prestashop Booking and Rental System addon.

1. Room: These facilities are mapped for particular room service.
2. Rent: These facilities are mapped for daily rental and hourly rental services.
3. Hotel: These facilities are mapped for a particular hotel booking service.

You can configure or delete the existing booking facilities from this interface. To add a new facility, click on the “+” button at the top right corner of the admin panel.

  • Title: Set a catchy title for the booking service.
  • Type: Set the booking service type for the offered facility. The three types include Room, Rent and Hotel.
  • Image Type: Specify the image type you want to use for depicting the booking facility. The two image type include Upload Image and Font Awesome.
  • Font Awesome Icon Class/Upload Image: If you have selected “Upload Image” type, then you have to browse a desired image from the local system. Else if you have selected the “Font Awesome Icon” type, then insert the font awesome class for that particular icon. For example, to depict the “Charging Port” facility, the font awesome class is “fa-plug”.
  • Activate: Enable or disable the booking facility.

3.6 Booking Price Rules

Price rules are basically created for specific products. This is a kind of offer or discount deal that you can use to entice the online users for grabbing that particular rental or booking service from the store.
The various price rules can be viewed and managed from a single interface under the Booking Price Rule Section. You can edit or delete the existing price rule. Additionally, you can create a new price rule for another bookable product on the store. To add a new booking price rule, click on the “+” button at the top right corner of the interface.

Specify the following field information while creating a new price rule.

  • Title: Set a desired catchy name for the price rule.
  • Select Product: Select the product over which you want to apply this booking price rule.
  • Date Type: Specify the date type from two options: Date Range and Specific Date.
    Start Date, End Date / Fix date: Enter the start date and end date if you have selected Date Range as Date Type. If you have selected the Specific Date option as Date Type then enter the fixed date to display the price rule.
  • Reduction Type: Set the reduction type as amount or percentage.
  • Reduction Value: If you have selected Amount as Reduction type then set the discount value you are offering to your customers. If you have chosen the Percentage type option, then set the discount percentage for the booking service.
  • Active: Enable or Disable the price rule.

3.7 Orders

Here, the admin can view the complete list of orders placed by the customers whether it is an appointment, room booking service, daily rental product or hourly rental product. The date and time of order, customer detail, payment type, payment value and order status is also visible in this backend report of Prestashop Booking and Rental System.

4.0 Front Interface of Prestashop Reservation And Booking Module

A) Appointment Type Product

B) Hotel Booking Type Service

Available Rooms in Super Deluxe Category

Available Rooms in Semi Deluxe Category

Available Rooms in Executive Rooms Category

Here you can see that there are no rooms in this category. This information is given to the frontend user in the form of an error message.

Available Rooms in Deluxe Category

Now as the customer will select the desired room from the list of available rooms, then they will be shown a new popup as given below.

This popup gives complete details about the room selected by the customer in accordance with their needs. Now as they click on the “Book Now” button the room booking service gets added to the cart which is shown below.

If the user wishes to check the booked room details again, they can simply click on the “Product Customization” link shown over the cart page.
This appears like the image below:

Order Confirmation Message on the frontend

Admin can also check the order details from the admin. The backend interface showing list of store orders looks like:

C) Daily Rental Type Product

D) Hourly Rental Product

E) Price Rule for Selective Products


For additional guidance, please refer to the tutorial video available below, which provides a step-by-step walkthrough of this module.


Magento Walmart Canada Integrator-User Manual

1.0 Introduction

Magento Walmart Canada Integrator offered by Knowband is an interface to synchronize the Walmart Marketplace with the Magento store. By using the Walmart API Key(Walmart Consumer ID, Walmart Private Key and Consumer Channel Type) the eCommerce store admin can connect the Walmart Marketplace with Magento store. With the help of Magento Walmart Canada Integration Module, the store admin can upload the products. Inventories, orders and shipping method from the backend of store.
Walmart is one of the largest profit generating company and has shown remarkable growth in few years. With the help of Magento Walmart Canada Integration Extension, the online merchant can easily list the products at the Marketplace and sync the orders from the Walmart Marketplace by running Cron jobs from the admin panel. Selling products at the Walmart Marketplace will enhance the popularity of the seller products on a large scale.

1.1 Features of Walmart Canada Magento API Integrator.

Walmart Canada Magento Integrator can be effortlessly installed by the eCommerce store admin.Technical Knowledge of the admin is not required to configure the Walmart Canada Magento Connector as no source code modification is required from the admin end. The various features offered by the Magento Walmart Canada API Integrator are:

  1. Walmart Canada Integrator offers a real time synchronization.No manual synchronization is required by the admin to sync the details from the Marketplace with eCommerce store and vice-versa.
  2. Even a non-technical store owner can set up the connection between Walmart Marketplace and Magento store. Connection can be established within few clicks.
  3. N number of profiles can be created in the backend of Walmart Canada Magento API integrator.
  4. Profile based listing helps in bulk product upload.
  5. Magento Walmart Canada Integrator allows the admin to map the categories and attributes of the eCommerce store with the Walmart Marketplace.
  6. The store admin can make changes in the inventories by editing the profile from the backend of Magento Walmart Canada Integration Module.
  7. Product listed at the Marketplace can be monitored from the backend of Magento Walmart Canada Integration Extension.
  8. Products can be renewed and deleted by the admin as per his choice from the admin panel of Walmart Canada Magento Integrator.
  9. With the help of Walmart Canada Magento Connector, the online merchant can even add shipping methods at the Marketplace.
  10. Magento Walmart Canada API Integrator offers admin the chance to win the BuyBox. The online merchant can reprice the products to win the BuyBox.
  11. Orders received at the Walmart Marketplace gets listed in the backend of Magento Walmart Canada API Integrator. Order status can be updated by the admin can by synced at the Marketplace by running the Cron job.
  12. The Online Merchant can monitor the error occurred while listing the product from the backend of the Magento Walmfrom the Marketplace with eCommerce store and vice-versa.
  13. The sellers can easily manage the lag time from the backend of Magento Walmart Canada Integration Extension.

2.0 Installation

Follow the following steps for installing Magento Walmart Canada Integrator:

  • Download the Walmart Canada Magento Connector package from Knowband store.
  • Unzip the package in the root folder of Magento setup via FTP panel.
  • In the admin panel go to the Walmart CA Marketplace.
  • The Magento Walmart Canada Integration Module is now ready to use.

2.1 How to connect the Walmart Marketplace with the Magento store using Magento Walmart Canada Integration Extension

To configure the Walmart Canada Magento Integrator, store admin needs the Walmart API key. In order to obtain the Walmart Consumer ID, Walmart Private Key and Consumer Channel Type, the admin needs to follow the following steps:

2.2 Walmart Canada Magento Connector API Activation

The store admin can obtain the Walmart Consumer ID, Walmart Private Key, Consumer Channel Type and other related details by following these steps:

  1. Login to your Walmart Seller Account.
  2. Click on the setting icon and then click on the API option at the bottom of the dropdown.
  3. Click on the Consumer Id and Copy the ID for future use.
  4. Click on the Regenerate Key to generate the Secret Key. A popup will appear in front of you.
  5. Click on the “Yes,Regenerate Key” on the Popup.
  6. Copy Consumer ID, Walmart Private Key, Consumer Channel Type and paste them in the respective options in the General setting tab of the Magento Walmart Canada API Integrator.

3.0 Admin Interface of Magento Walmart Canada Integrator

Magento Walmart Canada Integrator offers a User-friendly interface. After installation, the Magento CA Marketplace will be visible at the top of the admin panel. Magento Walmart Canada Integrator offers 14 tabs in admin panel for setting purpose.

  • General Settings
  • Profile Management
  • Shipping Carrier Mapping
  • Promotions
  • Shipping Override
  • Product Listing
  • Attribute Mapping
  • Order Setting
  • Order listing
  • Feed Status
  • BuyBox Report
  • Manage Lag Time
  • Tax Report
  • Sales Report
  • Product Sales Report
  • Synchronization
  • Audit Log

3.1 General Settings

In order to connect the ecommerce store with the Walmart Marketplace, the admin needs to fill all the mandatory fields in the general setting tab of Magento Walmart Canada Integrator. The input fields are described below:

1.Enable/Disable
The online Merchant can enable/disable the Walmart Canada Magento API integrator with a single click.
2.Walmart Consumer ID
Paste here the Consumer Id copied while login in Walmart Seller Account.
3.Walmart Private Key
Enter the private Key obtained while login in Walmart Seller Account.
4.Consumer Channel Type
Enter the consumer Channel to authenticate the integration between the Magento store and the Walmart Marketplace.
Click on the “Save Configuration” button at the top right side to complete the connection process.

3.2 Shipping Override

Walmart Canada Magento API integrator offers admin the acess to manage the shipping options at the Walmart Marketplace from the backend of the store. In the section, admin can create, edit and delete the shipping override as per his choice.

3.2.1 How to add a Shipping Template

Click on the “Add New” button at the top right of the Shipping override section.
A new page will appear in front of you. Fill all the mandatory fields to create the the a shipping template:

Shipping Override Title: Enter the shipping Override Title in this field.
Shipping Allowed: Admin can enable/ disable a shipping method with the click of a button.
Shipping Method: As per the requirement, admin can easily configure the shipping methods from the backend of Walmart Canada Magento API integrator. Shipping methods offered by the Walmart Canada Integrator are STANDARD and EXPRESS.

For further information on this, please refer to the following links:
https://marketplace.walmart.com/knowledgebase/articles/Article/Shipping-Standards-For-Marketplace-Sellers

Shipping Region: The online merchant can select the shipping region from the available choices.
Shipping Price: With Walmart Canada Magento API integrator the online merchant can set shipping price for various shipping regions and methods.

3.2.2 How to Edit and Delete the existing Shipping Override

Shipping overrides will get listed in the Shipping Override section of the Walmart Canada Magento API integrator. Click on the delete/edit buttons on the right side of the existing entries to delete and edit respectively.

3.3 Attribute Mapping

Attribute Mapping involves the mapping of the attributes of the eCommerce store with the attributes of the Marketplace. Attribute mapping helps in syncing the products from the store with the Marketplace. Attribute Mapping of the Walmart Canada Integrator helps in listing the products in an effortless way.

3.3.1 How to map the Attributes

The Store admin has the access to add and delete attributes from the backend of Magento Walmart Canada API Integrator. Click on the “Add New” button the top right of the section and fill all the mandatory fields to successfully map the attributes of the eCommerce store with the Marketplace.

3.3.2 How to delete the mapped Attributes

With Walmart Canada Magento Connector, the store admin can delete the mapped attribute with few clicks. The store admin can delete the mapped attribute by clicking the “Delete” button along the right side of the existing mapped attribute.

3.4 Profile Management

Unlimited profiles can be created, edited and deleted by the admin from the Walmart profile section of the Walmart Canada Magento Integrator. Profile based listing helps in bulk uploading of the products. Profile management section consists of two tabs: General settings and Profile Fields.


3.4.1 General Settings

With Magento Walmart Canada Integration Extension the store admin can map multiple categories of the eCommerce store with the categories of Magento Walmart. The store admin needs to fill all the mandatory details in the form to successfully submit the form. After filling all the details, the store admin needs to click on the “Submit Profile” at the top right side of the General setting section.

Profile Title: Enter a relevant name for the profile.
Store Language: The store admin needs to select the language available in the dropdown.
Walmart Category: The store admin needs to select the category type that he wants to map with the store category.
Store categories: With Magento Walmart Canada Integration Module, the store admin can select multiple categories for mapping with the category of the Walmart.
Custom Pricing: Custom pricing feature of the Magento Walmart Canada Integrator enables the admin to increase or decrease the product price at the Walmart with a fixed amount or percentage amount. Amount of price that admin wants to add or decrease is also set by the admin.
Barcode Identifier: With Walmart Canada Magento API integrator, the store admin can select the unique product field for the product. Barcode identifier will help to identify the product .
Product Brand Identifier: In this tab the admin needs to select the field having the value of product brand in your system.

Product Manufacturer Identifier: With Magento Walmart Canada Integration Extension, the admin can select the field with value equal to the product manufacturer in your system.
Customized Product Title: The store admin has the access to customize the product title from the list of place holders available. Selected placeholder will replaced by the dynamic value at the time of execution. The various placeholders available are:
{id_product} for Product ID
{product_title}for product title
{country_of_manufacture} for Country of Manufacturer
{sku} for Product SKU
{weight} for Product Weight
{short_description}for Product Short Description
{price} for Product Price
Shipping Override: This field helps the admin to select the shipping overrides for products from the list of options available.
Product Tax Code: With Product Tax Code field, the admin can provide the sales tax code for the products of the current profile.

3.4.2 Profile Fields

On the basis of the selected Walmart category, the admin can provide the additional information and values of the products while submitting the profile from the backend of Walmart Canada Magento Integrator.
Admin needs to click the “Submit Profile” button to save all the product information.

3.5 Products Listing

In Walmart Products listing tab, the admin can view the listed products at the Walmart Marketplace. Moreover Walmart Canada Magento Connector allows the admin to view the status of each product. In order to sync the products at the backend of the store, the admin needs to run the Cron job.

3.5.1 Renew a product

In case the product listing gets expired, the store admin can renew the product back at the Walmart Marketplace by clicking the “Renew” button next to the product. As soon as the product gets renewed, the button will be replaced by a “Halt” button.

3.5.2 Relist or Delete a product

If the admin wants to delete the product listed at the Walmart Marketplace, the store admin just needs to click the “Delete” button next to the product. At this time, Delete button will get replaced by the “Relist” button. The admin can relist the product back at the Walmart Marketplace by clicking the “Relist” button at the backend of the Walmart Canada Magento Integrator.

3.5.3 View Error

With Magento Walmart Canada API Integrator, the store admin can view the error occurred while listing the product. The store admin needs to click the “View Error” button to view the error.

3.6 Promotions

Various Promotional deals and offers can be run at the Walmart Marketplace from the backend of Magento Walmart Canada API Integrator. With the help of Walmart Canada Integrator, the store admin can run clearance and reduced price deals at the Walmart Marketplace.

3.6.1 How to create a New Promotion

The eCommerce store owner needs to click on the “Add New” button at the right side of the Walmart Promotions Listing section. As the admin clicks on the button, a new page will open in front of them. Fill all the mandatory fields in the displayed page.

Promotion Detail: Here enter the promotion details.
Price Type: The store admin can select the promotion type here. Admin can run a clearance and reduced promotion at the Walmart.
Discount Price: Here admin is supposed to enter the discount amount on the deals.
Start Date and End Date(UTC Timezone): Here enter the time duration during which the promotion will run at the Walmart Marketplace.
Product Selection: Admin can select the products or profiles on which he wants to offer the promotion.

3.6.2 How to Edit or Delete a Promotion

The store admin can edit and delete any existing promotion from the backend. Click the “Edit” and “Delete” button to perform the respective function.“Sync” button next to the promotion is used to sync the promotion at the Marketplace.

3.7 Manage Lag Time

The store admin can update the Lag time from the backend of the Magento Walmart Canada API Integrator. Lag time is used to avoid any shipping delay. Click on the “Update Shipping Lag Time” button to update the Lag Time.

A new popup dialog will appear in front you. Enter the Lag time in days and click on the “Update” button. This will update the Shipping Lag Time at the Walmart Marketplace.

3.8 Order Settings

In Magento Walmart Canada API Integrator, order setting tab can be used to map the order status at the store with the Walmart Marketplace. Cron jobs can be used to sync the order status at the Walmart Marketplace.

The various fields available at the Order Settings are:

Order Current State: Admin can Choose order Current Status here.
Order Shipped State: Admin can choose the order status for the shipped Orders placed at Walmart.
Order Acknowledge State: This field allows the admin to select the order state for the Acknowledge orders at Walmart store.
Order Cancel State: Select the order state for cancelled order at Walmart store.

3.9 Orders Listing

Order received at the Walmart gets listed at the backend of Walmart Canada Magento Connector.Admin needs to run the “Sync Order” tab to sync the orders from Walmart. To process the order, click on the “View” button next to the order received.

3.10 Feed Status

Multiple Cron Jobs can be run from the admin panel of the Walmart Canada Integrator. Every time a Cron is run, a feed gets created in the Walmart Feeds section. Complete detail of the feed can be viewed by clicking the “View” button next to the respective feed.

3.11 BuyBox Reports

Multiple Cron Jobs can be run from the admin panel of the
By clicking the “Sync Walmart BuyBox” button, cron job will be run to fetch the BuyBox report from the Walmart Marketplace. It might be possible that multiple competitors will be selling the same product at different price value. BuyBox report obtained will help the admin to compare the price of a product with the competitors product price.

With Multiple Cron Jobs can be run from the admin panel of the, admin can reprice the product value to win the BuyBox. Updated price can be synced at the Walmart by clicking the “Sync Repricing” in the Walmart synchronization section of Walmart Canada Magento Connector.

3.12 Synchronization

Walmart Synchronization section plays an important role in establishing the connection between the Walmart Marketplace and the store. Multiple cron jobs can be run to sync all the settings and changes from the Walmart store with the eCommerce store.


The various Cron jobs run to synchronize the settings and changes are as under:

Sync Products: This button helps the admin to sync all the product listed at the backend of Walmart Canada Magento API integrator to sync at the Walmart Marketplace. The cron job will add products with their mandatory product details at the Walmart Marketplace.

Sync Product Inventory: The following cron job is run to sync the quantity of the product at the Walmart Marketplace.

Sync Product Price: The following button will sync the updated product price at the Walmart.

Sync Orders: The following cron job will be used to sync orders from the Walmart Marketplace with the eCommerce store.

Sync Order Status: Updated order status can be synced at the Walmart Marketplace by running the Sync Order Status from the backend of Magento Walmart Canada Integration Extension.

Sync Feed Status: Feed status can be synced at the Magento store by running the following cron job.

Sync Shipping Lag Time: Lag time in days on shipping orders can be synced at the Walmart Marketplace by running the Cron Jobs.

Sync Walmart BuyBox: BuyBox report can be downloadable from the Walmart store by running the following Cron job. BuyBox report will help the admin to compare product price of various competitors.

Sync Repricing: Repriced value of products to win the BuyBox can be synced at the Walmart Marketplace by running the following Cron job.


3.13 Tax Code

Tax code section of Walmart Canada Magento Integrator enables the admin to view the tax code of the products in bulk. The online merchant can easily view the tax code of the inventories.

3.14 Audit Log

Tax code section of Walmart Canada Magento Integrator enables the admin to view the tax code of the products in bulk. The online merchant can easily view the tax code of the inventories.
All the Cron jobs executed can be viewed from the Audit Log section of the Magento Walmart Canada Integration Extension. Admin can easily view the status of each Cron job from the Walmart Audit Log section.

For further information, refer to the following links:

 Magento Walmart Canada Integration

Walmart Canada Magento API integrator Admin Demo


OpenCart Preferred Delivery Time Extension

1.0 Introduction

These days online customers demand product delivery as per their preferences. Now the online store admin can offer functionality to select the preferred delivery date and time. Knowband offers OpenCart preferred delivery time extension which is highly customizable and allows the admin to offer delivery date and time selection option on the website. The customers can get the ordered product on their preferred date and time which will improve their shopping experience.

The store admin can apply settings to show available dates and time slots for delivery. By allowing the customers to select the preferred date and time, the store admin can improve their store experience. The customers can select the date and time for order delivery. This is also beneficial for those sites who deliver gifts, cakes, cards and bouquets for special occasions like birthday, anniversary or any other special occasions. The Preferred delivery date and time module For Opencart is highly customizable and the store admin can apply the settings without any technical help. The admin just needs to select the options according to the requirements. Admin can also make the preferred delivery date and time selection for the customers.

1.1 Basic Features of this OpenCart preferred delivery time module

  • The store admin can offer functionality to select preferred delivery time and date for the ordered product without any hassle.
  • The online users can easily choose the date and time when they want the product to be delivered.
  • As an e-merchant, you can also allow the customers to update the selected date and time even after placing the order.
  • The OpenCart prefer delivery date module displays a calendar with available delivery days and time-slot for date and time selection.
  • The store admin can set the time slot range and also show an incomplete time range from the admin interface of this preferred delivery date and time module.
  • The store owner can set the time slot range from the admin interface of this OpenCart prefer delivery plugin.
  • As a store owner, you can set the start and end time for delivery.
  • The OpenCart preferred time module allows the store admin to select those days when he doesn’t want to offer delivery.
  • The store admin can also set the order status from the admin interface of this preferred delivery date and time extension.
  • There is no need to change even a single line of codes for implementing this functionality of preferred delivery date and time selection.
  • Admin can set the delivery days gap from the admin interface of this OpenCart preferred delivery time module.
  • The Preferred delivery date and time module For Opencart is mobile responsive.
  • The OpenCart prefer delivery time extension supports all the OpenCart themes.

2.0 Installation

First of all, buy the OpenCart preferred delivery time extension from the Knowband store.

After that, you will receive these files on your registered email.

  1. Source code file of Preferred delivery time extension in zipped file format.
  2. User Manual of this OpenCart preferred delivery time module.

For installing this OpenCart preferred delivery time module on your website you have to follow these steps:

1. Now unzip the received zip file. You will get the folders as shown in the below-mentioned image:

2. Copy all the folders of the zip file in the Root Directory of OpenCart setup via FTP manager.

So, OpenCart preferred delivery time module is now successfully installed and ready to use at your store.

Now go to the admin menu and click on the extensions and thereby click on configure button next to prefer delivery time extension.

3.0 Admin Interface

The online store admin can apply the settings for offering preferred delivery date and time functionality on the store. These are the customization options available at the admin interface of this OpenCart preferred delivery date and time extension:

  • Enable: The online store admin can activate or deactivate the OpenCart preferred delivery time module easily.
  • Preferred Delivery is mandatory: The store admin can make preferred delivery facility mandatory by selecting the option. In this case, the customers need to set the delivery date and time to continue.
  • Delivery Days Gap: The preferred delivery date and time module allow the store admin to set the delivery days gap. The customers will be able to select preferred days after 10 days gap.
  • Delivery Hour Gap: The store admin can add delivery hour gaps in the mentioned text fields. Once the hour gap is added, the customer can only select the preferred delivery time only after the mentioned delivery hour gap.
  • Delivery Minute Gap: Like delivery days gap and delivery hour gap, the admin can add delivery minute gap in the following text field.
  • Allow Time Slot: The store admin can also enable the settings to show time slots on the preferred delivery and time section.
  • Custom Time Slot: The admin can add custom time slots for which they want to allow the customers to select preferred delivery time.
  • Time Slot Range: Enter the time slot range from the admin interface of this OpenCart prefer delivery time module. For example, if time slot range is 3 then time can be from 03:00 to 06:00, 06:00 to 09:00.
  • Start Delivery Time: Set the starting time in 24 hours format.
  • End Delivery Time: Fix the end time in 24 hours format.
  • Allow Incomplete Time Range: Admin can also allow incomplete time range from the admin interface.
  • Maximum Calendar Days: The OpenCart prefer delivery time extension allows the store admin to set the maximum calendar days available for preferred delivery.
  • Delivery not available during these days: The admin can choose those days when product delivery will not be available.
  • Allow Post Order Delivery Update: Admin can allow or disallow the customers to update the preferred delivery date and time even after placing the order.
  • Select the order status: Admin can select the order status for which the customers can change their preferred delivery date and time.
  • Enter the time limit in hours: The online store admin can set the time limit in hours. The customers can update the preferred delivery days and time within this time duration.
  • Hint for preferred delivery time update: Admin can set any hint or message for the delivery date and time update.
  • Send Mail with Order Confirmation: The OpenCart store admin can enable/disable order success emails after completing the orders by selecting Preferred delivery time.
  • Mail Template: The store admin can modify the order confirmation email template as per their brand’s need.

4.0 User Interface

The customers can view the preferred delivery date and time selection option on the checkout page. They can select the date and time for delivery and get the product on the preferred date and time.

Customers can select the days from the calendar as shown below:

Customers can select the time from available time slots as shown below:

In order details, the customers can view the preferred delivery date and time details.


Admin can also allow the customers to update the selected date and time for delivery. The customers can update it and save the settings.

The customers can easily select the preferred delivery date and time from the available options and get the delivery on their selected time. The OpenCart prefer delivery time module makes the overall implementation very simple and hassle-free for the customers. Admin can fully control the process by making delivery date and time selection mandatory/optional, creating time slots, delivery days gap and maximum calendar days. The customers can get an e-mail along with the delivery date and time information. The Preferred delivery date and time module For Opencart is mobile responsive.

Tutorial: Watch the Video Guide of Opencart Preferred Delivery

To help you set up and use the Opencart Preferred Delivery Time Extension, we’ve created a detailed YouTube tutorial. The video walks you through the installation process, configuration options, and step-by-step instructions to manage preferred delivery dates and times effectively.

Watch the tutorial here:


Knowband is one of the most reputed names in the field of plugin development.

We provide best plugins for platforms like  Magento,  Prestashop, OpenCart and   Shopify.

Knowband OpenCart preferred delivery time extension Module Link

Knowband OpenCart prefer delivery time extension Admin Demo Link

Knowband OpenCart preferred delivery time module Front-end Demo

Knowband OpenCart prefer delivery time plugin User Manual

Knowband OpenCart prefer delivery time extension Youtube Video Link

Preferred delivery date and time OpenCart Marketplace Link

For more support and information, feel free to contact us via email at support@knowband.com anytime.
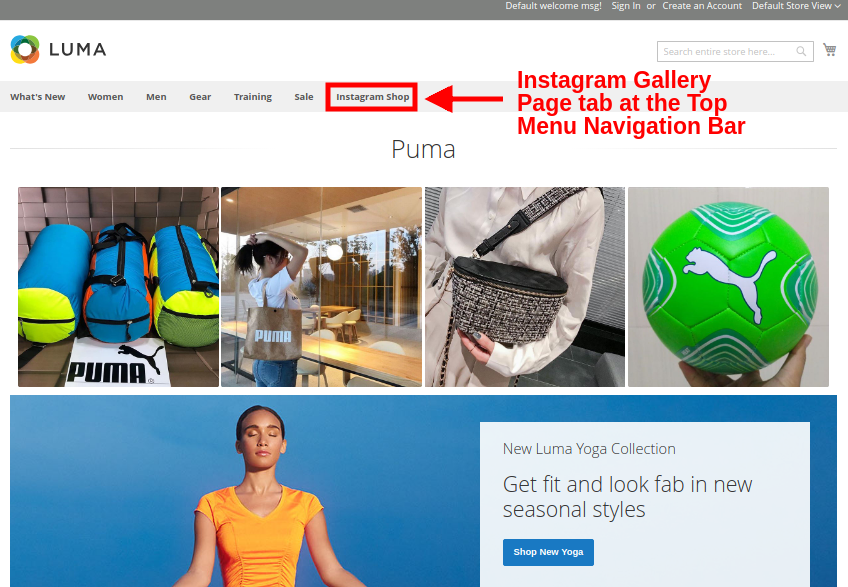
OpenCart Block Bot/User by IP, Country or User Agent Extension – User Manual

1.0 Introduction

If you own an eCommerce store, it is surely at risk of threats and dangers. The Internet space is full of automated programs referred to as bots, which may be good or bad. The bad or malicious bots are designed to perform repetitive tasks at high speed which reduces the loading speed of your website. In order to safeguard your online store from vulnerable threats and spam users, OpenCart Block Bot module from Knowband offers a spam blocker solution that allows the e-merchant to ban specific IP, country or user-agent. This anti-bot solution provided by OpenCart Block User Extension is a smart way to prevent the access of malicious users on the website and thereby improving the shopping experience of the genuine users of the store. OpenCart Spam Blocker module offers you great flexibility to intelligently filter out the suspected bot traffic on the store. Hence eliminating the chances of unwanted threats and spams on the store.
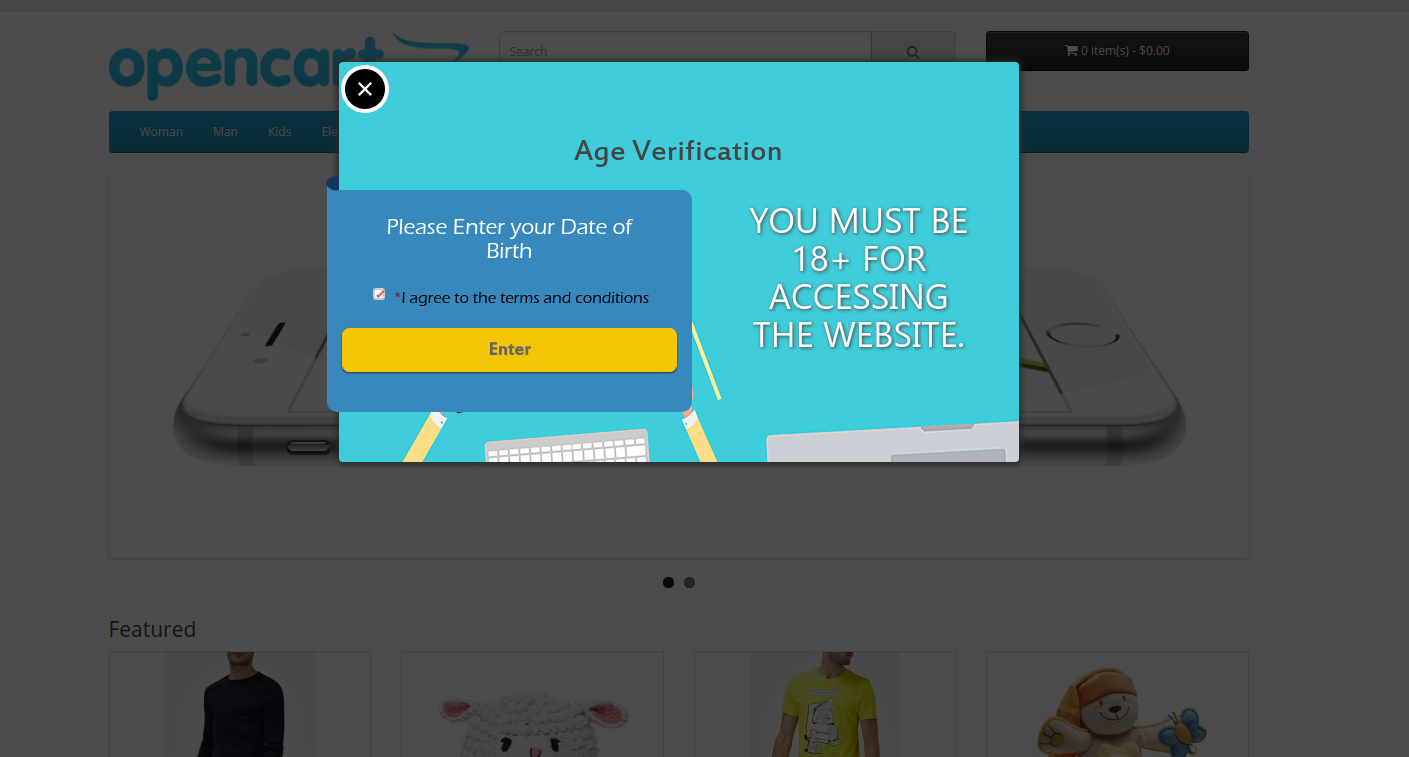
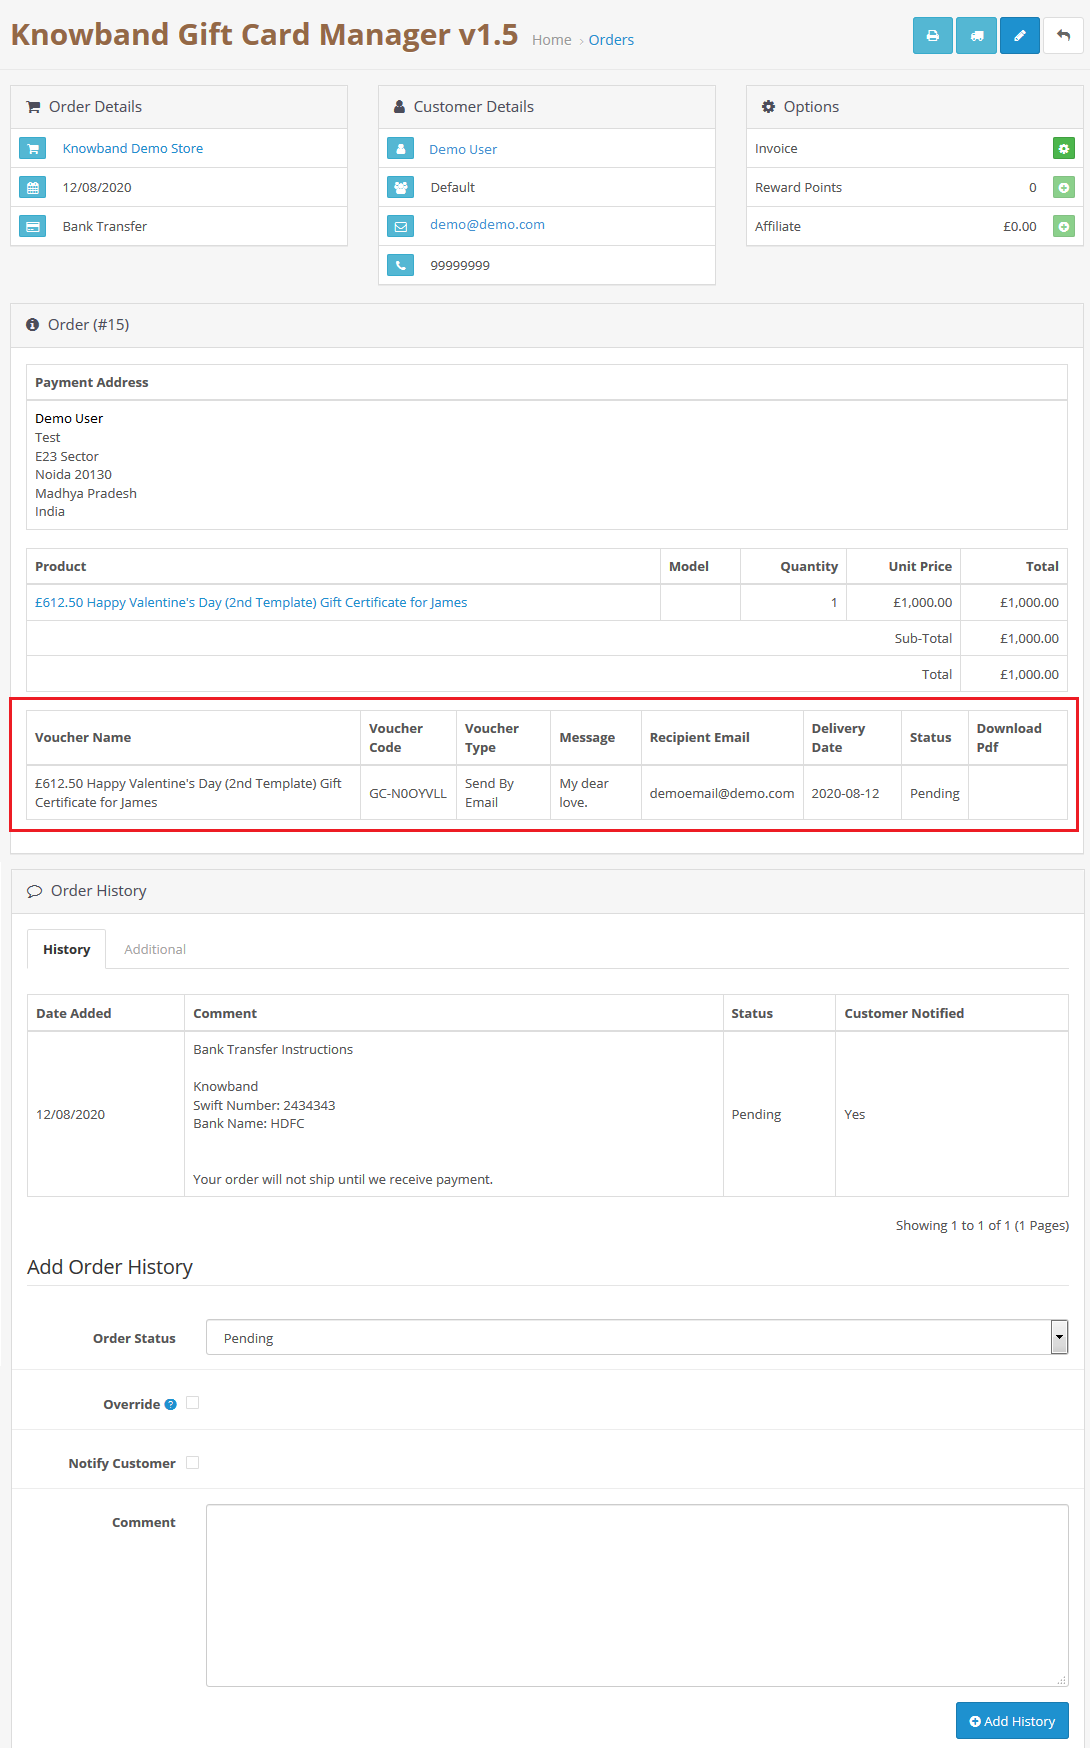
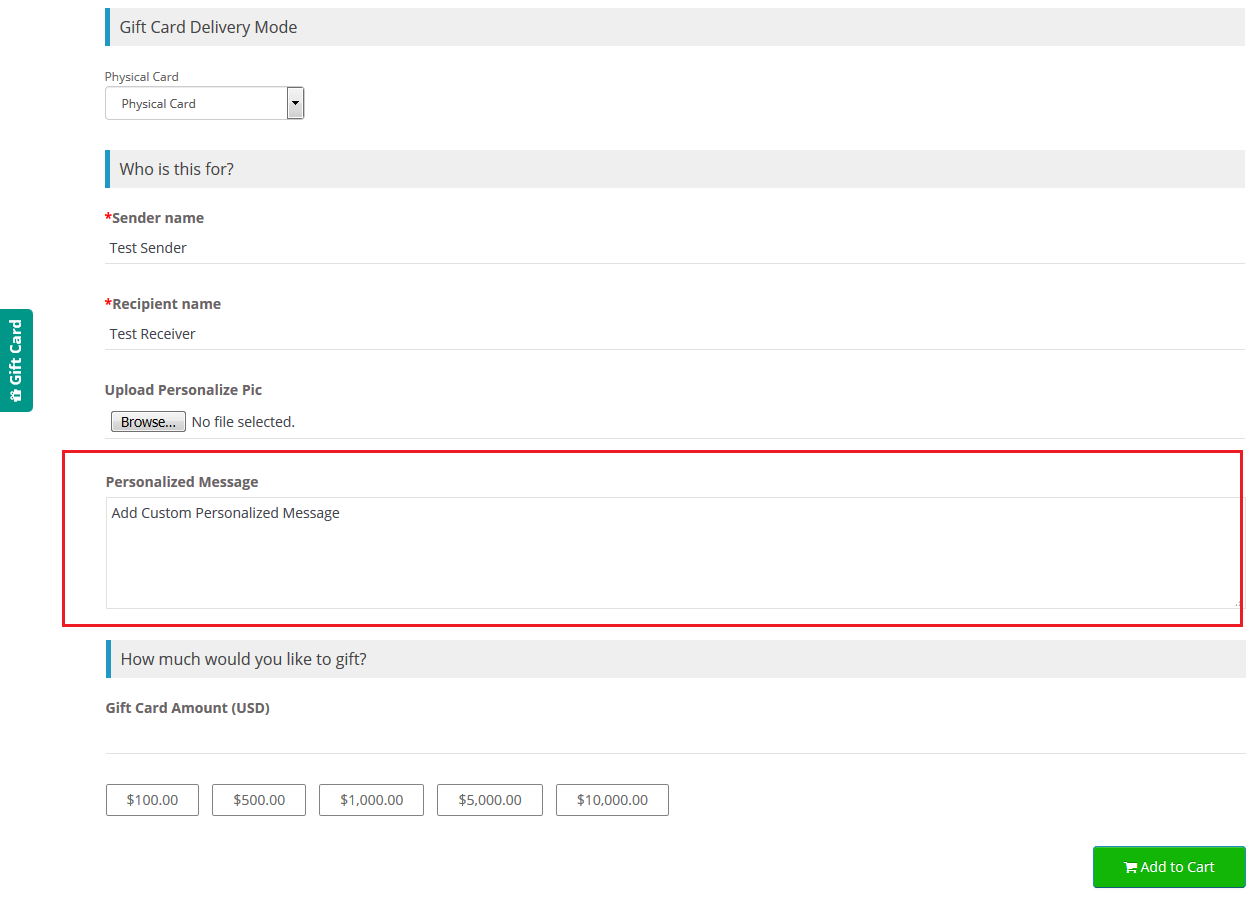
1.1 Striking Features of Spam Block Bot Extension for OpenCart

1. OpenCart Block User extension offers an effortless means to restrict the entry of the suspected users/bots based on their IP, country or user-agent.

2. IP Spam Blocker for OpenCart bans the unwanted traffic on the website and thus helps to maintain spam free traffic from the genuine users of the store.

3. The unblocking option eases the admin in getting back their real customers who are mistakenly blocked from accessing the website.

4. OpenCart Spam IP Blocker module gives flexibility to e-merchants in showing a custom block message to the frontend customers.

5. The multiple types of blocking options allow admin to block fraudulent orders and spam requests on their store from a specific IP or particular country.

6. OpenCart Blocker stops the malicious bots from unnecessarily crawling your website.

7. Blocking functionality of OpenCart Spam IP Blocker helps to safeguard your site from unauthorized users and their malicious content.

8. Opencart Blocker considerable improves the website loading speed by eliminating the irrelevant traffic through bad bots or users.

9. This anti-bot solution from OpenCart Block User module prevents harmful bots from running your website.

10. By implementing the Block Bot extension for your OpenCart store, you can prevent the data attacks and thereby ensure the privacy and confidentiality of customer information.

11. This Blocker module supports multiple languages which add to ultimate user experience.

12. OpenCart Block Bot by IP module helps to reduce server loads and bandwidth costs.

13. Block spam traffic by malicious bots and enhance the user shopping experience using this OpenCart Block User/bot by IP, Country or User Agent extension.

2.0 Installation Guide of OpenCart Block Bot module

Before starting the installation process, you have to buy the OpenCart Blocker extension from the Knowband store. Once purchased, you will receive the following files on your registered email.

  • Source code file of OpenCart Block Bot module in zipped file format.
  • User Manual of OpenCart IP Spam Blocker Extension

Now in order to install OpenCart Block Bot module for your website, follow the given steps:

1. Unzip the zip file. You will get the folders as shown in the image below


2. Copy all the folders of the zip file in the Root Directory of OpenCart setup via FTP manager.

So, OpenCart Spam Blocker extension is now successfully installed and is ready to use at your store. Go to the admin menu and click on the extensions and thereby click on configure button next to Blocker.

3.0 Admin Interface of OpenCart Block Bot module

Just after successful installation of OpenCart spam blocker module on your website, you can configure the blocker settings as per your requirements. Navigate the settings in the given order: Admin Panel > System > Knowband Extensions > Blocker

The simple to understand admin interface of OpenCart Blocker extension is divided into six sections namely:

1.Module Configuration
2.Block by IP Address
3.Block by Country
4.Block by User Agent
5.Blocker Customer Request
6.Allowed IP

Each of these sections have been discussed in detail below.

3.1 Module Configurations

  • Under this tab of OpenCart block Bot by IP module, you can modify the following listed basic settings.
  • Status: This option of Blocker extension allows you to enable or disable the blocker functionality for their store.
  • Display Custom Message: You can enable or disable the block message shown on the frontend to the banned users.
  • Custom Message: This option lets you set a specific block message for the front end users. You can set this custom message in French language also.
  • Include Header/Footer on Page: You can enable or disable this option. If enabled then the header footer content is shown on the frontend to blocked users.
  • Email Notification: You can enable or disable the notification for customer unblocking requests.
  • Mail Subject: This option sets the mail subject line which is shown as a notification email subject when the user sends an unblocking request to the store owner. This mail subject can also be specified in French language.

After all the settings of OpenCart Blocker are done, click on the “Save” button shown at the top right corner of admin panel to save the module settings.

3.2 Block by IP Address

As shown in the above screen image, the admin can easily view, manage and delete the various IP based banishment from the back-office.


If the admin wants to create a new IP ban, they can create by simply specifying the IP address and marking its status as enabled.

3.3 Block by Country

If the admin wants to restrict complete users of a particular country, then they can block it under the Block by Country section of the admin interface.
They have to simply select the desired countries and mark their block status as enabled.

3.4 Block by User Agent

To ban or restrict the users coming through a particular user agent like Mozilla or Chrome, ban the specific user-agent under the Block by User Agent section of backend.


3.5 Blocked Customer Request

You can view and manage the unblocking request by different customers of the store along with their details like Email ID, message, IP address, country and request date. If you find the customer is genuine, you can unblock them easily from the backend.

3.6 Allowed IP


If required, you can explicitly specify the particular IP to which you want to give access to the website. These can be edited or deleted as required.

4.0 Front Interface of OpenCart Spam Blocker Module

As the visitor enters to the store, they will see a block error message on their frontend. The user might be blocked based on IP, country or user-agent. If allowed by the admin, they can only see relevant header and footer information on their screen. The banned users of the store are allowed to send a unblocking request to the store merchant. If there request is approved by the admin, they can see the website content else they are totally restricted to access the site services.

The block interface takes the email ID and unblock message from the banned user of the store and shows the acknowledgment message as shown in the image below.