1.0 Introduction
A smooth and mobile-friendly user interface is the core of successful eCommerce websites. To create a fully mobile responsive layout system for the mobile and tablet users, Google Accelerated Mobile Pages(AMP) plugin has taken place into the market. The Google AMP pages are lite and optimized version of your site pages providing a quick responsive UI to the device users. OpenCart Accelerated Mobile Pages Extension by Knowband is one such tool to add Google AMP functionality to your online shop to capture mobile users through smartphones and tablets. Opencart AMP pages improve the web browsing experience by decreasing page load times. Faster mobile browsing is the only way where new customers will dive in and get motivated to purchase order.
More than 60% of your customers are mobile-based so it becomes important to create the AMP pages of store home page, category pages, product pages and CMS pages with the help of OpenCart Accelerated Mobile Pages Module. OpenCart AMP focuses on light content that increases the overall page speed and reduces the bounce rates. The reduced page load time contributes to the growth of traffic and SEO ranking.
1.1 Striking Features
OpenCart Accelerated Mobile Pages plugin offers additional features to the OpenCart site owners. Let us explore one by one.
1. OpenCart Accelerated Mobile Pages Extension adds optimized AMP pages to your website which are instantly loaded on mobile and tablet devices.
2. With the help of the Google Accelerated Mobile Pages(AMP) plugin, you can add Accelerated Mobile Page functionality to the home page, category pages, product pages, and CMS pages.
3. Knowband’s Accelerated Mobile Pages Extension for OpenCart provides an option to customize the home page, category pages, product pages, and CMS pages settings form the back-office.
4. You can upload a desired business logo for the AMP pages. Moreover, you can set the width and height of the site logo.
5. OpenCart AMP extension gives an option to display the bestsellers, new arrivals, and featured products on the home page. The e-merchant can set the number of featured products to be shown in a particular section and can be displayed in random order.
6. OpenCart Accelerated Mobile Pages Module provides an option to add social media sharing on the AMP mobile pages. The store admin can add extra icons apart from the ones provided with the Accelerated Mobile Pages Extension for OpenCart.
7. By using the Google Accelerated Mobile Pages Module, the OpenCart admin can automatically generate AMP sitemap with the help of a CRON job. They just have to click the Update Sitemap button.
8. Knowband’s OpenCart Accelerated Mobile Pages Addon supports Google Analytics allowing admin to enter the Analytics client Id for tracking the AMP performance.
9. Google Accelerated Mobile Pages Module for OpenCart supports multiple languages.
10. With the help of OpenCart Accelerated Mobile Pages Extension, the admin can set color and background color for AMP website and other different blocks of AMP.
11. To add more information to the AMP, admin can display YouTube, Vimeo and DailyMotion videos on the homepage of mobile pages.
12. Google Accelerated Mobile Pages(AMP) module allows lets you feature Instagram and Twitter feeds on the homepage.
13. The look and feel of cookie consent bar can also be changed from the back-office of Accelerated Mobile Pages Extension for OpenCart.
14. Store merchants can display advertisement on all the Mobile Pages by including Google Adsense from the admin interface of this OpenCart extension.
15. Store merchants can also implement Facebook pixel functionality on the mobile pages which helps you track the AMP website visitors.
16. OpenCart AMP module allows you to update AMP SEO URL on a single click.
2.0 Installation Guide
Before starting the installation process, you have to buy the OpenCart Accelerated Mobile Pages Extension from the Knowband store. Once purchased, you will receive the following files on your registered email.
- Source code file of OpenCart AMP Module in zipped file format.
- User Manual of OpenCart AMP Module.
Now in order to install this OpenCart AMP extension for your website, follow the given steps:
1. Unzip the zip file. You will get the folders as shown in the image below
2. Copy all the folders of the zip file in the Root Directory of OpenCart setup via FTP manager.
So, OpenCart Accelerated Mobile Pages plugin is now successfully installed and is ready to use at your store. Go to the admin menu and click on the extensions and thereby click on configure button next to Knowband AMP Pages.
3.0 Admin Interface
Just after successful installation of Google Accelerated Mobile Pages(AMP) plugin on your website, you can configure the AMP settings as per your requirements. Navigate the settings in the given order: Admin Panel > Extensions > Knowband AMP Pages.
The simple to understand admin interface of OpenCart Accelerated Mobile Pages Module is divided into nine sections namely:
1.General Settings
2.Home Page Settings
3.Category Page Settings
4.Product Page Settings
5. Look & Feel Settings
6.Social Media
7.Extra Icon
8.Tracking
9.Sitemap
Each of these sections has been discussed in detail below.
3.1 General Settings
The general settings of Google Accelerated Mobile Pages(AMP) plugin consist of the following configuration options: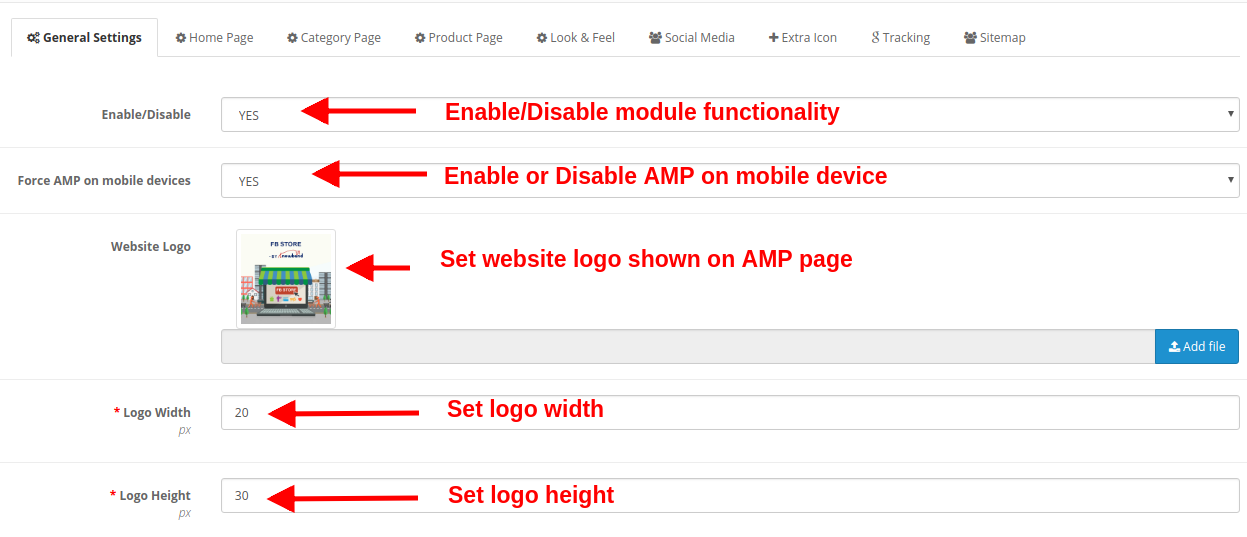
- Enable/Disable: The whole functionality of OpenCart Accelerated Mobile Pages Module can be enabled or disabled just by selecting Yes or No.
- Force AMP on Mobile Devices: This option enables or disables Google AMP functionality for mobile devices only.
- Website Logo: The website logo shown on the AMP mobile pages can be changed by uploading a new image file.
- Logo Width: This option sets the width for the logo image in pixels.
- Logo Height: This option sets the height for the logo image in pixels.
- Enable GDPR Cookie Consent Bar: This option enables or disables GDPR cookie consent bar for all the AMP mobile pages of the website.
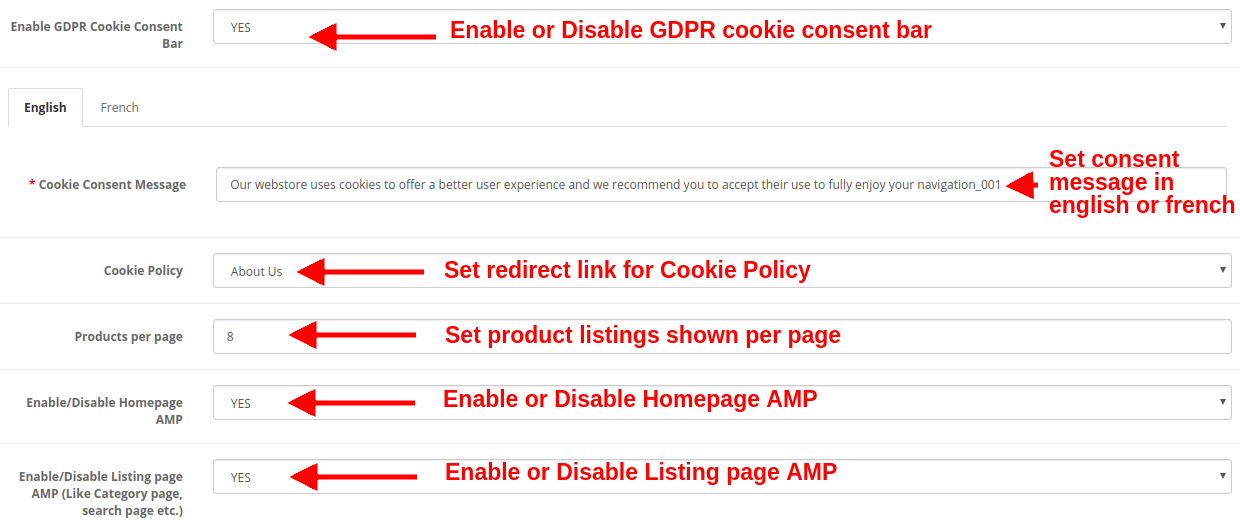
- Cookie Consent Message: This option allows you to set a cookie consent message shown on the consent bar. You can set this text in both English and French language.
- Cookie Policy: This option lets you set the URL for Coolie policy. When the user clicks the cookie policy text they are redirected to this specified page automatically.
- Products per Page: This option specifies the count of product listings on the category pages of the site.
- Enable/Disable Homepage AMP: This option enables or disables Google AMP on the Homepage of the website.
- Enable/Disable Listing Page AMP: This option enables or disables Google AMP on listing pages like category page, search page, etc.
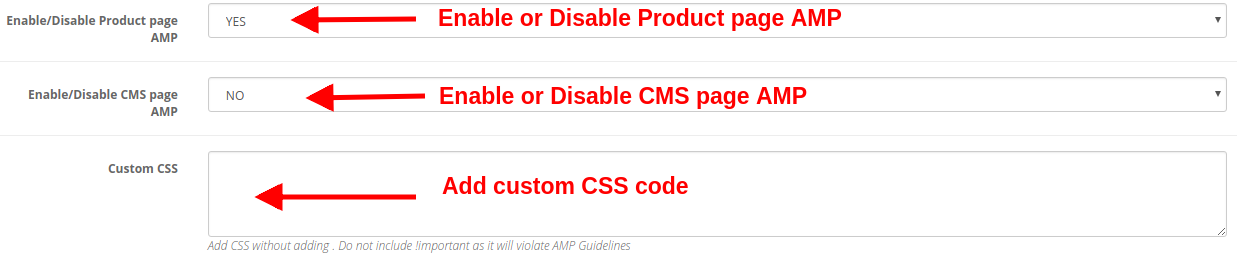
- Enable/Disable Product Page AMP: This option enables or disables Google AMP on product pages of the website.
- Enable/Disable CMS Page AMP: This option enables or disables Google AMP on different CMS pages of the site.
- Custom CSS: You can include custom CSS code to improve the front-end functionality of AMP mobile pages.
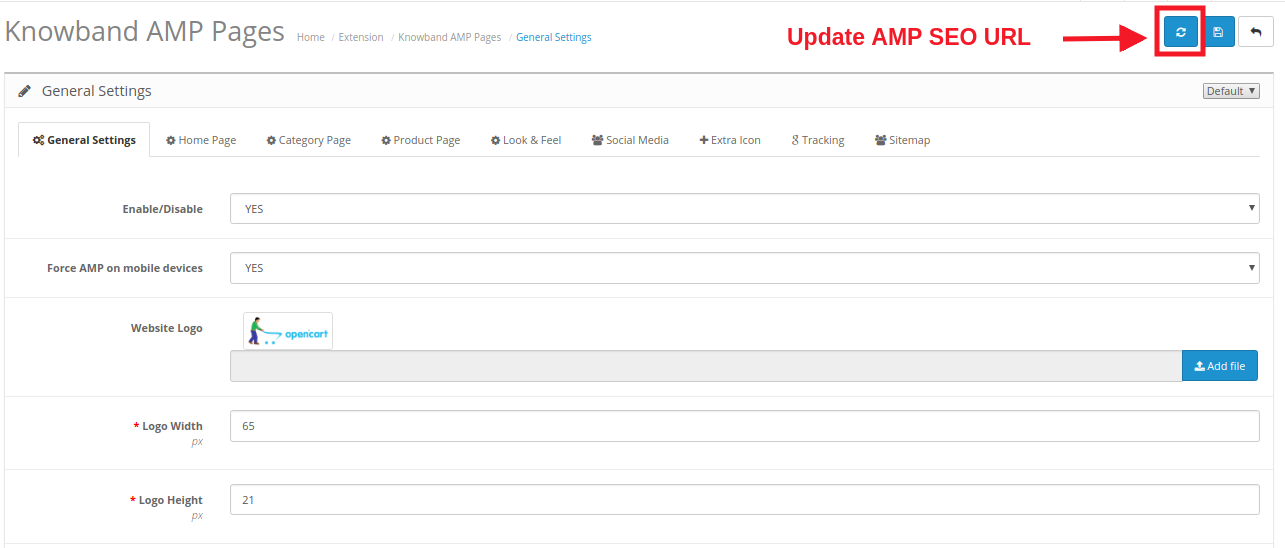
By clicking on the “Refresh” button shown in the General Settings of Knowband AMP module, the default URL is automatically updated to AMP SEO URL.
3.2 Home Page Settings
You can configure the AMP settings for the site’s Homepage. These settings are not applied to the other pages like category page, product page, etc. The various settings include: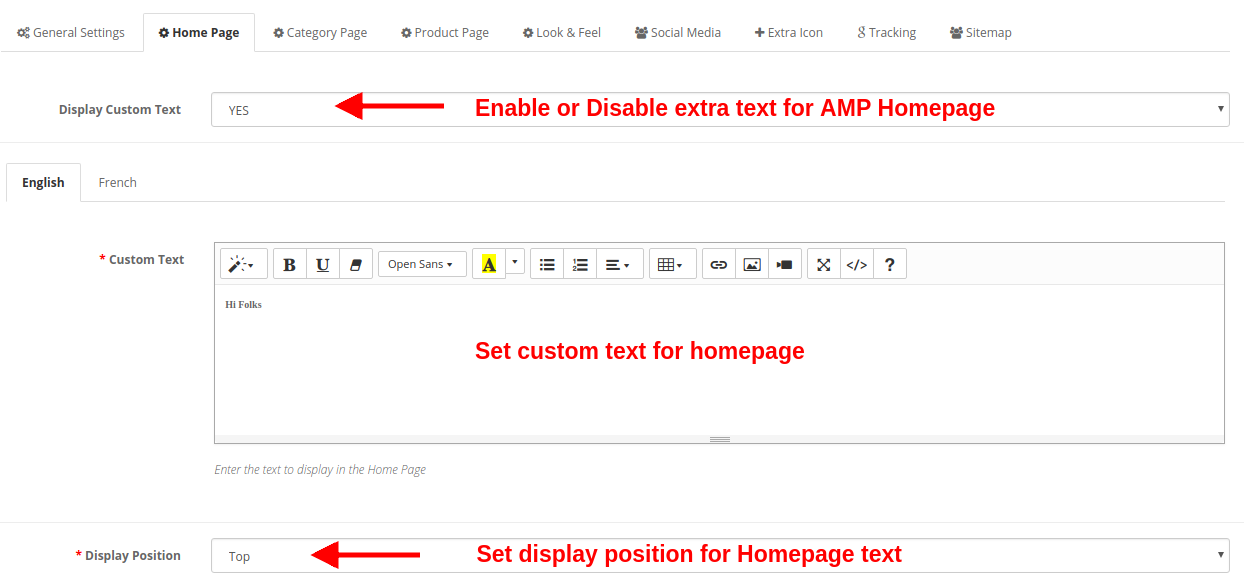
- Display Custom text: Using this option, you can set a desired text on the product page. This extra text can be enabled or disabled as per needs.
- Custom Text: You can specify the desired text you want to show on the Homepage. This custom text can be set in both English and French language.
- Display Position: You can set a specific location where you want to show this custom text. You can show at the top or bottom of the page.
a) Featured Products Settings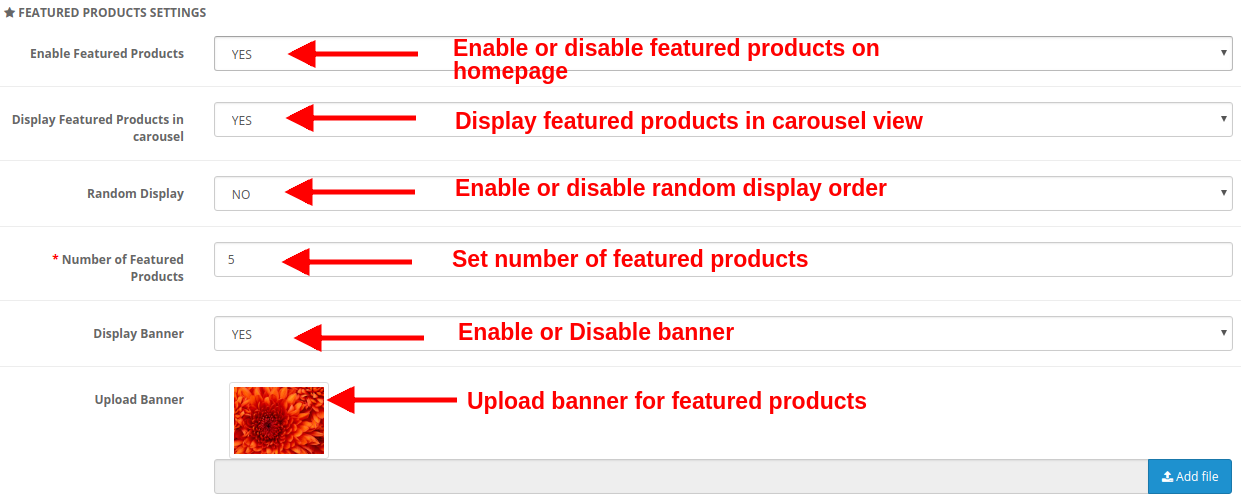
- Enable Featured Products: This option lets you to enable or disable the featured products shown on the product page.
- Display Featured Products in Carousel: You can enable this option to display the featured products in carousel view. If disabled, the products will be shown in the standard format.
- Random Display: This option if enabled shows random featured products. Every time the customer will see random products in the featured category. If this option is disabled, the products will be the same every time.
- Number of Featured Products: You can fix the number of products shown in the featured products section of the Homepage.
- Display Banner: Enable or disable the banner shown on the featured products section of the homepage.
- Upload Banner: This option lets you upload or select the image file you want to show as a banner for featured products.
b) Best Selling Products Settings
- Enable Best Selling Products: This option lets you enable or disable the best selling products shown on the product page.
- Display Best Selling Products in Carousel: You can enable this option to display the best selling products in carousel view. If disabled, the products will be shown in the standard format.
- Random Display: This option is enabled shows random best selling products. Every time the customer will see random products in the best selling category. If this option is disabled, the products will be the same every time.
- Number of Best Seller Products: You can fix the number of products shown in the best selling products section of the Homepage.
- Display Banner: Enable or disable the banner shown in the best selling products section of the homepage.
- Upload Banner: This option lets you upload or select the image file you want to show as a banner for best selling products.
c) New Arrival Products Settings
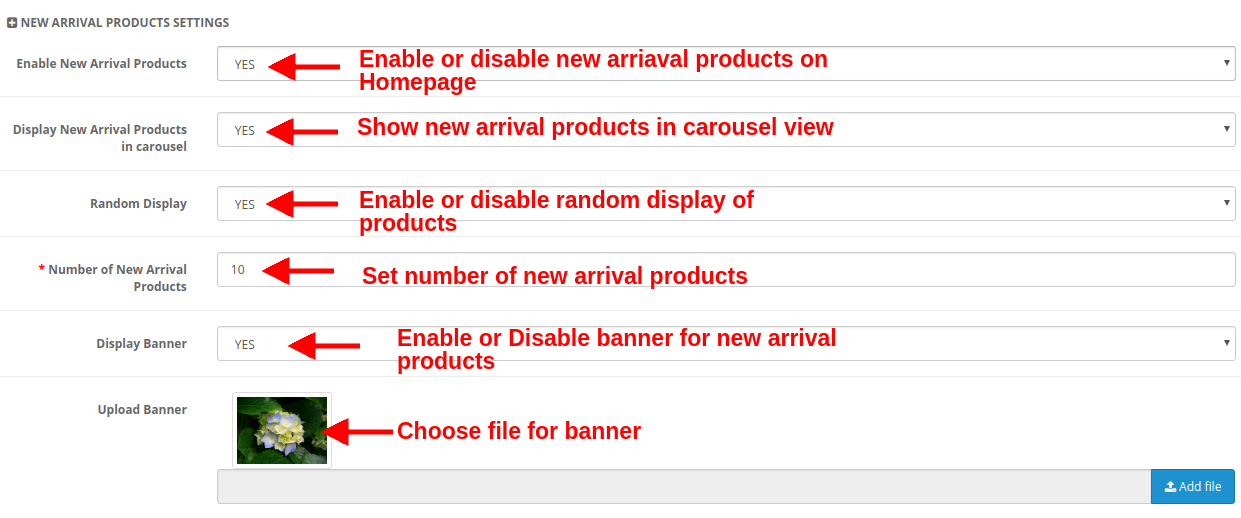
- Enable New Arrival Products: This option lets you enable or disable the new arrival products shown on the product page.
- Display New Arrival Products in Carousel: You can enable this option to display the new arrival products in carousel view. If disabled, the products will be shown in the standard format.
- Random Display: This option if enabled shows random new arrival products. Every time the customer will see random products in the new arrival category. If this option is disabled, the products will be the same every time.
- Number of Best Seller Products: You can fix the number of products shown in the new arrival section of the Homepage.
- Display Banner: Enable or disable the banner shown in the new arrival products section of the homepage.
- Upload Banner: This option lets you upload or select the image file you want to show as a banner for new arrival products.
d) YouTube Video
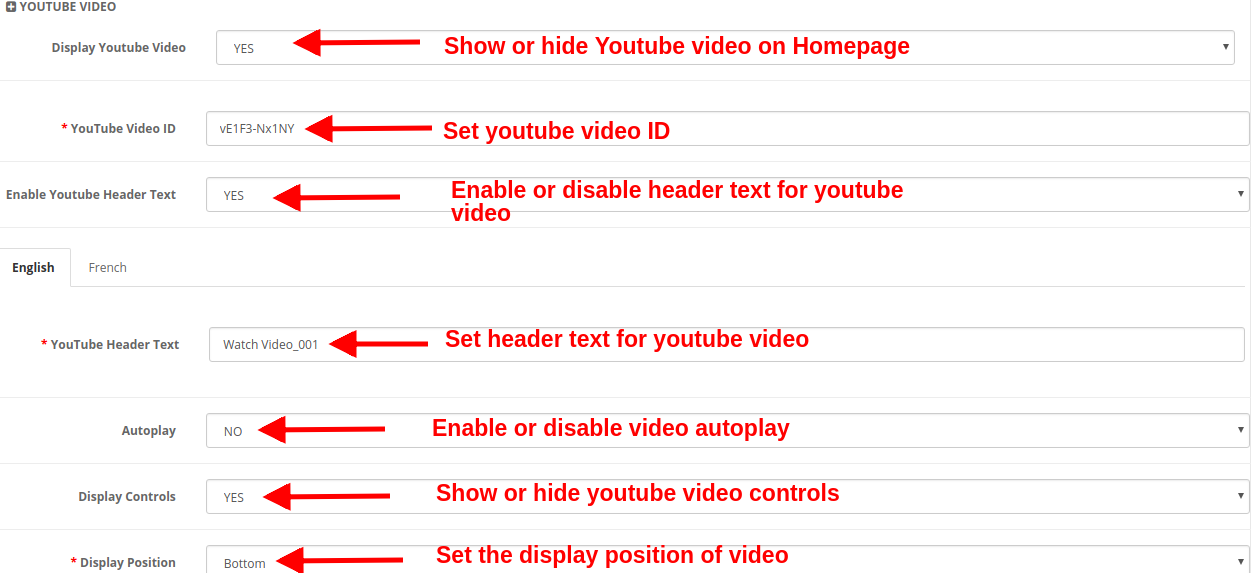
- Display Youtube Video: This option lets you show or hide the Youtube video on the Homepage.
- Youtube Video ID: With this option, you can set the Youtube video ID corresponding to the specific youtube video.
- Enable Youtube Header Text: You can show or hide the header text for the youtube video.
- YouTube Header Text: The youtube header text can be changed using this option. You can specify a custom text you want to show as header text for a video. This text can be set for English or French language.
- Autoplay: If this option is enabled, the video will automatically play as the homepage loads. But if this option is disabled, the user has to click the play button in order to view the youtube video.
- Display Controls: If this option is enabled, the youtube control bar is shown for the youtube video. Else if disabled, the youtube controls are not displayed.
- Display Position: You can set the position for the youtube video. This position can be either set to top or bottom.
e) Vimeo Video
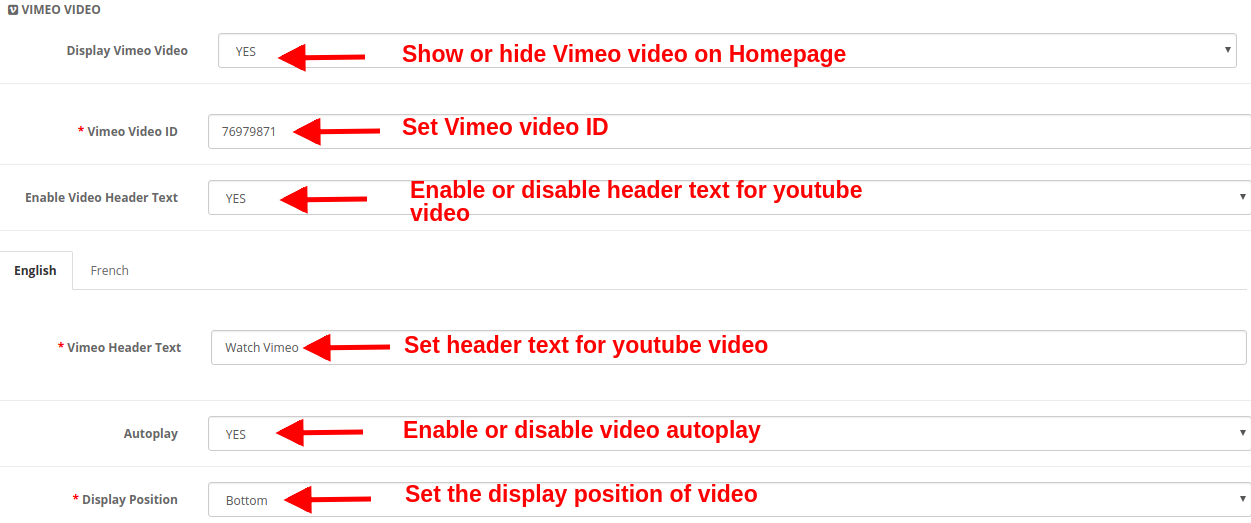
- Display Vimeo Video: This option lets you show or hide the Vimeo video on the Homepage.
- Vimeo Video ID: With this option, you can set the Vimeo video ID corresponding to the specific Vimeo video.
- Enable Video Header Text: You can show or hide the header text for the Vimeo video.
- Vimeo Header Text: The Vimeo header text can be changed using this option. You can specify a custom text you want to show as header text for a video. This text can be set for English or French language.
- Autoplay: If this option is enabled, the video will automatically play as the homepage loads. But if this option is disabled, the user has to click the play button in order to view the Vimeo video.
- Display Position: You can set the position for the Vimeo video. This position can be either set to top or bottom.
f) Dailymotion Video
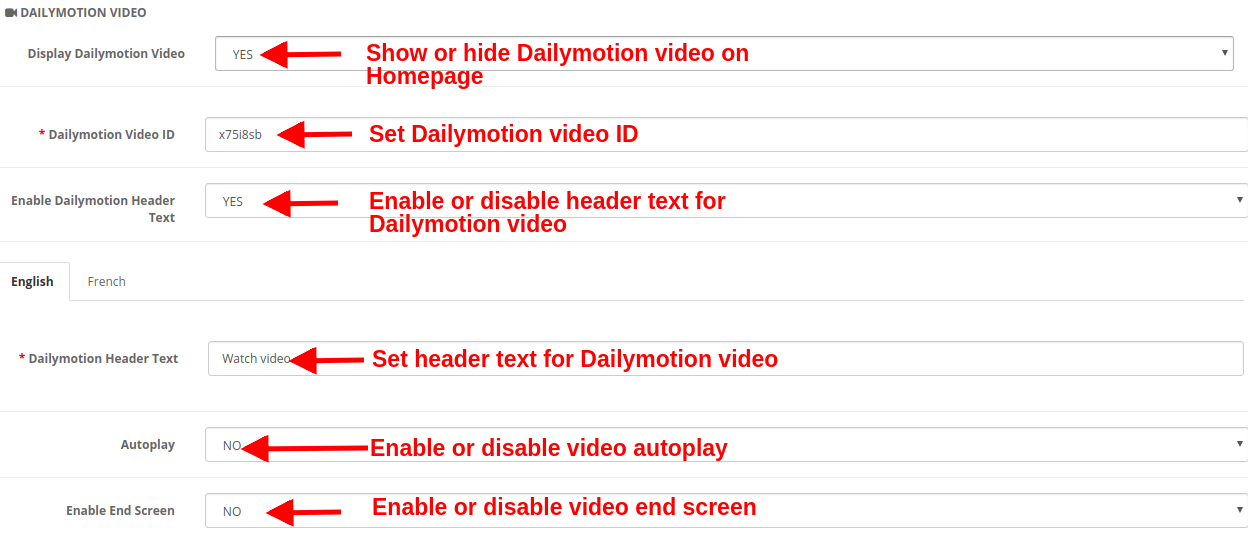
- Display Dailymotion Video: This option lets you show or hide the Dailymotion video on the Homepage.
- Dailymotion Video ID: With this option, you can set the Dailymotion video ID corresponding to the specific Dailymotion video.
- Enable Dailymotion Header Text: You can show or hide the header text for the Dailymotion video.
- Dailymotion Header Text: The Dailymotion header text can be changed using this option. You can specify a custom text you want to show as header text for the video. This text can be set for English or French language.
- Autoplay: If this option is enabled, the video will automatically play as the homepage loads. But if this option is disabled, the user has to click the play button in order to view the Dailymotion video.
- Enable End Screen: Show or hide the end screen at the end of the video. If enabled, it will show other recommended videos on the video end.
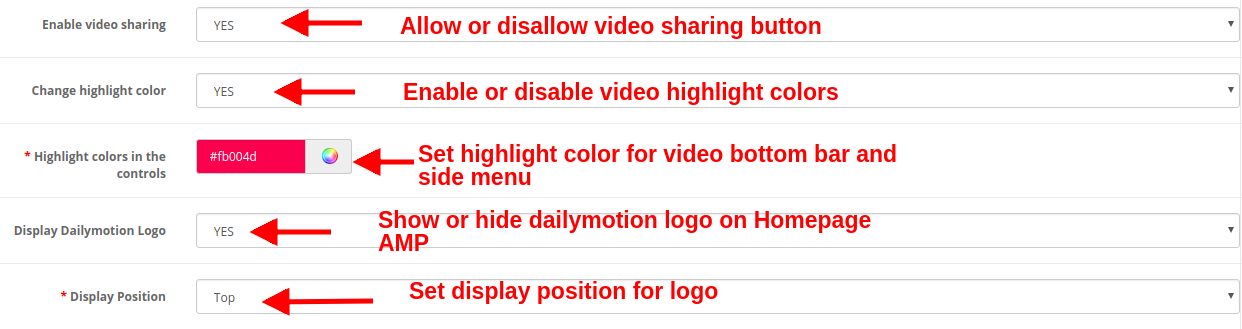
- Enable Video Sharing: Show or hide the share option for the Dailymotion video.
- Change Highlight Color: Enable or disable video highlight colors.
- Highlight Colors in the Control: Pick up the desired color which will be shown on the video bottom bar and side menu bar panel.
- Display Dailymotion Logo: You can show or hide the Dailymotion logo on the video.
- Display Position: You can set the position for the Dailymotion video. This position can be either set to top or bottom.
g) Instagram Feed
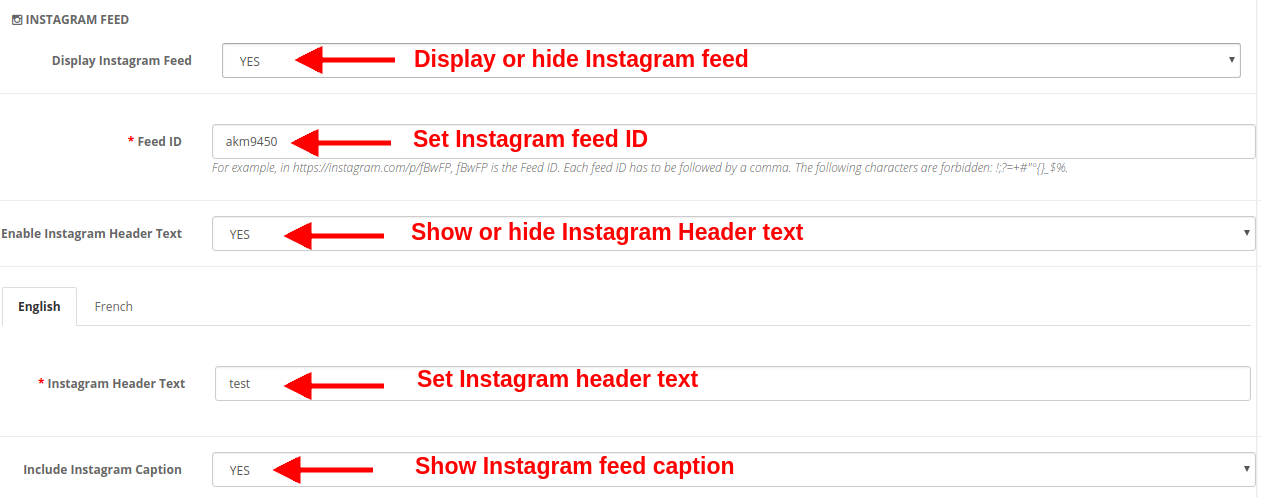
- Display Instagram Feed: You can show or hide the Instagram feed on the homepage of the website.
- Feed ID: This option allows you to set the Instagram feed ID which will be shown on the Homepage of the website. To set multiple feed IDs, separate each feed ID followed by a comma.
- Enable Instagram Header Text: You can enable or disable the header text shown for the Instagram feed.
- Instagram Header Text: This option lets you specify the header text for the Instagram post or feed.
- Include Instagram Caption: This option shows/hide the Instagram caption for the specific photo or video.
h) Twitter Feed
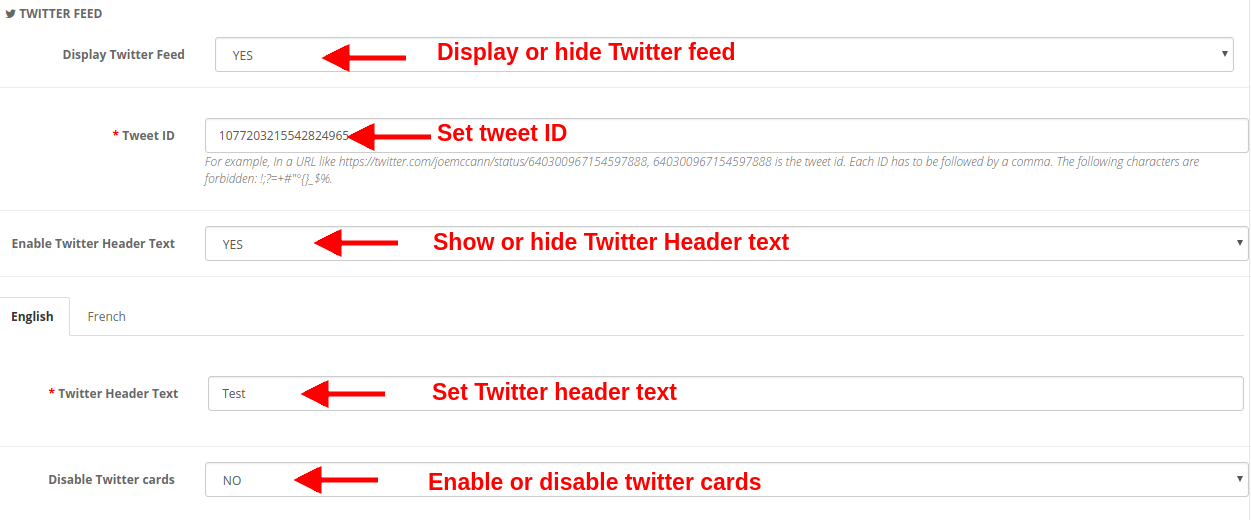
- Display Twitter Feed: You can show or hide the twitter feed on the Homepage of the website.
- Tweet ID: This option sets the Tweet ID which has to be displayed on the Homepage.
- Enable Twitter Header Text: You can enable or disable the Twitter Header Text shown over the tweet.
- Twitter Header Text: You can specify the header text for Twitter feeds.
- Disable Twitter Cards: If you set Yes for this option, the content is displayed in a compact form. Else if you set this option to No, the detailed twitter feed is displayed on the Homepage.
3.3 Category Page Settings
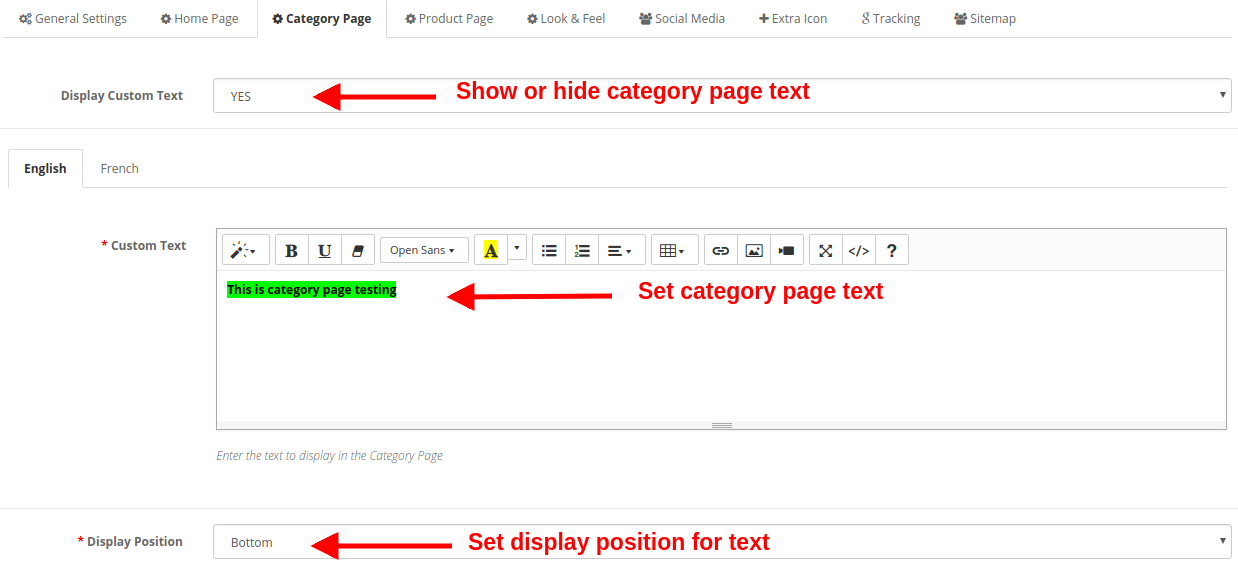
Under this section of Google Accelerated Mobile Pages(AMP) plugin, you can perform AMP settings for the category pages of the site. The various settings include:
- Display Custom Text: You can enable or disable this text shown on the category pages of the website.
- Custom Text: Using this option, you can set a desired text for the category pages. This text can be specified in English or French language.
- Display Position: You can set the position for this custom text on the category page. The text position can be set to Top or Bottom of page.
3.4 Product Page Settings
Under this section of OpenCart Accelerated Mobile Pages Module, you can perform AMP settings for the product pages of the site. The various settings include:

- Display Custom Text: You can enable or disable this text shown on the product pages of the website.
- Custom Text: Using this option, you can set a desired text for the product pages. This text can be specified in English or French language.
- Display Position: You can set the position for this custom text on the product page. The text position can be set to Top or Bottom of page.
- Display Product Review: You can show or hide product reviews on the AMP product pages.
- Display Related Products: You can enable or disable related products on the AMP product pages.
3.5 Look and Feel Settings
You can modify the look and feel settings for the AMP pages of your site. The settings can be done for each of the page element. You can make general settings, settings for product page, product listings, category page, and cookie consent bar.
a) General Setting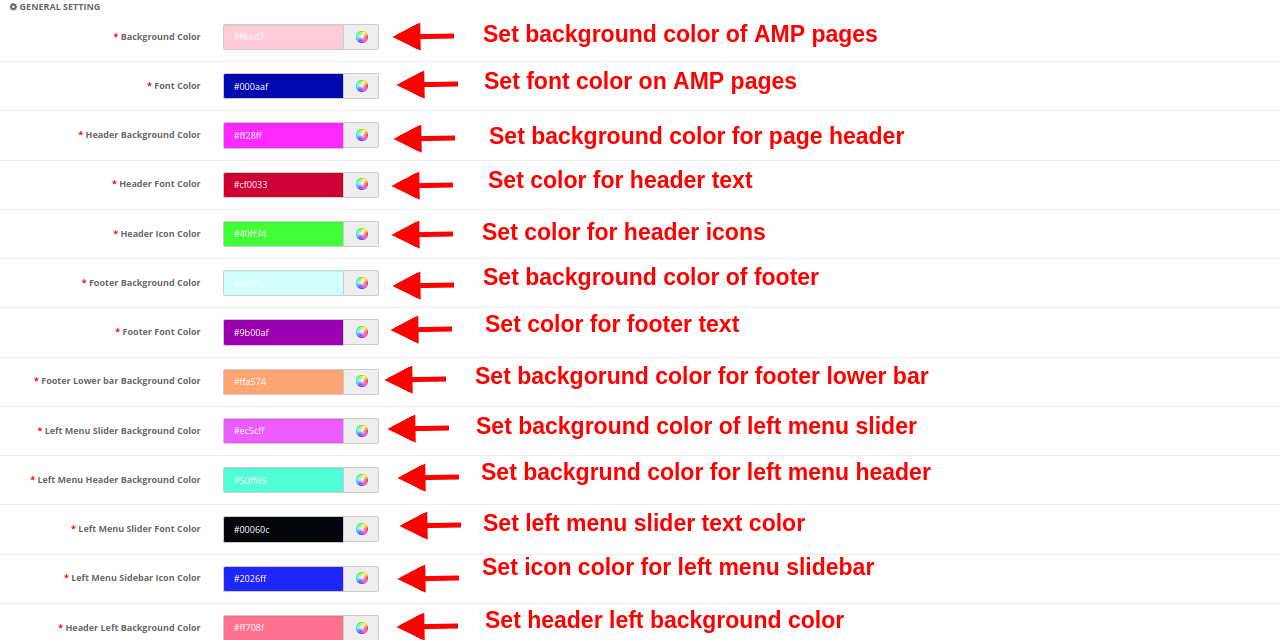
- Background Color: This option sets the background color for all the AMP pages.
- Font Color: This option sets the font color for the text shown on AMP pages.
- Header Background Color: This option sets the background color for the site header.
- Header Font Color: This option sets the font color for the text shown in the header section.
- Header Icon Color: This option sets the icon color for the icons shown in the header section of the site.
- Footer Background Color: This option sets the background color of the footer section of the AMP website.
- Footer Font Color: This option sets the font color for the text shown in the footer section.
- Footer Lower Bar Background Color: This sets the background color for the lower footer bar.
- Left Menu Slider Background Color: This option sets the background color for the left menu slider.
- Left Menu Header Background Color: This option sets the background color for the left menu header part.
- Left Menu Slider Font Color: This option sets the font color for the text shown in the left menu slider.
- Left Menu Sidebar Icon Color: This option sets the color for the icons shown in left menu sidebar.
- Header Left Background Color: This option sets the background color for the left header section.
b) Product Listing Setting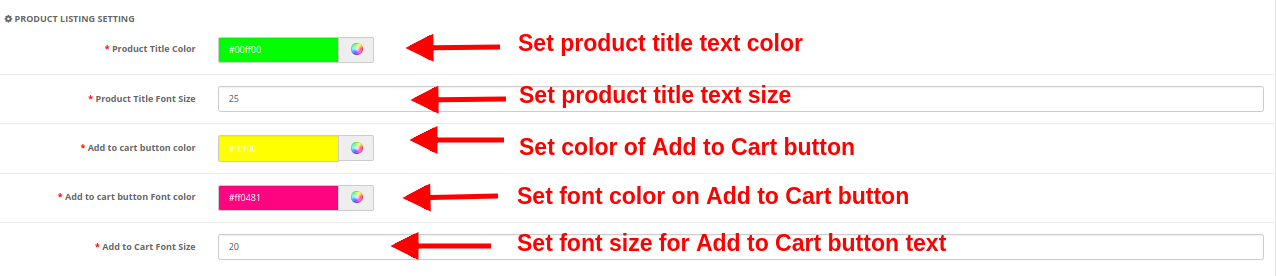
- Product Title Color: This option sets the color for the product title text.
- Product Title Font Size: This option sets the font size of the product title.
- Add to cart button color: This color specifies the background color of the Add to Cart button.
- Add to cart button Font color: This sets the font color for the text shown on Add to Cart button.
- Add to Cart Font Size: This option sets the size for the text shown on Add to Cart button.
c) Category Setting

- Category Heading Font Color: This option sets the color for the text shown as a category heading.
- Category Heading Font Size: This option sets the font size for the text shown as a category heading.
d) Product Setting

- Product Title Font Color: This option sets the color for the product title text.
- Product Title Font Size: This option sets the font size for the product title text.
- Add to cart button color: This option specifies the background color of the Add to Cart button.
- Add to cart button Font color: This option shows the font color for the text shown on Add to cart button.
- Add to cart button Font size: This option shows the font color for the text shown on Add to cart button.
e) Cookie Consent Bar

- Cookie Consent Background Color: This option sets the background color for the cookie consent bar.
- Consent Message Font Color: This option sets the font color for the text shown as consent message.
- Background Color of Accept Button: This option specifies the background color for the Accept Button shown on cookie consent bar.
- Font Color of Accept Button: This sets the font color for the text shown on Accept Button.
3.6 Social Media
Under the social media settings of Google AMP module, you have an option to add business contact information like address, email ID and contact number. You can also add social channels links to your AMP mobile pages so that customers can direct follow up with their queries or doubts on social media like Facebook, Twitter, LinkedIn, Pinterest, etc. Social channels are one way to keep your users updated about your online business. Admin can perform the following configurations: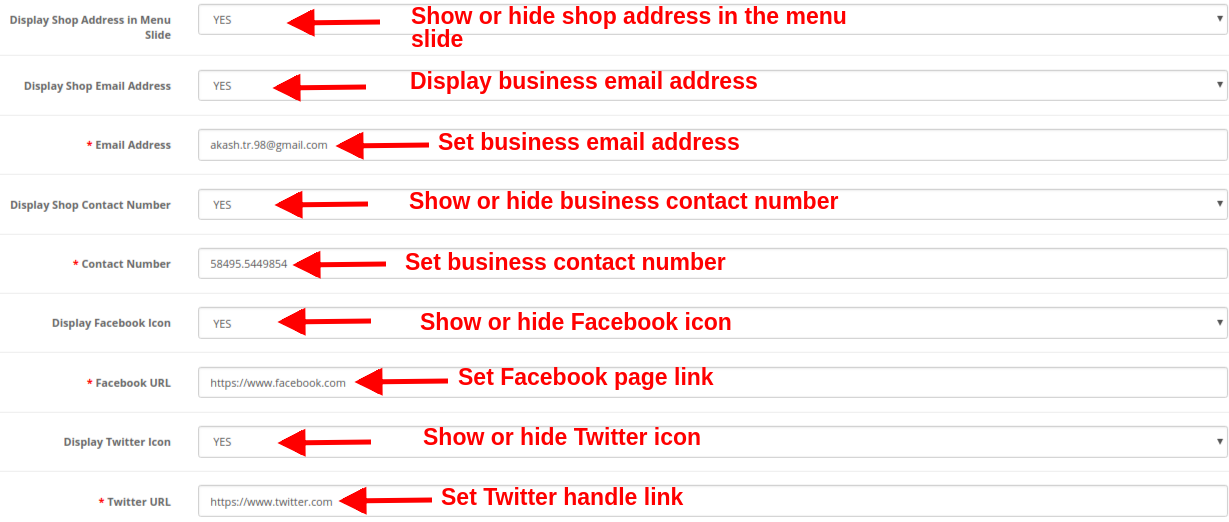
- Display Shop Address in Menu Slide: Show or hide business address in the left slider menu section.
- Display Shop Email Address: Show or hide the email address of your business in the left slider menu section.
- Email Address: Set the email address of your business using this option.
- Display Shop Contact Number: Show or hide the contact number for your business or shop.
- Contact Number: Set the contact number for your online shop.
- Display Facebook Icon: Show or hide the Facebook icon in the left menu slider of the website.
- Facebook URL: Set Facebook page URL using this option.
- Display Twitter Icon: Show or hide the Twitter icon in the left menu slider of the website.
- Twitter URL: Set Twitter page URL using this option.
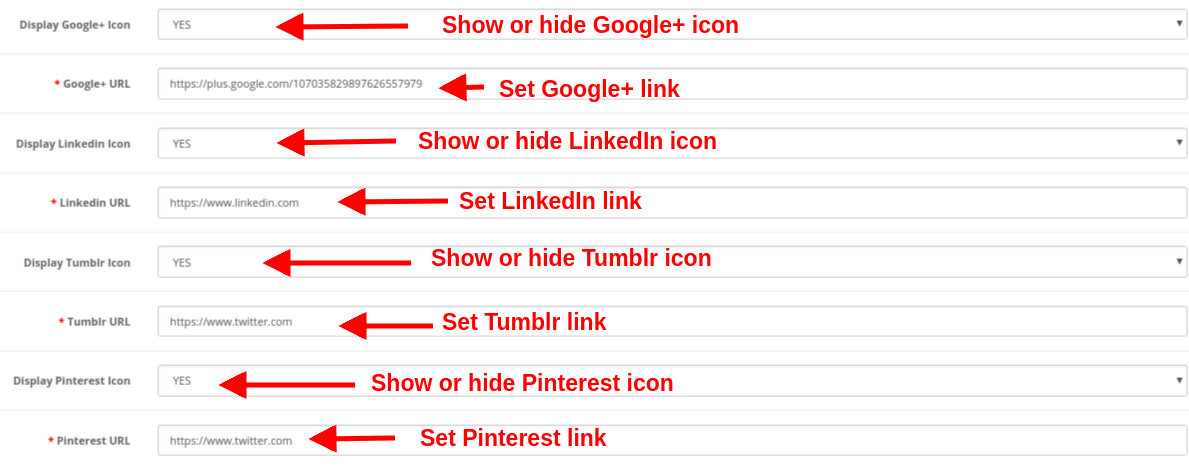
- Display Google+ Icon: Show or hide the Google+ icon in the left menu slider of the website.
- Google+ URL: Set Google+ page URL using this option.
- Display Linkedin Icon: Show or hide the LinkedIn icon in the left menu slider of the website.
- Linkedin URL: Set the LinkedIn page URL using this option.
- Display Tumblr Icon: Show or hide the Tumblr icon in the left menu slider of the website.
- Tumblr URL: Set Tumblr page URL using this option.
- Display Pinterest Icon: Show or hide the Pinterest icon in the left menu slider of the website.
- Pinterest URL: Set Pinterest page URL using this option.
3.7 Extra Icon
If they want to add more social media icon then they can add here with ease.
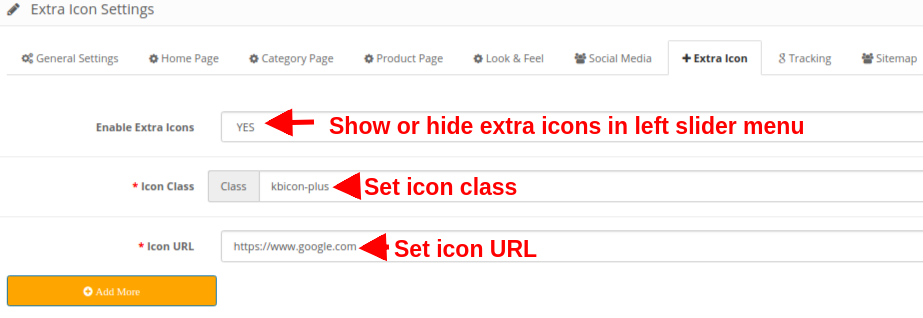
- Enable Extra Icons: Enable or Disable extra icons in the left slider menu.
- Icon Class: Set the icon class using this option.
- Icon URL: This option sets a URL corresponding to the icon.
An option to “Add More or Remove” is also provided so that you easily add new icons or delete the existing icons.
3.8 Tracking
The various tracking services offered by this OpenCart Accelerated Mobile Pages Extension allows you to track the performance of AMP pages. The three track services provided are:
Enable Google Analytics: If you want to track the performance of the accelerated mobile pages of your site, this feature allows you to enable or disable Google Analytics functionality.
Analytics Client Id: You can enter your Google analytics client ID to configure.
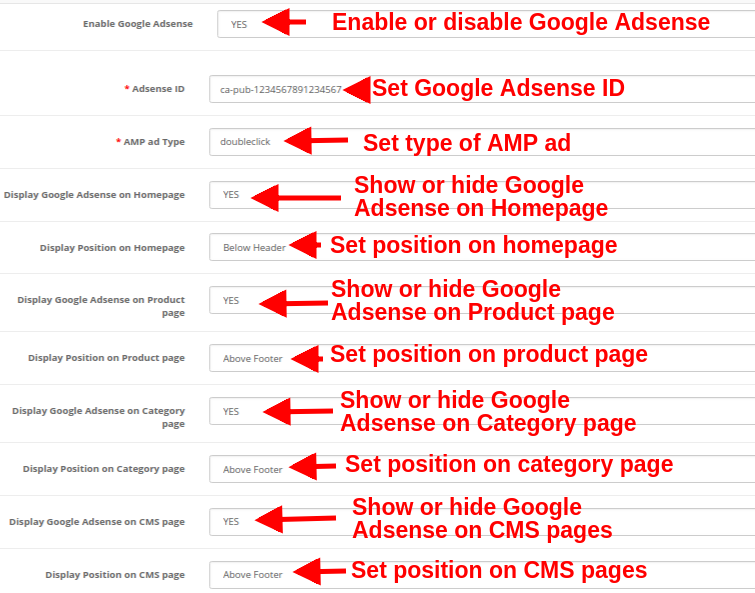
Enable Google Adsense: Activate or Deactivate the Google Adsense functionality from here.
Adsense ID: Enter the Adsense ID here.
AMP ad type: Enter the supported AMP ad type. This way the admin can specify an identifier for the ad network. The type attribute selects the template to use for the ad tag.
Display Google Adsense on Homepage: Enable the option in order to display Google adsense on the Homepage.
Display Position on Homepage: Select the position for showing Google adsense on the homepage.
Display Google Adsense on the Product page: Enable the option to show Adsense on the Product page.
Display Position on the Product page: Select the position for displaying Google adsense on the product page.
Display Google Adsense on Category page: Enable the option to show Adsense on a category page.
Display Position on Category page: Select the position for showing Google adsense on category.
Display Google Adsense on CMS page: Enable the option to show Adsense on the CMS page.
Display Position on CMS page: Select the position for showing Google adsense on CMS.
Enable Facebook Pixel: Enable or disable the option from here for implementing Facebook pixel tool to track site visitors.
Facebook Pixel ID: Enter the Facebook Pixel ID here.
3.9 Sitemap
In this section, the store admin can generate the AMP Sitemap by clicking the button.
As you will hit an enter or click on the “Click Here” button, the sitemap will be automatically updated and will display a “Success” message on the screen.
CRON INSTRUCTIONS
Add the corn to your store via control panel/putty to generate/update the sitemap. Please find the instructions to setup crons below:
- URLs to Add to Cron via Control Panel
- Generate Sitemap – https://octest1.knowband.com/2.3/index.php?route=amp/sitemap/sitemap
- Cron setup via SSH
- Generate Sitemap – 0 0 * * * curl -O /dev/null https://octest1.knowband.com/2.3/index.php?route=amp/sitemap/sitemap
4.0 Front Interface
After enabling the OpenCart Accelerated Mobile Pages(AMP) Module by Knowband the store admin can enable the settings for the home page, category pages, product pages, and CMS pages. As per the settings enabled by the admin, AMP will look as shown below:
Home Page
Various featured products, new arrivals products, and best seller products can be shown on the Homepage of the website.
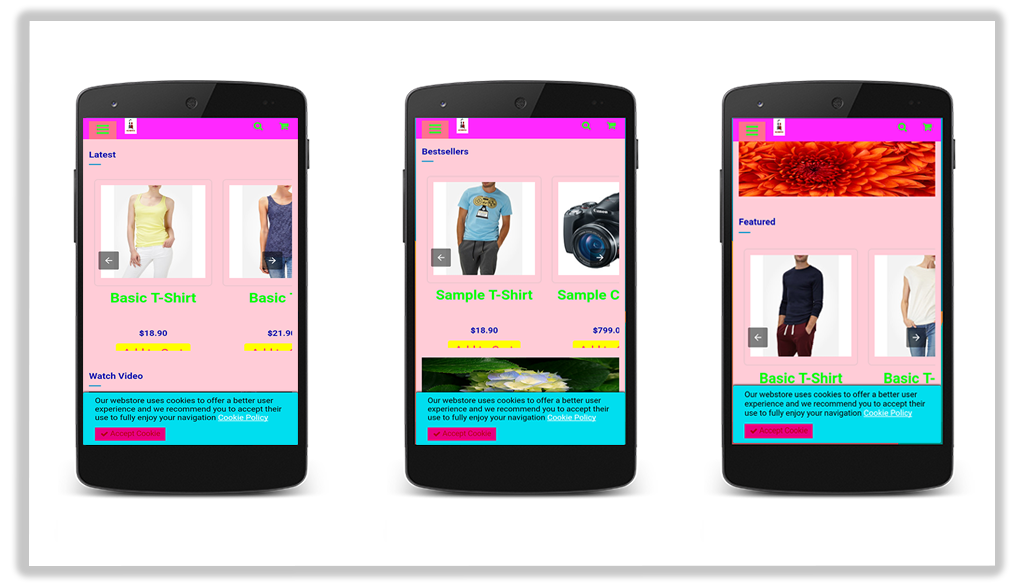
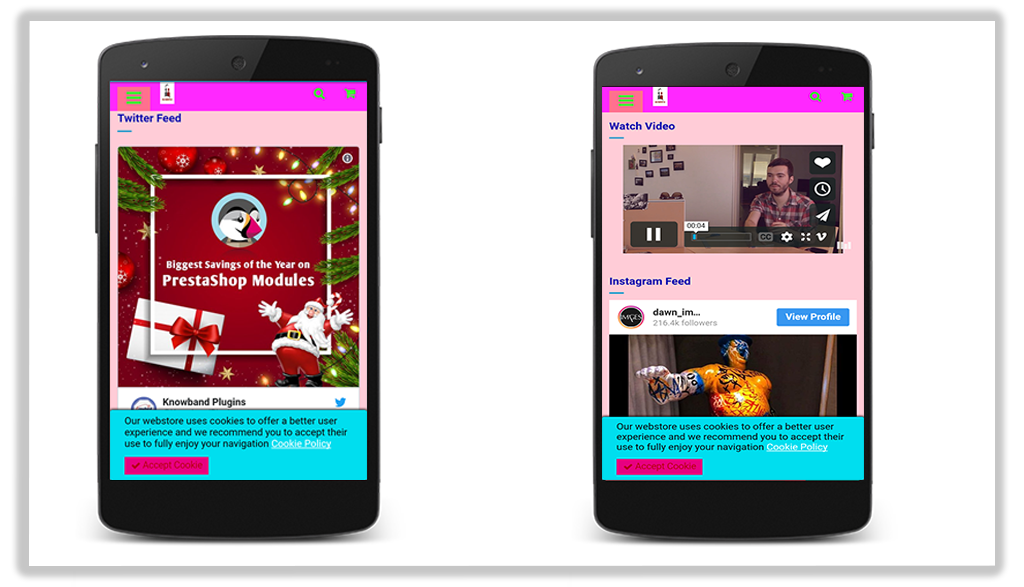
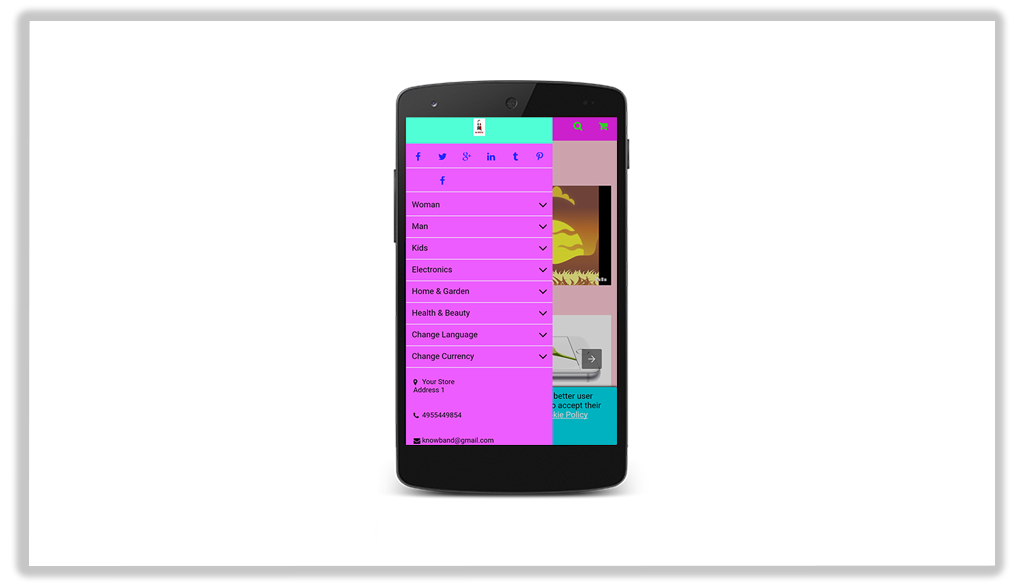
You can display YouTube video, Dailymotion video, Vimeo video, Instagram feed, and Twitter feed on the Homepage.
Product Page
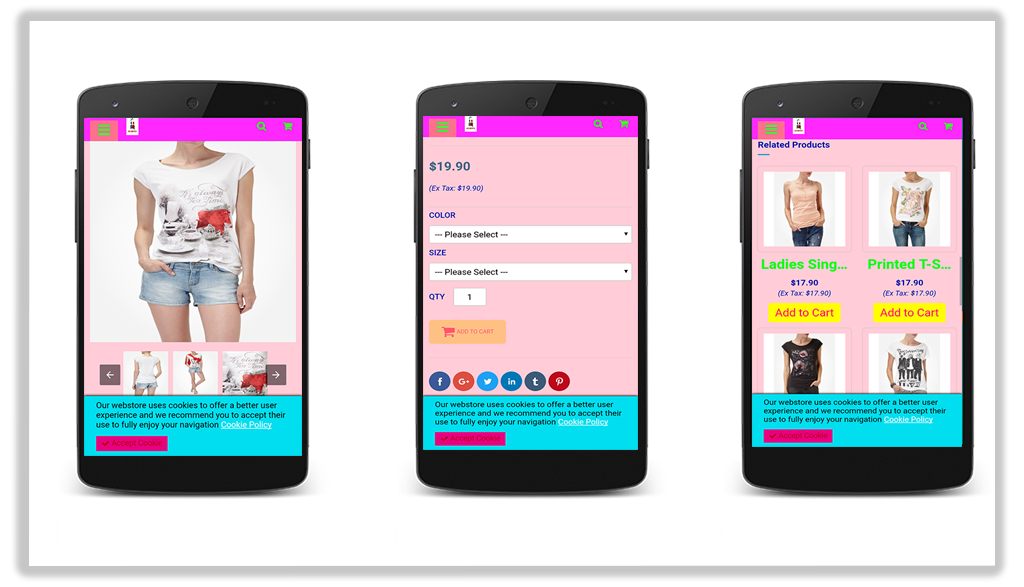
Category Page
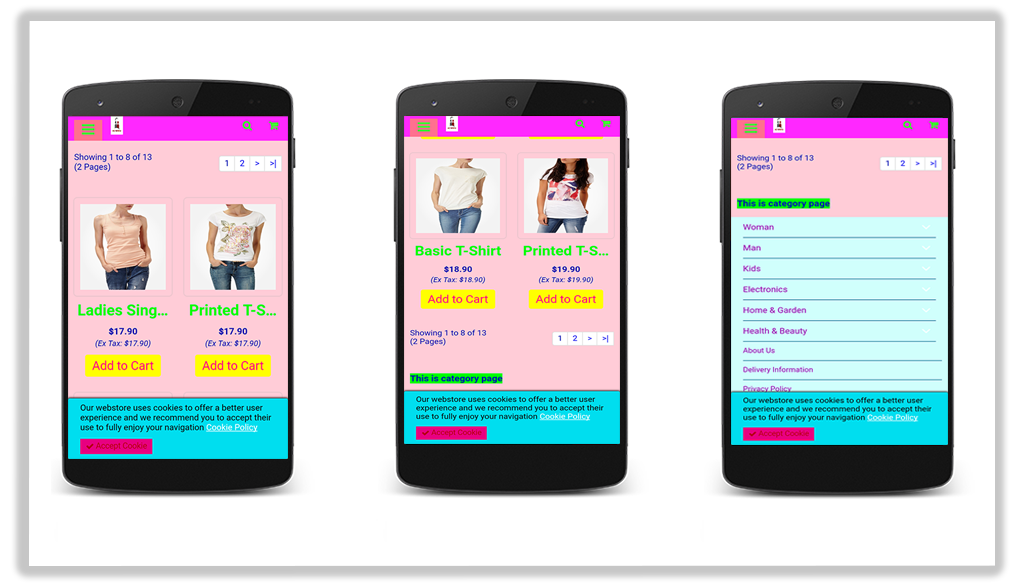
Cookie Consent Bar

Left Menu Slider
This way the OpenCart Accelerated Mobile Pages Extension converts the general website pages into accelerated mobile pages without any complicated process. The online merchant can implement the OpenCart Accelerated Mobile Pages module easily without any hassle and improve page load time easily without any hassle. The OpenCart Accelerated Mobile Pages Module provides separate settings for the homepage, product pages, category pages and CMS pages which makes configuration easy for the store admin. Admin can take a step ahead to reduce the bounce rate of the website by offering mobile responsive website pages.
For more OpenCart modules please visit Knowband.
OpenCart Accelerated Mobile Pages Extension Link
OpenCart Accelerated Mobile Pages Module Admin Demo Link
OpenCart AMP Module Front-end demo link
Google Accelerated Mobile Pages(AMP) plugin Marketplace Link
For more support and information, feel free to contact us via email at support@knowband.com anytime.
