OpenCart eBay Marketplace Integrator : User Manual

1.0 Introduction

Opencart eBay Marketplace Integrator by Knowband is one of the fastest means to connect your OpenCart store with eBay. The OpenCart plugin makes it easier for the store admin to connect their store with the marketplace. At the same time, the Opencart eBay Marketplace Integrator automates the entire process of product listing, inventory, and order management.

eBay is one of the most popular online marketplaces. Operating in over 30 countries worldwide, the marketplace has secured a significant place in online trading. ebay.com has gained the reputation of an online space where buyers and sellers come together and trade almost anything. The OpenCart store owners can streamline their selling and find a larger audience base in the popular marketplace.

OpenCart eBay Marketplace Integration Module by Knowband allows the OpenCart store admin to list their products on the eBay marketplace and manage their inventory and orders with a few button clicks. The Opencart eBay Marketplace Integrator makes it easier for the store admin to connect their store with the marketplace. At the same time, the OpenCart eBay API integrator automates the entire process of product listing, inventory, and order management.

1.1 Benefits offered by the Opencart eBay Marketplace Integrator:

  • The OpenCart eBay Integrator allows the store admin to skip the steps involved in lengthy store integration. The store admin can connect the store in a few simple steps.
  • The admin can create as many profiles as they wish from the back-end of the Opencart eBay Marketplace Integrator.
  • The profile-based product listing of the Opencart eBay Marketplace Integrator allows the store admin to skip manual listing.
  • The inventory can be easily managed with the help of these profiles created in the OpenCart eBay API Integration.
  • The eBay Connector makes it easier for the store admin to map the product attribute and categories with that attribute and categories of eBay.
  • The Opencart eBay Marketplace Integrator allows the merchants to add, remove, revise or relist the products on the marketplace.
  • Along with easy inventory management, the OpenCart eBay Connector offers easy order management as well. The admin can sync the orders received from ebay.com with their OpenCart store and process them from there. Thus, the merchants need not visit the marketplace.
  • The Opencart eBay Marketplace Integrator offers two-way synchronization that can be done by executing cron in the back-end.
  • The merchants can check the error that occurred while product listing from the back-end of the Opencart eBay Marketplace Integrator.

Discover the Latest Enhancements!

[New]Inventory Comparison

The Inventory Comparison feature ensures your OpenCart store and eBay stock stay consistent. Furthermore, it fetches the latest inventory from eBay, compares it with your store quantities, and marks any differences as Yes or No, helping to prevent overselling, stockouts, and manual errors while keeping your inventory accurate.

[New]Rate Limit Monitoring

The extension now includes a built-in feature to monitor eBay API usage and limits. Moreover, it tracks how frequently each API is called, displays the total allowed requests, and shows how many calls are still available.

Profile-Level Product Synchronisation:

Knowband’s Opencart eBay marketplace connector addon now includes profile-level product synchronization. This feature enables merchants to efficiently manage and synchronize their product listings by organizing them into profiles. Each profile can be customized with specific synchronization settings, streamlining inventory management and maintaining consistency across platforms.

Product Listings with Custom Titles and Descriptions:

The enhanced eBay Opencart connector addon allows merchants to create product listings with custom titles and descriptions on eBay. Merchants can now tailor these elements to better align with eBay’s search criteria and buyer preferences. This customization improves visibility, attracts more potential buyers, and ultimately increases sales.

eBay Business Policy Import:

The latest update to Knowband’s Opencart eBay marketplace connector includes the ability to import eBay business policies. This feature simplifies the process of bringing eBay’s business policies into Opencart, ensuring alignment in shipping, return, and payment policies. It enhances compliance, reduces manual errors, and saves time for merchants managing multiple platforms.

OpenCart eBay Marketplace Integration Module

Effortlessly sync your OpenCart store with eBay for seamless product listing and order management with Knowband’s OpenCart eBay Integration module.

SHOP NOW

2.0 Installation

Purchase the Opencart eBay Marketplace Integrator from the store. You’ll get the following files:

1. Zipped File containing the source code of the module
2. User Manual

Follow the below-mentioned steps to install the Opencart plugin in your store:

  1. Unzip the zipped. You’ll get the folders as shown in the image below:

OpenCart eBay Marketplace Integrator

2. Copy all the files and folders of the zip file in the Root Directory of the site.

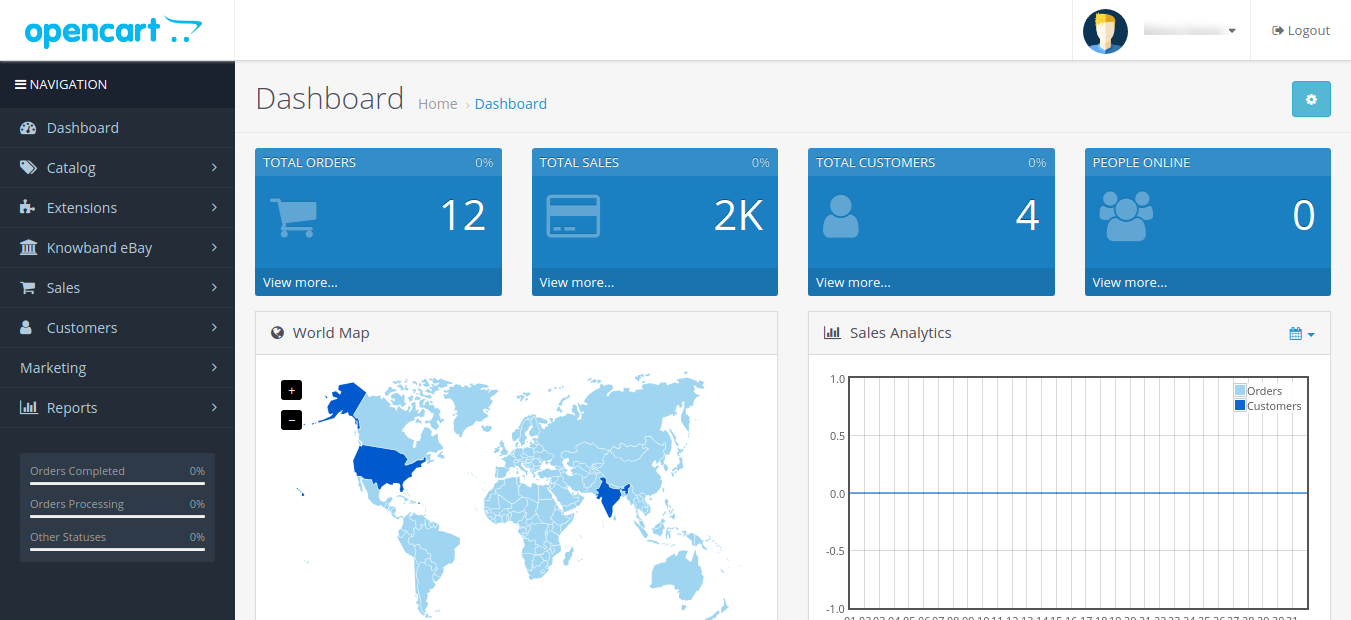
3. The OpenCart eBay Integration module is now installed and is ready to use. Go to Admin -> Main Menu -> Extensions as shown in the image below:
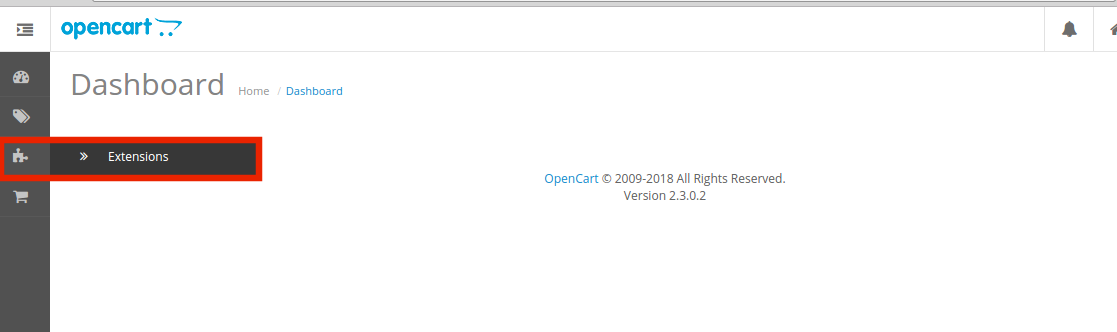
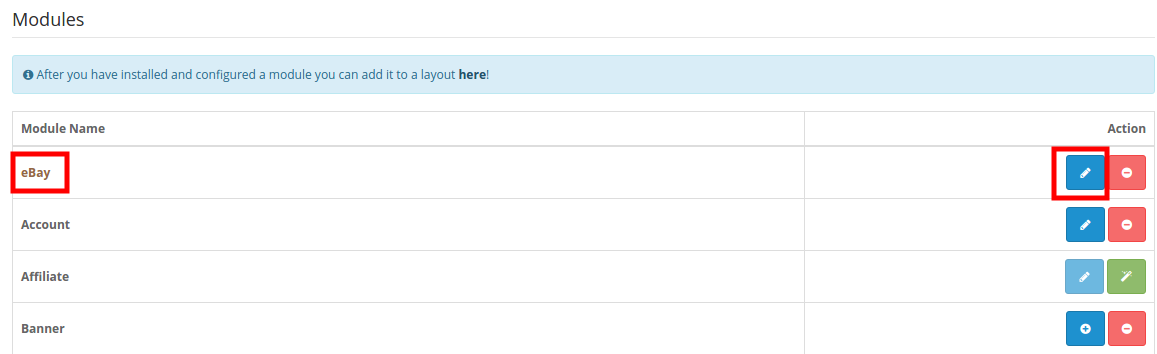
4. Select the eBay integration from the list of the modules and click on the Edit button.
2.2 Opencart eBay Marketplace Integrator- eBay Account Configuration

To start selling on eBay Marketplace you need to have a seller account on eBay. In this section, we are listing all the steps to create a seller account on eBay. Please find them below –

1. Go to the link – https://developer.ebay.com
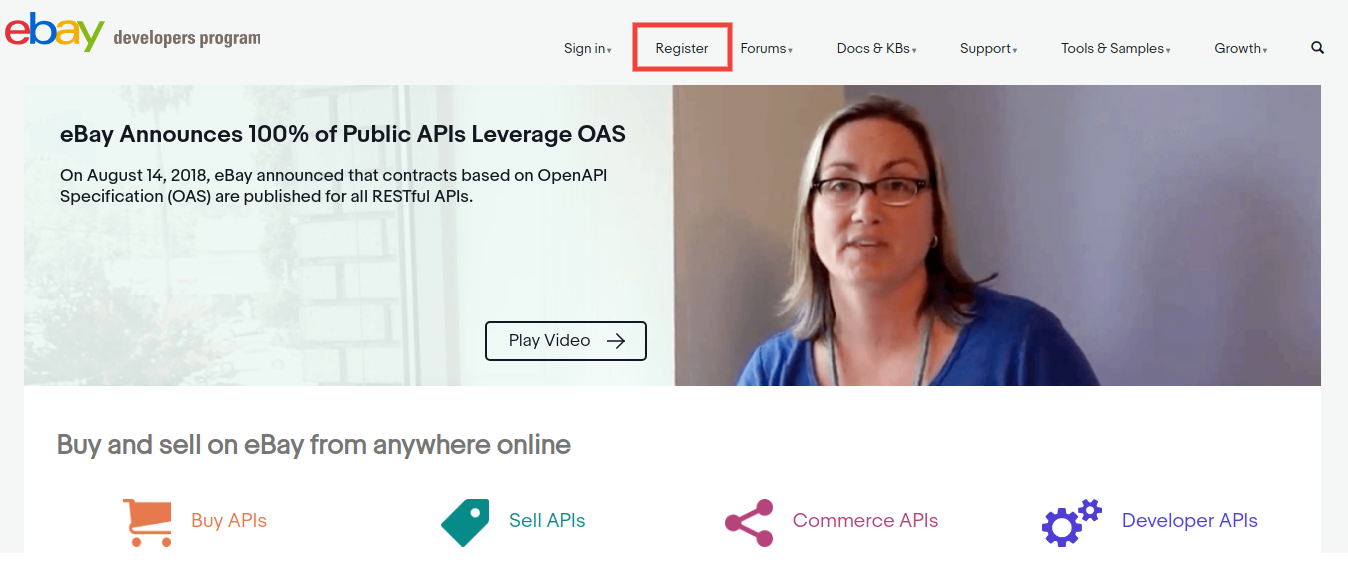
2. Click on the “Register” button for registration.
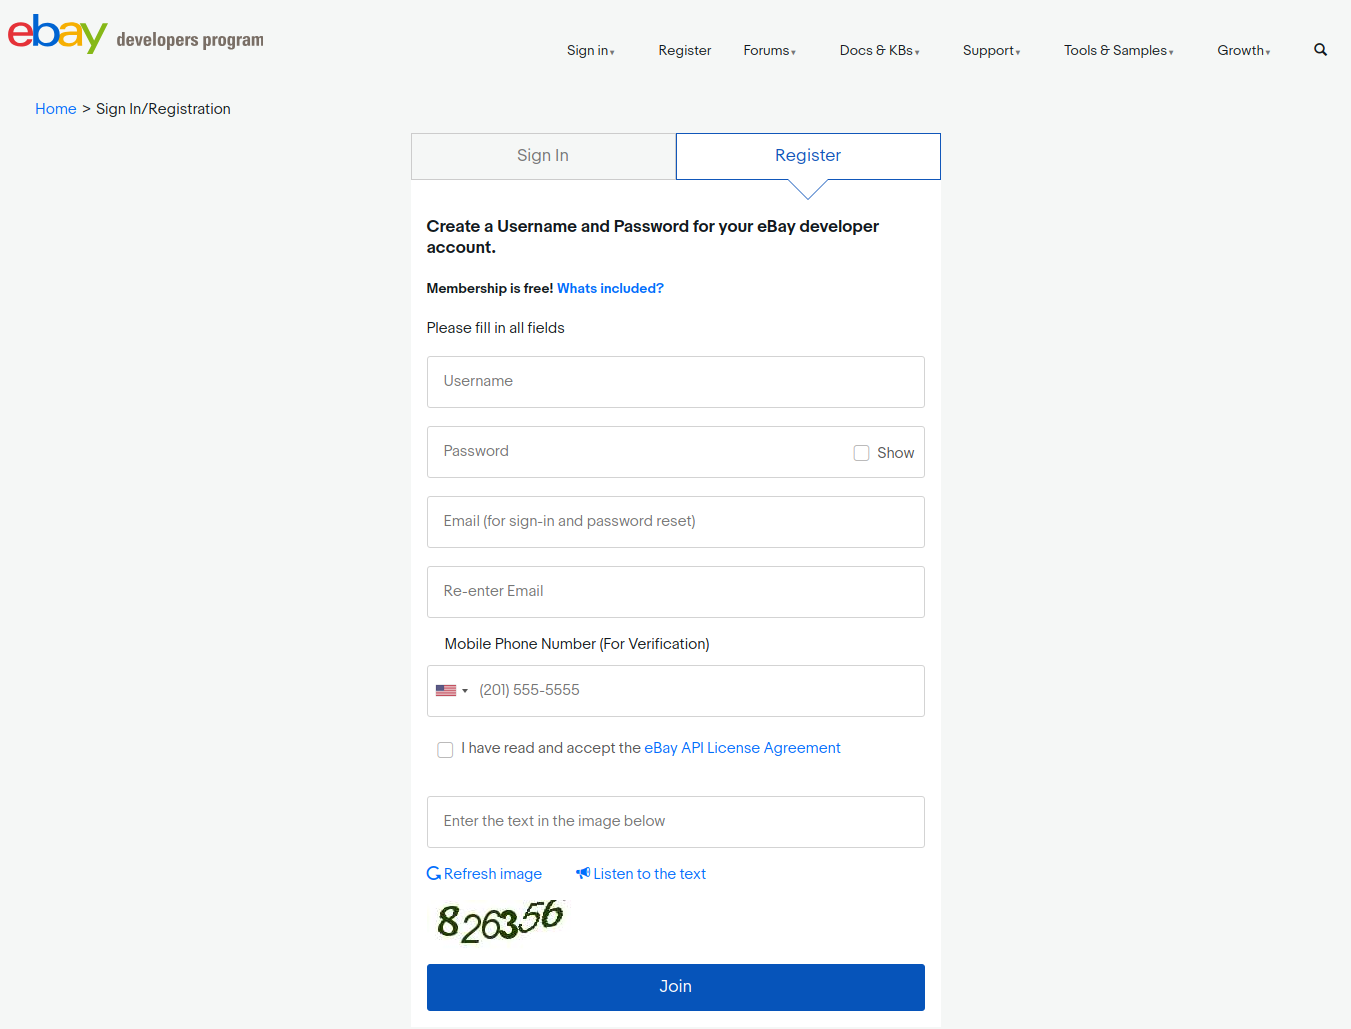
3. After filling-in valid data click on join and you will be redirected to the application creation page.
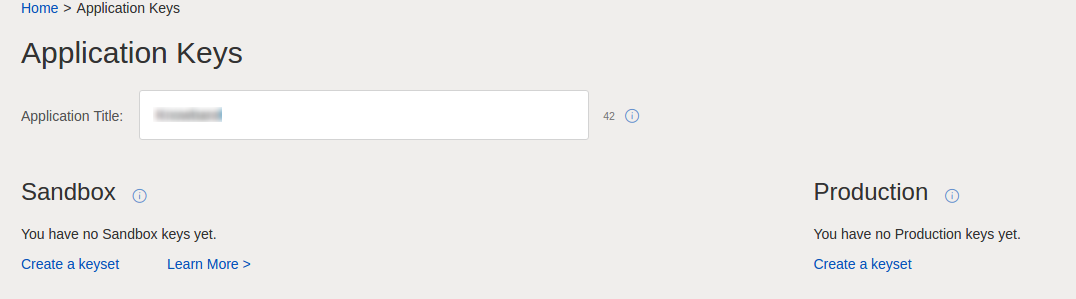
4. Enter the application name and click on ‘Create a keyset’ under the Production section, a new form will be opened.
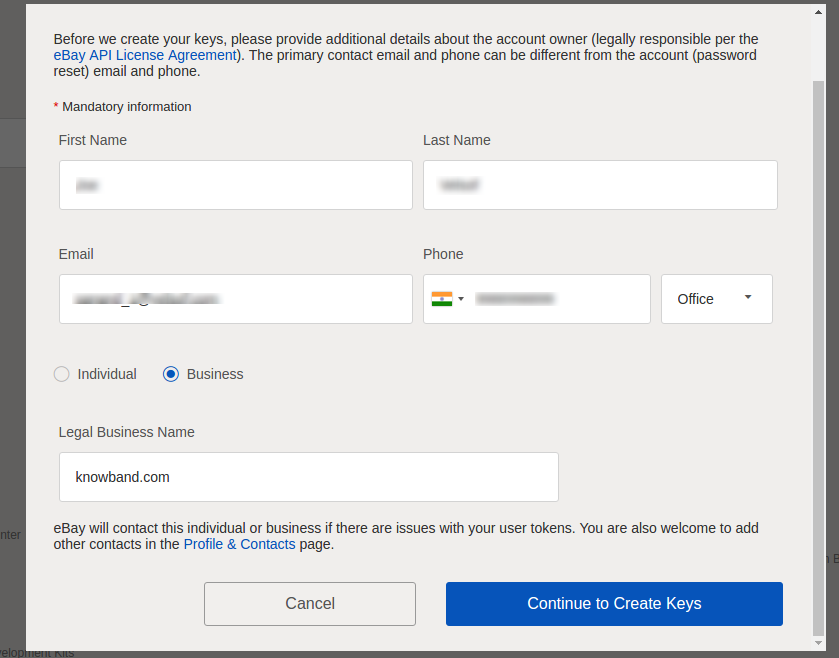
5. Enter the details and click on Continue to create Keys.

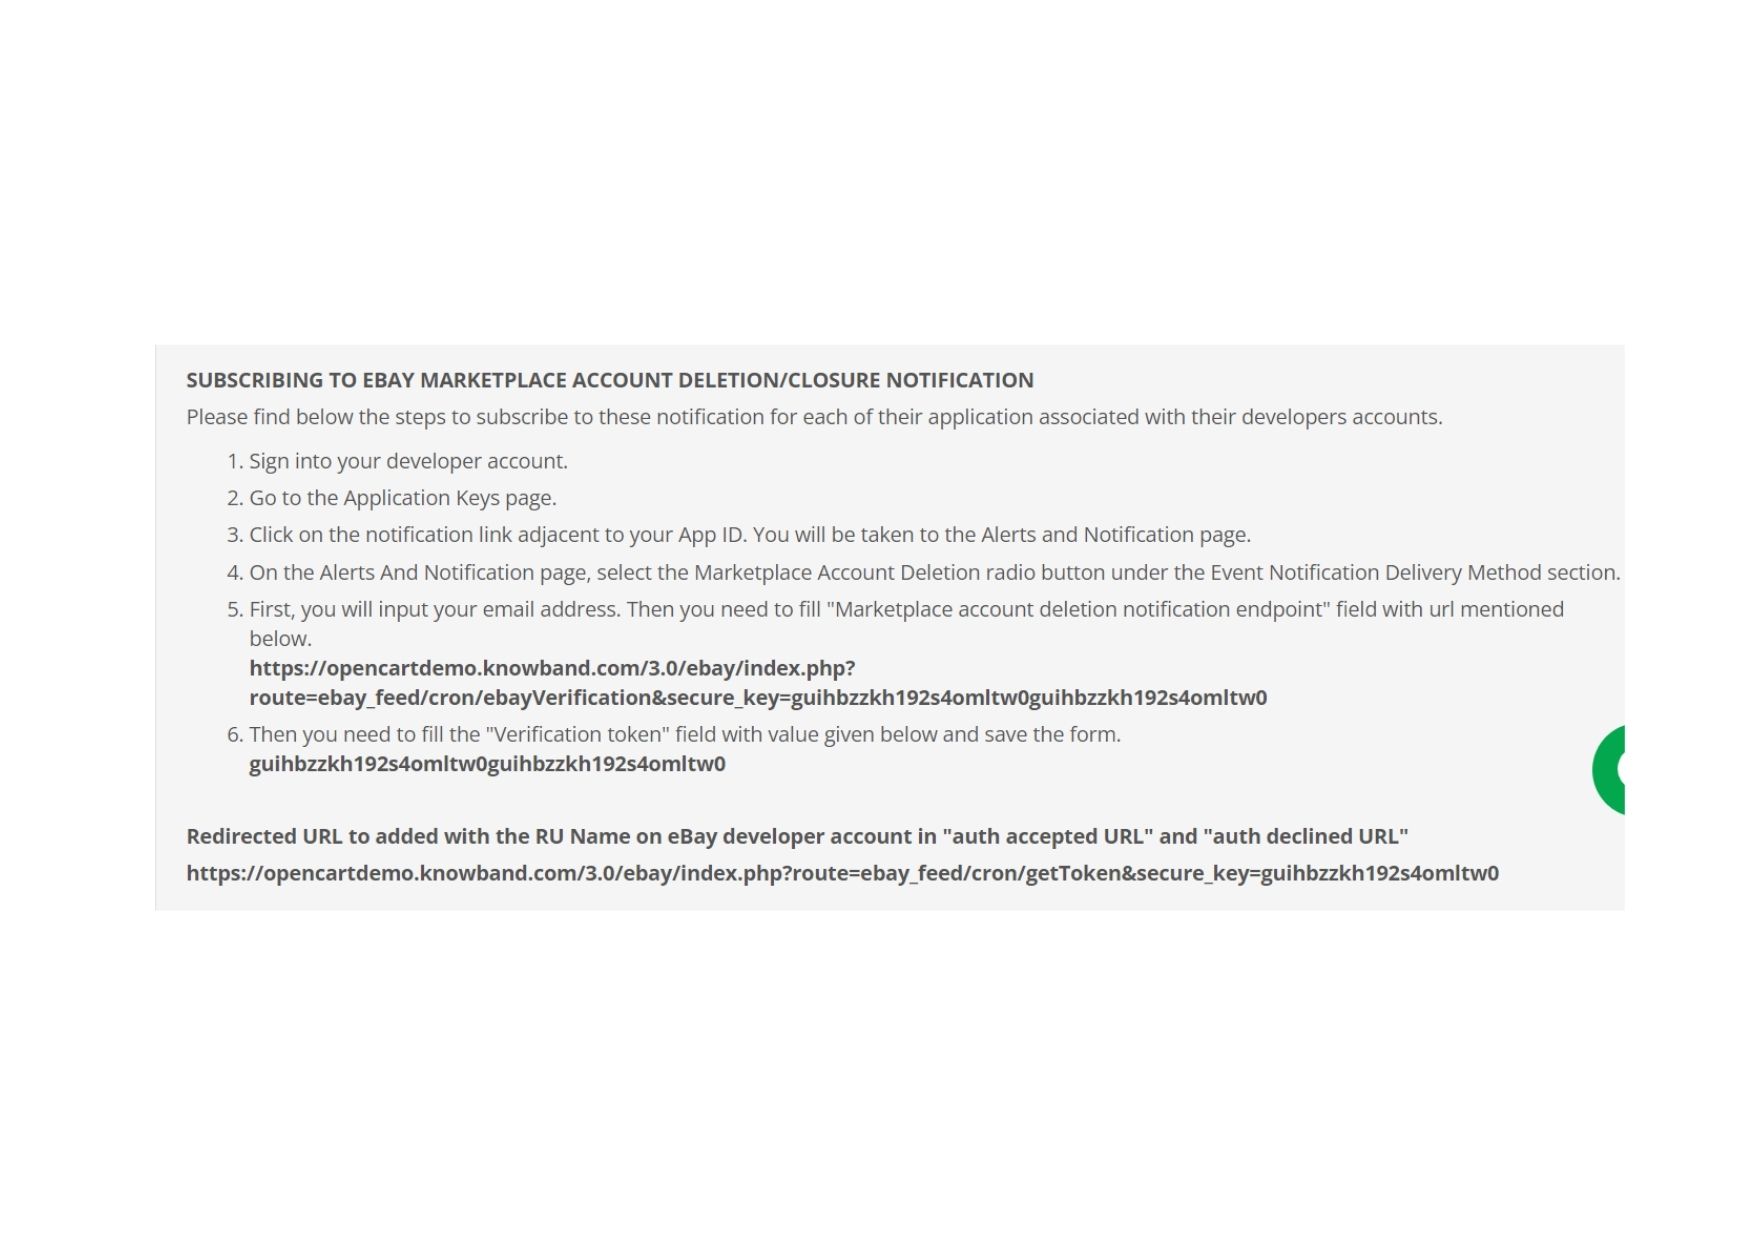
6. The application keys will be disabled until subscribed to eBay Marketplace Account Deletion/Closure Notifications.
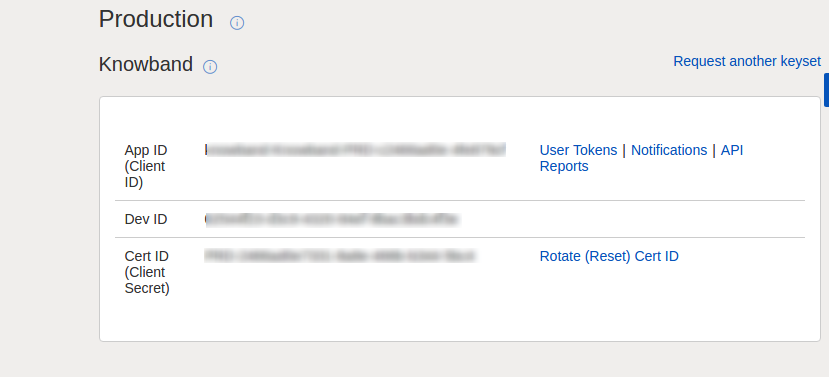
7. To comply with eBay Marketplace Account Deletion/Closure Notifications follow steps mentioned in general setting steps of OpenCart eBay Marketplace Integrator module.
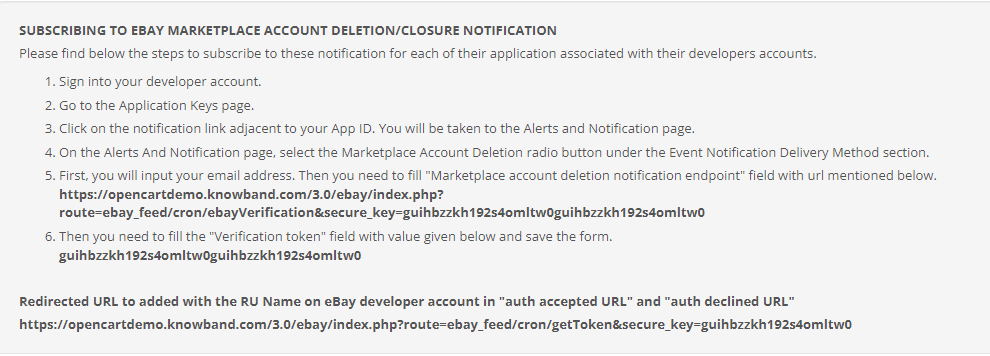
After you have successfully subscribed to eBay marketplace account deletion/closure notifications, you will be able to access API Keys from the developer’s account.

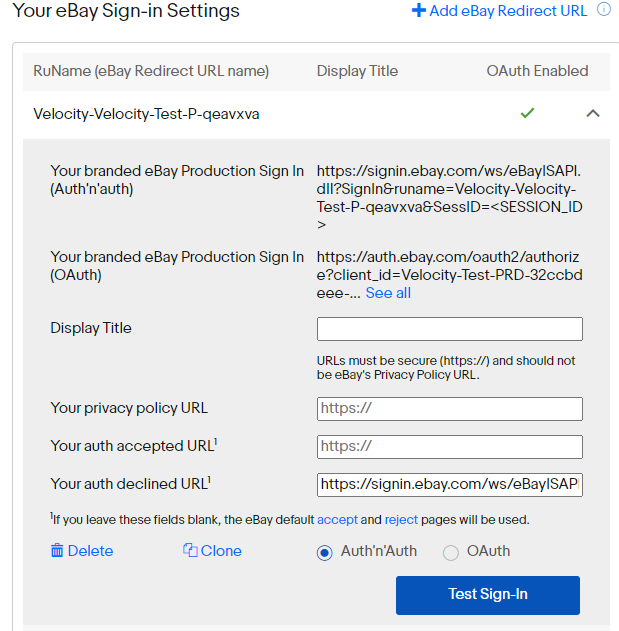
8. RU Name:

  1. If your RU Name is not created click on “+Add eBay Redirect URL”.
  2. Kindly copy the redirected URL from the module general setting and place it in the accept/decline field wall line.
  3. Place 
  4. Click Save.


3.0 Admin Interface


The admin panel of the OpenCart eBay Integration plugin offers 5 configuration options. They are discussed in detail below:

3.1 General Settings

Once you have created a seller’s account, you need to synchronize the store with the marketplace. To validate the synchronization go to General Settings of the admin interface of the OpenCart eBay Integrator Module.

Fill out the form shown in the General settings section. Each field for the configuration panel of the OpenCart eBay Connector Plugin is explained below:-
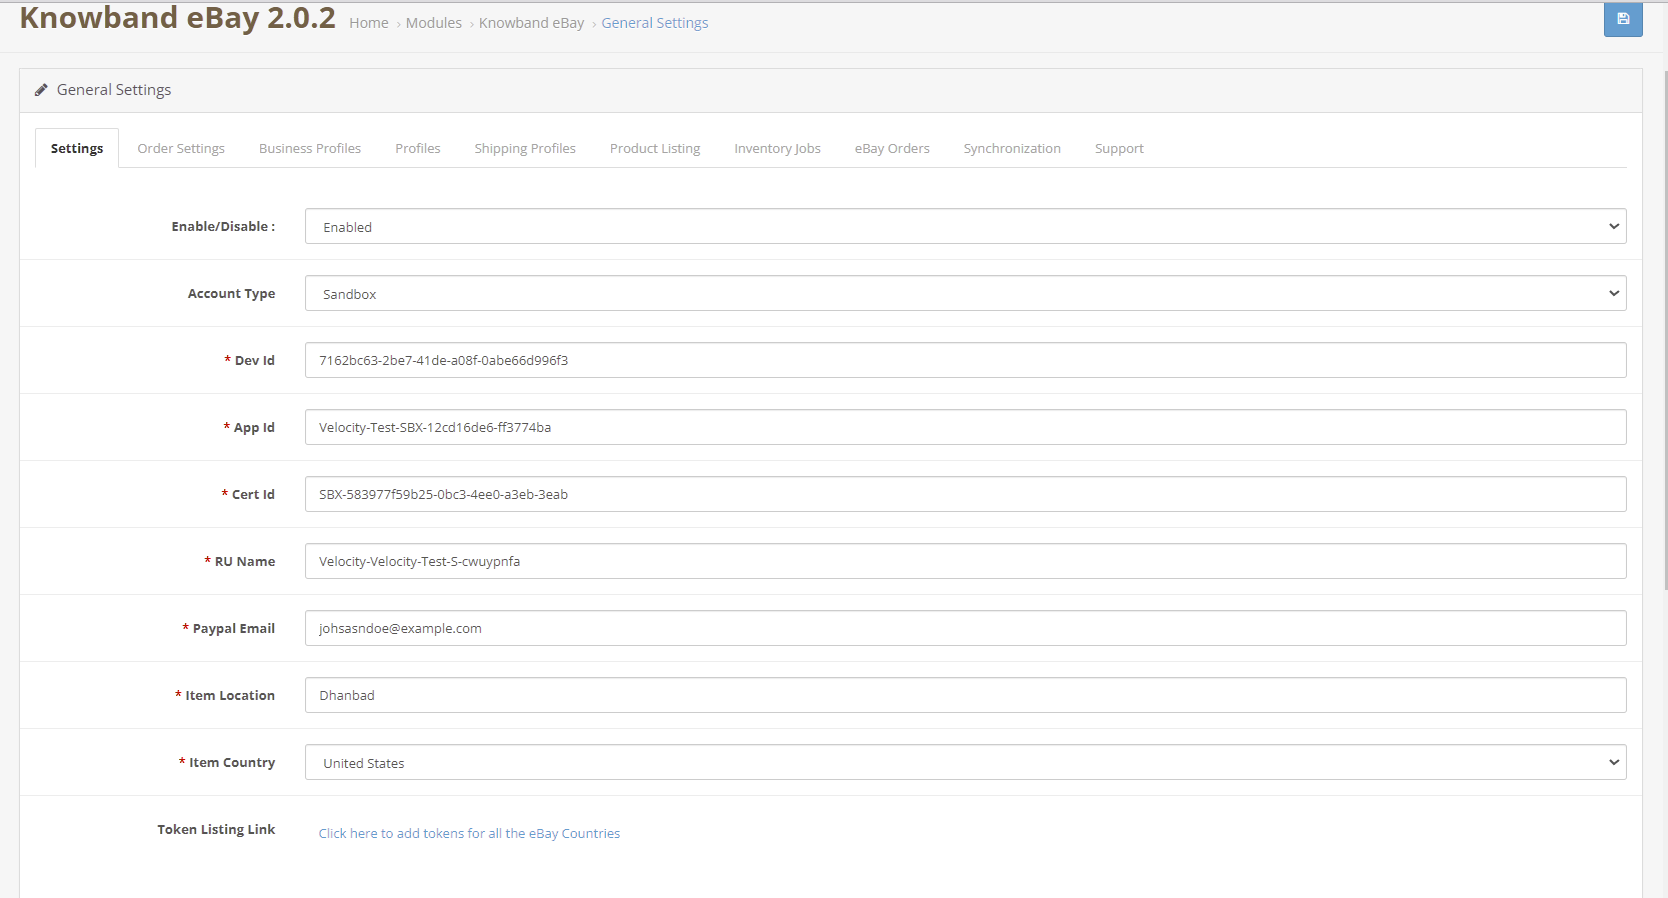
1. Enable/Disable

The drop-down menu consists of Enable or Disable option. Select the options to enable/disable the eBay OpenCart API integrator.

2. Account Type

The admin can either choose the Sandbox account for testing purposes or the Live eBay account for the final store integration.

3. Dev Id

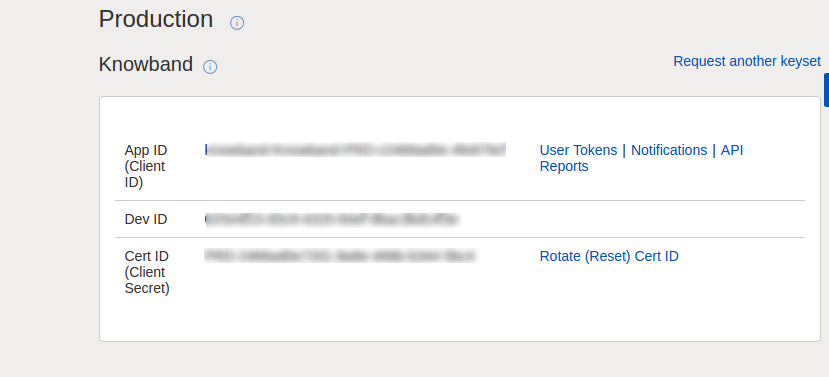
Enter the Dev ID of your eBay account here. To find your Dev ID, sign in to the eBay developer account. In the application key section, you’ll find App ID, Dev ID, and Cert ID as shown in the image below.
4. App Id

Copy the App ID from your eBay account as shown above and copy it in this field.

5. Cert Id

Enter the Cert Id of the eBay account in this section. You can find the Cert Id as shown in the above image.

6. RU Name

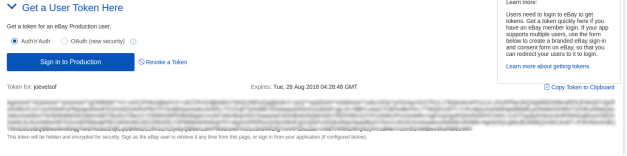
Enter the RU Name of the eBay account. To obtain your RU name, go to the ‘Get a Token from eBay via Your Application’ tab after adding a redirect URL.

7. Token

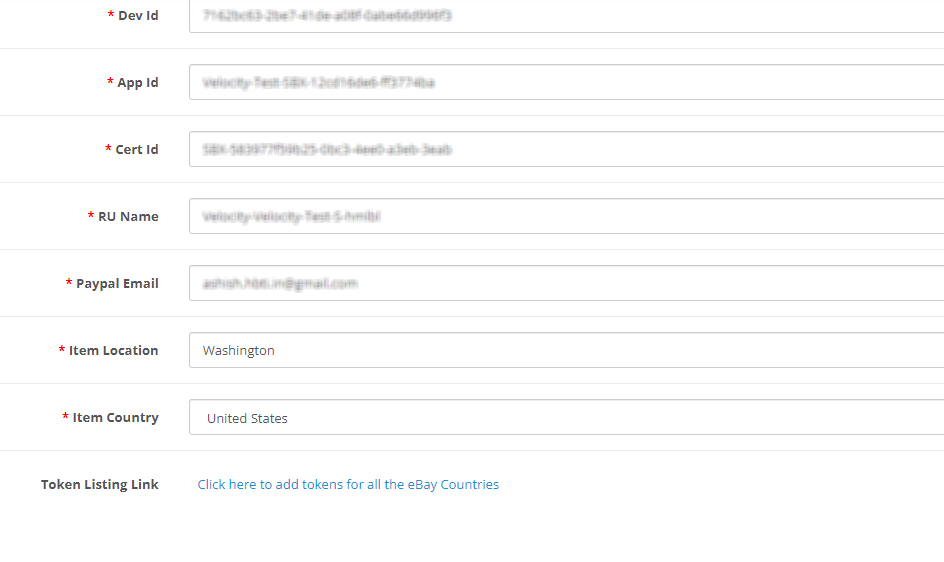
  1. Click on the Token Listing Link from the general settings of the module.
2. Login with your eBay seller’s account.

3. A message will be received of success or failure.

4. Follow the instructions given in the window.

5. Once Token is connected, you can enable/disable countries.

8. Paypal Email

Enter a valid PayPal ID connected to your eBay account. Follow the steps mentioned below:

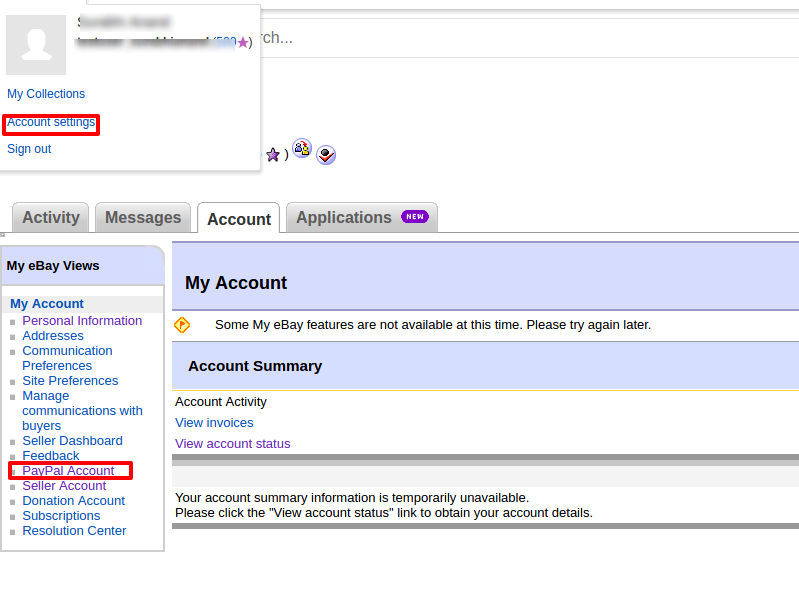
  1. Log in to your eBay seller account.
  2. Click on account settings from the top-left dropdown and click on Paypal account.
3. Now Sign up or link your already created PayPal account with the eBay seller account.
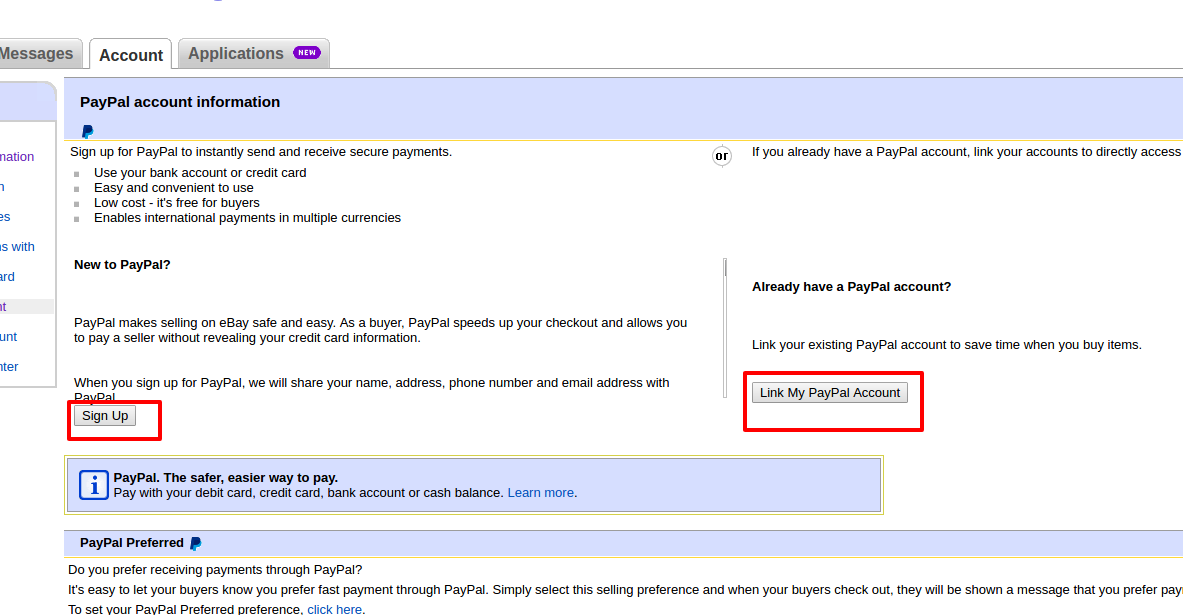
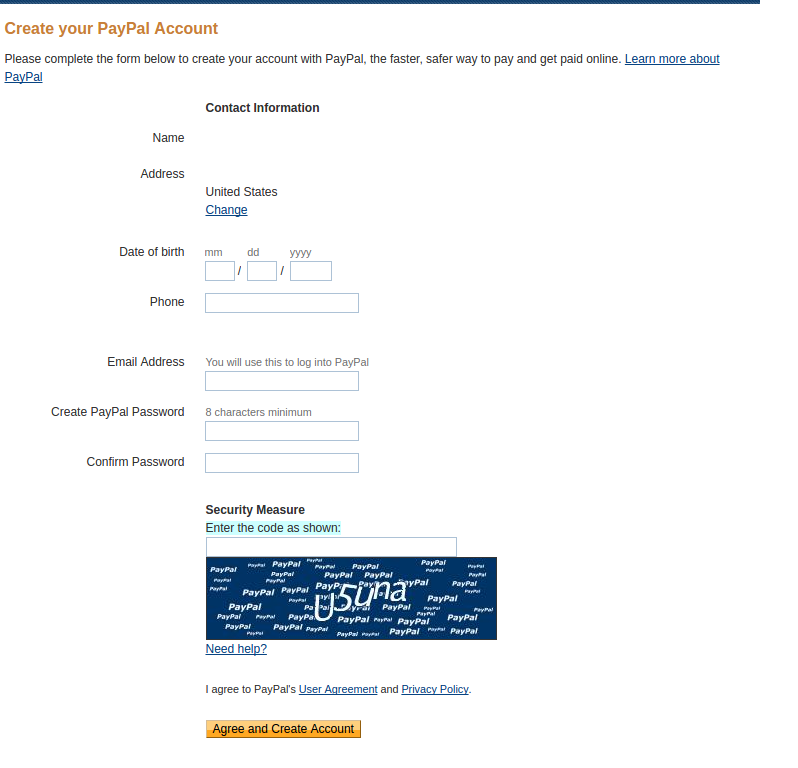
4. On clicking Sign Up, you will be redirected to the PayPal account creation page. Just create a profile by filling in the details and linking it to your seller’s account.
9. Item Country:  Choose the product country from the list of country choices available.

10. Item Location: Enter the location (within that country) of the product while creating the admin profile in the admin panel.

3.2 Order Settings

The OpenCart eBay Integrator allows the store admin to process the order to form the OpenCart admin panel. The admin can select the default order status from this tab. Further, sync with the marketplace by executing cron in the Synchronization tab.
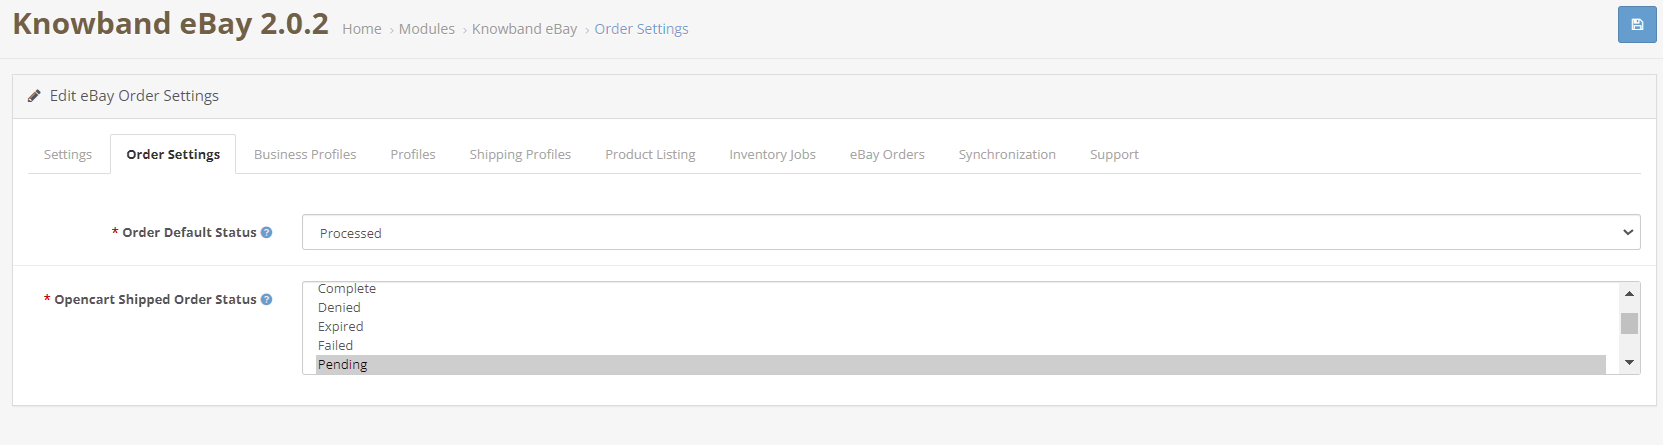
Order Default Status: Default status is the first status of the order when it is placed in the store. Select the default status of the orders that will be displayed in the marketplace.

OpenCart Shipped Order Status: Shipped status means that ordered items have been shipped. Select the status for shipped orders.

3.3 Profiles

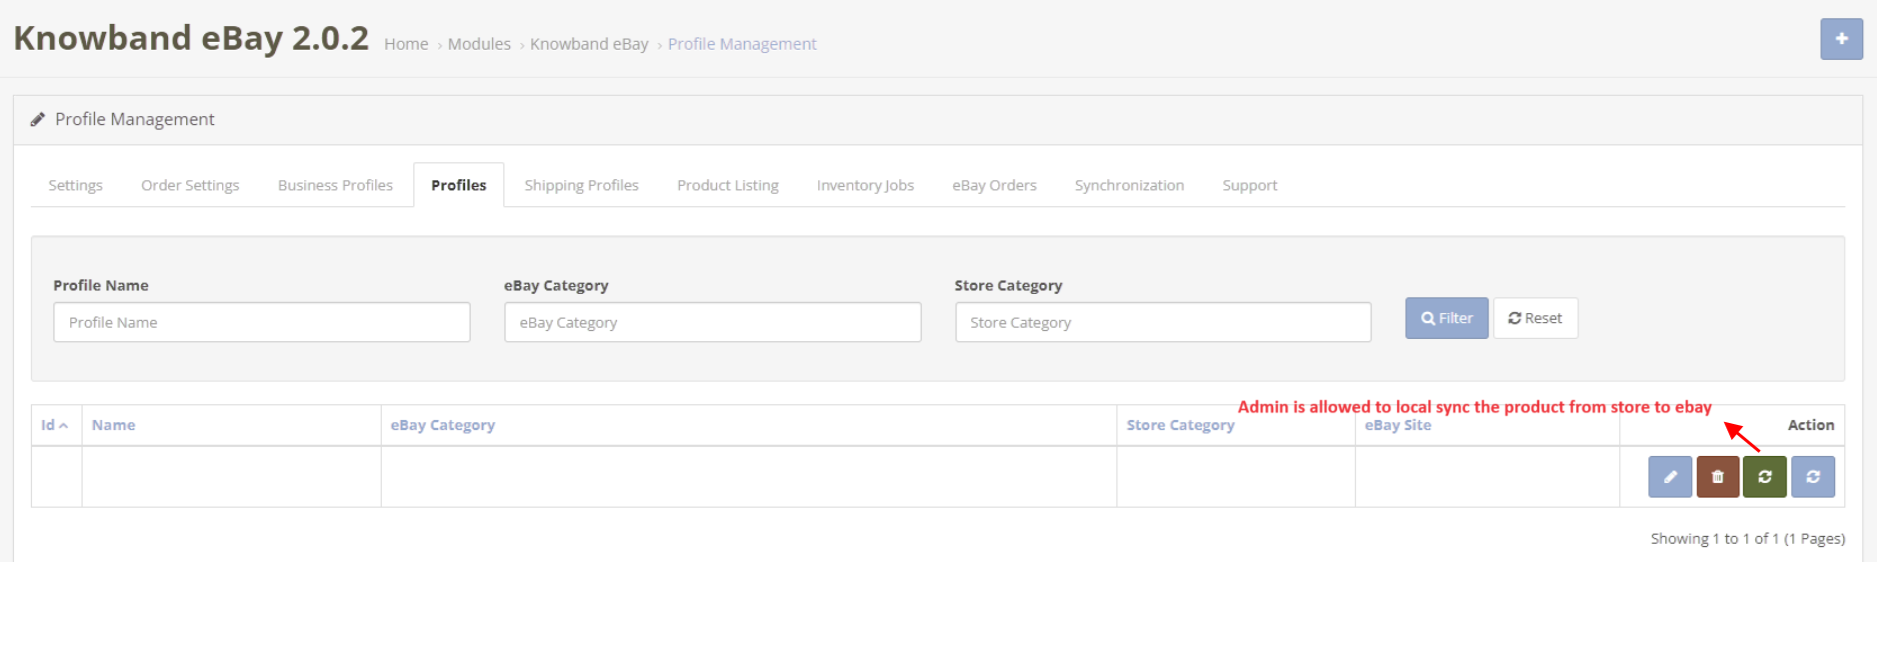
The OpenCart eBay Marketplace connector extension offers an option of a profile-based product listing to the store admin. The merchants can create profiles and manage them from the back-end of the OpenCart eBay Integration Addon.
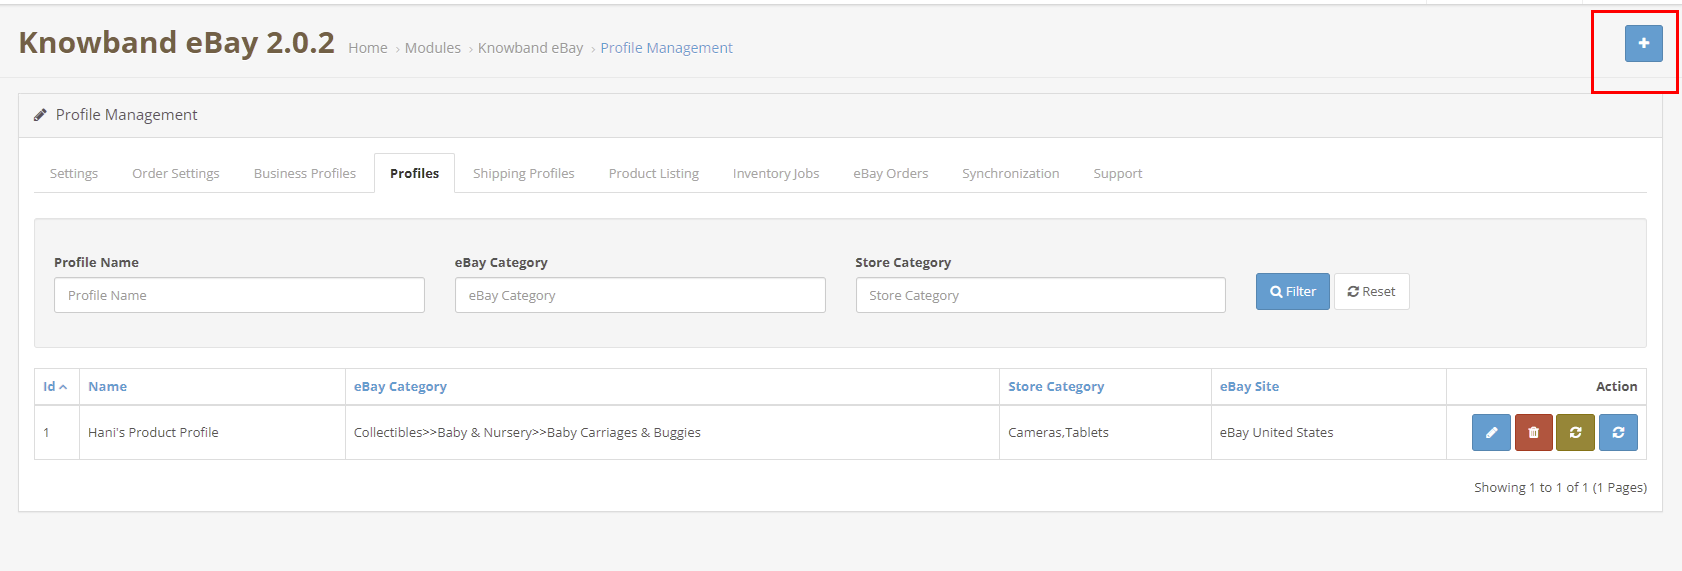
3.3.1 How to Create a New Profile?

To create a new profile, click on the ‘+’ sign in the top right section.
The profile management tab of the OpenCart eBay connector plugin is further categorized into two tabs:

  • General
  • Specifics

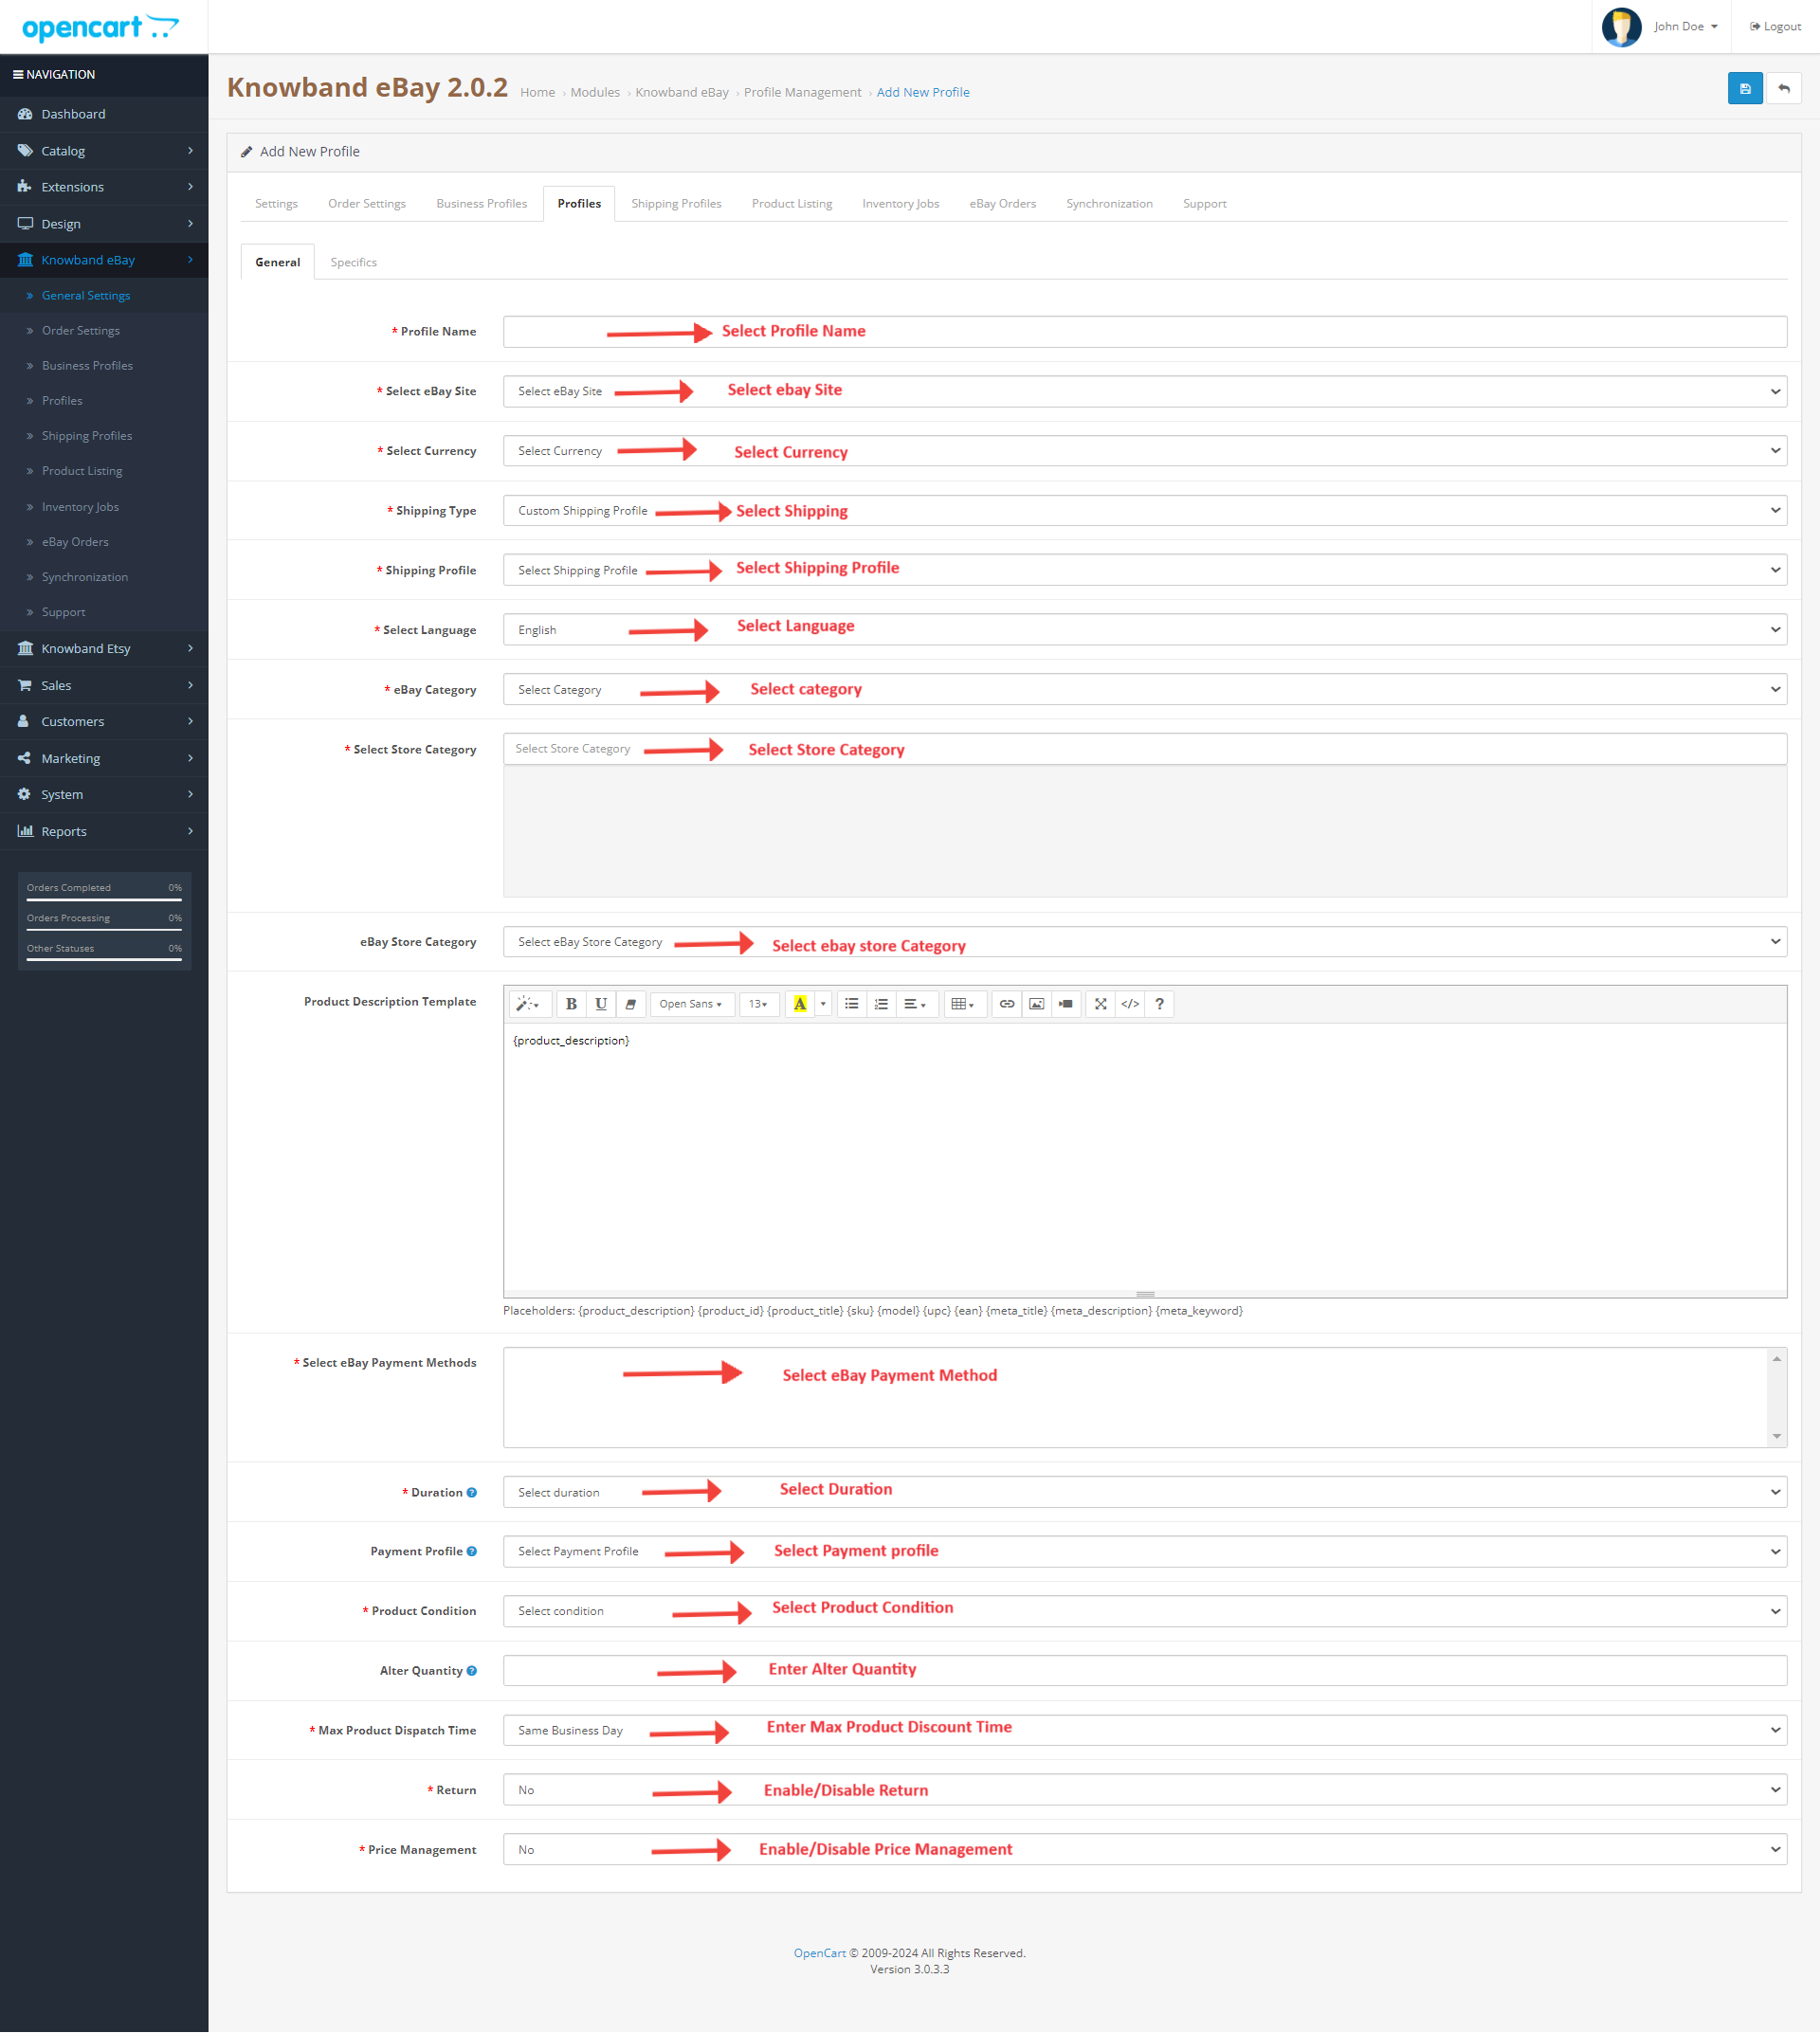
3.3.1.1 General

Profile Name: Enter a unique name for the profile here.

Select eBay Site: The eBay OpenCart API integrator allows the store admin to integrate their site with multiple eBay sites operating worldwide. Further, select the site from the drop-down menu.

Select Currency: Select the Currency type.

Shipping Profile: Select a Shipping Profile.

Select Language: Select the language.

eBay Category: The admin can easily map the eBay categories with OpenCart categories. Select the eBay category from the drop-down menu in which you want to map the categories of the OpenCart store.

Select Store Category: Check the categories that you want to map in the respective category of eBay. The store admin can map multiple categories of the store with a single category of eBay.

Select eBay Payment Methods: Check the payment methods that you want to map on eBay.

Duration: Select the duration for which the products of the profile are to be listed in the eBay marketplace from the drop-down menu.

Product Condition: Select the condition of your product to be listed.

Alter Quantity: The quantity is the minimum quantity that will be sent to eBay for listing. That is if “20” is the quantity set as “Product Quantity” in the profile and the quantity of any particular product is greater than “20” (Opencart product quantity ) let’s assume “30”, then, “20” will be sent as the product quantity to eBay for that product and if the product quantity is less than “20” let’s assume “7”, then, “7” will be sent as the product quantity to eBay.

Maximum Product Dispatch Time: Enter the maximum expected product dispatch time.

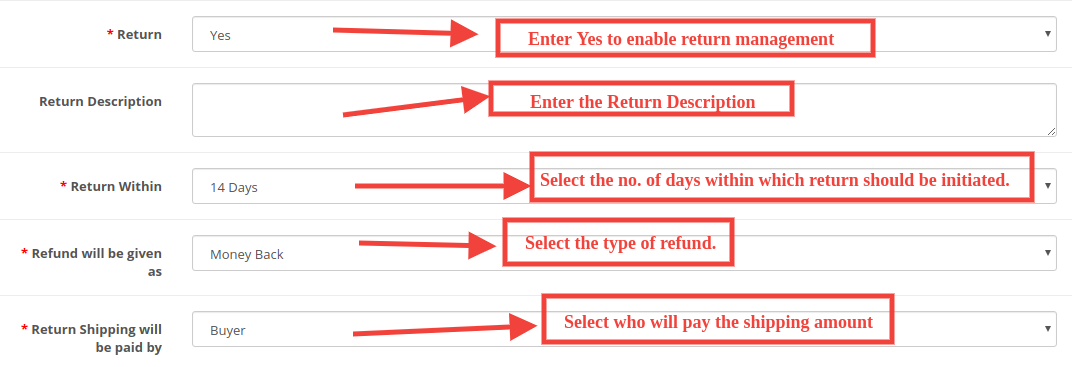
Return: Select whether you want to offer the return option for the listed products. If the admin selects Yes, then, the customers would be allowed to return the products.

Return Description: Enter the suitable return description.

Return Within: Select the no. of days within which return should be initiated.

Refund will be given as: The drop-down list shows several options in which the refund can be initiated. Select the one that suits your requirements.

Refund Shipping will be paid by Select who will pay for the shipping amount of the returned products.
Price Management: Enable/Disable price management.  If the admin selects Yes, then, the sellers would be allowed to manage the product price.
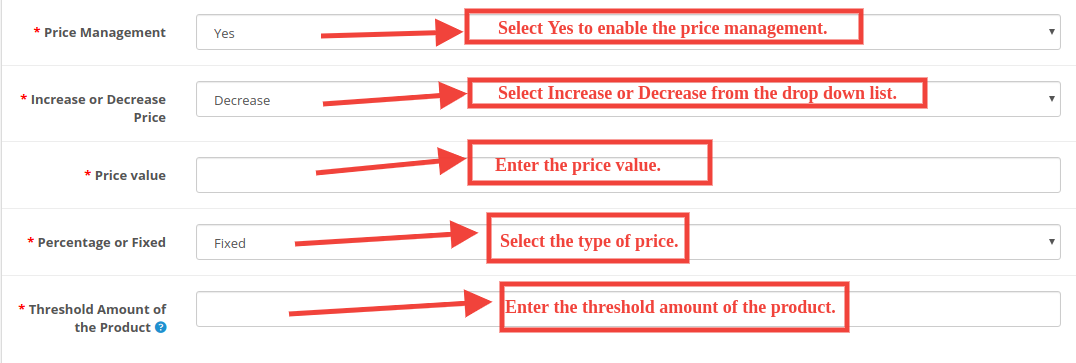
Increase or Decrease Price: Select an Increase or Decrease from the drop-down list.

Price value: Enter the price value.

Percentage or Fixed: Select the type of price.

Threshold Amount of the Product: Enter the threshold amount of the product.

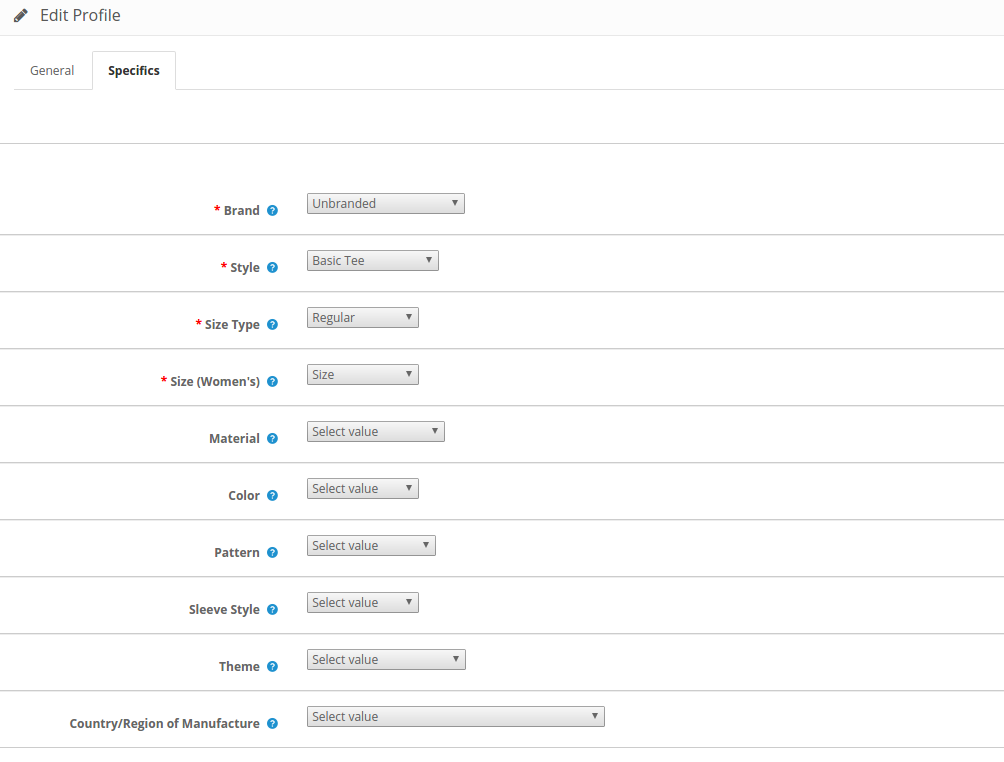
3.3.1.2 Specifics

The specifics in this section appear as per the eBay category selected in the General tab. The field marked with * is mandatory.
3.3.2 How to Edit the existing Profile?

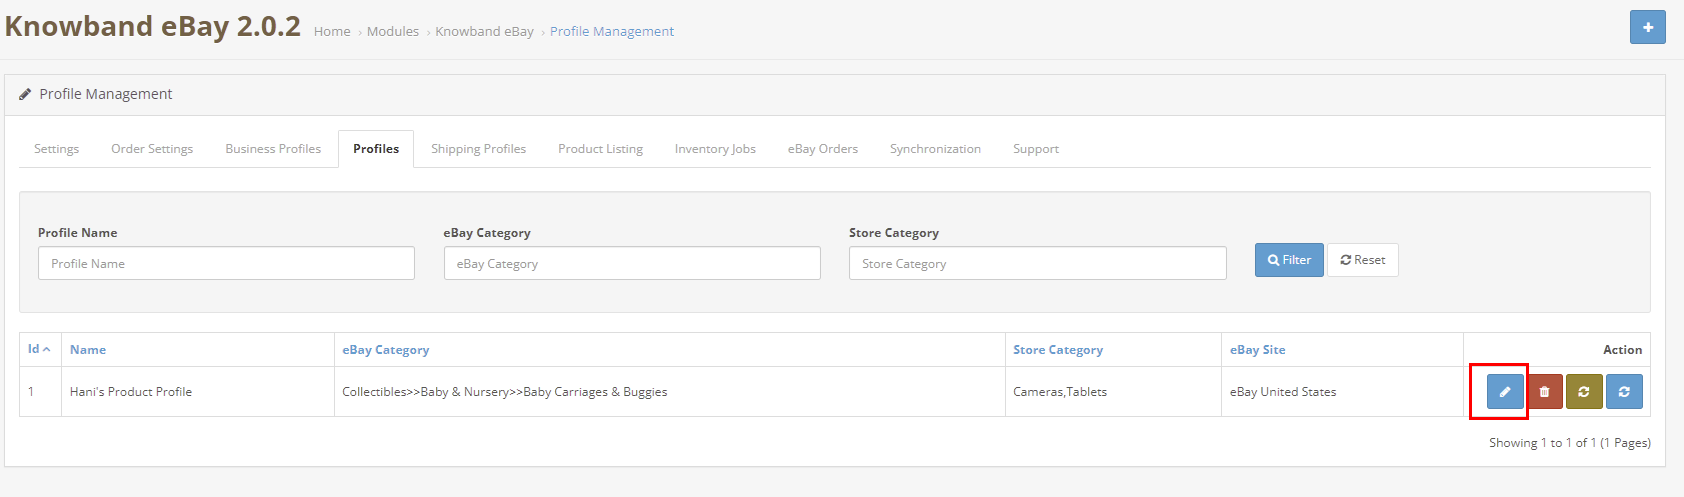
The store admin gets an option to edit the existing profile as per the requirement from the back-end of the OpenCart eBay Integrator extension. Click on the Edit button corresponding to the profile to make the changes as shown in the image below.
3.4 Shipping Profiles

This tab showcases the list of all the shipping profiles of the eBay Marketplace.
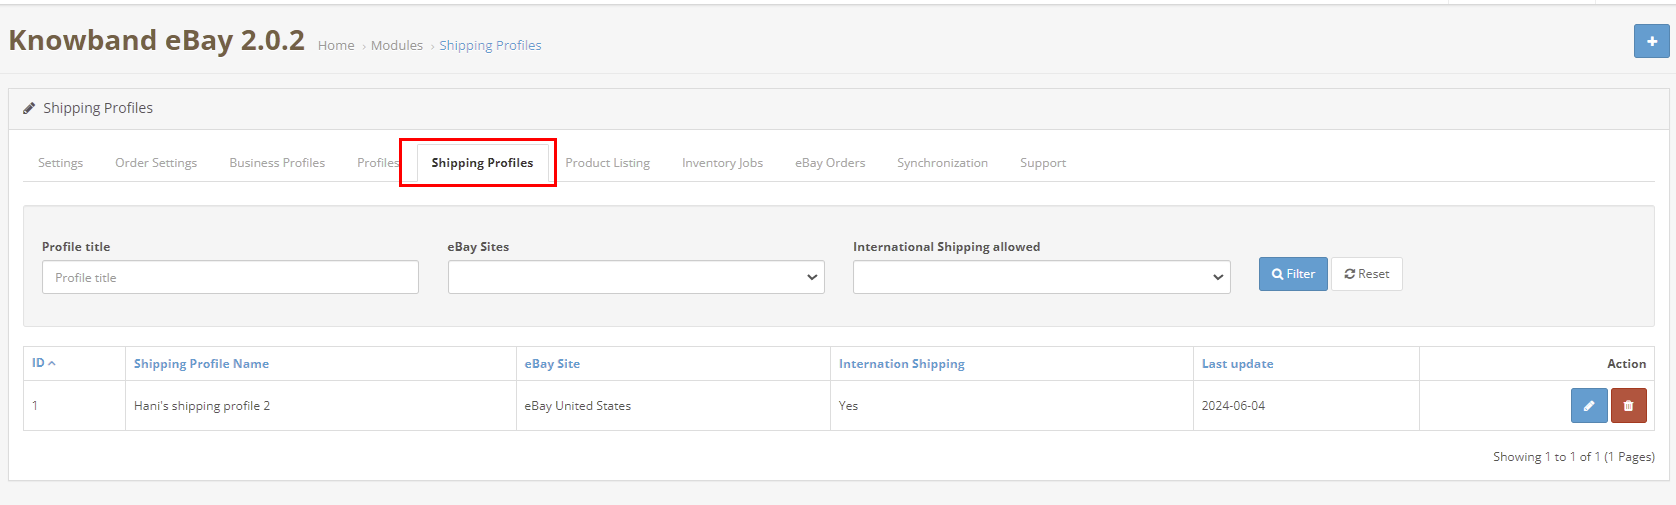
You can add multiple shipping profiles while you can also edit the existing shipping profiles too.
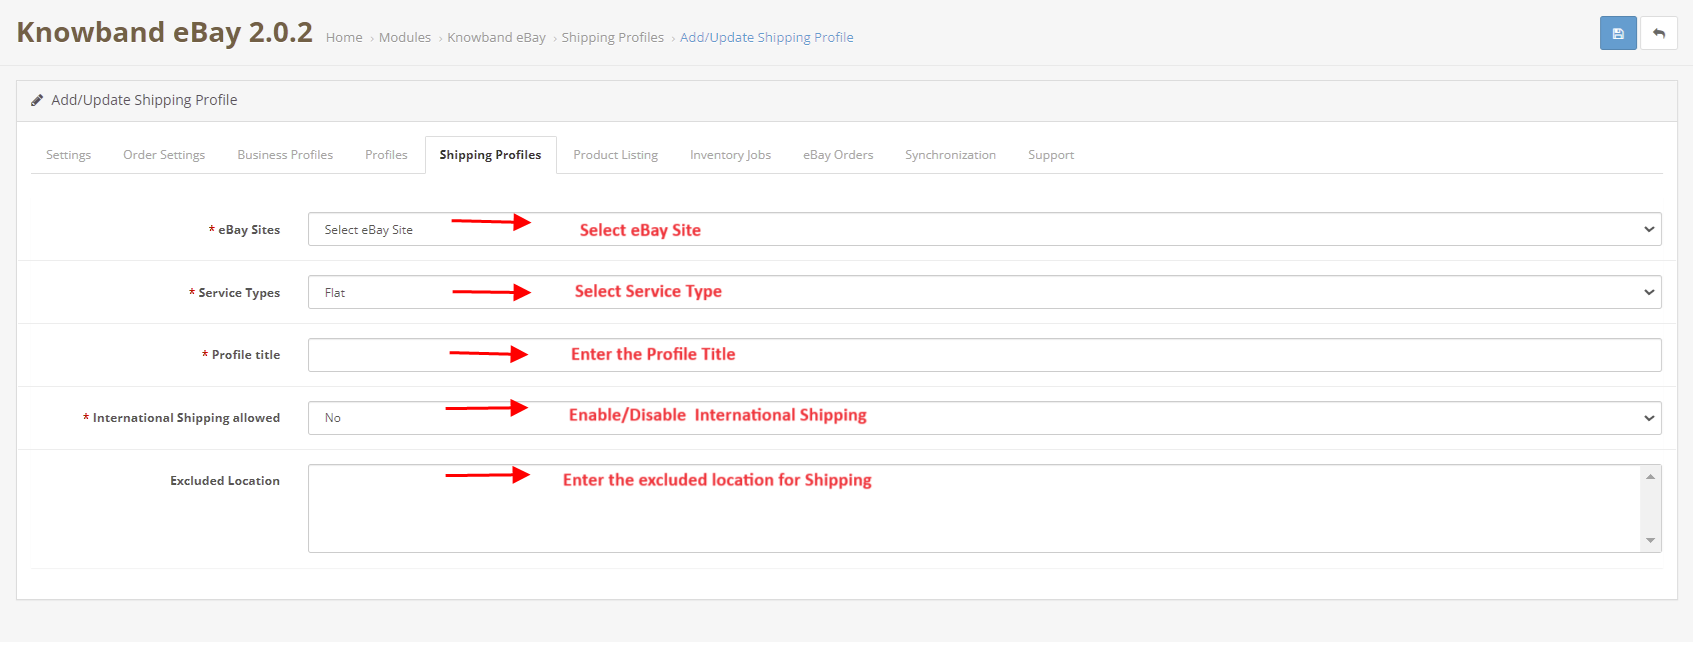
eBay Sites: Select the eBay site.
Service Types: Select the service type.
Profile Title: Enter the profile title.
International Shipping allowed: Enable/Disable the international shipping.
Excluded Location: Enter the excluded locations for shipping.

3.5 Product Listing

The OpenCart eBay Marketplace integrator makes it easier for the OpenCart store admin to view the product listing report. The products listed in the marketplace can be viewed from the back-end of the OpenCart eBay Integration plugin. The admin can remove the products by clicking on the ‘Delete’ button as shown in the image below.
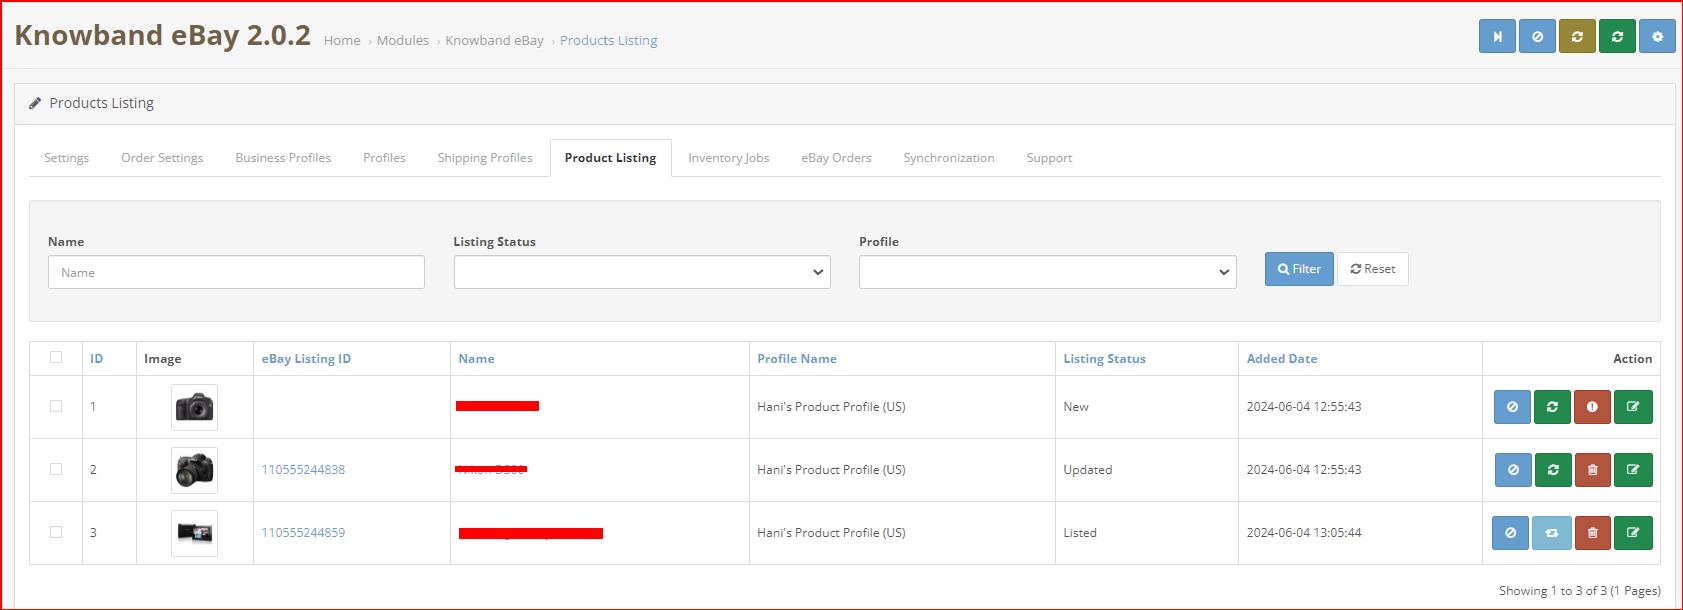
There are the following options available corresponding to each product listing:

  • Disable the Product

This tab enables the admin to disable the product from the backend of the module. After disabling the product, it will not be shown on the front-end of the Marketplace. It can be only visible after enabling the product from the backend.

  • Product Listing Relisting

This option offered by eBay Prestashop integrator allows the admin to relist products in case the listing is expired on eBay Marketplace. To relist the product, the admin has to click on the “Relist” action given in bulk actions.

  • Product Listing Revision

If any update is done in product details then by default it will be marked as updated and if cron is set for this action then it will be sent for revision. If the admin manually wants to send products for revision then he can mark the product and click on “revise” from bulk actions.

  • Individual Product Synchronization

This feature enables the admin to sync the products one by one (Along with the bulk sync option at the top right corner). By this, the admin can filter out the products that need not be shown on the front end of the eBay Marketplace.

  • Delete the product

This feature enables the admin to delete the product. Admin can simply click on the Delete button and the product will be deleted from the front-end of the website.

  • Adding products from the product listings tab

If you want to add a product to the product listing tab, the admin has to create a profile of the product in the Profile section of the module. (read section 3.3.1) There you will get a step-by-step procedure of creating a profile and adding the product in the products listing tab.

  • Different statues in the filter of the product listing

Here are some different statuses in the filter of the product listing.
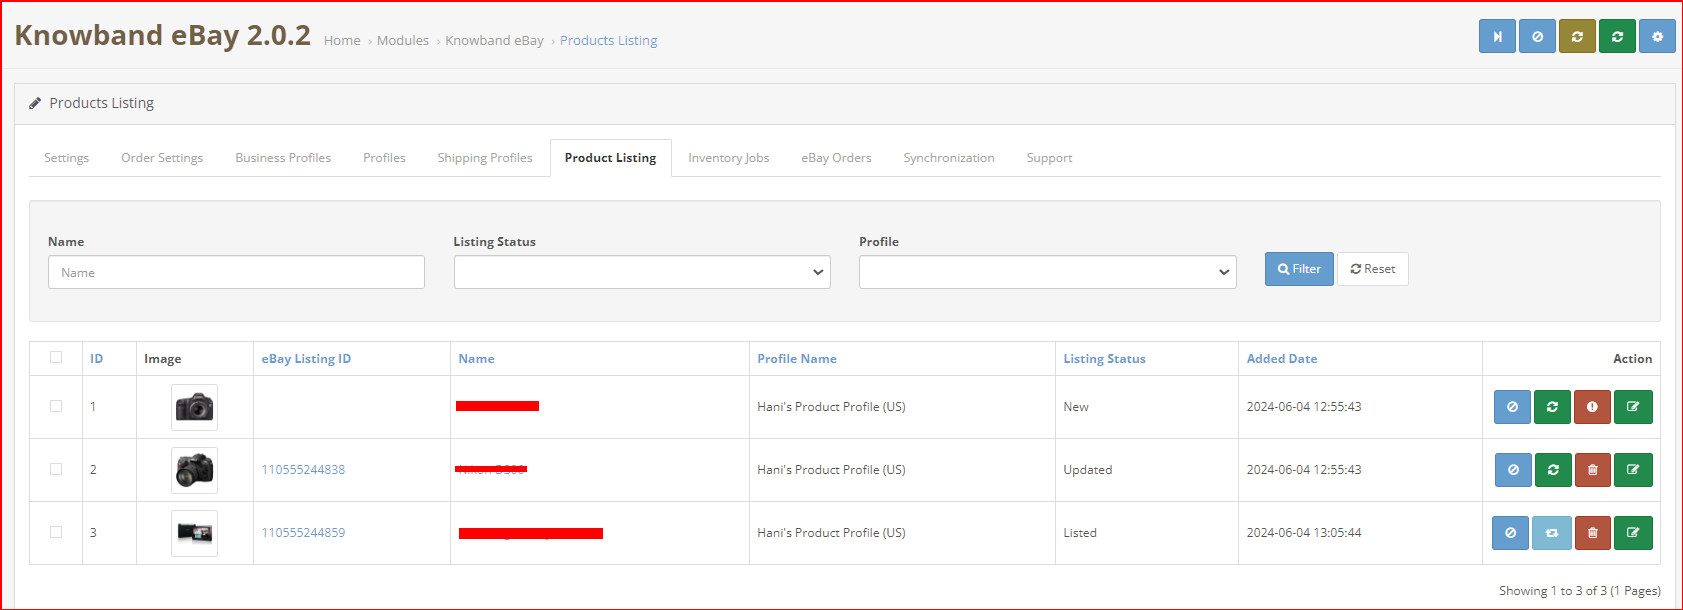
  • New: After applying this filter, the admin can view the new products listed on the Marketplace.
  • Listed: After applying this filter, the admin can view the listed products listed on the Marketplace.
  • Disabled:  After applying this filter, the admin can view the list of disabled products.
  • Updated: After applying this filter, the admin can view the updated products listed on the Marketplace.
  • Ended:  After applying this filter, the admin can view the list of ended products.
  • Relisting: After applying this filter, the admin can view the relist products listed on the Marketplace.
  • Listing a Product with Custom Product Details: The Opencart eBay marketplace connector provides custom product details features that enable listing the Opencart store’s products with a different name and different product description on the eBay marketplace.
  • Use Product Details: The store admin can enable/disable this feature from this button.
  • Custom Product Title: Enter the customized product title you want to synchronize on the eBay marketplace.
  • Custom Product Description: In this section, you can add the different product descriptions that you want to synchronize on the eBay marketplace for the mentioned product listing.

3.6 Inventory Cron:

This feature allows the store admin to sync the inventory of all the listed products from the OpenCart store to eBay.
3.7 Inventory Jobs

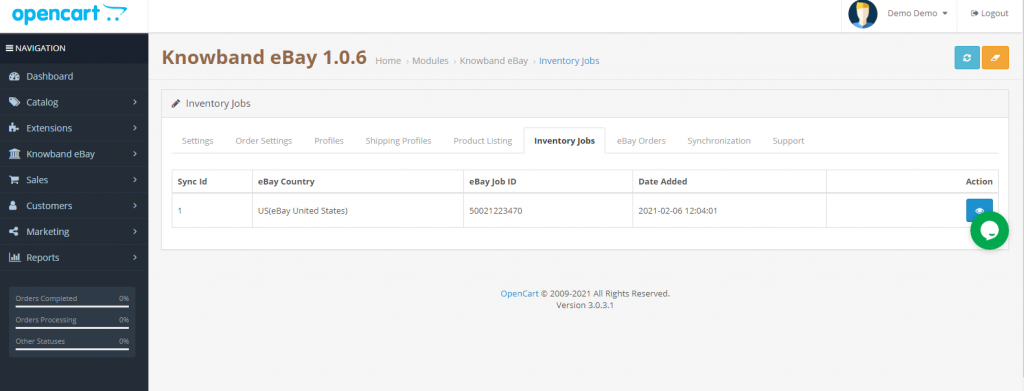
This section has a button “Sync Inventory of Listed Product” on the top right side to sync the inventory of all the listed barcodes to eBay.

It also shows the list of Job IDs corresponding to the country with the date of the last inventory sync of all listed products.

On the click of view button, it will open the log of inventory sync for that Job Id where we can see the variants for inventory have been updated with eBay status.

3.8 eBay Orders

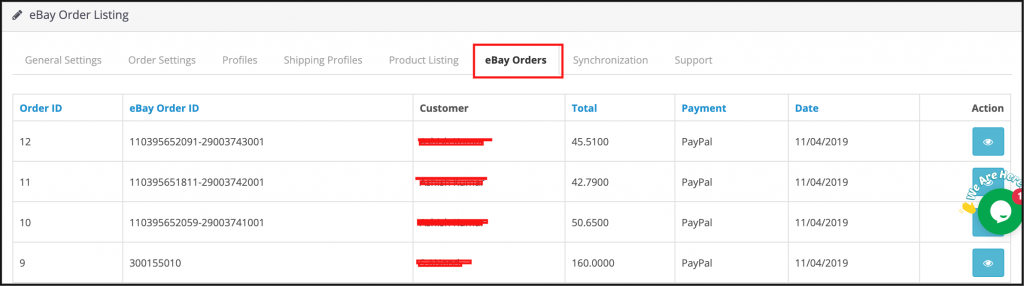
The orders received from the marketplace sync with the OpenCart store by executing cron in the Synchronization tab of the OpenCart eBay Marketplace connector module admin panel.

The orders will be listed in this tab as shown in the image below:
3.9 Synchronization

The eBay OpenCart Connector extension allows two-way integration to the OpenCart store owners. The merchants can list the products and the related details in the marketplace with the help of this OpenCart eBay API Integration. At the same time, the orders sync back from the eBay marketplace to the OpenCart store.
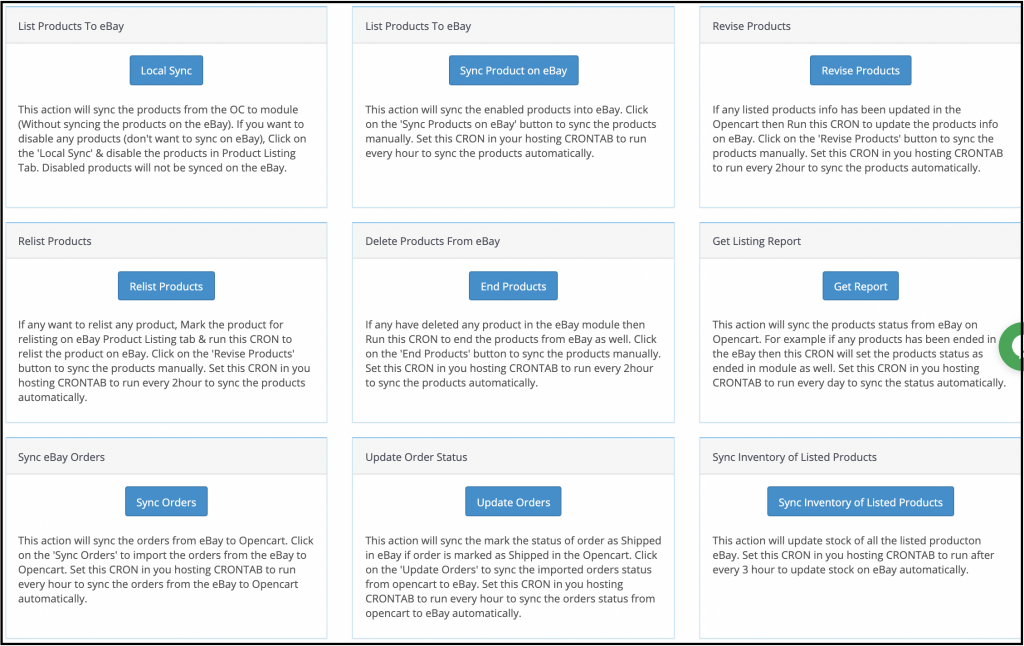
OpenCart eBay Connector Module offers three synchronization options offered including Category, Product, and Order synchronization.

3.9.1 How to sync the Products from the store to Opencart eBay Knowband Module?

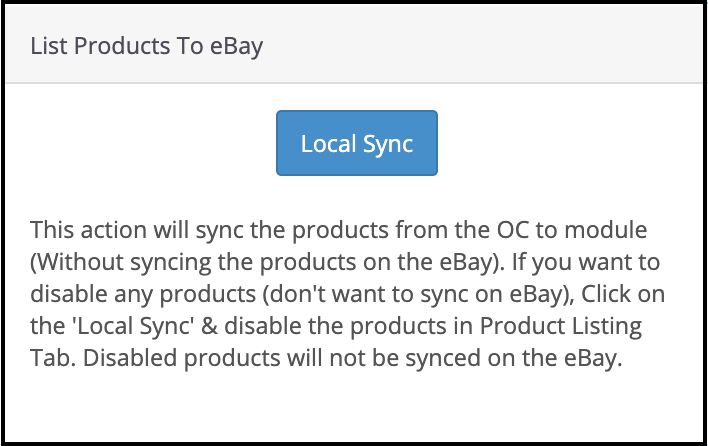
Add the shipping template and profile in this module. Now, click on the “Local Sync” button to sync products from the Opencart store to this module.
3.9.2 How to sync the Products with the eBay Marketplace?

Following are the steps to synchronize the profiles with eBay Marketplace –

  • Go to the Synchronization tab.
  • Select the profile whose products you want to list. Sync the profile with eBay.
  • Click on the “Sync Product on eBay” button as shown below.
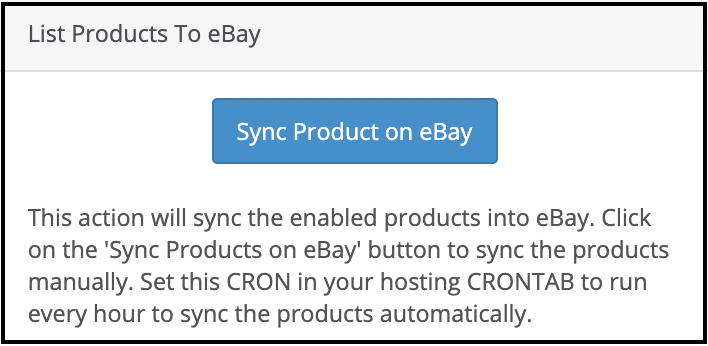
It would perform the following actions –

  1. Add the products in the marketplace with the respective product details.
  2. It will list products to eBay from your OpenCart store.

3.9.3 How to Relist the Products in the eBay Marketplace?

Click on the “Relist Products” button as shown below.
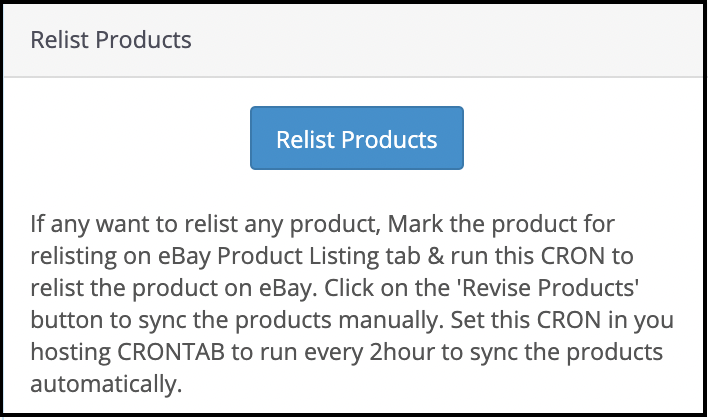
The cron job will relist the products that have expired from the marketplace.

3.9.4 How to Revise the product on the eBay Marketplace?

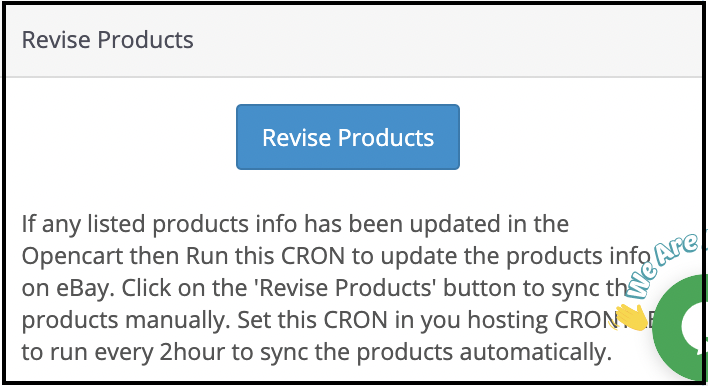
Click on the ‘Revise Products’ as shown below to revise the products on the marketplace. Any change in the product details, image, pricing, etc sync by executing this cron.
3.9.5 How to Remove a product on the eBay Marketplace?

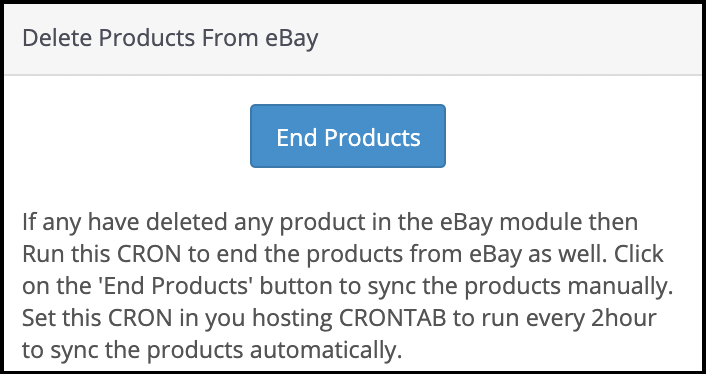
Click on the ‘End Product’ as shown below to delete the products from the marketplace. The admin needs to click on the ‘Delete’ button in the products listing tab before executing this cron.
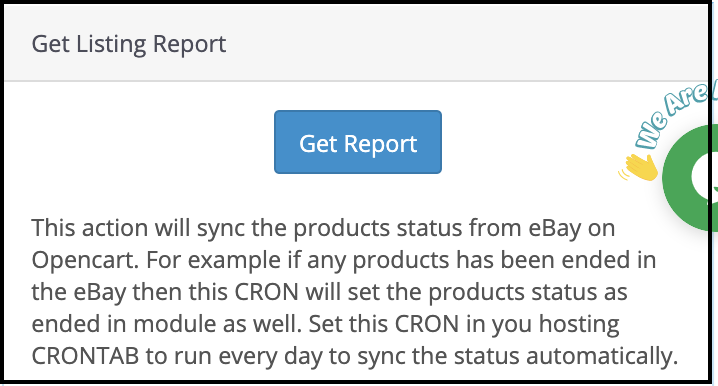
3.9.6 How to Import the listing report from the eBay Marketplace?

It fetches the product listing from the marketplace by executing the ‘Get Products Listing Report’ cron and updating the eBay status of the product on this module same as on the eBay marketplace.
3.9.7 How to sync Orders from the eBay Marketplace?

Click on the “Sync Orders” button to sync the orders received from the marketplace in the OpenCart store as shown below.
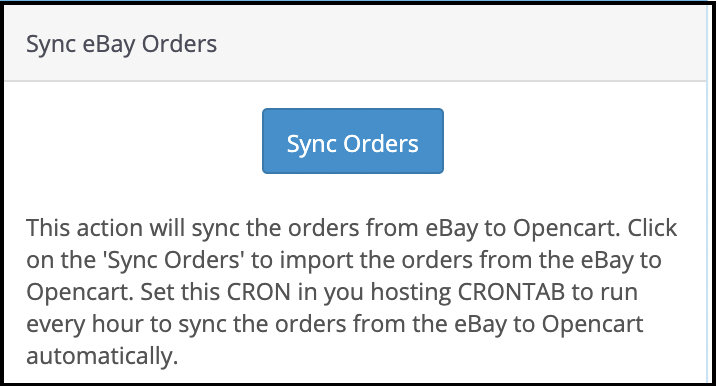
It would perform the following actions –

  • The plugin will sync all the Orders and related details from eBay Marketplace to the OpenCart store.
  • It creates the orders in the OpenCart store according to the details of the order received from the Marketplace. The admin can then process orders from a single interface, that is, from the back-end of the Opencart eBay Marketplace Integrator.

3.9.8 How to sync Order Status to the eBay Marketplace?

To sync the Click on the “Update Order Status on eBay” button as shown below.
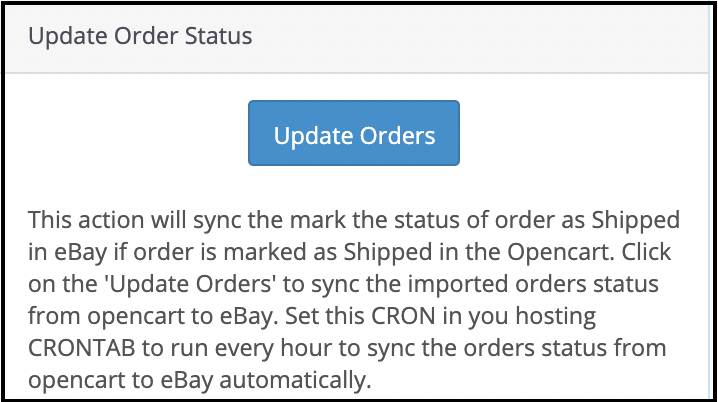
It would perform the following actions –

  • The cron checks if there is any status update recorded by the OpenCart module for any order.
  • These updates are then synchronized with the eBay marketplace.
  • It updates the Status of Orders as per the configuration settings modification in the “Order Settings” tab of the admin interface of the Opencart eBay Marketplace Integrator.

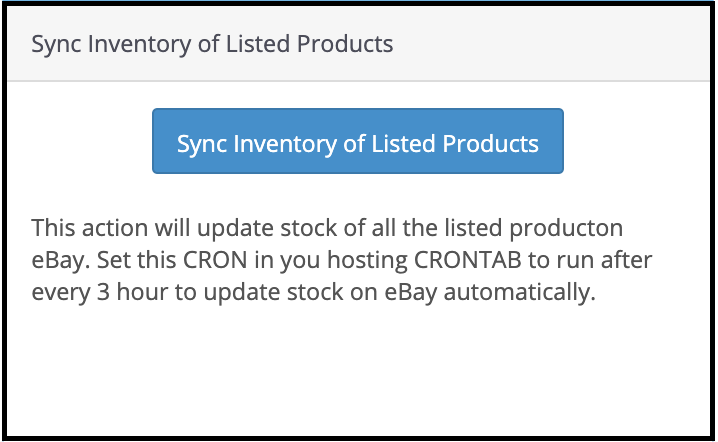
3.9.9 How to sync inventory to eBay Marketplace for all Products?

Click on “Sync Inventory of Listed Products” and it will update the inventory of all the listed products on the eBay marketplace.
3.10 How to Synchronize a Particular Profile on the eBay Marketplace?

All the crons available in the “Synchronization” tab of the Opencart eBay Connector plugin support all categories in bulk. However, if you wish to list or update a specific profile only, you can manage this task from the “Profile Management” tab.

In this section, we provide the “Local Sync,” “Sync Products,” and “Sync Product Status” crons to offer the Opencart admin flexibility in managing category-level synchronization between Opencart and eBay.

4.0 [New Enhancements] Inventory Comparison with eBay

The Inventory comparison tabs allows the Opencart store owners review and compare product stock available or quantity in their OpenCart store with the stock listed on eBay. This makes it easy to spot quantity differences and keep product availability consistent across both platforms.
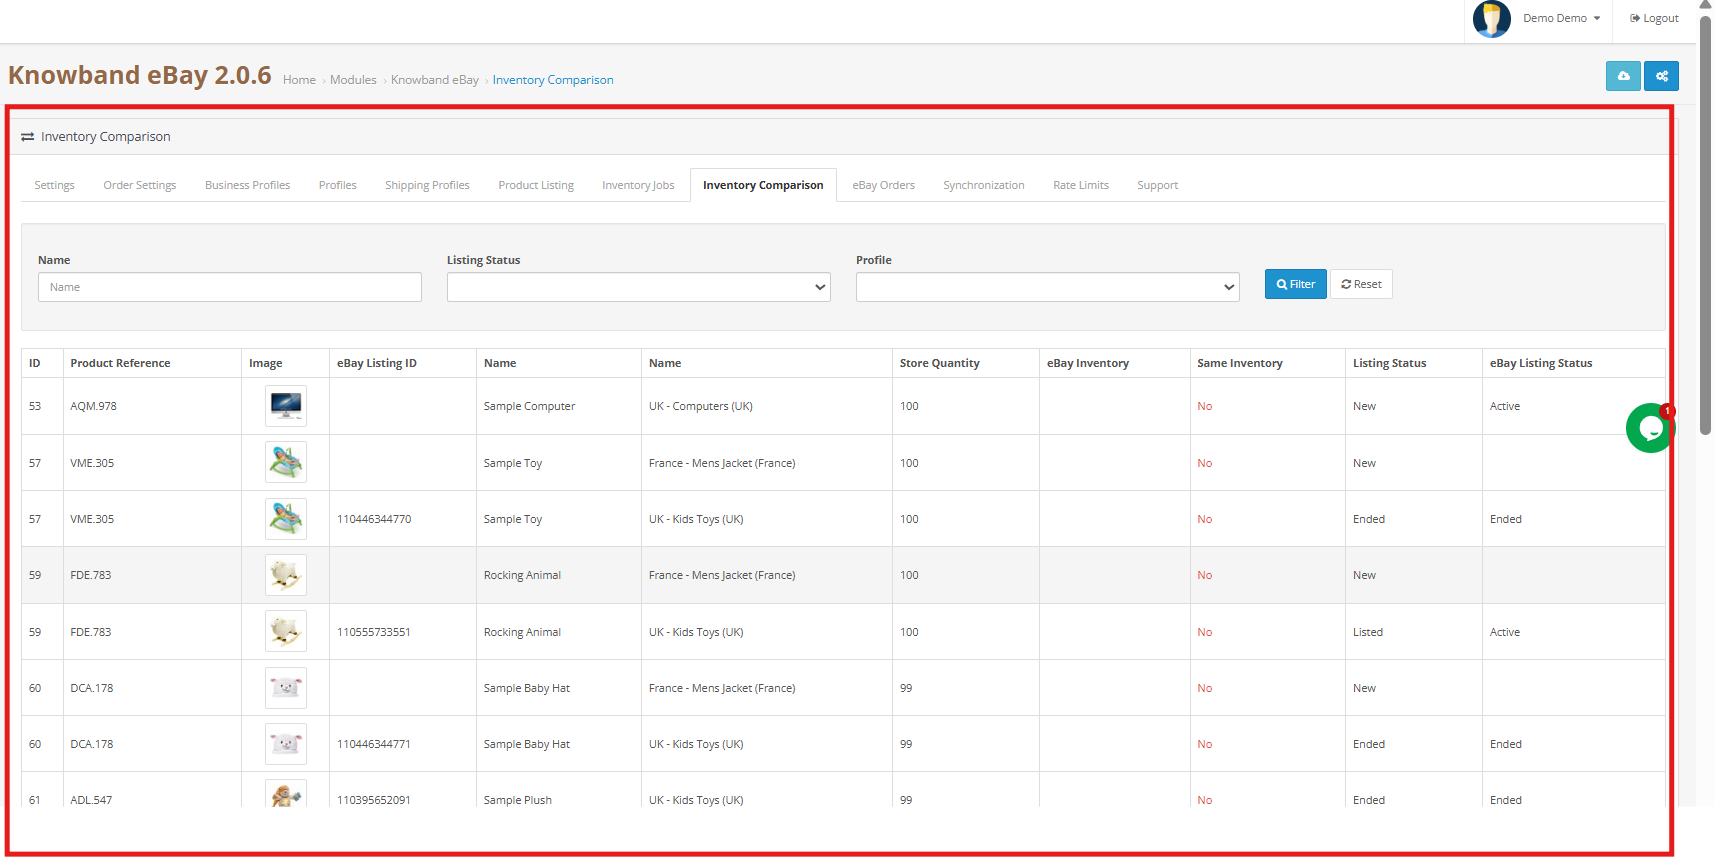
By regularly checking this section, sellers can reduce the risk of overselling, avoid out-of-stock situations, and maintain smooth inventory management without manual checks.

The comparison process runs through two cron jobs that work together to collect and verify inventory data.
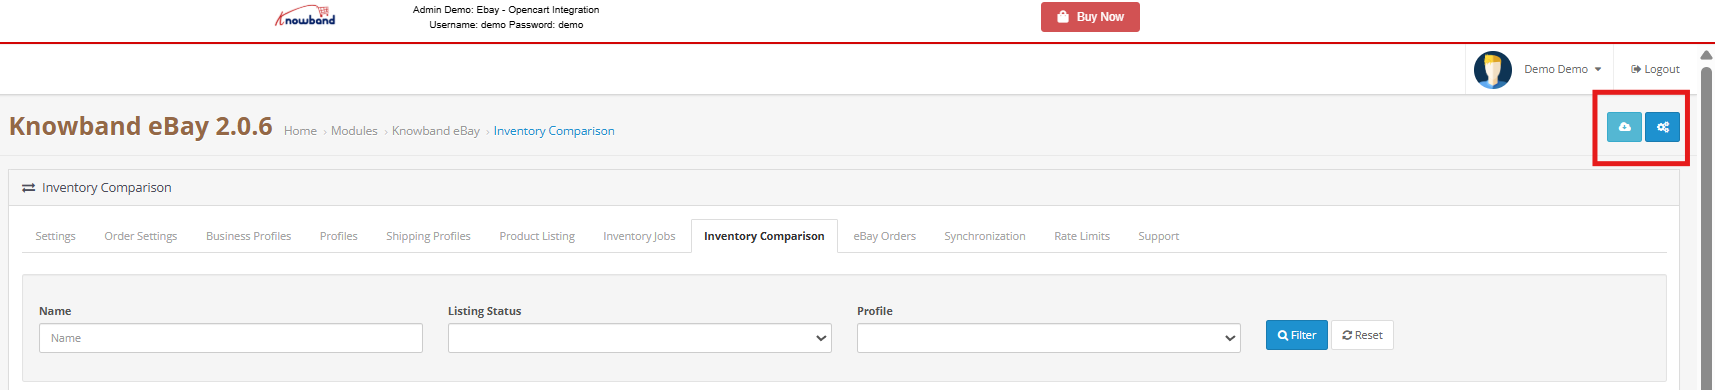
4.0.1  Fetch eBay Stock Data through Submit a Request to fetch eBay Inventory Cron

This scheduled cron fetches the latest product quantity details directly from your connected eBay account. When the cron runs, the fetched stock values are stored and displayed in the Inventory comparison section for reference.

Running this task ensures that the system always has updated eBay stock information ready for comparison.

4.0.2 Verify Inventory Data Using Process Last Inventory Request Cron

After the eBay inventory is fetched, this cron job compares the retrieved eBay quantities with the current inventory on your opencart. Furthermore, based on the comparison, this feature flags Yes or No depending on whether the stock values match or differ.

The results are clearly shown in the Inventory Comparison tab, helping store owners take quick action when needed.

4.1 API Usage & Rate Limit Monitoring

The Opencart eBay Marketplace Extension provides an API usage monitoring feature that helps track all eBay API interactions. Furthermore, it shows how many times each API has been called, along with the total limit and remaining available calls.

When an API request reaches or goes beyond the permitted limit, this feature automatically shows in the tab. This helps prevent interruptions and ensures the smooth operation of all syncing processes.

5.0 Support
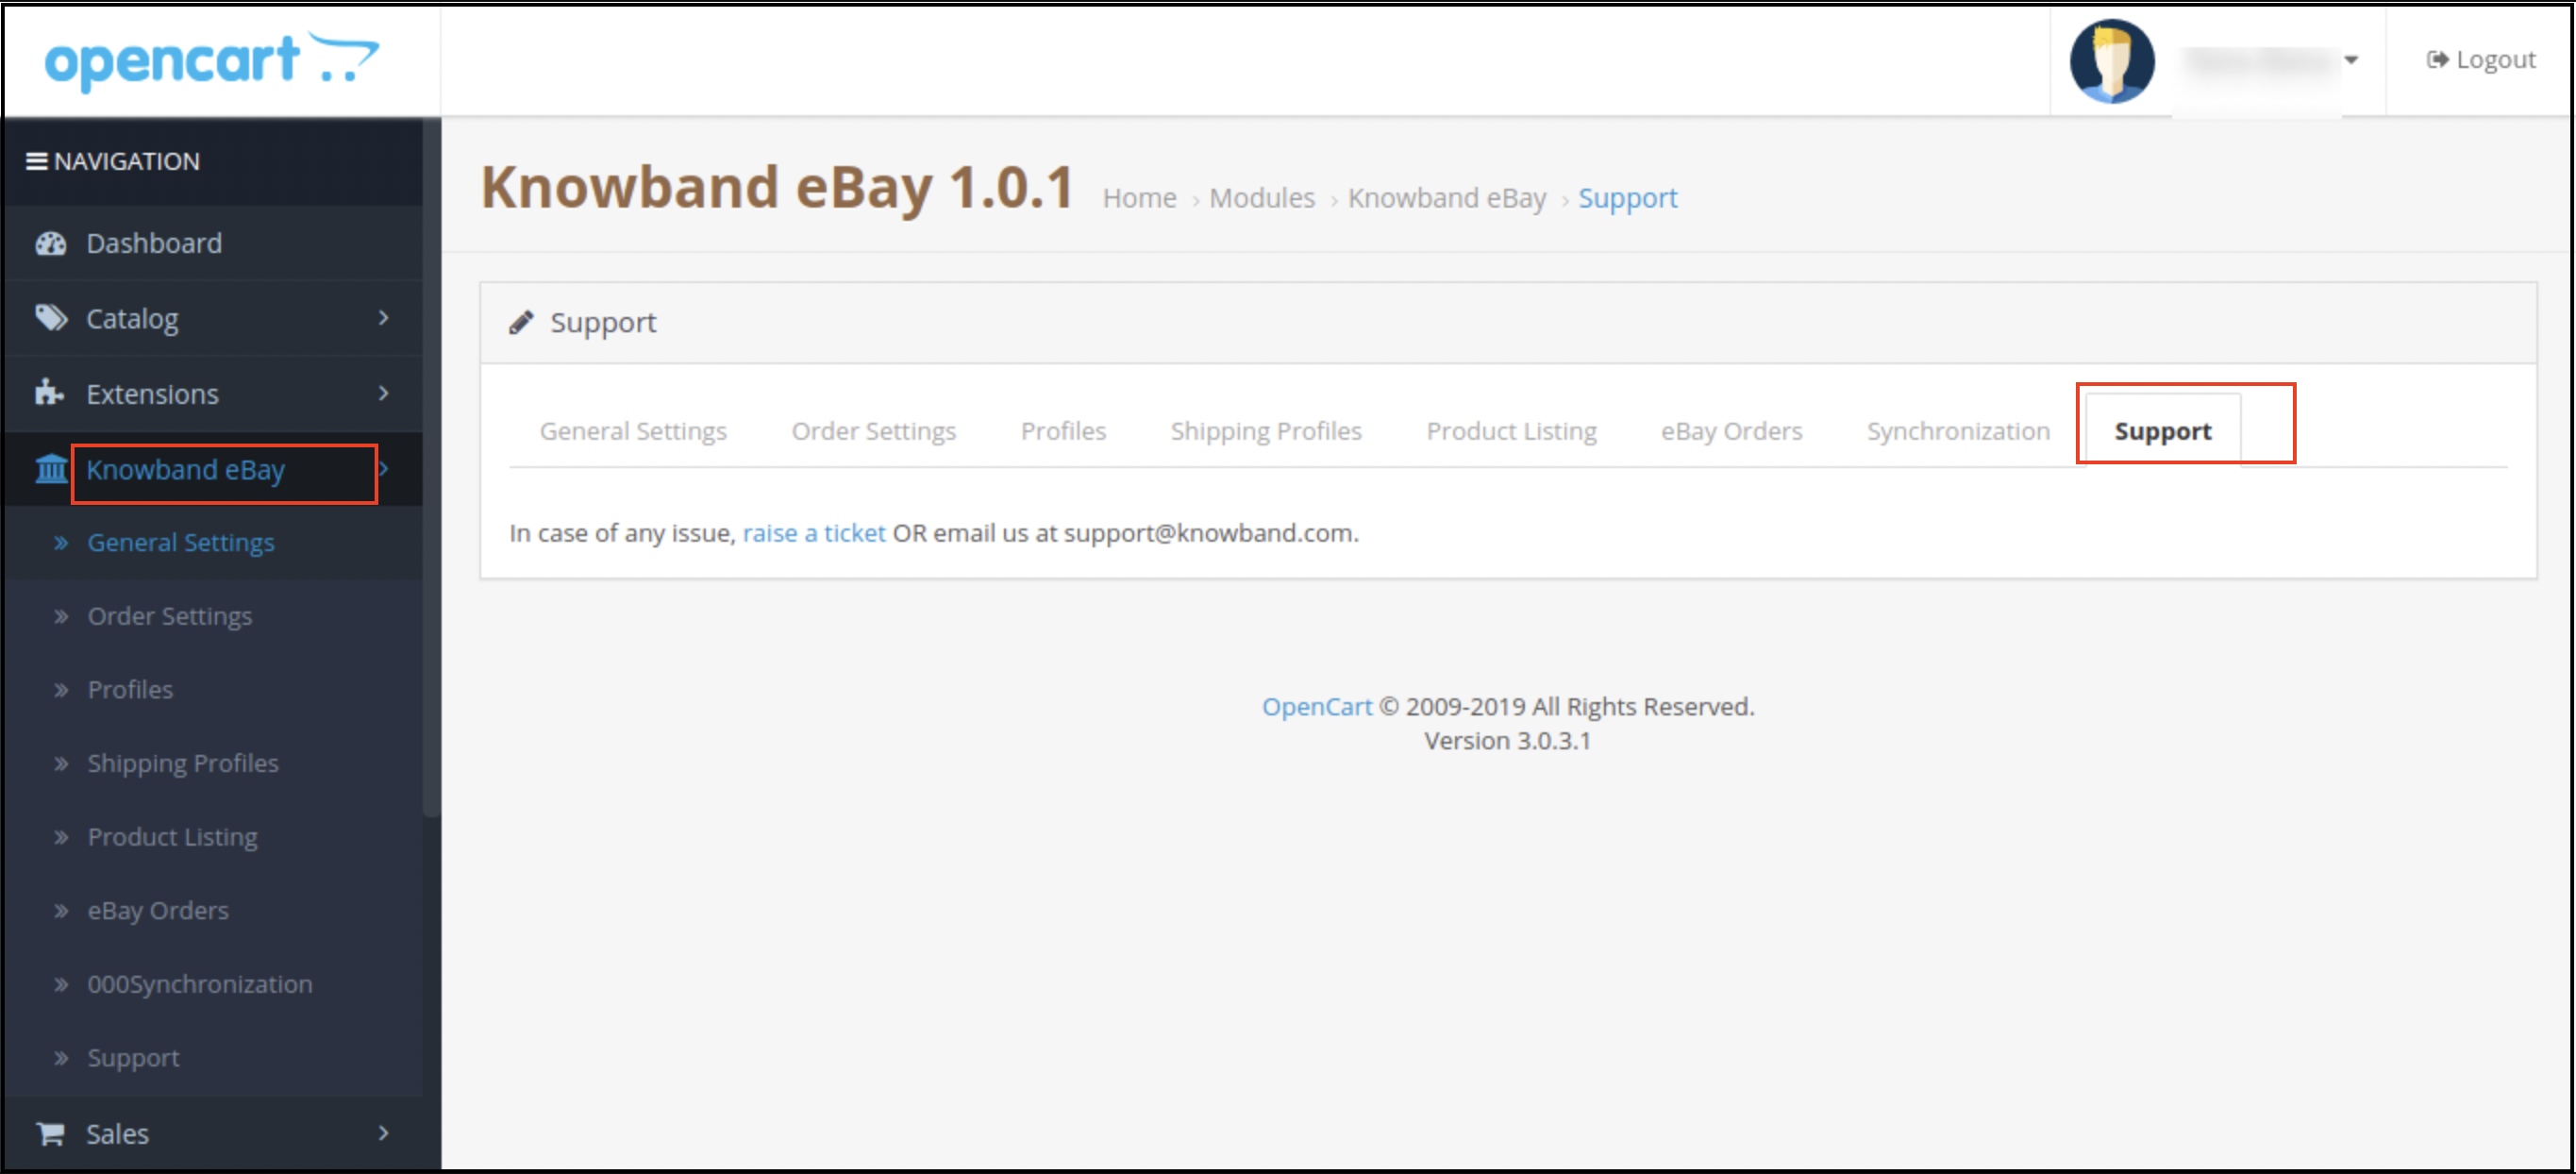
 

This tab is for admin support. In case of any query, the admin can raise a ticket or mail it to the email ID given in the support tab.

You can try this Opencart eBay Marketplace Integrator for your OpenCart store at budget-friendly prices.

OpenCart eBay Integration Module

eBay OpenCart API integrator Admin Demo

OpenCart Store

Must Read: Reasons to invest in the OpenCart eBay Marketplace Integration by Knowband

Full Tutorial of eBay Marketplace Integration Extension for OpenCart

This OpenCart eBay Marketplace Integration tutorial provides a complete step-by-step guide on installing and configuring the eBay integration module, connecting your OpenCart store with your eBay seller account, synchronizing products, categories, prices, and inventory in real time, managing orders seamlessly from the OpenCart admin panel, enabling automated product listing with advanced template controls, mapping store attributes with eBay specifications for accurate listings, and handling live/ended listings directly from your store.

Watch the tutorial here

Contact us at support@knowband.com for any query or custom change request as per your business requirement.

Opencart Walmart Integration – User Manual

1.0 Introduction

Today, marketplaces are playing an important role in the growth of e-commerce. Amazon, eBay are some of the well-known platforms, but in recent years several new marketplaces have entered the completion and these marketplaces have a good potential to drive the competition. Walmart is one of the most popular marketplaces and allows people from around the globe to buy and sell from walmart.com.

To start selling on Walmart.com, sellers need to register at Walmart. Please click on the link below to know more about the registration process.

https://marketplace.walmart.com/

2.0 Installation

After purchasing the module, you will get the following files as listed below:

1. zip (contains source code of the module)

2. User Manual

Follow the following steps to install the extension:

  1. Unzip the zip file. It would contain files and folders as shown below –

2. Copy all the files and folders of the unzipped folder into your Root Directory of the website.

3. Now module is ready to be installed in your store and you can find that in Admin -> Modules. It would be shown as below –

3.0 System Setup

Before proceeding ahead, it is important to understand the flow of actions to complete the setup. Store admin needs to take care of some specific instructions to complete the module setup.

  • Seller account setup: This section will help you to set up the shop on the Walmart marketplace and in the next steps you will learn about the Walmart API key. Walmart Consumer ID, Private Key, and Consumer Channel Type are required to integrate the OpenCart and Walmart marketplace. Please refer to the below screenshot:

  • Admin Interface: This section will help you to understand the complete working of the OpenCart to Walmart Integration module.

3.1 How to configure Walmart Opencart Integration extension?

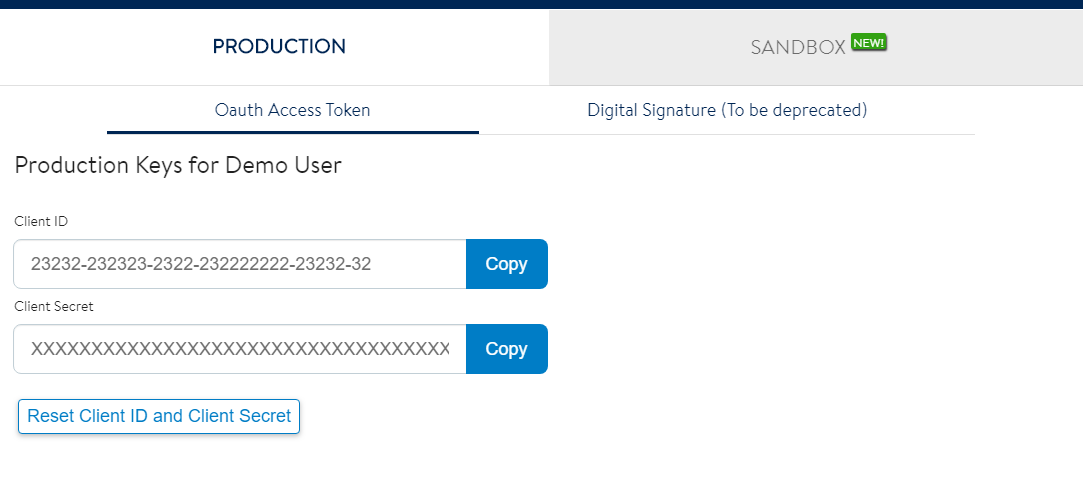
To configure the Walmart Marketplace Integrator, store admin needs to get the Client ID and Client Secret. In order to obtain Walmart Client ID, and Client Secret, follow the process given below:

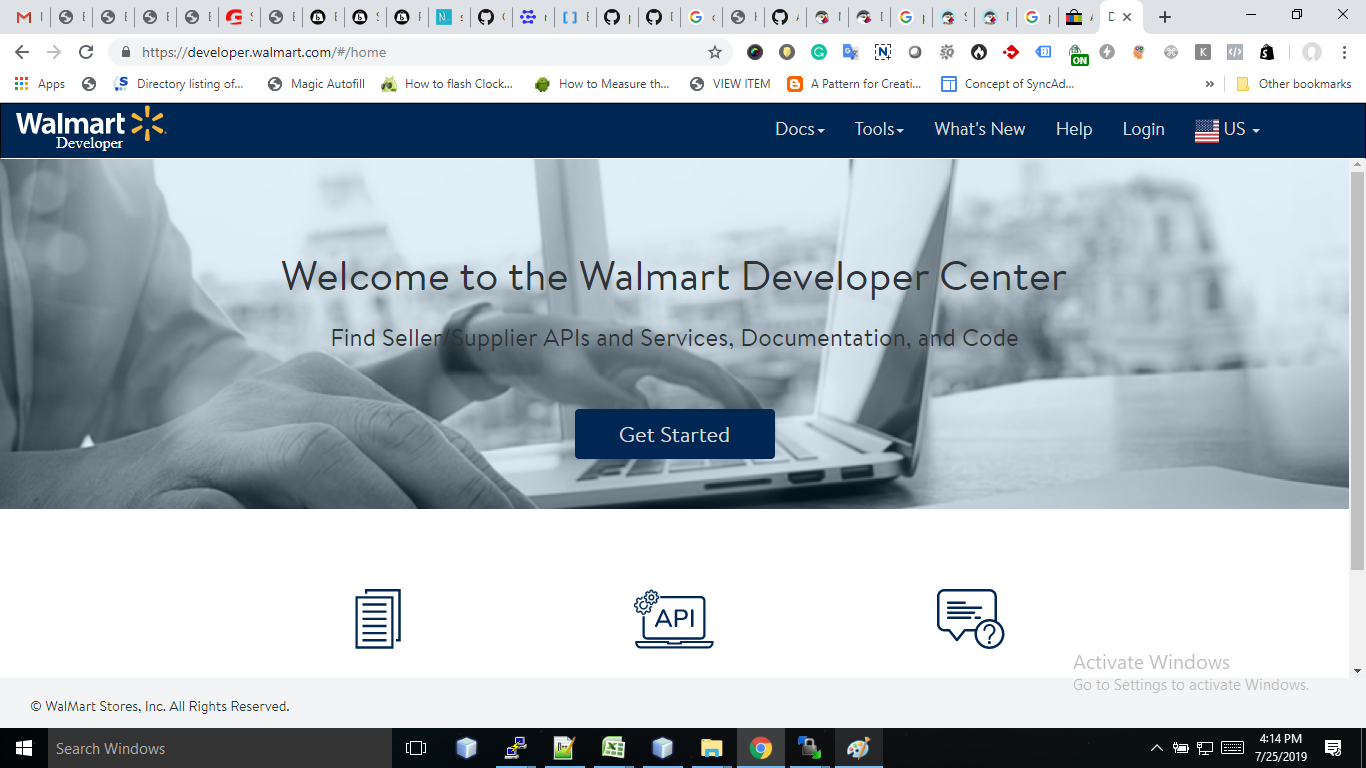
1. Go to https://developer.walmart.com/

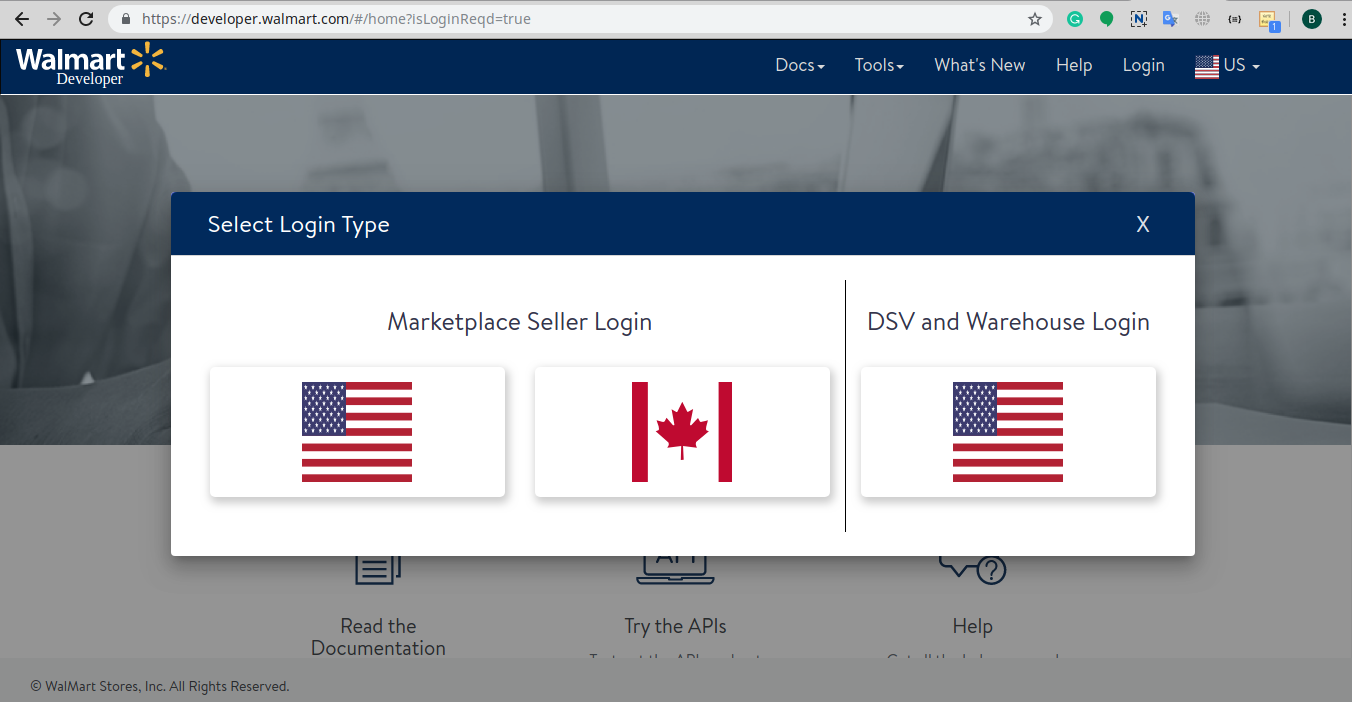
2. Select the Login type.

3. Log in using your Credentials.

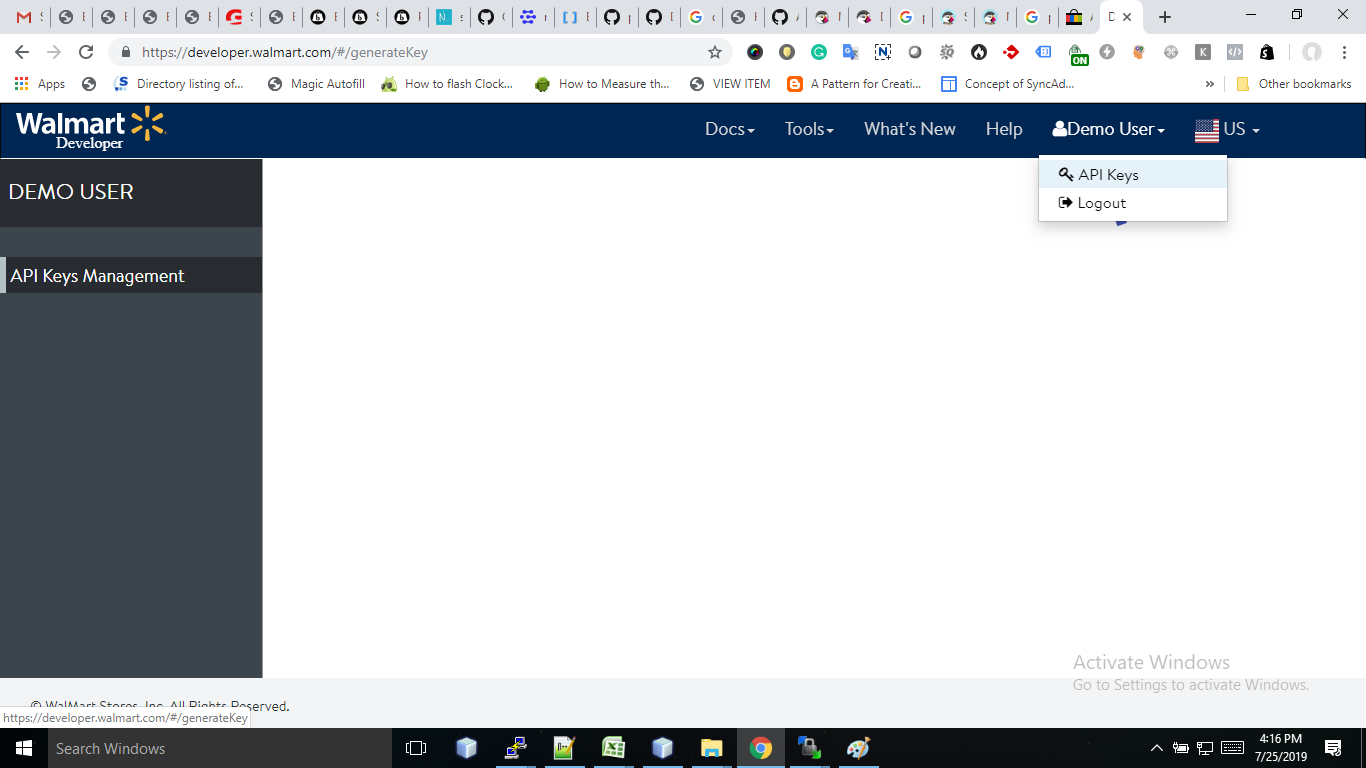
4. Click on your account and select “API Keys“.

5. Now you can get the New “Client ID” and “Client Secret” from here.

4.0 Admin Interface

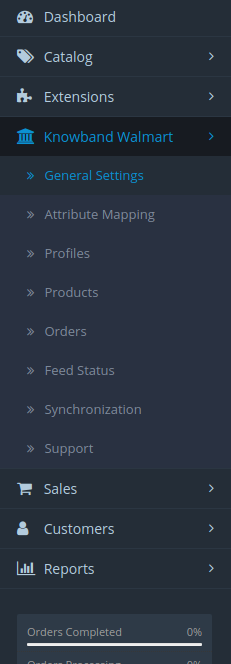
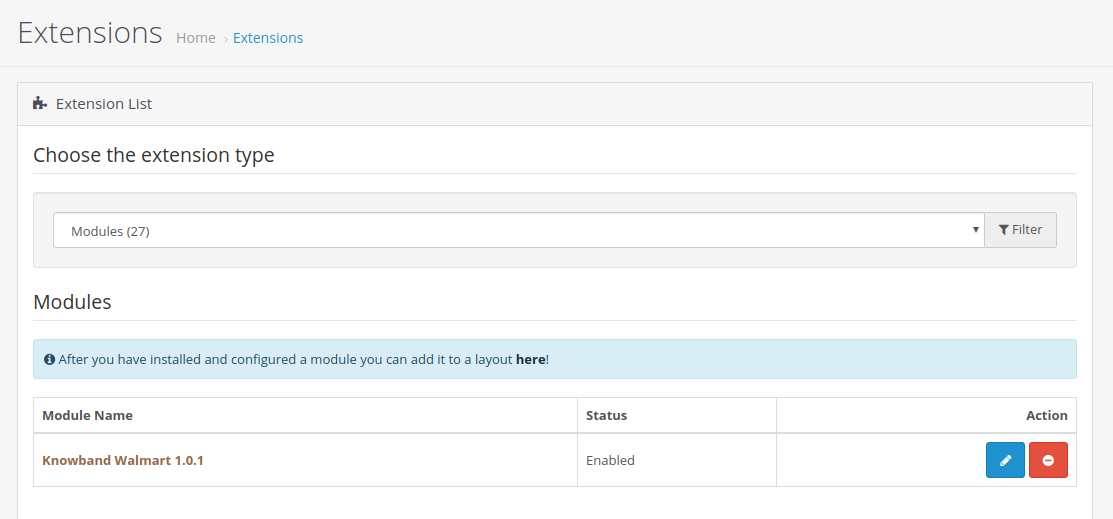
OpenCart Walmart Integration plugin has a user-friendly interface. The configuration settings can be managed via the admin interface. After installation, store admin can find the “Walmart Integration module” in the Extension List under the “Extensions” tab.

The Walmart integration extension will be displayed as shown below:

On clicking the Edit button next to the Walmart Integration module, it will redirect the admin to the admin interface. Here admin can see all the options to configure the OpenCart to Walmart Integration extension:

Walmart API Integration module offers the following options –

  1. General Settings
  2. Attribute Mapping
  3. Profiles
  4. Products
  5. Orders
  6. Feed Status
  7. Synchronization
  8. Support

Each tab is explained below.

4.1 General Settings

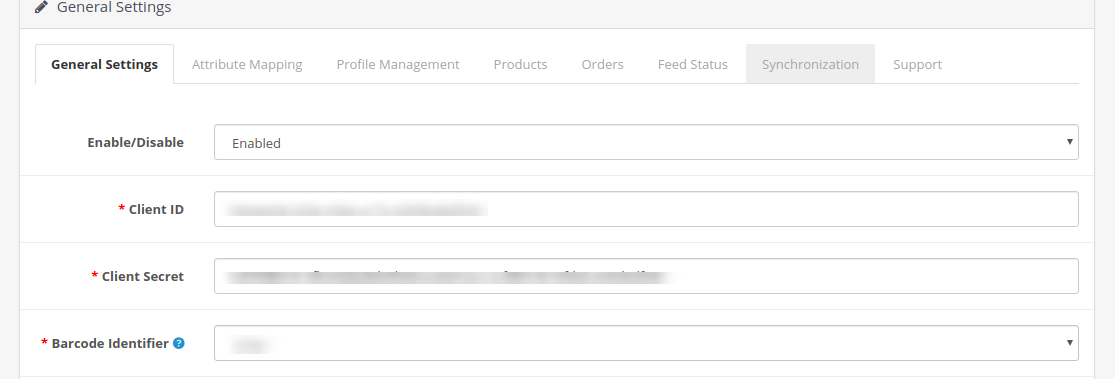
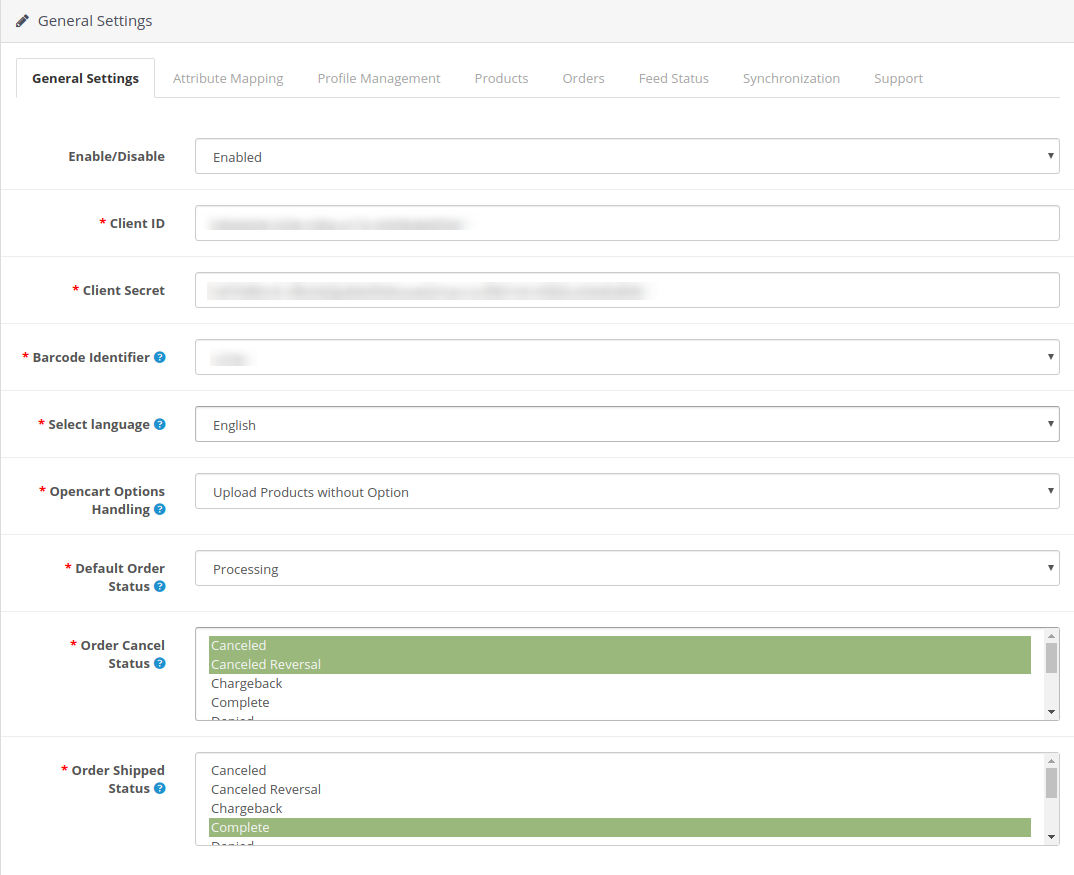
You can find the screenshot of “General Settings” page below –

General Settings tab is there for capturing details of Walmart API’s like Consumer Id, Private Key, and Consumer Channel Type, etc. This helps the admin to connect the OpenCart store with the Walmart marketplace. Please find the description of each input field below –

1. Enable/Disable

Admin can Enable/Disable the OpenCart Walmart integration module by using this option. If enabled, then only this module and all its settings will be working otherwise there will be no impact of this module on the store.

2. Client ID:

Enter Client Id in this field; it will authenticate the connection between the OpenCart store and Walmart Marketplace.

3. Client Secret:

Admin needs to enter Client Secret in this field.

3.Consumer Channel Type:

Enter the Consumer channel type API header in this field. This value can be copied from the Walmart API page.

4. Barcode Identifier:

Select the preferred Barcode Identifier from the drop-down list. The Walmart API Integration supports the UPC, GTIN, ISBN, and EAN.

5. Select Language:

Select the default language for the store.

6. Opencart Options Handling:

Enter Opencart Options Handling procedure.

7. Default Order Status:

Select the Default Order Status.

8. Order Cancel Status:

Select the Order Cancel Status option.

9. Order Shipped Status:

Select the Order Shipped Status.

After providing these details, click on the “Save” button. The Walmart API integration module verifies the API details and if the details are correct it will show the success message.

Now your OpenCart store has been connected with the Walmart marketplace.

4.2 Attribute Mapping

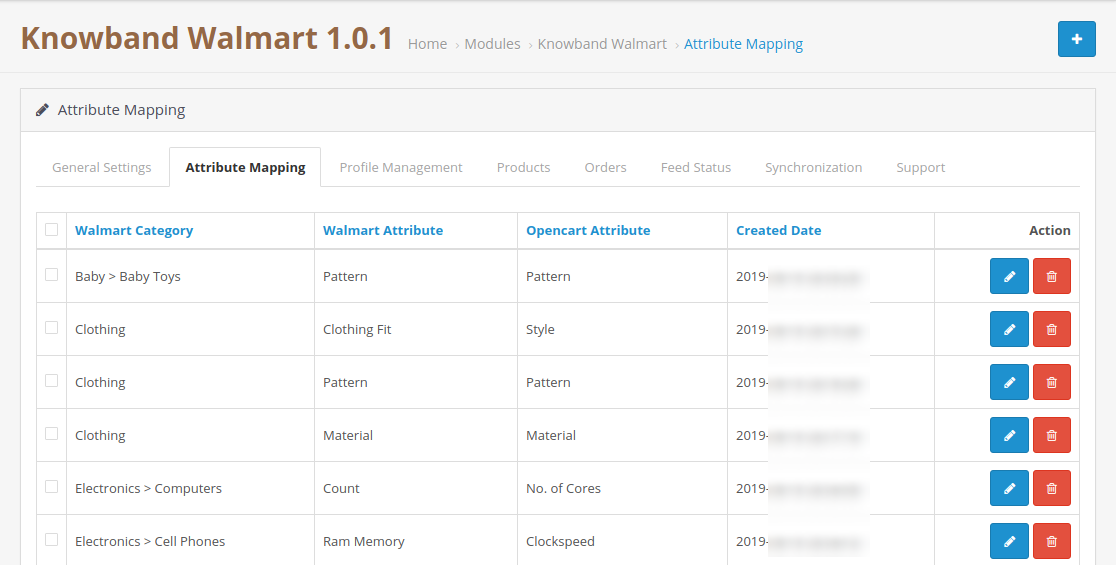
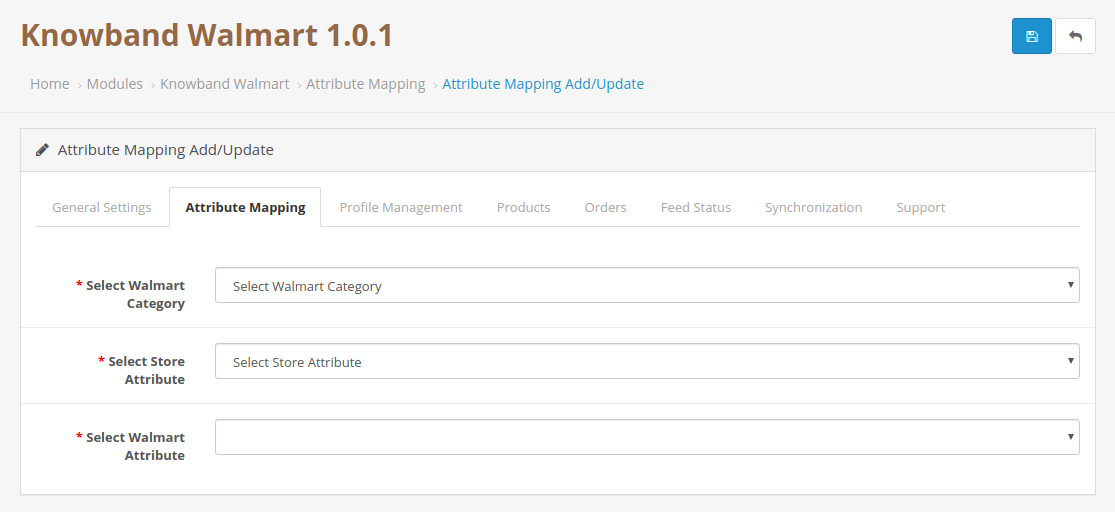
The attribute mapping tab of the OpenCart Walmart integration module allows admin to map the OpenCart store product attributes with the Walmart marketplace. Mapping of the OpenCart store attributes with the Walmart attributes so that these attributes can be mapped to the products during the profile creation. Please refer to the below screenshot-

4.2.1 How to Map Attributes

Click on the Attribute Mapping tab of the Walmart OpenCart Integration method, it will redirect to a new page as shown above in the screenshot. Now click on the (+) sign on the top of the page. It will open a new page with the option to select the Walmart category and as per the selected Walmart category Walmart attributes will appear in the drop-down list of the Walmart Attributes field. Admin can map the store attributes with the Walmart attributes by using this interface. Admin can add store attributes as per requirement from the OpenCart store admin panel. Please refer to the below screenshot-

4.3 Profile Management

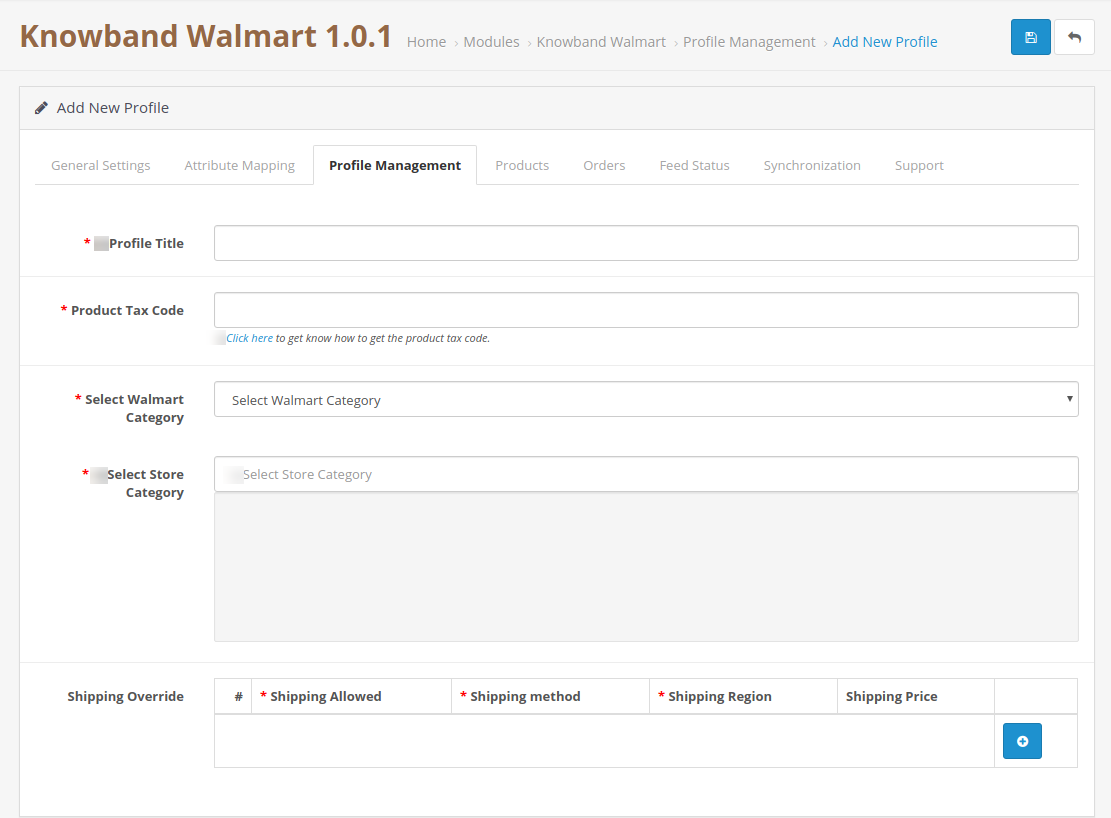
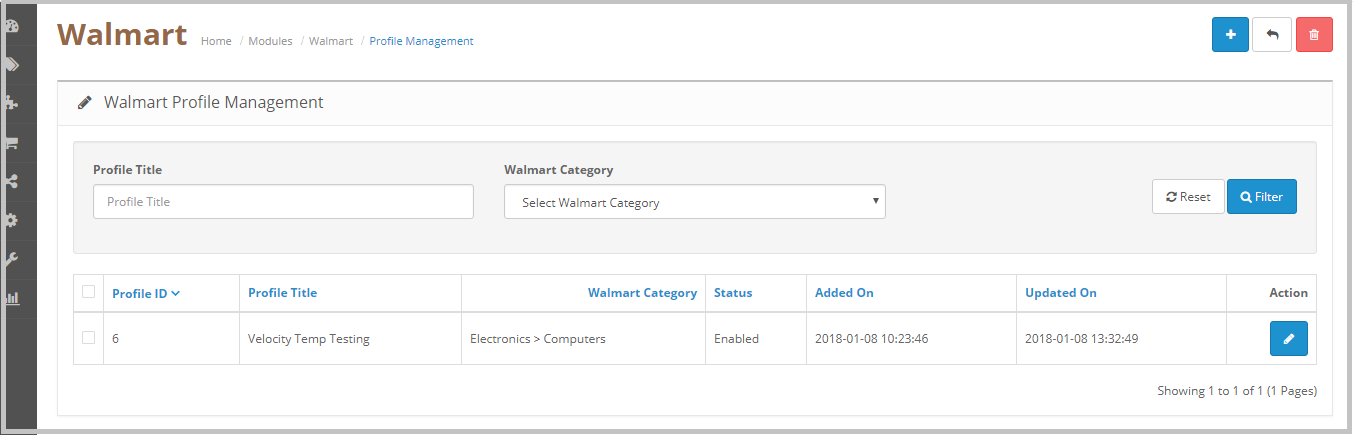
The profile Management tab provides options to list the product on the Walmart marketplace. In this section, the admin will be able to map OpenCart store product attributes and categories to Walmart store under the Walmart store product attributes and category. OpenCart Walmart integration extension allows the store admin to select multiple store categories to sync with the one Walmart category. It is mandatory to enter all the required details as per the instructions are given in the below screenshot. After entering all the details click on the Save button at the top of the form.

After creating a profile admin need to run the Product Sync by visiting the Synchronization >> Product Synchronization tab of the OpenCart Walmart Integration extension.

4.3.1 How to add New Profiles?

Following are the steps to add new profiles-

  1. Go to the Walmart API Integration extension -> Profile Management (Menu Option)
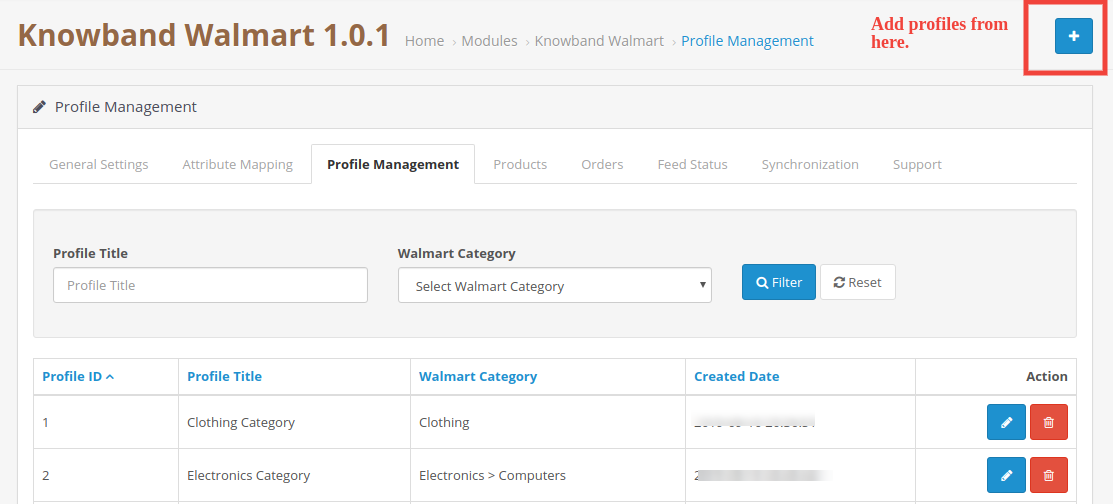
  2. It would redirect admin to a page where already added profiles will be listed (If any). Click on the “+” (plus icon as shown in the screenshot below) and it would redirect admin to a new page where a form with some input fields will be shown.

  1. Fill up the following input fields –
  2. Profile Title: Enter the Profile Title as per your choice.
  3. Product Tax Code: Enter the Tax code for the product. Tax code spreadsheet can be downloaded from the Walmart seller account, under Partner Profile select Taxes, Scroll down to the Download section and click on the US Tax Codes 2017 button.
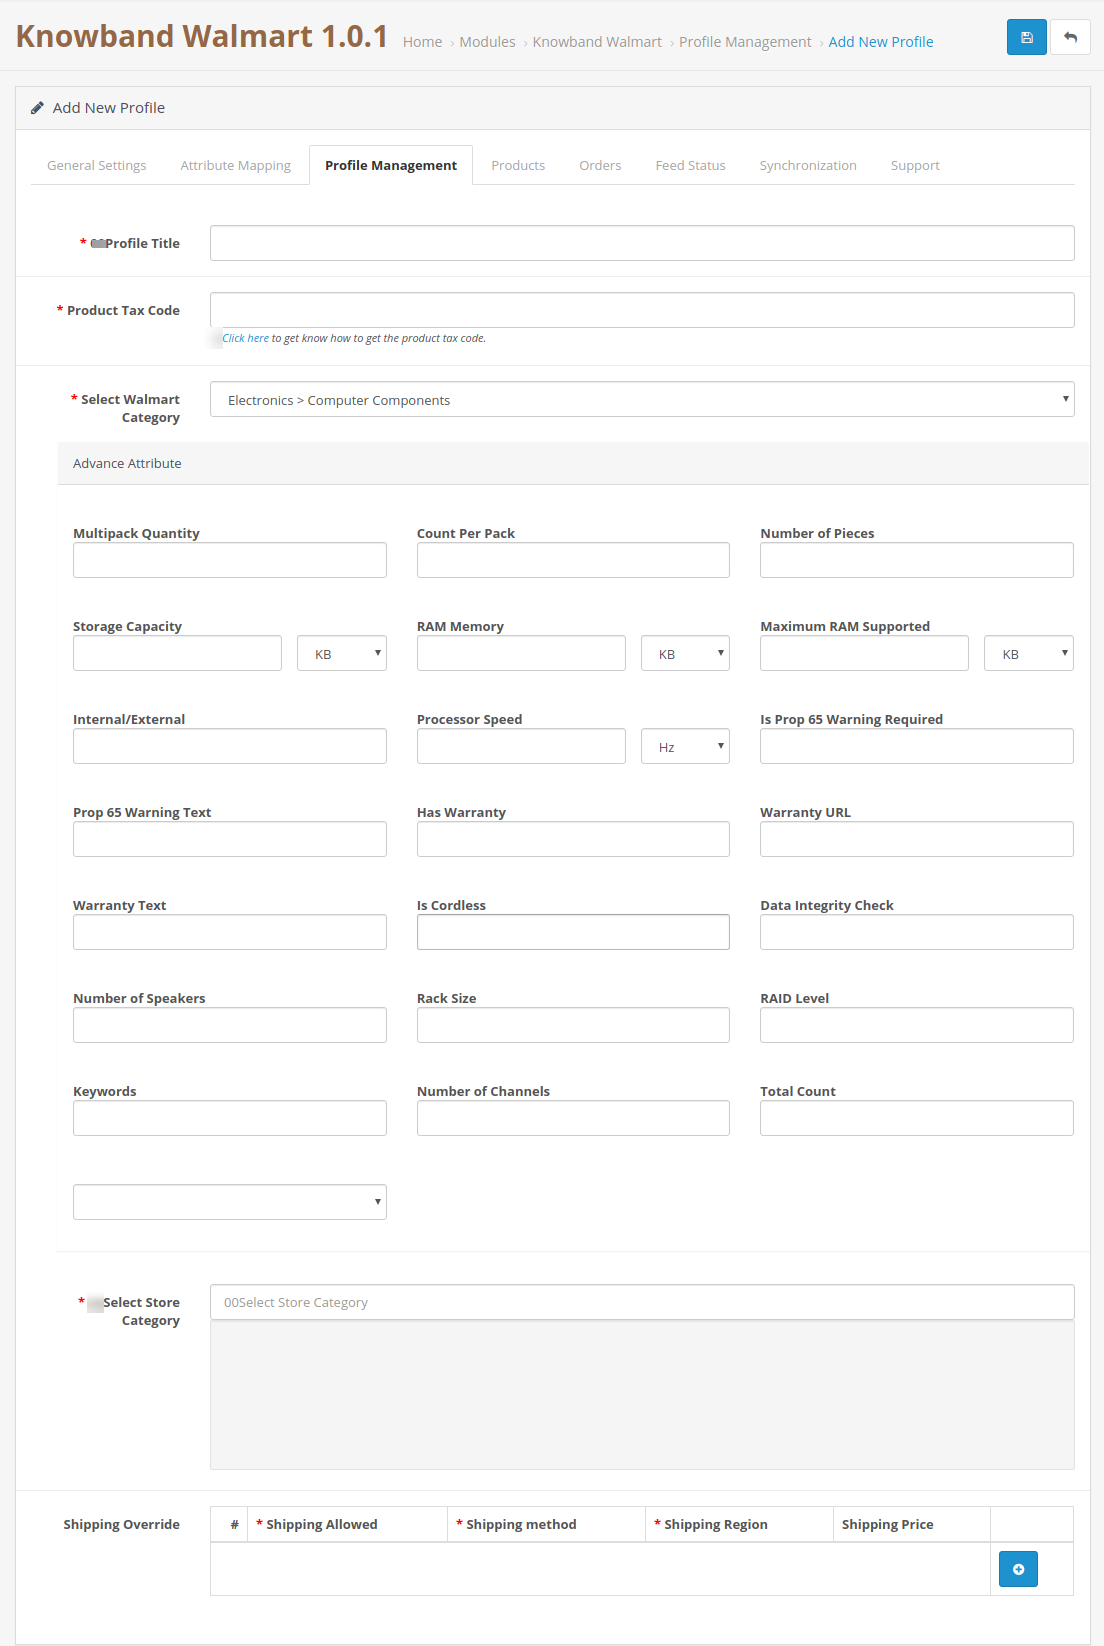
  4. Select Walmart Category: Select the correct Walmart Category for the products from the drop-down list. On selecting the Walmart category the Advance attribute options for the products will appear on the page. Please refer to the below screenshot. For example, we have selected the Walmart category as Baby > Baby clothing –


6. Select Store Category: Select the store category of the product.

2. Shipping Override: Admin can select the preferred shipping method from here; admin can add multiple shipping methods by using the Shipping Override option.

Admin can select the shipping method and the Shipping region to define the shipping methods for the Walmart store. As per choice admin can add multiple shipping options for the shipping.

4.3.2 How to Edit/Delete Profile?

Admin can easily update the profile entries; OpenCart Walmart Integration module allows admin to sync the changes to the Walmart marketplace in simple steps. Following are the steps to edit/delete profile from the system –

  1. Go to the Walmart Integration Module -> Profile Management (Menu Option)
  2. It would redirect admin to a page where already added profiles will be listed (If any, shown in the screenshot below).

  1. Click on the “Edit” button given just next to the Profile detail.
  2. If admin clicks on the “Edit” option, then, it would redirect the admin to a new page where a form with some already filled input fields will be shown. Admin can simply update values and save the details by clicking on the “Save” button.
  3. To “Delete” a profile admin needs to select the “Profile” (select the profile by clicking the checkbox) and click on the Delete button available at the top of the page.

4.4 Products

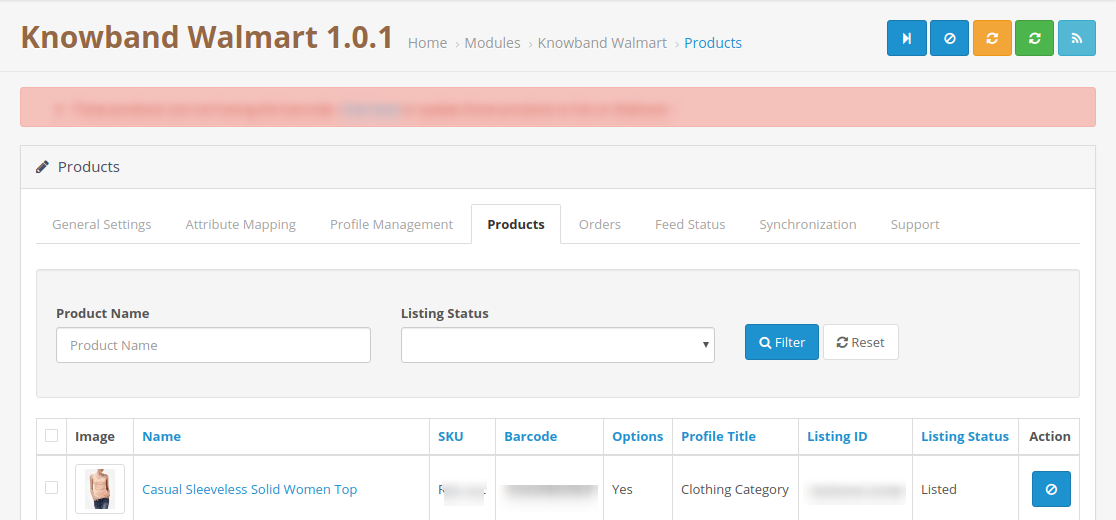
After creating a Profile admin need to run the sync operation (Synchronization >> Product Synchronization) to list the products selected under the newly created profile on the Walmart marketplace. As soon as the synchronization process will get completed it will display the “Success” message on the top of the page. Admin can check the status of listed products under the Product Listing tab of the Walmart OpenCart integration module. This tab shows the status of all the listed products and in case of any issue with the listing then admin can check the reason for listing error. Please refer to the below screenshot-

As shown in the above screenshot Product listing page shows the following fields:

  1. Image
  2. SKU
  3. Barcode
  4. Options
  5. Profile Title
  6. Listing ID
  7. Listing Status
  8. Action

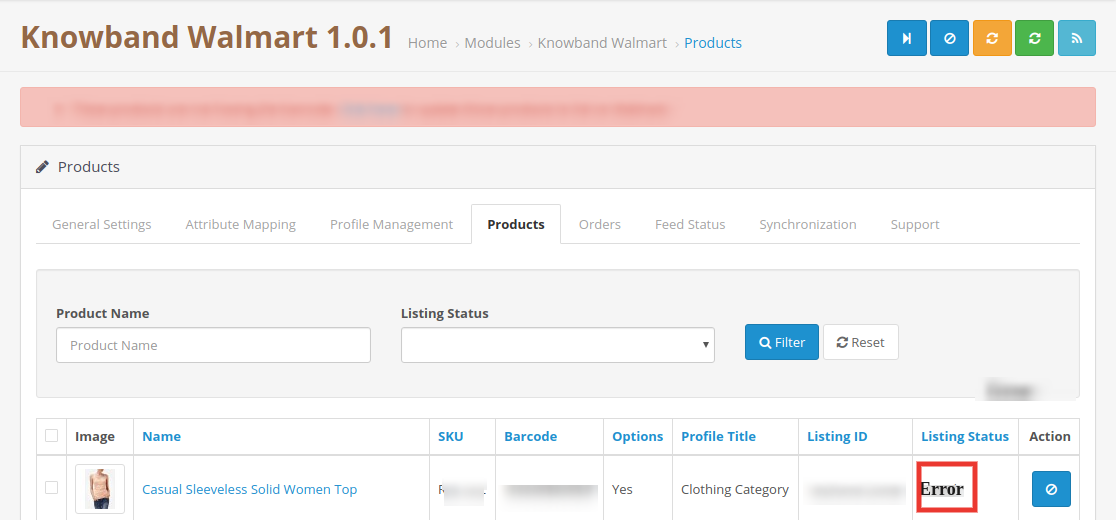
Admin can use the Name and Listing Status filters to check the listing status. Listing status filter shows the option to check the status of the products with Listed, Pending, Deleted, Inactive, Expired and Error.

4.4.1 How to check the listing error

In case of any missing information or wrong details of the product, the Walmart OpenCart integration module also displays the error message for the listing process. At the product listing page under the Listing Status admin can find the products with the Error status. To know the reason for the error admin needs to click on the second button given under the action field. It will open a popup with the details of the error. Please refer to the below screenshot:


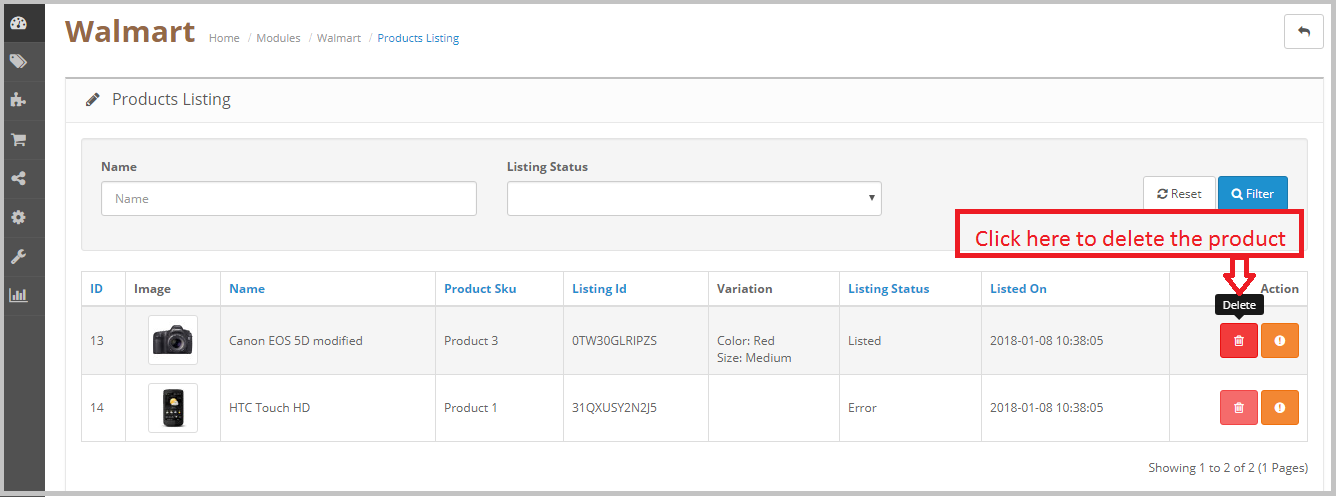
4.4.2 How to delete the product from Walmart

To delete a product from Walmart click on the Delete button next to the product under the Action field and then sync the products to the Walmart, this operation will retire the product from

Walmart without removing the product from the OpenCart store. Please refer to the below screenshot-


4.5 Order Listing

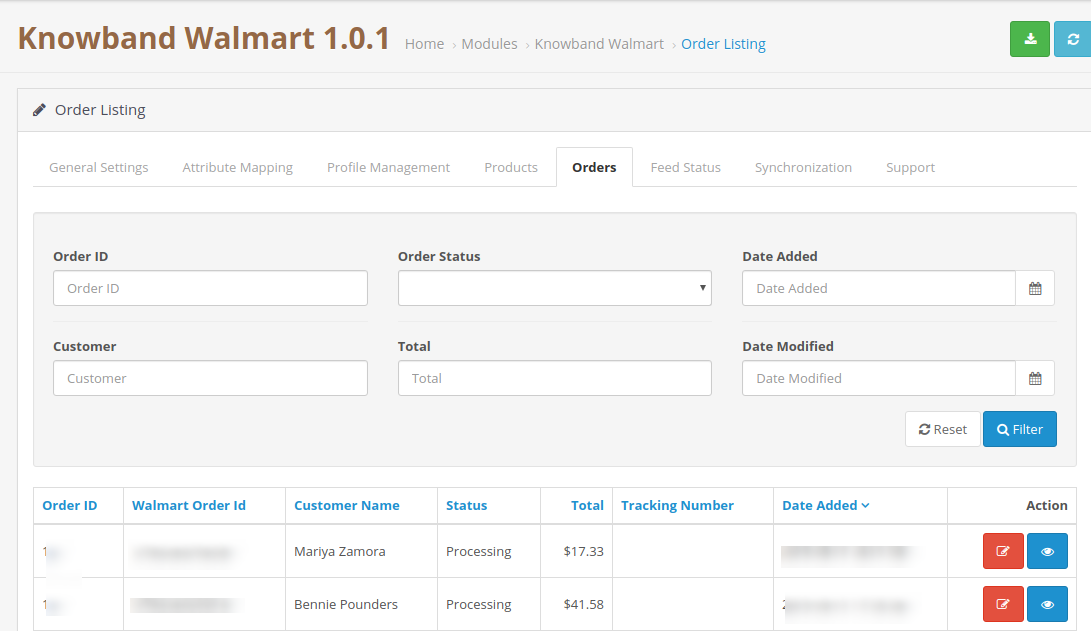
The order listing tab of the Walmart OpenCart connector module helps the store admin to synchronize the Walmart store orders to the OpenCart Store. To sync the orders to the OpenCart store admin need to run the Synchronization >> Order Download, after that, all the orders will be downloaded to the OpenCart store and admin can check the order details under the Order Listing tab. Please refer to the below screenshot-

Admin needs to run the Synchronization >> Acknowledgeorder cron to notify Walmart that the orders have been downloaded to the OpenCart store. After running this cron next time only the newly placed orders will be downloaded. Admin can also set up the cron job to automate the process.

4.5.1 Update Shipping information for the orders

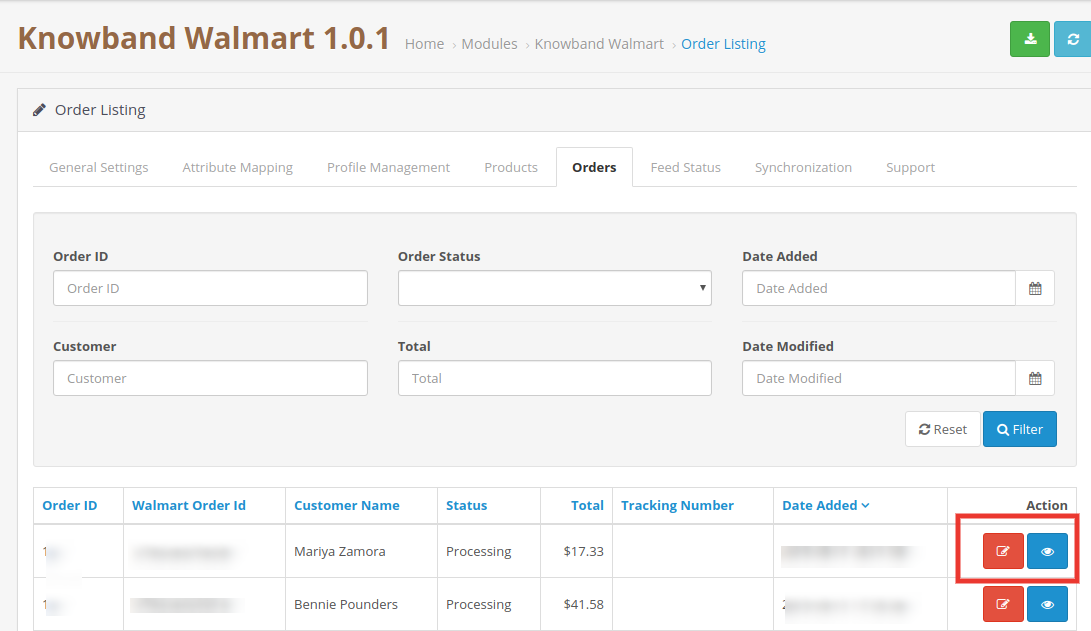
Admin can update the shipping information like shipping carrier, tracking id and the date of shipping for the Walmart orders and the order details can also be checked by using the “Edit” button under the Action field. Please refer to the below screenshot-

Update Tracking:

After downloading the orders from the Walmart store to the OpenCart store, store admin can update the shipping information for the Walmart orders and sync it to Walmart. To complete the synchronization admin need to run the Synchronization >> Update Shipment cron. This will update the order status of the Walmart store.

Edit:

Admin can update the status of the Walmart store order from the OpenCart store by clicking the Edit option.

4.6 Feed Status

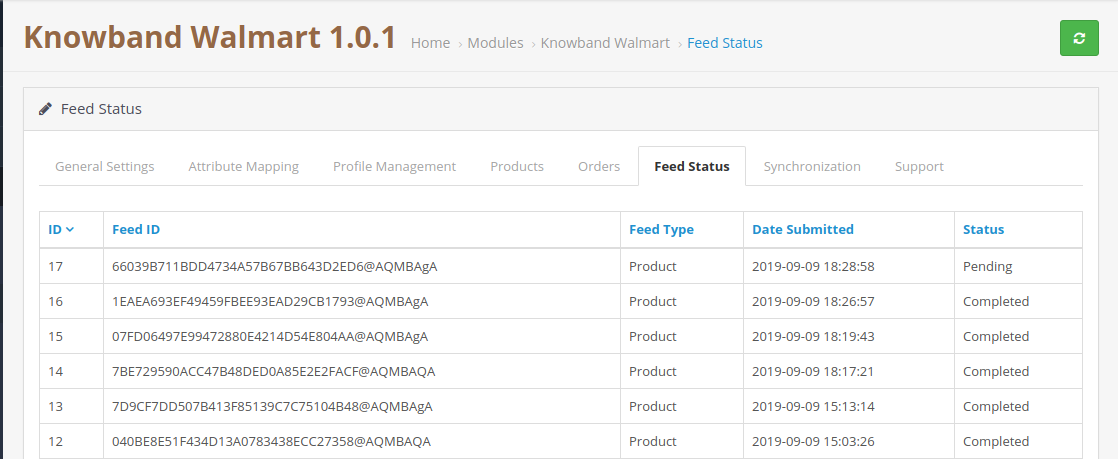
The status will be updated by the cron jobs if it is set. Otherwise, the user will have to click on the “Feed status” button on the synchronization page.

4.7 Synchronization

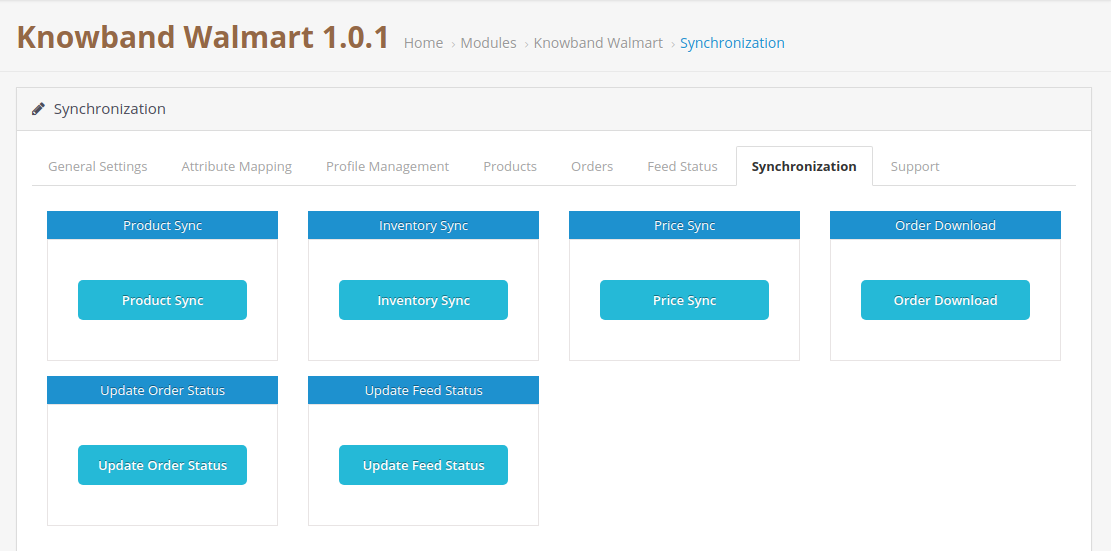
The Synchronization tab of the Walmart OpenCart Integration module synchronizes all the settings and changes done in the different tabs of the OpenCart Walmart Marketplace Integration Module. The synchronization between the OpenCart Store and Walmart Marketplace and vice-versa can be done from the ‘Synchronize‘ tab.

Product Sync:

After creating a new profile OpenCart store admin need to run the Product Sync. This operation lists all the products under the newly created profile on the Walmart marketplace. Admin can check the status of listed products under the “Product Listing Tab”.

Product Sync would perform following actions –

  • Update the products list in the Walmart marketplace.
  • It will add products to the Walmart Marketplace with the respective product details (e.g. Price, Quantity, Image, etc.).
  • It will update the expired products on Walmart Marketplace for the items in which ‘Renewal’ is enabled.
  • It will remove the products from Walmart Marketplace which are marked deleted on Store.

Inventory Sync:

The quantity of the products can be updated on the Walmart Marketplace by clicking the ‘Inventory Sync’. It updates the quantity status of each product listed on Walmart Marketplace.

Price Sync:

The price of the products can be synced to the marketplace by clicking the ‘Price Sync’.

  • This synchronization will update the price of the products on Walmart Marketplace.
  • It will update the changes in the price of the products.

Order Download:

Order download Synchronization will download all the orders from the Walmart marketplace to the OpenCart store.

Update Order Status:

After downloading the orders to the OpenCart store, the store admin needs to click on the Update order status button, so that the orders will be updated on the OpenCart store. Admin can also set up the cron job to automate the process.


Update Feed Status:

Update Feed Status will update the feed status of Walmart and will also update the product add/update/delete status on OpenCart.

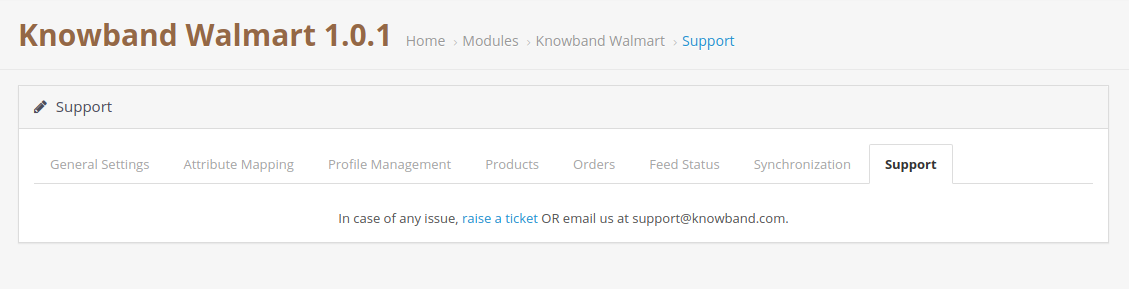
4.8 Support

In case of any issue, raise a ticket OR email us at support@knowband.com.

Product Page Details: https://www.knowband.com/opencart-walmart-integration

Opencart Etsy Marketplace Integration – User Manual

Introduction

Marketplaces have played a vital role in the growth of e-commerce. Amazon and eBay are some of the well-known platforms, but in recent years a number of new marketplaces have marked their presence in the eCommerce ecosystem. Etsy is one of the most popular marketplaces for handmade goods and vintage items. Etsy allows people from around the globe to buy and sell unique goods. This platform invites the sellers to showcase their creativity to the new audience, thus, helping them to reach out to potential customers globally. Etsy is a great place to extend the reach of your business. The process of starting a business in the Etsy marketplace is quite easy. Please click on the link below to know more about the rules and regulations of trading: https://www.etsy.com/in-en/sell. Opencart Etsy Marketplace Integration can help you reach your business goals effectively.

KnowBand, an eCommerce plugin, and marketplace integration development company offers the OpenCart Etsy integration module. The Opencart Etsy Marketplace Integrator allows the seller to synchronize their OpenCart store with the Etsy marketplace in a few simple steps. We do understand that being ready to start selling on the Etsy marketplace, it is also important for the store owner to analyze their business method and process so that they can be able to keep up with the new challenges. After starting to sell on multi-channel sellers have to keep proper track of their inventory status, product listings, shipping methods, delivery time, and customer support. To overcome all the major challenges of selling on a marketplace, KnowBand has developed the Opencart Etsy Marketplace Connector.

With the help of the Etsy OpenCart Integration extension, OpenCart store owners can effectively manage the inventory, orders, and shipping for the Etsy shop orders from the OpenCart store admin. OpenCart Etsy marketplace integration module offers the following advantages to the sellers:

  • Easy installation and user-friendly interface: The user-friendly interface of the OpenCart Etsy Marketplace Integration offers an effortless interface to list the products to the Etsy marketplace.
  • Bulk uploading of the products: OpenCart Etsy Marketplace Integrator Module allows the sellers to upload products in bulk. Sellers can create a profile to upload the entire category of the OpenCartstore to the Etsy marketplace.
  • Category and product attribute mapping: Sellers can easily map the product attributes and category of the OpenCartstore products with the Etsy store attributes and category via the OpenCart Etsy Marketplace Connector Extension.
  • Shipping templates: Create shipping templates from the OpenCartstore admin panel and sync these templates to the Etsy shop via OpenCart Etsy Marketplace Integration Plugin.
  • Order Management: Manage and keep track of Etsy shop orders from the OpenCartstore admin panel.
  • Order status: Admin can update the order status of the Etsy marketplace orders from the OpenCart store admin panel through a cron job.
  • Inventory management: Manage inventory for the Etsy store products from the OpenCart admin panel. After making any changes in the product inventory or attributes in the OpenCart store, the admin can easily synchronize the changes to the Etsy marketplace.
  • Secondary language: Admin can select a secondary language for the store and easily synchronize it with the Etsy marketplace shop through a cron job.

What’s New in the Recent Enhancements of Opencart Etsy Extension v2.0.4?

[New]Aligned with Etsy OpenAPI Standard

The OpenCart Etsy Extension has been enhanced to support OpenAPI authorisation headers, ensuring secure authentication and full compliance with Etsy’s current API standards. Furthermore, this update helps maintain uninterrupted connectivity between OpenCart and Etsy while aligning the extension with Etsy’s evolving security and policy requirements.

[New]Return Policy Synchronisation

In addition to the authentication header format update, Knowband’s Etsy Marketplace extension now includes Return Policy Synchronization, allowing merchants to seamlessly sync their return policies between their opencart store and Etsy. This ensures consistency across both platforms, reduces manual effort, and helps provide a clear and unified return experience for customers.

Profile Level Product Synchronization:

The enhanced Knowband’s Opencart Etsy marketplace connector extension now features profile-level product synchronization. This allows admins to list products from specific categories, offering a more targeted and efficient listing process compared to bulk product listing. This feature enhances inventory management and improves the accuracy of product listings on Etsy.

Product Listing with Custom Details:

The updated extension also includes a feature for product listing with custom details. Admins can now list products with unique titles and descriptions, differentiating their products and enhancing visibility on Etsy. This flexibility allows for better product presentation and marketing, tailored to attract specific customer segments.

You can watch our video on “New Features in Knowband’s Opencart Etsy Connector v1.0.9”:

2.0 Installation

After purchasing the module, you will get the following files as below:

1. zip (contains the source code of the module)

2. User Manual

Follow the following steps to install the extension:

  1. Unzip the zip file. It would contain files and folders as shown below –

2. Copy all the files and folders of the unzipped folder into the root folder of the website.

3. Now module is ready to be installed on your store and you can find that in Store Admin -> Modules and Services. It would be shown as below –

Etsy OpenCart Integration Extension

Knowband’s OpenCart Etsy Marketplace Integration plugin facilitates seamless integration between your OpenCart store and Etsy marketplace, streamlining product listings and order management.

SHOP NOW

3.0 System Setup

Before proceeding ahead, it is important to know the correct flow of actions to set up this system as several things are dependent on other things. If we do not take care of them then it would become difficult to process smoothly or it may be error-prone.

  • Seller account setup: This section will help you to set up the shop on the Etsy marketplace and in the next steps you will learn about the Etsy API key. Etsy API key and API Secret are required to integrate the Opencart and Etsy marketplace.
  • Admin Interface: This section will help you to understand the complete working of the Etsy Opencart Integration plugin.

4.0 Etsy Marketplace – Seller Account Setup

To start selling on Etsy Marketplace you need to have a seller account on Etsy. In this section, we are listing all the steps to create a seller account on Etsy. Please find them below –

  • Go to the link – https://www.etsy.com
  • Click on the “Sell on Etsy” button present at the top right corner.
  • Click on the “Register” button on the page you are visiting now. Refer to the screenshot given below.

  • Fill up the registration form and click on the “Register” button. It would create your seller account and send a verification email to the provided email address.

  • Now, it would also redirect you to another page as shown below.

5. Now, it is asking to set up your shop preferences. Complete all the highlighted sections – Shop Preferences and Name your shop, Stock your shop, how you will get paid, and Set up Billing.

5.0 Etsy Marketplace – Setup an App

To start communication between OpenCartStore and Etsy Seller Account, you need to create an App on Etsy Marketplace. Following are the steps to create an App on Etsy –

  • Fill up the form and click on “Read Terms and Create App”. Please make sure that you left the “Inventory Management Compatibility” checkbox is checked.
  • It would ask to accept “terms and conditions”. Accept and click on the “Create App” button.
  • It would register your App on Etsy Marketplace and provide API details as shown below.

Note: “The term ‘Etsy’ is a trademark of Etsy, Inc. This application uses the Etsy API but is not endorsed or certified by Etsy, Inc.”

6.0 Admin Interface

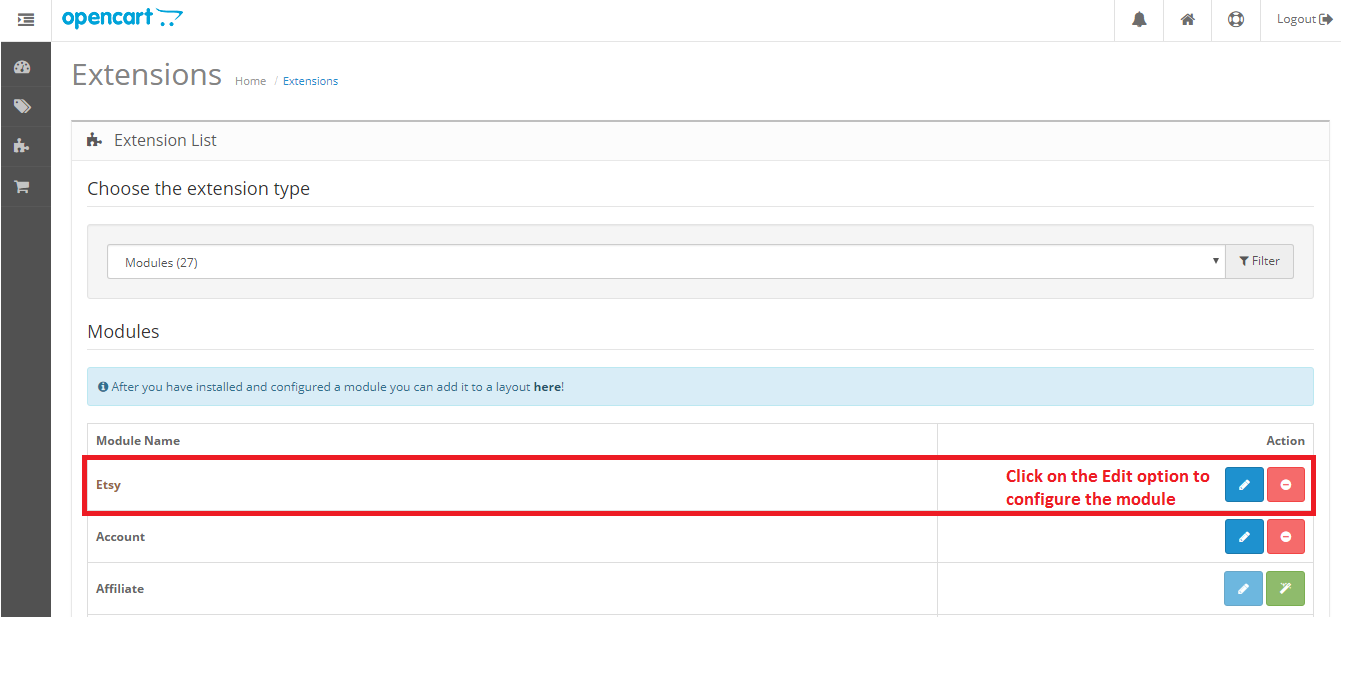
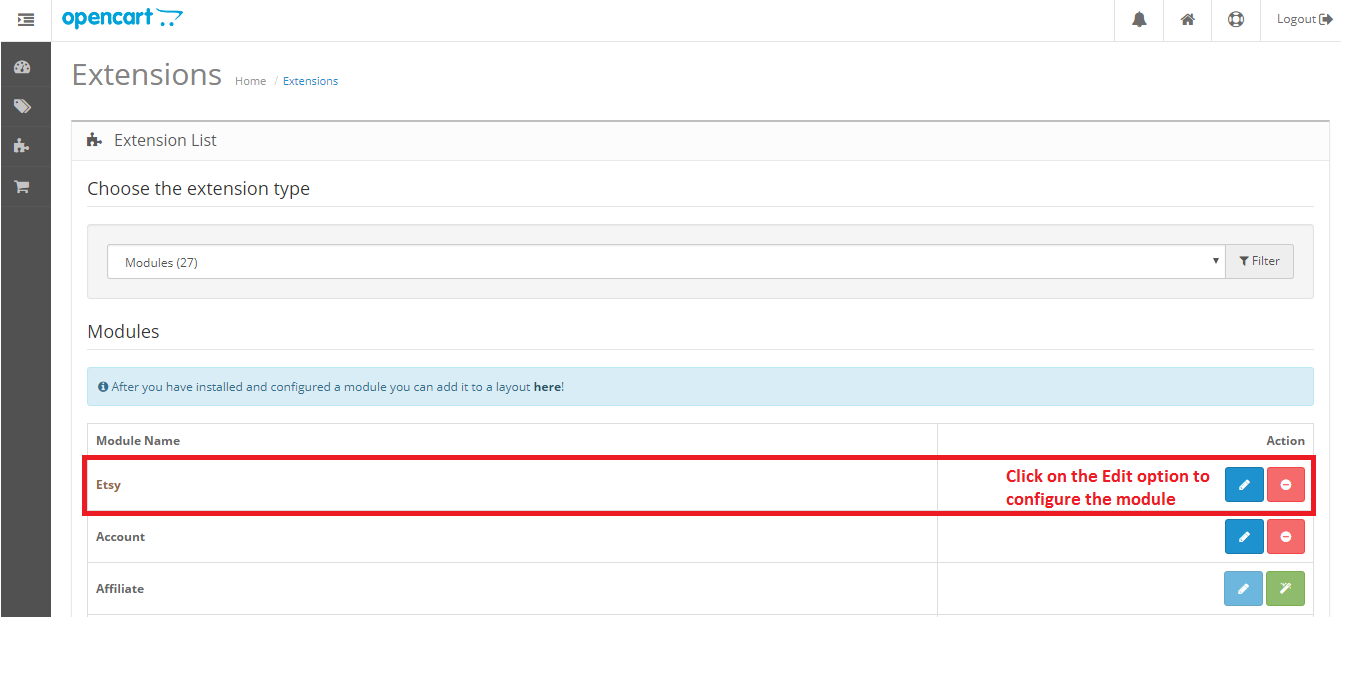
Opencart Etsy Marketplace connector is easy to configure. The configuration settings can be managed via the admin interface. After installation, the store admin can find the “Etsy” module in the Extension List under the “Extensions” tab.

The Etsy integration extension will display as shown below:

On clicking the Edit button next to the Etsy module, it will redirect to the admin interface. Here admin can see all the options to configure the Etsy module:

Etsy Marketplace extension offers the following options –

  1. General Settings
  2. Profiles
  3. Attribute Mapping
  4. Shop Section
  5. Shipping Templates
  6. Products
  7. Orders
  8. Synchronization
  9. Audit Log

Each tab is explained below.

6.1 General Settings

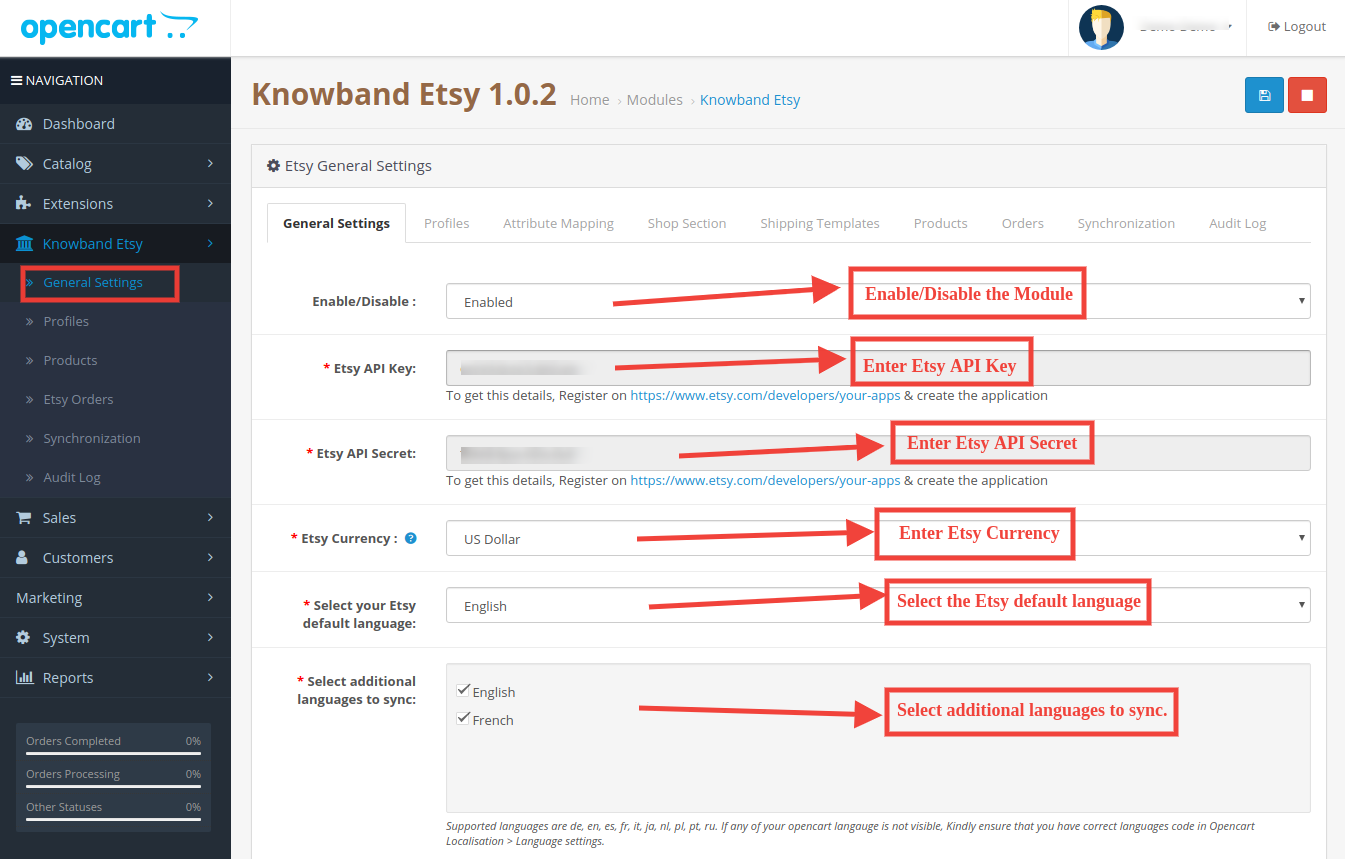
You can find the screenshot of the “General Settings” page below –

General Settings tab is there for capturing details of Etsy Marketplace API like API Key, Host, etc. This helps the admin to connect the OpenCart store with the Etsy marketplace. Please find the description of each input field below –

1. Enable/Disable

Admin can Enable/Disable Opencart Etsy Marketplace Integration by using this option. If enabled, then only this module and all its settings will be working otherwise there will be no impact of this module on the store.

2. Etsy API Key

Enter Etsy API Key which will authenticate the connection being established between OpenCartstore and Etsy Marketplace.

3. Etsy API Secret

Admin needs to enter Etsy API Secret mandatory for authentication between OpenCartstore and Etsy Marketplace.

4. Etsy Currency

Admin can select the Etsy currency from the menu.

5. Select your Etsy default language:

Admin can select the Etsy default language from the menu.

6. Select additional languages to sync:

Admin can select additional languages to sync with the Marketplace.

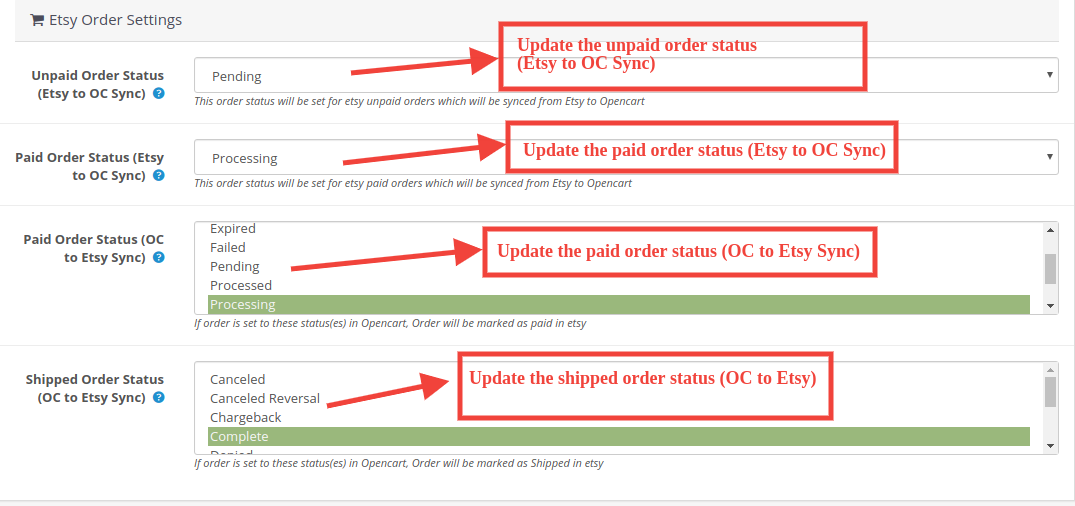
6.1.1 Etsy Order Settings:


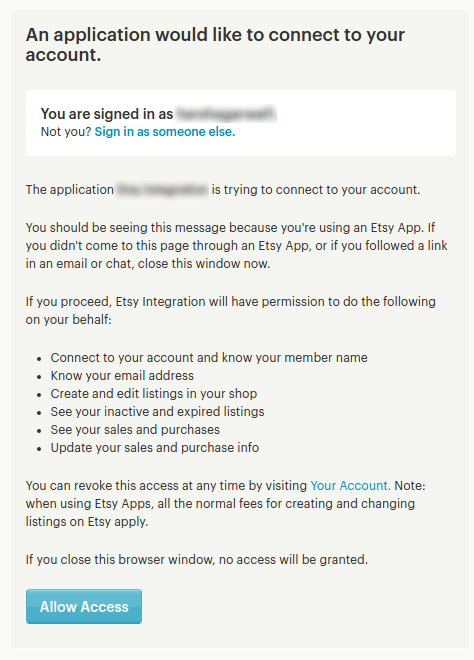
After providing these details, click on the “Save” button in the top right corner. It would redirect the admin to the Etsy Marketplace to allow the App Access for the store. Click on the “Allow Access” button as shown below and it will establish the connection between the store and Etsy Marketplace.

It would also redirect the admin back to the same page of “General Settings” and show the “Disconnect” button as the connection has now been set up with Etsy Marketplace.

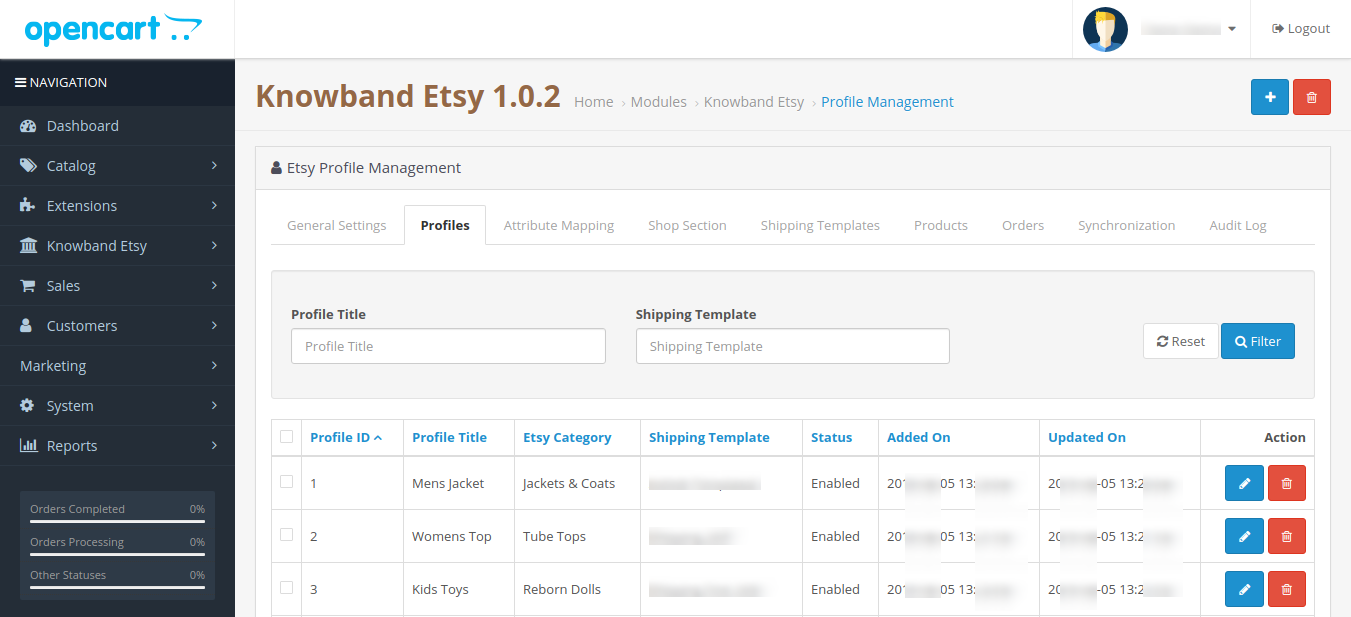
6.2 Profiles

The profile Management tab provides options to create the profile for product listing. In this section, the admin will be able to map OpenCart store product attributes and categories to Etsy Marketplace. Opencart Etsy Marketplace Connector allows the seller to select multiple store categories to sync with the one Etsy category.

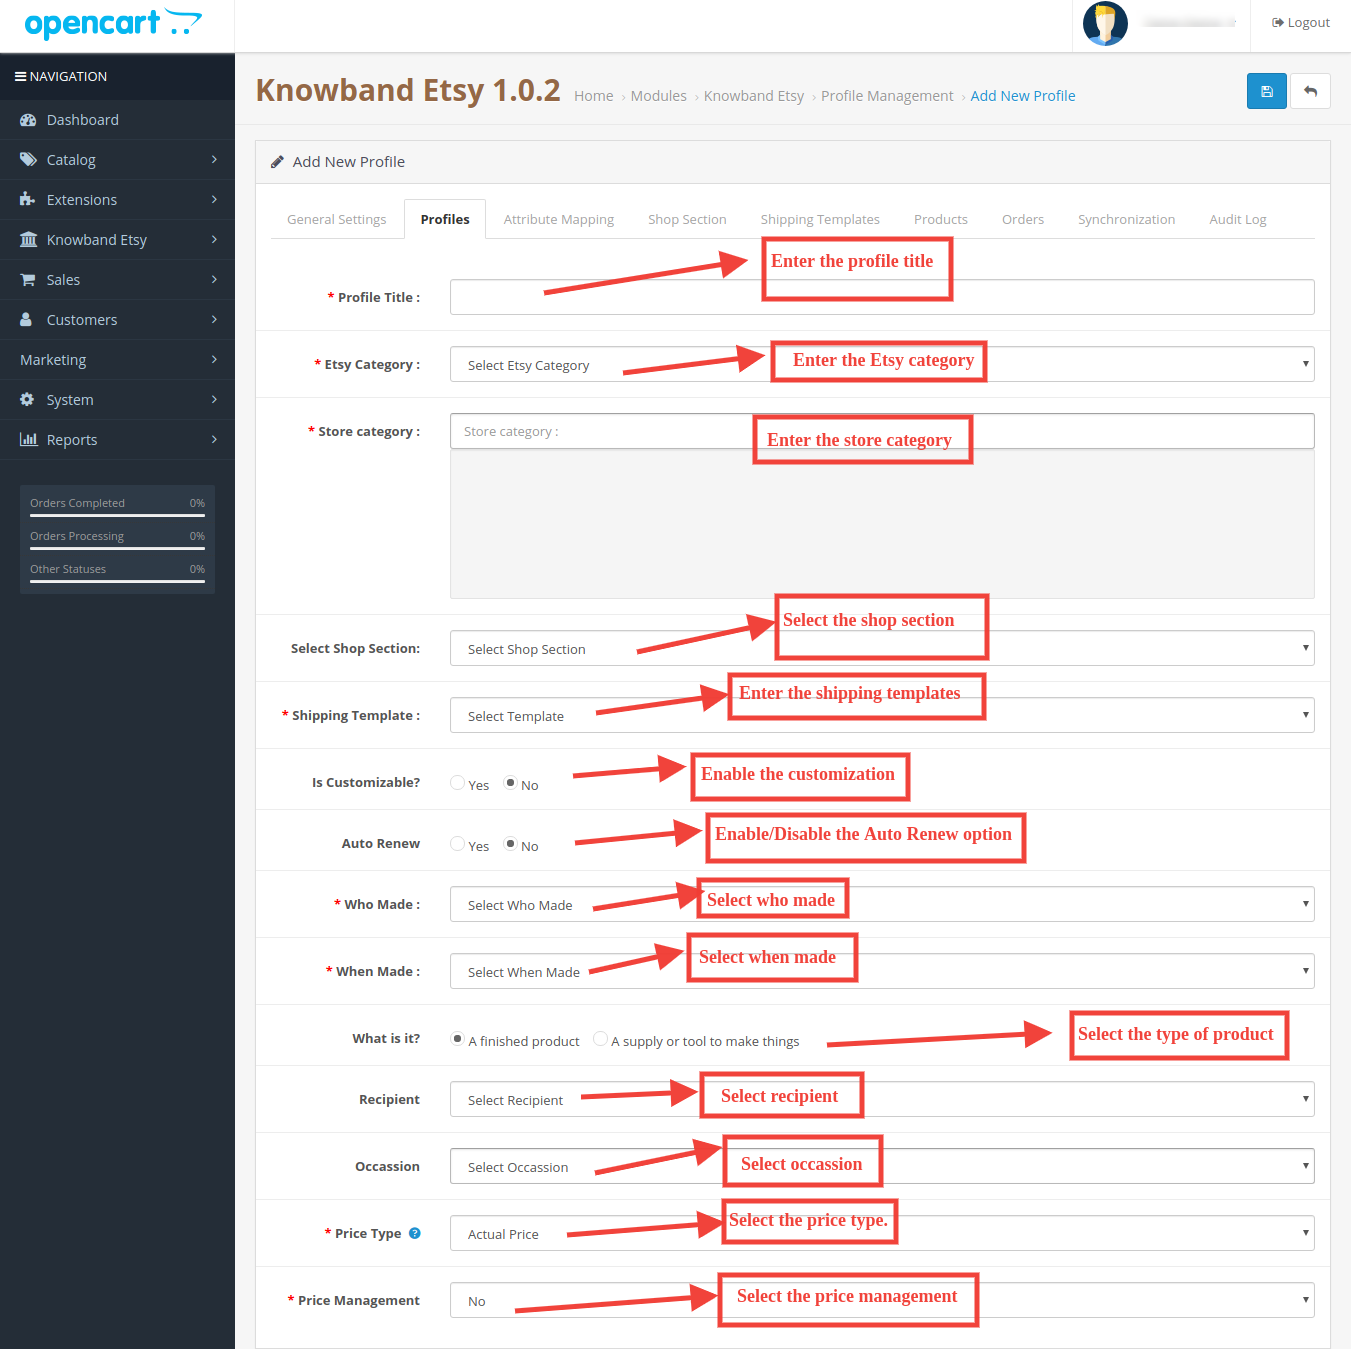
Admin needs to enter all the mandatory details as per the instructions are given in the below screenshot. After entering all the details click on the Save button at the top of the form.

6.2.1 How to Add New Profiles?

Following are the steps to add new profiles-

  1. Go to the Etsy Marketplace module-> Profiles(Menu Option)
  2. It would redirect the admin to a page where already added profiles will be listed (If any). Click on the “+” (plus icon as shown in the screenshot below) and it will redirect the admin to a new page where a form with some input fields will be shown.
  3. Fill up the following input fields –
  4. Profile Title: Enter the Profile Title as per your choice.
  5. Etsy Category (List of Etsy Marketplace categories): Select the correct category from the drop-down list.
  6. Store Category (Lists of Store Categories): Select the OpenCart store category for the products. The selected category will be mapped with the Etsy category (as selected in the Etsy Category) field.
  7. Select Shop Section: Select the shop section from the drop-down list.
  8. Shipping Template (List of Shipping Templates): Select the shipping template from the drop-down list.
  9. Is Customizable?: Select from the drop-down list.
  10. Who Made: Select from the drop-down list.
  11. When Made: Select from the drop-down list.
  12. What is it?: Select from the drop-down list.
  13. Recipient: Select from the drop-down list.
  14. Occasion: Select from the drop-down list.
  15. Price Type: Select from the drop-down list.
  16. Price Management: Select from the drop-down list.

6.2.2 How to Edit/Delete Profile?

Admin can easily update the profile entries; the Opencart Etsy Marketplace Connector allows the admin to sync the changes to the Etsy shop in simple steps. Following are the steps to edit/delete a profile from the system –

1. Go to the Etsy Module -> Profiles (Menu Option)

2. Click on the “Edit/Delete” button corresponding to each profile as shown in the above screenshot.

3. If an admin has clicked on the “Edit” option, then, it will redirect the admin to a new page where a form with some already filled input fields will be shown. Admin can simply update values and save the details by clicking on the “Save” button.

4. The admin can click on the “Delete” option to delete the selected Profile from the system.

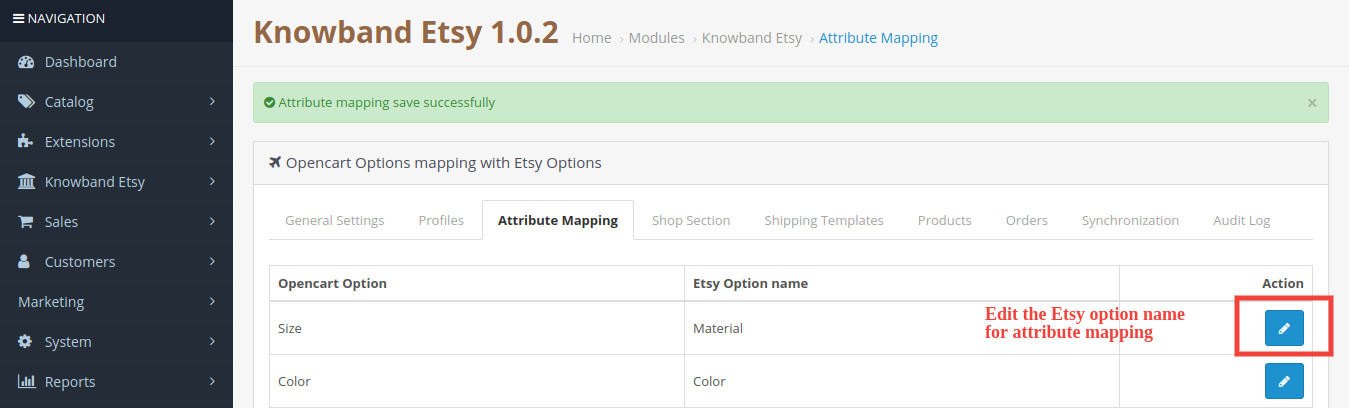
6.3 Attribute Mapping

This option helps to upload the Variation products. Select the correct attribute and save it.

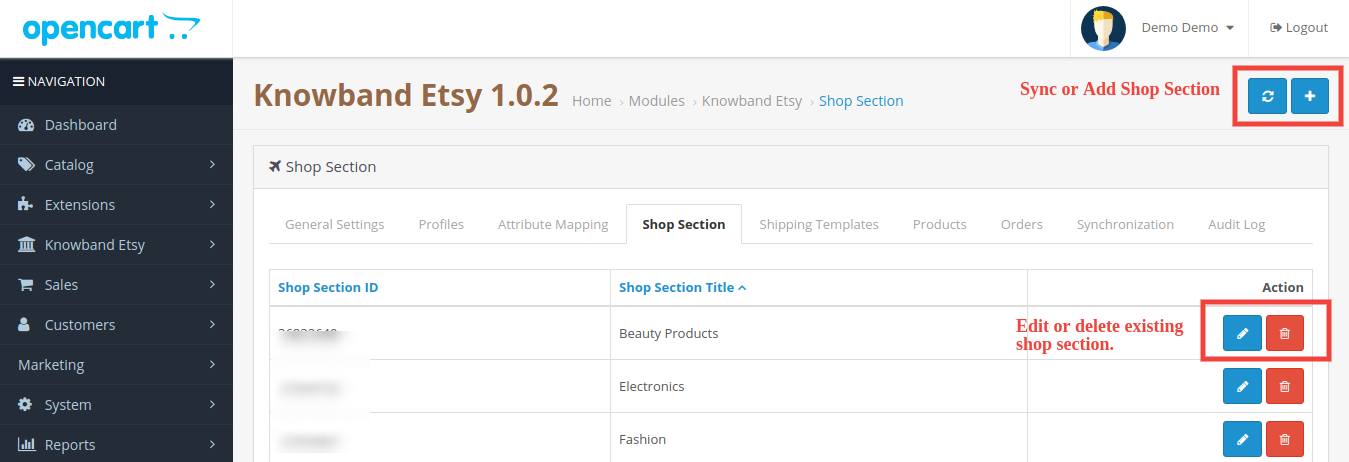
6.4 Shop Section

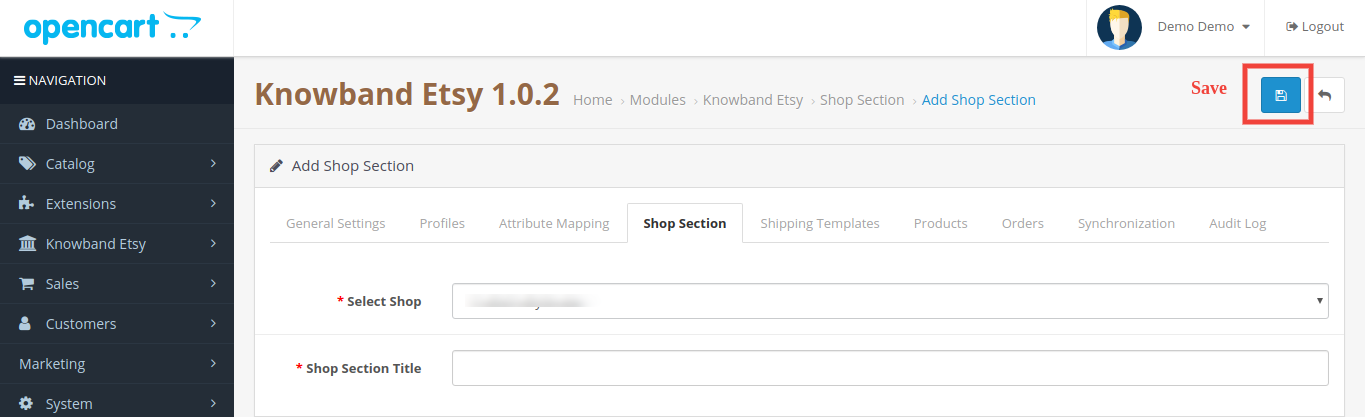
Under this tab, the admin can view the shop sections and their titles. You can edit, and delete the existing profile while you can add the new shop section too from the top right corner. You will be directed to the window below. The same window will open for editing the shop section with filled details.

6.5 Shipping Templates

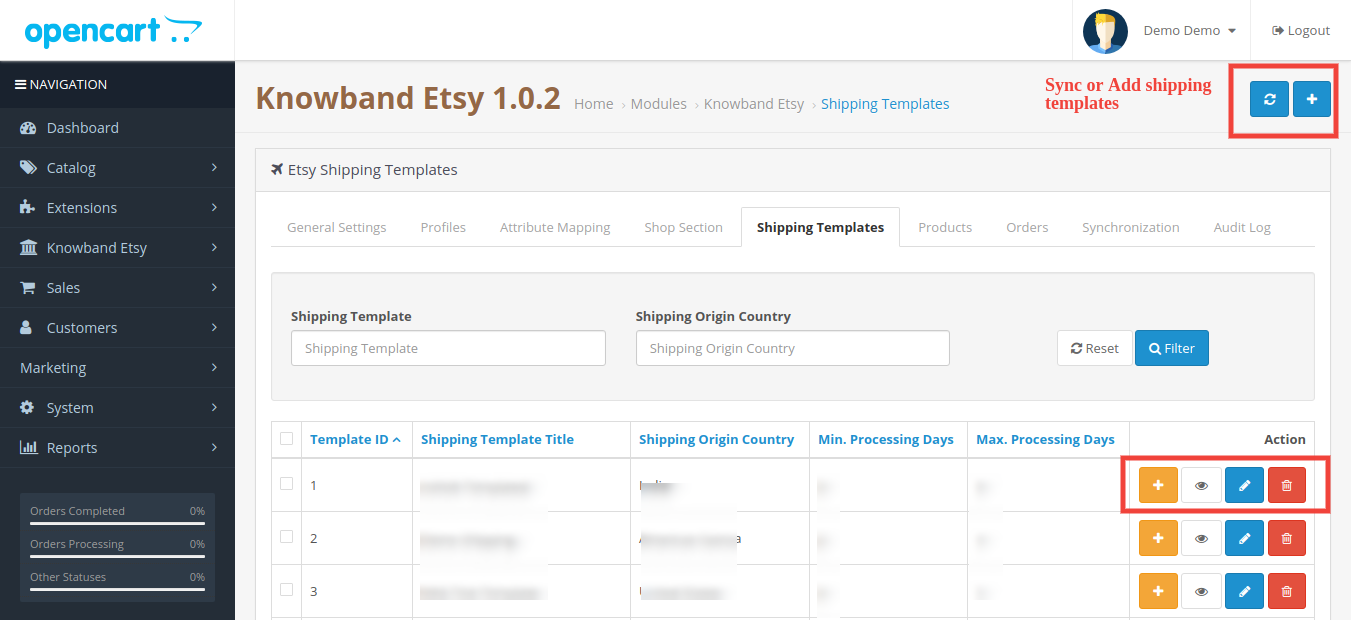
The shipping Templates tab is there to manage shipping options. In this section, the admin can create Shipping Templates along with other options for the existing shipping template like Add Shipping entry, View shipping entry, Edit Shipping Template, and Delete. Admin can create multiple shipping templates by using the EtsyOpenCart Integration module. Please refer to the next screenshot:

Admin can easily modify the existing shipping template or add new shipping templates. After creating new shipping templates, the store admin must sync the shipping templates to the Etsy shop by clicking the “Shipping Template Synchronization” option under the “Synchronization” tab.

6.5.1 How to add Shipping Templates?

Following are the steps to add a Shipping Template into the system –

  1. Go to the Etsy Marketplace -> Shipping Templates (Menu Option)
  2. It would display the page where already added Shipping Templates will list (If any). Click on the “+” (Plus Icon – as shown in the above screenshot).
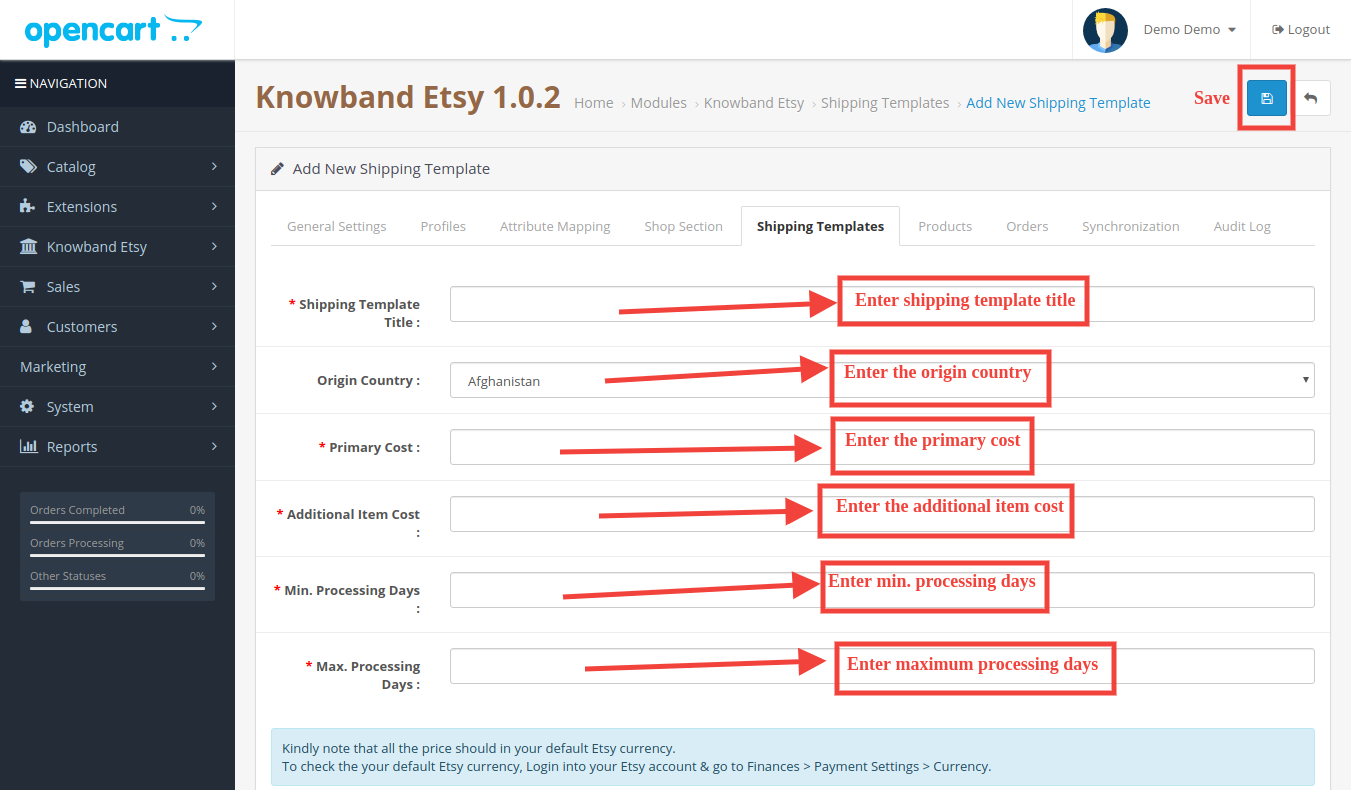
  3. It would redirect the admin to the new page where a form with some input field will be shown (Screenshot is shown below).
  4. Fill up the following input fields of form –
  5. Shipping Template Title: Enter the shipping template title as per your choice.
  6. Origin Country: Select the origin country from the drop-down list.
  7. Primary Cost: Enter the primary shipping cost for the shipment.
  8. Additional Item Cost: Enter the additional item cost for shipment. It is the additional cost if the customer adds a second product to the package.
  9. Min. Processing Days: Enter the minimum processing days. This field accepts only numeric values.
  10. Max. Processing Days: Enter the minimum processing days. This field accepts only numeric values.

Click on the “Save” button to add the new shipping template.

You can find the screenshot of the “Add New Shipping Template” form below –

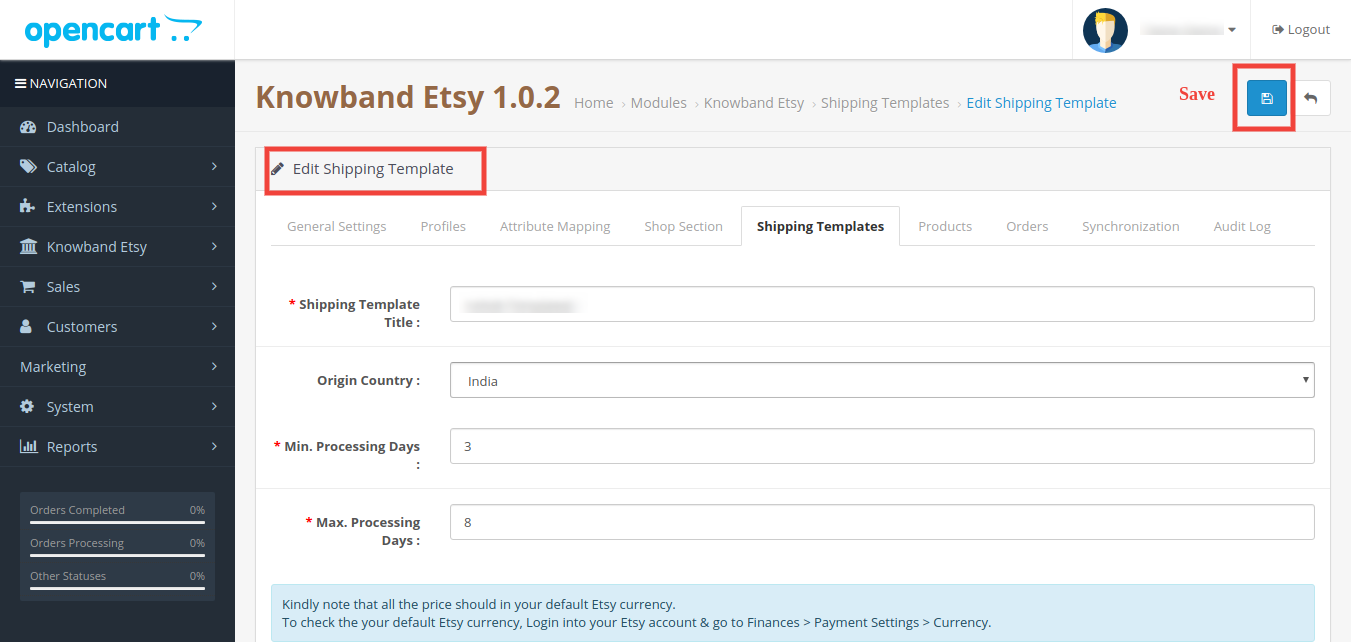
6.5.2 How to Edit/Delete Shipping Template?

Following are the steps to edit/delete Shipping Template from the system –

1. Go to the Etsy Marketplace -> Shipping Templates (Menu Option)

2. It would display the page where already added Shipping Templates will list (If any). Click on the “Edit/Delete” buttons corresponding to each Shipping Template.

3. Admin can update the values as per the requirement and save the details by clicking on the “Save” button.

4. If an admin has chosen the “Delete” option then it would delete the Shipping Template and all its Shipping Template Entries from the system.

Admin can modify the shipping template details by using the Edit option. After making the changes in the shipping template details, the admin needs to save the changes and synchronize the shipping templates with the Etsy marketplace.

6.5.3 How to Edit/Delete Shipping Location of a Shipping Template?

The shipping Entry tab of the Etsy OpenCart module allows the admin to define the destination country and the standard shipping cost for the selected destination. Admin can create only one shipping entry for a particular destination (country/region). Following are the steps to view the Shipping Template location into the system –

1. Go to the Etsy Marketplace Connector module -> Shipping Templates (Menu Option)

2. It would display the page where already added Shipping Templates will list (If any). Click on the “+” button given corresponding to each Shipping Template listed.

3. It would display the page as the screenshot given below:

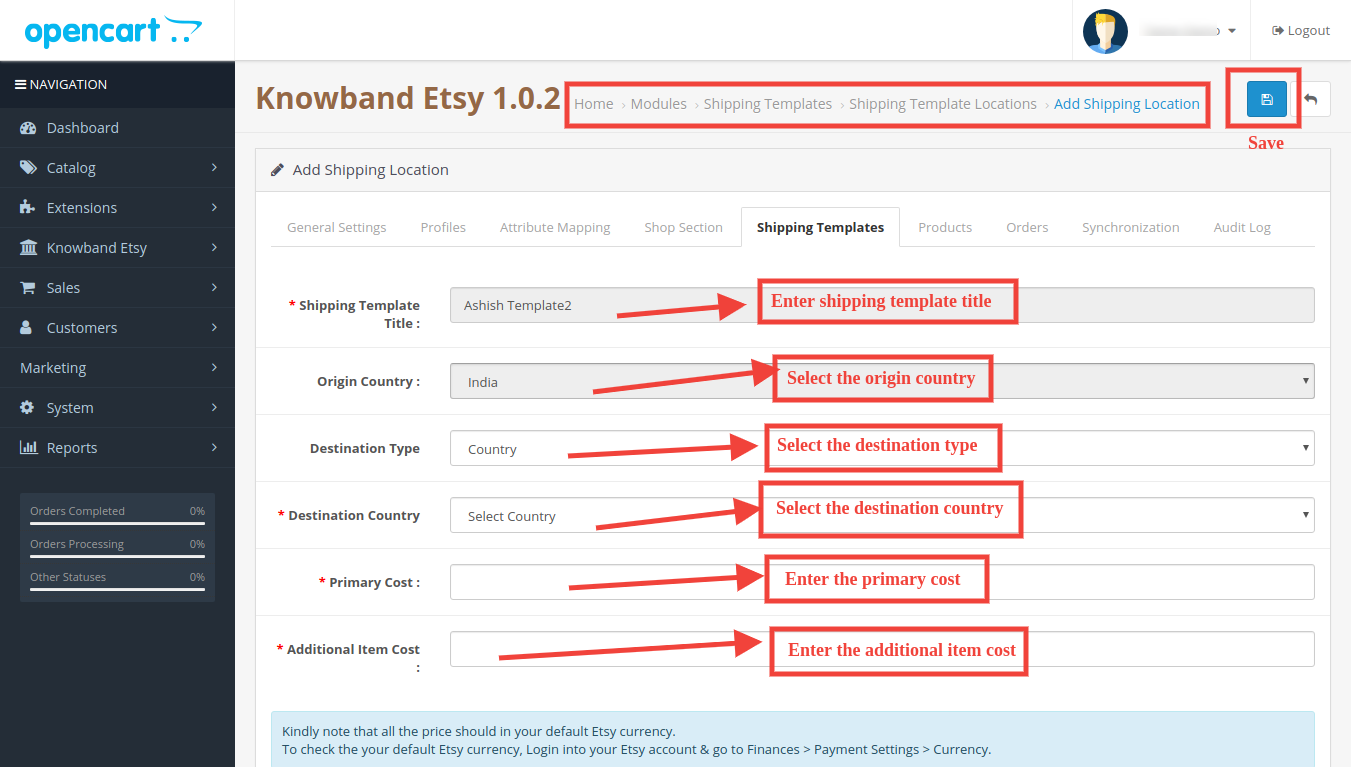
  • Shipping Template Title: Enter the shipping template title.
  • Origin Country: Select the country of origin.
  • Destination Type: Select the country of destination for the shipping template.
  • Destination Country: Select the destination country.
  • Primary Cost: Enter the Primary Cost.
  • Additional Item Cost: Enter the additional item cost.

6.6 Products

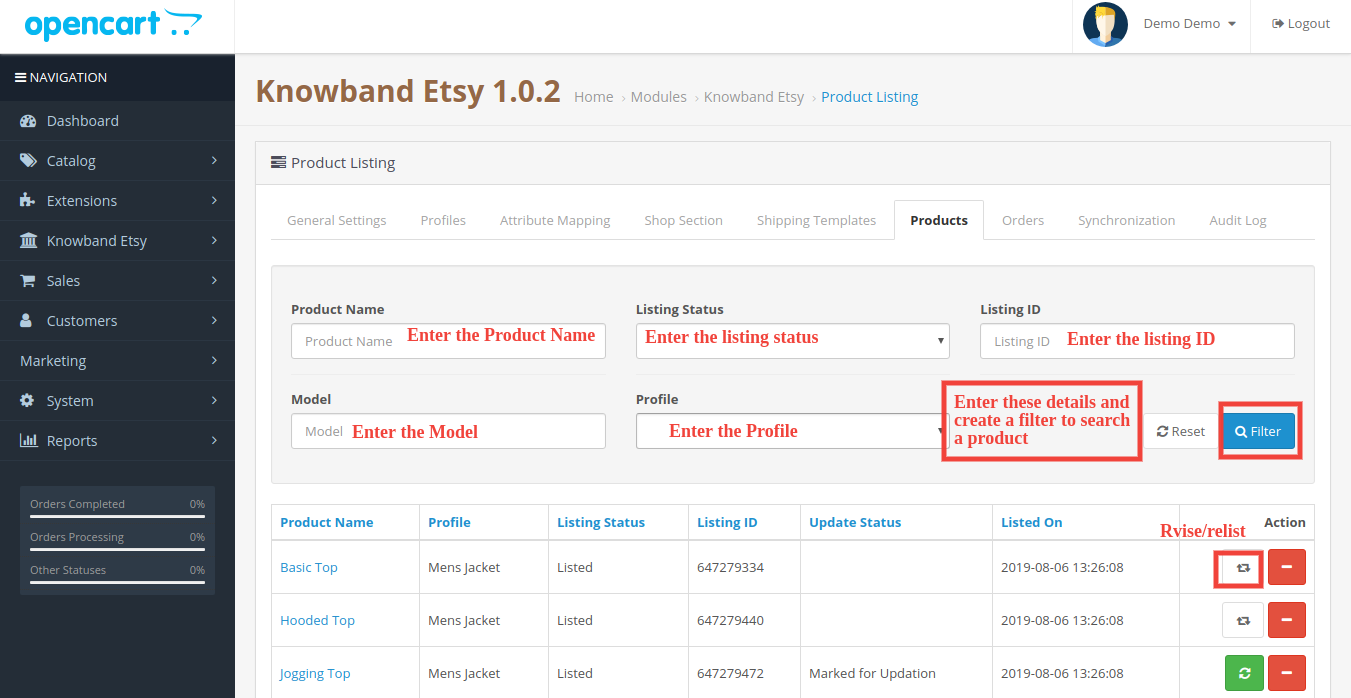
In the Etsy OpenCart integration extension after creating the profile, the admin needs to sync the products which are selected in the profile to the Etsy marketplace. Admin can also check the status of the listed products from the OpenCart store admin panel. The product listing tab of the Etsy Marketplace Integration shows a list of all the products that are to list on Etsy Marketplace with their status and values as shown in the screenshot below –

Please note that after creating a profile the admin must click on the “Product Synchronization” option under the “Synchronization” tab of the Etsy module to list the selected products to the Etsy marketplace. Admin can click on the Revise/Relist button to activate it on the Etsy Marketplace. Admin can also delete the product listing by clicking on the “-” button.

6.7 Order Settings

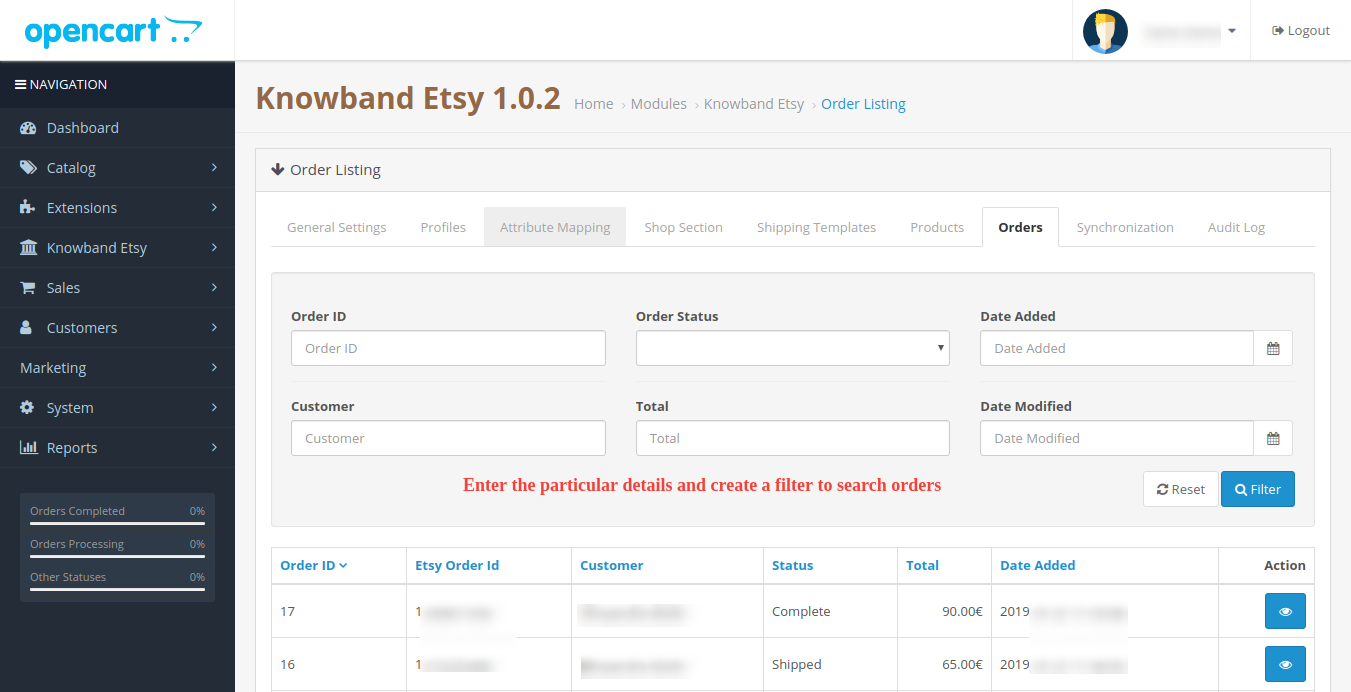
The order Settings tab is there for mapping store order status with Etsy Marketplace order status which will be used during capturing orders from Etsy Marketplace. The screenshot below will show you the order listings and the admin can also create a filter to search for a particular order.

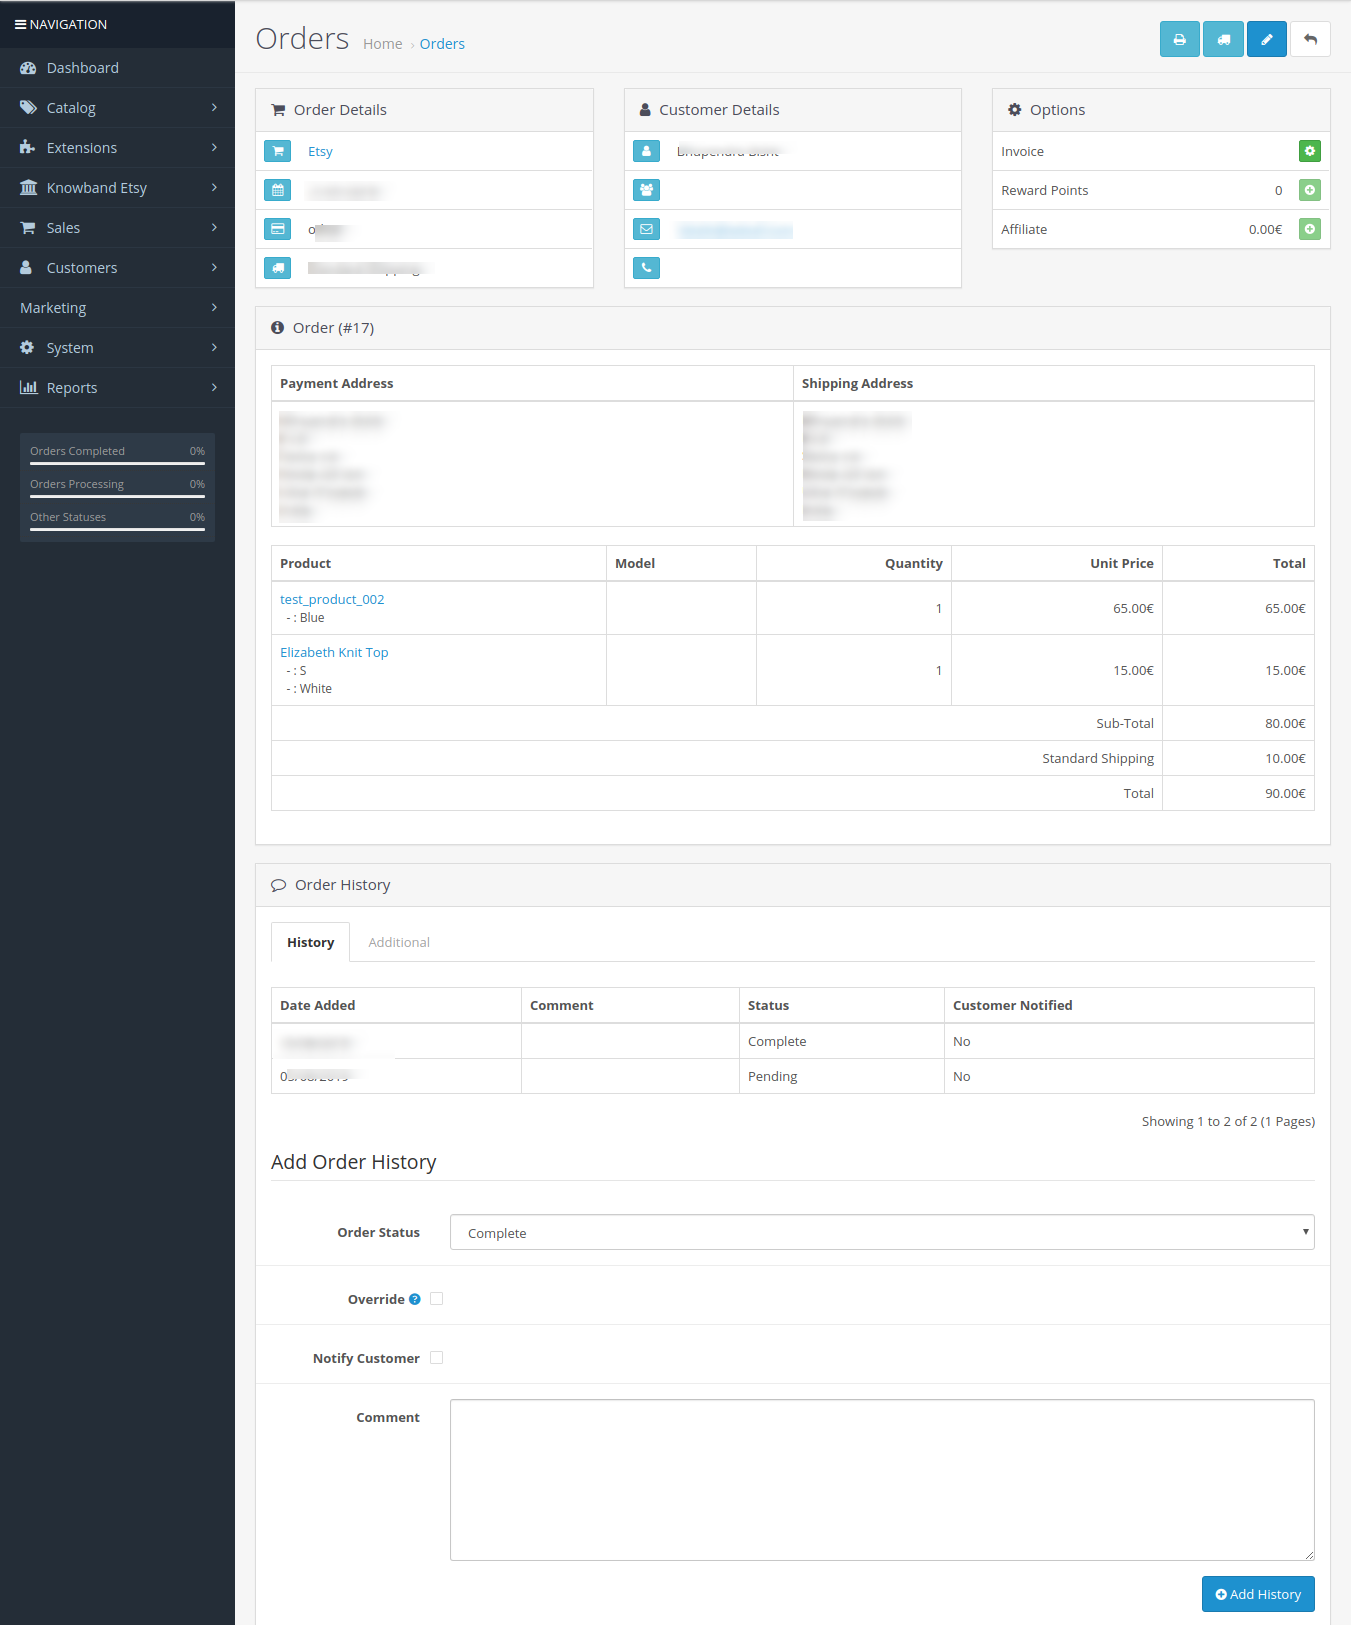
6.5.1 How to view Order Details and Status?

Following are the steps to map order status –

  1. Go to the Etsy Marketplace Integration module -> Orders (Menu Option)
  2. It would display a page the same as shown in the above screenshot.
  3. Click on the View Button given below the “Action” tab.
  4. It would display the page with all the Order details as shown below.

6.8 Synchronization

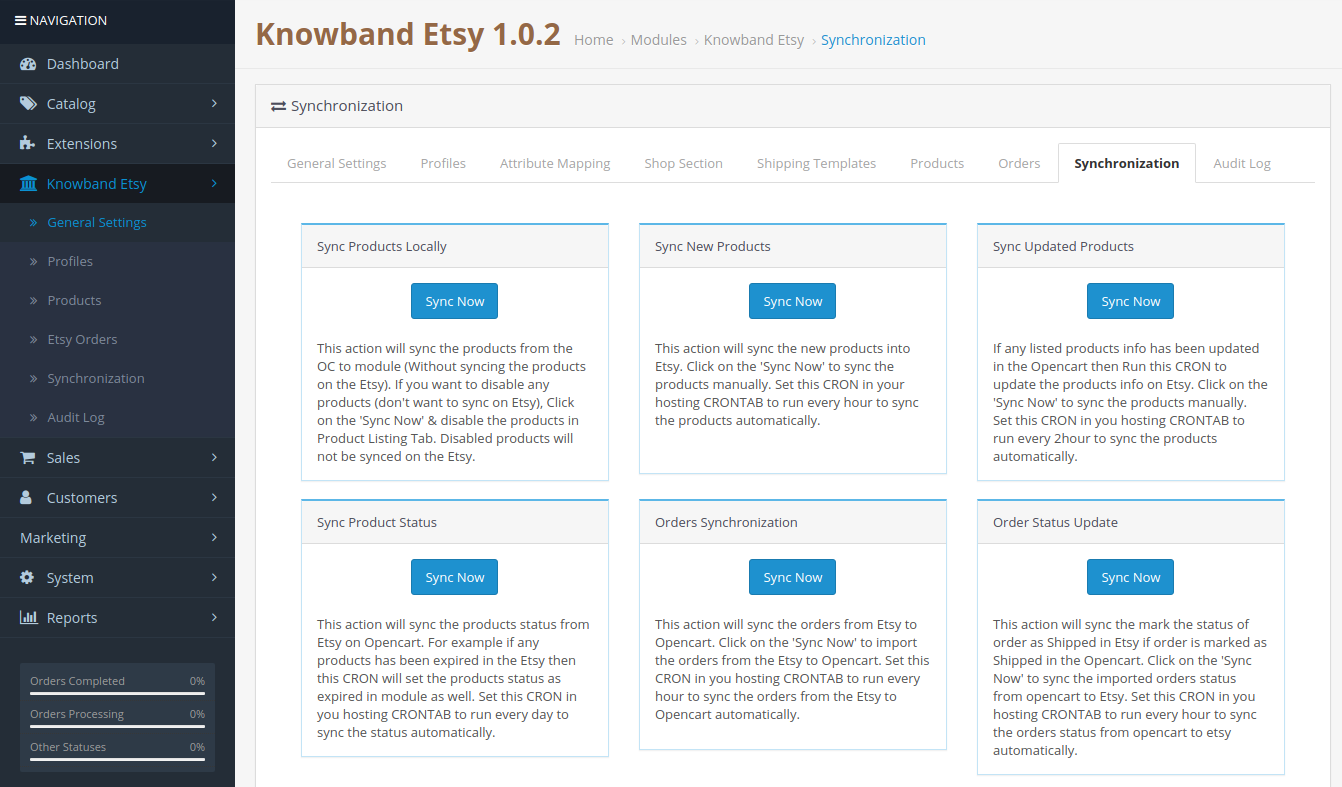
All tabs defined above are basically for saving the settings and options into the system which are used during synchronization between OpenCart Store and Etsy Marketplace. There are the following jobs to synchronize content between OpenCart Store and Etsy Marketplace which you can find below –

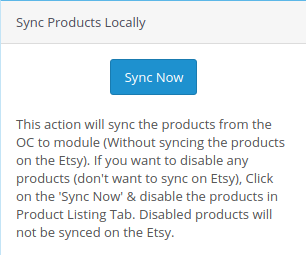
6.8.1 How to sync products locally?

Following are the steps to synchronize sync products locally on Etsy Marketplace –

1. Go to the Etsy Marketplace ->Synchronization (Menu Option)

2. It would redirect admin to a new page where all synchronization actions list as shown in the above screenshot.

3. Click on the “Sync Now” button shown below.

This action will sync the products from the OC to the module (Without syncing the products on Etsy). If you want to disable any products (don’t want to sync on Etsy), click on the ‘Sync Now’ & disable the products in the Product Listing Tab. Disabled products will not be synced on Etsy.

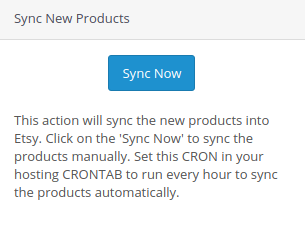
6.8.2 How to Sync New Products on Etsy Marketplace?

Following are the steps to get Countries and Regions from Etsy Marketplace –

1. Go to the Etsy Marketplace Integration module->Synchronization (Menu Option)

2. It would redirect admin to a new page where all synchronization actions list as shown in the above screenshot.

3. Click on the “Sync Now” button shown below.

This action will sync the new products into Etsy. Click on the ‘Sync Now’ to sync the products manually. Set this CRON in your hosting CRONTAB to run every hour to sync the products automatically

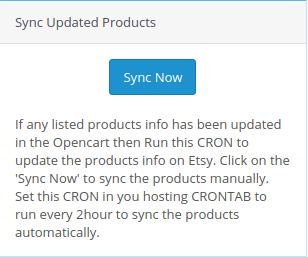
6.8.3 How to sync Updated Products on Etsy Marketplace?

Following are the steps to synchronize Products Listing on Etsy Marketplace –

1. Goto the Etsy Marketplace Integrator module -> Synchronization (Menu Option)

2. It would redirect admin to a new page where all synchronization actions list as shown in the above screenshot.

3. Click on the “Sync Now” button shown below.

If any listed product info has been updated in the Opencart then Run this CRON to update the product info on Etsy. Click on the ‘Sync Now’ to sync the products manually. Set this CRON in your hosting CRONTAB to run every 2hour to sync the products automatically.

6.8.4 How to sync Products Status on Etsy Marketplace?

Following are the steps to synchronize Products Variations Listing on Etsy Marketplace –

1. Goto the Etsy Marketplace Integration module -> Synchronization (Menu Option)

2. It would redirect admin to a new page where all synchronization actions list as shown in the above screenshot.

3. Click on the “Sync Now” button shown below.

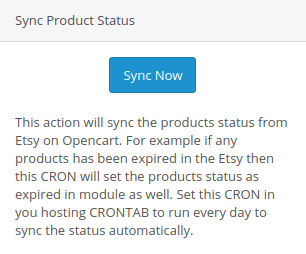
This action will sync the status of the products from Etsy on Opencart. For example, if any products have been expired in Etsy then this CRON will set the status of the products as expired in the module as well. Set this CRON in your hosting CRONTAB to run every day to sync the status automatically.

6.8.5 How to Synchronize orders from Etsy Marketplace?

Following are the steps to synchronize Products Variations Listing on Etsy Marketplace –

  1. Goto the Etsy Marketplace Integration module -> Synchronization (Menu Option)
  2. It would redirect the admin to a new page where all synchronization actions are listed as shown in the above screenshot.
  3. Click on the “Sync Now” button shown below.

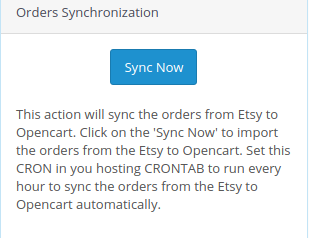
 This action will sync the orders from Etsy to Opencart. Click on the ‘Sync Now’ to import the orders from Etsy to Opencart. Set this CRON in your hosting CRONTAB to run every hour to sync the orders from Etsy to Opencart automatically.

6.8.6 How to update Orders Status on Etsy Marketplace?

Following are the steps to update the status of orders on Etsy Marketplace –

1. Goto the Etsy Marketplace Integrator module -> Synchronization (Menu Option)

2. It would redirect admin to a new page where all synchronization actions are listed as shown in the above screenshot.

3. Click on the “Sync Now” button shown below.

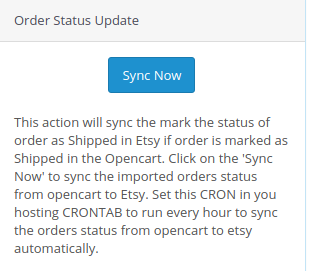
This action will sync the mark the status of order as Shipped in Etsy if the order is marked as Shipped in the Opencart. Click on the ‘Sync Now’ to sync the status of the imported order from OpenCart to Etsy. Set this CRON in your hosting CRONTAB to run every hour to sync the status of the order from OpenCart to Etsy automatically.

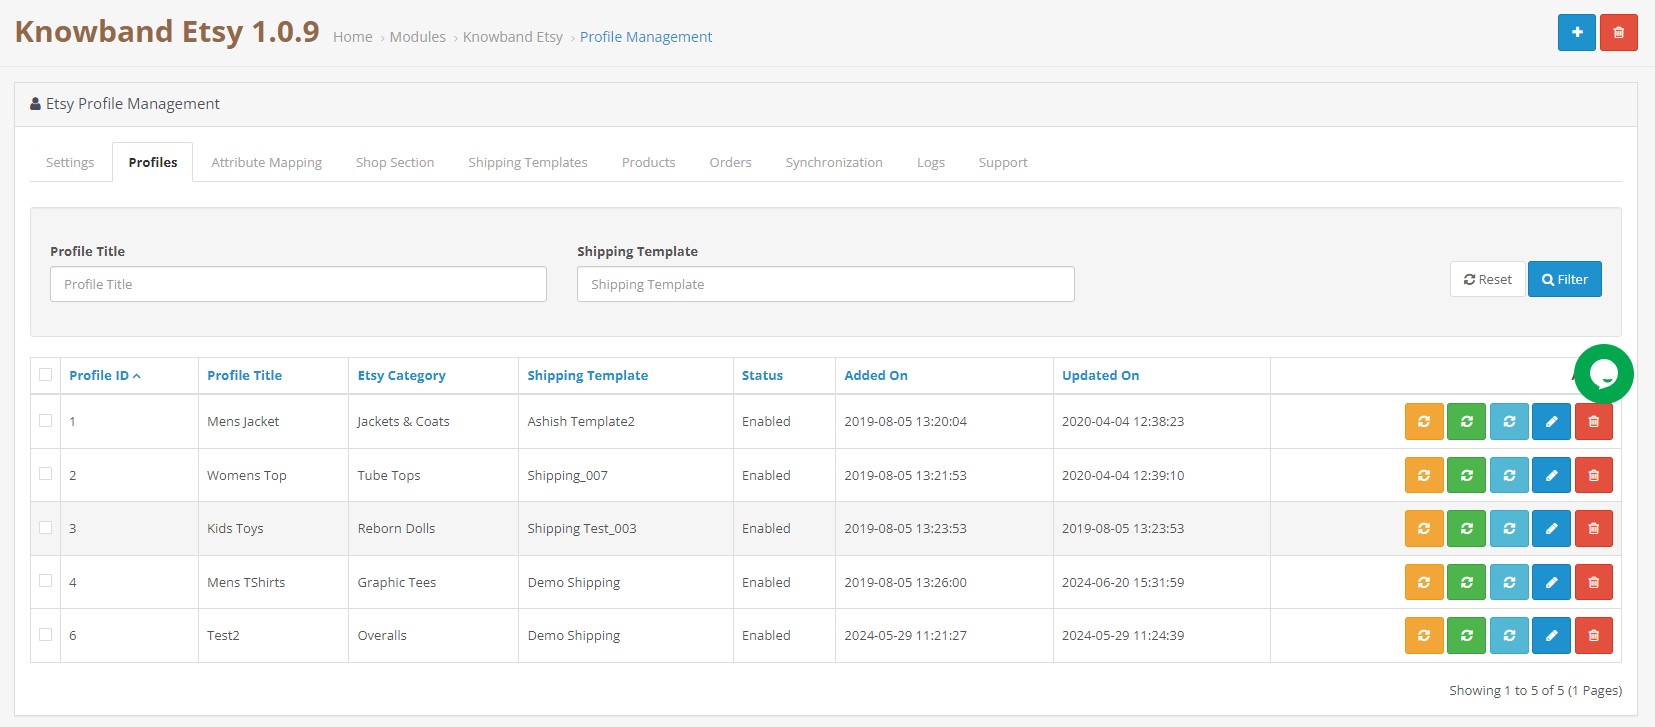
6.8.7. How to Synchronize a Particular Profile on the Etsy Marketplace?

All the crons available in the “Synchronization” tab of the Opencart Etsy Connector plugin provide support for all the categories in bulk. However, if you want to list/update a particular profile only, you can handle this task from the “Profile Management” tab itself.

In this section, we have provided the “Local Sync”, “Sync Products”, and “Sync Product Status” crons to provide the Opencart admin with the flexibility of managing the category-level synchronization between Opencart and Etsy.

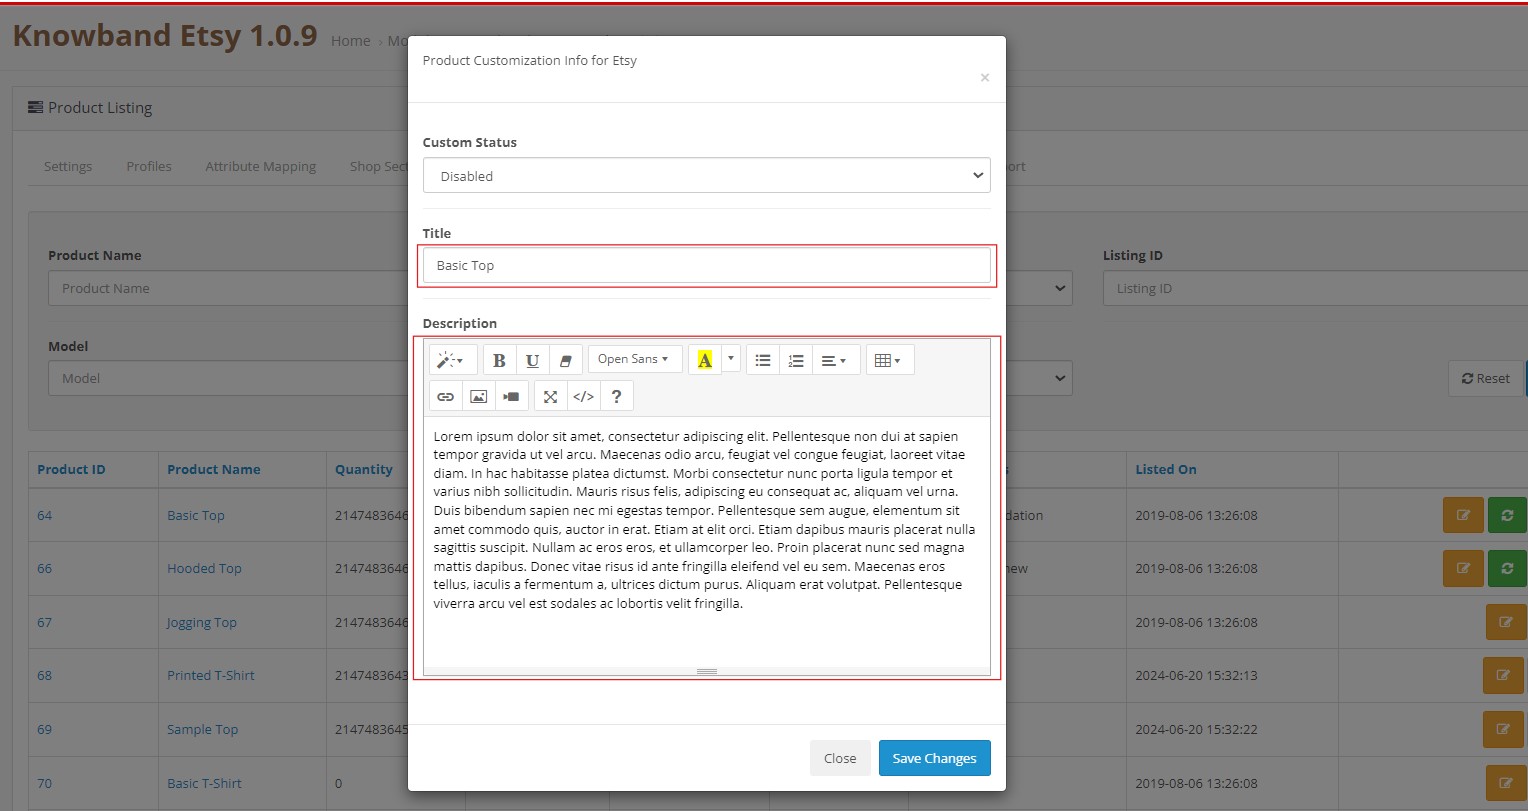
6.8.8 How to List the Products with Custom Details on Etsy Marketplace.

Knowband’s Opencart Etsy Marketplace Integration Extension comes with a custom product details listing option. This feature allows the Opencart store admin to list the products on the Etsy marketplace with different names and product descriptions.

If you want to list the product as it is, you can keep the custom status disabled. However, if you want to list the products with different details as in the screenshot above, save the same.

These details will be updated in the next product synchronization.

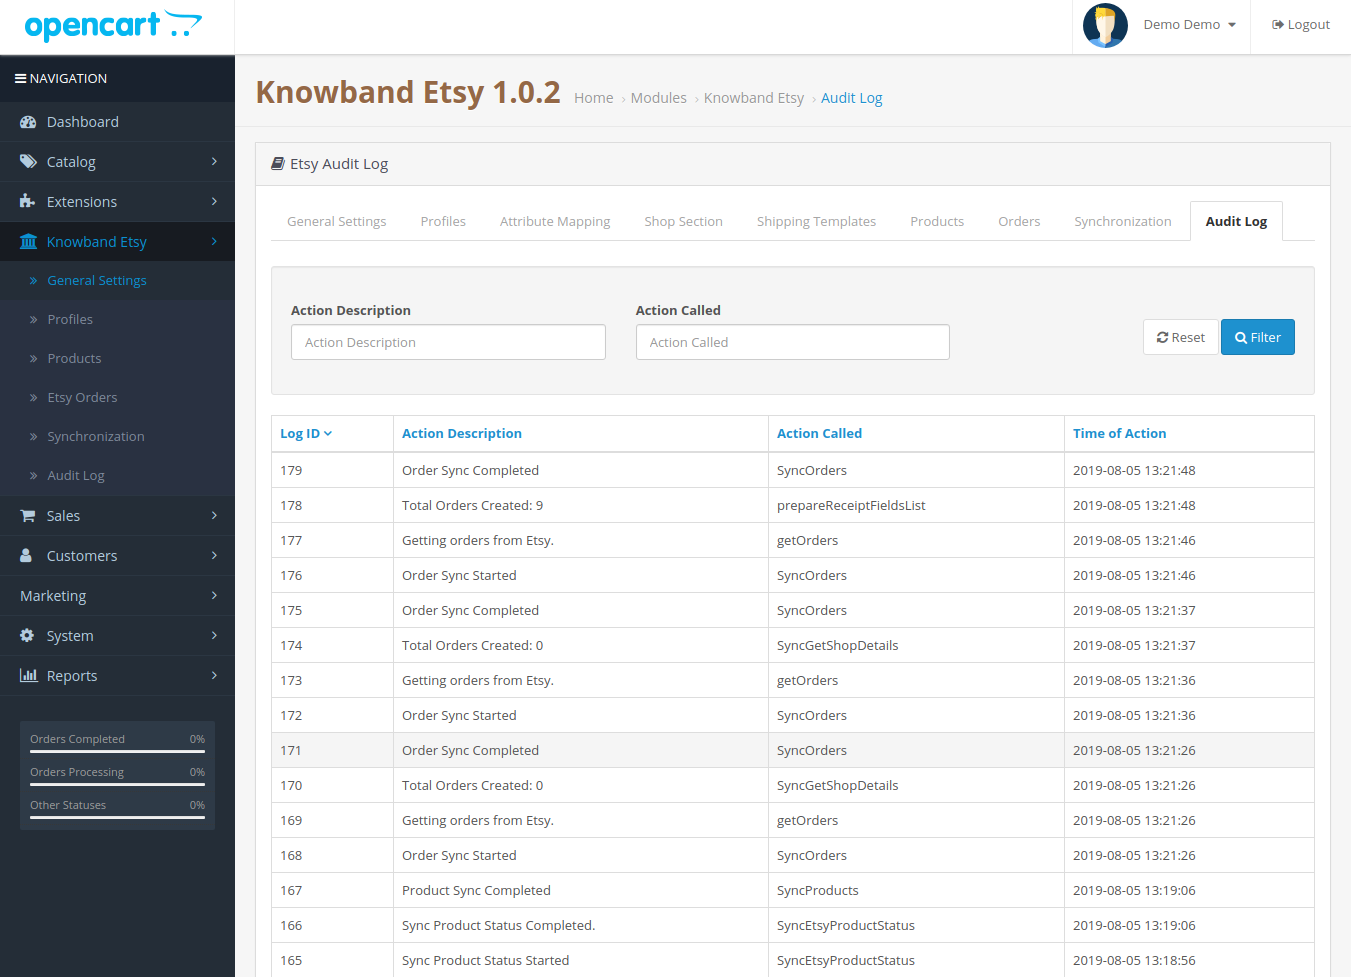
6.9 Audit Log

The audit log helps the admin to keep track of all the tasks performed. Please refer to the attached screenshot below.

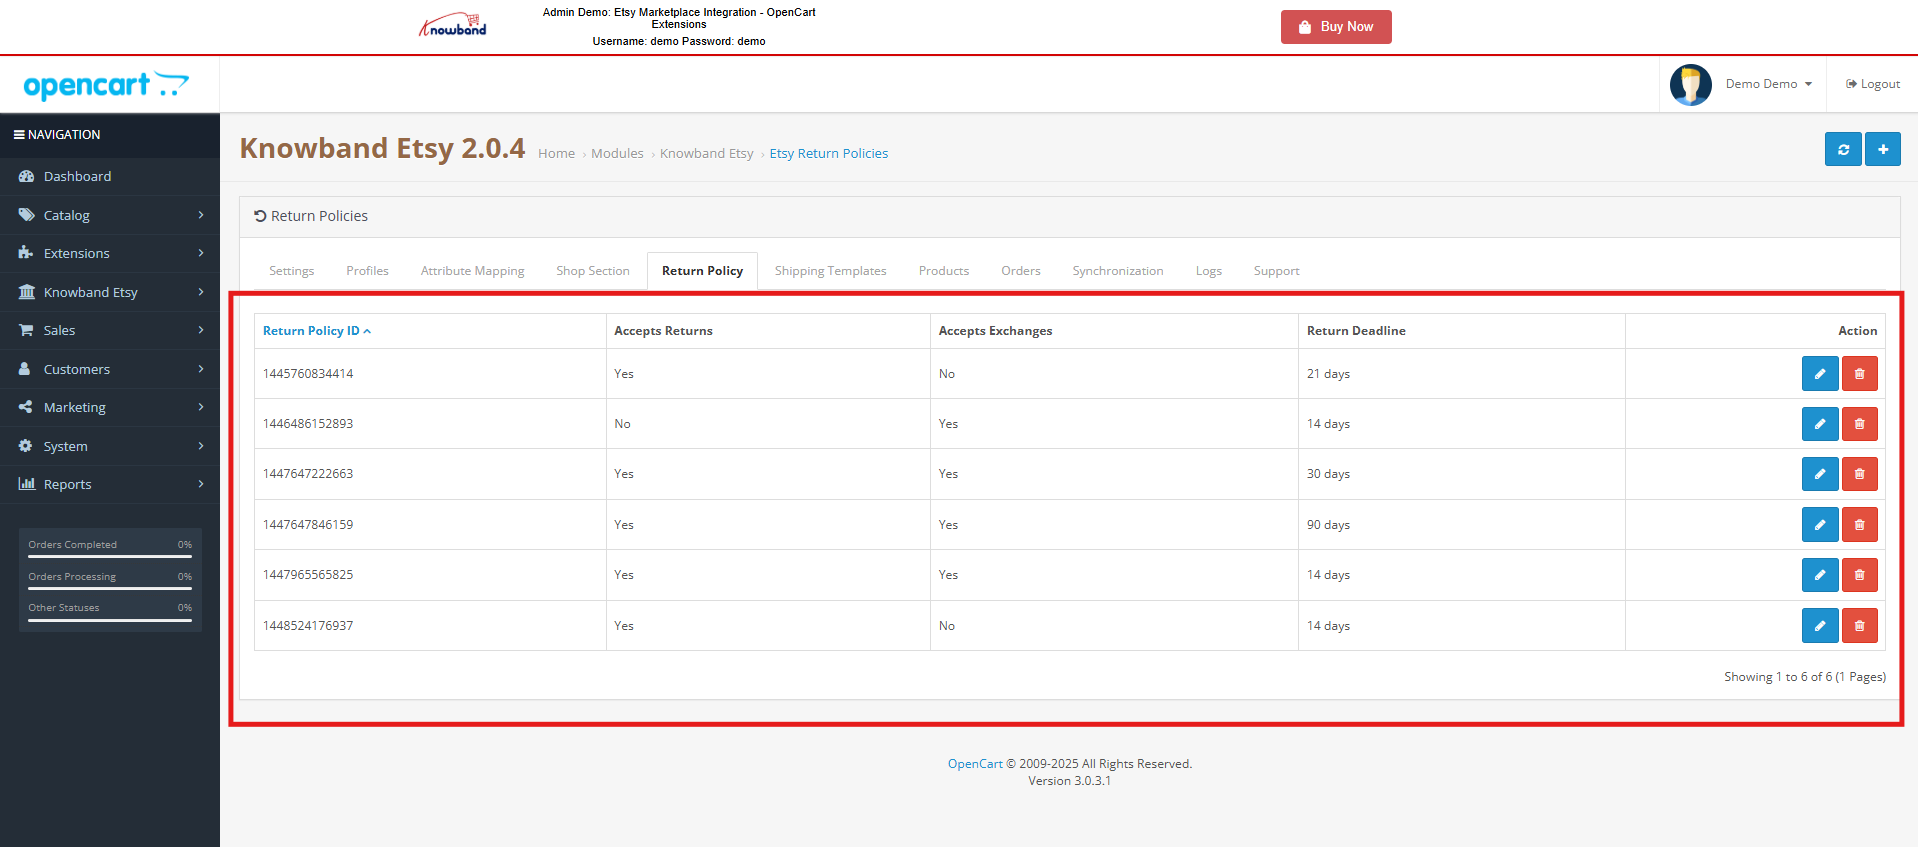
6.10 [New] Return Policy Synchronisation

The OpenCart Etsy Module allows the admin to efficiently manage and synchronize return policies between their Opencart store and Etsy. Admins can create, edit, or delete multiple return policies within the module and assign them to specific profiles. Once a return policy is mapped to a profile, all categories associated with that profile are automatically updated on Etsy with the selected return policy, ensuring uniform policy application across listings.

Add New Return Policy

Admins can create new return policies or modify existing ones directly from the OpenCart Etsy Marketplace Module. Moreover, this provides flexibility to manage different return rules based on business requirements without needing to log in to Etsy separately.

Sync Return Policies

Using the Return Policy Sync cron, admins can fetch all available return policies from Etsy into the OpenCart store. Moreover, the synchronization process includes important details such as return and exchange acceptance, the number of allowed returns or exchanges, and return deadline dates, ensuring accurate and up-to-date policy data.

Profile Mapping

Within the profile mapping section, admins can select and assign a return policy to products under a specific category. This makes it easy to manage return rules in bulk rather than applying them individually to each product.

Automatic Updates

When a category is added or updated within a mapped profile, the assigned return policy is automatically applied to the product of the categories mapped on Etsy. This ensures consistency between the OpenCart store and Etsy listings, reduces manual work, and helps maintain compliance with Etsy’s policies.

Watch the Tutorial of the Etsy Marketplace Integration Extension

This OpenCart Etsy Marketplace Integration tutorial provides a complete step-by-step guide on installing and configuring the Etsy integration module, connecting your OpenCart store with your Etsy seller account, synchronizing products, categories, prices, and inventory in real time, managing Etsy orders directly from the OpenCart admin panel, enabling automated product listing with customizable template controls, mapping store attributes with Etsy product requirements for accurate listings, organizing products into Etsy Shop Sections for better storefront management, and handling active, drafted, or expired Etsy listings seamlessly from your OpenCart store.

Module link of Opencart Etsy Connector Plugin

Admin Demo link of the OpenCart Etsy Integration Module.

You can also find this OpenCart Etsy Integration Module directly on the OpenCart Store.

Opencart Option SKU Manager plugin – User Manual

Introduction

Opencart do not assign unique SKU to each option of a product. For example, if one product has multiple options (sizes & color), then you cannot update the inventory of each option directly. You have to enter/scan product SKU, then select one option from option list. To remove this option selection step, we have developed a module (Opencart Option SKU Manager) to assign unique SKU to each option of product. After installing this module, you can directly enter/scan the SKU of option of SKU and update the quantity.

Functionality and working

How to install plugin

Follow the steps explained below to install the module.

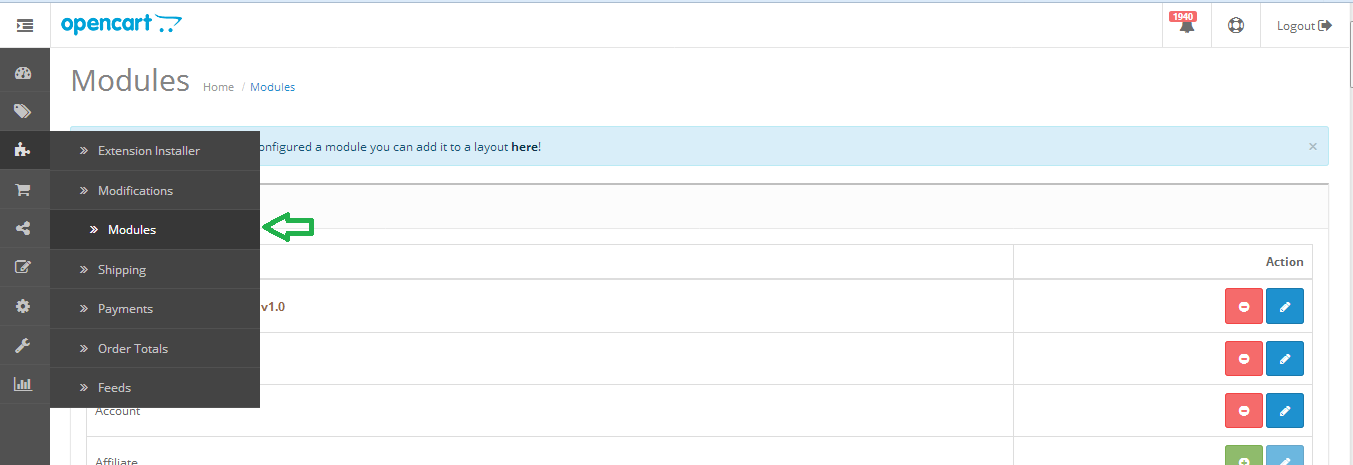
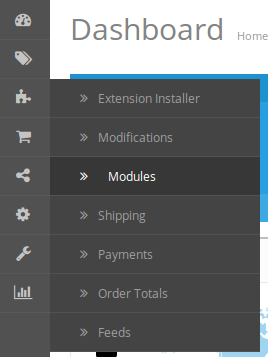
Step 1: Open the modules list from menu as shown below.

Step 2: Click on install button against “Option SKU Manager ” plugin as shown below. Plugin will be installed successfully and read to use.

How to enable plugin

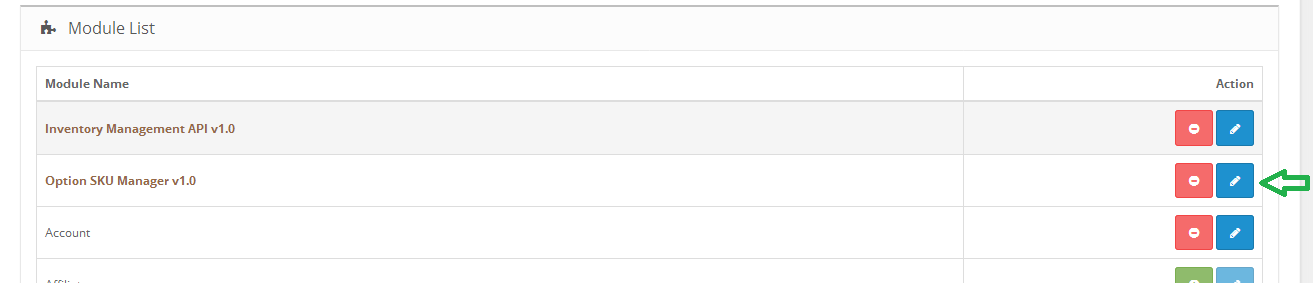
Step 1: Click on edit button against “Option SKU Manager ” plugin as shown below.

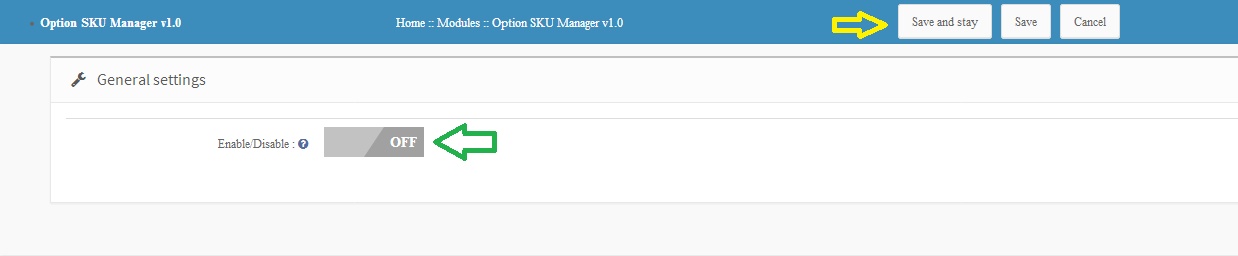
Step 2: Enable the module and click on either “Save and Stay” or “Save” button. Module will be successfully enabled.

How to assign unique SKU to variations

Once you have installed and enabled the module, you can assign unique SKU to each product variations. Follow the steps below to assign unique SKU.

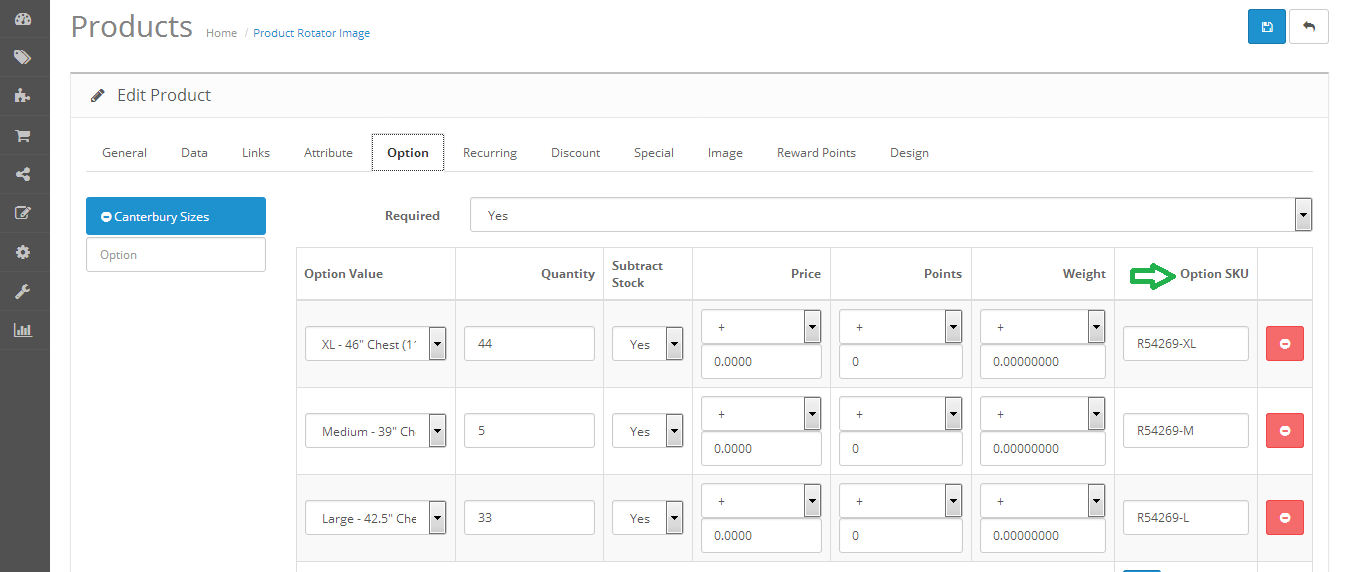
Step 1: Edit any product and click on options tab. Enter unique SKU for each variations and save the product.


OpenCart One Click Checkout Extension – User Manual

OpenCart One Click Checkout Extension

Introduction

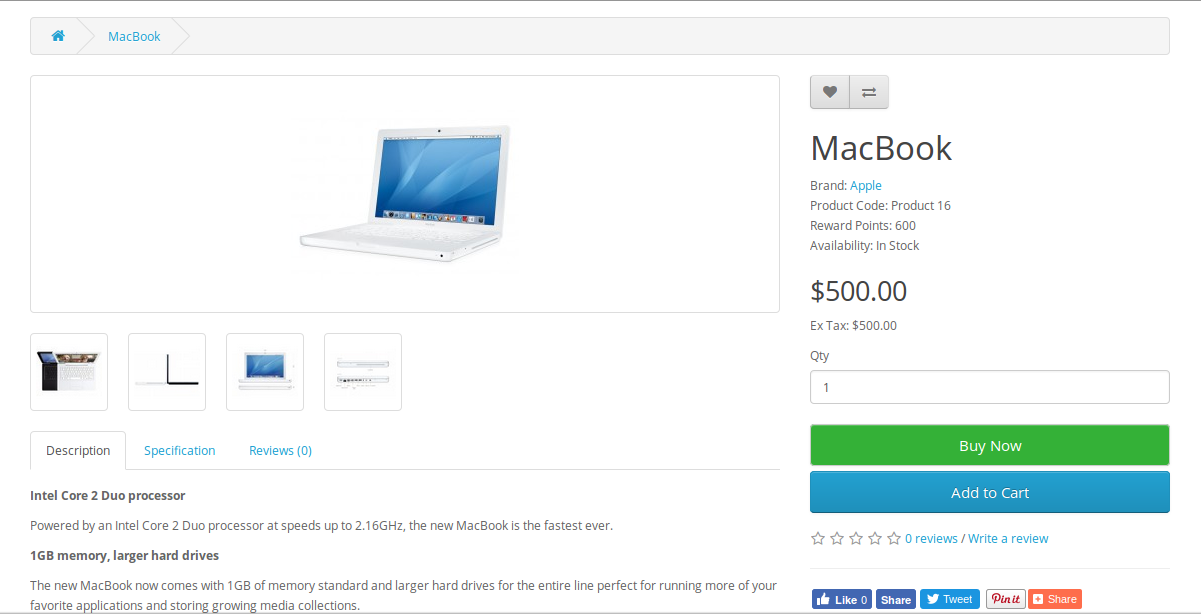
OpenCart One Click Checkout is a plugin which when enabled, allows customer to buy product instantly. A new button “Buy Now” will be shown at product details page. On clicking this button, old cart will be hidden and new product will be added to cart for instant checkout.

On successful order confirmation, old cart will be resumed.

Old cart can also be resumed along with new product, if after clicking on “Buy Now” button customer didn’t complete checkout process instead navigates to any other page.

This plugin will also provide option to track the number of times the users clicked and bought from the “Buy Now” button.

Google analytics code can also be inserted through this plugin which will be helpful in Google tracking on click of “Buy Now” button.

Installation

Follow the following steps for installing One Click Checkout Module:

  1. Download the extension package.
  2. Unzip the package on your root folder of Opencart setup via FTP manager (like Filezilla or WinSCP – download here: https://filezilla-project.org/).
  3. In Admin Panel go to “Extensions > Modules > One Click Checkout >Install”.


  1. That is all – Your system is ready.
  2. Click Edit link to edit settings.

User Manual

This User Manual Guide users through the Admin Module/Store Front settings and features of the One Click Checkout Module.

Admin Panel Settings

Admin Panel Settings contains the 3 tabs for settings.

1. General Settings

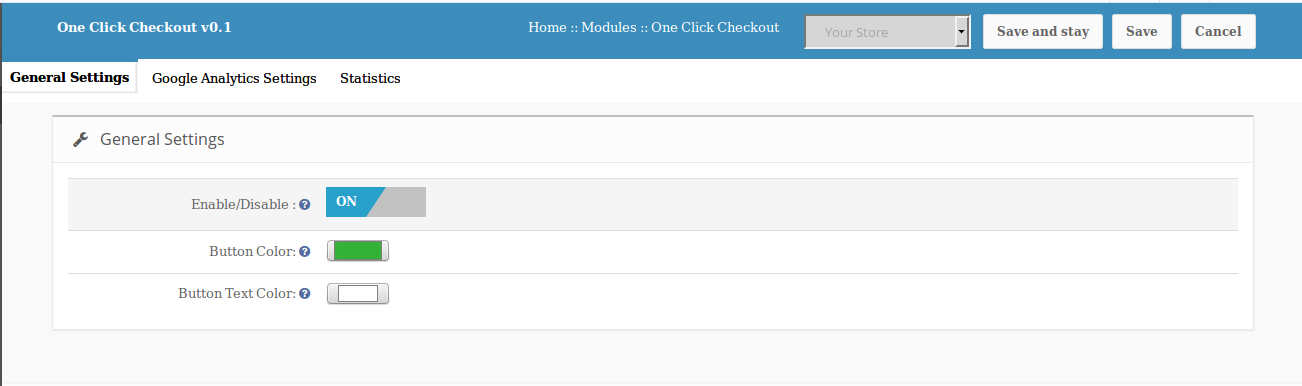
From here, Admin can enable/disable this plugin. Also look and feel of Button can be controlled here. Initially colors will be already selected with their default values. 

Setting will have options as:-

  1. Enable/Disable: This option allows admin to enable or disable the plugin. By default this option will be disabled.
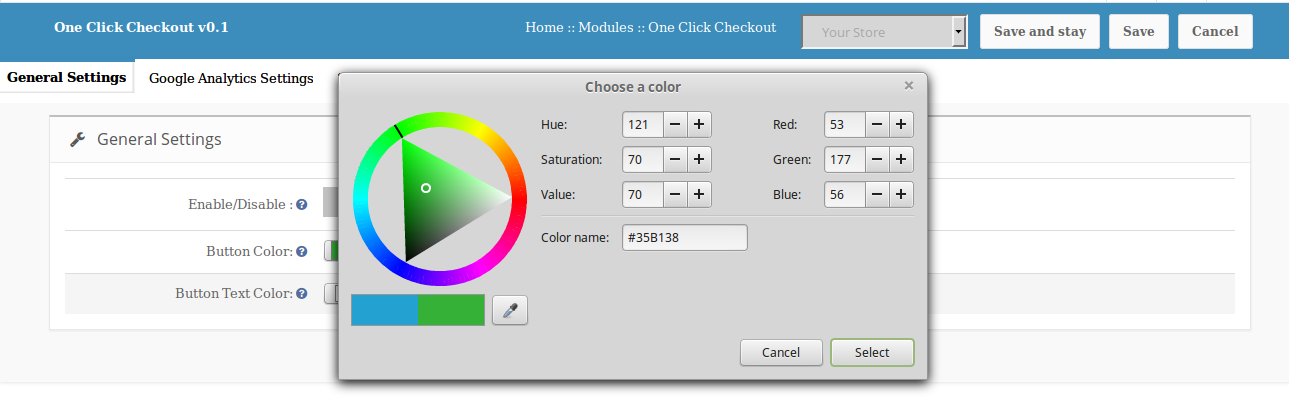
  2. Button Color: The color of “Buy Now” Button at product details page of front end can be changed by this option. Default color will be blue.
  3. Button Text Color: “Buy Now” Button text color can be changed by this option. Default color will be white.

2. Google Analytics Settings

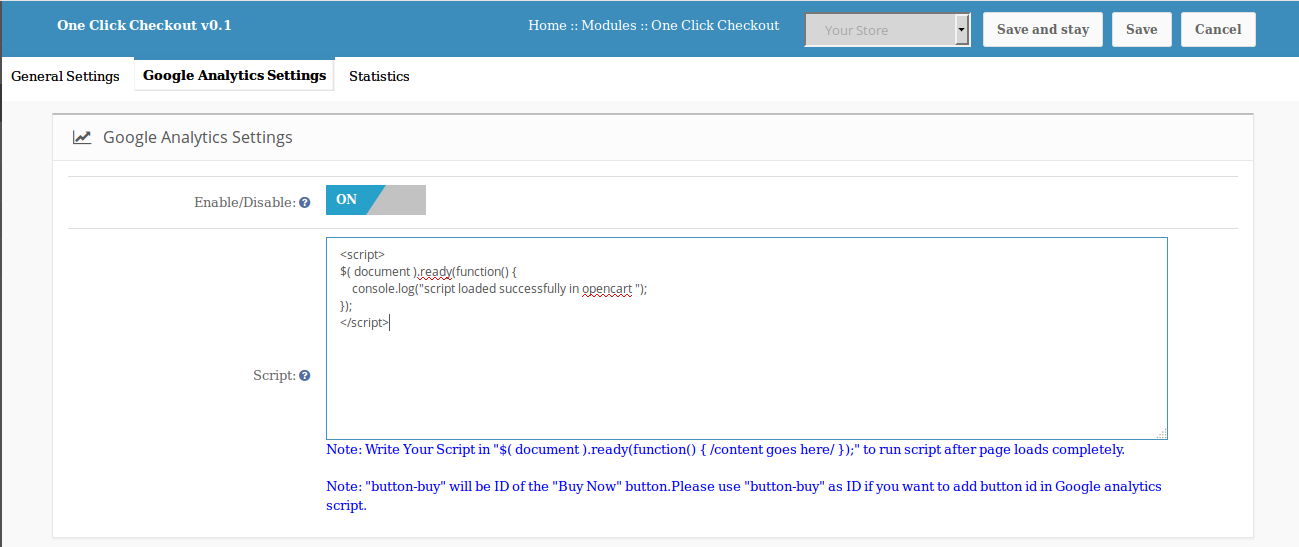
From here Admin will have option to add Google analytics script to track “Buy Now” button click.

Setting will have options as:-

  1. Enable/Disable: This option allows admin to enable or disable option to add Google analytics script.
  2. Script: Admin can insert or write script in text area for Google tracking on “Buy Now” button click.

Note: There will be note having “Buy Now”button ID which can be used by admin while creating script to be added.

Also there will be a note which tells admin to write script in $(document).ready(function(){ //content goes here// }); so that script will run after page is loaded completely.

3. Statistics

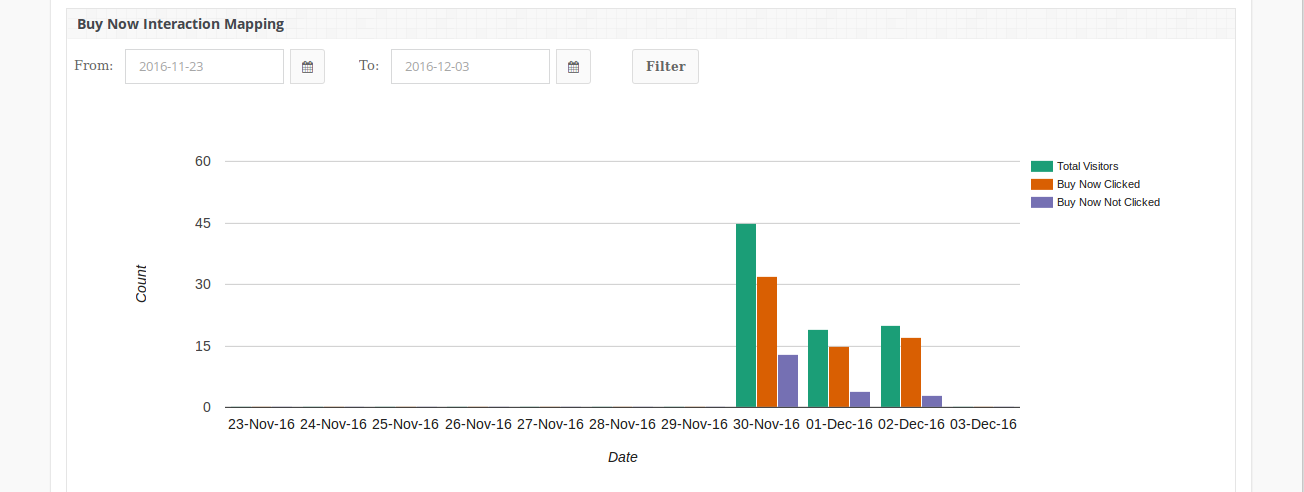
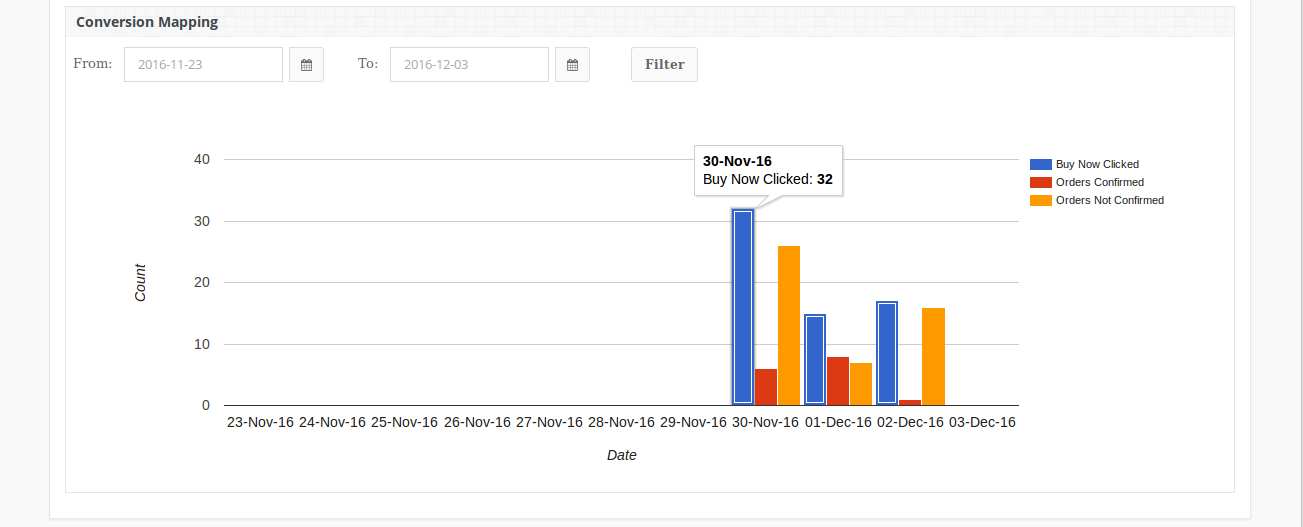
From here admin can see the no. of customers who visited product page and also the conversion mapping of those who clicked on “Buy Now” button and placed successful order.

  1. Two Bar charts will be shown here. There will be filter to select start date and end date to create bar chart.
  2. Buy Now Interaction mapping:-

It will show mapping between No. of visitors to Product details page and No. of visitors who clicked “Buy Now” Button and who didn’t click “Buy Now”button on each day in last 10 days.

Conversion Mapping:-

It will show mapping between No. of clicks on “Buy Now” Button and No. of order confirmed after clicking “Buy Now”button and No. Order which are not confirmed on each day in last 10 days.

If admin wants to see statistics of any particular day or period or month or week, he/she has set

“From:” Date and “To:” Date and click “Filter” button. Results will be shown accordingly.

After enabling this plugin, a new “Buy Now” button will be shown at product details page along with “Add to Cart” Button.

The module at the front-end will appear as follows:

  • This “Buy Now” button allows customer to order product instantly. On clicking “Buy Now” button, a new cart will be created having product (for which button was clicked) and customer will be redirected to checkout page.
  • On successful Order confirmation, if old cart was not empty, old cart will be resumed.
  • After clicking “Buy Now” button, if customer will navigate to any other page then old cart will be resumed along with this new product.
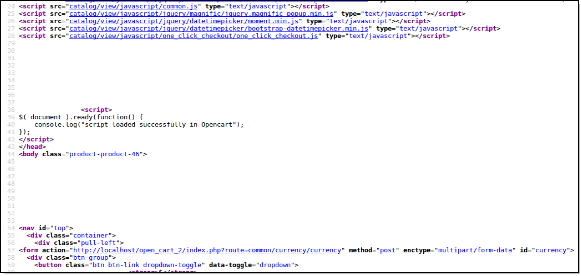
  • If Google analytics setting will be enabled then it will show added script on viewing page source. Picture is shown below.

The Script loaded in above picture is sample script. If Admin writes Google analytic script in admin panel, that script will be visible here.

This Would Also Interest You:

OpenCart Mailigen Integrator – User Manual

Opencart Mailigen Integrator

Opencart Mailigen Integrator is an open-cart plug-in that allows you to automatically synchronize email addresses of customers of your store with your Mailigen account. This plugin will synchronize the emails of users even if they opt out of subscribing to the newsletter. Opencart Mailigen Integrator will provide multiple settings to store owners like synchronizing the customer email as soon as the user enters it in an email field. Opencart Mailigen Integrator can also be configured to synchronize emails from third party email fields on the store.

User Manual

This User Manual will guide you through the Admin Module/Store Front settings and various features of the this Opencart Mailigen Integrator.

Admin Panel

The admin panel have 2 tabs for configuring this plugin, as listed below:

  • General Settings
  • Mailigen Settings

General Settings

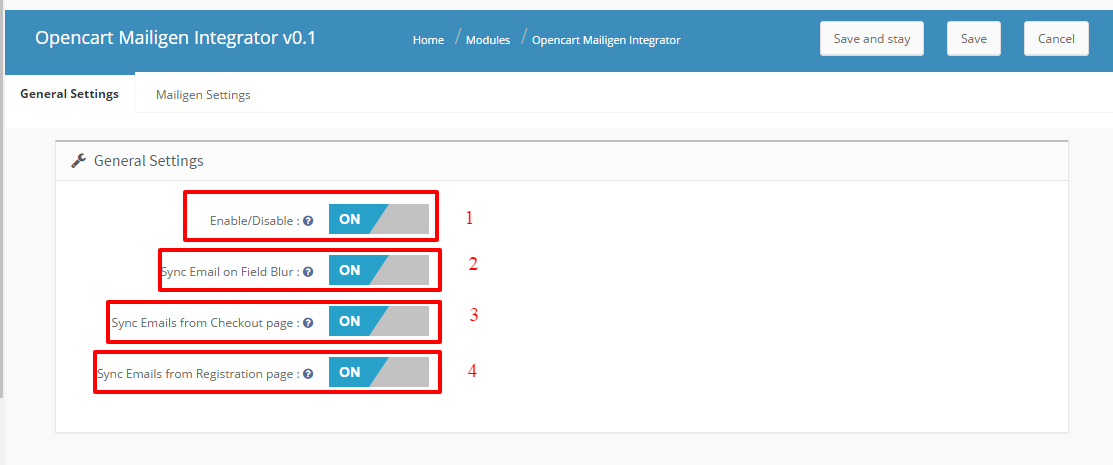
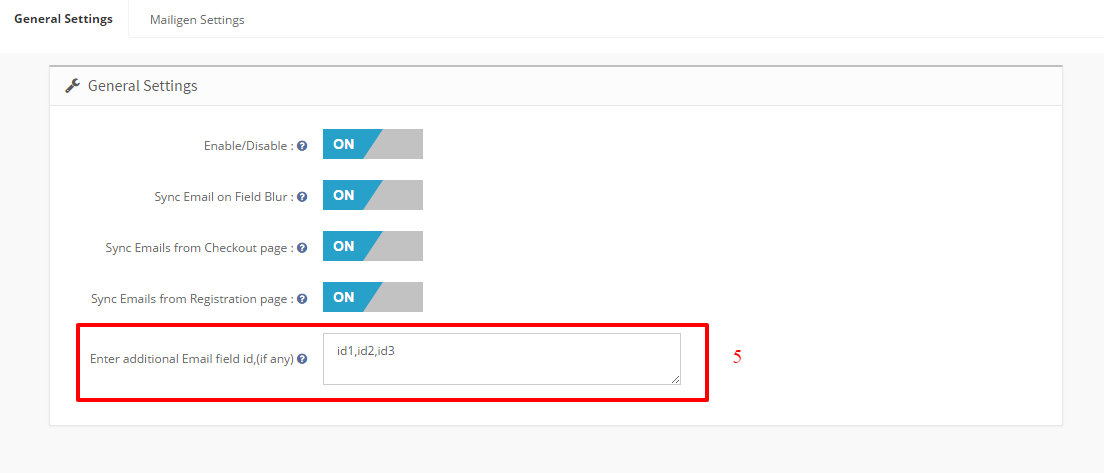
General Settings tab have following options:

  • Enable/Disable : In this General setting’s tab of Admin panel , Admin will have the option to Enable/ Disable the plugin. This is the global enable switch. On switching this on, the entire module is switched on and similarly switched off on turning it off.
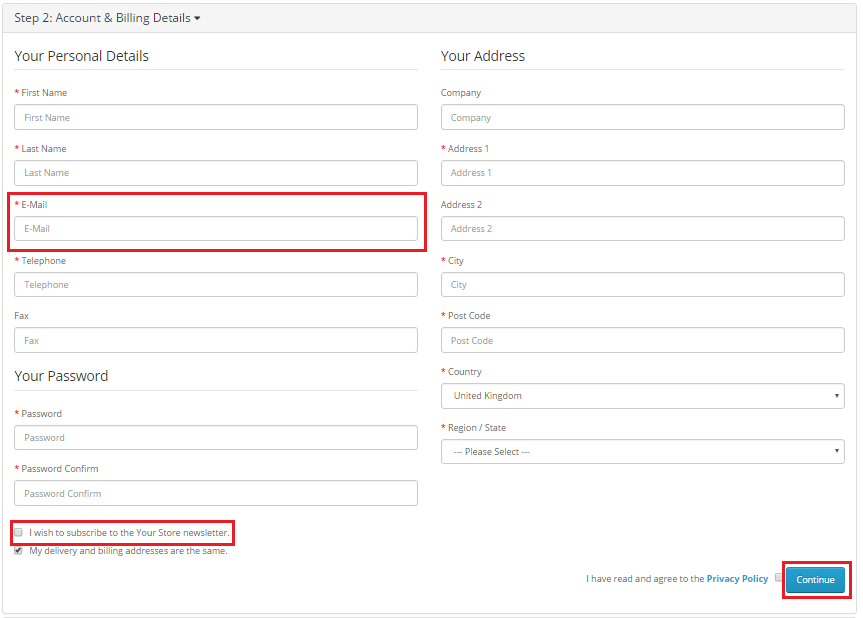
  • Synchronize Email on Blur From Input Field : This option when enabled , module will synchronize the email id on the javascript blur event of email field irrespective of the fact if the user have submitted the form or an error occurred in form submission.
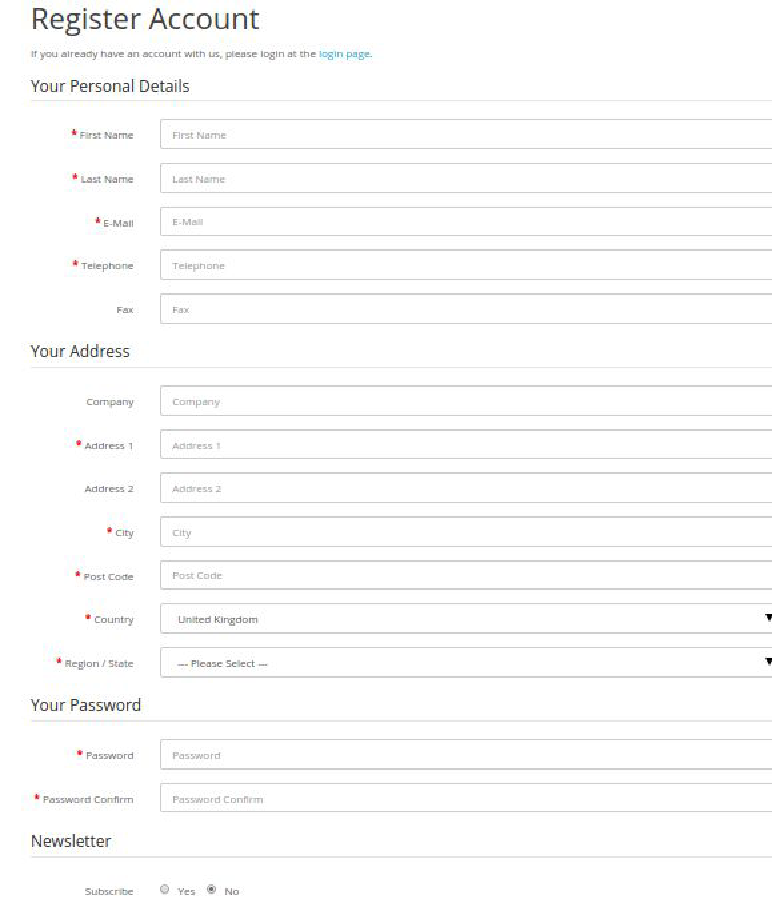
  • Synchronize Email from Checkout page : This option when enabled , module will synchronize the email field values from the checkout page when user fills ‘billing Details’ and click ‘Continue’. Email id will be synchronized even if customers choose not to subscribe to the newsletter.
  • Synchronize Email from Registration page : This option when enabled , module will synchronize the email field values from the Registration page. Email id will be synchronized even if customers choose not to subscribe to the newsletter
  • Third-party Selectors : This option features a text area that will be hidden and for developer purpose only. This input will be used to synchronize emails from the fields with the given selectors. This option is to synchronize emails from the non-default email fields. This text area will be used to collect comma-separated selectors of the email fields that the user wants to synchronize emails from. The purpose of this field is to enable admin to make module compatible with other newsletter forms which are coming because of theme or third party module.

Mailigen Settings

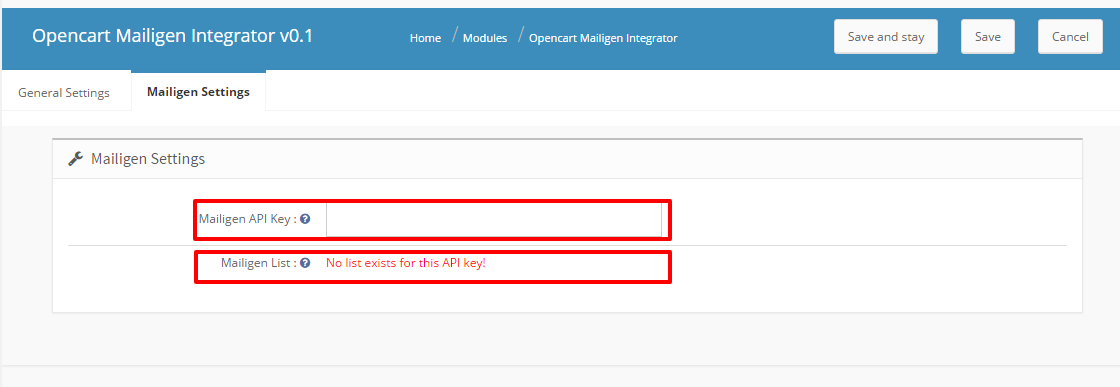
The Mailigen Settings tab will  provide users the interface to provide their Mailigen account credentials so that API connection can be made.

  1. Mailigen API Key : Mailigen API key is the key that the user created on his Mailigen account at www.mailigen.com. This API key will be used to connect to the Mailigen API.
  2. Mailigen Lists : Mailigen lists are those lists that the user has created in his Mailigen account at www.mailigen.com . Mailigen Lists will be available only when a valid Mailigen API key  is provided.

NOTE : If the Mailigen Setting fields > Mailigen API key field is empty then no lists will be shown , but an error message will be shown instead saying ‘No lists available for these credentials’.

Front End

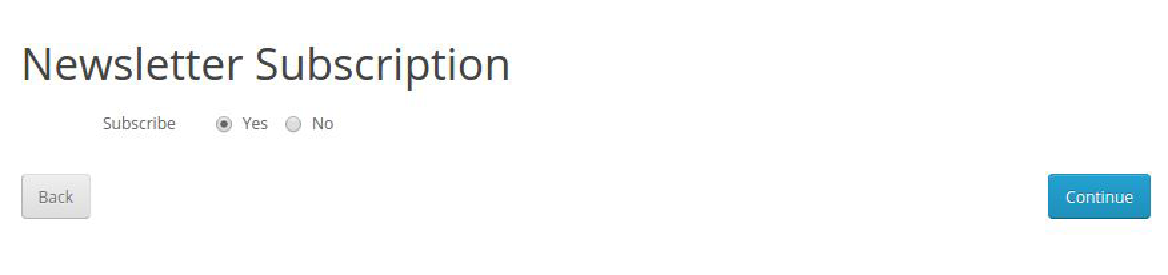
Newsletter Subscription

Whether the customer opts for the newsletter subscription or he do not , In both the cases customer is automatically added to the lists configured in admin panel when clicked on continue.

Registration Page

if the ‘Add module on  Registration Page’ setting is enabled in Admin panel, Then customer will also be added to the configured lists on registration page whether or not he/she chooses the option to subscribe to newsletter.

Checkout Page

If the ‘Sync Email from checkout page’ is enabled in admin panel,  then on the Checkout page , customer’s email address will be synchronized to the configuration lists , neglecting the fact if the user is logged on in or a guest user.

For logged in customers :

For the logged in customers , If the ‘Sync from Checkout page’ is enabled in admin panel, then on the checkout page, Customer’s email address will be synchronized to the mailigen  configuration lists as soon as the customer ‘Confirm’ the ‘ Billing Details ‘.

For Guest Users:

For Guest users (users that are not logged in ) , if the ‘Sync Email from checkout page’ and ‘Sync Email on Field Blur’ is enabled in admin panel, then on the Checkout page , customer’s email address will be synchronized to the mailigen configuration lists as soon as the user fills his email address in email field of ‘ Billing Details ‘.

If the ‘Sync Email on Field Blur ‘ is disabled in admin panel, then the entered email will be sent to the configuration lists when the user click on ‘continue’ at the ‘Billing Details’ section of the checkout page.

For Users Registering on Checkout Page

For Guest users (users that are not logged in ) and who want to register , if the ‘Sync Email from checkout page’ and ‘Sync Email on Field Blur’ is enabled in admin panel,  then on the Checkout page , customer’s email address will be synchronized to the mailigen configuration lists as soon as the user fills his email address in email field of ‘ Account & Billing Details ‘.

If the ‘Sync Email on Field Blur ‘ is disabled in admin panel, then the entered email will be sent to the configuration lists when the user click on ‘ Register ‘ at the ‘Account & Billing Details’ section of the checkout page. The email will be sent to the configuration list of mailigen account irrespective of the choices the user made about the subscription to the newsletter.

Installation Manual

  • Download the Opencart Mailigen Integrator package.
  • Unzip the package, and open the /upload folder  and upload the contents of upload folder  via FTP manager (like Filezilla or WinSCP – download here: https://filezilla-project.org/). Folder structure for opencart Mailigen Integrator plugin is shown in the image below:
  • You will be able find the Opencart Mailigen Integrator module that is ready to be installed in the “Modules List” in your Opencart store as shown below.

  • Click on the Install link to install. Once the module is installed properly the ‘’ link will be converted to ” and the ” button will be enabled.

Related Stories:

OpenCart Exit Popup Extension – User Manual

OpenCart Exit PopUp Module

Introduction

OpenCart Exit Popup is an addon which when enabled shows a popup in the front website whenever the customer tries to leave the web page from the upper side. The front popup values and functionality can be changed from the admin panel. Admin can also set the cookie life to make the popup disabled for the given amount of time on a same device. The text can also be changed from the admin panel.

Installation

Follow the following steps for installing Exit Popup Module:

  • Download the extension package.
  • Unzip the package on your root folder of Opencart setup via FTP manager (like Filezilla or WinSCP – download here).
  • In Admin Panel go to “Extensions > Modules > Exit Popup>Install”.

  • That is all – Your system is ready.
  • Click Edit link to edit settings.

User Manual

This User Manual Guide users through the Admin Module/Store Front settings and features of the Exit Popup Module.

Admin Module

The Admin Module contains these 7 tabs for settings and view.

  1. General Settings
  2. Display Settings
  3. Look and Feel Settings
  4. Discount Settings
  5. Email Marketing
  6. Email Settings
  7. Statistics

All the information provided below is for the case if Admin has only one store.

In case of more than one store, drop down of store list will be seen. Admin can change store and can set different settings for different store front.

After changing store, settings or values of selected store will be visible.

All the functionality will be same no matter if anyone have 1 store or many. All you have to do is just select the store and save the settings accordingly.

1. General Settings 

The General Settings has the following options:

  • Status: This option will enable or disable the complete functionality of the OpenCart Exit Intent popup module.
  • Email Recheck: This option will enable or disable the email recheck functionality of the store. If enabled, no same email address is provided discount voucher more than one time.
  • Popup Title: With this option, you can set the desired title for the exit intent popup in English or French language.
  • Discount Information: You can set any discount information which will be shown over the exit intent popup.

  • Sub-title Text: This field will set the title for the discount or email subscription popup.
  • Popup Display Interval: You can set a fixed time interval (in days) after which the responsive exit popup will be shown to the same user.
  • Custom CSS: This option allows you to include additional CSS code from the backend of this module.
  • CMS Page for the Conditions of use: Using this option, you can set the desired CMS page on which user is redirected when they check the Conditions of use.

2. Display Settings 

  • Minimum Screen Size: This option sets a minimum screen size to display exit popup on frontend.
  • Maximum Display Frequency: This option lets you show the exit popup on frontend after the specified time.
  • Hide Popup After: This option lets you choose the time interval after which the exit popup will hide automatically.
  • Set Time Interval: Using this option, you can set a specific date range when you want to display the exit popup on frontend.
  • Where to Display: This option will let you choose the page where you want to display the exit popup on frontend.
  • When to Display: This option allows you to set display time after which the exit popup will be shown on the frontend to users. The options include immediately, after some time, after scroll down percent, or upon exit.
  • GEO Location: With this option, you can select the countries where you want to show/hide the exit popup to users.

3. Look and Feel Settings

The Look & Feel settings is to change the colors of popup window. It has the following options:

  • Theme: This option allows you to select the theme you want to apply for an exit popup.
  • Select the theme to see a preview: Select the theme you want to check the preview.

You get five pre-defined templates for exit popup as shown below.

Theme 1:

Theme 2:

Theme 3:

Theme 4:

Theme 5:


4. Discount Settings

The discount which is offered using OpenCart exit pop extension can be configured with the listed settings:

  • Generate Coupon: If generate coupon type is set to “Fixed Code”, a fixed code is sent to every customer with fixed discount value.
  • Coupon Code: Using this option, you can specify the fixed coupon code which is sent to all the customers. This coupon is generated at the backend under the Coupons section.

This fixed coupon code has a unique code value, discount value, validity period and status(enabled/disabled). You can change these details under the Coupon section of Marketing Tab at the backend as shown below.

The second way to offer a discount is by generating a new coupon code for every user.

  • Generate Coupon: If generate coupon mode is selected to “New code each time”, then new coupon code is generated each time for every new user.
  • Discount Amount Type: This option allows you to select the coupon discount type as Fixed or Percentage. Percentage discount will be deducted from the total cart balance by given percentage. Another option is Fixed amount. The fixed amount will be deducted from the cart.
  • Discount Amount: Using this option, you can specify the discount which you want to offer to your customers through the exit popup. This discount can be a fixed value or a percentage value.
  • Threshold Amount: This option allows you to set a minimum cart amount which is required to use the discount voucher. The coupon will not work if the cart amount is less than the Minimum Cart Amount.


5. Email Marketing Settings

Email Marketing settings involves the following options:

  • Enable MailChimp: Enable or disable MailChimp Integrator services for your eCommerce website.
  • MailChimp API Key: With this option, you can set the API key for connecting with the MailChimp account.
  • MailChimp List: This option shows you the fetched lists connected with the particular MailChimp account. You can select one out of those lists.
  • Enable Constant Contact: This option allows you to enable or disable the Constant Contact integration service. The process is similar for this email marketing service. You have to set the API key, Token, and lists associated with that account.

6. Email Template Settings

Under this section of the OpenCart Exit Intent Popup module, you can configure the discount email sent to the customers. This includes the following options:

  • Coupon Display Options: This option will set the location where you want to show the discount coupon code: over popup or email. The discount coupon can be shown on exit popup, discount email, or both.
  • Email Subject: With this option, you can set the subject for the discount email.


  • Email Content: This option allows you to set the content of the discount email. You can add as much text, images or links in the email content.
  • Test Email: With this option, you can set a test email address which can be used for testing purposes.

7. Statistics

The Statistics feature of Opencart Exit popup extension allows you to check the coupon details in tabular and graphical format. You can see the number of visitors, Visitor stayed, Visitors not stayed, coupons generated, coupons used. You can use filters to filter the data which is getting displayed. By default all data of 8 days is shown.

  • Date Range Filter: In this filter, there are two date pickers and one filter button in visitor statistics. From date and to date are given using date picker and when the Filter button is clicked, all the data between those two dates is shown. If From date is greater than To date than message will be displayed “No Data Found for specified date”.

In Coupon statistics there is one filter and a filter button. Total 7 days stats can be seen.If admin selected date 2016-01-01. Then stats will be from 2015-12-26 to 2016-01-01.

Store Front

After enabling this plugin the Popup is shown in the front website whenever the customer tries to leave the web page from the upper side.

The module at the front-end appears as follows:

Visitor has to enter the email id and click on the button.

A coupon is generated and the success message is shown in the popup window and an email is sent to the provided email id containing coupon code, Coupon value in percentage or fixed amount and validity.

If user has already claimed coupon then a failure message will be seen.

Disclaimer: In case the “Exit” popup does not display at the front, kindly clear the cache or delete the cookies. Sometimes cookies prevent the popup from displaying at front.

OpenCart Better Thank You Page Extension- User Manual

Introduction

Opencart Better Thank you page is a plugin which when enabled makes the order confirmation page look better than the previous OpenCart Order Confirmation page.

Through this Opencart Better Thank You Page plugin, Admin can show three different blocks at order confirmation page:-

  1. Products Block: All the related products which the customer might be interested to buy can be shown.
  2. Discount Block: In this block of the Opencart custom thank you page plugin, discount coupon code will be shown which can be applied for next purchase.
  3. Advertisement Block:  In this block of the Opencart custom success page module, banner can be shown for advertisements.

Installation

Follow the following steps for installing “Better thank you page” Module:

  • Download the extension package.
  • Unzip the package on your root folder of Opencart setup via FTP manager (like Filezilla or WinSCP – download here: https://filezilla-project.org/).
  • In Admin Panel go to “Extensions > Modules > Better Thank You Page>Install”.

  • That is all – Your system is ready.
  • Click Edit link to edit settings.

User Manual

This User Manual Guide users through the Admin Module/Store Front settings and features of the Better Thank You Page Module.

Admin Panel Settings

Admin Panel Settings of the Opencart success page extension contains the 4 tabs for settings:

1. General Settings

The General Settings of this Opencart module by Knowband has following options:

  • Enable/Disable: This option of the Opencart Better Thank you page plugin allows user to enable or disable the plugin. Switch it on to enable the Opencart module.
  • Show Order Id: Enable this option of the Opencart custom thank you page module to show Id to customers at order success page.

2. Products Settings

After clicking on the products settings tab of the Opencart custom success page module, the below screen appears. It has following options:

  • Show Related Products: Enable this option of the Opencart success page extension to show related products block at the order success page. All products related to products ordered by customer will be shown here.
  • Product Block Position: It decides the sort order in which Related Products Block will be shown on screen with respect to Discount and Advertisement section.
  • Text Message: Here HTML or any text message can be added to show at the end of all 3 blocks.

3. Discount Settings

After clicking on the discount settings tab of the Opencart Better Thank you page module by Knowband, the below screen will appear. It has the following options:

  • Enable: By enabling this option of the Opencart module, admin can generate discount coupon on every successful order. This coupon can be used only one time.
  • Discount Block Position: It decides the sort order in which Discount section will be shown on screen with respect to Related Product List section and Advertisement section.
  • Discount Type: Discount type can be percentage discount or fixed value discount. Coupons will be generated as per this setting of the Opencart custom thank you page plugin.
  • Discount Value: Here, in thsi field of the Opencart custom success page module, the admin can set discount value of coupon based on discount type. For Percentage type discount, discount value can be in between 1 to 100.
  • Discount Period: In this field of the Opencart success page extension, the admin can set the validity of coupon generated at successful checkout.

4. Advertisement Settings

After clicking on the advertisement settings tab of the Opencart Better Thank you page, below screen appears. It has following options:

  • Enable: If admin enables this option of the Opencart custom thank you page, then he/she can upload any banner or picture to be displayed as advertisement on the order confirmation page.
  • Banner Position: It decides the sort order in which Advertisement section will be shown on screen with respect to Related Product List section and Discount section.
  • Background Image: This field of the Opencart custom success page module by Knowband allows the admin to upload the banner which he/she wants to be shown on the front end of the order confirmation page. Already uploaded image can be removed by clicking remove button.

5. Store Front

After enabling this Opencart success page extension the order confirmation box of the front end will be changed and a new order confirmation page will appear with the features of the back-end settings done in the better thank you page.

The Opencart module at the front-end will appear as follows:

Module Link:
https://www.knowband.com/opencart-better-thank-you-page

Admin Demo:
https://ocdemo.knowband.com/2.0/admin/index.php?route=module/btyp&token=7f45e8b4986f806a3e445643cb4a622c

Front Demo:
https://ocdemo.knowband.com/2.0/

OpenCart MockingFish Heatmap and A/B Testing Tool – User Manual

Installation Guide of OpenCart Heatmap and AB Testing Tool

  1. Copy “upload” module folder to your OpenCart root directory.
  2. After upload, module will be listed on module listing page in admin panel as shown given below screen.

Note: 

Install the module and a “Edit” button will be there in front of this plugin on module listing page as shown in screen below:

User Manual

To access this module, Click on “Edit” button. On clicking, module interface will be opened and following screen will be display as given below:

Module back end has 1 tab:

  • General Settings

General Settings

This tab has following two options: Enable/Disable:

  1. When enabled is selected module will insert added script in the front end.
  2. MockingFish Script: This field will contain the script which needs to be inserted in website header. If you do not have any script, click on application details tab which lists down all steps to get MockingFish script.

OpenCart Mobile App Builder – User Manual

Develop FlutterOpenCart Mobile App for your eCommerce store with KnowBand’s OpenCart Mobile App Builder & start observing a sudden growth in your store conversions & sales.

1.0 Introduction

If you are an OpenCart website owner & currently selling products on your website, try KnowBand’s automated mobile apps solution & take your business to the mobile world. The OpenCart Mobile App Builder is the pre-configured framework designed to develop FlutterAndroid & iOS apps for your online website. This ready-to-go mobile app solution is the most advanced & smartest solution to own a pair of fully functional Android & iOS stores without any coding or technical skills.

KnowBand has made a mark in the eCommerce industry as a leading mobile app provider for almost all the major eCommerce platforms. Its OpenCart Mobile App Builder is the easiest way to build feature-packed OpenCart Mobile Apps in just 3 simple steps:

1. Purchase the OpenCart Mobile App Builder extension.

2. Share the app-related specifications & requirements.

3. Get your own FlutterOpenCart Apps in 2-3 days.

We, at KnowBand, are an exceptionally skilled and proficient pool of programmers, designers, and other involved professionals. We can deliver an OpenCart mobile app that closely matches your personal expectations and business requirements. If you are not sure about the utility of this mobile app for your OpenCart store, let us throw some light on this amazing OpenCart Mobile App Builder.

Latest Enhancements in Opencart Mobile App Builder v4.8

The OpenCart Mobile App Builder Extension now introduces two powerful new integrations with the AI-Powered Chatbot Extension and the Opencart VideoMate Extension. These latest integrations significantly improve customer engagement, automate support, and enhance product presentation within your mobile application.

The Opencart AI Chatbot Extension leverages popular and advanced AI models of 2026, such as OpenAI ChatGPT, Google Gemini, Claude, and DeepSeek, enabling intelligent, real-time customer interaction directly inside the mobile app.

The Opencart Video Manager Extension transforms the shopping experience with immersive video carousels and a floating video player, helping merchants showcase products in a more engaging and conversion-driven format.

Together, these features make the OpenCart Mobile App Builder a complete AI-powered mobile commerce solution for modern eCommerce stores.

1.1 Prominent Features of OpenCart Mobile App Builder:

The following are some of the major features you’ll get in your OpenCart Mobile Apps:

–> Customizable Home Screen Layout (Complete Flexibility)

–> Store Branding–>WhatsApp Chat Support (24*7)

–> Google & Facebook Login

–> OTP & Fingerprint Login

–> Both Tablet & Mobile Support

–> Android 4.2 and Up Android Version Support

–> iOS 9 And Up iOS Version Support*

–> Automatic Inventory Update

–> Multiple Color & Font Choices

–> Multi-lingual & RTL (Right To Left) Support

–> Multi-currency Support

–> All Product Type Support

–> Website Payment Method Supported on Apps

–> Website Shipping Method Supported on Apps

–> Custom Payment Method Integration

–> Unlimited Push Notifications

–> Product Social Sharing Options

–> Multiple Filtering & Sorting Options

–> Wishlist Functionality

–> Website Coupon/Vouchers Supported on Apps.

–> Simplified Checkout Screen

–> Real-time Order Tracking

–> Seamless Accordion Menu

–> Clear-cut Product & Category Screen

Also, watch the video on the New Features of Knowband’s Mobile App Builders:

1.2 Recent Enhancements in Opencart Mobile App Builder!

1. Dynamic Position of the Signup-Login Popup in Home Page Layout: Admins can now customize the position of the signup-login popup on the home page, offering a more flexible user experience.

2. Enhanced Review Pages:

  • Write Review: Simplified process for customers to leave feedback.
  • Read Review: Improved interface for browsing reviews.
  • Review on Product Page: Reviews are now more accessible directly on product pages.

3. Video in Banner Elements: We have introduced video options in the banners available for the app’s home page layout. Now, the admin can add a YouTube video or can also upload a video below 2 MB for the square, horizontal, grid, and countdown banner components.

4. Push Notification Updates: Recently Firebase has officially deprecated the older cloud messaging API. Due to that the admin configurations now support uploading Firebase key JSON files for better management.

5. CMS and Layout Redirection in Banners and Category Elements: Banners and category elements available in the home page layout now support redirection to CMS and multi-layered layouts.

6. Automatic Banner Sliding in Horizontal Banner Slider: Horizontal banner sliders now feature automatic sliding, improving user engagement. The admin can also add the time difference on which he wants to slide the banners automatically.

7. List and Grid View for Product Listing Screen: Users can toggle between list and grid views on the product listing screen for more convenient browsing. This new feature not only improves the UI but also provides more convenience to the customers while browsing the products.

8. Common Notification by Admin: Admins can now send common notifications to all users, ensuring important messages reach everyone. Furthermore, customers can check all the past notifications in the notification tab available in the app.

9. Custom Banner Element in Home Page Layout: Now, the Opencart admin can upload banners of any size, offering greater customization of the home page.

10. Redirection in Top Category Element: Top category elements now support redirection to specific layouts, improving user navigation.

11. Advertisement Setting: The enhanced OpenCart Mobile App Builder allows store admins to turn their apps into revenue-generating channels by incorporating in-app advertisements. With Google AdMob integration, admins can now display banner ads on various app pages, creating a seamless way to generate additional income while keeping users engaged.

12. Navigation Setting: With flexible customization options, the store admin can adjust the look and feel of the tab bar layout. Now, the modules allow the admin to choose the names, set redirections, choose icons, and personalize color schemes, offering a unique and branded app experience that aligns with their store’s style.


Knowband’s OpenCart Mobile App Builder

The OpenCart Mobile App Builder by Knowband helps you create a mobile app for your store without coding. Easily turn your website into a user-friendly app!

SHOP NOW

2.0 OpenCart Mobile App Demo

KnowBand offers a demo of OpenCart Mobile Apps before actual mobile app development. We have brought free of cost demo for all the eCommerce store owners out there.

2.1 View Our Demo Store working on Apps

Take a look at our app functionalities with our demo OpenCart Mobile Apps. We have integrated our demo store with the app in order to let you explore the app working. All you need to do is to follow these simple instructions:

Step 1: Download and install the Nautica OpenCart Mobile App on your testing device. Here, are the links to OpenCart Demo Apps:–> Apple App Store–> Google Play Store

Step 2: Open the App and tap the “View Demo” button being displayed on the splash screen. Enter some relevant details like Name, E-mail & Store URL & experience our demo store running on the demo app.

Note: To access the Admin Panel of KnowBand’s OpenCart Mobile App Builder on our demo store, visit here.

2.2 View Your Store working on Demo Apps

Want to test your own store on the demo apps. Well, we made even that possible with 3 simple steps:

Step 1: Download & install FREE OpenCart Mobile App Builder plugin on your OpenCart website.

Step 2: Install the Demo Apps (links in the previous section) on your mobile testing device. Open the App & enter your website URL in “View Your Store”.

Step 3: Tap “View Your Store” and start experiencing your own store on OpenCart Demo apps.

Note: This Free version of Mobile App Builder is just for the demo purpose & no APK/IPA files will be provided with this module. In order to get your own APK/IPA files, you need to purchase the paid version of the OpenCart Mobile App Builder.

3.0 Build OpenCart Mobile App in 3 Simple Steps

Once you are satisfied with the demo apps working, it’s time to build your own mobile apps. The process to develop mobile apps with OpenCart Mobile App Builder is only a matter of these 3 simple steps:

Step 1: Purchase & Install Module on your website.

Download zipped OpenCart Mobile App Builder & install the same on your store using your store FTP details.

Step 2: Share your App Specifications

Share your App details/requirements with us through our pre-requisites form.

Step 3: Get Your Android & iOS Apps in 1-2 days

Our skilled & professional developers would get back to you with your apps in just 1-2 days.

Note: You can publish these APK/IPA files on respective app stores. Refer following links for the same:

How to publish an Android app on the Google Play Store?

How to publish an iOS app on the Apple App Store?

If there is any issue while publishing the app on respective stores, we would get it done for you.

4.0 Admin Panel Screens

Once the OpenCart Mobile App Builder is installed on the website, let’s take a look at its backend panel configuration. First of all, go to Extensions>>Modules>>KnowBand Mobile App Creator & click on configure option. It will bring the following interfaces to you:

4.1 General Settings:

a) Status: Enable/disable the OpenCart Mobile App Builder module to make the apps work on mobile devices.

b) Enable Back in Stock: This option allows the admin to enable/disable Knowband’s back-in-stock module in the apps.

c) [New] Enable Spin & Win: This option allows the admin to enable or disable the Knowband’s Spin & Win Module in the mobile app.

d) [New] Enable AI Chatbot: You can now enable the AI Chatbot on your mobile app using the Opencart AI Chatbot Extension.

e)[New] Enable Videomate: Now, admins can easily add the instagram reels, shorts, videos in trending vidgets using the Opencart Videomate Extension

f) Font Style: This option provides multiple font styles to suit your app’s appearance.

g) Show Add to Cart Button on Product Grid: If you want to show/hide the “add to cart” button from the product listing pages, you can manage the same from this button.

h) Mandatory Phone Number at Registration: Make the mobile number field optional/mandatory on the app’s sign-up page from here.

i) Redirect on Cart Page when Add to Cart: If you want users to directly redirect to the cart page upon clicking on the “add to cart” button, you can enable this option from here.

j) Enable Notification List Feature: This button allows the store admin to enable/disable the notification feature in the Android and iOS apps.

k) Enable Sing-up Pop-up: You can enable/disable the login pop-up for the non-logged-in customers in the app.

l) Enable Request Log Reporting: Enable the error log on mobile apps. This log file is used when the app shows any error or abnormal behaviour.

m) Select Layout for Home Page: Choose the desired layout for your app home screen. You can create multiple layouts under the Home Page Layout tab.

n) Enable WhatsApp Chat Support: Enable/disable the WhatsApp chat option on mobile apps.

o) App Button Color: Choose the button color for your apps.

p) App Theme Color: Choose the theme color for your apps.

q) App Button Text Color: Choose a button-text color for your apps.

r) App Background Color: Choose a background color for your apps.

p) Enable Logo: Enable the logo in your mobile apps. You can upload the logo image which will be displayed on the header of the mobile apps.

q) Fingerprint Login: Enable/disable fingerprint login in mobile apps.

r) Phone Number Login: Enable/disable phone no login in the mobile apps.

s) Disabled Shipping Methods: Disable the shipping methods that you do not want to display in the apps.

4.2 Payment Methods:

The OpenCart Mobile App Creator offers additional COD payment option to make the payments easier in the apps. The mobile apps with this extension already support web-view payment options in mobile apps.

4.3 Push Notifications:

a) Service Account Json: In order to set-up the push notification in both the Android and iOS app, you will have to add the google_services.json file in this section. You can get the same in your Firebase account or can also ask the Knowband support team for the JSON file for your Firebase project.

b) Order Success Notification: Configure an automated order creation push notification which would be sent automatically on the user’s apps who successfully create an order.

c) Order Status Update Notification: Configure an order status update notification which would be sent automatically to the users whenever there is an update in order delivery status.

d) Abandoned Cart Notification: Configure automated abandoned cart notification which would be sent automatically to the users who left their products in the cart.

e) Send Notification: The store admin can even send manual notifications & highlight any deal or discount to the mobile app users.

4.4 Information Pages:

This tab of the OpenCart Mobile App Maker allows you to manage the CMS pages on the apps. You can customize the name and landing page of various CMS along with their sort order. New pages can also be added from here if there is a requirement.
4.5 Home Page Layout:

The OpenCart Mobile App Builder allows you to create & save various intuitive & appealing layouts for your mobile app home screen.

After adding the layout, click on Edit option & start adding & configuring various elements for your app home screen.

The store admin can configure the following design elements on the mobile app home screen:

Top Categories:

These are the categories displayed on the top of the home screen in the form of squares. You can configure their images & landing pages from the backend. Maximum 8 such categories are added of which 4 are mandatory.

Square Banner:

You can offer a square-shaped banner on the home screen of OpenCart Mobile App whose image & landing page link can set from the backend.

Sliding Banner:

These are the sliders for your home screen which can be configured from the module backend.

Grid Banner:

These are the banners for the app home screen displayed in the form of a grid listing & can be customized accordingly.

Countdown Banner

The OpenCart Mobile App Maker offers a count-down timer banner in your mobile apps. You can configure the banner image, landing page, and timer from the backend.

Square Products:

You can even list the products in square listing on the mobile app home screen.

Sliding Products

The products can be displayed in the slider view on the mobile app Home Screen & can be configured from backend panel.

Grid Products:

The products can be displayed in the grid view on the home screen.

Products Recently Accessed:

The OpenCart Mobile App Creator offers the recent products tab on the mobile app home screen which displays recent products viewed by the user. You can just add the element in your layout to display the same on the home screen.

Login/Sign up Pop-up:

The Opencart admin can encourage the customers to keep their account logged in in the apps by showing a dynamic login/sign-up pop-up on the home page of the app.

Advertisement Banner:

The Opencart App admin can select the position of the advertisement banner on the home page with this layout component.
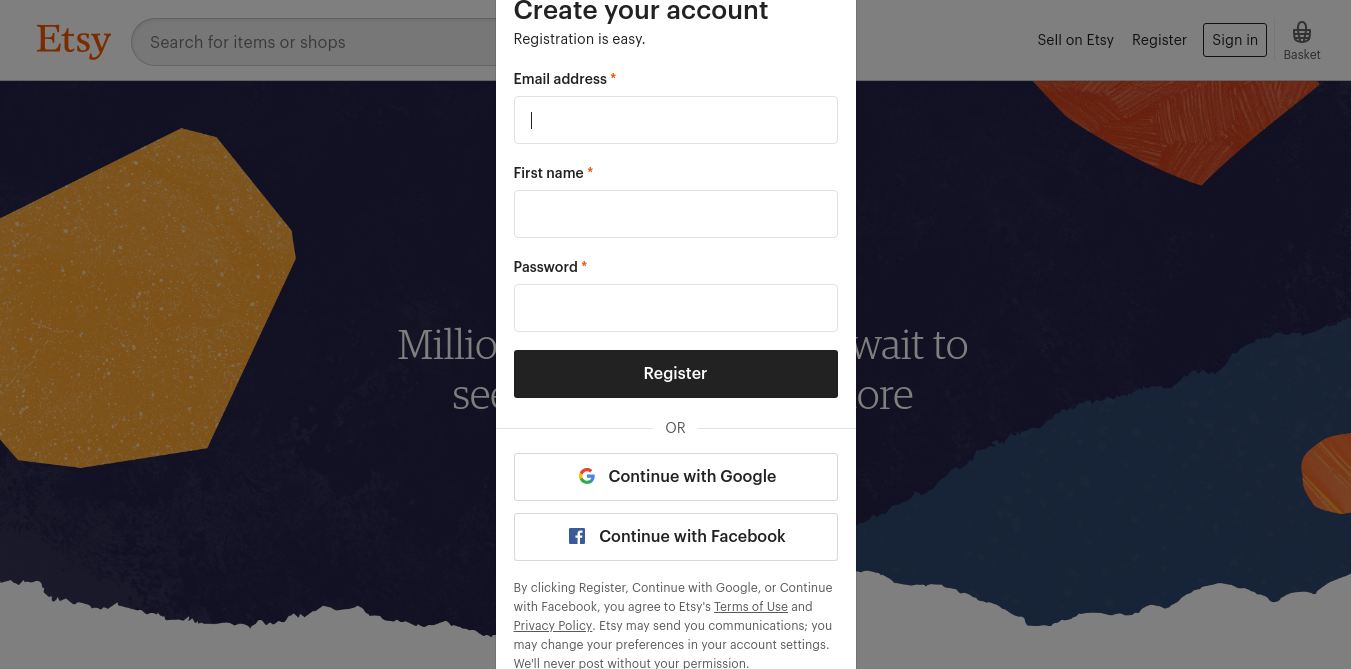
Note: The store admin can add up to 20 elements while designing the layout in the backend panel.  

4.6 Advertisement Setting:

The updated Opencart App Maker allows the store admin to use their apps as an additional income channel by providing in-app advertising features in the apps. The new app comes with Google AdMob integration that allows the admin to show banner advertisements on the different pages of the app.

Enable Advertisement:

This setting will enable/disable the advertisements in the apps.

Enable Advertisement on Home:

If you want to enable/disable the advertisement feature on the home page of the app, you can use the following button.

Home Ad Unit ID:

The admin can find the Ad Unit ID on the Google AdMob console. Once done, you can enter the unit ID in the following section.

Enable Advertisement on Product:

This button will enable/disable the advertisement on the product page of the app.

Product Ad Unit ID:

Enter the Product Ad Unit ID in this section.

Select Product Position:

Using this option, the store admin can select the position of the Ad on the product page. This feature allows the admin to select from the below product image and description or above the add to cart button or related product section, providing more flexibility to the store admin.

Enable Advertisement on Checkout:

Using this button, the store admin can enable/disable the Advertisements on the checkout page.

Checkout Ad Unit ID:

Enter the Unit ID here.

Select Checkout Position:

Select the Advertisement position from here. The store admin can select from various options like top of the screen, bottom of the screen, above the products, and below the shipping methods.

Enable Advertisement on Cart:

Enable/Disable the advertisement on the cart page with this button.

Cart Ad Unit ID:

Enter the Unit ID for the banner on the cart page.

Select Cart Position:

The store admin can select the ad position from here. This option allows the admin to select from below the products or above the products option.

Enable Advertisement on Category:

This feature will enable/disable the Advertisement on the category page.

Category Ad Unit ID:

Enter the category Ad Unit ID.

Enable Advertisement on CMS:

Enable/Disable the advertisement on the CMS pages from here.

CMS Ad Unit ID:

Add the CMS Ad Unit ID.

4.7. Navigation Setting:

The Opencart Mobile App Builder provides the admin with the option to modify the look and feel on the bottom navigation bar of the app. Using the built-in features, the store admin can modify the name, redirection, icon, and color combinations of the tab bar layout.

Here is a detailed overview:

Enable Tab:

The store admin can enable/disable the bottom navigation icons from the following option.

Name:

Enter the navigation icon name here.

Select Navigation:

Select the redirect activity from home, cart, category, search, and profile from here.

Select Image Type:

The store admin can select if he wants to upload a custom image for the navigation bar components or the option to select built-in images is also there under the configurations.

In total, the app provides 5 different bottom navigation bar icons that can be configured with the help of the above-mentioned guide.

5.0 Mobile App Screens:

5.1 Home Screen:

The OpenCart Mobile App Builder offers a dynamic home screen in the mobile apps which can be easily designed from the backend panel. The store admin gets the complete flexibility to design & craft the home screen as per his/her choice. The OpenCart Mobile App Builder offers the following designing elements:

–> Top Categories

–> Square Banners

–> Sliding Banners

–> Grid Banners

–> Square Products

–> Sliding Products

–> Grid Products

–> Countdown Timer Banner

–> Recently Viewed Products

-> Login/sign up Pop-up.

The positioning of these attributes can also be changed as well just with simple drag & drop.

a) Dynamic Layouts: Craft alluring home screen layouts on your own which connect with the users & compel them to make the purchase.

b) Website Logo: Add your store logo in the module backend & display the same on the header of the app.

c) Search: The search option in the OpenCart Mobile App allows the users to search for products without any hassle. Keyword makes it easier for the buyers to get the right product in the least time.

d) Wishlist: Wishlist option in the OpenCart Mobile App lets you bookmark the products regarding future purchase.

e) Shopping Cart: The users can access the shopping cart from the top-right corner of the home screen.

f) WhatsAppYour OpenCart Mobile App users can directly contact you regarding any query or concern through WhatsApp chat option on the home screen.

5.2 Accordion Menu (Navigation Bar)

The OpenCart Mobile Apps for Android & iOS come up with easy to use categorization of your store products. The online shoppers get to browse all the categories in the navigation bar along with all CMS pages.


The Accordion menu categories are the same as of your store & it provides the following options:

My Account: The My Account screen of OpenCart Mobile App contains all the user information like Personal Details, Shipping Address(s) & Order Details. There is even an option for the users to register their fingerprints. The online shoppers get to view complete personal details from here & update the password as well.

Categories: All your store categories are fetched on the mobile apps as well. Offer a multi-level categorization to your app users & let them browse products with ease.

CMS Pages: All of your website CMS pages like About Us, Contact Us, Terms & Conditions, etc will be displayed here.

5.3 Category Screen:

All sorts of categorizations available on your the OpenCart stores will be displayed in the mobile apps as well. The category screen has two views: Grid & List view. The product image, name, and price is displayed for all product listings. The mobile apps with OpenCart Mobile App Maker have multiple filter & sorting options which simplify product search for the users.

Sort: Sort option in OpenCart Mobile Apps allow the users to view products in Low to High or High to Low category.

Filter: Filter down the category products with various attributes like price, cost etc. & search desired products without any efforts.

5.4 Product Screen:

The product screen of the OpenCart Mobile App is as simple & easy-to-use as it could get. Every product has multiple images displayed along with its name & price. The product availability is also displayed as “In Stock” or “Out Of Stock”. The product screen has the following other options:

Product Options: Various options related to the product like size, color, etc. are displayed on the product screen. These options are the same as available on your website.

Short Description: Users get to read the short description of your product to quickly make up their minds. The OpenCart Mobile App displays both short & full descriptions of the products.

Product Info & Care: All the information related to the specific product is displayed under this section. This is the same information as of the website.

Add To Wishlist: The users can even add the products into the wishlist bag from here. The products added in wishlist are bookmarked for the future purchase.

Add To Cart: The Add To Cart button allows you to add product in the cart which can be processed further in successful order creation.

Product Social Sharing: The OpenCart Mobile App has the option to share the products on different social platforms, Bluetooth & e-mail. The users can share the products with their friends & relatives & bring potential users to your store.

5.5 Wishlist Screen:

The OpenCart Mobile App Builder has a wishlist bag allowing the users to bookmark products for future purchases. The users can view the list of all wishlist products from this screen. It has the following options:

Add To Cart:

The app users can add the wishlist product directly into shopping cart with Add To Cart option.

5.6 Login Screen

The OpenCart Mobile App Creator offers various one-tap login options & make sign-in/registration process more seamless:

Login: The app users can authenticate & access OpenCart Mobile Apps using e-mail sign-in credentials.

Sign Up: All the new users can sign-up & create their account on the store from the mobile App. The sign-up form of the OpenCart Mobile App is fully uncluttered.

Login with Phone Number: Your OpenCart Mobile App comes up with a phone number login option as well which allows users to verify OTP & log in without any hassle.

Login with Fingerprint: Your app users also get an option to log in with a fingerprint. This biometric authentication allows the users to login apps in seconds.
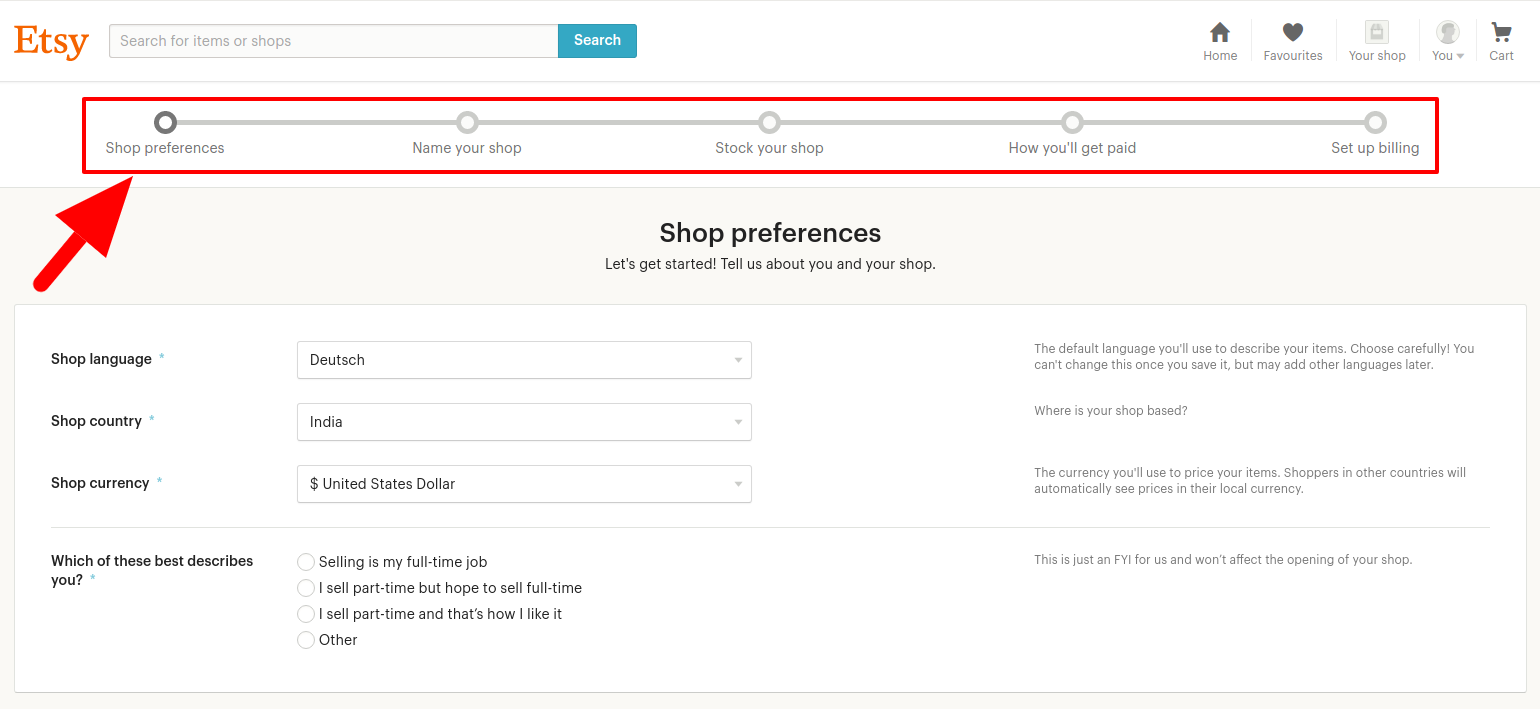
Login with Facebook: The users can log in into mobile apps using their Facebook Account Credentials.

Log in with Google: The users can log in into app using their Google Account Credentials.

5.7 Shopping Cart Screen:

The Shopping Cart screen of your OpenCart Mobile App will display all products added into shopping cart.
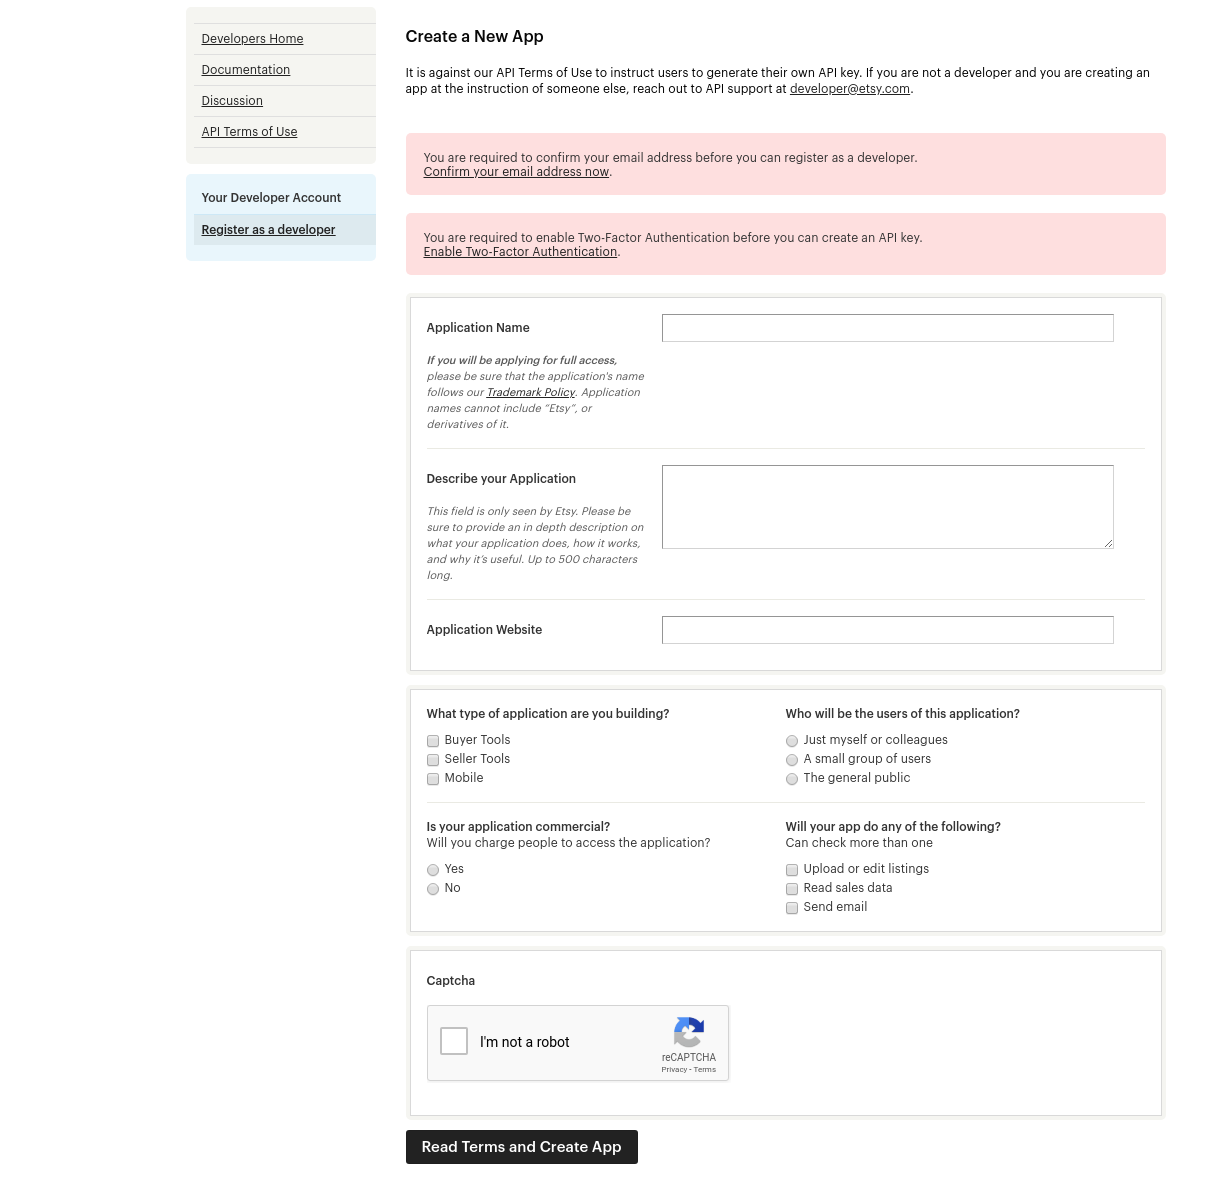
The app user’s can view Product name, quantity, total price & shipping cost. This screen has the following options:
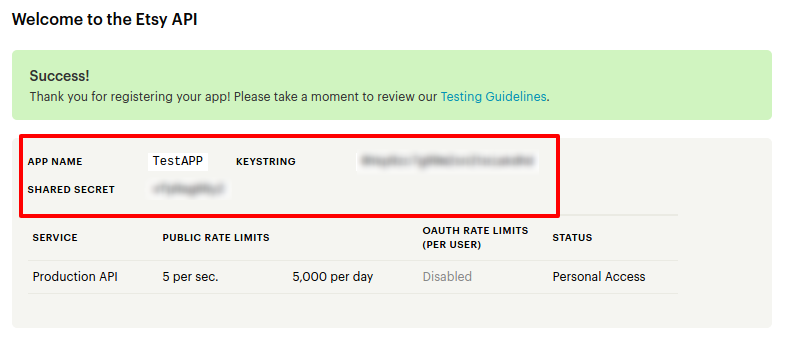
1. Apply Voucher:This option allows the users to get discounts & offers by entering valid coupons & voucher running on your website.

2. Total Product Price:The users can view the complete cost of their shopping bag which is automatically updated as per any addition in the cart.
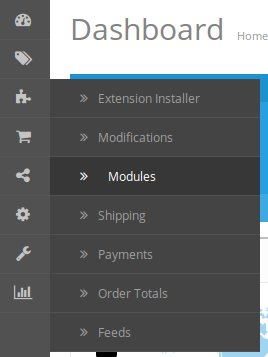
3. Update Product Quantity:The users can even update the specific product quantity.

4. Remove Product:The app users can simply remove the product from the cart.

6. Continue To CheckoutThe app users can proceed further to the checkout & payment screens just by tapping the “Continue To Checkout” option. It will re-direct users on the checkout screen.

5.8 Checkout Process:

There is a simplified checkout process in the OpenCart mobile app builder. Details like shipping details, billing details, order numbers, order comments, and others are available for customers in the checkout process of the mobile app.

Orders can be placed by just following a few easy steps on the eCommerce mobile apps.

  1. Users can choose a product and add it to their cart. After clicking on the shopping bag, the customer can select the appropriate amount of a product. In addition, mobile app users can view the total number of products and shipping prices.

At the bottom of the same page, the customer also gets the option to apply any vouchers and coupon codes.

2.  The user can review the order after selecting the Continue to Checkout option and can see various details. Such as product pricing, shipping cost, shipping address (editable on the same page), order summary (number of products), and total price.

Moreover, the customer can choose their preferred shipping method on the same page. In addition, the user can specify any particular requests or requirements in the order comment field at the bottom of the screen.

3. After clicking on the continue to checkout option, the front end mobile app user will be redirected to the payment method screen. On this screen, customers can choose from all the payment alternatives available on the e-commerce website. The Android and iOS apps consist of a cash-on-delivery payment option by default.

4. Once the user has completed the online payments, he or she will be forwarded to the order summary screen. In which, the customer can view the order status, order number, and amount, along with other information. The order confirmation popup message will also appear on the screens of mobile app users.


5.9 Payment Screen:

The payment screen on OpenCart Mobile App displays both web-view & Flutterapp payment methods. The OpenCart Mobile Apps supports all sorts of website payment options along with PayPal & COD payment methods. Moreover, various other native payment options like PayU, Apple Pay, Amazon Pay, Braintree, Stripe etc. can also be added in your mobile app over a fair price.

5.10 My Account Screen

My Account screen of the OpenCart Android/iOS App allows the users to view the complete account details including a list of all previous orders by just tapping on my orders option. My Account screen has the following other options:

Order History:The users get to know about complete order details created on the app. The order creation date, reference, price & delivery status is available on this screen.

Update Profile:Users can also update their pre-saved profile details like First or last name, phone number & password.

Shipping Address(s):The app users can see the complete list of saved Shipping Addresses. New Shipping address can also be added from here.

Order Details:The app users can view the complete list of the previously placed orders from the app.

Re-order feature:There is a direct re-order functionality allowing the users to repeat the order just by clicking the “Re-order” button

5.11 Order Detail Screen

Order details screen of OpenCart Android & iOS App provides complete order detail such as shipping address, product summary, shipping and payment method, and total cost summary. This order detail is of the previous order placed by you. The users can even track the delivery of previously placed orders directly from this screen.

5.12. In-App Advertisement Samples:

The admin can set the advertisement banners on the different pages of the app. Here’s how it will look to your customers.

6.0 Advanced OpenCart Marketplace with Mobile App

KnowBand’s OpenCart Marketplace converts your online website into a fully-fledged marketplace. The OpenCart Mobile App Builder is fully compatible with OpenCart Marketplace extension. This means you can bring the entire marketplace listing on the same OpenCart Android & iOS Mobile Apps. Thus, launch a pair of Marketplace-compatible Mobile Apps with KnowBand & attract a large base of sellers & customers to your store.

–> As the user clicks on the Seller option, he/she is redirected to the Seller page of the mobile store. The user can view the list of the sellers of the marketplace along with their ratings.

–> The customers can click on the name of the seller in order to see his profile and the product being offered. The sellers can log in with their username and password. They are then redirected to the dashboard.

7.0 OpenCart Mobile App Builder for Android and iOS – Video Tutorial

This video tutorial walks you through the complete configuration of the OpenCart Mobile App Builder extension by KnowBand. Learn how to set up your app from backend to frontend with step-by-step guidance on:

  • General Settings

  • Push Notification Settings

  • Payment Methods

  • Home Page Layout

  • And many more essential configurations

By the end of this tutorial, you’ll be able to fully configure your OpenCart mobile app for both Android and iOS, ensuring a smooth and professional setup.

Get to know more about OpenCart Marketplace with Mobile App.

That’s it! For More Info on KnowBand’s OpenCart Mobile App Builder.

You can check out the free version of OpenCart Mobile App Builder for Android, and free OpenCart Mobile App Builder for iOS