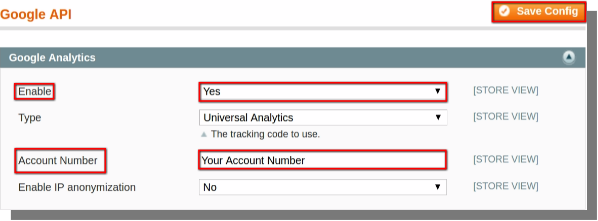
Google Analytics is a free Google service that allows the webmasters and site administrators to monitor their websites traffic and conversion rates. Magento supports two type of tracking:
Page View tracking: List the origin from which your store visitors linked to your store.
E-commerce tracking: List the customers that make purchase and they buy.
This tutorial will guide you how to install the themes on Magento.
Things to do before Installing Magento themes
Create an account on Magento Connect. Magento Connect is an extension marketplace, you can find Magento Connect on the link provided below:
https://www.magentocommerce.com/magento-connect/
Installing Magento Themes
You can follow the below mentioned steps to install the themes:
Open the back-end of your store and hover your cursor on the System menu and then on Magento Connect option and then click on the Magento Connect Manager option.
System Menu(menu bar)>>Magento Connect>>Magento Connect Manager.
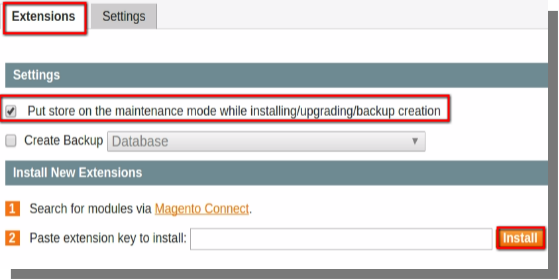
Under Extensions Tab:
Make sure that the check-box for “put store on the maintenance mode while installing/upgrading” is marked.
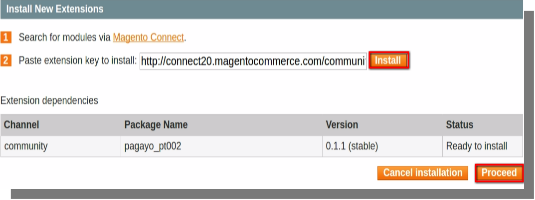
You will see a “paste extension key to install” option, paste the extension key on the box provided and click on install.
How to get the extension key for themes:
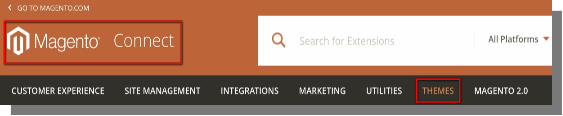
Open the magento connect and click on themes on the menu bar.
Here you can Refine your results by choosing type of platform(Enterprise or Community), version etc.
Select the platform and Version and enter the keyword for the theme which you wish to install(for e.g Fashion,Business service etc).
Select the theme that fits beautifully according to your need.
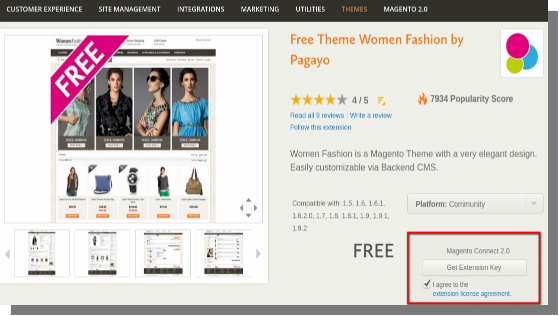
You will be directed to a page where you can will see the install option, click on it you will get the extension key for your theme.
Copy the extension key and paste it on “paste extension key to install” option at your back-end.
Click on Install.
If you get this error after clicking on install:
Go to Magento connect.
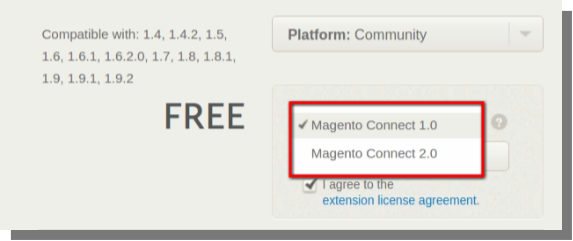
Change the Magento connect from Magento Connect 1.0 to 2.0.
Click on Get extension Key.
Copy the key and paste it.
Again click on Install button and then click on Proceed.
After completion, click on refresh button below the command window at the bottom of the page.
The Theme will be installed after completion of the above mentioned steps.
Magento is one of the most popular Content Management System(CMS) for an E-commerce website. It is one of the most flexible E-commerce platforms. Magento uses MySQL as its database, PHP as the programming language and elements of zend framework. It has two Editions one is a Paid edition and other is an Unpaid edition:
Enterprise Edition ( Paid )
Community Edition ( Unpaid )
The tutorial runs you through the ways to install Magento on Ubuntu. Read on to know:
Prerequisites for installing Magento
Before we begin, there are few steps that are needed to be completed in order to install magento. These steps include :
You will need at least 2 GB ram for installing magento on Virtual private server (VPS).
You will need a LAMP(Linux, Apache, Mysql and PHP) stack installed on your VPS server.
Now for installing it you need to first download magento, you can get a community edition version of magento online.
Getting Started
After complete download you will see a ZIP folder named mazento.zip on your downloads folder.
Copy the Zip Folder to the path provided below :
/var/www/html
Extract the files here by right clicking on the zipped folder and then left clicking on the Extract here option.
Creating Database using PHPMyAdmin
For creating a database follow the steps provided below :
Open a new tab of your browser and enter the following on the address bar :
localhost/phpmyadmin/
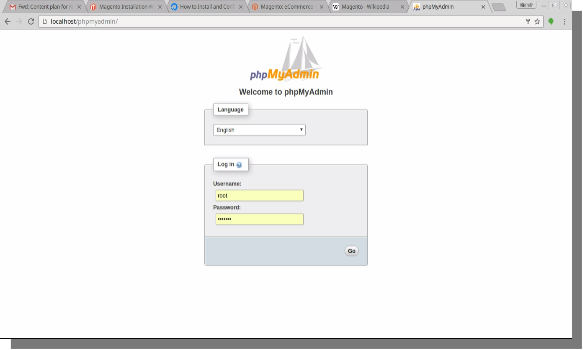
Press enter you will see the login page of PHPMyAdmin. Enter the Username and Password and click on Go to login. The login page will look like this.
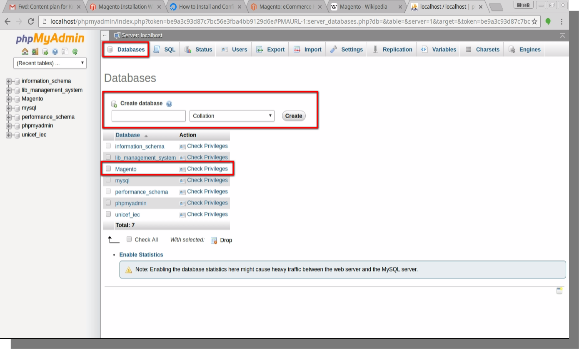
You will see phpmyadmin main page, click on database, you will see a create database option.
Enter the name of database( say magento) and click on create option, your database will be created as shown below.
Importing sample database on Your database
After successfully creating the database, you have to import the sample database on your database. Now for that you have to follow the below mentioned steps:
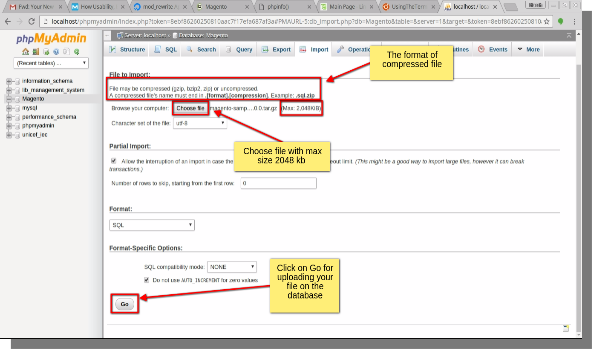
Click the import option on phpmyadmin page.
Now click on the choose file to upload the sample database on your database.For uploading a file you have to note the following properties of the uploaded file:
The maximum size of the file must be 2048 kb.
The format of the file must be .sql format.
The type of compression used to compress large files must be .zip
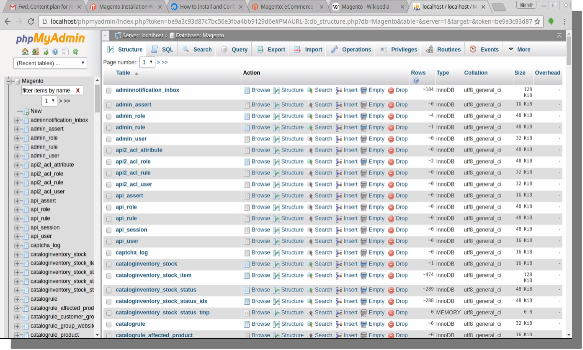
Now click on Go option and your file containing sample database will be uploaded on your database.You will see that the files are uploaded on your database.
Triggering magento setup file
Now all you have to do is to trigger the magento setup file. Consider the following steps for the same.
Now open a new tab of your browser and enter the following path:
Localhost/magento or
localhost/magento/index.php/install
License Agreement
You will be directed to Magento’s installation page, accept the agreement’s terms and conditions and click on continue.
Localization
Select the Locale(language), Time zone and Default currency and click on continue.
Configuration
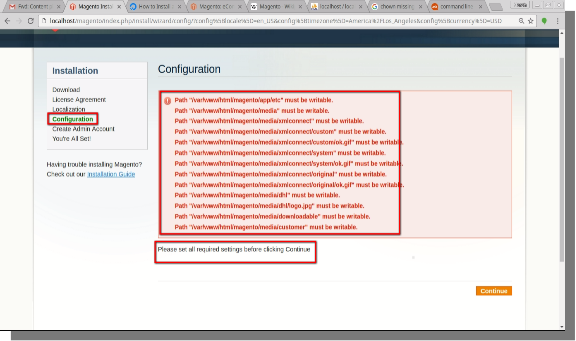
Here you will encounter the “write permission issue”, you have to fix all these issues before continuing further.
For fixing the write permission issue follow the below mentioned steps:
Open the terminal of your system.( CTRL+ALT+T )
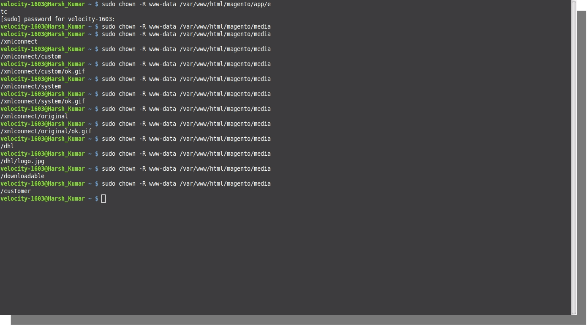
Enter the following command to resolve the permission issues:
It will ask you for the system password, enter your system password and press enter, it will ask the password only once.
Enter the command for all the files having same issue, using the example above and then click continue option on the magento installation page.
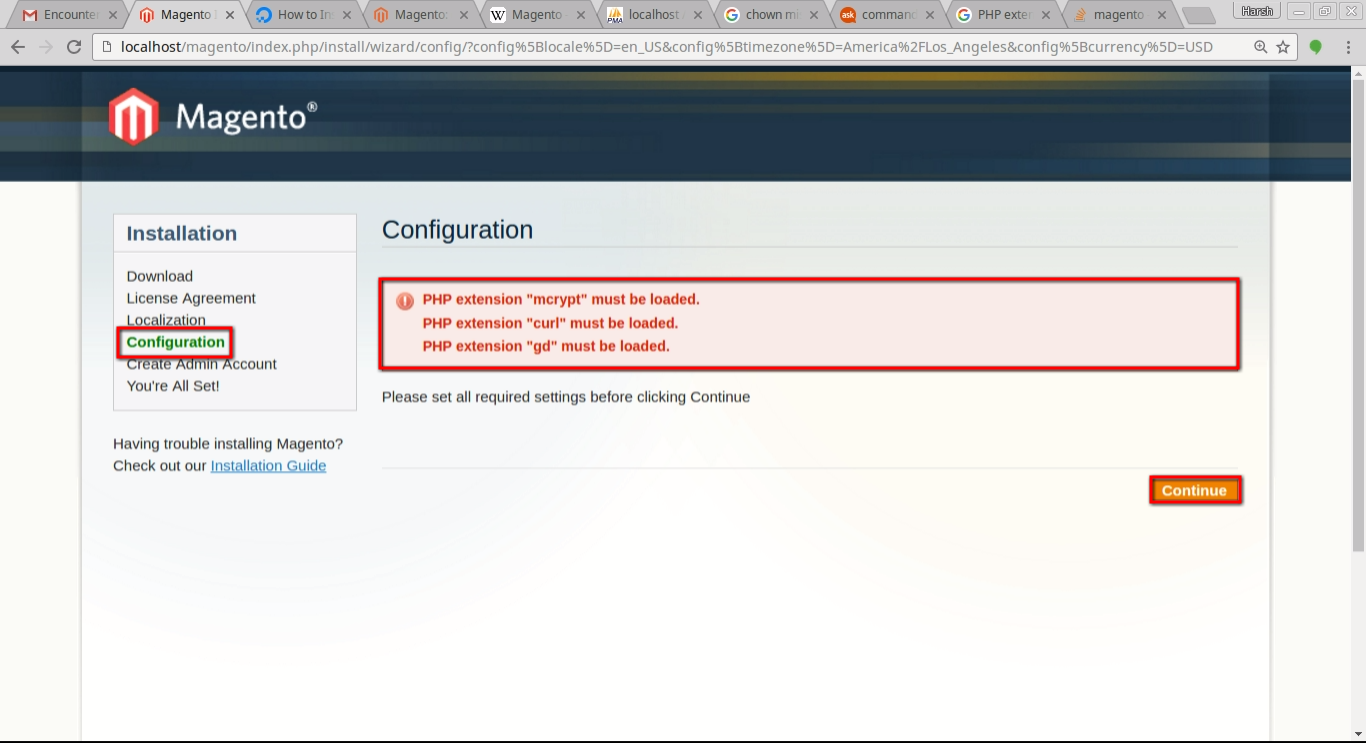
After clicking on the continue option you will encounter php extension loading error. It is shown below:
If you encounter this error follow the steps below:
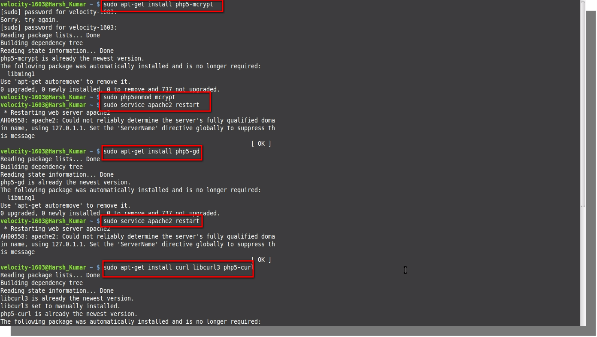
Open the terminal and enter the command below :
For installing mcrypt
sudo apt-get install php5-mcrypt
sudo php5 enmod mcrypt
sudo service apache2 restart
For installing curl
sudo apt-get install curl libcurl3 php5-curl
sudo service apache2 restart
For installing gd
sudo apt-get install php5-gd
sudo service apache2 restart
Then click continue on the magento installation page.
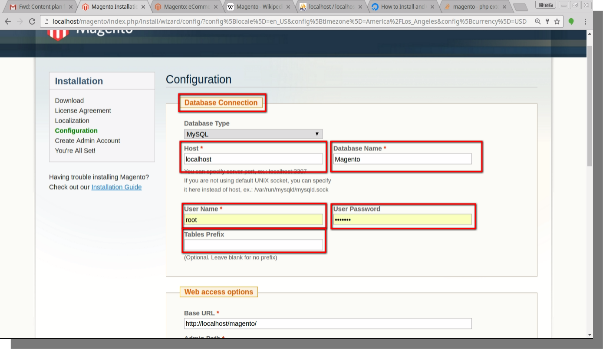
Database Connection Page
After clicking continue you will be directed to a database connection page where you can:
Set a Username and Password.
Change the database name.
Set the table prefixes. (optional)
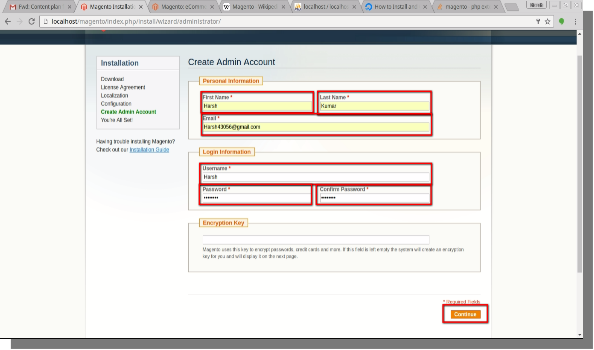
Create Admin Account
After Completing all the processes under configuration, you will be directed to create admin account, where you have to :
Enter your Personal details:
First Name
Last Name
E-mail Id
Enter Login Information:
Username
Password
Confirm Password
Enter Encryption Key (Optional)
Then click on continue button.
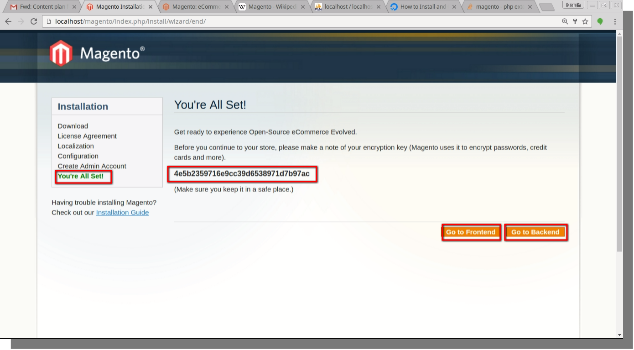
You are all set
This is the last step in the installation process of magento. Here you will be provided with an encryption key which you have to save, as magento uses it to encrypt passwords, credit cards etc.
Now you have two options on your screen:
Go to Front-End
Go to Back-End
You can visit either of them.
Front-End And Back-End
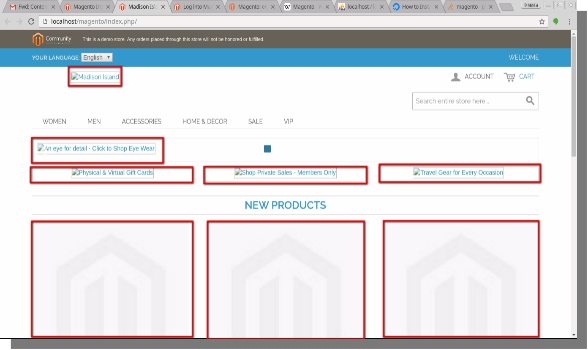
When You visit your Front-End, you will notice that there are no logos, banners and images for any product or brand. Therefore for that you have to make some changes from the Back-End to make sure that everything works well before you can work on magento.
Necessary changes
For Uploading Images on the front end
Copy Media and Skin folders from magento-sample-data and paste them on your setup folder.
Setup folder will already contain these folders, just you have to do is replace them.
Then go to your Front-End and refresh the page. You will see that the logos, images and banners are uploaded.
In some case you will see there is no updation, the Front-End is still blank. In that case follow the below mentioned steps:
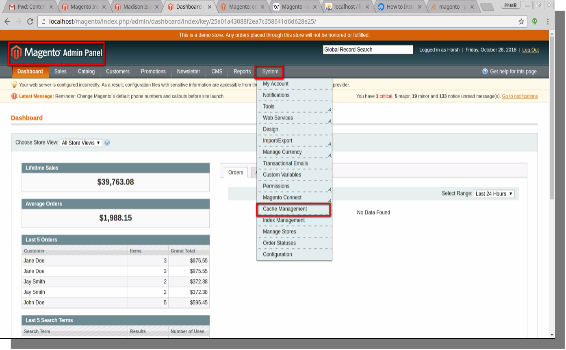
Then go to your Back-End, hover your cursor over system menu in the admin panel menu bar and click on the cache management on the drop-down option.
After clicking on the cache management option you will be directed to a new page where you will see two options on the top right corner of the page:
Flush Magento Cache
Flush Cache storage
Click on these options to Flush Magento Cache and Cache Storage.
Now Go to your Front-end and refresh the page, you will see that all the banners, logos, images are updated, you will get your Front-end ready.
Modifying File Index.php
Now Open Index.php, you will find index.php at the path provided below:
/var/www/html/magento
Click on the Index.php file and open it.
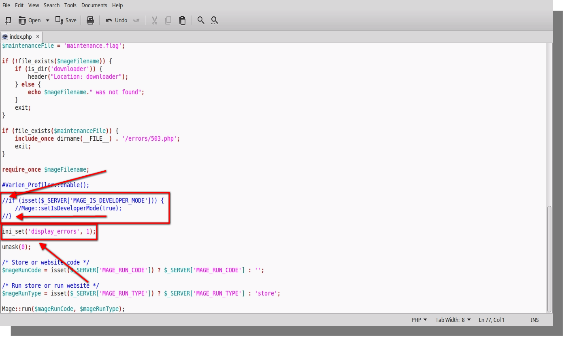
You will see a Php code, go to line 73,74 and 75 and place double slash at the beginning of these lines and remove “#” at the beginning of line 77 as shown below:
Now save the file and close it.
Modifying File Varien.php
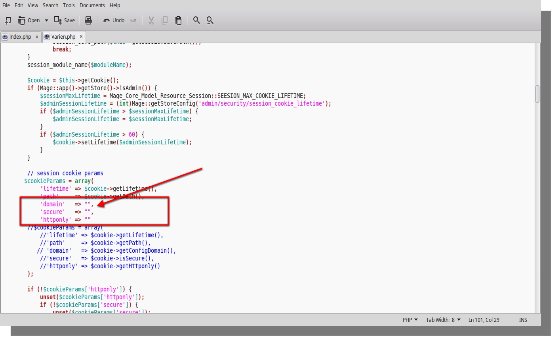
Now Open Varien.php, you will find Varien.php at the path provided below:
In this tutorial we will guide you how to configure SSL on Magento. The basic function of an SSL is to encrypt all communication between the browser and the server. It ensures that your site is protected with the HTTPS connection. It gains your users/clients trust and it also improves your site’s search engine ranking.
Configuring SSL
To configure SSL on your magento store you can follow the steps below:
Open the back-end of your store and hover your cursor on the System menu and then click on the Configuration option.
System Menu(menu bar)>>Configuration
1. A page that opens will contain Configuration options like:
General
Web
Design
Contacts
Report
Content Management etc.
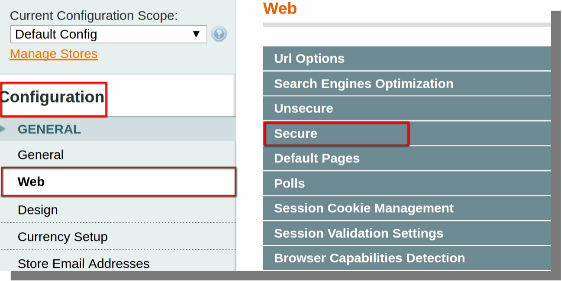
Click on the Web option, you will see Web option on the right side on the same page.
Click on Secure Drop-down option.
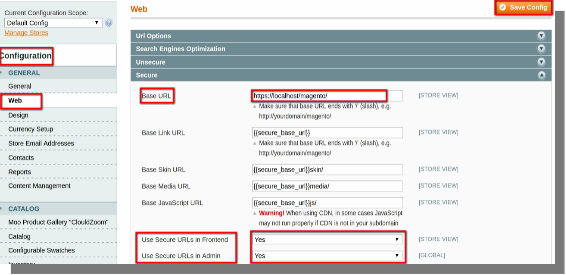
Under Secure drop-down option, you will see sub-options, you have to modify them.(Note: please modify the below mentioned sub-options only).
2. Modify the below Mentioned Sub-options:
Base URL ( Change http to https )
Secure URLs in Front-end ( Change status from ‘NO’ to ‘YES’ )
Secure URLs in Admin ( Change status from ‘NO’ to ‘YES’ )
After modification click on Save Config button provided at the top right corner of the page.
That’s it, your magento store is now configured with SSL.
The shipping methods happen to be one of the key features when it comes to providing a flawless checkout. Hence, the eCommerce sellers should clarify the shipping policy to the customer. Lack of enough shipping methods may cripple some of the easy conversions. Additionally, not having properly clarified and enough shipping methods is a very prominent reason for cart abandonment.
Both Magento 2.x and 1.x allows you to configure the shipping policy to be shown in the front-end of the site. The blog brings forth the steps involved in configuring the shipping methods in Magento 1 and 2.
How to configure shipping method in Magento 2?
Magento 2 by default comes with 7 shipping methods ready to be enabled for your store’s customers. Follow the steps mentioned below to configure shipping methods in Magento 2:
Log in to your Magento 2.x store. Go to the Dashboard -> Configuration
You will be redirected to the Configuration section of the back-end that has a number of menu options listed in the left-hand side.
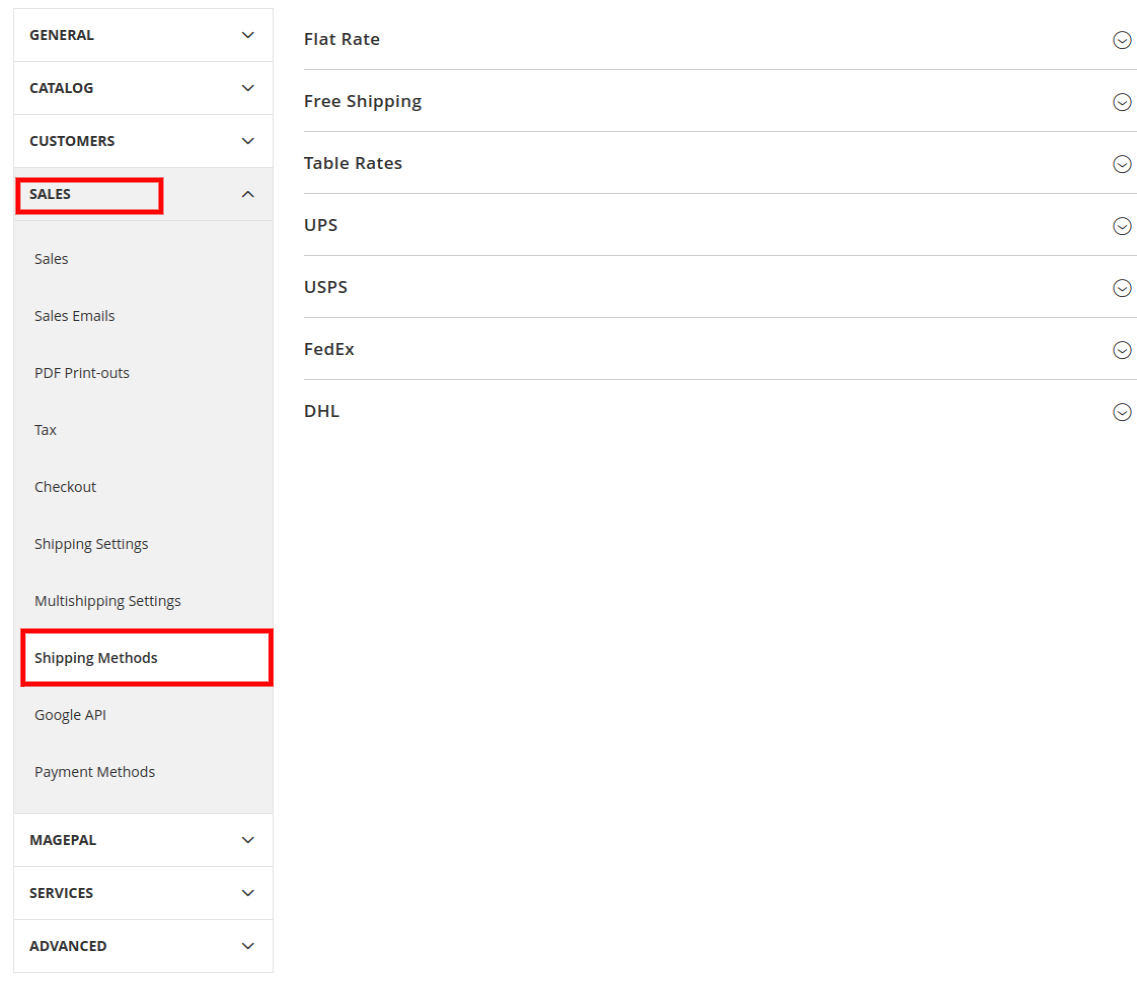
Navigate to the Sales option. Expand it’s menu options and click on Shipping Methods.
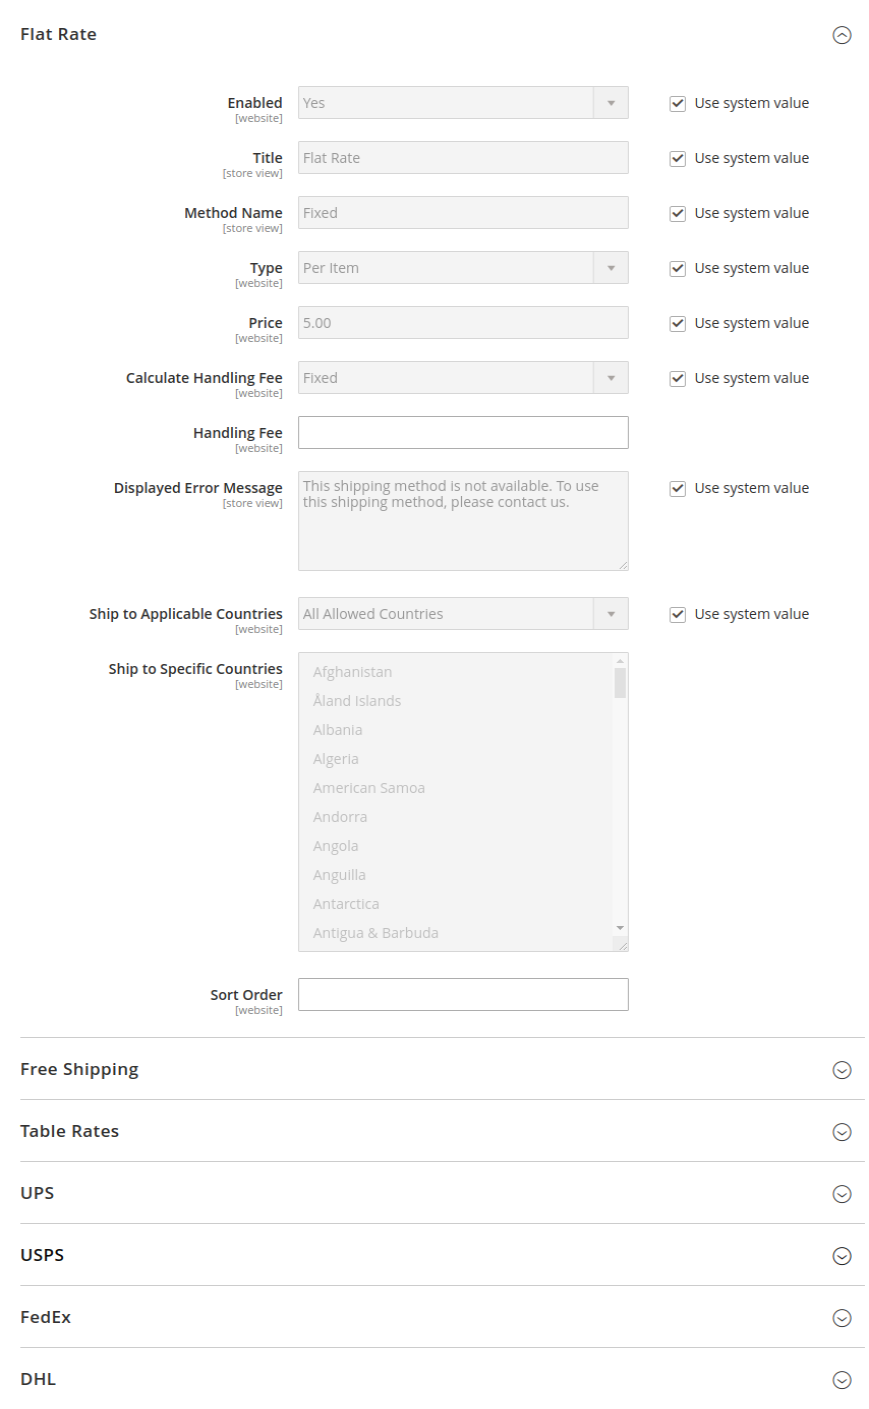
You’ll find 7 default shipping methods, namely,
Flat Rate
Free Shipping
Table Rates
UPS
USPS
FedEx
DHL
Enable the respective shipping methods by expanding the configuration options and by selecting Yes in the Apply Custom Shipping Policy field. In the Shipping Policy field, enter your shipping policy in the respective text box and click Save Config.
How to Configure Shipping Methods in Magento 1?
To configure shipping methods in Magento, you can follow the below-mentioned steps:
Open the back-end of your store and hover your cursor on the System menu and then click on the Configuration option.
System Menu (menu bar)>>Configuration
System Menu (menu bar)>>Configuration>>Sales>>Shipping settings
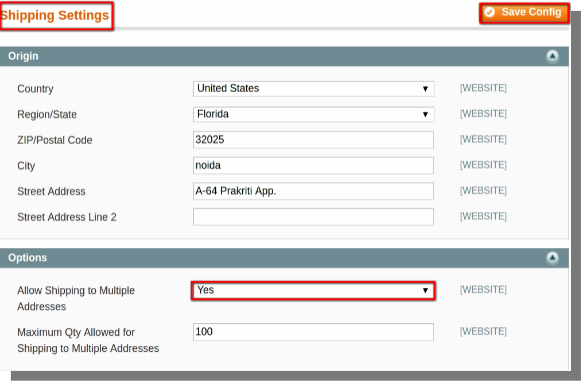
Before enabling the shipping method you should configure the shipping setting.
Expand the origin section:
Enter Address.
Enter the ZIP/Postal code.
Select the Country and State from their respective drop-down menu.
1. Expand the options section:
Choose Yes option from the shipping to multiple addresses drop-down menu.
Enter the maximum quantity allowed for shipping to multiple addresses.
Then click on save config button.
After enabling the settings it’s time to Configure the Shipping methods.
Open your Magento’s Back-end store and goto:
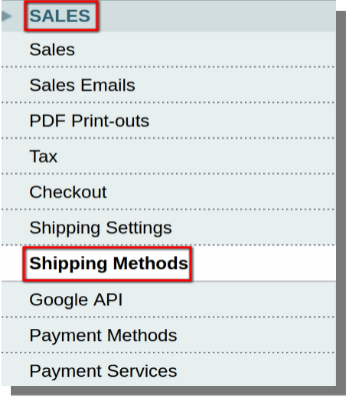
System Menu(menu bar)>>Configuration>>Sales>>Shipping Methods
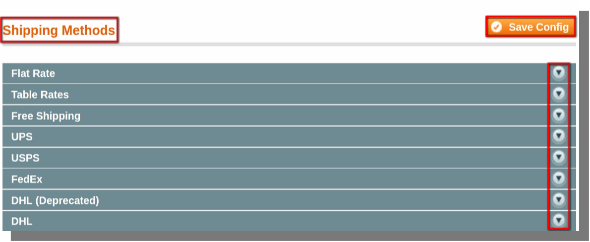
You have to expand the options available and make necessary changes. We have listed some of the main changes you can make to configure shipping methods.
2. Expand Flat rate section:
Enable/Disable the flat rate.
Enter the title, method name, type, handling fee.
Enter the error message.
Choose the countries where you wish to ship your products.
3. Expand Table rates section:
Enable/Disable table rate.
Enter the title, method name, handling fee.
Enter the error message.
Choose the countries where you wish to ship your products.
4. Expand Free shipping section:
Enable/Disable free shipping.
Enter the title, method name, minimum order amount, handling fee.
Enter the error message.
Choose the countries where you wish to ship your products.
5. Expand UPS section:
Enable/Disable for checkout.
Enter the title, UPS type, Gateway URL, handling fee.
Choose the weight unit, Pick-up methods.
Enter the error message
Choose the countries where you wish to ship your products.
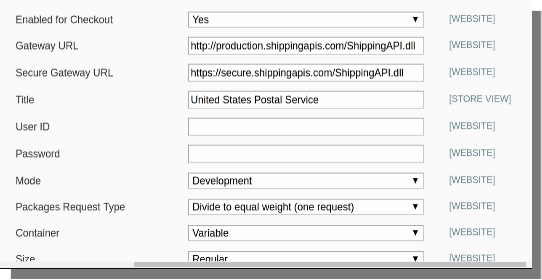
6. Expand USPS section:
Enable/Disable for checkout.
Enter the title, Gateway URL, handling fee.
Choose the Mode(Development and Live).
Enter the User id and Password.
Choose the weight unit, Pick-up methods.
Enter the error message
Choose the countries where you wish to ship your products.
An example for USPS is given below:
7. Expand FedEx section:
Enable/Disable for checkout.
Enter the title, handling fee, meter number.
Enter the Account Id.
Enter the Key and Password.
Choose the weight unit, Pick-up methods.
Enter the error message
Choose the countries where you wish to ship your products.
9. Expand DHL section:
Enable/Disable for checkout.
Enter the title, Gateway URL, handling fee.
Enter the Account Number.
Enter the Access Id and Password.
Choose the weight unit.
Enter the error message
Choose the countries where you wish to ship your products.
After making the necessary changes, click on save config option to save the changes and configure shipping methods on your Magento store.
Both Magento 1 and Magento 2 provides different payment methods in order to allow you to accept the payment using different payment gateway like PayPal etc. The users/clients can also pay through credit cards, visa, master-card, check or money and other payment methods. In this tutorial, we will discuss how to configure payment methods in Magento 2 and Magento 1 store.
How to Configure Payment Methods in Magento 1.x?
To configure payment methods in Magento, you can follow the below mentioned steps:
Open the back-end of your store and hover your cursor on the System menu and then click on the Configuration option.
System Menu (menu bar)>>Configuration
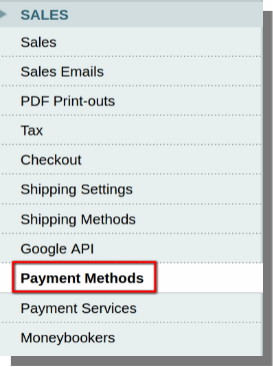
On the page that opens, scroll down to Sales option and click on the Payment methods option.
Payment Method option will let you choose which payment methods your store will accept.
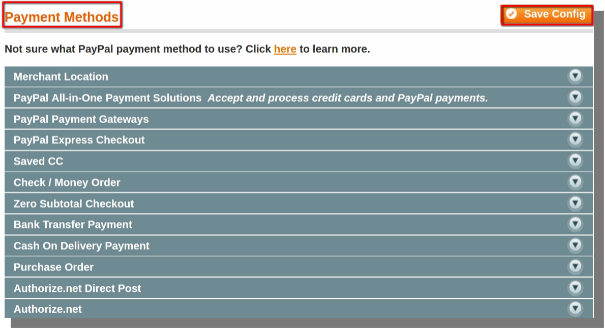
On the page that opens, you can:
Set the merchant location.
Turn on and off the verification and validation of cards.
Choose the cards for payments.
Enable/Disable checks and money orders.
Set up PayPal payments.
Enable/Disable Cash on Delivery etc.
After selecting the payment methods and gateways, click on save config option.
In this way, you can configure payment methods in Magento.
( Note: All payment methods have different configurations, so it is very difficult to explain in detail how to configure each one of them. You can simply follow the instructions on their specific pages ).
How to configure payment methods in Magento 2.x?
Magento 2 by default offers 6 payment methods. In order to configure the payment methods, follow the steps mentioned-below:
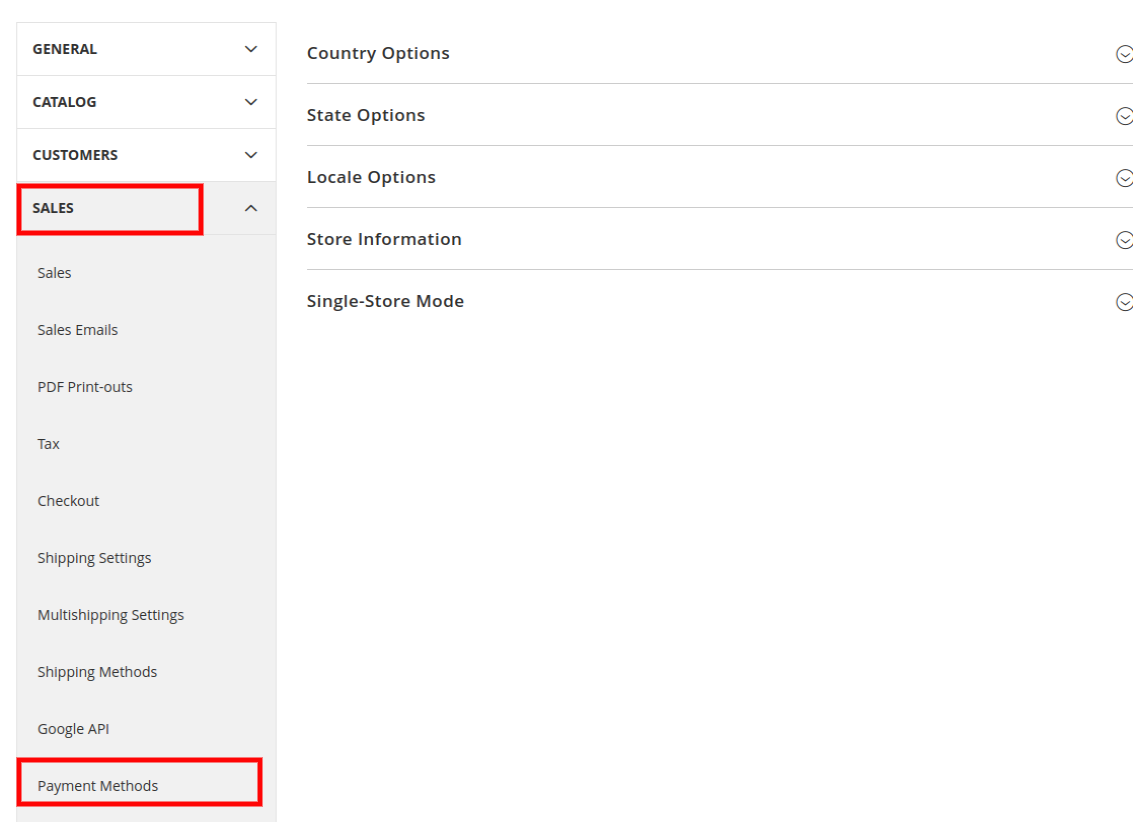
Go to the main menu of the Dashboard of Magento 2. Navigate to Store -> Configuration.
You’ll be redirected to the interface as shown in the image below:
There will be a number of menu options. Go to Sales -> Payment Methods.
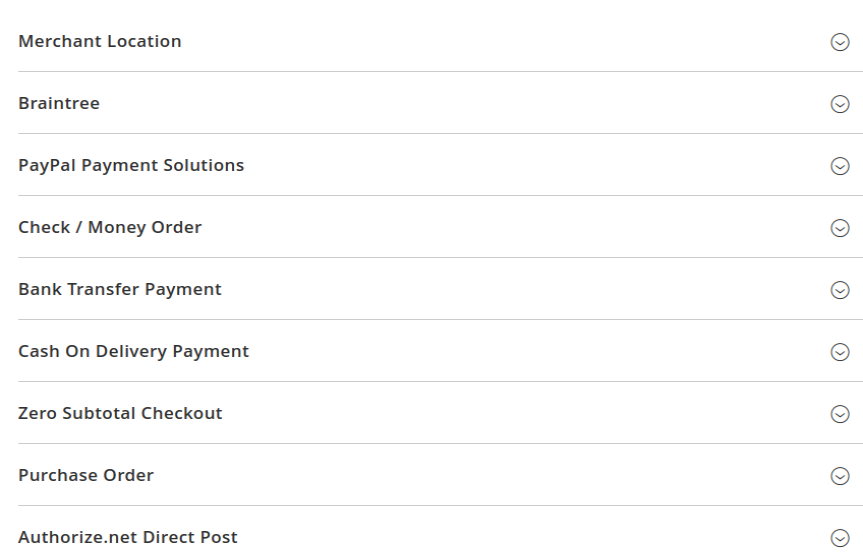
You will find the list of the default payment methods here.
Expand the payment option that you want to enable in your store. You will get some configuration options for each payment method. For instance, if you want to enable Bank transfer Payment, then, expand it. Enter the required information in order to configure it. The various required field for this particular payment method is mentioned below:
Enable – Enable/disable bank transfer payment method. Title – Enter a title that will be shown in frontend to your customers. New Order Status – Set order status after using this payment method. Payment from applicable countries – Select countries where you want to show and allow this particular payment method. Payment from Specific Countries – If you want to allow this payment method in only some countries of the world, then, select those specific countries here. Instructions – Allow the customers to enter additional information like pay to your bank account, bank details need to be shown. You can specify these bank details in this section. Minimum Order Total – Set the minimum order amount to qualify for using this payment method. Maximum Order Total – Set the maximum order amount to limit for using this payment method. Sort Order – Specify the positions of listing all the options in an order. The method with 0 will show first and others in ascending orders.
After successfully configuring each setting, click Save Config.
You can also configure other default payment methods in a similar way. For configuring shipping methods in your Magento store, click here.
This tutorial will guide you, how to add products in your store. The products in your store can be grouped as Simple, Grouped, Configurable, Virtual, Bundle and Downloadable products.
Adding Products
To add products in your store, you can follow the steps provided below :
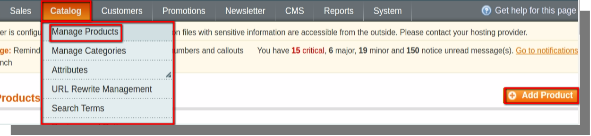
Open the back-end of your store and hover your cursor on the Catalog menu and then click on the Manage Products option.
Catalog Menu(menu bar)>>Manage Products
The Page that opens will contain an Add Product option at the top right corner of the page, click on the add product option to add product.
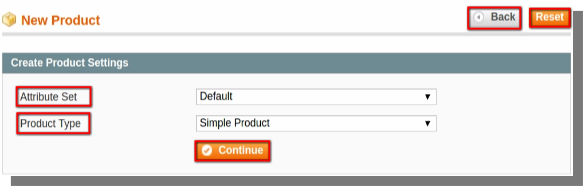
The page that opens after clicking on add product contains:
Two options( Back and Reset ) at the top right corner.
Two drop down options to choose the attribute set and the type of product.
And a continue button at the center.
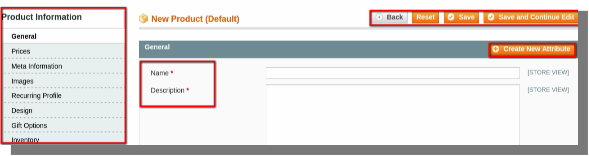
After clicking on continue option, a page will open where you can enter the details of the product like:
General details including Names, Description, SKU, Weight, Status etc.
Price
Images
Design
Place them under different categories
Related products and much more.
You can save the details and finally add the product.
You will notice that the product is available for sale at the front-end of your store.
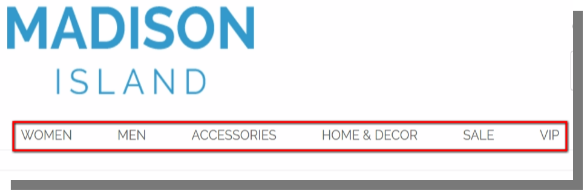
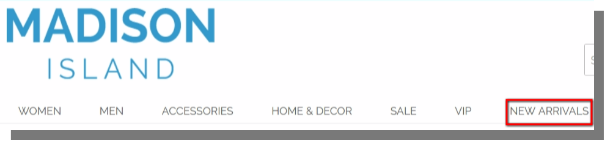
This tutorial will guide you how to add Menu items on the Menu bar on the Front-end of your store. Adding menu is very important task, as all the users use the menu items to navigate through-out the site, so it is very important to set the most appropriate menu items on menu bar. You can add menu items on the menu bar in number of ways, in this tutorial we have used the method of creating categories and adding it on the menu bar.
Creating Categories
For adding menu items you can follow the steps below:
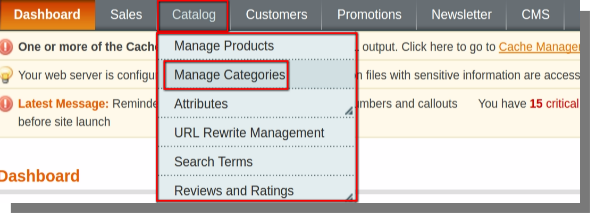
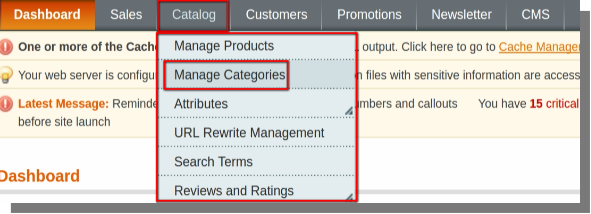
Open the back-end of your store and hover your cursor on the Catalog menu and then click on the Manage Categories option.
Catalog Menu(menu bar)>>Manage Categories.
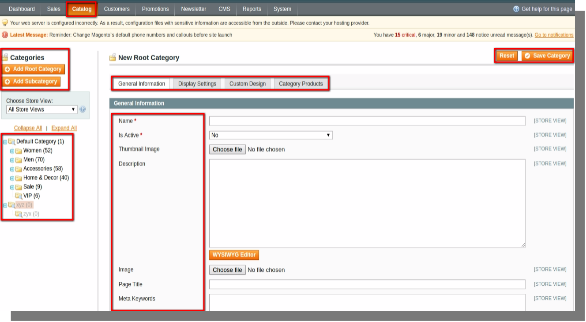
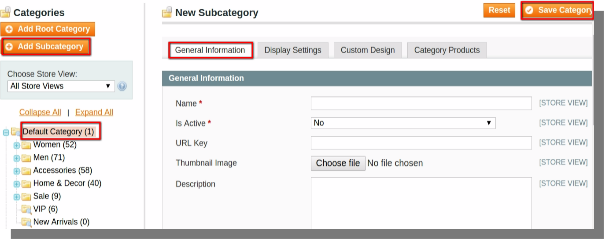
A page will open which will contain options like :
Add root category
Add subcategory
Save category and Reset at top right corner of the page.
General Information, Display Settings, Custom Design, Category Products.
The same Page will also contain the list of all categories and their subcategories.
First, click on Default category and then immediately on add subcategory.
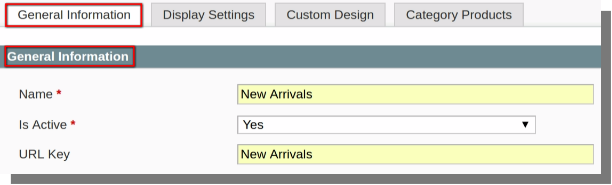
Fill in the details in the box provided, as shown below:
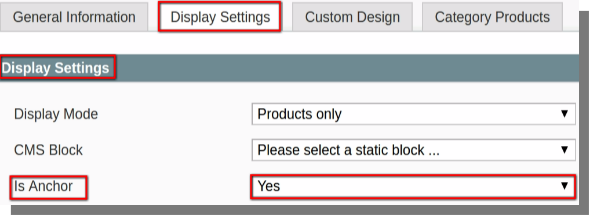
After filling the details click on Display settings tab available on the same page.
Change the status of Is Anchor from ‘No’ to ‘Yes’.
Now all you have to do is Click on the save category button to save the category you have created.
Now go to the Front-end of your store and refresh the page, you will notice that the menu item is added on the menu bar.