How can you best adapt with the new Google Penguin 4.0 update?

It is still too early to reach certain conclusions for the ways to handle the new Google Penguin 4.0 update. But, considering the previous Google updates and the major tweak of Penguin being a part of Google’s core algorithm, experts suggest some ways that can be helpful. Some of my personal opinions are also shared in my previous researches:

While researching the impacts and better ways to adapt with the Penguin 4.0, I came across certain implications that stuck to mind. How would these new tweaks in the Google’s algorithm would affect the SEO in the real world?

Is it fairer to use such a massive tool is real time? “Or” Is penguin adequate enough to maintain a fair play when it comes to its efficiency is catching the actual Spammy link building?

These question led me to indulge myself in a research, where I reached to some conclusions based on different opinions:

Yes, I think real time would help to some active filters and expectations that would not have to wait for the next update to refresh the rogue link removal.

It is very clear that rogue links need to be removed and there is no second opinion for that. Waiting for the next update for this to happen is quite ineffective when it comes to the cunning black hat practitioners. Being a real time algorithm, Penguin would now be more effective in catching the off-rule players who somehow get spared in the seasonal updates.

It will improve the quality of SERPs plus the visibility of some really good contents could be ensured. Moreover, the new websites with some really good content should also have a fair chance to present their contents in greater visibility. At least when they are playing by the game rules.

Hopefully, with some more advancements in AI, the new core algorithm with Penguin 4.0 being an active member, would be now more intelligent to present a more understandable SERP. But this has to wait for the RankBrain AI system to learn as much as possible.

The major implications of Penguin 4.0 being actively refreshed would be now seen positively in the SEO world. Hopefully, the fair gameplay would now be encouraged more than ever, and a more positive war play could be seen in the coming days.

Penguin being real time also implies that the changes in the Google SERPs would now more frequent, and everyone will get a fair chance to rectify their mistakes if they get penalized somehow. The condition is they stick to the fair play rules. It is understandable that Penguin 4.0 is like a double edged sword which has both the implications – positive and negative. Positive for those who play by the rules of Penguin and other 200 signals used by Google, and the negative for those who are still stuck with the gray hat or black hat practices.


What threats does the new Google Penguin 4.0 update bring in 2016?

It’s still so early to judge the new threats and risks Google Penguin 4.0 update would bring to your business. But it’s never so early to get armed to face the worst. No major ups and down have been notified as of now. Bests are still the best.

The real time aspect of Penguin 4.0 indeed has some outcomes yet to be faced. Let’s see how in future this new nature would affect the Google’s SERPs. Hopefully, there is a massive fluctuation yet to come.

                                                   No major fluctuations have been noticed for the big tens.

How the real-time Penguin would affect your ranking in Google’s SERPs?

I have done some research on this aspect. It can be seen in my post “Unlock the secrets of how penalties would work in Google Penguin 4.0 update?”

However, I would like to add some points to it.

  1. The importance of your SEO provider is exponentially massive at the moment. You must expect them, to provide you a detail report about the recent fluctuations that is being observed in the past few days.
  2. It too early to judge, but if your reports suggest any negative influence from the Penguin 4.0, then its a right time to act and look into your site and particular pages experiencing the fluctuations. As Google says, Penguin 4.0 would not affect your whole site ranking if it finds a violation, but it is also important to note that it is never the whole site. It is the ranking of your individual pages that decides the whole ranking structure of the site.
  3. Because of granularity, its is now harder to diagnose the small penalties by Penguin 4.0. So, the role of your SEO service provider becomes more paramount here to diagnose them and act accordingly.
  4. Links could hurt you if gone wrong. Penguin 4.0 update has some positive and negative aspects which I have also mentioned in my post “What does the “real-time” aspect of Google Penguin 4.0 means for your business?”. These aspects are just based on the initial understanding of the new Penguin 4.0 update. However, they clearly suggest that a regular housekeeping is now performed by the Penguin and might also be possible that you won’t notice it in action.
  5. Penguin 4.0 is Google’s first major update since 2015, and it has certain things in its trunk which we would see when it is finally rolled out.
  6. In short, Penguin 4.0 is a mix of certain positive and negative implications. The positive implications for those who play by the rules and also follow the standards laid for other 200 signals used by Google to rank the pages. The negative implication should be strictly analyzed as it will really affect your strategies if you want to play by the rogue rules.

You can get notified about my updated research and learn:

How to put your eCommerce site on a fast track? (Part 1)

People are getting busy day by day and there is no time left to gaze a website for its proper loading. We are living in a jet age where everybody wants “instant coffee” results and a delay of even few seconds can prove catastrophic for your online business.

It is a common observation that people don’t like to spend time on a website which takes more than the average time of 2- 3 seconds for proper loading. If your sales are hampered by a slow loading eCommerce site, it is important to prepare a quick action plan for the improved speed of your online store. Check out some of these quick tips.

Reduce the size of your web page-

A normal web page consists of a number of site elements like images, links, JavaScript, CSS and other such components that together forms the page size. The loading time of your website is directly proportional to the size of your web pages. It is important to keep your page size within few kilobytes for better site performance. Do not include heavy elements, graphics and other such components that tends to make your page heavier and affects the loading time of your website.

Implement browser caching and In- Memory technology-

The irrelevant accessing of a database often creates problems for loading time of a website and thus affects the customer engagement to a great extent. In case, there are repeated unnecessary requests for data access, you need to employ various techniques that can store the temporary information like product catalog, customer specific information, indexing information of search results and other critical data to stop overloading of data access requests.

The techniques like caching involves making use of RAM available on a server for the quick accessing of database information. The process helps in improving the rate of input- output operations that can be made 10 times faster for improved loading time of the eCommerce site. There are certain Knowband extensions like PrestaShop EasyDB Backup Manager that can help in quick backup of site database for providing immunity in case of hacking attempt, site crash or other such activities.

Use the appropriate image resolution and quality- 

Improve the performance of your eCommerce site with these simple speed optimization tips.

Most of the eCommerce site owners are poor in specifying the dimensions of the images on a site which results in slower loading of the website. Due to the absence of this, it is important to mention the image resolution, dimension, pixel density and other such parameters for getting a high quality image. With all these crucial information, it is easier to create placeholders for the faster loading of the web page and images at the same time.

Utilize the services of a Content Delivery Network-

If you are one of those eCommerce site owners that have customers all around the world, it is important to use the Content delivery network without any hurdle. This is because it helps in caching the content quickly by accessing the information from the servers located at the different parts of the world. Due to this, the loading time of the content is automatically reduced to a great extent.

Minimize the number of plugins on a site-

Keeping your site cluttered with unnecessary plugins will not do any good to your online business prospects but will only affect the site performance if their functioning is overlapping with each other. Instead of just keeping any plugins, you need to visit the Knowband store for grabbing the right eCommerce modules for your online store. You can avail the PrestaShop plugins, OpenCart extensions or Magento modules for improving the performance of your online store.

Don’t test the patience of your targeted customers with a slow loading website but initiate the timely action with the help of these hack tips. By following these simple tips, site owners can keep their customers engaged to their website without any efforts. For more information about the same, stay tuned to the next part.

Liked This? You’ll Like These Too

Unlock the secrets of how penalties would work in Google Penguin 4.0 update?

By rolling out the new Google Penguin Update 4.0, Google has made itself very clear that link penalties would be more vigorous now. However, a major tweak in its nature was seen when Google announced that “Penguin is real time now.” Unlike the previous versions of Penguin like Penguin 3.0 and all past versions, the new Penguin would not wait for an update to get refreshed. The penguin 4.0 would now refresh in real time and without any notification like every part of Google’s core algorithm. To know more about the notification from Google, you can have a look at my previous researches this week.

How would the penalties go on from now?

Granularity:Granular approach, as suggested by Google’s blog post says that spamming will be more devalued now. The new Penguin 4.0 is competent to catch the spamming signals and penalize the pages accordingly.

Punishing the particular link instead of the whole site-

If a page is found violate the game rules, the penalties would be imposed on the page itself rather than punishing the whole site for it.

Spamming signals would be checked in all sections, not just the pages-

The spamming signals will be now searched in every part of the site, including the pages, images, tags, links, back links, folders, directories, etc. The page level focus of Penguin 4.0 update would make sure that granularity is maintained in the core algorithm.

Localized spammy links would also be in focus-

The new Penguin 4.0 update would focus on spammy links and rogue players in localized links. The localized links would be accumulated to verify the game rules.

How would strategies for Penguin proof SEO go now?

Link building for website pages-

You should start link building for your inner website pages. The more you focus on link building them with relevant backlinks, the more visibility you would get in SERPs.

Local SEO is more important now-

Localized spammy links are more in focus now. Make your local searches more and more relevant and useful to the users. Target the local users as much as possible.

Off page, SEO would be helpful-

On page SEO is more important, but neglecting the off page SEO would not be a great idea in this case. The off page practices in combination to Penguin 4.0 friendly practices would help a lot. Off page, strategies should be adopted considering the needs and requirements of Google Hummingbird.

It not only Penguin 4.0, but there are also total 200 more signals –

It is not only Penguin that affects your ranking on Google SERPs. Remember, Penguin 4.0 is a part pf Core algorithm now, so the Google’s core algorithm is more resourceful than ever. Google uses a total of 200 signals to judge the pages and links; Penguin is just one of them. So, do not overlook other signals in the presence of a Penguin proof strategy.

Do not buy links, rely on organic traffic-

Rouge links are always the prime focus of any Penguin update that has come so far. Try to build more relevant links by social sharing, blog posting, forum participation, testimonials, interviews, etc. In short, make your off-page presence fruitful.

Some key facts about Google’s Penguin-

  • It was first rolled out in 2012 to fight against web spam.
  • It penalized several websites with spammy links.
  • The penalties were imposed by wiping the rouge links from Google’s SERPs.
  • It used to penalize the whole site if caught in foul play. (but now the rules are changed)
  • Websites penalized by a Penguin update would only get refreshed by the next Penguin update.

Get notified about my updated research on Penguin 4.0 Update and learn:

You appear to be in an area affected by Penguin 4.0 – Mark yourself safe

Penguin update 4.0 is still rolling out, but its effects are at best at the moment; Not regarding SERPs but in SEO world. It makes me wonder if it is still rolling out or have already hit the floor? The evening of 23 September 2016 was shaken by the massive tremor when Google finally announced that they are rolling out the Penguin update 4.0. Google made itself clear about some significant tweaks in its official blog post “Penguin is now part of our core algorithm.” However, there are still some points which are confusing the webmasters across the globe.

Points that were made clear:

  1. Penguin is a part of Google’s core algorithm now- It means, Google won’t be feeding any more update versions for Penguin from now. It also makes clear that Penguin will always be in constant action now. But, that does not mean that Penguin will not evolve now. Hopefully, being a part of Google’s core algorithm makes it more susceptible to frequent updates and evolution. The difference is, they won’t tag it with a version number now.
  2. Penguin is real-time now- With the first point, Google also made it clear that Penguin update 4.0 is a real- time algorithm. Earlier, when a Penguin update was rolled out, it had to wait for the next update to be refreshed again. With becoming a core part of the main algorithm, Penguin 4.0 would now be refreshed frequently in real-time. So, the changes now reflect much faster with the new Penguin update.
  3. Granularity in Penguin’s algorithm- There was a one liner from Google regarding this concept. It is something like “Penguin would now devalue spam by ranking on the basis of spam signals, instead of affecting the whole site.” According to what I perceived, the spamming signals would now be in a more strict surveillance. Spamming would affect your ranking in parts. The spamming signals combined with all the other 200 signals used by Google to ranking the pages, would together decide the new rank of your pages rather than affecting the whole site.

Things which seems to be unclear as of now –

  • Google says, it has tested the Penguin Update 4.0. I wonder how much long it was tested.
  • Is Penguin update 4.0 still in rolling put phase yet? What if It has already hit the floor?
  • The sites which were affected by Penguin 3.0, have they recovered or will they recover anytime sooner or later?
  • No major signs have been noticed yet. Just a battle to rank on the keyword, like every other day of the year, could be noticed until now.
  • How frequently the Penguin 4.0 would refresh in real-time?
  • If no more updates on Penguin in future, then how the major changes in its algorithm would be conveyed? Or, it will remain silent and do its job?

These are some question that strikes my mind when I think of this Google Penguin Update 4.0. Hopefully, my future researches would have answers to these questions.

You can get notified about my updated research and learn:

What does the “real-time” aspect of Google Penguin 4.0 means for your business?

It was in 2012 when Google First launched its Penguin update. A complete upside down was seen in its SERPs. We have seen some high ranking companies suffer a huge loss due to Penguin update. Was It really necessary? What was the cause that encouraged Google to hit these high ranking companies?
Well, Google did not have any personal grudge against these wiped out links. The whole campaign led by Google in Penguin update was to improve the quality of its SERPs with more relevant signals to be encouraged. It was a time when Google had to act in order to save those links/signals who were actually relevant. Most of the links and pages that were wiped out from Google’s SERPs were caught by the Penguin Update doing something that was degrading the relevancy and accuracy of results in its SERPs. Buying links, Keyword stuffing, Bad links, irrelevant backlinks etc. were some of the so-called malpractices that were affecting the relevancy of its SERPs.

What if your website was hit by Google Penguin?

Earlier, when your website was once hit by the Penguin update, it was the next Penguin update itself that could help you recover your ranking; the condition is, you manage to rectify your mistakes in the mean time. Penguin update is more like a decontamination of Google’s SERPs from the rouge links and results that were affecting the quality of it SERPs. Google has released four Penguin updates till now. You can have a look at my Post “Google Penguin 4.0 is live with real-time core algorithm” to know more about the dates of release of previous Penguin updates by Google.
As it’s trending now that “Penguin 4.0 update 2016 is live now as a real-time core algorithm”, It makes me wonder; What exactly the real time mean to you and your business?
According to the official blog post at Google Webmaster blog, they have made the Penguin as an integral part of the Google’s core algorithm. It means that no more Penguin updates from this point would come. There are certain implications that tease me with this new nature of Google Penguin.

If no more Penguin updates, then how would Google control the rogue signals?

One of the major implications of this notification from Google also signifies that Penguin would not be a seasonal hazard now. It would be more like a frequent “dacoit” that would rob your wealth if you don’t play by the rules. Being a part of the core algorithm also means that you would get penalized with an immediate effect if Google catches you violating its terms.
People are also calling it as ‘Webspam Update’. Penguin is a tool of Google using which it penalizes the websites that were being optimized in an unnatural way. Let’s say these websites had tons of bad links, irrespective of their relevance. Google used its ‘Penguin’ as a contract killer to wipe out these rogue links/signals and websites, and it really worked. Penguin would always terrify such rouge malpractices. It was so unconventional to present such a cute bird as a massive tool of decontamination; Just a personal comment.

Must look at these positive implications of Penguin being real time now-

  1. If Penguin is real time now, it means you would get penalized frequently if malpractices are caught by Google. But you will also get the fair chances to rectify your mistakes and regain the ranking without waiting for next Penguin update.
  2. If you are playing by the rules, you don’t have to fear the other rogue players as everyone would be now under a constant monitor.  This is just a personal expectation from this new update, let’s see what happens in the future.

As a crux of this Penguin 4.0 update, it is more like a regular housekeeping and a real-time system to nuke the offenders.

Get notified about my updated research and learn:

Google Penguin 4.0 is live with real-time core algorithm

After a long time, the Google Penguin Update 4.0 is live now. Google has officially confirmed the Penguin 4.0 update on Google webmaster blog. Some people are calling it Google Penguin 4.0 or the real time Penguin. All these names signify the new nature of Penguin. Its really been a while since Google came up with Penguin 3.0 in 2014. This time, the update carries a tweak as you do not have to wait for more Penguin updates now. Yes, its real time now, and is the part of Google’s core algorithm. Now your “disavow file” will play a crucial role.

Here are some special tweaks that Google has come up with:

The update is live, but it is still in rolling out phase. So, you might not see its full impact as of now. Hopefully, this won’t take long.

The real time System of Penguin 4.0 –

Penguin becoming a part of Google’s core algorithm was more of an unconfirmed rumor as of now. But, now it’s clear like crystal that you don’t have to wait for next Penguin update to recover your rank if you get penalized by the update. With Penguin becoming real time, Google has confirmed that changes and refreshing of rankings would become more faster now. Earlier, you had to wait for Penguin 4.0 if you were once penalized by Penguin 3.0.

Penguin now devalues spam-

The penalties form Google will now be based on spam signals, rather than affecting the whole website. In my perception, I think the evaluation would be now more page by page rather than punishing the whole website for spammy pages.

Past Penguin updates

  • Penguin 1.0 on April 24, 2012 (impacting ~3.1% of queries)
  • Penguin 1.1 on May 26, 2012 (impacting less than 0.1%)
  • Penguin 1.2 on October 5, 2012 (impacting ~0.3% of queries)
  • Penguin 2.0 on May 22, 2013 (impacting 2.3% of queries)
  • Penguin 2.1 on Oct. 4, 2013 (impacting around 1% of queries)
  • Penguin 3.0 on October 17, 2014 (impacting around 1% of queries)
  • Penguin 4.0 & real-time on September 23, 2016

Get notified about my updated research and learn:

How to get SQL Server Management Studio 2008 Express installed on a Windows 7?

SQL Server Management Studio (SSMS) is a platform that was launched along side the Microsoft SQL Server 2005 which is meant for configuring, managing and administering all other components present in a Microsoft SQL Server. There are both script editors and graphical tools that are capable to work with different objects and features of the server.

One of the prominent feature of SSMS is the Object Explorer that allows user to browse, select and operate upon the various objects located within the server. As per the version 11 of the SSMS, the entire application has been rewritten in WPF interface which is similar to the one used in Visual Studio 2010. For Windows users who are thinking about utilizing the services of this SQL Server Management Studio 2008 Express can now perform the same in a flawless manner. Here are the installation steps for SSMS on a Windows 7 systems.

Note- Unfortunately, the SQL Server Management Studio (SSMS) is not available on Linux based systems. Certain fixes through platform like Wine are tried but there are still performance issues in this SSMS which makes it ineligible for Linux platform.

You need to first download the Microsoft SQL Server 2008 Management Studio Express and then select either SQLManagementStudio_x64_ENU.exe or SQLManagementStudio_x86_ENU.exe based on the bits supported by a system. This blog explains the installation process for a 64 bit Windows 7 system.

Now, ensure that you are logged into your system as an administrator and not as a secondary user. In order to install the SSMS platform, you need to right click on the exe file and then select on the option “Run as Administrator”. Windows 7 users will get a compatibility issue related warning which needs to be ignored and the installation process should be resumed as it is. Windows users also need to apply latest changes in SQL Server 2008 Service Pack 2.

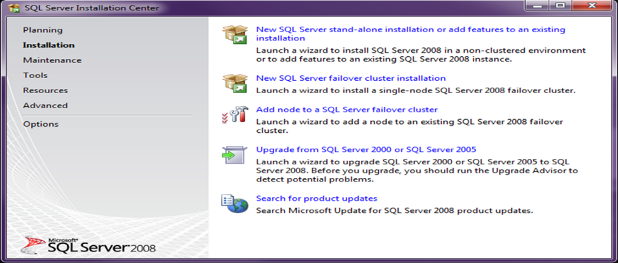
A window screen about the “SQL Server Installation Center” will be displayed as shown below. You need to select the “Installation” tab there.

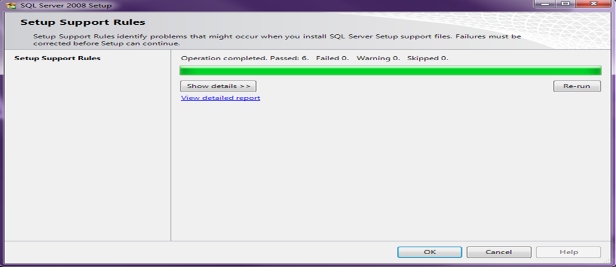
User now needs to select the “New SQL Server stand- alone installation or add features to an existing installation”. The process will initiate the rule check. Ensure that there are no failures in the process and click on the OK button. The window of the process is shown below:

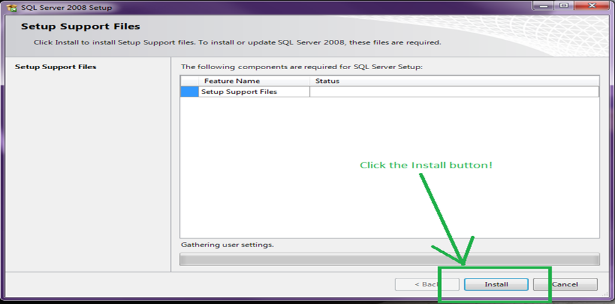
User will now get the screen that says “Gathering user settings” and stays there for a while. After this, the user will get a window screen as shown below where he/she needs to install the Setup Support files.

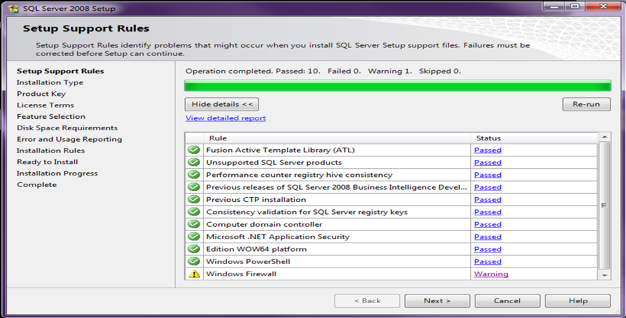
Again, the user will come across a rule check and will have a Firewall warning in the end. In case, the user wishes to enable the remote access to SQL Server, the required Firewall configuration can be done accordingly. Click on the Next button as shown in the window screen below.

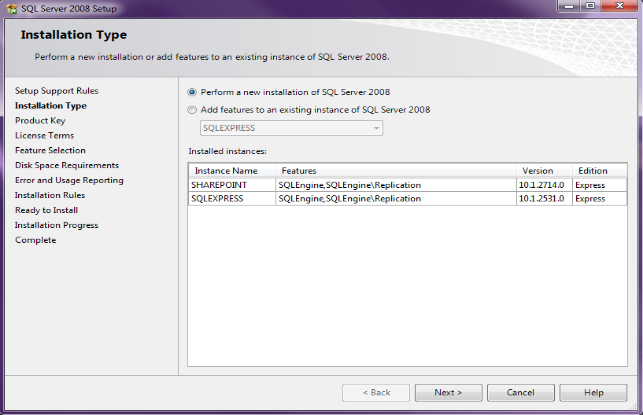
While installing the platform, user will have to make a choice between “Perform a new installation of SQL Server 2008” or “Add features to an existing instance of SQL Server 2008”. Make sure that you are selecting the option “New installation” and not “Add features”. Finally, click on the Next button as shown below.

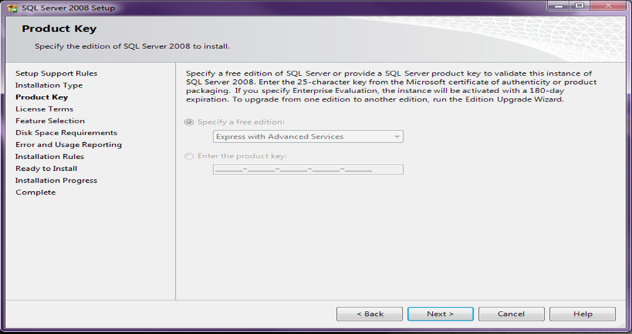
Now, the user would come across a page that asks for Product Key window. As, SQL Server Express is a free product, so you can skip the product key entering field and click on the Next button as shown in the image below.

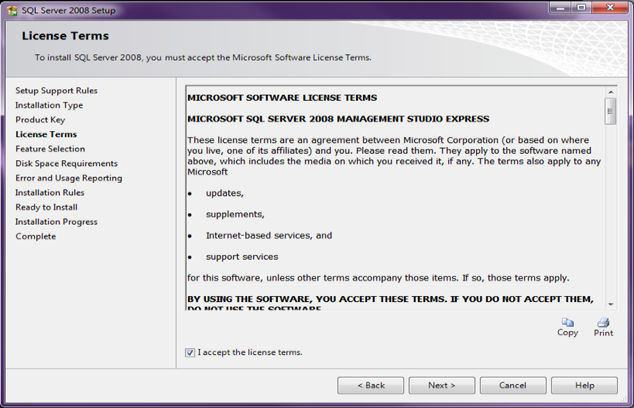
User needs to accept the License Terms and click on the Next button. The window screen is displayed below.

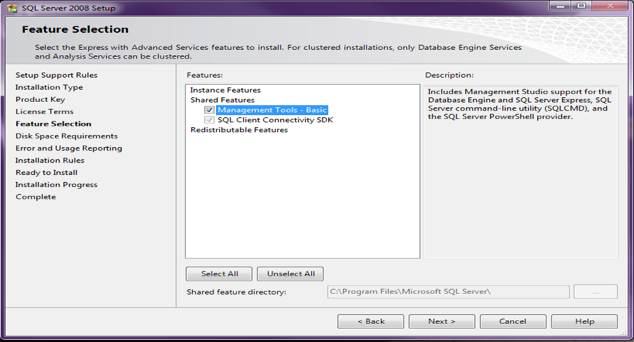
In order to have the desired features in the SSMS platform, it is time for Feature Selection. User needs to check the box as shown in the figure and put a check mark on it that says “Management Tools- Basic”. Click on the Next button in the end.

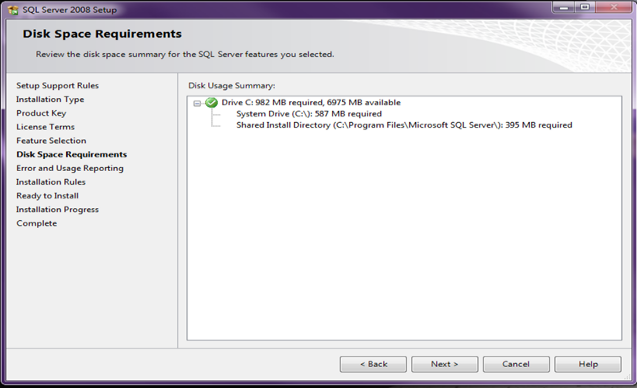
Now, the user needs to verify the disk space requirements and then click on the Next button as shown below.

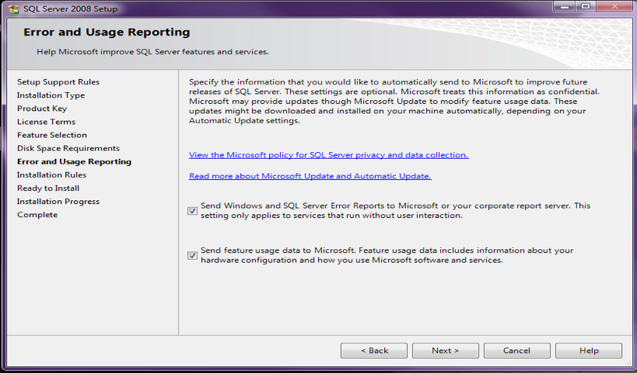
In order to improve the SQL Server features and services by providing the error reporting, you need to put a check mark on the required option and then click on the Next button shown in the image below.

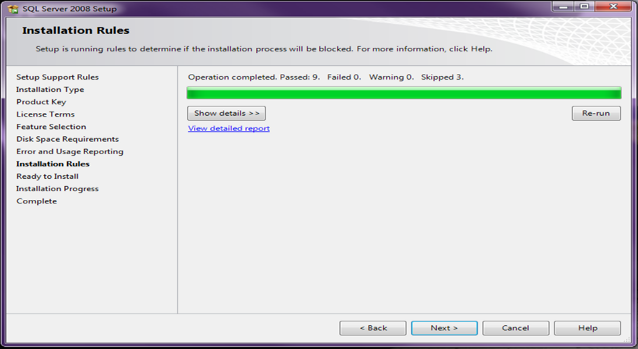
A quick rule check is again started. Now, click on the Next button shown in the window screen displayed below:

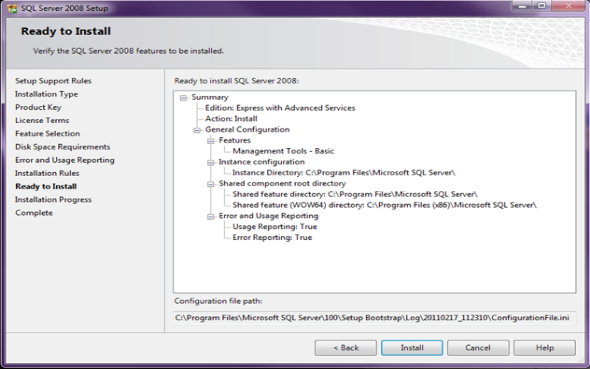
The user will now see a window screen as shown in the figure below that says “Ready to install”. Click on the Install button located on that screen below. The entire installation process will take around 5 minutes for the completion.

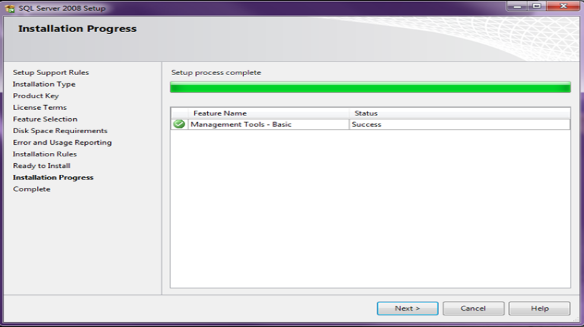
Again, click on the Next button on the “Installation Progress” window as shown below once the installation process is completed.

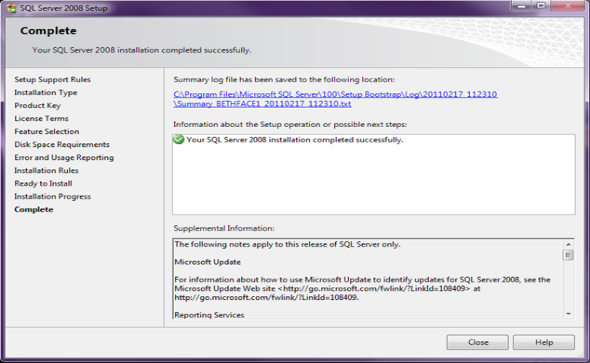
A complete window screen will appear like the one shown below. Users needs to close it and they are all set to use SSMS platform now.

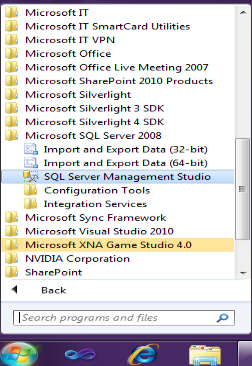
Once the SSMS platform is installed properly, user can now run the SQL Server Management Studio without any problem. The installed platform can be seen in the Programs option as Microsoft SQL Server 2008. You need to ensure that you are running the program as an administrator for accessing all the available features. Here is the image shown below that will provide you a view of the SSMS under Programs.

With these simple steps, it is now easier to install SQL Server Management Studio 2008 Express on Windows 7 systems without any problem. If you are eager to add new functionalities and features in your online store based on eCommerce platforms like Magento, OpenCart and PrestaShop, you can add the customized extensions from Knowband store. Just visit the Knowband store at www.knowband.com and get the various extensions for your online store.

We also provide a No Code Mobile App solution for all the major eCommerce platforms like Prestashop, Opencart, Magento, Magento 2 and Woocommerce. Know more here:

Liked This? You’ll Like These Too

How to install MySQL on Windows and Linux Systems?

MySQL is an open source relational database management system (RDBMS) that is quite popular in various business spheres. The license of this open source project is available for numerous users around the world under the GNU General Public License. It is used by a number of database users around the world due to its OS platform independent feature. This tutorial discusses how to install MySQL on Windows and Linux System.

MySQL open source database system is written in programming languages like C and C++. It can be used with a variety of operating systems like Windows, AIX, FreeBSD, Linux, OS X,  OpenBSD, OpenSolaris and much more. In this blog, we are discussing the installation steps for MySQL on Microsoft Windows and Linux systems. Let us first check out the installation steps for MySQL platform on Windows systems.

Checkpoints to be cleared before the swiftly installing MySQL on Windows and Linux System

If you are one of the Windows users who is looking to install this MySQL, you need to keep in mind certain guidelines for a seamless installation process. Here are the checkpoints for Windows users during the installation process of MySQL.

Keep in mind the size of your database table- In case, the users require a table with a size more than 4GB, it is important to install MySQL platform on a NTFS or new file system. Apart from this, the user needs to use MAX_ROWS and AVG_ROW_LENGTH commands during the creation of a MySQL database table.

Resolve the anti virus scanning issue- There are certain anti virus softwares like Norton/Symantec anti virus that cause problems for directories consisting of MySQL data and temporary tables regarding the performance of MySQL platform. These anti virus softwares read the contents of MySQL files as spam and thus affects the overall performance of the database system.

To handle this situation, it is important to disable the virus scanning feature on the main directory known as datadir which is used to store the MySQL table data. The MySQL users can utilize the inbuilt feature of an anti virus softwares to avoid certain files during the virus scanning process. Apart from this, the temporary files of the MySQL platform can also be exempted from the virus scan program by configuring the separate temporary directory for MySQL temporary files and including this particular directory into the virus scanning exclusion list. For performing this critical task, you need to include a configuration option for the tmpdir parameter in the my.ini configuration file.

How to install MySQL on Windows systems?

If you are a Windows users, it is now easier to download MySQL installer for ensuring a quick installation and configuration of MySQL platform. Here are the simple steps that are involved in the installation process.

  • First, download the MySQL installer from the link and run it on your Windows system.
  • Now, select the appropriate Setup Type for your Windows system. Normally, it is recommended to install MySQL server and other MySQL tools associated with the MySQL development and other helpful tools such as MySQL Workbench by opting for the Developer Default setup method. Otherwise, the user needs to select the Custom setup type for the manual selection of desired MySQL products on their system.
  • It is time to complete the installation process by implementing the various steps mentioned in the MySQL installation wizard. After the completion of the process, all the MySQL products are installed and MySQL server is started.
  • Once, the MySQL platform is installed, it is now easier to configure MySQL to ensure the automatic initialization of MySQL server during the time of system restart.
  • In this way, Windows users can flawlessly install the MySQL installer application on their system. They can use the same application later on to make any configuration or upgradation on the MySQL products.

How to install MySQL on Linux systems?

Being a platform independent database software, MySQL can be easily installed on Linux systems using Ubuntu version. If you are one of the Linux users, you need to perform the following steps for installing MySQL platform on Linux Ubuntu systems.

  • Open the Linux terminal window and run the following command

sudo apt-get install mysql-server

  • During the installation process, Linux users will be asked for the root password.
  • To ensure the proper working and installation of the MySQL server, you need to run the following command

sudo netstat -tap | grep mysql

  • Apart from this, Linux users need to check the lines as mentioned below:

tcp  0     0 localhost.localdo:mysql *:*       LISTEN       13059/mysqld

  • If you are experiencing problems in the working of the SQL server, it is recommended to restart it by executing the following command through Mysql.

sudo /etc/init.d/mysql restart

  • Once, the MySQL is installed, Linux users can start its functioning by running the following command

mysql -u root -p

  • This will change the command prompt to mysql> which will inform the users that they are currently inside the MySQL environment.

Here are the certain set of commands for Linux users in a MySQL environment:

  • For creation of the database, use the following command:

 create database databasename;

  • For accessing the MySQL database, you need to use the following command:

 use databasename;

With the help of the above Linux commands, users can now effortlessly create, insert, update and make other changes in the MySQL database without any assistance.

The above blog is a great help for both Windows and Linux users during the installation of MySQL platform. It will help these operating system users to enjoy the features and functionalities of a MySQL database in a seamless manner. If you are in need to add customized modules or new functionality on your eCommerce store based on Magento, PrestaShop or OpenCart platforms, you need to visit our Knowband store.

Liked This? You’ll Like These Too

How to migrate from MySQL Database to MSSQL Database?

Migration is the crucial and important step in a business environment due to the various restrictions in a platform or a framework and the need to make the data accessible on other required platforms. This migration helps in improving the usability and access to data or content among different available platforms.

Here, we are discussing how to migrate the data of MySQL into Microsoft SQL Server in a flawless manner. There is no “Rocket Science” involved in the entire process and it is as simple as it can be. By performing certain simple steps, it is now much easier to plan the migration from MySQL platform to Microsoft SQL Server environment. Before going further in this direction, let us first discuss the various things that need to be considered while planning a migration process.

Checklists for the data migration from MySQL to MSSQL platform

If you want to perform the data migration task from MySQL to MSSQL platform in a flawless manner, you need to pay attention to various things.

  • It is also important to analyze properly if the SQL Server Management Studio is installed efficiently or not. In the case of the Windows system, you need to perform the certain installation steps for Microsoft SQL Server Management Studio. This platform is restricted to Window users only and is not available for Linux users.

Data Migration Steps from MySQL to MSSQL platform

Here is the step by step instructions for performing the data migration from MySQL platform to MSSQL platform. Take a look below at these simple steps.

  • You need to first download and install the MySQL ODBC Connector, to begin with, the above process. You can also find out the latest release of this extension here.
  • Now, it is time to download and install SQL Server Migration Assistant for MySQL platform. Users can easily download the same from here.
  • On the same page, you need to locate and click on the “Download” button. The action would open up a new page. Once the page is opened, you need to select the file named as “SSMA_MySql\SSMA for MySql.5.3.0.exe”. The user just has to download the required file from there and get it installed on your system.
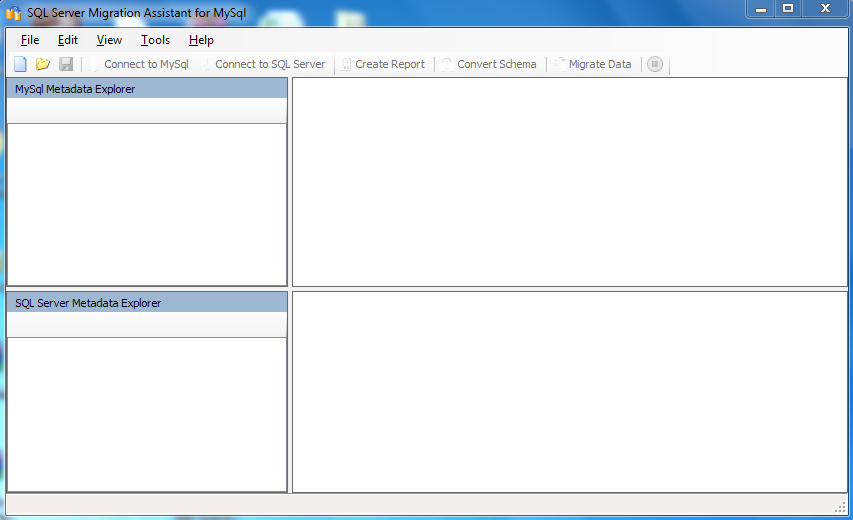
  • The user just has to open the “Microsoft SQL Server Migration Assistant for MySQL” tool that is already installed on your system. In case, the tool is not visible on the desktop, it is time to go to “Start” button and search the same tool over there. You would get the screen as shown below:

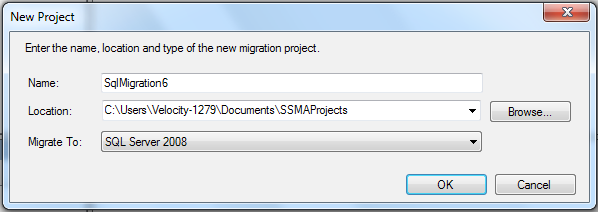
  • To get started with this platform, you need to go to “File -> New Project” and then create a new project for the data migration from MySQL to MSSQL platform. Here is the screenshot of the same process as shown below:

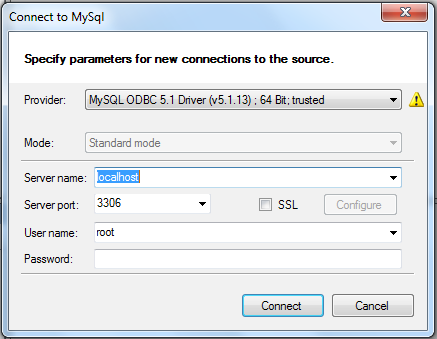
  • Once, the user has created the project successfully, it is time to click on the “Connect to MySQL” option present on the top of the page. A dialog box would be opened known as “Connect to MySQL”. Once, the dialog box is opened, user needs to perform the following functions:
  • First, select the “Provider” as “MySQL ODBC 5.1 Driver”.
  • Now, enter the “Server name” as “localhost”.
  • You need to enter the “Username” and “Password” of localhost which are required for logging into the MySQL.
  • Finally, you need to click on the “Connect” option. This will help in connecting the user to MySQL and contains the list of all the databases that are mapped along with the username that are used for login purposes.

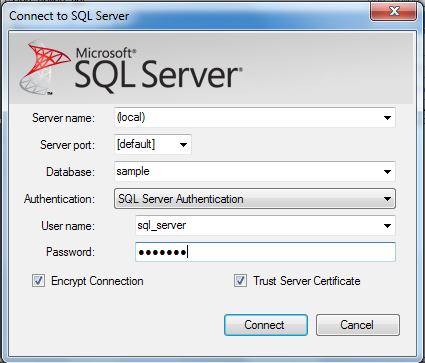
  • After this, you need to click on the “Connect to SQL Server” option provided at the top. This will open up a new dialog box known as “Connect to SQL Server” as shown below. Now, you need to perform the following steps as mentioned below:

  • You need to first select or enter the Server Name.
  • Now, the user needs to select the “Server Port” as “default”.
  • To carry out the data migration of the MySQL platform, it is important to select the right database. This database creation in SQL Server with the help of “SQL Server Management Studio” is an important step before the creation of a database connection.
  • The user needs to select the “Authentication” as Windows or SQL Server.
  • It is required to enter the “Username” and “Password” for connecting the SQL Server.

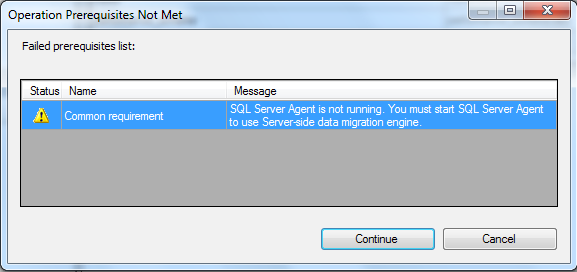
Finally, you need to click on the “Connect” option. It will open up a new dialog box that says “Operation Prerequisite Not Met”, you need to click on “Continue” option. With this step, you would be able to establish a connection with SQL Server along with list of all the databases. Below are the images about the same process.

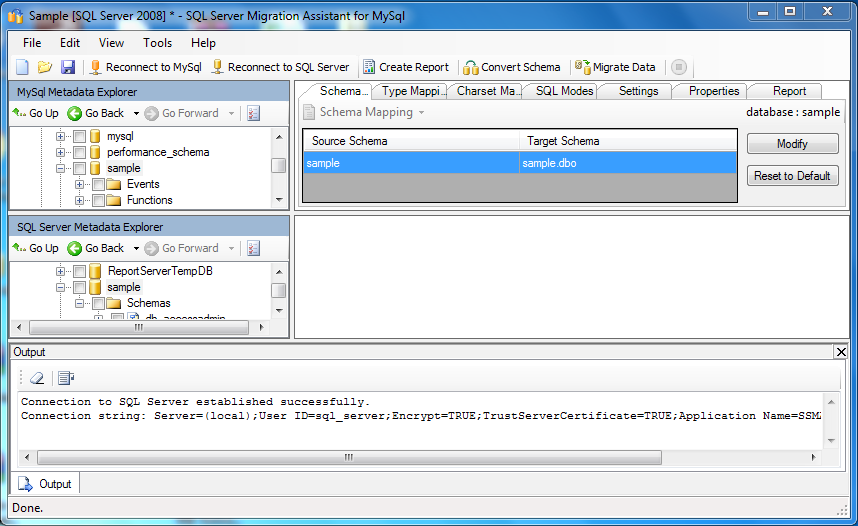
  • Now, you need to select the database from “MySQL Metadata Explorer” sub- window that needs to be migrated to SQL Server. Once, you have made the selection, a “Convert Schema” option is enabled which needs to be clicked. With this step, you can easily convert the MySQL Database Schema into the SQL Server Database Schema. This process changes the data types of all the columns available in database tables into an applicable data type of the SQL Server.
  • Once, the schema has been converted, you need to select the database from the “SQL Server Metadata Explorer” sub-window. The user just have to right click on that and then select “Save as Script” option to save the required script into the desired location of the system. This is an important step before finally accomplishing the data migration as all the tables of your existing MySQL needs to be created on the target database of the SQL Server.
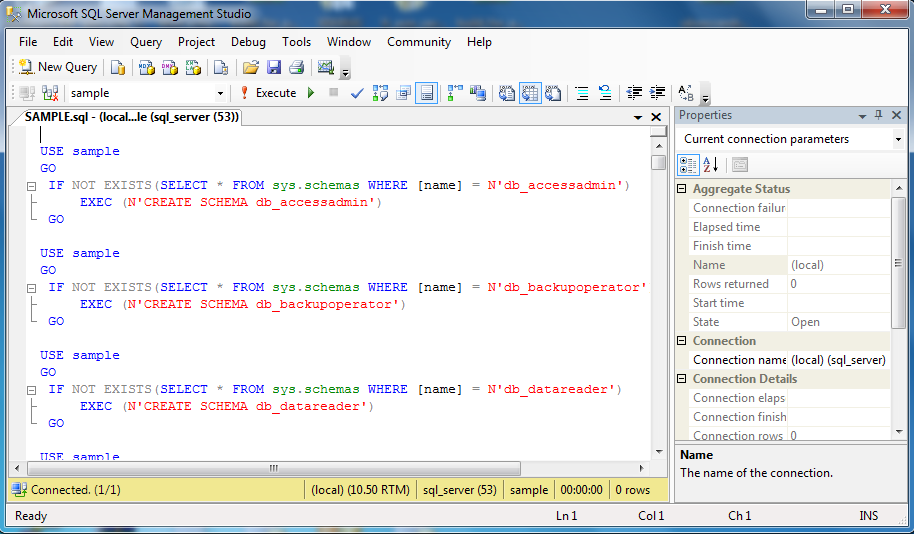
  • Now, it is time to locate the file that you have saved and double click on it. An “SQL Server Management Studio” window will open up asking for the establishment of connection with the SQL Server. You need to enter the required credentials over there and then click on the “Connect” option.
  • Once, the connection has been established, you need to click on the “Execute” option located at the top. This option will help in executing the file and will include all the tables into the selected database as shown in the image below:

  • Now, you need to move towards the “SQL Server Migration Assistant” tool and then select the required database where you want to perform the migration into the SQL Server. This will help in enabling the “Migrate Data” option provided at the top. By clicking on it, a dialog box will open up asking for the establishment of the connection with MySQL and SQL Server one by one. You need to enter the required credentials over there to establish the connection as shown in the image below:

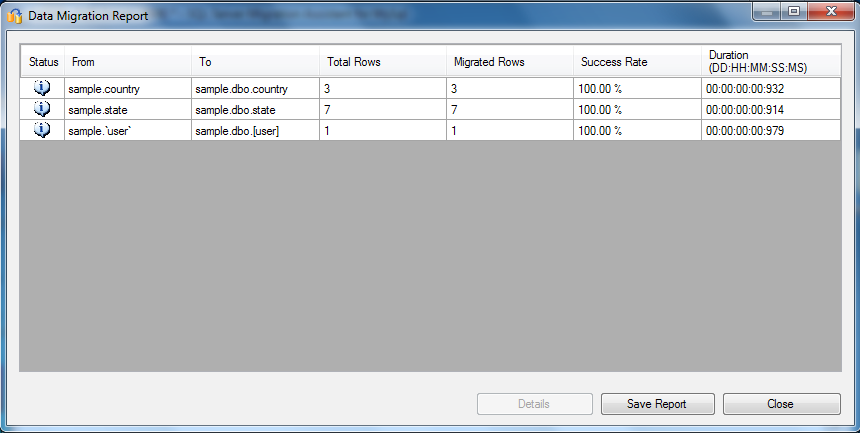
  • Once, you have successfully established the connection, the system would automatically migrate the data into the targeted database of SQL Server and can also be seen in the “SQL Server Management Studio” for refreshing the above database.

With the implementation of these simple steps, it is now easier to migrate the data of MySQL into the MSSQL platform without any trouble. In this way, websites can migrate their existing database from the MySQL platform to MSSQL Server in a quick and efficient manner. For more information about the useful eCommerce extensions that can help in the data migration services, you can visit our website at knowband for availing our expert custom module development services.
Liked This? You’ll Like These Too